

Let’s move beyond the bright, sunlit gardens and step into the evening, where the color palette shifts into something more mysterious and magical. This is where deep purples, twilight blues, and shadowy greens come alive, offering you a chance to create embroidery with a completely different mood and depth.
You don’t need dozens of new techniques to achieve this. Instead, it’s about making subtle, intentional choices—selecting a charcoal fabric instead of pure black, adding a single strand of metallic thread for a hint of moonlight, or using stitch direction to create shadows within a petal.
Think of these ideas not as strict patterns, but as starting points. They are invitations to explore how color, texture, and placement can transform your work from a simple floral into an evocative, atmospheric piece of art. You have the skill; now let’s give it a new light to shine in.
1. Cascading Wisteria with Dimensional Vines
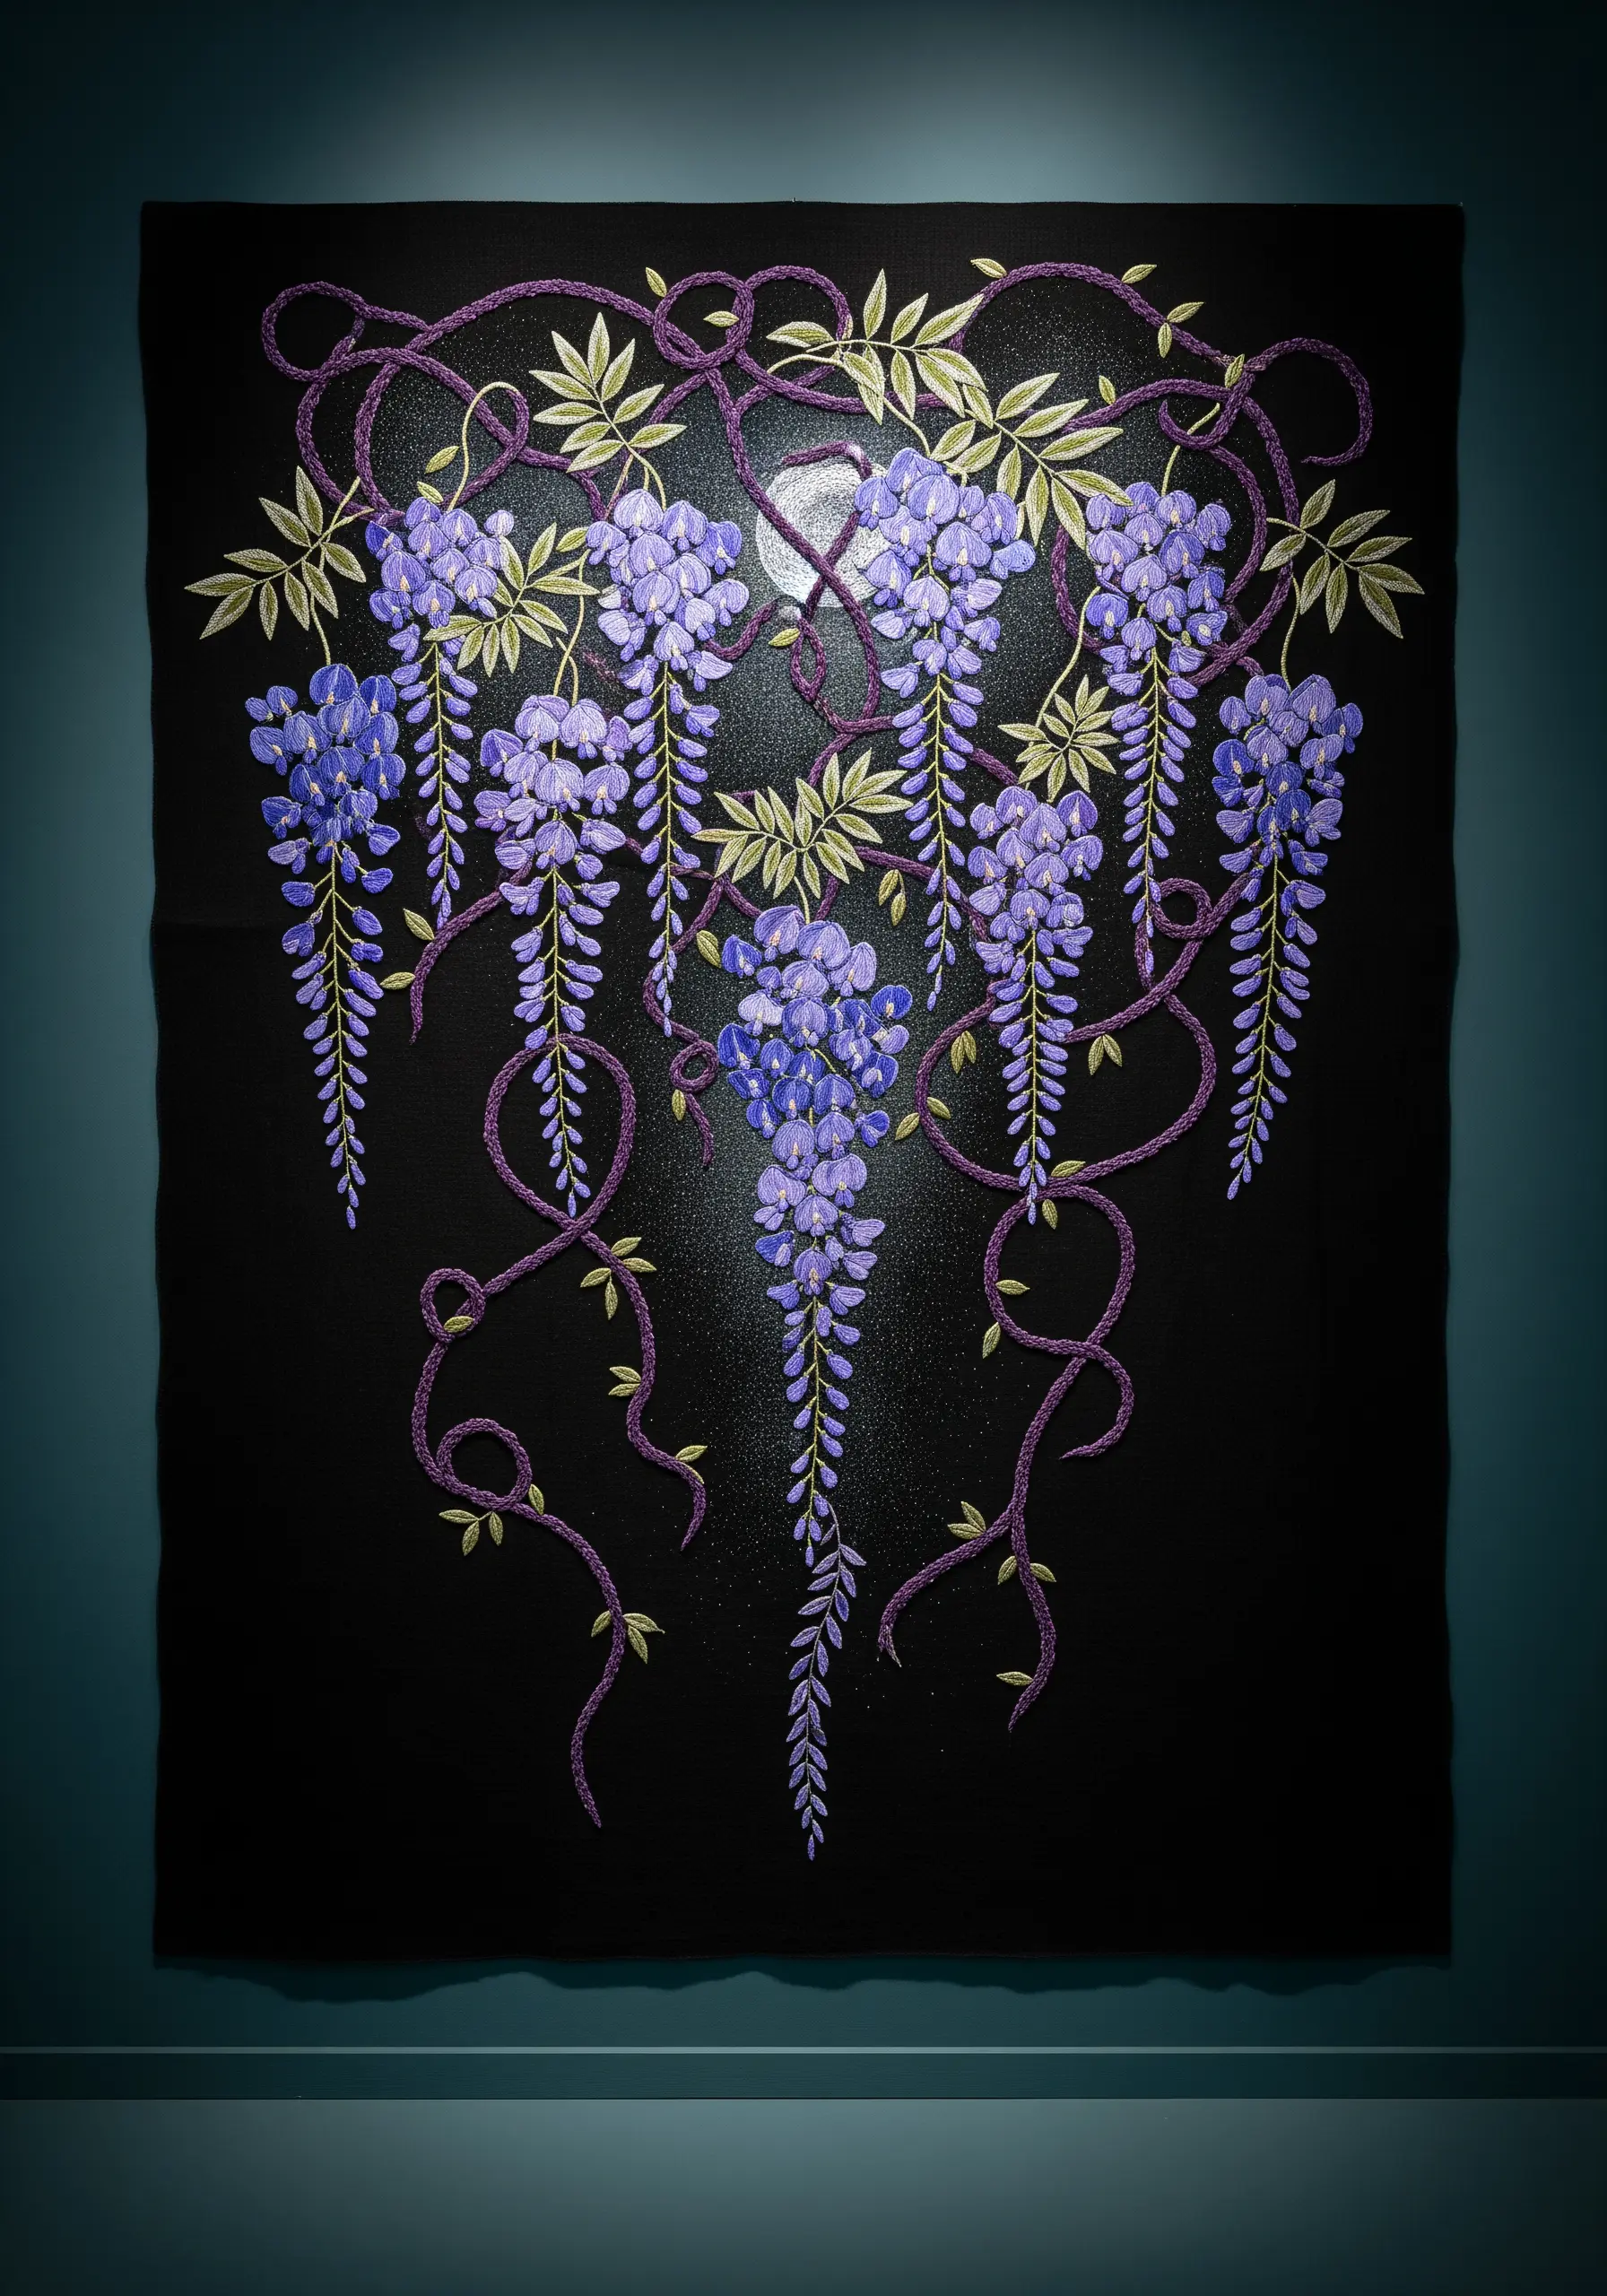
Create a sense of depth by stitching the wisteria blossoms first, using a simple satin stitch in shades of periwinkle and deep violet.
For the twisting vines, use a padded satin stitch or couch a thick, textured yarn onto the fabric surface with a matching embroidery floss.
This technique makes the vines physically stand out from the background, adding a sculptural quality that catches the light.
A very light mist of silver fabric spray paint applied before stitching can create a subtle, moonlit glow in the center of your composition, making the black fabric feel less flat.
2. Moonlit Peony on Velvet
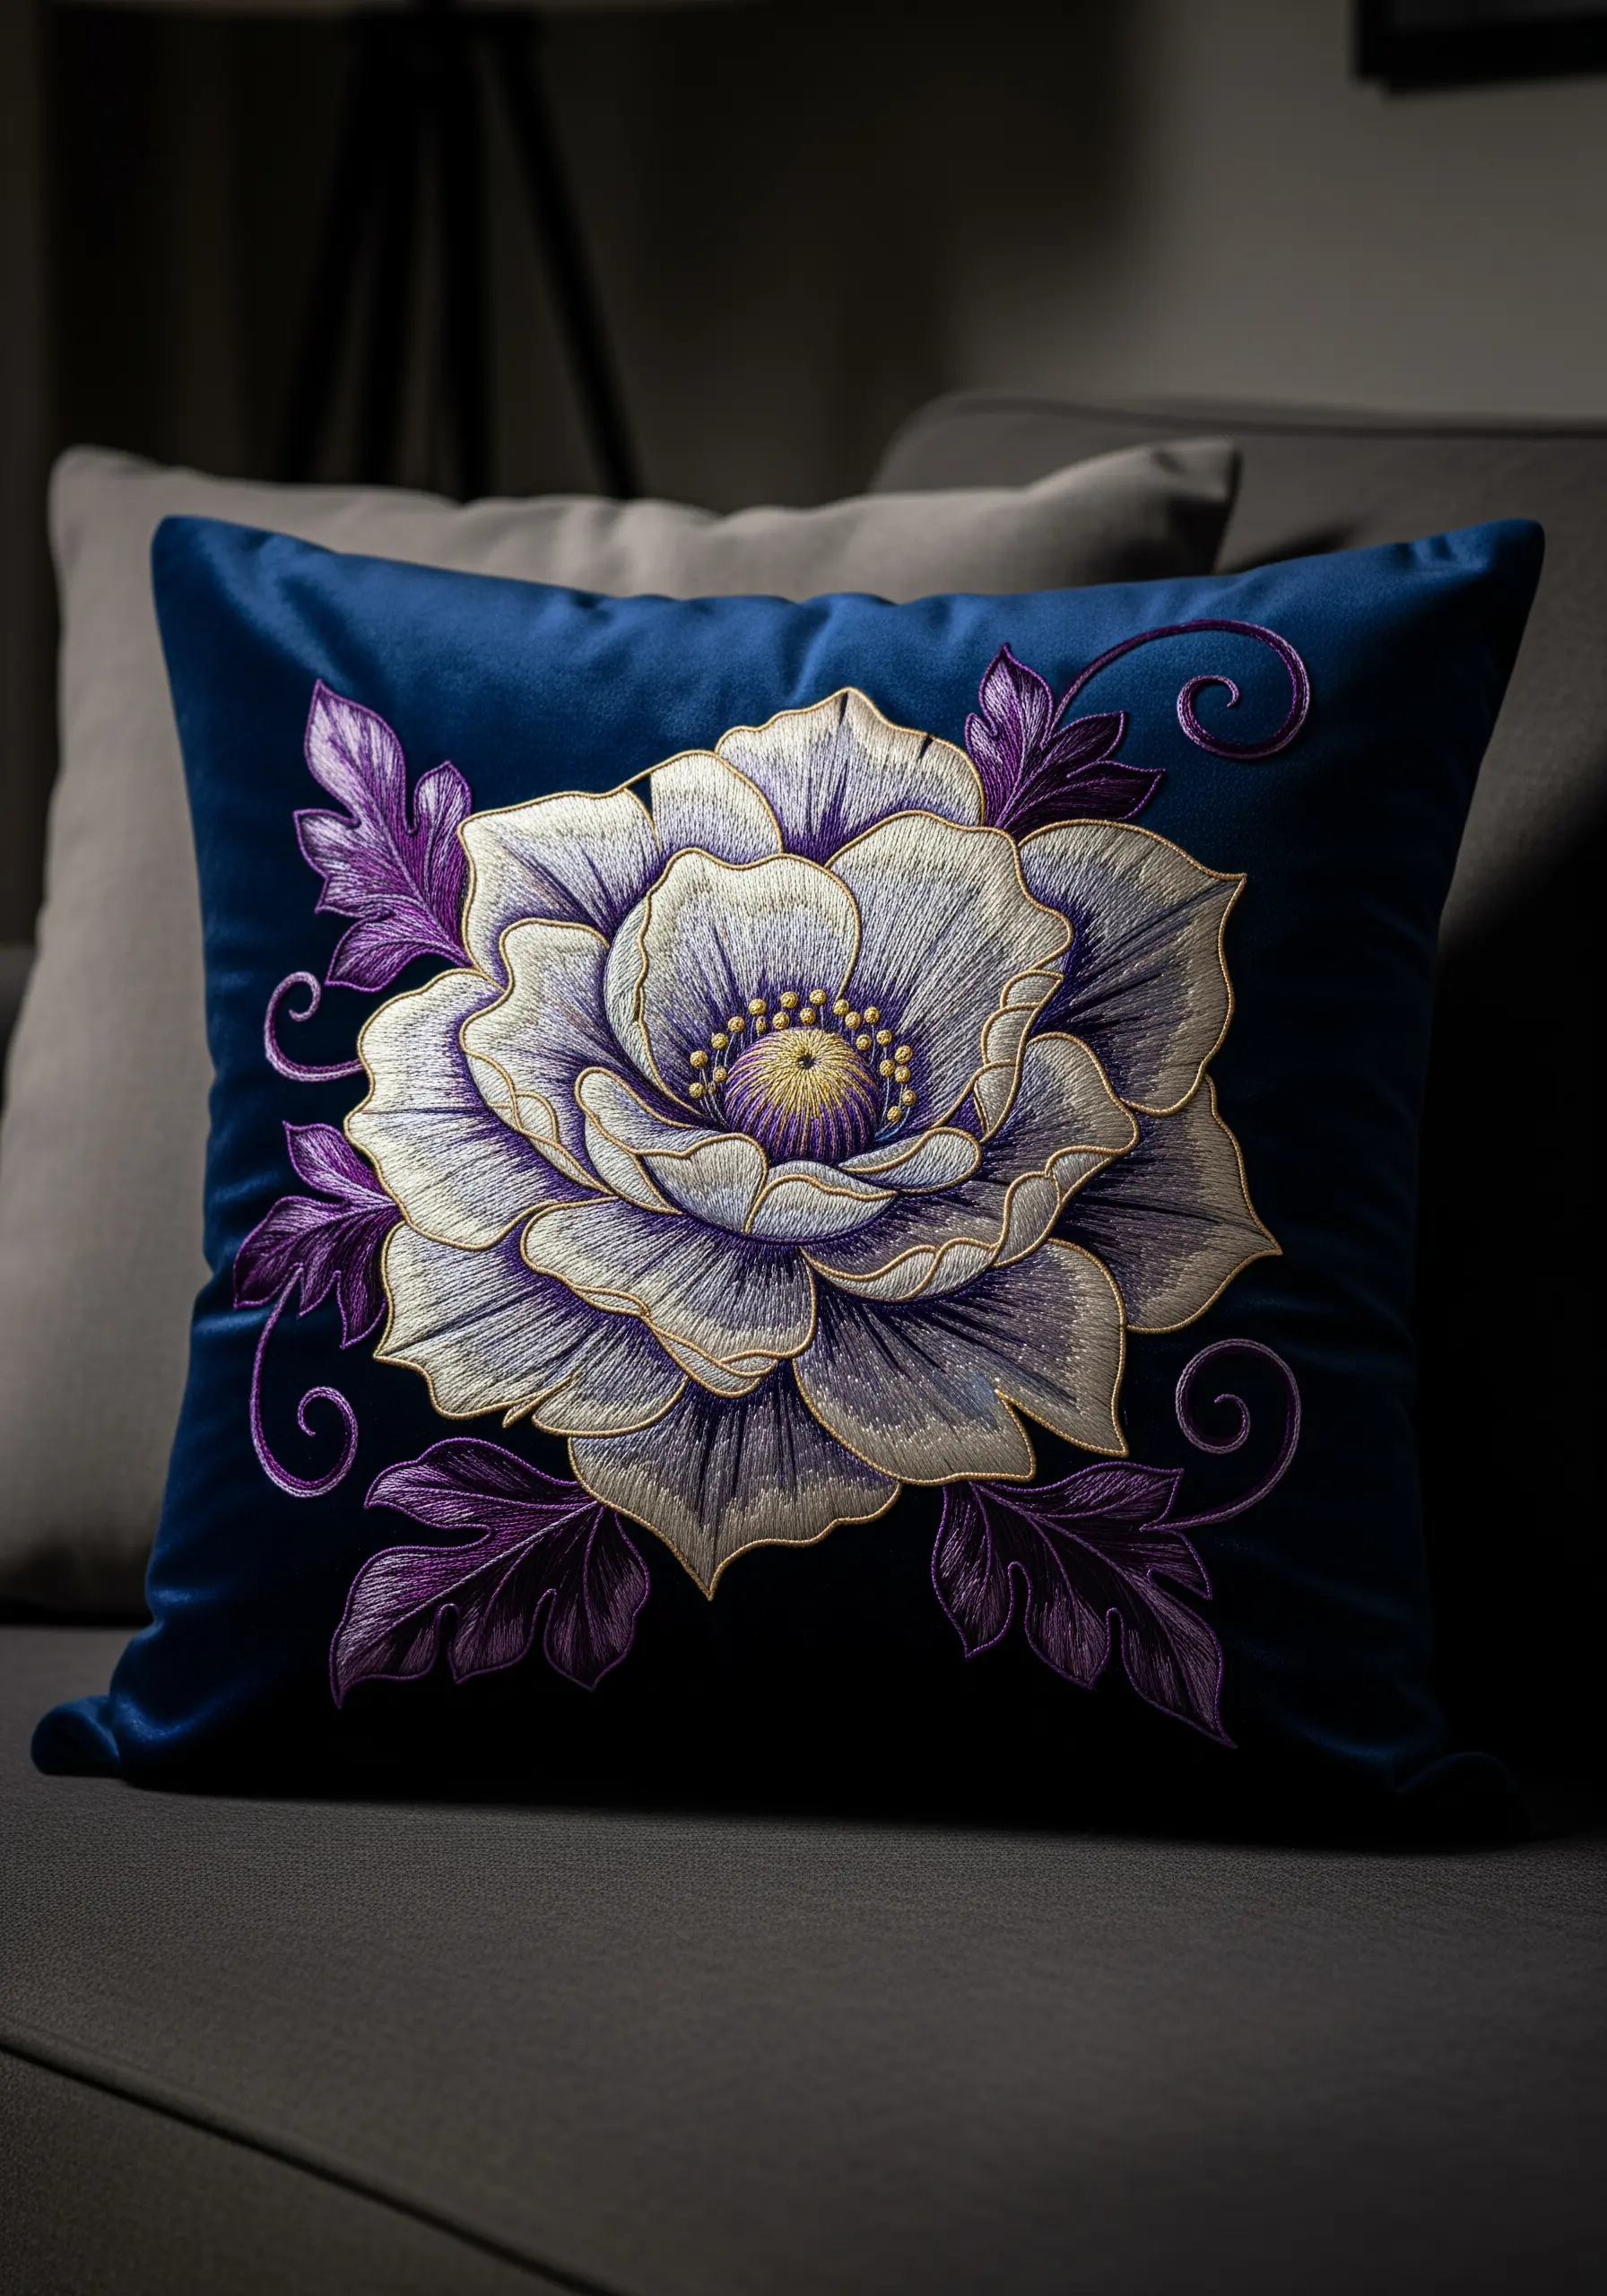
Embroidering on velvet requires a medium-weight, tear-away stabilizer to prevent the fabric from stretching and distorting your stitches.
To achieve that luminous, almost-white glow on the petals, use long-and-short stitch with a palette of pale grey, off-white, and the faintest lilac.
This creates a gradient that feels more natural than pure white, suggesting reflected moonlight.
Outline the petal edges with a single strand of fine metallic gold thread to add a touch of luxury and define the flower’s shape against the rich, dark velvet.
These gold-thread cushion designs are perfect for creating a high-end look.
3. Celestial Herbology on Denim
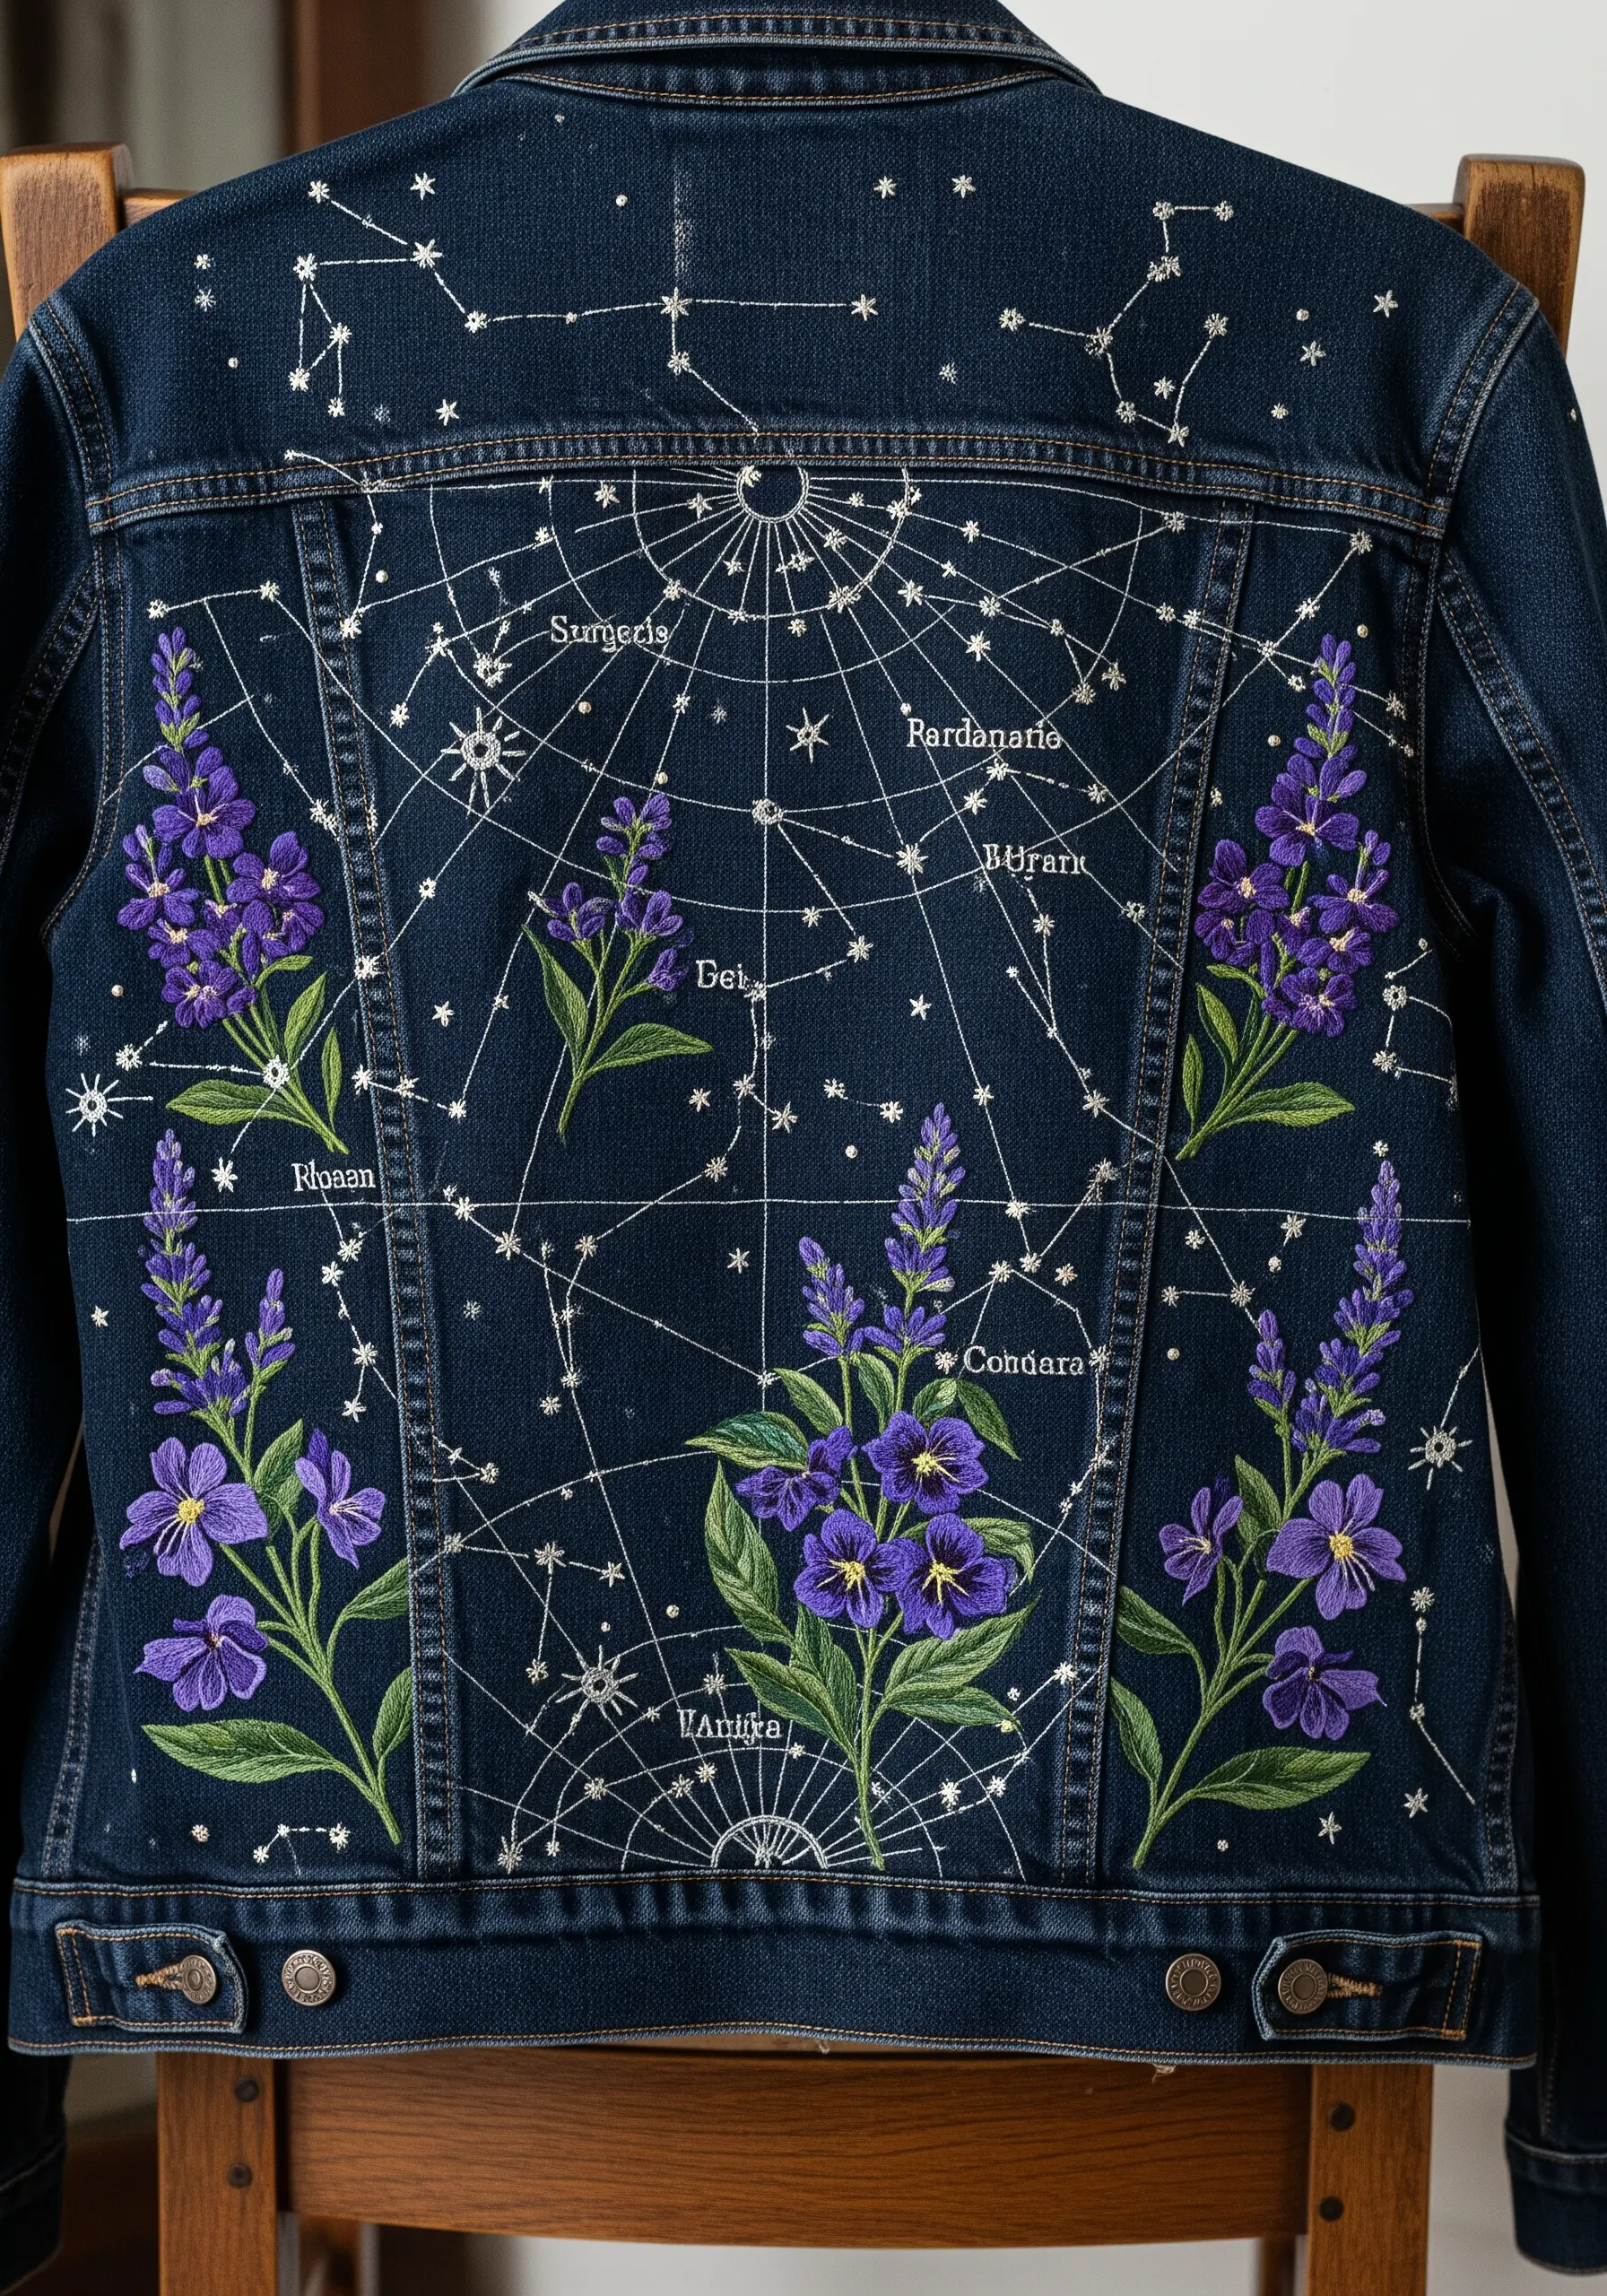
Combine botanical and celestial themes by mapping out your constellation lines first.
Use a single strand of a bright white or silver metallic thread and a simple backstitch for the stars and lines; this keeps them delicate and sharp against the dense denim.
For the lavender and pansies, use a fuller satin stitch with three or four strands of floss to create a bold contrast in texture and weight.
Always use a stabilizer on the inside of the jacket to prevent puckering, especially with larger, stitch-heavy designs.
This technique turns a simple garment into one of those wildflower embroidery patterns that feel personal and unique.
4. An Elegant Iris Wreath for Table Linens
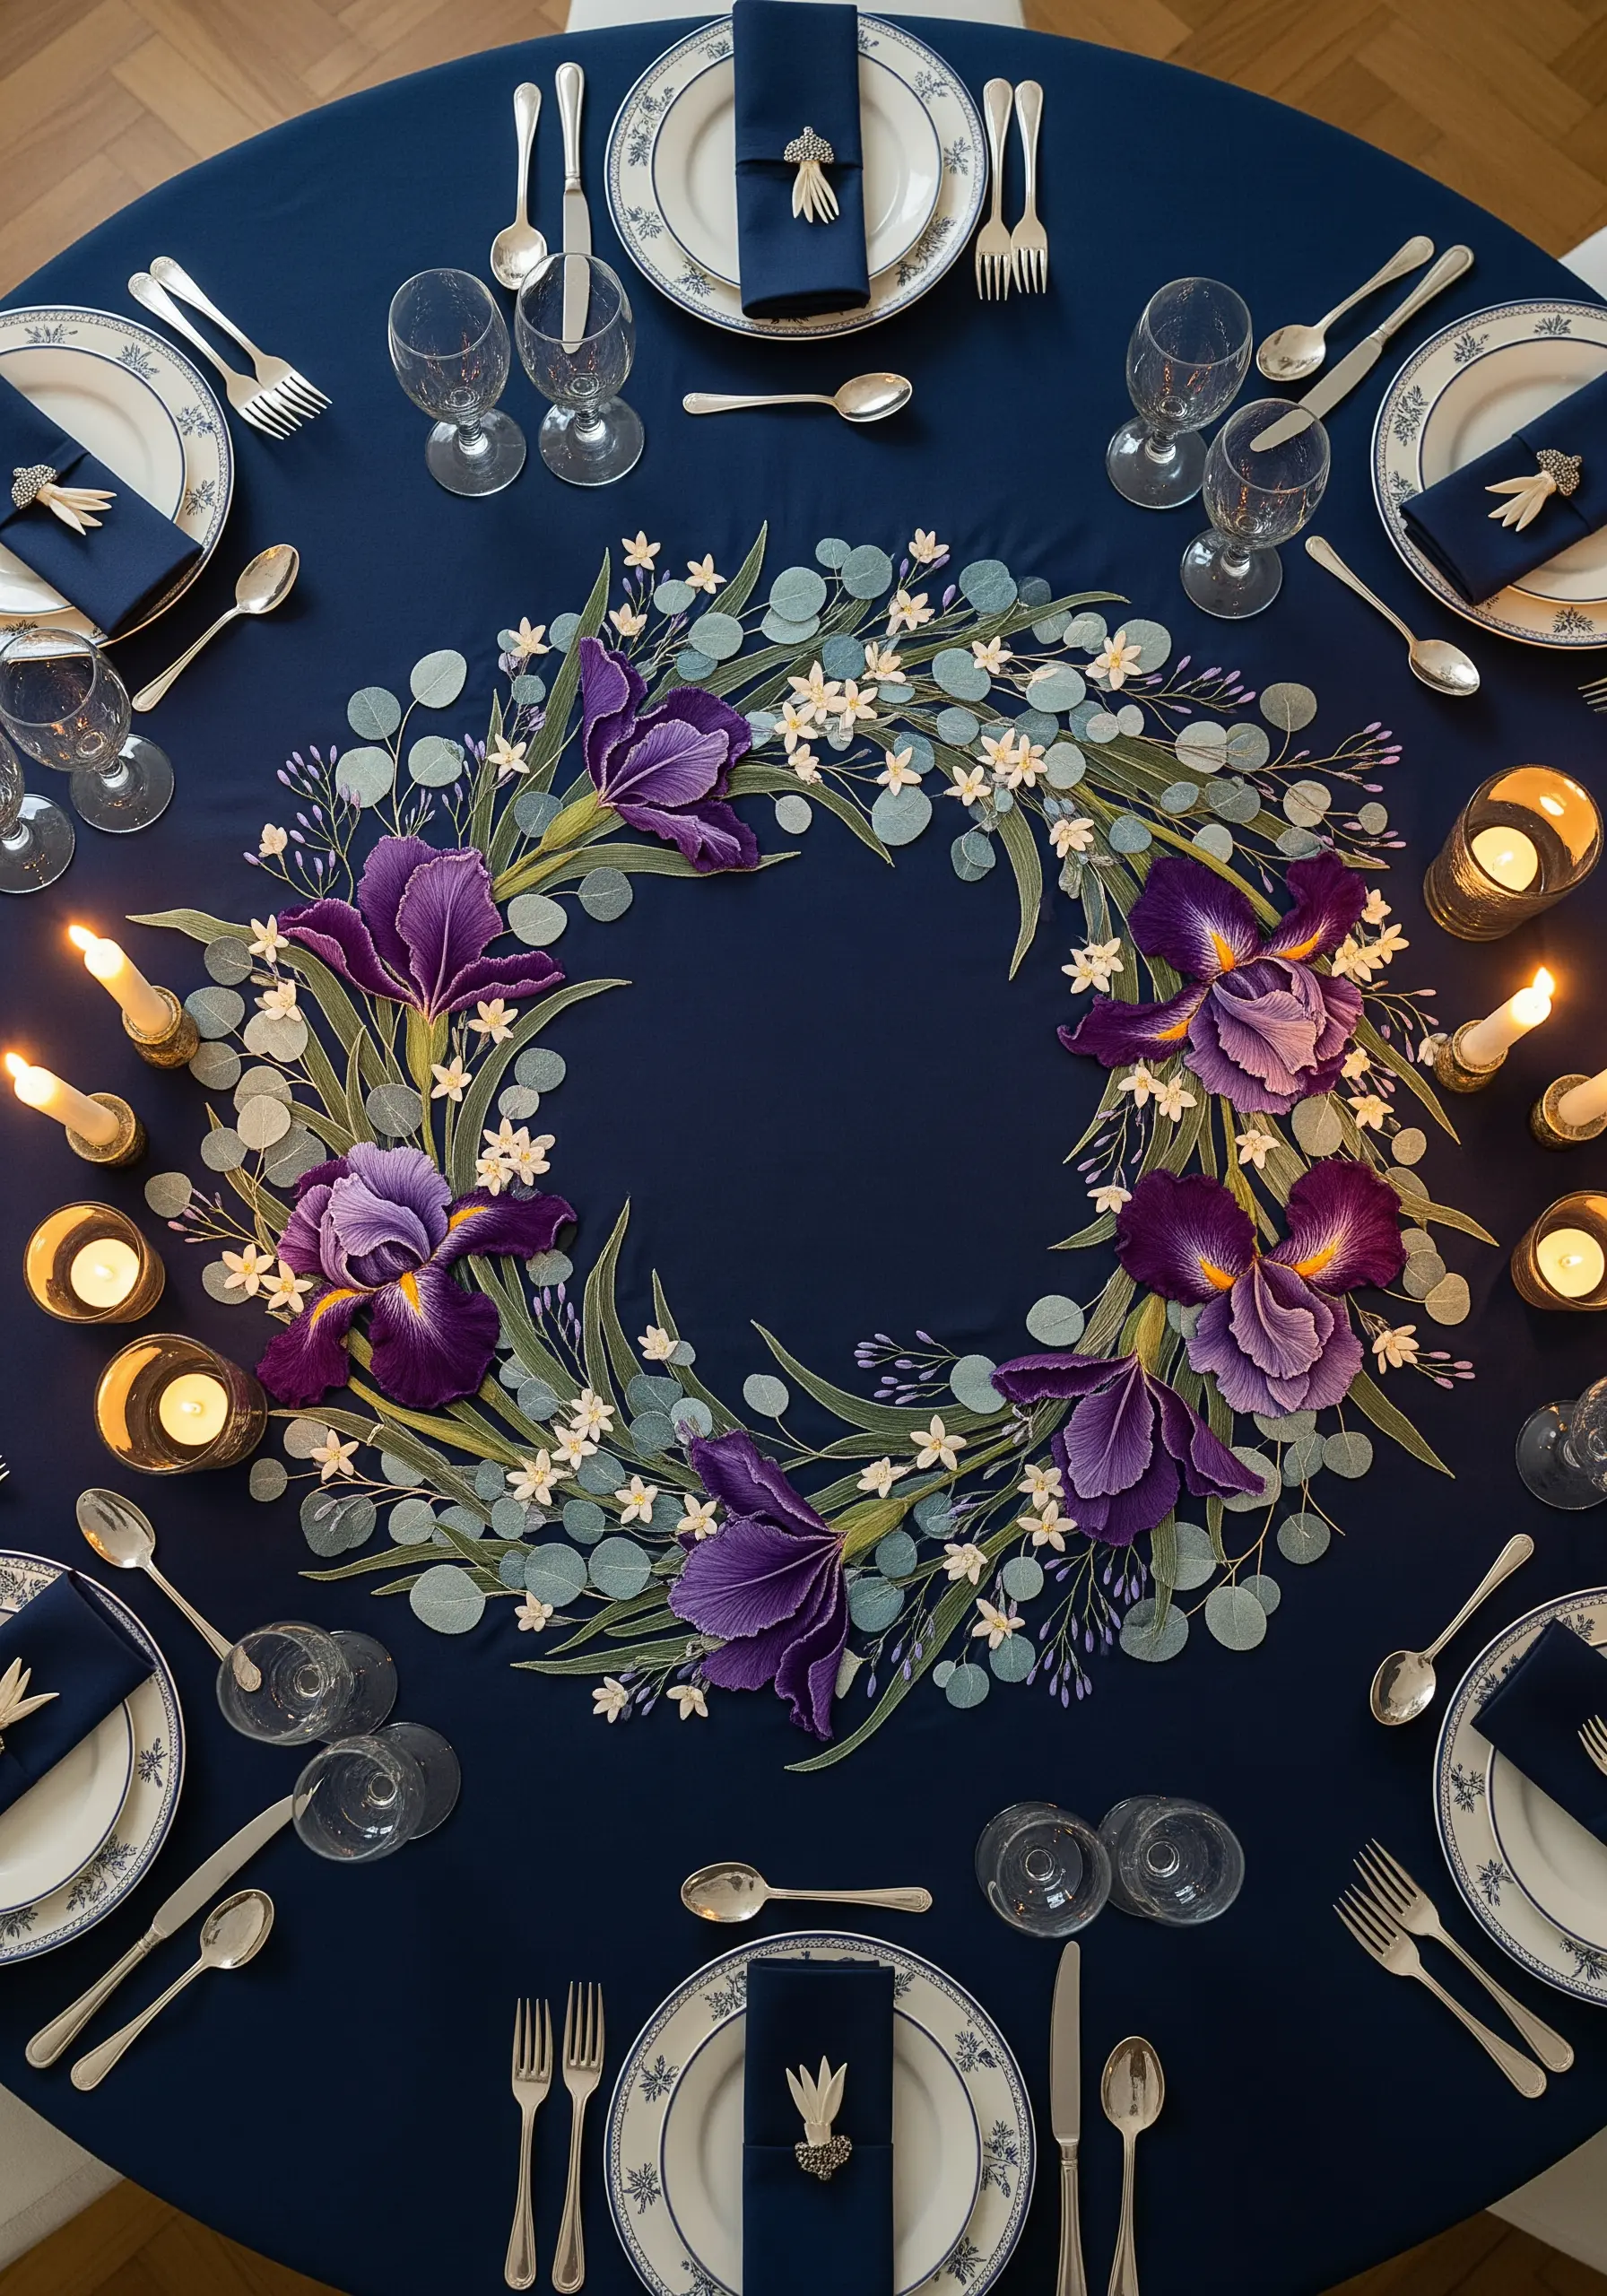
For a large-scale project like a tablecloth, create a balanced composition by first lightly sketching the circular flow of your wreath with a water-soluble pen.
Give the iris petals realistic dimension by angling your long-and-short stitches to follow the natural curve and ruffle of the flower.
Incorporate small, delicate filler flowers like tiny white lazy daisy stitches to break up the intense purples and add airiness to the design.
Using a slightly muted sage green for the eucalyptus leaves ensures they complement the vibrant irises without competing for attention.
This thoughtful approach elevates simple table linen embroidery motifs into true heirloom pieces.
5. Symmetrical Passion Flowers on a Table Runner
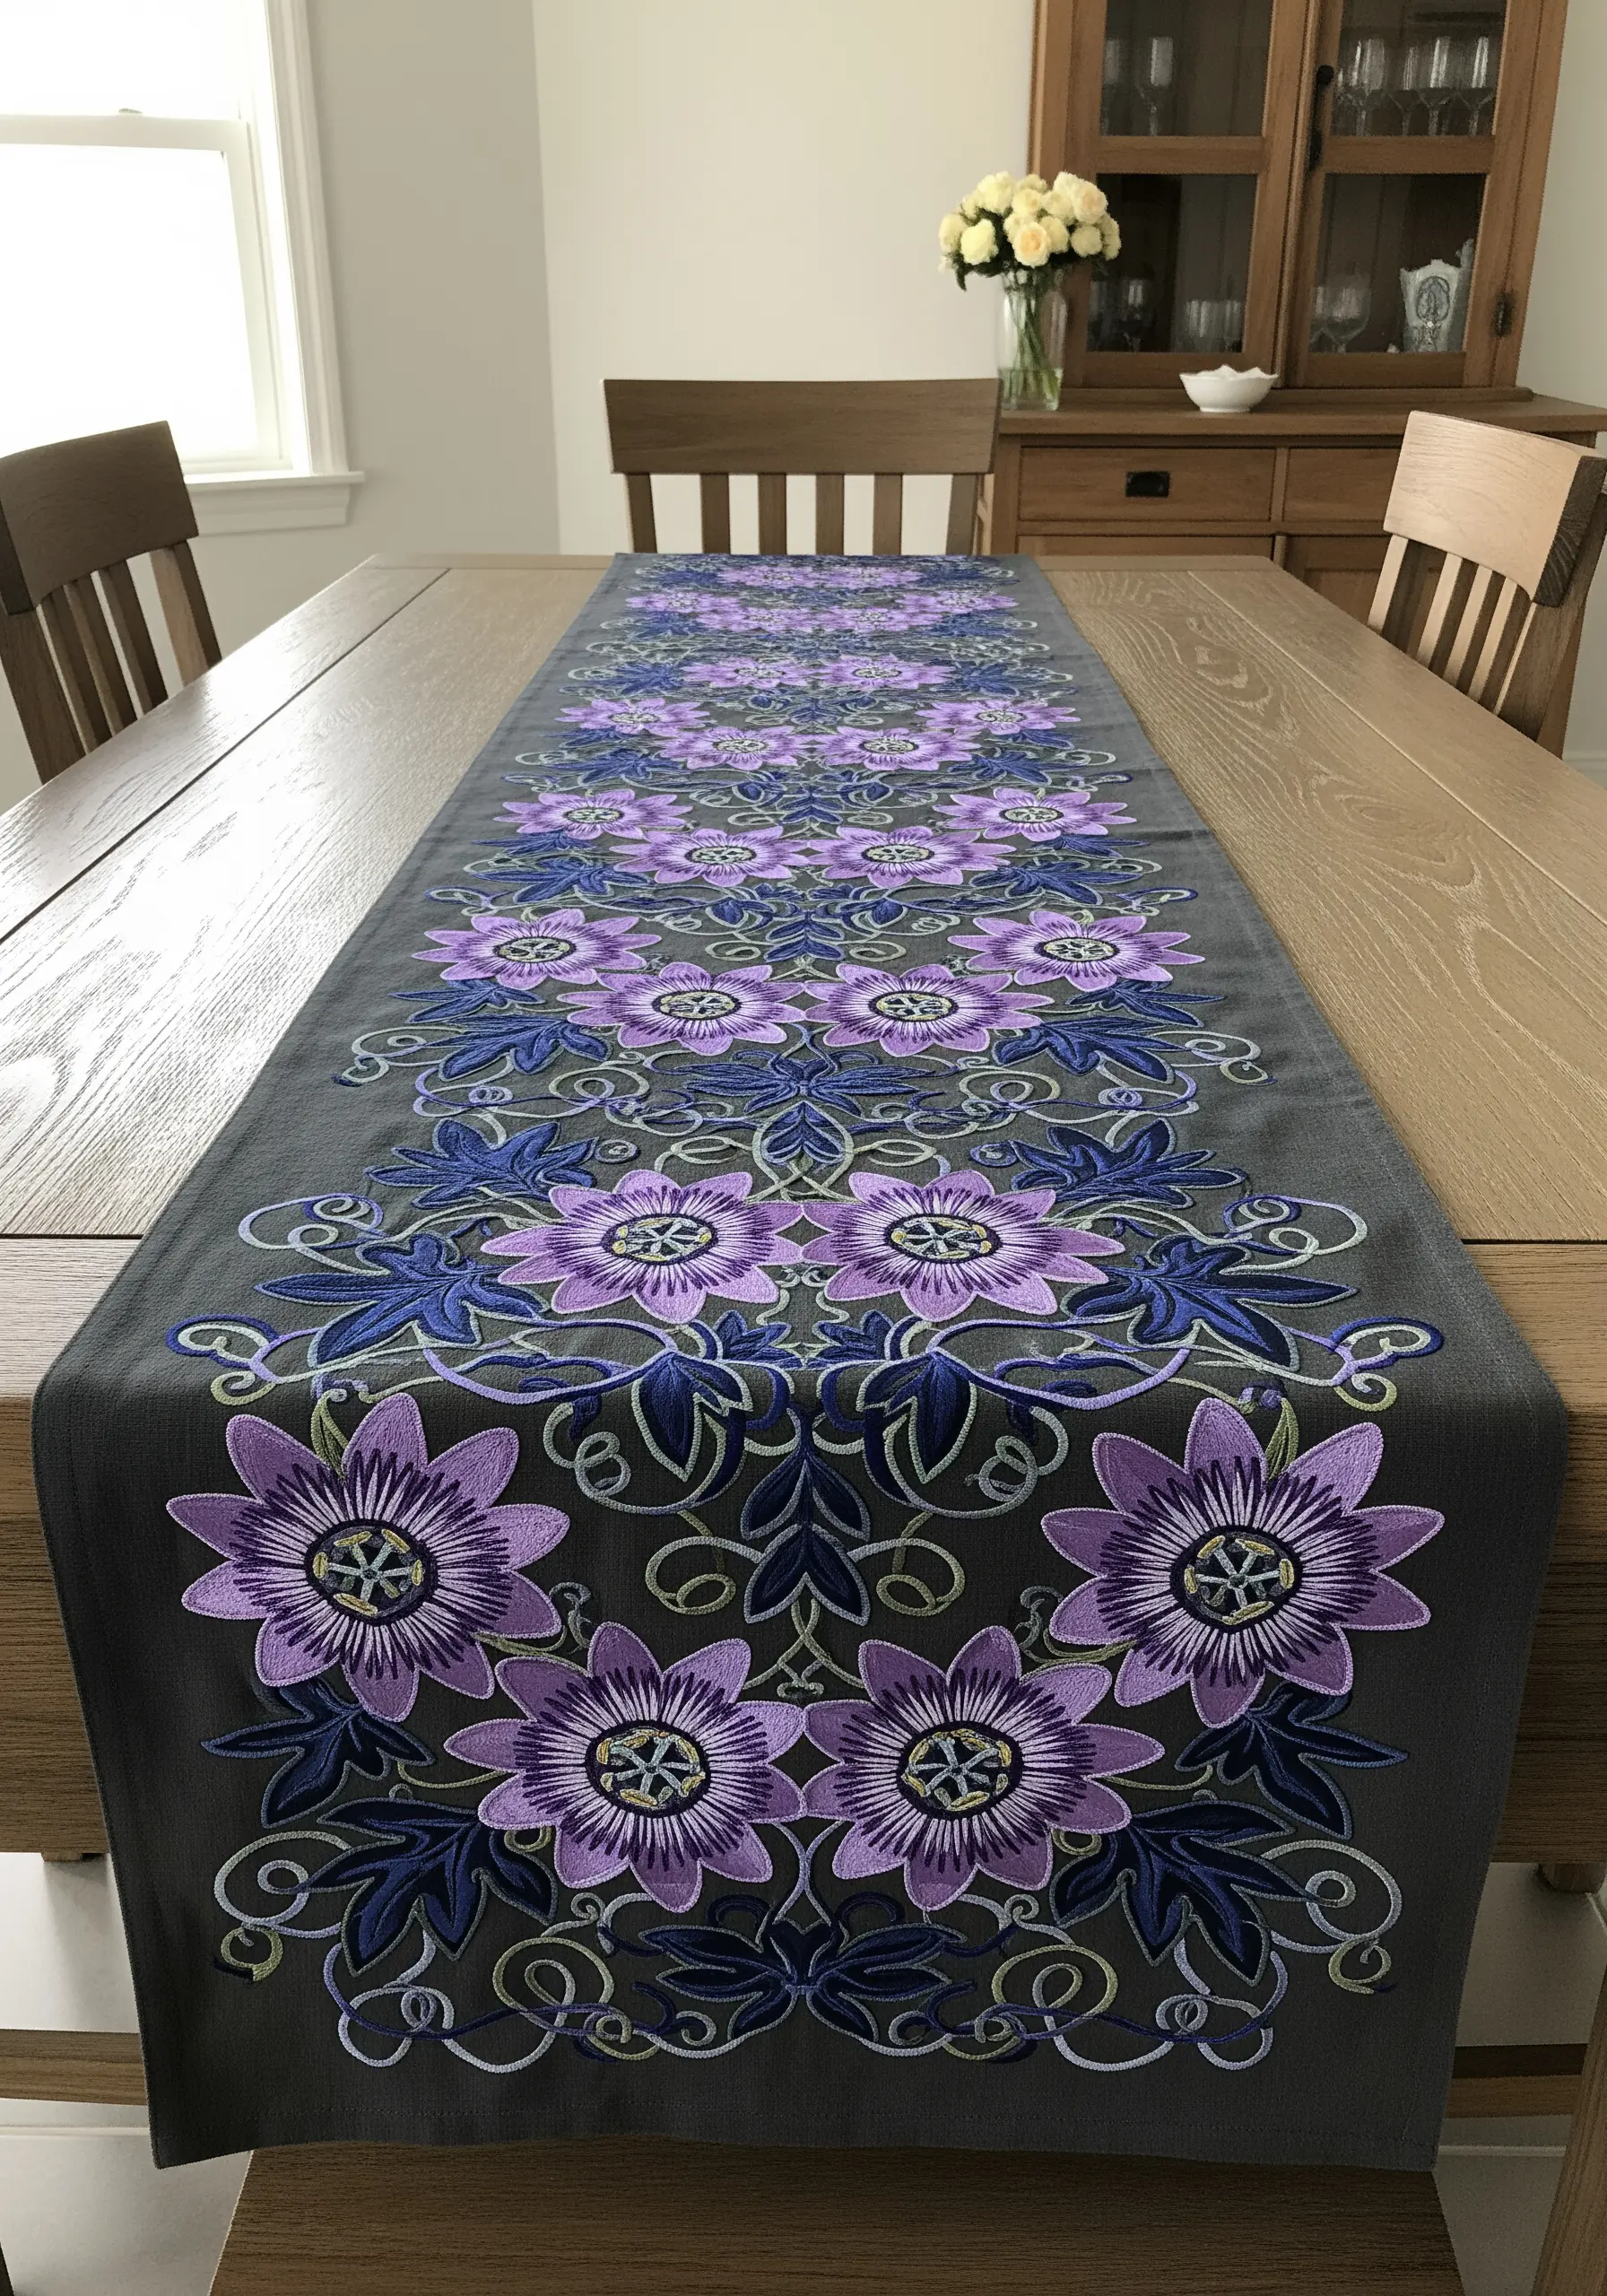
To achieve a perfectly symmetrical, repeating pattern, create a stencil on tracing paper and use it to transfer the design down the length of the runner.
The complexity of a passion flower comes from its center; build this up in layers.
Start with a base of satin stitch, then add delicate straight stitches in a contrasting color for the corona filaments, and finish with French knots for the stigma.
Using a dark charcoal grey fabric instead of black provides a softer background that allows the deep blues and purples to stand out without harshness.
6. Queen Anne’s Lace Silhouettes on a Lampshade
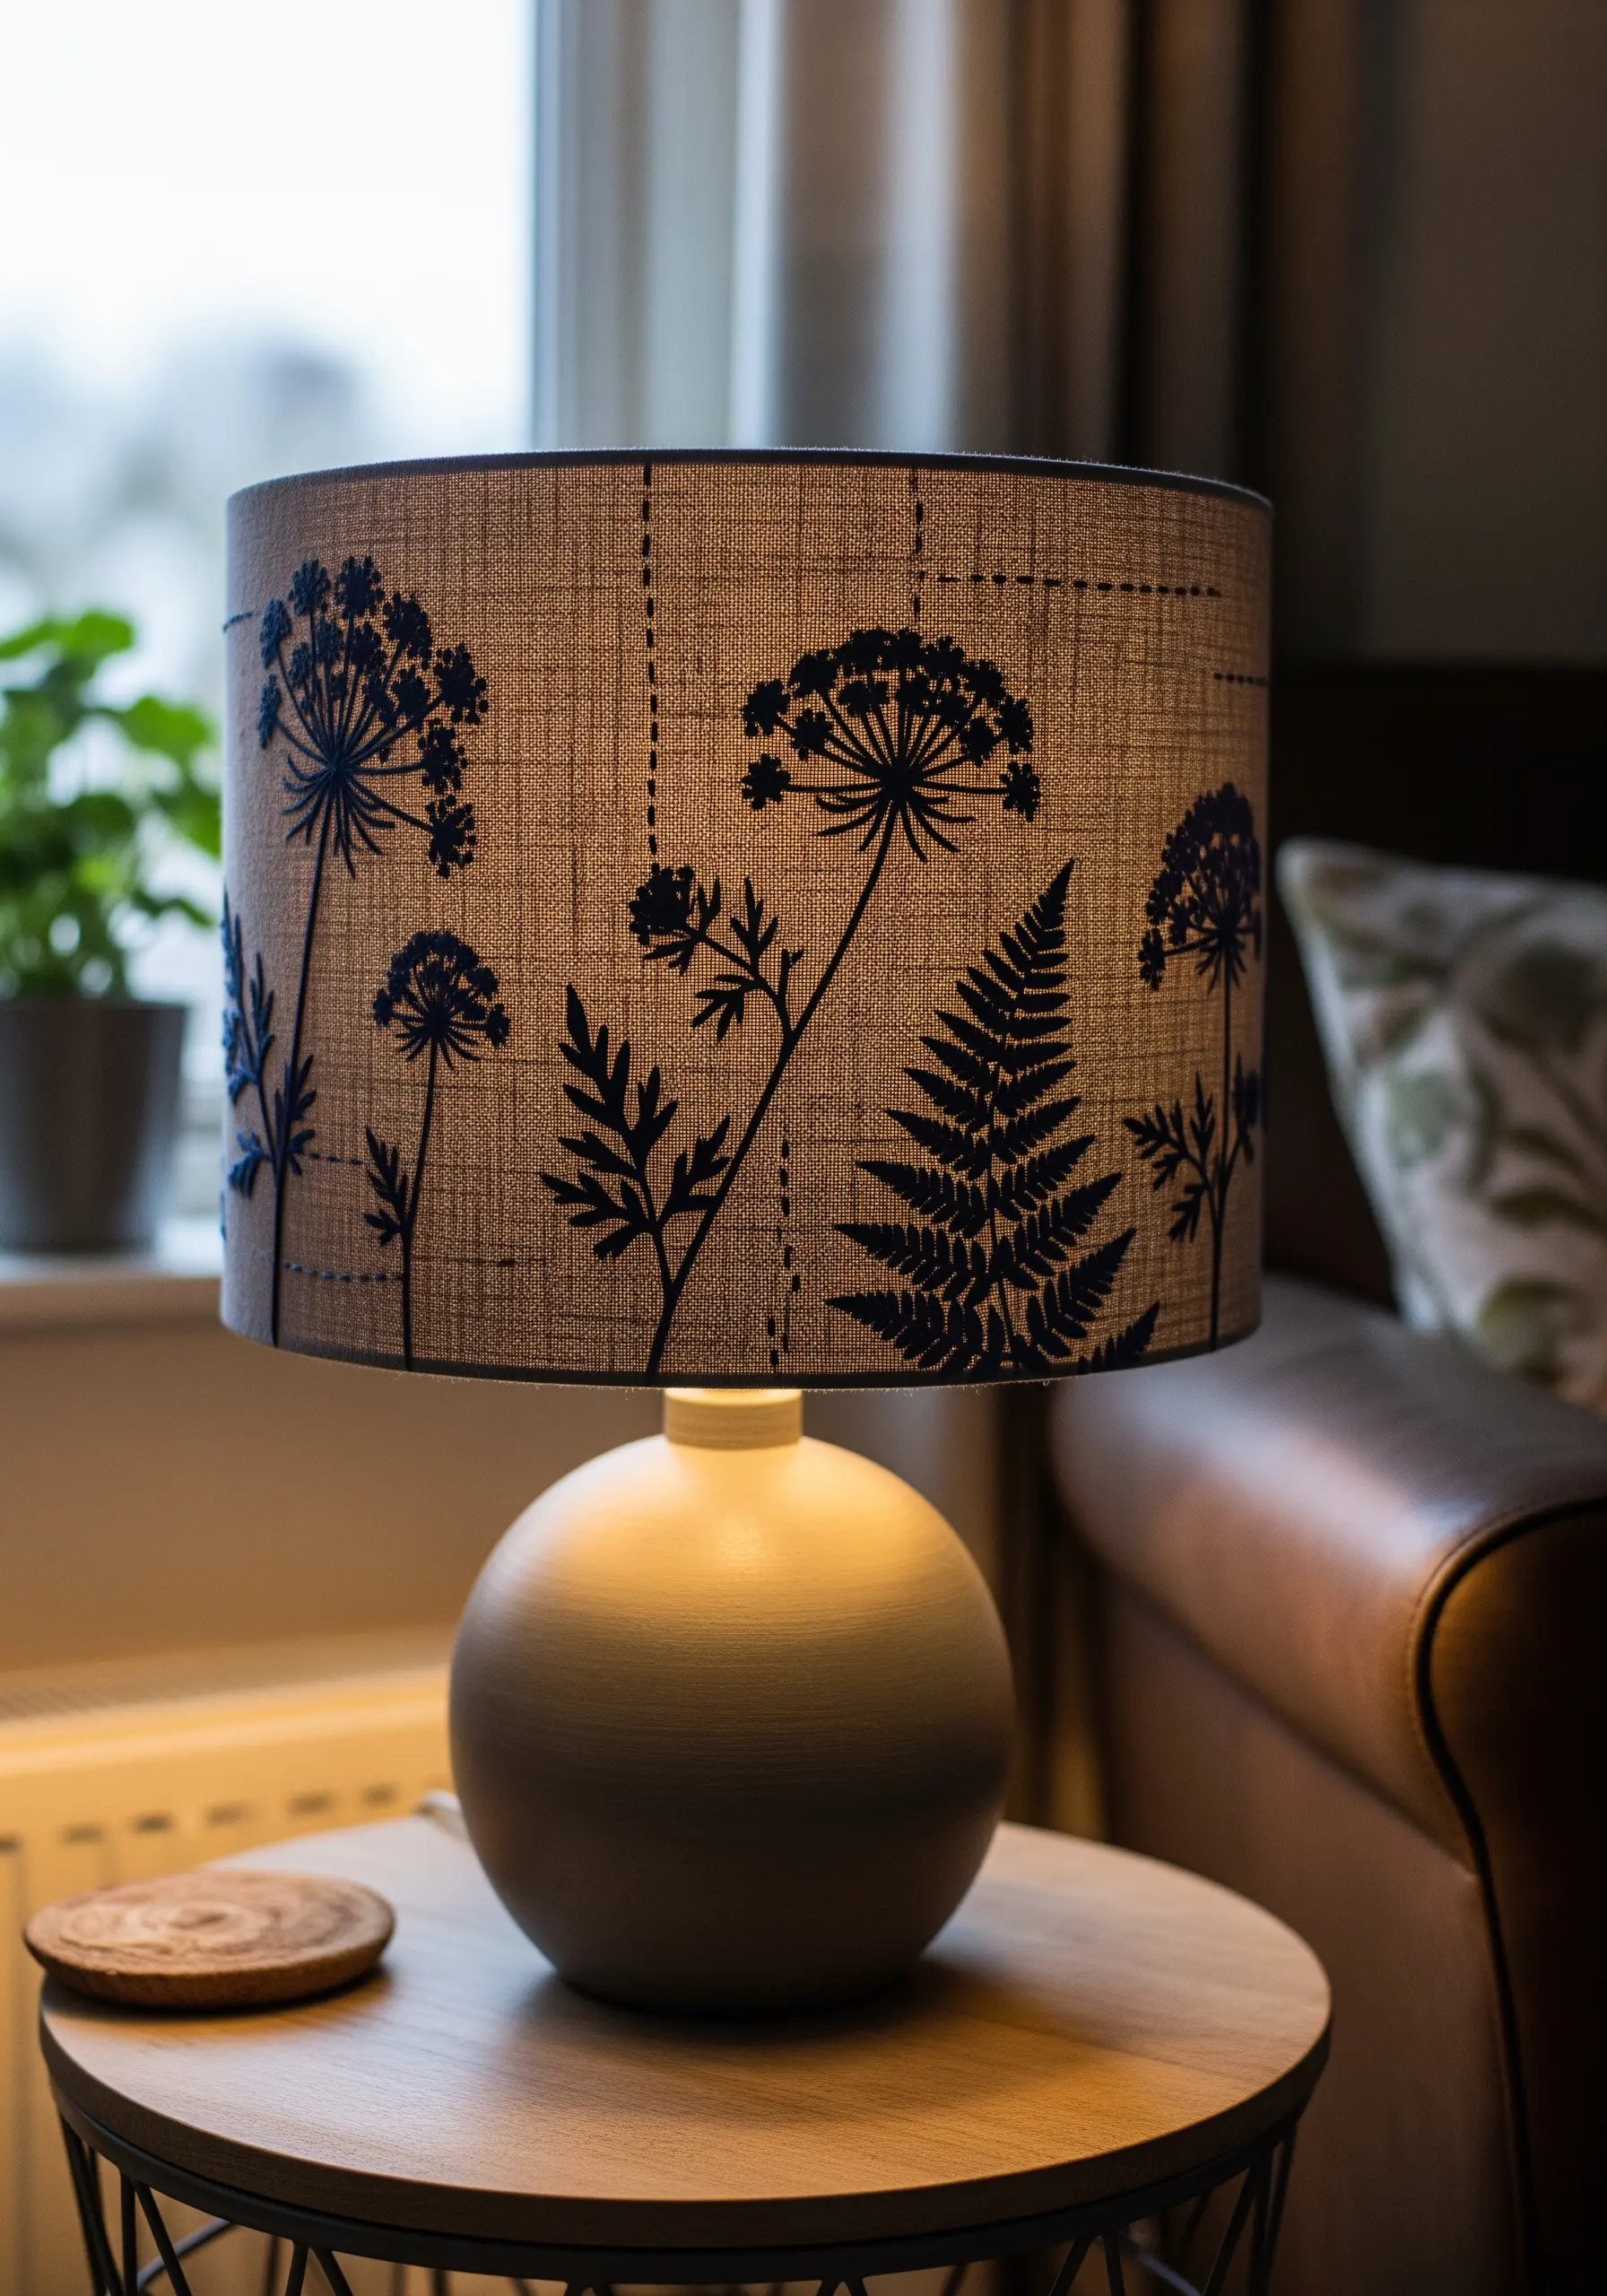
Create a dramatic silhouette effect by embroidering your design on a light-colored, textured fabric like linen or cotton chambray.
Use a single, dark color—like navy or charcoal—and focus on outline stitches like stem stitch or split stitch to define the shapes.
This ensures the design is crisp and clear when the lamp is turned on.
Remember to embroider the fabric panel while it’s flat, before assembling it onto the lampshade rings, for much easier stitching.
This technique is one of the most elegant embroidery accents for functional home items.
7. Luminous Water Lilies with a Painted Background
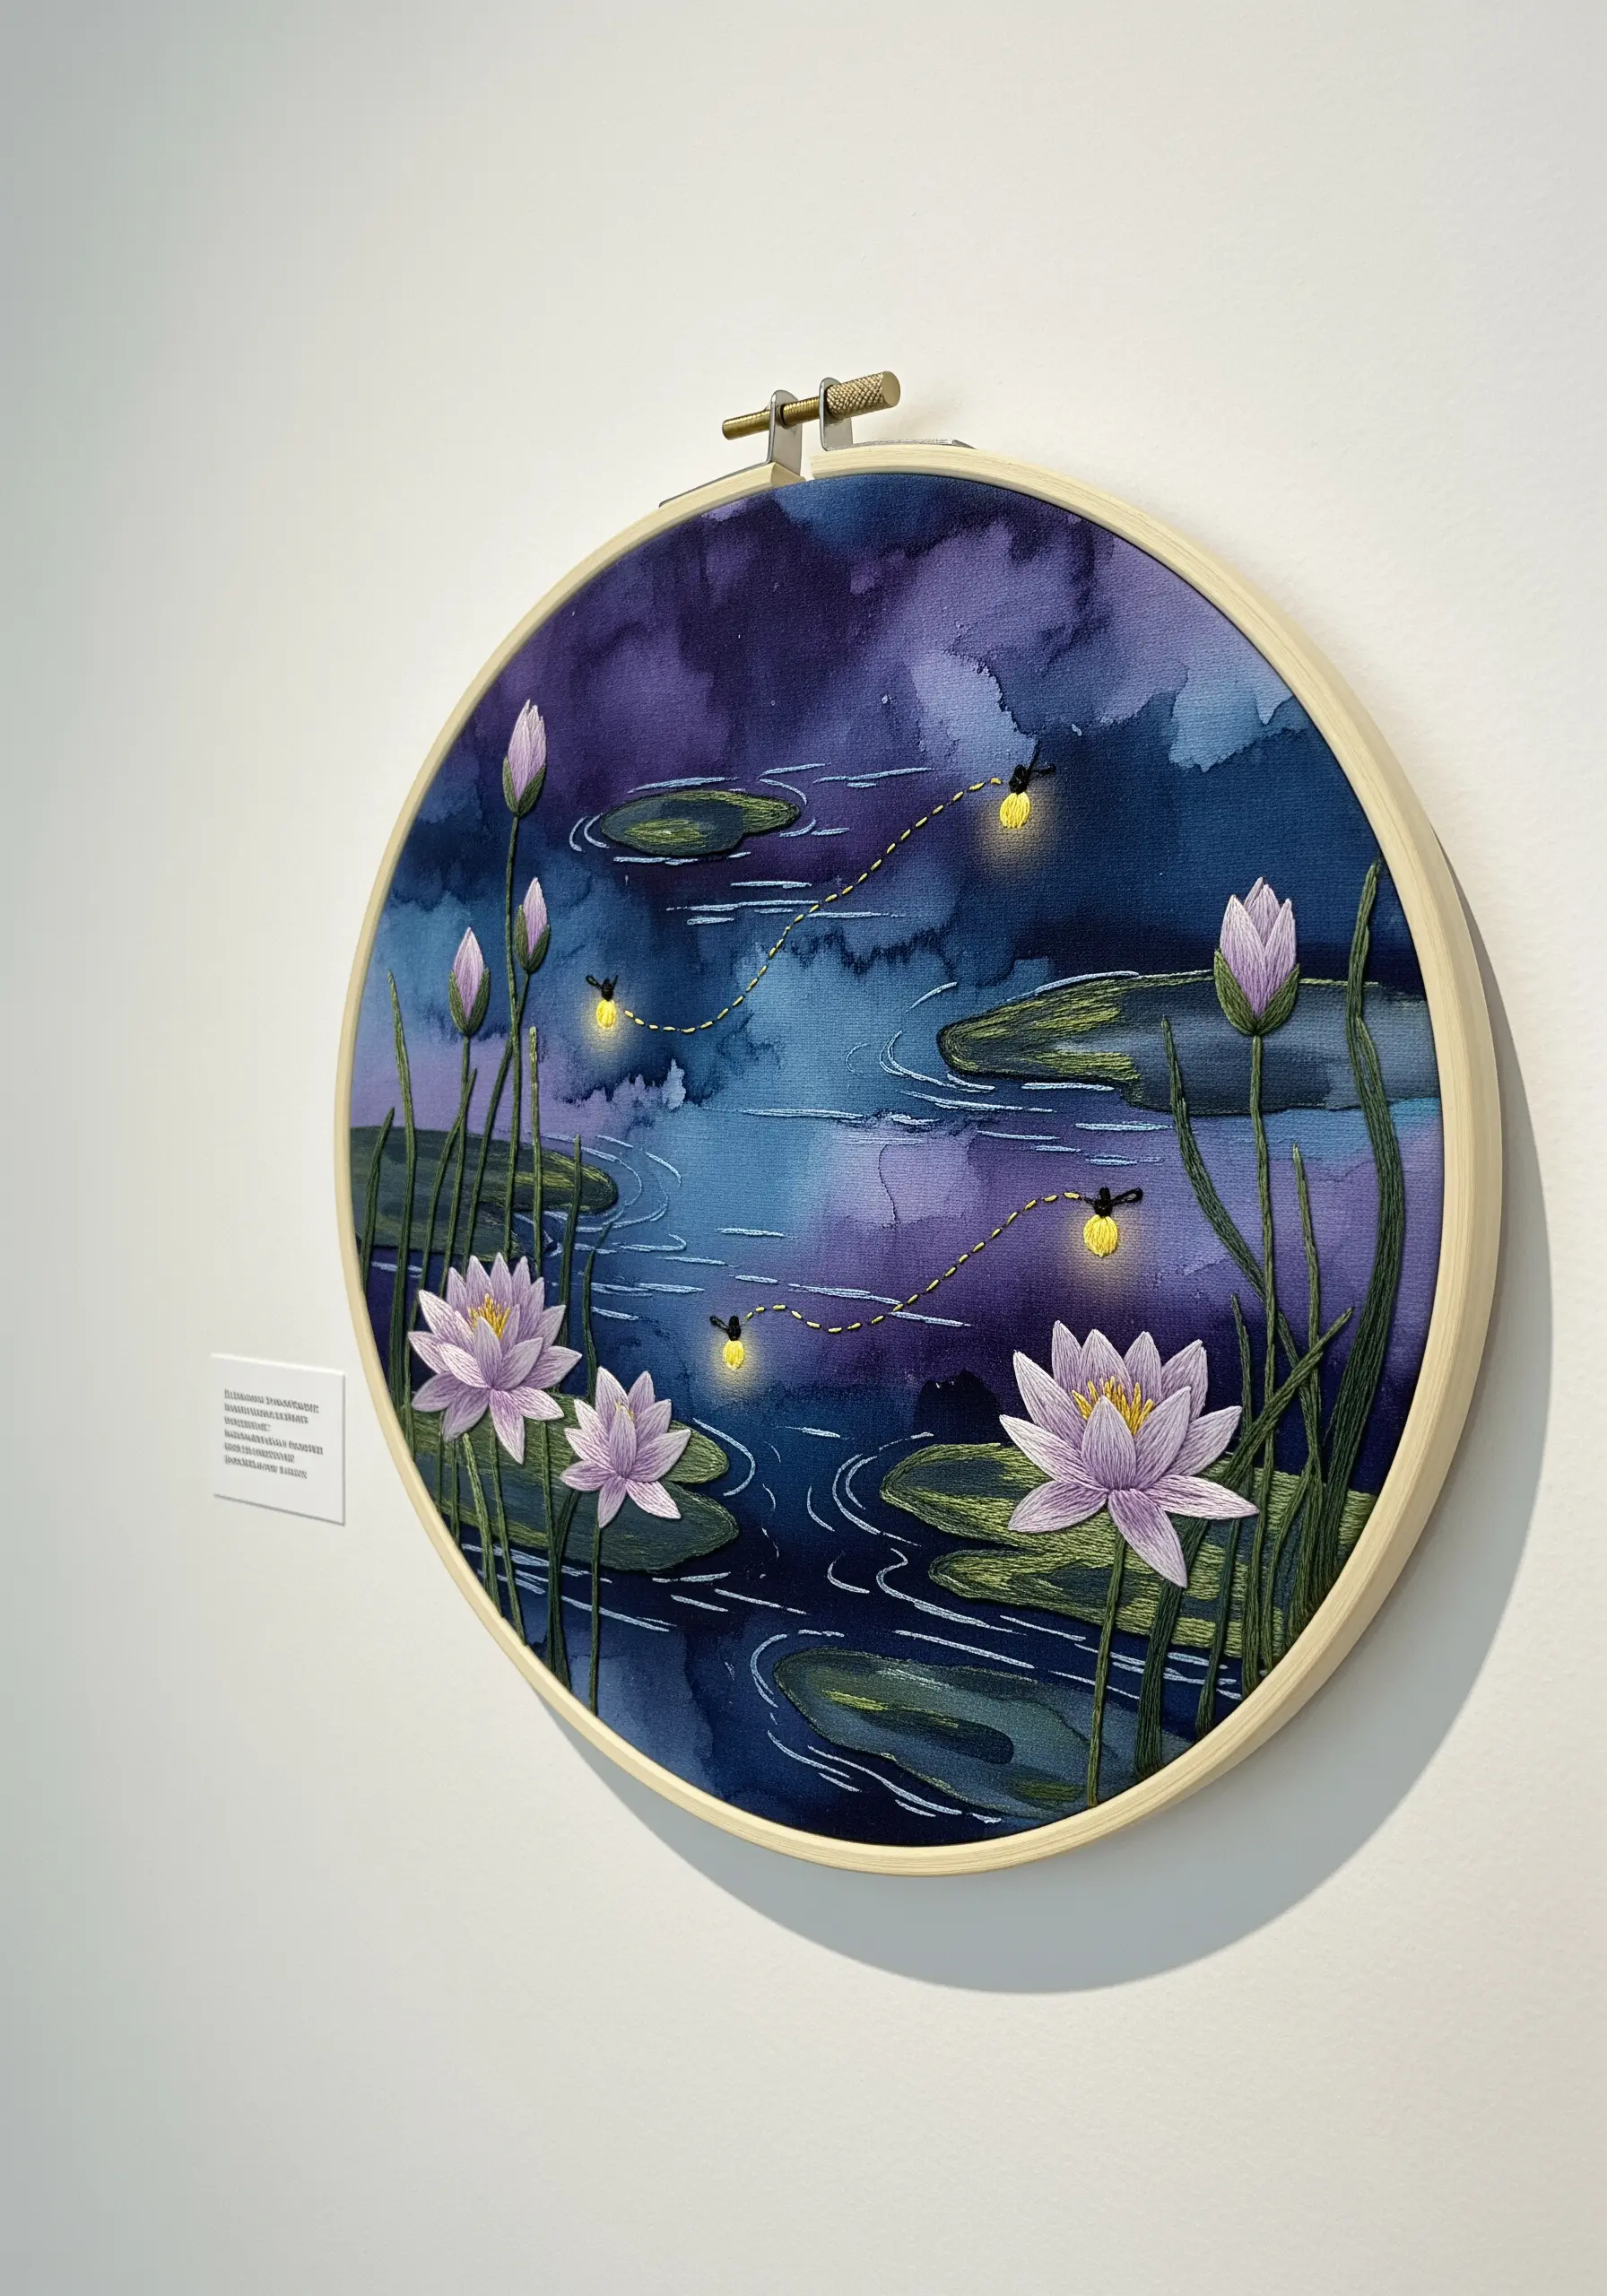
Elevate your hoop art by creating a watercolor background before you stitch.
Wet your fabric and apply washes of deep blue and purple watercolor paint, allowing them to bleed together for a dreamy, atmospheric effect.
Once the fabric is completely dry, stitch your water lilies and pads, using the painted background as your guide.
For the fireflies, use a single French knot of bright yellow or metallic gold thread, with a trailing straight stitch behind it to suggest movement and light.
This method transforms floral embroidery hoops into mixed-media masterpieces.
8. Upholstered Headboard with Clematis Vines
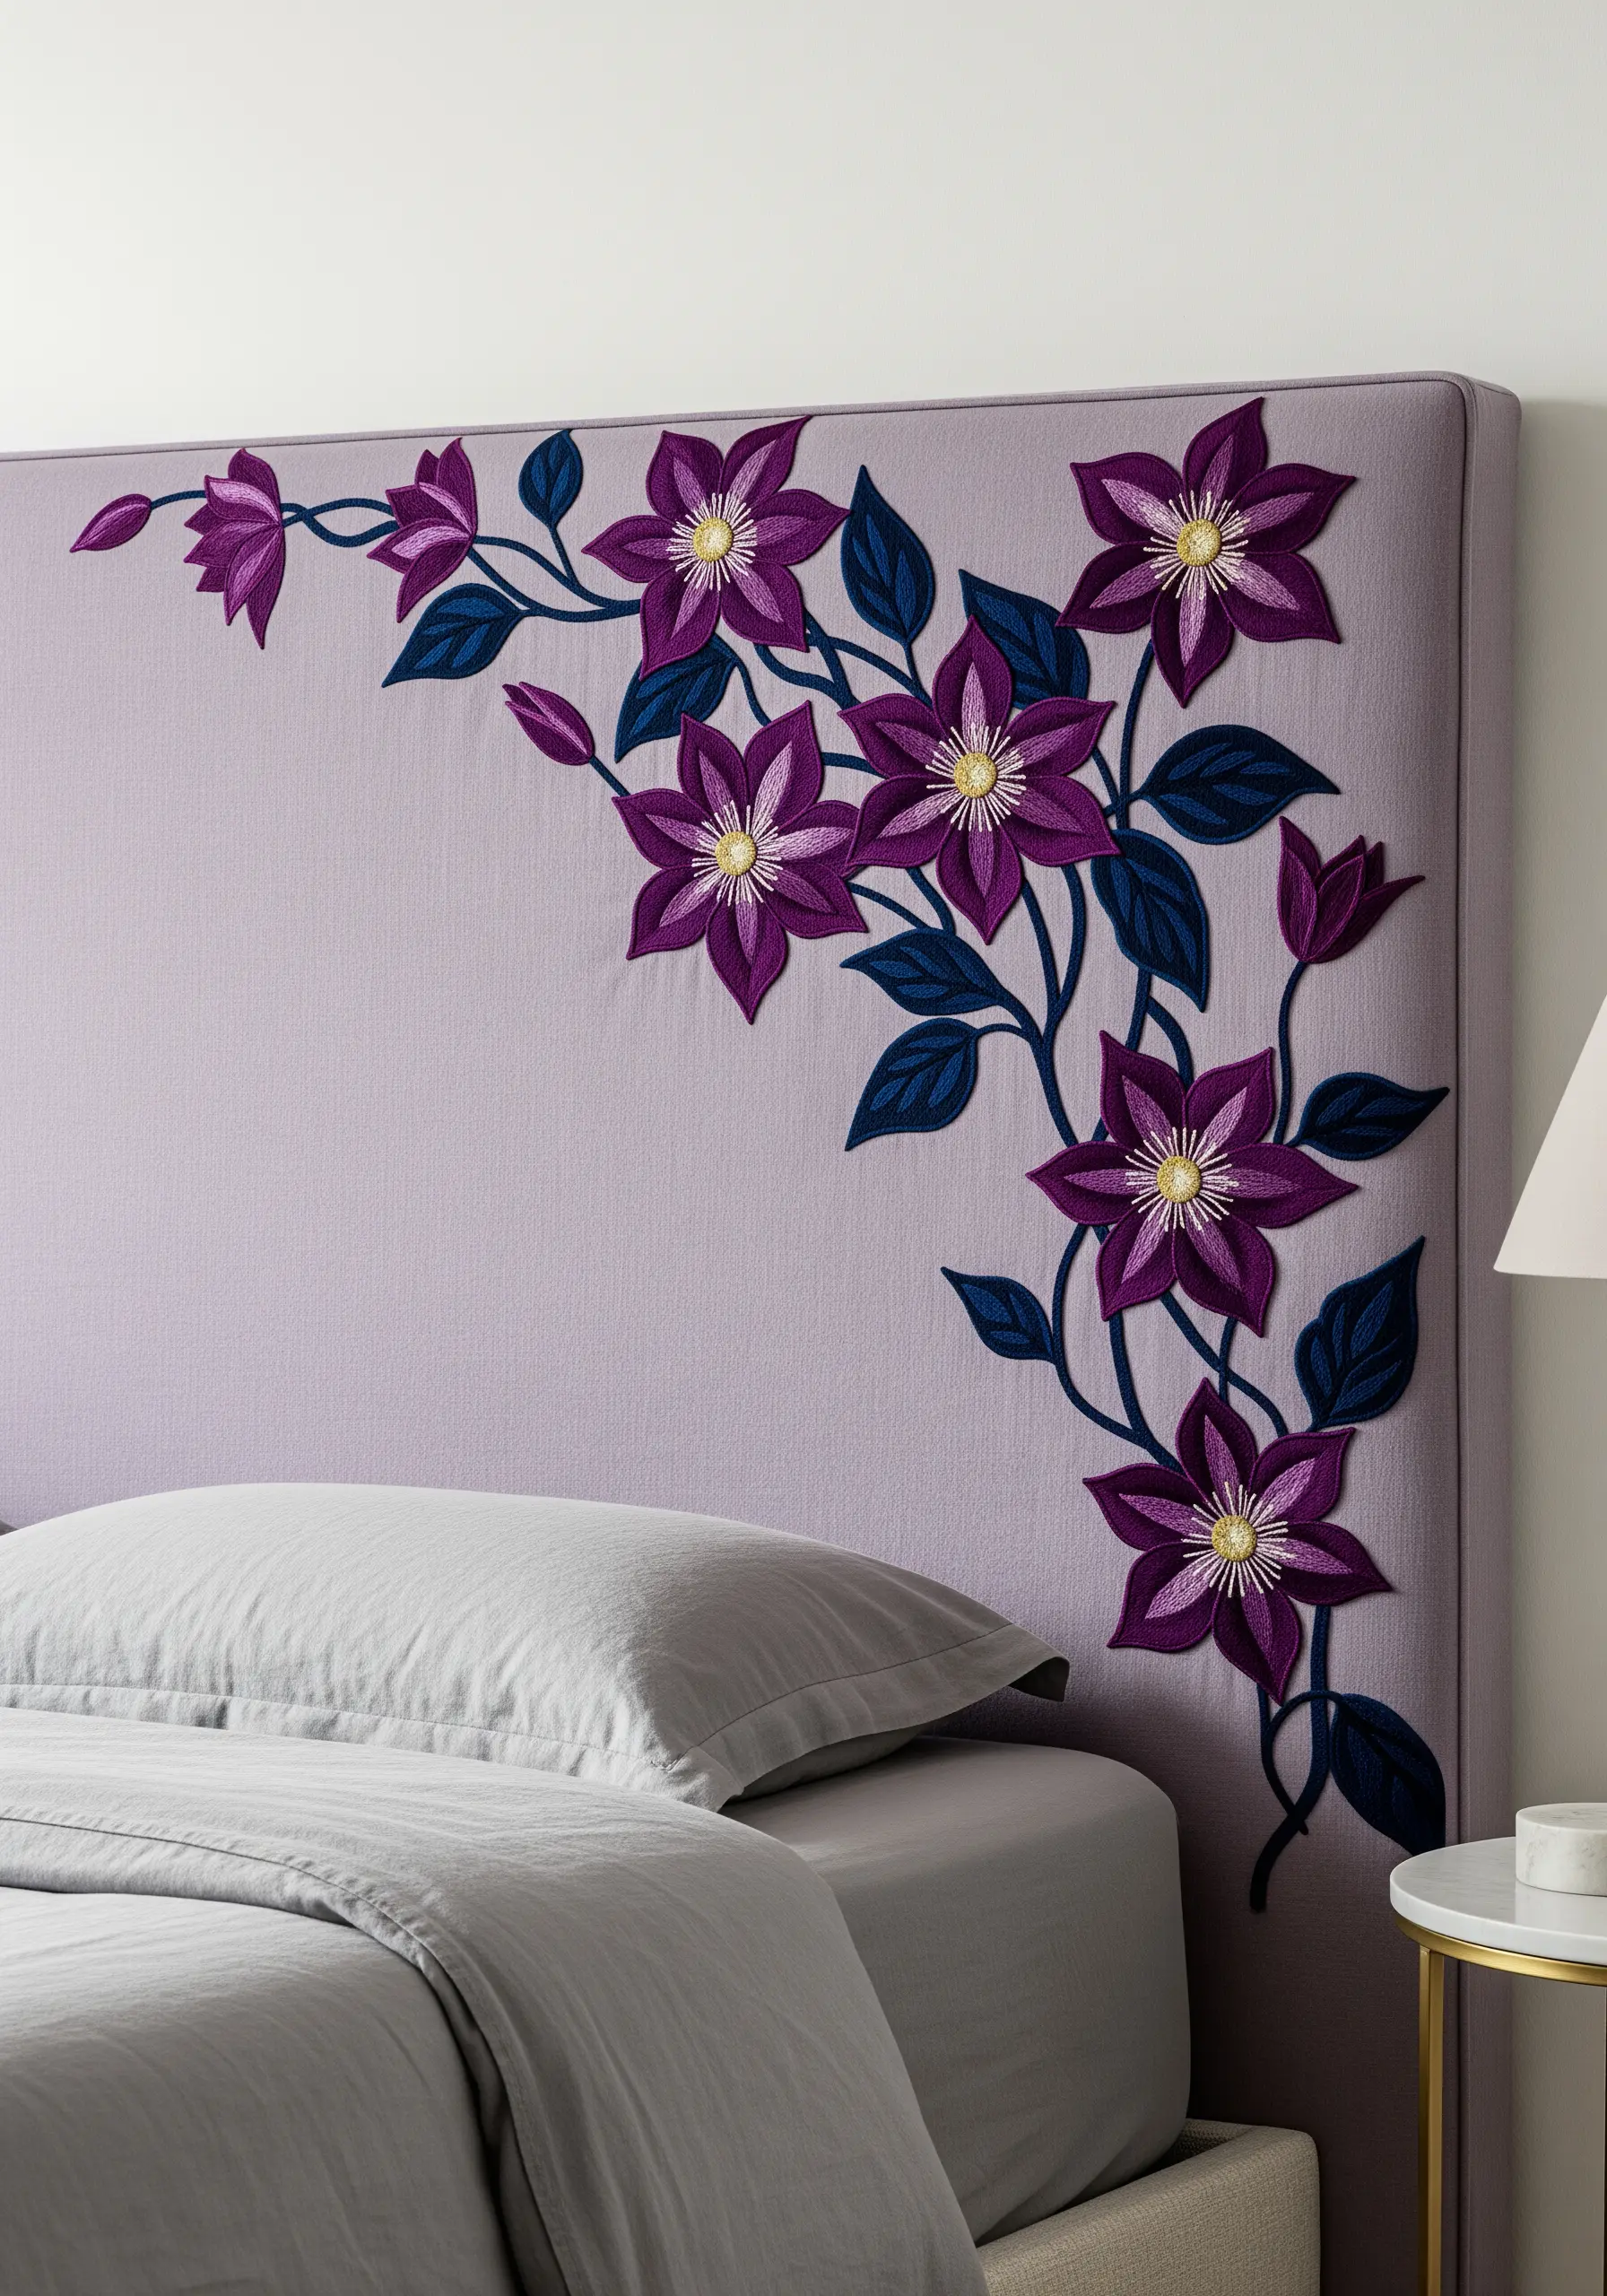
For a large-scale design on an upholstered surface, combine embroidery with appliqué to cover more area without excessive stitching time.
Cut the petal shapes from a complementary fabric, secure them with an iron-on adhesive, and then stitch the detailed outlines and veins on top.
This creates a clean, bold look with added dimension.
Choose a thread with a slight sheen, like rayon or silk, to stand out against the matte texture of the linen headboard fabric.
This is one of my favorite creative ways to use embroidery for a bedroom makeover.
9. A Vivid Pansy Garden on a Tote Bag
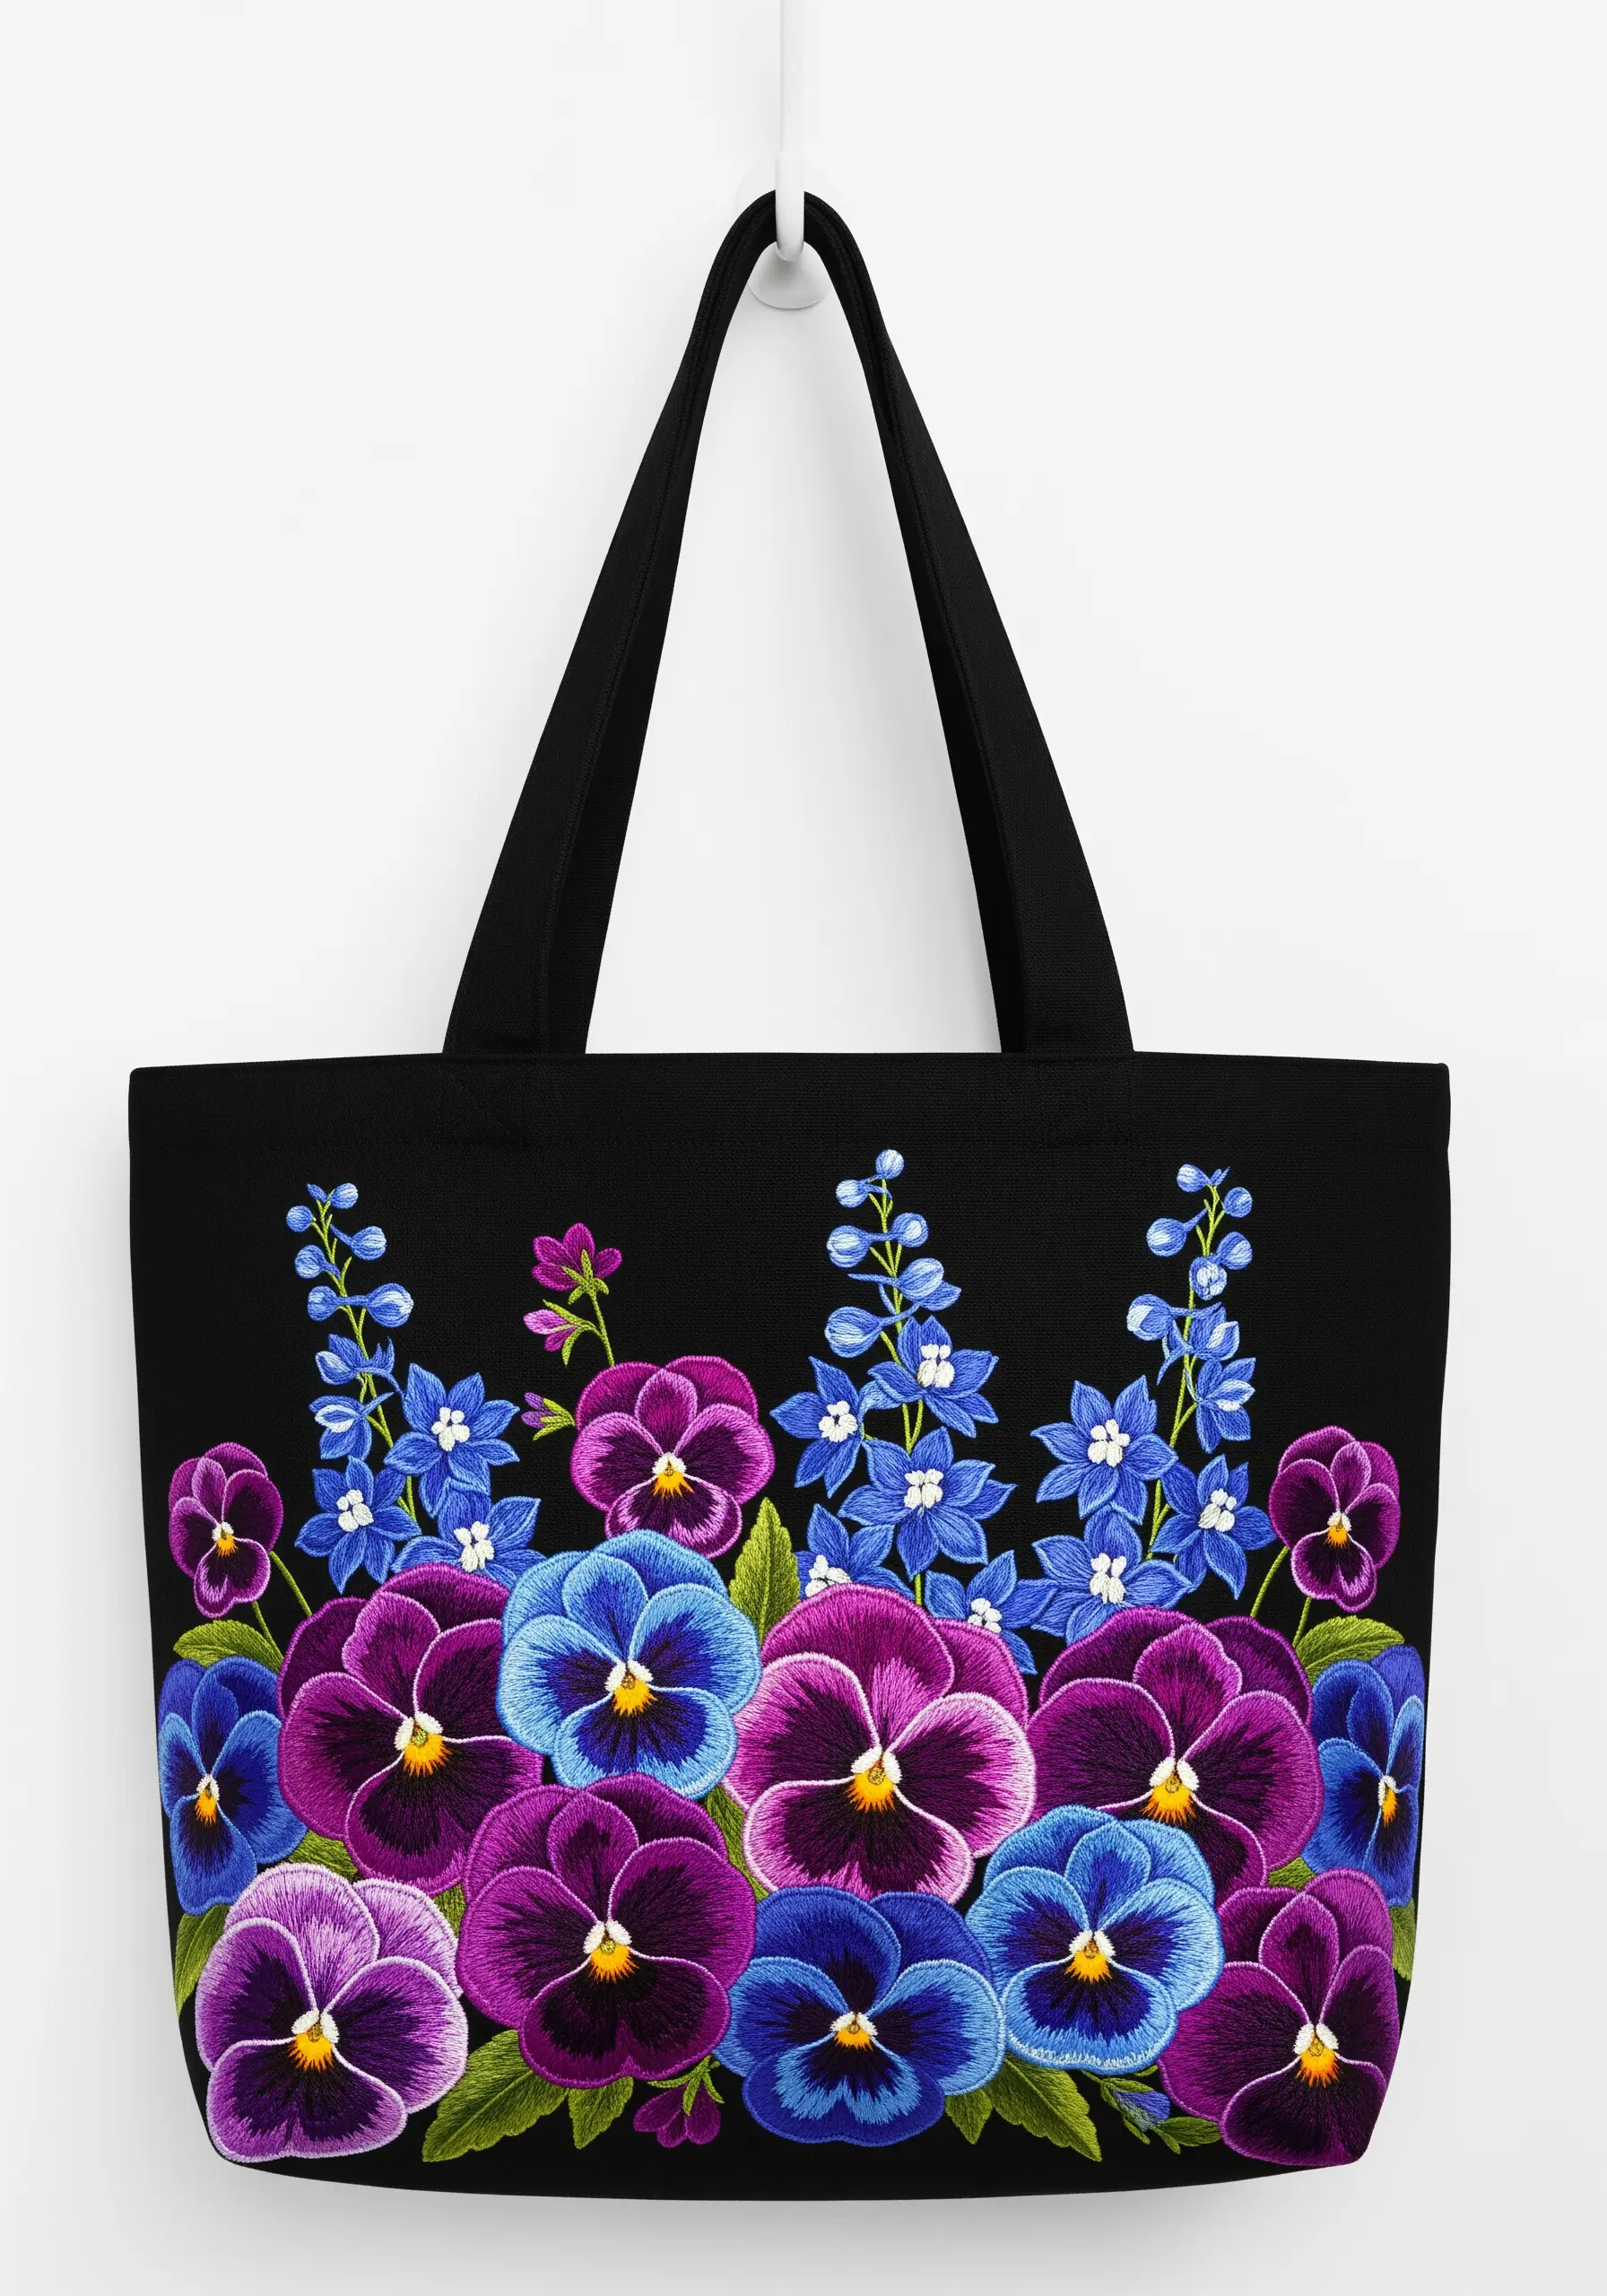
To achieve that lush, velvety look of pansy petals, use long-and-short stitch to blend multiple shades of purple, magenta, and blue within a single flower.
Don’t be afraid to place contrasting colors right next to each other; this is what gives pansies their distinct, painterly appearance.
Stitch on a heavy-duty canvas tote and pack your stitches tightly to create a dense, durable surface that resembles a patch.
A bright yellow French knot in the center of each flower provides a focal point and a pop of complementary color.
This project can easily transform plain tote bags into garden-inspired masterpieces.
10. Foxgloves on a Sheer Curtain Panel
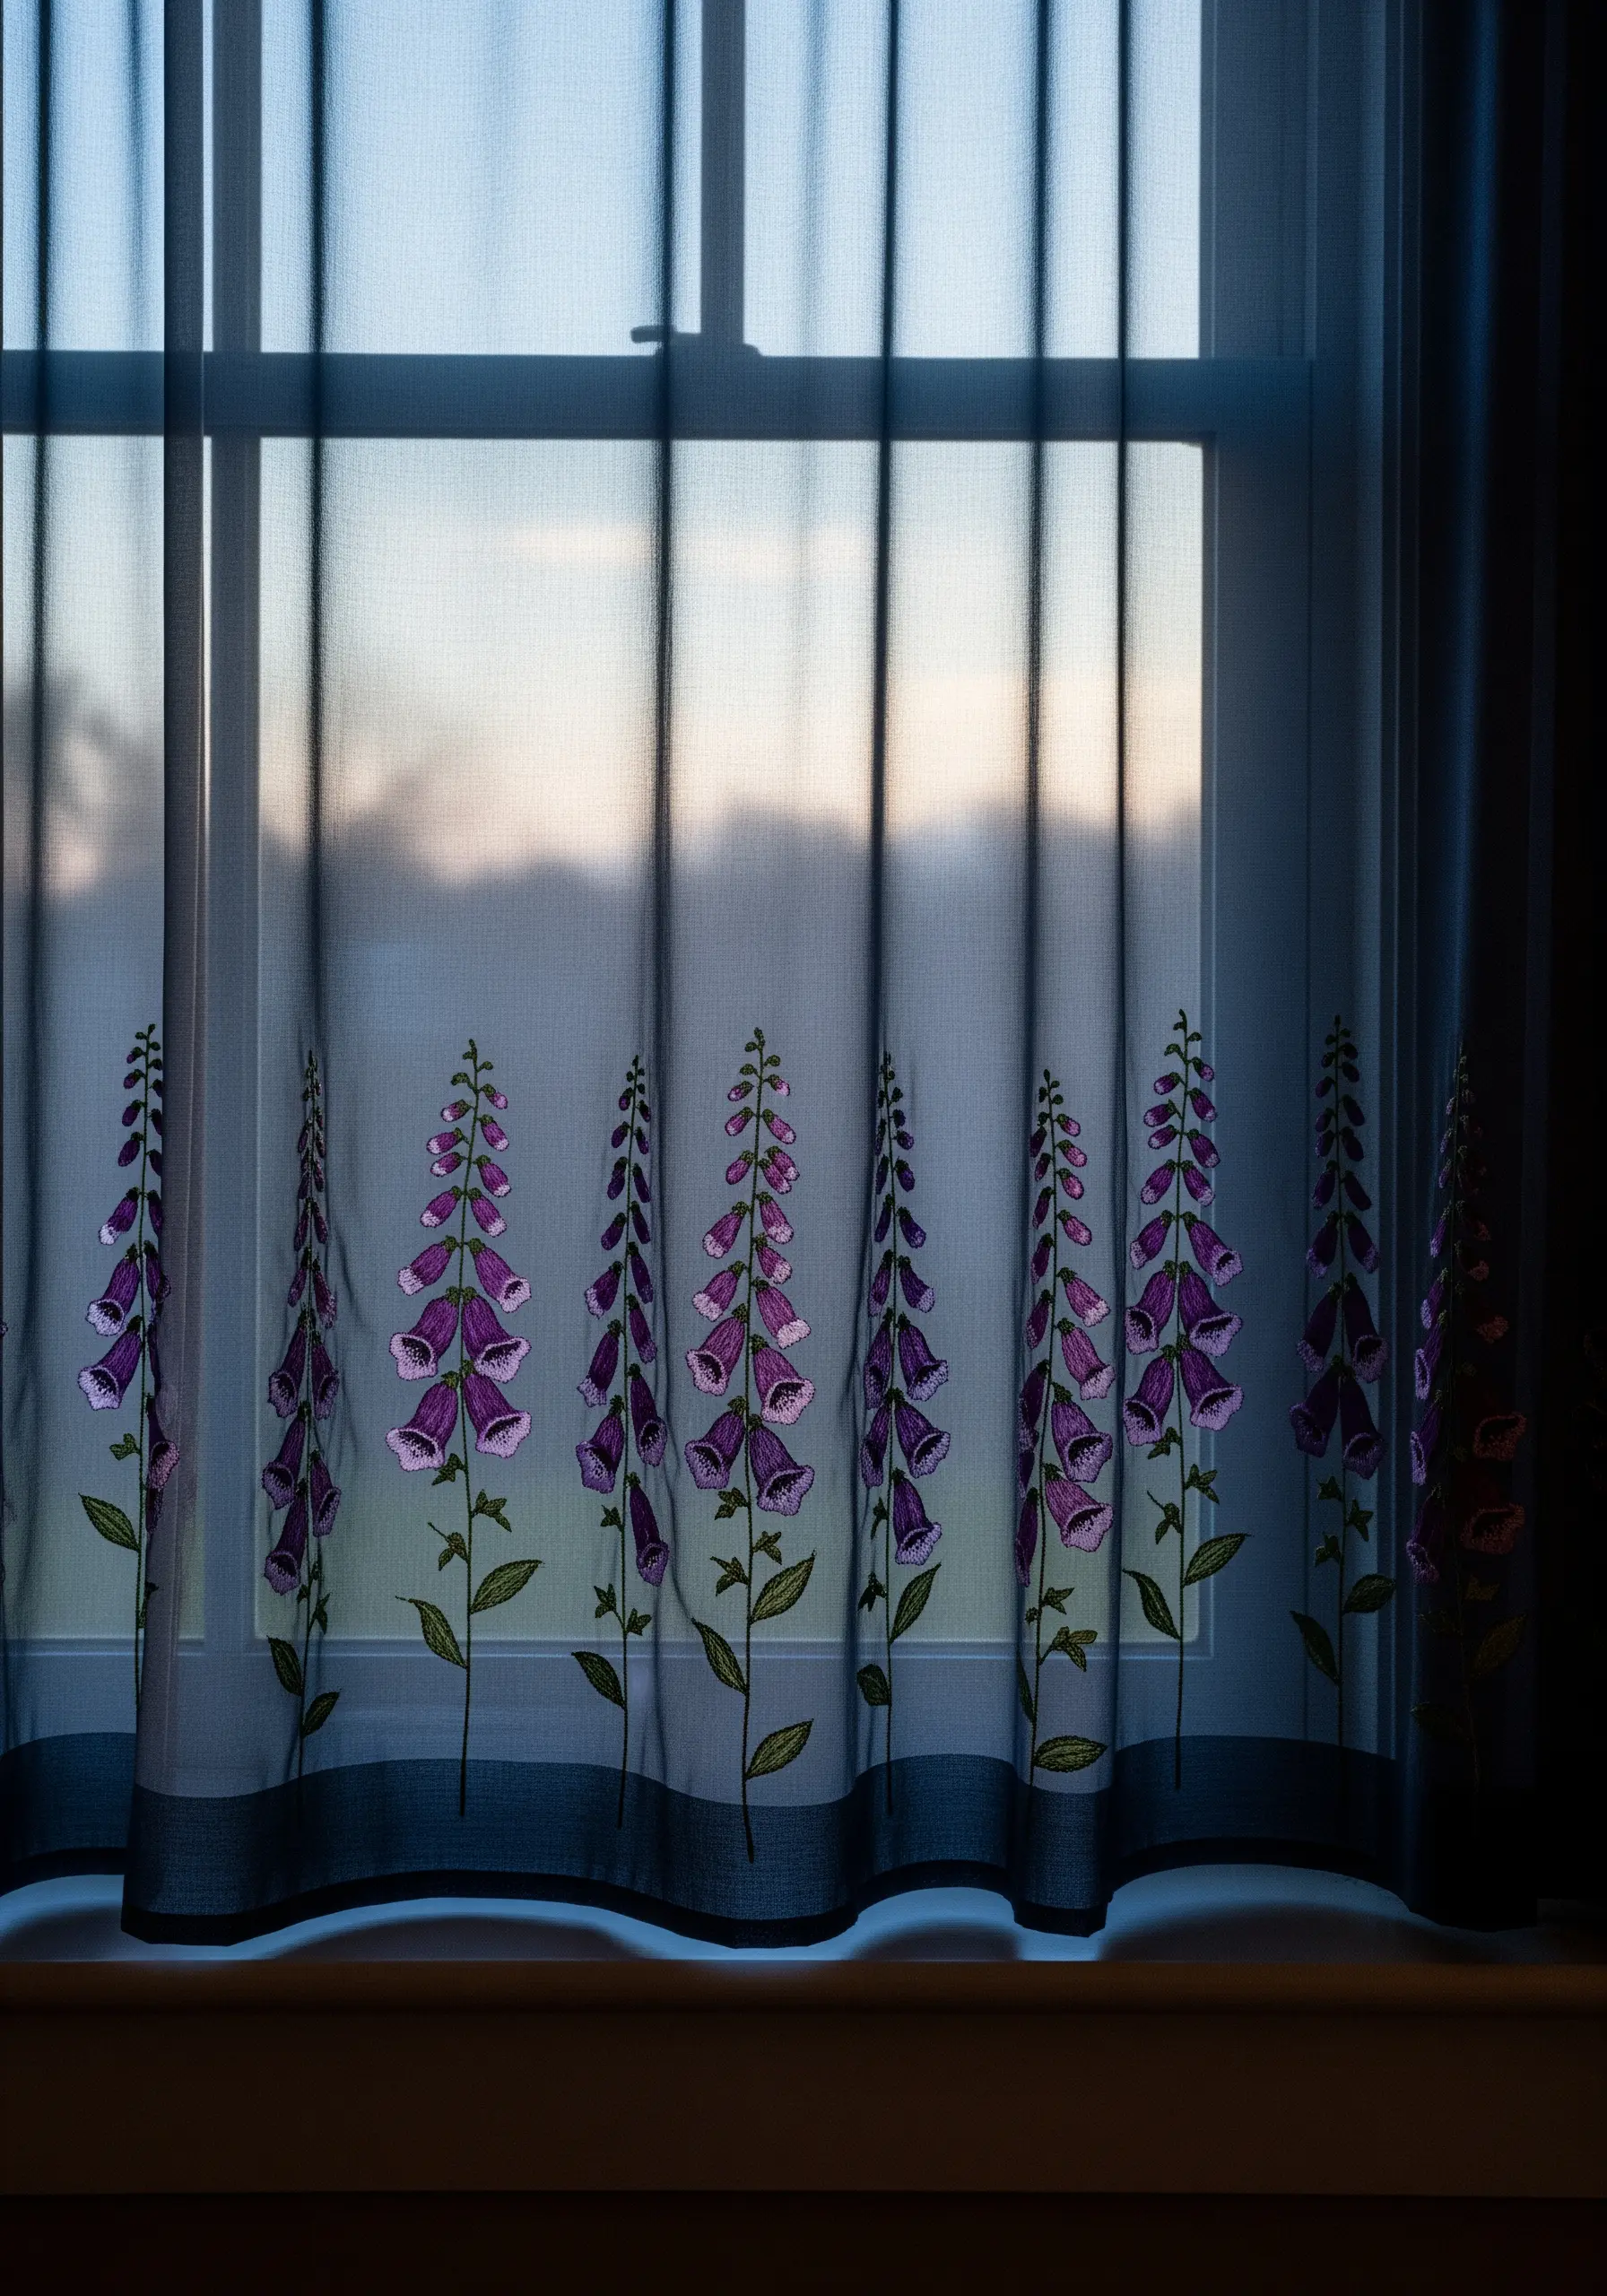
When embroidering on sheer or semi-sheer fabric, a water-soluble stabilizer is your best friend. It provides the support you need and rinses away completely, leaving no trace.
Choose a lightweight thread to avoid weighing down or puckering the delicate fabric.
Since the back of your work will be visible, focus on keeping your stitches neat and burying your thread tails securely.
This vertical design draws the eye upward and adds an elegant, ethereal touch to a window, filtering the light beautifully.
11. Luna Moth in a Satin-Lined Tray
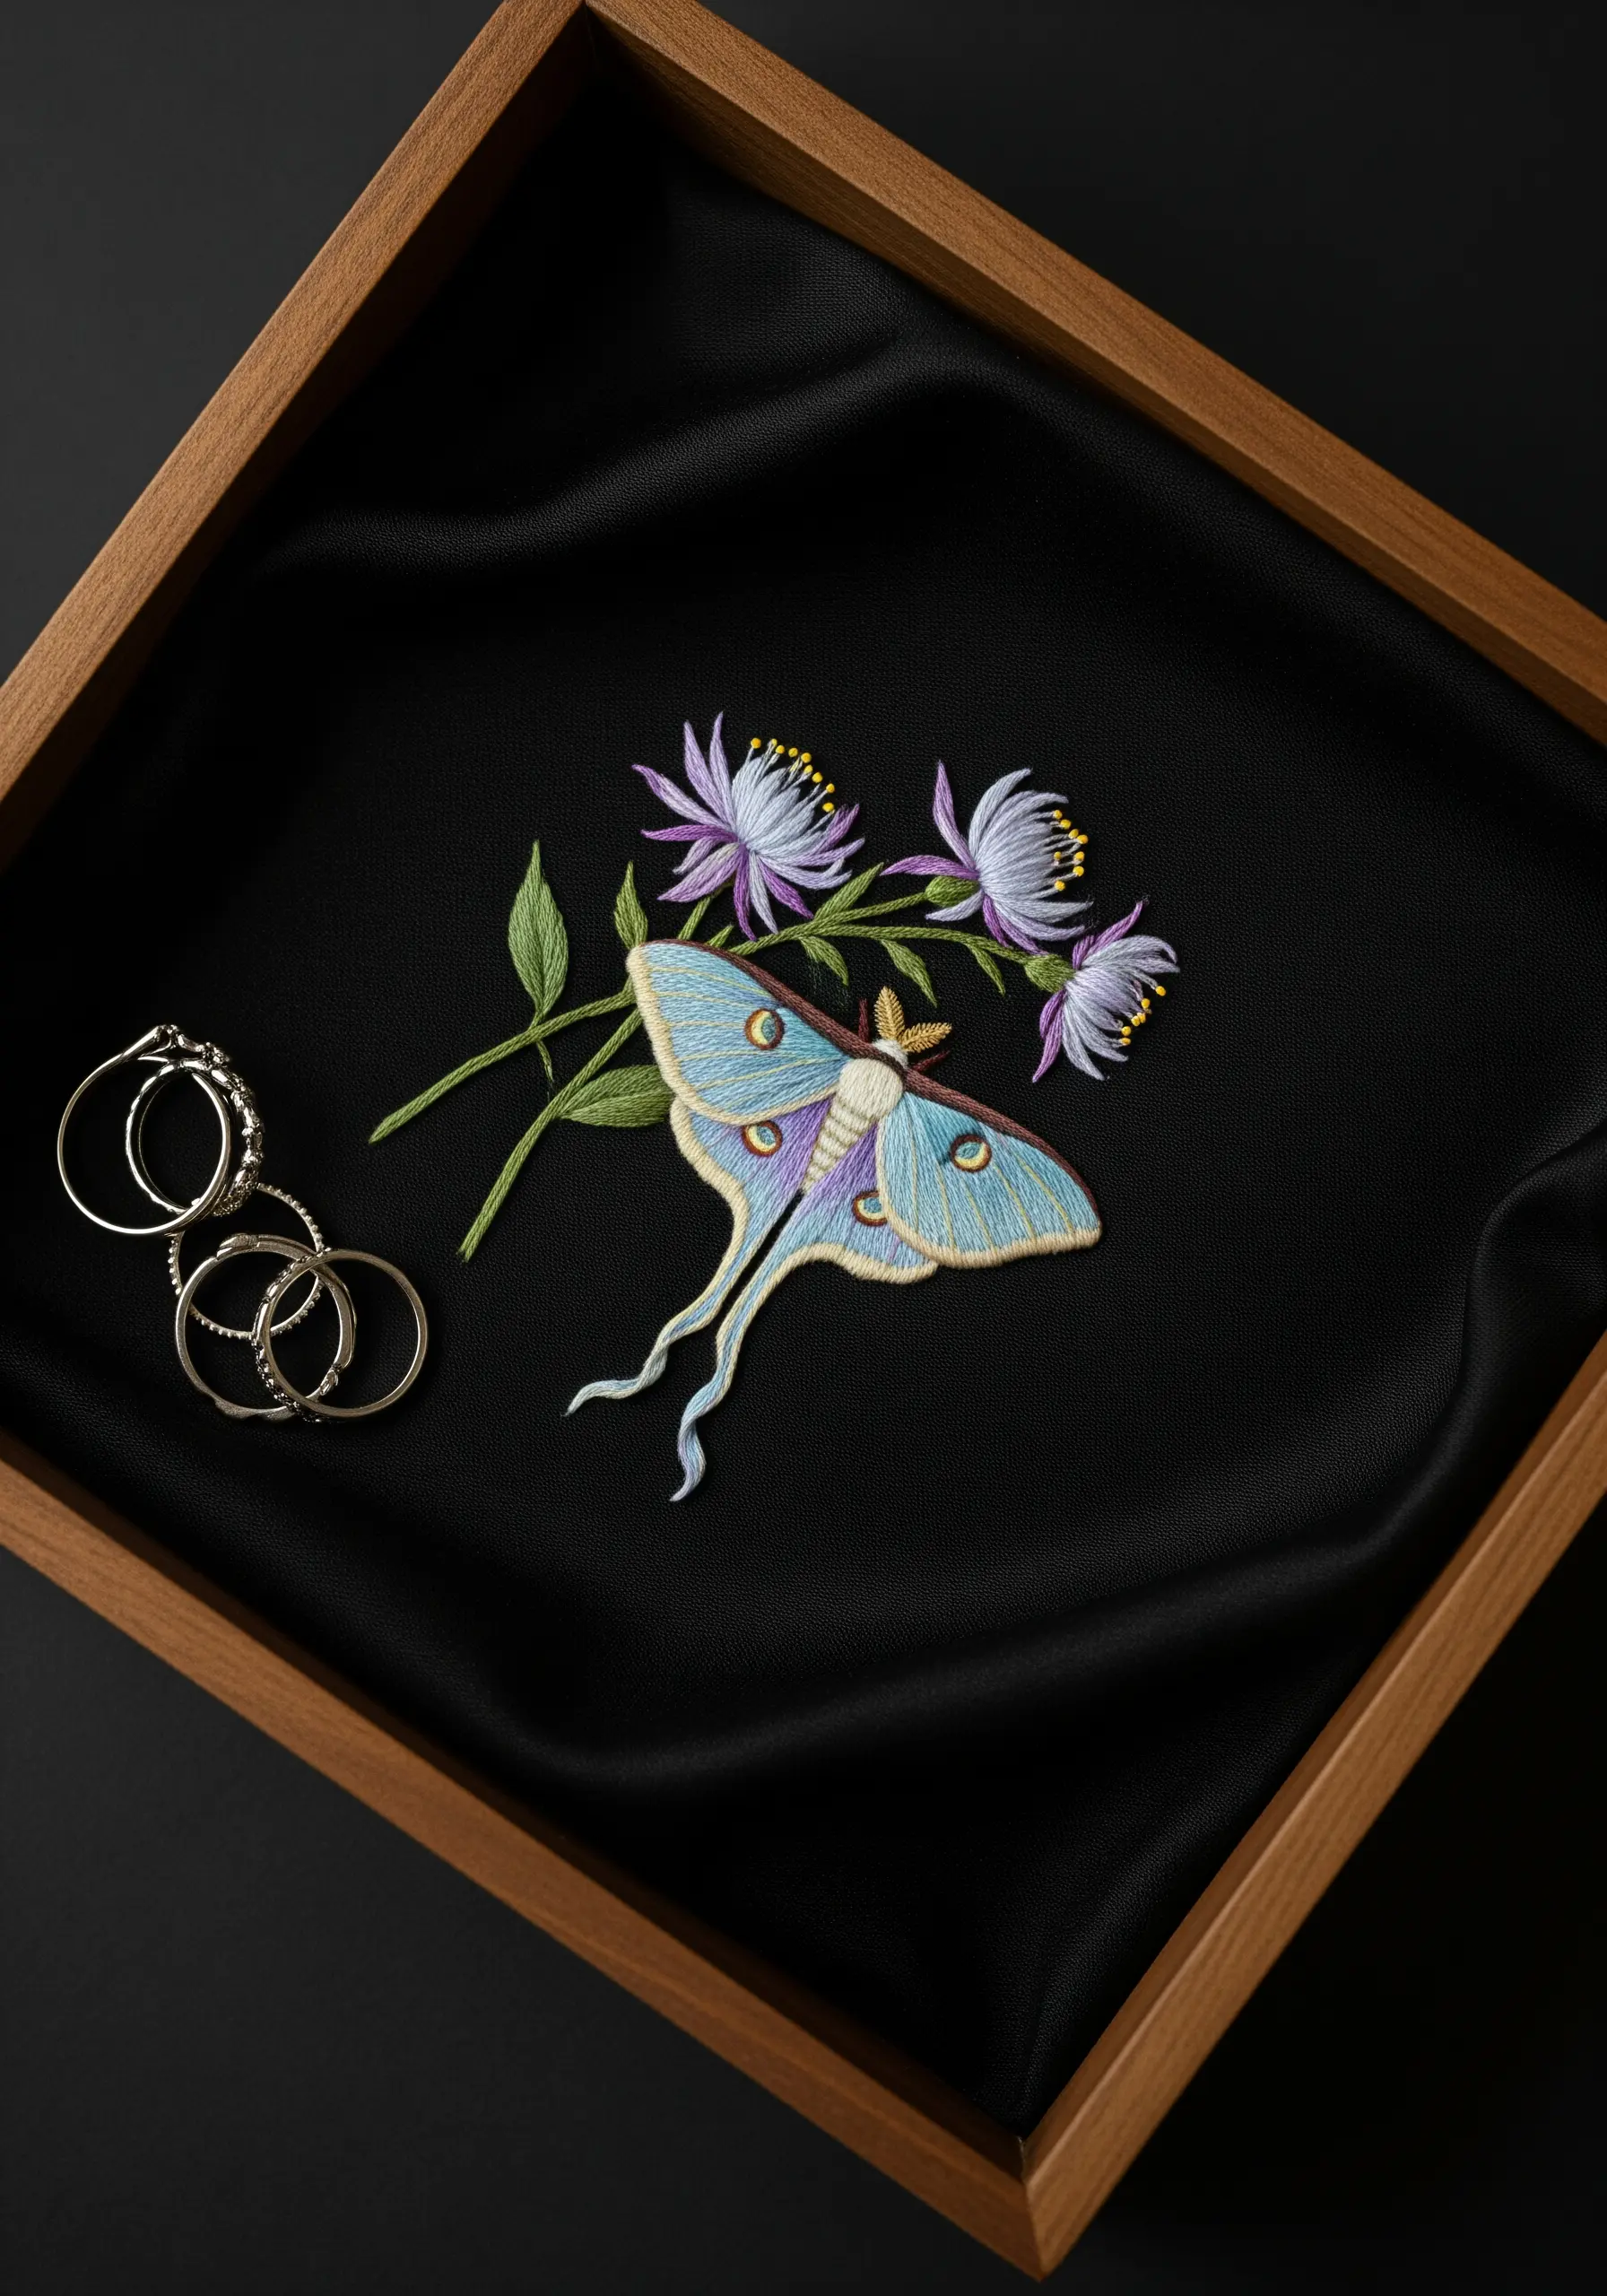
To capture the delicate details of a Luna moth’s wings, work with only one or two strands of embroidery floss.
Use a split stitch for the fine outlines and a smooth satin stitch for the block colors, ensuring your stitches lie flat and even on the satin fabric.
The key to a professional finish on satin is to use a very sharp, fine needle to minimize snags and holes.
This small, focused project makes one of the most handmade embroidery gifts that double as mini art pieces.
12. Midnight Morning Glories on a Skirt Hem
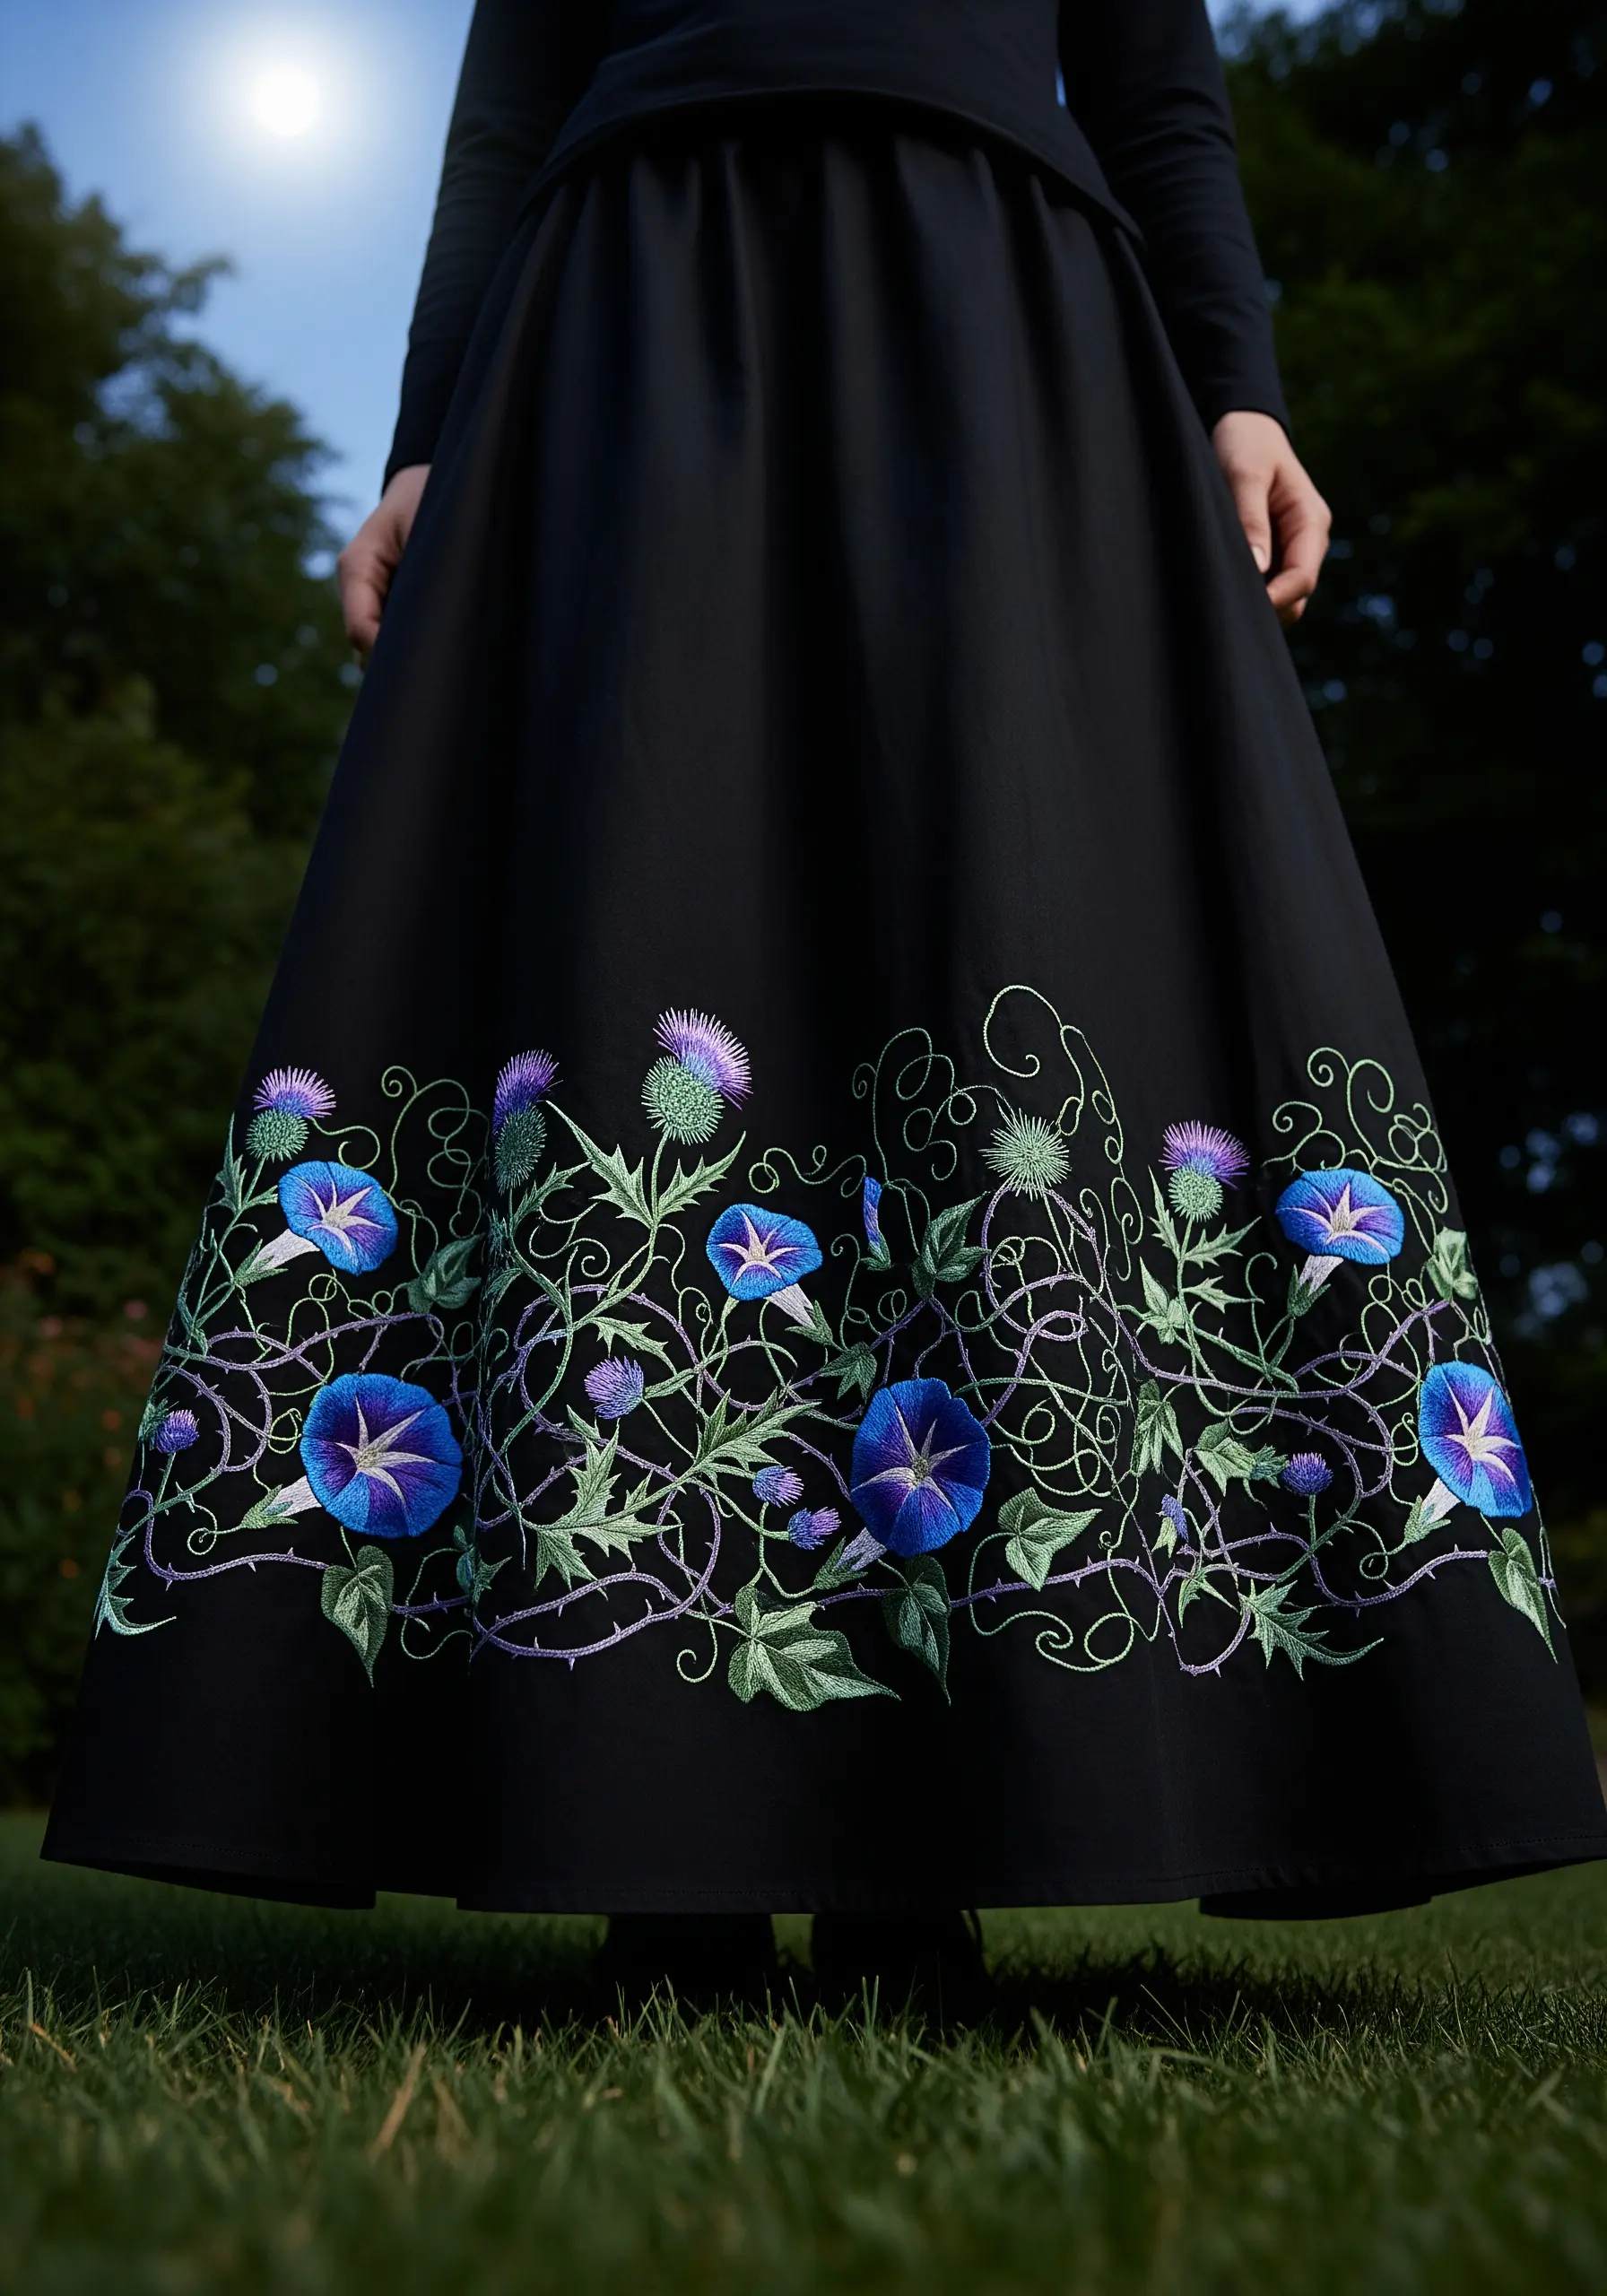
To create a design that flows naturally around a garment’s hem, trace your pattern onto a strip of lightweight, water-soluble stabilizer and pin it in place before stitching.
Mimic the trumpet shape of the morning glory by directing your satin stitches from the outer edge inward toward the center, creating a sense of depth.
Use a thorny, wandering vine stitched in a whipped backstitch to connect the blooms and add a wild, untamed energy to the composition.
13. A Solitary Cyclamen on a Dinner Napkin
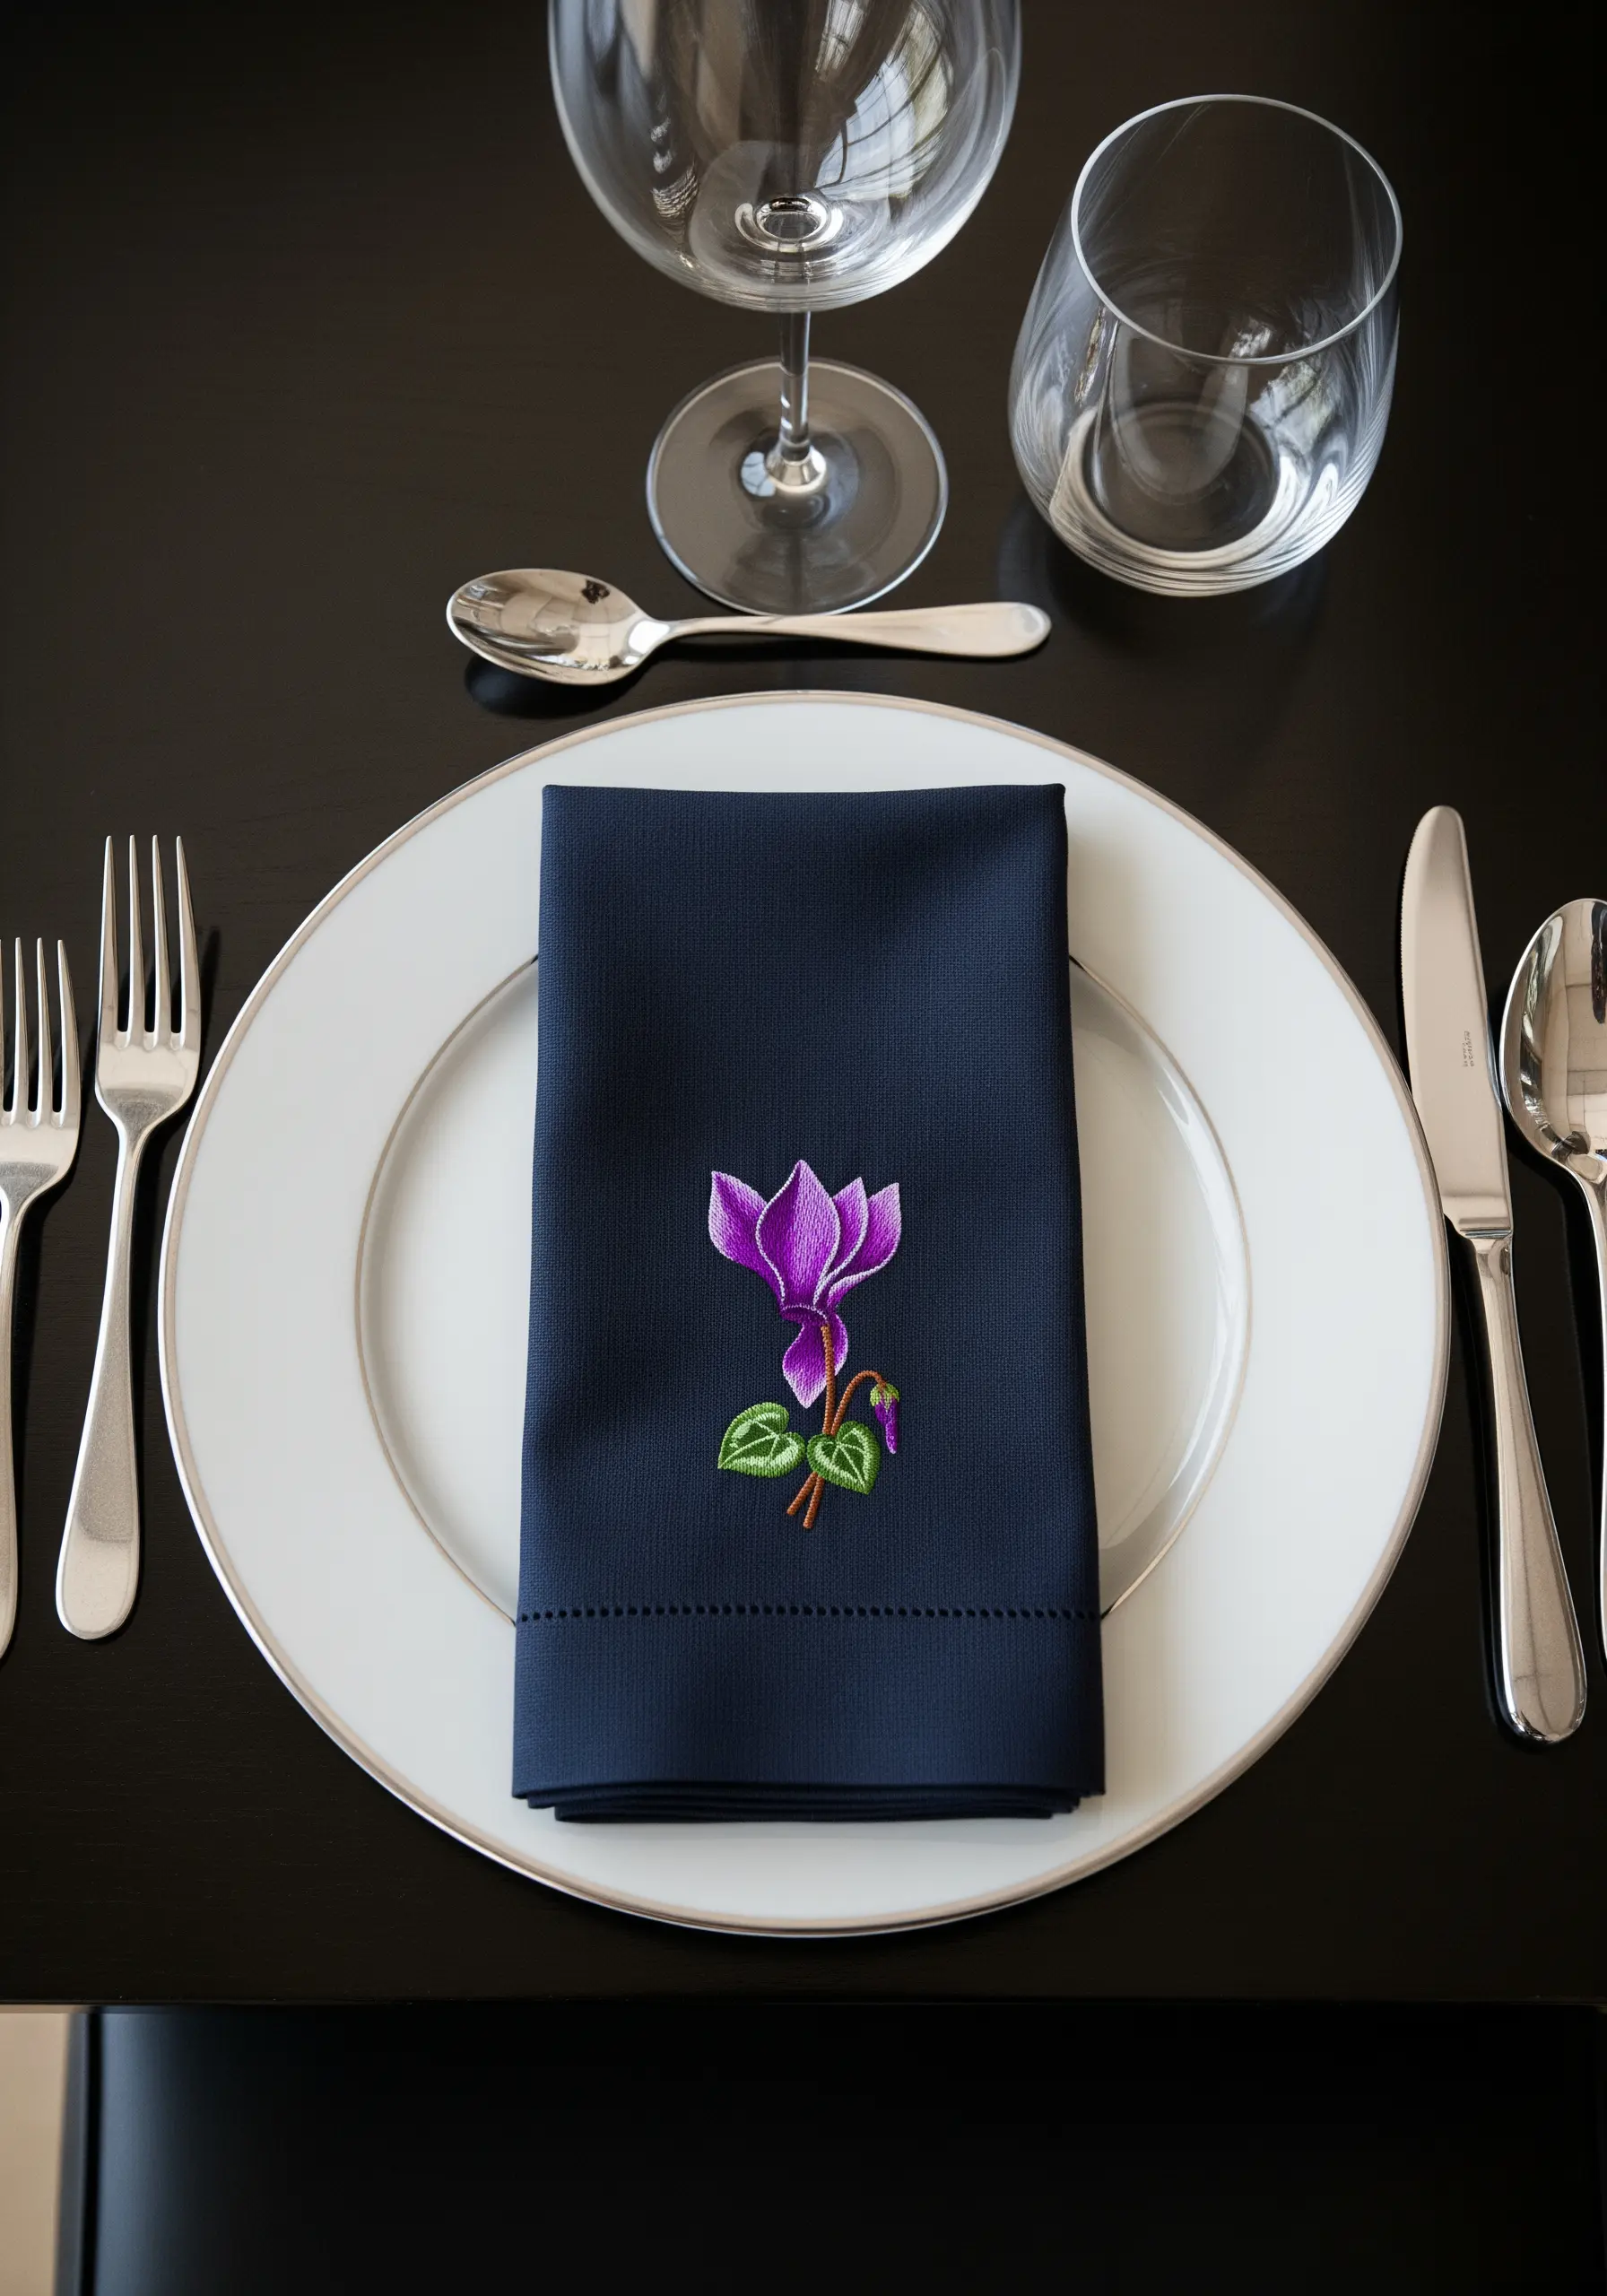
For a touch of minimalist elegance, place a single, exquisitely stitched botanical on a dark linen napkin.
Focus on perfect execution: use a split stitch to create a sharp, clean outline for the petals and leaves.
Fill the petals with a perfectly smooth satin stitch, ensuring each stitch lies flush against the next without overlapping.
The impact of this design comes from its simplicity and flawless technique, making it a perfect example of how minimal embroidery patterns can feel luxurious.
14. Botanical Bookmarks for Quiet Moments

Small projects like bookmarks are an excellent way to practice and perfect specific stitches.
Use vertical satin stitches for lavender stalks to emphasize their height, and try a woven wheel stitch for the thistle to give it a dense, textural center.
Stitch your designs on a sturdy cotton canvas for durability.
To finish them professionally, back the embroidered pieces with a layer of felt or stiff cardstock, trimming the edges neatly.
These are charming and cozy embroidery projects to gift to any book lover.
15. Geometric Dahlia on a Velvet Journal
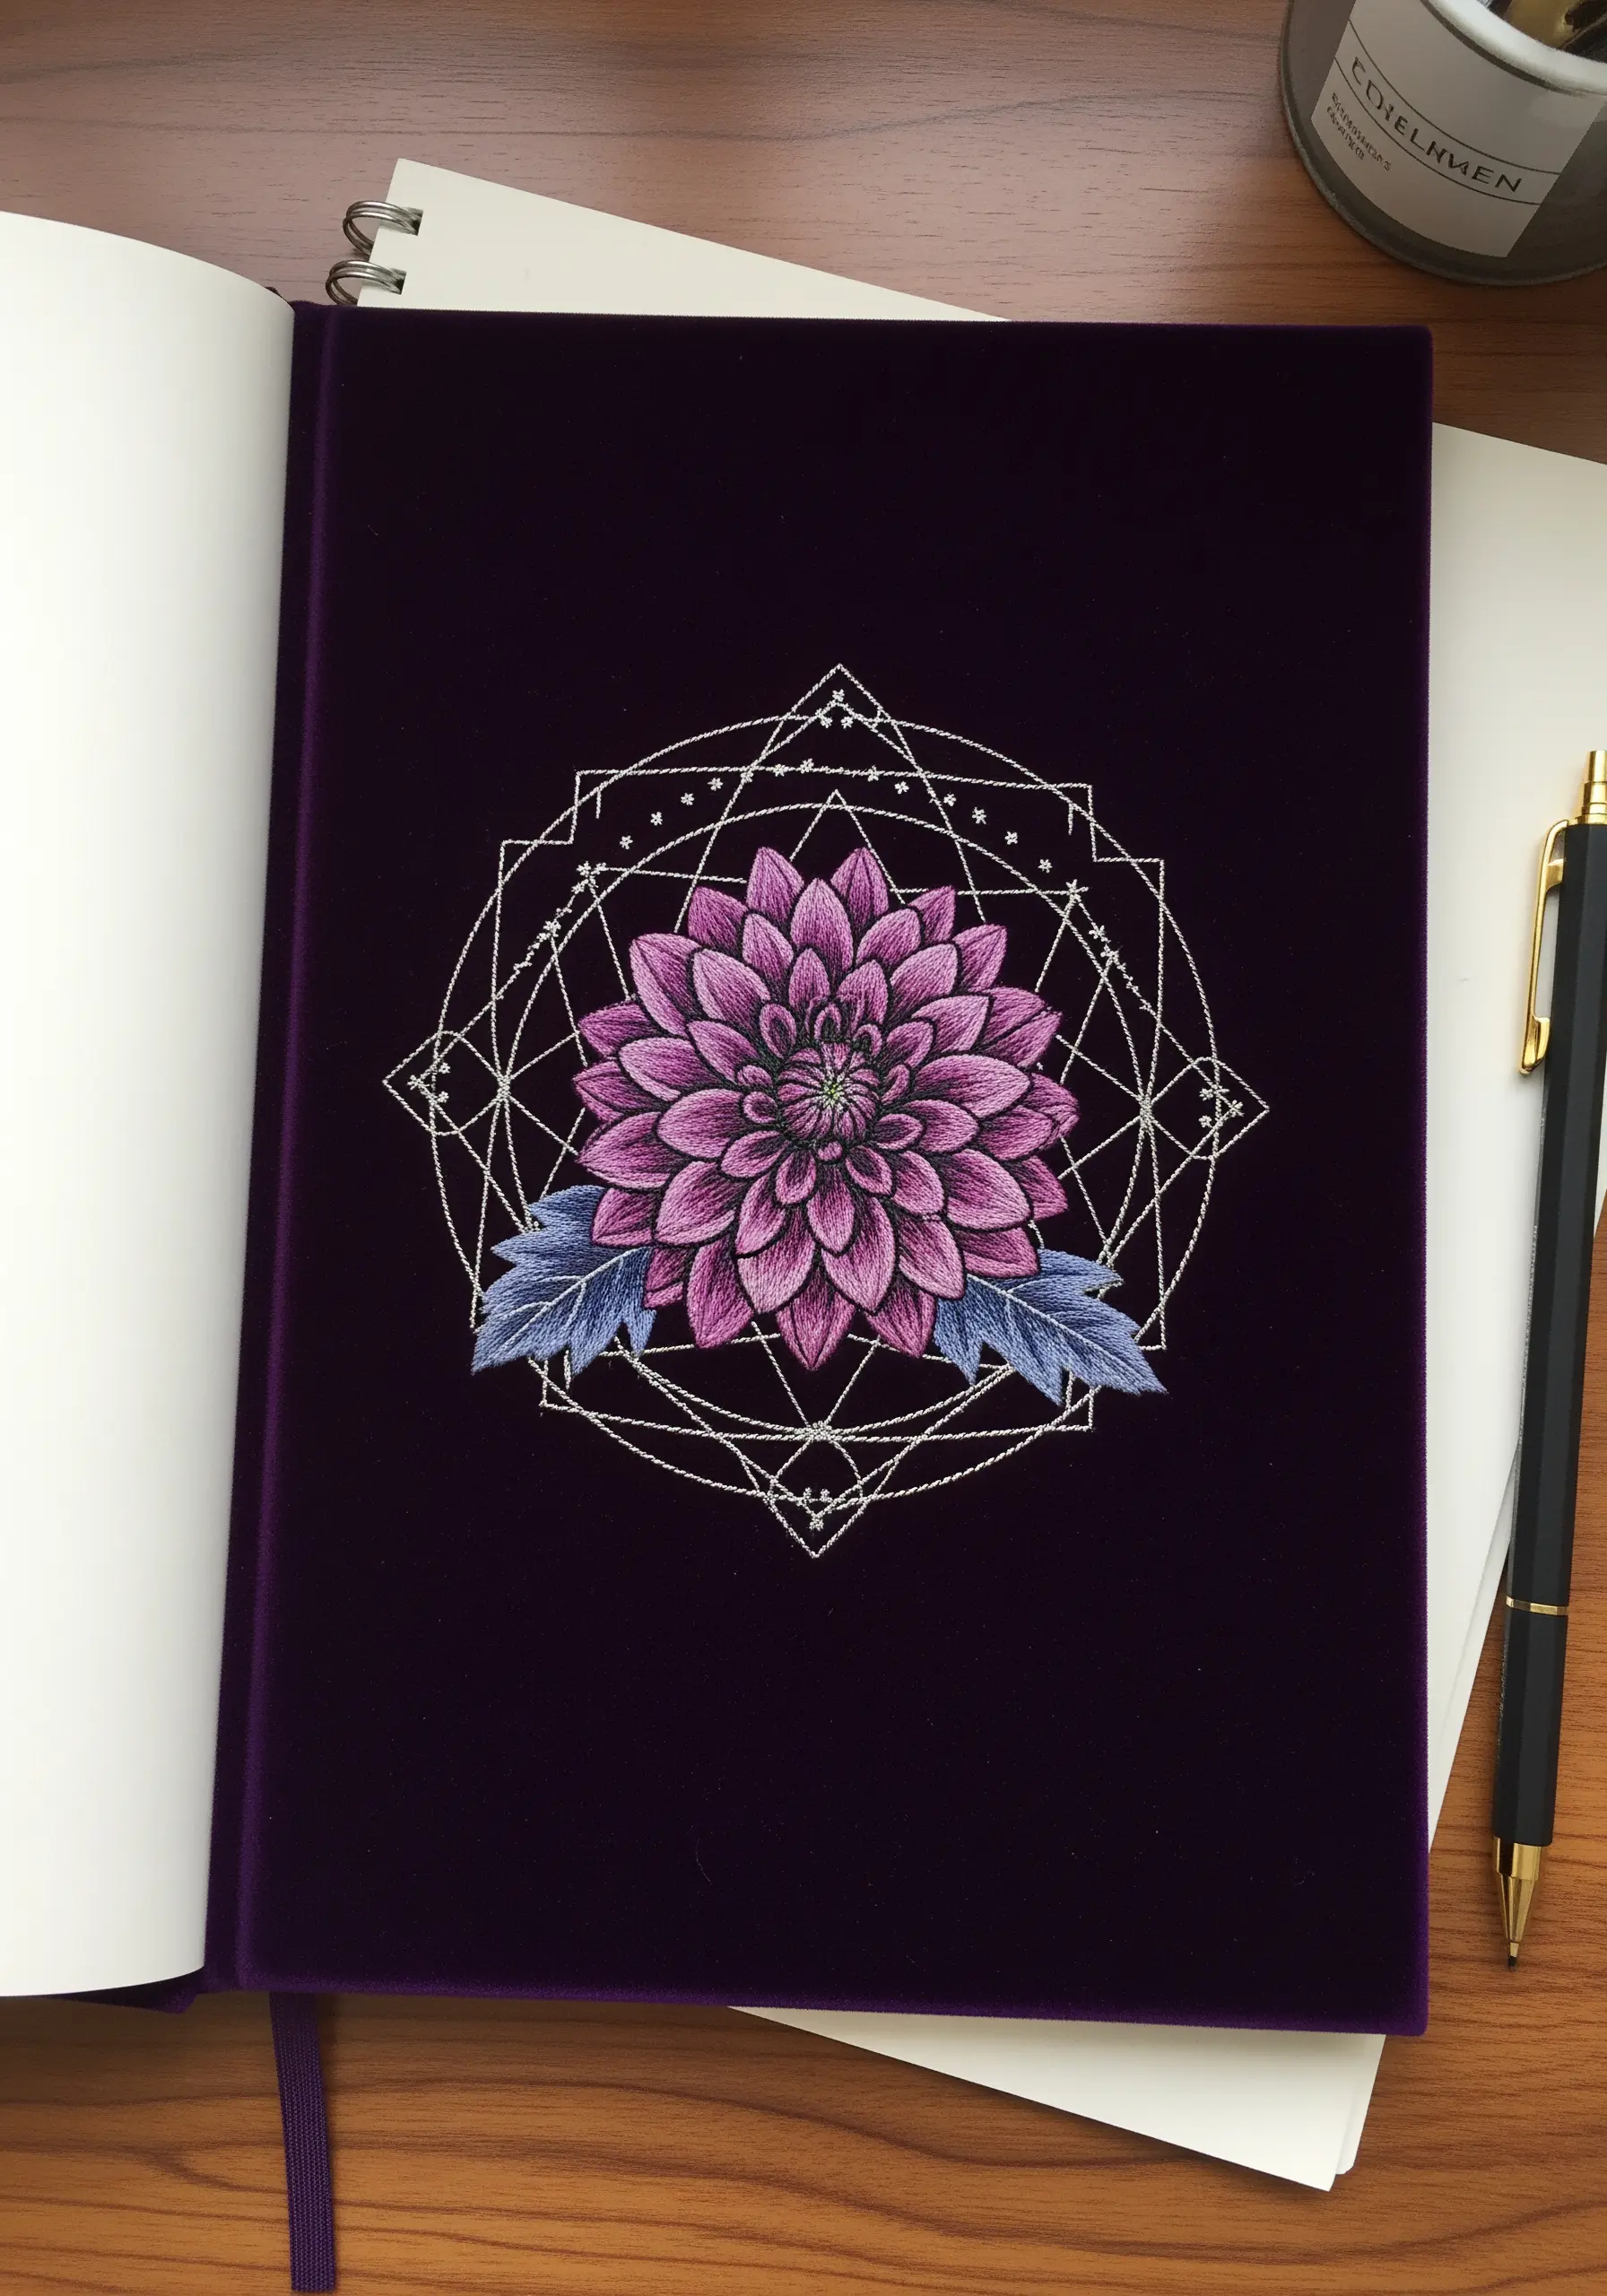
Create a striking contrast by pairing a soft, intricate floral with sharp, geometric lines.
Stitch the geometric framework first using a single strand of silver or white thread in a simple backstitch to keep the lines crisp and delicate.
For the dahlia, use a long-and-short stitch with a rich gradient of pinks and purples to make it the undeniable focal point.
When embroidering on a pre-made journal, use a strong, sharp needle and a thimble to help you push through the thick cover material.
16. A Triptych of Starry Lavender Fields
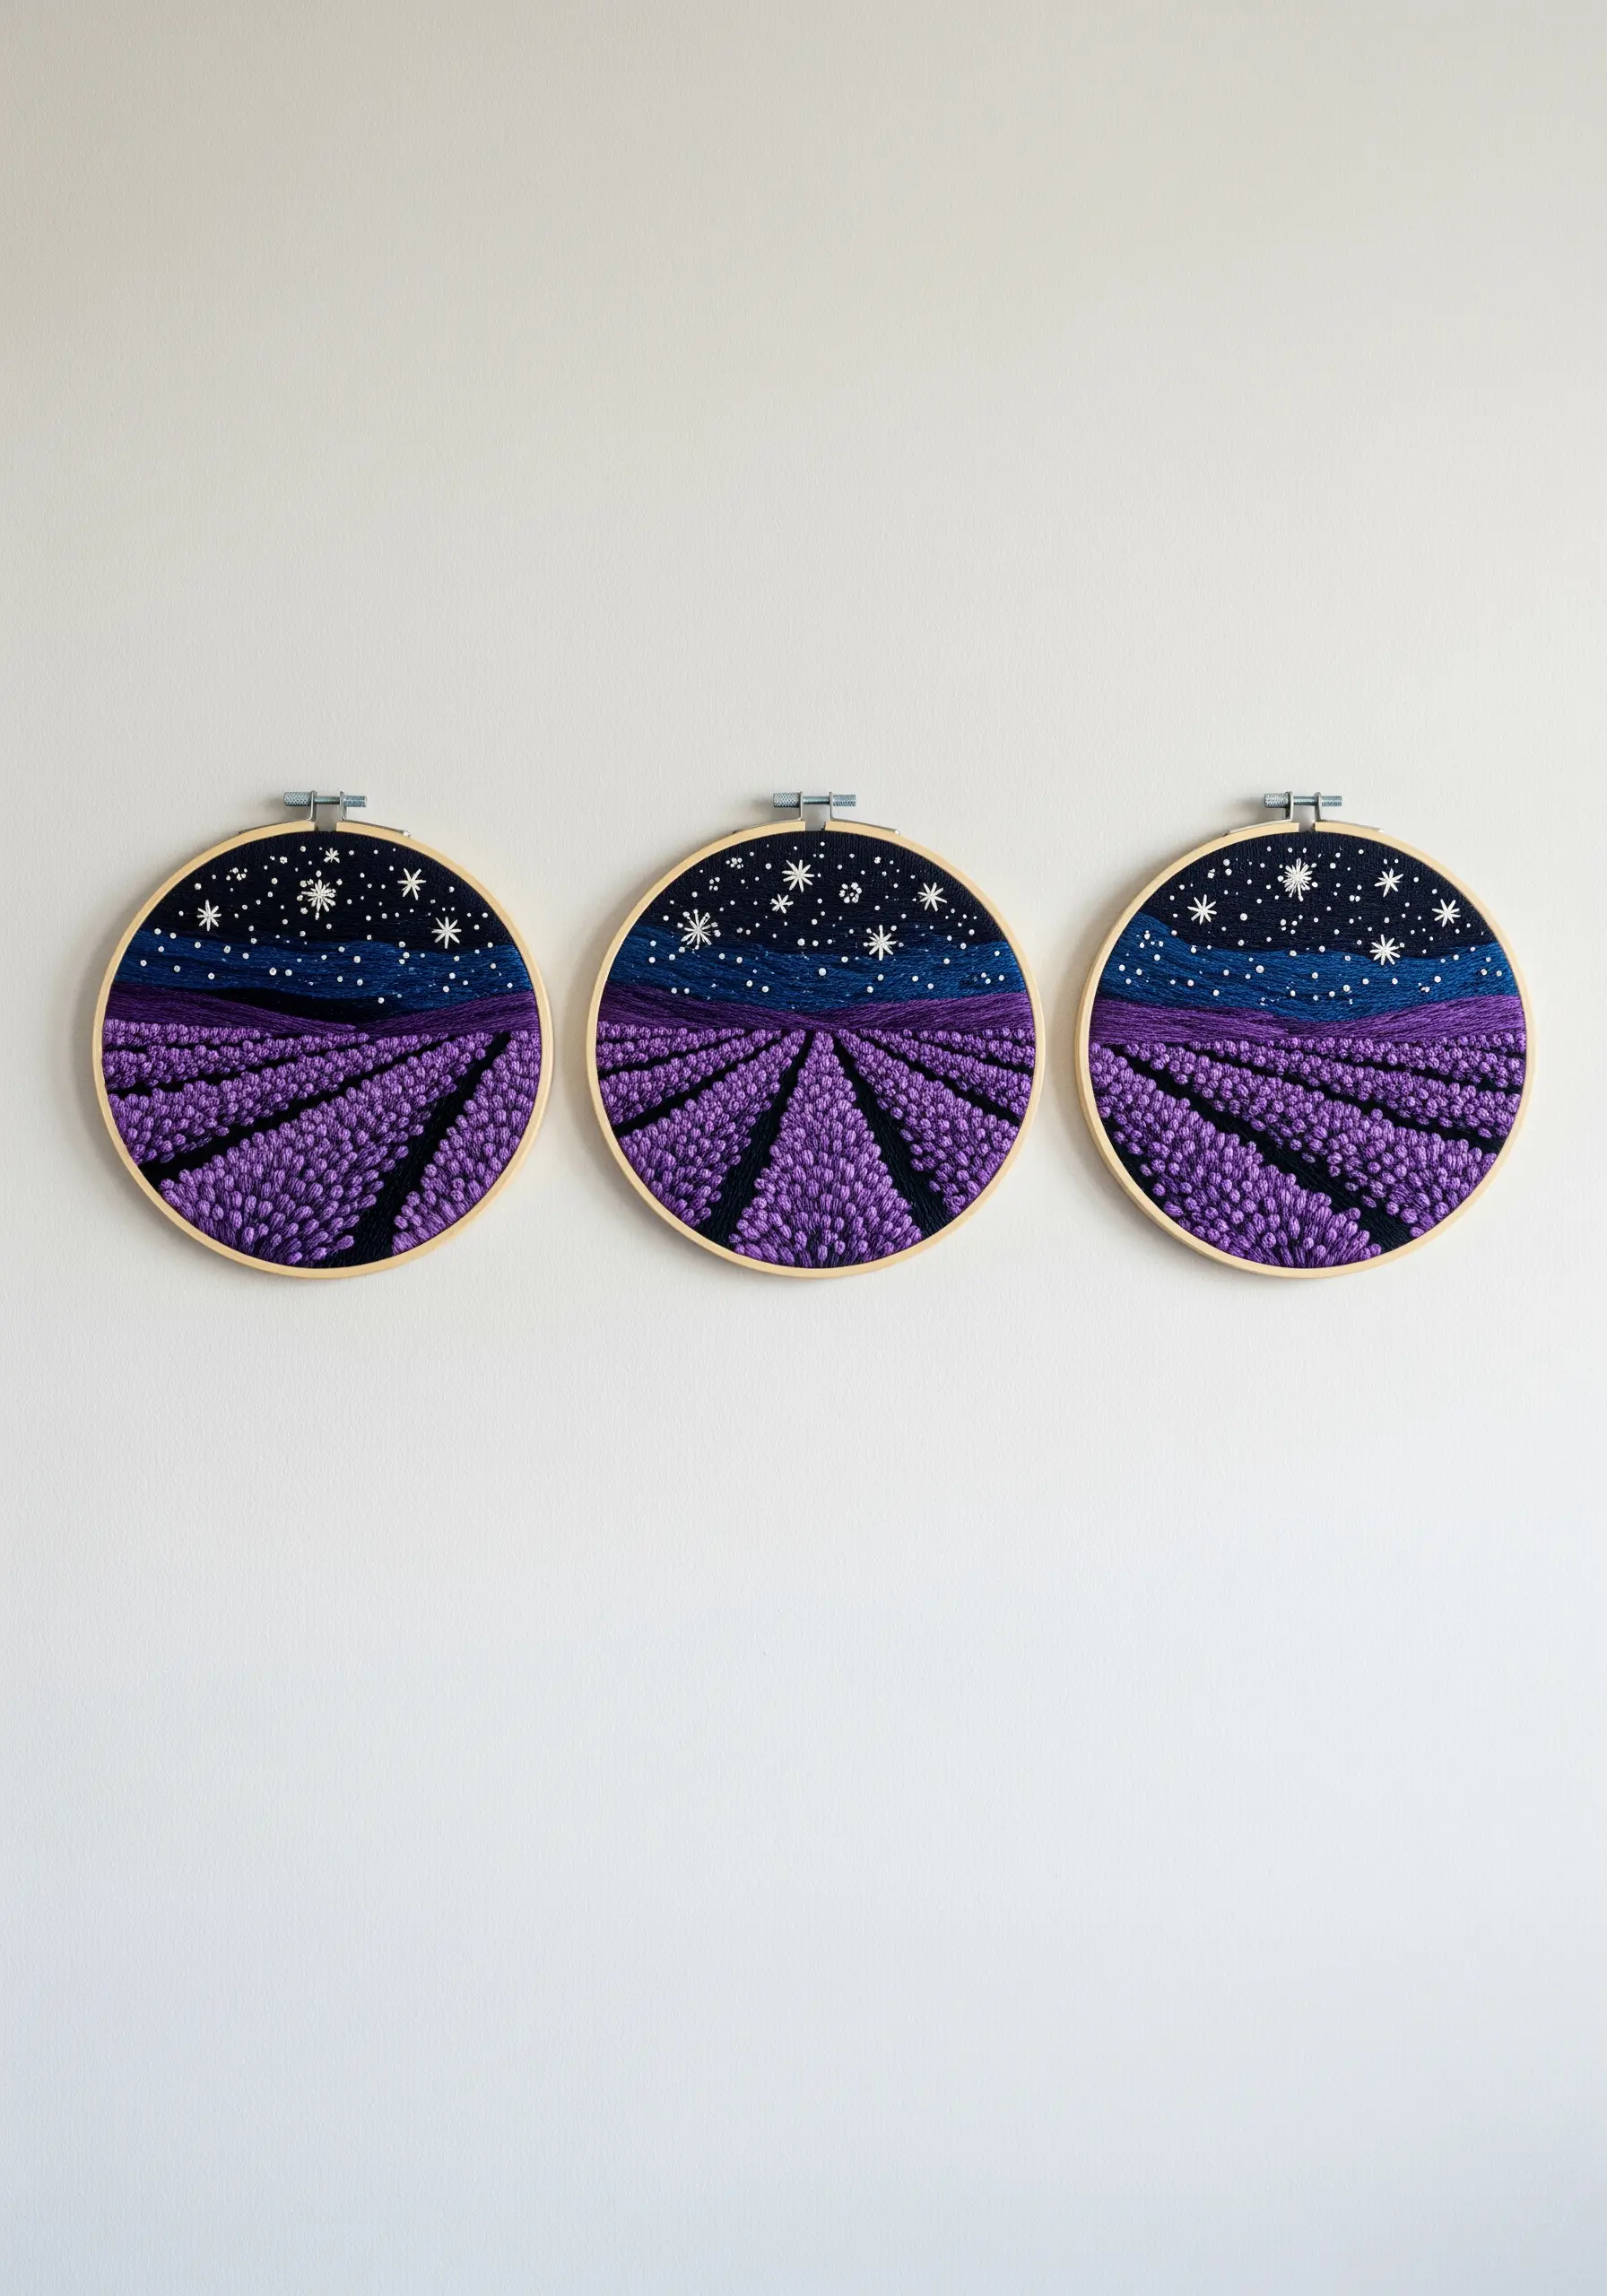
Create a panoramic scene by splitting your design across three separate hoops.
To build the lavender fields, use dense rows of French knots or short vertical satin stitches, transitioning from a darker purple in the foreground to a lighter lilac in the distance to create perspective.
For the night sky, scatter French knots and star stitches of varying sizes using a bright white thread to mimic a star-filled expanse.
This method turns a simple landscape into an immersive piece of romantic embroidery wall hangings.
17. Symmetrical Blooms on a Statement Collar
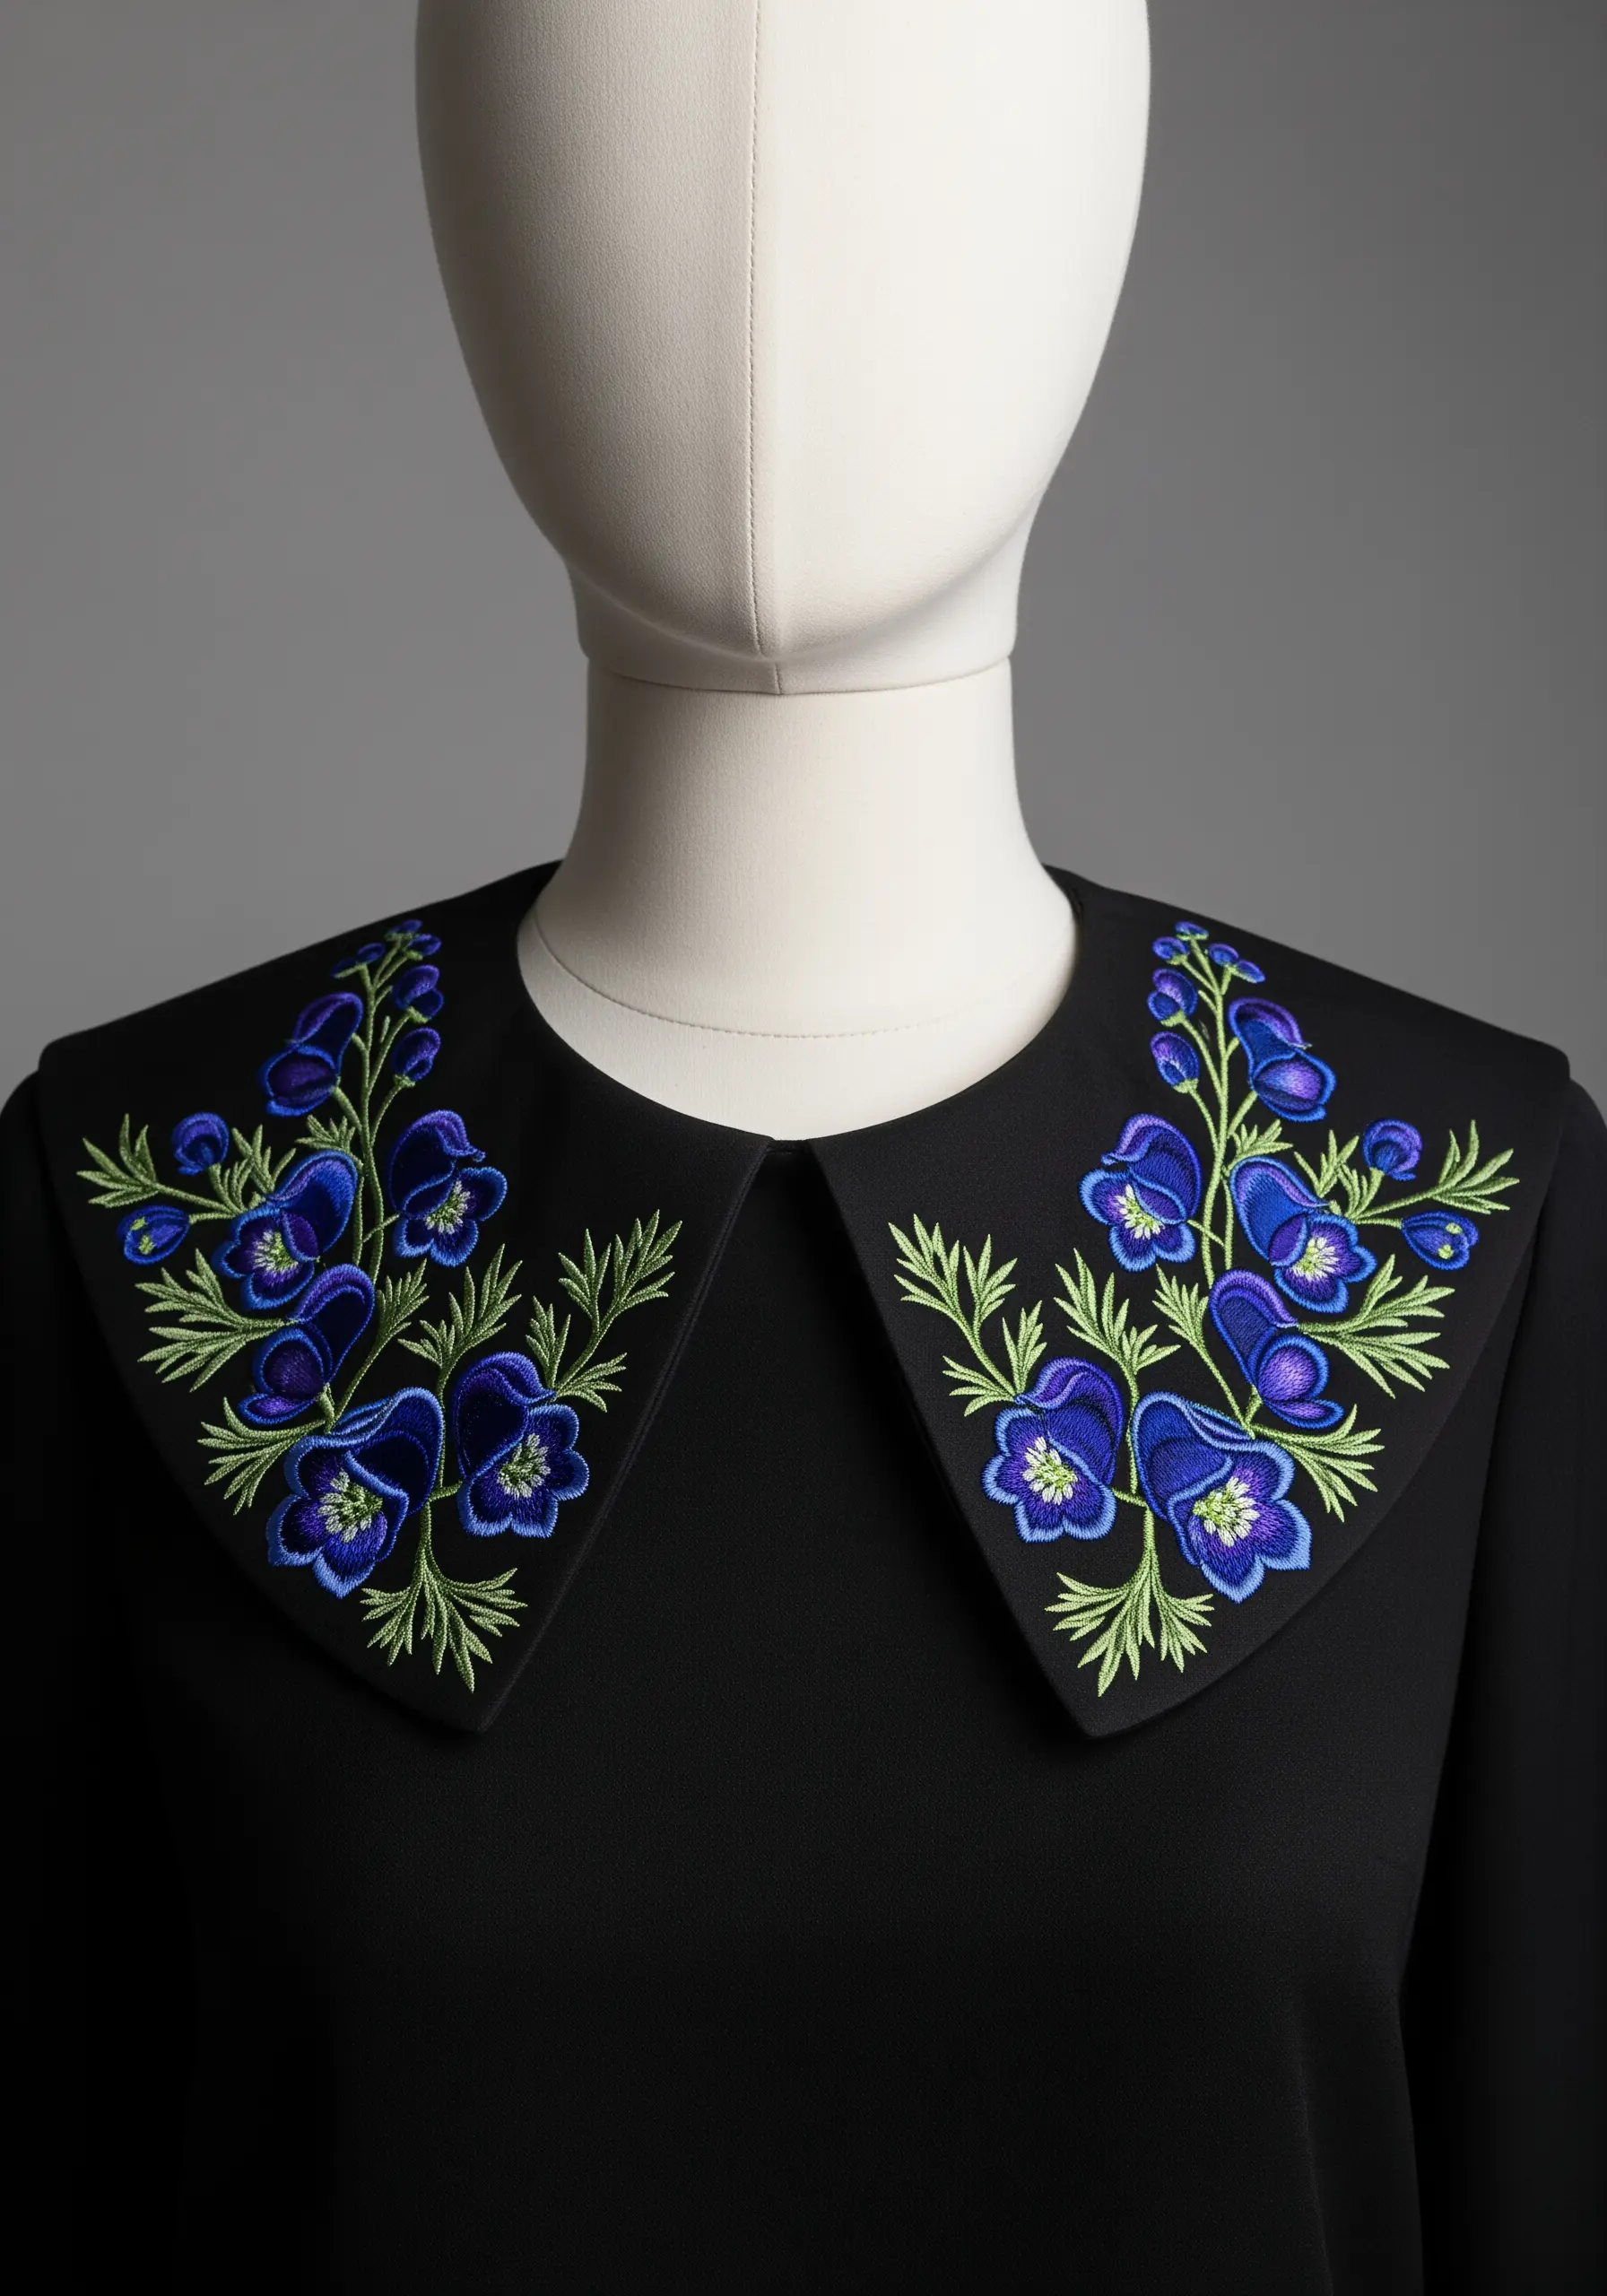
For apparel embroidery, especially on a prominent feature like a collar, precision is key.
Perfectly mirror your design by transferring it to both sides with a fine-tipped, air-erasable marker.
Use a crisp satin stitch with a defining split-stitch outline to ensure the flowers have a clean, graphic quality that stands out against the base fabric.
Always secure your thread ends meticulously on the back to ensure the design withstands wear and washing.
18. A Velvet Pincushion with Hellebores
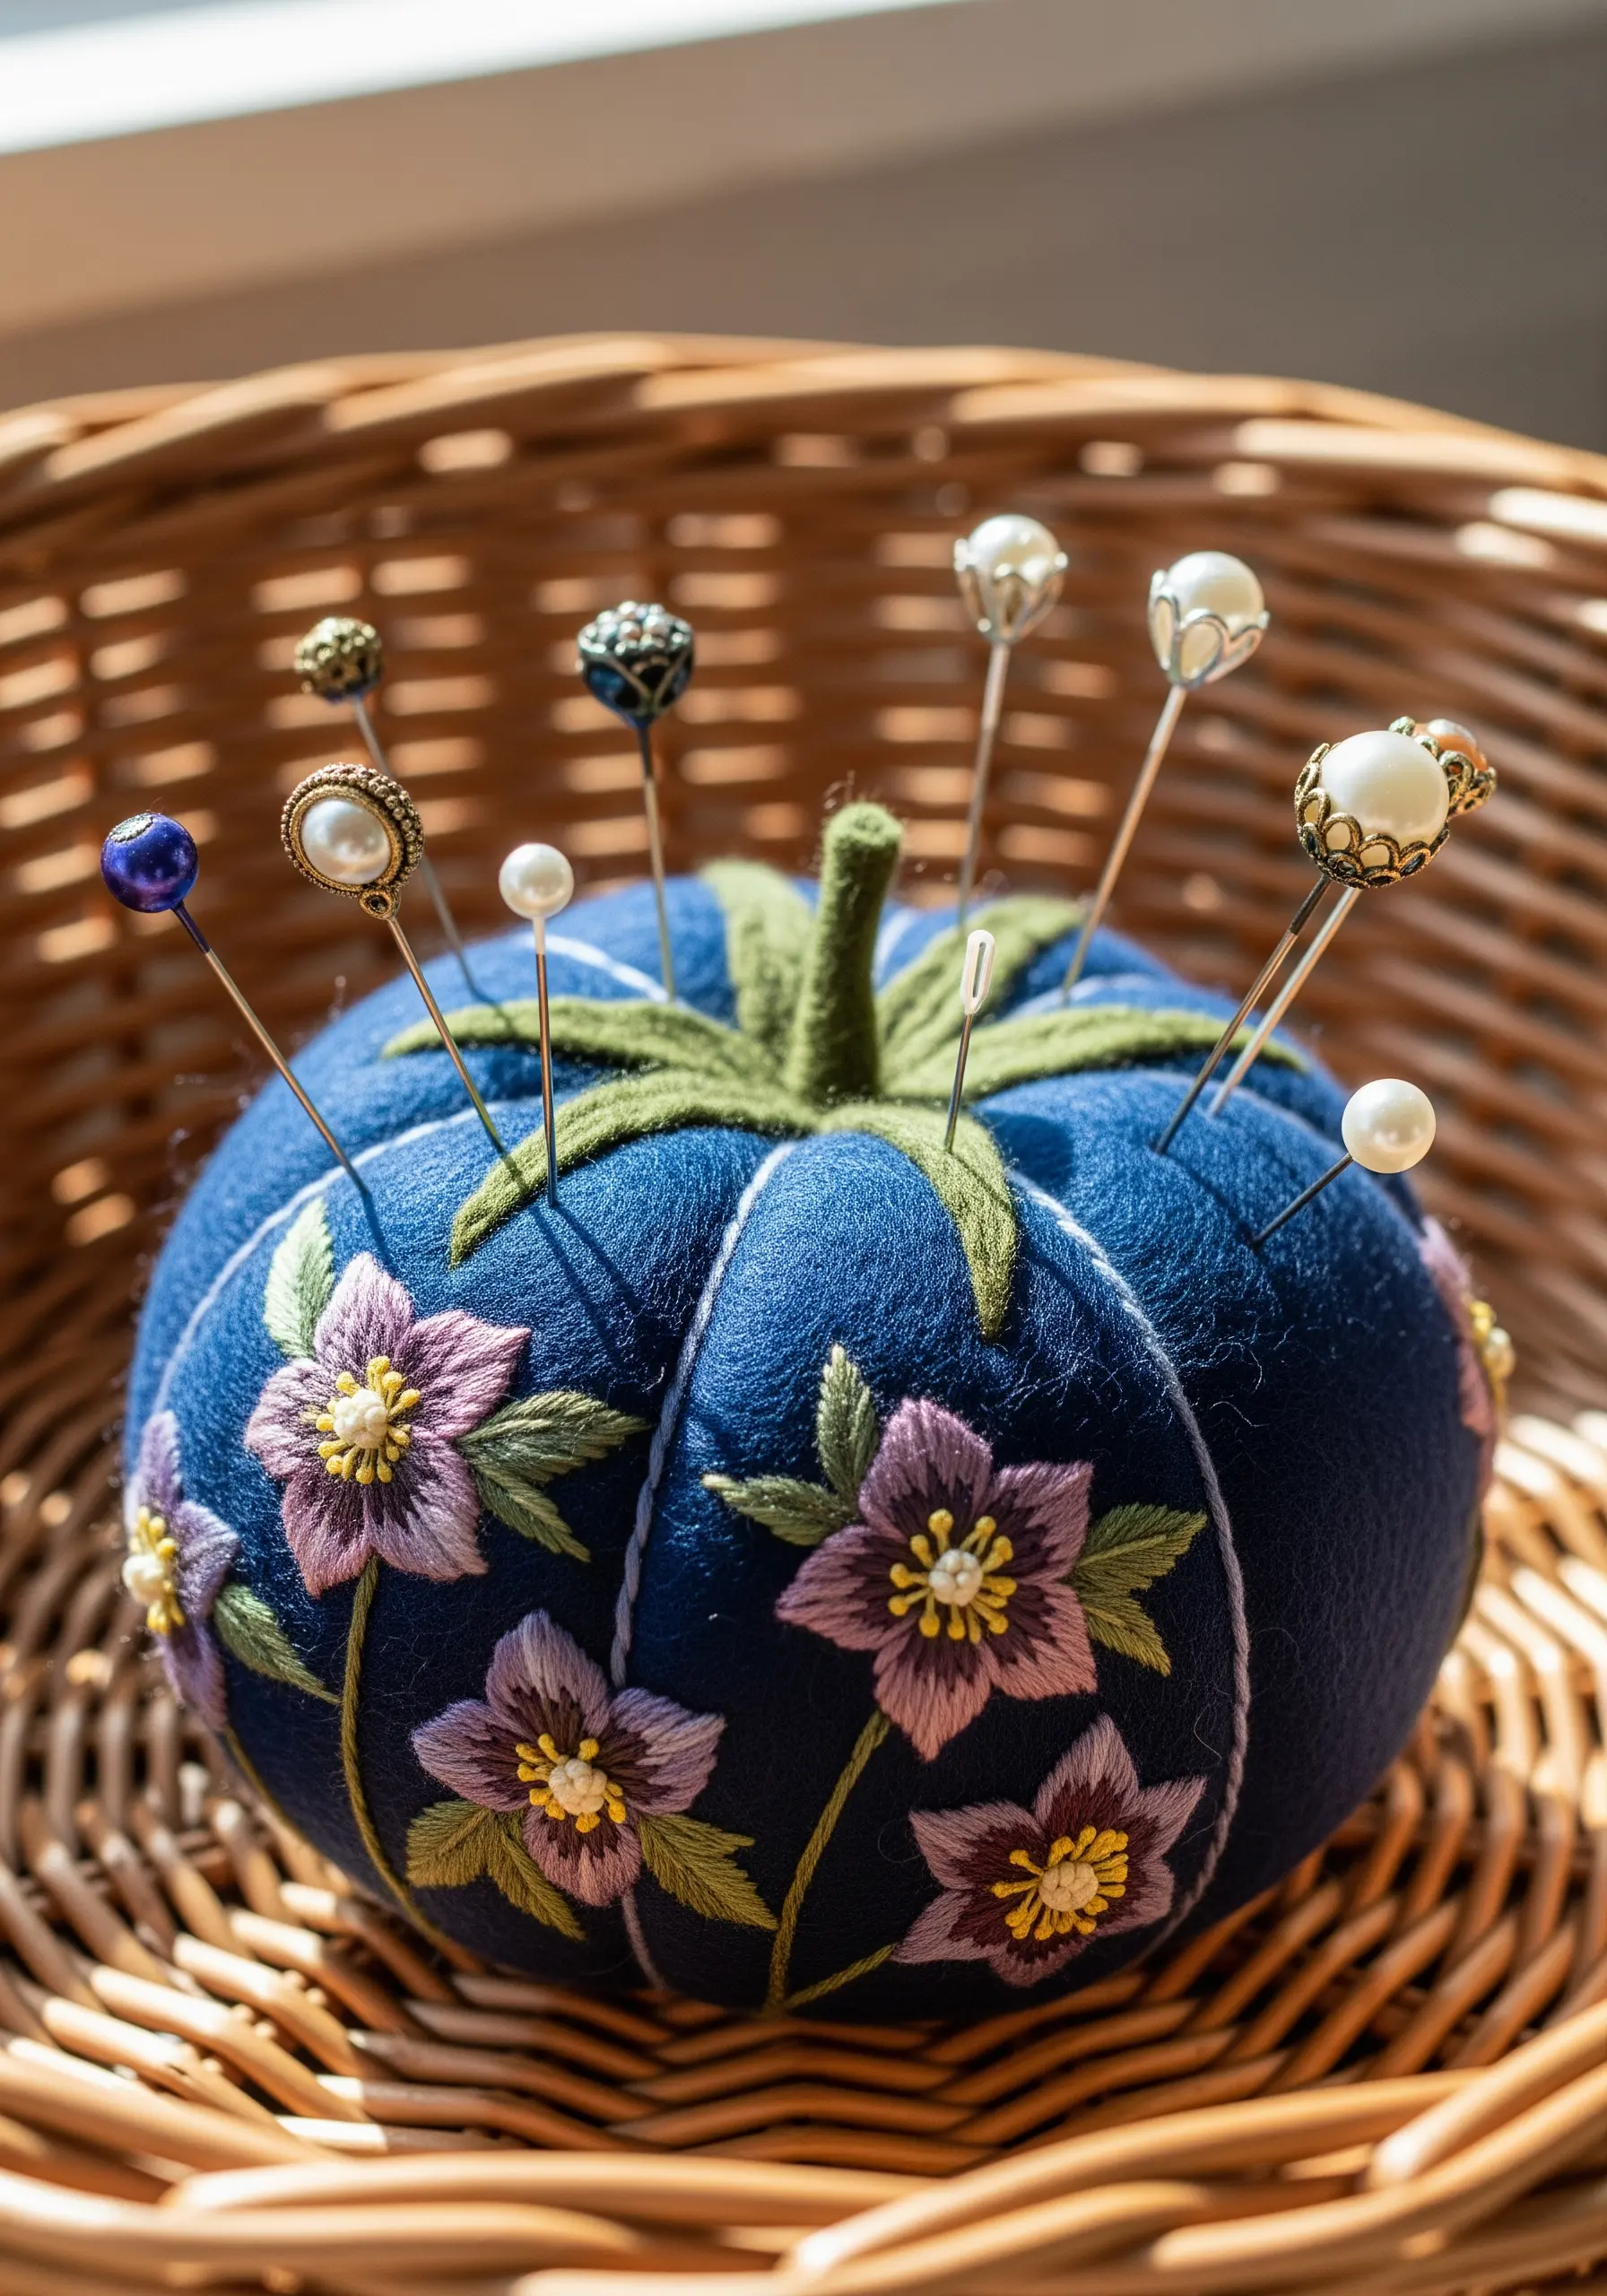
Turn a simple sewing tool into a piece of art by embroidering it with delicate florals.
Use a padded satin stitch for the petals to give them a subtle, raised dimension against the plush velvet.
A cluster of yellow French knots in the center adds a realistic touch and a bright pop of color.
Choose a wool felt or tightly woven cotton for the pincushion itself, as these fabrics hold their shape well and are ideal for embroidery.
It’s one of those small, simple stitches that turn everyday items into handmade treasures.
19. A Forget-Me-Not Wreath for a Photo Frame

Add a tactile, three-dimensional element to your embroidery by using woven wheel stitches for the flowers.
This stitch creates a raised, rose-like texture that is incredibly touchable and visually interesting.
Alternate the direction of your simple straight-stitch leaves to create a sense of natural, organic movement within the wreath.
Placing this embroidered border around a cherished photograph adds a layer of handmade warmth and personal meaning.
20. Peacock Iris Fan

Combine two dramatic motifs—an iris and peacock feathers—by integrating their color palettes.
Use the same deep blues, purples, and teals in both the flower and the feathers to create a cohesive, harmonious design.
To capture the shimmer of the peacock’s eye, blend a single strand of metallic teal or gold thread with your regular floss.
When stitching on a delicate fan, use a fine, sharp needle and maintain gentle tension to avoid tearing the material.
This project is ideal for those who enjoy creative embroidery projects that transform ordinary fabric into functional art.


