

There’s a moment in every stitching journey where you pause and wonder, “What’s next?” You’ve mastered the stitches, you love the feel of thread and fabric, but you’re seeking a way to make your work feel less like a hobby and more like art. You want your vision to translate into something truly intentional and expressive.
The answer often lies not in learning a hundred new stitches, but in rethinking how you use color and texture. Fabric collage embroidery isn’t just about stitching on fabric; it’s about stitching *with* fabric. It’s about seeing scraps, patterns, and layers as your paint palette, and your needle as the finest of brushes.
Here, you will find ways to build depth, create movement, and tell stories through the thoughtful combination of materials. These aren’t just projects to copy, but principles to absorb, empowering you to create work that feels uniquely and confidently yours. Let’s begin.
1. Layering Fabrics for Underwater Depth

Create a sense of deep water by layering sheer and patterned blue fabrics for your background.
Build up your coral reef using gathered or pleated fabric scraps in vibrant pinks and oranges to create realistic, fan-like textures.
Secure these elements with free-motion machine stitching or a simple running stitch, outlining the shapes to define them against the background.
Add final details like French knots or tiny seed beads to mimic air bubbles and add a subtle sparkle, enhancing the illusion of light filtering through water.
2. Embrace Raw Edges for Organic Abstraction
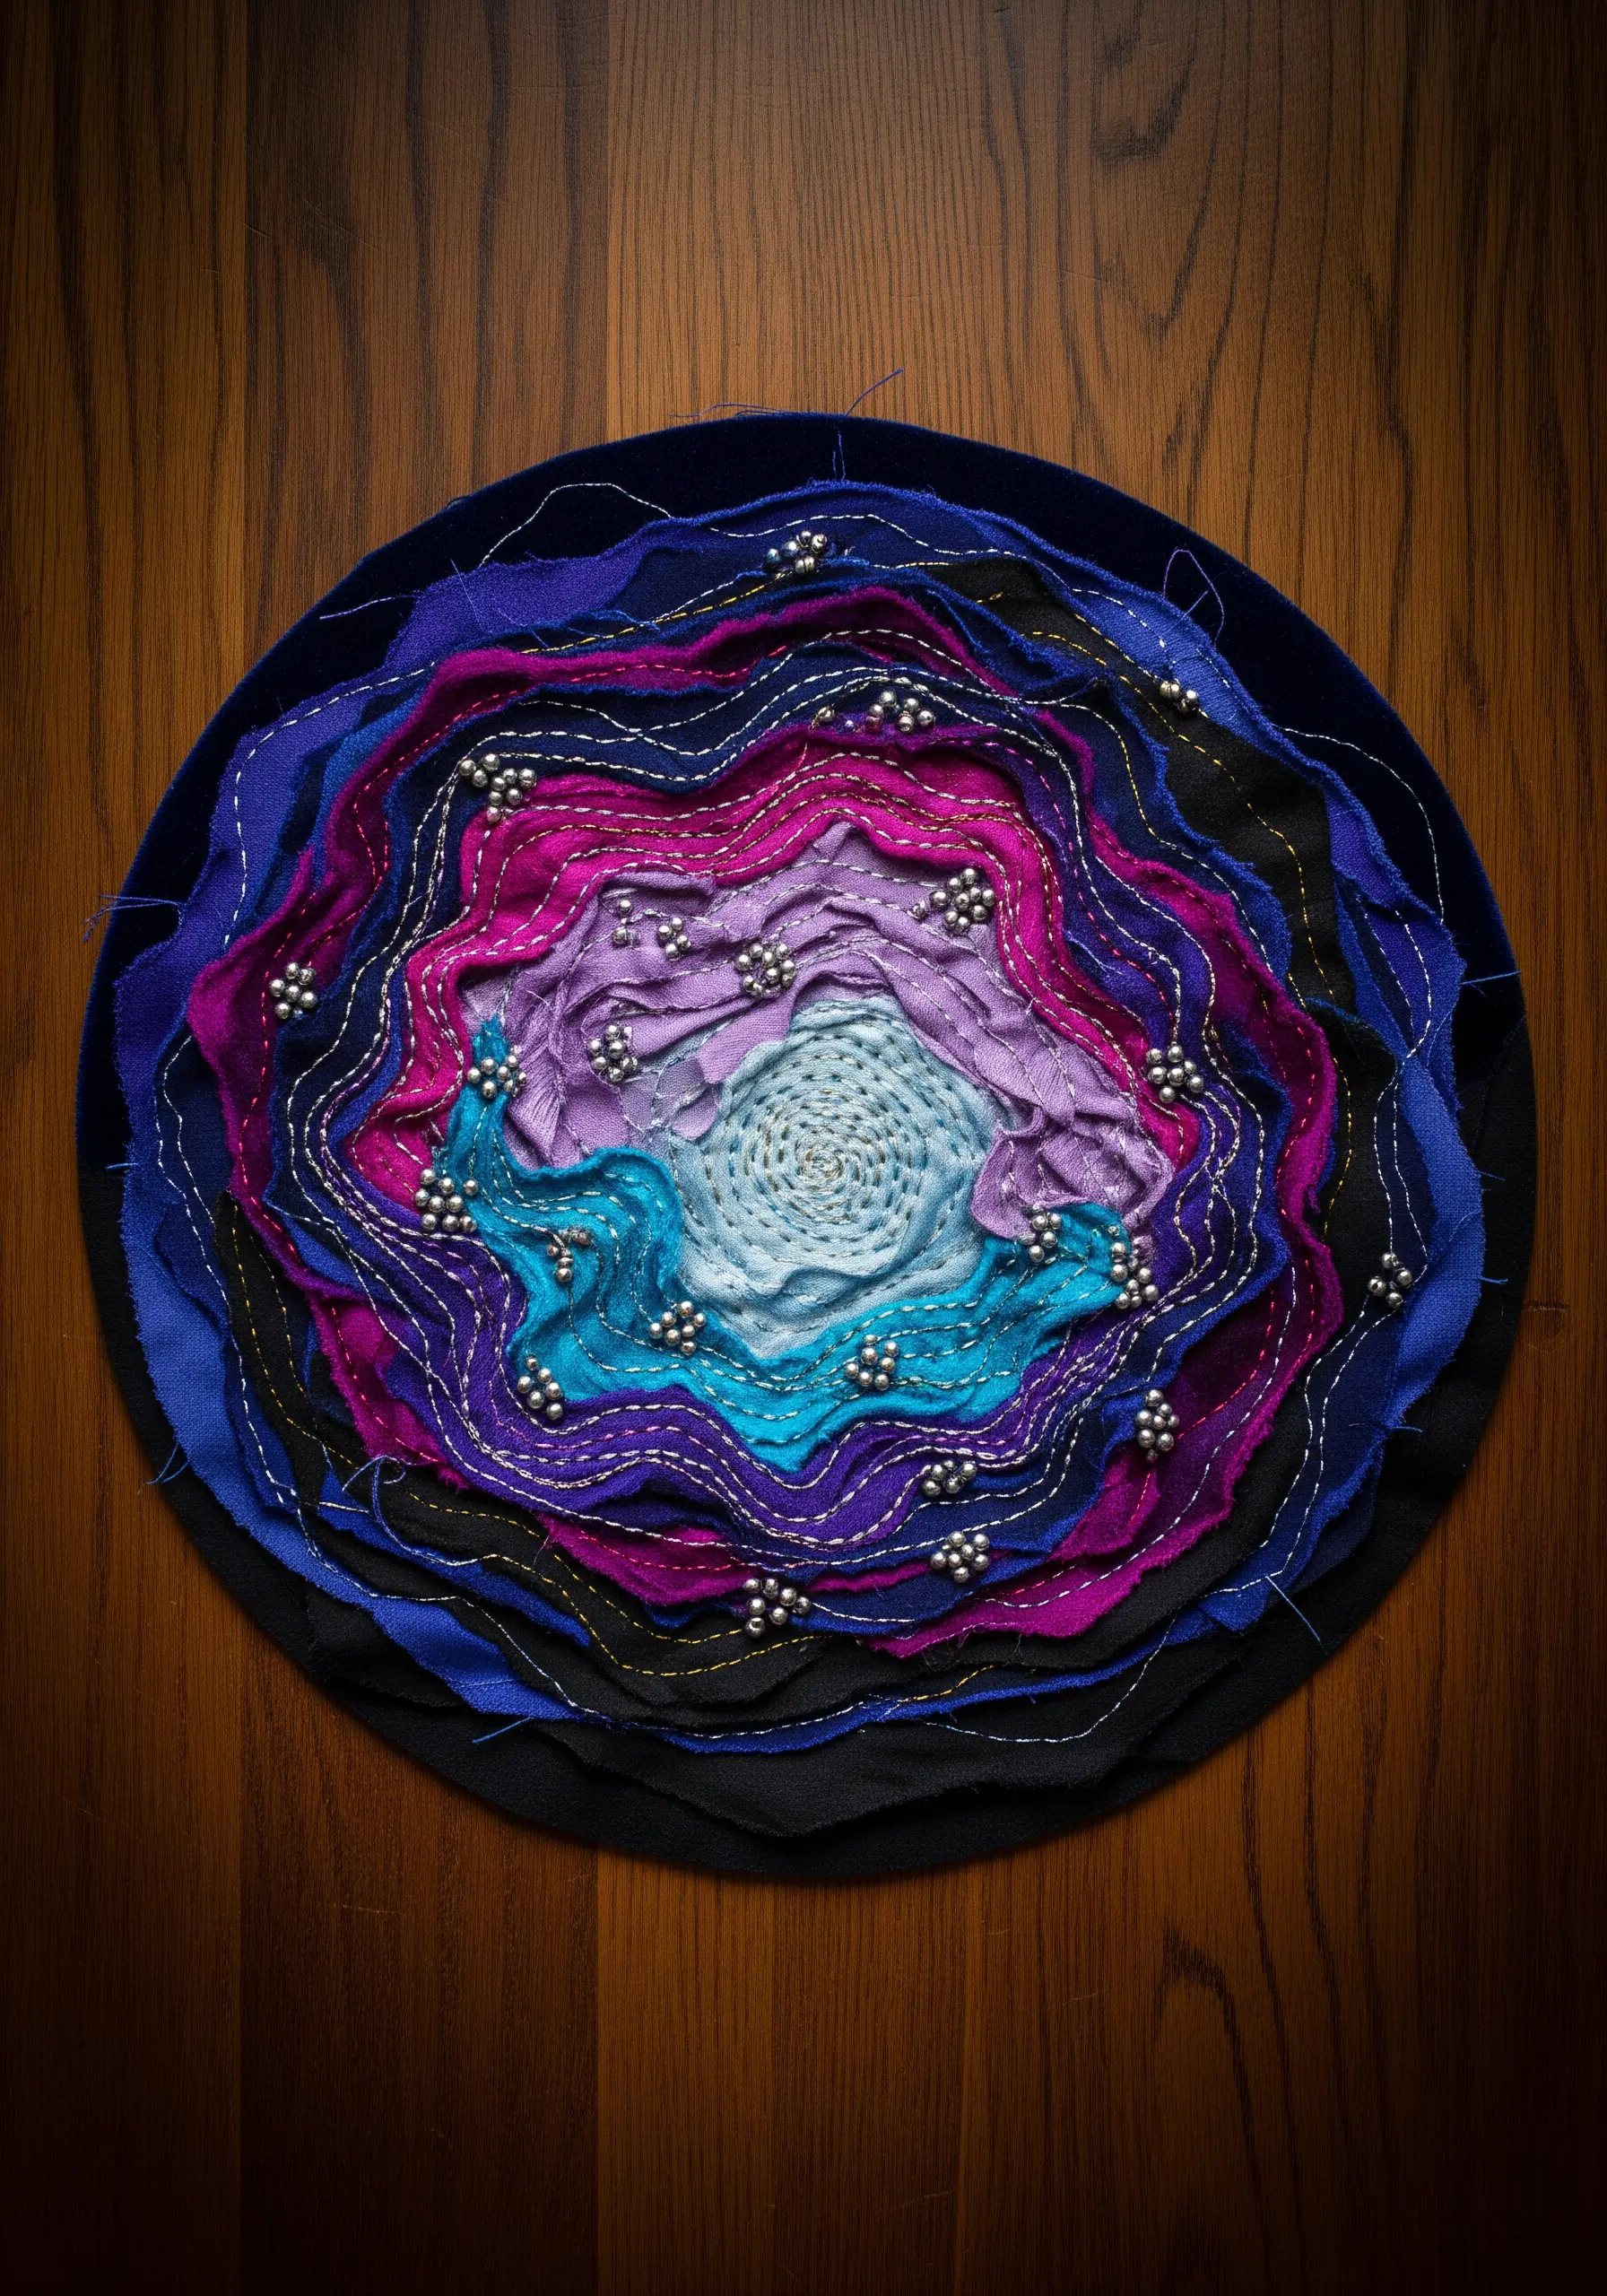
Create a dynamic abstract piece by cutting concentric layers of fabric with raw, unfinished edges.
Arrange them from dark to light to create a gradient effect that draws the eye inward, mimicking natural formations like geodes or nebulas.
Use a simple, contrasting running stitch to tack the layers down, allowing the lines to wander organically rather than following a perfect circle.
Incorporate metallic beads sporadically to introduce a hard, reflective texture that contrasts beautifully with the soft, fraying fabric.
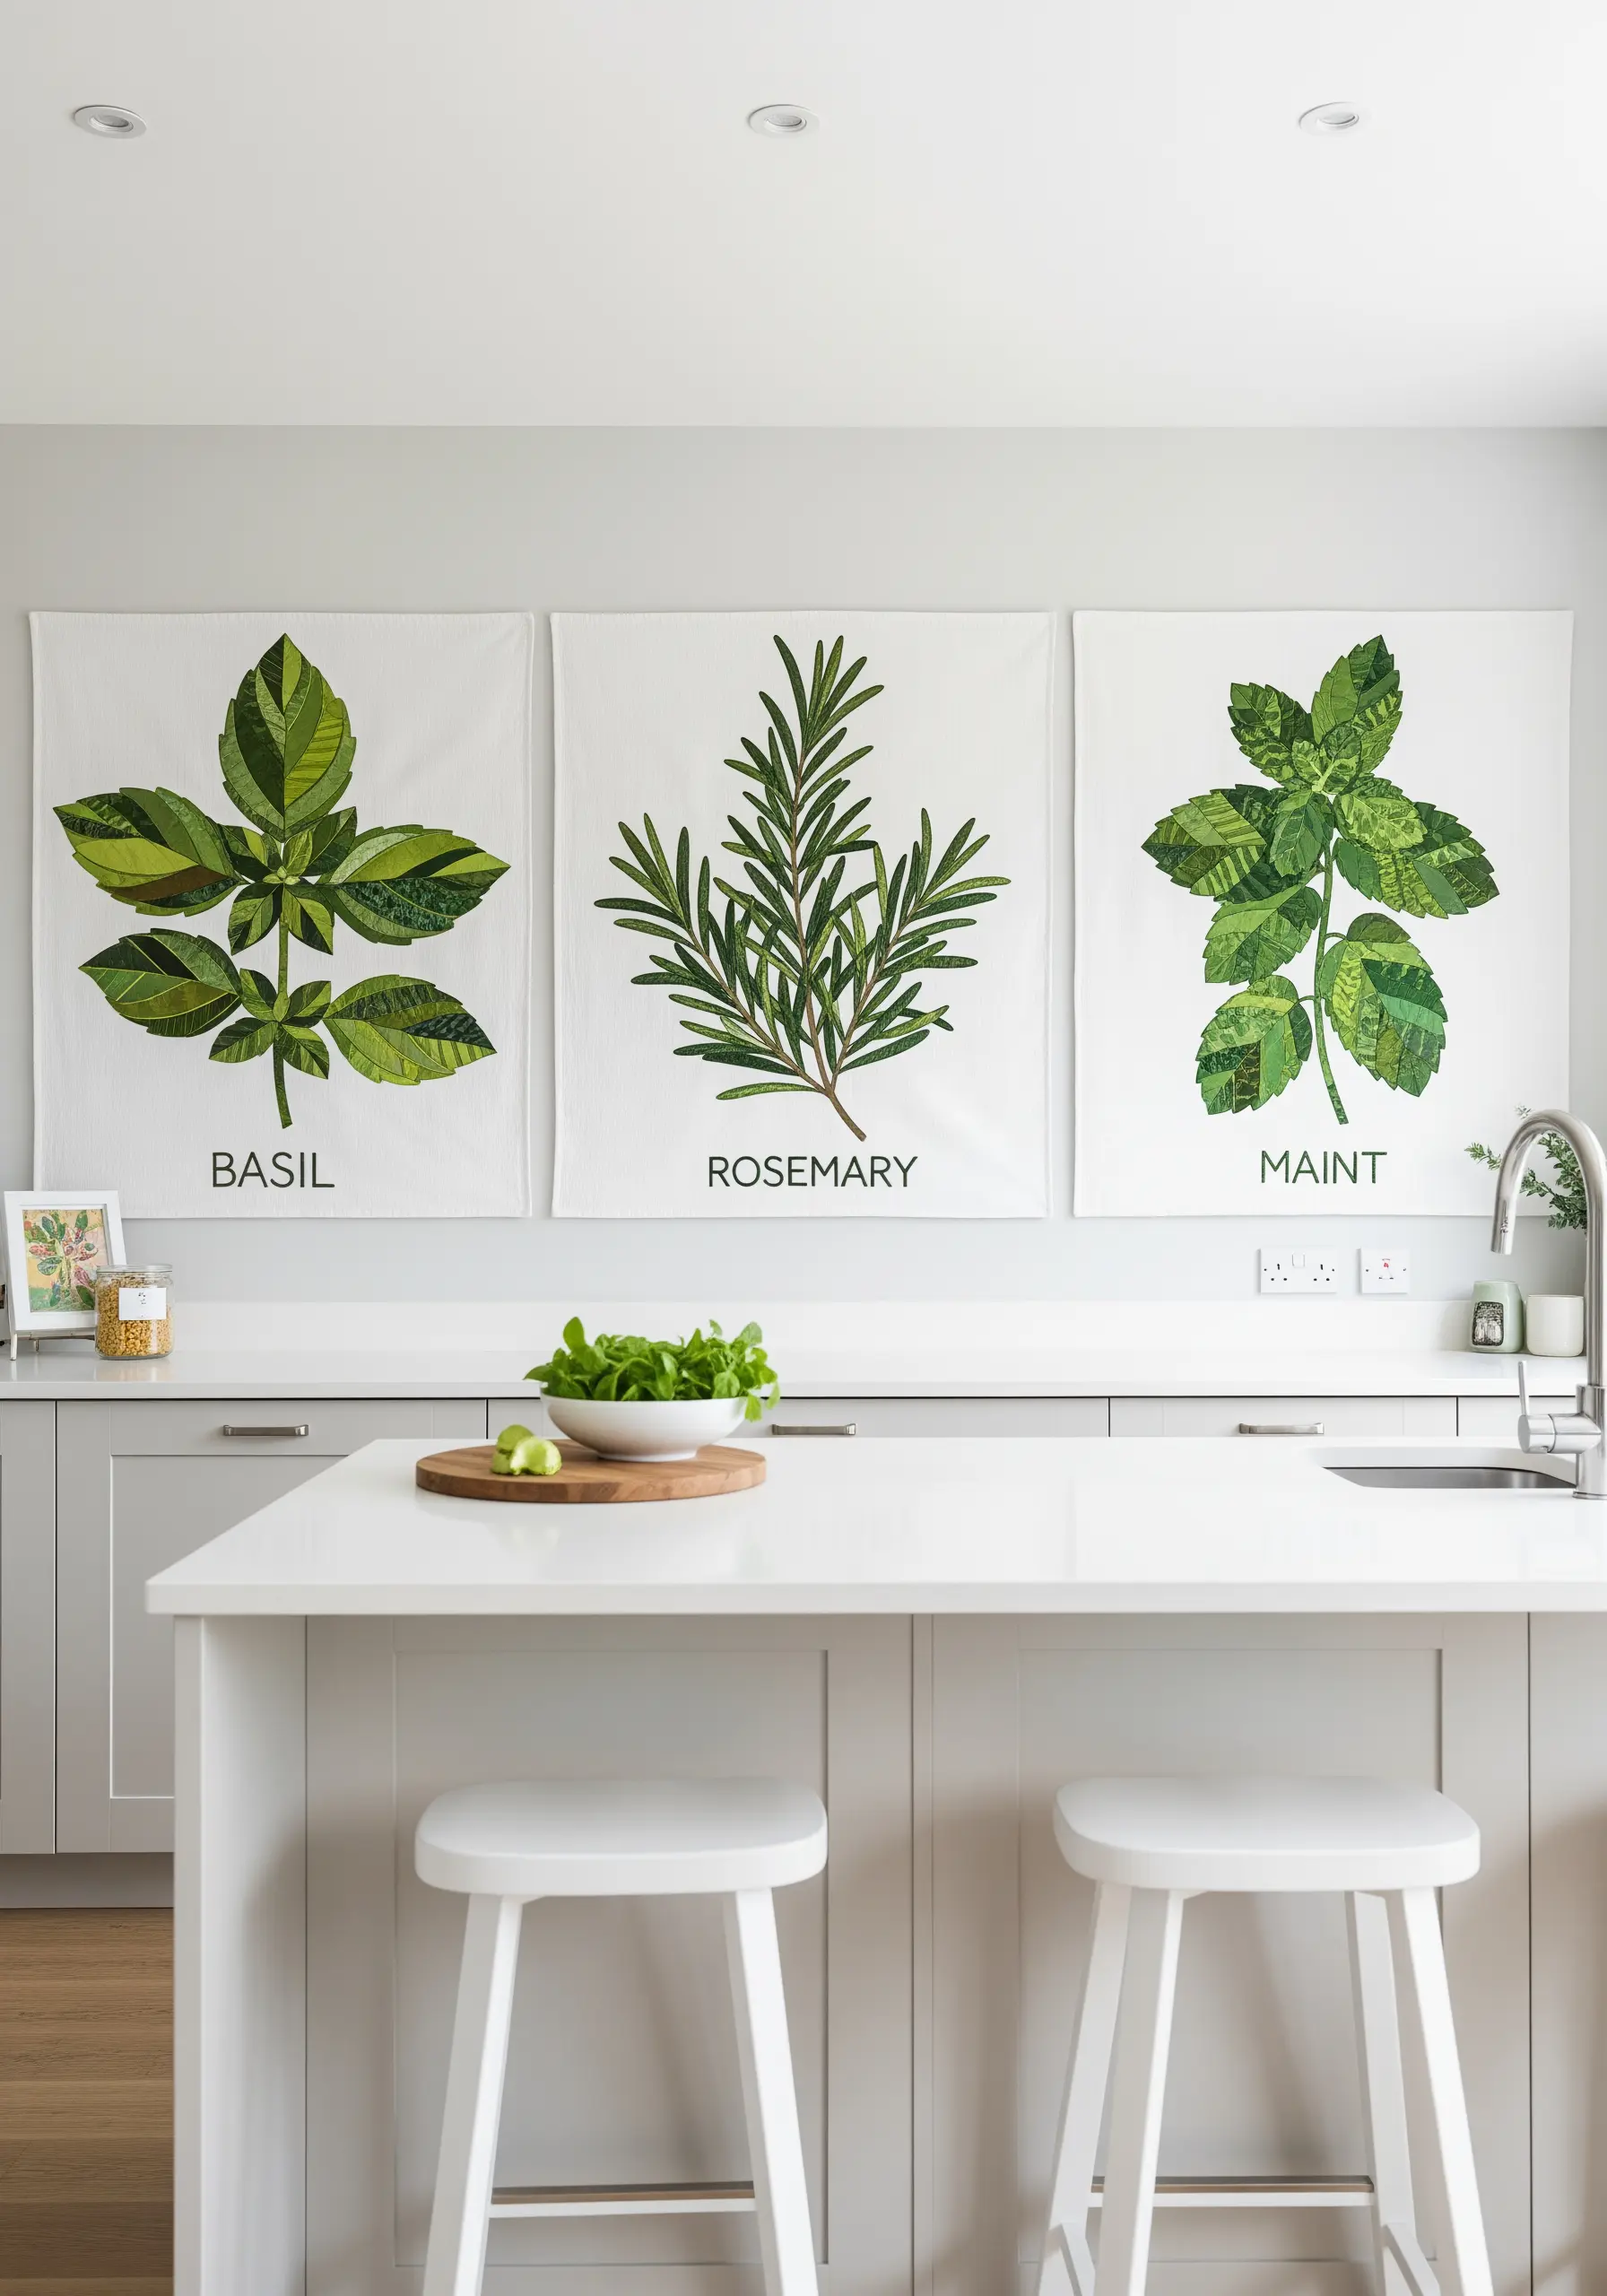
3. Design a Cohesive Series with a Visual Theme
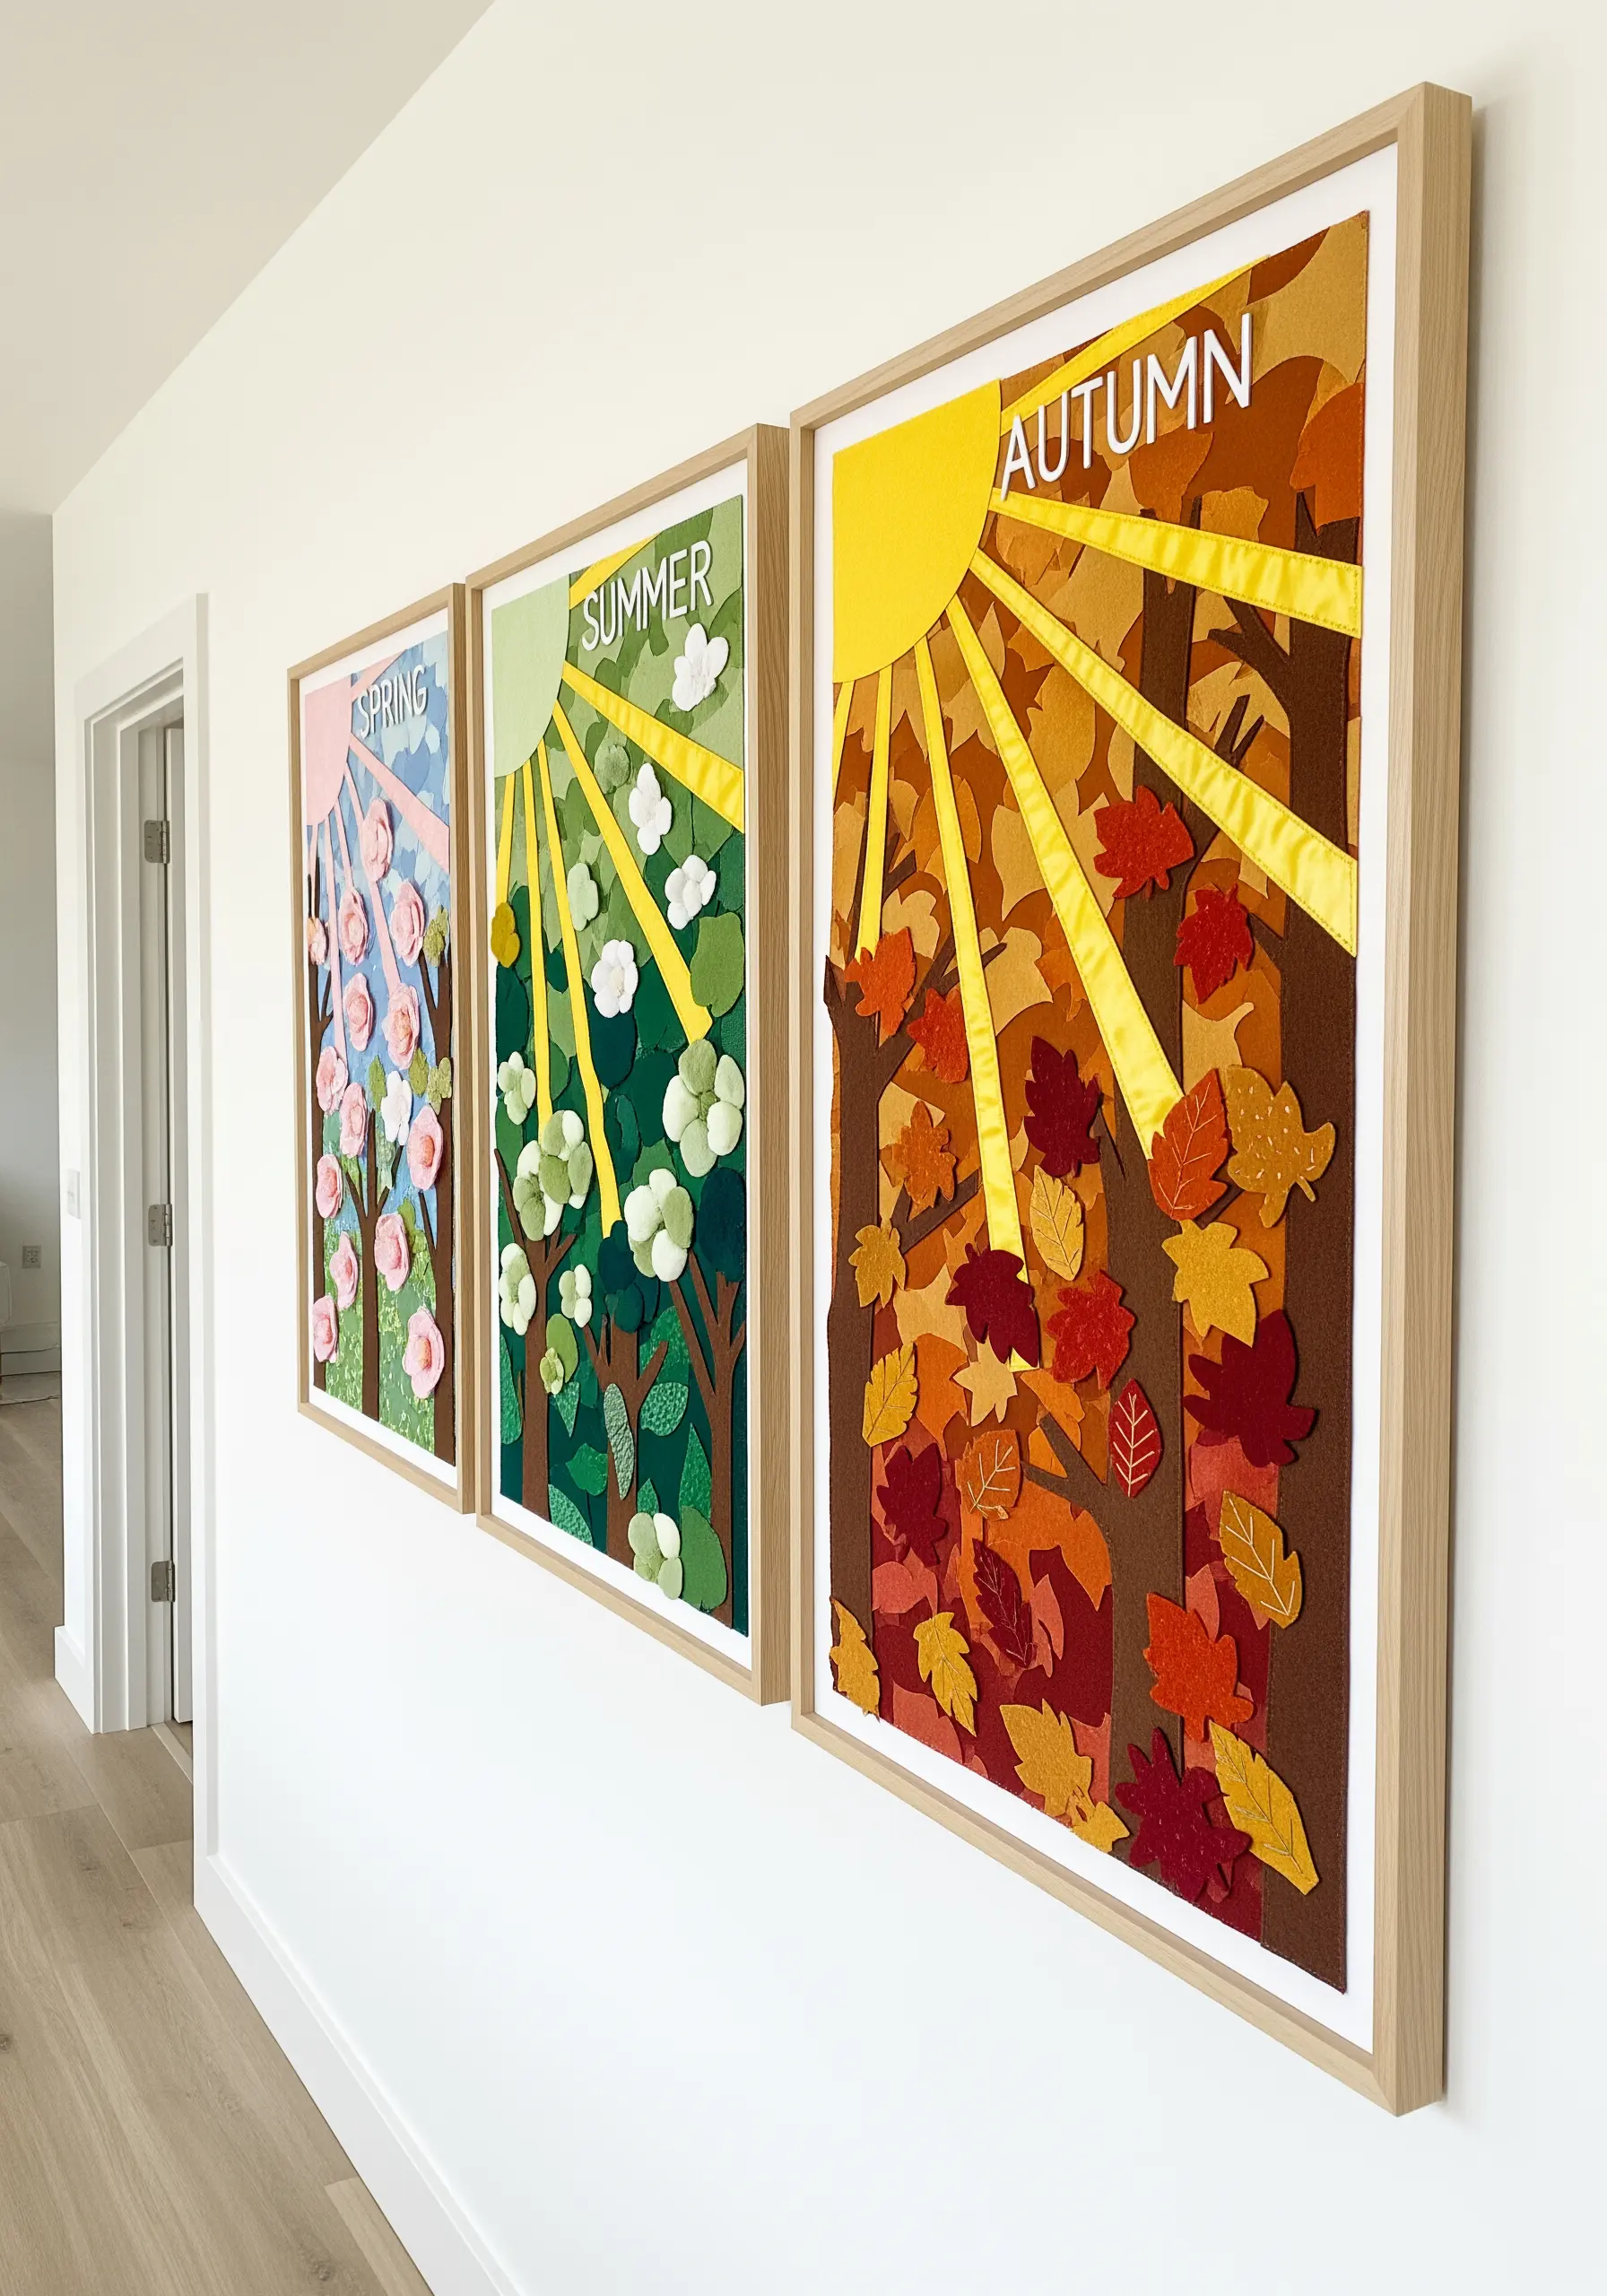
When creating a series, unify your pieces with a recurring element, like the graphic sun and its rays, to tell a continuous story.
Use felt for its clean edges and vibrant, opaque color, which allows for crisp shapes without the need for hemming.
Introduce dimension by layering cut-out shapes—like leaves and flower petals—and folding or curling them before stitching them in place.
Maintain a consistent color palette within each season to reinforce the theme, while ensuring the overall style connects all the framed embroidery pieces.
4. Paint with Fabric: Patchwork Cityscapes

Build a complex scene like a cityscape by treating fabric scraps like daubs of paint.
Use varying shades of grey, blue, and black fabric for the buildings to create depth and architectural form.
Incorporate small, vibrant squares of yellow, orange, and blue to represent lit windows, strategically placing them to create rhythm and life within the scene.
A quilted grid of straight stitches adds texture and unifies the disparate fabric pieces, mimicking the structure of city blocks.
5. Mix Patterns for Playful Folk-Art Florals
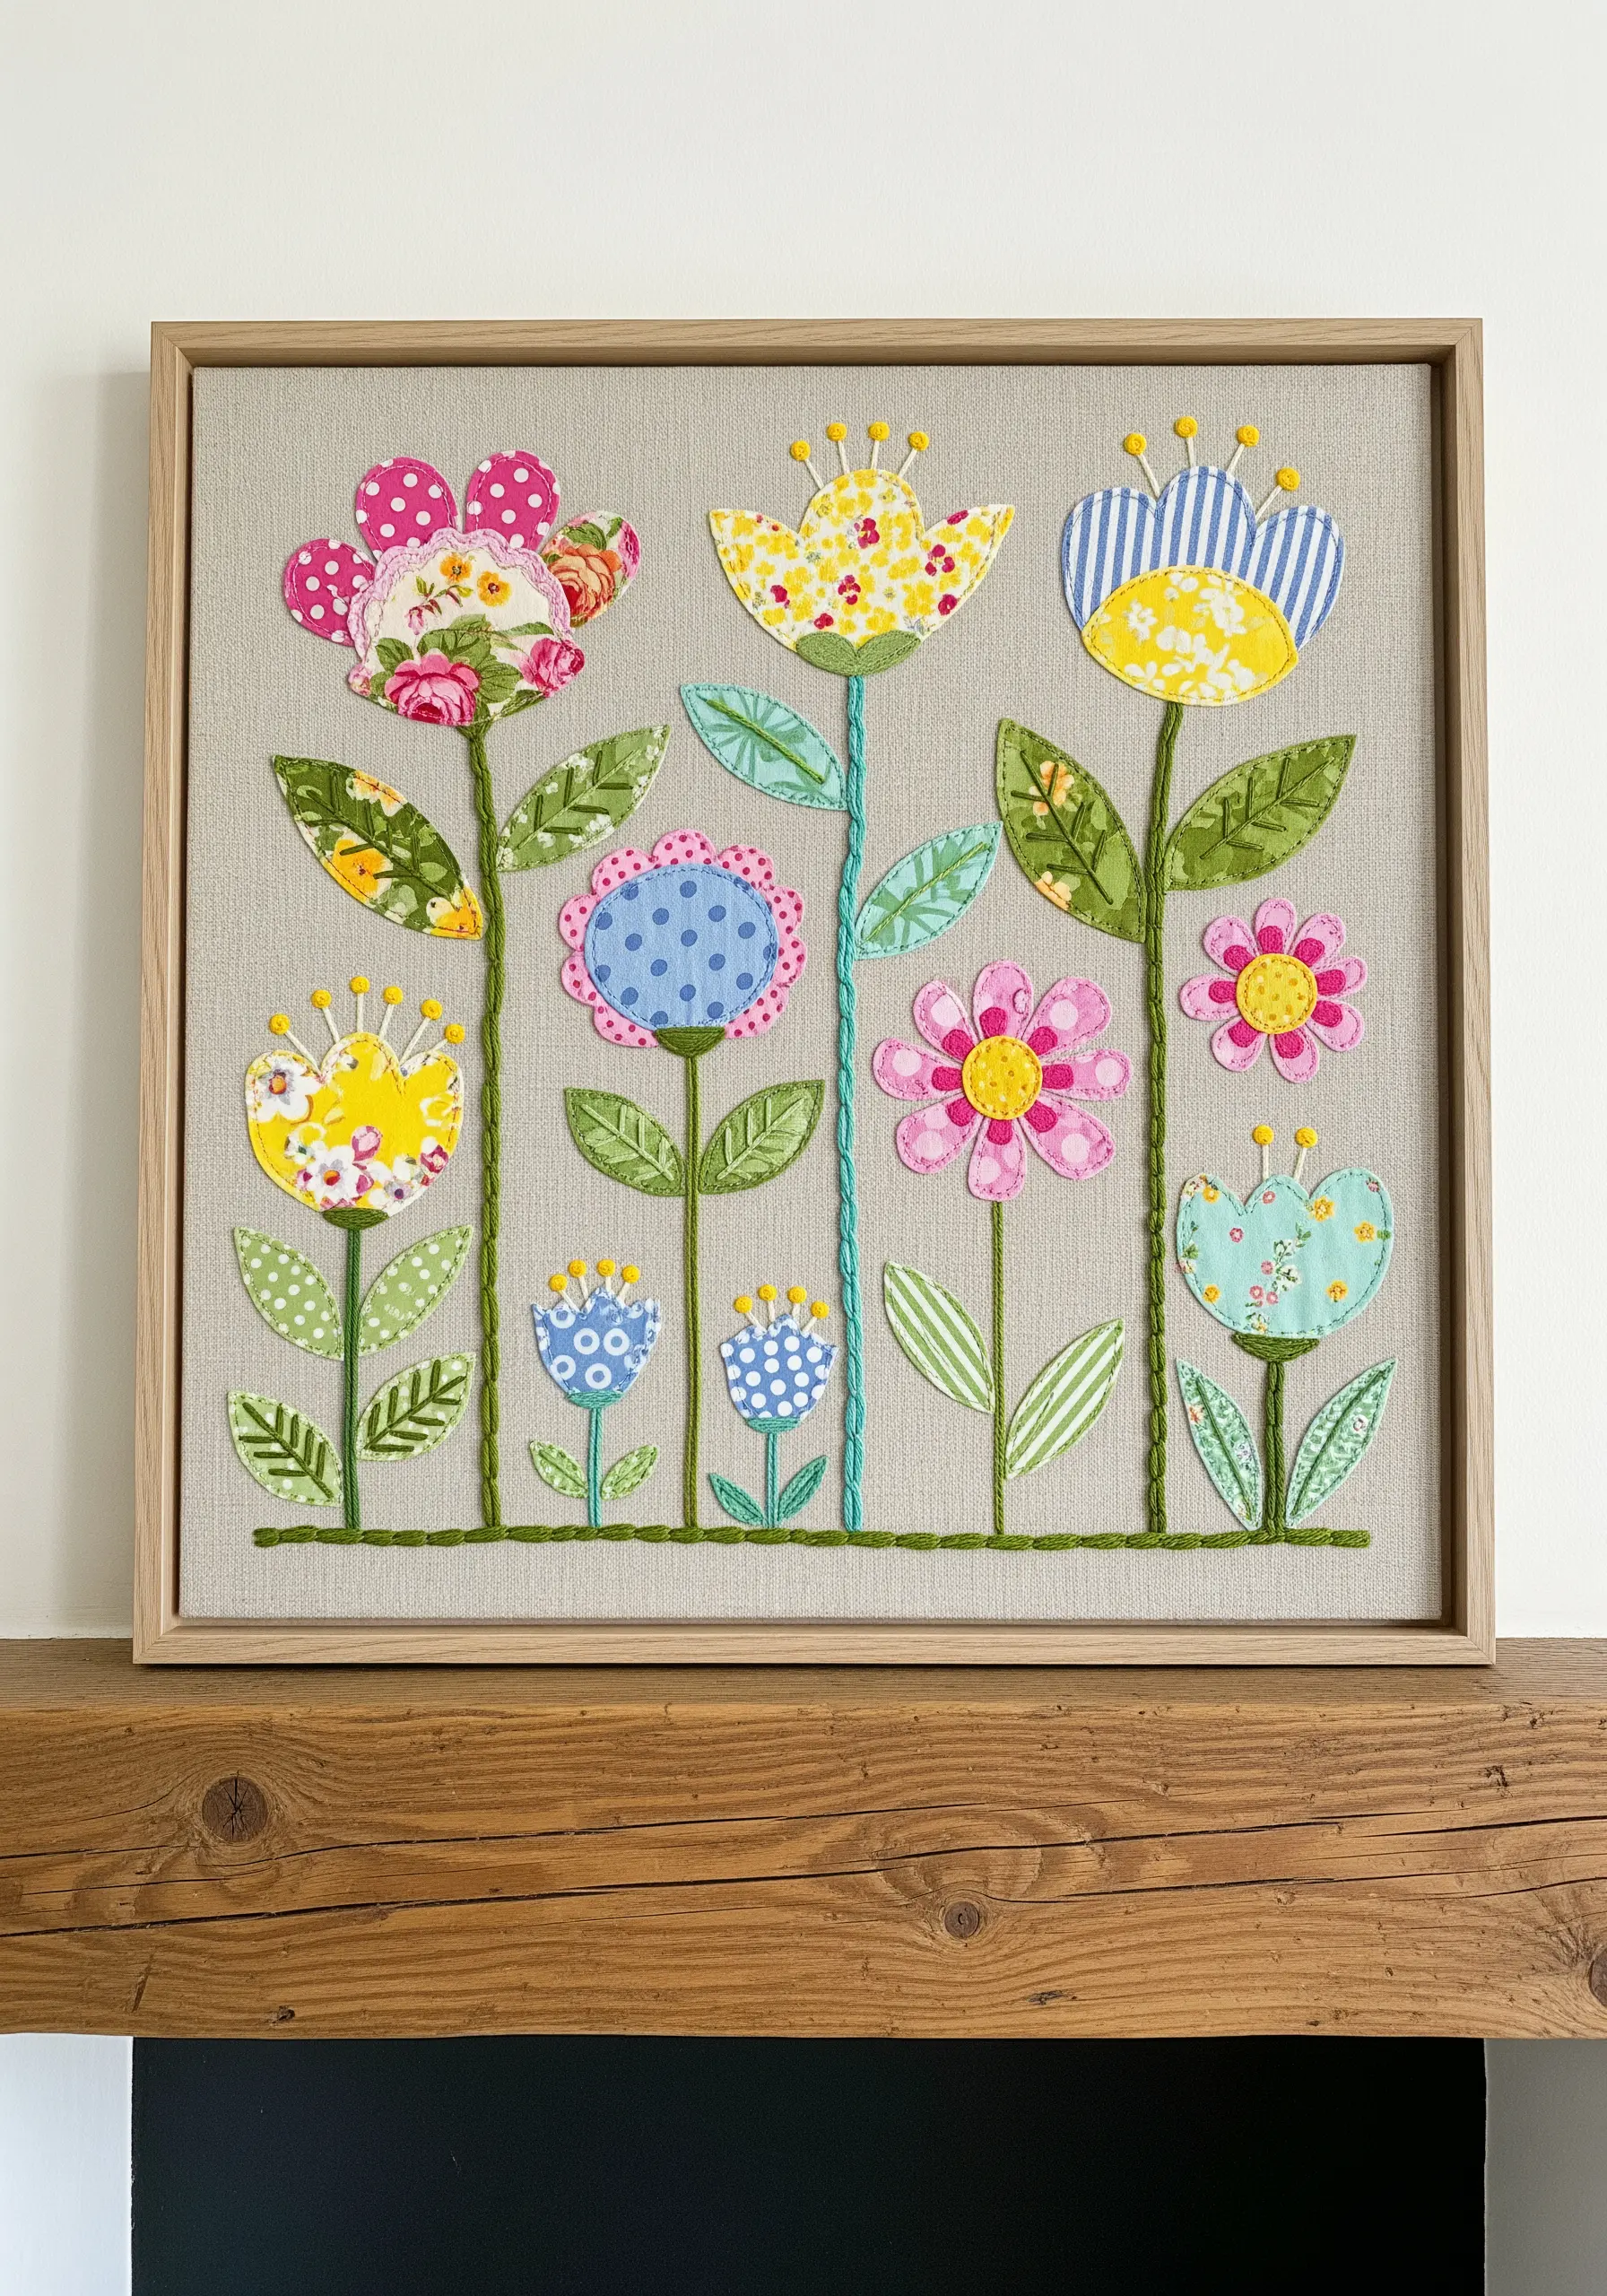
Create whimsical flowers by cutting petals and leaves from a variety of patterned fabrics—polka dots, stripes, and florals all work together.
Define each shape with a clean, simple outline stitch like a backstitch or stem stitch in a contrasting color to make the forms pop.
Use thicker threads or twisted cords for the stems to give them physical presence and a strong vertical line.
Add small details with French knots or satin-stitched circles for the flower centers, tying the disparate patterns together with a consistent stitch technique.
6. Master the Gradient with Layered Appliqué
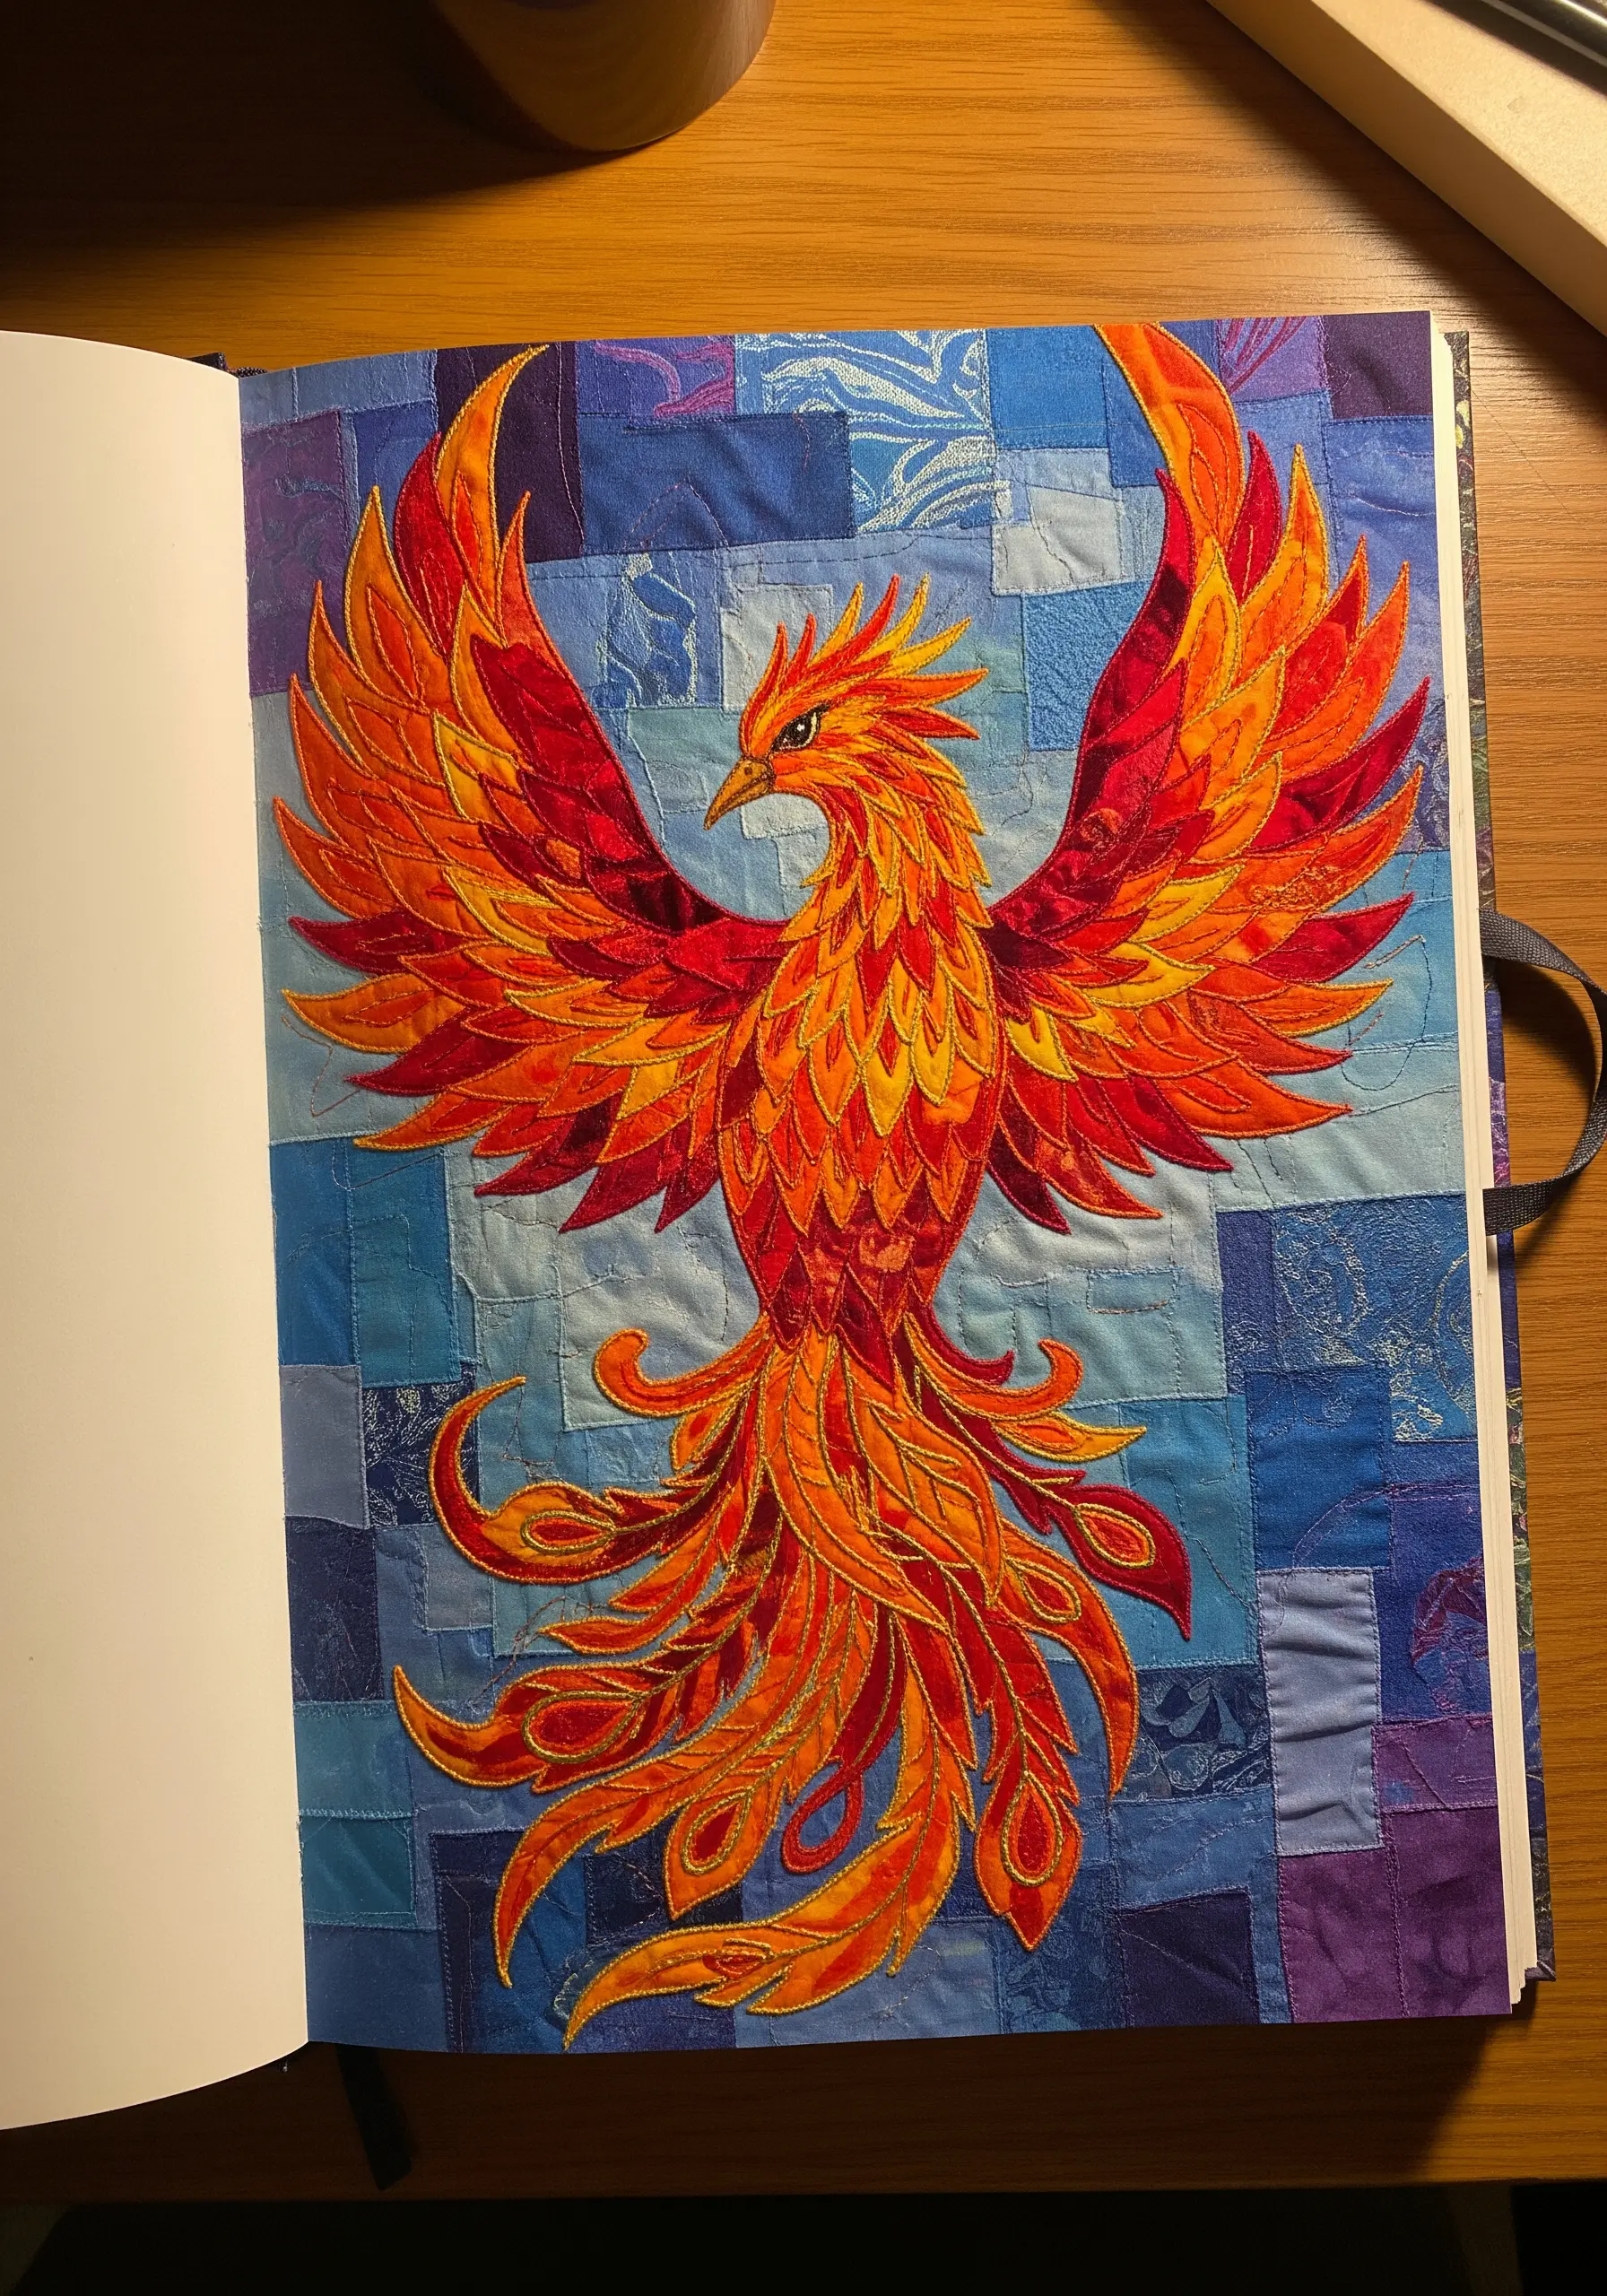
To achieve a seamless fiery gradient, cut your fabric pieces—like feathers—from multiple shades of red, orange, and yellow.
Overlap the pieces strategically, placing darker tones underneath and lighter ones on top to create highlights and a sense of dynamic movement.
Outline each intricate shape with a satin stitch or a tight zig-zag stitch using a metallic or variegated gold thread to unify the collage and add a magical shimmer.
For the background, use a patchwork of cool blues and purples to make the warm tones of the phoenix appear even more vibrant and intense.
7. Achieve Graphic Precision with Felt Appliqué
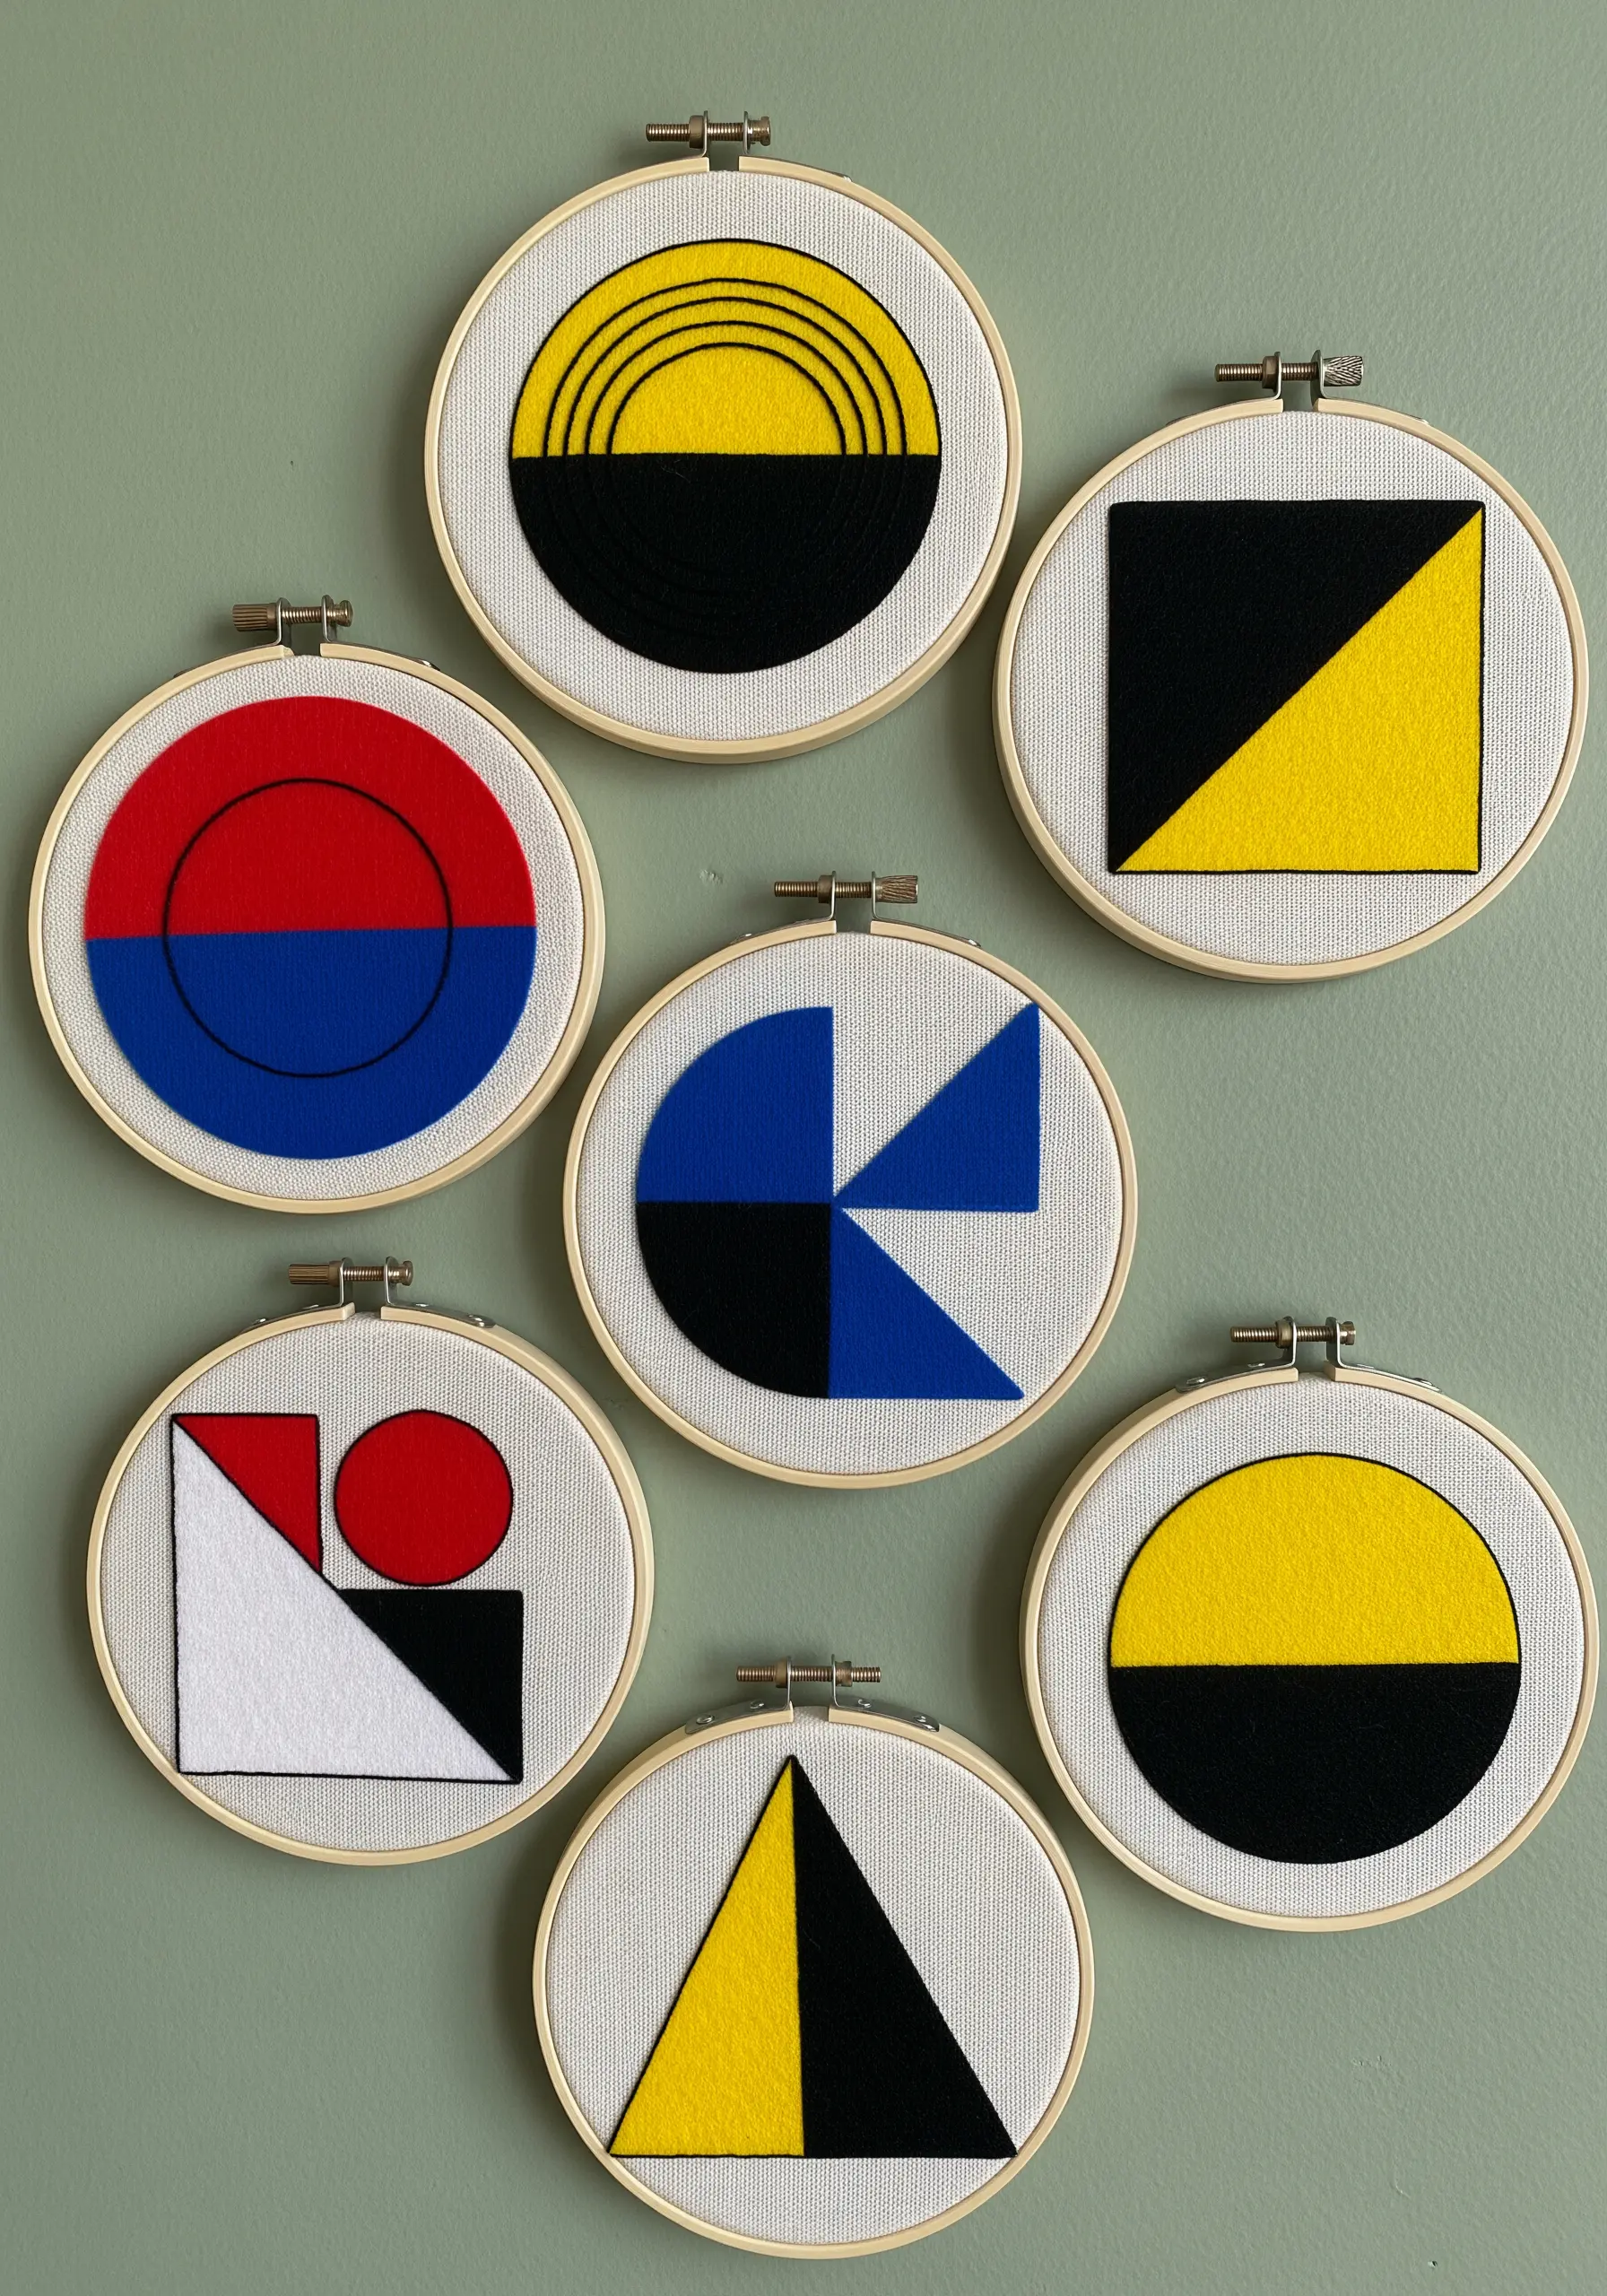
For sharp, clean geometric designs, felt is your ideal material because its pressed fibers won’t fray at the edges.
Use a primary color palette—red, yellow, blue, and black—to create high-contrast compositions inspired by modernist art movements like Bauhaus.
Secure the felt pieces with a nearly invisible whip stitch using a matching thread color, or lean into the design with a deliberate, visible running stitch.
Arrange a series of these small hoop embroidery ideas on a wall to create a larger, impactful gallery installation.
8. Integrate Dimensional Fibers for Expressive Portraits
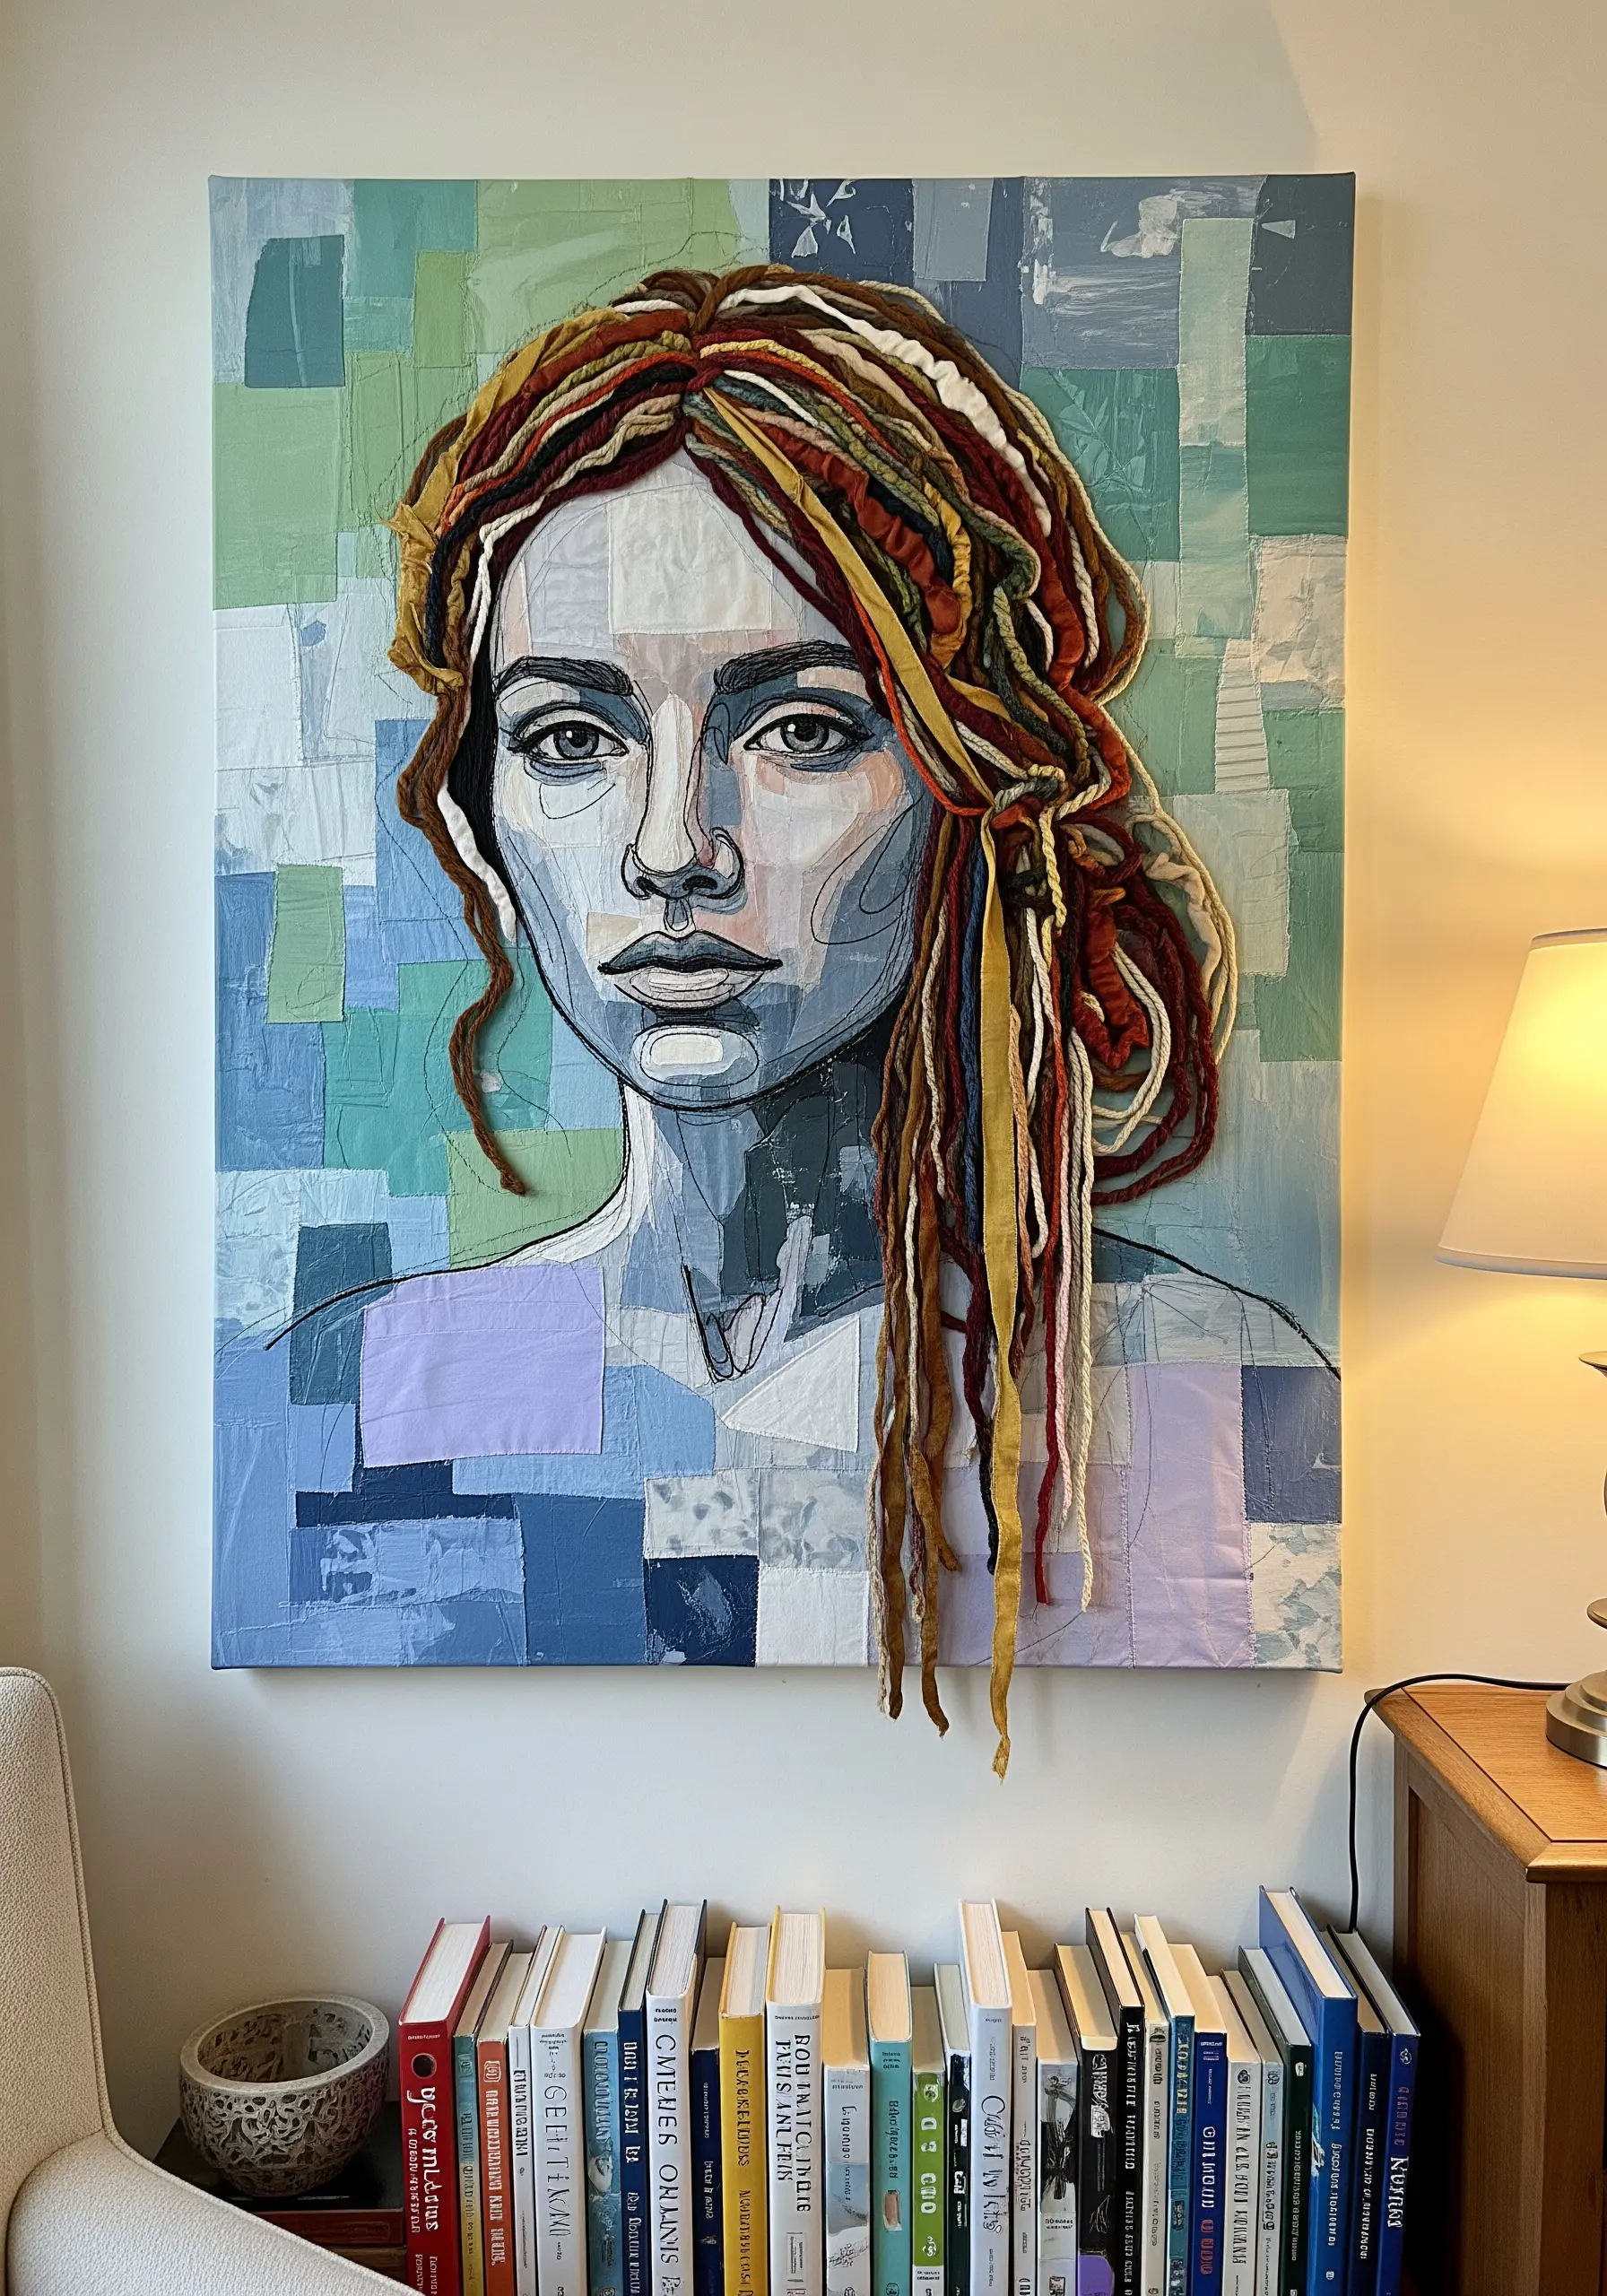
Create the foundation of a portrait using fabric collage, focusing on value—light, mid, and dark tones—to sculpt the facial features.
Introduce a powerful textural shift by adding hair made from thick yarns, wool roving, and fabric strips.
Couch these thicker fibers onto the canvas by tacking them down with a thinner, matching thread, allowing them to drape, loop, and hang freely for a truly three-dimensional effect.
This technique elevates a flat collage into a tactile piece, creating stunning mixed-fiber projects that invite touch.
9. Stitching Atmospheric Depth in Landscapes
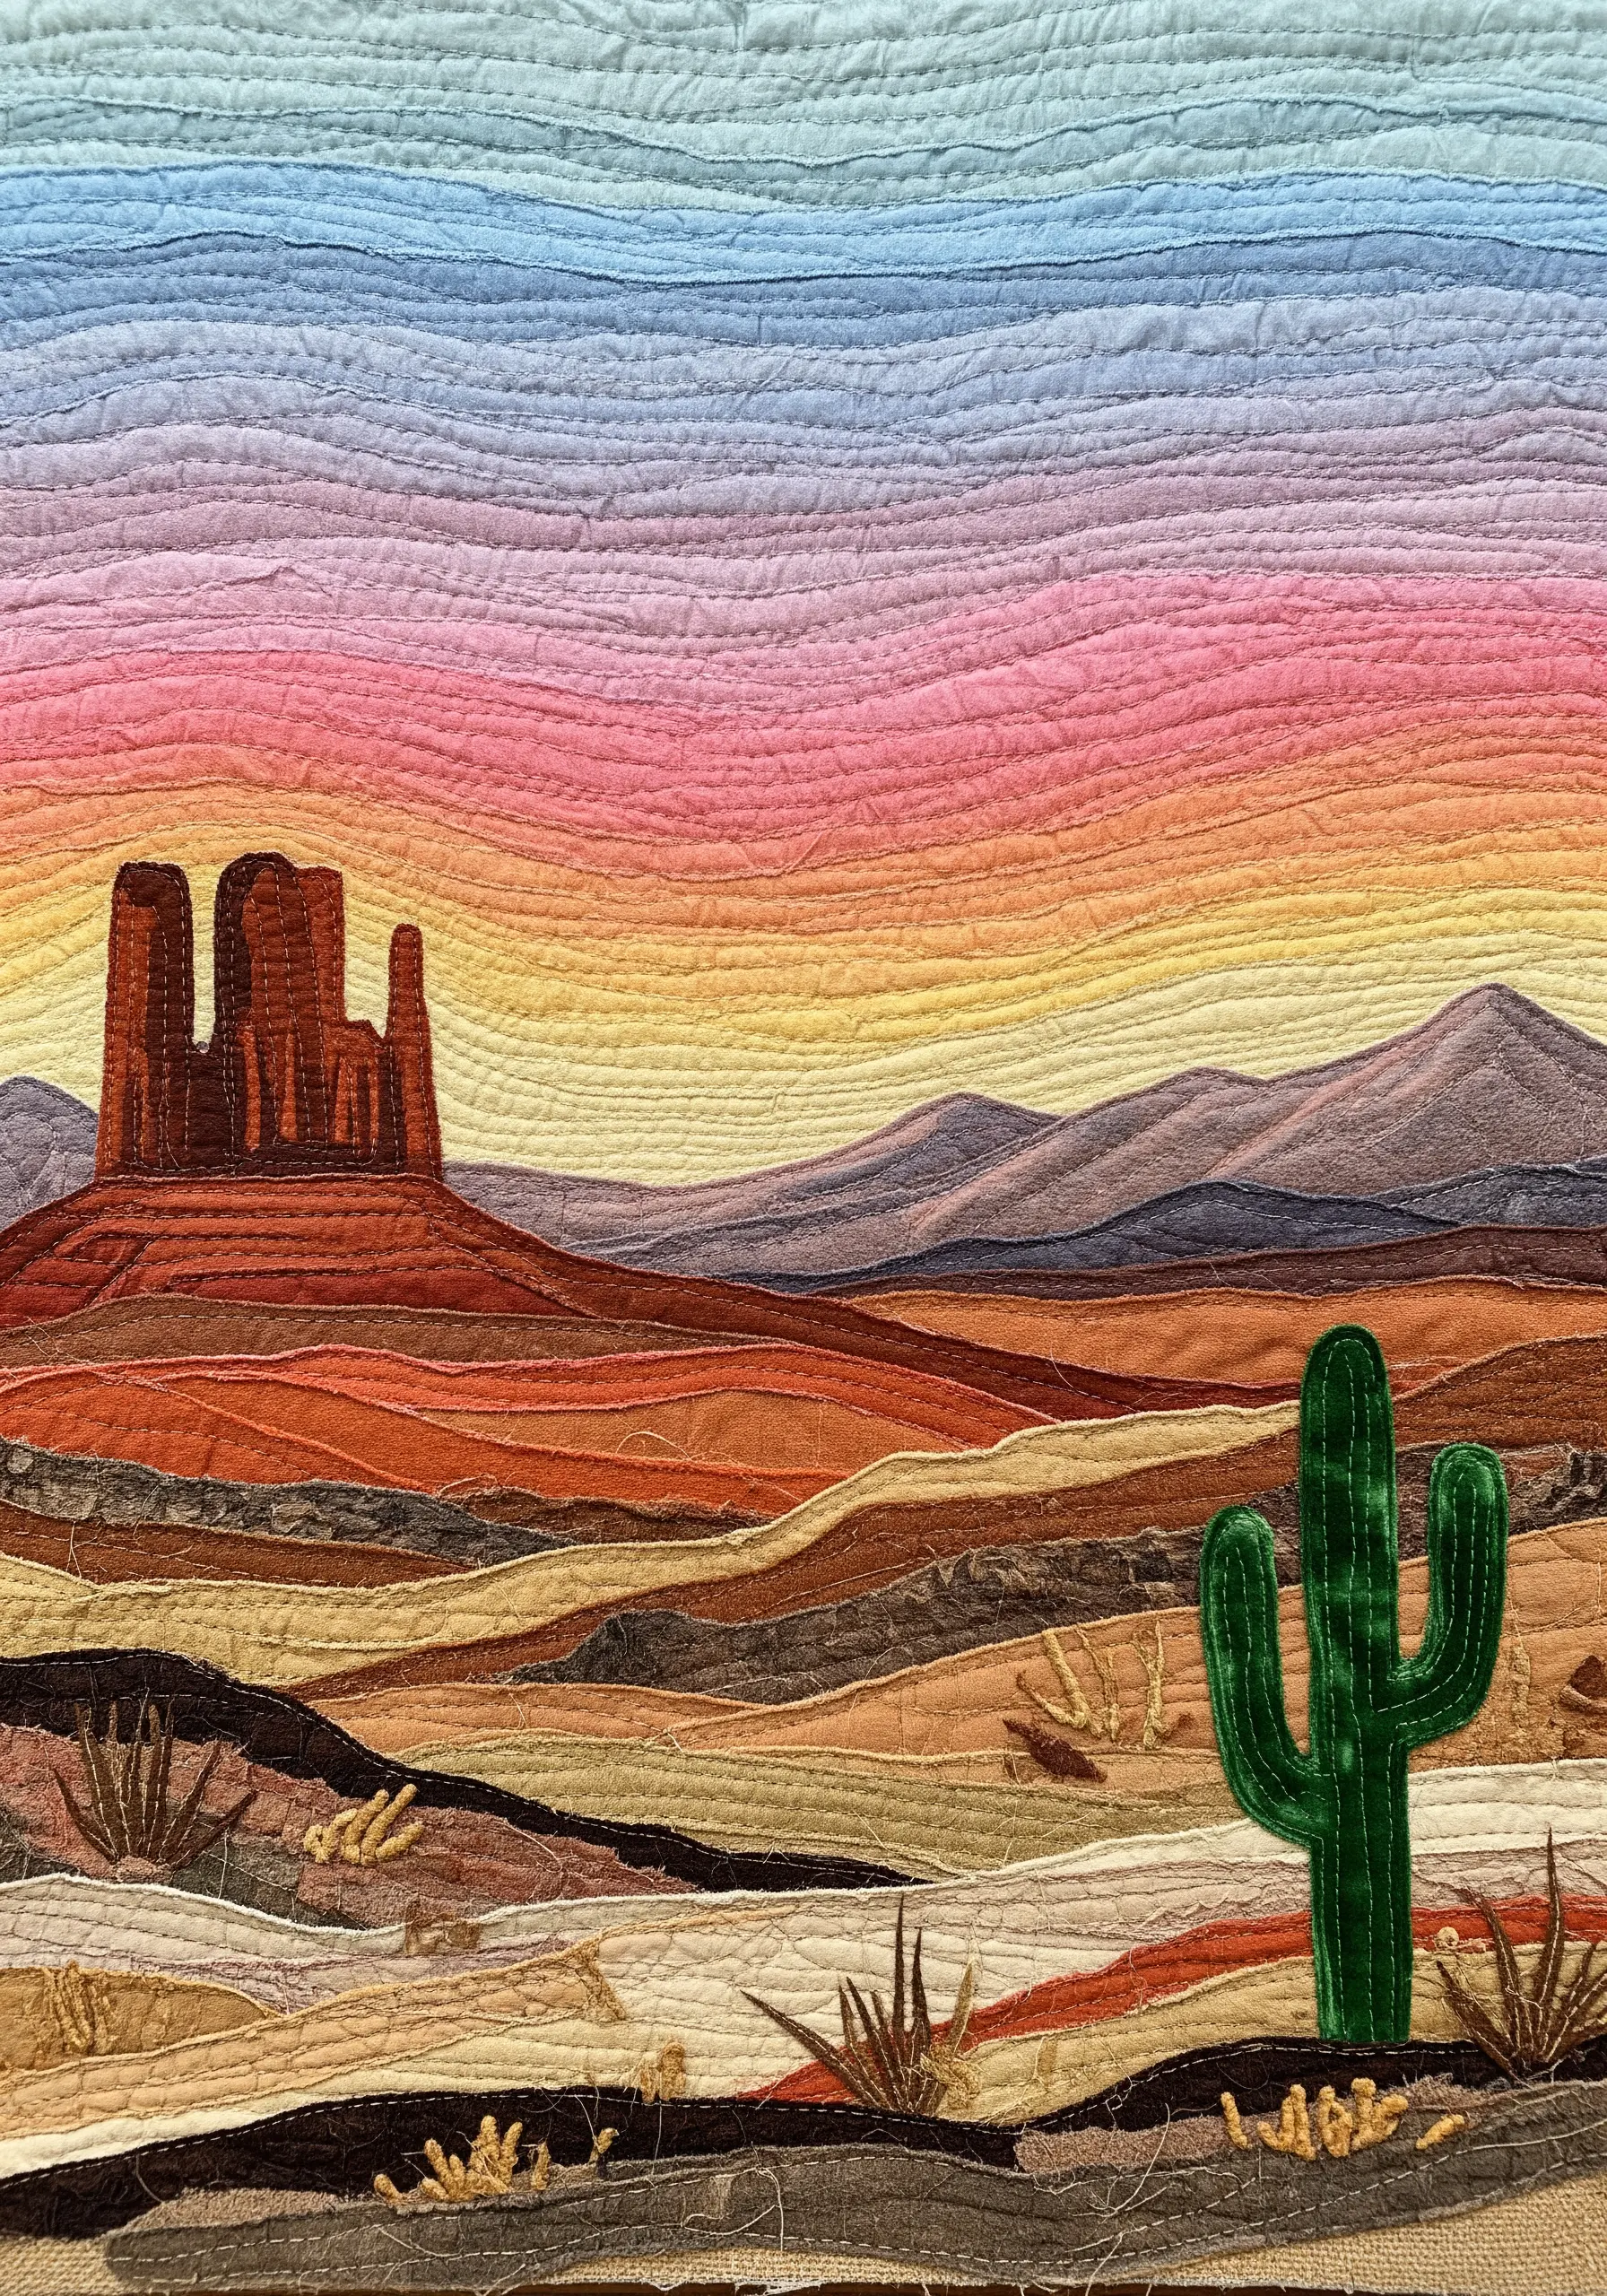
Create the illusion of distance by using fabrics with muted, cooler tones and less detail for the mountains in the background.
Bring the foreground forward with warmer, more saturated colors and textured fabrics for the desert floor and rock formations.
Use horizontal lines of free-motion quilting across the entire piece to unify the composition and mimic the striations of sedimentary rock and desert heat haze.
This approach is fundamental to capturing nature’s textures in your next embroidery project.
10. Create Flow Across Multiple Panels
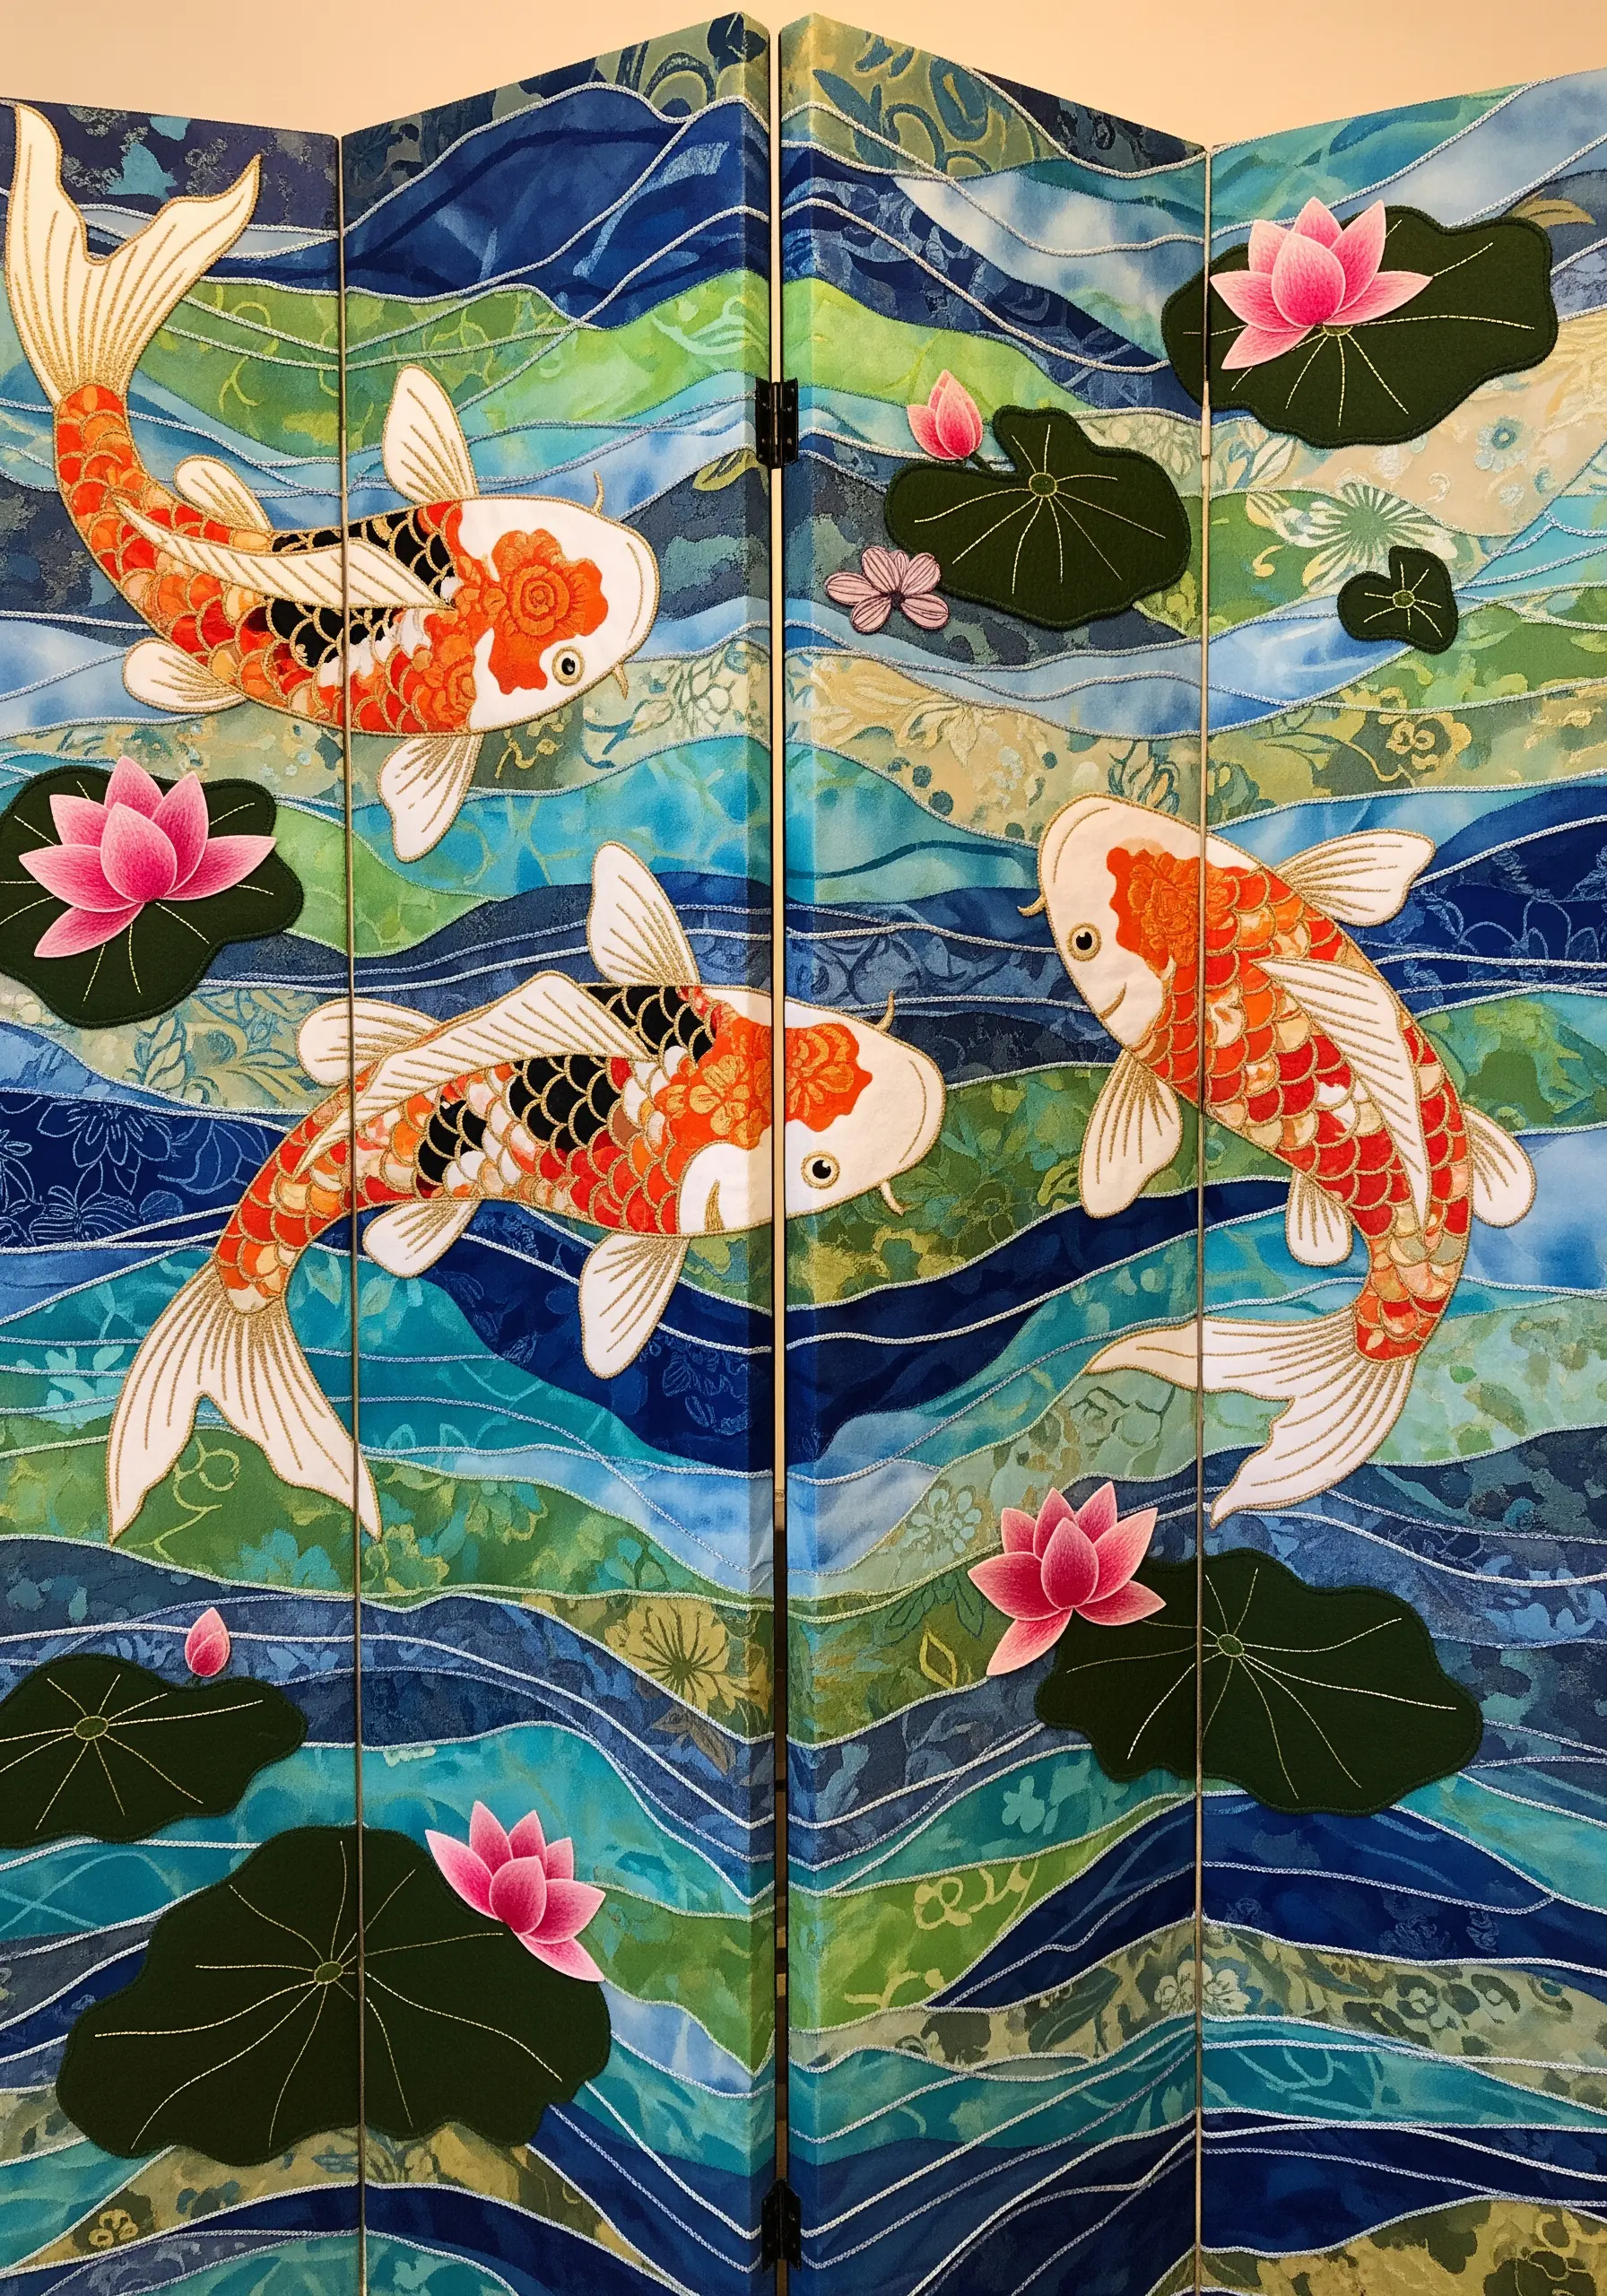
When working on a multi-panel surface like a screen, design your composition to flow seamlessly across the breaks.
Use wavy, batik-style fabrics for the water background, cutting and layering them to create a continuous sense of current and depth.
Construct the koi fish from multiple small, overlapping appliqué pieces—especially for the scales—to give them form and iridescence.
Use a satin stitch outline in a high-contrast thread, like gold or white, to define the primary motifs and ensure they stand out against the busy background.
11. Weave Abstract Data into Textile Art
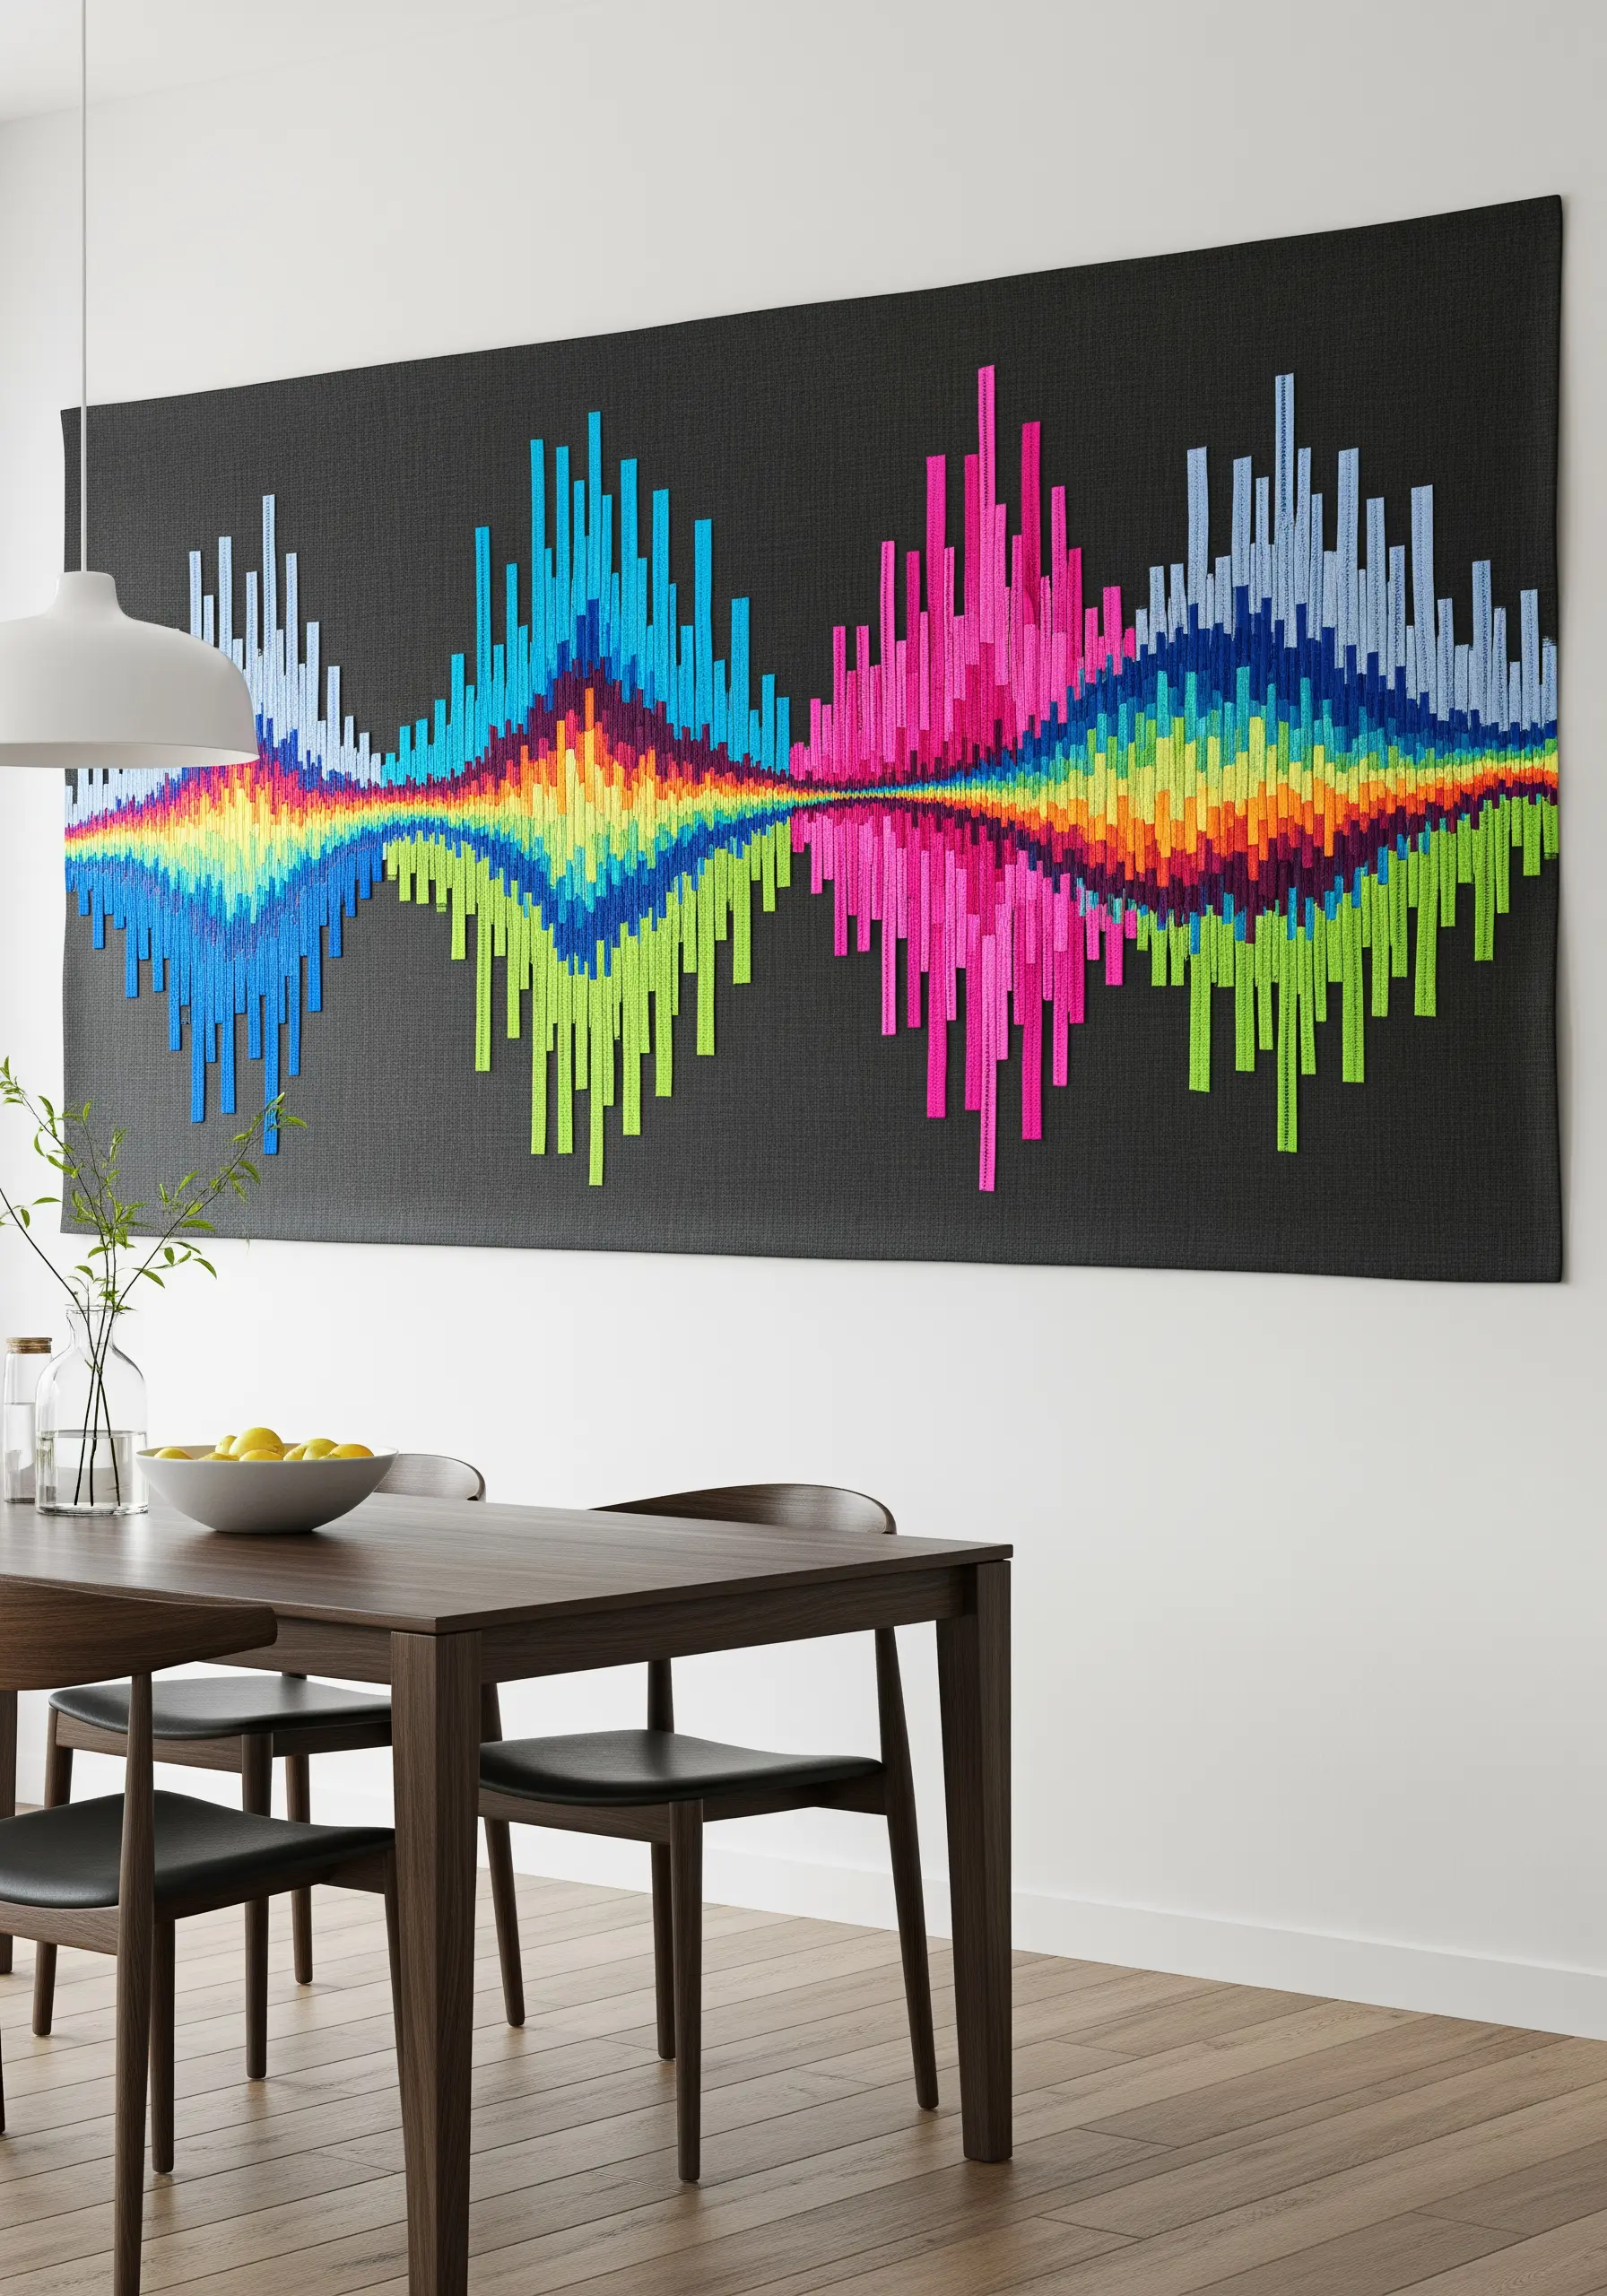
Translate abstract concepts like soundwaves into a tactile experience by using folded fabric strips or ribbons.
Create a grid or warp on your background fabric and weave the colored strips through it, varying their height to match the peaks and valleys of your chosen soundwave.
Arrange the colors in a gradient to add another layer of visual information and aesthetic harmony.
The result is a powerful piece of a fiber art installation that turns invisible data into a dramatic, textural statement.
12. Master the Art of Fussy-Cutting
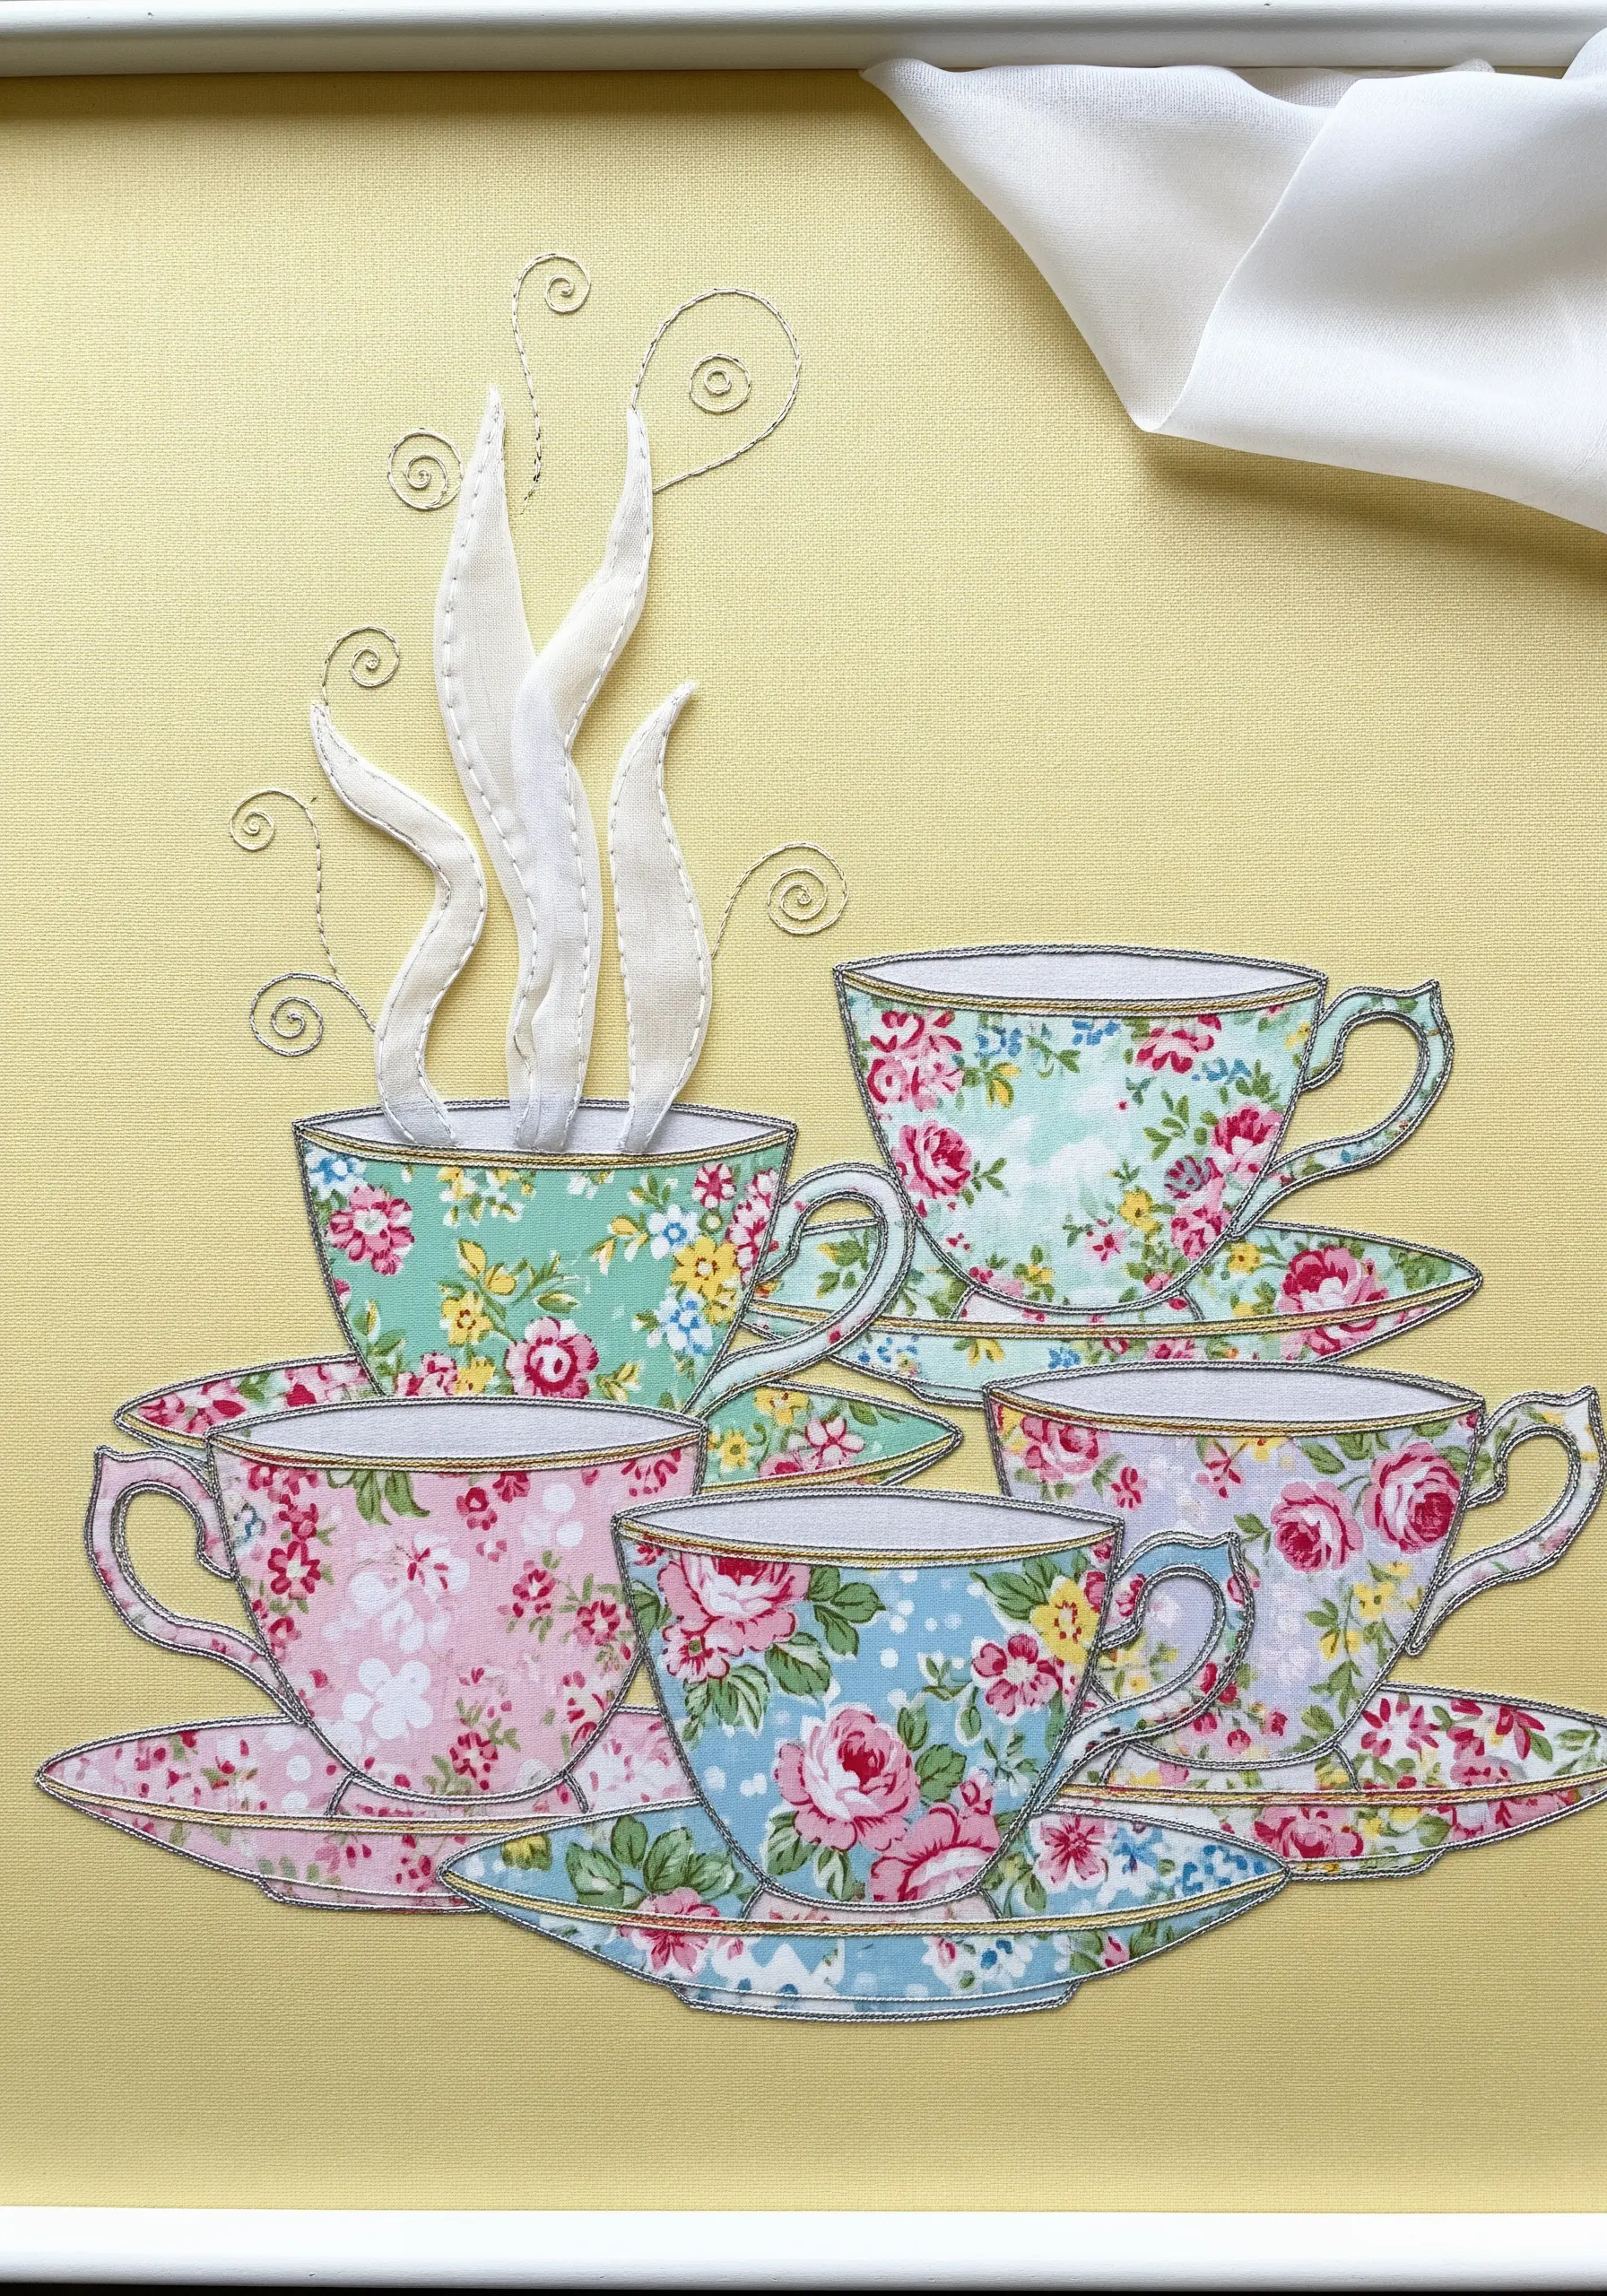
Fussy-cutting is the technique of intentionally cutting a specific motif from a patterned fabric.
Use it to place a perfect rose or floral spray right in the center of an appliqué shape, like a teacup.
This adds a layer of deliberate artistry and narrative to your collage, turning random patterns into intentional design elements.
Outline your fussy-cut pieces with a delicate machine stitch or a neat backstitch to secure them and give them a clean, finished edge.
13. Recreate Stained Glass with Fabric and Beads

To achieve a stained-glass effect, use jewel-toned, silky fabrics for your main shapes.
Create the “leading” by using thick black fabric strips or a heavy satin stitch to outline each colored section, which makes the colors appear more luminous.
Incorporate beading along the outlines and within the shapes to mimic the way light refracts through textured glass.
This method is perfect for creating embroidered mandala wall art designs for mindful stitching.
14. Unify Diverse Techniques in a Single Artwork
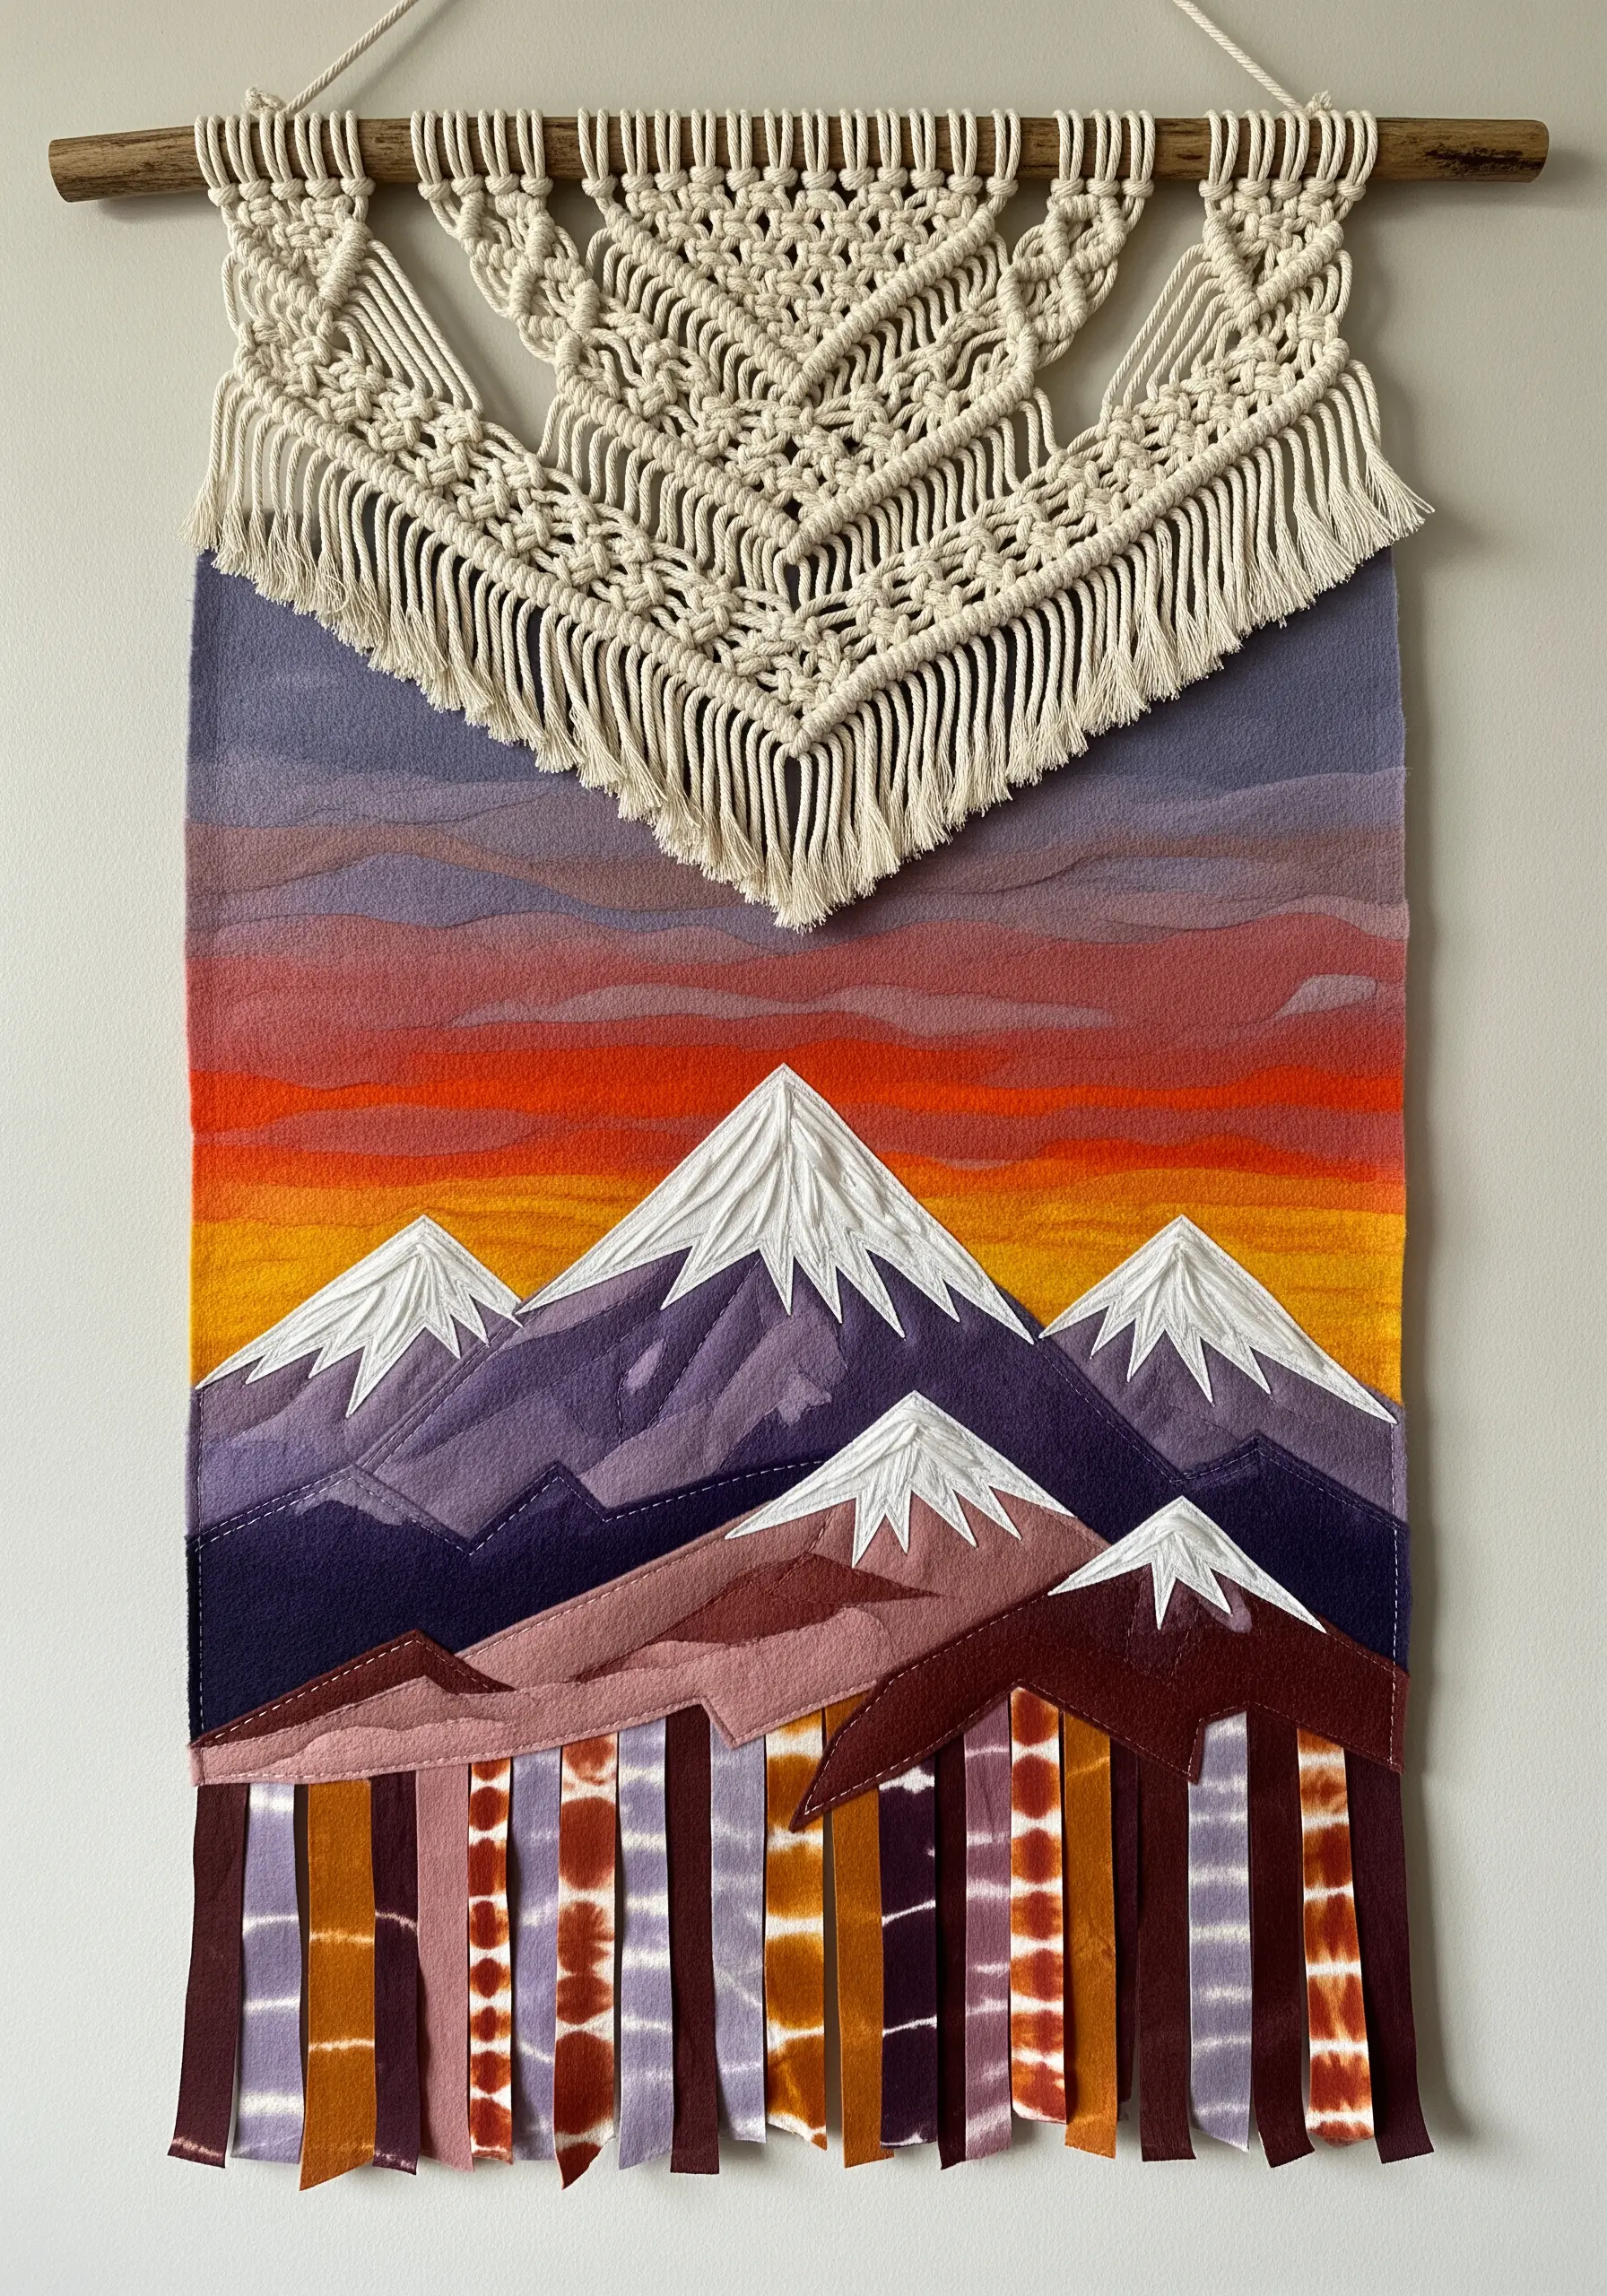
Don’t be afraid to combine different fiber arts. Here, a macrame header flows beautifully into a fabric collage landscape.
Create your background fabric first, using dyeing techniques or piecing together a painted-sky gradient.
Layer your appliquéd mountains on top, using quilting to add texture and dimension to the snowy peaks.
Incorporate unique elements like tie-dyed fabric strips at the bottom to add fringe and movement, tying the whole eclectic piece together.
15. Stitch a Geode with Batik and Metallic Threads
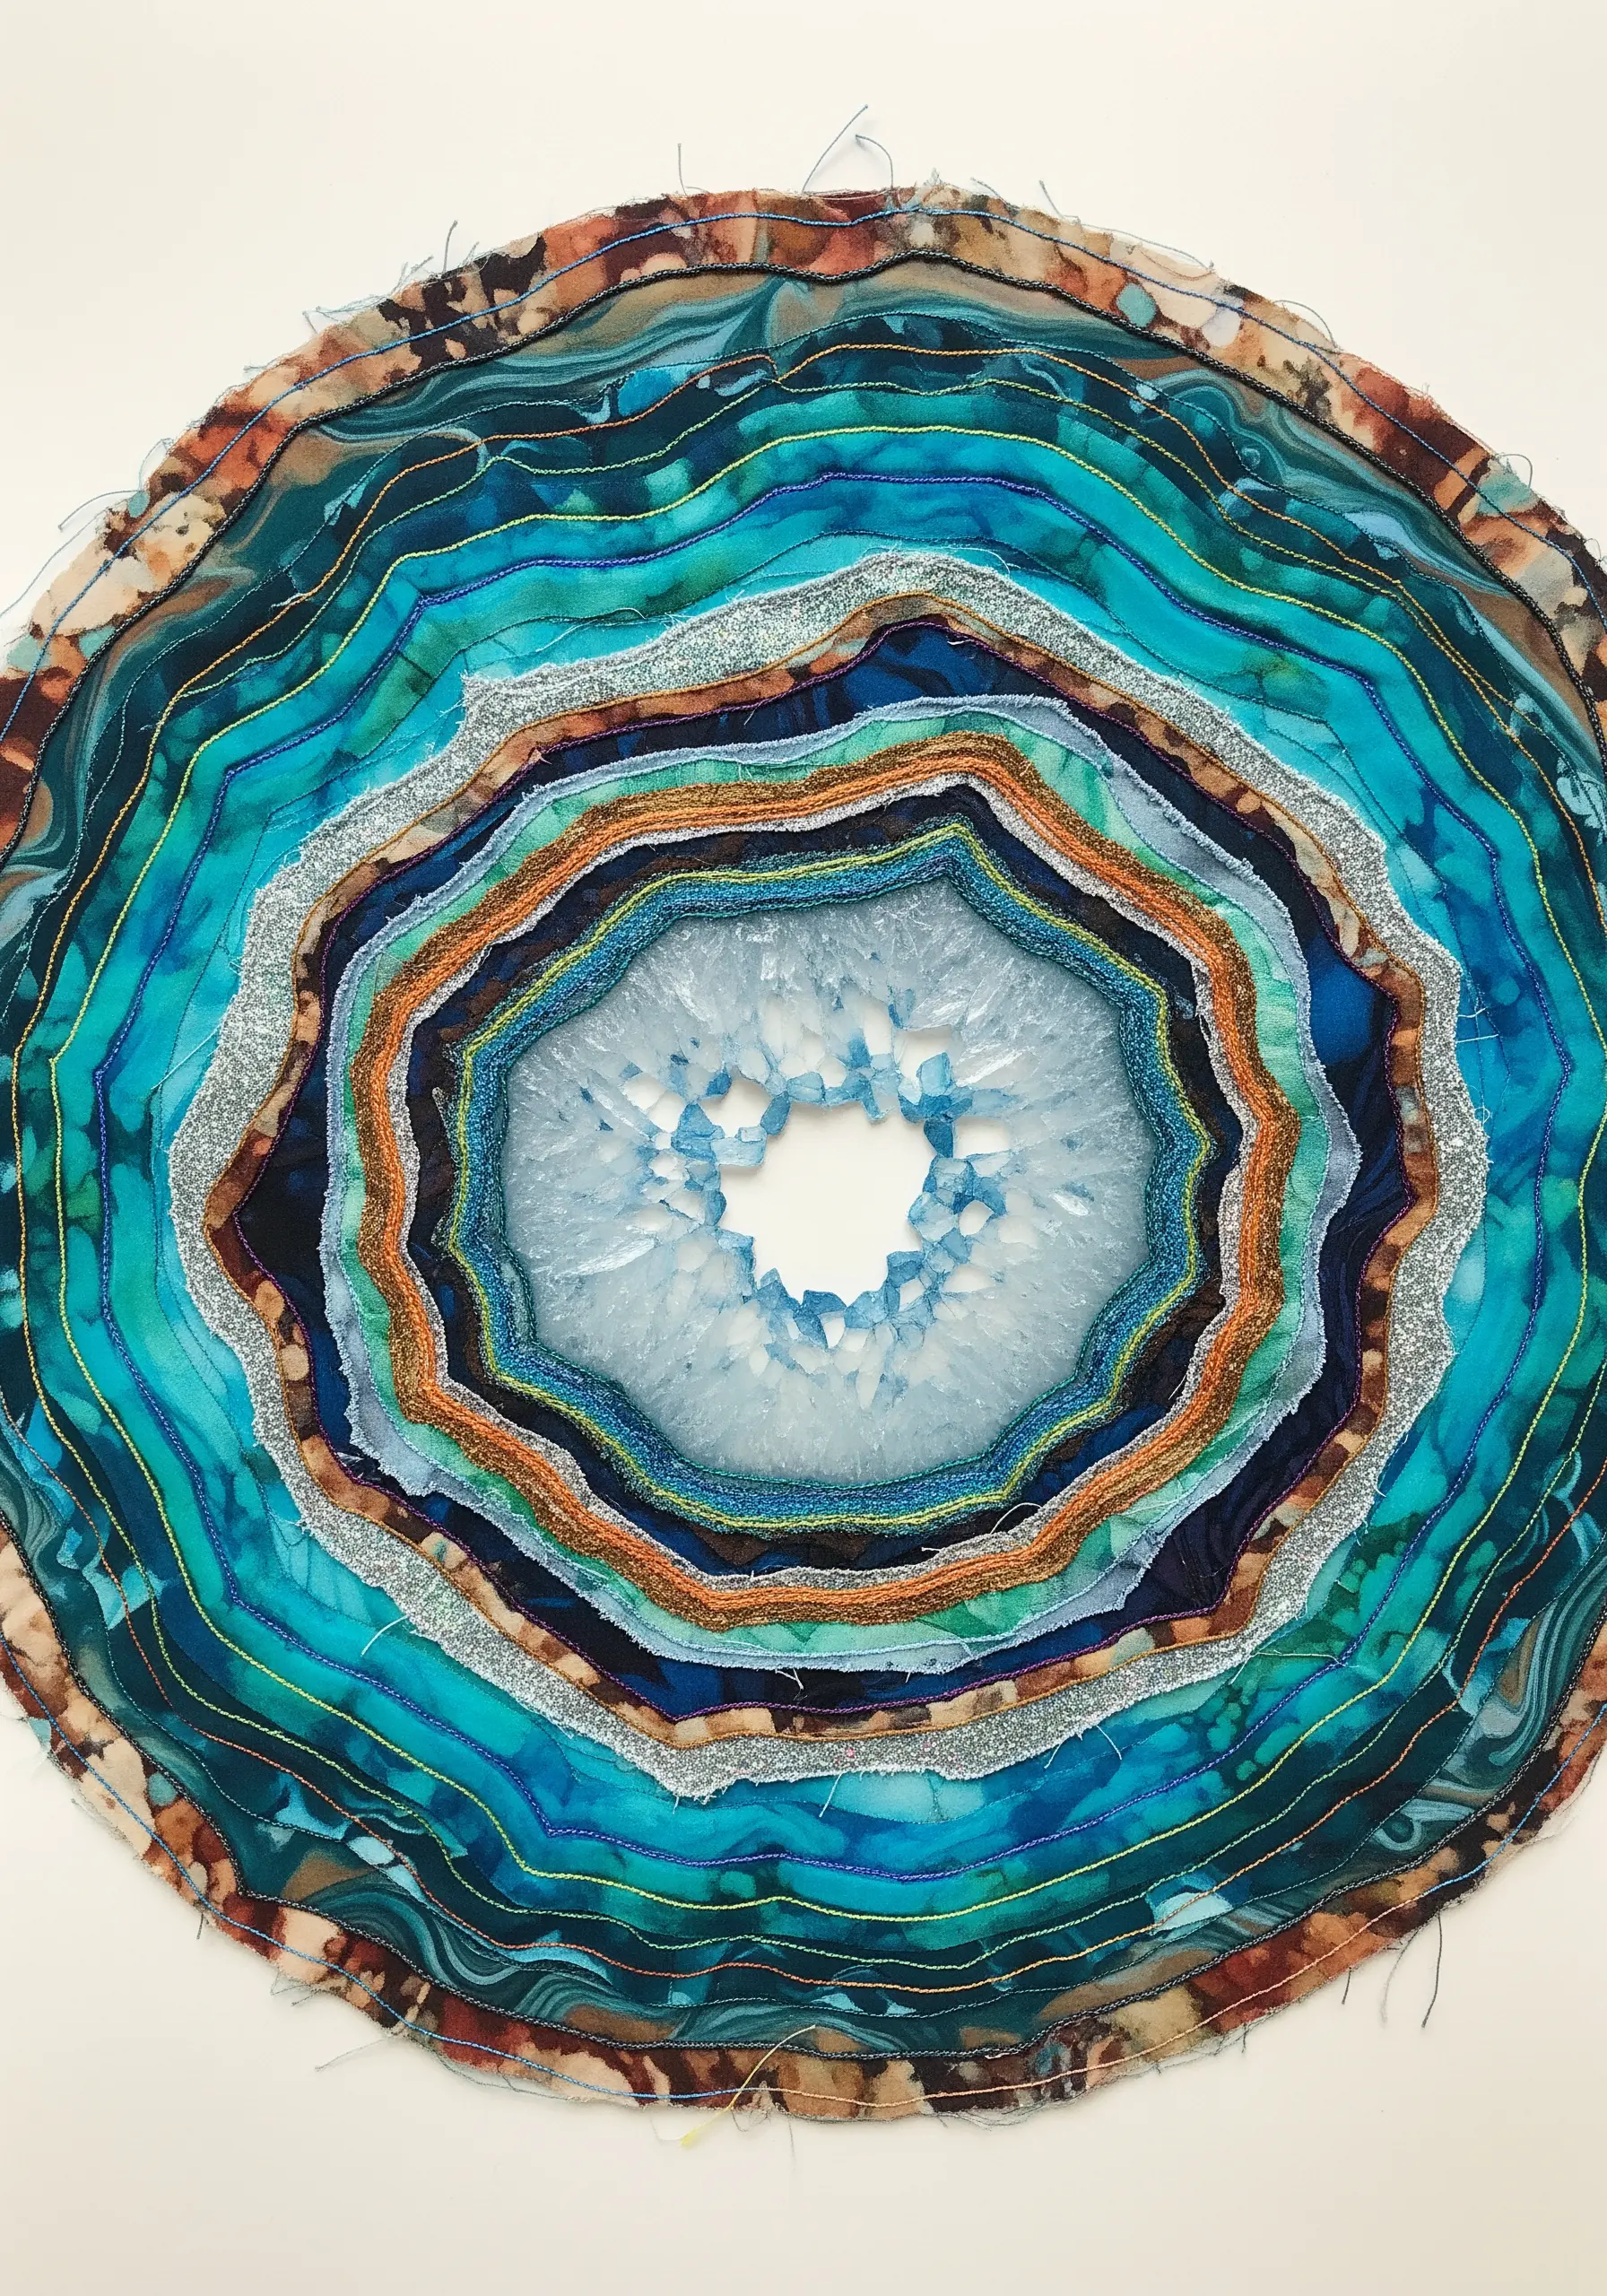
Mimic the concentric rings of a geode by layering circles of batik fabric, which already has a natural, mineral-like pattern.
Leave the edges raw and wavy to enhance the organic feel of the rock formation.
Incorporate layers of silver or glitter fabric to represent the crystalline interior, adding a crucial textural contrast.
Use a meandering stitch in a gold metallic thread to secure the layers, adding another line of sparkle that defines the rings.
16. Combine Appliqué and Thread Painting for Realism
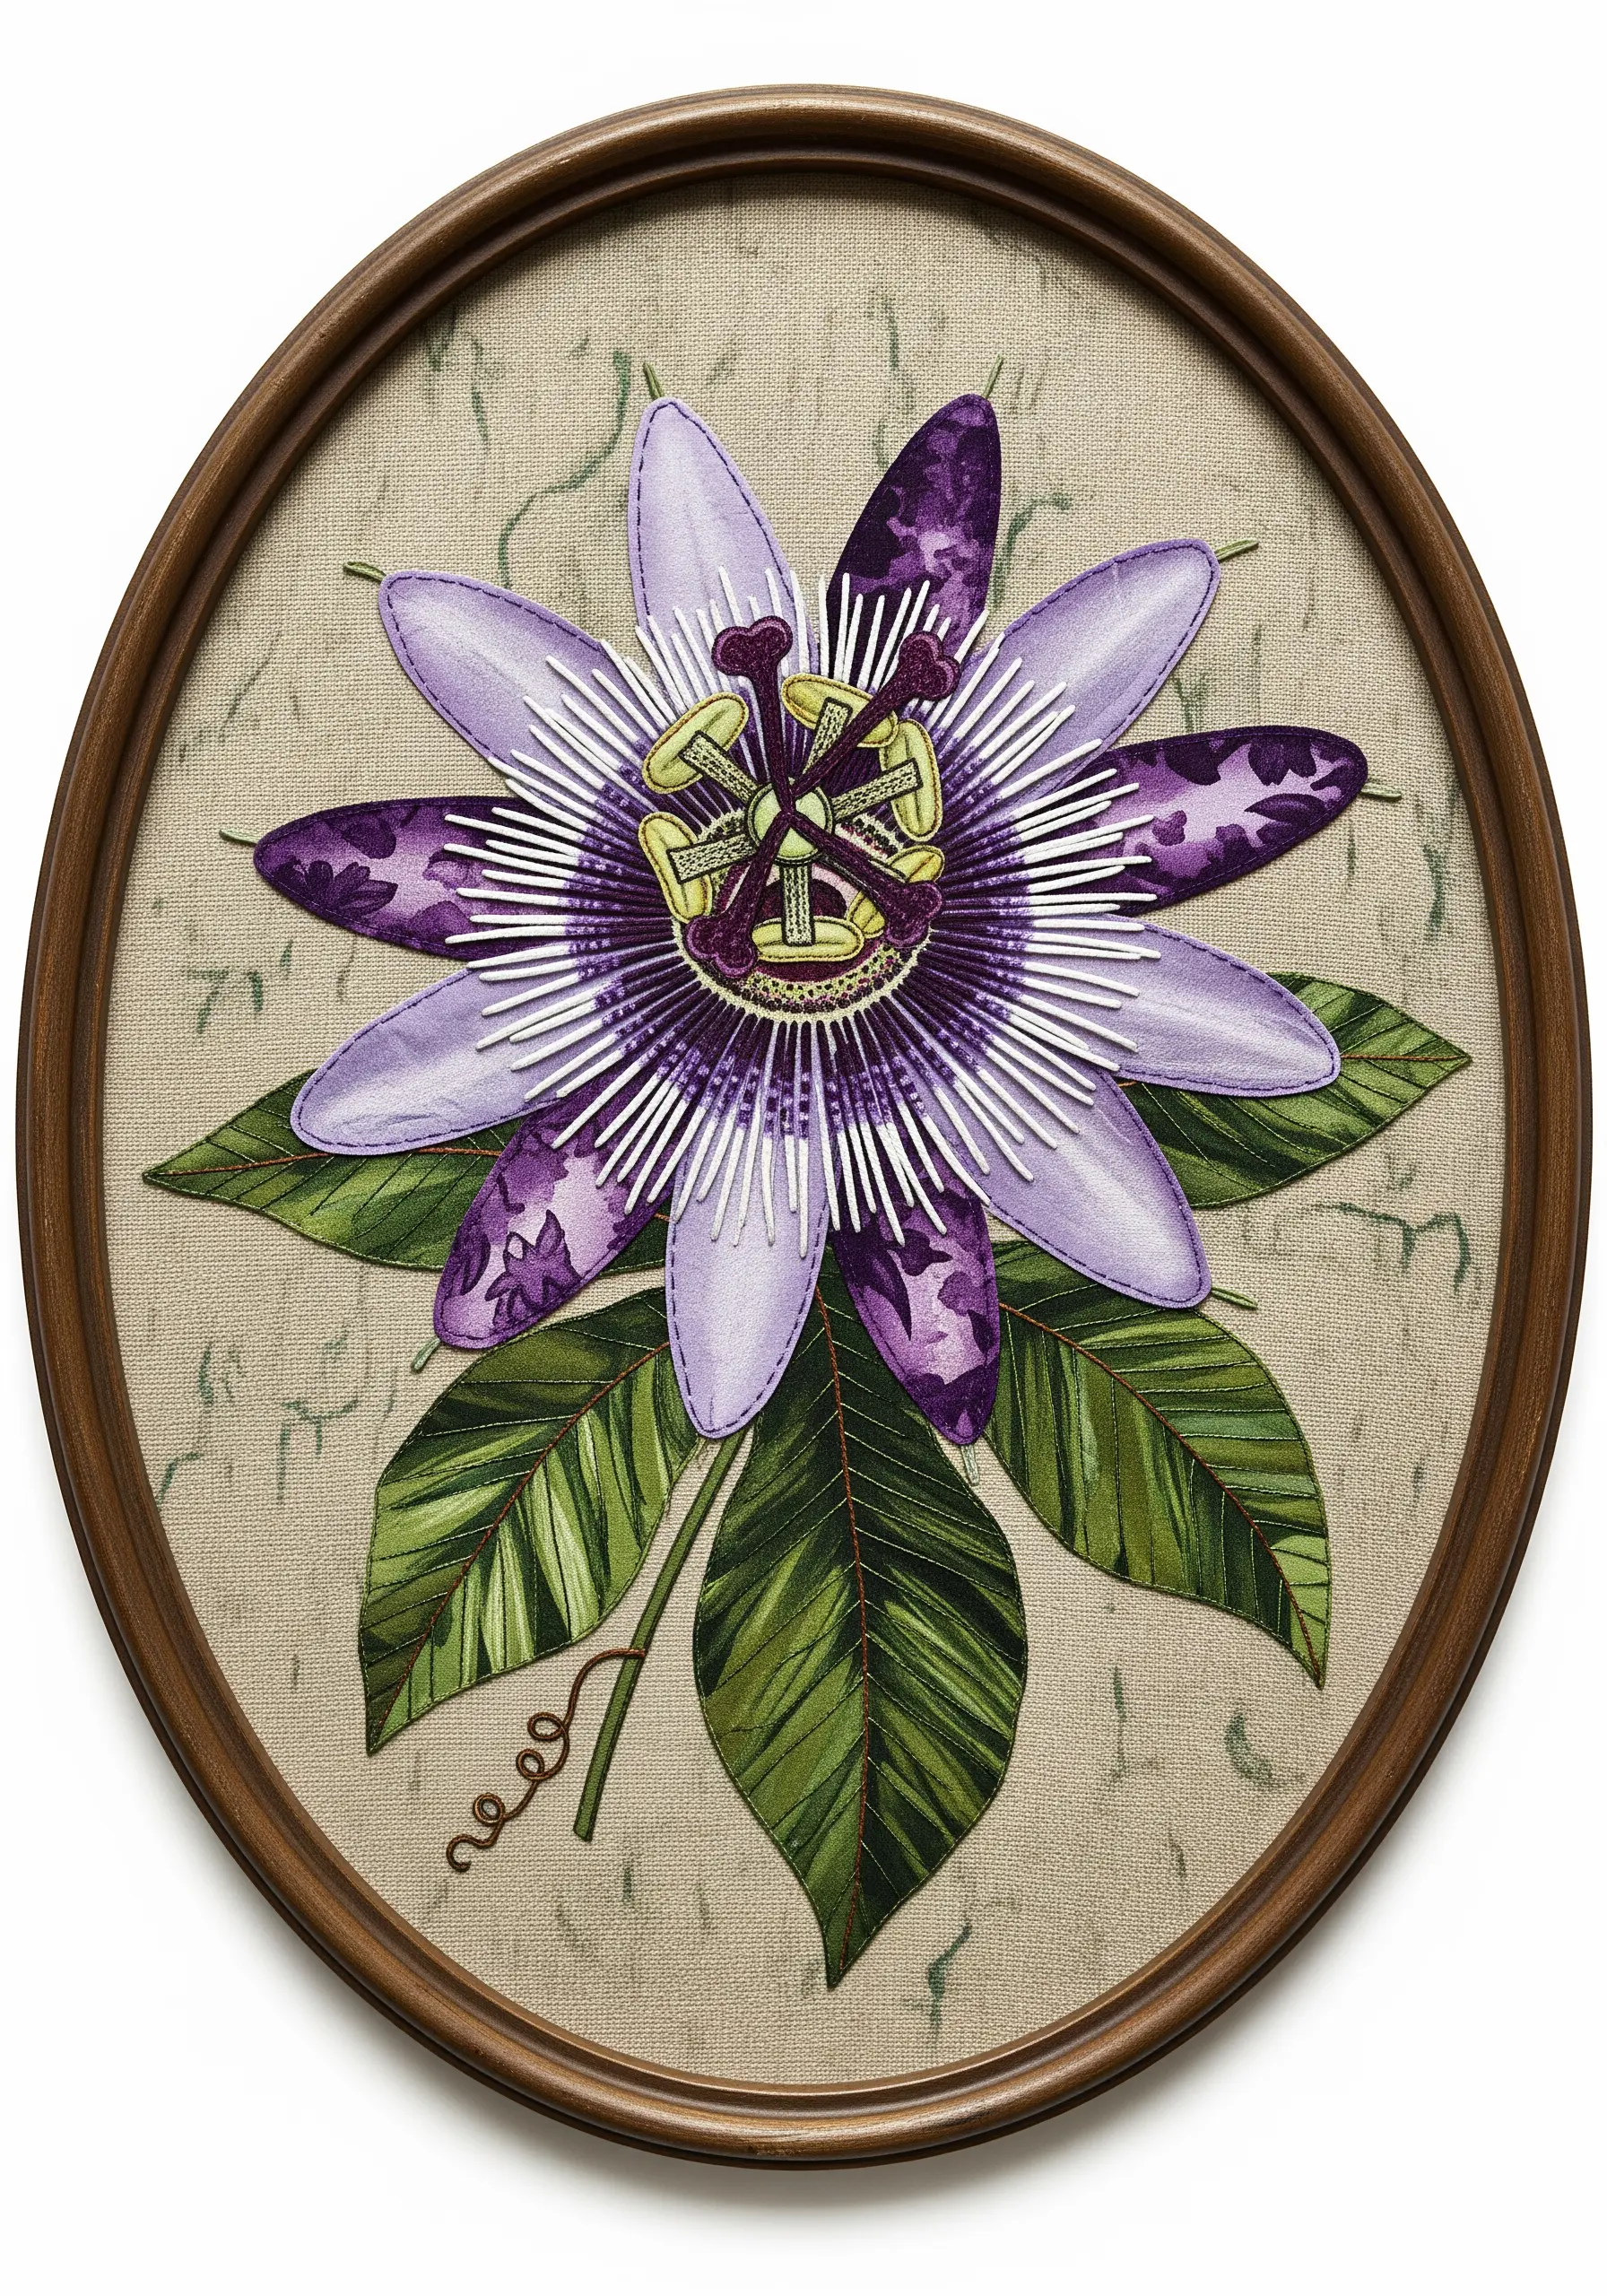
For complex botanicals, start with a fabric appliqué base for the larger shapes like petals and leaves.
Use fabrics with subtle patterns or hand-dye them to create initial color variation and depth.
Then, work over the top with dense thread painting—using long and short stitches—to add fine details, shadows, and highlights that the fabric alone cannot provide.
These are the fundamentals of floral thread painting techniques to make petals look hyper-realistic.
17. Define Regions with Contrasting Patterns
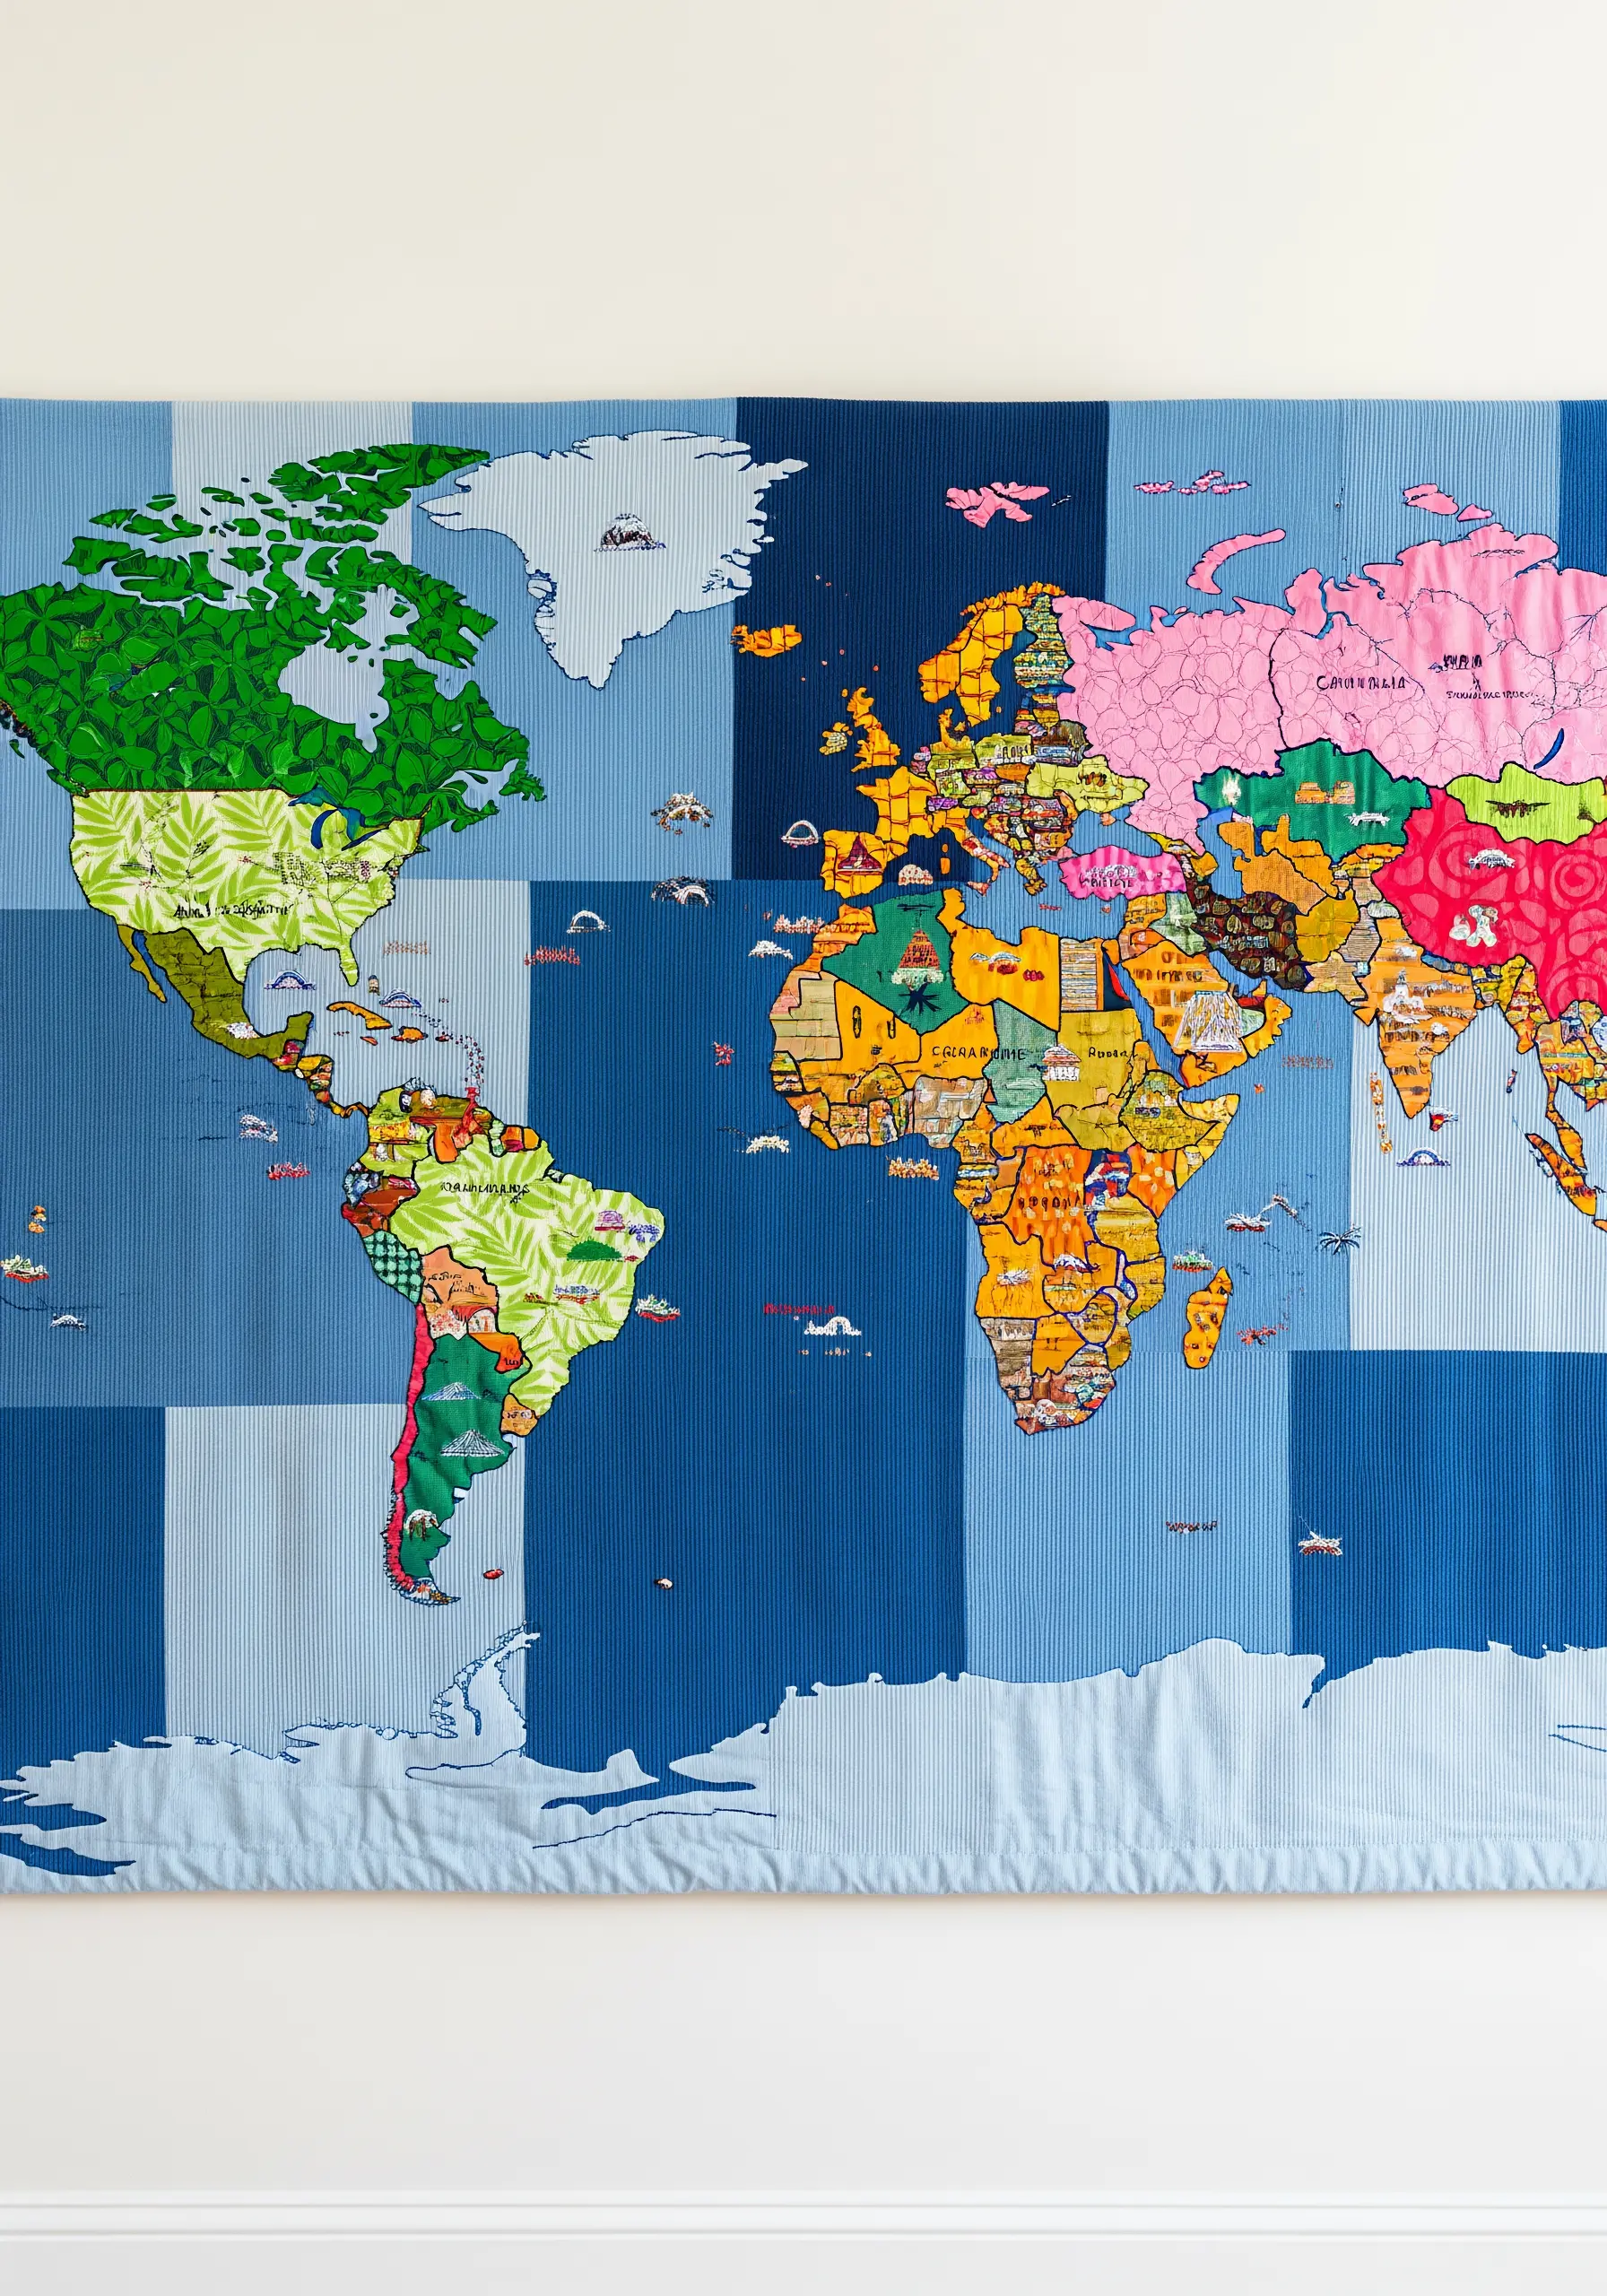
When creating a complex composition like a map, use distinct patterns to visually separate different sections.
Assign a unique fabric—like leafy greens for South America or vibrant florals for parts of Asia—to give each area its own personality.
Place these patterned pieces against a more uniform, subtly textured background, like a striped or solid blue for the ocean, to ensure the landmasses are the clear focus.
This technique turns a potentially chaotic design into an organized, readable, and visually delightful piece of art.
18. Build a Scene with Layered Mixed Media
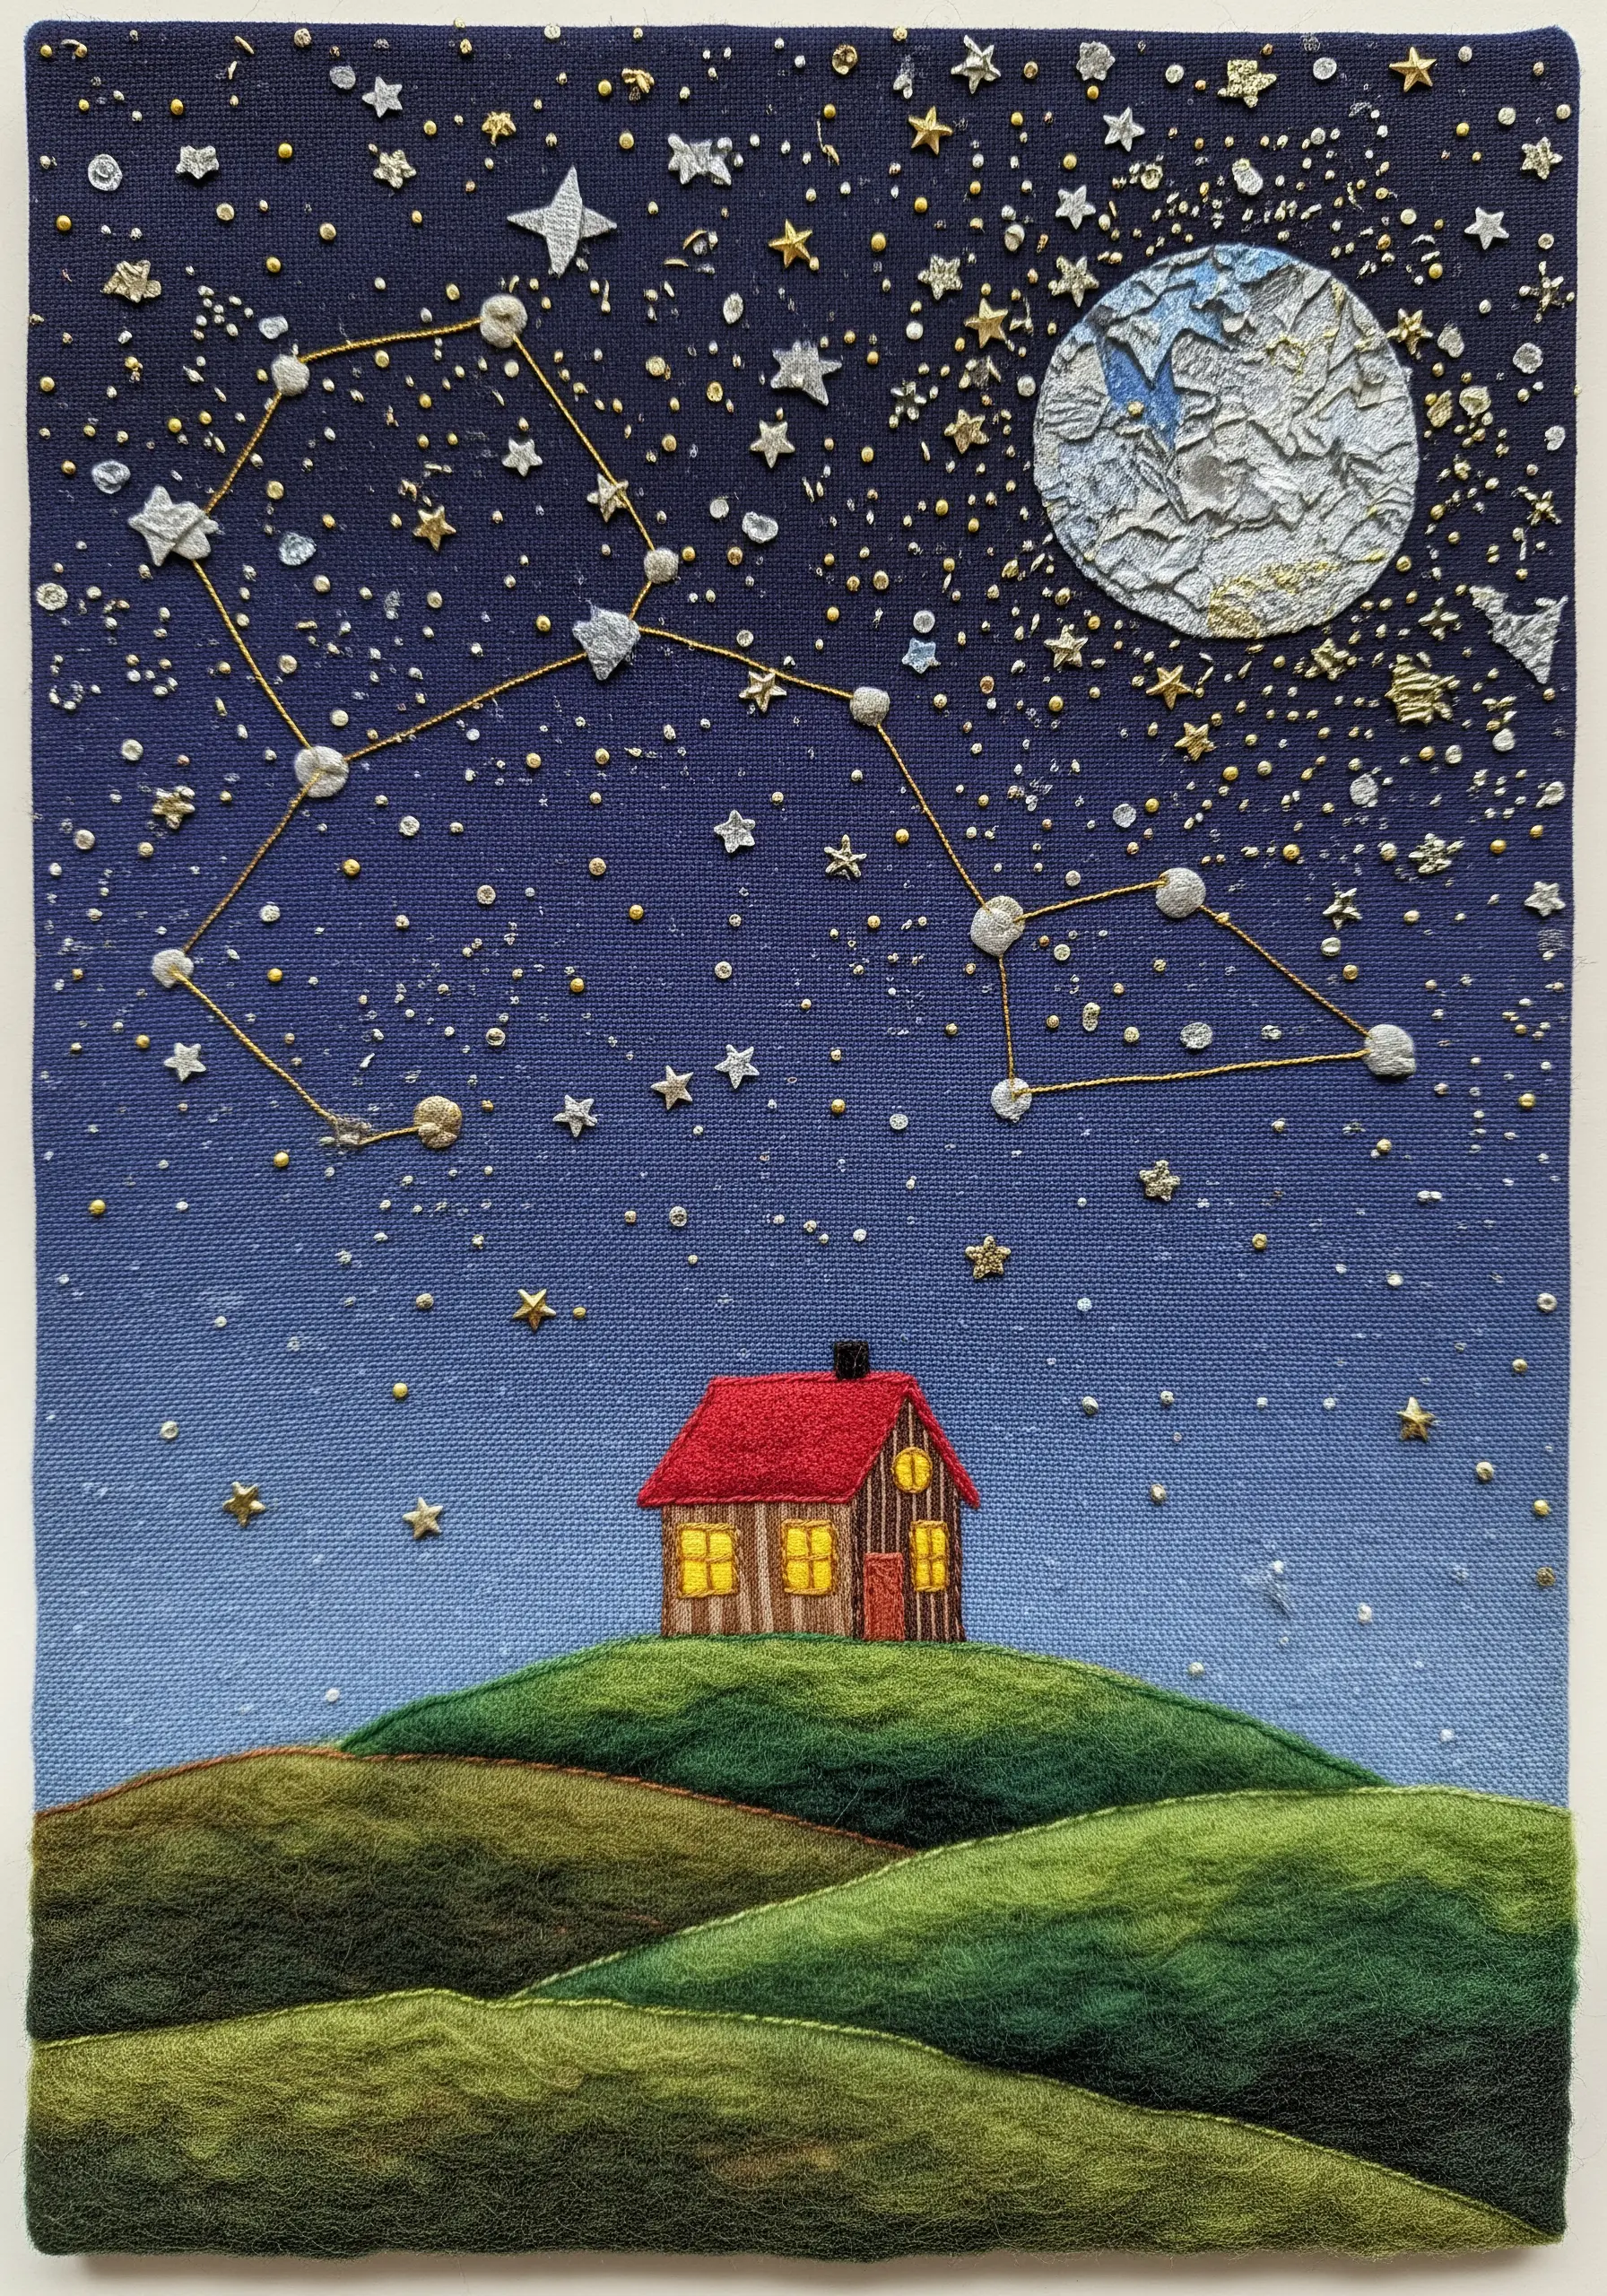
For these types of DIY mixed-media embroidery projects, start by painting a simple gradient on your canvas for the night sky to create a smooth, atmospheric base.
Create soft, rolling hills by needle-felting wool roving directly onto the canvas, which provides a beautiful, fuzzy texture that contrasts with the flat sky.
Add your focal point—an appliquéd cottage with tiny stitches for windows—to ground the scene.
Finally, scatter French knots, seed beads, and star-shaped sequins across the sky to create a magical, twinkling constellation that feels both deep and detailed.
19. Create Depth with Monochromatic Texture
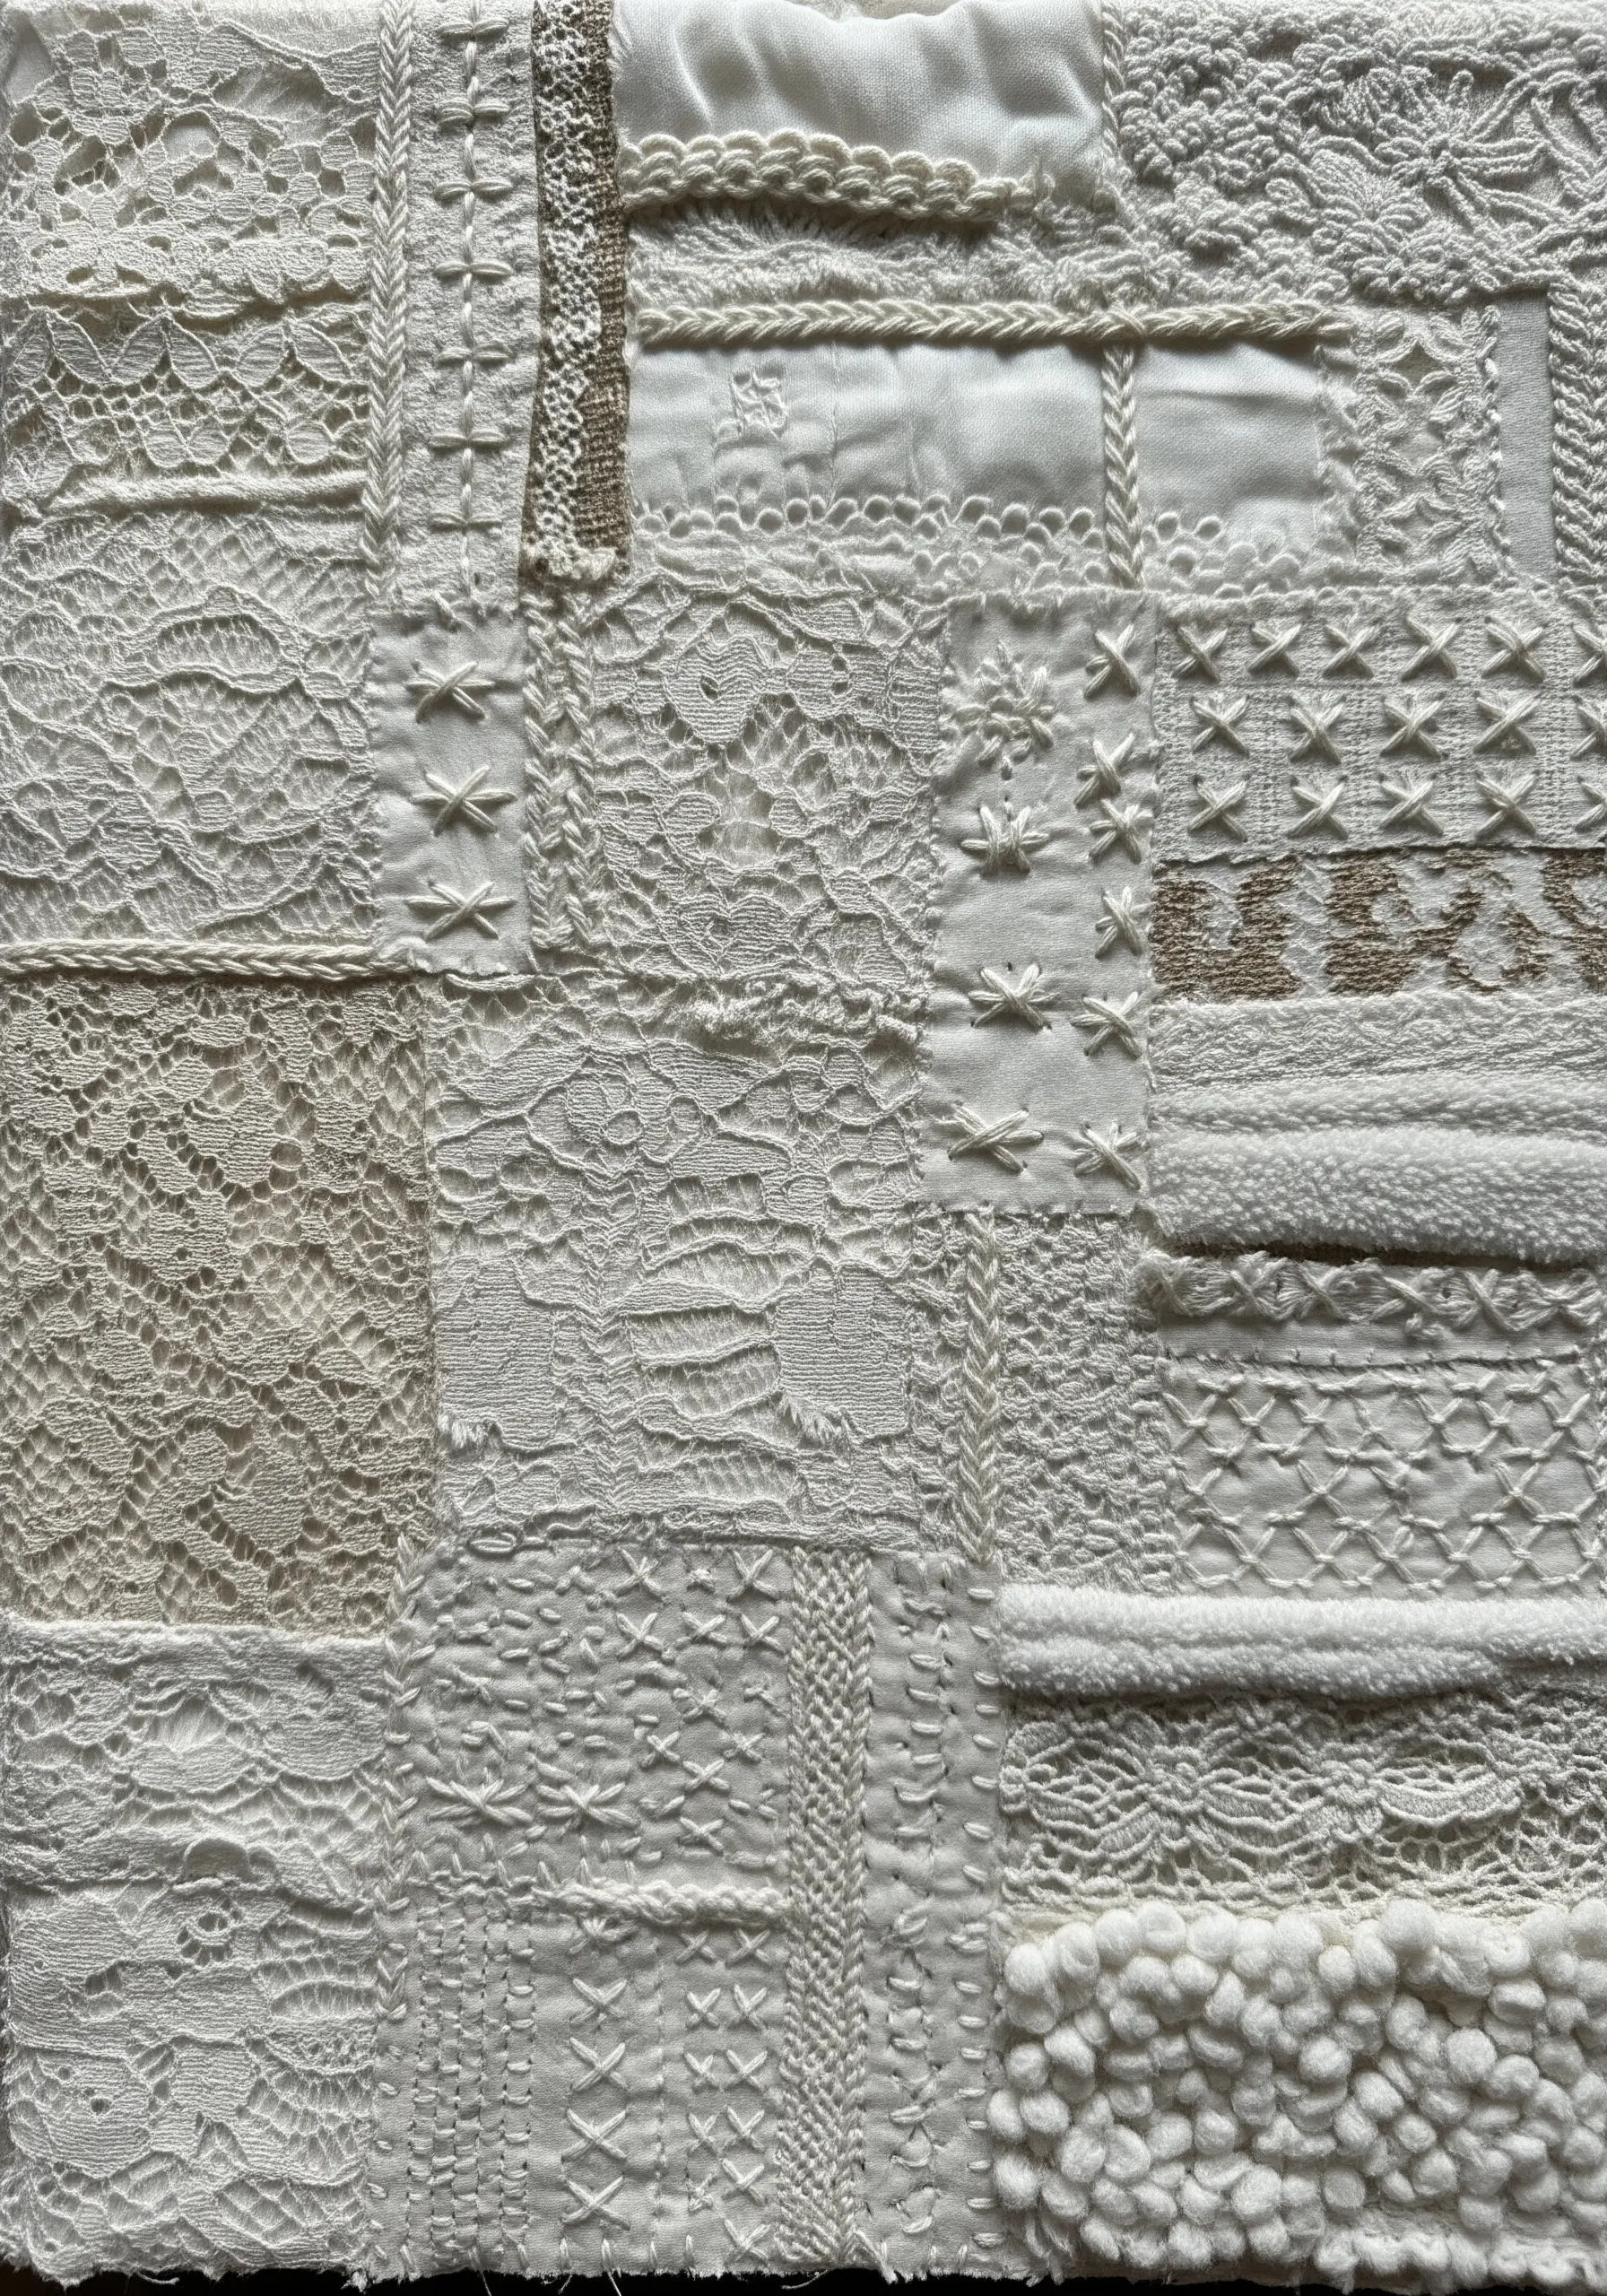
A single-color palette forces you to focus entirely on texture. Gather fabric scraps in one color, like white or cream, but with varied weaves and surfaces: lace, cotton, wool, satin.
Arrange them in a simple patchwork grid to let the subtle differences shine.
This is a perfect example of high-texture fabric collage embroidery, where you add hand stitching—like seed stitches or cross stitches—using a thread of the same color for another layer of quiet, tactile detail.
The final piece becomes a sophisticated study in light and shadow, proving that color isn’t necessary for a rich visual experience.
20. Combine Paper Art and Stitching for 3D Effects

Bridge the gap between paper crafts and embroidery by incorporating 3D objects like origami cranes into your work.
Secure the paper elements to the fabric with a few discreet stitches through their center.
Use fine, colorful threads to stitch sweeping, curved lines that connect the objects, suggesting flight paths or gentle breezes.
This minimalist approach is one of my favorite paper art projects that turn simple stitches into stunning decor, blending two art forms into one cohesive piece.
21. Sculptural Appliqué for Still Life
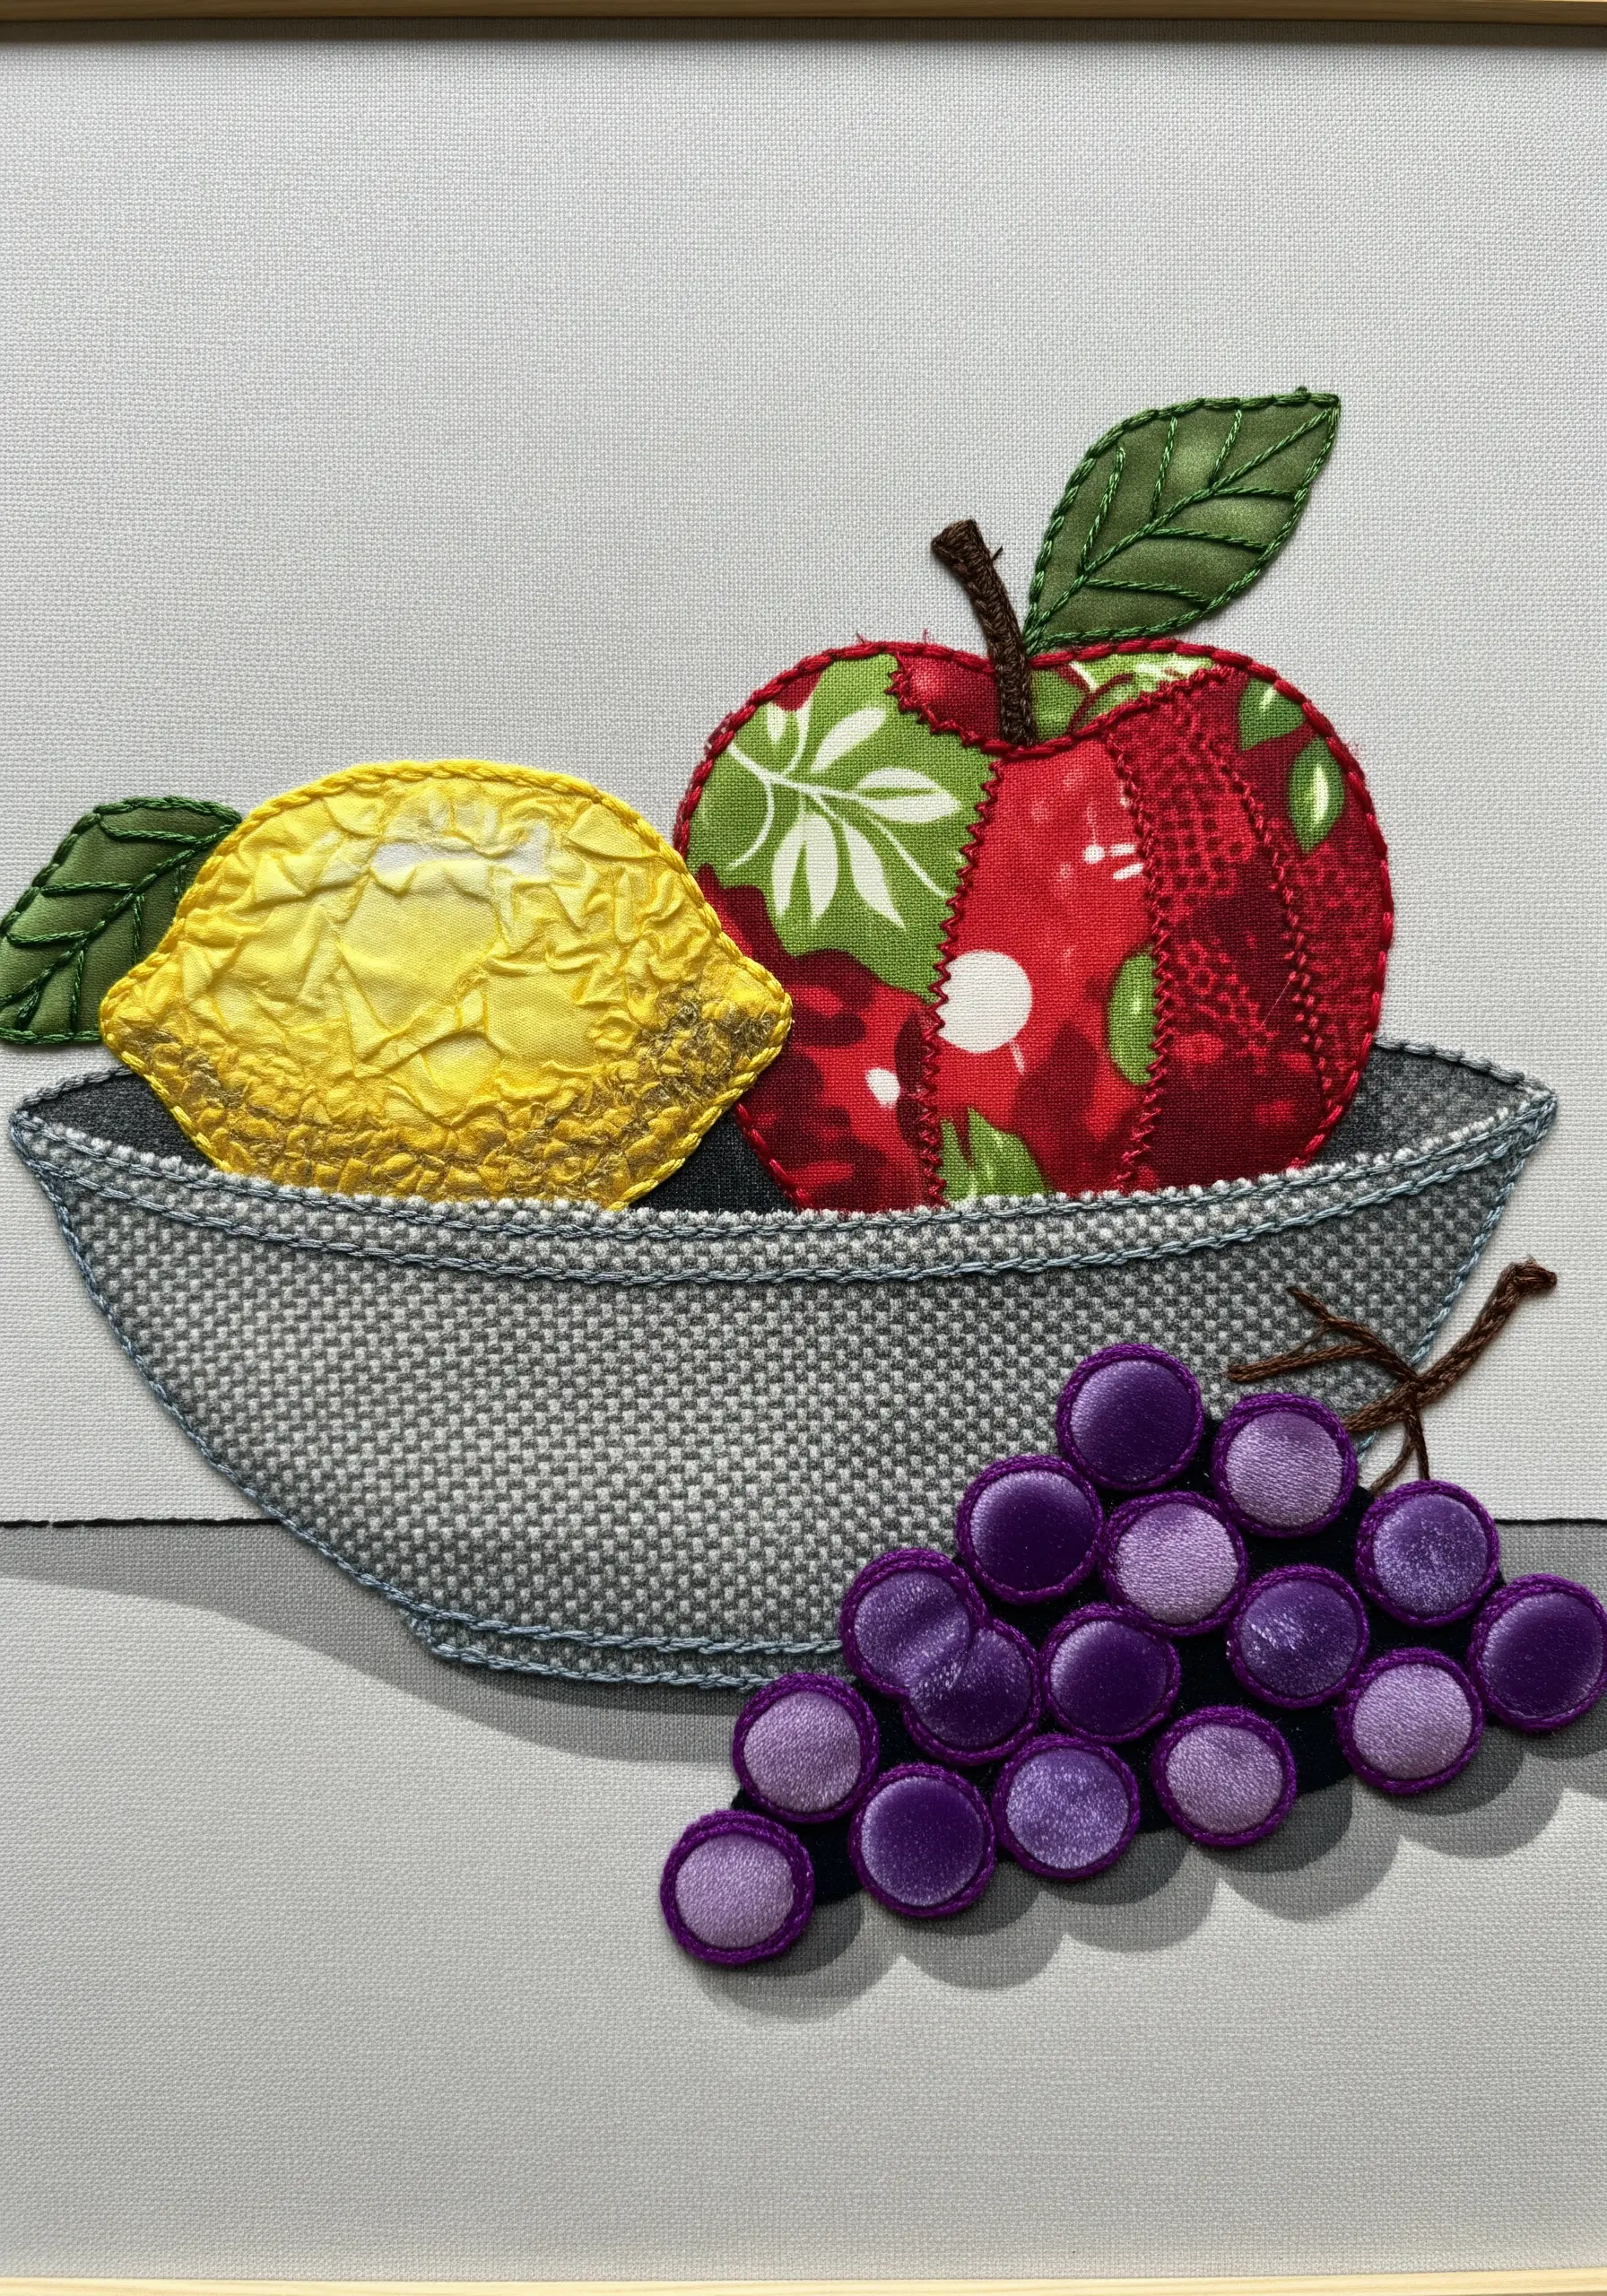
Give your appliqué subjects three-dimensional form using trapunto, a technique where you stuff small padded shapes from behind.
For the grapes, create individual stuffed velvet circles and cluster them together to create a realistic bunch.
For the lemon, use a puckered, textured yellow fabric and add subtle quilting lines to mimic the peel’s texture.
Contrast these sculptural elements with a flat, patterned fabric for the apple to create visual variety and interest.
22. Layered Transparencies for Abstract Compositions
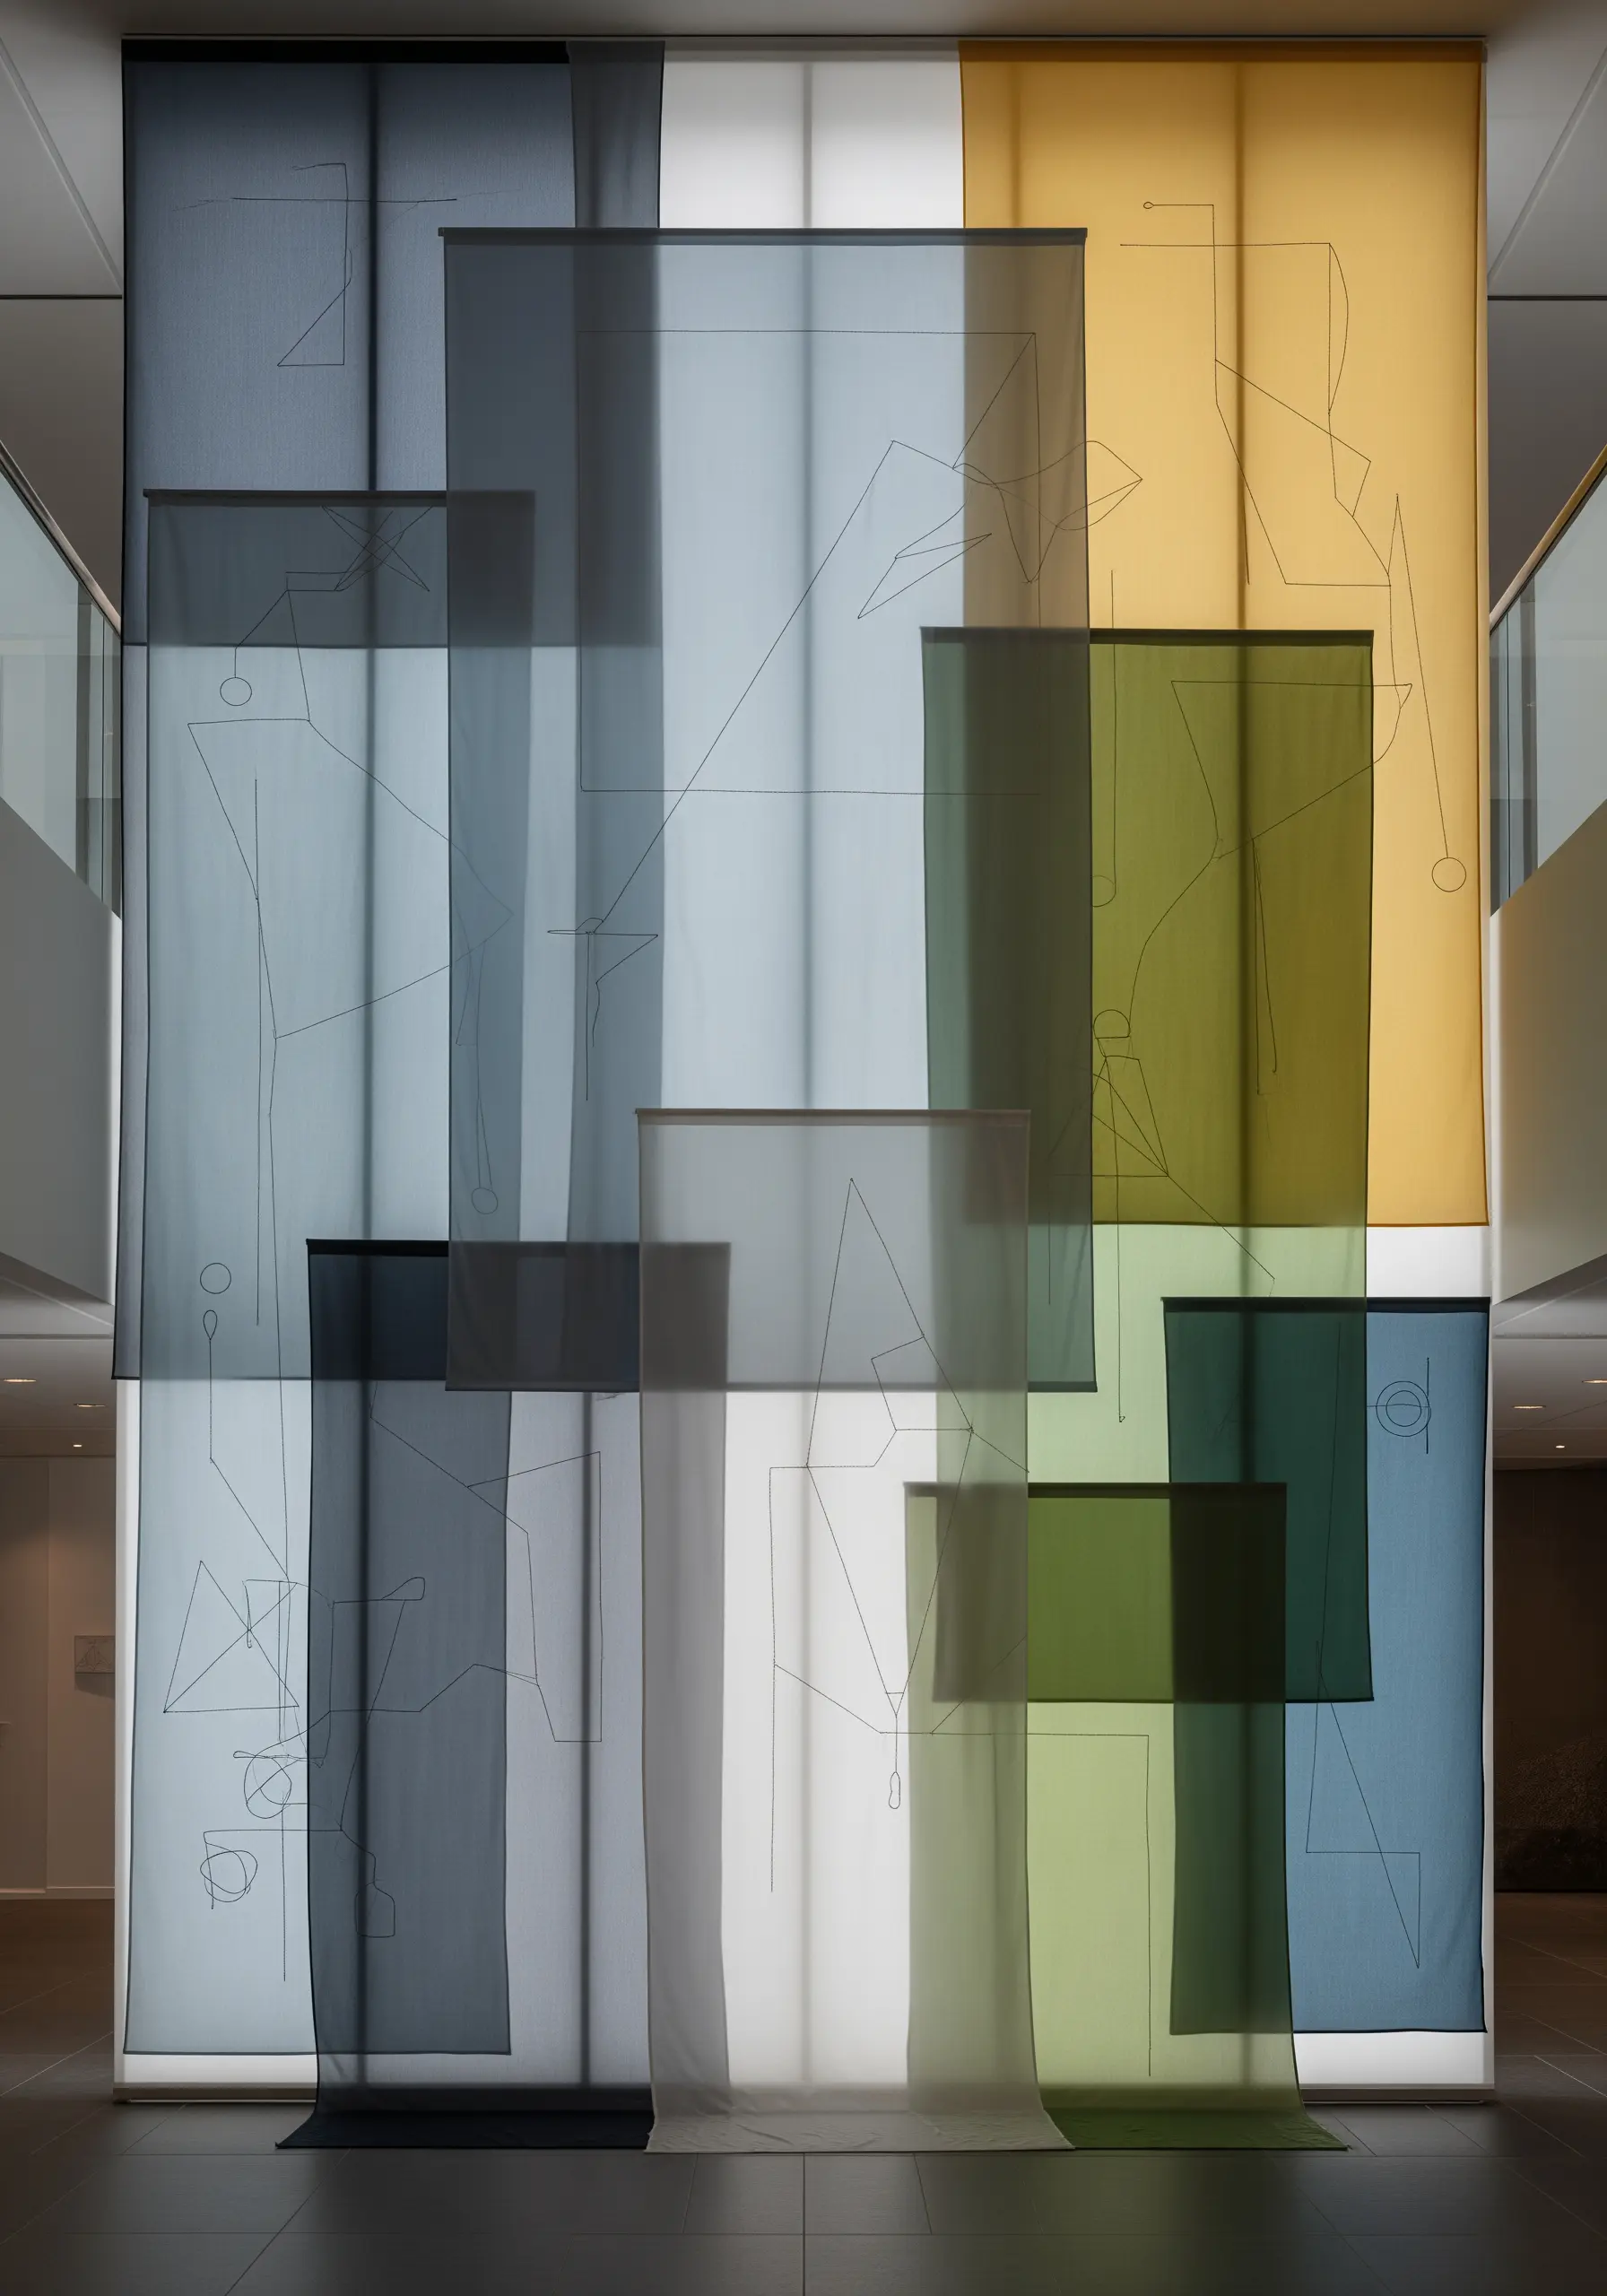
Explore color theory by layering sheer, translucent fabrics. Where colors overlap, new shades will emerge, creating an ethereal, watercolor-like effect.
Keep your stitching minimal—a single, fine backstitch line is enough to add a graphic element without distracting from the color play.
The transparency allows the line art to appear and disappear as it crosses different colored panels, adding complexity and depth.
This technique is perfect for creating large-scale, abstract framed embroidery patterns to add a modern twist to your walls.
23. Create Vibrancy with Log Cabin Patchwork
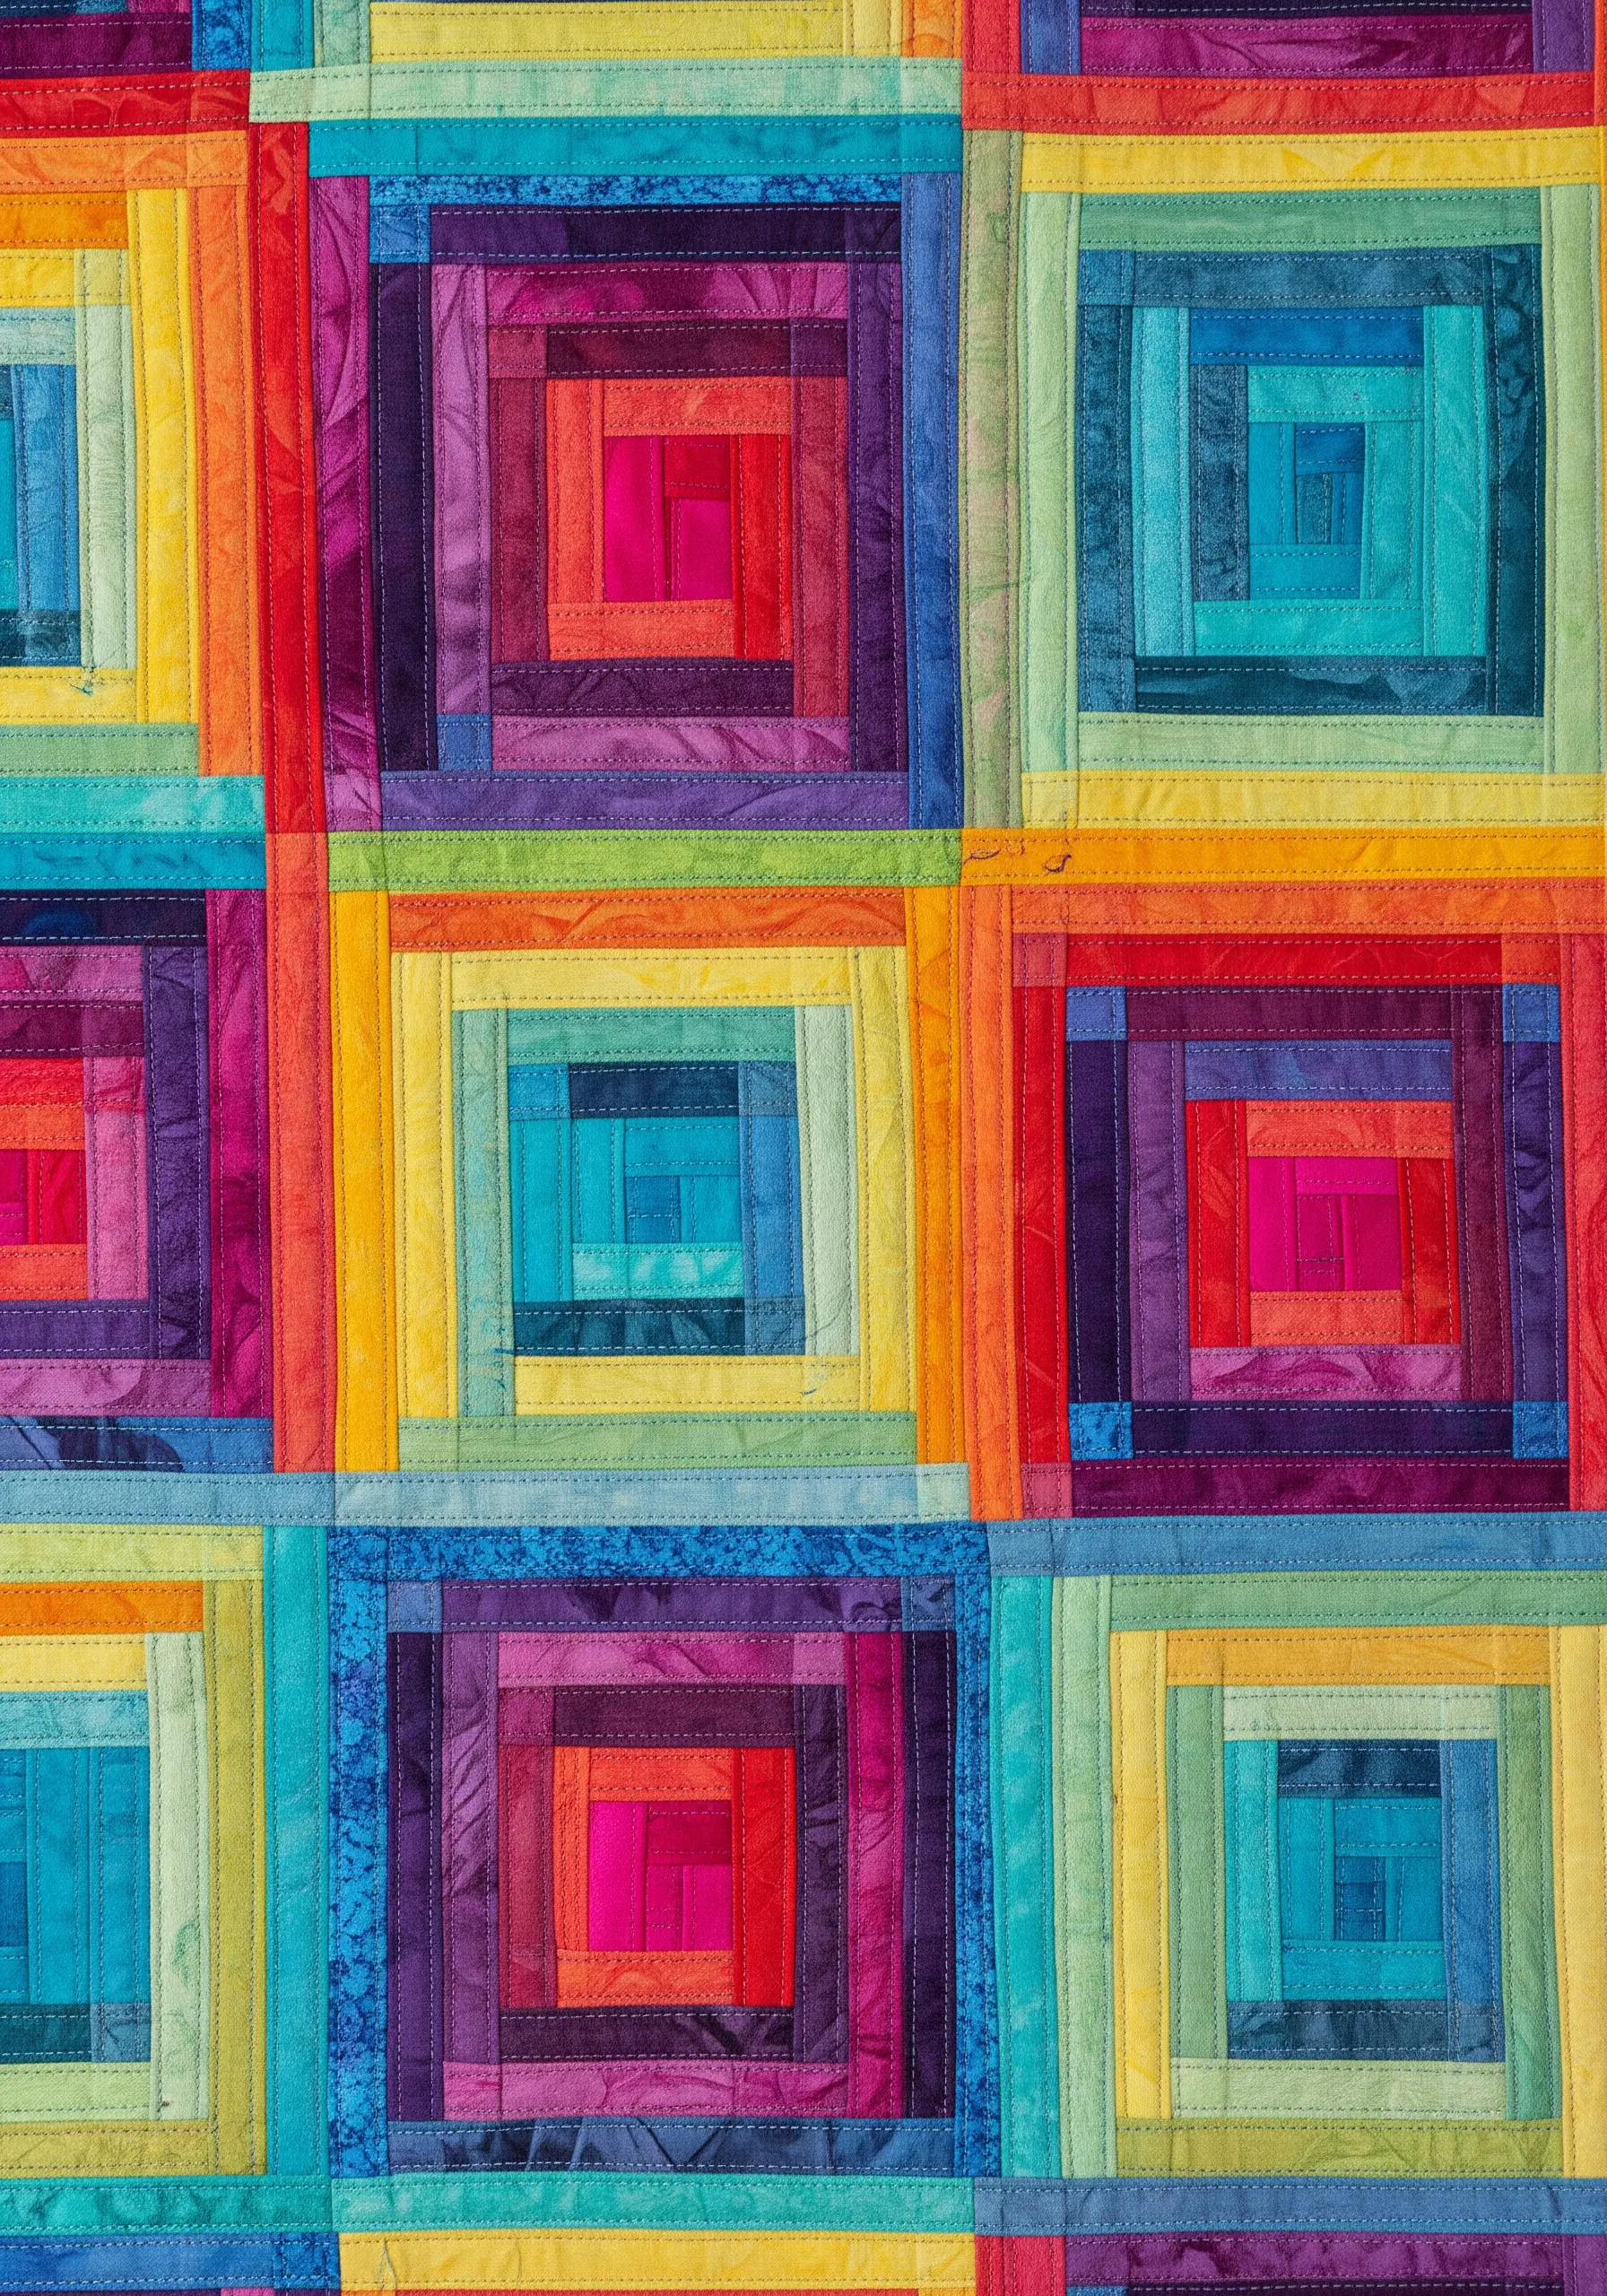
The log cabin quilt block is a classic way to play with color value and create dynamic patterns.
Build each block by stitching fabric strips around a central square, alternating between light and dark values or between different color families.
Use fabrics with subtle tonal variations, like batiks, to add richness and prevent the colors from looking flat.
Arrange the finished blocks in different orientations to create secondary patterns, like diamonds or zig-zags, across the entire quilt top.
24. Layering Felt for a Rich Autumnal Palette
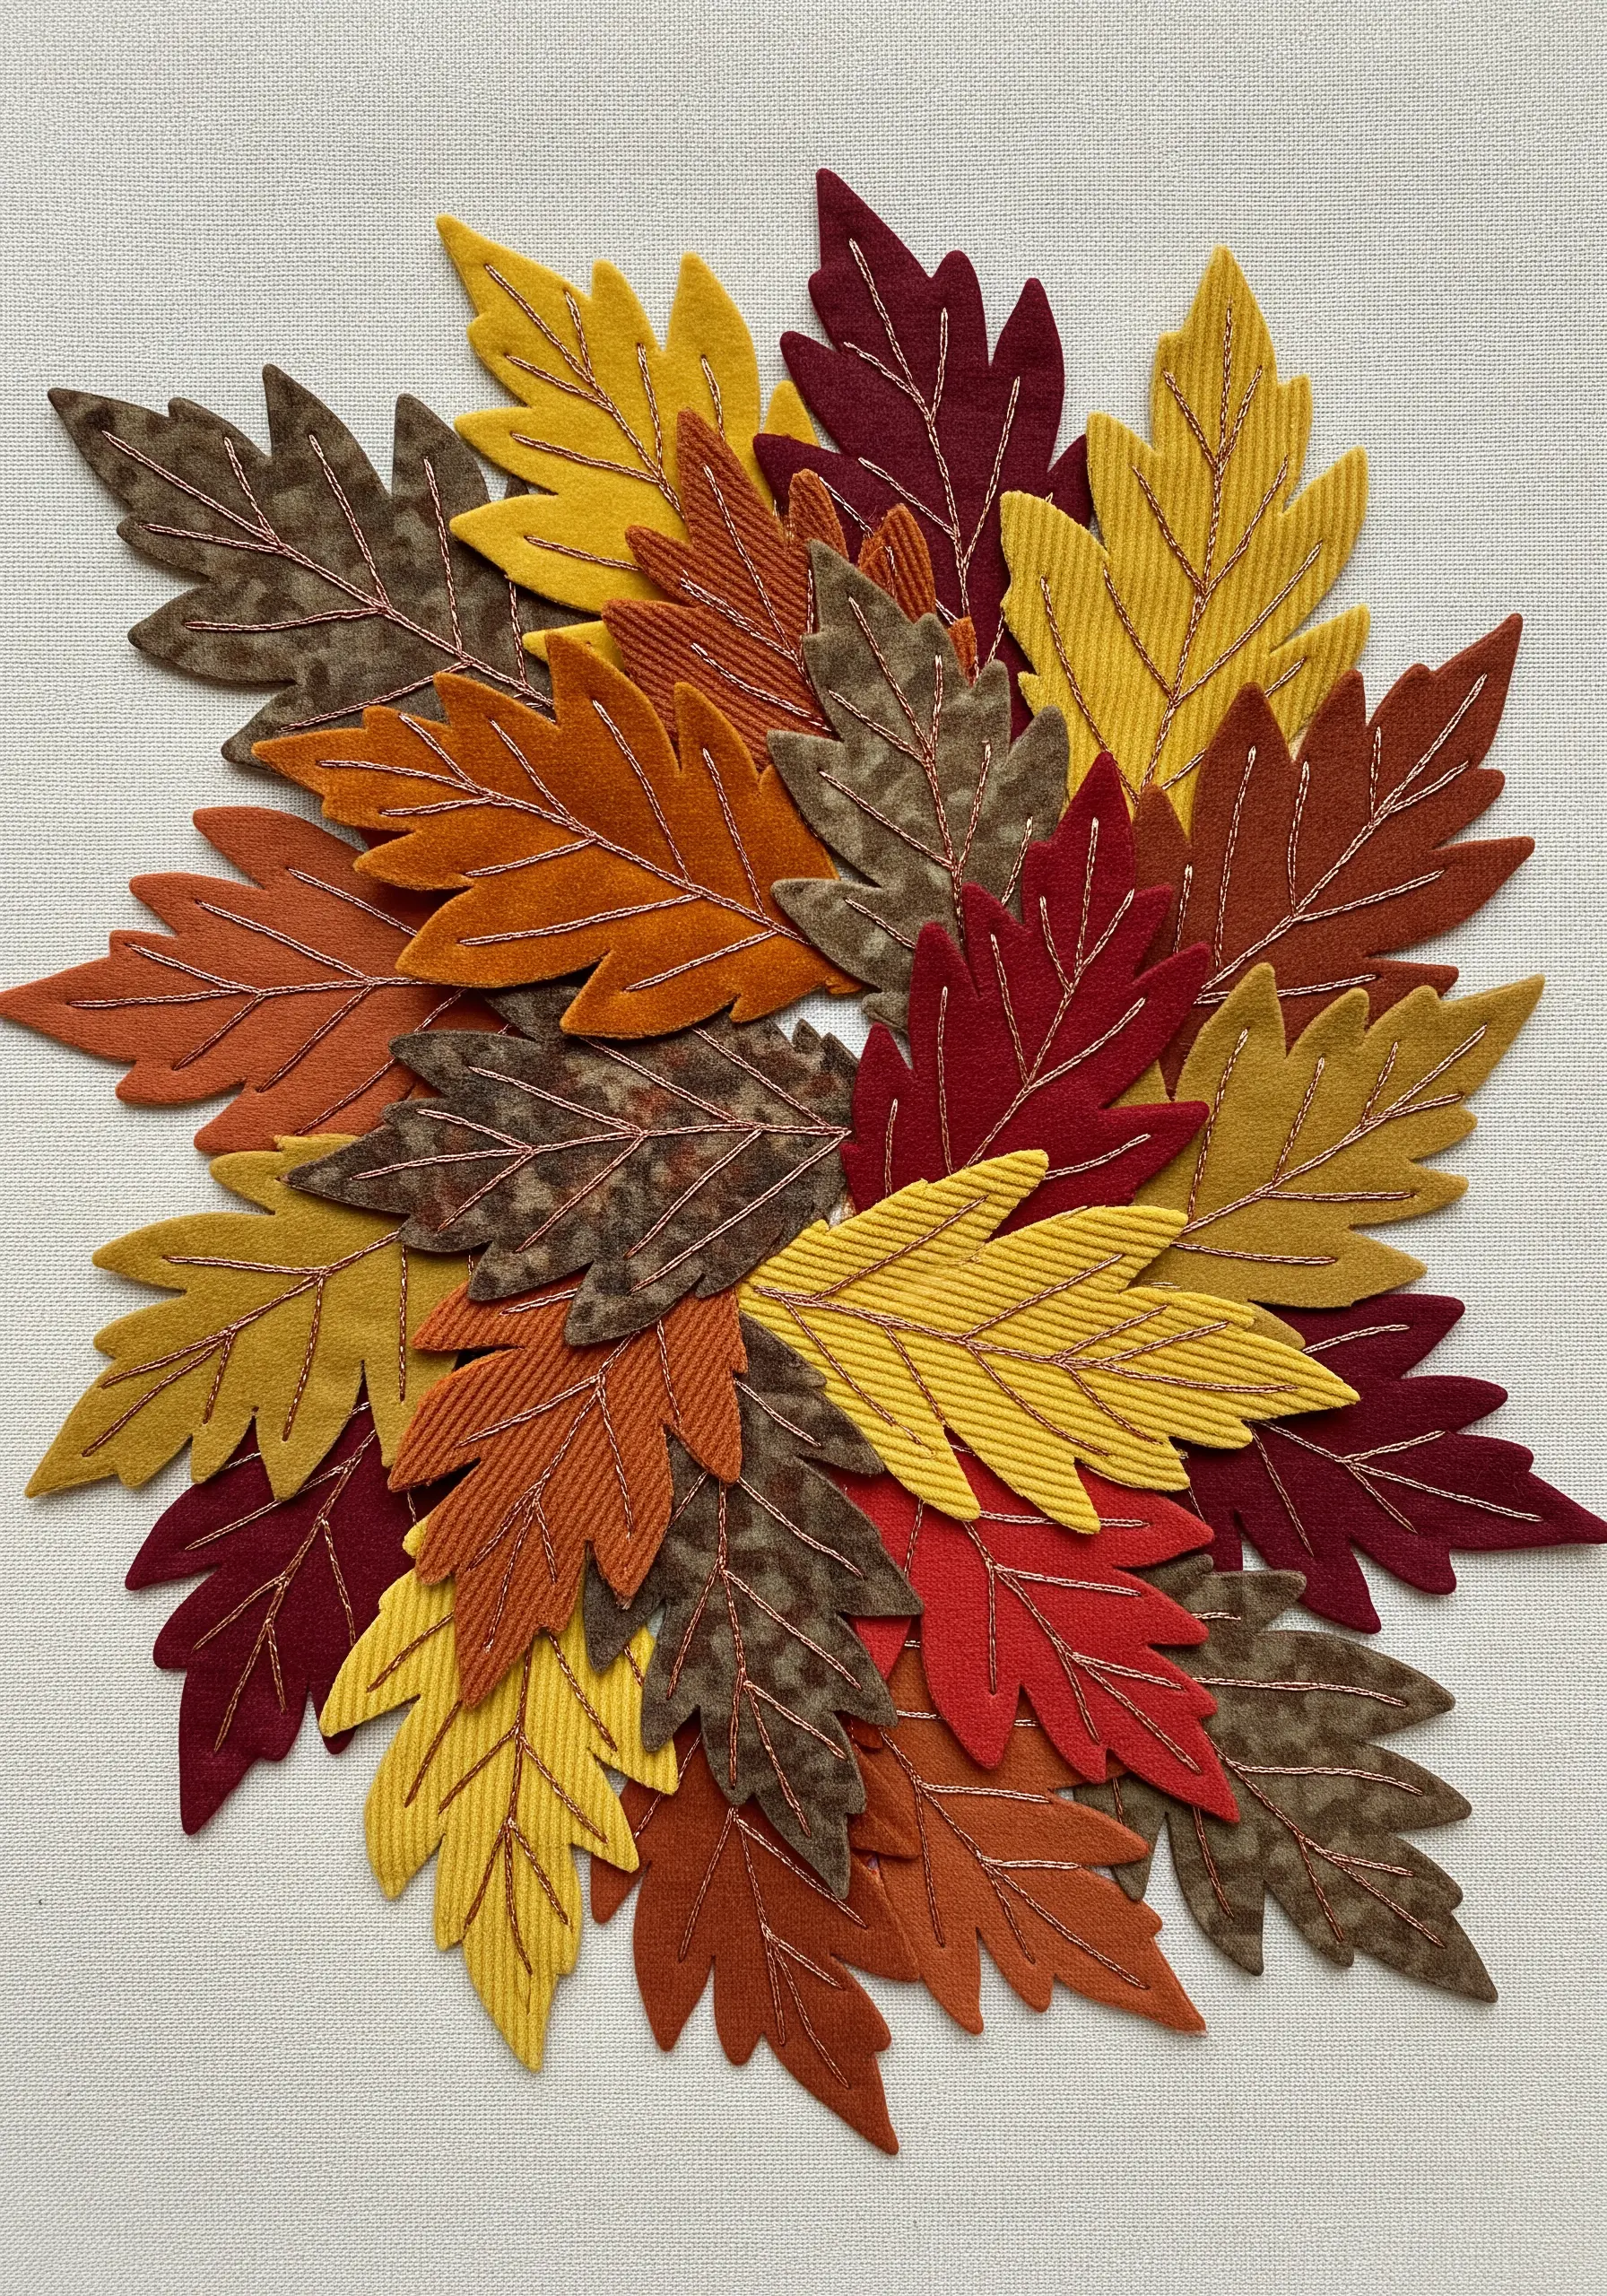
Capture the essence of autumn by layering die-cut felt leaves in a rich palette of mustard, rust, and burgundy.
Introduce textural variety by mixing flat felt with corduroy or other ribbed fabrics.
Use a variegated brown or copper thread for the stitched veins, allowing the subtle color shifts in the thread to add naturalistic detail.
Arrange the leaves in a circular, overlapping pattern to create a sense of movement, as if they’ve been swept together by the wind. Perfect leaf embroidery stitches complete the effect.
25. Tell a Story with Pattern and Texture
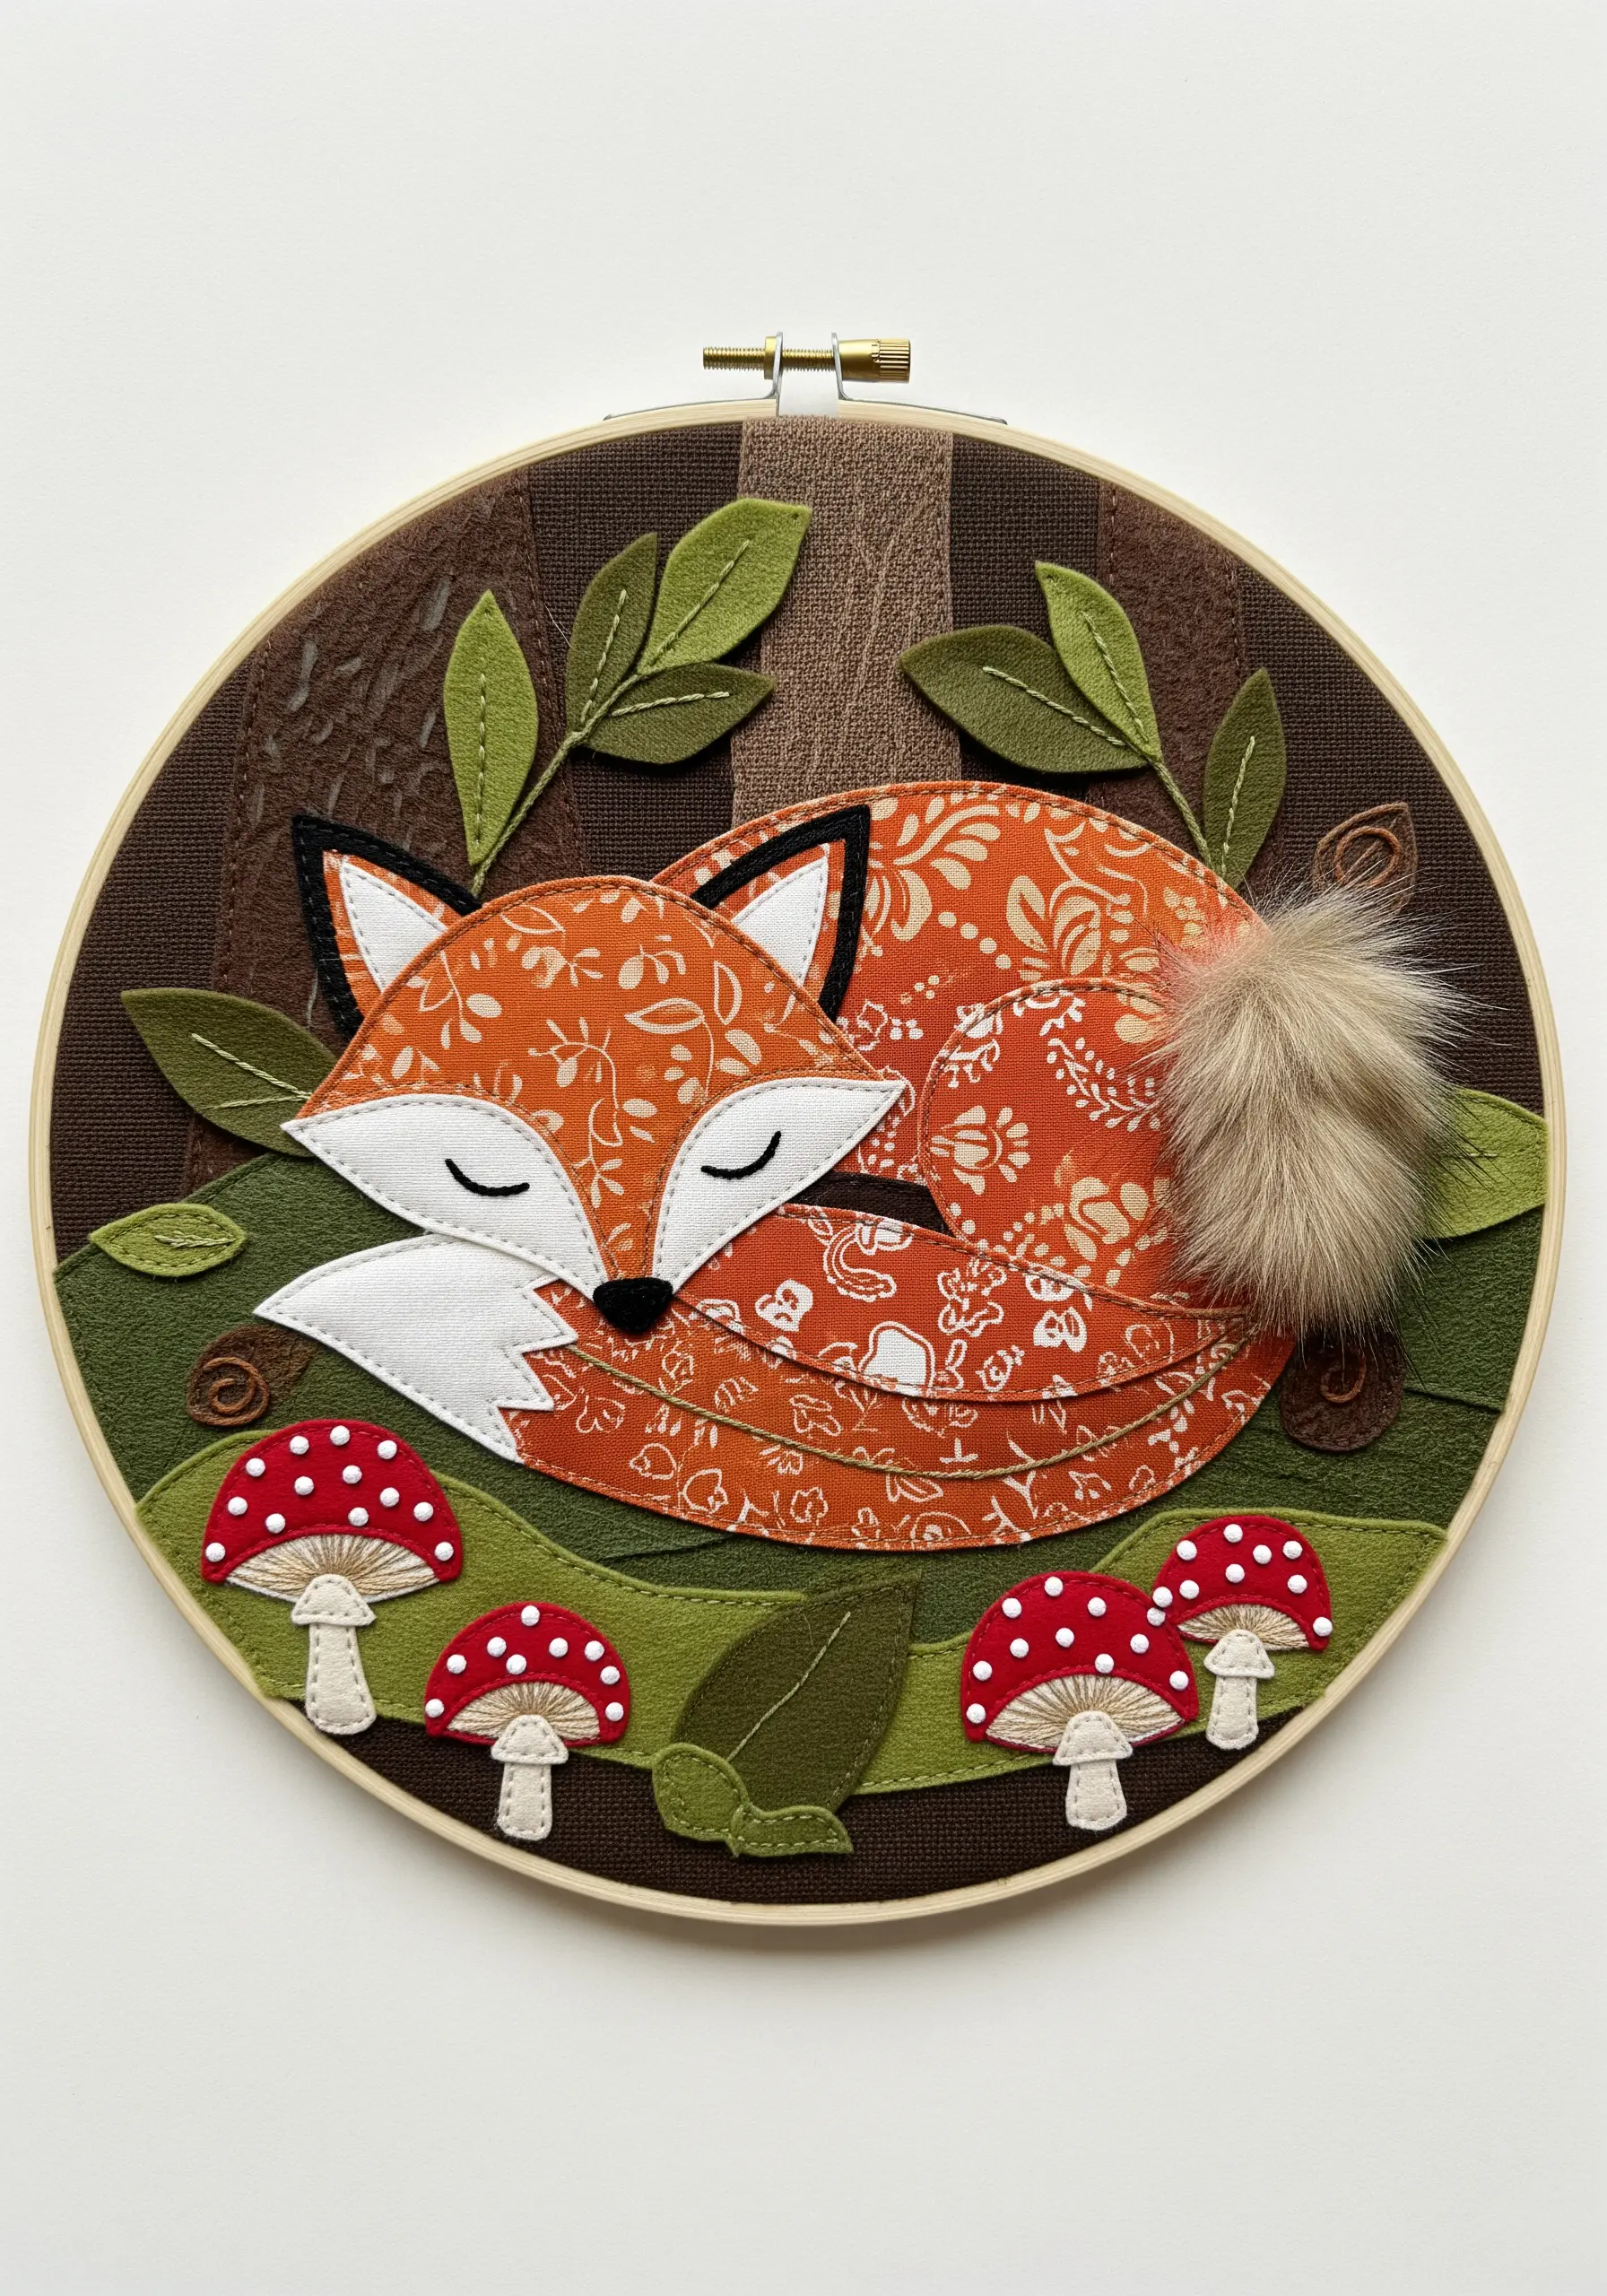
Use fabric choices to build character and narrative. A patterned orange fabric for the fox’s body adds charm and whimsy.
Incorporate different materials to create a tactile world: soft felt for the background, smooth cotton for details, and even a tiny faux fur pom-pom for the tail tip.
Layering the felt background pieces—the green hill over the brown tree bark—instantly creates a simple but effective sense of depth.
This project is ideal for creating rustic woodland cottage themes in your home.
26. Combine Weaving and Embroidery for a Hybrid Seascape
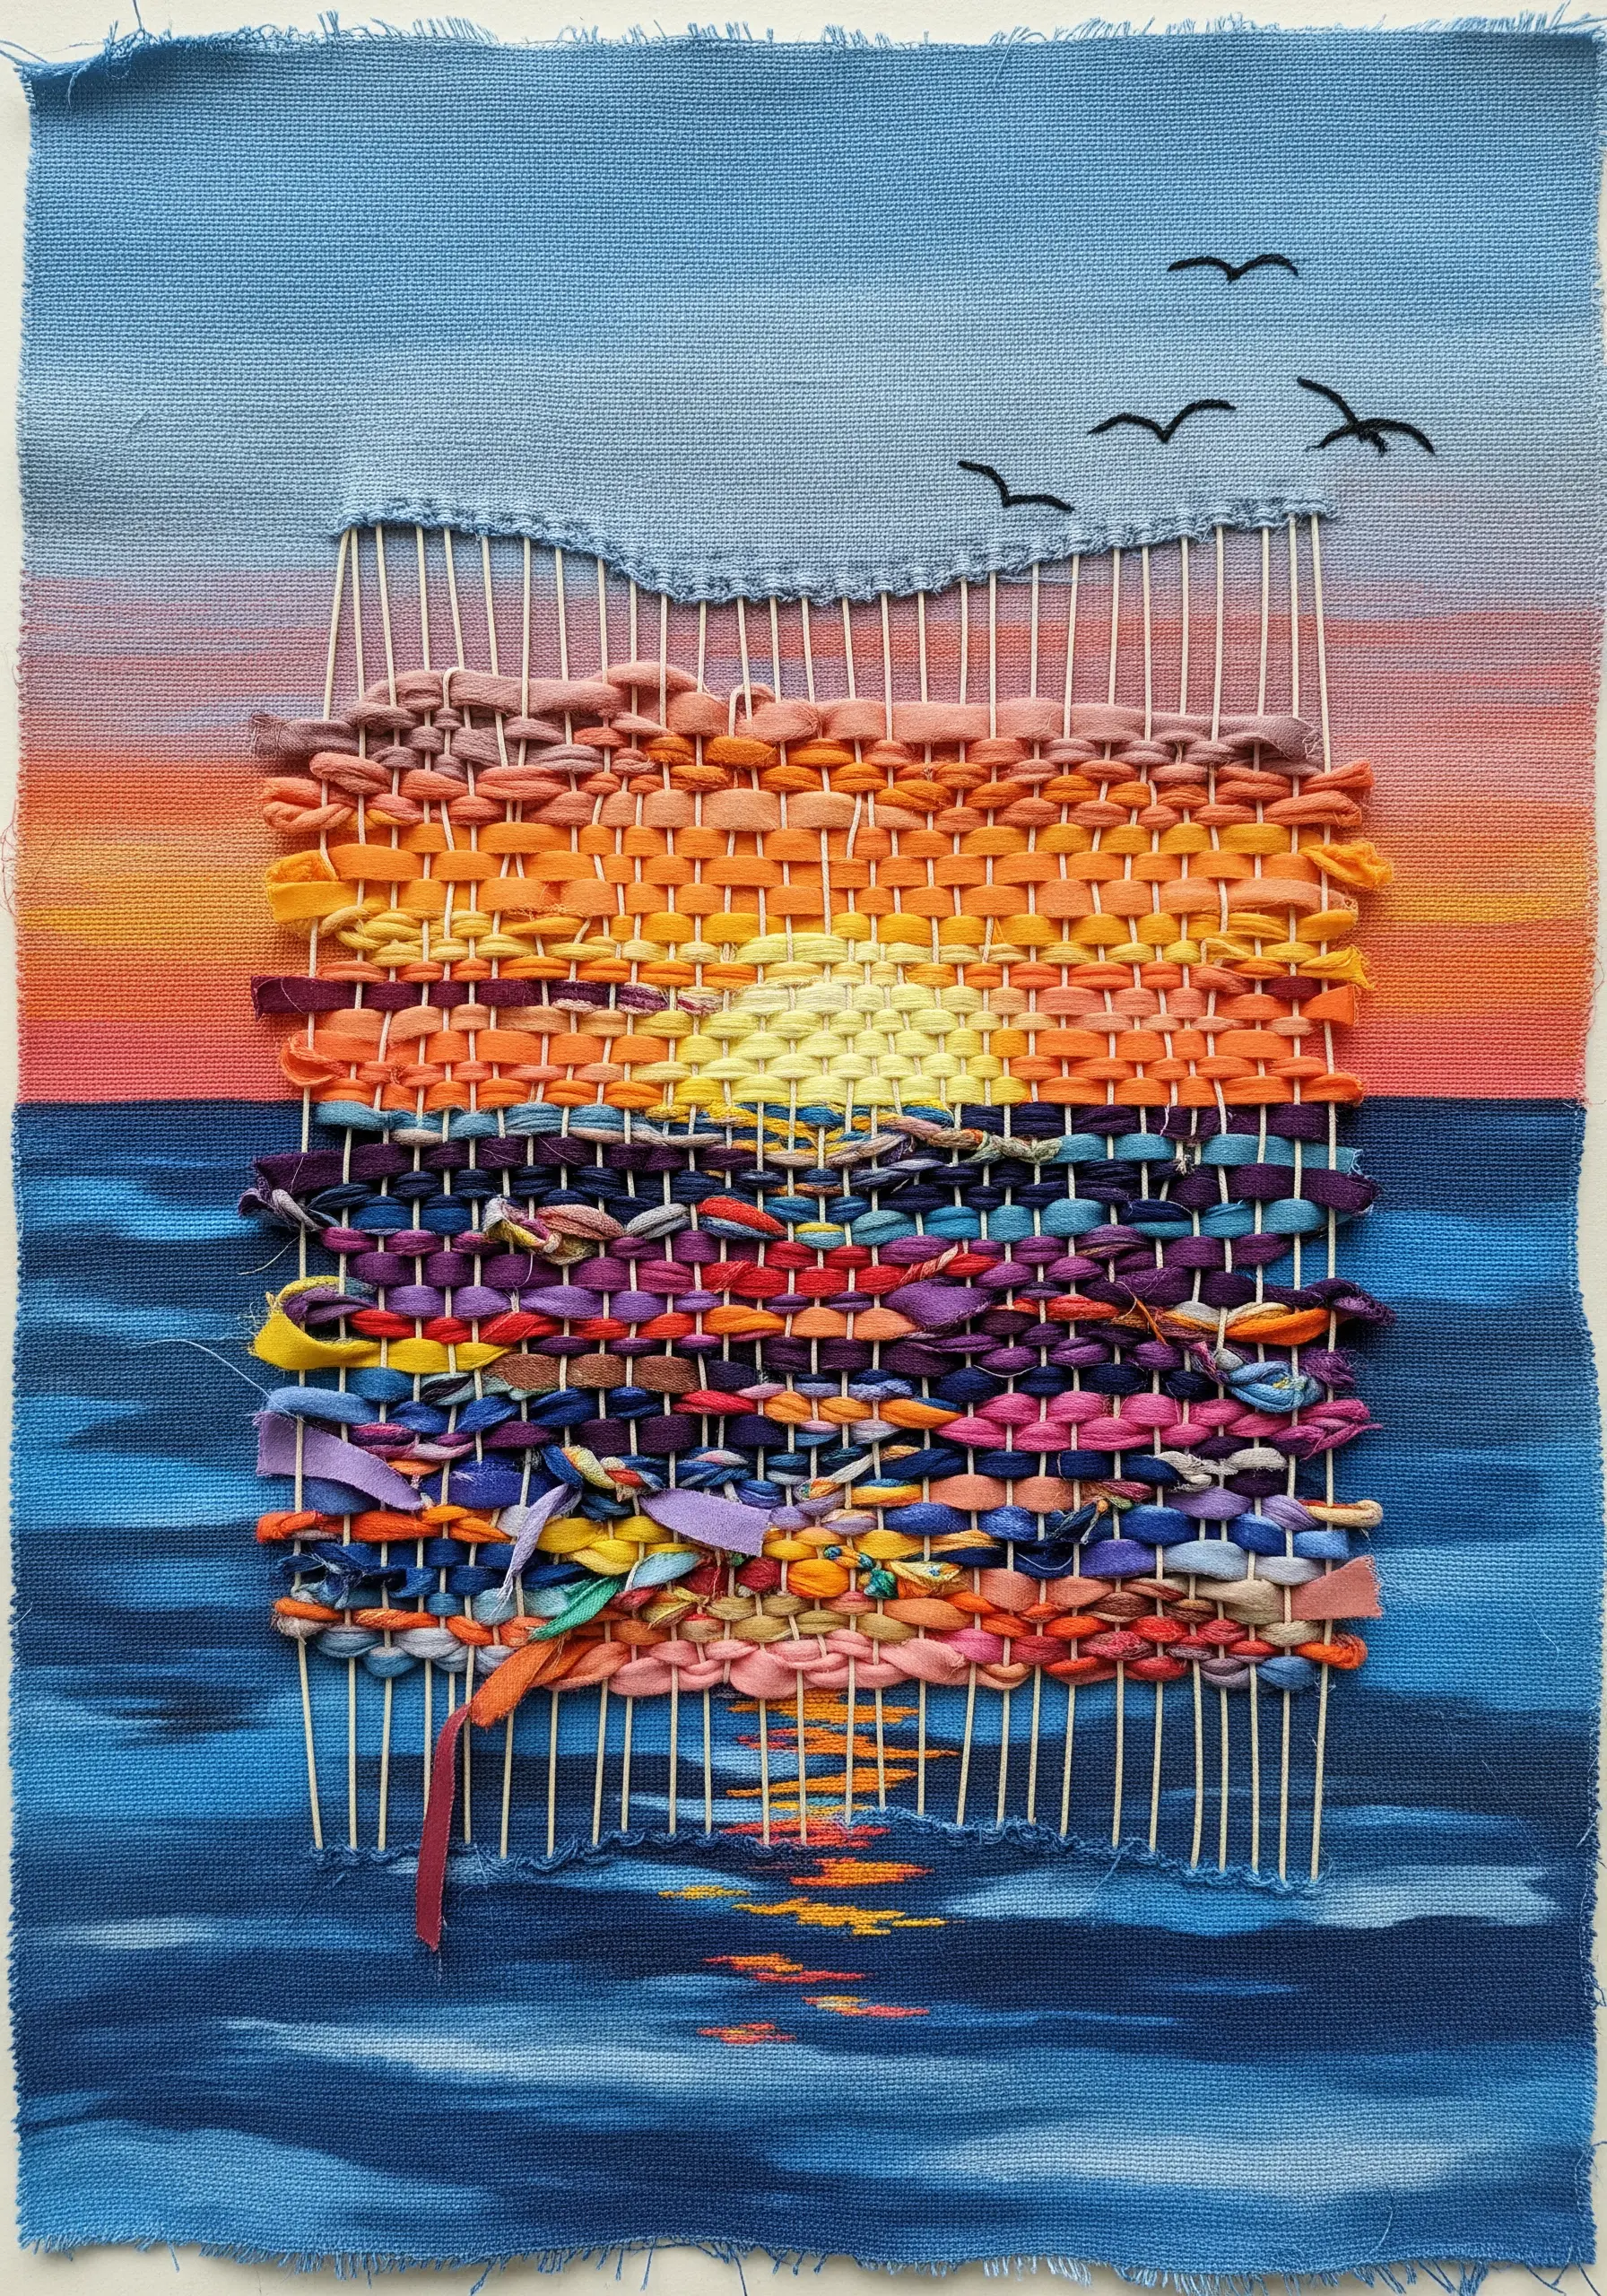
Create a stunning focal point by weaving fabric strips directly into the warp threads of your background fabric.
Choose a gradient of sunset colors for the weaving to represent the sun reflecting on the water, letting the raw, frayed edges of the strips add texture.
Leave the warp threads exposed at the top and bottom of the woven section to create a deconstructed, artistic frame.
Finish the scene with a few simple, dark stitches for birds in the sky, providing a minimalist contrast to the heavy texture below.
27. Guide the Eye with Dynamic Vertical Composition
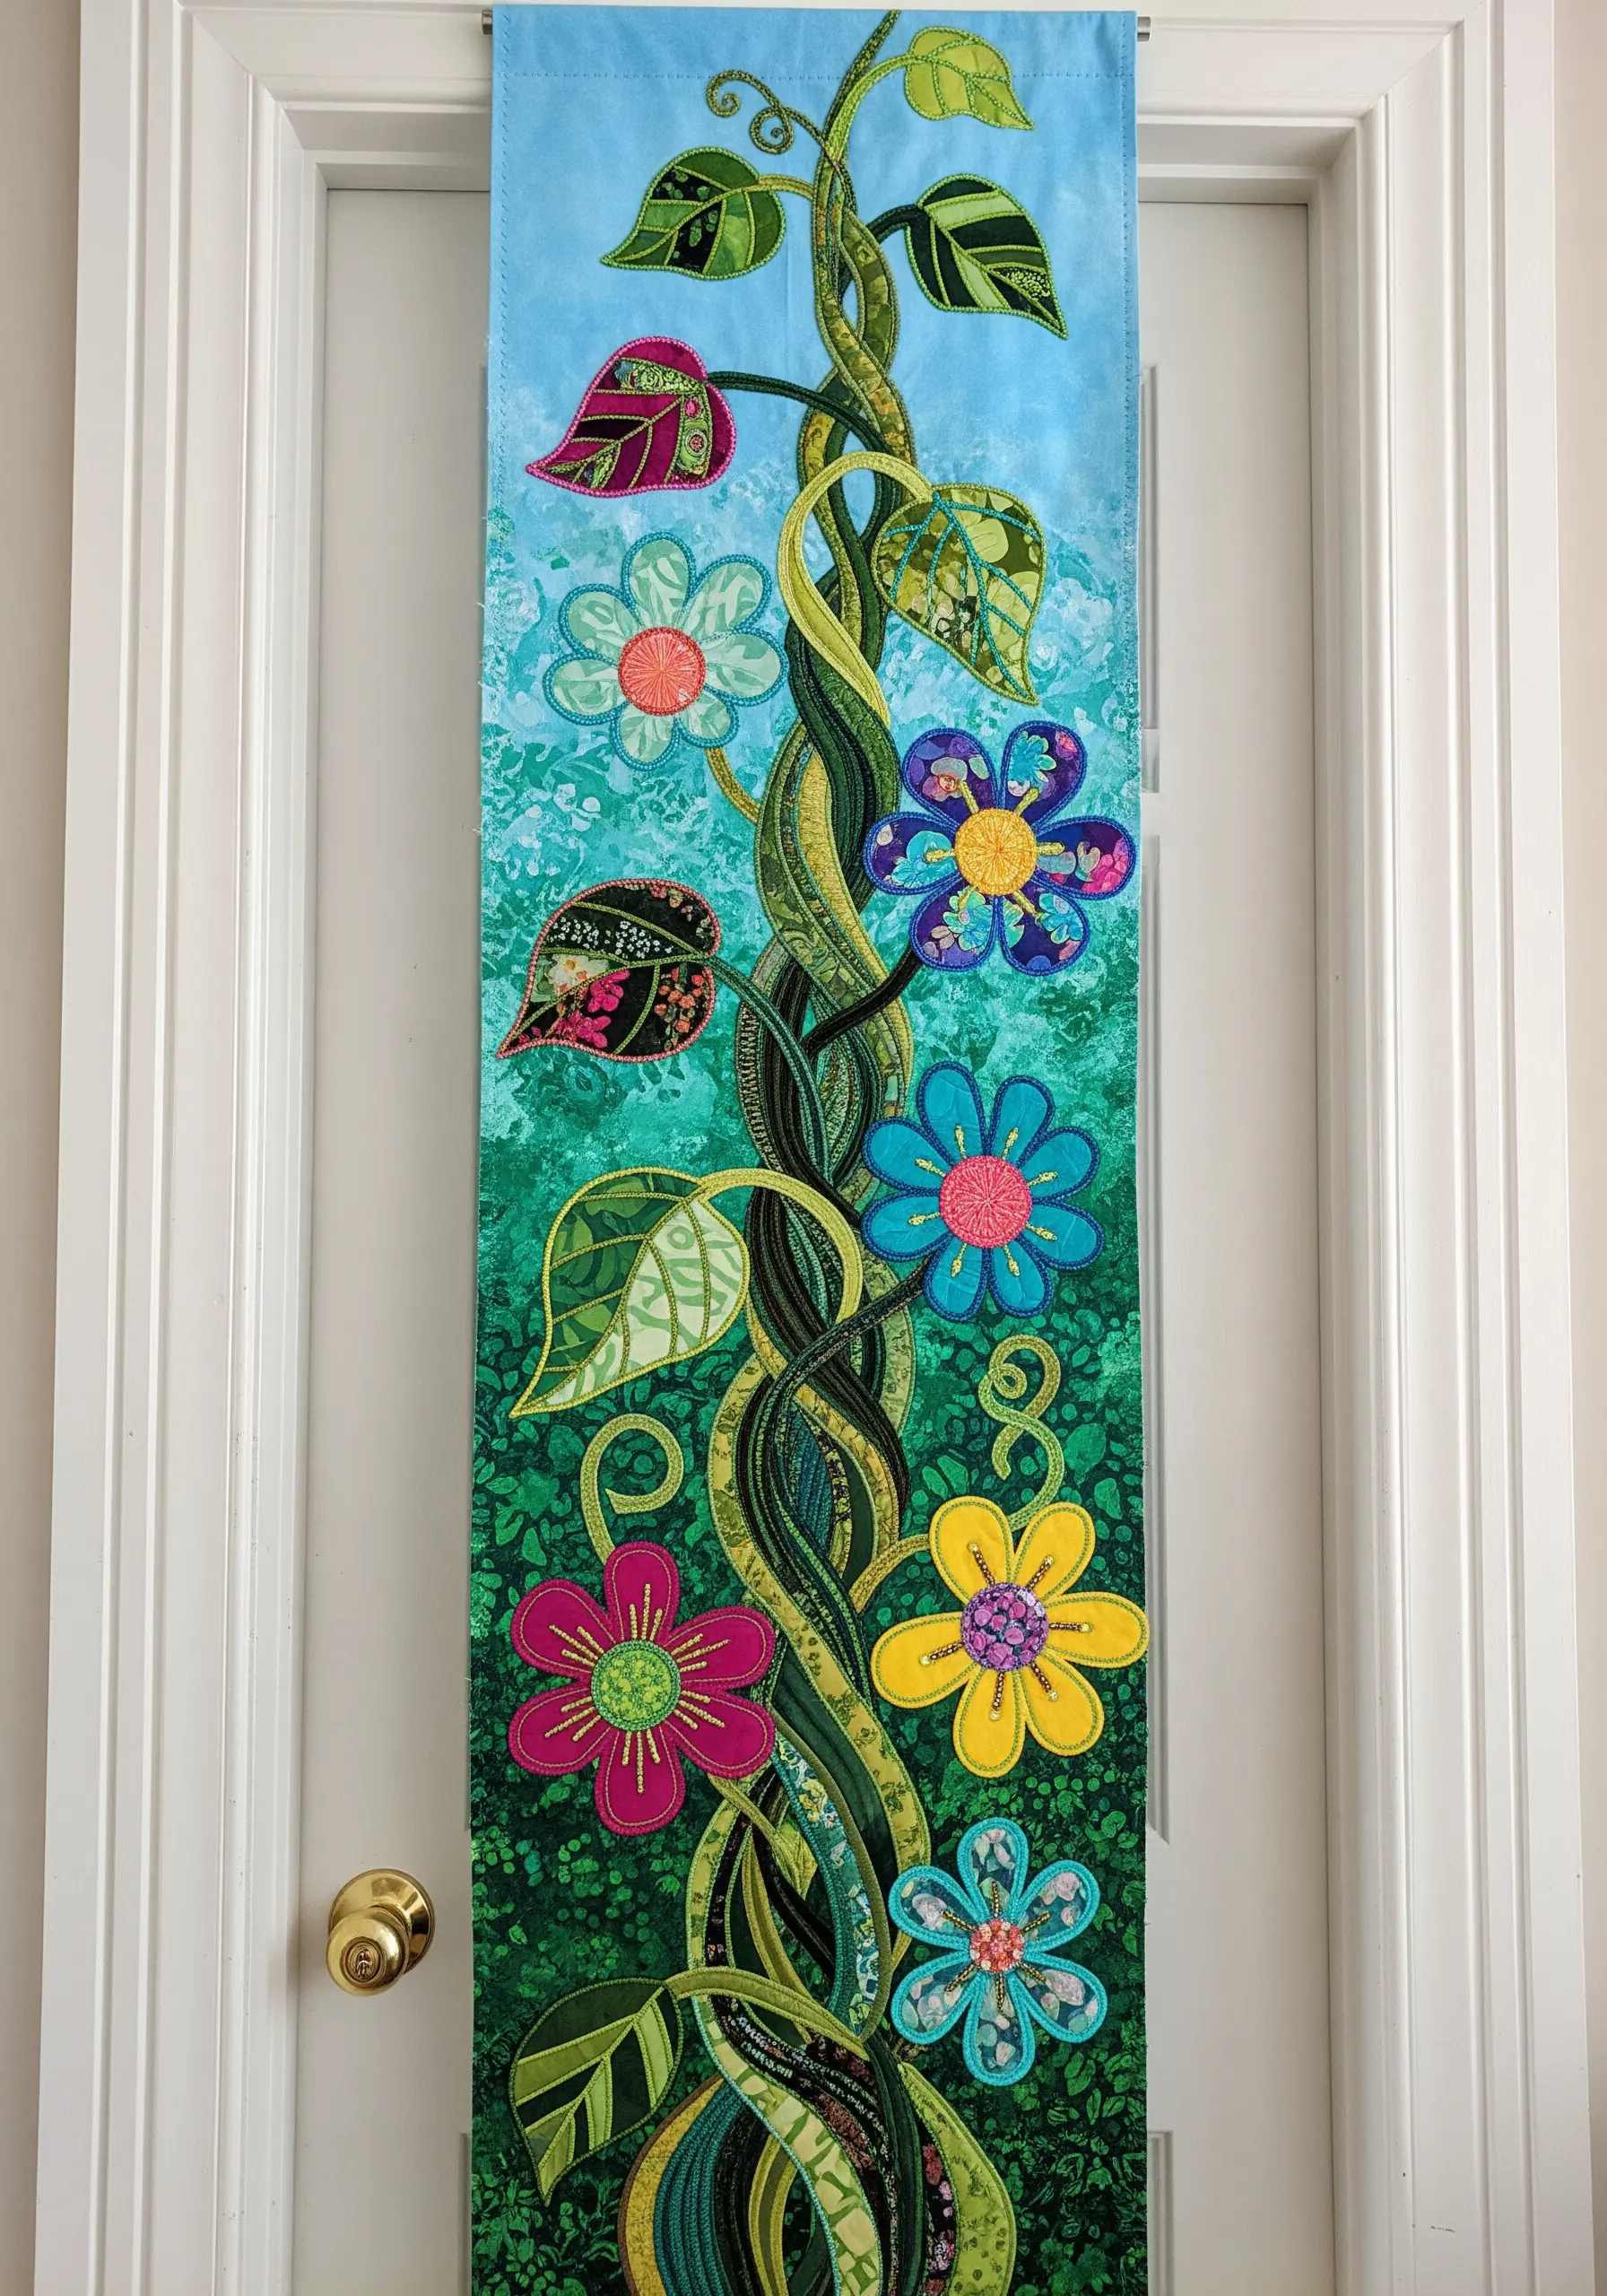
For a tall, narrow space like a door, use a strong diagonal or curving line to create a sense of upward movement.
Cut the vine from a swirling, patterned green fabric to give it inherent energy, then outline it with a satin stitch to define its path.
Scatter brightly colored appliqué flowers along the vine, using a variety of patterns and shapes to create visual interest and rhythm.
A background fabric with a subtle, tonal pattern, like a blue-green batik, adds depth without competing with the main design.
28. Illustrate a Narrative with Four Quadrants
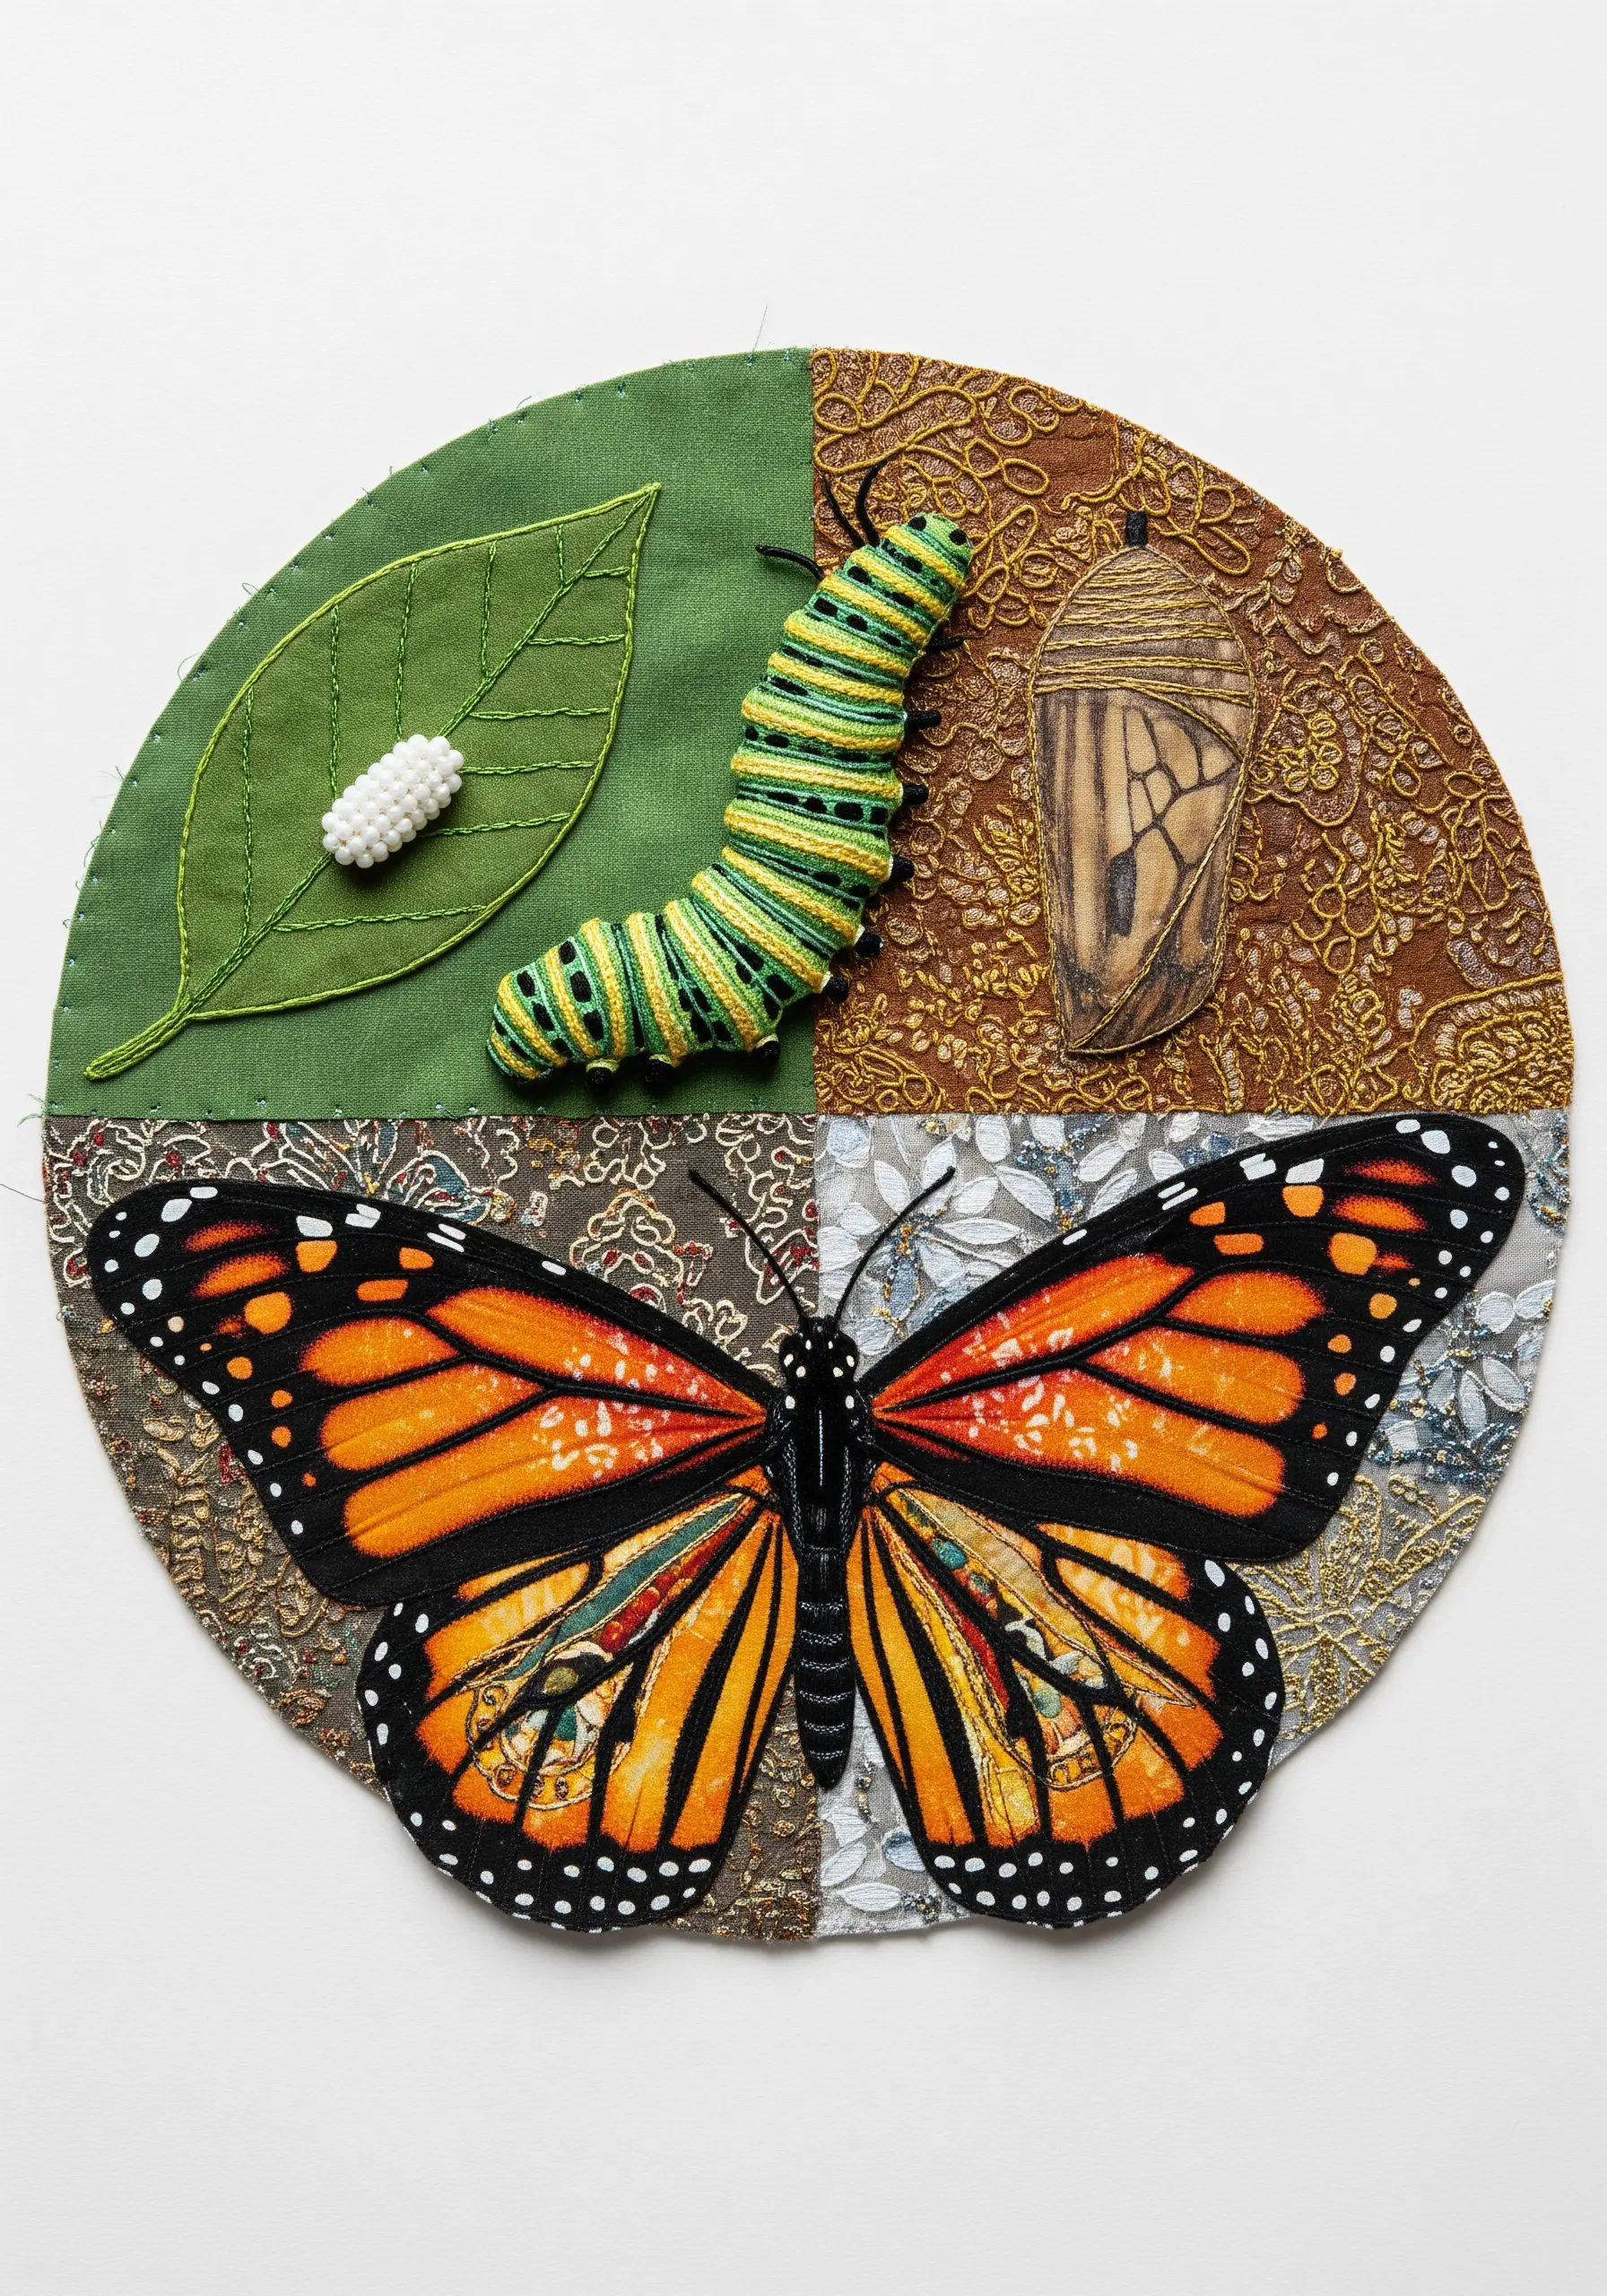
Tell a story or explain a process, like a life cycle, by dividing your composition into distinct sections.
Use different background fabrics and techniques for each quadrant to visually represent each stage: simple appliqué for the leaf, padded satin stitch for the caterpillar, and thread painting for the chrysalis.
Create the final butterfly with a combination of printed fabric and thread painting to achieve the most realistic and detailed effect.
This quadrant layout is a powerful graphic tool for educational or narrative handmade art pieces that tell a story.
29. Deconstruct an Image with Glitch Embroidery

Start with a printed fabric landscape as your base. This provides the realistic foundation for your abstract deconstruction.
Layer strips of brightly colored, patterned, or digitally printed fabric horizontally across the image to create “glitch” bars.
Use dense, chaotic free-motion stitching over these bars and extending onto the background, mimicking digital noise and data corruption.
The contrast between the serene landscape and the frenetic, colorful stitching creates a compelling, contemporary statement.
30. Create Botanical Illustrations with Fabric Scraps
Achieve a realistic, painterly effect for botanical art by using a variety of green patterned fabric scraps for the leaves.
Cut small pieces and arrange them like a mosaic to create natural-looking color variations, highlights, and shadows.
Use a free-motion zigzag stitch in a dark green or black thread to outline the leaves and add the delicate vein details.
This is a great way to elevate simple kitchen textiles or create stunning wall art for a clean, modern look.
31. Reinterpret Masterpieces with Texture and Shine

Pay homage to a famous painting by translating its key elements into fabric and thread.
Use gold lamé, sequins, and metallic fabrics to capture the opulence of Klimt’s gold leaf period.
Recreate the blocky patterns in the robes with small, precisely cut pieces of fabric appliqué.
Use couching with gold cord or thick yarn to replicate the swirling, Art Nouveau lines, adding a crucial layer of dimensional texture to the composition.
32. Sculpting an Abstract Seascape with Found Materials
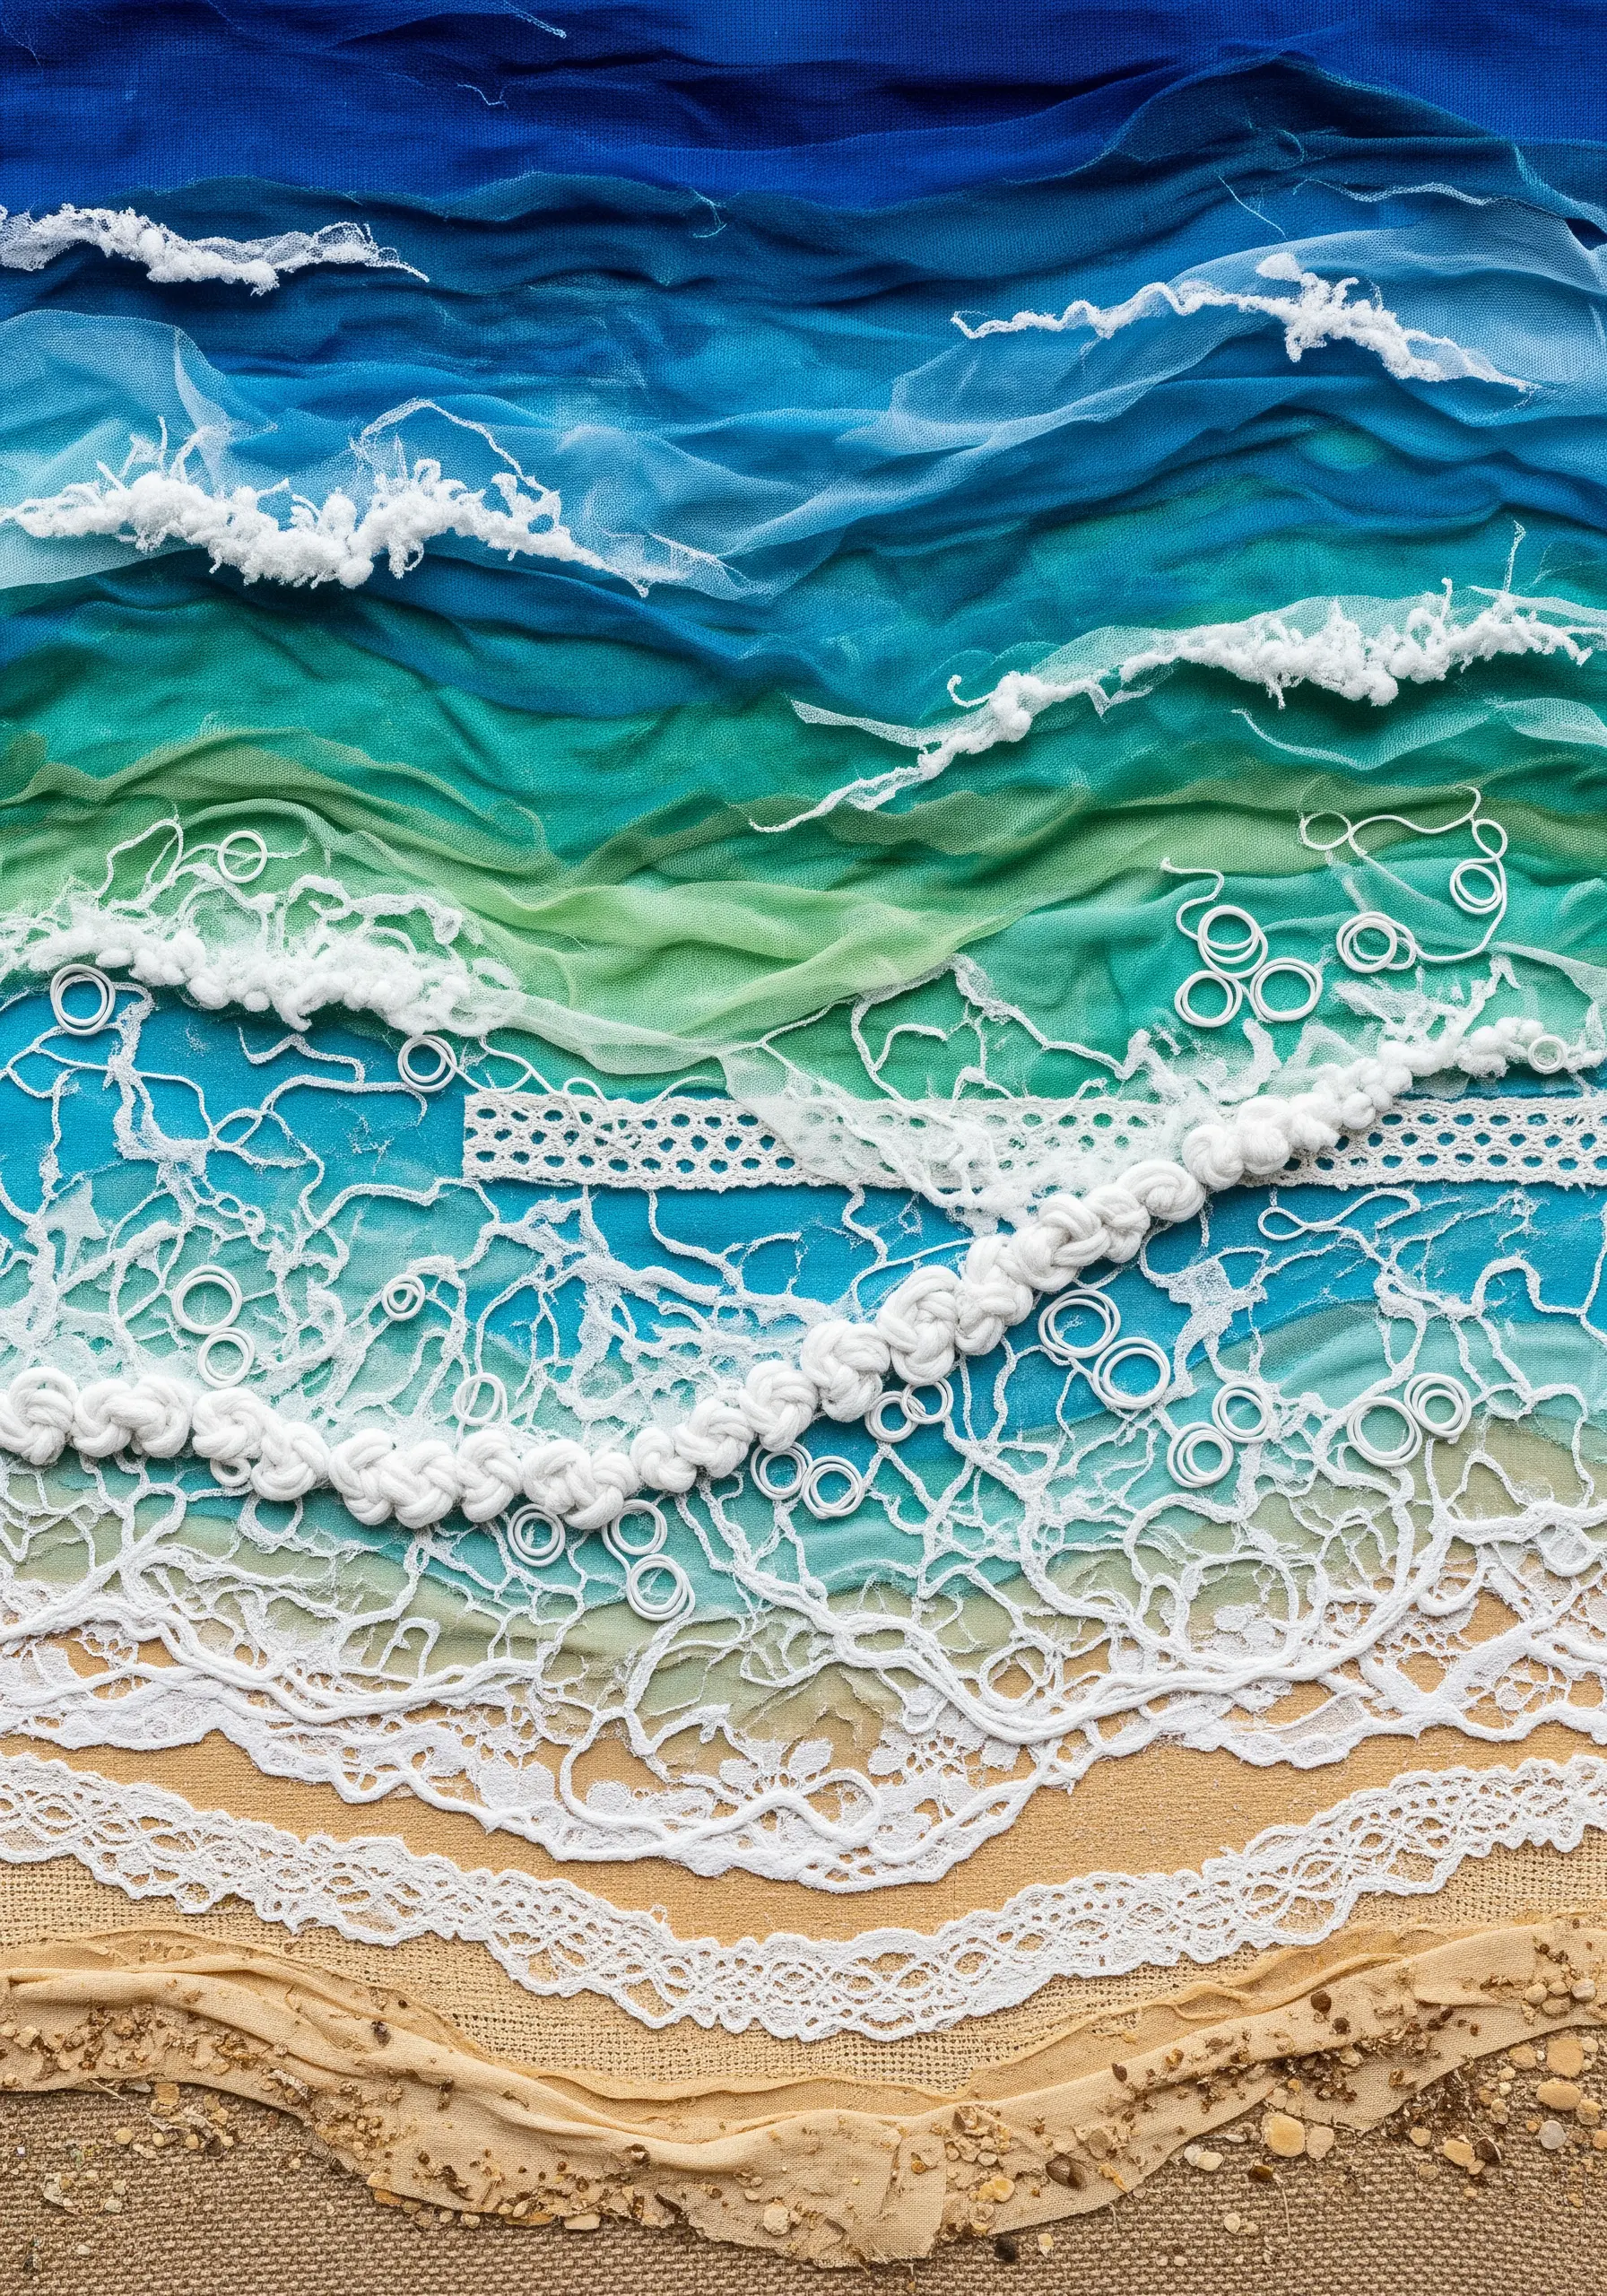
Build layers of texture to create a dynamic, abstract ocean scene. Start with a painted or dyed fabric background for the water and sand.
Create crashing waves by gathering and ruching sheer fabrics like organza and tulle, then stitching them down in wave-like crests.
Incorporate found objects and unconventional materials like lace, braided trim, and even plastic rings to represent sea foam and spray.
This multi-textural approach results in abstract layered collage ideas that are incredibly expressive and tactile.
33. Building Form with Padded Satin Stitch
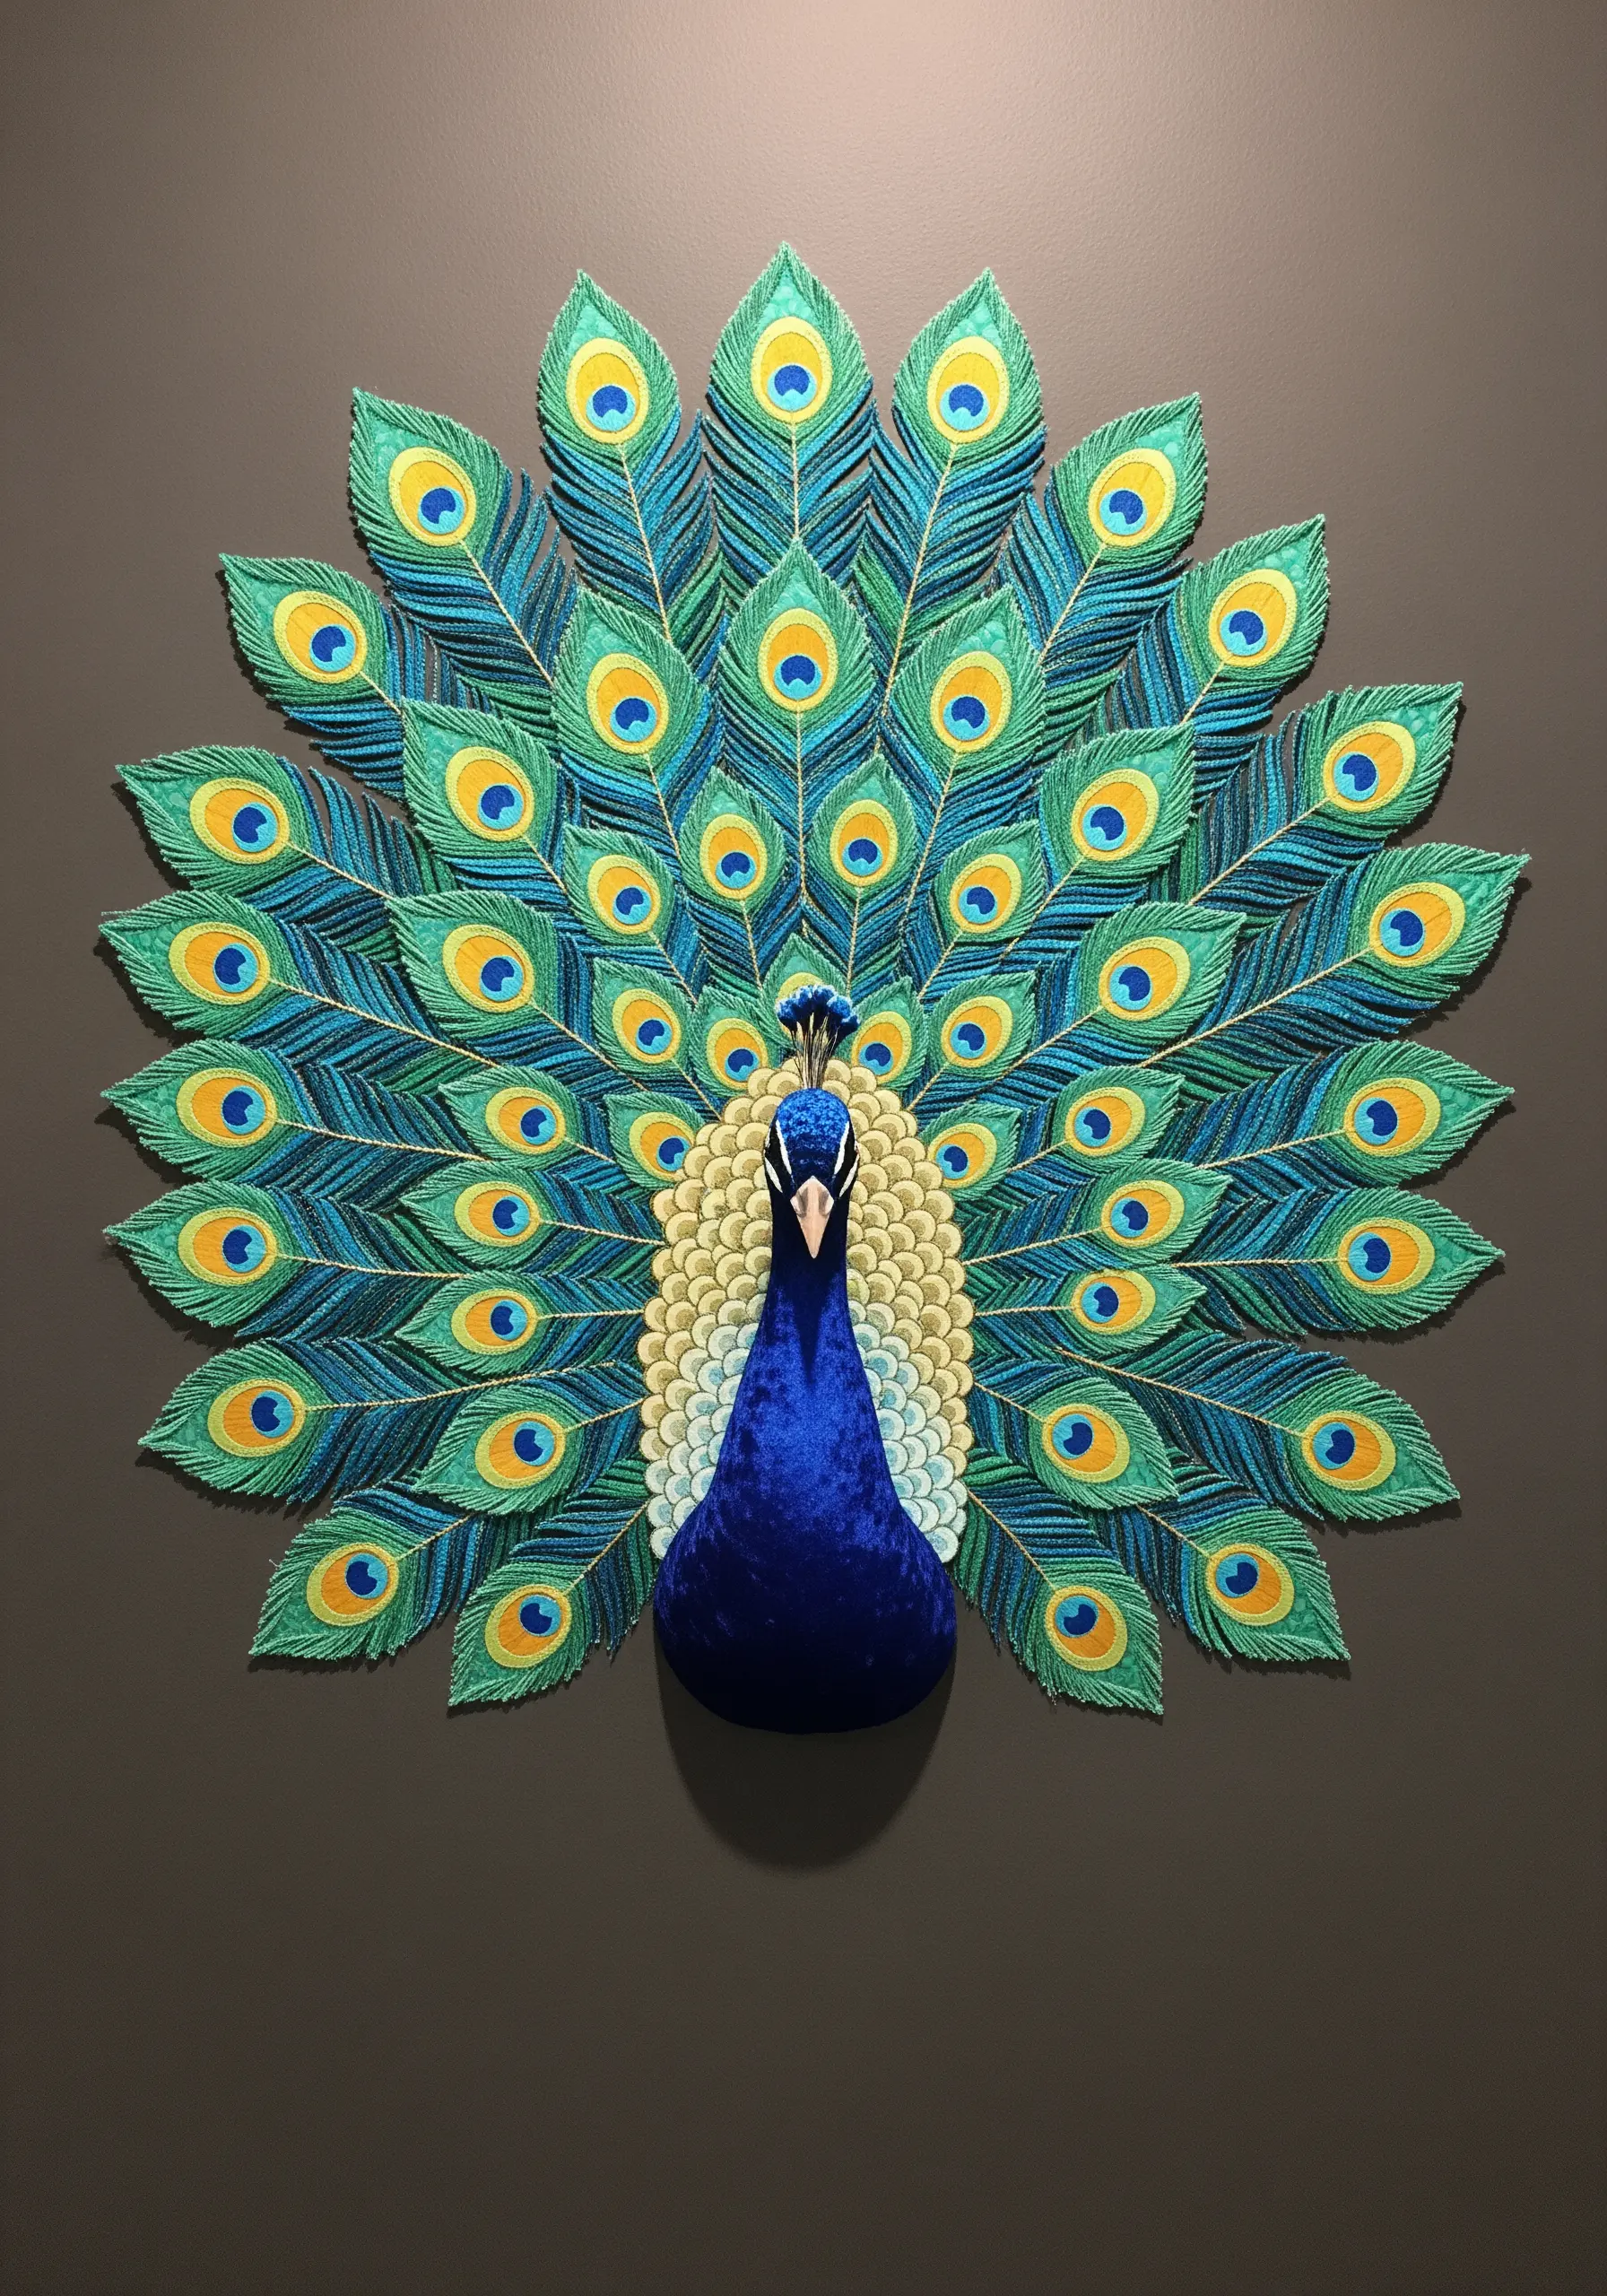
Create highly dimensional, sculptural embroidery by using a padded satin stitch.
First, create an underlay of stitches (like seed stitches or straight stitches) within the shape you want to raise. Then, cover this padding with smooth, dense satin stitches.
For the peacock feathers, work each section of color as a separate padded element to create a stunning, three-dimensional tiled effect.
The velvet appliqué for the body provides a soft, deep texture that contrasts beautifully with the sleek, shiny thread of the feathers.
34. Unify a Collection with Color and Technique
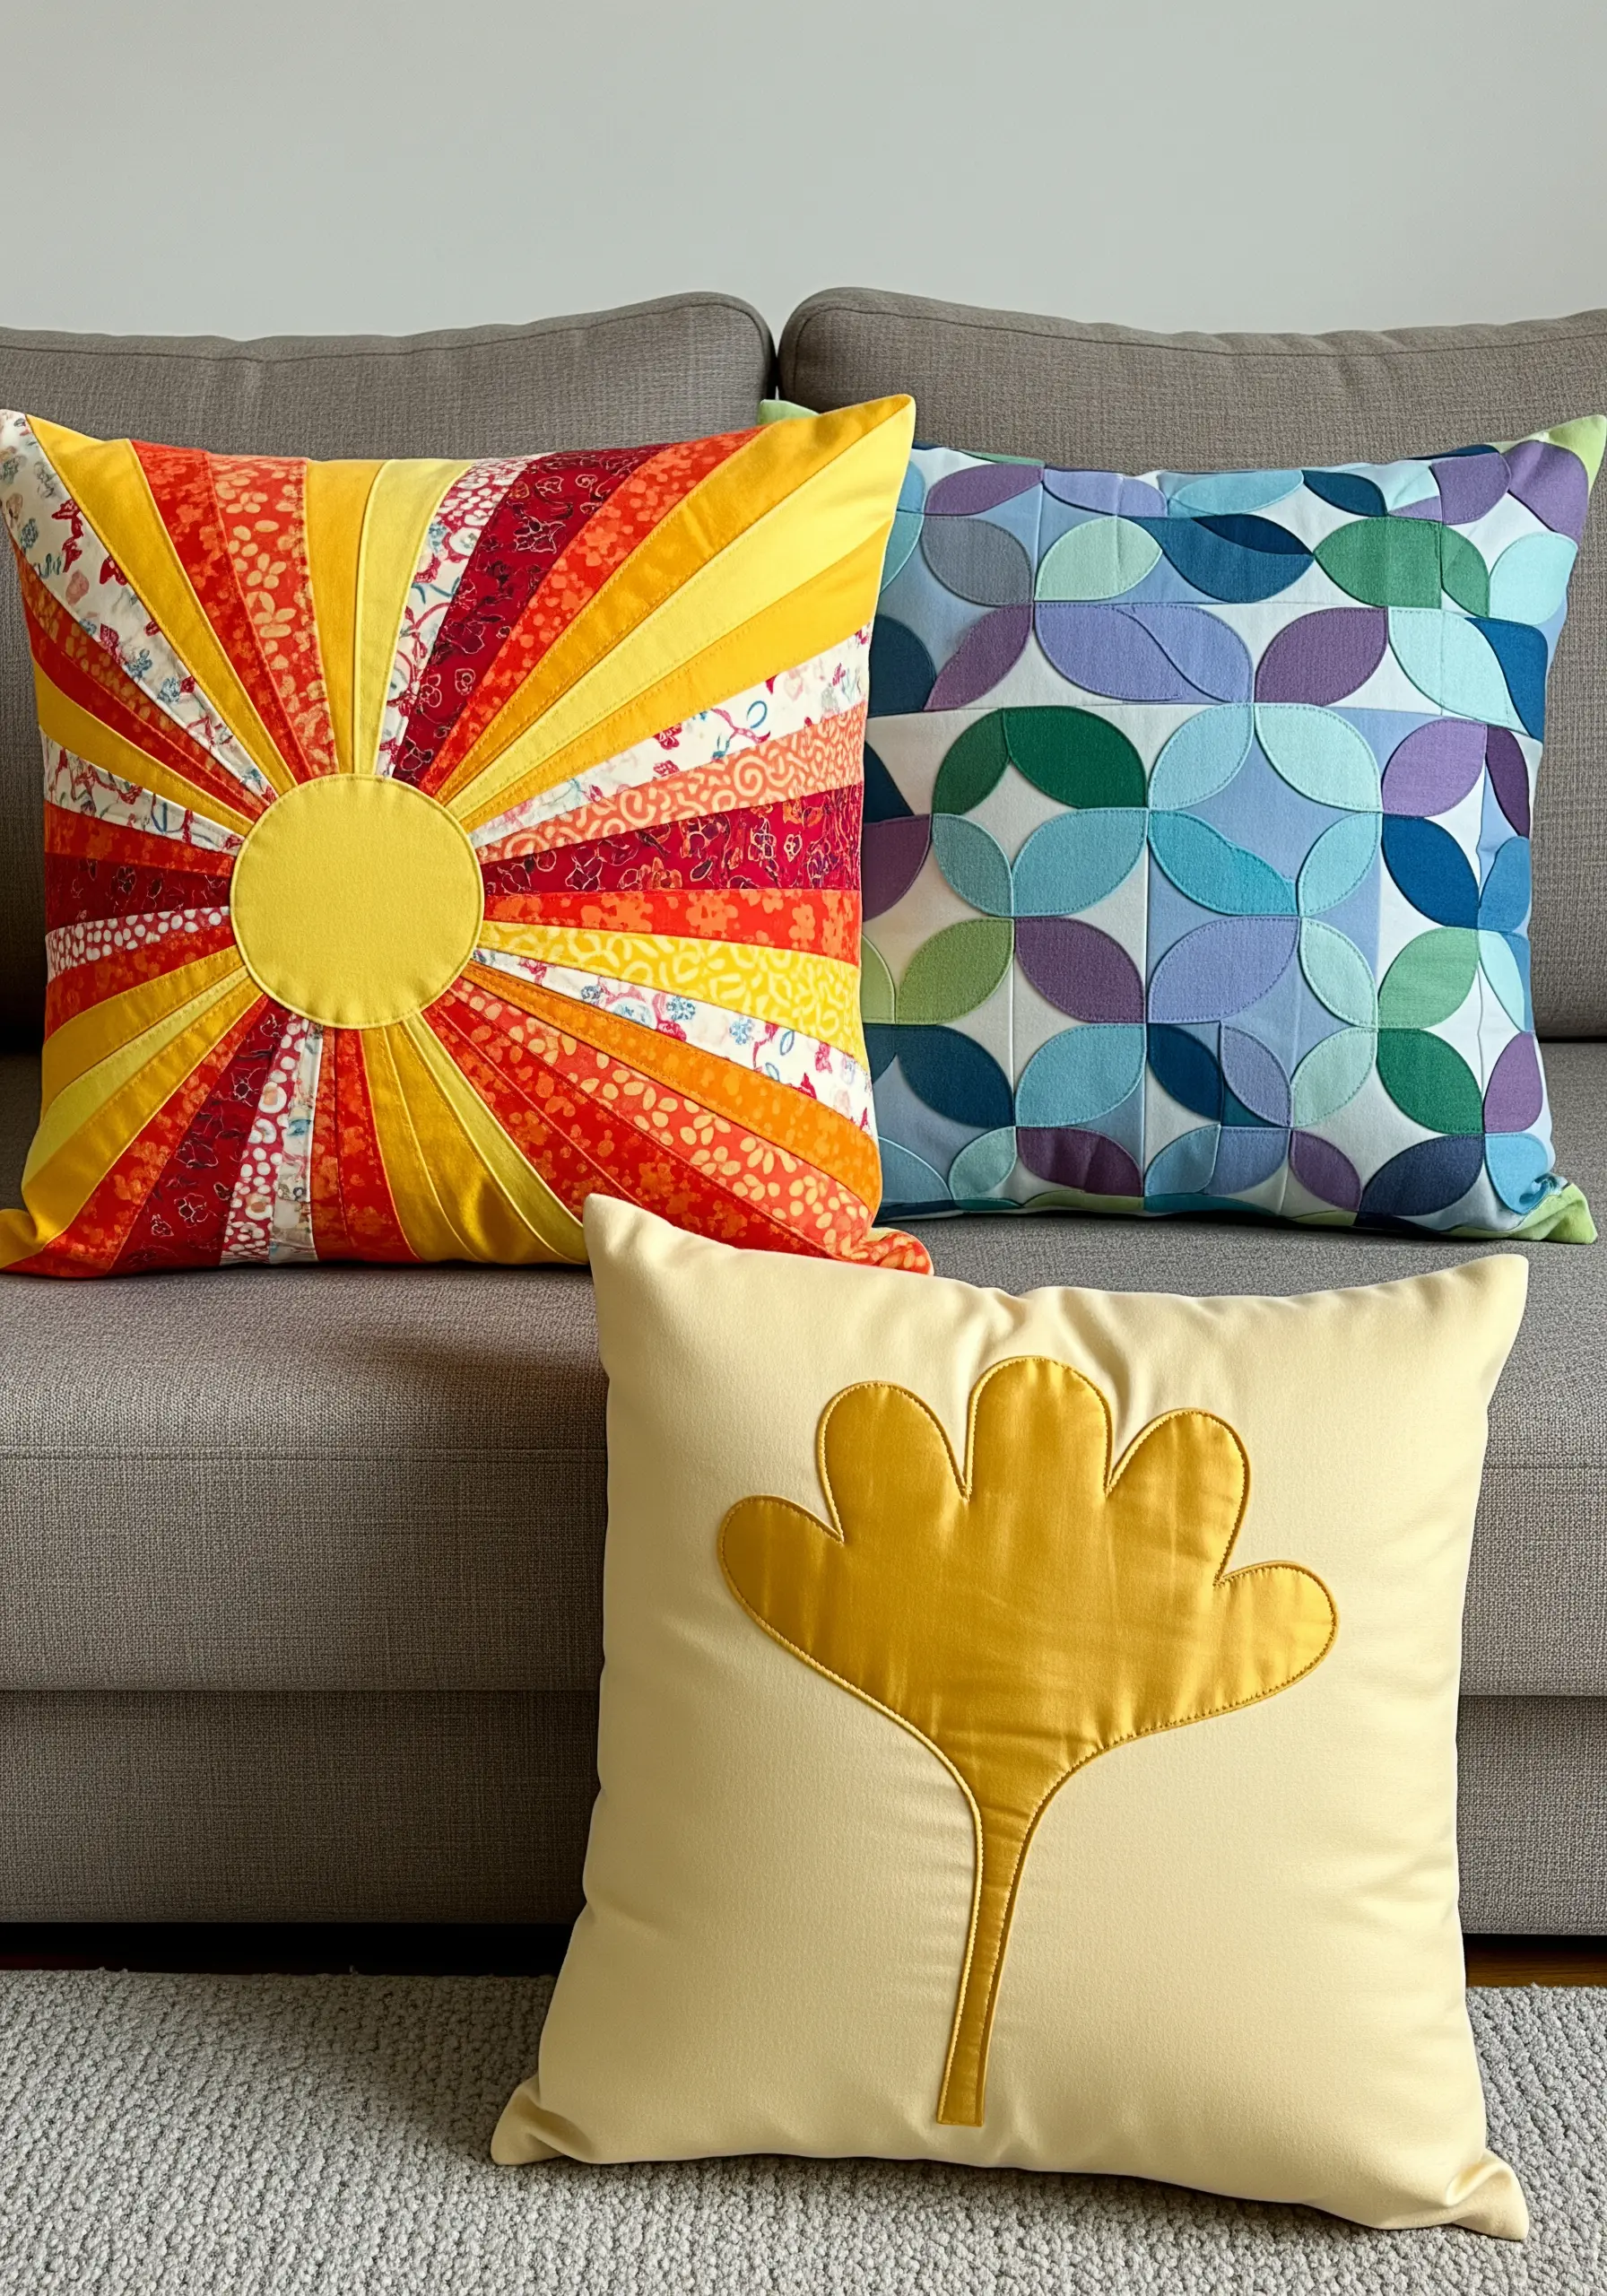
To create a cohesive set of decorative objects like pillows, you don’t need them to match perfectly. Instead, unify them with a shared color story.
Explore different appliqué techniques on each pillow—like strip piecing for the sunburst, curved piecing for the geometric pattern, and simple shape appliqué for the leaf.
The consistent use of warm yellows, cool blues, and a similar outlining stitch ties the distinct designs together into a harmonious collection.
These are perfect embroidery pillow ideas for any living space, allowing for creative freedom while ensuring the final pieces look intentional.
35. Create Photorealism with Thread and Fabric
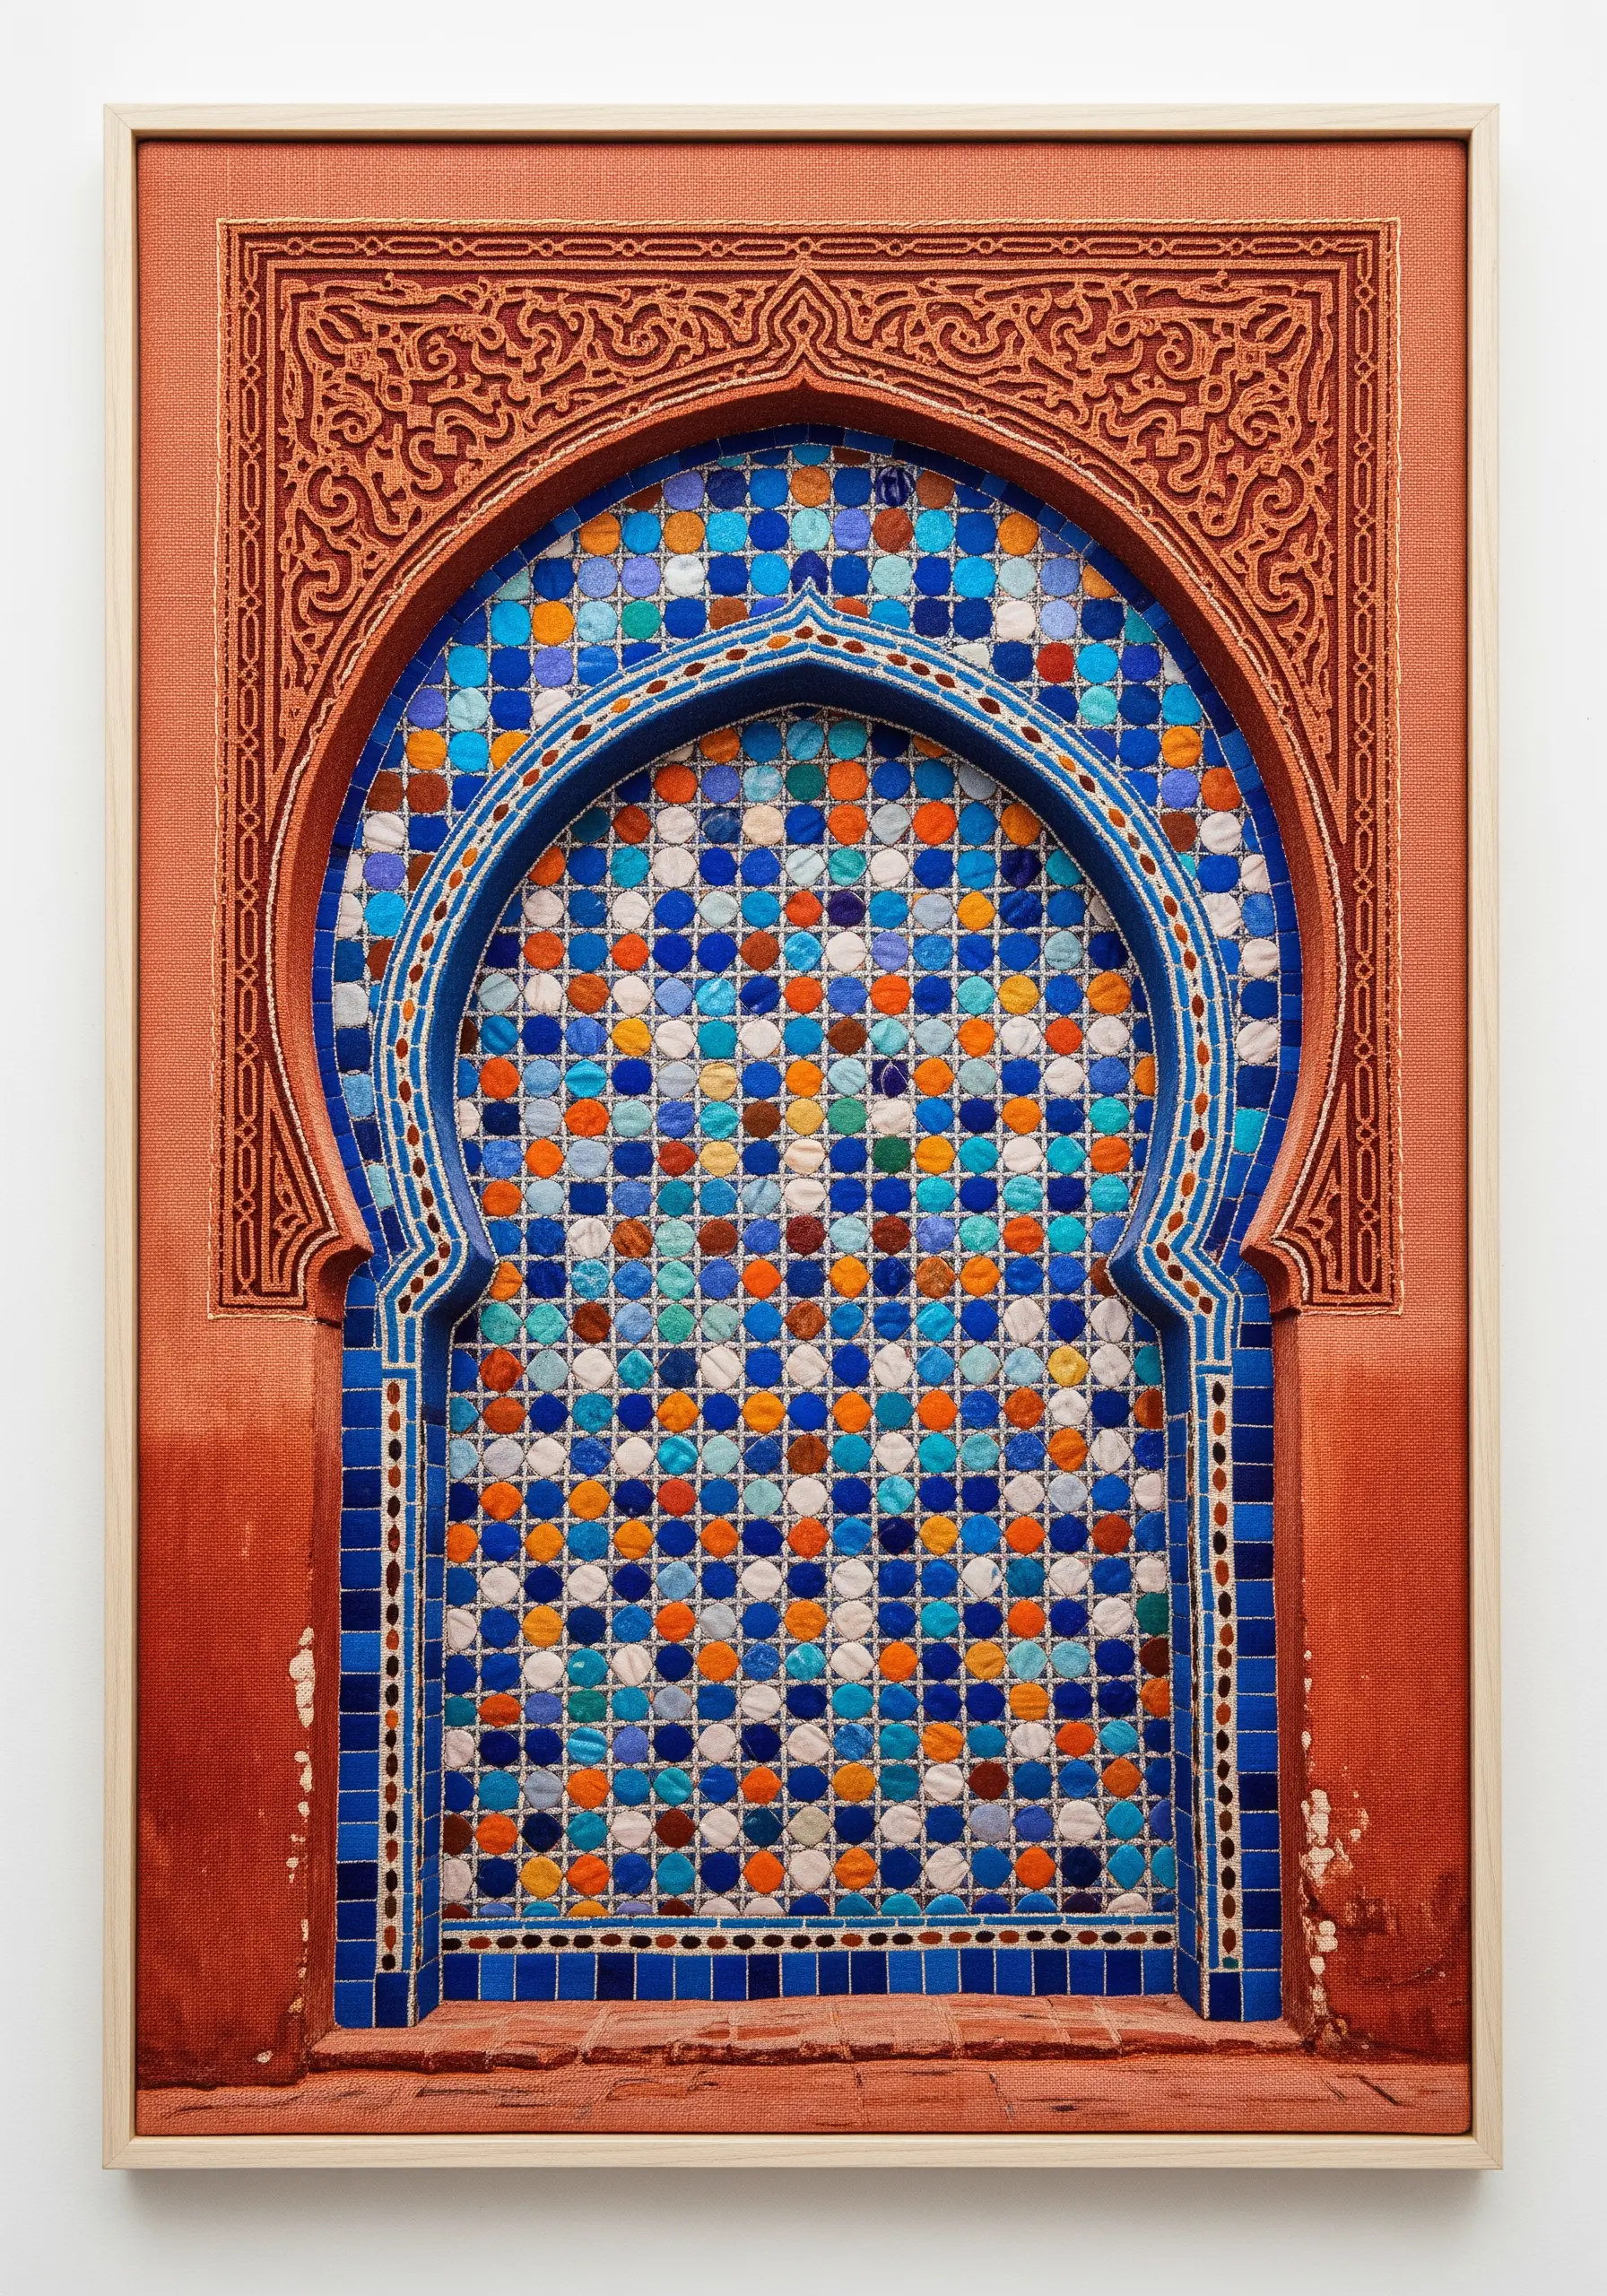
To replicate a complex architectural feature, break it down into layers of texture and color.
Use tiny, square fabric pieces or dense satin stitches to mimic the mosaic tiles, arranging them in a semi-random pattern to capture the handmade quality.
For the carved terracotta frame, use a base fabric of the right color and then add dense, tonal free-motion stitching to create the illusion of carved relief and shadow.
This meticulous attention to texture is what elevates the piece from a simple depiction to a work of stunning realism.


