

Your journal is more than just paper; it’s a quiet space for your thoughts, plans, and memories. A hand-stitched leaf, whether a simple outline or a complex botanical study, can turn that space into something deeply personal and reflective of the care you put into it.
But embroidery on a journal cover or bookmark presents its own unique challenges—the surface can’t be hooped, and the finished work needs to be durable. The key isn’t complexity, but intention. It’s about choosing the right stitch for the leaf’s shape, understanding how color can create depth, and how a simple outline can be just as powerful as a fully filled design.
Here, you’ll find techniques that transform your stitching from simple decoration into an expressive art form. You’ll learn how to make your edges cleaner, your gradients smoother, and your compositions more balanced. These are not just patterns; they are thoughtful approaches to making your everyday items more beautiful, one stitch at a time.
1. Create Depth with Cascading Satin Stitch
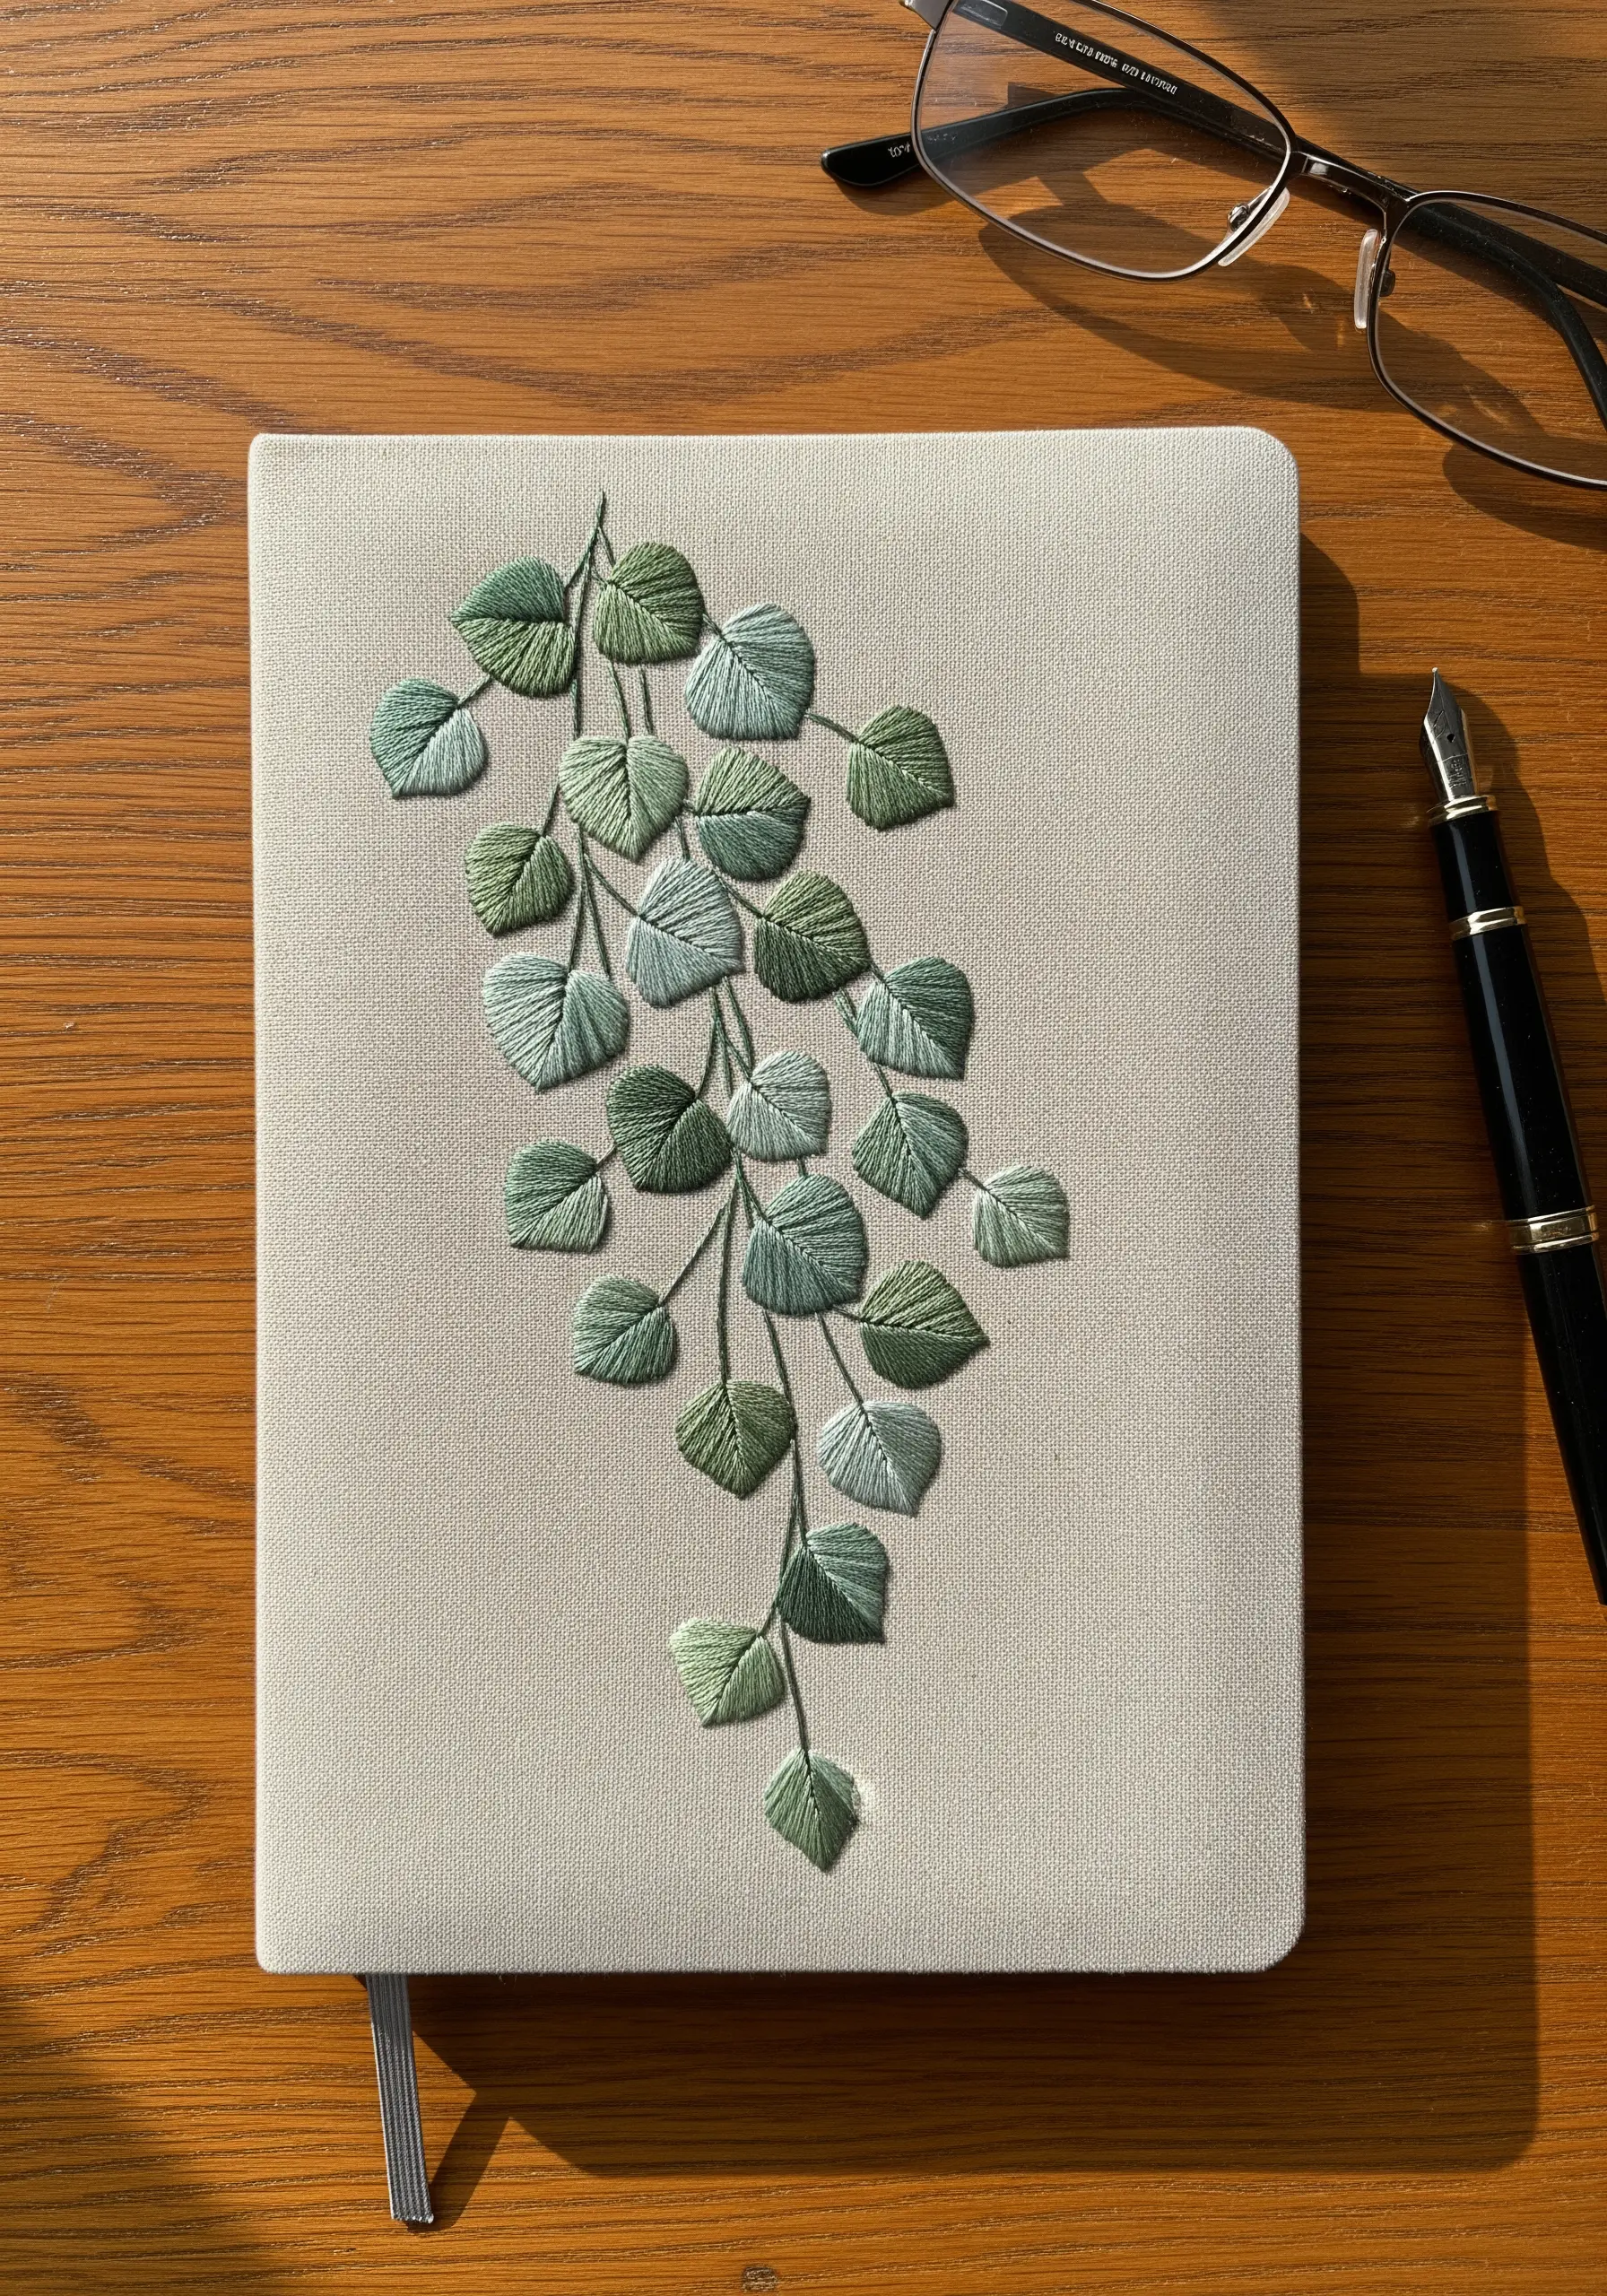
To achieve this gentle, overlapping effect, focus on varying the direction of your satin stitch for each leaf.
Stitch the leaves in the background first, using slightly lighter shades or fewer strands of floss—this creates an illusion of distance.
For the foreground leaves, use a full six strands and angle your stitches to follow the natural curve, making them appear fuller and closer.
This technique turns a simple vine into a dynamic composition with palpable depth.
2. Define Bold Shapes with a Split Stitch Outline

For a crisp, clean finish on a bold leaf like a Monstera, always begin with a precise outline.
Use a two-strand split stitch along the entire perimeter, including the inner cutouts.
This simple step acts as a ‘rail’ for your satin stitches, preventing them from spilling over and ensuring your edges are sharp and intentional.
Fill each section with satin stitch, angling your threads toward the central vein for a smooth, cohesive look that highlights the leaf’s structure.
3. Master Elegance with Minimal Line Art Leaves
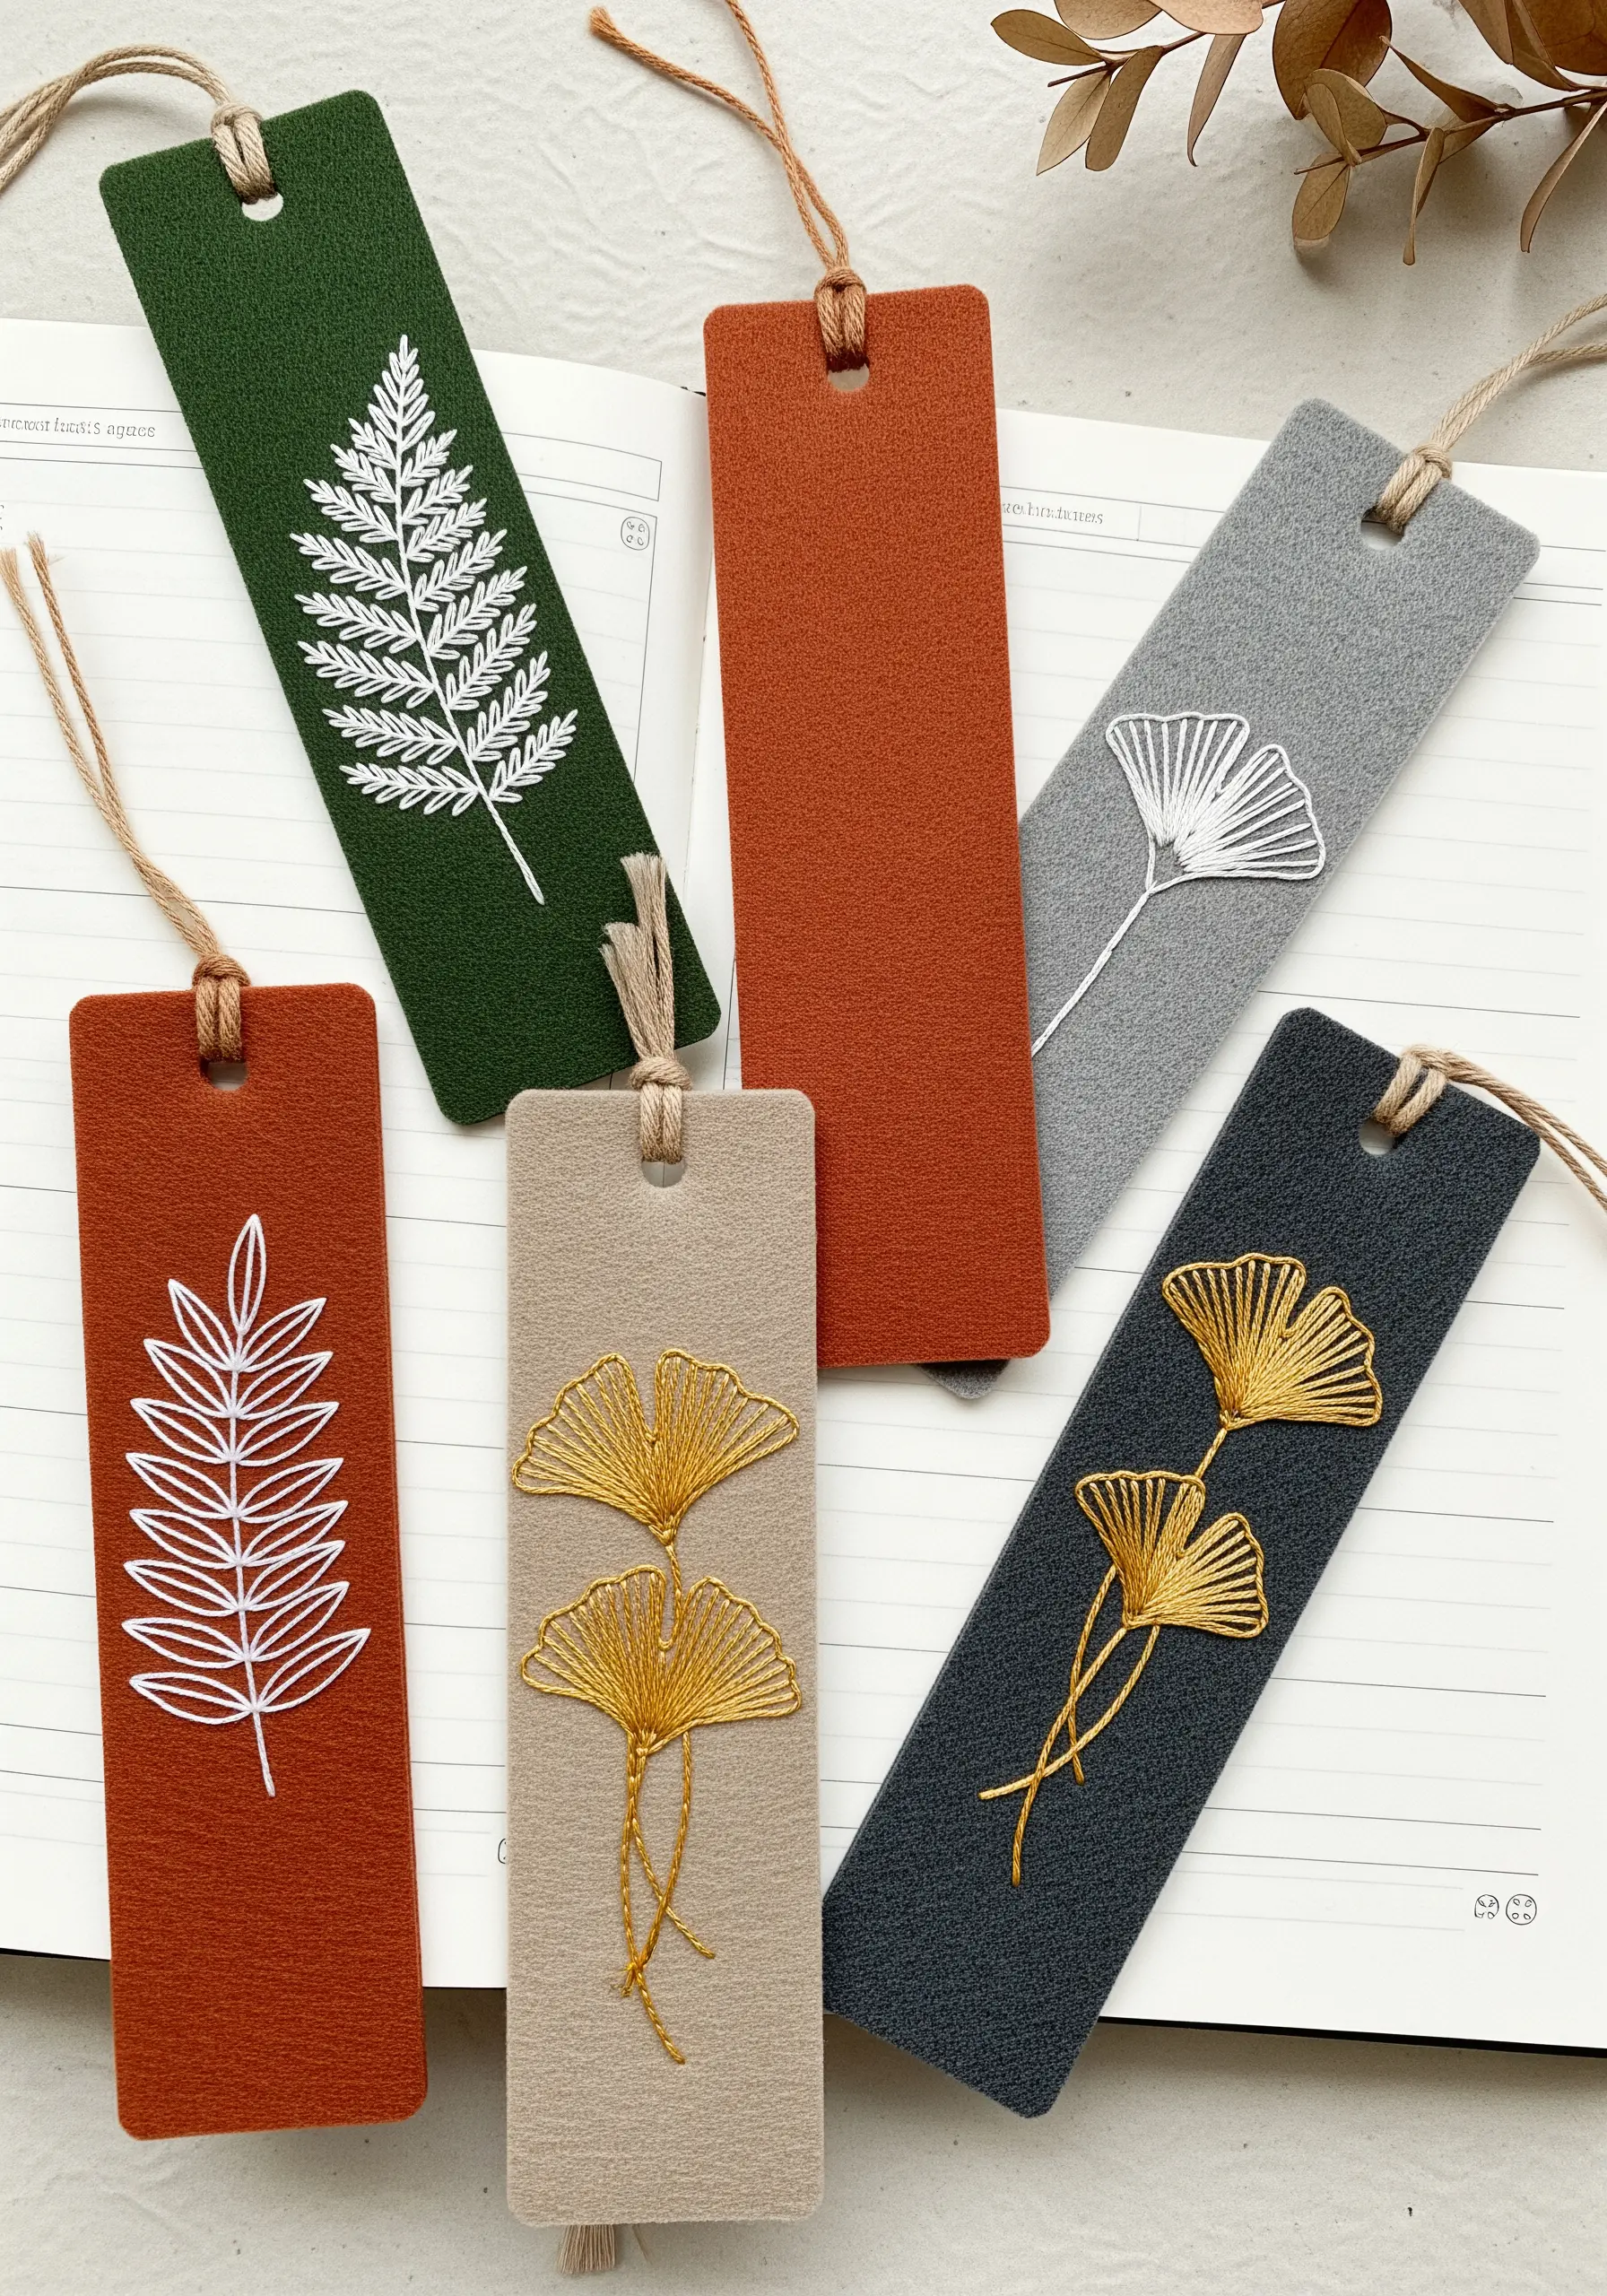
When working on a non-traditional surface like felt, lean into the power of simple lines.
Use a single strand of contrasting thread and a sharp needle to keep your backstitch or stem stitch clean and defined.
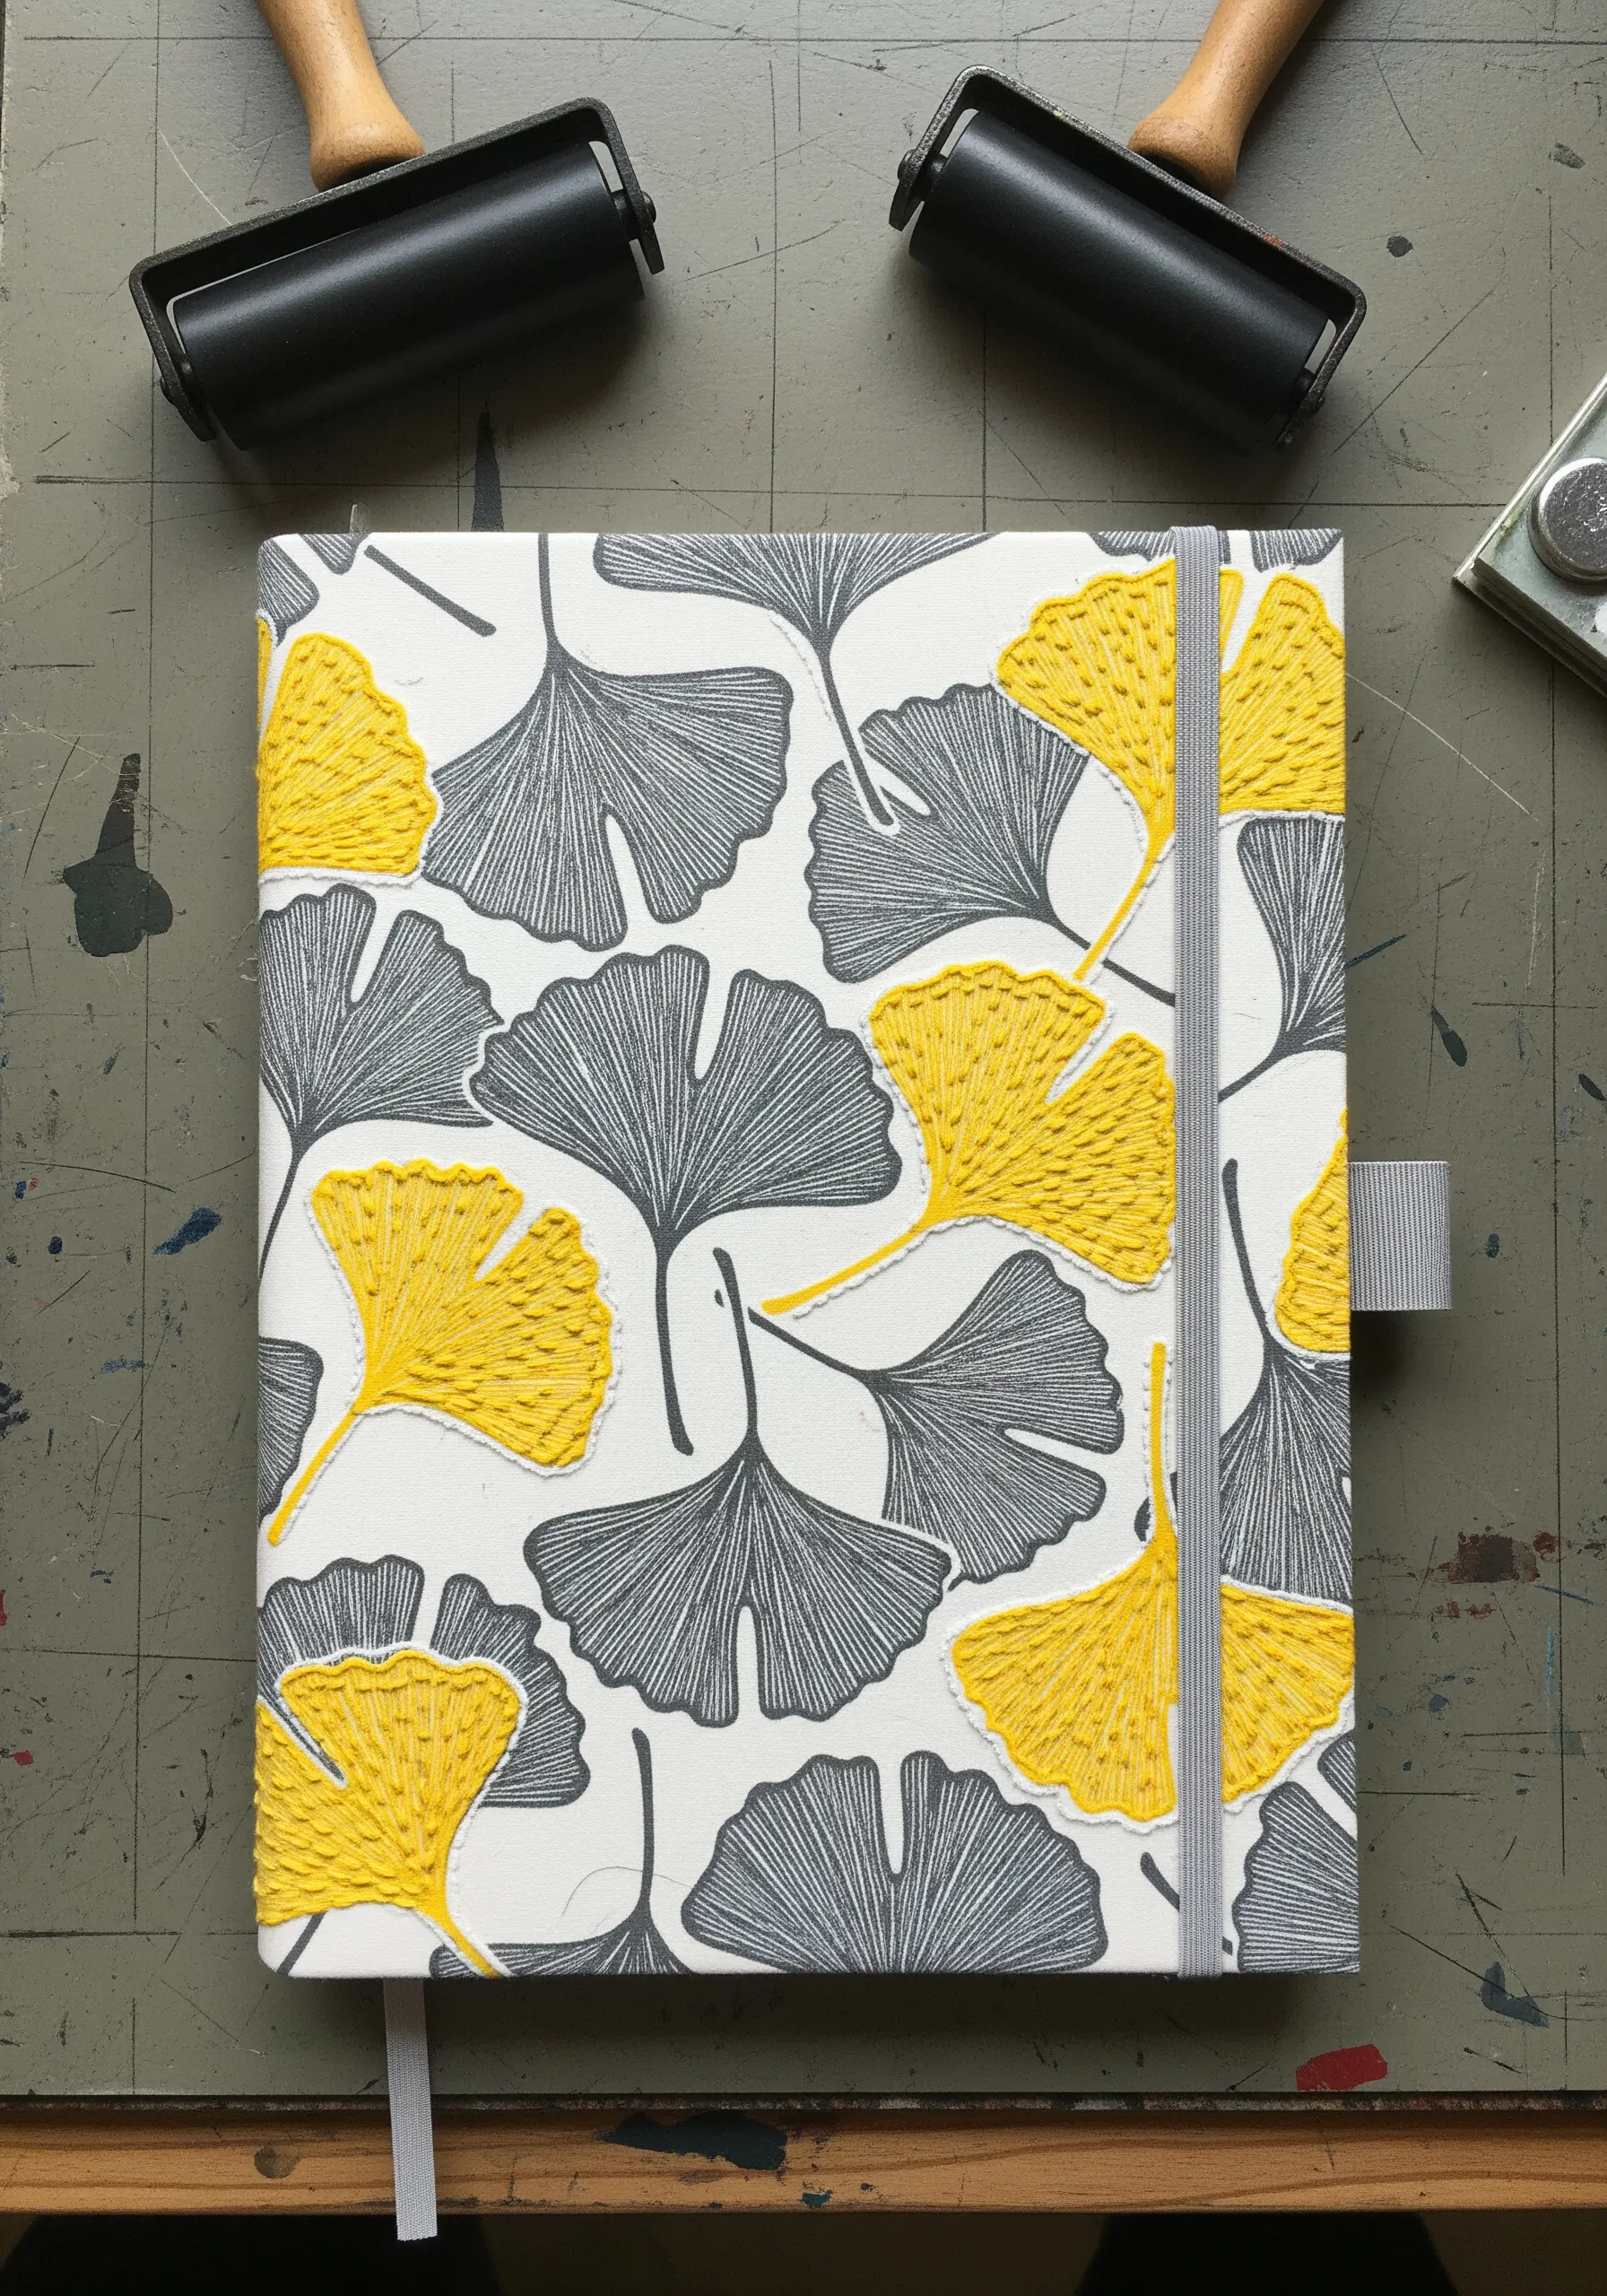
For the delicate ginkgo leaves, use long, fanned straight stitches originating from a single point to create that iconic shape.
These minimal line art motifs prove that you don’t need dense fill to make a strong visual statement; sometimes, restraint is everything.
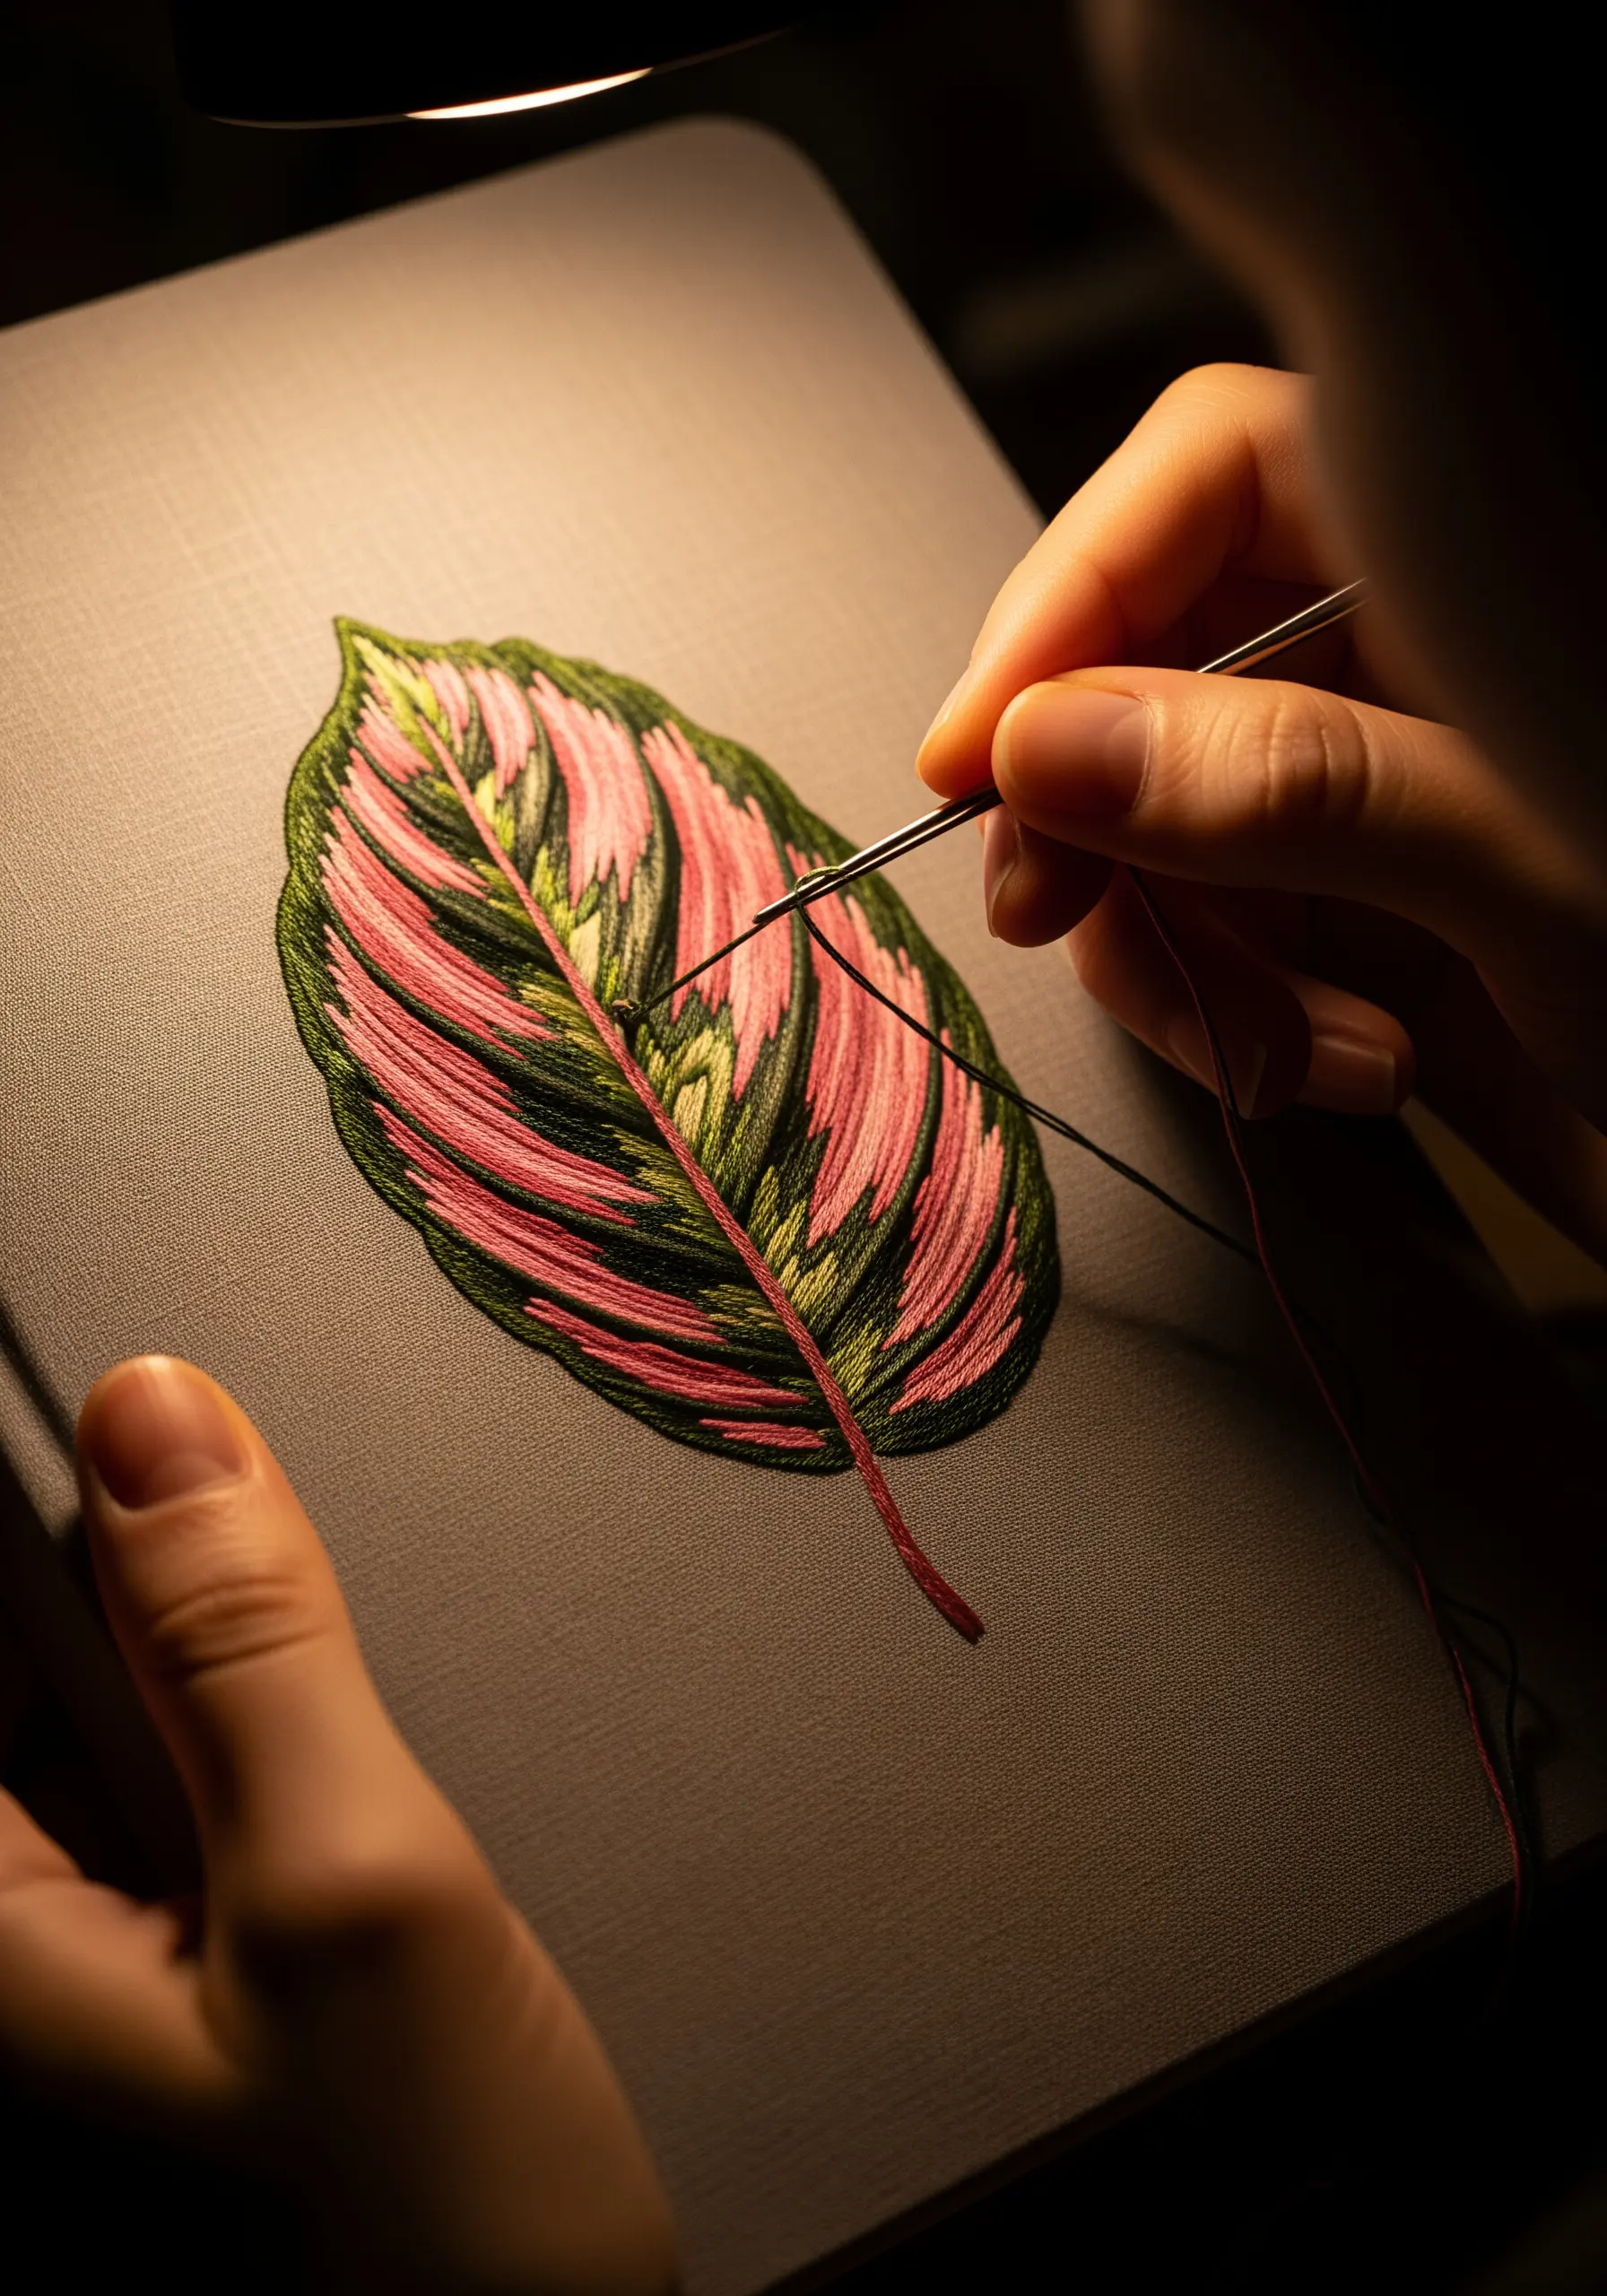
4. Paint with Thread Using Long-and-Short Stitch
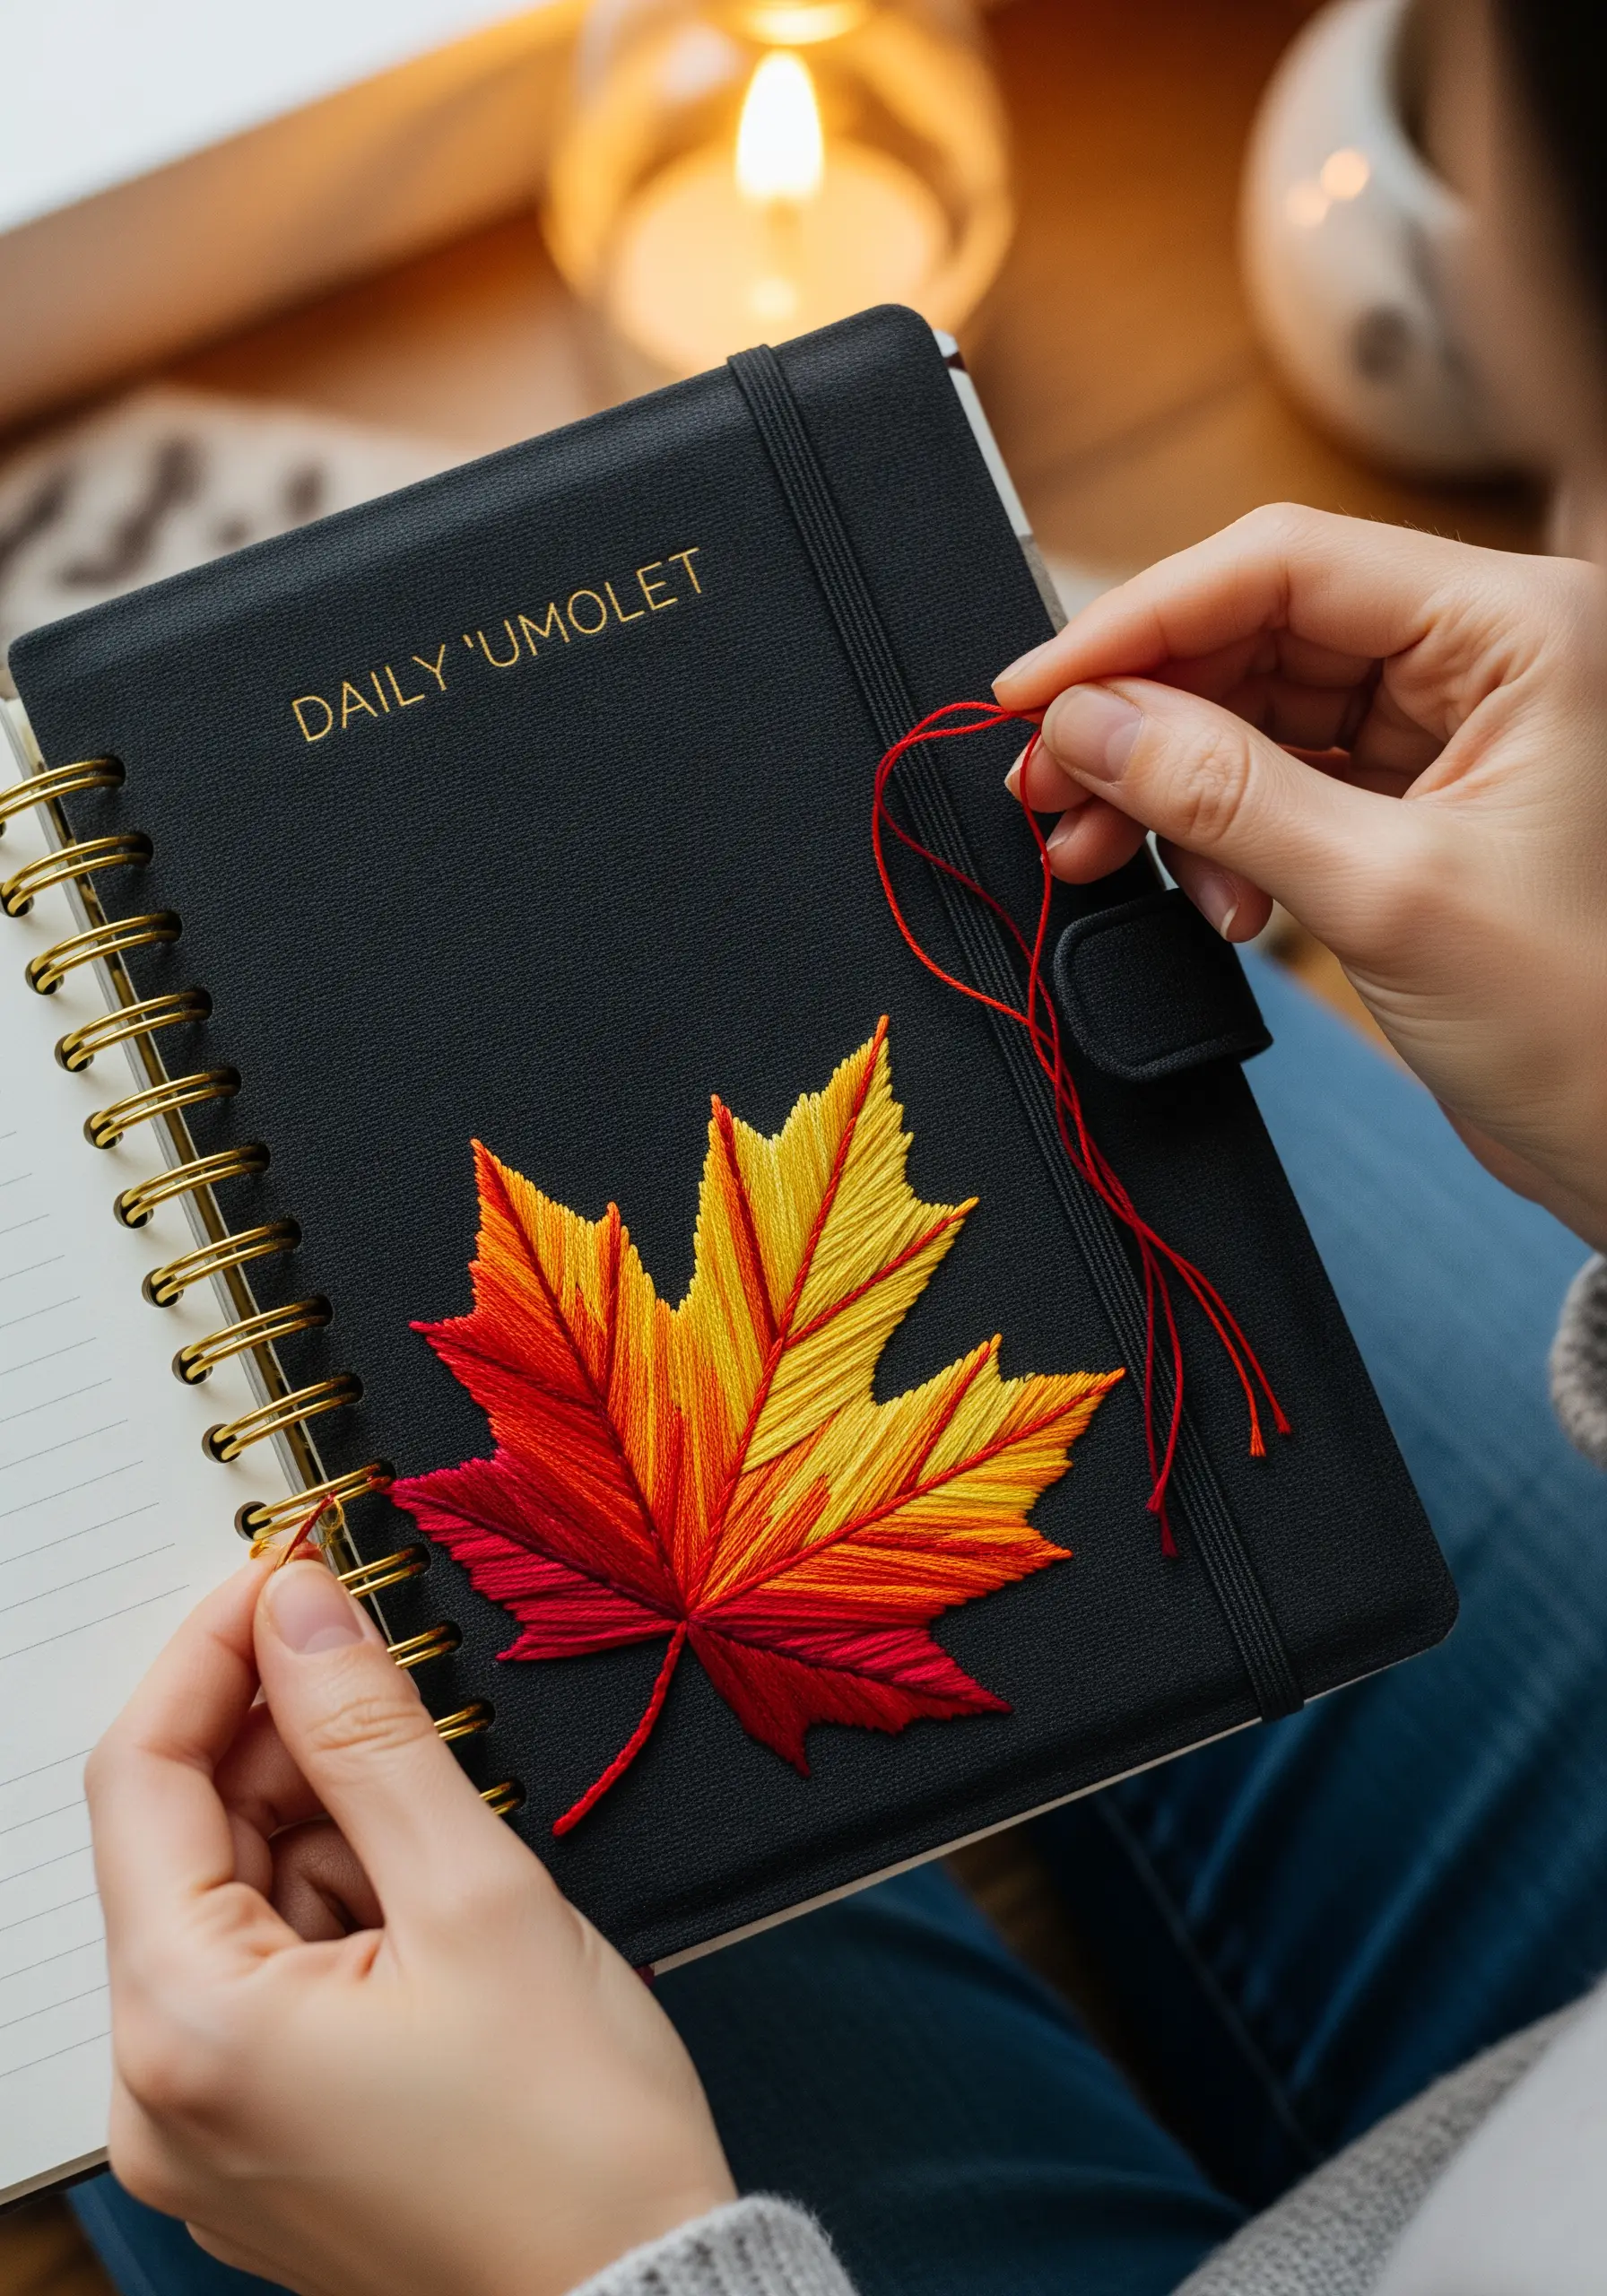
Create a fiery autumn gradient by blending colors seamlessly with the long-and-short stitch, a technique often called thread painting.
Start with the lightest color (yellow) at the leaf tips, using alternating long and short stitches.
Introduce the next color (orange) by stitching up into the gaps of the previous row, slightly overlapping them to blur the transition.
Finish with the darkest shade (red) at the base, ensuring your stitches always follow the direction of the leaf’s natural veins for a realistic flow.
5. Build Delicate Texture in an Olive Wreath

A successful wreath design relies on a balance of texture and negative space.
Use a fine stem stitch or whipped backstitch for the branches to create a smooth, cord-like line.
Keep the olive leaves small and delicate with a simple fishbone stitch, varying the greens to add depth and realism.
Finish with plump French knots or satin-stitched ovals for the olives, which add just the right amount of textural contrast to this classic motif.
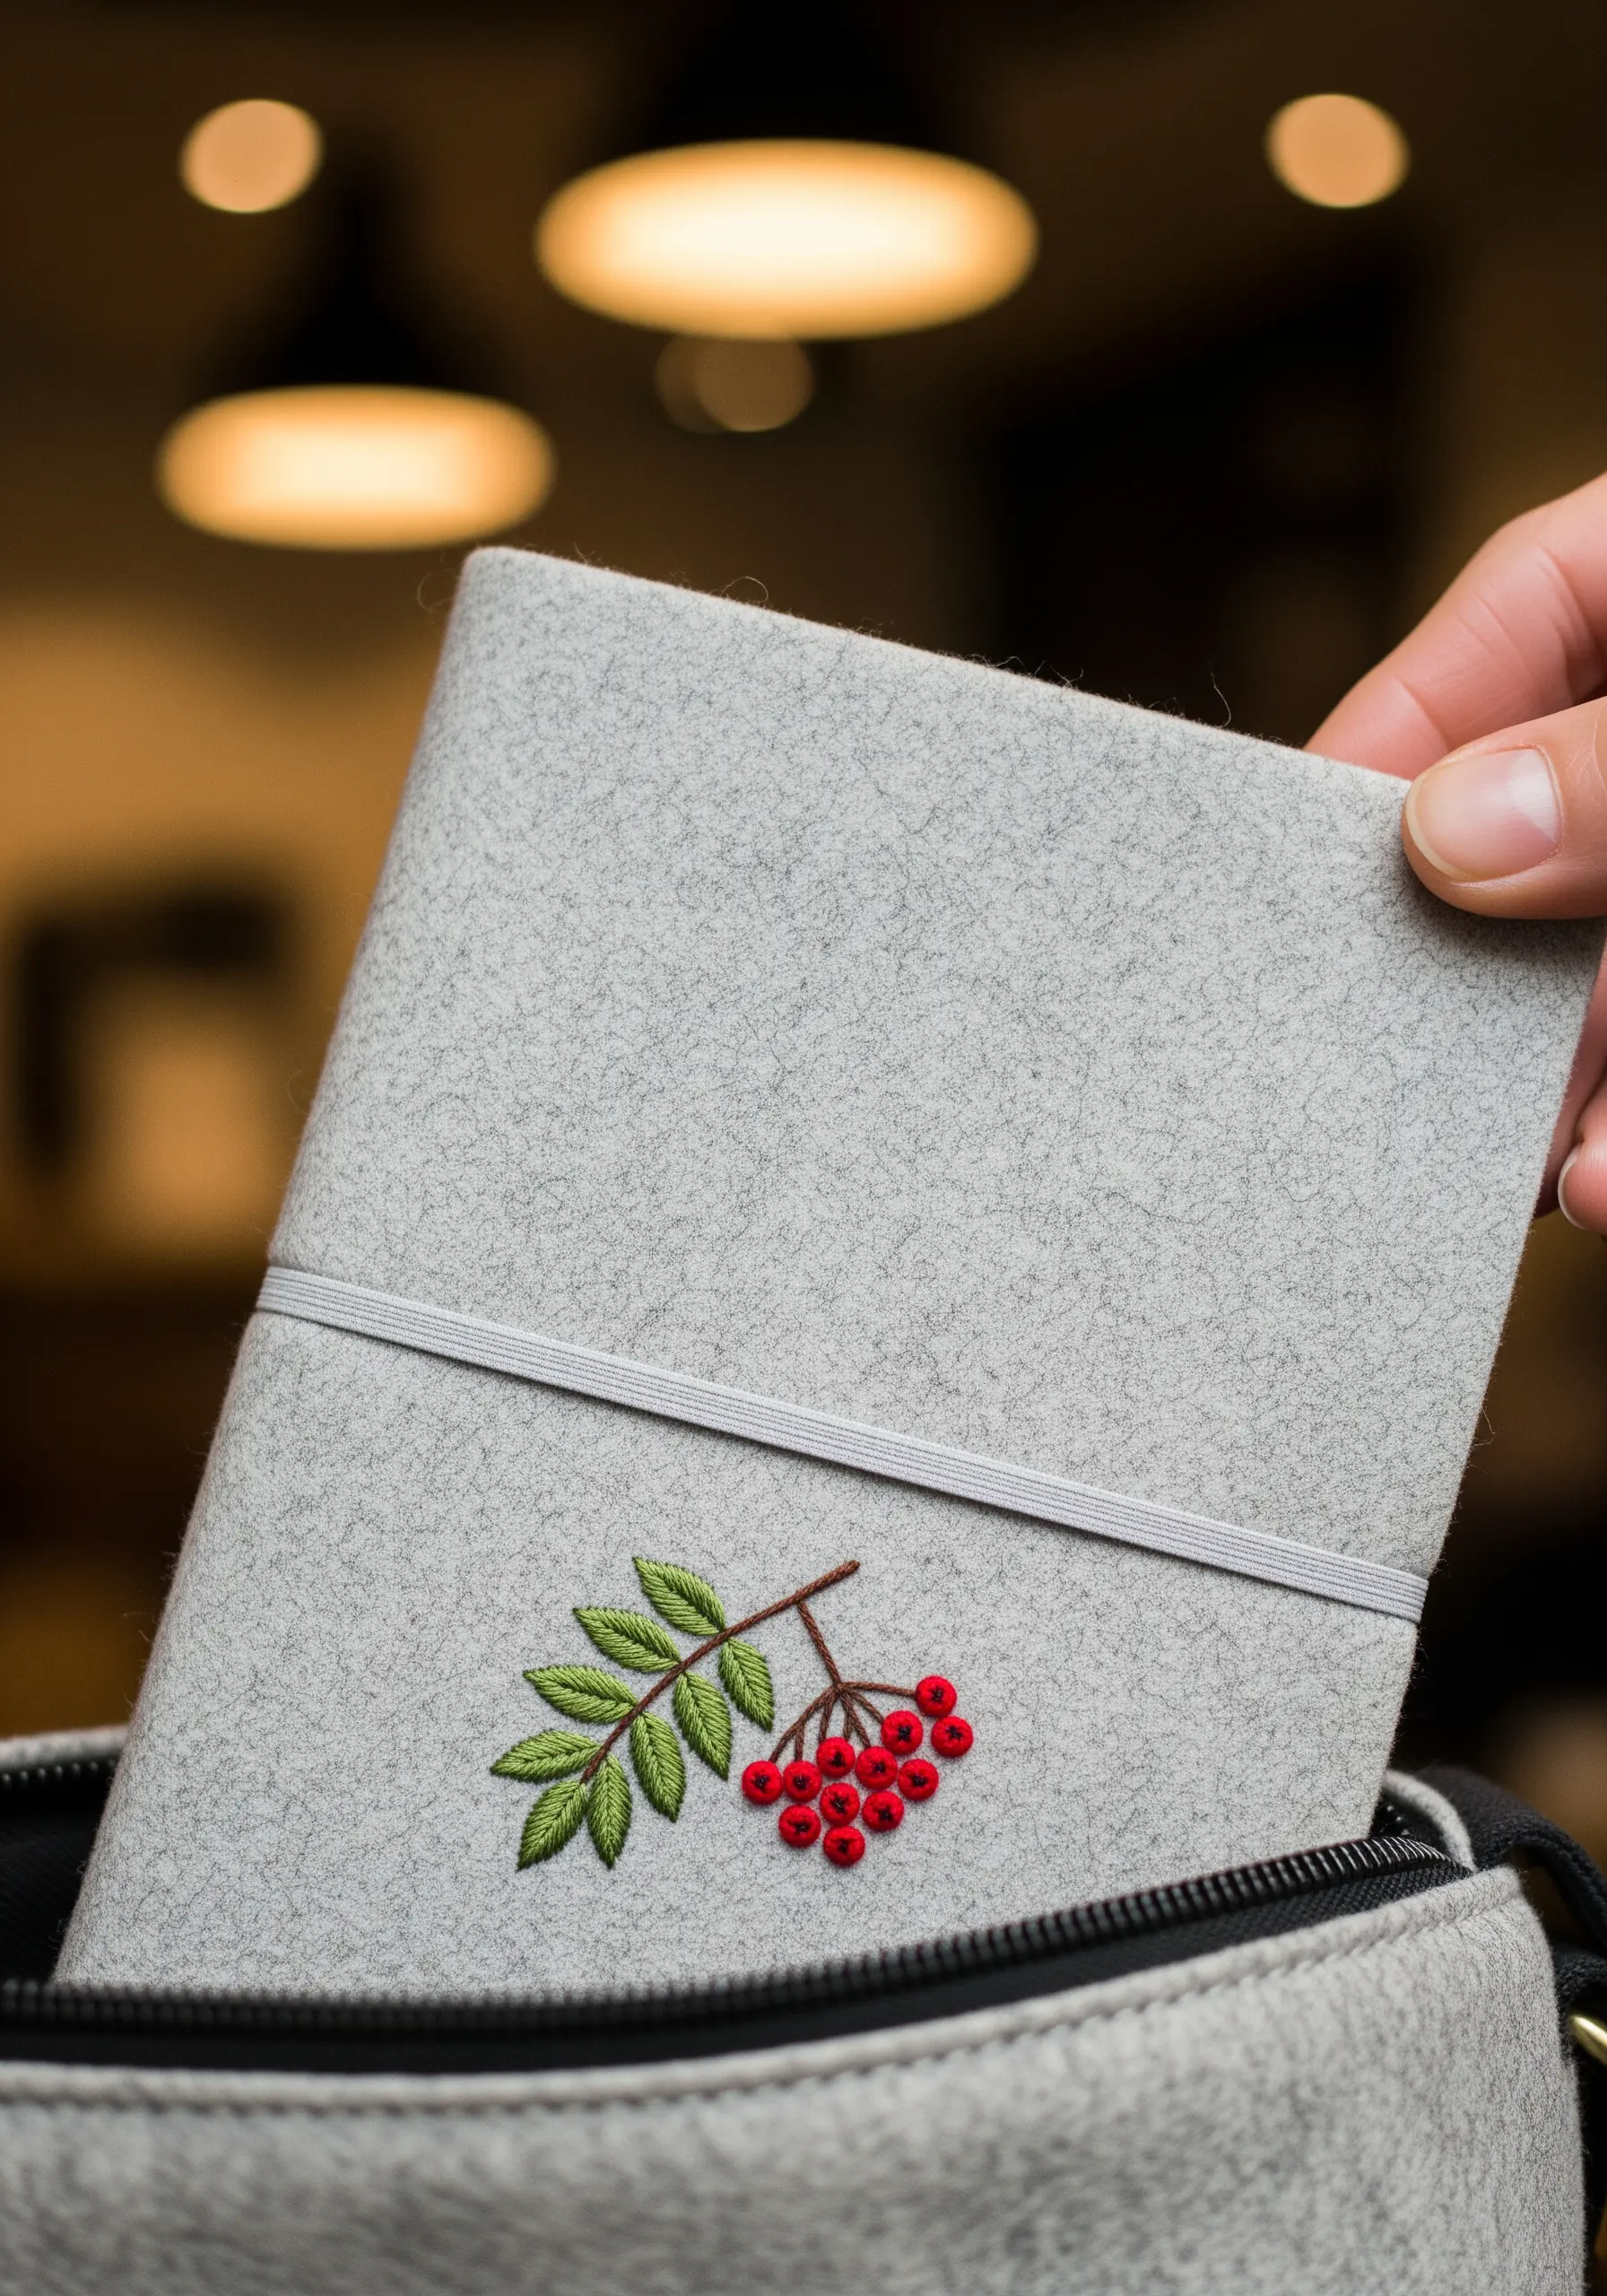
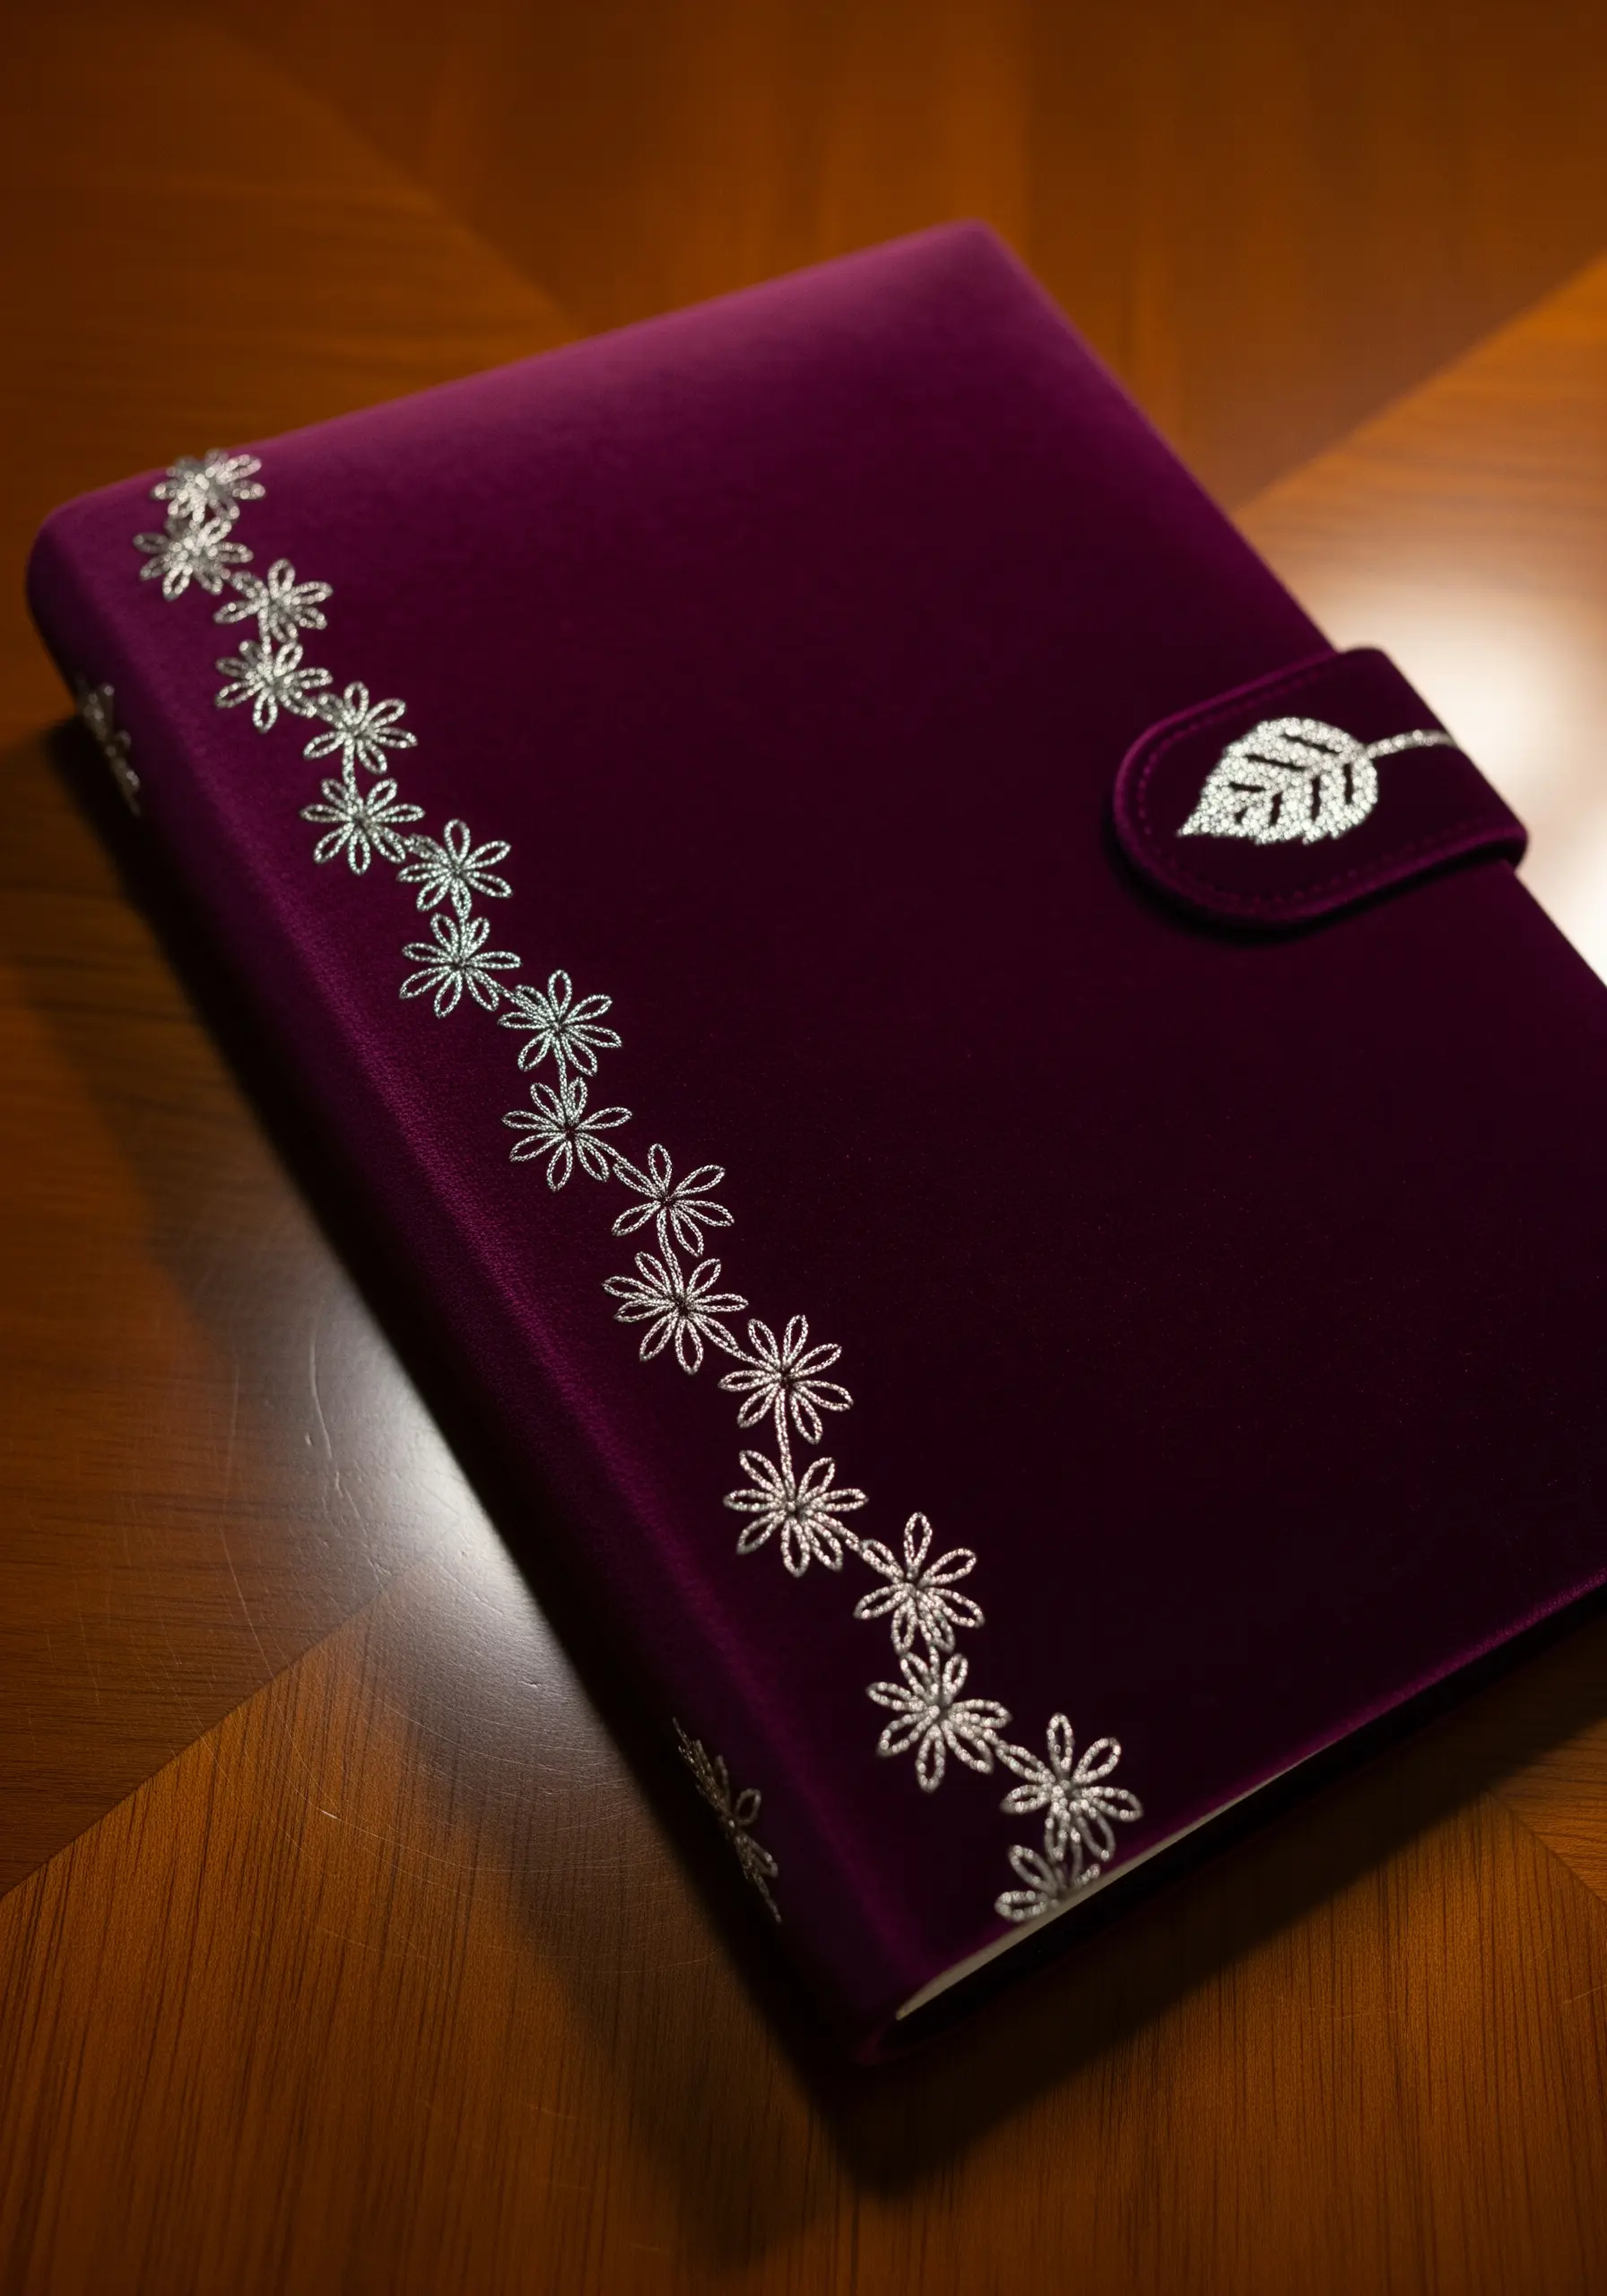
6. Elevate a Journal Band with Metallic Thread
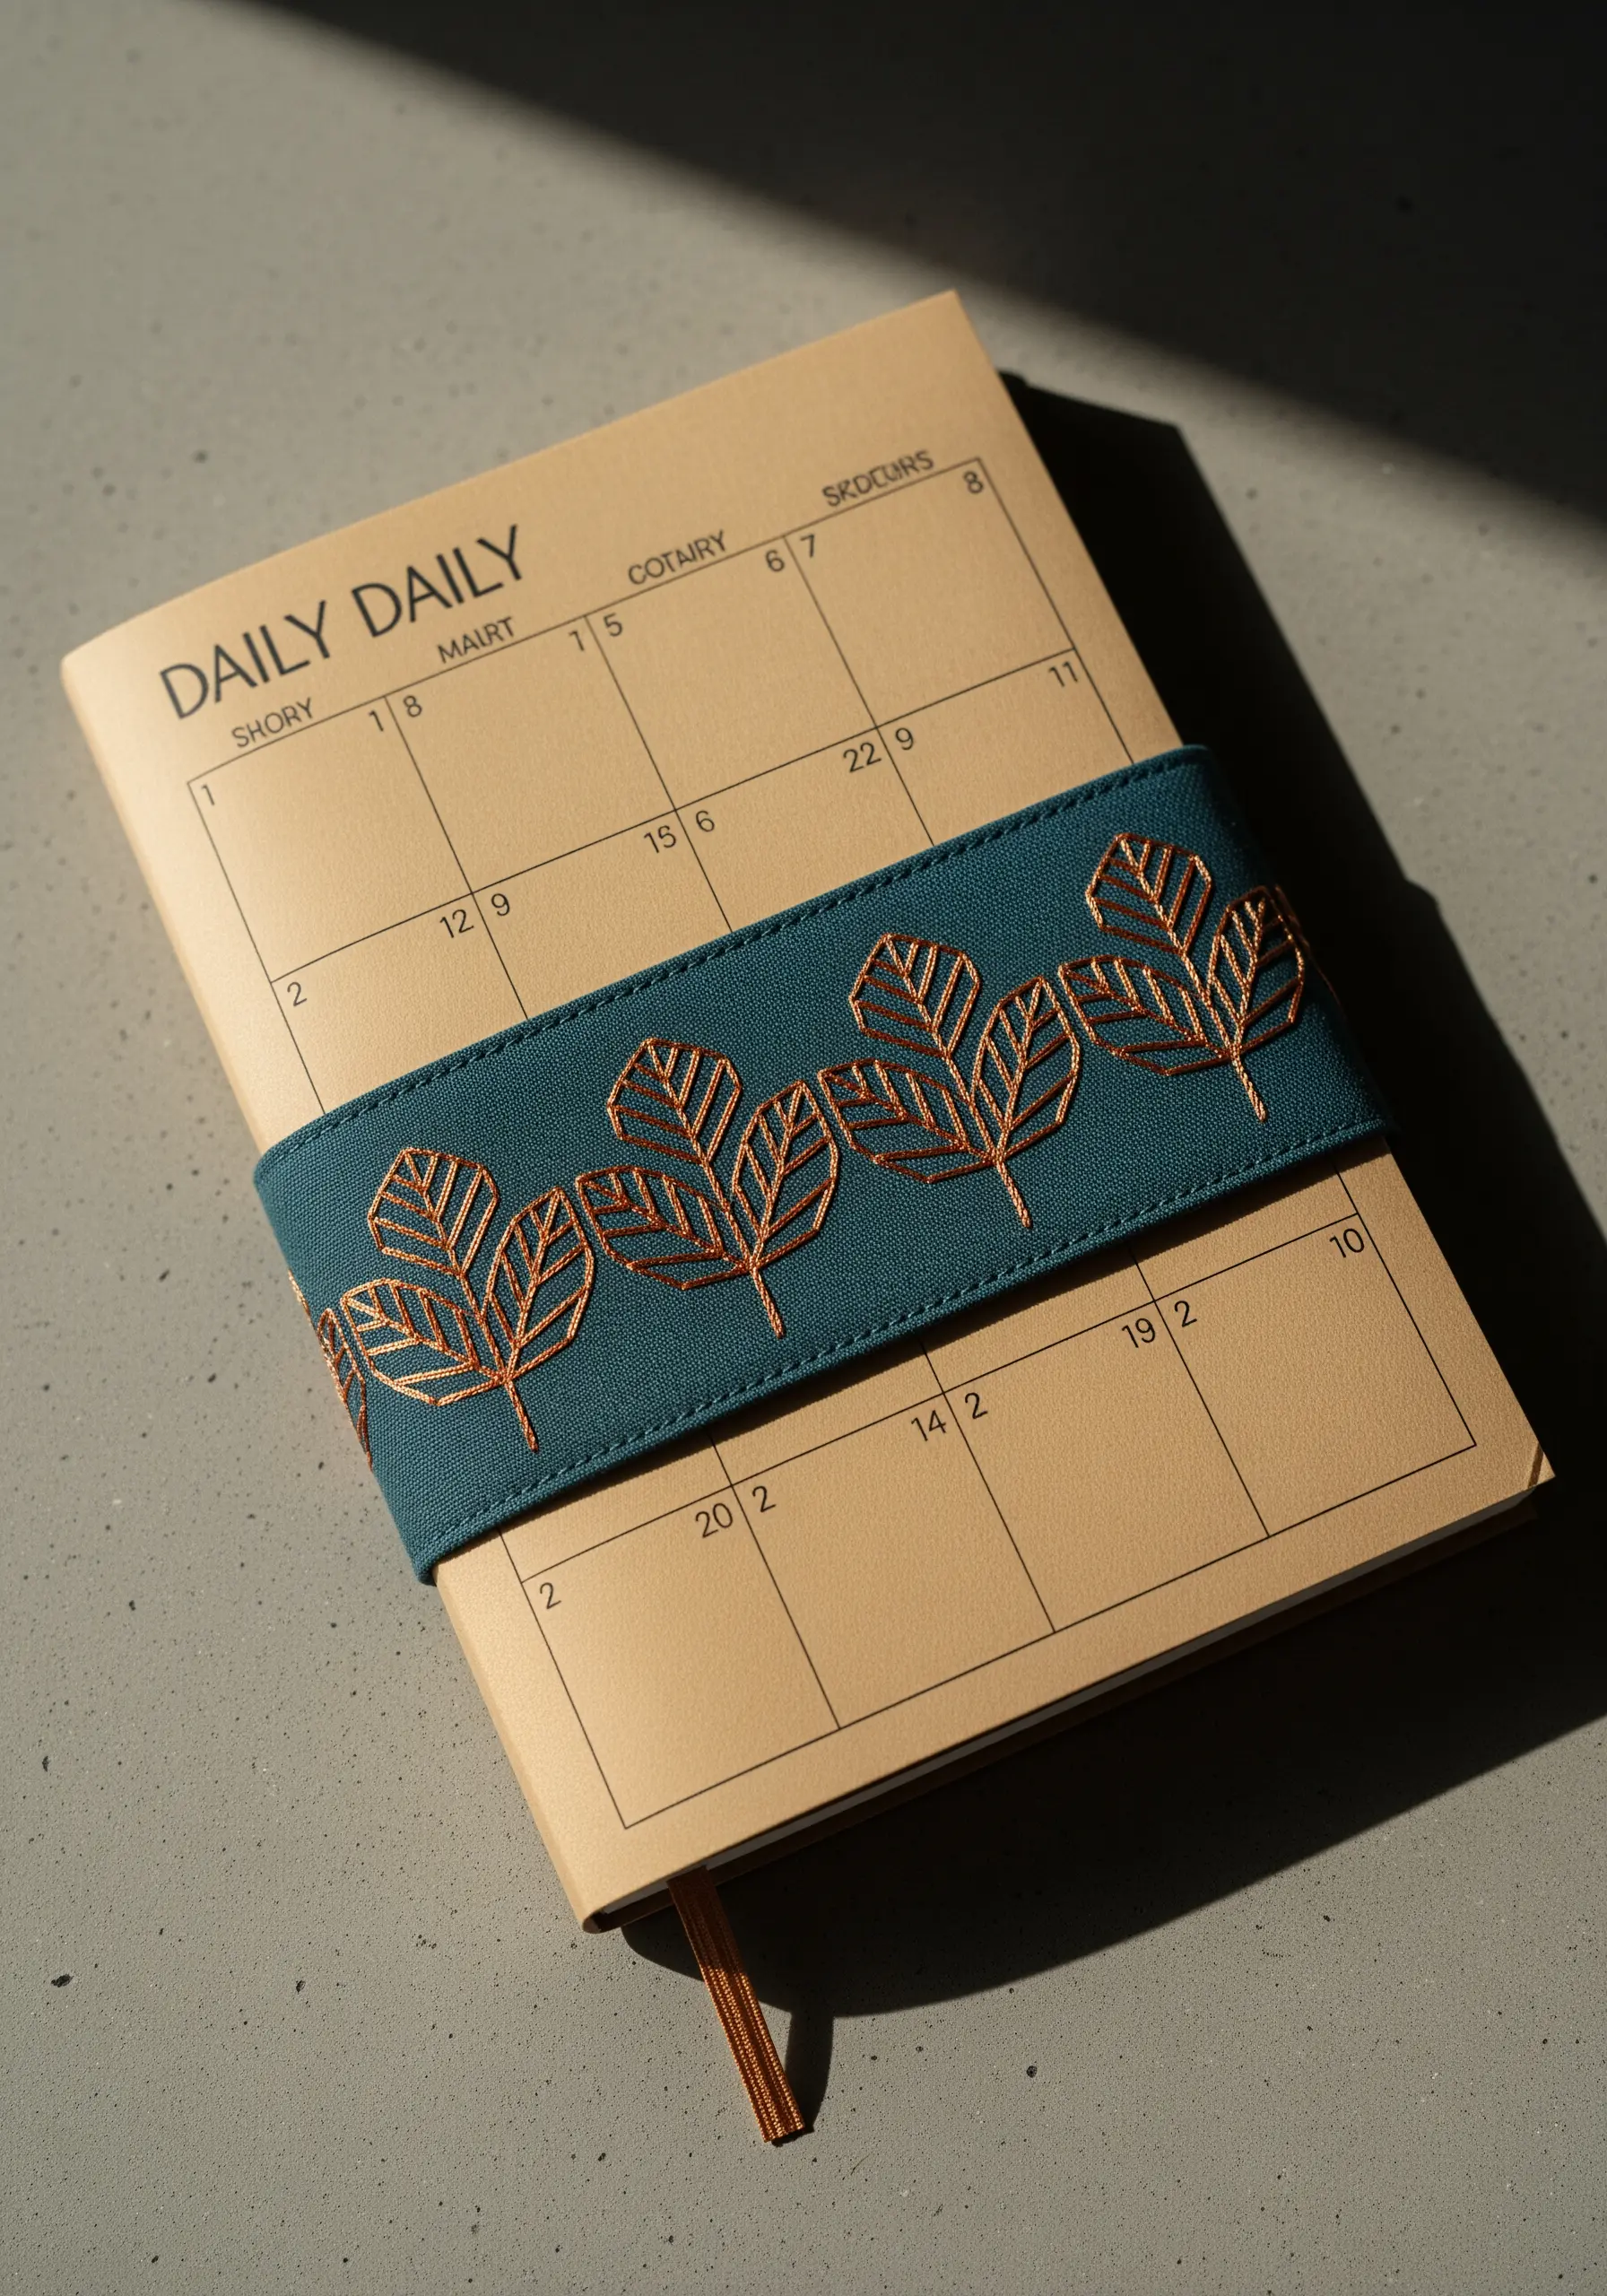
Stitching with metallic floss can be challenging, but the payoff is immense, especially against a dark fabric.
To prevent fraying, use shorter lengths of thread (no more than 12 inches) and a thread conditioner like beeswax.
Work a simple backstitch or stem stitch for these repeating leaf outlines. The key is consistent stitch length, which ensures the metallic thread catches the light evenly for a luxurious, cohesive sheen.
7. Create a Living Border with a Climbing Vine

Transform the edge of your journal into a garden trellis by stitching a continuous climbing vine.
Map out the main stem first using a flowing stem stitch. Then, add the leaves using a directional satin stitch or fishbone stitch, ensuring they point slightly upwards as if reaching for light.
Intersperse tiny red French knots for berries, which adds a pop of color and breaks the monotony of the green, making the entire design feel more alive and organic.
8. Achieve Painterly Softness in Corner Florals
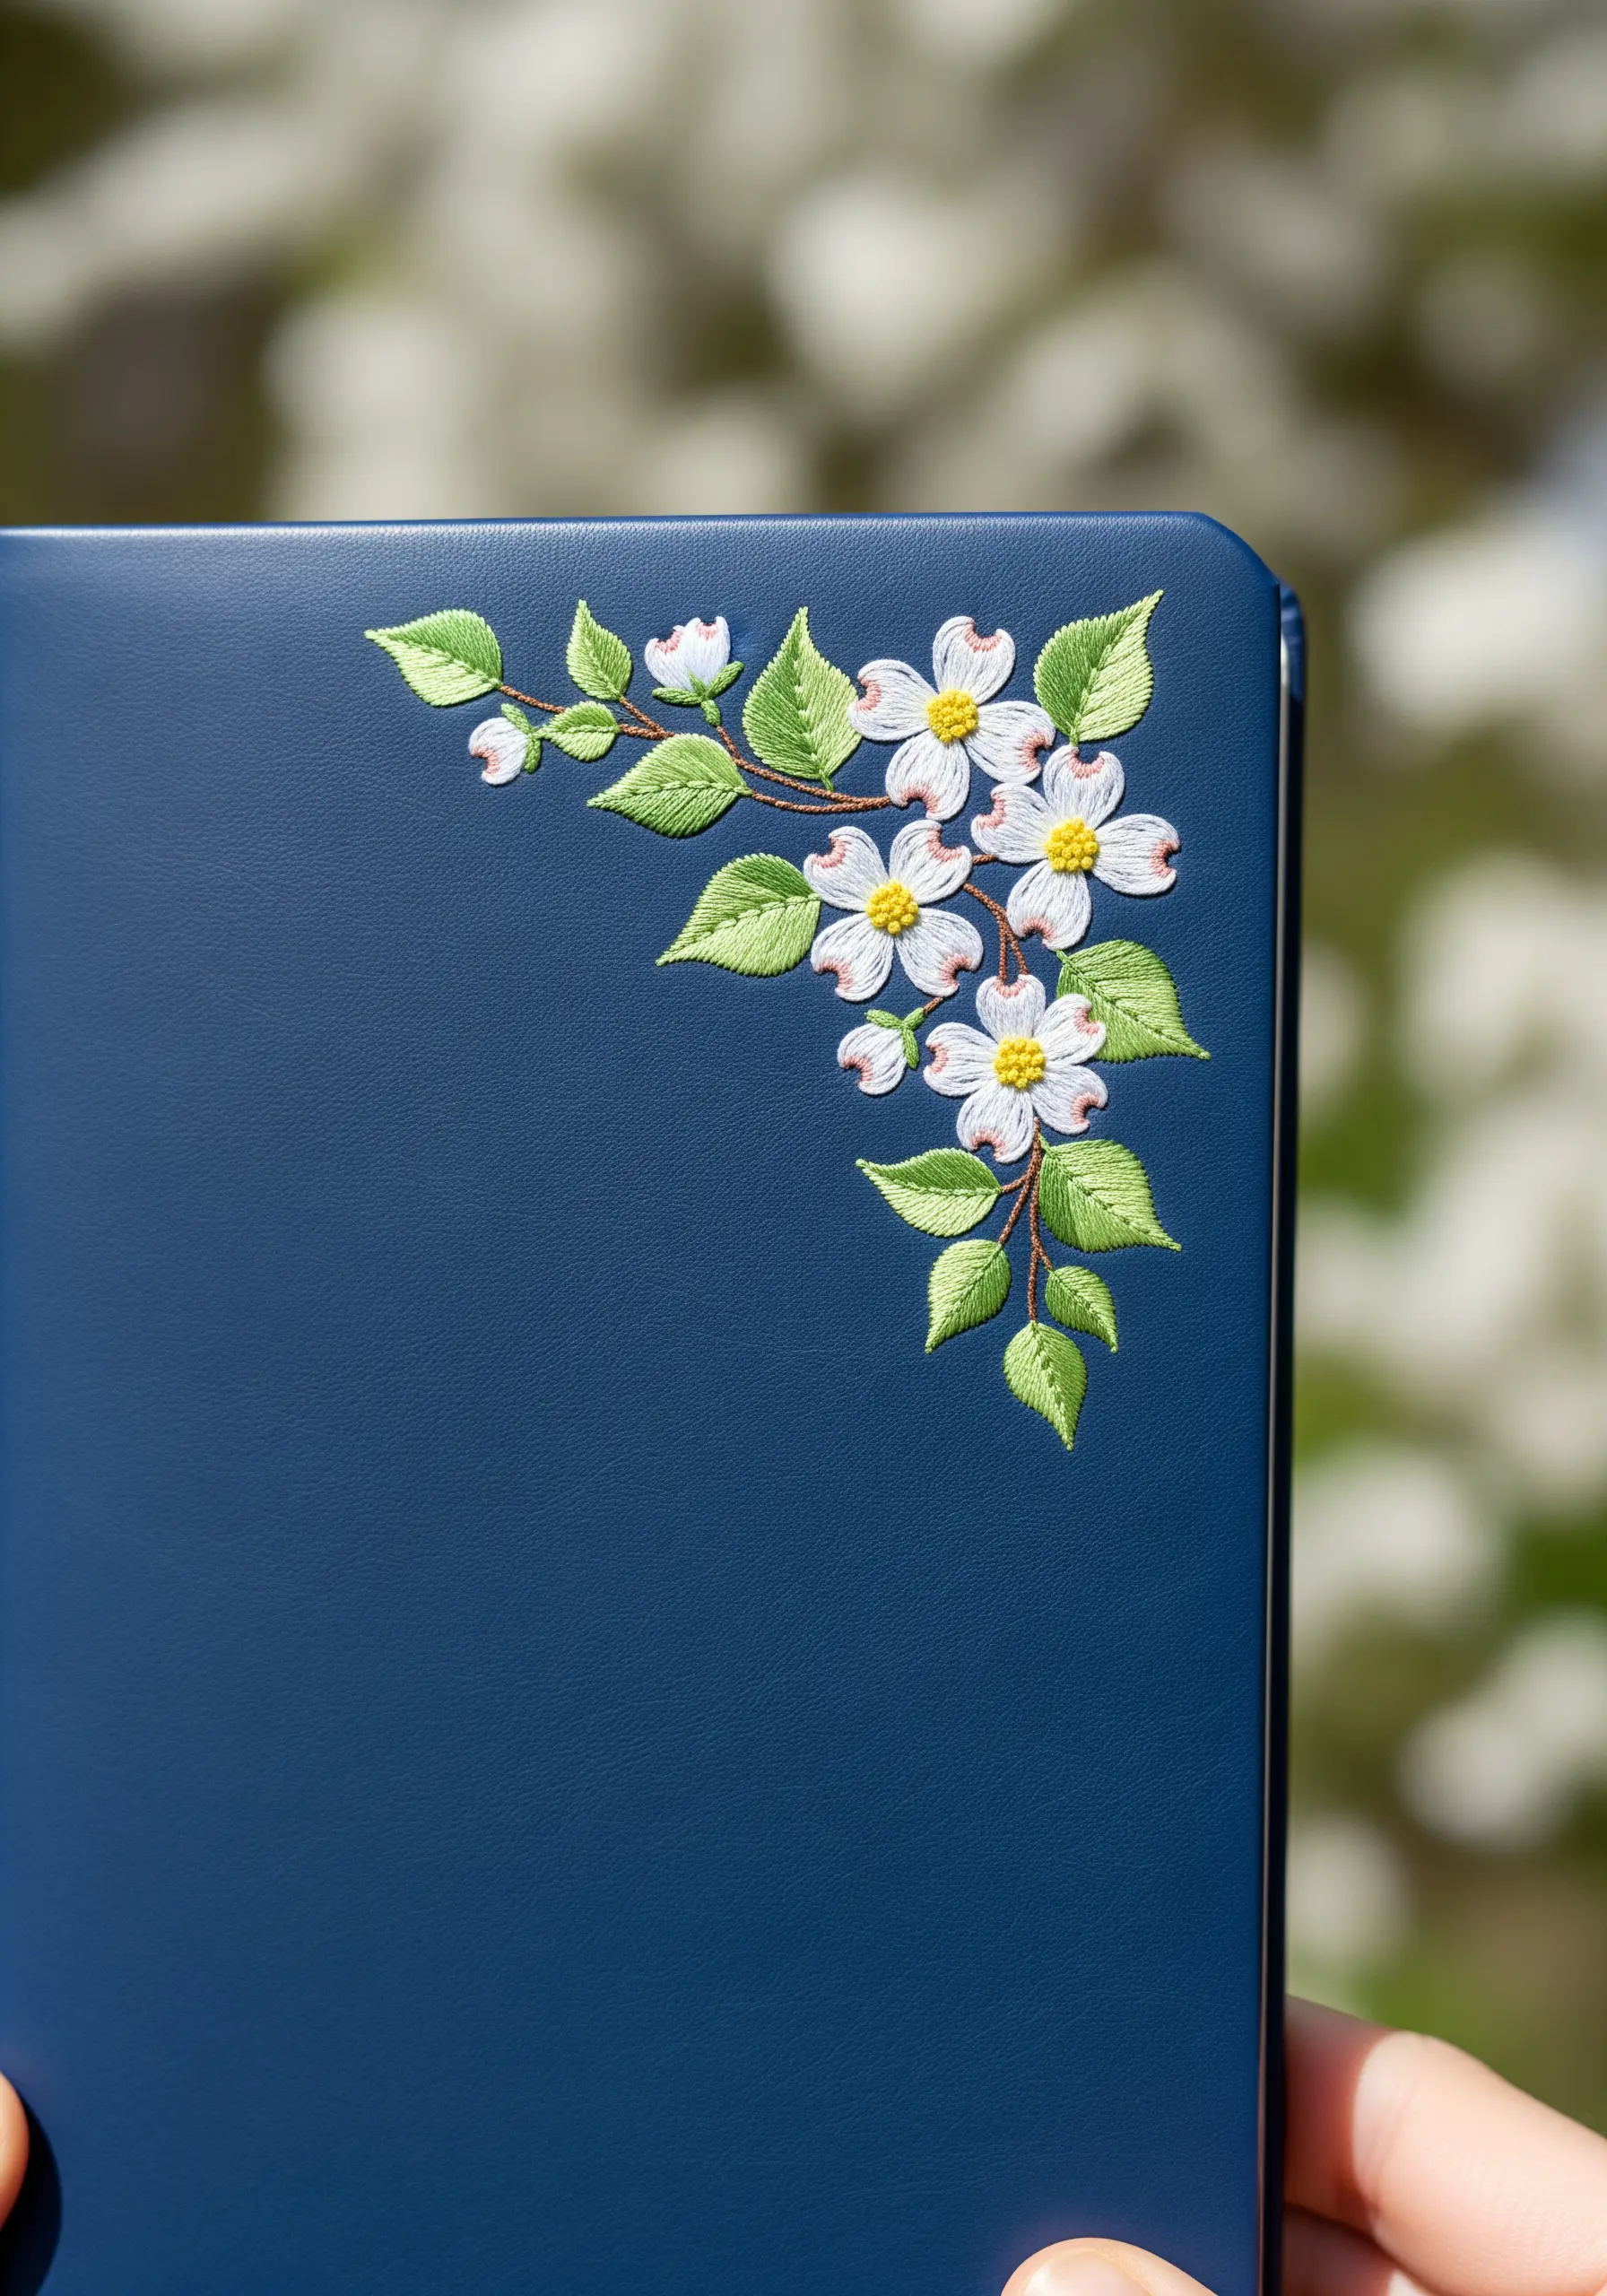
Soften the look of your botanicals by blending shades within each leaf and petal.
Instead of a solid color, use two or three similar tones of green for the leaves, working them with a fishbone stitch to create natural-looking highlights.
For the flowers, use a pale off-white for the main petals and add a hint of pale yellow or blush near the center to give them warmth and dimension.
This subtle color work elevates a simple floral corner into a piece of art with a delicate, hand-painted quality.
9. Capture Ephemeral Beauty with Skeleton Leaves
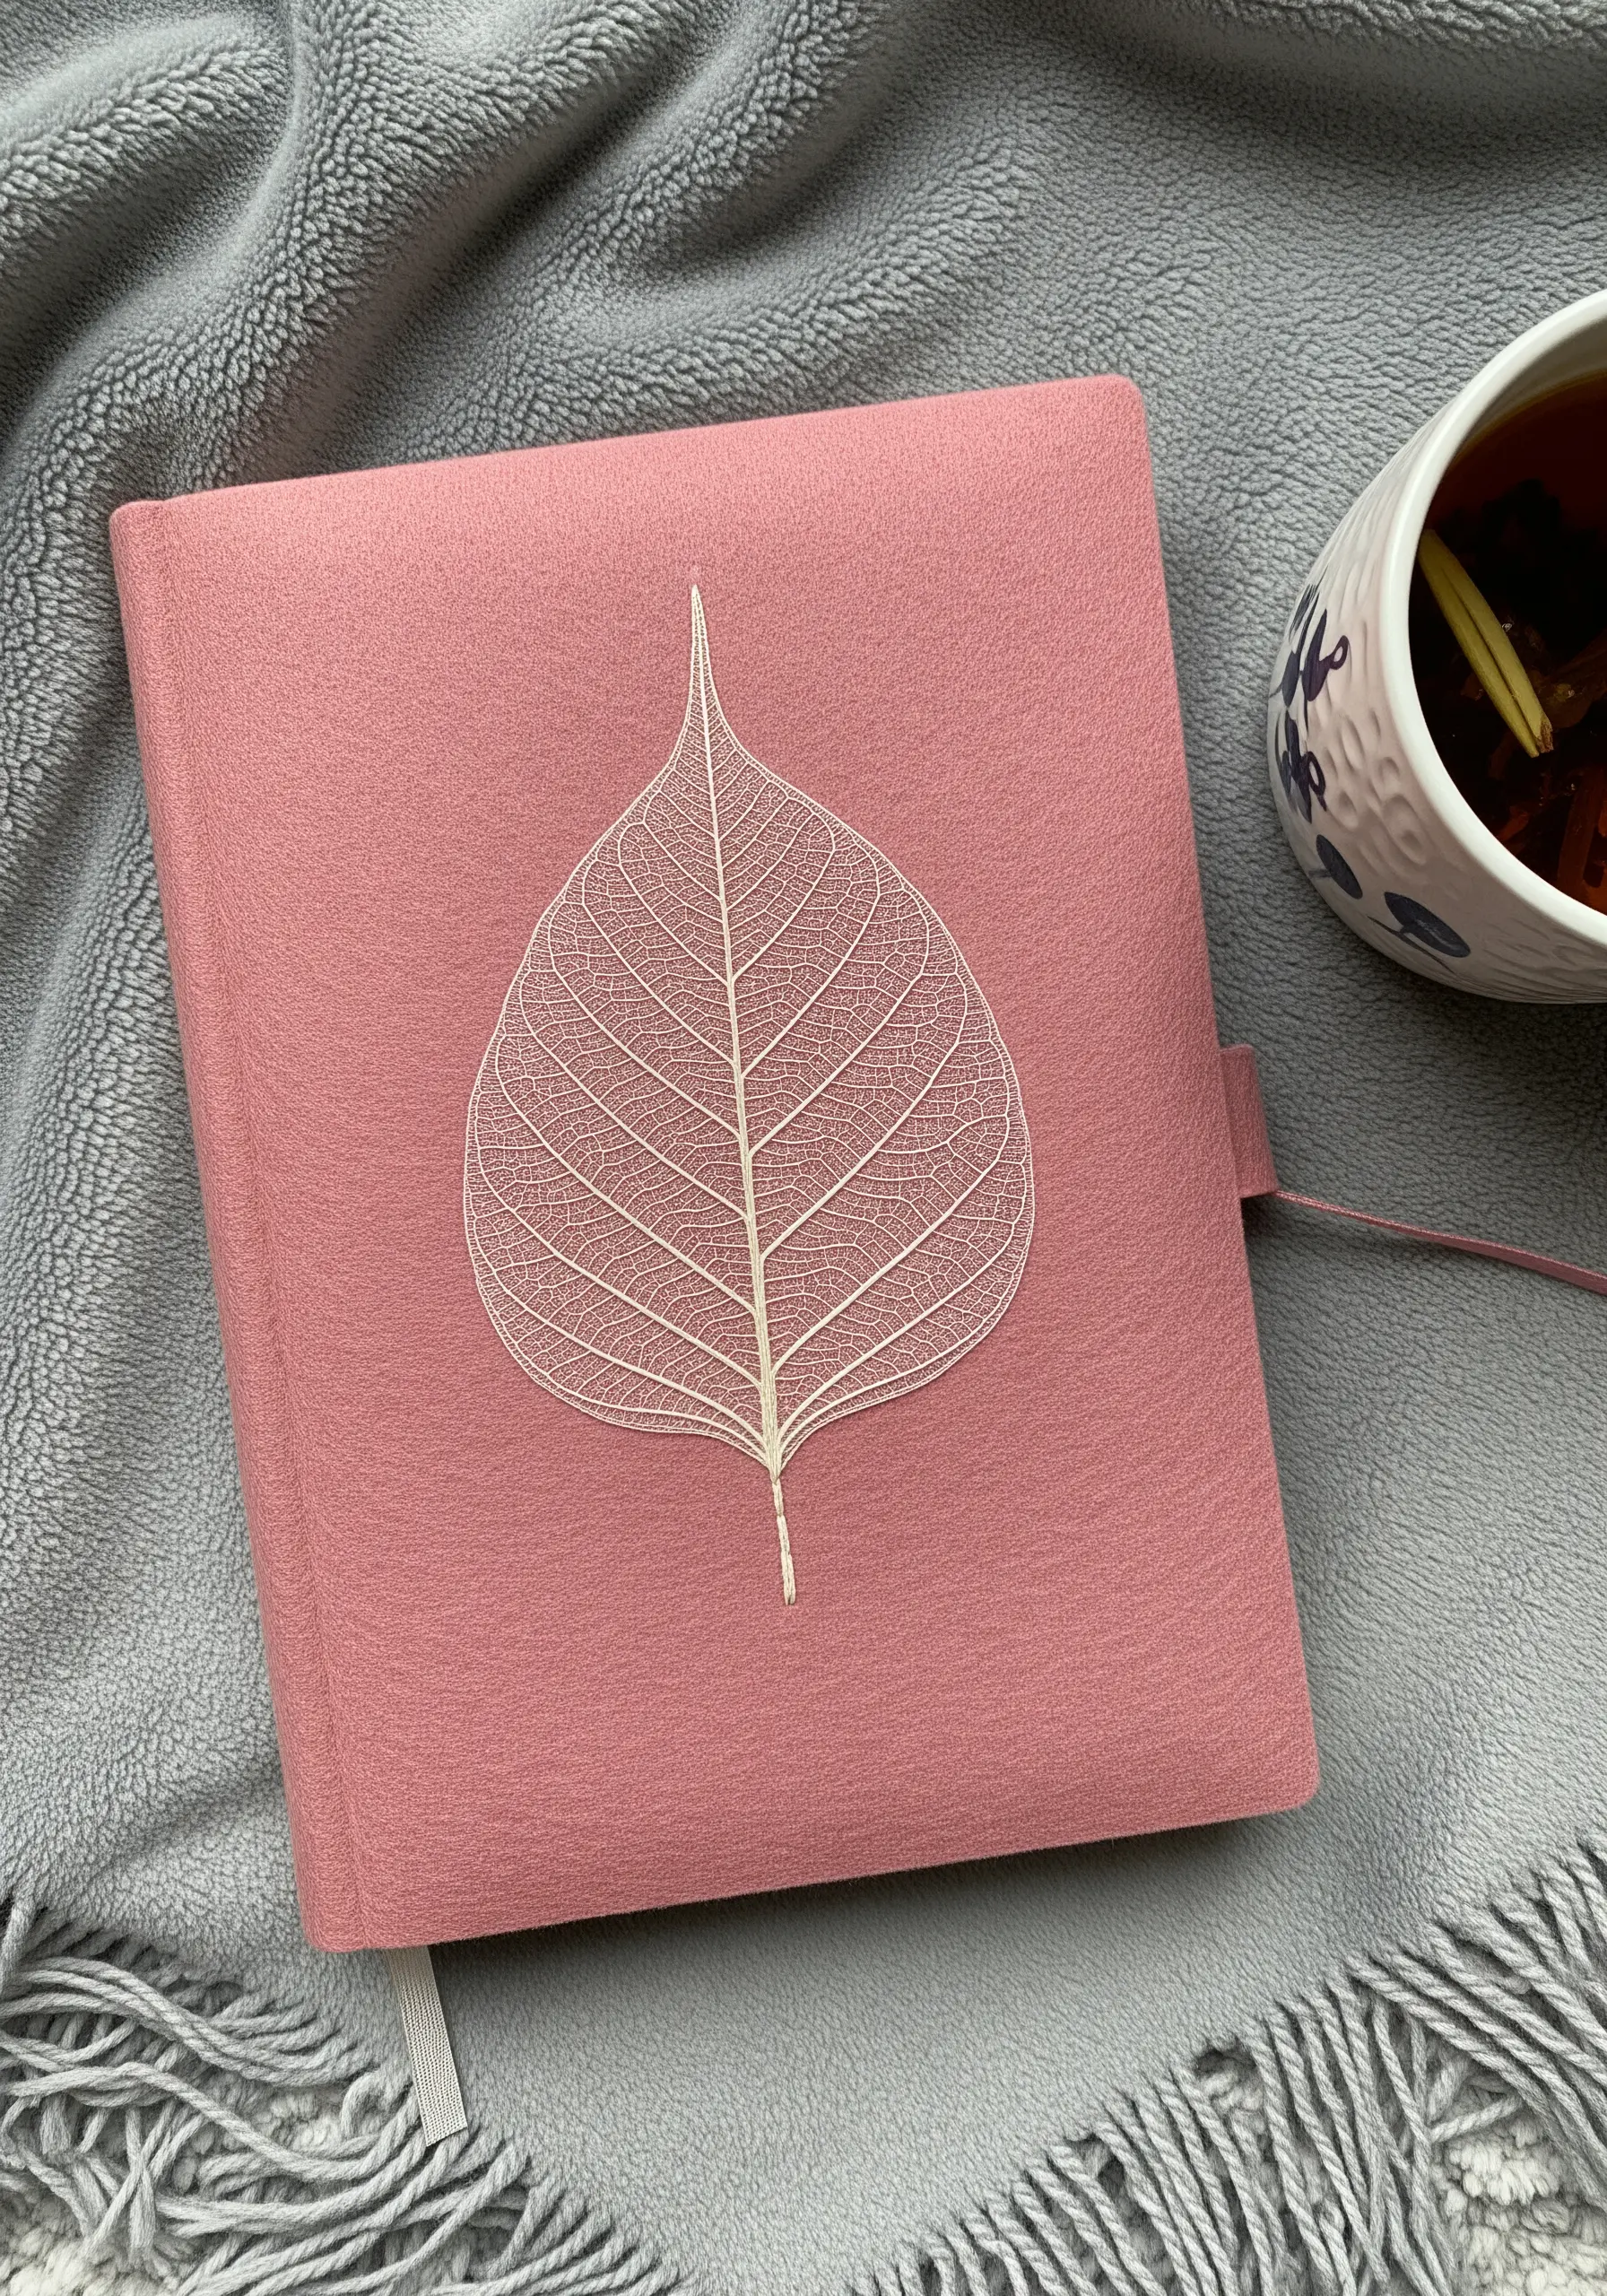
Recreate the delicate structure of a skeleton leaf by using a single strand of fine, off-white thread on a contrasting fabric.
Use a fine backstitch or split stitch for the central vein and main branches to give them strength.
For the intricate network of smaller veins, switch to single straight stitches. This shift in technique mimics the natural variation in a real leaf’s structure, resulting in a design that feels both precise and wonderfully fragile.
10. Frame a Focal Point with an Embroidered Patch
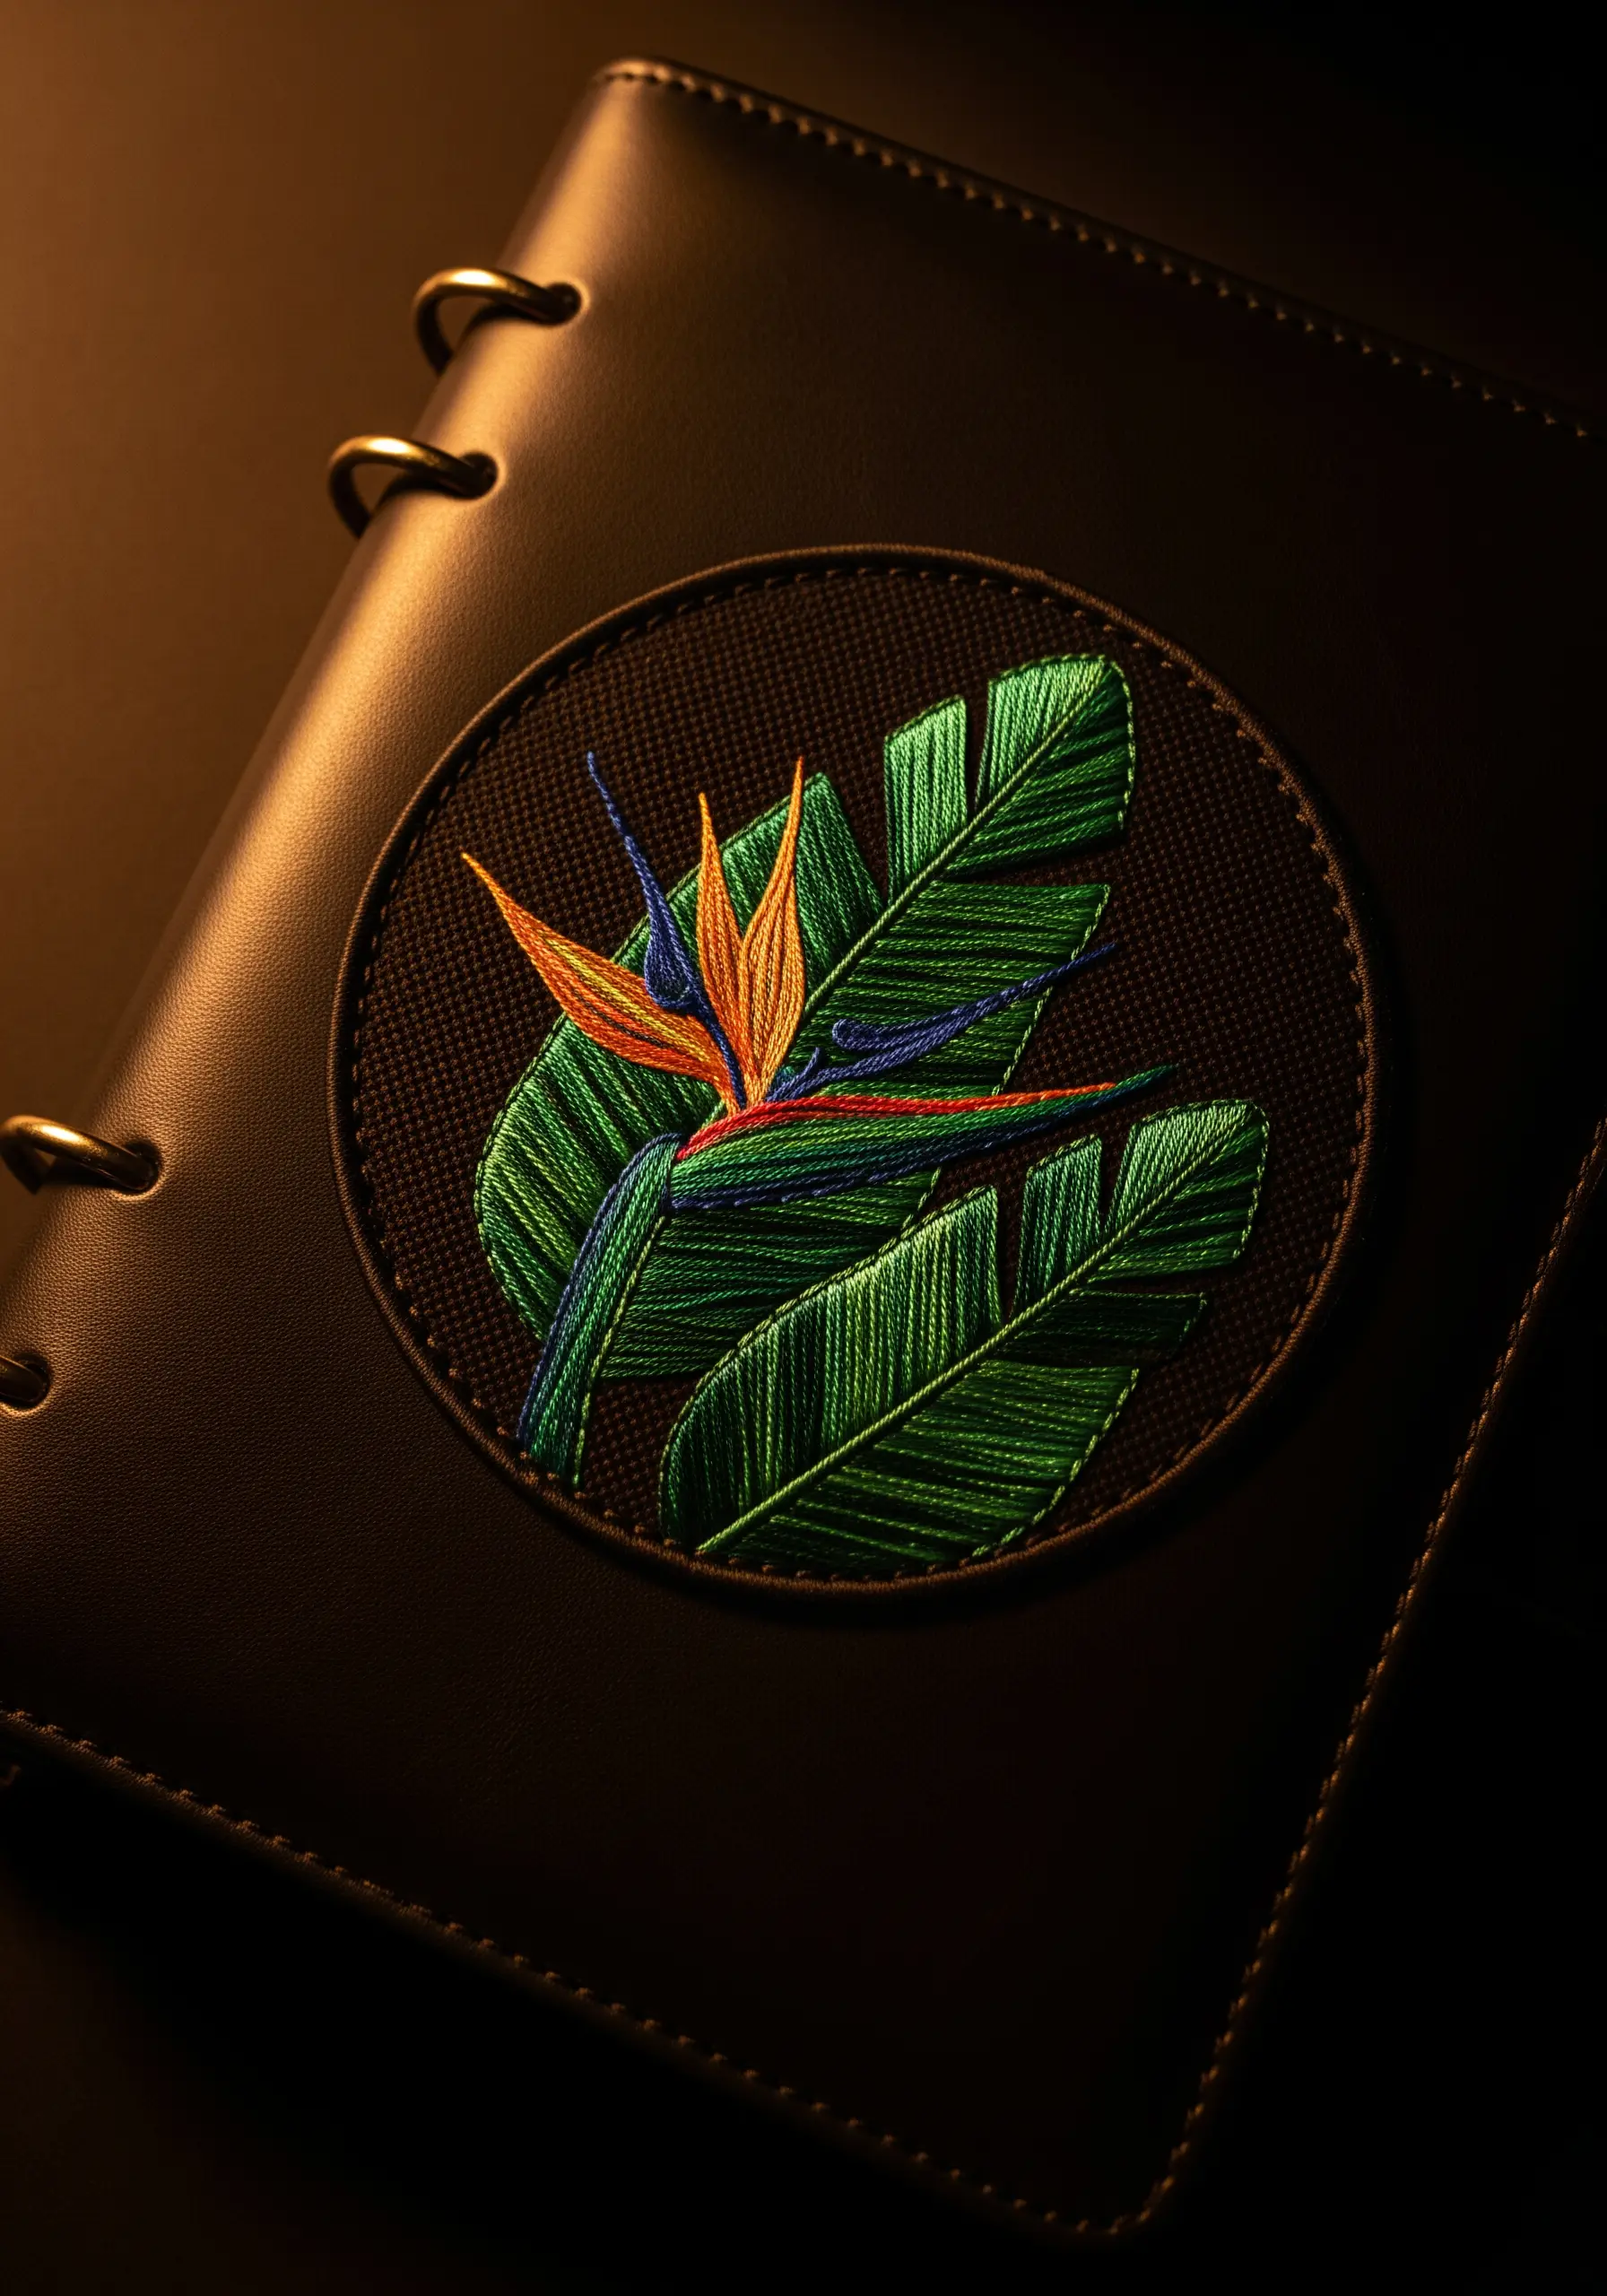
An embroidered patch allows you to work on a separate piece of fabric, which is ideal for complex designs or materials that are difficult to hoop.
Complete your embroidery on a sturdy, tightly woven fabric like canvas or linen. To finish the edge, use a close, tight satin stitch border.
You can then securely attach the patch to your journal cover with fabric glue or by stitching it on with a neat running stitch, creating a polished, professional focal point.
11. Build a Lush Forest Floor with Layered Stitches
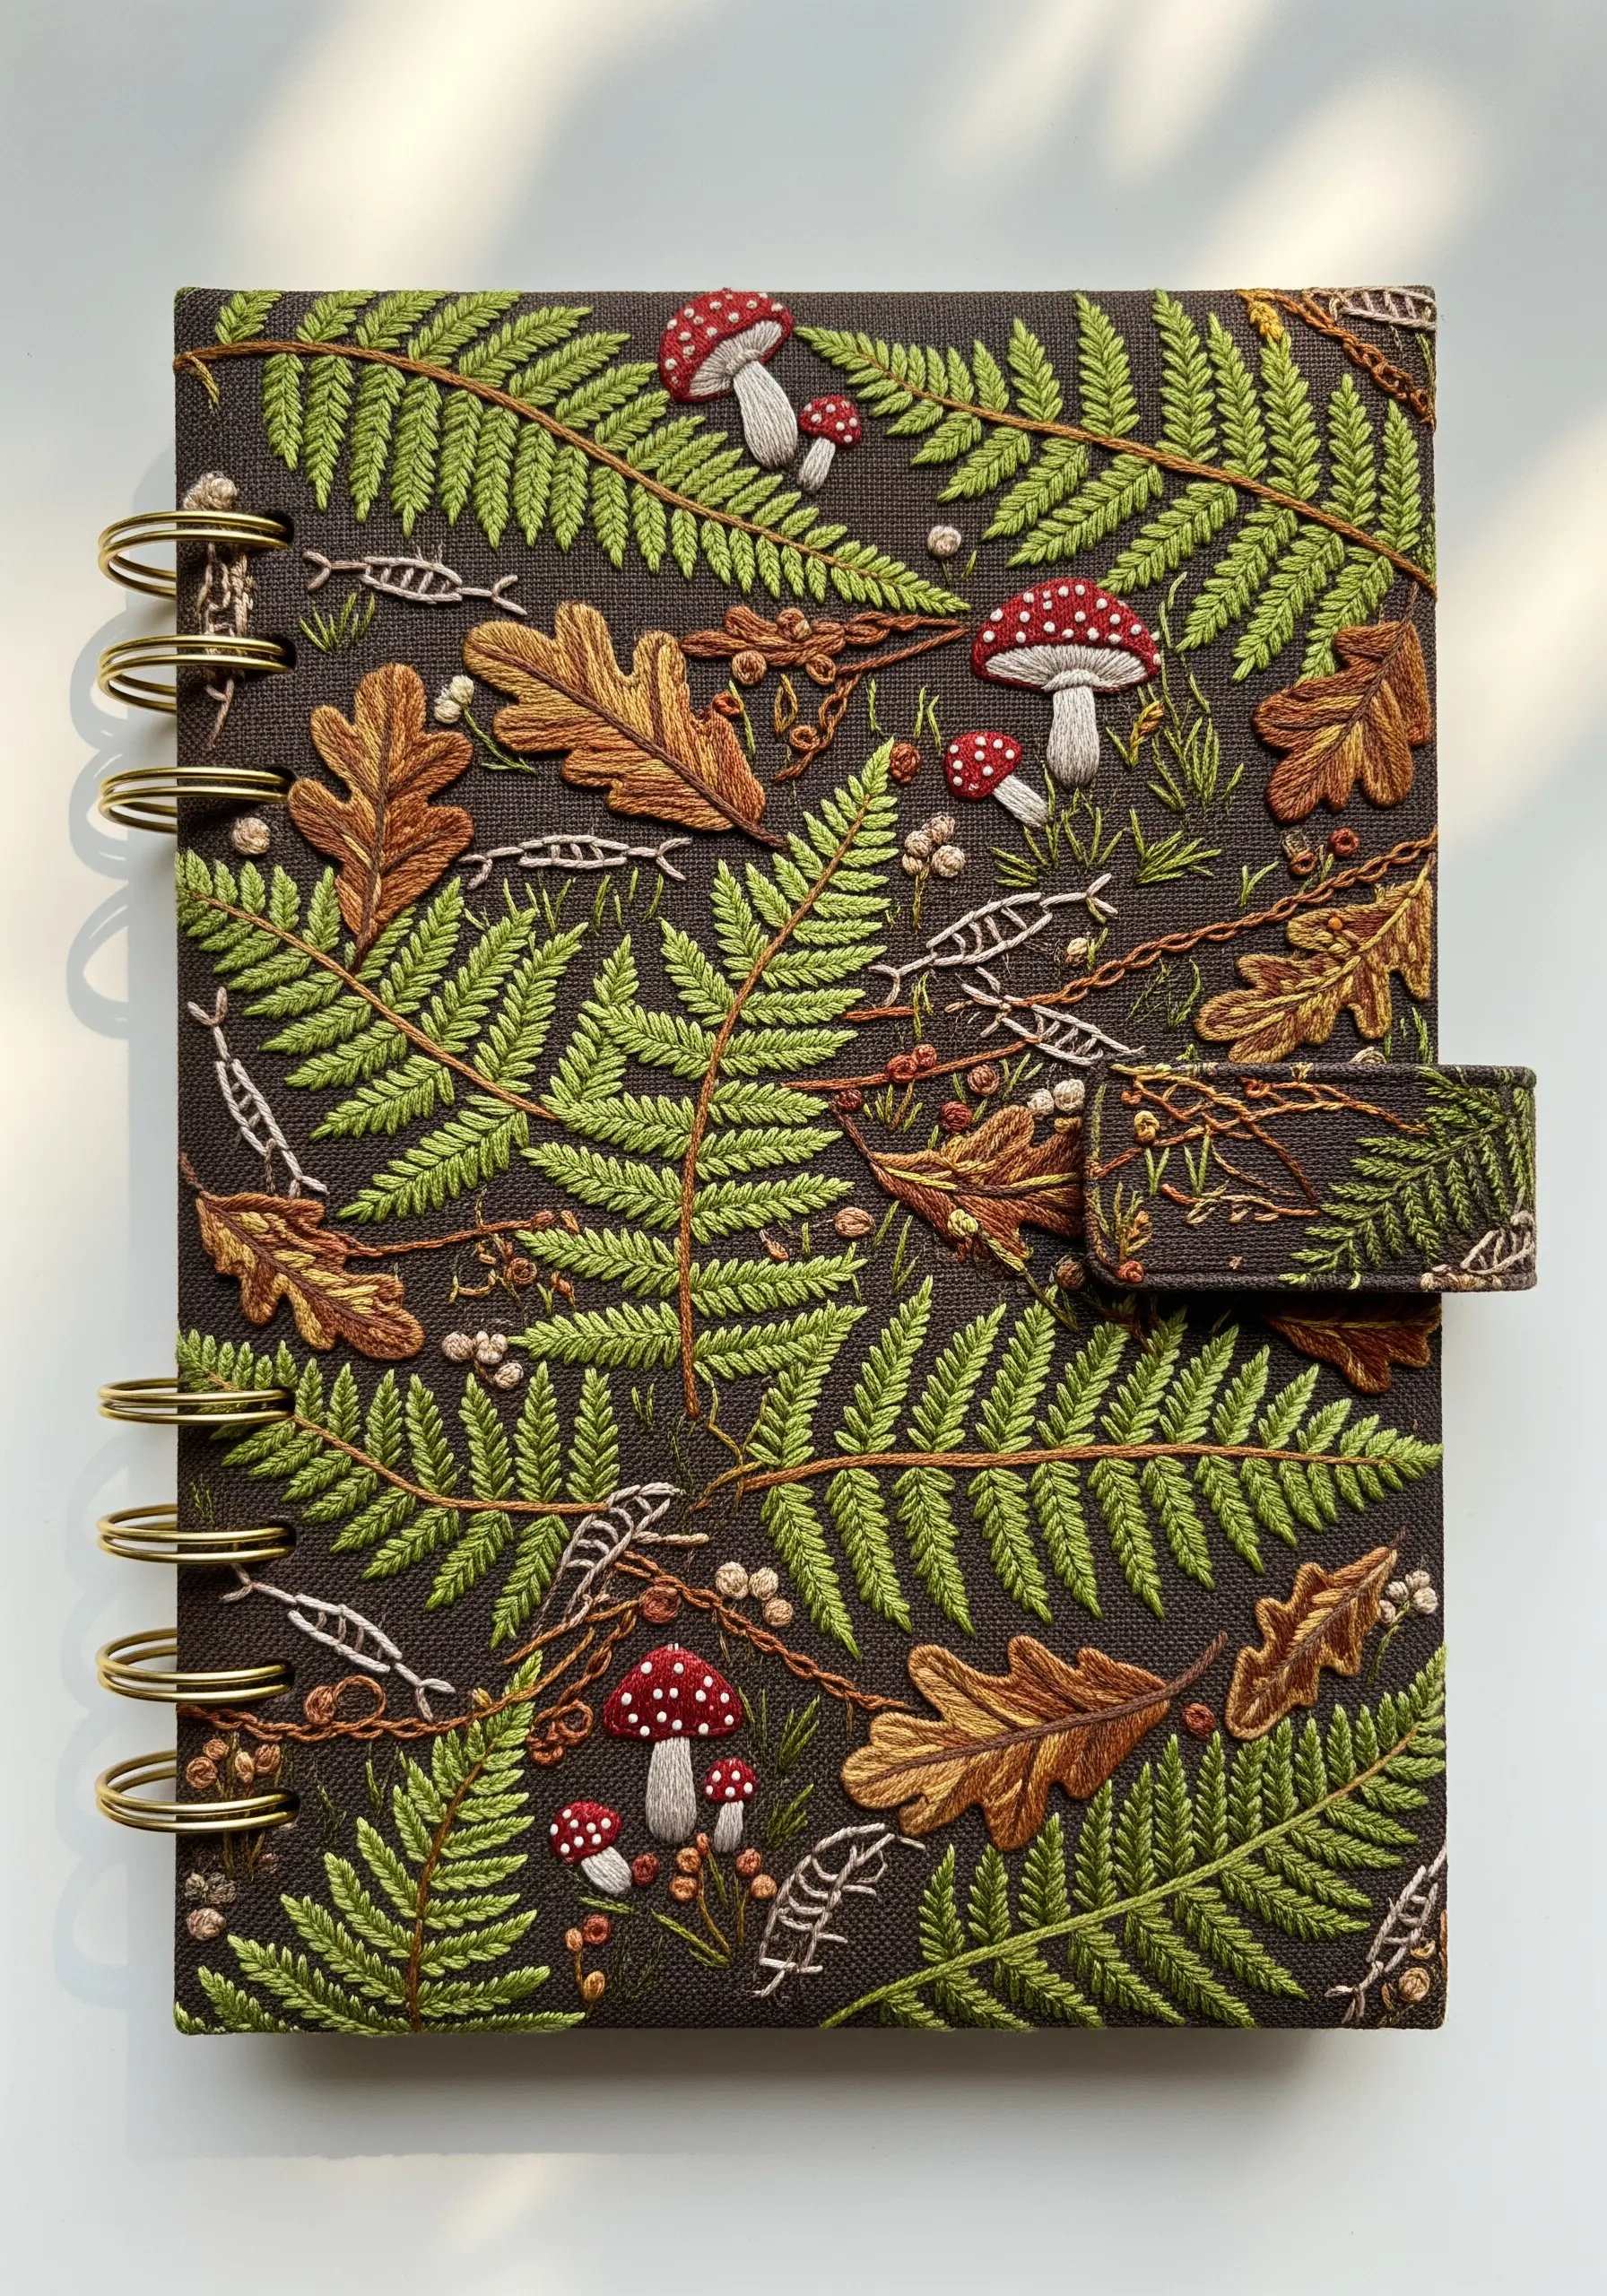
Create a dense, textural forest scene by layering different botanical elements and stitches.
Start with the background elements, like the fern fronds, using an open stitch like the fern stitch. Then, add the solid oak leaves in the foreground using satin stitch.
Incorporate small details like French knot berries and padded satin stitch mushrooms to add dimension. This layering technique gives the impression of a rich, overlapping ecosystem, turning your journal cover into a tactile work of mixed fiber creations inspired by nature.
12. Make Small Motifs Pop with French Knots
When adding a small detail to a textured surface like felt, ensure it has enough dimension to stand out.
While the leaves can be a simple satin or fishbone stitch, use tightly packed French knots for the berries.
Wrap the thread two or three times around the needle for each knot to make them plump and substantial. This creates a raised, beaded effect that adds a delightful tactile quality and visual weight to the tiny motif.
13. Design a Botanical Sampler for Skill-Building
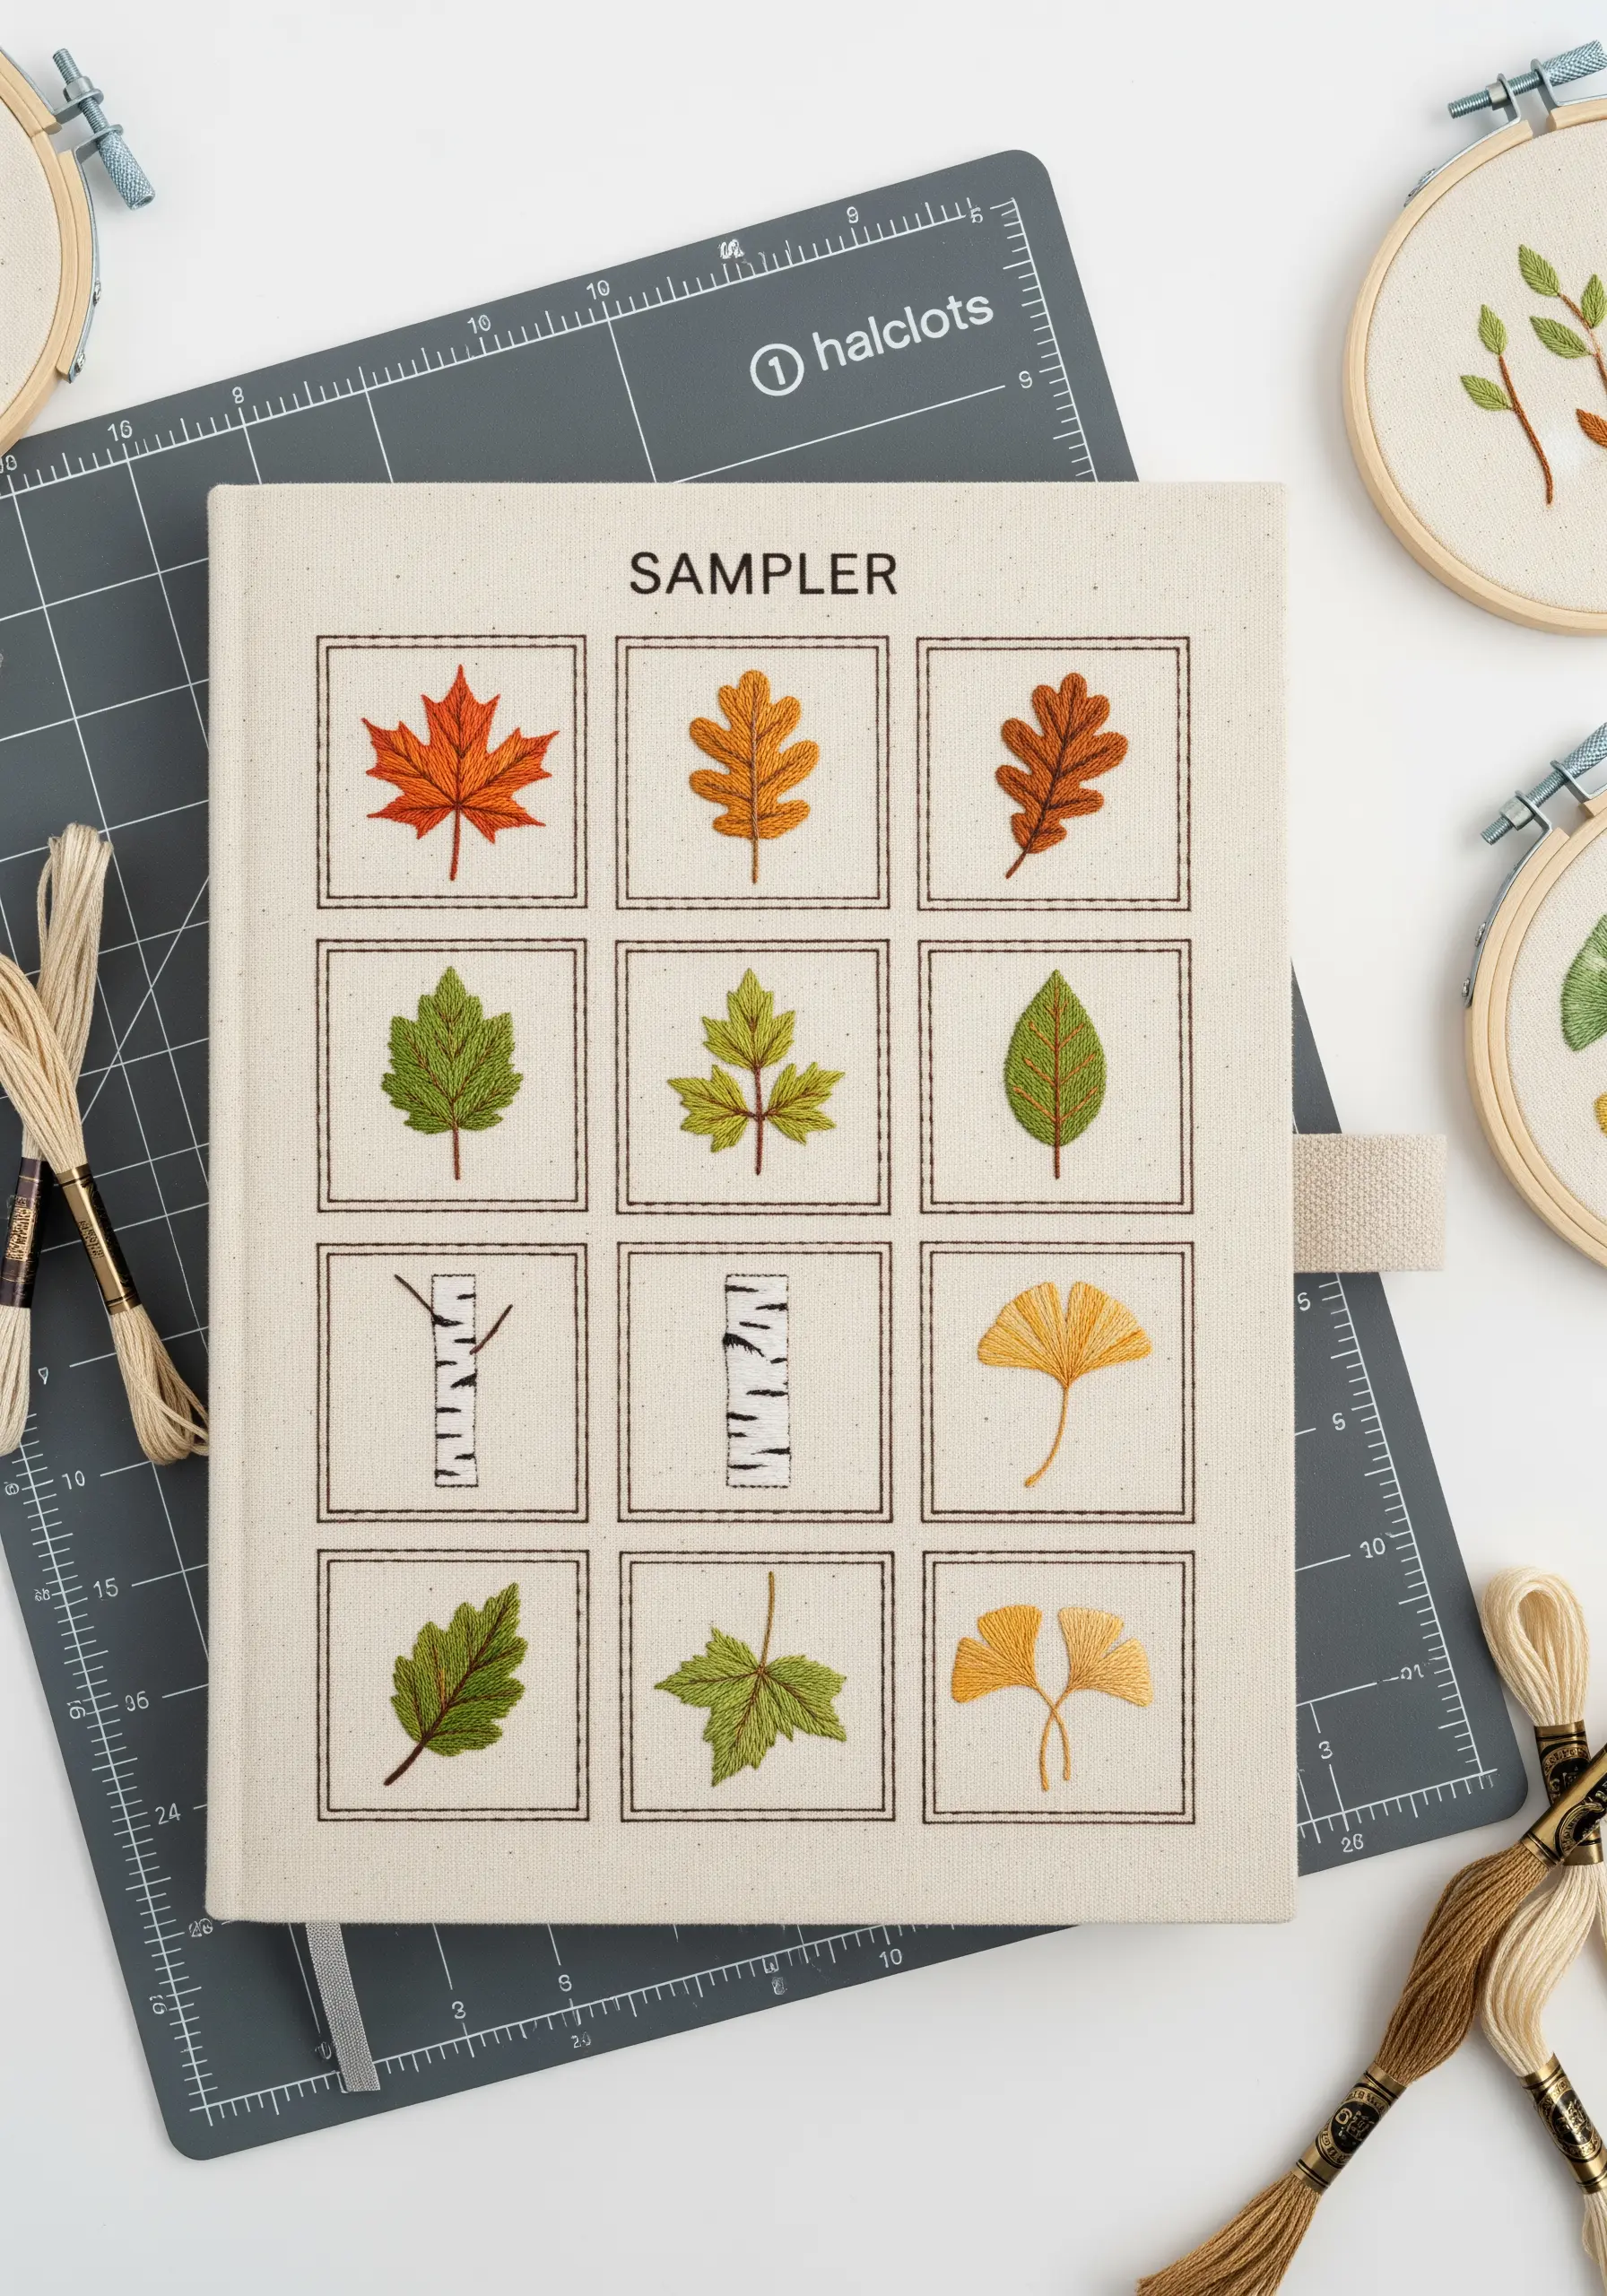
Turn your journal cover into a reference guide by creating a botanical sampler.
Divide the space into a grid with a simple backstitch. In each square, stitch a different leaf type, focusing on a specific technique for each one.
Use this as an opportunity to master stitch direction in satin stitch, the rhythm of fishbone stitch, or the texture of French knots. A botanical sampler is not just a beautiful design; it’s a record of your growing skill.
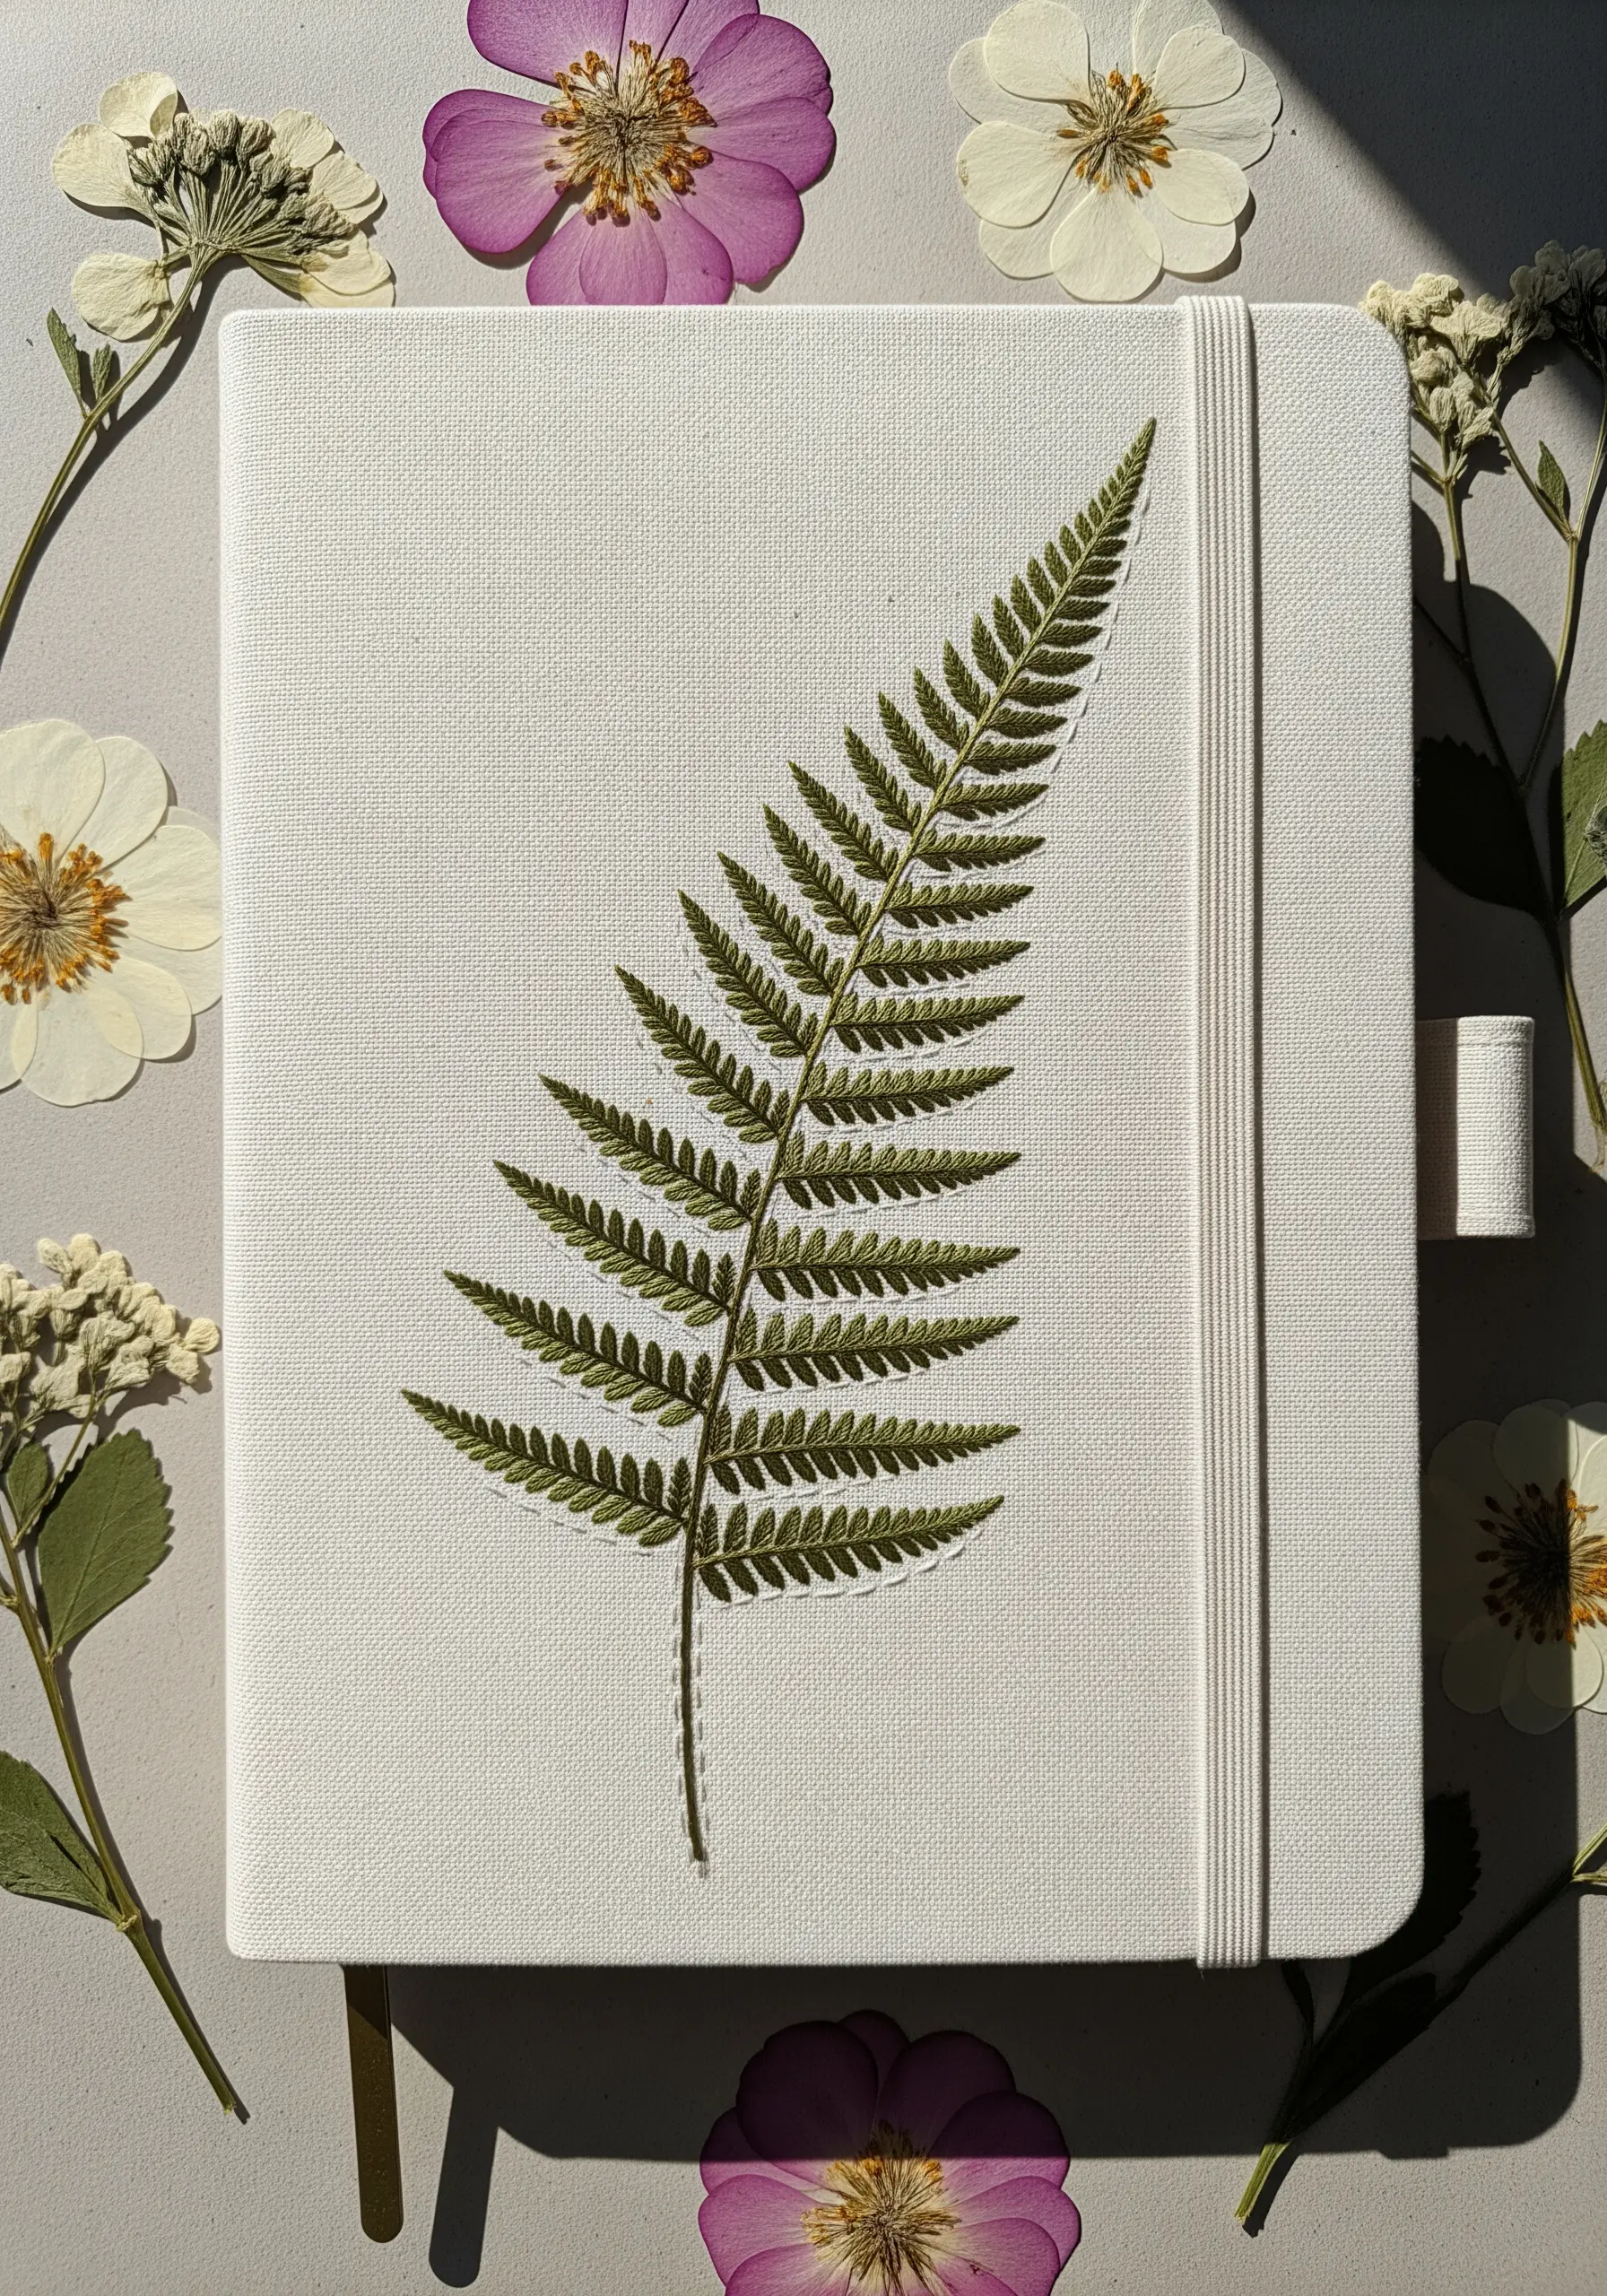
14. Evoke Calm with Weeping Willow Branches
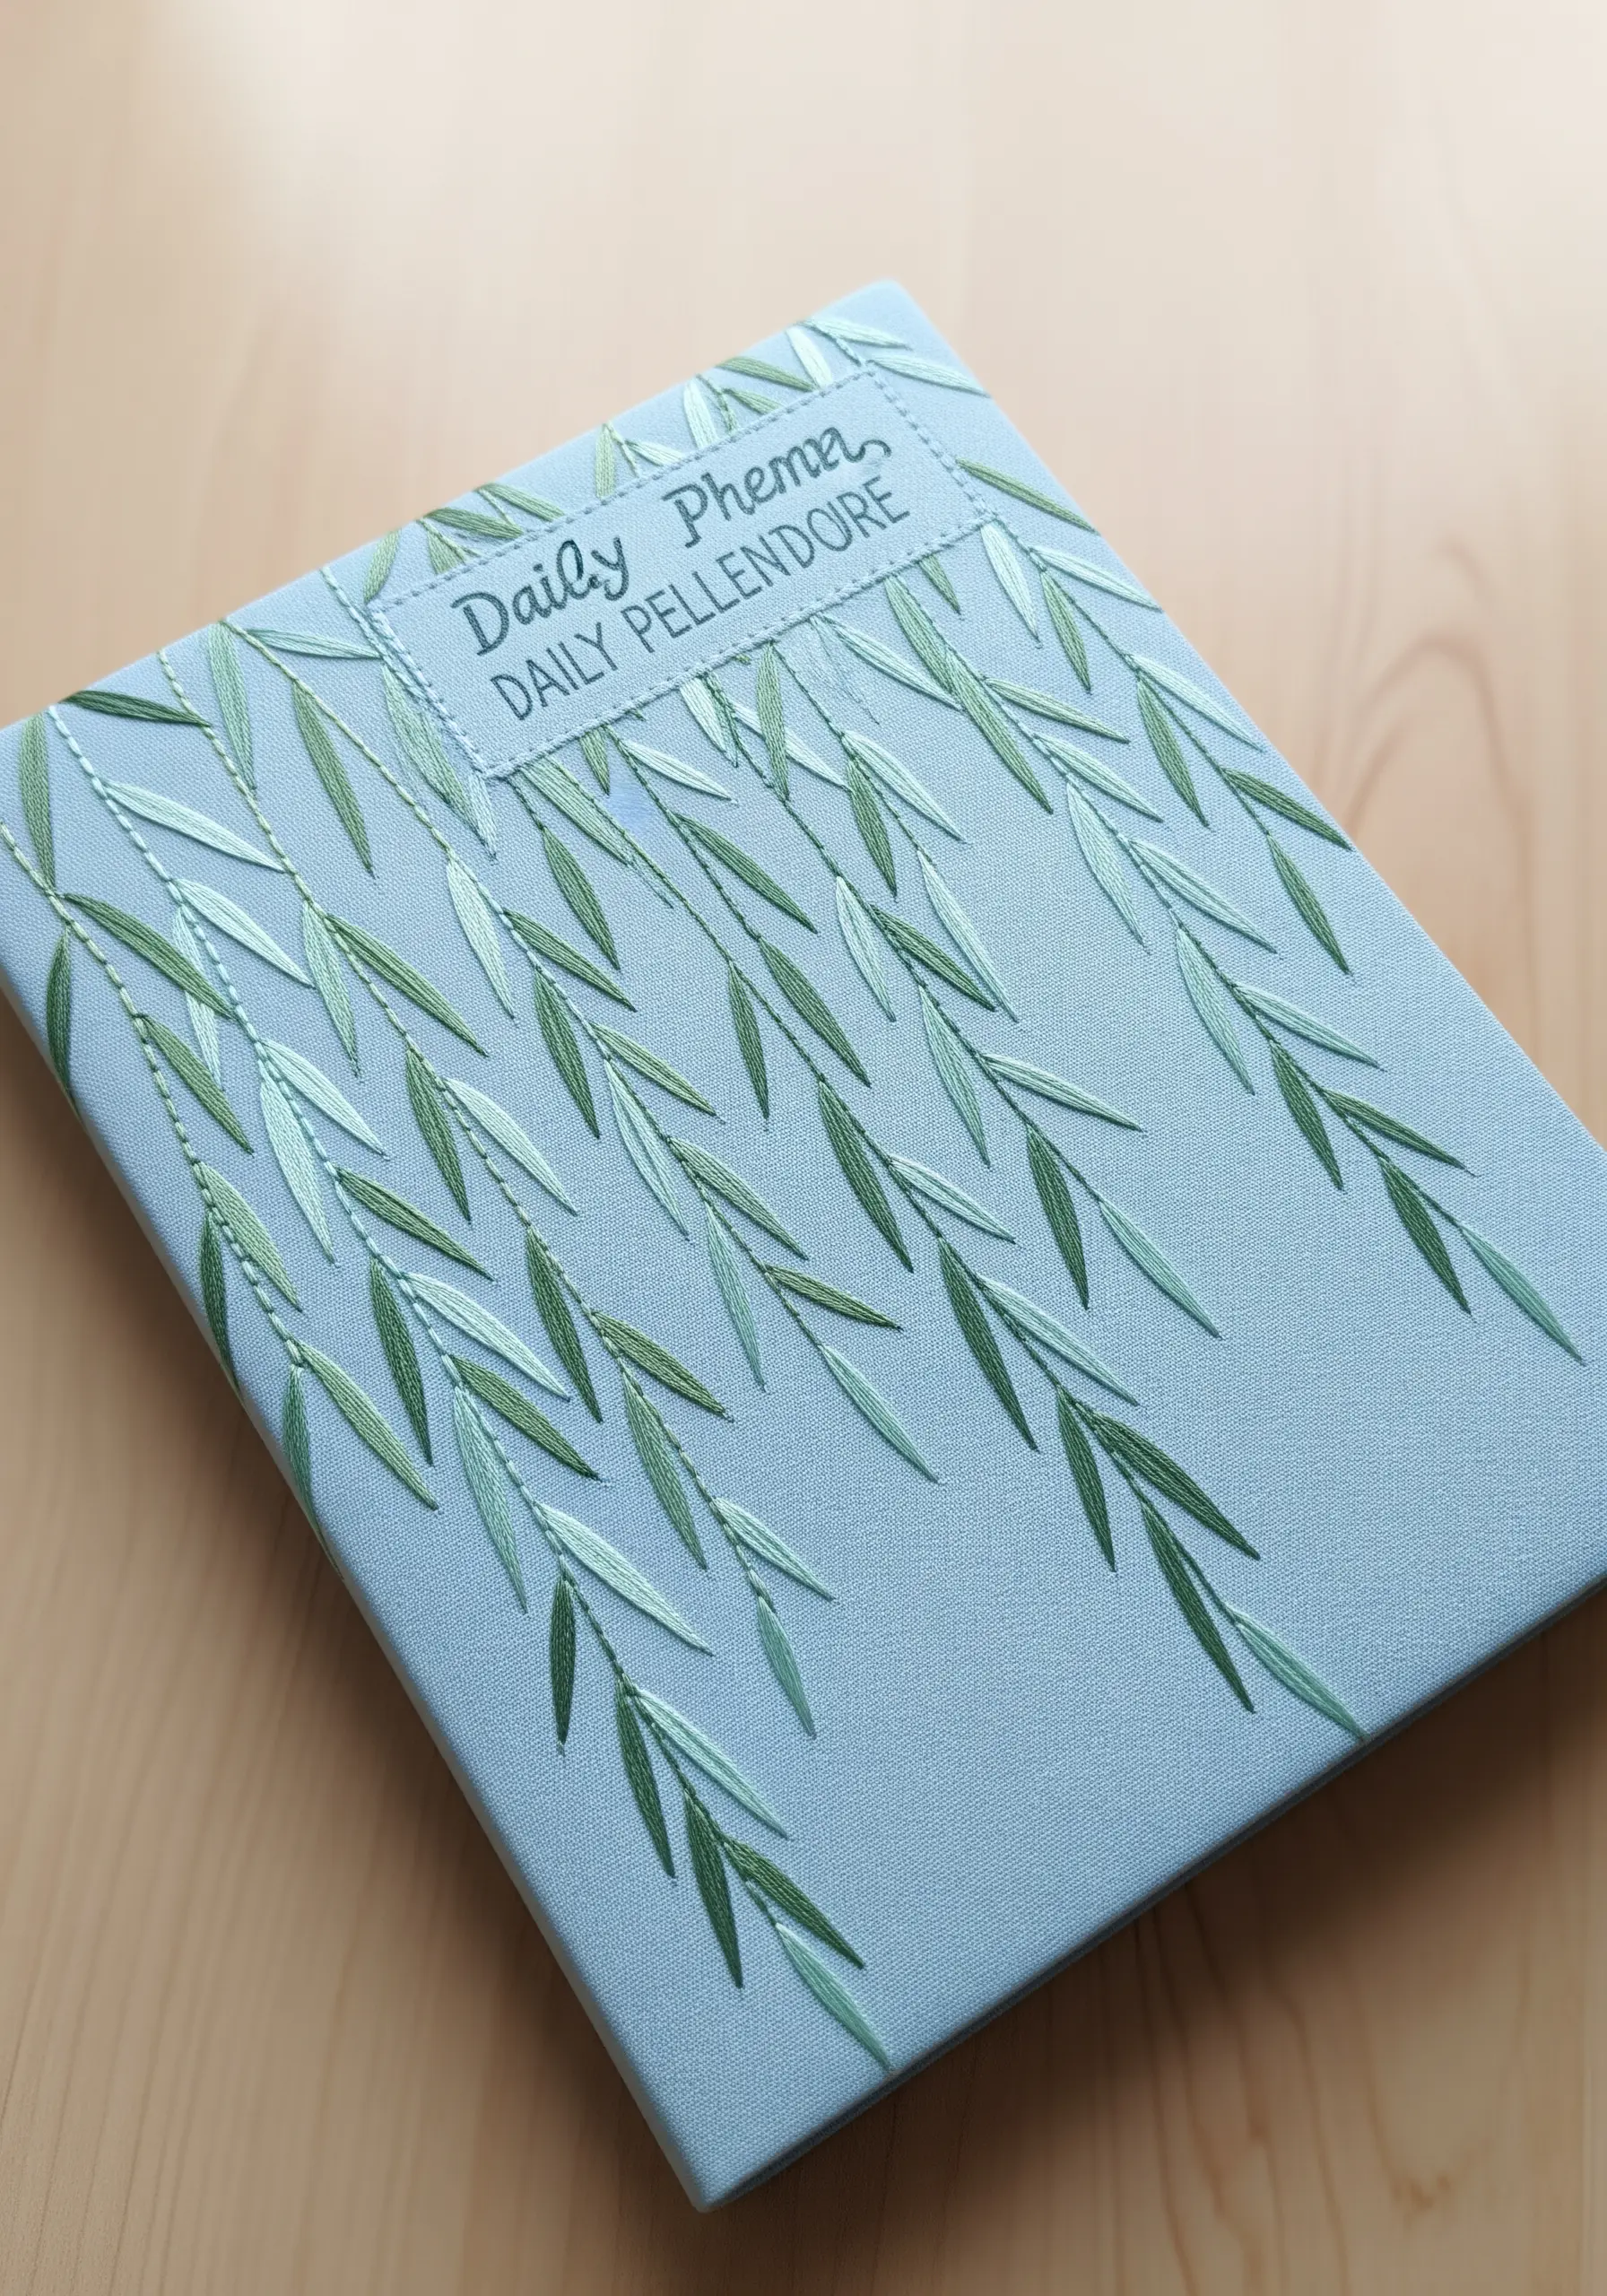
Capture the graceful drape of willow leaves with a combination of stitch choice and composition.
Use a simple detached chain stitch or a single, long straight stitch for each leaf, ensuring they all angle downwards from the central stem.
Vary the shades of green subtly from branch to branch to create a sense of light and movement.
Let the branches cascade from the top of the cover, leaving the bottom portion open to enhance the feeling of gentle, downward motion.
15. Add Detail with a Contrasting Central Vein

For long, narrow leaves like rosemary, add structure and definition by stitching the central stem last.
First, complete all the leaves using a satin stitch, angling them outwards and upwards from the invisible centerline.
Then, use a contrasting color—like a dark brown against green—and a simple backstitch to add the stem right down the middle, overlapping the base of the leaves.
This technique gives your branch a clean, graphic quality and makes the foliage appear fuller.
16. Repurpose Fabric for a Functional Notebook Pocket
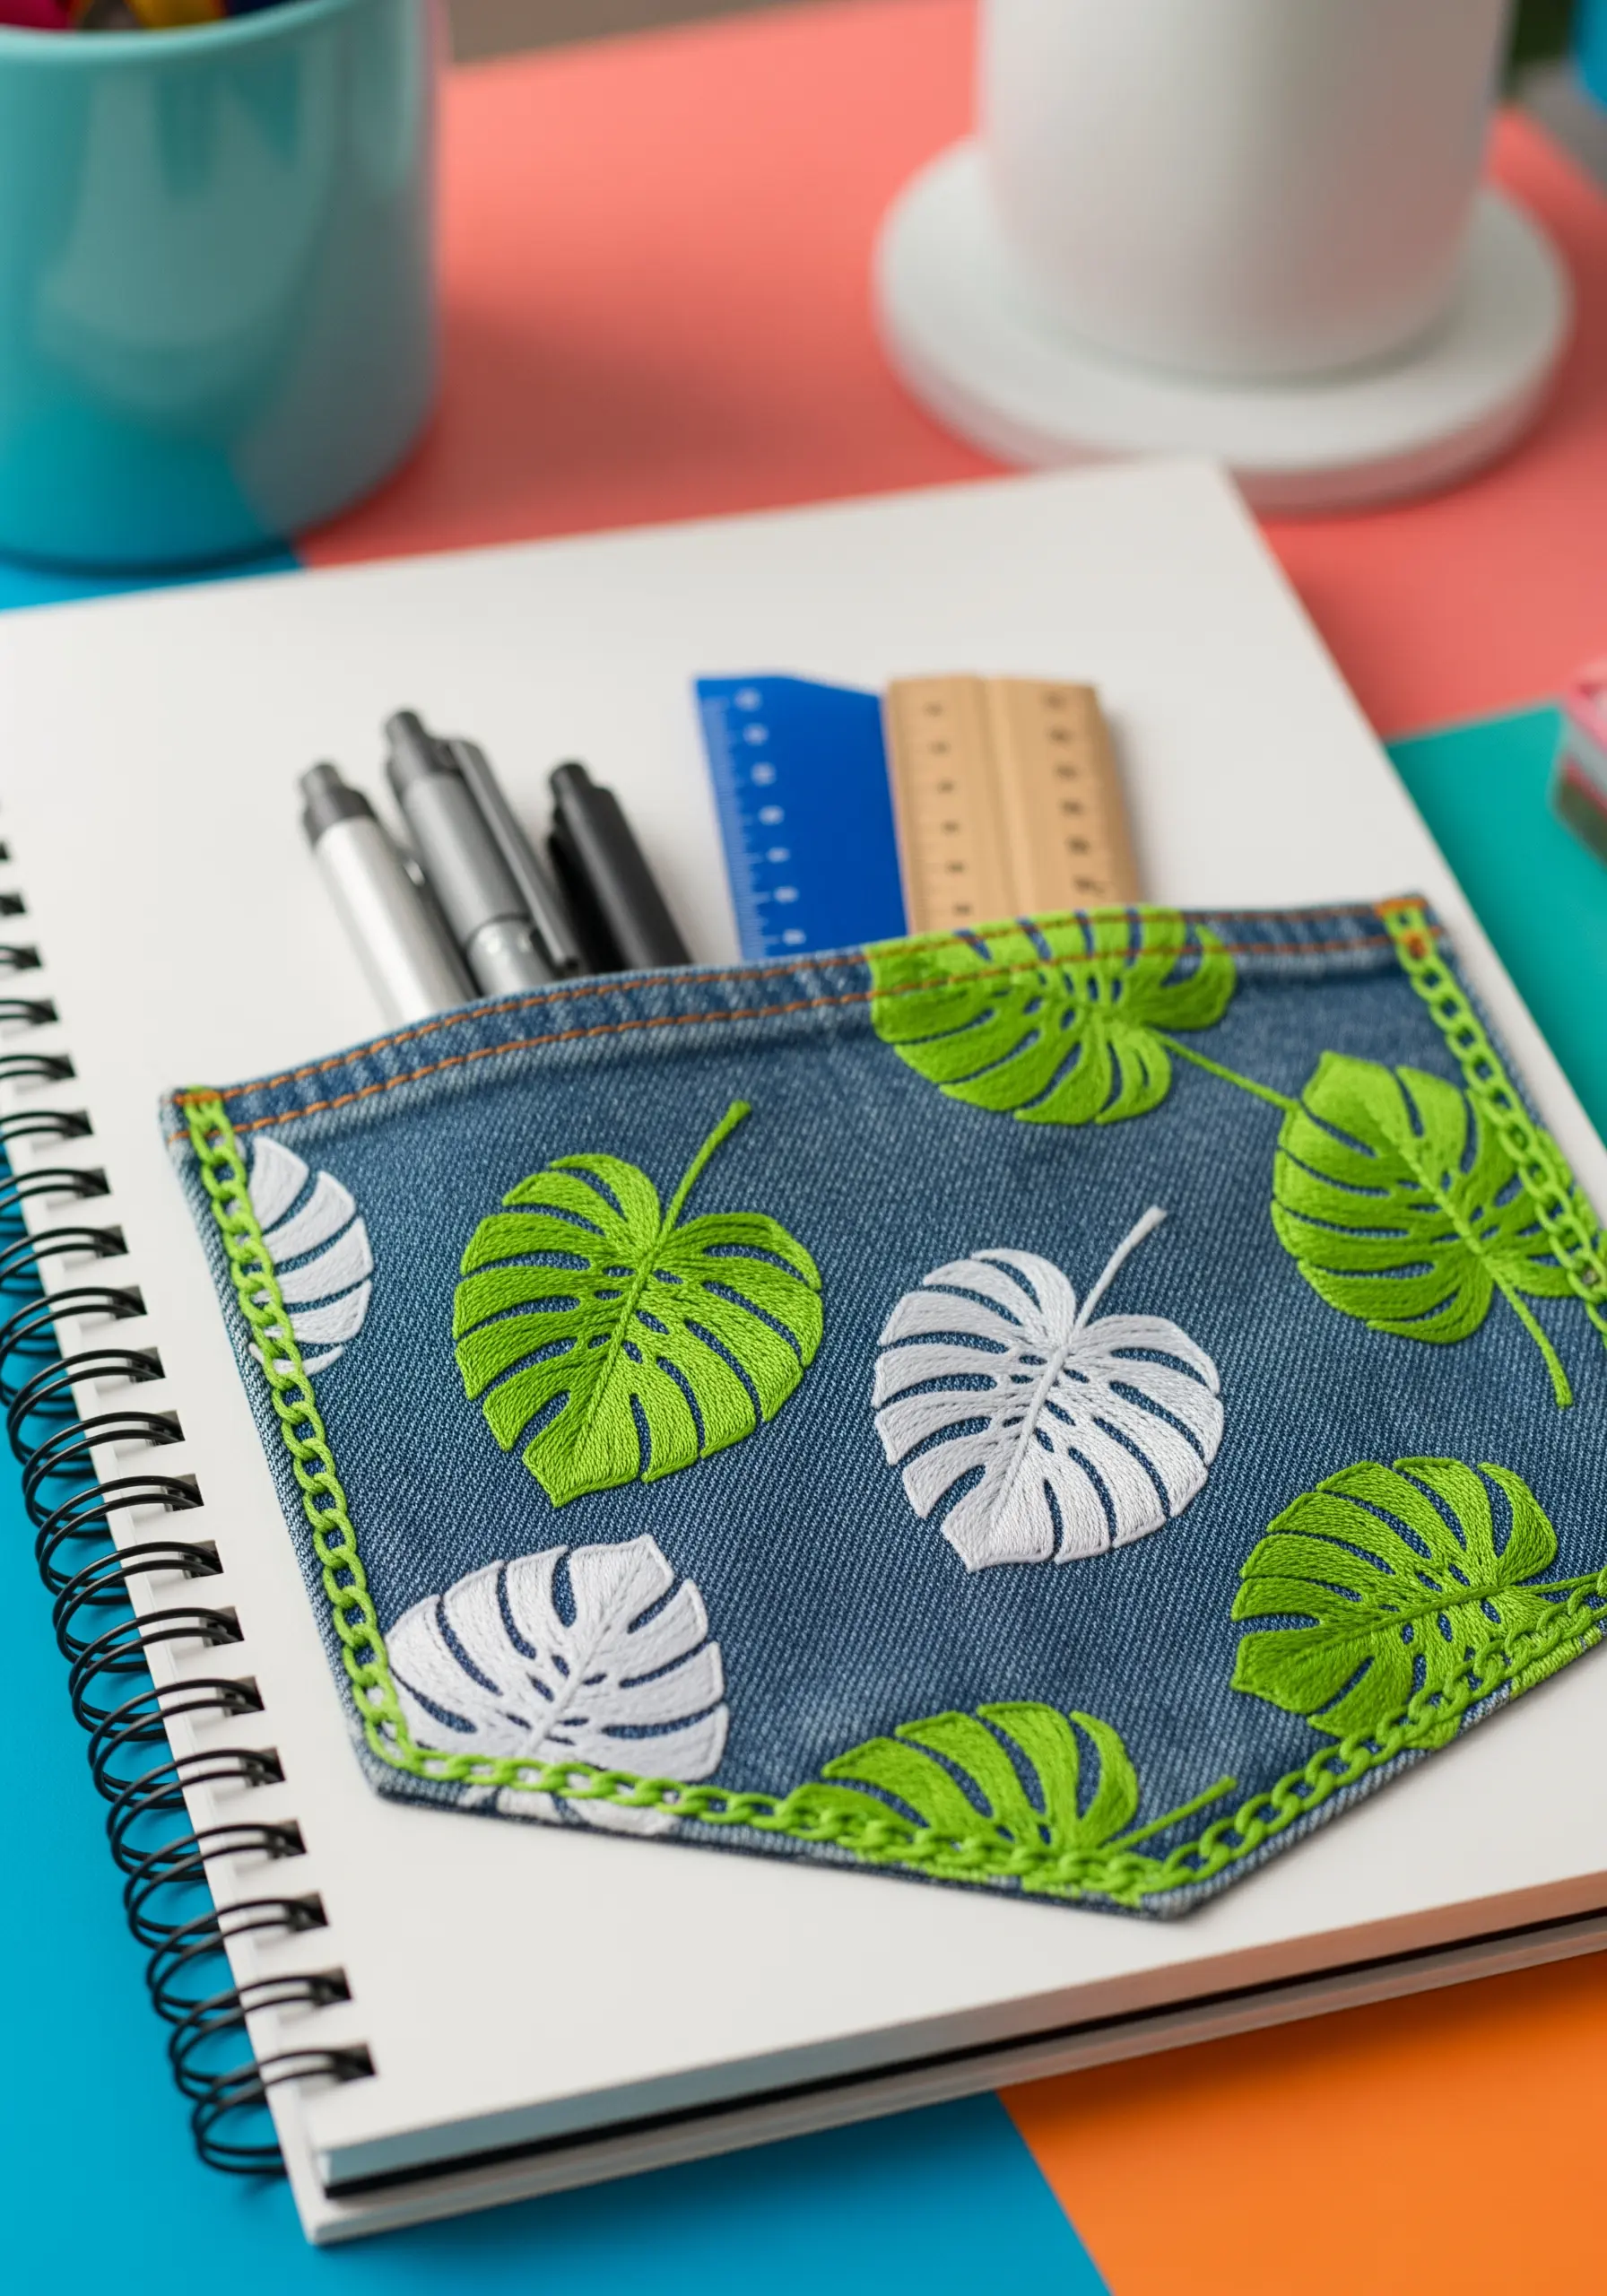
Give a simple spiral notebook a custom touch by adding an embroidered pocket made from repurposed denim.
Stitch your leaf motifs directly onto the denim pocket before attaching it. Use bold, contrasting colors like bright green and white to stand out against the blue fabric.
Secure the pocket to the notebook cover with a decorative and sturdy stitch, like a blanket stitch, using a contrasting thread to frame your work and add a final handmade detail.
17. Explore Value and Texture with a Monochromatic Leaf
Challenge yourself by working with a single color family to create a design that relies entirely on texture and light.
Using shades of black, grey, and white, fill the leaf with dense long-and-short stitch.
Pay close attention to stitch direction; by changing the angle of your stitches in different sections, you can mimic the way light reflects off the surfaces of a real leaf.
This is how you can embroider realistic shadows and highlights without changing your color palette.
18. Create Subtle Dimension with Padded Satin Stitch

Give your small leaf motifs a raised, three-dimensional quality using padded satin stitch.
First, fill the area of the leaf with small seed stitches or a layer of satin stitches perpendicular to your final layer. This creates a cushioned base.
Then, cover this padding with your top layer of satin stitch, using a single, uniform color. The underlying stitches will lift the surface, creating a subtle, sculptural effect that beautifully catches the light.
19. Use Appliqué for Bold, Detached Motifs
For perfectly crisp, individual leaf motifs, consider stitching them as separate appliqué patches.
Embroider each leaf on a piece of felt or sturdy fabric, then carefully cut it out, leaving a tiny margin.
Arrange the finished leaves on your journal cover and secure them with a few tiny, discreet stitches or fabric glue.
This method allows for precise placement and creates a layered, collage-like effect that feels both playful and polished. These are perfect tiny embroidery patterns that can be used anywhere.
20. Pair Embroidery with Fabric Texture
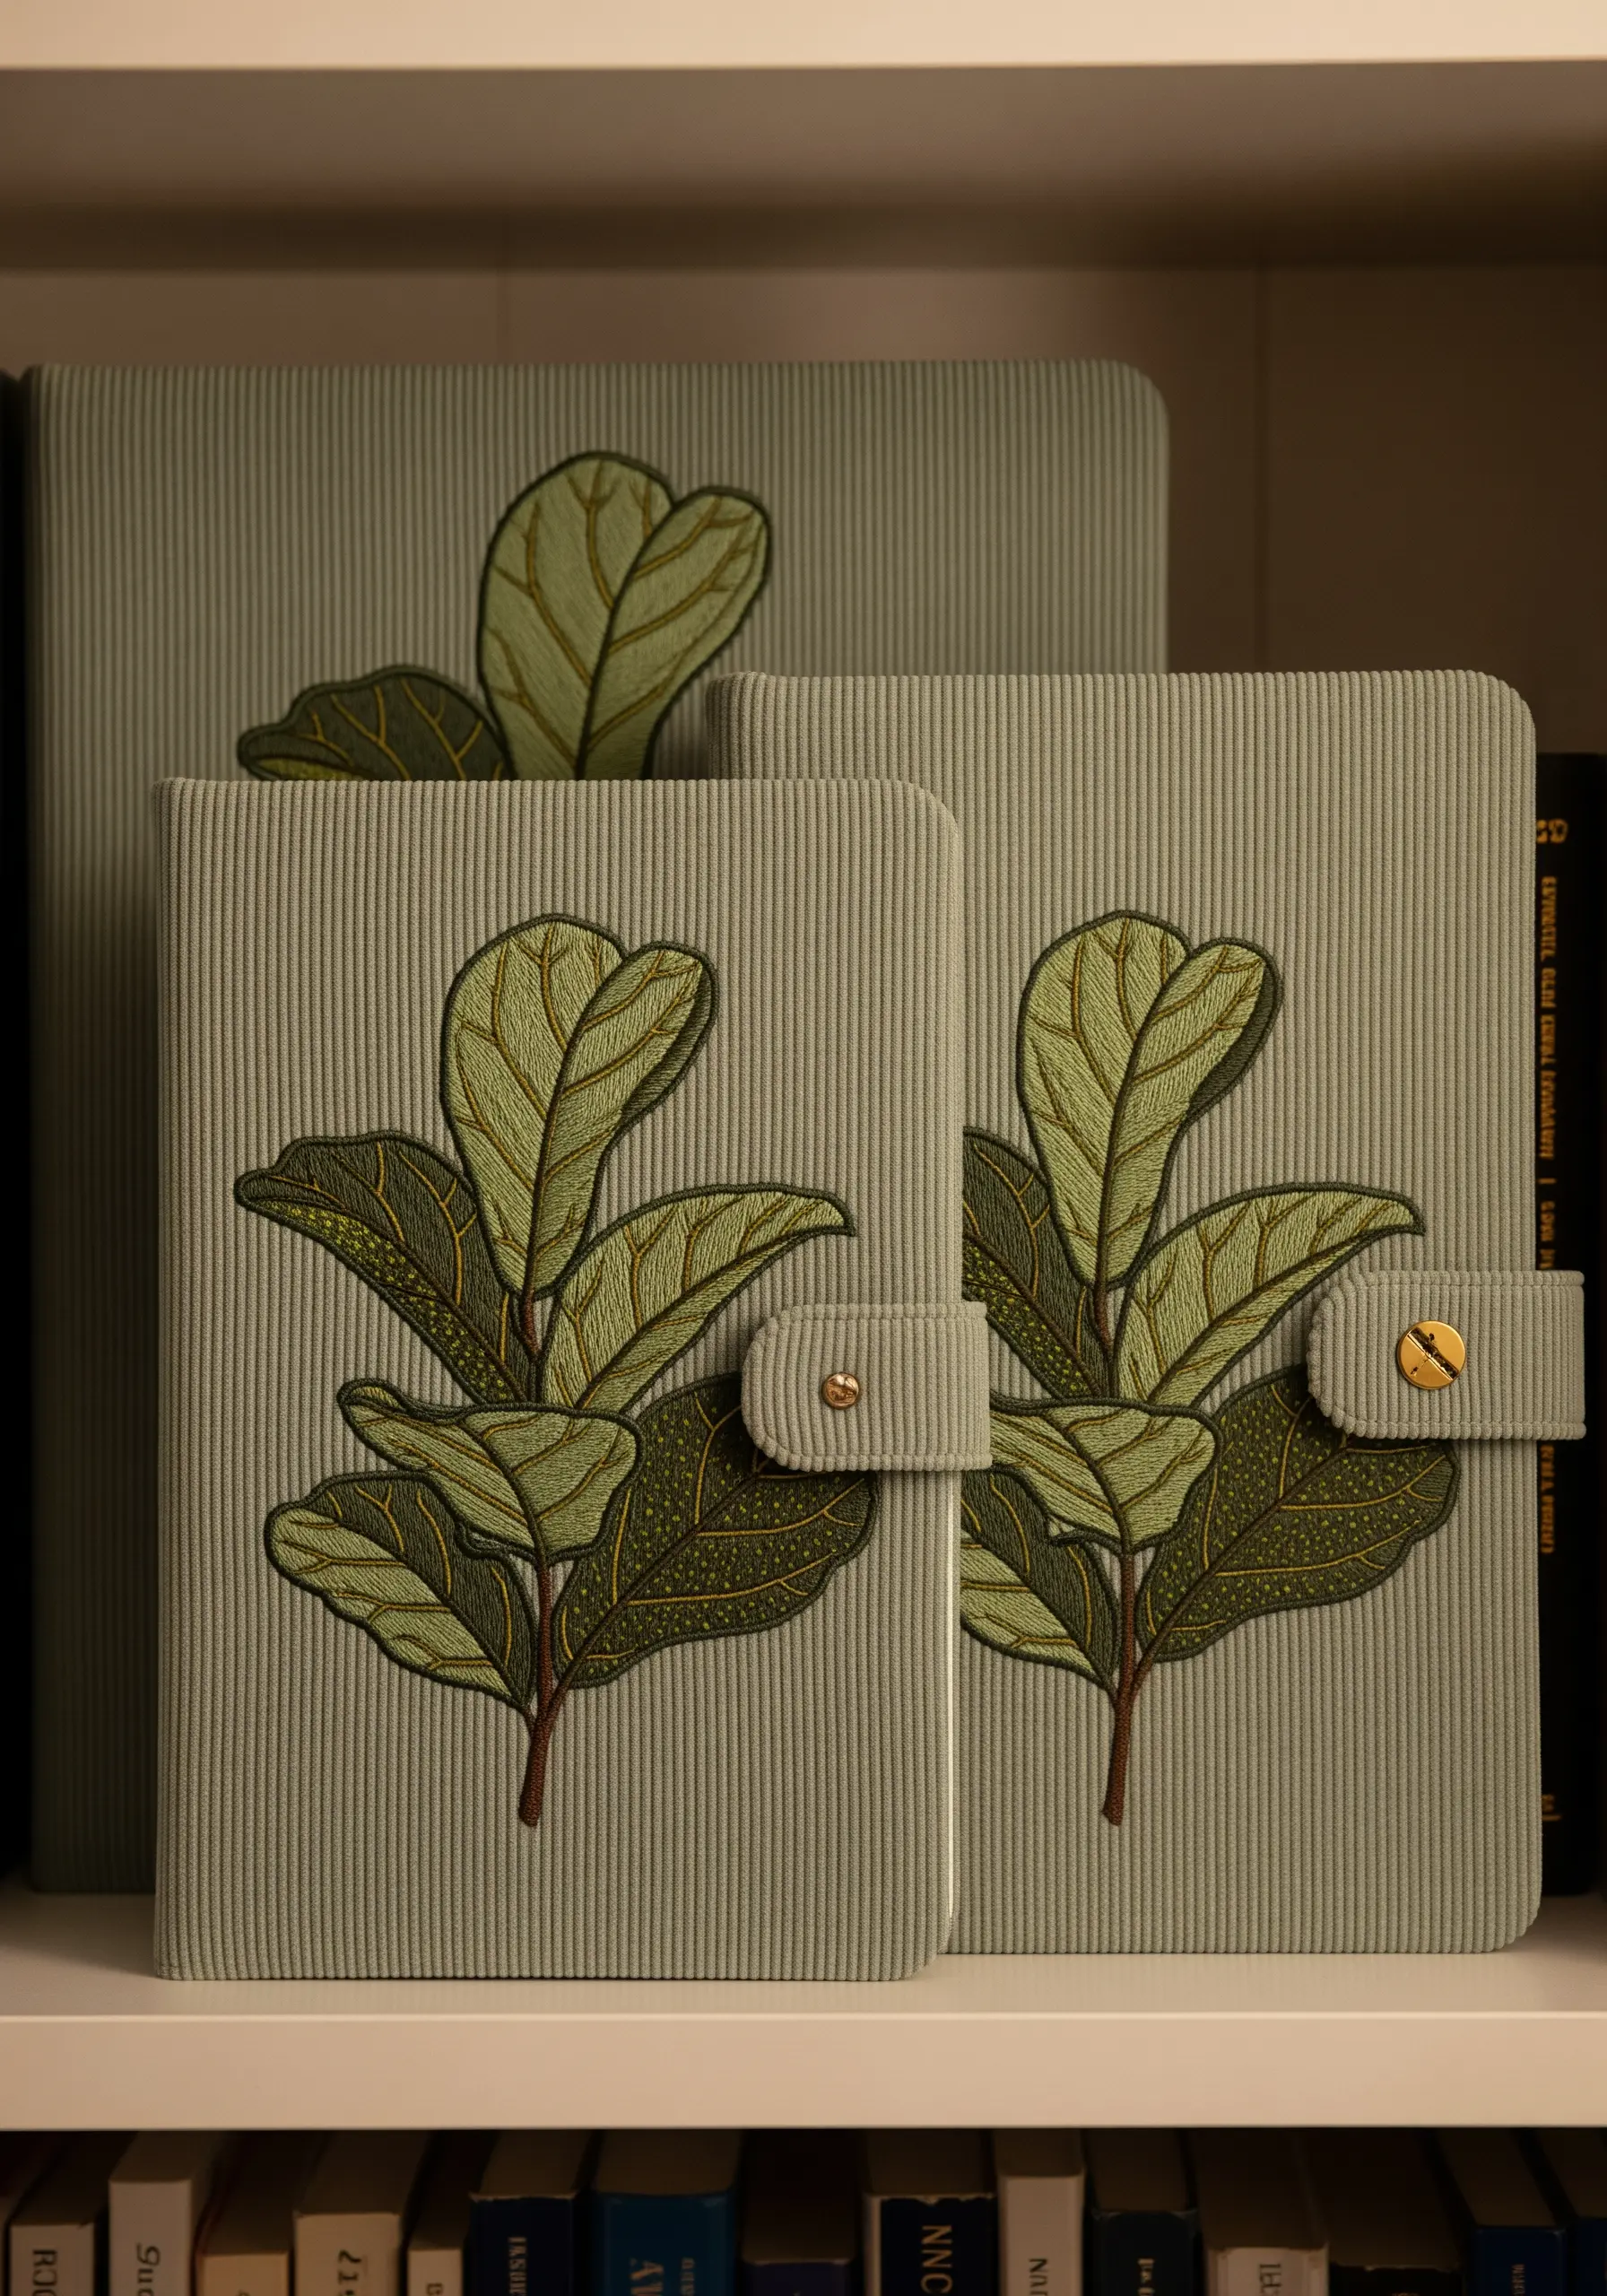
Let the texture of your journal’s cover influence your design for a more integrated, thoughtful piece.
On a tactile fabric like this wide-wale corduroy, the fabric’s lines naturally complement the veins of a fiddle-leaf fig.
Use a long-and-short stitch that follows the leaf’s organic curves, allowing the texture of the corduroy to add an extra layer of visual interest. This synergy between thread and fabric makes the final piece feel cohesive and intentional.
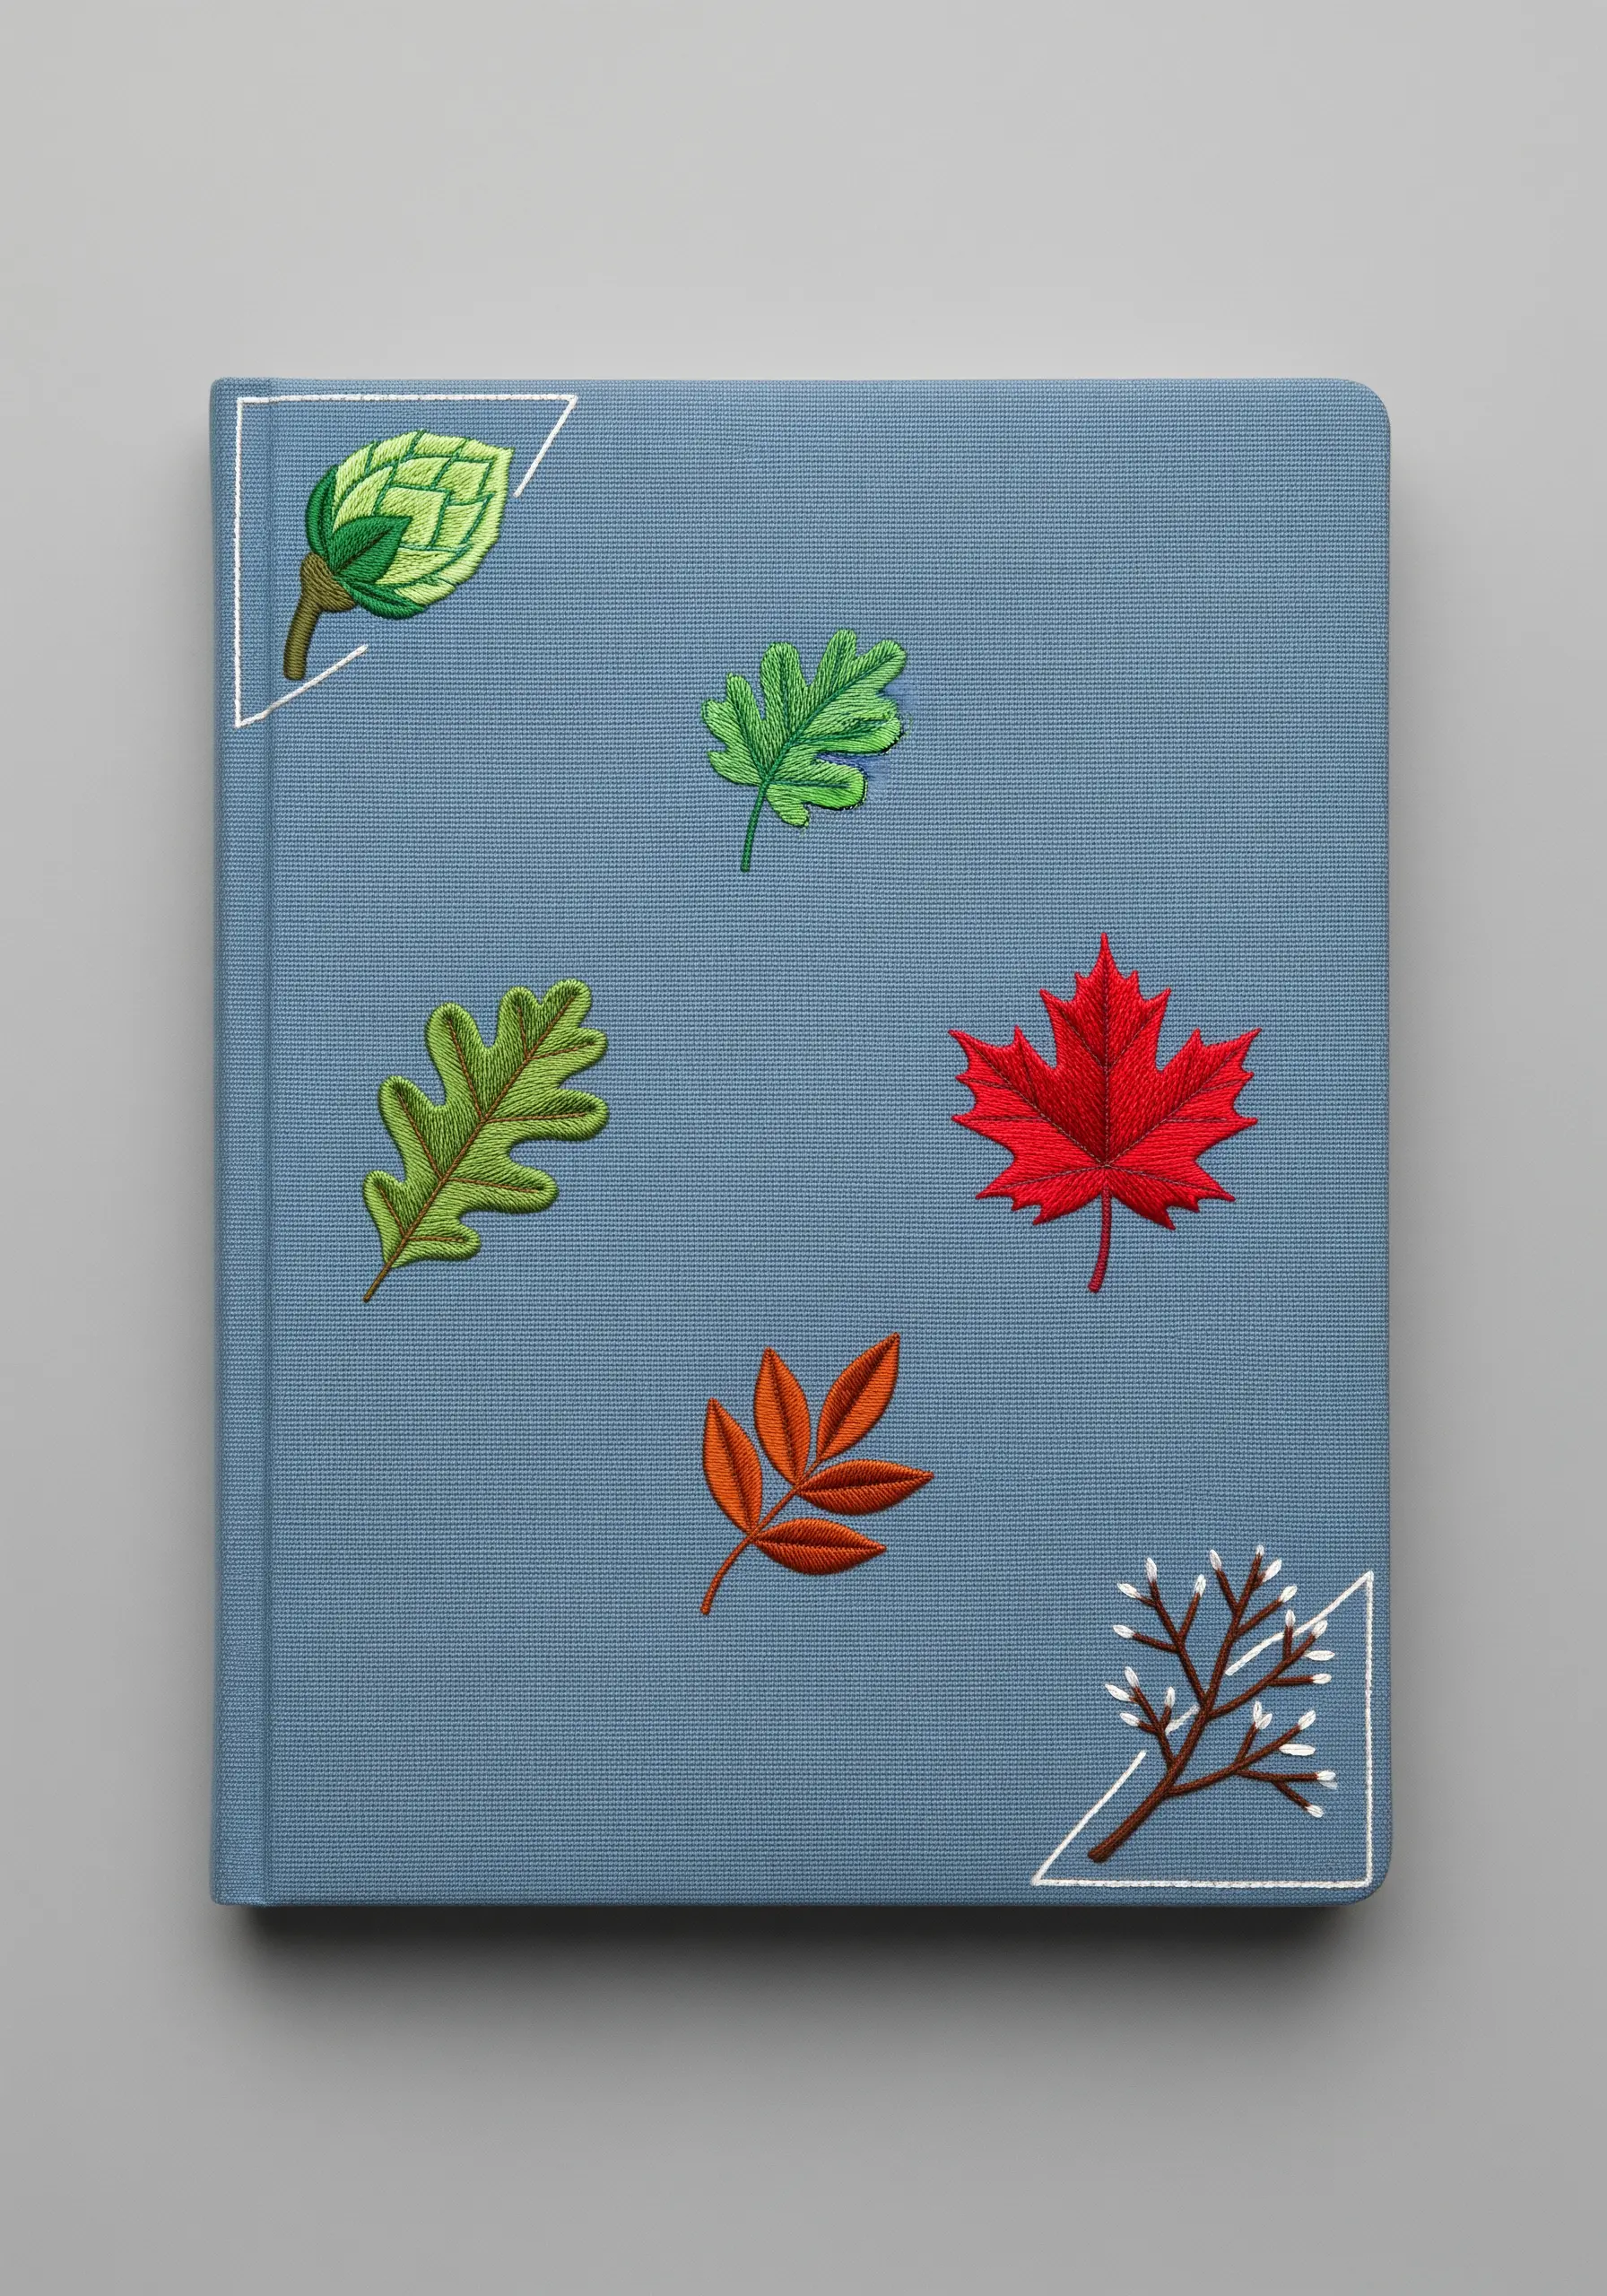
21. Curate a Collection of Botanical Specimens
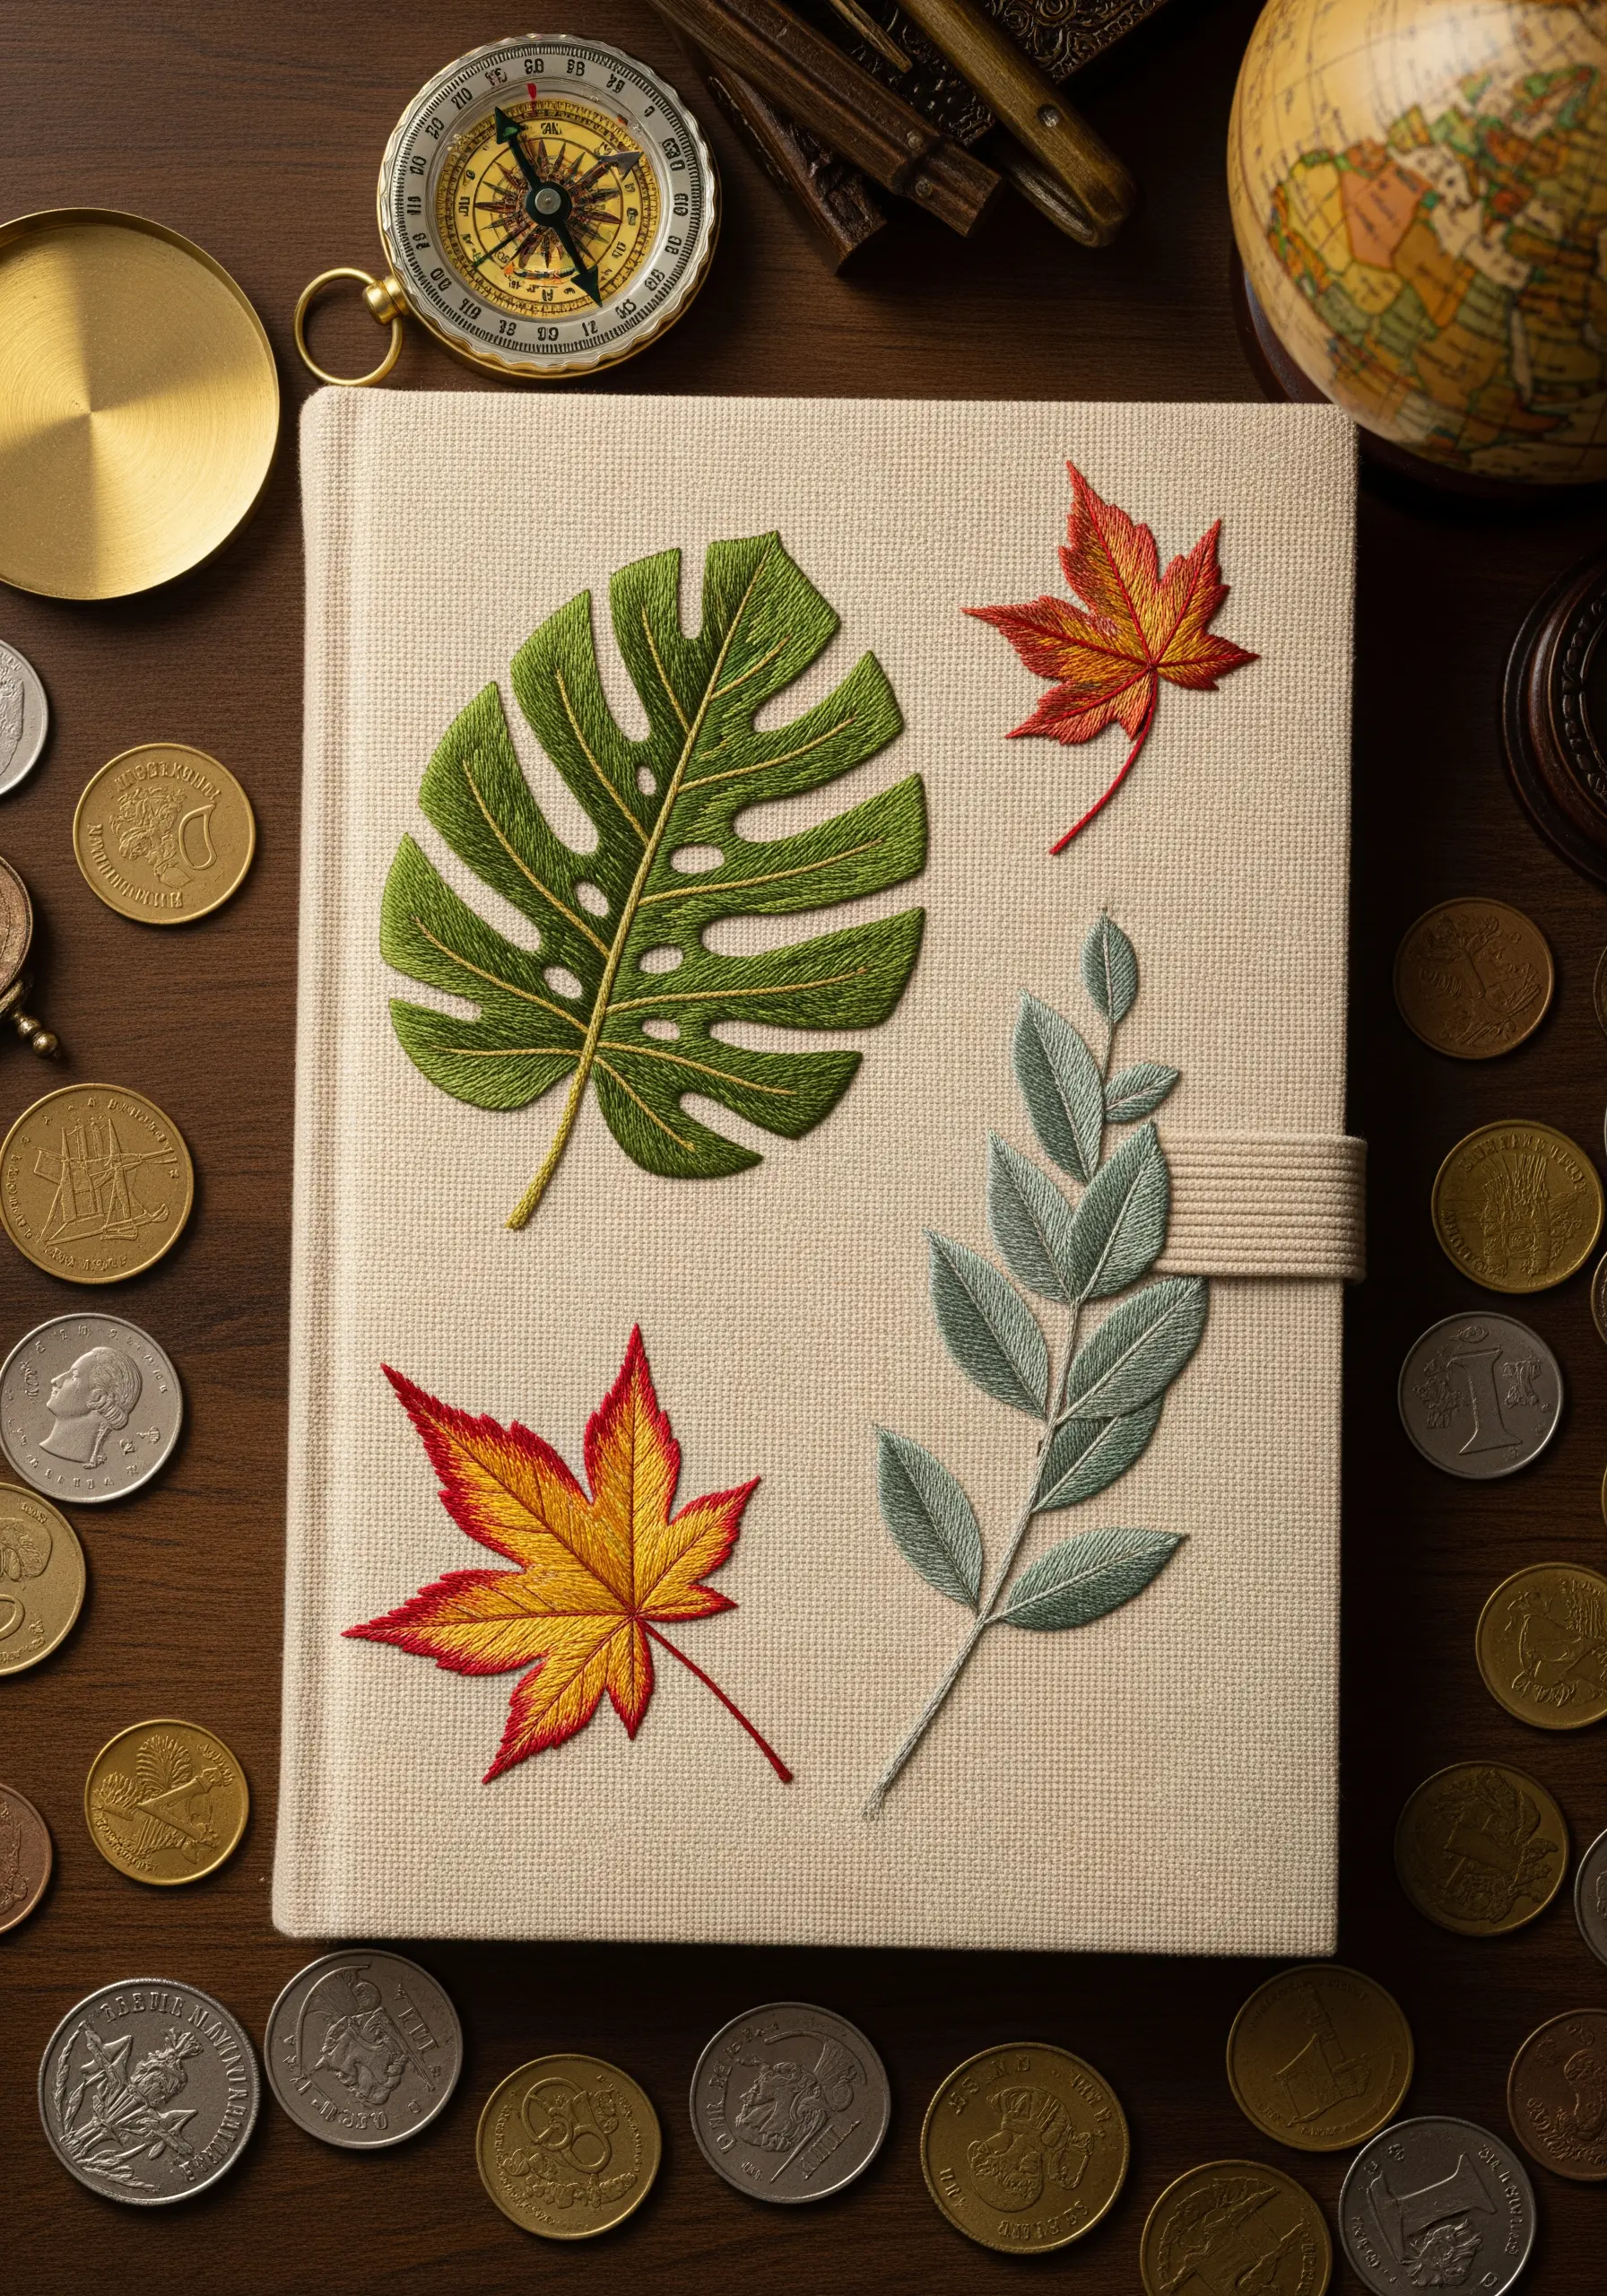
Tell a story by composing a collection of different leaf types on your cover, as if they were pressed specimens from your travels.
Select leaves with distinct shapes and colors—like the fenestrated Monstera, the fiery maple, and the cool-toned eucalyptus—to create visual variety.
Ensure each leaf is stitched with care and precision, turning your journal into a personal herbarium. This approach is wonderful for creating stunning framed embroidery pieces as well.
22. Achieve Luxe Contrast with Metallic Thread on Velvet
Create a truly opulent look by pairing the high sheen of metallic thread with the deep pile of velvet.
Choose a simple, graphic motif like these stylized daisies, as complex details can get lost in the fabric’s texture.
Use a stabilizer on the back to prevent the fabric from shifting, and work with a sharp needle and short lengths of metallic floss to ensure your stitches are clean and bright against the rich, dark background.
23. Capture Herbal Details with Precision
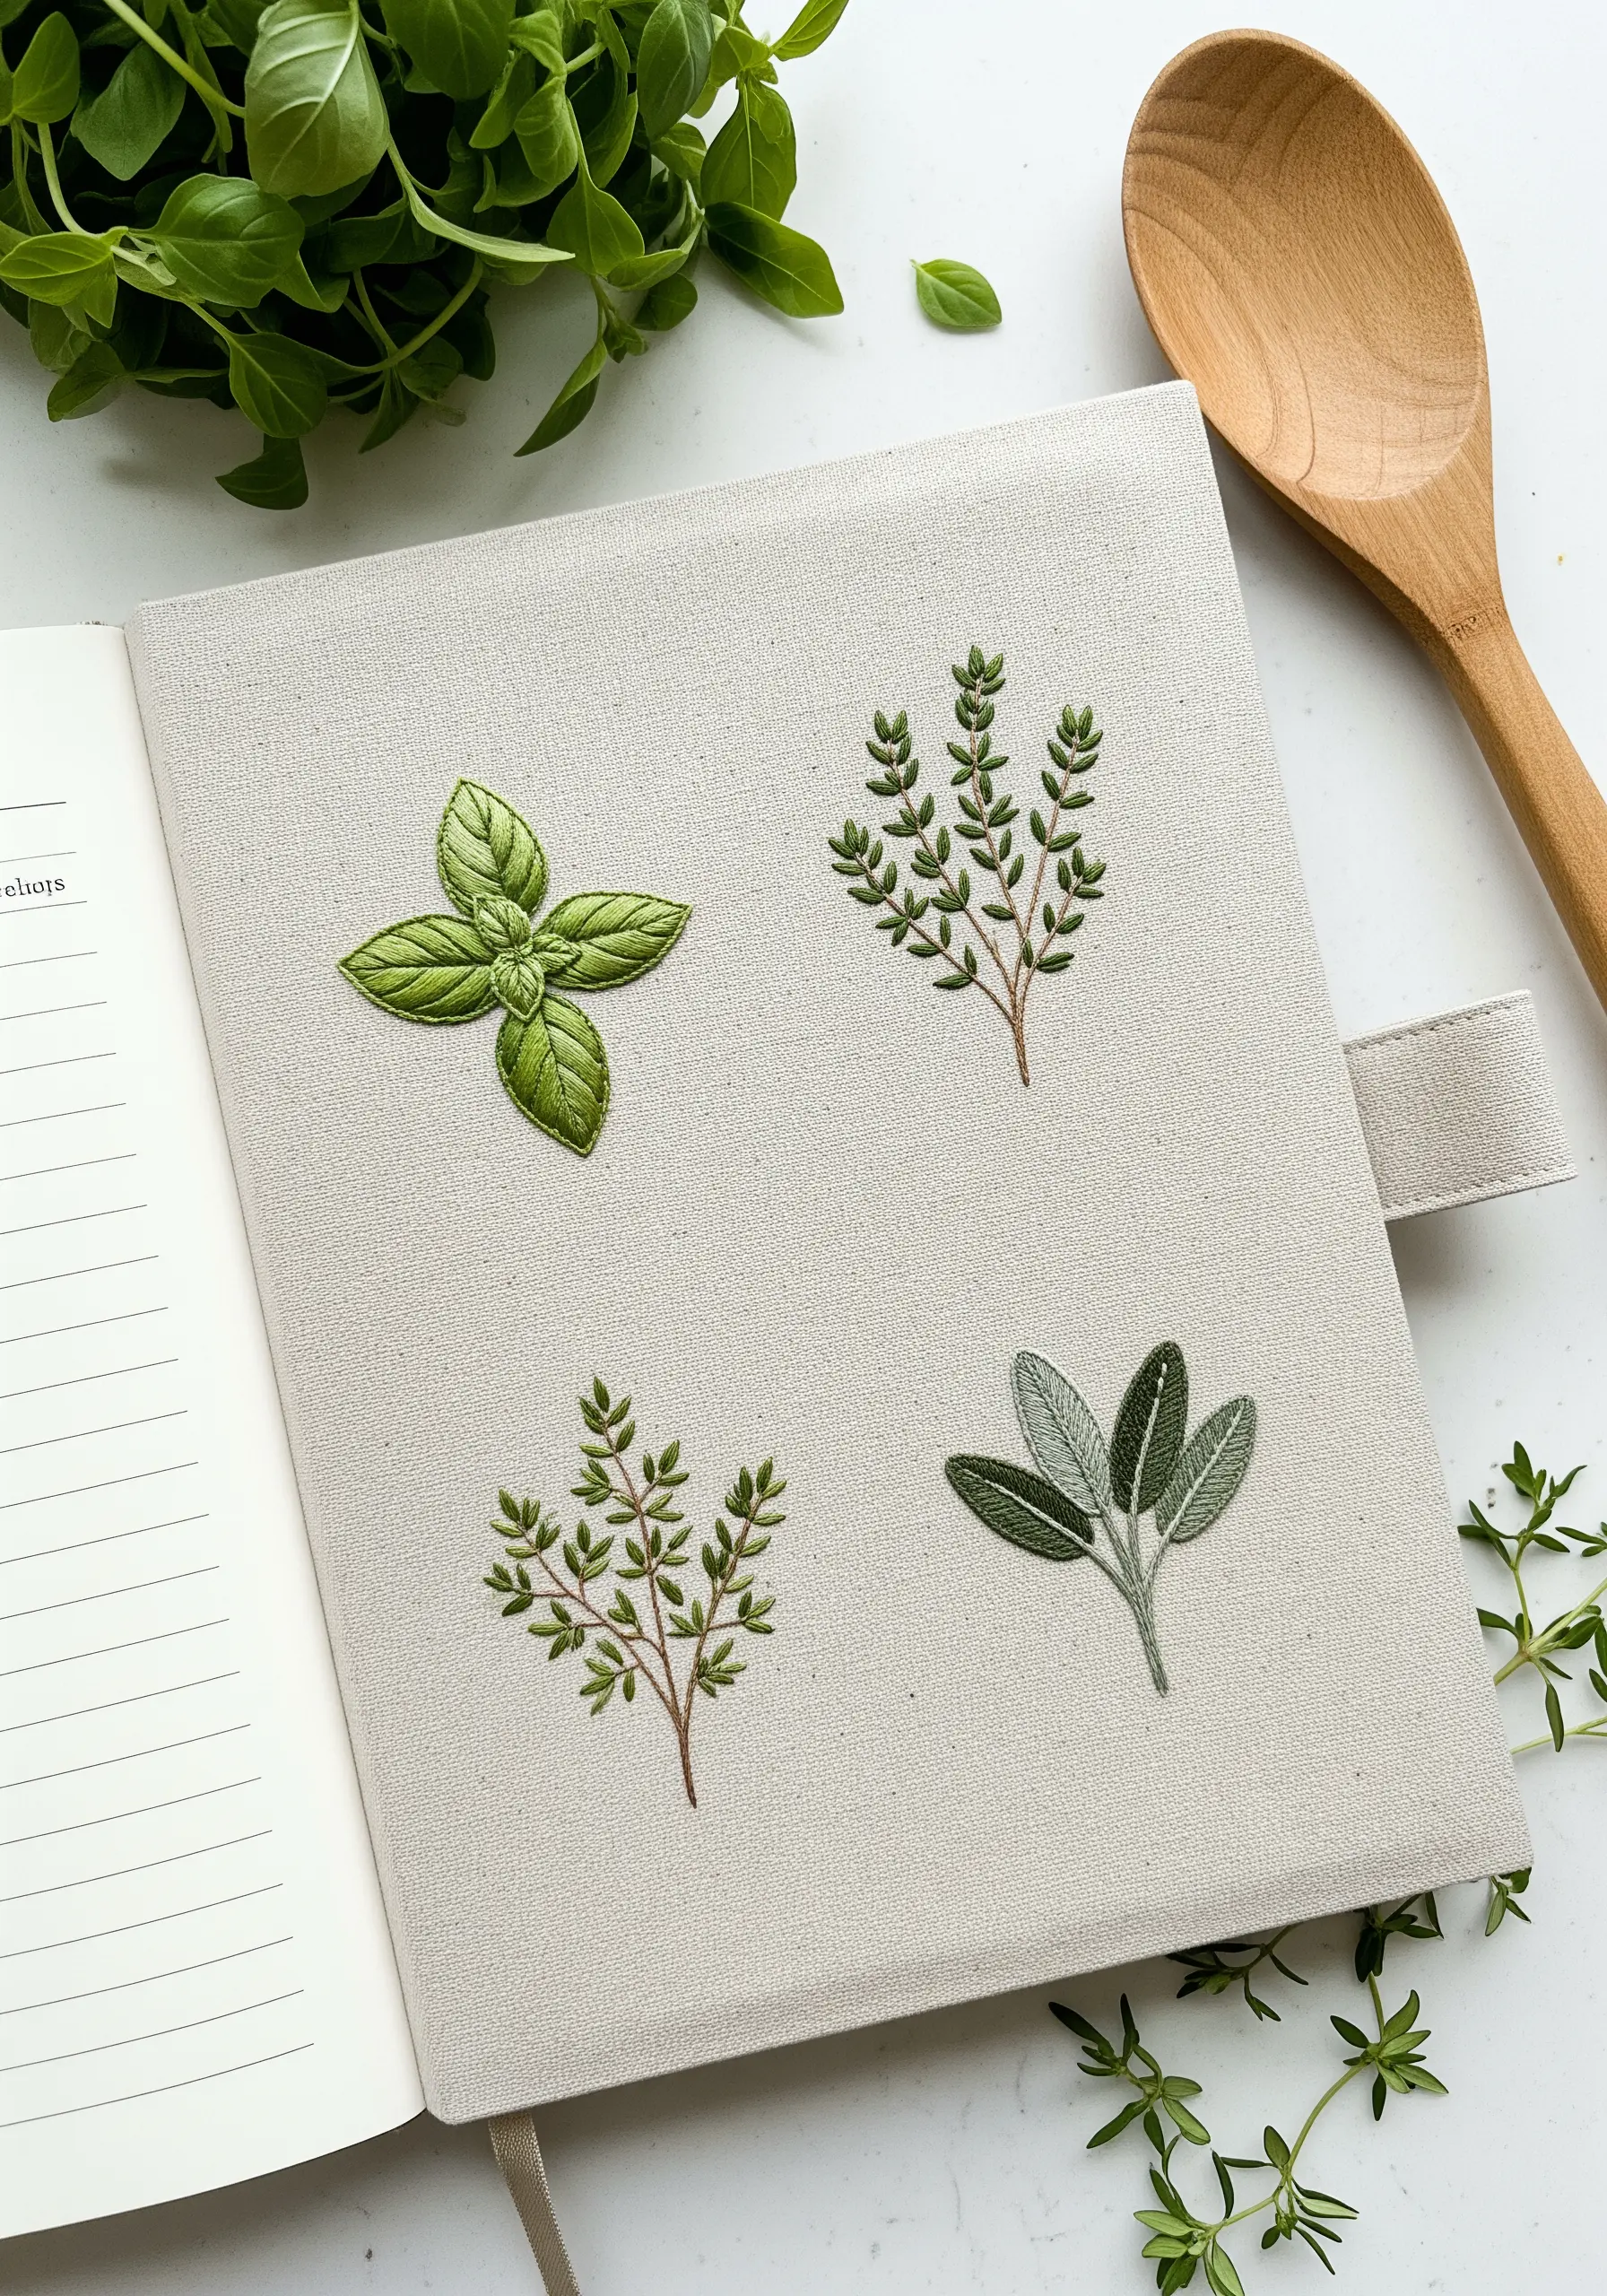
When embroidering familiar herbs, accuracy in shape and texture is key to making them recognizable and beautiful.
For basil, use a padded satin stitch to give the leaves their characteristic fullness. For thyme and oregano, use tiny detached chain stitches for the leaves and a fine backstitch for the woody stems.
Use a fishbone stitch for the sage leaves to capture their central vein and soft, silvery-green appearance. These subtle technical choices make each herb distinct.
24. Create Texture with Negative Space
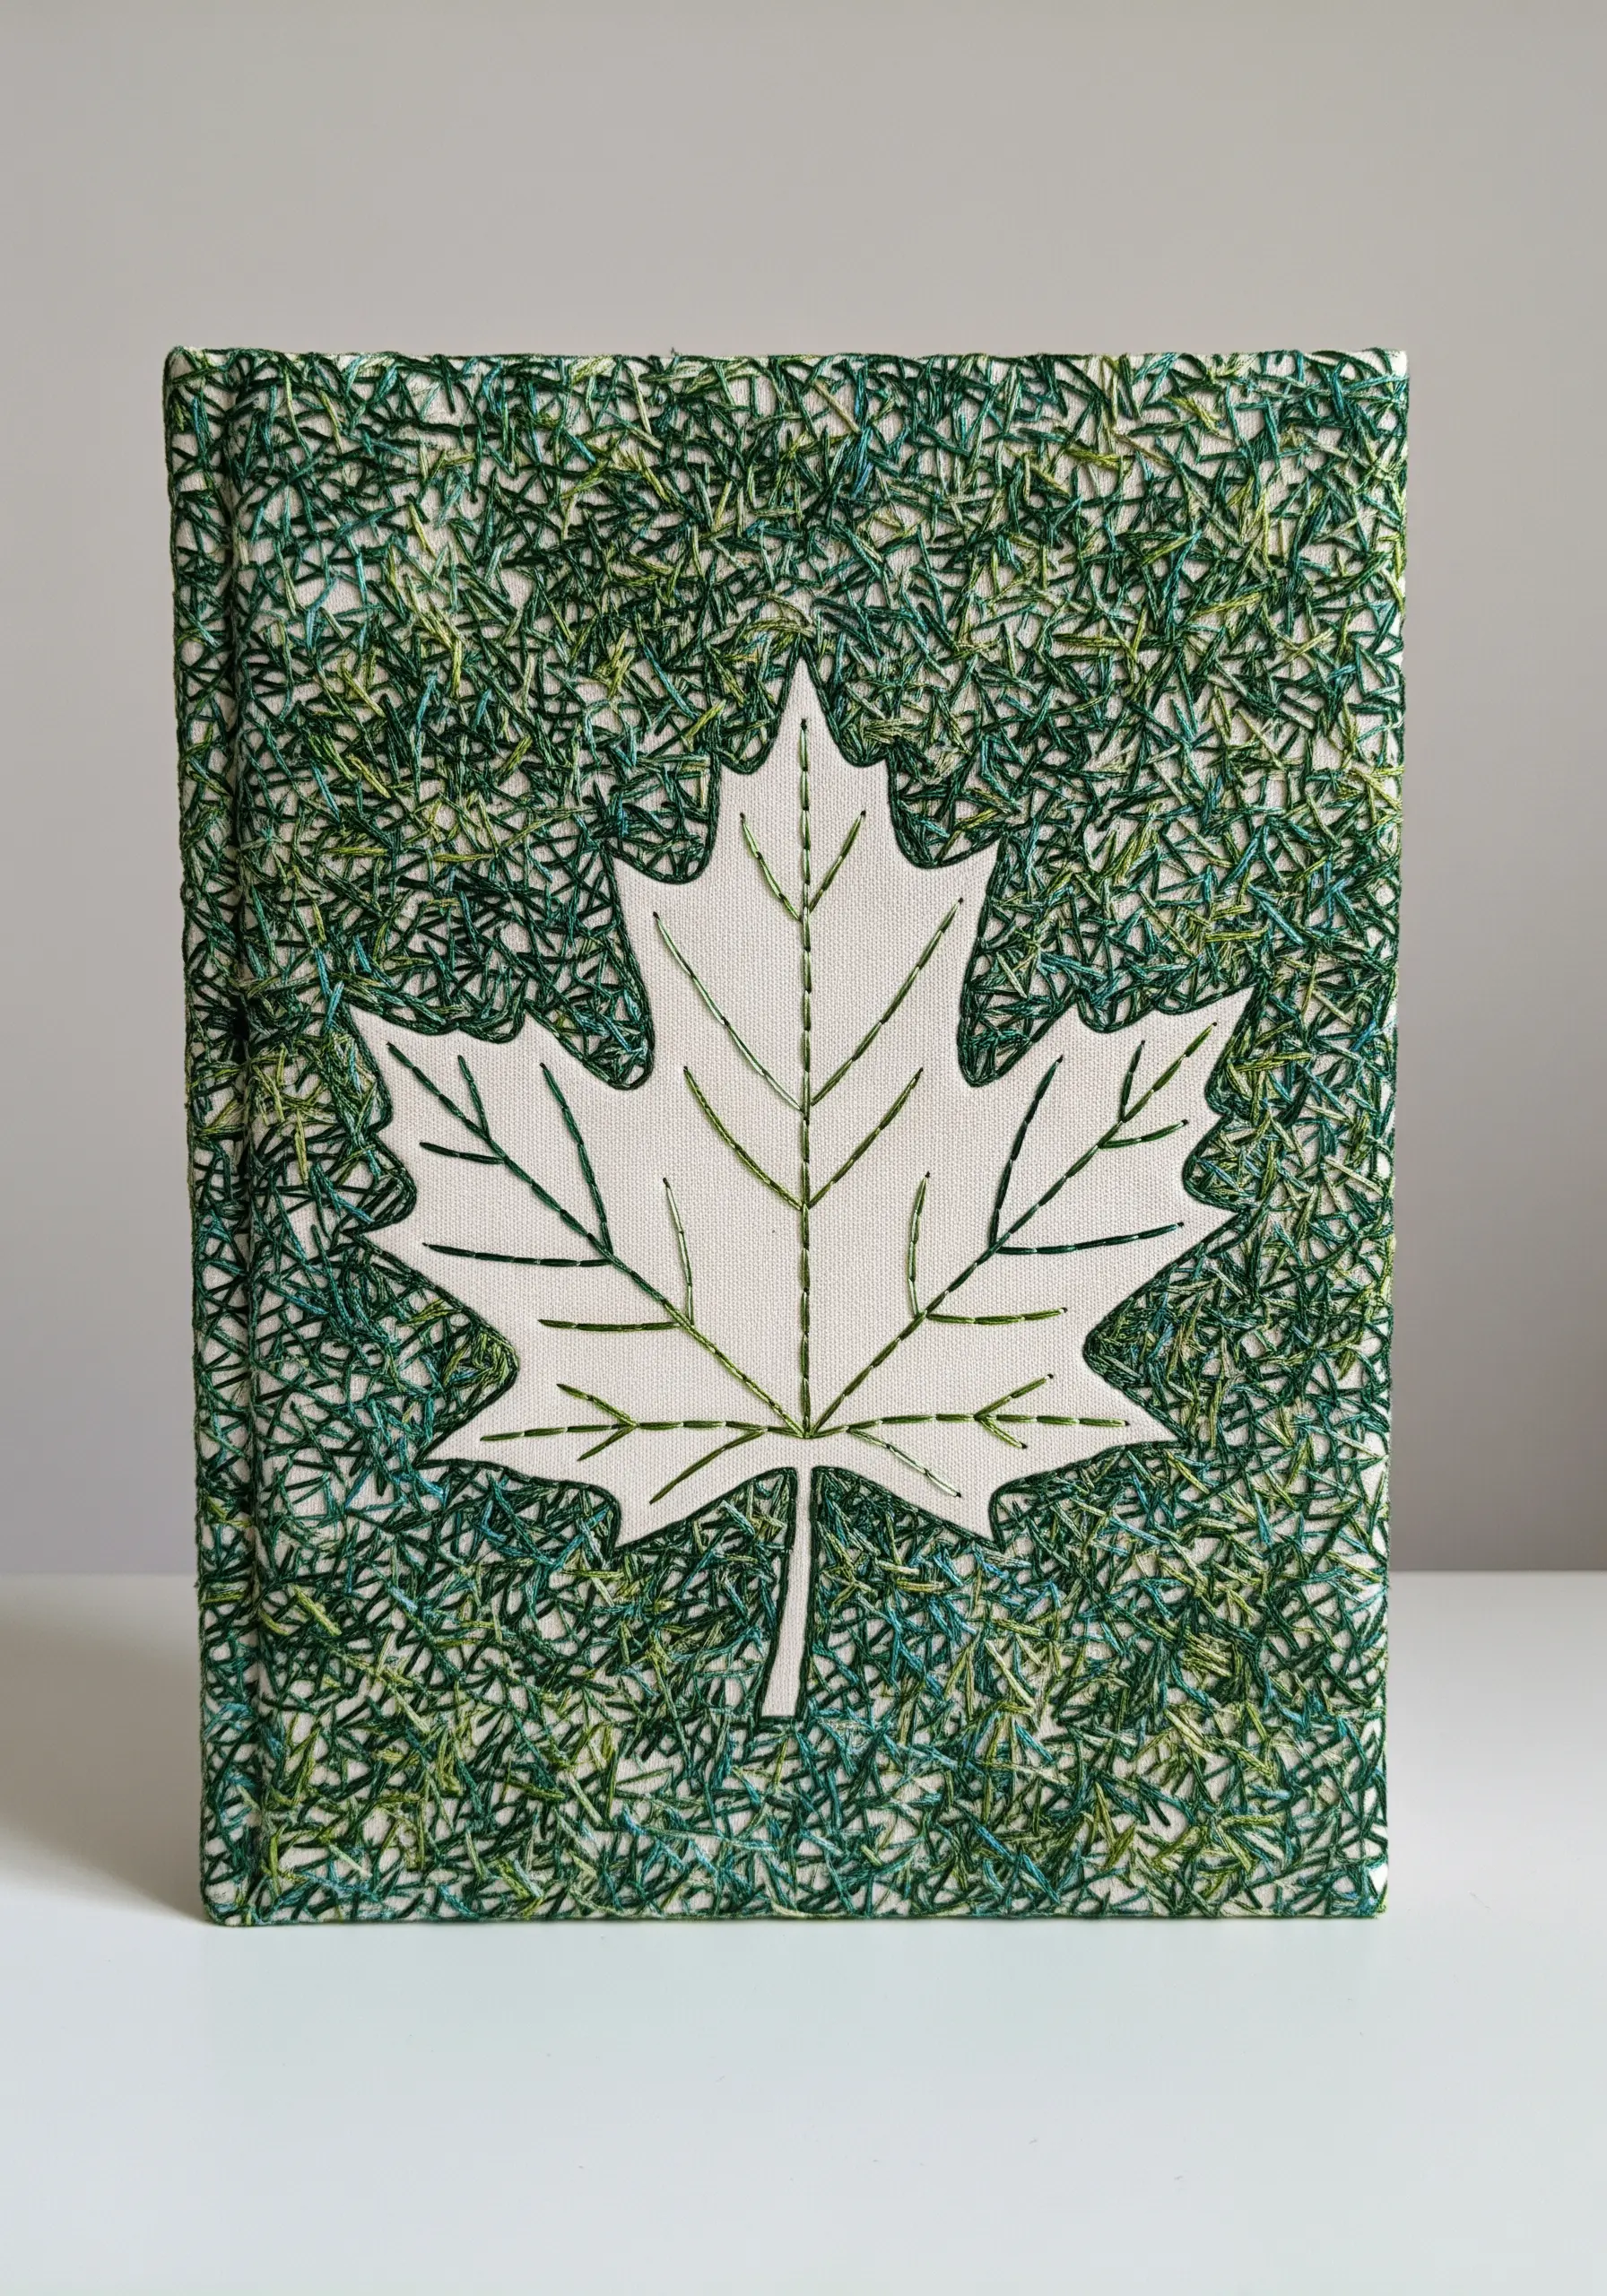
Reverse the traditional approach by stitching the background instead of the motif itself.
Start by tracing your leaf shape onto the journal cover. Then, using a variegated green thread, fill the entire area around the leaf with a dense, chaotic layer of seed stitch or short straight stitches.
This technique, known as voiding, creates incredible texture and makes the simple, unstitched leaf shape the dramatic focal point. Outline the leaf with a simple backstitch to define its edge.
25. Embellish with Beads for a Glimmering Finish

Incorporate beading to add a layer of texture and light-catching elegance to your embroidery.
After stitching the veins of your leaves with a simple backstitch, fill the sections with seed beads instead of floss.
Use a strong beading thread and a fine beading needle, securing every few beads with a tacking stitch on the back. Grouping analogous colors—like golds, bronzes, and deep browns—creates a sophisticated, mosaic-like effect.
This is a form of high-texture fabric collage that feels incredibly luxurious.
26. Embroider on Satin Ribbon for a Functional Bookmark
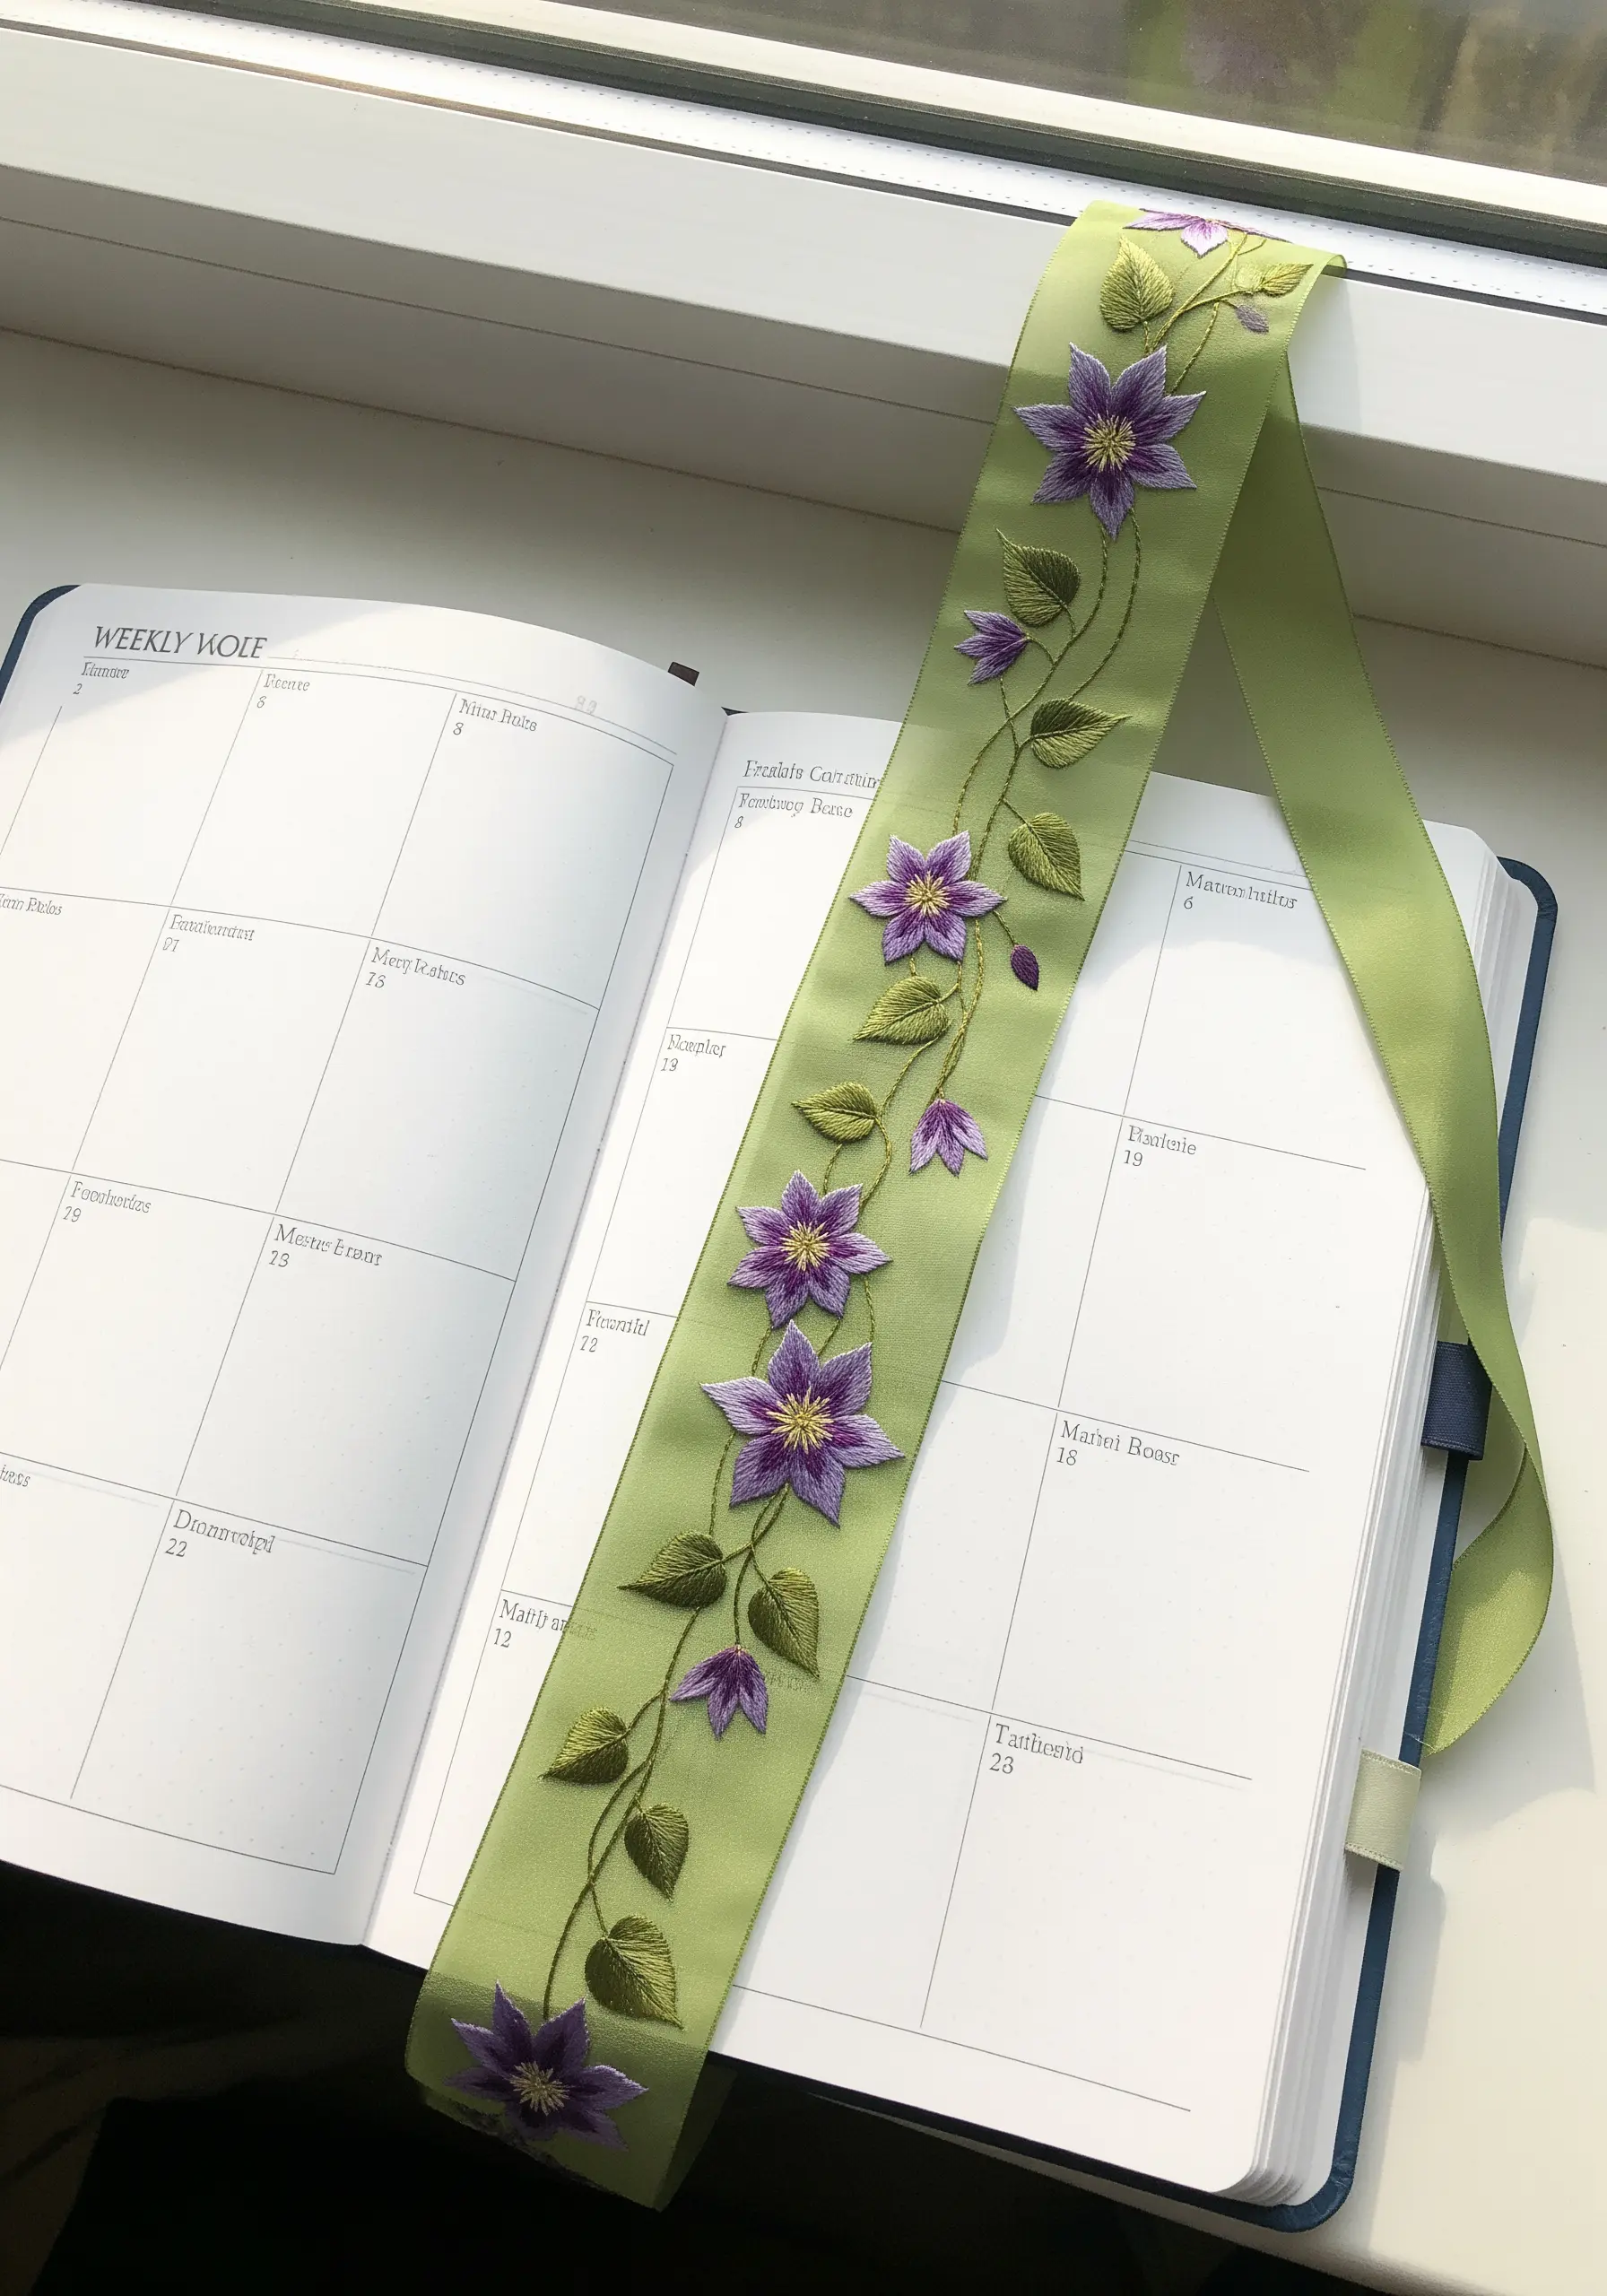
Stitching on a slippery fabric like satin ribbon requires a few adjustments for a beautiful result.
Use a fine, sharp needle to avoid snagging the fabric and back your work with a lightweight, iron-on stabilizer to provide structure.
Keep your tension consistent but not too tight to prevent puckering. A satin stitch works beautifully for the flowers and leaves, creating a smooth, lustrous design that feels perfectly at home on the ribbon’s surface.
27. Combine Embroidery with Block Printing
Create a dynamic, layered design by combining two different mediums: block printing and embroidery.
First, use a hand-carved stamp and fabric ink to print your ginkgo leaf pattern onto the journal cover. Once the ink is fully dry and heat-set, select a few leaves to fill with embroidery.
Using a contrasting color and a simple satin stitch gives those selected leaves texture and dimension, making them pop against the flat, printed background.
This is a great technique for creative collage inspirations on fabric.
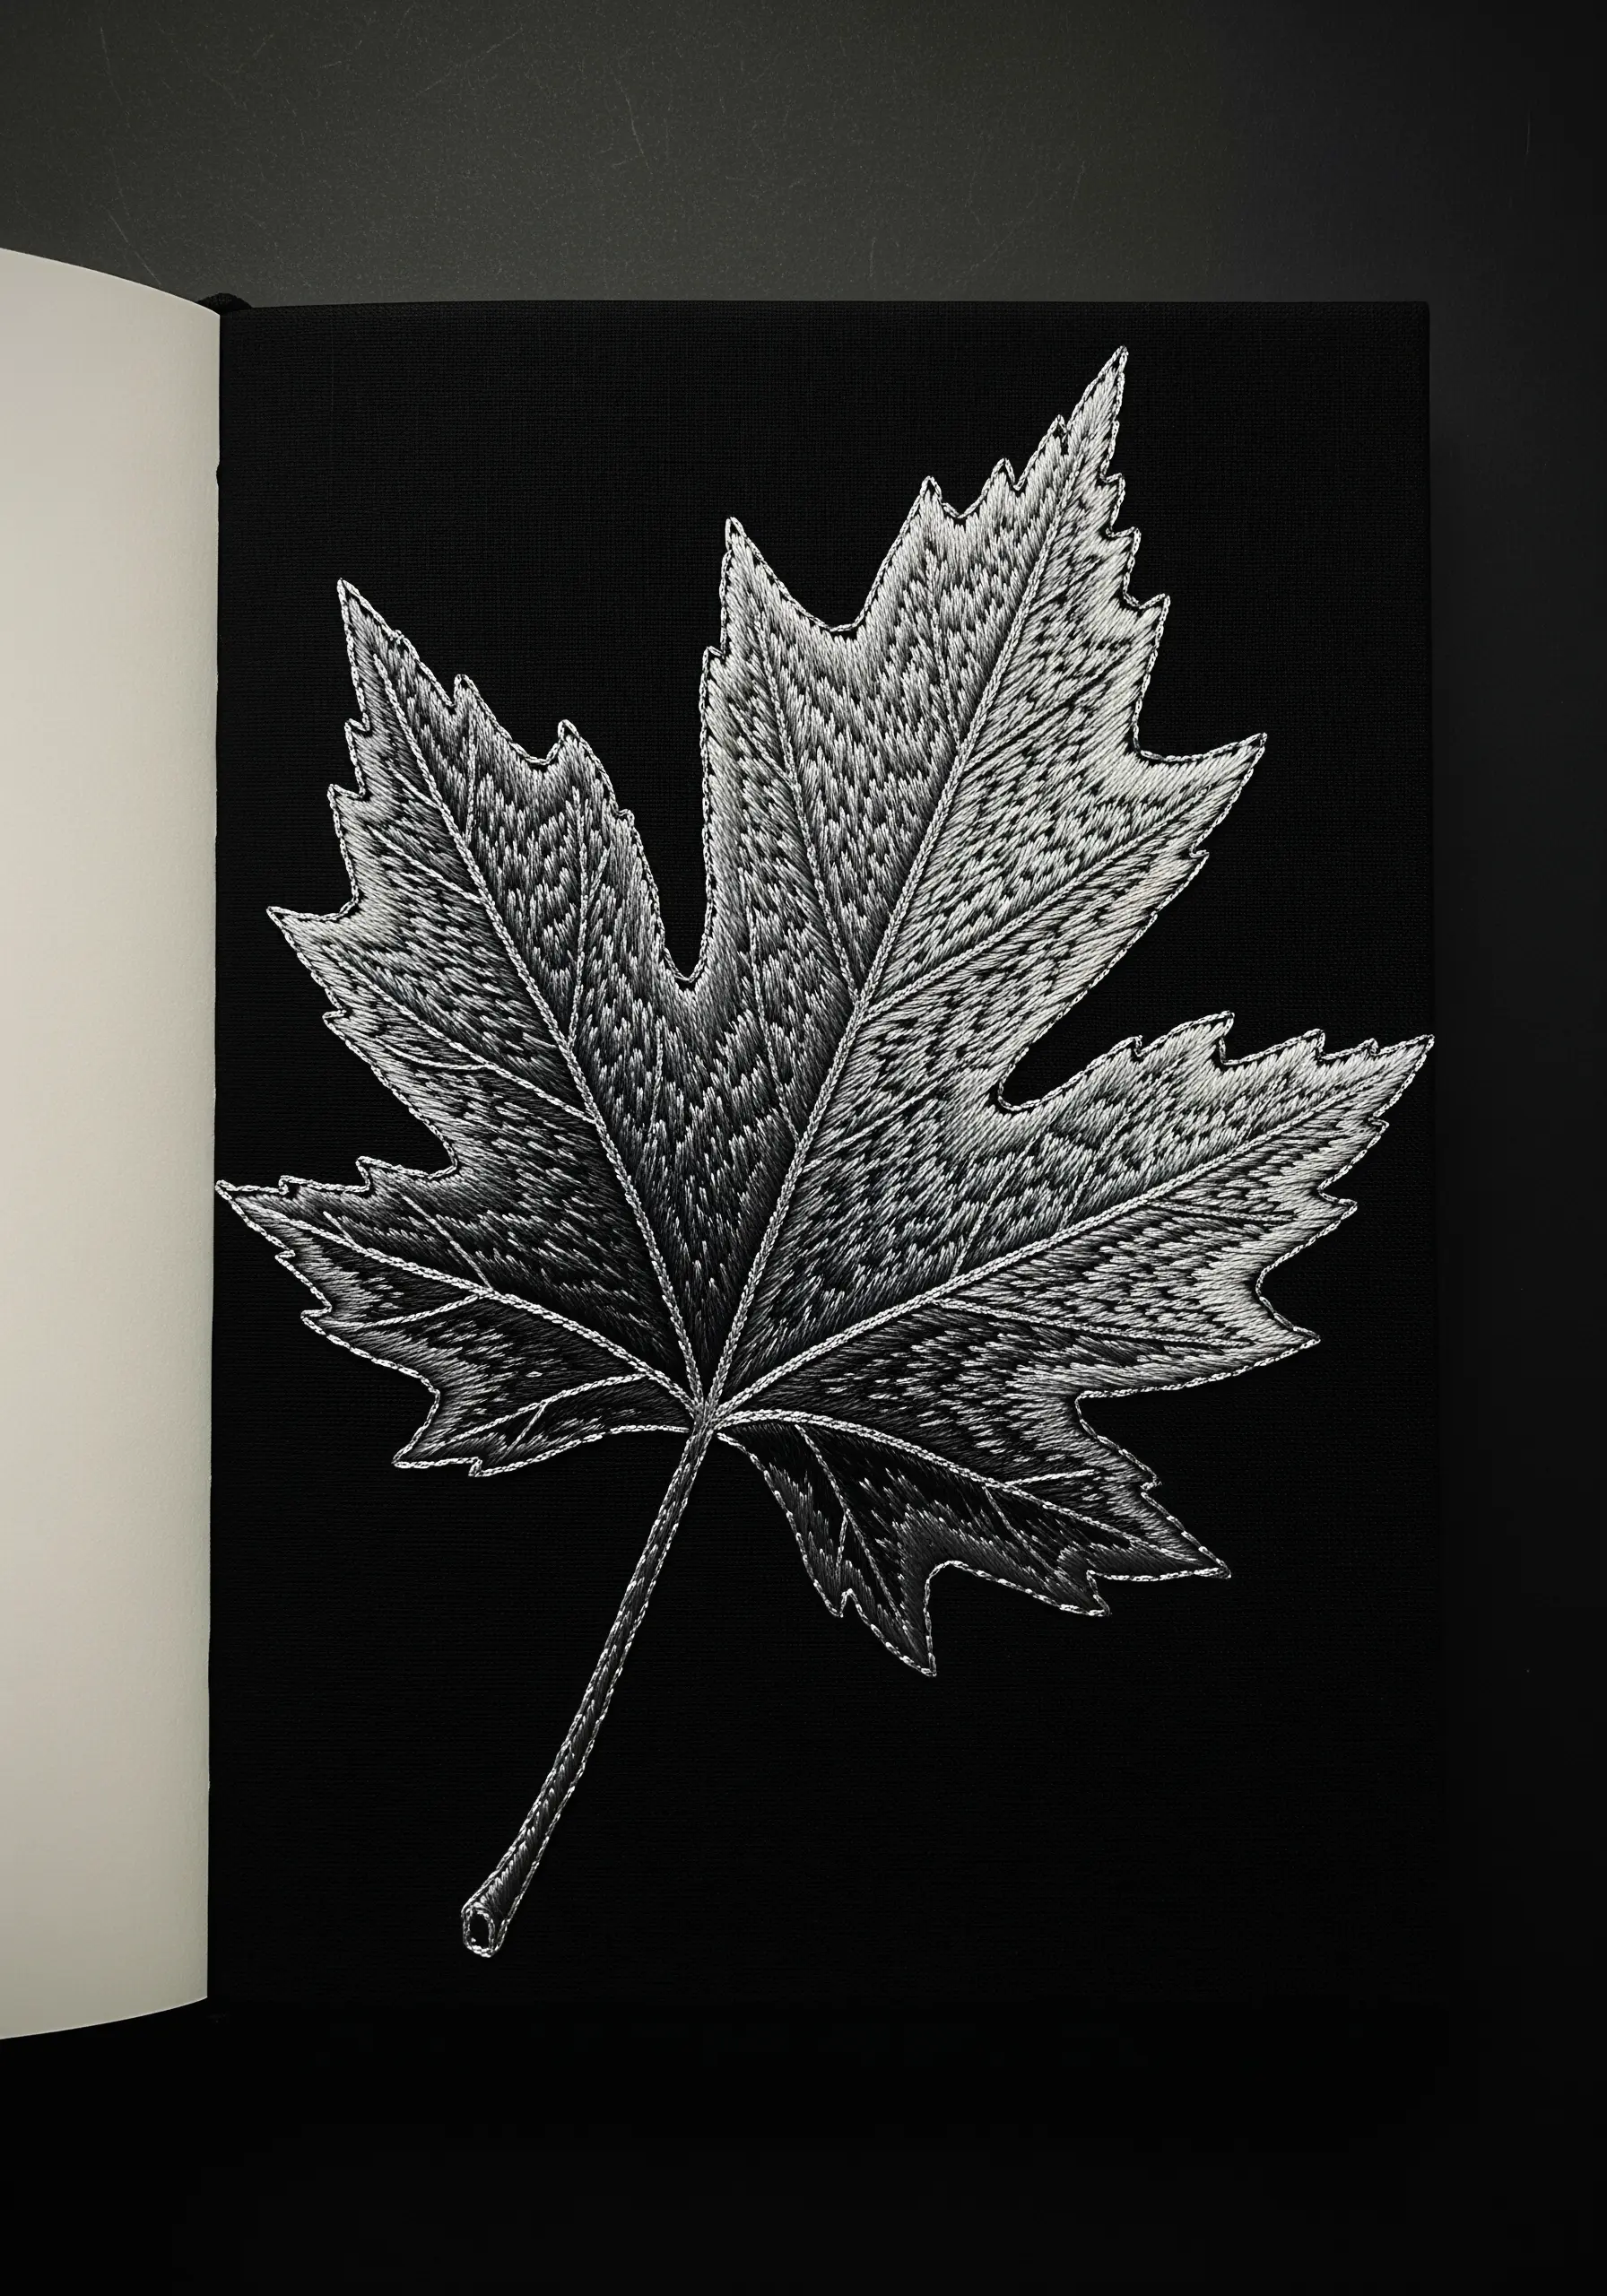
28. Use a Split Stitch Outline for a Crisp Finish
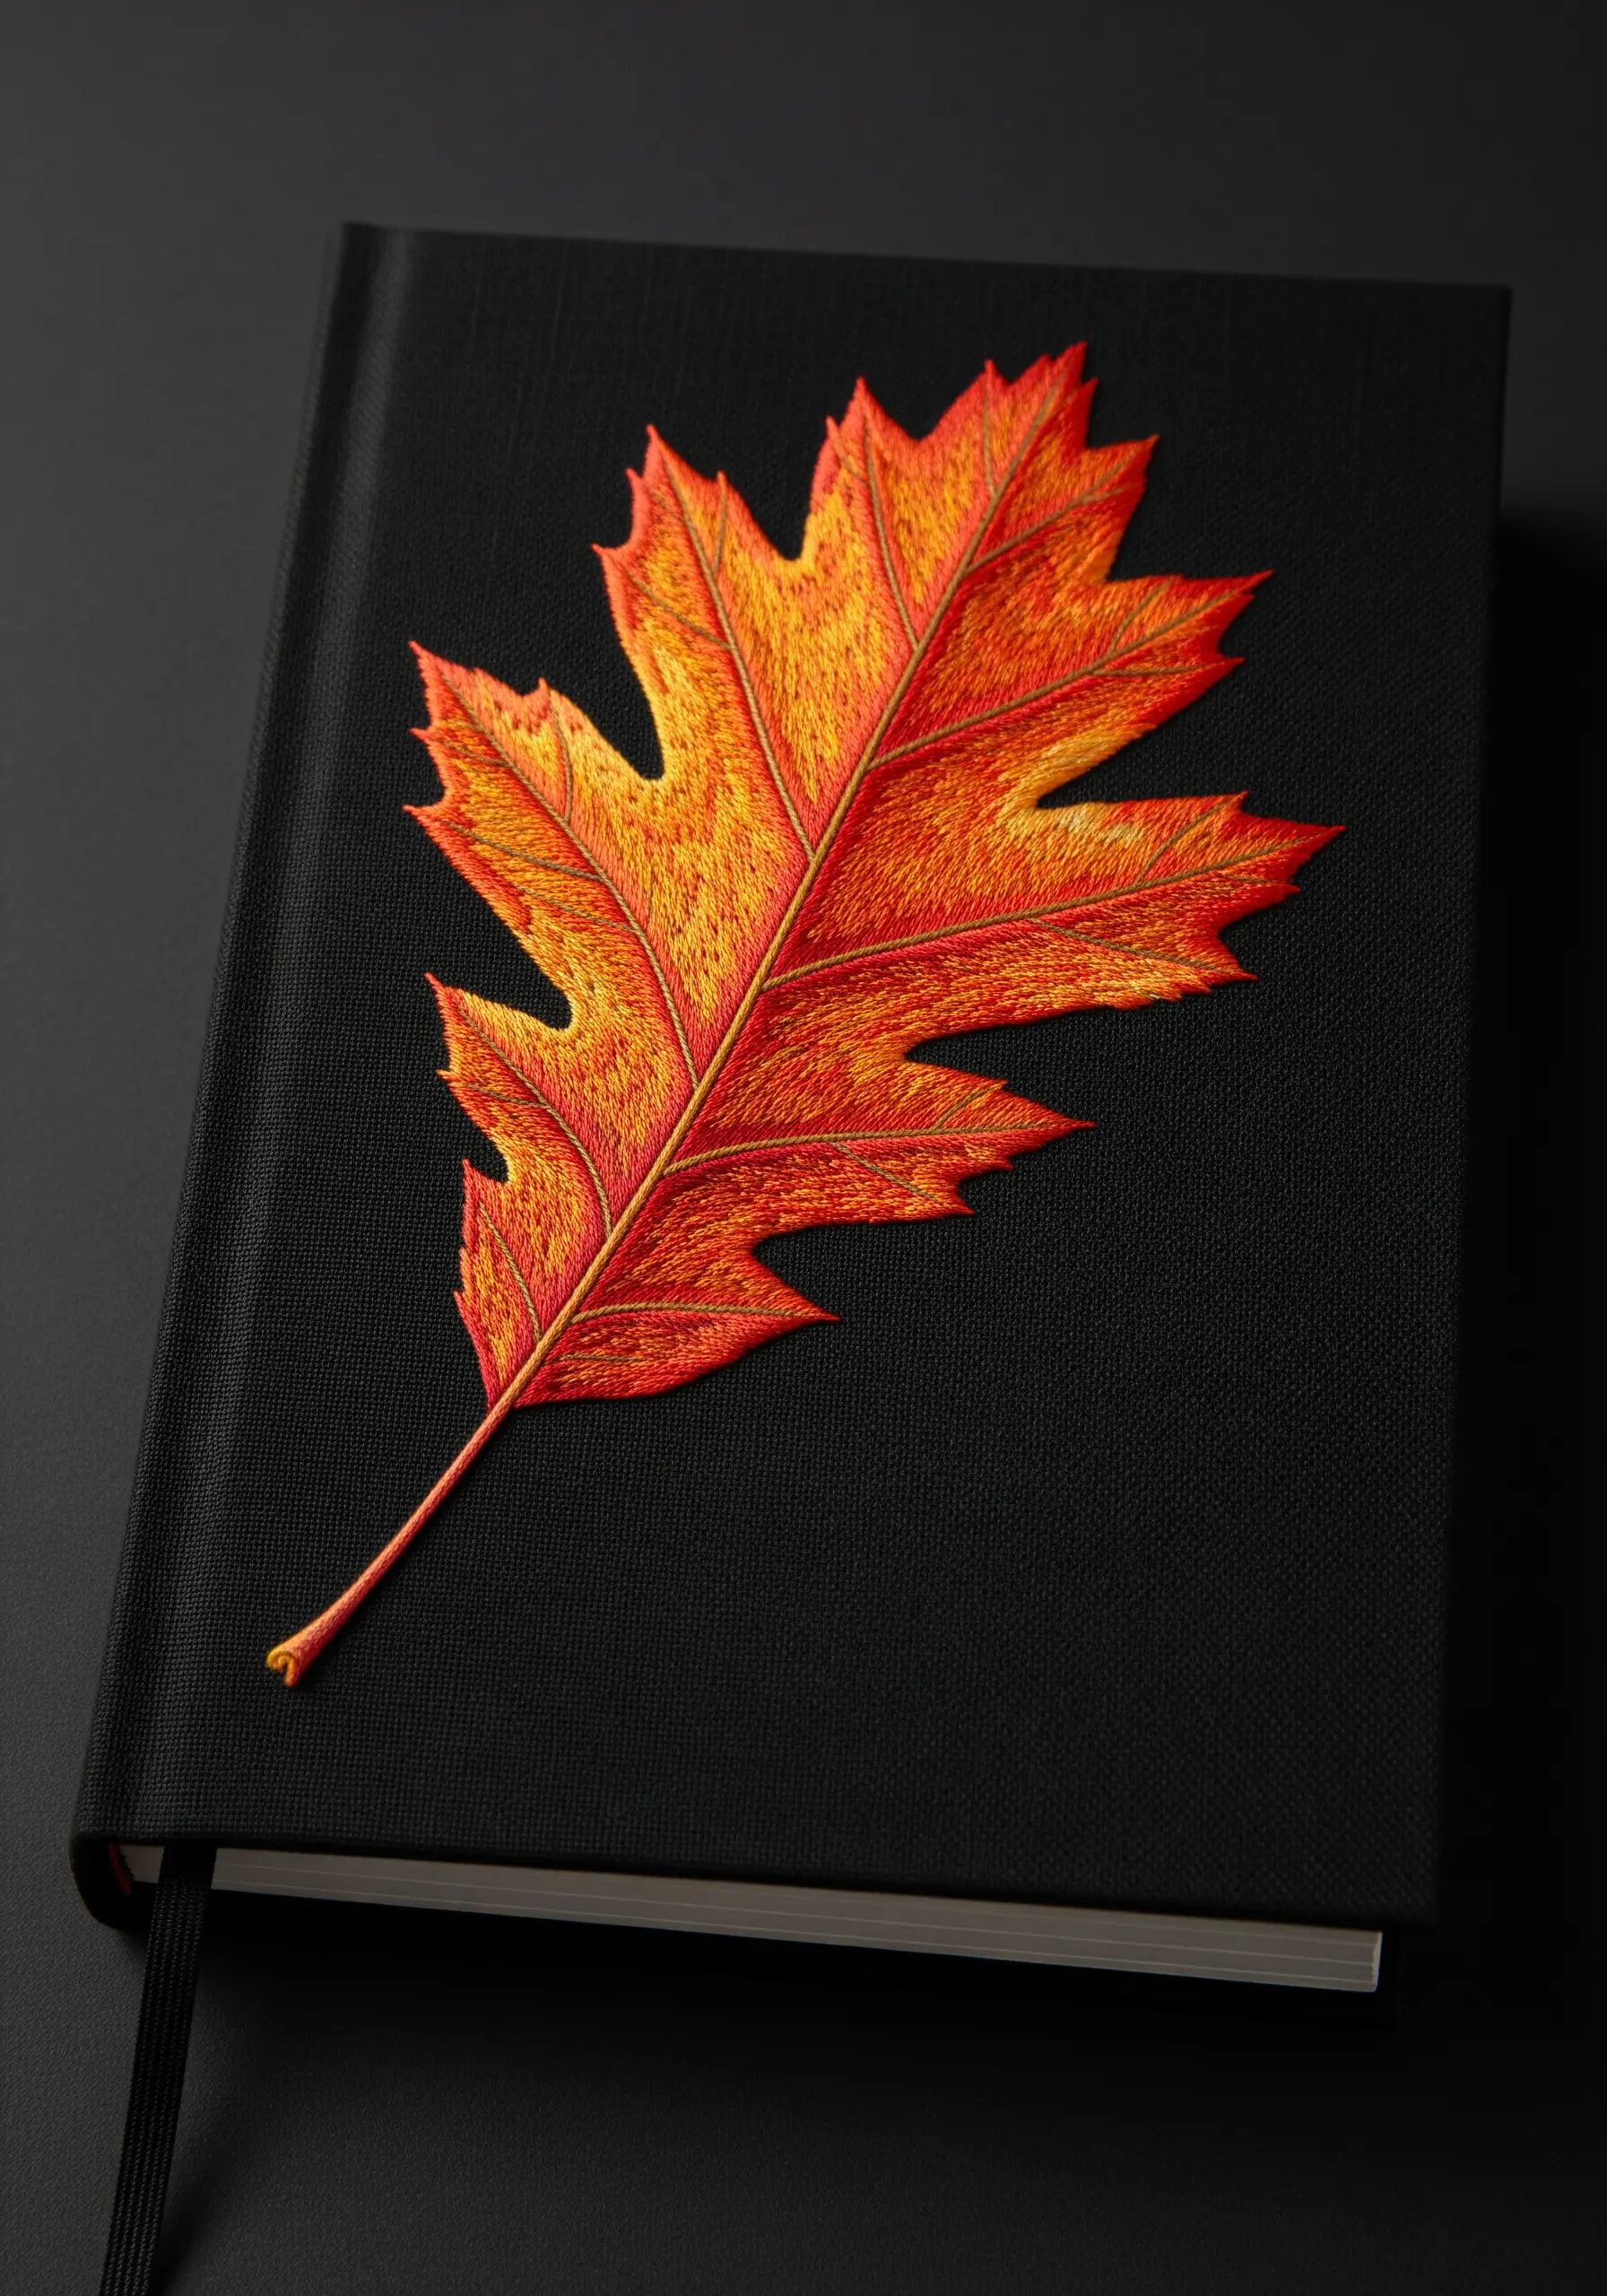
To make a vividly colored leaf truly stand out against a dark background, a sharp, defined edge is essential.
Before you begin filling the shape, outline the entire leaf with a two-strand split stitch in a matching color. This raised edge contains your fill stitches and gives the motif a clean, almost graphic quality.
Fill the interior with long-and-short stitch, blending from orange to yellow to create that fiery autumn glow. The outline ensures that even with complex color blending, the shape remains powerful and clear.
29. Create a Playful Pattern with Pastel Leaves
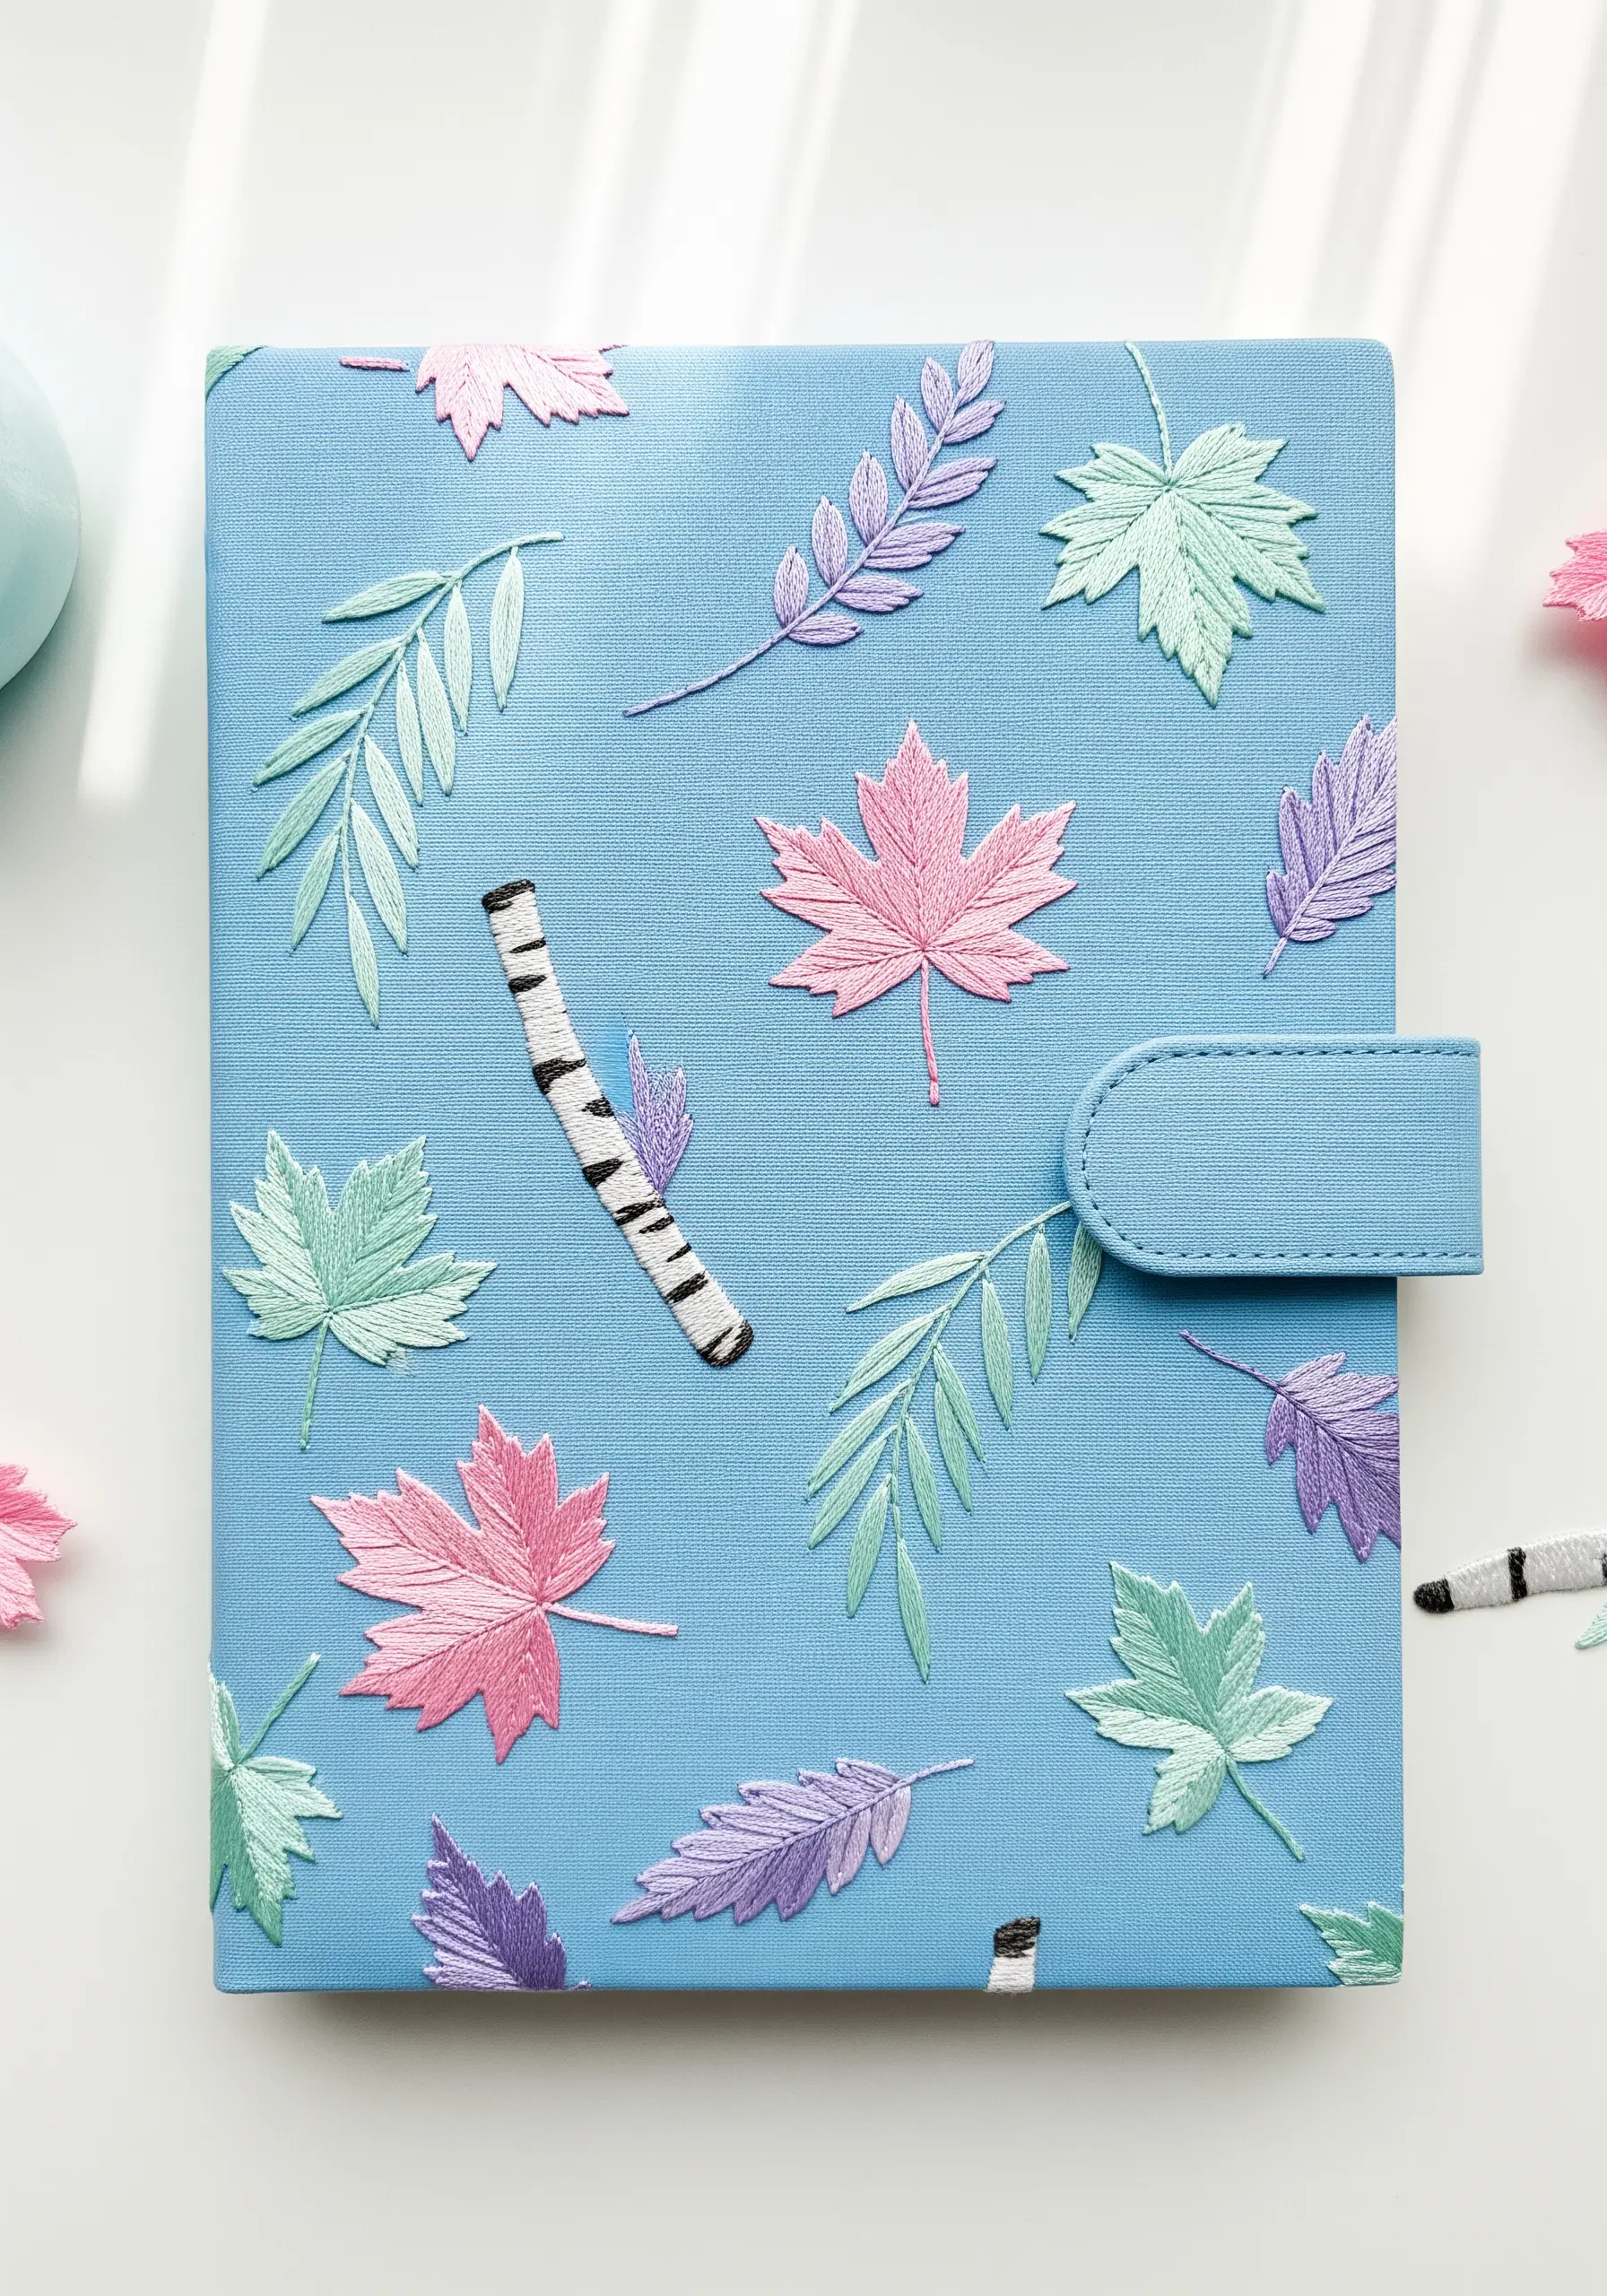
Move beyond realism and embrace a soft, illustrative style with a pastel color palette.
Scatter various leaf shapes across your journal cover in an irregular pattern. Use simple fill stitches like satin stitch or fishbone stitch, keeping the designs flat and graphic.
The combination of soft pinks, mints, and lavenders against the light blue background creates a calming, dreamlike aesthetic. Adding a simple birch log motif provides a nice vertical contrast to the scattered leaves.
30. Emulate a Botanical Illustration

Capture the analytical beauty of a vintage botanical chart by combining realistic stitching with diagrammatic elements.
Stitch the central plant with careful thread painting to achieve realism in the leaves and berries. Use French knots for texture on the berries and a whipped backstitch for the stem.
Then, using a single strand of a contrasting thread (like gold or black), add abstract diagrams and labels with simple straight stitches and backstitch. This juxtaposition of art and science creates a deeply intelligent and compelling design.
31. Organize Your Planner with Embroidered Tabs
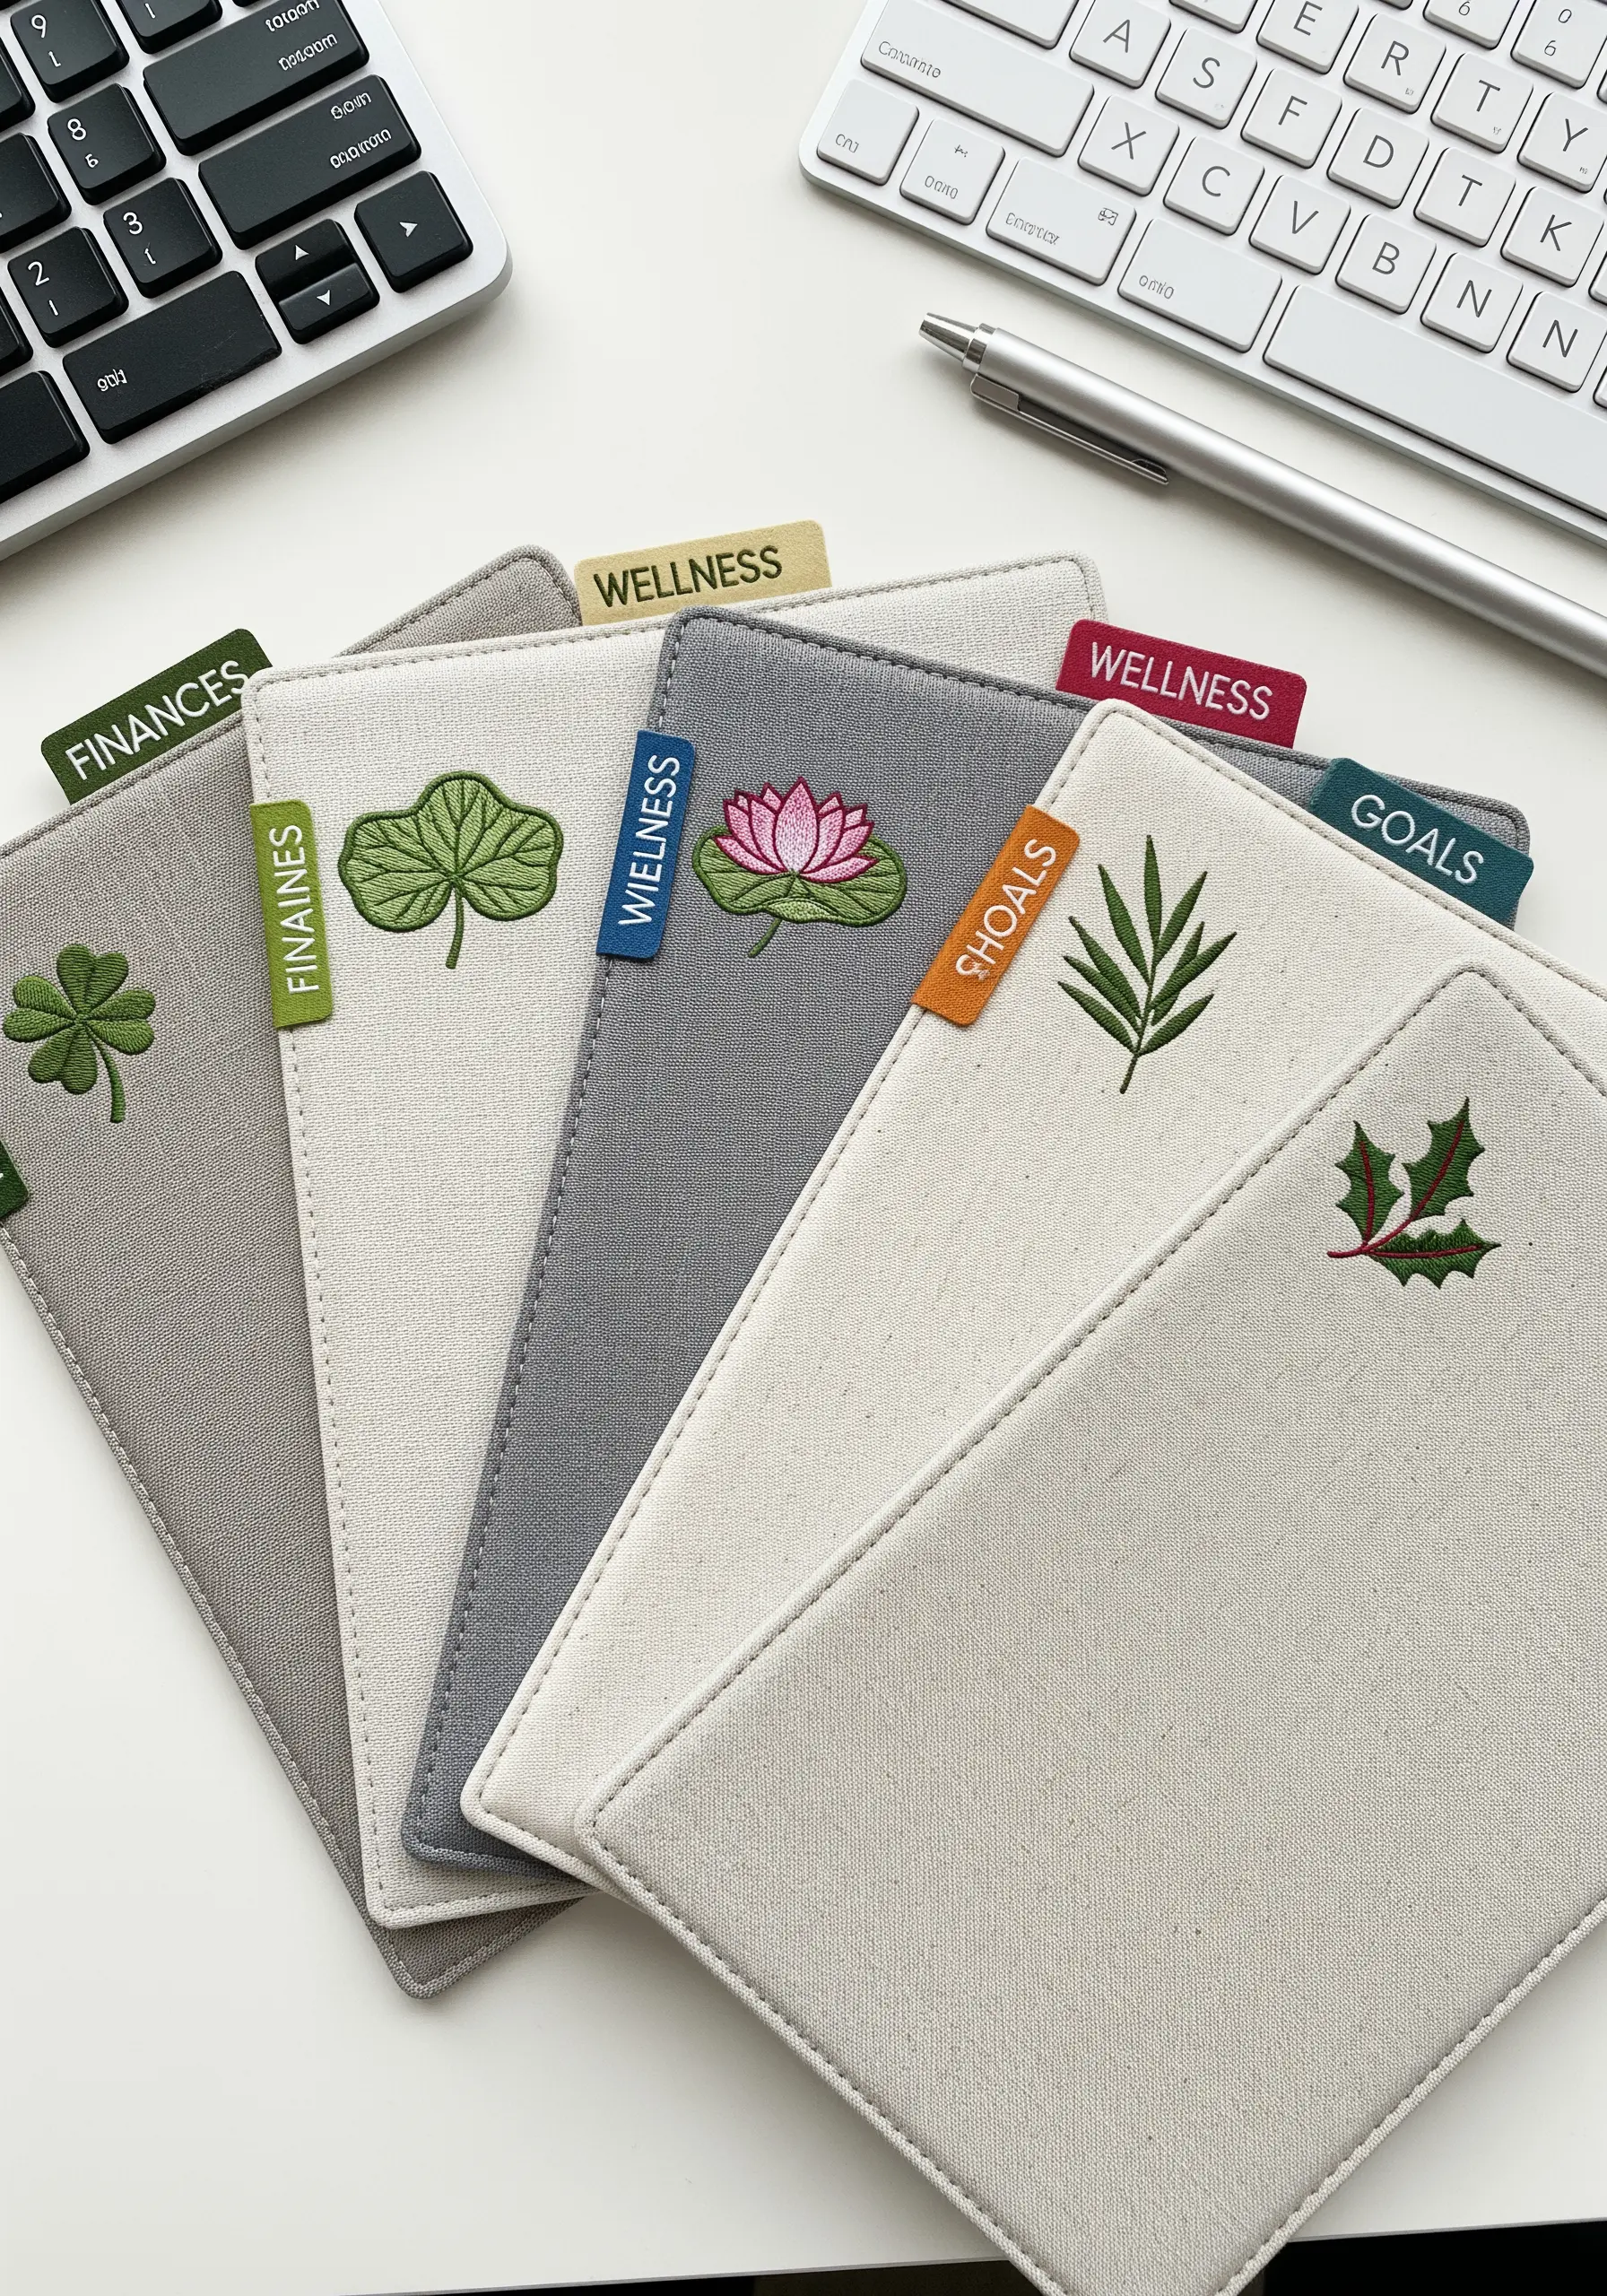
Combine function and beauty by adding small, embroidered motifs to your planner’s organizational tabs.
Choose simple, recognizable leaf shapes that can be stitched quickly and clearly on a small scale. A four-leaf clover, a lotus leaf, or a simple palm frond are excellent choices.
Use a basic satin stitch or outline stitch with just a few strands of floss to keep the designs from becoming bulky. This personal touch makes planning feel more creative and intentional.
32. Direct Your Stitches to Create Flow and Veins
The direction of your stitches is the most powerful tool for creating realism in a leaf.
Instead of stitching straight across, angle your long-and-short stitches to follow the natural, curved direction of the veins, fanning out from the central line.
For the central vein itself, use a heavier line of split stitch or stem stitch after the fill is complete. This masterful control of stitch direction is what transforms a flat shape into a living, breathing leaf with convincing movement.
33. Integrate Embroidery with a Geometric Pattern
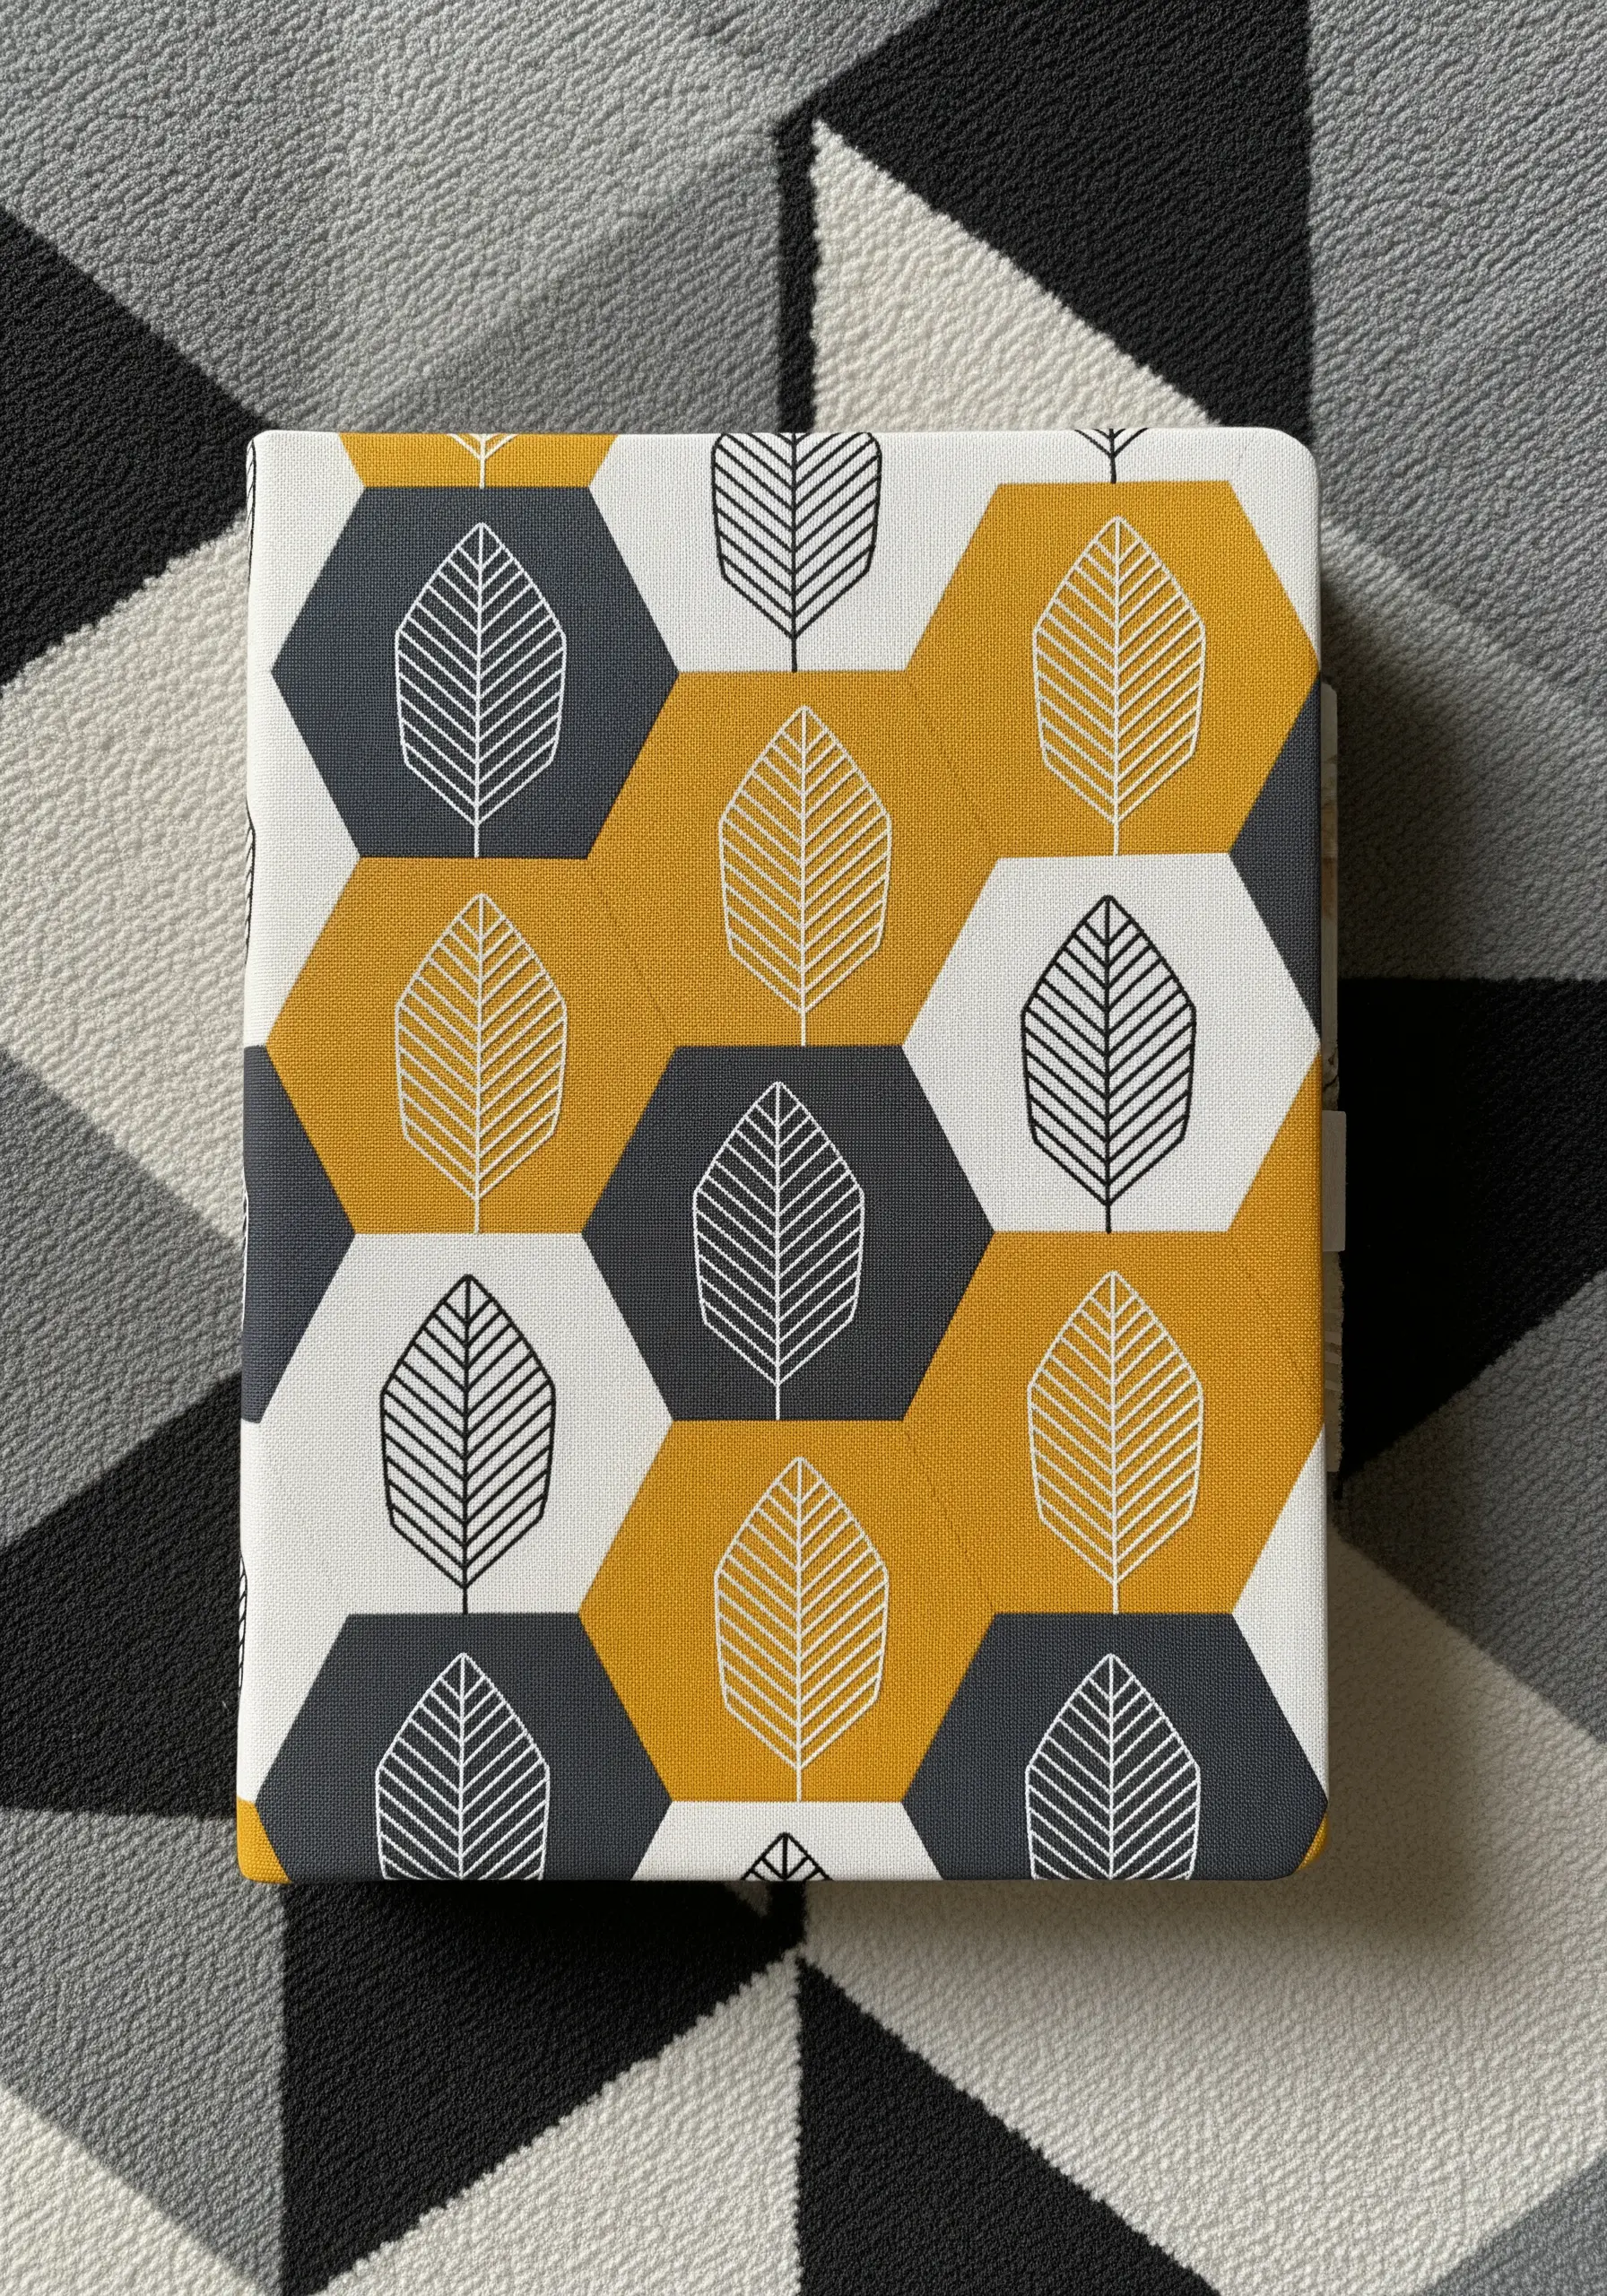
Create a striking modern design by embroidering simple line-art leaves within a bold, geometric pattern.
Let the clean lines of the hexagons guide the placement of your motifs. By using a simple backstitch in a contrasting color (white or black), you ensure the leaf’s organic shape stands out while still feeling connected to the graphic background.
This technique demonstrates a sophisticated understanding of balance between organic and structured forms, perfect for fans of geometric patterns.
34. Build a Dense Canopy with Layered Embroidery
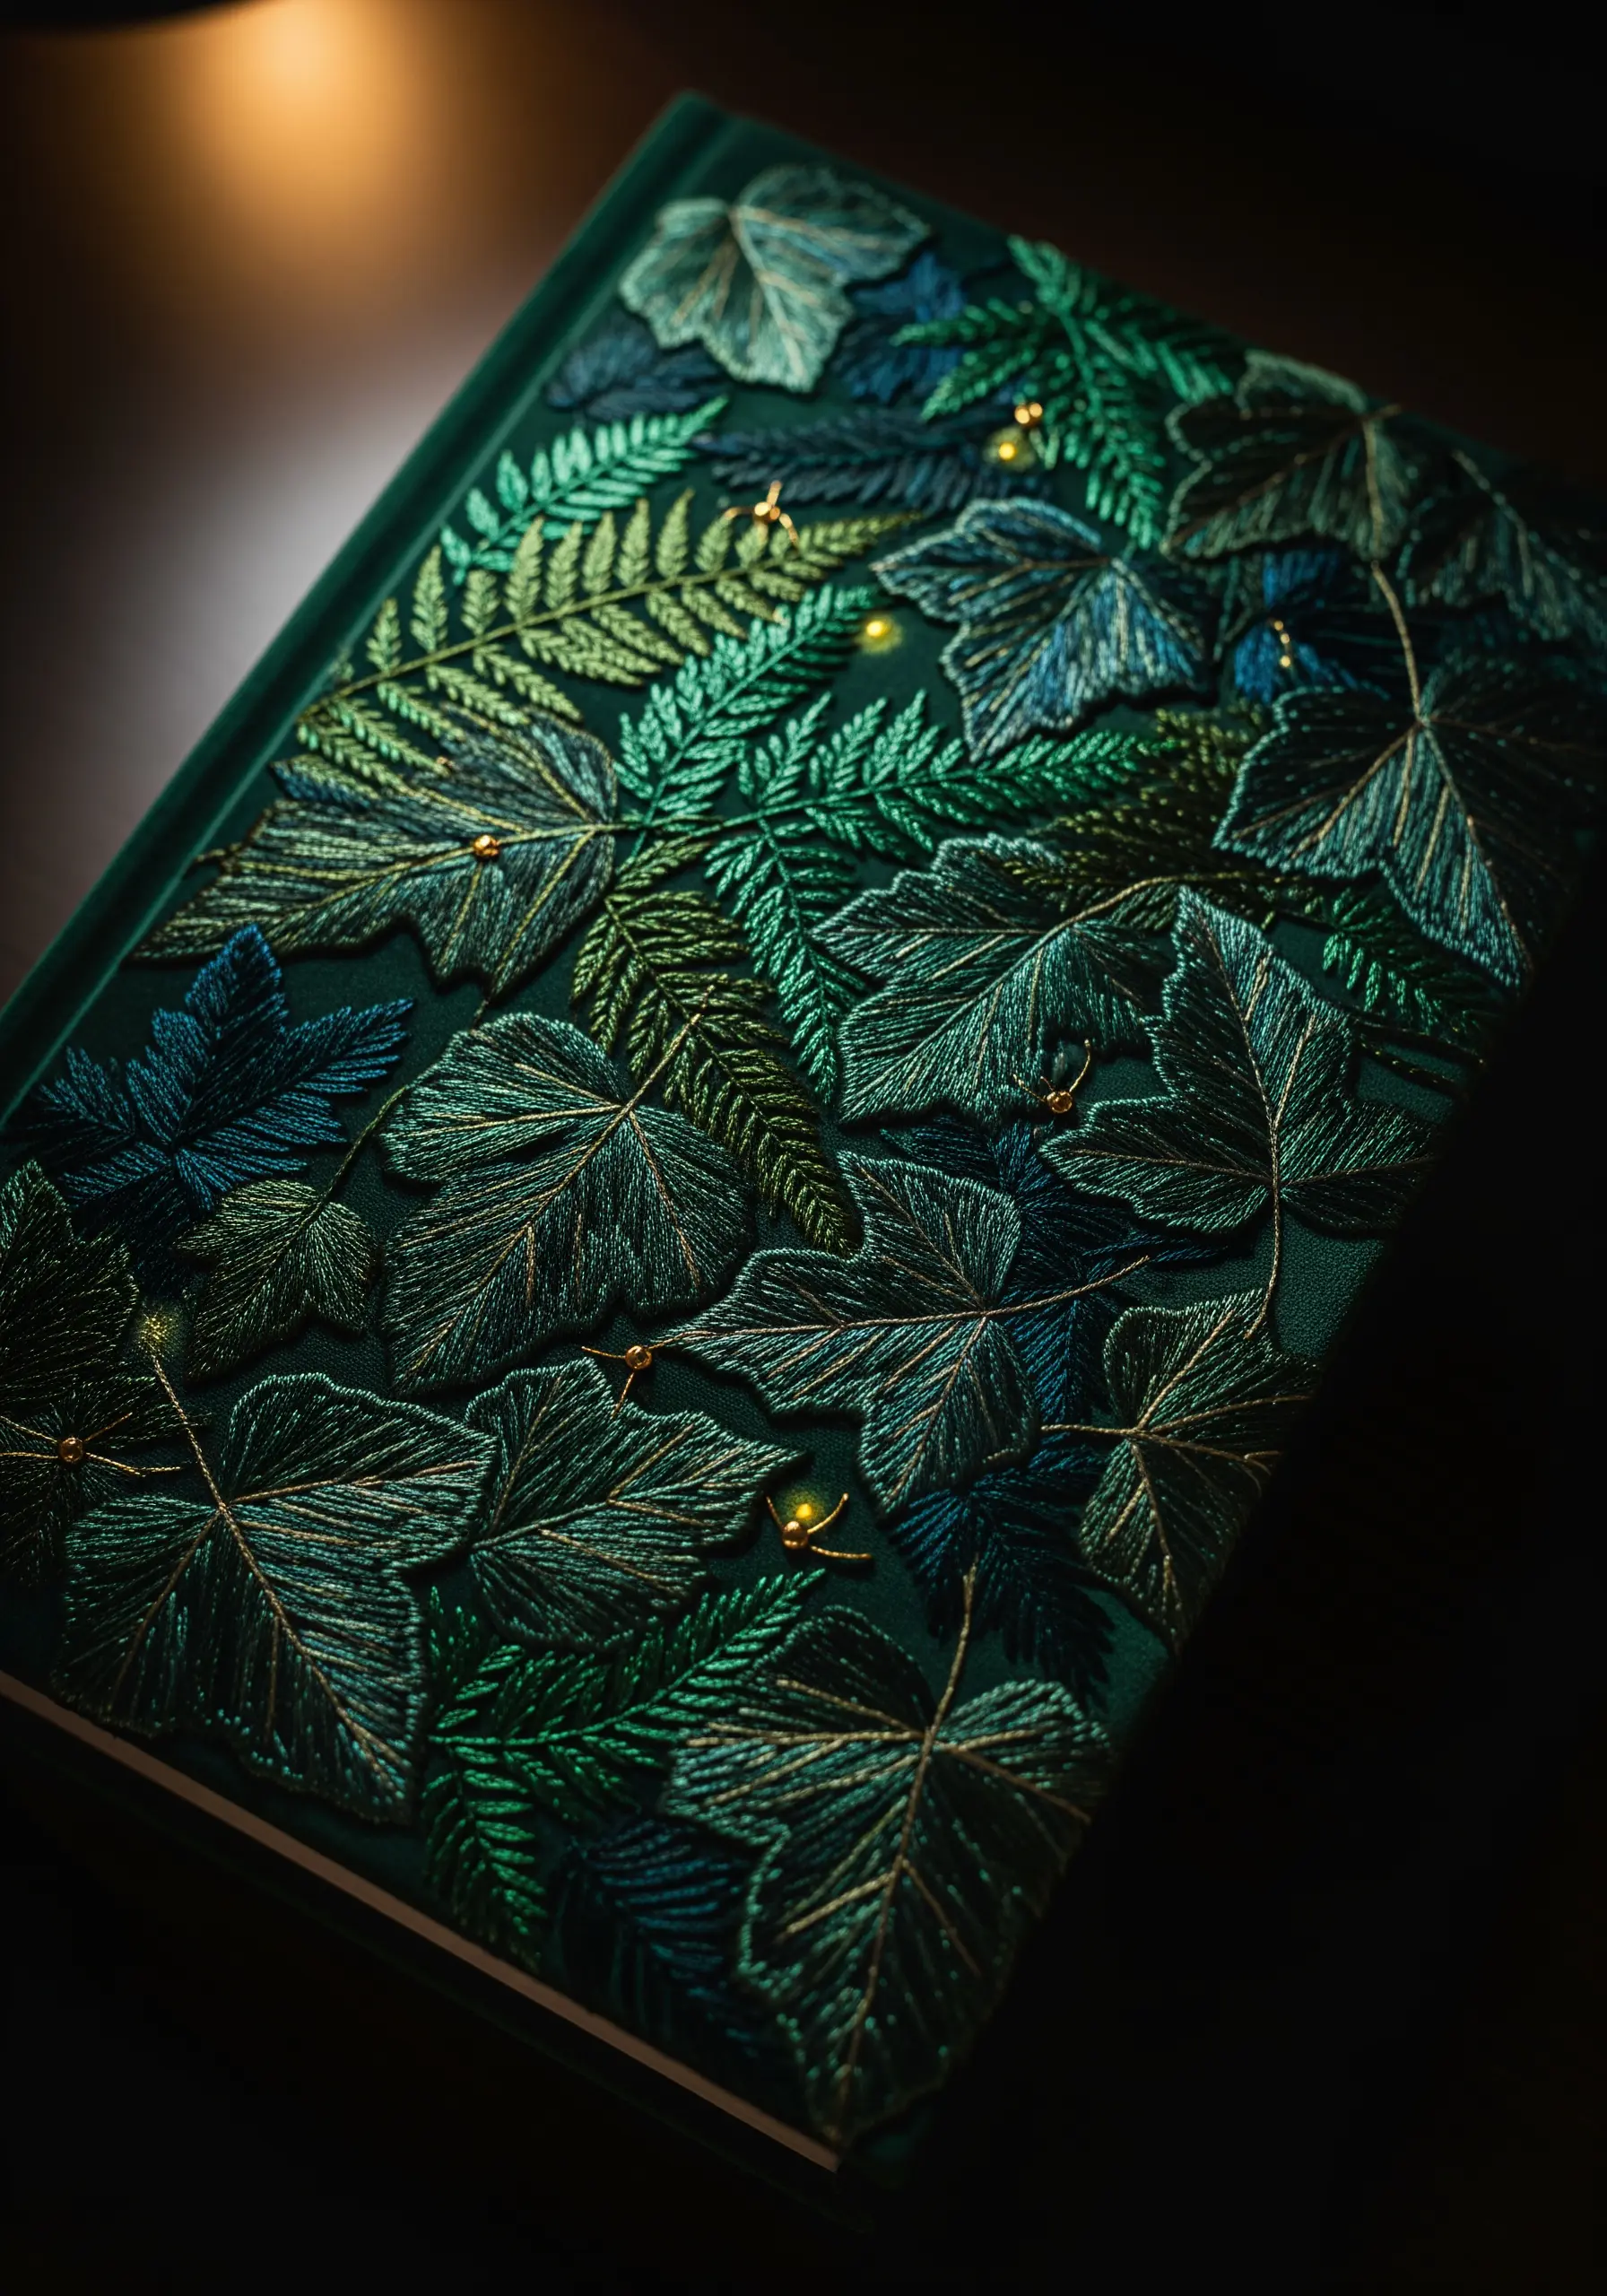
Create the feeling of a dense, moonlit forest by layering different leaf shapes and thread textures.
Start with larger leaves in the background, using a flat satin stitch. Then, add more leaves on top, using stitches with more texture, like fishbone stitch or even some stumpwork techniques for raised elements.
Use a palette of deep greens, blues, and teals with varied sheens—some matte, some satin—to mimic how light filters through a canopy. The tiny gold French knots add a final touch of magic, like distant stars or fireflies.
35. Achieve Hyperrealism with Printed Fabric Appliqué
For an incredibly realistic fern, combine the precision of printing with the texture of embroidery.
Print a high-resolution image of a fern onto printable fabric. Carefully cut it out, leaving a small white border to mimic a sticker or specimen tag.
Use a permanent adhesive or a neat running stitch to apply it to your journal. The result is a crisp, detailed image that you could enhance further by tracing a few veins with a single strand of green thread for a subtle, mixed-media touch. This is an elegant alternative to inspiring pressed flower art projects.
36. Craft Simple Shamrocks with Detached Chain Stitches
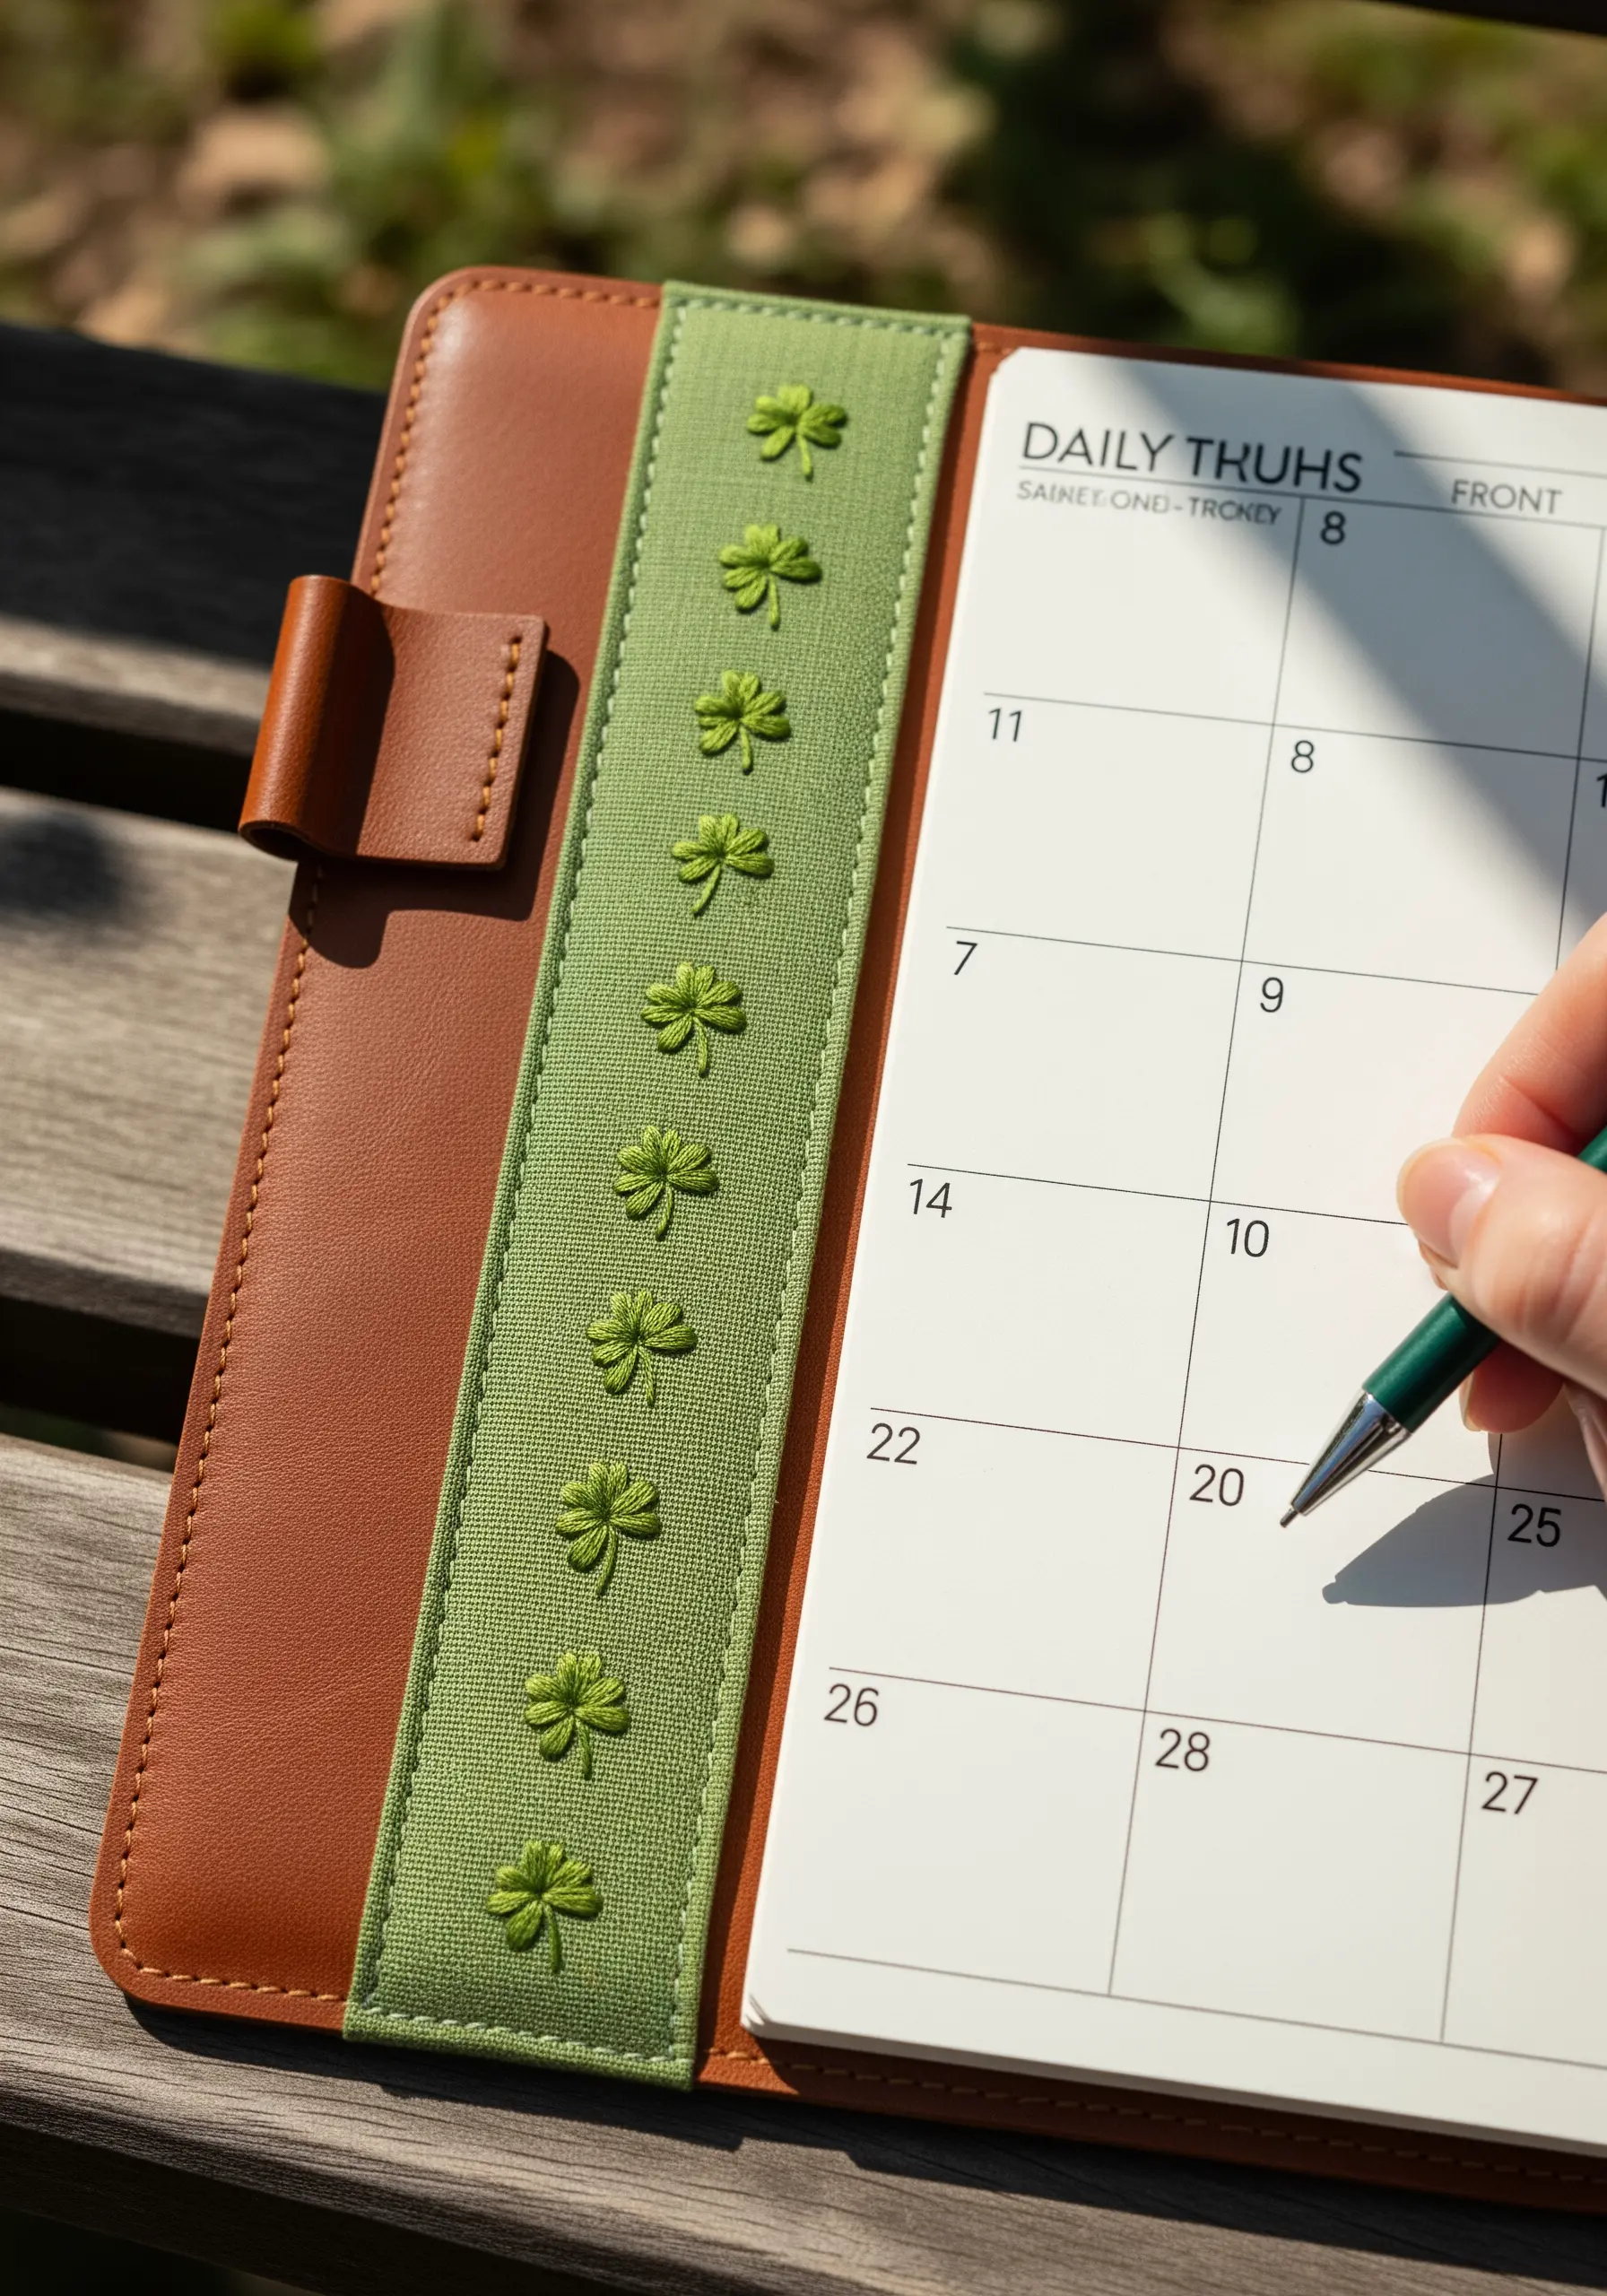
You can create a perfect shamrock or clover with just four strategically placed stitches.
Use the detached chain stitch (or lazy daisy stitch) for each of the three leaves, arranging them in a cluster.
Add a single short, straight stitch for the stem. For a fuller look, use all six strands of embroidery floss. This technique is fast, easy, and creates a beautifully clean and symbolic motif, perfect for a repeating pattern on a planner band.


