

Sometimes, the single thread in your needle feels limiting. You have a vision—rich with texture, depth, and story—but the path from a simple stitch to a finished piece of art feels unclear. How do you move beyond the lines and into a world where your embroidery can truly breathe?
The answer lies in letting go of boundaries. Think of your needle and thread not just as tools for stitching, but as instruments for assembling, connecting, and layering. By blending your embroidery with other materials—fabric scraps, torn paper, natural elements, or even metallic hardware—you unlock a new language of expression.
This is where your work transforms. A simple backstitch becomes the energetic outline of a paper city. Torn strips of linen become the waves of a tactile ocean. Your stitches are no longer just decoration; they are the glue, the structure, and the soul that holds a textured world together. Let’s explore how you can start building these layered stories, right now.
1. Build a Forest Floor with Layered Textiles
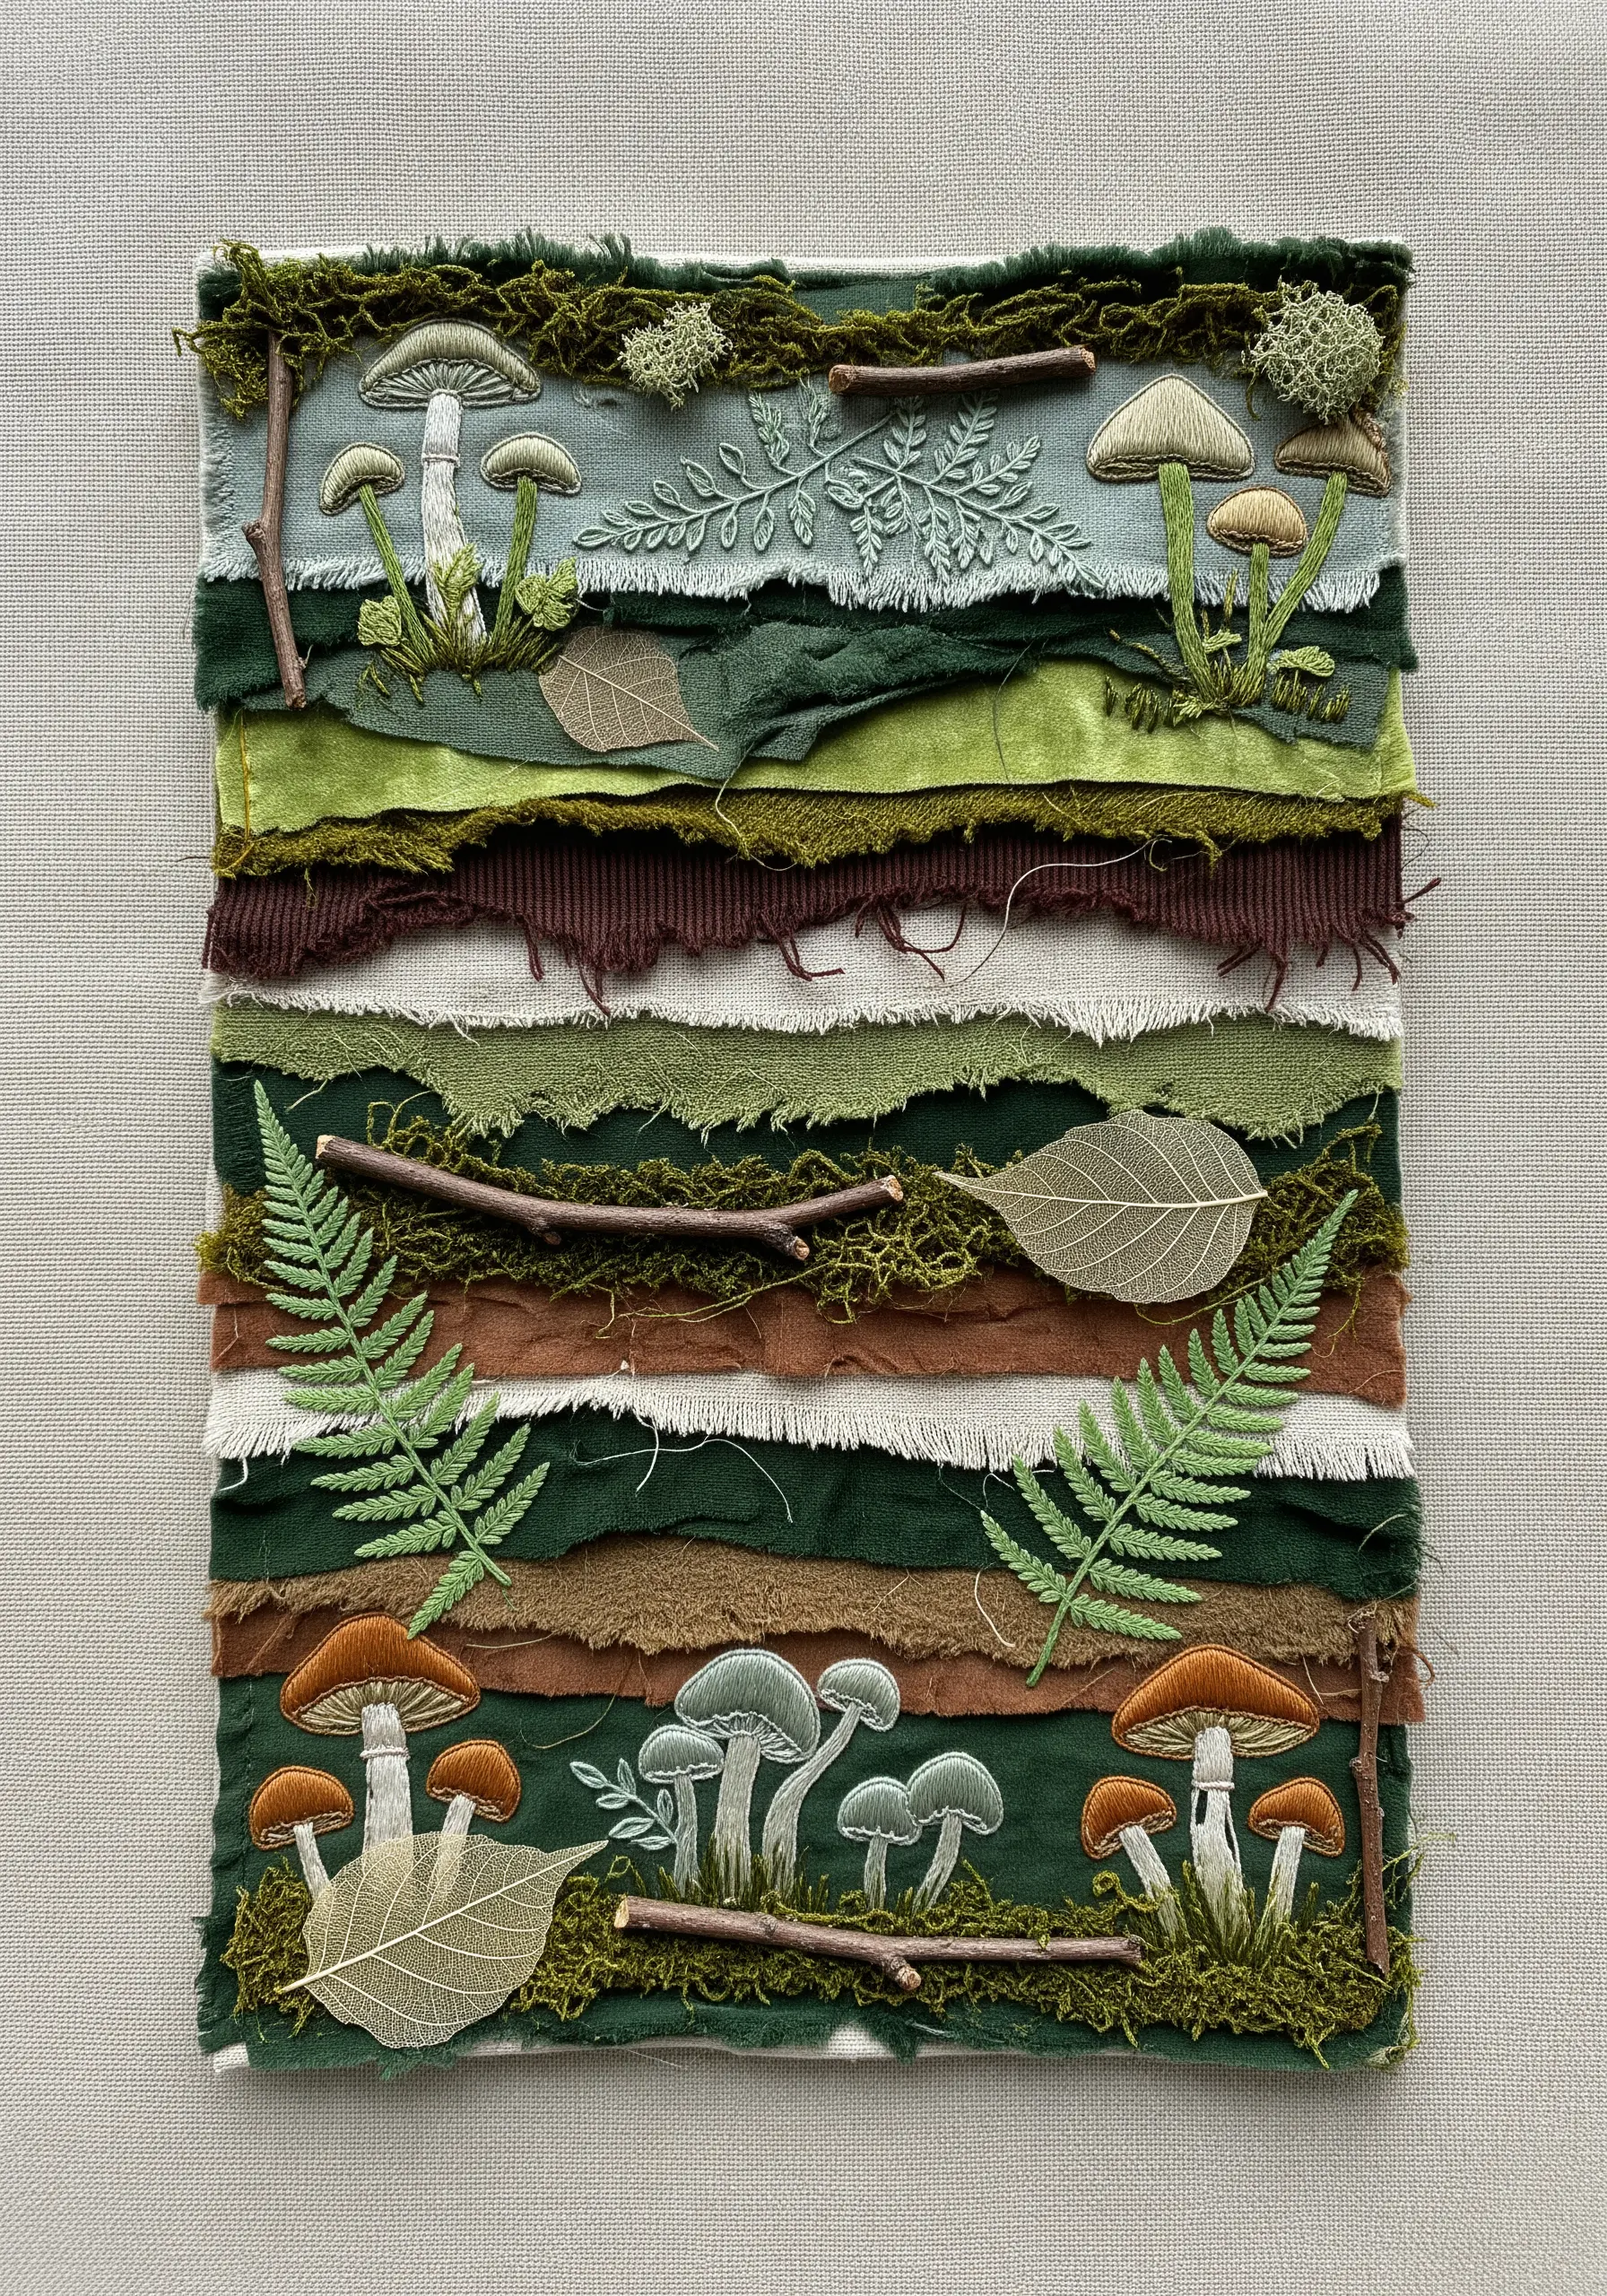
Create an immersive landscape by layering torn strips of fabric like corduroy, velvet, and linen to mimic soil and earth.
Vary the textures to add depth—the rib of corduroy suggests ploughed earth, while crushed velvet can look like damp soil.
Incorporate preserved natural elements like skeleton leaves, twigs, and moss, securing them with tiny, discreet couching stitches.
Embroider your main motifs, like these mushrooms, on a separate piece of fabric, cut them out, and appliqué them onto the collage for a clean, raised effect.
This technique turns your embroidery into a piece of nature-texture wall hangings that feel both tactile and alive.
2. Outline Urban Collages with Energetic Threadwork
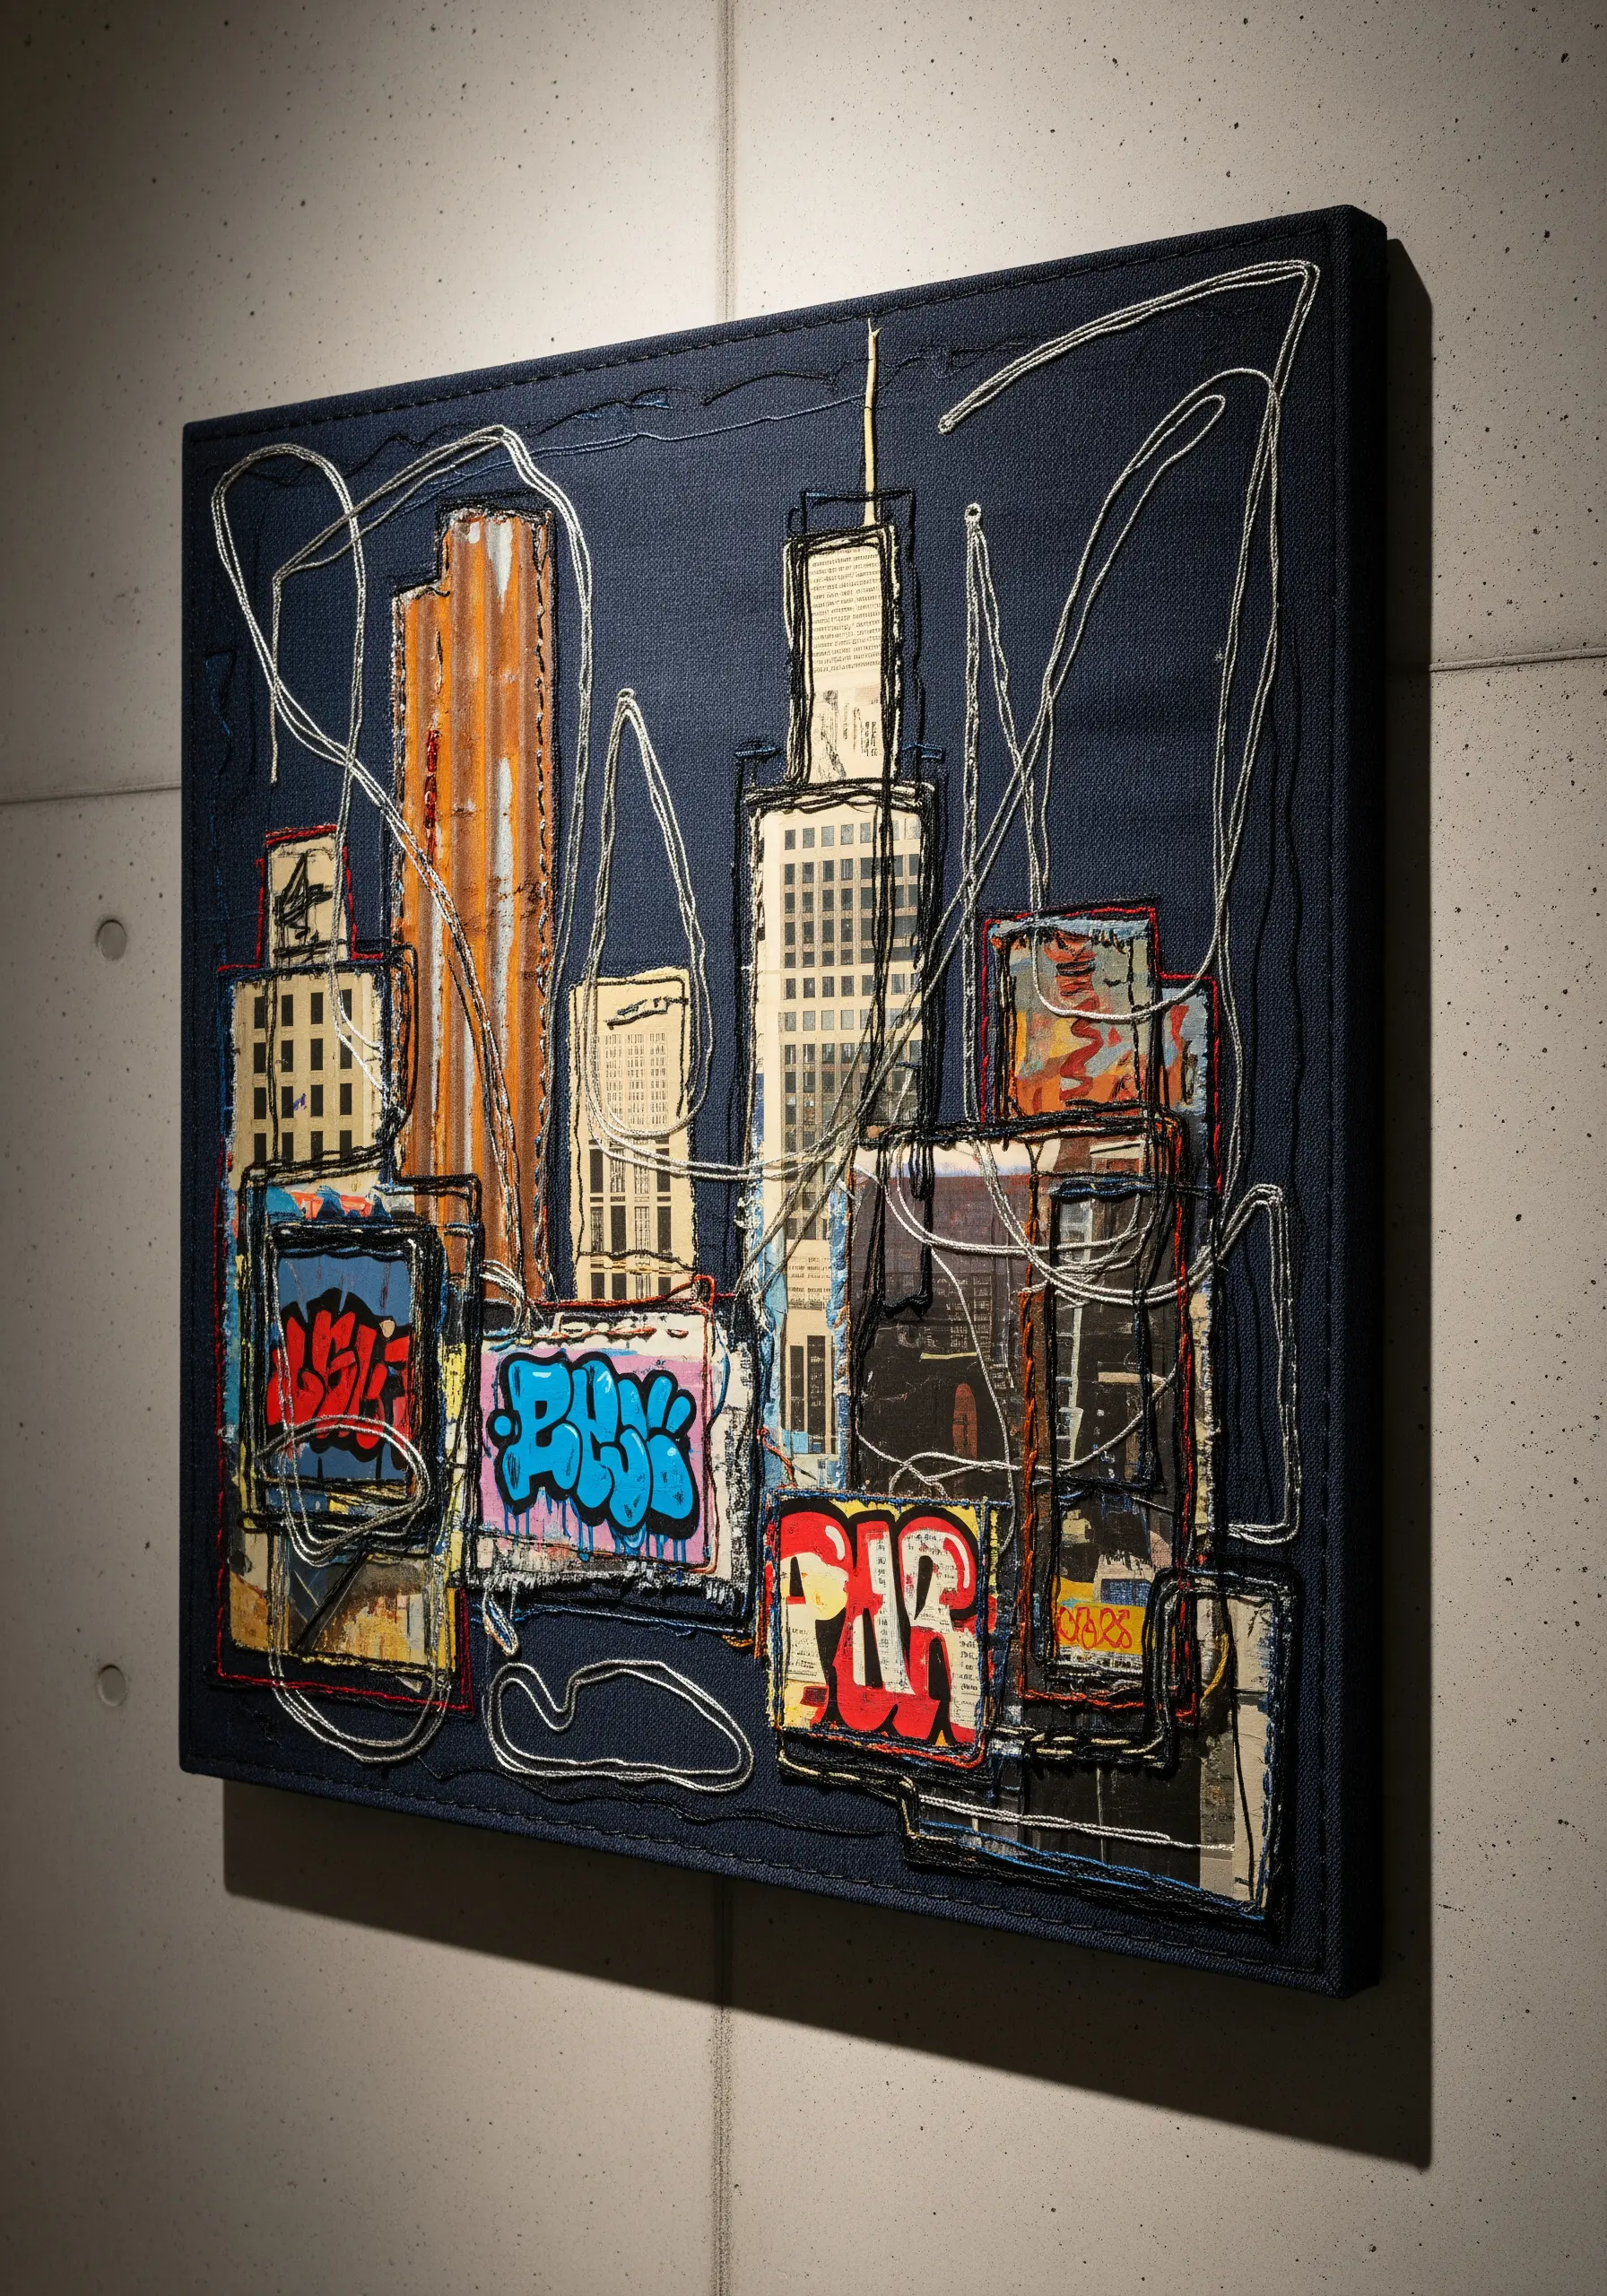
Start with a base of cut paper or fabric scraps to form your cityscape, focusing on bold shapes and architectural silhouettes.
Use a free-form running stitch or backstitch with a high-contrast thread to both secure the collage pieces and add a layer of graphic energy.
Don’t aim for perfect lines; instead, let your thread wander, loop, and cross over itself to capture the chaotic dynamism of a city.
This method works especially well for adding a handmade, gritty texture to DIY collage art ideas that would otherwise feel flat.
3. Weave a Celestial Scene with Iridescent Layers
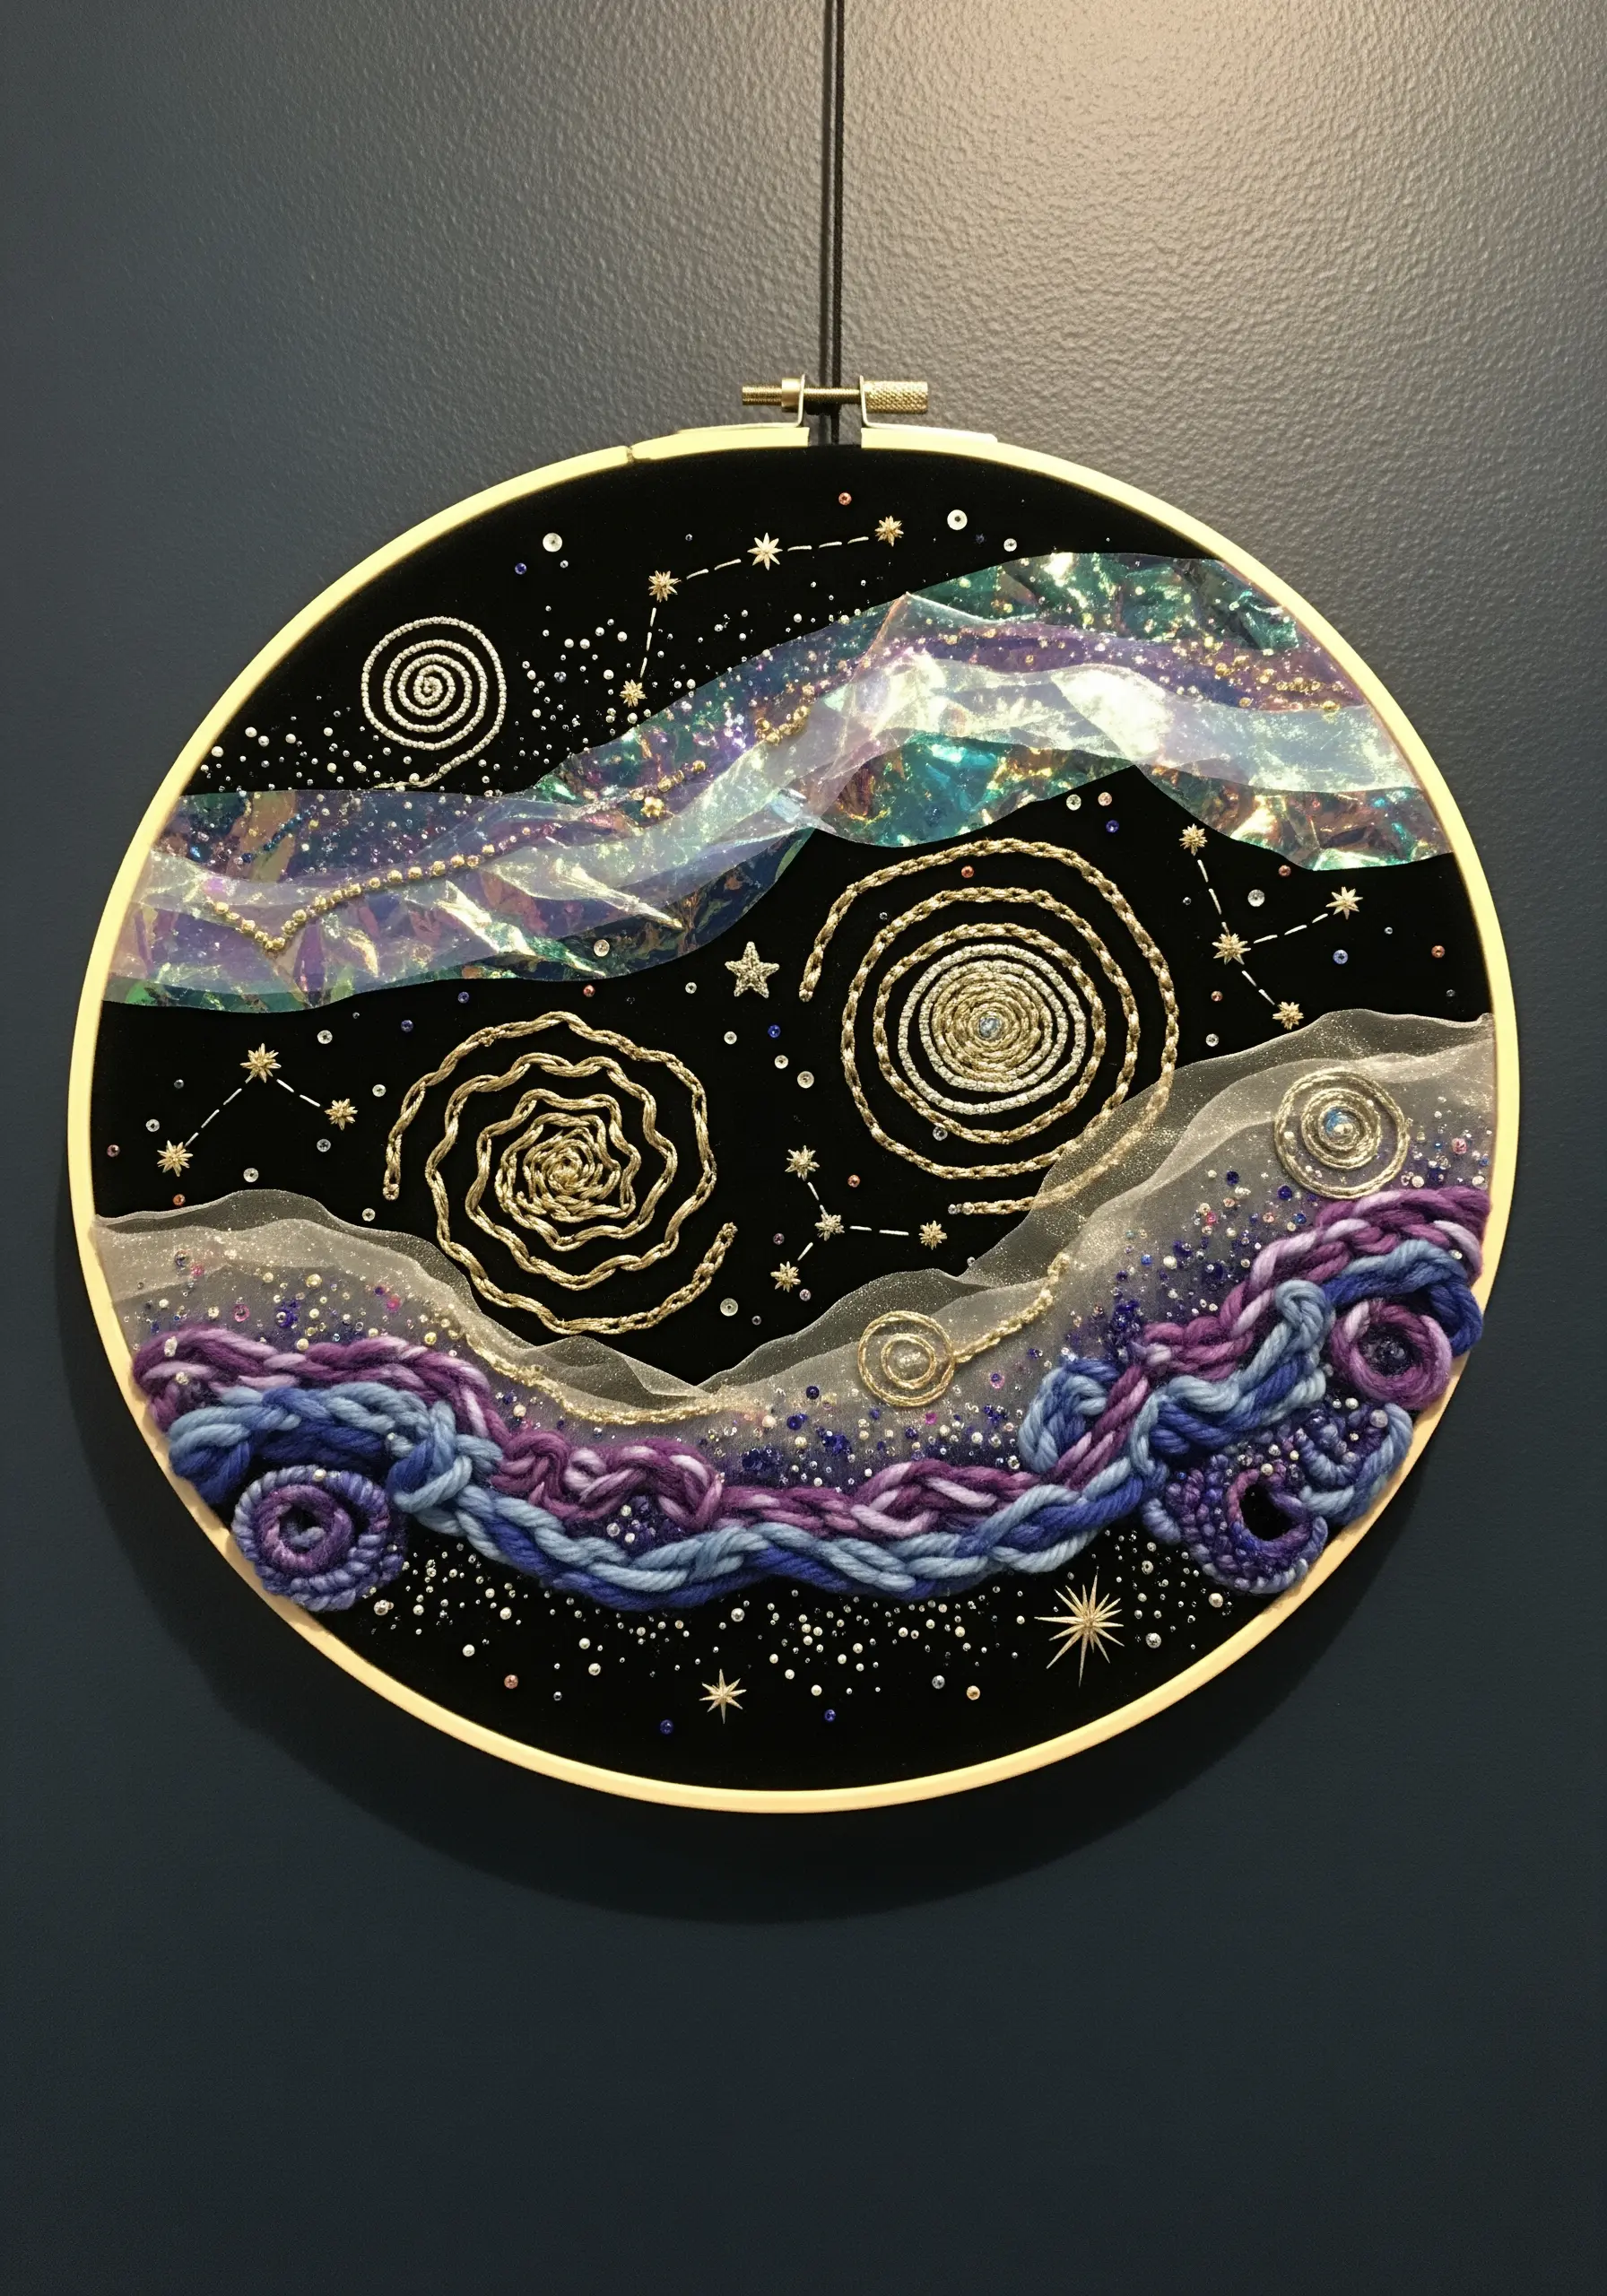
To create a sense of cosmic depth, work on dark fabric like black velvet, which absorbs light and makes other elements pop.
Layer sheer, iridescent materials like cellophane or organza and secure them with sparse, strategically placed stitches to mimic nebulae or galaxies.
For sharp, metallic details, couch thick gold cord into spirals and use French knots or seed beads for scattered stars.
Combine this with chunky, soft-plied yarn to introduce a soft, cloud-like texture that contrasts beautifully with the sharp sparkle of the beads and metallic threads.
4. Sculpt a Coral Reef with Dimensional Stitches
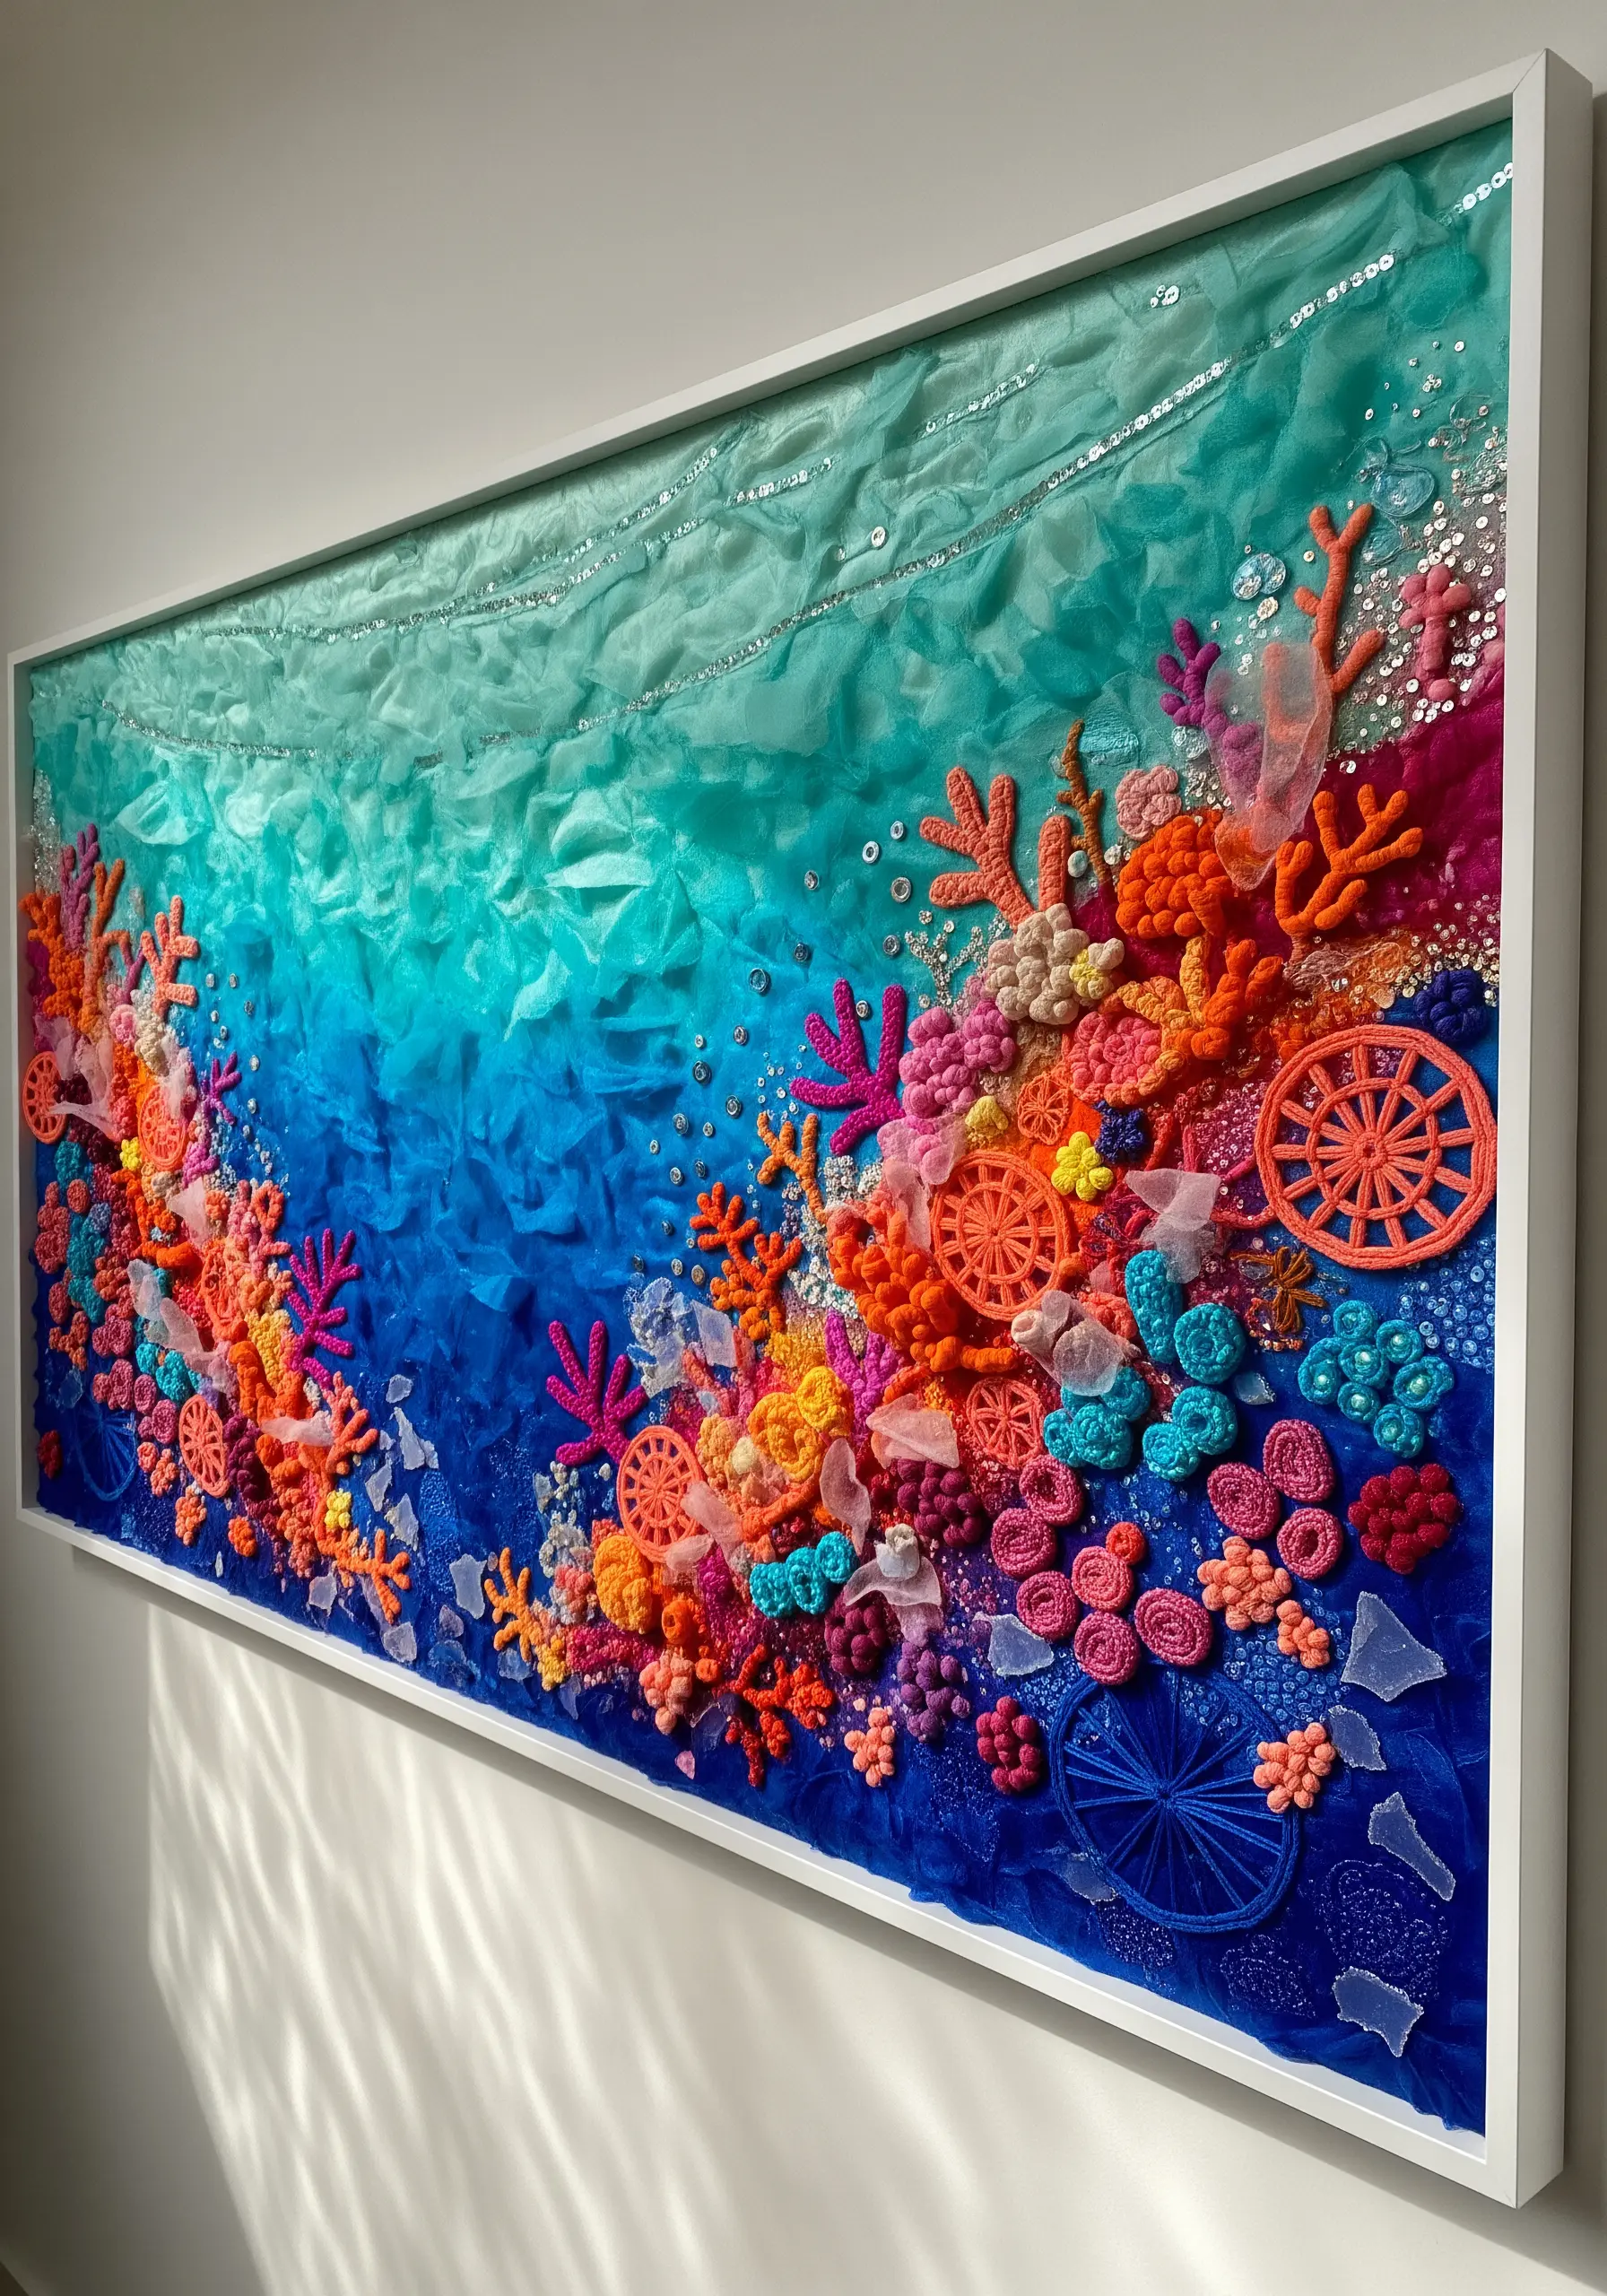
Build your vibrant underwater world by first creating a background of layered and ruched tulle in ocean tones.
Incorporate crocheted or knitted forms for complex coral structures; their inherent texture adds dimension instantly.
Use bullion knots, French knots, and woven wheel stitches in bright, high-contrast colors to create the smaller, intricate coral textures.
Scatter sequins and beads throughout to mimic the way light refracts underwater, adding a final layer of sparkle and movement to your large-scale fiber art installations.
5. Unify Vintage Ephemera with Delicate Stitches

Arrange your composition of vintage papers, stamps, and lace on a neutral linen background before stitching.
Use a single, thin thread to connect disparate elements, creating a visual narrative that flows across the piece.
Stitch directly through the paper with a sharp, fine needle to minimize tearing, using a simple backstitch for clean lines.
Allow some threads to hang loose or trail off the edge; this adds to the delicate, found-object aesthetic and softens the overall look.
6. Construct Geometric Compositions with Heavy Cord
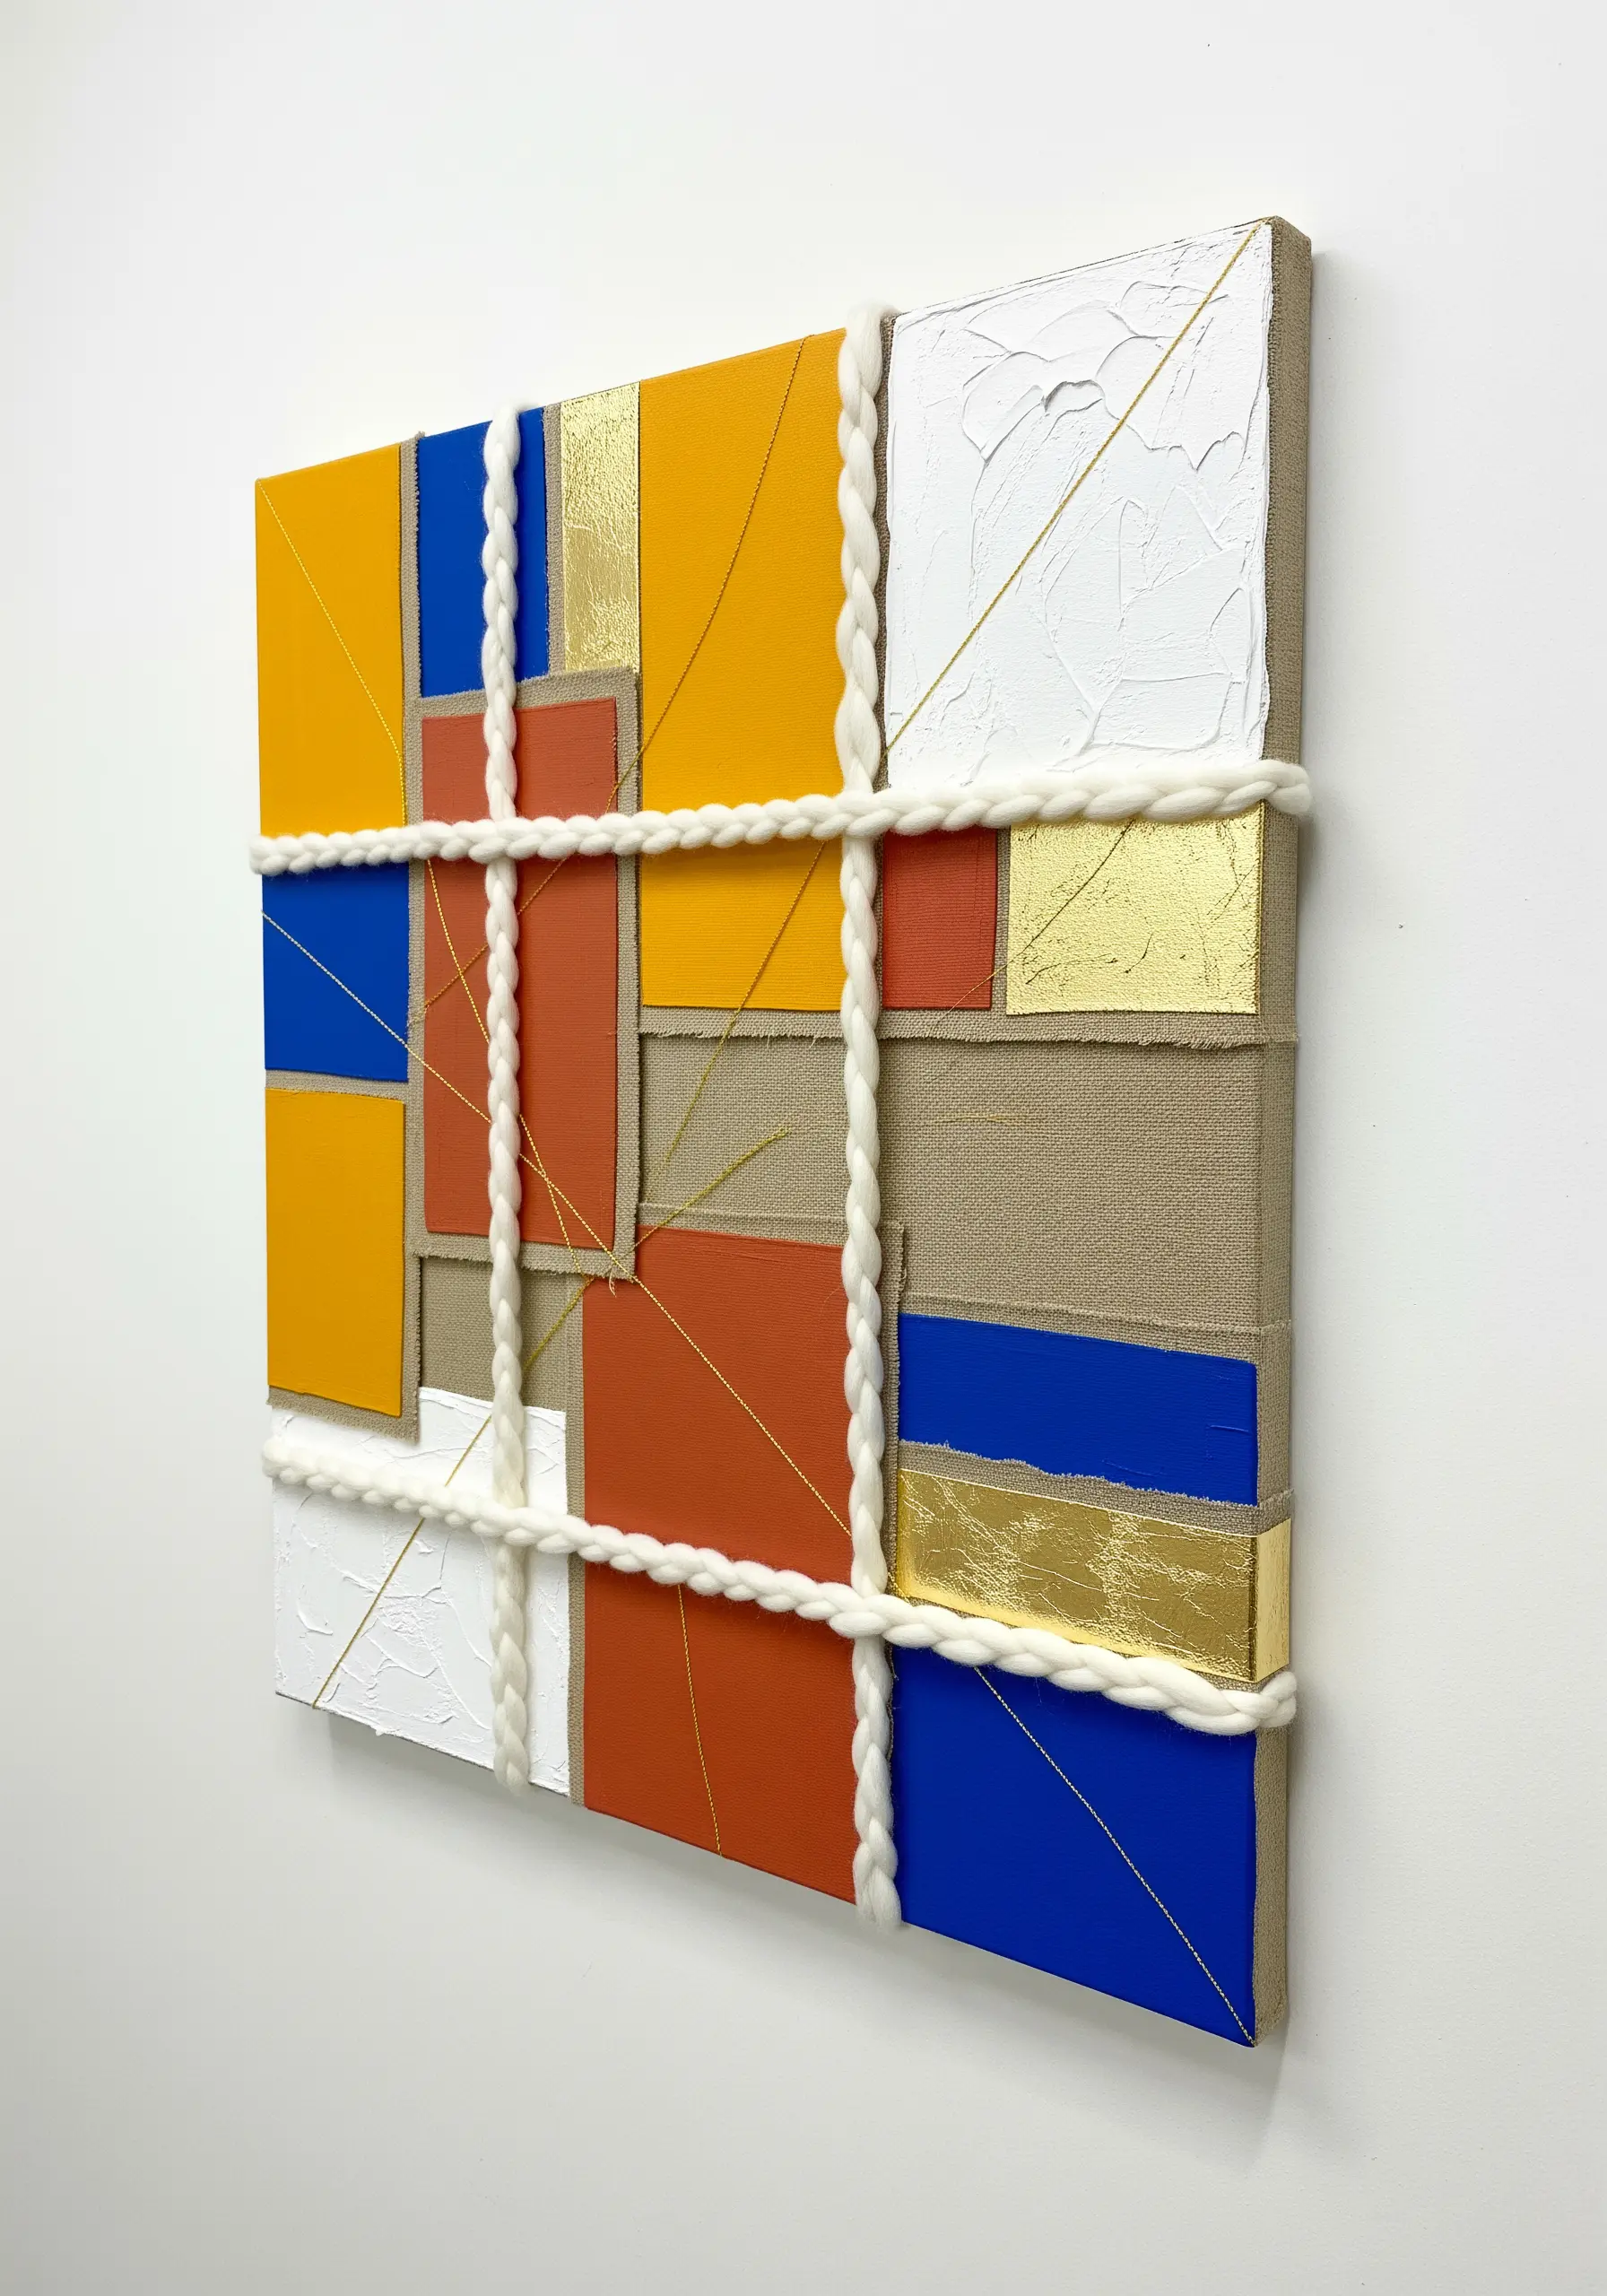
Begin by painting blocks of color onto a sturdy canvas, creating a hard-edged, abstract background.
Incorporate metallic elements like gold leaf to add a touch of luxury and break up the matte surfaces of the paint.
Instead of fine embroidery floss, use thick, sculptural fibers like wool roving or cotton cord to create a bold, structural grid over the top.
Secure the heavy cord by couching it with a thinner, matching thread, which allows you to create clean lines and sharp angles that define the composition.
7. Frame Pressed Botanicals with Sheer Fabric Overlays
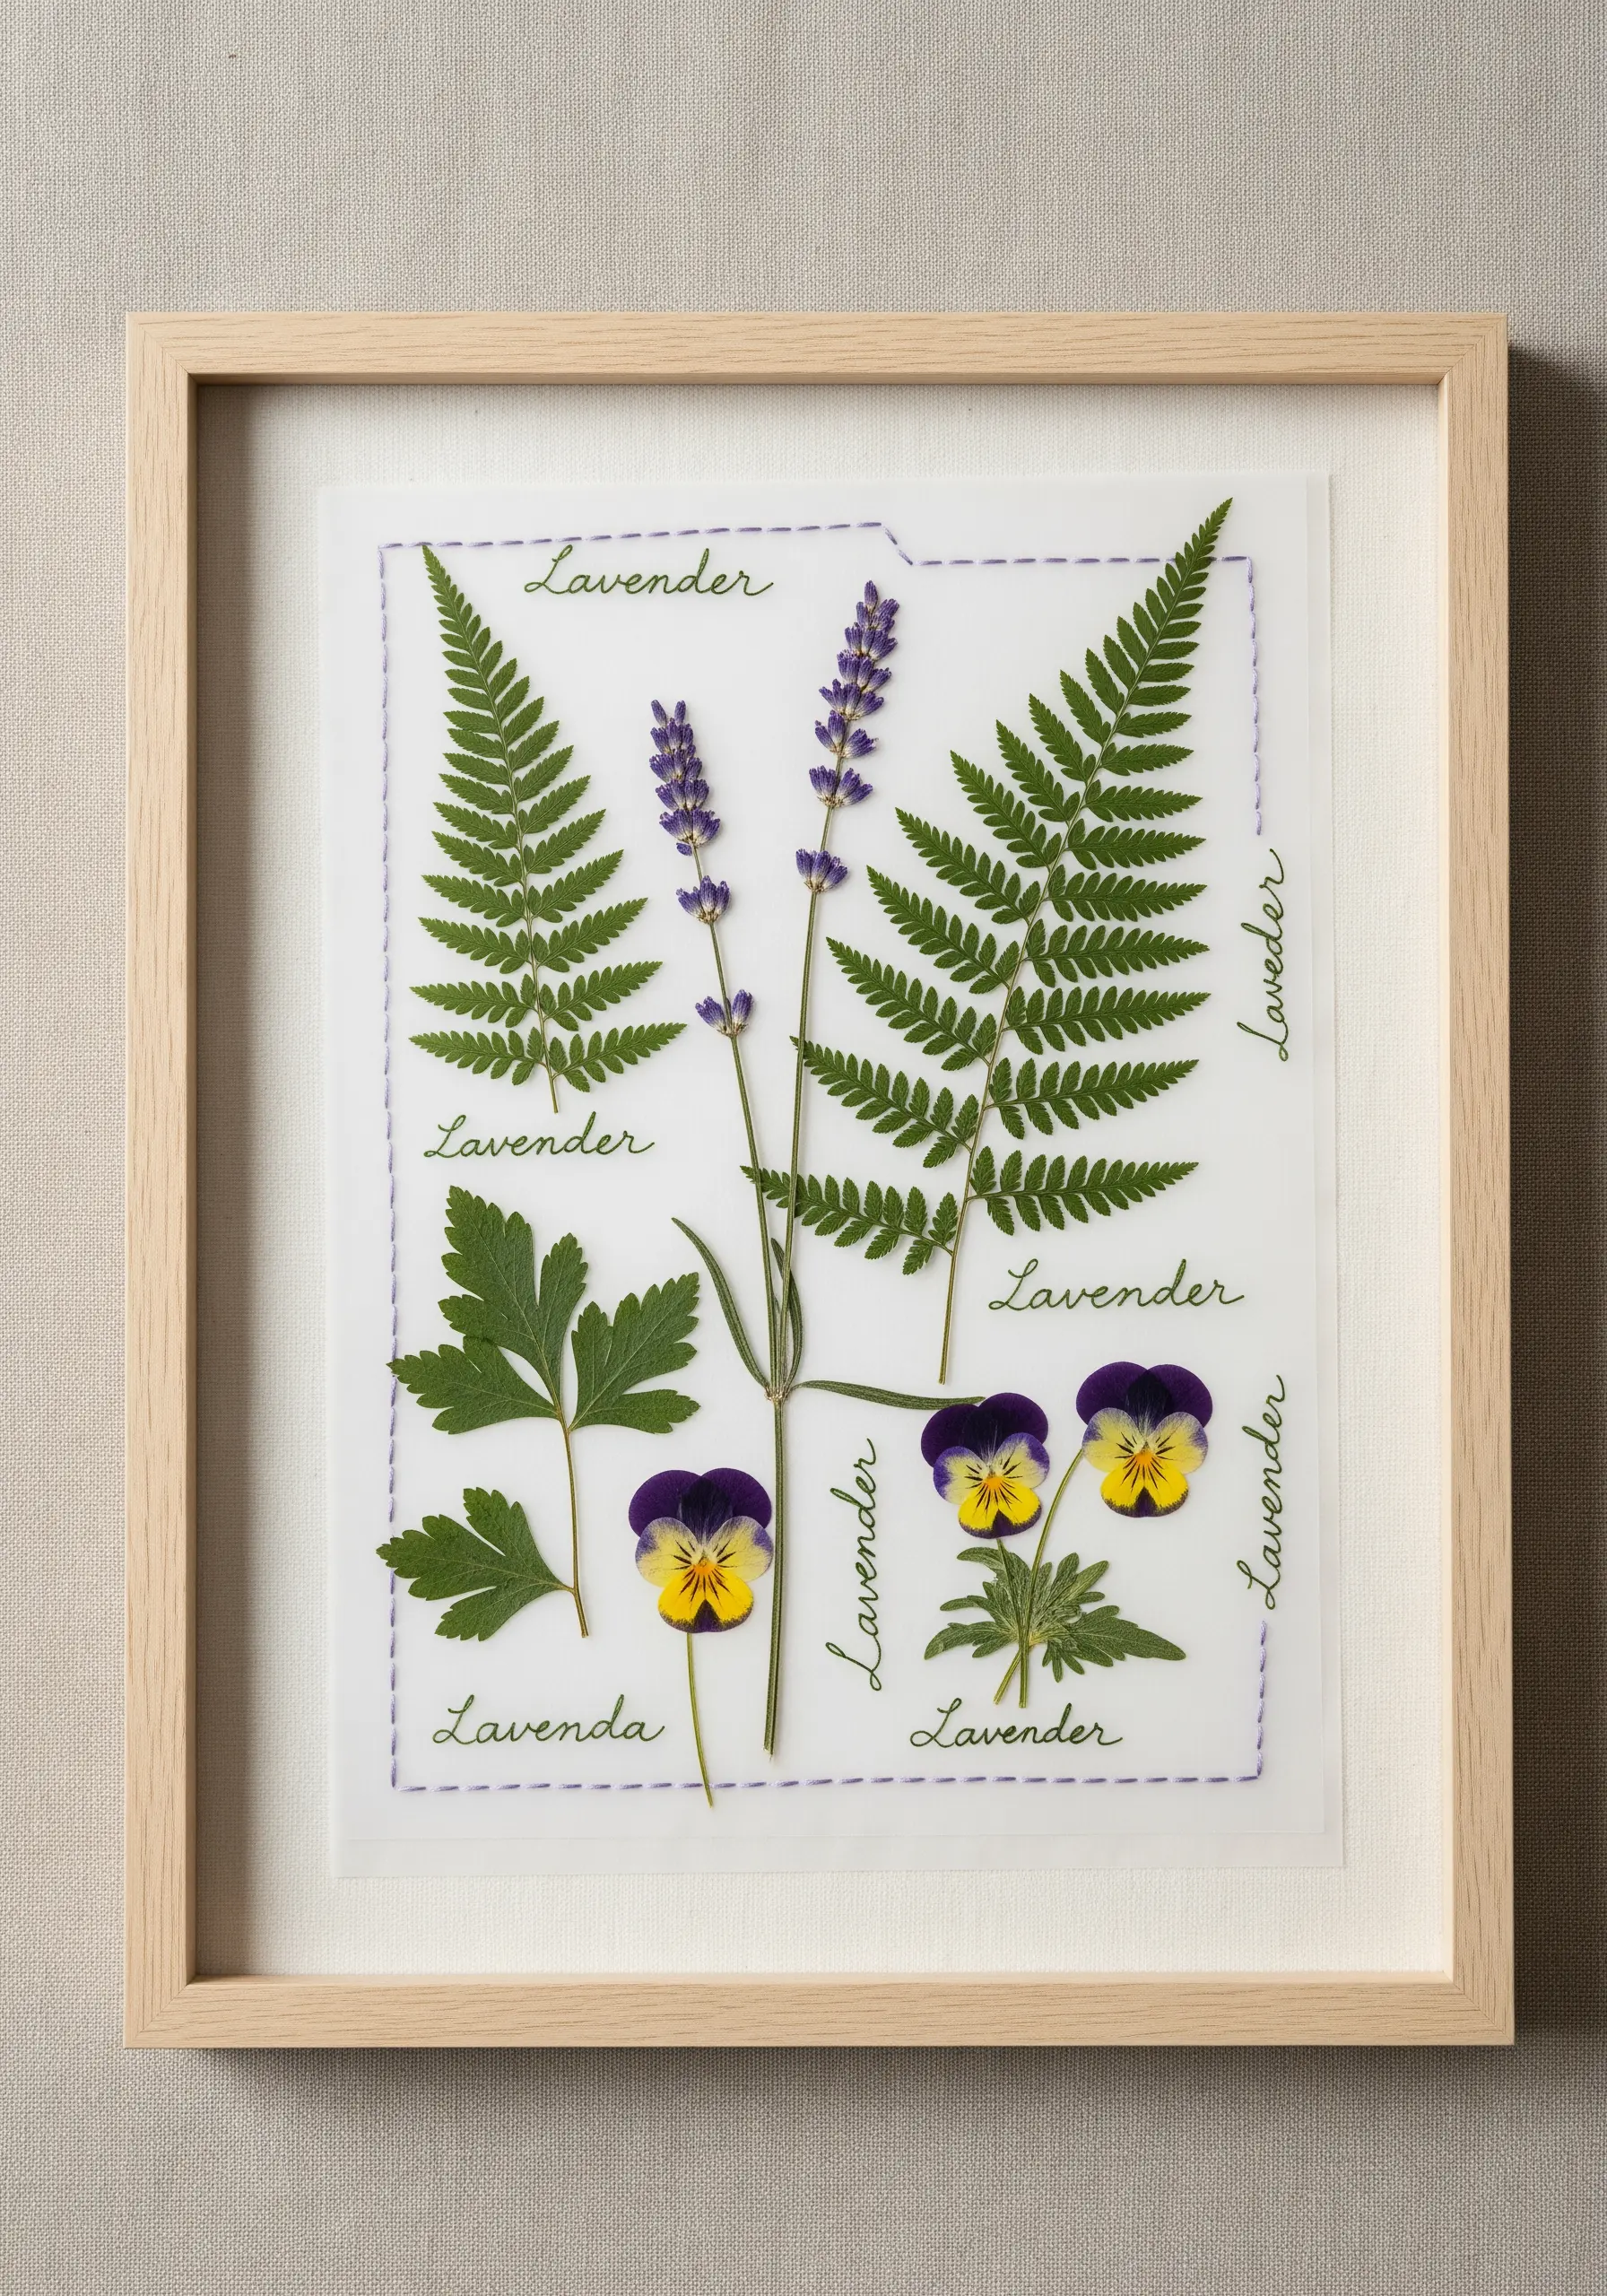
Carefully arrange your pressed flowers and leaves on a piece of high-quality watercolor paper.
Place a layer of sheer fabric, like organza or tulle, over the botanicals. This protects them while creating a soft, ethereal filter.
Use a simple running stitch or backstitch on the sheer layer to create a delicate border or add hand-lettered text.
The embroidery doesn’t touch the plants themselves but interacts with them visually, transforming your piece into elegant, pressed flower embroidery ideas that feel like scientific illustrations.
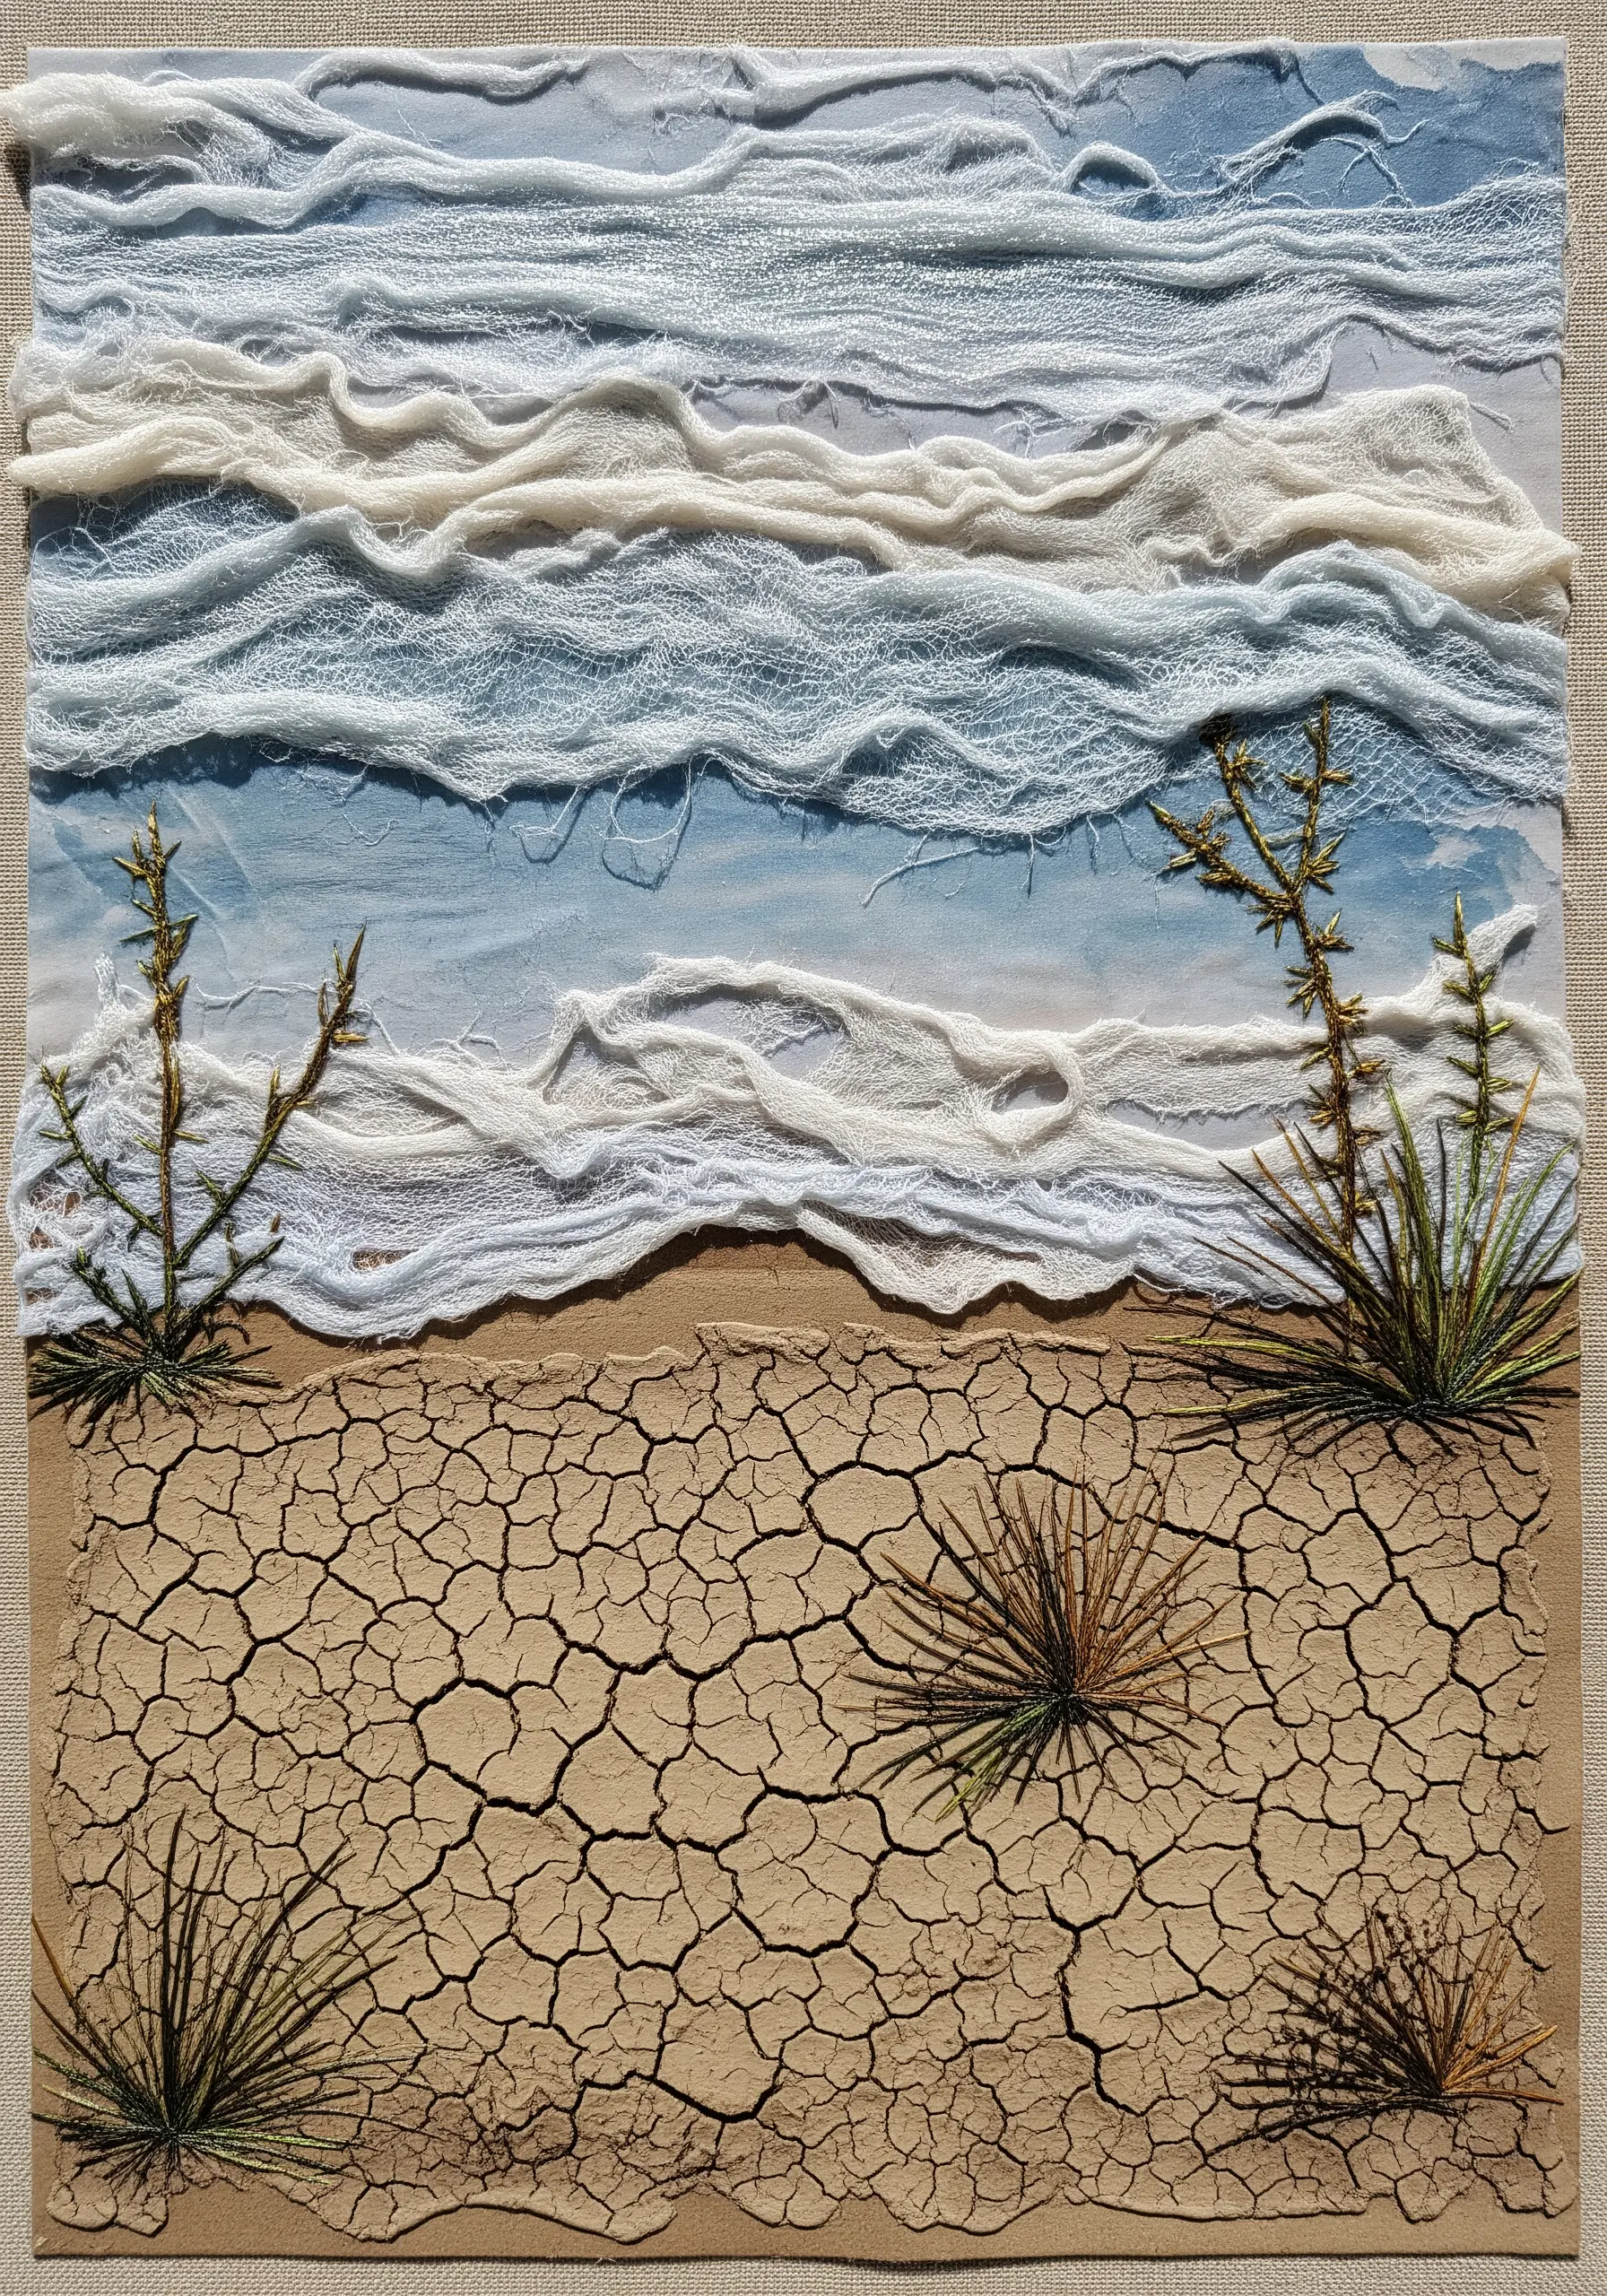
8. Capture the Coastline with Raw, Frayed Edges
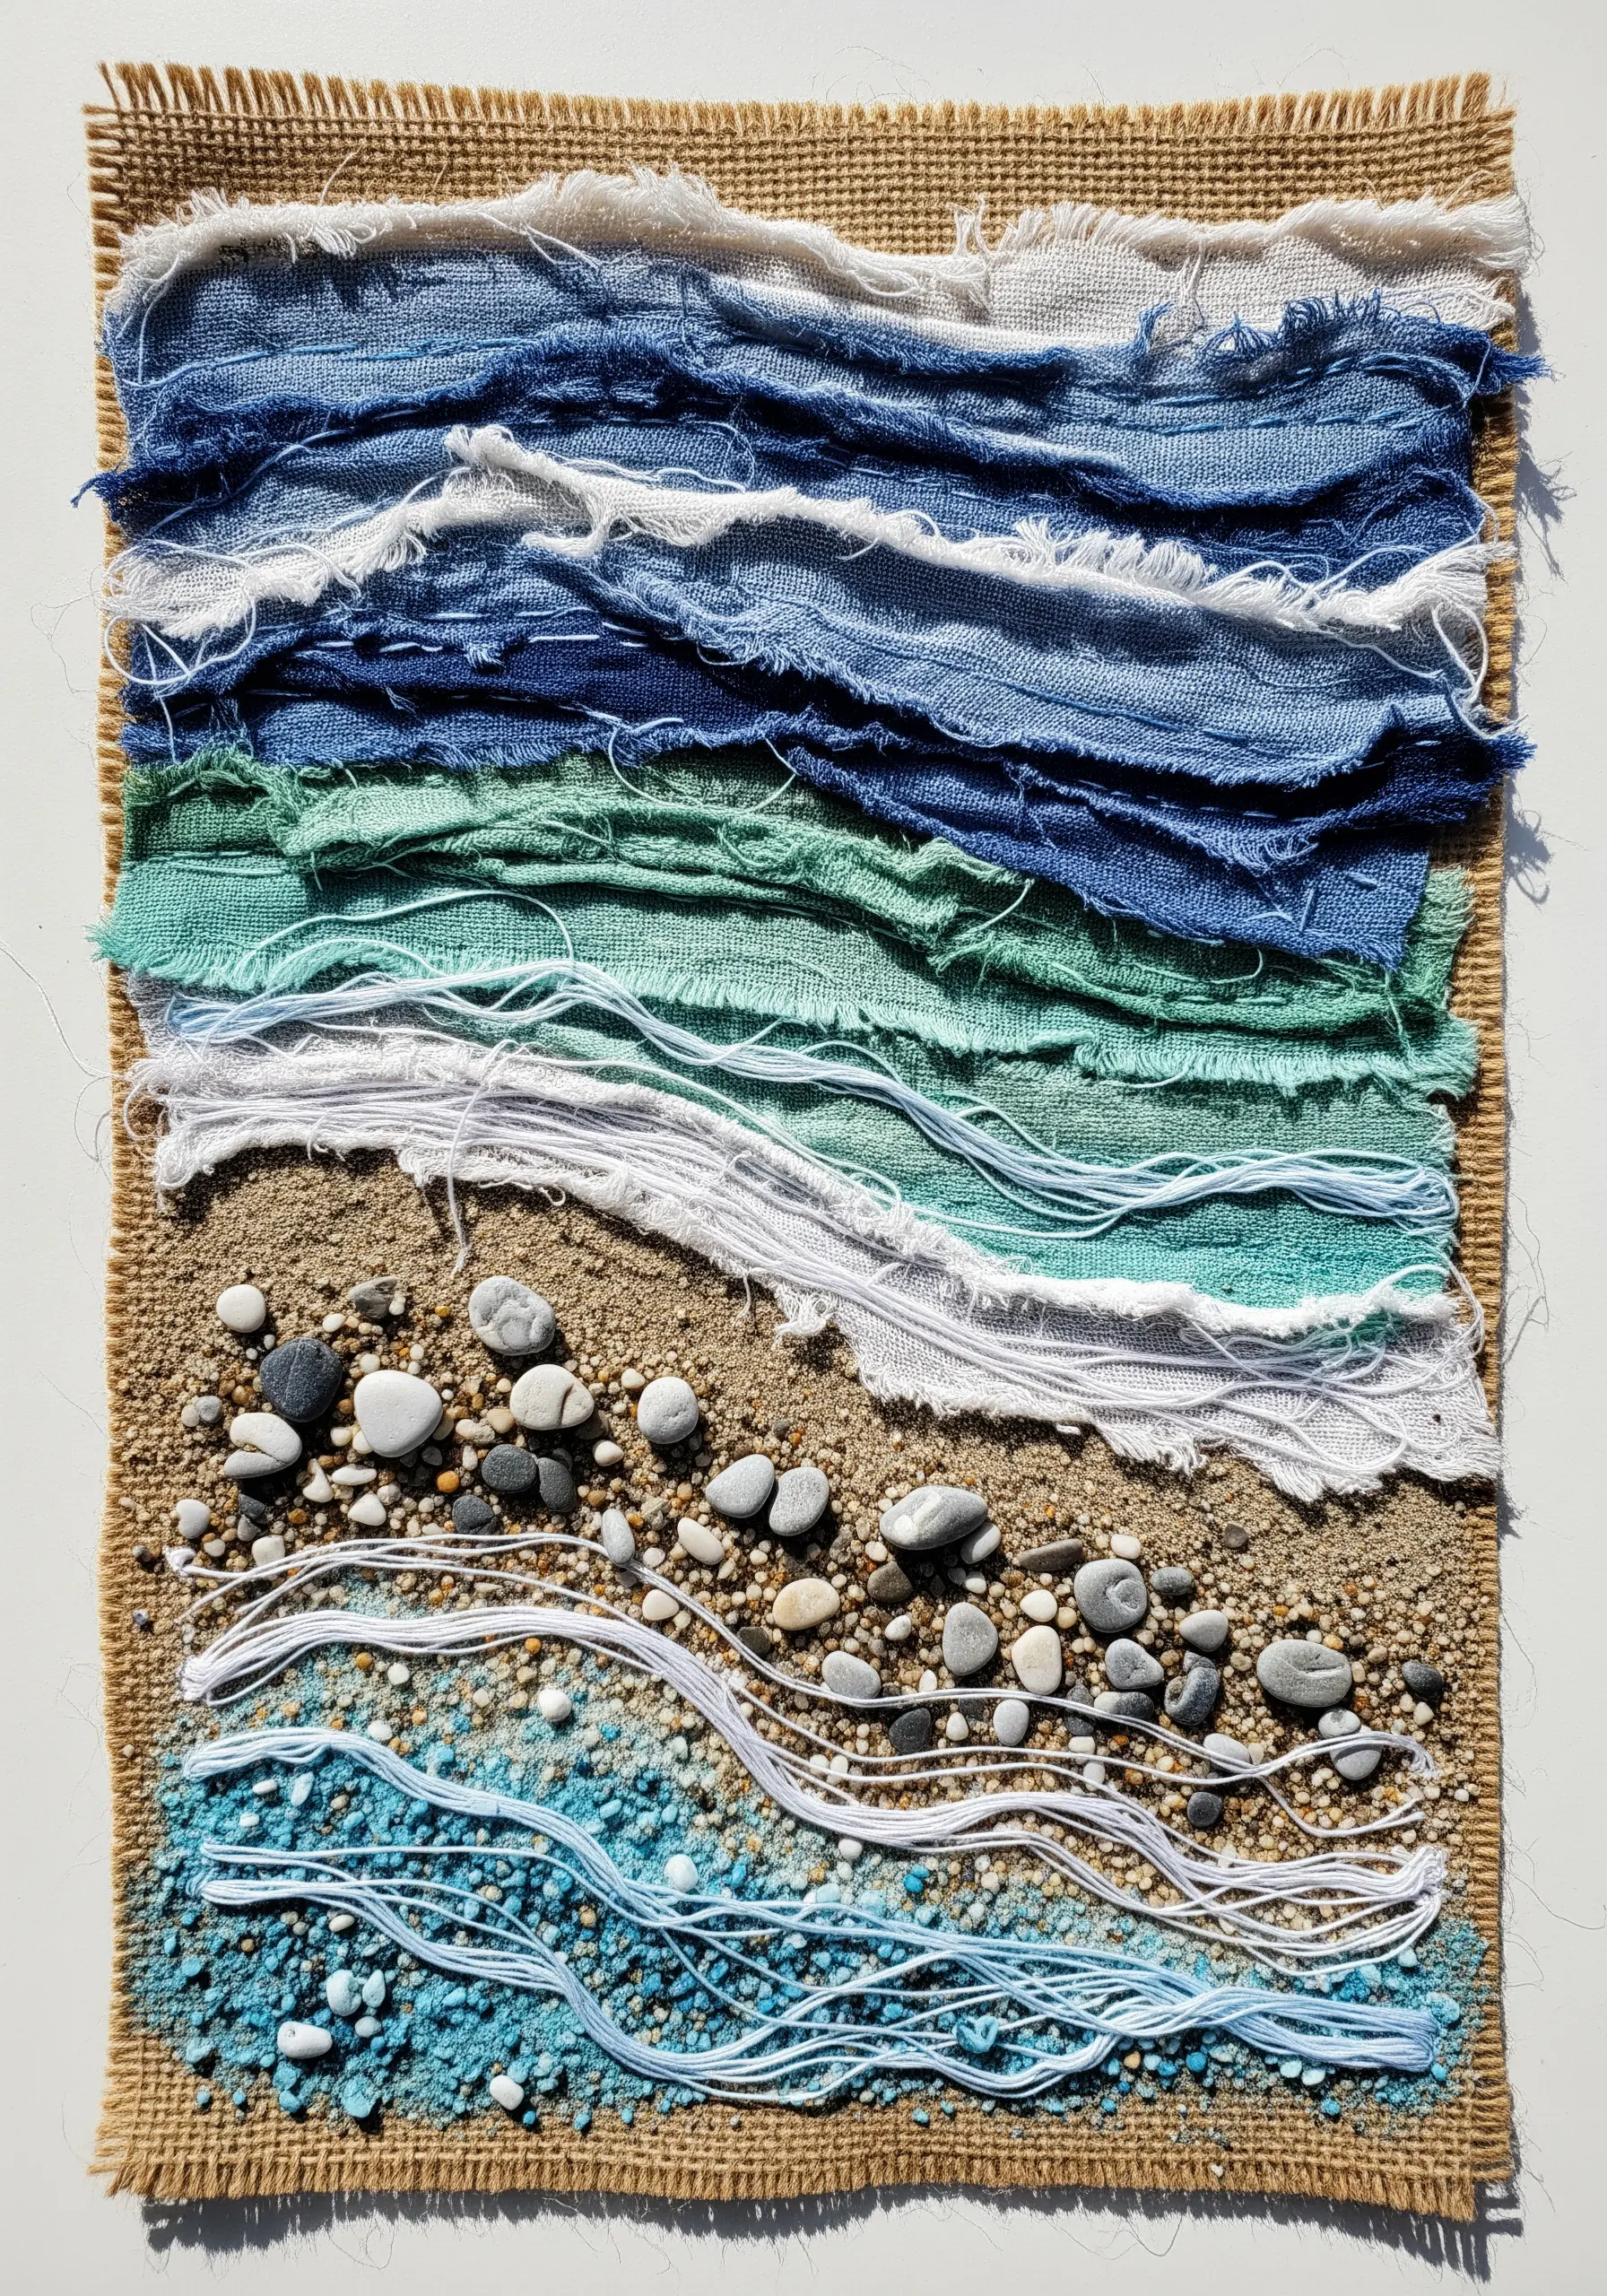
Use coarse burlap as your base to immediately establish a sandy, natural feel.
Create waves and seafoam by layering torn strips of linen and cotton in shades of blue and white, leaving the frayed edges exposed for texture.
Adhere real sand and small pebbles to the lower portion using a strong fabric glue, then stitch over and around them to integrate them into the scene.
Use loose, unwound threads to represent the fine lines of seafoam washing over the shore, letting them curl and tangle naturally.
9. Achieve Feathered Dimension with Cut-Fabric Appliqué
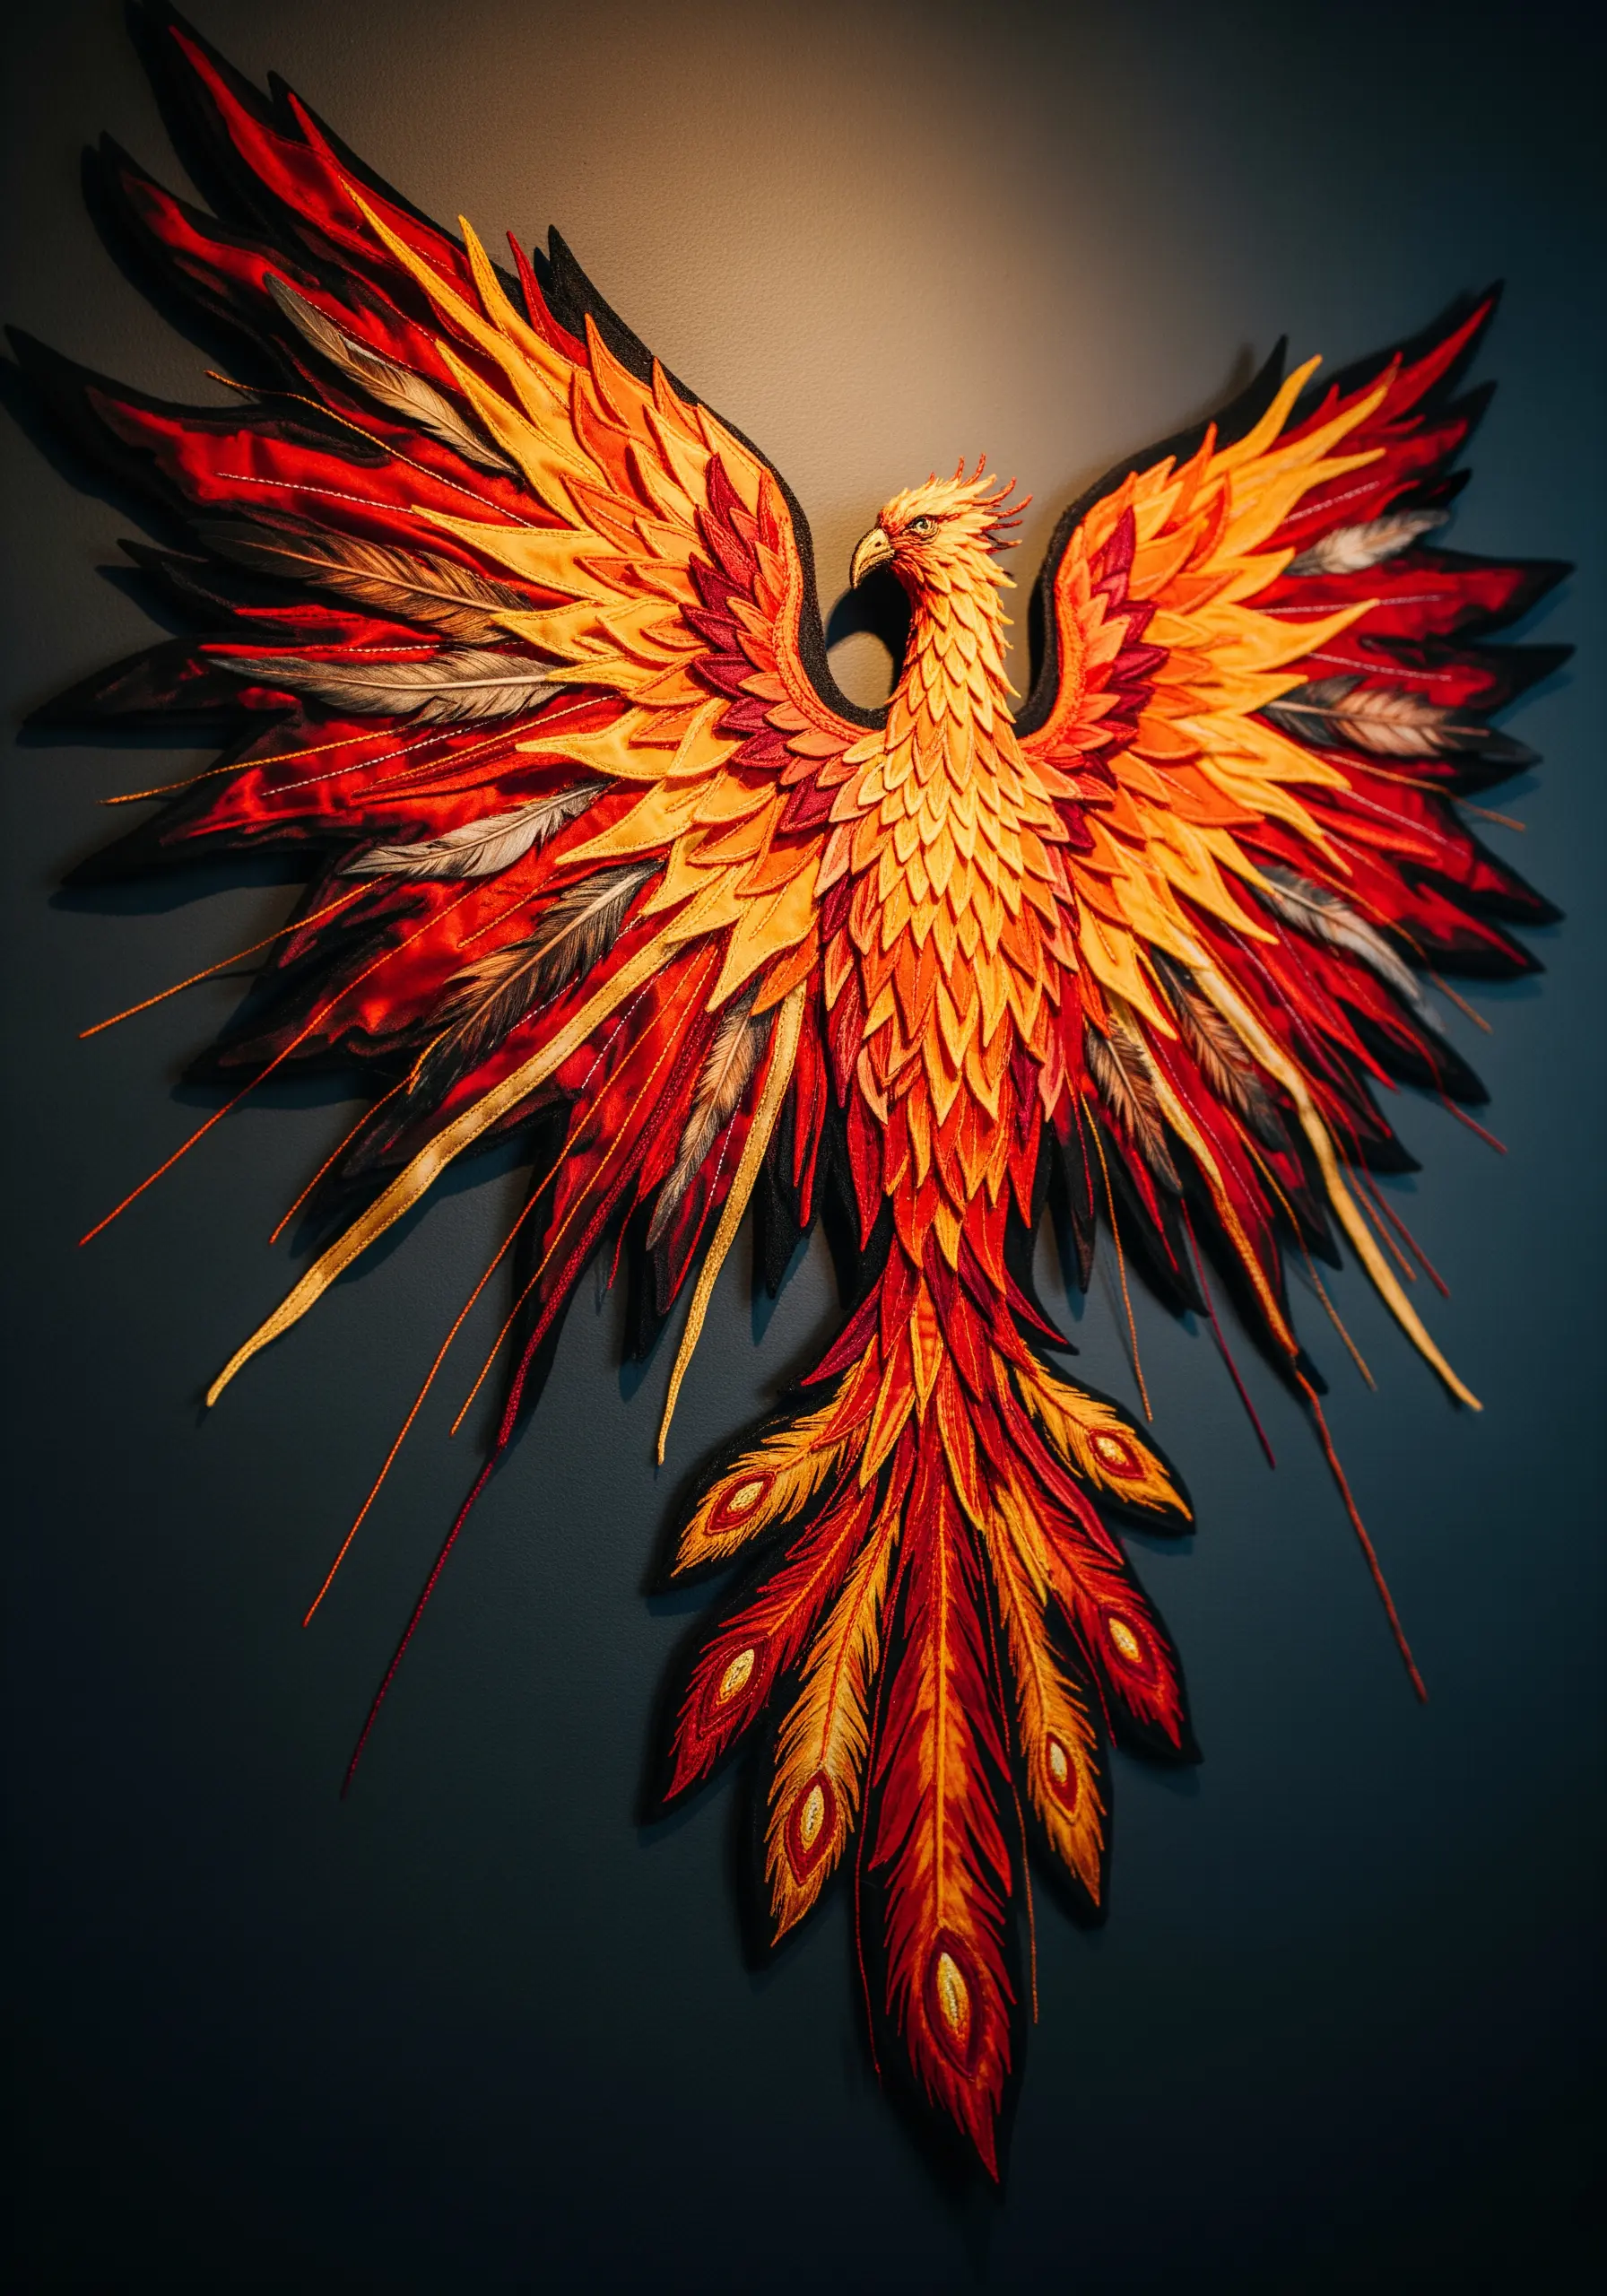
To create a dynamic, layered effect like this phoenix, cut individual feather shapes from different fabrics in a cohesive color palette.
Arrange the fabric pieces, layering them to build up form and dimension, and secure them with fabric glue or fusible web.
Use machine or hand embroidery to add fine details like feather barbs and outlines, which also permanently secures the appliqué pieces.
This technique allows you to create large, intricate, and almost sculptural creative embroidery projects with incredible depth.
10. Assemble Mechanical Art with Wire and Found Objects
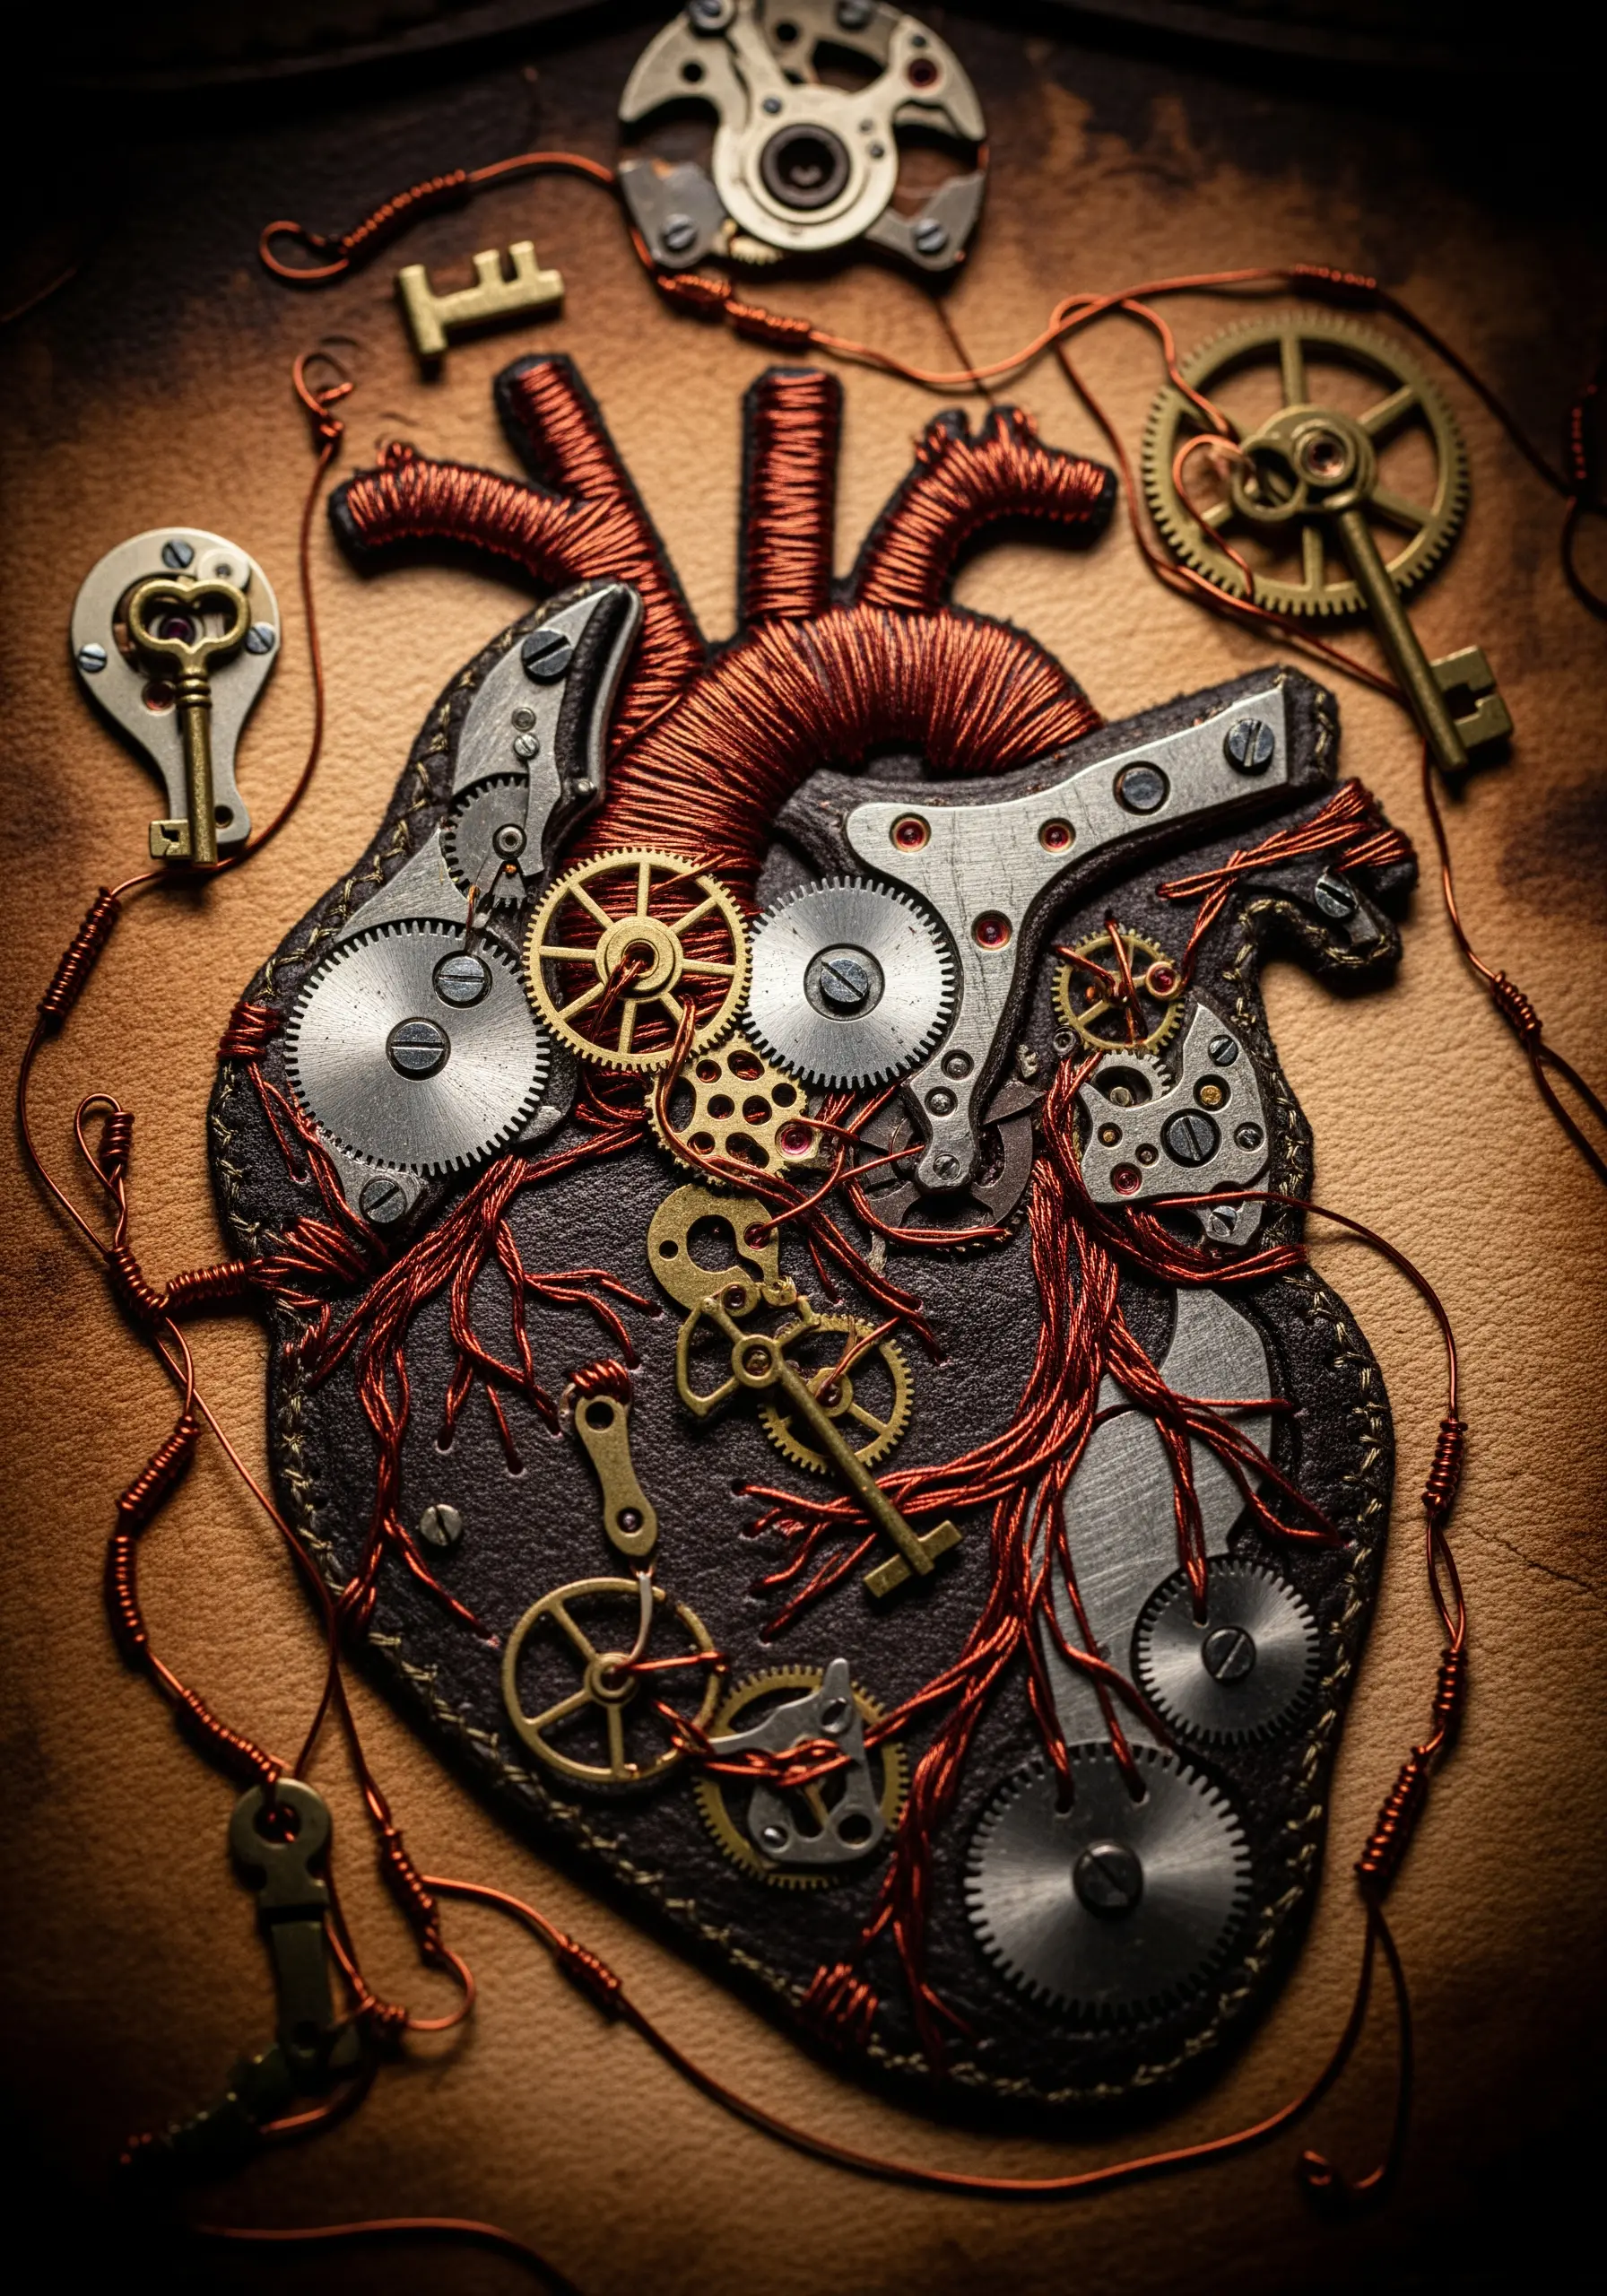
For a steampunk aesthetic, use a sturdy base like leather or dense felt that can support the weight of metal components.
Arrange found objects like watch gears, cogs, and old keys to build your central motif.
Instead of thread, use fine-gauge copper wire to secure the pieces, wrapping it around elements and stitching it through the base material.
The wire acts as both a structural component and a design element, mimicking arteries or wires and unifying the entire piece.
11. Paint an Autumnal Landscape with Felted Wool
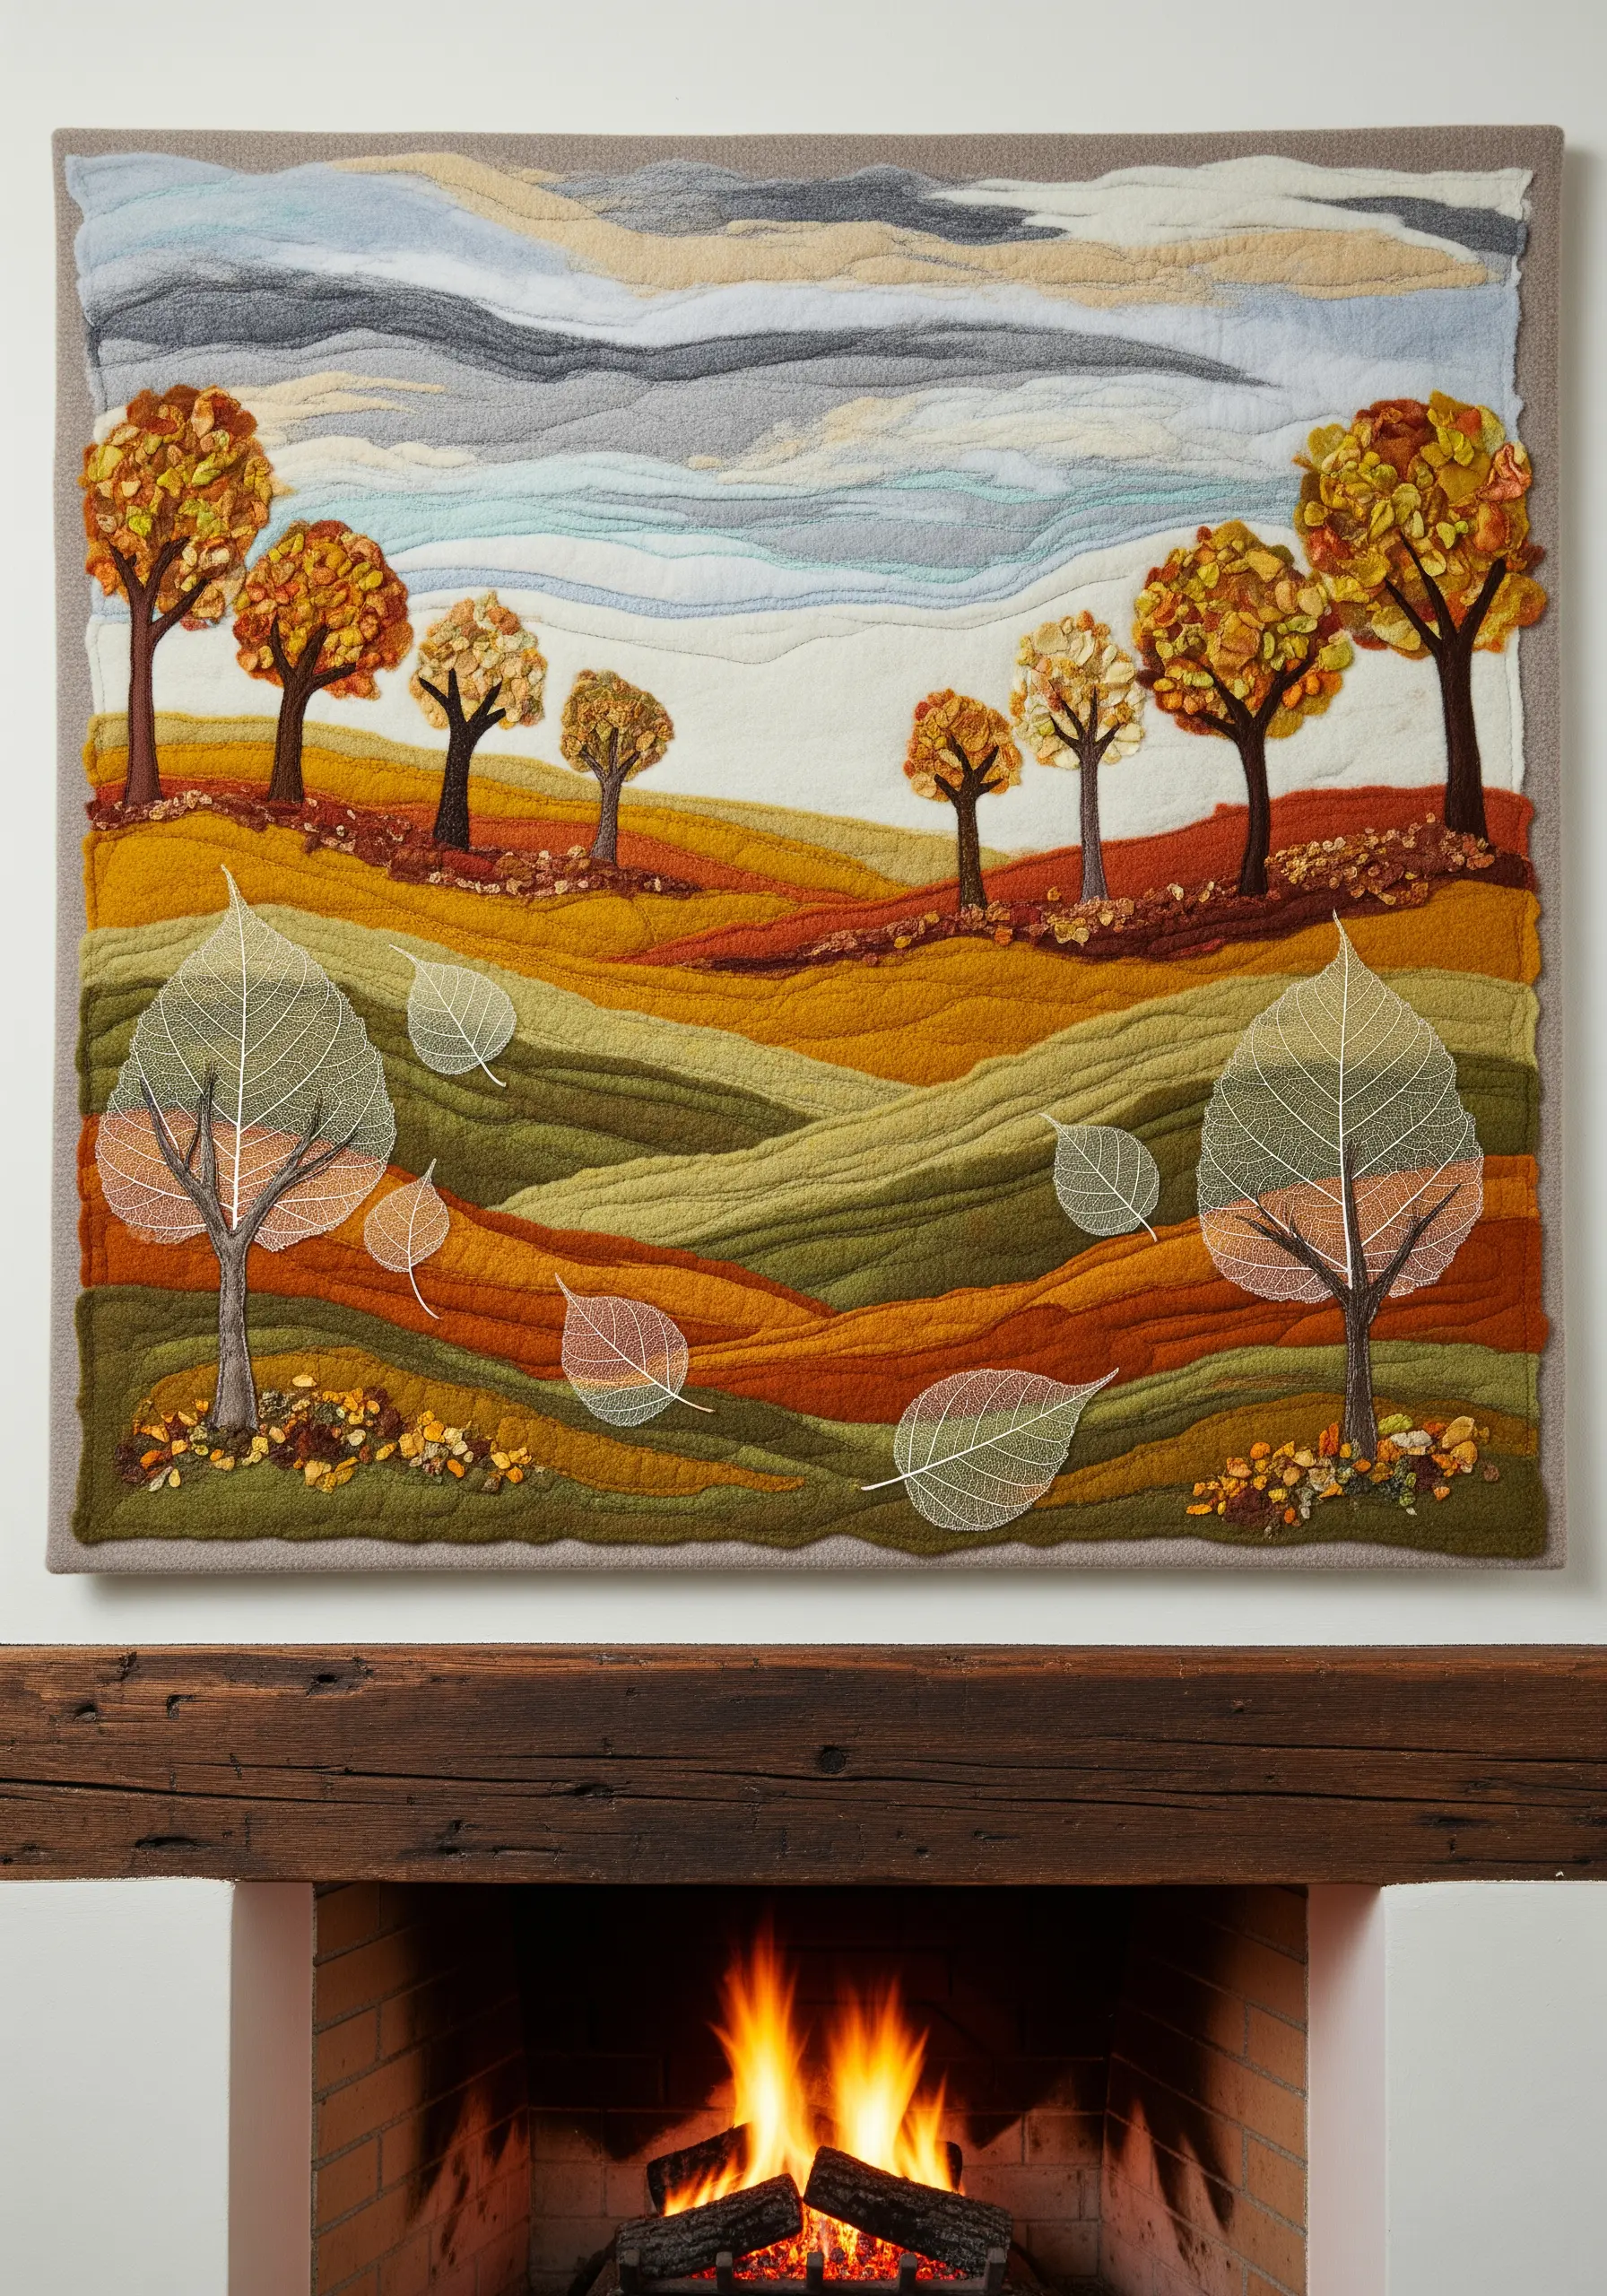
Start by needle-felting layers of wool roving onto a felt backing to create a soft, painterly background of rolling hills and sky.
This process blends colors more gently than thread, forming a perfect base for more detailed work.
Add embroidered details like tree trunks and branches using backstitch or stem stitch to introduce sharp lines over the soft background.
Finally, incorporate delicate elements like preserved skeleton leaves, attaching them with a few hidden stitches to create a truly multilayered textile wall art effect.
12. Create Pop-Art Portraits with Comic Book Collage
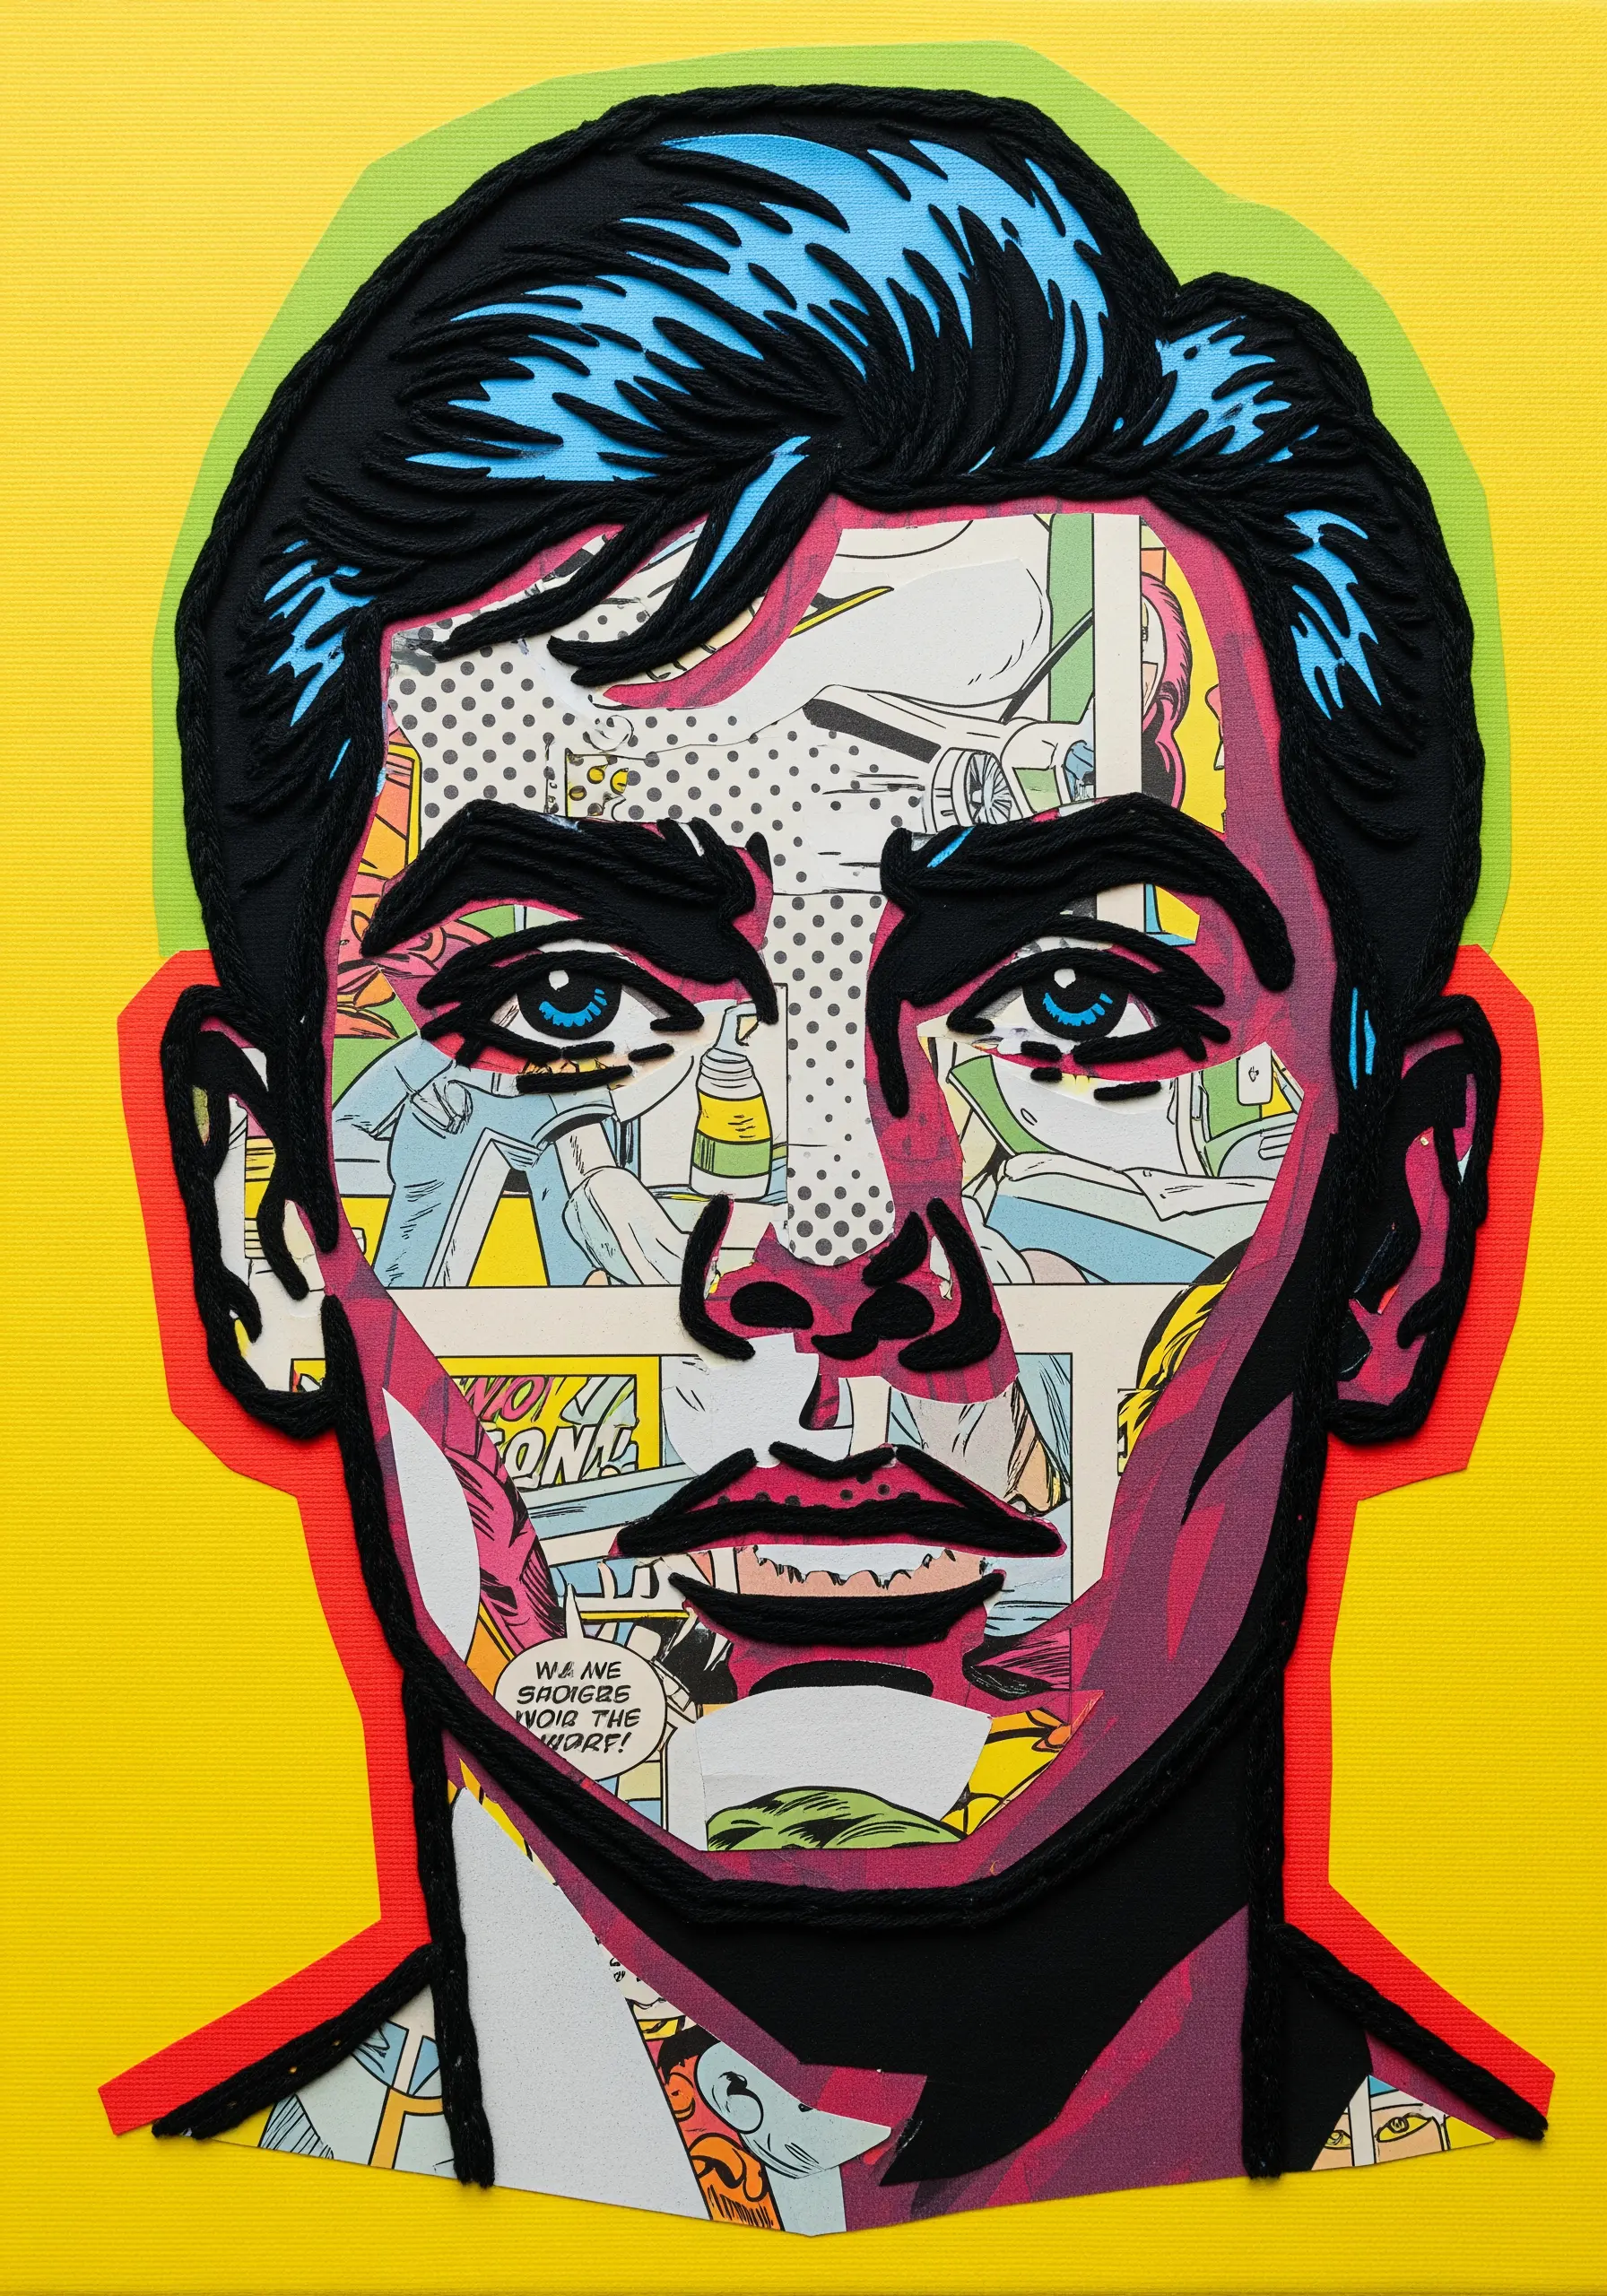
Build the foundation of your portrait by collaging pieces of old comic books, focusing on interesting textures, colors, or speech bubbles.
Use a thick, bold black thread to outline the features, creating a strong graphic style that separates the collage elements from the solid blocks of color.
A dense satin stitch or whipped backstitch will give you the weight and smoothness needed for these heavy, illustrative lines.
This technique transforms simple paper into iconic pop-art stitch motifs that feel both classic and contemporary.
13. Embody Kintsugi with Gold Thread and Fabric
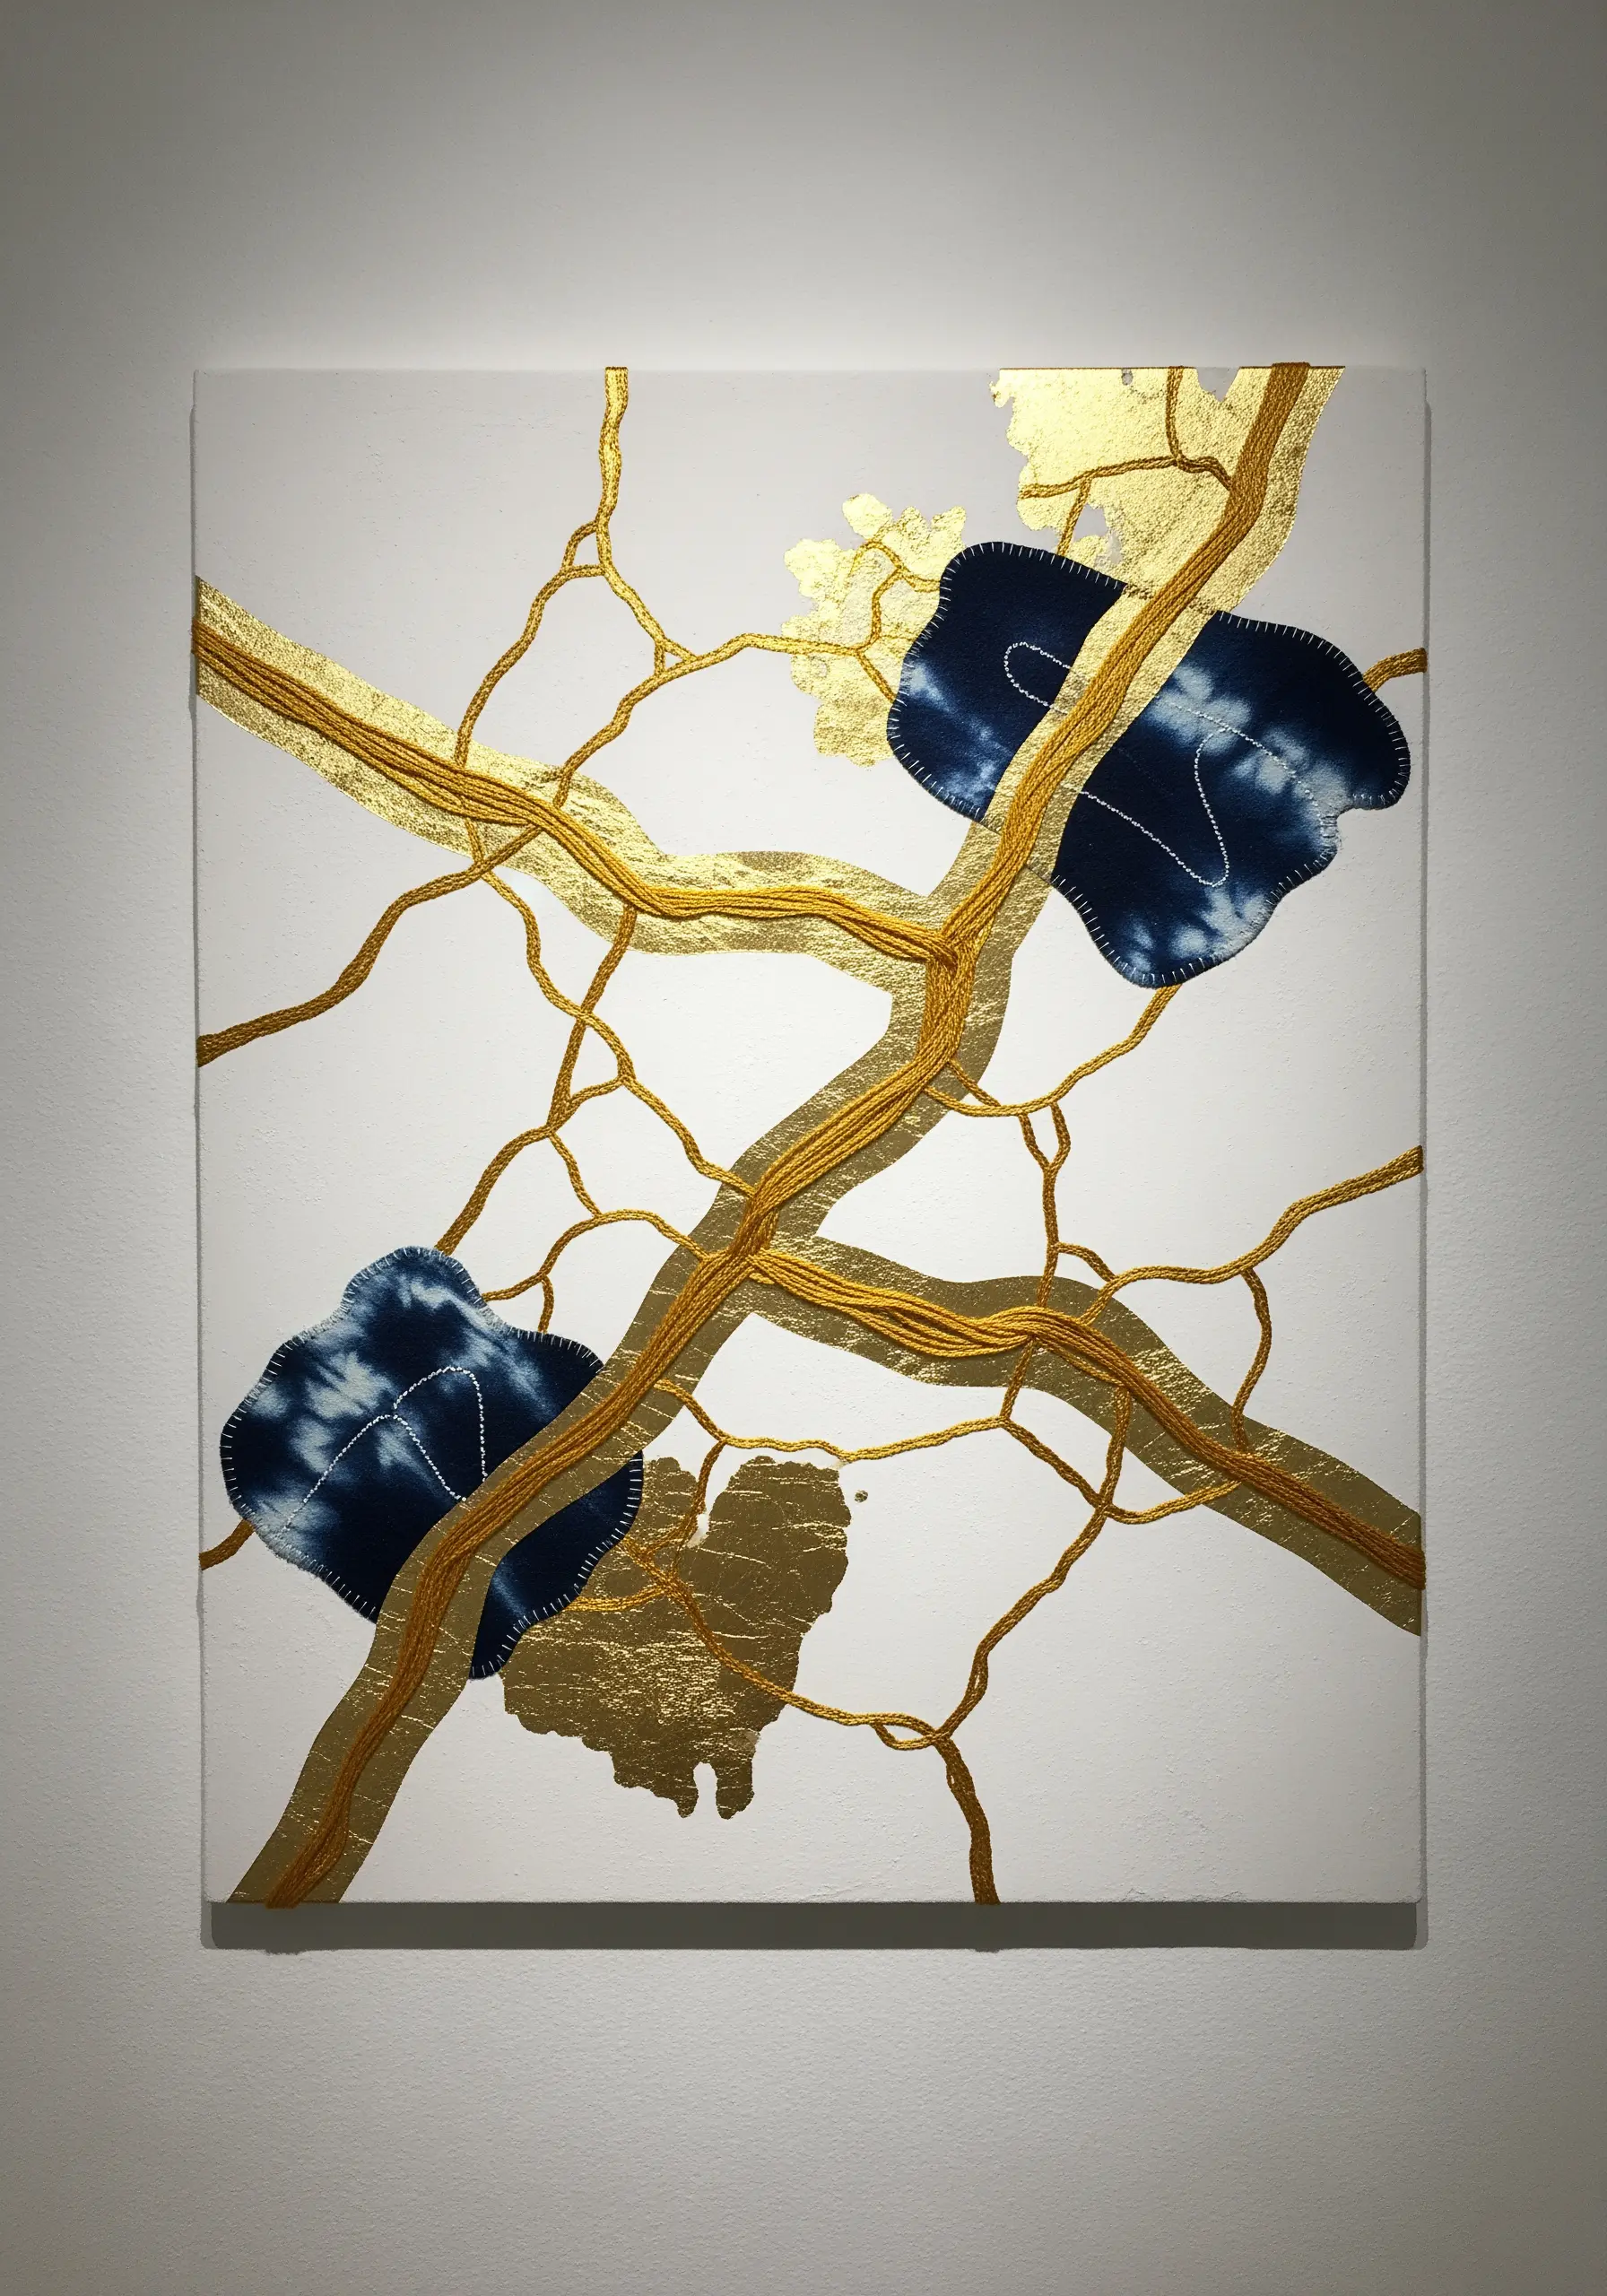
Embrace the Japanese art of repairing broken pottery by creating ‘cracks’ in your canvas with gold leaf and metallic thread.
Use a couching stitch to lay down thick, shimmering gold cord, which gives you precise control over the meandering lines.
Incorporate patches of textured fabric, like this indigo-dyed cotton, treating them as beautiful repairs within the composition.
The combination of thread, gold leaf, and fabric creates a rich visual narrative about healing and beauty in imperfection.
14. Sculpt a Botanical Wreath with Felt and Cord
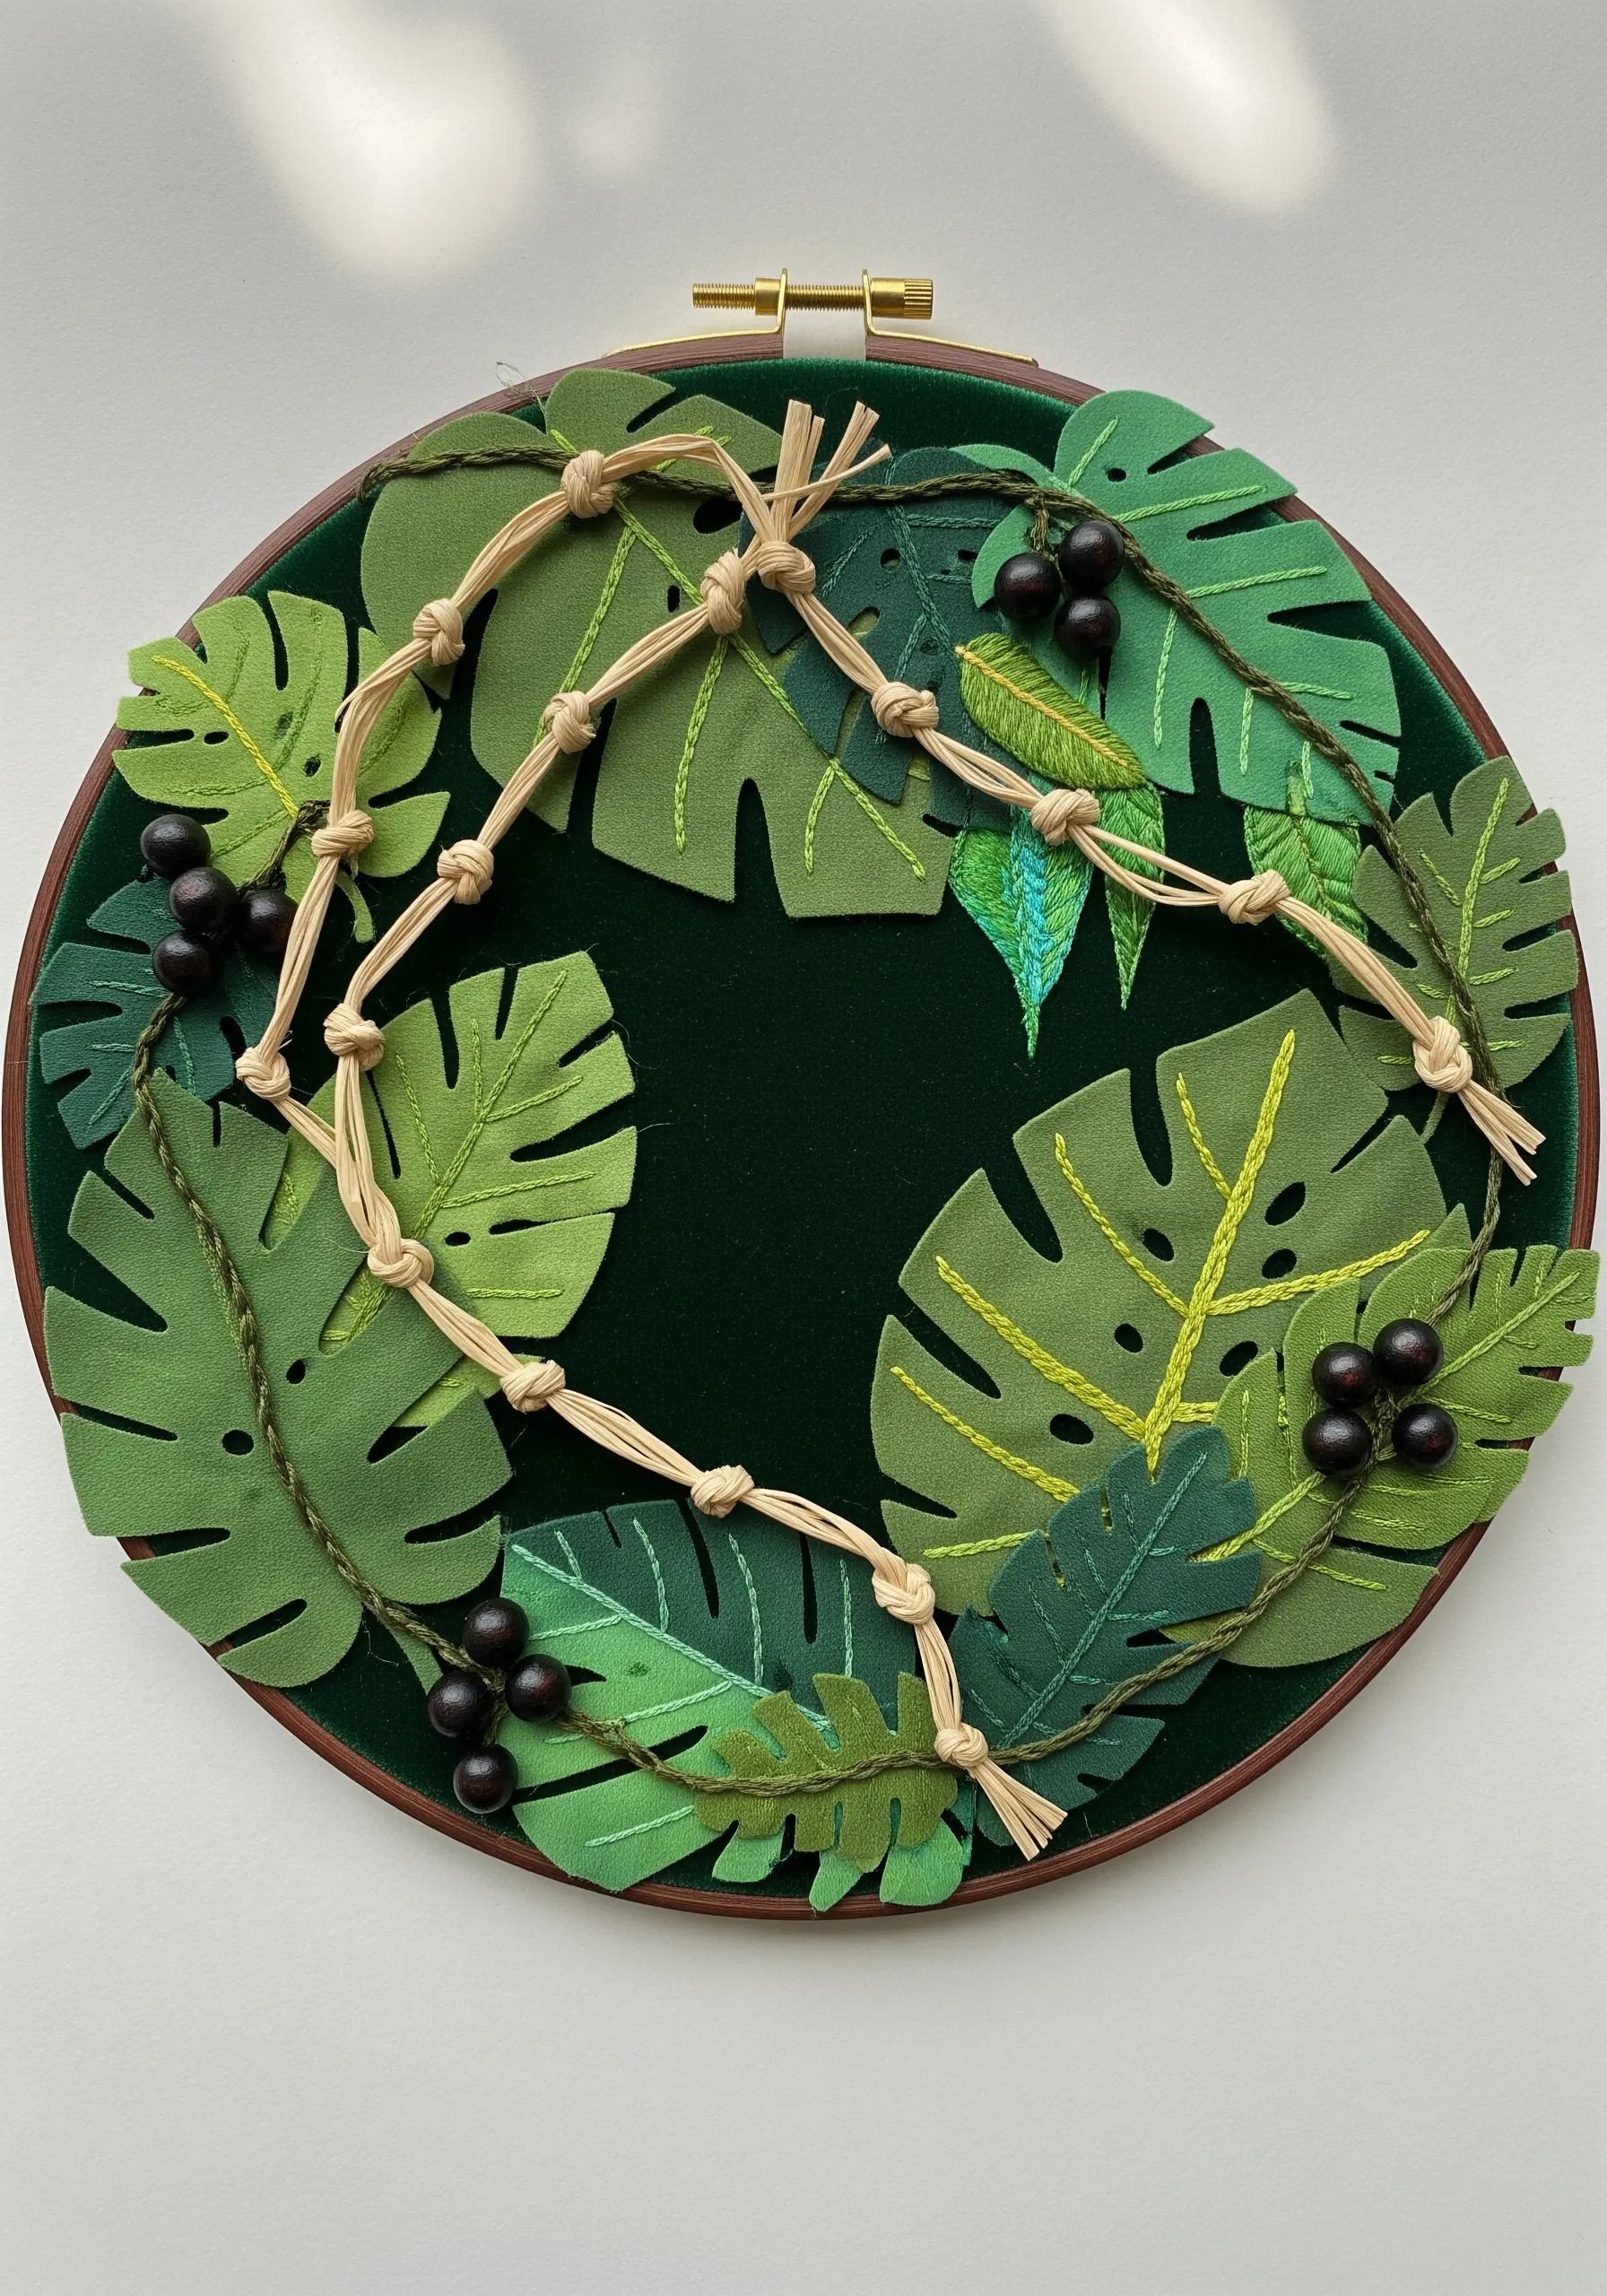
Move beyond flat embroidery by cutting leaf shapes from various shades of green felt to create a base for your wreath.
Layer the felt leaves and add subtle details with simple stitches like running stitch or backstitch for the veins.
Introduce a different texture by incorporating macrame-style knots with a natural-colored cord, creating a vine-like structure.
This approach turns your embroidery hoop into a frame for a sculptural, botanical textile art piece that has real physical depth.
15. Mimic Geological Strata with Textured Fabrics
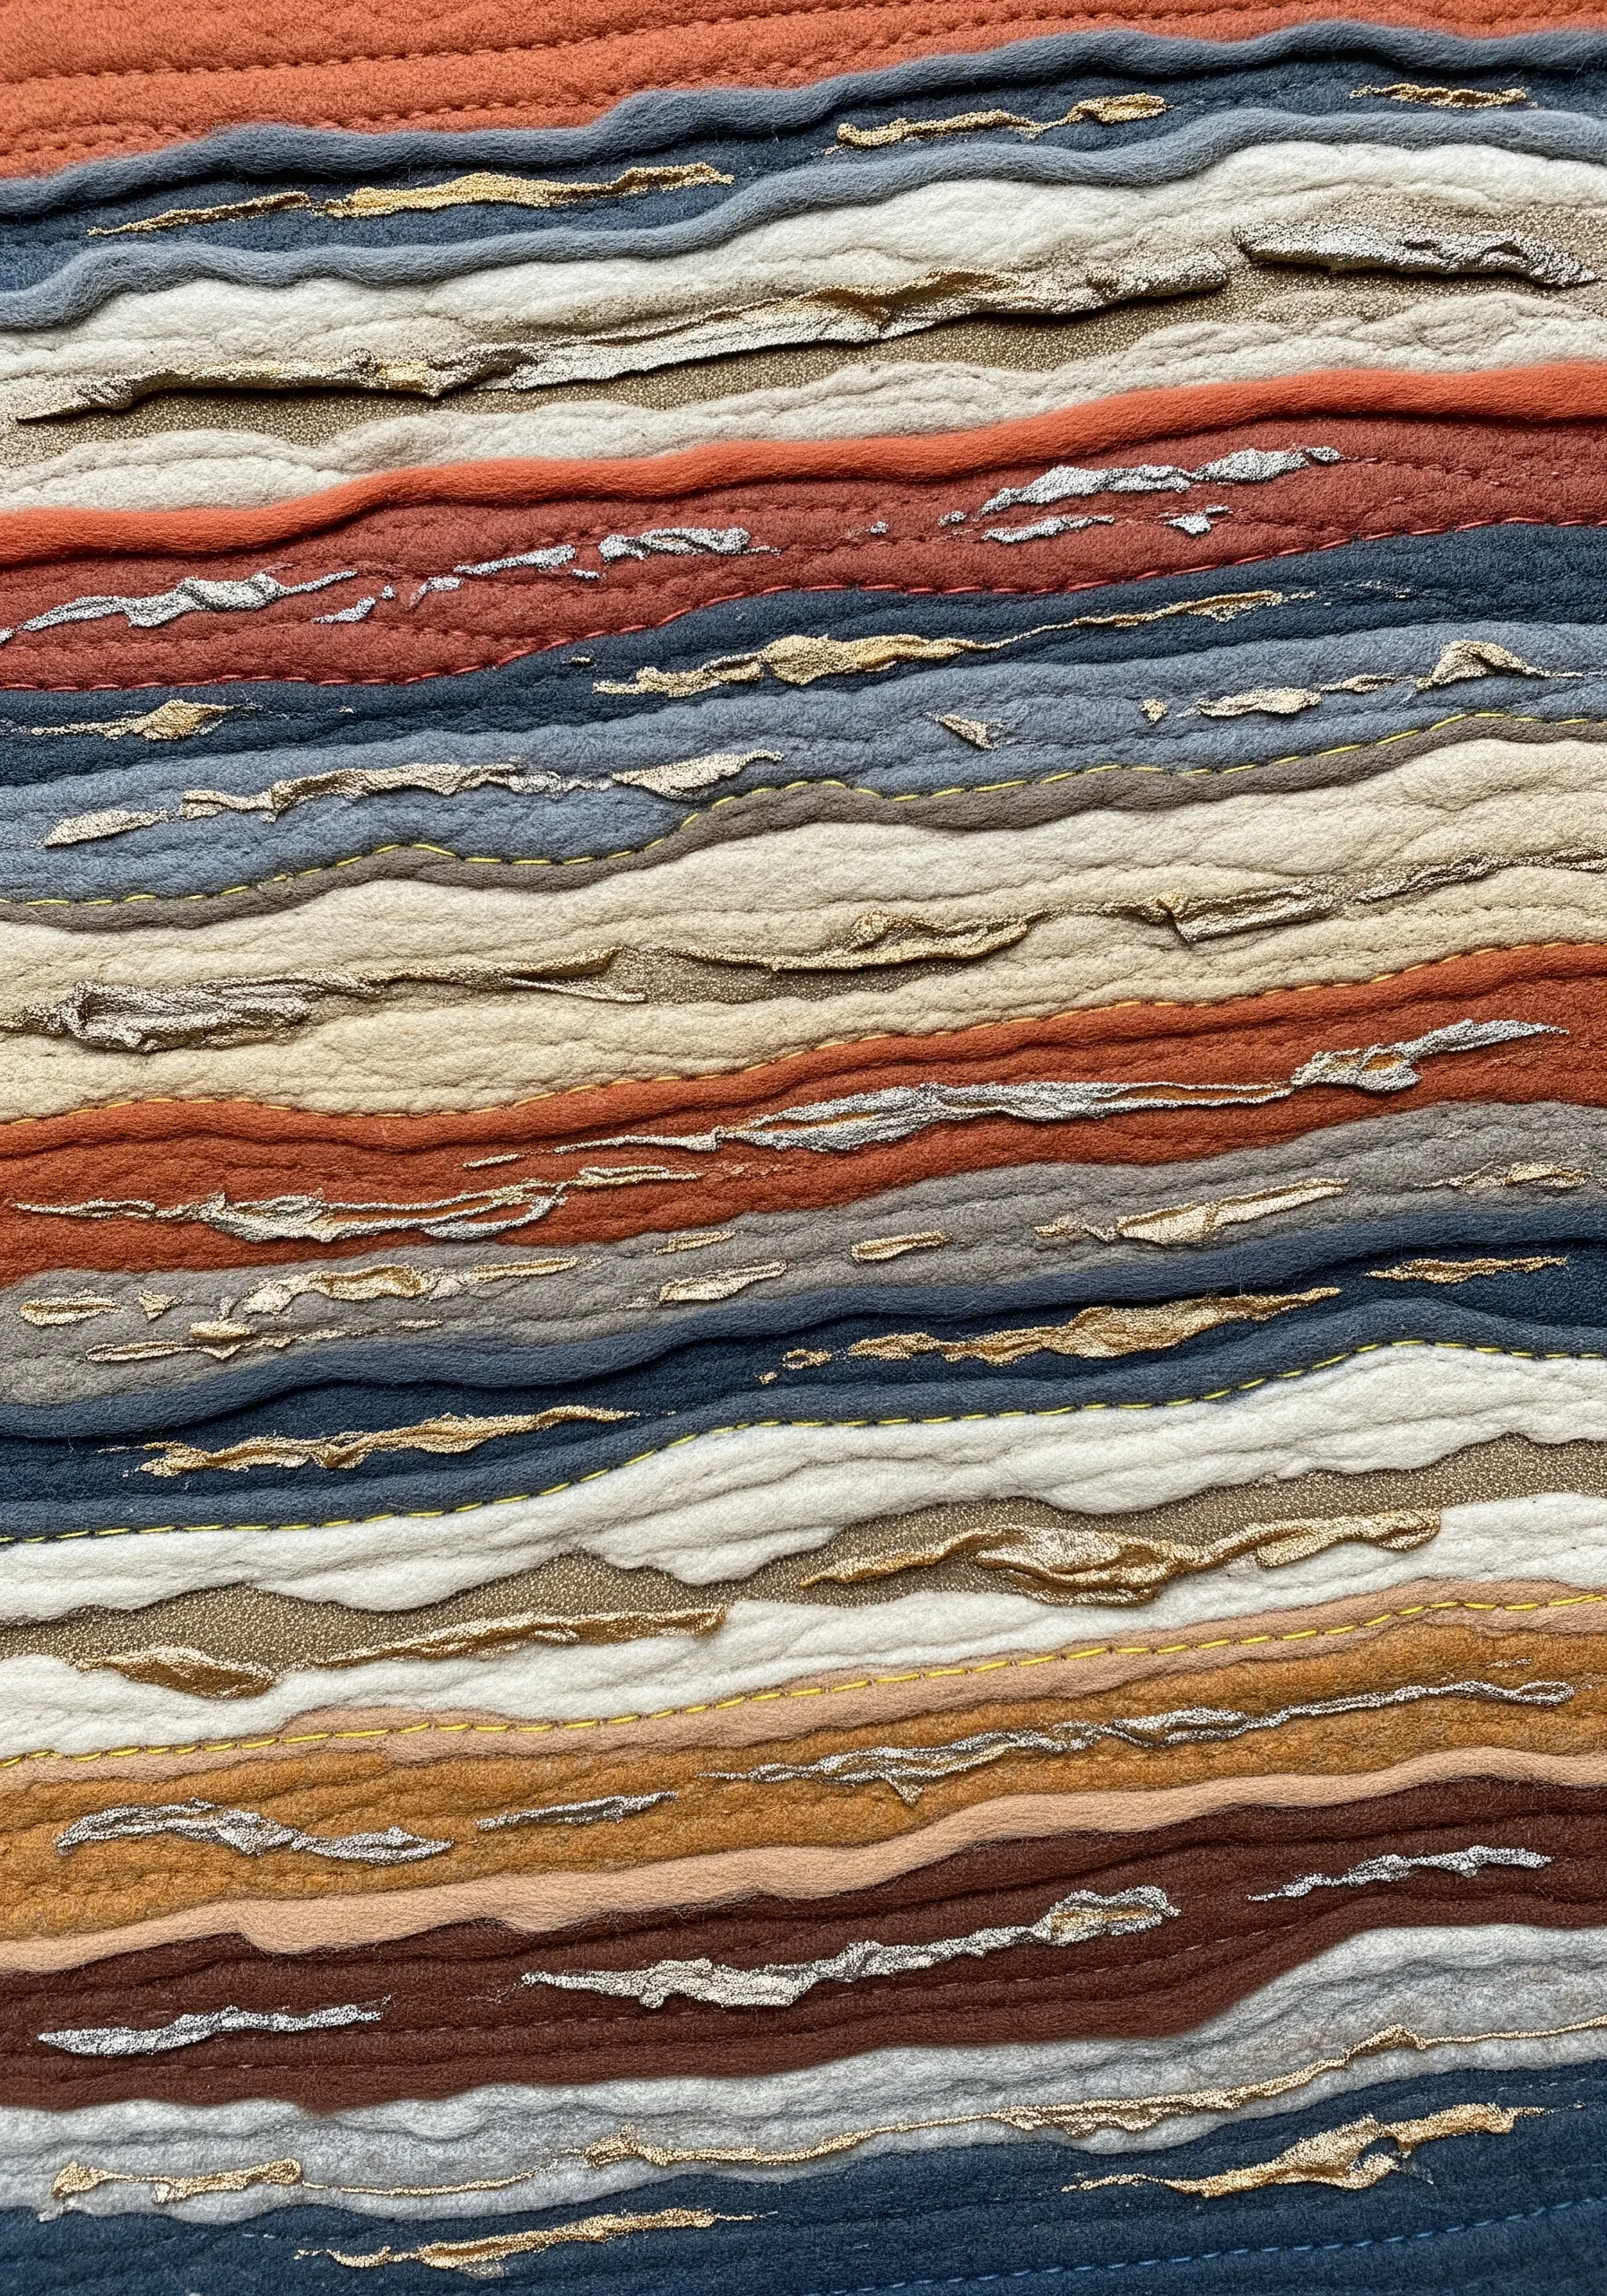
Layer strips of thick, tactile fabrics like felt, fleece, or boiled wool to create an abstract landscape resembling rock layers.
Distress the fabric by tearing, rubbing, or needle-felting the edges to create a more organic, eroded appearance.
Introduce fine lines of metallic thread using a simple running stitch. This adds a subtle glint, like mineral veins running through stone.
The contrast between the soft, matte wool and the shimmering thread creates a sophisticated and organic texture embroidery design.
16. Capture the Aurora Borealis with Luminous Tulle
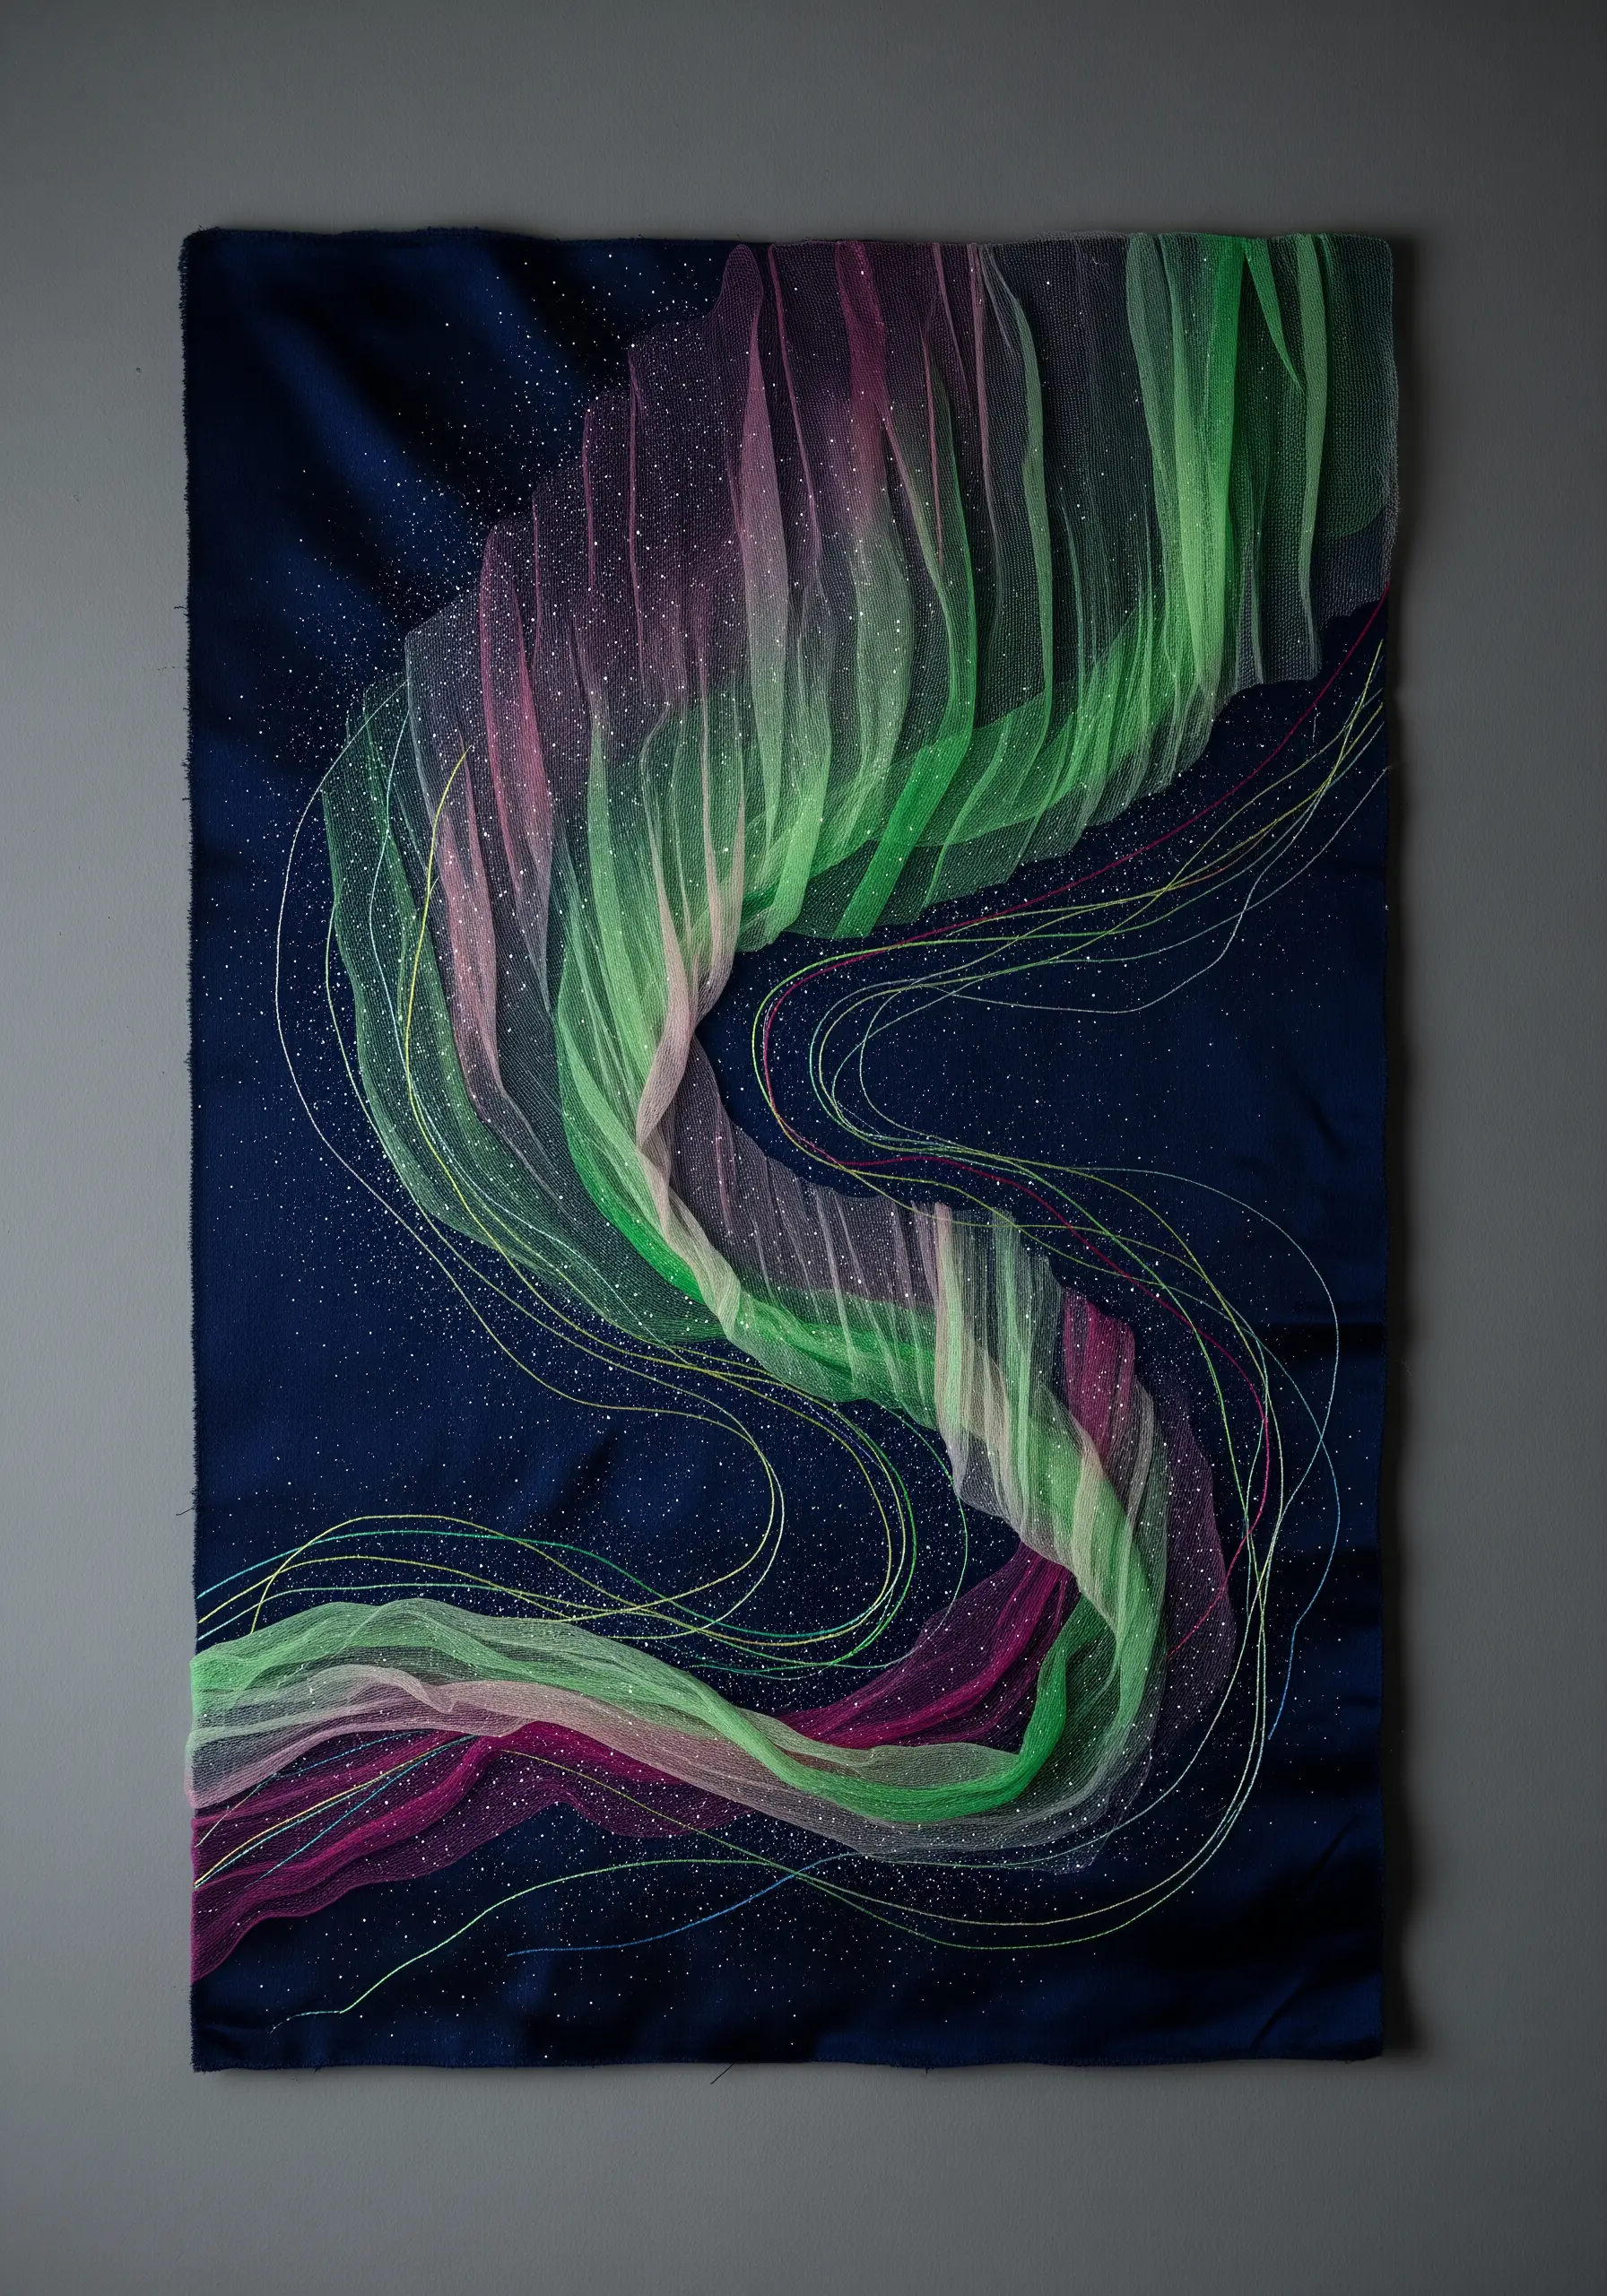
On a dark, satin-finish fabric, drape and sculpt layers of brightly colored tulle to capture the fluid movement of the northern lights.
Don’t flatten the tulle; allow it to fold and bunch to create variations in color density and light transmission.
Secure the tulle with minimal, hidden stitches so it appears to float on the surface.
Finally, scatter fine glitter or a spray of tiny French knots made with iridescent thread to represent distant stars shining through the aurora.
17. Design a Stained-Glass Window with Sheer Overlays
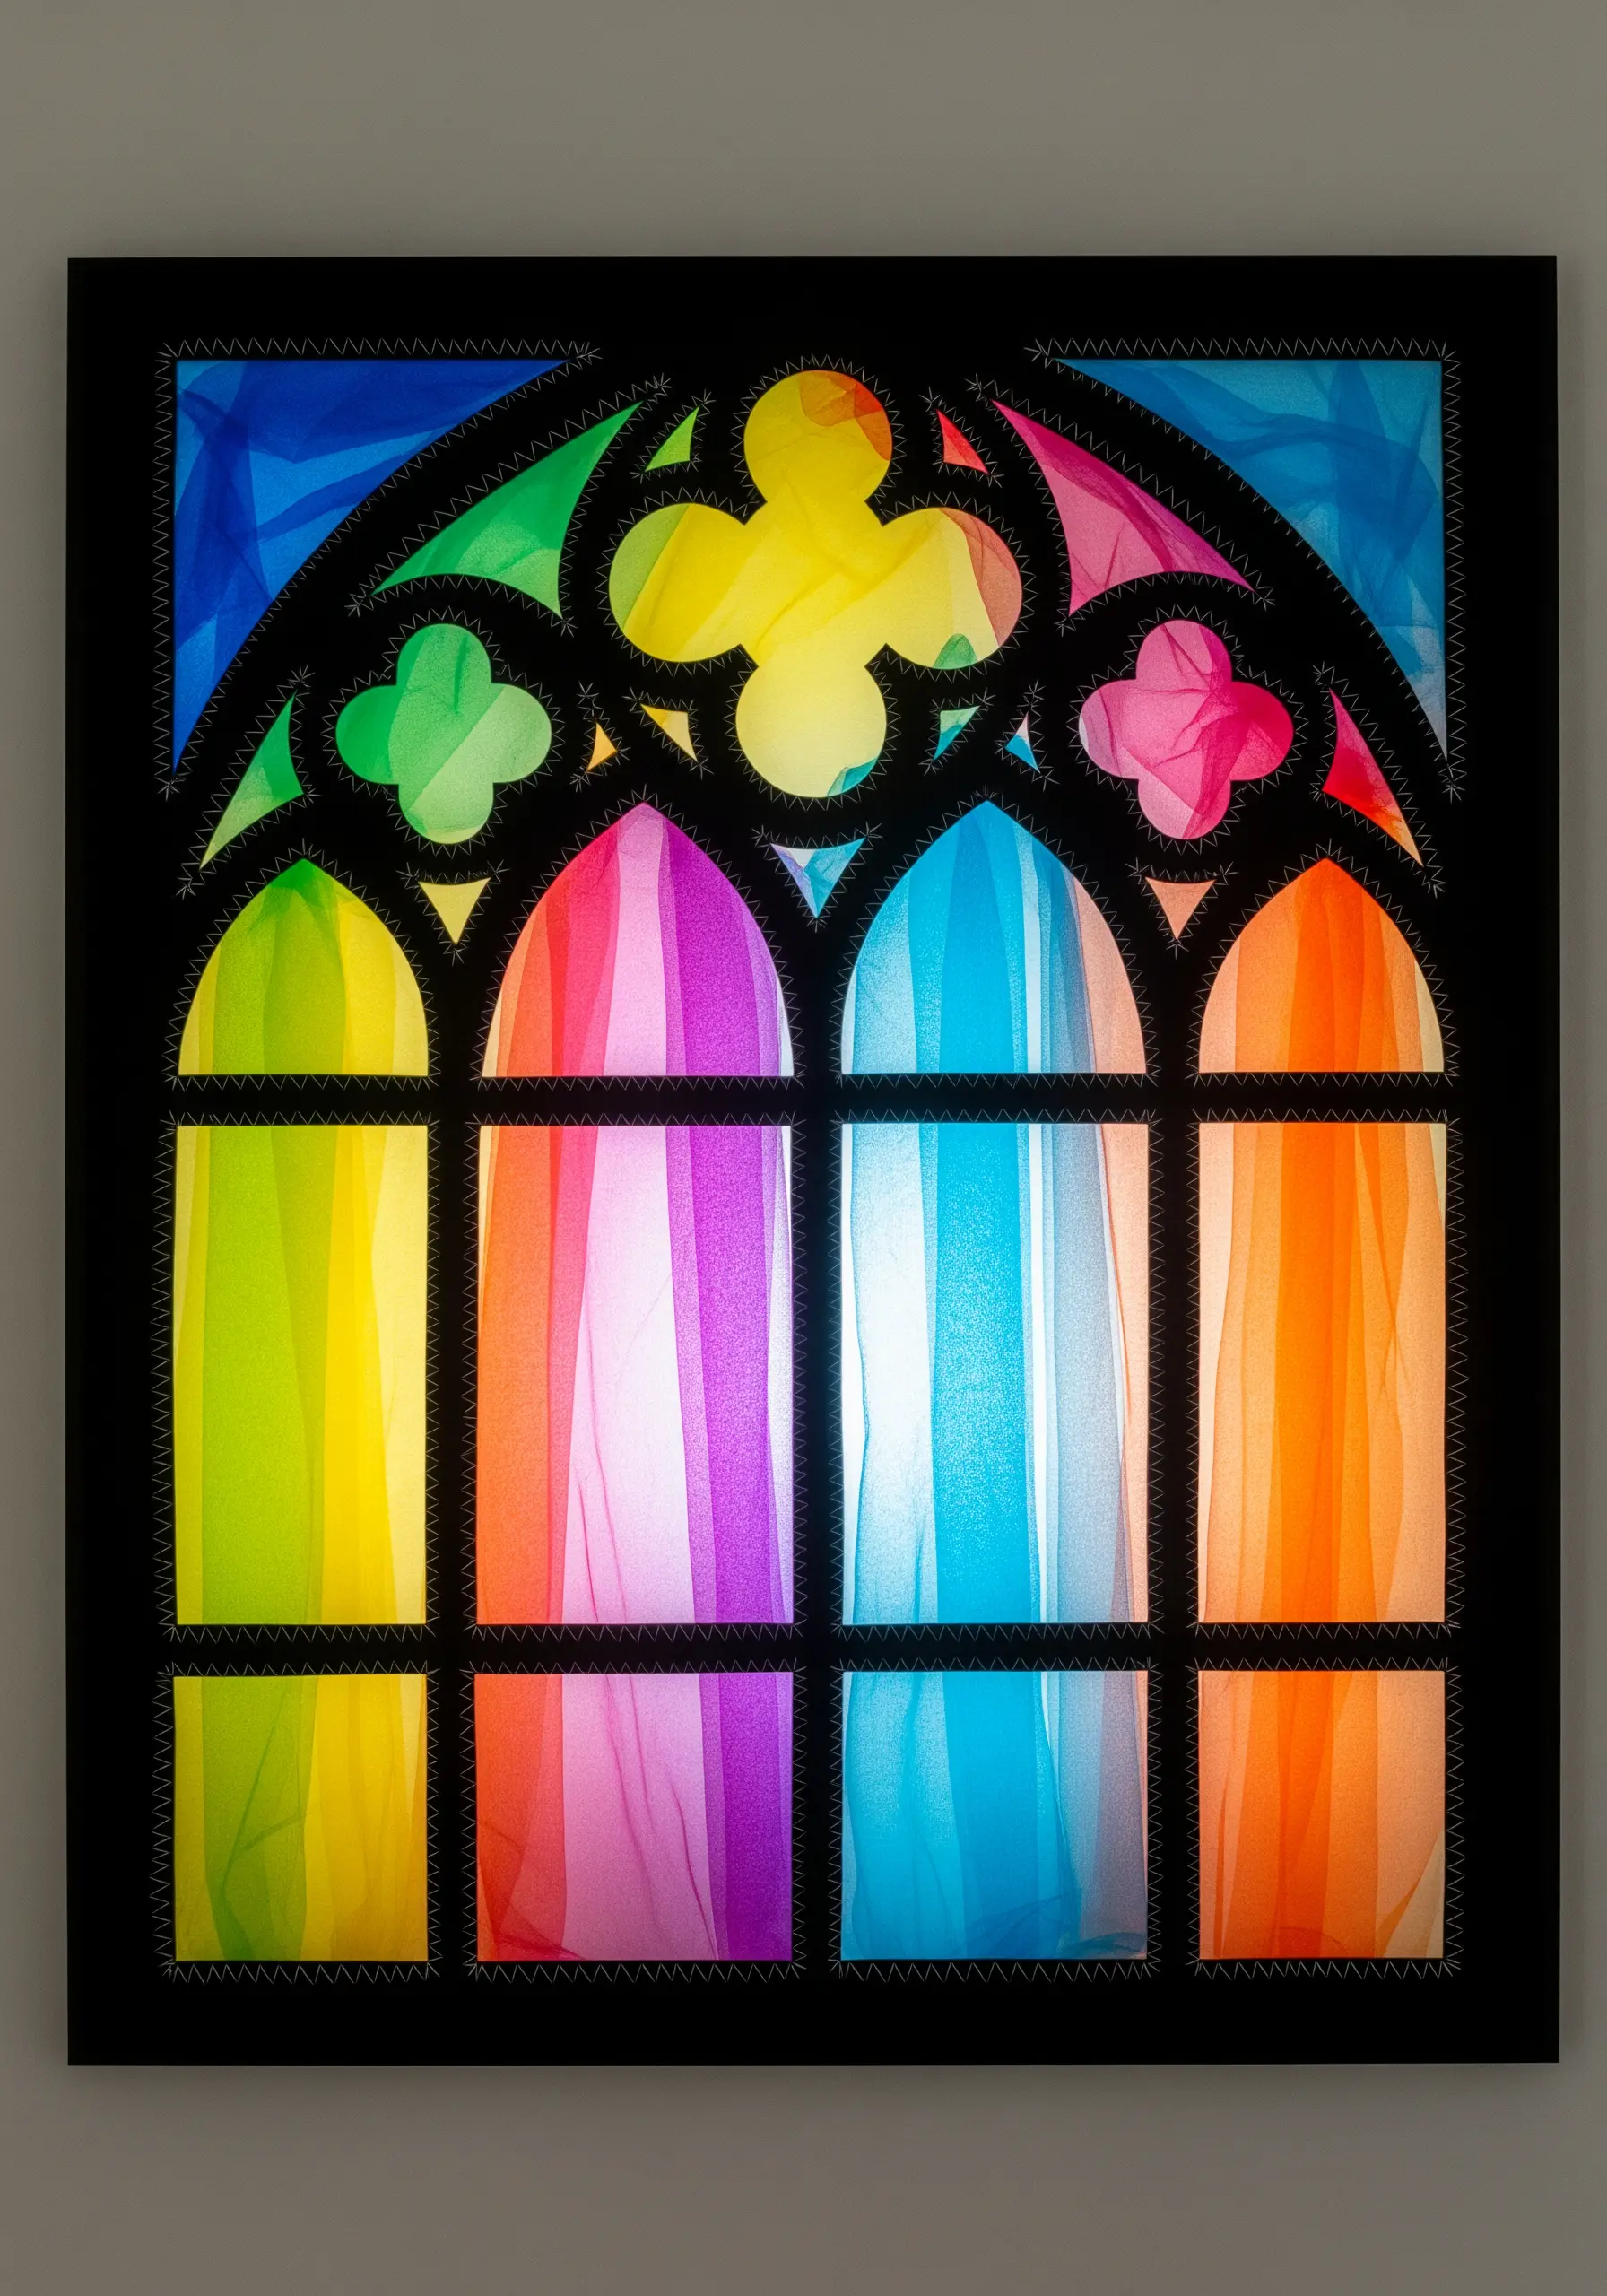
Create your ‘leading’ by cutting a frame from stiff black felt or cardstock, which provides a bold and stable structure.
Behind each opening, layer different colors of translucent fabric like organza or chiffon to mimic colored glass.
Use a simple, high-contrast stitch like a white backstitch to attach the frame to the colored layers, adding a graphic, hand-drawn quality.
When lit from behind, this technique creates a luminous effect, making it one of the most effective fabric collage embroidery layouts for playing with light and color.
18. Craft an Alchemist’s Journal with Paper, Beads, and Gold Thread
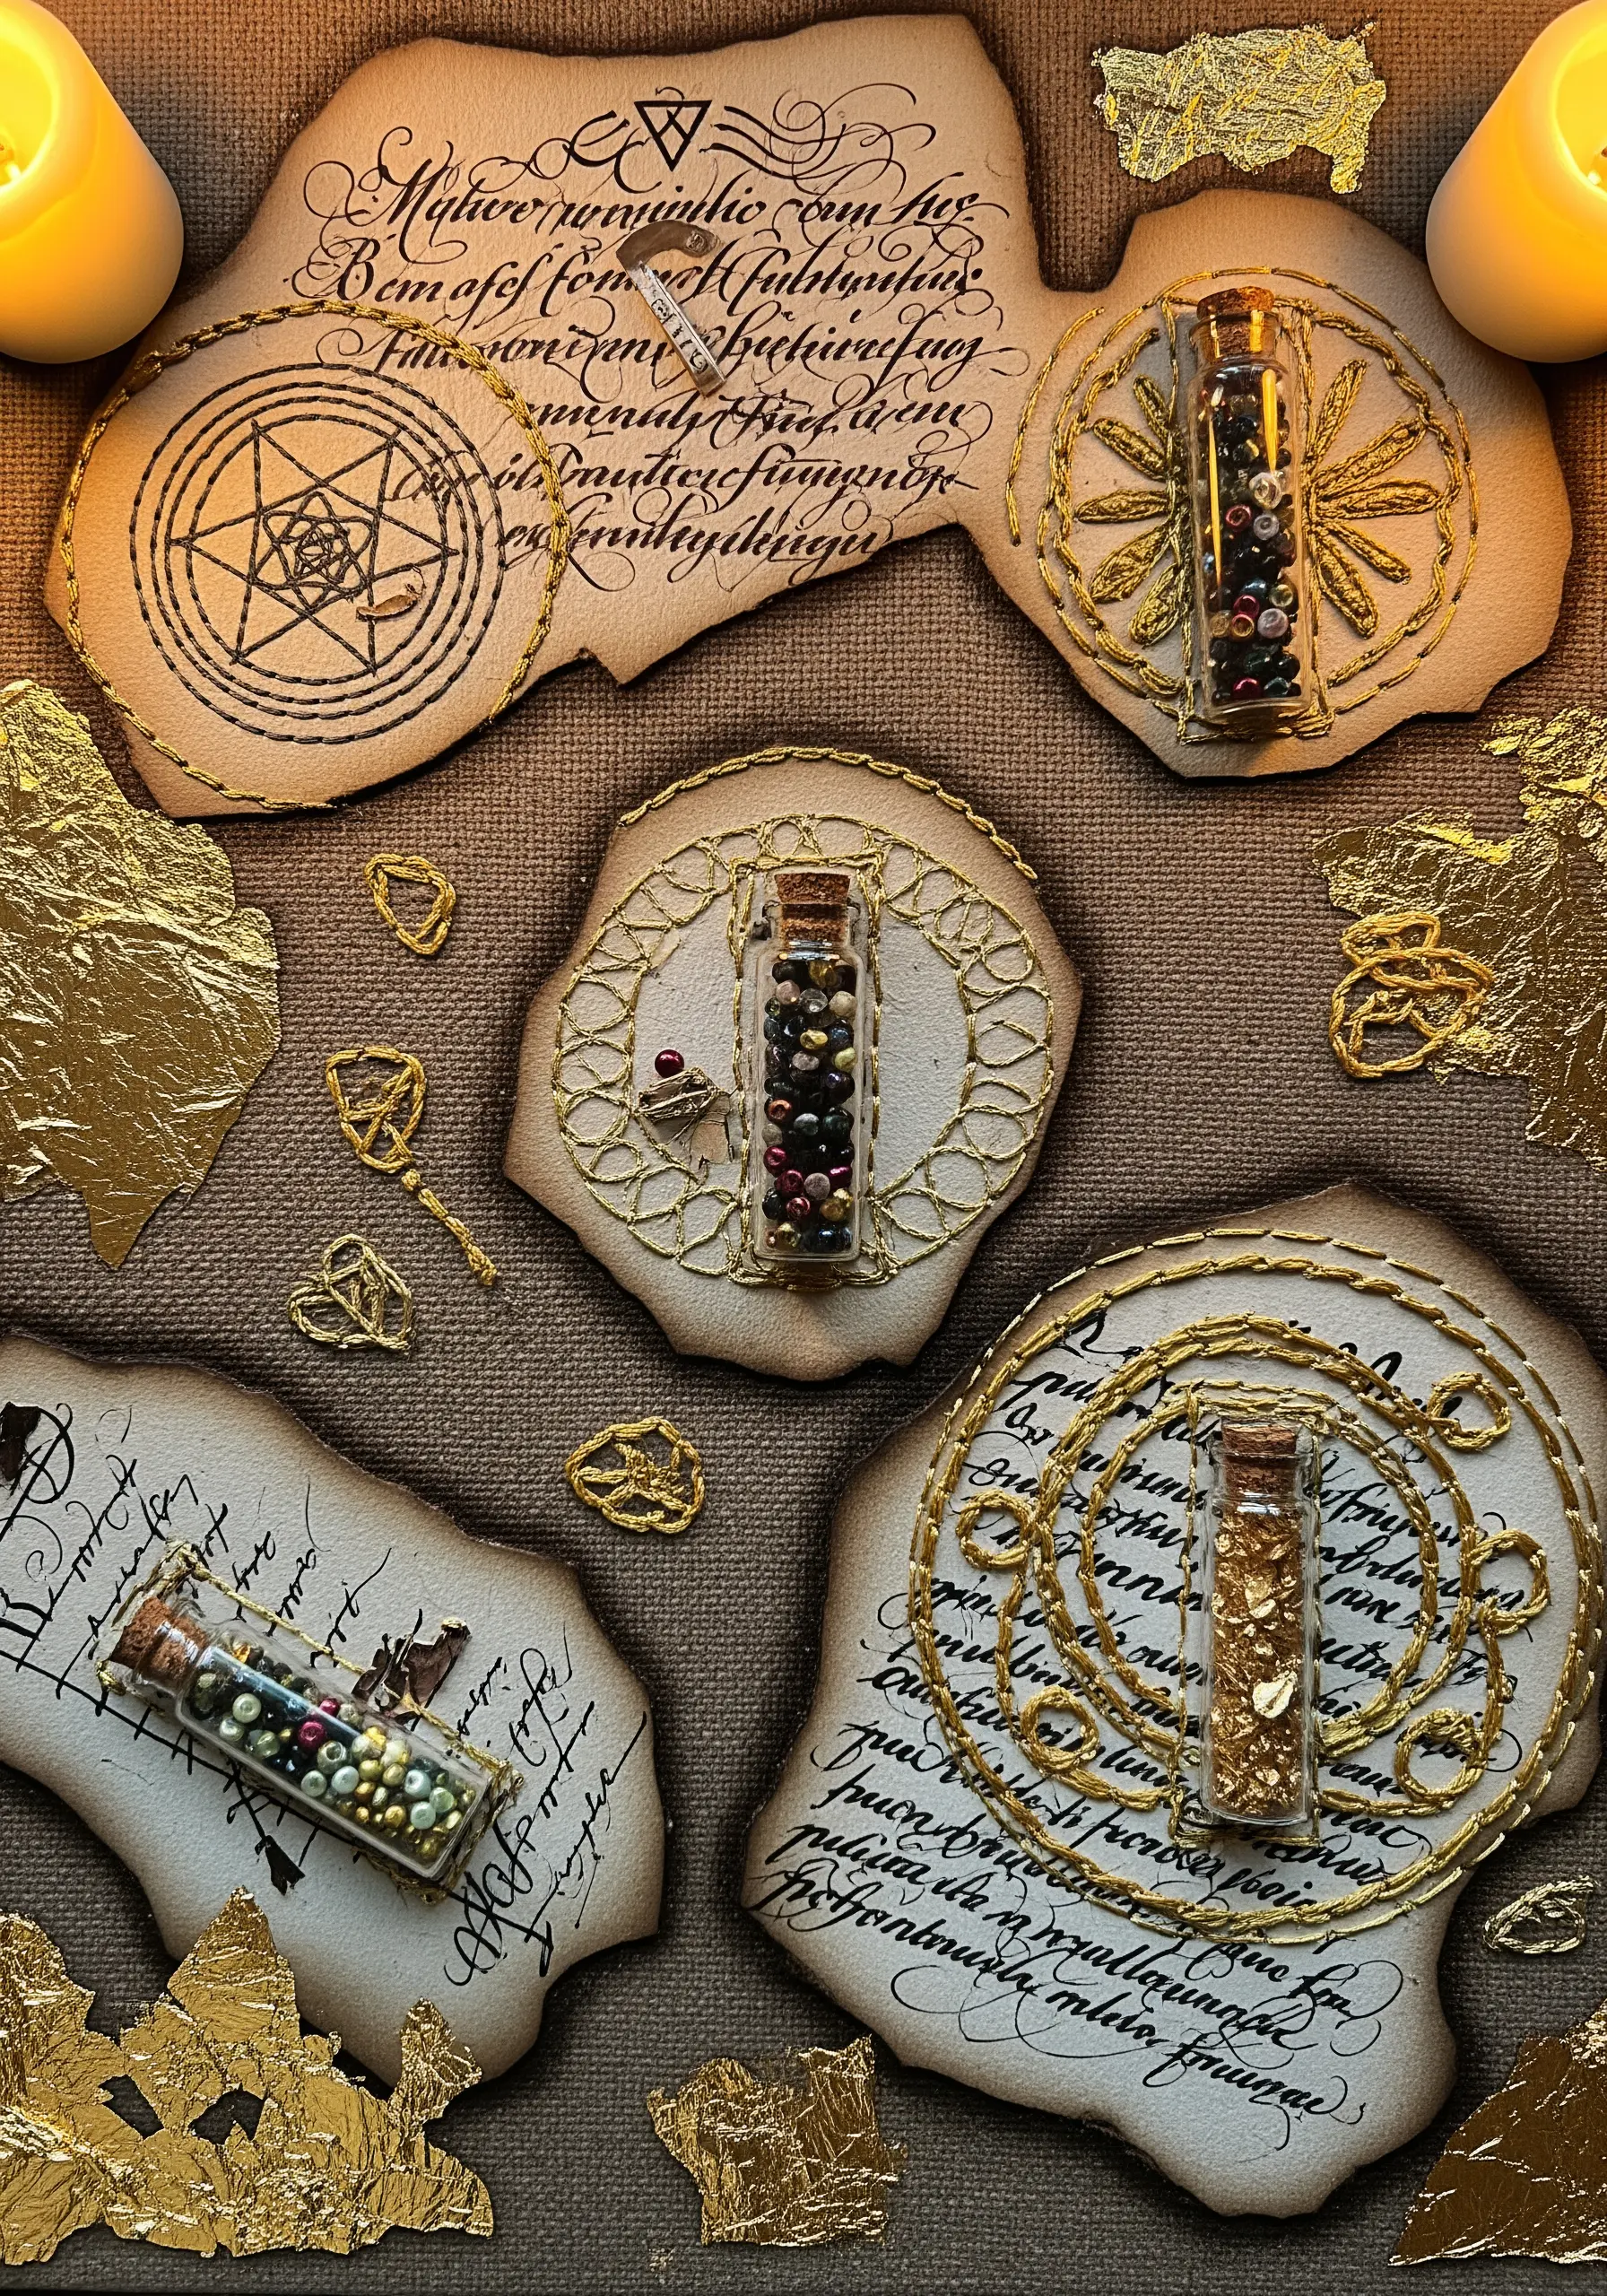
Begin by aging paper with coffee or tea and carefully burning the edges to create an ancient scroll effect.
Incorporate small, dimensional objects like tiny glass vials filled with beads or gold leaf, securing them with thread wrapped around the bottle necks.
Use a shimmering gold metallic thread to stitch intricate, mystical symbols and borders, which unifies the different elements with a touch of magic.
This is a perfect way to explore DIY embroidered mixed-media journals and tell a story through texture and found objects.
19. Sculpt a Volcanic Eruption with Fabric and Texture

Create the molten landscape by pleating, twisting, and gathering fabrics like satin, silk, and velvet in fiery colors.
Use a combination of hand-stitching and fabric glue to secure the dramatic folds, building a highly textured, three-dimensional mountain.
For the explosive eruption, use Turkey work (ghiordes knot) with glittery or metallic threads to create a dense, upward spray of texture.
This project is a powerful exploration of abstract thread sculpting tricks, turning fabric into a dynamic natural event.
20. Visualize Sound with Graphic Lines and Iridescent Film
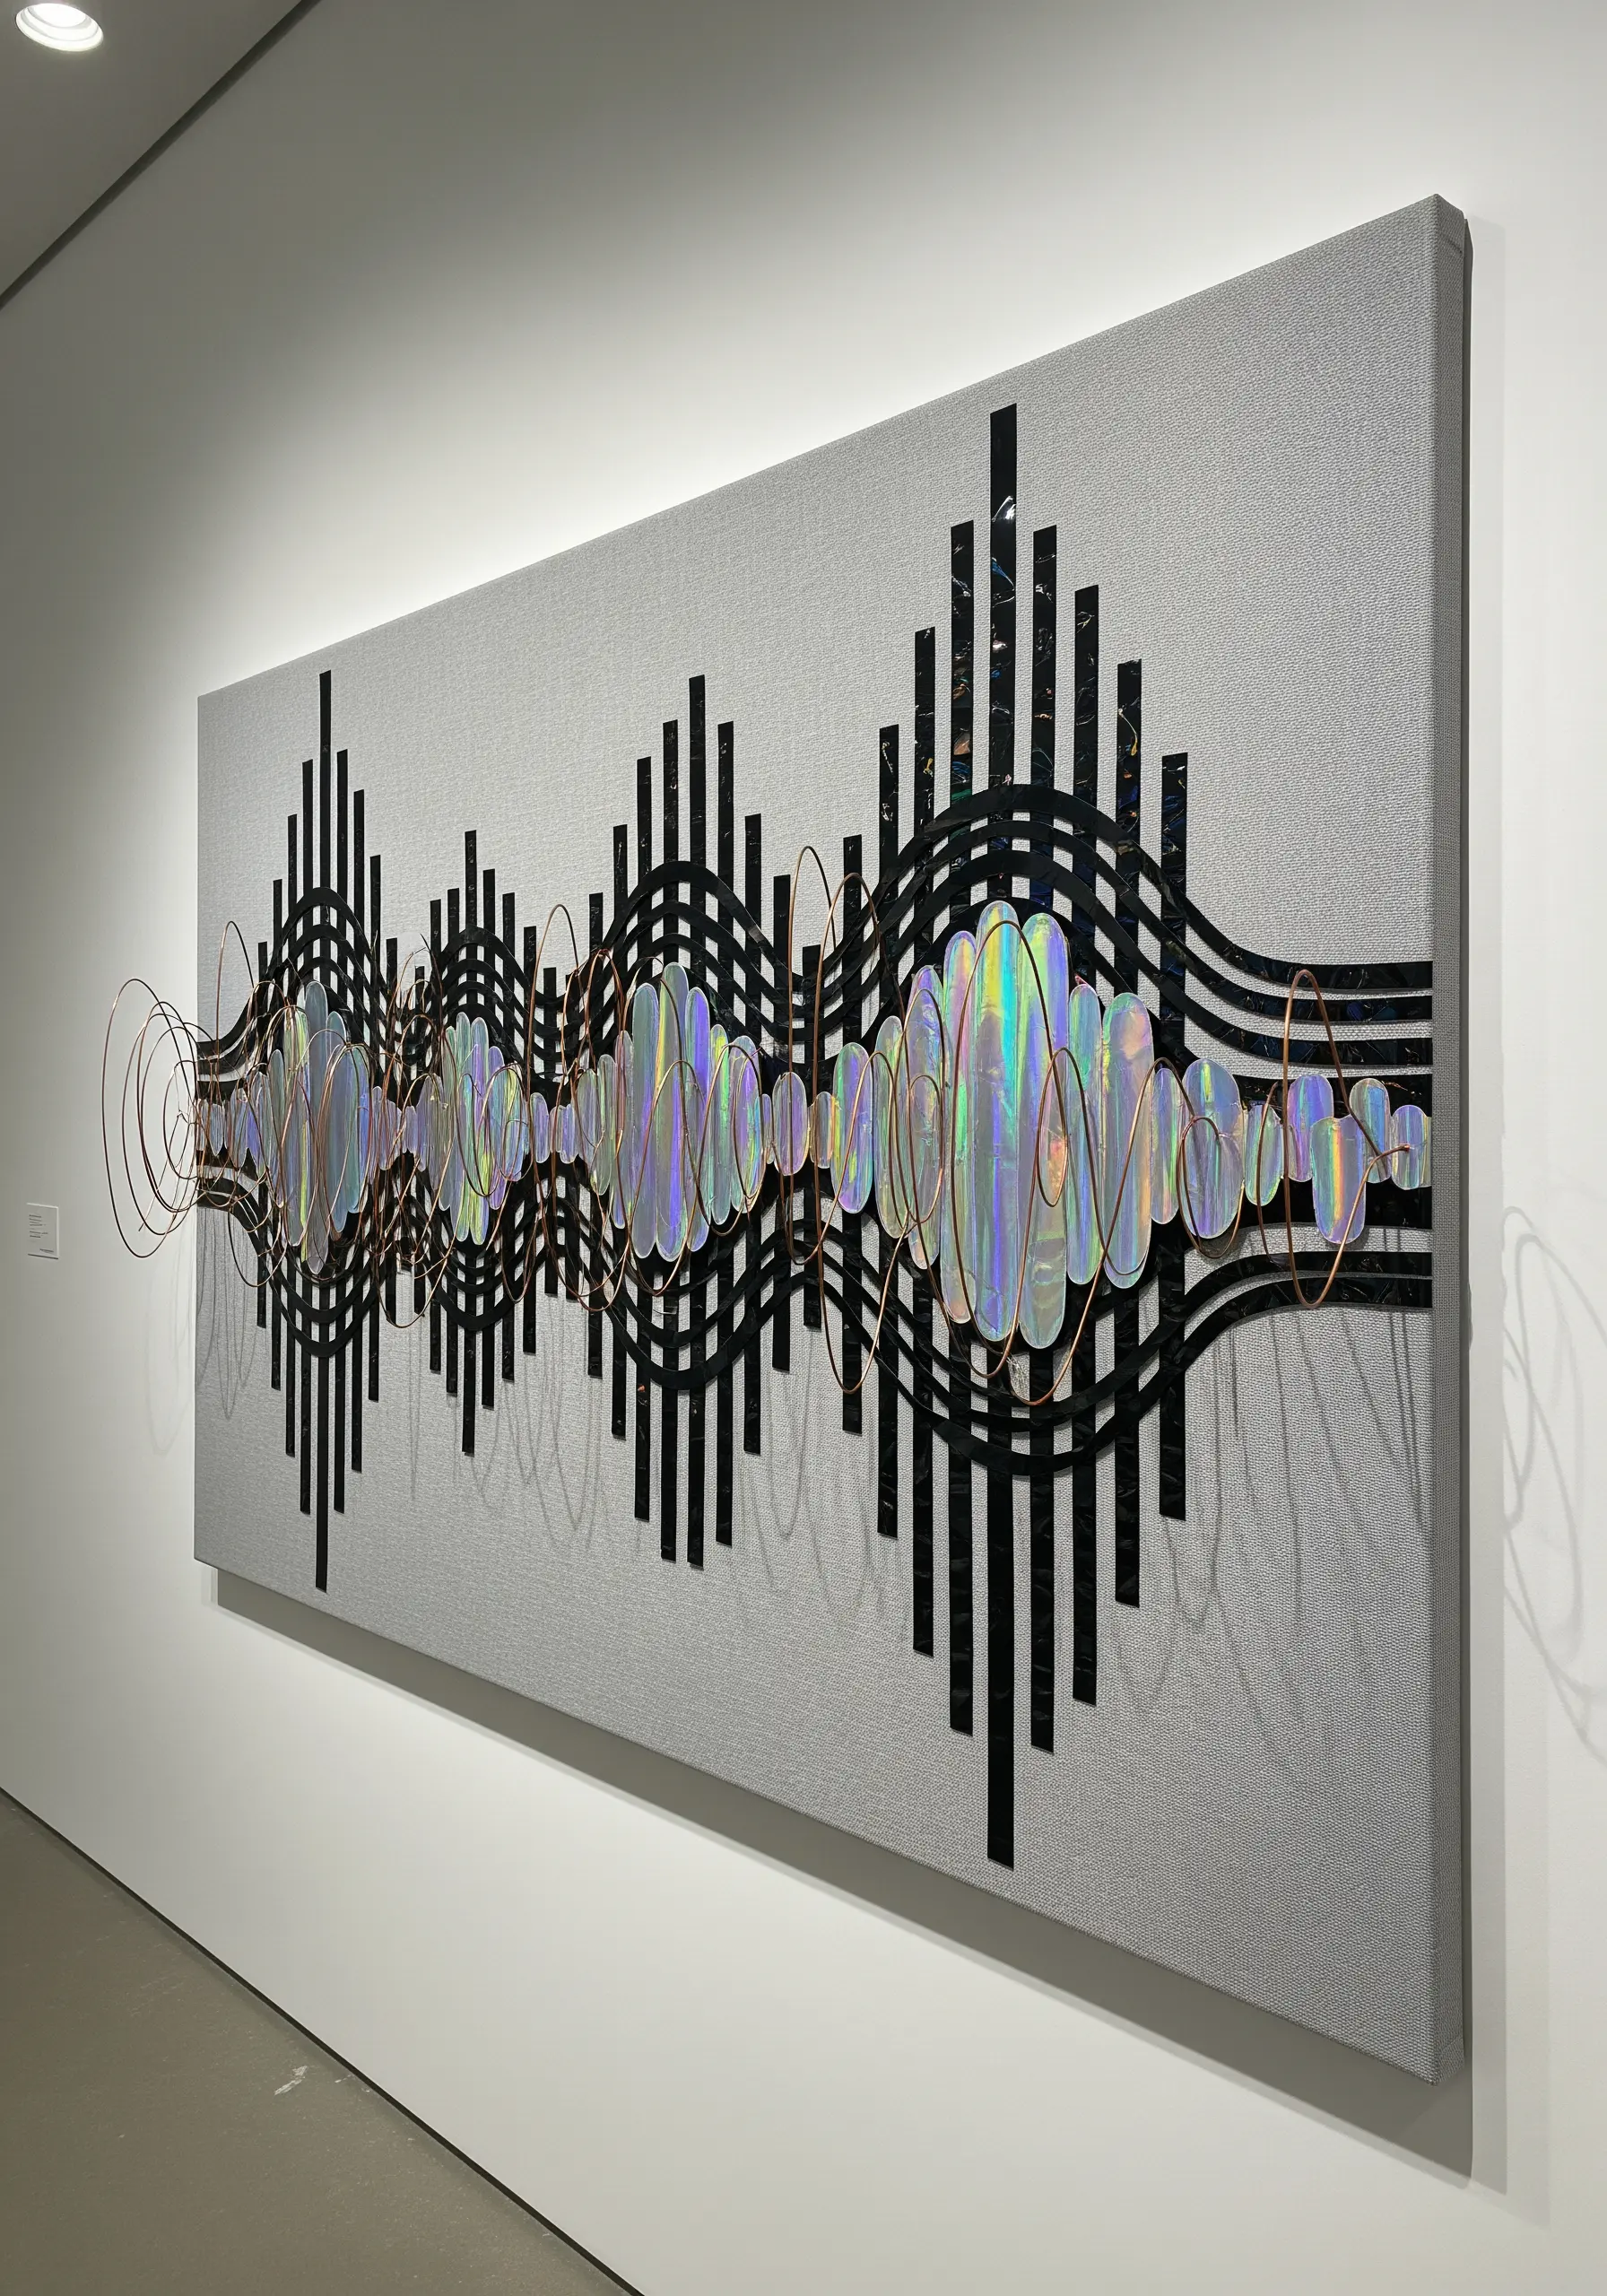
Translate an abstract concept like a soundwave into a visual medium by using bold, graphic shapes cut from black fabric or card.
Incorporate reflective or iridescent materials to represent the fluctuating, ethereal nature of sound itself.
Use coiled wire and precisely stitched lines to add another layer of detail, suggesting frequency and vibration.
This highly conceptual approach pushes the boundaries of embroidery, transforming it into a piece of modern, abstract minimal embroidery.
21. Illustrate Metamorphosis with Contrasting Materials
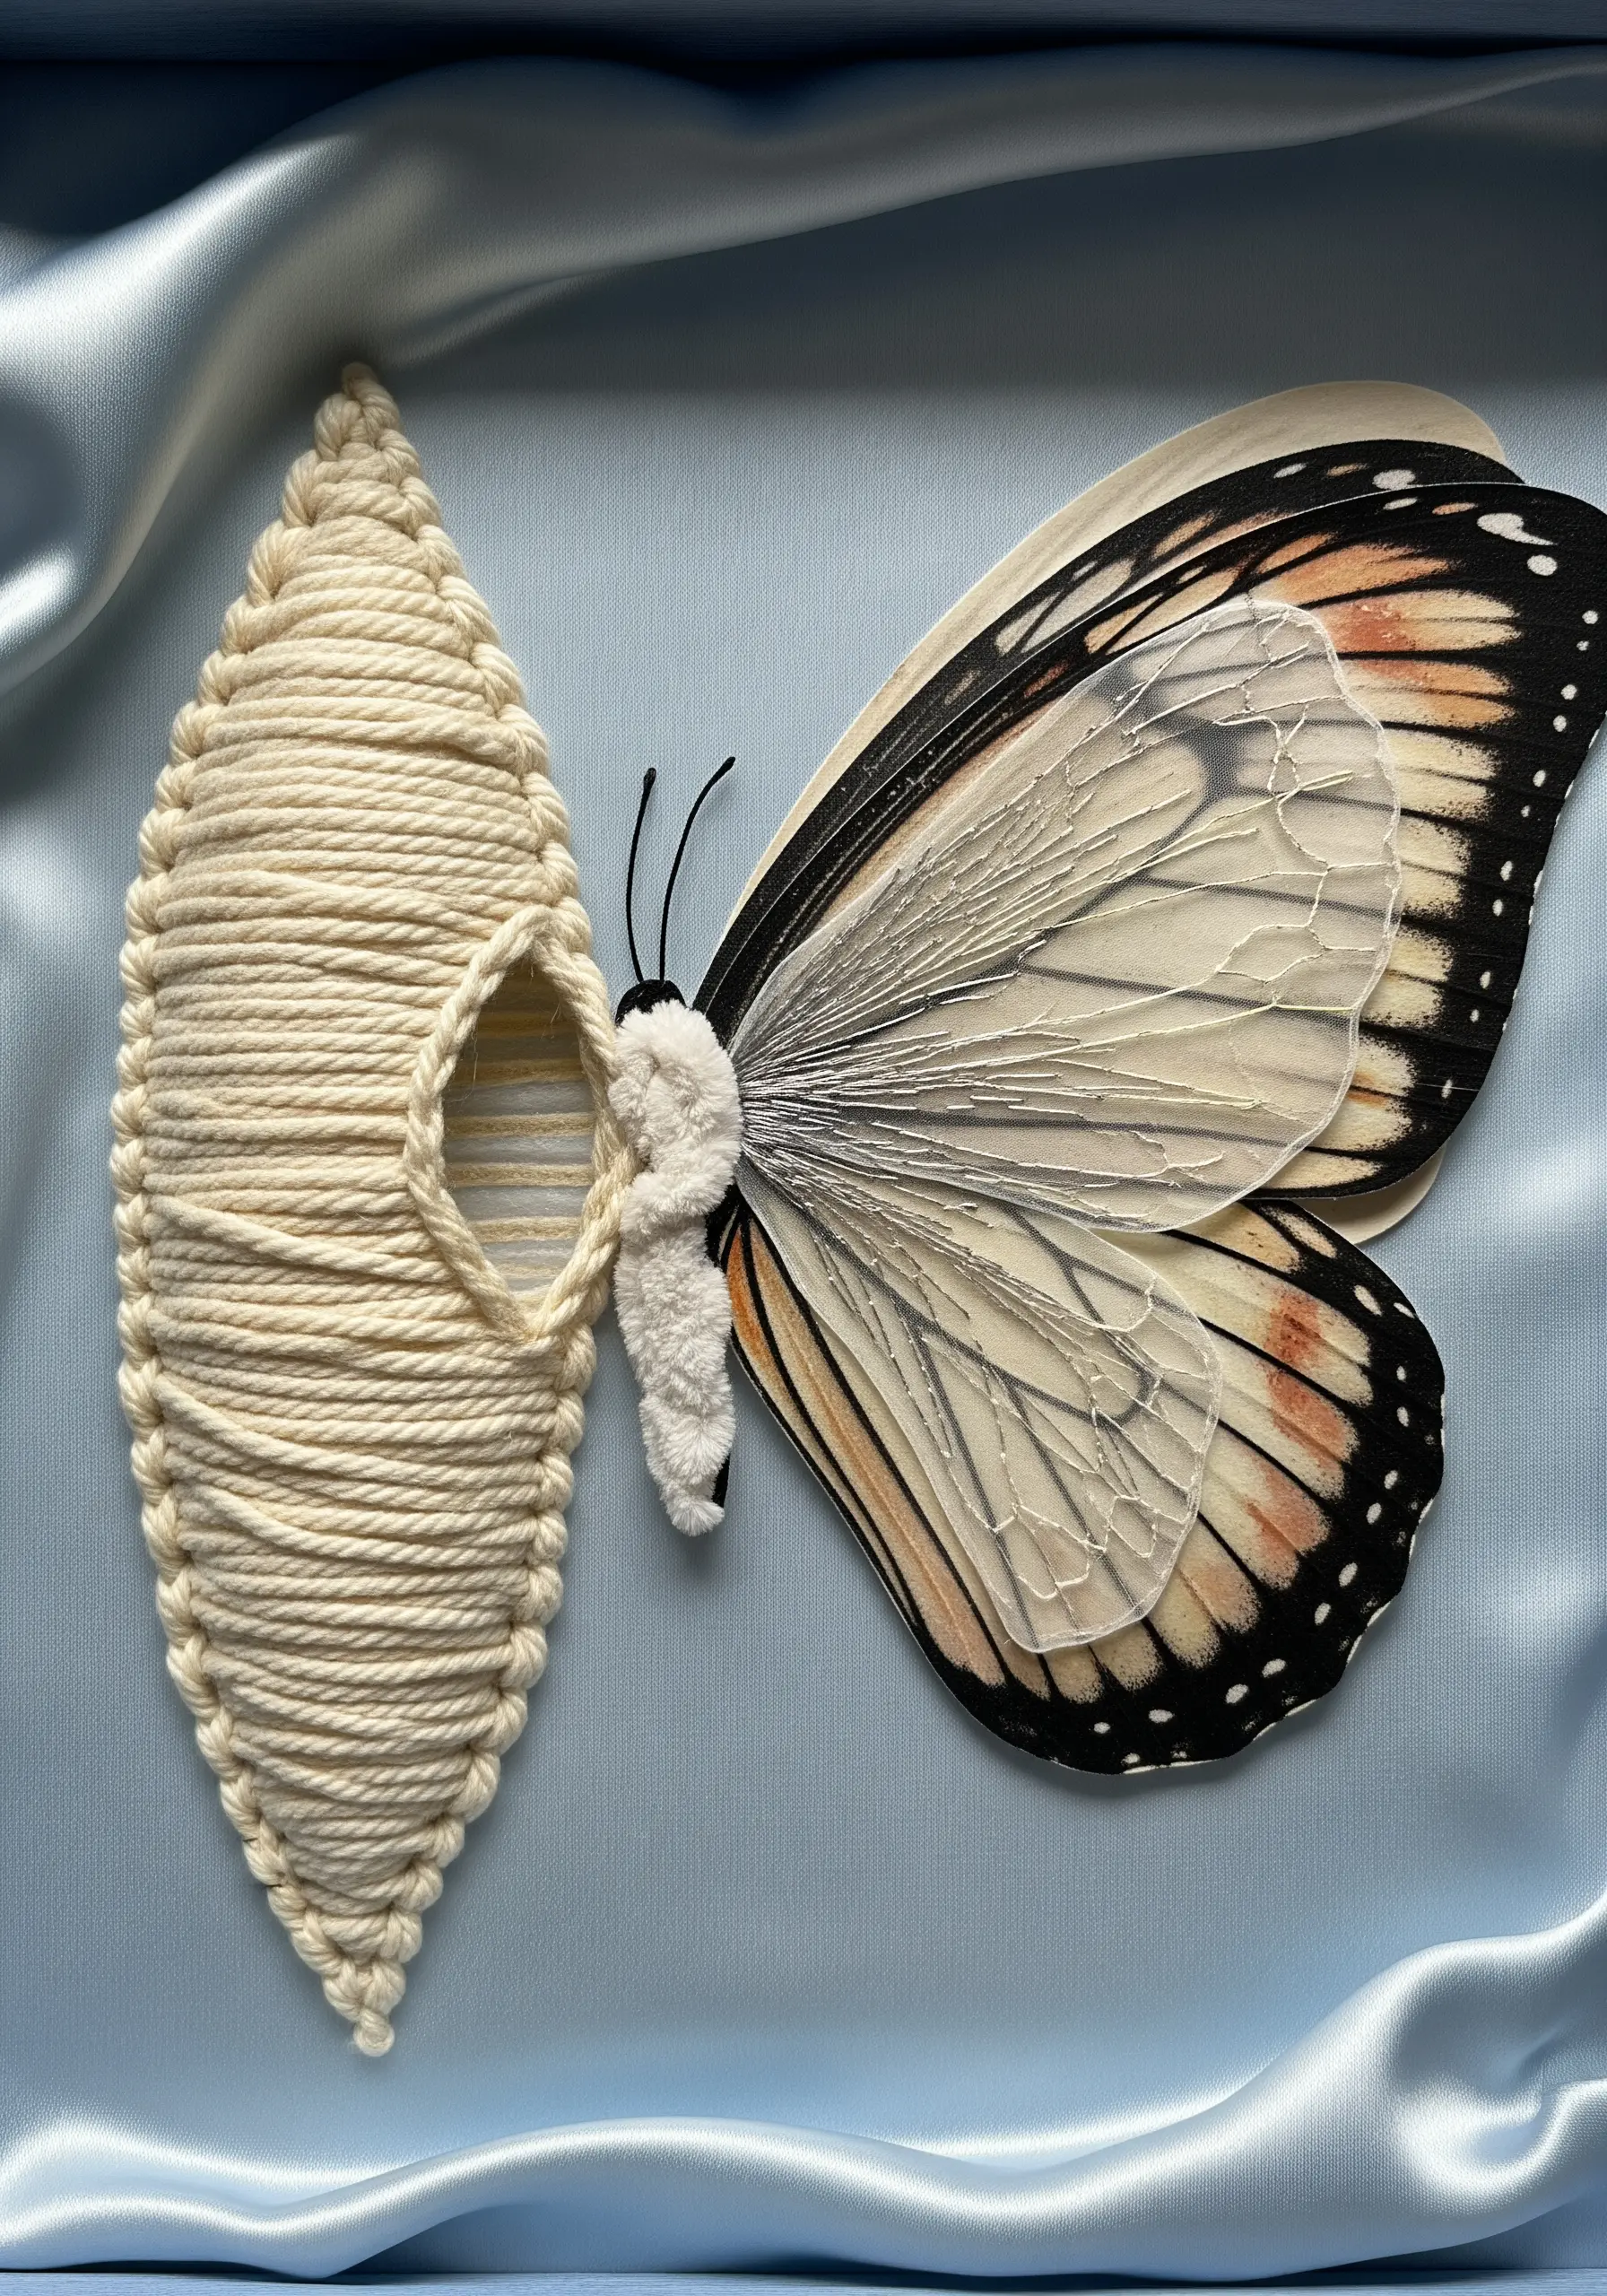
Tell a story of transformation by combining completely different textures in one piece.
Create a dense, protective cocoon using a wrapping or weaving technique with thick, soft yarn to emphasize its solid, enclosed nature.
For the butterfly, use a delicate, printed image on sheer vellum or organza to convey lightness and fragility.
The extreme contrast between the heavy yarn and the translucent wing makes the narrative instantly clear and visually compelling.
22. Design a Playful Sampler with Felt and Found Objects
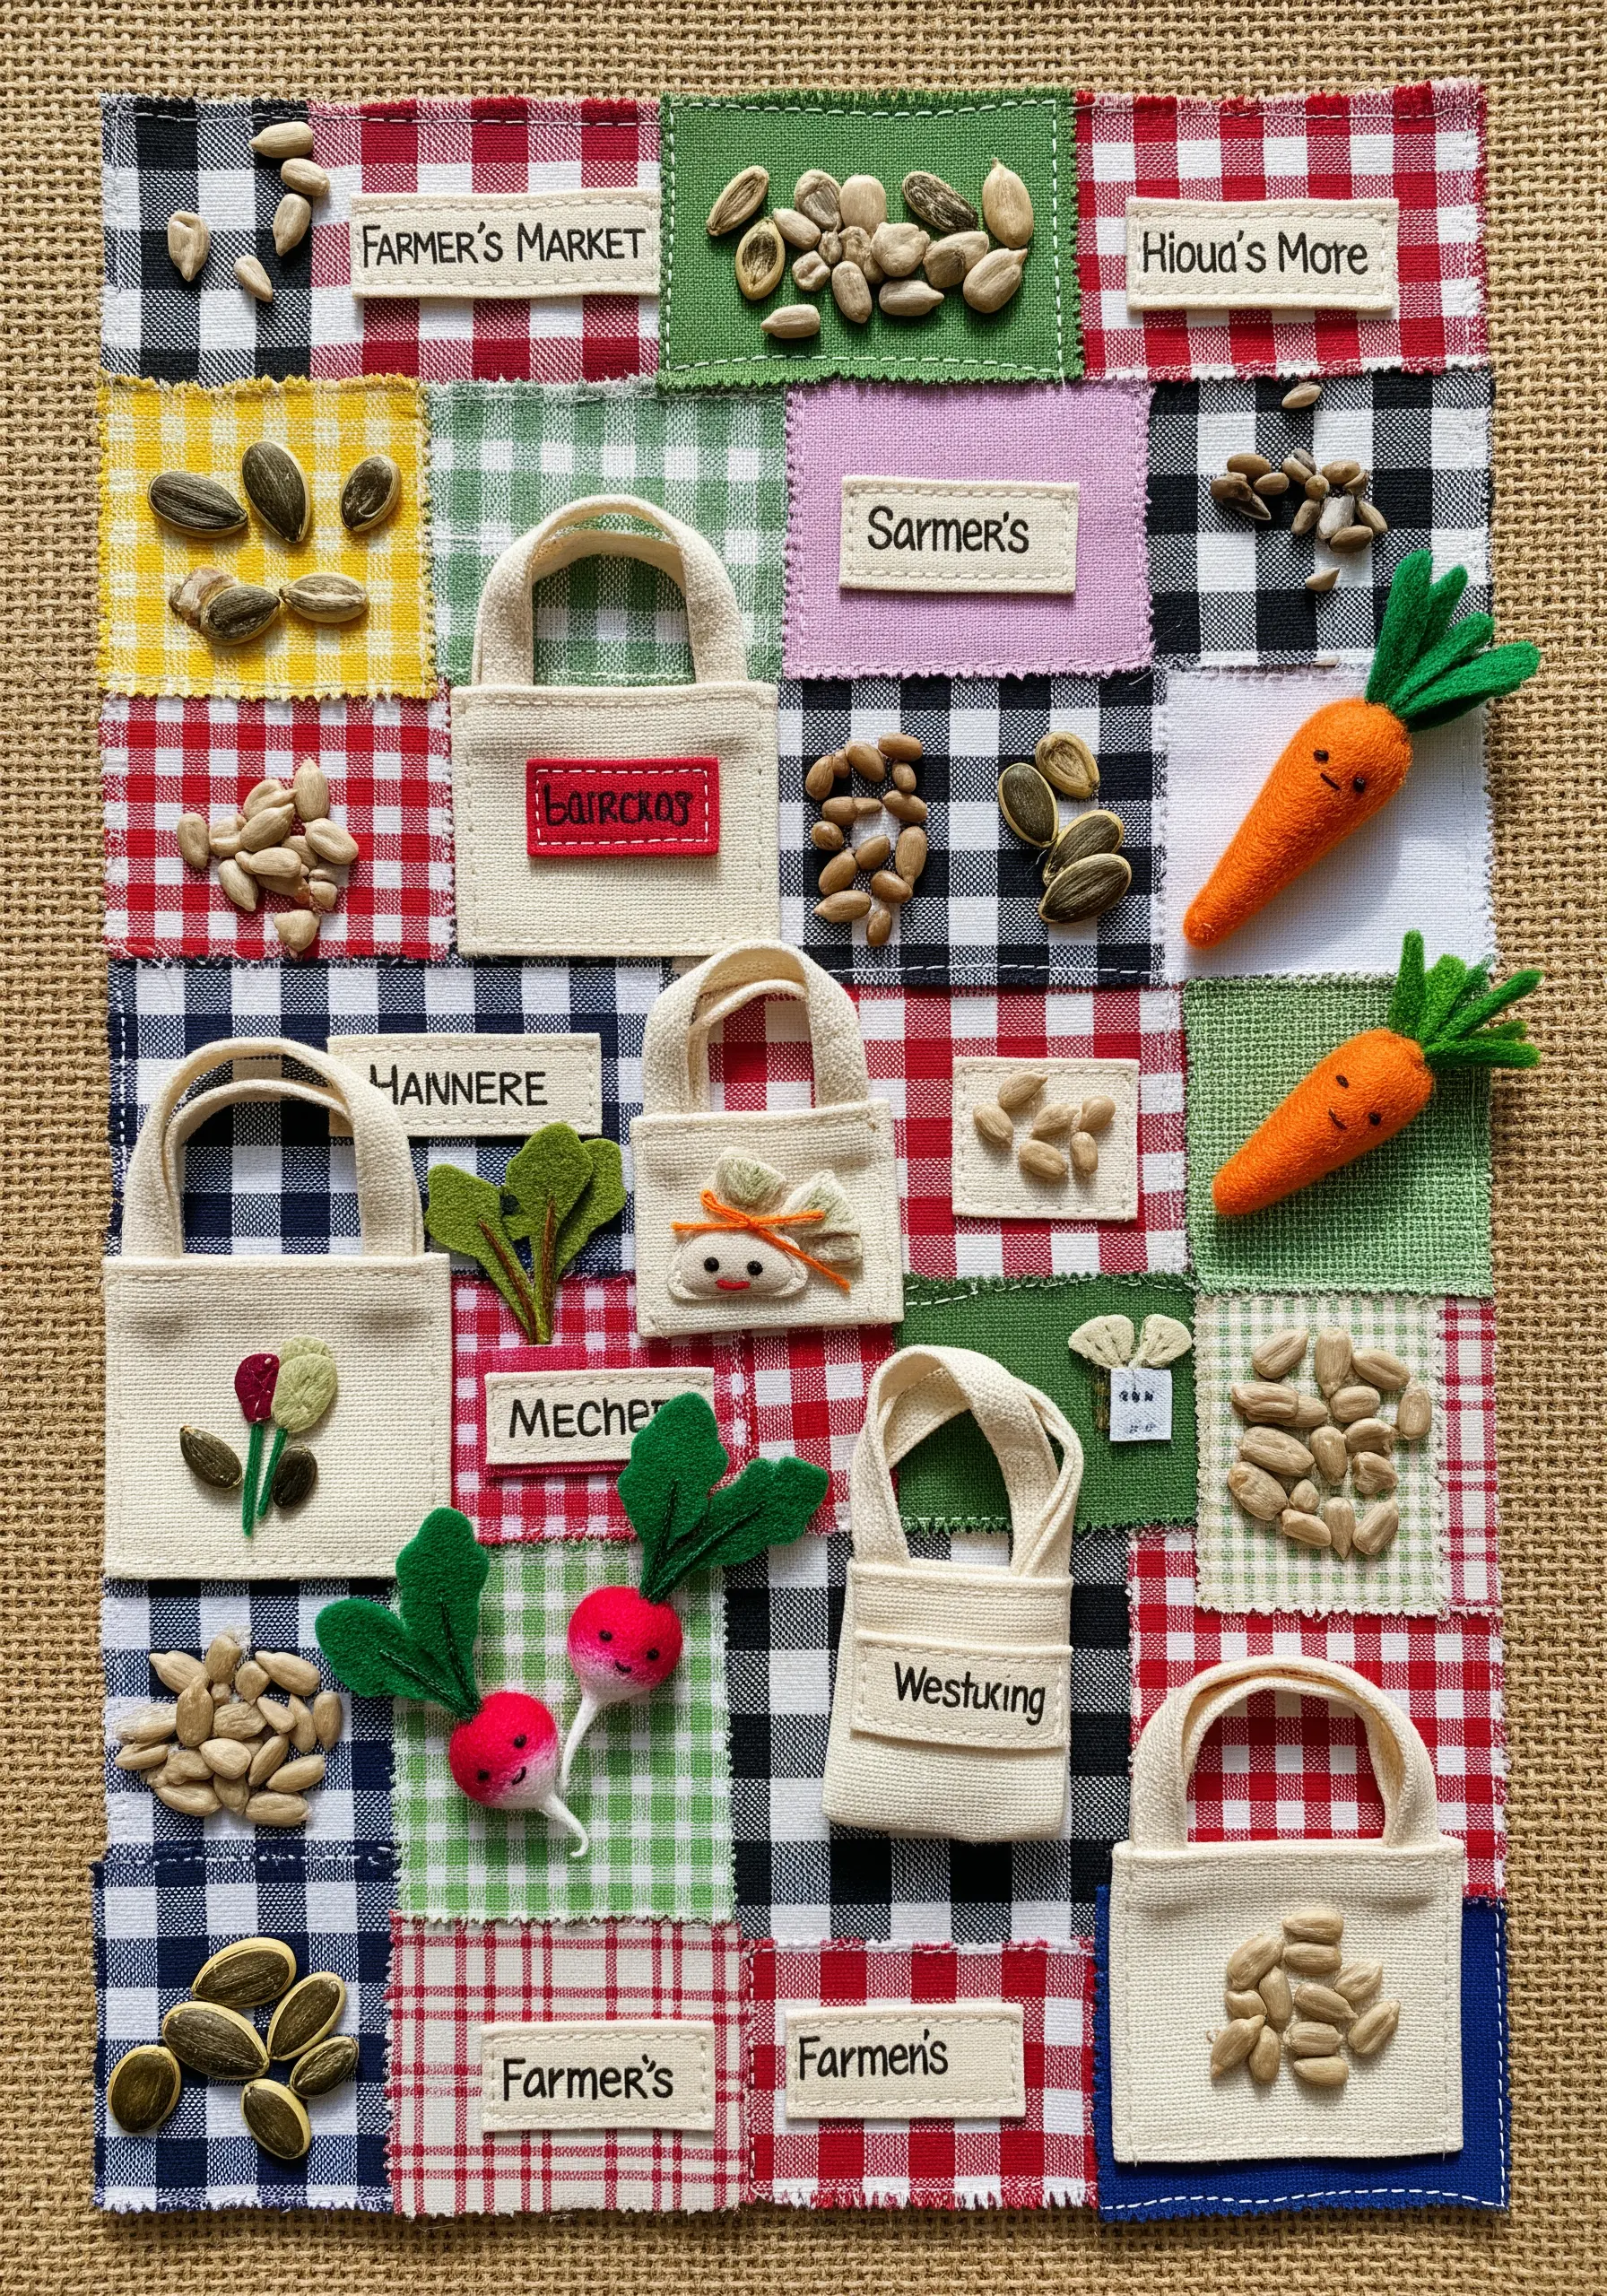
Create a charming quilt-like effect by stitching together patches of patterned fabric like gingham.
Craft dimensional elements from felt, such as carrots and radishes, and appliqué them onto the patches for a soft, playful look.
Incorporate non-traditional materials like real seeds, attaching them with a strong glue or by carefully stitching a sheer fabric pouch over them.
This method turns a simple sampler into a tactile experience, perfect for fabric projects that are perfect for crafting with kids.
23. Create a Sunken Treasure Scene with Rich Textures
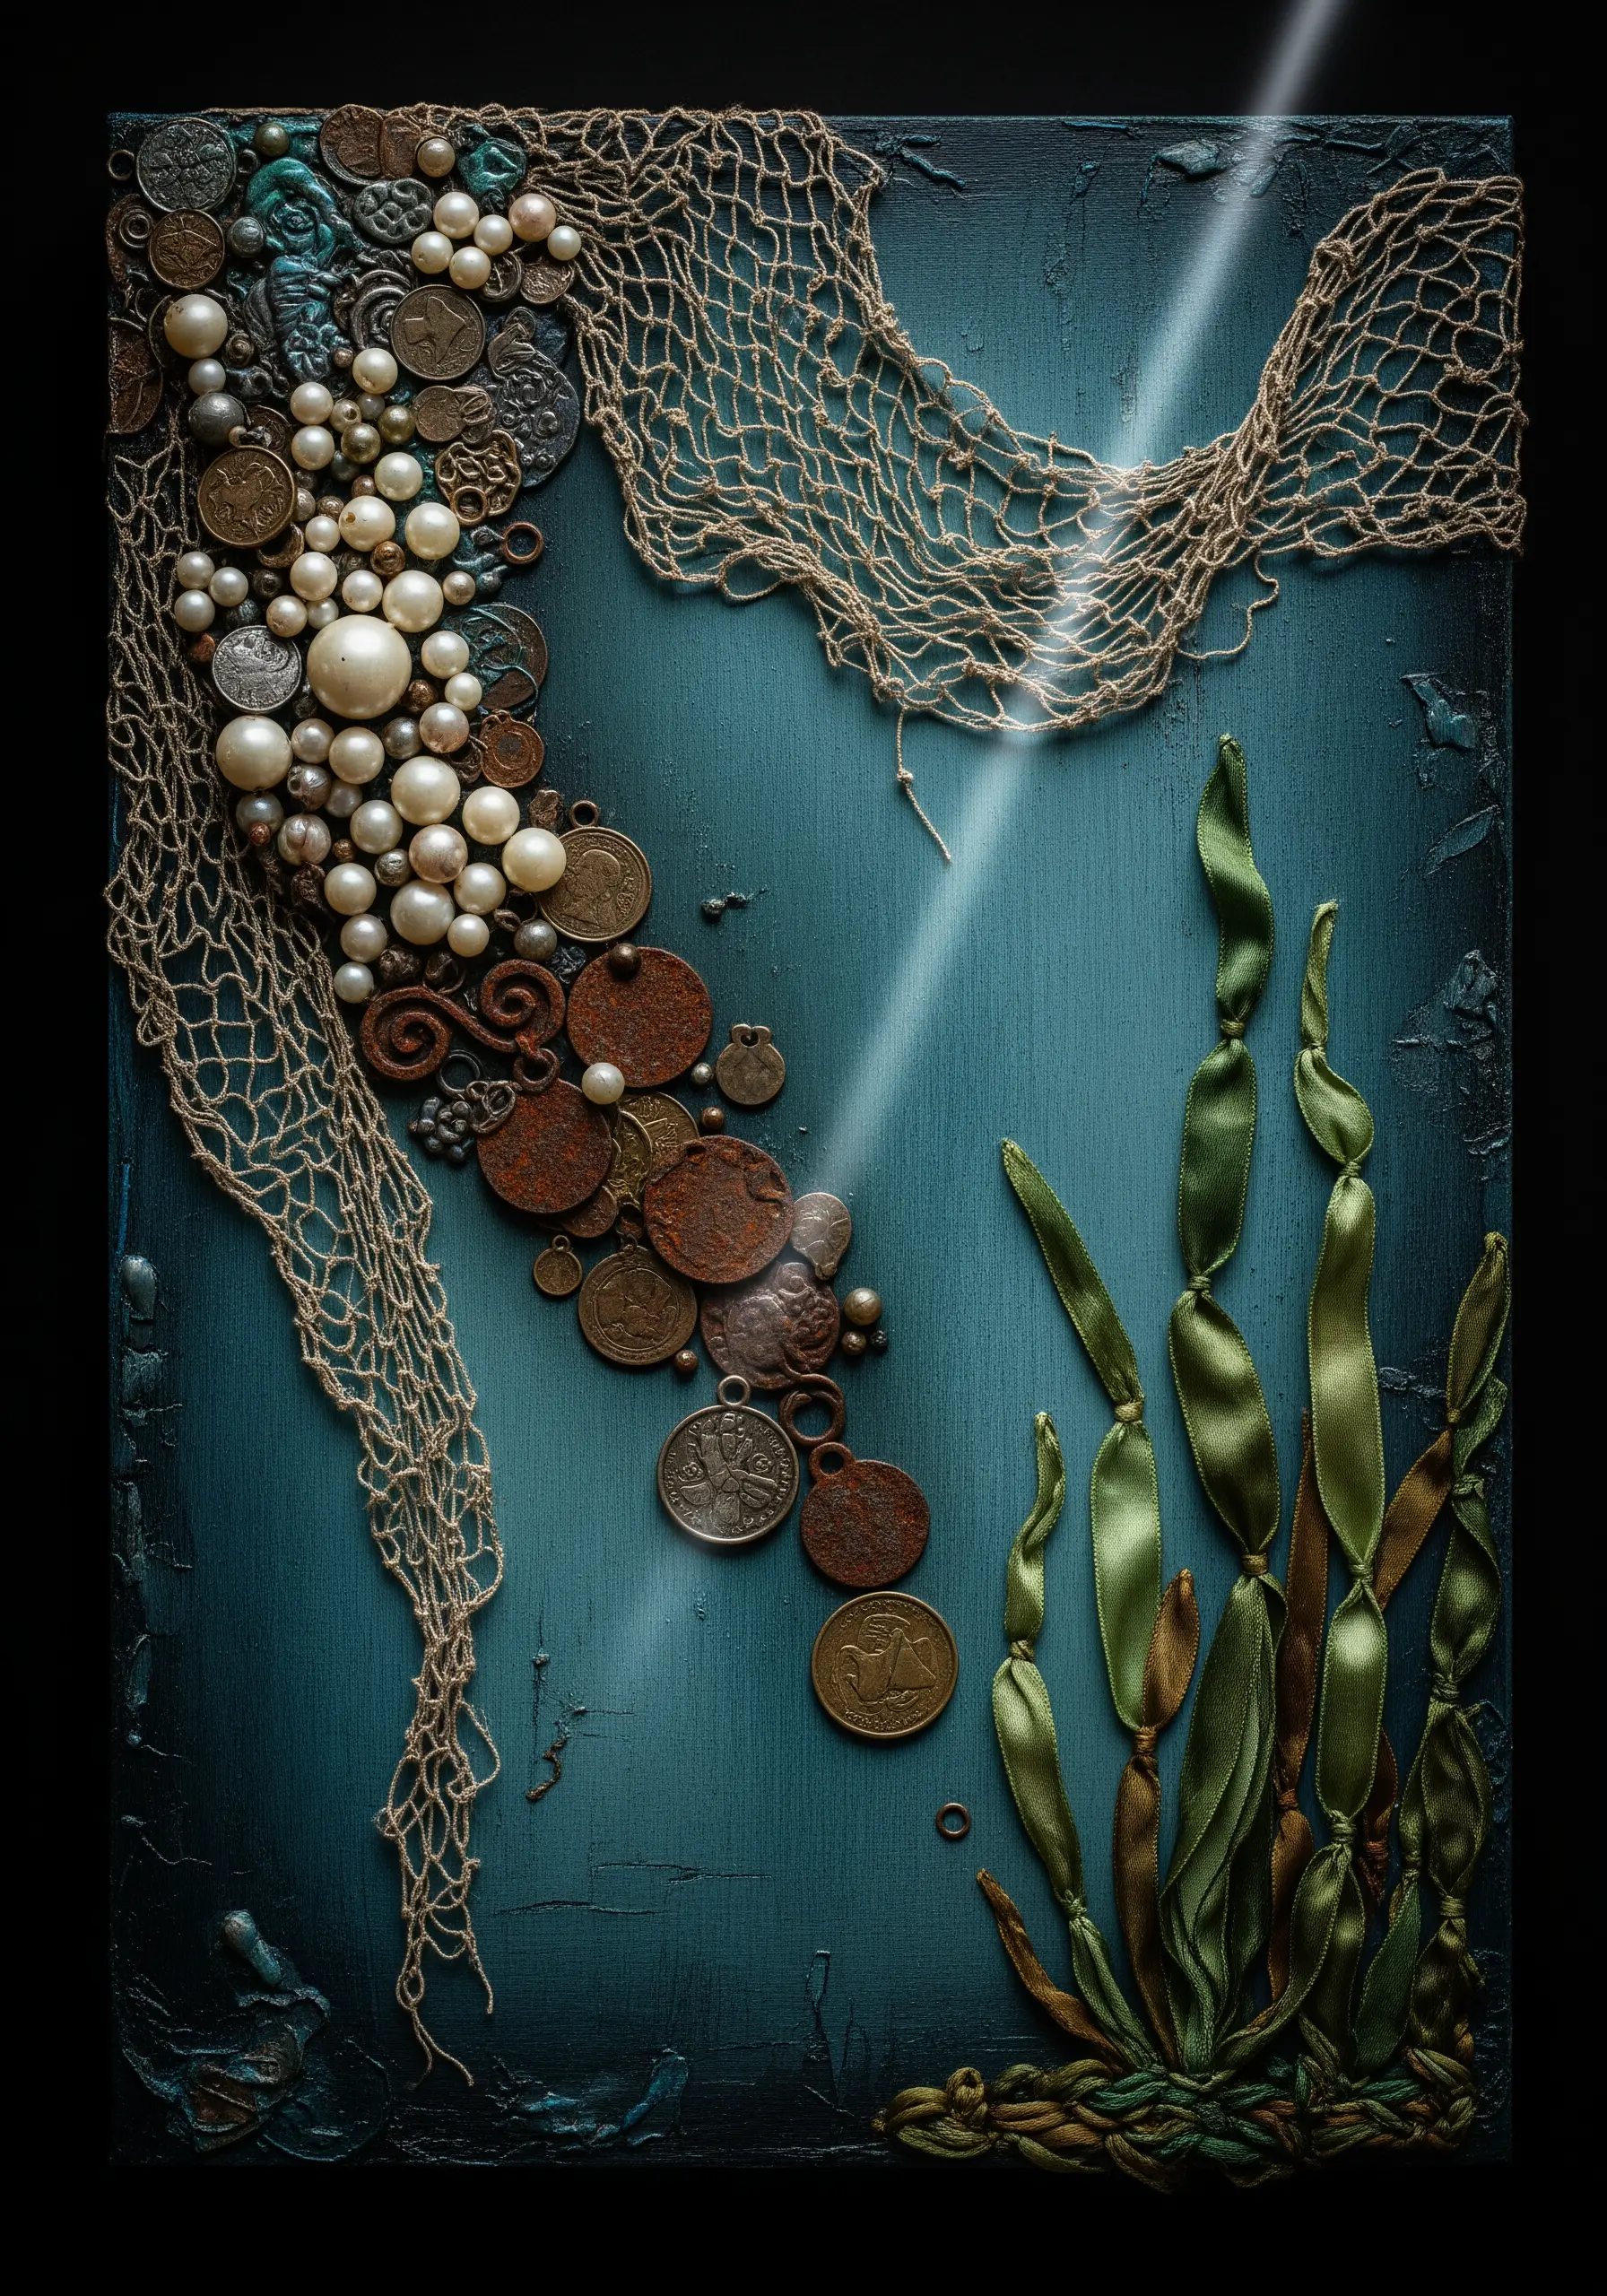
Start with a painted canvas or fabric base in deep, moody blues to establish an underwater atmosphere.
Drape and secure netting to add a layer of texture and create a sense of mystery.
Build up your ‘treasure’ using a cascade of old coins, faux pearls, and beads, attaching them securely with heavy-duty thread or E6000 glue.
Form seaweed by knotting and twisting strips of silk ribbon, which gives it a natural, flowing movement.
24. Recreate Glacial Ice with Crystalline Textures
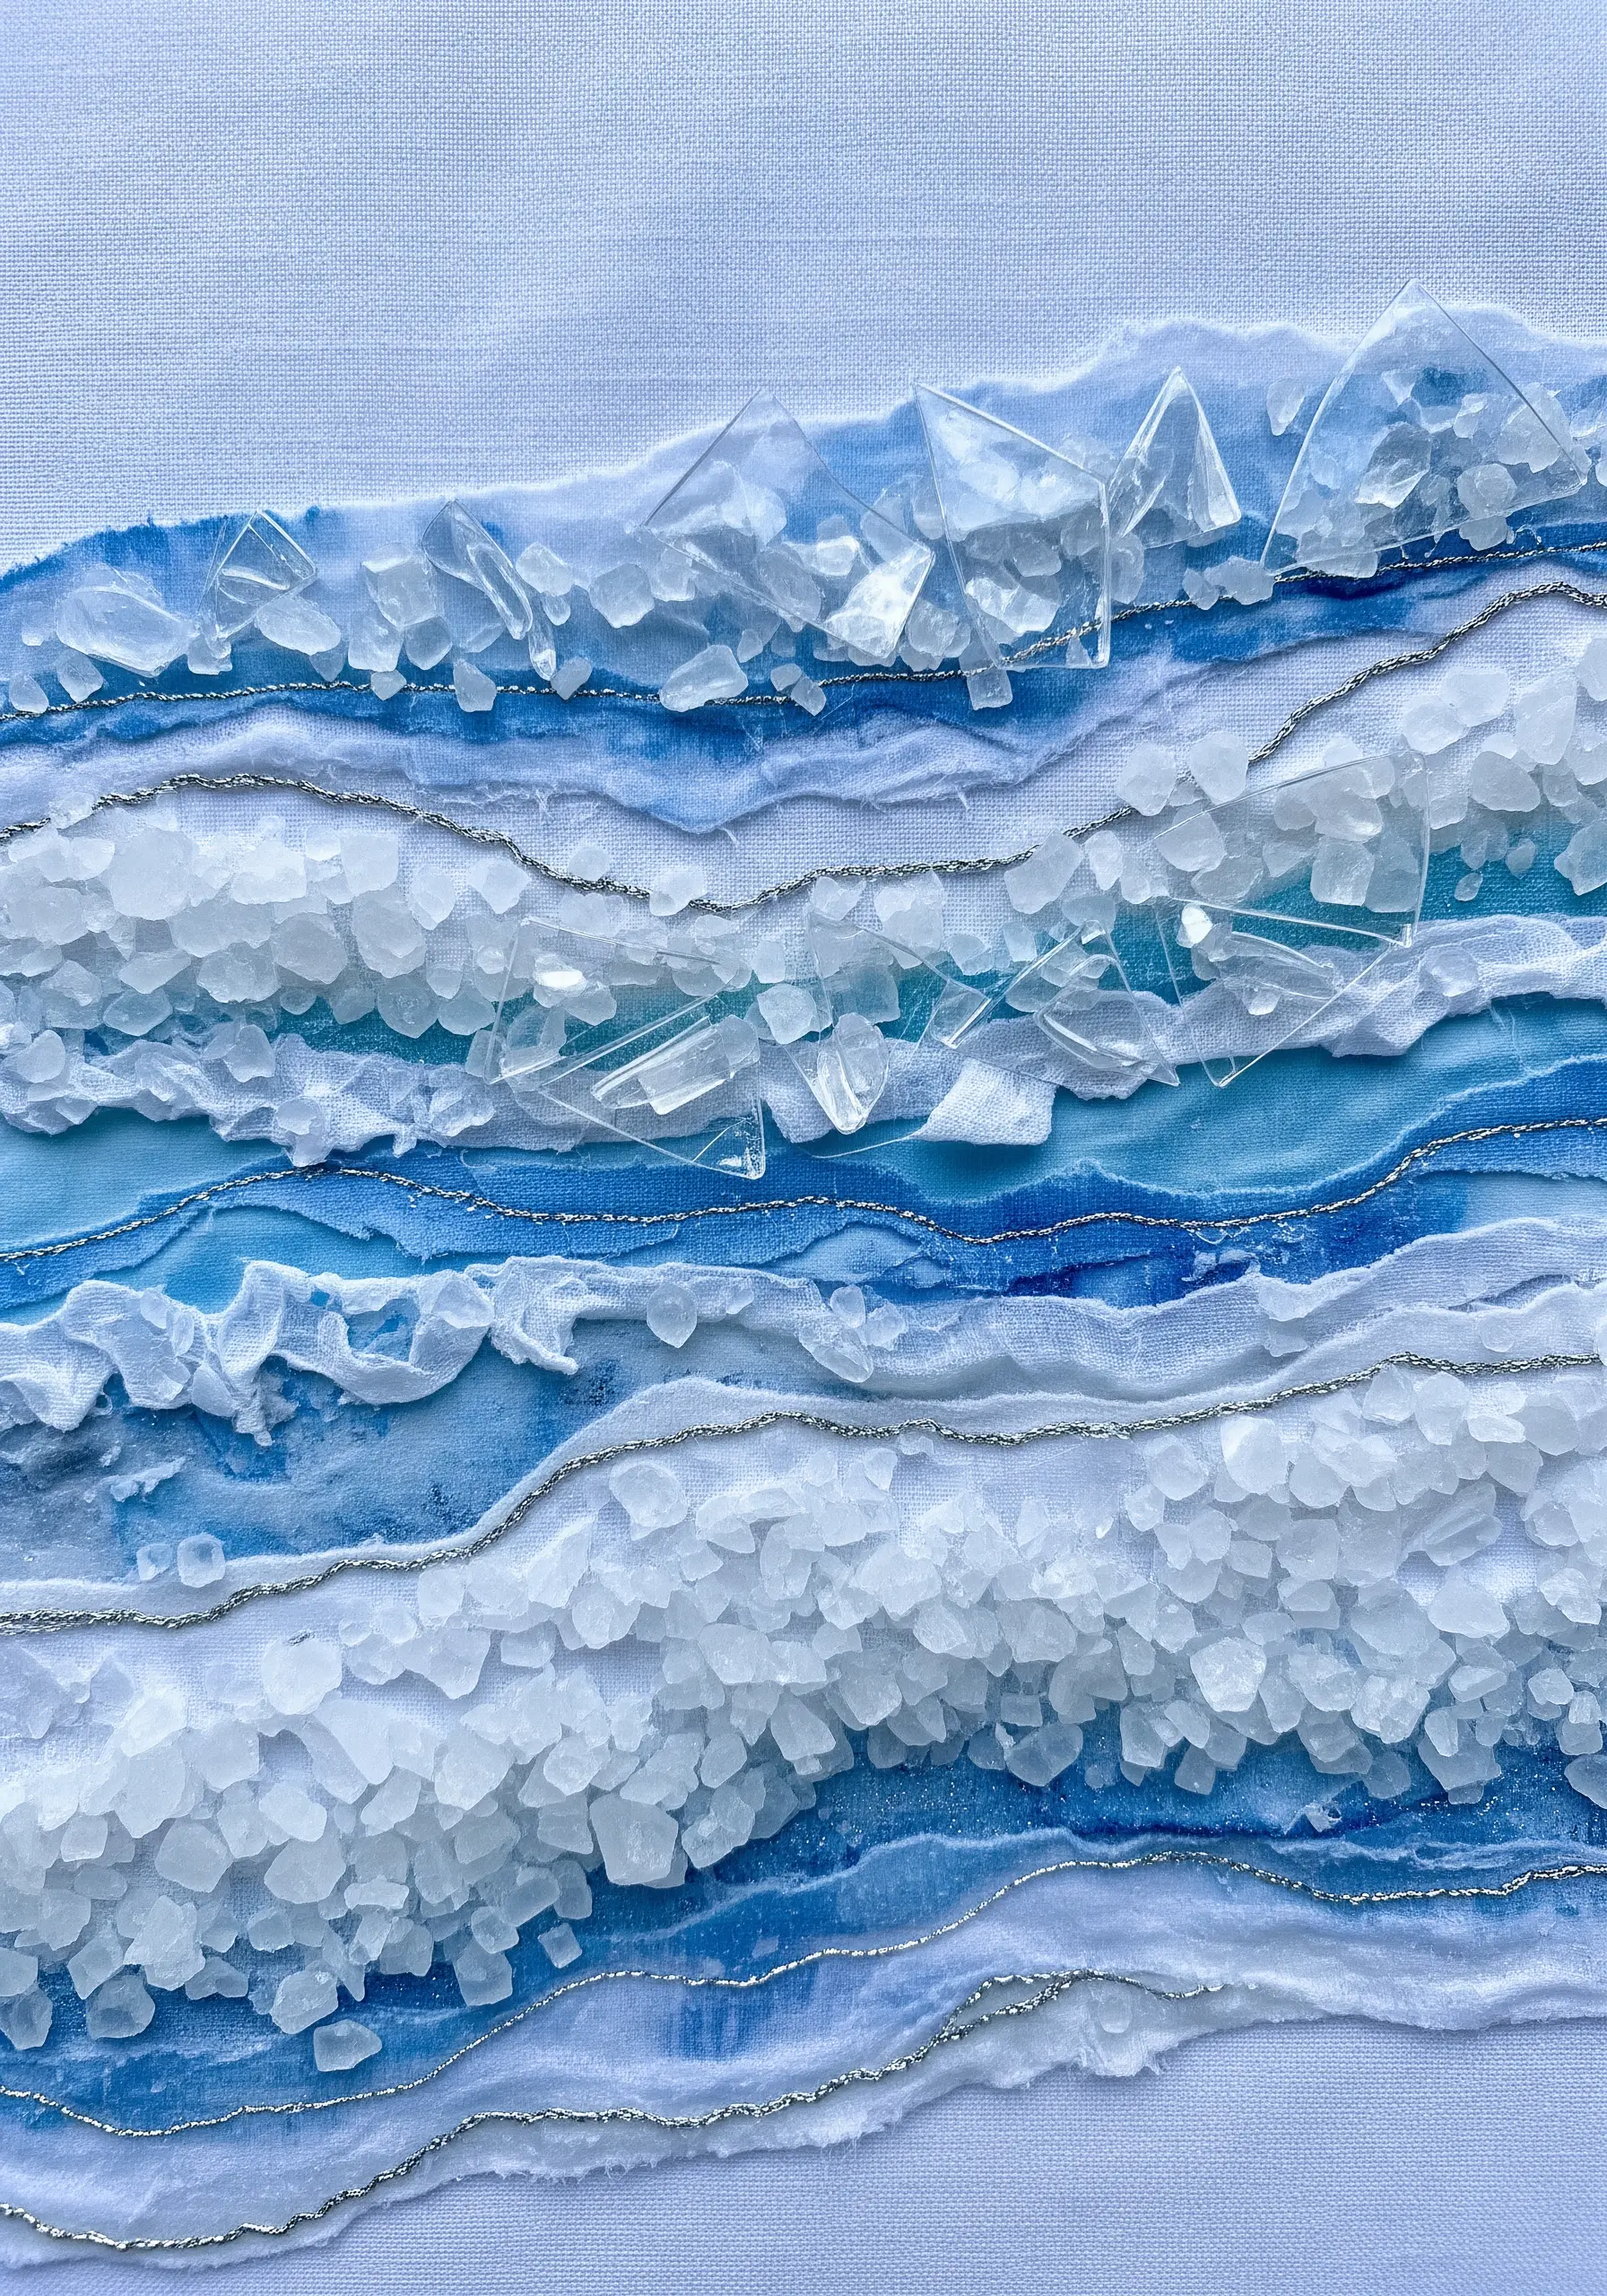
Build up layers of translucent and white fabrics, like organza and distressed cotton, to simulate the depth and color of ice and snow.
Use fine silver metallic thread to stitch wavy lines, suggesting water currents or light reflecting off the ice.
For a realistic icy texture, adhere coarse sea salt, Epsom salts, or clear shattered plastic onto the fabric using a strong gel medium.
This technique is a fantastic way to explore ways to embroider natural textures that are unconventional and highly tactile.
25. Craft Vibrant Felt Appliqué with Simple Stitches
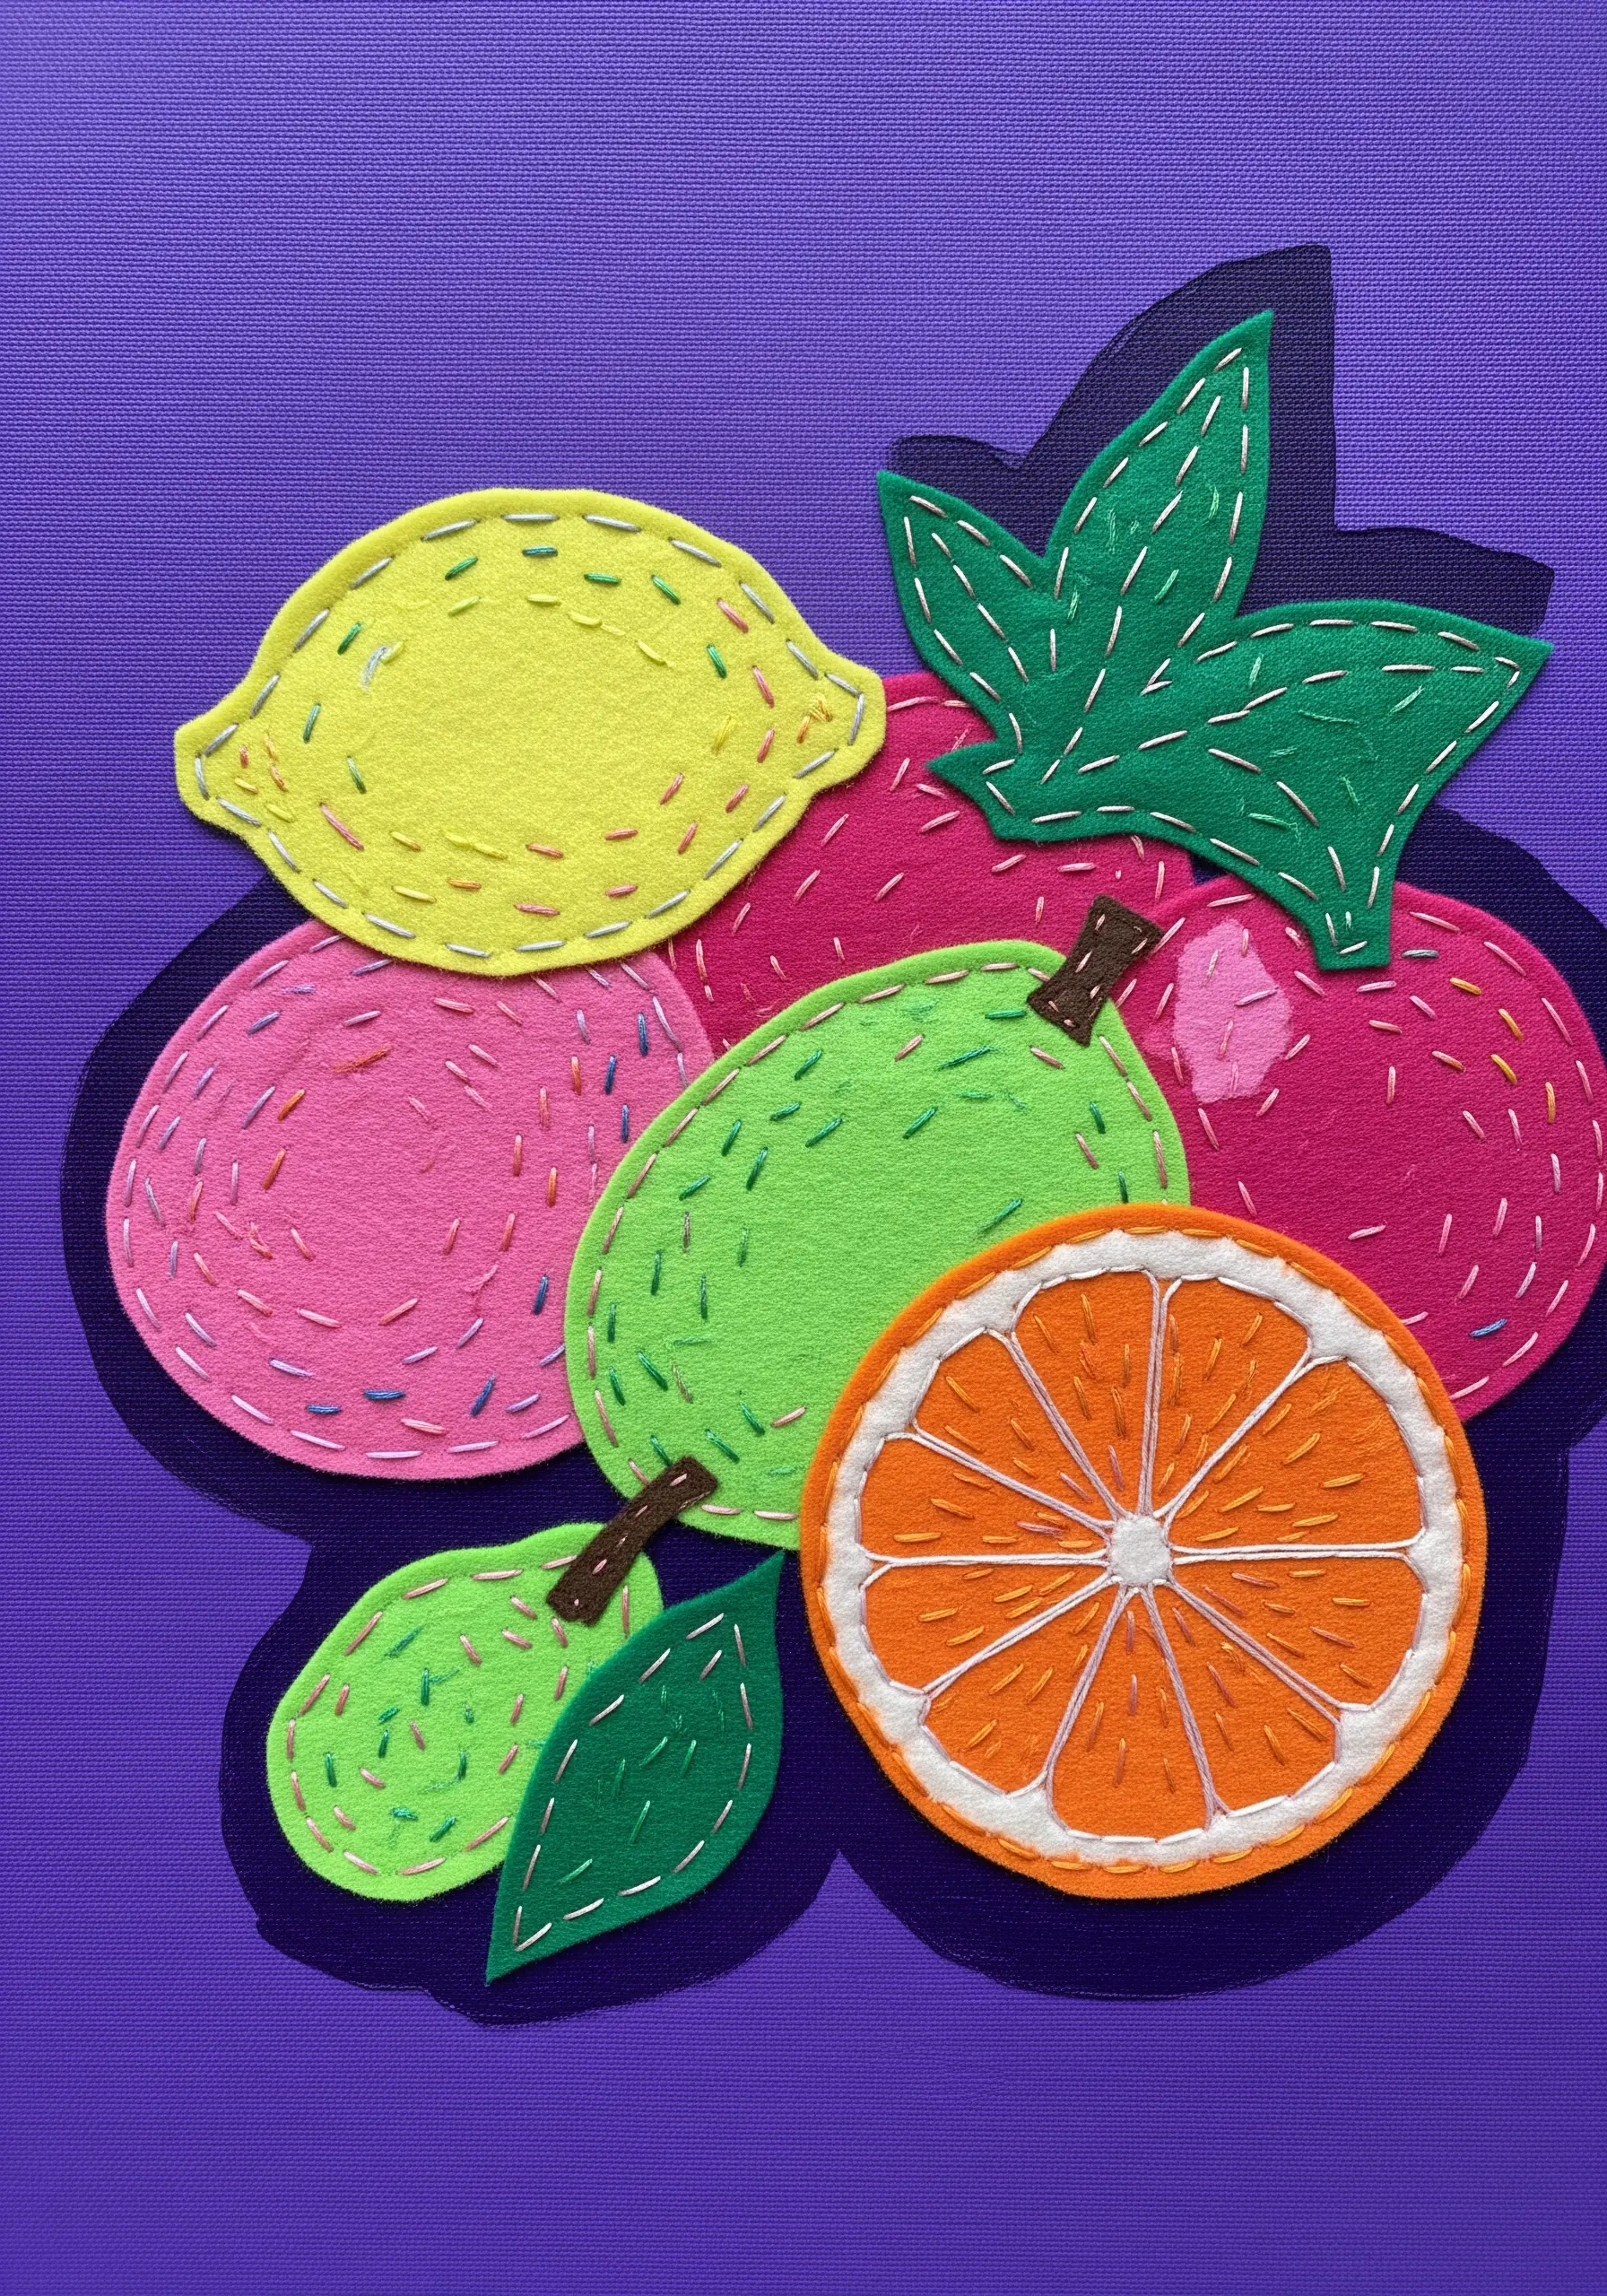
Use brightly colored felt for your fruit shapes; its stiffness and opacity make it ideal for creating clean, bold designs.
Layer the felt pieces to create dimension, like the segments of the orange slice, before you begin stitching.
You don’t need complex stitches. A simple running stitch or backstitch in a contrasting thread is all it takes to add charming detail and secure the pieces.
This is an accessible way to play with color and shape, resulting in cute and colorful embroidery projects with a graphic, modern feel.
26. Weave a Family History with Photos and Fabric
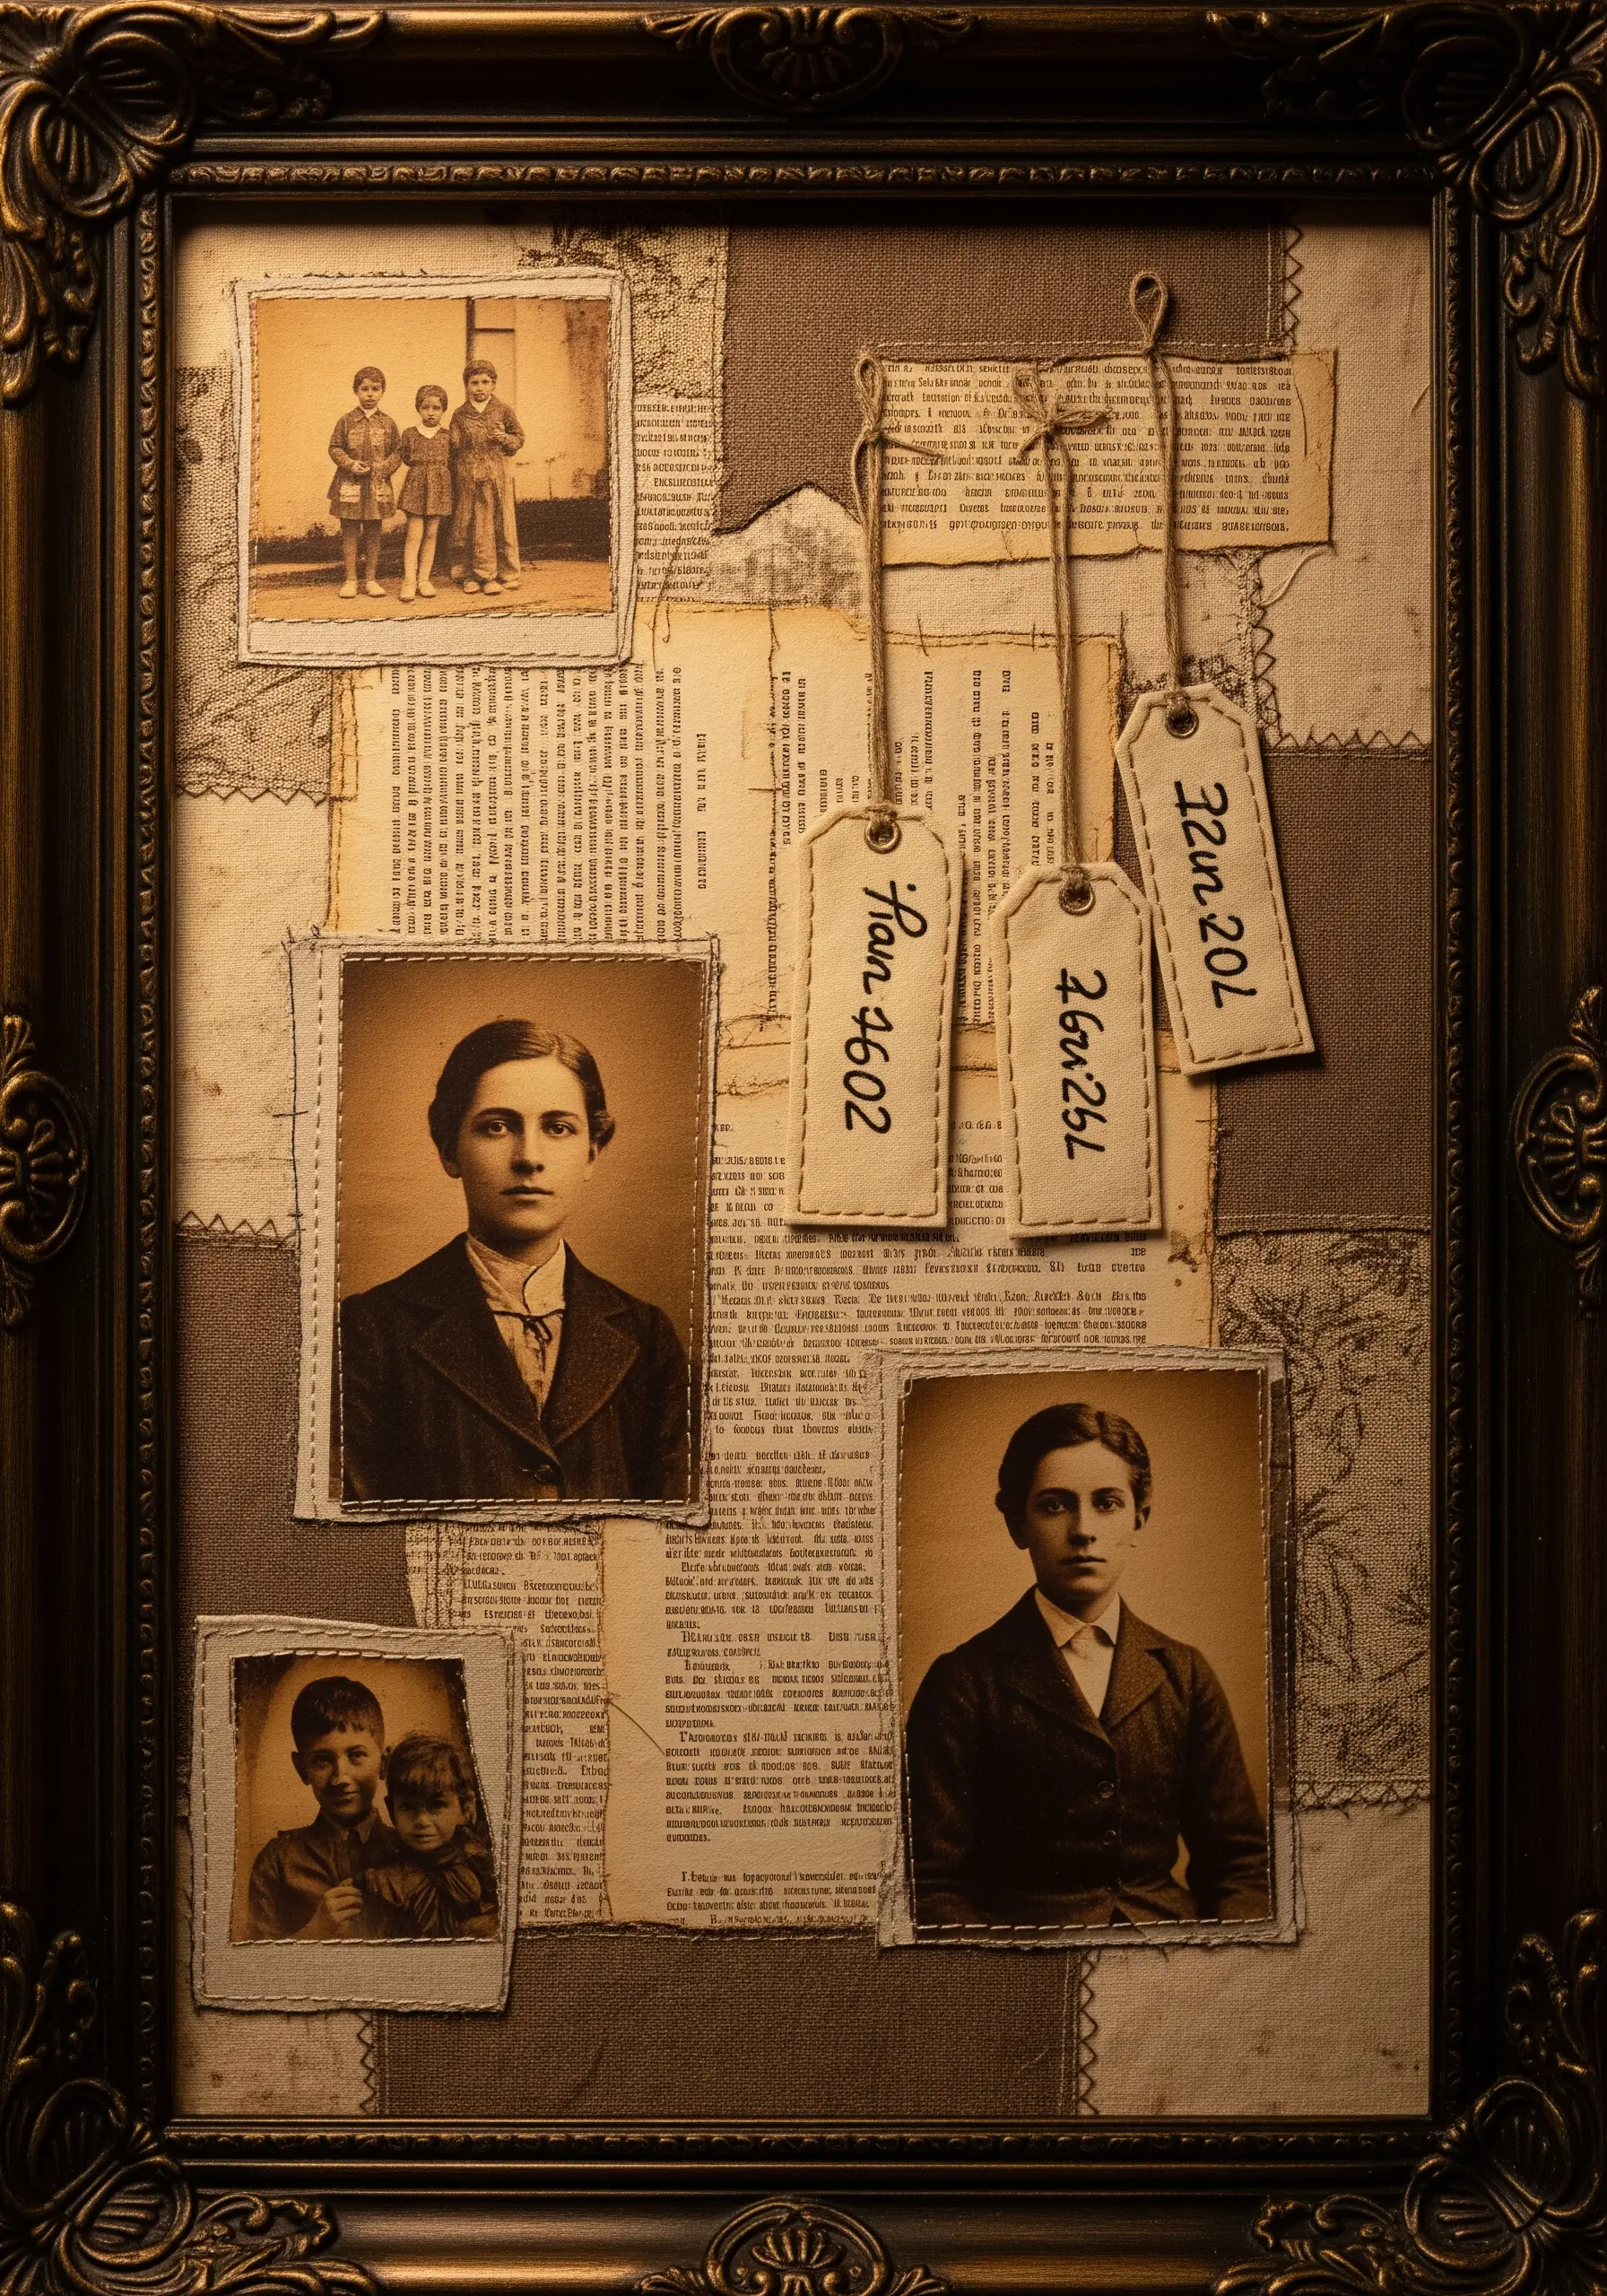
Combine photocopied vintage photographs with scraps of linen and pages from old books to create a narrative collage.
Use a sewing machine’s zigzag stitch to frame the photos and attach them to the backing fabric. This adds a raw, archival texture.
Incorporate small, hand-stitched details or hanging tags to add dates, names, or notes, further personalizing the piece.
This thoughtful approach turns your embroidery into meaningful, personalized framed embroidery designs that honor memory and heritage.
27. Layer Psychedelic Petals with Neon Thread
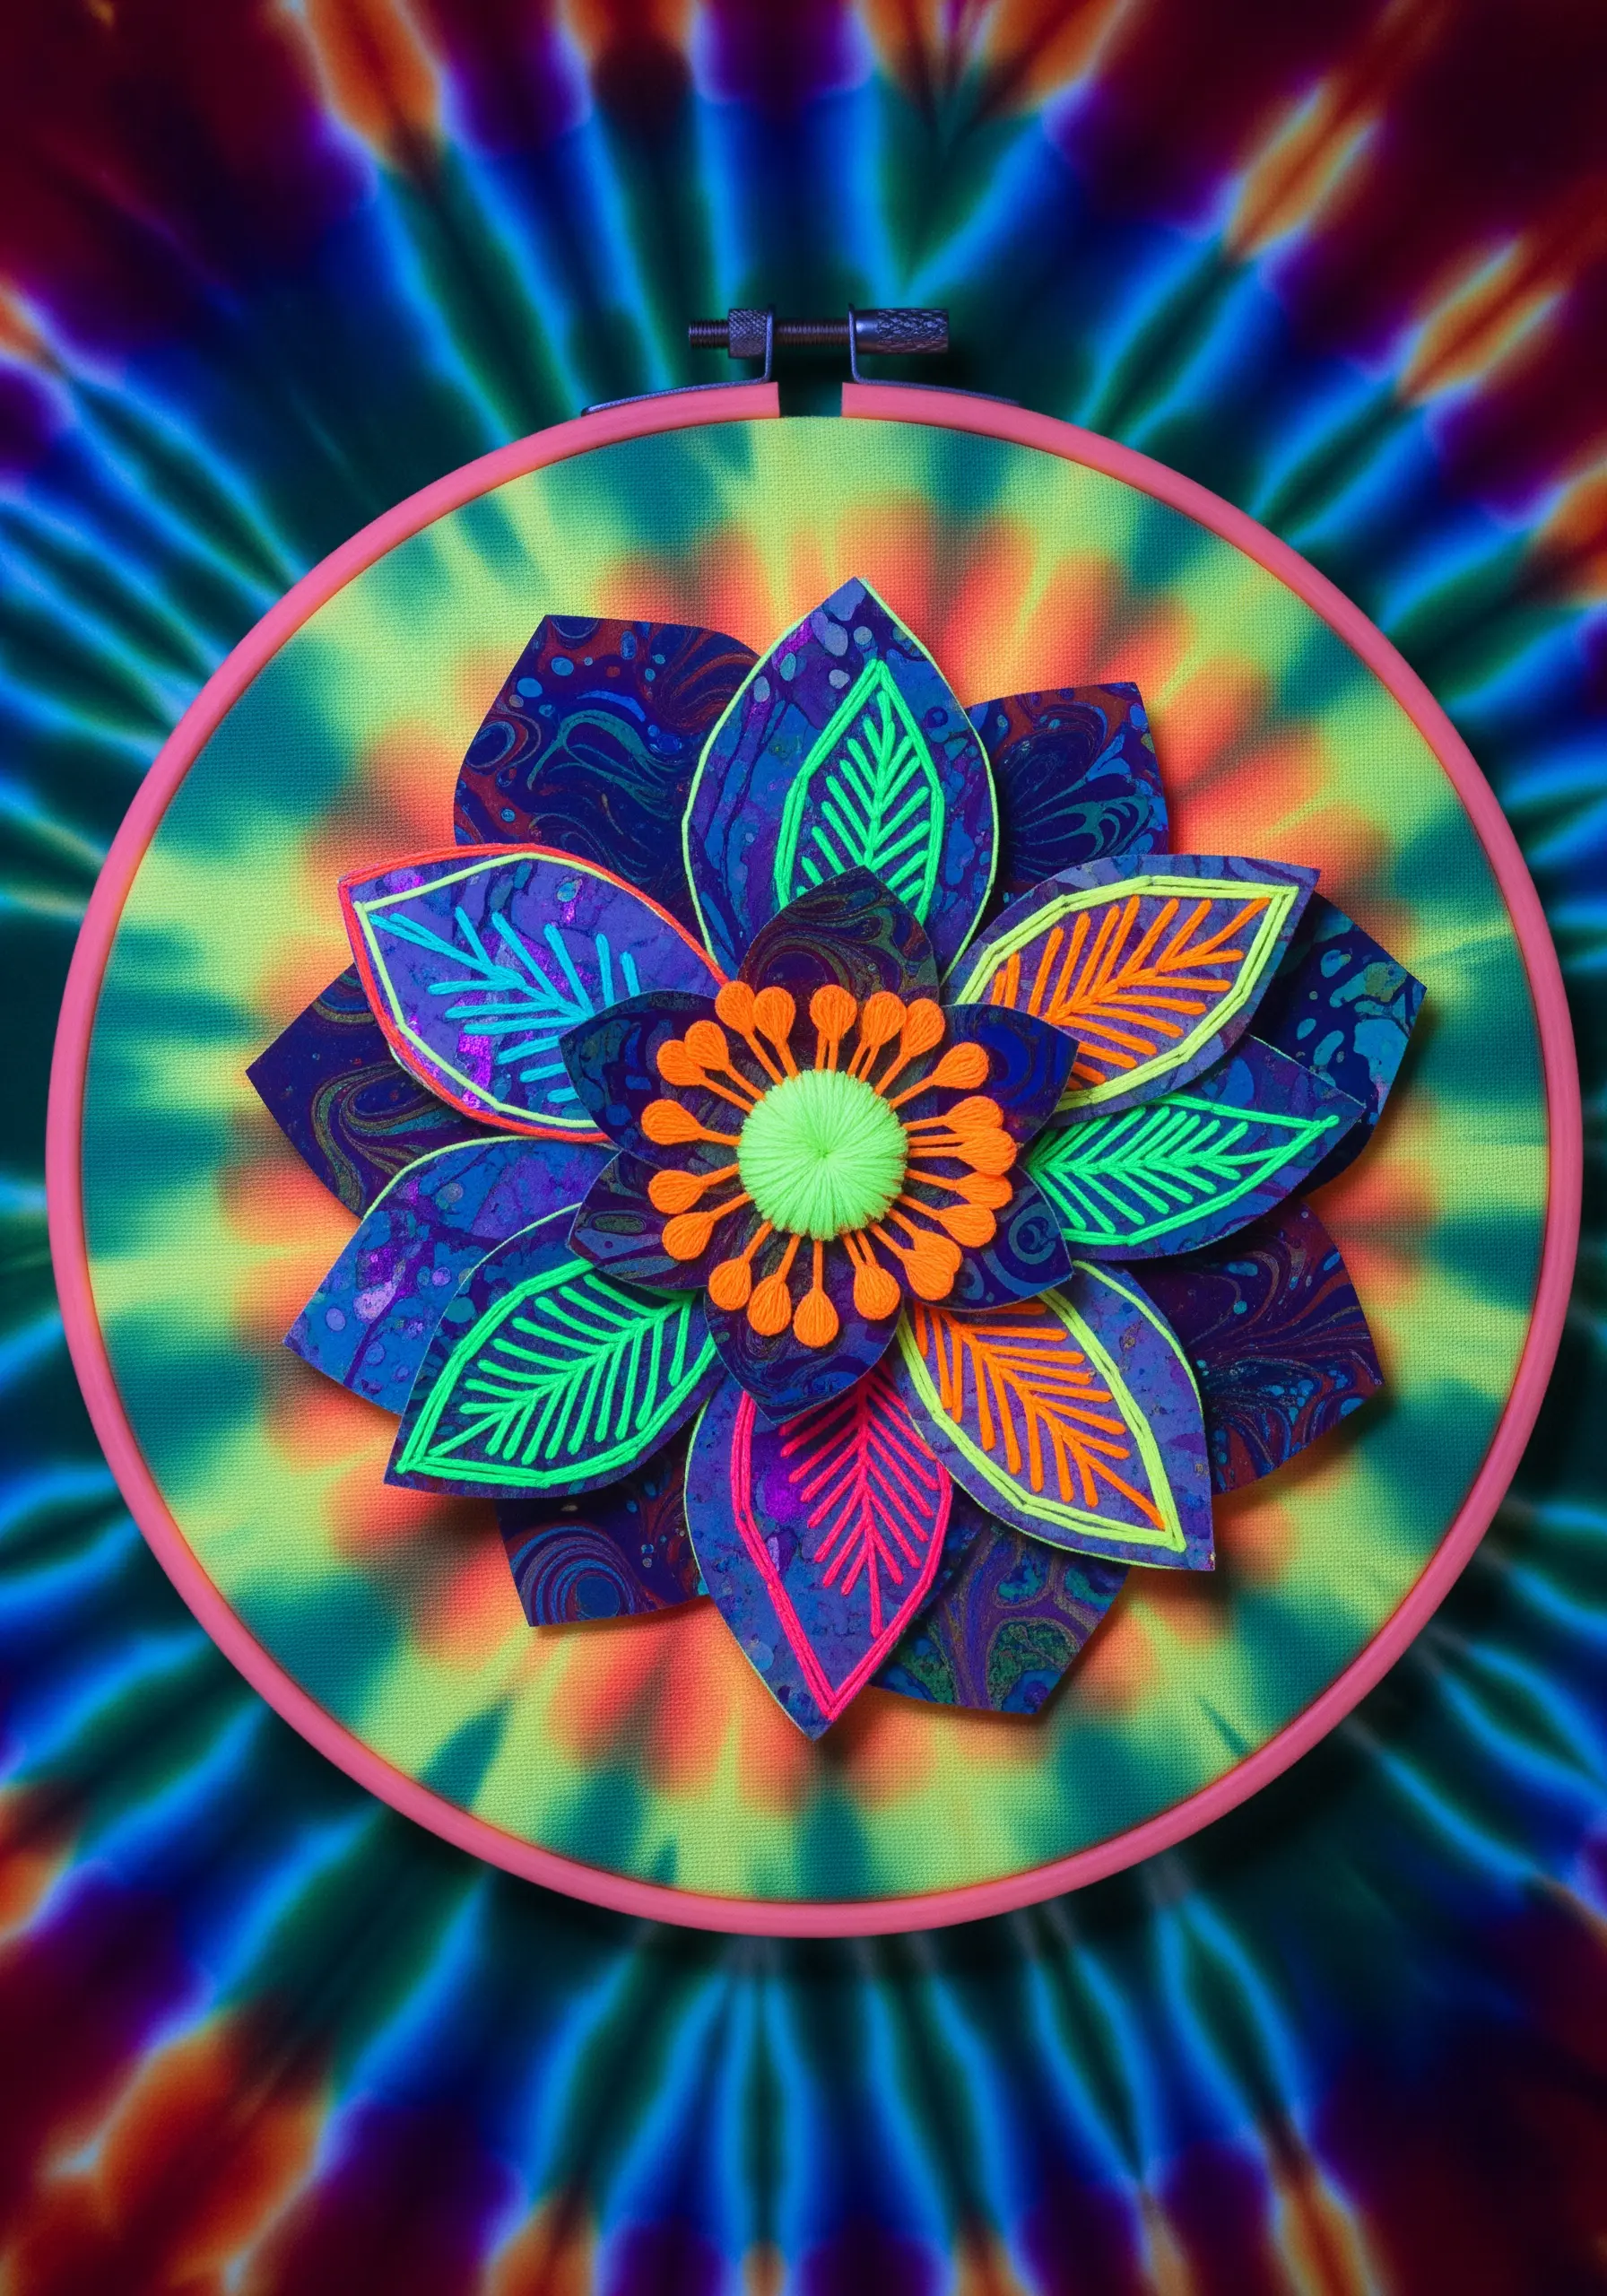
Start with a high-energy background fabric, like this tie-dye, to set a vibrant tone for your entire piece.
Cut petal shapes from intricately patterned paper or fabric, layering them to build a three-dimensional flower.
Use bright, neon embroidery floss to add veins and outlines to the petals. The neon thread will pop against the busy patterns, creating visual clarity and excitement.
This technique allows you to create bold color-pop embroidery that feels electric and full of movement.
28. Convey a Desert Landscape with Arid Textures
To achieve a cracked earth effect, apply a thick layer of gesso or crackle paste to your canvas and let it dry completely.
For wispy, arid clouds, use stretched and frayed pieces of cheesecloth or medical gauze, securing them with a spray adhesive or a few stitches.
Use sparse, wiry stitches like the fly stitch or feather stitch with a variegated brown and green thread to create resilient desert shrubs.
This method is perfect for earth-inspired embroidery designs that focus on the beauty of harsh, dry environments.
29. Capture a Rainy Night with Light and Reflection
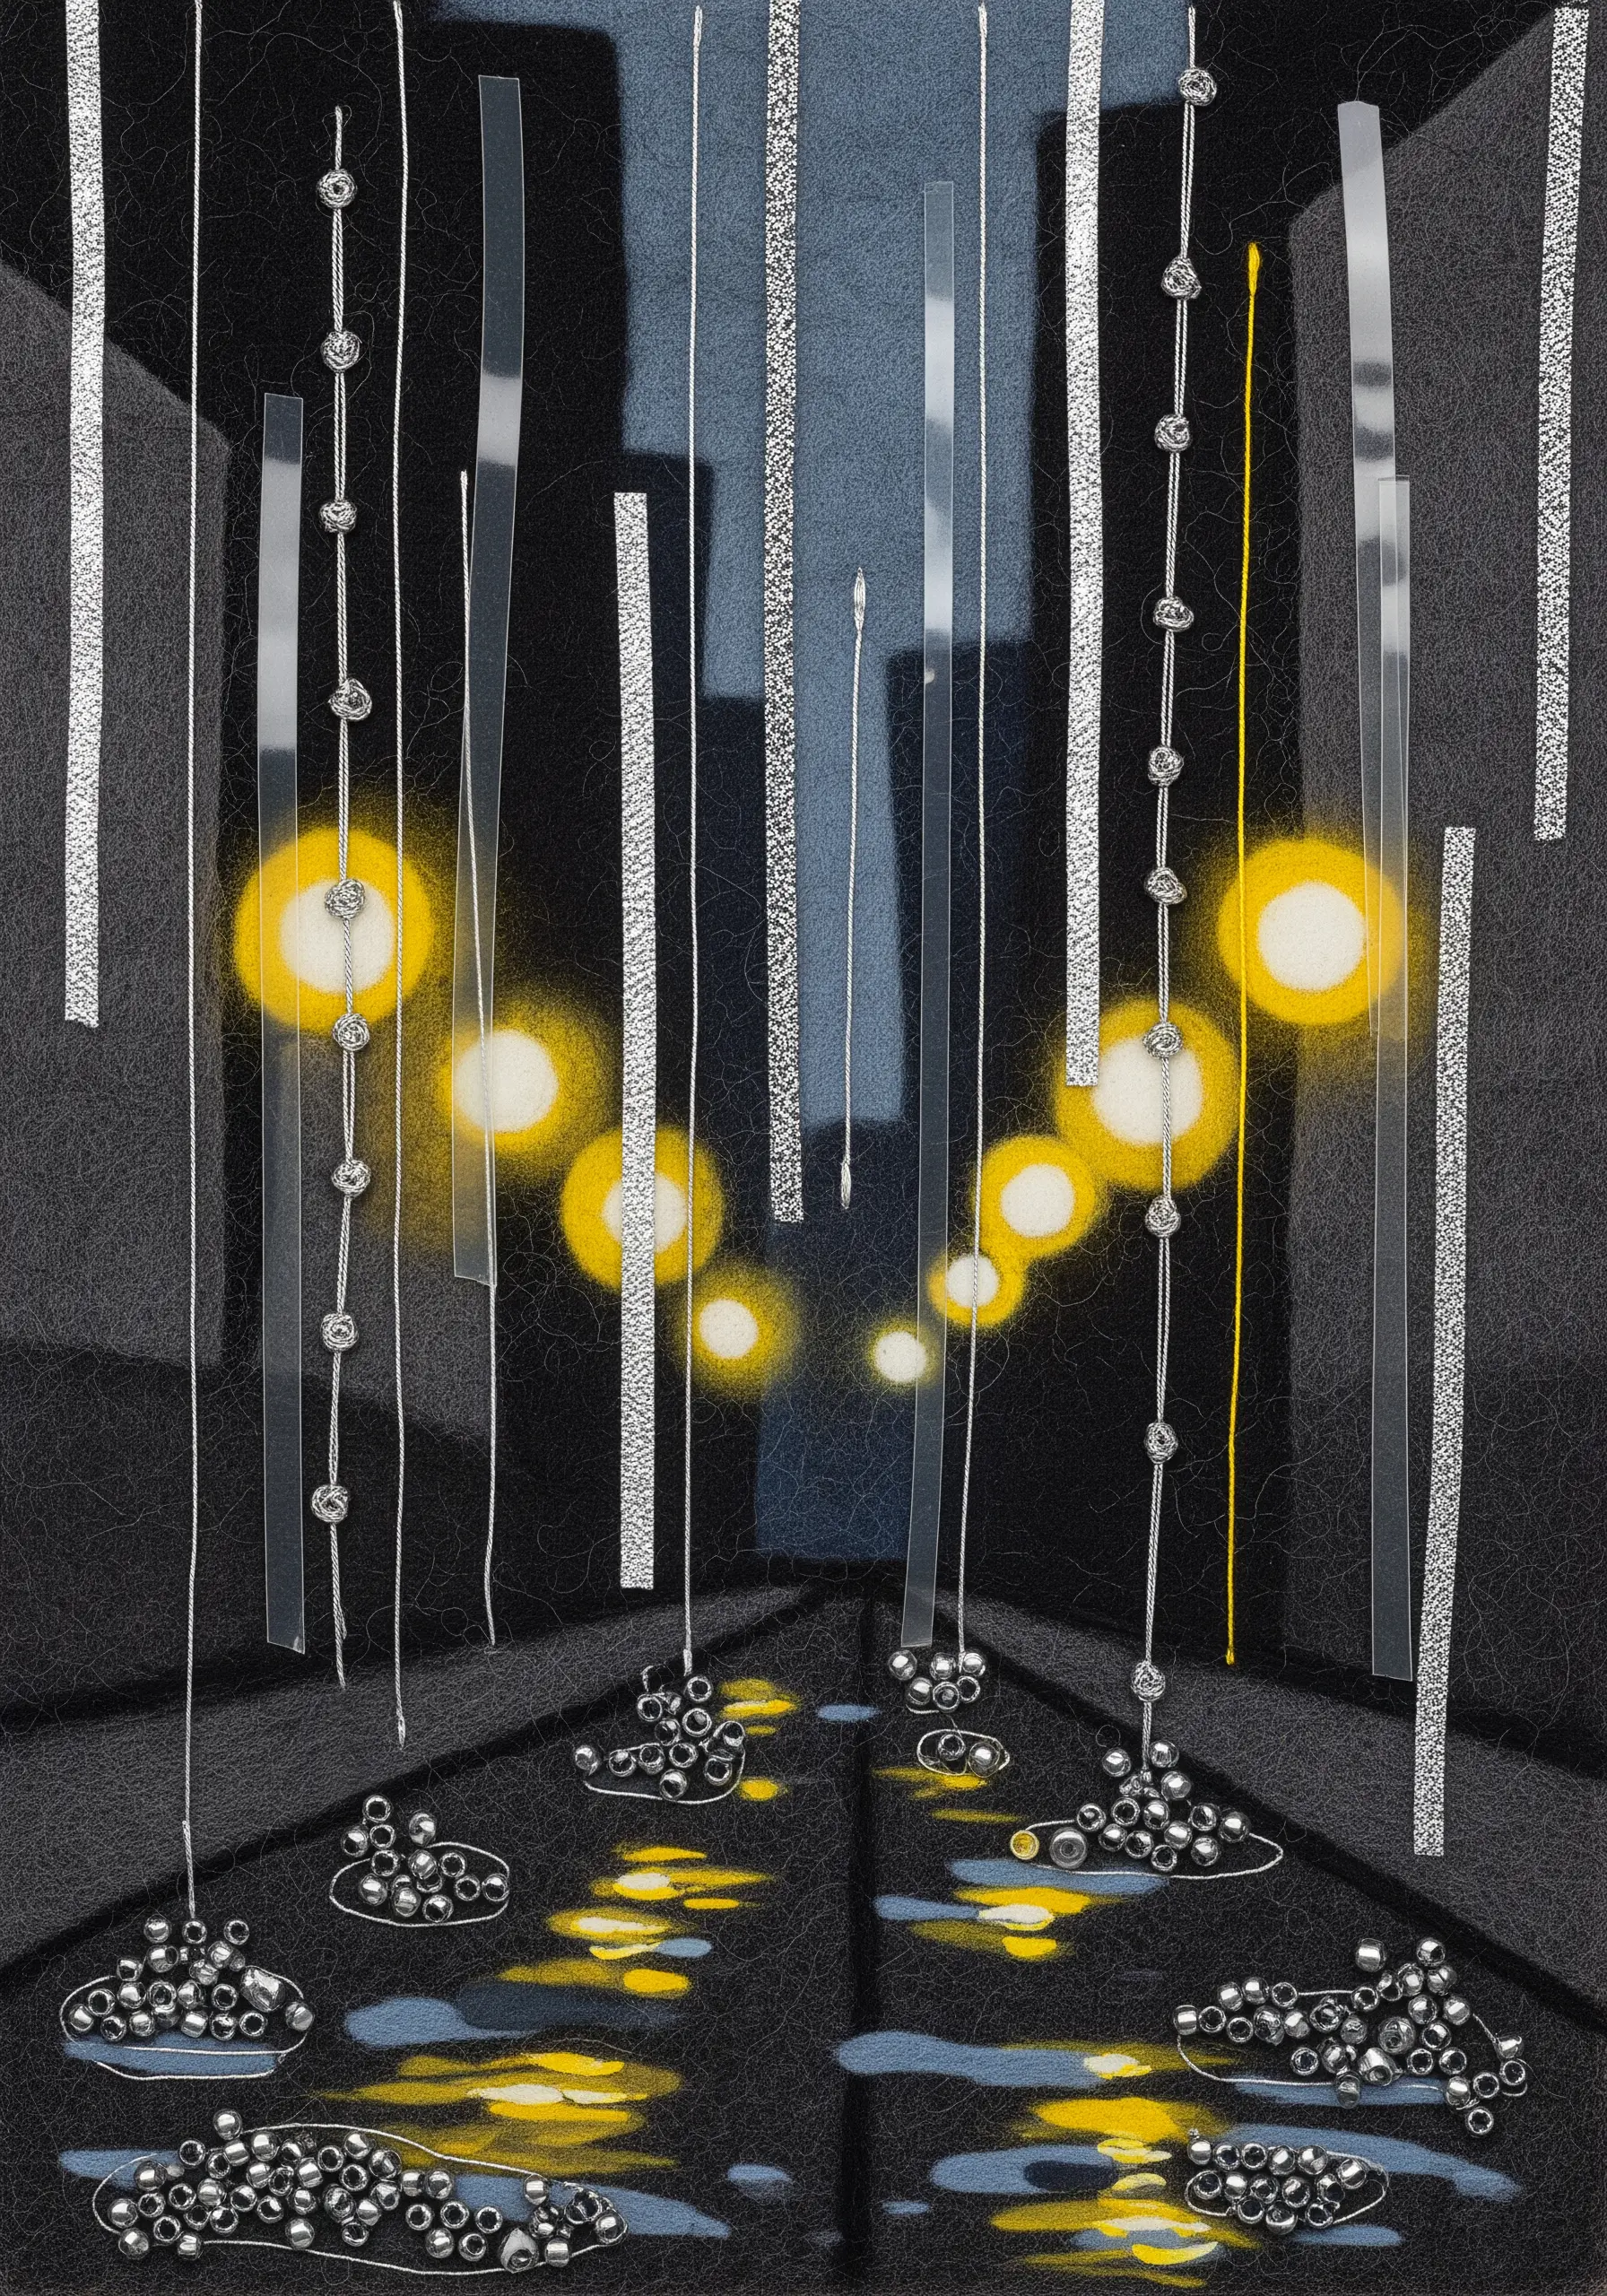
Create a dark, abstract city background using layers of gray and black felt.
To simulate the blur of streetlights, use a needle-felting technique with yellow wool roving, or paint soft circles with acrylic paint.
Incorporate strips of translucent vellum or plastic to represent sheets of rain, and use couched silver thread for vertical rain streaks.
Finally, stitch clusters of silver beads in the ‘puddles’ to mimic the reflection of light on wet pavement, adding a final touch of realism.
30. Construct a Secret Garden Diorama
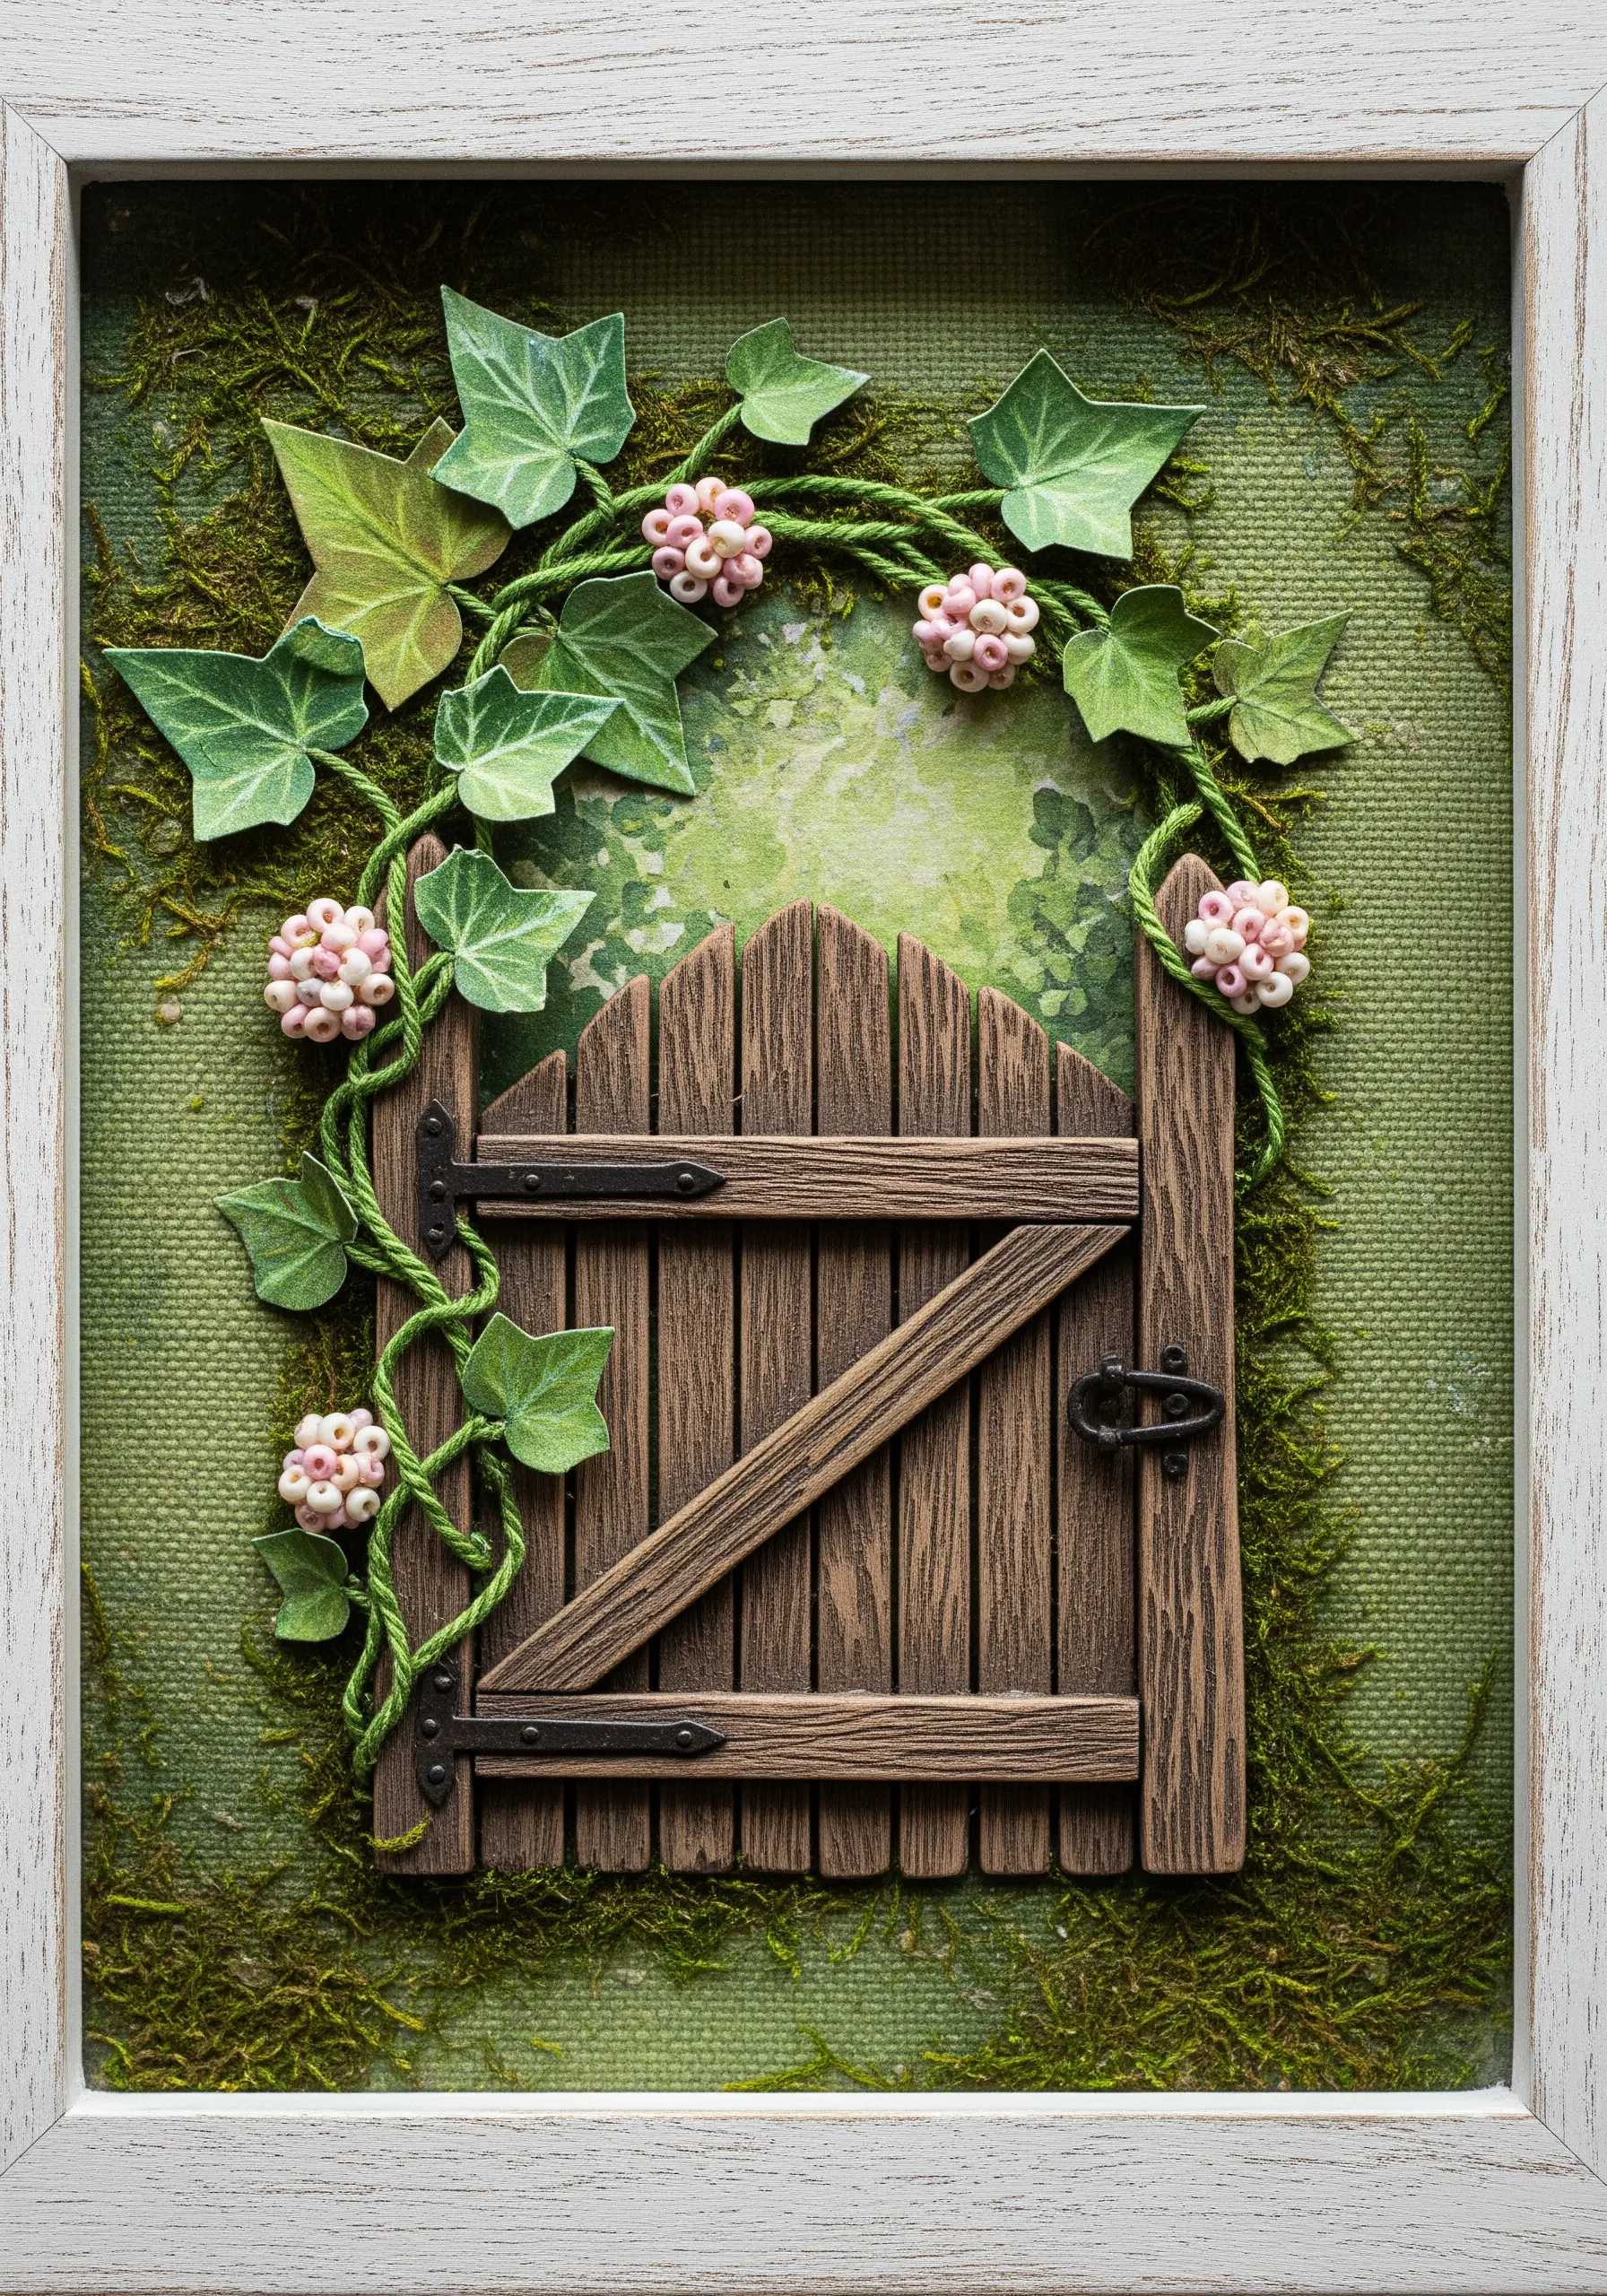
Build a three-dimensional scene by starting with a painted canvas for a soft-focus garden background.
Use materials like scored cardstock or craft wood for structural elements like the gate, which gives the piece a solid form.
Create delicate climbing vines from twisted paper or embroidery floss, and attach pre-cut paper leaves for realistic foliage.
For the flowers, cluster French knots or small beads to create tiny, textured blossoms, turning your frame into a magical portal.
31. Deconstruct and Reassemble Vintage Textiles
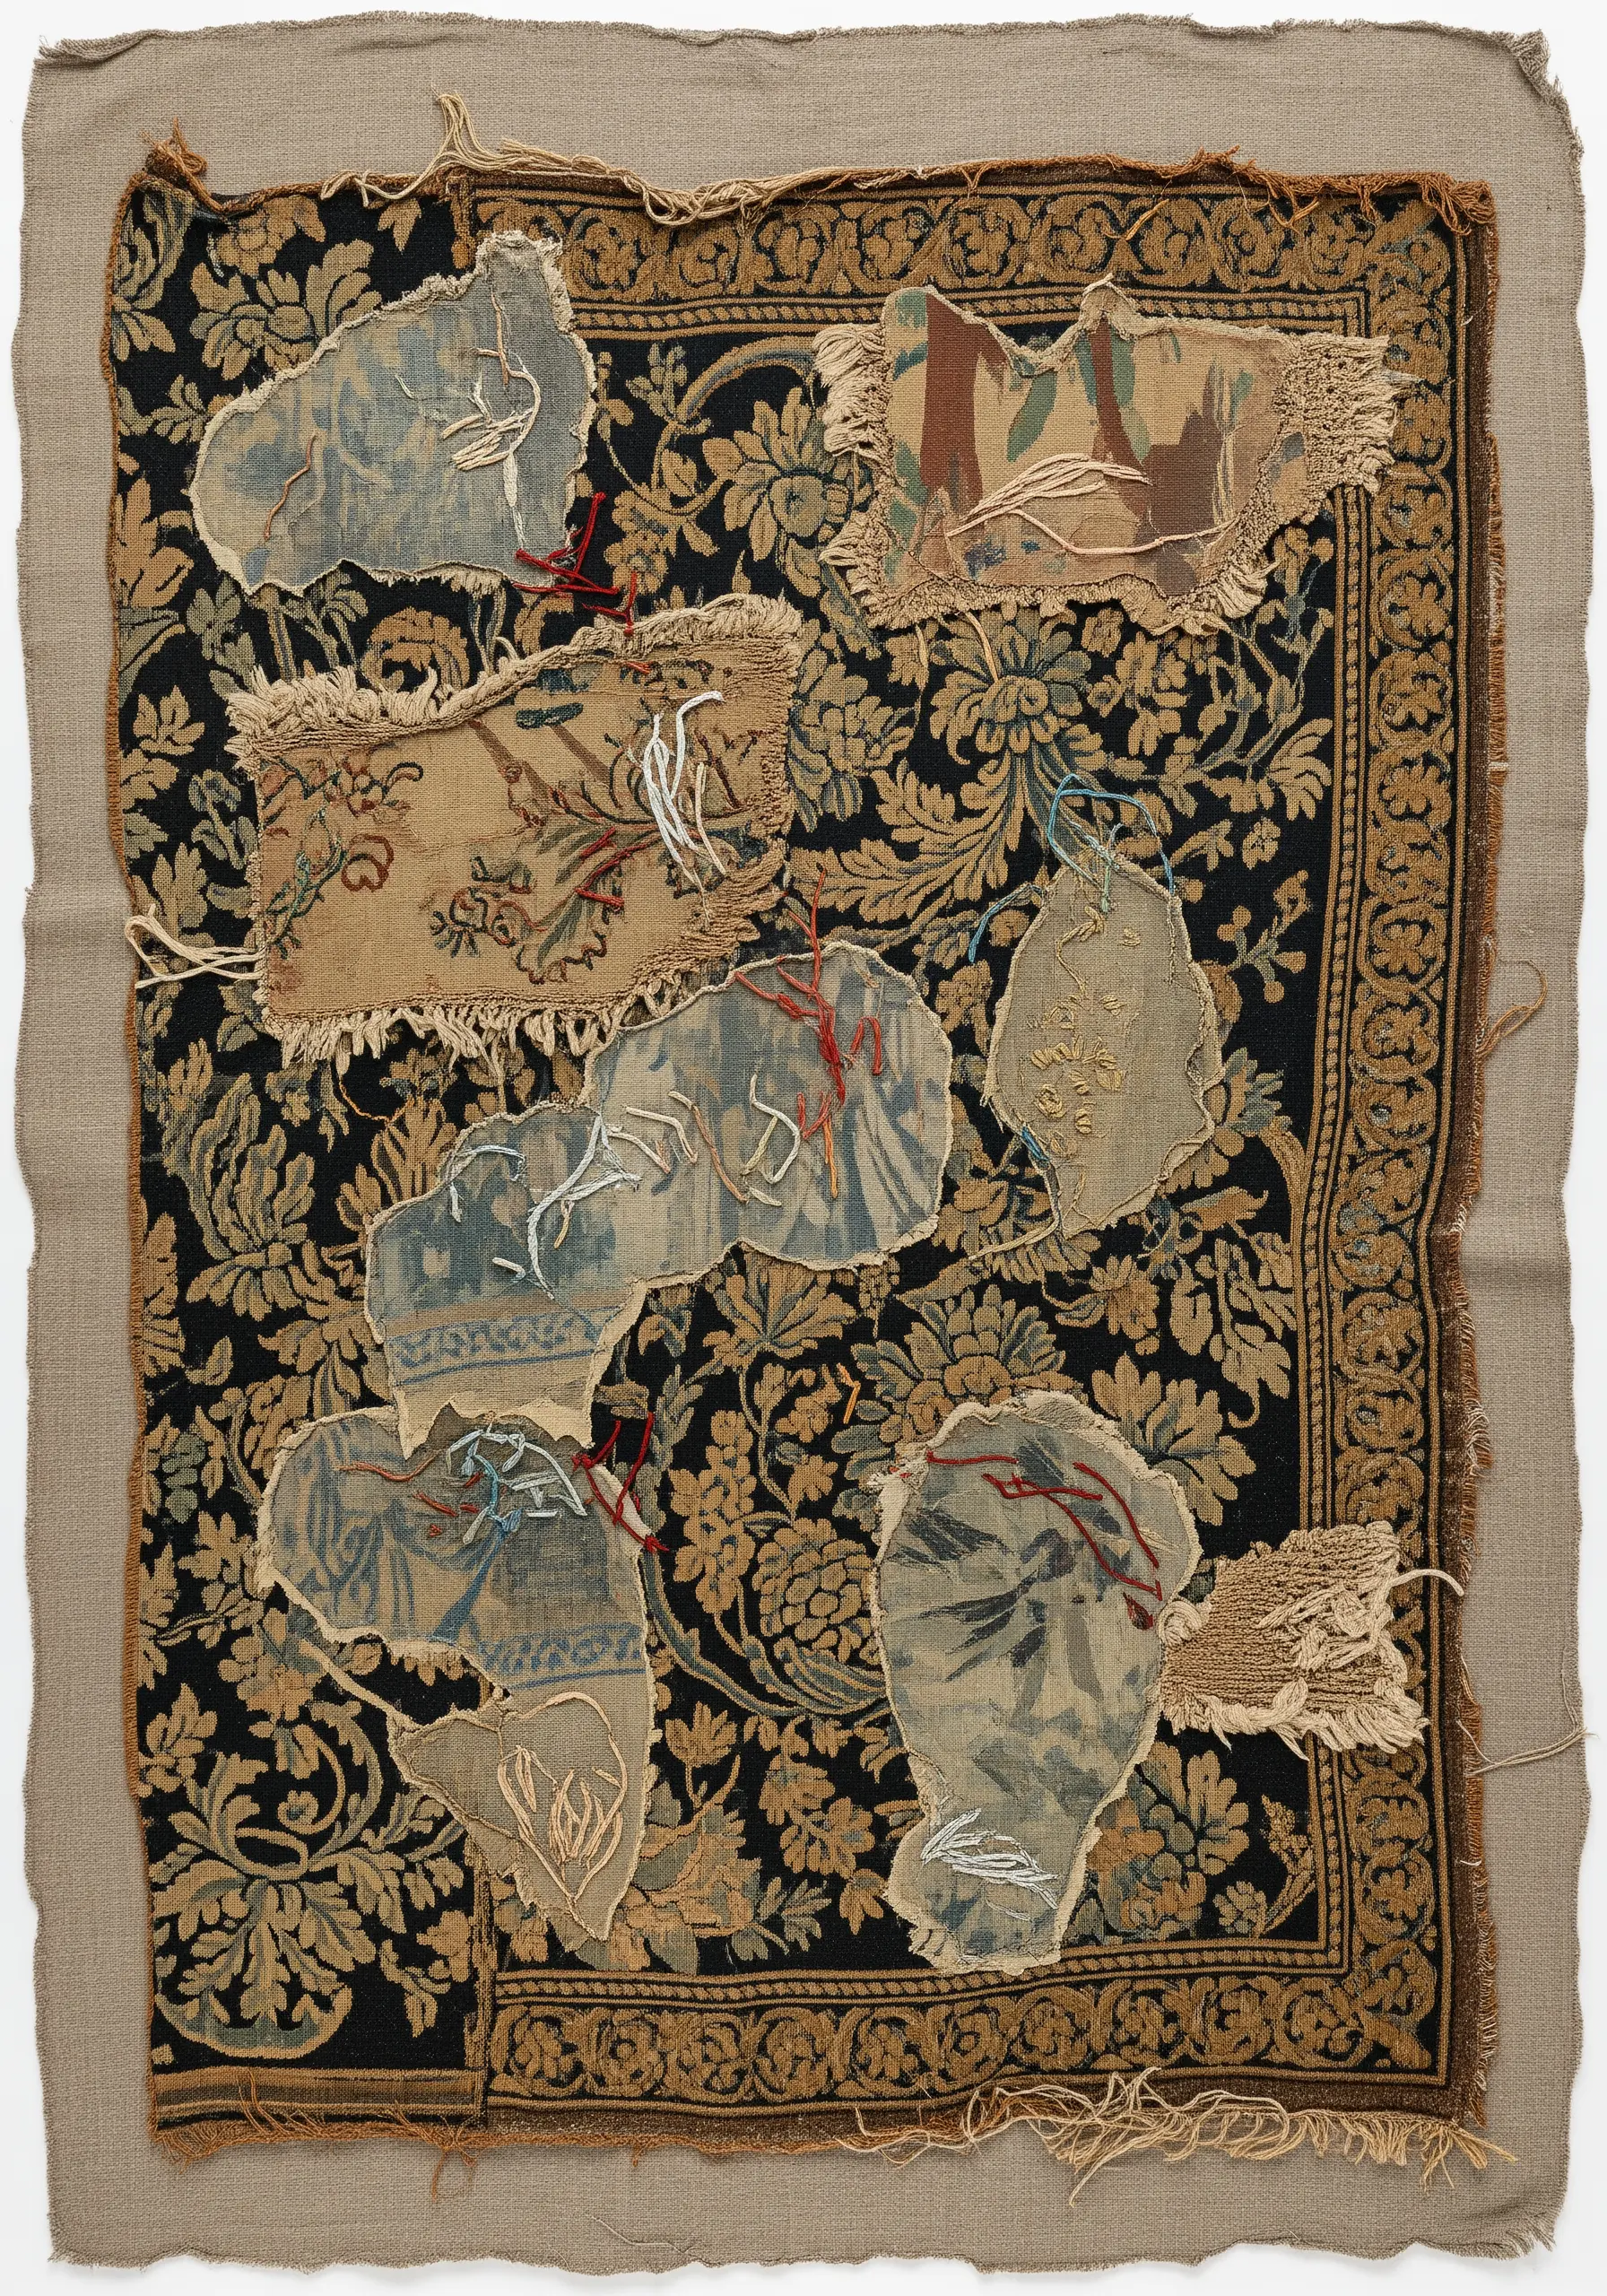
Start with a beautiful piece of vintage fabric, like an old tapestry or brocade, as your base.
Layer torn fragments of other complimentary textiles on top, embracing their raw, frayed edges.
Use simple, visible mending stitches like the running stitch or seed stitch to attach the fragments. This approach, inspired by Japanese Boro, celebrates repair and history.
The contrast between the ornate base fabric and the rustic stitching creates a compelling dialogue between past and present.
32. Stitch a Technological Landscape with Fiber Optics

While using real fiber optics is advanced, you can achieve a similar high-tech look by using a mix of materials on a black canvas.
Mount non-working circuit boards or other tech components for an authentic industrial feel.
Mimic the flow of data by couching bundles of iridescent, metallic, and neon threads between the components.
This is a modern take on collage, blending embroidery with assemblage to create futuristic stitch patterns that bridge the gap between craft and technology.
33. Create a Sweet Escape with Candy and Fabric

Build a whimsical landscape with rolling hills made from brightly colored and patterned quilting cotton.
Use felt appliqué for charming details like gingerbread houses and candy wrappers, outlining them with a simple white backstitch for a clean, illustrative look.
Incorporate real candies and lollipops by either stitching them on securely (for display pieces) or using them as inspiration for embroidered versions.
This playful technique results in whimsical yarn wall art crafts that are joyful, vibrant, and delightfully unexpected.


