

You have the threads, the hoops, and the desire to create something beautiful for your walls. But perhaps you feel a gap between the vision in your head and the piece in your hands. You’re ready to move beyond simple patterns and create embroidery that feels less like a craft project and more like a piece of intentional art.
Minimalism isn’t about emptiness; it’s about precision. It’s the art of making every single stitch count. In minimalist embroidery, a single line must be fluid, a block of color must be flawless, and the space you leave empty must be just as deliberate as the space you fill.
Here, you will find not just patterns, but the techniques behind them. You’ll learn how to control your line weight, master a smooth satin stitch, and use texture and composition to create pieces that are quiet yet powerful. This is your guide to creating modern, sophisticated hoop art that truly elevates your space—with clarity, confidence, and your own two hands.
1. Master Geometric Precision with Guided Stitches
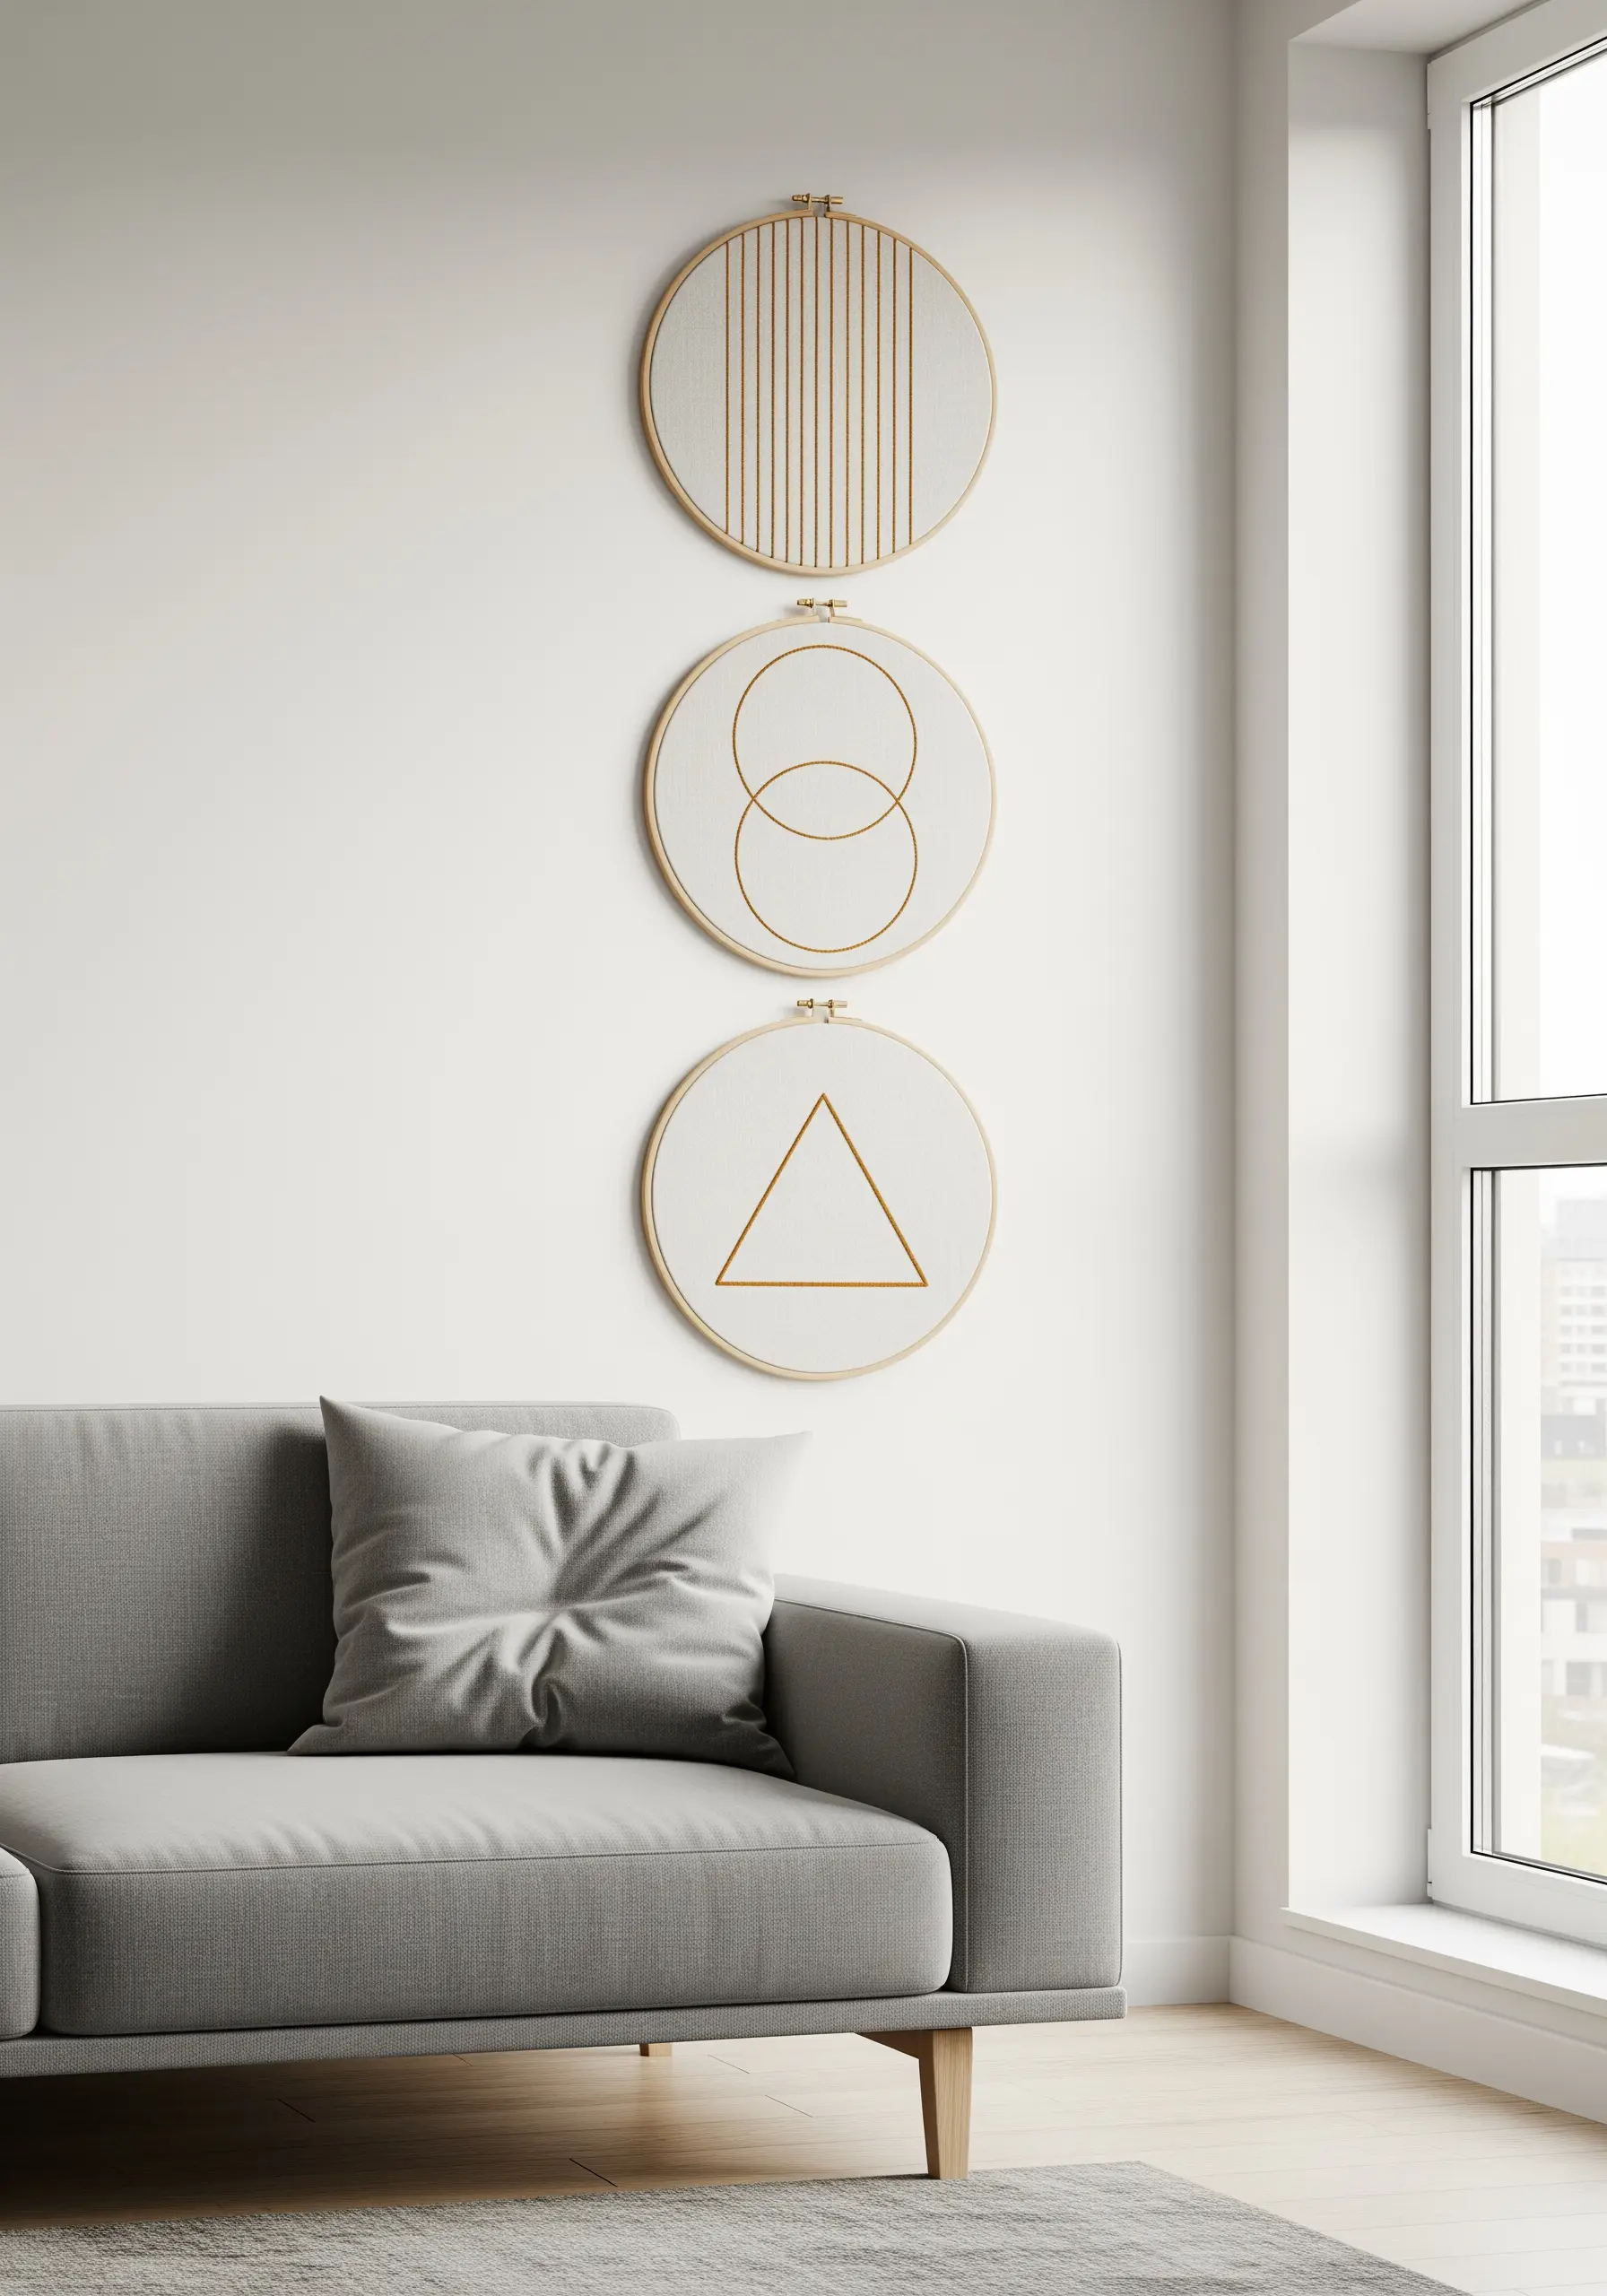
For clean, architectural lines, use a single strand of six-strand cotton floss.
A backstitch provides superior control and sharpness compared to a running stitch, ensuring your geometric forms are crisp and intentional.
Before you stitch, lightly draw your pattern with a water-soluble pen and use a ruler to guarantee perfectly parallel lines and exact angles.
This method removes guesswork and allows the simple power of the form to stand out, which is the essence of minimalist design.
Group a series of geometric hoops together for a composition that feels both rhythmic and calm.
2. Create Depth with Varied Line Weight
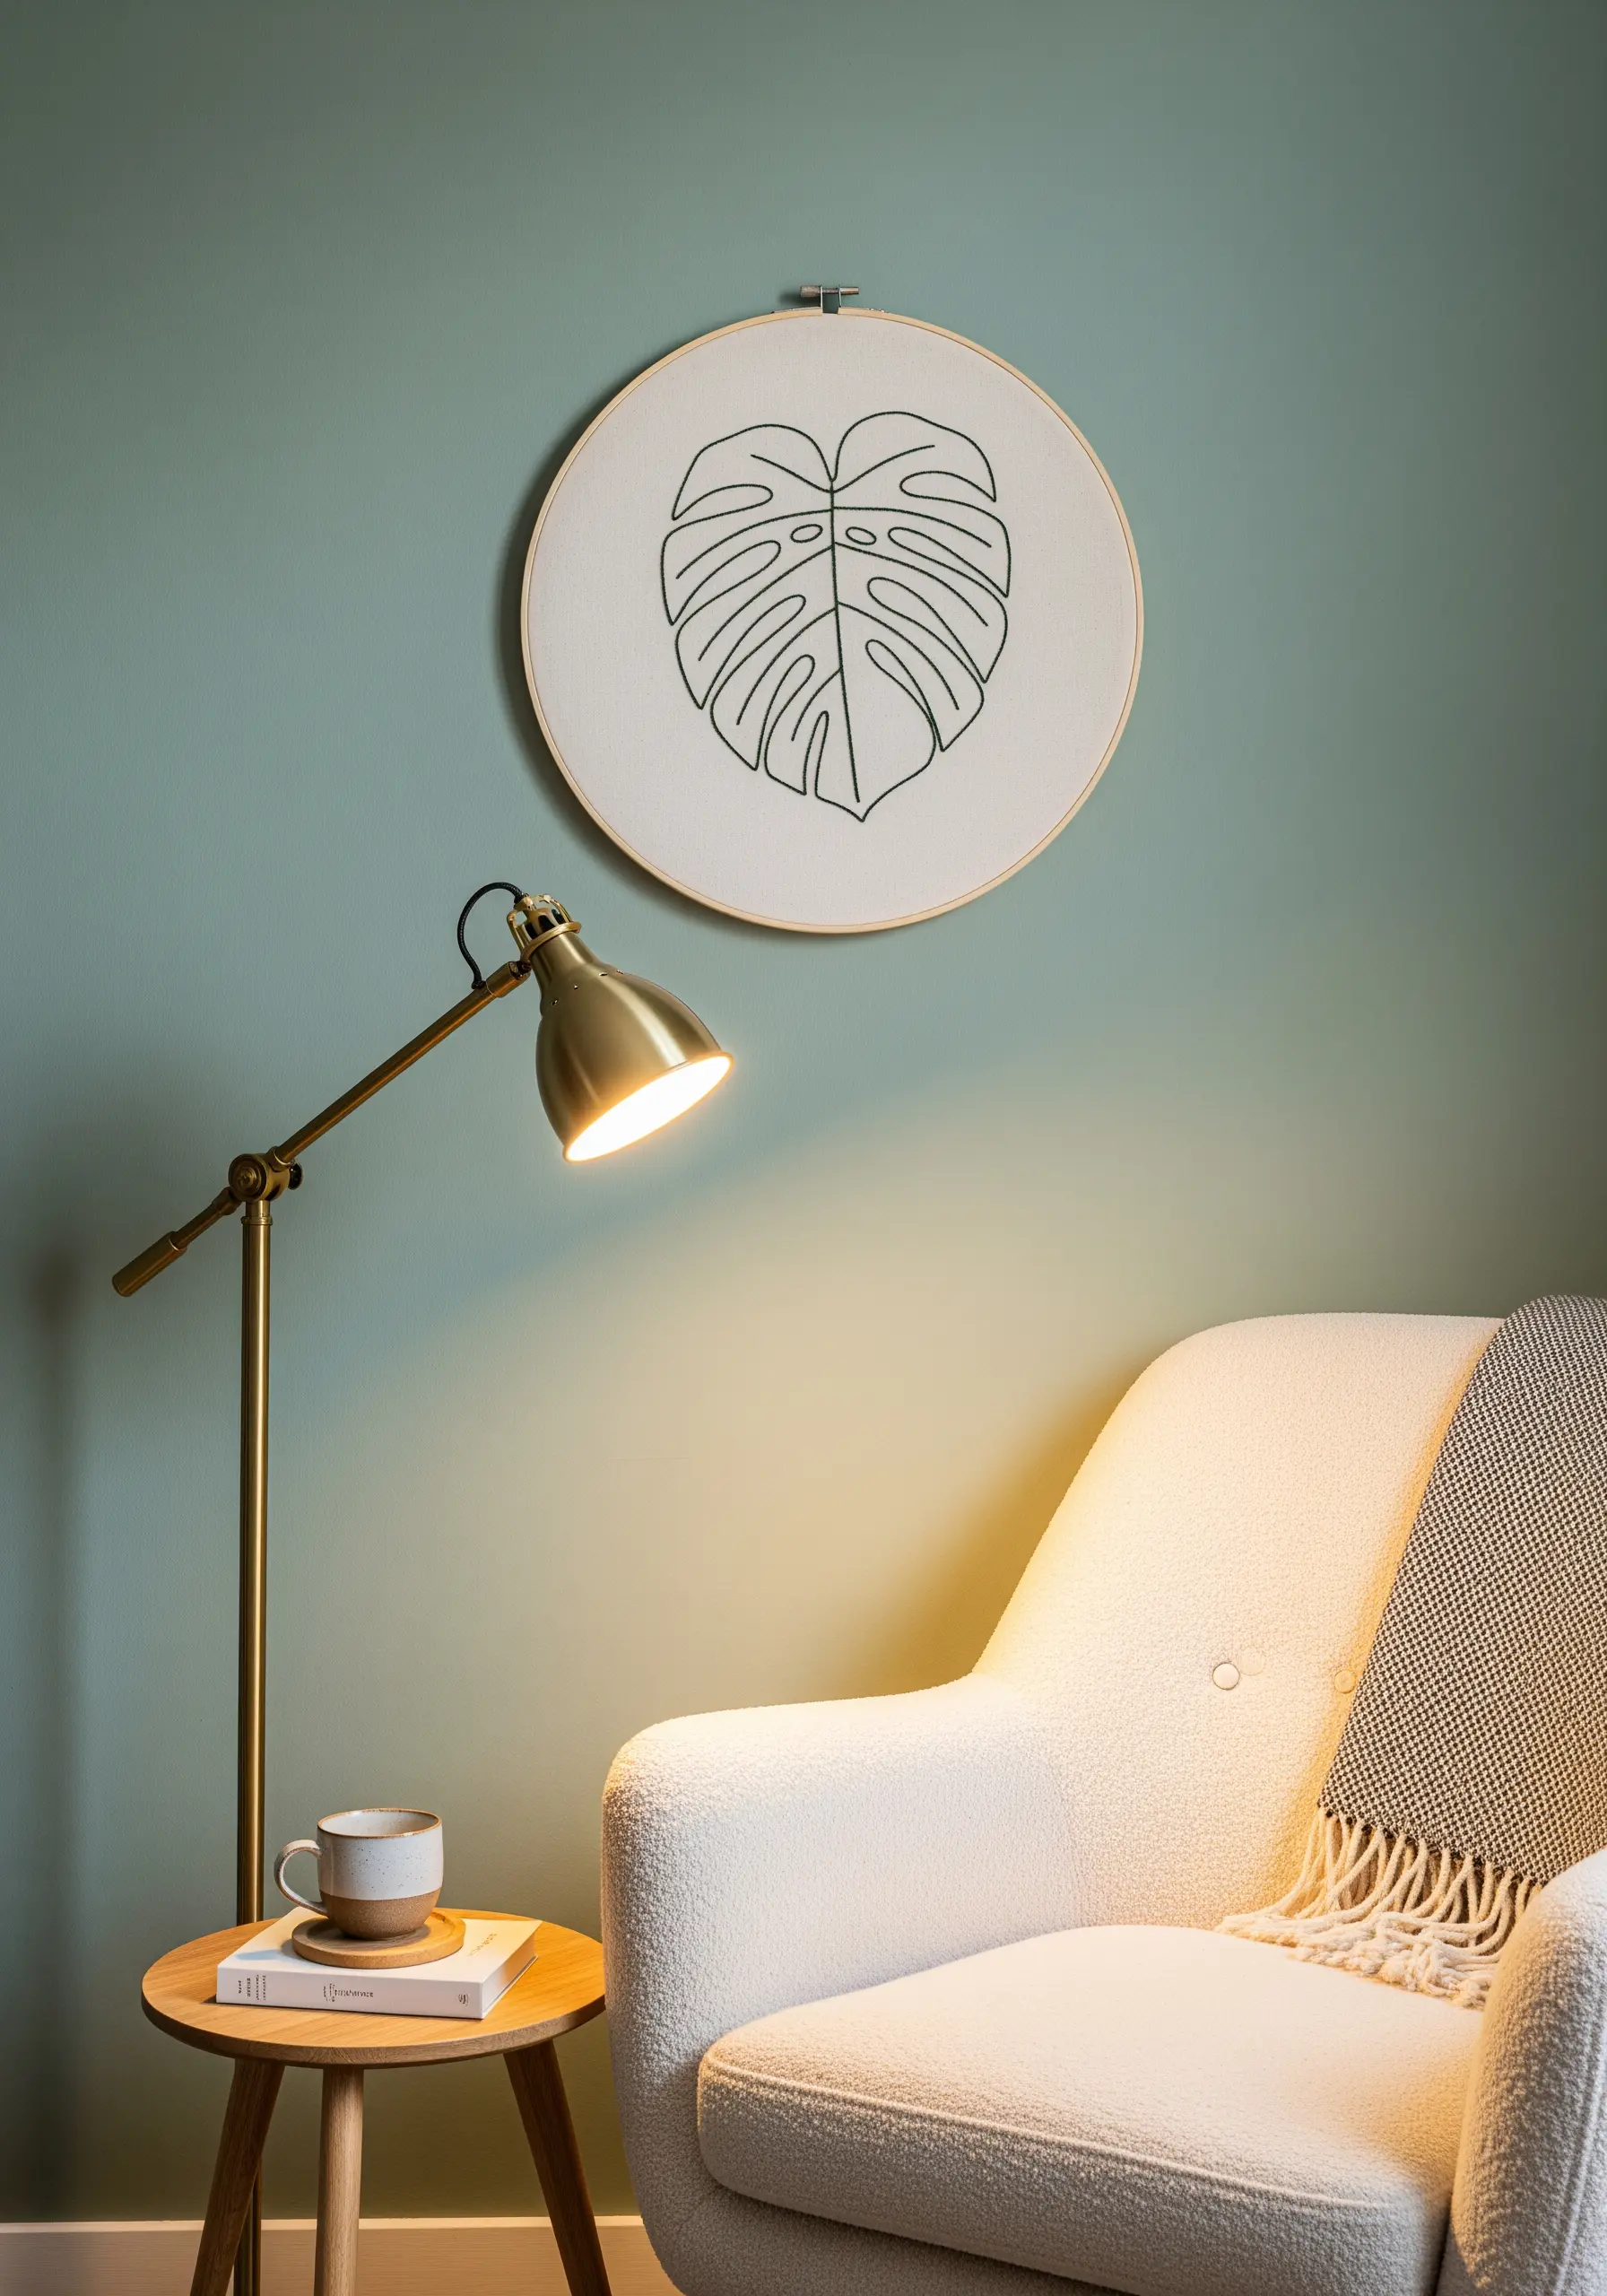
Give your botanical line art a professional, illustrative quality by varying the thickness of your stitches.
Use three strands of floss for the main outline of the leaf to give it presence, then switch to a single strand for the delicate inner veins.
This subtle shift creates an immediate sense of depth and realism without adding any complex colors or shading.
A simple stem stitch is perfect for this, as it follows curves smoothly and its thickness can be easily adjusted by changing your strand count.
Explore different leaf stitch techniques to find the one that best captures the texture you envision.
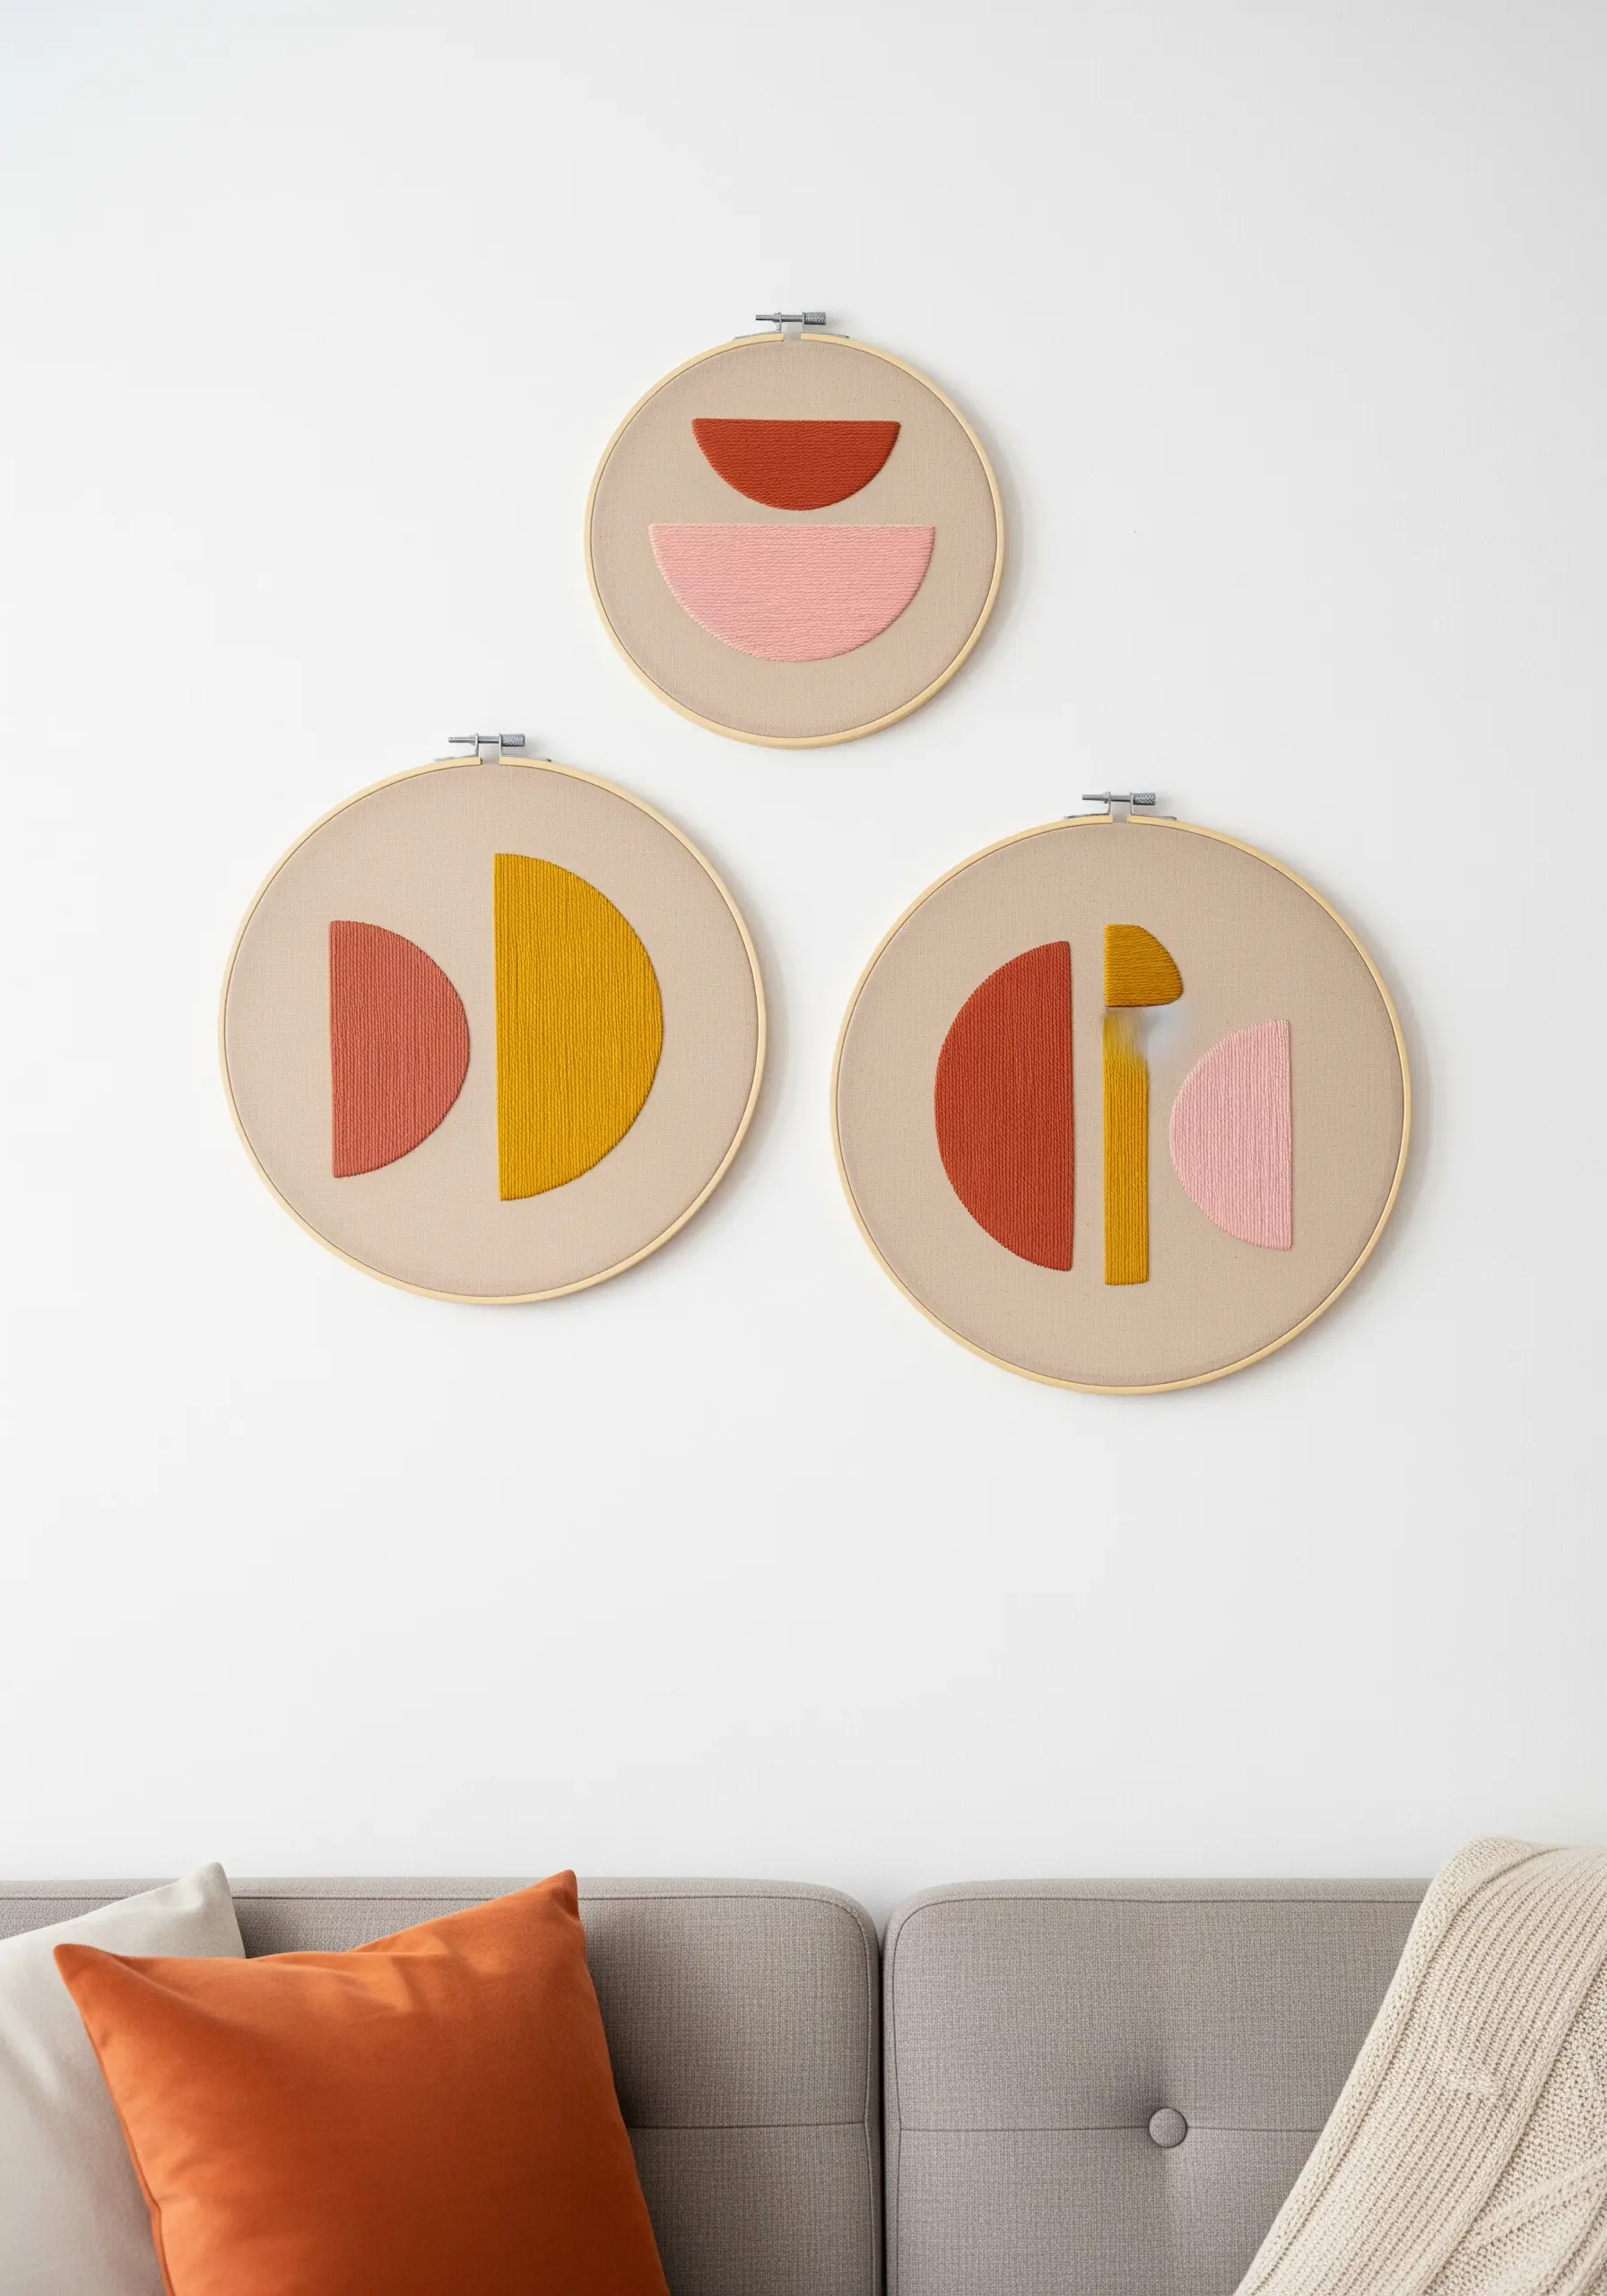
3. Unify a Gallery Wall with a Consistent Thread
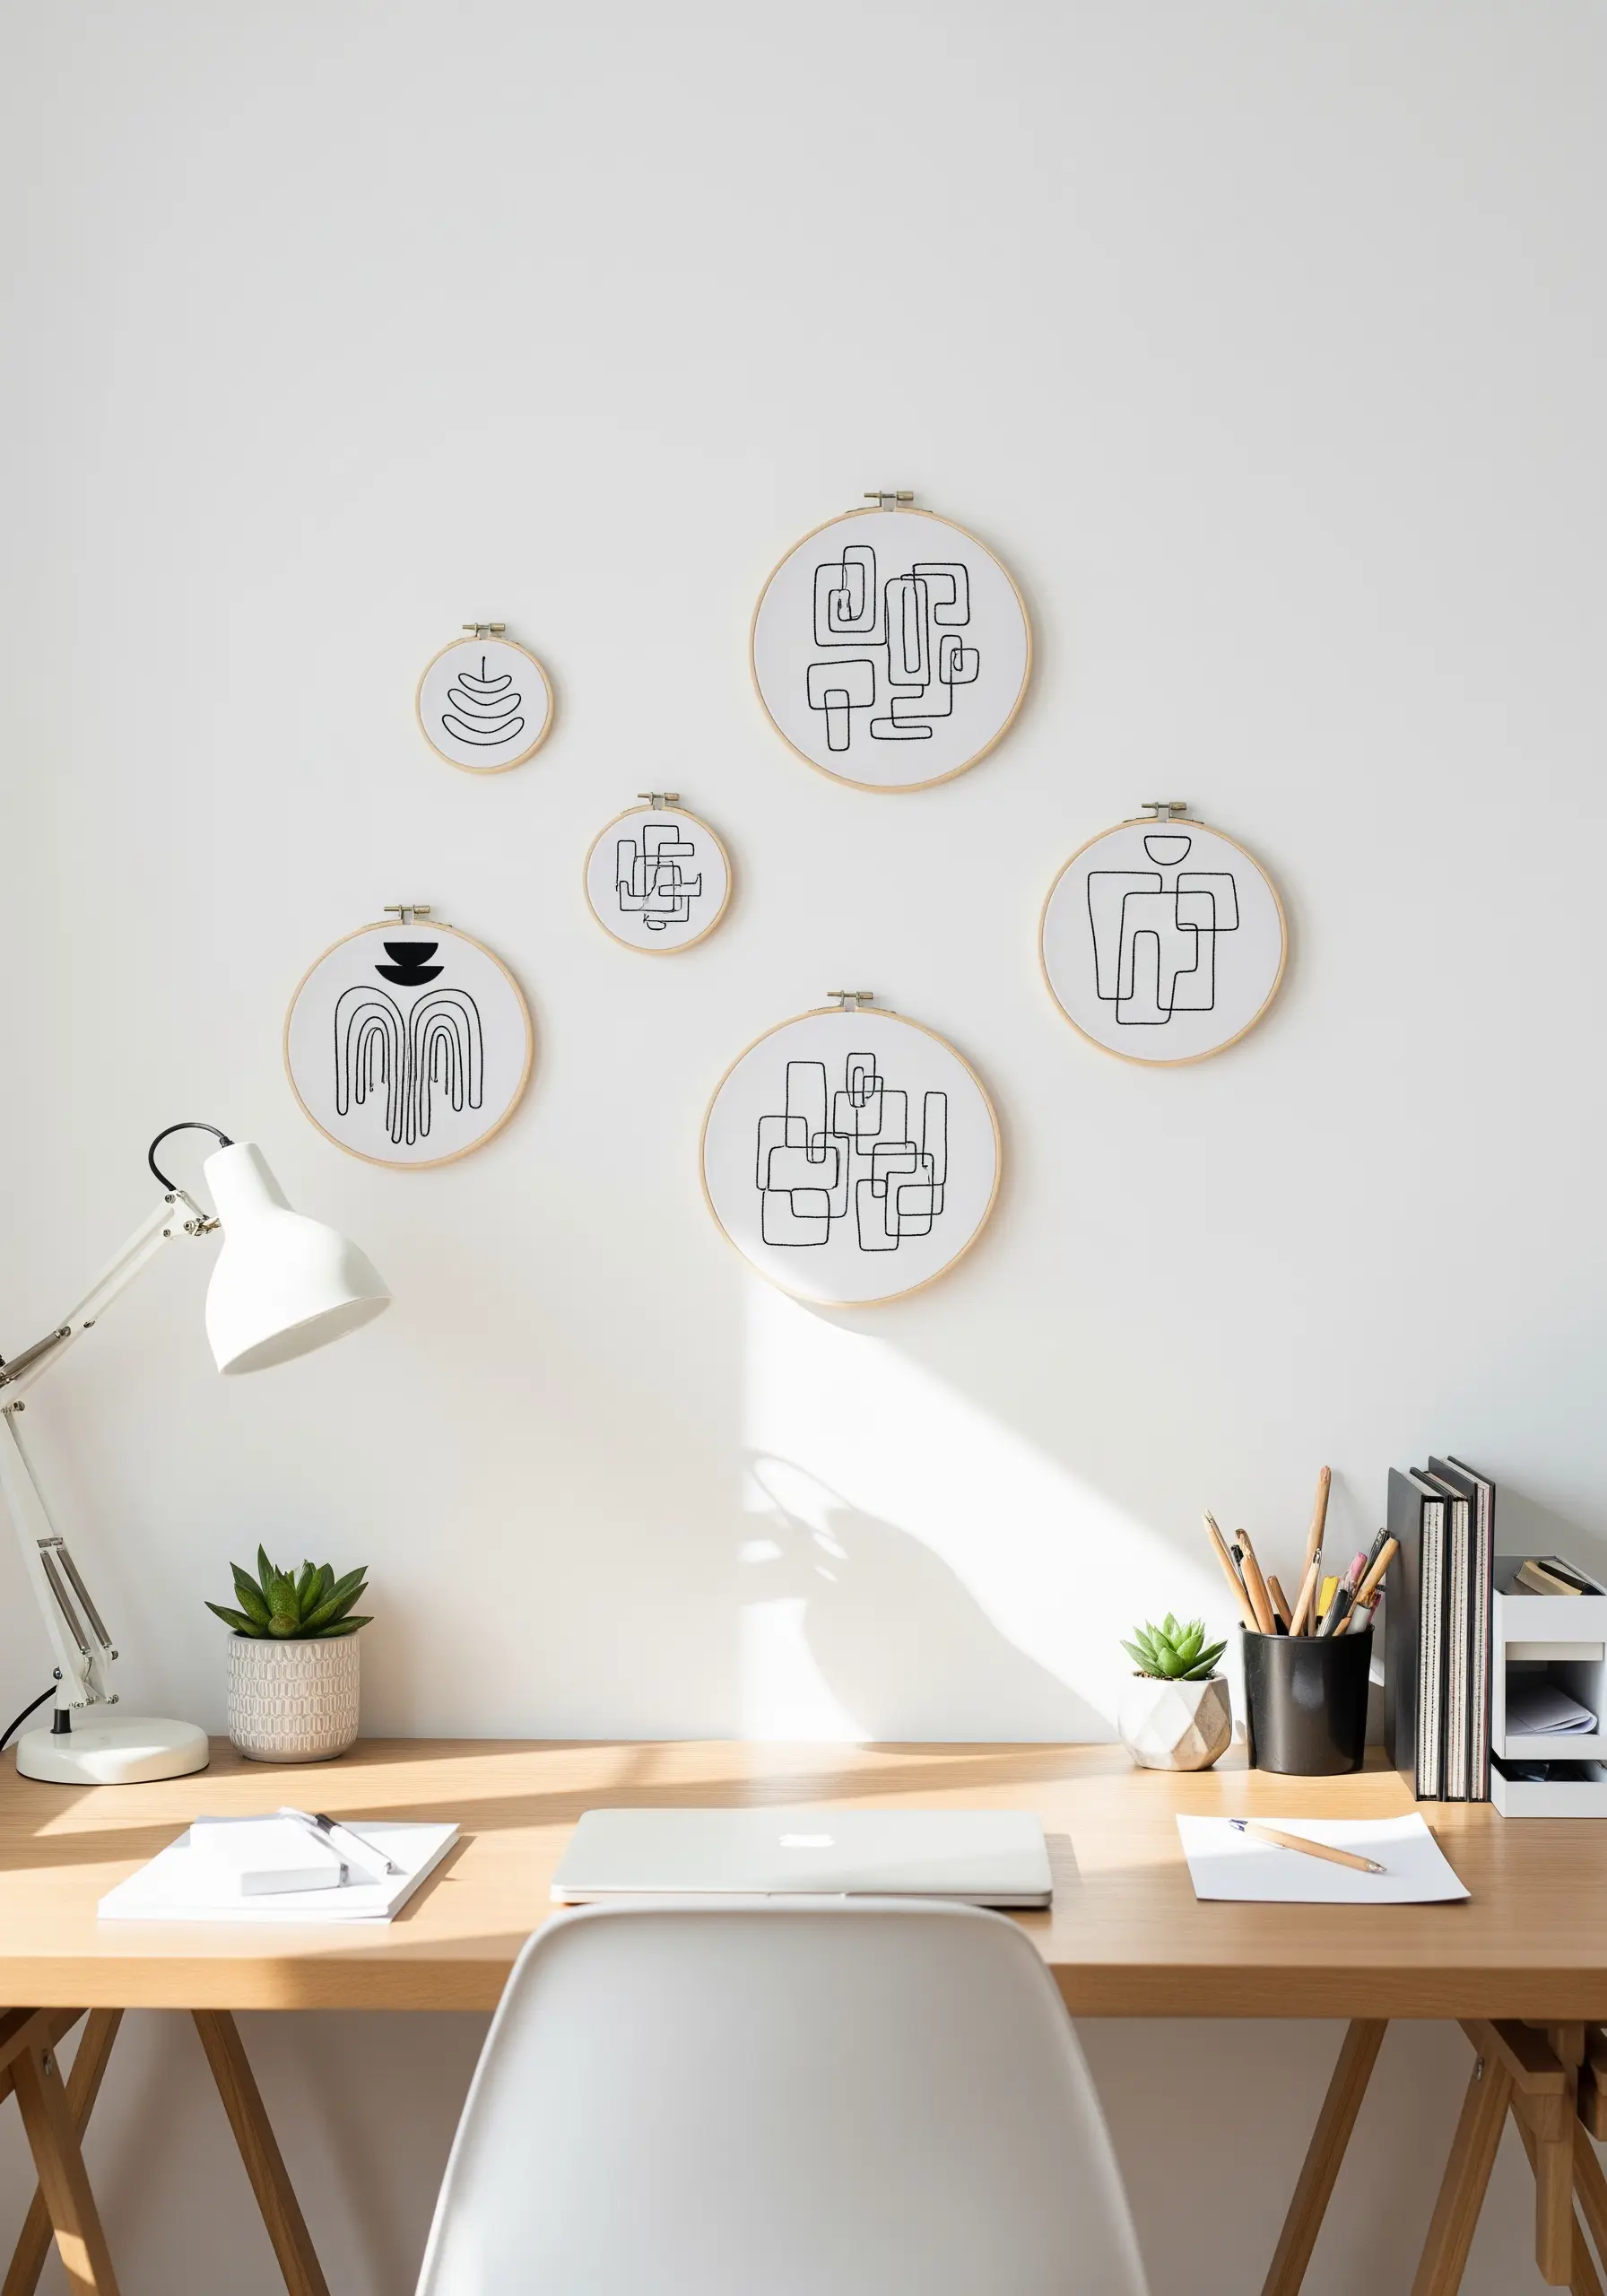
To create a cohesive gallery wall from multiple small hoops, treat them as a single canvas.
Use the same color and weight of thread—such as a bold, black perle cotton—across all designs, even if the abstract motifs themselves differ.
This consistency acts as a unifying element, making the collection feel intentional and curated rather than random.
Arrange the hooped wall collage layouts in an organic, flowing pattern to contrast with the sharp lines of your desk and shelves.
This approach allows you to explore different abstract shapes while maintaining a harmonious, modern aesthetic.
4. Stitch Atmospheric Landscapes with Texture
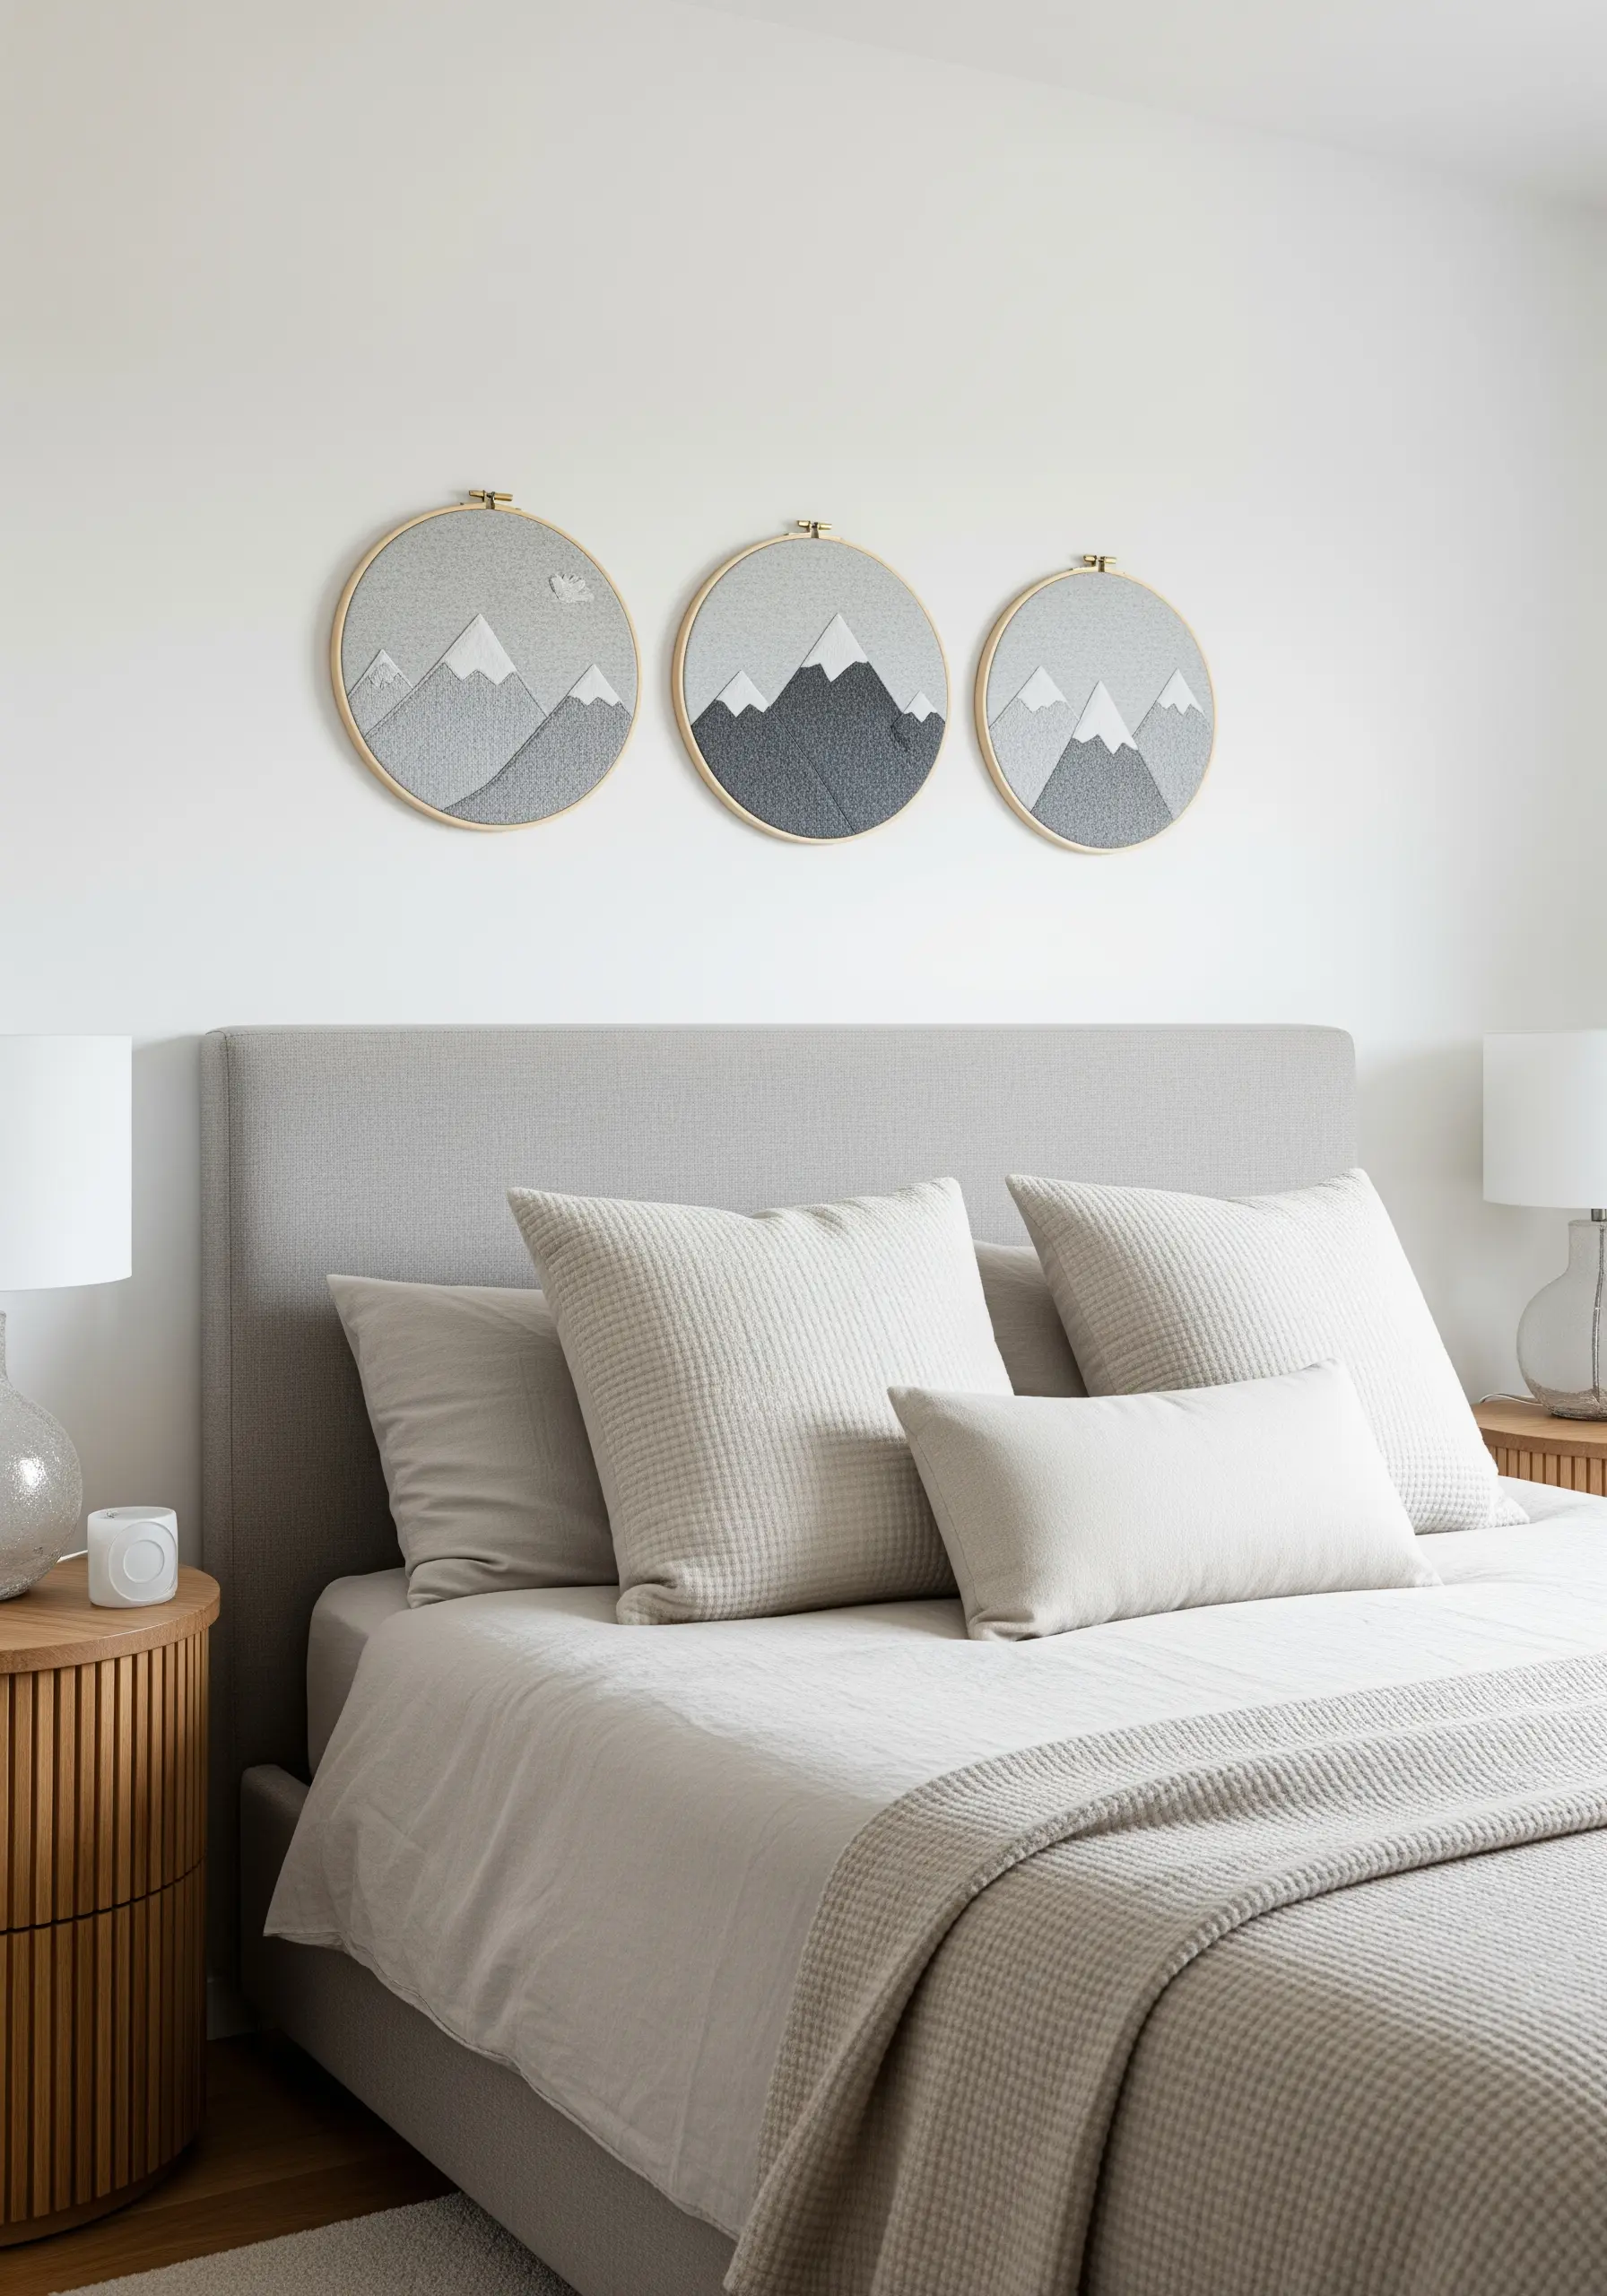
Evoke the quiet mood of a mountain range by focusing on texture instead of intricate detail.
Use dense, vertical straight stitches for the mountain faces, varying the shades of grey to suggest light and shadow.
For the sky, switch to sparsely placed seed stitches or tiny cross stitches to create a sense of open space and mist.
This contrast in stitch density does the work of complex shading, allowing you to build serene mountain landscape thread painting techniques with minimal effort.
The result is a triptych that feels calm and expansive, perfect for a tranquil bedroom.
5. Amplify Impact with High-Contrast Fabric
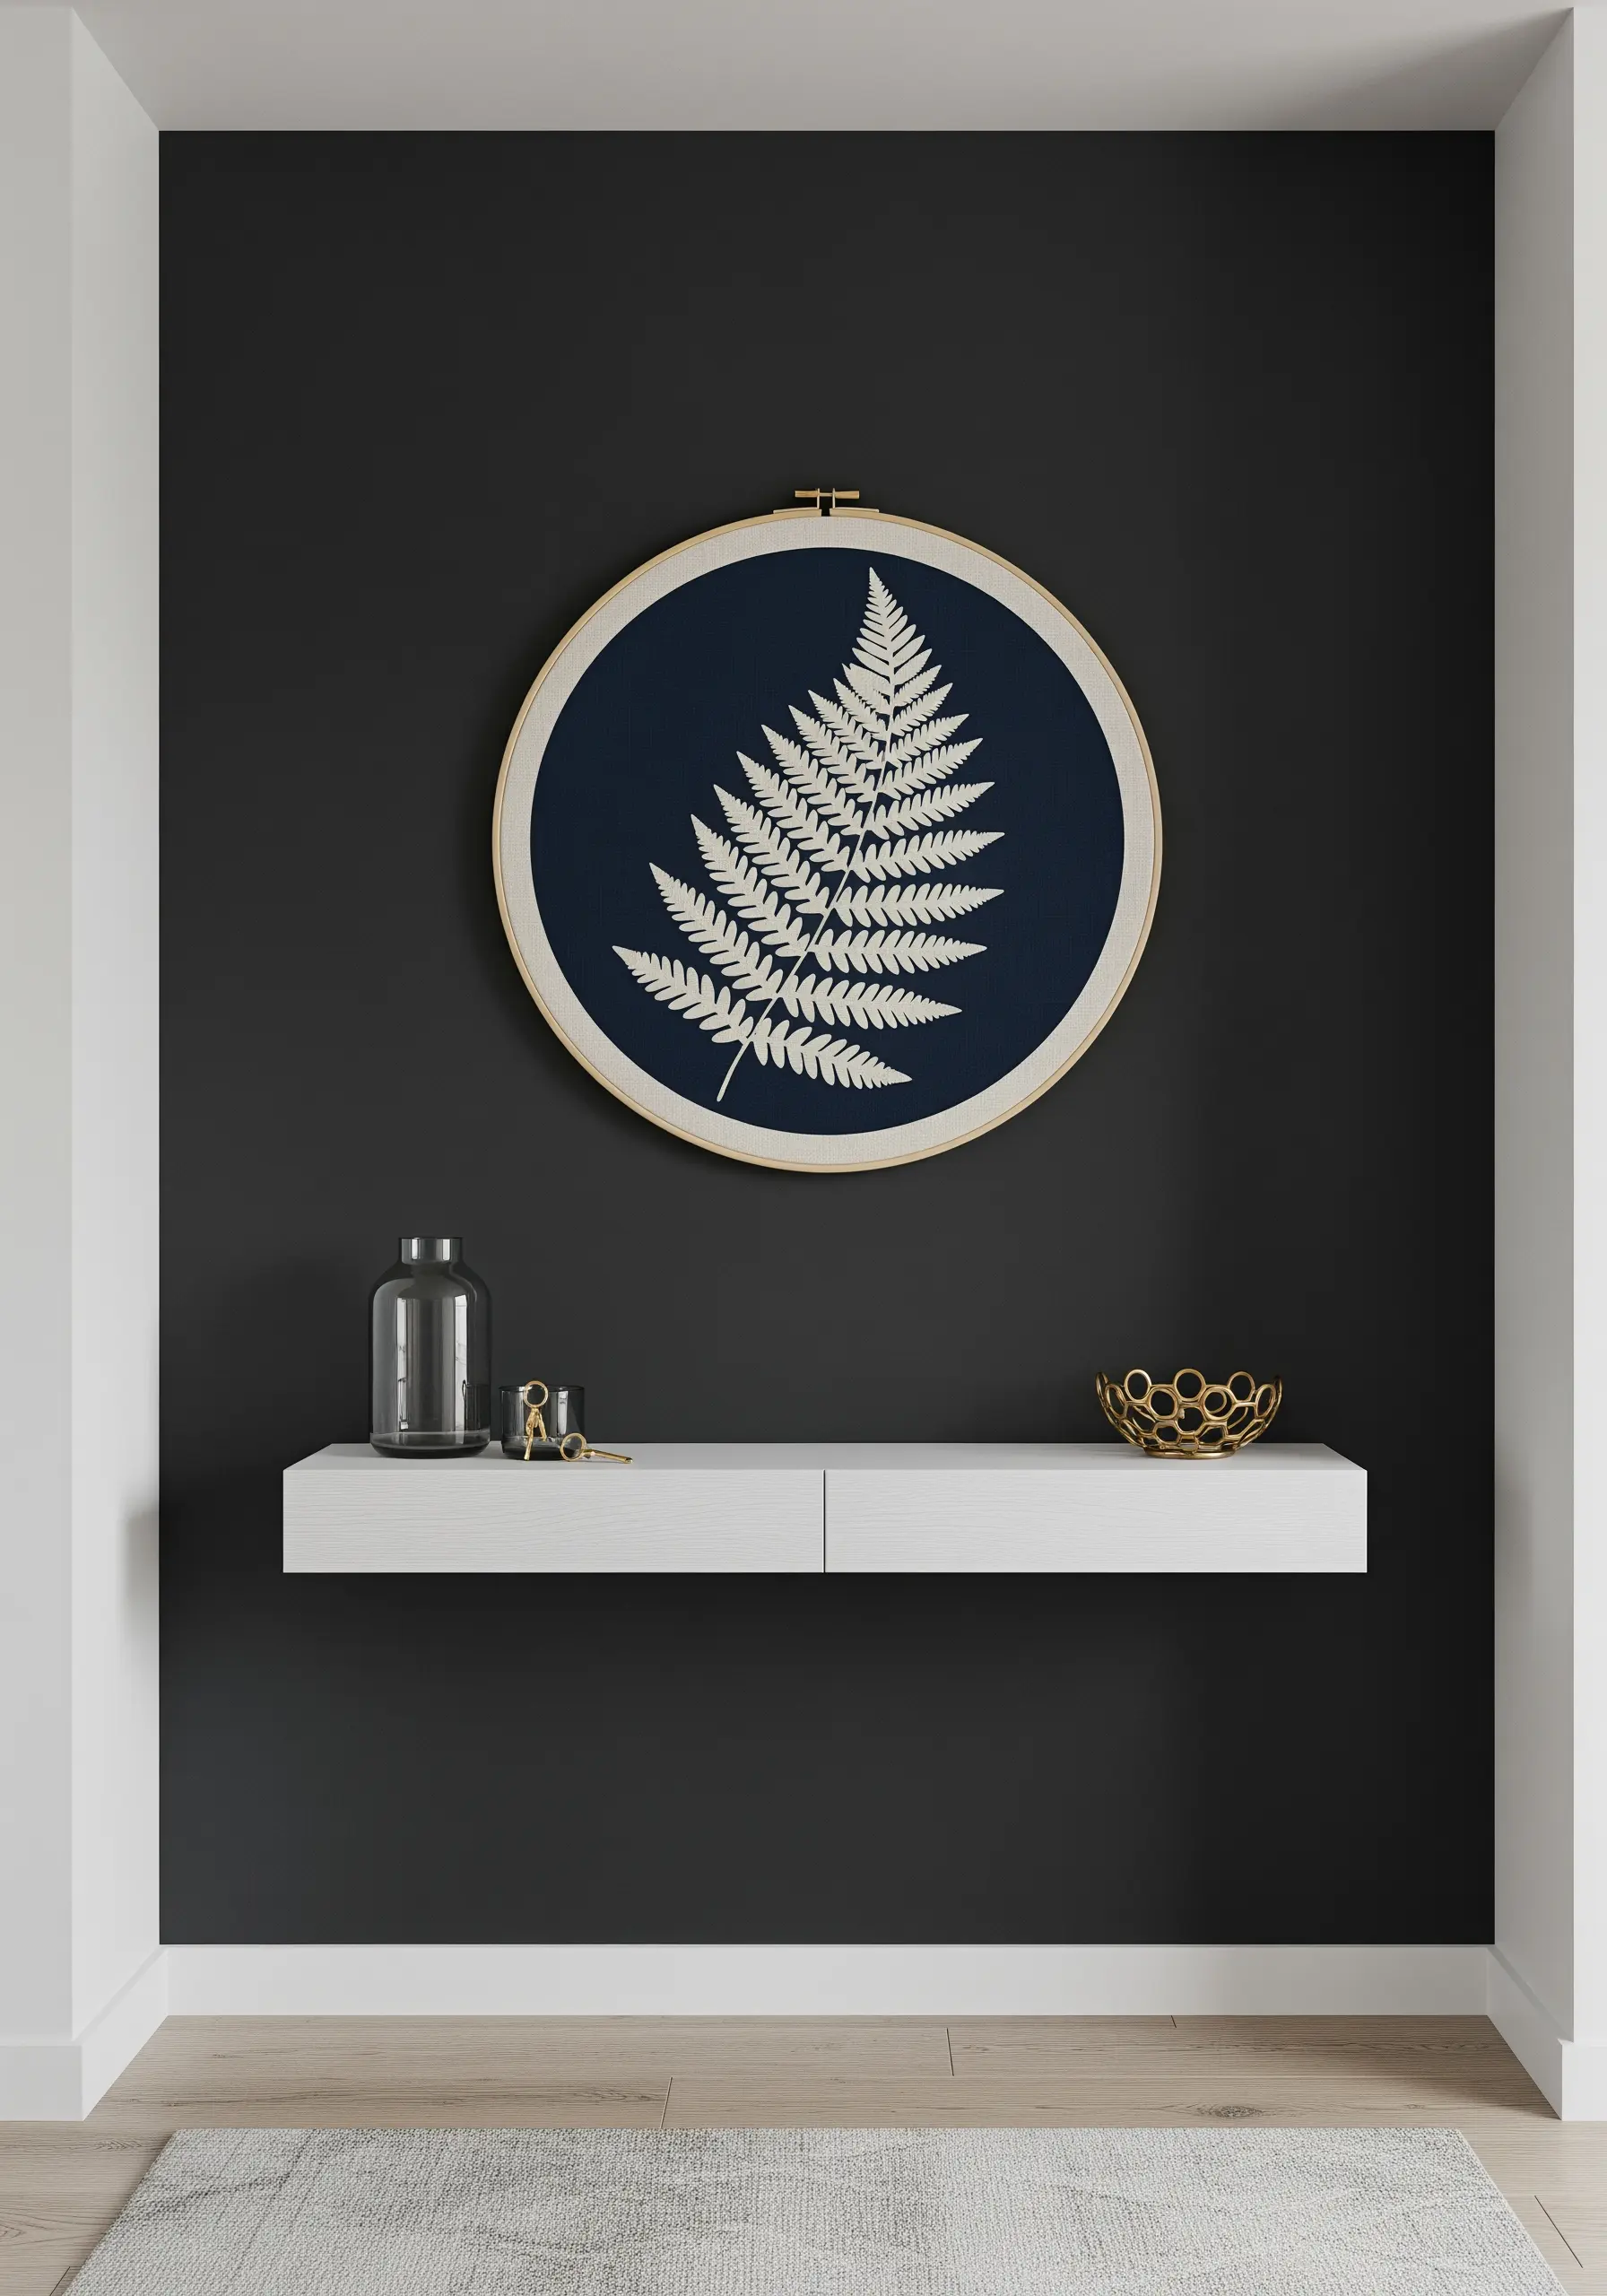
Make a simple motif unforgettable by stitching it on a dark, dramatic background.
Choose a tightly woven fabric like navy or charcoal linen, which prevents the light-colored thread from sinking in and becoming dull.
Use a bright, high-quality thread like a crisp white or ecru, and notice how every single stitch stands out with graphic clarity.
This technique is especially effective for detailed silhouettes like ferns or florals, where the negative space becomes as powerful as the stitched form.
These dark thread embroidery designs create an instant focal point in an entryway or hallway.
6. Achieve Fluid Cursive with the Right Stitch
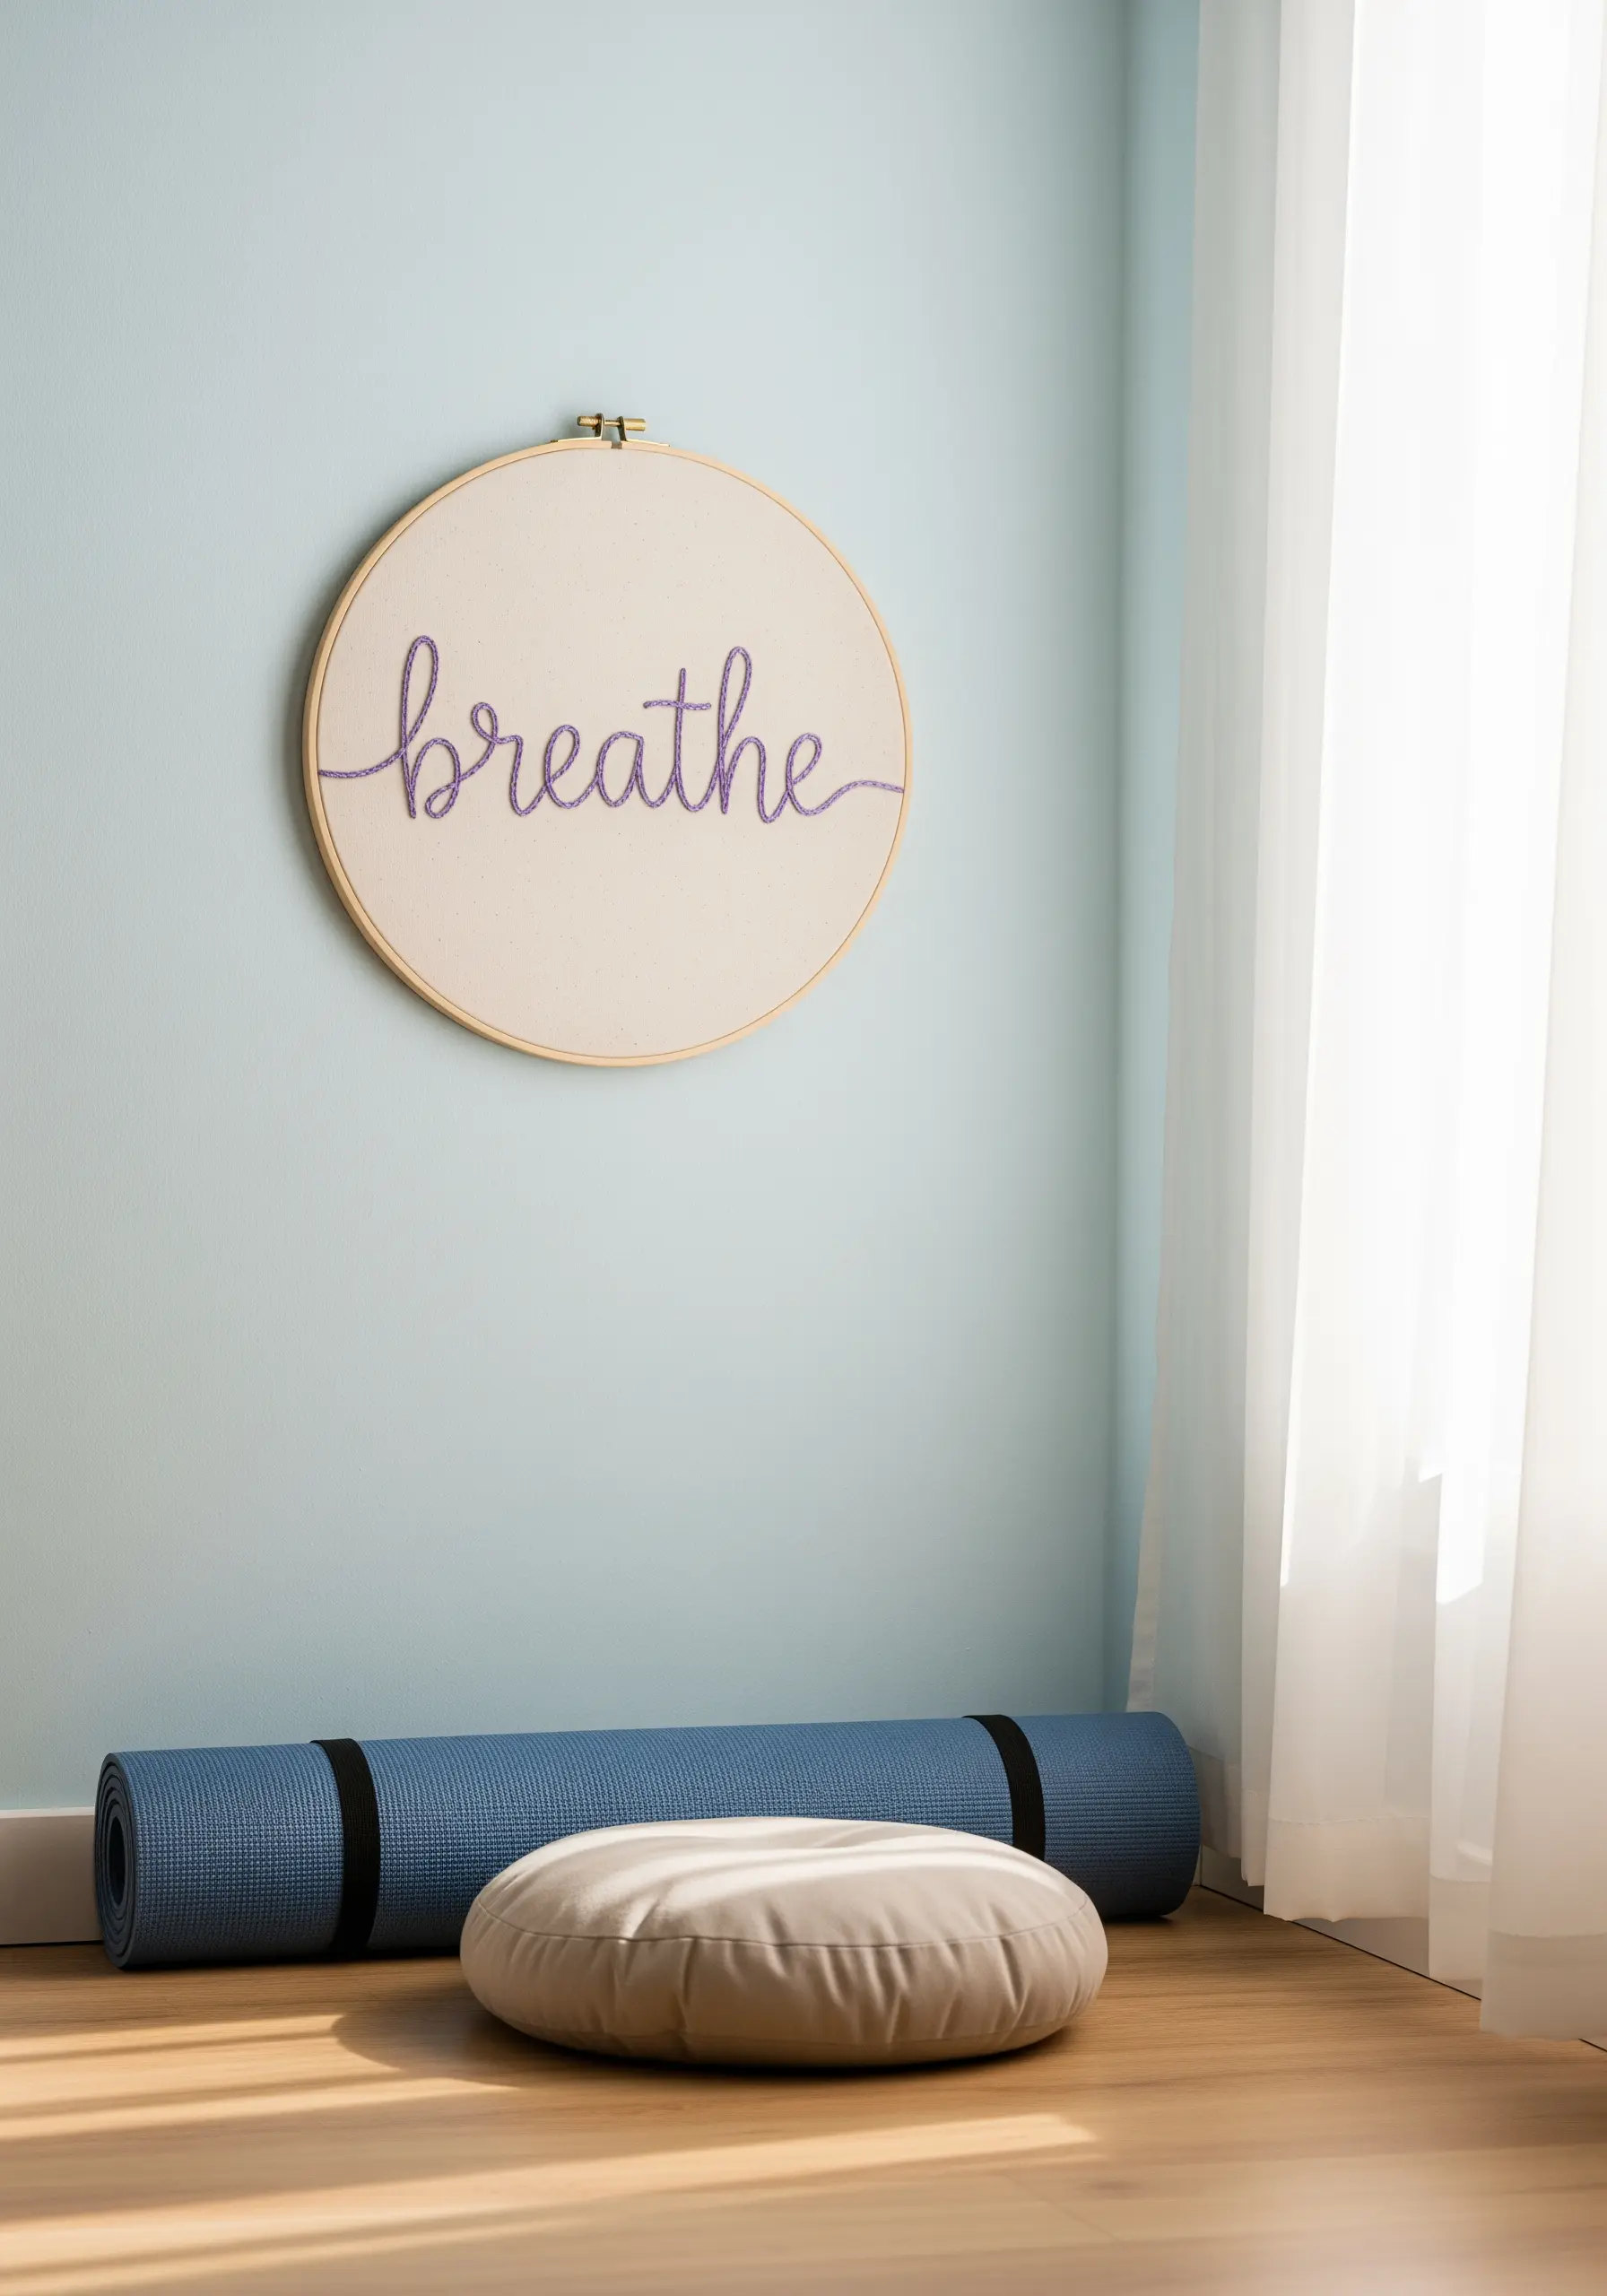
For elegant, handwritten text, your stitch choice is everything.
Avoid backstitch, which can create jagged edges on curves. Instead, opt for a stem stitch or a whipped backstitch for a smooth, rope-like finish that flows beautifully.
To add subtle texture, try using a variegated thread in a gentle color gradient, which gives the word a soft, almost watercolor-like effect.
These minimal typography quotes serve as gentle reminders in spaces dedicated to calm and reflection.
Keep the design simple—one word is often enough to set the tone for an entire room.
7. Create a Graphic Statement with Repetition
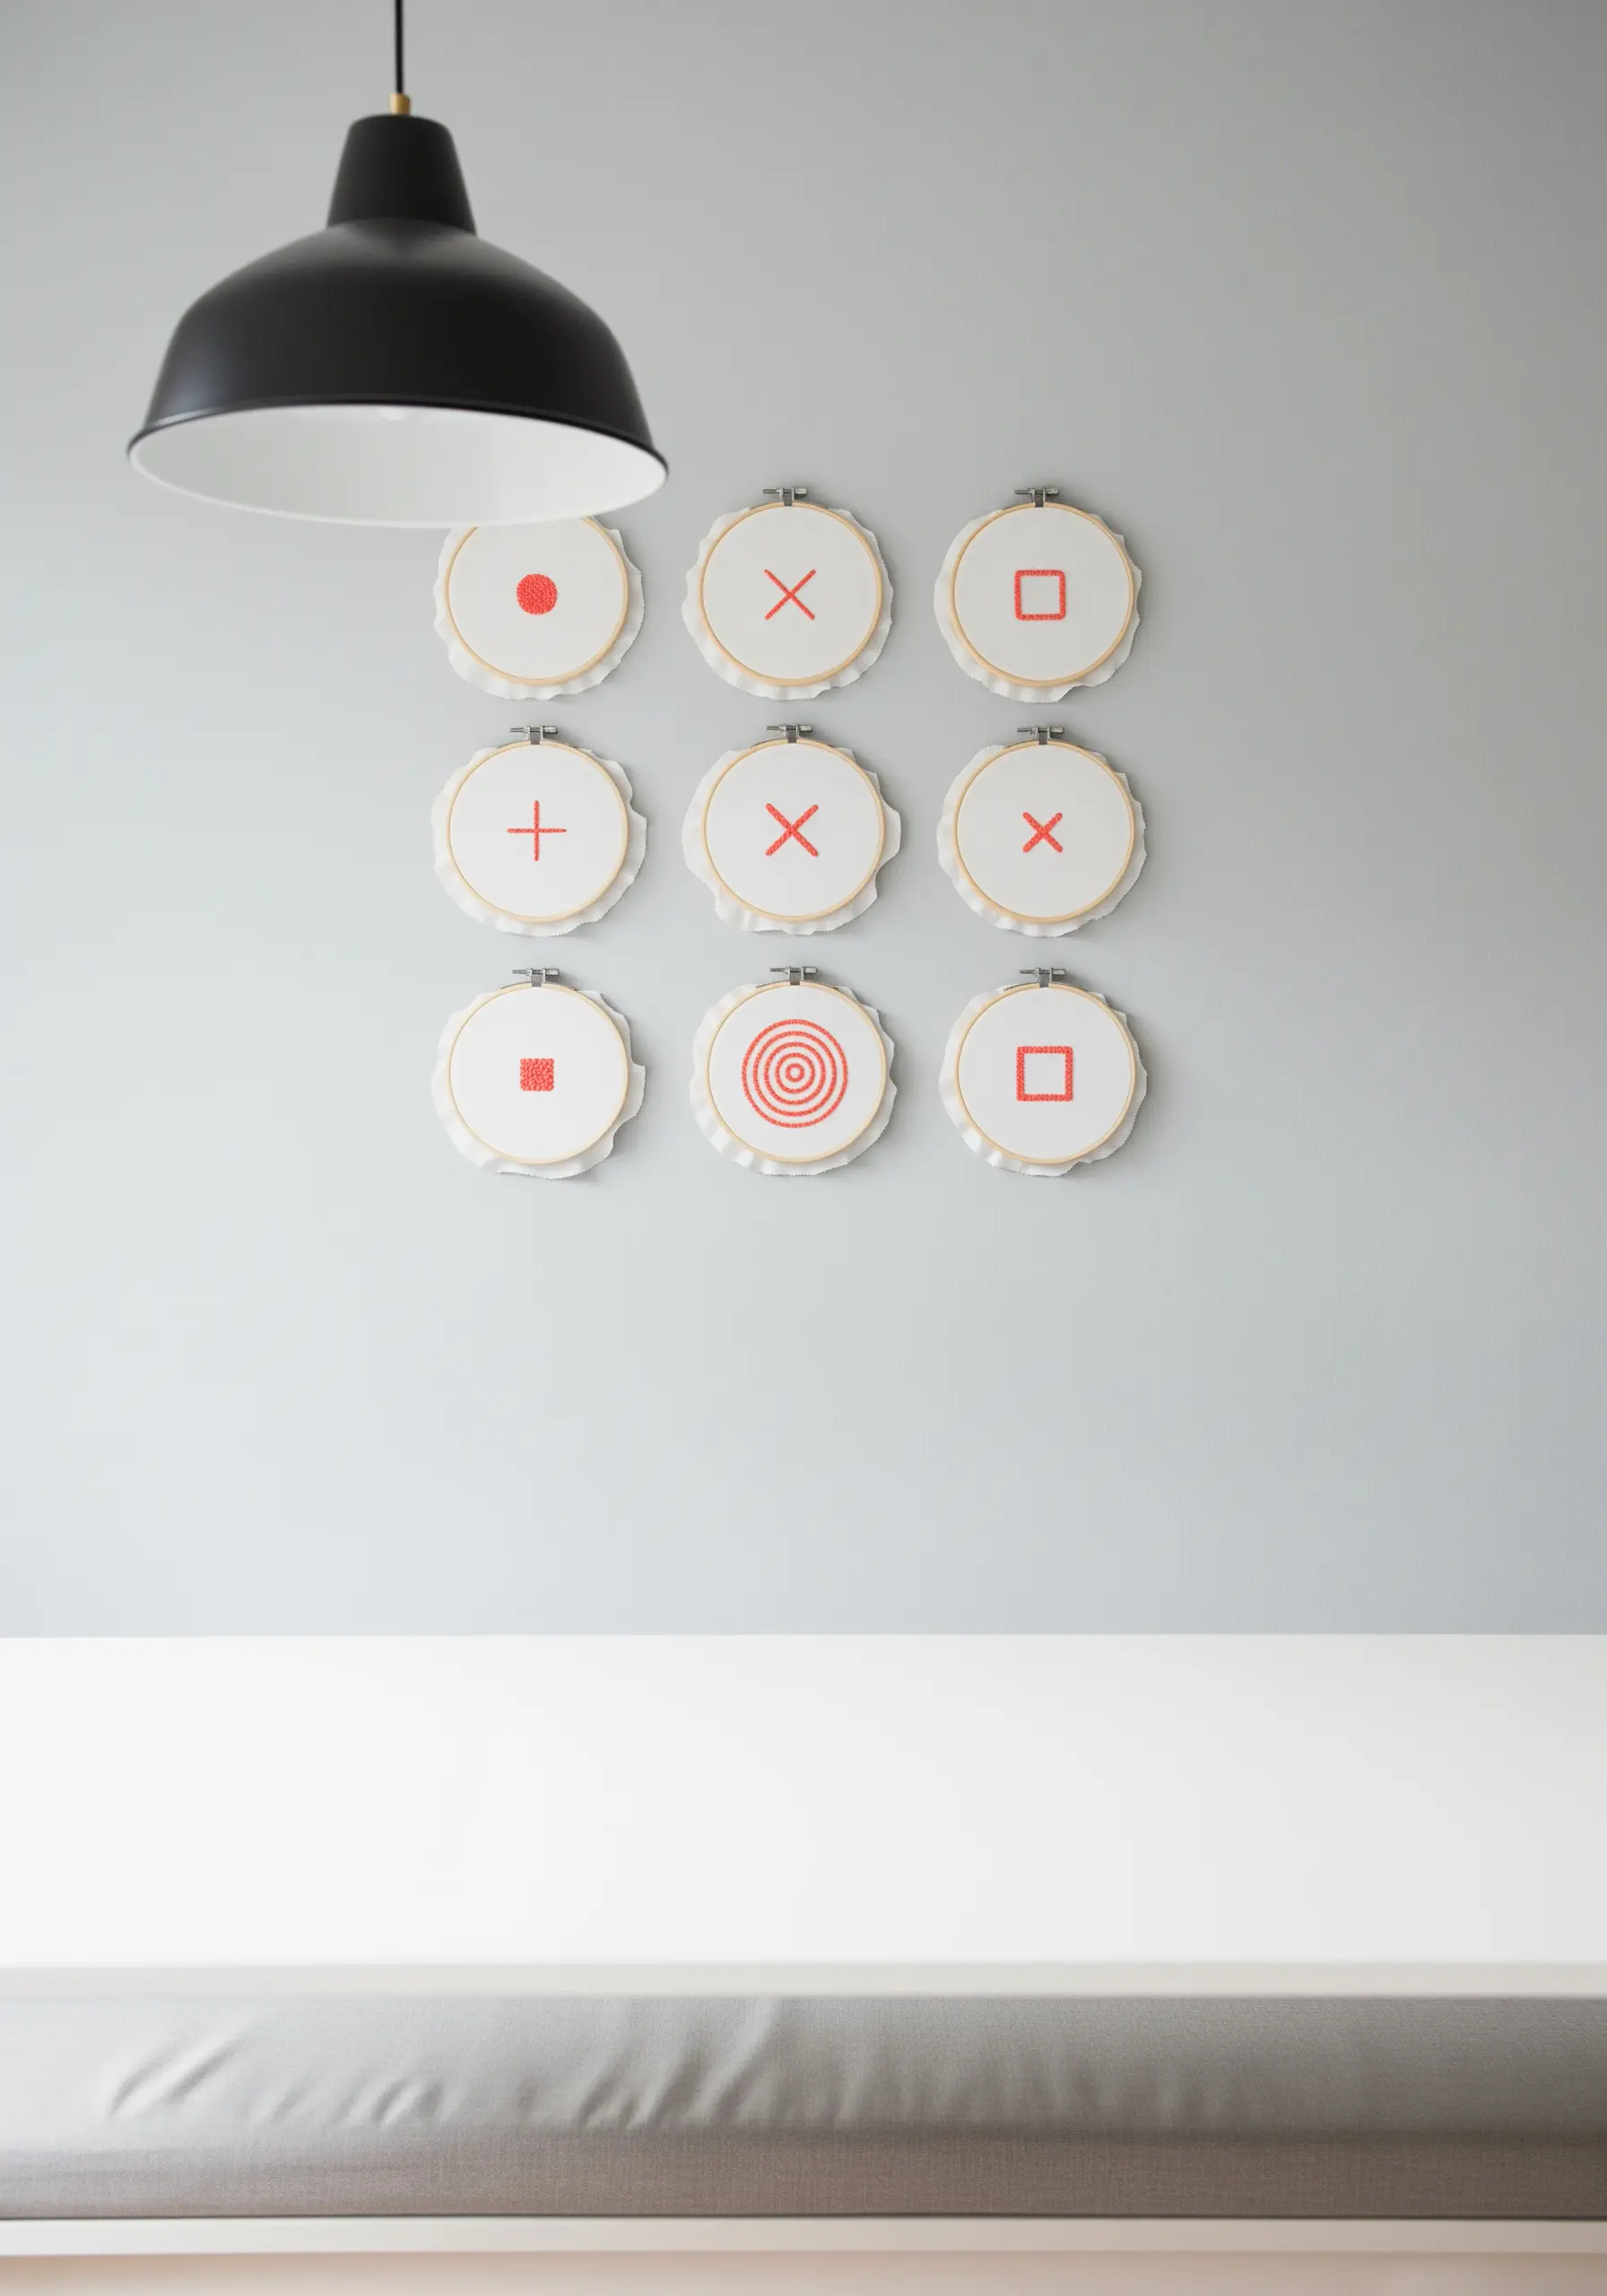
Transform simple symbols into a compelling piece of modern art through the power of repetition.
Arrange small hoops in a structured grid and stitch a single, bold motif in each one using a vibrant accent color like coral or red.
The uniformity of the grid and the consistent color palette provide order, while the variation in the simple shapes keeps the composition engaging.
This is a perfect way to experiment with geometric framed embroidery patterns and positive and negative space.
8. Add a Touch of Luxury with Metallic Thread
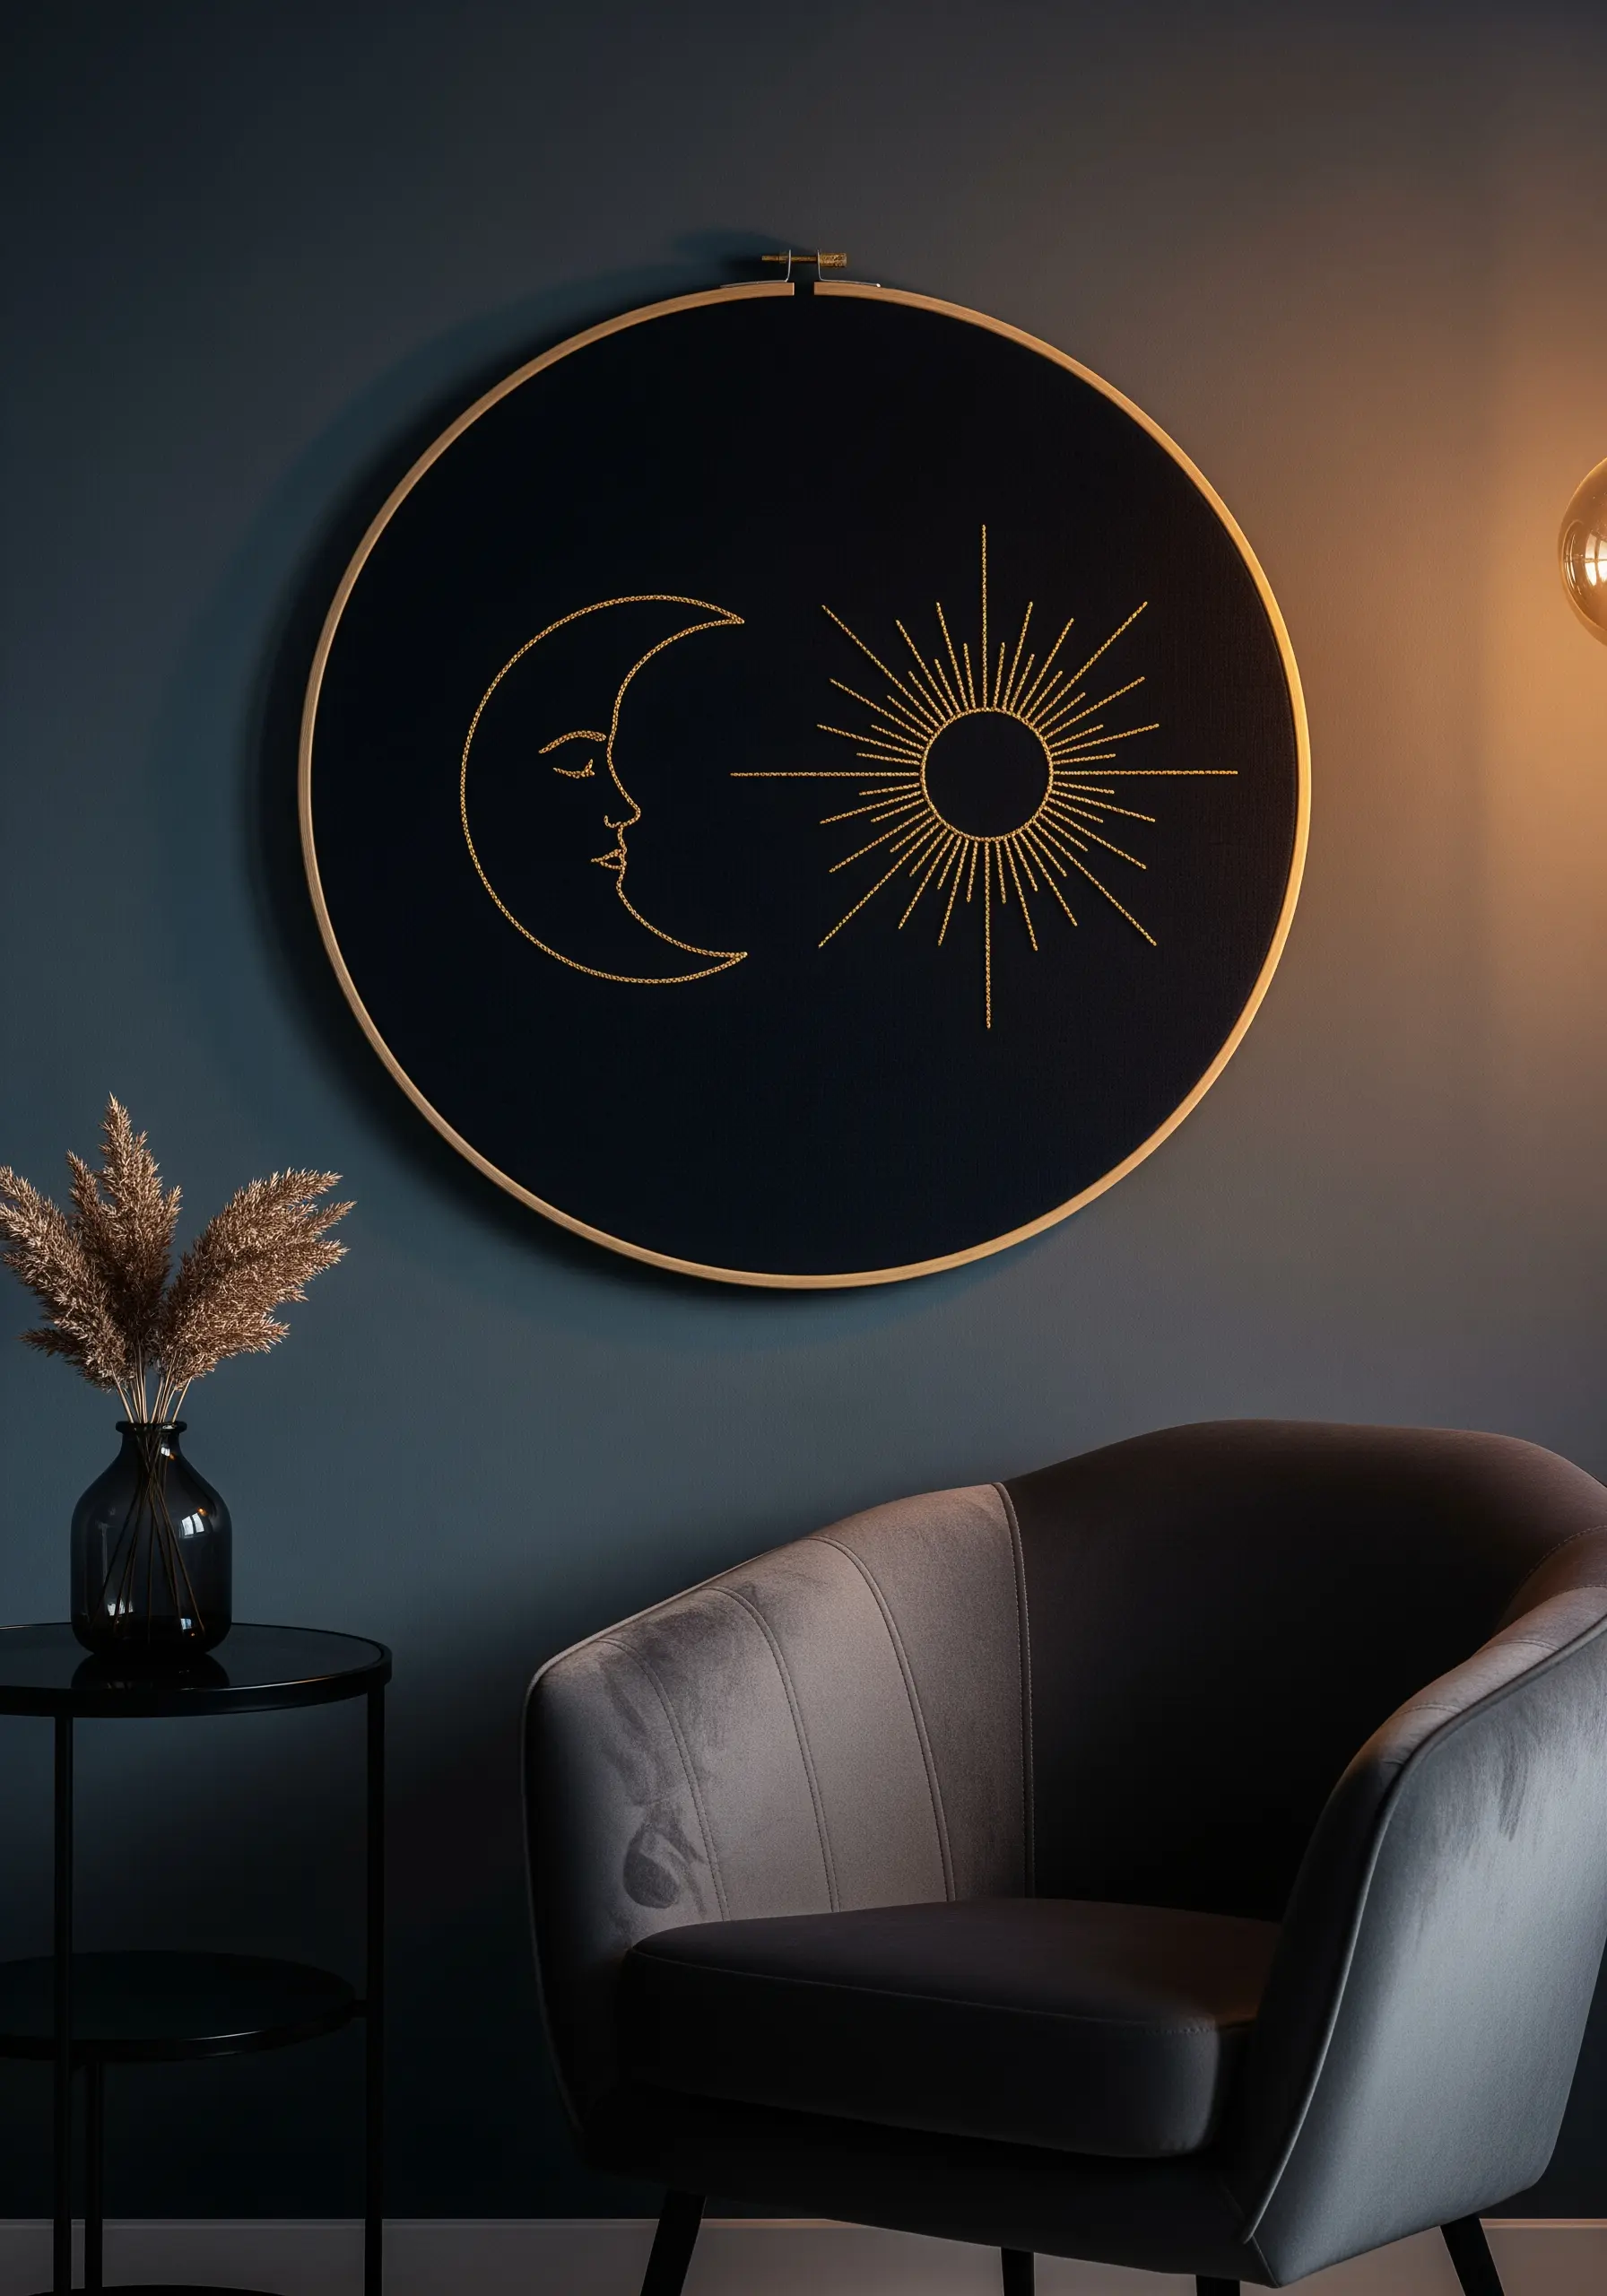
Elevate a simple line design by strategically incorporating metallic thread.
For a celestial motif, use a fine gold metallic floss for the sun’s rays to catch the light, creating a subtle shimmer that draws the eye.
To make it easier to work with, use shorter lengths of thread (no more than 12 inches) and a thread conditioner like beeswax to prevent tangling and breakage.
Pairing it with a standard cotton floss for the moon creates a beautiful contrast in texture and finish.
This thoughtful use of metallic thread for modern artwork adds a layer of sophistication to an otherwise simple design.
9. Perfect Your Satin Stitch with a Split-Stitch Border
To achieve flawless, solid blocks of color, the preparation is as important as the stitch itself.
Before filling any shape with satin stitch, outline its entire perimeter with a tight, precise split stitch using a single strand of matching thread.
This raised edge acts as a perfect boundary, preventing your satin stitches from slipping and ensuring your shapes have clean, defined edges.
This technique is essential for creating the clean, graphic look of these abstract embroidery patterns.
The result is a smooth, professional finish that looks more like a solid piece of fabric than individual threads.
10. Capture Character with Expressive Line Art
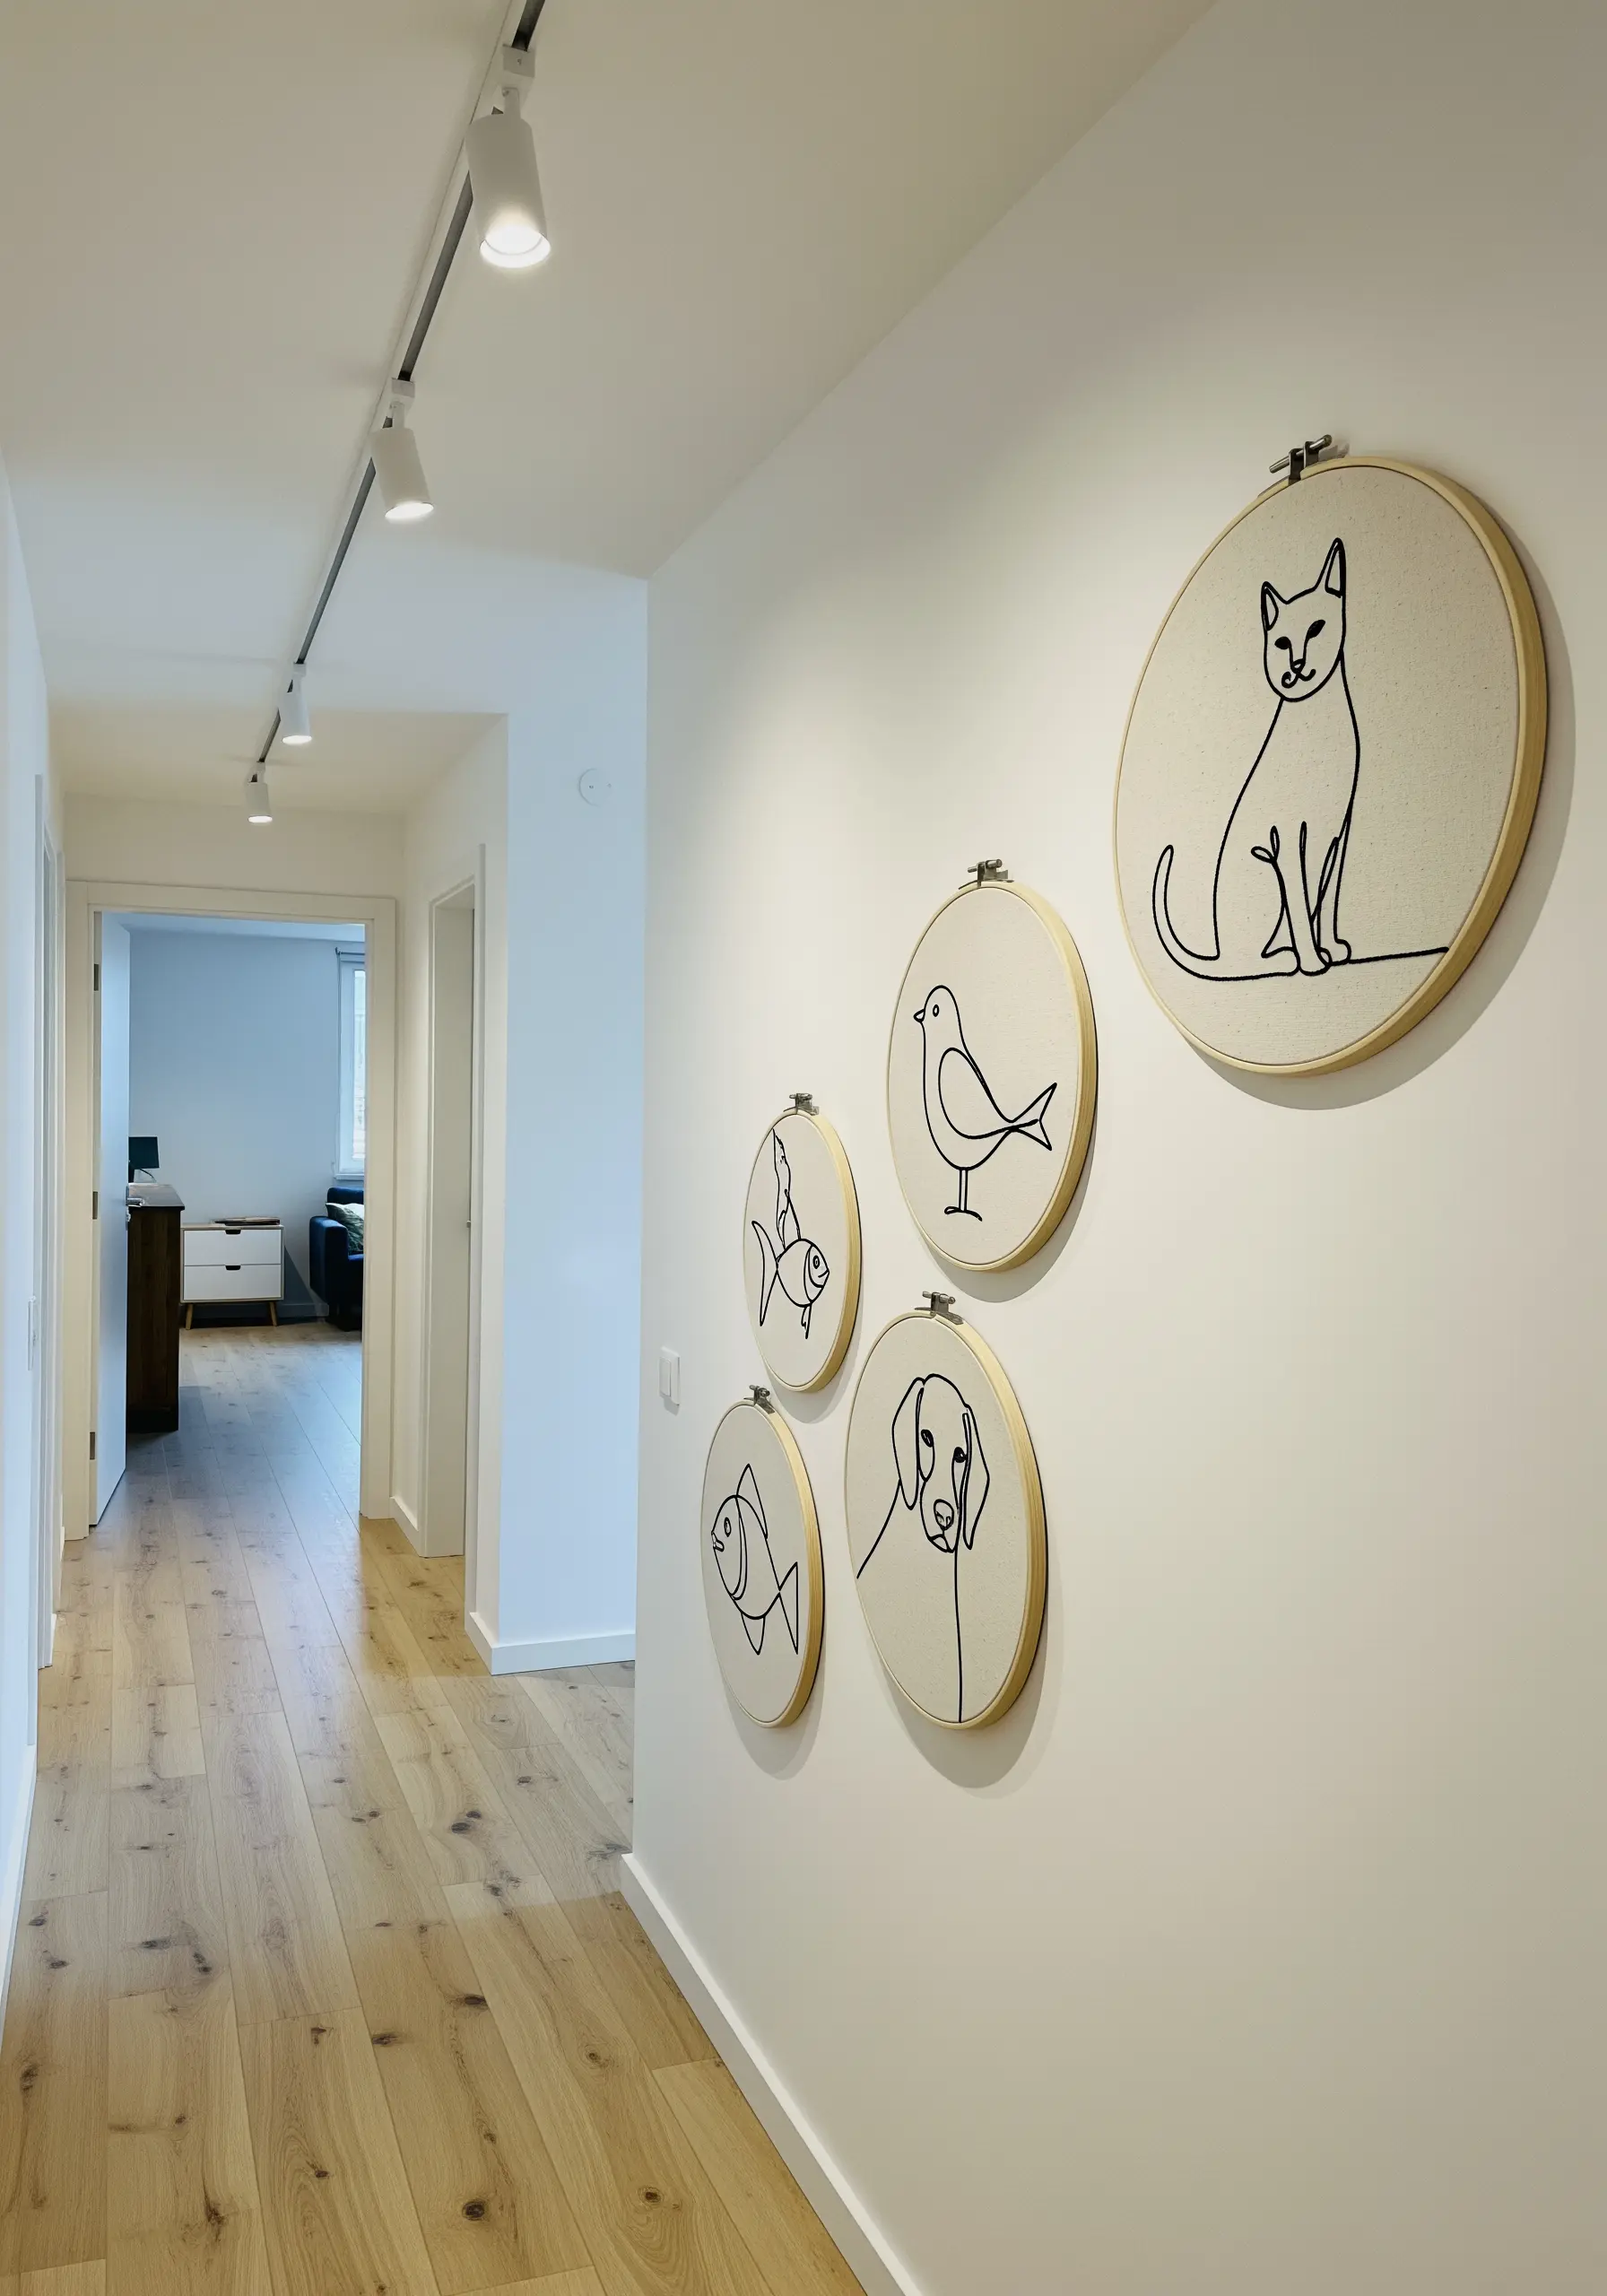
When stitching minimalist animal portraits, focus on capturing the essence of the form with a single, flowing line.
Use a backstitch for its precision and control, ensuring each curve and angle is deliberate.
Study the animal’s key features—the curve of a cat’s back, the droop of a dog’s ear—and translate them into an uninterrupted line.
This style of pet line art embroidery ideas celebrates simplicity, proving you don’t need color or shading to convey personality.
Group different pets together in a hallway to create a personal and charming gallery.
11. Embrace the Power of Negative Space
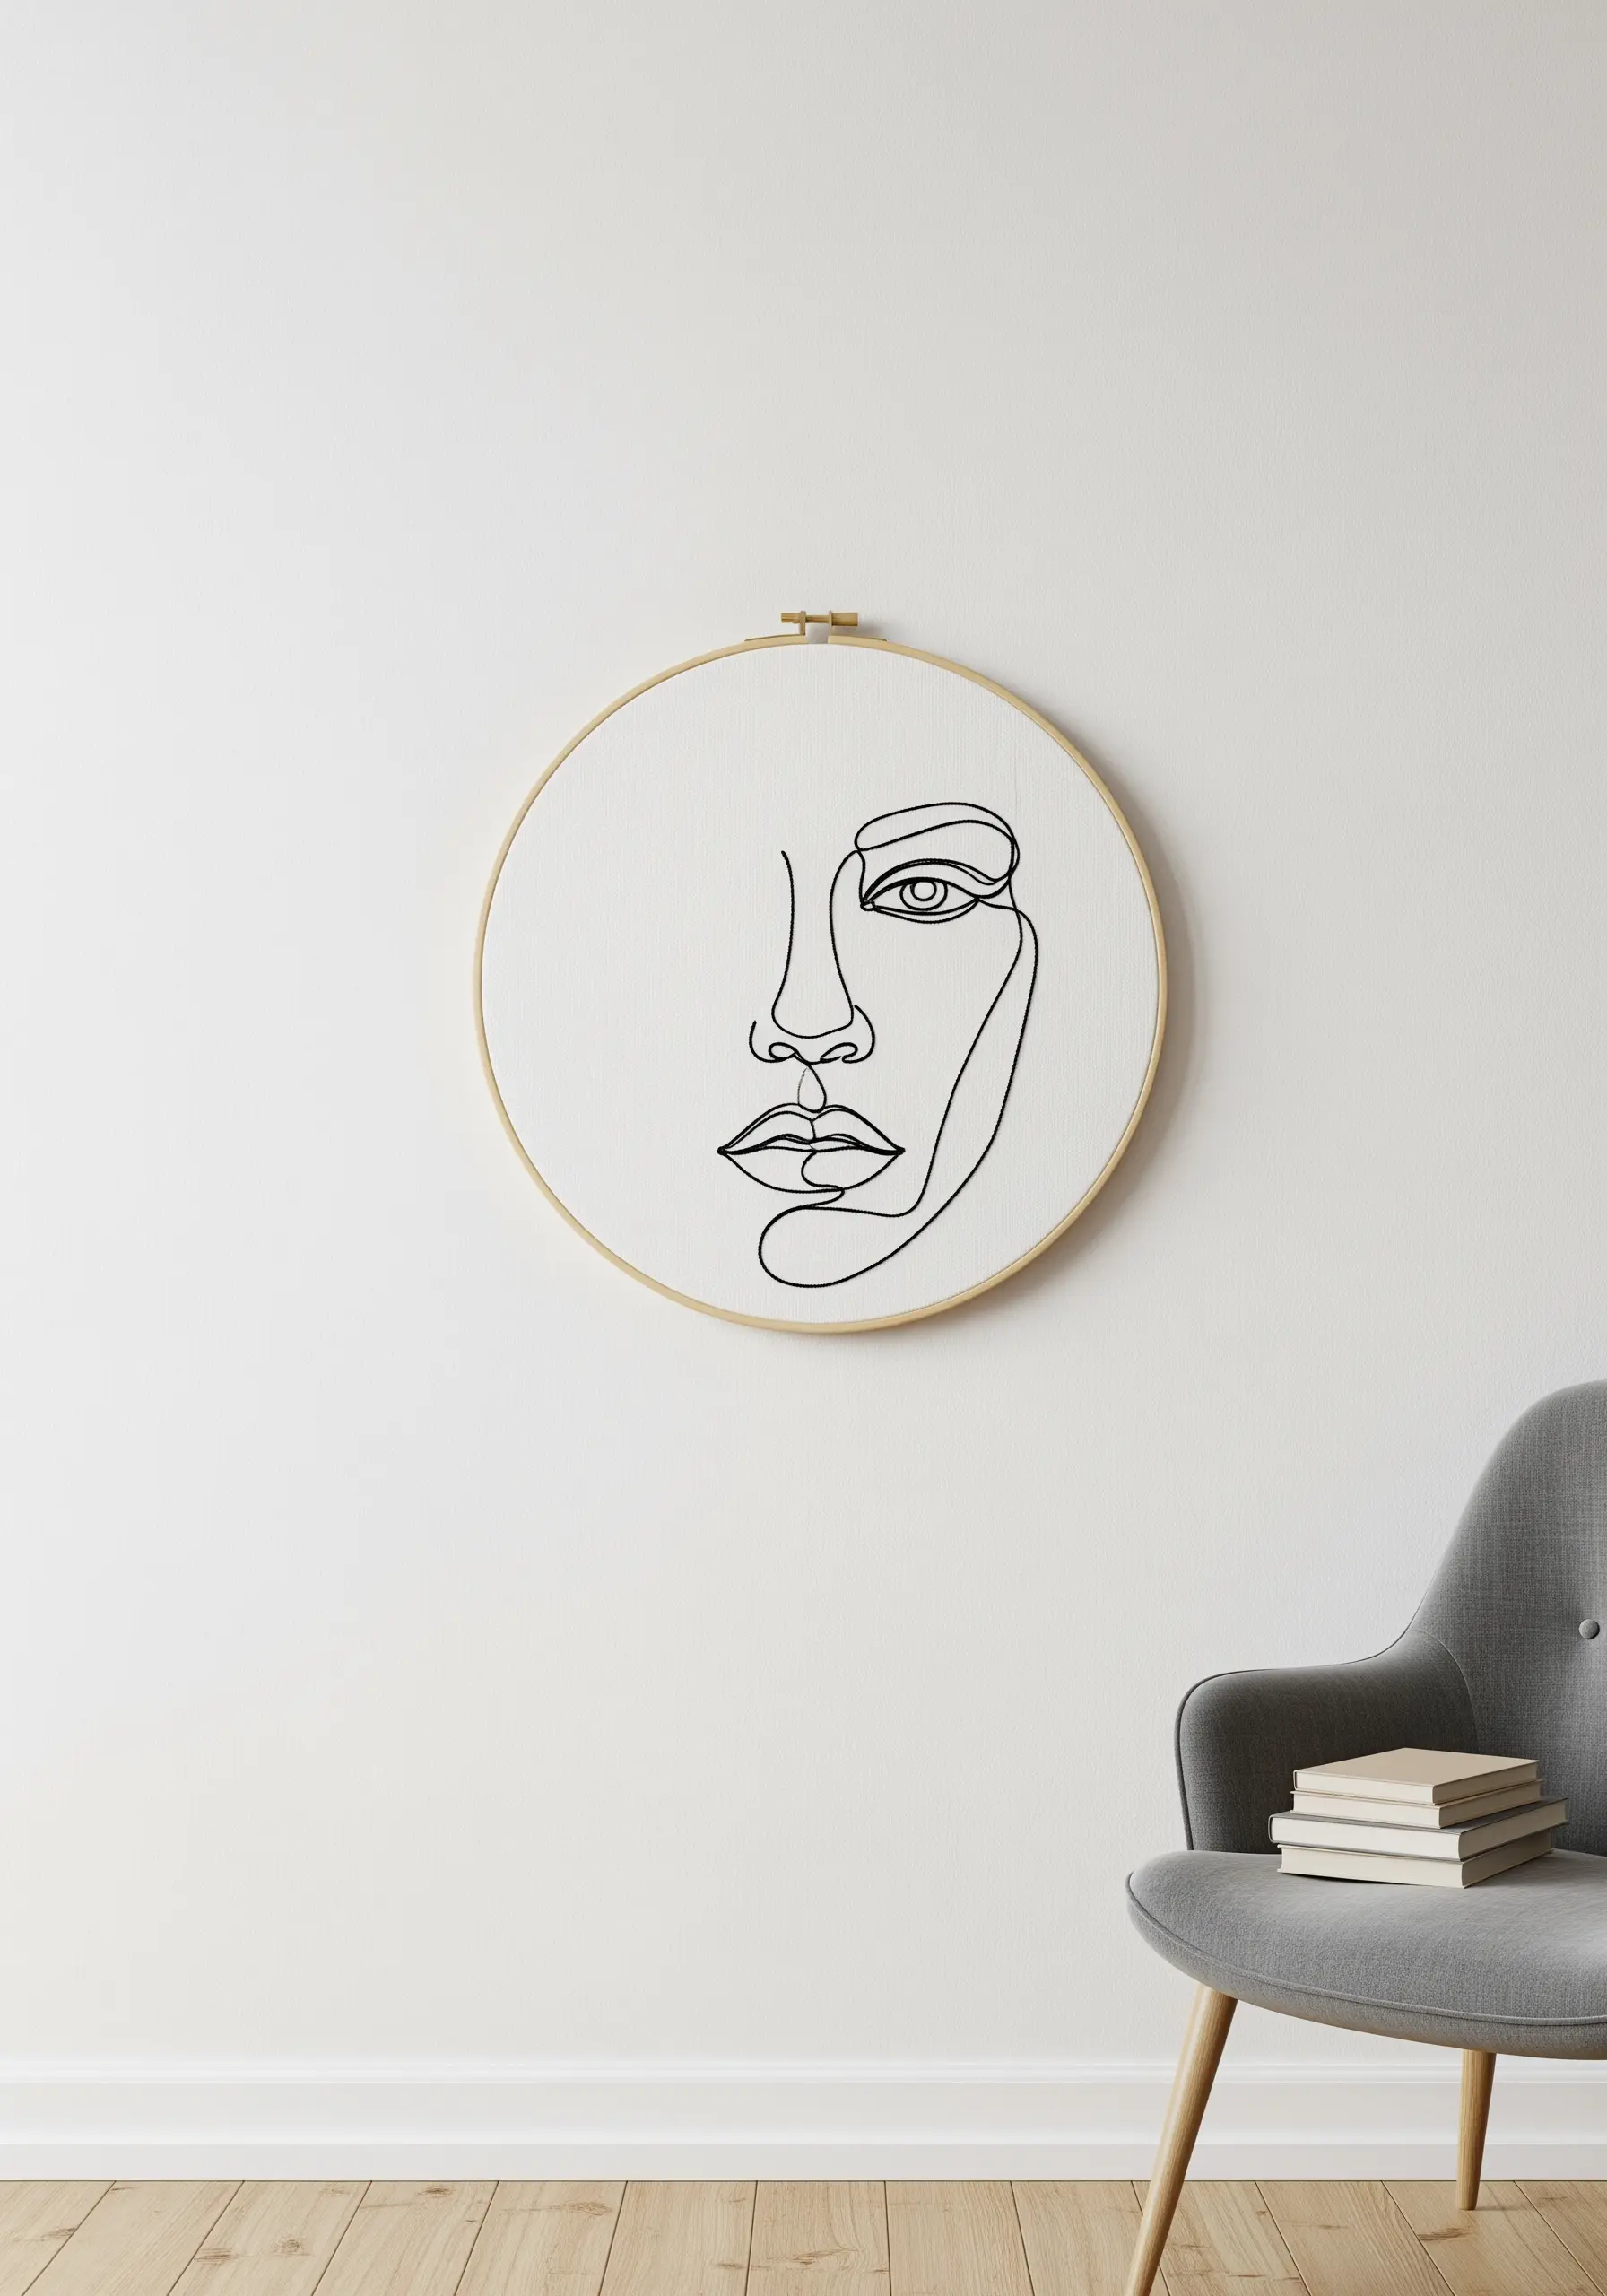
In minimalist embroidery, the unstitched fabric is as important as the thread itself.
When composing a piece of modern line art, carefully consider the placement of your motif within the hoop.
An off-center design often feels more dynamic and sophisticated than one placed directly in the middle.
Let the clean, open space around your stitches create a sense of calm and focus, drawing the viewer’s eye directly to your handiwork.
This intentional use of negative space is what elevates a simple design into a refined piece of art.
12. Stitch Architectural Details with a Fine Point
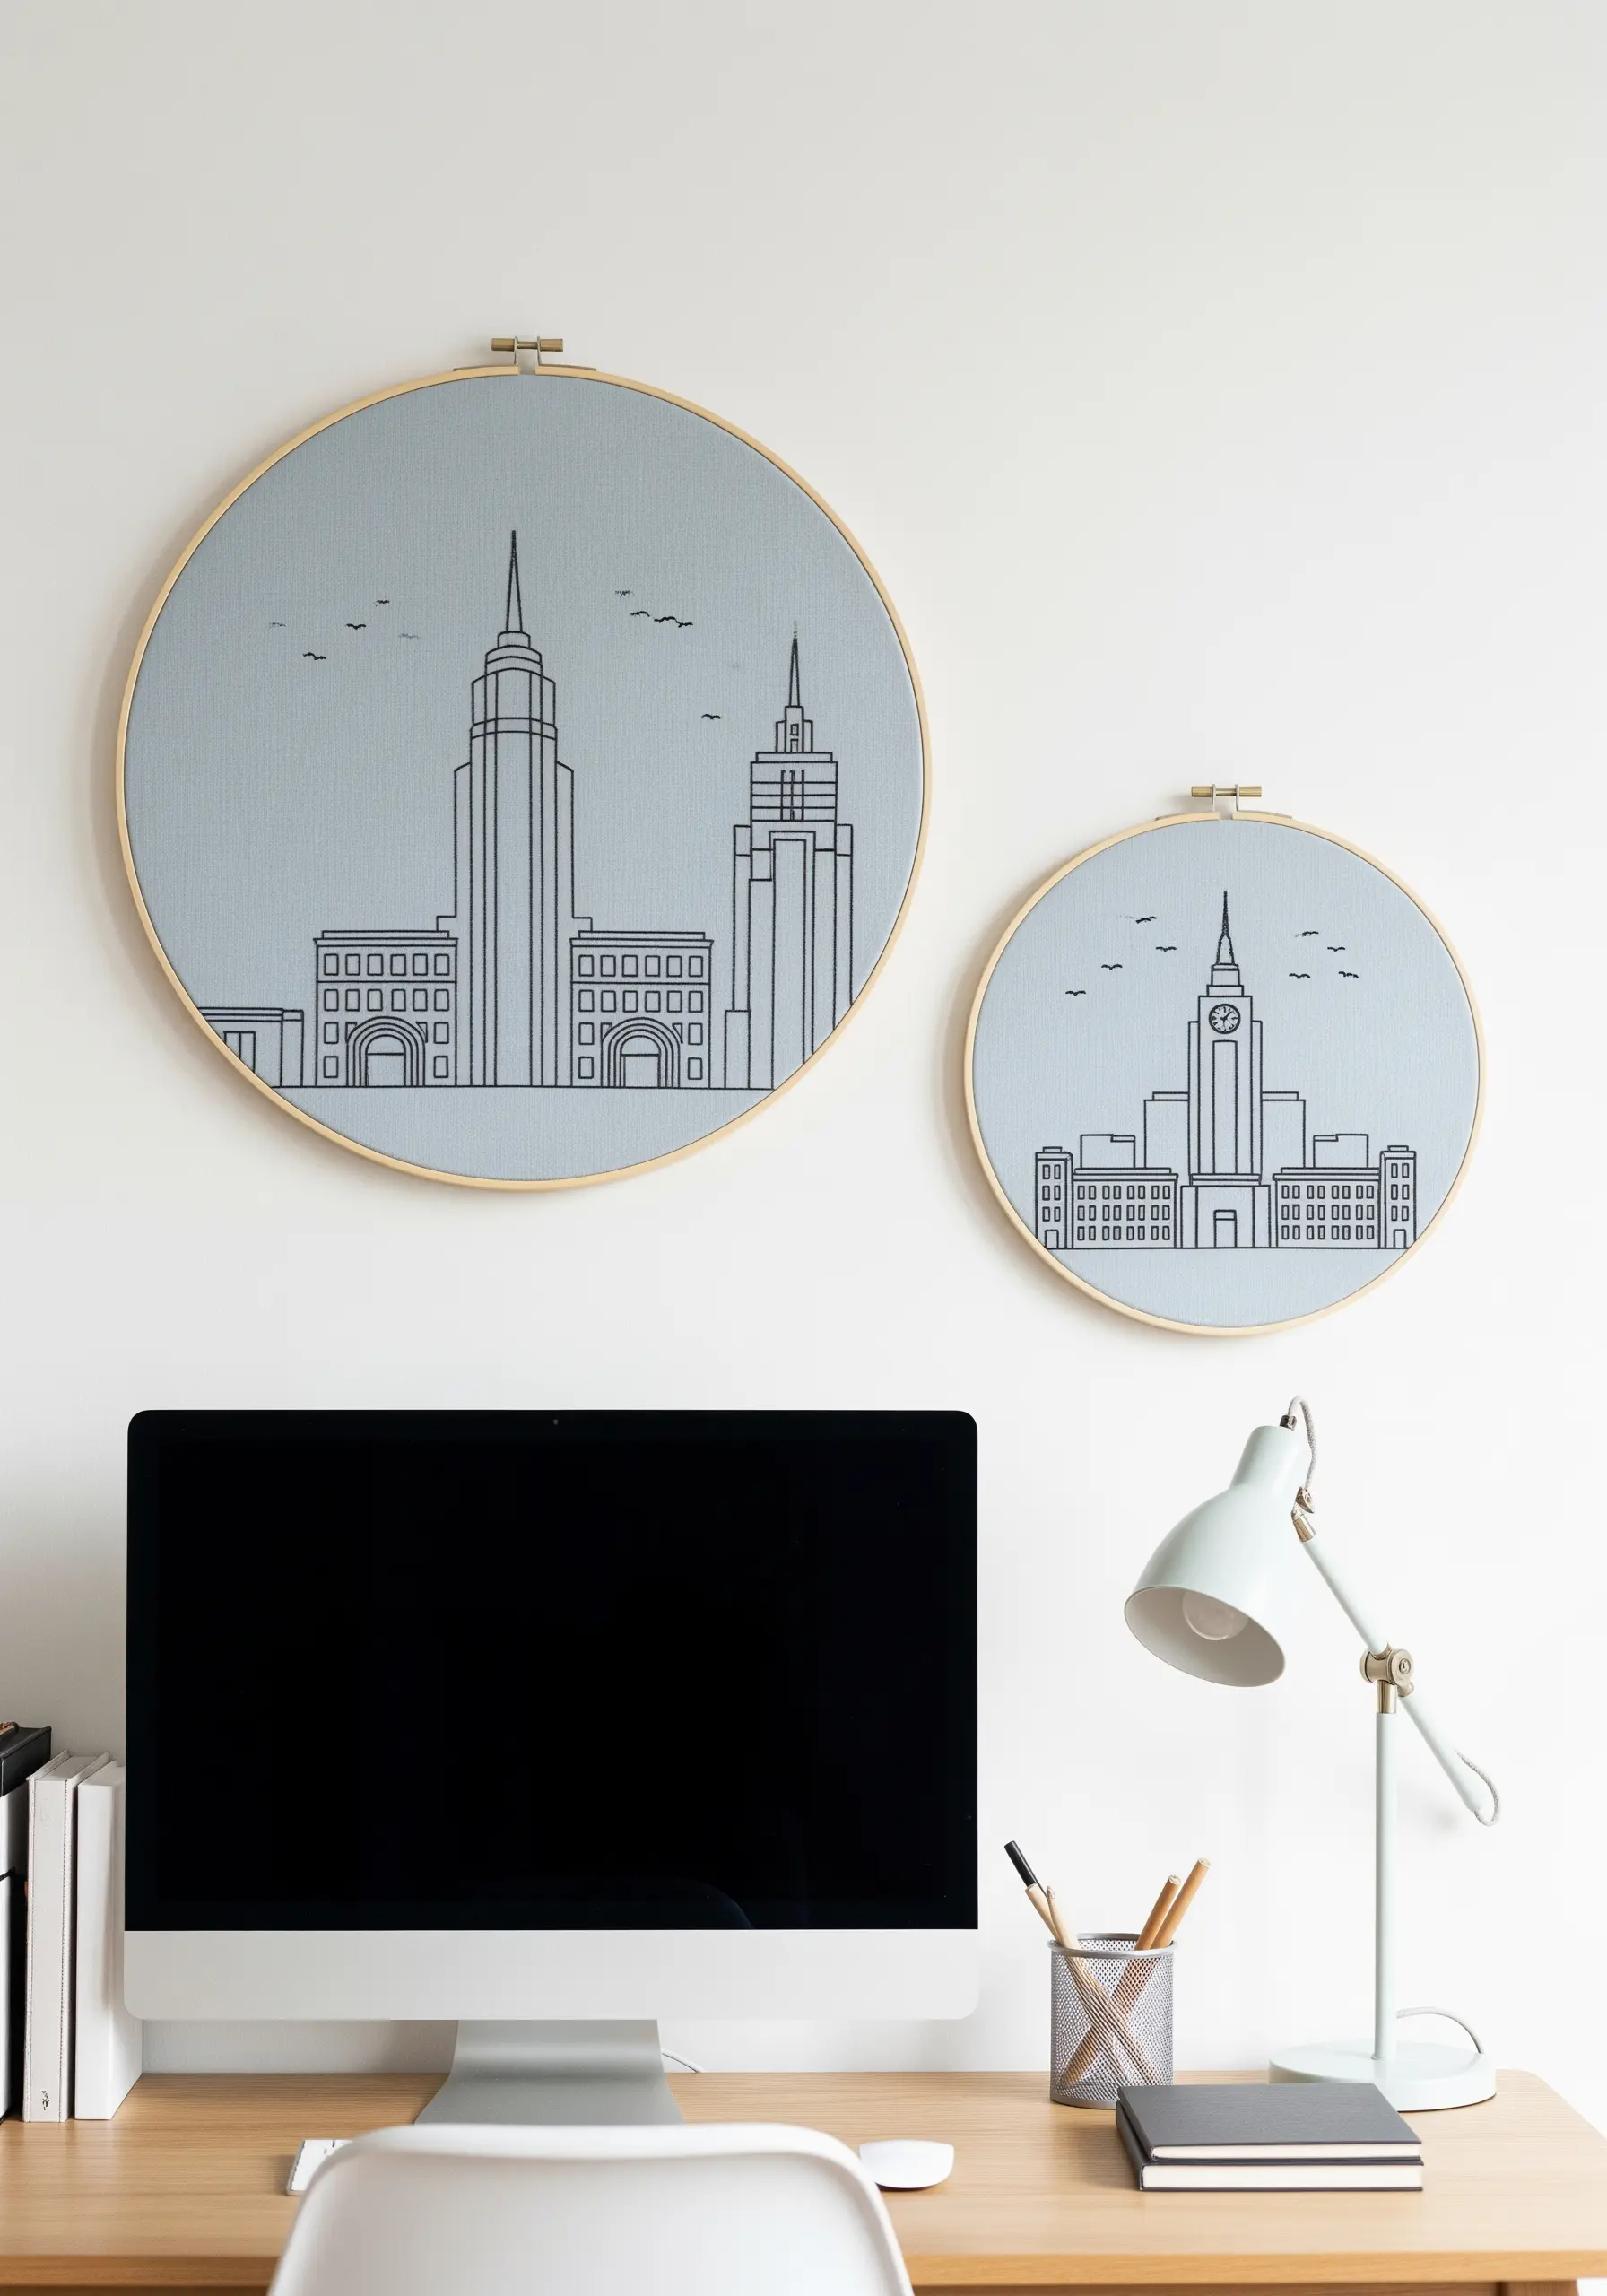
Capture the essence of a city skyline with clean, precise outlines.
Use a fine-tipped, heat-erasable pen to transfer the architectural details onto your fabric, ensuring every window and spire is accounted for.
Stitch the entire design using a single strand of black floss and a simple backstitch to maintain a crisp, graphic quality.
This style of one line embroidery wall arts is perfect for a home office, adding a touch of urban sophistication without creating visual clutter.
Displaying two different cityscapes or perspectives together adds narrative depth to your wall.
13. Create Flow with a Continuous Multi-Hoop Design
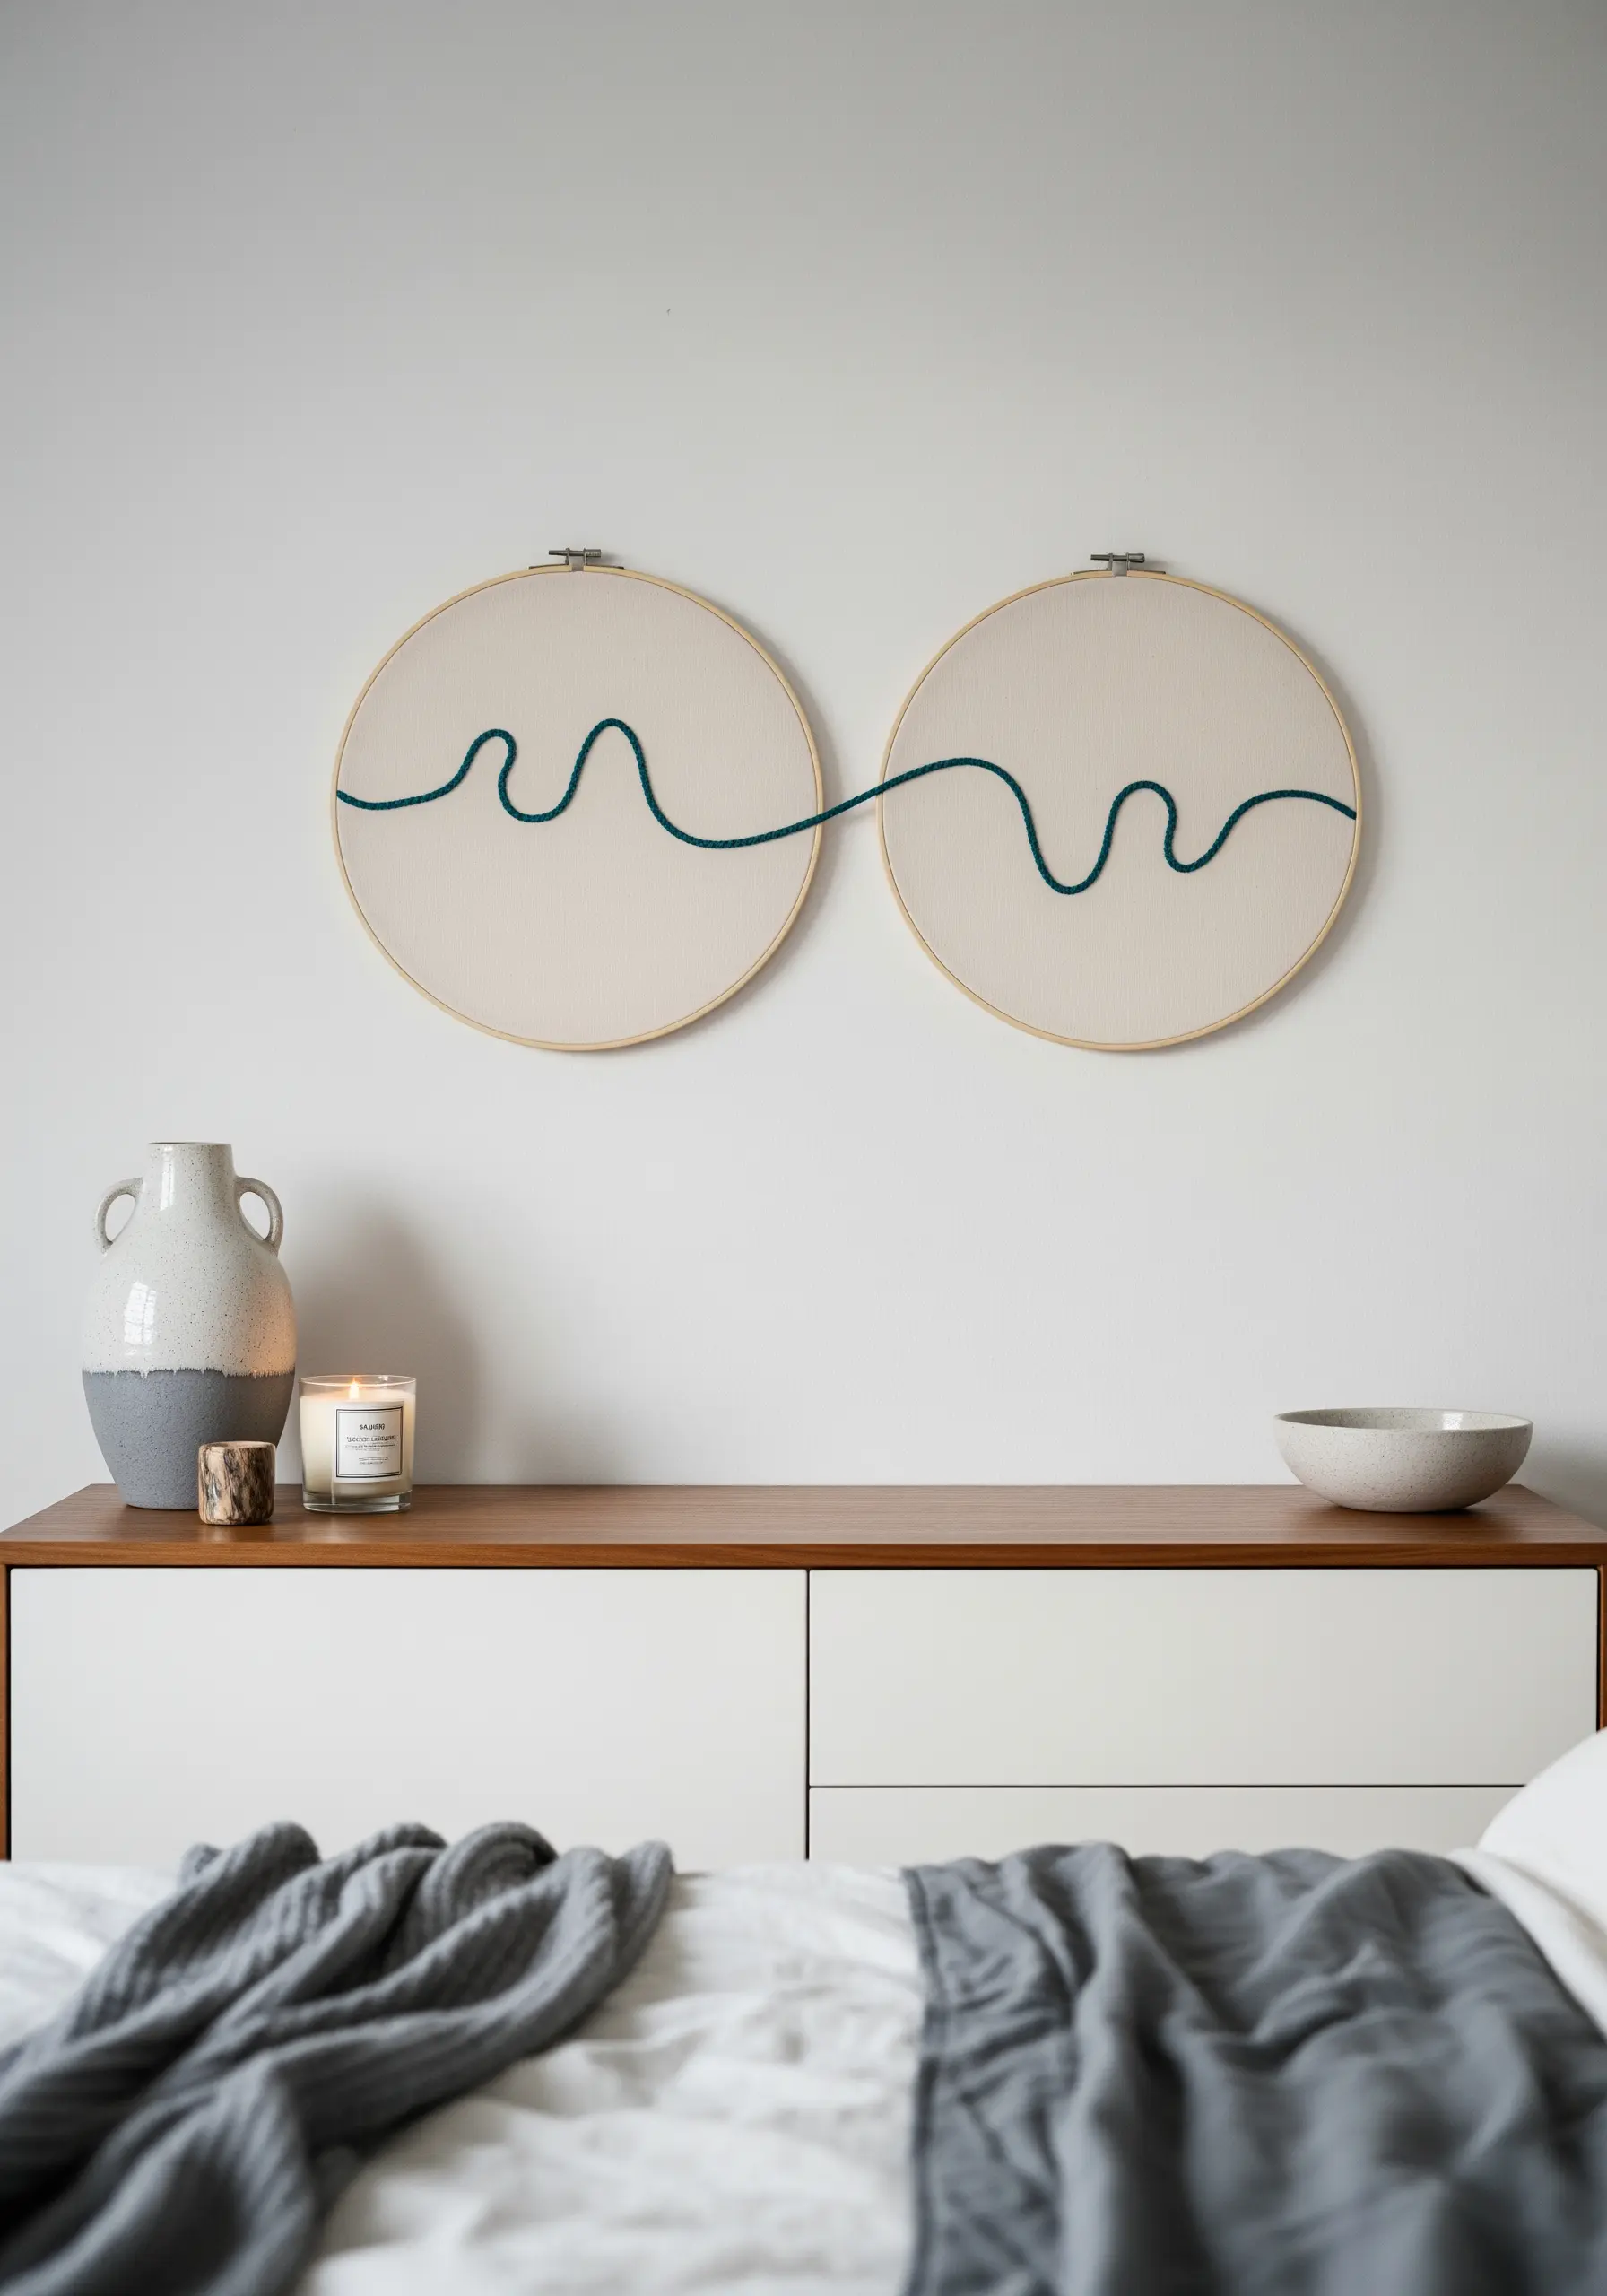
Break free from the single-hoop constraint by creating a design that flows across two or more frames.
To achieve this, stretch your fabric over both hoops simultaneously while they are pushed together, then draw your continuous line.
Once the pattern is marked, stitch the design as a single piece.
Only after the embroidery is complete should you separate the hoops, ensuring the line matches up perfectly.
This method creates stunning abstract thread illusion techniques that make your wall art feel integrated and expansive.
14. Map the Night Sky with Delicate Stitches

Recreate a favorite constellation using simple, elegant stitches on a dark canvas.
Use tiny French knots for the stars, varying the number of wraps around the needle (one wrap for small stars, two for larger ones) to indicate their brightness.
Connect them with a single, sharp backstitch using just one strand of white or silver thread.
These dreamy nature-inspired embroidery designs are perfect for a bedroom or cozy reading nook, adding a touch of quiet wonder.
The high contrast of white on navy fabric makes the design truly shine, especially under a warm reading light.
15. Suggest Motion with Graduated Color Lines
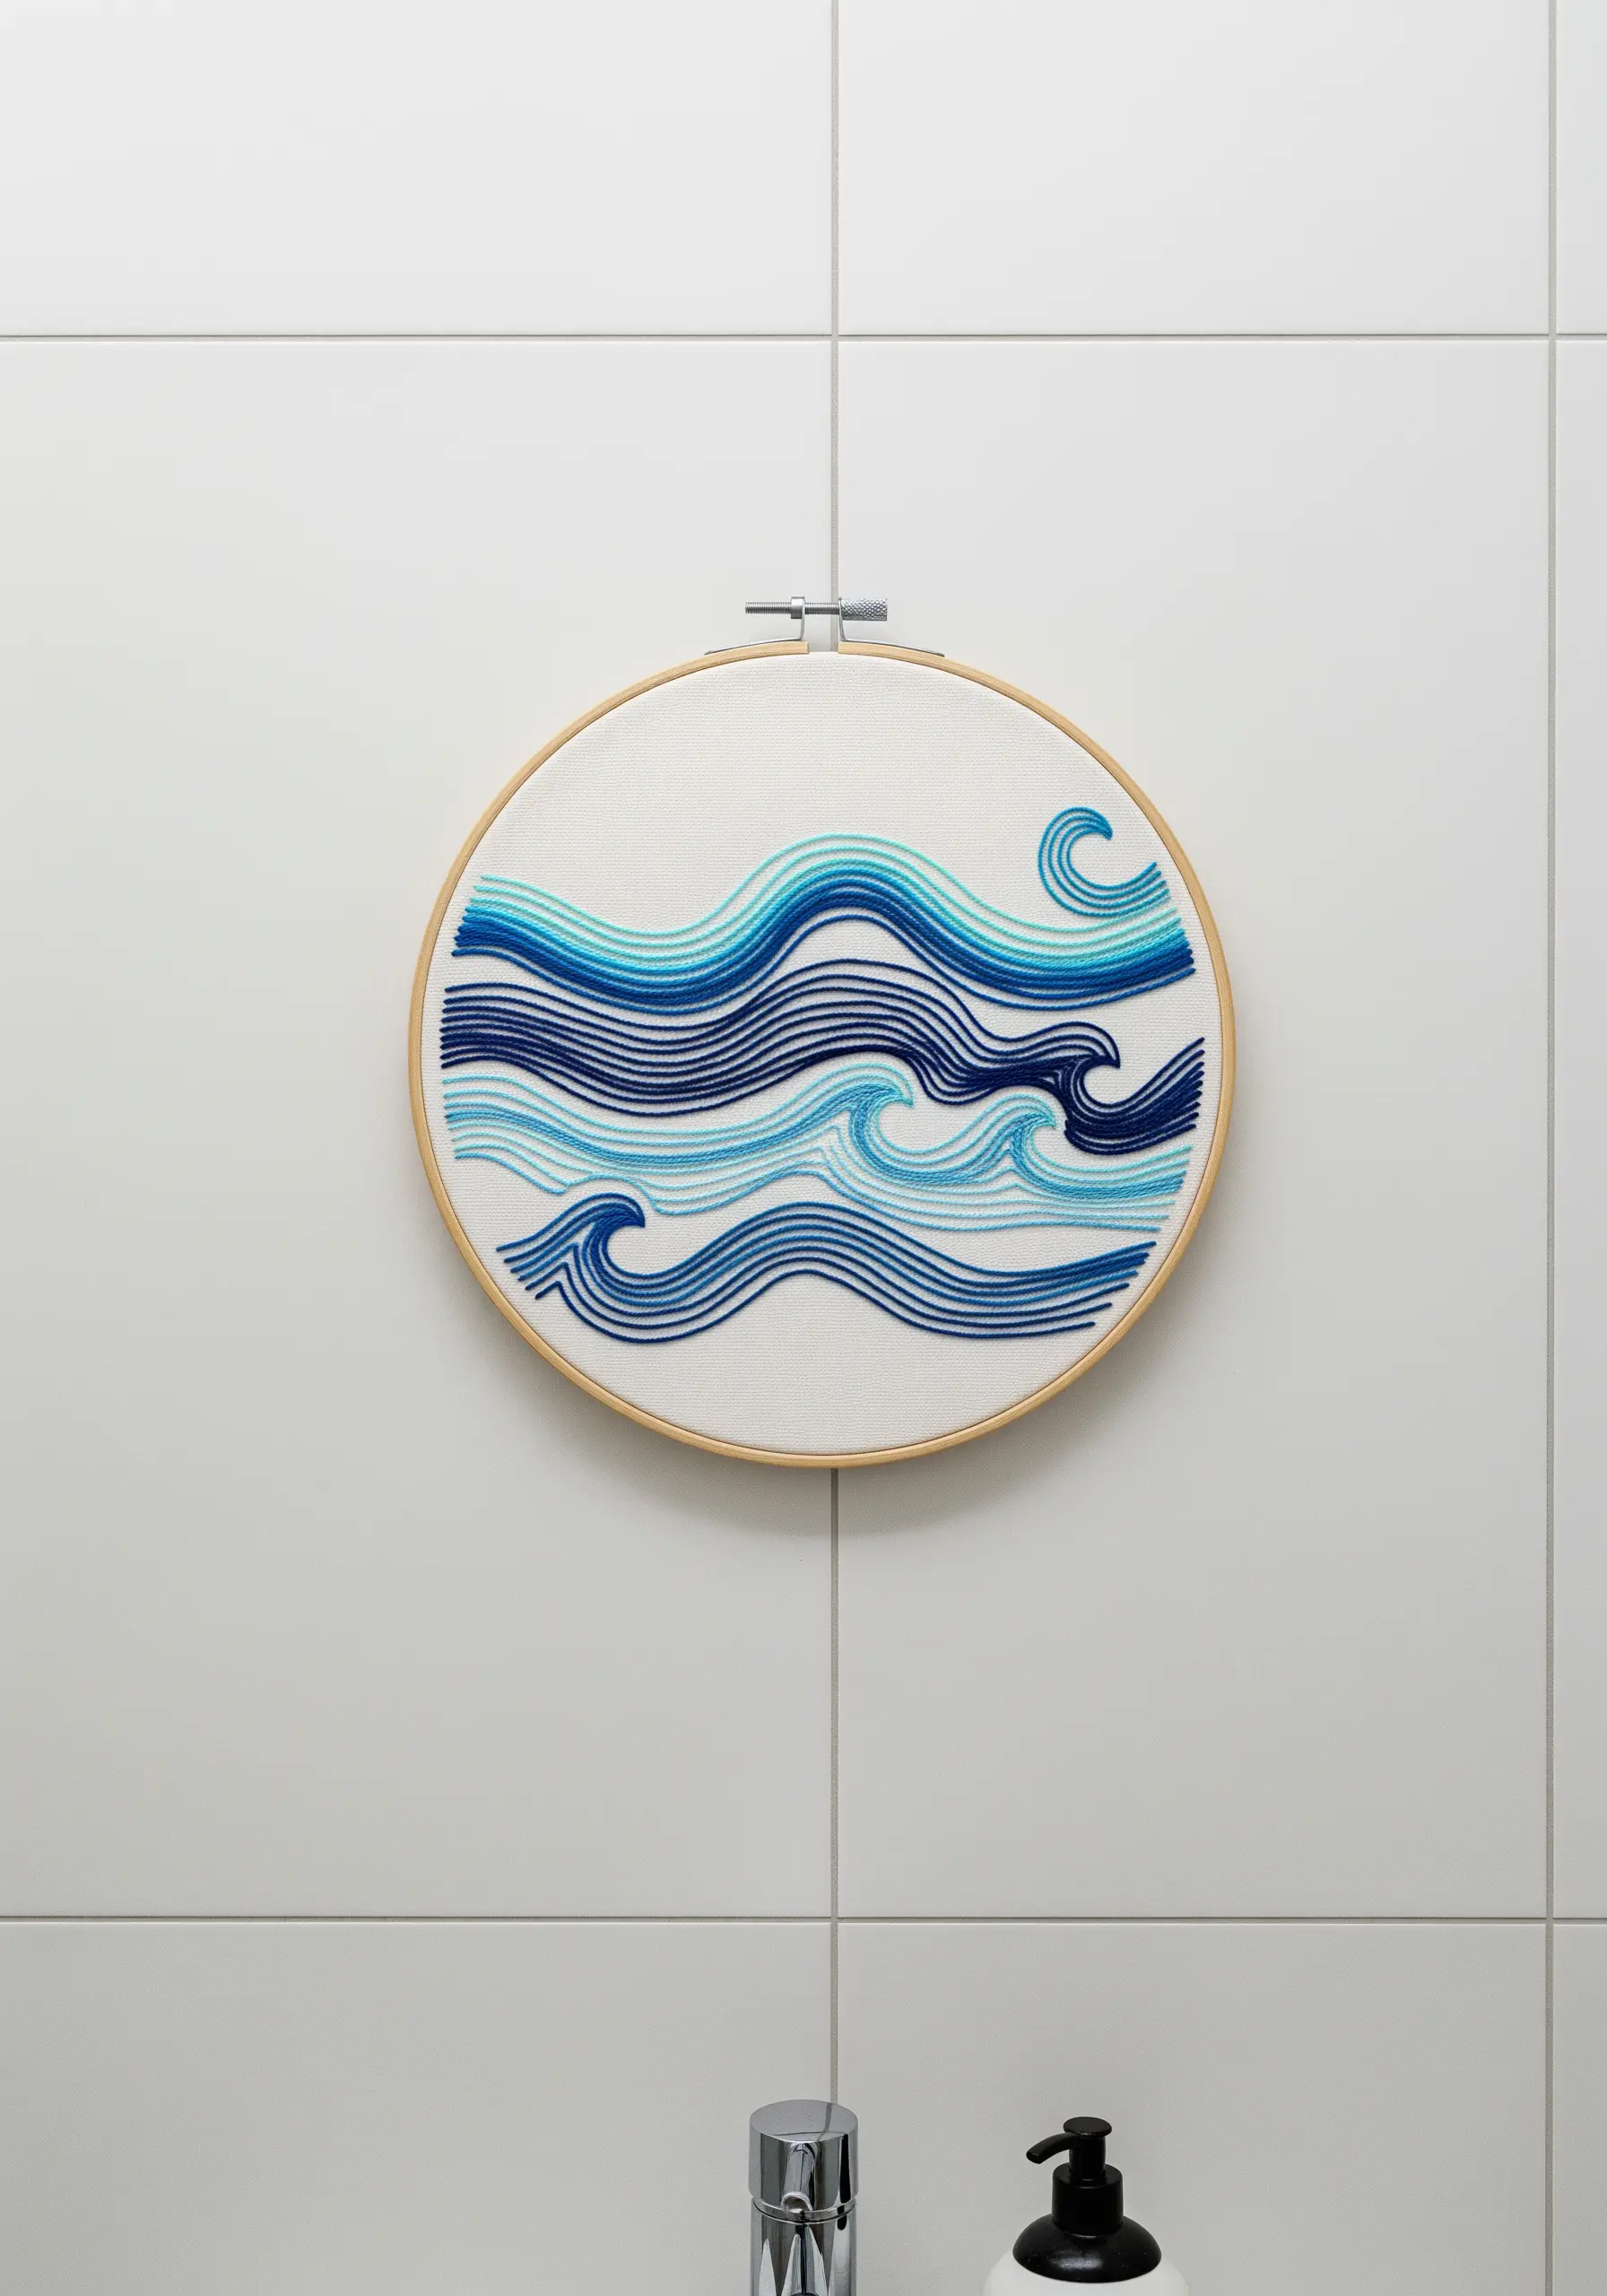
You can create the illusion of movement and depth using only simple straight stitches and a smart color palette.
Choose four to five shades of a single color, from light to dark, to represent ocean waves.
Stitch rows of parallel lines, arranging the colors in a gradient to mimic the way light hits water.
Keep the stitches smooth and even, letting the color do all the expressive work.
This technique is perfect for creating minimal ocean-inspired embroidery pieces that feel both abstract and instantly recognizable.
16. Balance Your Composition with Visual Weight
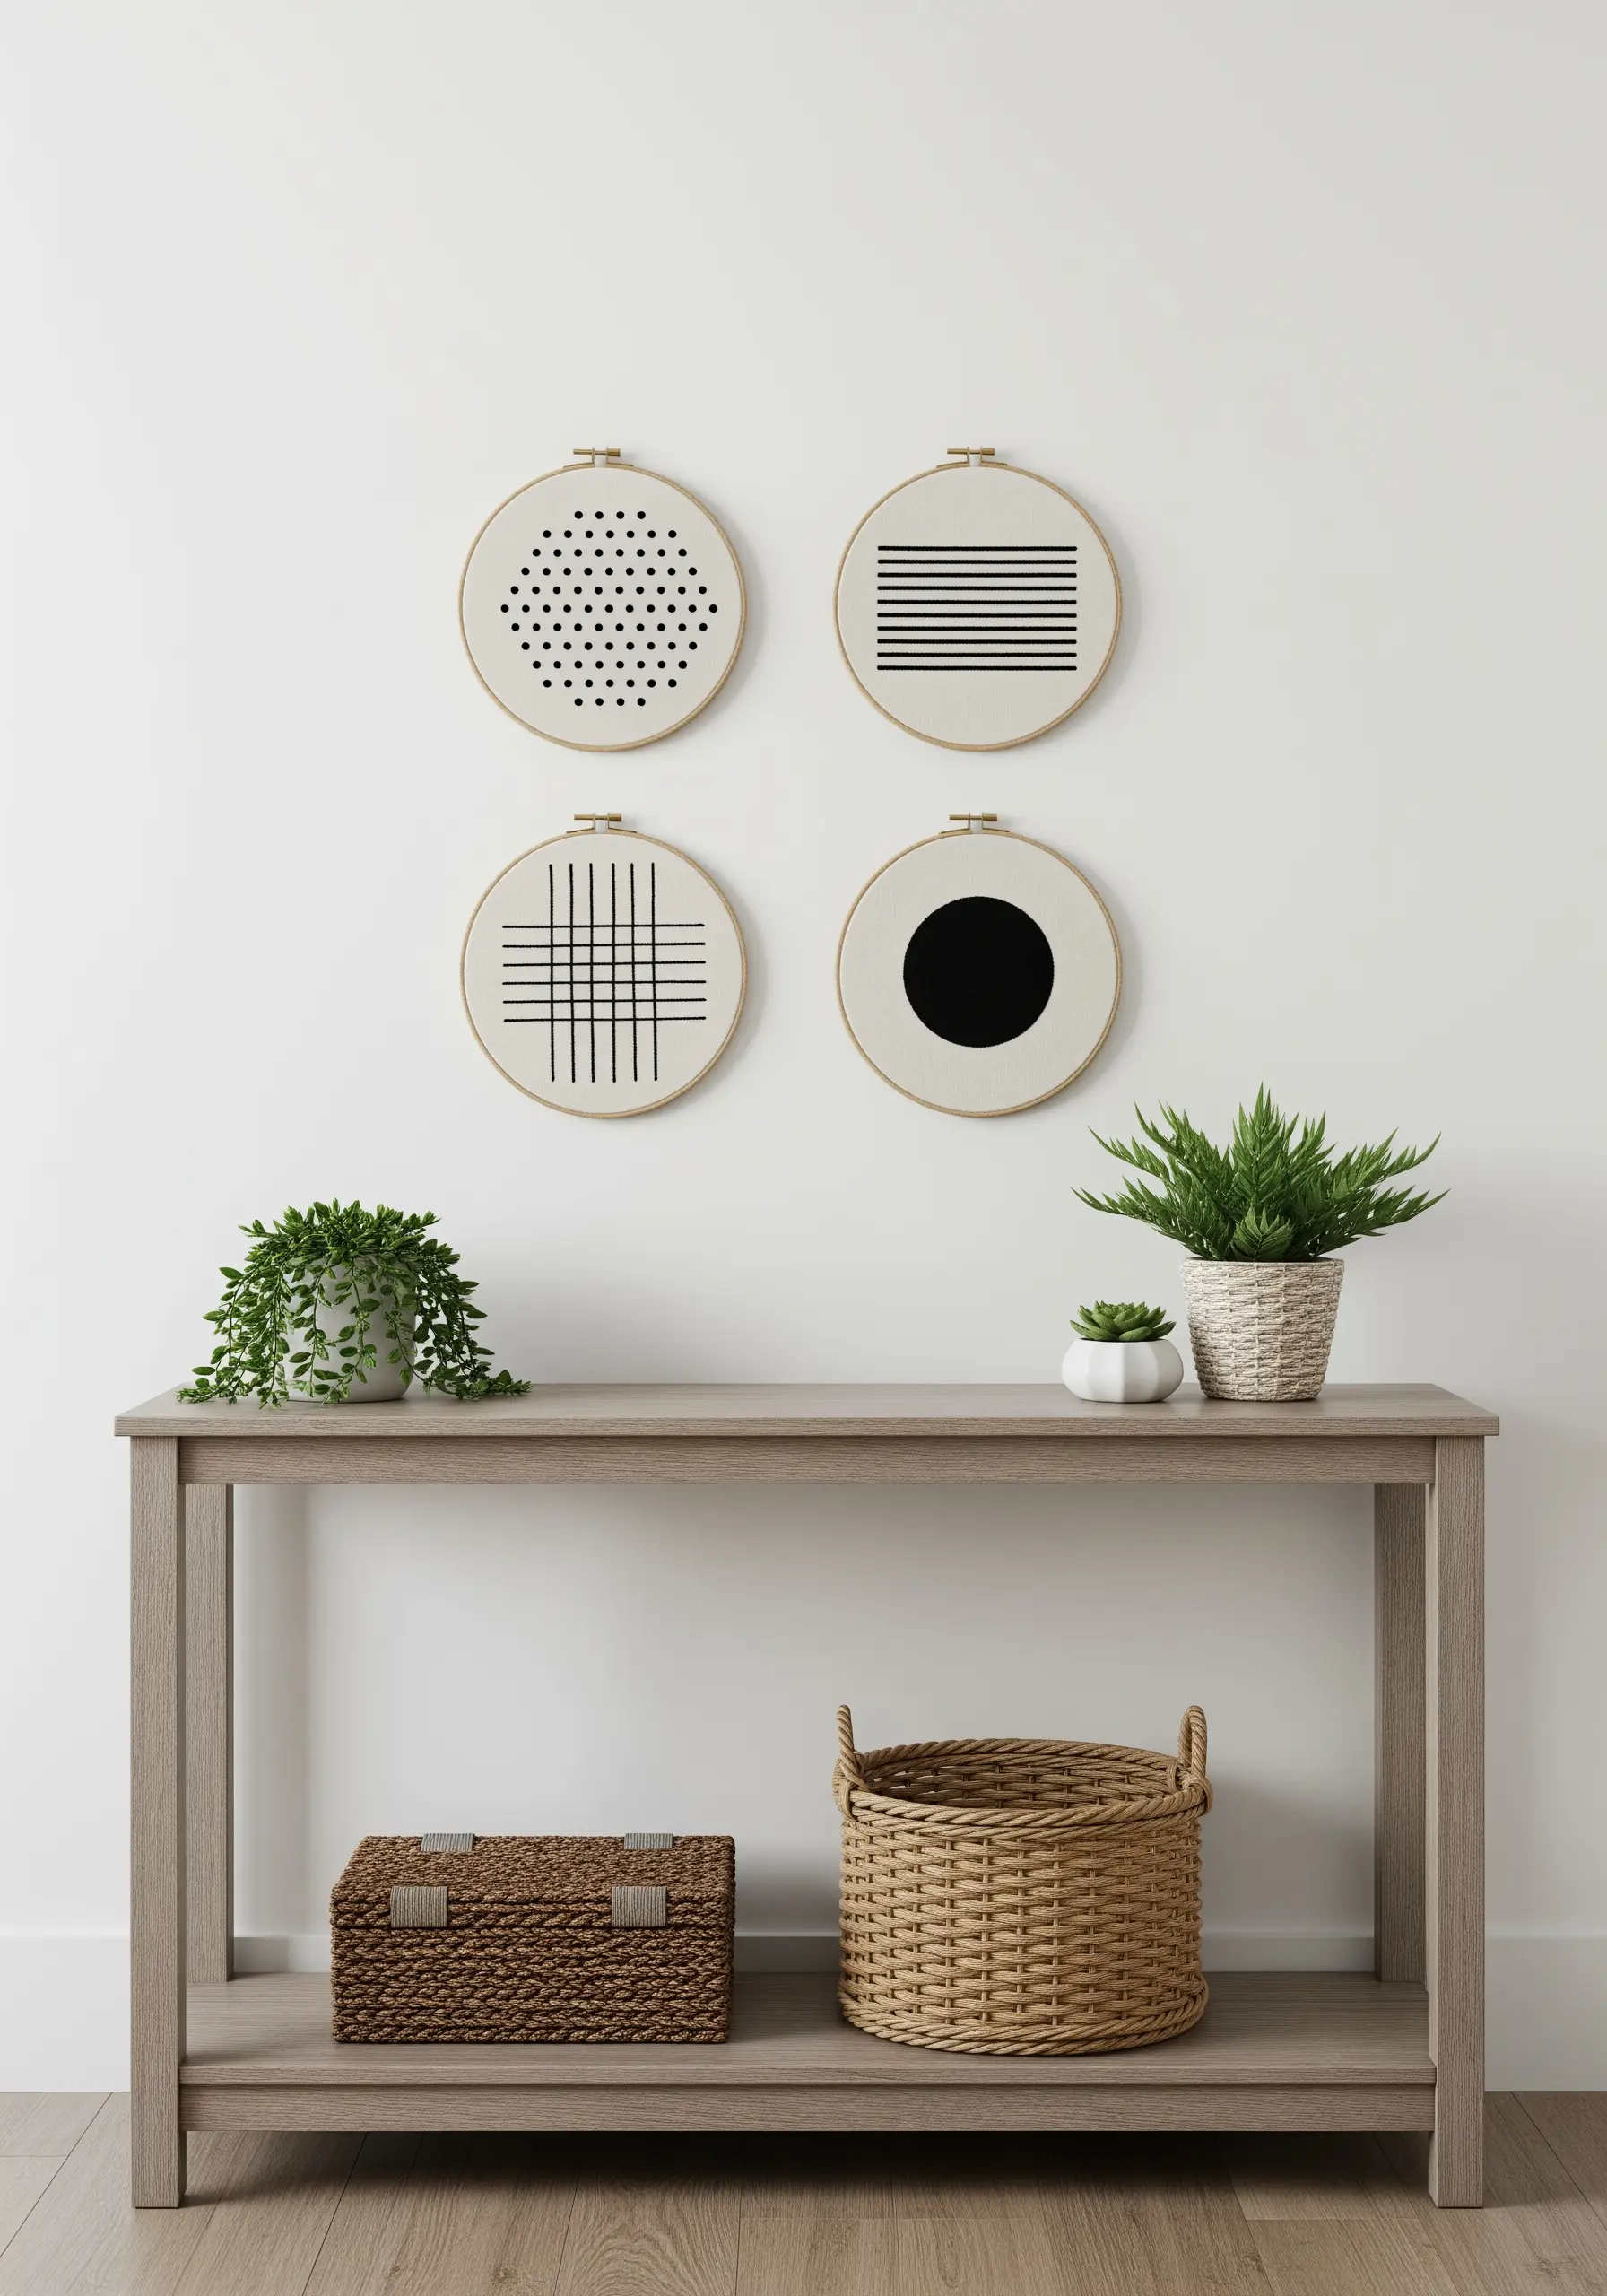
When designing a set of graphic hoops, think like a designer and balance the visual weight of each piece.
Pair a hoop with a dense, filled-in shape (like a solid black circle) with others that feature delicate lines or sparse patterns.
This contrast creates a dynamic relationship between the pieces, preventing the collection from feeling either too heavy or too flimsy.
These abstract minimal embroidery pieces are a fantastic exercise in composition and balance.
Arrange them asymmetrically on the wall to enhance their modern, artistic feel.
17. Curate a Botanical Collection with a Muted Palette

Design a sophisticated botanical trio by unifying different plant motifs with a restrained color palette.
Choose a neutral fabric, like a soft grey linen, as your base for all three hoops.
Select just two or three muted thread colors—such as dusty lavender, terracotta, and charcoal—and use them across the different designs.
This approach ensures your collection feels cohesive and calm, allowing the unique forms of the lavender, eucalyptus, and other sprigs to shine.
These minimalist botanical stitch designs are perfect for adding a touch of nature above a sofa.
18. Create a Raised Monogram with Padding Stitches
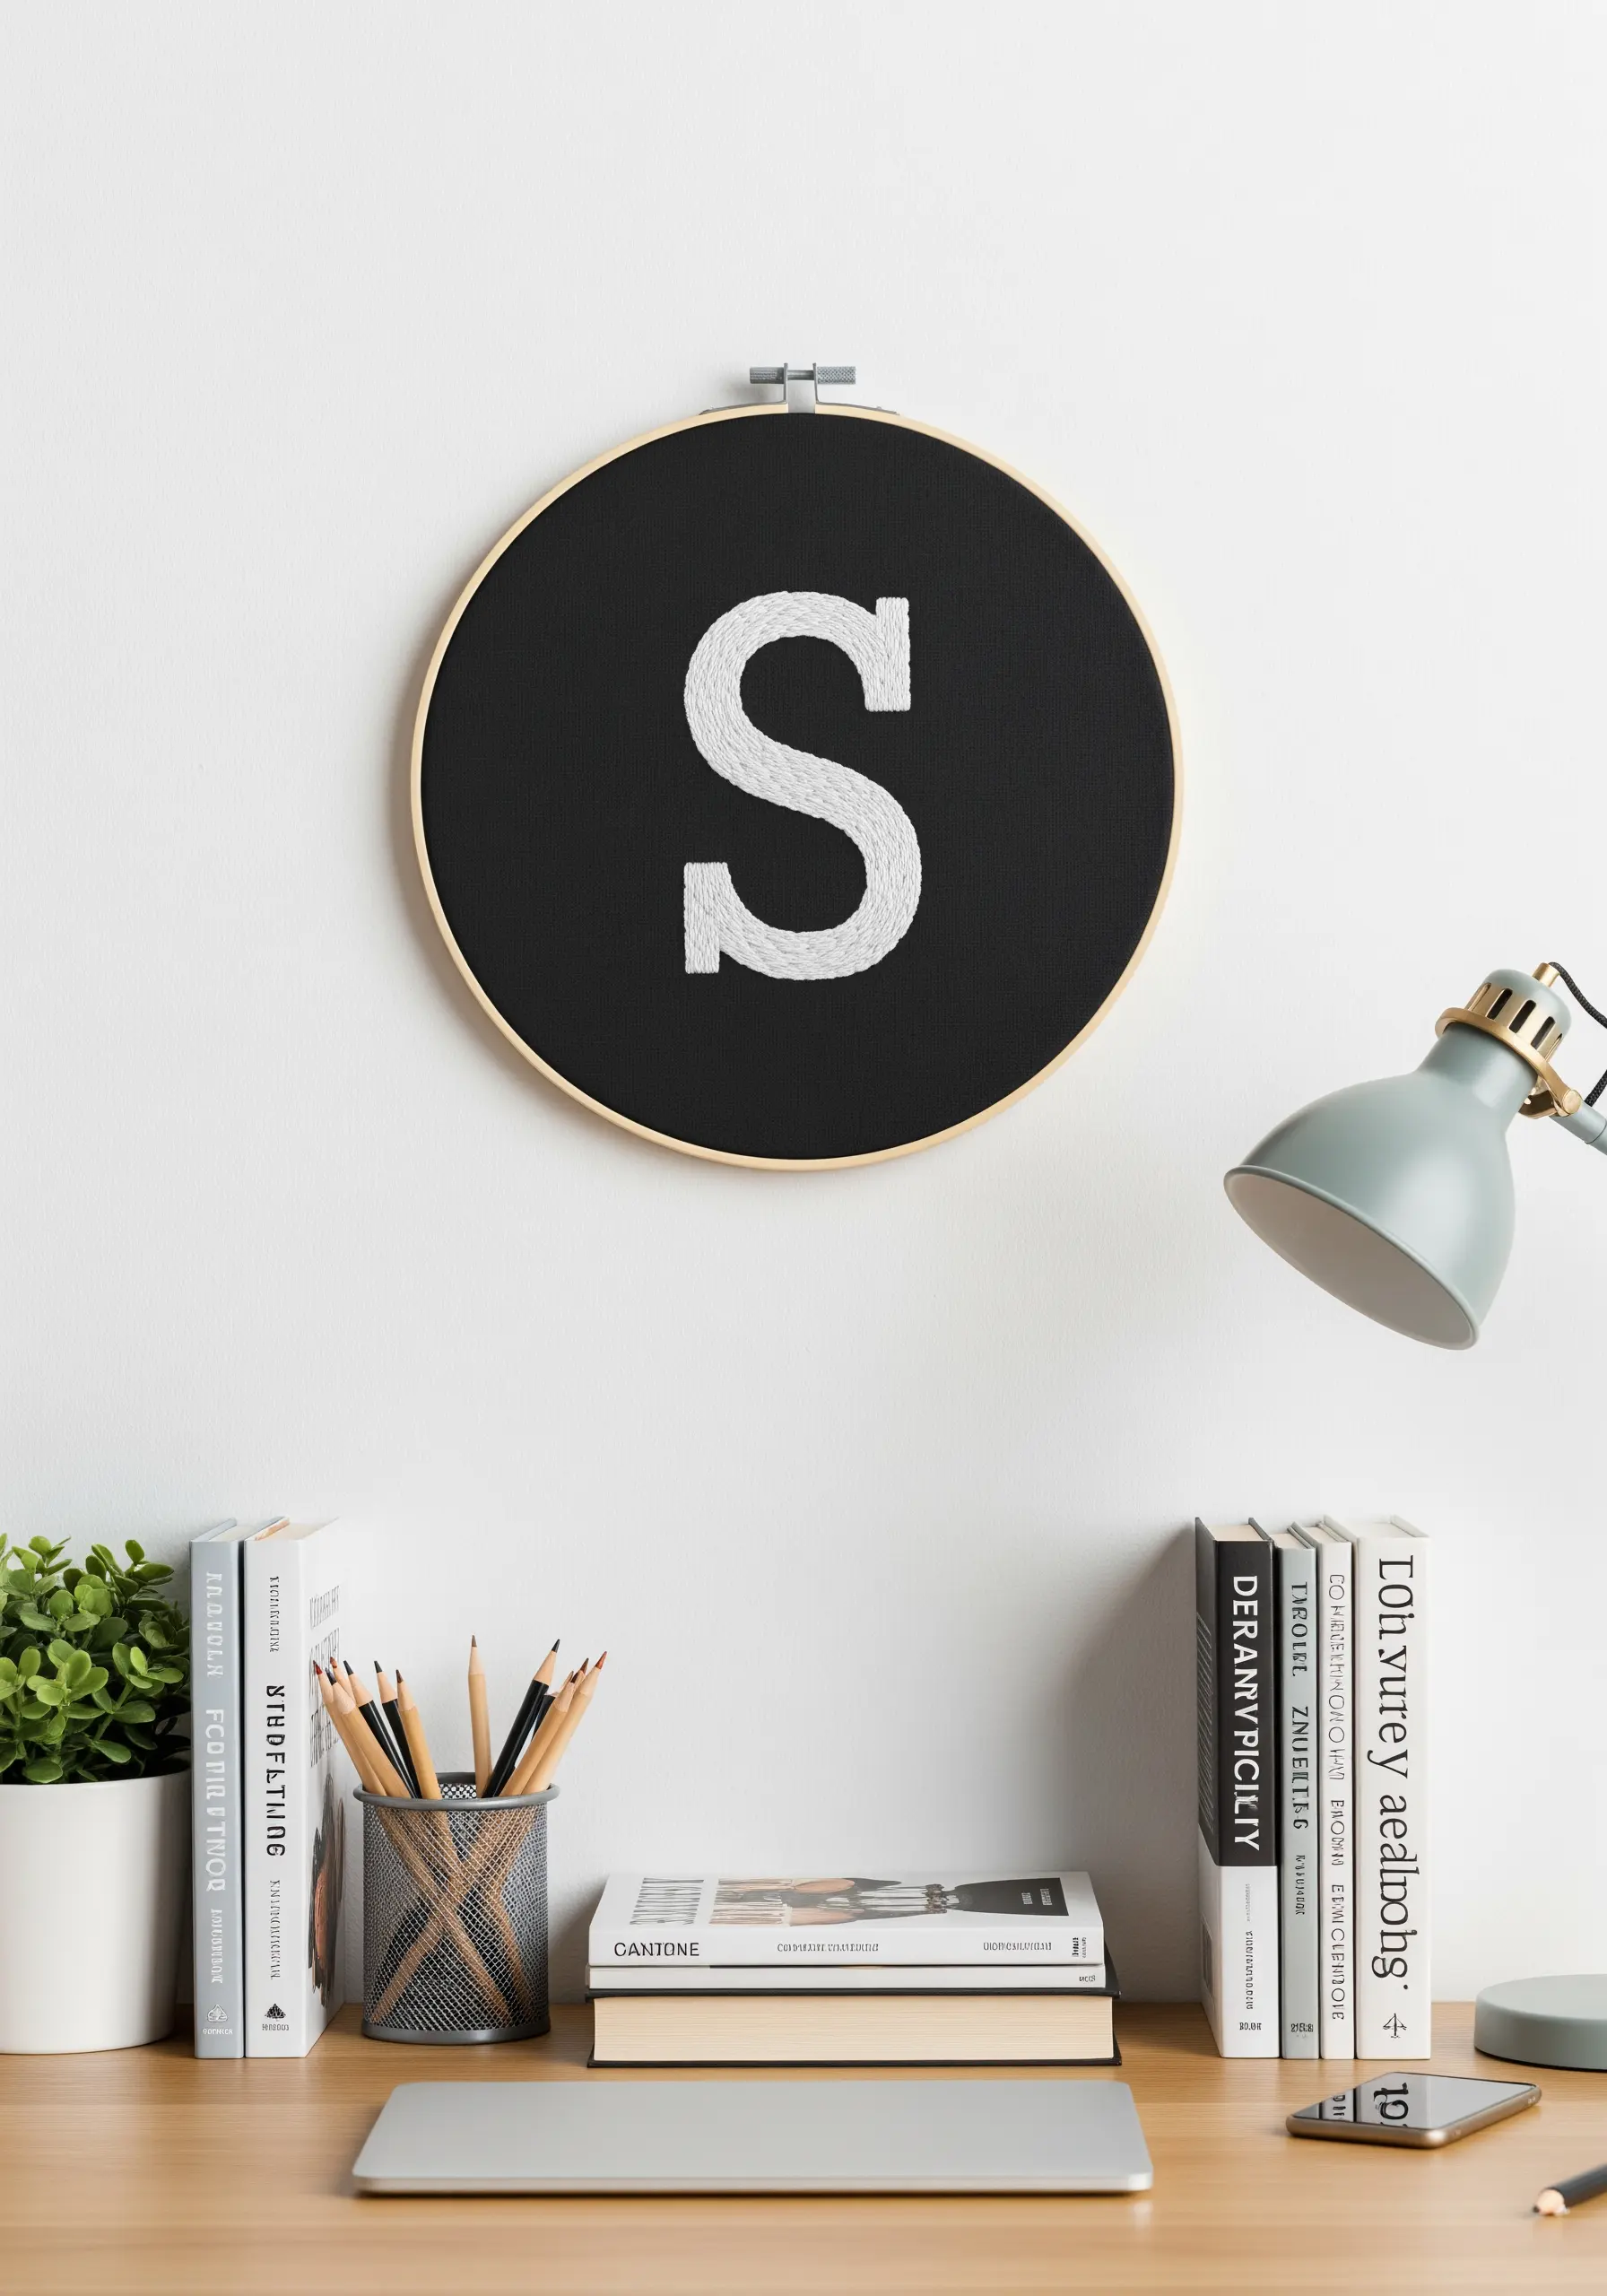
Give your embroidered monogram a professional, three-dimensional effect by padding it before you begin your final satin stitch.
First, fill the entire letter shape with rows of simple straight stitches or seed stitches.
Then, work your final layer of satin stitches perpendicular to the padding stitches underneath.
This underlayer pushes the top threads upward, creating a subtle, satisfying lift that gives the letter weight and presence.
A personalized name monogram wall embroidery piece becomes a bold, graphic statement for a modern workspace.
19. Achieve Bold Coverage with Full-Strand Floss
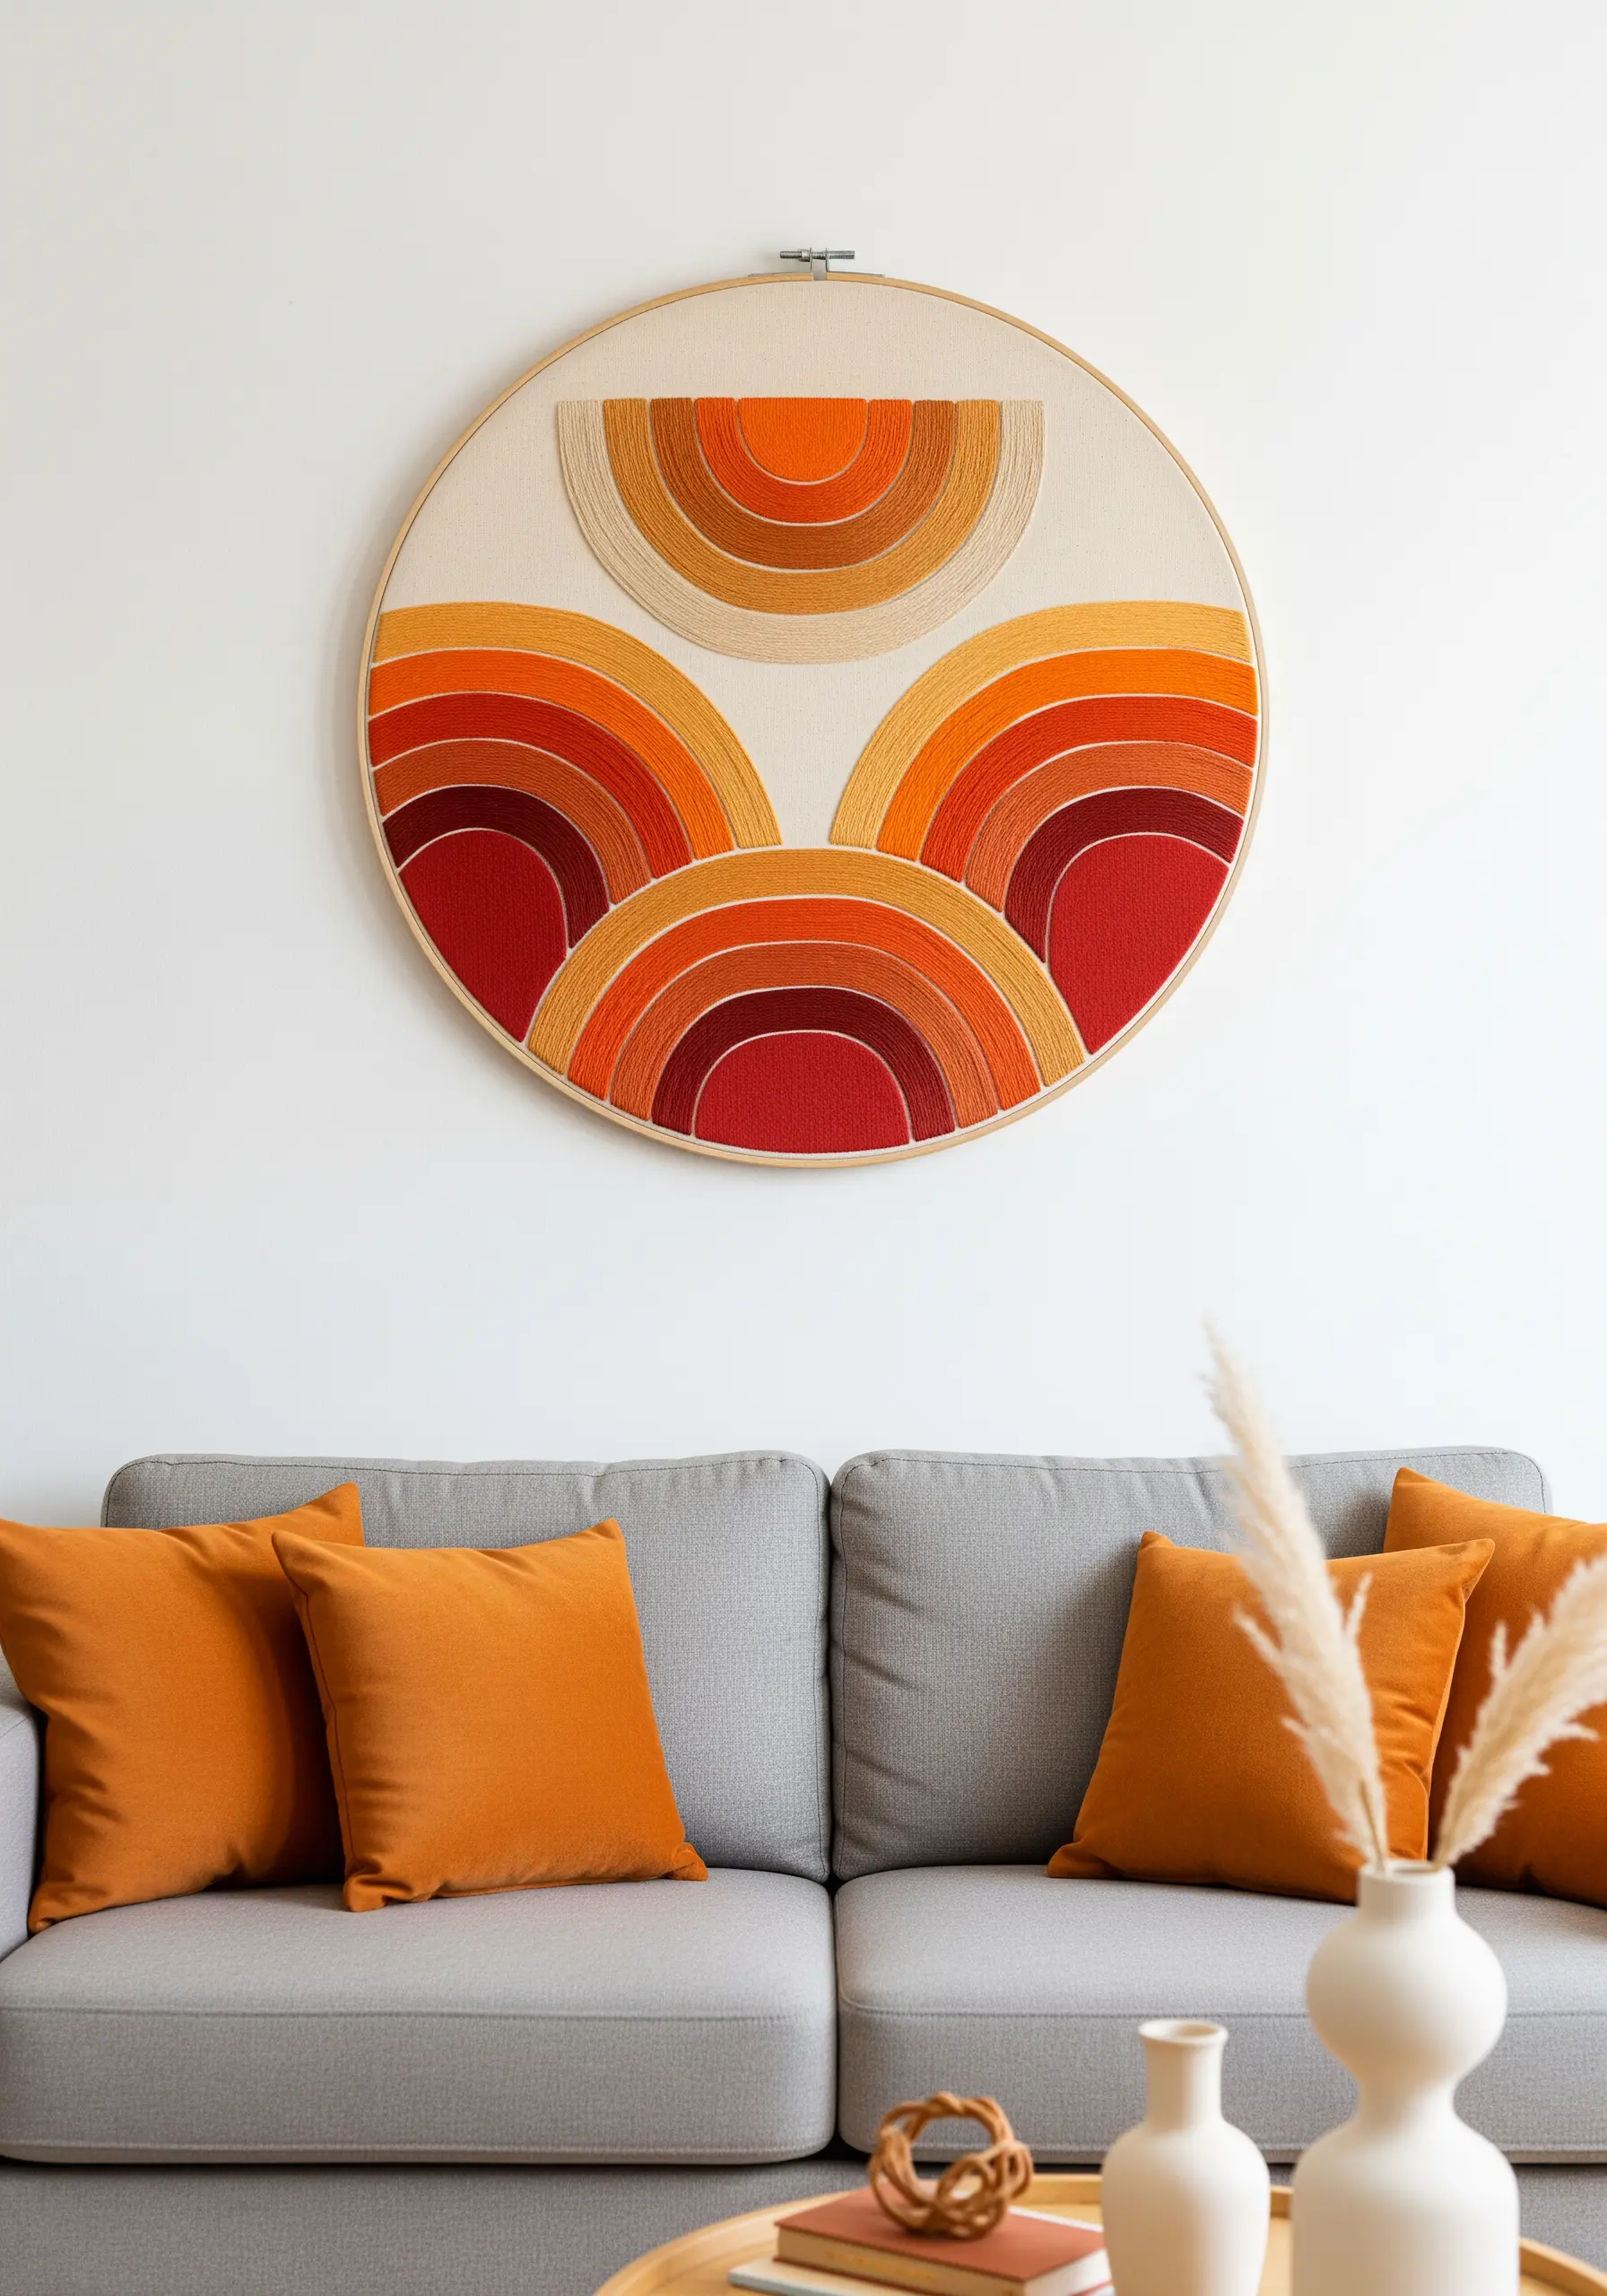
For a retro, graphic look with complete, opaque color coverage, don’t separate your embroidery floss.
Use all six strands at once to create a thick, textured satin stitch that fills large areas quickly and effectively.
This technique creates a finish that feels almost like woven yarn, perfect for bold, color-blocked designs.
The slightly rustic texture of the full-strand floss enhances the warm, nostalgic feel of retro 70s style pillow embroidery designs.
Pair warm tones like ochre, rust, and burgundy for a classic, sun-drenched palette.
20. Differentiate Textures in a Monochrome Design
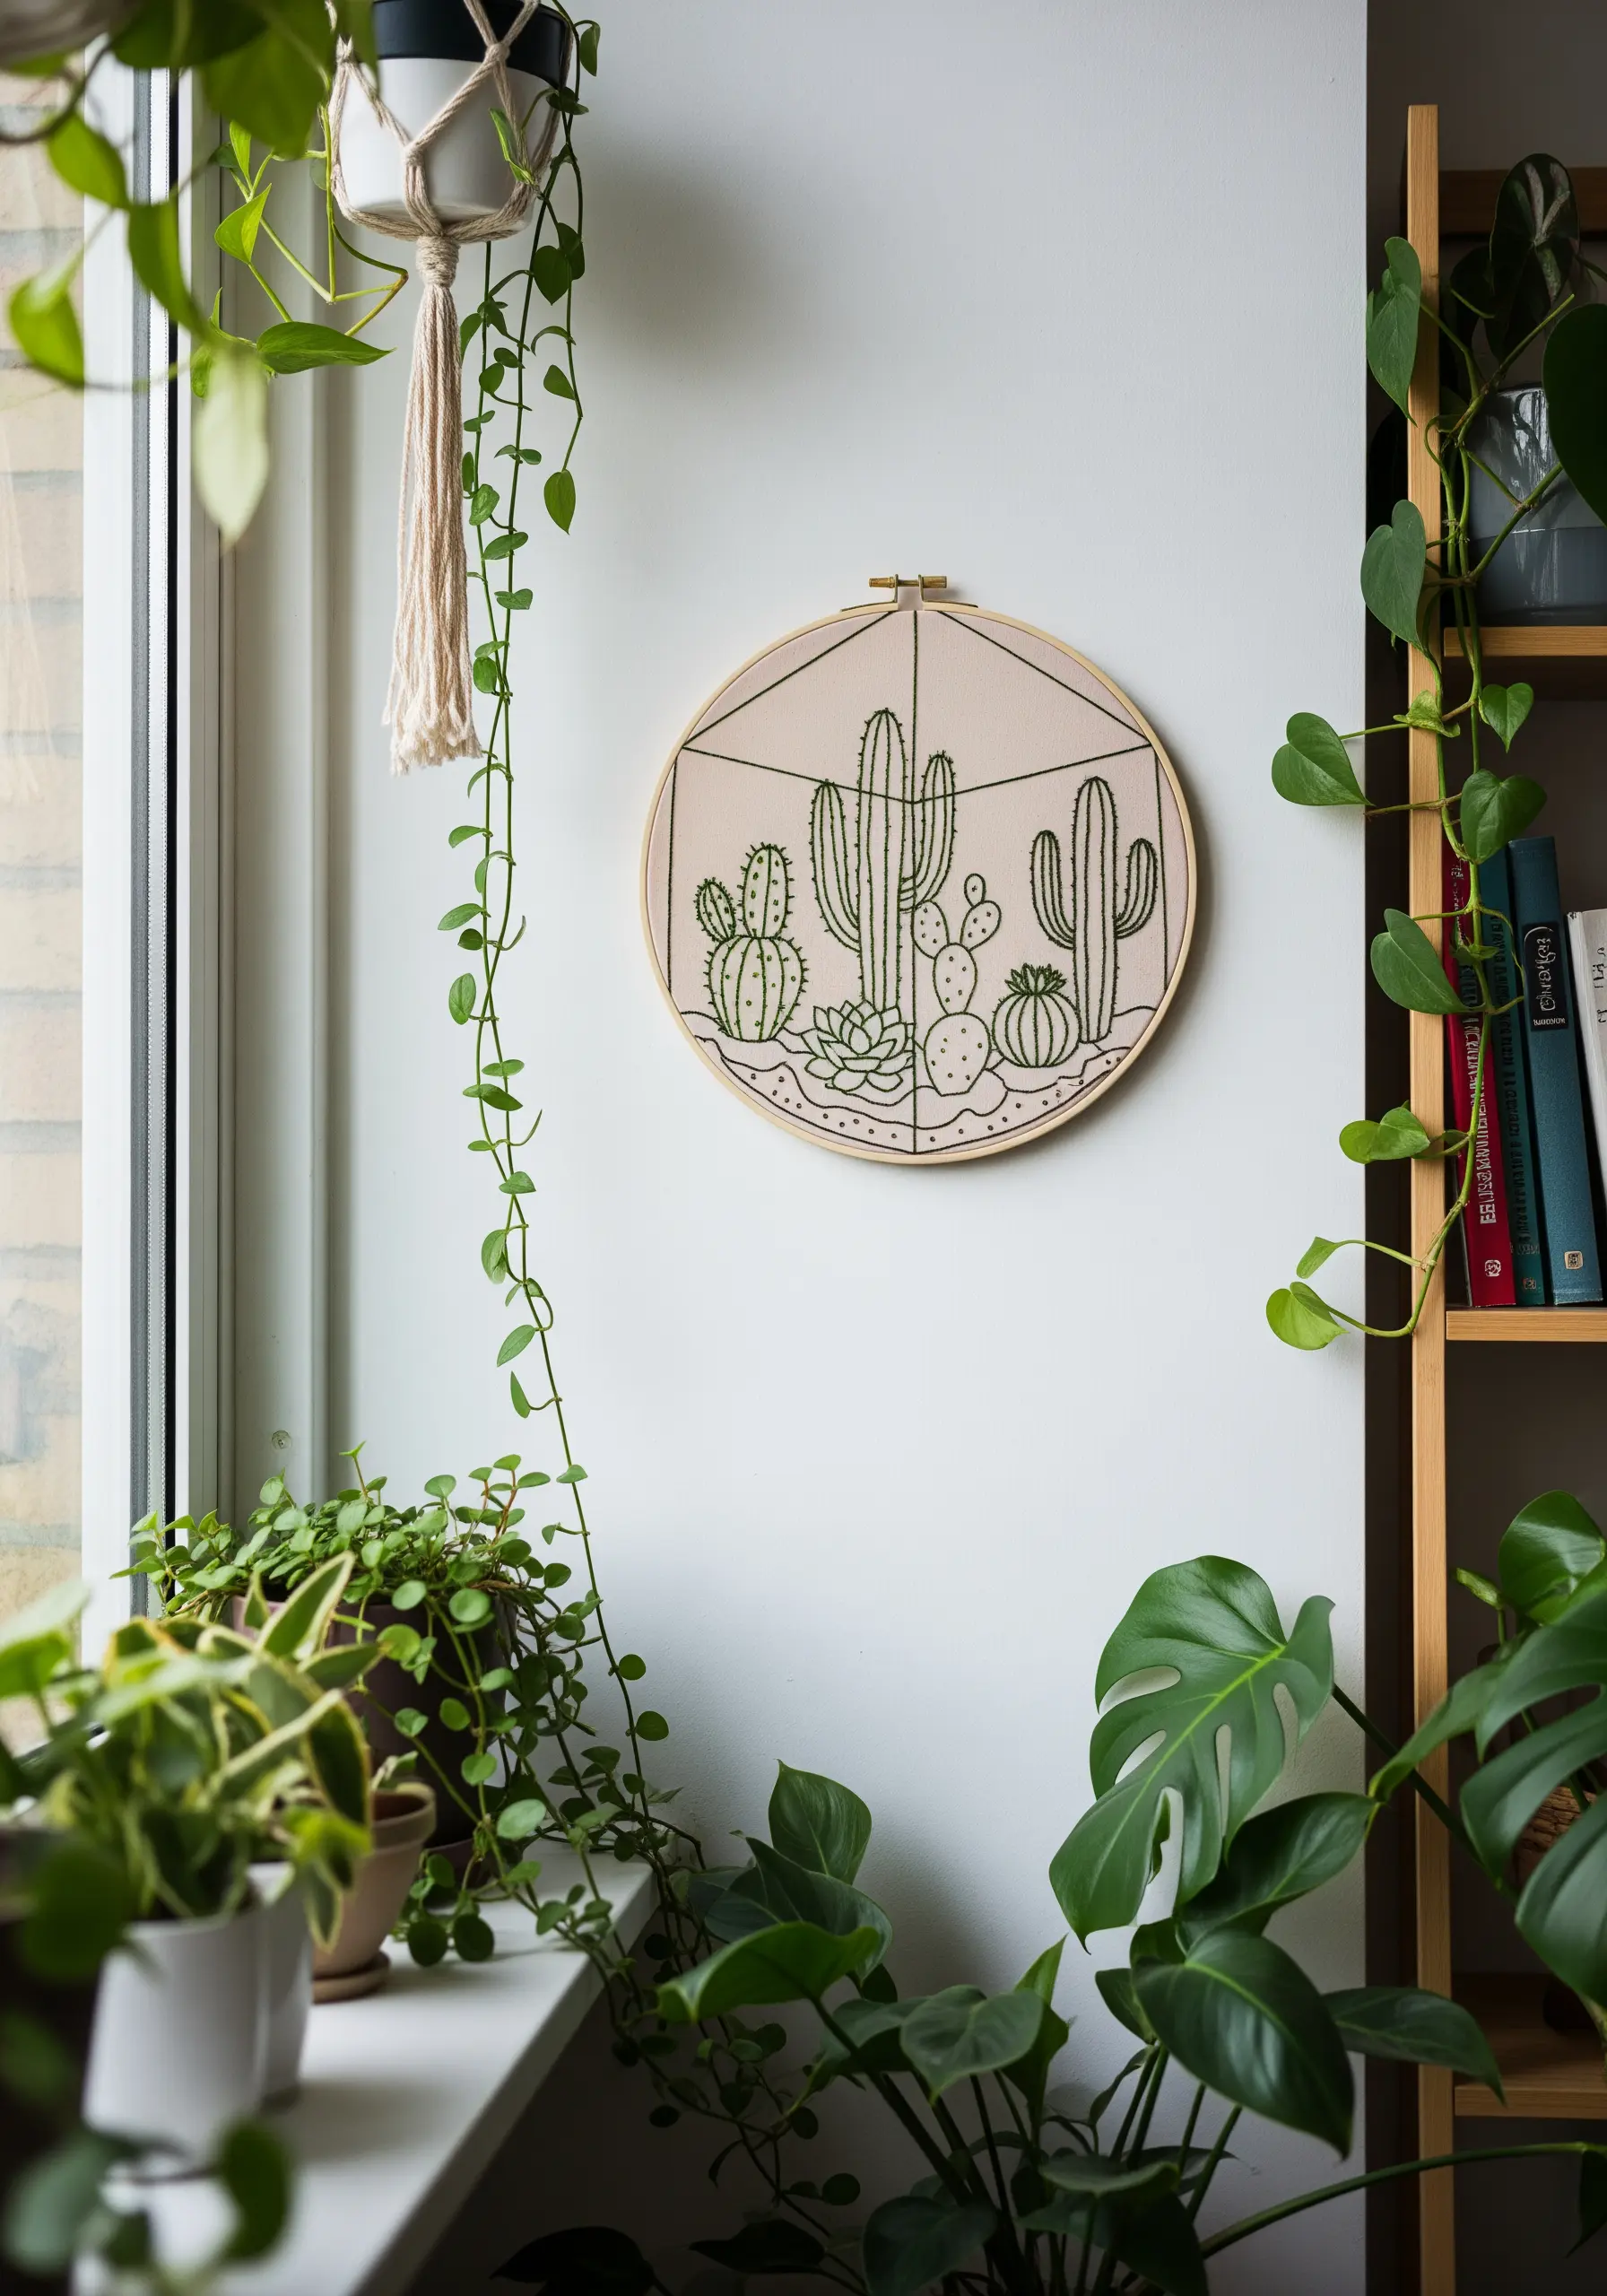
When working with a single color, use a variety of stitches to create interest and define different elements.
In a cactus terrarium, for example, use vertical straight stitches for a tall saguaro, French knots for a flowering succulent, and a split stitch outline for a prickly pear.
This subtle shift in texture helps the viewer distinguish between the different plants, adding depth and detail to the composition.
It’s an elegant way to add complexity to simple houseplant embroidery motifs without overwhelming the minimalist aesthetic.
21. Extend Your Art Beyond the Hoop’s Edge
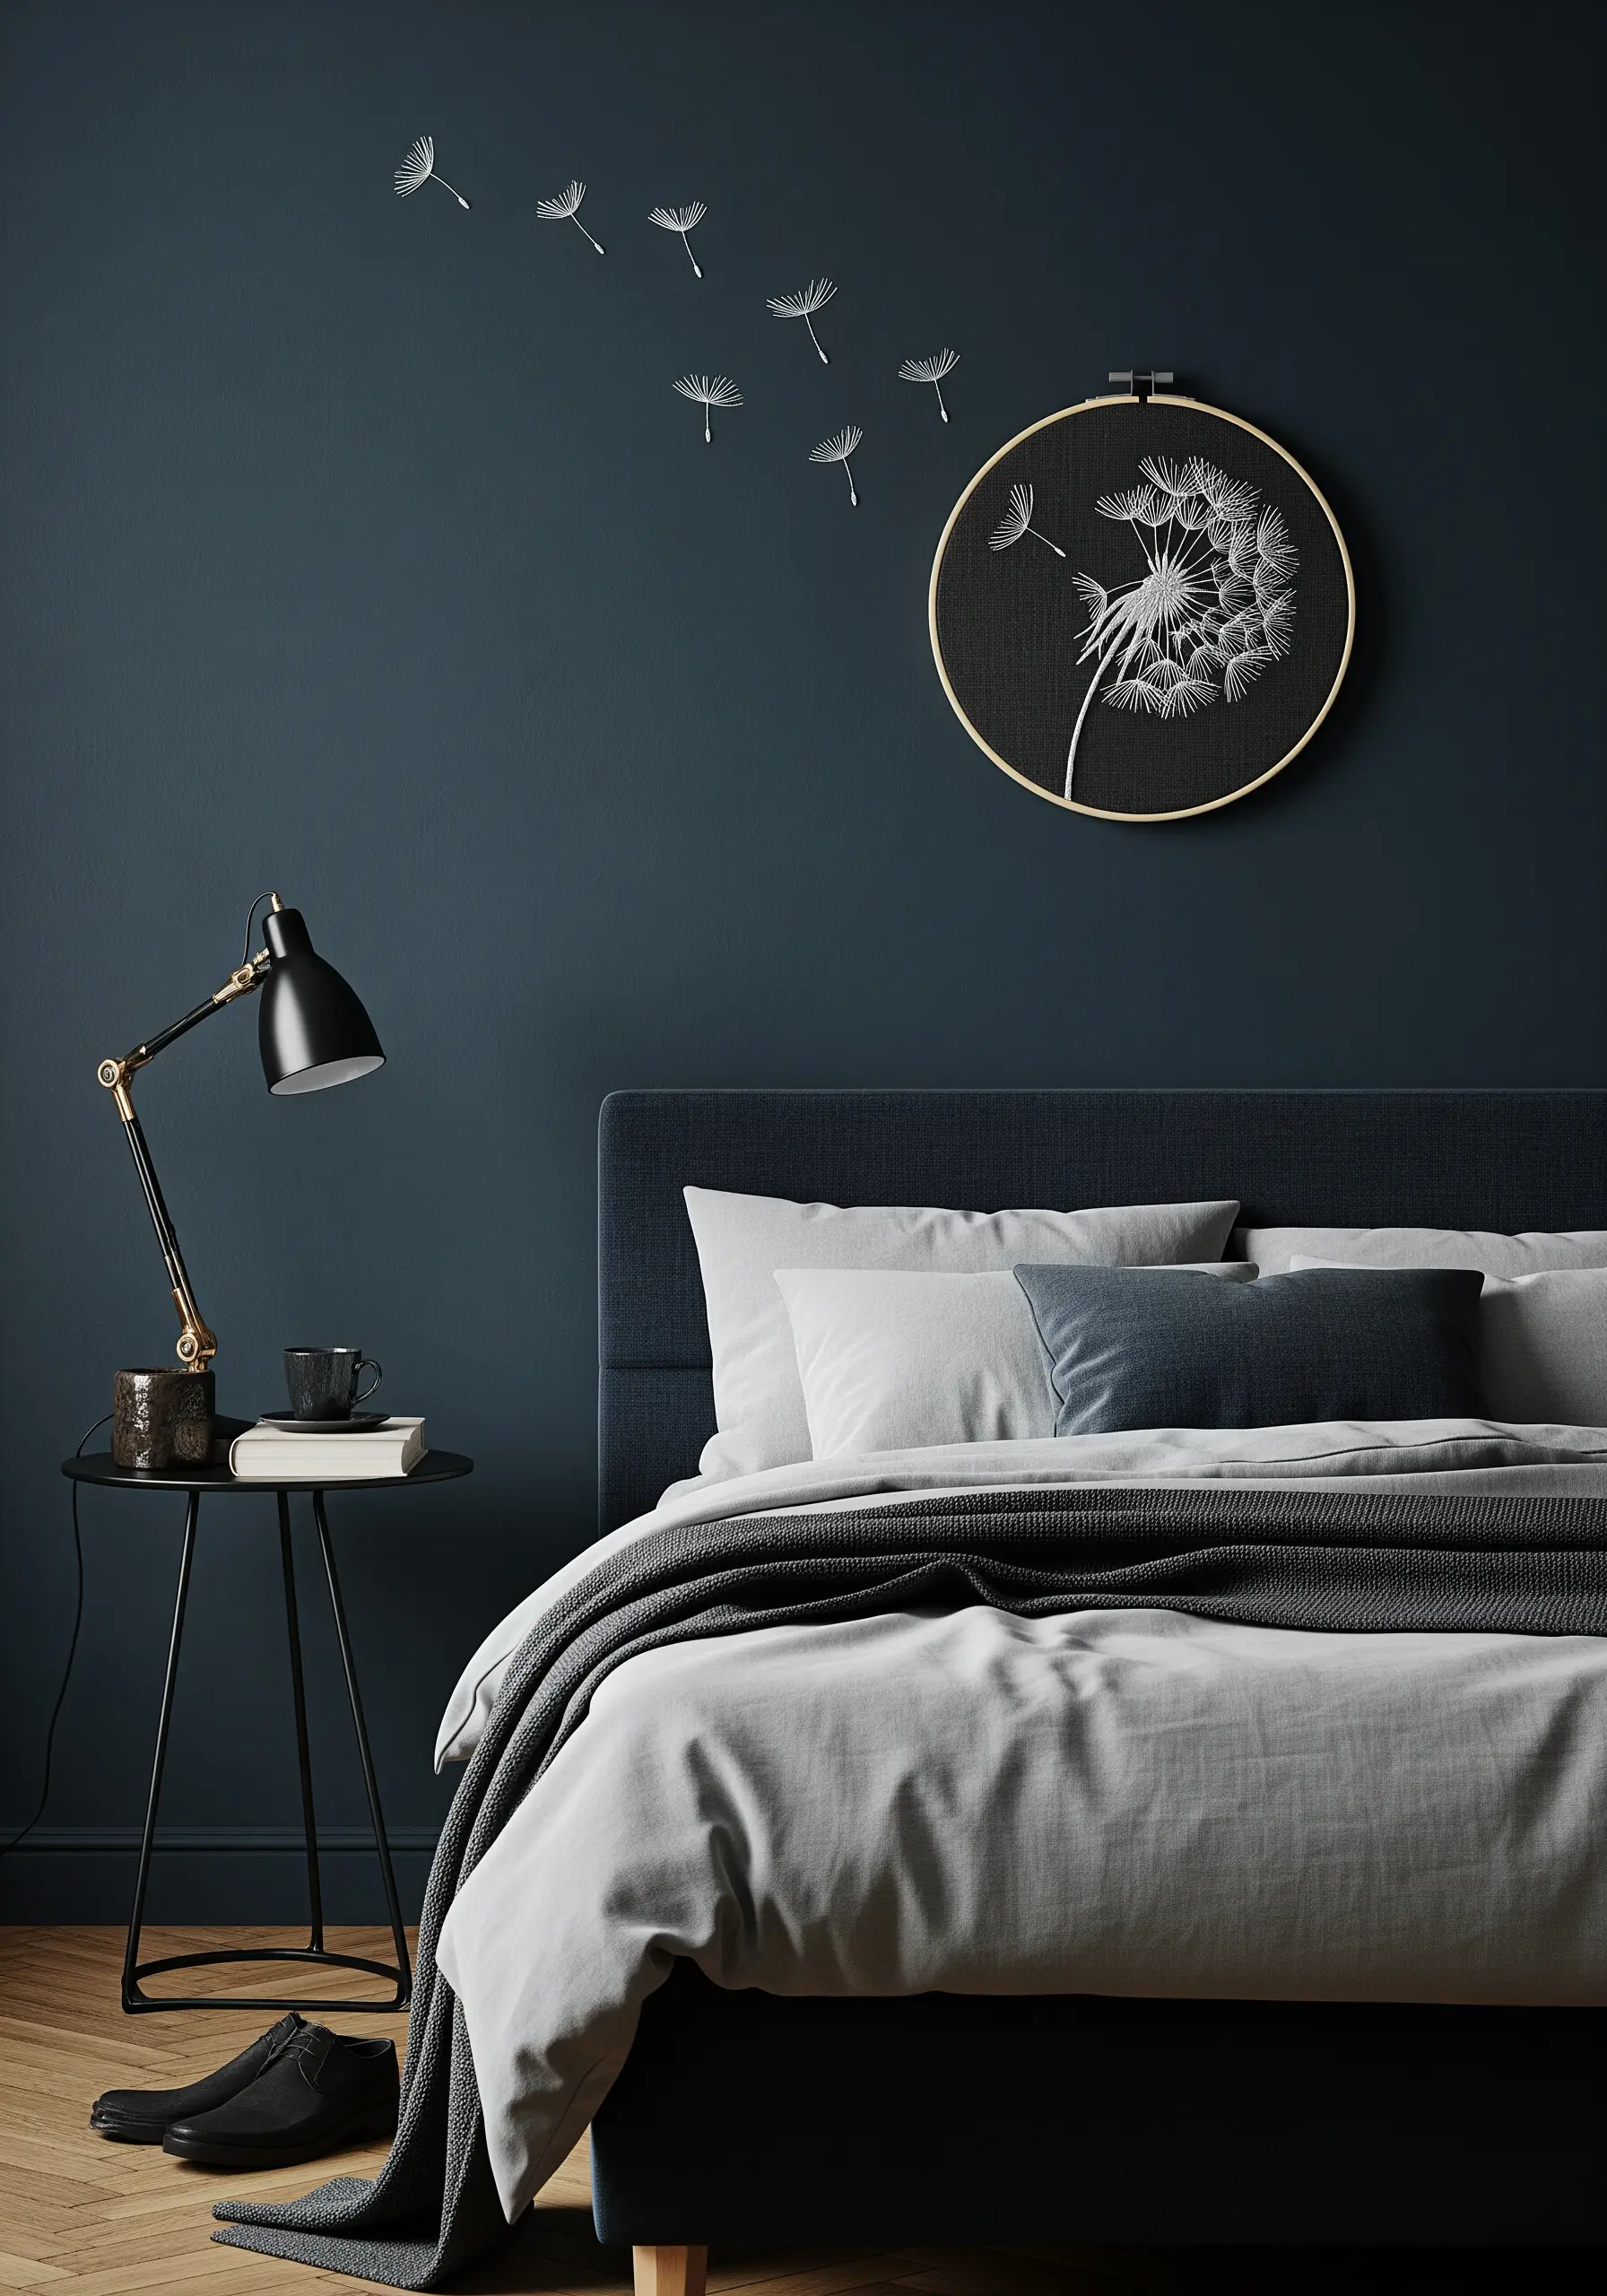
Create a dynamic and surprising installation by allowing elements of your design to float beyond the boundary of the hoop.
Stitch your main motif, like a dandelion head, within the frame. Then, create the drifting seeds as separate, tiny stitched pieces on soluble stabilizer.
Once dissolved, you’ll have freestanding thread motifs that you can mount directly onto the wall with tiny dabs of fabric glue or small pins.
This technique turns the wall itself into your canvas and allows for abstract broken shape designs that feel alive.
22. Add Tactile Dimension with Hanging Threads
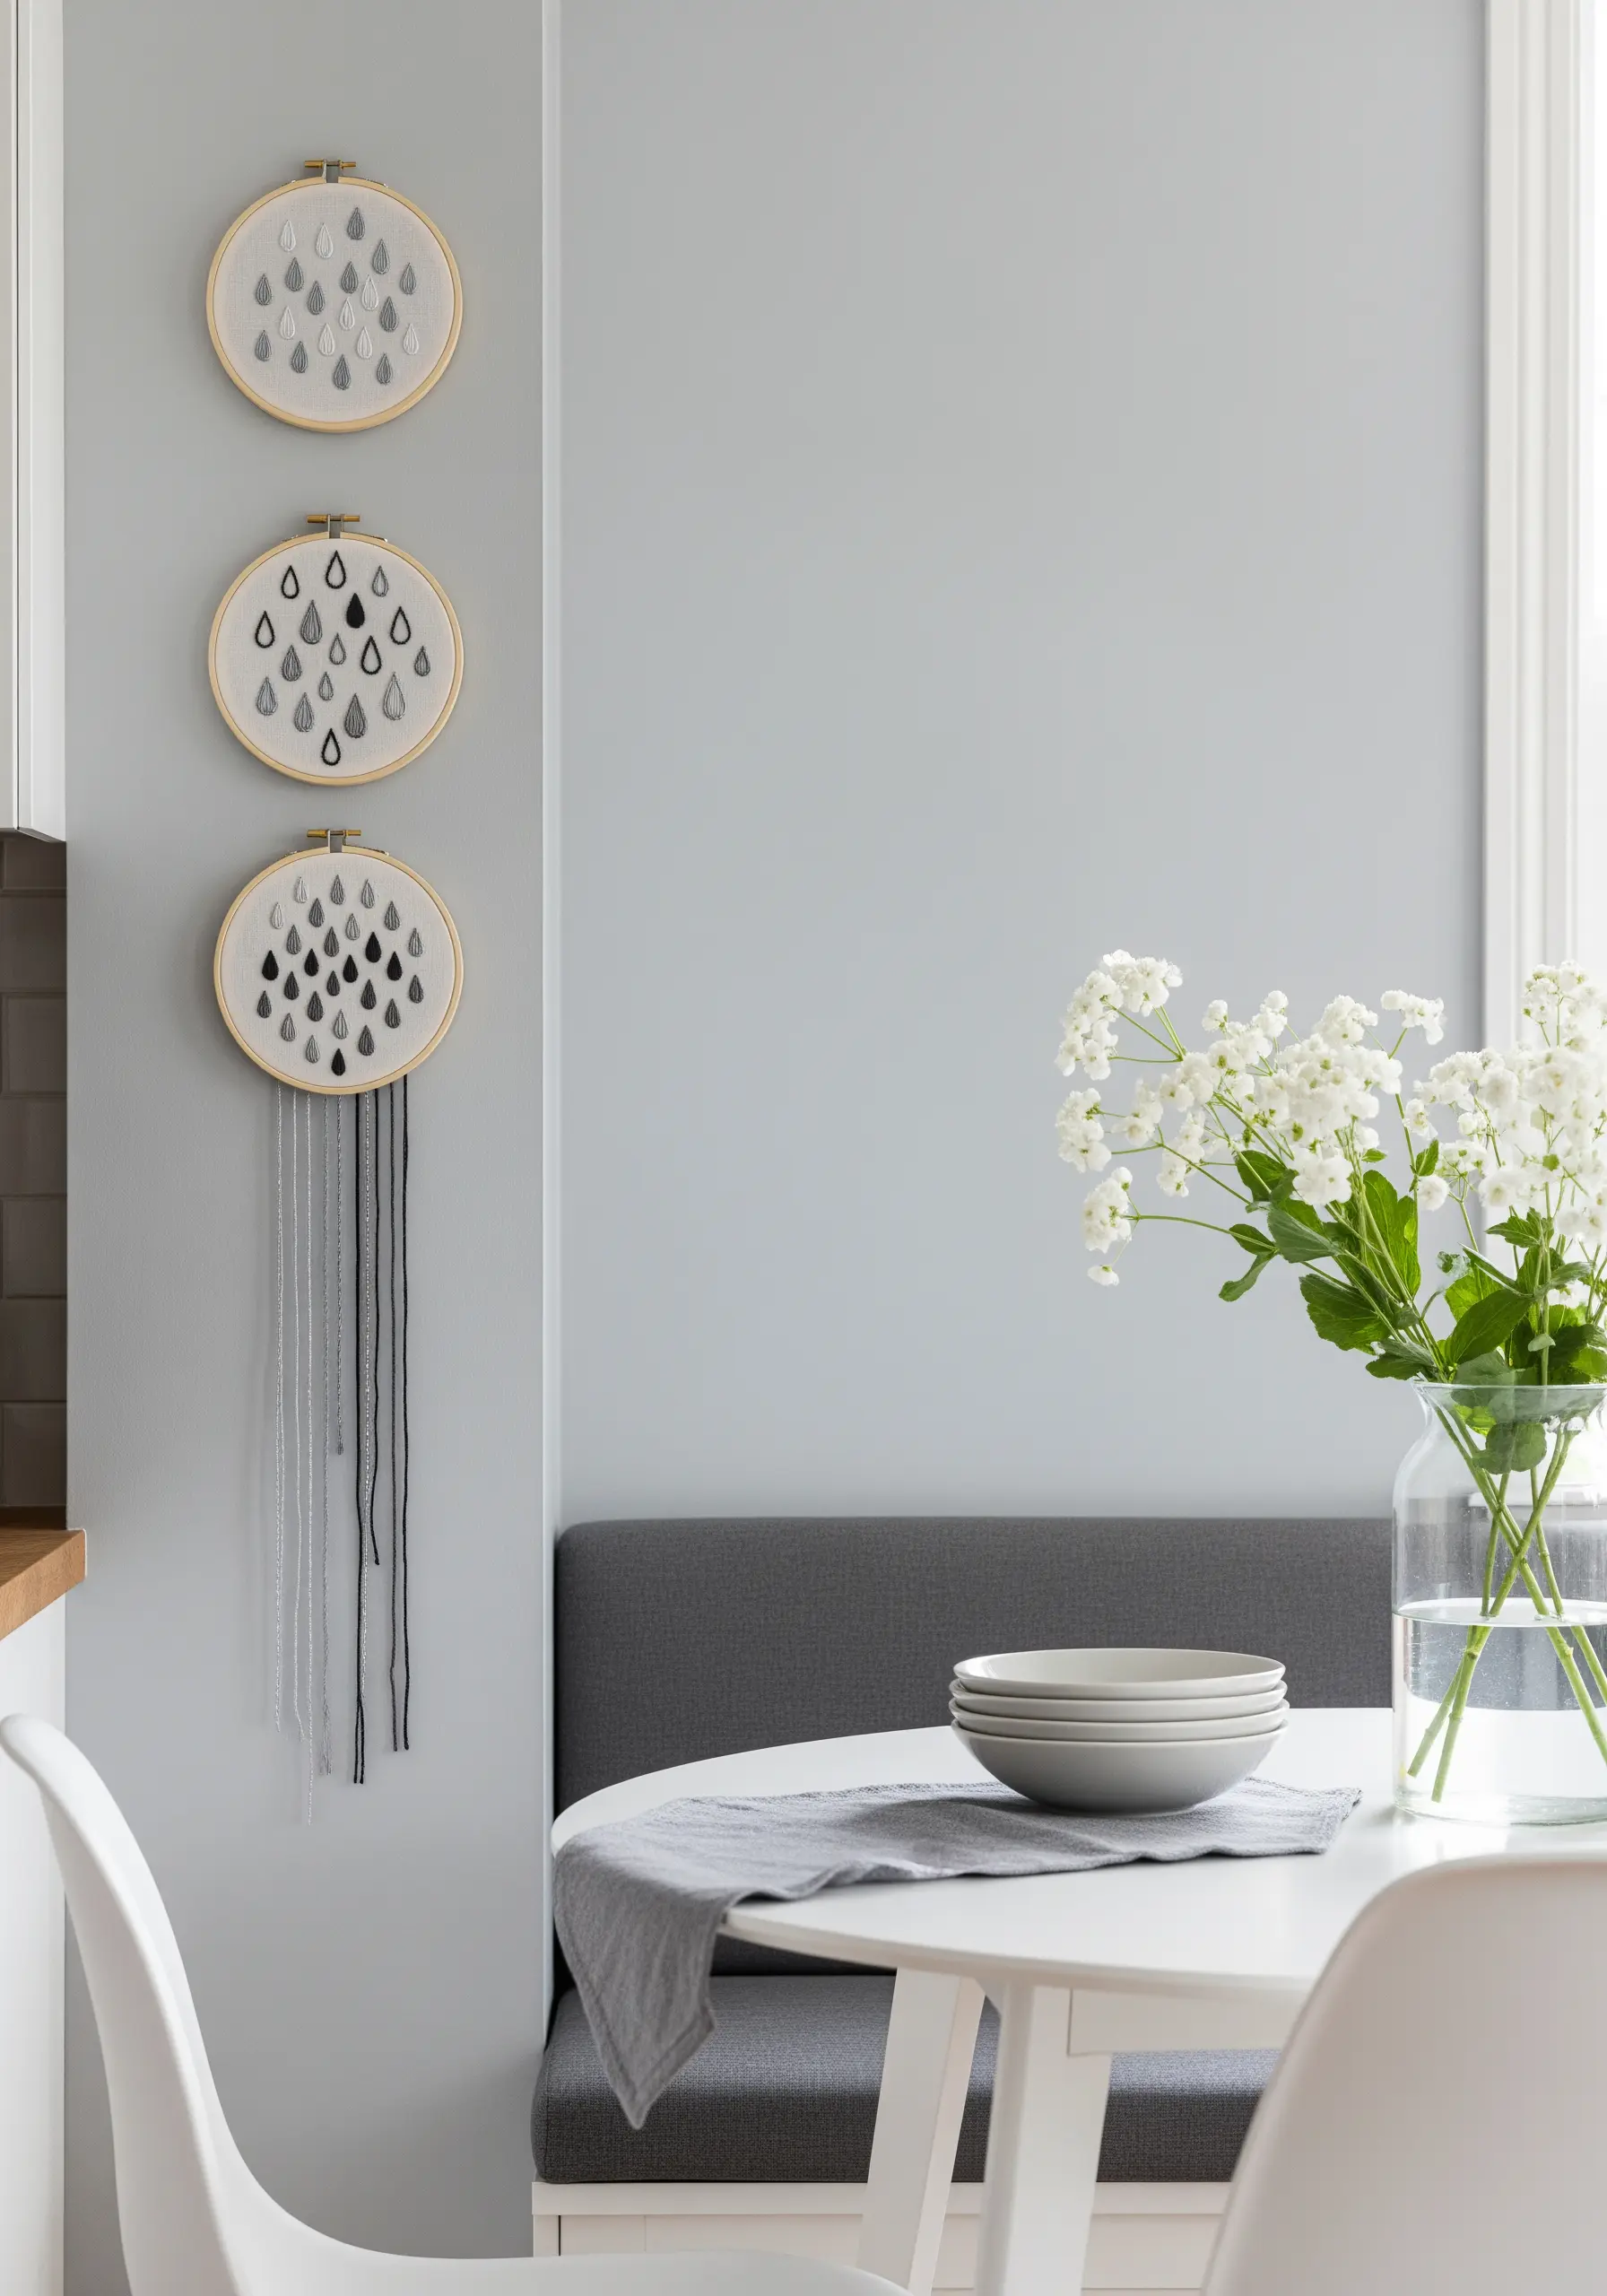
Introduce an element of soft sculpture to your hoop art by leaving threads intentionally loose.
After stitching the raindrop motifs, instead of knotting off your thread, allow long tails to hang from the bottom of the hoop.
Use different shades of grey, black, and white, and trim them at varying lengths to create a natural, cascading effect like falling rain.
This simple addition of mixed fiber embroidery techniques transforms a flat image into a multi-sensory piece with movement and texture.
23. Achieve a Flawless Circle with a Split Stitch Outline
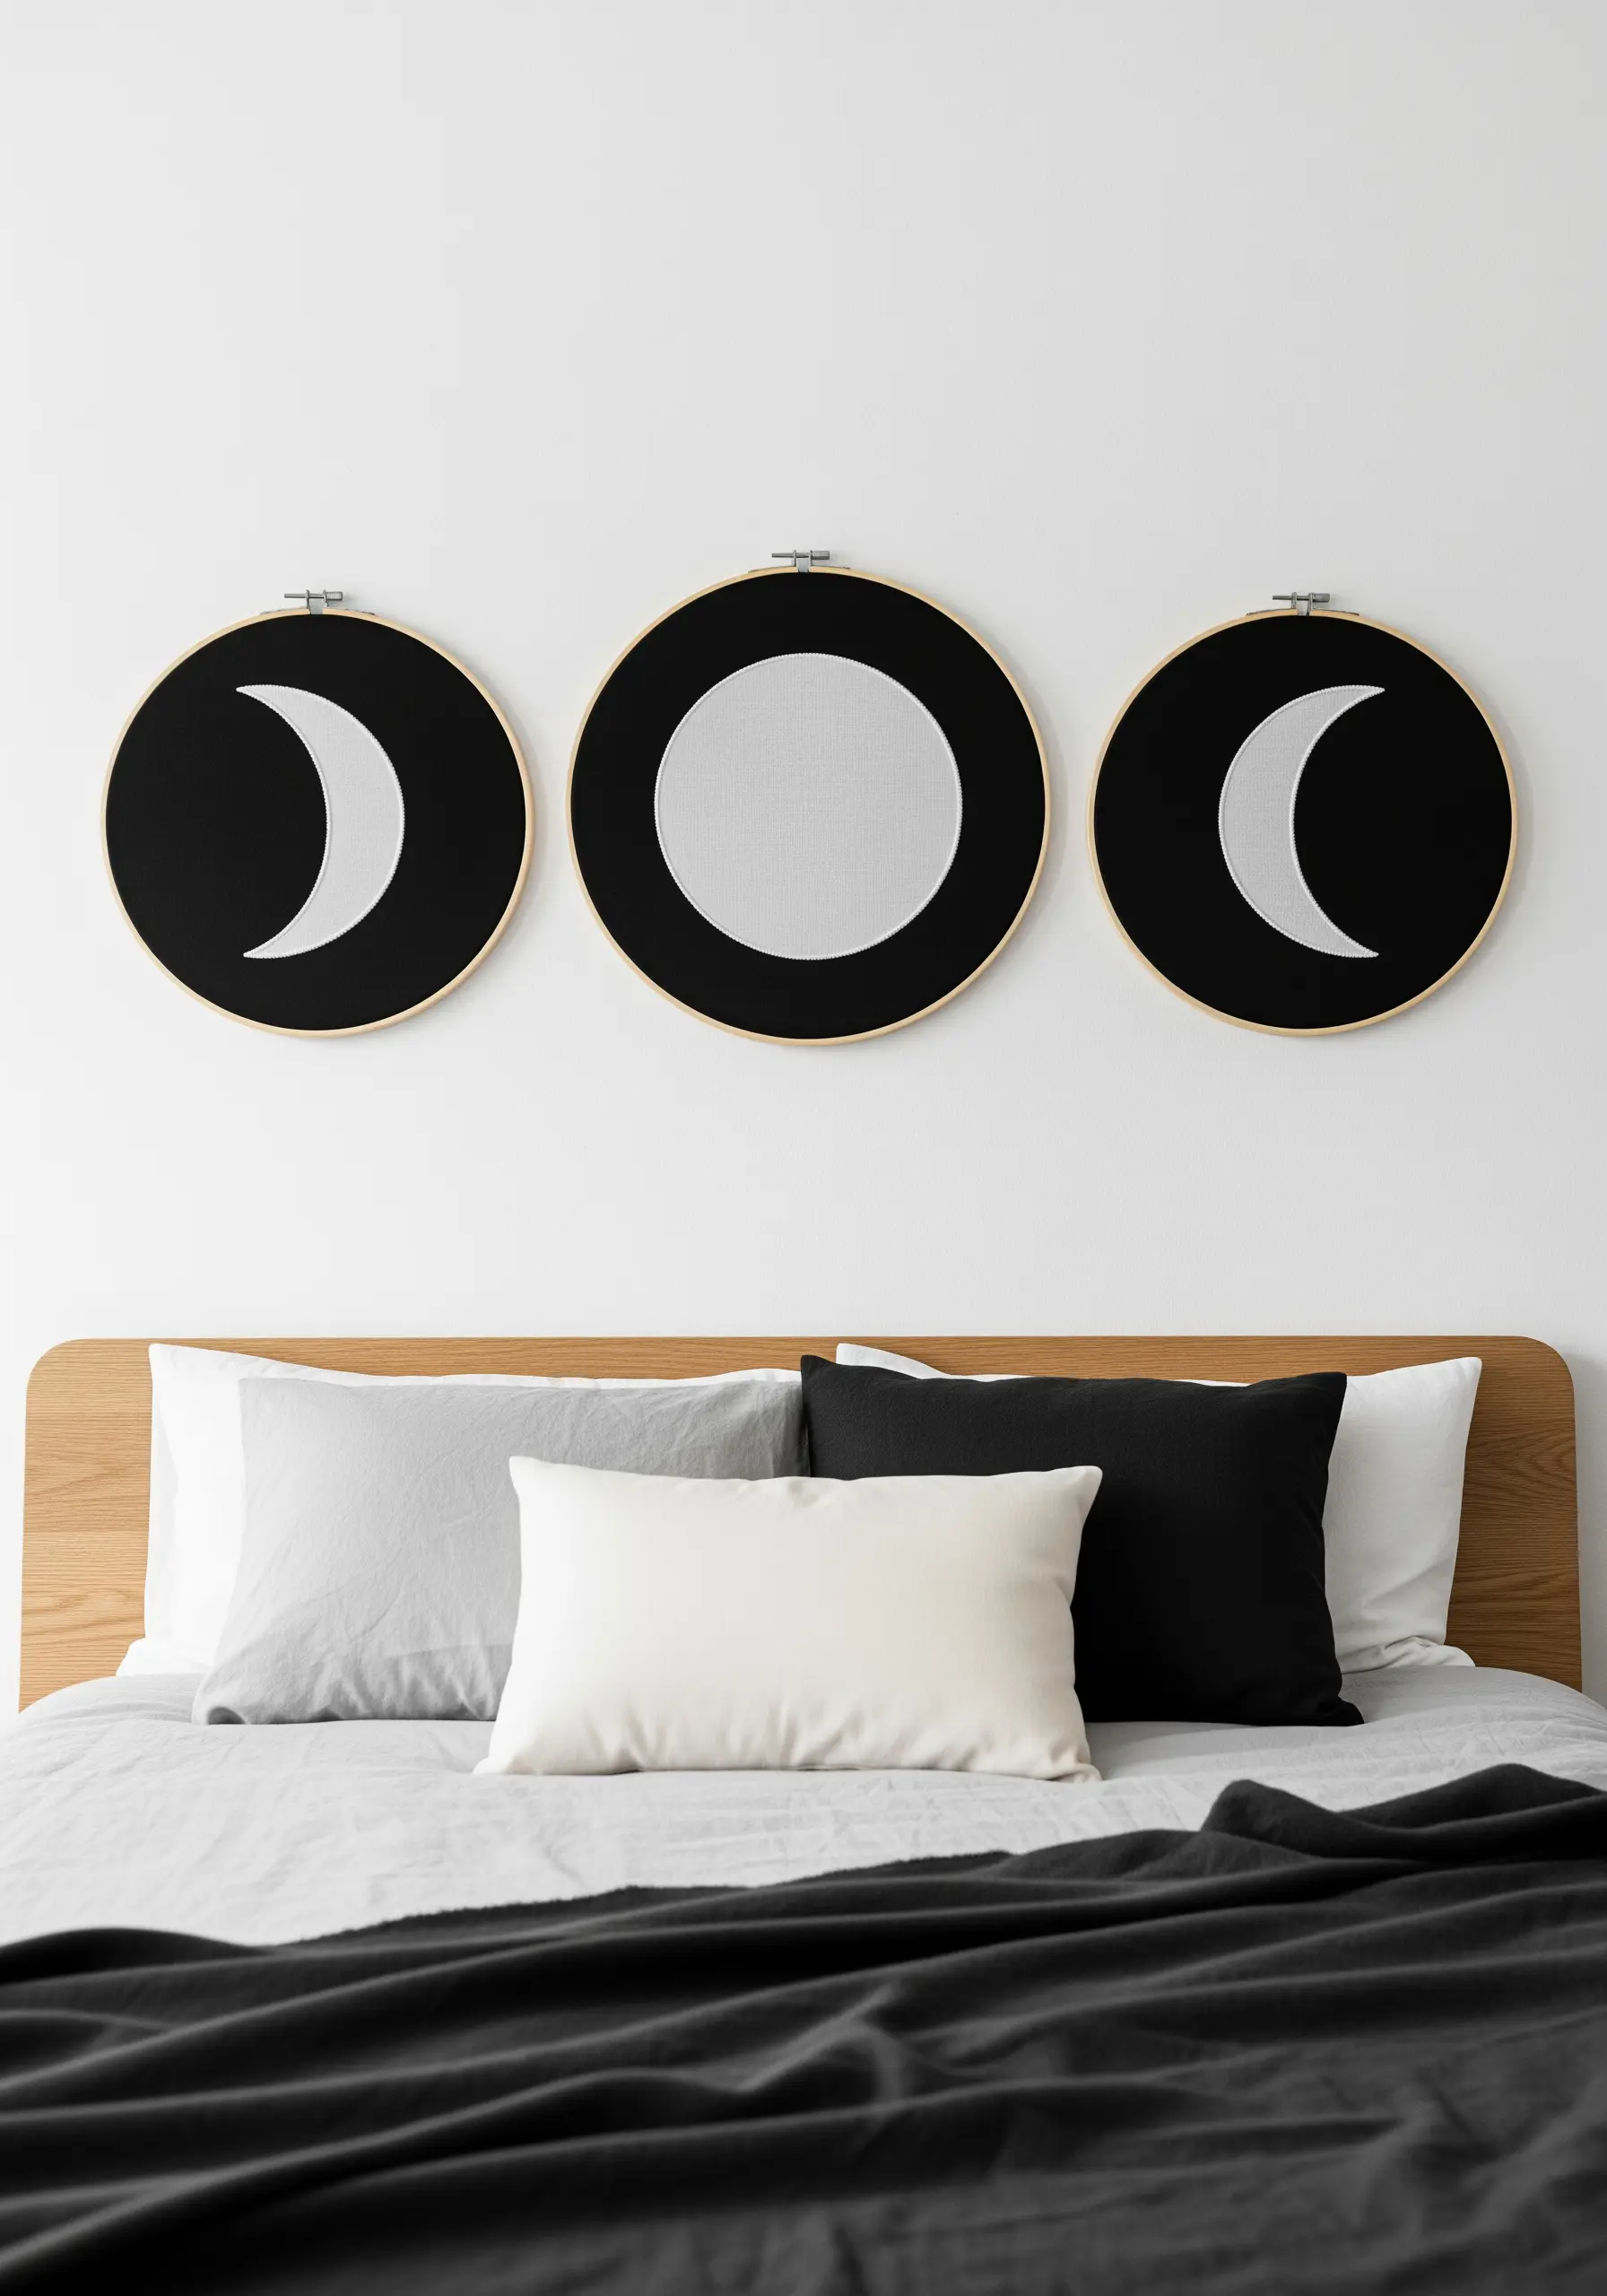
The secret to a perfectly round, satin-stitched shape lies in creating a firm boundary.
Before you begin filling in the moon phases, carefully outline each circle and crescent with a tight split stitch.
This raised edge will contain your satin stitches, preventing them from pulling the fabric or creating a wobbly edge.
Tuck the end of each satin stitch just under this border for a crisp, seamless finish.
This meticulous approach is essential for clean, graphic monochrome embroidery wall art concepts.
24. Embrace the Simplicity of a Single Line
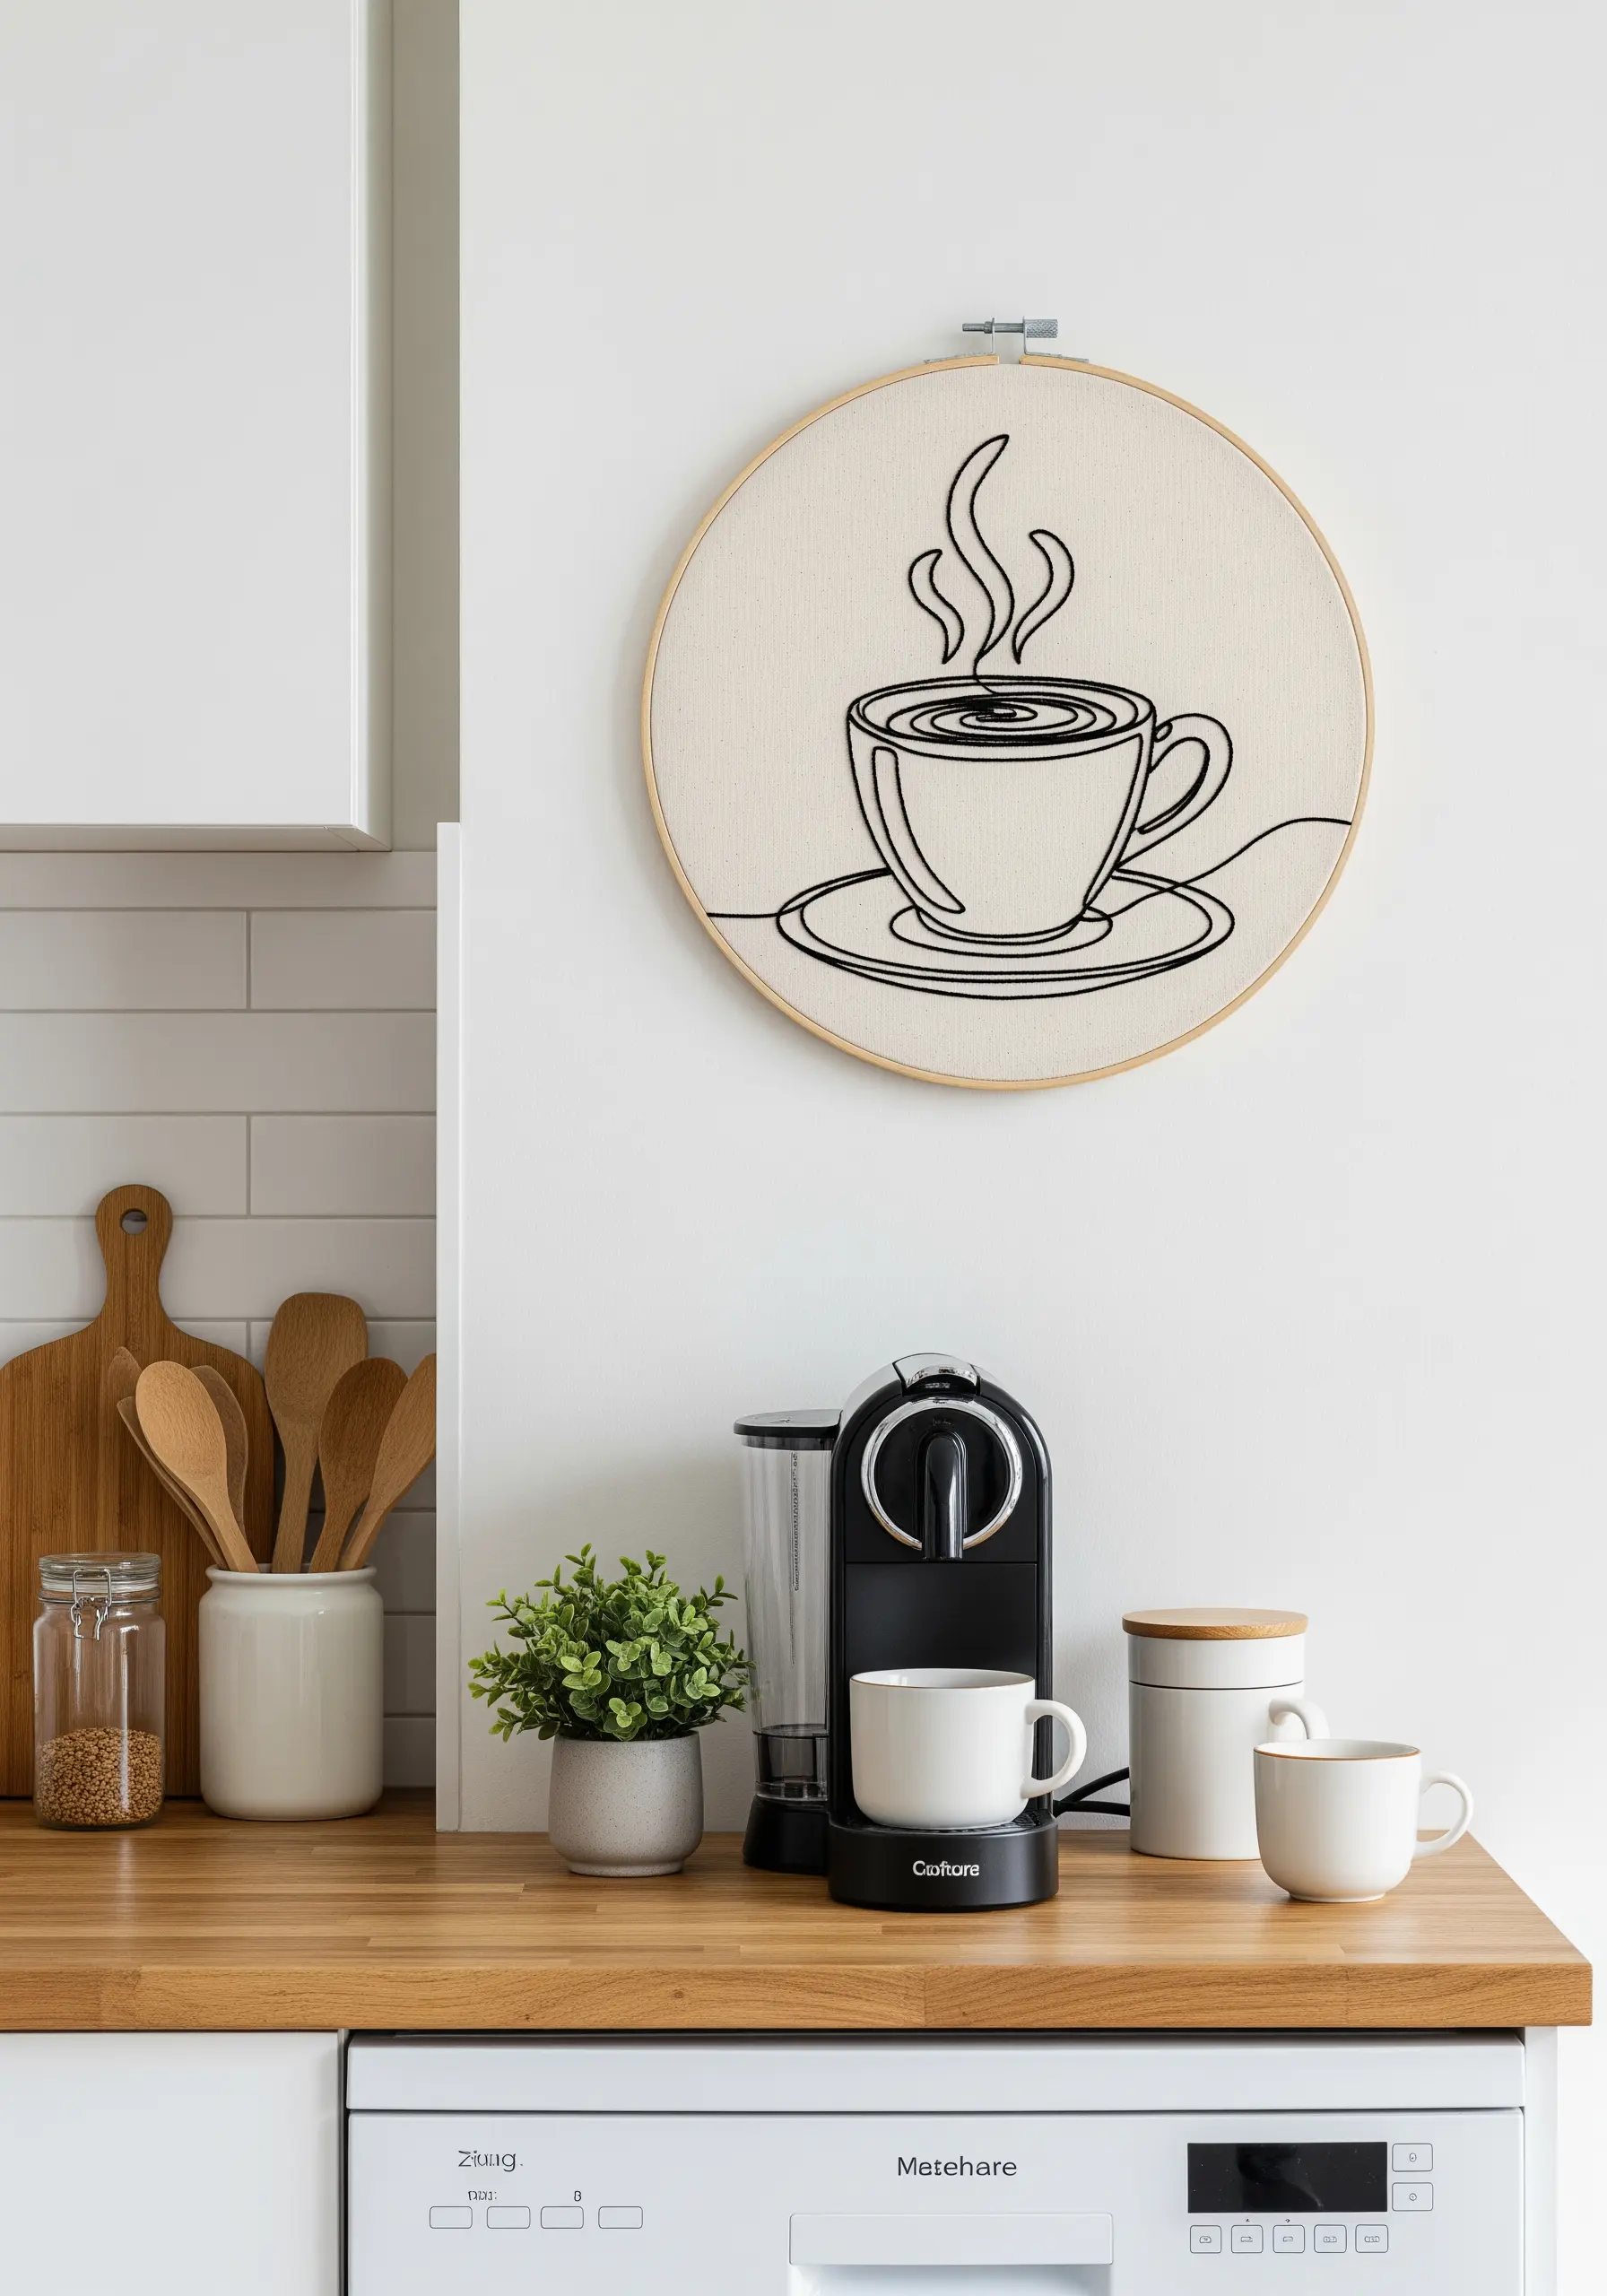
Celebrate the beauty of a single, unbroken line to create an image that is both simple and sophisticated.
Choose a dark, high-contrast thread like black perle cotton that has a natural sheen and won’t untwist as you work.
Use a stem stitch or a whipped backstitch to ensure the line remains fluid and consistent, especially around tight curves like the handle of a coffee cup.
This style of embroidery is perfect for a minimalist kitchen space, adding a touch of personality without creating clutter.
25. Translate Sound into Stitches with Precision
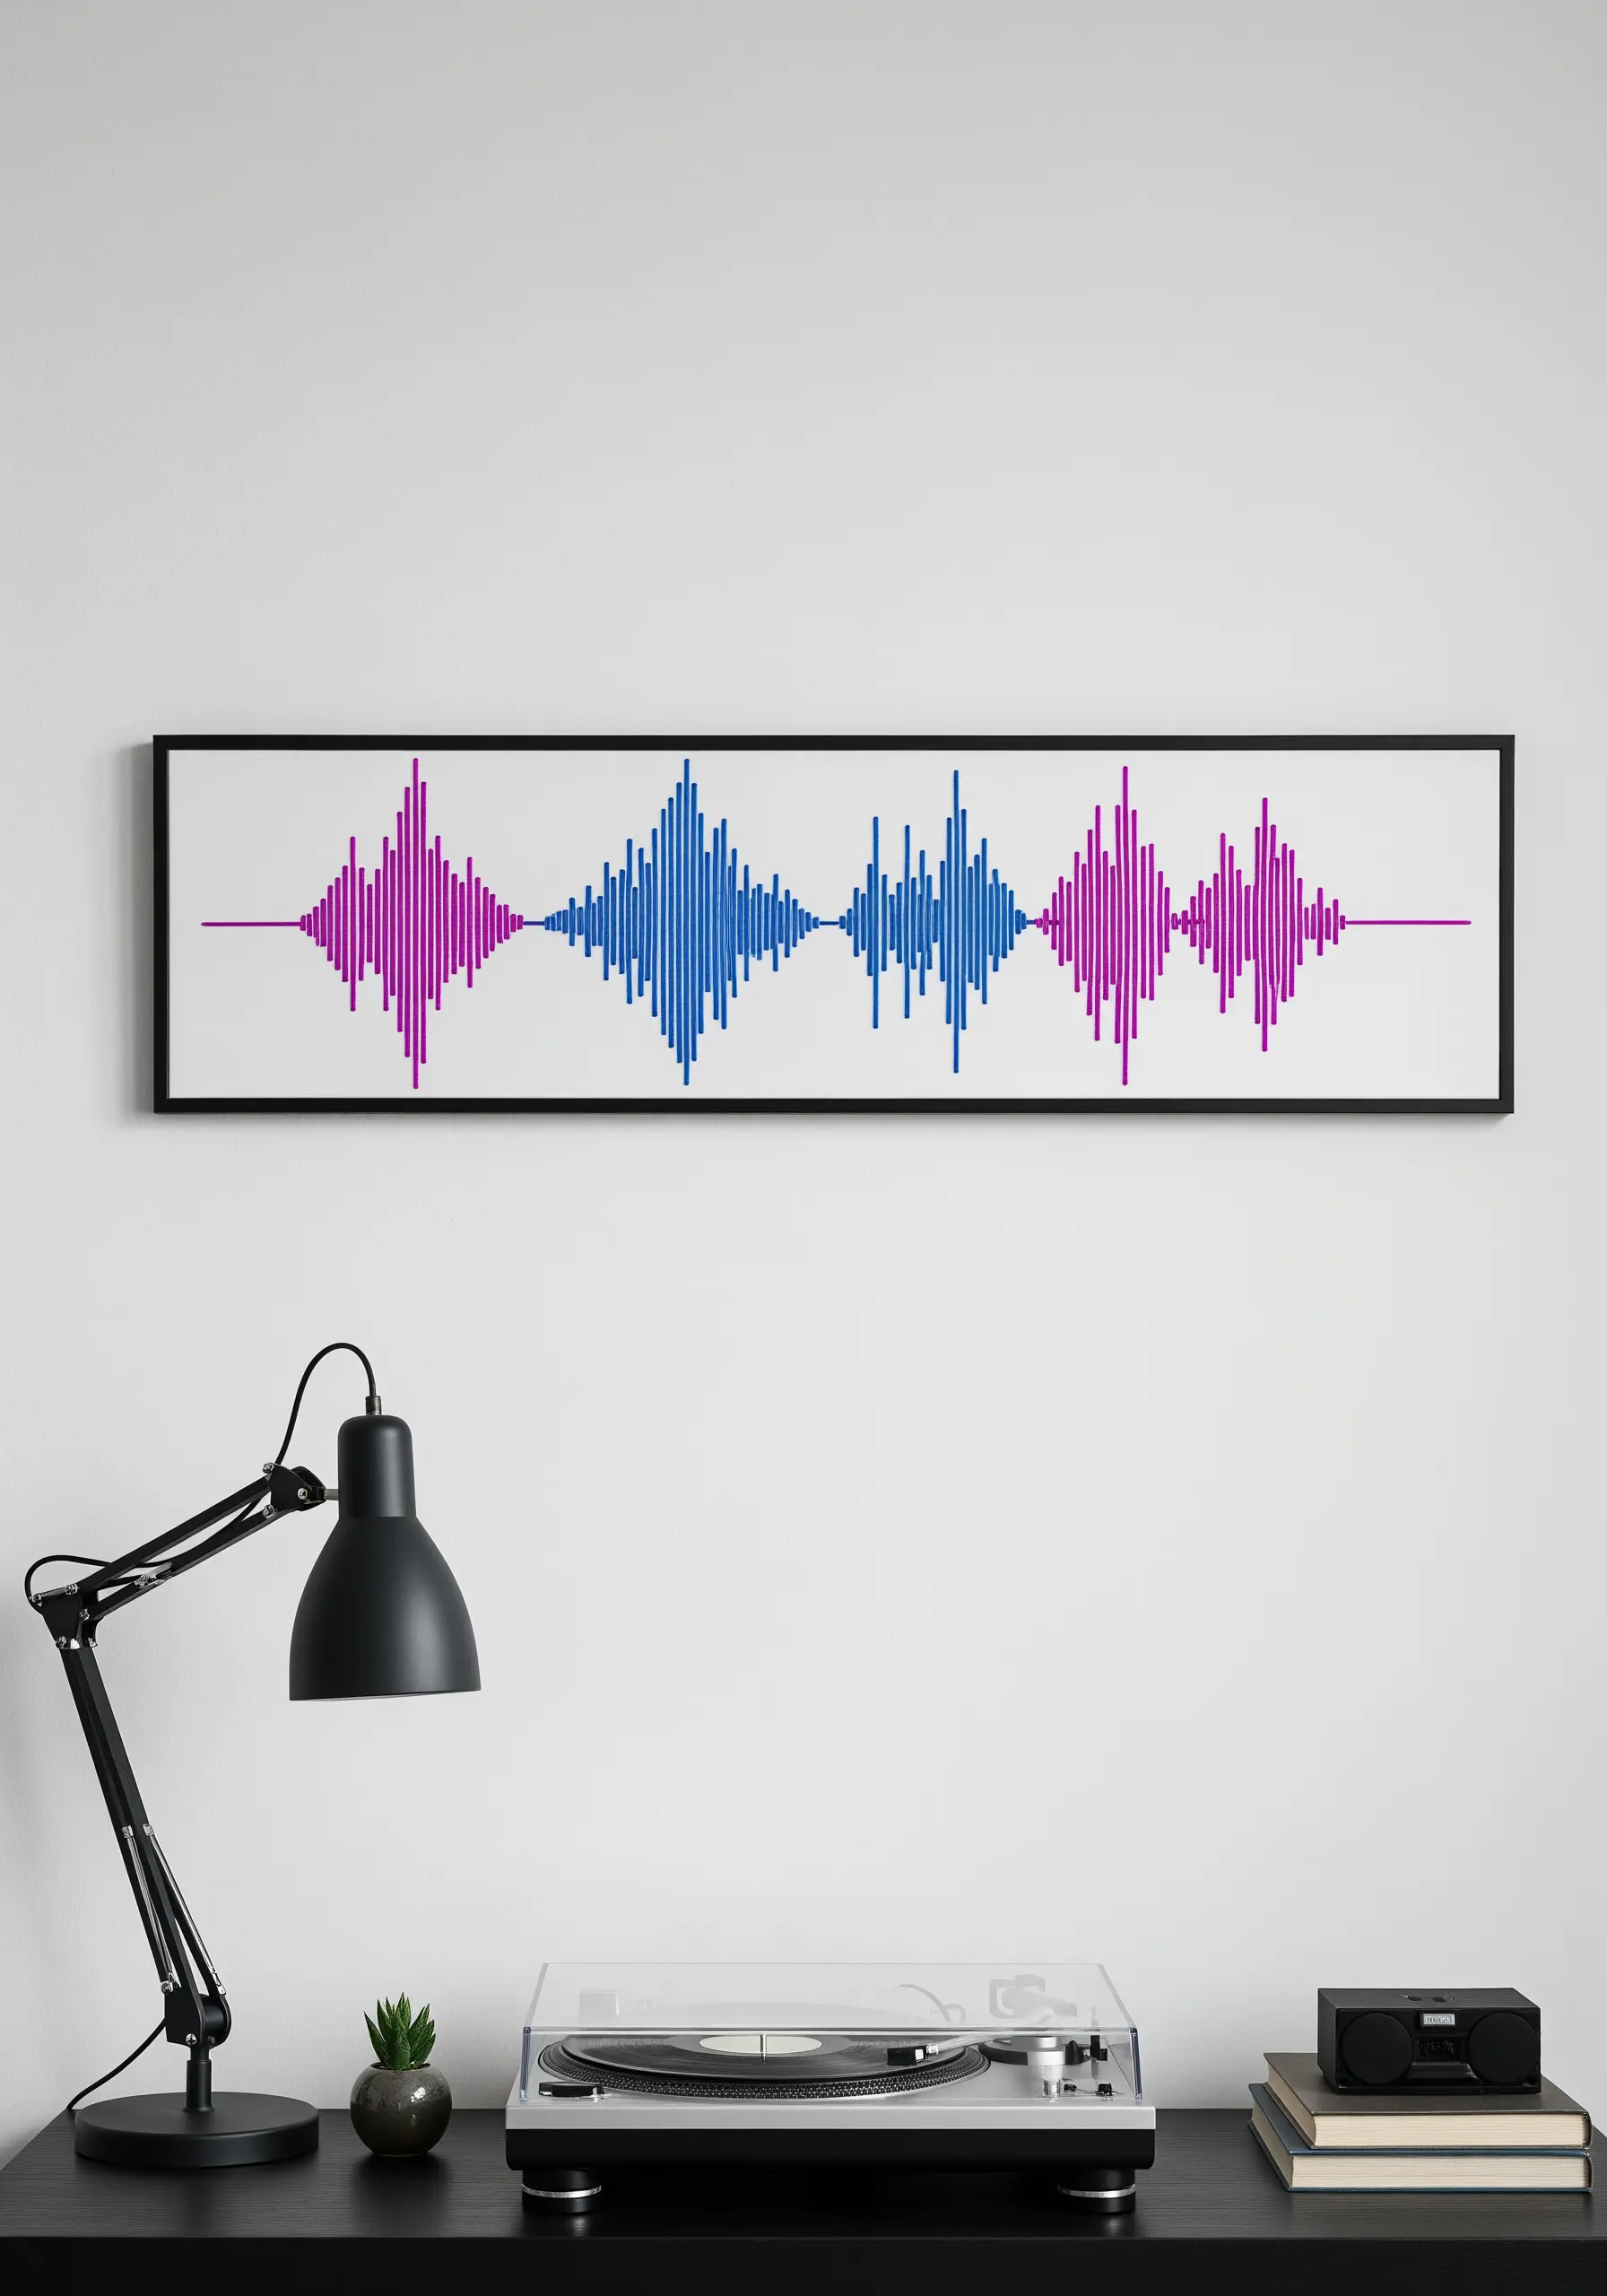
Turn a meaningful soundwave—a favorite song clip, a loved one’s voice—into a graphic piece of art.
Use a fine-grid water-soluble stabilizer to help you plot the peaks and valleys with absolute precision.
Work in vertical satin stitches, ensuring each one is pulled to the same tension for a uniform, clean finish.
A simple color transition can highlight different parts of the soundwave, adding another layer of visual storytelling.
This is the ultimate in personalized art, turning fleeting abstract embroidery motifs inspired by music into a lasting visual statement.


