

When you begin a project for a nursery, you’re doing more than just stitching; you’re creating a piece of the calm, gentle world you want for a little one. It can feel like every stitch needs to be perfect, every color just right. But the secret to truly beautiful nursery stitch art isn’t about flawless technique—it’s about thoughtful, intentional details.
Instead of focusing on complexity, let’s explore how to bring your work to life through texture, dimension, and soft, dreamy palettes. It’s about choosing a padded satin stitch to make a mushroom feel plump and real, or using a metallic thread to make stars gently shimmer. These small adjustments are what transform simple materials into something that feels deeply personal and alive.
Here, you’ll find twenty ideas designed to build your confidence and refine your eye. Each one focuses on a specific technique or material choice that offers a visible, touchable improvement. Let this be your guide to creating textile art that is not only beautiful to look at, but is also filled with the warmth and care of your own two hands.
1. Create a Three-Dimensional Cloud Mobile

Move beyond flat wall art by constructing a plush, three-dimensional cloud from soft felt or fleece.
Instead of simple fabric raindrops, elevate the design by cutting teardrop shapes from sturdy felt and embellishing them with metallic thread.
Use a dense seed stitch or a scatter of tiny French knots with silver or iridescent thread to make each drop sparkle, creating a gentle, light-catching mobile that feels truly magical.
This technique adds a sensory layer to the decor, turning a simple shape into an interactive, textural piece.
2. Refine Animal Motifs with Directional Fill Stitches

When filling in graphic animal shapes, swap the standard satin stitch for a brick stitch or long-and-short stitch.
This approach staggers your stitches like masonry, eliminating the gaps and puckering that often occur with large filled areas, resulting in a perfectly smooth, woven finish.
Use matte cotton floss in soft, earthy tones to reinforce the modern, gentle aesthetic.
Pay close attention to the direction of your stitches—following the natural contours of the animal’s body makes the final piece feel more organic and alive.
3. Master Crisp Appliqué with Stabilizer
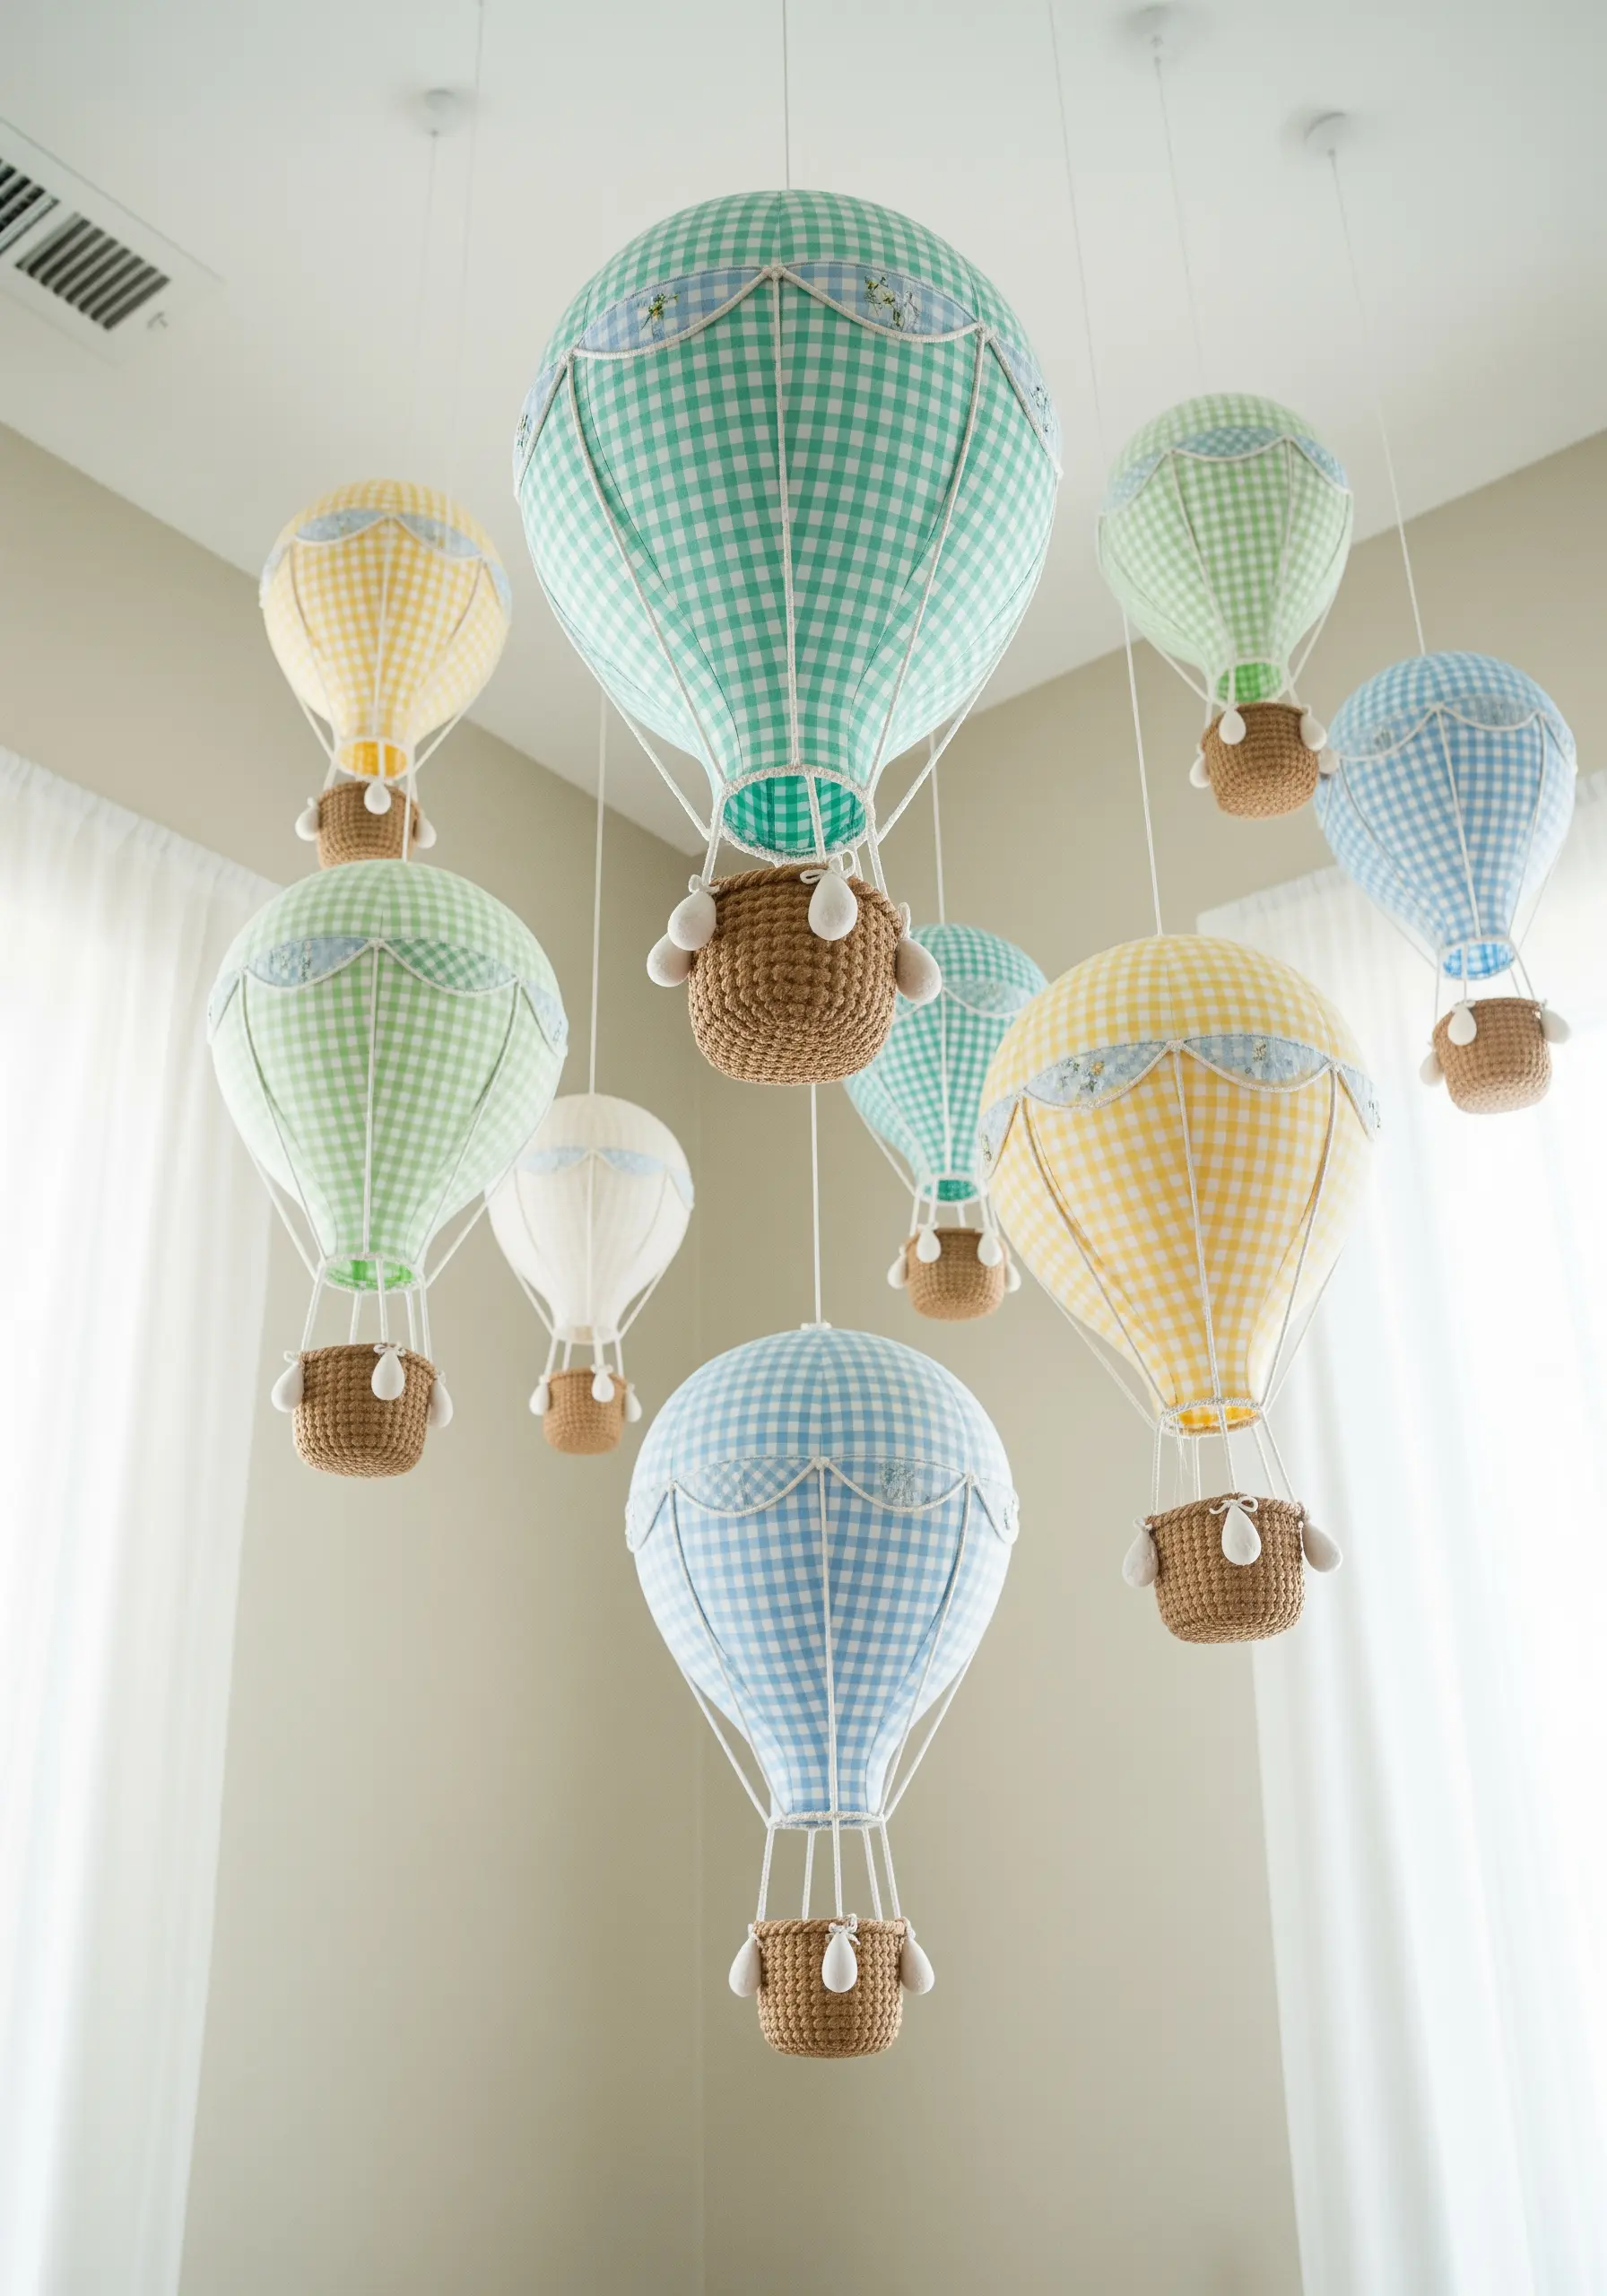
To achieve the clean, sharp edges on these gingham hot air balloons, iron a lightweight fusible stabilizer to the back of your fabric before cutting out the shapes.
This prevents fraying and distortion, allowing you to create perfect panels with professional precision.
For the decorative scalloped edges, use a whipped backstitch with a contrasting thread to create a raised, corded effect that adds dimension and complements the crocheted baskets.
This combination of crisp fabric appliqué and textural stitching creates a sophisticated, multi-dimensional mobile.
4. Achieve Bold, Textured Lettering with Couching

Instead of laboriously filling each letter with satin stitches, create this bold, textural alphabet using the couching technique.
Simply lay down a thick material—like chunky yarn, cotton rope, or multiple strands of embroidery floss held together—and tack it to the fabric with a thinner, contrasting thread.
This method is not only faster but also creates texture and depth that makes the letters pop from the canvas banner.
Alternate between couching and simple satin stitch fills to create a dynamic, playful rhythm across the alphabet.
5. Combine Velvet Appliqué and Metallic Threads

Create a celestial scene with dramatic contrast by using different material sheens.
For the moon, choose a soft, light-absorbing fabric like velvet or velour, and for the stars, opt for a high-shine metallic lamé or glitter felt.
Connect your stars into constellations using a fine gold metallic thread in a simple backstitch.
To make each star sparkle, outline it with the same metallic thread and add a central French knot, turning a simple banner into a dreamy, high-contrast night sky.
6. Add Tactile Details to an Appliqué Quilt

Transform a simple appliqué quilt into a sensory experience with thoughtfully chosen stitches.
Instead of a machine-stitched edge, secure your animal shapes with a hand-worked blanket stitch for a soft, heirloom quality.
For the lion’s mane, create a wonderfully plush, 3D fringe using the turkey work stitch (also known as the ghiordes knot).
These tactile details invite touch and add a playful, interactive dimension to the wall hanging.
7. Build Depth with Layered Felt and Beadwork

Create a dynamic ocean scene by layering different shades of wool felt to simulate the depth of water.
Cut each wave as a separate piece, arranging them from lightest to darkest to create perspective.
For the seafoam, use a combination of white French knots, clear seed beads, and tiny iridescent sequins.
This mixed-media approach not only adds rich texture but also catches the light beautifully, mimicking the sparkle of sun on water.
8. Focus on Precision in Minimalist Landscapes

For a clean, modern triptych like this, the focus is entirely on precision and composition.
Use high-quality, stiff felt or even faux leather, and cut your mountain shapes with a rotary cutter or a sharp craft knife against a ruler for perfectly straight lines.
Secure the pieces with a minimal, almost invisible running stitch using a single strand of matching thread.
The power of this design lies in its simplicity, so crisp execution is what transforms it from a craft project into a piece of minimalist art.
9. Explore Stumpwork for Whimsical 3D Scenes
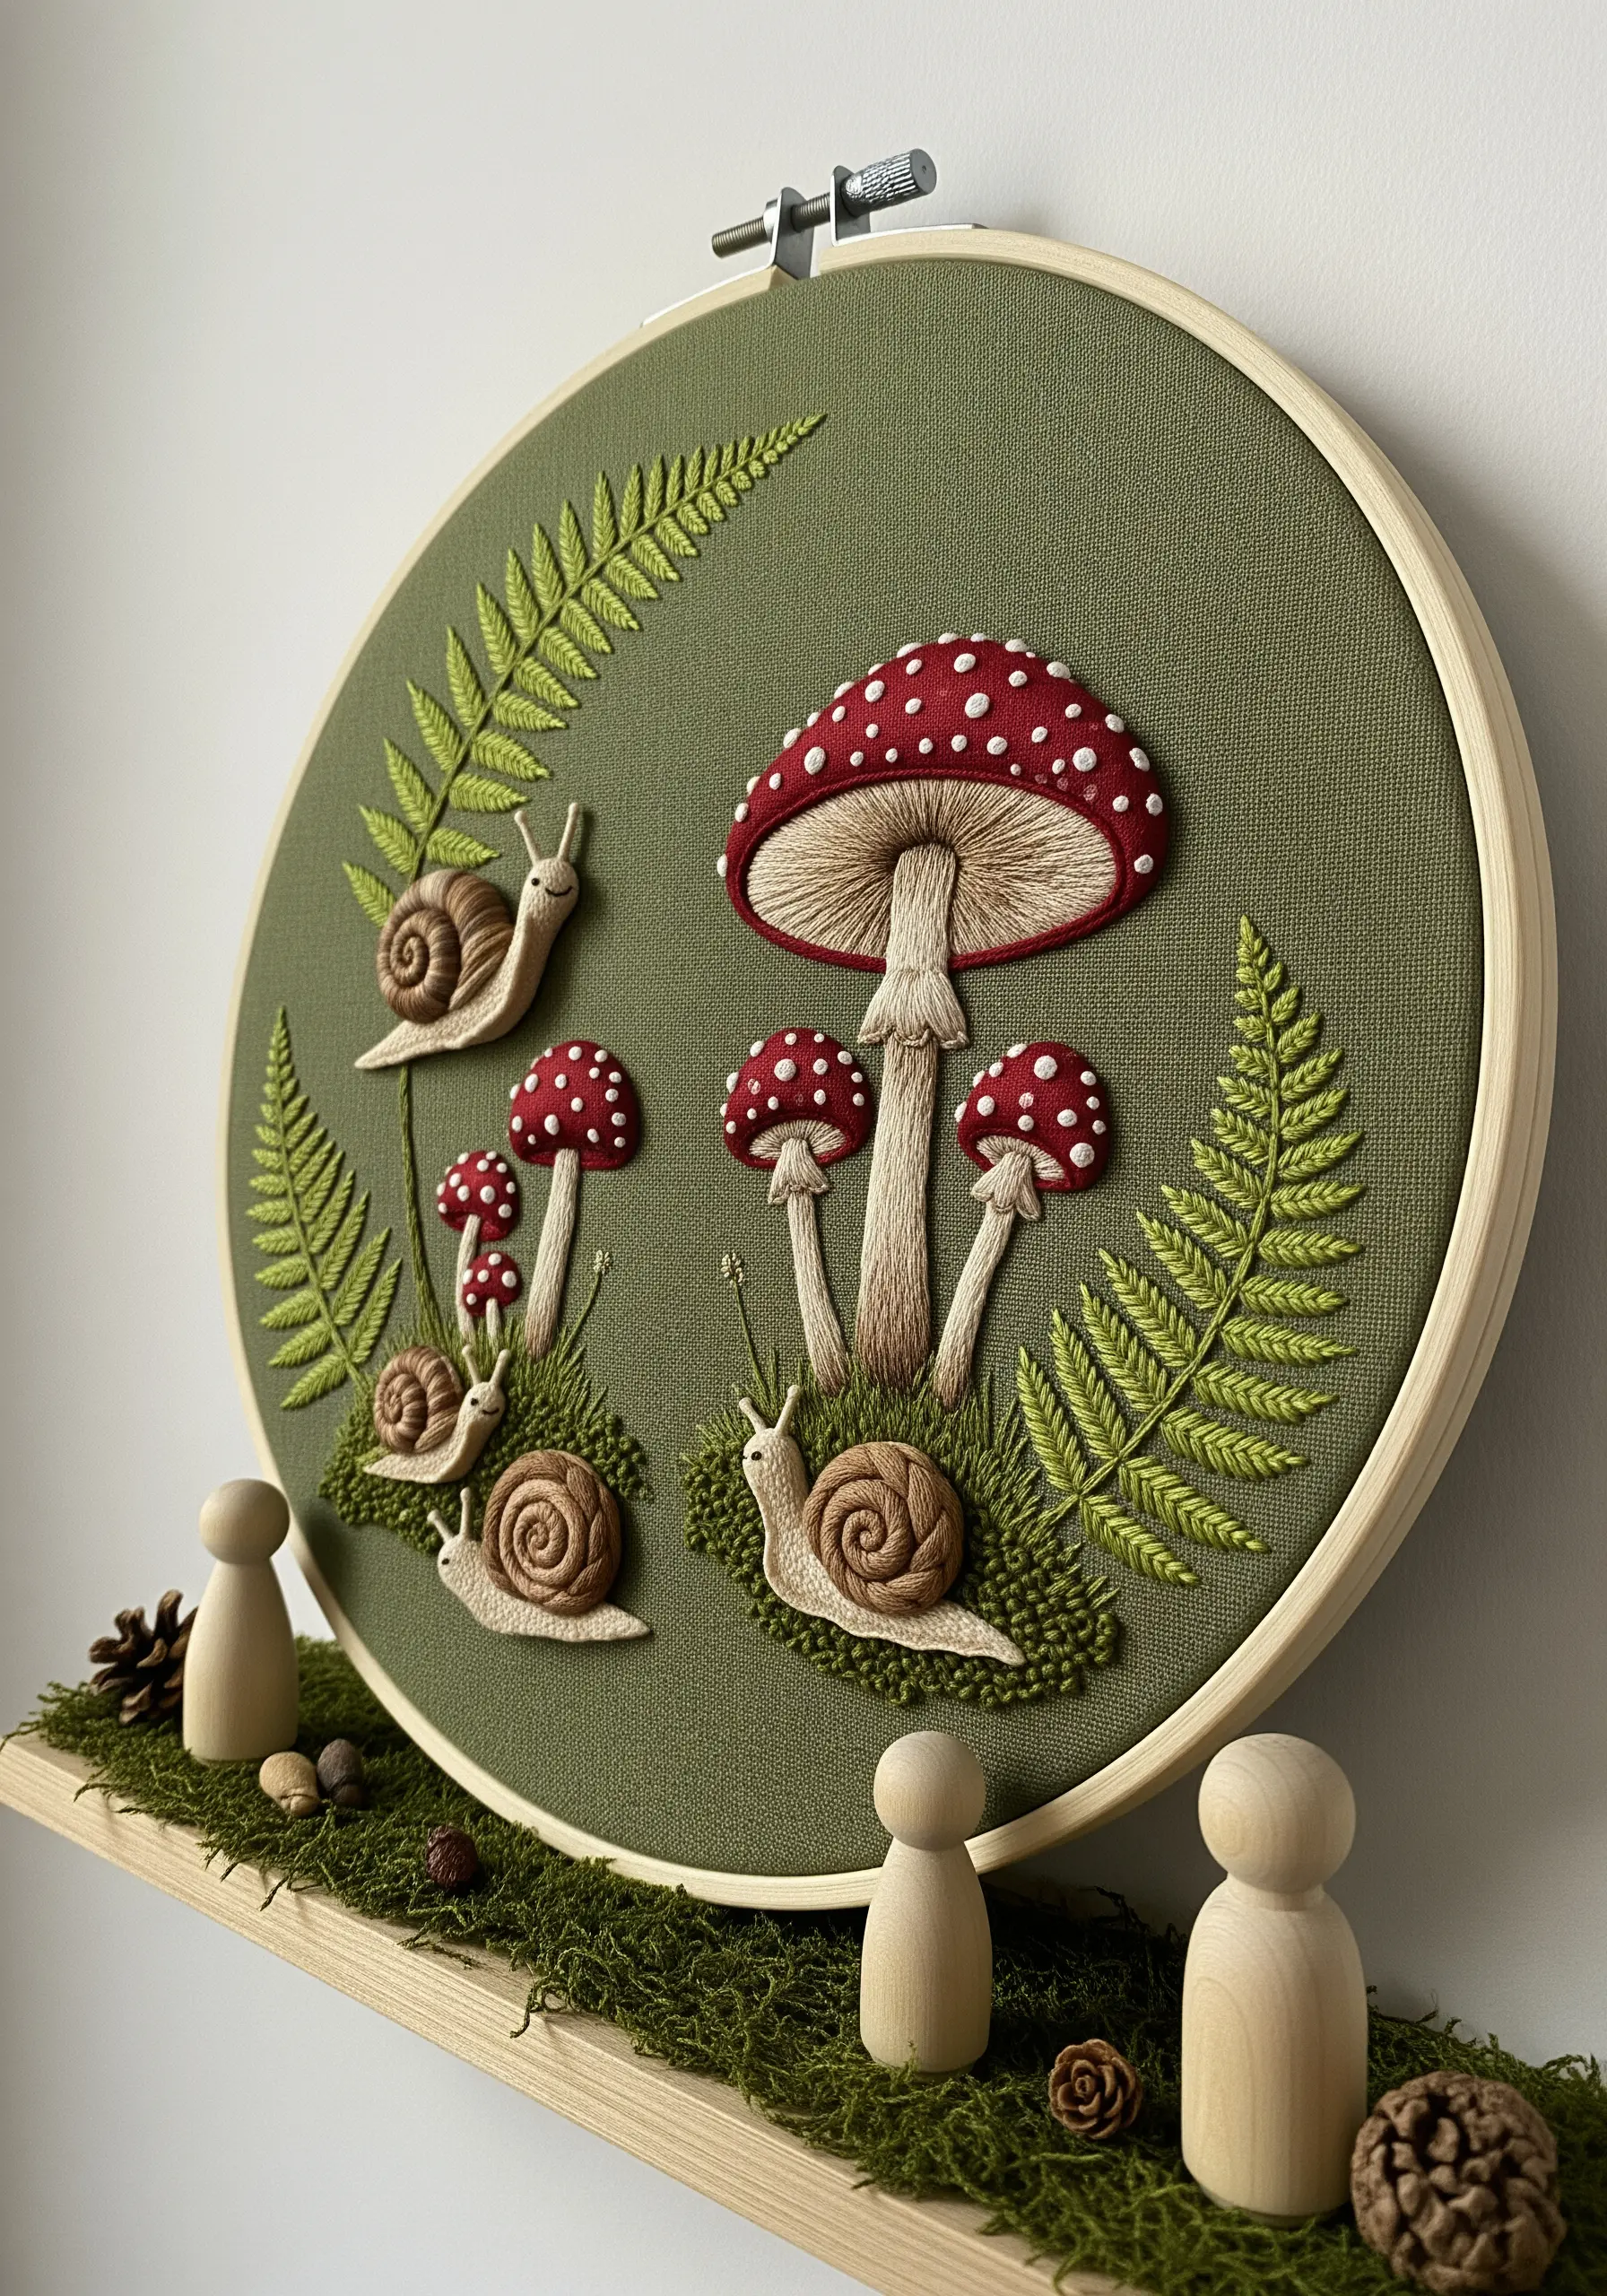
Bring a woodland scene to life with stumpwork, a technique that creates raised, three-dimensional elements.
Create the mushroom caps by stitching a padded satin stitch over a small piece of felt cut to shape. This lifts the element off the fabric for a realistic, rounded effect.
For the mossy forest floor, use a dense cluster of French knots in several shades of green to build up realistic texture.
These dimensional techniques turn your hoop into a miniature, tactile world.
10. Craft a Sculptural Rainbow with Wrapped Yarn

This textural wall hanging uses yarn wrapping, a technique closely related to embroidery in its focus on color and tension.
To create perfectly smooth, dense arches, ensure you wrap your yarn tightly and consistently around a cotton rope or wire base, pushing the strands together as you go to avoid gaps.
Choose a muted, earthy palette for a sophisticated and calming effect.
The contrast between the smooth, wrapped arches and the soft, fringed ends is what gives this piece its aesthetic appeal.
11. Elevate Felt Shapes with Subtle Stitch Details

Transform simple felt fruit shapes into charming, detailed pieces with just a few well-placed stitches.
Before sewing your shapes together, add tiny details with embroidery floss. Use small white French knots for strawberry seeds or a few straight stitches in a darker color to suggest the core on a pear half.
This minimal embroidery adds a layer of handcrafted quality that elevates the garland from a simple cutout to a thoughtful decoration.
12. Design a Large-Scale Felt Wall Mural
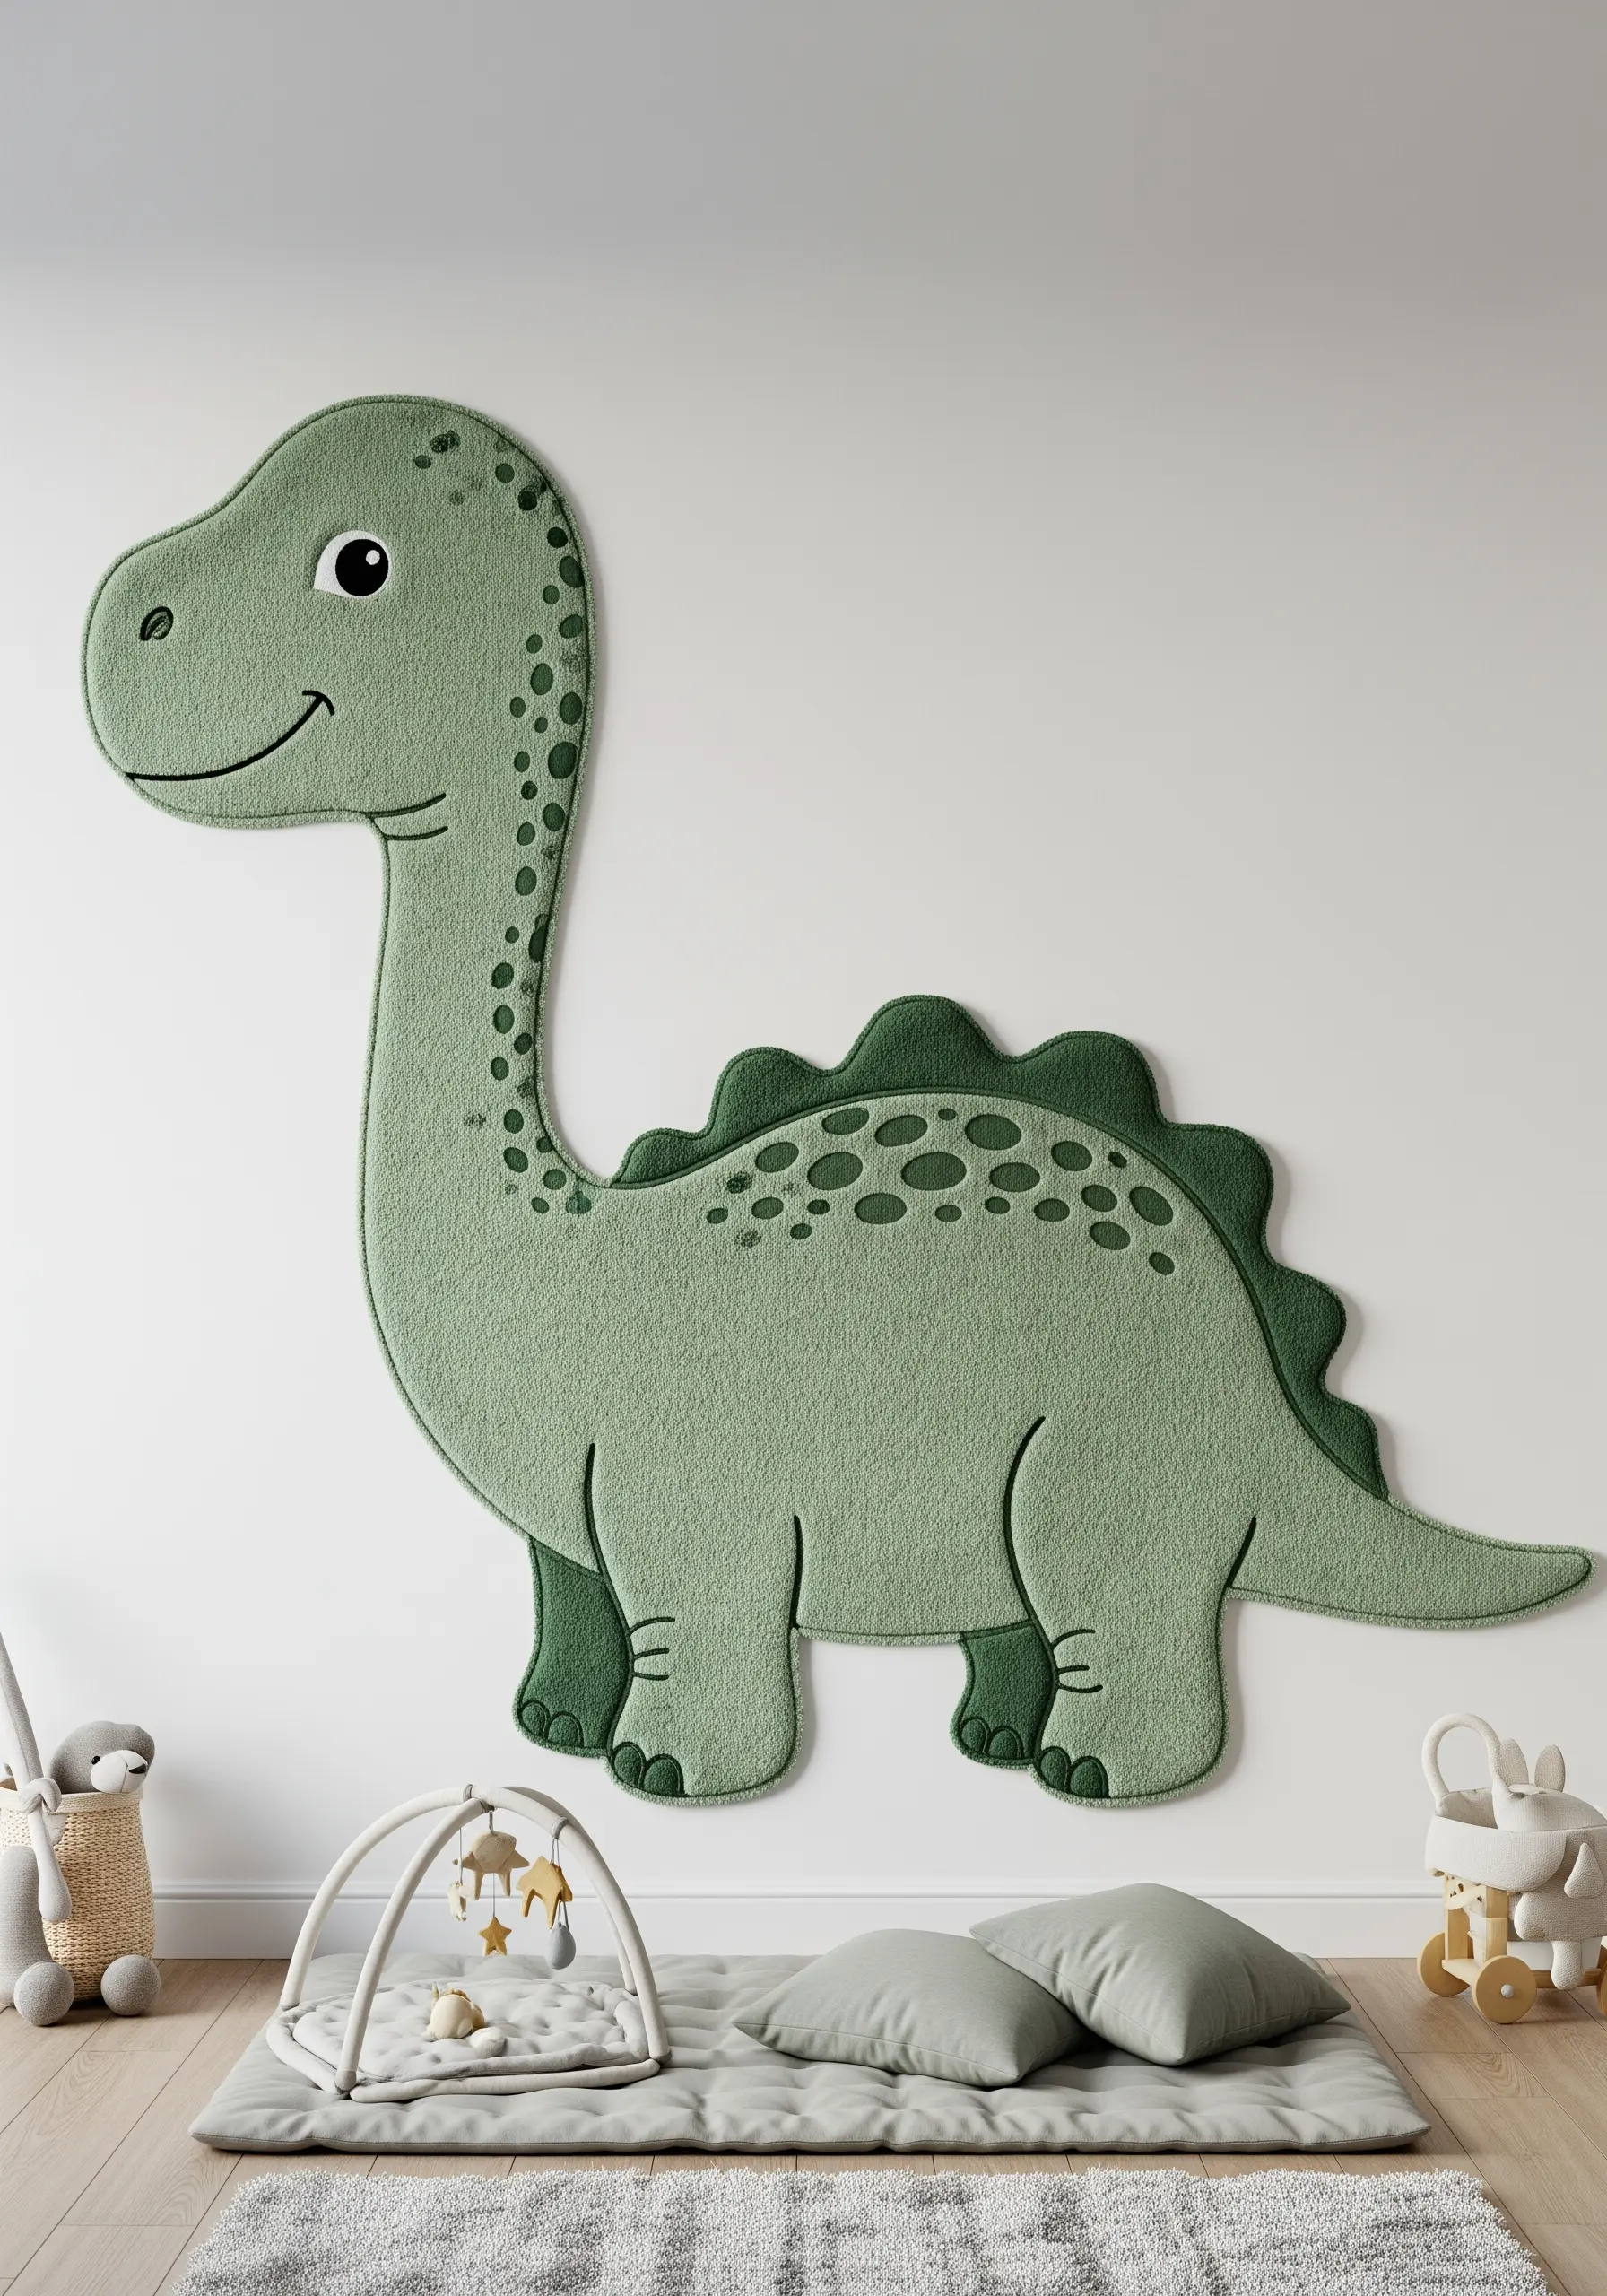
Don’t be afraid to take your textile art off the hoop and onto the wall.
For a large-scale piece like this dinosaur, use thick, high-quality wool-blend felt that holds its shape well.
You can lightly secure it to the wall with removable adhesive strips, then add definition by stitching the outline and details directly onto the felt shape with a contrasting embroidery floss and a simple backstitch.
This method creates a soft, impactful mural that is both visually engaging and safe for a child’s room.
13. Mix Floral Fabrics and Felt for a Name Banner

Create a beautiful, personalized banner by combining the textures of soft felt, printed cotton, and dimensional embellishments.
Use a floral-print fabric for the appliqué letters, and give them a clean, defined edge by outlining each one with a simple stem stitch in a solid, coordinating color.
Add rolled felt roses and hand-stitched leaves at the corners to introduce a soft, three-dimensional element that ties the entire design together.
14. Use Satin Ribbon for High-Impact Shine

For elements like the sun’s rays, substitute traditional embroidery floss with wide satin ribbon to create bold, light-catching dimension.
When making each straight stitch, use your needle to ensure the ribbon lays completely flat, without any twists, to maximize its natural sheen.
Contrast this high-shine element with a matte cotton background and a silver lamé appliqué moon for a celestial duo that plays beautifully with light and texture.
15. Paint with Thread for Realistic Florals

Achieve a soft, painterly effect in your floral embroidery by using the long-and-short stitch technique, also known as thread painting.
This method allows you to blend colors seamlessly, creating gentle gradients that mimic the delicate shading of real petals.
Start with just three shades of one color (light, medium, and dark) per petal to practice the technique.
Contrast the smooth petals with textured French knot centers to make your flowers truly pop.
16. Create a Graphic Cityscape with Layered Felt
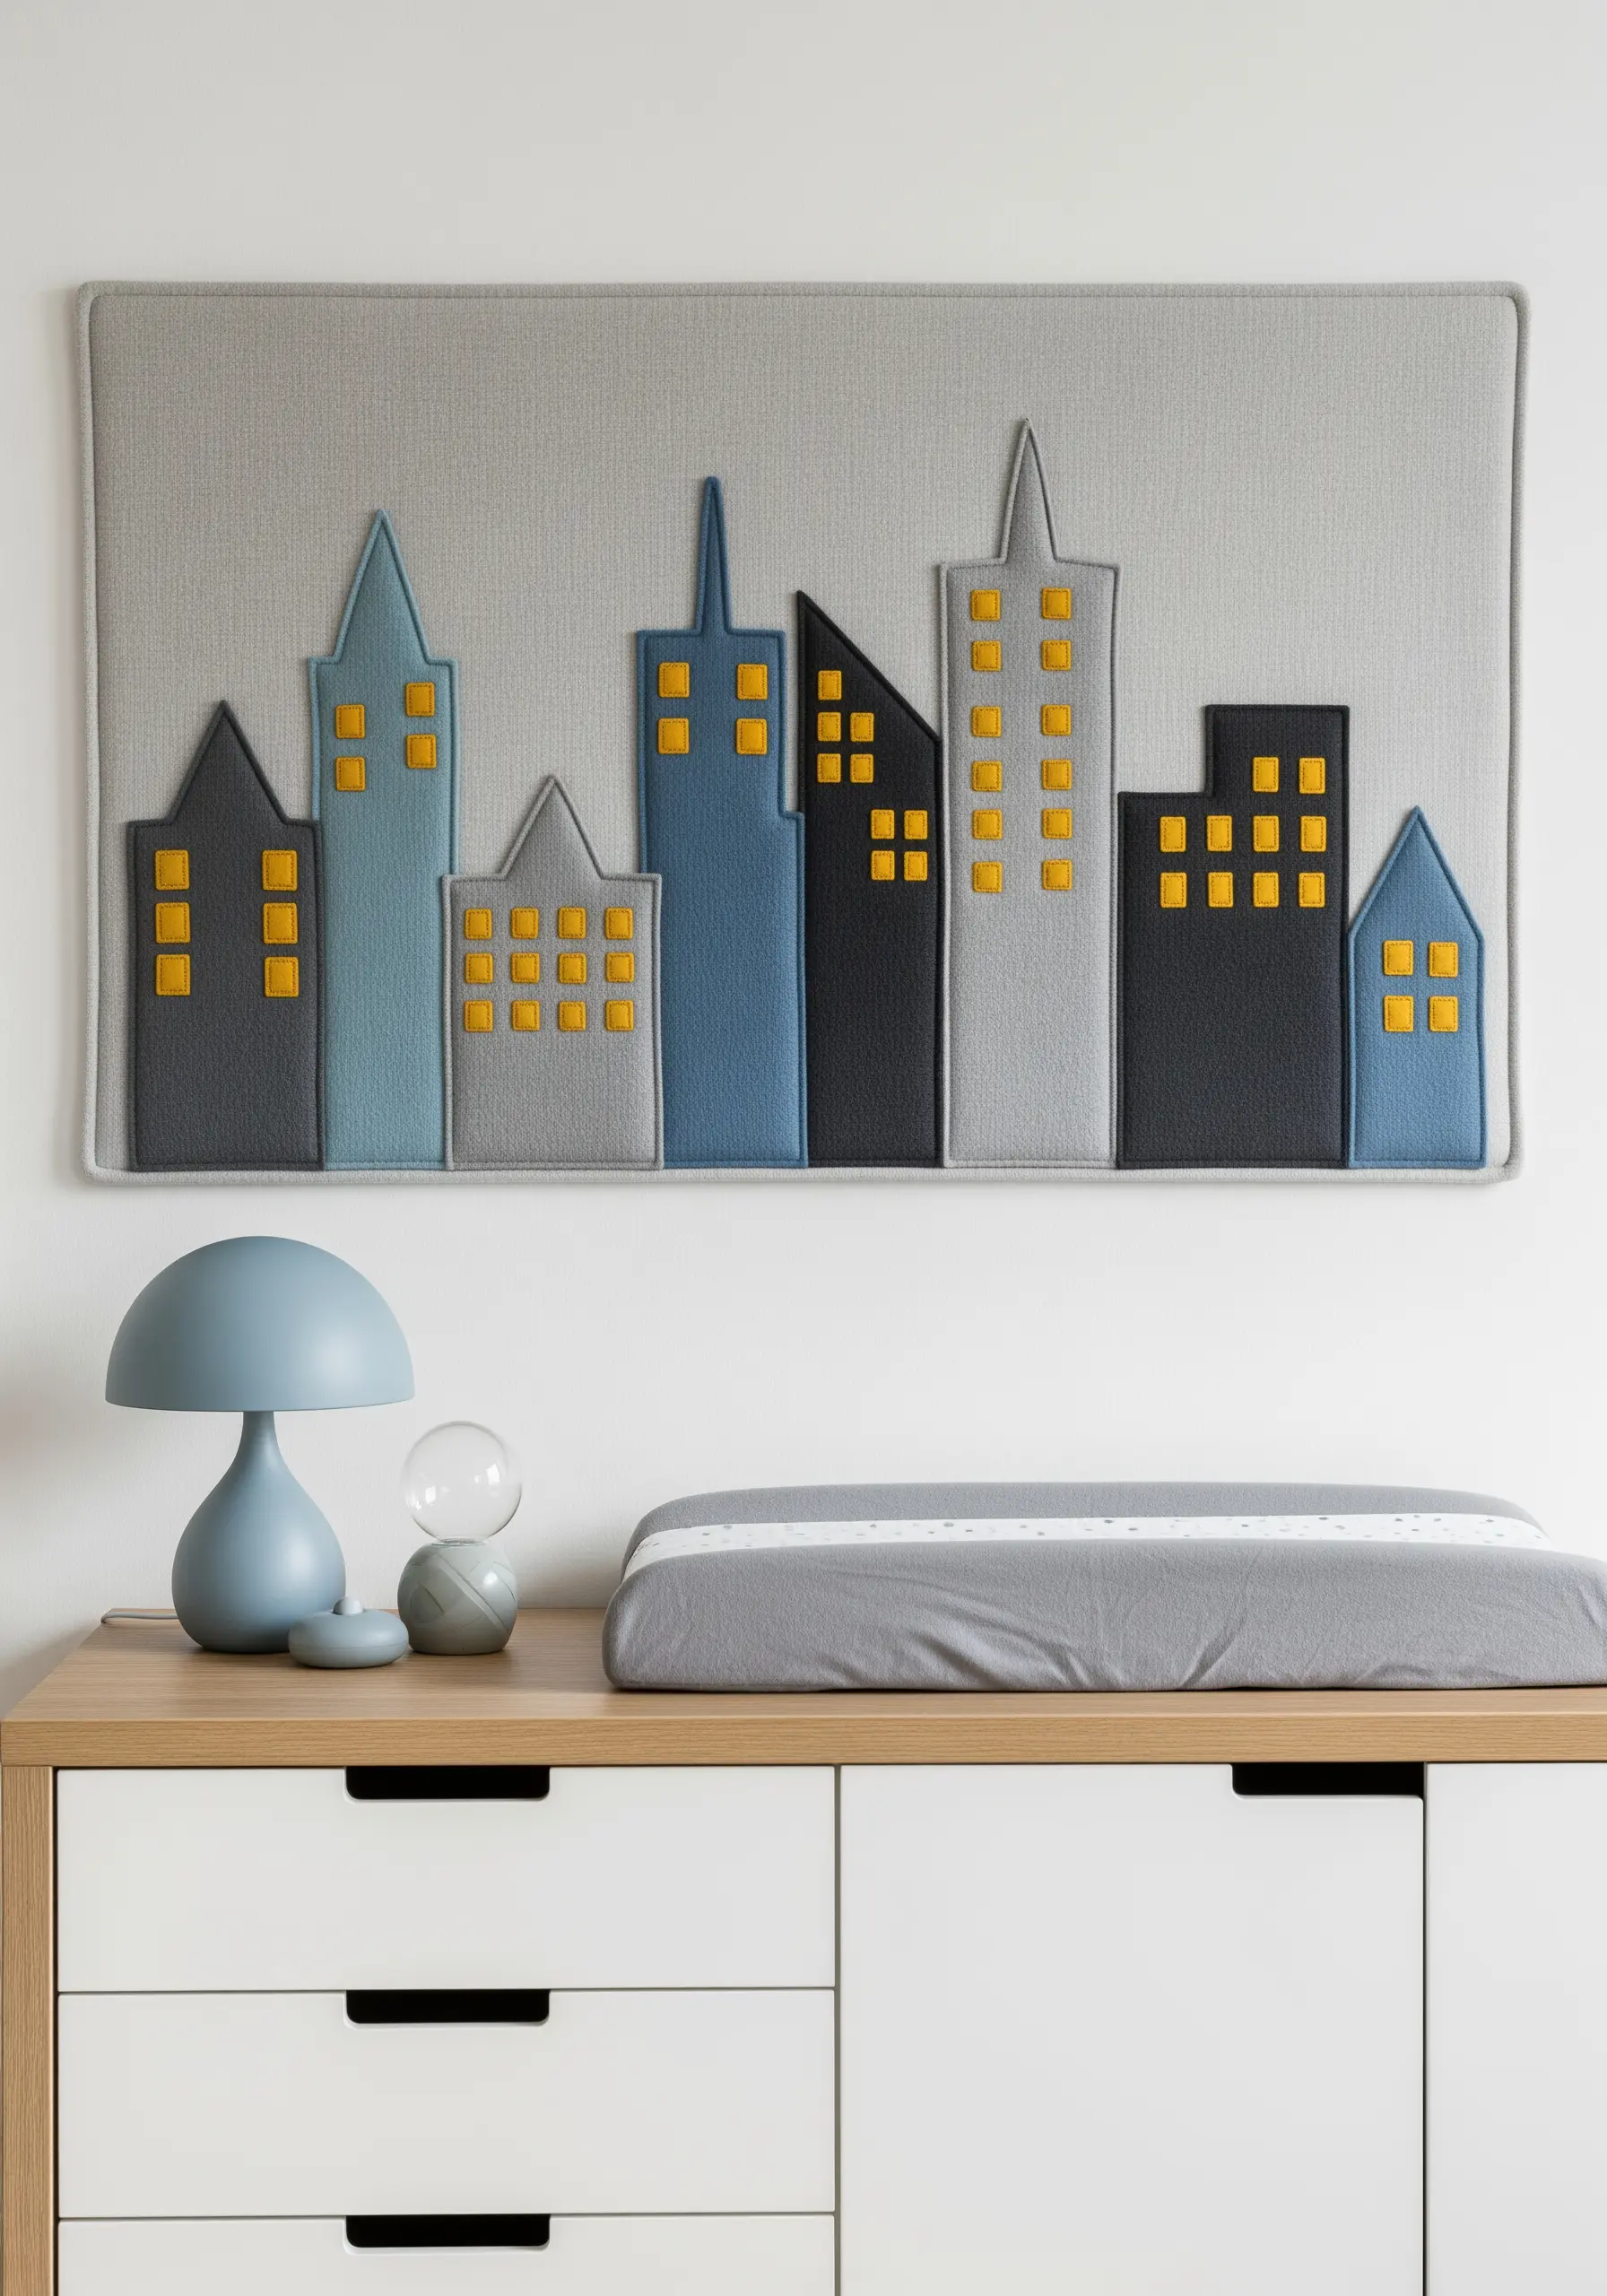
Construct a modern, graphic cityscape using layers of felt in a cool, cohesive color palette.
To create the illusion of glowing windows, use a shimmery yellow or gold fabric instead of plain matte felt. This subtle switch adds a touch of magic and depth.
Define each building and window with a clean, simple backstitch in a dark grey thread. This sharpens the geometric shapes and gives the entire piece a polished, finished look.
17. Embroider Feathers for Delicate Movement

For a mobile with a sense of lightness and flight, focus on the embroidered details of the wings.
Use a fan of satin stitches in soft, variegated pastel threads to create the illusion of individual feathers.
Combine small-scale patterned fabrics for the bird bodies with solid-colored wings to ensure your delicate stitch work stands out.
The artistry is in making these stitched elements feel as light and airy as real feathers, adding graceful movement to the mobile.
18. Add Sensory Ribbons to an Ocean Play Mat

Make a textile piece interactive and engaging by incorporating different materials and textures.
On this quilted ocean scene, the jellyfish is brought to life with a cascade of colorful satin and grosgrain ribbons for tentacles.
This not only adds a wonderful sense of movement but also provides a rich sensory element for a baby to explore.
Further enhance the underwater world with free-motion quilting to create wave patterns and shiny French knots for air bubbles.
19. Design a Minimalist Mid-Century Mobile

Embrace the power of simple forms and a sophisticated color palette with a Mid-Century Modern inspired mobile.
The beauty of this design lies not in complex stitching, but in the careful execution of its organic shapes and the balance of the composition.
Cut your felt pieces precisely and stitch them with a nearly invisible whipstitch using a matching thread. Focus on creating a pleasing arrangement of color and form that moves gently in the air.
20. Frame Your Textile Art for a Cohesive Display

Elevate simple felt creations by presenting them as a cohesive collection in matching shadow box frames.
This approach turns individual motifs into a unified piece of wall art. Lightly stuff your felt shapes—like the clouds and sun—to give them a soft, 3D pop against the linen backing.
For elements like the rainbow, couch thick yarn or use raised satin stitches to add texture. Framing your work adds polish and transforms it into a cherished keepsake.


