

You have the thread, the needle, the desire to create something beautiful. But sometimes, the path from a simple stitch to a finished piece of art feels unclear. What if the secret isn’t a more complicated stitch, but a new surface? This month, I want you to put your fabric aside and pick up a piece of paper.
Paper invites a different kind of creativity. It’s crisp, it holds a line, and it allows you to combine the softness of thread with the structure of collage, folding, and cutting. You don’t need to change your stitching style; you just need to change your canvas. This shift in material will sharpen your eye for composition and texture in ways that fabric alone cannot.
These techniques aren’t about replacing your love for textile embroidery. They are about expanding it. Think of this as a creative retreat for your hands and your mind—a way to see your threads in a new light, create stunning mixed-media pieces, and return to your fabric work with a renewed sense of confidence and artistic clarity.
1. Celestial Cardstock Embroidery
Trade your fabric for heavy cardstock to create embroidery with unmatched sharpness and precision.
Use a piercing tool or a large needle to pre-punch holes along your design before you begin stitching.
This prevents the paper from tearing and ensures each stitch is clean and uniform.
For celestial designs, pair high-contrast paper with metallic threads—the shimmer creates a striking visual against a matte, dark background, offering a level of graphic crispness that soft fabric cannot replicate.
This technique is perfect for creating zodiac-inspired embroidery patterns or geometric art.
2. Woven Paper & Thread Tapestry
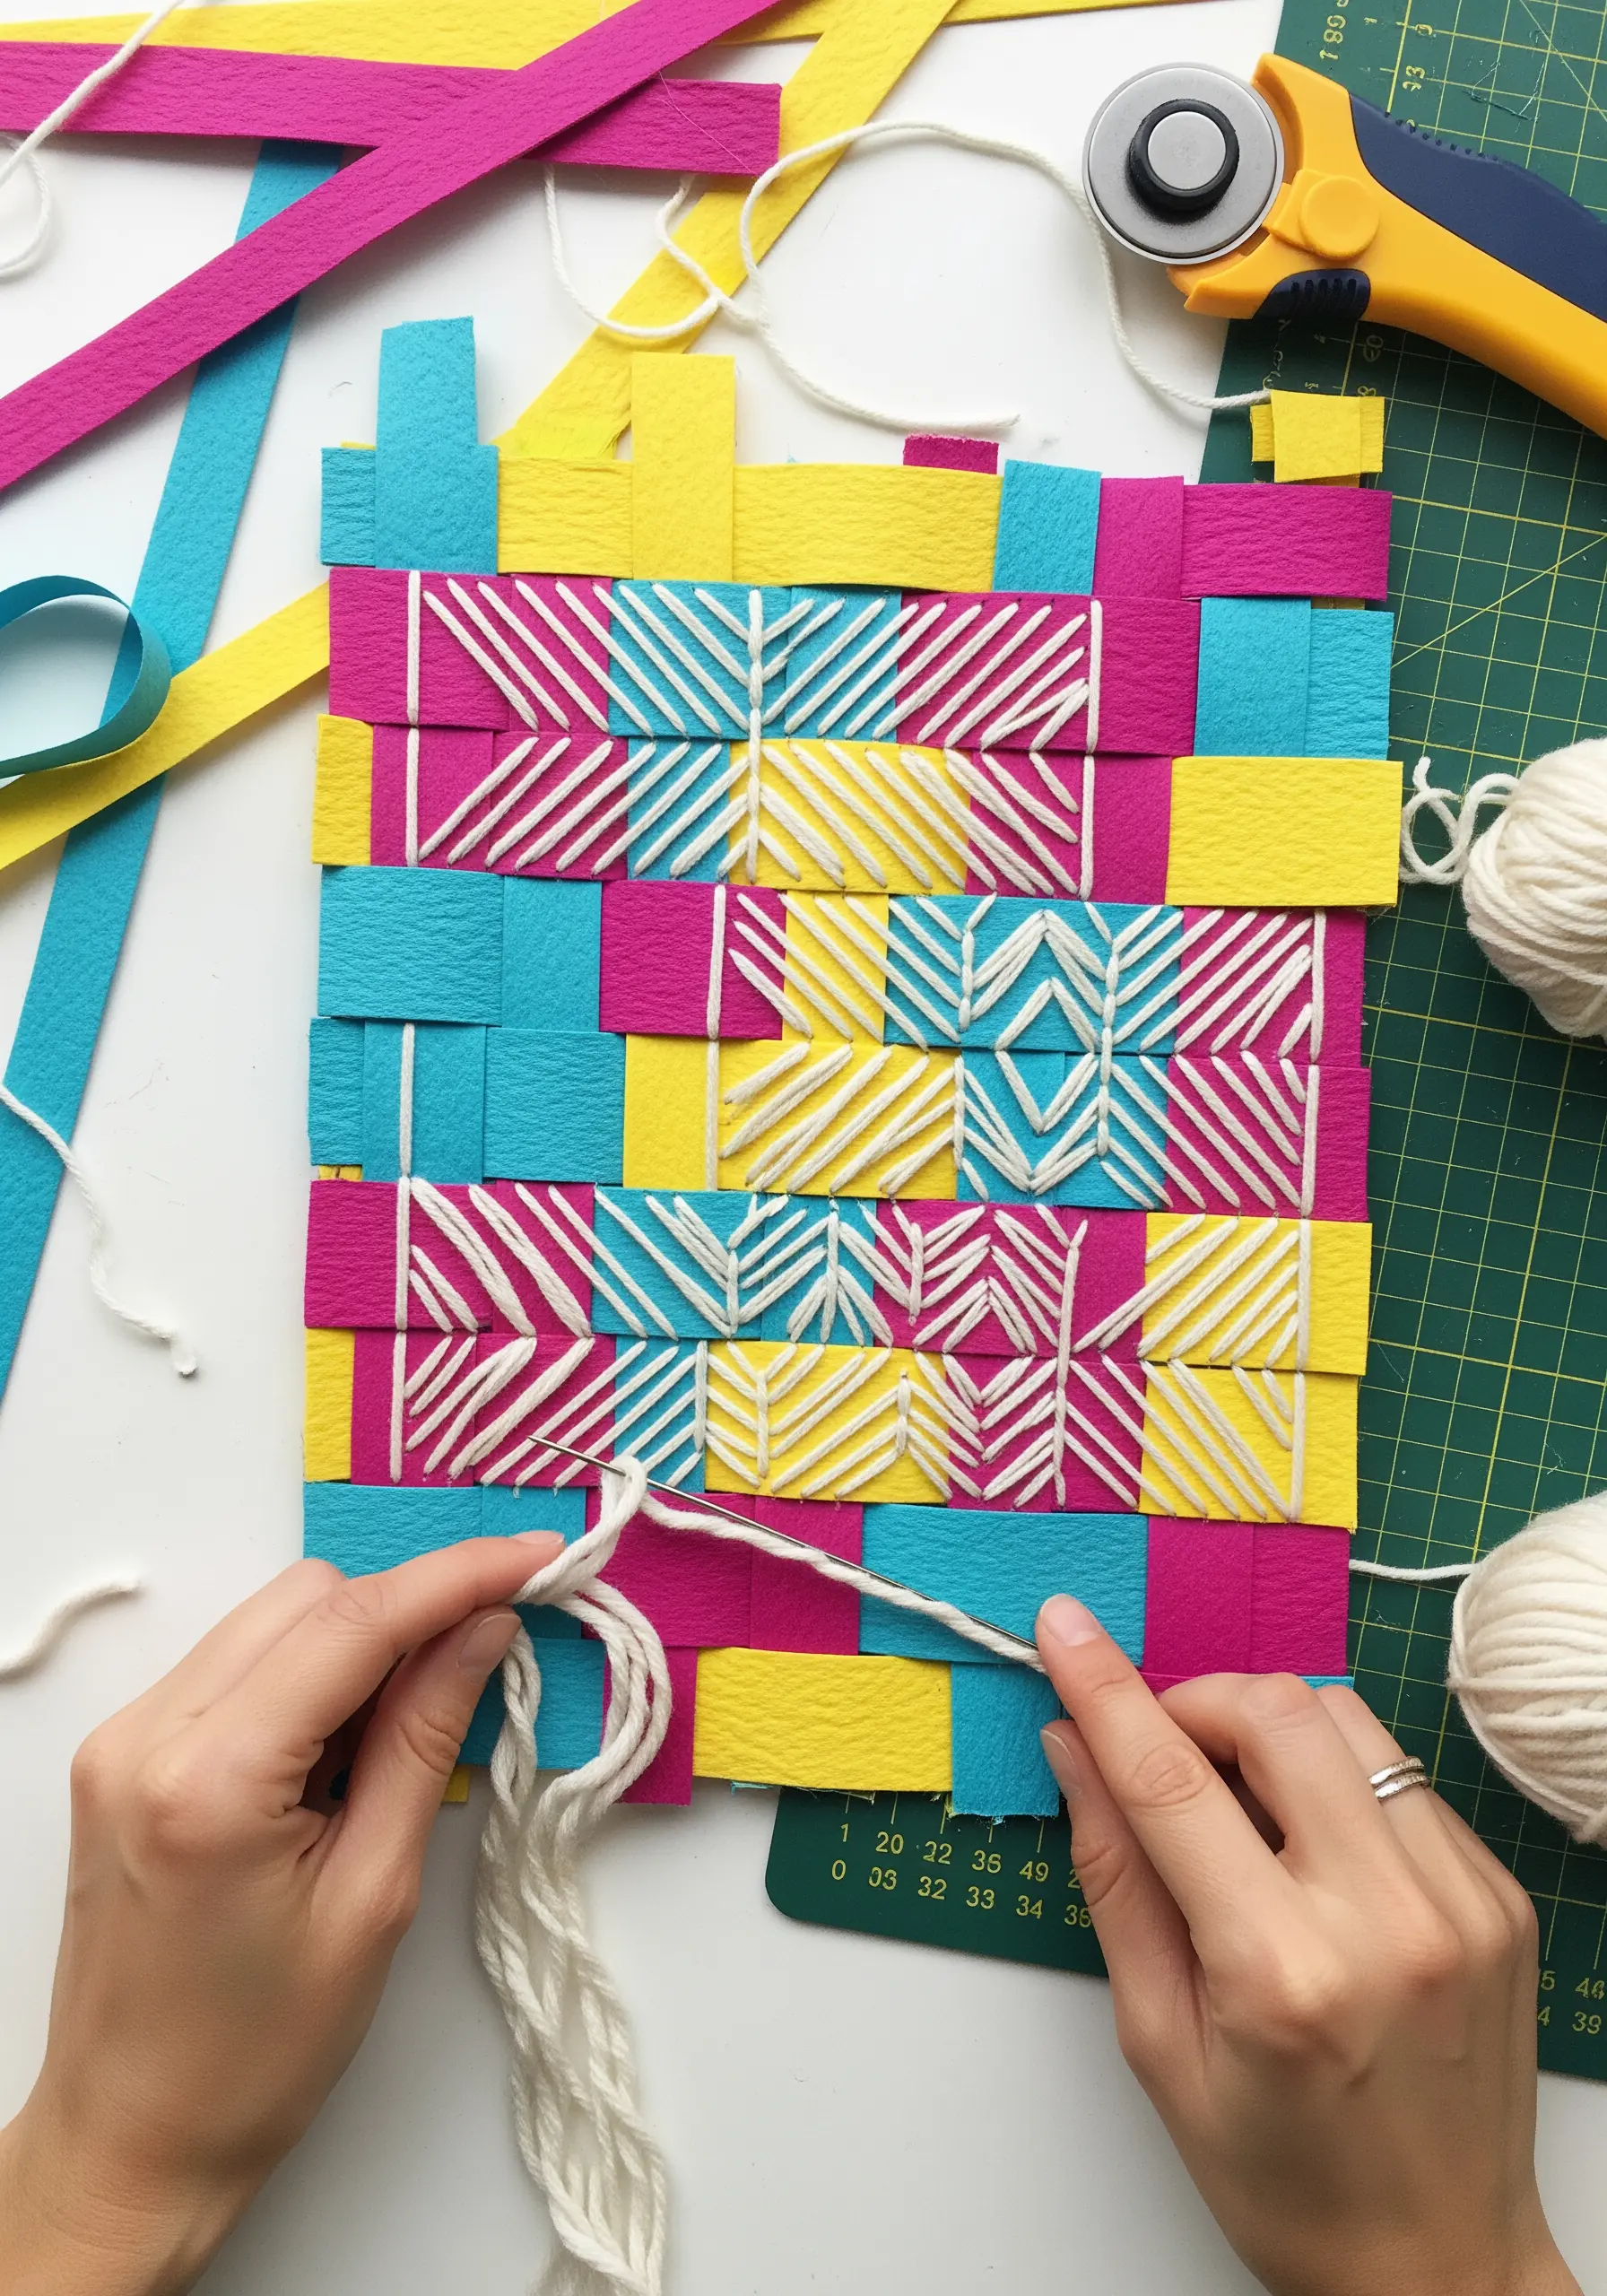
Combine paper weaving and embroidery to build a base full of texture and color from the very start.
First, weave strips of colored cardstock to create a sturdy, grid-like canvas.
Then, use that woven structure as a guide for your stitching, treating the paper intersections like the grid of Aida cloth.
Use a thick yarn or multiple strands of floss to couch, wrap, or weave through the paper, adding a soft, dimensional layer that contrasts beautifully with the flat, graphic paper strips.
3. Layered Paper & Stitch Collage
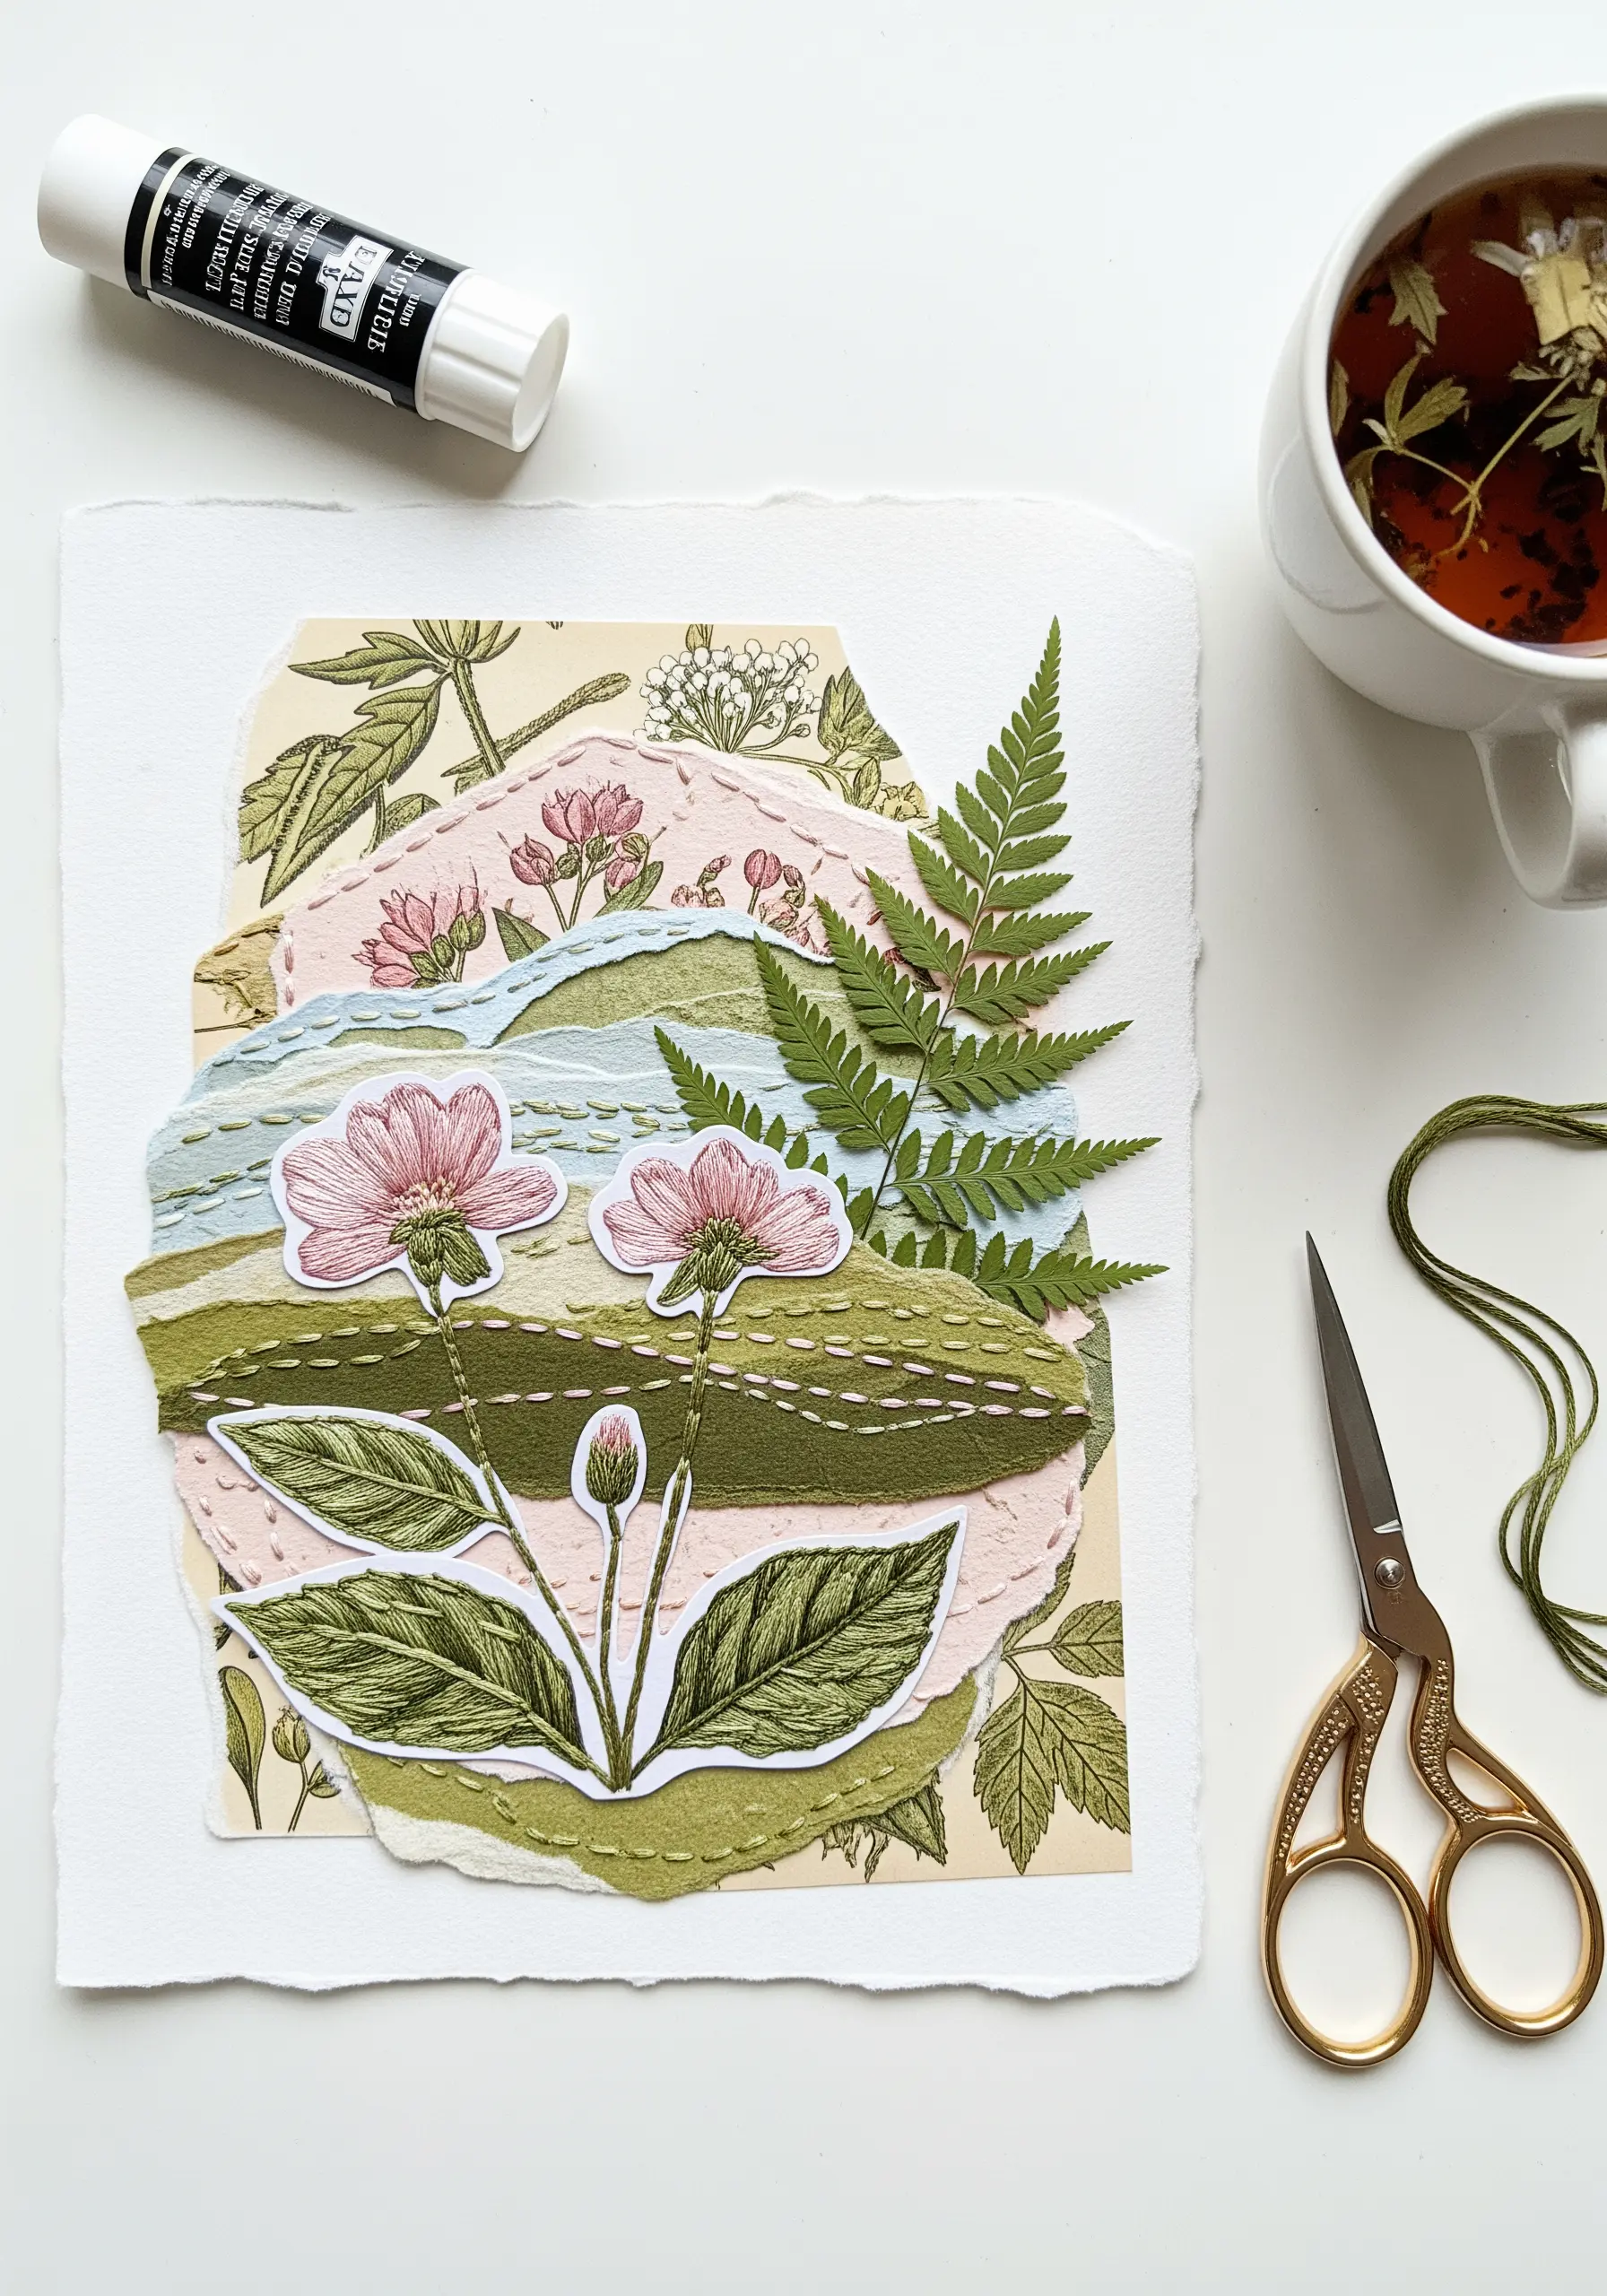
Use thread as a unifying element in a mixed-media paper collage.
Start by arranging torn paper, vintage illustrations, or other ephemera to build your composition.
Instead of relying solely on glue, use a simple running stitch to connect the different layers, creating both a physical bond and a visual path for the eye to follow.
The stitches add a subtle, handmade texture that transforms disparate elements into a cohesive piece of art, making it one of the most effective DIY collage techniques for storytelling.
4. Suspended Origami with Beaded Threads
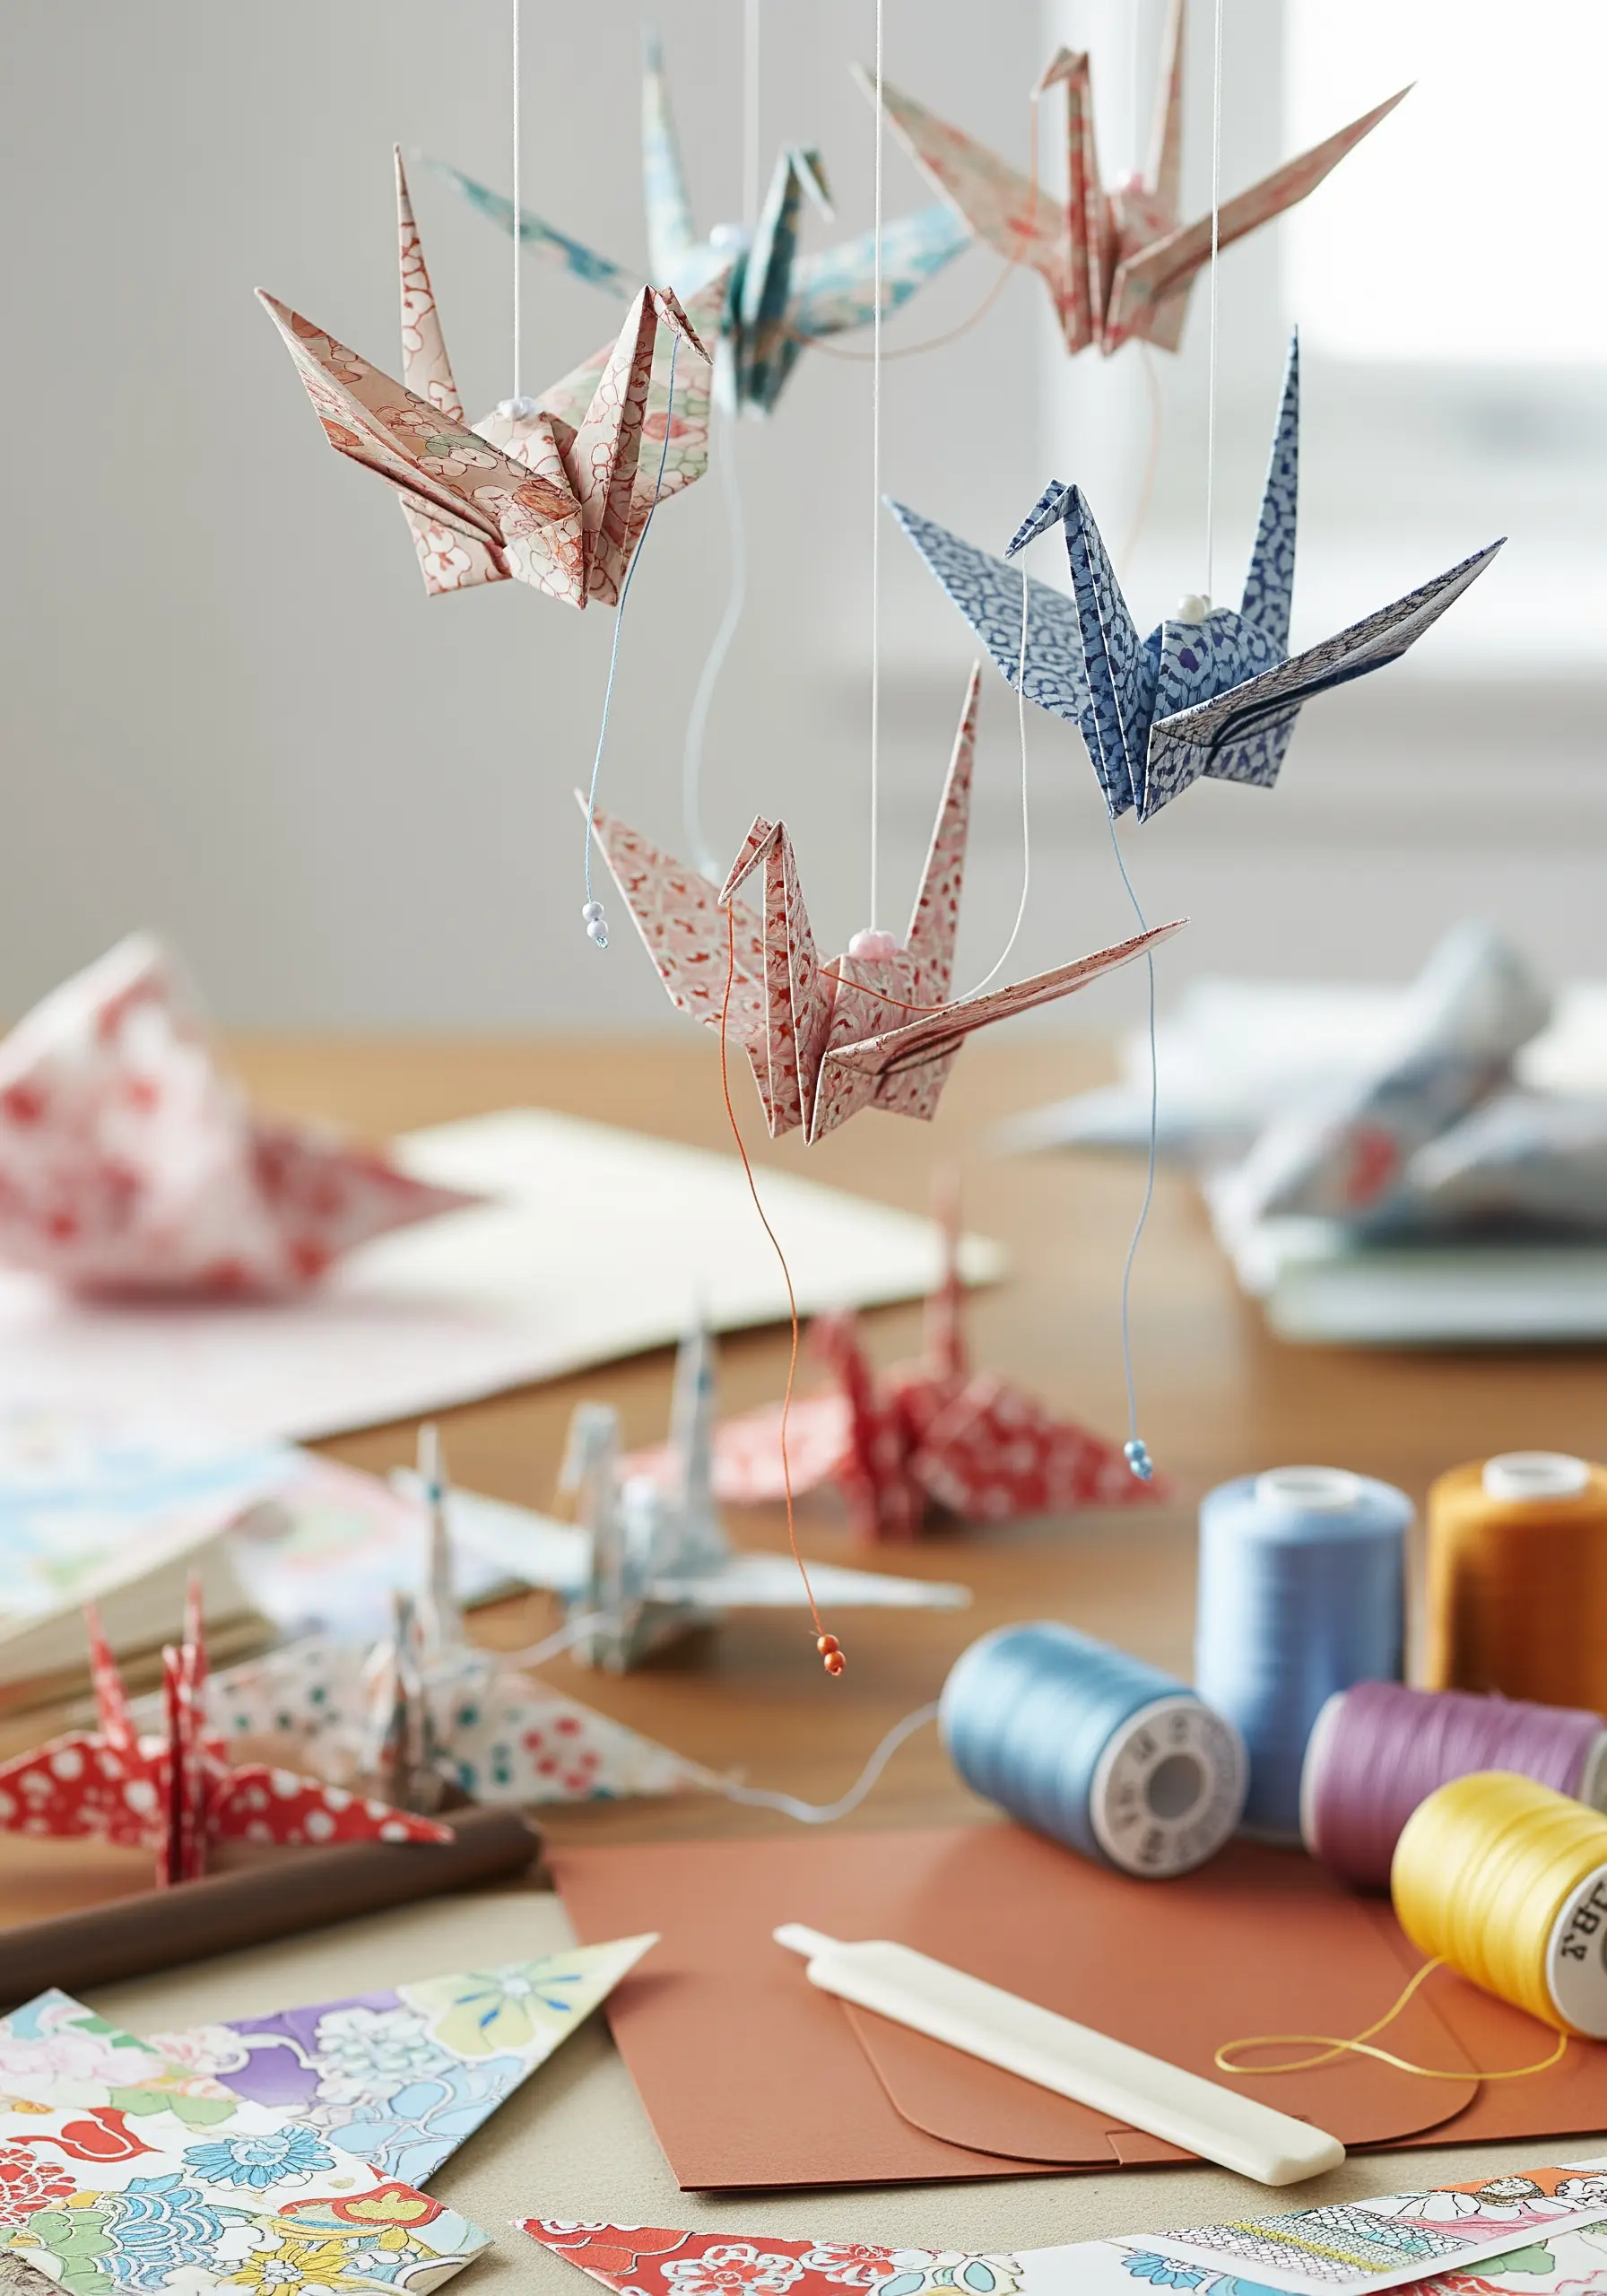
Elevate a classic origami mobile by focusing on the finishing details.
Instead of using generic string, suspend your folded paper cranes with high-quality embroidery thread that complements the colors of your paper.
Thread a single, small glass bead onto the end of each strand before knotting it inside the origami form.
This tiny addition acts as a weight, helping the mobile hang straight and catch the light, turning a simple craft into a piece of refined handmade wall art.
5. Quilling with a Stitched Frame

Create a visual boundary for your paper quilling by adding a delicate, hand-stitched border.
After your quilled design is glued to the paper, use a simple backstitch or seed stitch to create a circle or square frame around it.
This embroidered line contains the visual energy of the 3D quilling and integrates it more smoothly with the flat paper background.
It’s a subtle touch that adds a layer of sophistication and craftsmanship.
6. Papercut Art with Thread Highlights
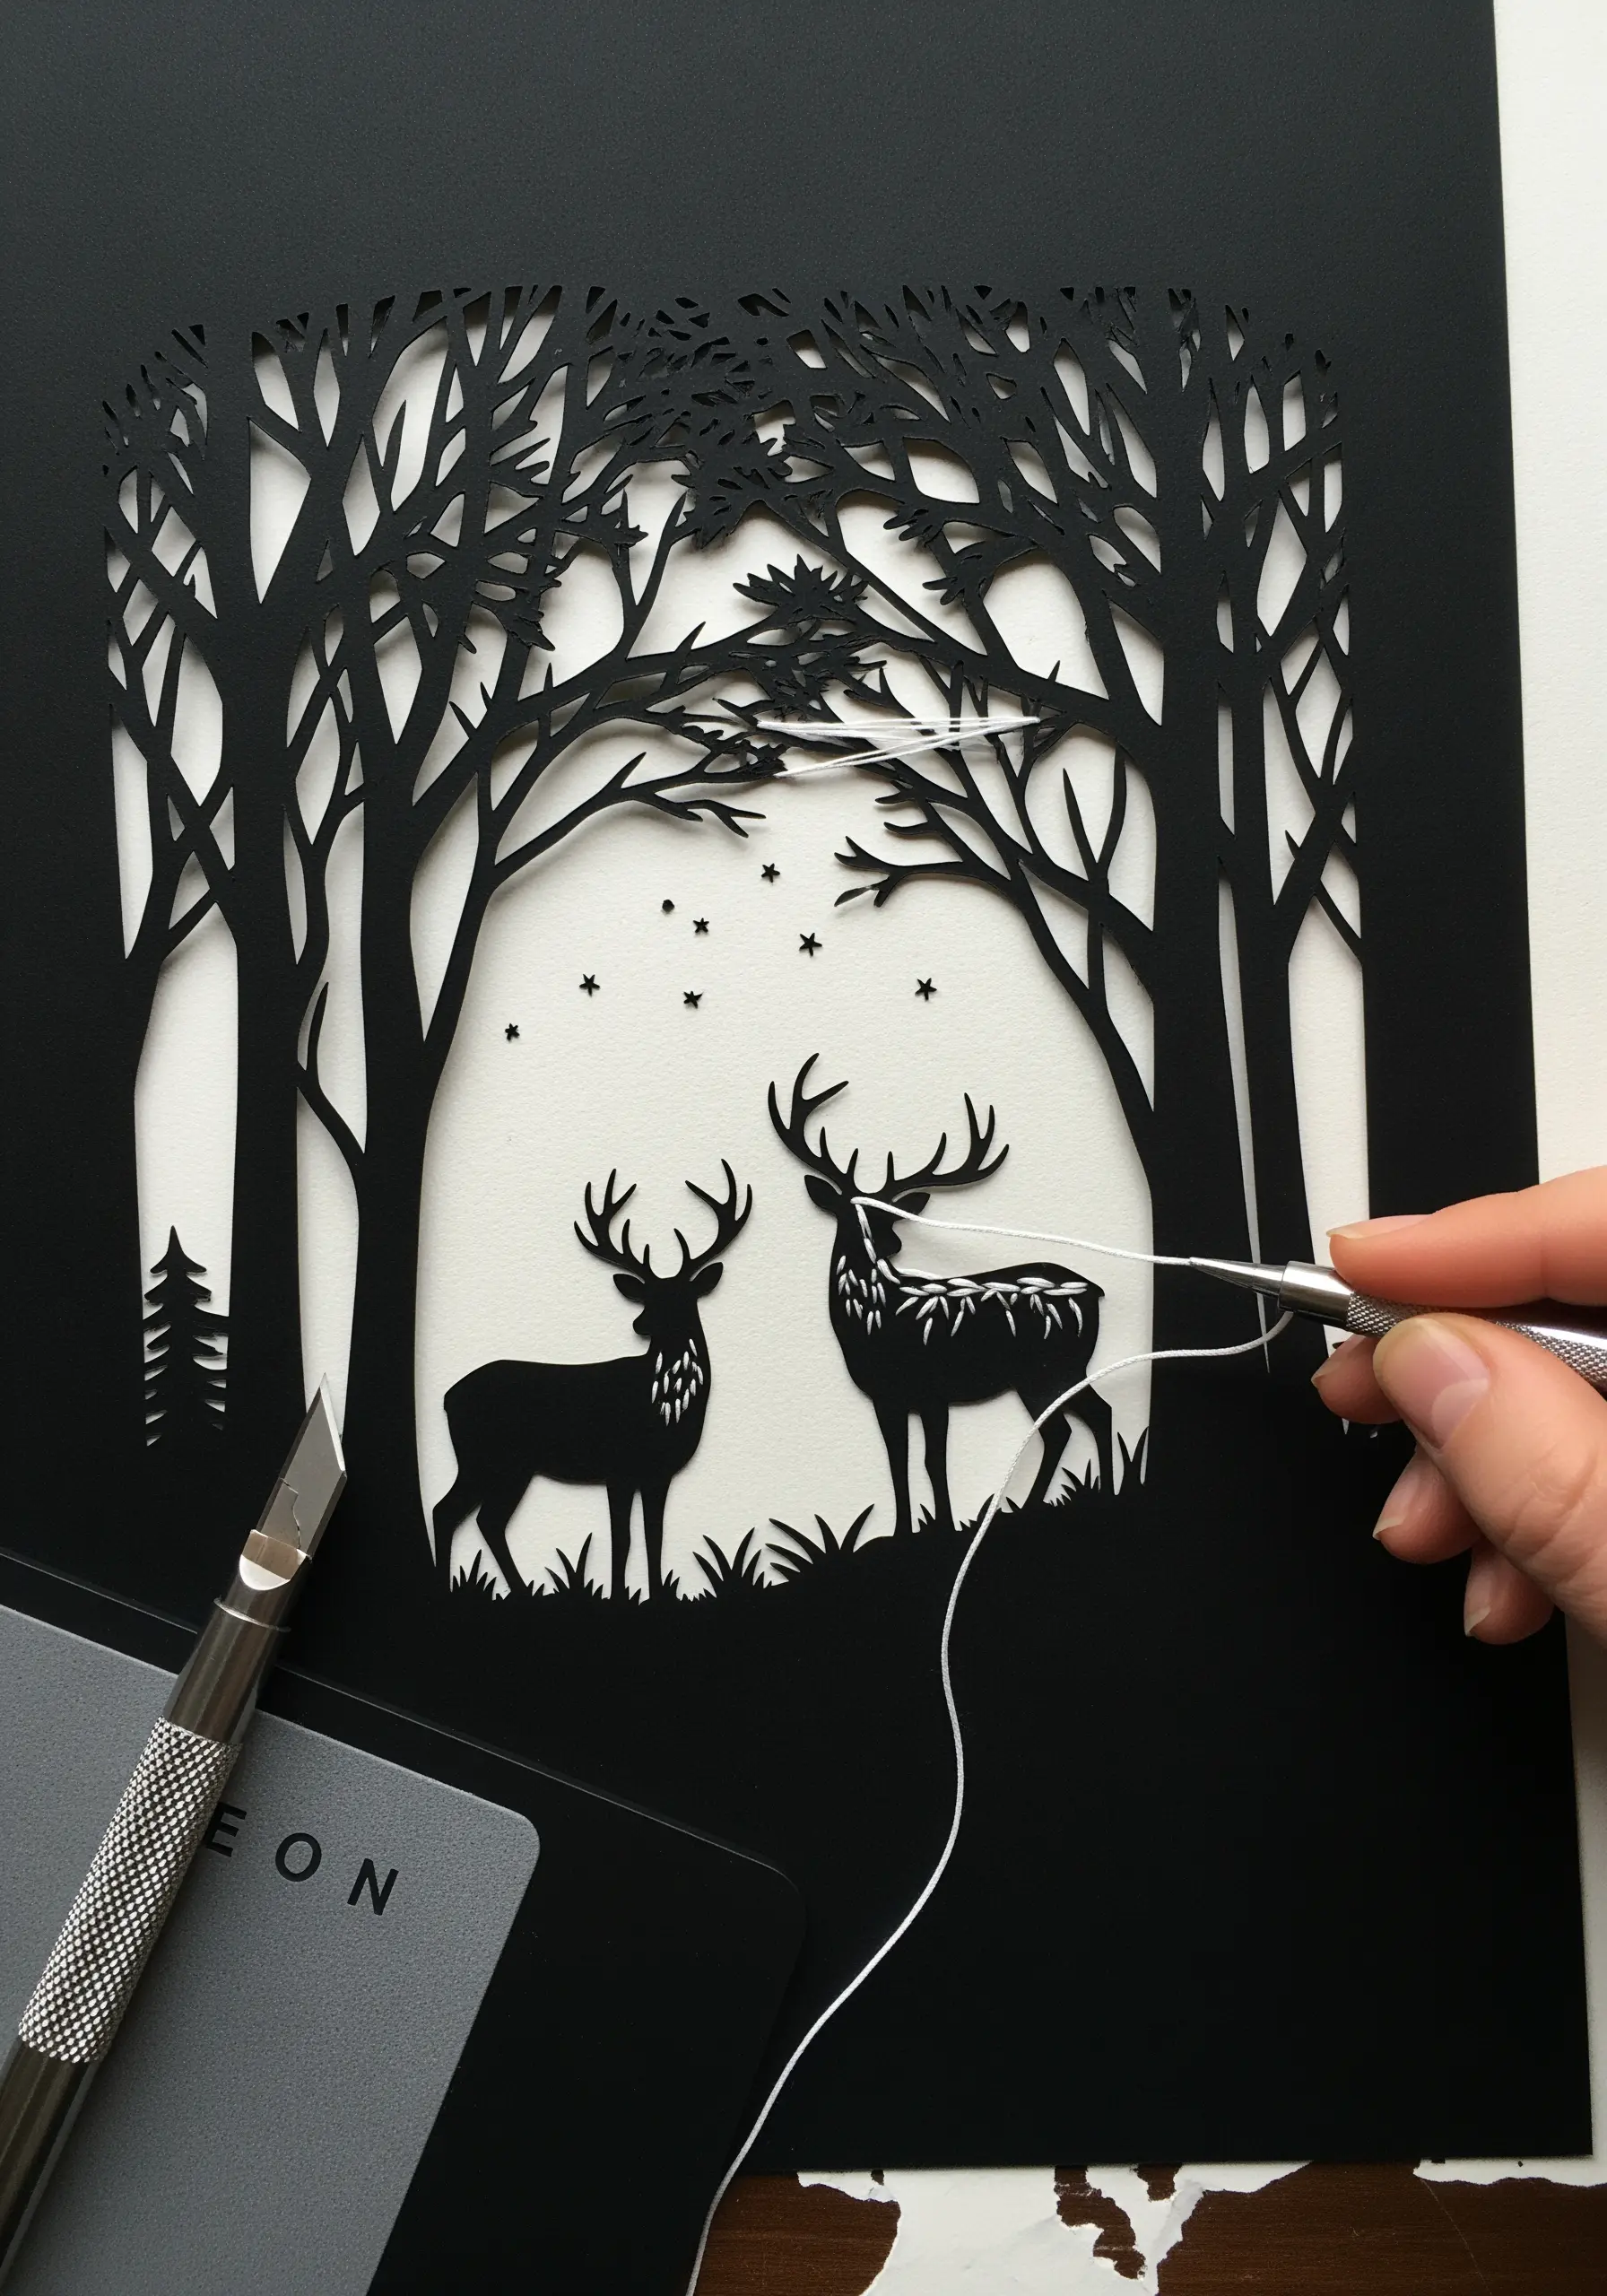
Introduce softness and subtle detail to sharp papercut art by strategically replacing cut lines with stitches.
For intricate silhouettes, like the branches of a tree or the antlers of a deer, use a single strand of contrasting thread to add fine details.
This hybrid approach allows you to create texture that paper alone cannot achieve, blending the crispness of the blade with the delicate touch of the needle.
It’s an ideal way to make statement embroidery pieces with a unique graphic quality.
7. Stitching on an Embossed Surface

Use embossed paper to create a textured guide for your embroidery.
Run a sheet of heavy cardstock through an embossing machine with a geometric folder.
The raised and recessed pattern provides a perfect template for stitching—you can trace the lines with a backstitch or fill the shapes with satin stitch.
This technique creates a wonderfully tactile piece where the texture of the paper and the thread work together.
8. Photo Embroidery for Mixed-Media Portraits

Transform a simple photograph into a captivating piece of art by adding embroidered elements.
Print a photo on heavy matte paper, which is sturdy enough to withstand needle piercing.
Use vibrant threads to stitch details directly onto the image—a floral crown, a patterned collar, or abstract accents.
The contrast between the flat photograph and the dimensional, colorful thread creates a stunning, surreal effect that draws the viewer in.
9. Botanical Journaling with Binding Stitches
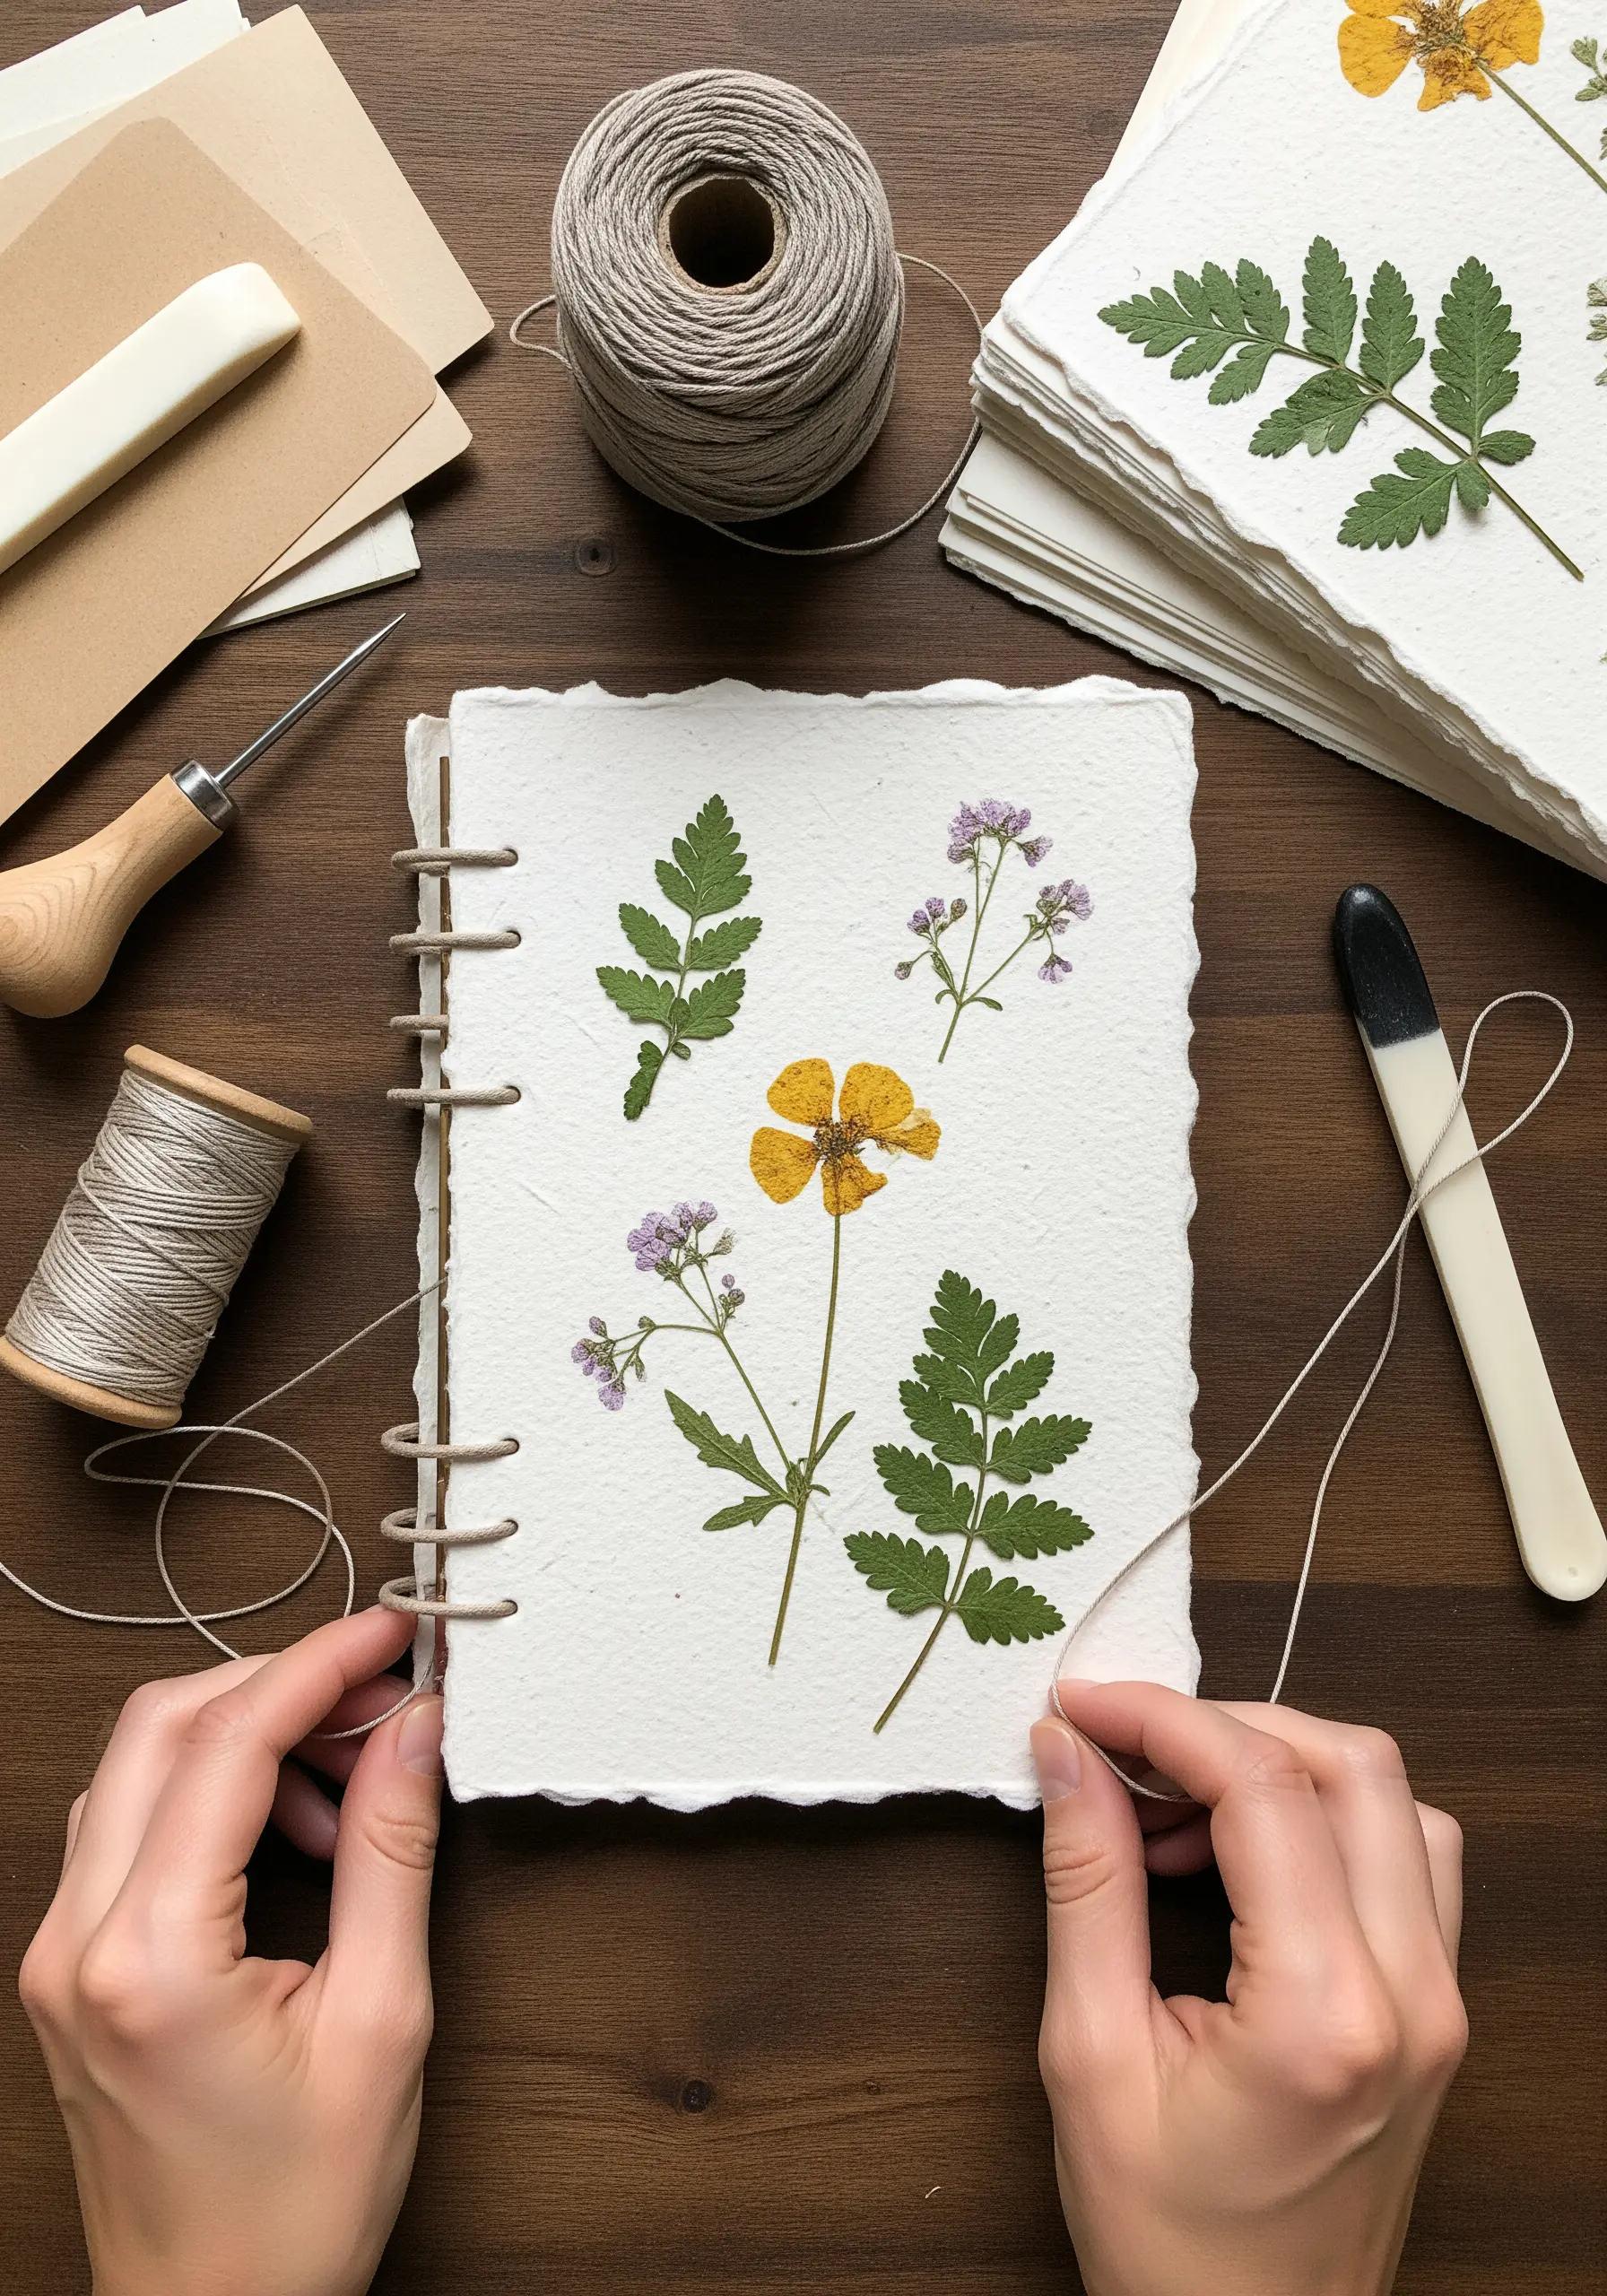
Integrate nature directly into your handmade books by using binding stitches to secure pressed botanicals.
When assembling your journal, lay pressed flowers or leaves onto the cover or pages.
Then, use a pamphlet stitch or Coptic binding, carefully looping the thread over the delicate stems to hold them in place.
The binding becomes both functional and decorative, framing the natural elements beautifully.
10. Layered Vellum & Ethereal Stitches
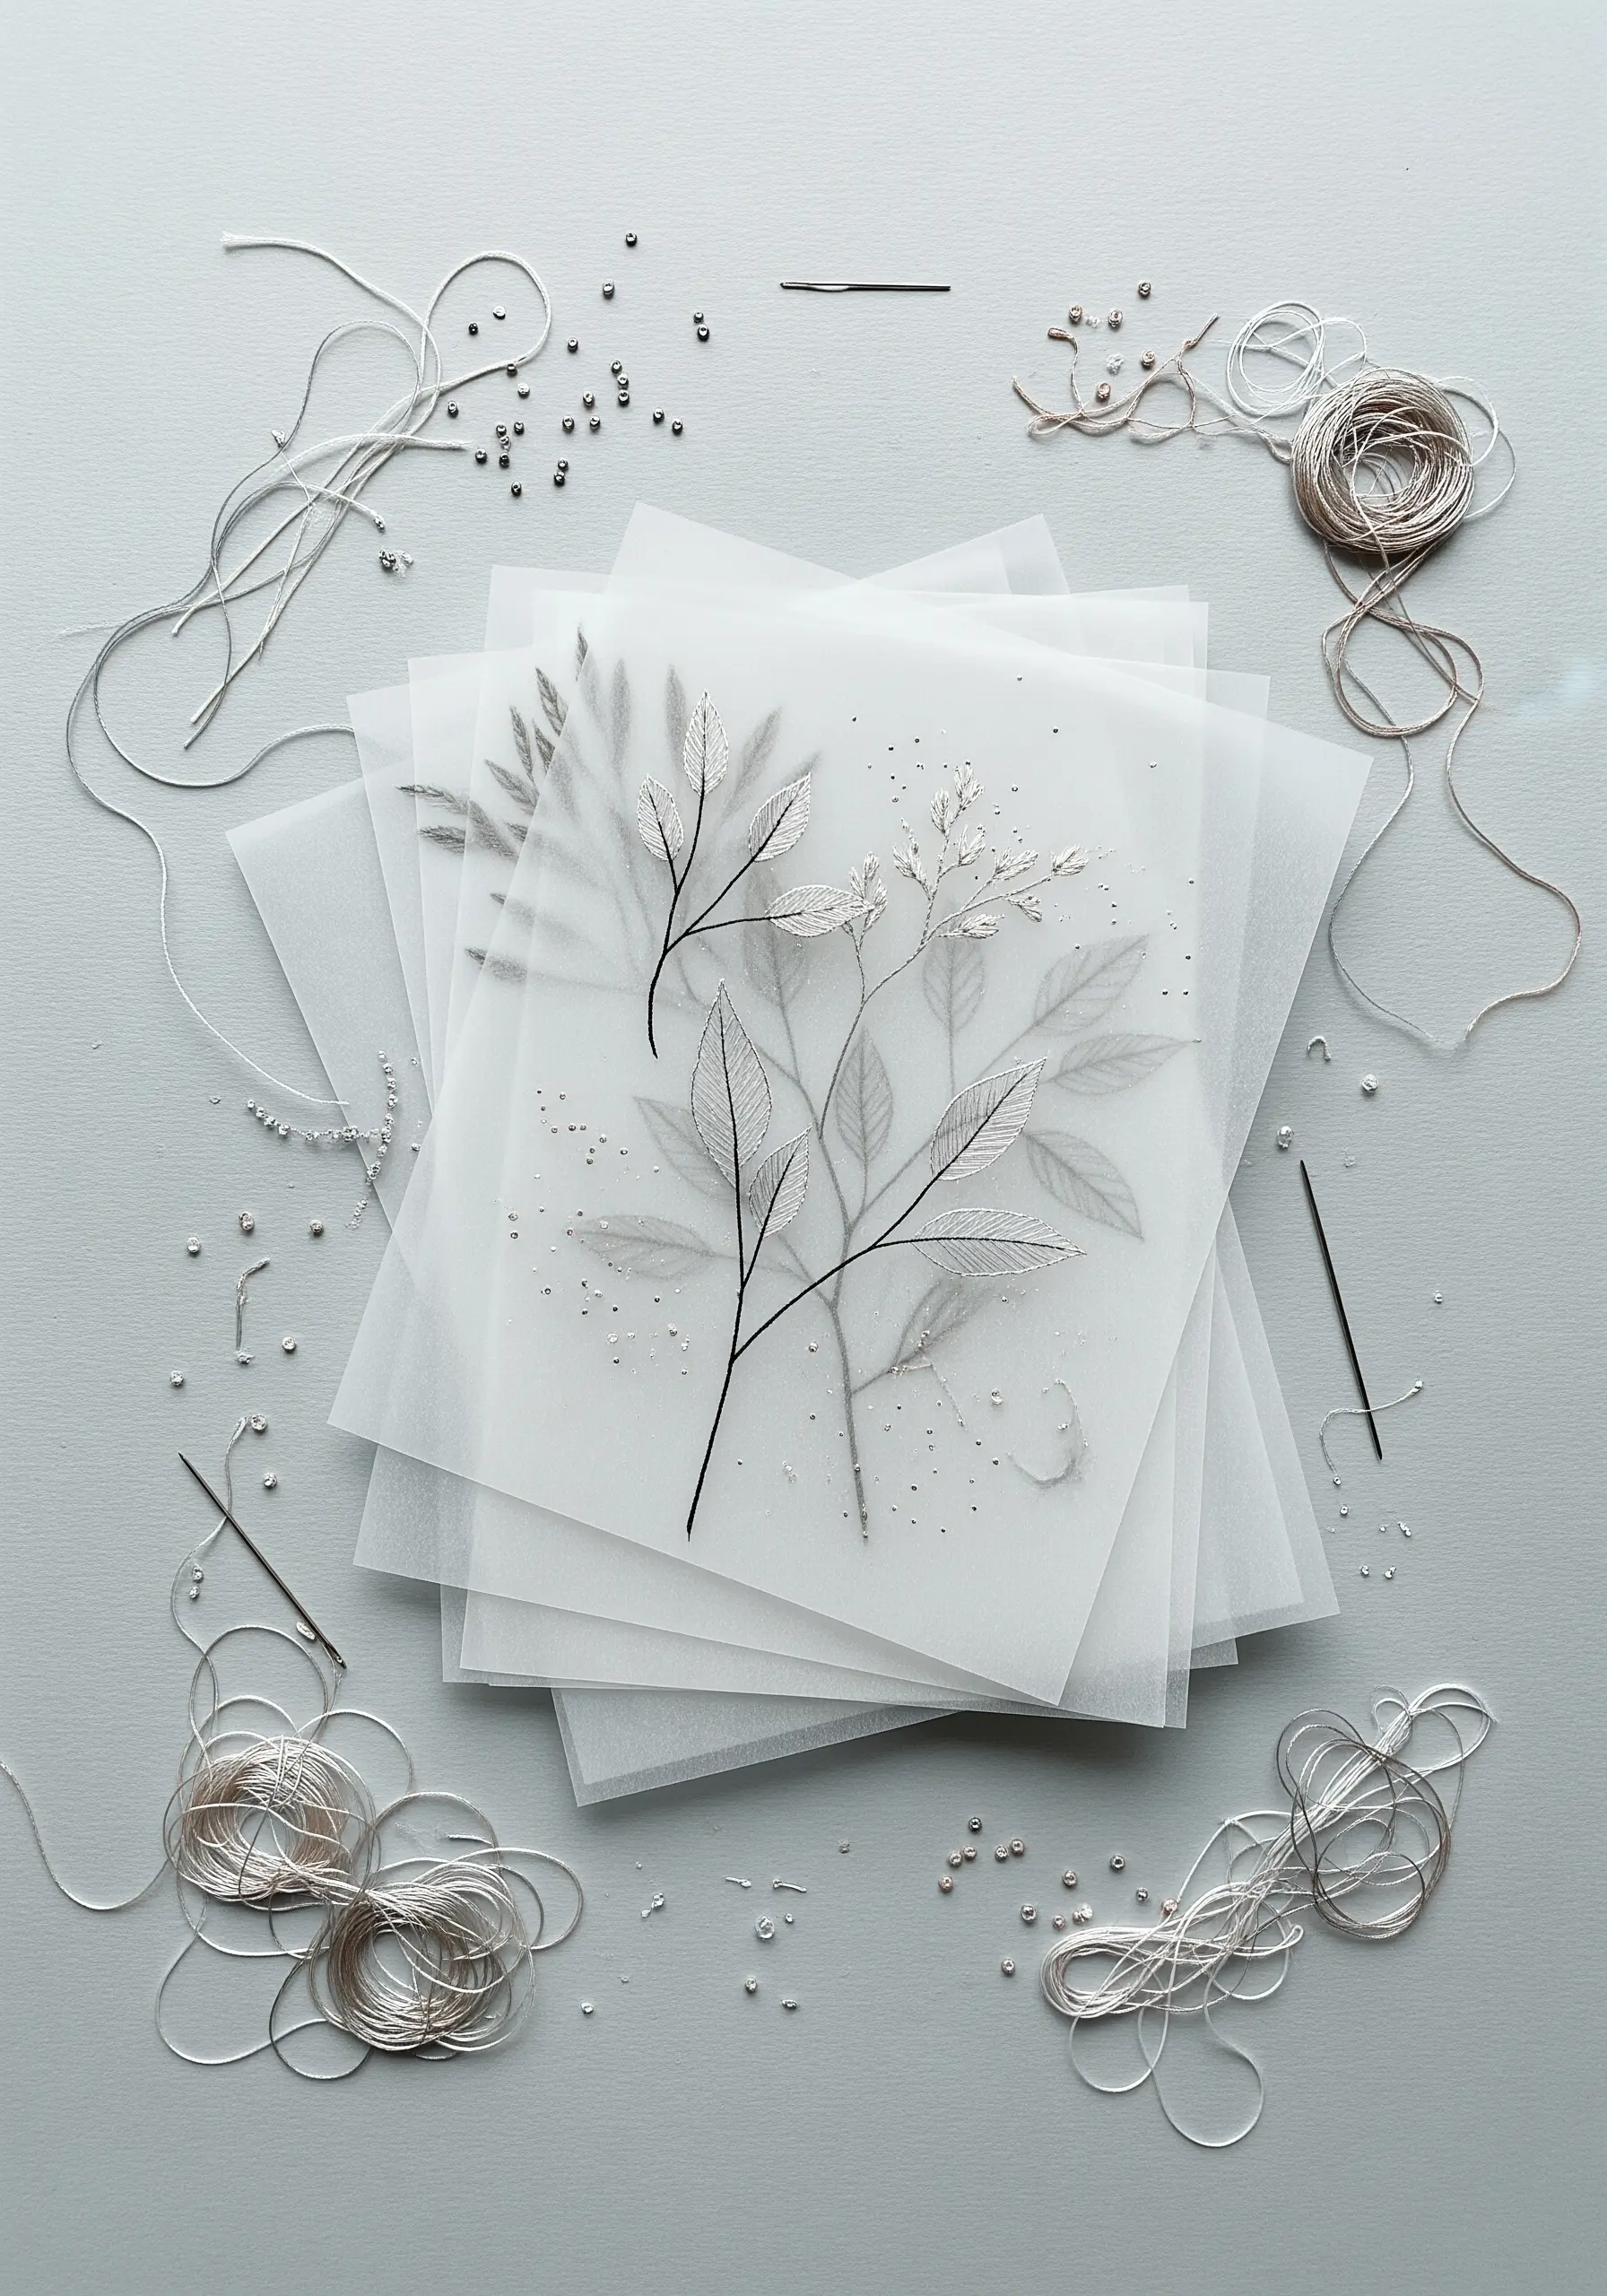
Embroider on semi-translucent vellum to create art that plays with light and layering.
Use a fine, single strand of white, silver, or pale-colored thread to stitch delicate botanical or geometric designs.
The translucency of the vellum softens the stitches, giving them a ghostly, ethereal quality.
For added depth, stack multiple stitched sheets to create a composition that shifts and changes as the light hits it, making your embroidery look like floating art.
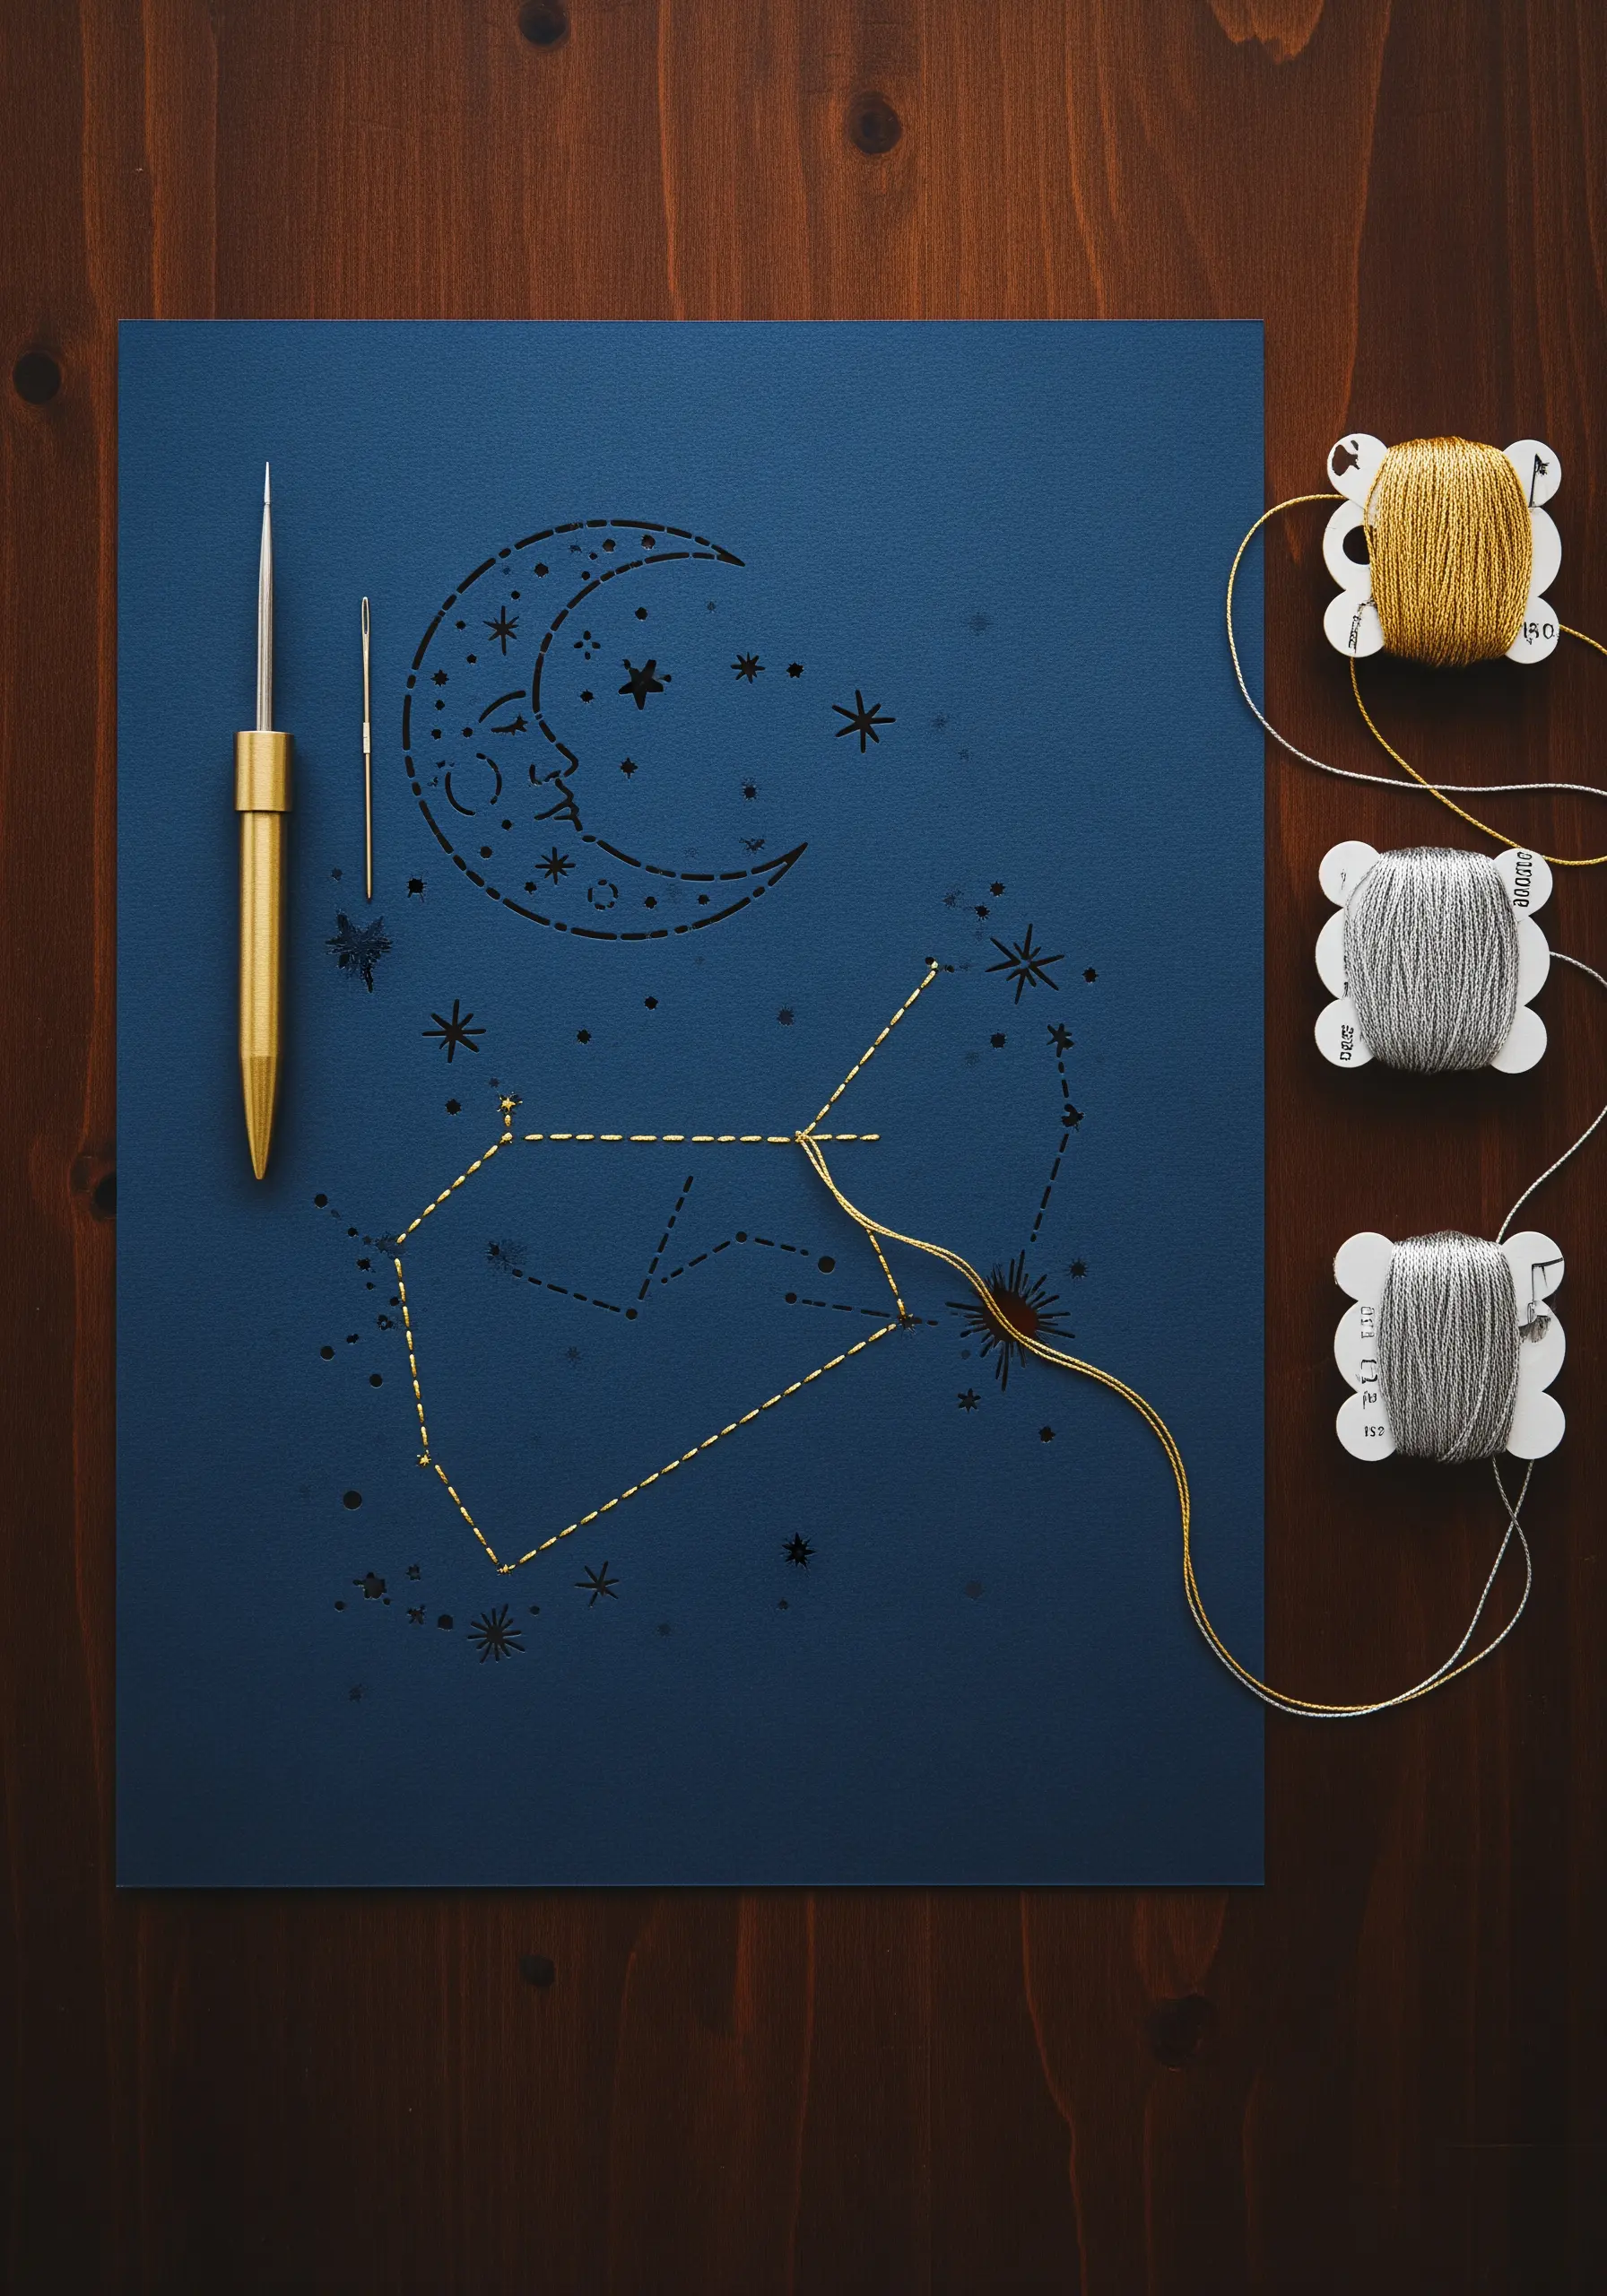
11. Constellation Maps with String Art Techniques
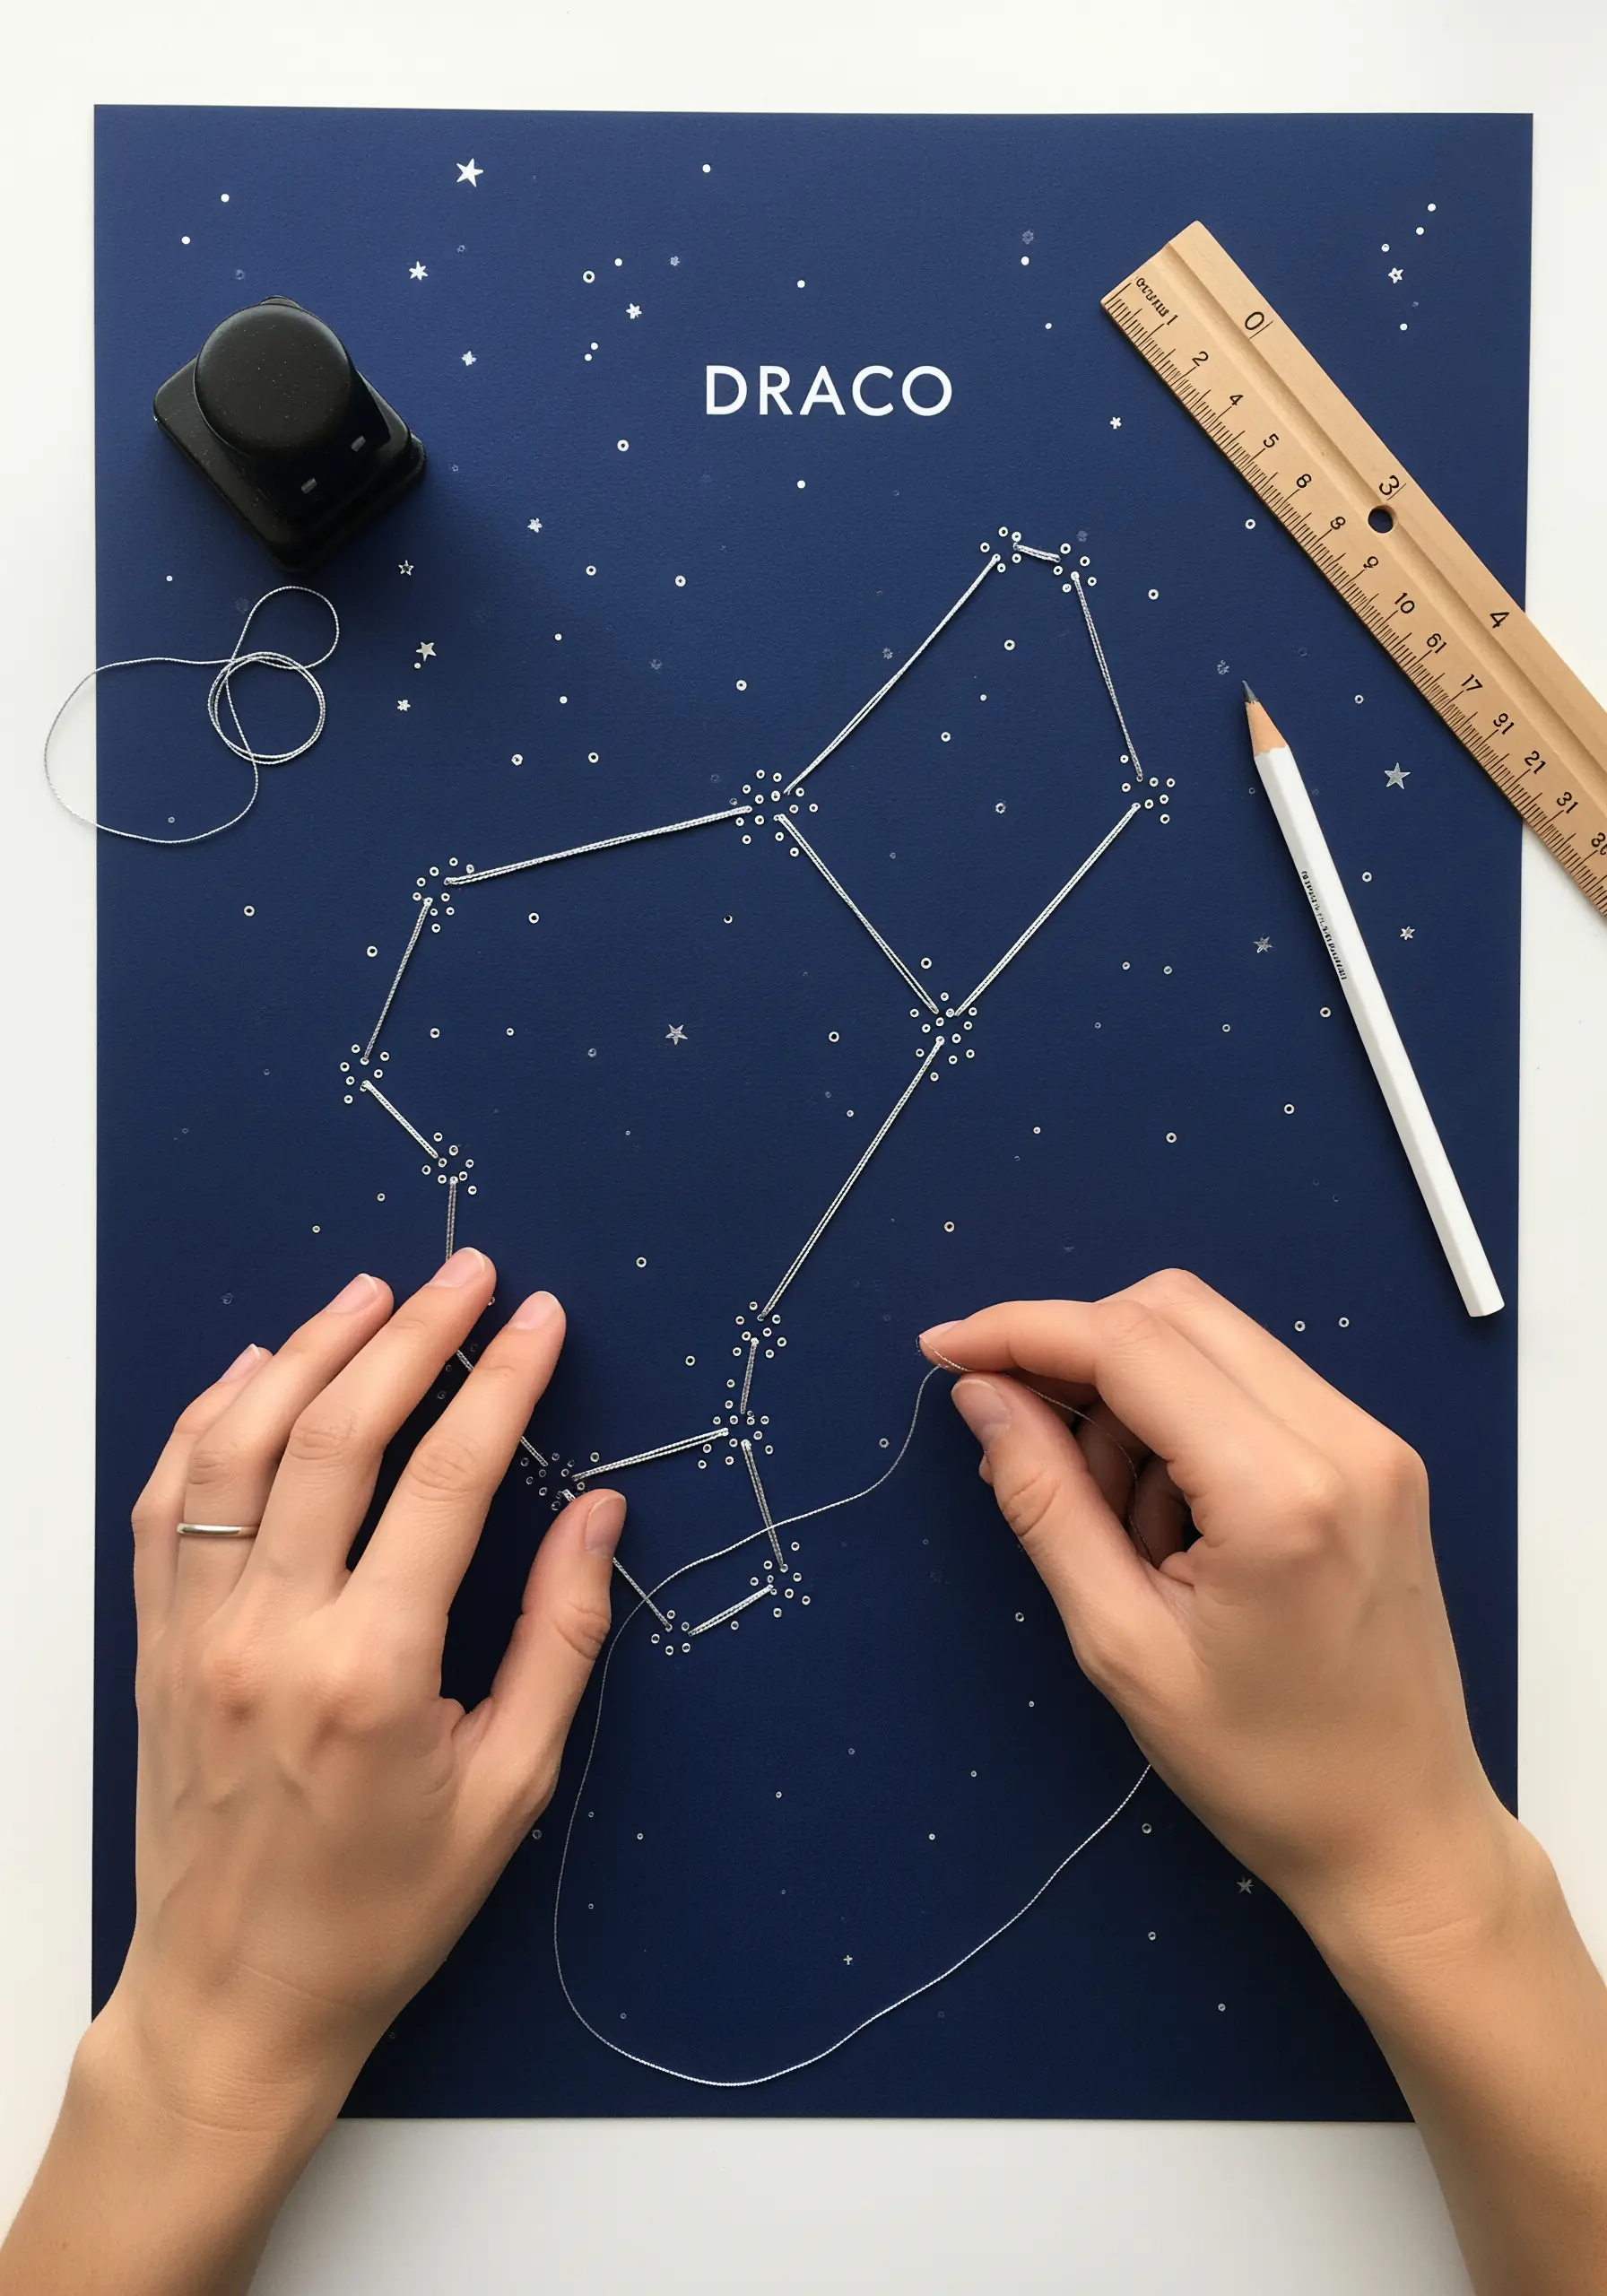
Use the principles of string art to create precise and graphic constellation maps.
On a piece of dark, heavy cardstock, mark the positions of the stars in a constellation and punch small, clean holes.
Then, using a single continuous strand of metallic or white thread, weave it from point to point, wrapping it around each hole to create tension.
This method produces incredibly sharp, straight lines that are perfect for abstract stitch maps and celestial designs.
12. Stitched Edging on Woven Paper
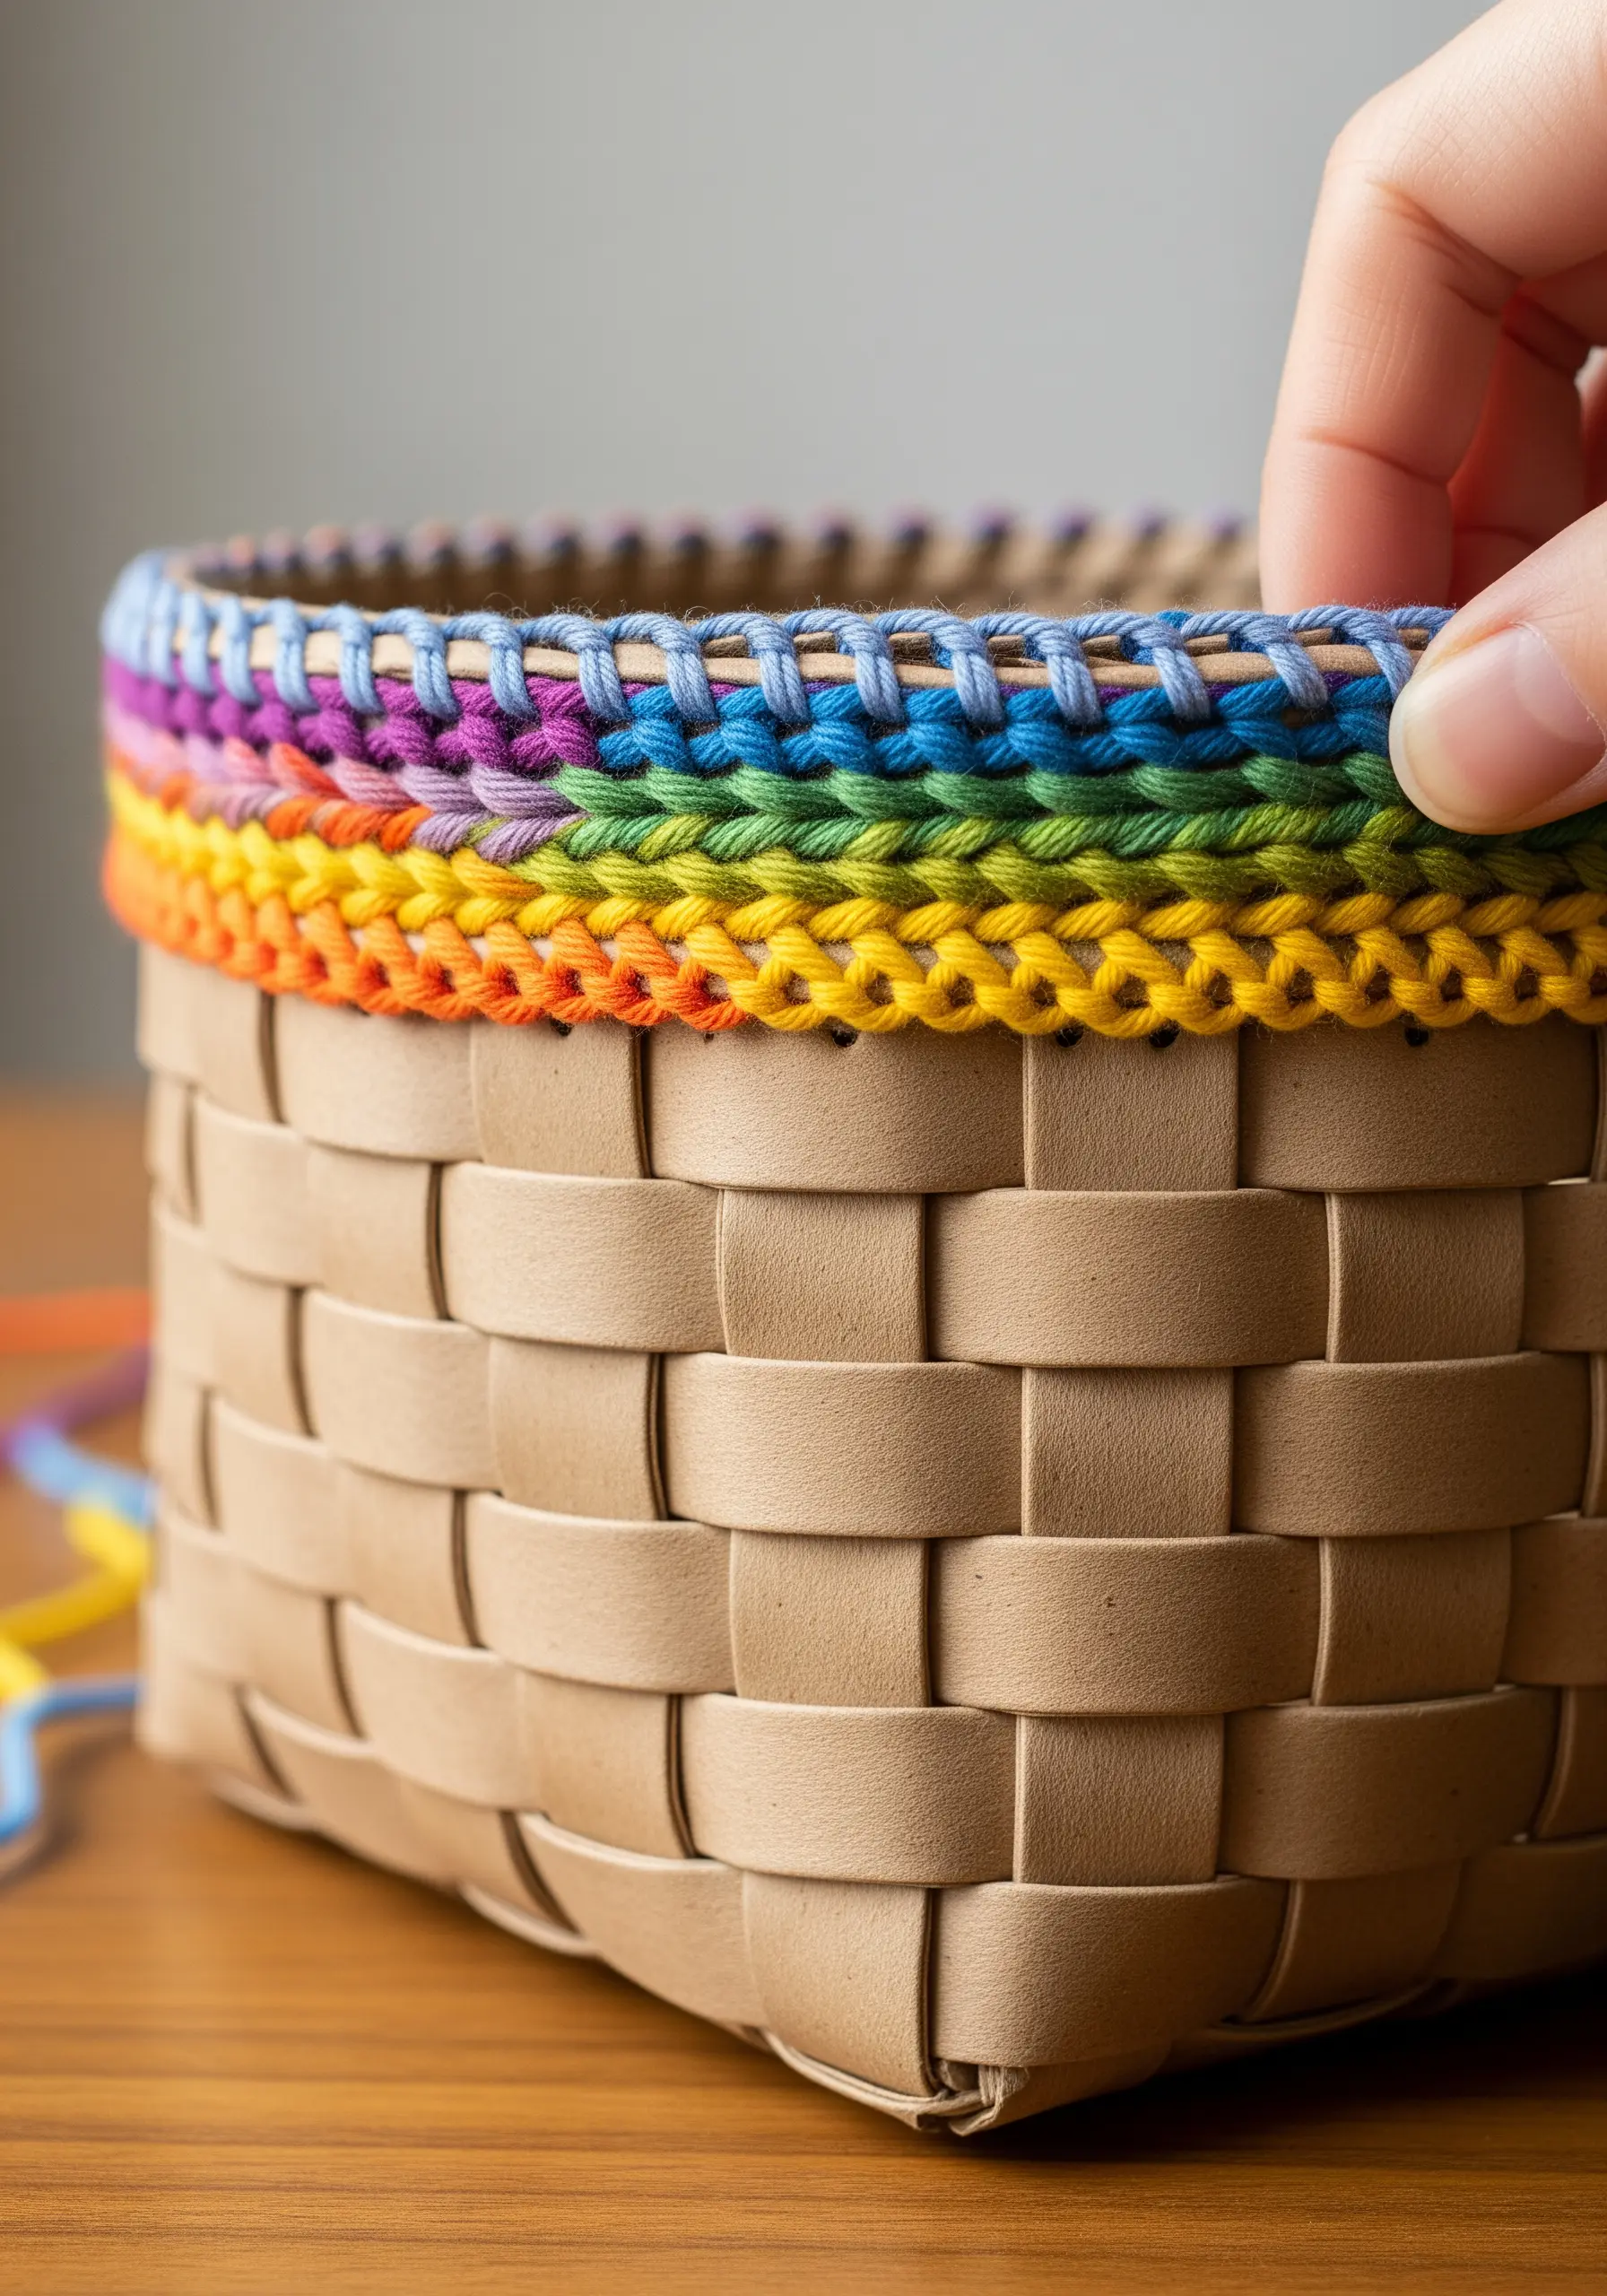
Add a polished, handcrafted finish to a simple woven paper basket with a decorative stitched edge.
Using colorful embroidery floss, work a blanket stitch or a simple wrapping stitch around the top rim of the basket.
This detail not only introduces color and soft texture but also structurally reinforces the paper’s edge, increasing its durability.
Try a rainbow gradient for a vibrant effect that elevates the entire piece.
13. Topographical Stitching on Crumpled Paper
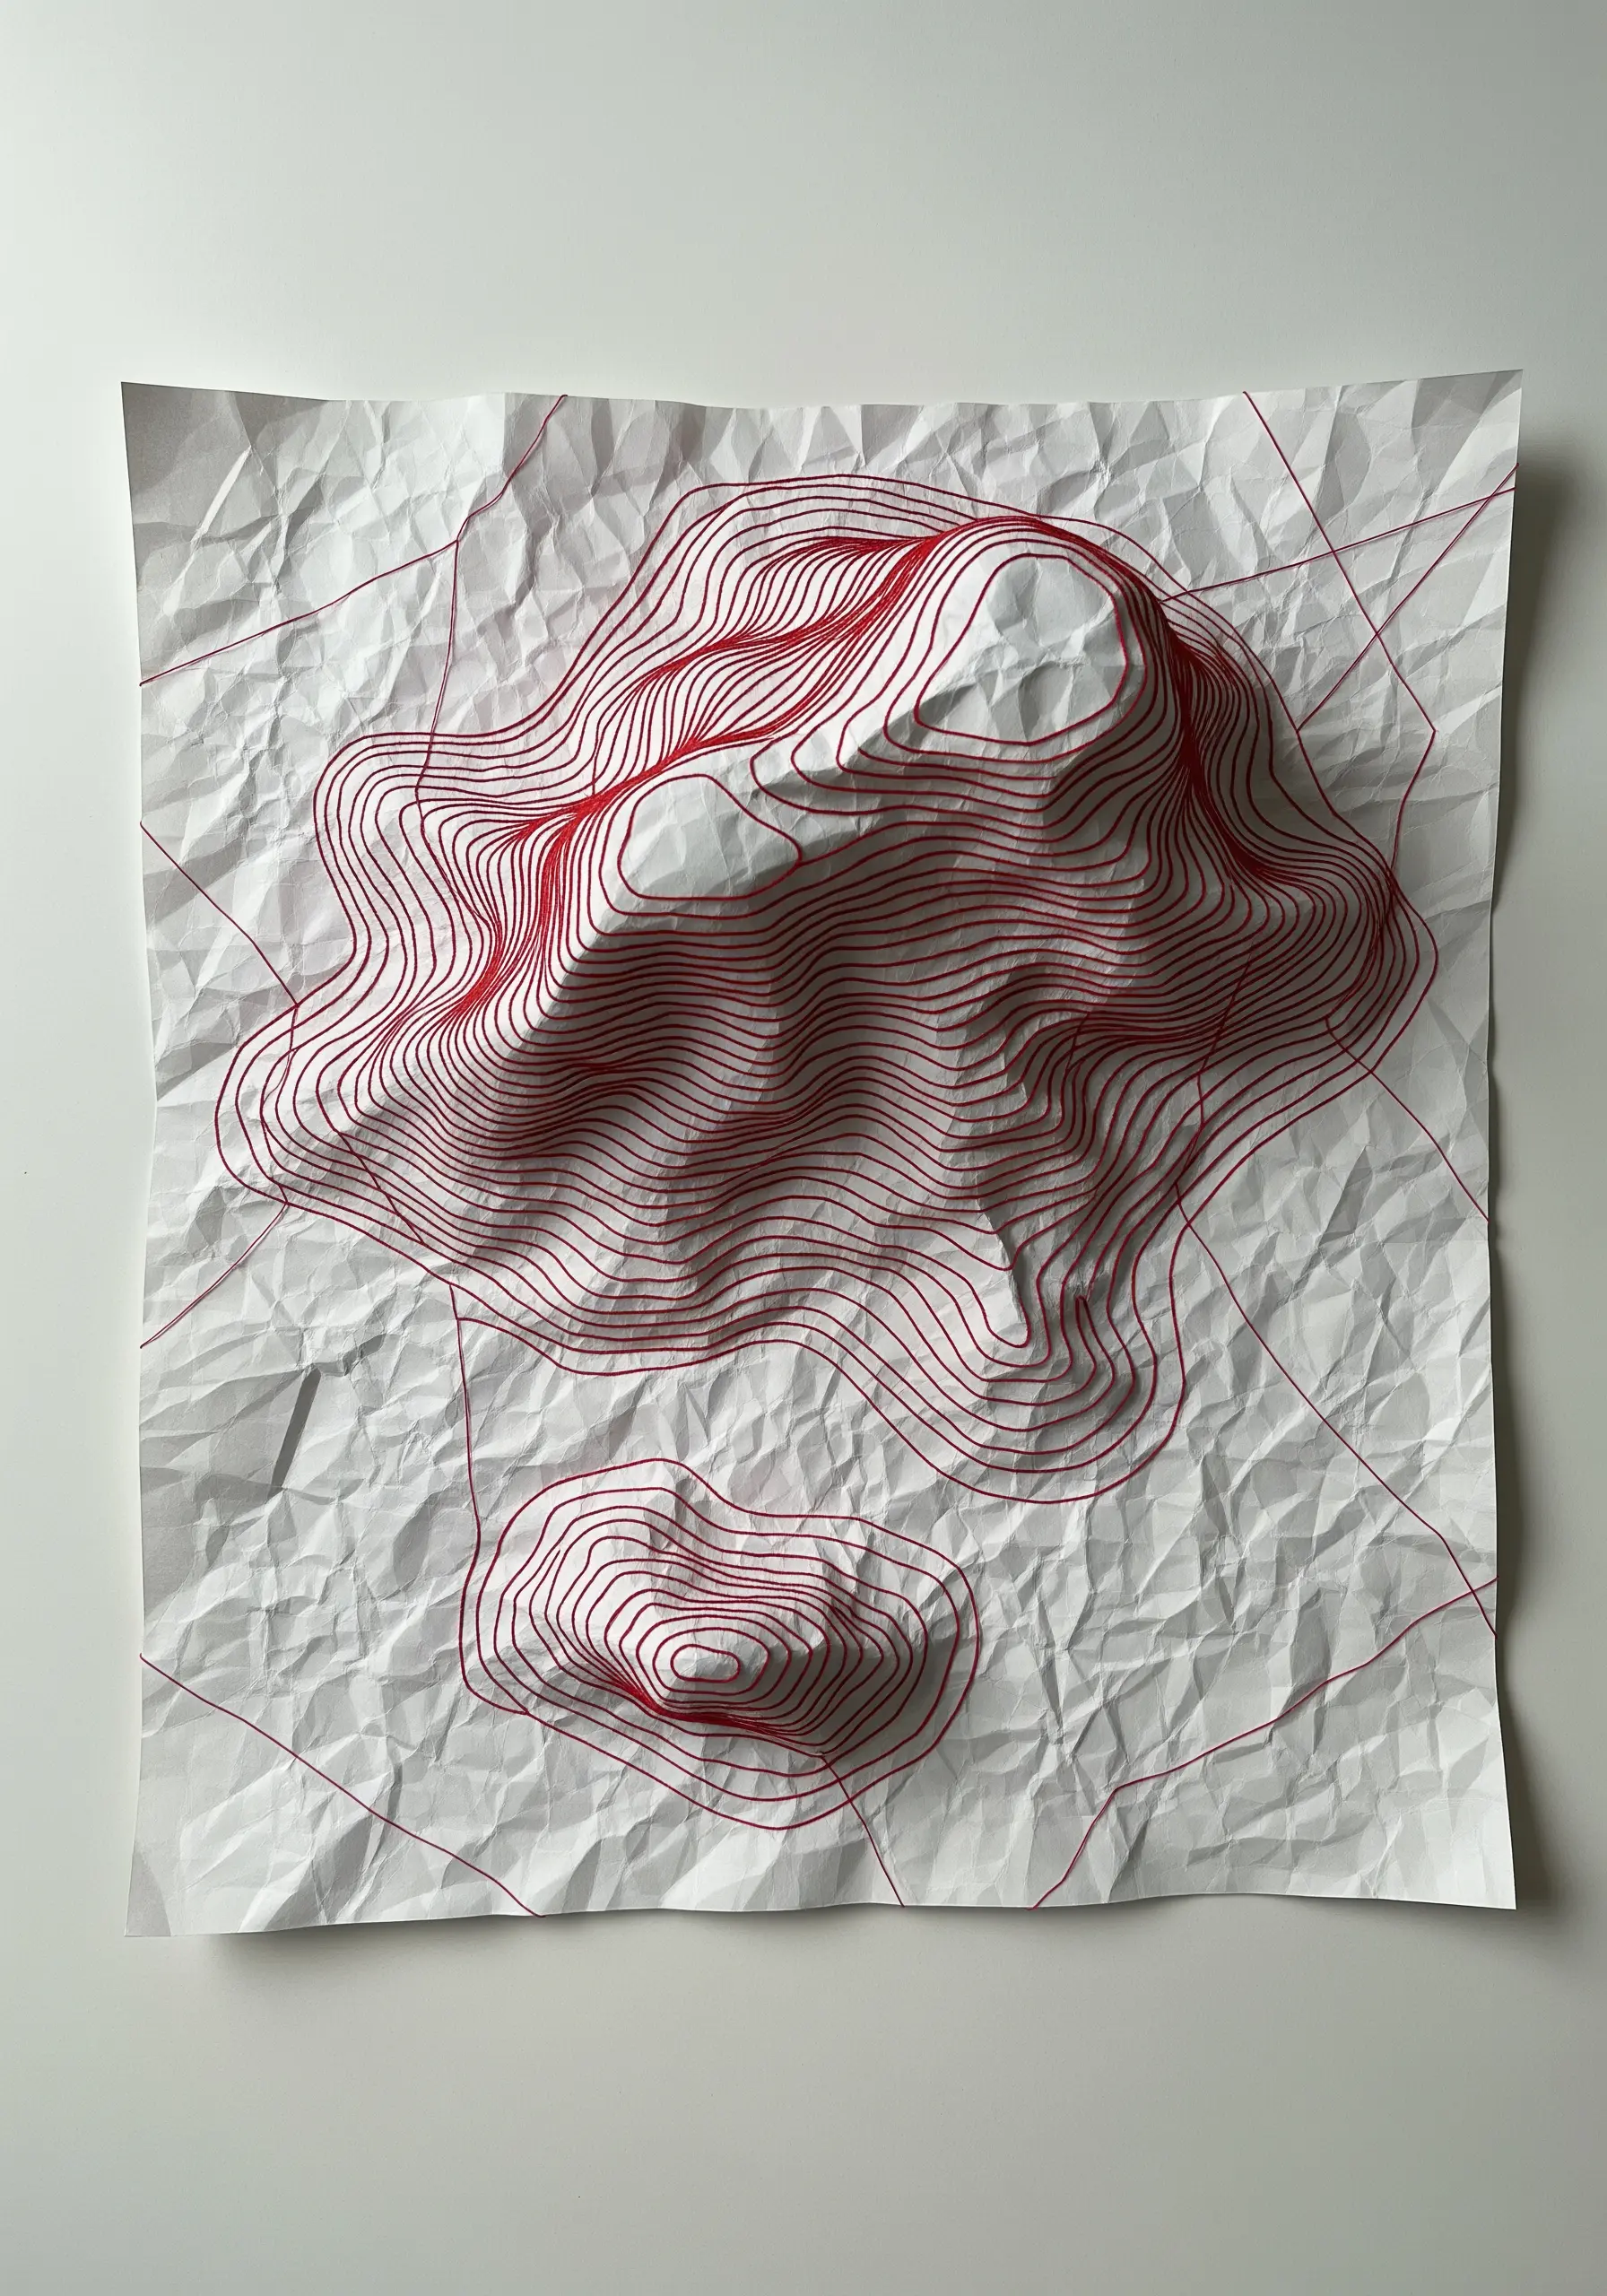
Create a map with authentic, three-dimensional texture by stitching onto crumpled paper.
Gently crumple a sheet of drawing paper to create a network of organic ridges and valleys, then smooth it out partially.
Use a simple backstitch to trace topographic lines across this uneven surface.
The thread will rise and fall with the paper’s texture, creating a dynamic, tactile piece where the material itself helps to tell the story of the landscape.
14. Stamped Gift Tags with Custom Tassels
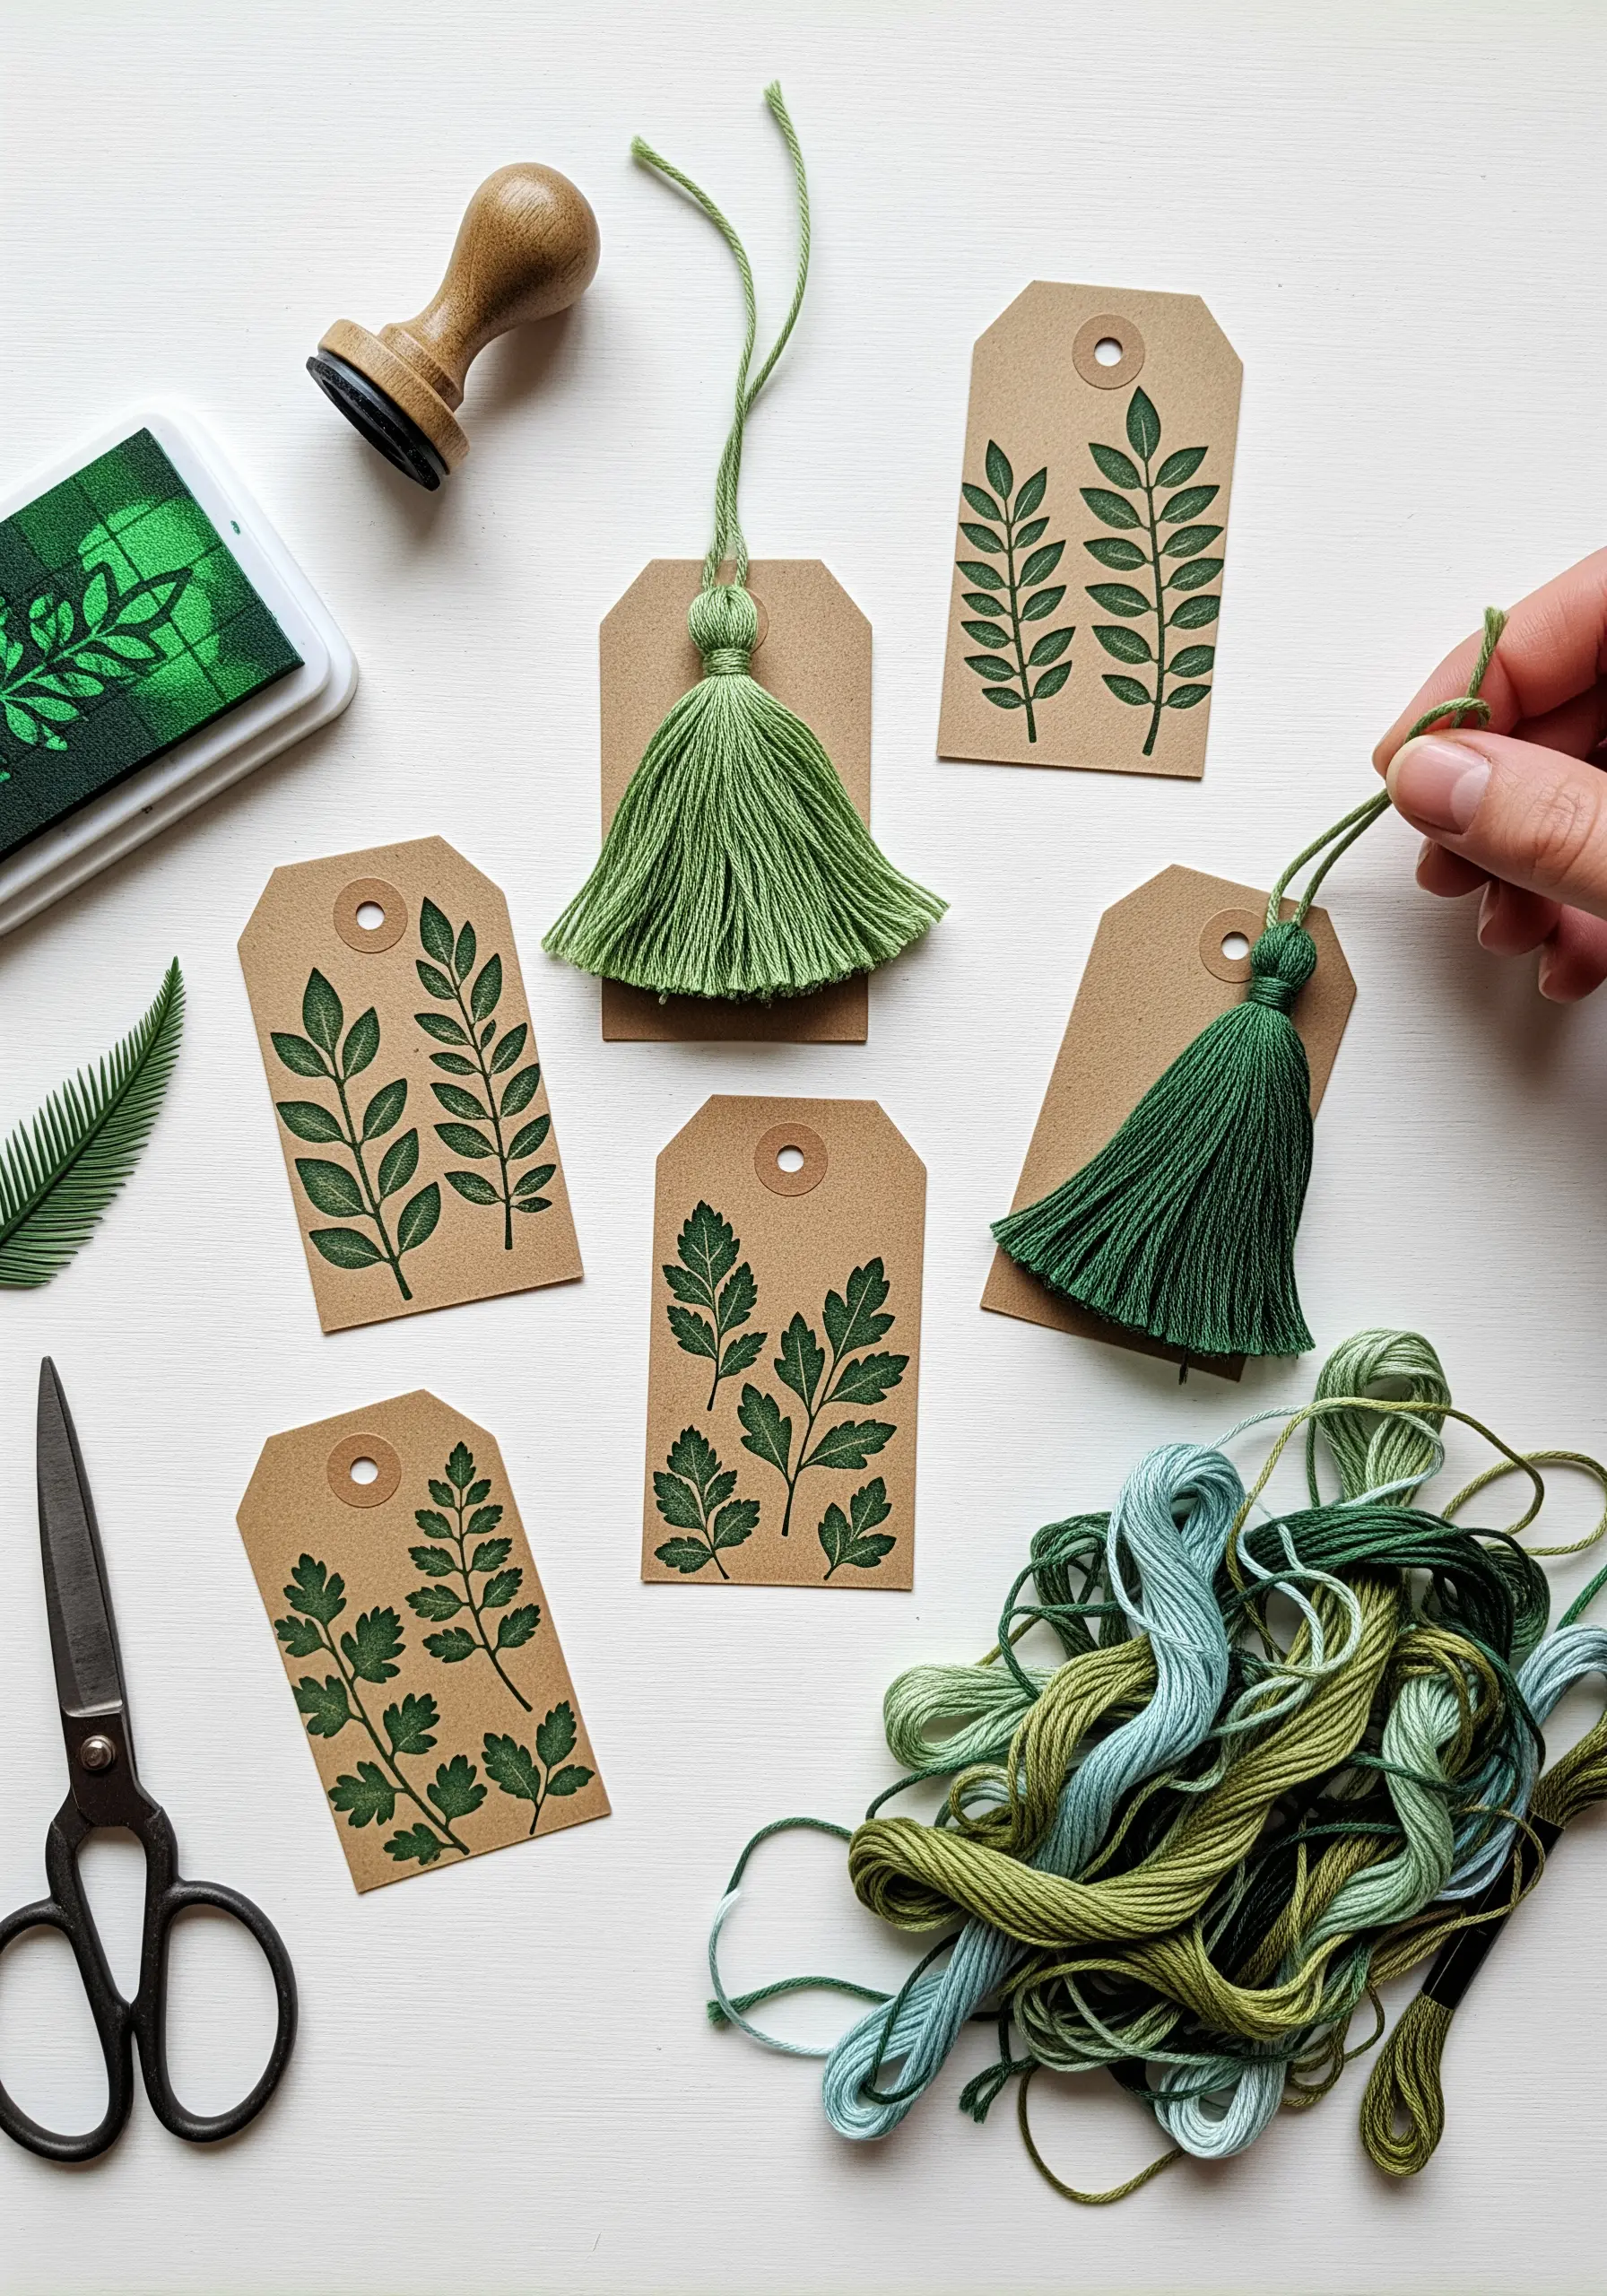
Coordinate your gift wrapping perfectly by creating custom tassels for your hand-stamped tags.
After stamping your designs, select embroidery floss that matches the ink color and wrap it to create a small, neat tassel.
Making your own allows you to control the size, fluffiness, and color mix, ensuring a cohesive and professional look.
It’s a simple step that transforms a simple tag into a memorable part of your thoughtful gifts.
15. Couching Thread on Greeting Cards
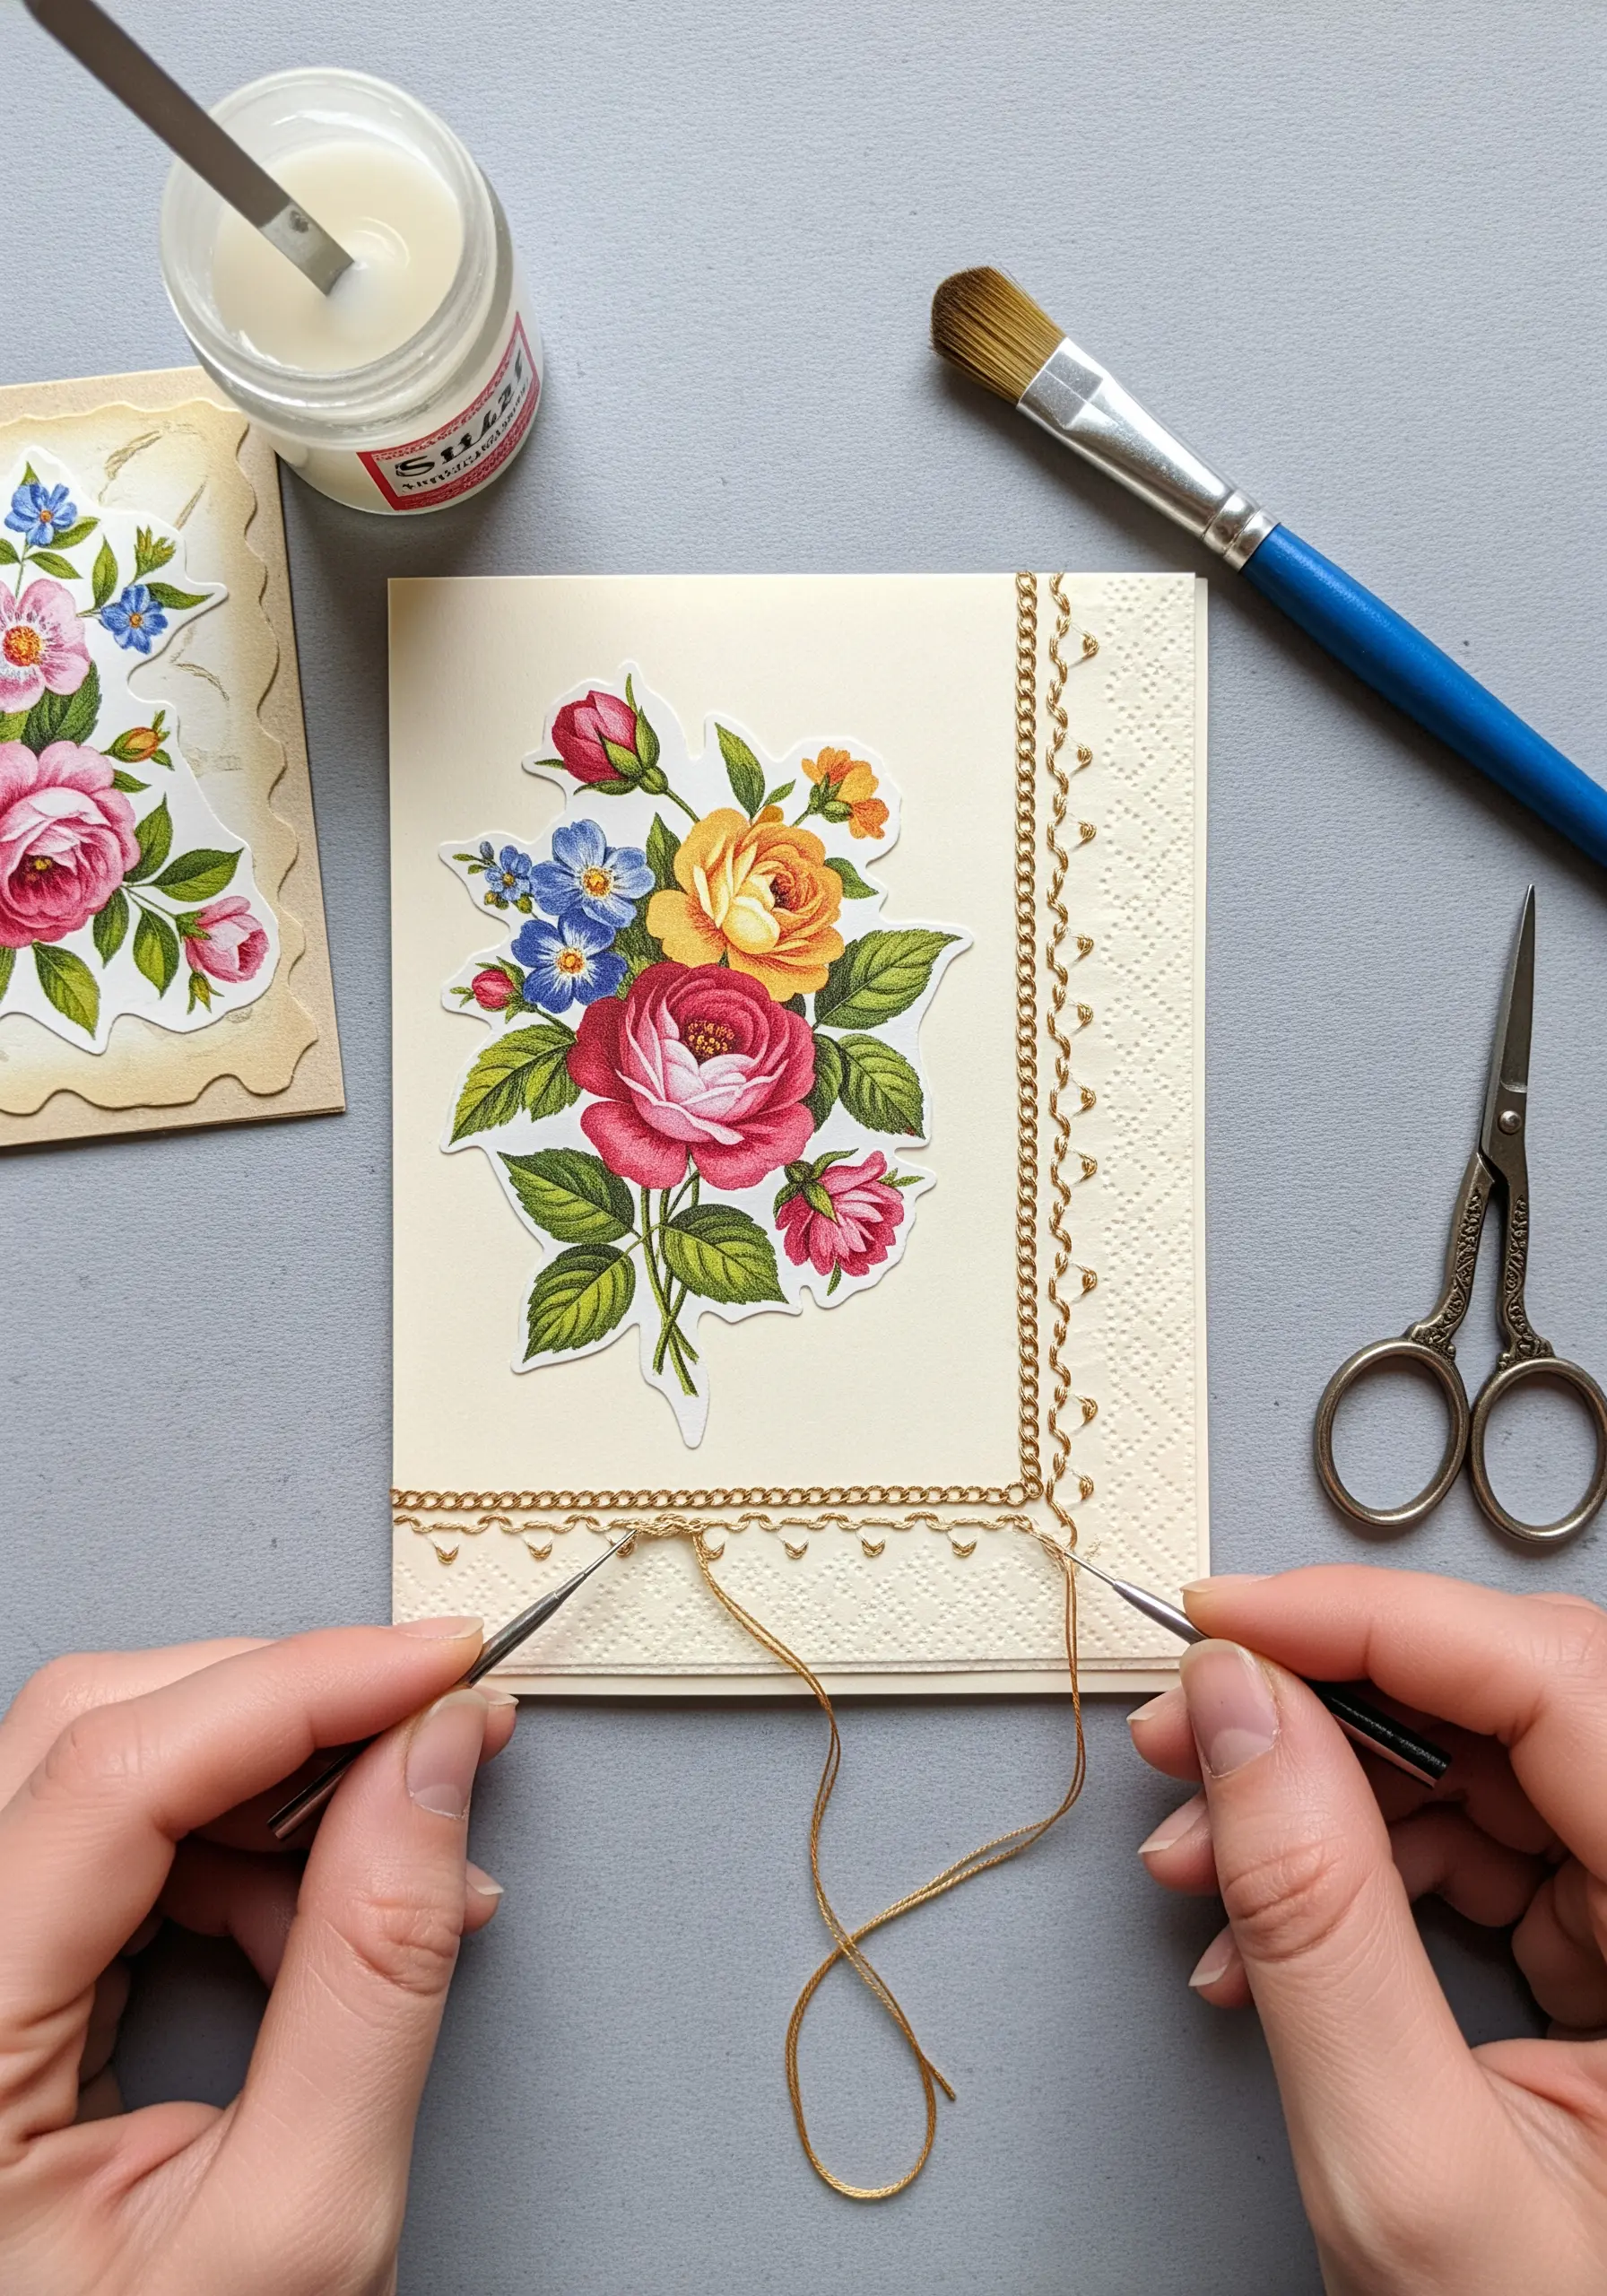
Apply thick, decorative cords to paper without excessive piercing by using the couching technique.
Lay your main thread (such as a metallic cord or pearl cotton) on the surface of the card in your desired shape.
Then, use a finer, less conspicuous thread to tack it down with small, evenly spaced stitches.
This method is ideal for creating elegant, raised outlines and flowing script that would be impossible with traditional stitches on paper.
16. Papermaking with Embedded Thread
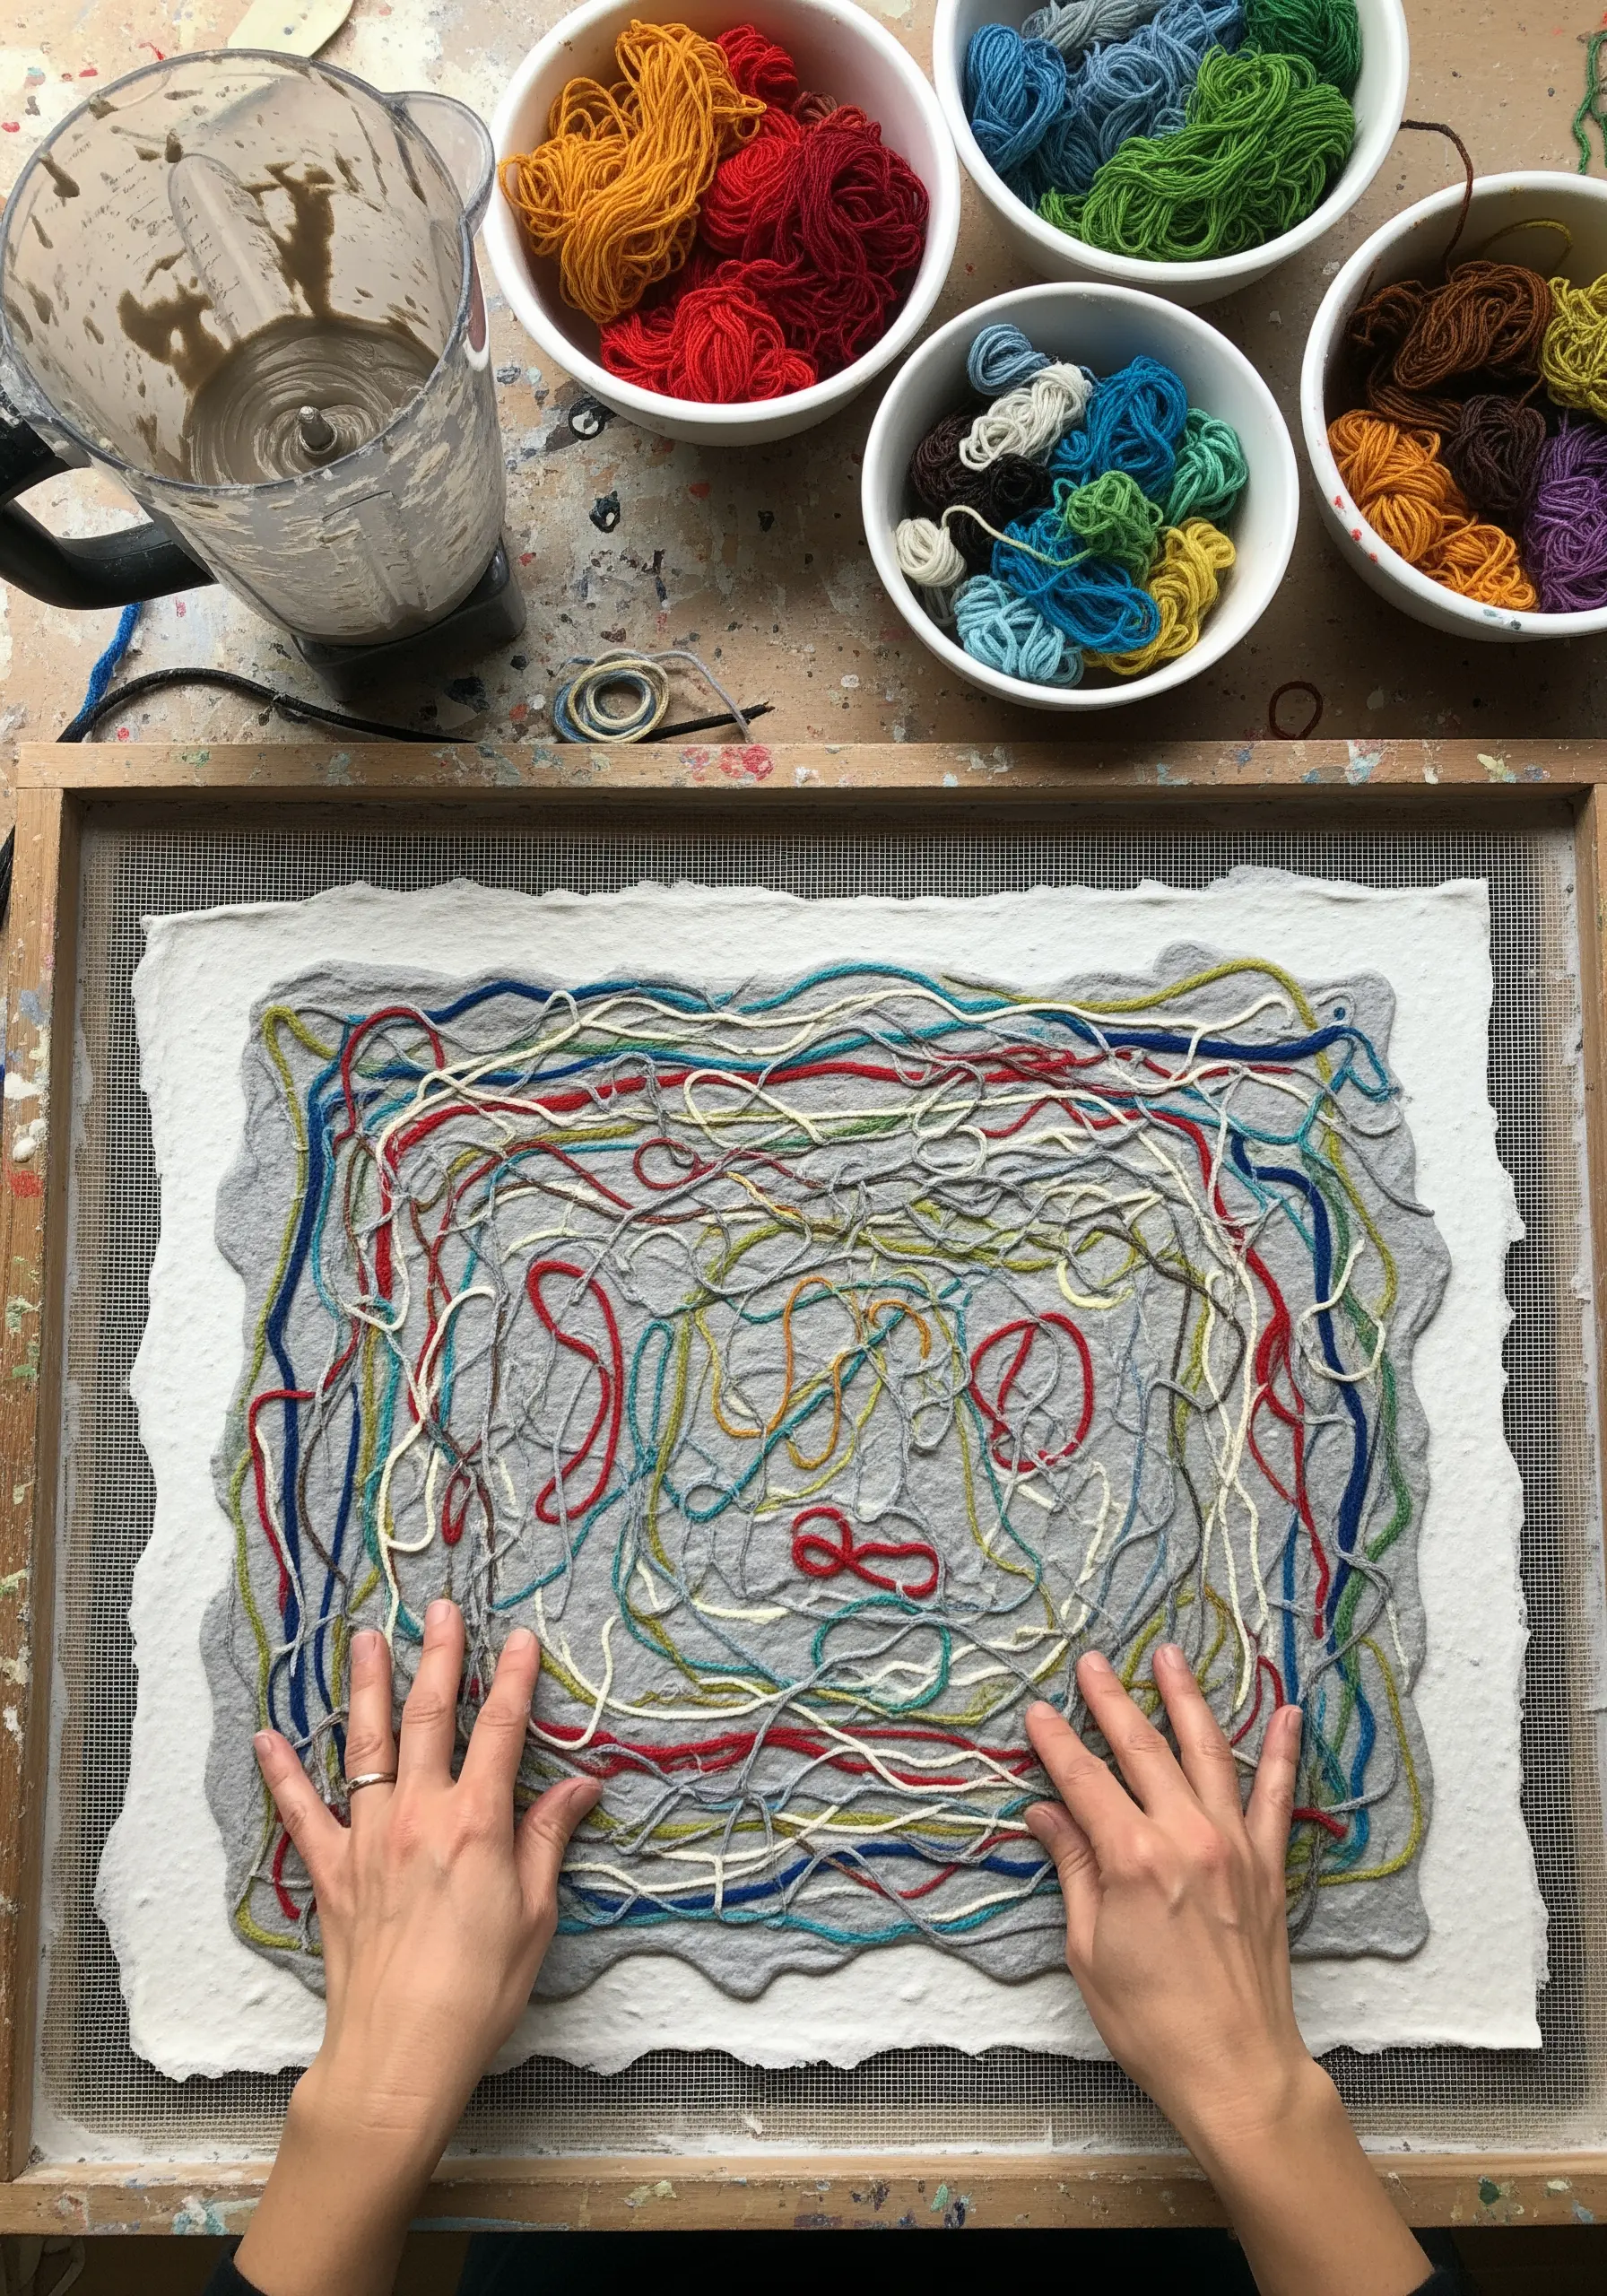
Integrate thread and paper at the most fundamental level by adding fibers directly into your paper pulp.
While the pulp is still wet on the screen, arrange strands of colorful yarn or embroidery floss in abstract patterns.
As the paper dries, the fibers become permanently embedded, creating a truly unique sheet of paper where the design is part of its structure.
This results in beautiful, painterly mixed-fiber art pieces.
17. Japanese Stab Binding as a Focal Point
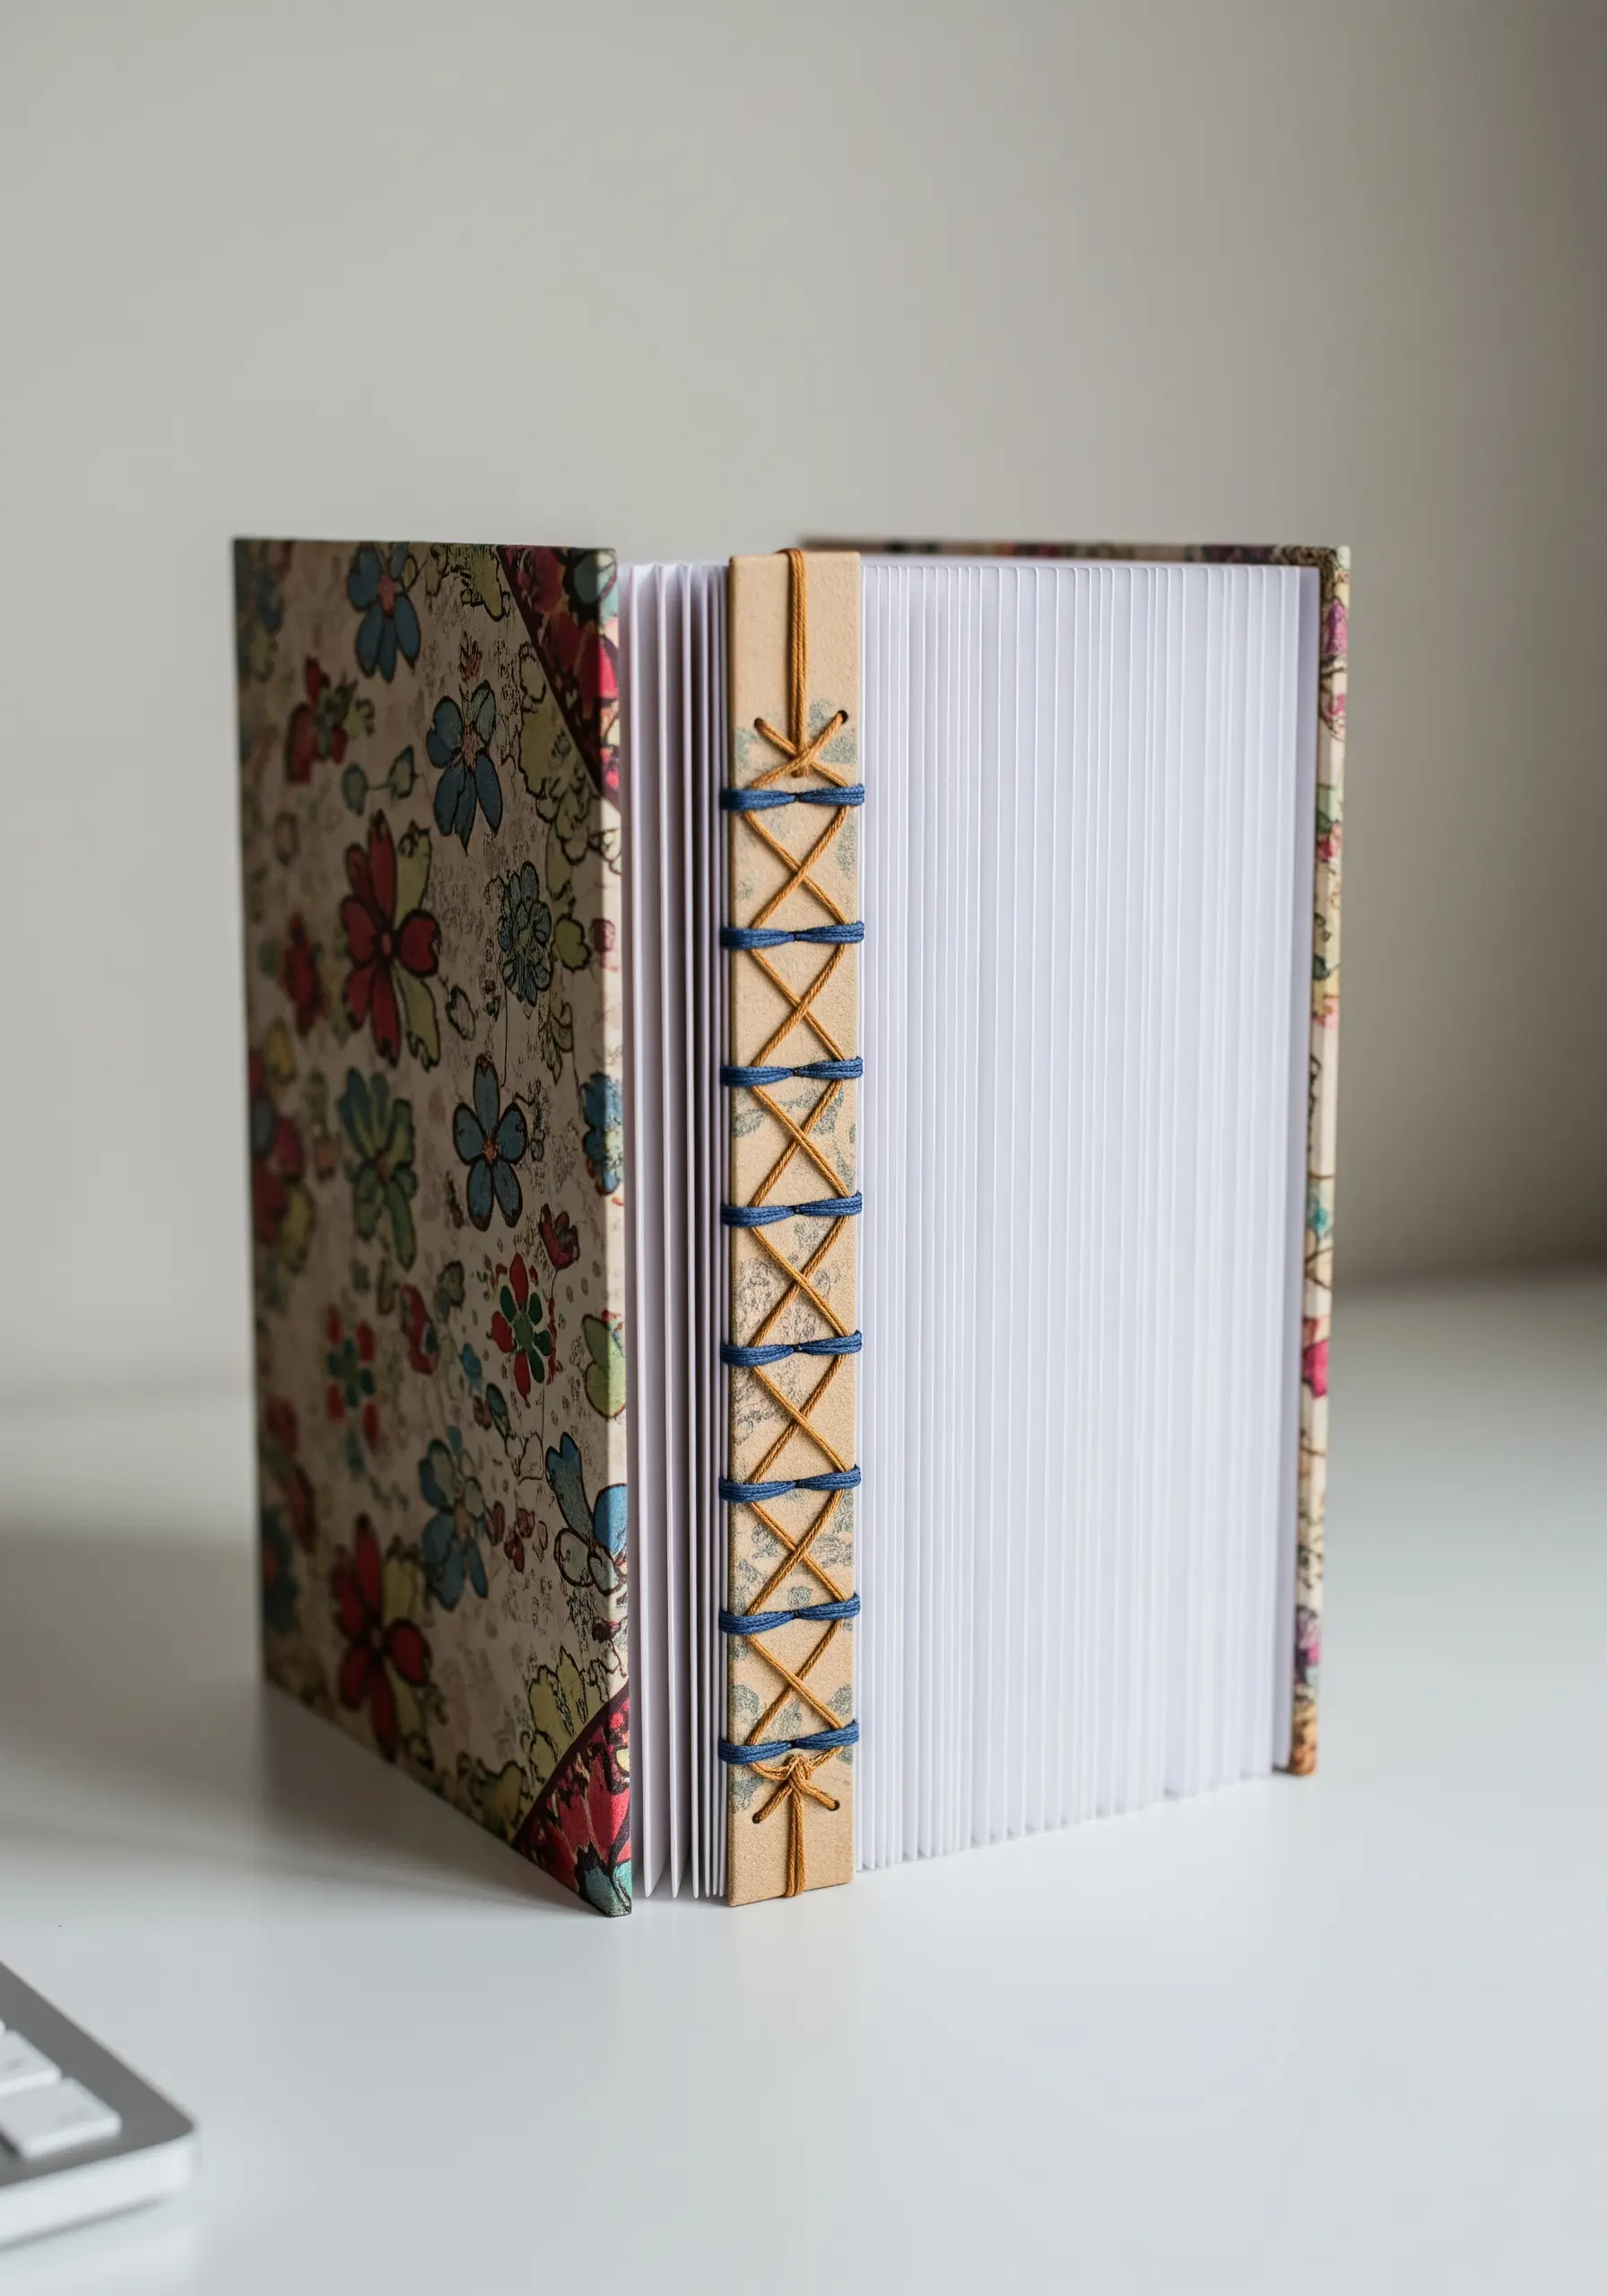
Transform a book’s construction into its main decorative feature with Japanese stab binding.
This traditional technique uses stitches that pass through the front cover, pages, and back cover, leaving the thread exposed on the spine.
Choose an intricate pattern like a hemp-leaf or tortoise-shell design and use a contrasting, high-quality linen thread.
The binding itself becomes a beautiful, functional piece of embroidery.
18. Lacing Thread Through a Paper Collage

Add a layer of graphic energy to a geometric paper collage by lacing thread through it.
Before assembling your collage, punch a series of small, evenly spaced holes along the edges of your paper shapes.
After gluing them down, use a contrasting thread to connect the holes, creating linear patterns, grids, or radiating lines.
This method physically and visually stitches the composition together, blending hard-edged paper with soft, linear threadwork.
19. Watercolor Garland Linked with Thread
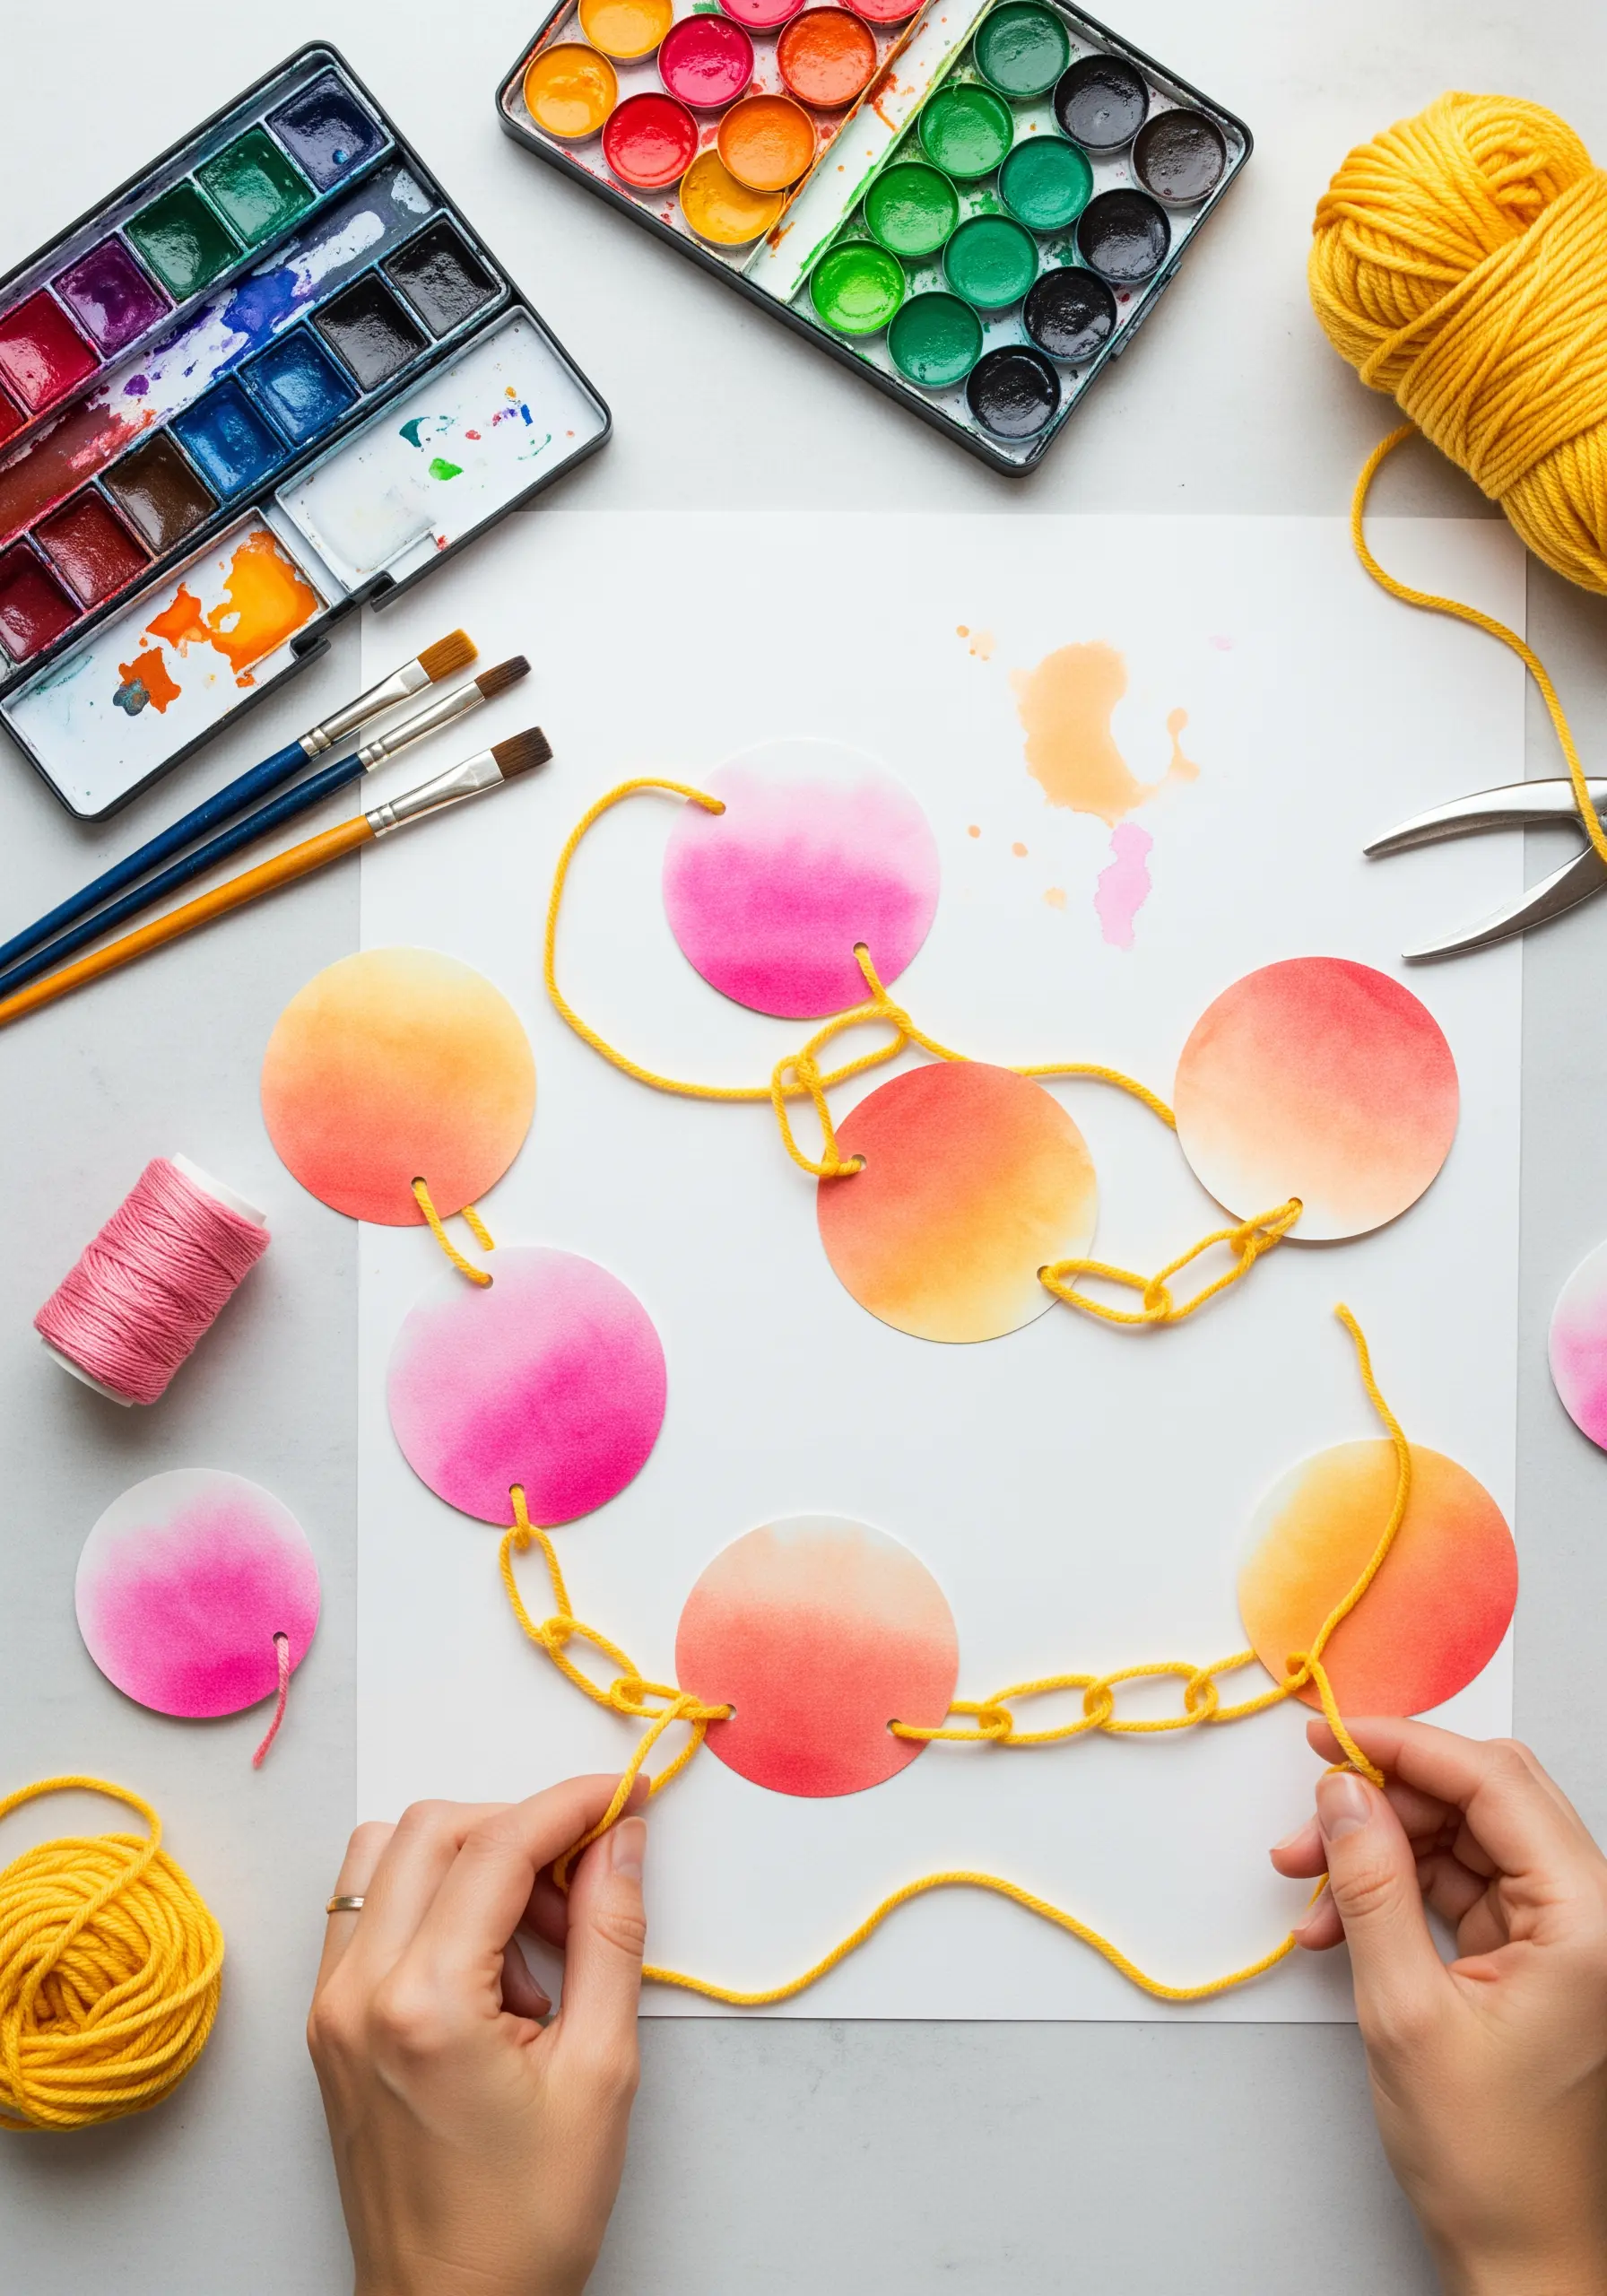
Construct a delicate, airy garland by linking watercolor-painted paper shapes with simple thread chains.
Punch a small hole on opposite sides of each painted paper disc.
Instead of using jump rings, use a crochet hook to create a chain of yarn or thick thread, looping it through the holes to connect the pieces.
This technique gives the garland a soft, handmade quality and allows for graceful movement.
20. Torn Paper Landscapes with French Knots
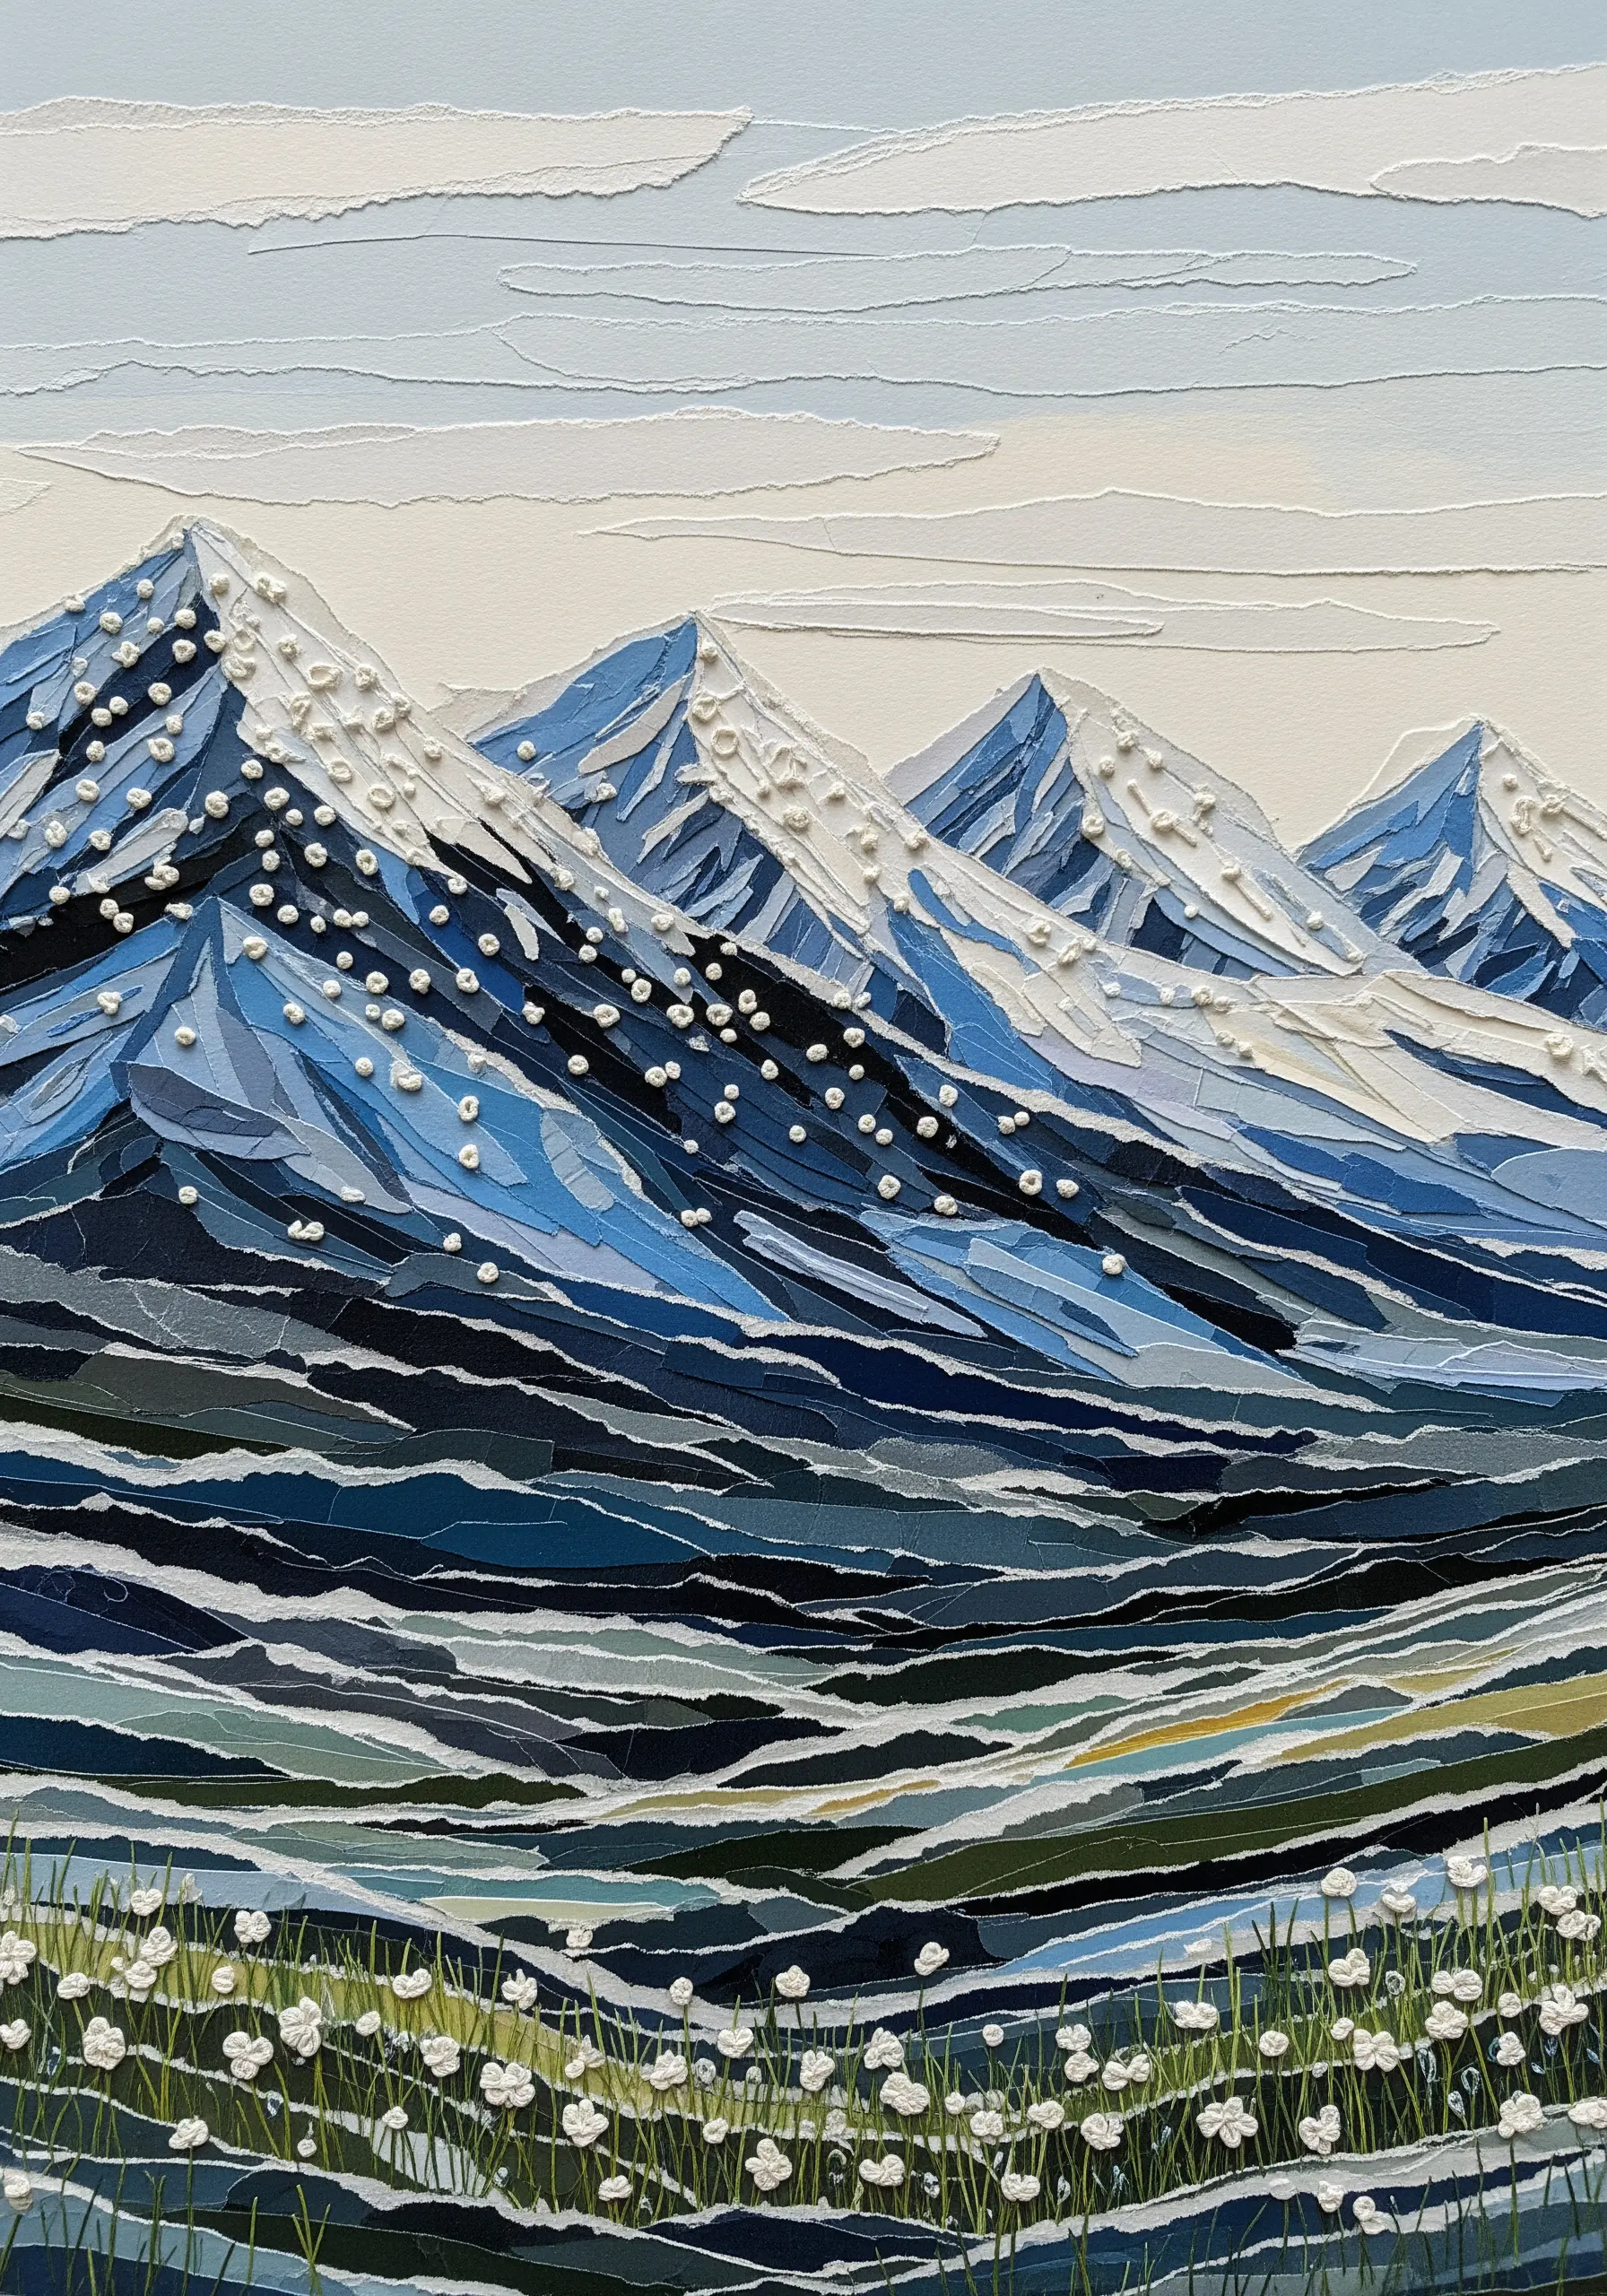
Create soft, painterly landscapes by layering torn paper, then add focus and texture with embroidery.
Tear different colored papers to build up mountains, hills, and sky, which creates more organic edges than cutting.
Once your scene is composed, use tiny French knots to suggest details like distant snow on a peak, wildflowers in a field, or stars in the sky.
The small, tactile dots provide a beautiful contrast to the broad, soft shapes of the torn paper.
21. Architectural Cardboard with Tensioned Thread
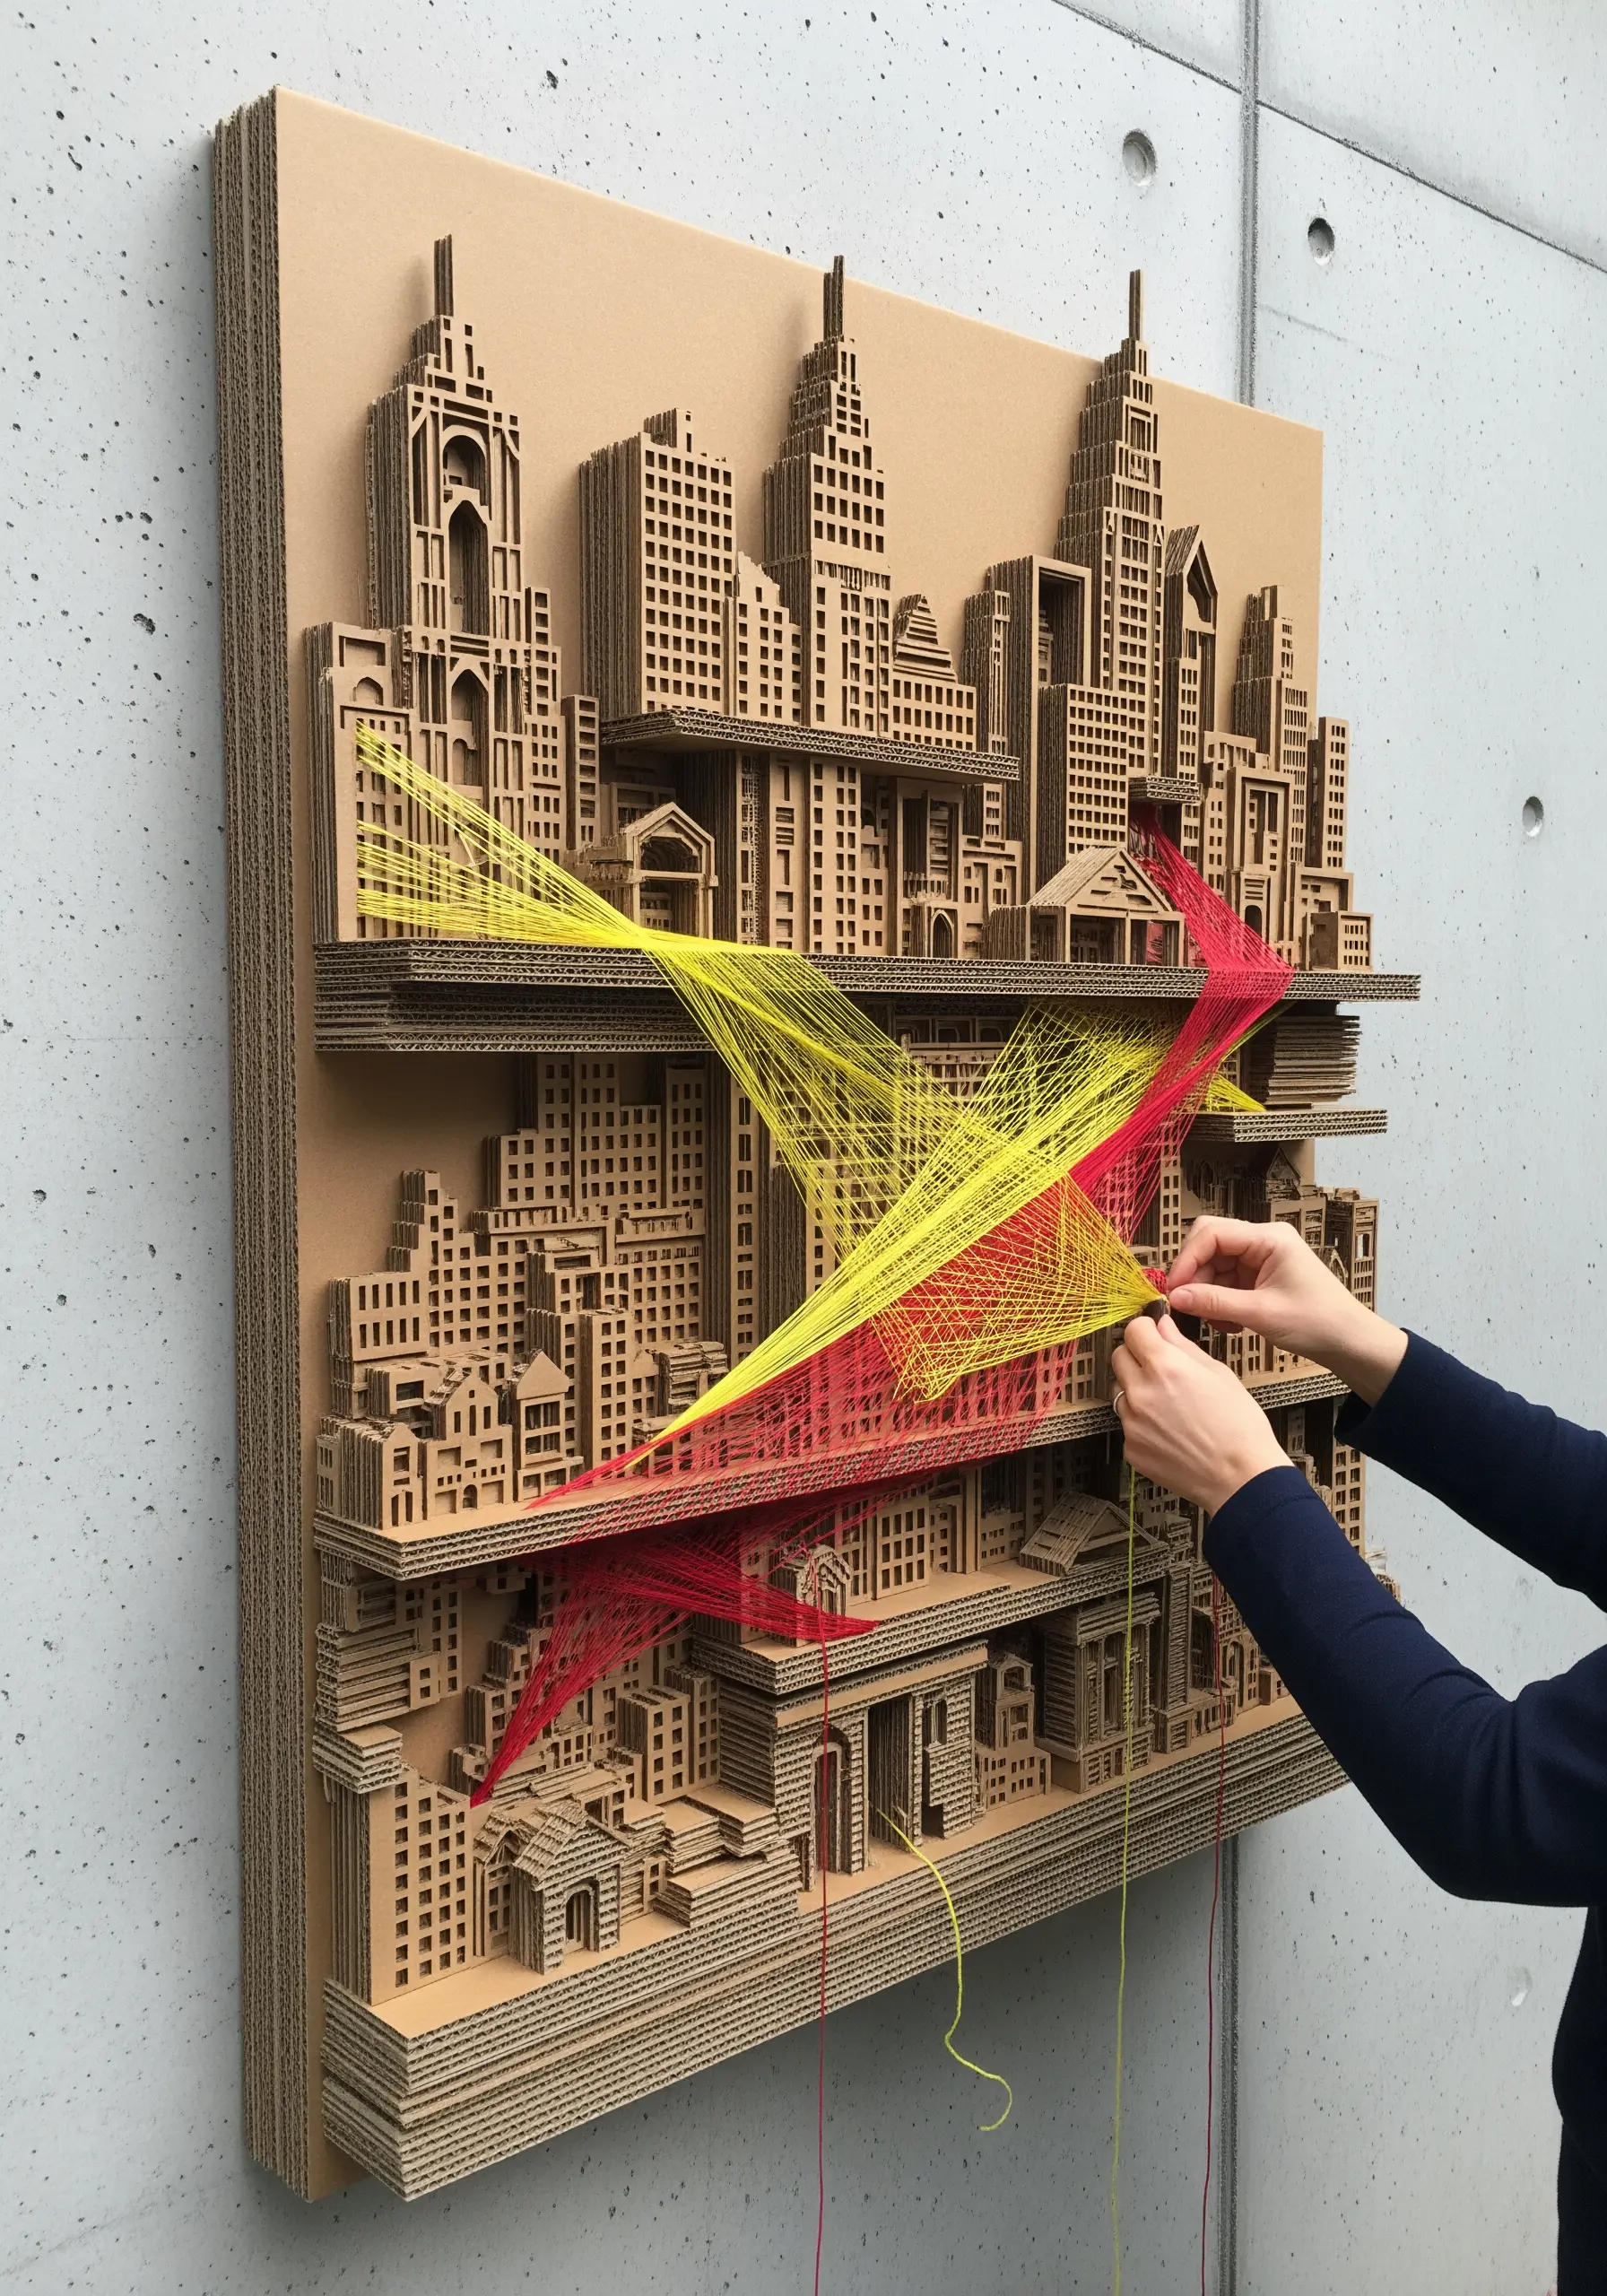
Use thread as a dynamic, line-drawing tool within a three-dimensional cardboard sculpture.
Build a layered architectural model from cut cardboard pieces.
Then, stretch brightly colored thread between different anchor points on the structure, creating taut, vibrant lines that cut through the space.
This technique turns thread into a graphic element that defines form and creates a sense of energy and movement, resulting in stunning handmade sculptures.
22. Highlighting Paper Folds with Stitching
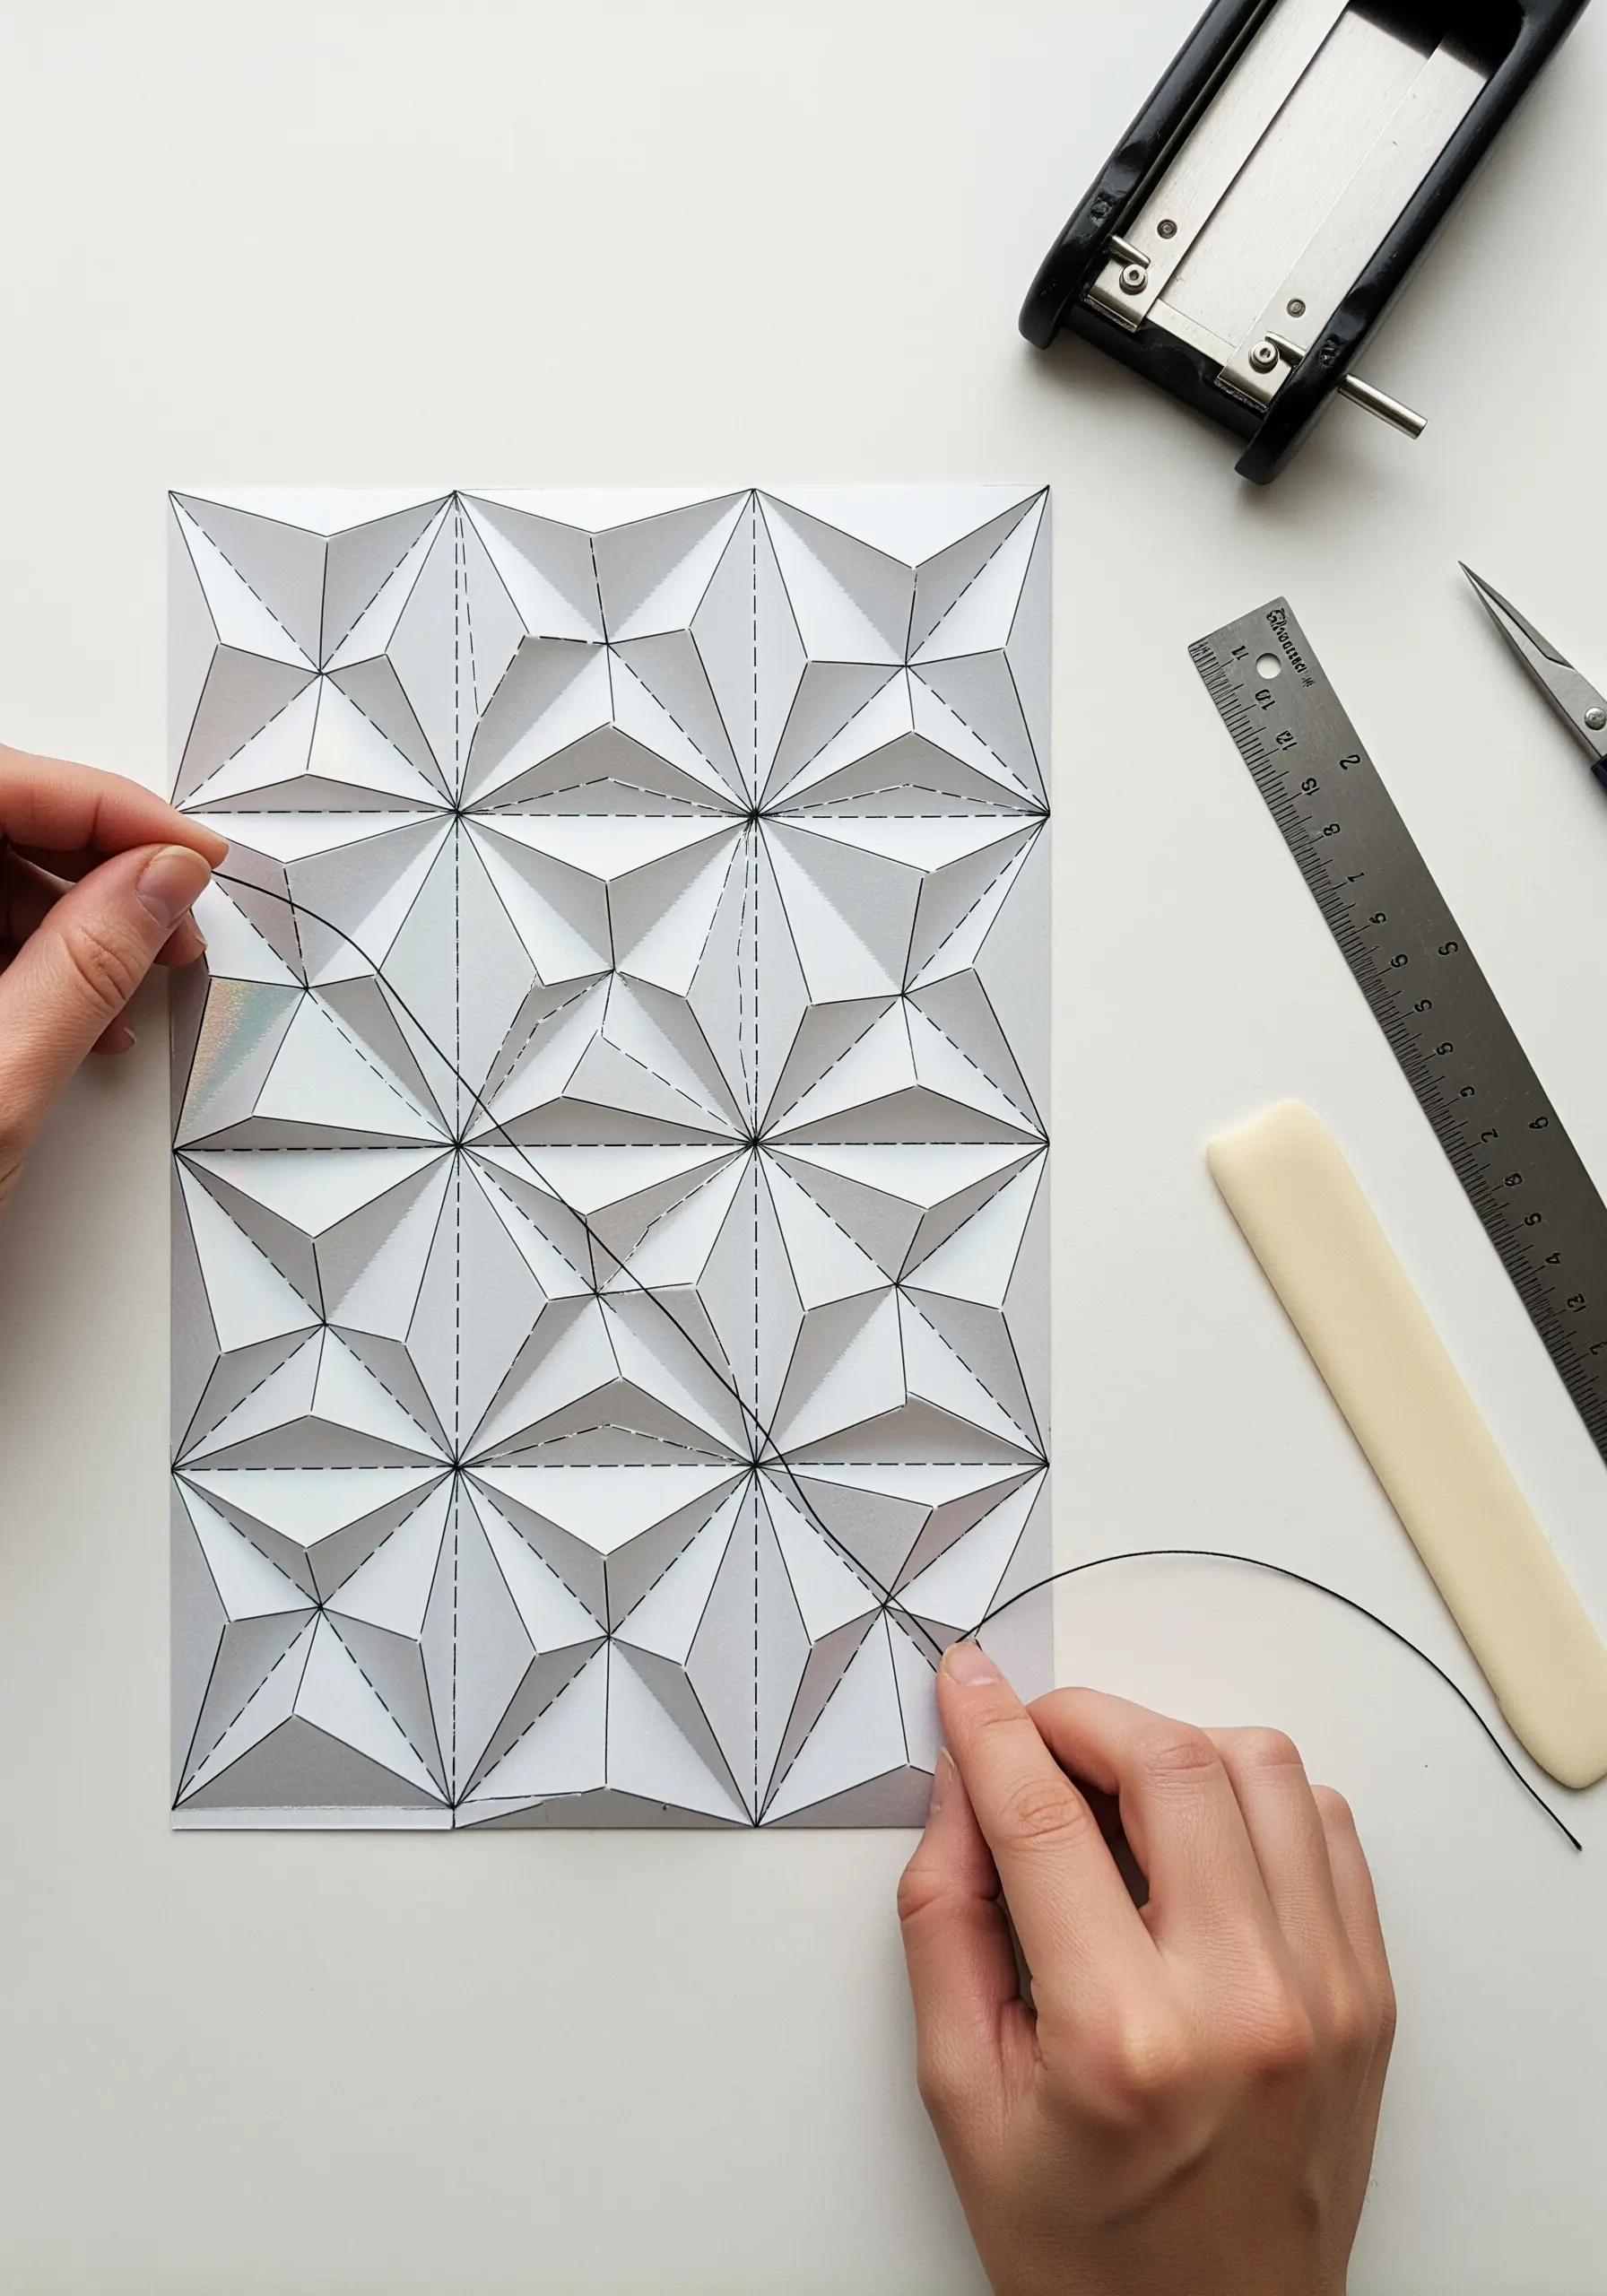
Add definition and a textile element to 3D folded paper art by tracing the primary fold lines with thread.
After you have creased your geometric tessellation or origami form, use a simple backstitch to follow the most important lines.
Choose a thread color that contrasts with the paper to emphasize the structure and geometry.
This small touch reinforces the folds and highlights the way light and shadow play across the dimensional surface, elevating your paper art patterns.
23. Cross-Stitch with a Paper-Cut Stencil
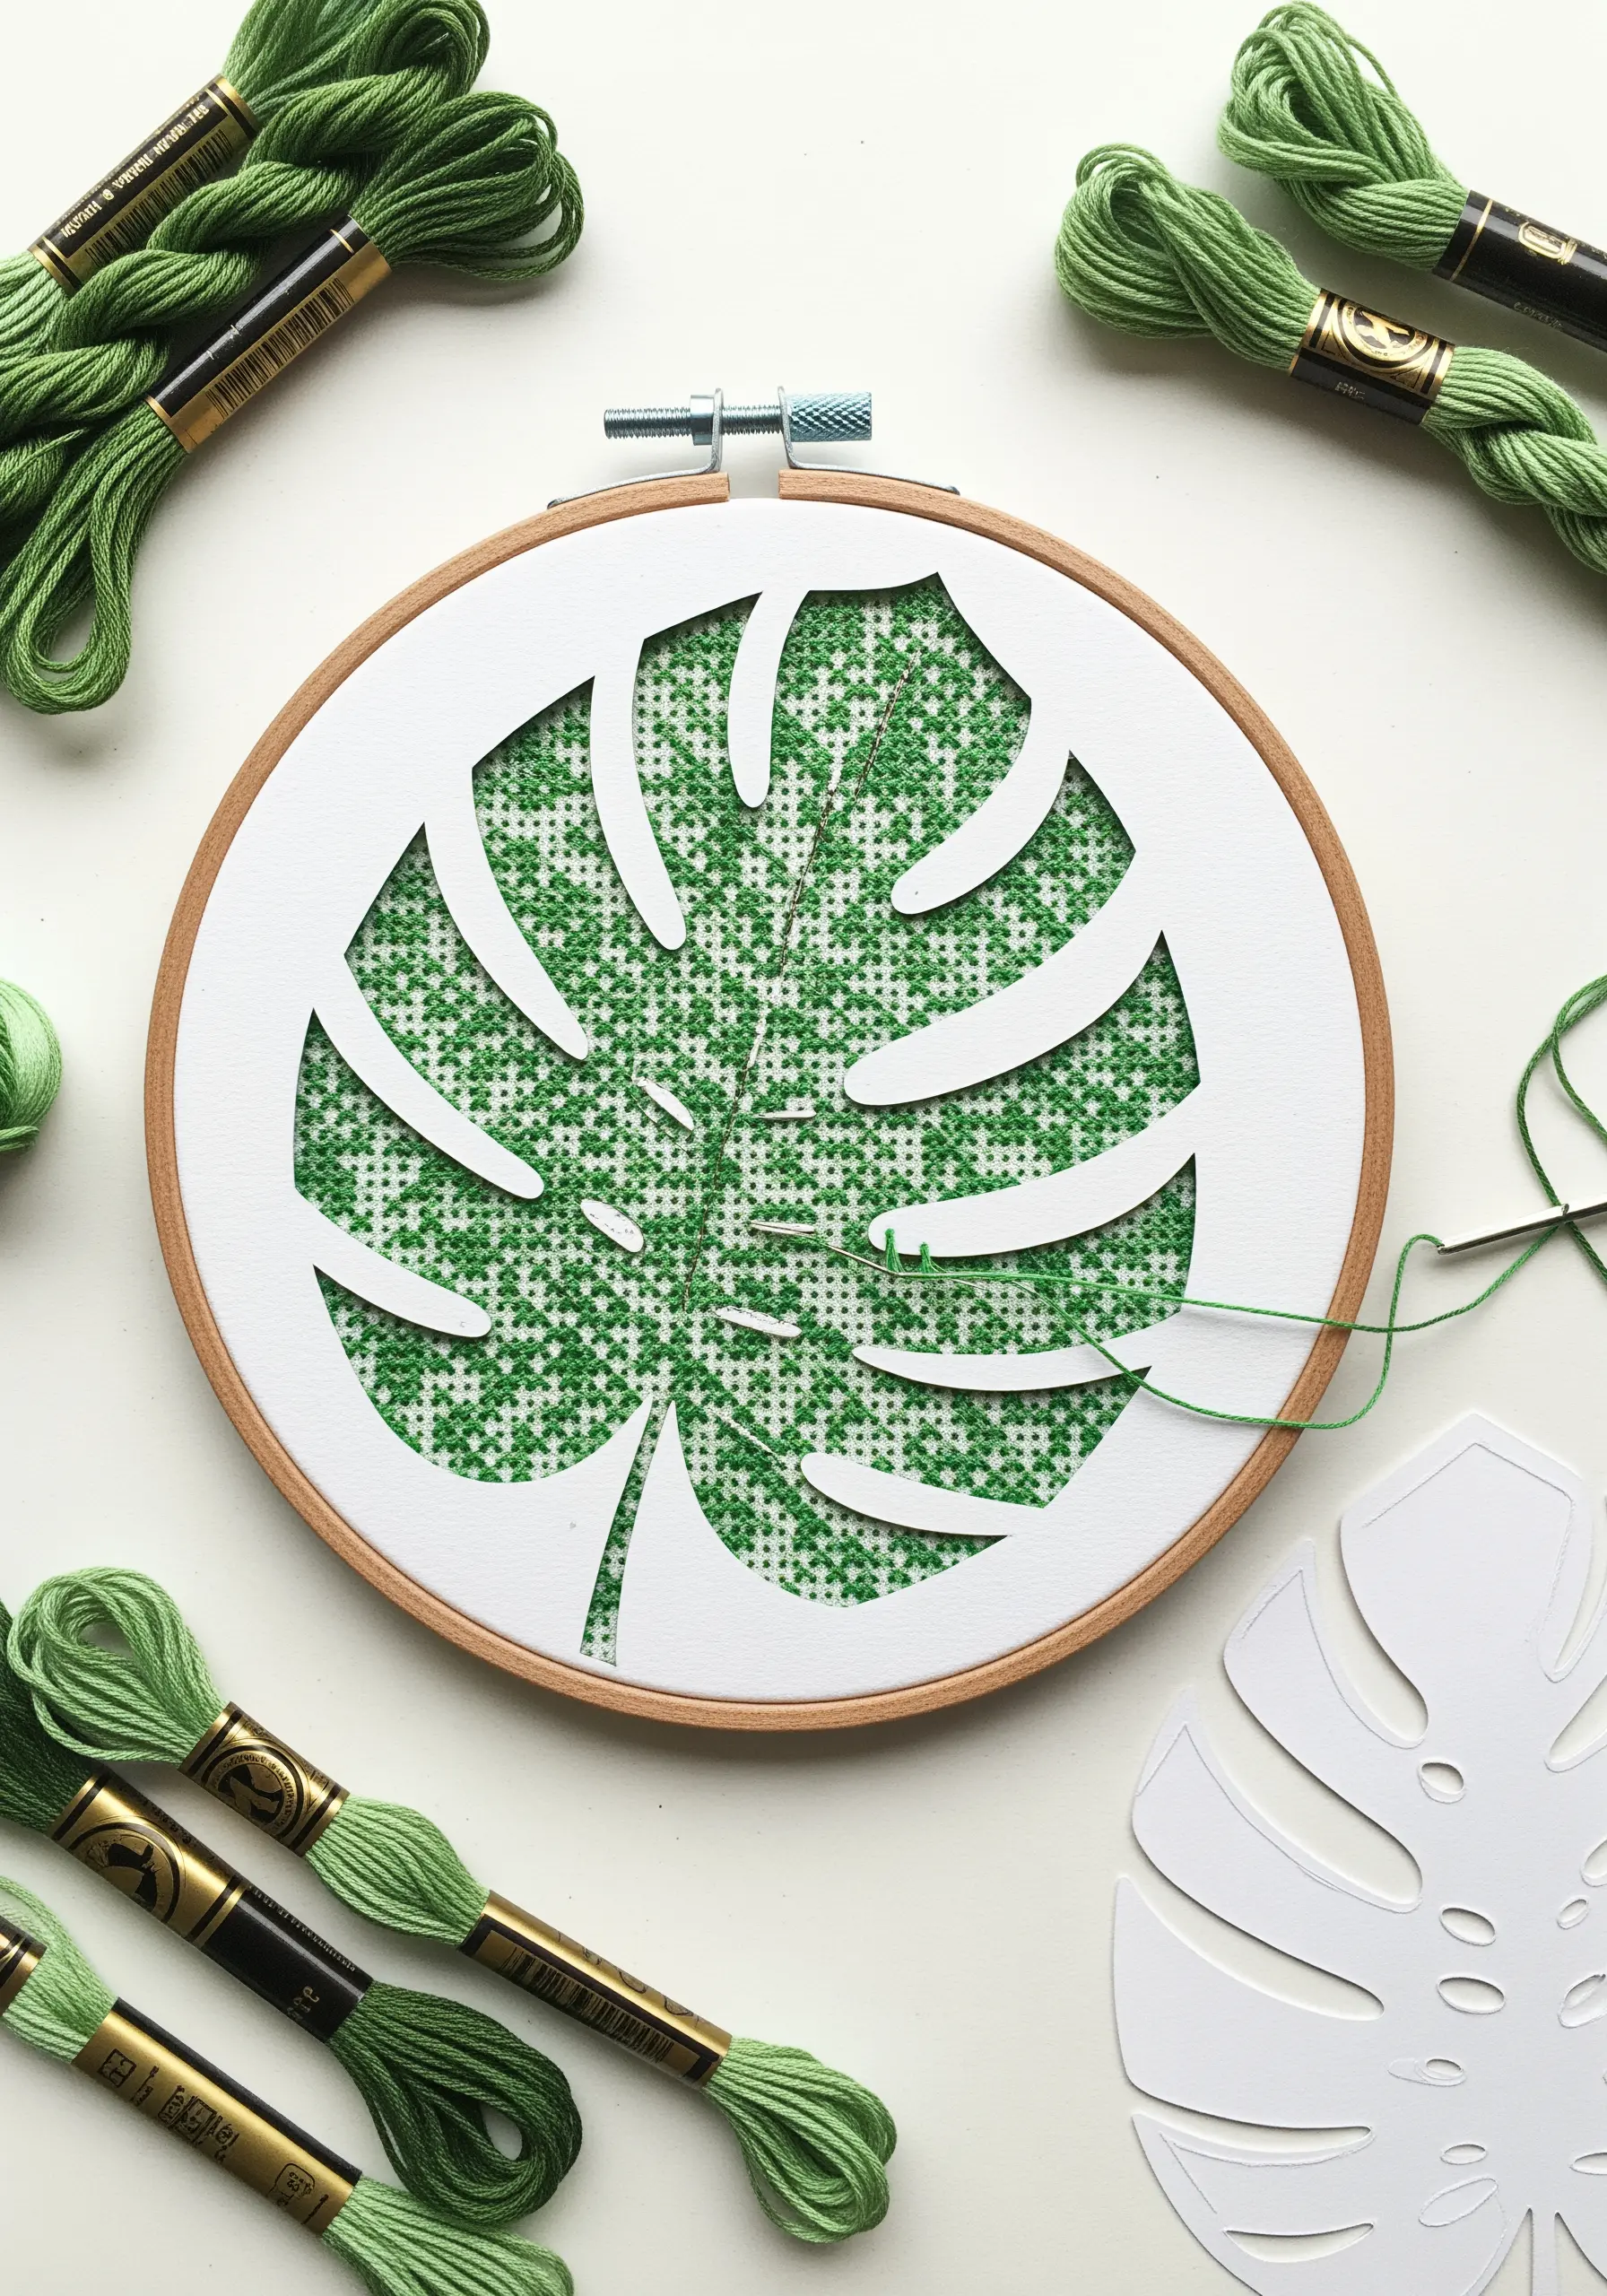
Achieve perfectly shaped cross-stitch motifs by using a paper cutout as a stencil.
Cut a shape, like a leaf or an initial, from sturdy paper and lay it over your Aida cloth in the hoop.
Stitch your cross-stitches within the negative space of the paper cutout.
This ensures your design has incredibly crisp, clean edges. You can then remove the paper or leave it in place for a layered, mixed-media frame.


