

Combining pressed flowers with embroidery is more than just a technique; it’s a way of holding a moment in your hands. It allows you to preserve the fleeting beauty of a garden, a wildflower from a favorite walk, or a petal from a meaningful bouquet and give it a new, lasting life through thread.
The true artistry isn’t in complex, difficult stitches. It’s in the balance you create—the way a simple line of backstitch can become a stem, or a few French knots can transform into a cluster of berries alongside a real leaf. Your needle and thread are not competing with the flower; they are creating its story, its frame, its home.
In these ideas, you’ll see that it’s the thoughtful choices that make each piece special. It might be the decision to use sheer fabric to let light shine through, or to frame a single petal with a textured border. Let these pieces inspire you to see the potential in every delicate bloom and to create gifts that feel both beautifully handmade and deeply personal.
1. Lavender Wreath on Sheer Tulle

When working on a sheer fabric like tulle or organza, you allow light to pass through, making the piece feel exceptionally delicate.
Instead of heavy stitches, frame your pressed lavender with a light feather stitch or open chain stitch using just two or three strands of floss.
This creates a border that complements the airiness of the flowers rather than overpowering them.
Anchor your pressed flowers from behind with tiny, discreet couching stitches that are nearly invisible from the front.
2. Frame a Single Bloom with Textured Stitches

Elevate a single, dramatic petal by framing it with a textured, rustic border.
Use a series of detached chain stitches or fly stitches, arranged in a grid, to build a frame that has both visual weight and handmade charm.
Choosing an earthy green thread grounds the vibrant magenta of the bougainvillea, creating a beautiful contrast that feels both natural and intentional.
This technique is perfect for small sachets or gift tags where one bloom is the star.
3. Create Celestial Scenes with Tulle Appliqué

To make botanicals appear as if they are floating, first arrange and secure them onto a piece of fine tulle cut to your desired shape, like this crescent moon.
Carefully trim the tulle, leaving a small border, and then appliqué it onto a dark background fabric using a fine, discreet whipstitch.
The dark navy fabric provides a dramatic backdrop, allowing simple star-like French knots and backstitched constellations to shine alongside the floral moon.
4. Fill a Monogram with Seasonal Foliage

Give a monogram a natural, artistic touch by transforming it into a vessel for tiny pressed leaves.
First, create a clean, sharp outline of the letter using a two-stranded backstitch or stem stitch.
Then, treat the inside like a mosaic, arranging small, colorful leaves and petals to create a sense of flow and balance.
A few tiny French knots in orange or red can mimic berries, adding another layer of texture. This makes personalized framed embroidery designs deeply meaningful.
5. Isolate Botanicals for Modern Impact

The power of this design lies in its restraint. By placing a single, perfectly pressed fern or a small bunch of pansies in the center of the hoop, you celebrate its natural form.
Use ample negative space to draw the eye directly to the botanical specimen, creating a clean, gallery-like feel.
Secure the botanicals with minimal, almost invisible couching stitches using a single strand of thread that matches the color of the stem or petal.
6. Encapsulate Loose Petals Under Tulle

For functional items like cushions, protect delicate pressed flowers and petals by securing them under a sheer layer of tulle or organza.
Arrange your rose petals directly on the pillow fabric, then carefully lay the sheer layer over top.
Frame the arrangement by stitching down a piece of lace trim around the edges. This not only secures the tulle but also adds a beautiful, romantic finishing touch without piercing the petals themselves.
7. Stitch a Hybrid Meadow Landscape

Create a dynamic meadow scene by combining embroidered grasses with real pressed flowers.
Use a variety of green threads and directional straight stitches to build up a dense, textured layer of grass at the bottom of your hoop. This grounds the composition.
Then, carefully position and secure your pressed cosmos and daisies so they appear to be blooming directly from the stitched foliage, blending the two mediums seamlessly.
8. Embellish a Journal with a Framed Bloom

Elevate a simple journal cover by creating a fabric appliqué window for your main flower.
Center a contrasting fabric scrap, like a piece of linen, and stitch it down before securing your pressed pansy.
Then, use a simple stem stitch and detached chain stitches to embroider a delicate vine that appears to grow around the fabric frame, unifying the design. It’s one of the best quick stitch inspirations to beautify your notebooks and journals.
9. Layer Fabric for a Floating Botanical Wall Hanging
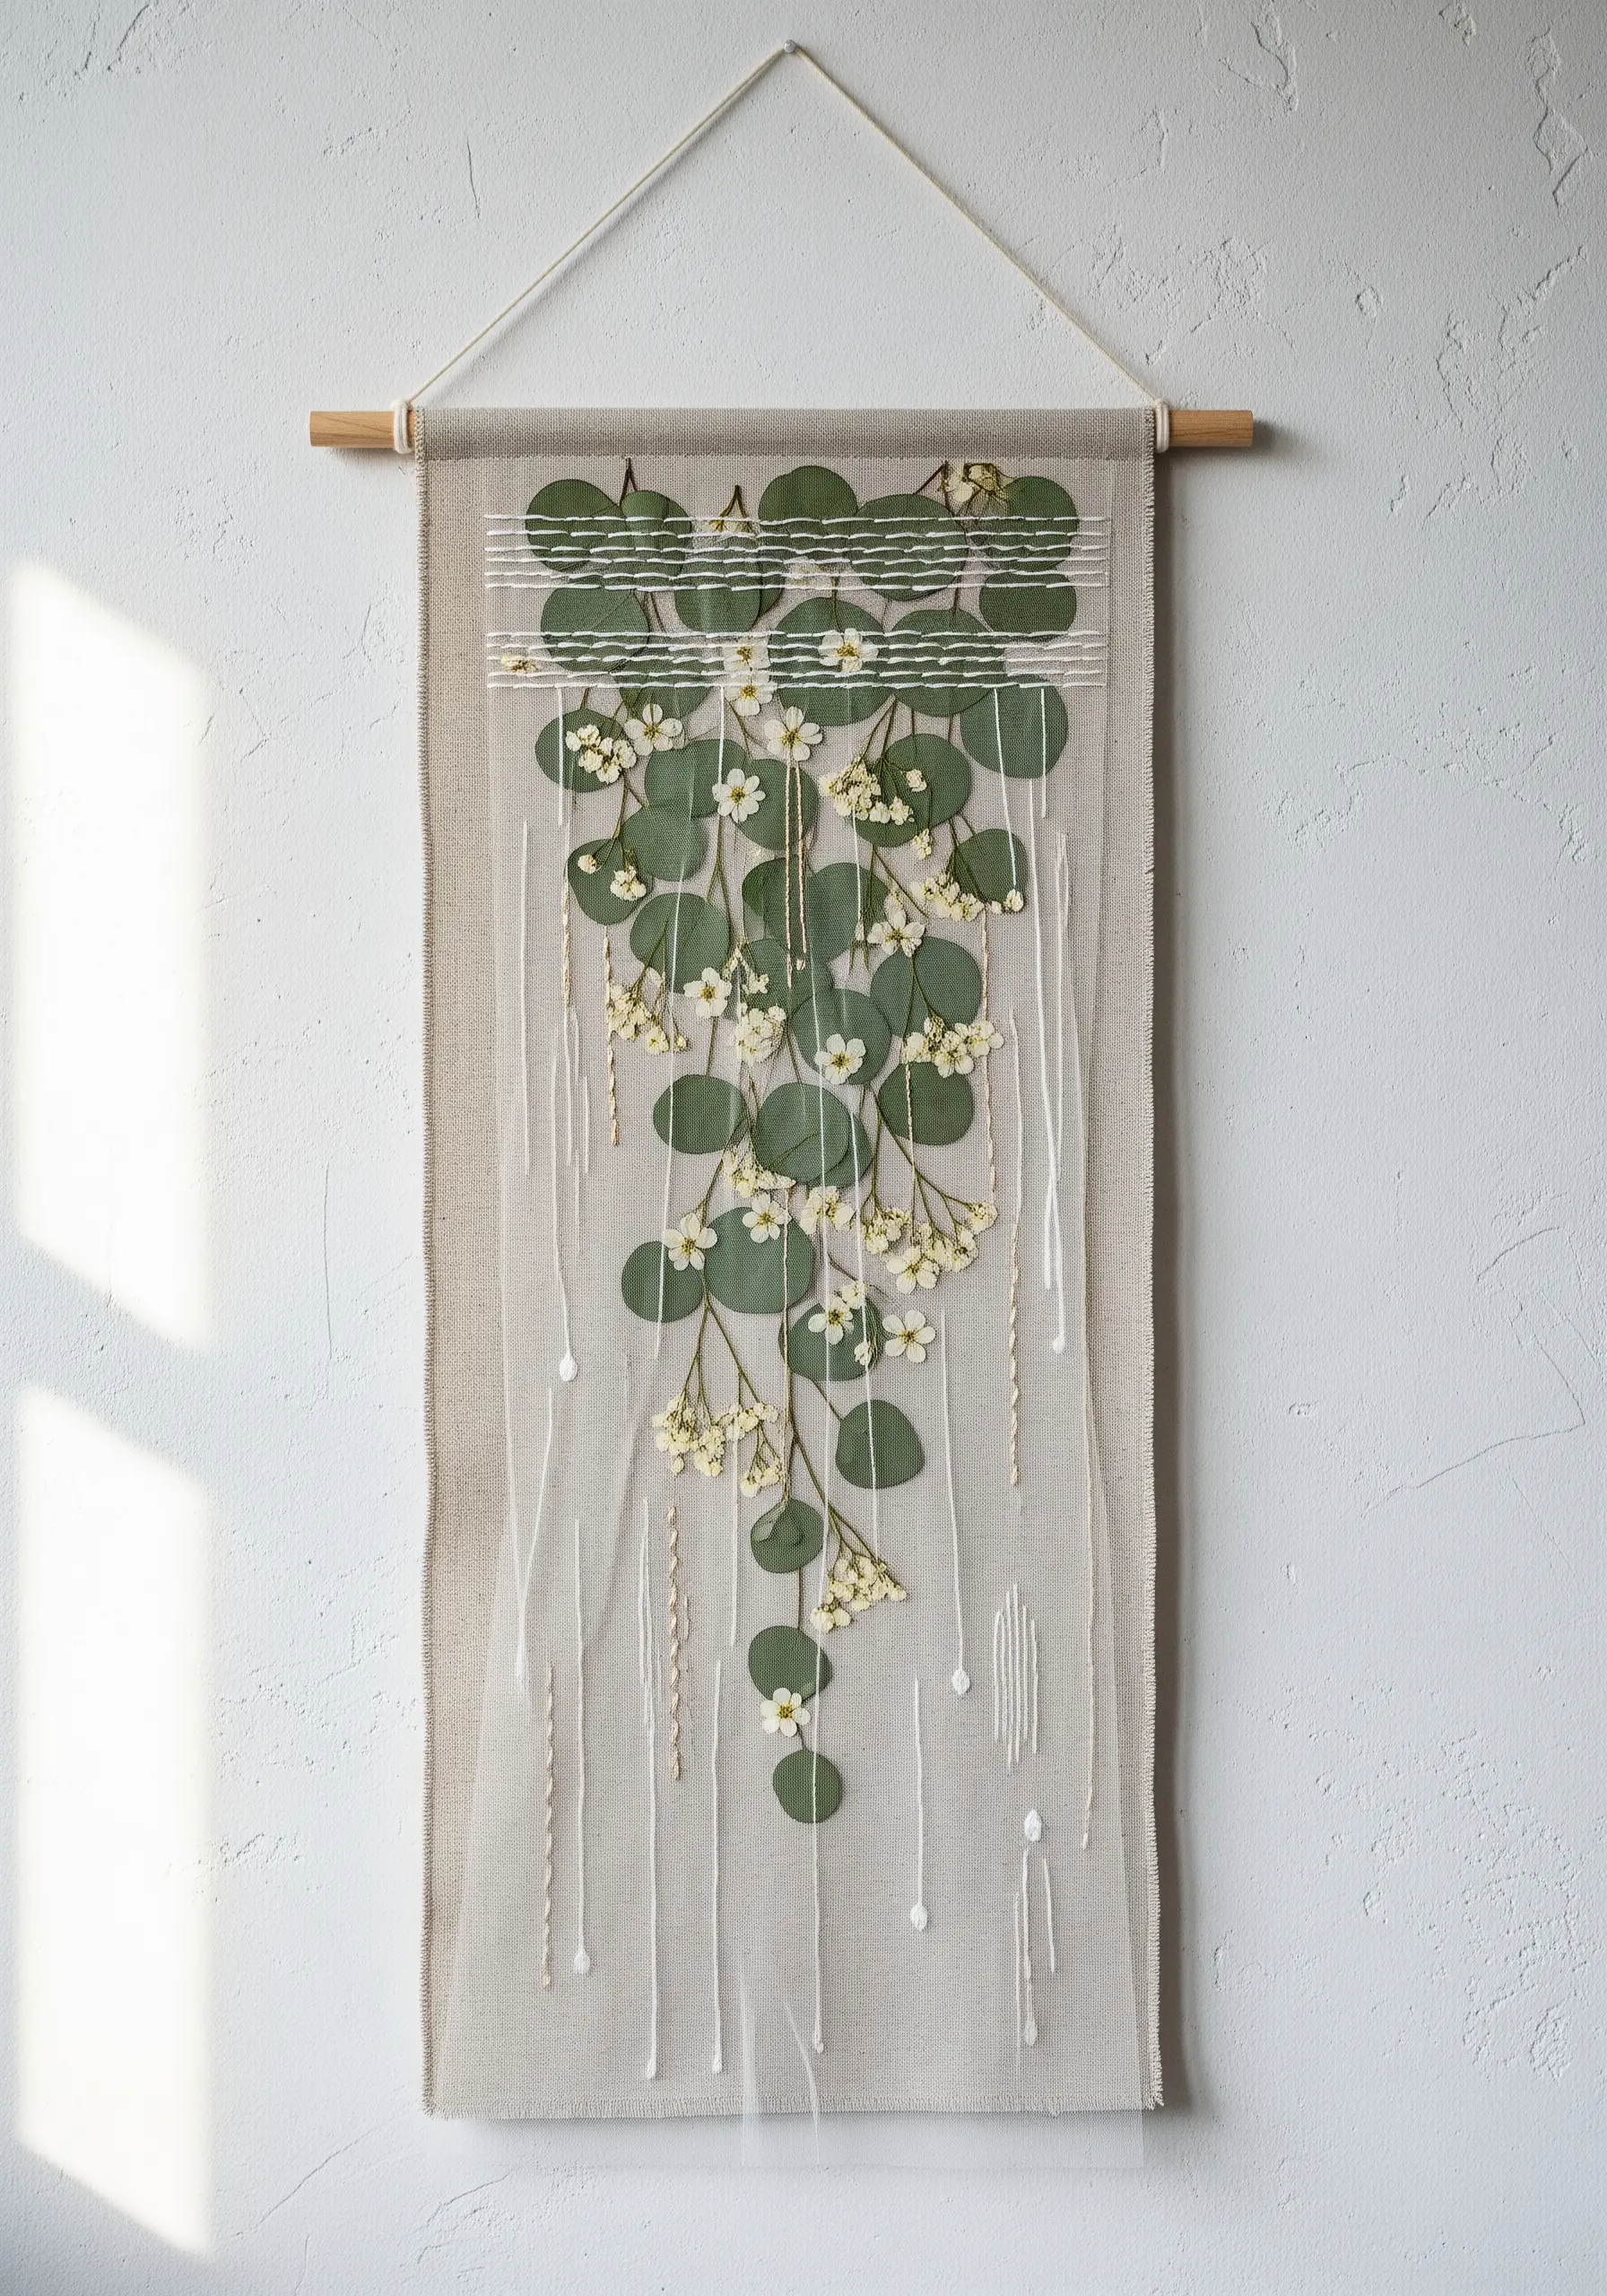
Build depth and texture by layering different fabrics. Start with a solid linen or canvas base for your wall hanging.
Add a shorter, narrower layer of sheer organza over the top, stitching it down only at the top edge.
Arrange your pressed botanicals between the two layers, allowing them to be gently held in place. A few vertical running stitches in a thick, soft yarn adds a final abstract, modern touch.
10. Create a Gradient with a Petal Mosaic

Instead of stitching a solid shape, fill it with a mosaic of tiny pressed petals for incredible texture and color depth.
First, establish a strong border for your heart shape using a couched thread or a bold chain stitch.
Carefully arrange the petals inside, transitioning from a deep red to a soft pink to create a beautiful gradient effect. Secure them with a light, clear-drying fabric adhesive for a clean finish.
11. Design a Labeled Herbarium Gift Set

This is a wonderfully thoughtful gift for a cook or gardener. For each sachet, use appliqué to create a clean background for a single herb specimen.
After securing the pressed herb, add a simple, elegant label underneath using a fine-tipped permanent fabric pen or a neat backstitch with a single strand of dark thread.
The combination of real herbs and clean typography feels both rustic and sophisticated.
12. Weave a Botanical Dreamcatcher

Use a single, taut layer of tulle in your hoop as a transparent canvas. This is the key to the floating effect.
Create a web by wrapping a metallic gold thread around the inner hoop and across the center, securing it with tension.
Then, carefully weave your pressed flowers and delicate greenery into the threads, securing them with tiny extra stitches or a dot of clear glue where needed. The result is magical.
13. Play with High-Contrast Celestial Designs

A black or dark navy fabric provides the ultimate dramatic backdrop, making both your thread and your flowers pop.
For a sun motif, stitch radiating lines in a bright yellow or gold, then place a vibrant pressed flower at the very center.
For the moon, use a shimmering silver thread for the crescent outline and fill it with delicate, airy baby’s breath. The contrast makes these simple designs incredibly impactful.
14. Use Minimal Stitching to Frame Tall Flowers

When your botanical specimen is as elegant and structural as a delphinium, your embroidery should be its quiet support, not the main event.
After securing the flower, add a simple running stitch border around it. Choose a thread color that pulls a hue from the petals themselves, which creates a cohesive, harmonious look.
This clean, geometric frame contains the organic shape of the flower, resulting in beautifully balanced modern framed embroidery.
15. Build a Miniature Terrarium Scene

Combine bold line art with delicate natural elements to create a captivating 3D illusion.
First, stitch the geometric outline of the terrarium using a thick, 4-strand backstitch to make the lines crisp and defined.
Then, fill the stitched ‘panes’ with a miniature landscape of pressed ferns, preserved moss, and tiny flowers, turning the 2D surface into a tiny world.
16. Create a Bouquet Illusion on a Banner

This technique gives your arrangement a polished, layered look, as if it’s a real bouquet wrapped in paper.
First, arrange your pressed flowers on a fabric banner. Then, place a diamond-shaped piece of sheer organza over the top.
Stitch the organza down along its edges. Finally, add the bow and tied stems on top of the organza using a simple backstitch, completing the illusion.
17. Add Embellishments for a Touch of Magic

Take your botanical art to the next level by adding textural embellishments. A hand-dyed fabric that looks like a cloudy sky provides a much more interesting background than plain white.
After arranging your Queen Anne’s Lace, stitch tiny seed pearls or white French knots scattered among the florets.
These additions catch the light and create the delicate illusion of morning dewdrops.
18. Add Mood with an Abstract Thorny Frame
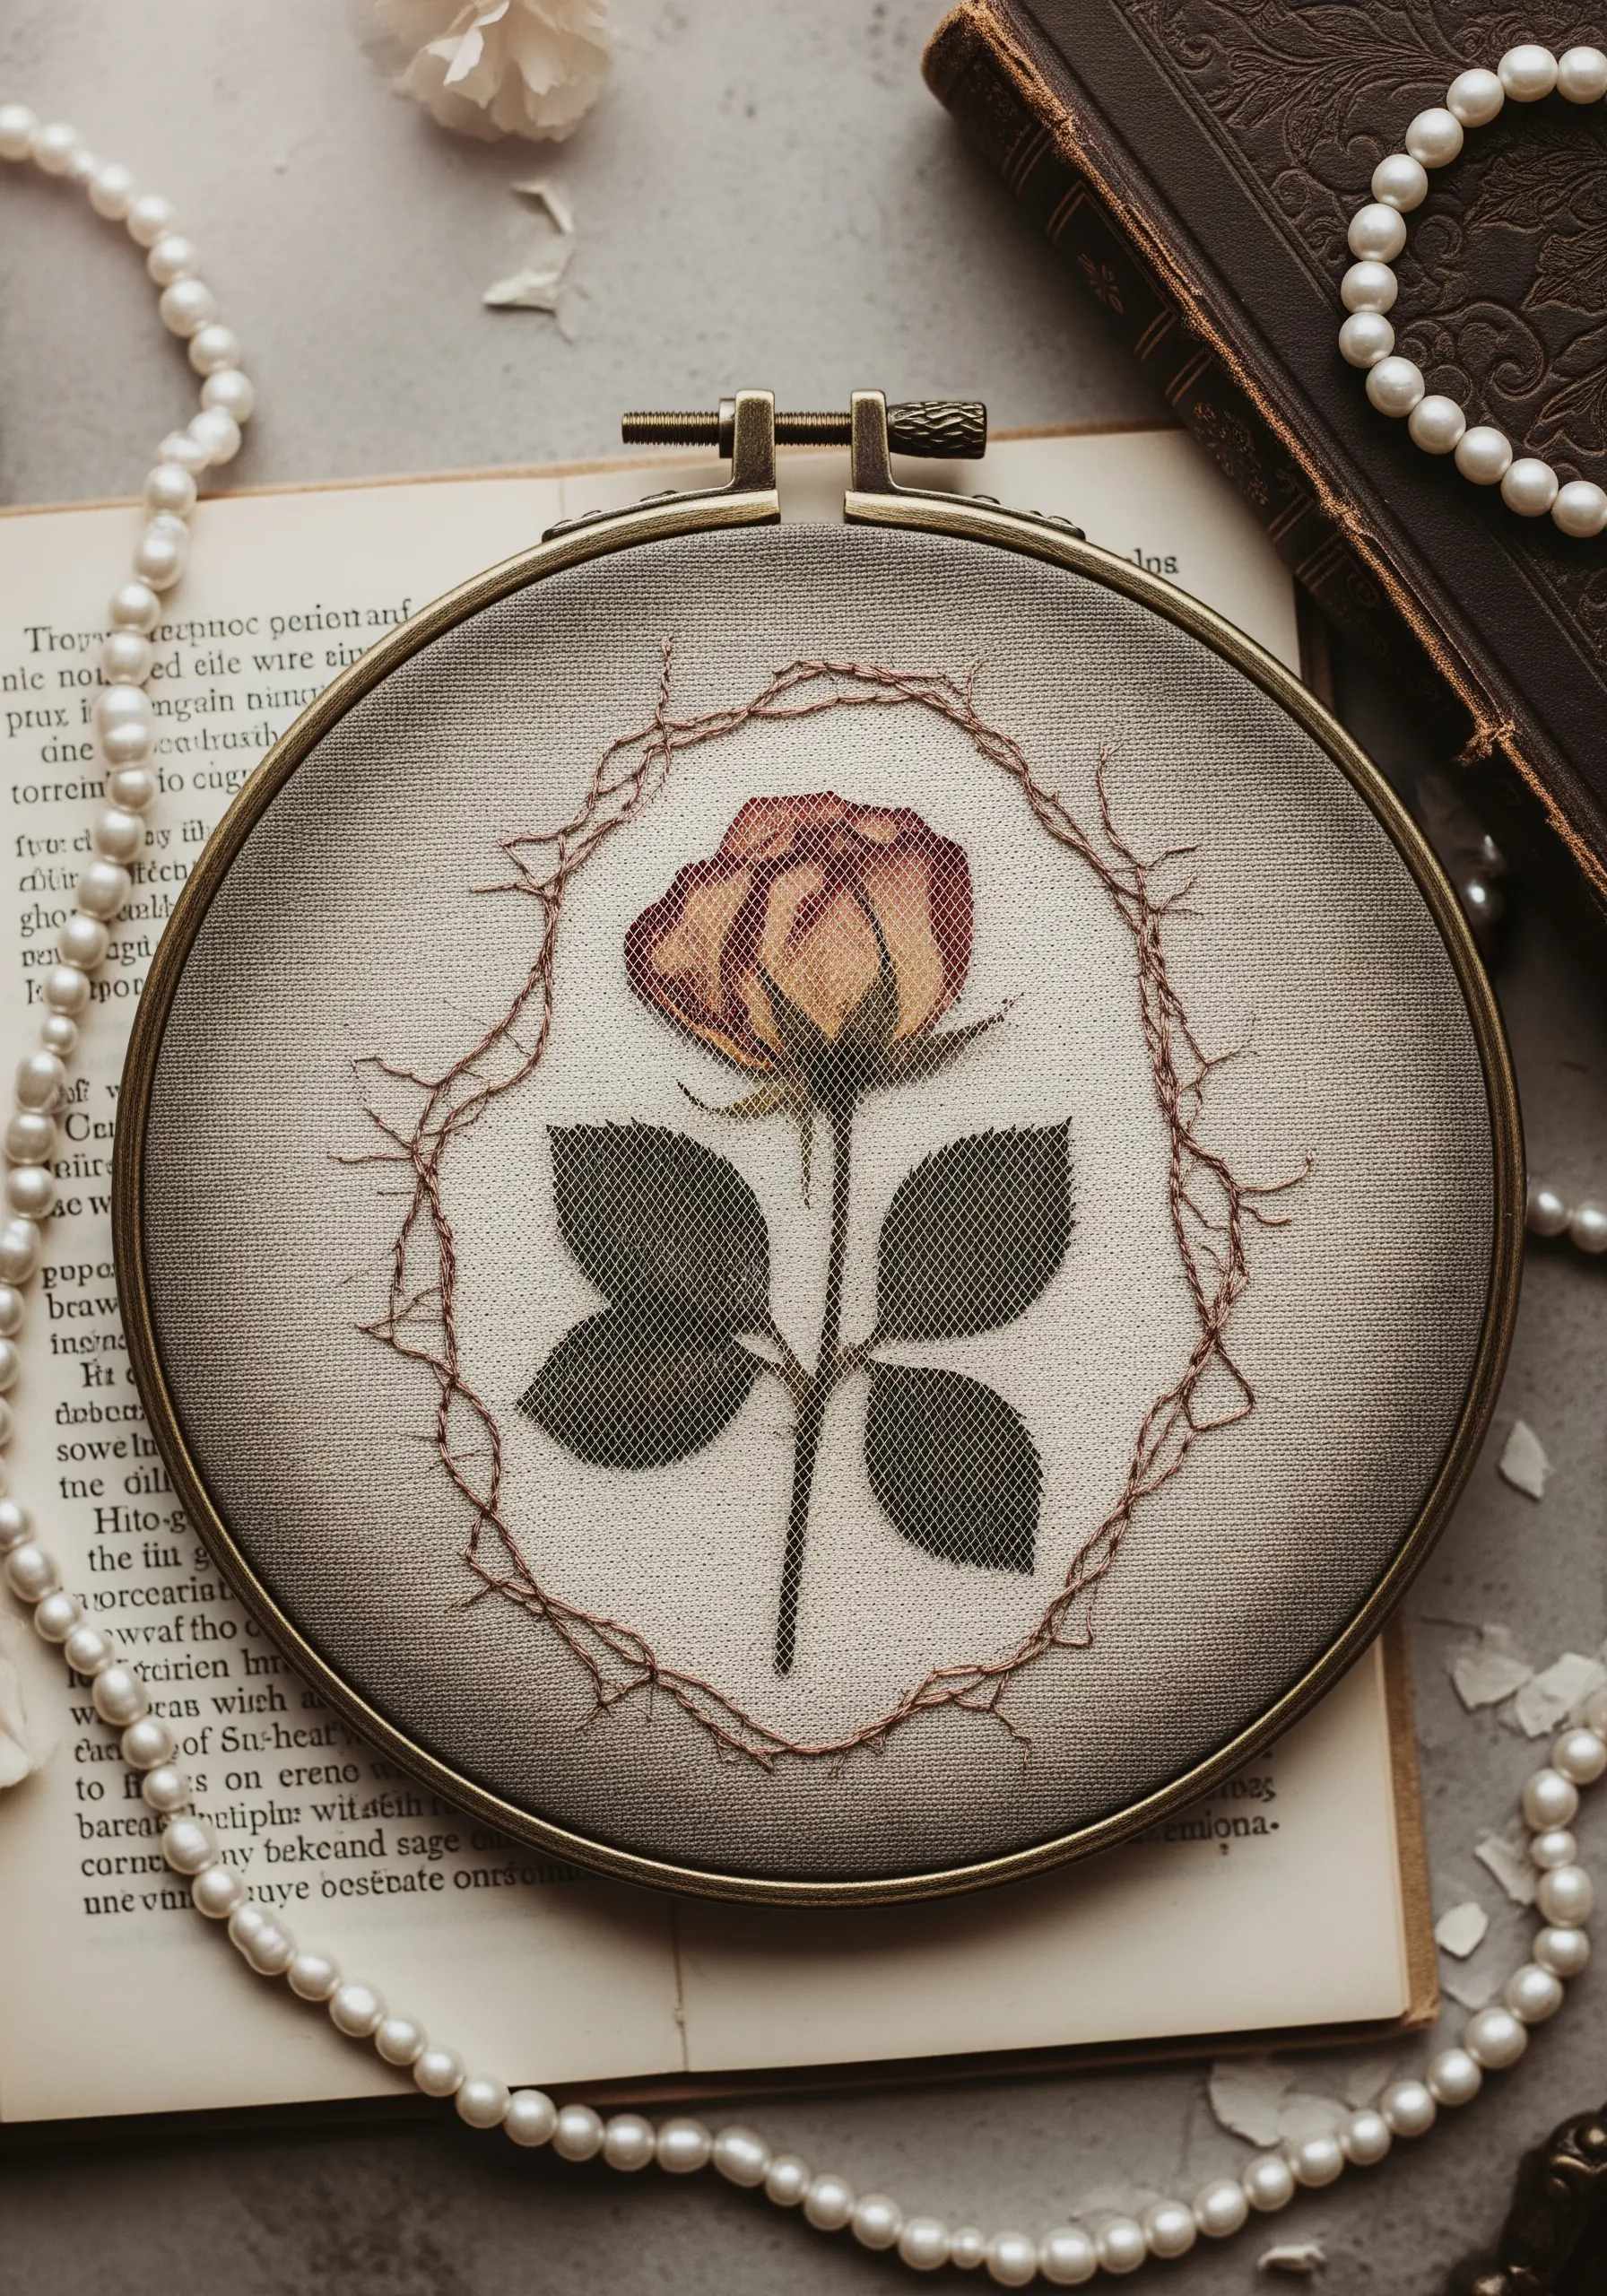
Juxtapose the delicate, fading beauty of a pressed rose with a frame that feels wild and emotional.
Use a variegated brown thread to stitch a loose, thorny border. Create this effect with overlapping straight stitches of different lengths and angles.
This organic, slightly chaotic frame provides a stunning contrast to the ordered structure of the rose, creating a piece with a vintage, gothic feel.
19. Design a Geometric Leaf Sampler

Turn a simple leaf collection into a piece of modern art by imposing a geometric structure.
Using a metallic or brightly colored thread, stitch a grid of triangles or squares directly onto your fabric.
Then, carefully place one small, unique pressed leaf inside each shape. The rigid grid highlights the soft, organic curves of each leaf, making for striking minimal embroidery wall pieces.
20. Craft a Miniature Wearable Bloom

When creating embroidered jewelry, choose a single, small, but perfectly formed bloom like this pansy.
Use a high-quality, tightly woven fabric like linen or cotton twill to ensure clean edges when you finish the pendant.
Secure the flower with a few tiny, invisible couching stitches right in the center, and add one or two gold seed beads to mimic the stamen and add a hint of sparkle. It’s a perfect way to make handmade embroidered jewelry and accessories that make perfect gifts.
21. Grow a Blooming Family Tree

This is a deeply sentimental gift that combines embroidery and personal history.
First, stitch the trunk and branches of the tree using a textured stitch like split stitch or chain stitch.
Use a simple, clean backstitch to add the names along the branches. Finally, assign a unique pressed flower to each person, securing it at the end of their branch. The variety of blooms makes the tree feel vibrant and alive.
22. Emphasize Details with Stitched Veins

Breathe new life into pressed leaves by tracing their natural patterns with thread.
After arranging your leaves in a wreath, use a single strand of metallic copper or gold thread to stitch over the central veins.
A simple straight stitch or a delicate backstitch is all you need. This technique not only secures the leaves but also adds a shimmering texture that catches the light beautifully. Explore other leaf vein stitch methods to add realism.
23. Preserve a Sprig in a Felt Bookmark

Create a bookmark that is both beautiful and durable. Cut a window out from one piece of felt.
Behind this window, sandwich a delicate pressed sprig between two layers of fine tulle or organza. Place a solid piece of felt behind it all.
Finally, use a simple running stitch or blanket stitch around the window and the outer edges to seal the botanical inside, protecting it from wear and tear. You can find more DIY cozy embroidery bookmarks that make reading magical.
24. Craft a Whimsical Balloon Bouquet

This playful design is perfect for a celebration gift. Use the large, translucent petals of flowers like hydrangeas or poppies to represent the balloons.
Their natural transparency and vibrant colors are perfect for this illusion.
Then, use long straight stitches with colorful floss to create the balloon strings, gathering them together at the bottom and tying them with a tiny, neatly stitched bow.
25. Create a Backlit Botanical Suncatcher

For a stunning stained-glass effect, use two nested embroidery hoops to create tension.
Stretch a layer of sheer organza over the inner hoop, place your flower, then stretch a second layer of organza over the top before securing it with the outer hoop.
The pressure holds the flower in place without any stitches. When held to the light, the flower’s delicate structure is revealed. It’s a perfect use of negative space embroidery techniques.
26. Symbolize a Union with Botanical Rings

This is one of the most thoughtful pressed flower embroidery ideas for wedding decor and gifts.
Use a shimmering gold metallic thread to create two interlocking rings with a smooth satin stitch.
Inside one ring, place a petal from the bridal bouquet; inside the other, place a leaf from the wedding venue. This technique turns the embroidery into a vessel for memories.
Finish with the name and date in a simple, elegant script below the rings.
27. Merge Cross-Stitch with Pressed Florals

Create a charming juxtaposition of styles by combining the geometric grid of cross-stitch with the organic freedom of real flowers.
First, complete your cross-stitch design of a solid object, like this vintage teacup. This provides a solid, graphic base.
Then, arrange pressed flowers like chamomile to look as if they are steam or a fragrant bouquet rising from the cup. This surprising mix of textures is delightful and unique.
28. Illustrate Zodiac Signs with Petal Mosaics
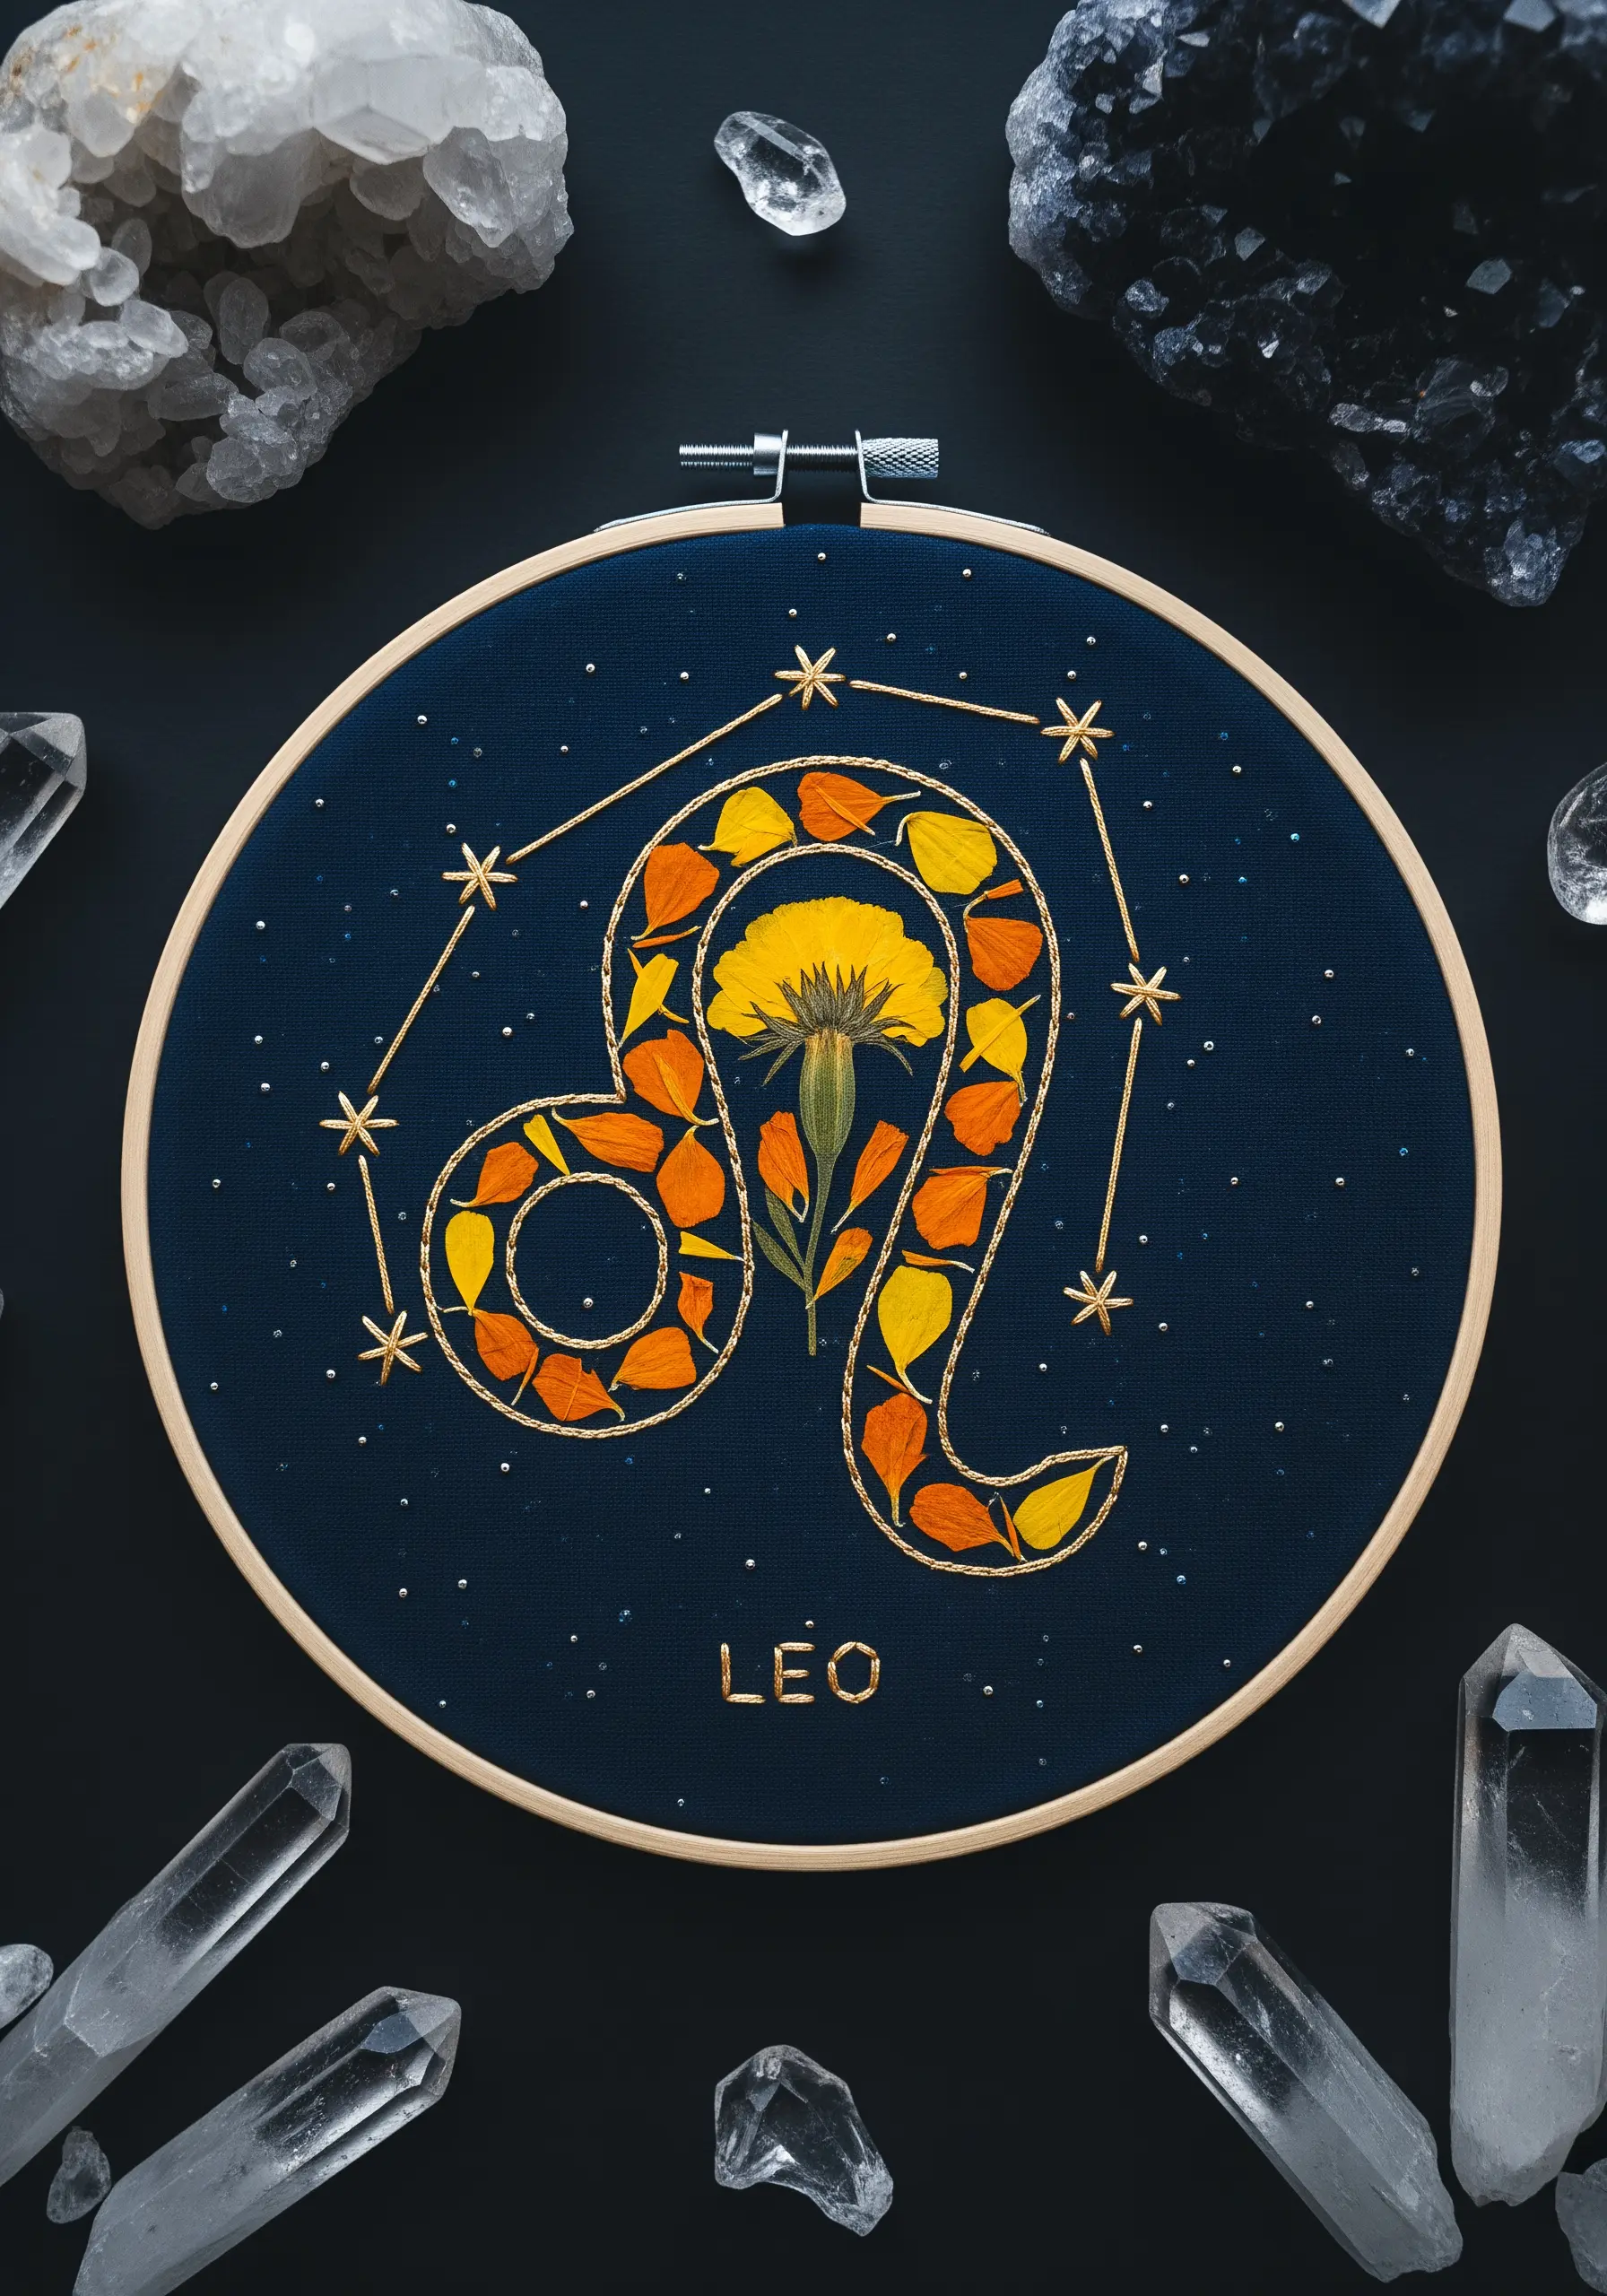
For a truly personalized gift, translate a zodiac sign into a botanical masterpiece.
Outline the main symbol and its corresponding constellation using a fine metallic gold thread and simple backstitches for a clean, celestial look.
Then, carefully fill the interior of the symbol with a mosaic of tiny petals in a color palette that matches the sign’s element—like fiery oranges and yellows for Leo. This combination of linear stitching and natural texture is captivating.
29. Tell a Story in a Floating Glass Frame

A hanging glass frame is the perfect way to create a miniature scene that interacts with light.
Carefully place a pressed flower between the two panes of glass. On a small scrap of organza, stitch a tiny, detailed bee.
Trim the organza very close to the stitches and place it near the flower inside the frame. The transparent fabric will seem to disappear, making the bee look like it’s truly flying.
30. Add Texture with a Dimensional Pathway

Guide the viewer’s eye through your composition while adding incredible tactile interest.
After creating two lush clusters of pressed wildflowers, connect them with a winding path made from dimensional stitches.
Use chunky French knots, Turkey work, or even tiny, dense yarn pom-poms in a gradient of earthy tones. This sculptural element provides a beautiful contrast to the flat, delicate nature of the pressed botanicals.


