
Before you pick up your needle, I want you to take a moment and look closely at a real flower. Notice how the light catches the edge of a petal, how the colors aren’t flat but a blend of a dozen subtle shades. This is where the magic of realistic embroidery begins—not with complex stitches, but with careful observation.
You don’t need to be a master painter to create breathtaking florals. You simply need to learn to see the details and translate them into thread. It’s about choosing one more shade of pink than you think you need, or changing the direction of your stitches to follow a curve. These small, intentional choices are what separate a simple craft from a work of art.
In the ideas that follow, I’ll show you exactly how to make those choices. We’ll move beyond basic satin stitch and explore how texture, dimension, and color blending can bring your roses and tulips to life. You already have the patience and the passion; now, let’s refine your technique.
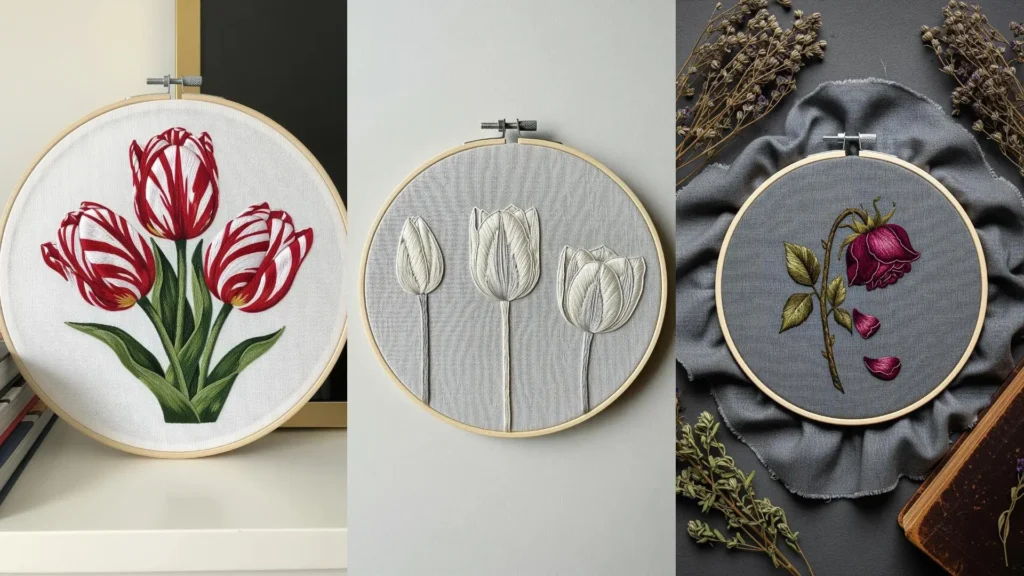
1. Master Photorealistic Petal Depth
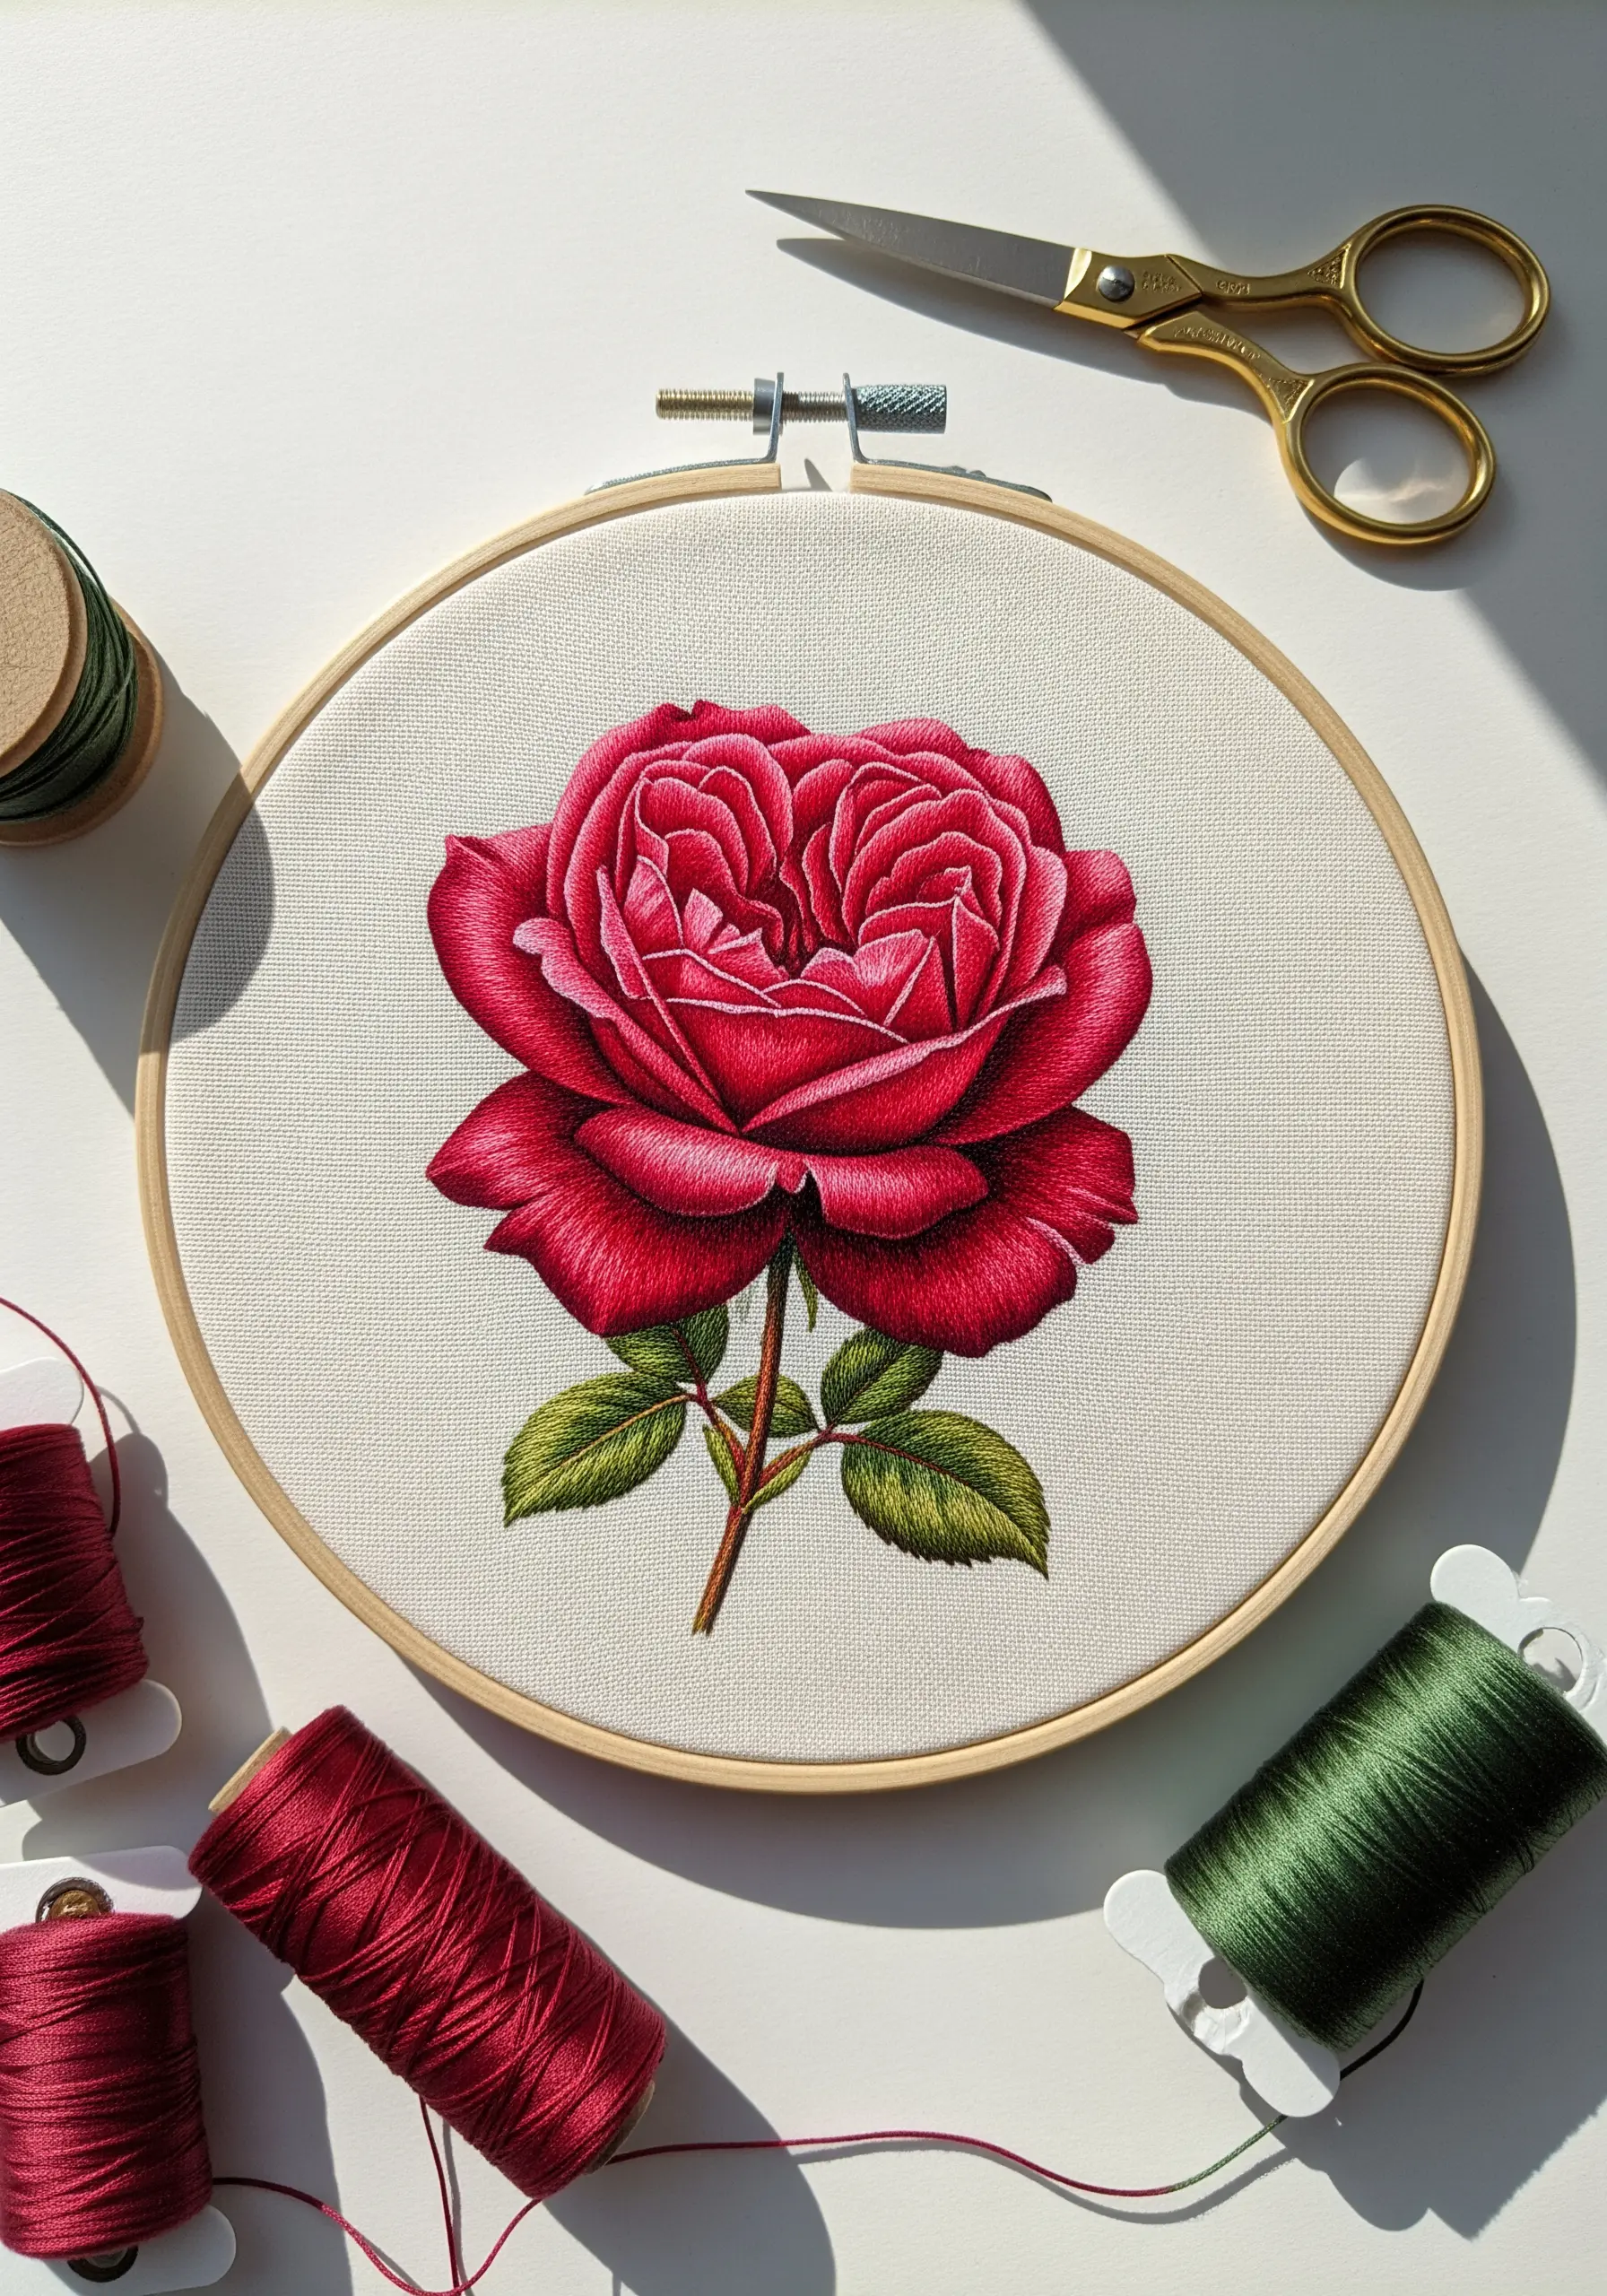
To achieve this level of realism, you must think like a painter, using thread to blend color and create dimension.
Work with four to five shades of red, from a deep crimson to a pale pink, using single-strand floss for the finest control.
Use long-and-short stitch, angling your stitches to follow the natural curve of each petal.
Reserve your lightest thread for the very edges of the petals to mimic how light hits the surface, which gives the rose its full, voluminous shape.
For the leaves, blend two shades of green within each section to avoid a flat, cartoonish look, one of the most effective wildflower thread painting techniques.
2. Amplify Color with a Black Canvas
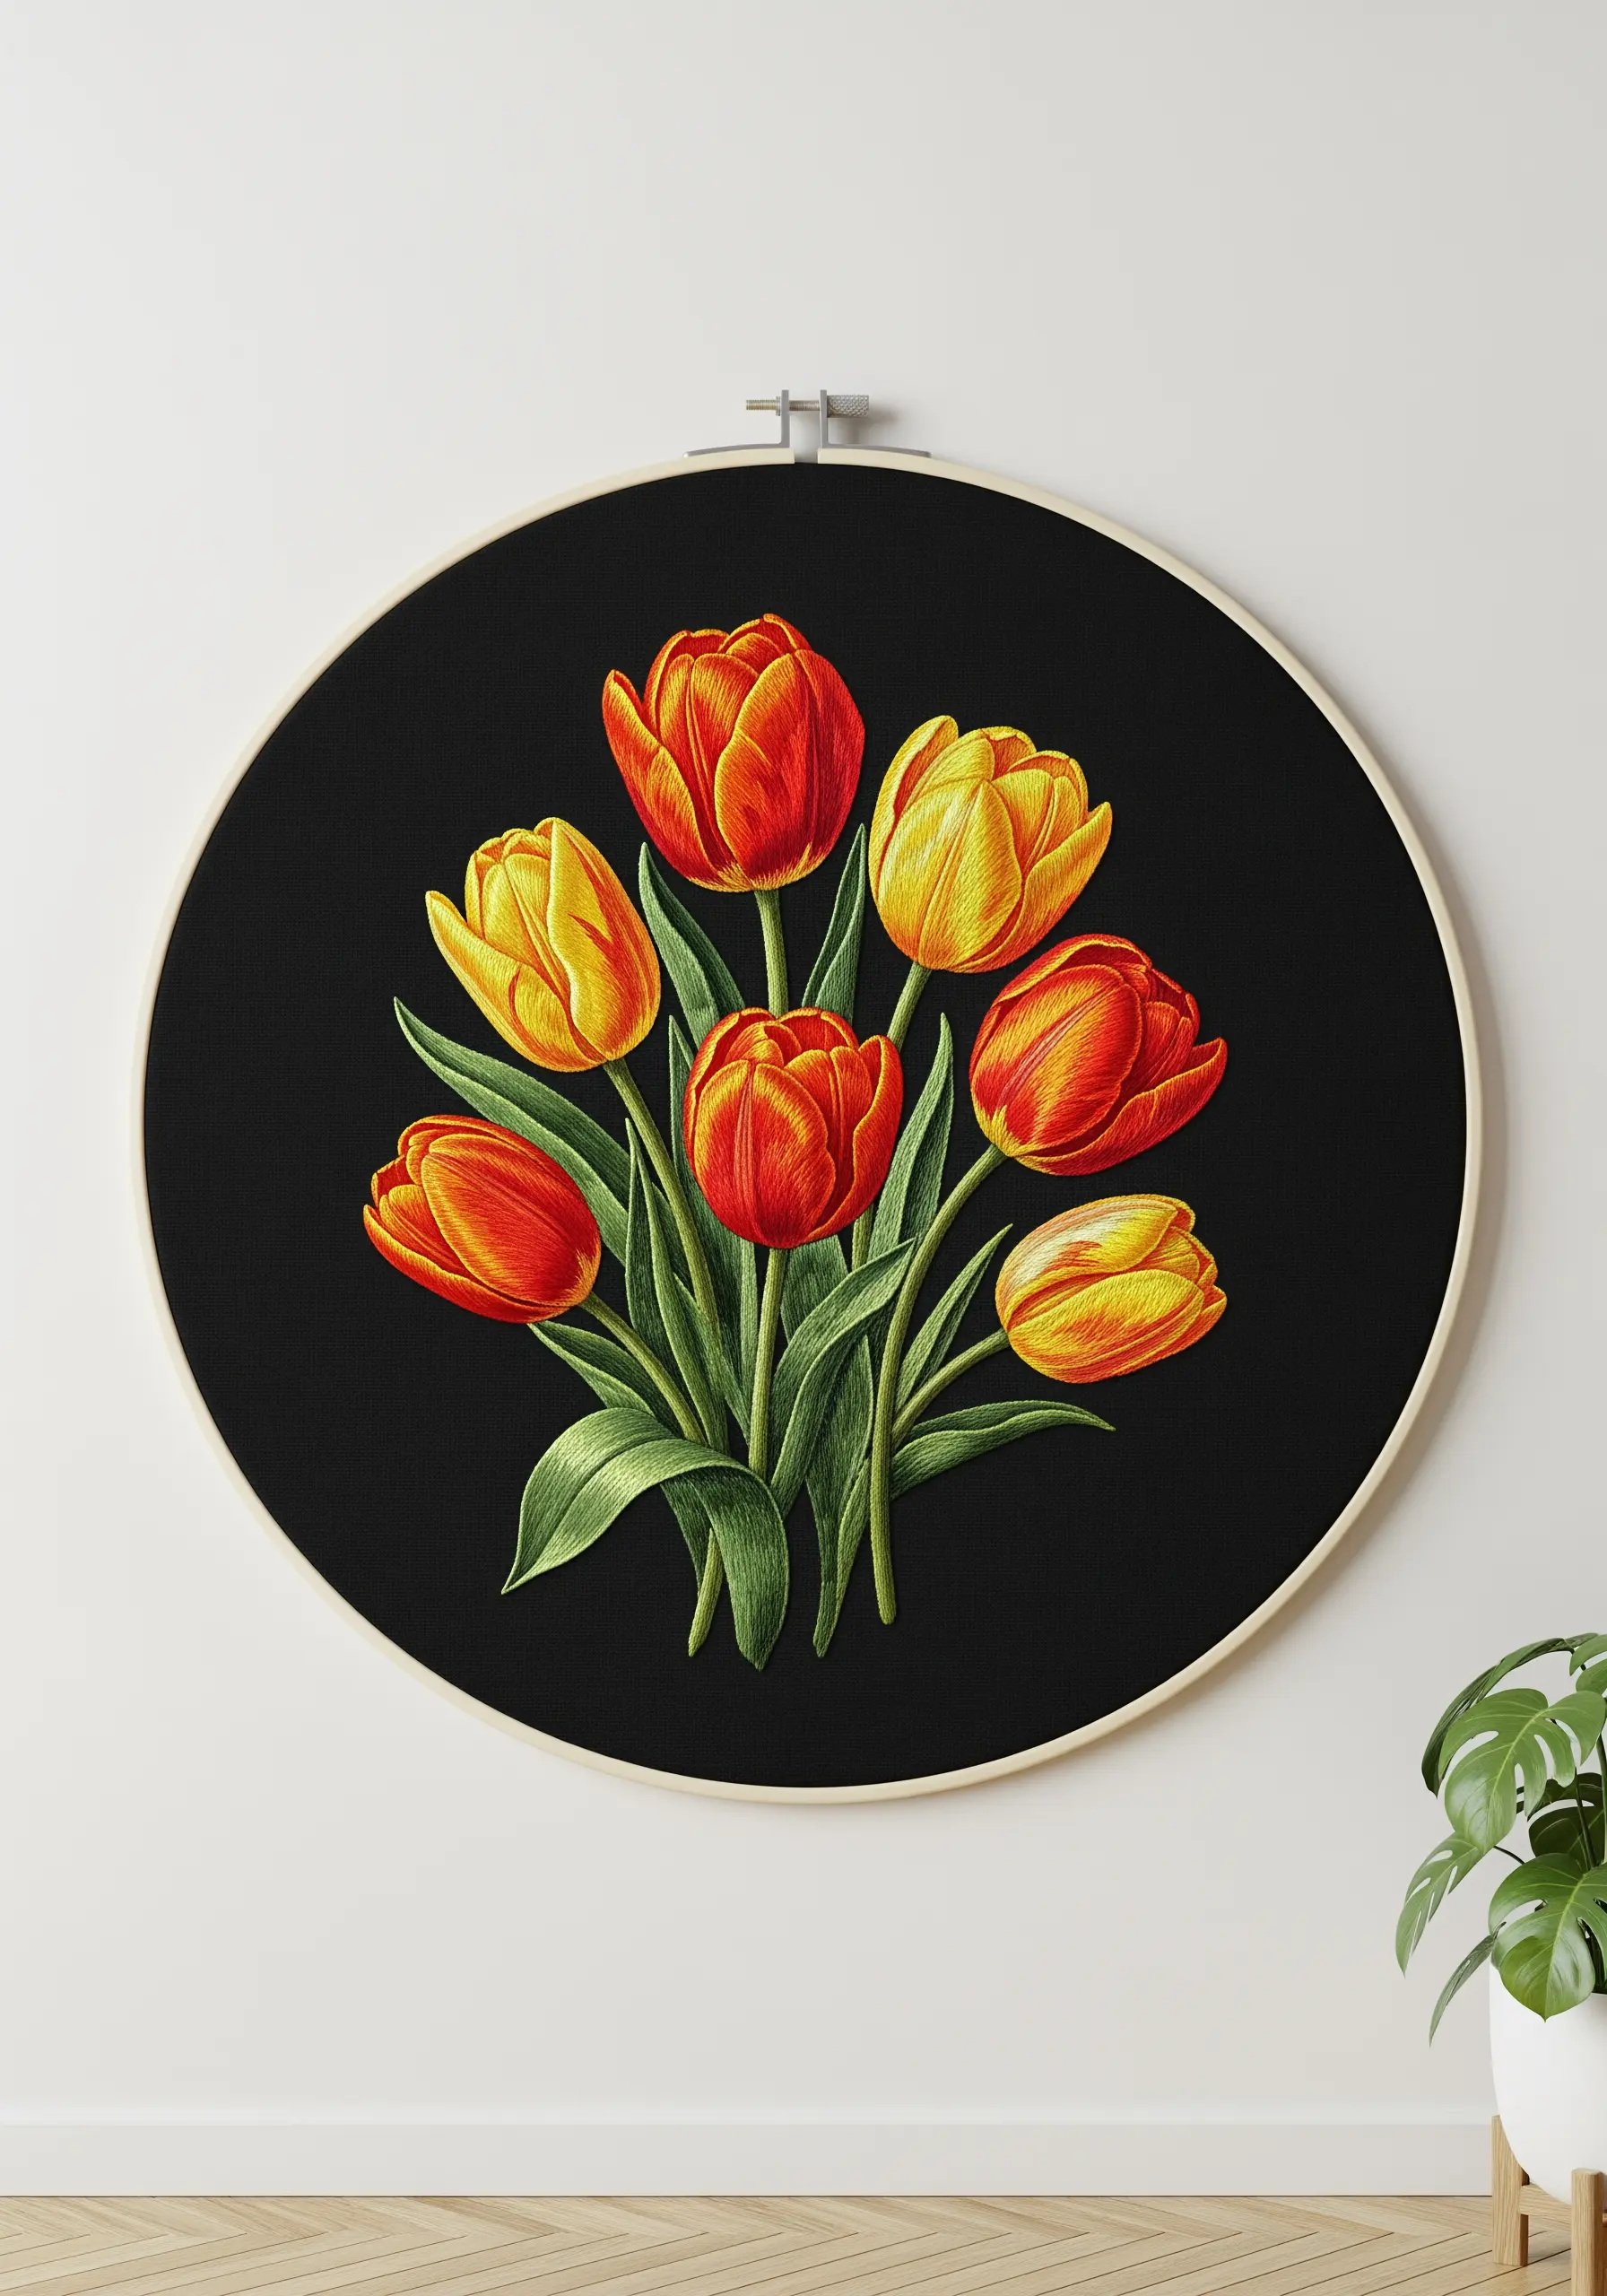
Stitching on black fabric is a powerful way to make your colors appear more vibrant and luminous.
Choose high-sheen threads, like rayon or silk, to maximize the light they catch against the dark background.
To prevent the dark fabric from showing through your stitches, use a double layer of thread or stitch a base layer of white before adding your color.
This technique, known as underpainting in thread, ensures your yellows and reds remain pure and brilliant without being dulled by the black canvas.
3. Create Contrast with Dimensional Stitches
Combine flat and raised stitches to guide the viewer’s eye and create a tangible sense of depth.
Use padded satin stitch for the tulip petals, layering thread underneath to physically lift them from the fabric surface.
For the roses, switch to a woven wheel stitch (or spider web rose stitch), which builds a dense, spiraling texture that mimics a blooming flower.
This contrast between the smoother tulips and the tightly woven roses makes the entire composition more dynamic and engaging.
4. Sculpt with Silk Ribbon Embroidery
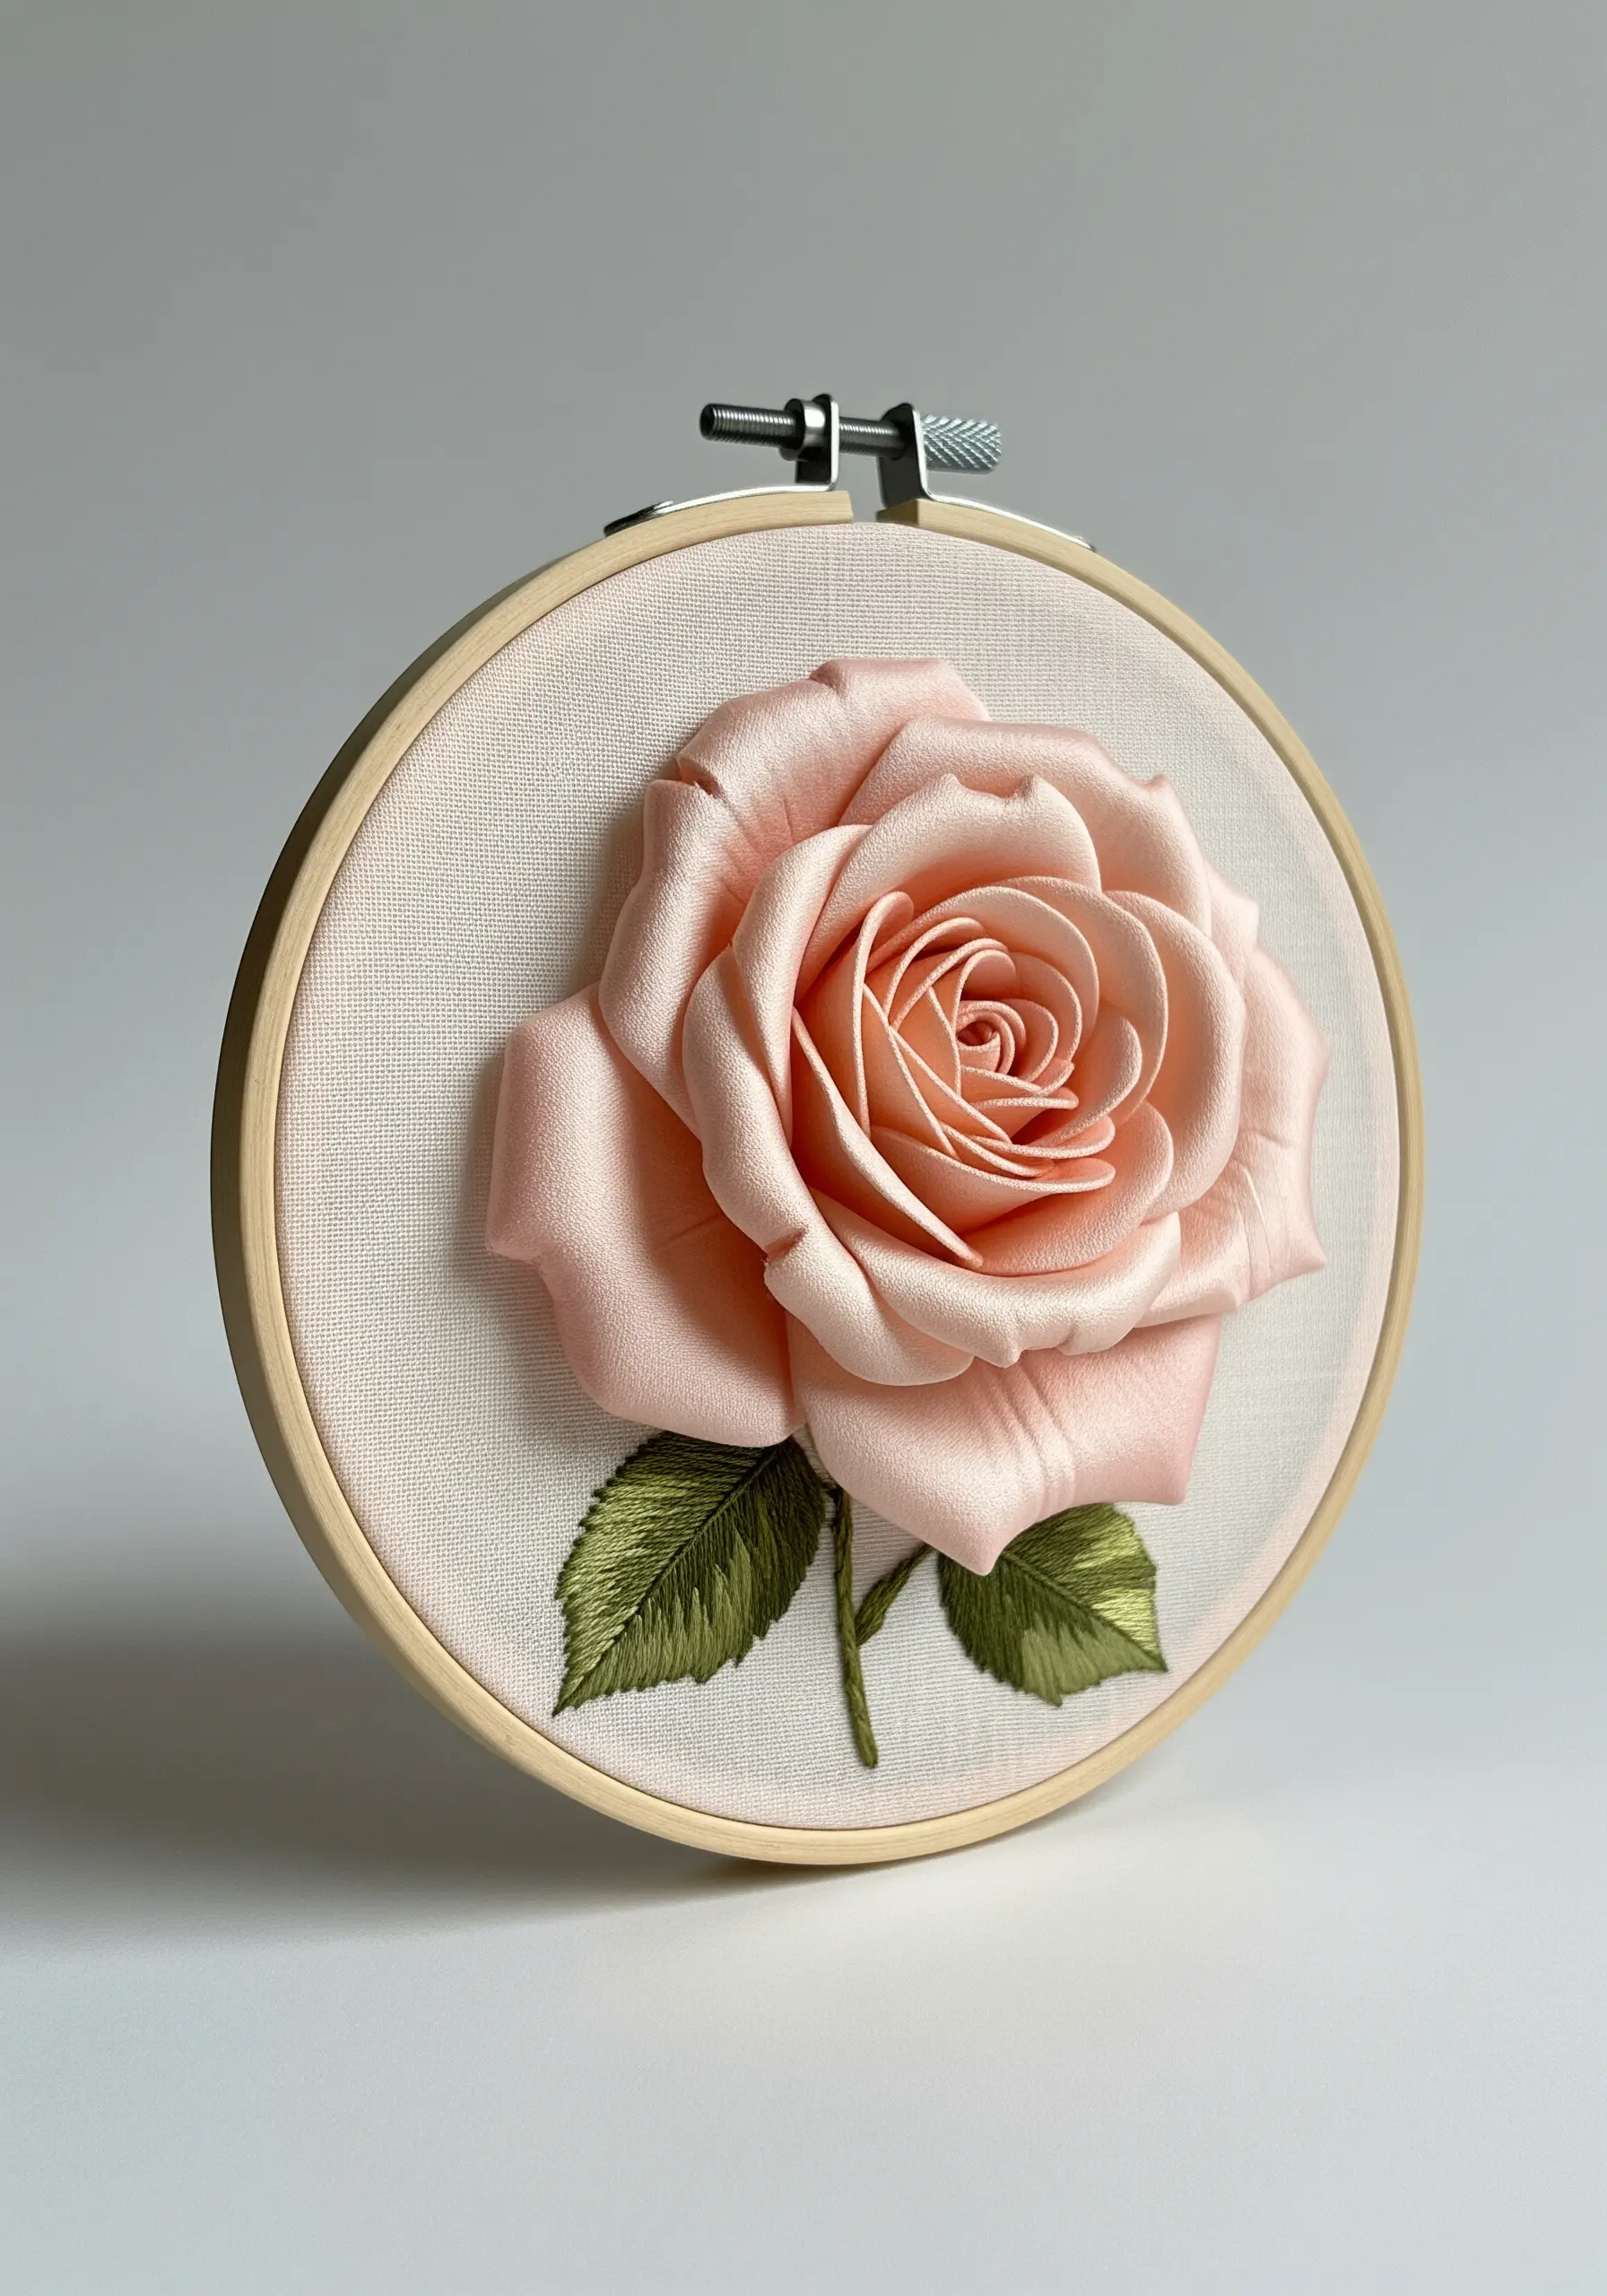
For a rose that feels impossibly soft and three-dimensional, put down the floss and pick up silk ribbon.
Use a wide (7mm or more) ribbon and a large-eye chenille needle, which parts the fabric threads rather than piercing them.
Create each petal with a single stitch, twisting the ribbon as you pull it through to create naturalistic folds and curls.
This technique is not only faster than thread painting but also offers unparalleled texture and light reflection, creating a truly luxurious finish.
5. Stitch Variegated Petals on Velvet
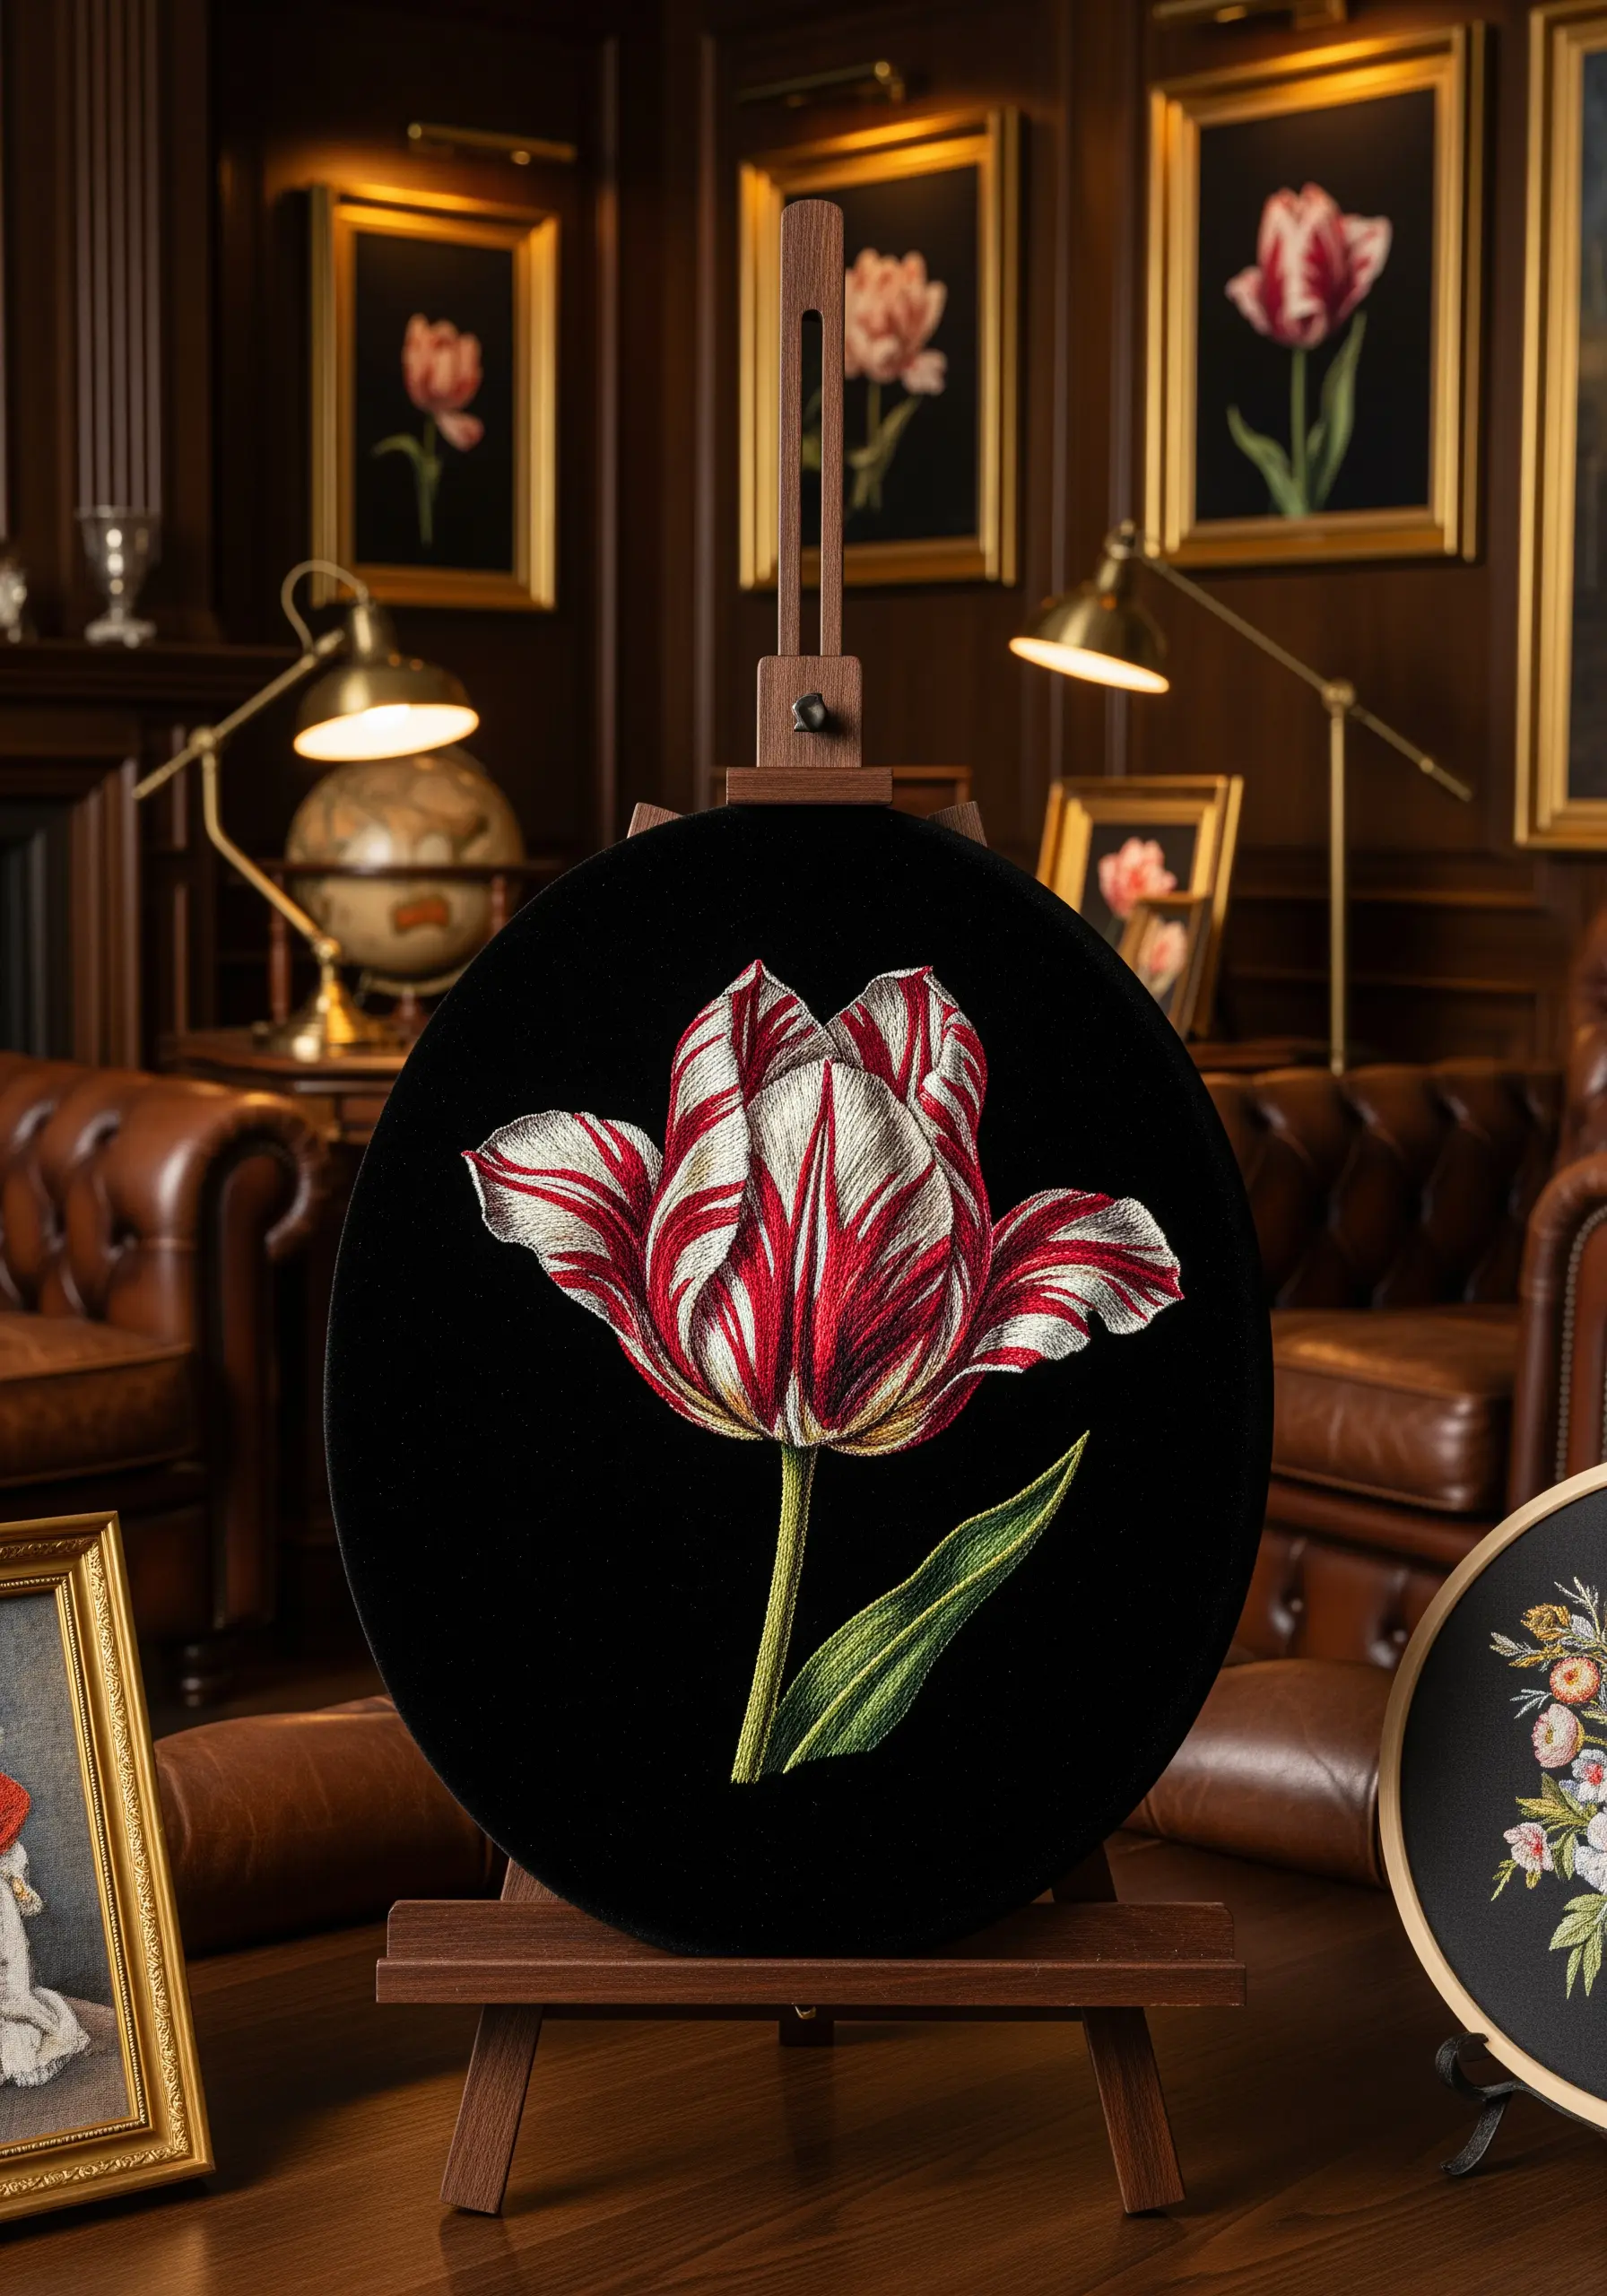
To capture the dramatic stripes of a Rembrandt tulip, precise thread painting is essential.
Work on a rich, dark velvet fabric; its pile absorbs light, making your thread appear even brighter and more defined.
Use a single strand of floss and map your color changes carefully, treating each stripe as its own small section of satin stitch.
Keep your stitches perfectly parallel and tightly packed to create the sharp, clean edges that make this design so striking.
6. Define Form with Minimalist Outlines
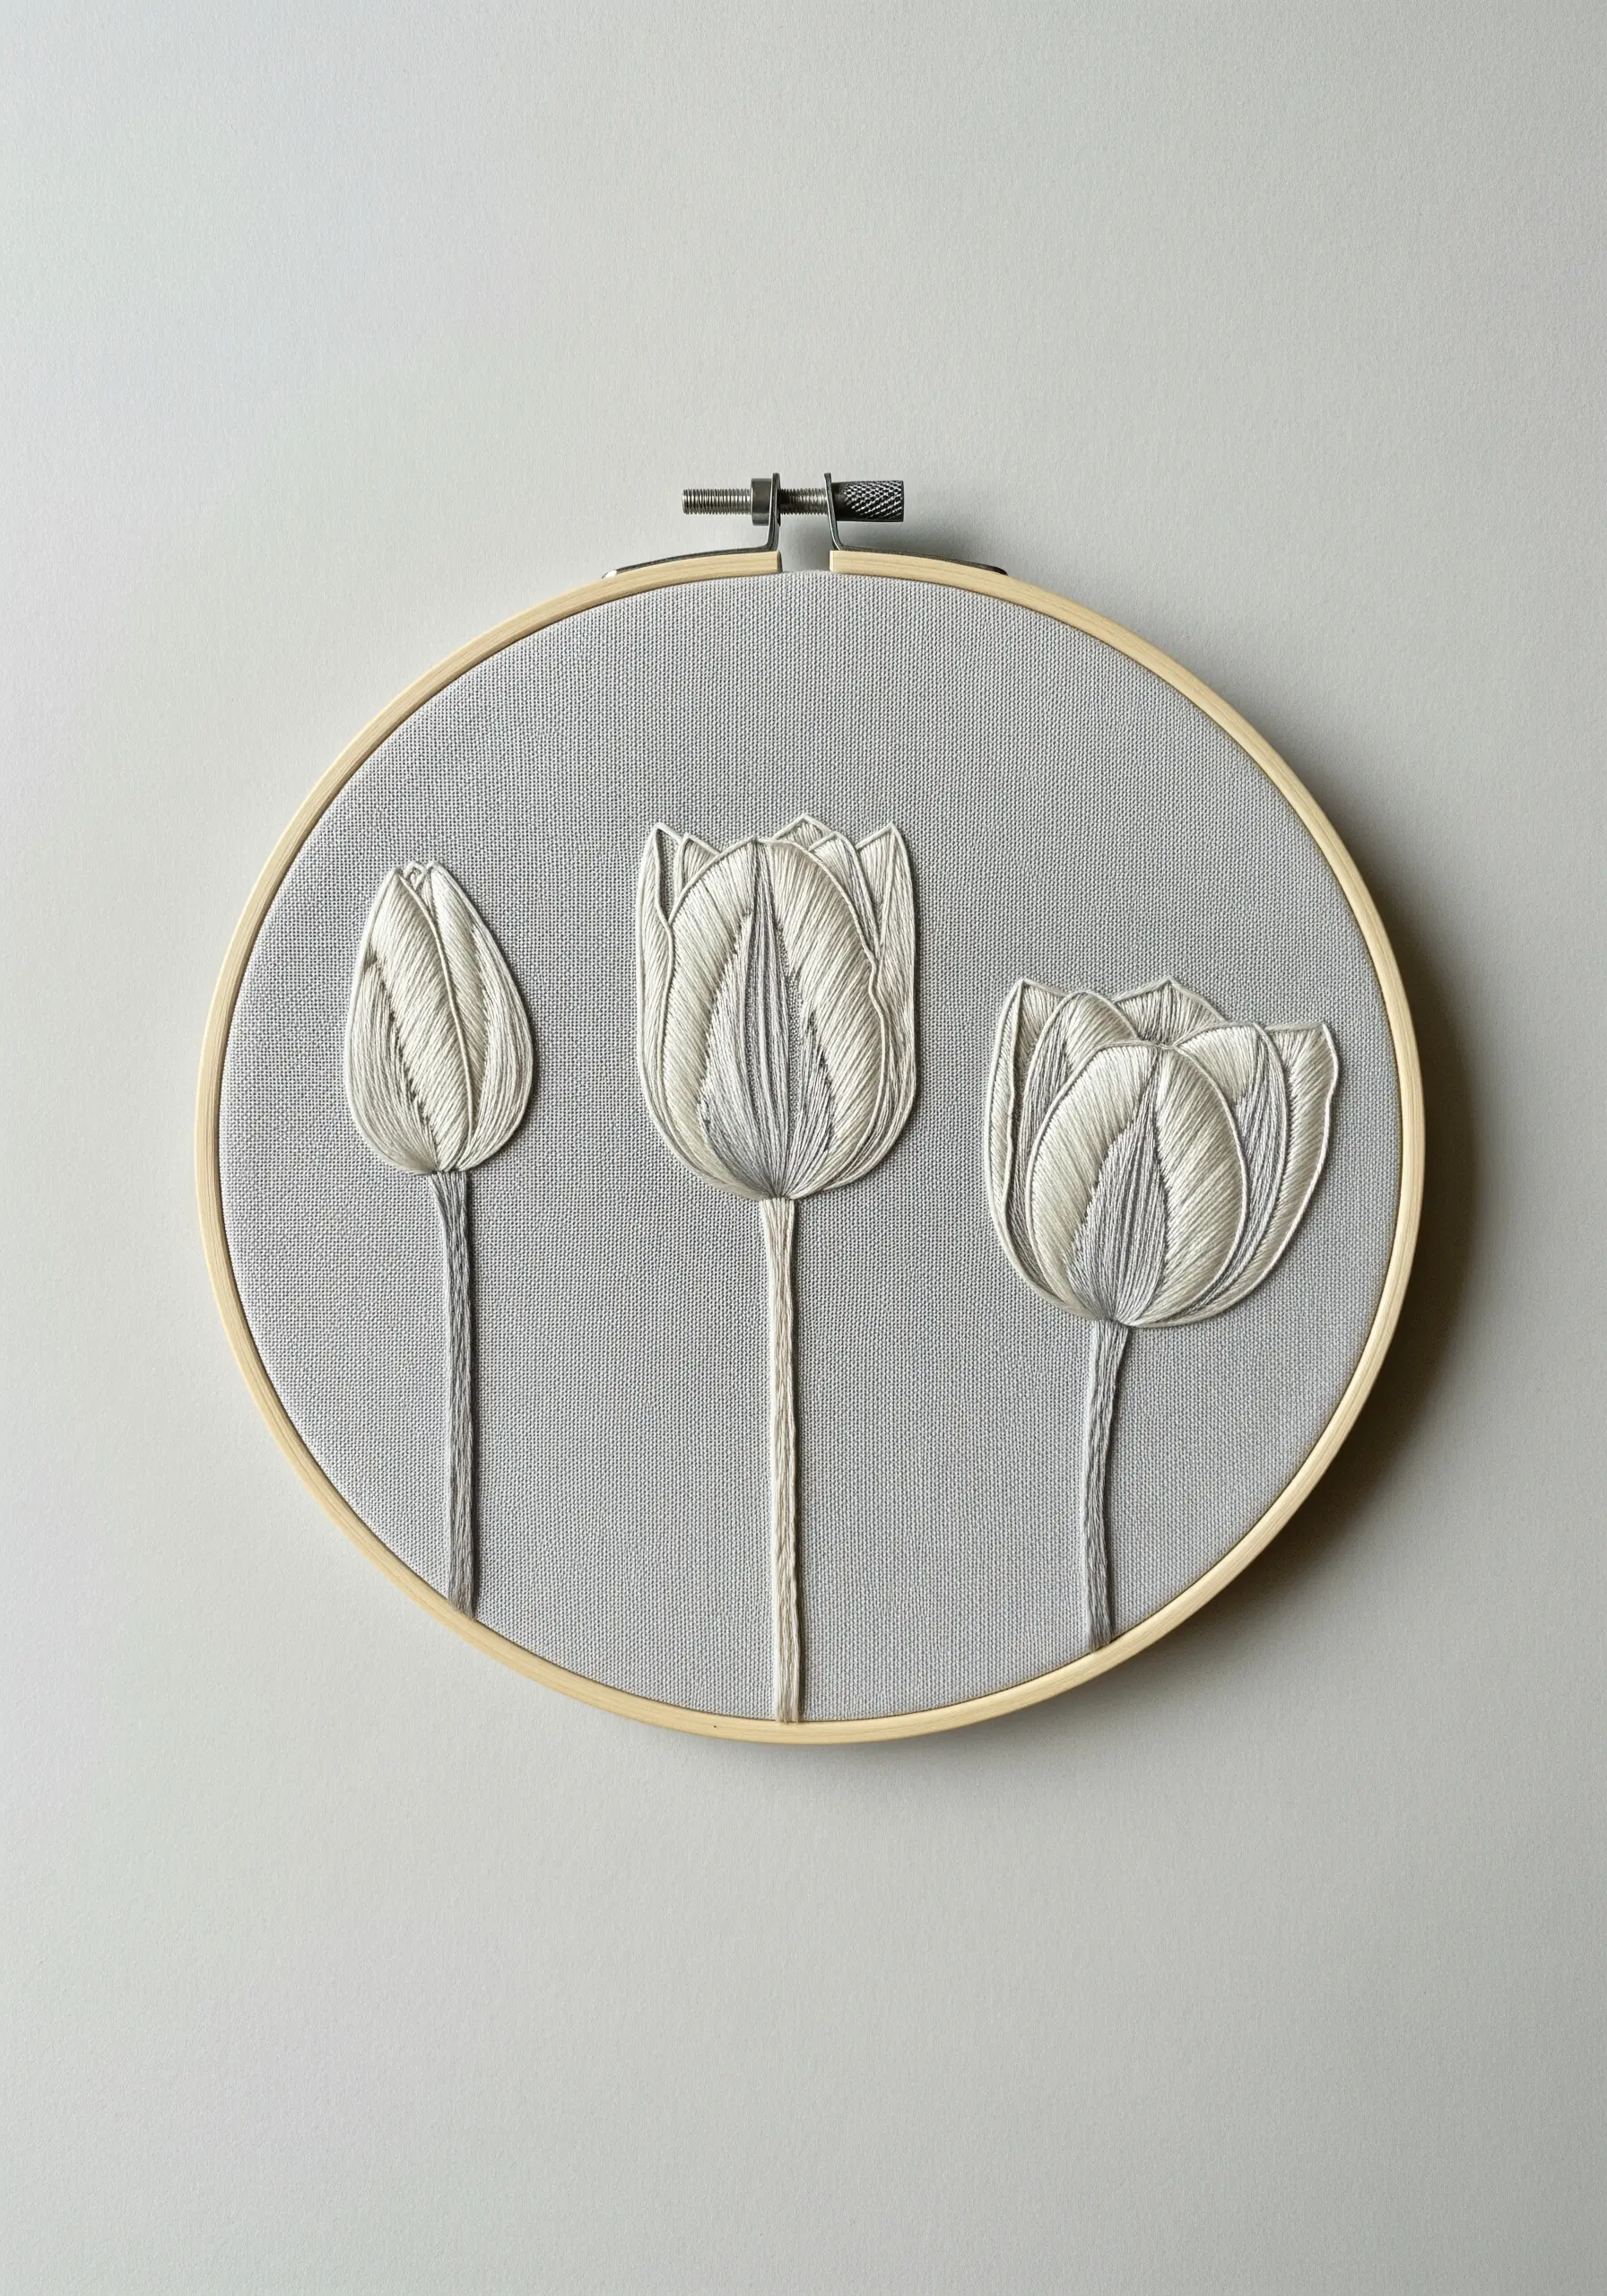
You don’t need a full palette of colors to create a beautiful floral design; sometimes, texture and line are enough.
Use a single color of thread in varying weights—perhaps a 6-strand floss for the outlines and a 2-strand floss for the delicate inner shading.
Emphasize the form of the tulips with directional satin stitch, letting the angle of your stitches define the curve of the petals.
This approach transforms a simple sketch into one of the most elegant minimal line drawing embroidery ideas.
7. Frame a Pillow with a Delicate Rose Vine
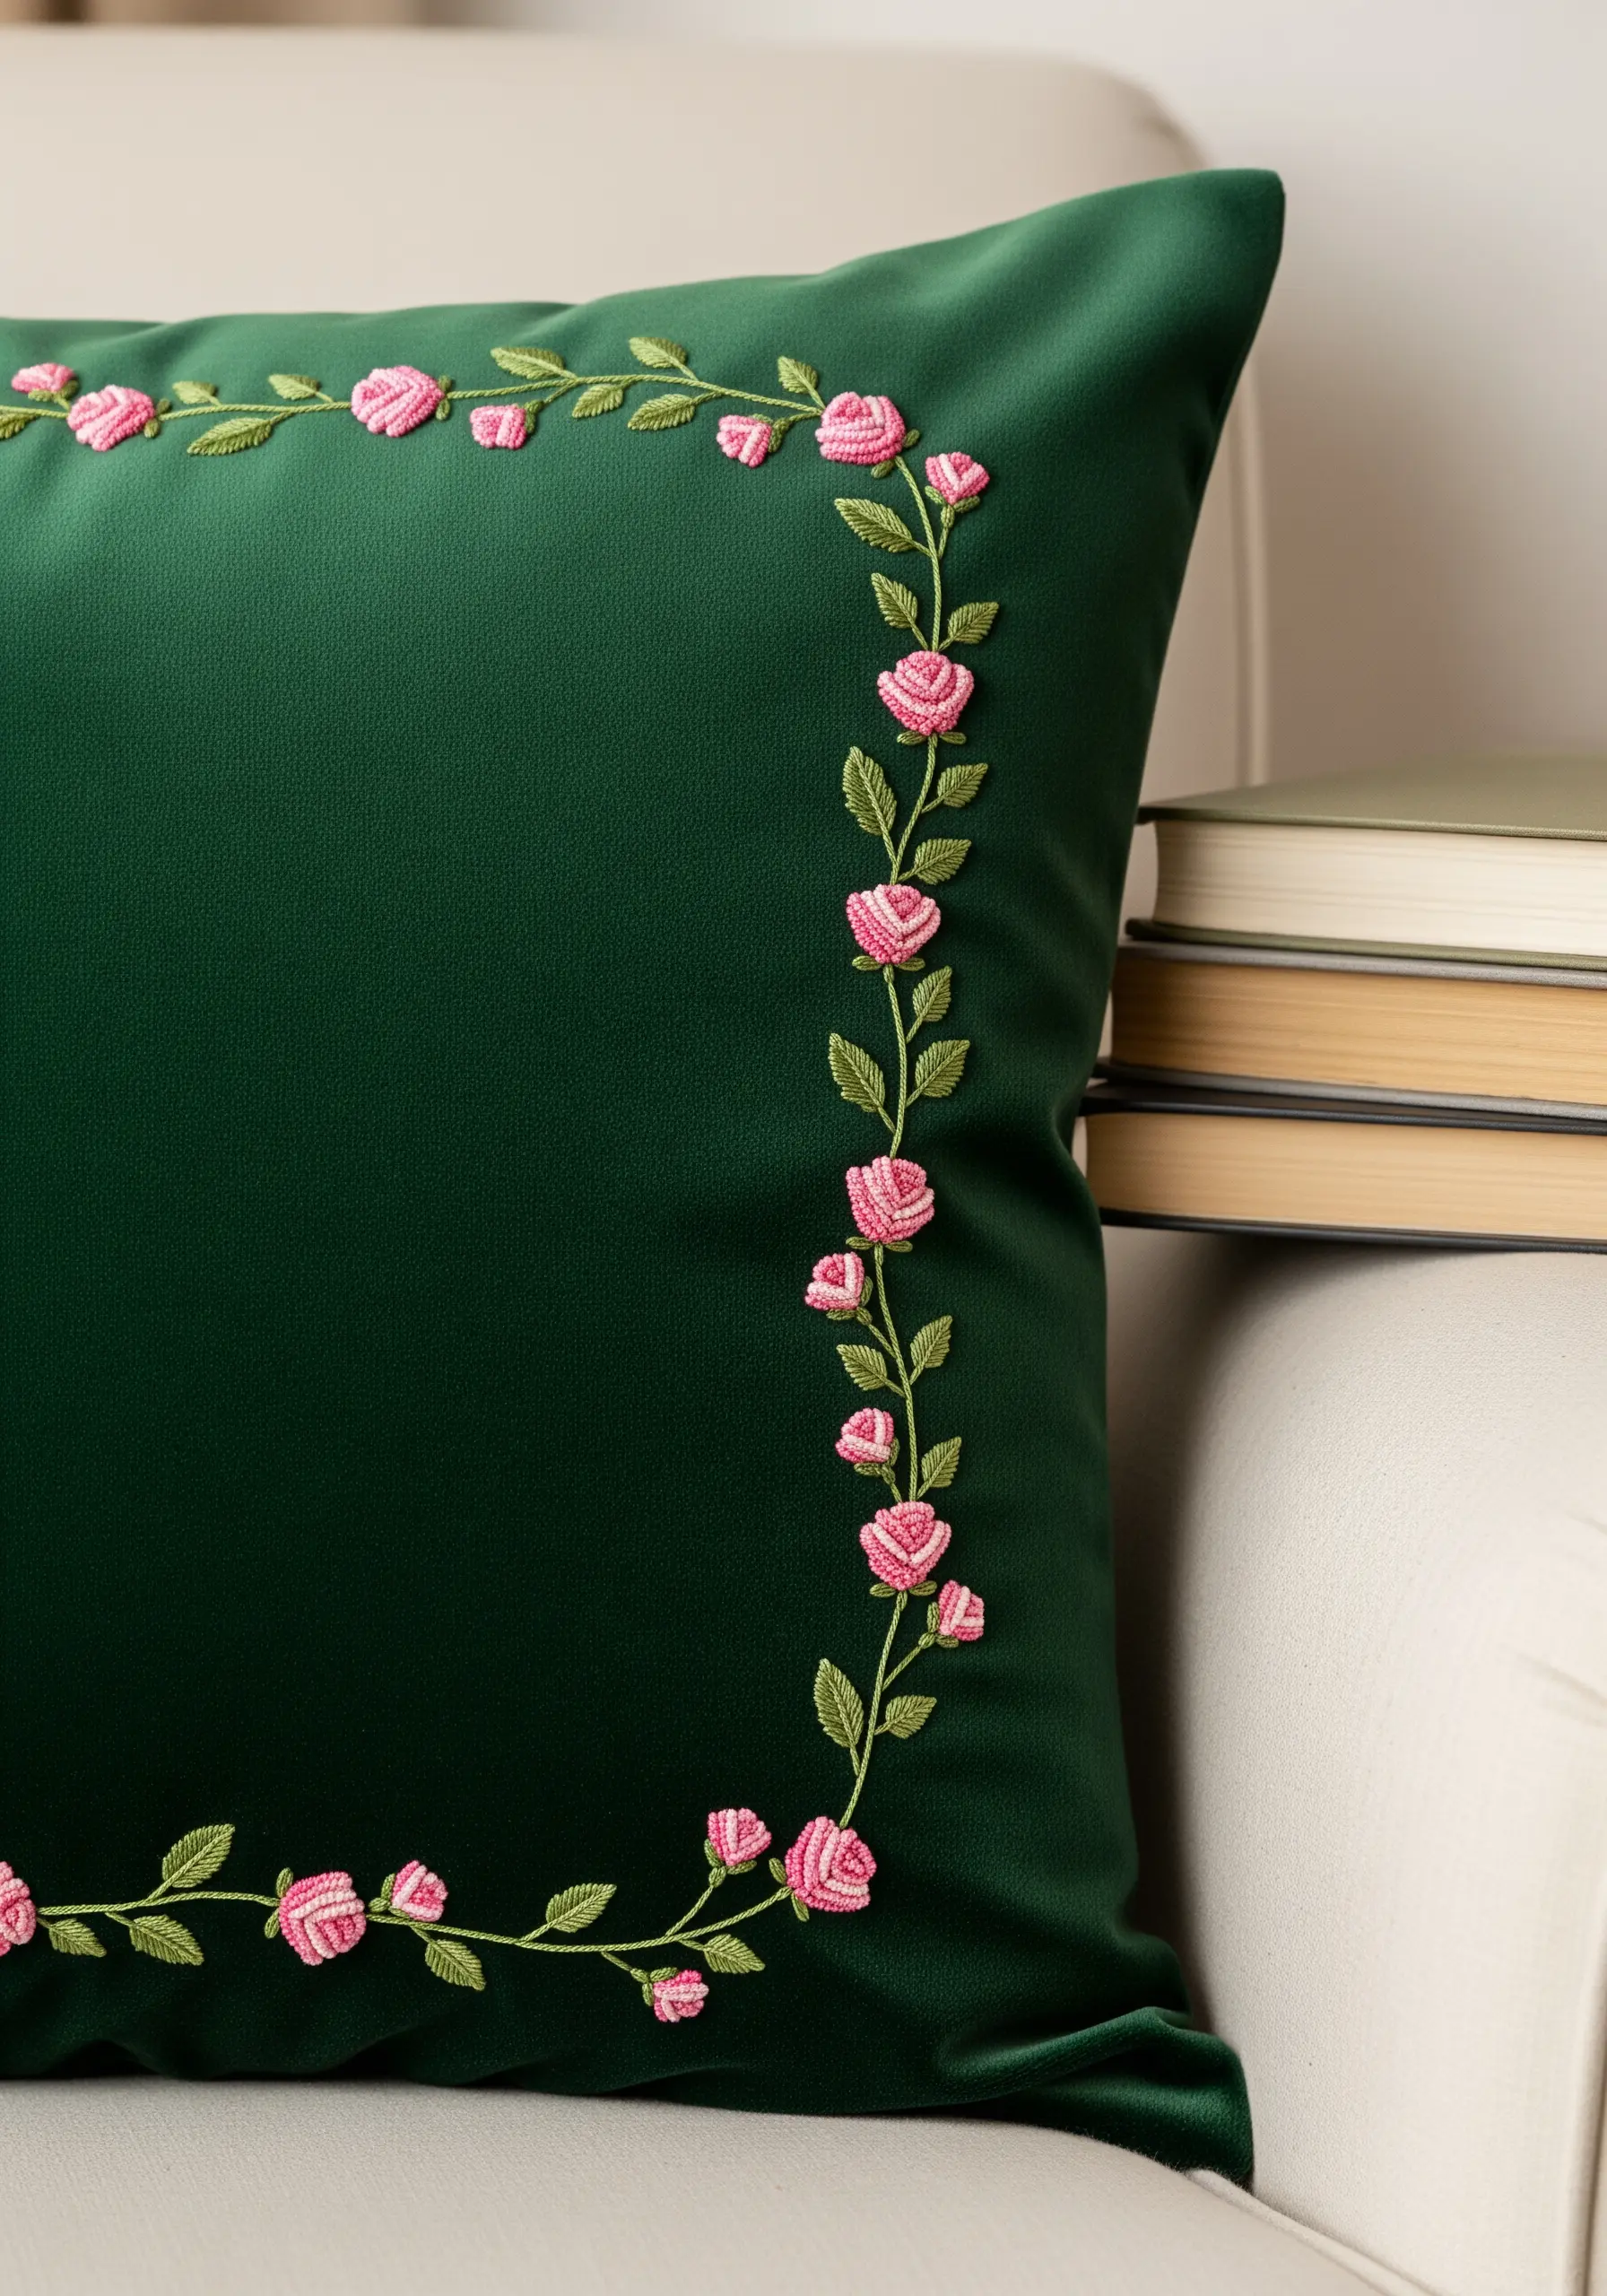
Elevate a simple cushion cover by adding a refined, functional border that feels intentional and integrated.
Use woven wheel stitches for the tiny roses—they are durable and won’t snag easily on a functional item like a pillow.
Connect the roses with a flowing stem stitched in a simple backstitch or stem stitch, adding detached chain stitches for the leaves.
This transforms the pillow into one of your own handmade embroidered home decor gifts, perfect for you or a loved one.
8. Stitch a Landscape with Perspective
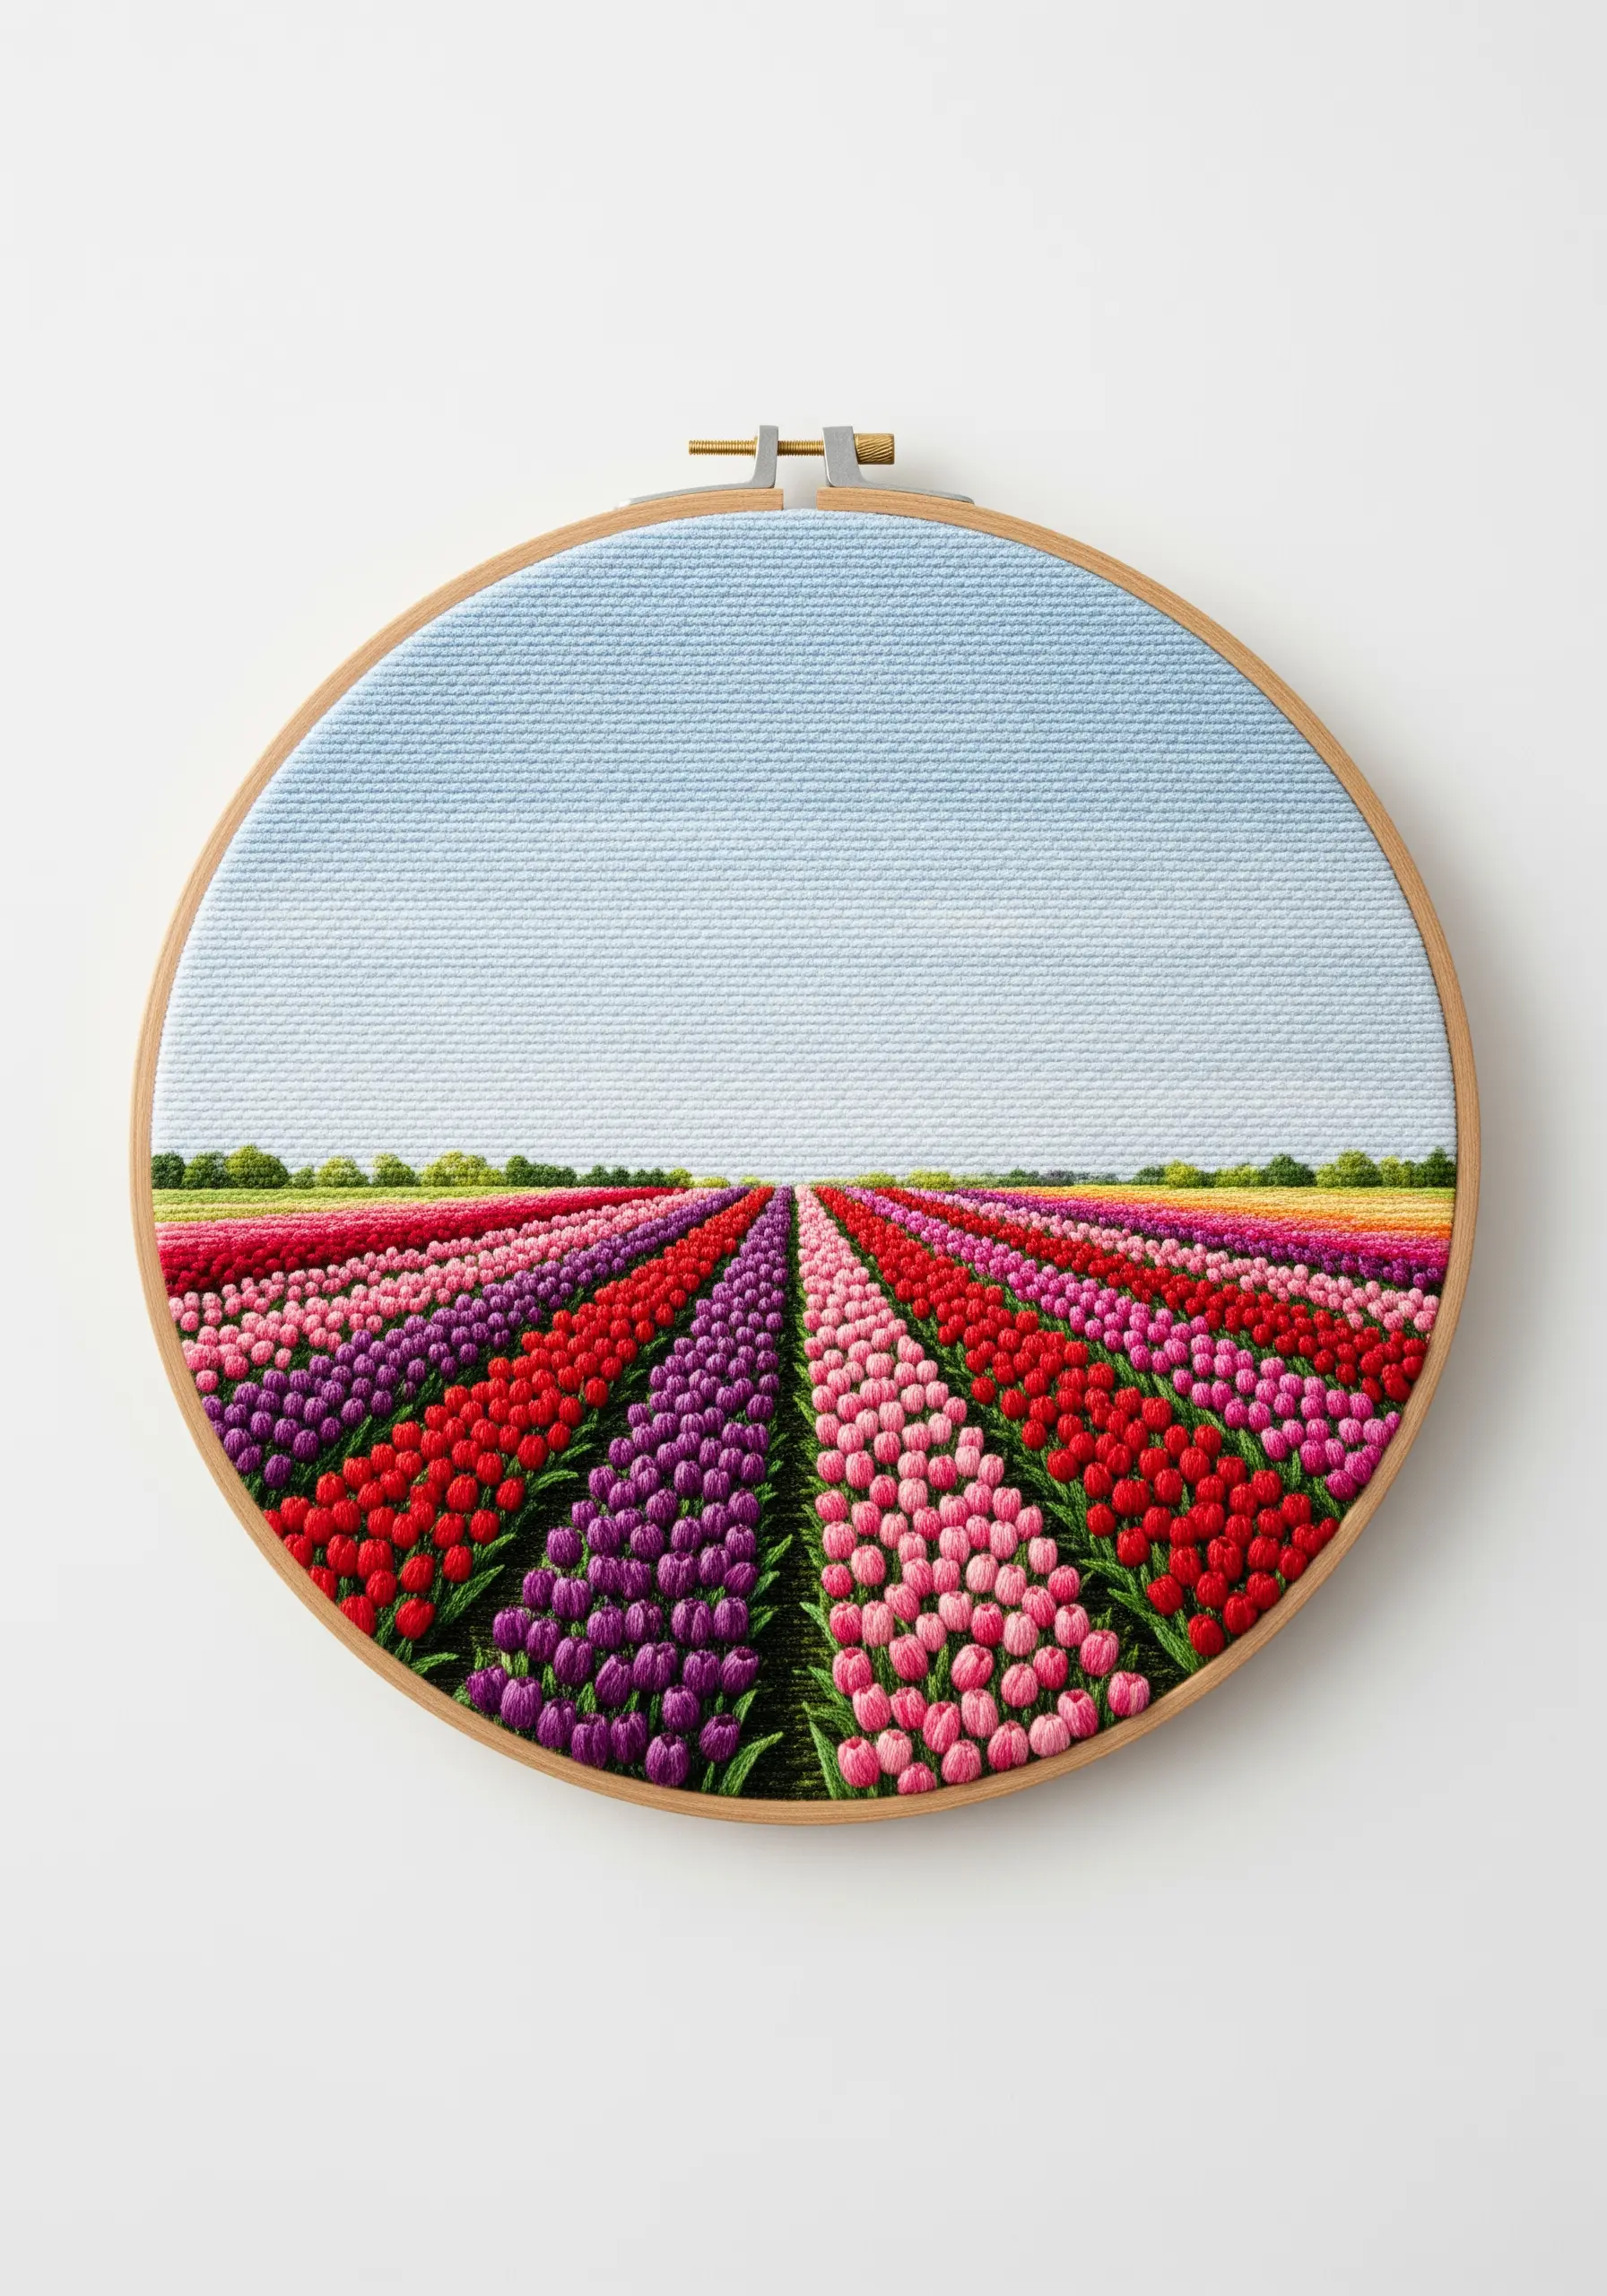
To create the illusion of a vast tulip field, you must manipulate scale and texture to suggest distance.
Use larger, more detailed French knots or small satin stitches for the tulips in the foreground, using a wider range of colors.
As you move toward the horizon, make your stitches smaller, less detailed, and closer together in value.
Fill the sky with a dense field of single-strand seed stitches in a uniform light blue; this simple texture makes the vibrant field below feel even more dynamic.
9. Tell a Story with Imperfect Petals
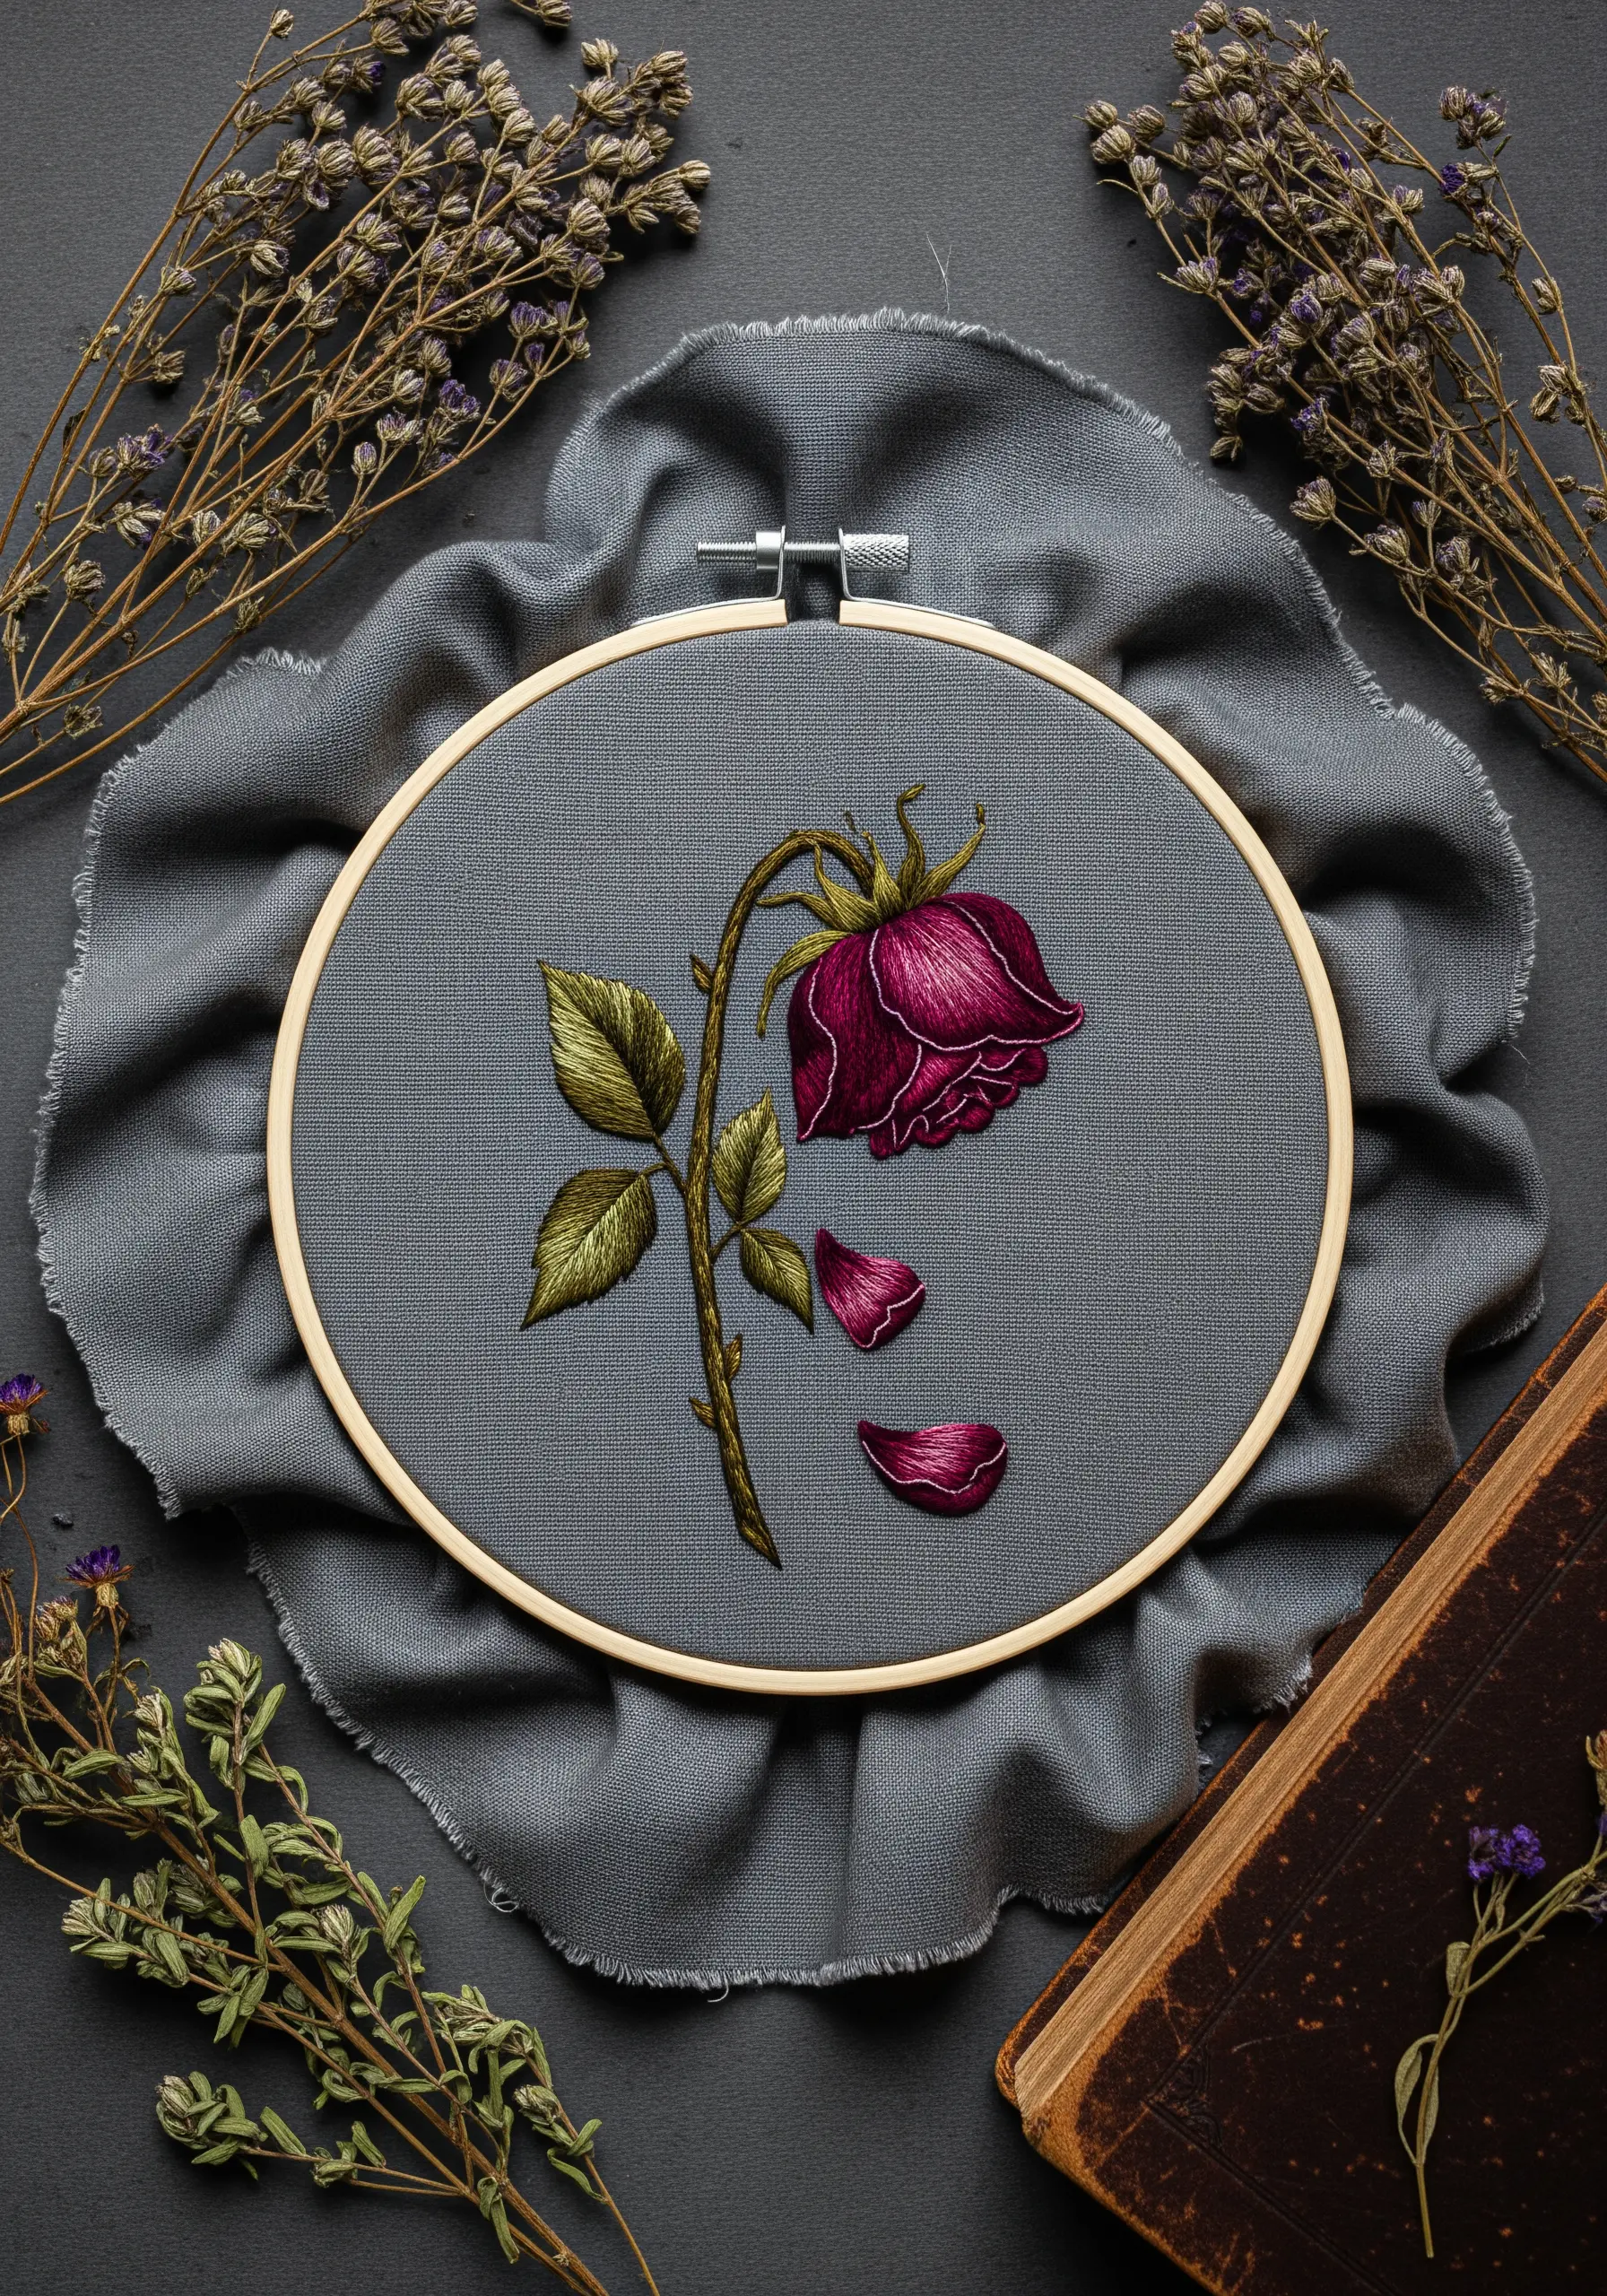
A wilting rose offers a unique opportunity for expressive stitching that captures a sense of delicate decay.
Use a muted, dusty color palette and allow your long-and-short stitches to be slightly less uniform to suggest fragility.
Incorporate a single strand of metallic thread along the petal edges to mimic a dried, crinkled texture.
Stitching a few fallen petals separately from the main flower is a powerful narrative device that completes the melancholic, beautiful story.
10. Capture a Botanical Illustration Aesthetic
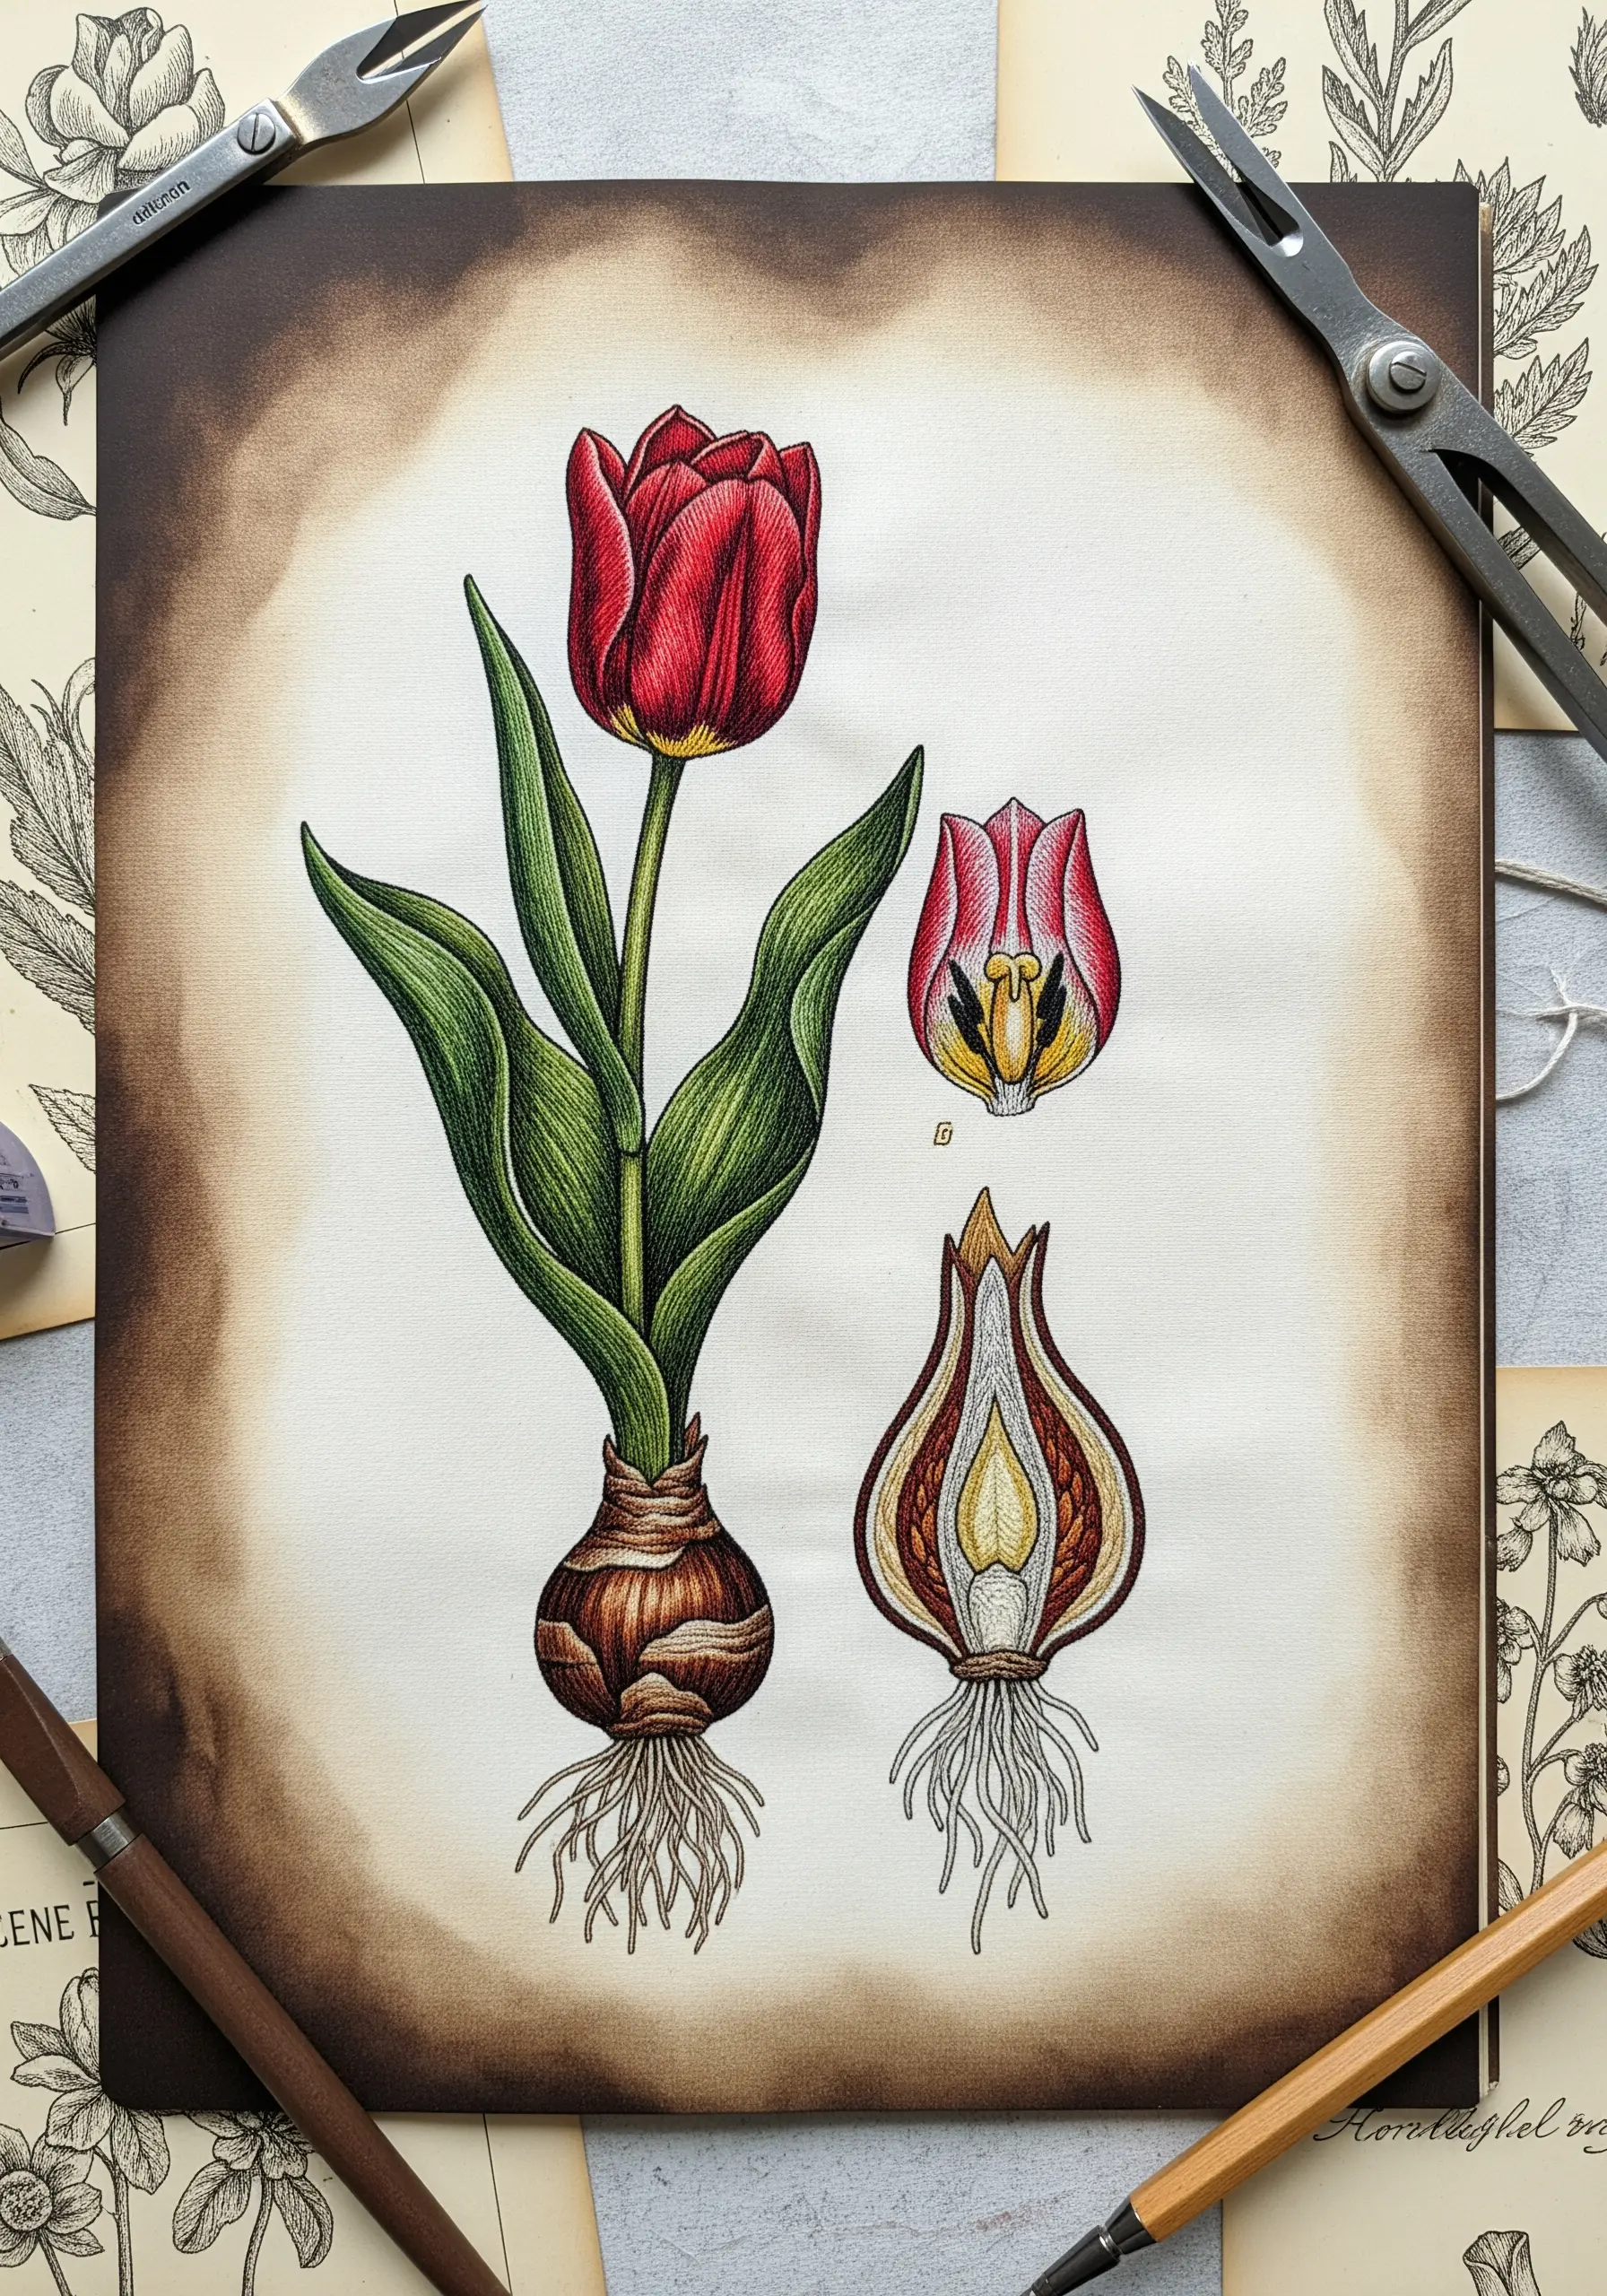
Recreate the precision of a scientific drawing by focusing on clean lines and accurate detail.
Start by tea-staining your fabric to give it the warm, aged look of vintage botanical paper.
Use a single strand of black or dark brown floss for all outlines, employing a sharp backstitch for maximum definition.
Fill the sections with disciplined satin stitch, ensuring your stitches are smooth and uniform to honor the classic, educational style of the illustration.
11. Create Ethereal Florals on Tulle

Stitching on sheer fabric like tulle or organza creates a magical, floating effect that feels incredibly delicate.
Use a water-soluble stabilizer on the back; it provides the support needed for stitching and then dissolves away, leaving only your threads.
Incorporate metallic gold thread for the leaves and outlines to add a touch of light-catching elegance.
The negative space becomes part of the design, making these botanical hoop embroidery projects perfect for hanging in a window where light can pass through.
12. Achieve Crisp Lines on Variegated Tulips
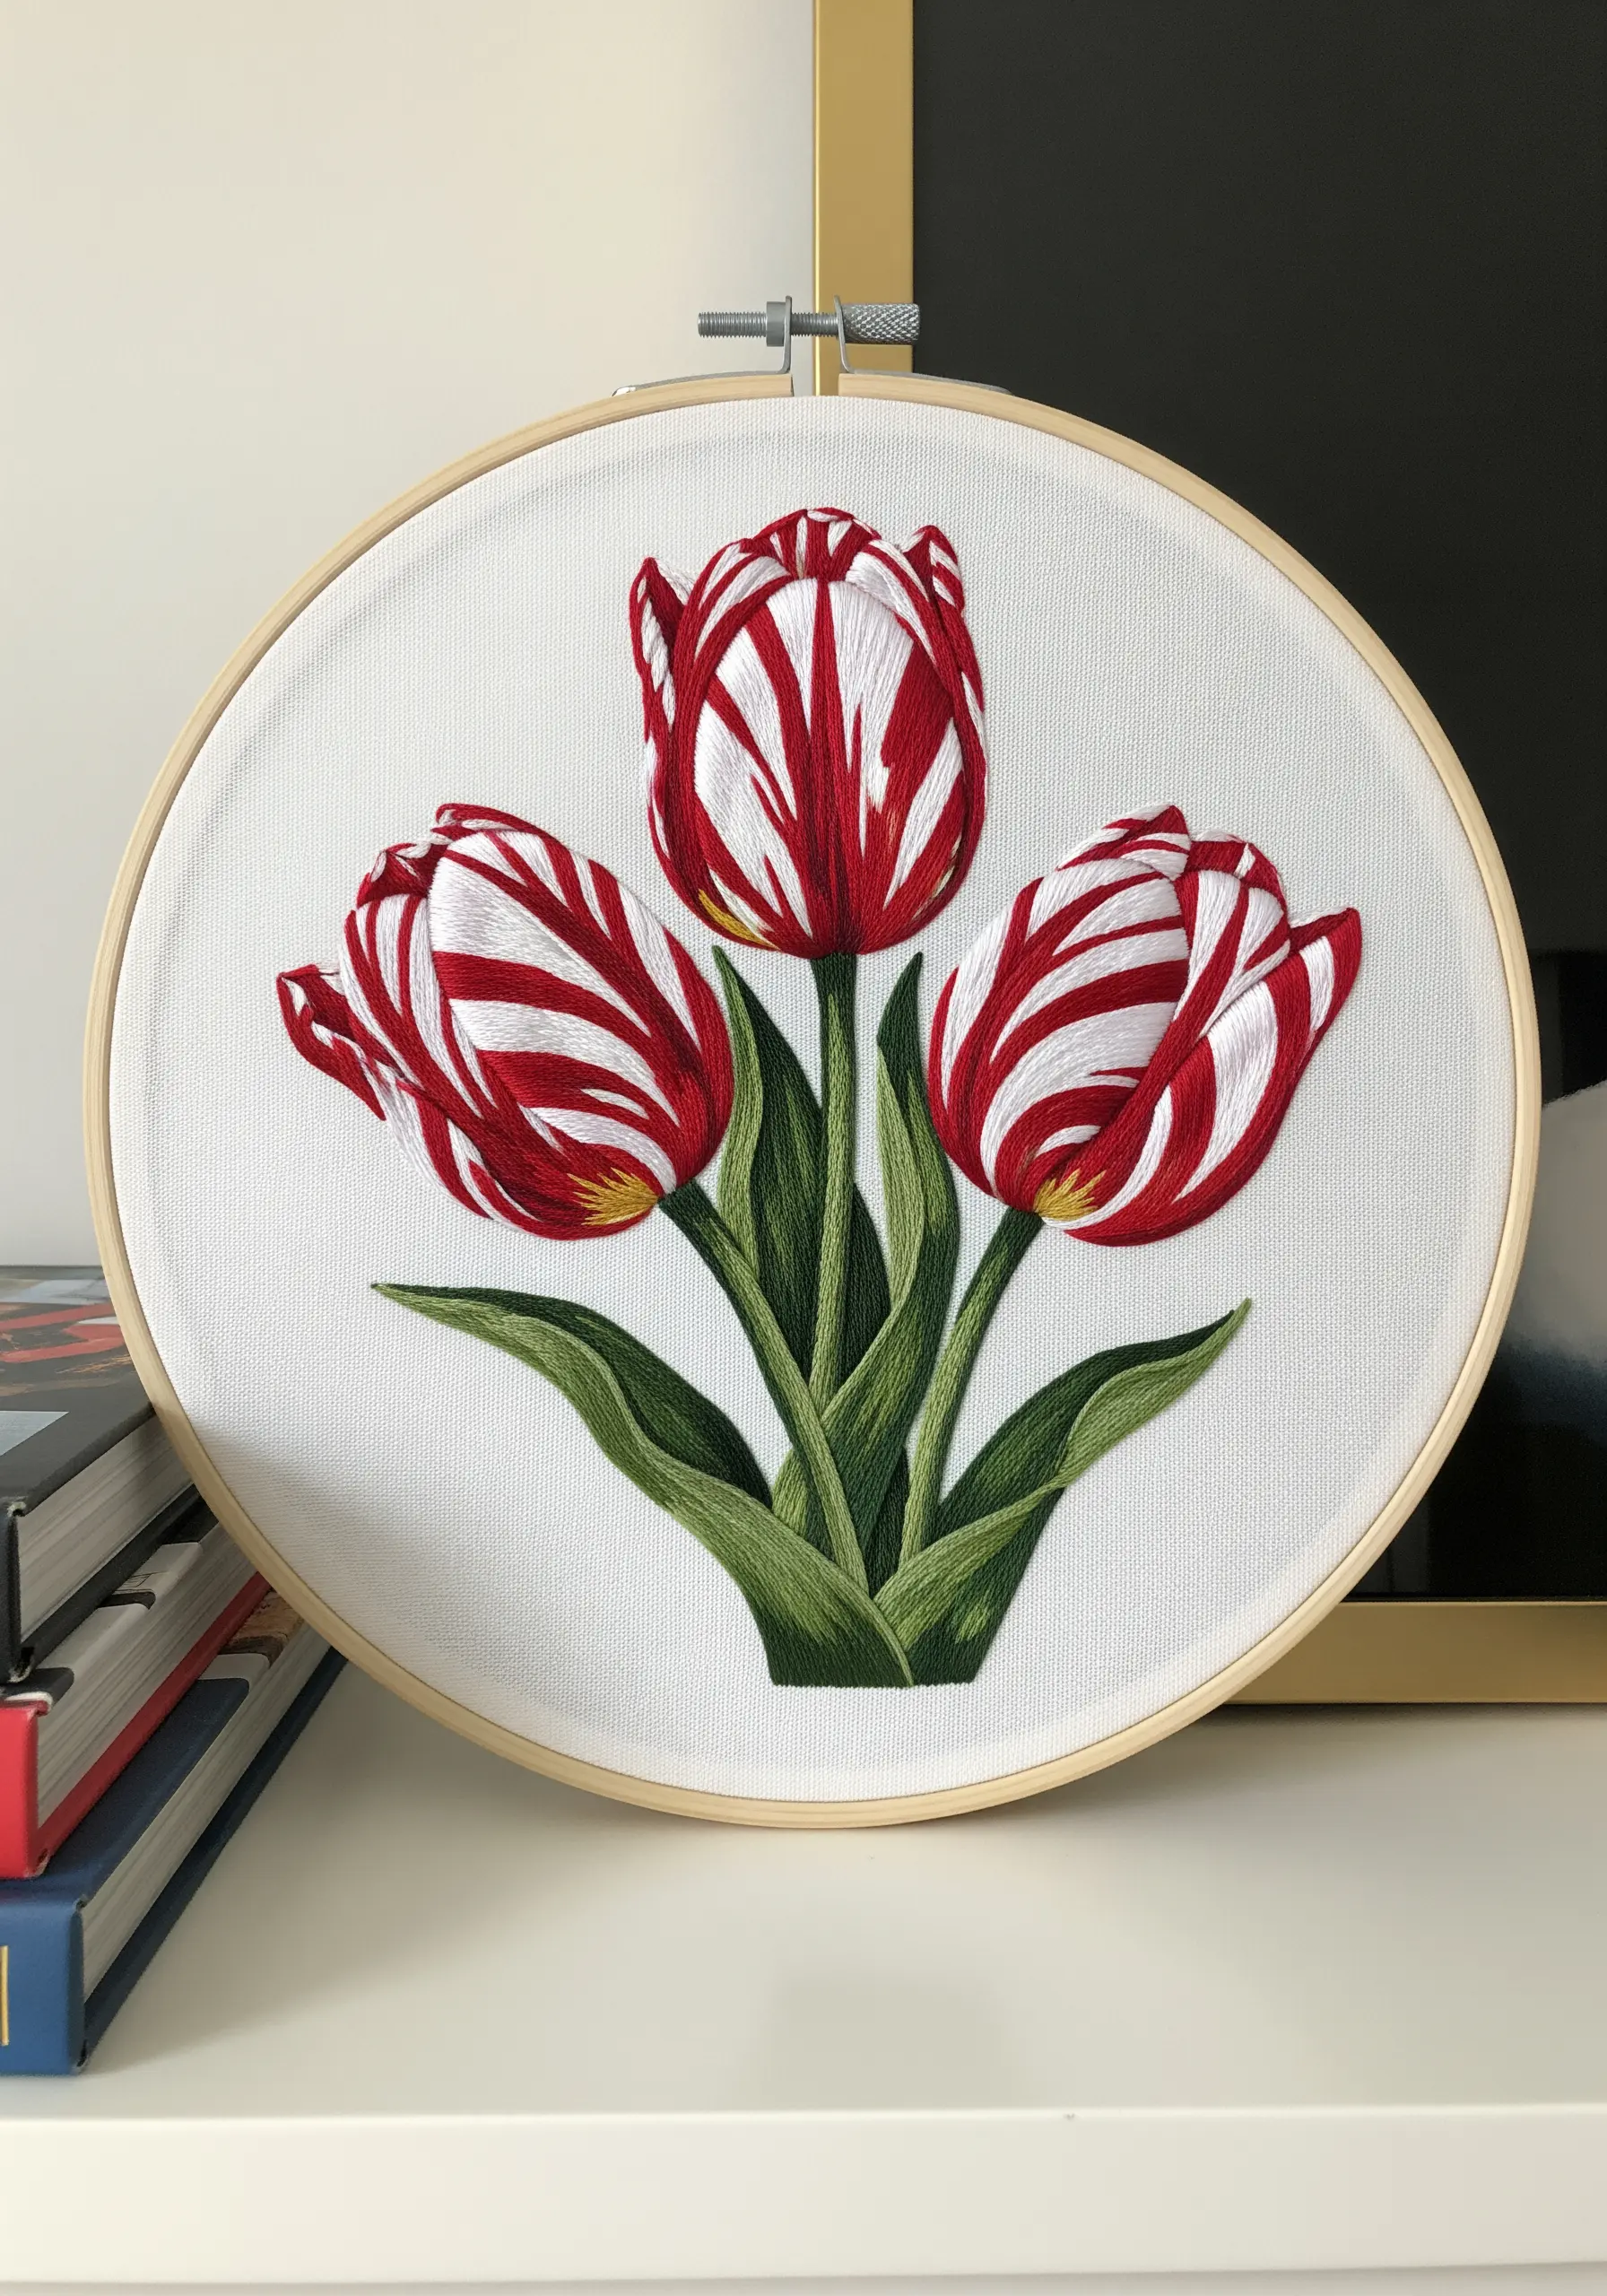
The key to stitching dramatic, candy-striped tulips is maintaining razor-sharp edges between the red and white sections.
Instead of blending, treat each color block as a separate shape. Outline the white sections first with a split stitch, then fill them with satin stitch.
Next, outline and fill the red sections, ensuring your needle enters the fabric just beside the white stitches, not through them.
This method prevents the colors from muddying and creates the clean, graphic look these flowers are known for.
13. Design a Bold Statement Piece for Denim
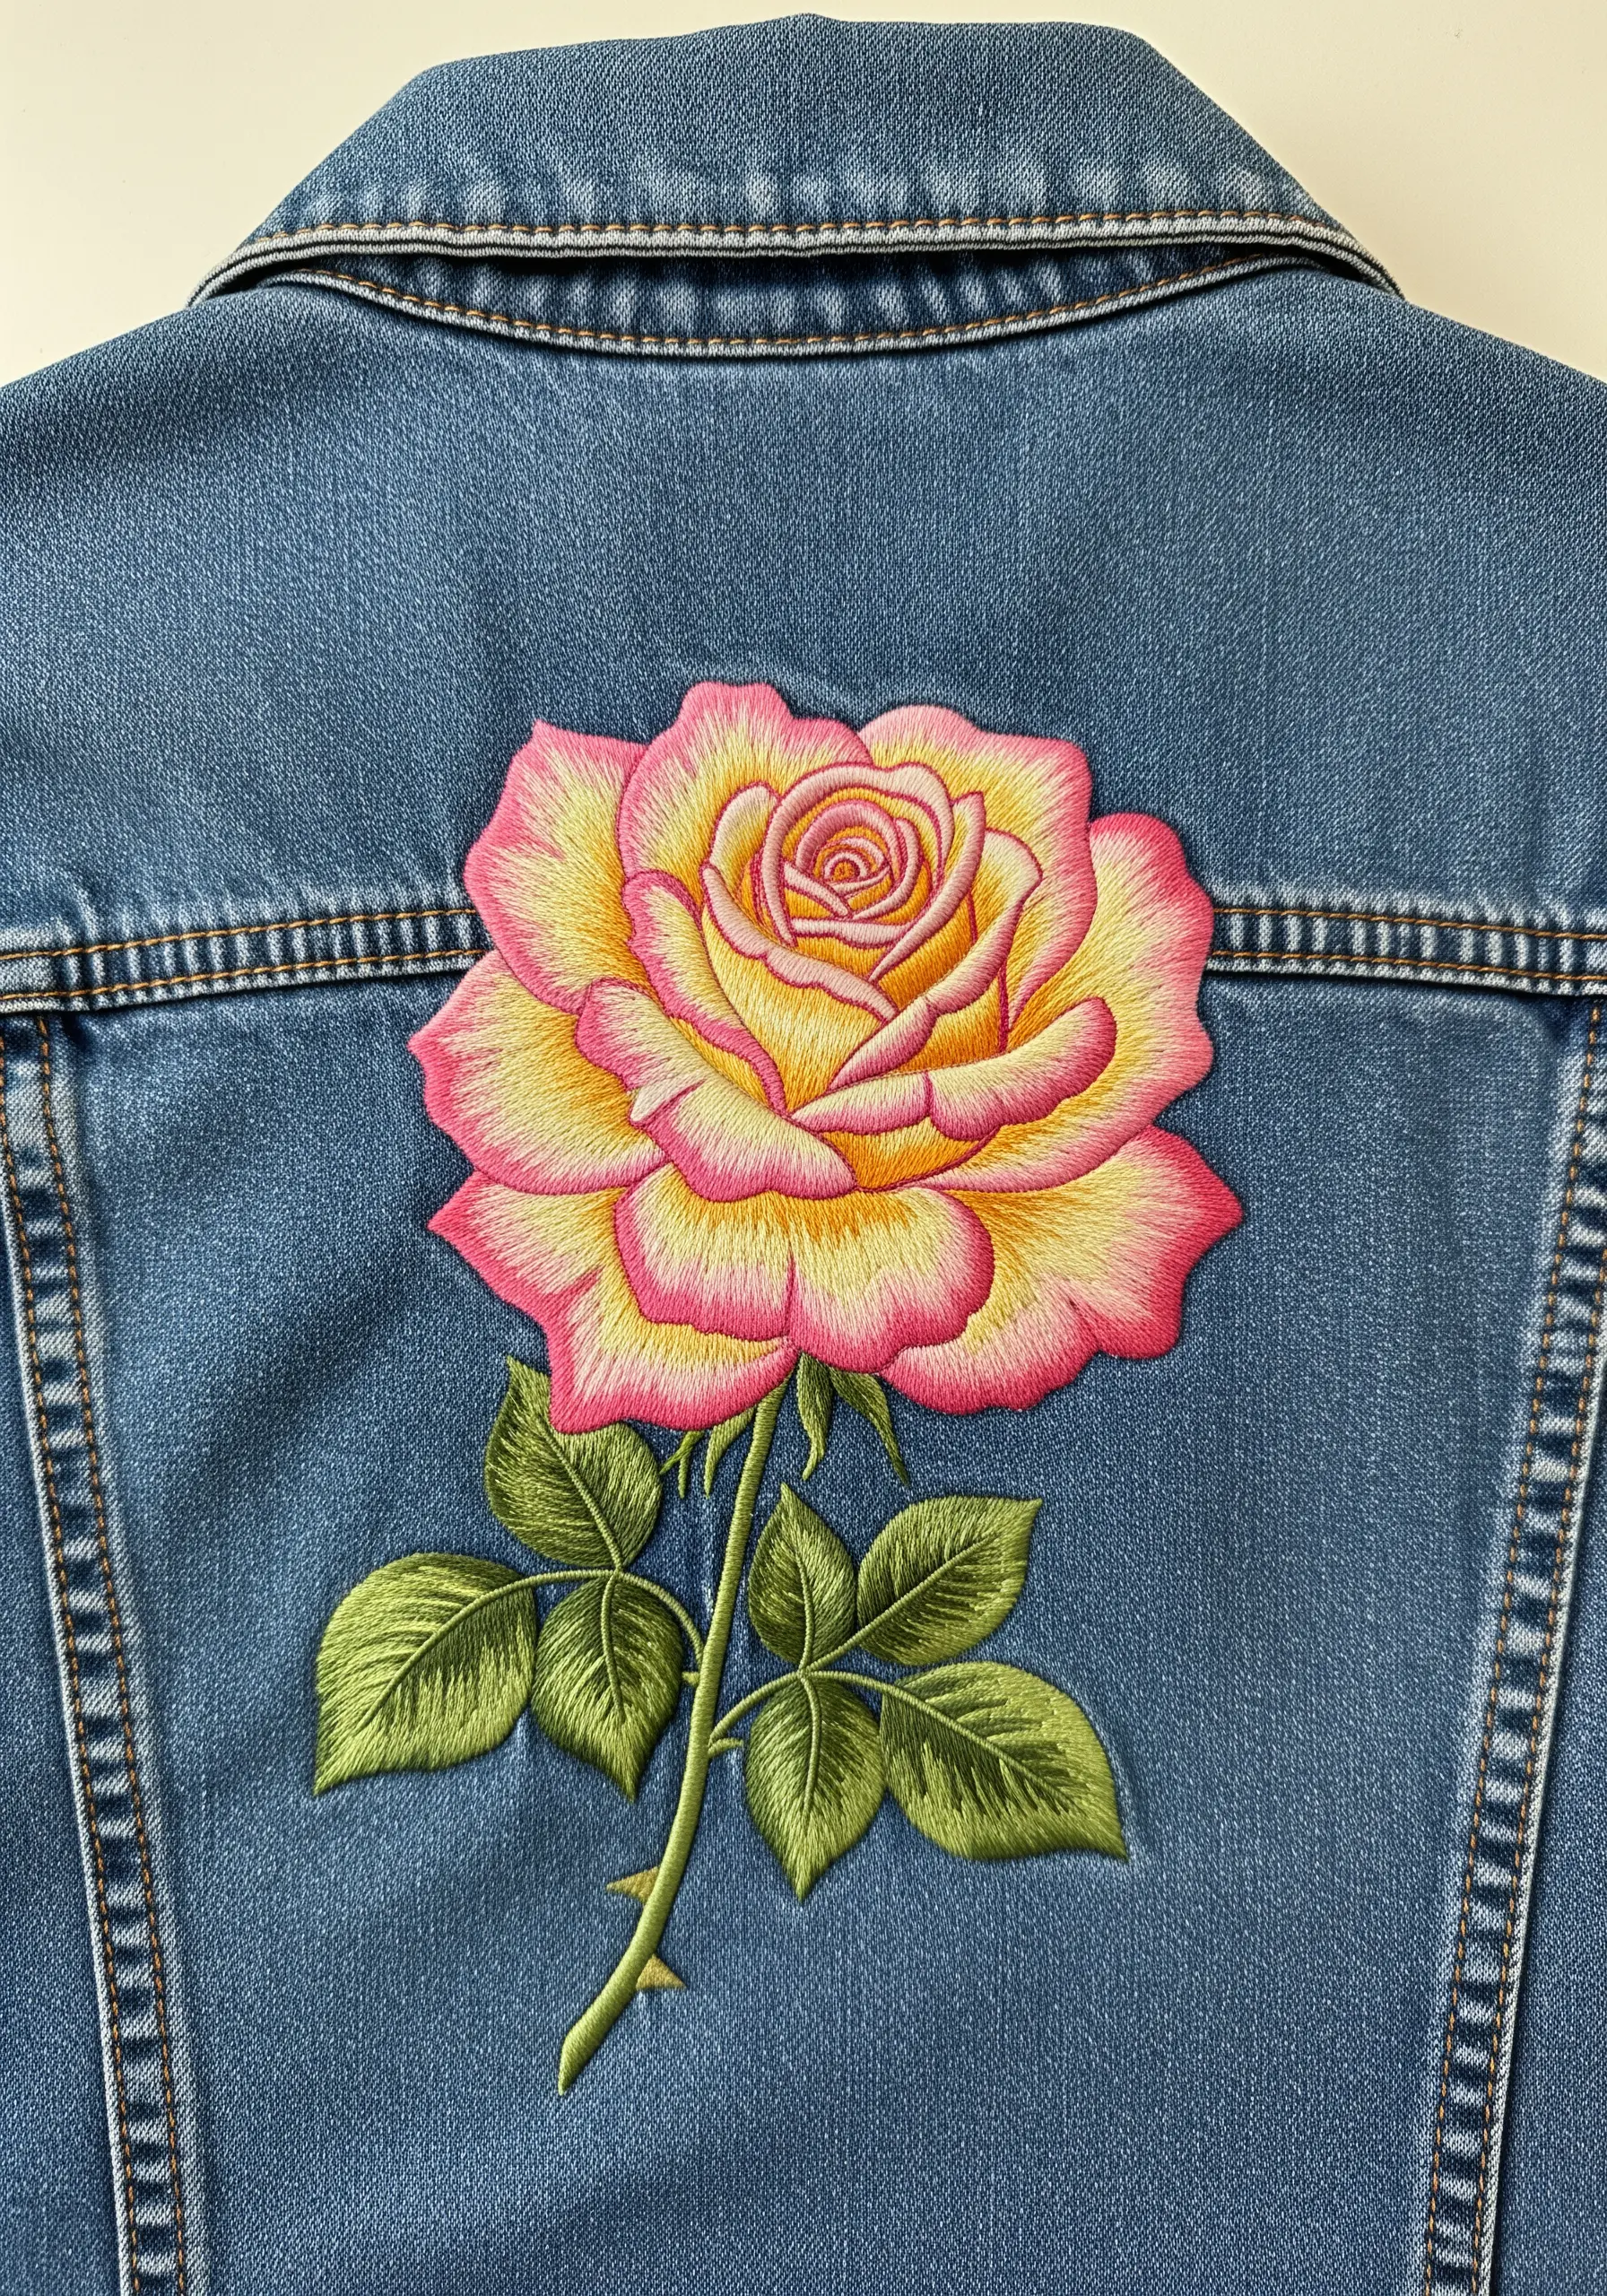
When embroidering on a heavy fabric like denim, you need to adjust your technique for a bold, durable result.
Use all six strands of your floss for a thicker, more impactful stitch that won’t get lost in the fabric’s texture.
A simple satin stitch with clear, blended color sections works best. Avoid tiny, intricate details that might not read well on the textured surface.
Back your finished embroidery with an iron-on stabilizer (like Sulky Tender Touch) to protect the stitches from friction and wear during washing.
14. Capture the Velvety Sheen of Dark Petals

To embroider a flower as dark and complex as a ‘Queen of the Night’ tulip, your thread choice is everything.
Use silk or rayon threads instead of cotton. Their natural luster mimics the way light catches on dark, velvety petals, preventing the flower from looking flat.
Incorporate deep purples, burgundies, and even black threads to build up shadows, using long-and-short stitch to blend them subtly.
A few carefully placed stitches of bright white or pale yellow for the stamen will draw the eye inward and make the dark colors feel even richer.
15. Construct a Dimensional Wreath with Negative Space
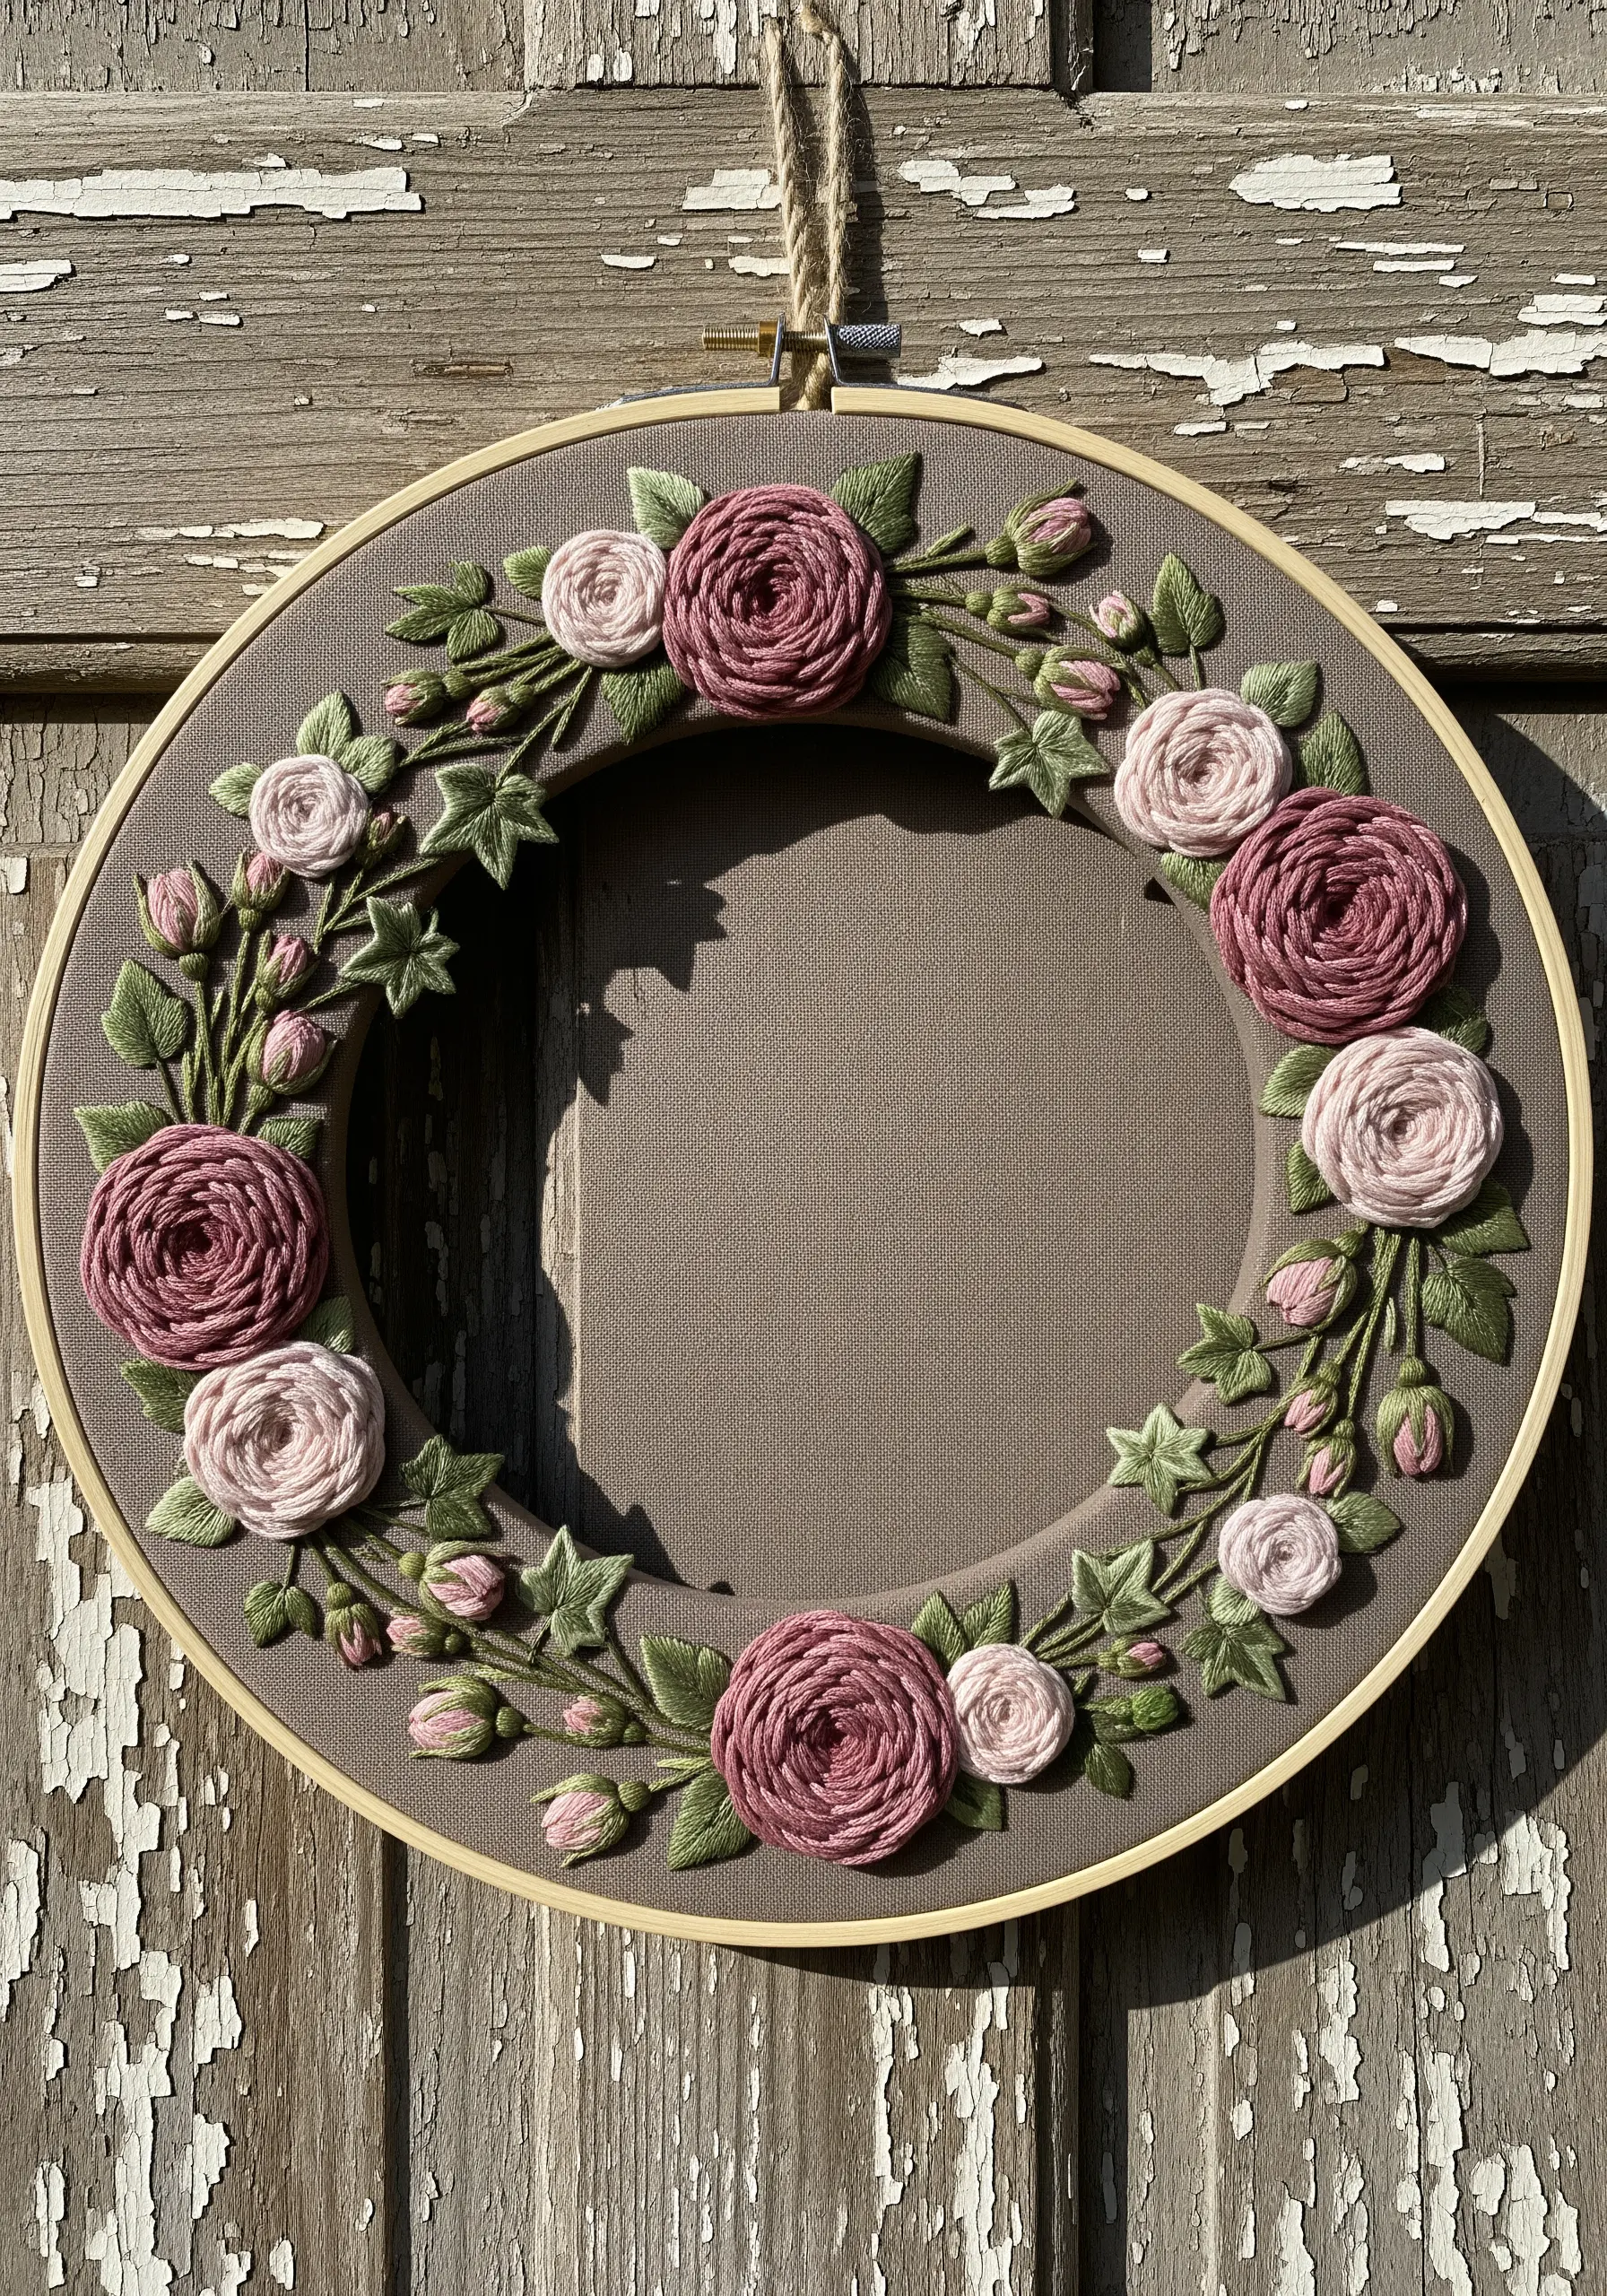
A wreath design allows you to play with symmetry and balance, using the empty center as a key compositional element.
Build the roses using the cast-on stitch, which creates highly dimensional, textured petals that stand up from the fabric.
Alternate larger and smaller roses, and tuck in bullion knot rosebuds to create a sense of rhythm and flow.
Stitching on a muted, neutral fabric ensures that the textures and colors of your floral elements remain the focal point of the piece.
16. Add Hyper-Realism with Beaded Water Droplets

Tiny, clear seed beads are the perfect embellishment for creating the illusion of fresh dew on your stitched petals.
First, complete all your thread painting for the tulips and leaves, ensuring your color blending is smooth.
Then, using a fine beading needle and a single strand of thread that matches your fabric, scatter clear beads across the surface.
Secure each bead with two or three small stitches. This extra step adds a surprising touch of realism and texture that catches the light beautifully.
17. Combine Printing and Stitching for a Vintage Look
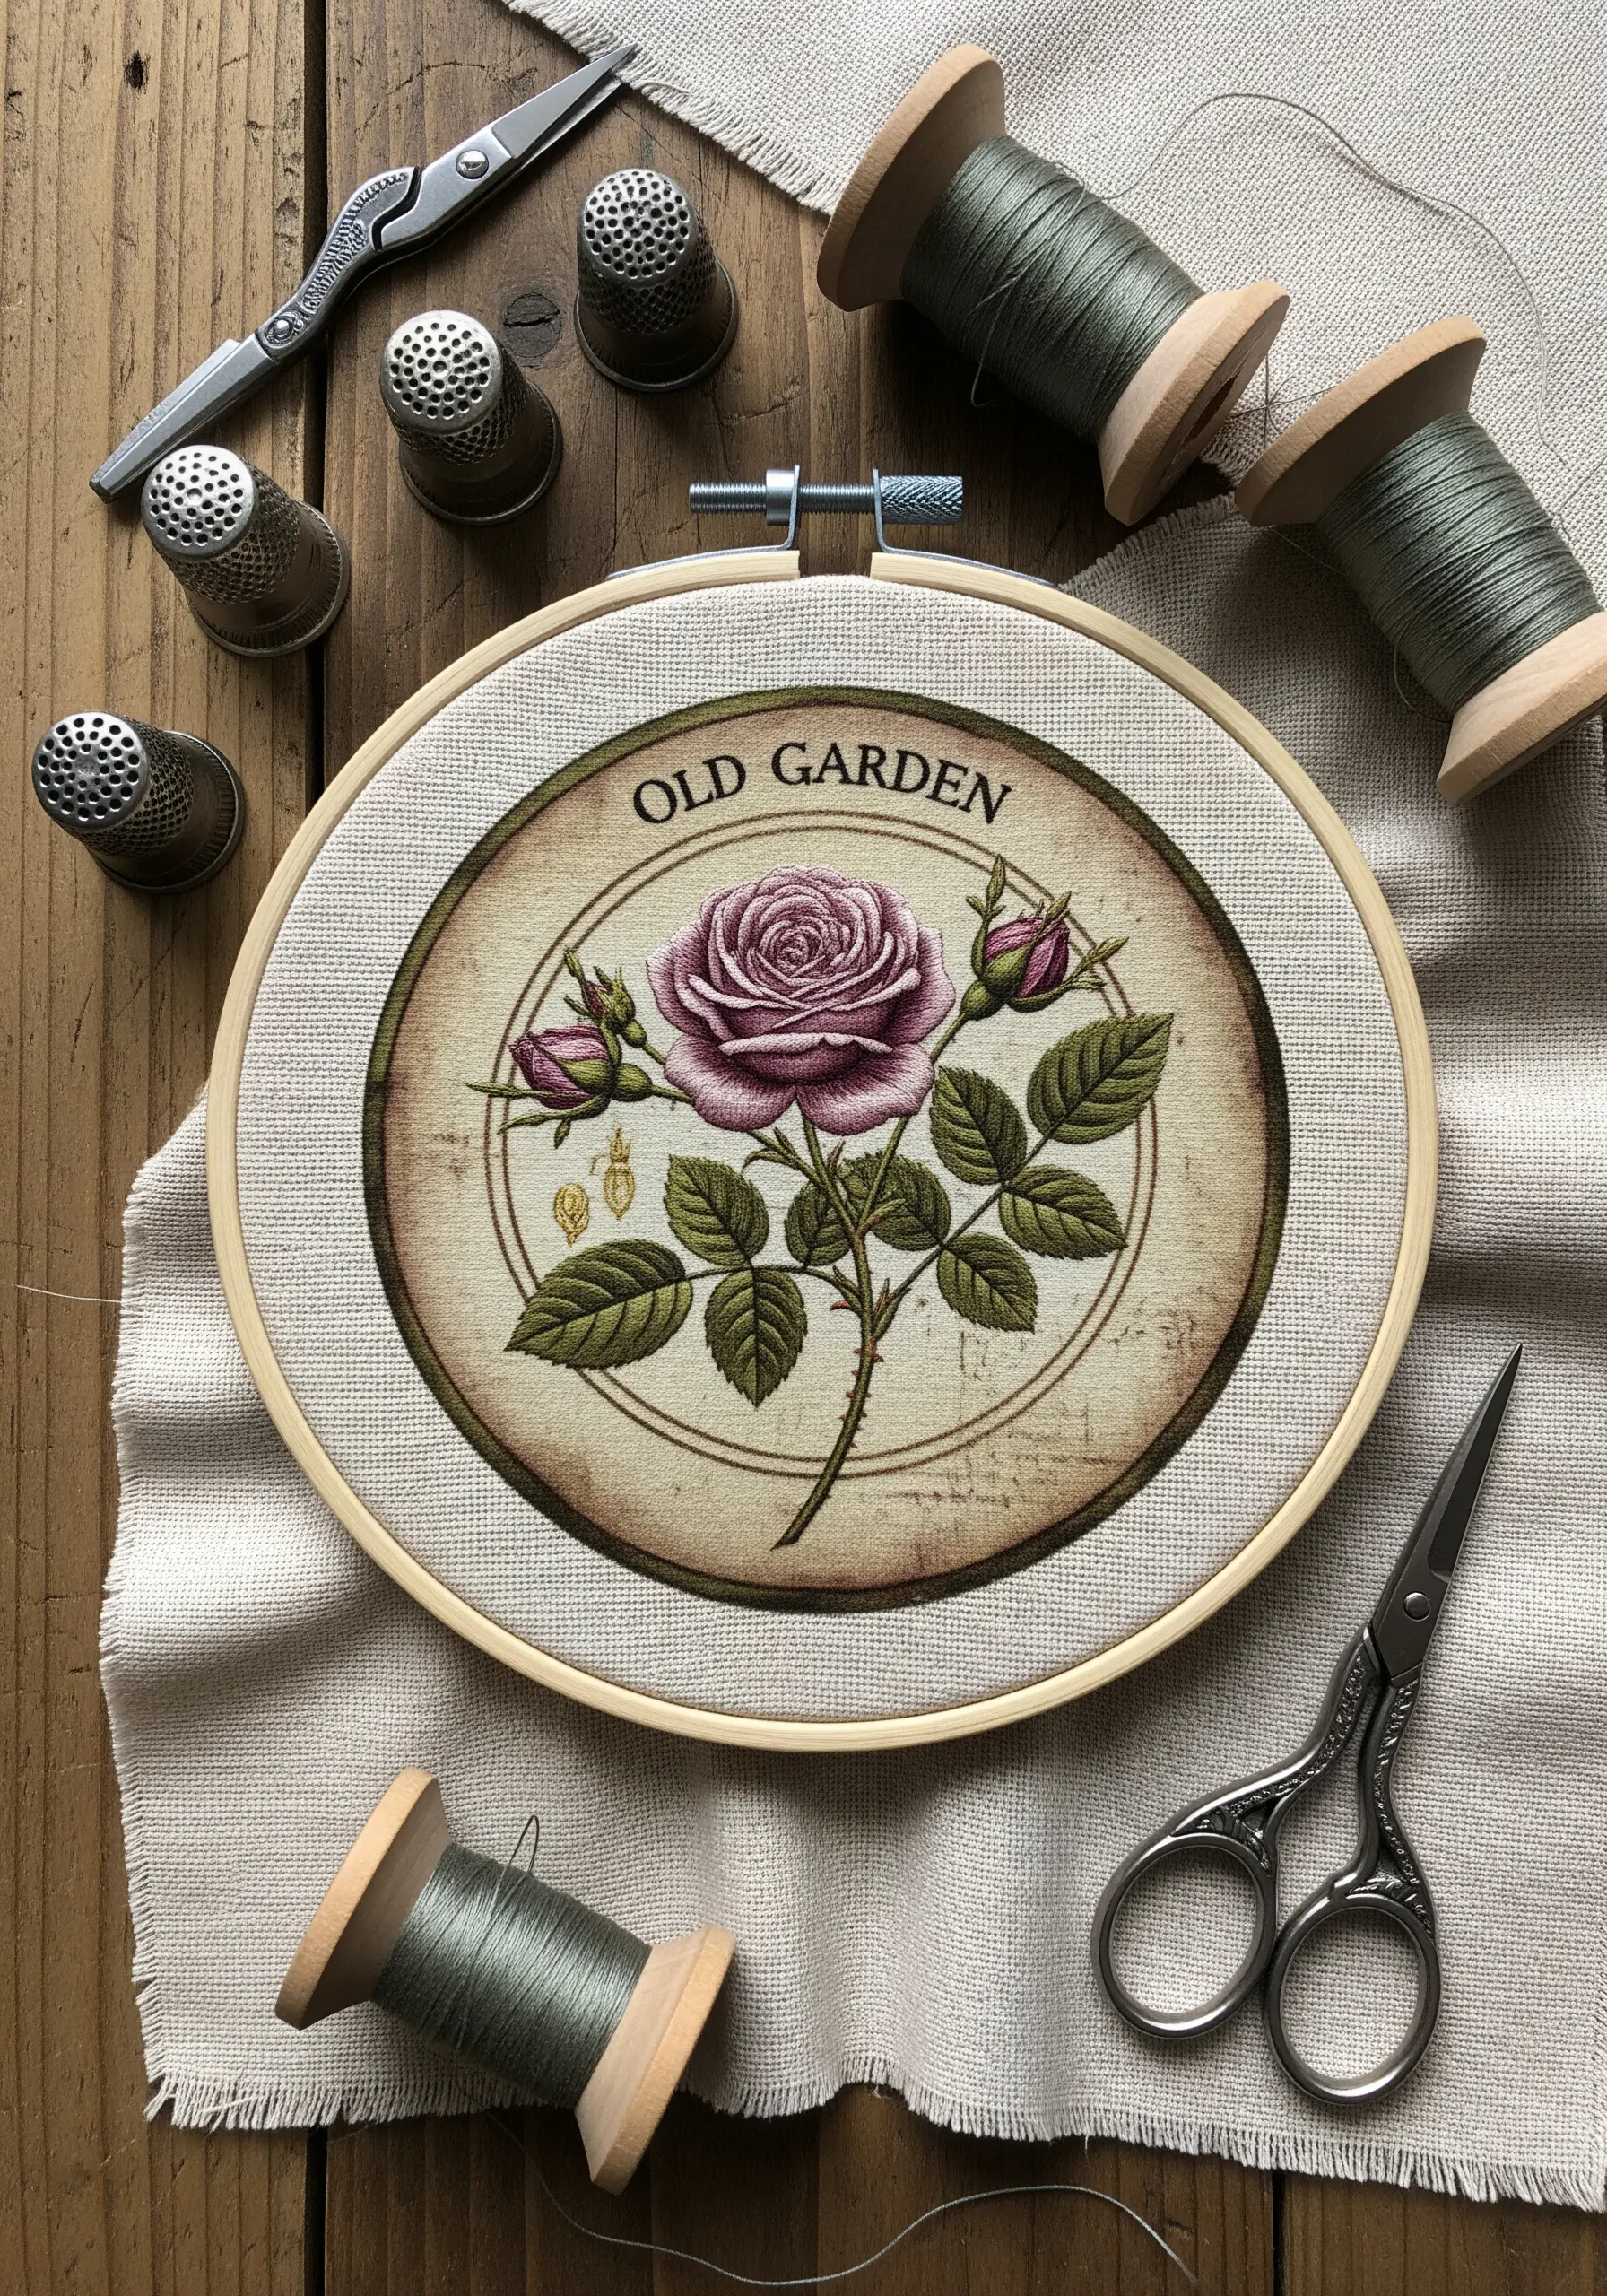
For a beautiful, layered effect, print a vintage design directly onto your fabric before you begin stitching.
You can use iron-on transfer paper or a specialty service to get the image onto a light-colored cotton or linen.
Instead of filling the entire design, use your thread to selectively accent key areas—outline the main rose, add satin stitch to the buds, and define the leaves.
This mixed-media approach adds depth and a sense of history, turning your embroidery into a unique work of creative collage art.
18. Create the Illusion of Glass and Water
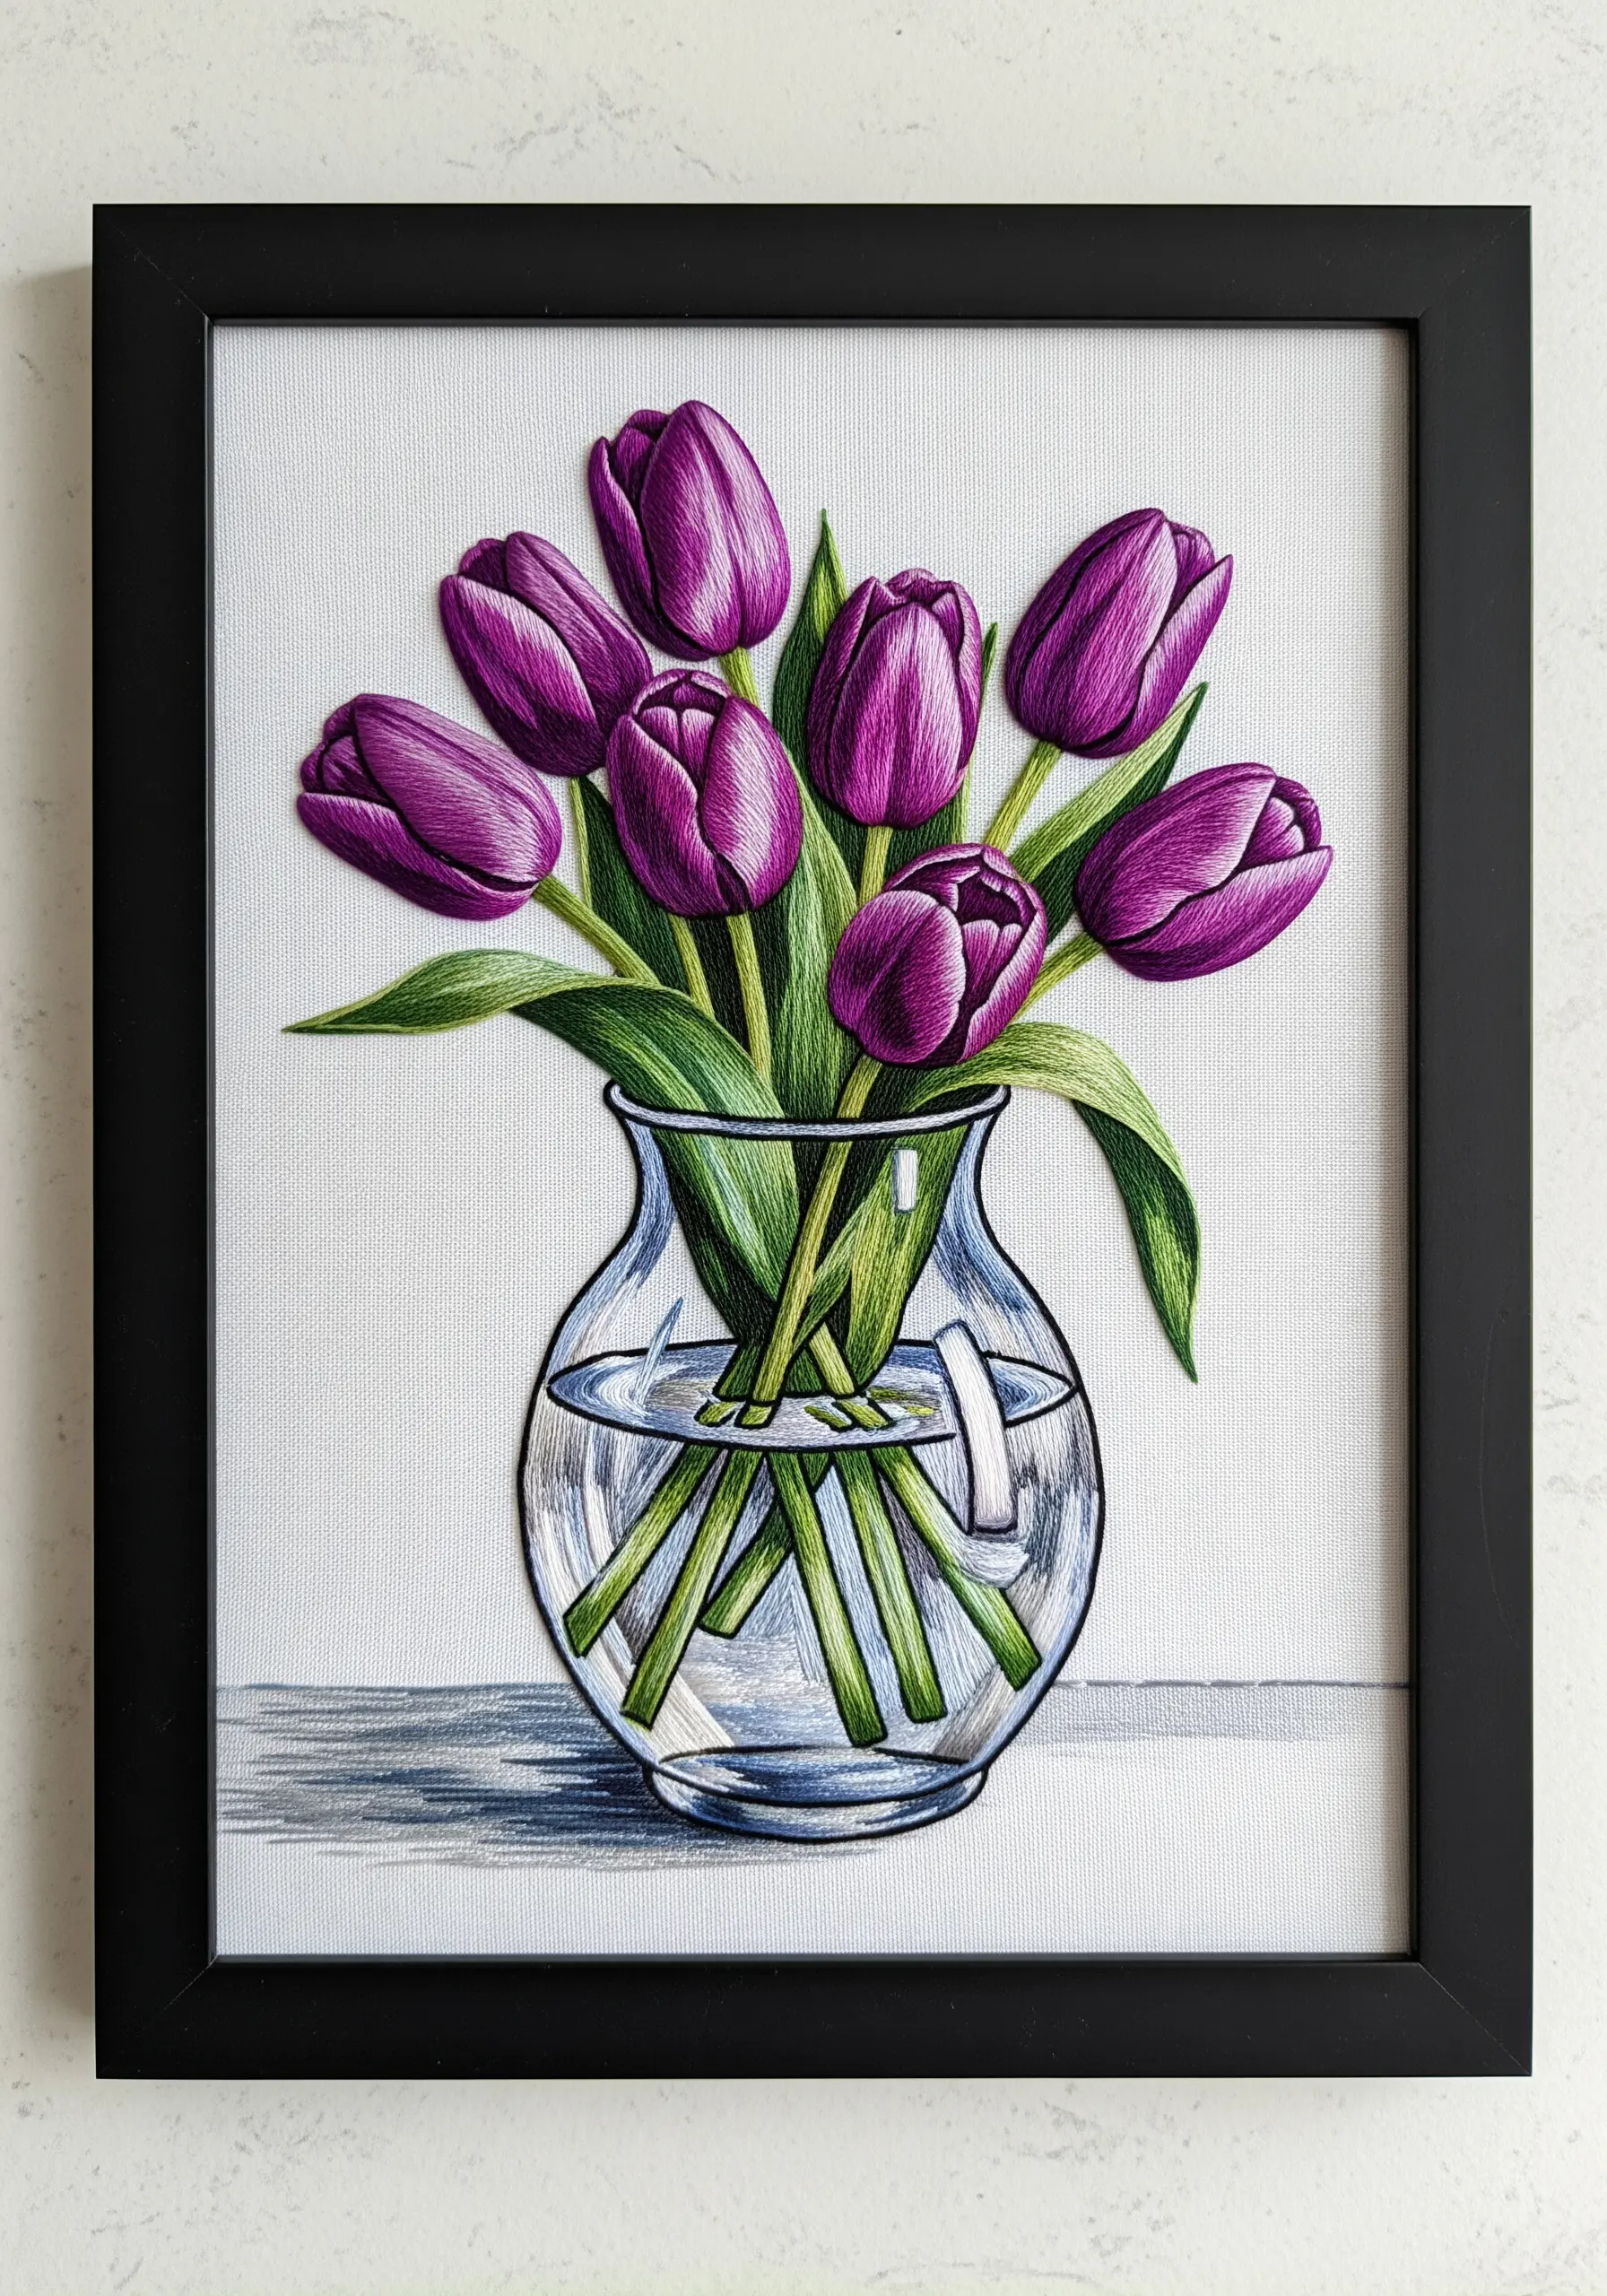
Stitching a transparent object like a glass vase requires you to stitch what you *see*, not what you *know* is there—reflections, refractions, and highlights.
Use a single strand of light grey or blue thread to outline the vase, then use sparse, directional straight stitches to suggest reflections.
Where the stems are visible through the glass, use a slightly lighter shade of green and distort their shape to mimic water refraction.
A few sharp, white stitches for highlights are the final touch that sells the illusion of transparency and makes the glass feel real.
19. Capture the Texture of Autumnal Rose Hips
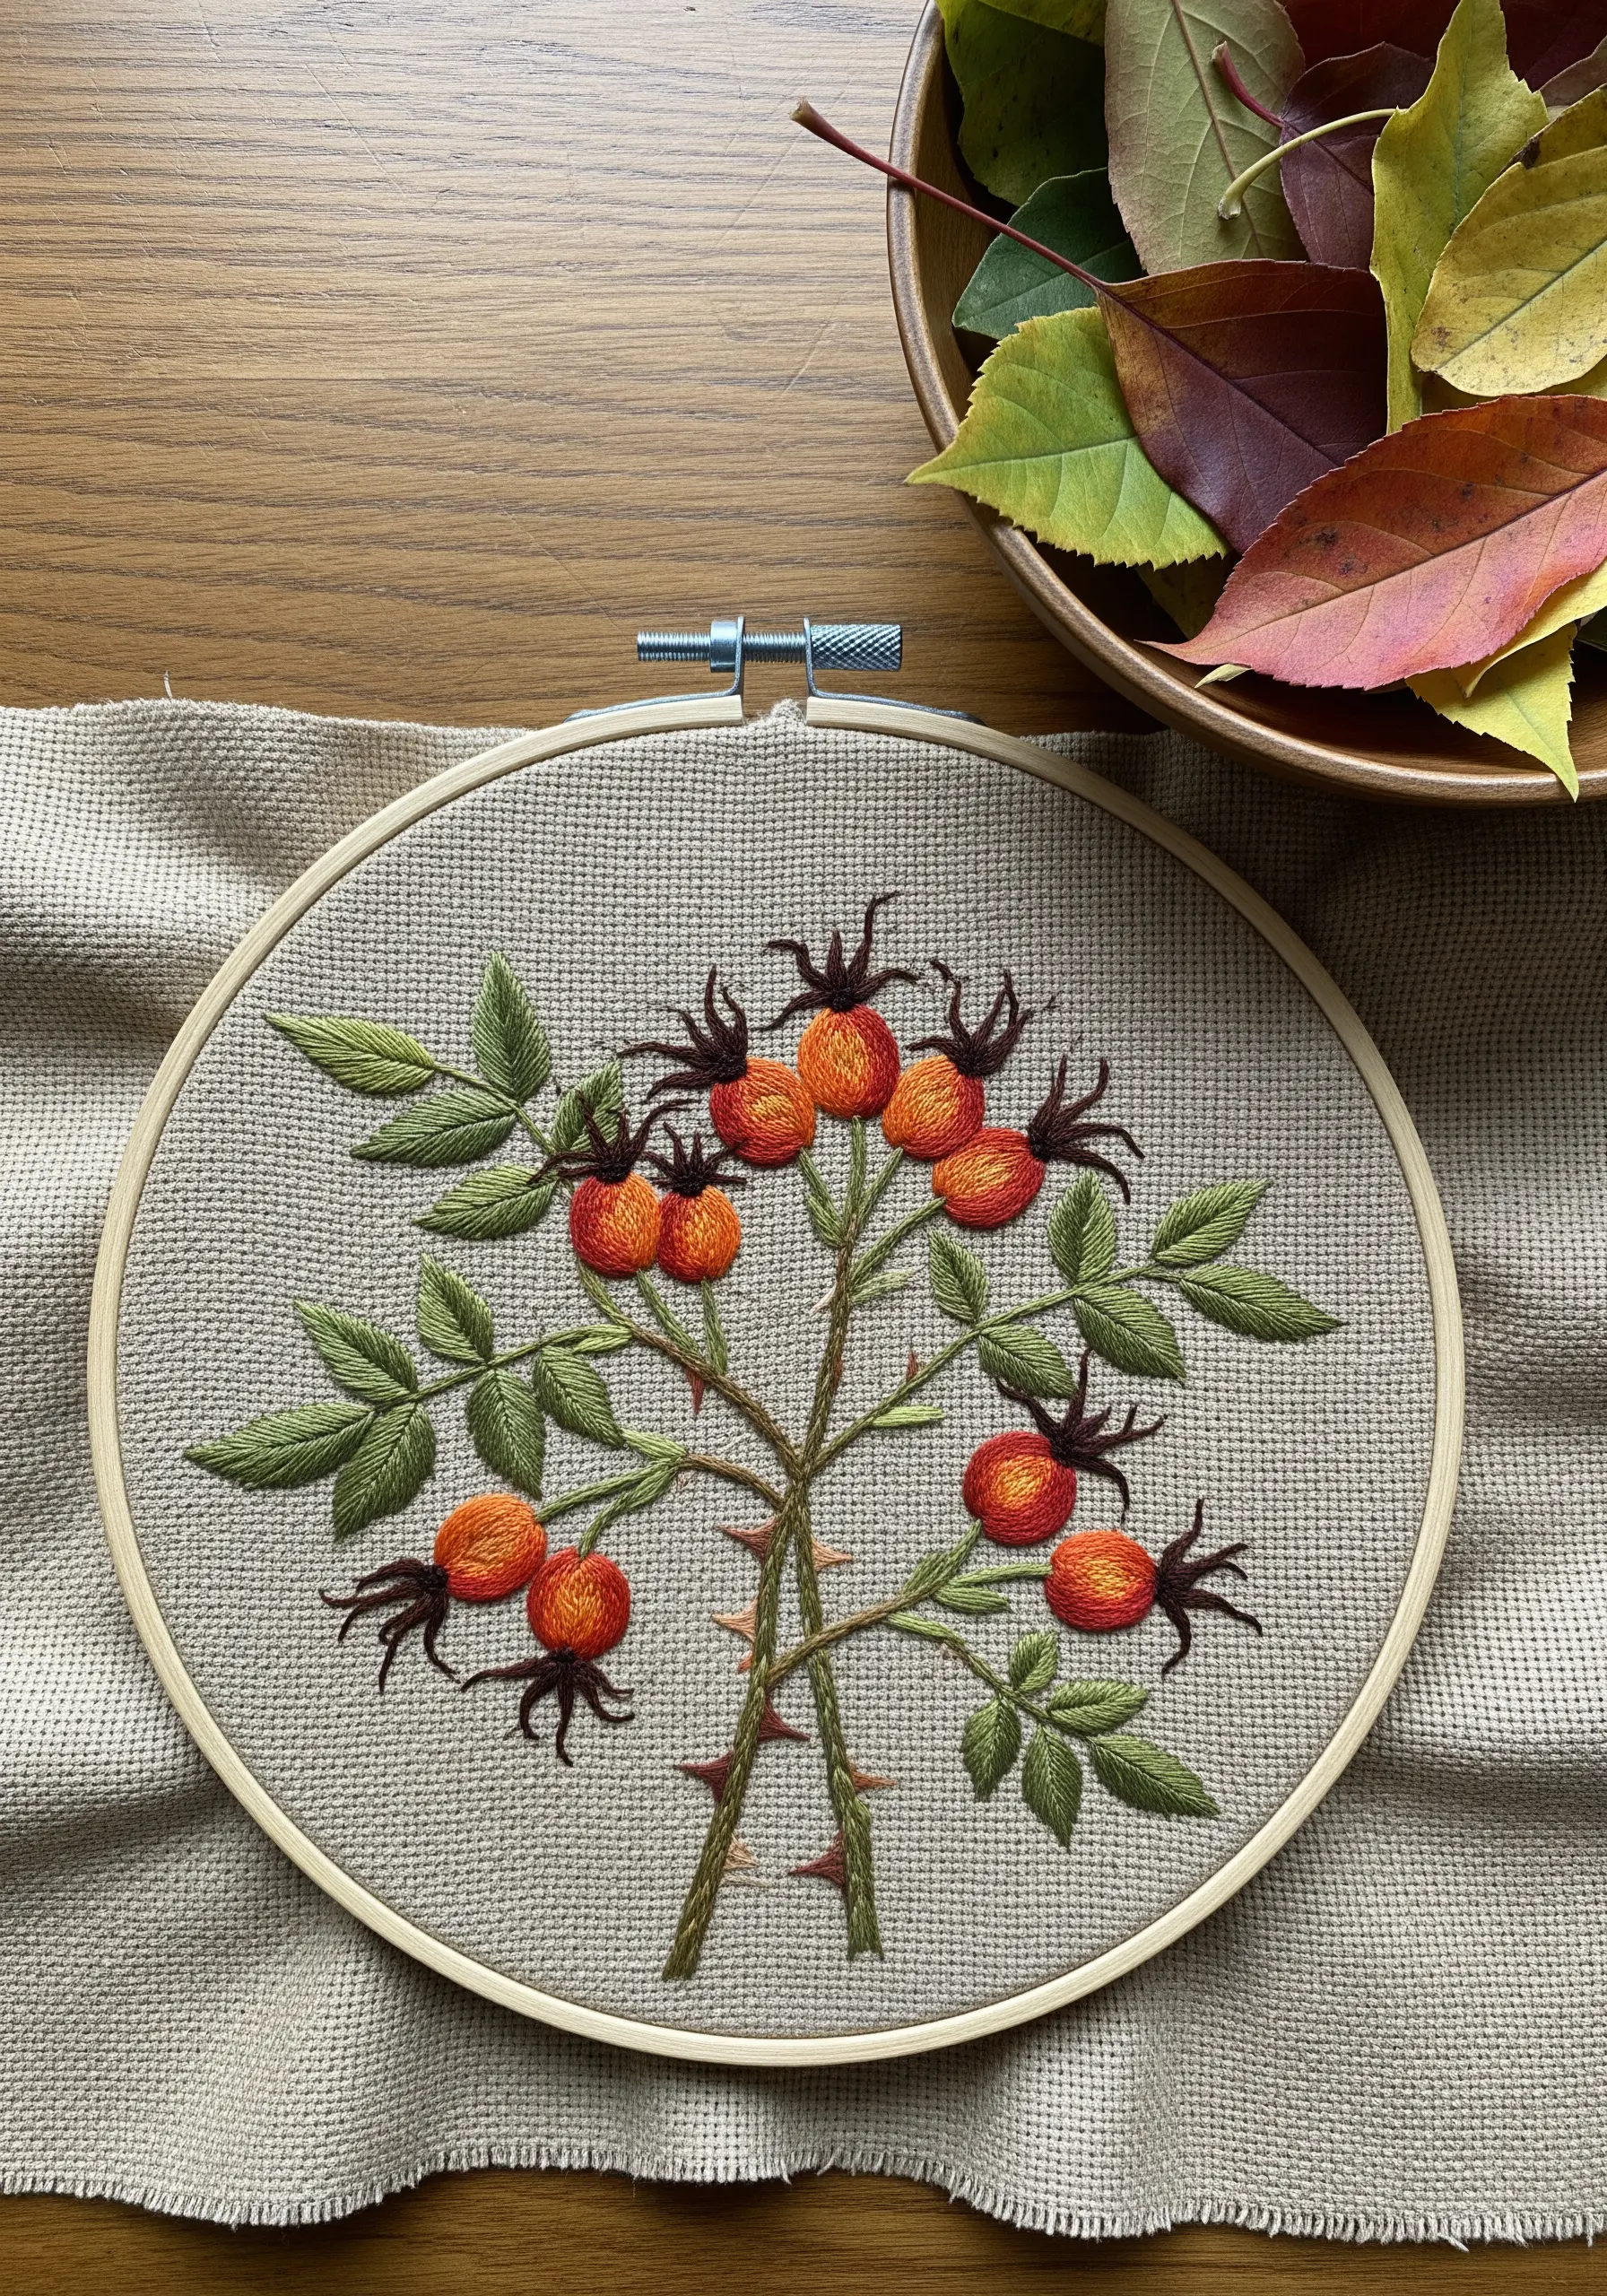
Move beyond the flower itself and explore the beauty of the rose plant in other seasons, like the vibrant hips of autumn.
Use padded satin stitch to give the rose hips a round, plump shape. Create a small pad of foundation stitches, then cover it with smooth, vertical satin stitches.
Incorporate a small highlight of a lighter orange or yellow on one side to make them look spherical and shiny.
Use a contrasting texture for the spiky sepals, like several straight stitches fanning out from the top, to complete the realistic look.
20. Replicate Fringed Edges with Turkey Work
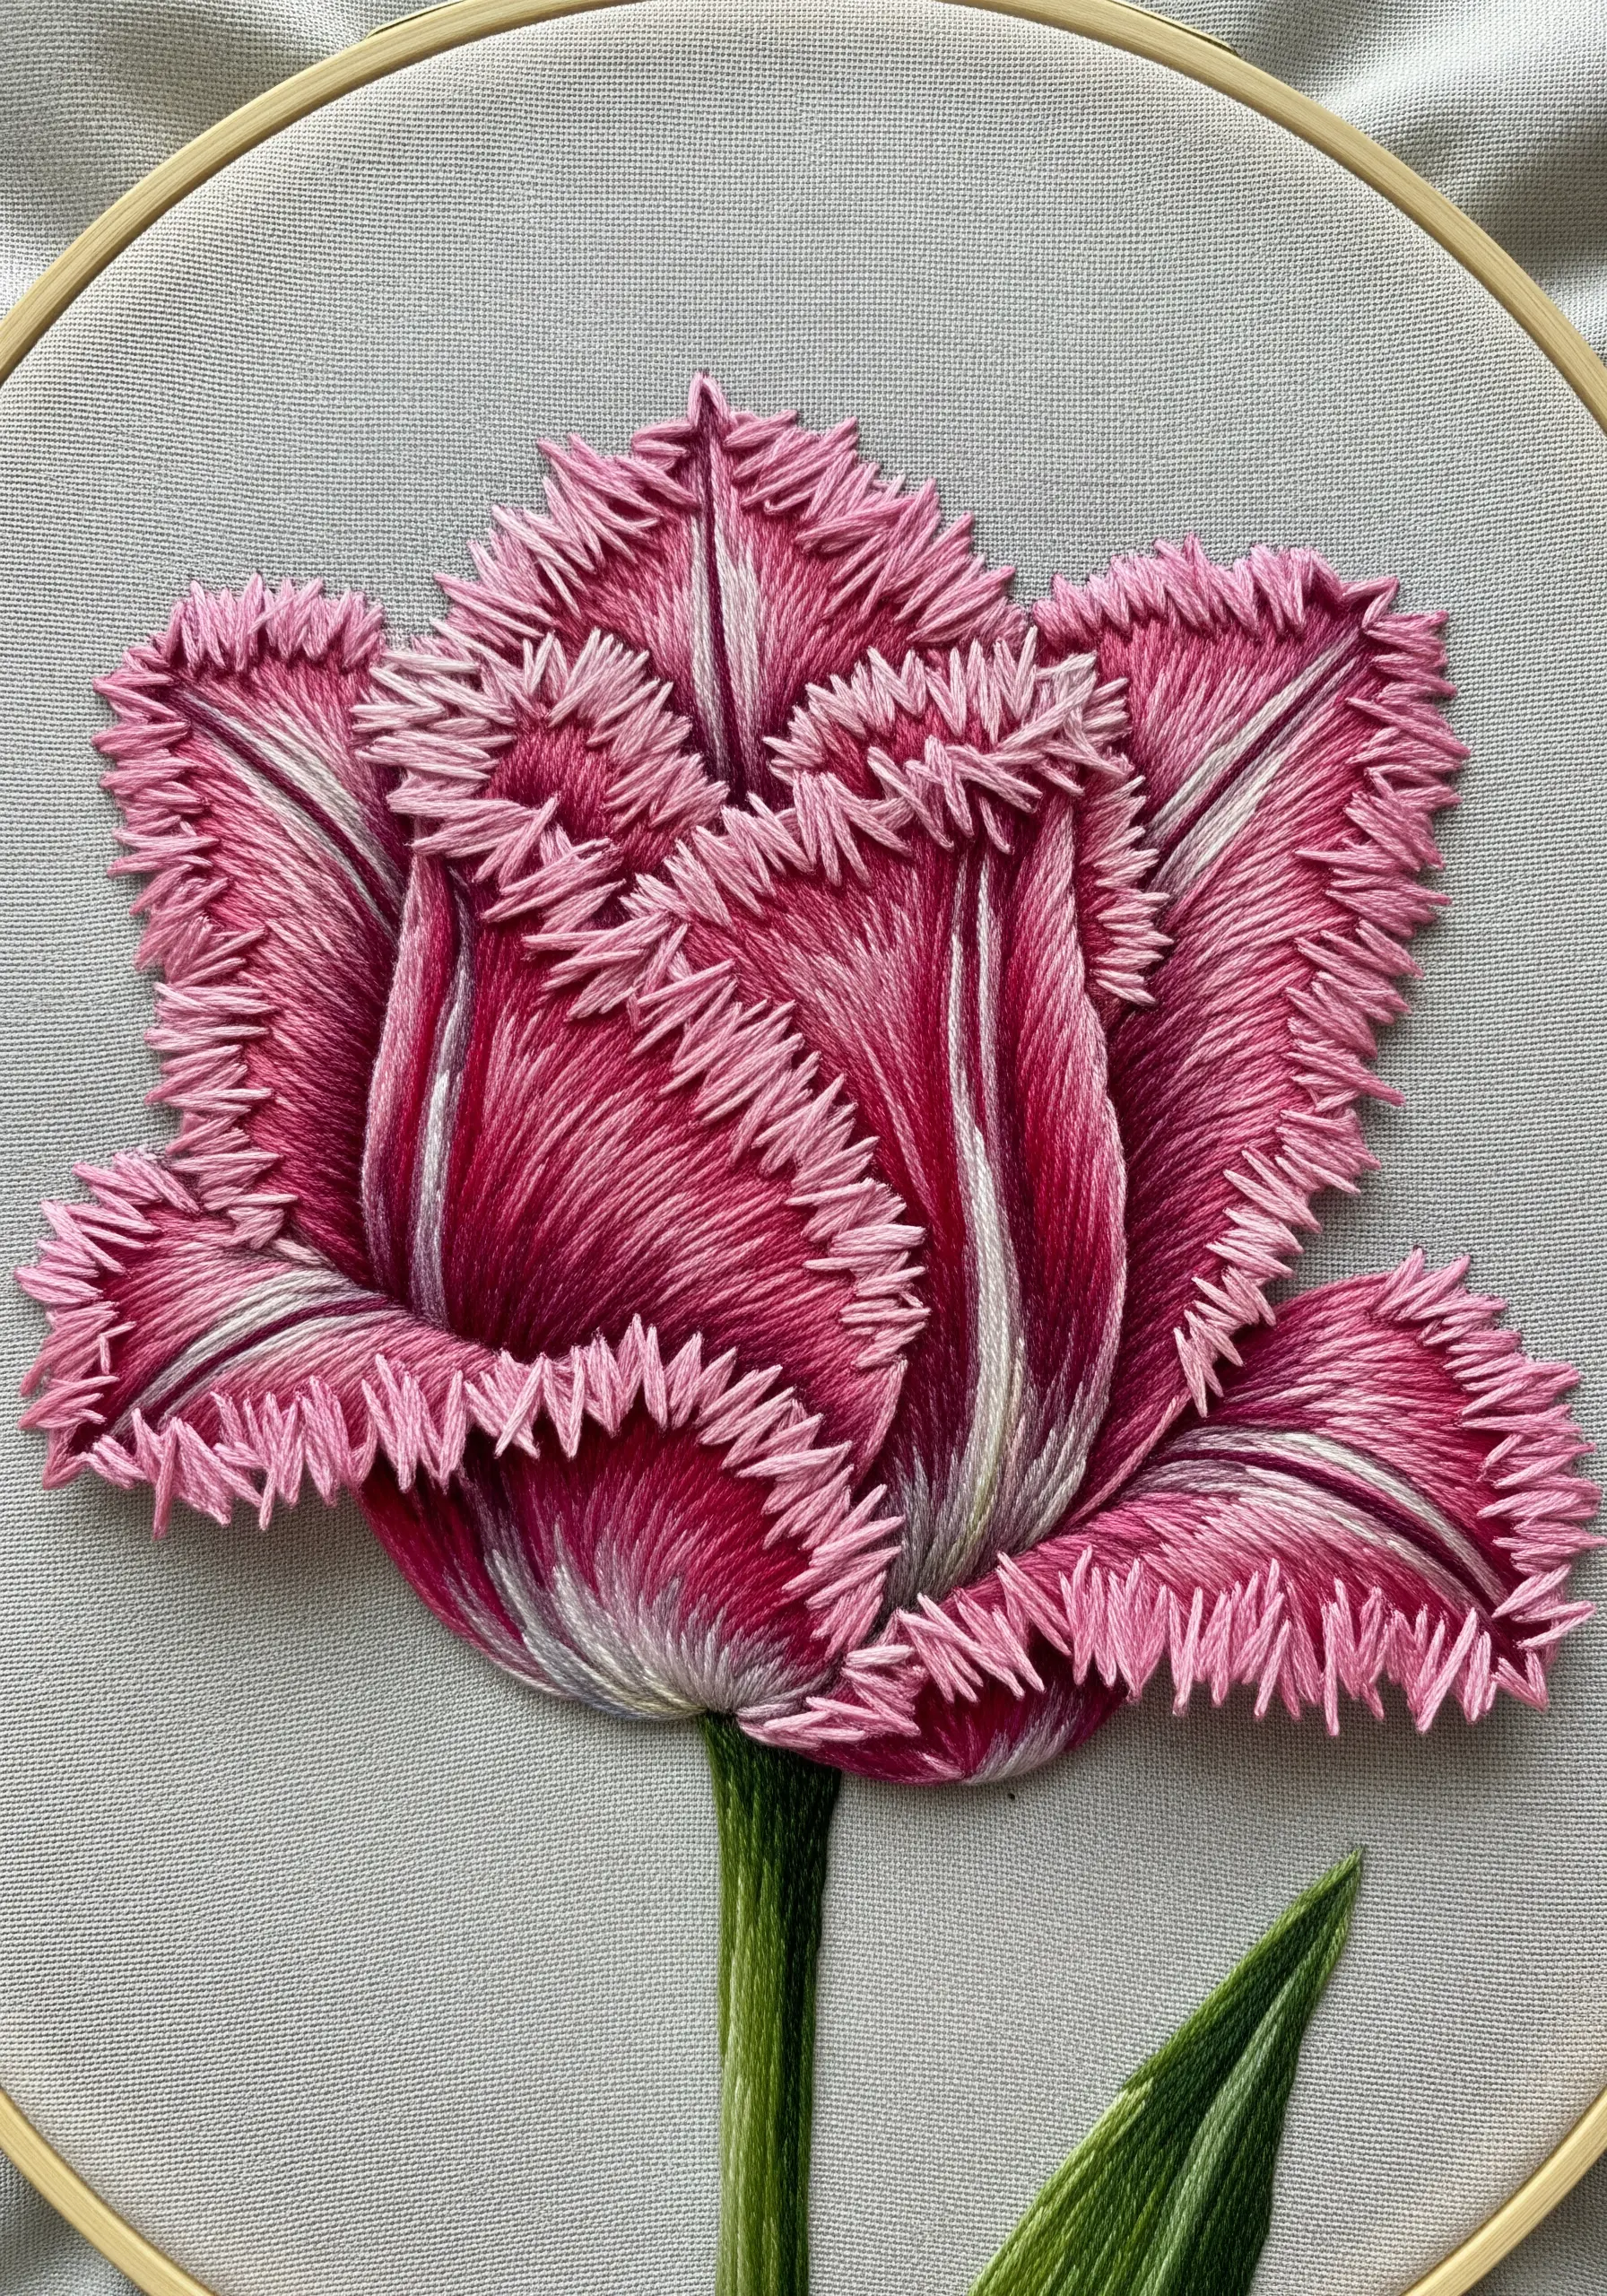
The unique, feathery edge of a fringed tulip demands a special stitch that can replicate its texture.
Outline the edges of the petals with turkey work (or ghiordes knot). This stitch creates loops of thread on the surface of the fabric.
Once all your loops are complete, carefully snip them open with sharp embroidery scissors and fluff them up to create a soft, fringed effect.
Fill in the rest of the petal with smooth, long-and-short stitch to create a beautiful contrast between the flat color and the textured edge.
21. Build a Lush Garden with Layered Textures
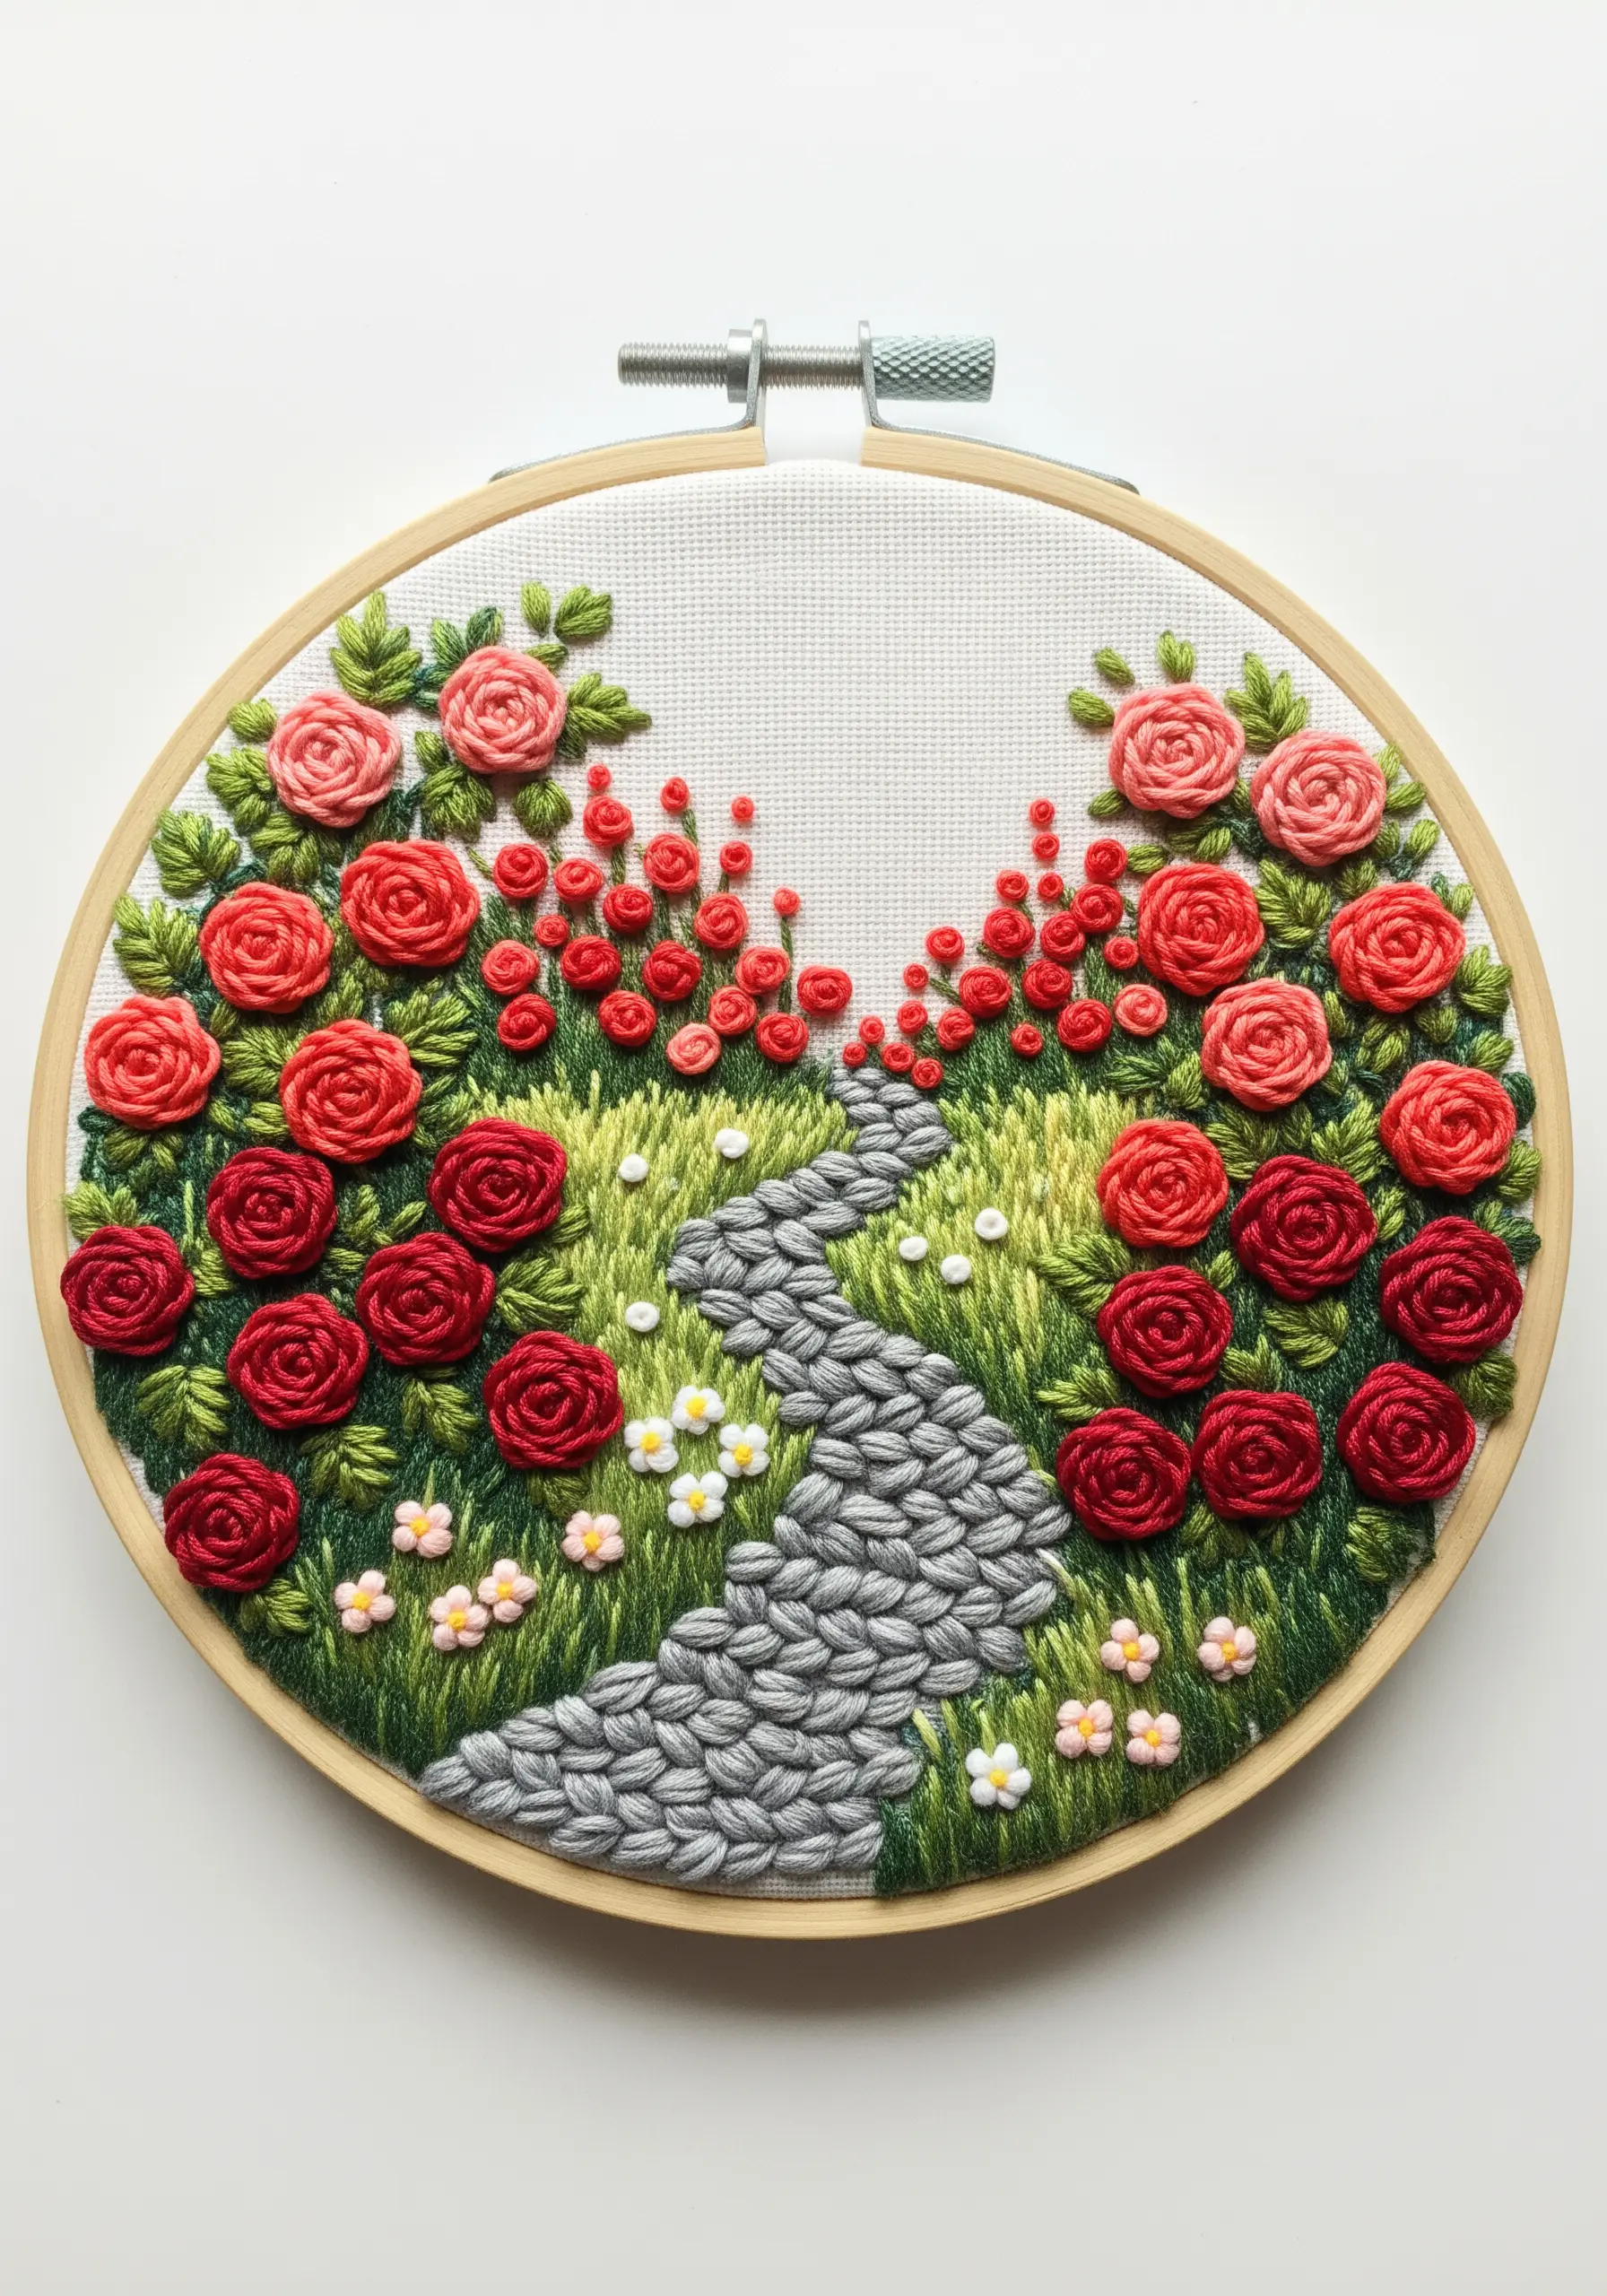
Create a truly immersive scene by combining multiple dimensional stitches in a single piece.
Use woven wheel stitches for the roses and bullion knots for the smaller buds to establish the primary floral shapes.
Fill the grassy areas with a mix of French knots and straight stitches in various shades of green to build up a lush, uneven texture.
For the stone path, a basketweave stitch provides a structured, geometric texture that contrasts beautifully with the organic chaos of the garden.
This type of piece makes an excellent addition to embroidery hoop wall murals, telling a complete story.
22. Achieve Soft Shading on a Muted Background
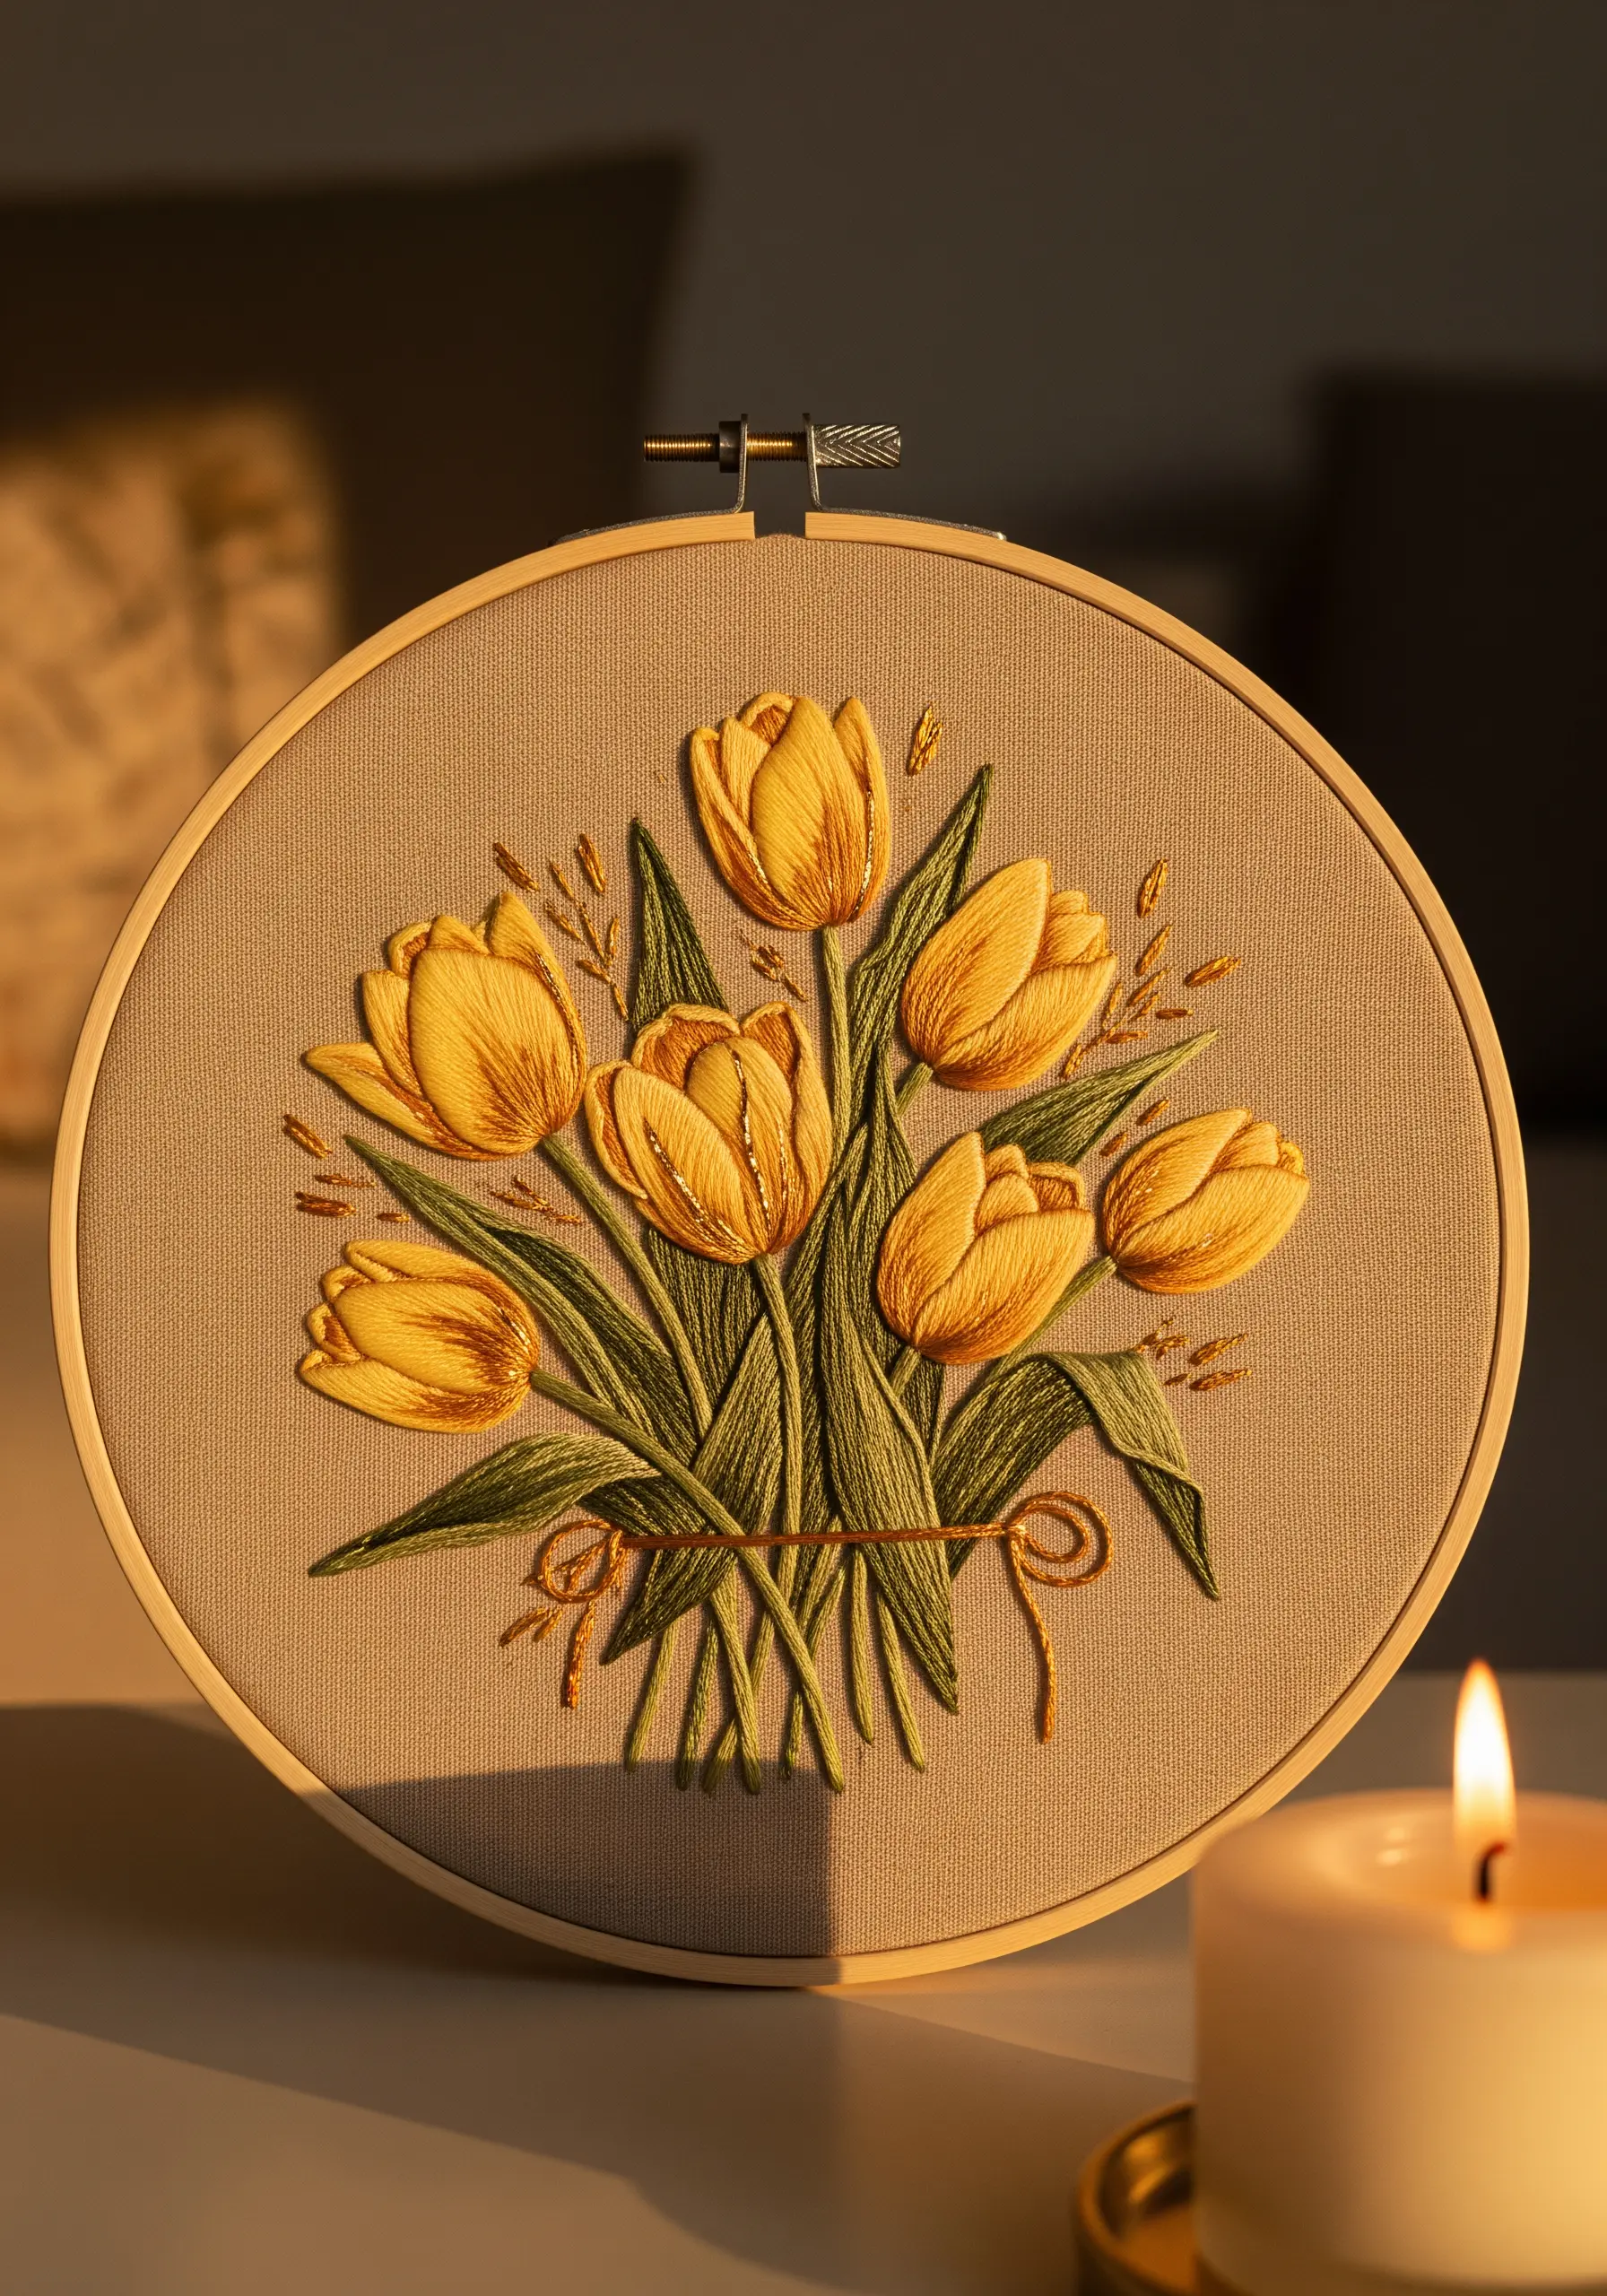
When working with a subtle color palette, success lies in the gentle transition between shades.
Stitch on a neutral, earth-toned fabric like linen or cotton twill. This allows the soft yellow of the tulips to glow without being overpowering.
Use long-and-short stitch to blend your yellows and browns, ensuring you overlap your stitches just enough to create a seamless gradient.
This technique creates a warm, painterly effect that feels calm and sophisticated, perfect for cozy embroidery projects.
23. Isolate a Single Petal for Dramatic Effect
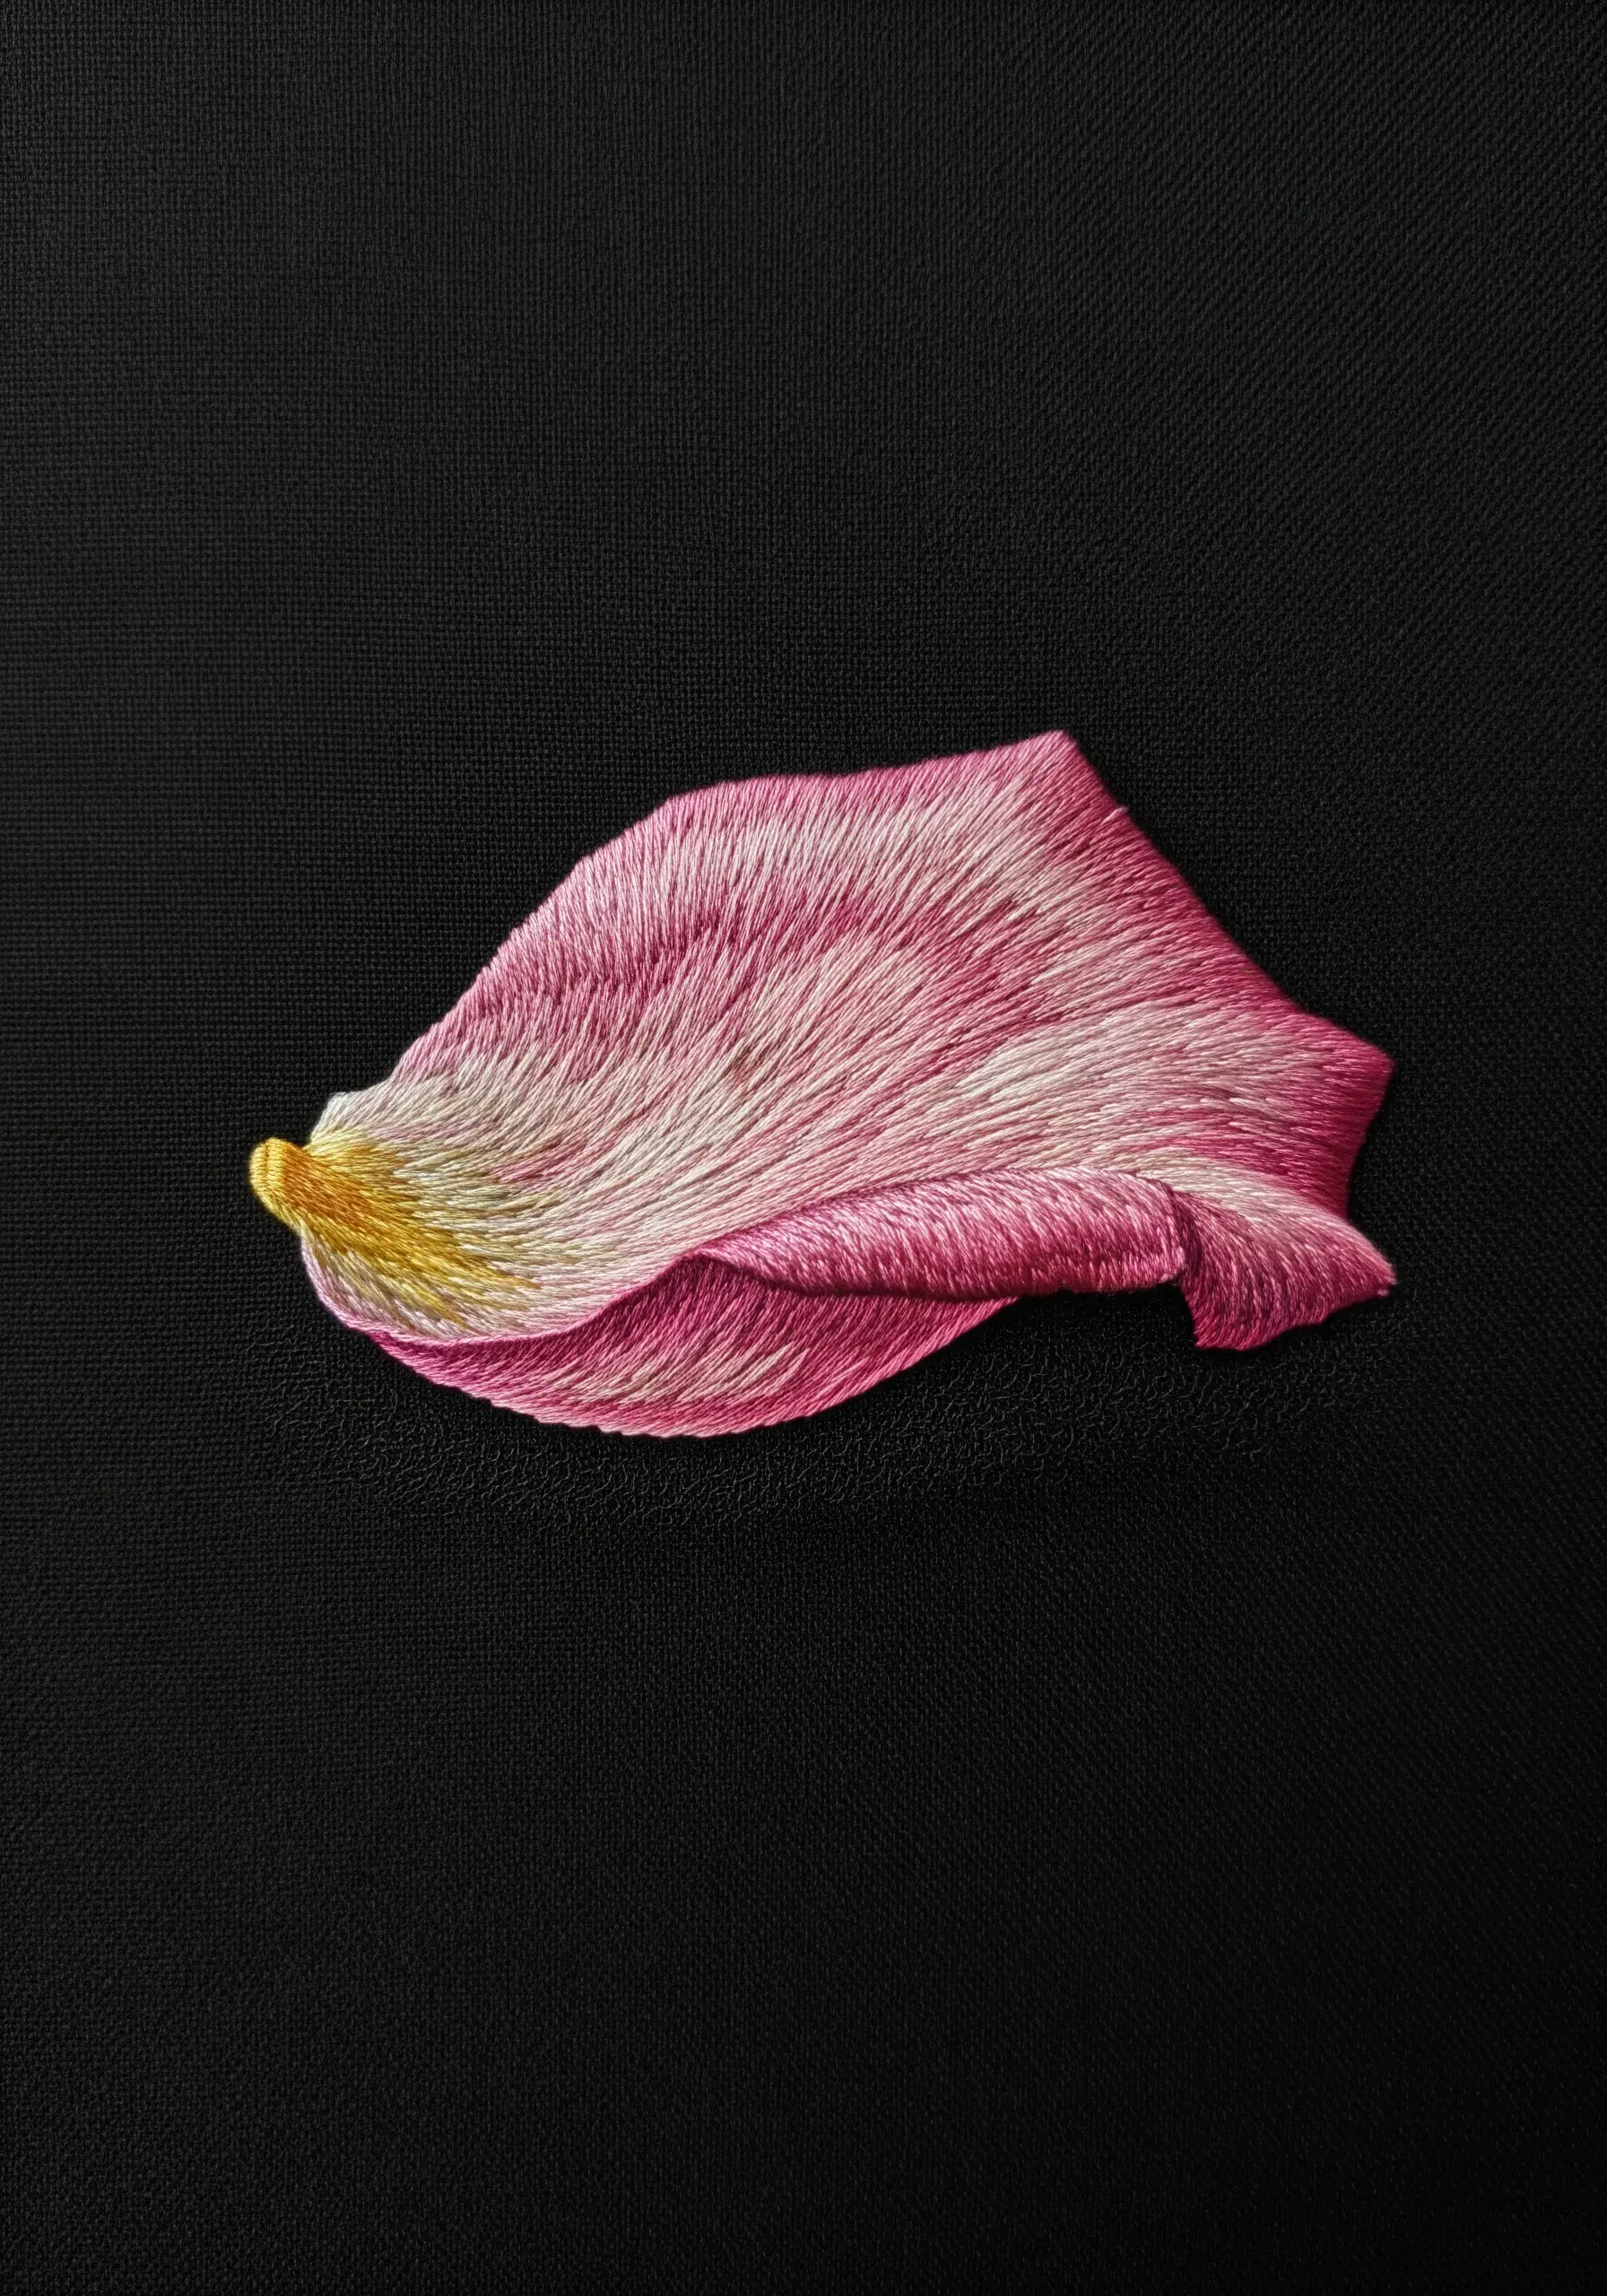
Focusing on a single, perfectly rendered petal allows you to elevate a simple shape into a piece of fine art.
This exercise is all about mastering the direction of your stitches. Notice how the threads fan out from the base and curve gently, following the petal’s form.
Work with at least five shades of pink and white, using single-strand floss to create an almost imperceptible blend.
Stitching on a black background isolates the subject, forcing the viewer to appreciate the incredible detail and skill in your thread painting.
24. Embrace Simplicity with Graphic Satin Stitch
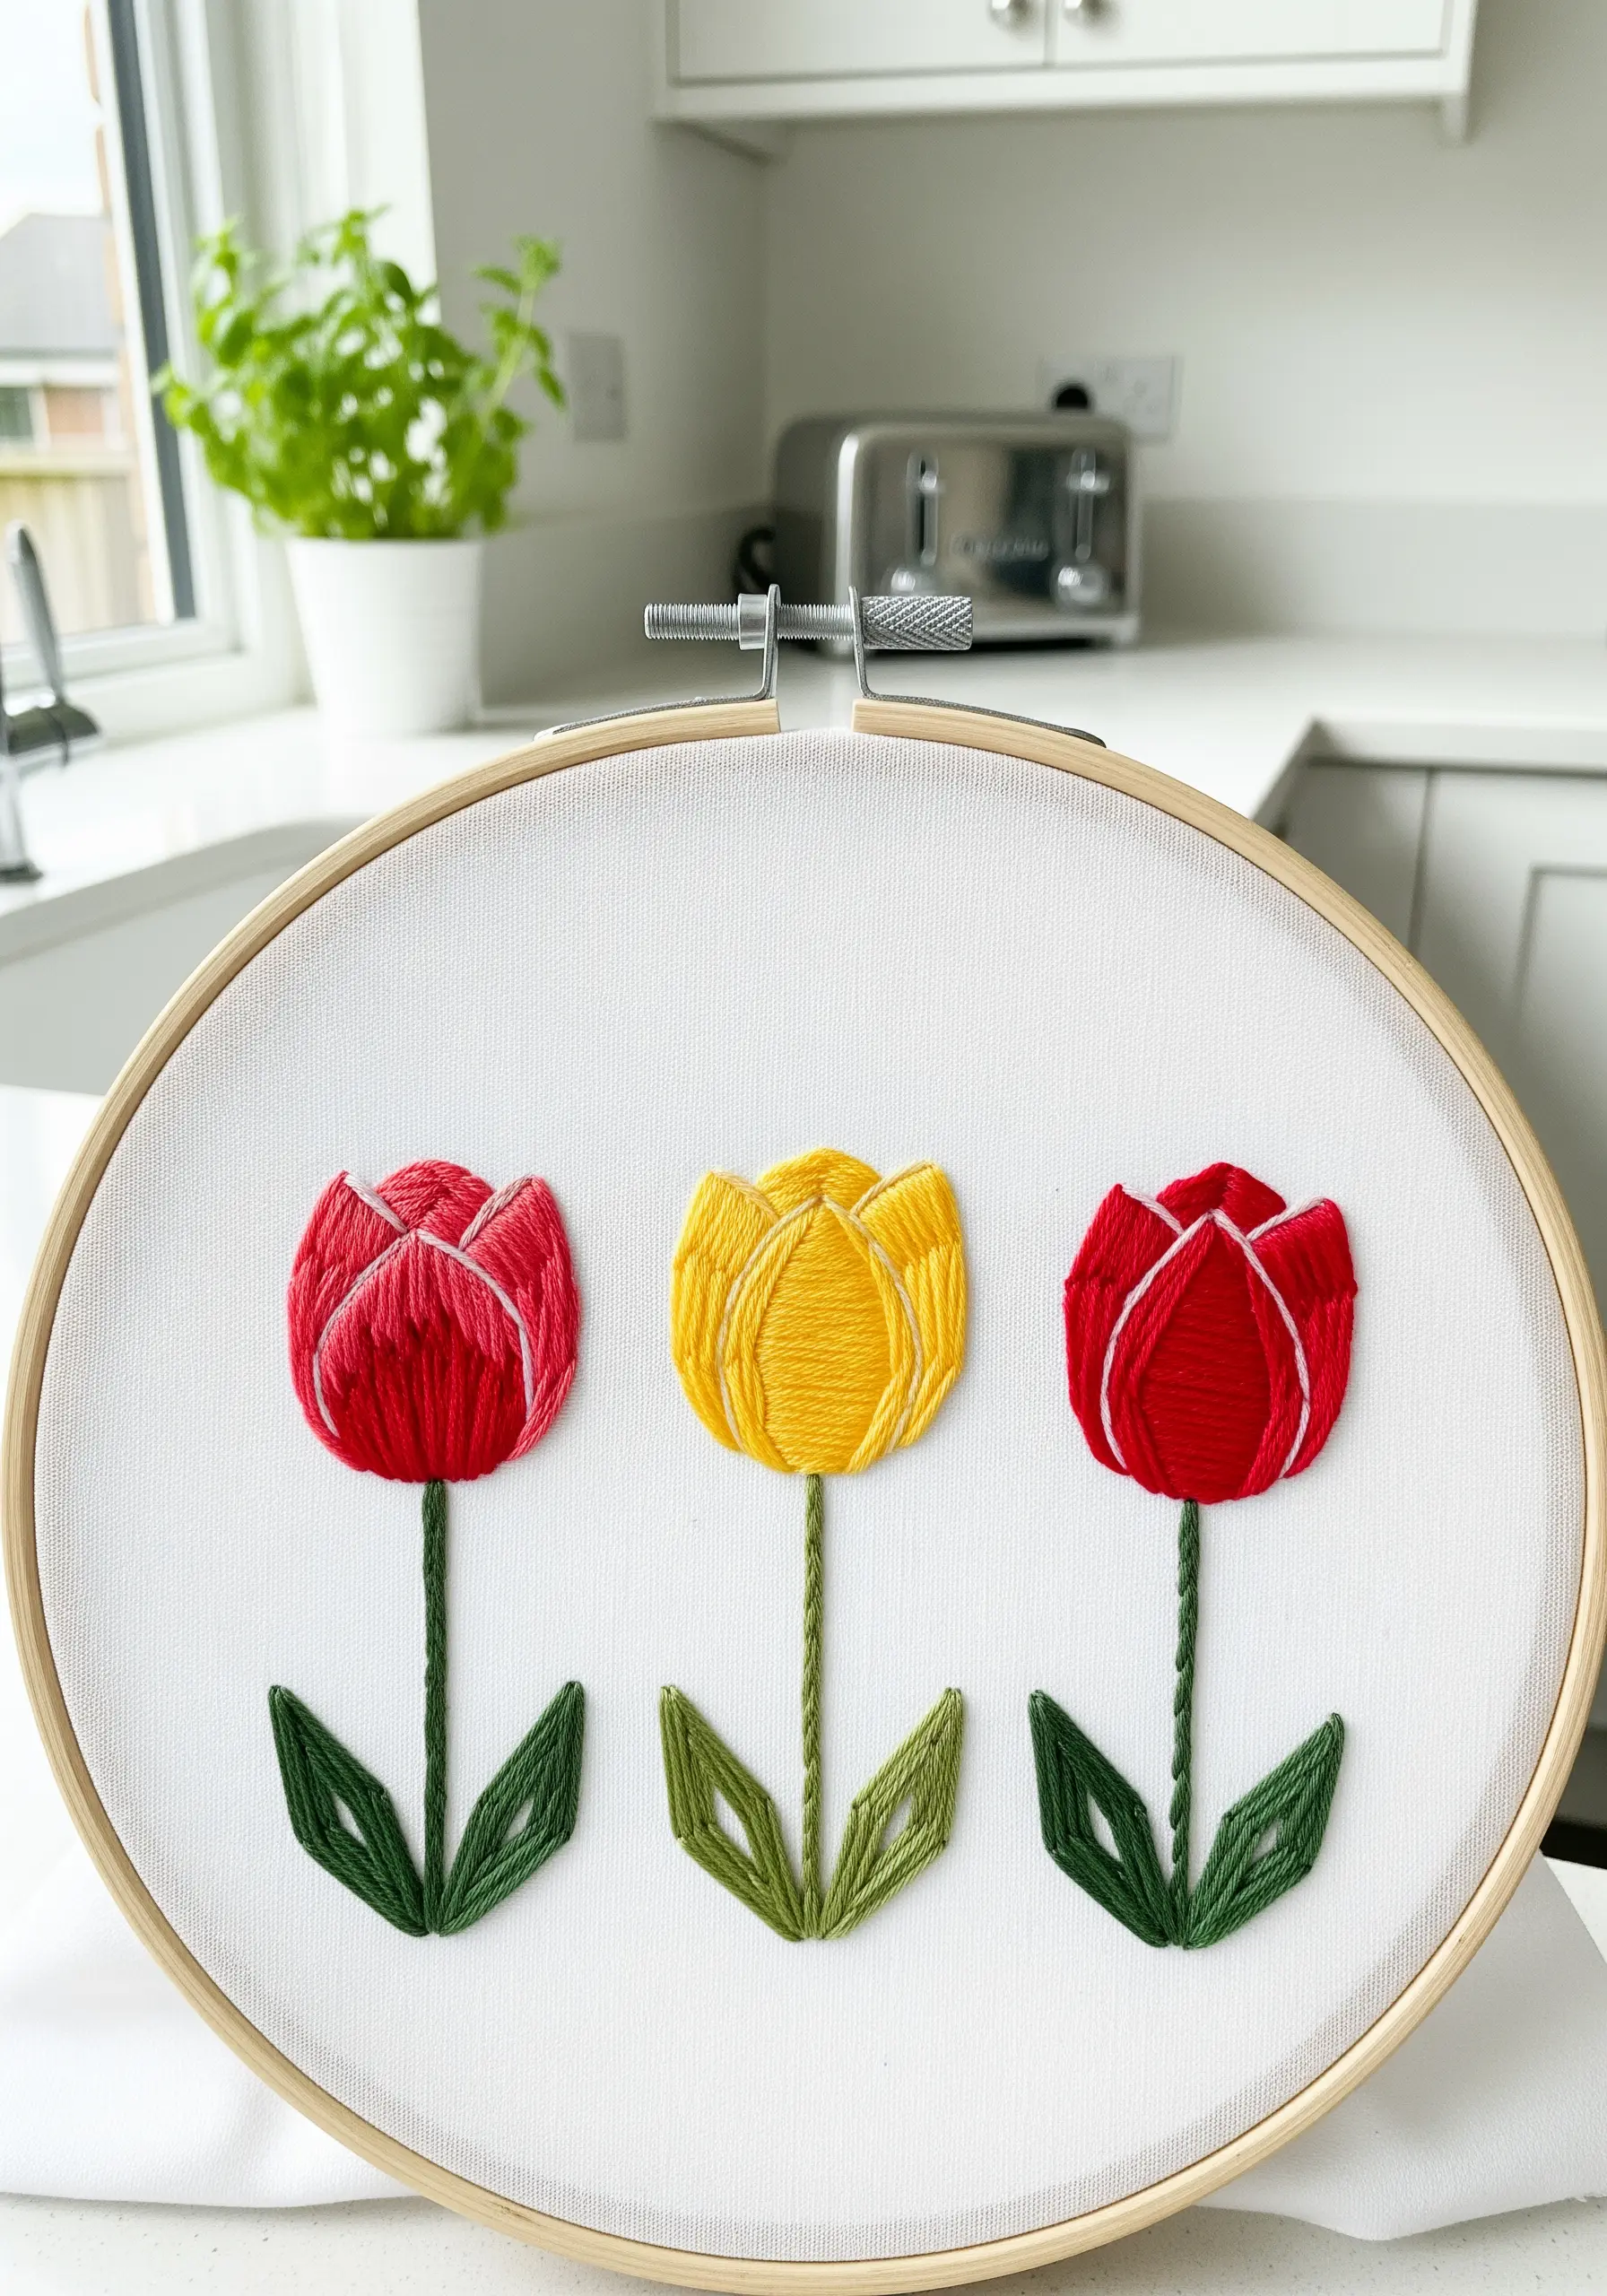
Achieve a clean, modern, and cheerful look by simplifying your flowers into bold, graphic shapes.
Use a classic satin stitch to fill each petal section, focusing on keeping your stitches perfectly parallel and your edges crisp.
A simple outline in a contrasting color, like the white on the red tulips, adds definition and a touch of playful charm.
This style is one of the most effective beginner-friendly embroidery designs because it relies on mastering one basic stitch rather than complex blending.
25. Create a Trellis with Painted and Stitched Elements
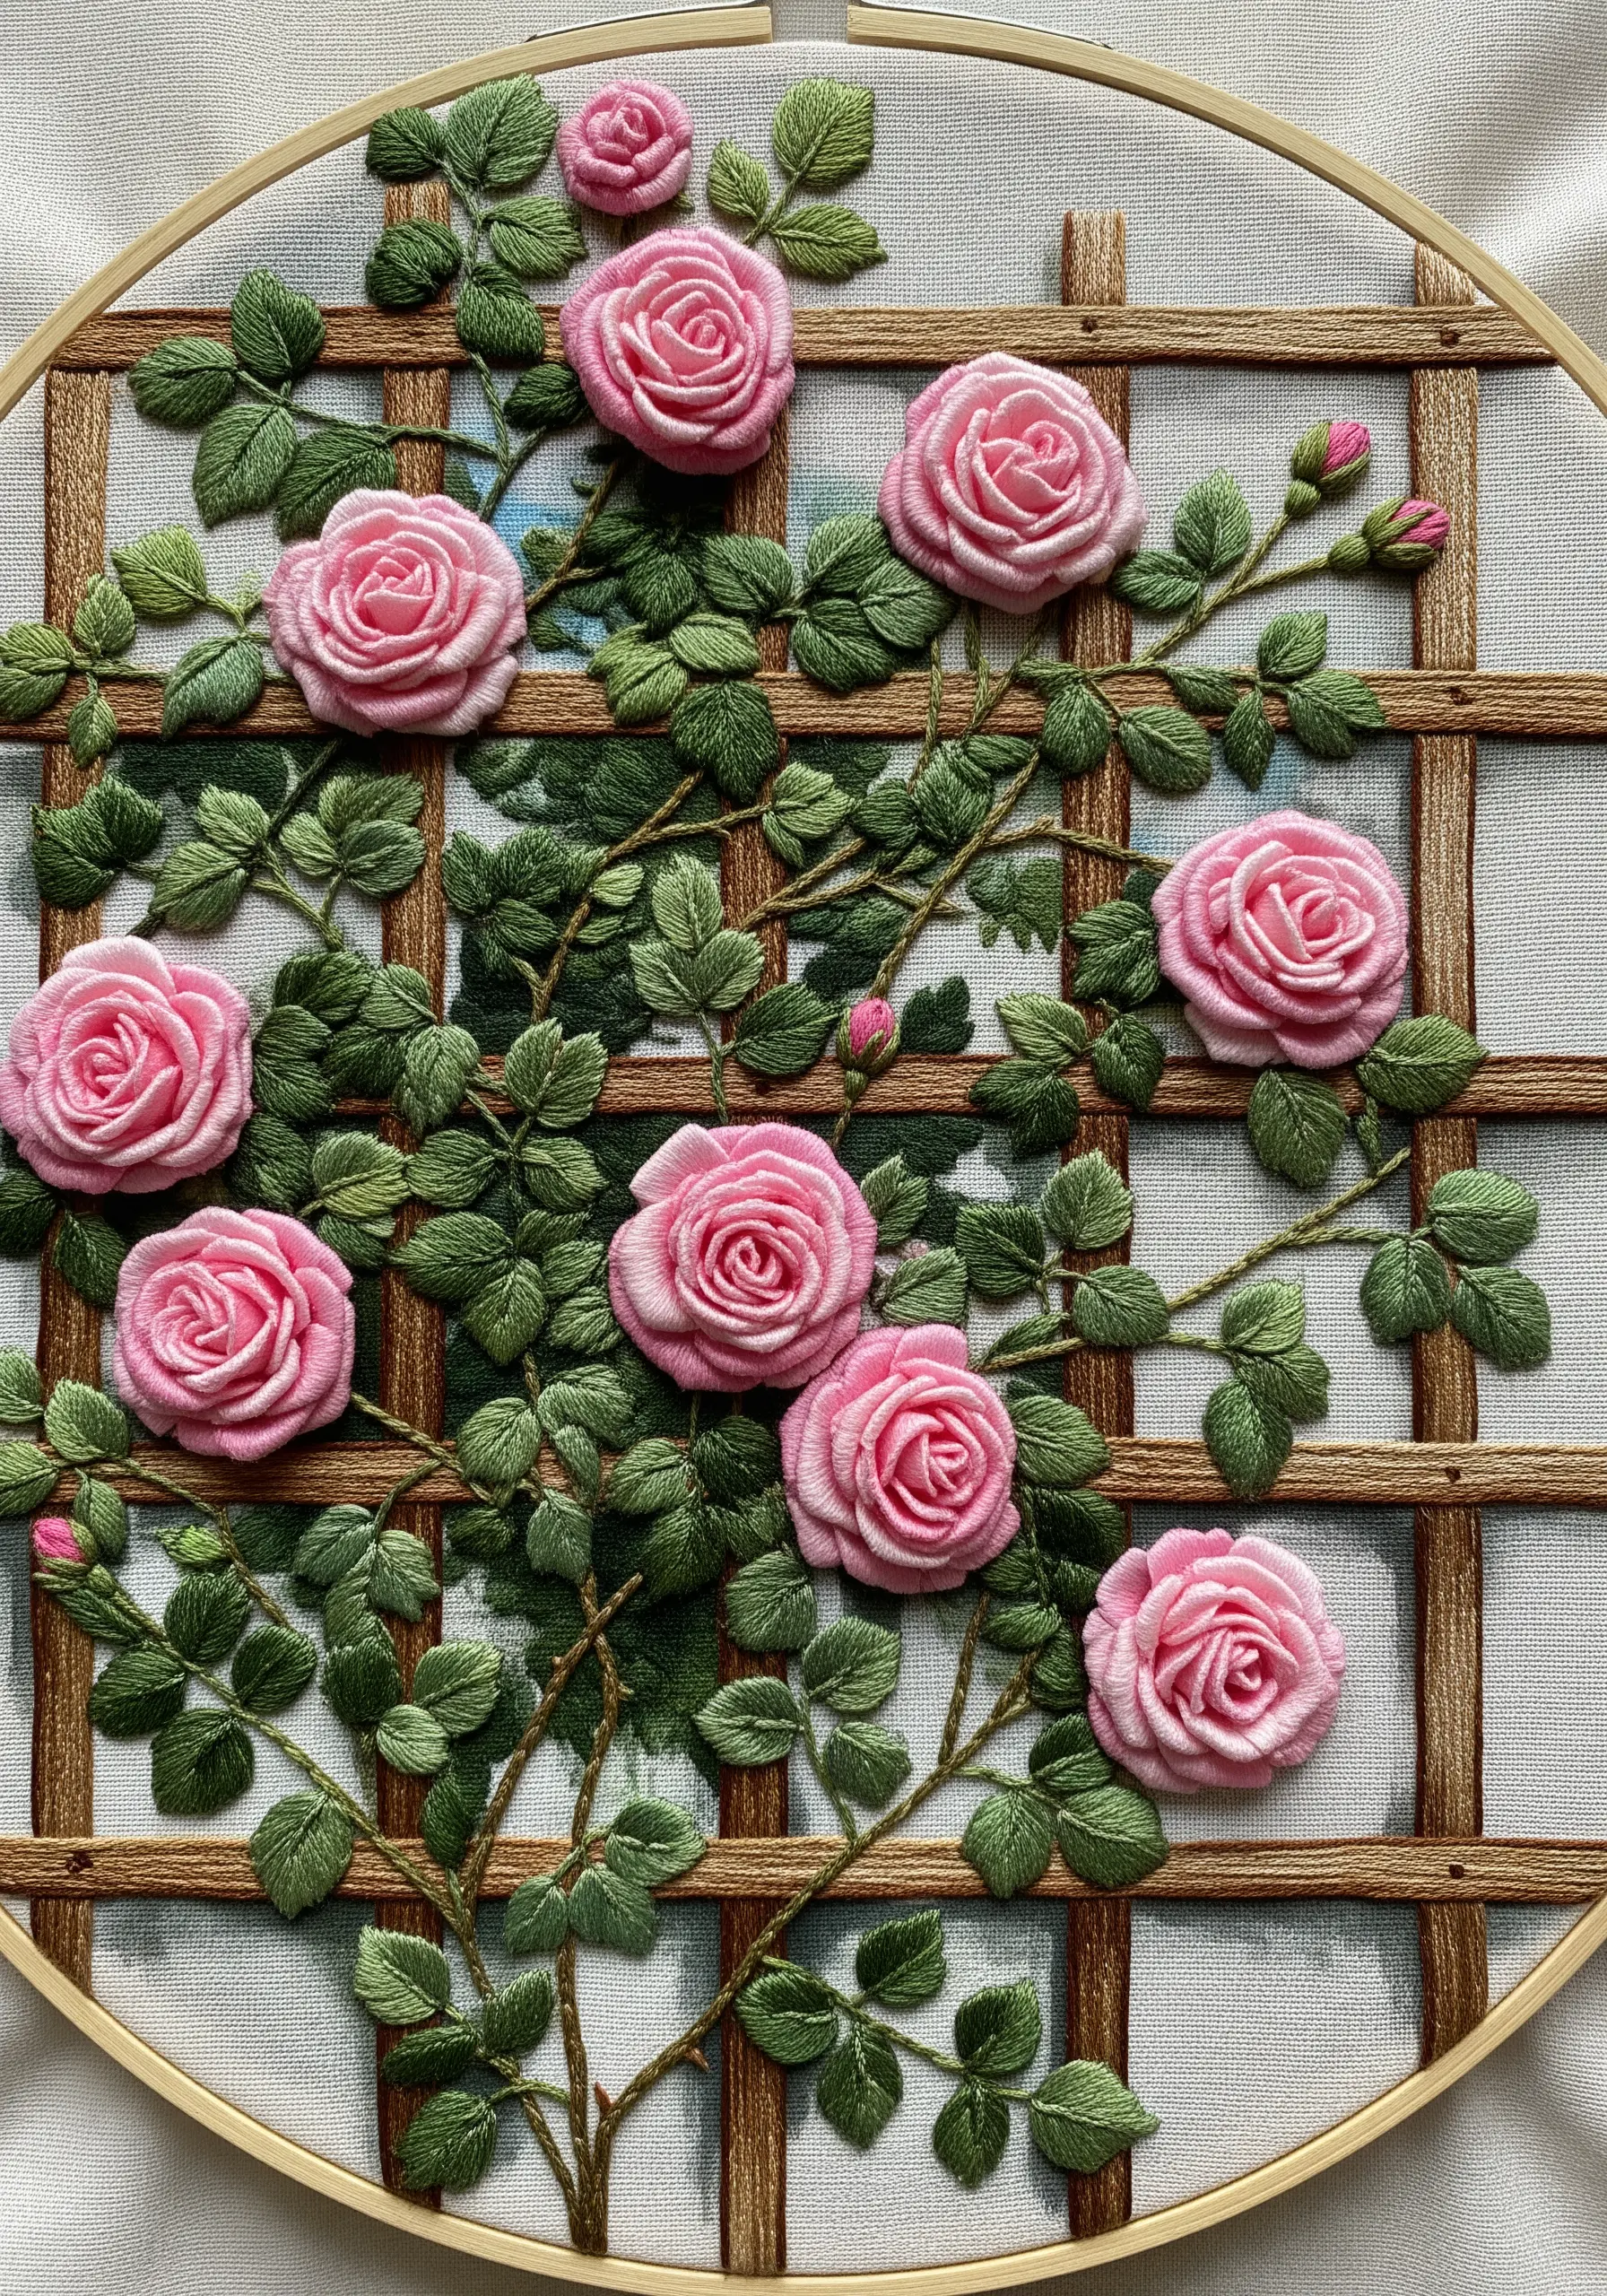
Combine watercolor painting and embroidery to create a background that adds depth without overwhelming your stitches.
Lightly paint a simple trellis and some background leaves directly onto your fabric with watercolor paints or inks.
Once dry, use dimensional stitches like the woven wheel for the roses and detached chain stitch for the foreground leaves.
The stitched elements will pop against the softer, painted background, creating a beautiful layered effect that feels both artistic and achievable.
26. Perfect the Open Wild Rose
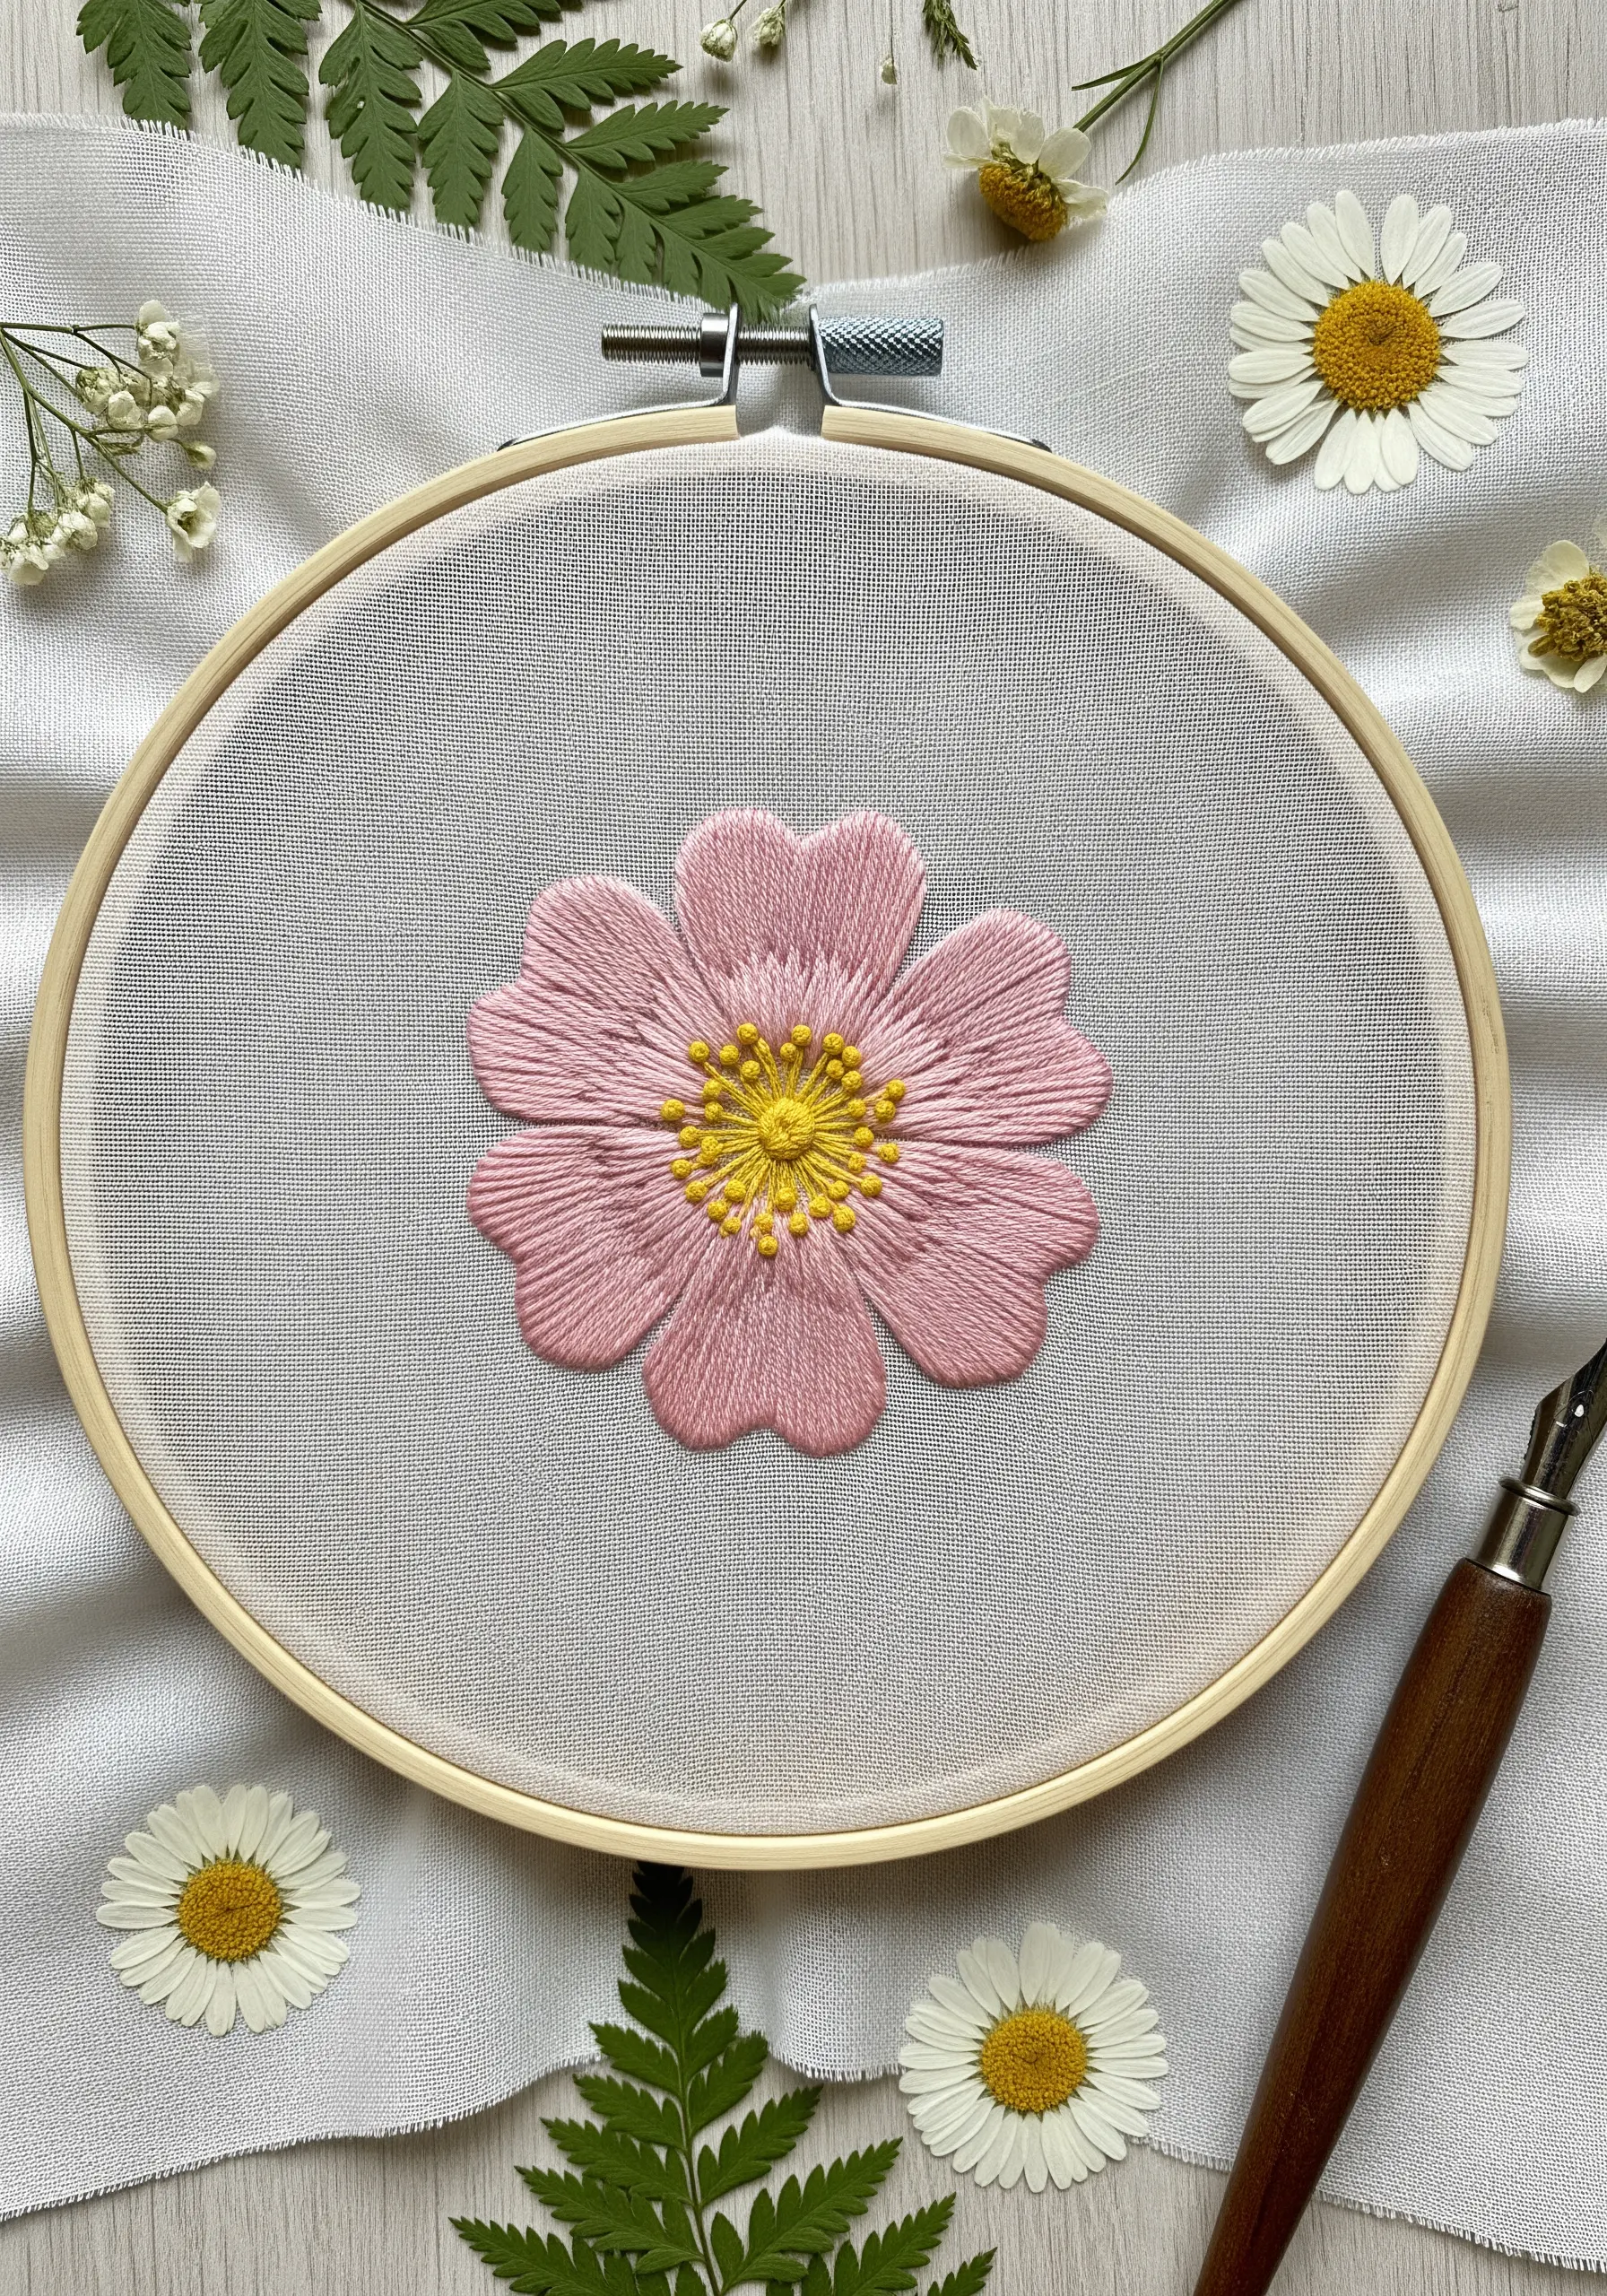
Unlike a garden rose, the beauty of a wild rose is in its simple, open form. Your stitching should reflect that.
Use a fishbone stitch for the petals. This stitch creates a central line, or vein, which is perfect for these flatter, more delicate flowers.
Fill the center with a dense cluster of bright yellow French knots to mimic the texture of the stamens.
This combination of a smooth, directional petal stitch and a textured center creates a balanced and realistic depiction.
27. Frame Your Work with a Stitched Border
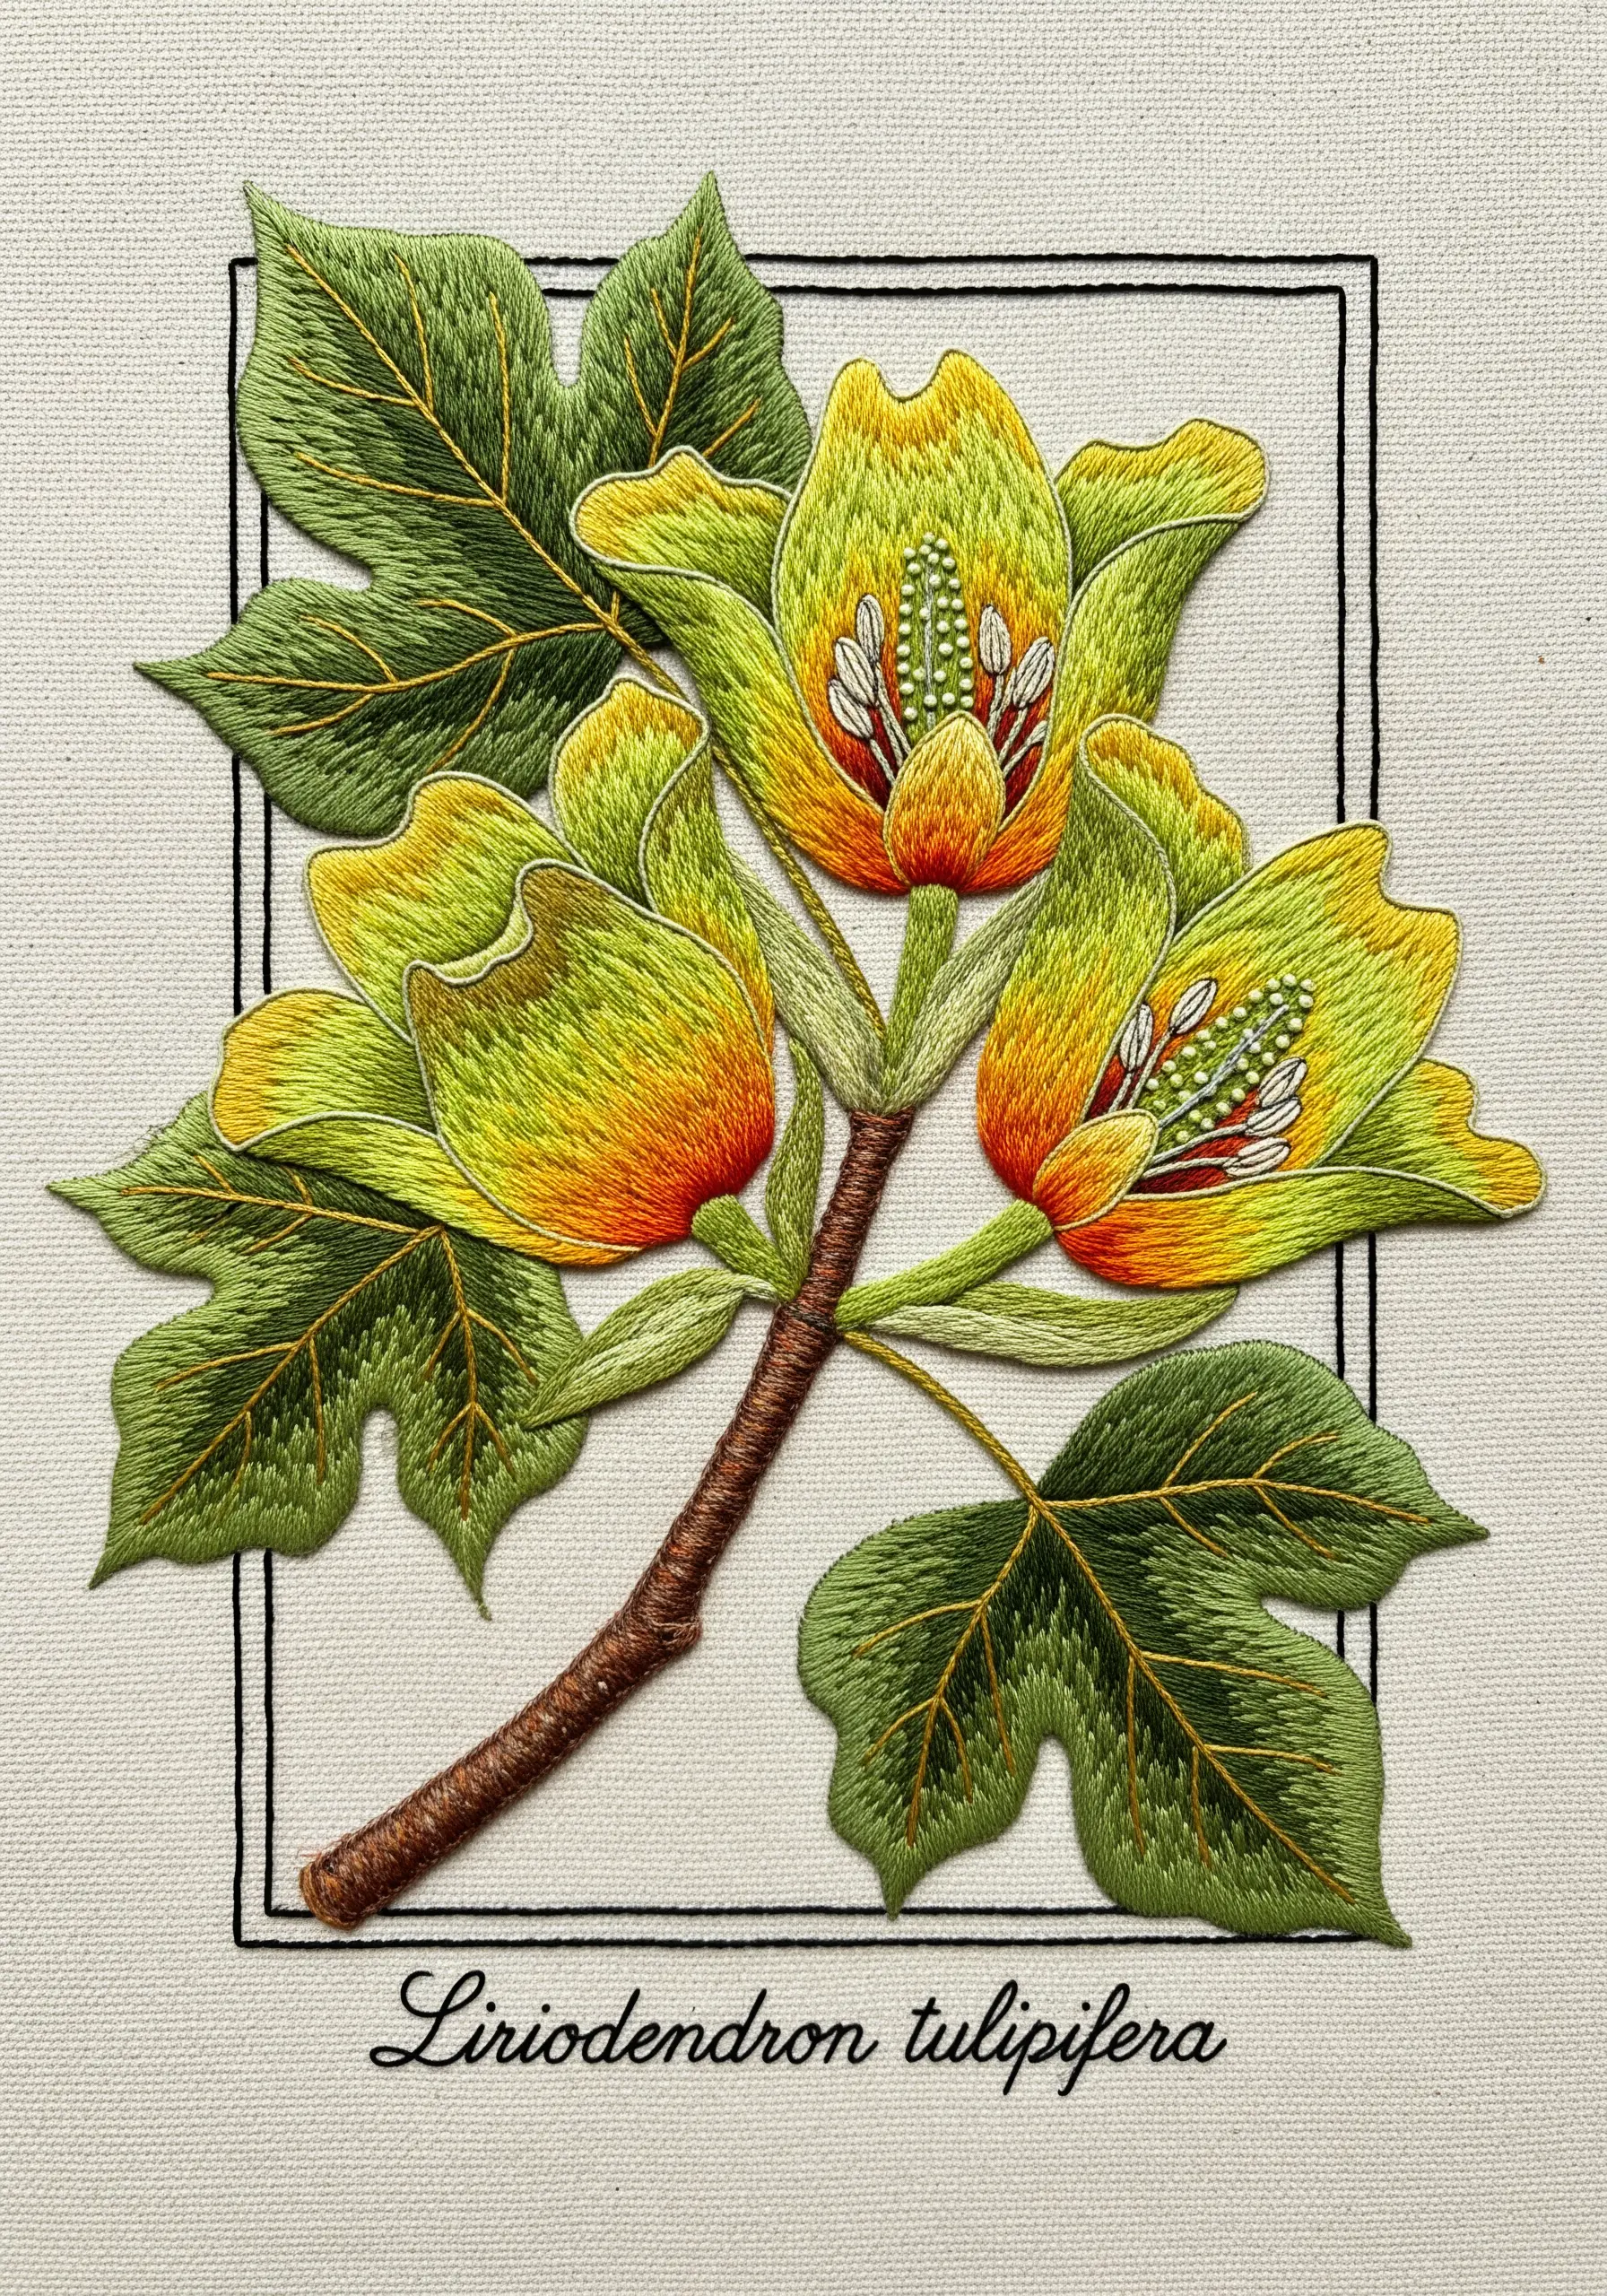
Adding a simple, stitched frame directly onto the fabric can elevate your composition and give it a finished, professional look.
After completing your central floral motif, use a simple backstitch in a dark, contrasting color to create a clean rectangular border.
This technique contains the energy of the floral design and draws the viewer’s eye inward, making the artwork feel more intentional.
It’s a small detail that makes a huge difference, turning your hoop art into a piece that feels ready for a gallery wall.
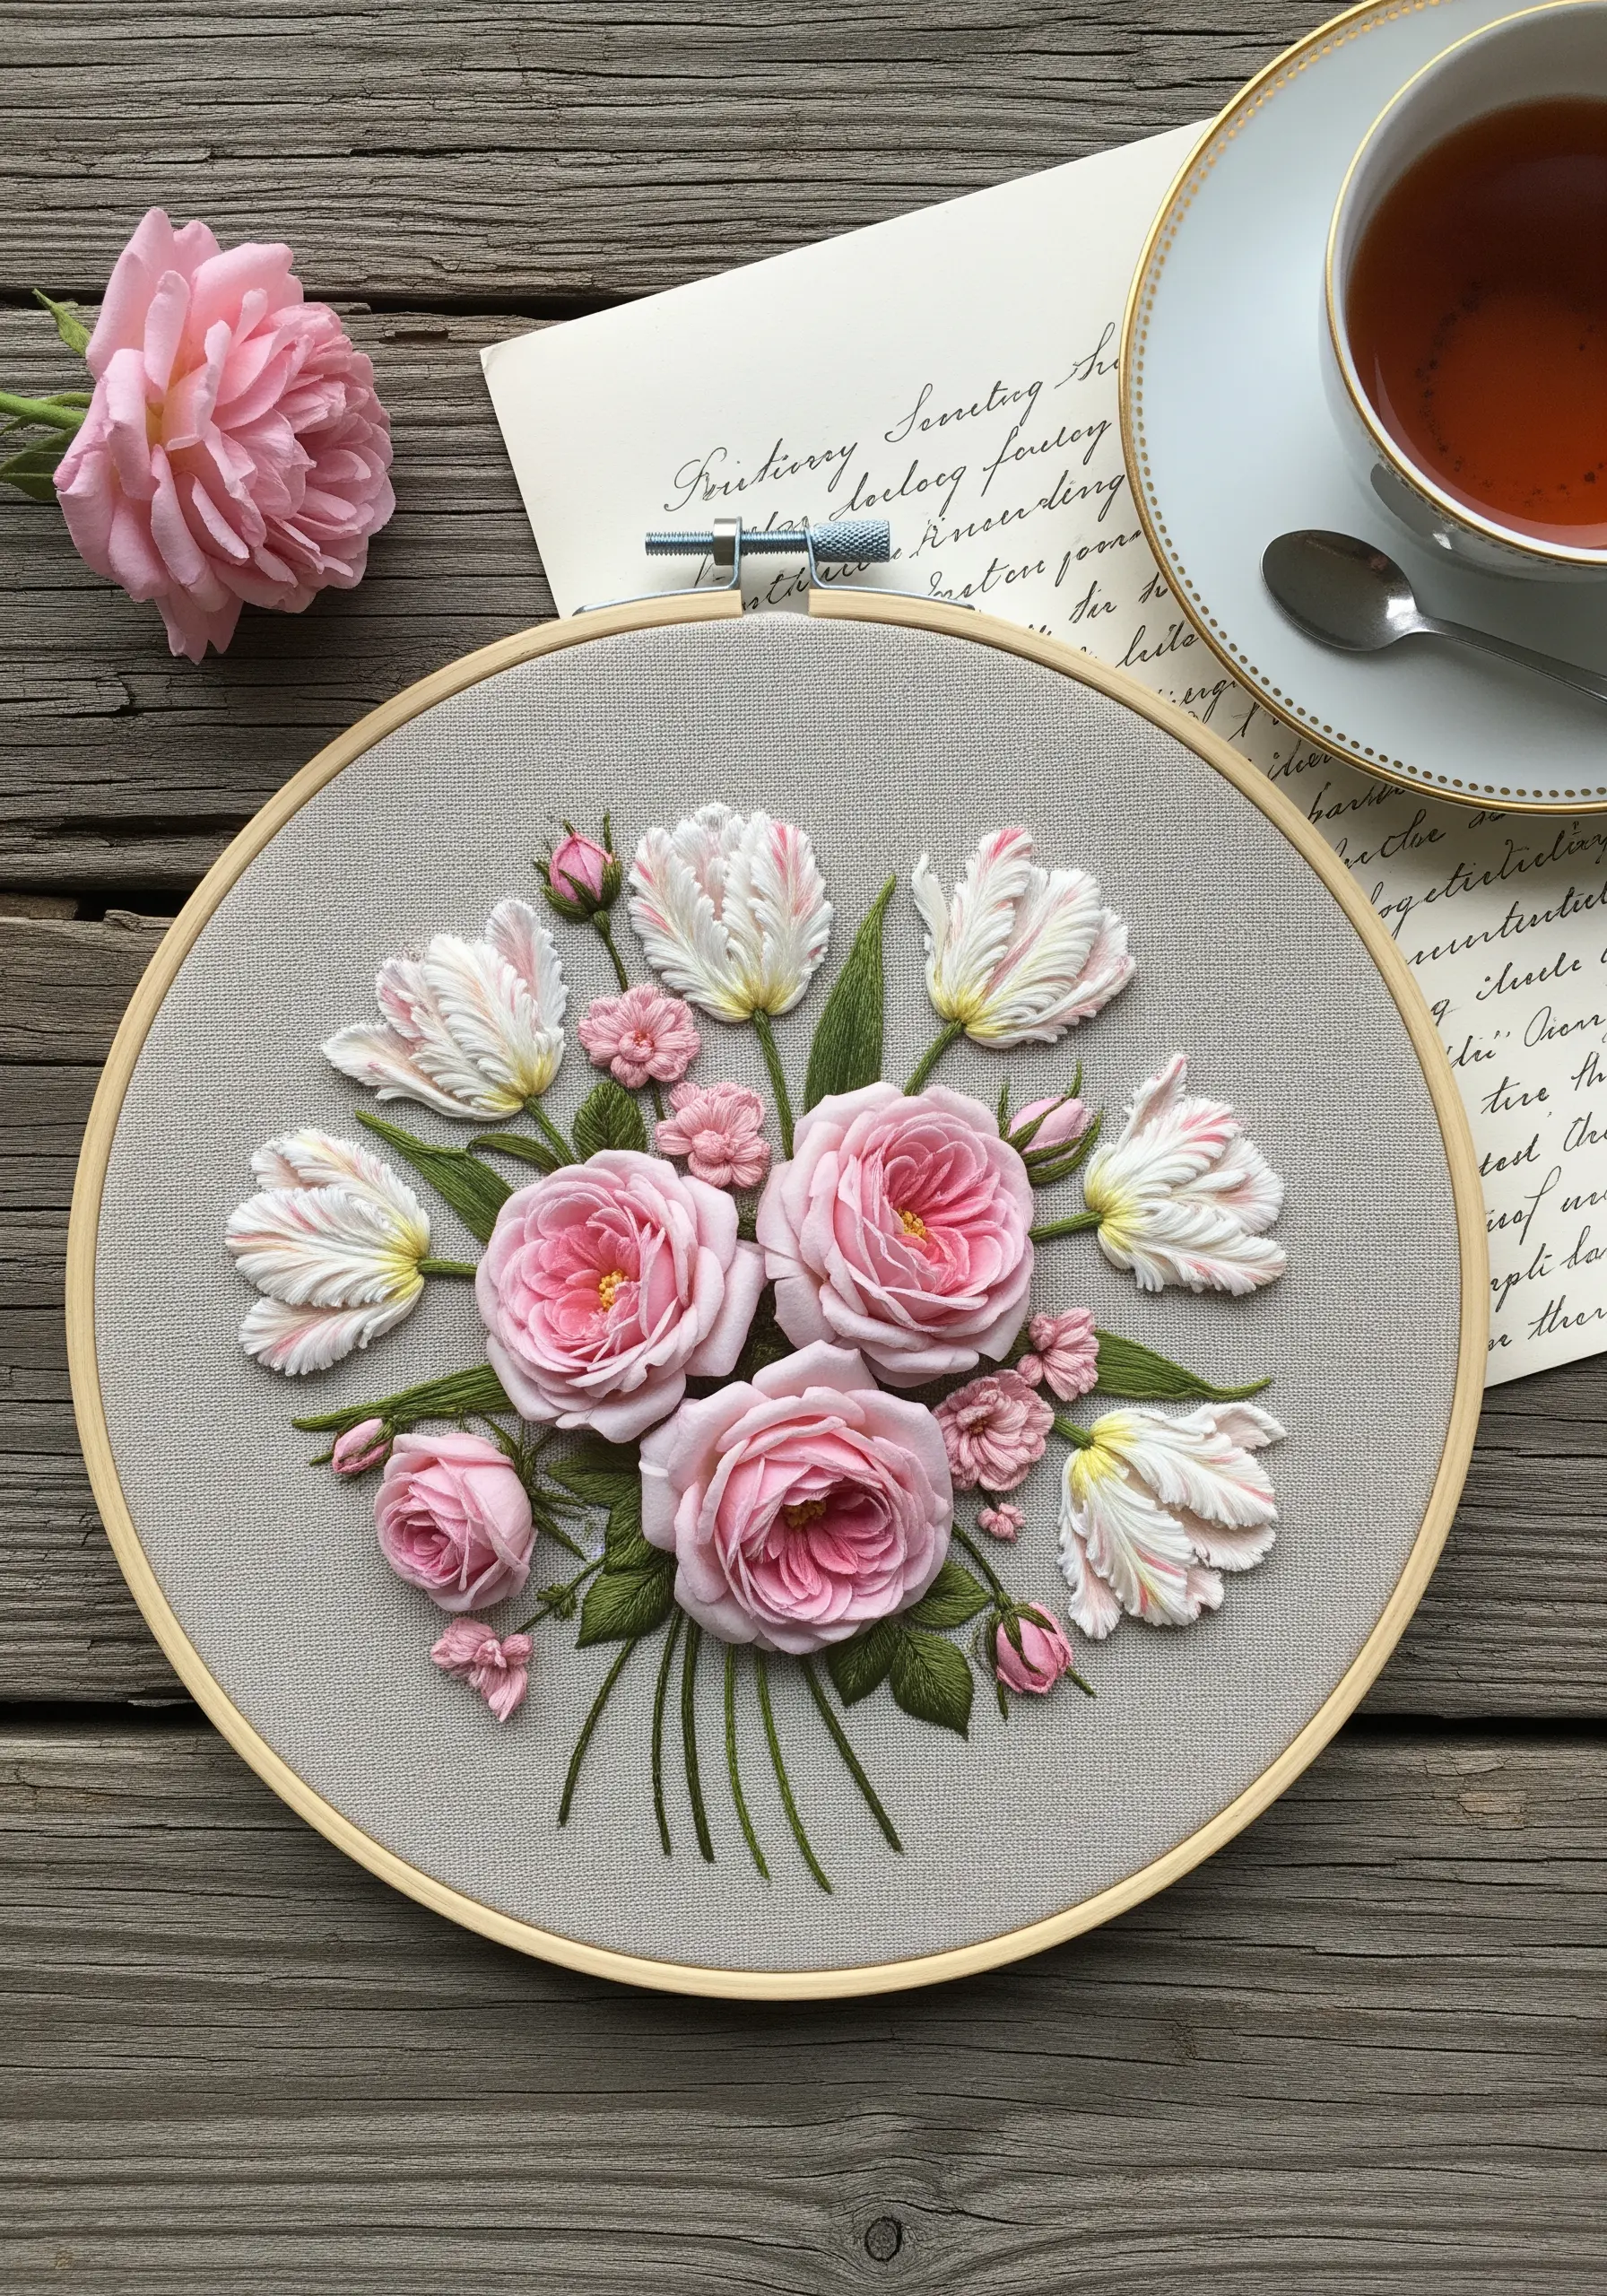
28. Compose a Tapestry of Abundant Florals
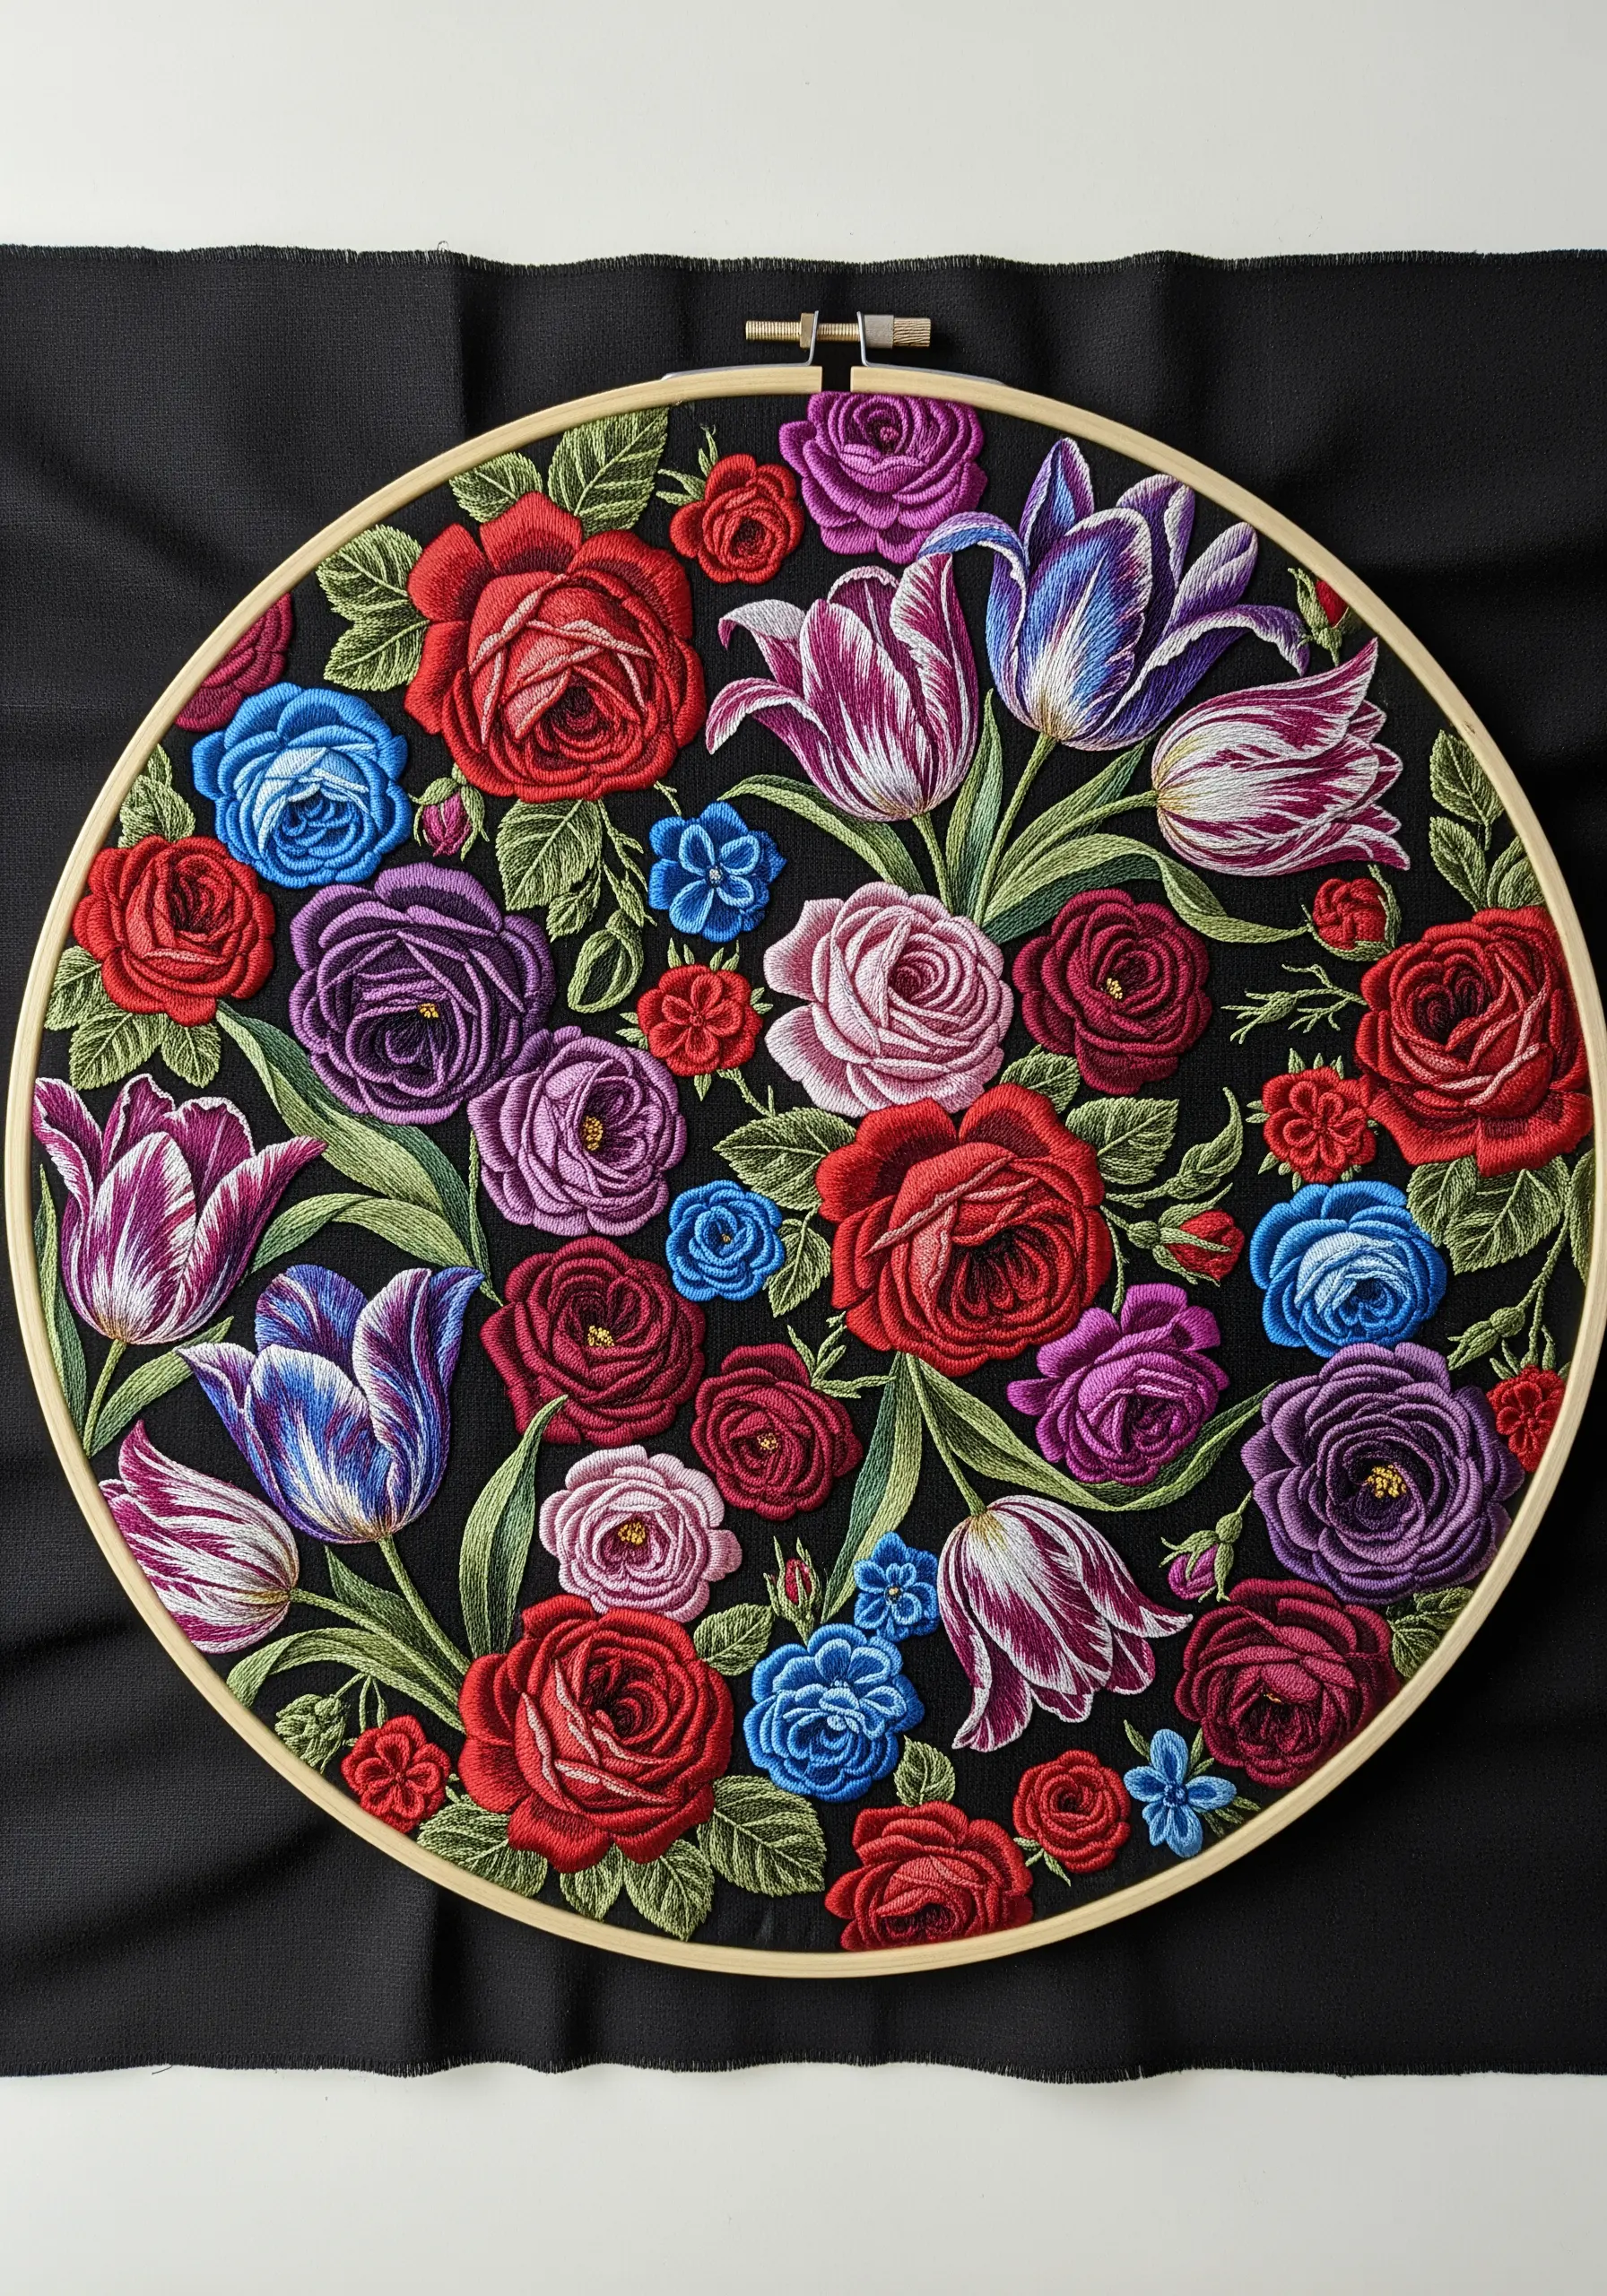
When filling an entire hoop with flowers, the key to success is creating variety in shape, color, and scale to avoid a chaotic result.
Start by stitching your largest flowers—the main roses and tulips—to anchor the composition.
Then, fill in the gaps with smaller filler flowers and leaves, overlapping them slightly to create a sense of lush density.
Stick to a defined color palette, like these jewel tones of red, purple, and blue. This cohesion ensures the final piece feels abundant and rich, not messy, and is a great way to use color palette tips for hoop art.


