

Have you ever looked at a piece of embroidery and felt the texture—the rough bark, the soft moss, the delicate feather—before your fingers even touched it? That connection is what separates good stitching from truly expressive art.
Forget simply filling in shapes with color. We’re going to explore how to use thread, stitch direction, and dimension to tell a story. This is about transforming your needle into a tool for sculpting, building worlds stitch by stitch that feel as real as they look.
These ideas are your starting point. Trust your instincts, experiment with materials you already have, and allow the rhythm of your stitches to bring a piece of the natural world into your hands. You have the ability to create something deeply tactile and memorable, so let’s begin.
1. Sculptural Tree Bark with Yarn Couching
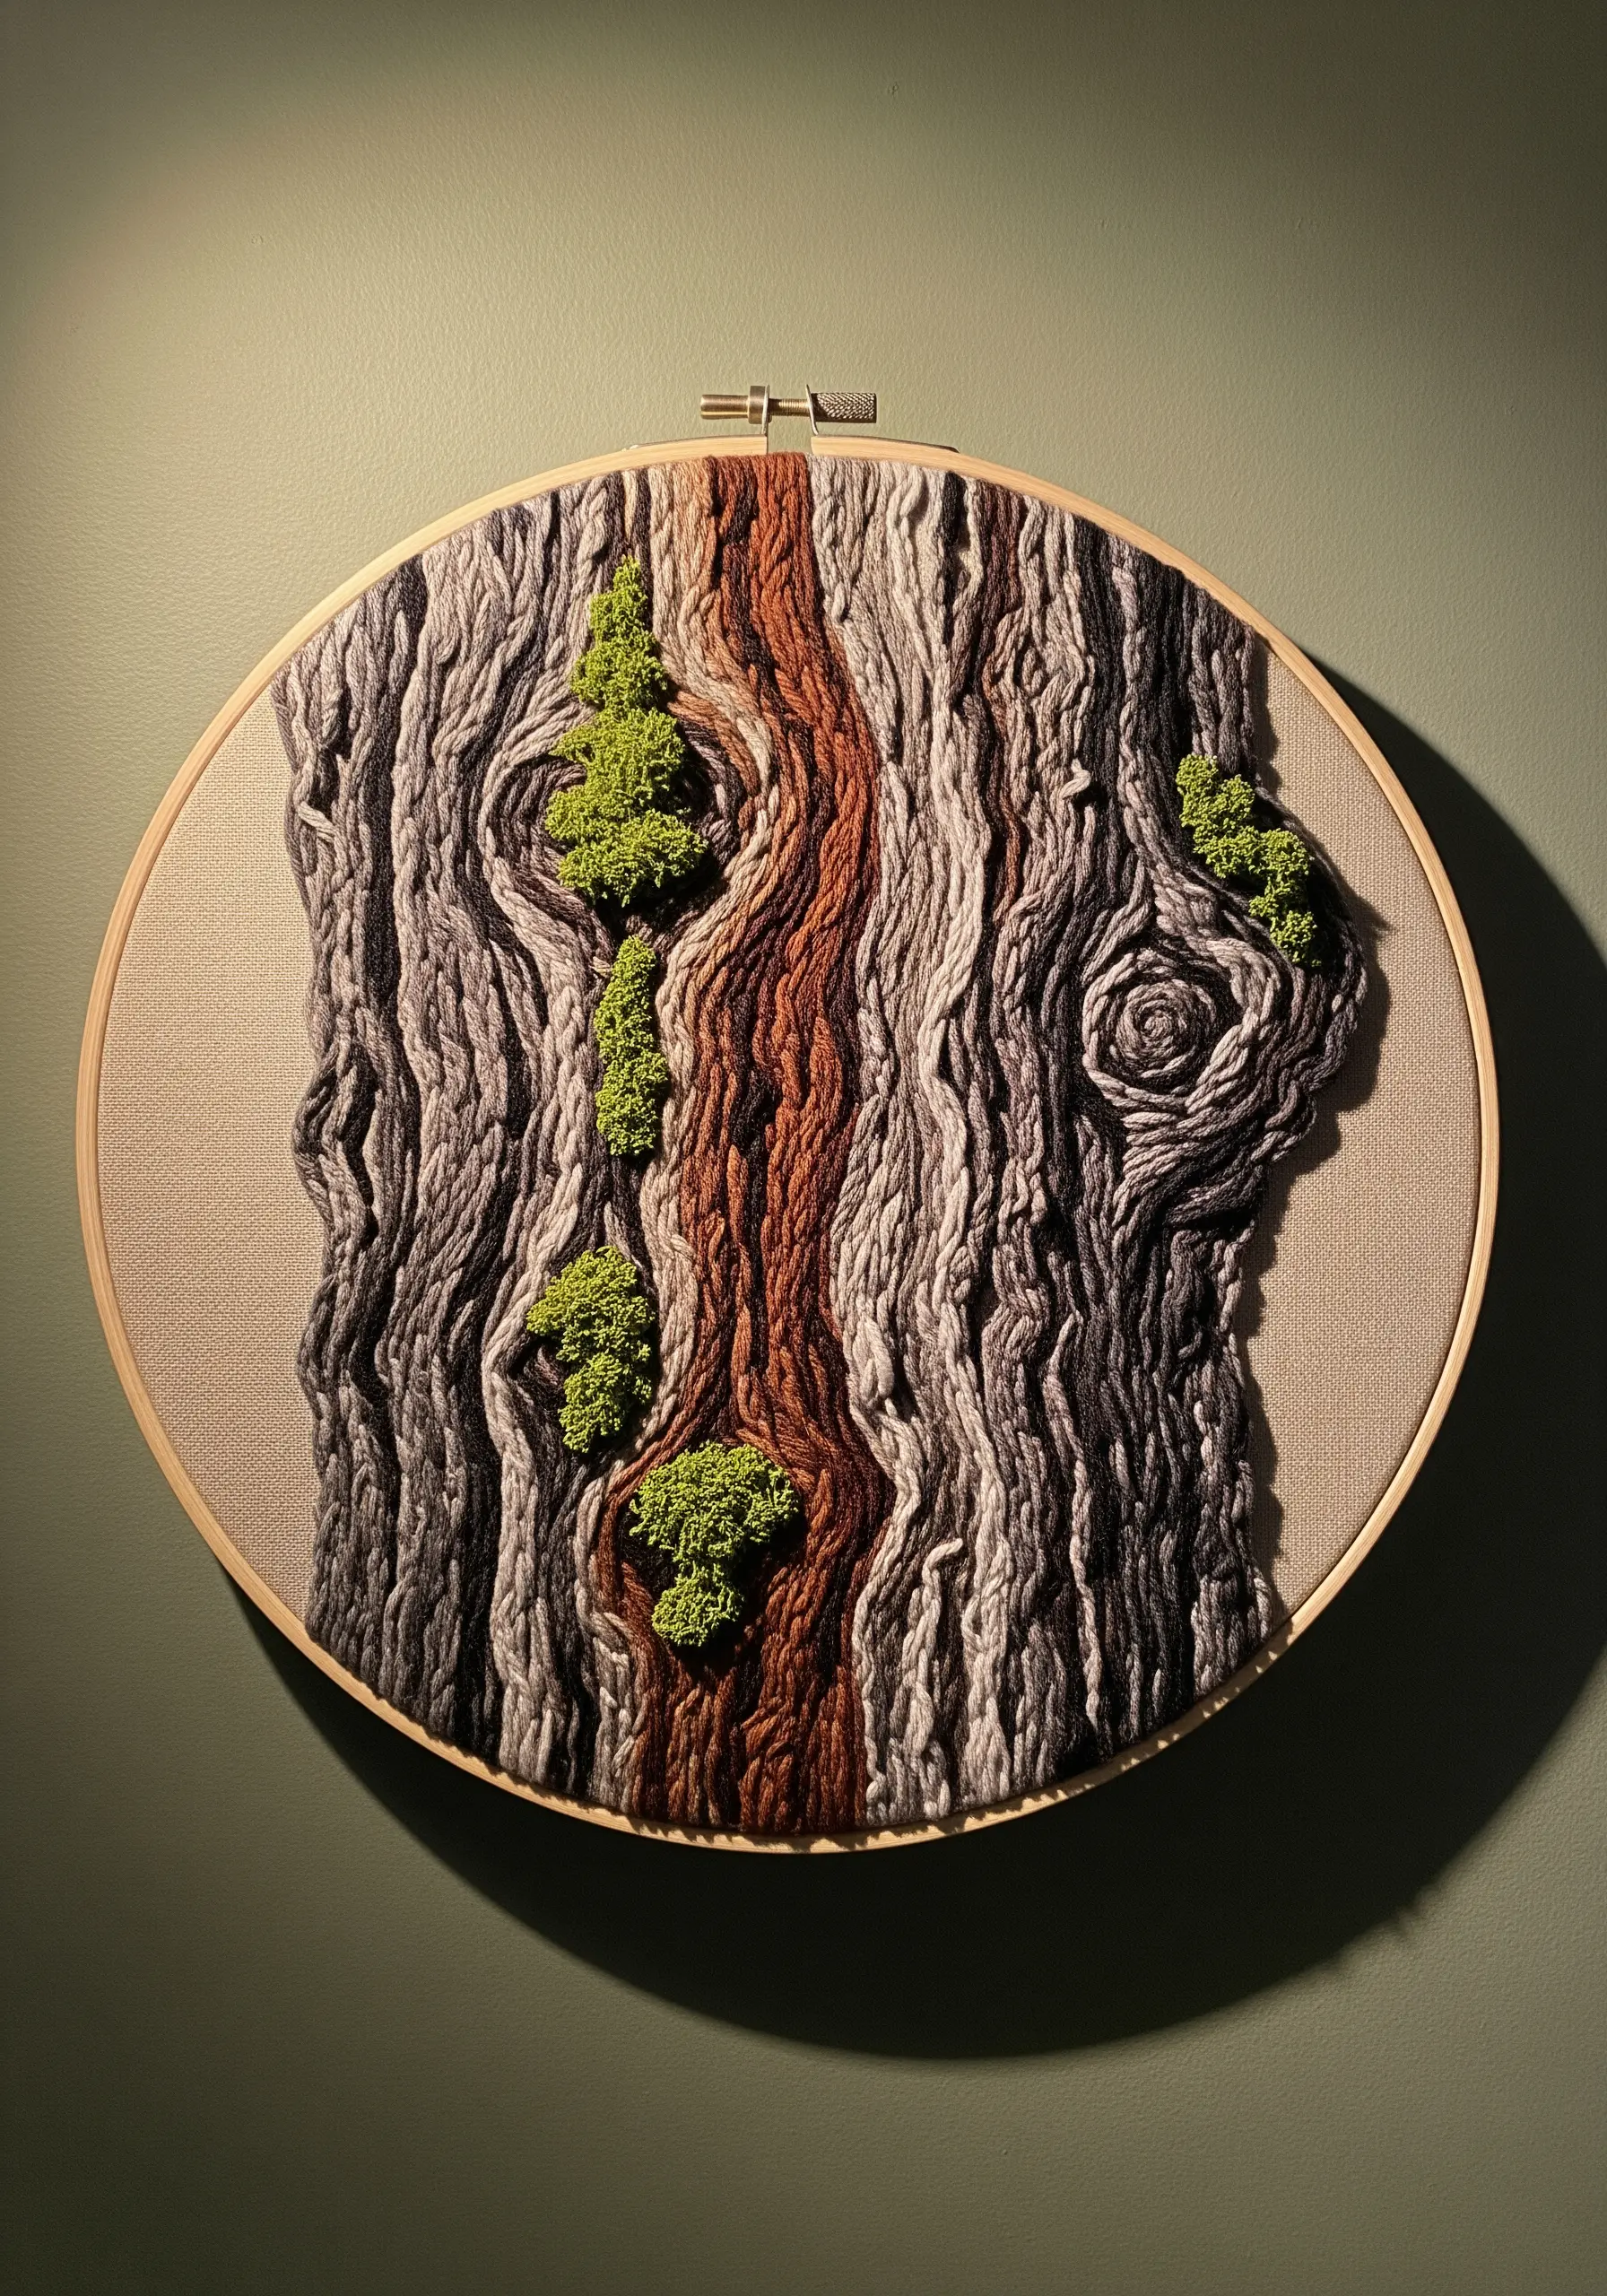
Create astonishingly realistic tree bark by thinking in layers, not just stitches.
Start by couching thick, variegated wool yarn for the primary bark grooves. Use a thinner, matching thread to tack it down with small, invisible stitches, letting the yarn’s natural twist dictate the flow.
For the mossy accents, build up dense clusters of French knots using two or three strands of bright green floss. Vary the knot size and tightness to mimic organic growth.
This combination of high-relief yarn and delicate knots creates a dynamic surface that invites touch, turning a simple hoop into one of your most stunning natural texture embroidery patterns.
2. The Feather’s Ethereal Gradient
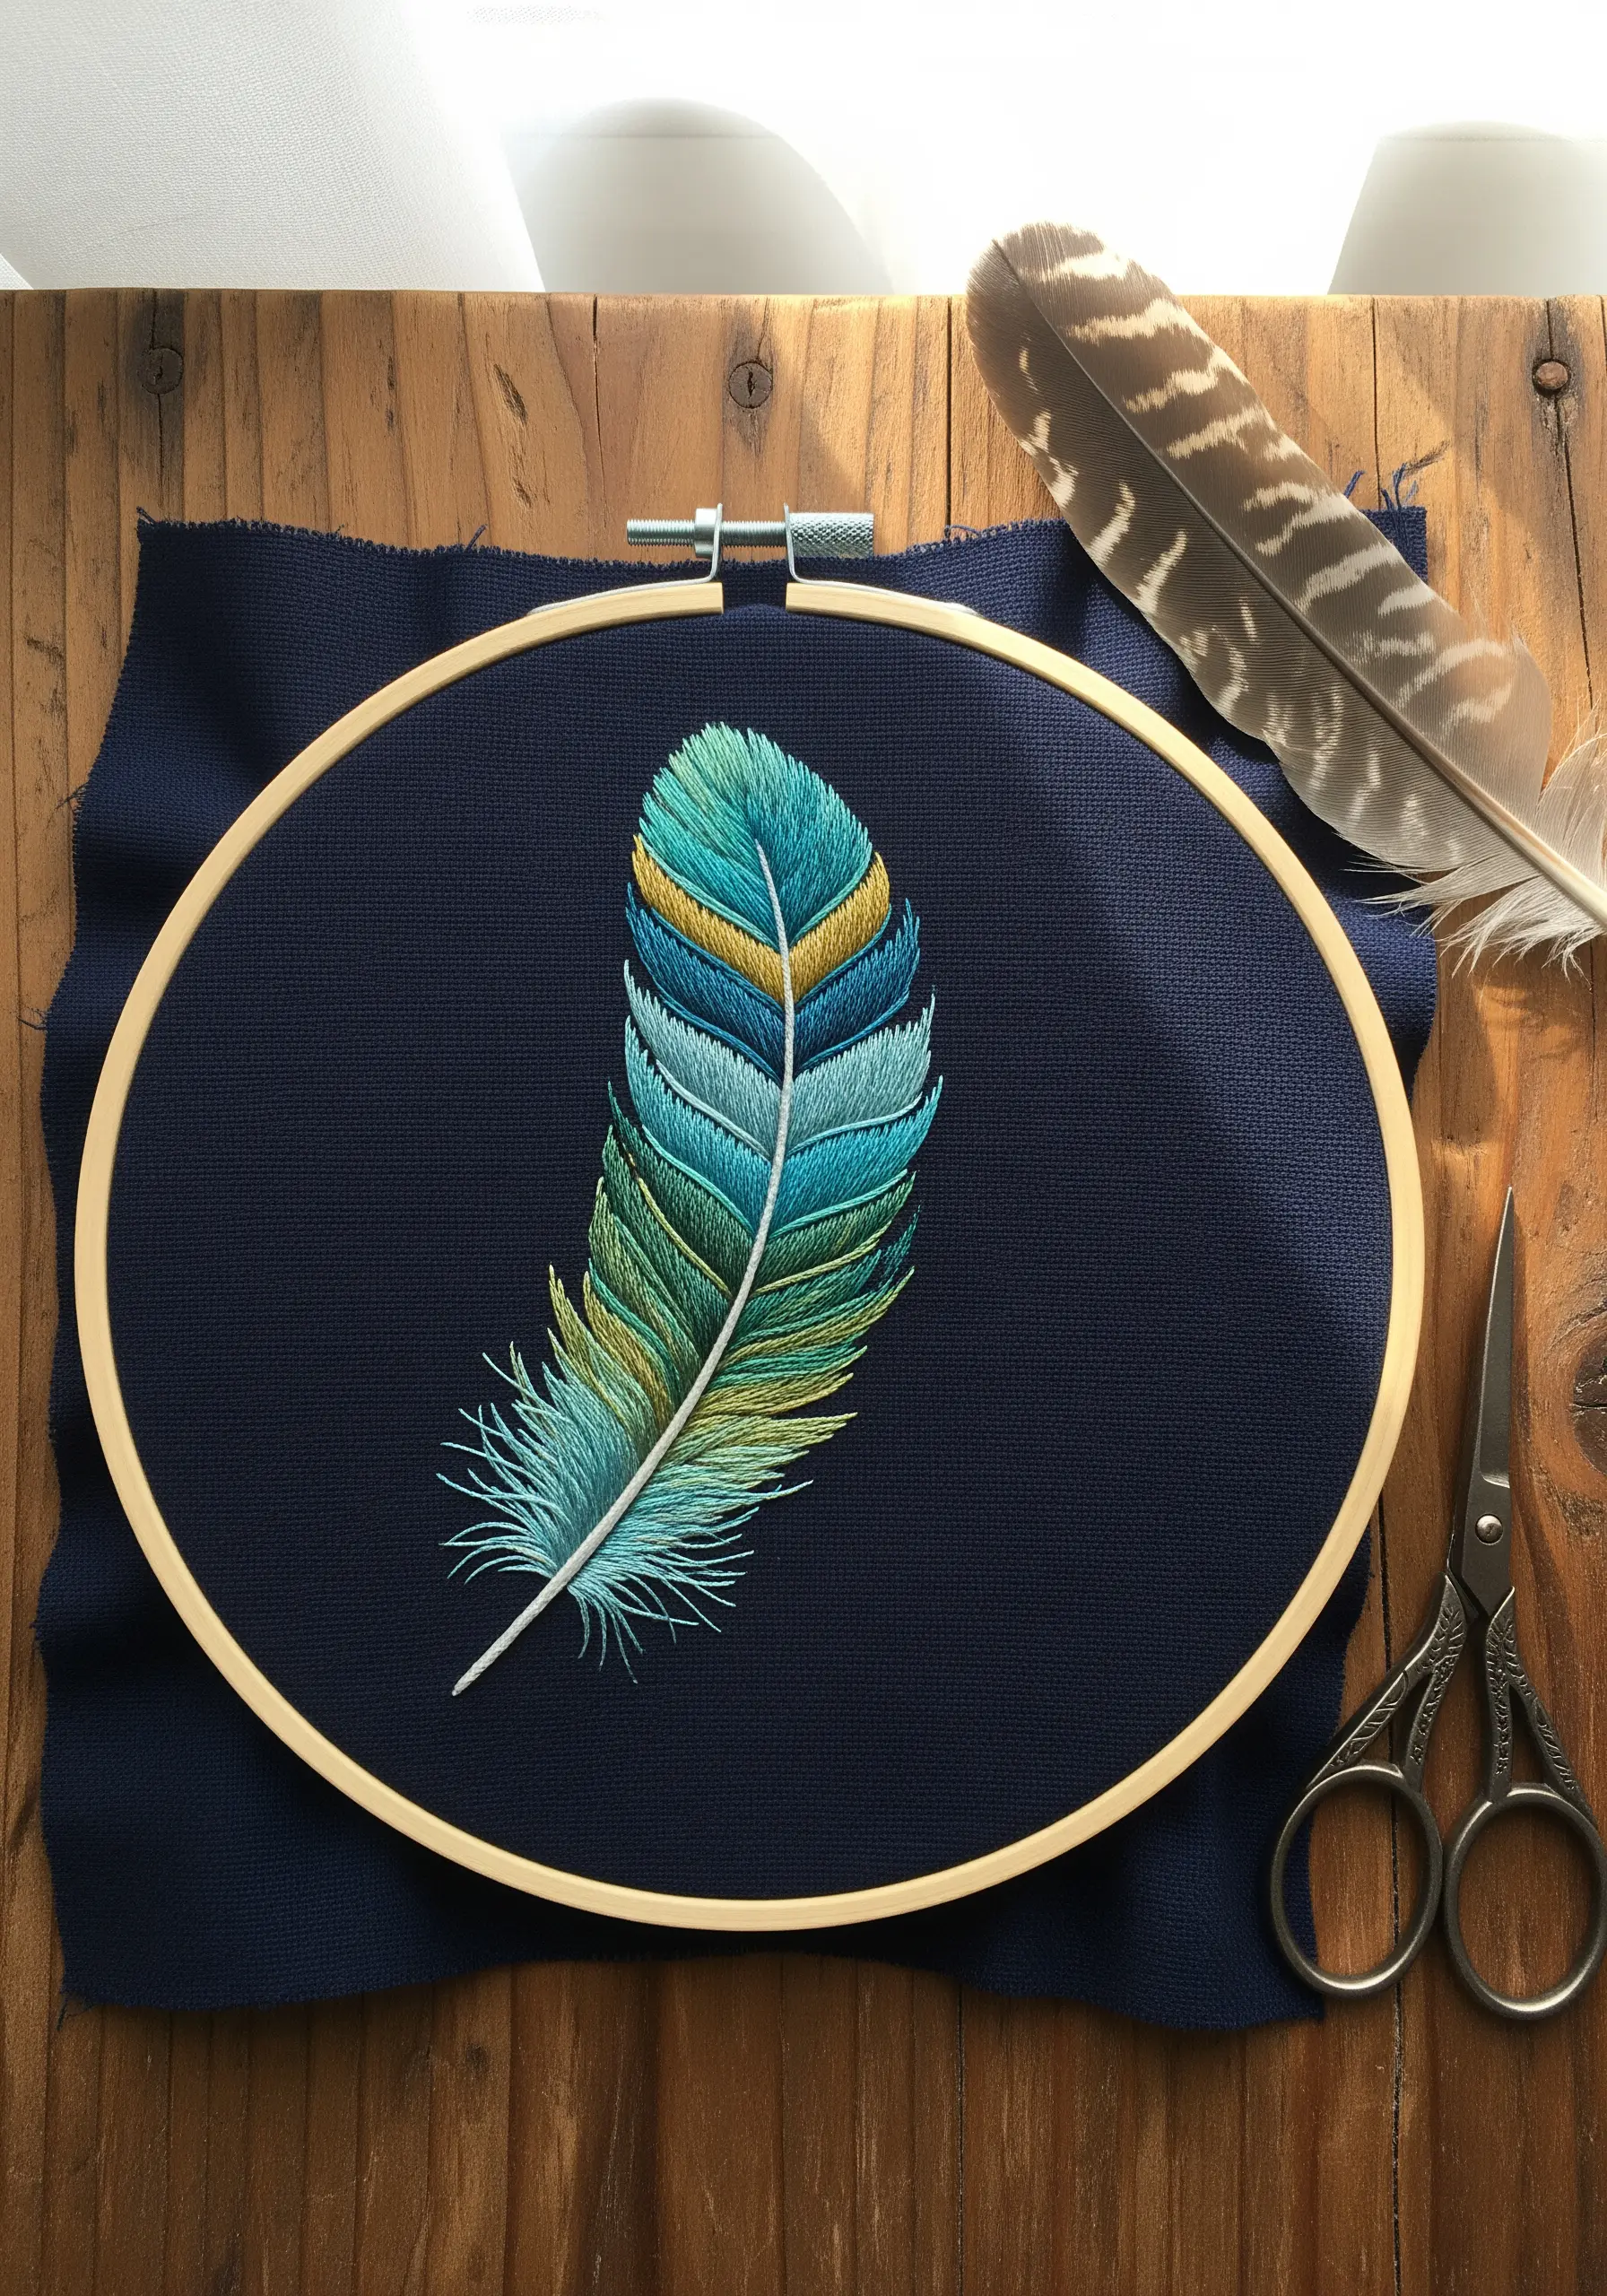
Capture the weightless quality of a feather using the long-and-short stitch, also known as thread painting.
Work with a single strand of floss to achieve the smoothest color transitions. Split your feather design into sections by color, and blend the edges where they meet by overlapping your stitches slightly.
The key is to direct your stitches outward from the central shaft, mimicking the natural growth of the barbs. This directional stitching creates a subtle shimmer and sense of movement, making the feather feel like it could float away.
3. Agate Rings with Coiled Cord
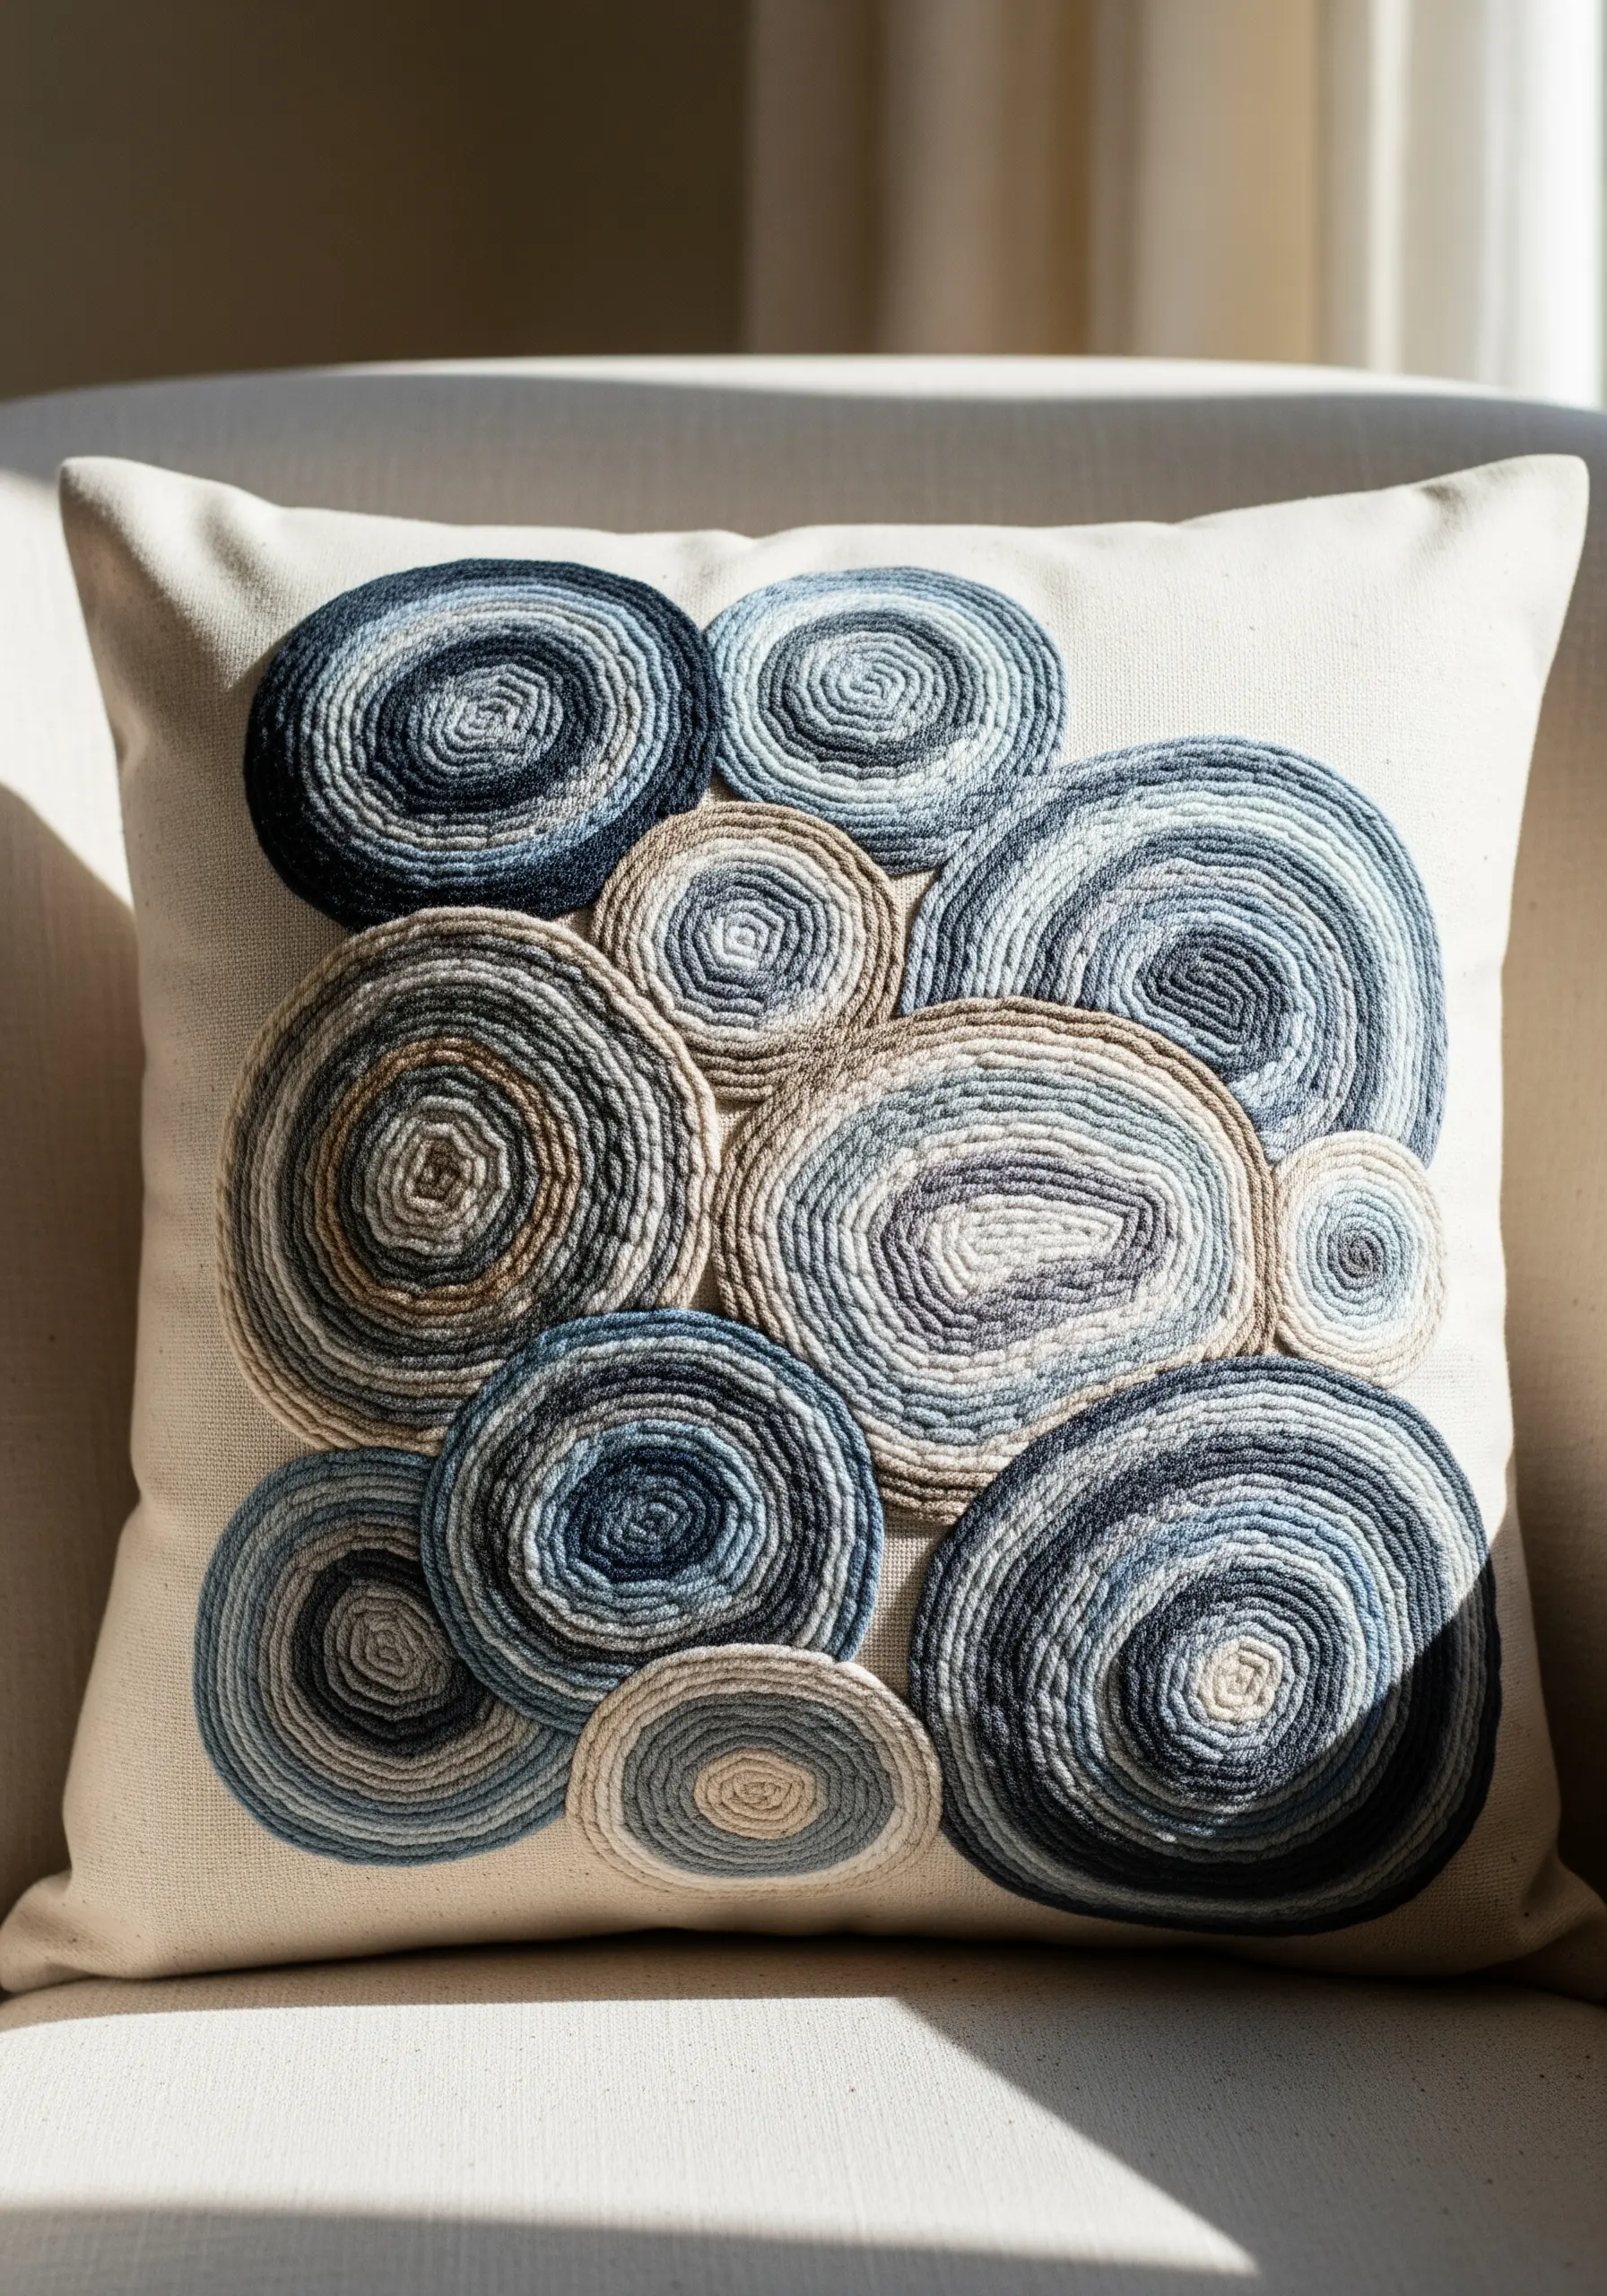
Recreate the mesmerizing patterns of agate stones by coiling and couching variegated cording or yarn onto your fabric.
Choose a thick, multi-toned cord and stitch it down in a tight spiral, using a matching color of standard floss so the securing stitches disappear.
Overlap several of these coiled circles to build a composition that feels organic and geological. This technique is perfect for adding bold, graphic texture to embroidery cushion pillow ideas, transforming a simple home accessory into a piece of art.
4. The Layered Forest Floor Sampler

Build a rich, tactile story of the forest by combining multiple textures in one piece.
Use a bed of Turkey work or uncut loops to form a mossy base. Fill in other areas with satin-stitched leaves, using variegated thread to give them depth. Incorporate chain stitches to represent fallen branches or roots.
For the ultimate touch of realism, couch actual twigs onto your fabric. This mixed-media approach transforms your embroidery into a multi-sensory experience of organic-inspired embroidery textures.
5. Sculpting Ocean Foam with Knots

Capture the chaotic, airy texture of sea foam using a dense arrangement of French knots and bullion knots.
Use a fluffy, bright white wool or cotton thread to give your knots extra volume. Vary the size of your knots and cluster them tightly to create the look of cresting waves.
Contrast the soft foam with couched jute or hemp cord for the wet sand. This play on texture makes your seascape feel dynamic and alive, bringing the energy of the ocean right into your art.
The result is a piece filled with abstract thread texture hacks that make your art feel alive and dynamic.
6. Radiant Mushroom Gills with Satin Stitch

Mimic the delicate, linear structure of mushroom gills with meticulously placed straight stitches or a radial satin stitch.
Use a single strand of thread with a slight sheen, like silk or rayon, to catch the light and create a subtle pearlescent effect.
The success of this design lies in tension and precision. Each stitch should radiate perfectly from the stem, creating a hypnotic pattern. This focus on line and light is a beautiful way to interpret forest floor botanical stitch ideas with minimalist elegance.
7. Layered Birch Bark with Fabric Collage
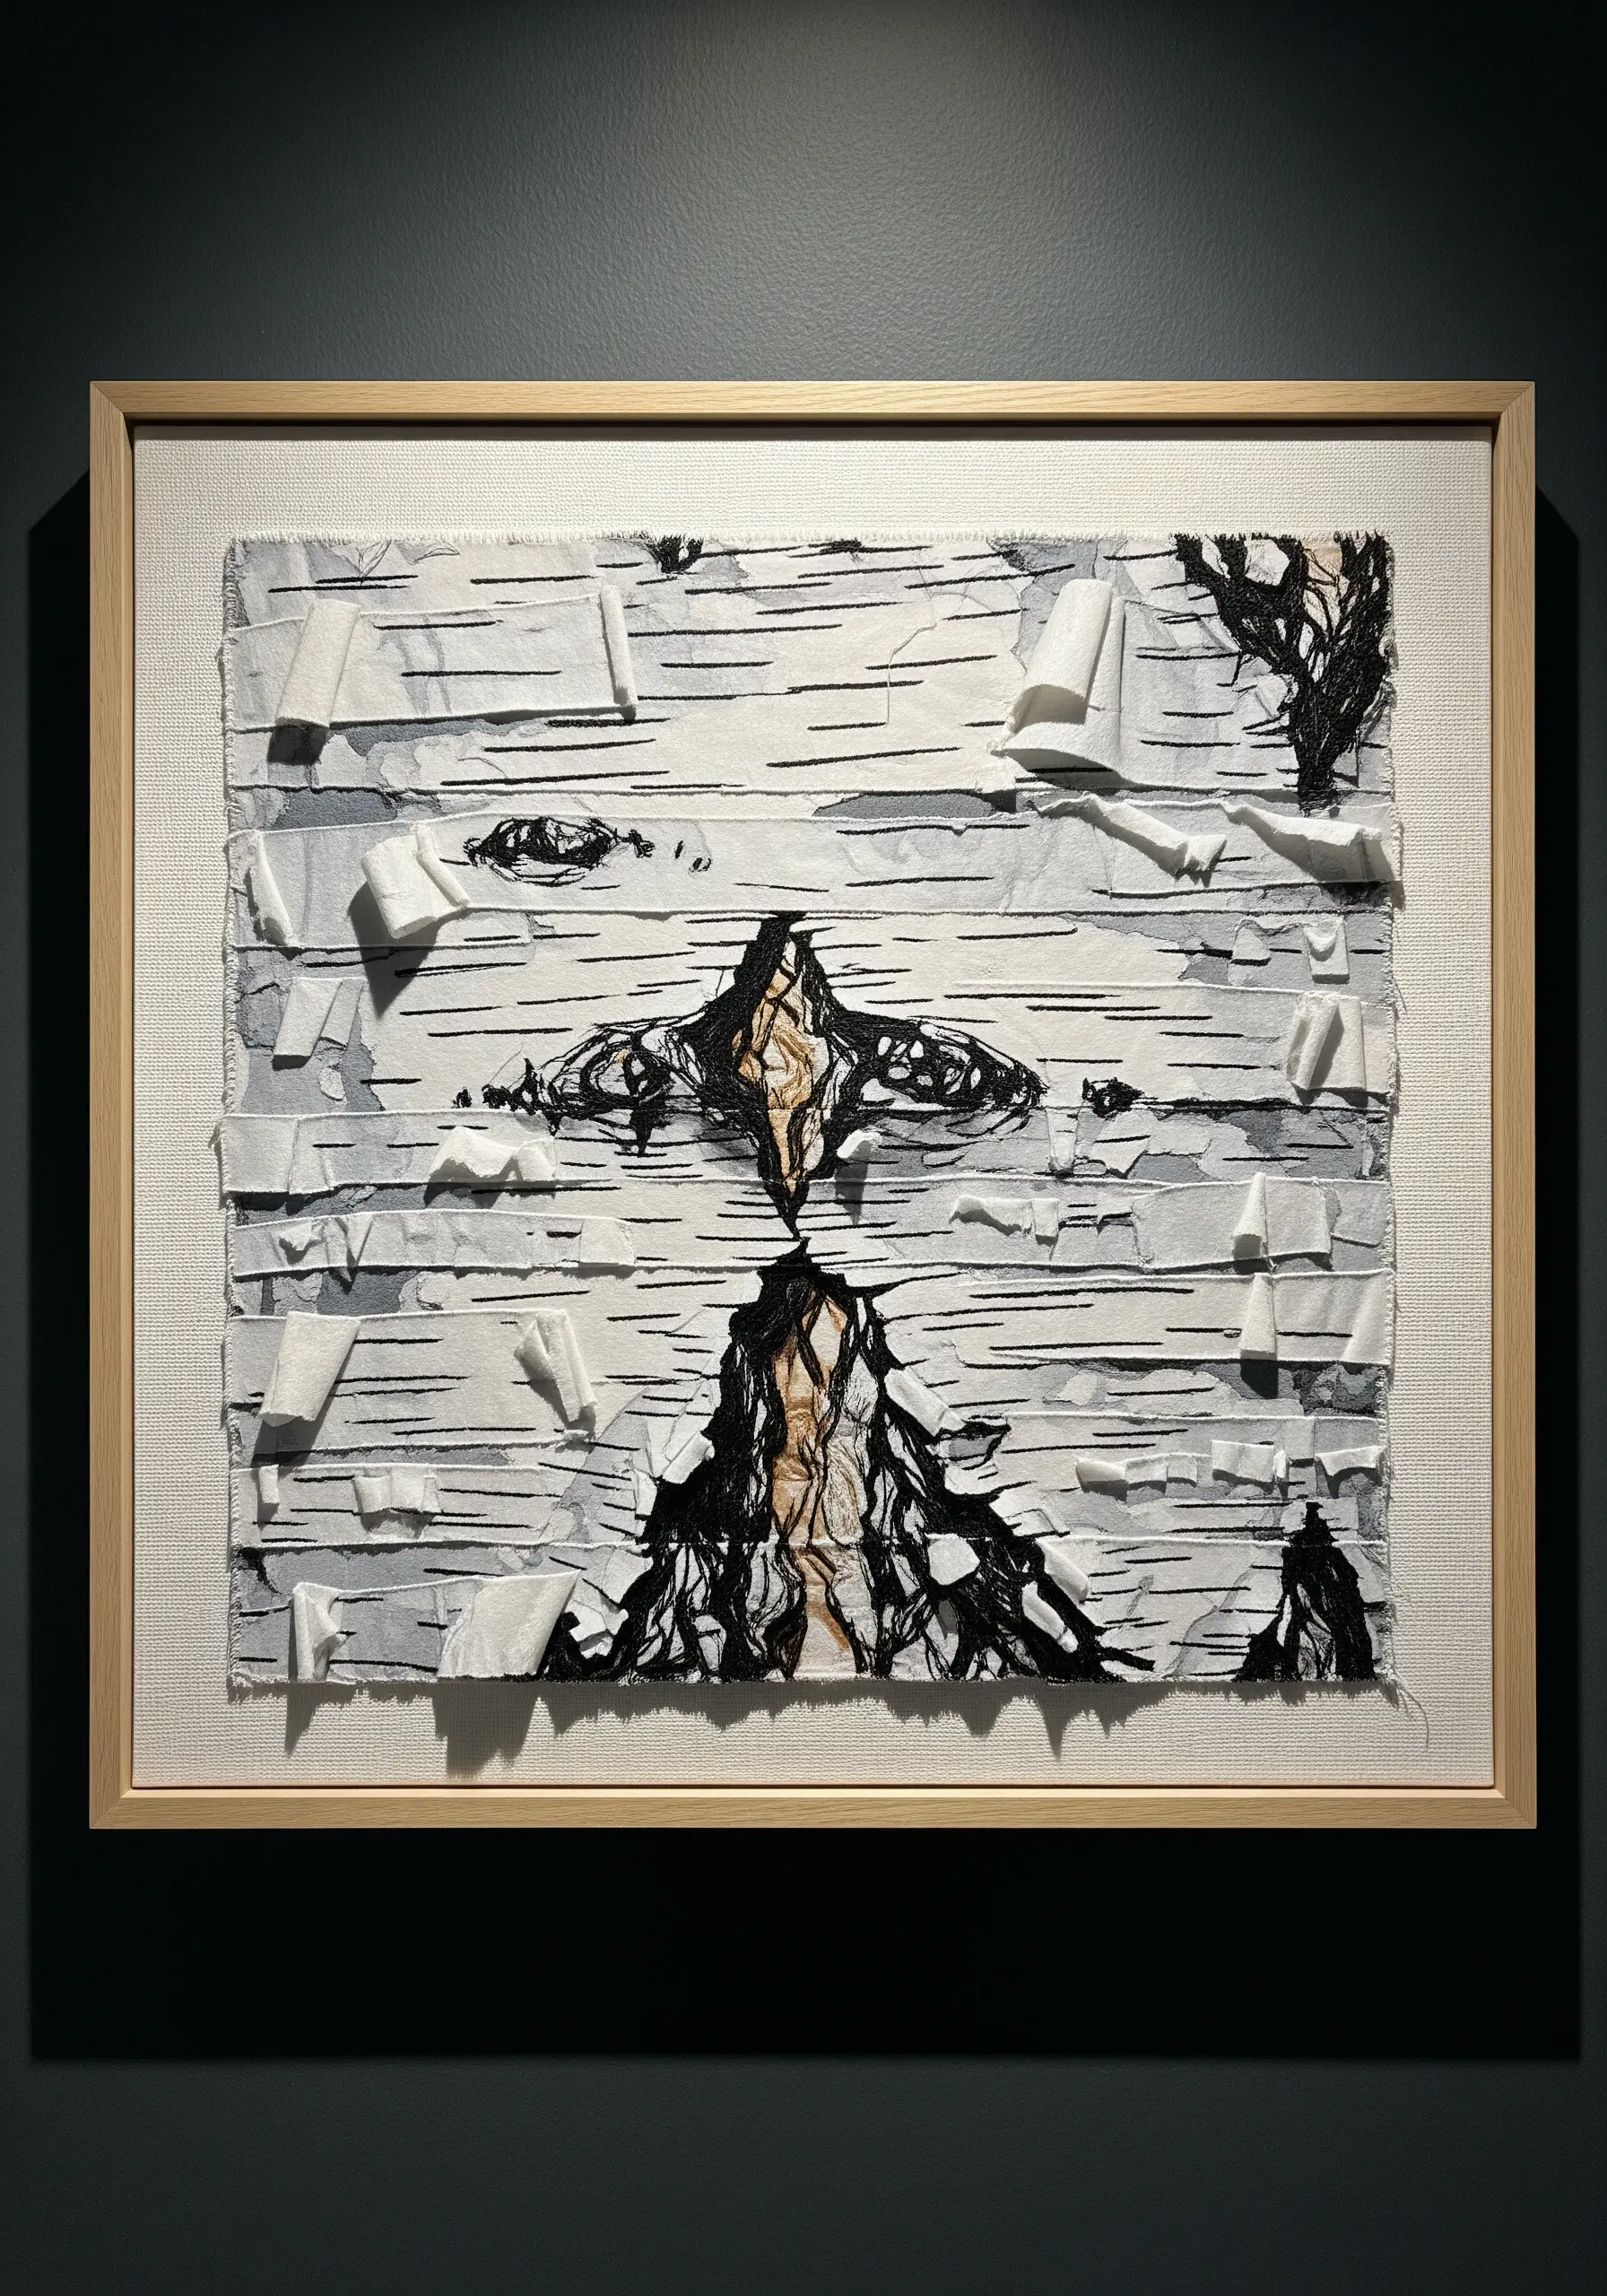
Create the papery, peeling texture of birch bark by combining fabric appliqué with minimal stitching.
Cut or tear thin strips of white and off-white linen or cotton. Layer them horizontally onto your base fabric, securing them with a few anchoring stitches and allowing some edges to curl up.
Use a dark, contrasting thread to add the characteristic black marks and knots with short, expressive straight stitches or free-motion machine embroidery. This creative fabric collage base gives your work an immediate sense of depth and realism.
8. Mineral Formations with Beads and Metallics

Emulate the crystalline structure of minerals and geodes by integrating beads and metallic threads into your stitching.
For a druzy texture, cover an area with a dense layer of tiny seed beads. To create crystal facets, outline satin-stitched shapes with a fine metallic thread or a single row of bugle beads.
For agate lines, couch shimmering metallic cords in organic rings. This mixed-media embroidery technique is perfect for capturing the sparkle and depth of geological wonders.
9. Flowing Grasses with Unrestrained Stitches

Capture the feeling of wind sweeping through tall grass by leaving your stitches long and free.
Instead of pulling each stitch taut, leave long, loose tails of thread on the surface, anchoring them only at one end. Use a mix of materials—flat silk ribbon, variegated cotton floss, and fine yarn—to create variation in texture and light reflection.
This technique breaks the traditional rules of embroidery to create a piece that is dynamic, sculptural, and full of natural movement. It’s one of the best creative ways to stitch natural textures like a pro.
10. The Geometric Precision of a Sunflower Head

Translate the natural geometry of a sunflower’s seed head into a mesmerizing pattern of stitches.
Use a grid of intersecting backstitches or stem stitches to create the foundational diamond shapes. Then, fill the center of each diamond with a single French knot or a seed stitch.
Create a gradient effect by using darker, larger knots in the center and transitioning to lighter, smaller stitches toward the petals. This structured approach turns a floral subject into a stunning piece of geometric art.
11. Cracked Earth with Contour Stitching
Mimic the parched, cracked texture of dry earth with contoured fill stitches and bold outlines.
Fill each organic shape with rows of stem stitch or satin stitch that follow its contours, creating a sense of dimension. Use a variegated brown or ochre thread to enhance the natural, earthy feel.
Define the cracks with a heavy, dark outline in backstitch or a couched thick thread. This high-contrast approach is perfect for tote bag embroidery patterns, creating a durable and visually striking design.
12. Delicate Frost on Sheer Fabric

Capture the ethereal quality of frost crystals by stitching on a transparent or semi-transparent fabric like tulle or organza.
Use a fine, bright white or silver metallic thread to create delicate fern-like shapes with tiny straight stitches and fly stitches.
Layer your stitches to build up density, just as frost forms in nature. The sheer background makes your stitches appear to float, creating a magical, weightless effect that is perfect for minimal embroidery ideas using texture instead of color.
13. Ruffled Shelf Fungus with Raised Stitches
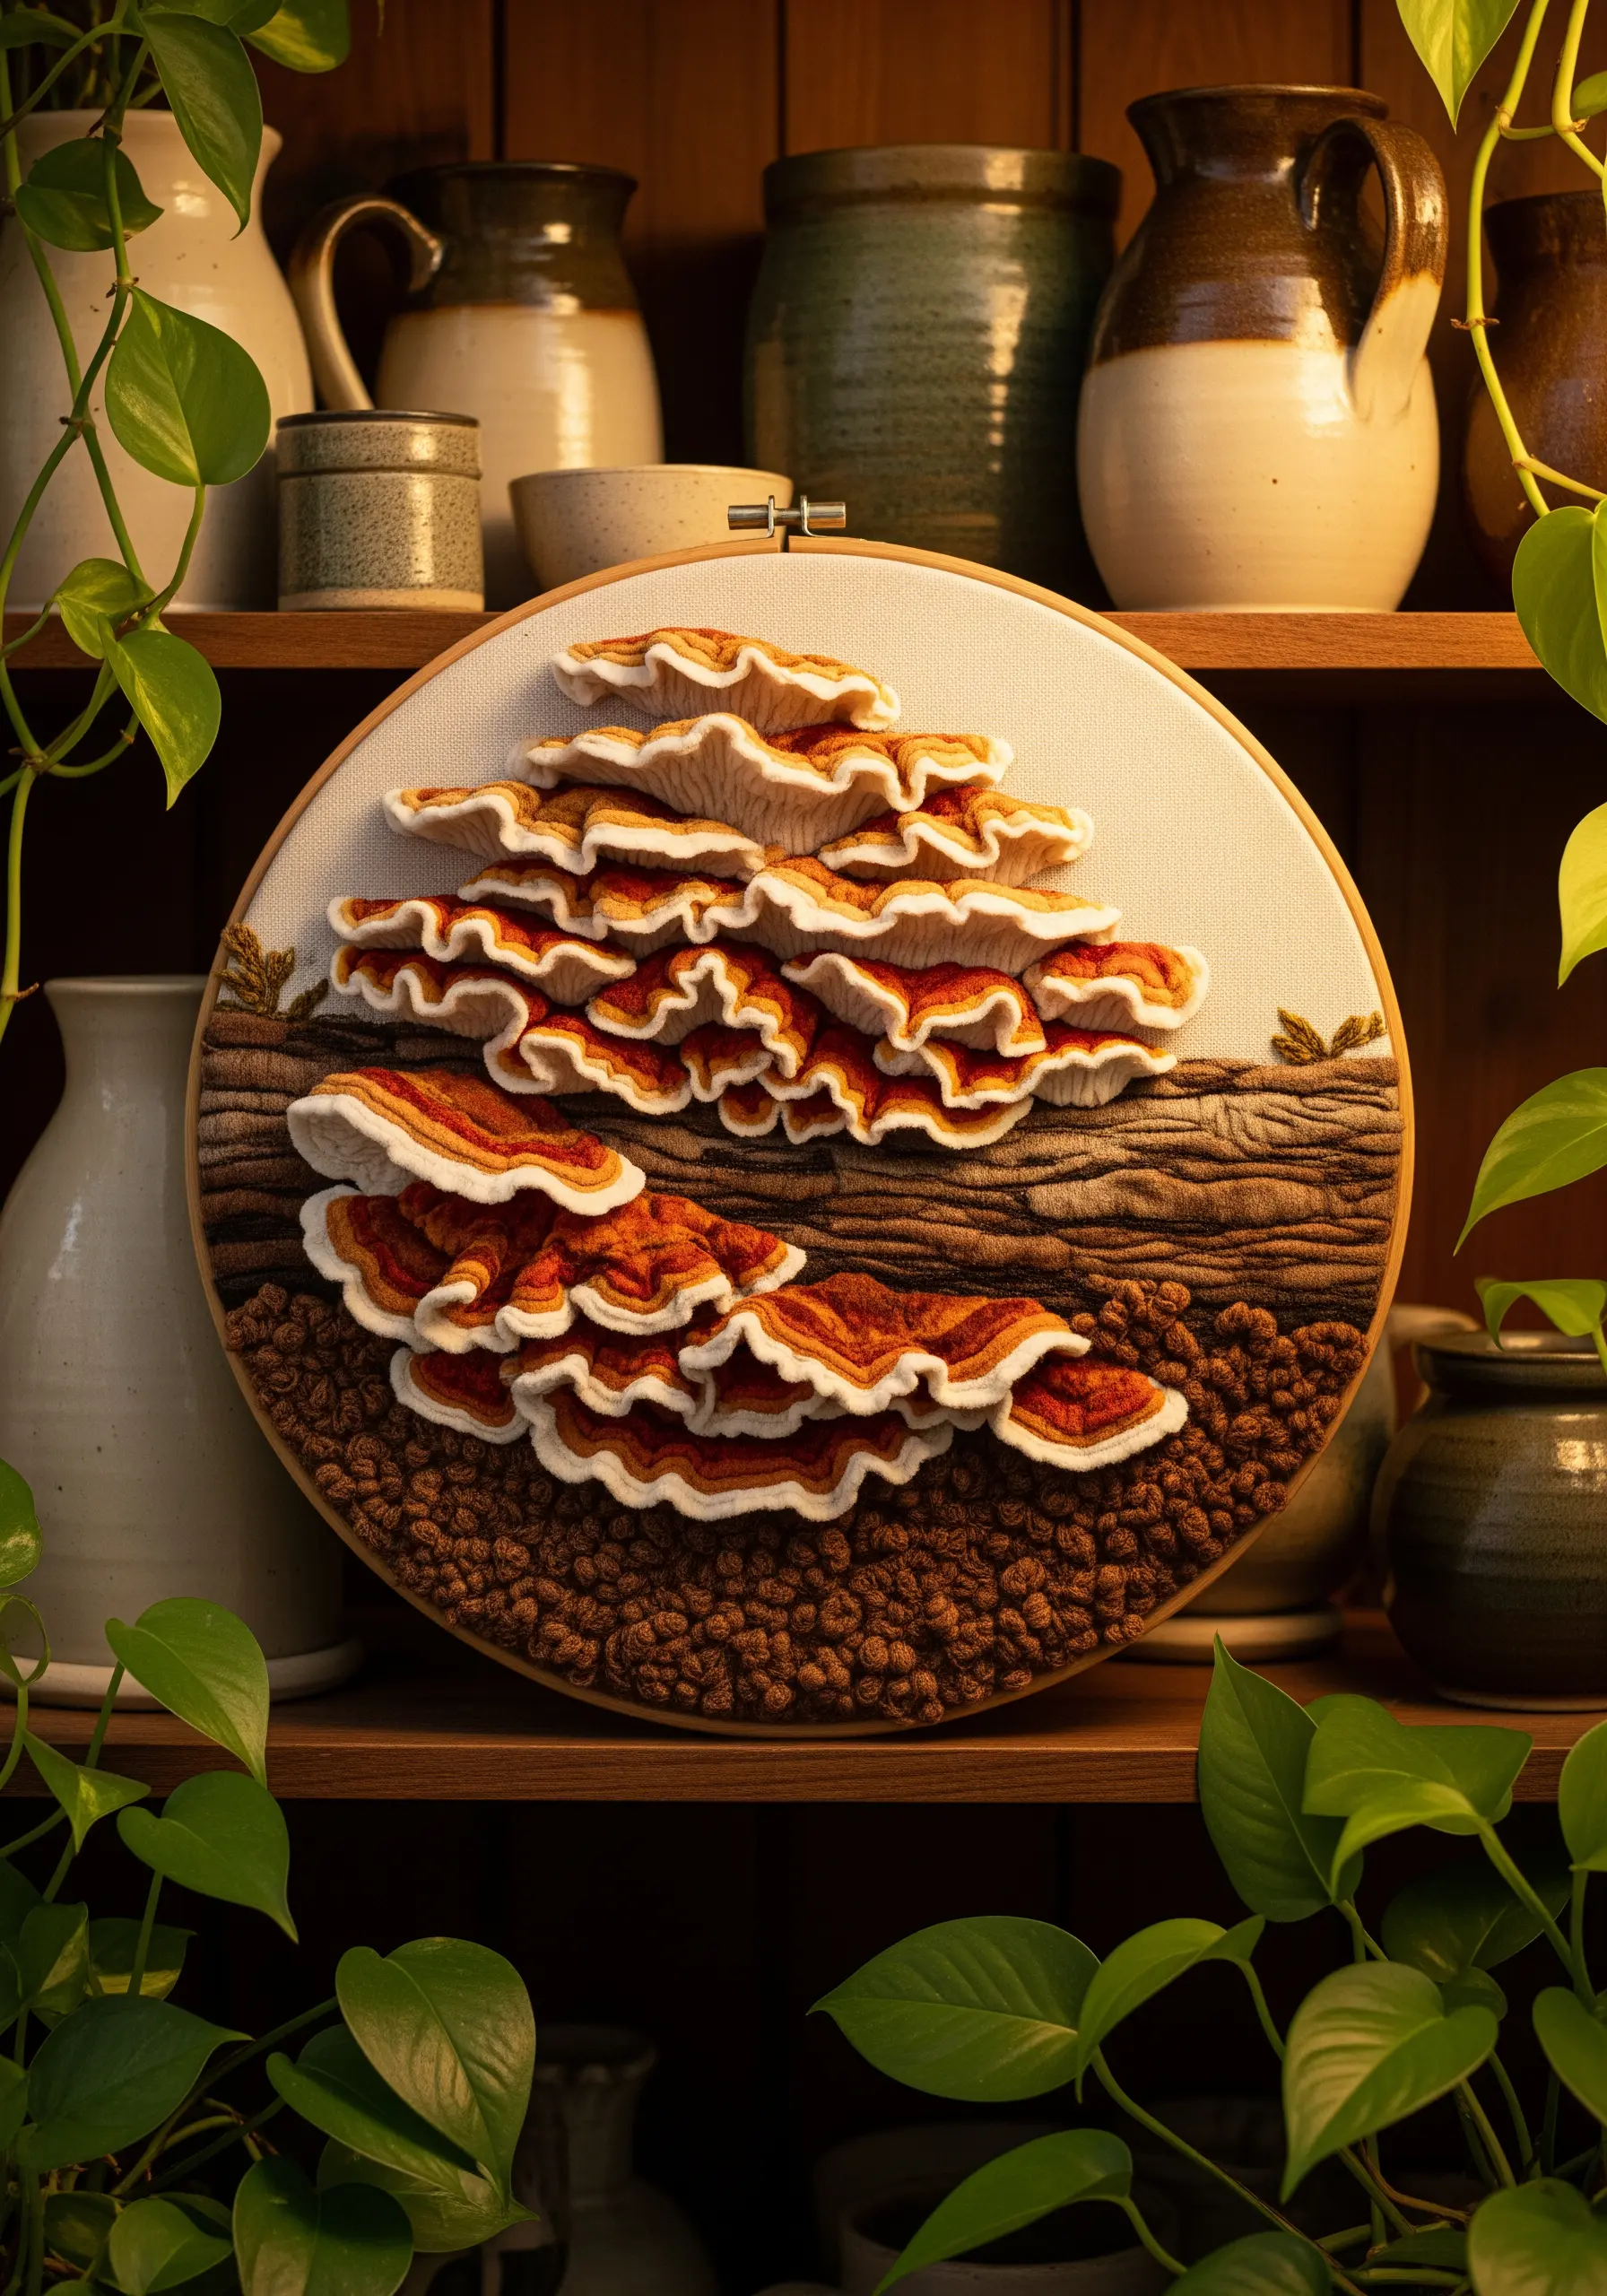
Achieve the distinctive ruffled edges of shelf mushrooms using a padded satin stitch or cast-on stitches for a three-dimensional effect.
Create a foundation by layering felt or several rows of foundation stitches, then cover it with satin stitch to create a raised shape. For the ruffles, use detached buttonhole stitch or cast-on stitches along the edge of each fungal shelf.
Use precise color changes to mimic the growth rings, making your organic texture embroidery designs pop off the fabric.
14. Fossilized Texture with Cord and Knots

Recreate the ancient, stony texture of an ammonite fossil by combining metallic elements with dense, earthy stitches.
Couch a smooth, silvery cord in a tight spiral to form the fossil’s main shell. This gives it a solid, structural feel. Surround the central form with a dense mix of French knots, bullion knots, and seed stitches in sandy, fossil-gray tones.
This high-contrast combination of smooth metallic and rough, knotted textures creates a compelling design that feels both decorative and ancient.
15. Undulating Sand with Beaded Contours

Capture the gentle ripples of sand or water by stitching wavy lines and embellishing them with tiny beads.
Use a simple running stitch or stem stitch with a neutral-colored thread to create your flowing lines. Then, go back and secure tiny seed beads or sprinkle microbeads along these contours.
The beads will catch the light and add a subtle, granular texture, mimicking the way sunlight glints off sand or water. It’s an elegant way to add texture to minimal cream-tone pillow embroidery projects.
16. Glistening Spiderweb with Beading

Transform a simple spiderweb into a work of art by using beads to represent dewdrops.
First, create the web’s structure using a fine, strong thread like a single strand of silk or a metallic filament. Use straight stitches for the radial lines and a couched thread for the spiral.
Then, carefully stitch tiny, clear seed beads or crystals along the threads. The dark background will make the web and its ‘dewdrops’ stand out, creating a delicate and magical effect.
17. Woodgrain Illusions with Directional Stitches

You don’t need complex stitches to create a realistic woodgrain effect—the magic is in the direction of your stitches.
Use a simple split stitch or stem stitch, but vary the length and curve of your lines to mimic the natural flow of wood. For knots, stitch in a tight, swirling circle.
Work with several closely related shades of brown, gray, or beige to add depth and realism. This technique proves that even the simplest stitches can create incredible nature-inspired texture patterns that look expensive.
18. Layered Lichen with French and Colonial Knots

Replicate the crusty, complex texture of lichen growing on stone by densely clustering a variety of knots.
Use French knots for the smaller, grainier textures and colonial knots for a rounder, more raised effect. Mix several shades of gray, pale green, and even bright orange floss within the same cluster.
For an extra layer of realism, apply your stitches over a fabric that is printed or painted to look like stone. This combines surface design with embroidery for a truly immersive texture.
19. Illuminated Textures on a Lampshade
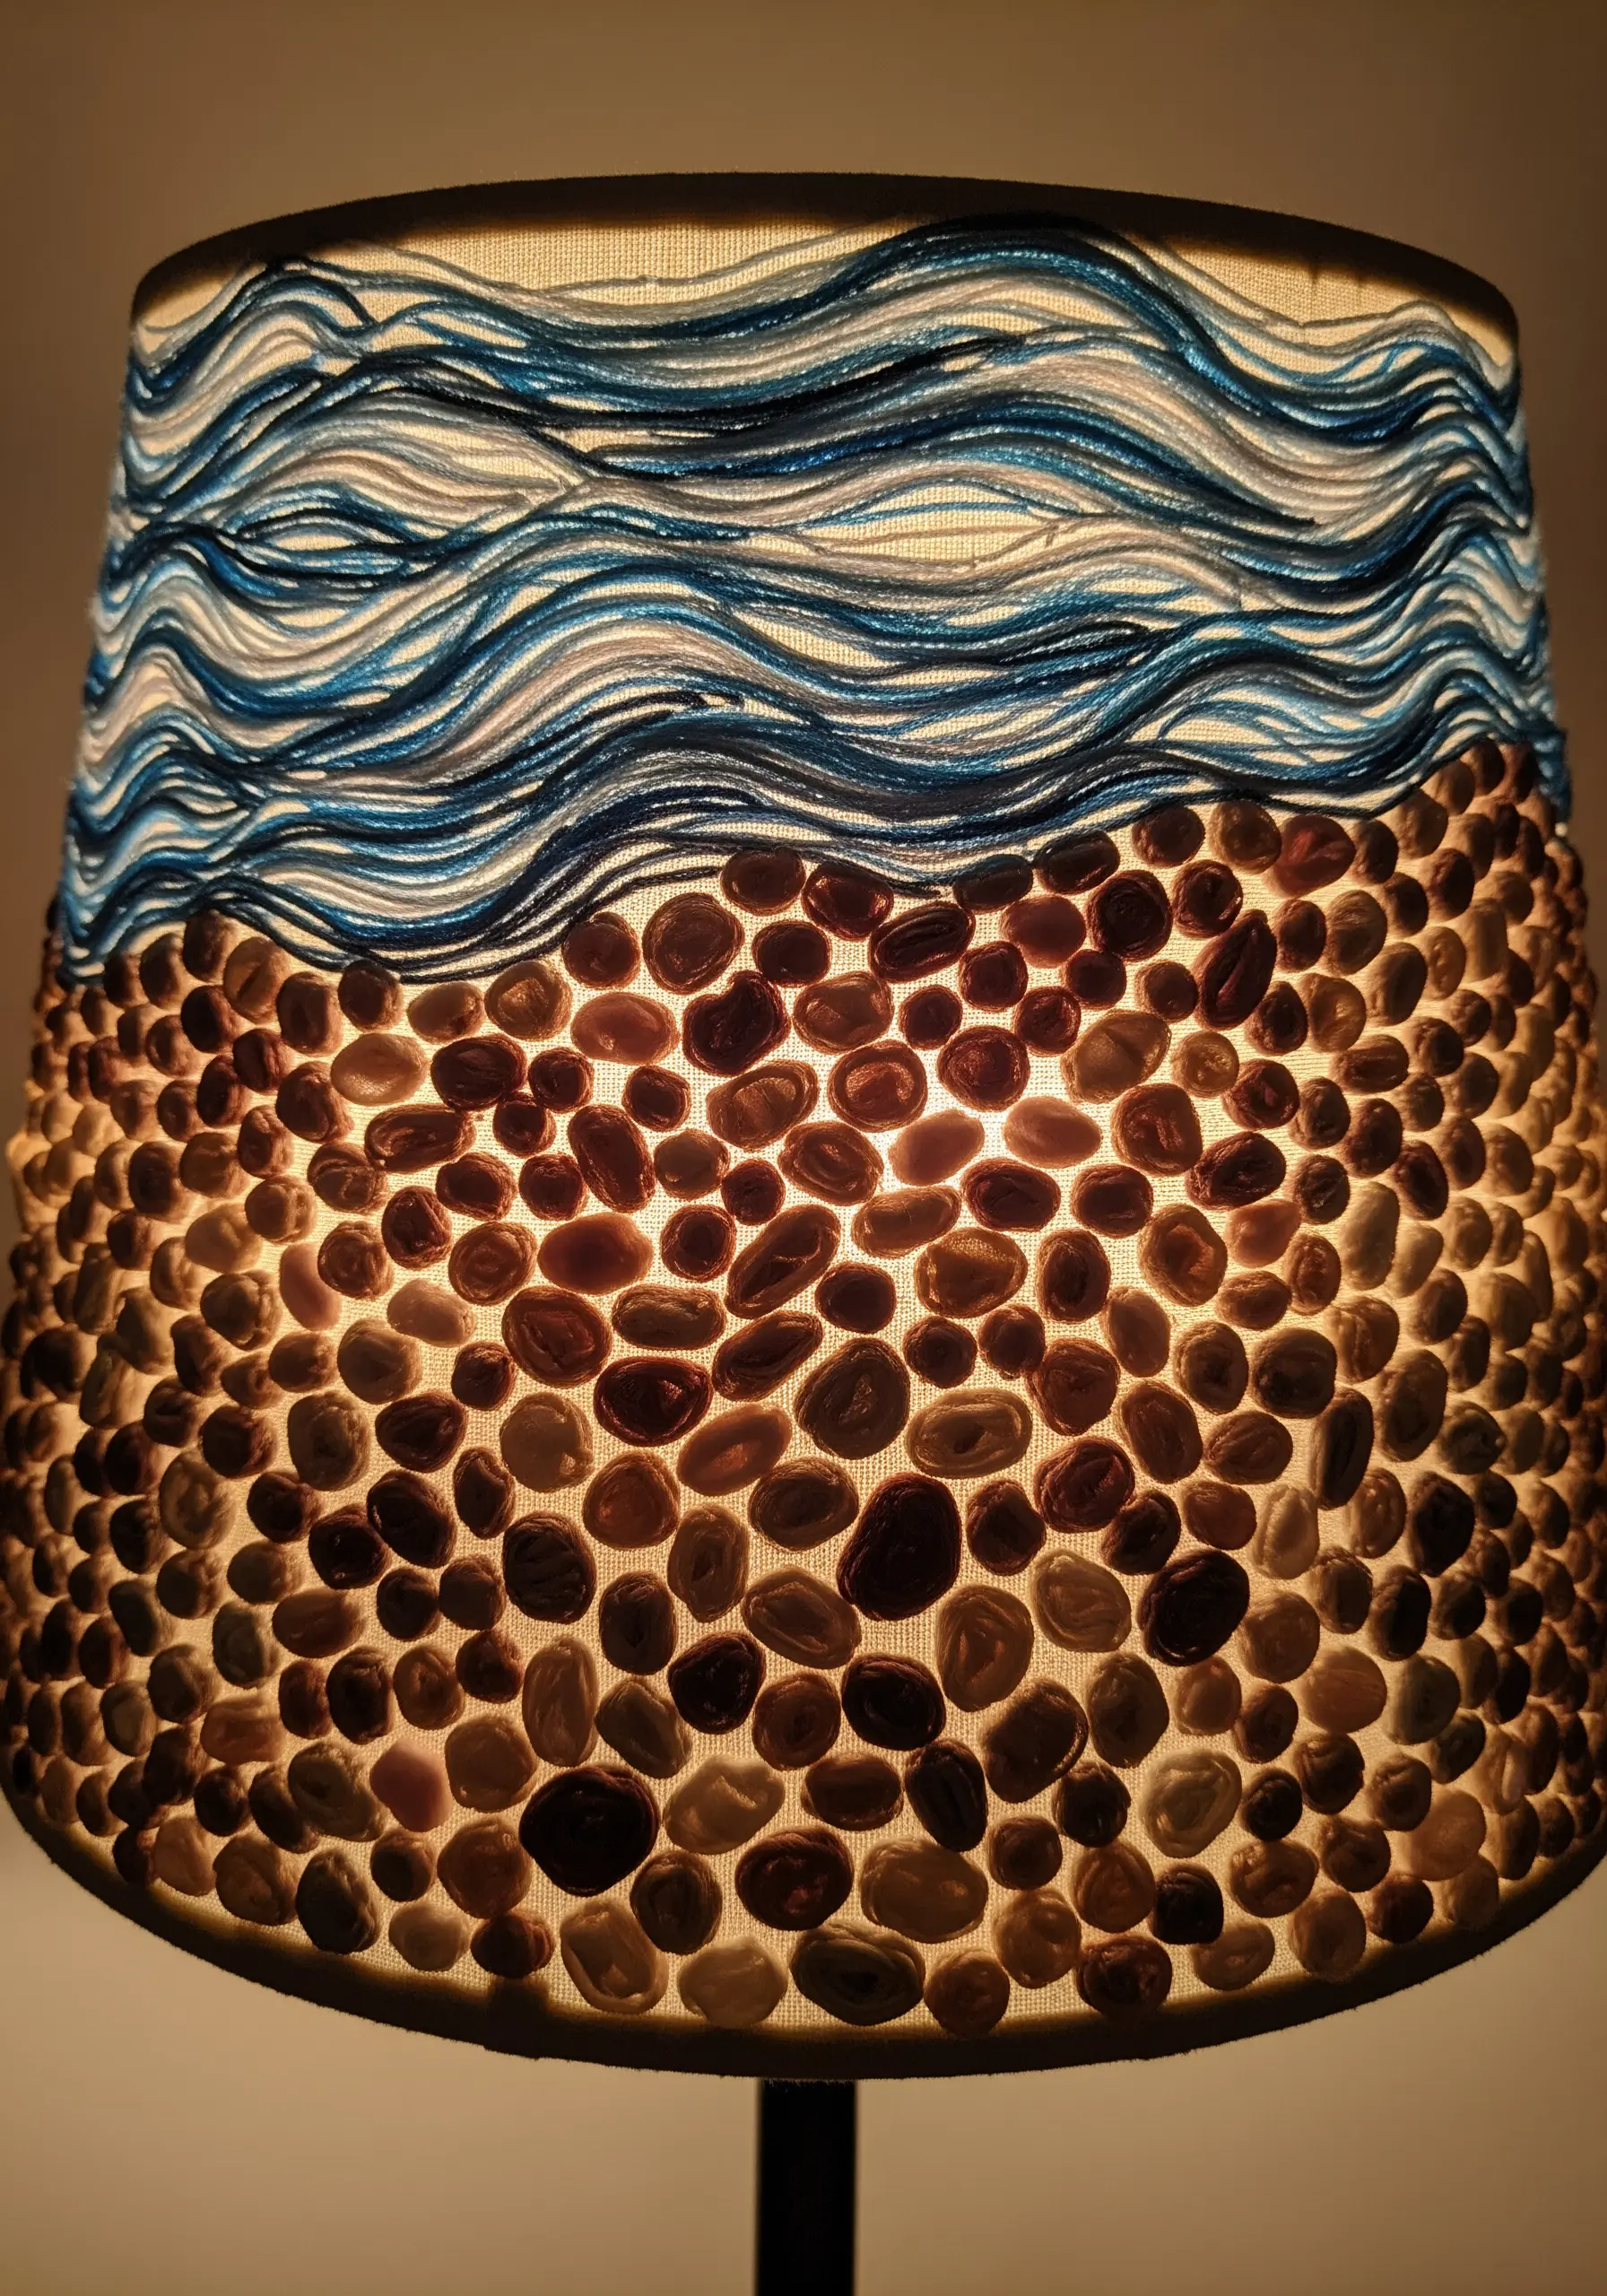
Take your embroidery off the wall and into functional decor by stitching on a translucent lampshade.
Choose textures that will interact beautifully with light. Couched yarn for waves will create dramatic shadows, while satin-stitched pebbles or polished stones will glow from within when the lamp is on.
Ensure your stitches on the inside are neat, as they will be visible. This project turns your stitching into an interactive piece that changes its character from day to night.
20. Coral Reefs with Dimensional Stitches
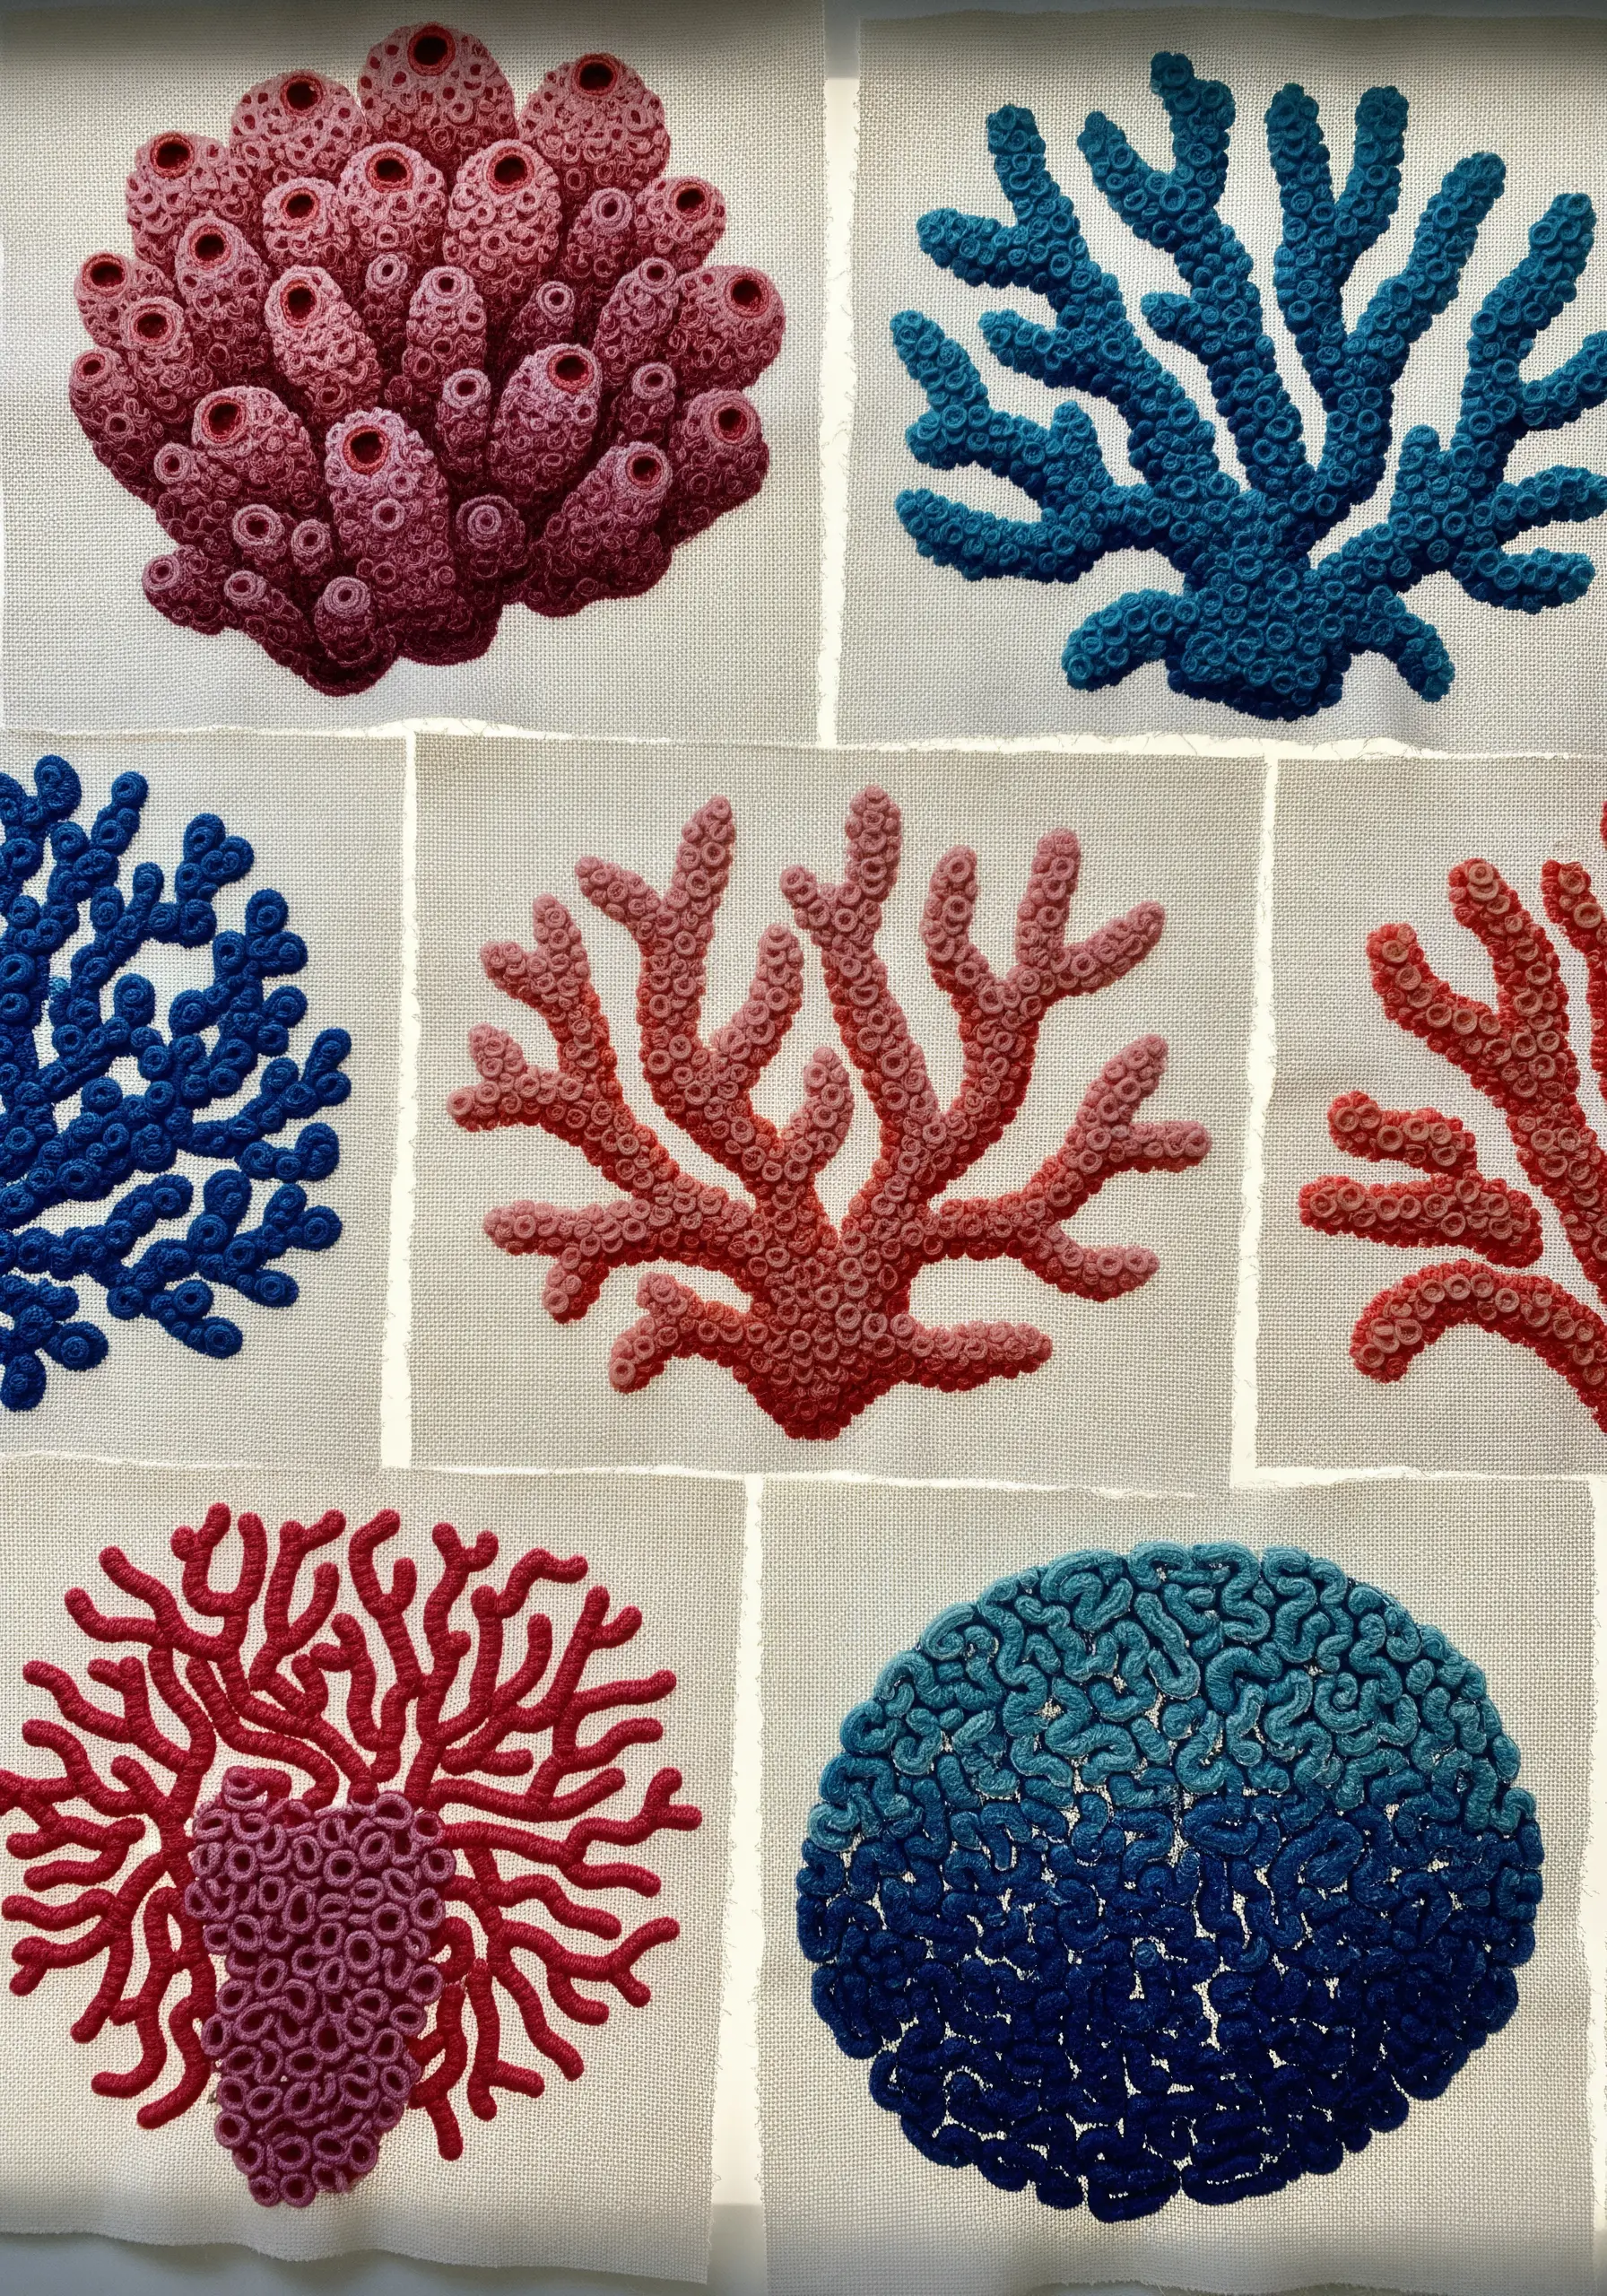
Build an underwater world by using stitches that create branching, porous, and brain-like coral shapes.
Bullion knots are perfect for tube-like structures, while dense French knots can form brain coral. For branching corals, use a series of connected lazy daisy stitches or raised stem stitch bands.
Work in vibrant, saturated colors on individual fabric patches and then appliqué them together for a stunning quilt-like composition. This makes it one of the most creative embroidery projects that transform ordinary fabric.
21. Translucent Honeycomb with Resin
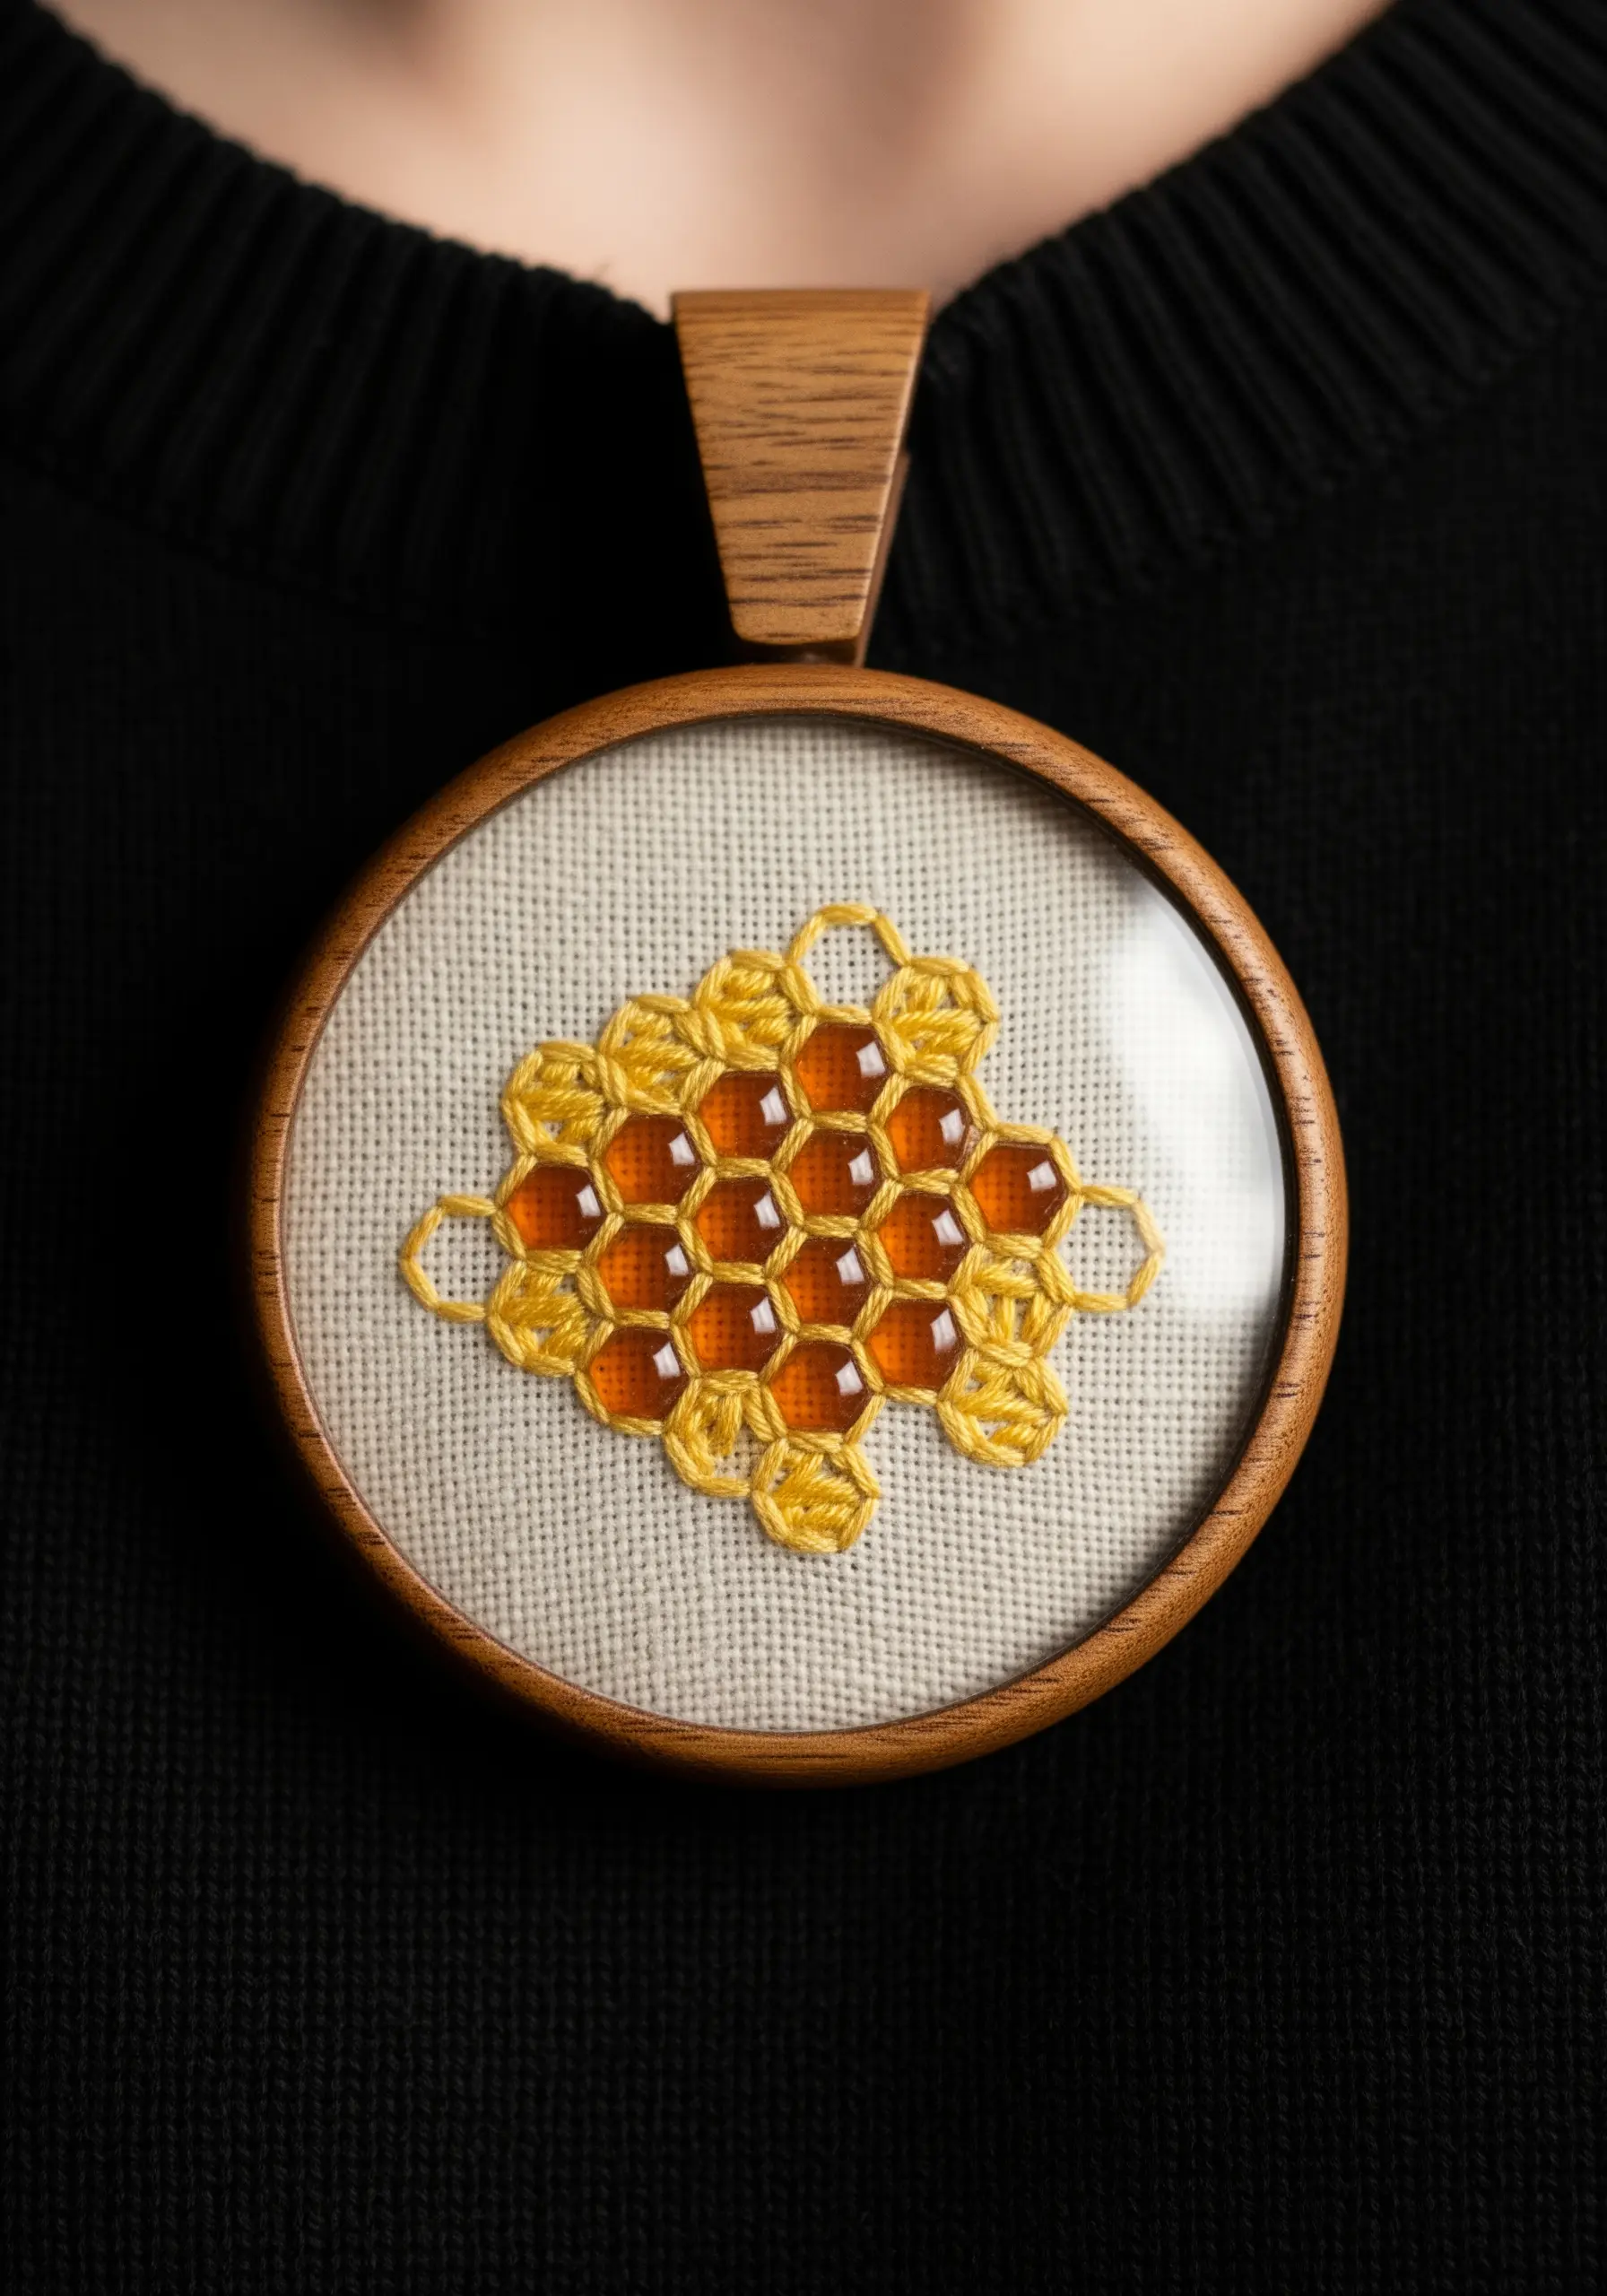
Combine embroidery with resin to create the unique, liquid-filled look of a honeycomb.
First, stitch the hexagonal outlines of the comb onto your fabric using a simple backstitch in a golden yellow thread. Once complete, carefully apply a small drop of clear or amber-tinted UV resin into each cell.
Cure the resin under a UV lamp. The result is a stunning mixed-media piece where the stitched structure holds a glossy, transparent filling, perfect for pendants or handmade embroidered jewelry and accessories.
22. The Delicate Veins of a Skeleton Leaf

Capture the fragile intricacy of a skeleton leaf using a water-soluble stabilizer.
Draw or print your leaf vein pattern onto a sheet of stabilizer and hoop it with your fabric. Using a single strand of thread, carefully trace every line with a tight backstitch or machine stitch.
When you’re finished, rinse the stabilizer away in warm water. All that will remain is your delicate thread lace structure. This advanced technique creates breathtakingly intricate art.
23. Graphic Pinecone on a Terrycloth Towel

When embroidering on a high-pile fabric like a towel, choose a bold design and a stitch that won’t get lost in the texture.
A graphic pinecone pattern is perfect. Use a heavy-weight thread like perle cotton or all six strands of floss.
A whipped backstitch or a heavy chain stitch will sit on top of the terrycloth loops, ensuring your design remains clear and defined. This approach combines functionality with a touch of rustic elegance.
24. A Starry Galaxy with French Knots and Metallics

Create a mesmerizing galaxy effect with a dense field of French knots punctuated by sparkling starbursts.
Use white, silver, and pale yellow floss to make thousands of tiny French knots, varying the number of wraps to change their size. This creates the ‘star dust’ background.
For the larger stars, use a bright silver metallic thread to stitch star stitches or lazy daisies radiating from a central point. The contrast between the matte cotton knots and the shimmering metallic stars gives the piece incredible depth.
25. Cascading Scales with Layered Stitches
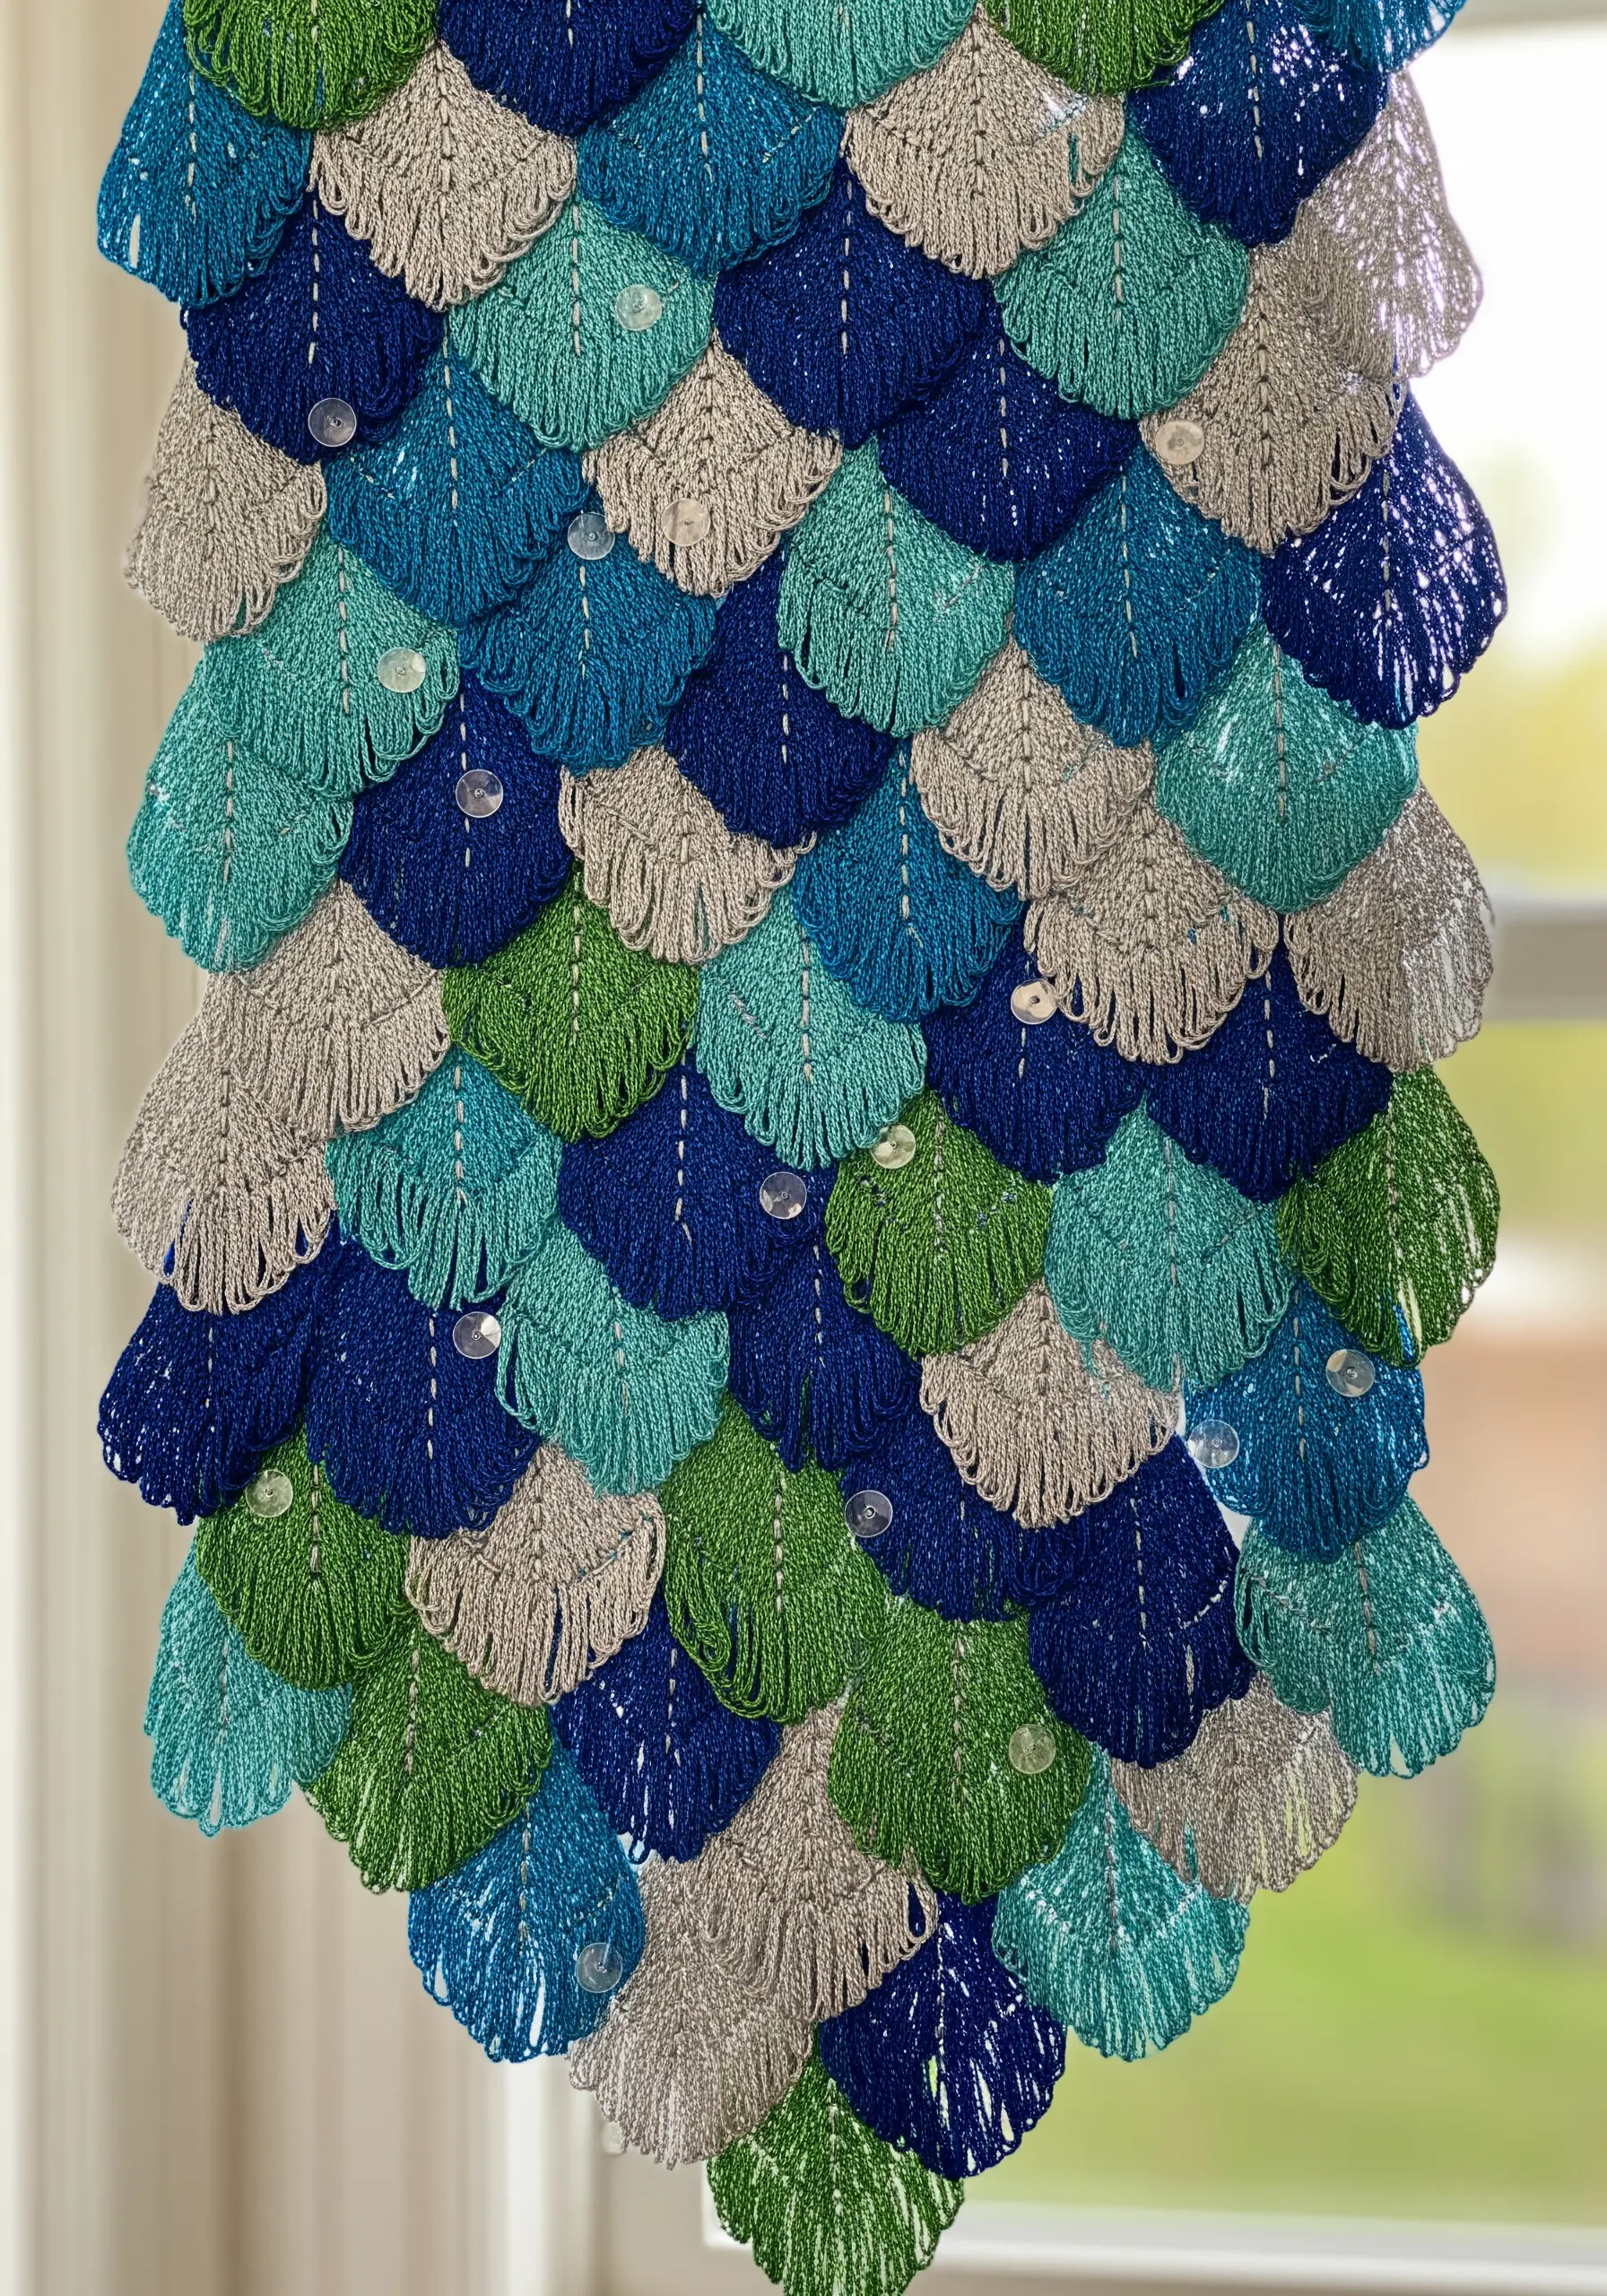
Create a dynamic, three-dimensional surface that mimics fish scales or layered petals with the fishbone stitch or detached chain stitch.
Work in rows from the bottom up, slightly overlapping each row with the one above it. This creates a beautifully layered effect.
For extra texture and movement, leave the bottom loop of each stitch slightly loose, allowing it to lift from the fabric. Using variegated thread will enhance the sense of depth and make each ‘scale’ unique.
26. Crystalline Forms with Knots and Beads
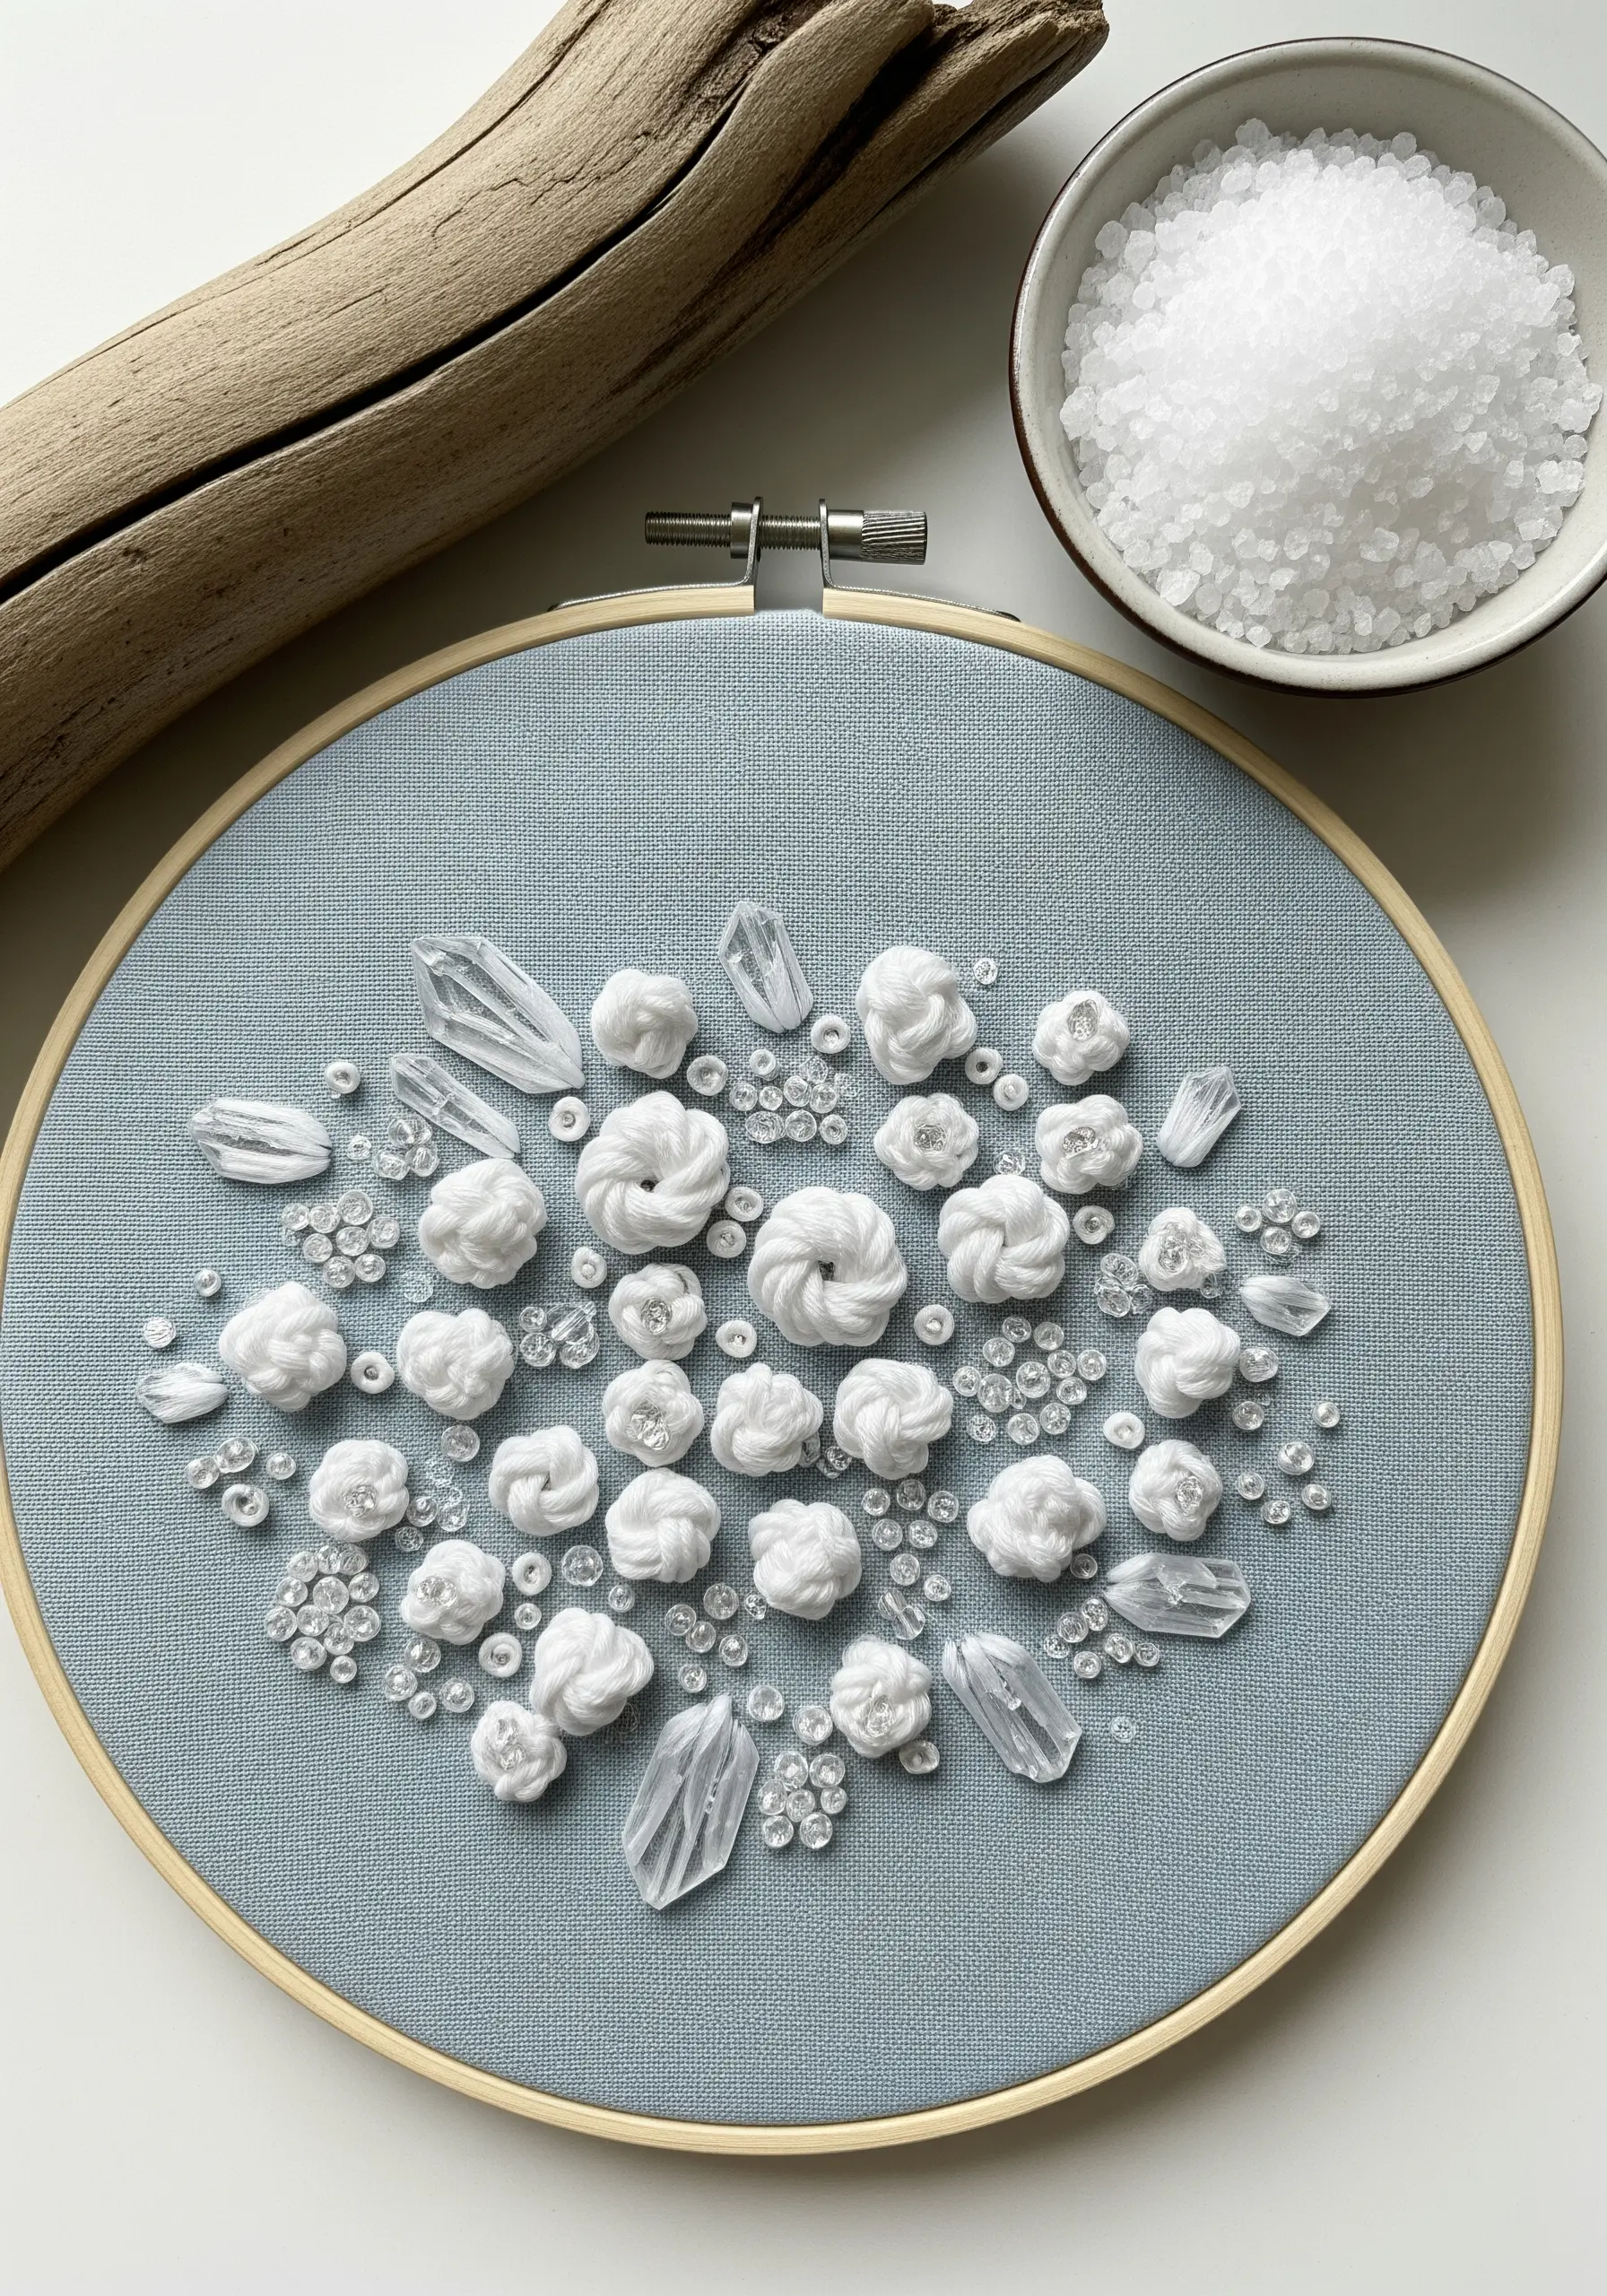
Evoke the texture of salt flats or ice crystals by combining soft, white knots with hard, clear beads.
Create clusters of white bullion knots or woven wheel stitches to act as the soft, foundational ‘snow’ or salt base. Their roundness provides a wonderful contrast to the sharp facets of crystals.
Scatter clear or iridescent beads and quartz-like crystal beads among the knots. This mixed-fiber creation plays with light and texture, creating a design that feels both soft and sharp, just like ice.
27. A Tangled Bird’s Nest with Natural Fibers

Build a truly sculptural bird’s nest by incorporating unconventional, natural fibers into your work.
Use a base of couched jute or raffia, stitched in a swirling circle. Then, weave in different materials like thin wire, dried grasses, or even horsehair, leaving the ends loose and wild.
This is less about precise stitches and more about building layers of chaotic texture. Tuck a few bead ‘eggs’ into the center to complete the story. It’s a perfect example of how rustic farmhouse embroidery wall projects can be wonderfully dimensional.
28. Airy Dandelion Seeds with Straight Stitch

Capture the delicate, weightless feeling of a dandelion clock with the simplest of stitches: the straight stitch.
The key to this design is precision and thread weight. Use a single strand of white floss for the parachute-like pappus and a slightly heavier thread for the central stem and seed.
Create the floating seeds by stitching detached, individual parachutes across the fabric. This minimalist approach creates a powerful sense of movement and fragility.
29. Volcanic Flow with Thick Roving and Knots

Convey the immense power of a volcanic eruption with high-contrast, ultra-textural materials.
Use thick, unspun wool roving in fiery reds, oranges, and yellows for the lava. Couch it down in flowing, energetic lines to show movement. For the volcanic rock, create a dense field of knots using a chunky, variegated gray yarn.
This dramatic juxtaposition of smooth, flowing roving and rough, static knots creates a piece of fiber art that feels powerful and elemental.
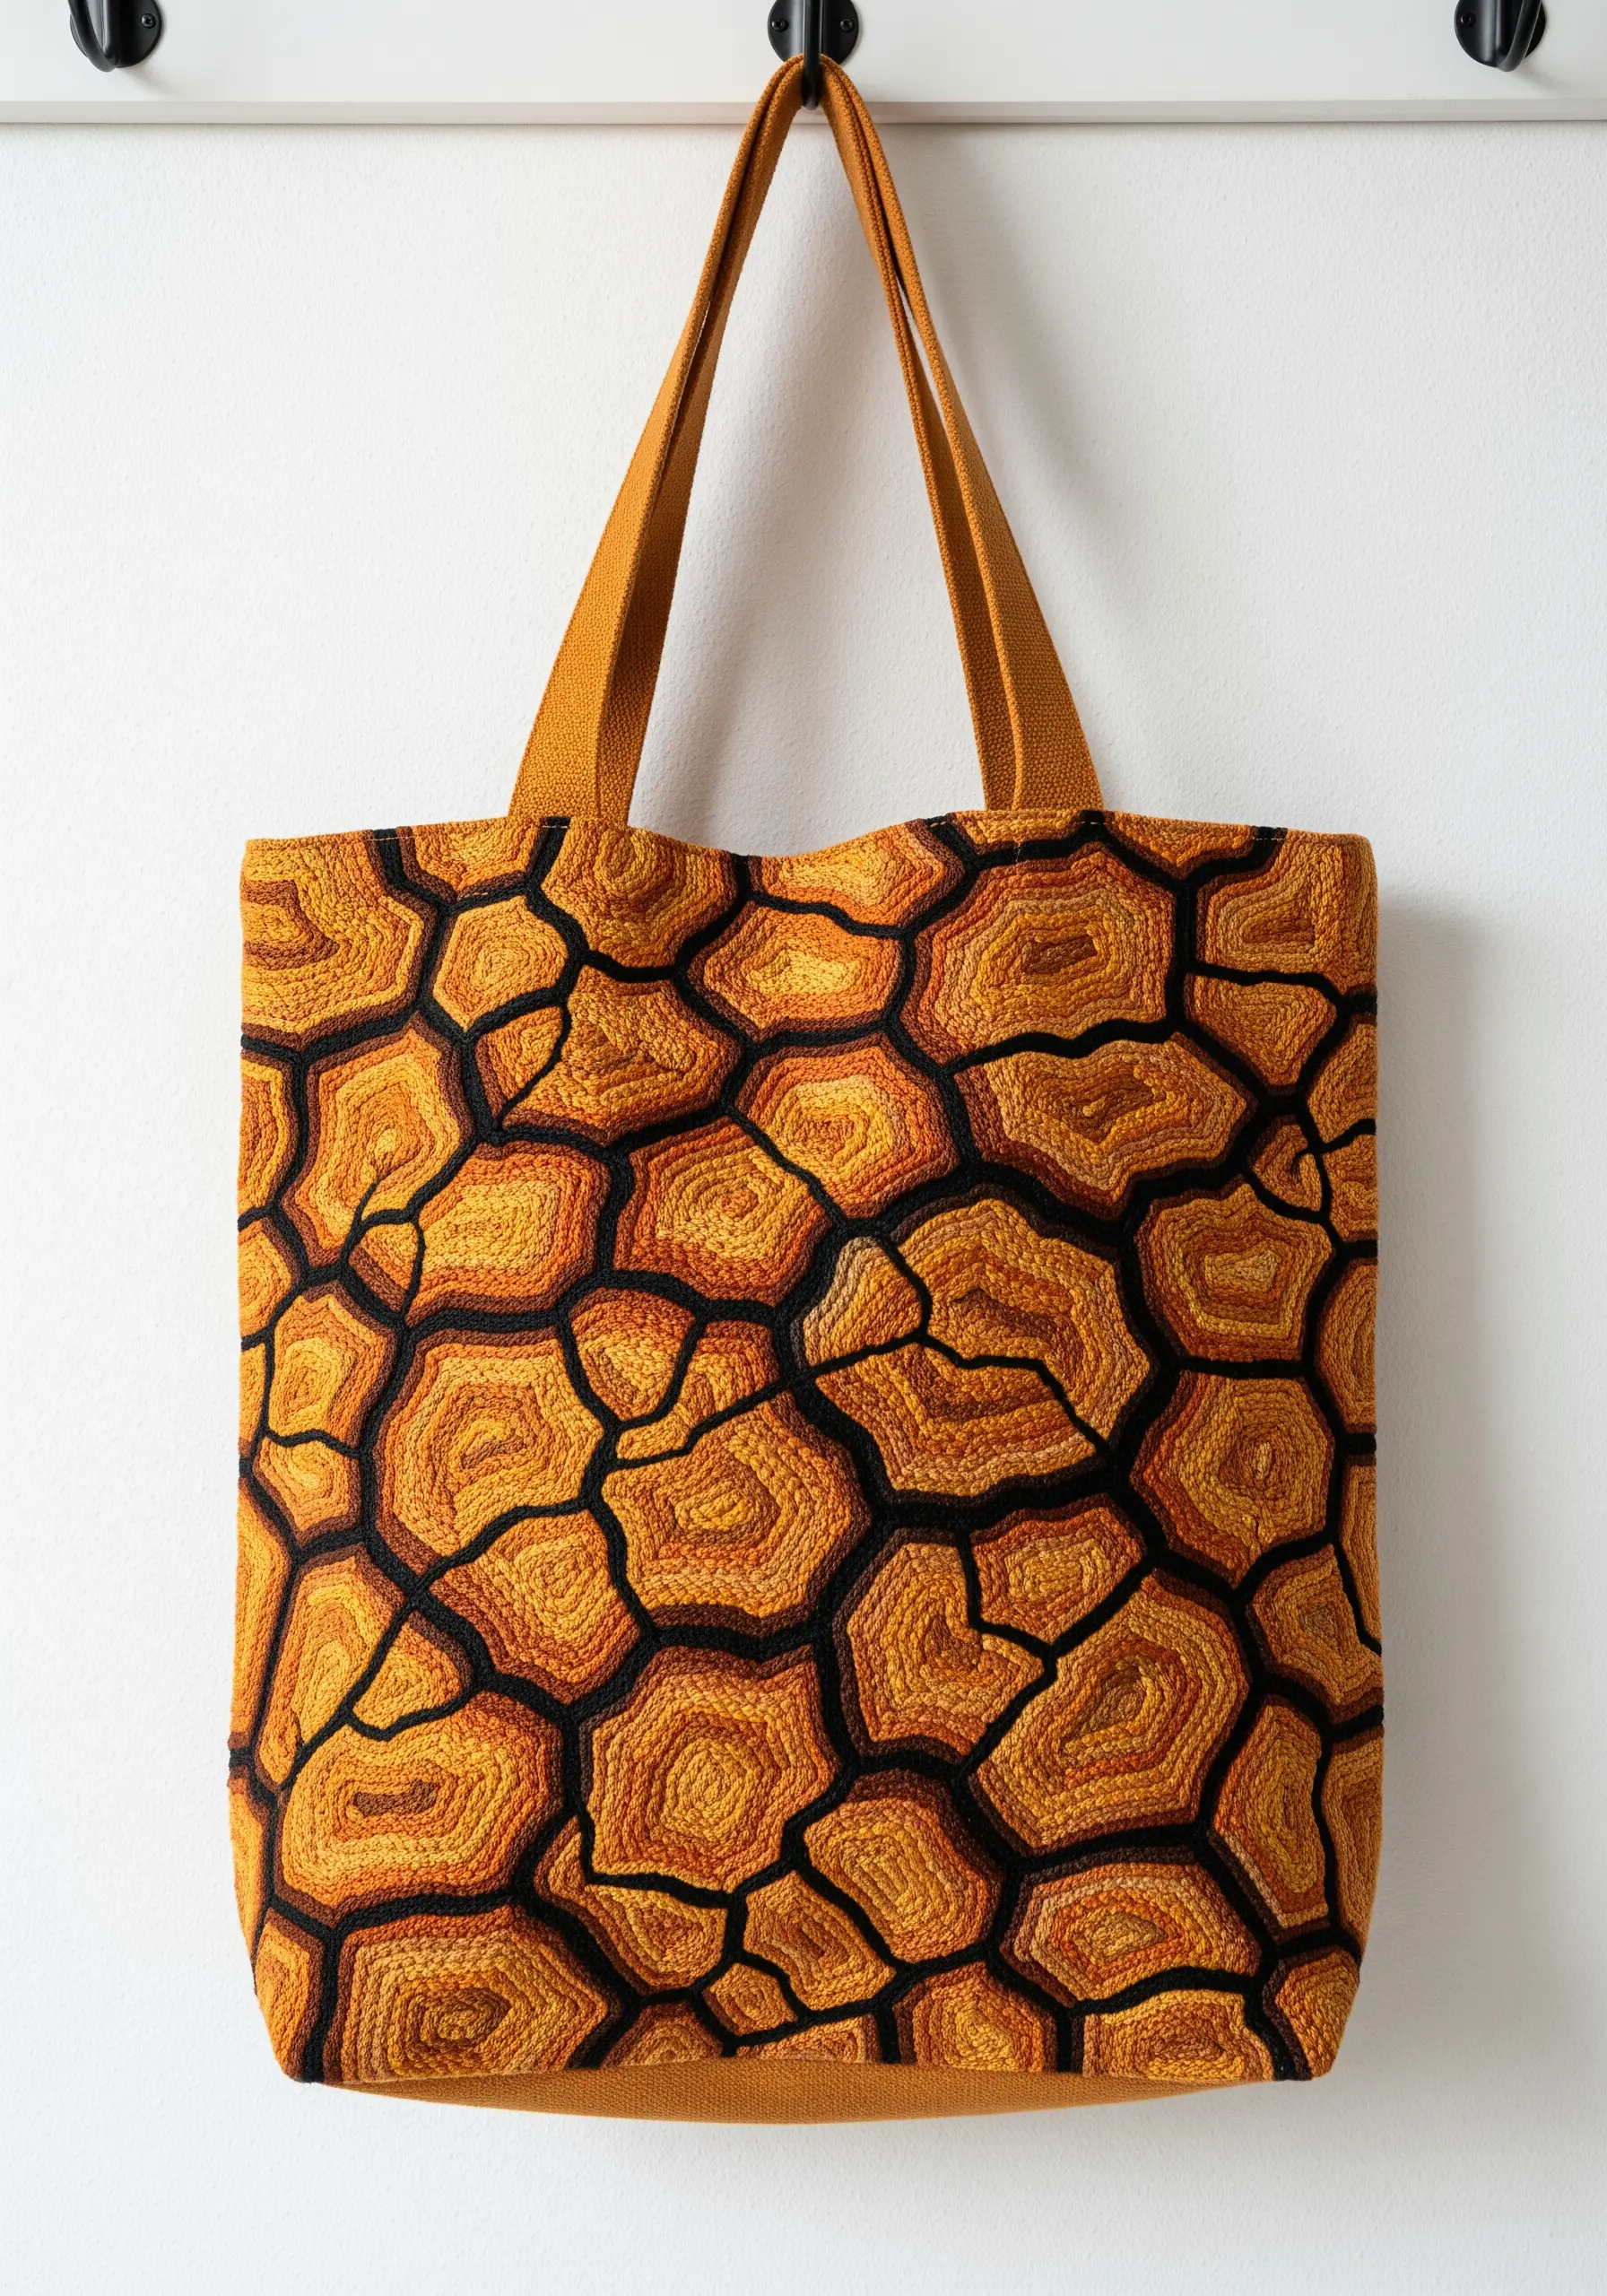
30. Tree Rings with Couched Concentric Circles
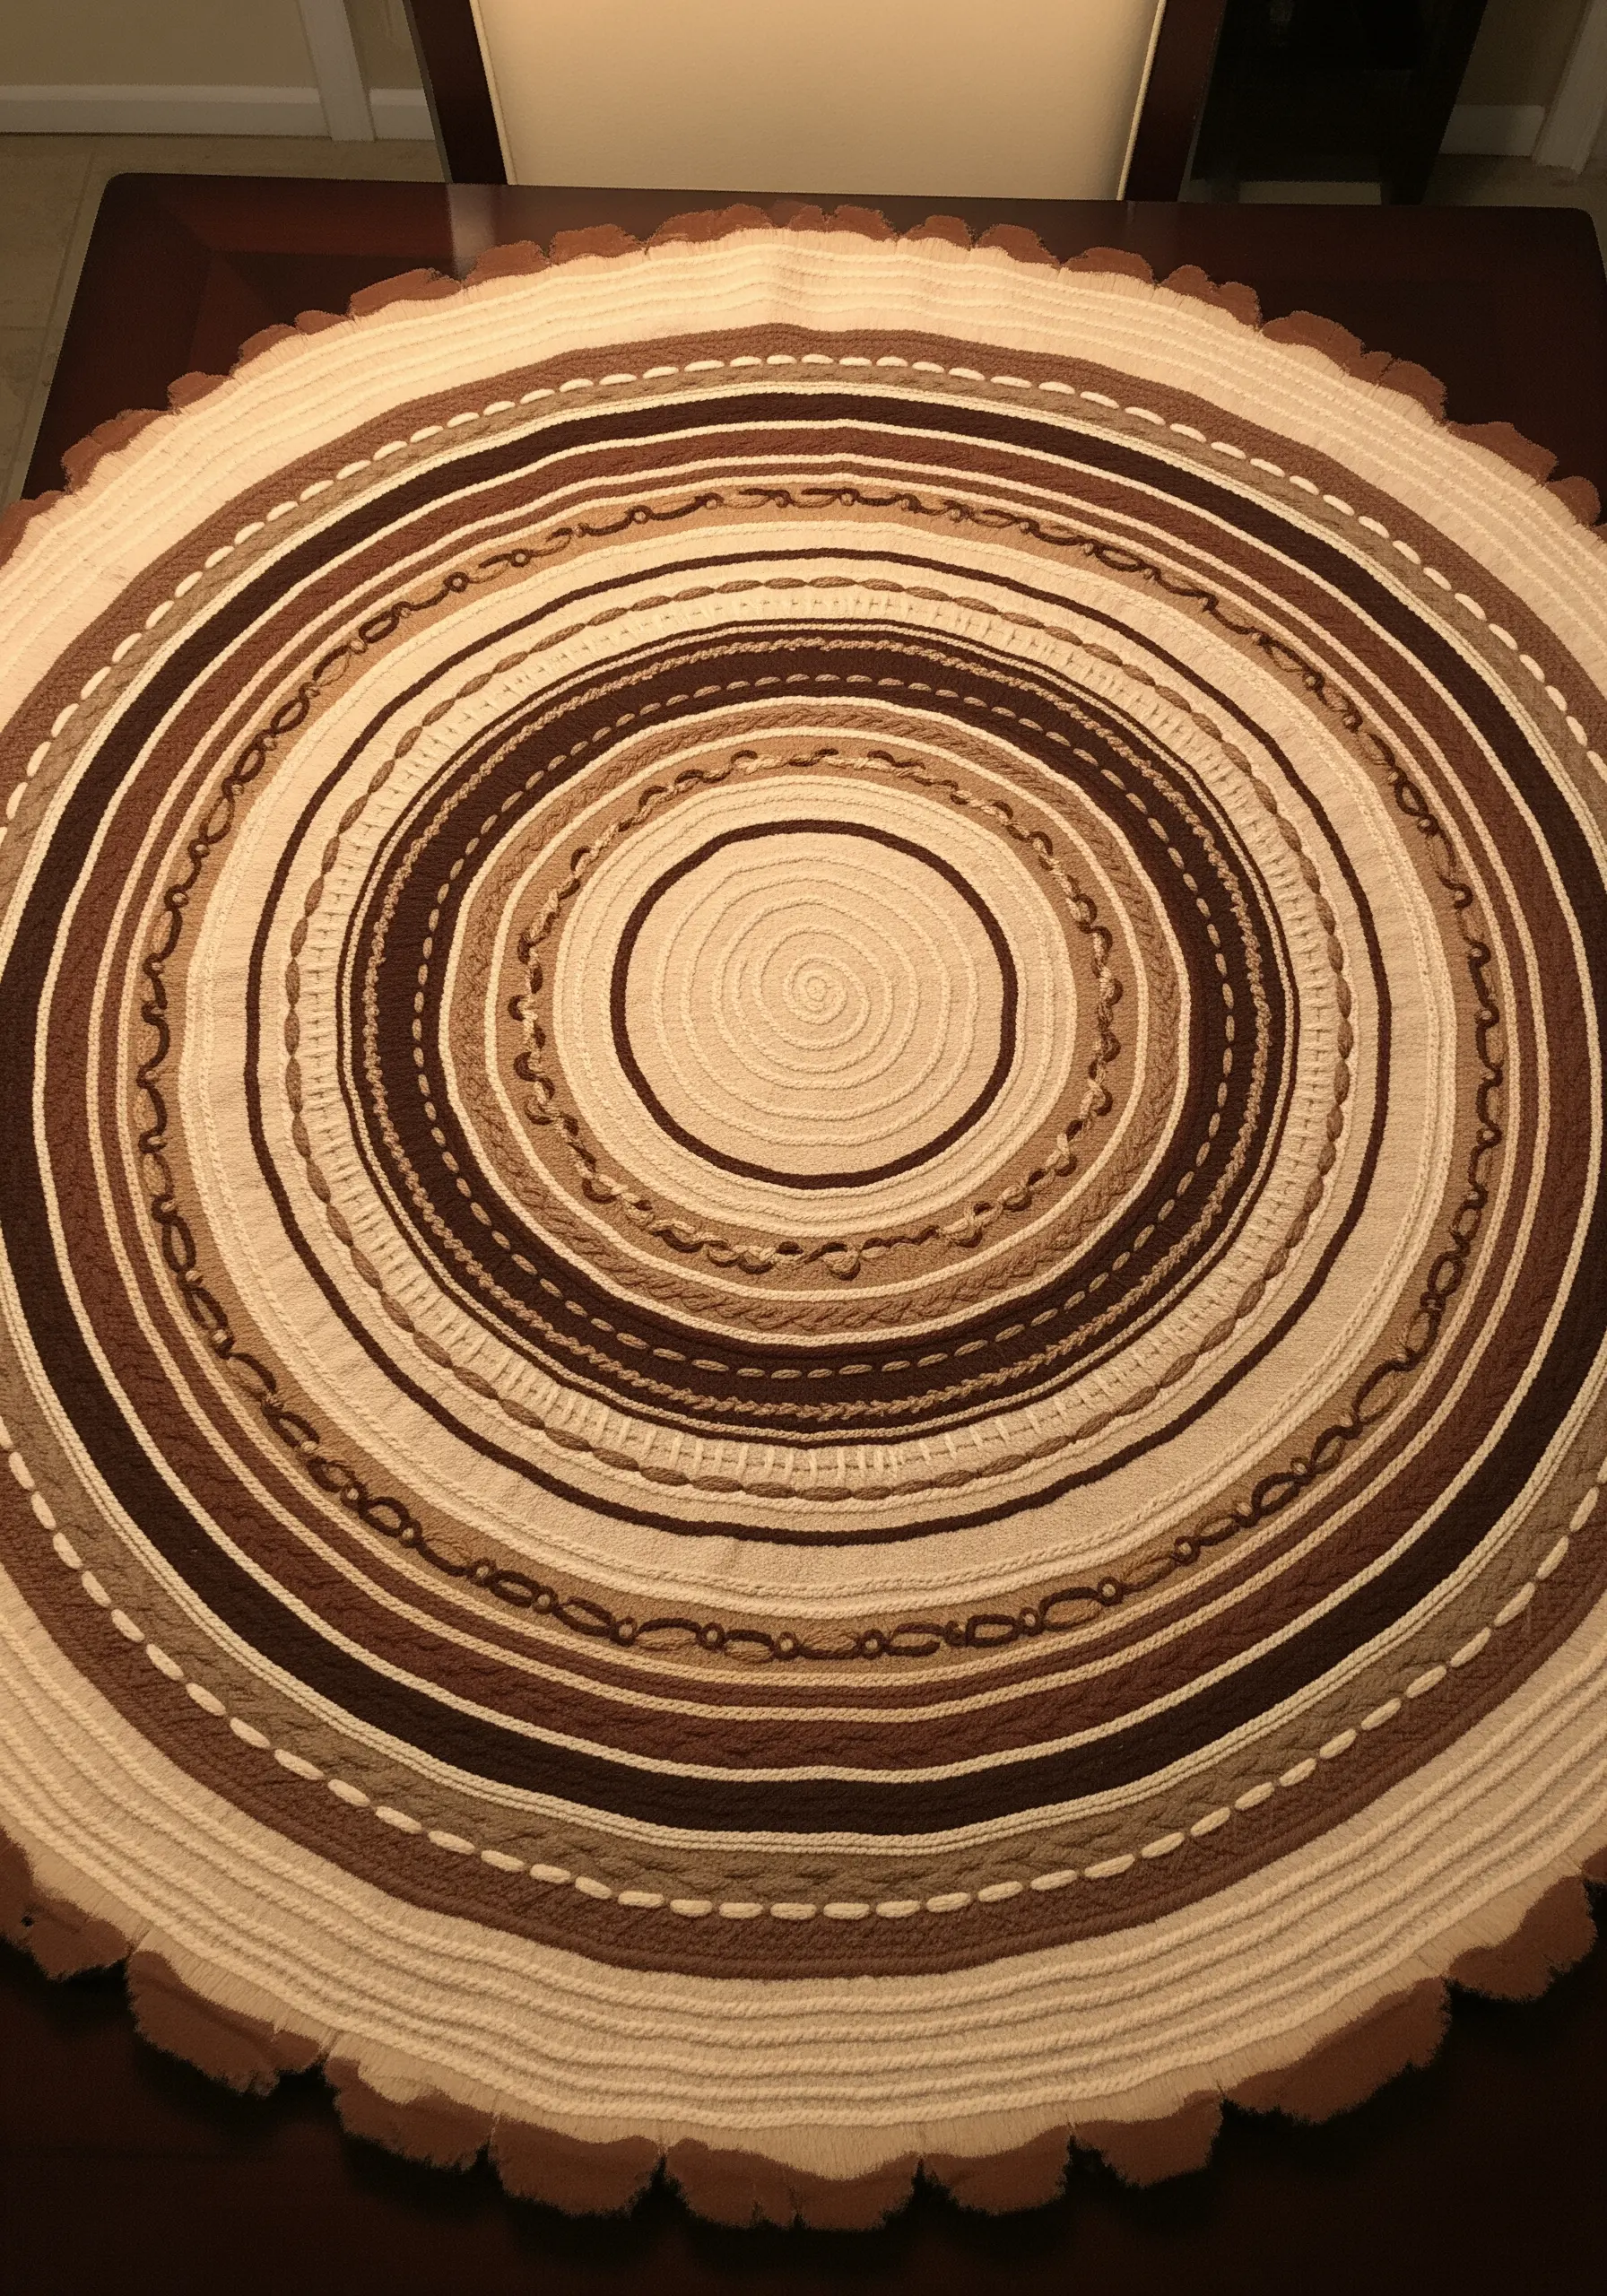
Translate the life story of a tree into a tactile piece by couching different yarns and cords in concentric circles.
Vary the thickness, color, and texture of the materials you couch to represent different growth rings. A thin, dark cotton thread can mark a harsh winter, while a thick, soft wool yarn can signify a season of growth.
This meditative technique results in a beautiful, symbolic design that works wonderfully as wall art, a placemat, or a tabletop centerpiece. It’s a stunning way to bring embroidery ideas using natural textures into functional decor.


