

When you look at a quiet pond, you see more than just plants and water. You see the glassy sheen on the surface, the soft texture of a cattail, and the impossibly delicate structure of a dragonfly’s wing. Your embroidery can capture this, too—it just requires shifting your focus from simply filling a shape to truly observing and translating texture and light.
This collection of ideas is designed to help you make that shift. Forget just choosing colors; we’re going to explore how the direction of a single stitch can create the curve of a petal, how a different fiber can mimic the fluff of a seed pod, and how leaving space empty can be more powerful than filling it.
These are not just patterns, but invitations to look closer. To let the quiet details of a wetland scene inform your needle and thread, and in doing so, transform your embroidery into something with depth, intention, and a quiet, natural elegance.
1. Sculptural Water Lilies with Layered Satin Stitch
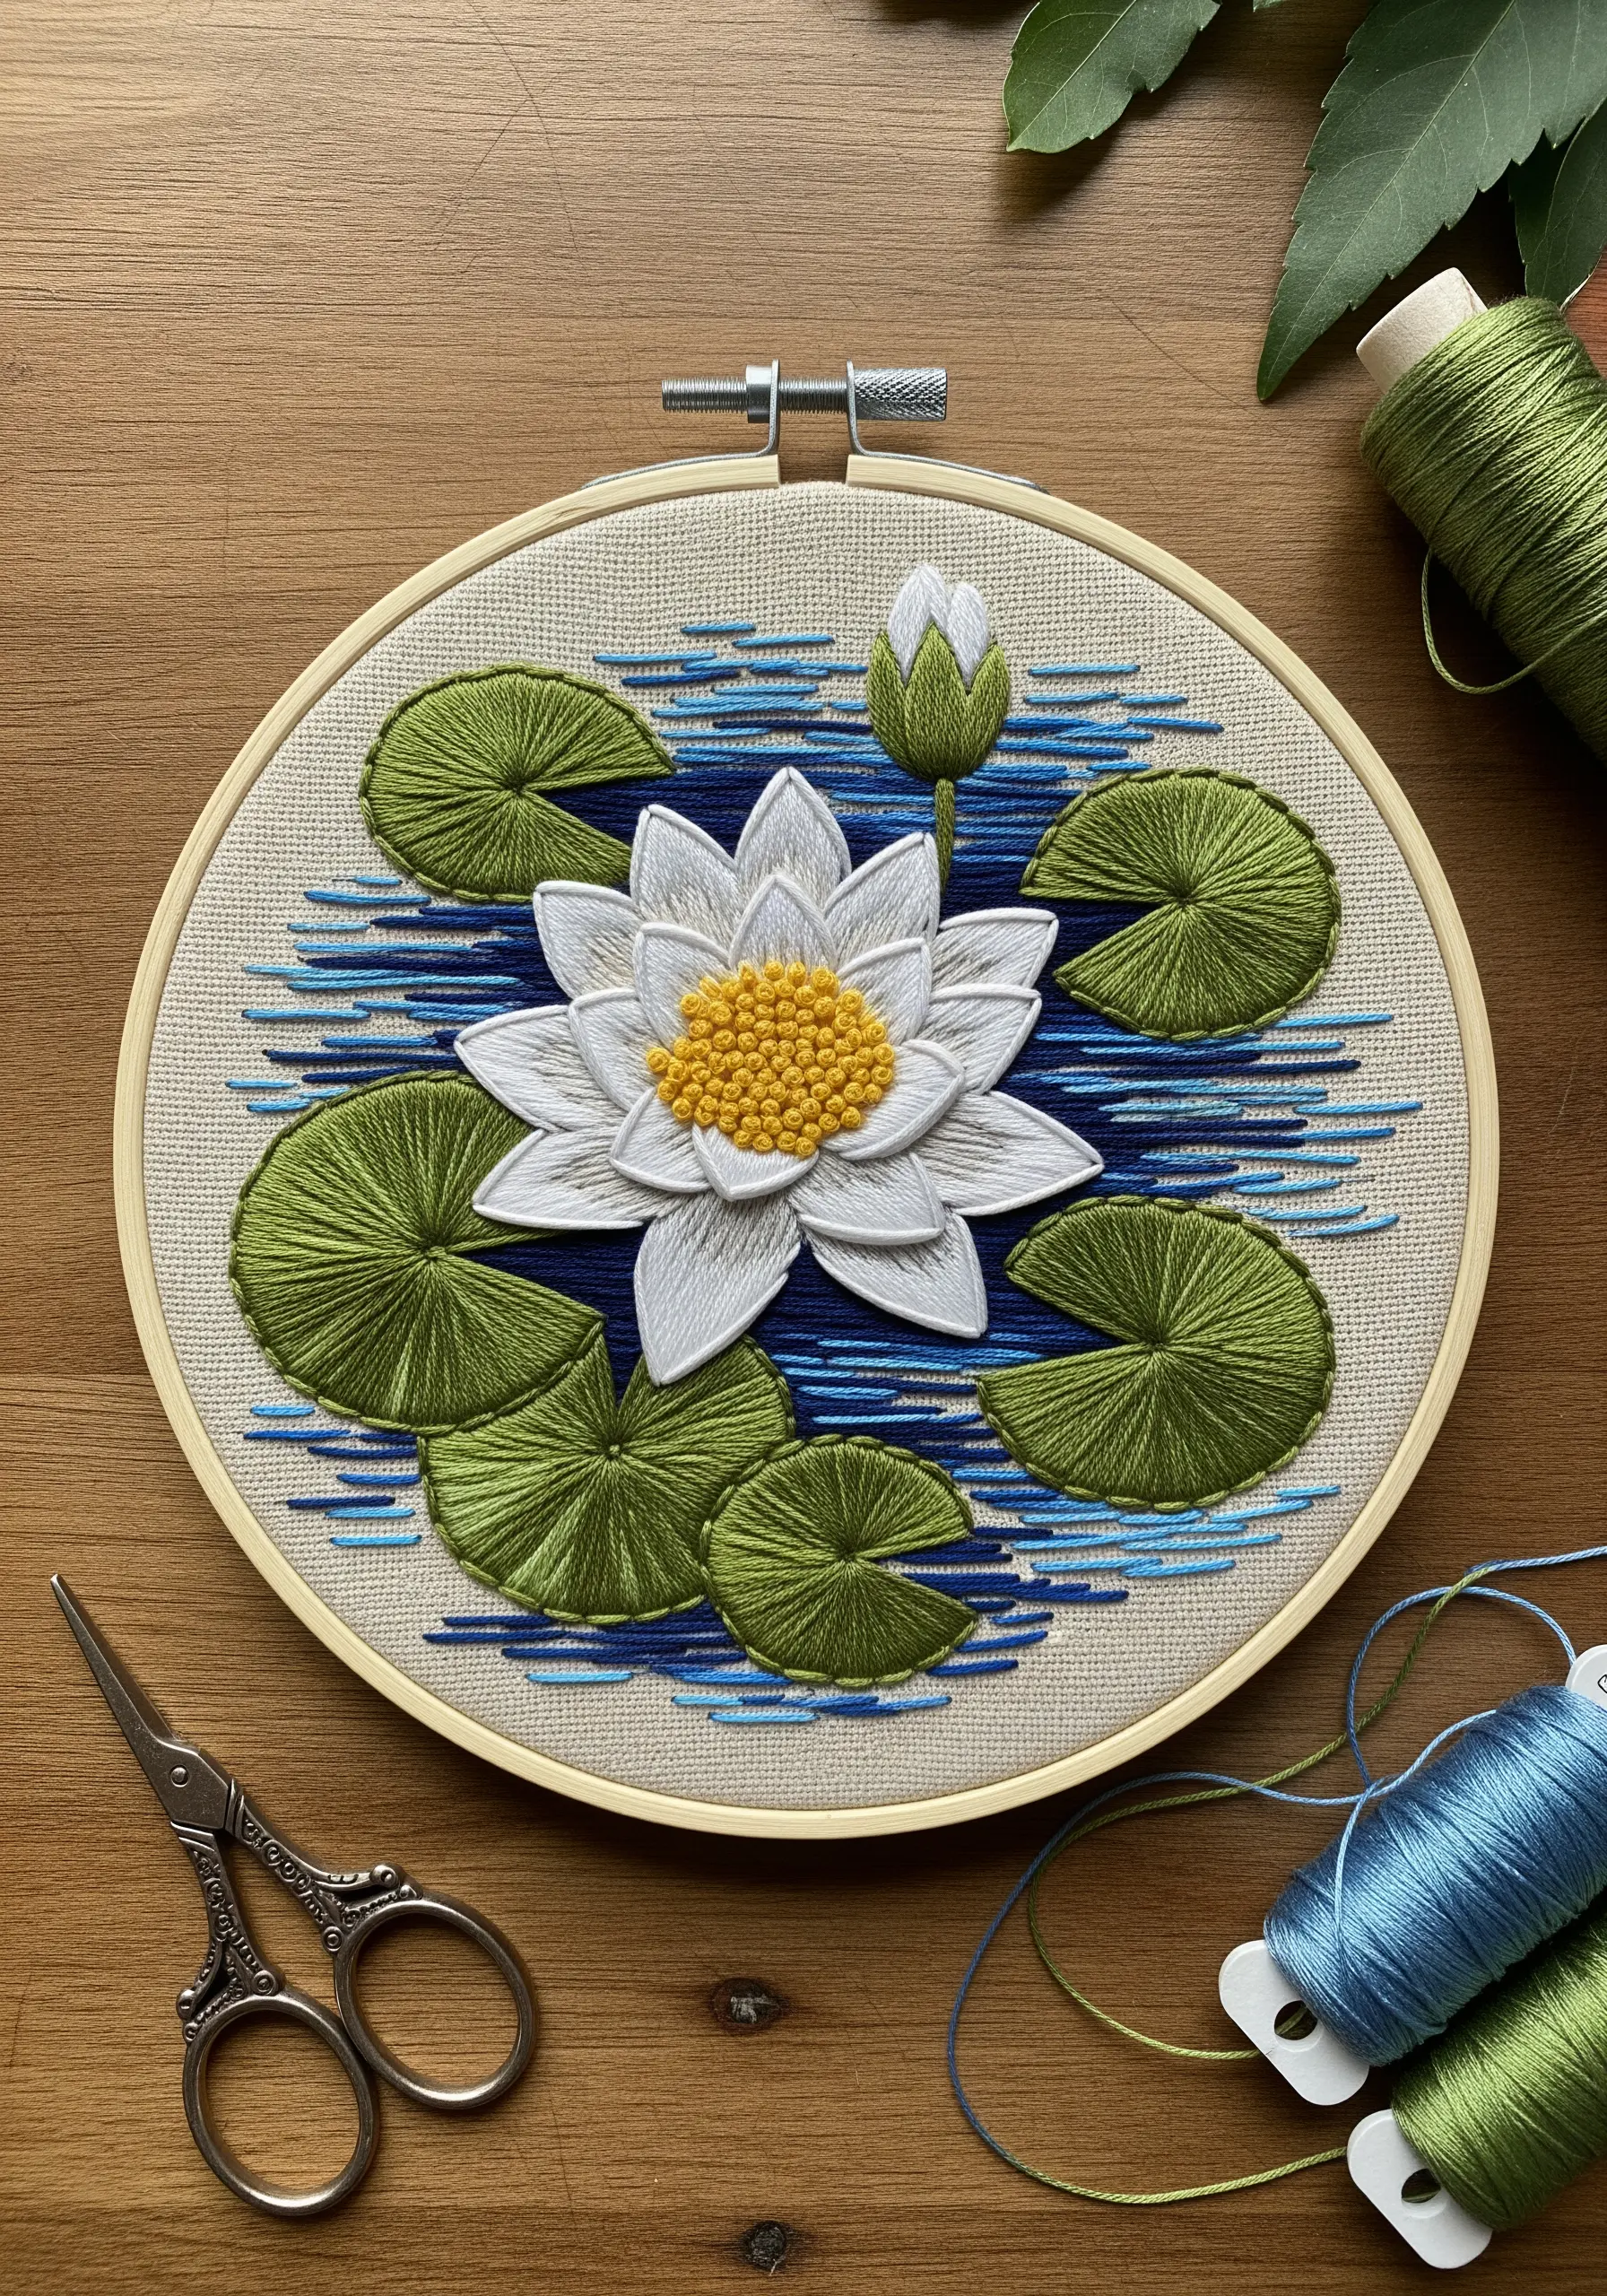
To prevent your water lily from looking flat, build the petals in distinct, overlapping layers.
Stitch the bottom-most petals first, using a padded satin stitch to give them a subtle lift.
For the upper petals, use a standard satin stitch, ensuring your stitches follow the natural curve of the petal, from base to tip.
Create a dense, textural center with a cluster of tightly packed yellow French knots—this contrast in texture makes the smooth petals pop.
The water itself is achieved with simple, long straight stitches in varying shades of blue, which gives a sense of calm movement without distracting from the main flower.
2. Ethereal Dragonfly Wings with Sheer Appliqué
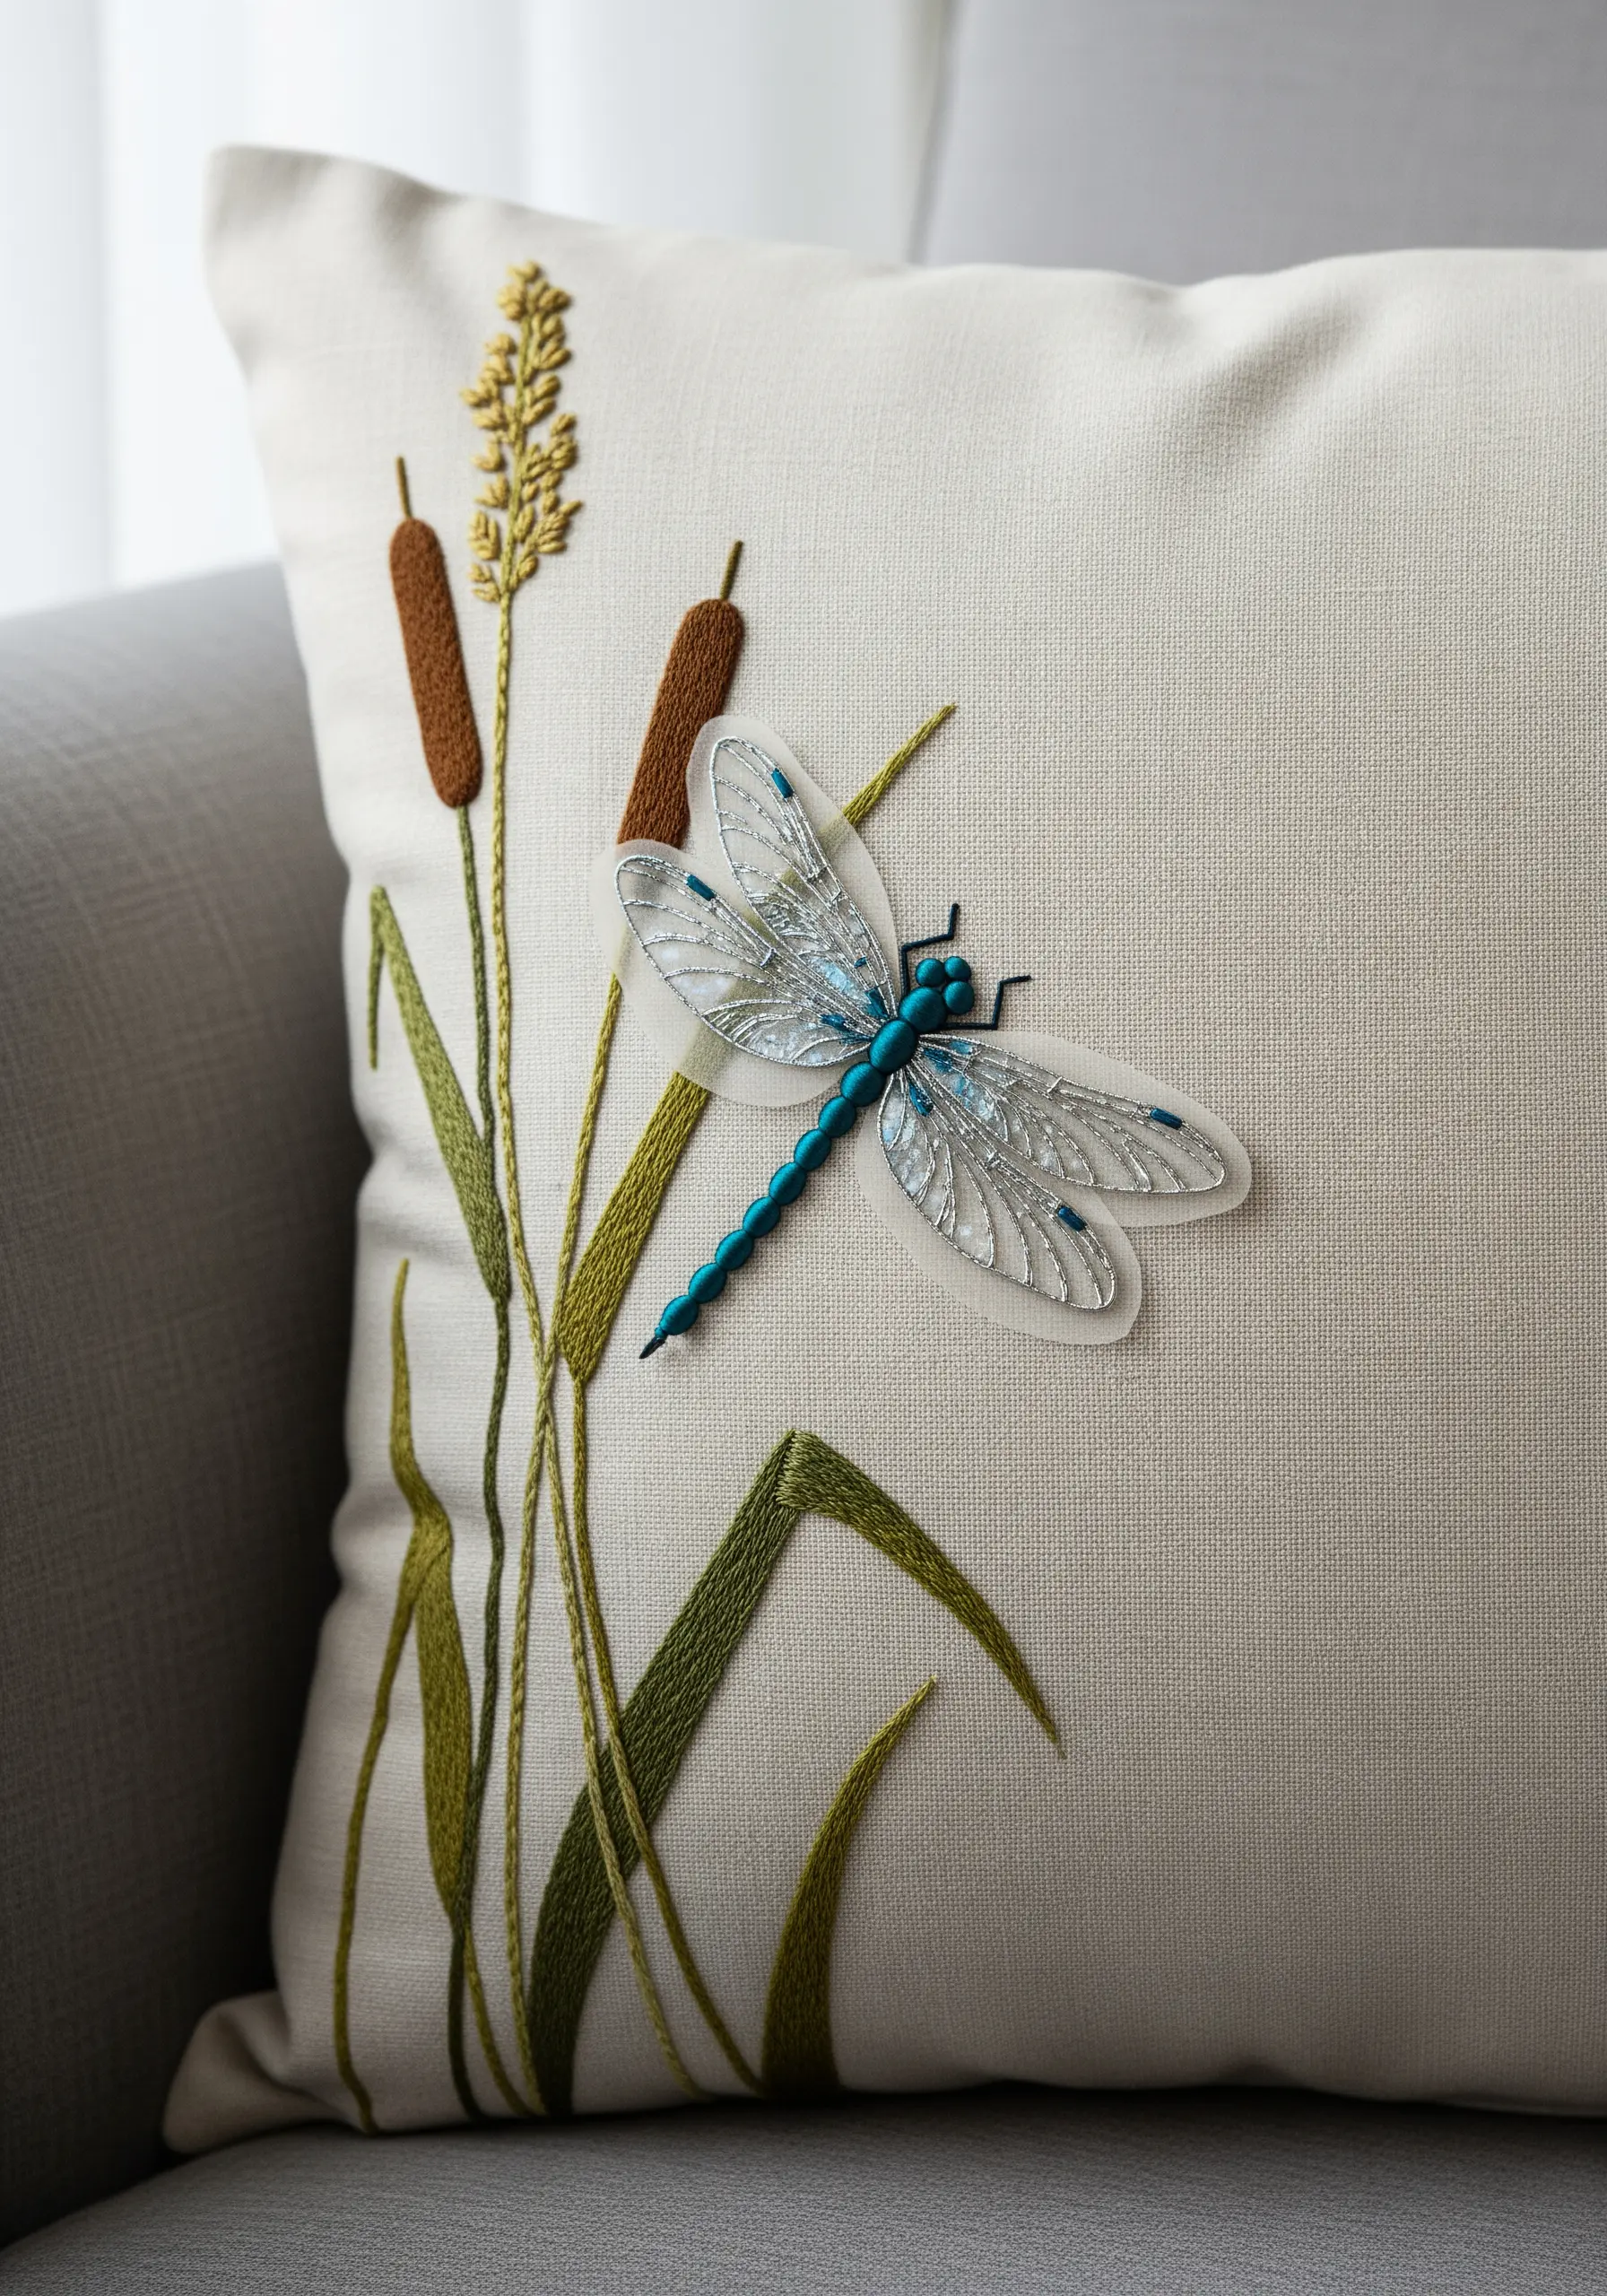
Capture the transparent quality of dragonfly wings by using a small piece of organza or tulle as an appliqué base.
First, stitch the reed stems directly onto your cushion cover using a stem stitch for the stalks and a satin stitch for the leaves.
For the dragonfly, lay the sheer fabric over your design and secure it with a fine outline stitch, then trim the excess carefully.
Use a single strand of metallic or silver thread to add delicate veins, which catches the light beautifully.
This mixed-media approach turns simple embroidered cushion covers into sophisticated decorative pieces.
3. Create a Luminous Sunset with Thread Blending
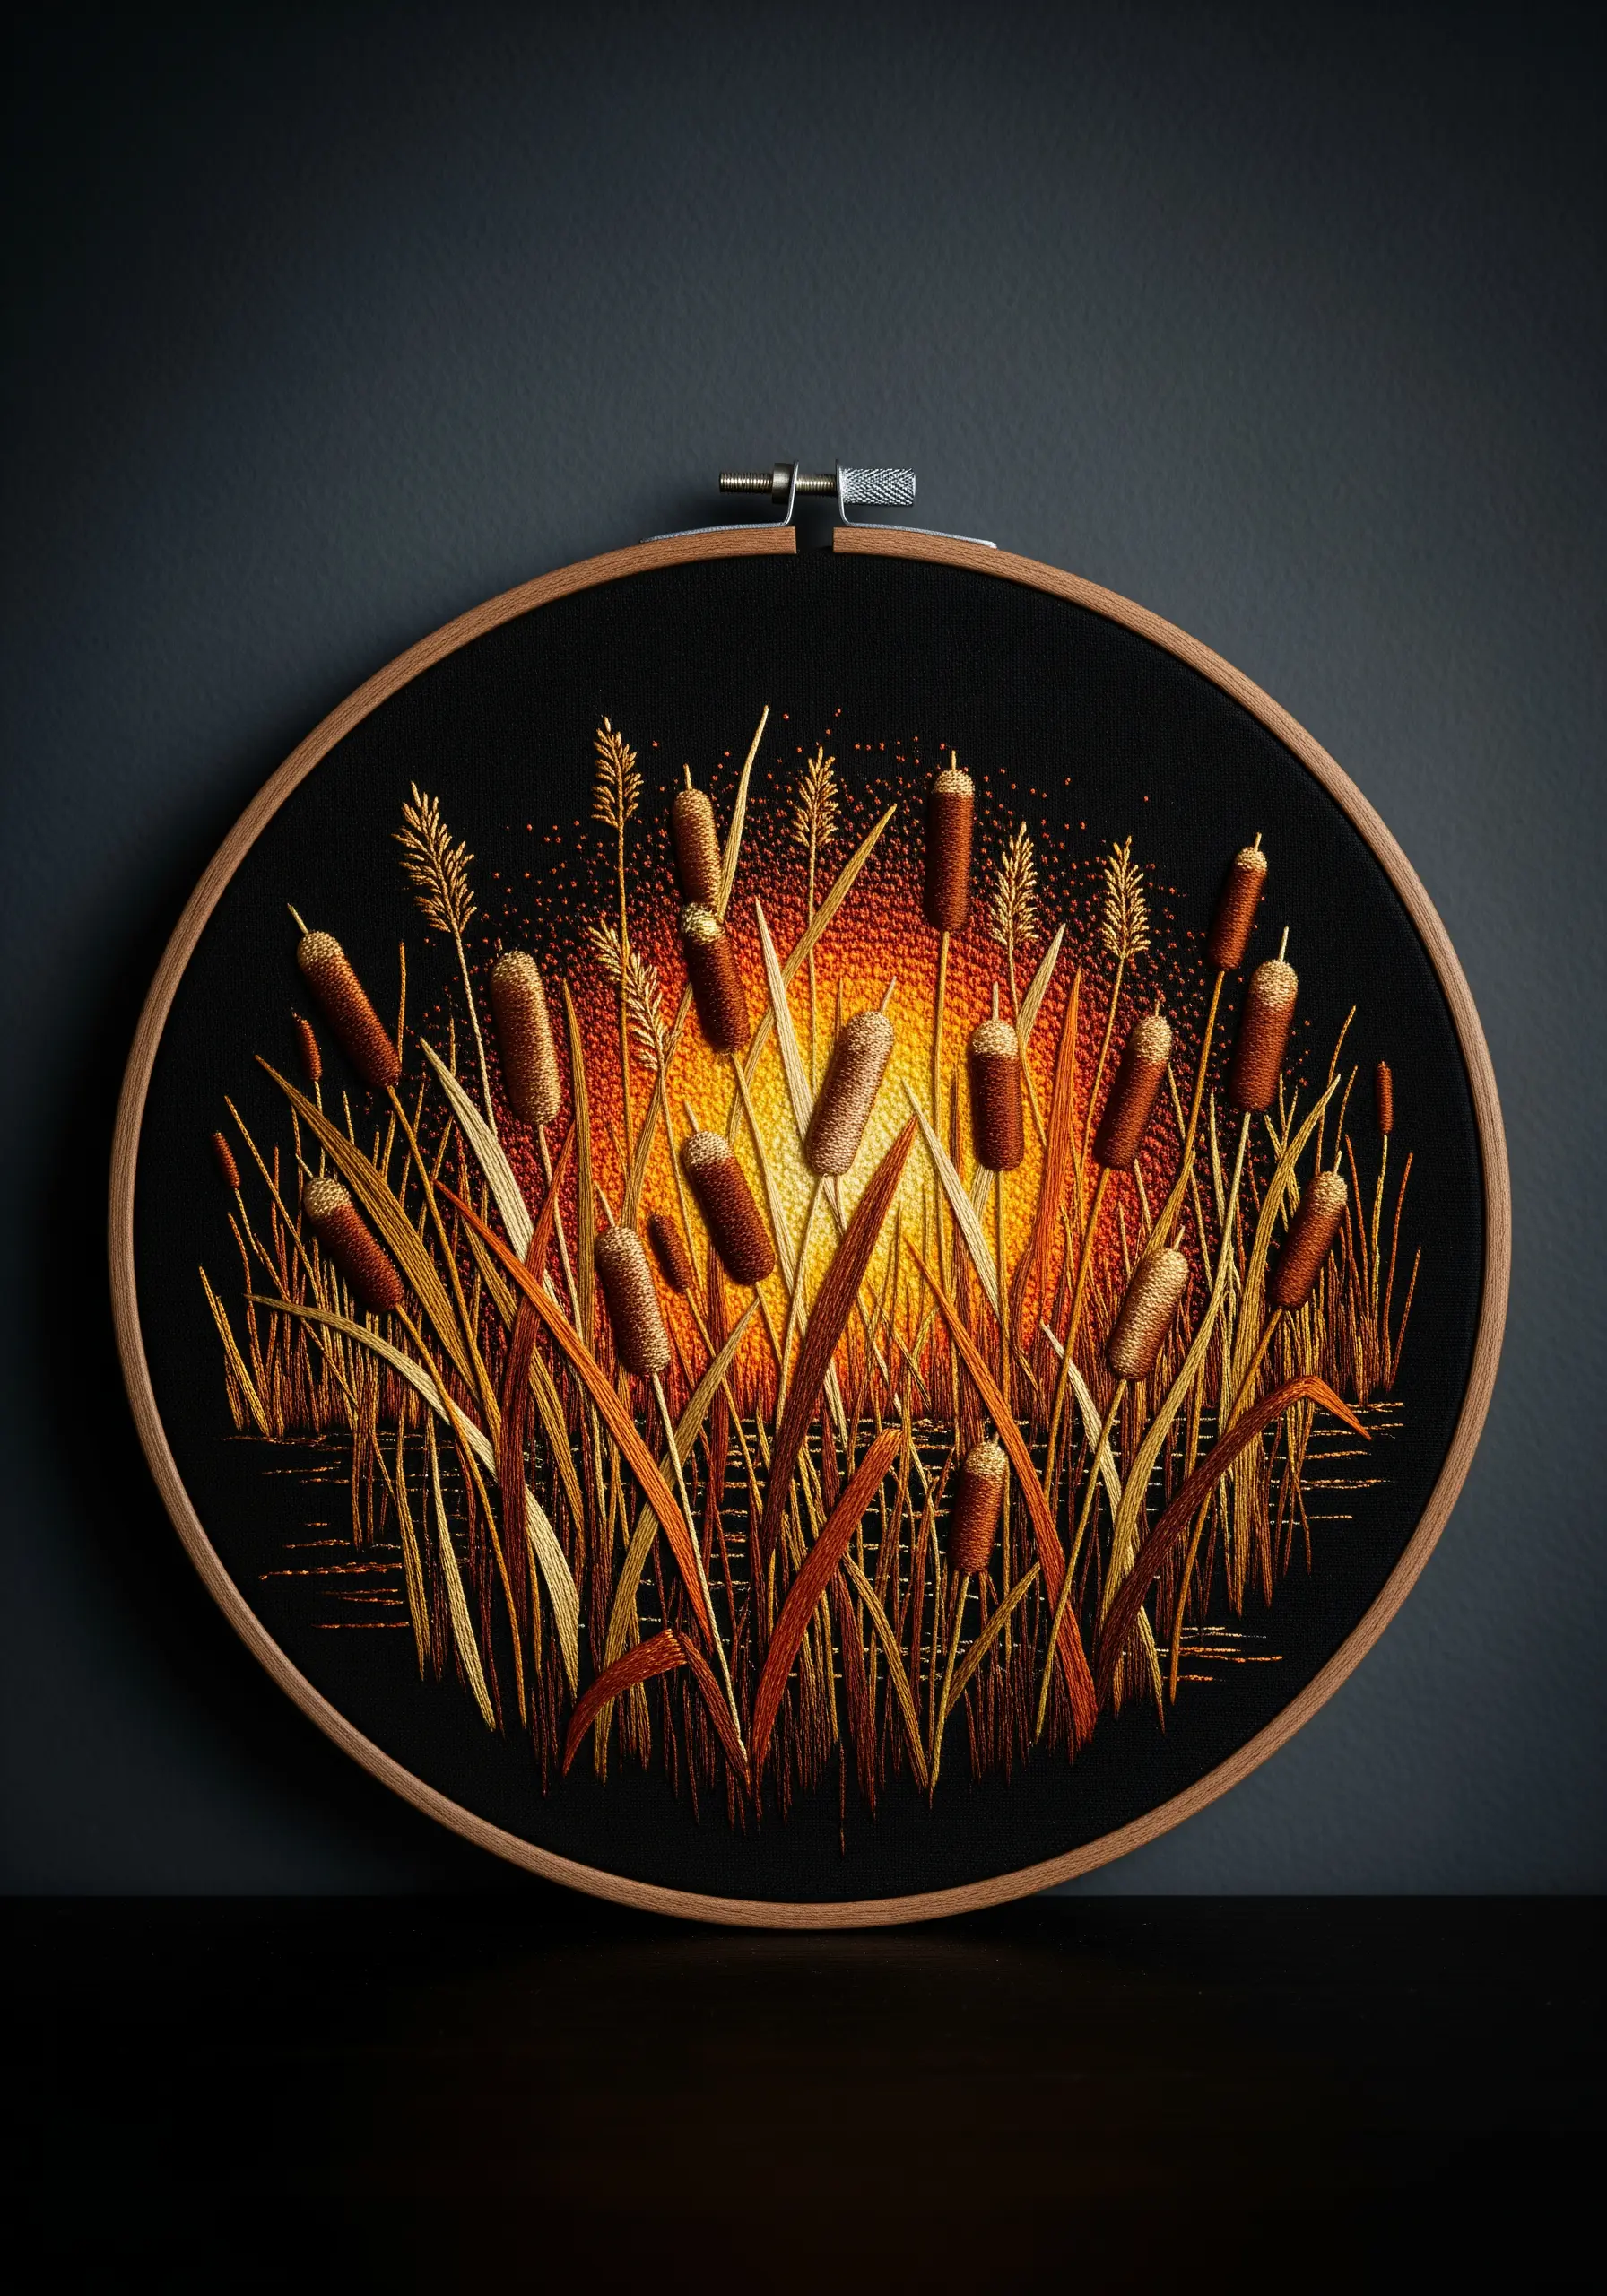
To achieve a glowing sunset effect on dark fabric, choose four to five shades of thread ranging from deep orange to pale yellow.
Work from the outside in, using long and short stitches to seamlessly blend each color into the next, creating a soft gradient.
Use the lightest yellow for the center and keep your stitches dense to create a solid orb of light.
Add a final touch by scattering tiny seed stitches in the lightest yellow around the sun’s edge—this creates the illusion of diffused, hazy light against the dark reeds.
This technique works best on black or navy linen, where the contrast makes the colors truly radiate.
4. Imply Depth with Varied Thread Weight
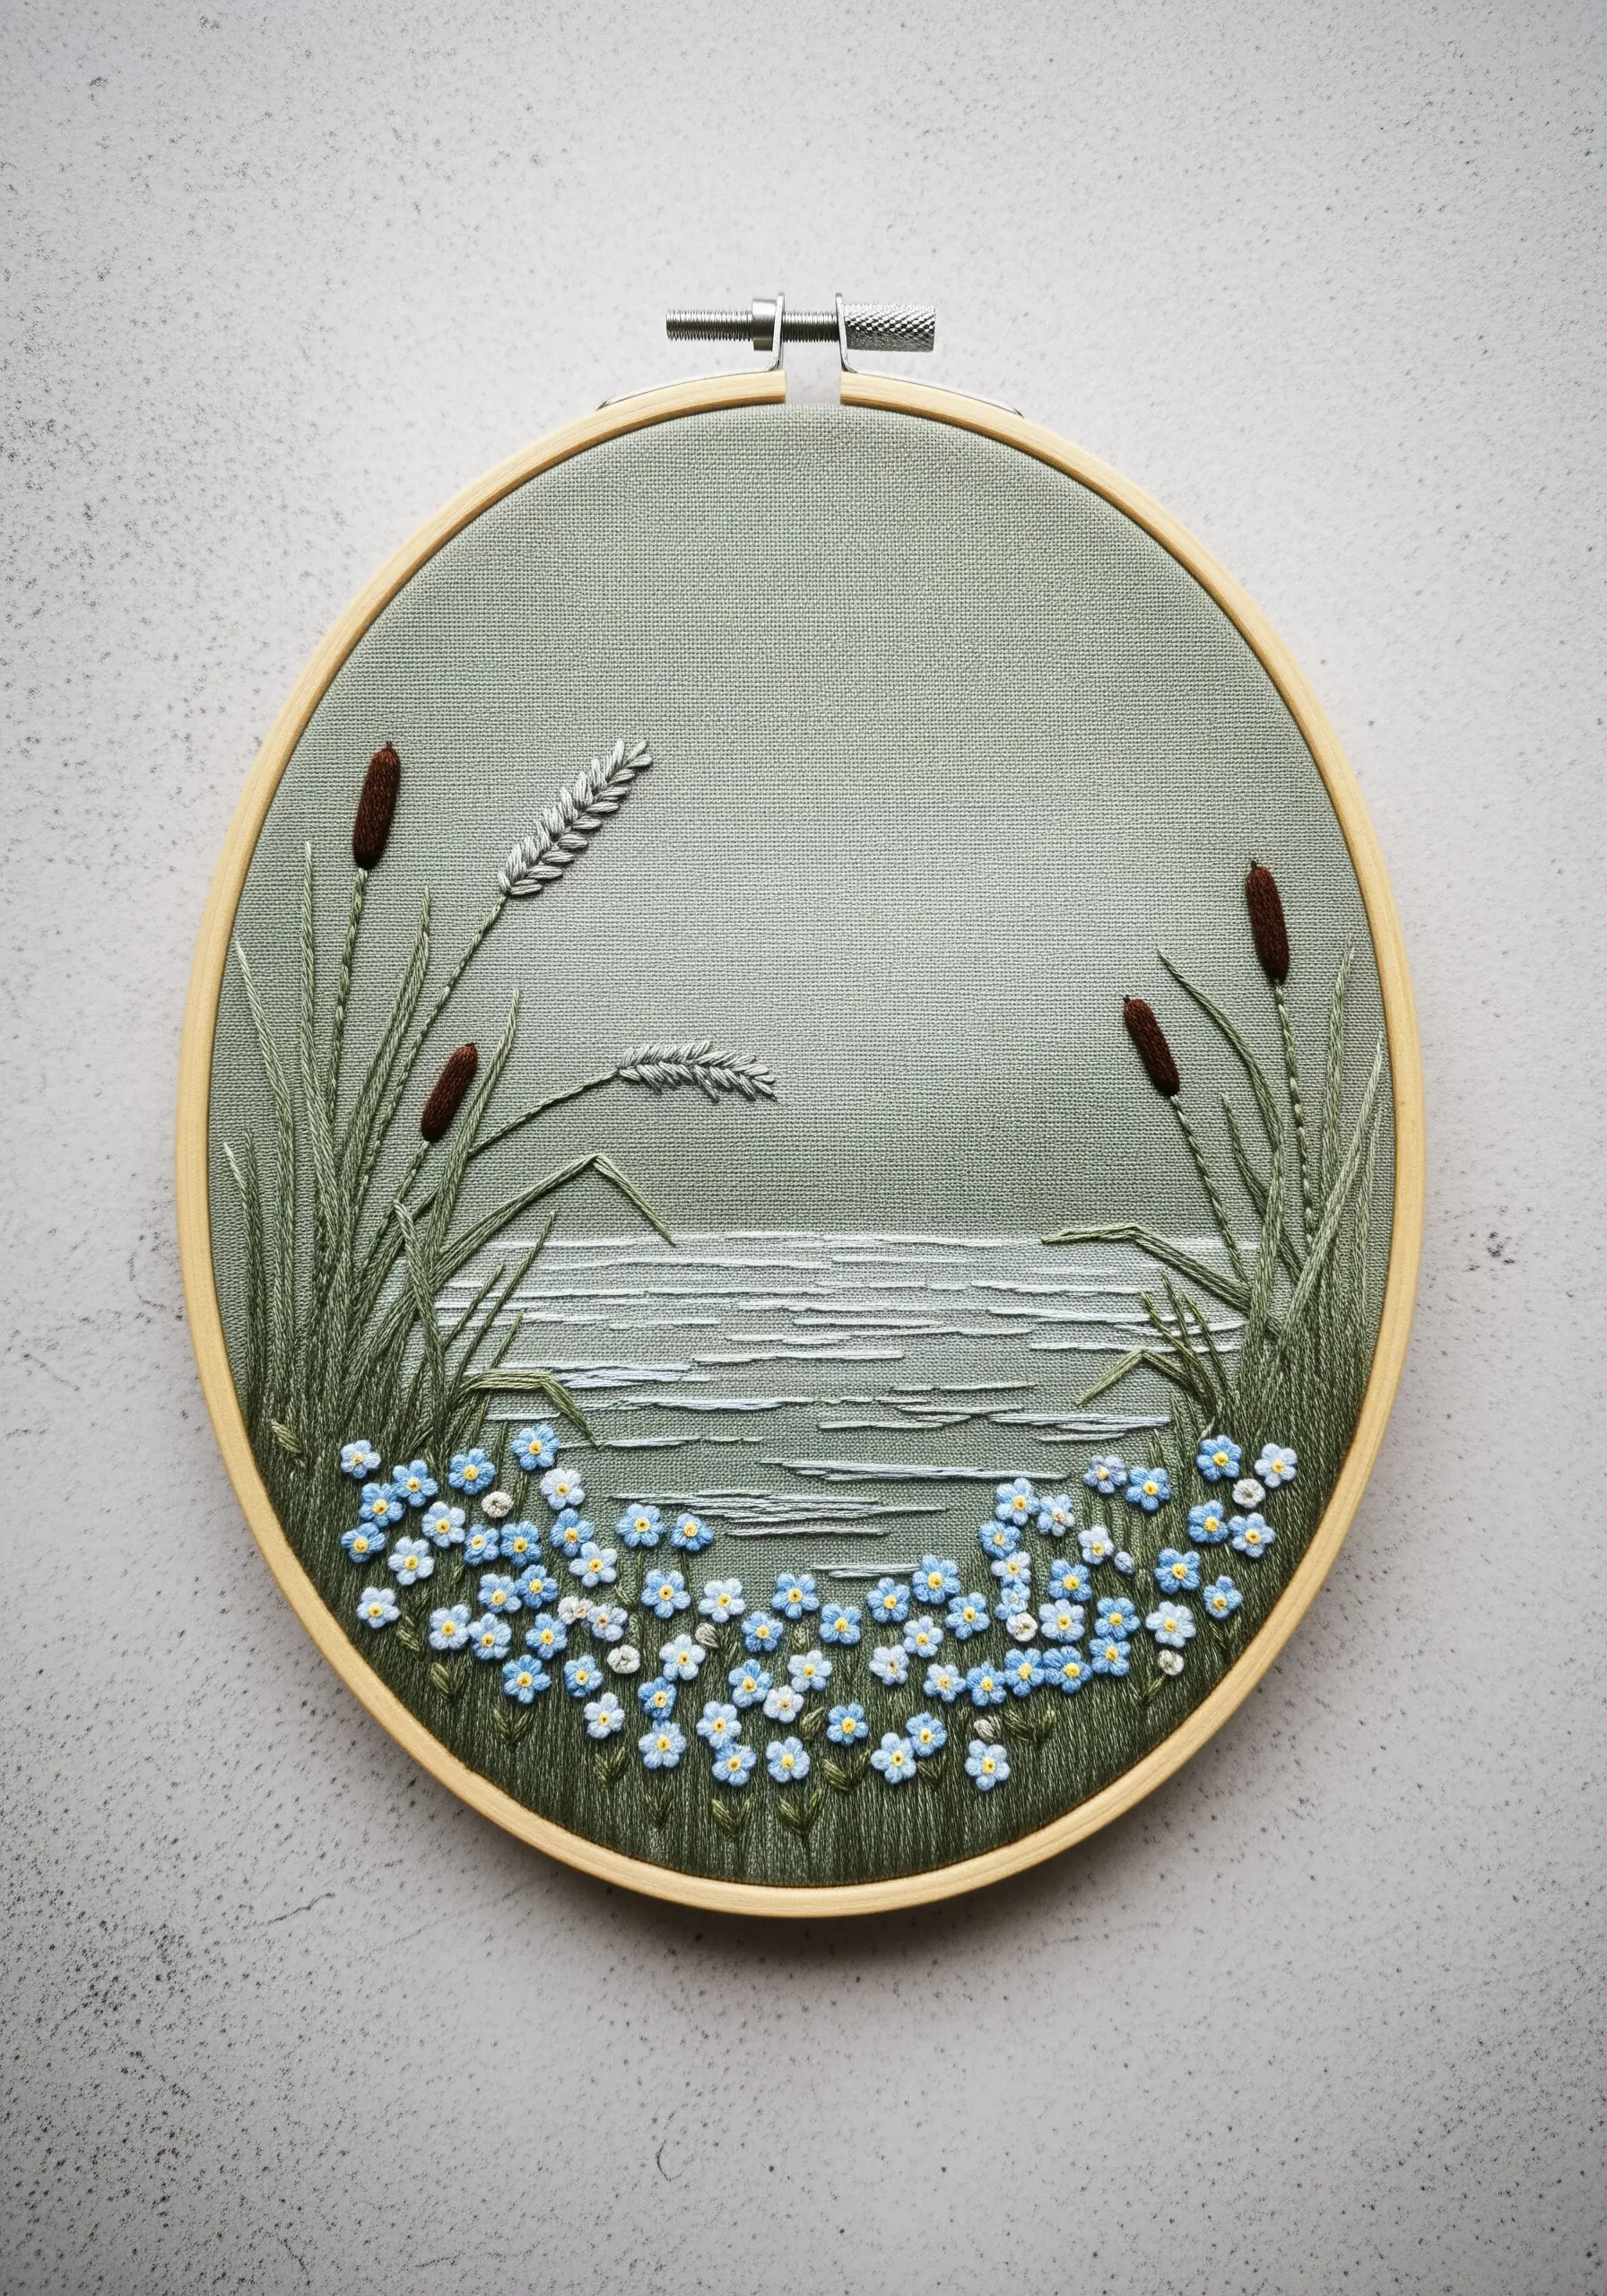
Create a sense of atmospheric perspective in your landscape by adjusting the number of floss strands you use.
For the distant water, use a single strand of white or light grey thread for the highlights; this makes it recede visually.
Use two or three strands for the mid-ground reeds, giving them more substance.
Finally, bring the foreground into sharp focus by stitching the forget-me-nots with four strands and adding crisp French knot centers.
This subtle shift in thread weight is a simple yet powerful tool for creating realistic depth in your composition.
5. Stitch Dynamic Movement in Water
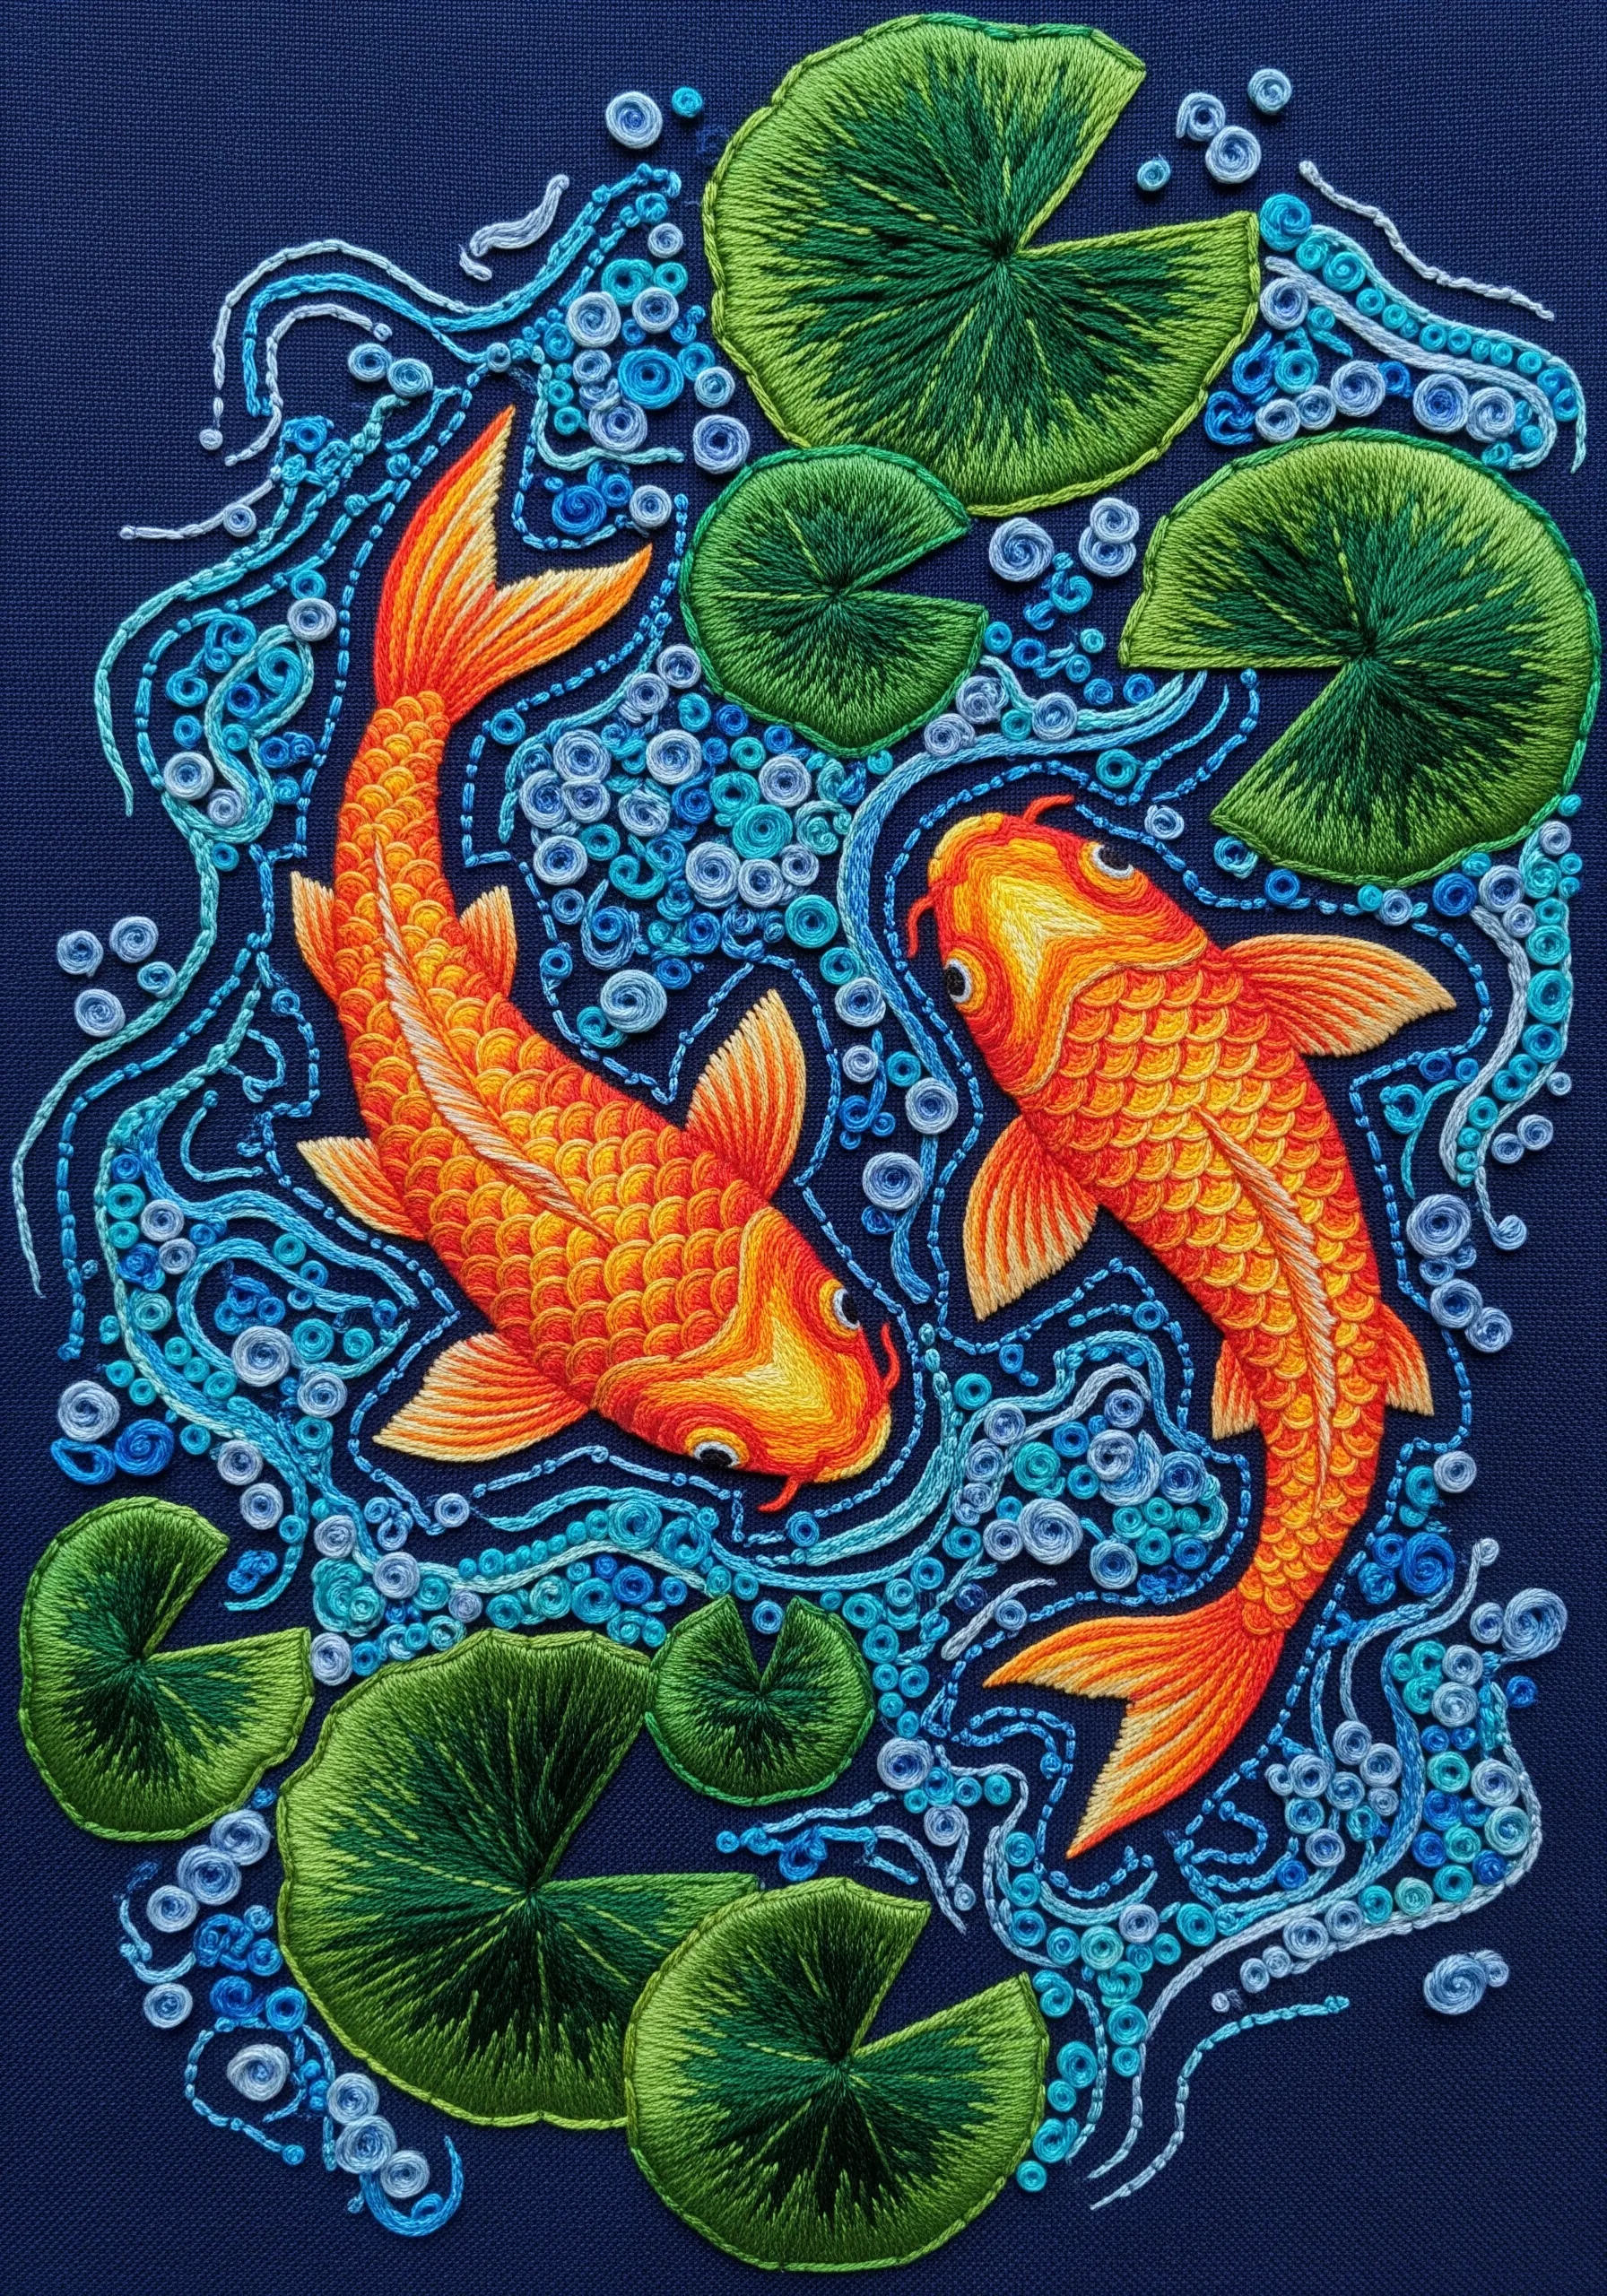
Bring your water scenes to life by focusing on texture and directional stitching.
For the koi fish, orient your satin stitches to follow the direction of the scales, which creates a natural, shimmering effect as the light hits the thread.
Instead of flatly filling the water, use a playful mix of French knots, bullion knots, and swirling stem stitch outlines in shades of blue and turquoise.
This varied texture suggests bubbles and currents, giving the entire piece a sense of energy and fluid motion that a simple satin stitch fill could never achieve.
6. Master Realistic Reflections with Mirrored Stitching
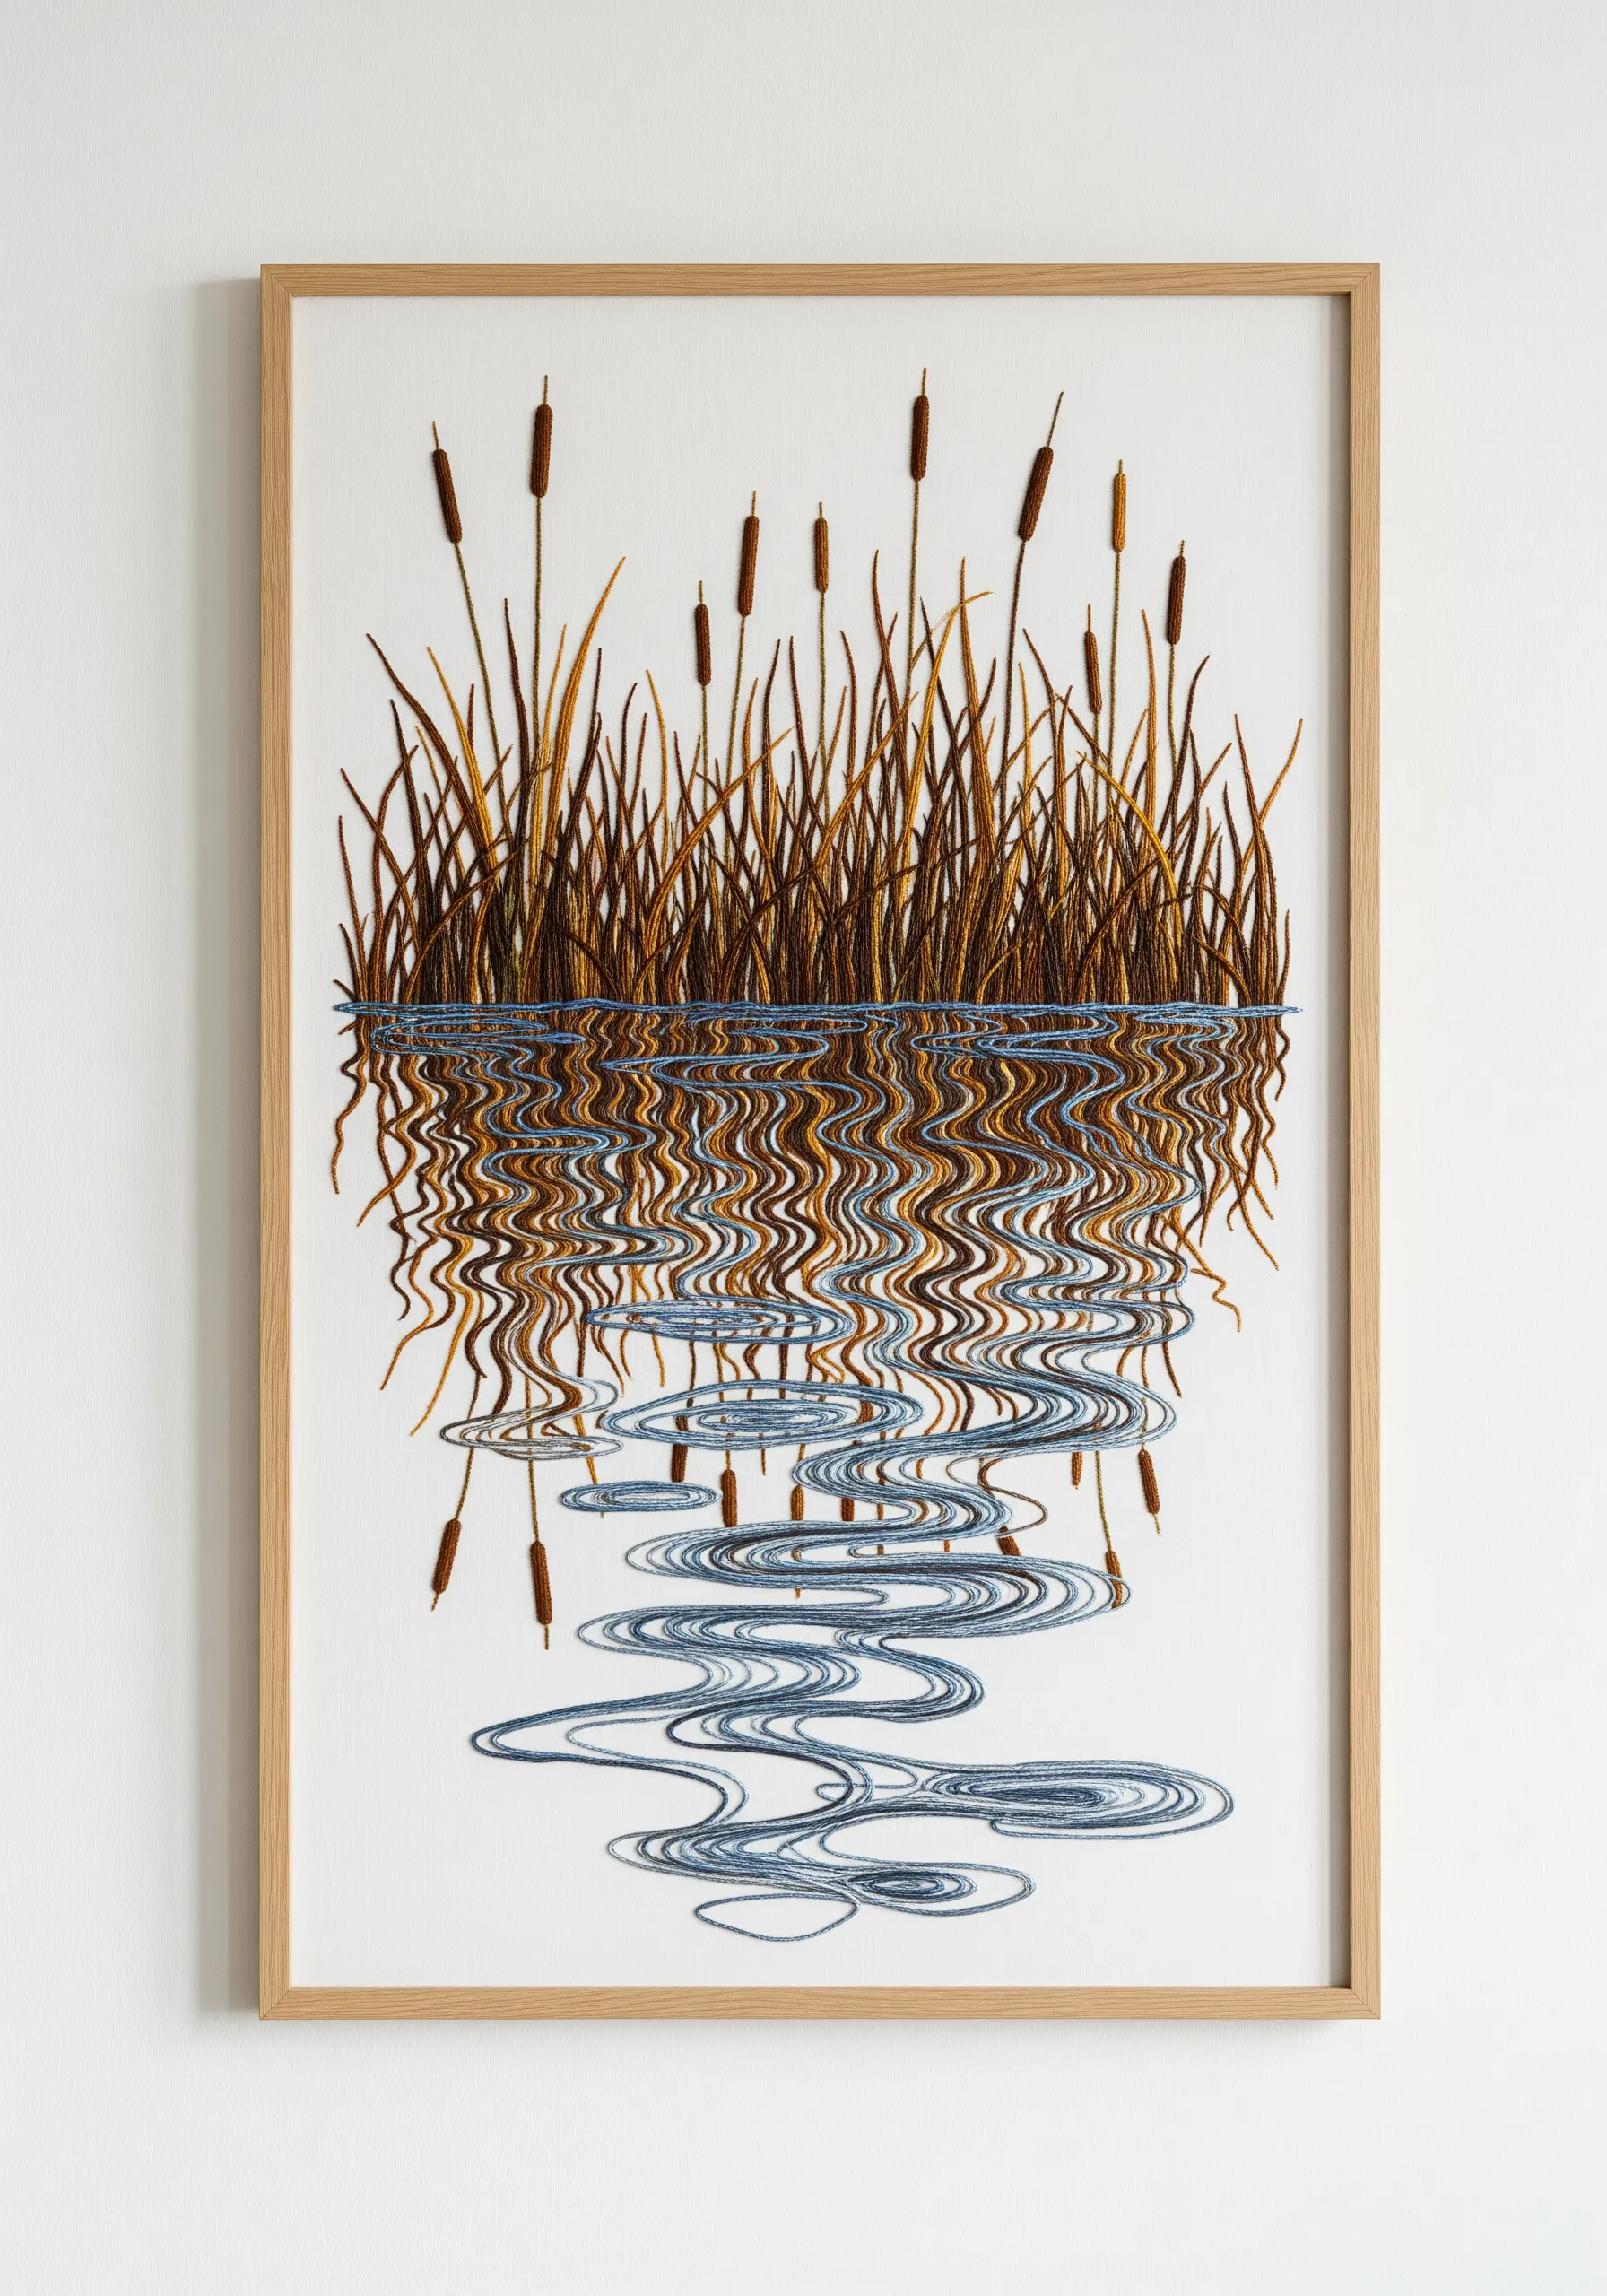
To create a convincing water reflection, think of the waterline as a mirror.
Stitch the reeds above the water first, paying attention to their colors and shapes.
Below the waterline, replicate those shapes upside down, but interrupt the stitches with wavy horizontal lines of blue and grey thread.
Slightly blend the colors of the reeds with the water’s colors in the reflection. This distortion is key to making the effect believable.
Presenting this work in a simple wooden frame turns your stitch-work into a modern framed embroidery design with a sophisticated, artistic feel.
7. Achieve Clean Lines with a Whipped Backstitch
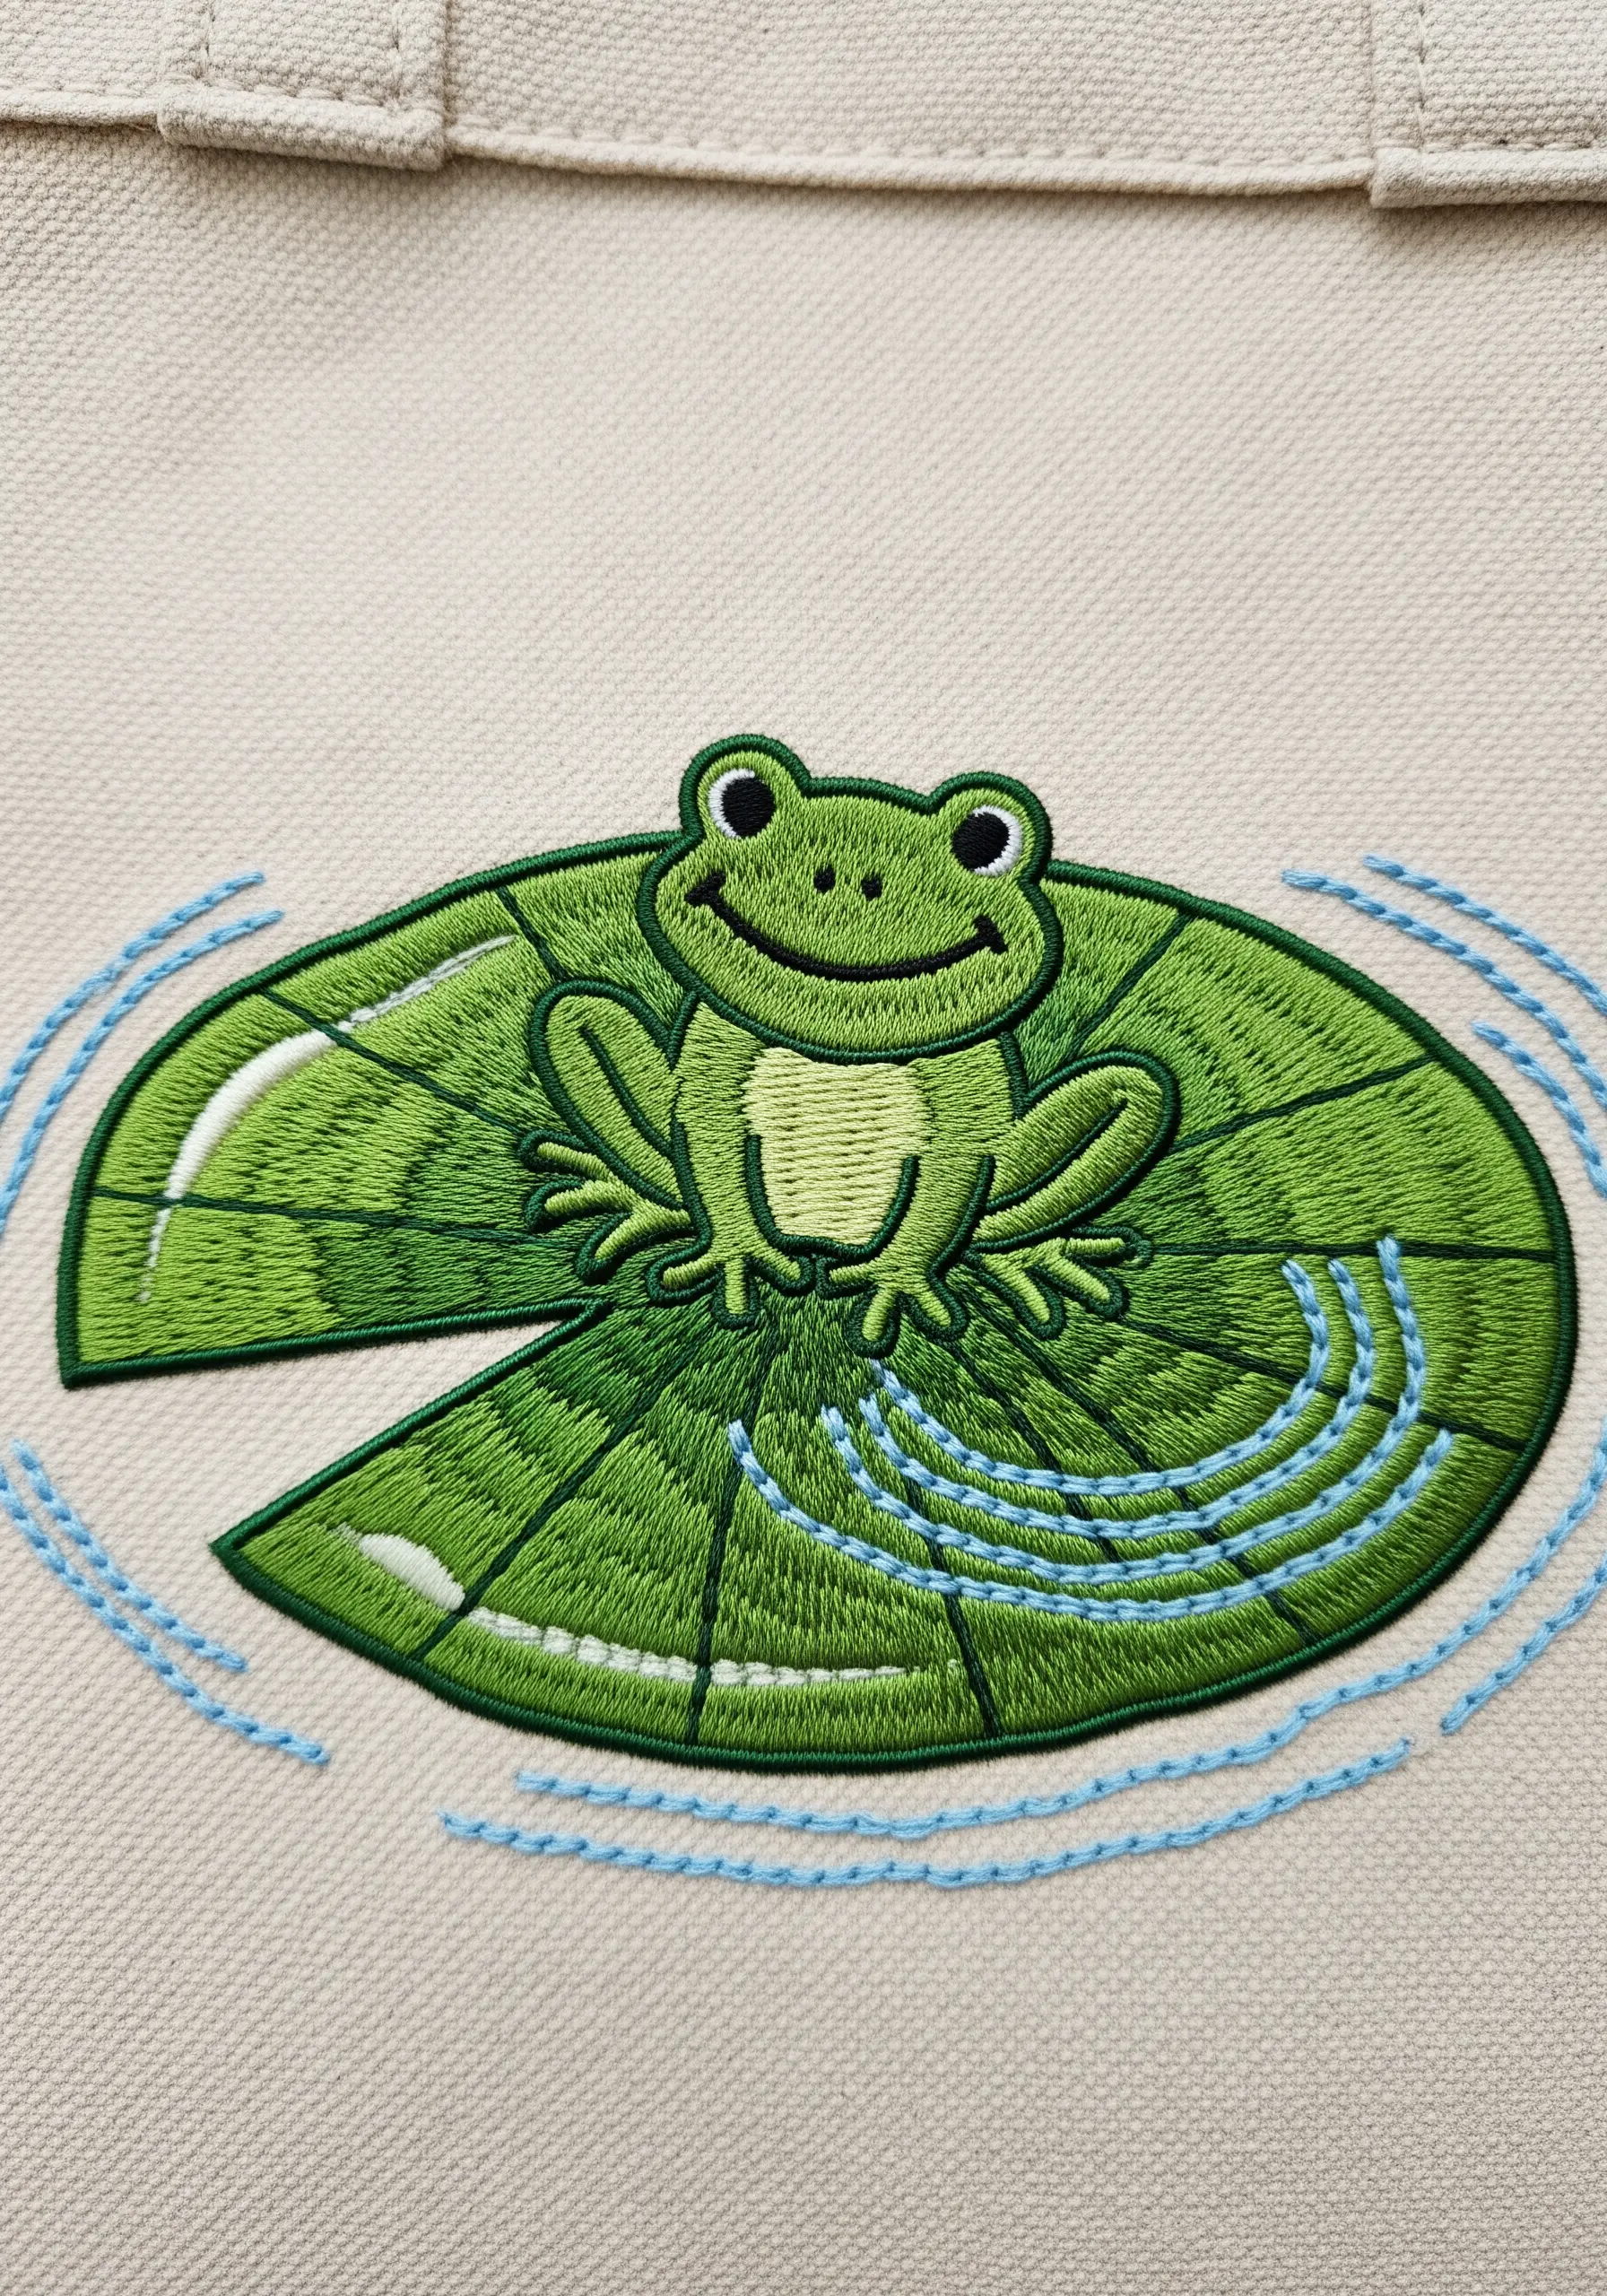
For a clean, graphic look similar to machine embroidery, a perfectly executed outline is essential.
Start by creating a standard backstitch outline for your entire design—the frog, the lily pad, and the water ripples.
Then, take a new thread of the same color and ‘whip’ it around each backstitch without piercing the fabric.
This technique covers the gaps in a standard backstitch, creating a smooth, solid, and slightly raised line that looks incredibly professional and sharp.
Fill the sections with a tidy satin stitch laid at a consistent angle for a polished finish.
8. Use High Contrast for Minimalist Drama
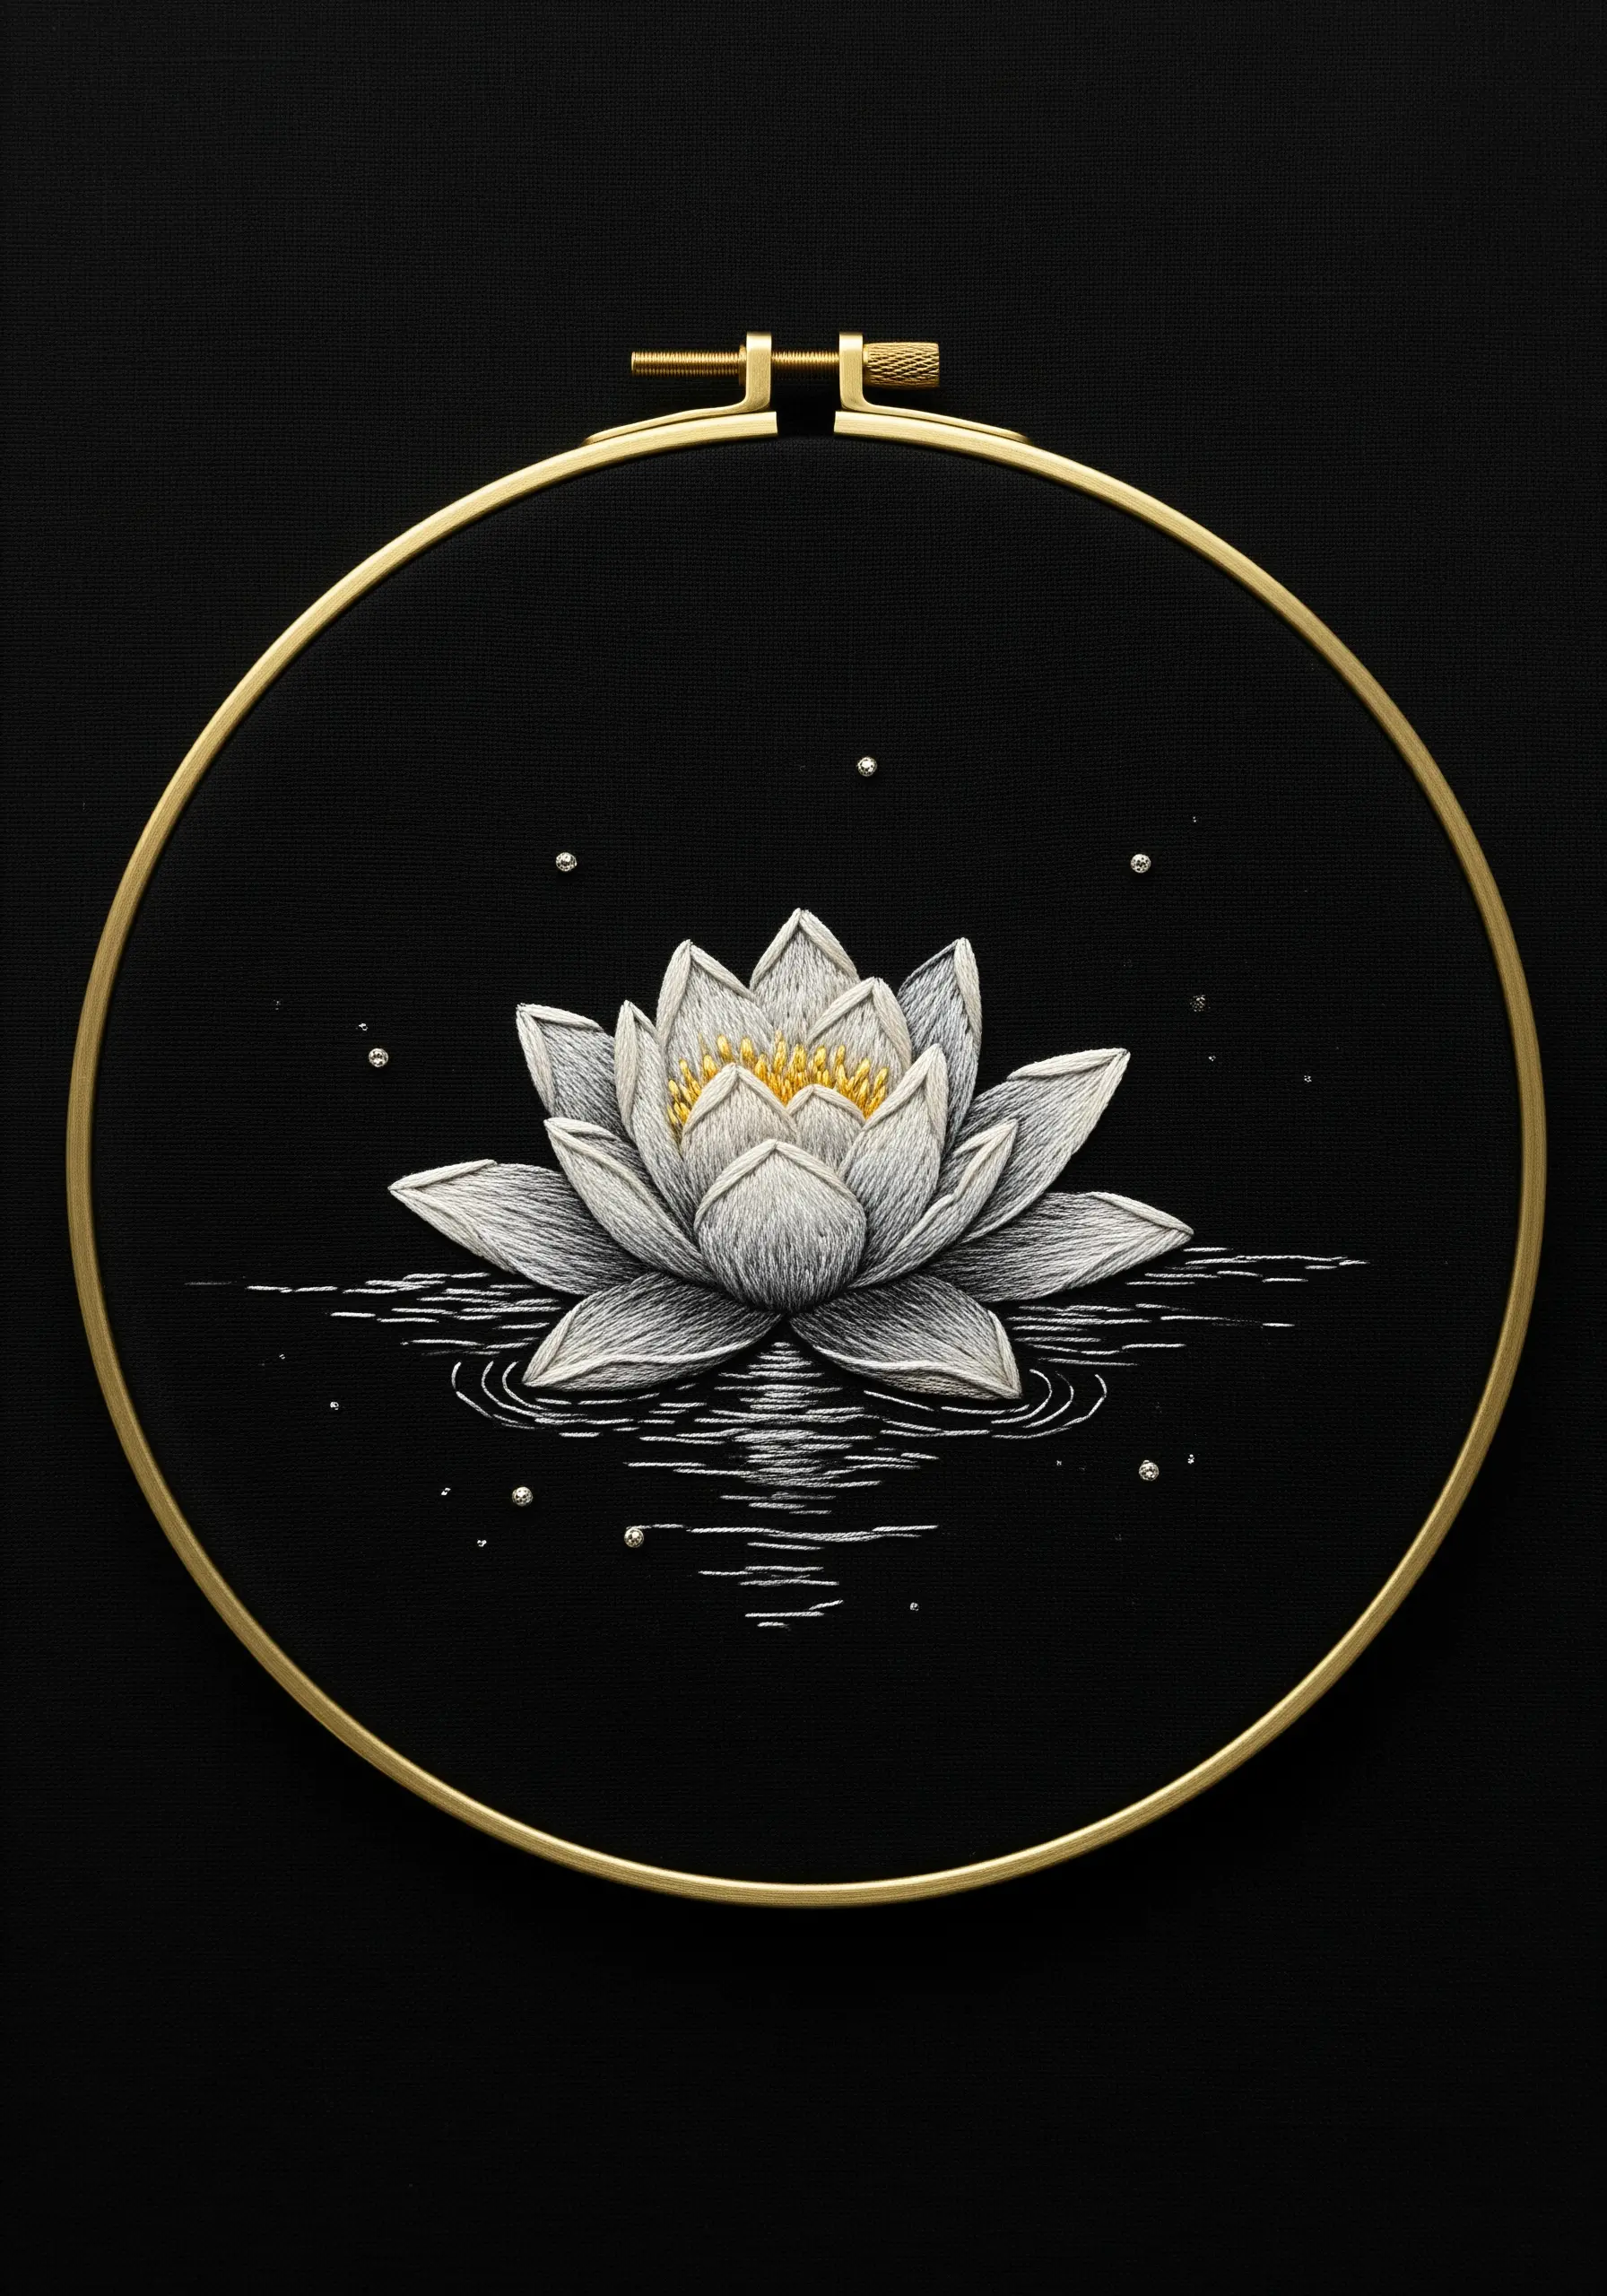
Create a striking piece by pairing a monochrome palette with a dark background.
On black fabric, use shades of white and grey to stitch your water lily, relying on long-and-short stitch to create subtle shadows and highlights on the petals.
A single pop of color—like the pale yellow French knots in the center—draws the eye and adds a focal point.
Finish with a few sparsely placed silver seed stitches or French knots to represent starlight or moisture, enhancing the quiet, dramatic mood.
This is a perfect example of how minimalist embroidery projects that double as gifts can feel incredibly luxurious.
9. Design a Balanced Botanical Wreath
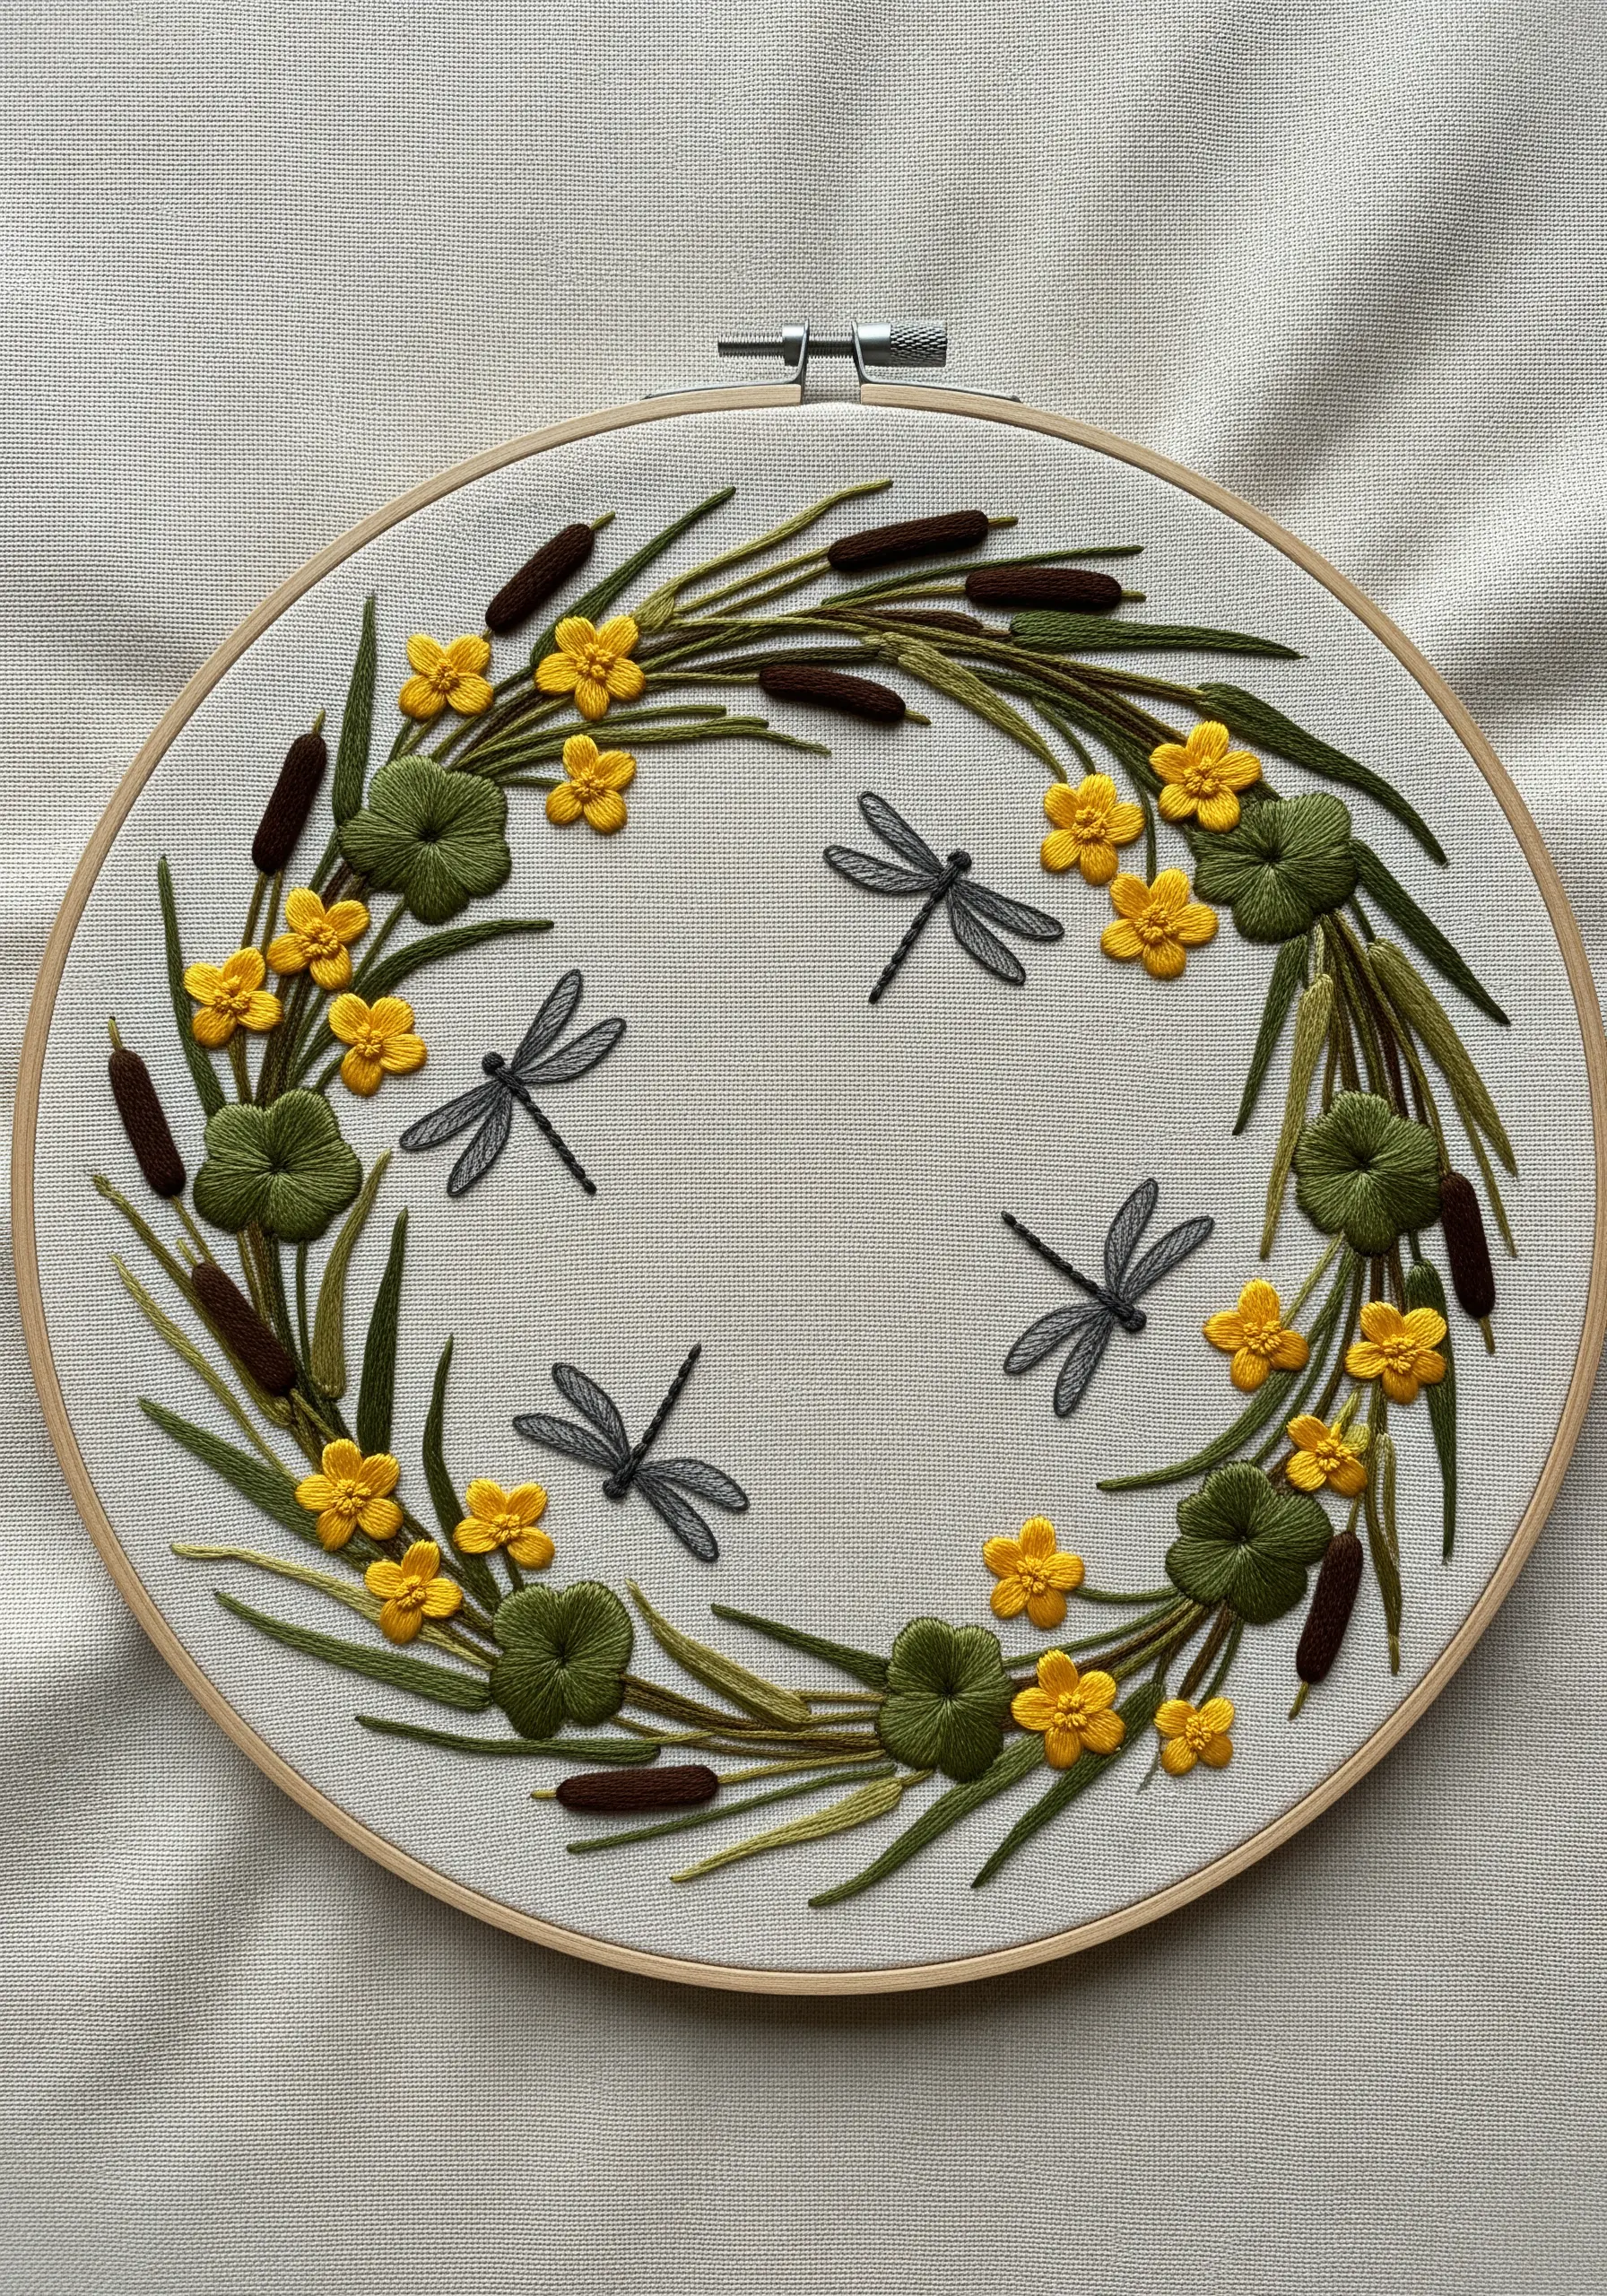
When creating a wreath, balance is more important than perfect symmetry.
Alternate your key elements, such as the cattails and lily pads, around the circle to create a natural rhythm.
Introduce a secondary element, like the small yellow flowers, to fill gaps and add pops of color.
Give the lily pads a three-dimensional feel with a padded satin stitch, which makes them stand out from the flatter leaves.
Finally, place your delicate dragonflies in the negative space at the center to draw the eye inward, completing the harmonious composition of your handmade embroidery hoop designs.
10. Amplify a Motif with Beaded Texture
Make a tiny, delicate subject the undeniable focal point by surrounding it with a contrasting texture.
Stitch your dragonfly in the center using just a few simple stitches—a straight stitch for the body and detached chain stitches for the wings.
Then, using a complementary metallic thread, stitch long bugle beads in a spiral or geometric pattern radiating outwards.
The hard, reflective surface of the beads creates a visual frame that draws immediate attention to the soft, matte texture of the embroidered dragonfly in the center.
11. Master Photorealism with Needlepainting
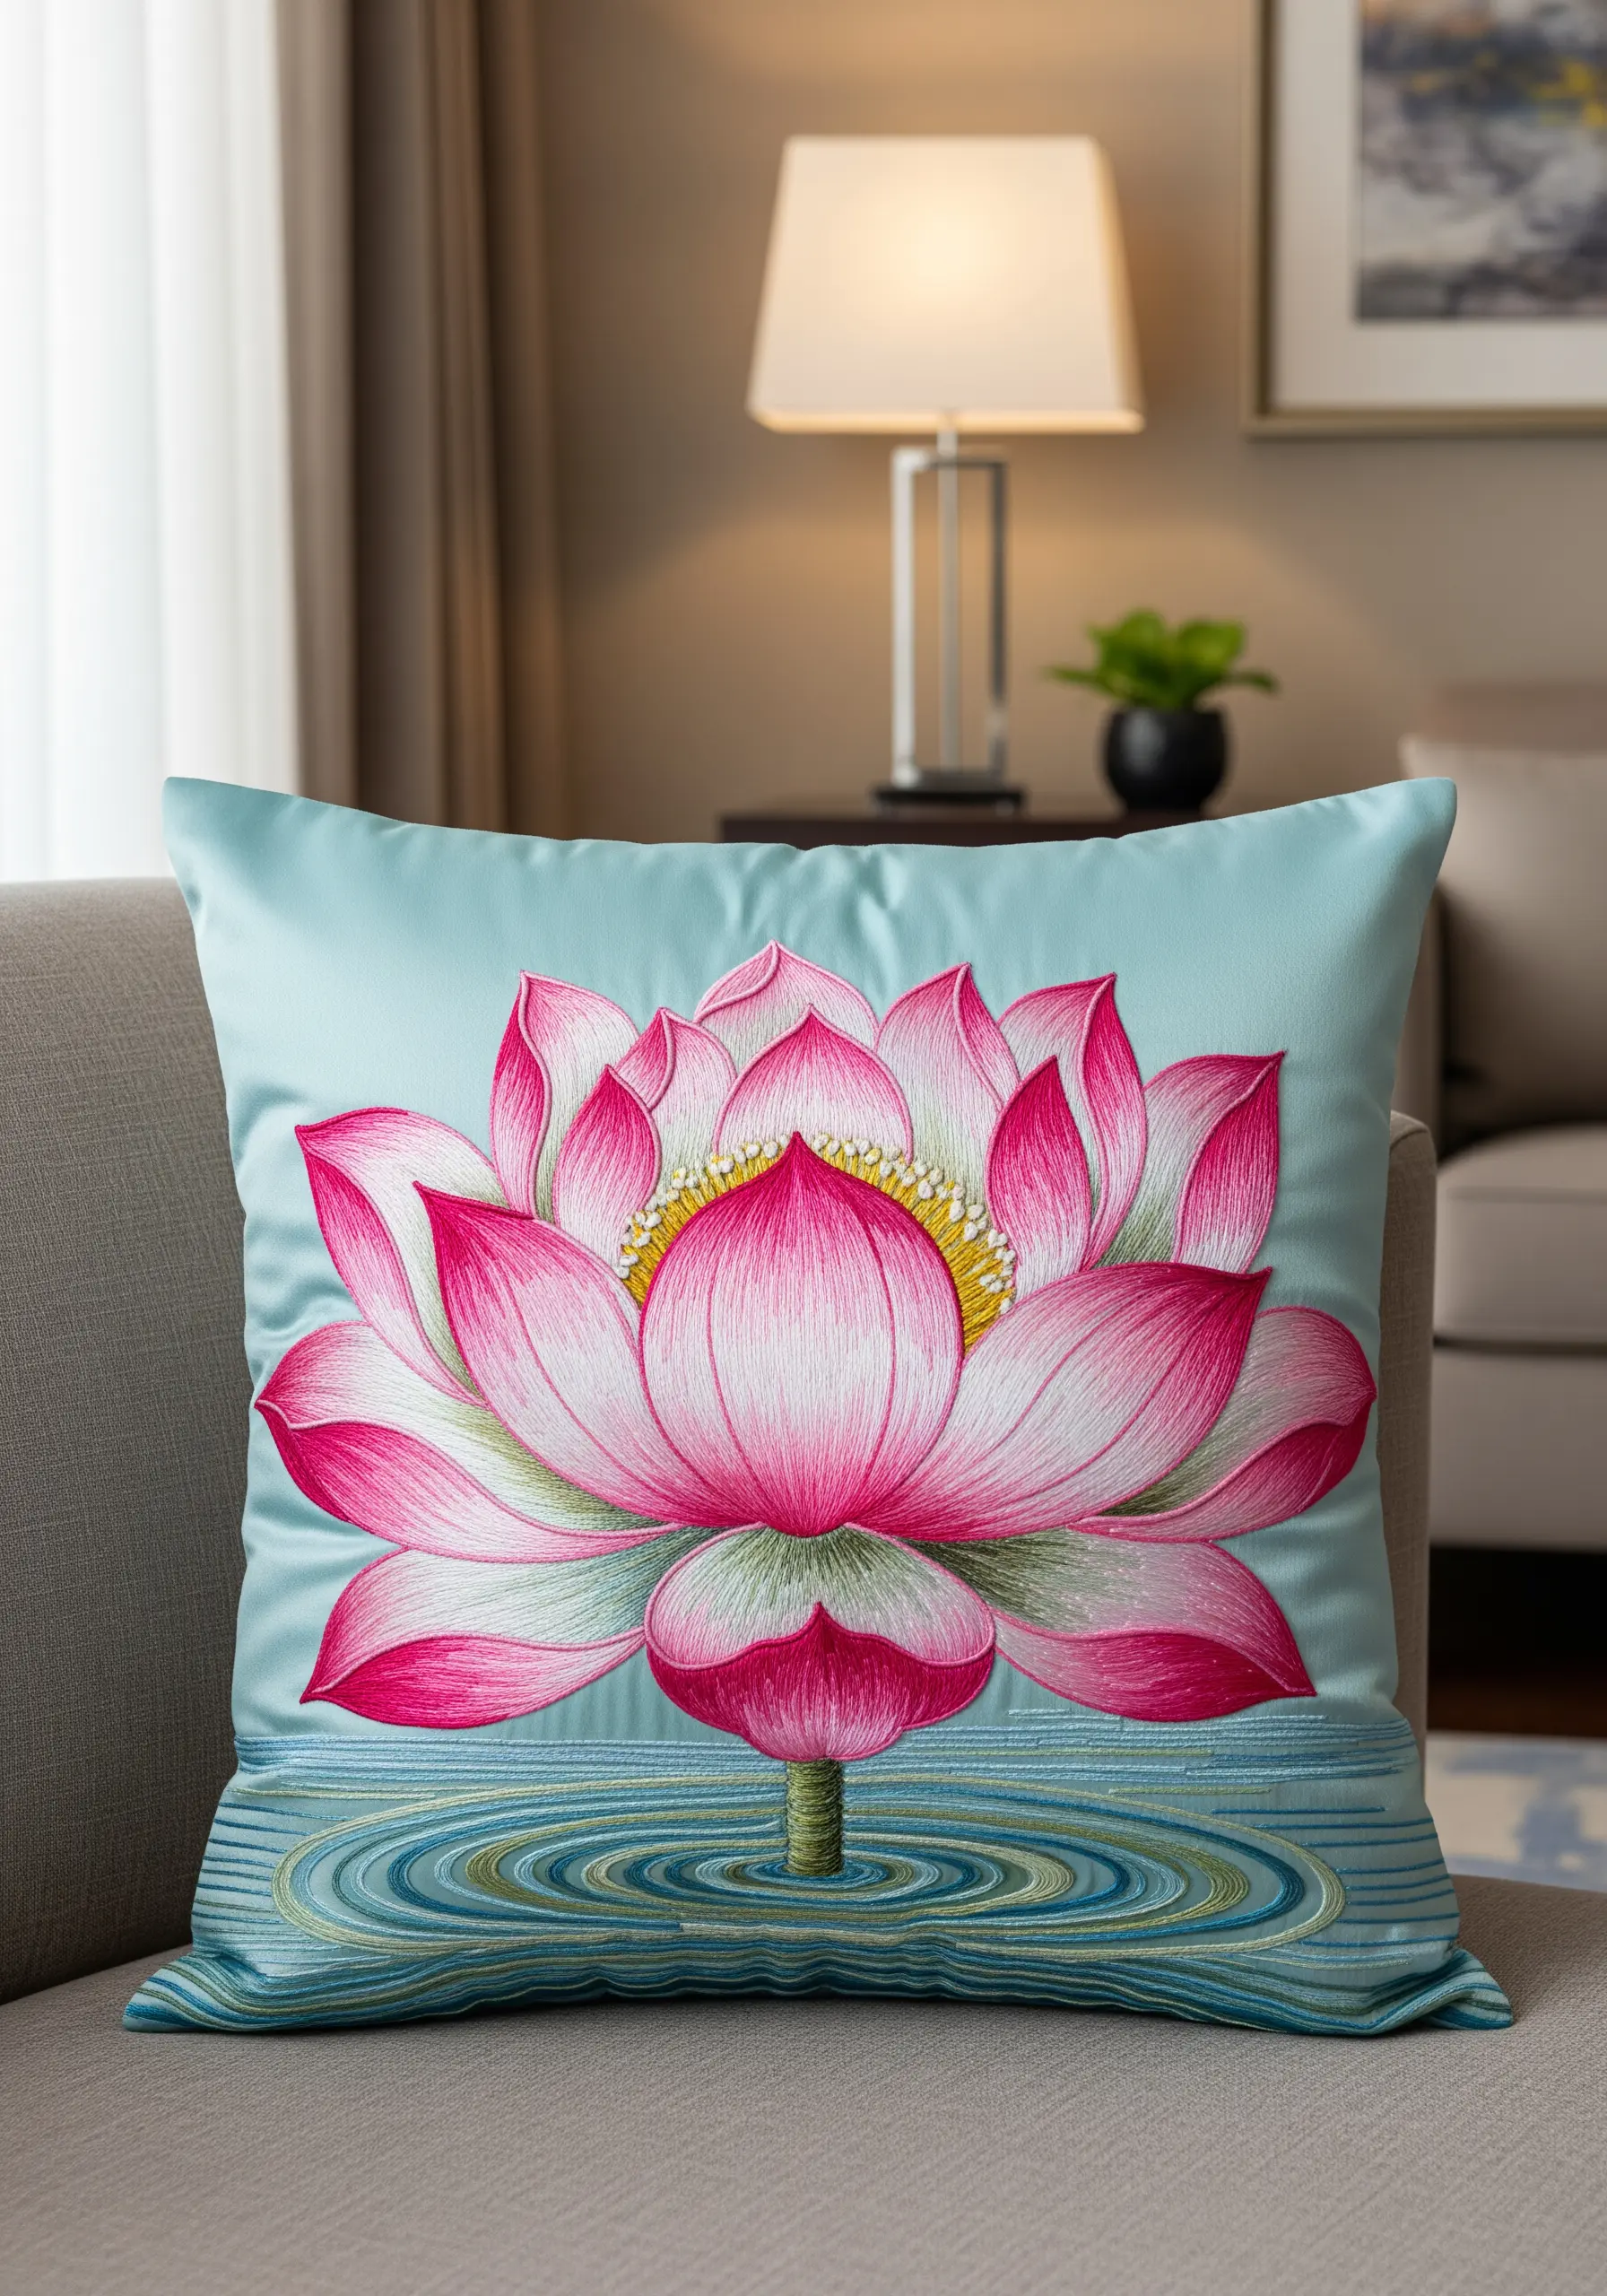
For a painterly, realistic lotus, the long-and-short stitch is your most important tool.
Use a single strand of six-ply floss to maintain fine control over color blending.
Map out your color zones on each petal—darkest at the base, lightest at the tip—and fill them with staggered stitches, blending each shade into the next.
This technique is a patient process, but it eliminates harsh lines and creates the soft, seamless gradients seen in nature, perfect for ombre gradient thread embroidery on luxe fabrics like silk or satin.
12. Incorporate Yarn for Fluffy Textures
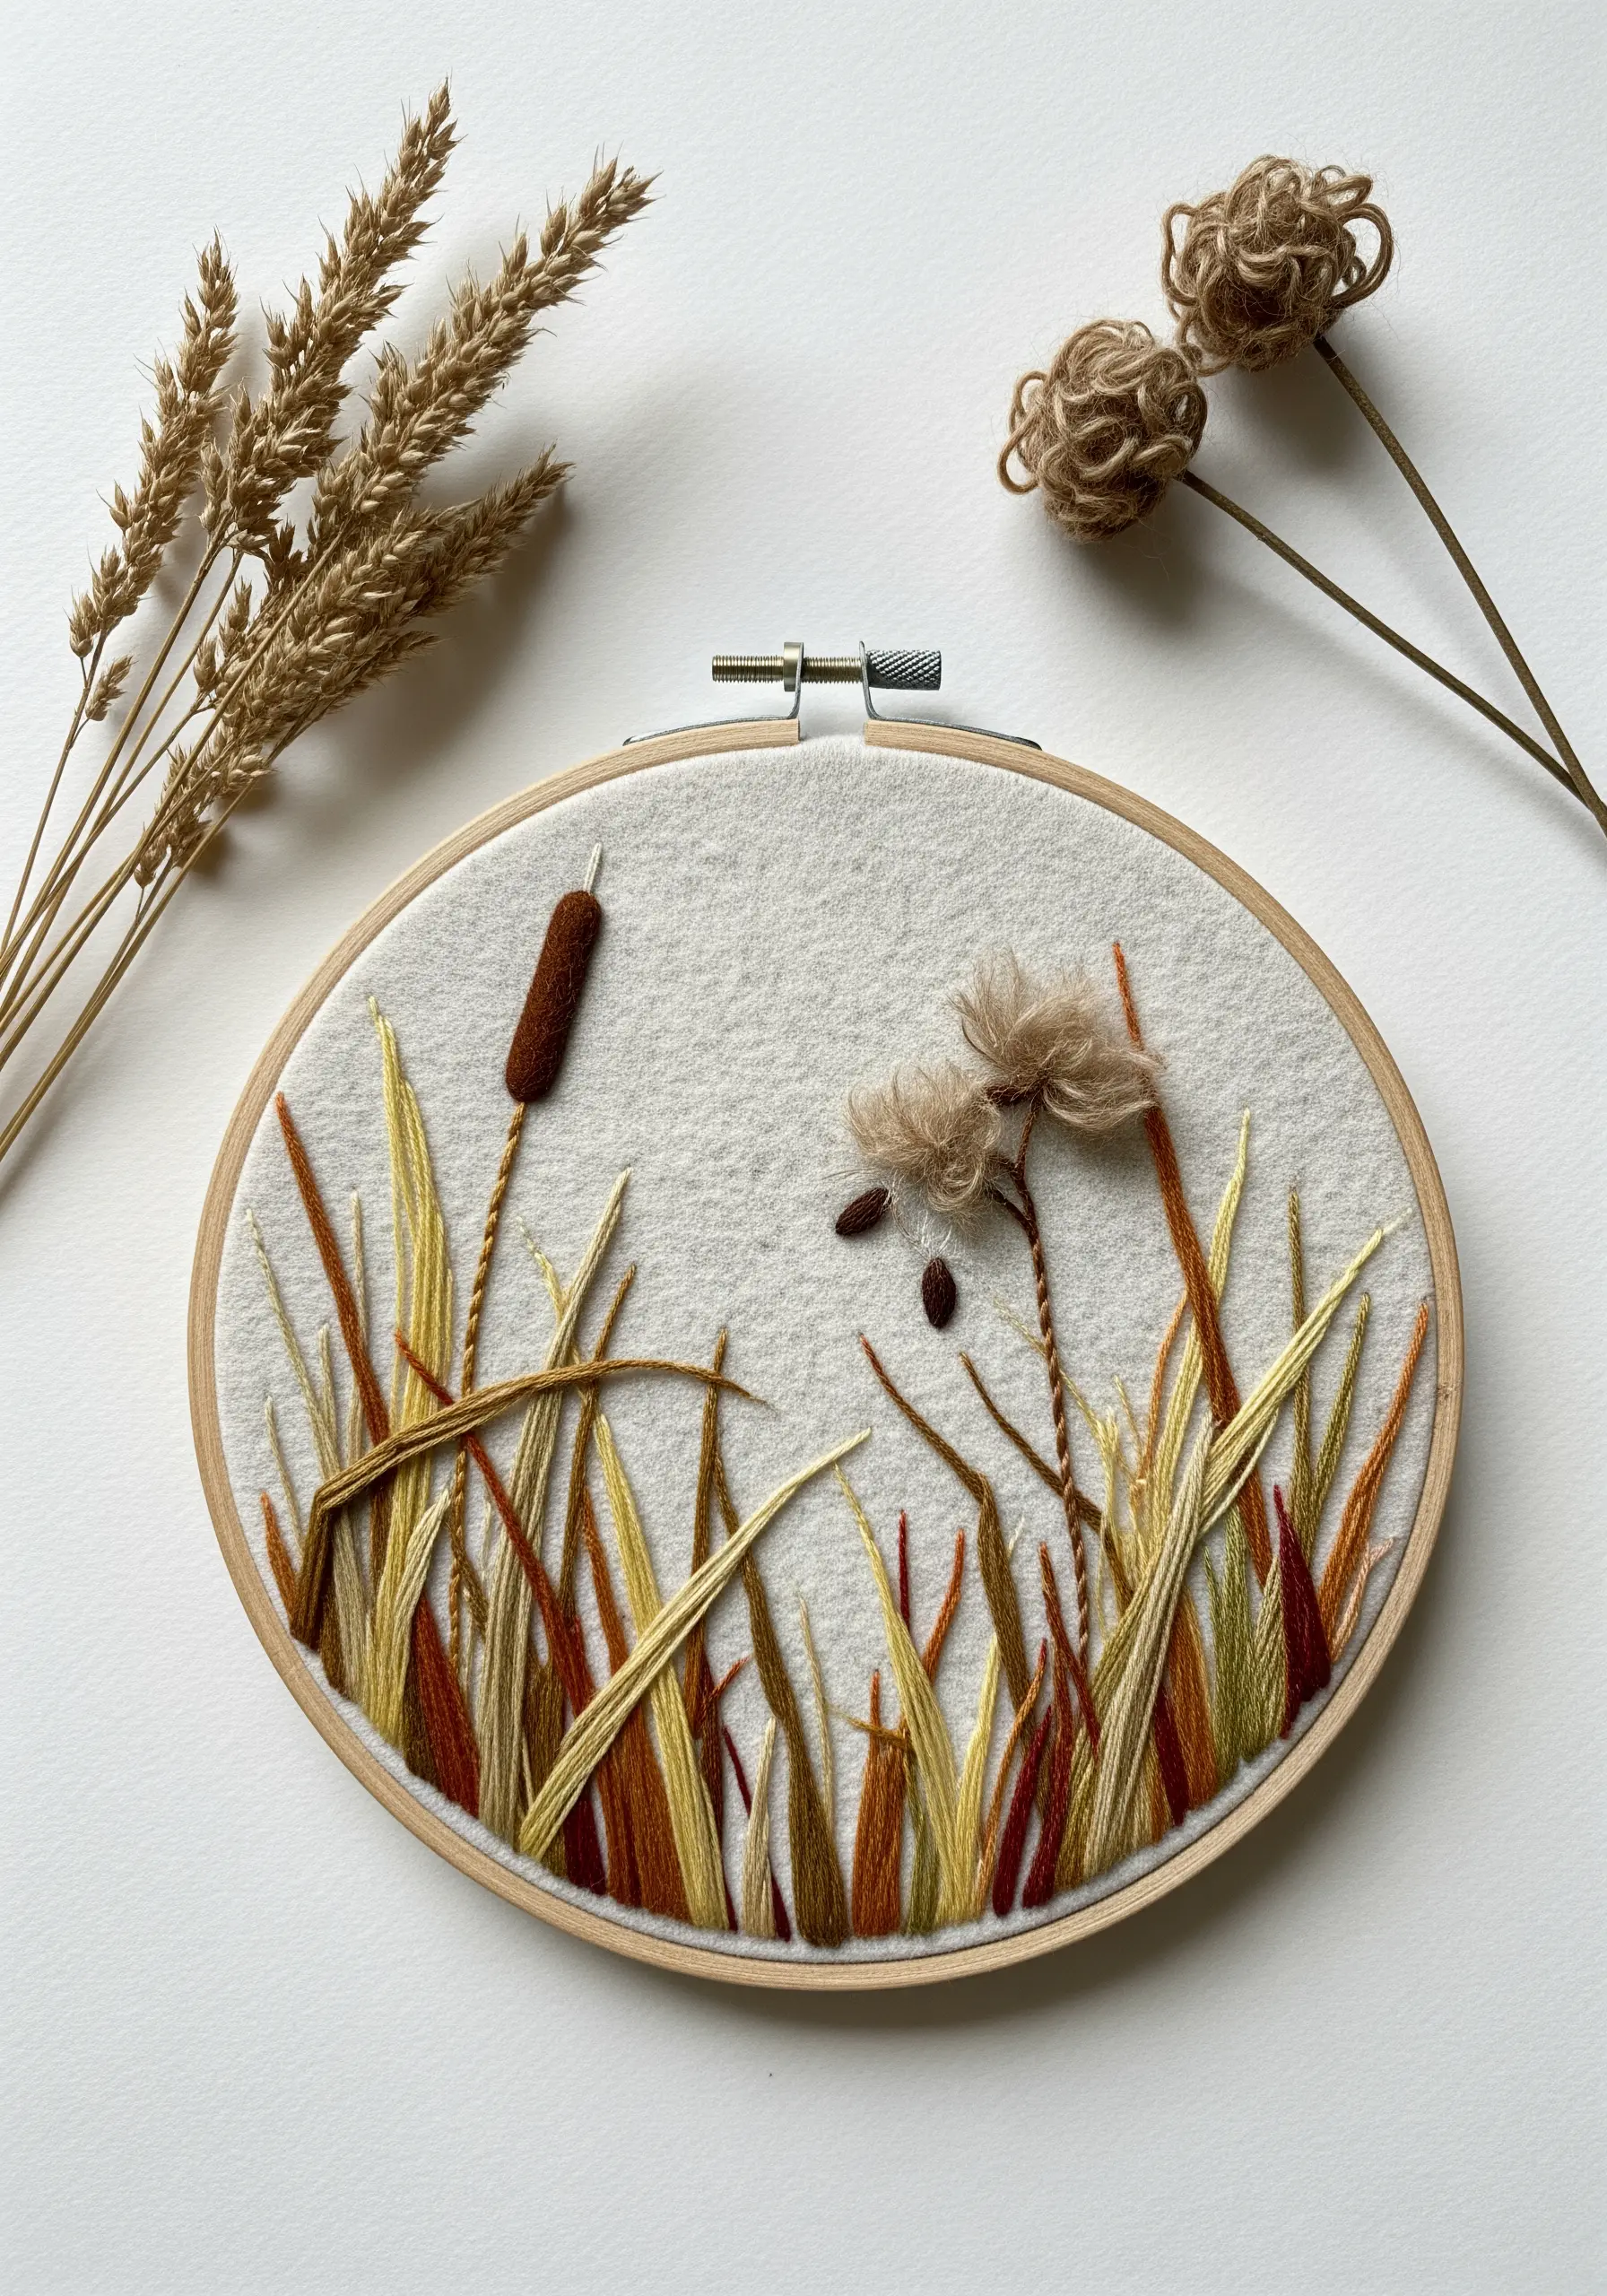
Move beyond standard floss to add surprising and delightful textures to your work.
While the grass stalks can be stitched with traditional six-strand floss, create the fluffy cattail heads or seed pods using a completely different material, like brushed wool yarn.
Use turkey work (ghiordes knot) or simple loops that you can later snip and fluff up with your needle.
This mix of fibers adds a tactile dimension that invites touch and makes your organic texture embroidery designs much more dynamic and interesting.
13. Illustrate Motion with a Beaded Path
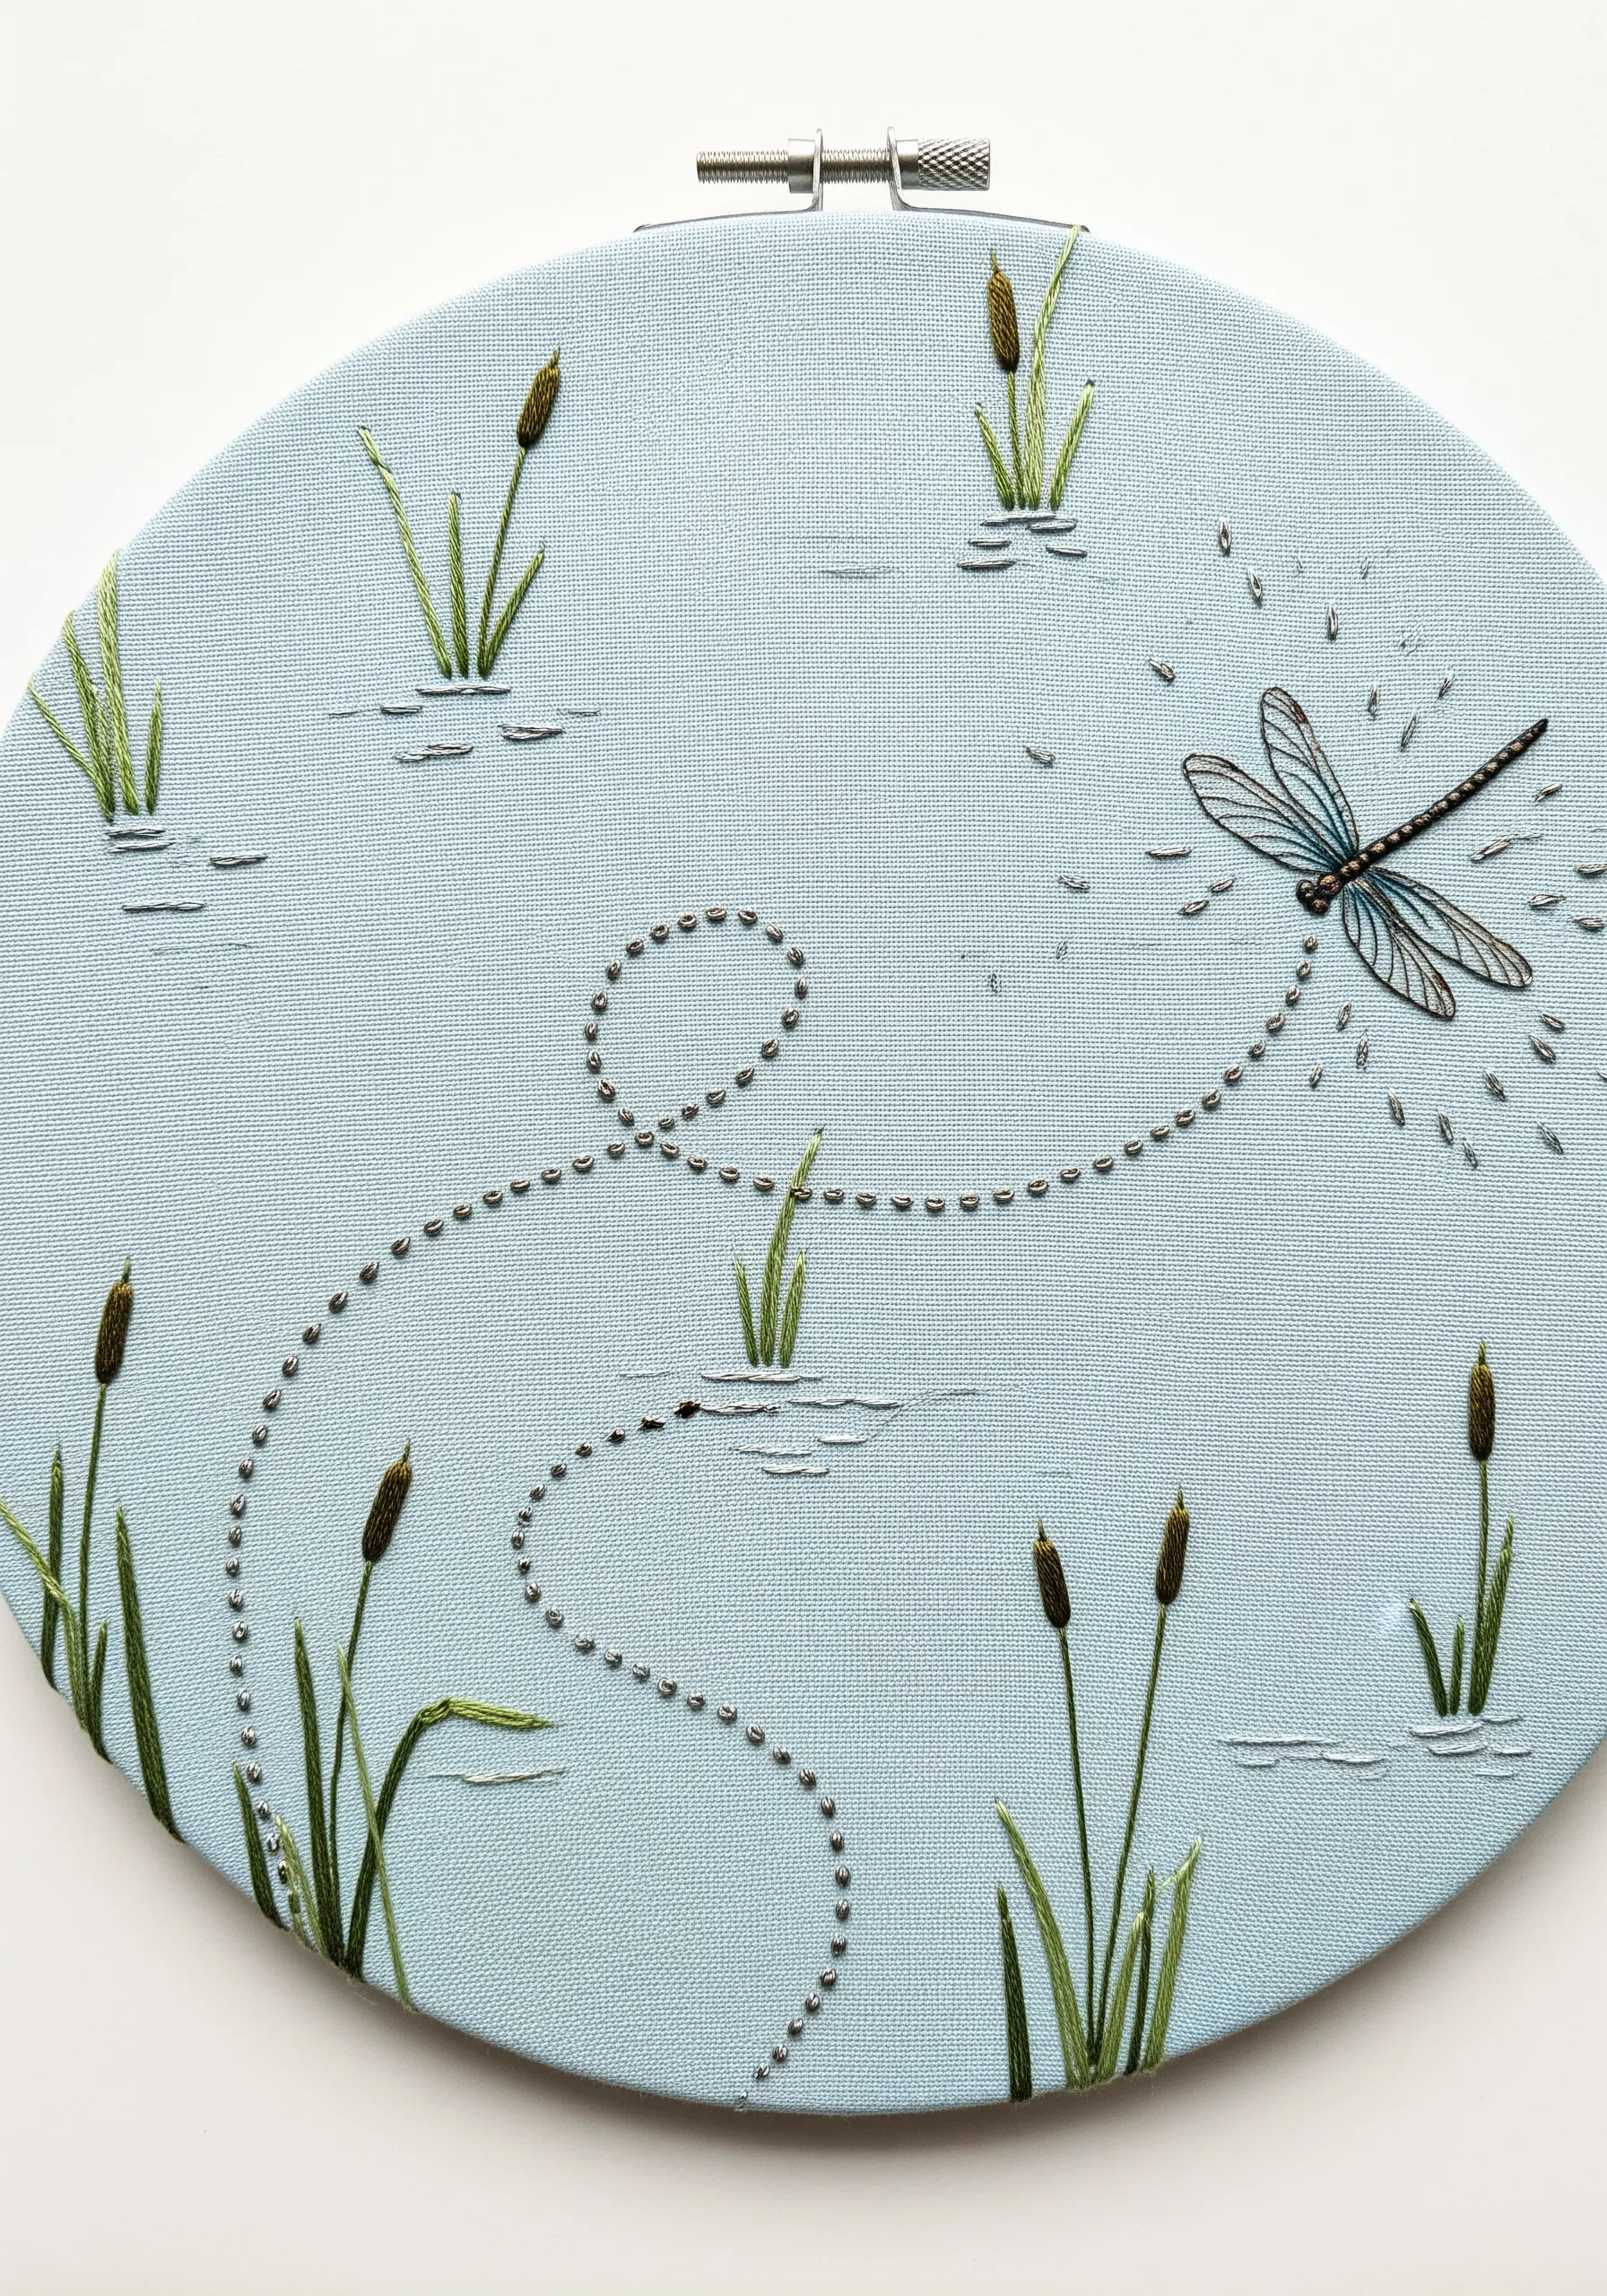
Suggest movement and tell a story in your embroidery without adding complex elements.
After stitching your dragonfly, create its flight path using a trail of tiny seed beads, French knots, or colonial knots.
Create a graceful, looping curve to guide the viewer’s eye through the composition.
By varying the spacing between the beads—placing them closer together on turns and farther apart on straightaways—you can create a subtle illusion of the dragonfly slowing down and speeding up.
14. Capture Detail with Color Blocking
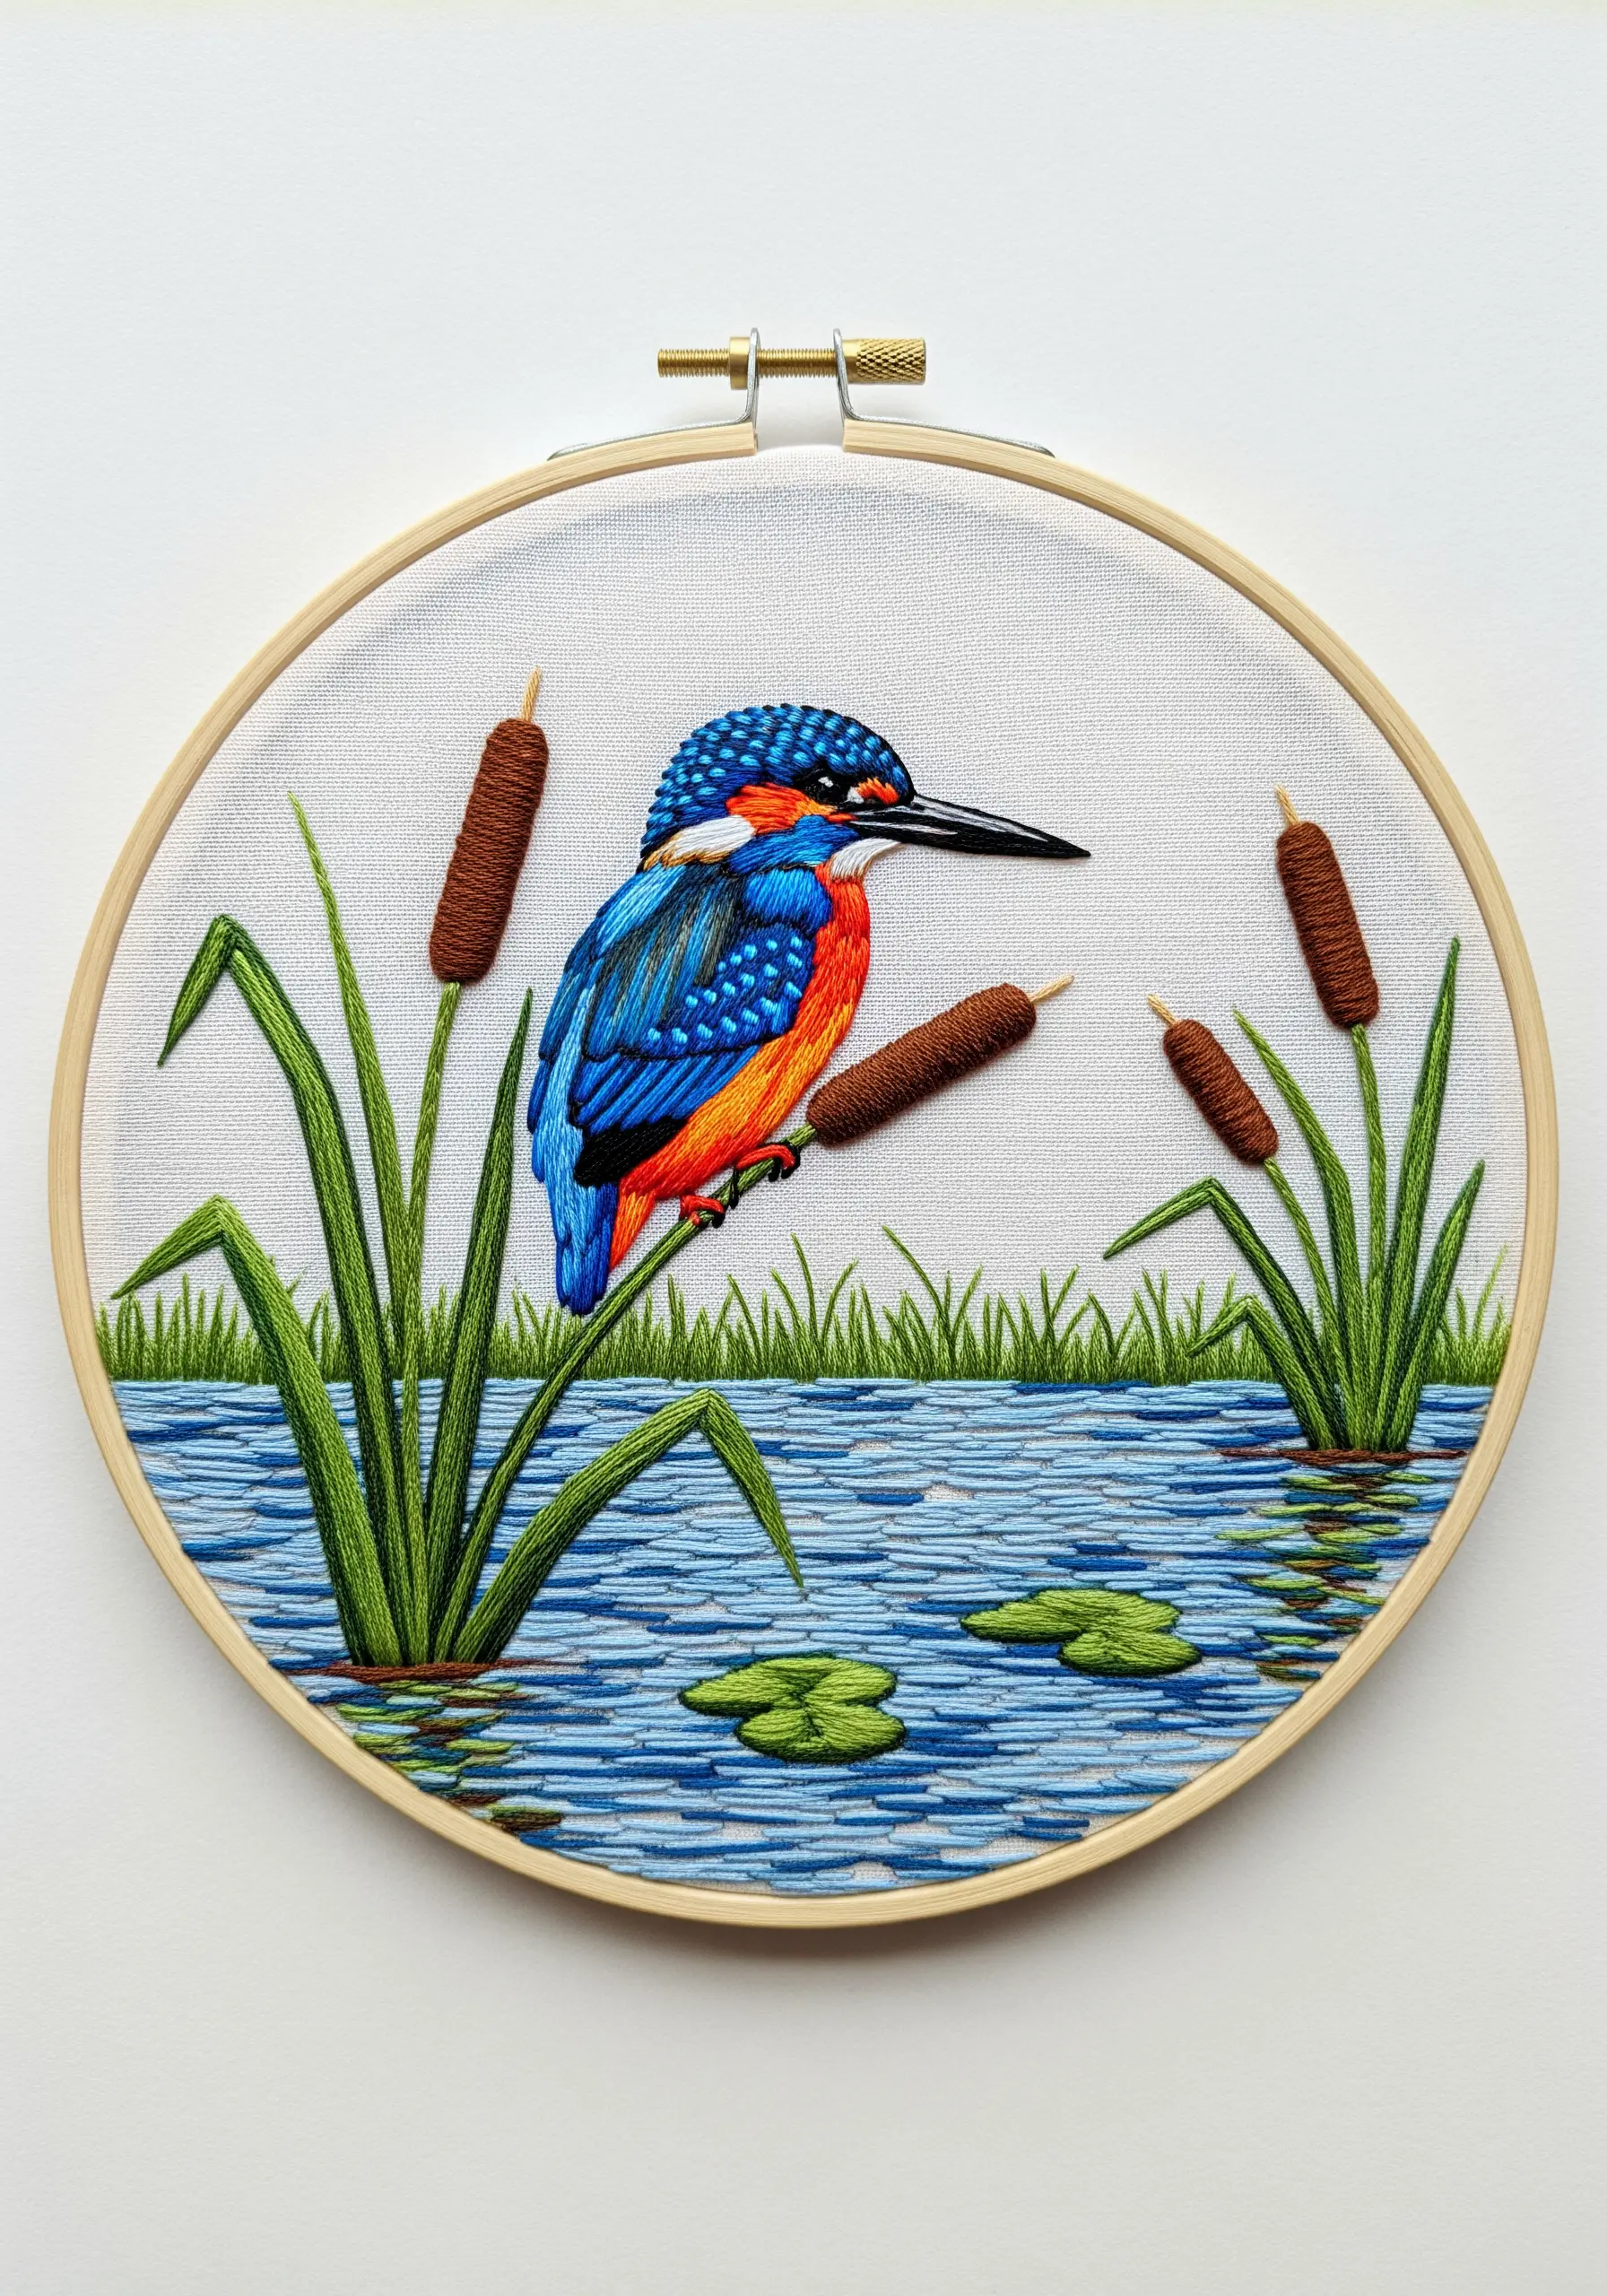
When tackling a complex, multi-colored subject like a kingfisher, don’t get overwhelmed. Break it down into small, manageable shapes.
Lightly sketch the main color areas onto your fabric first—the blue on the head, the orange of the breast, the dark beak.
Fill each small section individually using short, neat satin stitches or long-and-short stitches, paying close attention to the direction of the feathers.
This methodical approach allows you to build intricate detail piece by piece, resulting in a clean, vibrant, and impressively detailed final image.
15. Explore Wing Designs with Varied Techniques

Use dragonfly wings as a canvas to experiment with different fill stitches and materials.
For a geometric, stained-glass effect, try blackwork or pattern darning with a fine black thread.
To create an iridescent shimmer, fill the wing sections with tiny, overlapping sequins or seed beads.
For a soft, watercolor look, color the fabric lightly with fabric markers or pencils before outlining the sections with a delicate backstitch.
This turns a simple study into a showcase of your technical range.
16. Build a 3D Scene with Layered Fabric
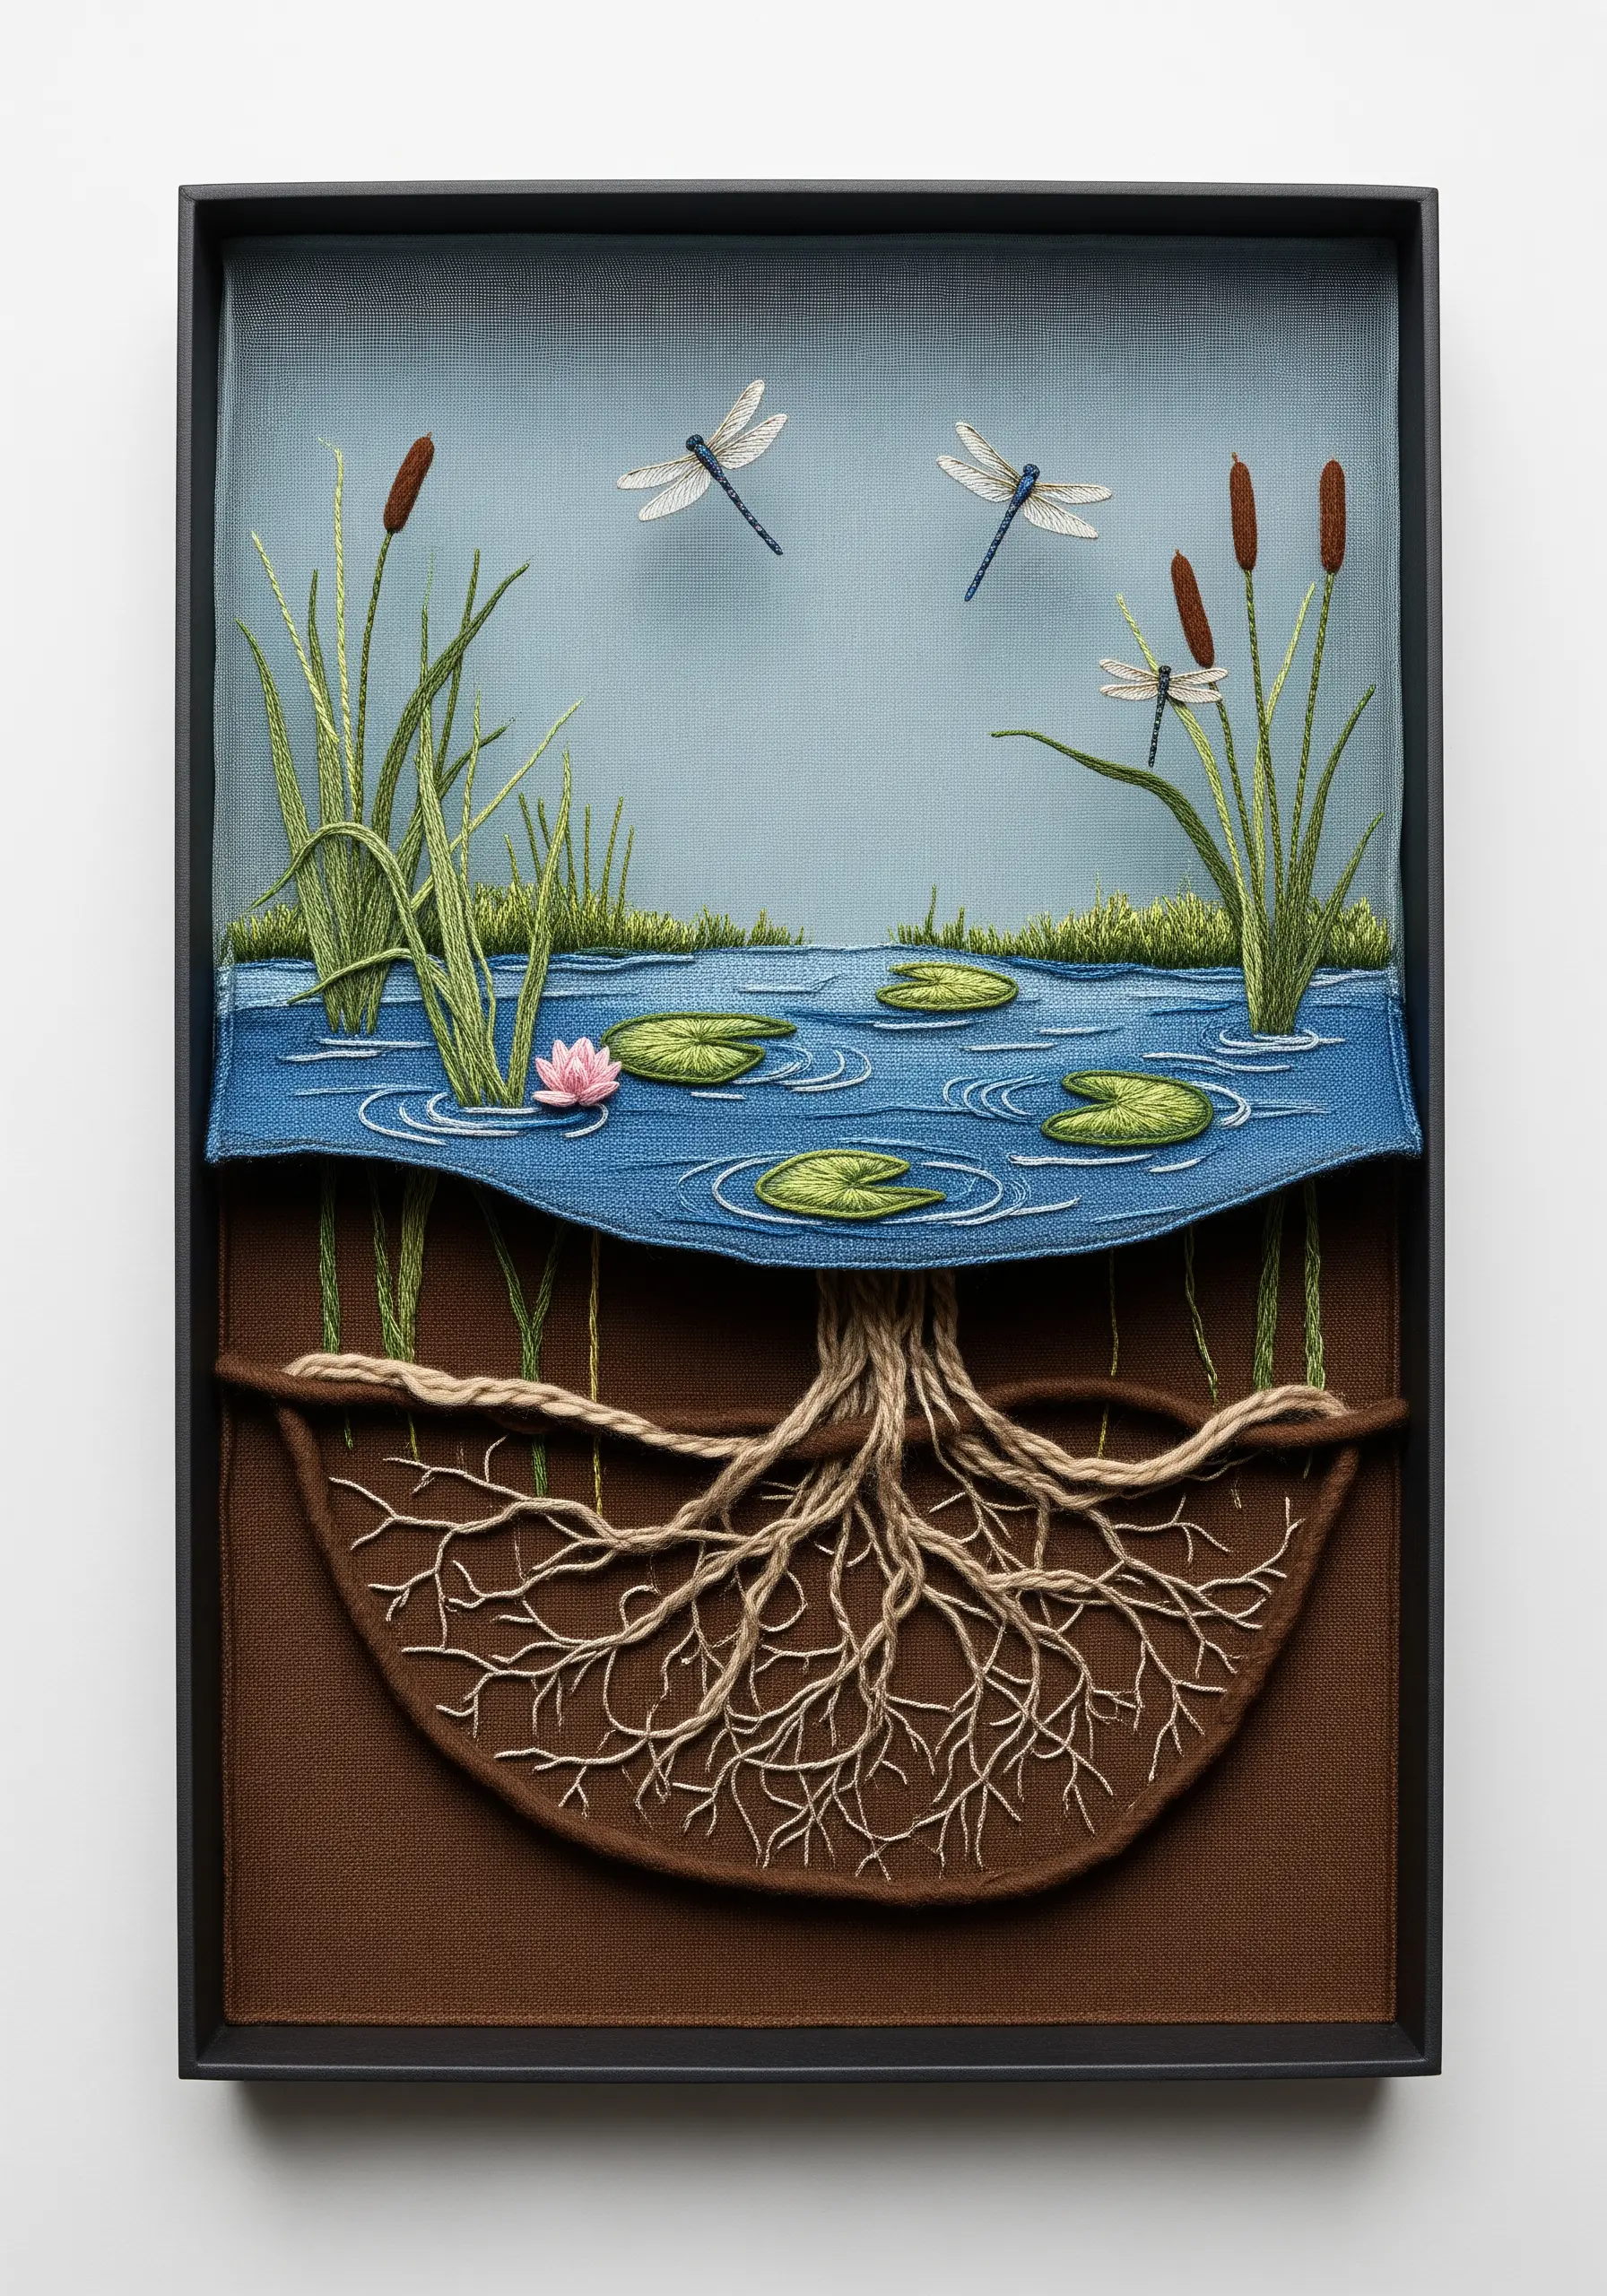
Create an incredible sense of depth by stitching your design on multiple, stacked layers of fabric.
Embroider the underwater roots on a piece of brown fabric first, using thick, couched yarn to give them a gnarled texture.
On a separate piece of blue fabric, stitch the water’s surface, reeds, and lily pads.
Carefully cut the blue fabric to create a wavy shoreline and layer it on top of the brown fabric inside a shadow box frame. This physical separation makes for a truly immersive 3D embroidery wall art piece.
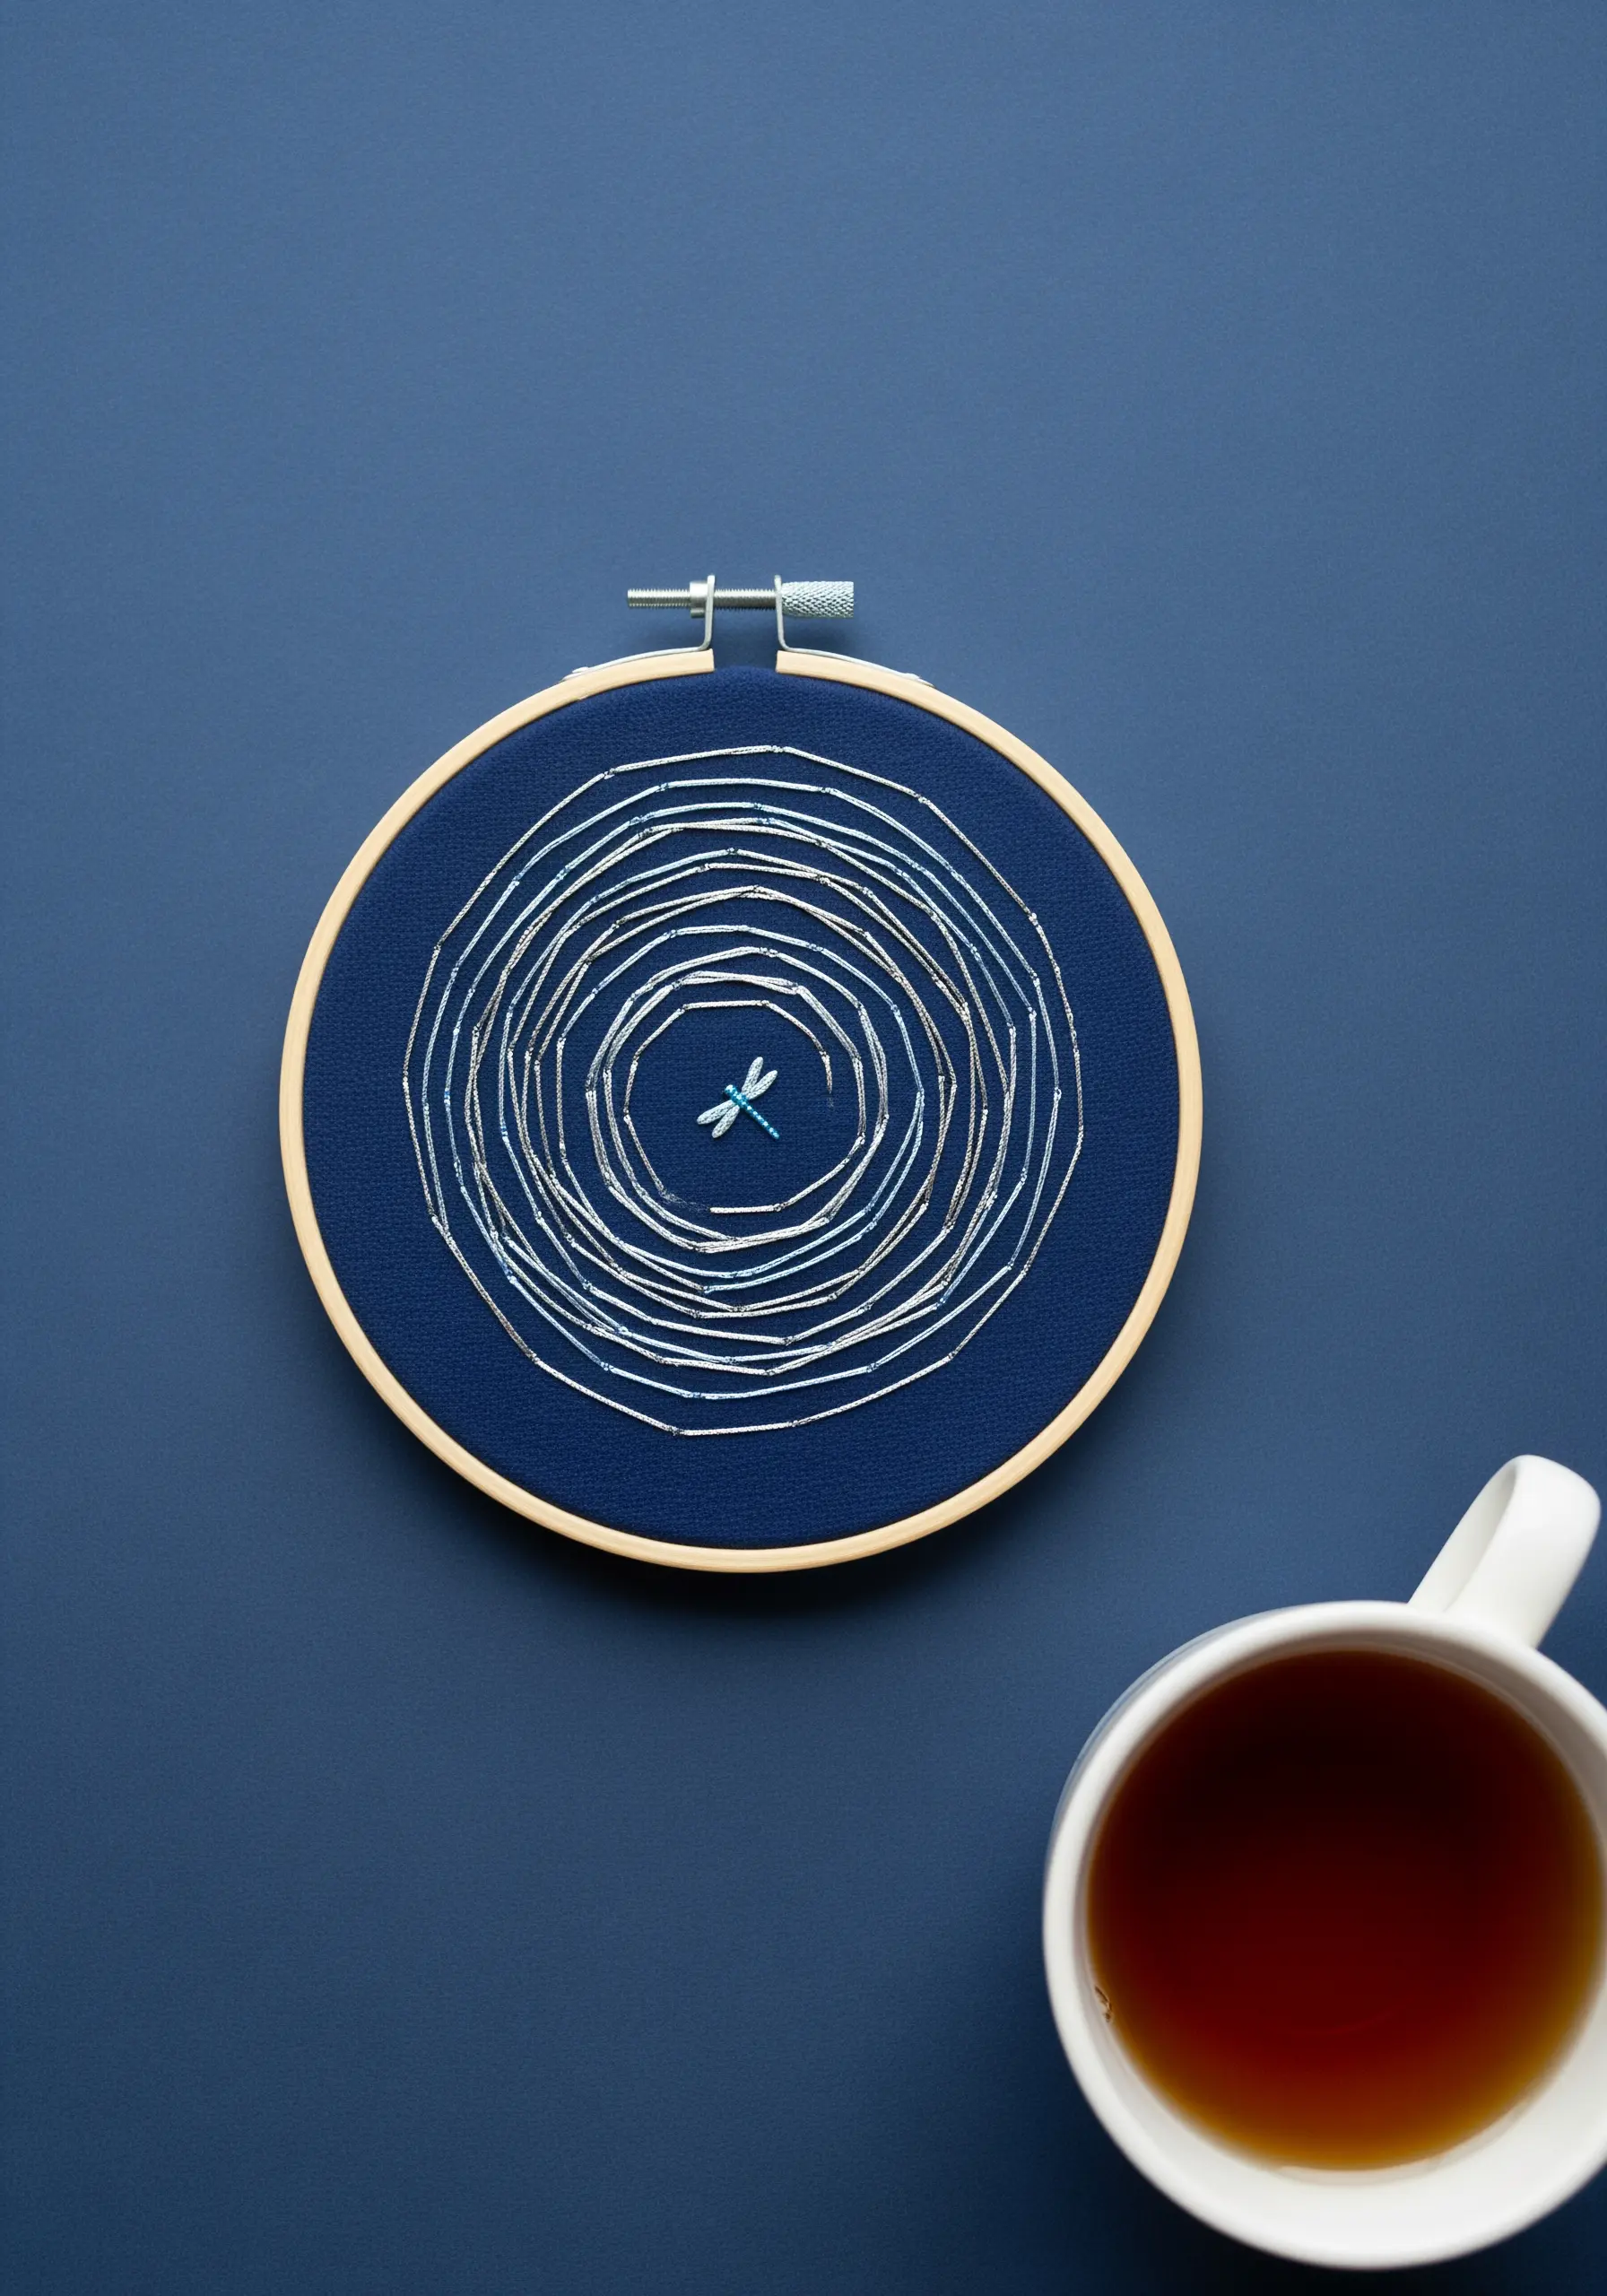
17. Achieve Perfect Symmetry with a Mandala Layout
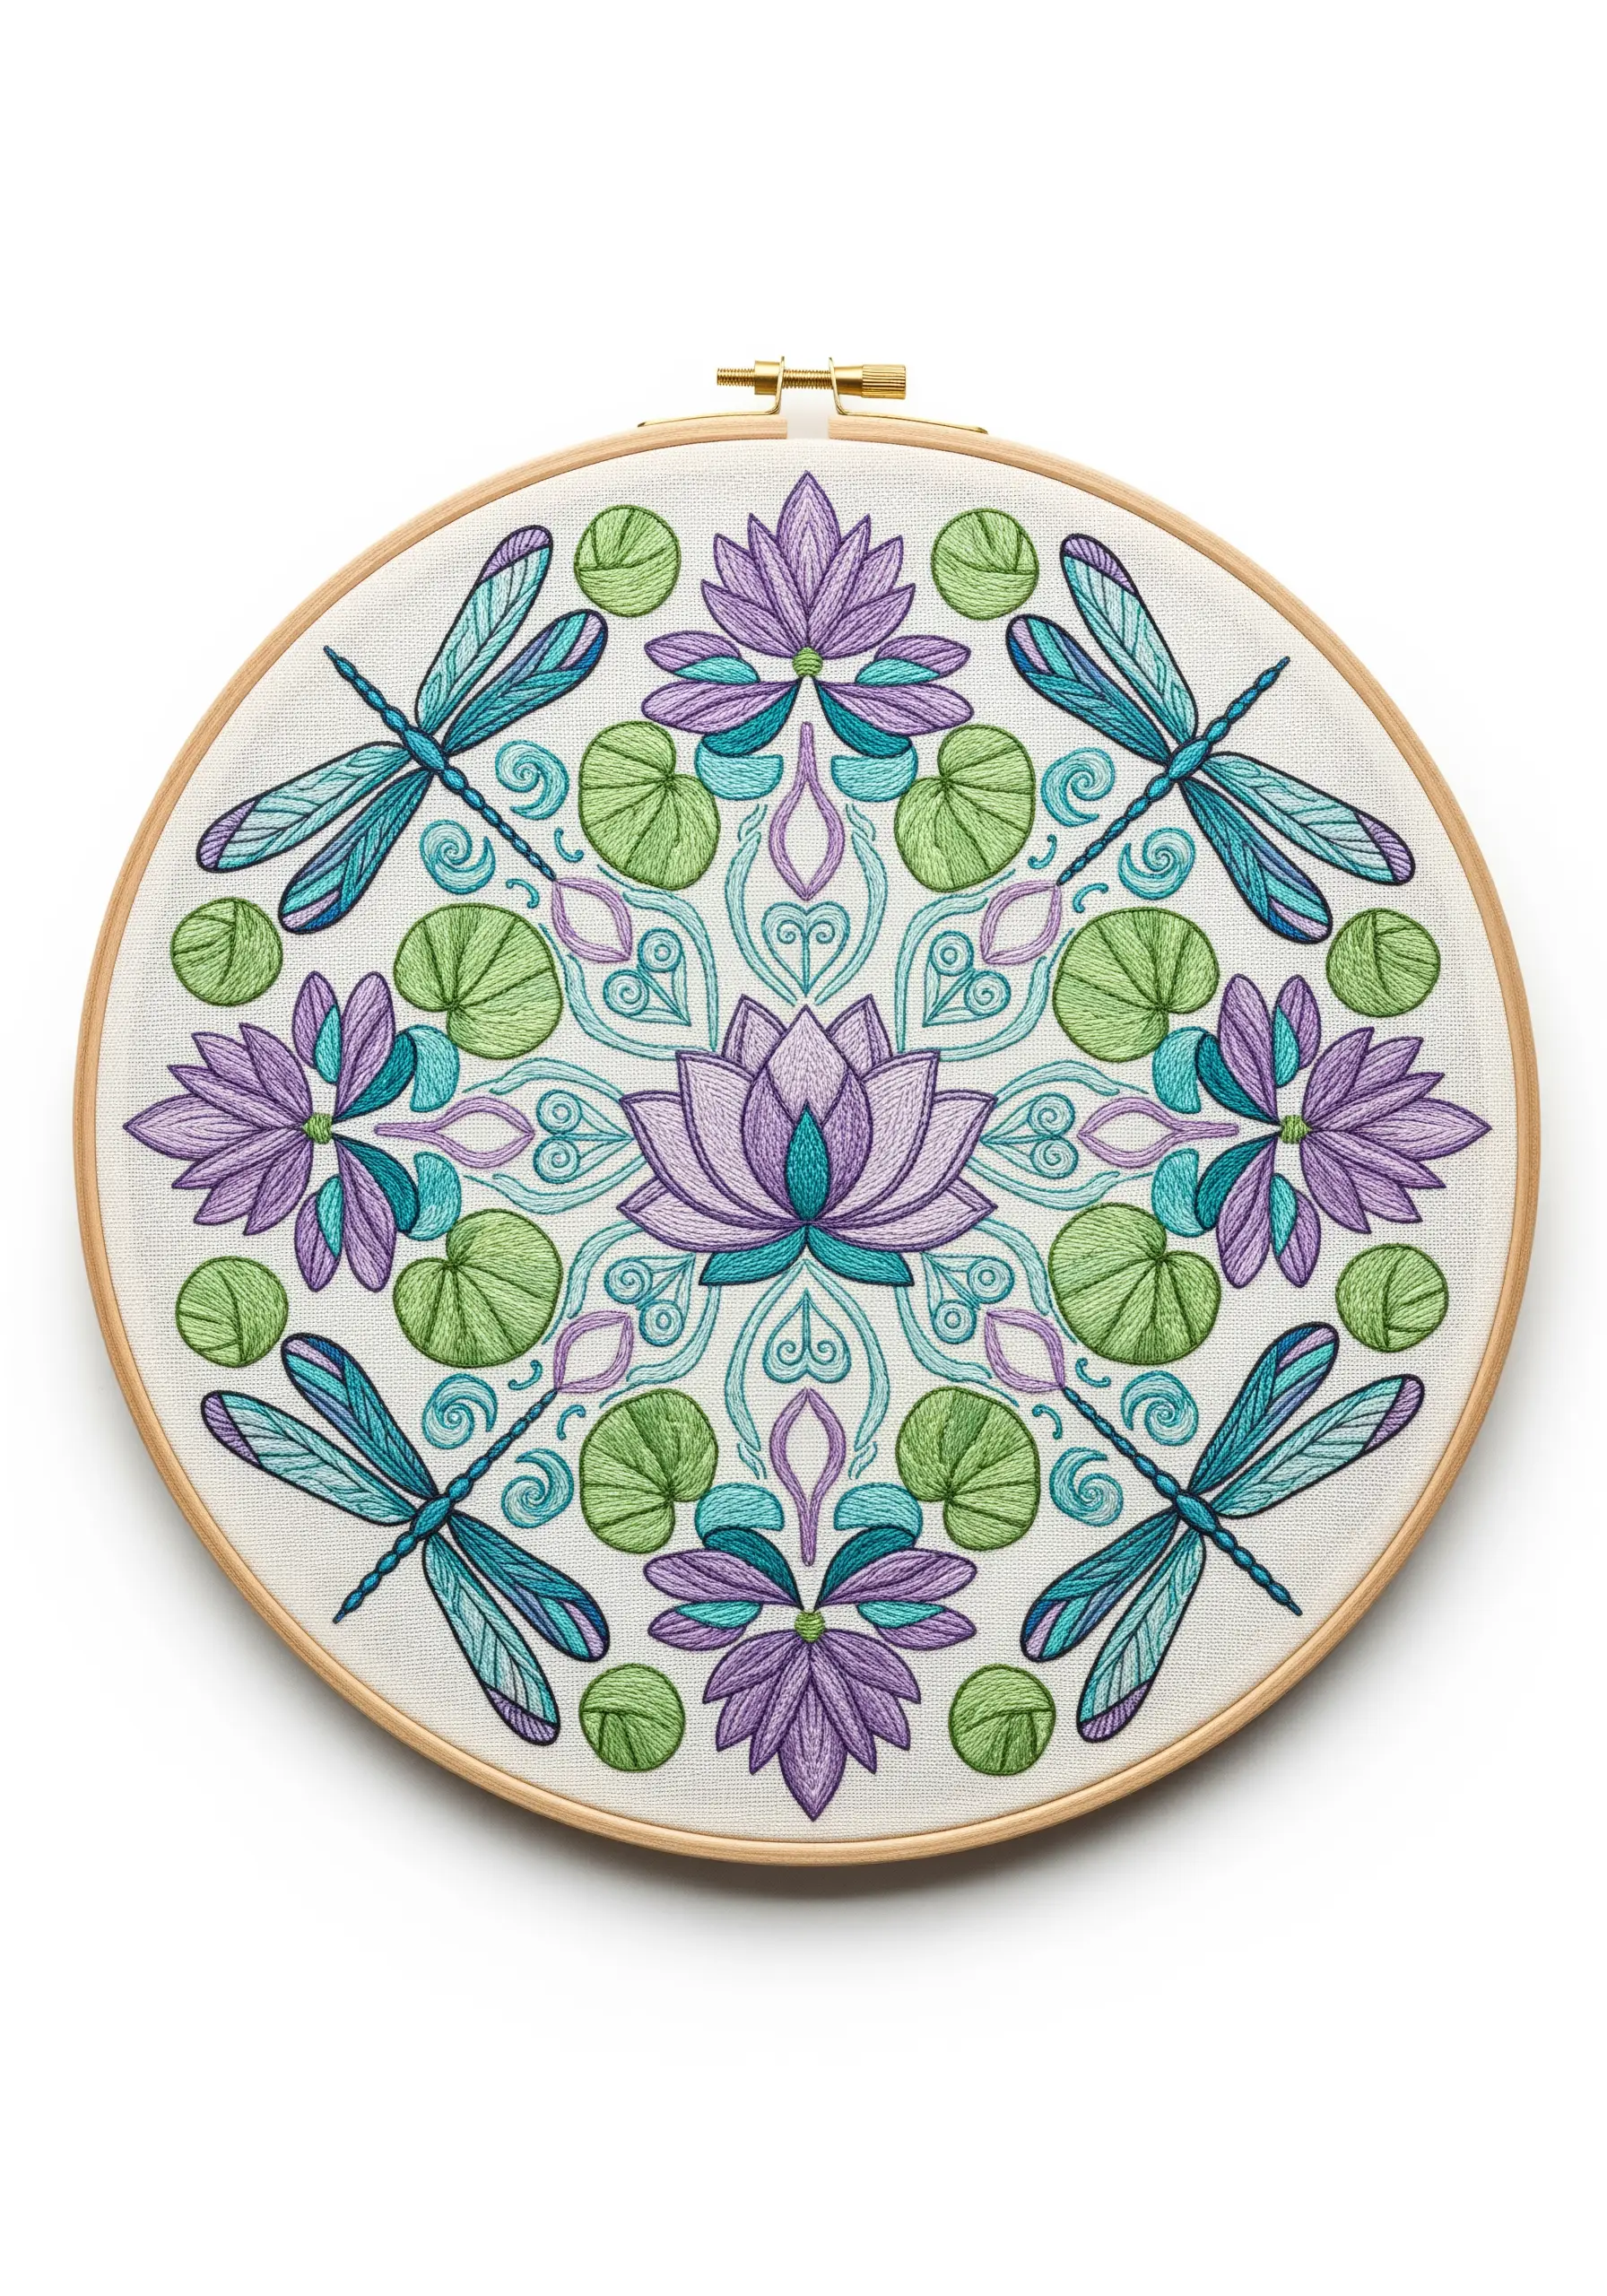
Turn botanical elements into a calming, meditative design by arranging them in a symmetrical mandala.
Start by finding the exact center of your hoop and use a fabric marker to draw guidelines, dividing the circle into quarters or eighths.
Place your main motifs, like the central lotus, on these lines to anchor the design.
Mirror every element, from the dragonflies to the lily pads, in the opposing sections. Using a consistent color palette and stitch type for corresponding parts is key to achieving a harmonious, balanced finish.
18. Embellish a Journal with Overlapping Stems
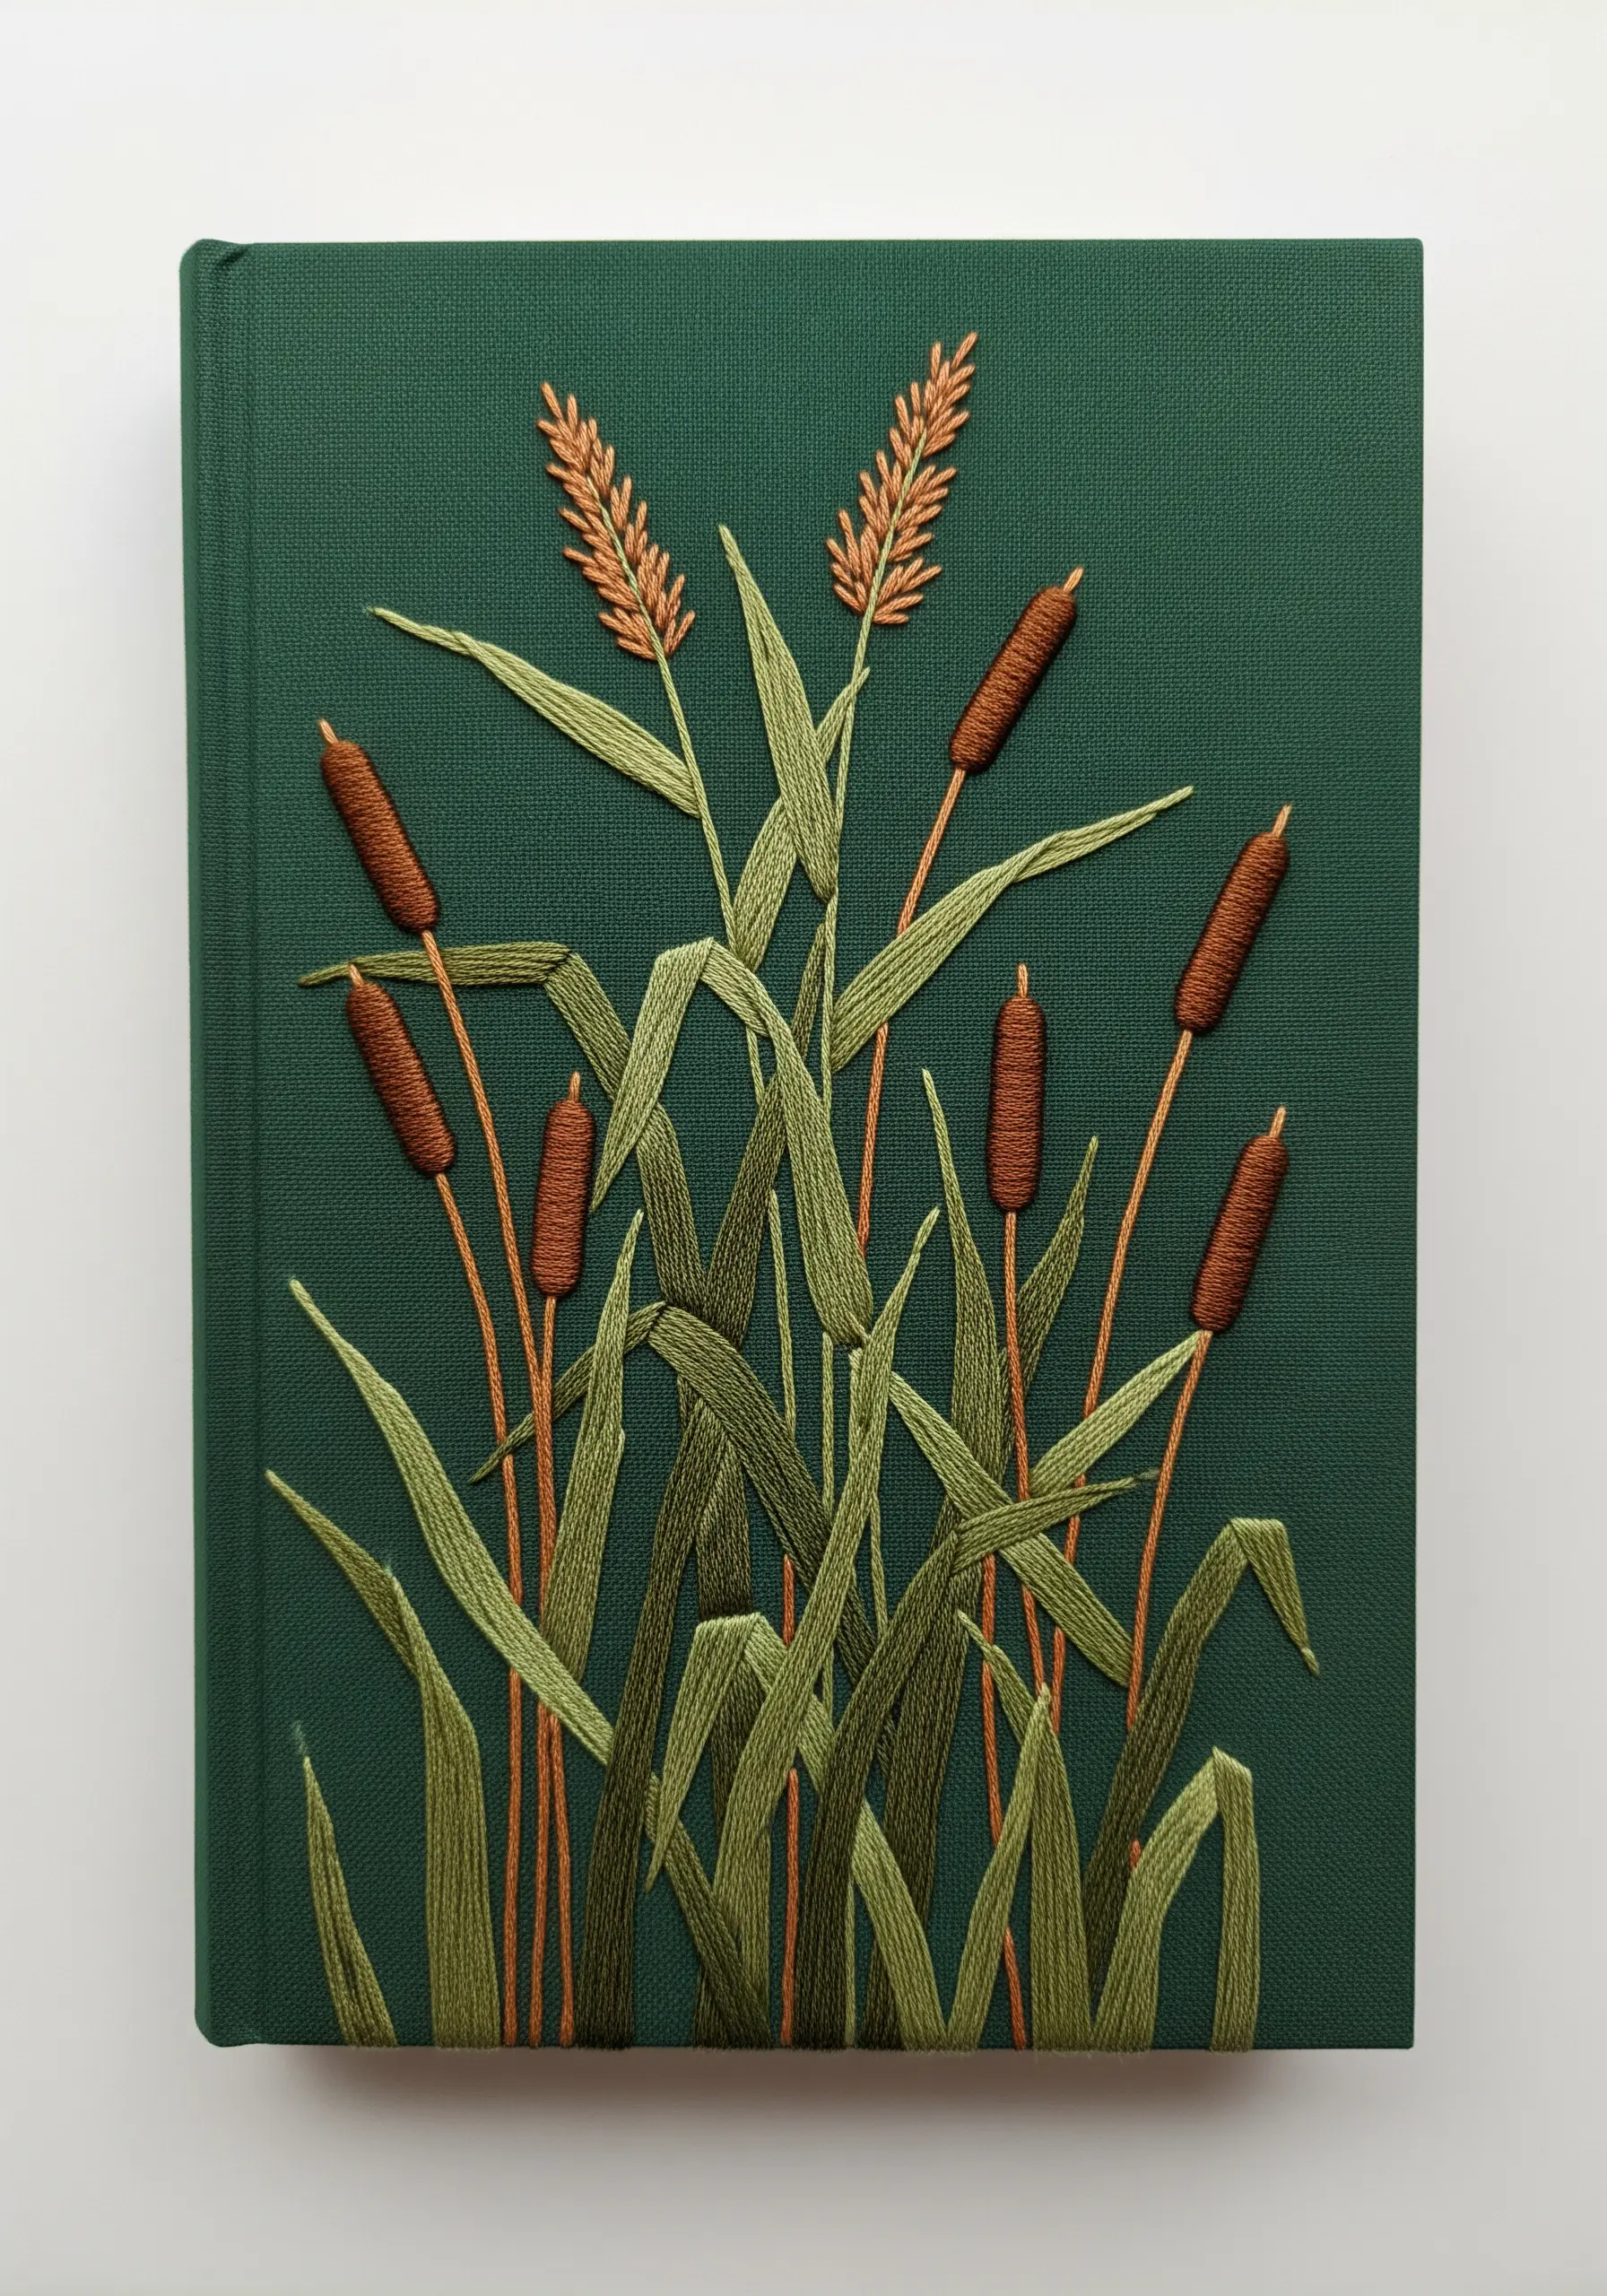
When embroidering on a functional item like a book cover, create visual interest through thoughtful composition.
Arrange your cattail stems and leaves so they overlap at varying angles. This simple trick creates an illusion of depth and a more natural, less static arrangement.
Use a stem stitch for the outlines to give them a clean, defined look, and fill the broader leaves with a directional satin stitch.
This thoughtful placement transforms a simple motif into a dynamic design, making for beautiful embroidered gifts that turn simple clothes into meaningful keepsakes.


