

You already know the quiet magic of pressed flowers—the way they hold the memory of a season in their delicate, paper-thin forms. But what if you could translate that fleeting beauty into something lasting, something with texture, depth, and a story told in thread?
This is where botanical embroidery moves beyond simple replication and becomes an art form. It’s about more than just tracing a petal’s edge; it’s about capturing its essence. Think of the soft gradient of a poppy, the intricate silhouette of a fern, or the gentle drift of a dandelion seed on the wind. These are the details thread can bring to life in ways a pressed flower cannot.
Here, you’ll discover techniques that empower you to do just that. We’ll explore how stitching on sheer fabric can make blossoms float, how raised stitches can give petals a lifelike curl, and how combining real botanicals with thread can create something entirely new. Your needle is the tool, and your fabric is the garden. It’s time to start planting.
1. Create a Floating Botanical Panel
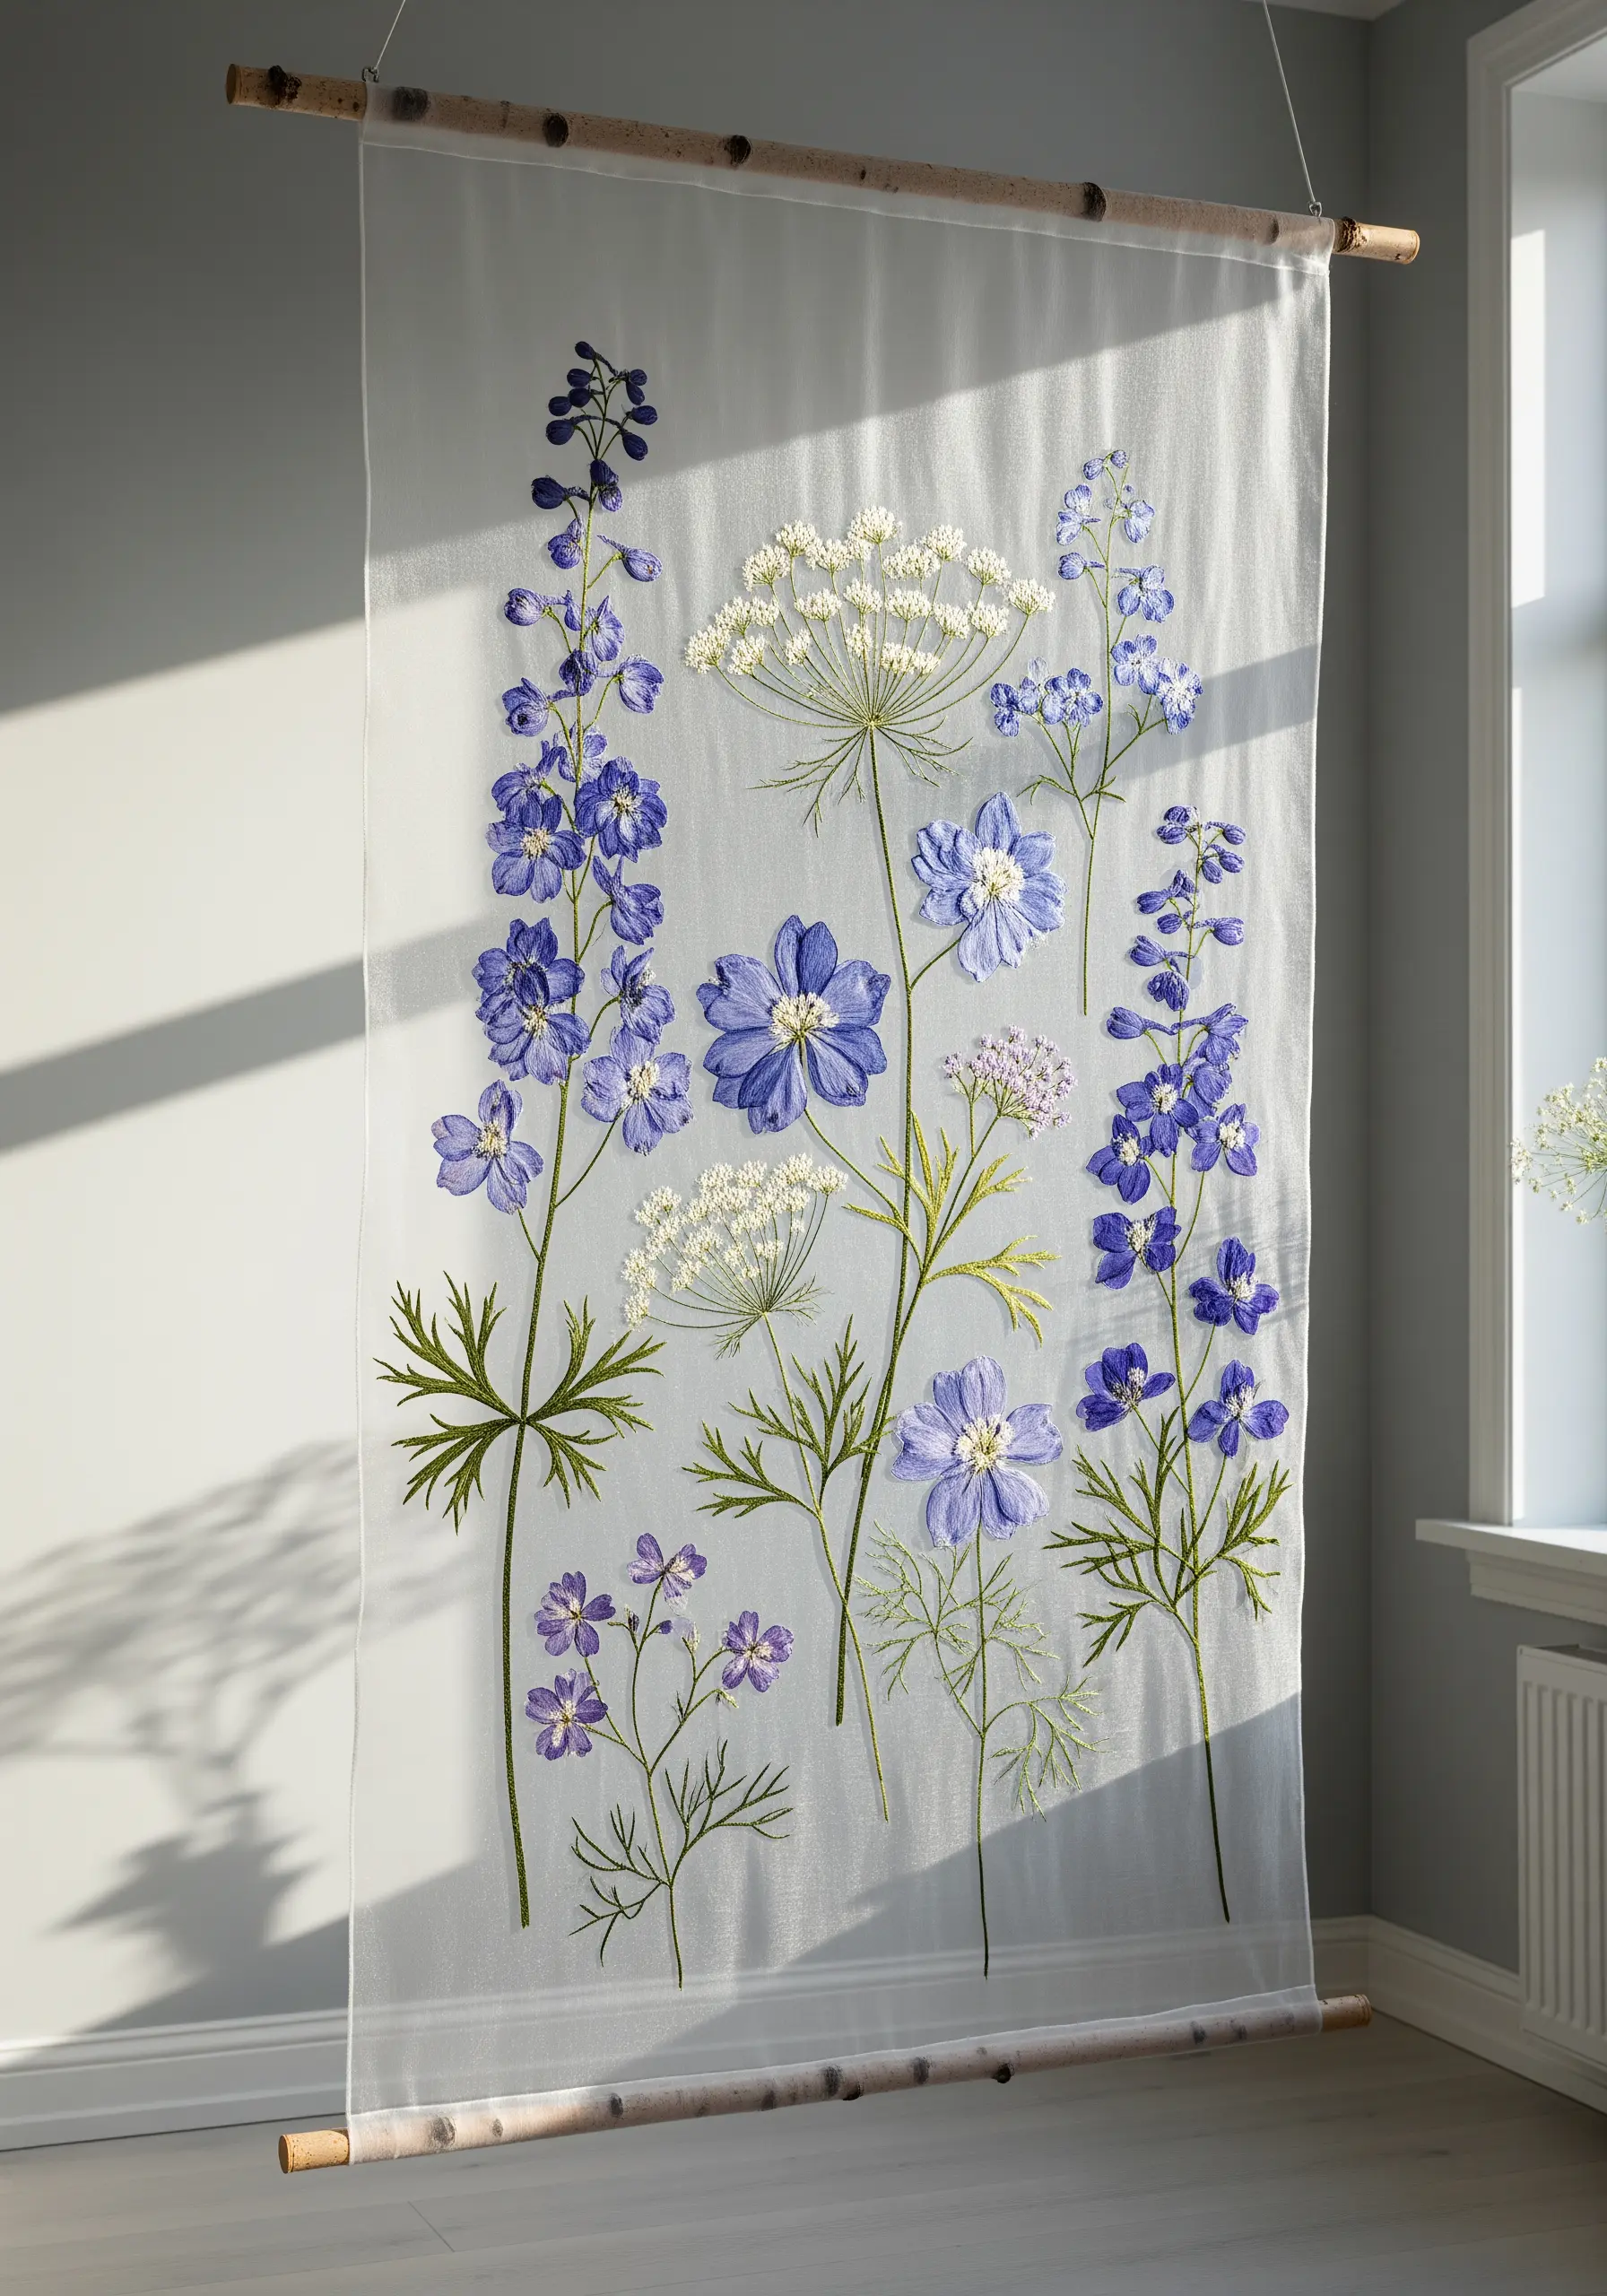
Stitch your design onto a sheer fabric like organza or tulle to create an ethereal, floating effect.
Use a water-soluble or tear-away stabilizer to support your stitches, which you’ll remove completely once finished.
This technique allows light to pass through the fabric, highlighting the delicate threadwork and making the botanicals appear suspended in mid-air.
For a natural finish, mount the panel between two birch or driftwood branches, turning your embroidery into a stunning piece of nature-inspired wall decor.
2. Add Dimension with Raised Stitches
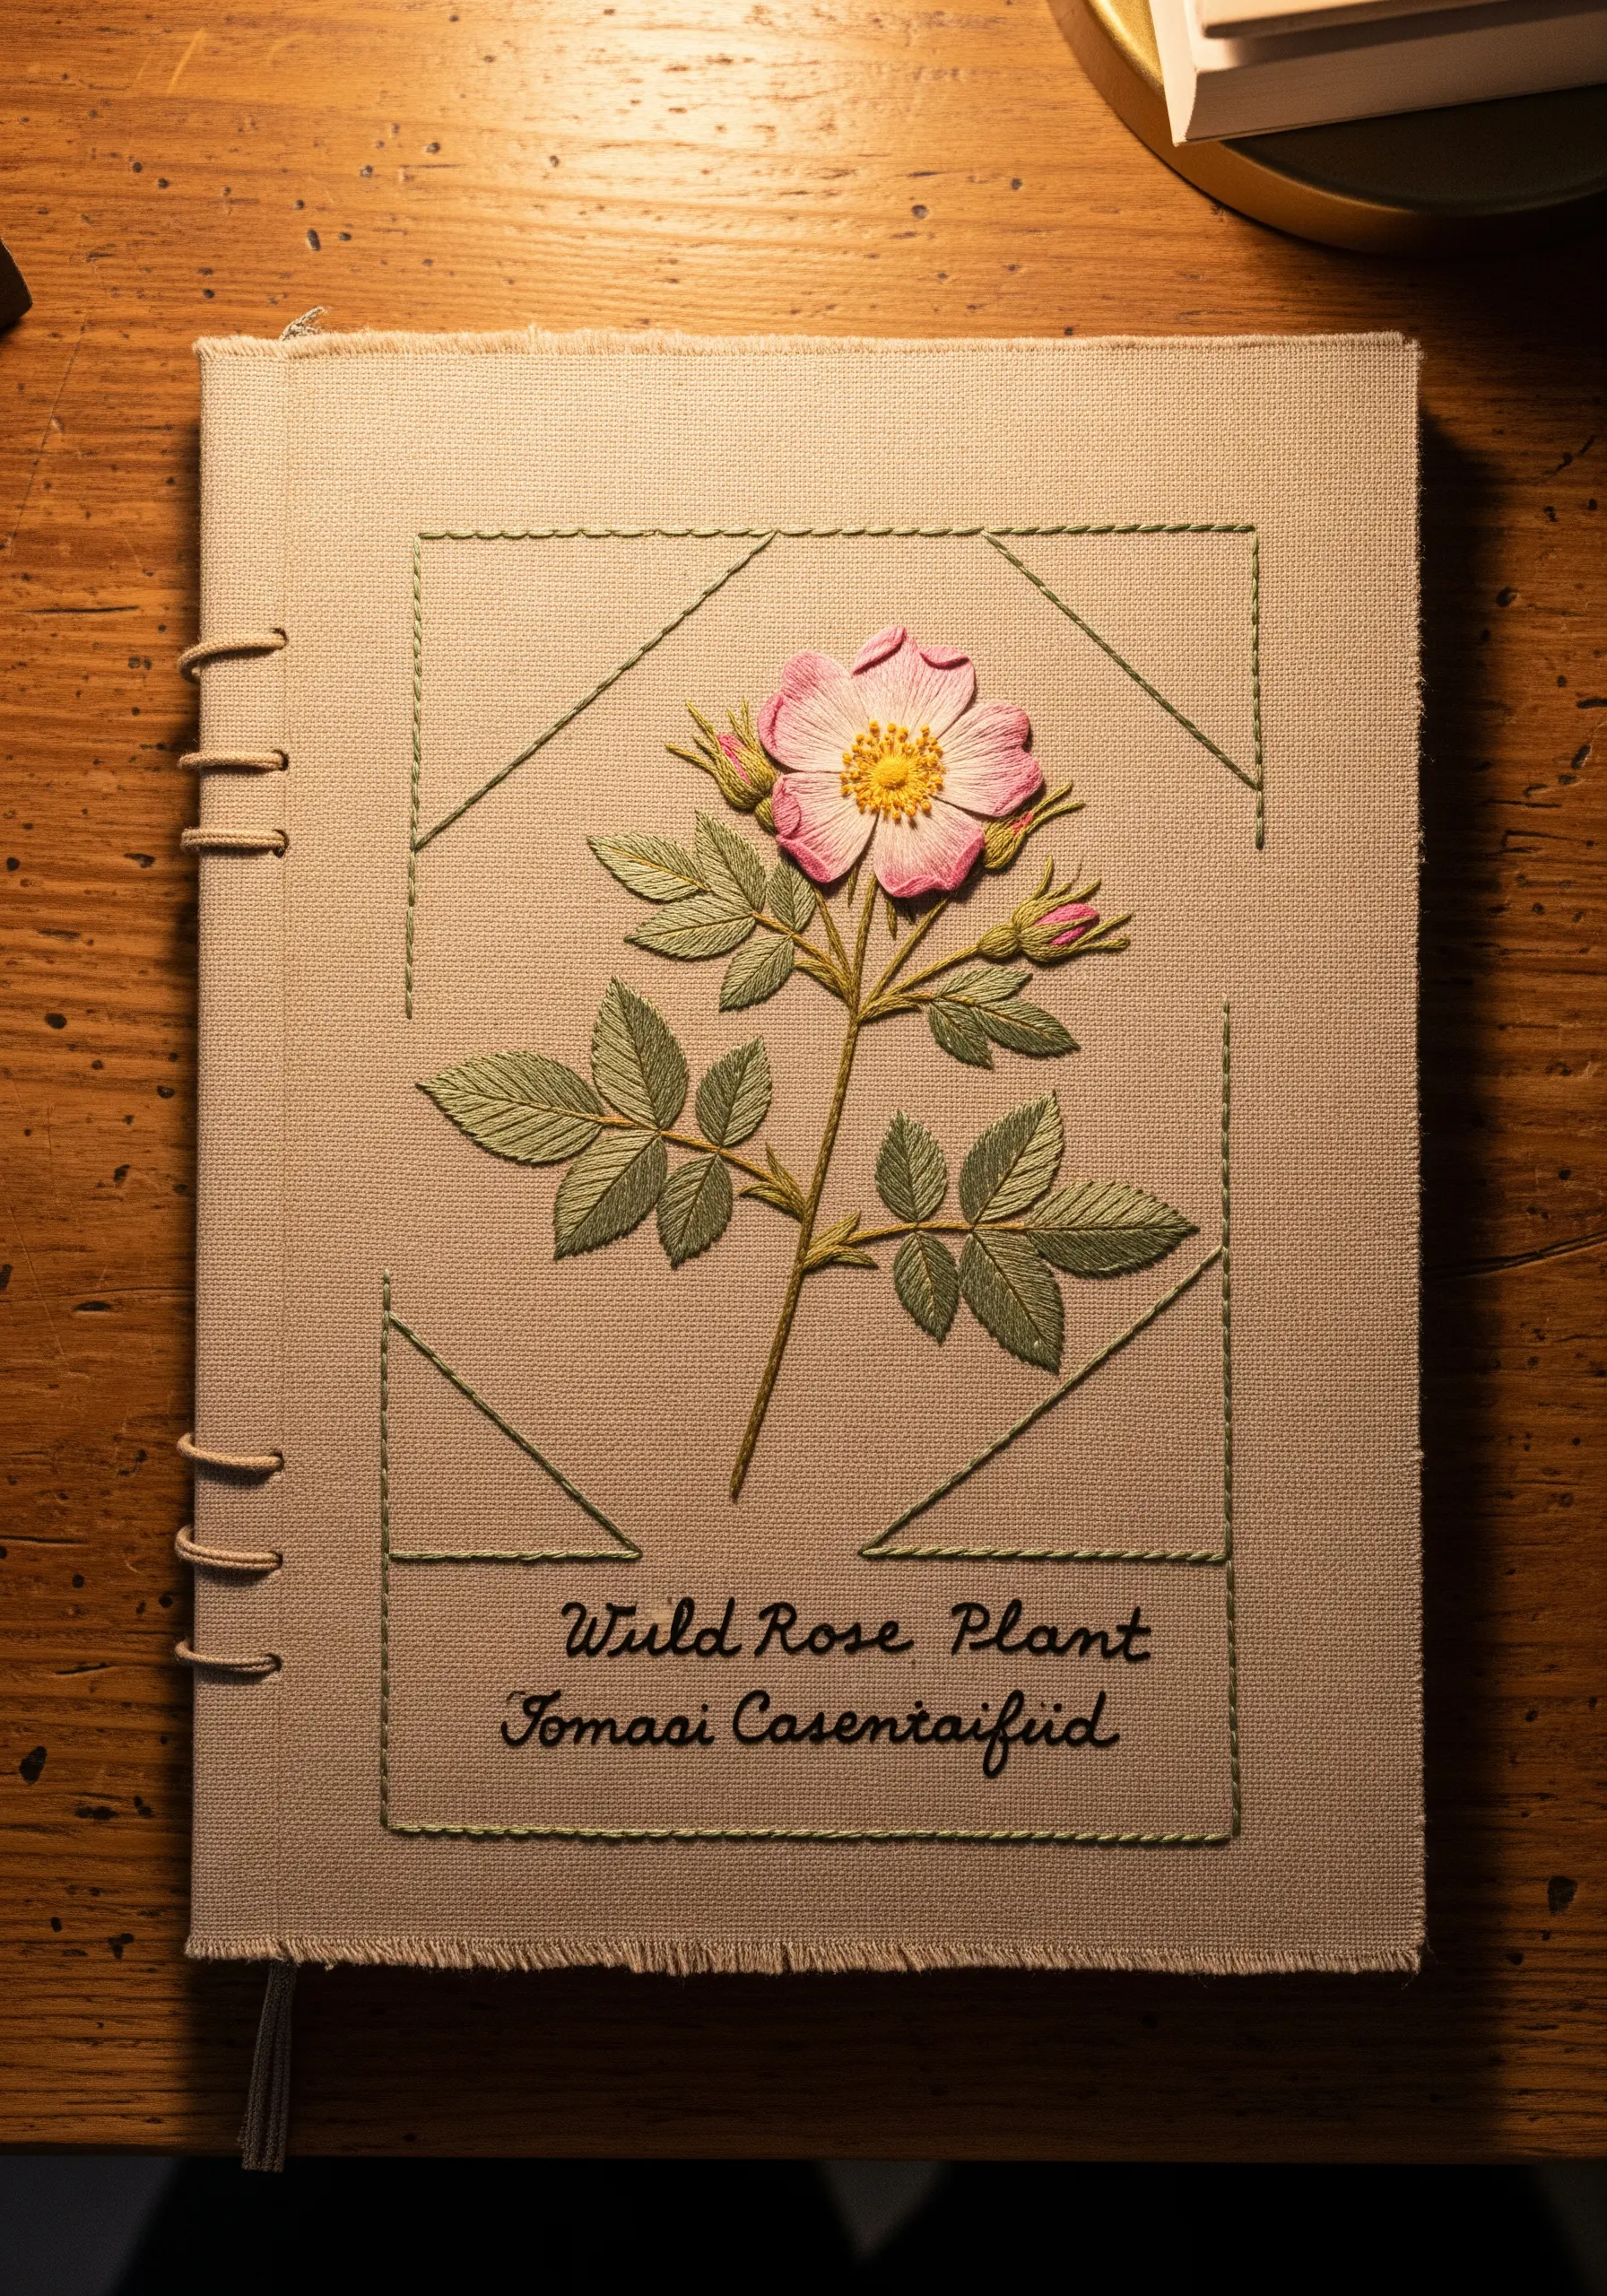
Elevate a simple flower by using stumpwork techniques to give your petals a three-dimensional form.
Stitch the petals as separate elements on a spare piece of fabric with a wire outline, cut them out, and then apply them to your main design.
This method allows the petals to lift off the surface, creating realistic shadows and depth that a flat satin stitch cannot achieve.
For the lettering, use a single strand of thread and a sharp needle to execute a precise backstitch, ensuring your minimal typography is crisp and legible.
3. Design a Cascading Floral Table Runner
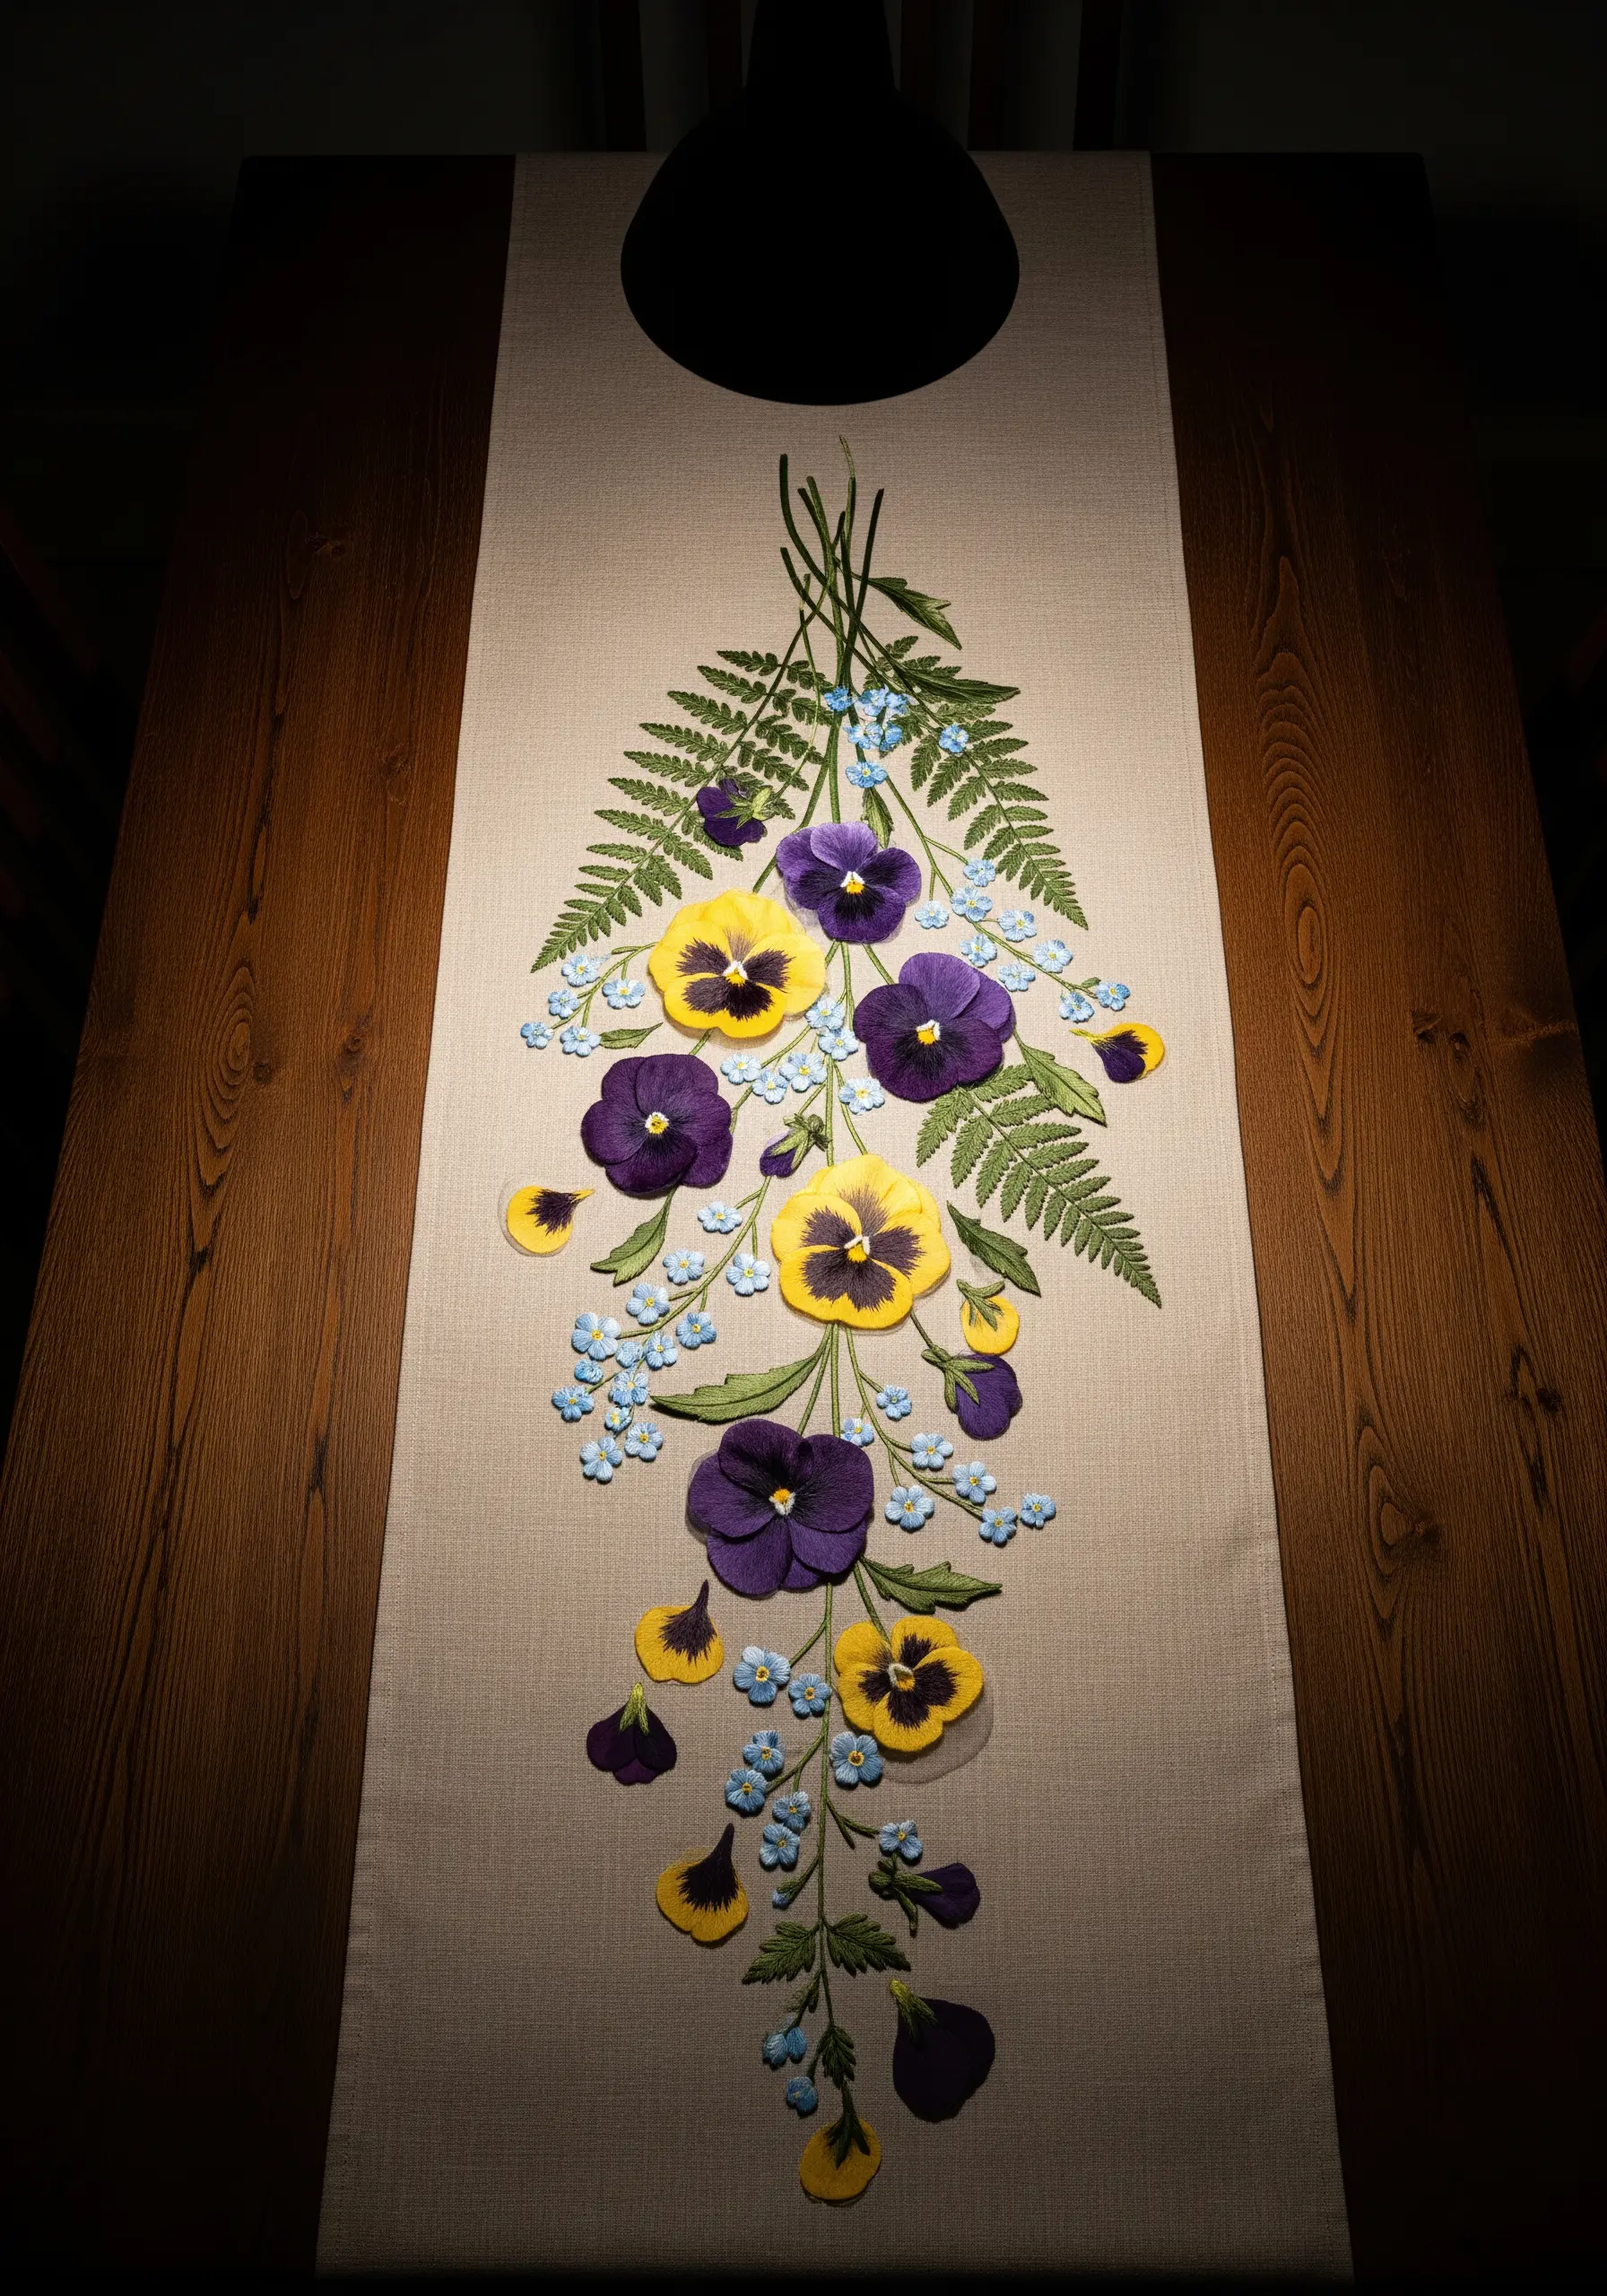
Guide the eye by arranging your botanicals in a flowing, asymmetrical composition that cascades down the fabric.
Combine different textures to add realism: use padded satin stitch for the full pansy petals, tiny French knots for the forget-me-nots, and fishbone stitch for the delicate fern fronds.
This textural variety makes the arrangement feel dynamic and alive, turning a simple table runner into a centerpiece.
The strategic use of detached, falling petals at the edges enhances the sense of natural movement.
4. Frame Florals in a Circular Composition

Arrange your flowers in a circular or wreath-like pattern to create a sense of harmony and completeness.
Use long-and-short stitch to blend shades of orange and yellow in the poppy petals, giving them a soft, painted quality.
A simple, thin border stitched in a contrasting color contains the design, making the entire composition feel intentional and polished.
This approach works beautifully on functional items like pillows, turning them into focused pieces of handmade pillow cushion embroidery.
5. Deconstruct Botanicals for a Gallery Look

Explore a single botanical element across multiple panels to create a large-scale art installation.
Stitch different stages of a plant’s life or variations in color on separate layers of sheer fabric.
This deconstructed approach encourages the viewer to appreciate the form and line of the plant in a new, analytical way.
Using a monochrome or limited color palette—like white, silver, and gold—transforms simple stitches into a sophisticated piece of fiber art.
6. Master the Art of the Silhouette
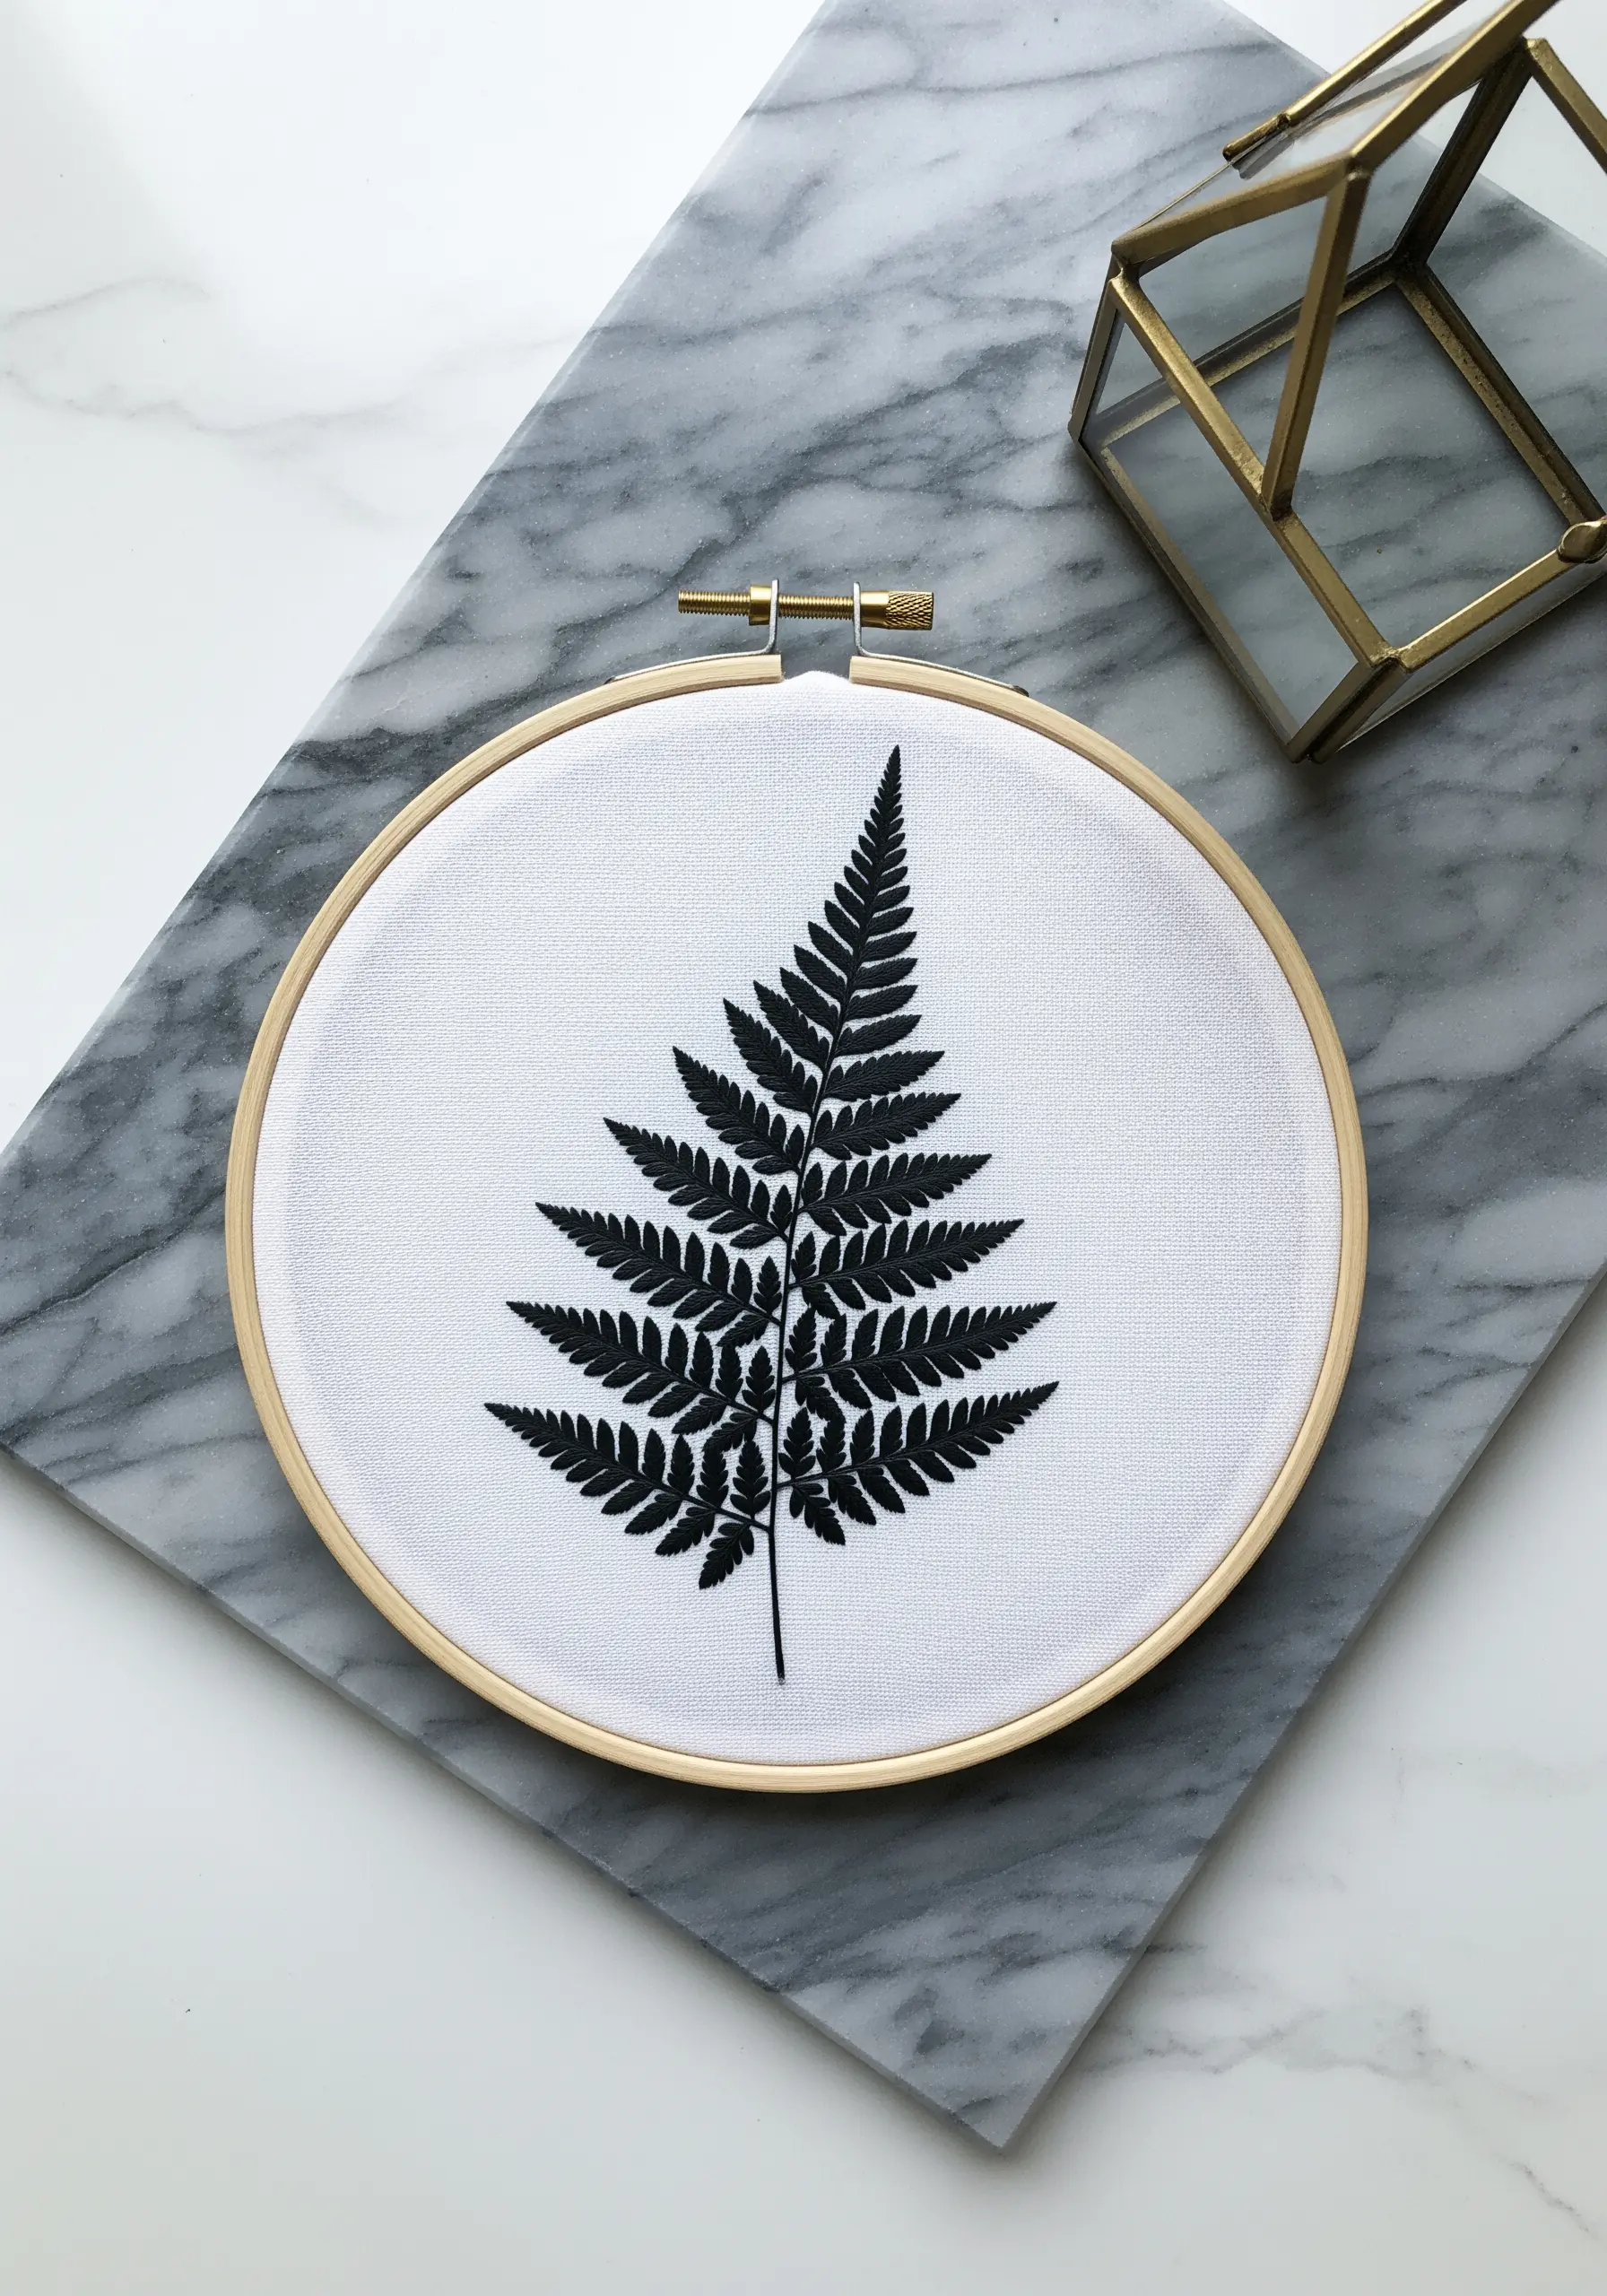
Create a striking, graphic statement by stitching a botanical silhouette in a single dark color on a crisp, light background.
The success of this technique lies in precision. Use a fine split stitch or stem stitch to capture every intricate detail of the plant’s shape.
This minimalist approach removes the complexity of color choice and shading, allowing you to focus entirely on the beauty of the form itself.
It’s a perfect way to create minimalist embroidery hoops that feel both modern and timeless.
7. Stitch a Field of Lavender

To create the impression of a lavender field, focus on repetition with subtle variations.
Vary the height and angle of each lavender stalk slightly to avoid a rigid, unnatural look.
Use a combination of tiny French knots and short straight stitches for the blossoms, which adds texture and mimics the plant’s organic structure.
This method transforms a simple design into a fragrant-looking piece of lavender field embroidery perfect for a wall hanging.
8. Compose a Dramatic Headboard Tapestry
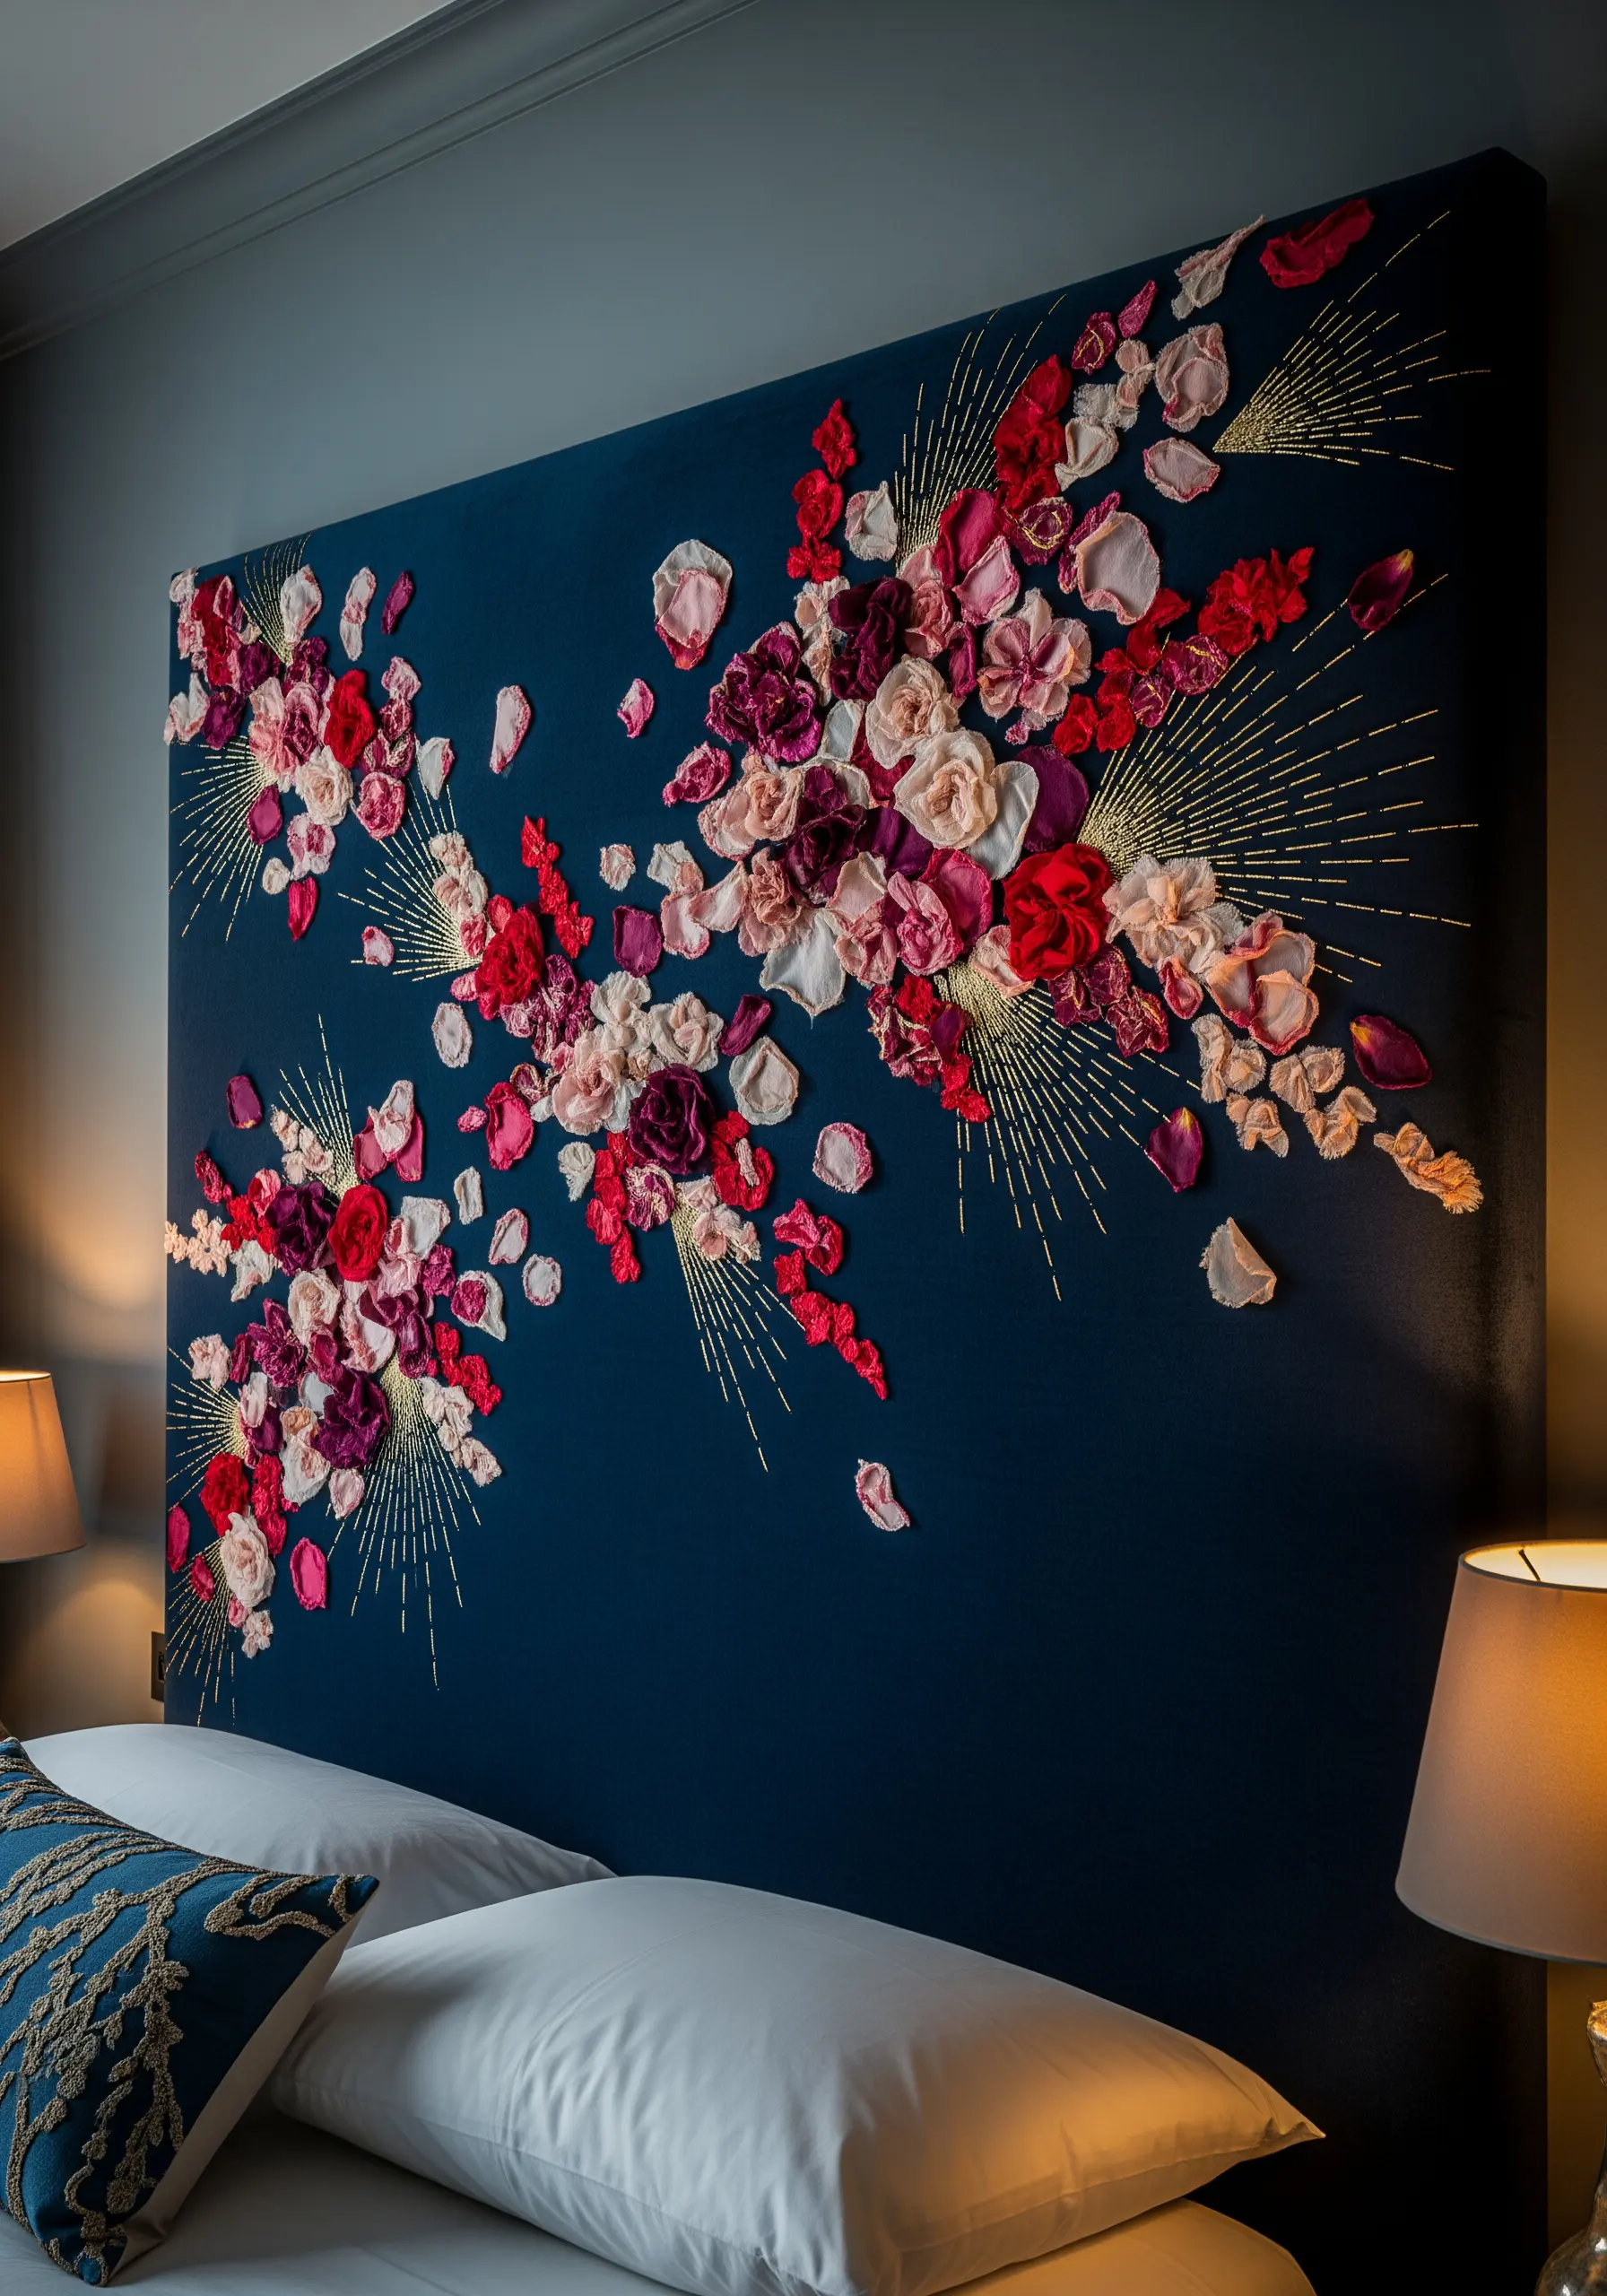
Transform your bedroom by creating a large-scale floral explosion on a dark, dramatic background fabric.
Combine fabric appliqué and ribbon embroidery for the larger petals with traditional stitches for finer details.
Incorporate bursts of metallic thread or seed beads radiating from the floral clusters to add a touch of glamour and catch the light.
This mixed-media technique allows you to build layers of texture and color, creating a truly show-stopping embroidered headboard.
9. Tell a Story with a Triptych
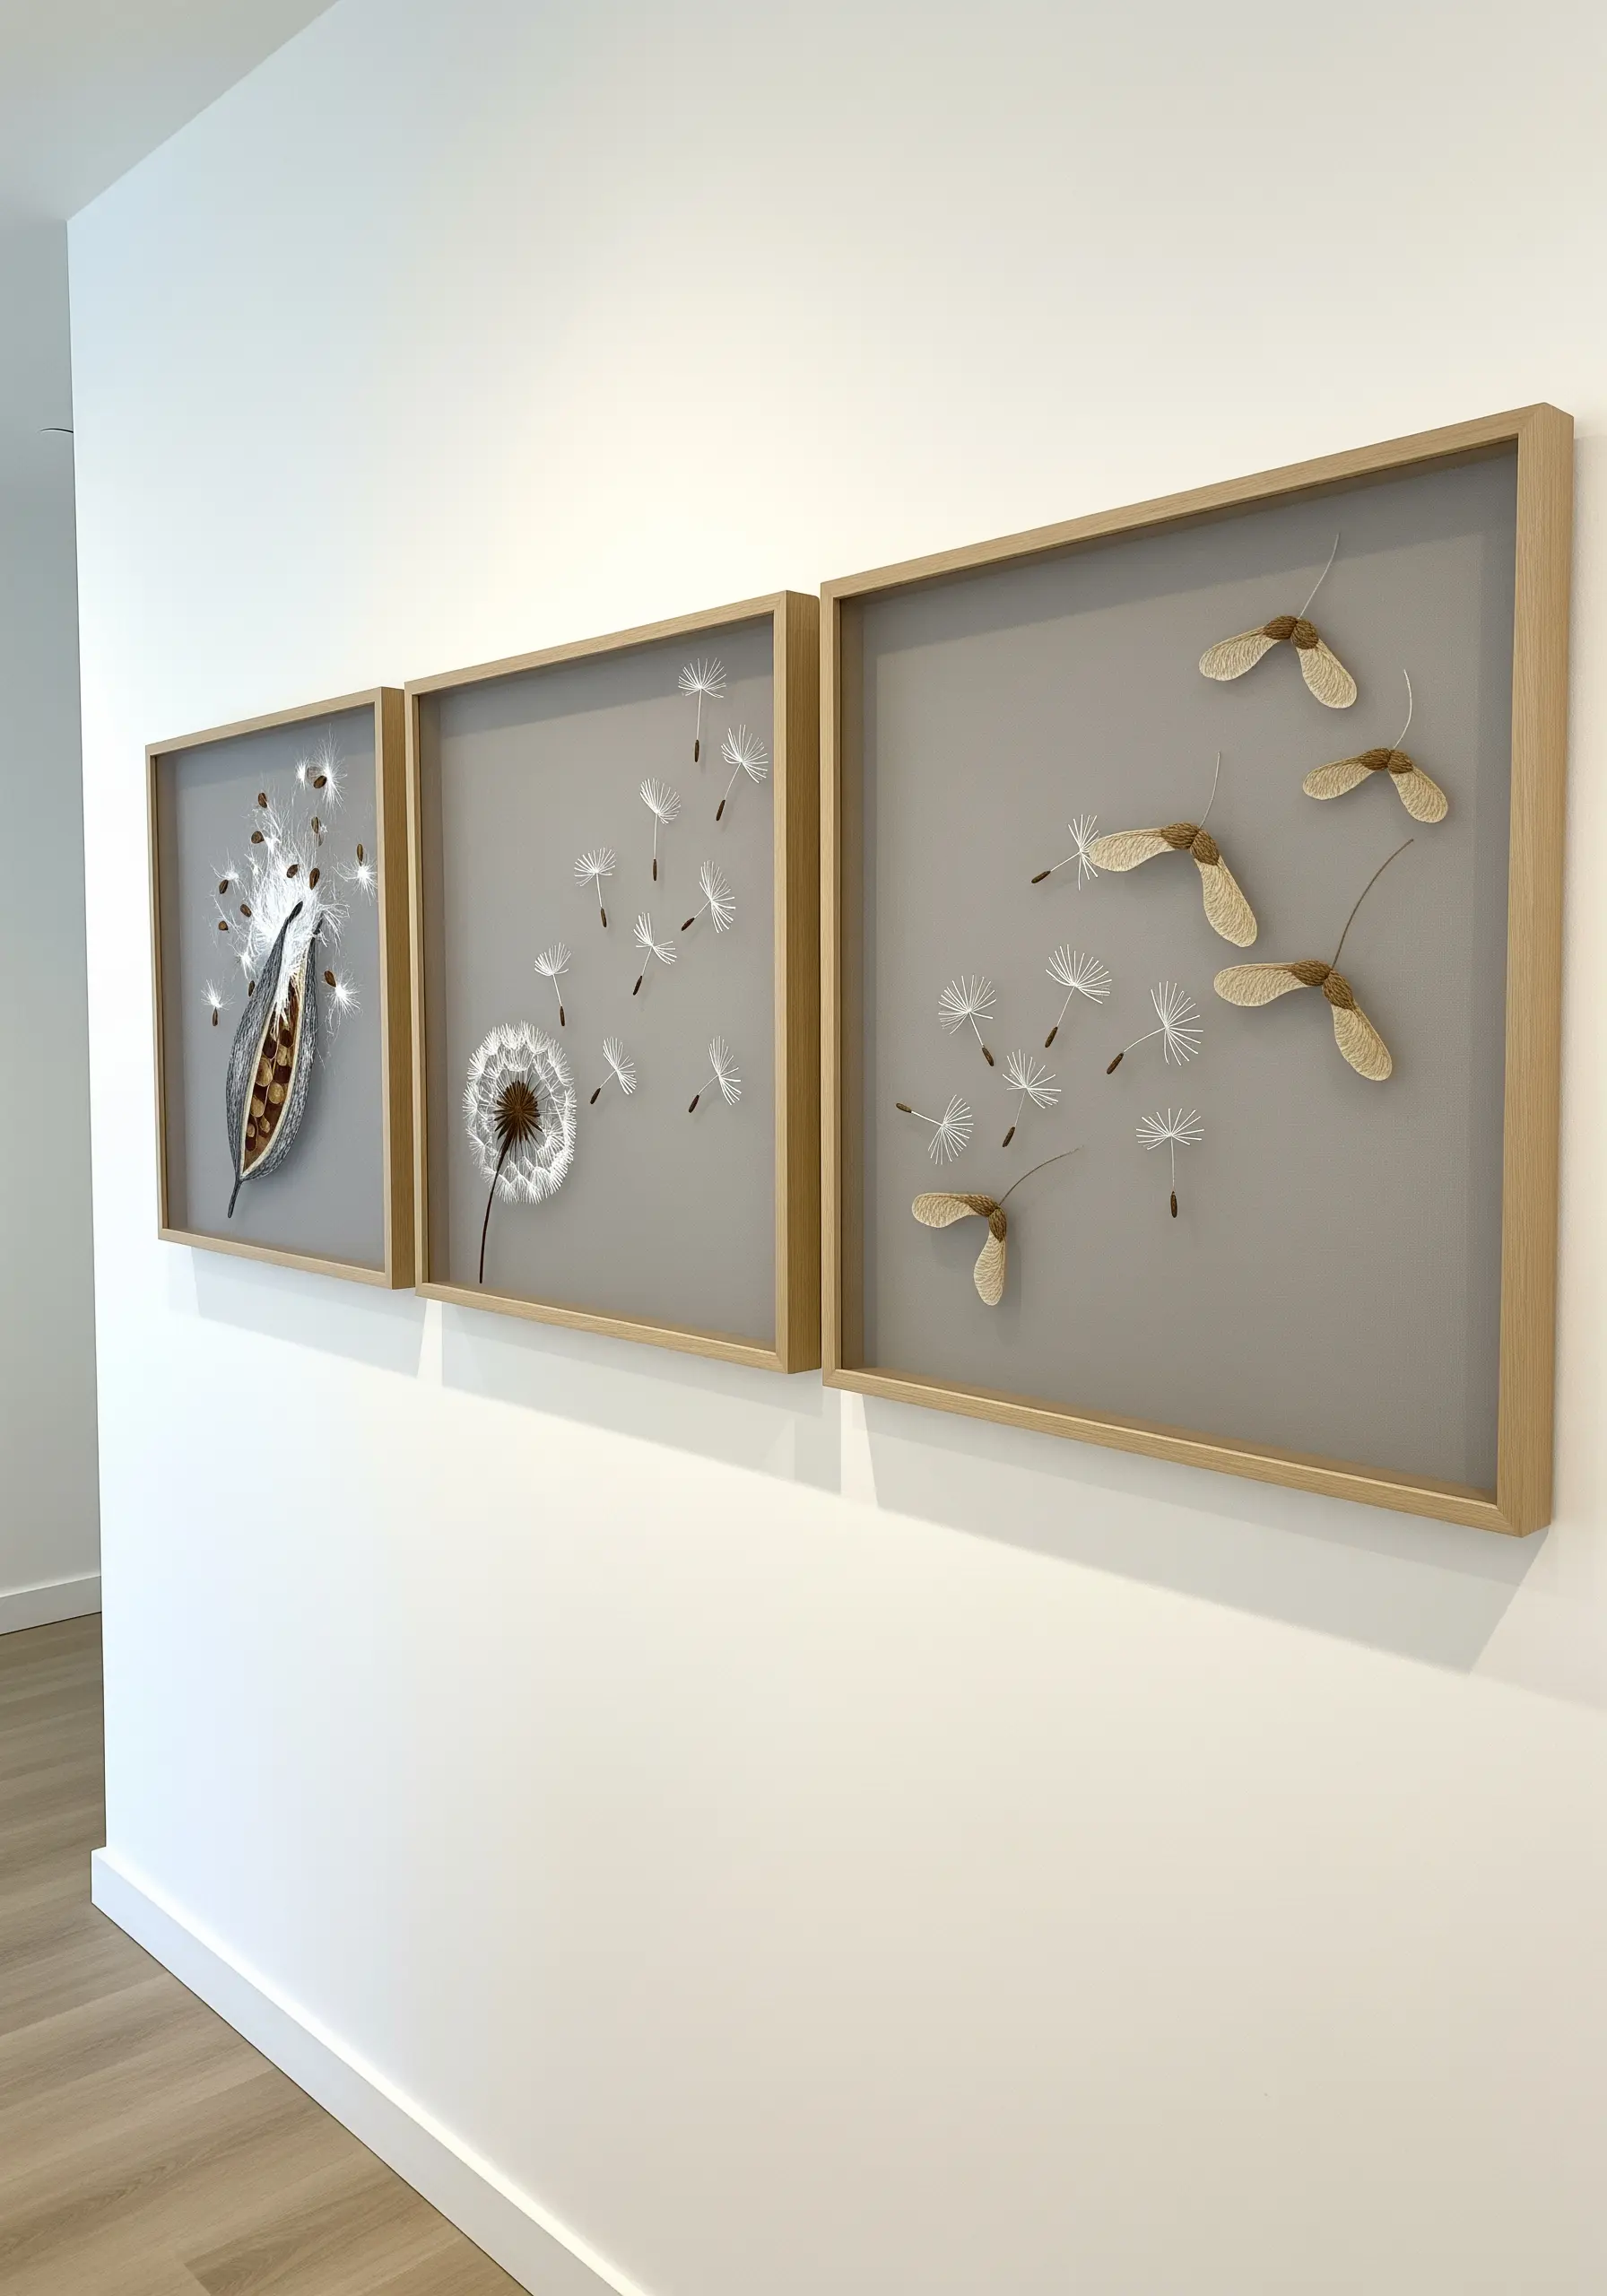
Use a series of three framed pieces to depict a sense of movement or the passage of time.
Focus on delicate elements like dandelion seeds or maple keys floating across the panels, using negative space to create a feeling of lightness and motion.
Stitch these motifs on tulle or organza and layer it over a solid backing fabric for added depth and shadow play.
This narrative approach turns your stitching into compelling framed embroidery art that tells a story.
10. Frame a View with a Vine Border
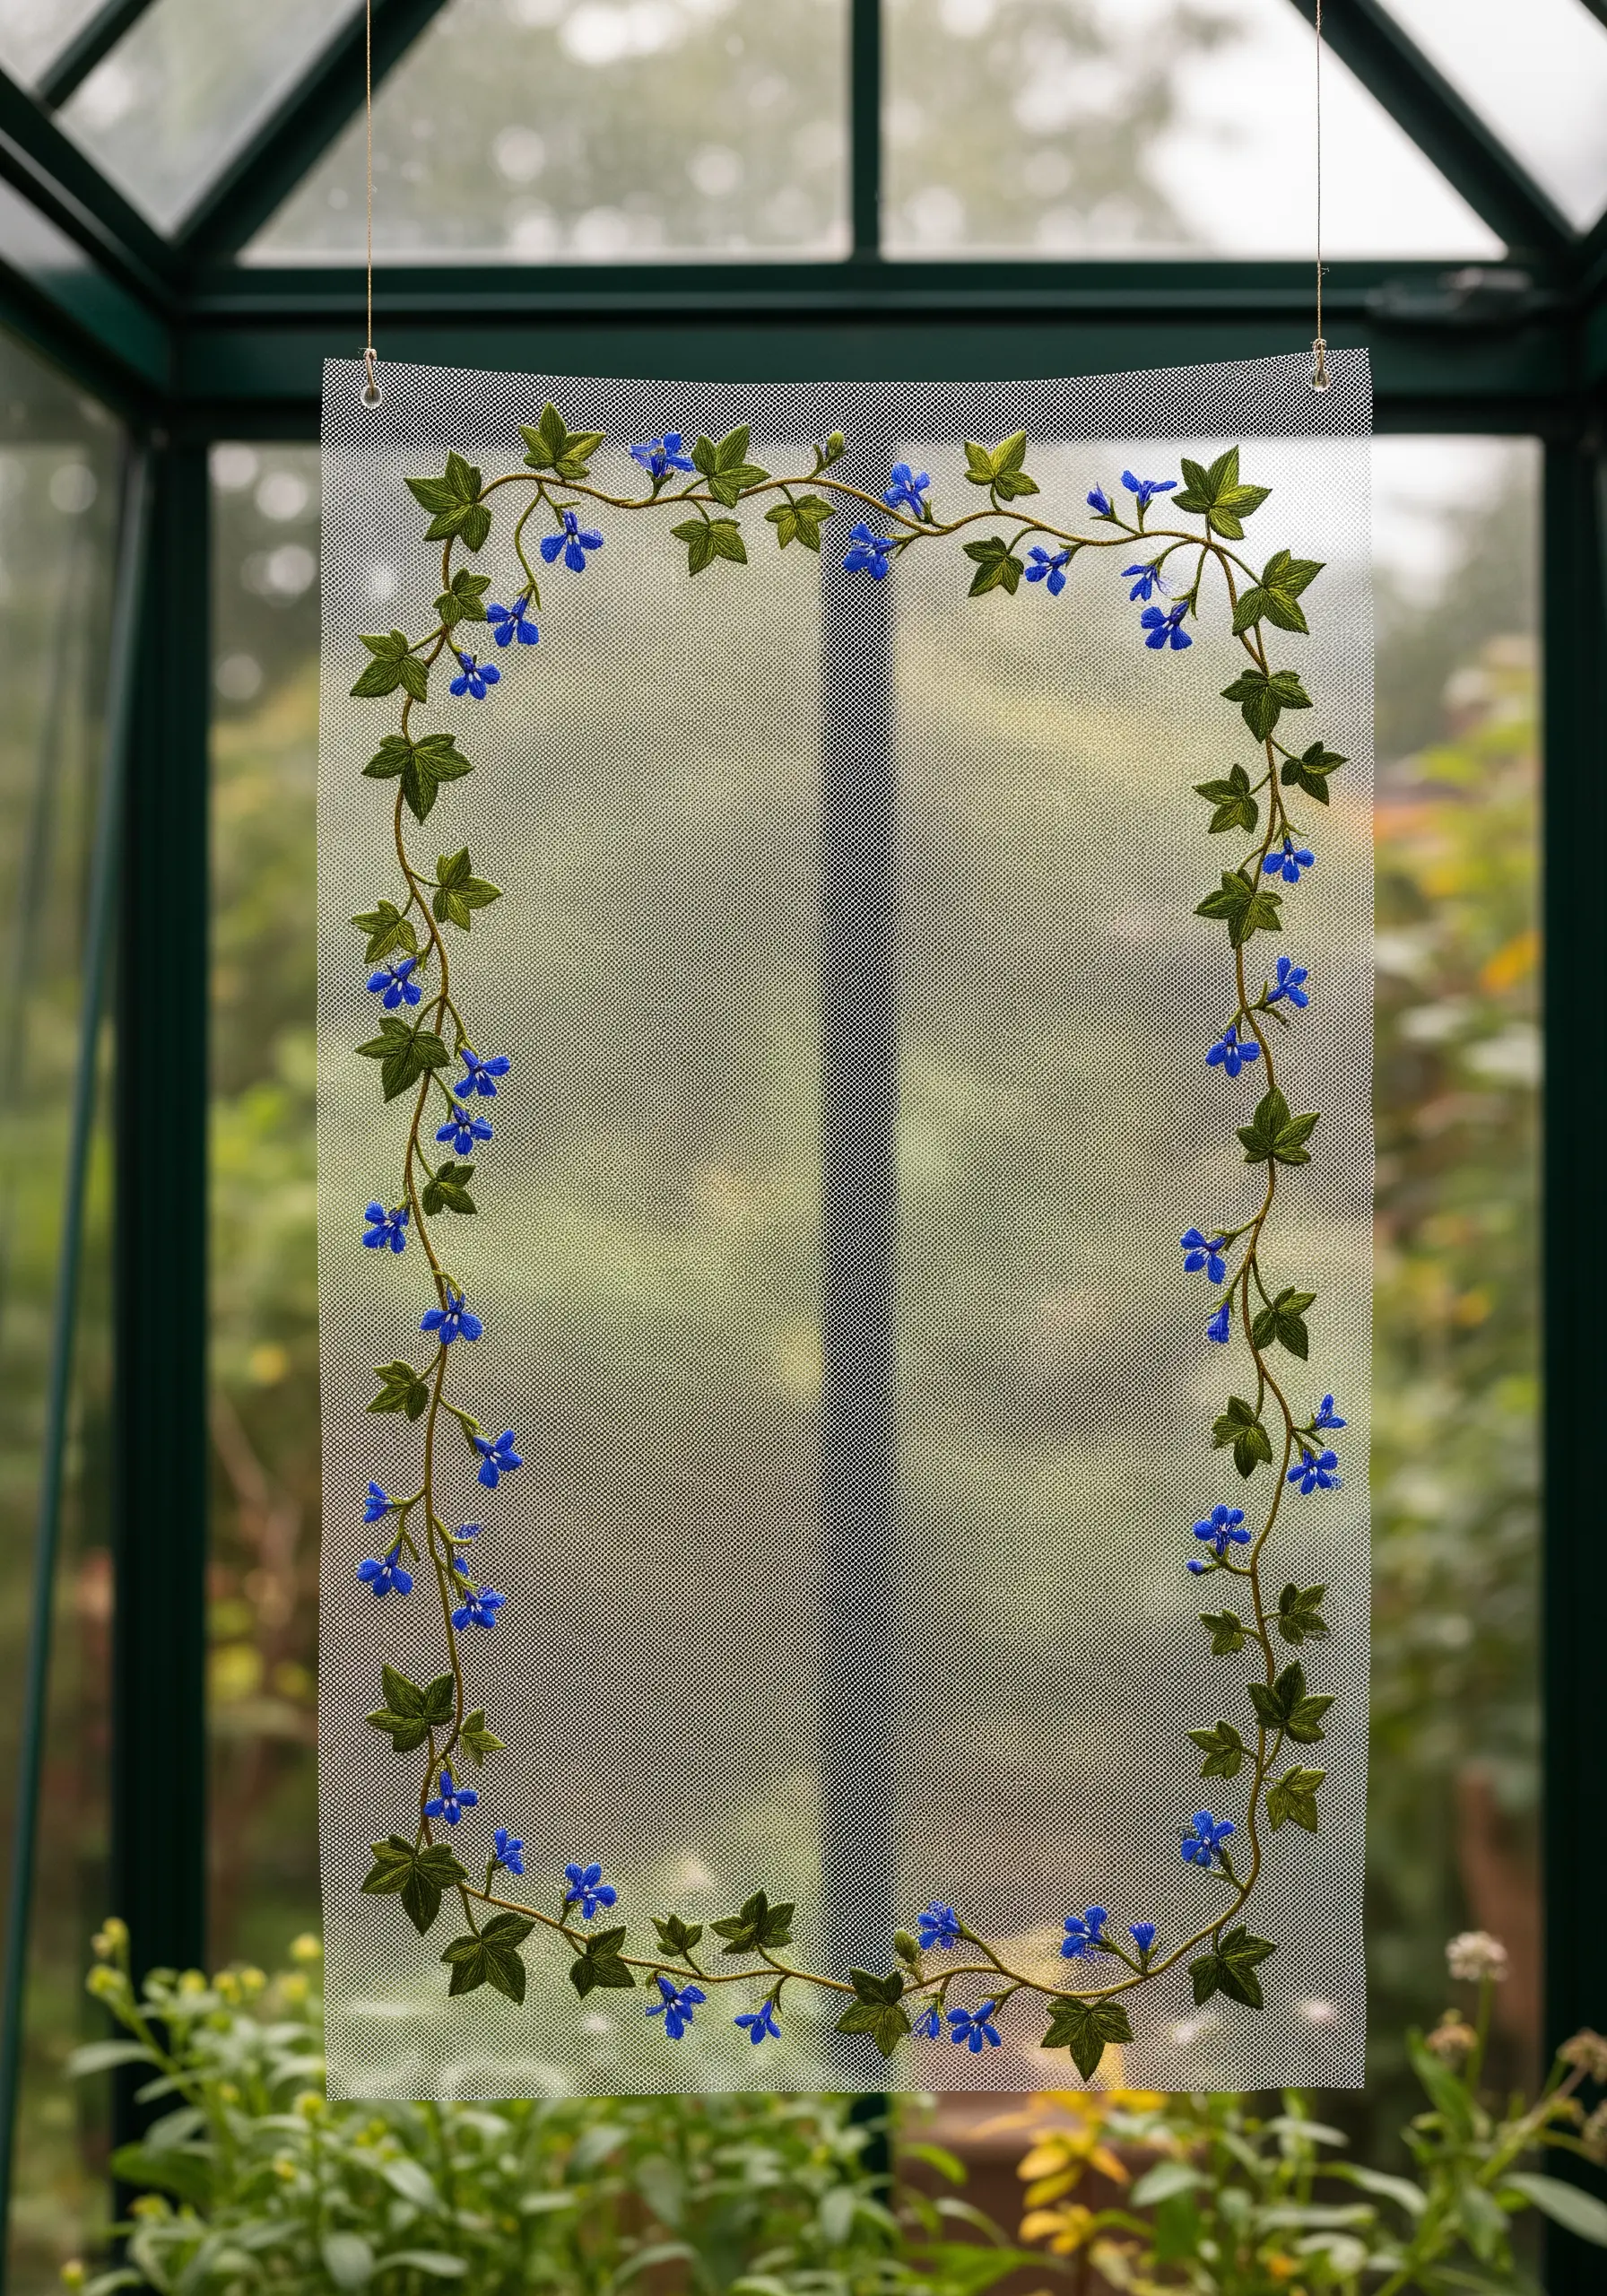
Stitch a delicate floral or ivy border onto a large panel of transparent fabric to create an elegant, ethereal frame.
When hung in a window or doorway, the central negative space allows the outside view to become part of the artwork.
This technique feels less like a solid barrier and more like a subtle, decorative screen that interacts with its environment.
It’s an inventive way to use floral border stitch concepts in home décor.
11. Anchor Real Pressed Flowers with Thread

Combine the authentic texture of pressed botanicals with the permanence of embroidery.
Instead of relying on glue, secure delicate pressed flowers and leaves to your fabric with tiny, strategically placed couching stitches.
Use a single strand of thread in a matching color to make the stitches nearly invisible, allowing the natural beauty of the flower to be the focus.
This method turns simple felt coasters into cherished pieces of timeless pressed flower art.
12. Achieve a Watercolor Effect on Curtains
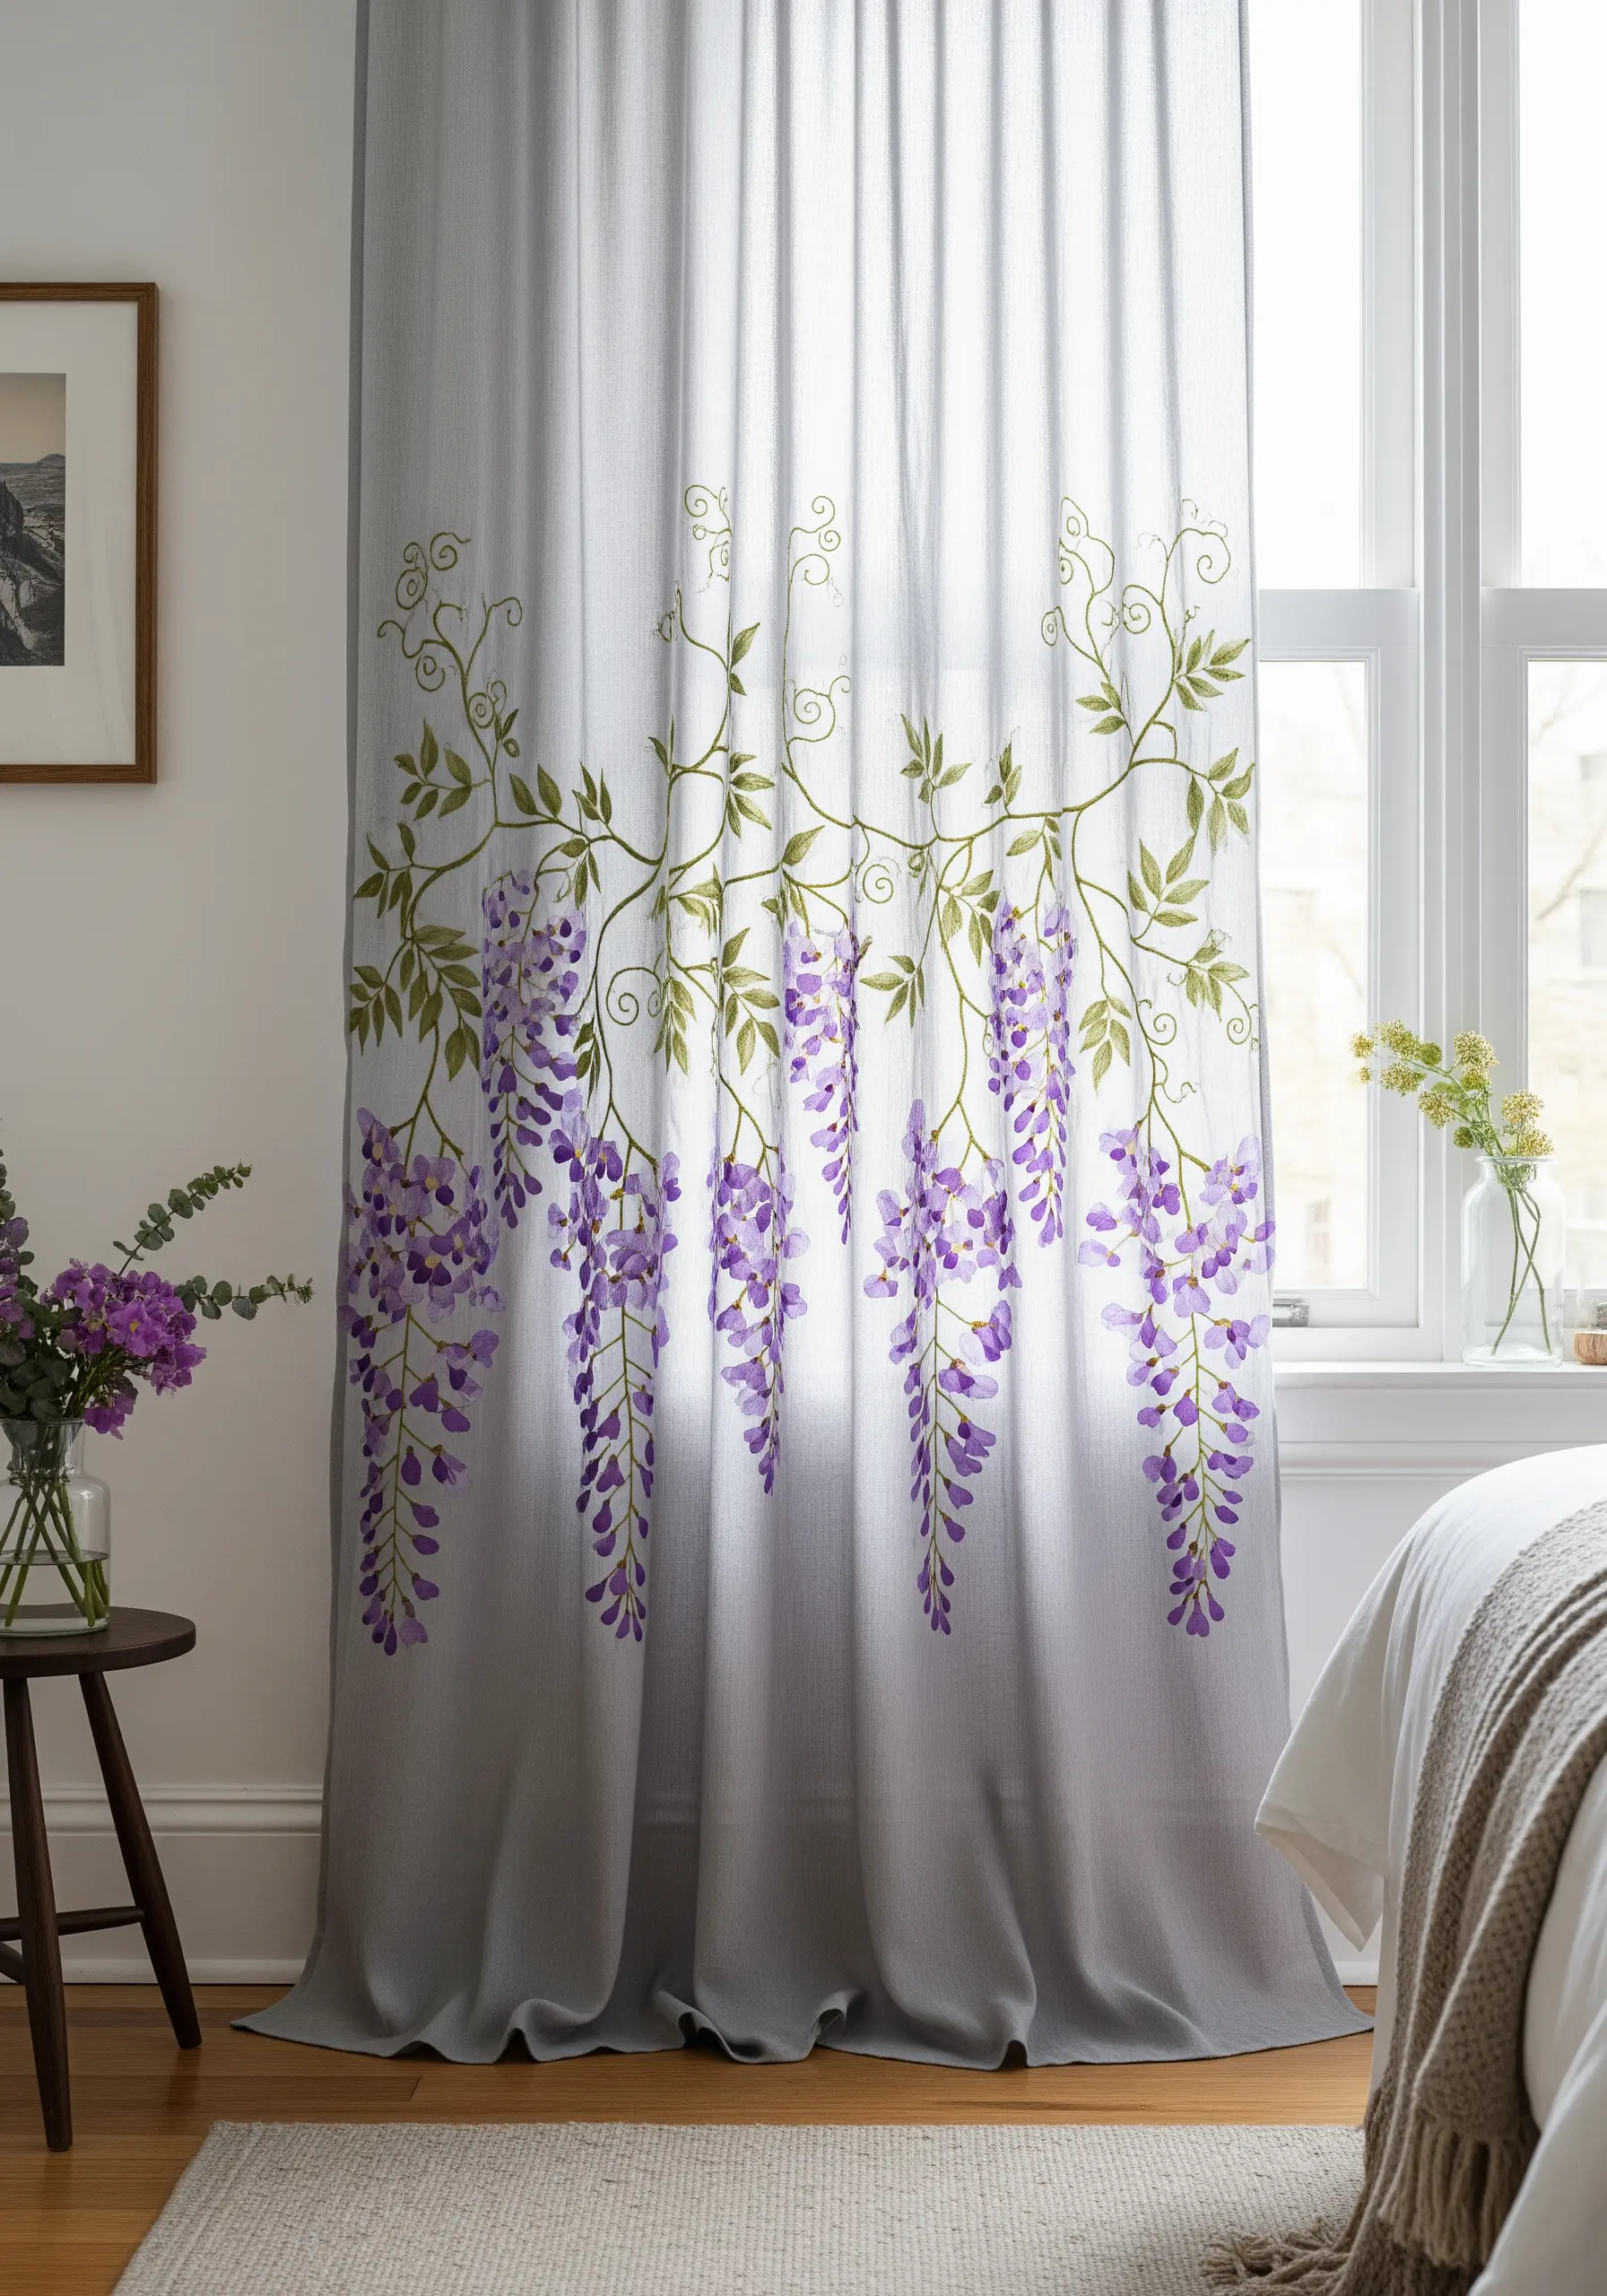
Give your floral embroidery a soft, painterly look by using the long-and-short stitch to blend colors seamlessly.
For wisteria, blend multiple shades of purple and lavender within each cluster of blossoms to create a gentle gradient that mimics a watercolor painting.
Choose a lightweight thread that won’t weigh down the curtain fabric, ensuring it continues to drape beautifully.
This technique adds a touch of watercolor-style floral elegance to functional home décor.
13. Cultivate a Maximalist Meadow Tapestry

Create the feeling of an abundant wildflower meadow by filling your entire fabric with dense, layered stitching.
Vary your stitch types to build rich texture: lazy daisies for simple petals, French knots for flower centers, bullion knots for buds, and satin stitch for larger blooms.
Use threads of different weights—a thick cotton for a bold poppy, a single strand for a delicate cornflower—to make certain elements stand out.
This approach celebrates color and texture, resulting in a vibrant, joyful piece of modern embroidered tapestry.
14. Embellish Paper Goods with Botanicals
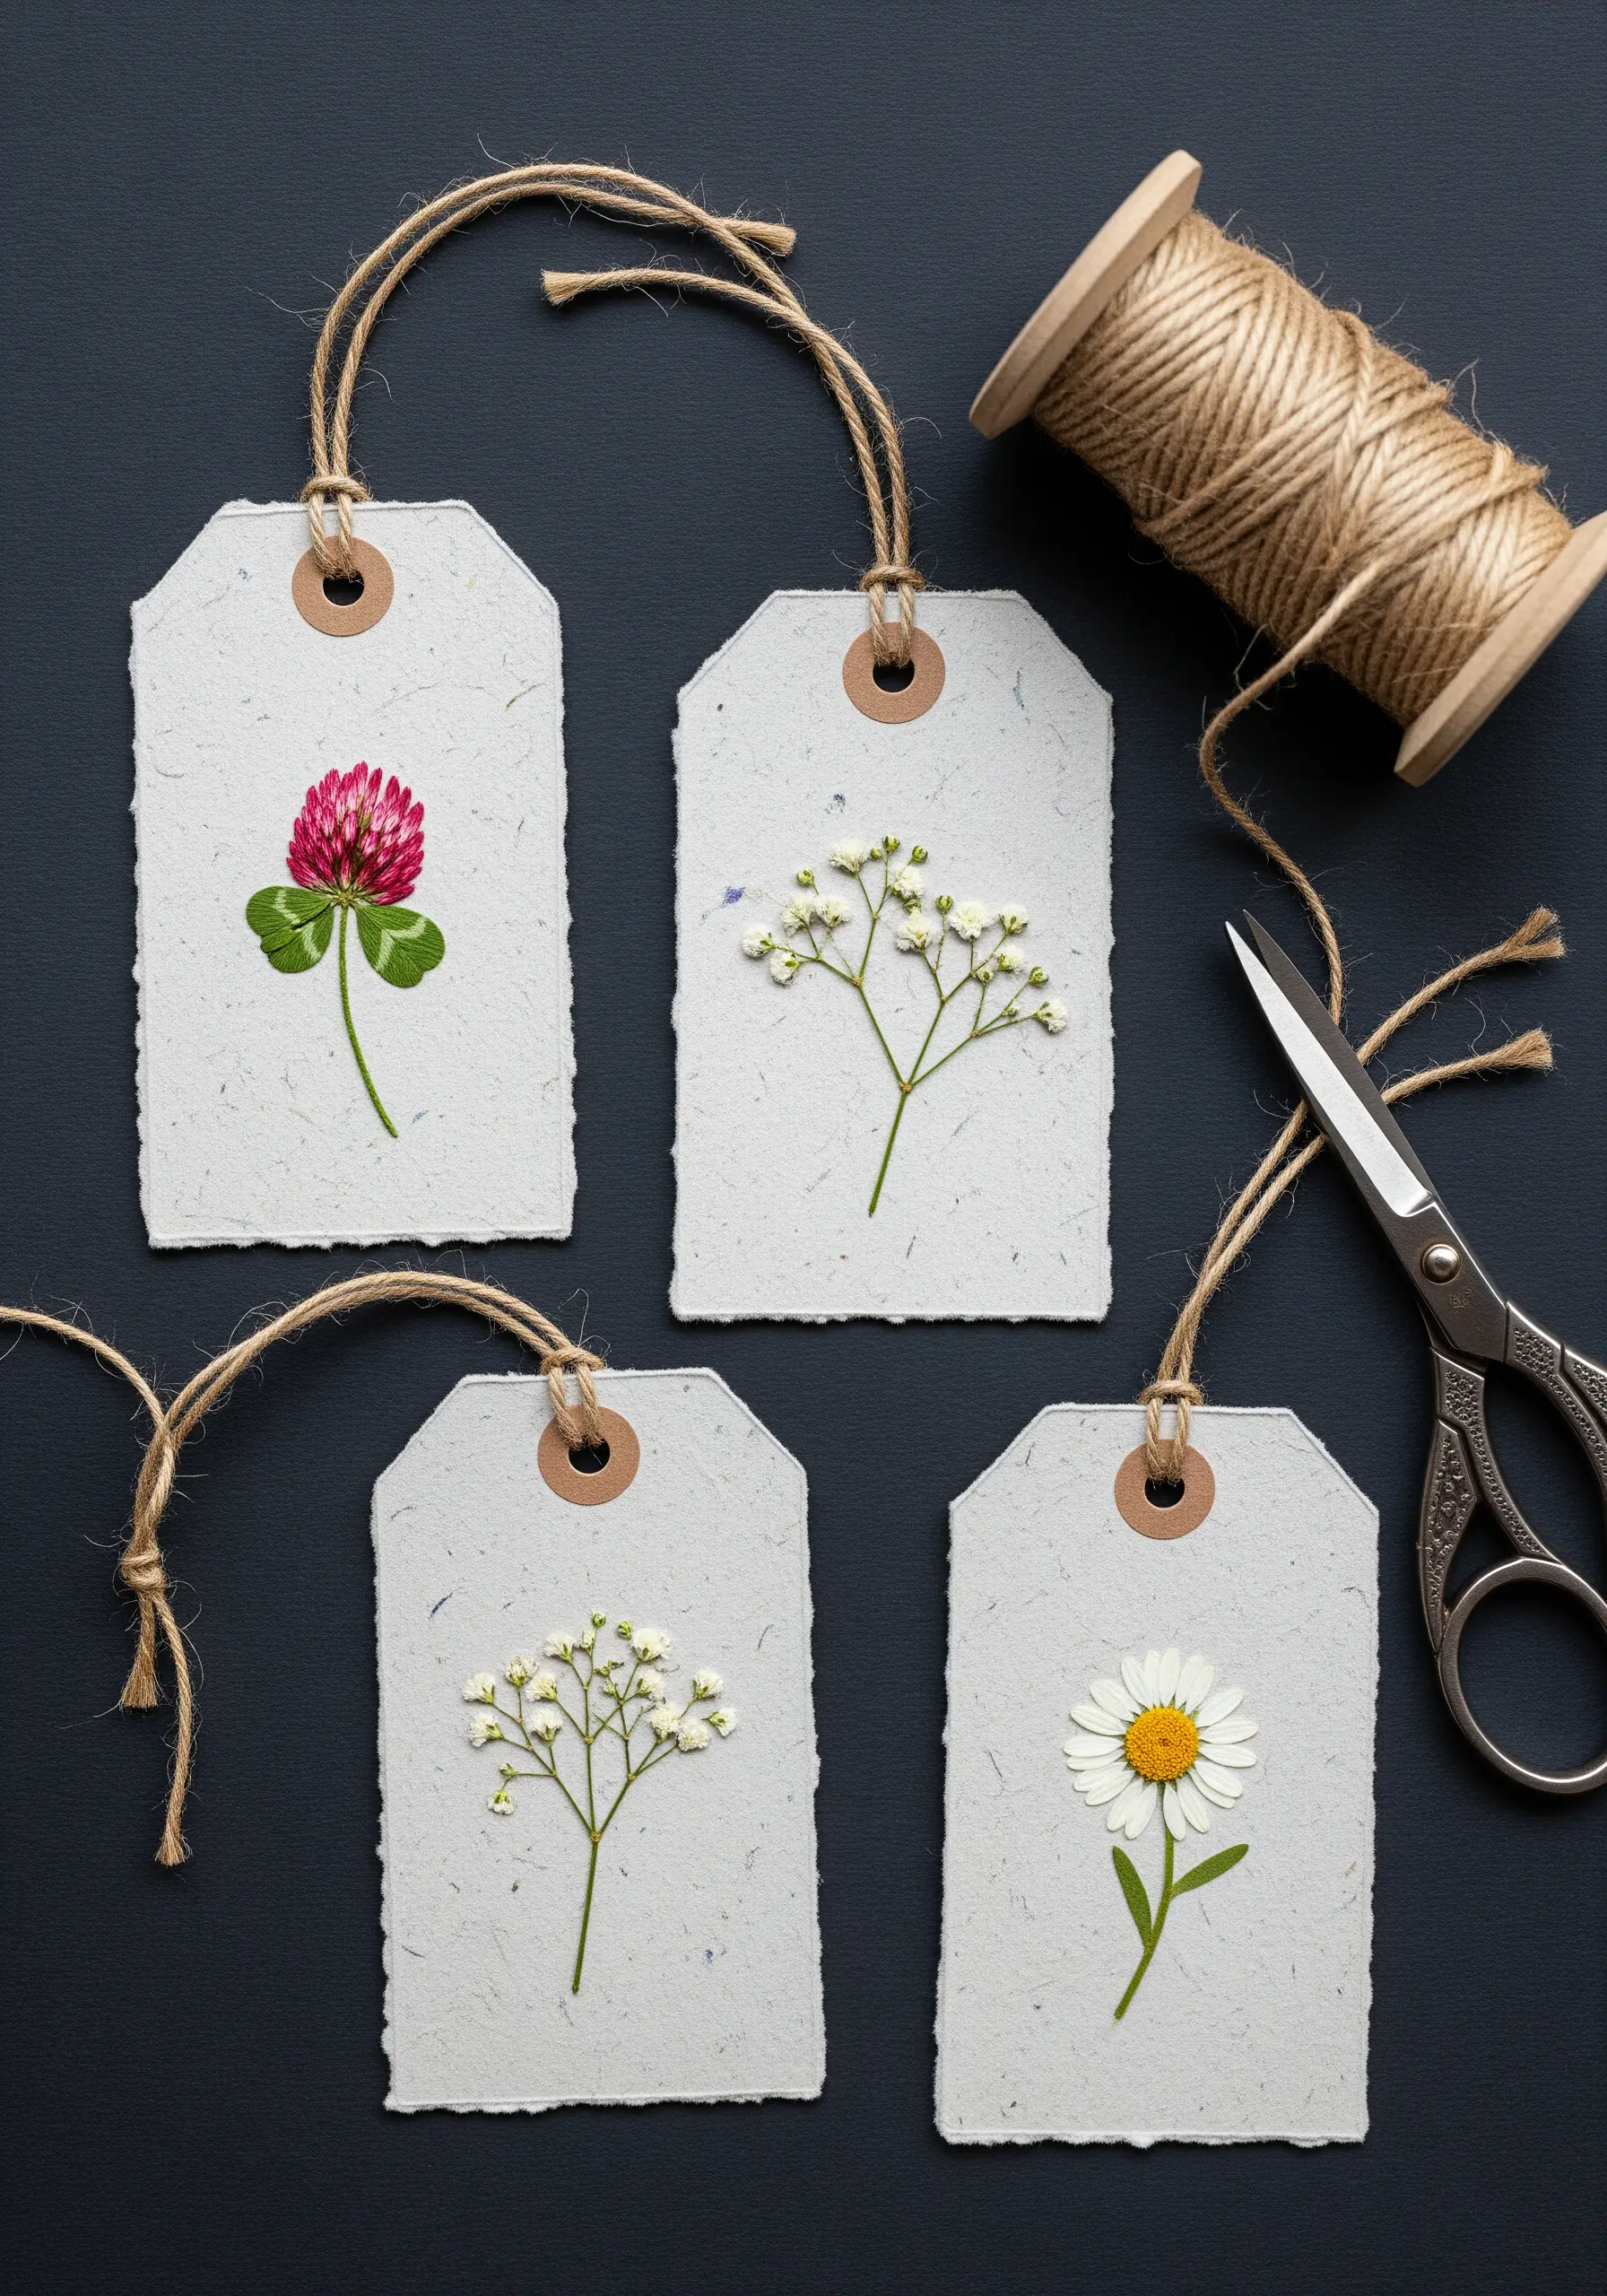
Extend your embroidery skills beyond fabric by incorporating pressed flowers into paper crafts.
Attach a single, perfect bloom or a delicate sprig to handmade paper gift tags using a few careful stitches through the stem.
This avoids messy glue and adds a subtle, handcrafted detail that elevates the final product.
It’s a wonderful way to create small embroidery ideas that feel personal and unique.
15. Illuminate Your Stitches on a Lampshade
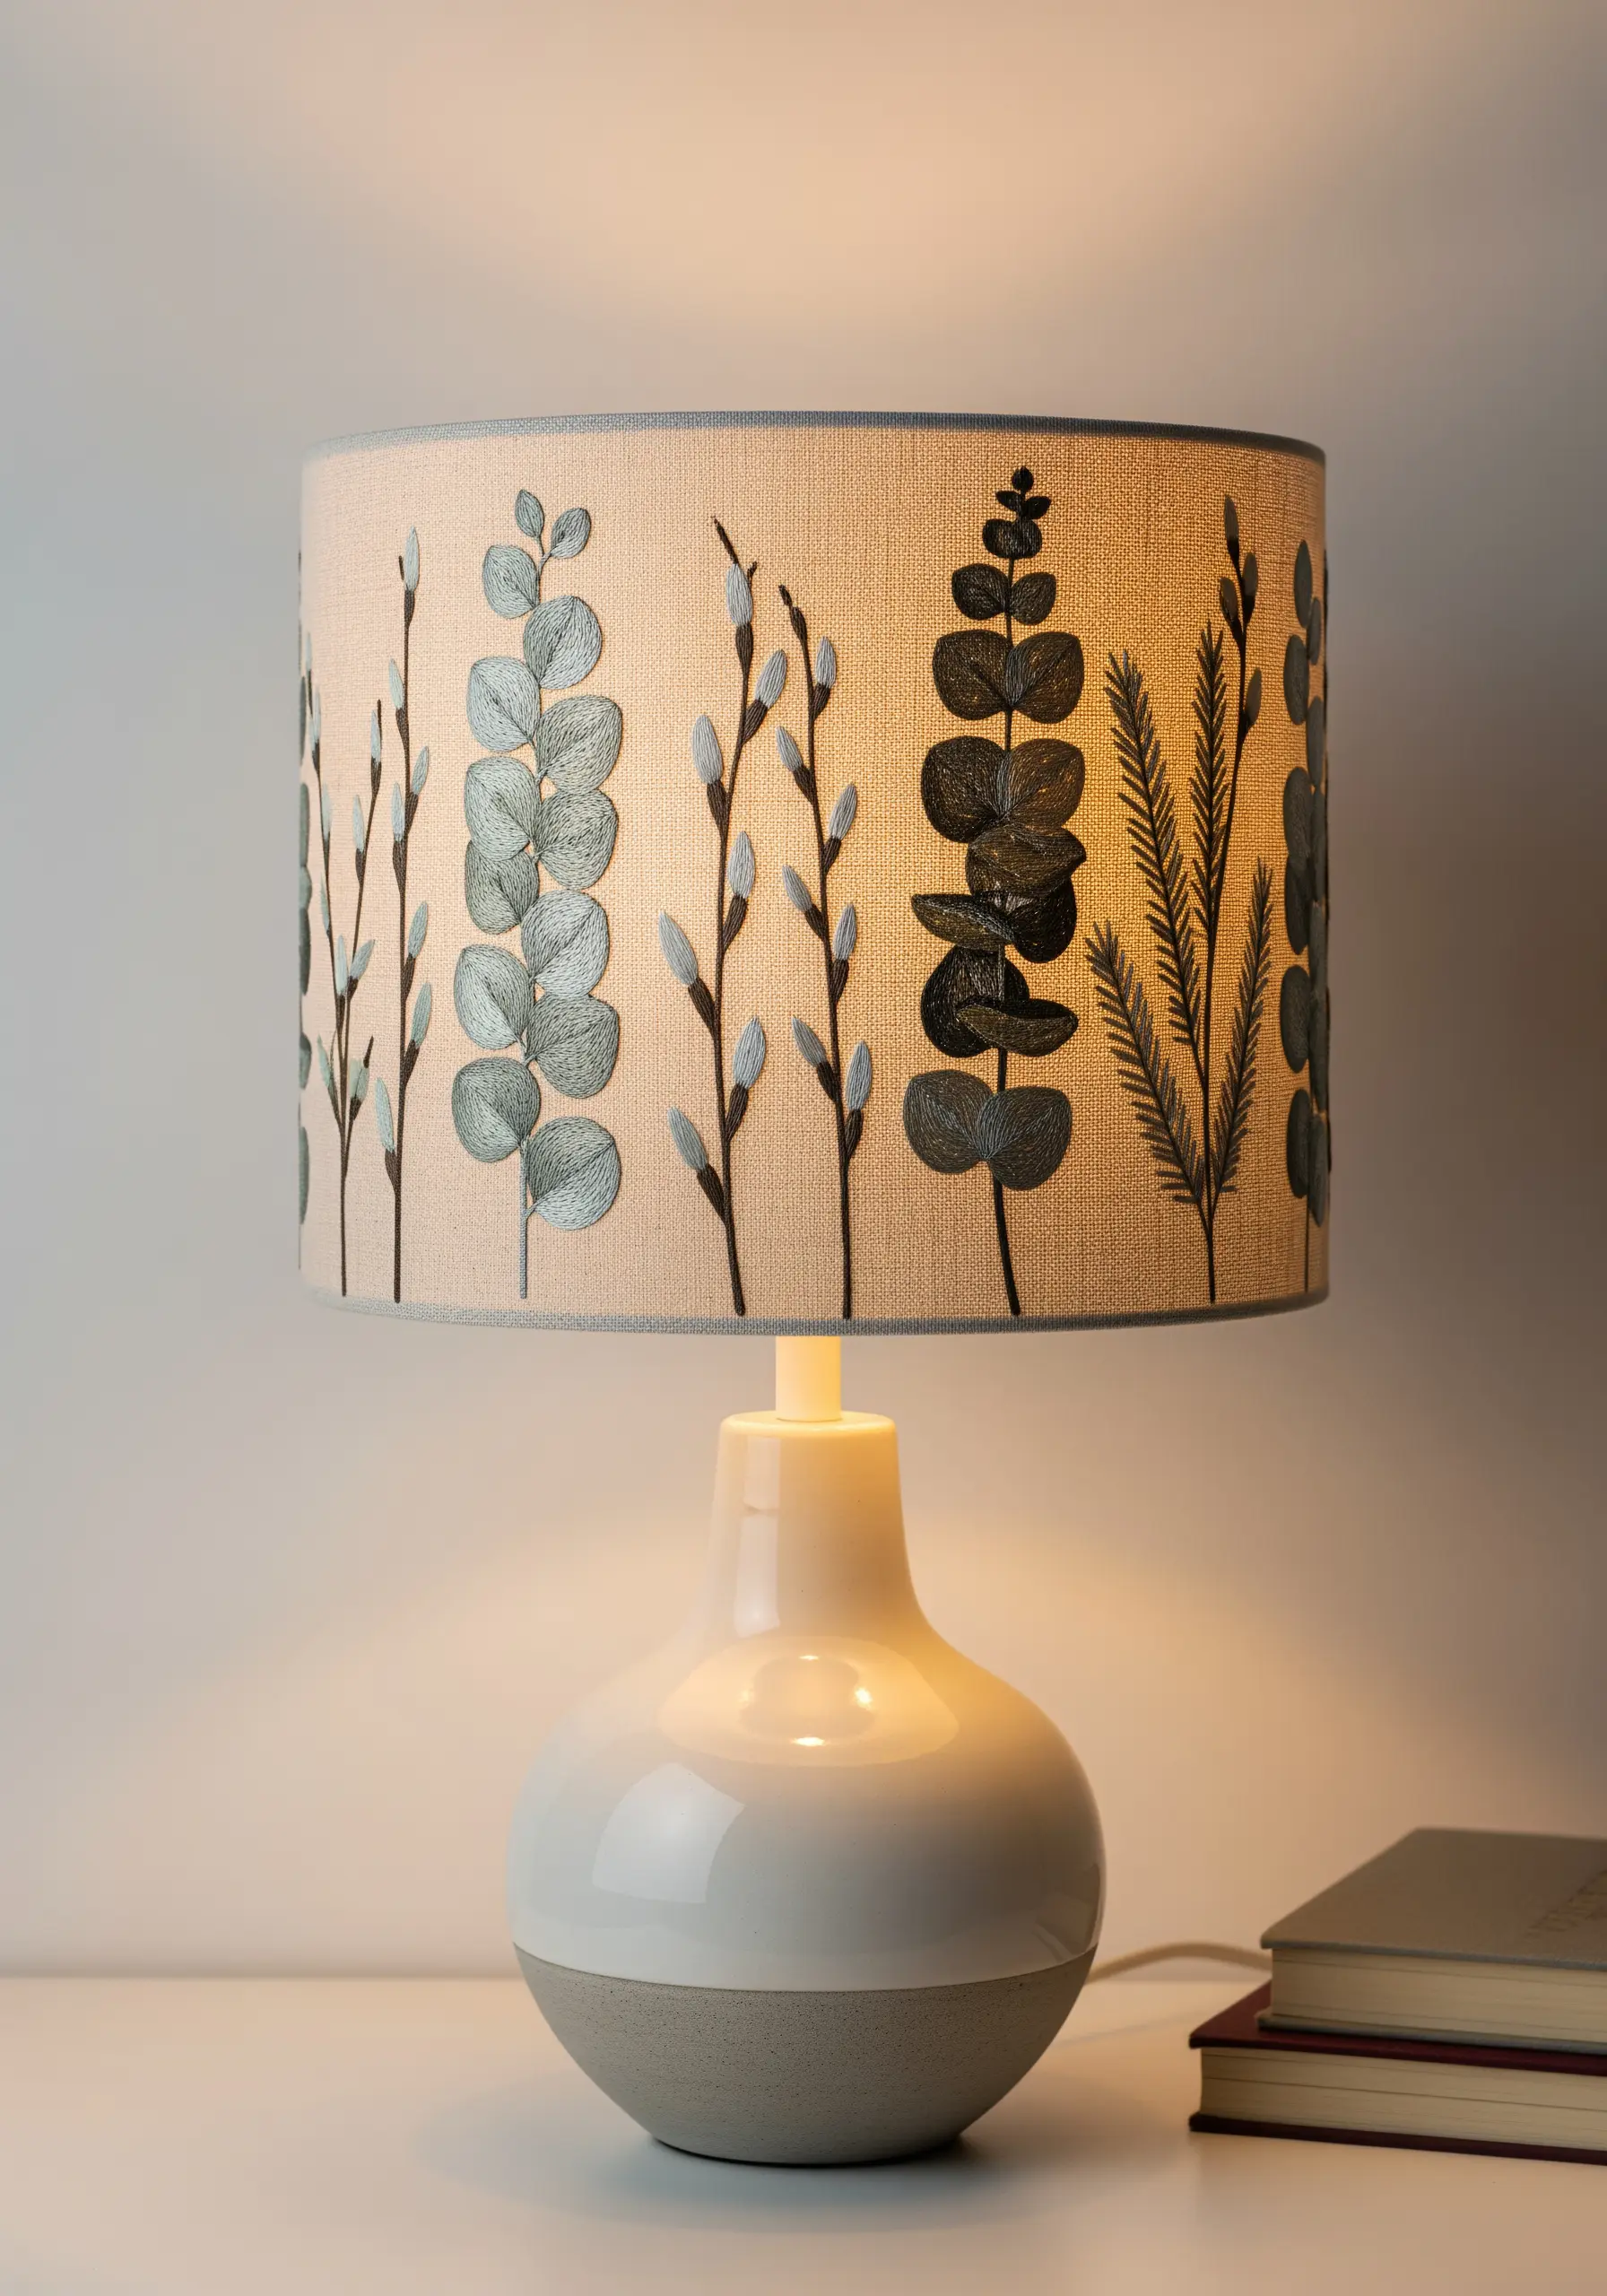
Embroidering a lampshade allows your threadwork to interact with light in a unique way.
Stitch your design onto the fabric panel before the lampshade is constructed for easier handling.
Choose a limited, cohesive color palette. The backlighting will emphasize the texture and silhouette of your stitches, so even simple satin and stem stitches will have a dramatic effect.
This project turns a functional object into a piece of elegant embroidery decor.
16. Create Symmetry with a Floral Mandala
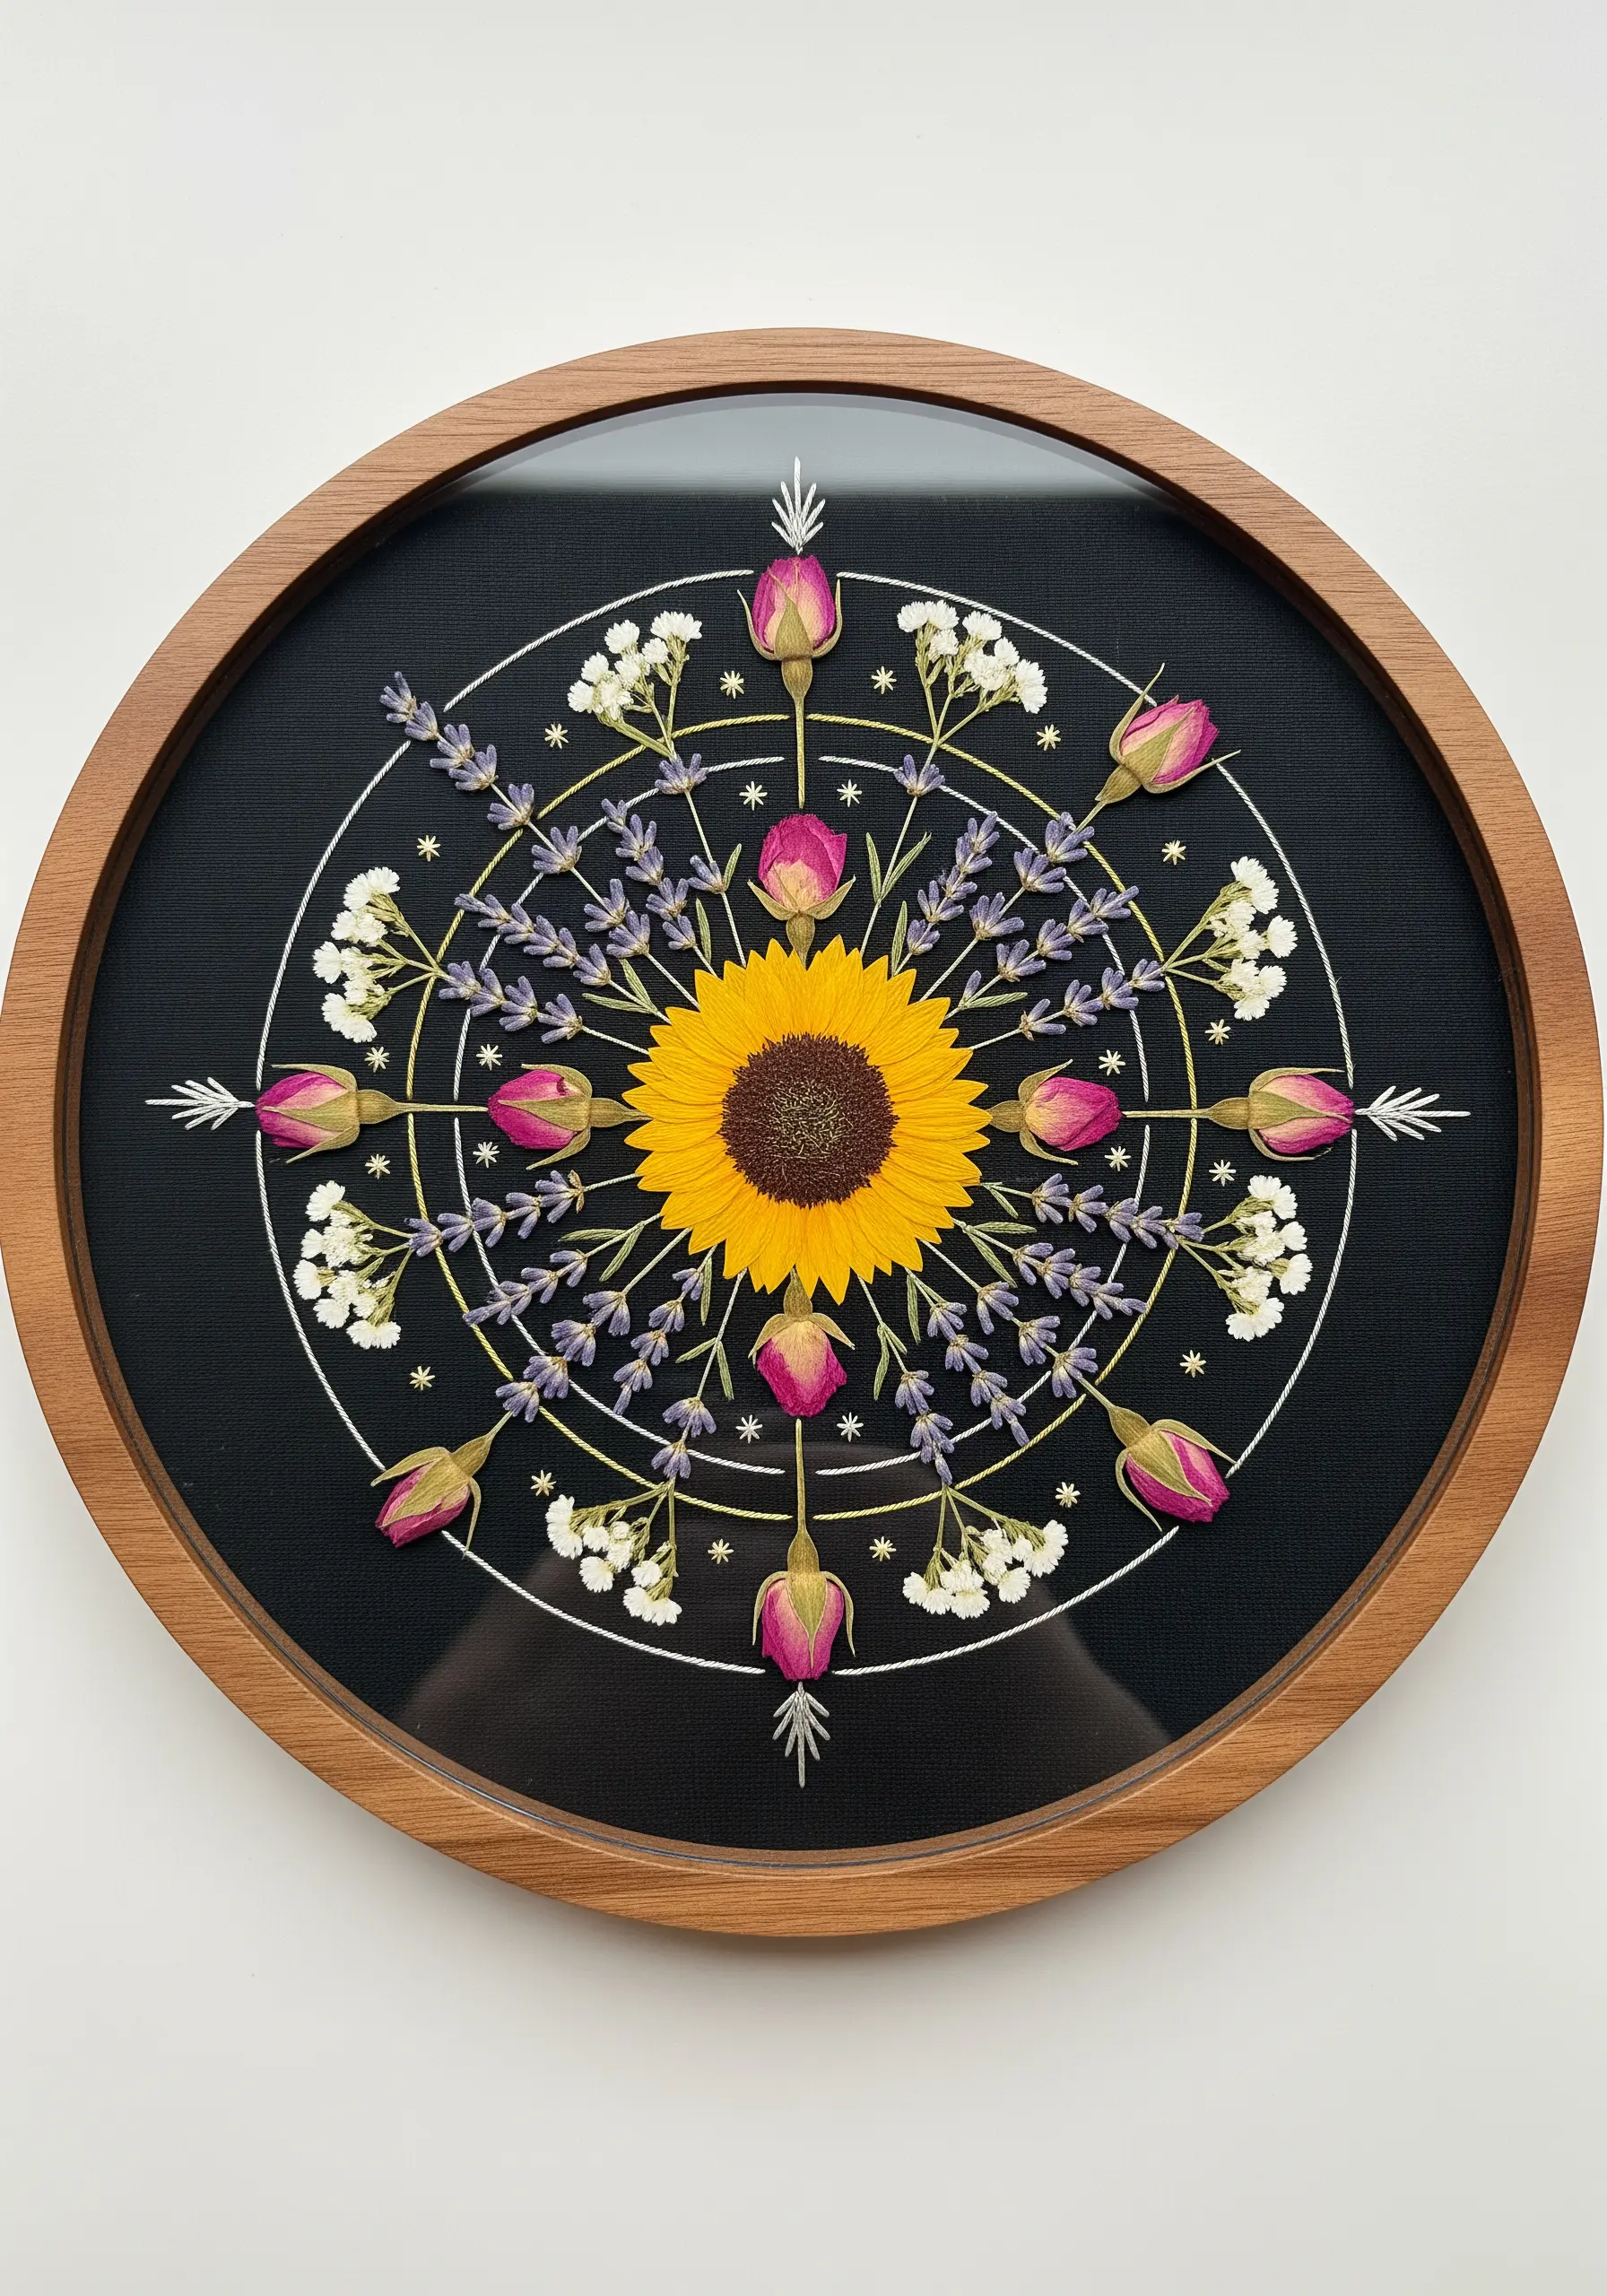
Combine the organic beauty of real flowers with the structured harmony of a mandala design.
Use a central flower as your anchor point and arrange real dried rosebuds, lavender sprigs, and baby’s breath in a symmetrical, radial pattern.
Add fine, stitched geometric lines to provide structure and contrast against the soft textures of the botanicals.
This combination of pressed flowers with embroidery creates a meditative and visually balanced piece.
17. Craft a Bold Fabric Collage Leaf

Instead of filling a large shape with thread, use fabric scraps to create a vibrant collage.
Cut pieces of fabric in warm tones—red, orange, yellow—and arrange them to create a color gradient within the leaf outline.
Secure the pieces with a bold, decorative running stitch or couched yarn, turning the structural stitches into a key part of the design.
This fabric collage embroidery technique is perfect for upcycling scraps and making a statement on a denim jacket.
18. Construct a Serene Botanical Mobile
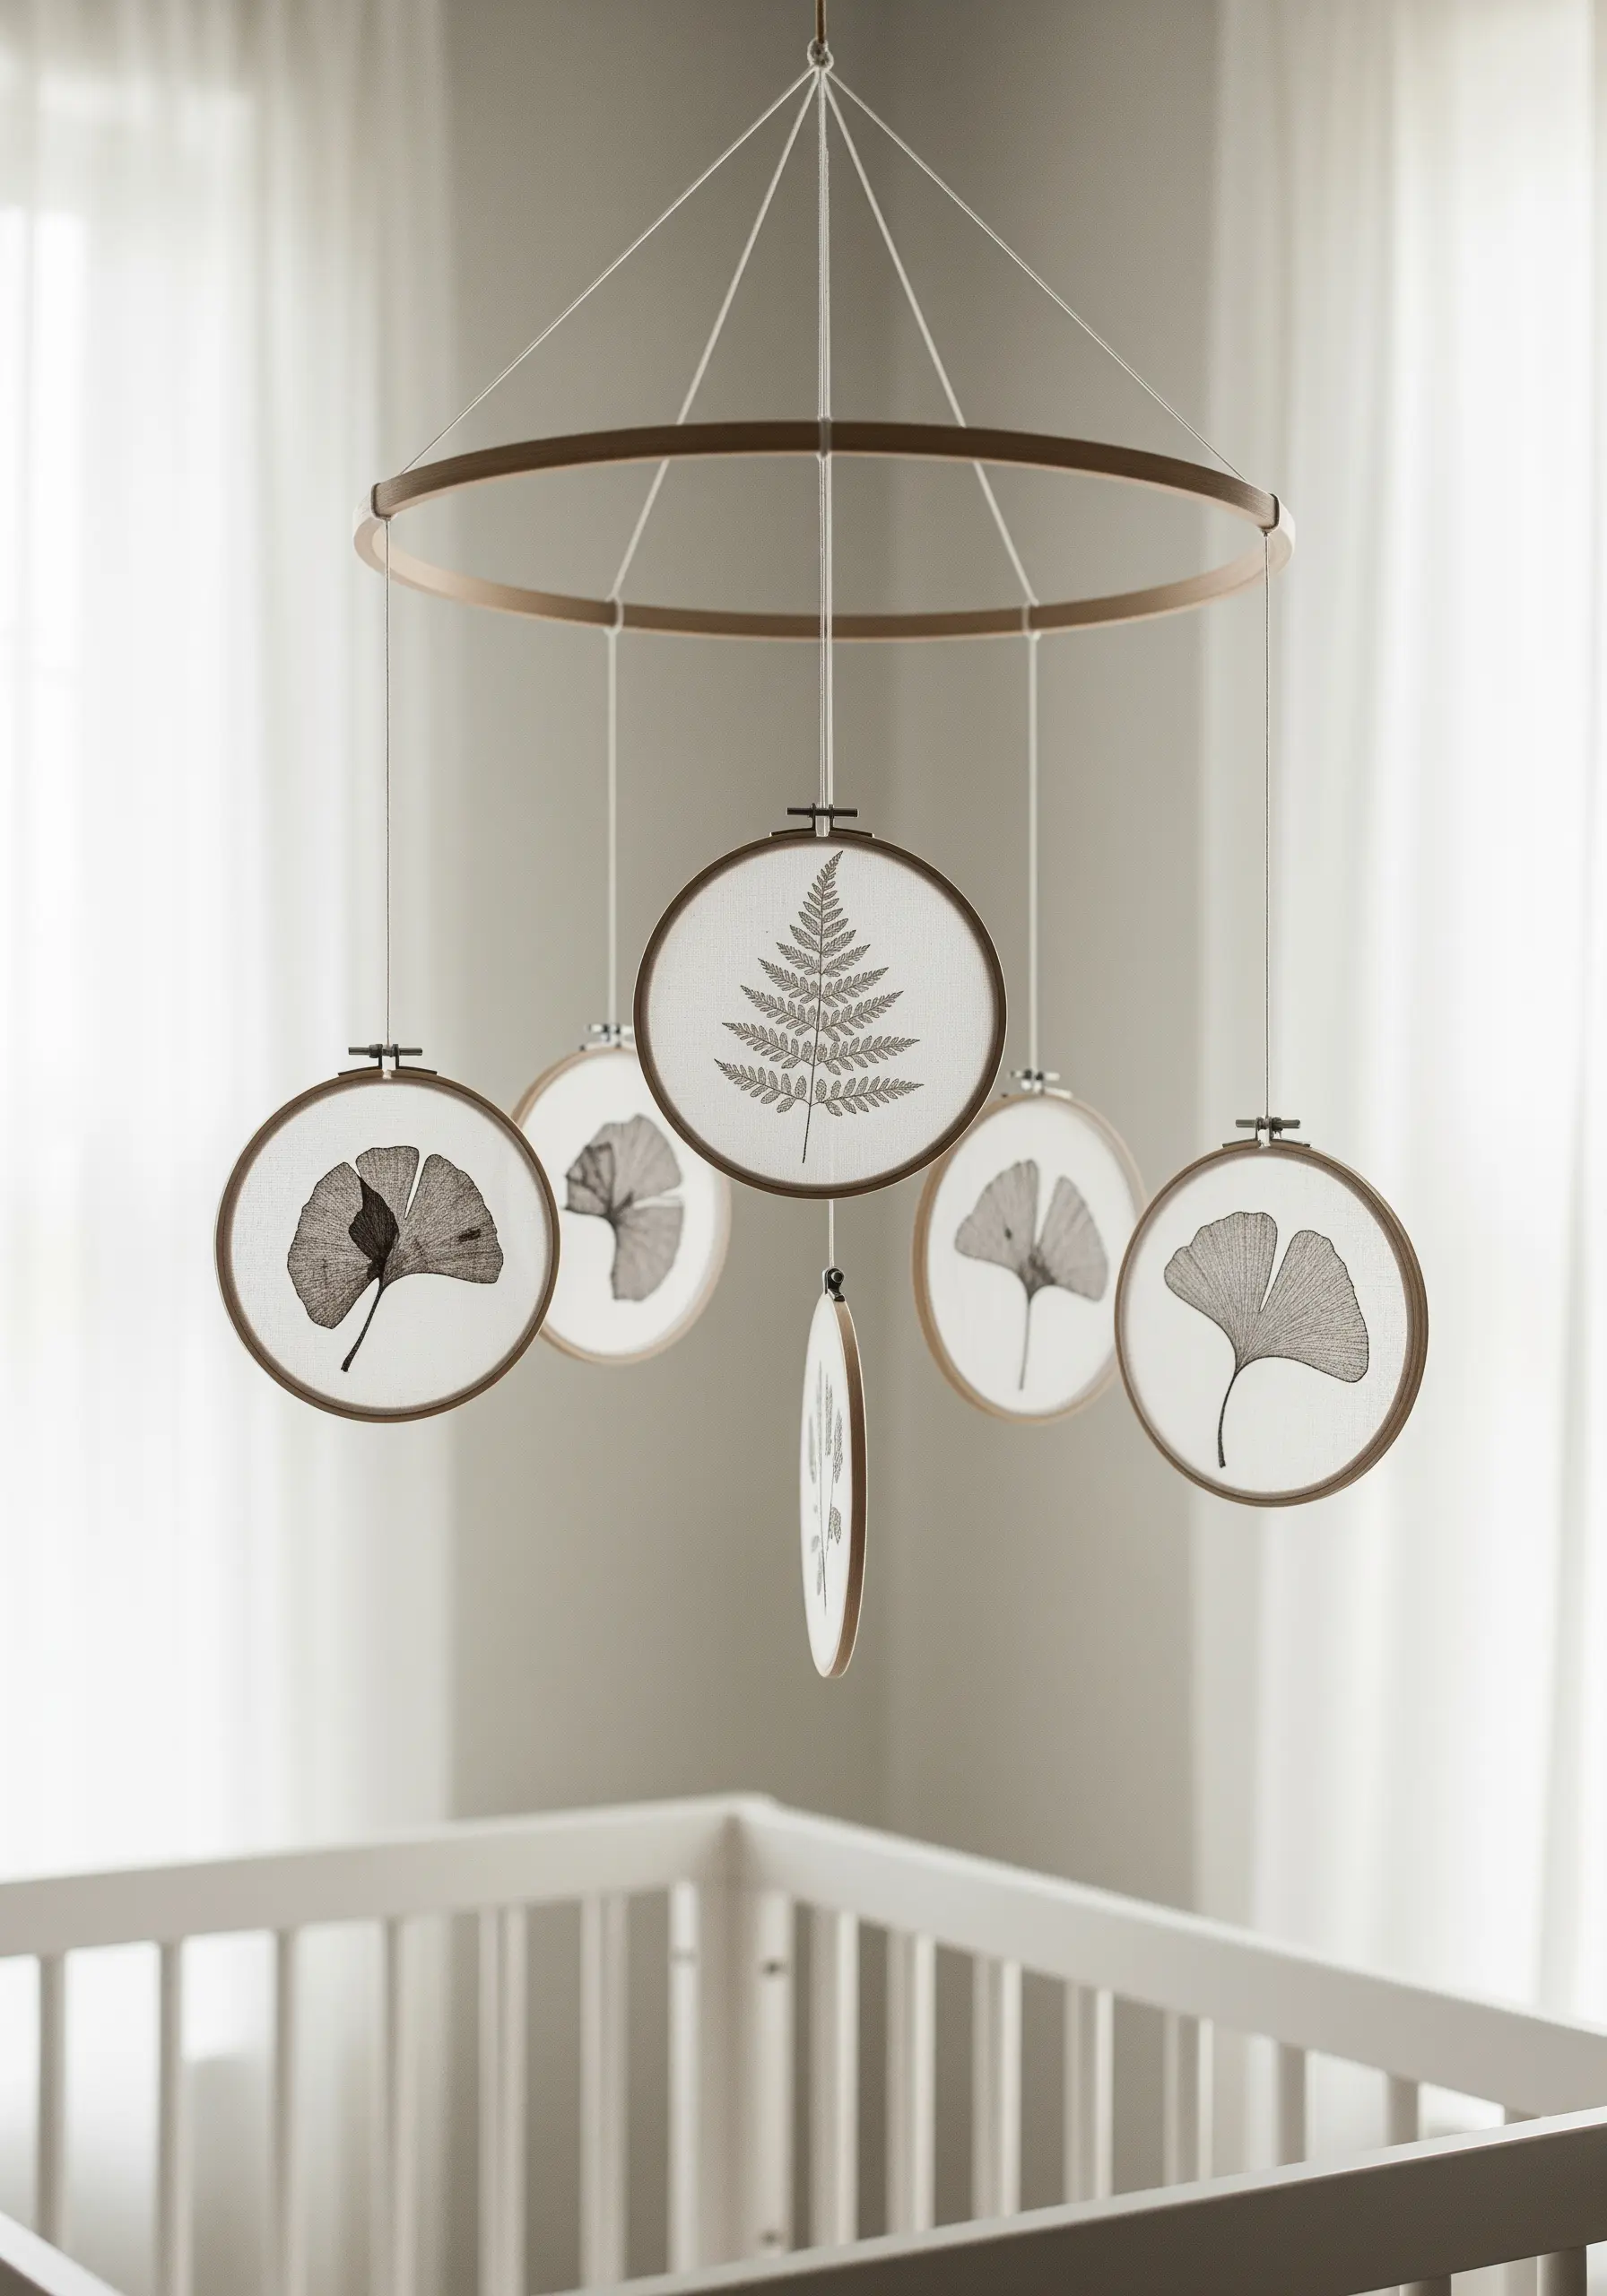
Create a gentle, calming mobile for a nursery or quiet corner using delicate botanical motifs.
Embroider leaf silhouettes onto a semi-transparent fabric like linen or cotton voile in small, lightweight hoops.
Using a muted, earthy color palette enhances the serene and natural feel of the piece.
This project transforms simple embroidery hoops into a graceful, kinetic sculpture that moves with the slightest breeze, perfect for dreamy, nature-inspired decor.
19. Stitch a Hyper-Realistic Herbal Bookmark
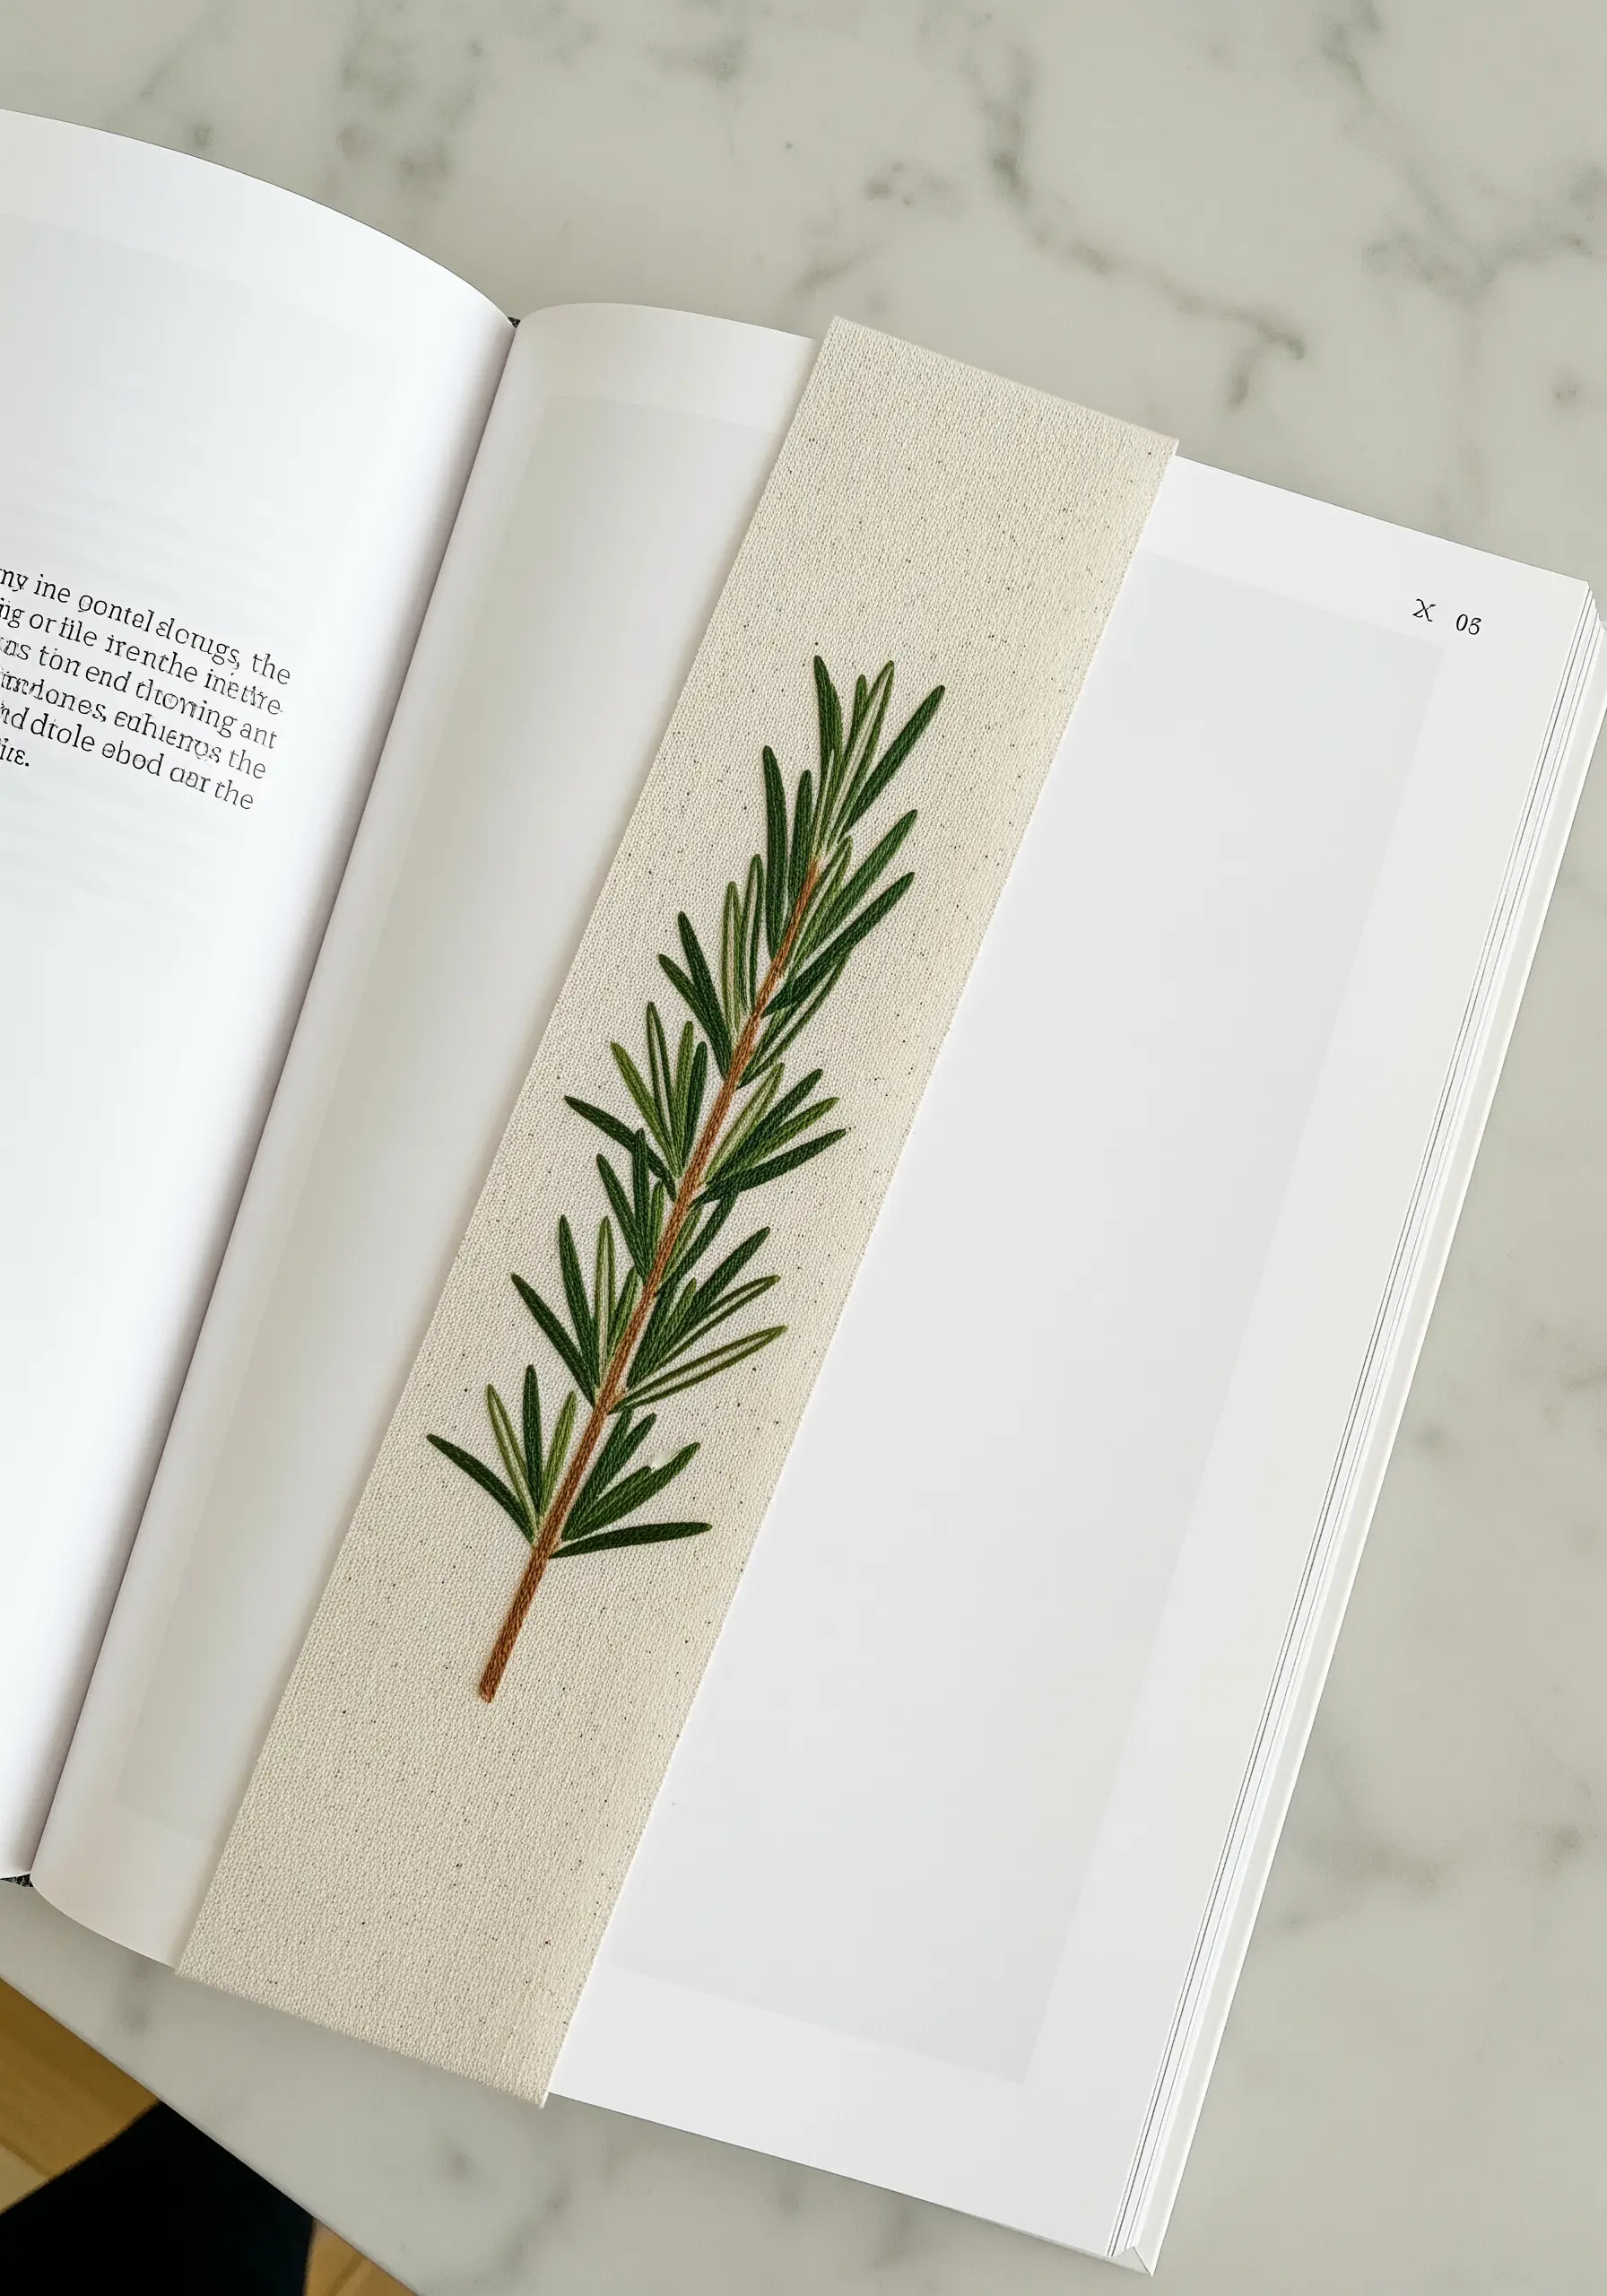
Capture the fine detail of a single botanical sprig, like rosemary, for an elegant and practical project.
Use a single strand of floss to maintain precision. A stem stitch for the main branch and tiny, angled straight stitches for the needles will create a remarkably lifelike effect.
The key is observing the natural growth pattern of the plant and replicating it in thread.
This technique turns a simple bookmark into a small, detailed piece of minimalist botanical stitching.
20. Arrange a Modular Botanical Grid

Instead of committing to one large composition, create a series of small, individual botanical studies.
Stitch each flower or leaf on its own square of fabric, which you can then arrange in a grid formation.
This modular approach is less intimidating and offers flexibility in how you display the final piece.
It’s an excellent way to build a collection of tiny embroidery wall art that can grow over time.
21. Deconstruct a Flower to Perfect Your Technique

Improve your thread painting skills with a botanical study page, stitching a flower and its components separately.
First, embroider the complete blossom. Then, on the same piece of fabric, stitch its individual petals and leaves as isolated elements.
This analytical exercise forces you to focus on the specific shapes, shading, and stitch directions that make each part unique.
It’s a fantastic way to practice and understand the anatomy of your subjects, leading to more realistic botanical embroidery shading.
22. Apply Bold Appliqué to Textured Surfaces
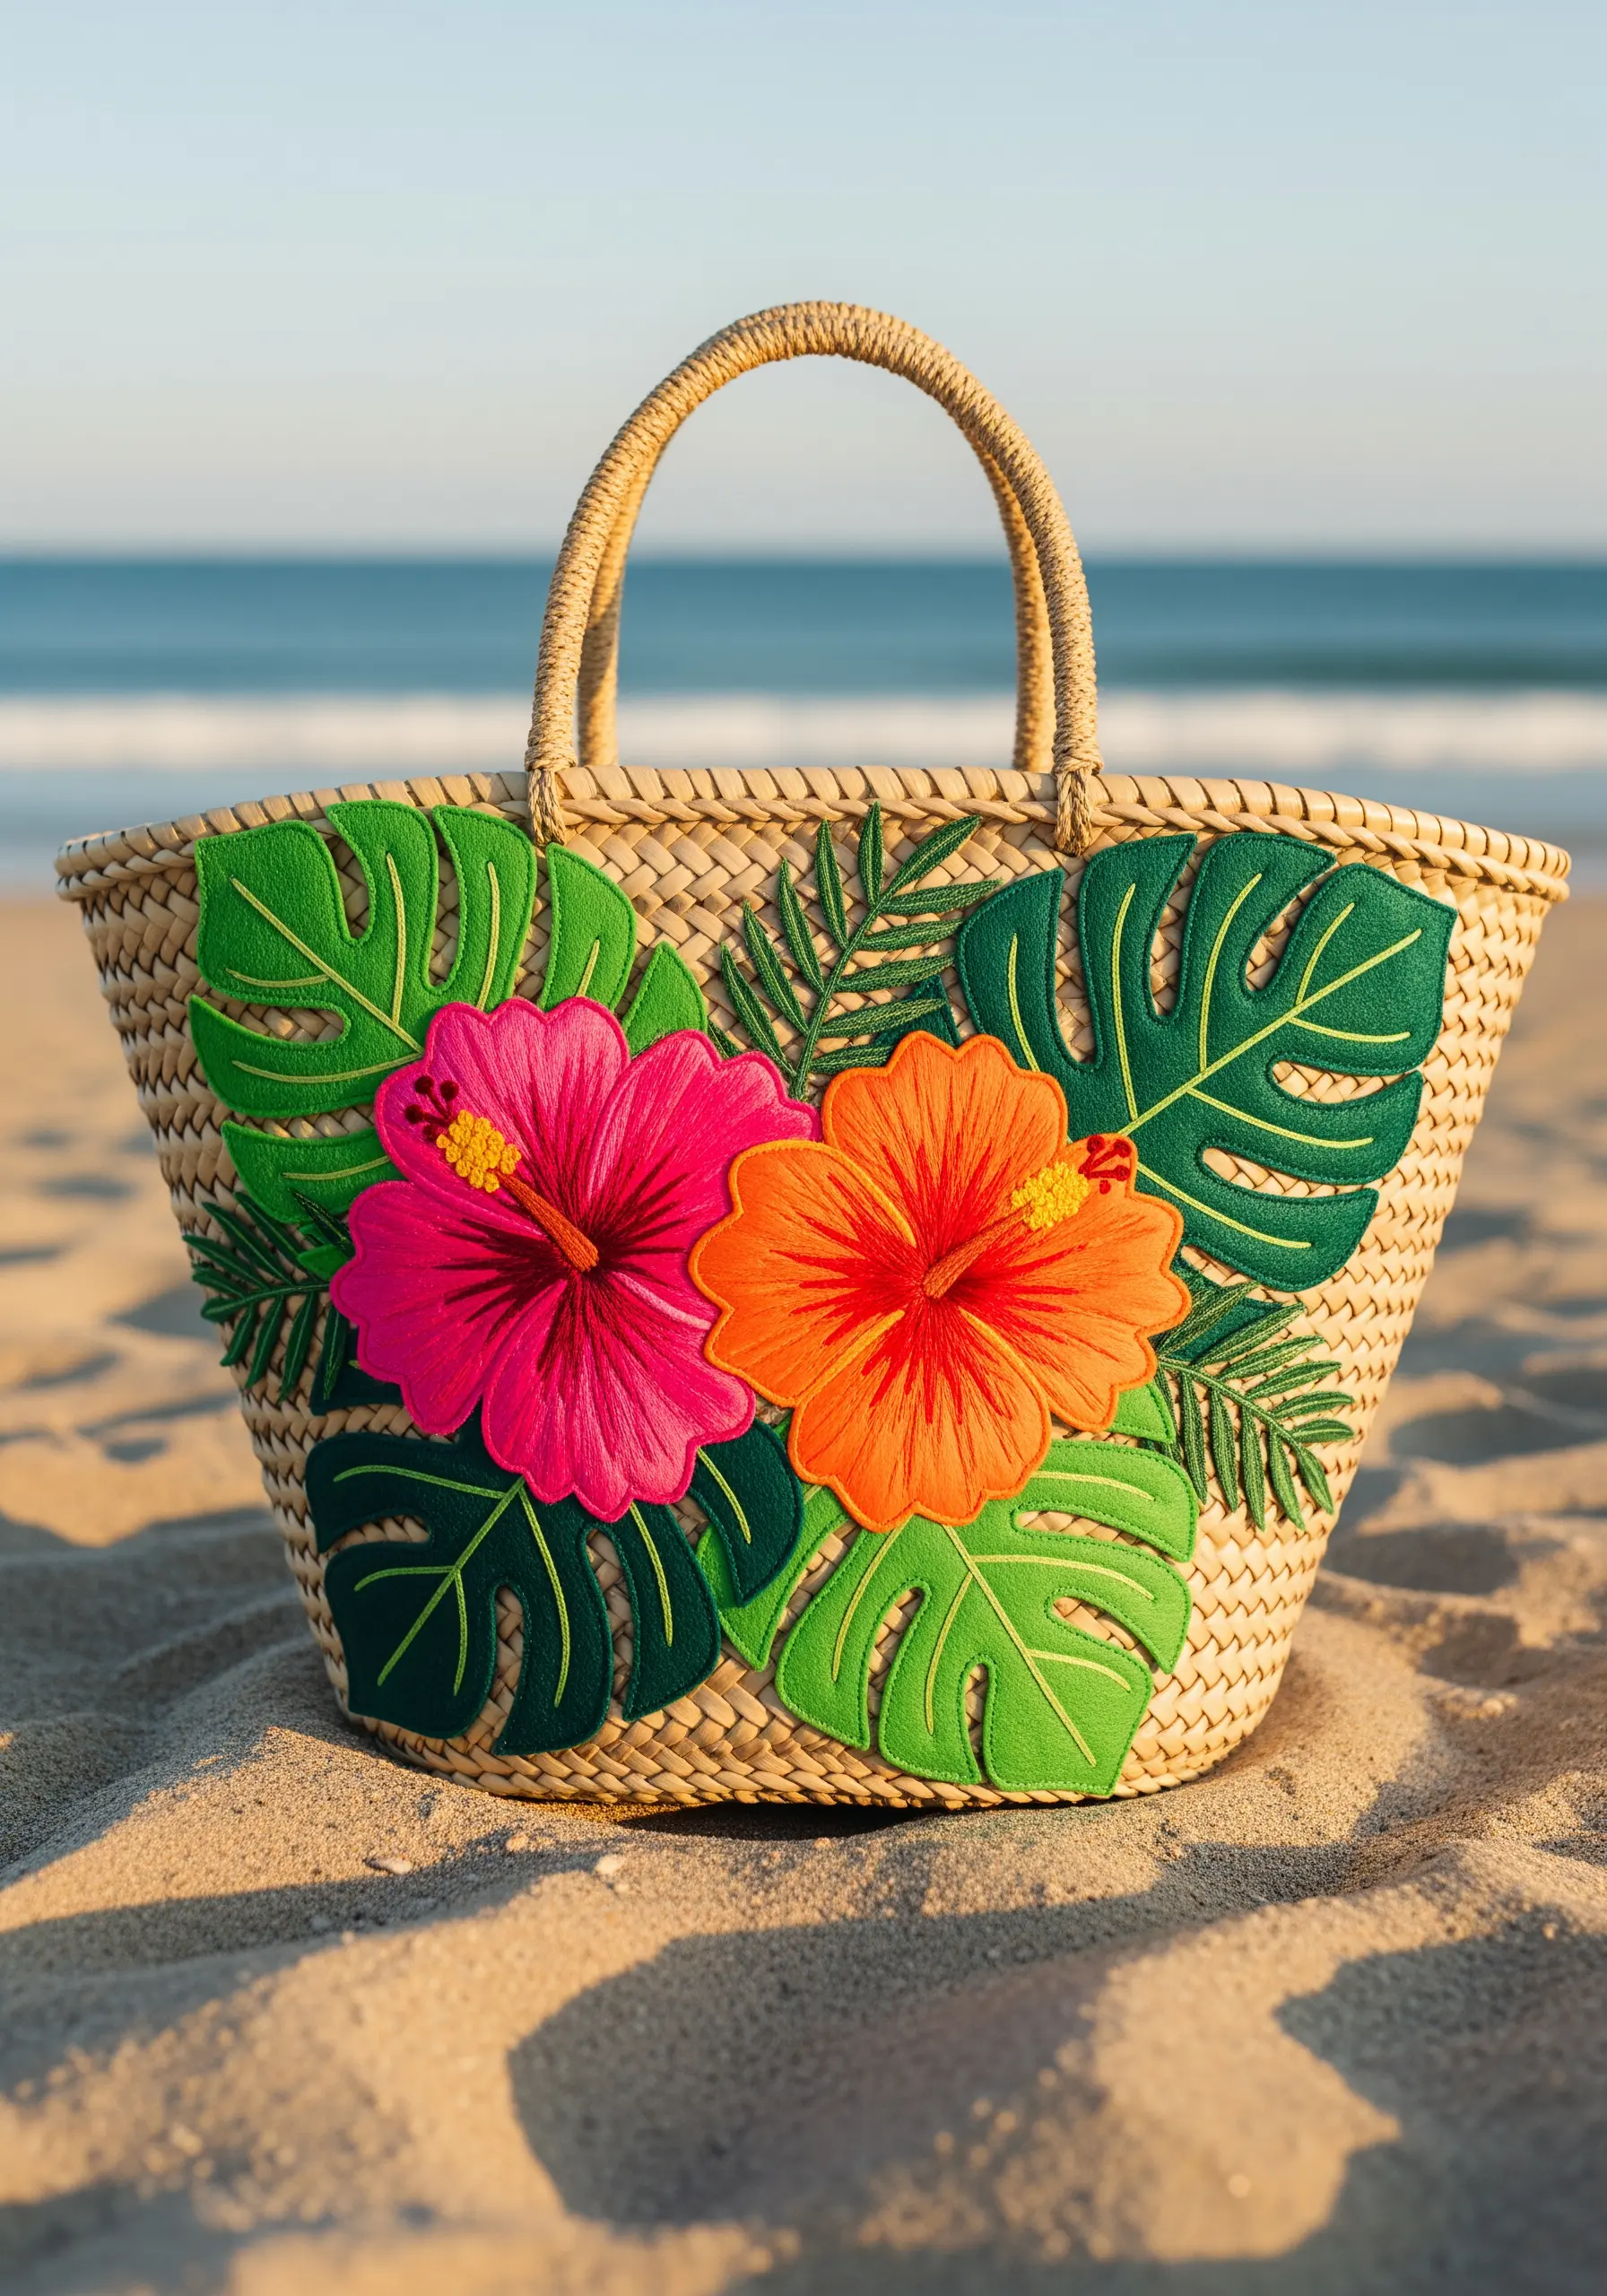
When working on a coarse surface like a woven straw bag, traditional embroidery can be difficult. Switch to appliqué instead.
Cut your flower and leaf shapes from felt or stiffened fabric, then use a dense satin stitch around the edges before cutting them out.
Secure these bold, graphic shapes to the bag with a strong, coordinating thread for a clean and durable finish that pops.
This technique is perfect for adding vibrant tropical botanical embroidery patterns to summer accessories.
23. Create an Ethereal Petal-Scattered Tablescape

For a truly romantic and delicate effect, combine minimalist stitching with scattered, secured fabric petals.
Stitch tiny sprigs of baby’s breath directly onto a sheer table runner using small, discreet stitches.
Then, cut out individual petal shapes from silk or organza and tack them down with a single, tiny stitch each, as if they have just fallen.
This creates a dreamy, ephemeral look perfect for elegant table linens at weddings or special events.
24. Embellish Furniture with Radial Stitches
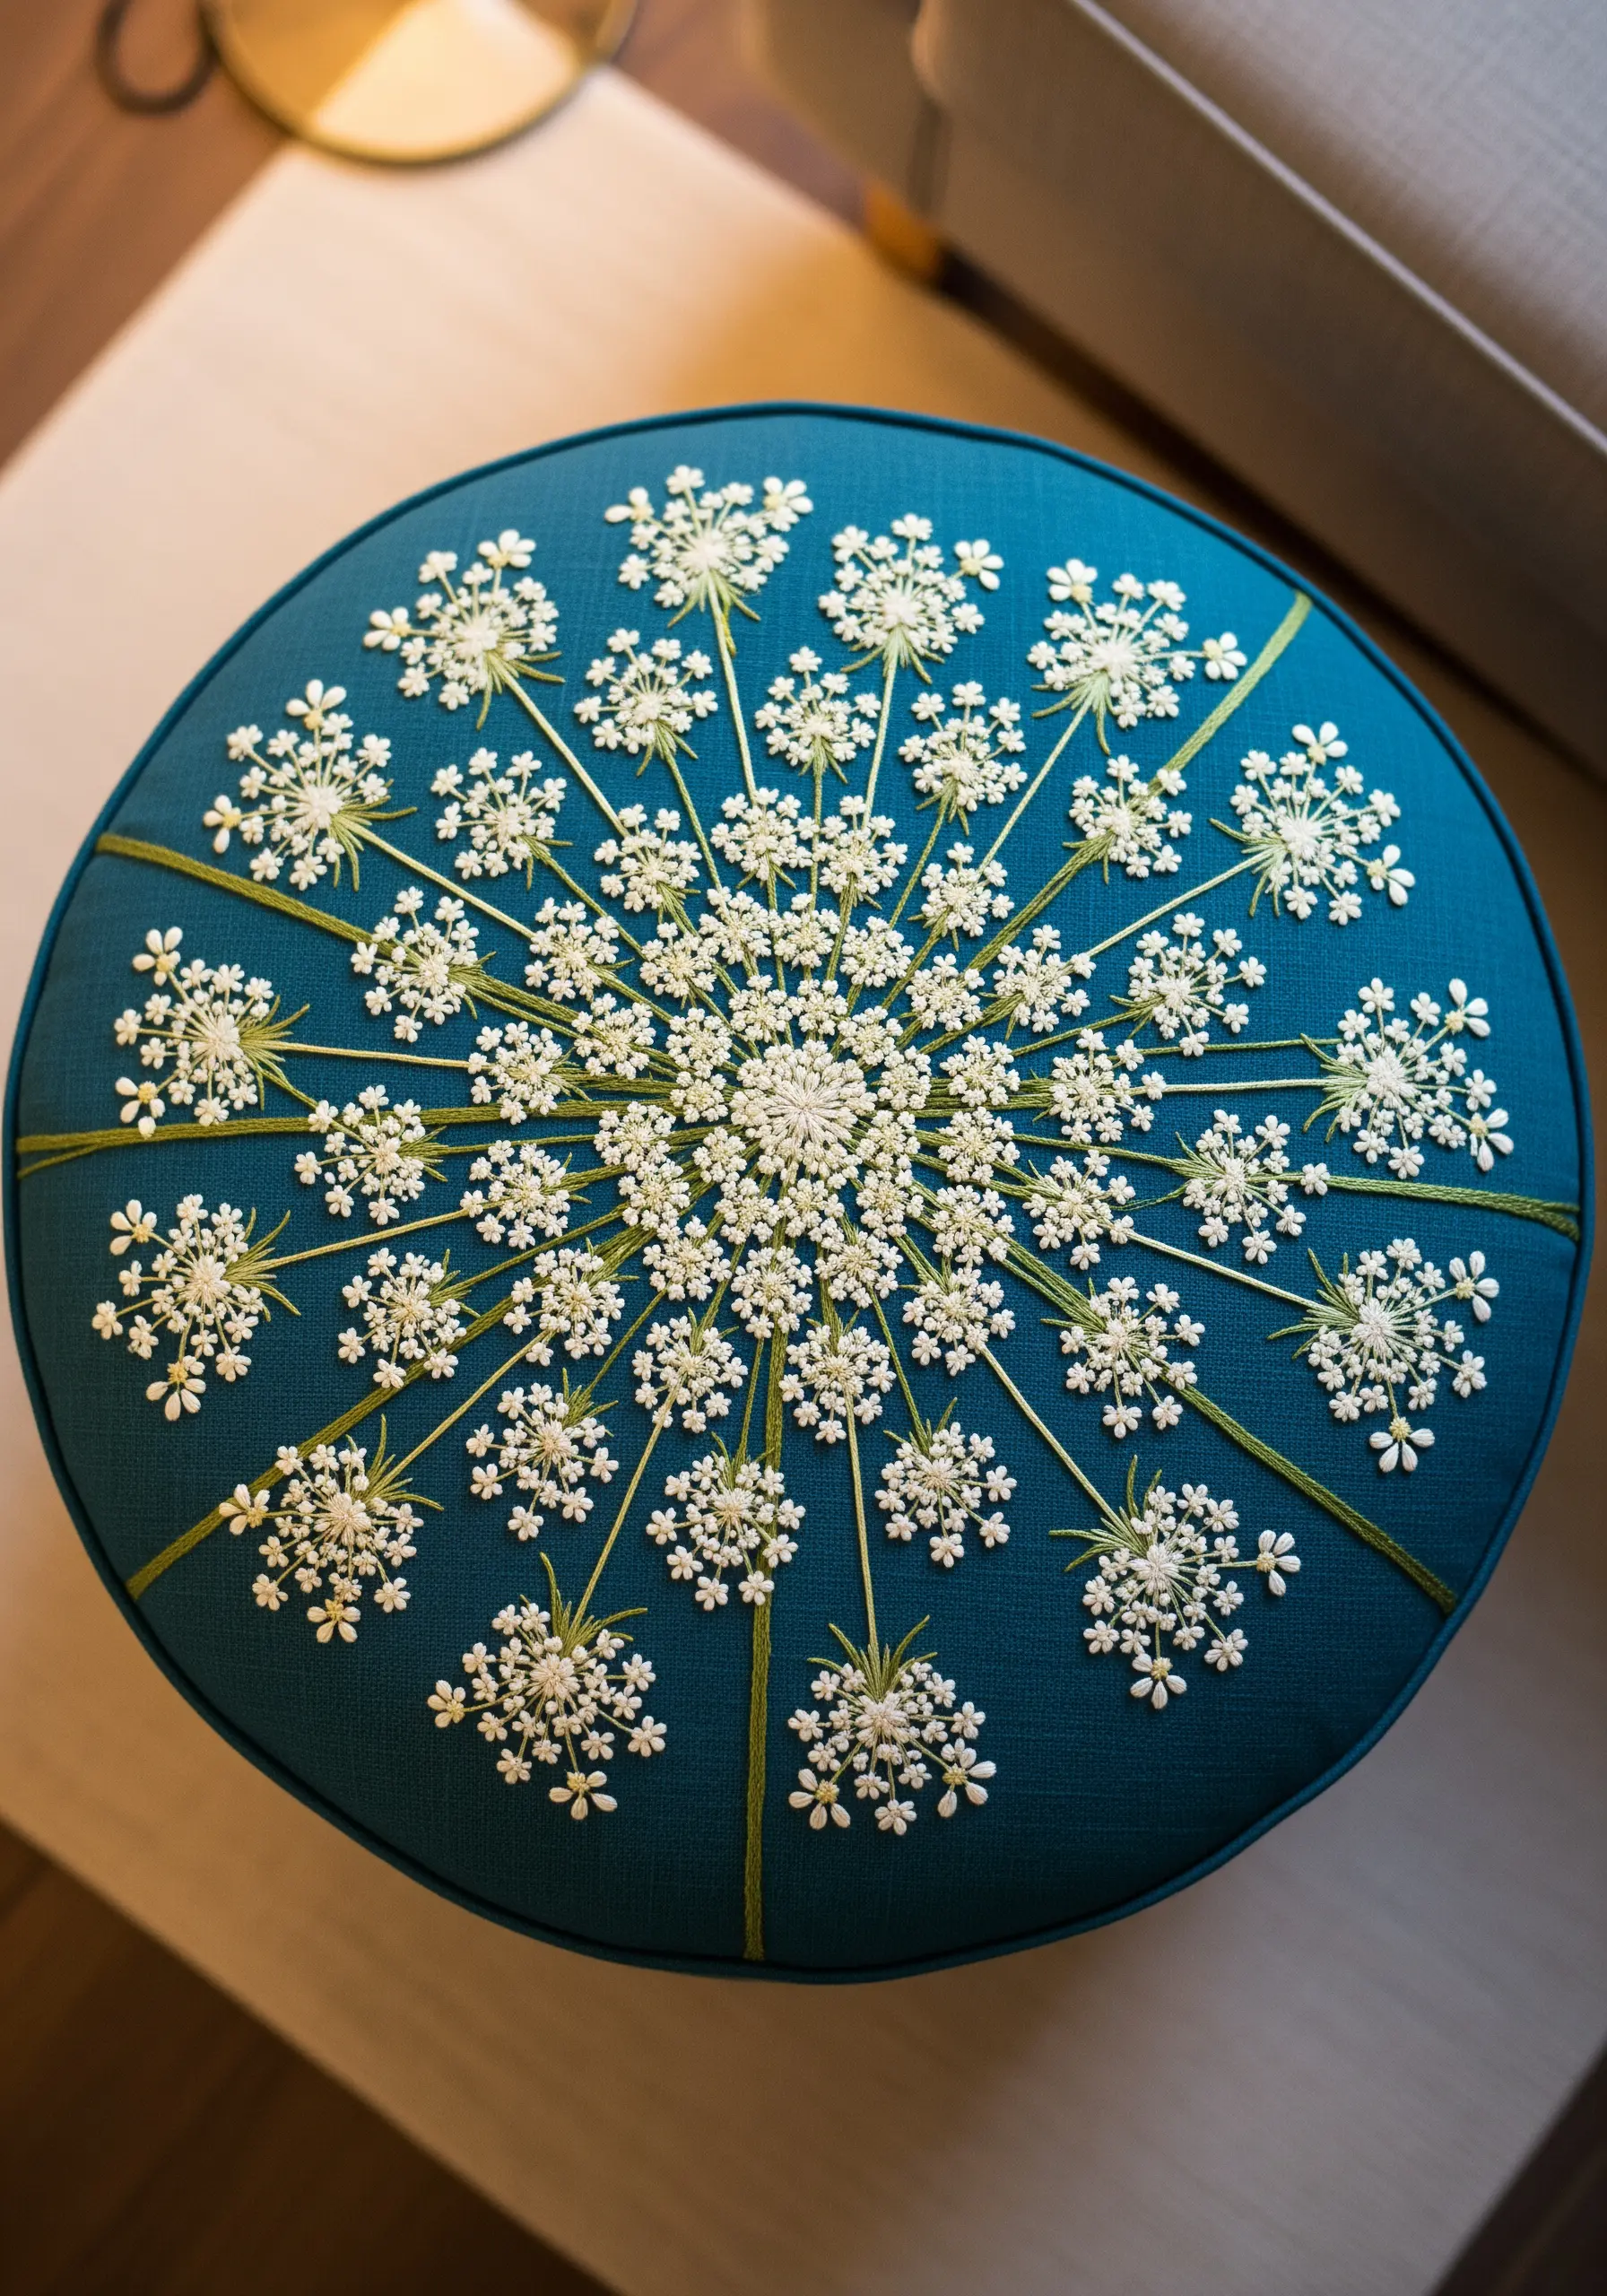
Turn a piece of furniture into a statement with a bold, symmetrical embroidery design.
To create the explosive look of Queen Anne’s Lace, use a mass of French knots for the central cluster of florets.
Radiate long, elegant straight stitches outward for the stems, finishing each one with a few tiny knots to represent the smaller blossoms.
Using durable upholstery thread ensures your design is not only beautiful but also resilient enough for everyday use on a functional piece like a stool.
25. Adorn a Throw with Golden Hour Botanicals
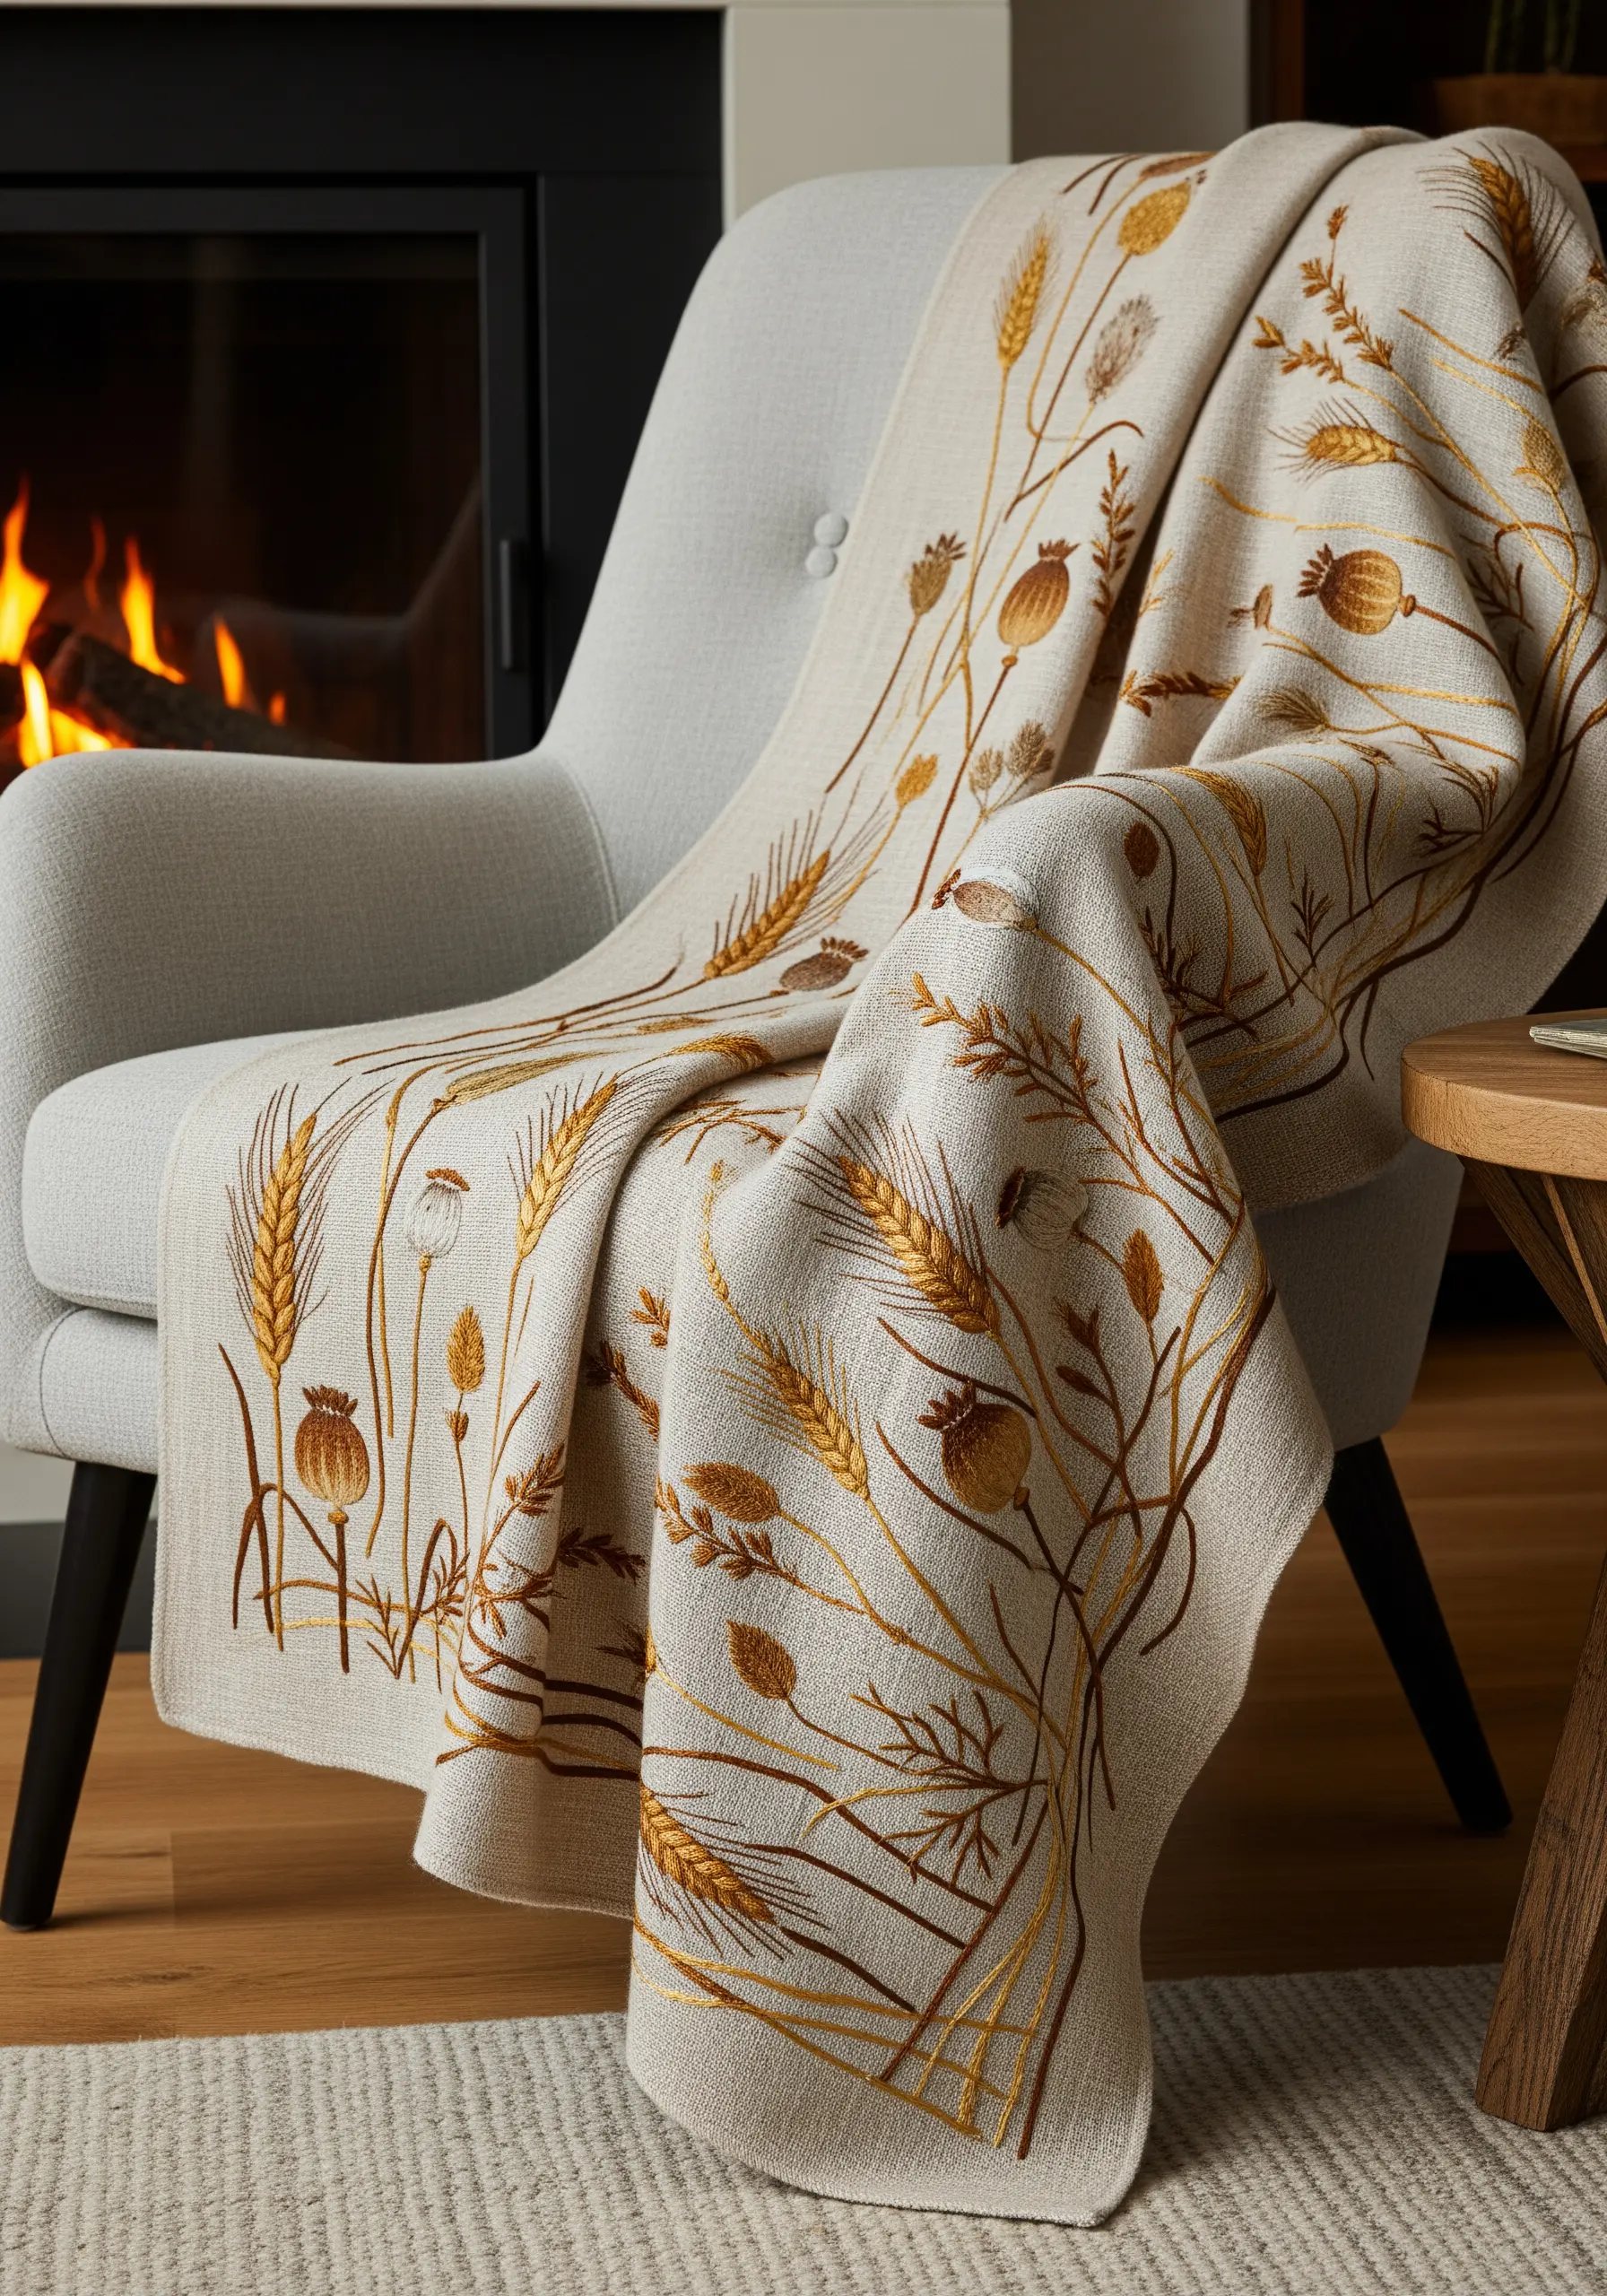
Create a cozy and elegant throw blanket by stitching a flowing pattern of field botanicals in warm, metallic tones.
Use a limited color palette of gold, bronze, and brown to evoke the feeling of a sunlit harvest field.
Simple line stitches like stem stitch, backstitch, and straight stitch are ideal for this, as they create a beautiful design without making the blanket stiff or heavy.
This approach adds a layer of subtle, earthy embroidery that feels both rustic and luxurious.
26. Capture Underwater Movement with Blended Threads

To mimic the subtle color variations and gentle sway of aquatic plants, blend your threads directly in the needle.
Combine two or three different shades of green and brown floss together for a single stitch. This creates an immediate, natural-looking gradient without complex shading.
Use flowing, organic stitches like the stem stitch, whipped backstitch, and fishbone stitch to replicate the way seaweed moves in the water.
This technique brings a dynamic, underwater world to life, perfect for minimal ocean-inspired embroidery.
27. Personalize Linens with Herb and Monogram Pairings
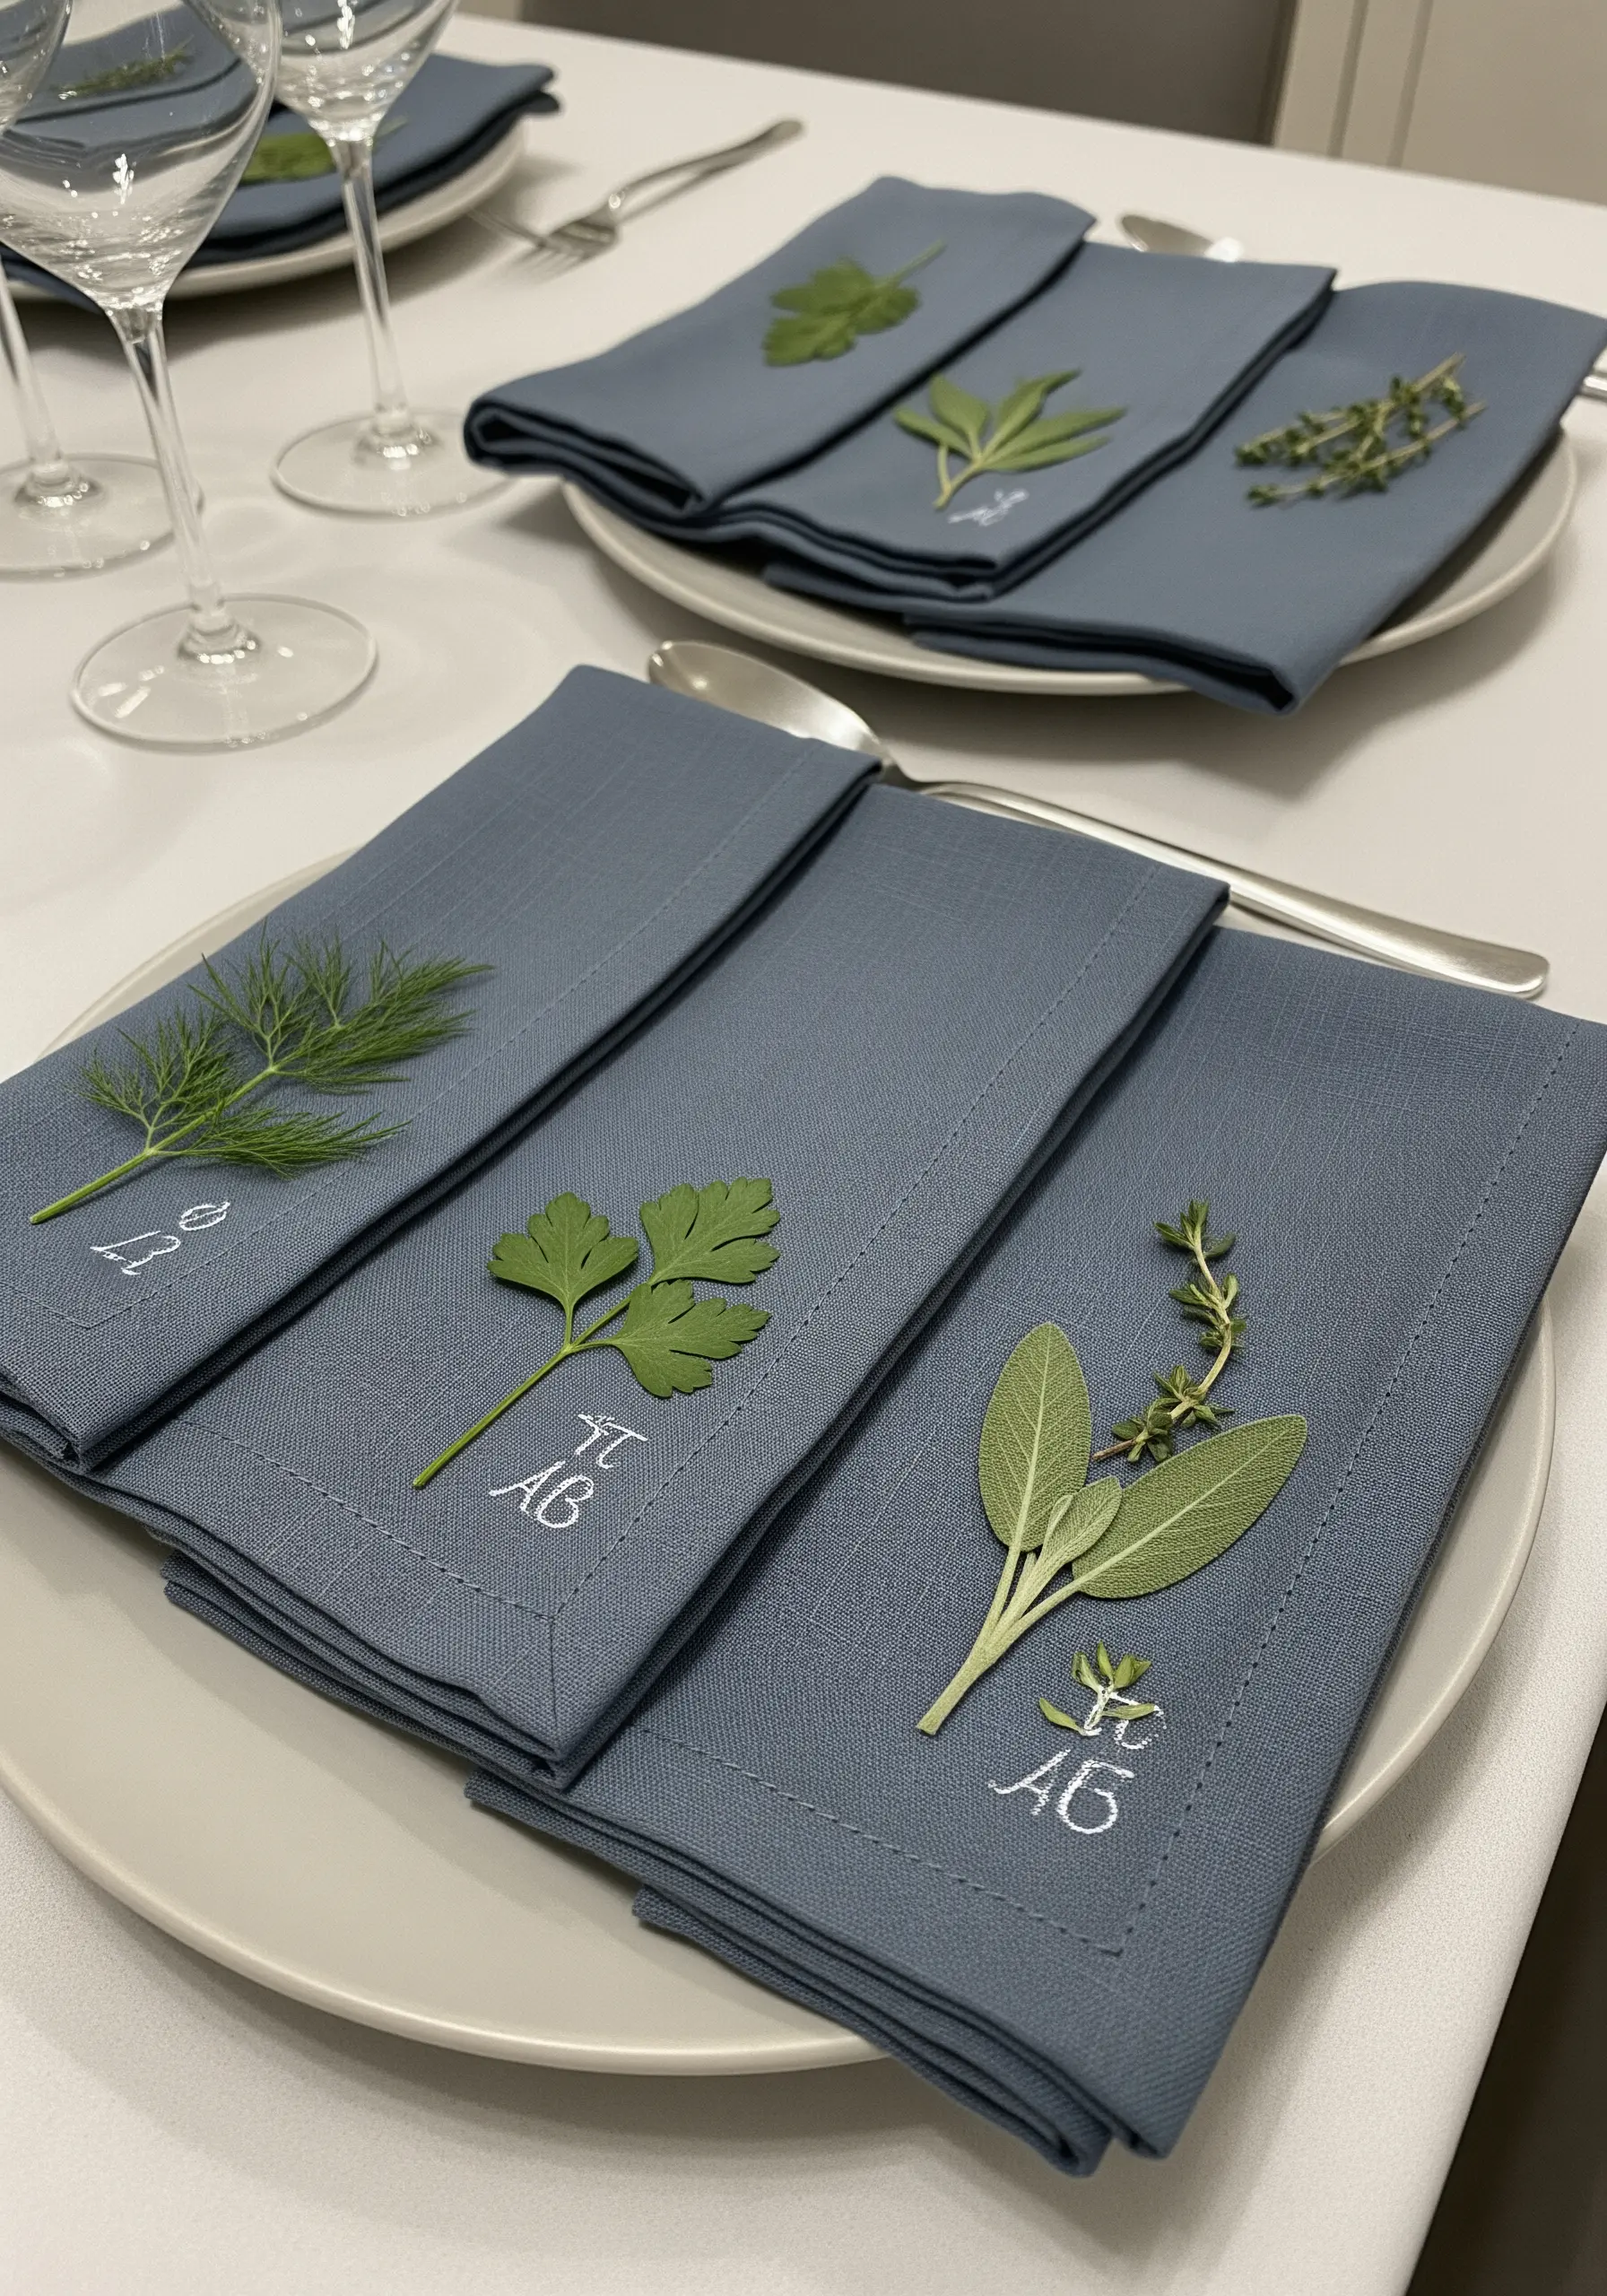
Elevate simple table linens by combining a delicately stitched monogram with a space for a real botanical element.
Stitch the initials in a clean, classic font using a contrasting thread. Then, at your table setting, simply tuck a fresh sprig of a complementary herb like dill, sage, or thyme beside it.
This multi-sensory approach pairs the permanence of embroidery with the fresh, ephemeral scent and texture of real herbs, creating a memorable dining experience.
28. Make a Statement with Large-Scale Screen Panels
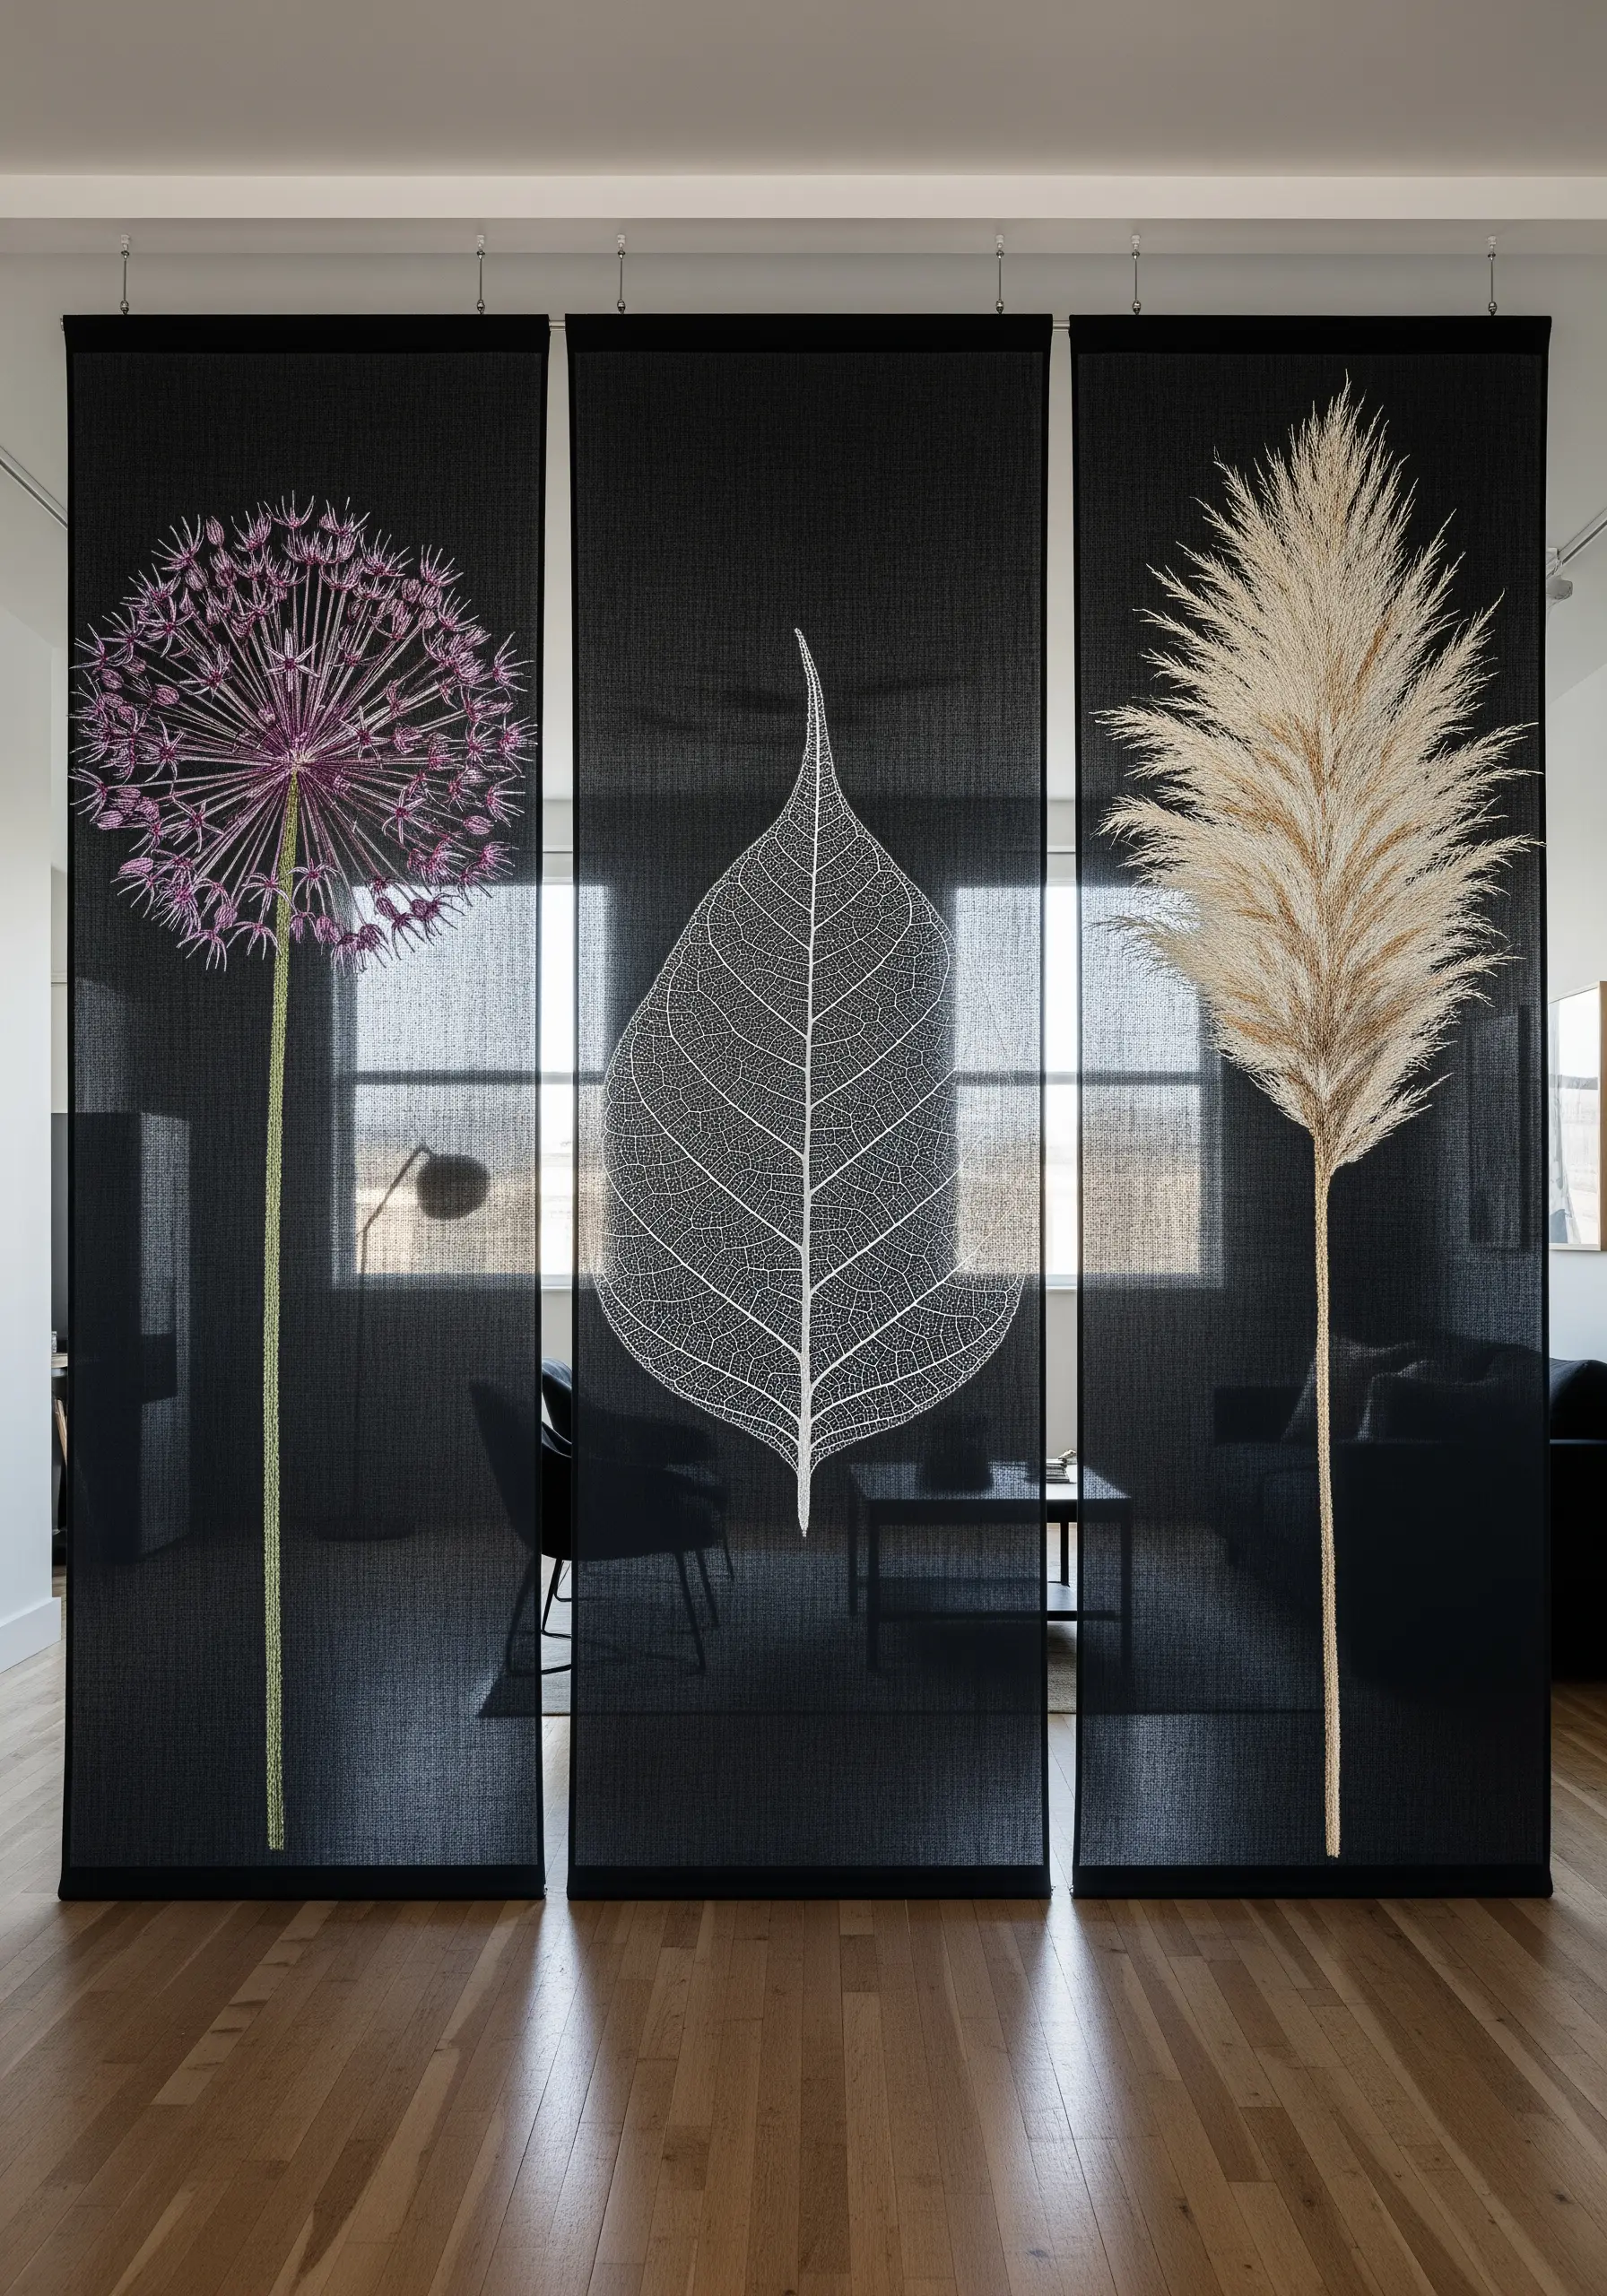
Use embroidery to create dramatic, graphic art on functional items like room dividers.
Choose botanicals with strong, recognizable silhouettes, like an allium head or a pampas grass plume, which read well from a distance.
Stitching in a single, high-contrast color (like white on black) emphasizes the form and creates a bold, modern look.
This transforms simple fabric panels into striking pieces of embroidered wall panels that define a space.
29. Suspend a Moment with Encapsulated Embroidery
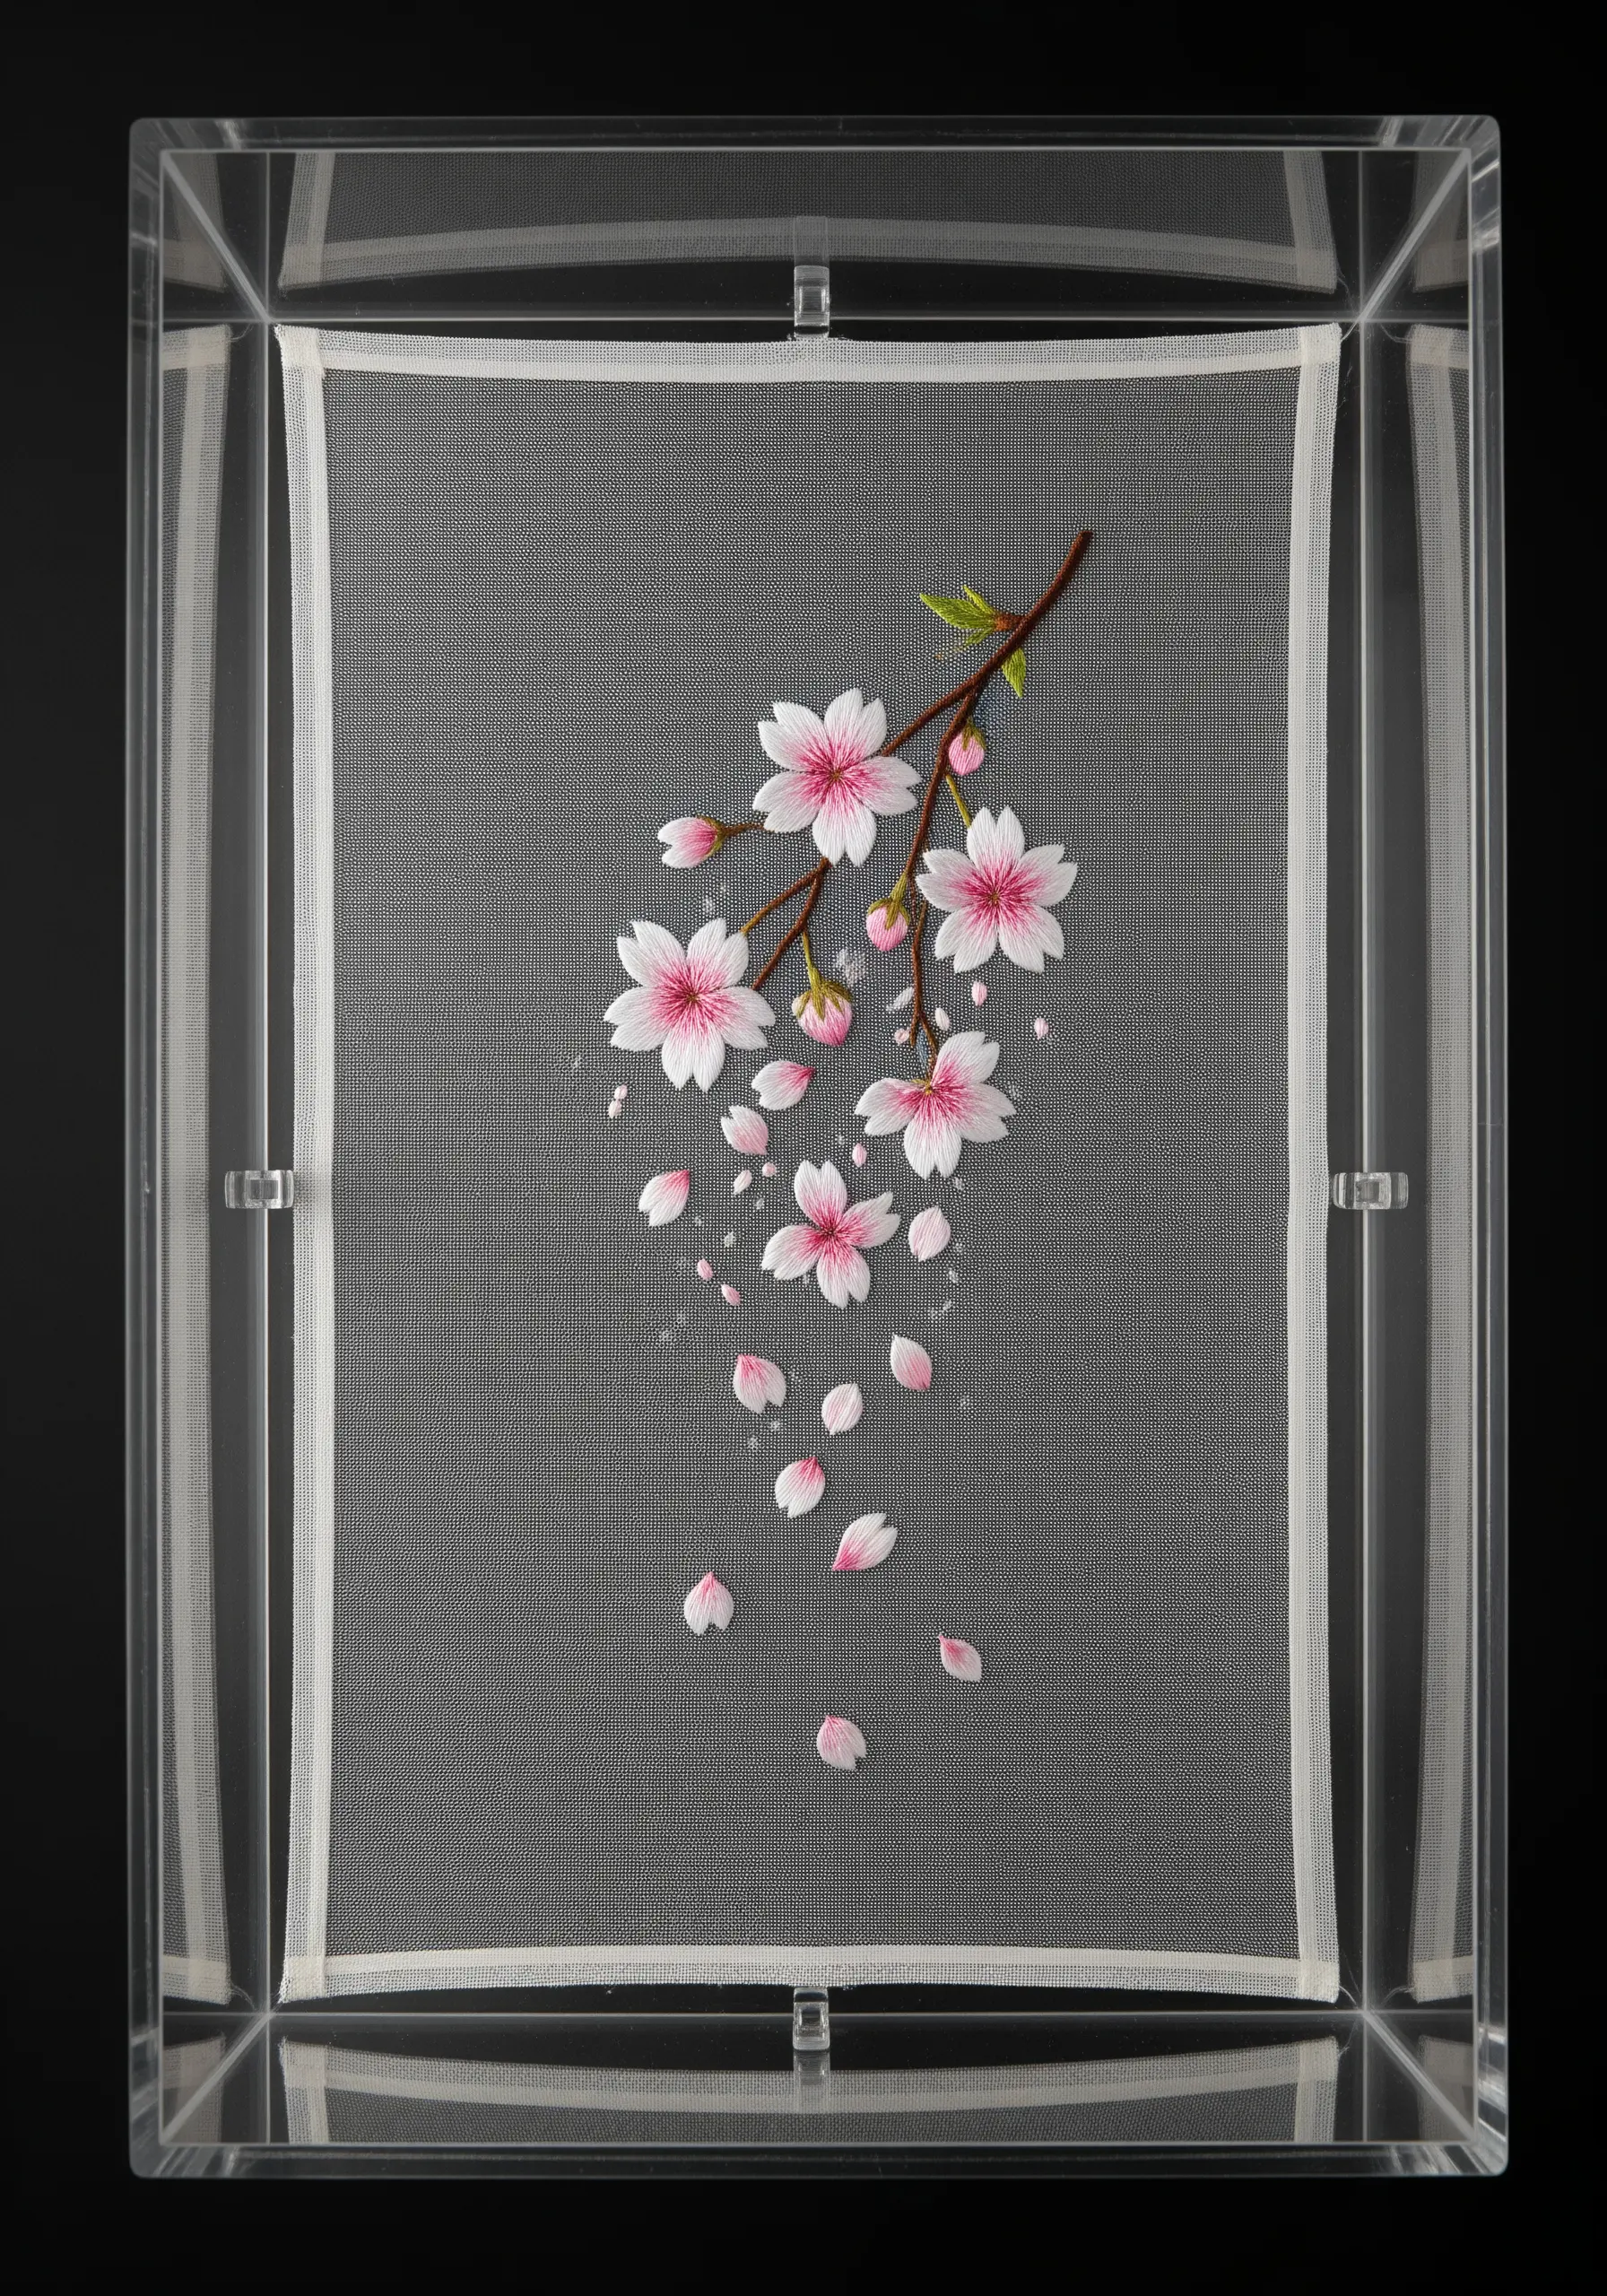
Create the illusion of blossoms frozen in time by stitching on fine tulle and encasing the work in a clear acrylic frame.
Use a combination of attached and detached stitches to show some petals still on the branch while others appear to be gently falling.
The transparency of both the fabric and the frame removes all visual barriers, making the delicate threadwork the sole focus.
This presentation technique turns your embroidery into a precious, preserved specimen of handmade art.
30. Add a Subtle, Personal Mark on Apparel
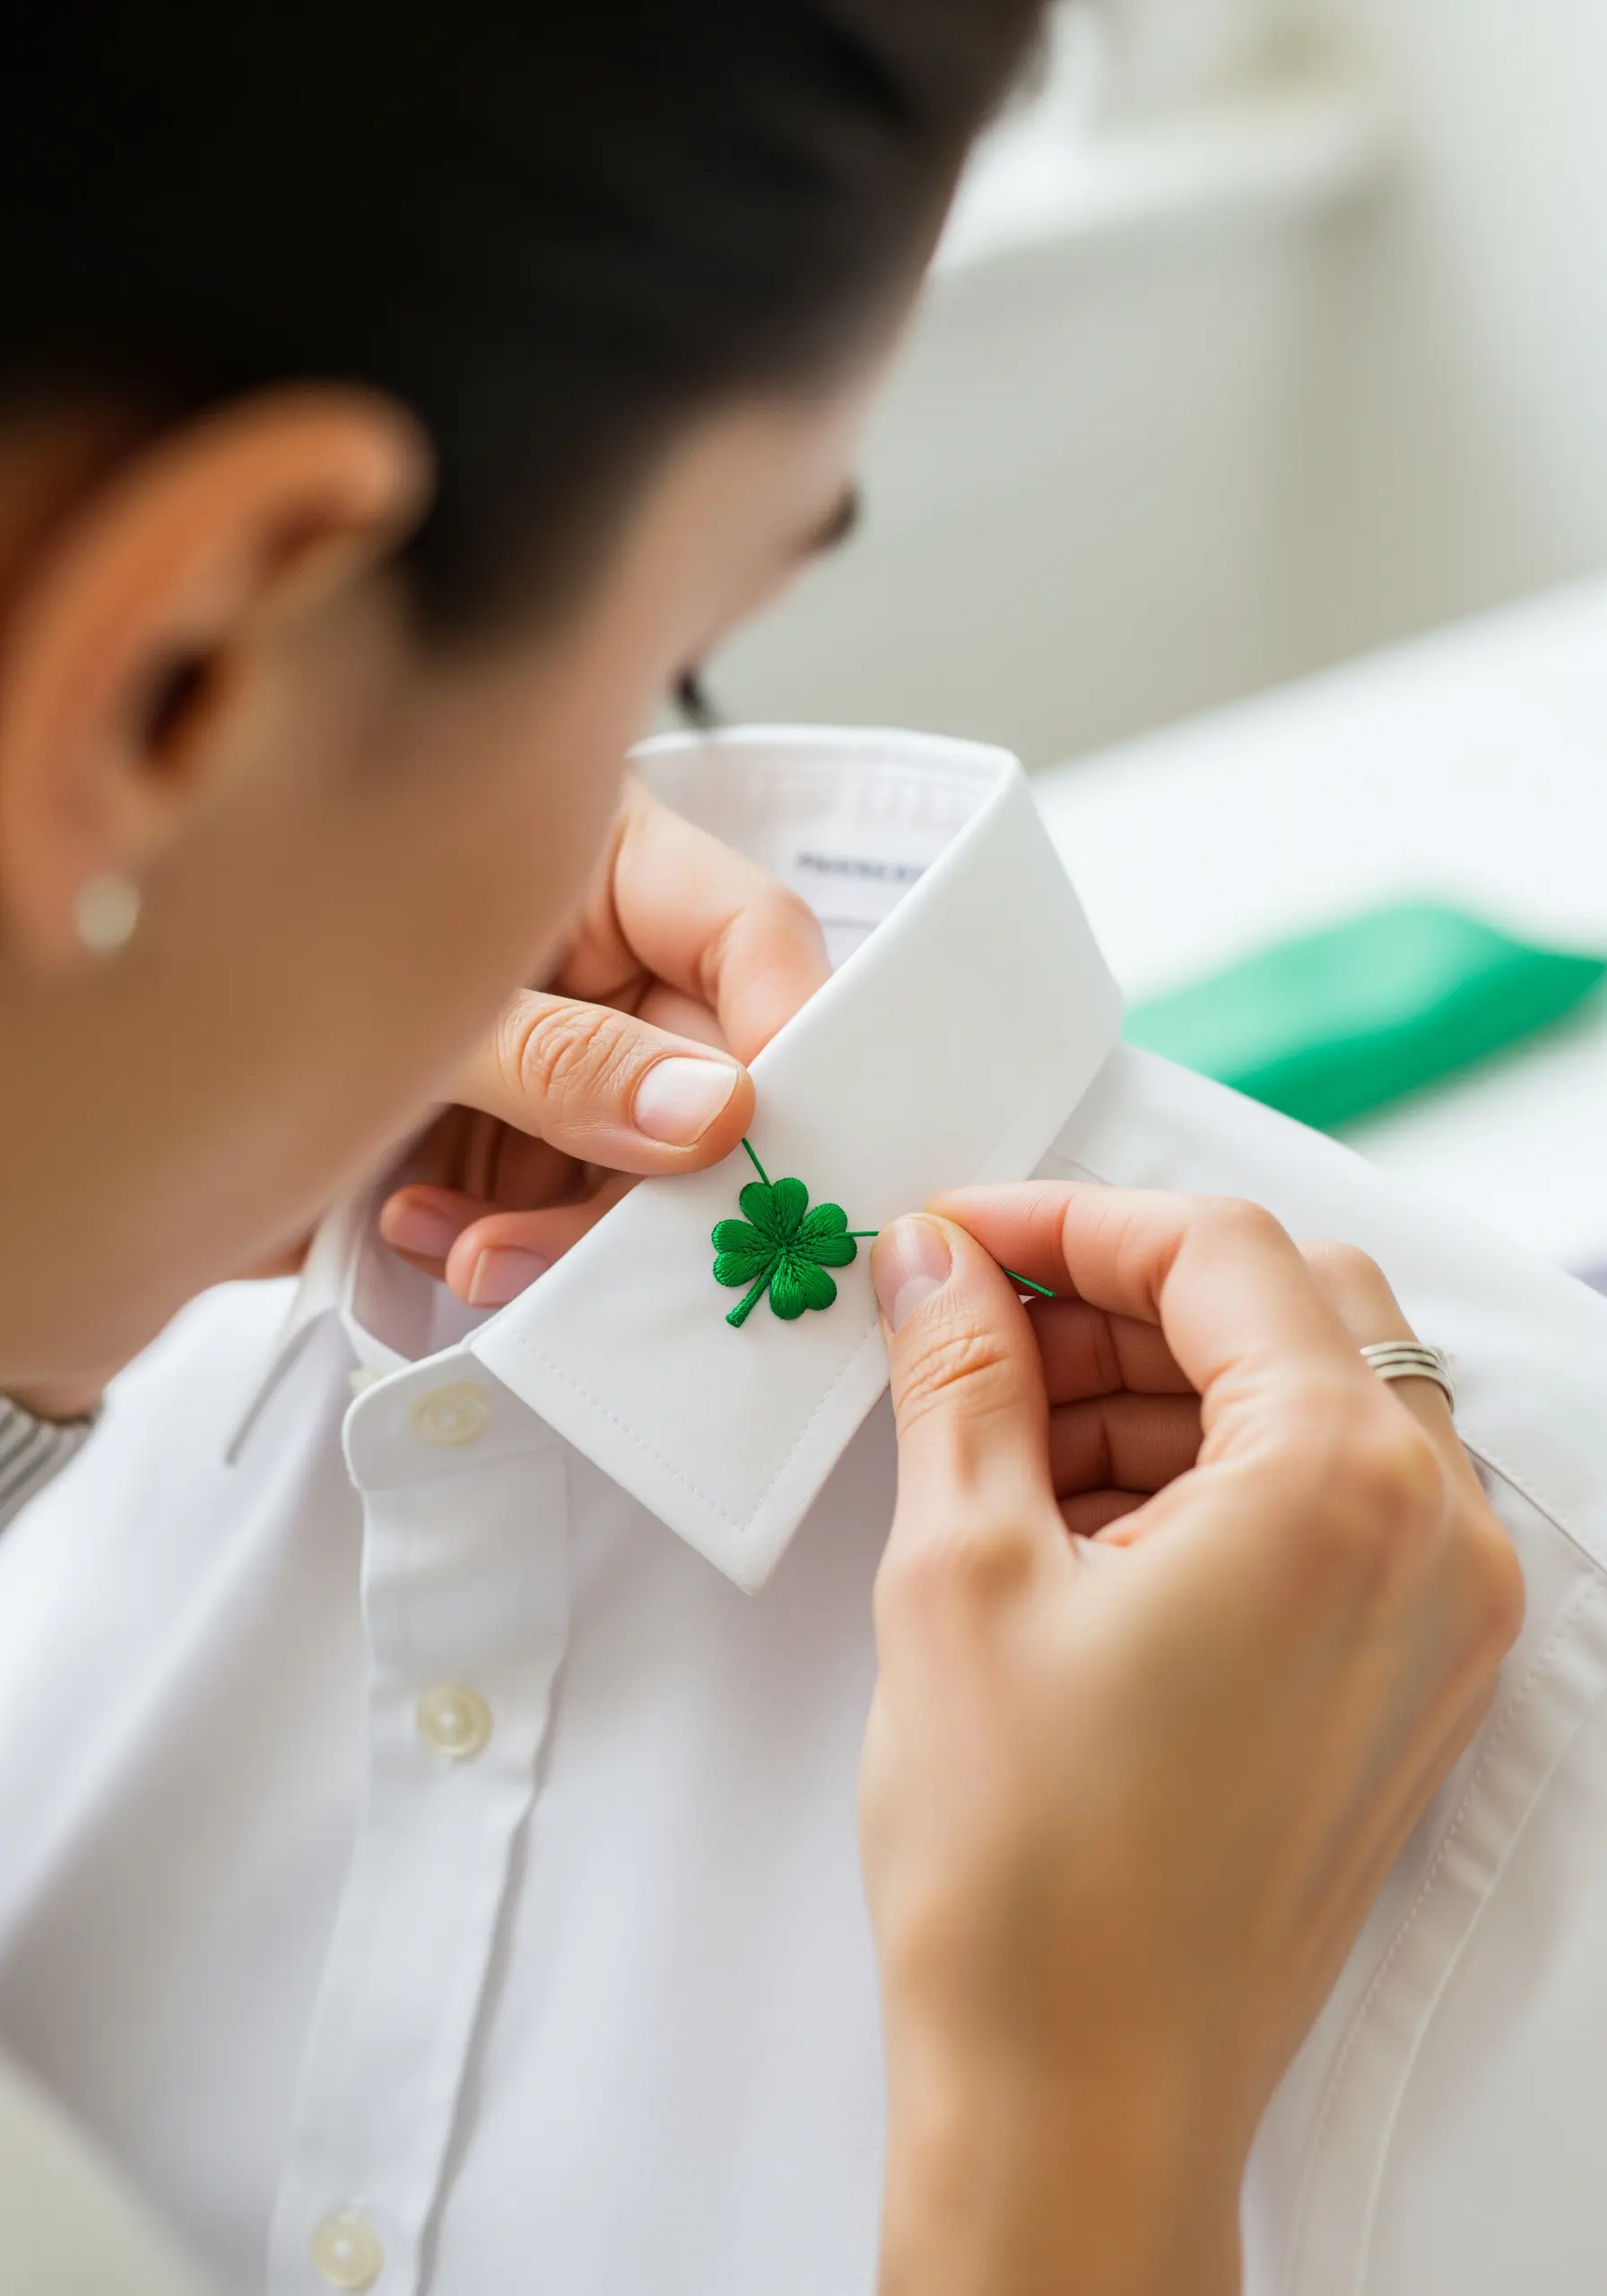
The most impactful embroidery is sometimes the smallest and most unexpected.
Place a single, perfectly executed motif in a discreet location, like the point of a shirt collar.
Use a padded satin stitch to give the small shape—like this four-leaf clover—a slight, satisfying plumpness that makes it stand out from the fabric.
This thoughtful placement turns a simple garment into a personalized piece, demonstrating that even tiny stitched details can have a significant impact.


