

Fabric collage is where the soul of quilting meets the delicate artistry of embroidery. It’s an invitation to think beyond thread alone and to see your fabric scraps not as leftovers, but as a painter sees their palette—full of texture, color, and story.
You don’t need complex new skills. Instead, I want you to reconsider the materials you already have. Think about how the texture of corduroy can become the gills of a mushroom, or how a frayed edge of linen can soften into a dreamy cloud. This is about building scenes, layer by layer, with intention.
These designs are more than just patterns; they are starting points. They will show you how to combine simple appliqué with thoughtful stitches to create pieces that feel deeply personal, cozy, and alive with handmade character. Let’s begin.
1. Master Directional Fill for Tactile Realism

To give your appliqué shapes a sense of volume, orient your fill stitches to follow the natural contours of the subject.
For this sleeping fox, the stitches on its body curve gently, mimicking the roundness of its form and suggesting soft fur.
This technique, known as directional satin stitch or long-and-short stitch, turns a flat fabric piece into a dynamic, touchable element.
Use a single strand of floss for the finest detail, or two strands for a slightly cozier, more defined texture.
2. Unify Appliqué with Integrated Outline Stitching
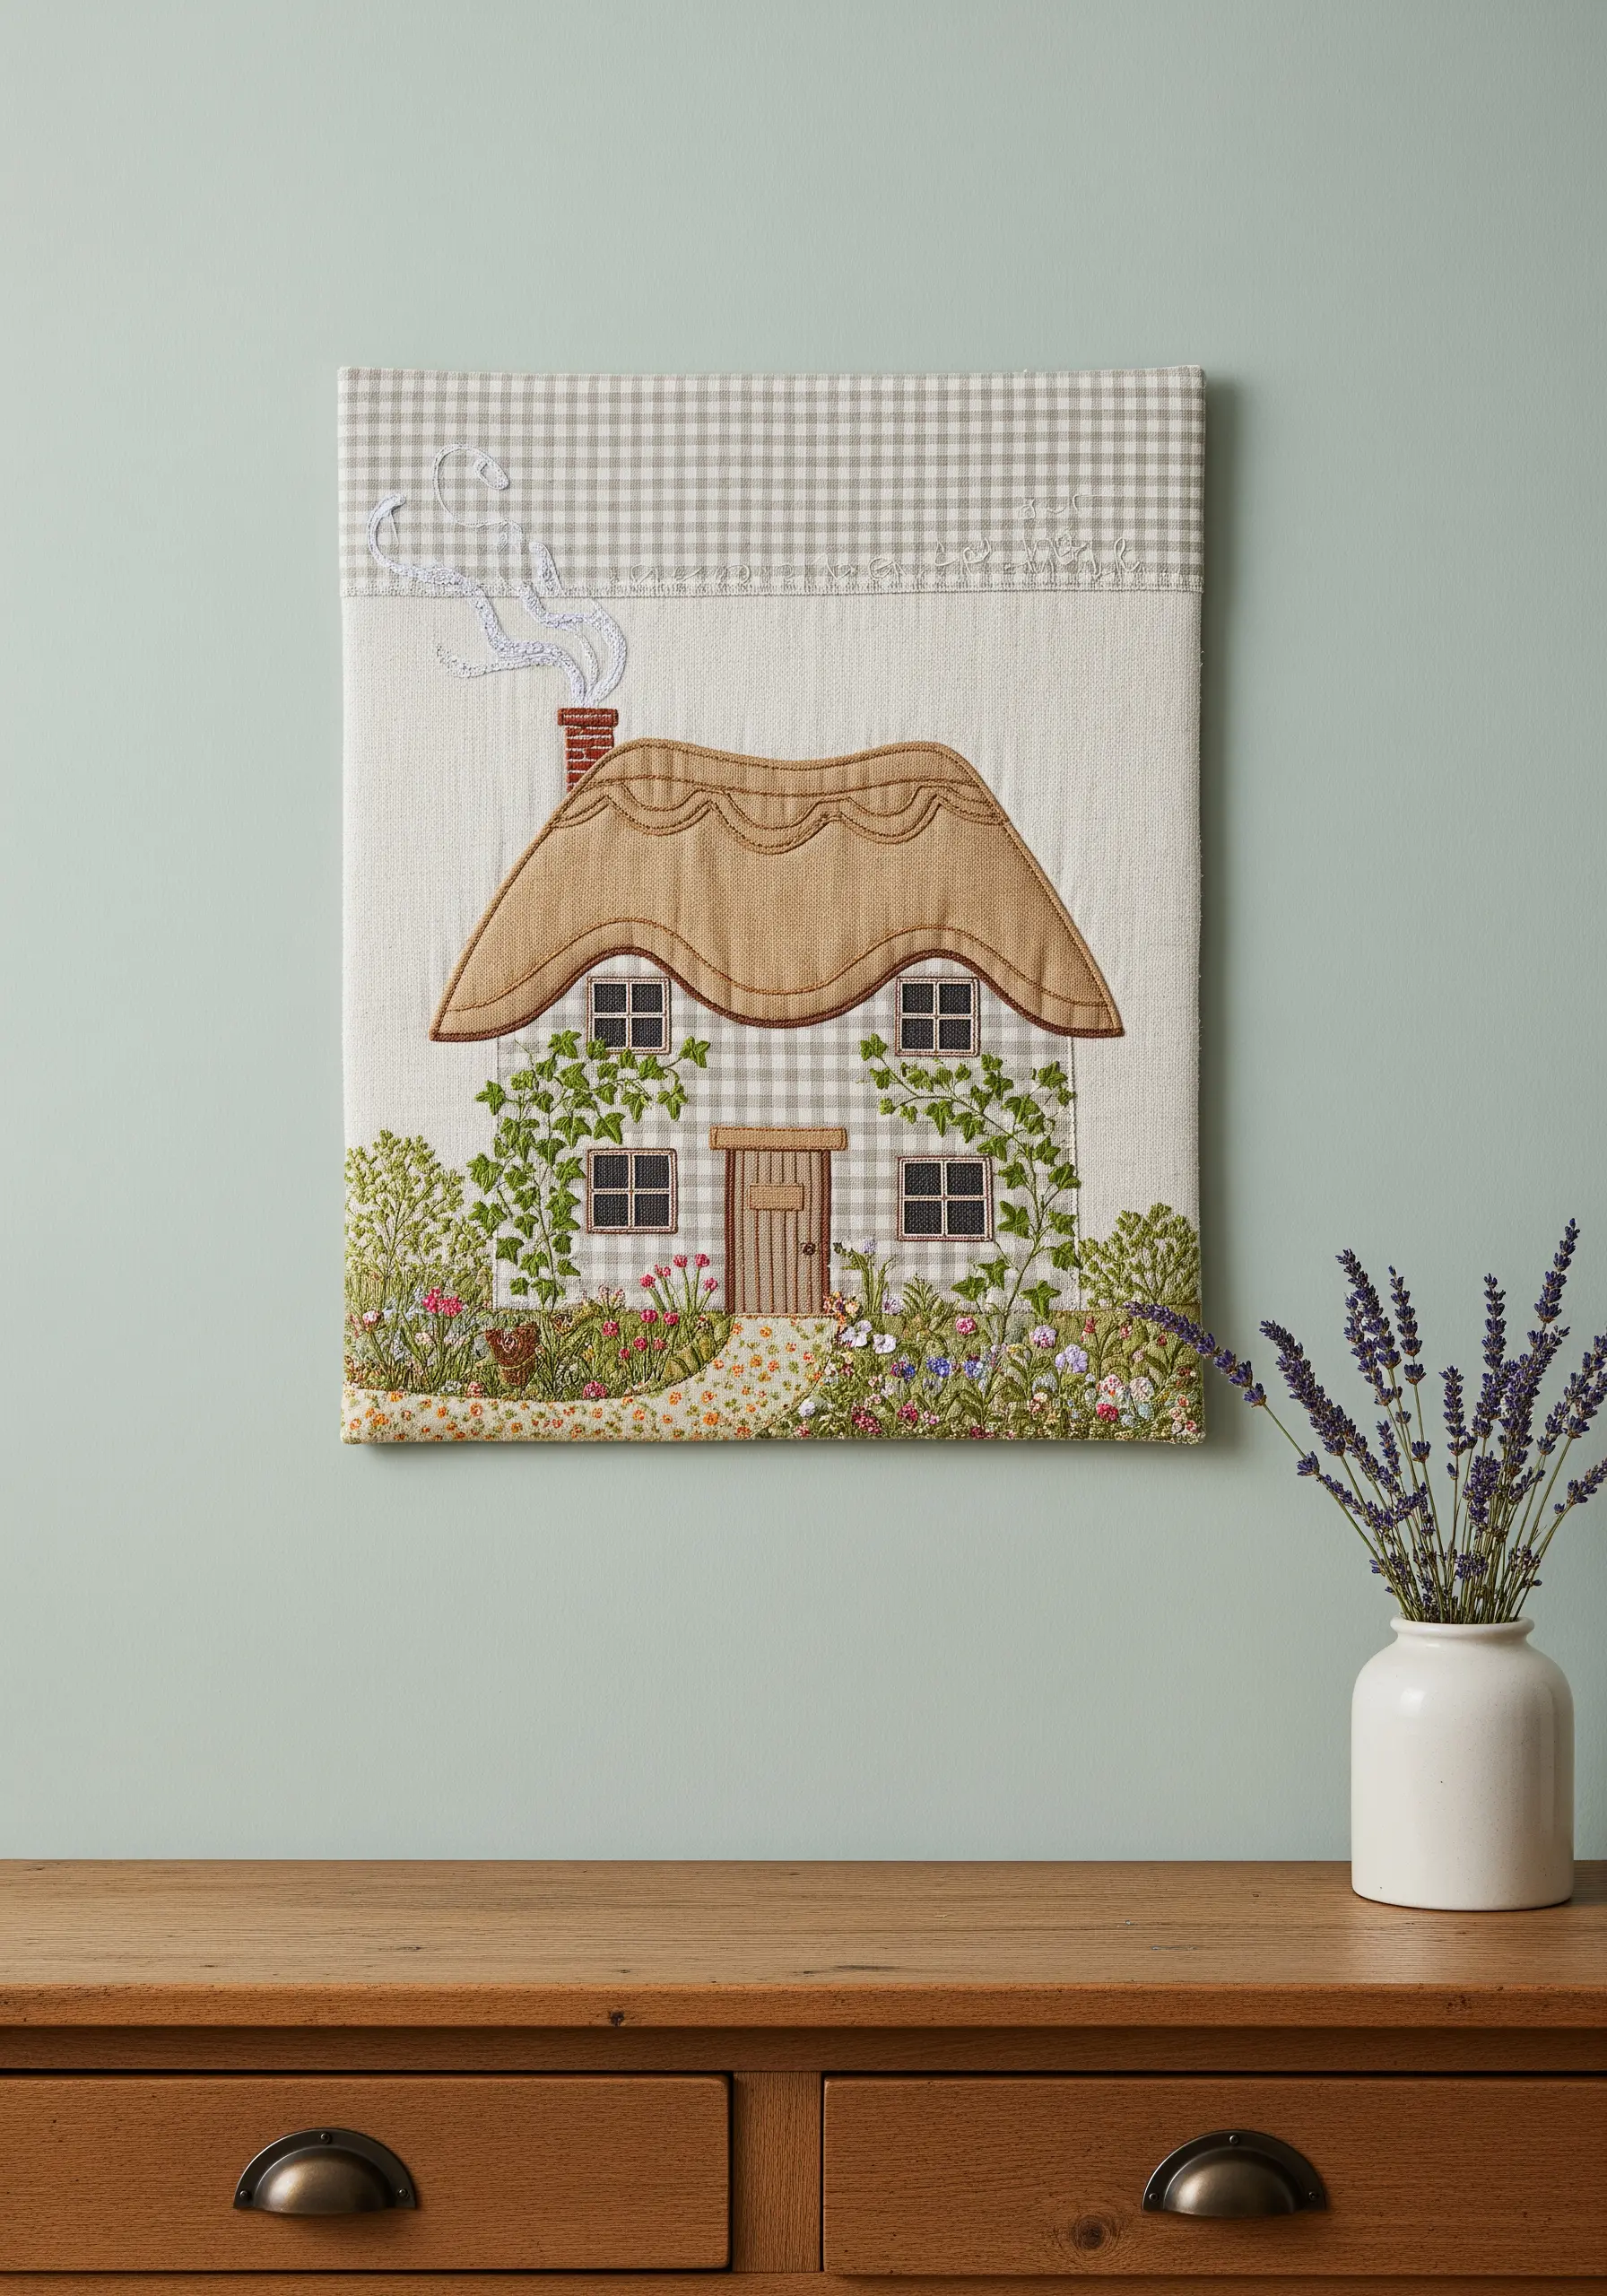
When combining multiple fabric patterns, like the gingham and thatched roof here, a consistent outline stitch is key to a cohesive look.
Use a stem stitch or a whipped backstitch in a neutral or coordinating color to trace the edges of your appliqué pieces.
This not only secures the fabric but also creates a clean, illustrative line that ties the entire composition together, making it look intentional and polished.
For the delicate vines, a simple backstitch allows the floral fabric details to remain the focus.
3. Create Ethereal Textures with Frayed Fabric Edges
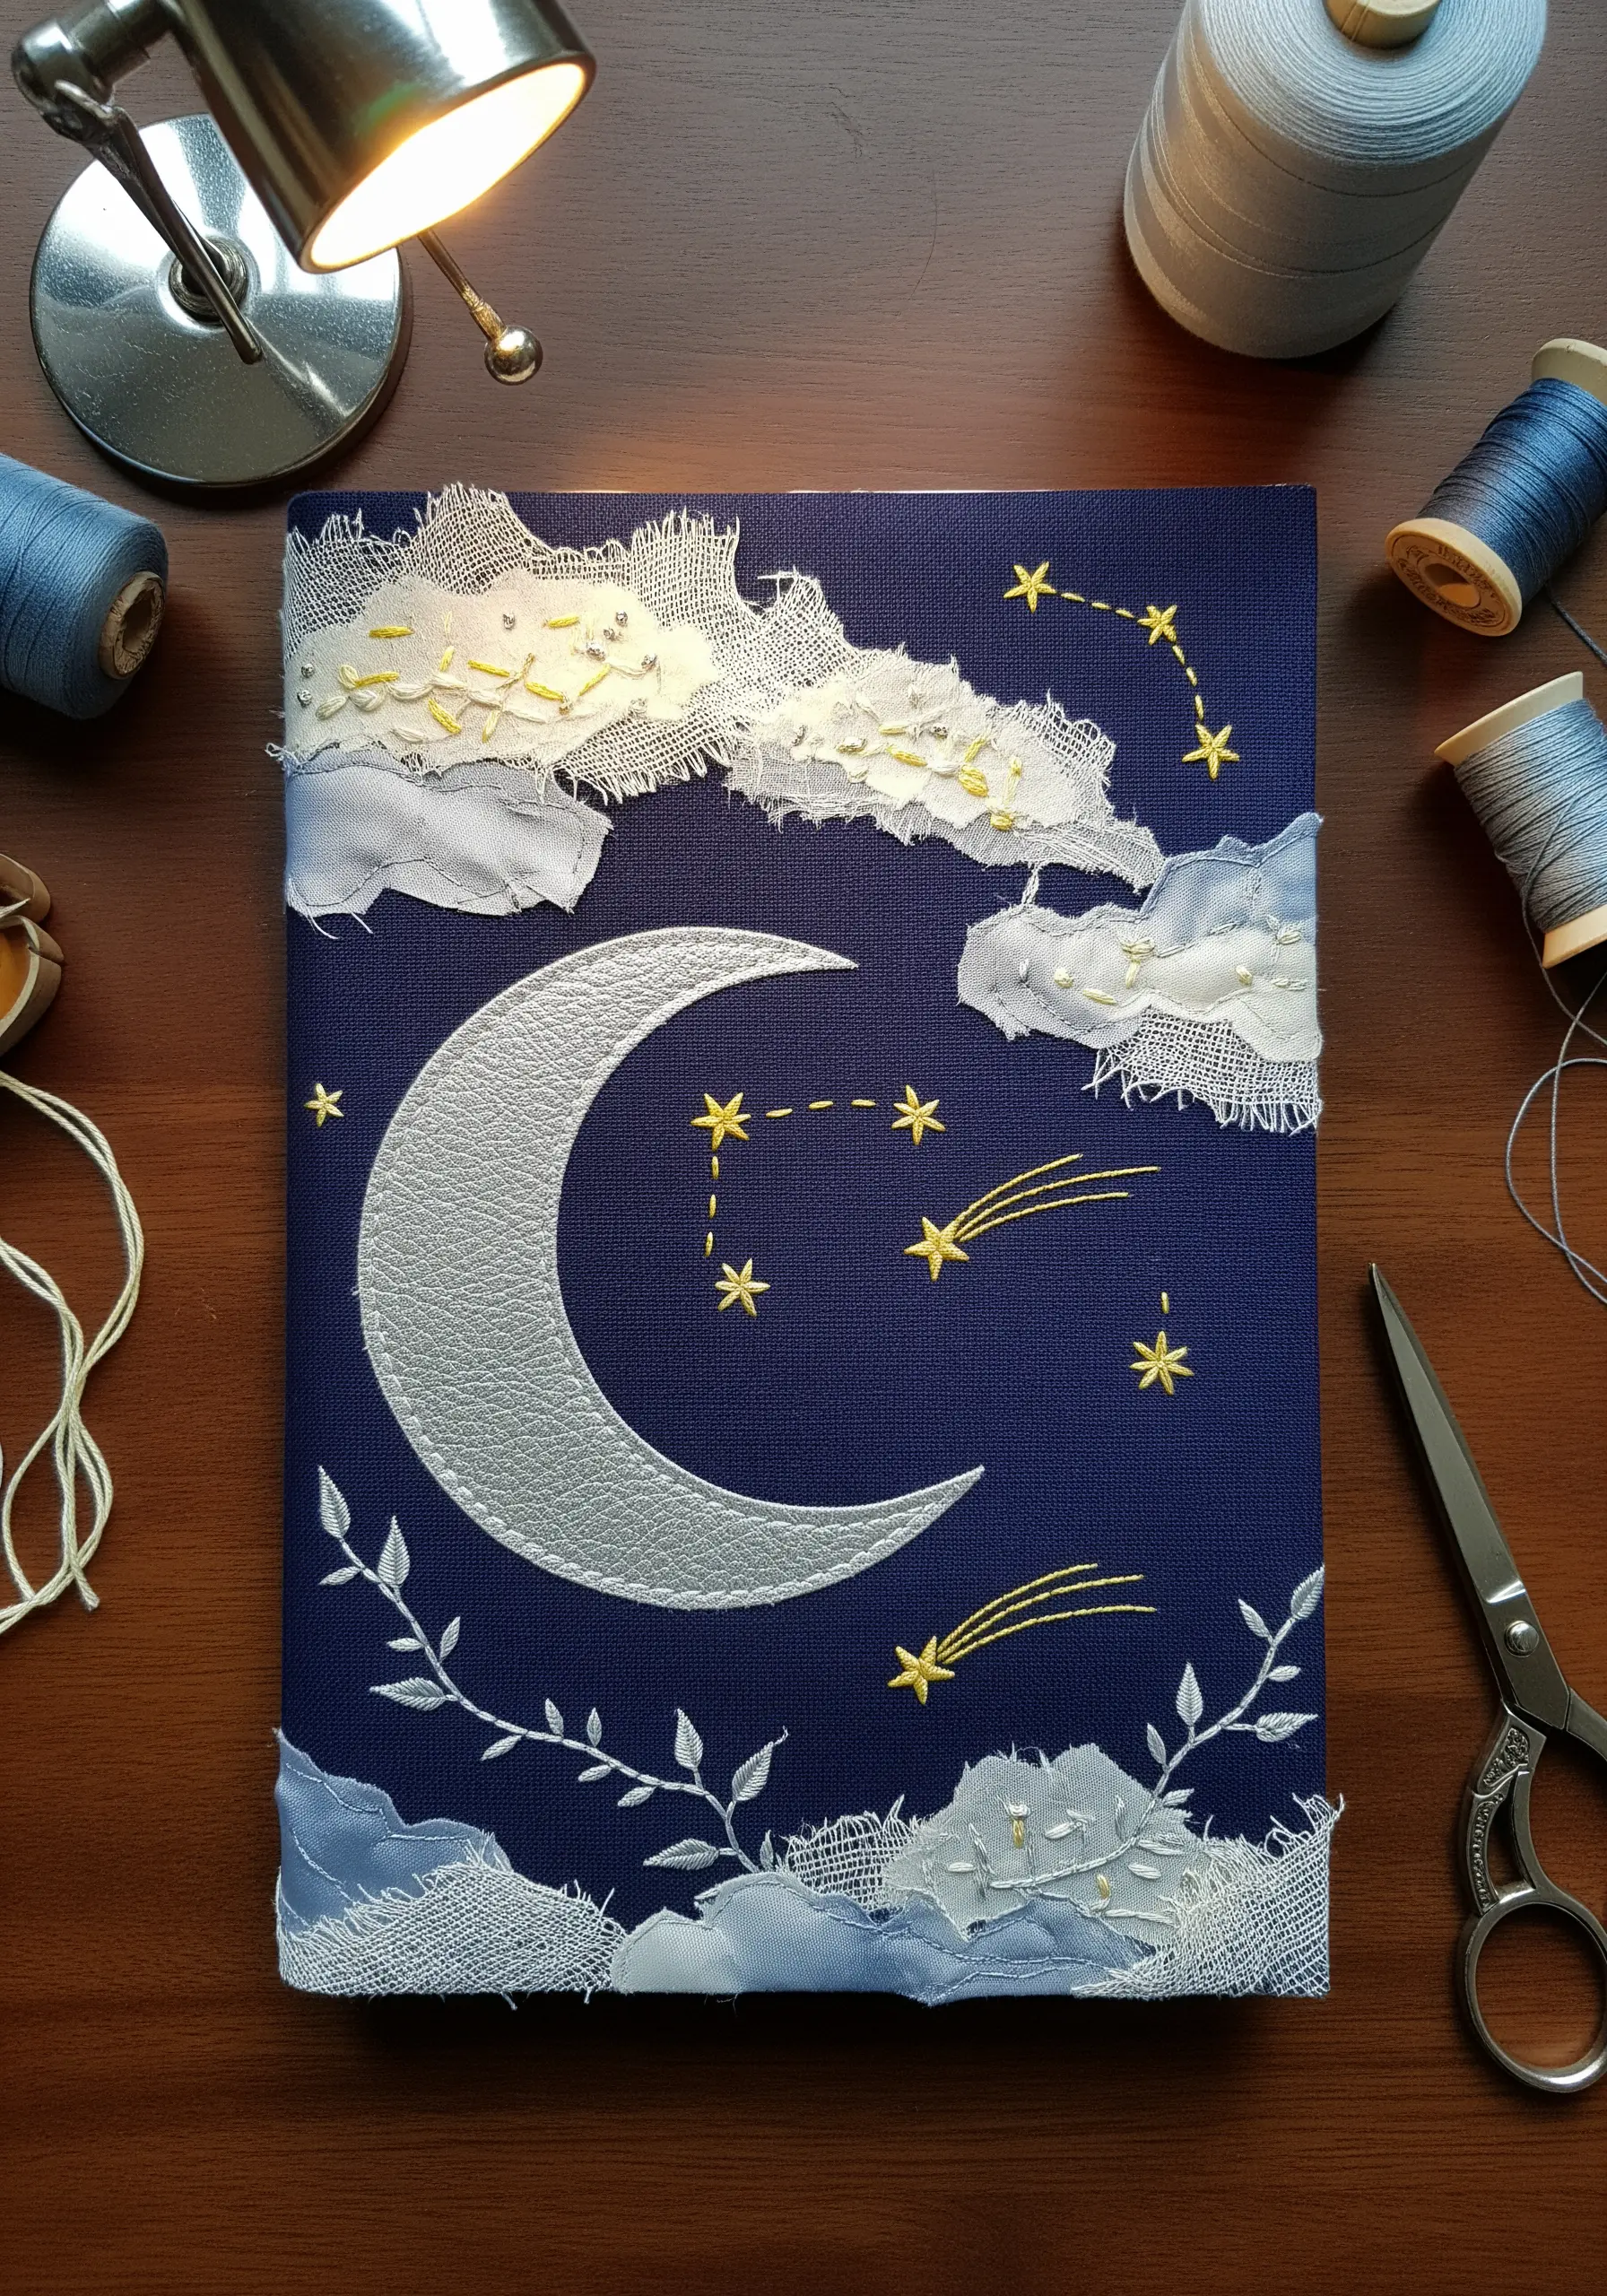
Instead of seeking perfect, clean edges for elements like clouds or mist, embrace the natural texture of frayed fabric.
Cut your appliqué shapes from a loosely woven fabric like gauze or linen, then gently pull at the threads along the edges before stitching them down.
Secure the shape with a few scattered seed stitches in a matching thread, allowing the frayed edges to remain loose and soft.
This adds a dreamy, tactile quality that perfectly complements celestial or relaxing nature scene embroidery hoops.
4. Balance Patterned Appliqué with Simple Stitches
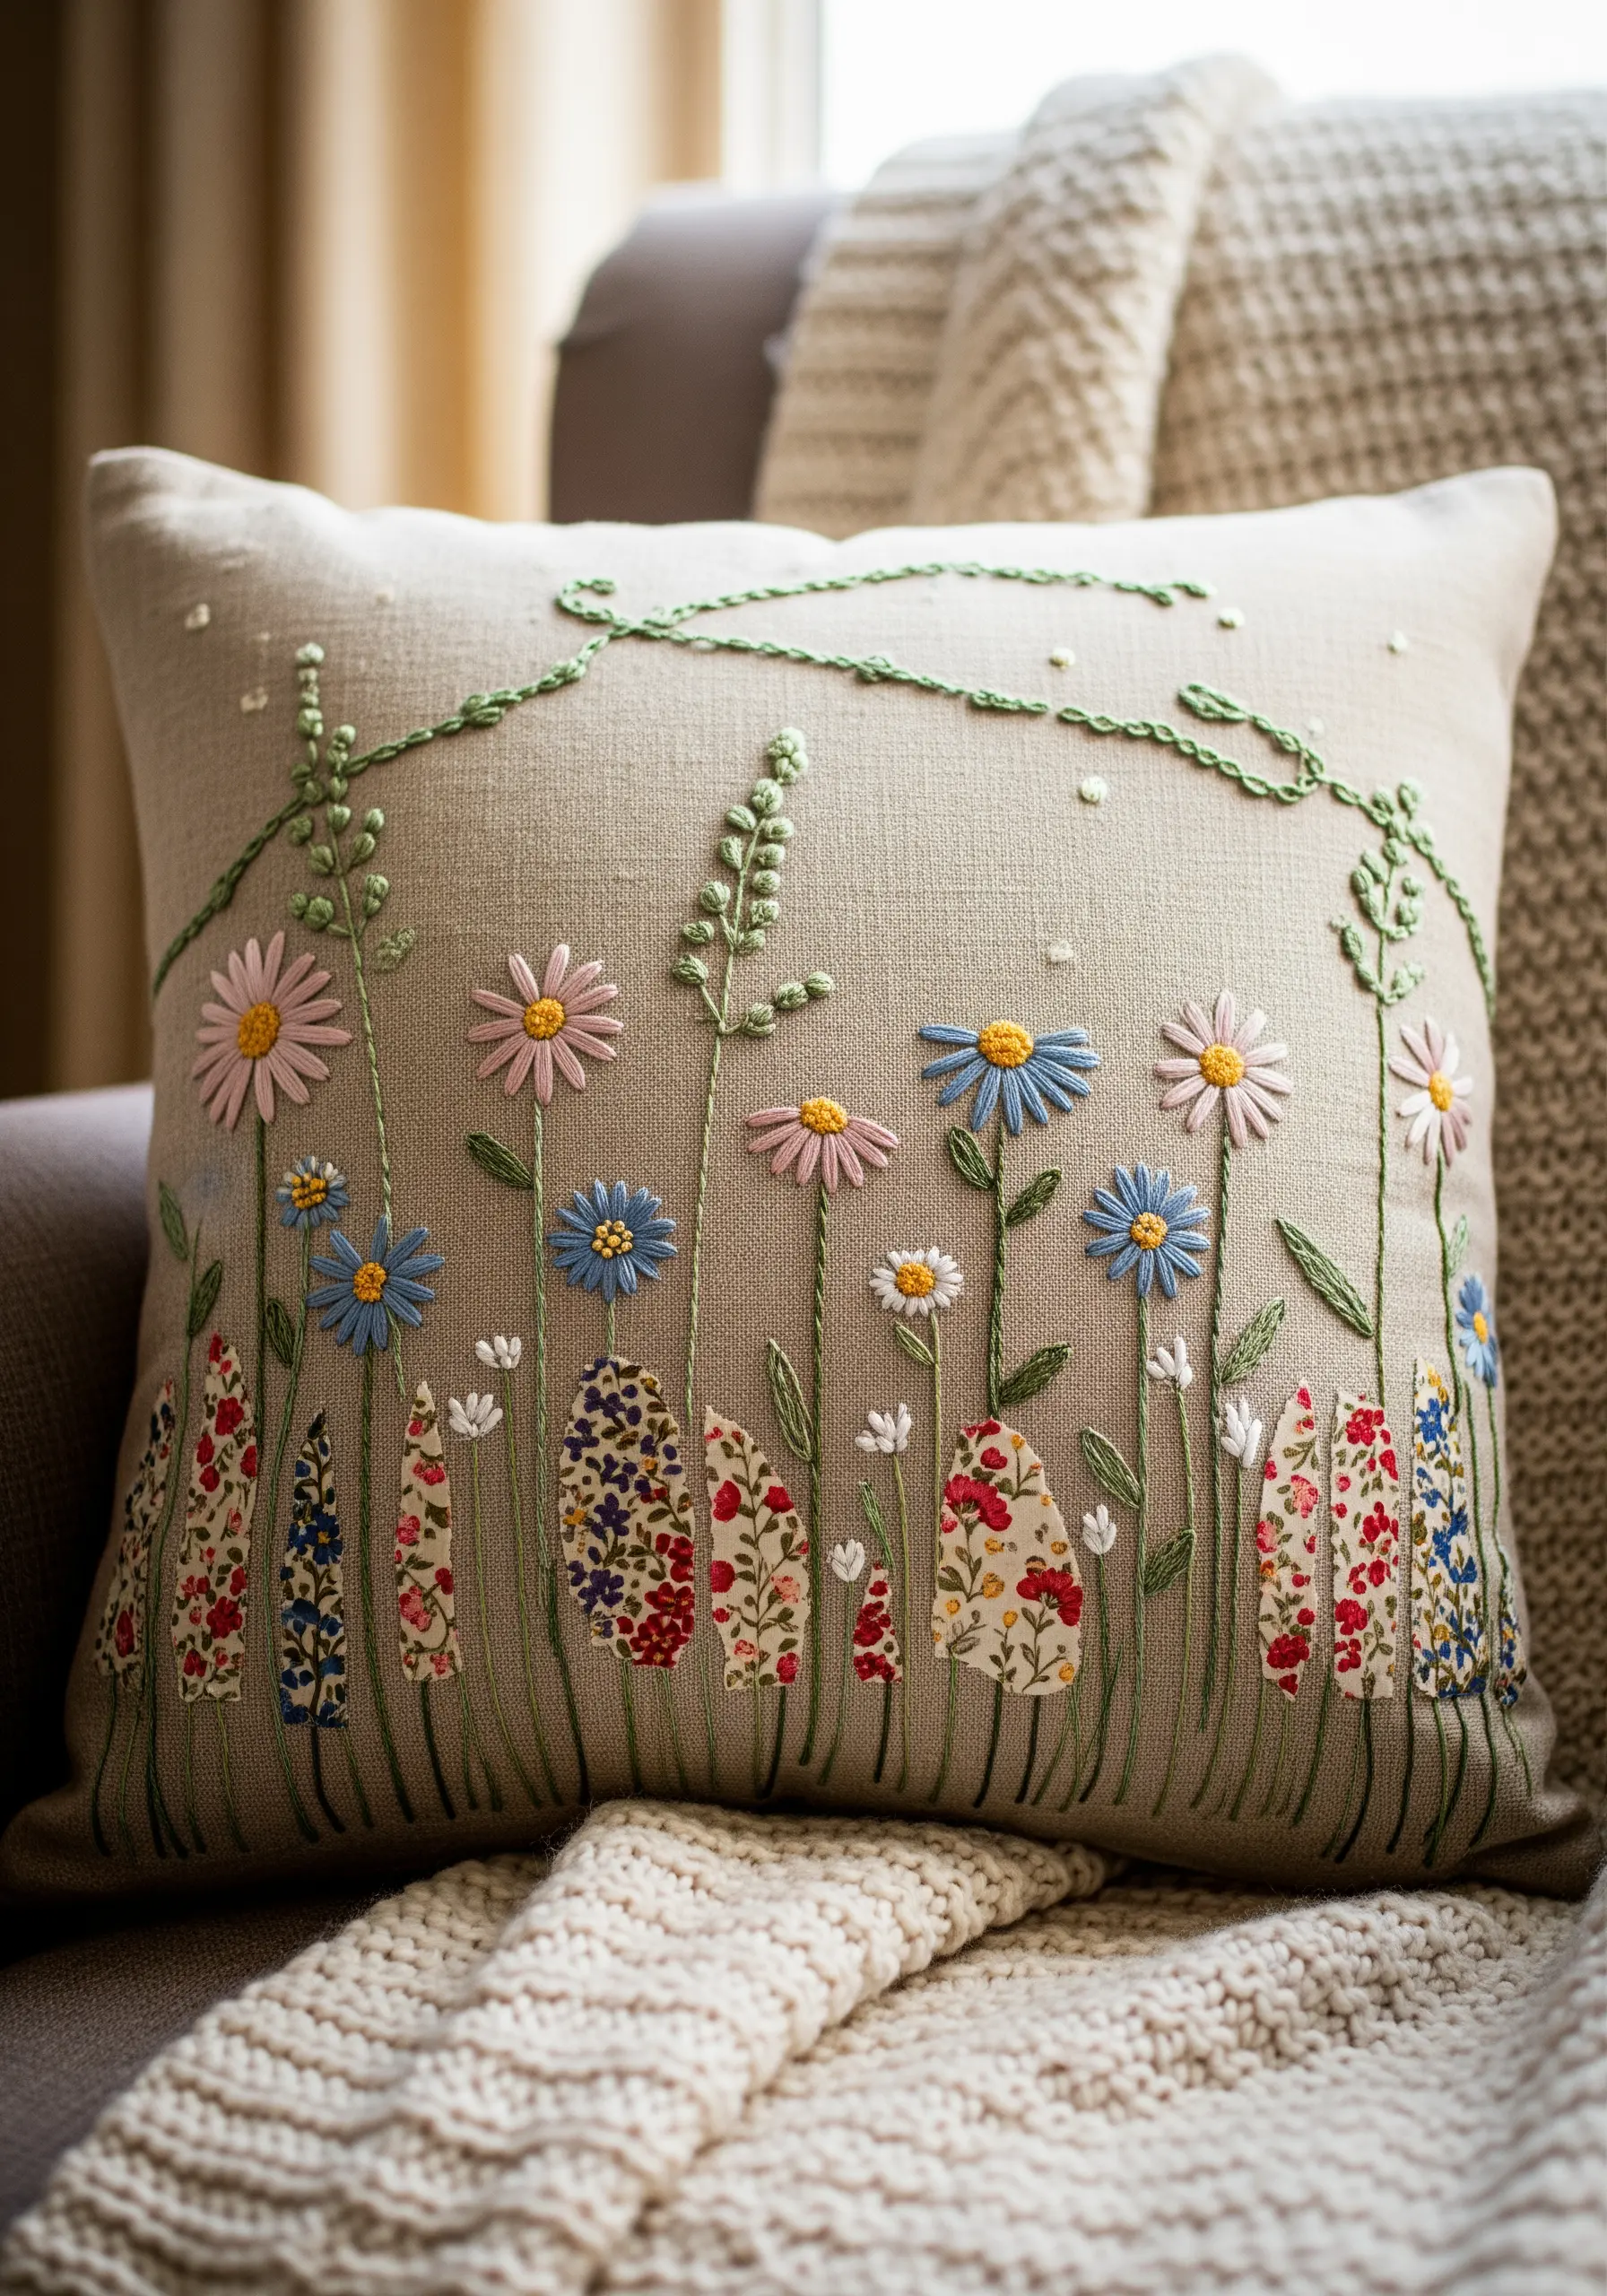
When using boldly patterned fabrics for your appliqué shapes, keep the surrounding embroidery minimal to avoid overwhelming the design.
Here, simple lazy daisy stitches for the petals and straight stitches for the stems in solid colors provide structure without competing with the floral fabric.
This technique allows the collage elements to be the hero of the piece while the embroidery serves as a graceful supporting framework.
It’s a perfect strategy for turning scrap fabric collage embroidery ideas into elegant home decor.
5. Select Fabrics to Tell a Story

The choice of fabric for your appliqué can add a layer of narrative to your piece.
For this tea-themed table runner, chintz and calico fabrics evoke a sense of classic kitchen linens and vintage charm.
When planning your project, think about the story you want to tell. A rustic scene might call for linen or burlap, while a child’s design could use playful gingham or polka dots.
This thoughtful selection transforms a simple motif into an evocative piece of table linen embroidery.
6. Build Dimension with Layered Corduroy and Felt
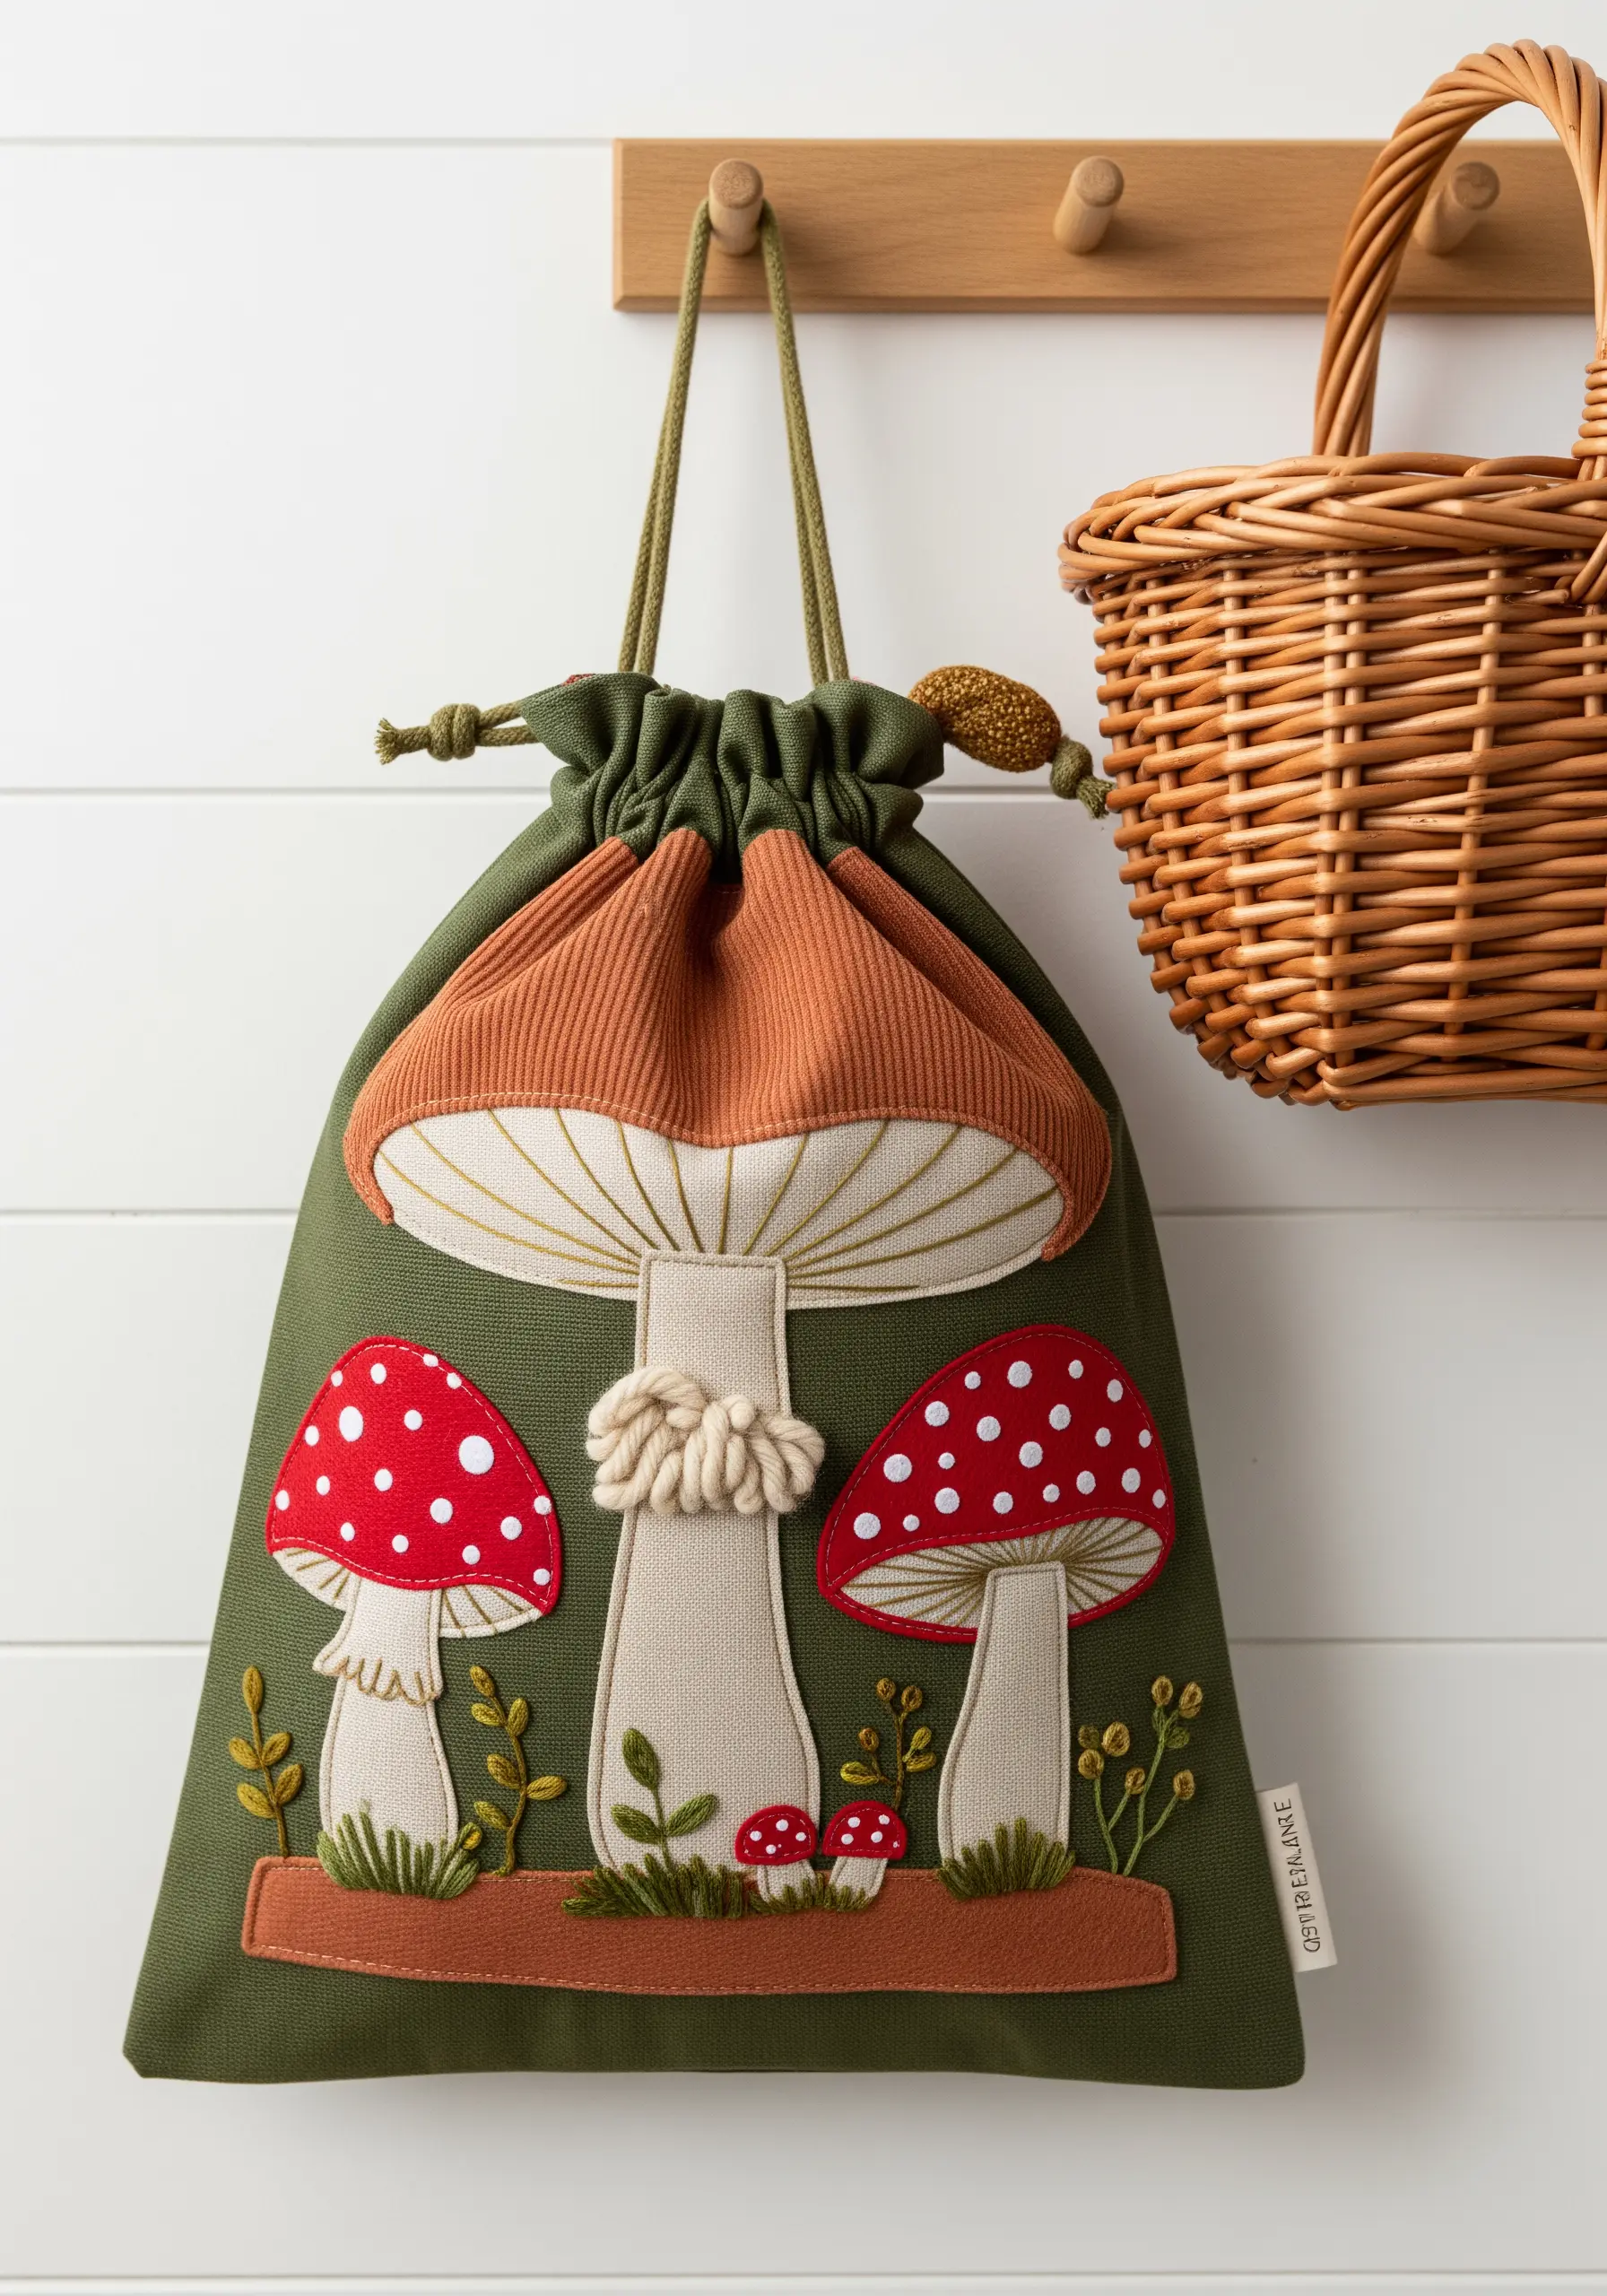
Incorporate fabrics with inherent texture, like corduroy, to create instant dimension.
The ribbed texture of the corduroy on the mushroom cap immediately suggests gills without requiring complex stitching.
For raised elements like the mushroom’s ring, create a small bundle of thick yarn or roving and couch it onto the surface with coordinating thread.
This tactile approach adds depth and makes your whimsical fabric collage embroidery scenes incredibly engaging.
7. Layer Appliqué for Dynamic Compositions
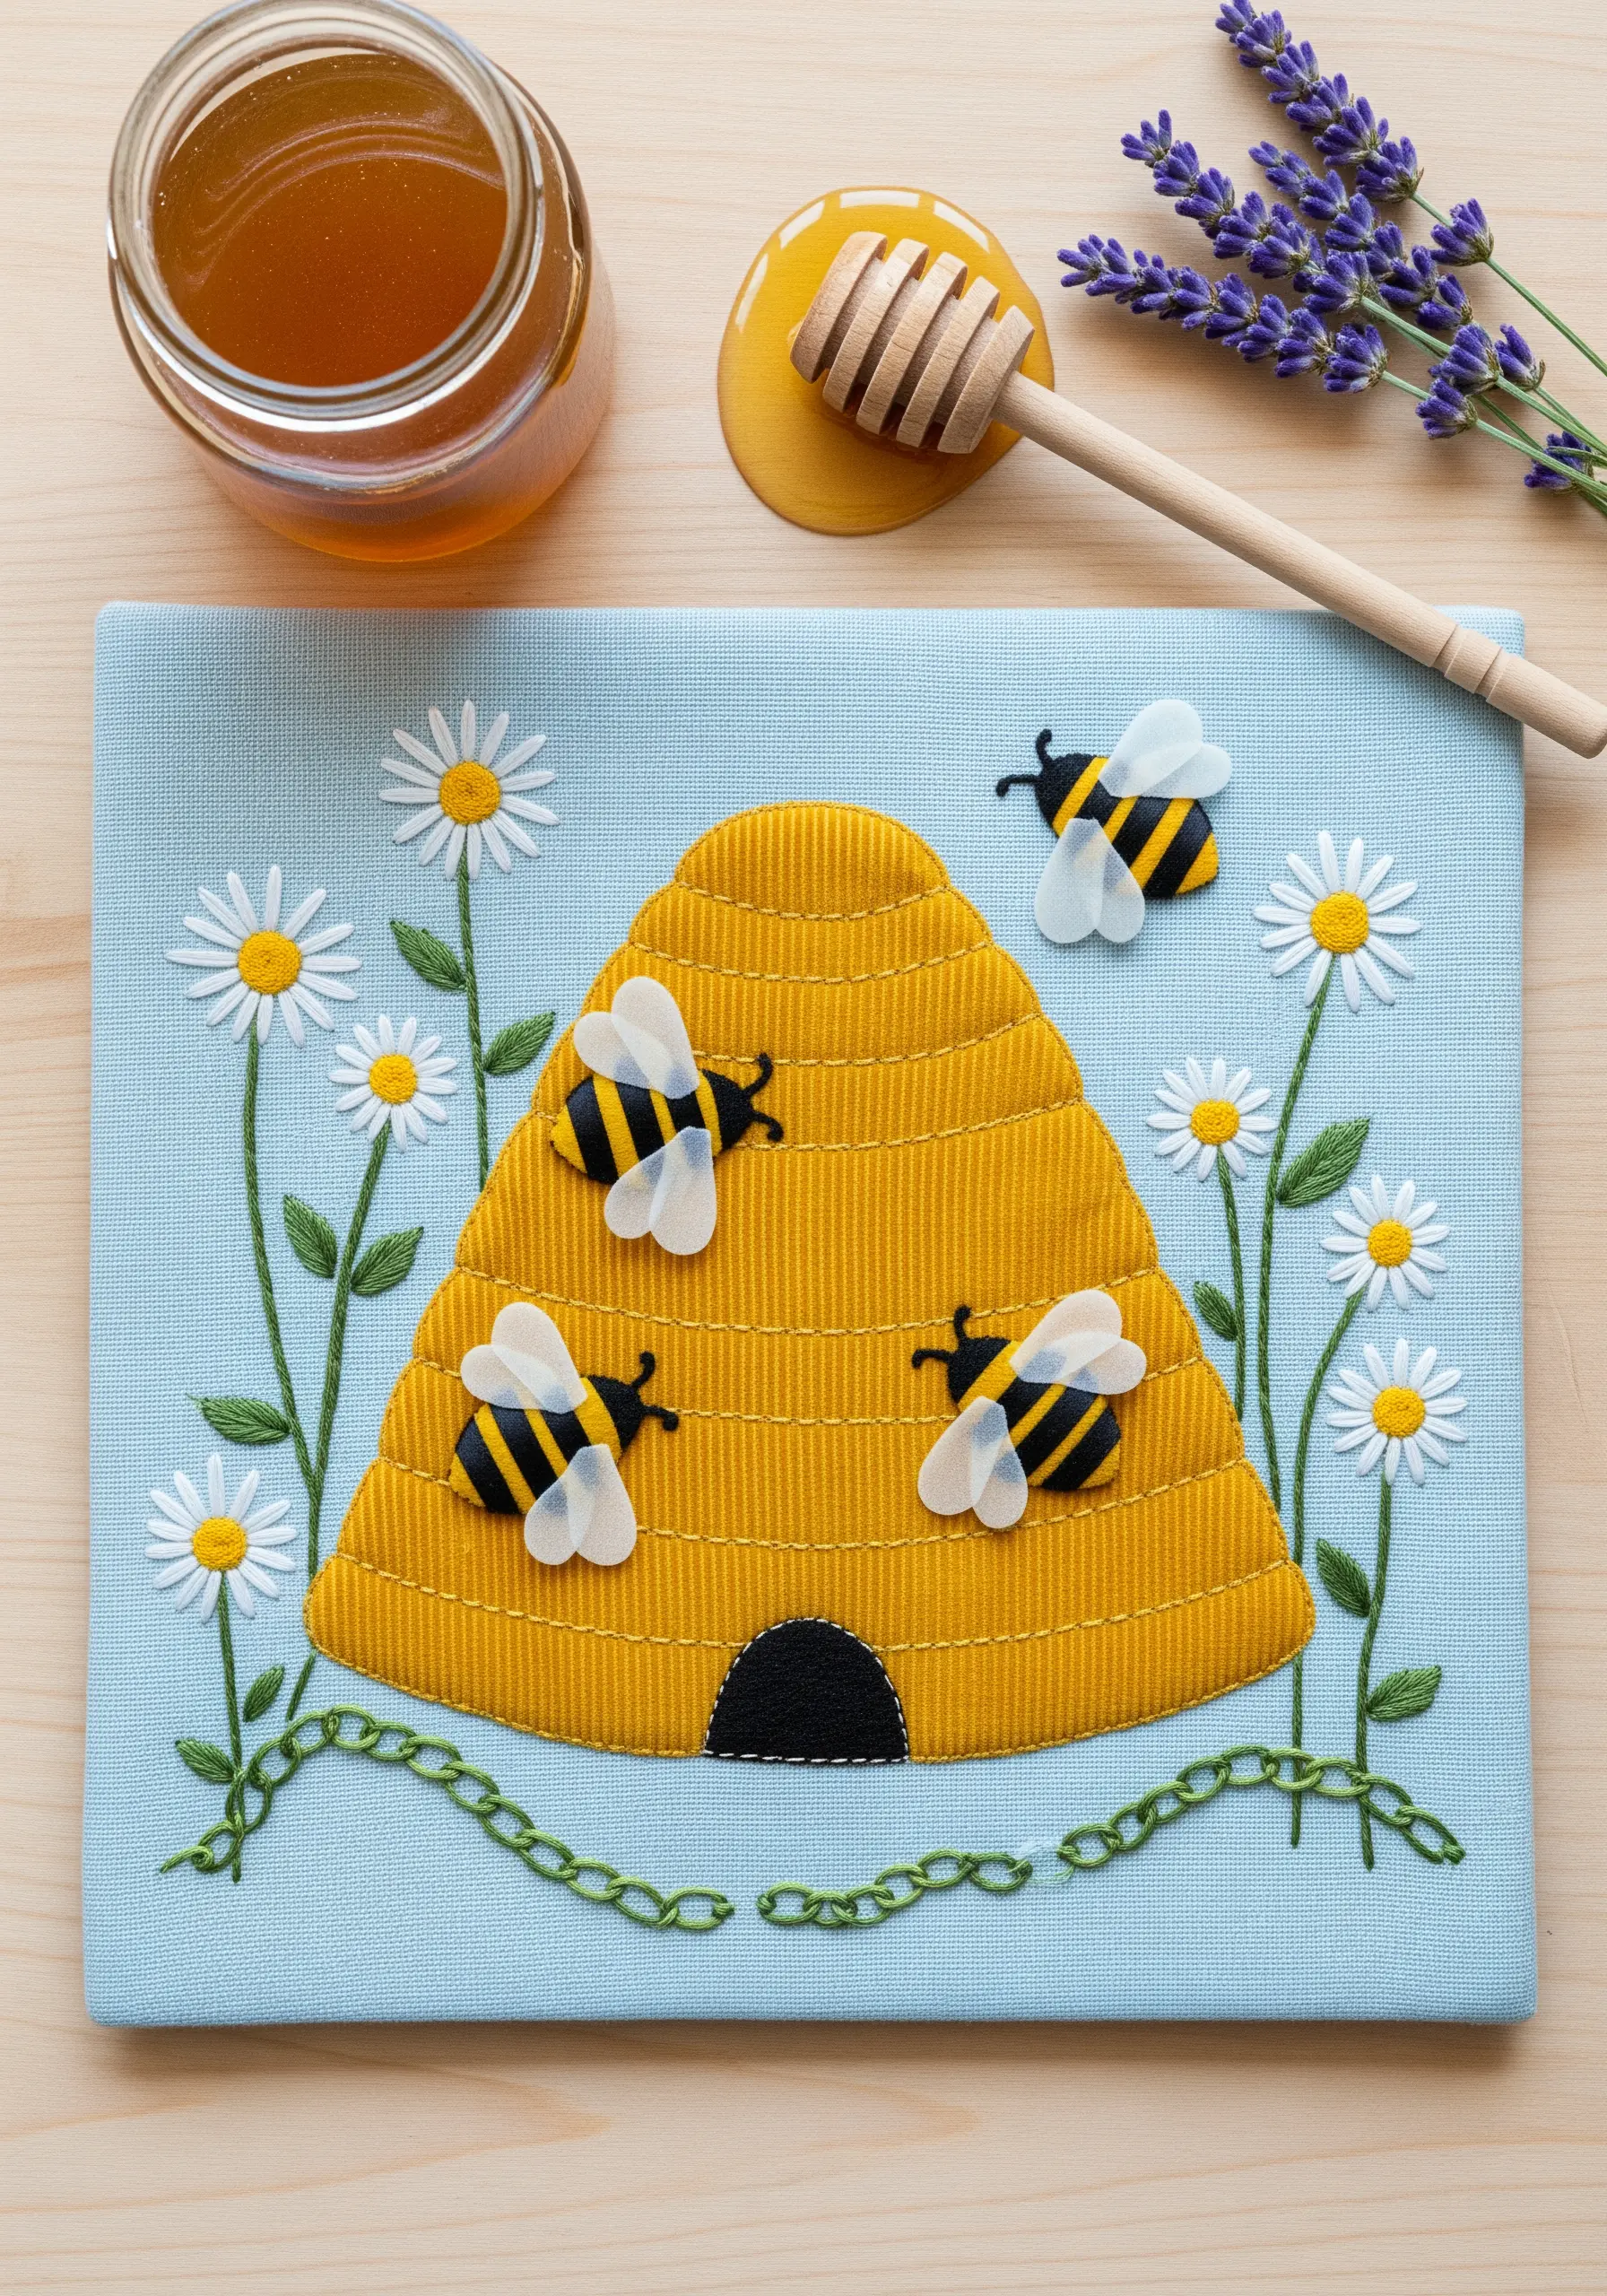
Create a sense of movement and depth by layering your appliqué pieces.
Position elements like the bees’ wings slightly overlapping the body, or place foreground daisies in front of the beehive’s base.
Secure each layer with a simple whipstitch or a tiny running stitch around the edge. This technique breaks up flat surfaces and makes the scene feel alive and interactive.
It’s an effective way to turn simple shapes into fun hoop art projects.
8. Create Mosaics with Fabric Scraps

Achieve a stunning, painterly effect by using tiny, carefully cut fabric scraps to form a mosaic.
Sort your scraps by color and tone, then cut them into geometric or organic shapes to ‘paint’ the form of your subject, like this majestic stag.
Adhere them with a light fabric glue or fusible web before stitching the edges with a single strand of thread to blend them seamlessly.
This transforms simple materials into sophisticated, framed embroidery art pieces.
9. Design Interactive Elements for Tactile Books
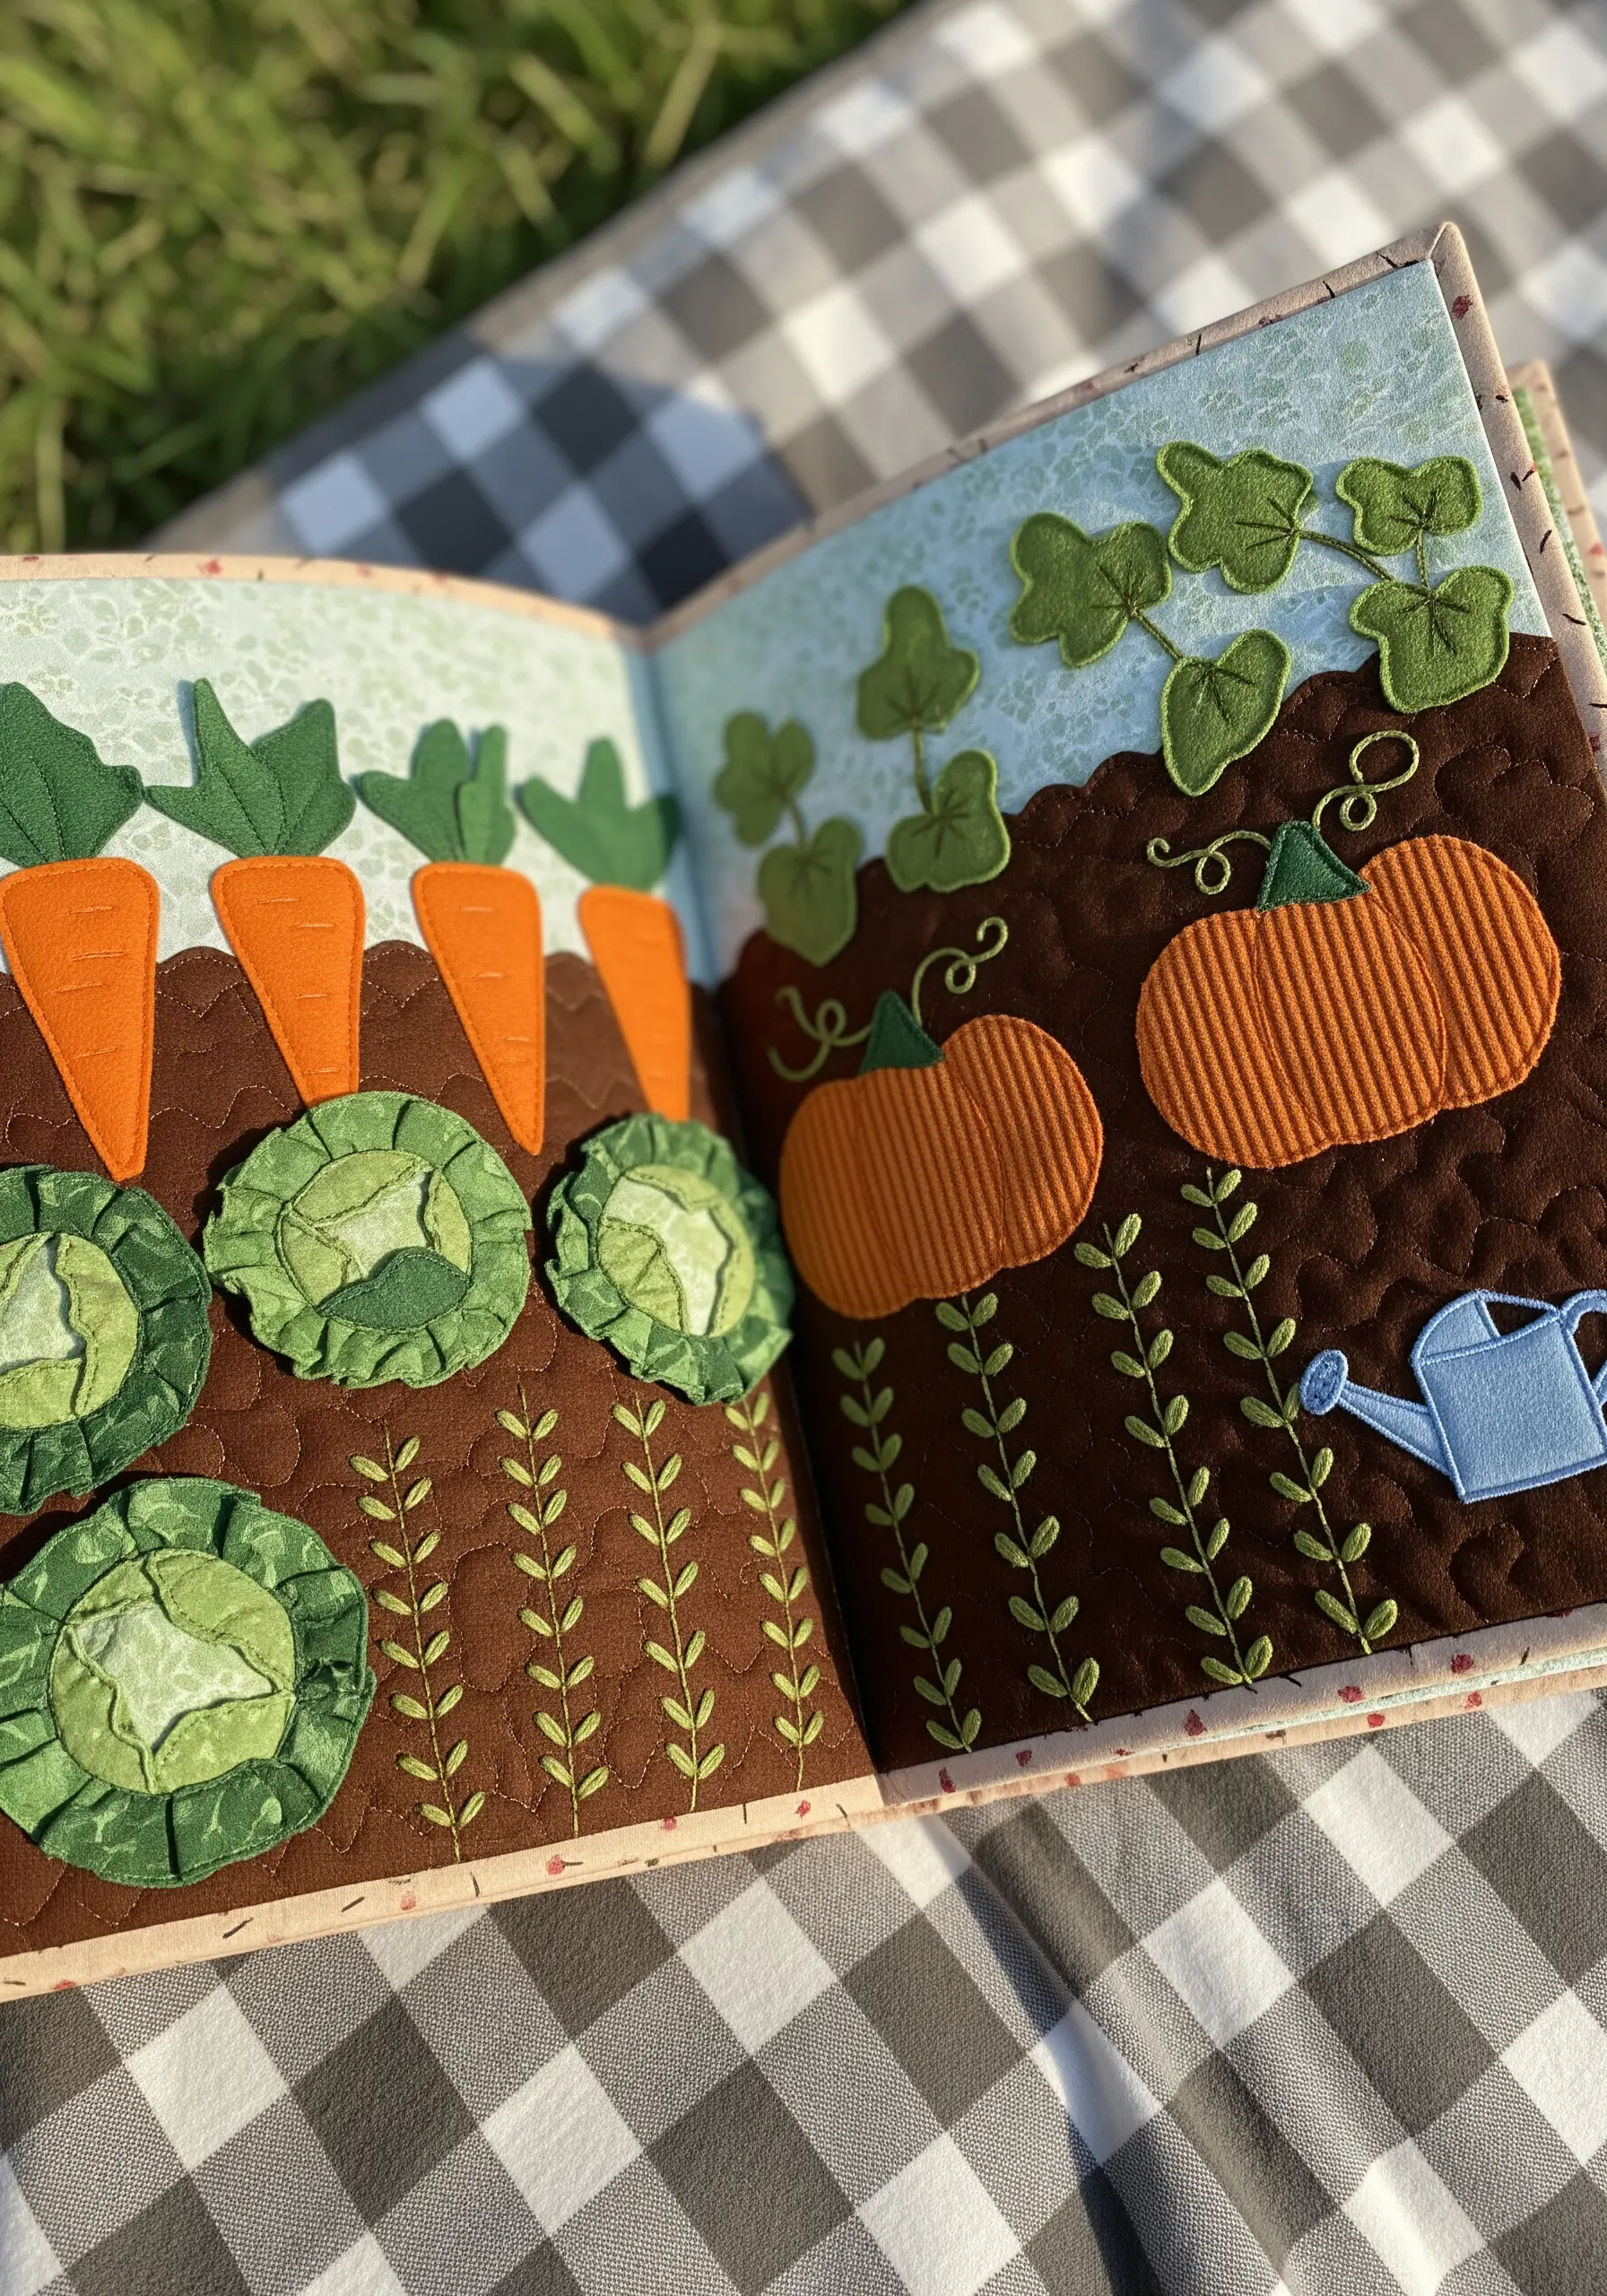
For children’s fabric books or interactive wall hangings, build elements that invite touch.
Stuff appliqué shapes like the cabbages with a thin layer of batting before stitching them down to create a soft, puffy texture.
Use different fabrics like felt for the carrots and corduroy for the pumpkins to introduce varied sensory experiences.
The goal is to make the embroidery not just something to see, but something to feel and explore.
10. Curate a Thematic Hoop Art Collection

Group smaller fabric collage pieces together to create a powerful gallery wall.
To ensure cohesion, choose a unifying theme, such as berries or botanicals, and vary the background fabrics and thread colors for interest.
Using patterned fabric for the main motif, like the strawberries, and solid fabric for others, like the winterberries, creates a beautiful visual rhythm.
This is a wonderful way to build hooped wall collage layouts that tell a seasonal story.
11. Translate Quilting Blocks into Fabric Art

Borrow techniques from quilting to create charming, structured fabric collages.
Each square in this piece acts as a miniature canvas for a different cottage-core motif, using appliqué and simple embroidery.
The sashing—the fabric strips between the blocks—provides a clean frame for each scene, creating a sense of order and calm.
This approach is perfect for larger projects like quilts, cushion covers, or hand-embroidered wall hangings.
12. Craft Dimension with Raised Stitches and Appliqué

Combine flat appliqué with highly textural, three-dimensional stitches for a dynamic effect.
The simple gray fabric gate provides a stable background for the vibrant, raised woven wheel flowers that seem to bloom right off the surface.
To create these flowers, use a thicker thread, like pearl cotton or all six strands of floss, to give them more volume.
The contrast between the flat and raised elements creates visual depth and immediate appeal.
13. Build a Landscape with Layered Textile Techniques
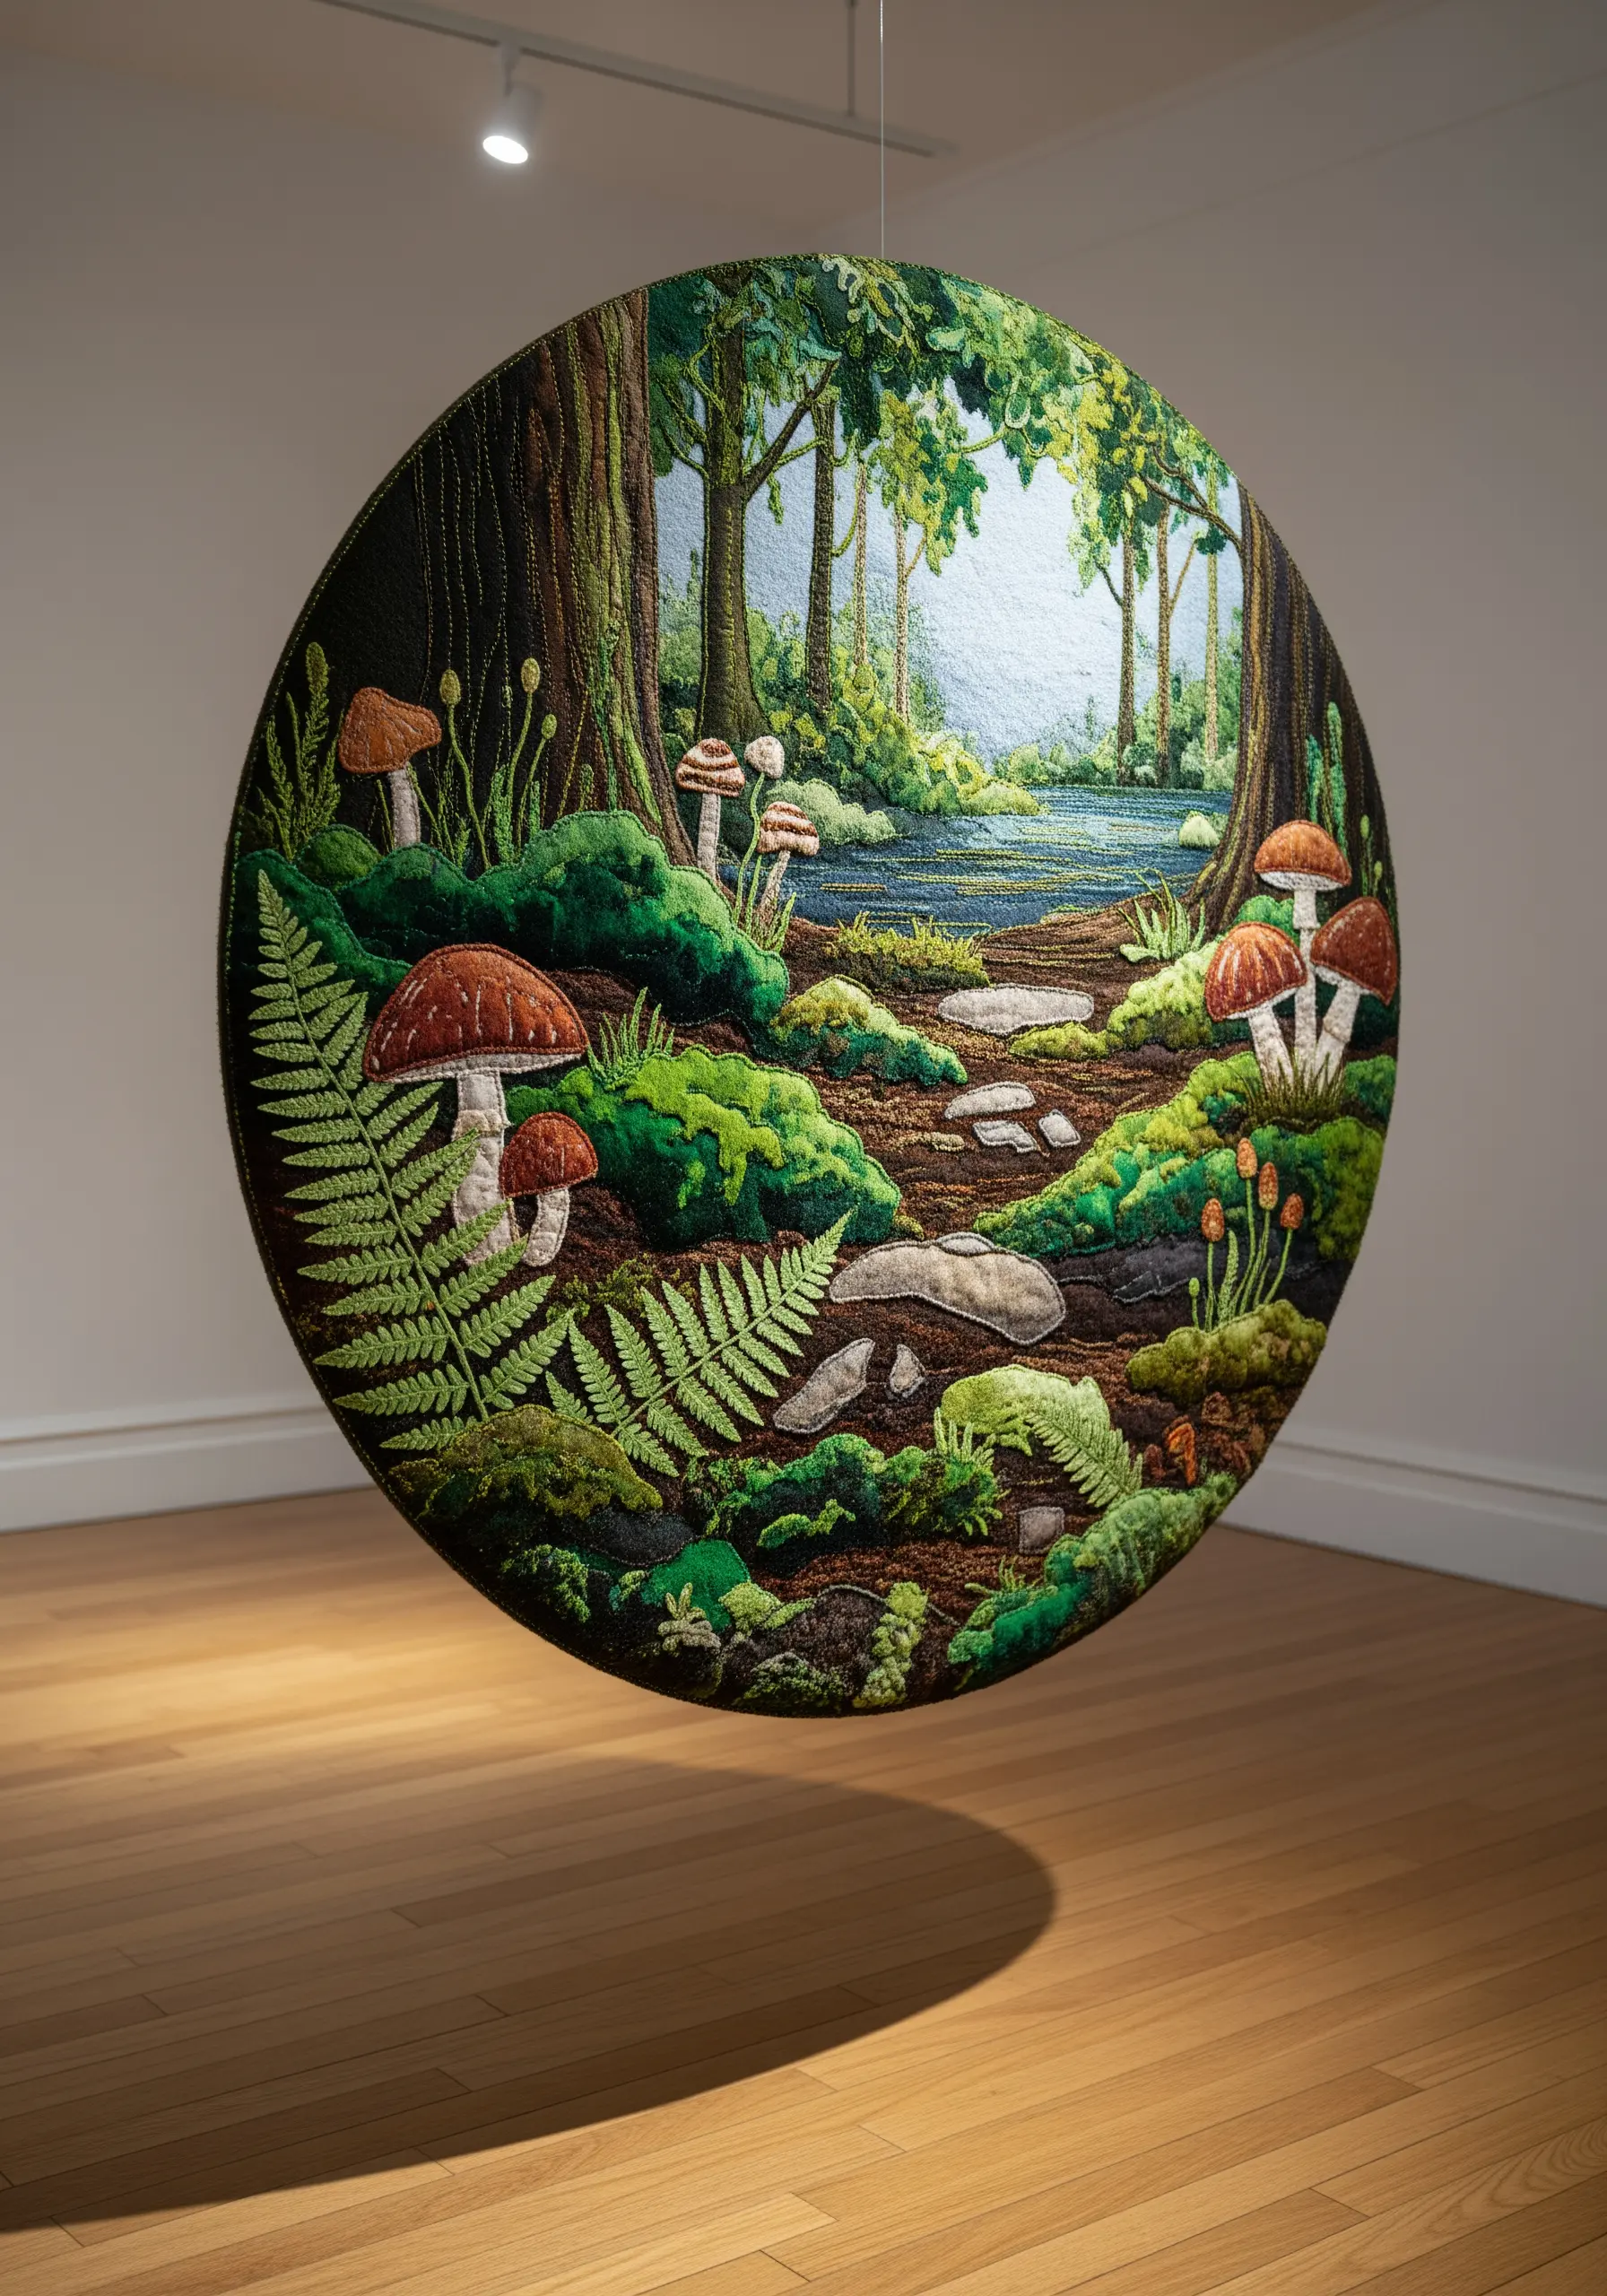
For a complex scene, think like a landscape painter and build your composition in layers—foreground, mid-ground, and background.
Use thick, textural stitches like French knots and turkey work for the mossy foreground to bring it forward visually.
In the mid-ground, use appliqué for defined shapes like mushrooms. For the distant background, use smoother, flatter stitches or even fabric paint to create a sense of atmospheric depth.
This method allows you to create truly immersive nature-inspired embroidery ideas.
14. Add Whimsy with Miniature Embellishments
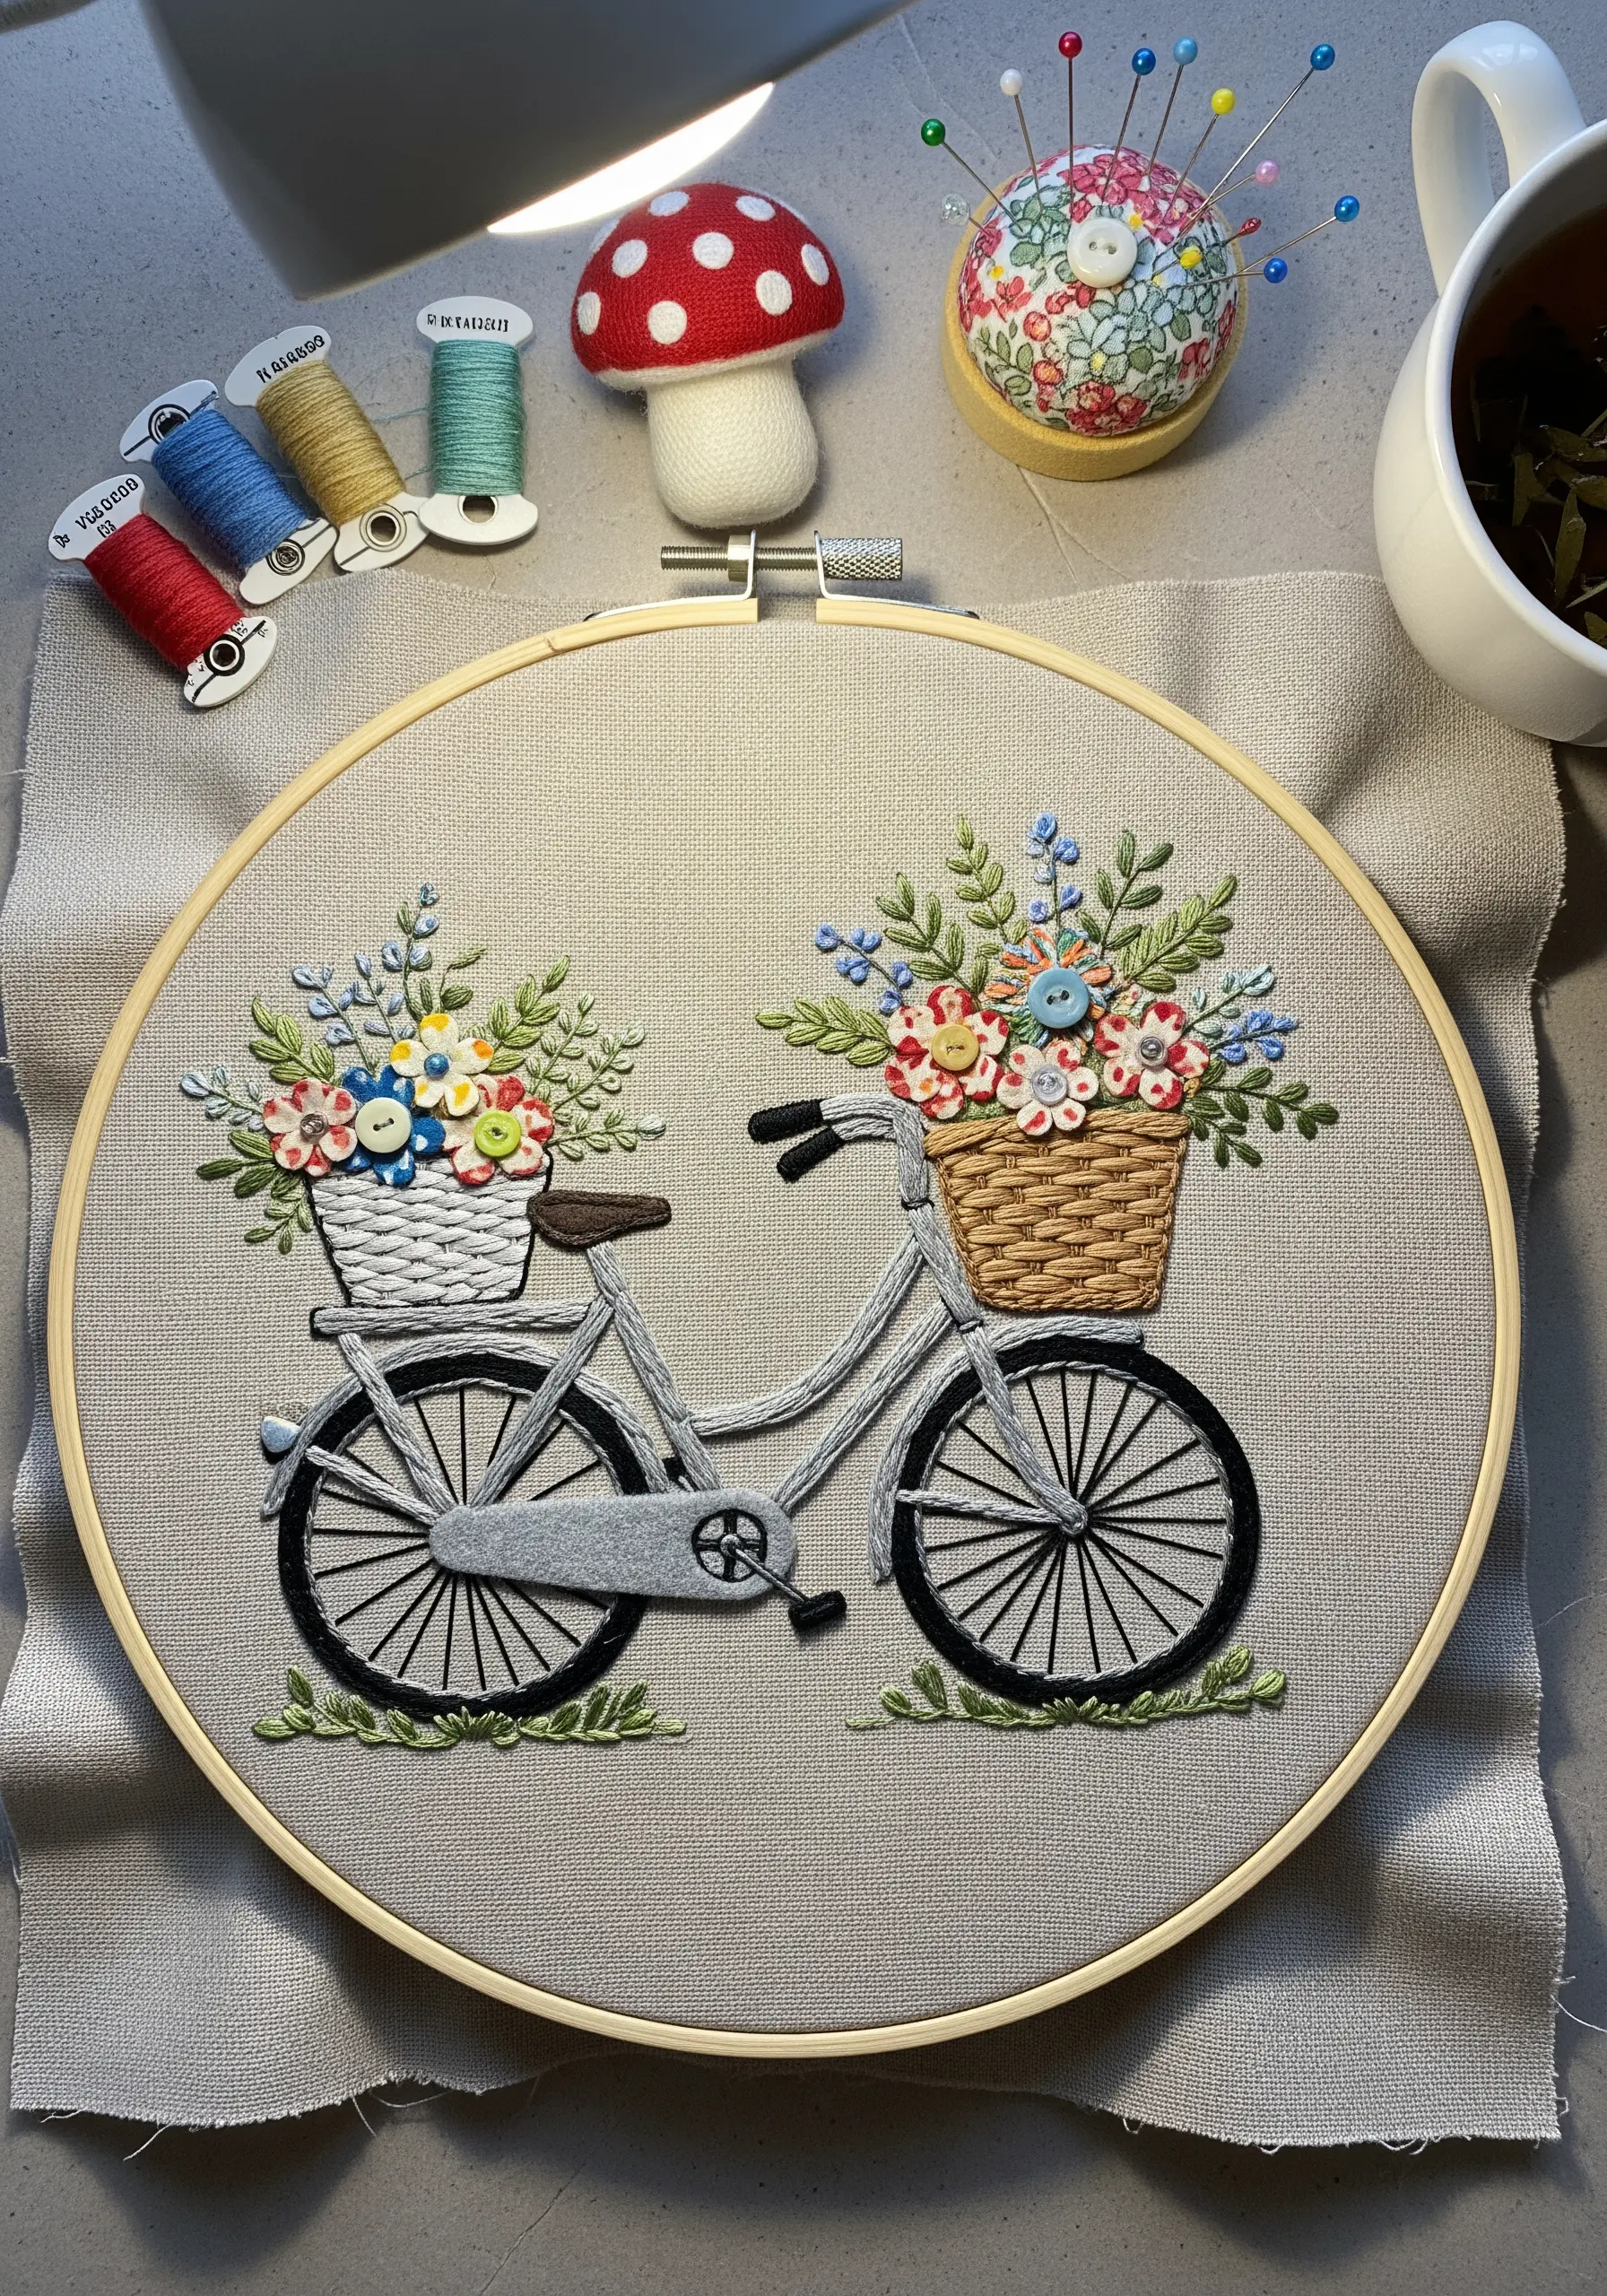
Elevate a simple appliqué and embroidery design by incorporating tiny, unexpected embellishments like beads or buttons.
Here, a mix of colorful buttons and beads stitched into the baskets creates the illusion of overflowing flowers with minimal effort.
This technique adds a playful, three-dimensional quality and is a fantastic way to use up your button collection.
It’s a perfect finishing touch for small embroidery ideas to add a personal touch to gifts.
15. Create Realistic Foliage with 3D Stitches
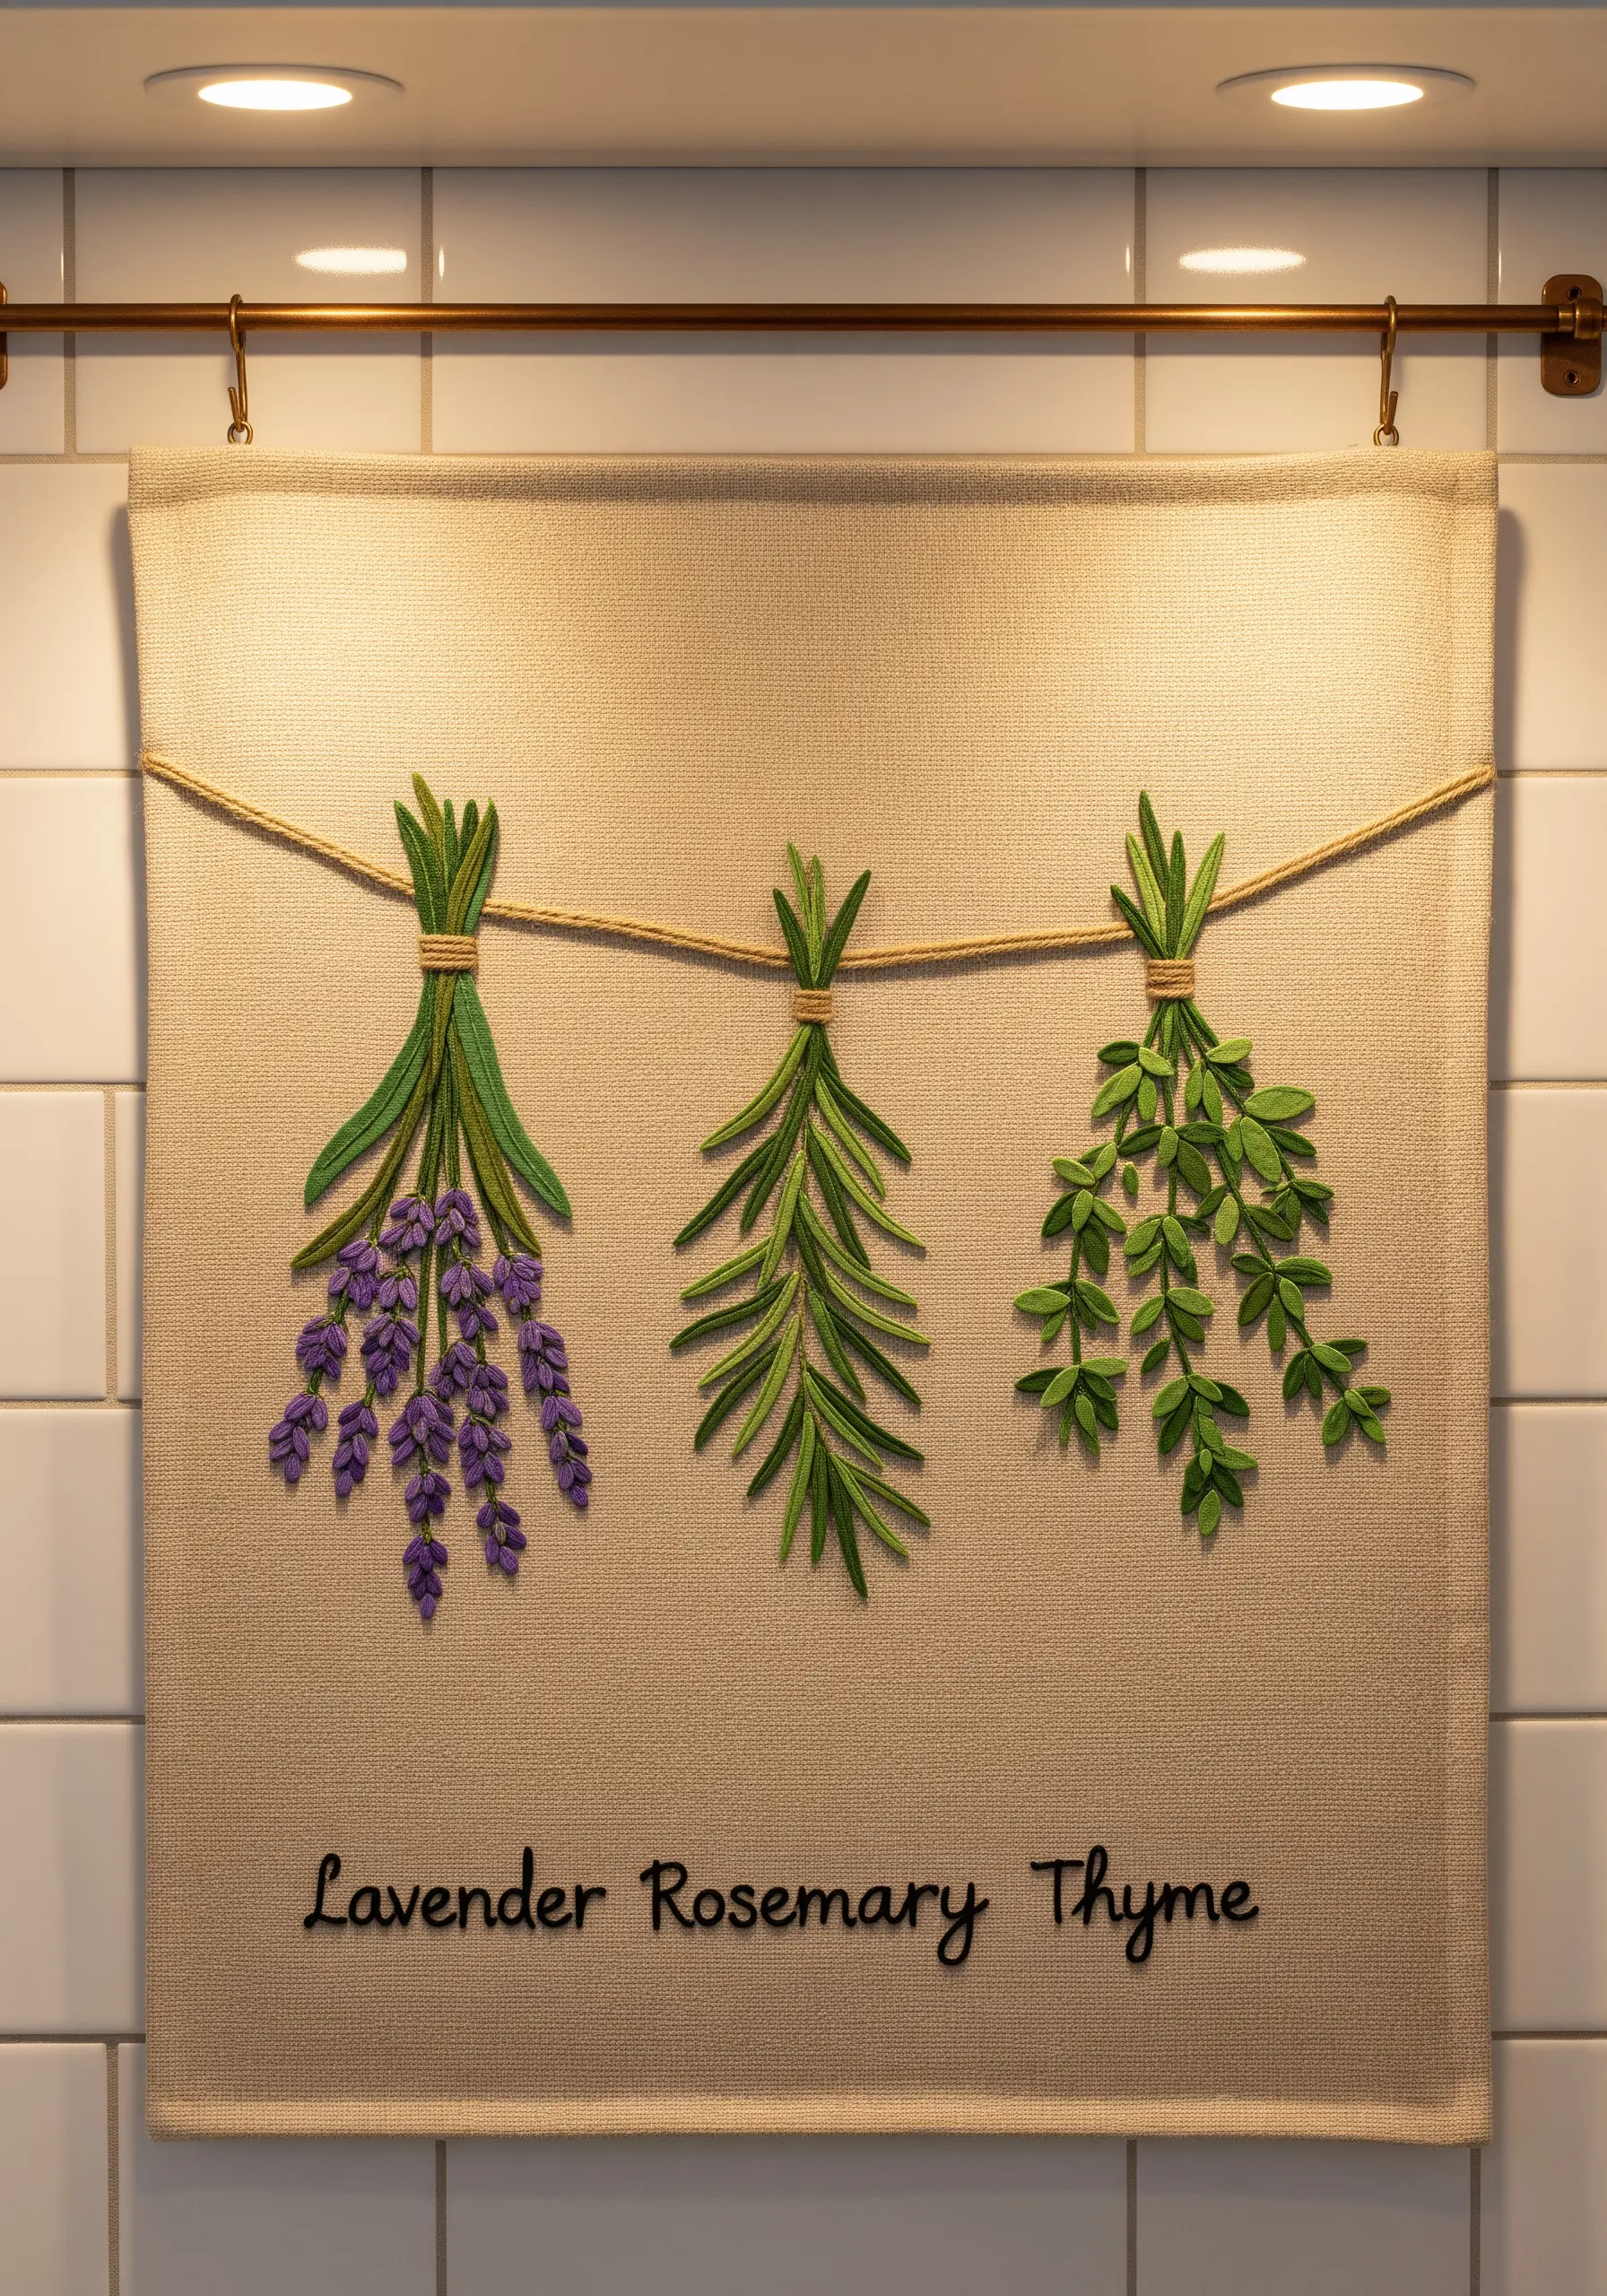
Give your embroidered herbs and plants a lifelike, three-dimensional quality using detached stitches.
For the lavender and rosemary, use detached chain stitches or fishbone stitches worked loosely to allow the foliage to lift slightly from the fabric.
You can create these herb bundles separately on a scrap piece of felt, cut them out, and then appliqué them onto your final piece for even more dimension.
These leaf vein stitch methods are perfect for kitchen decor.
16. Design in Pairs for Balanced Wall Decor

When creating artwork for a specific space, like above a bed, consider making a diptych—two pieces that complement each other.
You can create mirror images, variations on a theme, or two separate compositions that share a color palette and style, like these two bluebirds.
This approach creates a more intentional and impactful display than a single piece might, turning simple motifs into elegant bedroom wall embroidery ideas.
17. Add Character with Patterned Fabric Accents
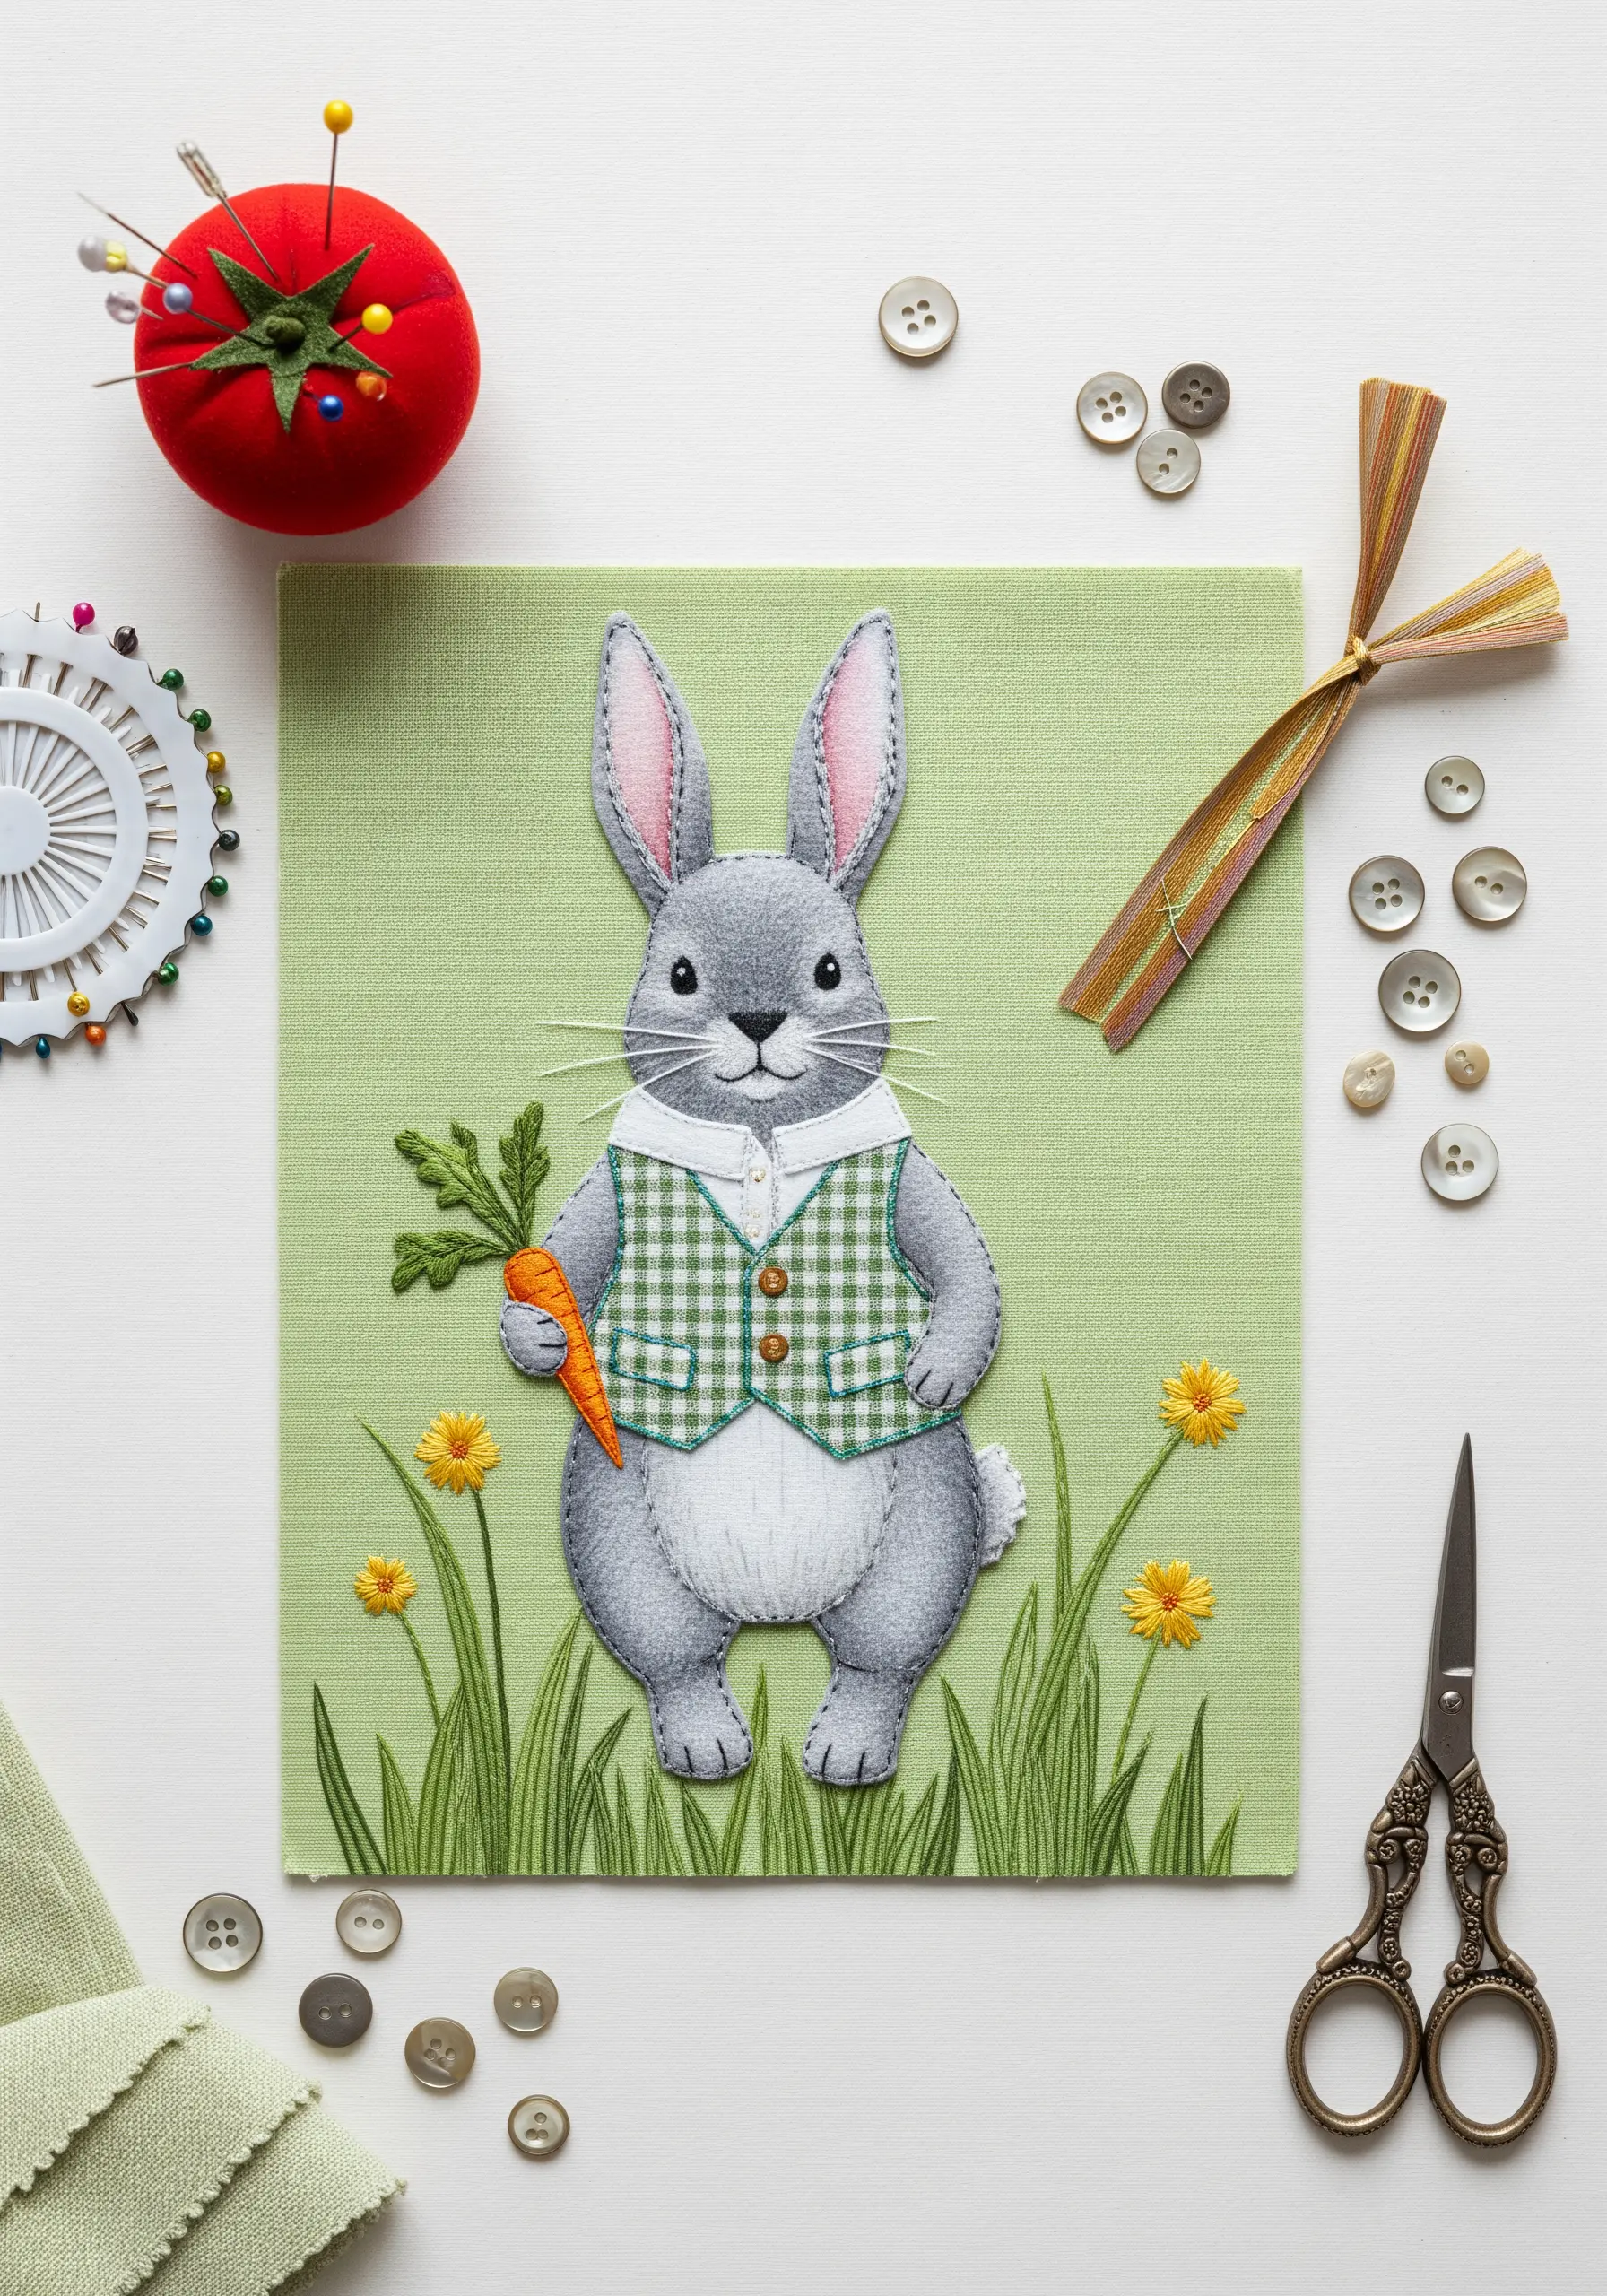
Introduce personality into your appliqué characters by using patterned fabric for their clothing.
A simple gingham or check fabric for the rabbit’s waistcoat instantly adds a touch of classic, storybook charm.
Secure the clothing pieces first, then layer the solid-colored body parts on top to create a clean, finished look.
This simple technique is perfect for adding narrative detail to tiny animal embroidery sketches.
18. Integrate Your Art with Unconventional Surfaces

Take your fabric collage off the hoop and mount it on an unexpected surface for a rustic, integrated look.
A piece of reclaimed wood or a weathered board makes a beautiful, earthy backdrop for a cottage-themed design like a wishing well.
Use a strong fabric adhesive to secure the main piece, then add embroidered details directly over the fabric and onto the wood for a truly unique piece of mixed-media embroidery.
19. Craft Scented Sachets with Appliqué Patches

Combine fabric collage with a functional purpose by creating small, scented sachets.
First, complete your appliqué and embroidery on a small square of fabric. Then, place a second fabric square on top, right sides together, and sew around three sides.
Turn the pouch right-side out, fill with dried lavender or other herbs, and stitch the final opening closed.
These make charming and cozy embroidery projects to gift a loved one.
20. Go Bold with Large-Scale Patchwork Appliqué
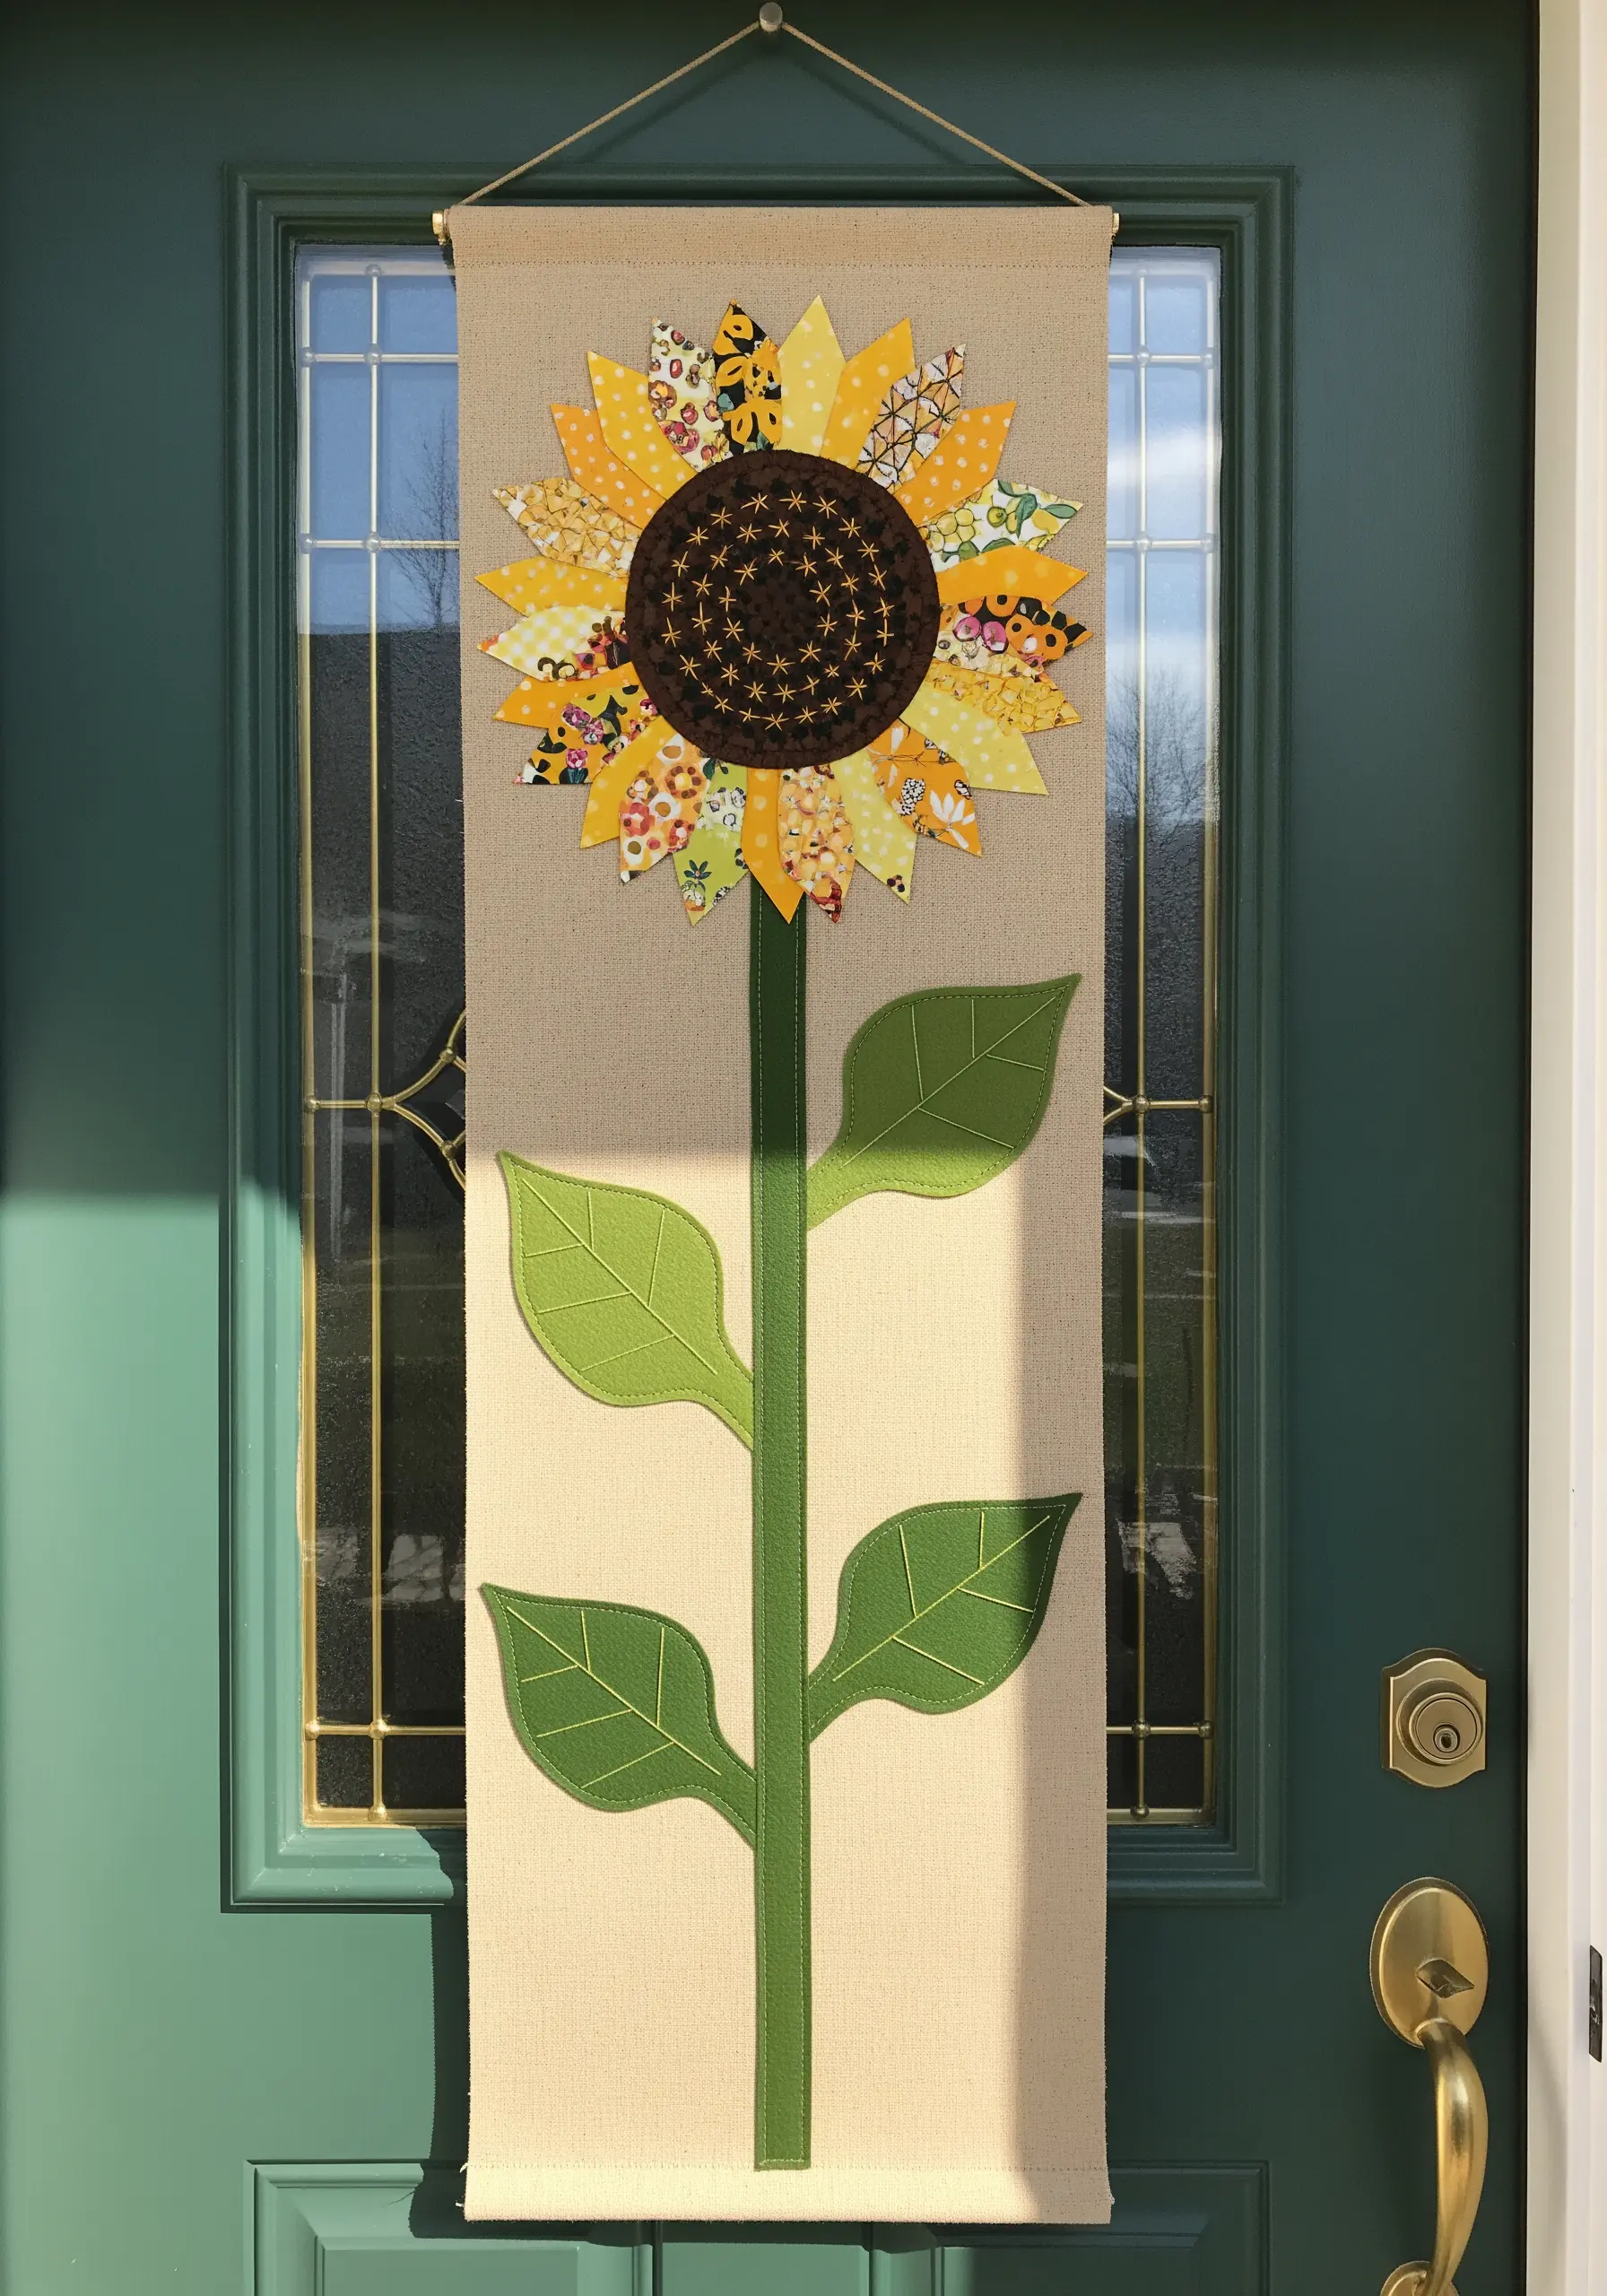
Don’t be afraid to scale up your fabric collage for a high-impact piece like a door hanging or wall banner.
For large shapes like the sunflower petals, use a fusible web to adhere the fabric pieces smoothly before stitching the edges by machine or hand.
Mixing multiple patterns within a single color family, like the yellows and oranges here, adds texture and visual interest without looking chaotic.
This is a great way to create statement-making embroidered wall panels.
21. Personalize Your Welcome with Appliqué Lettering

Create a warm, personalized welcome sign using appliqué letters cut from a variety of coordinating fabrics.
To keep the letters looking crisp, trace them onto a fusible interfacing first, iron it onto your fabric, and then cut them out. This prevents fraying and makes them easier to position.
Arrange the letters on a sturdy background fabric like burlap or canvas and secure them with a simple machine or hand stitch.
22. Combine Appliqué with Delicate Metallic Accents

Elevate a simple appliqué design by adding a touch of sparkle with metallic thread.
Outline the felt leaf shapes with a simple backstitch in a contrasting color, then add a delicate, swirling vine using a fine gold metallic thread.
To make stitching with metallics easier, use a shorter length of thread than usual and a needle with a slightly larger eye to reduce friction and fraying.
These unexpected ways to use metallic thread add a touch of magic.
23. Construct Soft Sculptures for Nursery Mobiles

Use felt and simple sewing techniques to create three-dimensional, soft-sculpture elements for a nursery mobile.
Cut two identical shapes for each cloud, moon, or star. Stitch them together around the edges, leaving a small gap for stuffing with poly-fil, then stitch the gap closed.
Add embroidered details like sleepy eyes before you stuff the shapes. This creates wonderfully dreamy baby clothing embroidery ideas and decor.
24. Create Texture with Fabric Manipulation
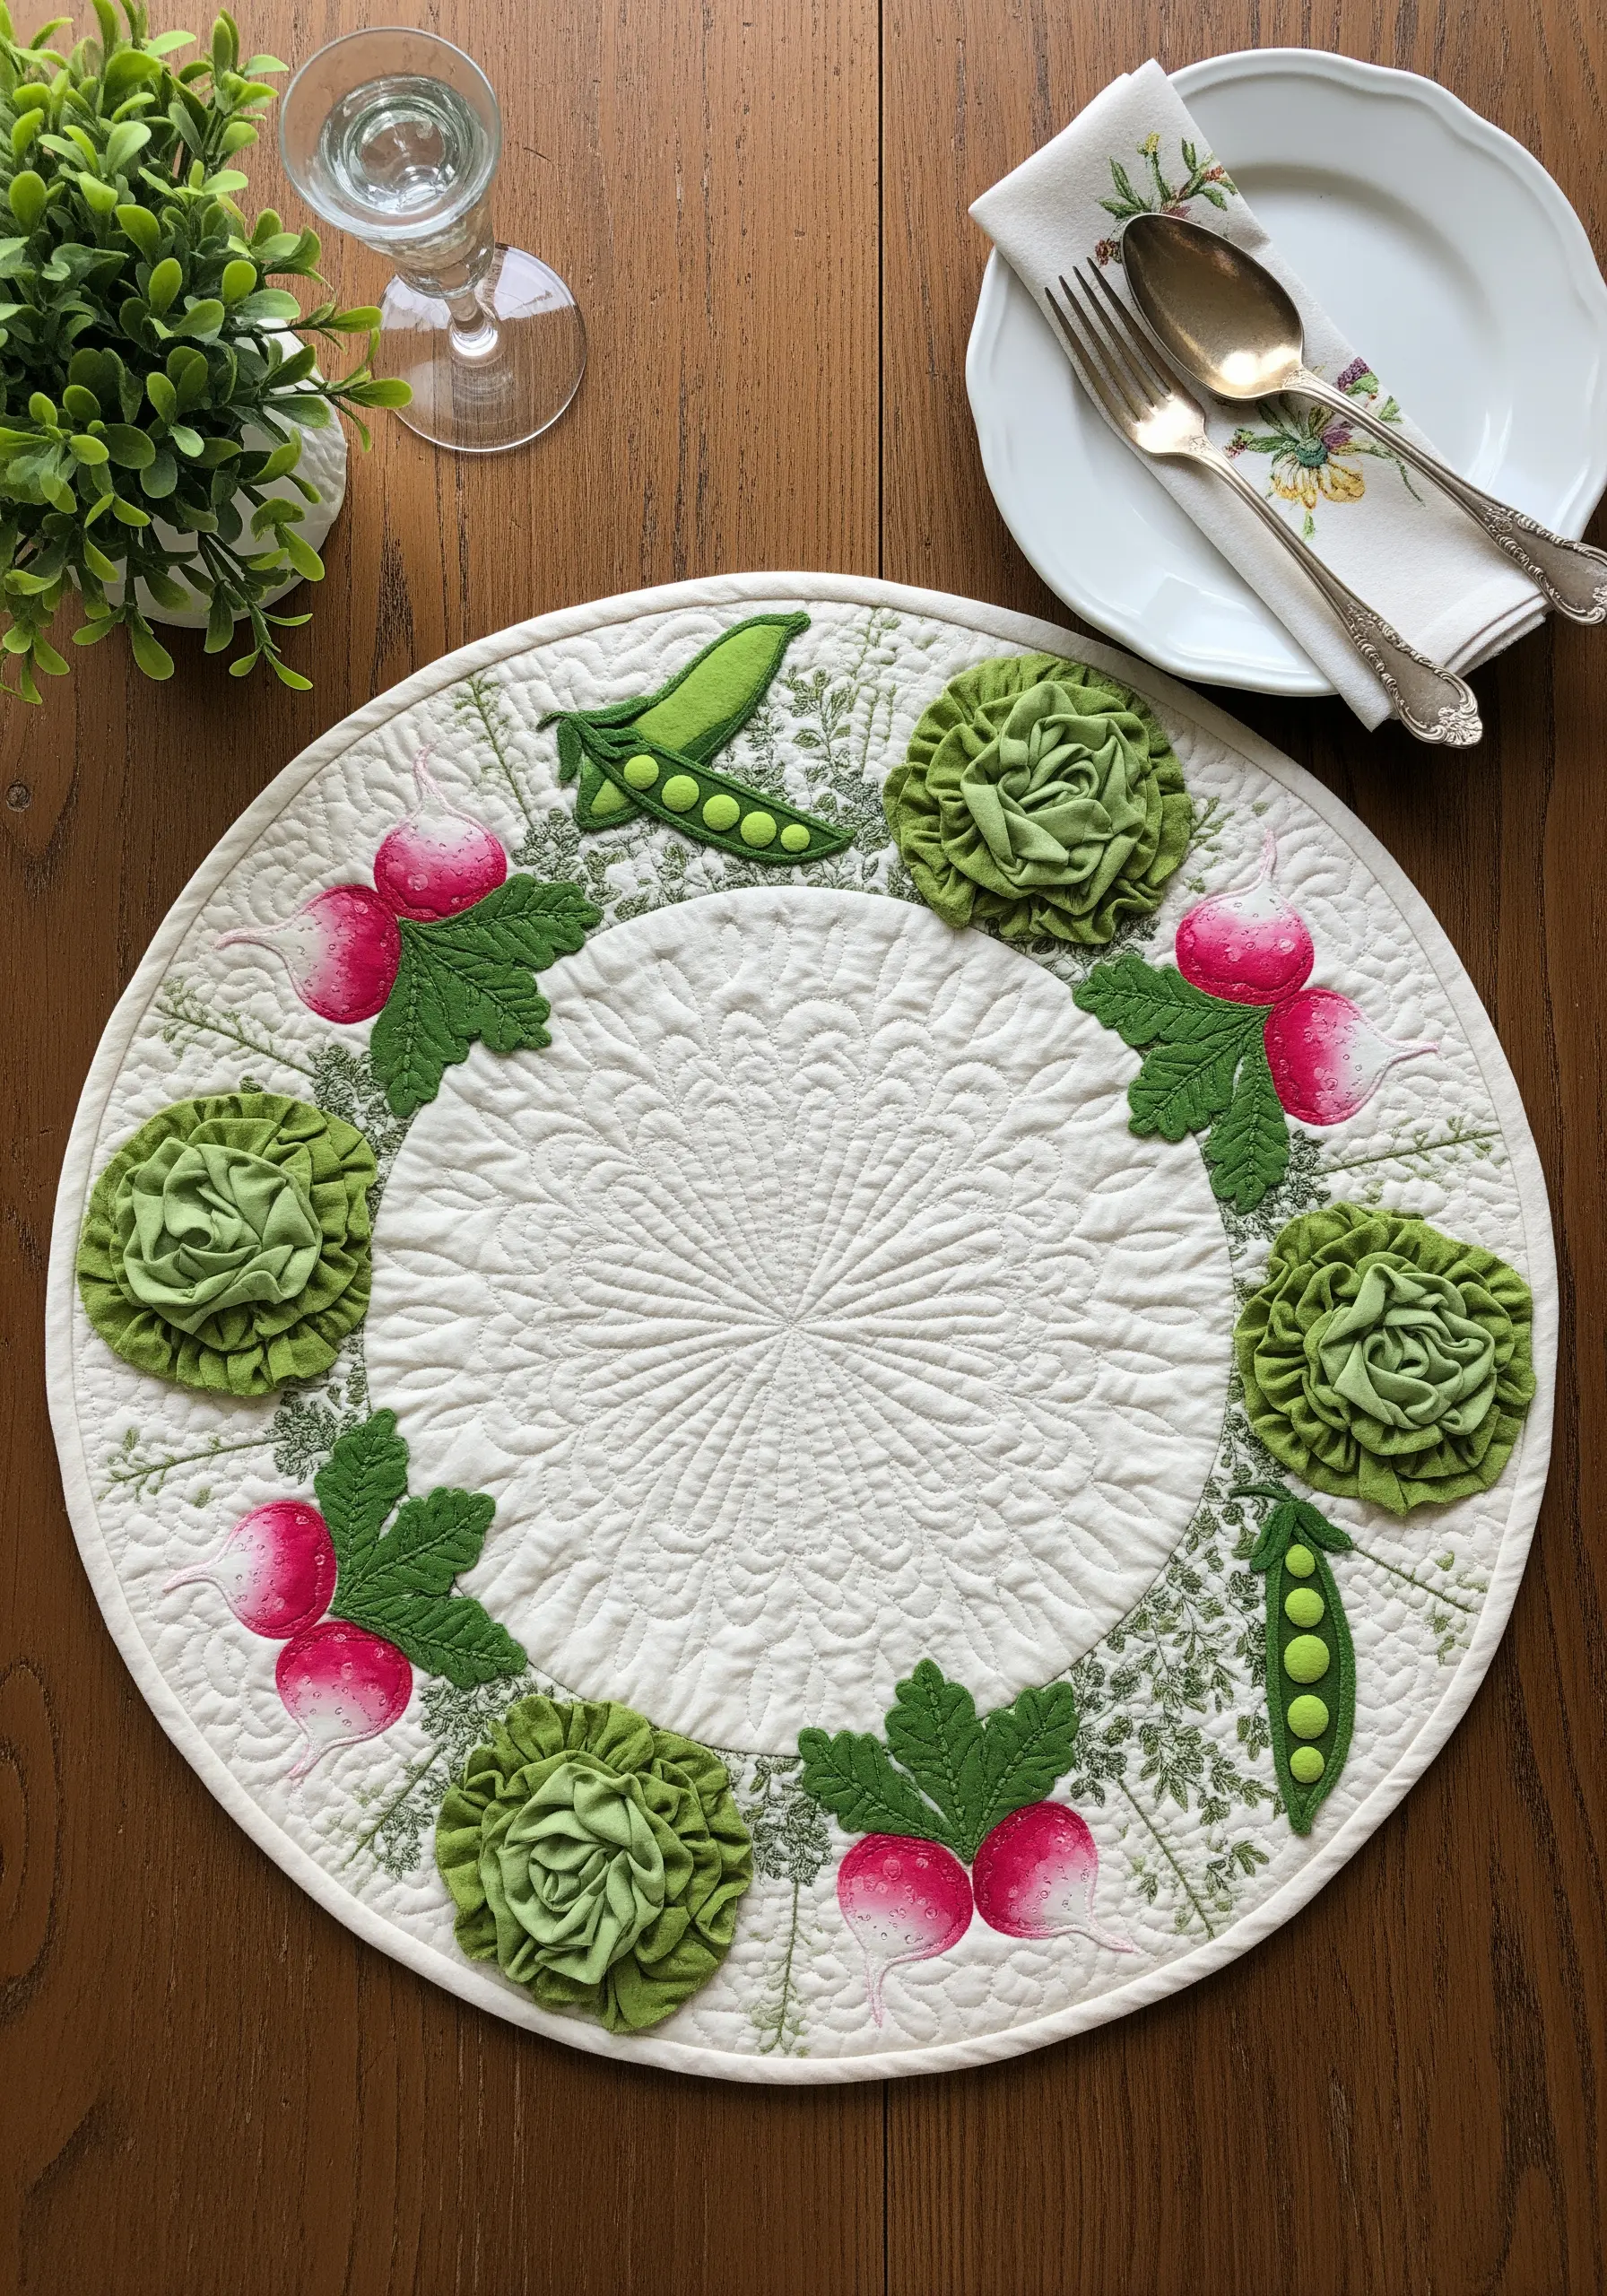
Instead of relying solely on appliqué, manipulate fabric to create unique three-dimensional textures.
To create the gathered lettuces on this placemat, cut a circle of fabric, sew a running stitch around the edge, and gently pull the thread to gather it into a rosette.
Secure the shape with a few stitches in the center. This technique, known as a yo-yo in quilting, is perfect for creating dimensional flowers or foliage.
25. Evoke Coziness with Fluffy, High-Pile Fabrics
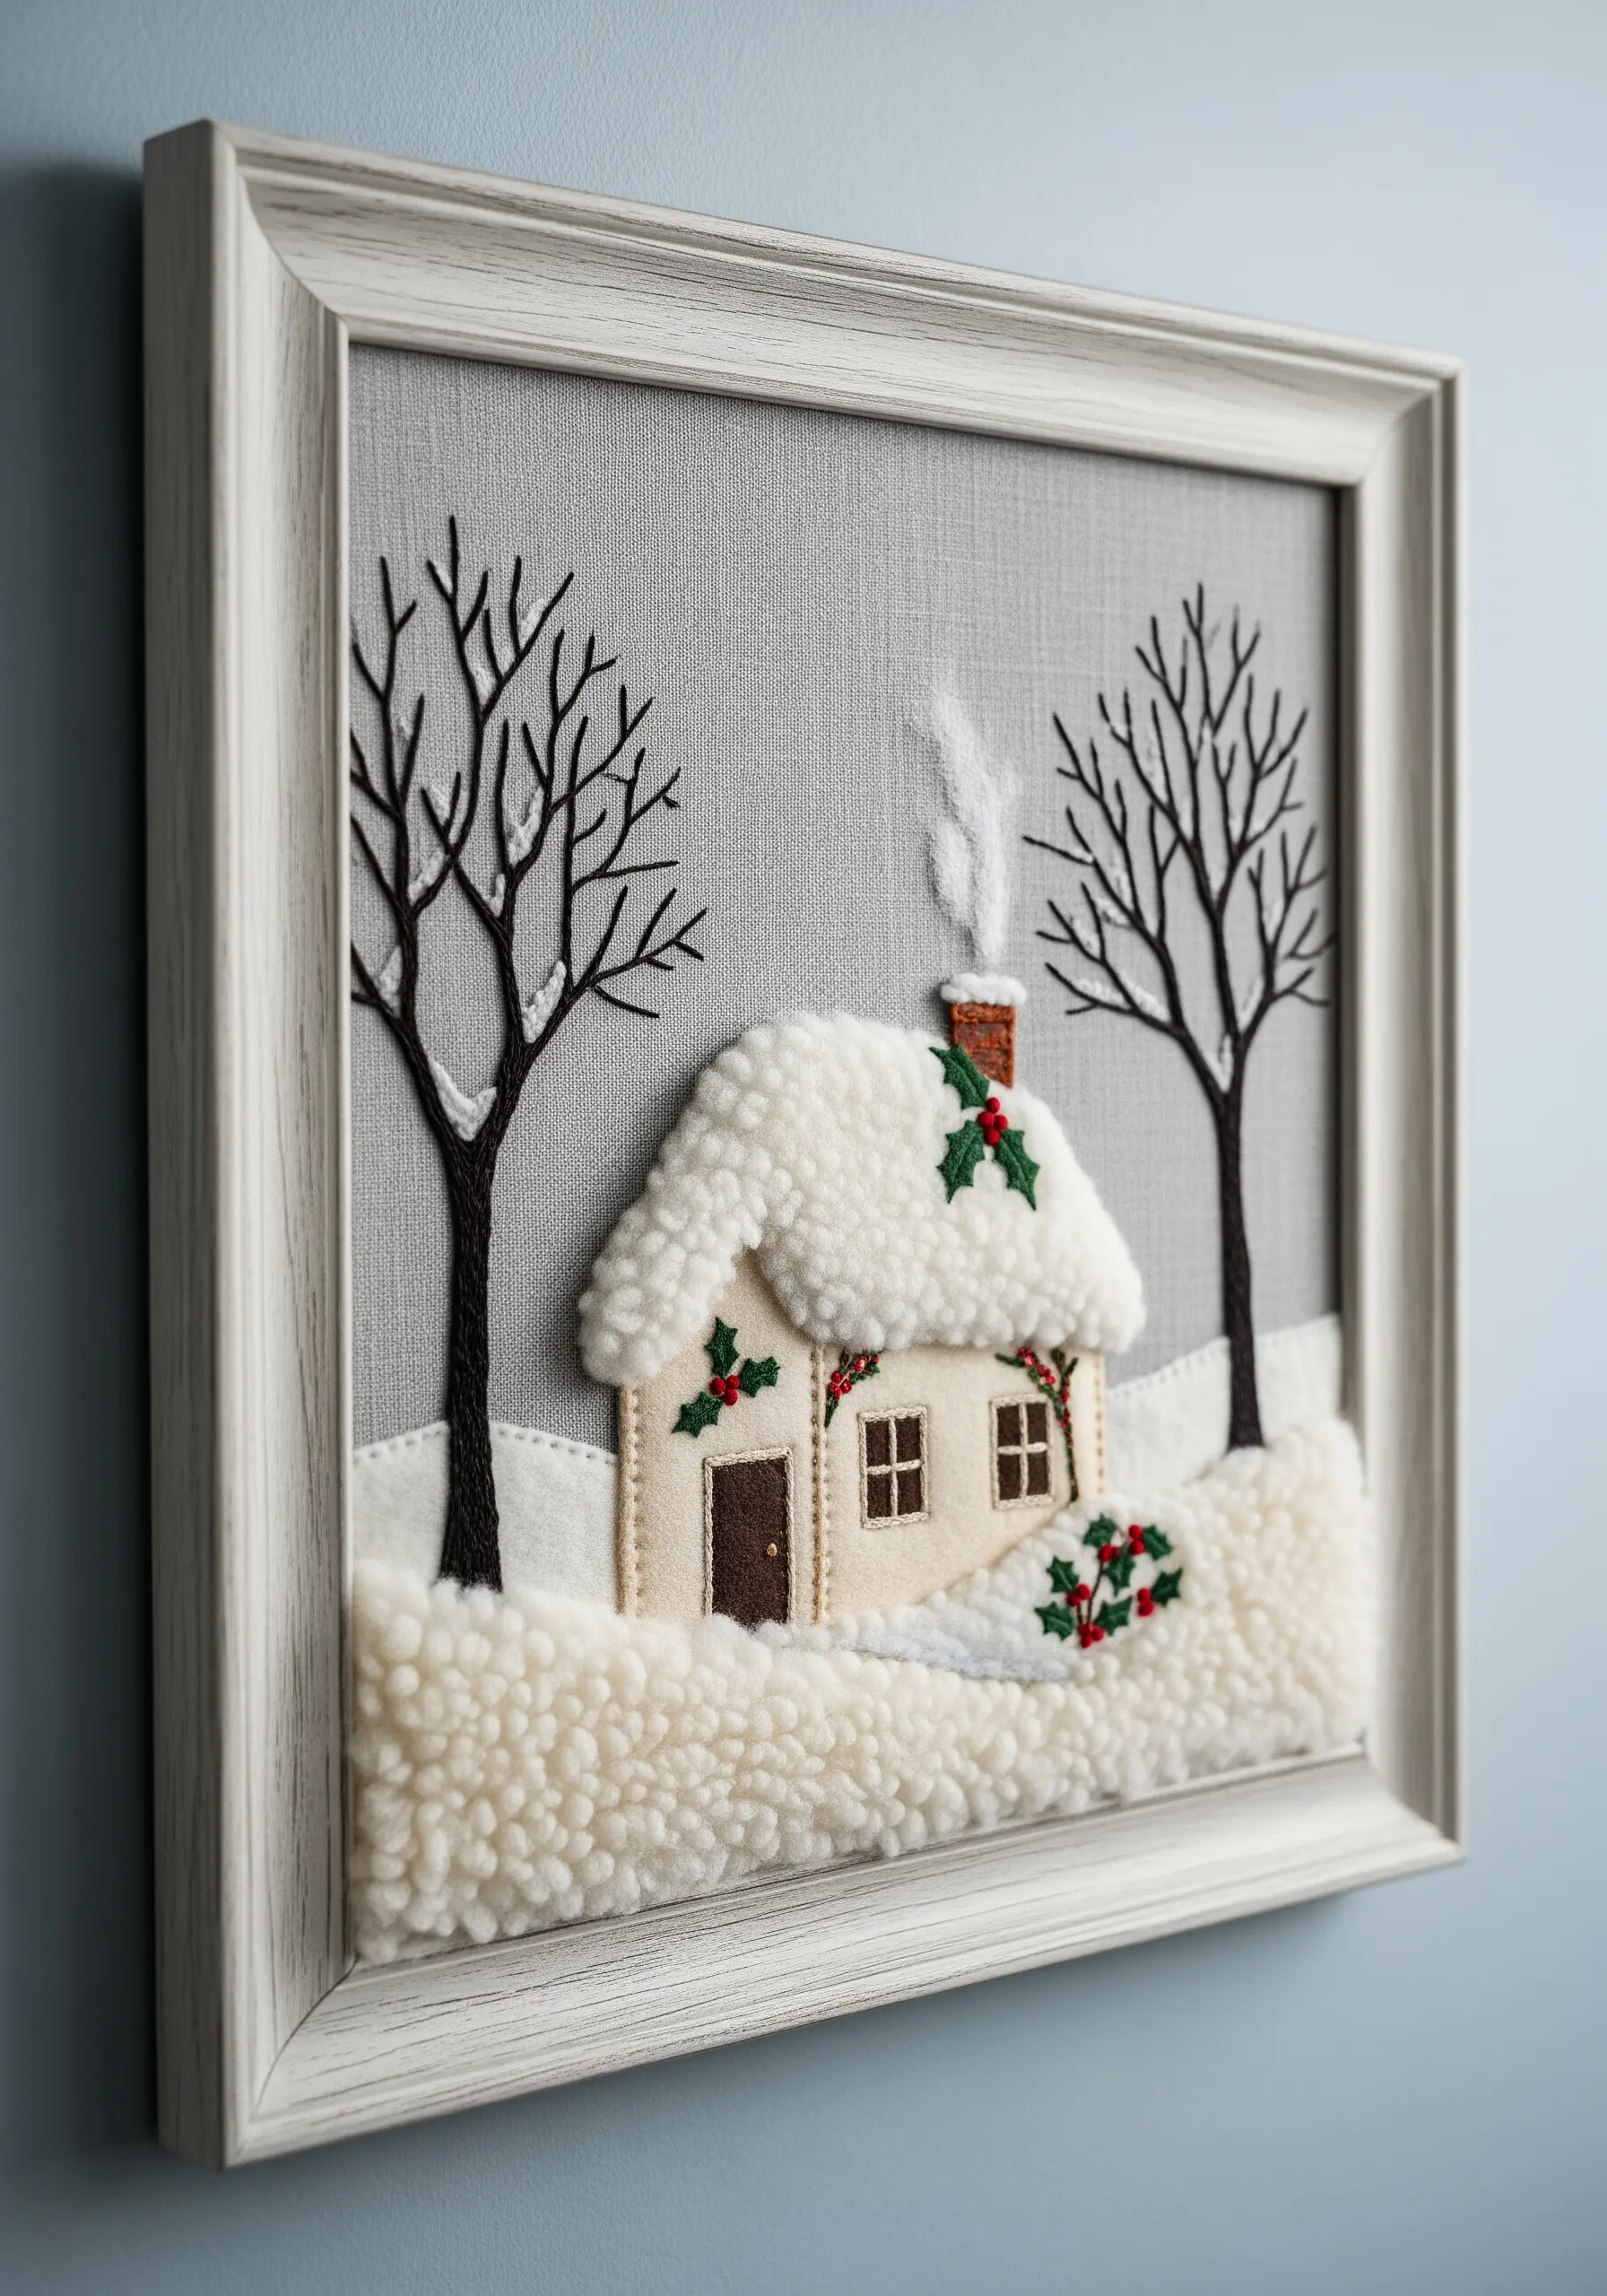
Use high-pile fabrics like sherpa, fleece, or faux fur to create a tangible sense of warmth and coziness in your winter scenes.
When cutting these fluffy fabrics, be prepared for some shedding. A lint roller can be helpful to clean up the edges before you stitch.
Secure the sherpa ‘snow’ with a simple whipstitch using a strong thread that won’t get lost in the pile. This is perfect for creating seasonal embroidery decor.
26. Frame Your Vignettes for a Polished Finish

Presenting your fabric collage in a simple wooden frame instantly elevates it from a craft project to a piece of finished art.
Ensure your background fabric is pressed and stretched taut over a piece of acid-free mounting board before framing to prevent any puckering.
The frame provides a clean, defined border that draws the viewer’s eye into the scene, making the colors and textures pop. This is an essential step for easy-to-make framed embroidery pieces.
27. Mix and Match Textures for Playful Characters

Combine different fabric textures within a single appliqué character to add depth and personality.
On the owl, a herringbone wool provides a classic feel for the body, while a soft, patterned cotton adds a touch of whimsy to the wing.
For the other animals, felt provides a smooth, dense surface that contrasts beautifully with the plaid and herringbone fabrics of the stockings. This mix makes the designs dynamic and engaging.
28. Bridge Appliqué and Embroidery Seamlessly

Create a design where appliqué and embroidery flow into one another for a truly integrated look.
Here, the embroidered herbs at the top of the apron seem to grow directly out of the printed fabric of the pocket below.
To achieve this, choose embroidery thread colors that exactly match the colors in your printed fabric. This visual connection makes the entire piece feel like a single, cohesive botanical illustration.
29. Combine Function and Form with Felt Appliqué
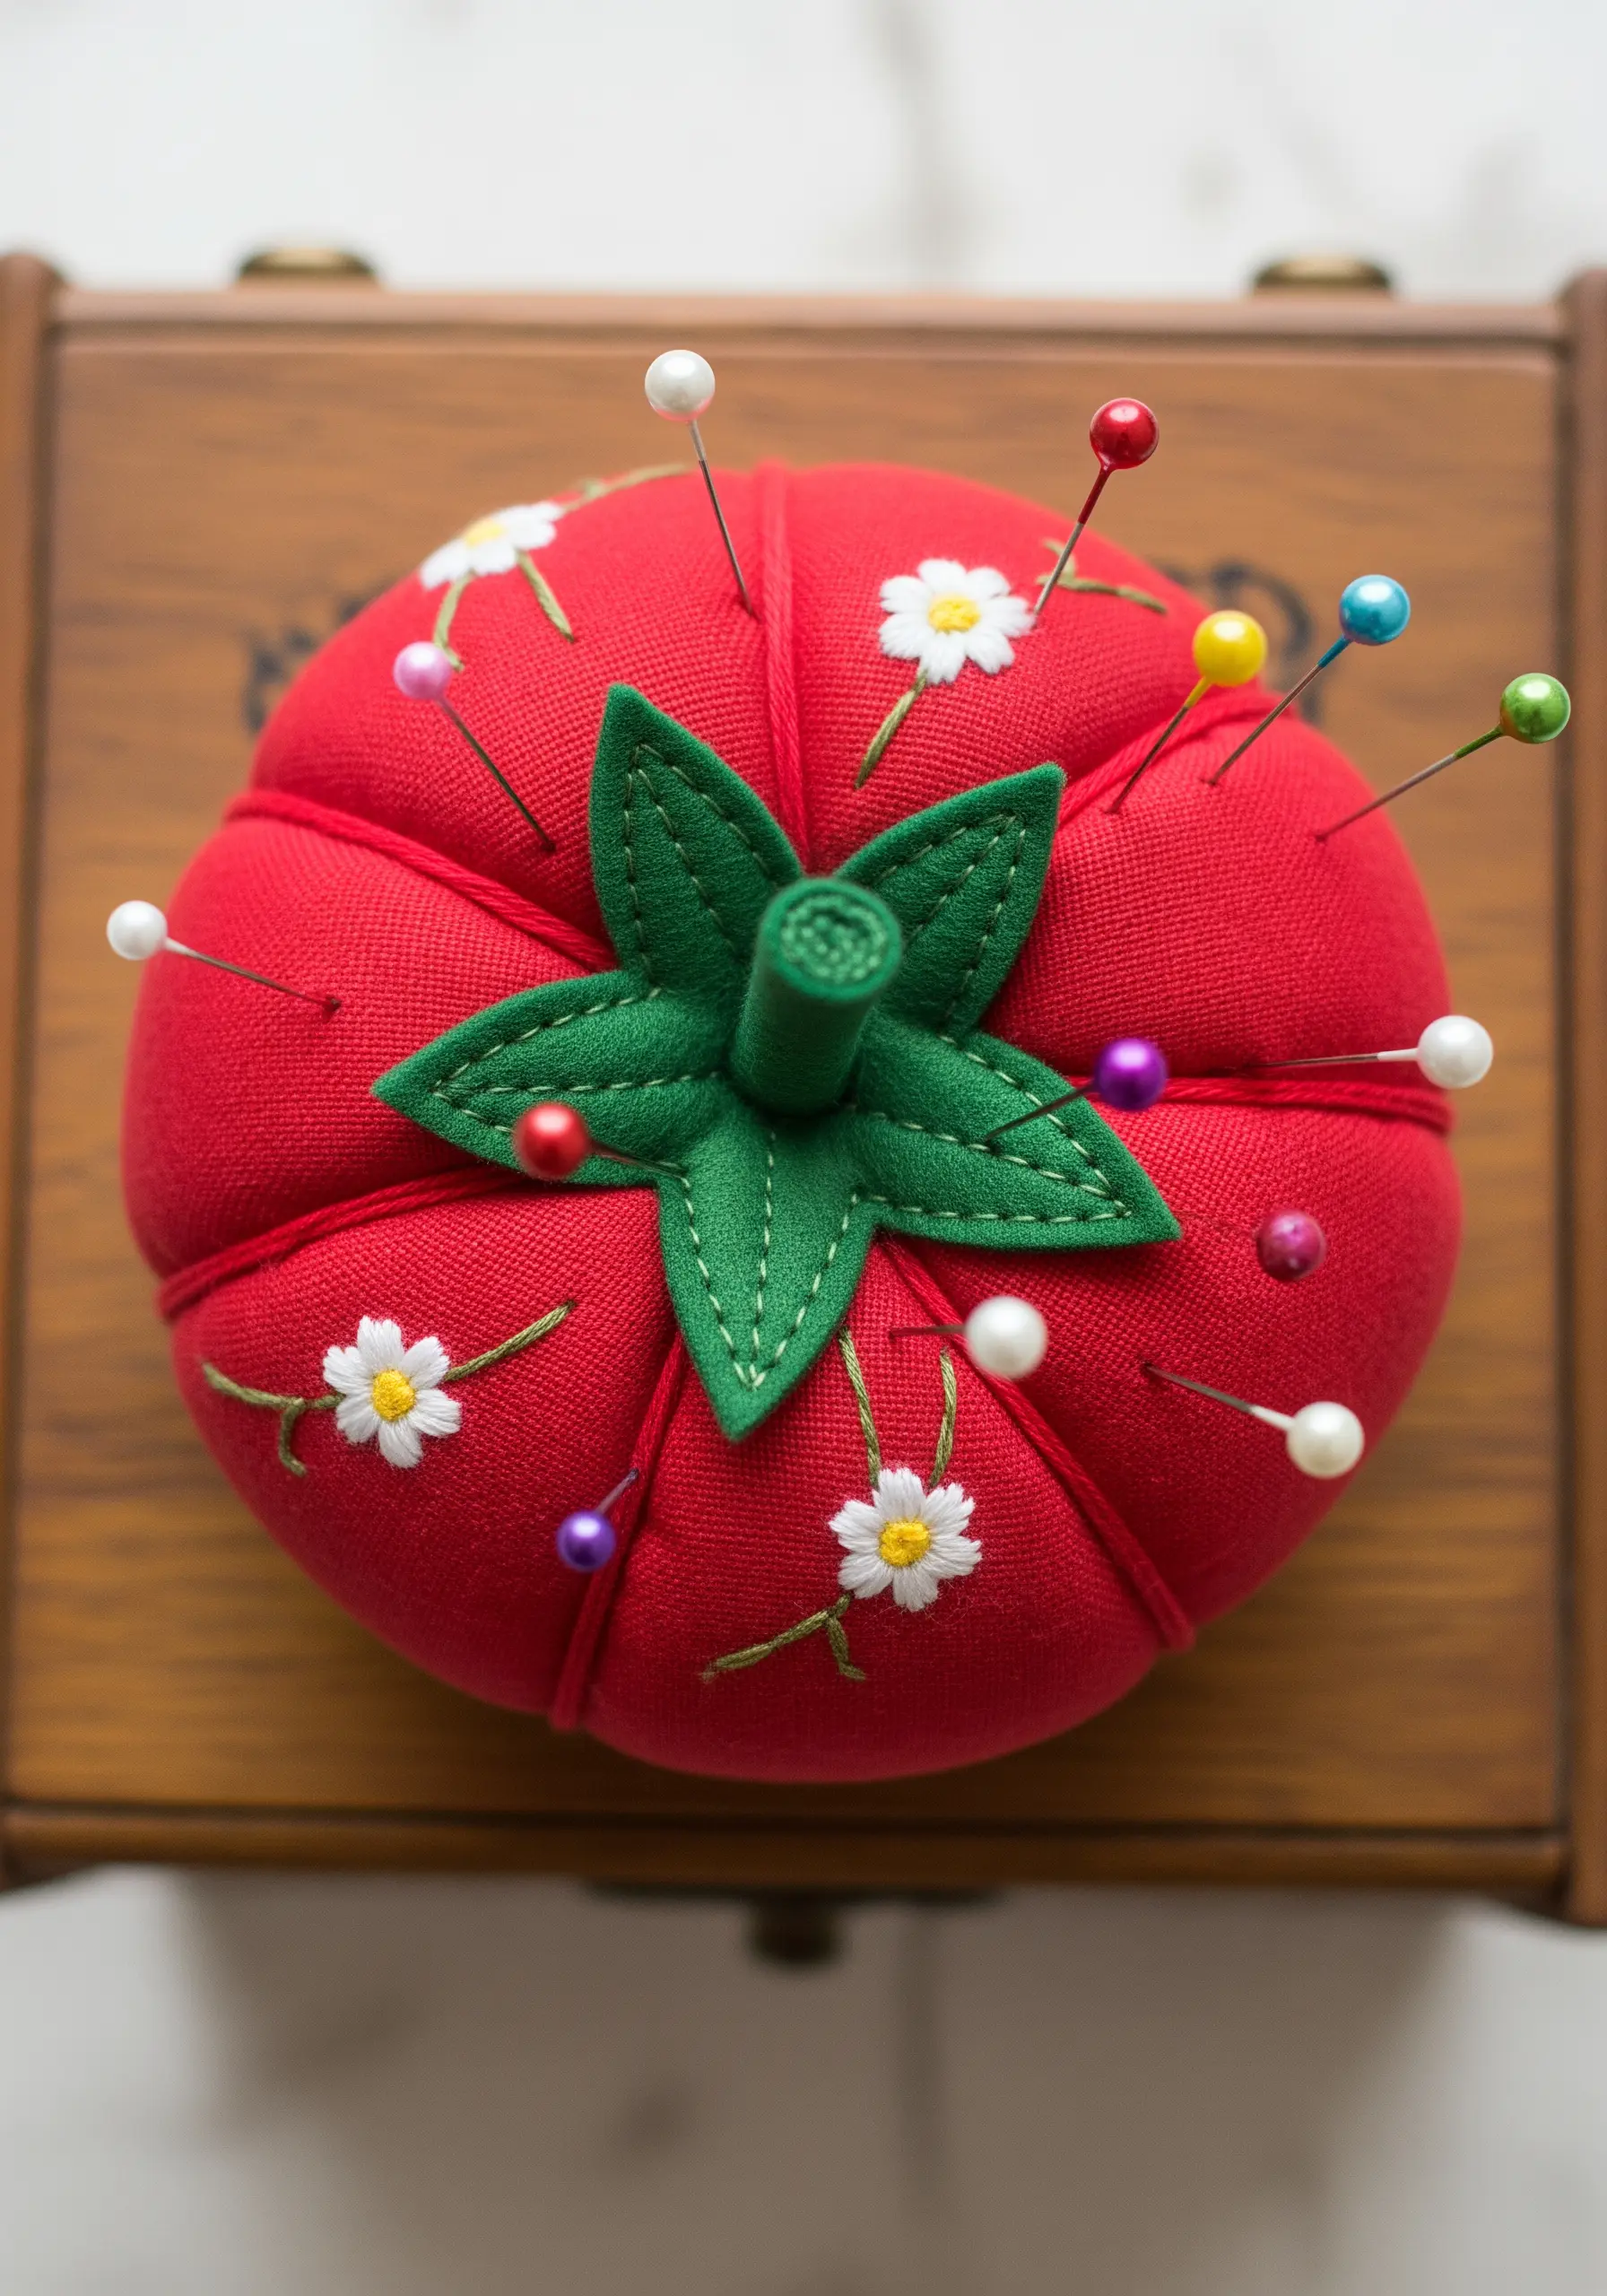
Turn a practical sewing tool into a piece of cottage-core art.
Use felt for the appliqué leaves on a classic tomato pincushion; its non-fraying edges make it perfect for cutting intricate shapes.
A few simple stitches, like the tiny lazy daisies here, add a touch of handmade charm without interfering with the pincushion’s function.
These charming DIY embroidery projects bring joy to everyday tasks.
30. Capture a Moment with Narrative Appliqué
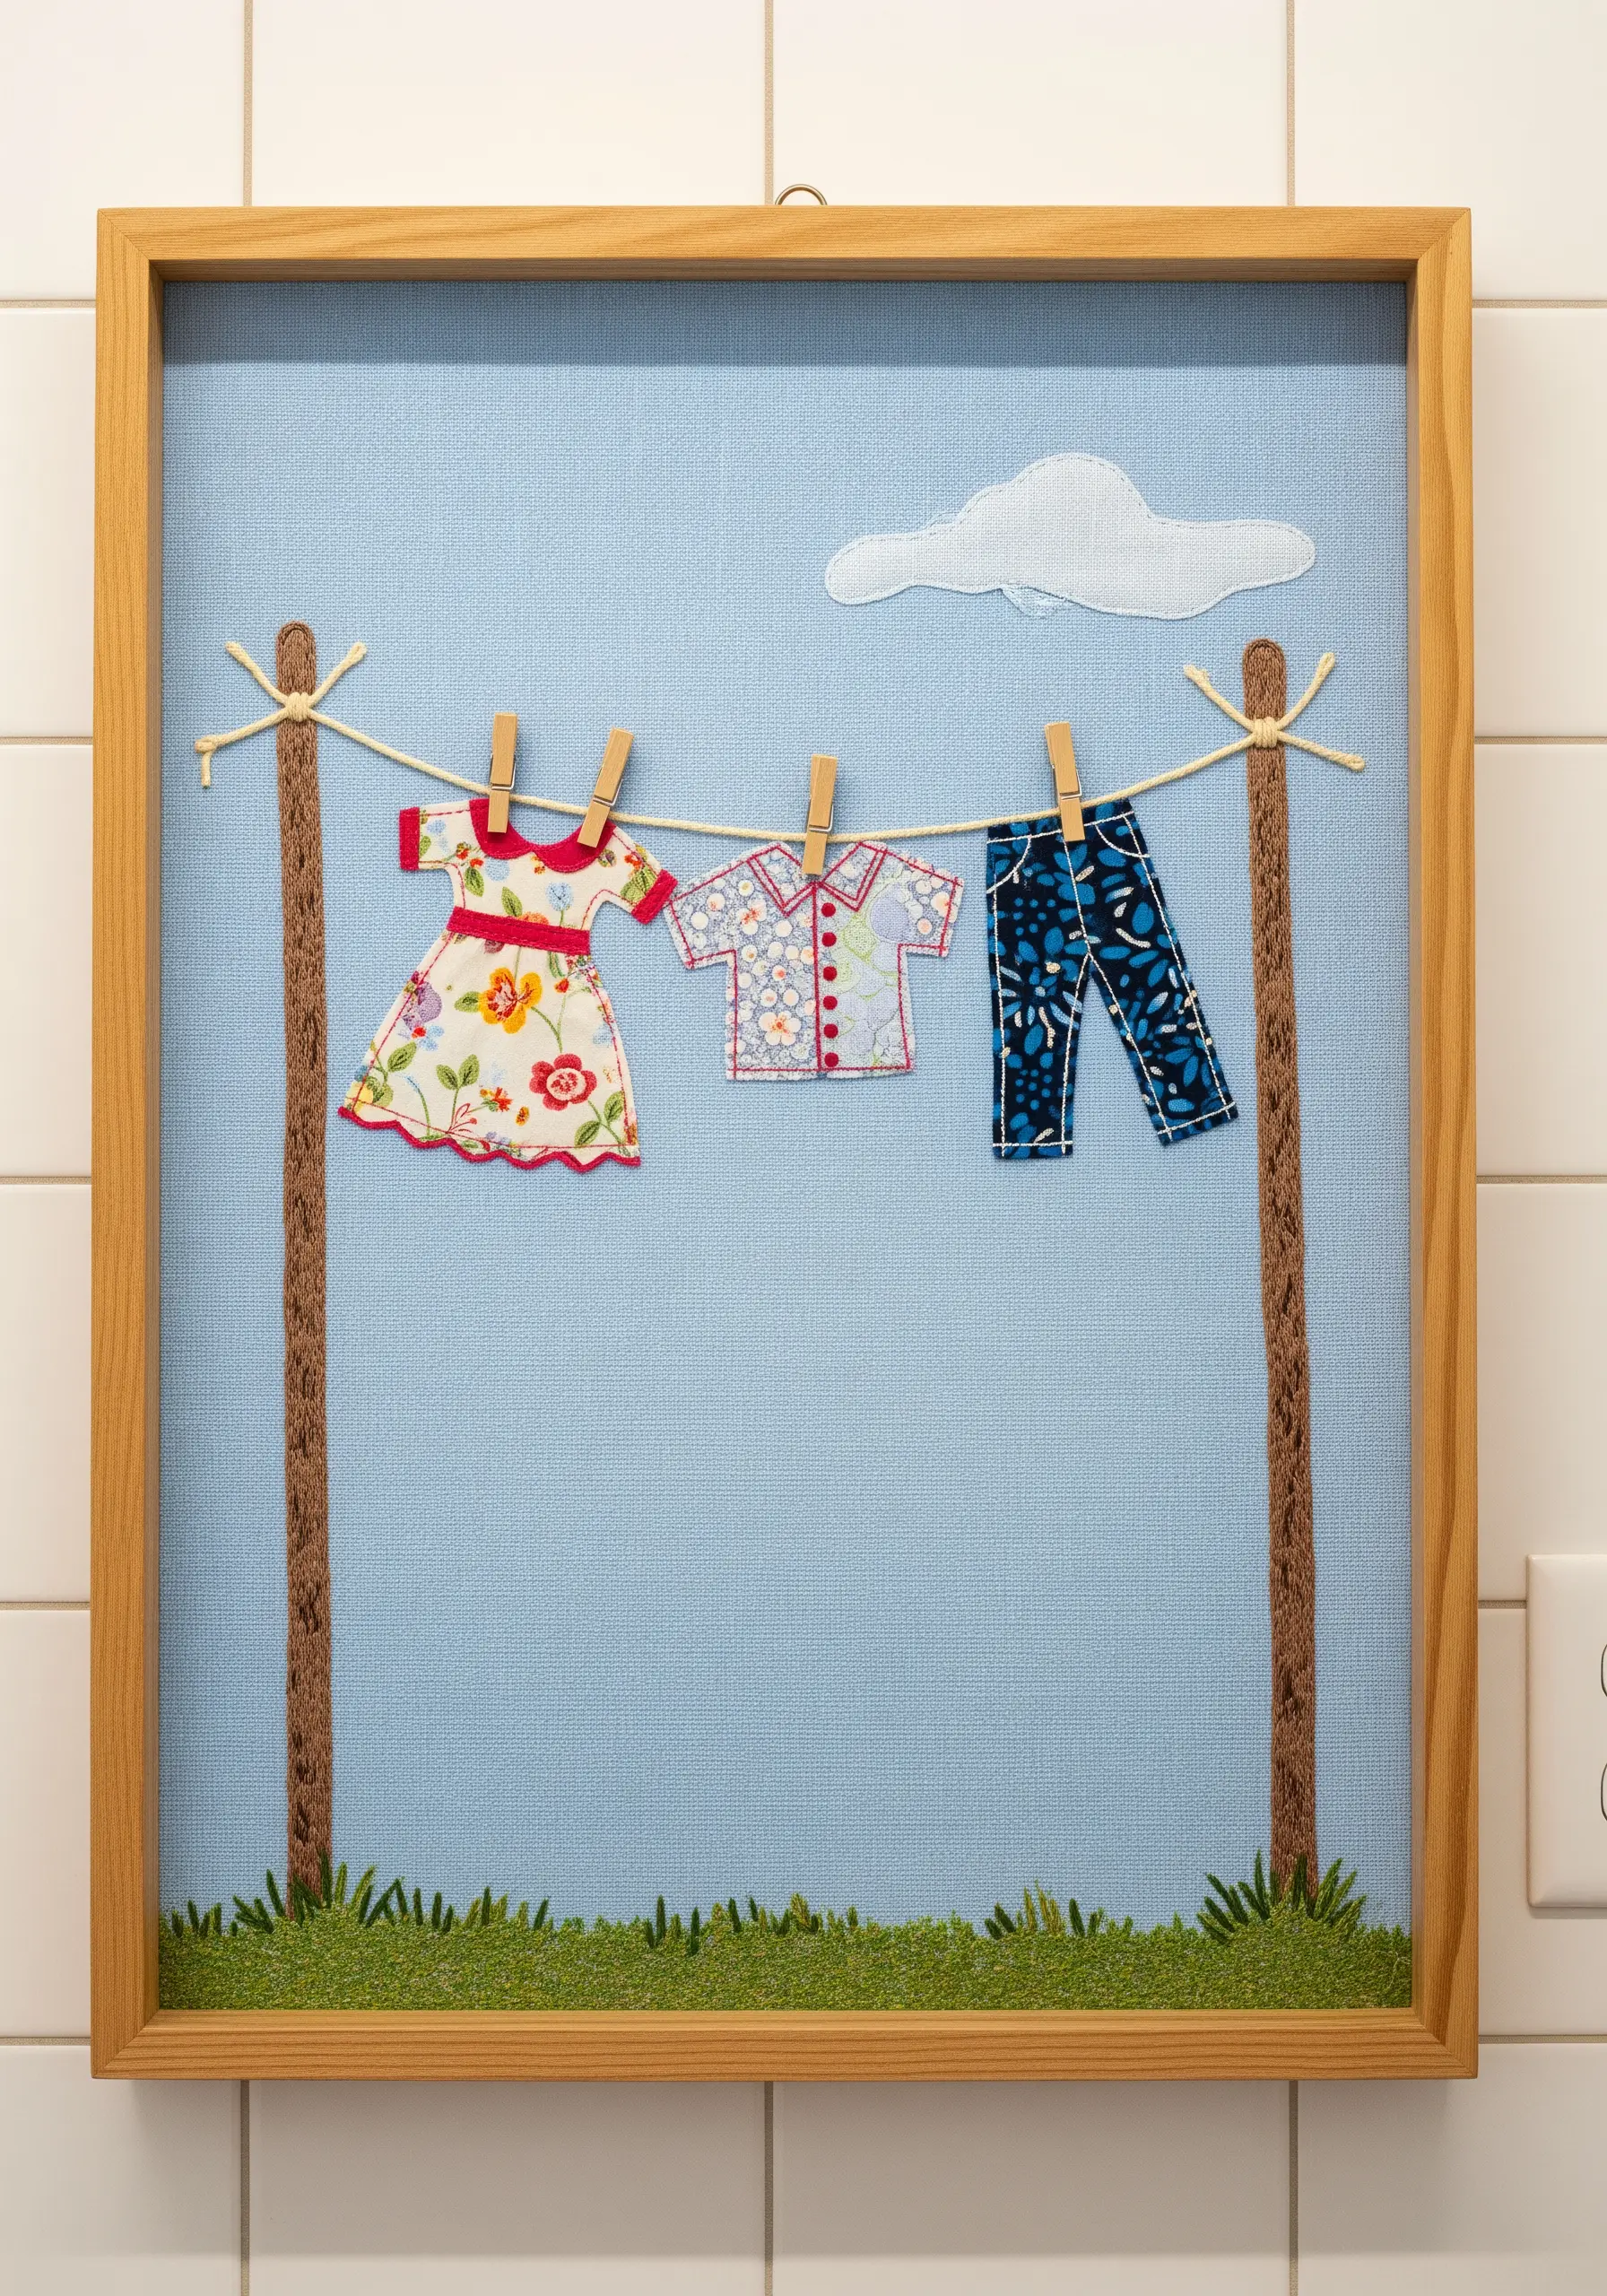
Use fabric collage to tell a small, quiet story, like clothes drying on a line.
Select fabrics for the tiny garments that have their own character—a floral print for a dress, a simple check for a shirt. These choices add to the narrative.
Use real twine for the clothesline and miniature clothespins to add a layer of playful realism to your framed embroidery wall art.
31. Simplify Your Process with Felt and Backstitch

For a clean and graphic cottage-core look, combine felt appliqué with a simple backstitch outline.
Felt is ideal for beginners because its edges don’t fray, allowing you to cut precise shapes without extra finishing steps.
Layer the felt pieces to build your character, then use two or three strands of black or dark brown floss to add definition and illustrative detail with a simple backstitch.
This is a perfect entry point for organic-inspired embroidery textures.
32. Mix and Match Fabrics for Functional Art

Transform a simple embroidery hoop into a functional piece of decor, like this charming wall clock.
Use a variety of scrap fabrics for the appliqué numbers to create a playful, eclectic look that embodies the cottage-core spirit.
A neutral, lightly patterned background fabric helps to unify the different patterns of the numbers and the central owl motif.
You can find simple clock mechanisms at most craft stores to complete your project.
33. Enlarge Motifs for Statement Outdoor Decor
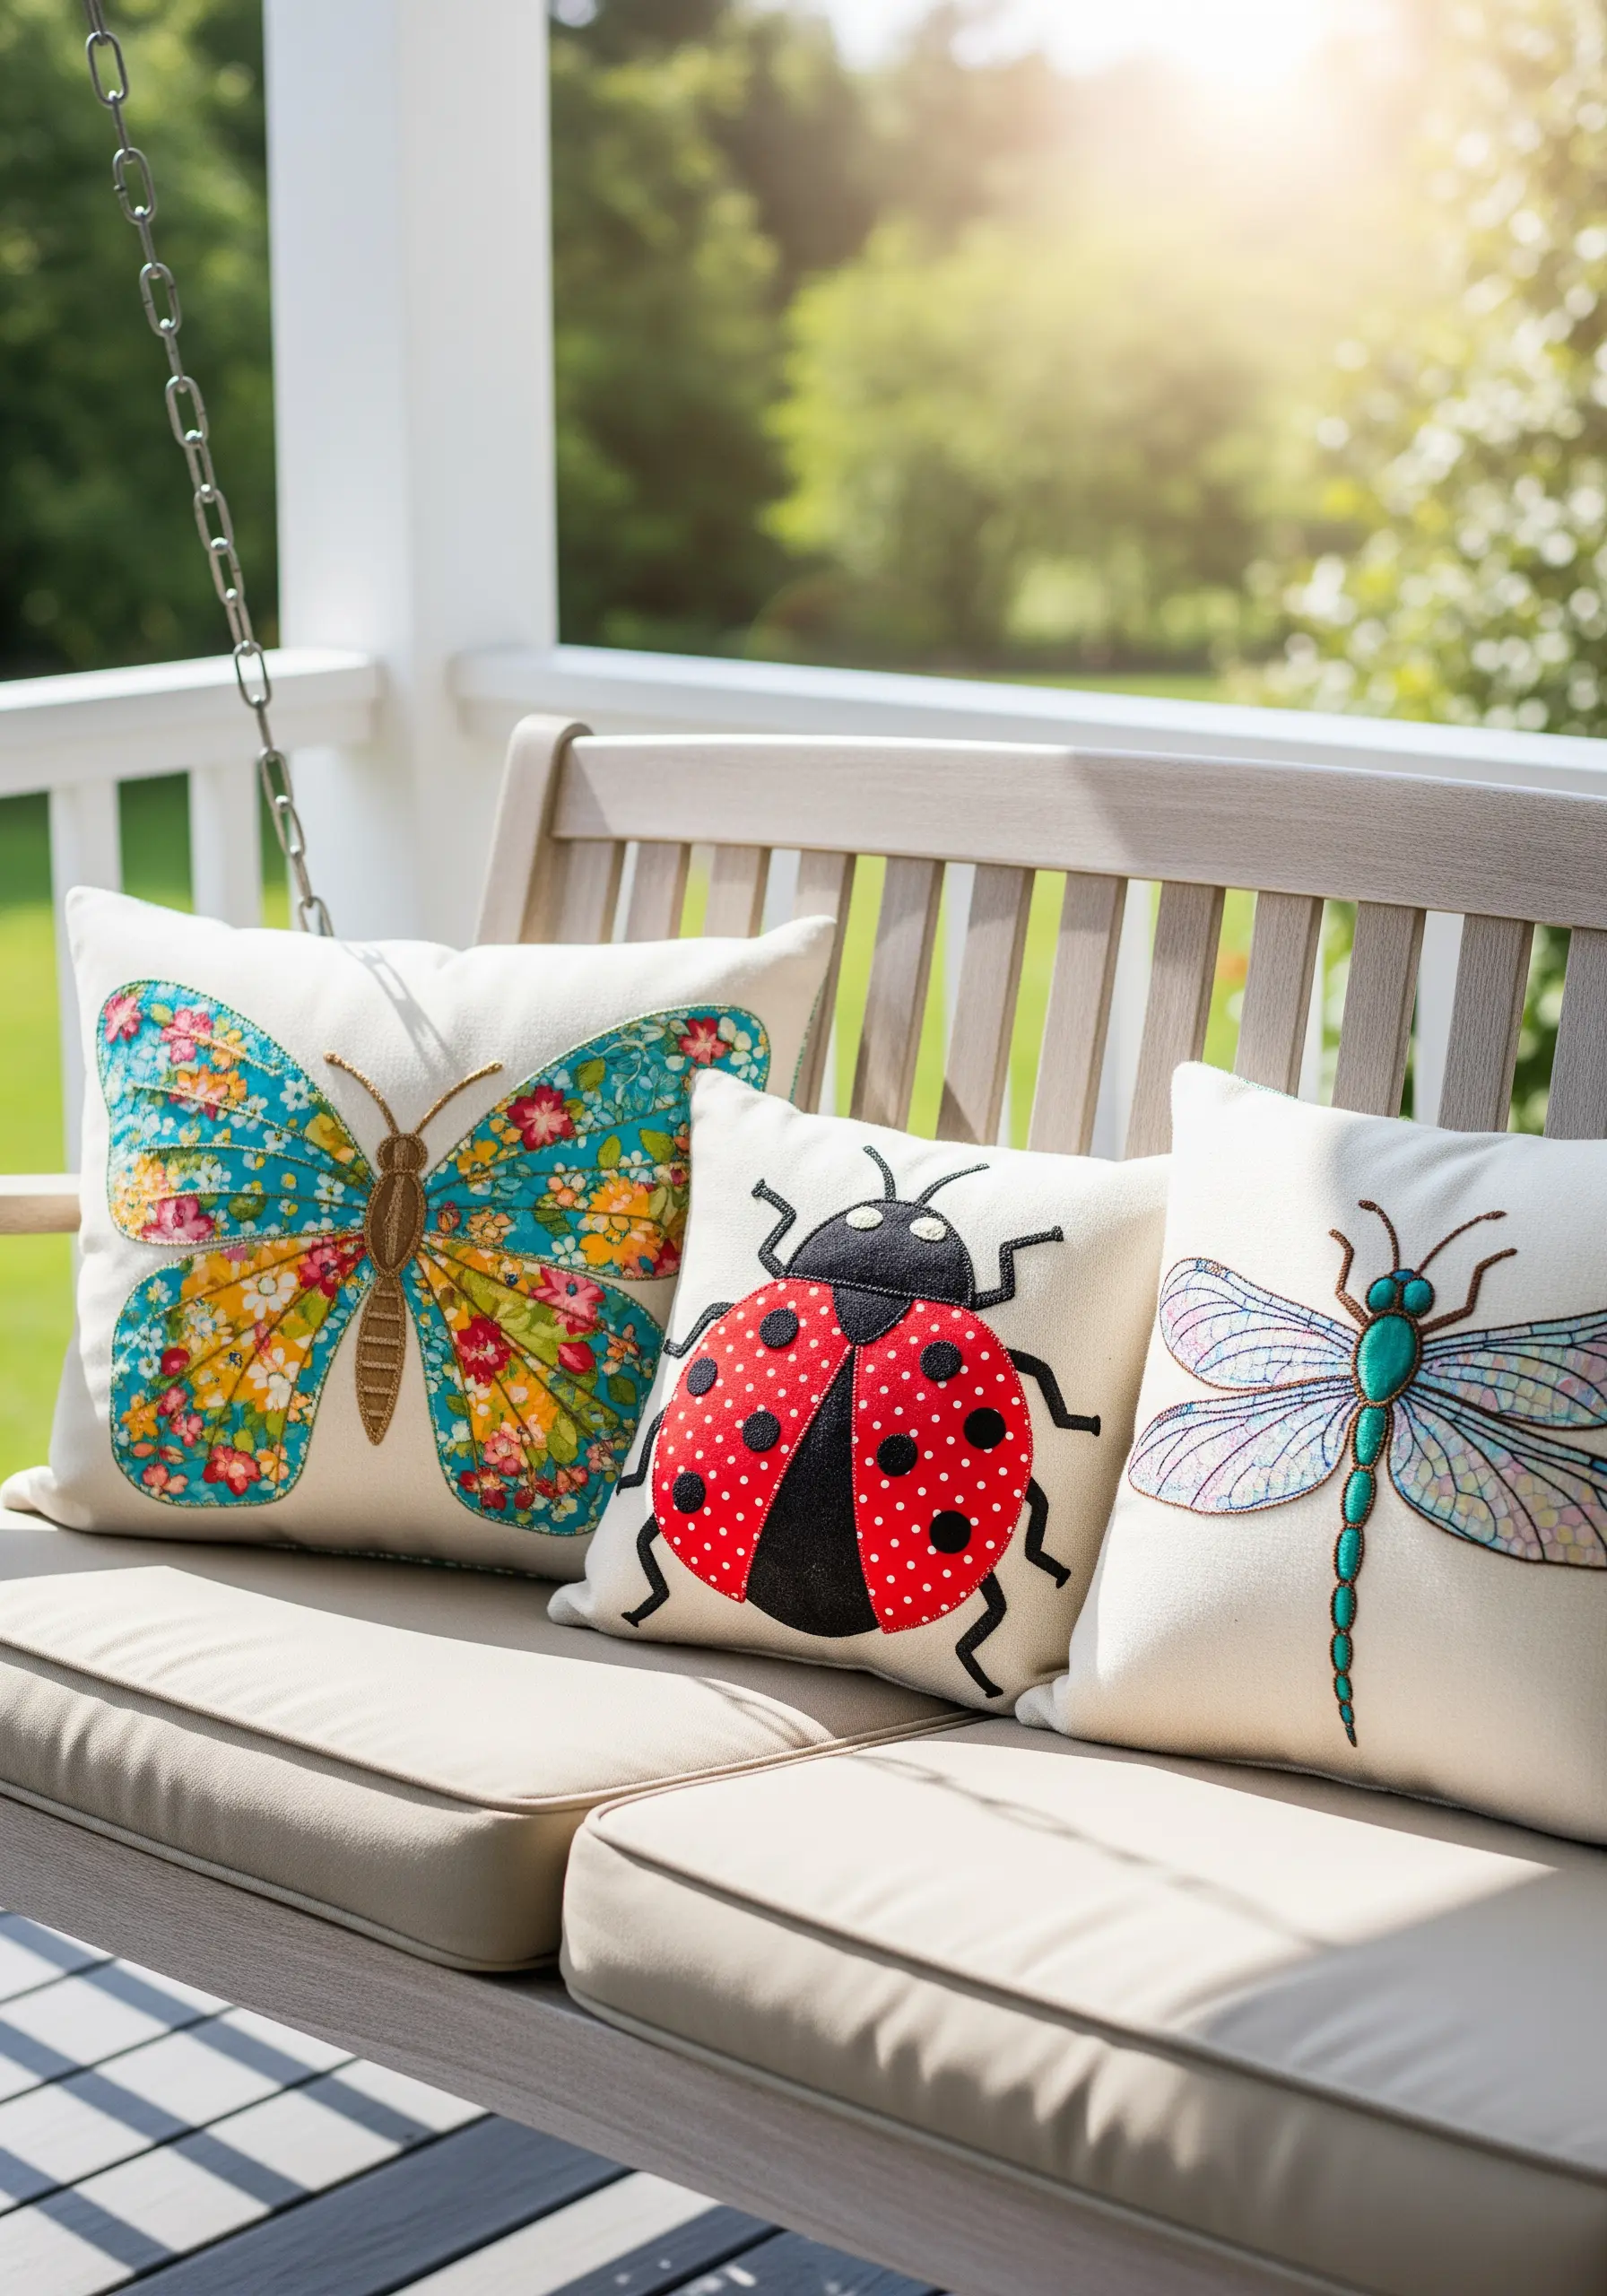
Take your fabric collage skills outdoors by creating large-scale appliqué for pillows and cushions.
Choose durable, fade-resistant fabrics suitable for outdoor use. For the intricate details, like the dragonfly’s wings, use a sheer or organza fabric layered over a solid color to create an iridescent effect.
A simple machine zigzag stitch is a fast and durable way to secure the edges of large appliqué pieces meant for heavy use.
34. Add Detail with Minimalist Stitching

Even on a simple appliqué shape, a few well-placed stitches can add significant charm and detail.
On this strawberry coaster, tiny yellow seed stitches and white lazy daisies suggest seeds and blossoms without overwhelming the patterned fabric.
A simple running stitch border in a contrasting color provides a clean, handmade finish. It’s a testament to how small stitches that add instant charm can make a big impact.
35. Create a Gallery Wall with Framed Fabric Squares

Design a cohesive gallery wall by mounting small fabric collage pieces on stretched canvas or in simple frames.
Working on a series of small squares allows you to explore different cottage-core motifs while maintaining a consistent style and color palette.
Varying the frame styles and orientations, as seen here, adds a relaxed, collected-over-time feeling that is central to the cottage-core aesthetic, perfect for a cozy embroidery wall decor collection.
36. Plan a Cohesive Four-Patch Design
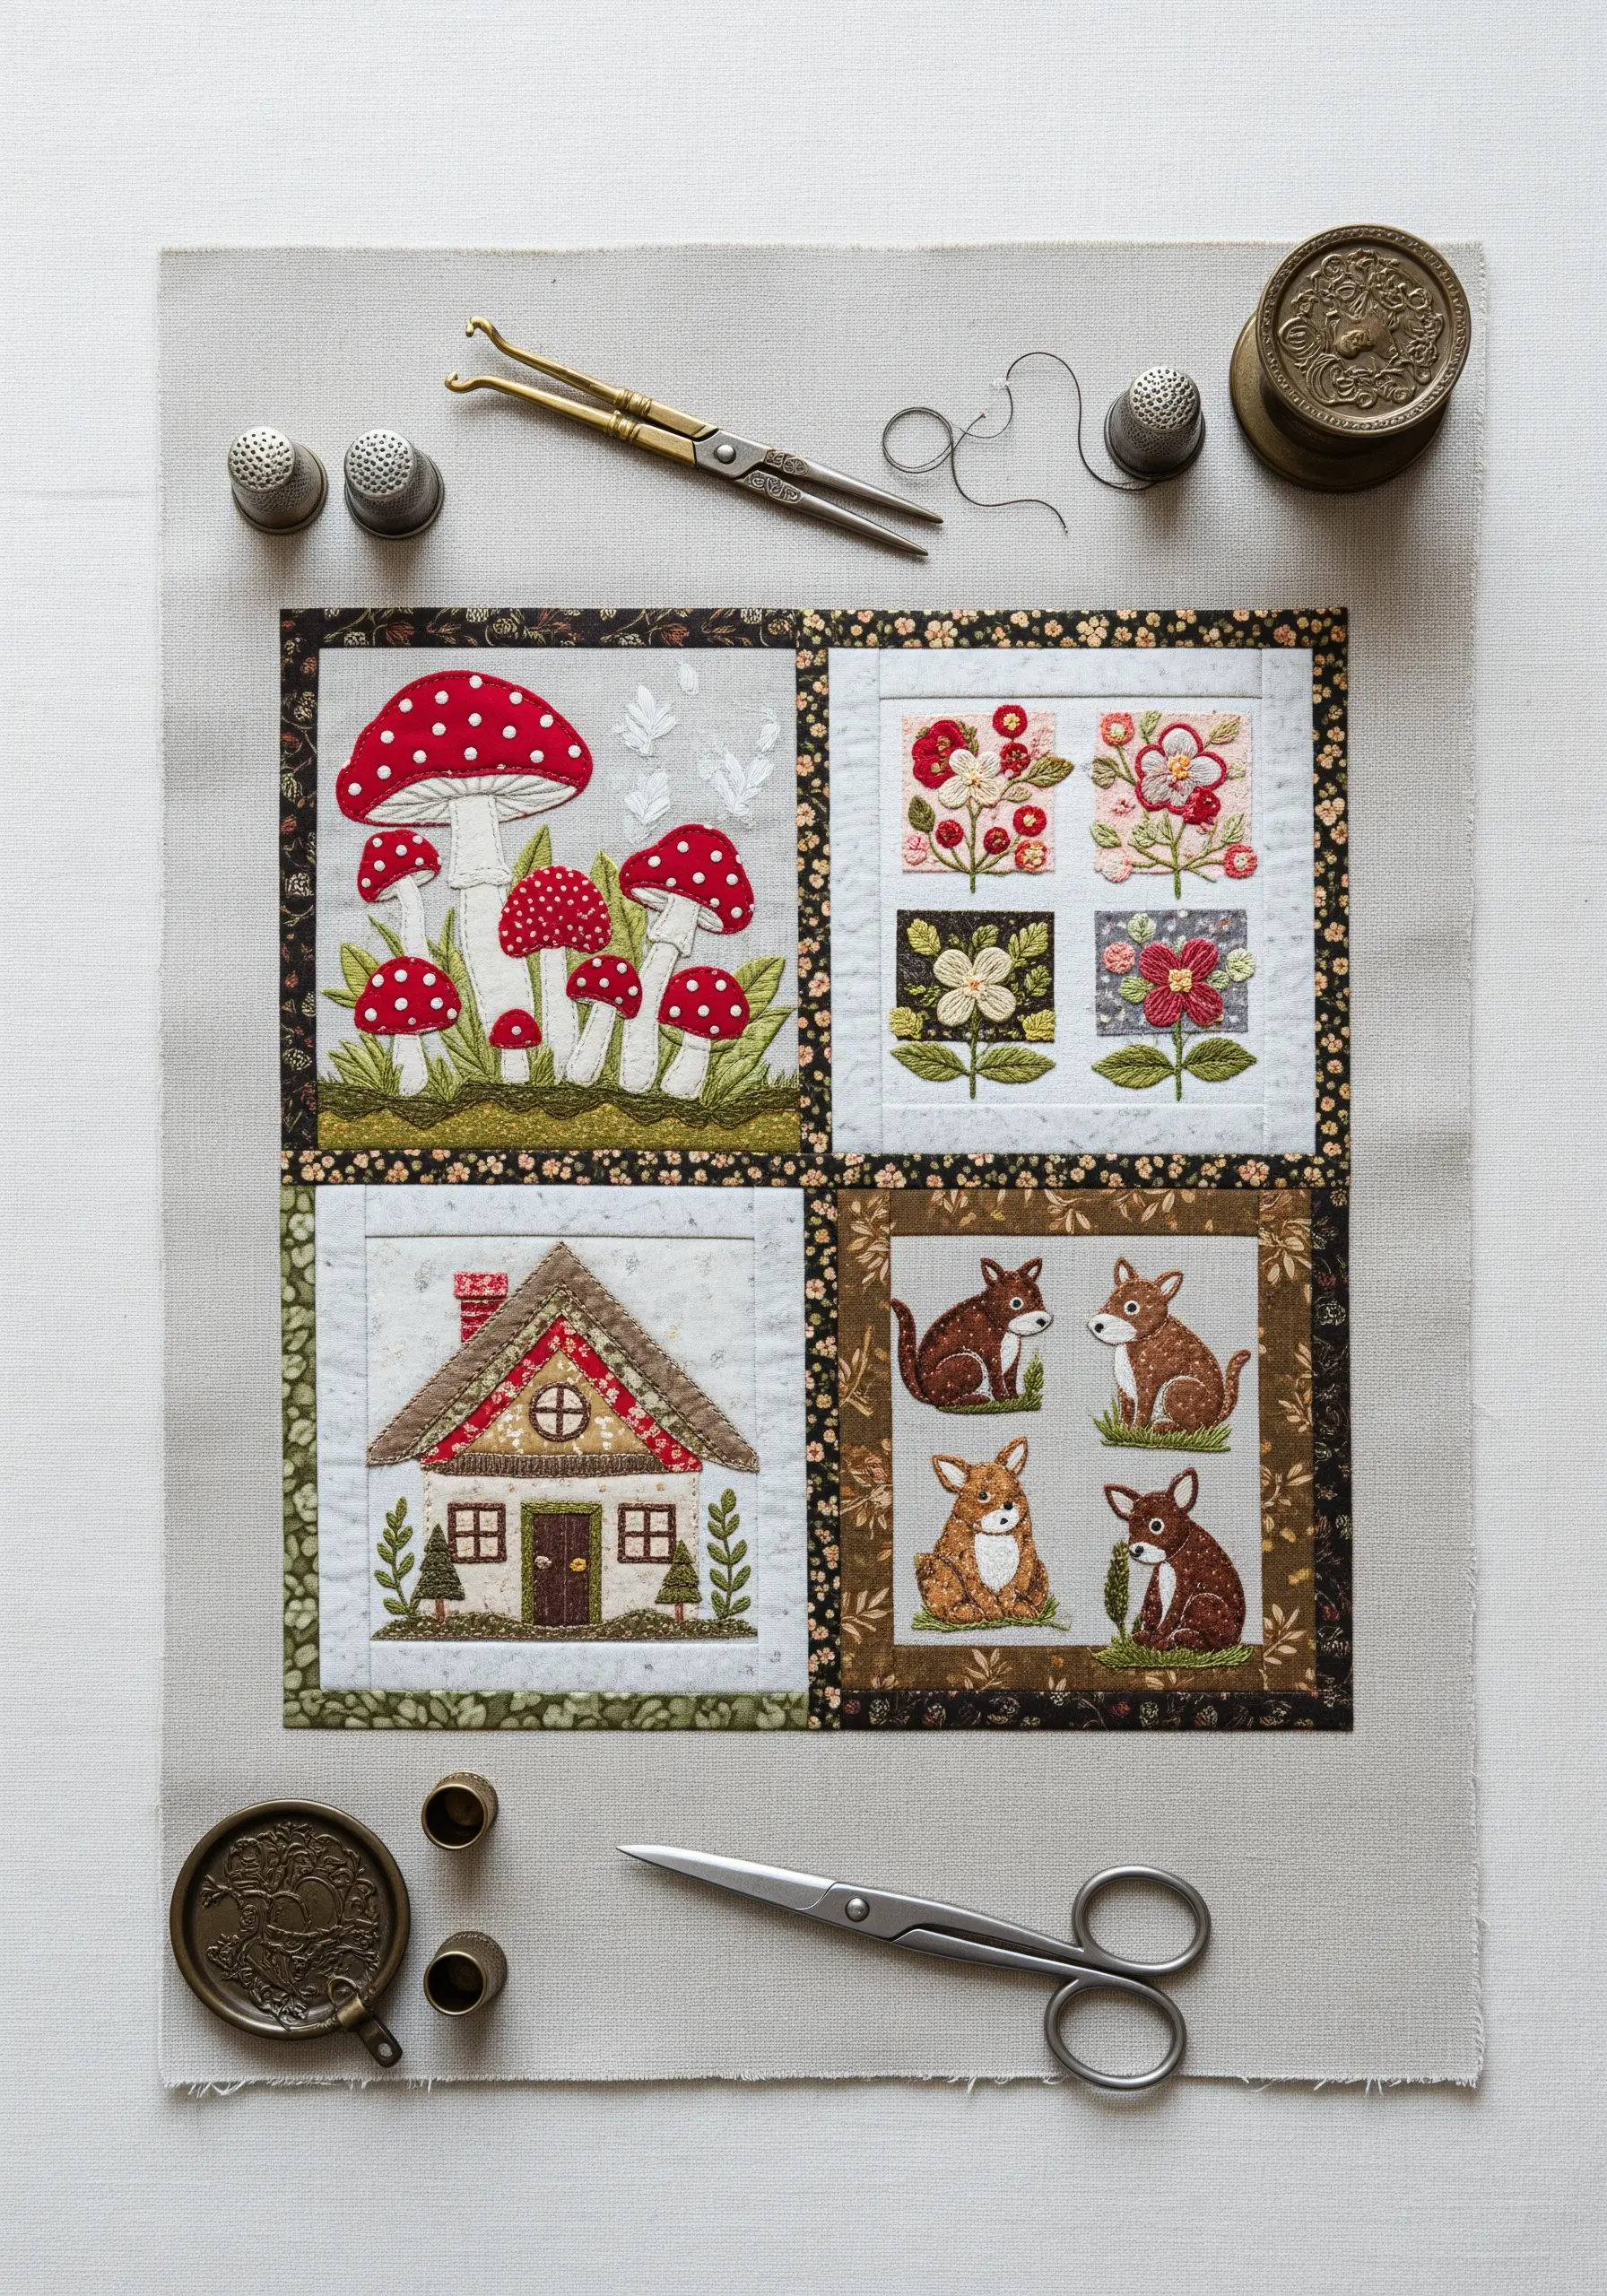
For a structured yet charming piece, plan your fabric collage around a classic four-patch or nine-patch quilting layout.
Assign a different motif to each block, but unify the overall design by repeating colors and fabrics throughout the different squares.
For instance, the red from the mushrooms is echoed in the cottage roof and the flowers, creating a pleasing visual harmony.
This approach helps you create complex-looking fabric collage embroidery layouts with ease.


