

Before you pick up another needle, I want you to reconsider the thread in your hands. It’s not just for filling in patterns; it’s a line you can draw with, a texture you can build, and a quiet statement you can make in your most personal space—the bedroom.
Your stitching doesn’t need to be loud to be powerful. A minimalist bedroom calls for art that breathes, that offers a sense of calm and intention. The ideas that follow are more than just pretty pictures; they are studies in line, texture, and restraint.
Here, you will learn how to make a single stitch feel significant, how to use negative space as a vital part of your design, and how to choose materials that elevate a simple concept into a piece of art. It’s time to create embroidery that feels as clean, quiet, and restorative as the room it’s made for.
1. Master the Fluidity of Single-Line Art
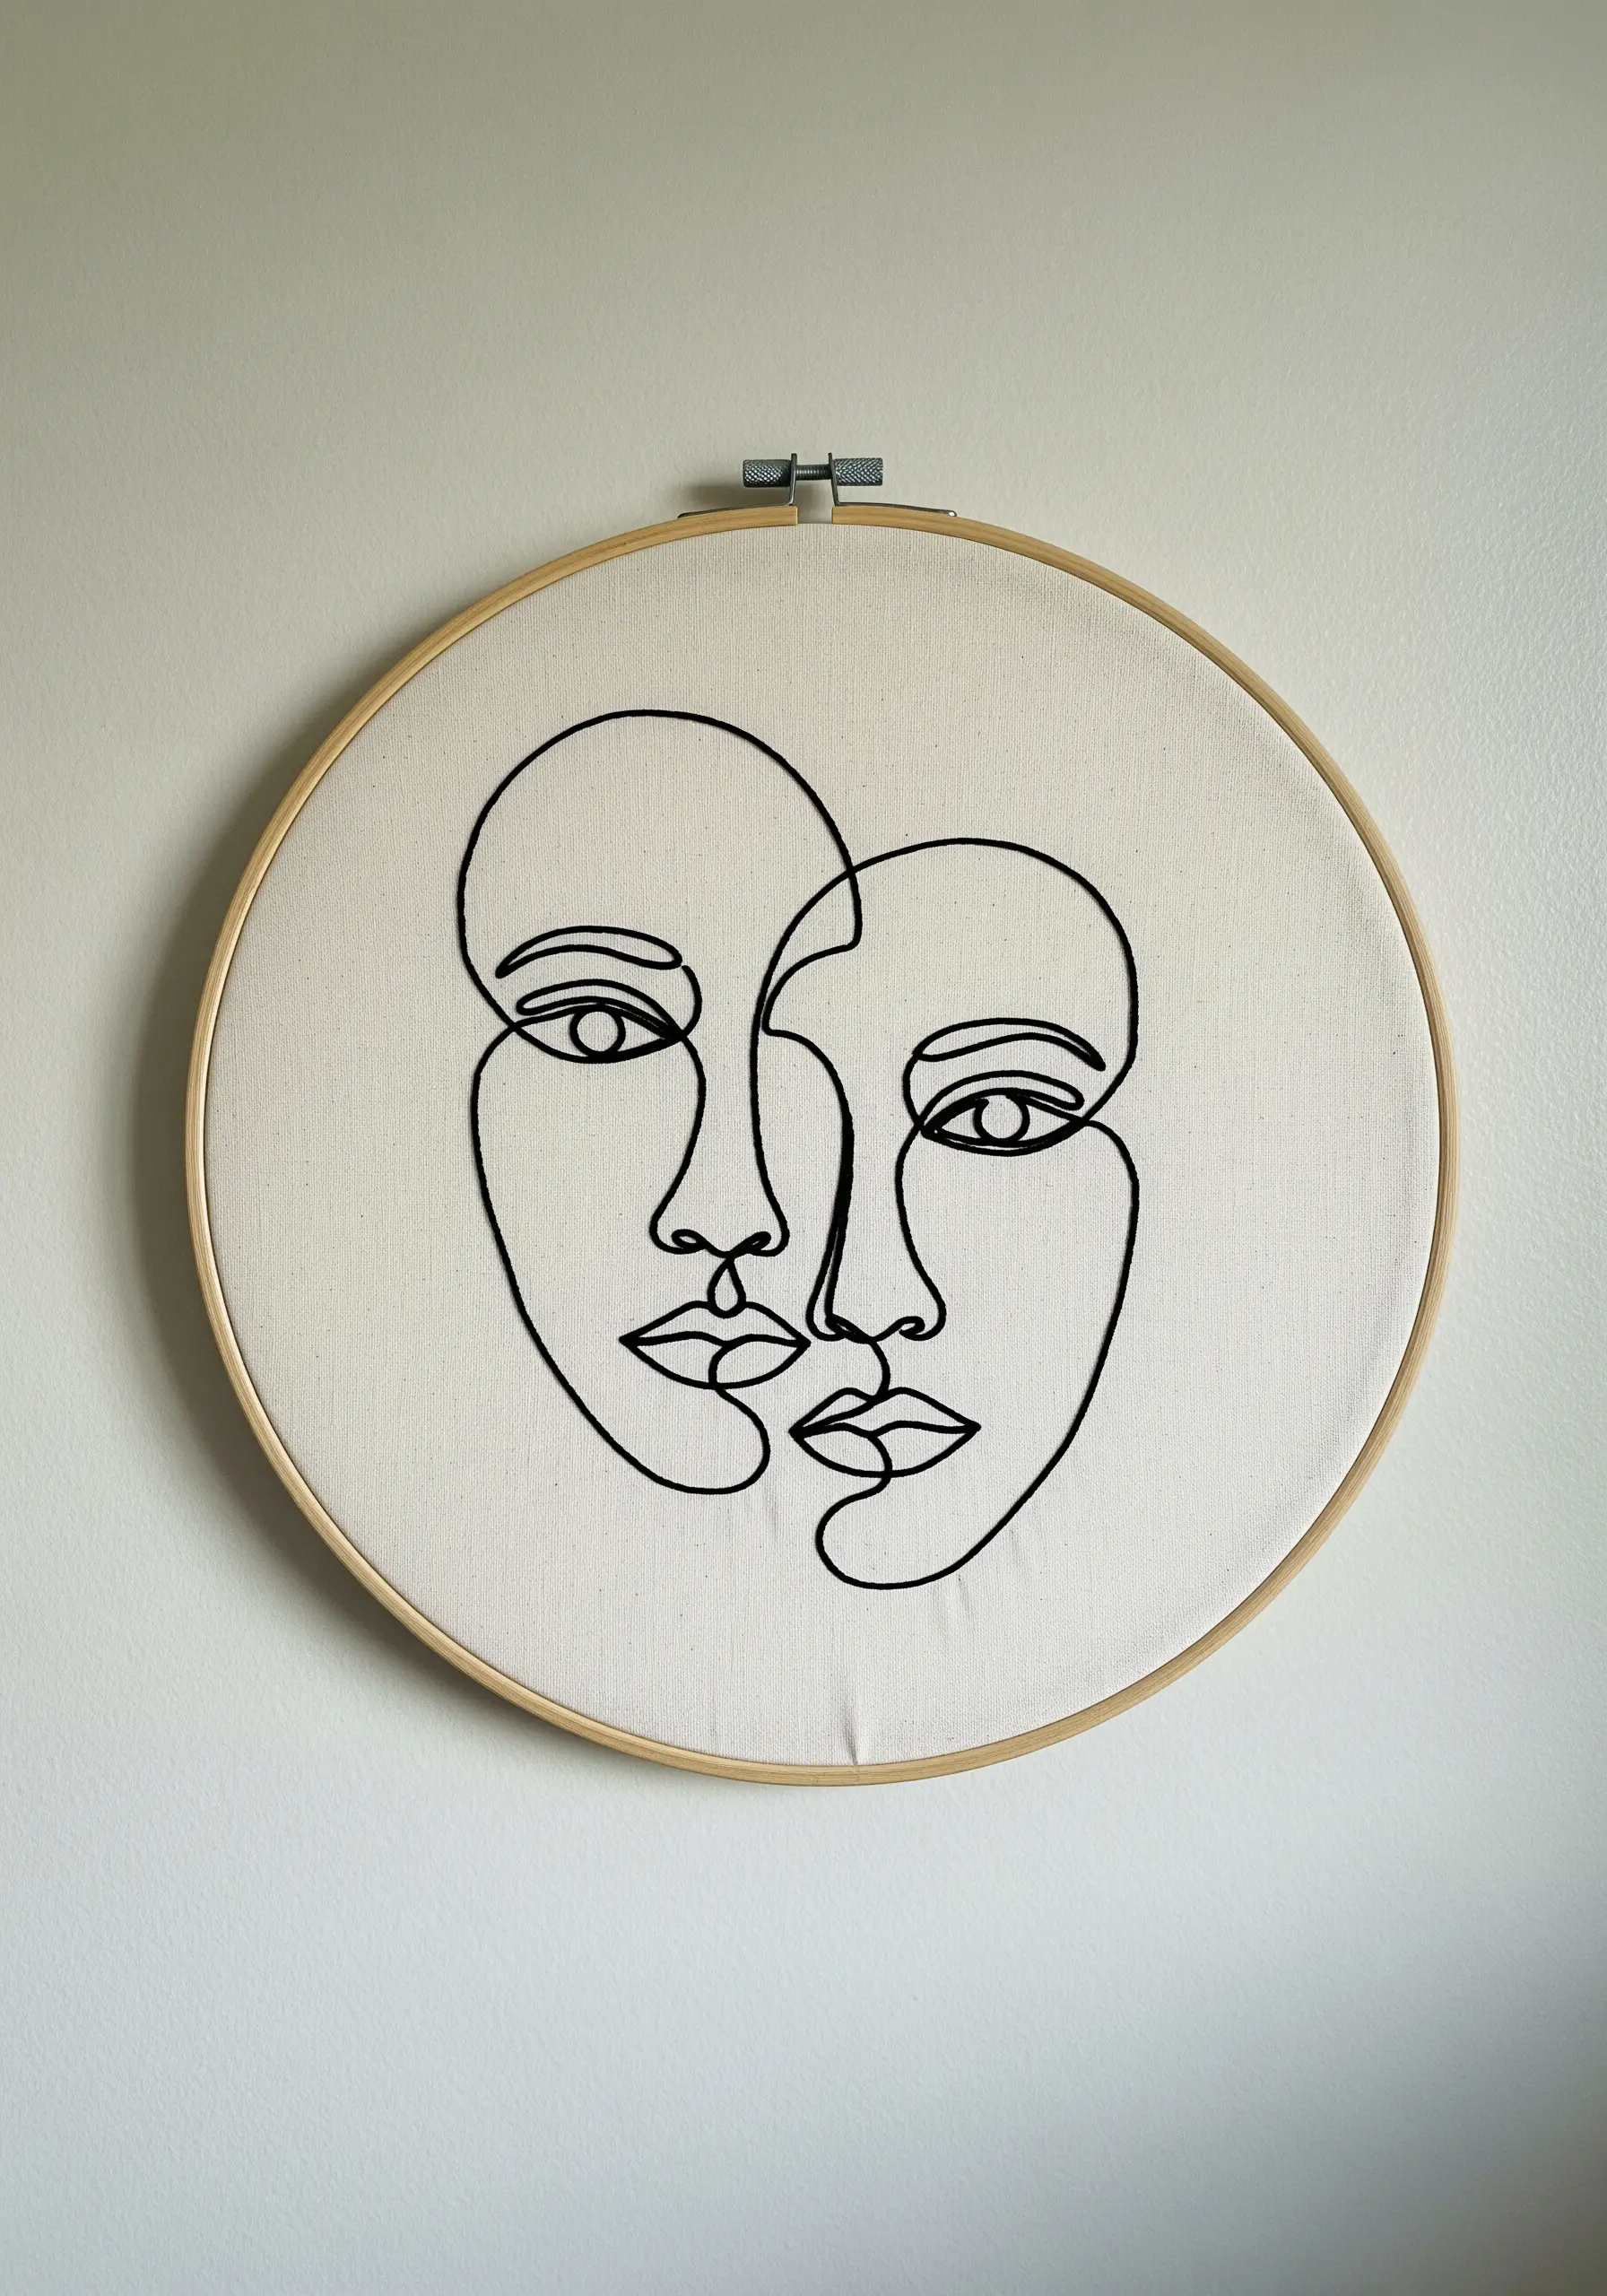
To achieve the smooth, unbroken look of continuous modern line art thread designs, use a whipped backstitch or a stem stitch.
These stitches wrap around the base stitch, eliminating the segmented appearance of a simple backstitch and creating a truly fluid line.
Opt for a 6-strand floss or a #8 pearl cotton to give your lines enough weight and presence against the neutral canvas.
Maintain consistent tension, especially around tight curves, to prevent the fabric from puckering and ensure the artwork lays flat and clean.
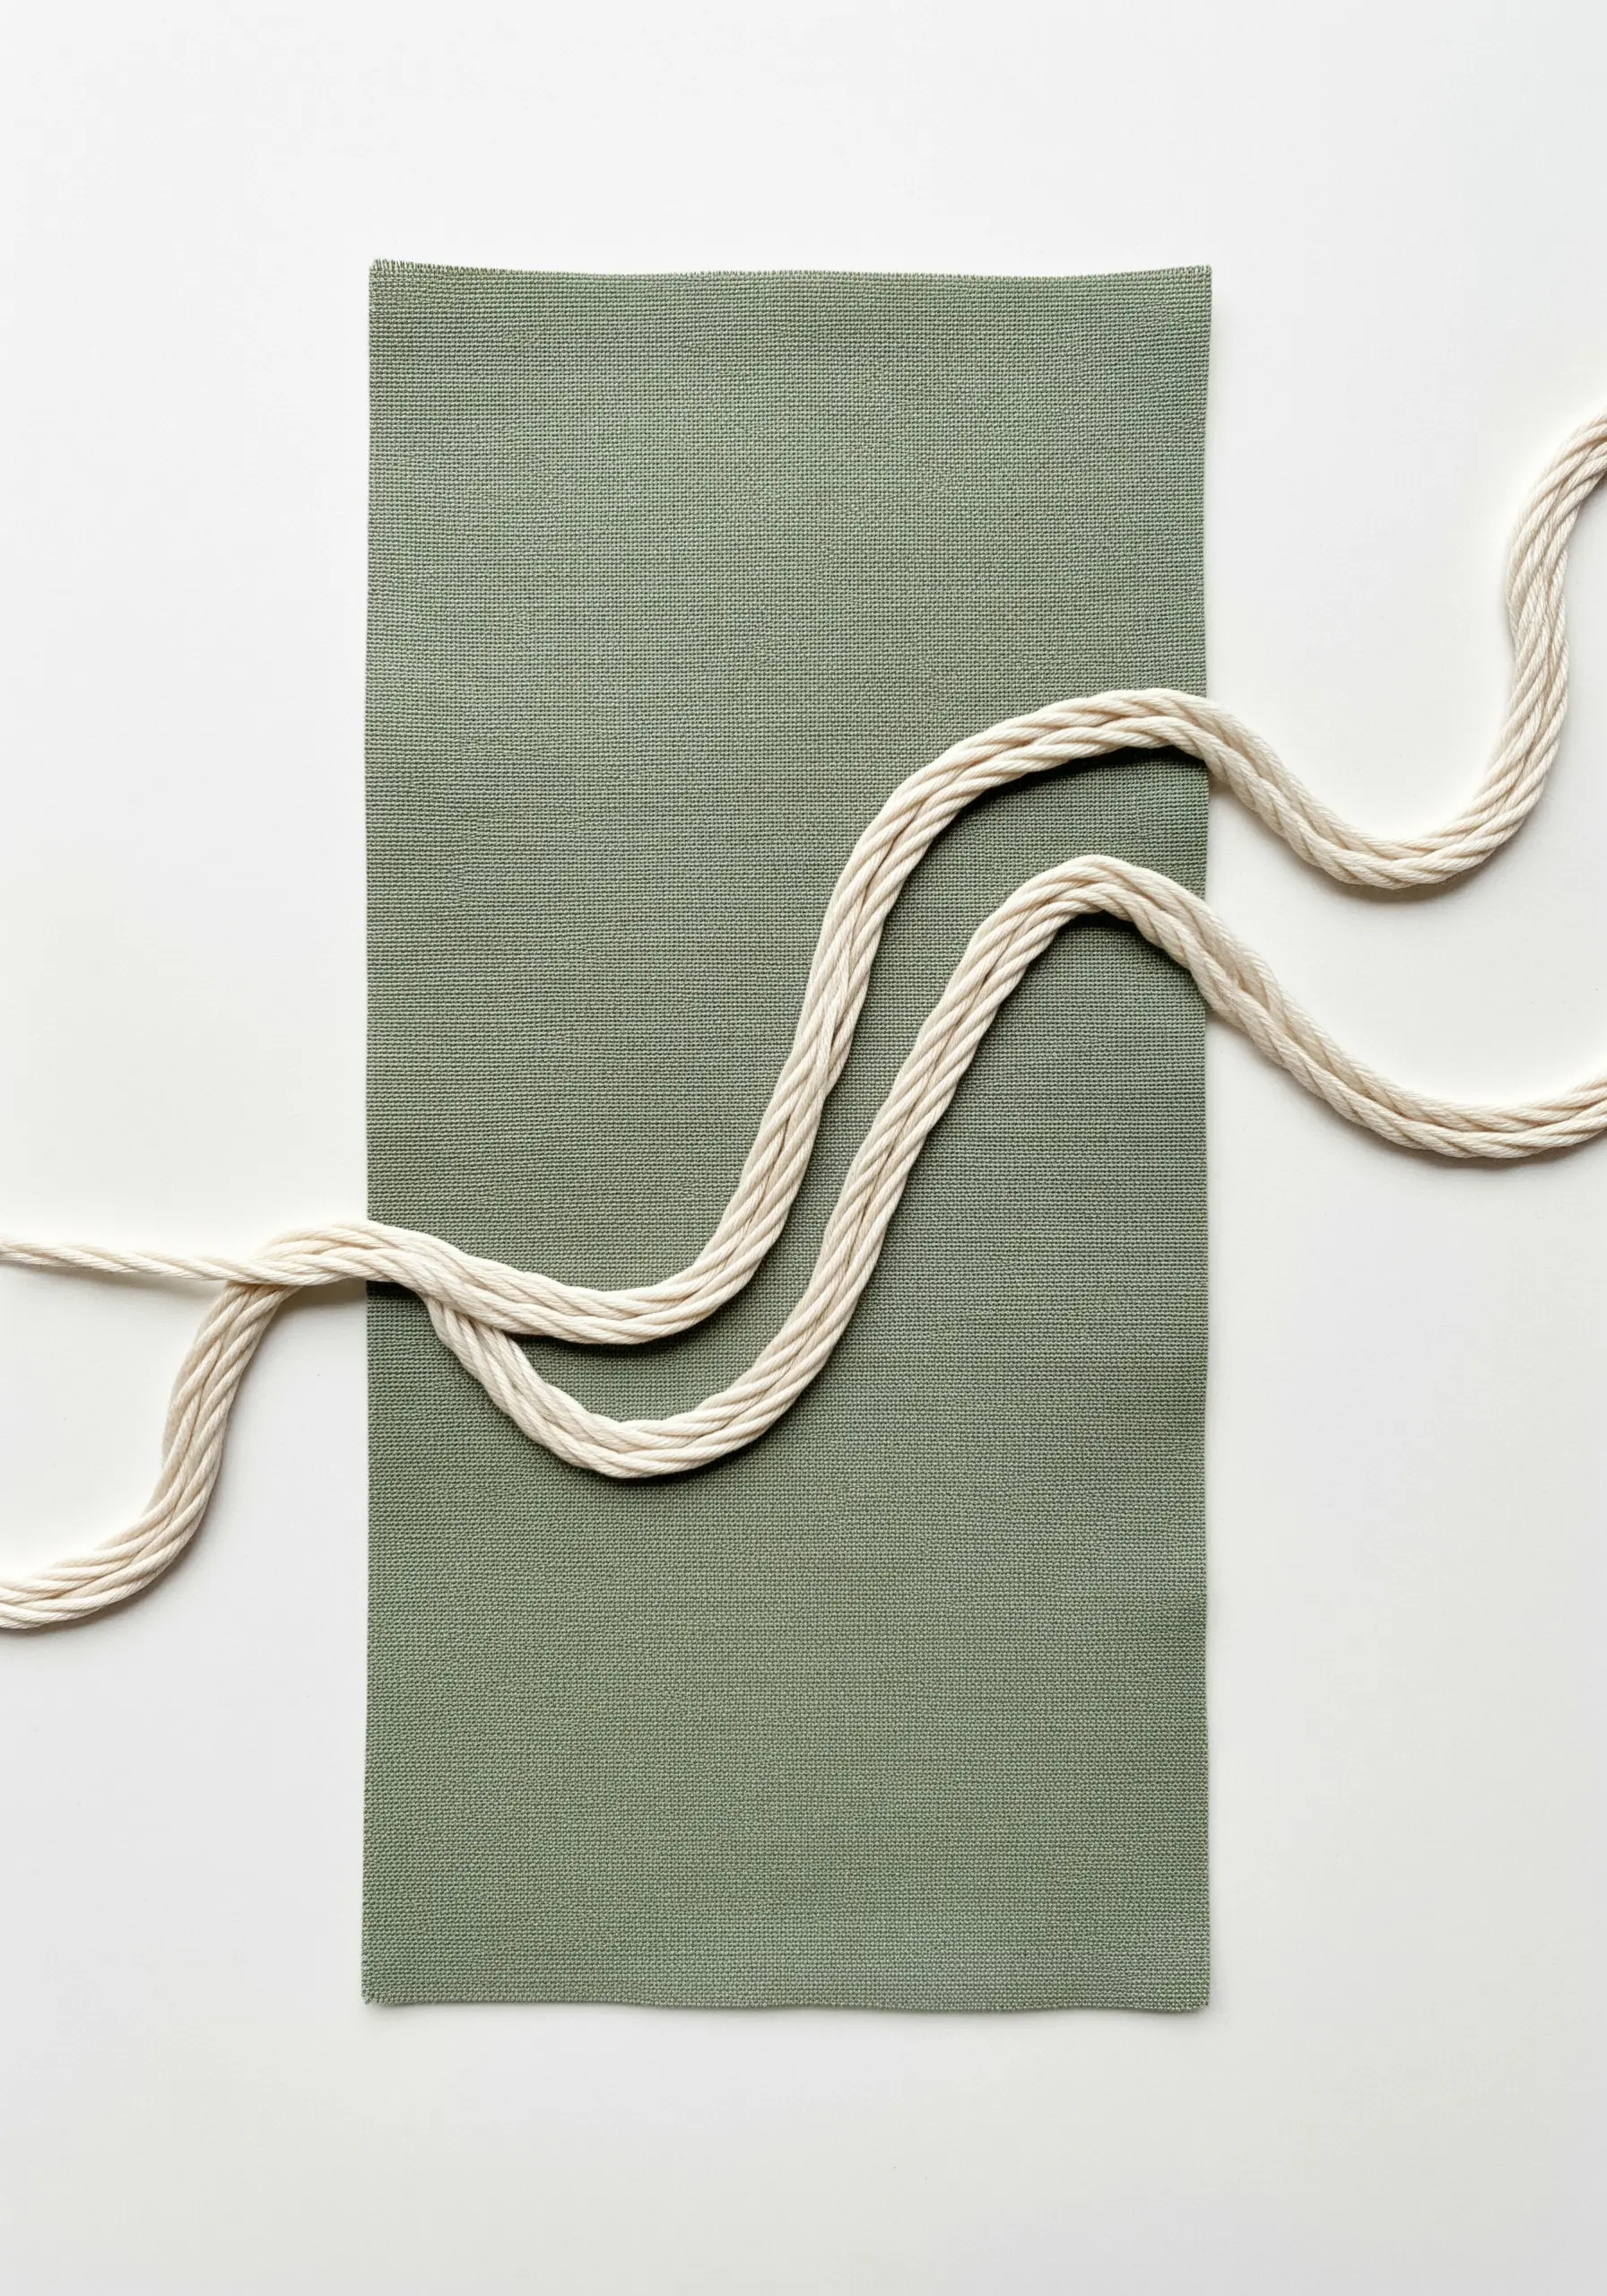
2. Explore Architectural Texture with Wrapped Cording
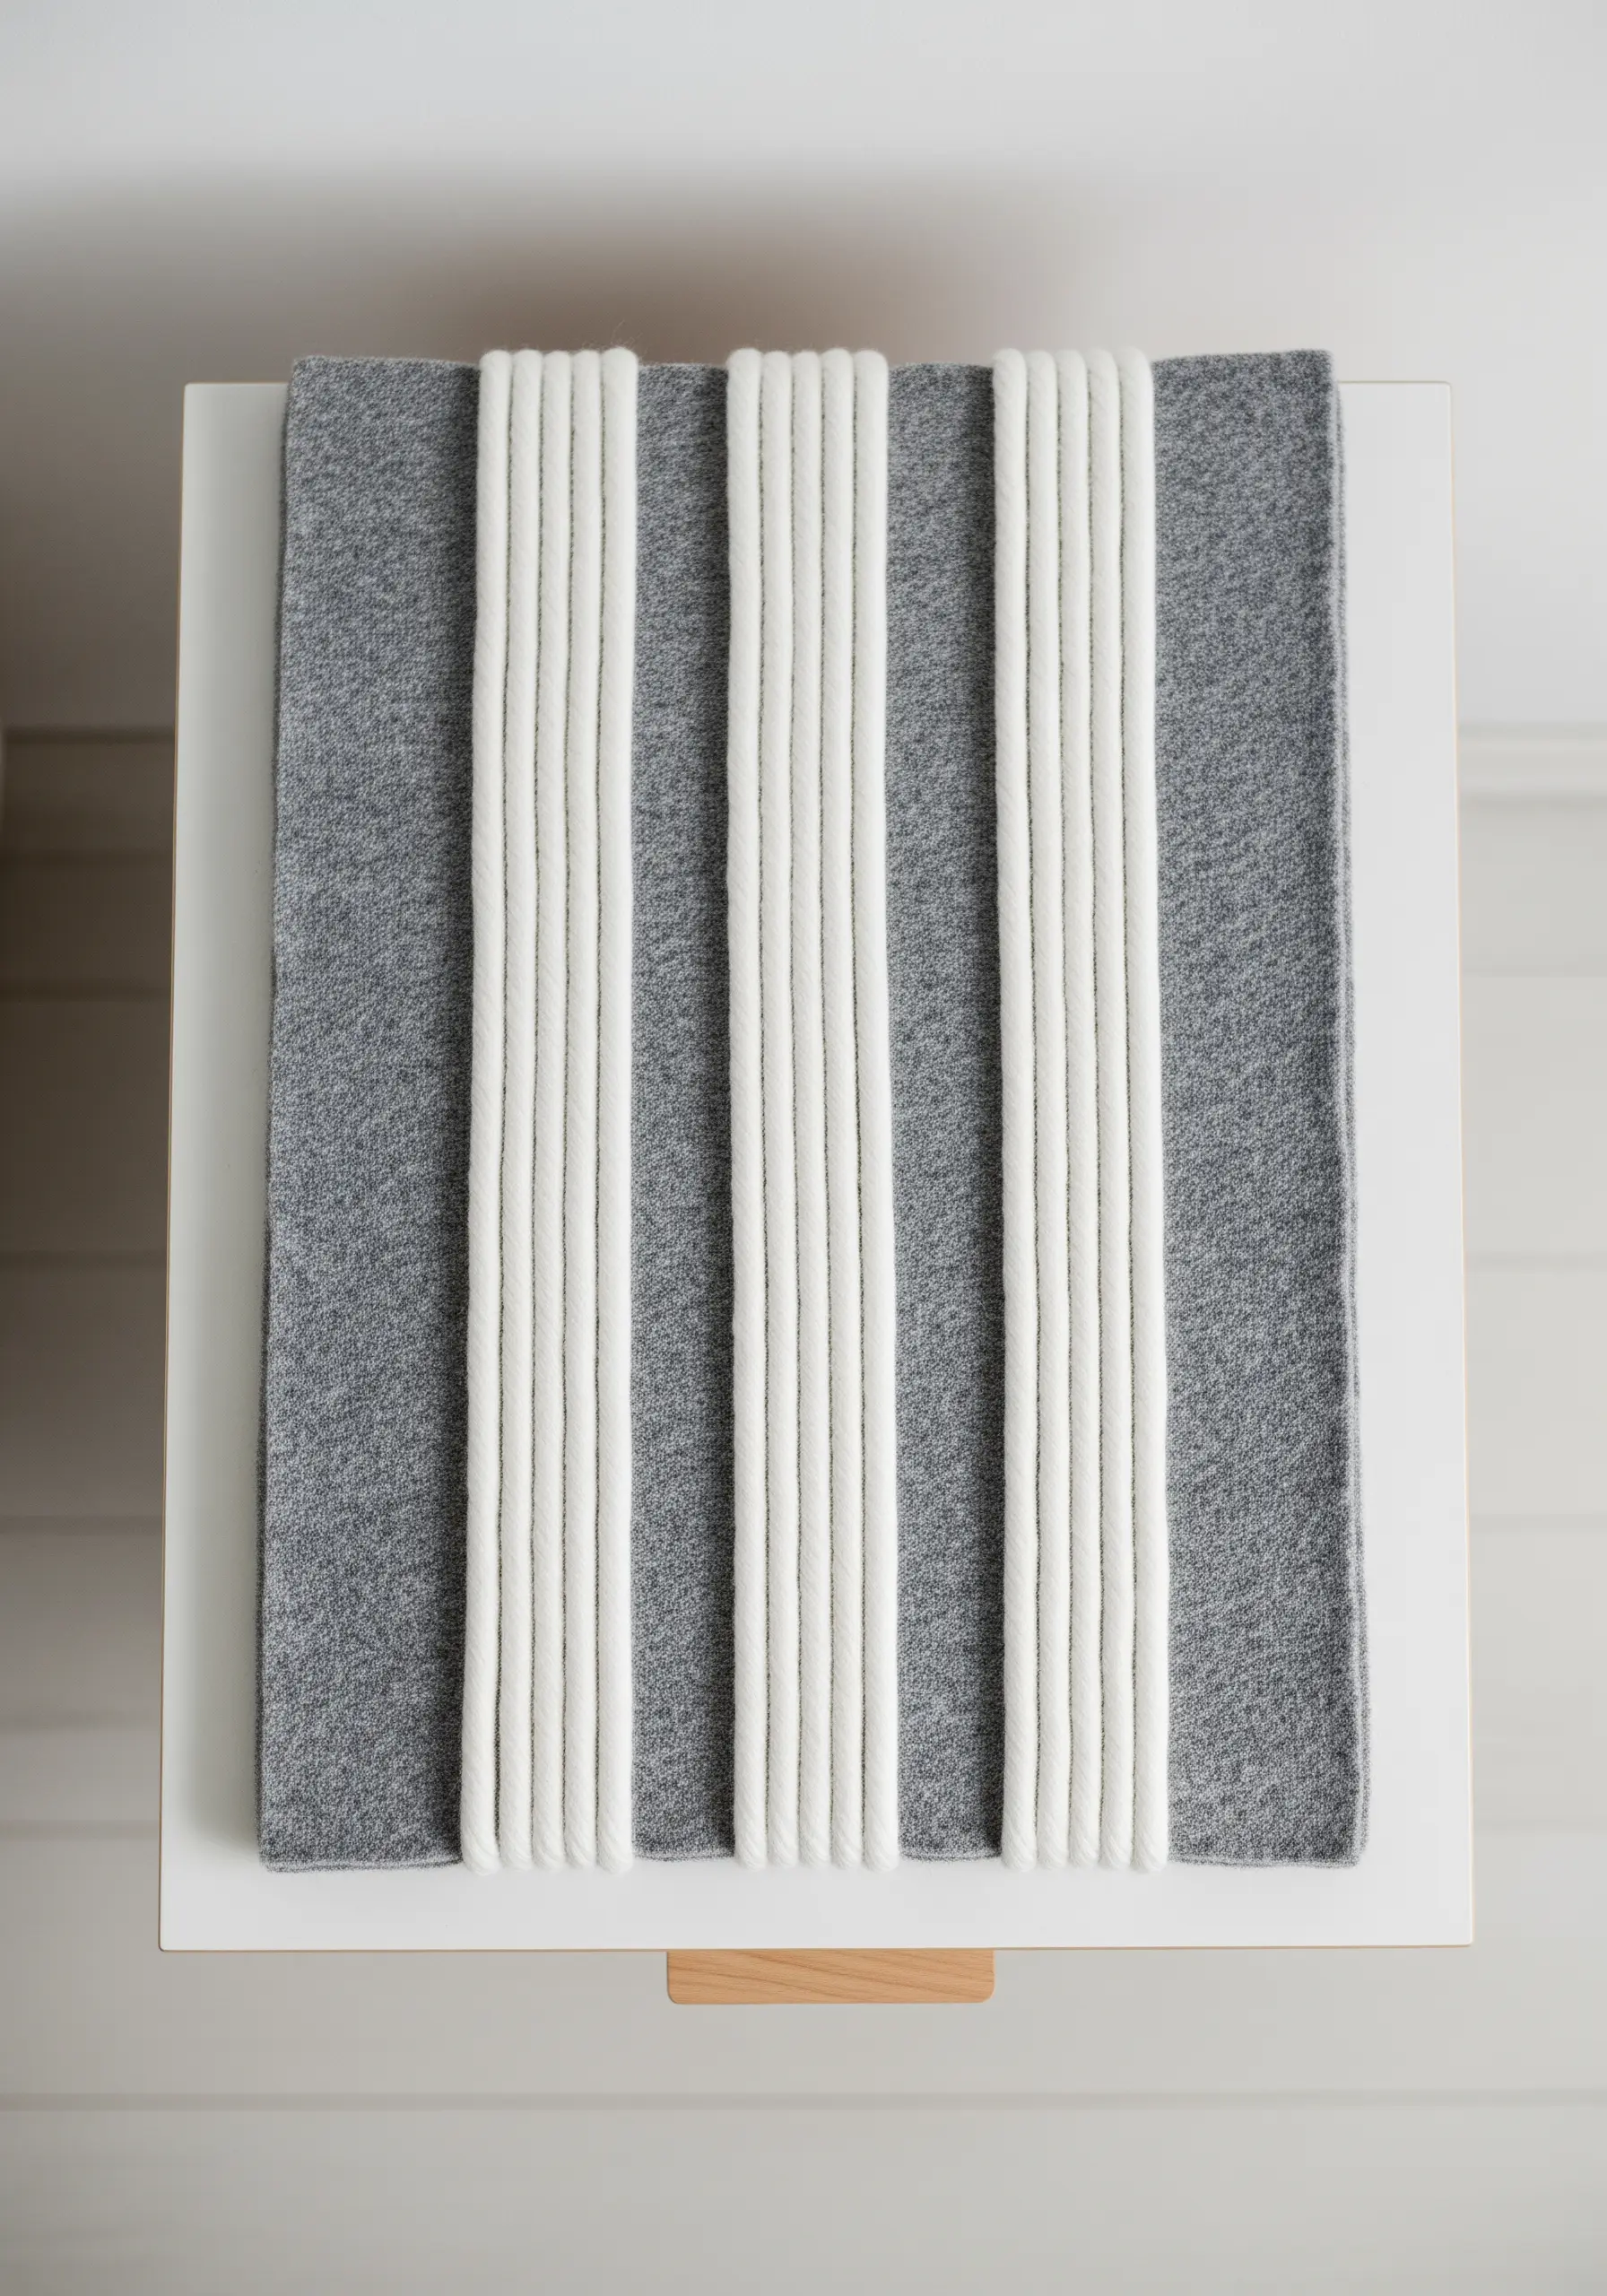
Move beyond the hoop and create texture by wrapping thick cotton cording or yarn around a stretched canvas or wooden board.
The key to this clean, sculptural look is impeccable tension; each wrap must be tight and perfectly aligned with the last.
Secure the ends of the cord on the back of the panel with a strong fabric glue or small staples for a completely hidden finish.
Play with negative space by leaving sections of the base fabric exposed, creating a rhythmic pattern that draws the eye.
3. Illustrate Lunar Phases with Seed Stitching

Render the moon’s textured surface using a dense scattering of tiny seed stitches and French knots on a dark navy or black linen.
Instead of bright white, choose an off-white or very light grey thread for a softer, more realistic glow that feels less stark.
Vary the density of your stitches—more concentrated in the center and sparser towards the edges—to create a subtle sense of shadow and dimension.
Displaying them as a triptych transforms individual pieces into a cohesive narrative for calm spaces.
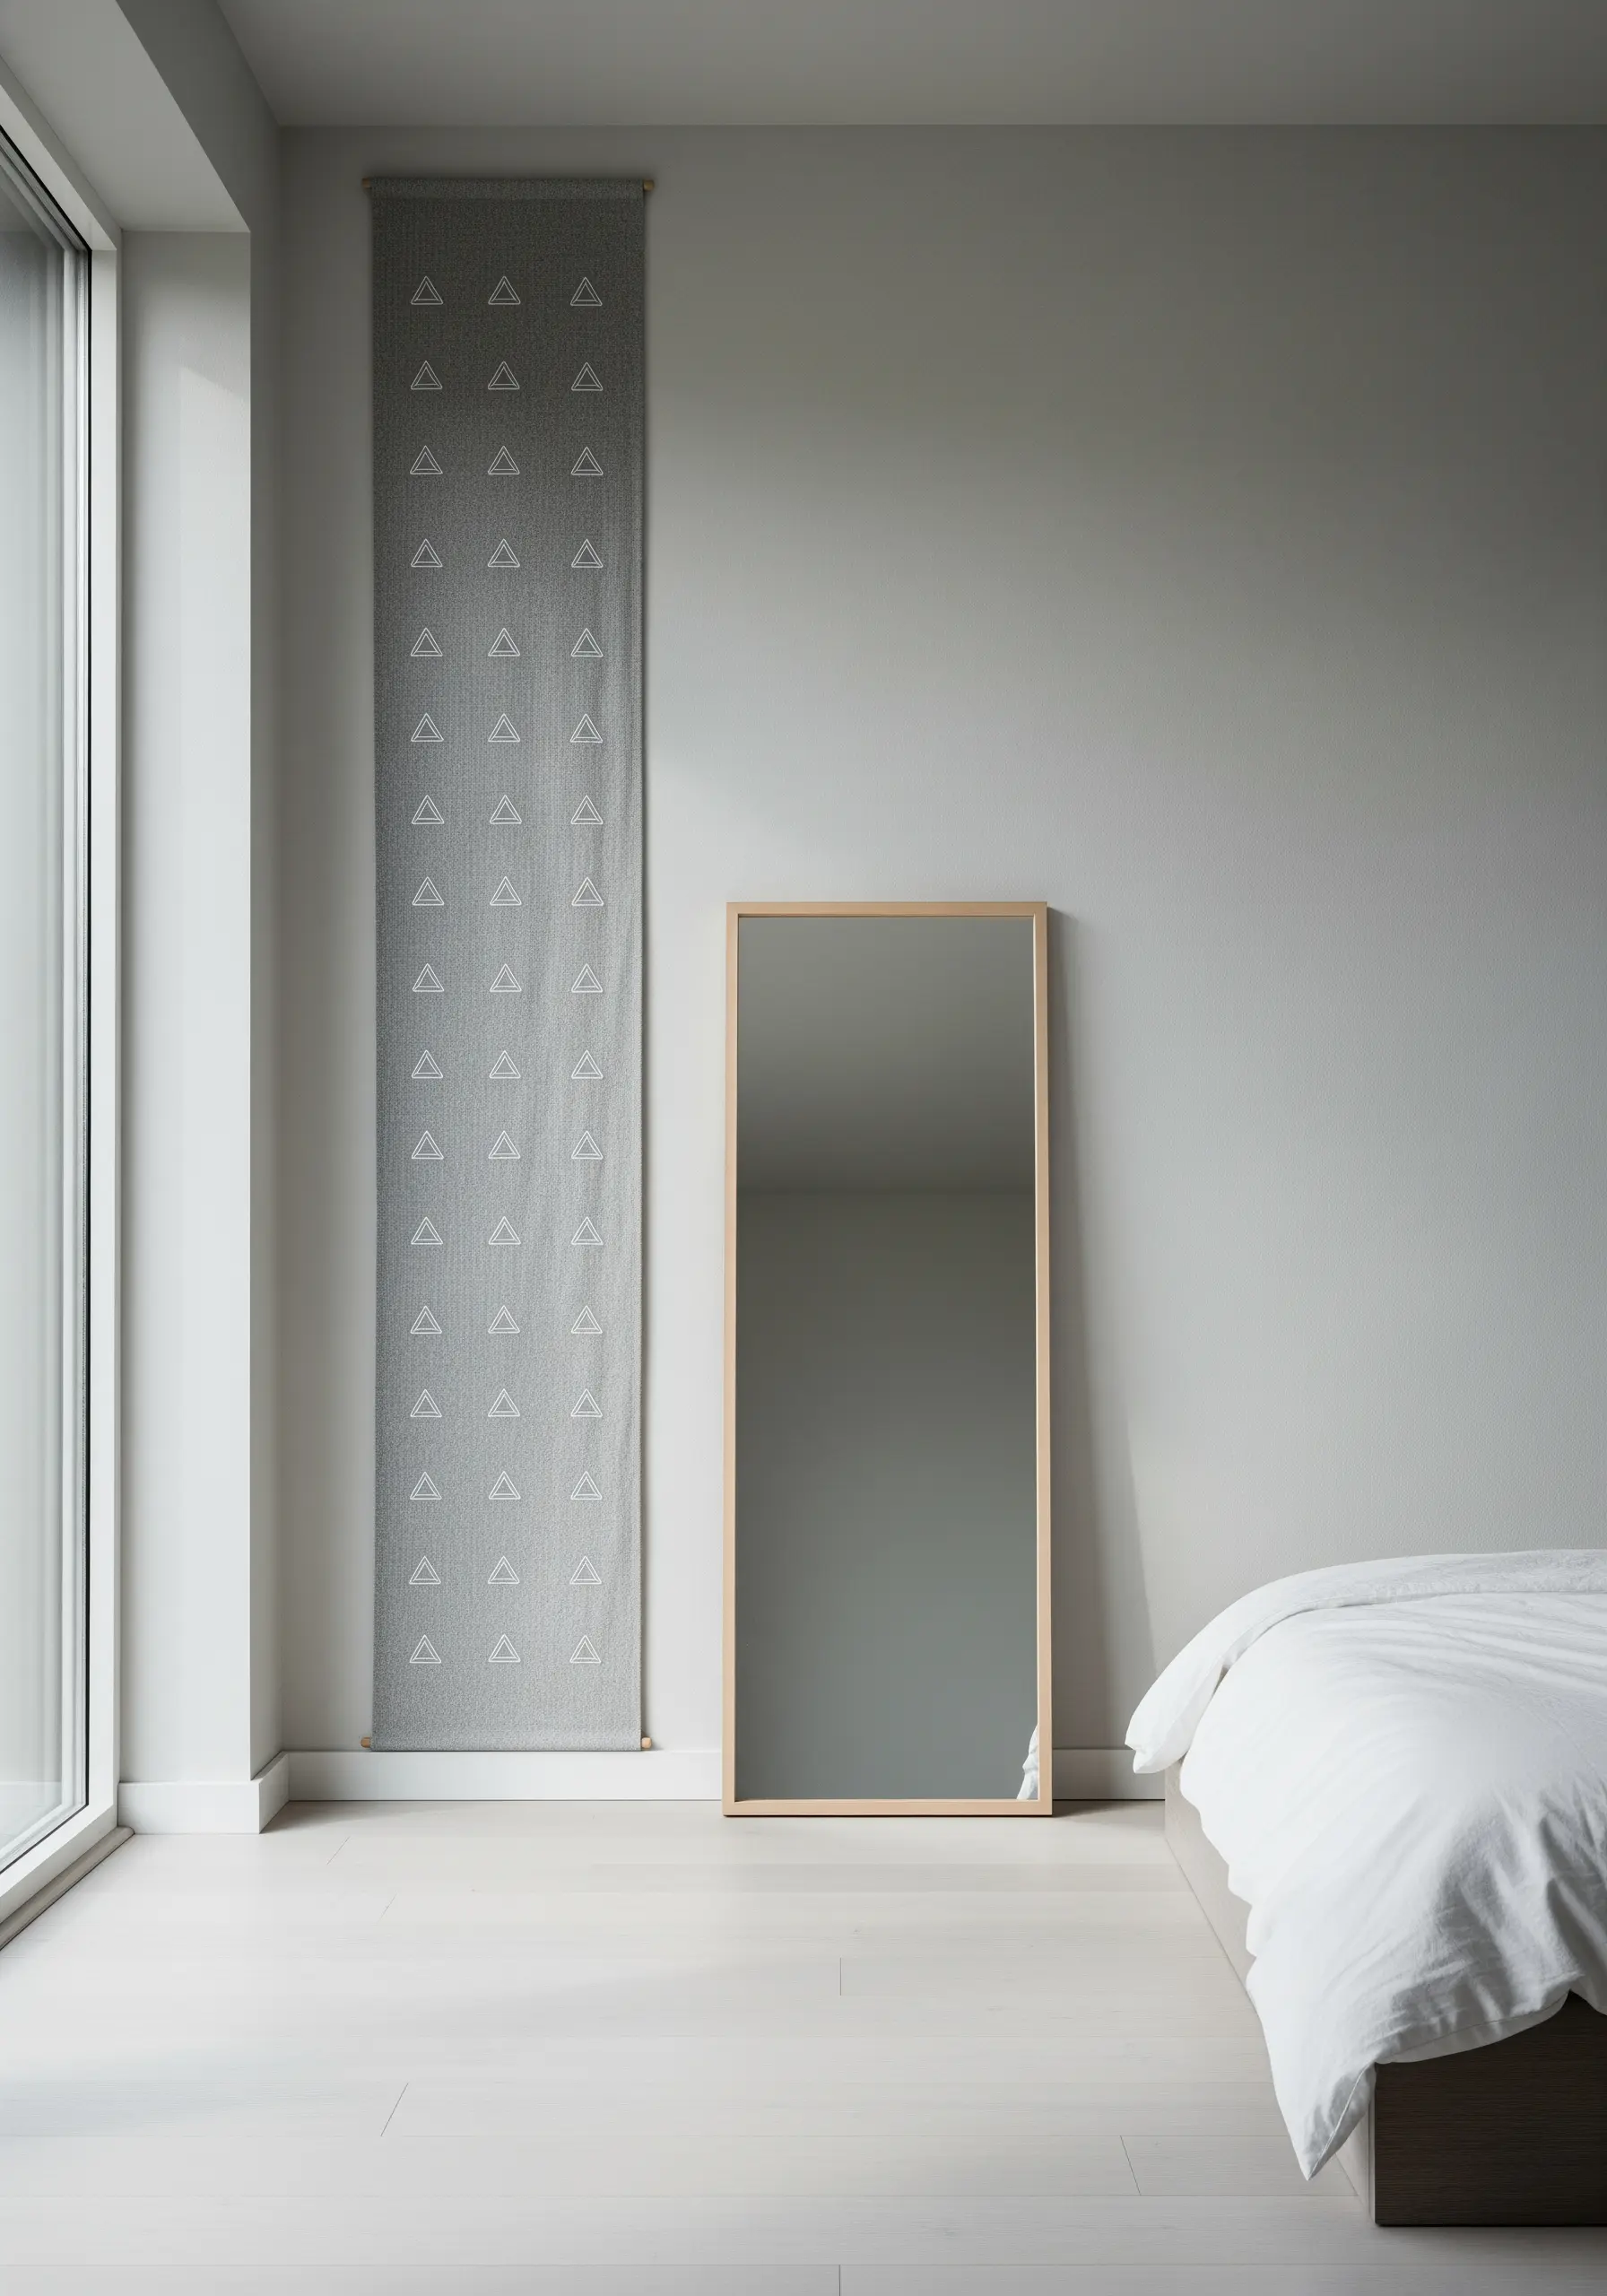
4. Scale Up Your Linework on Wall Hangings
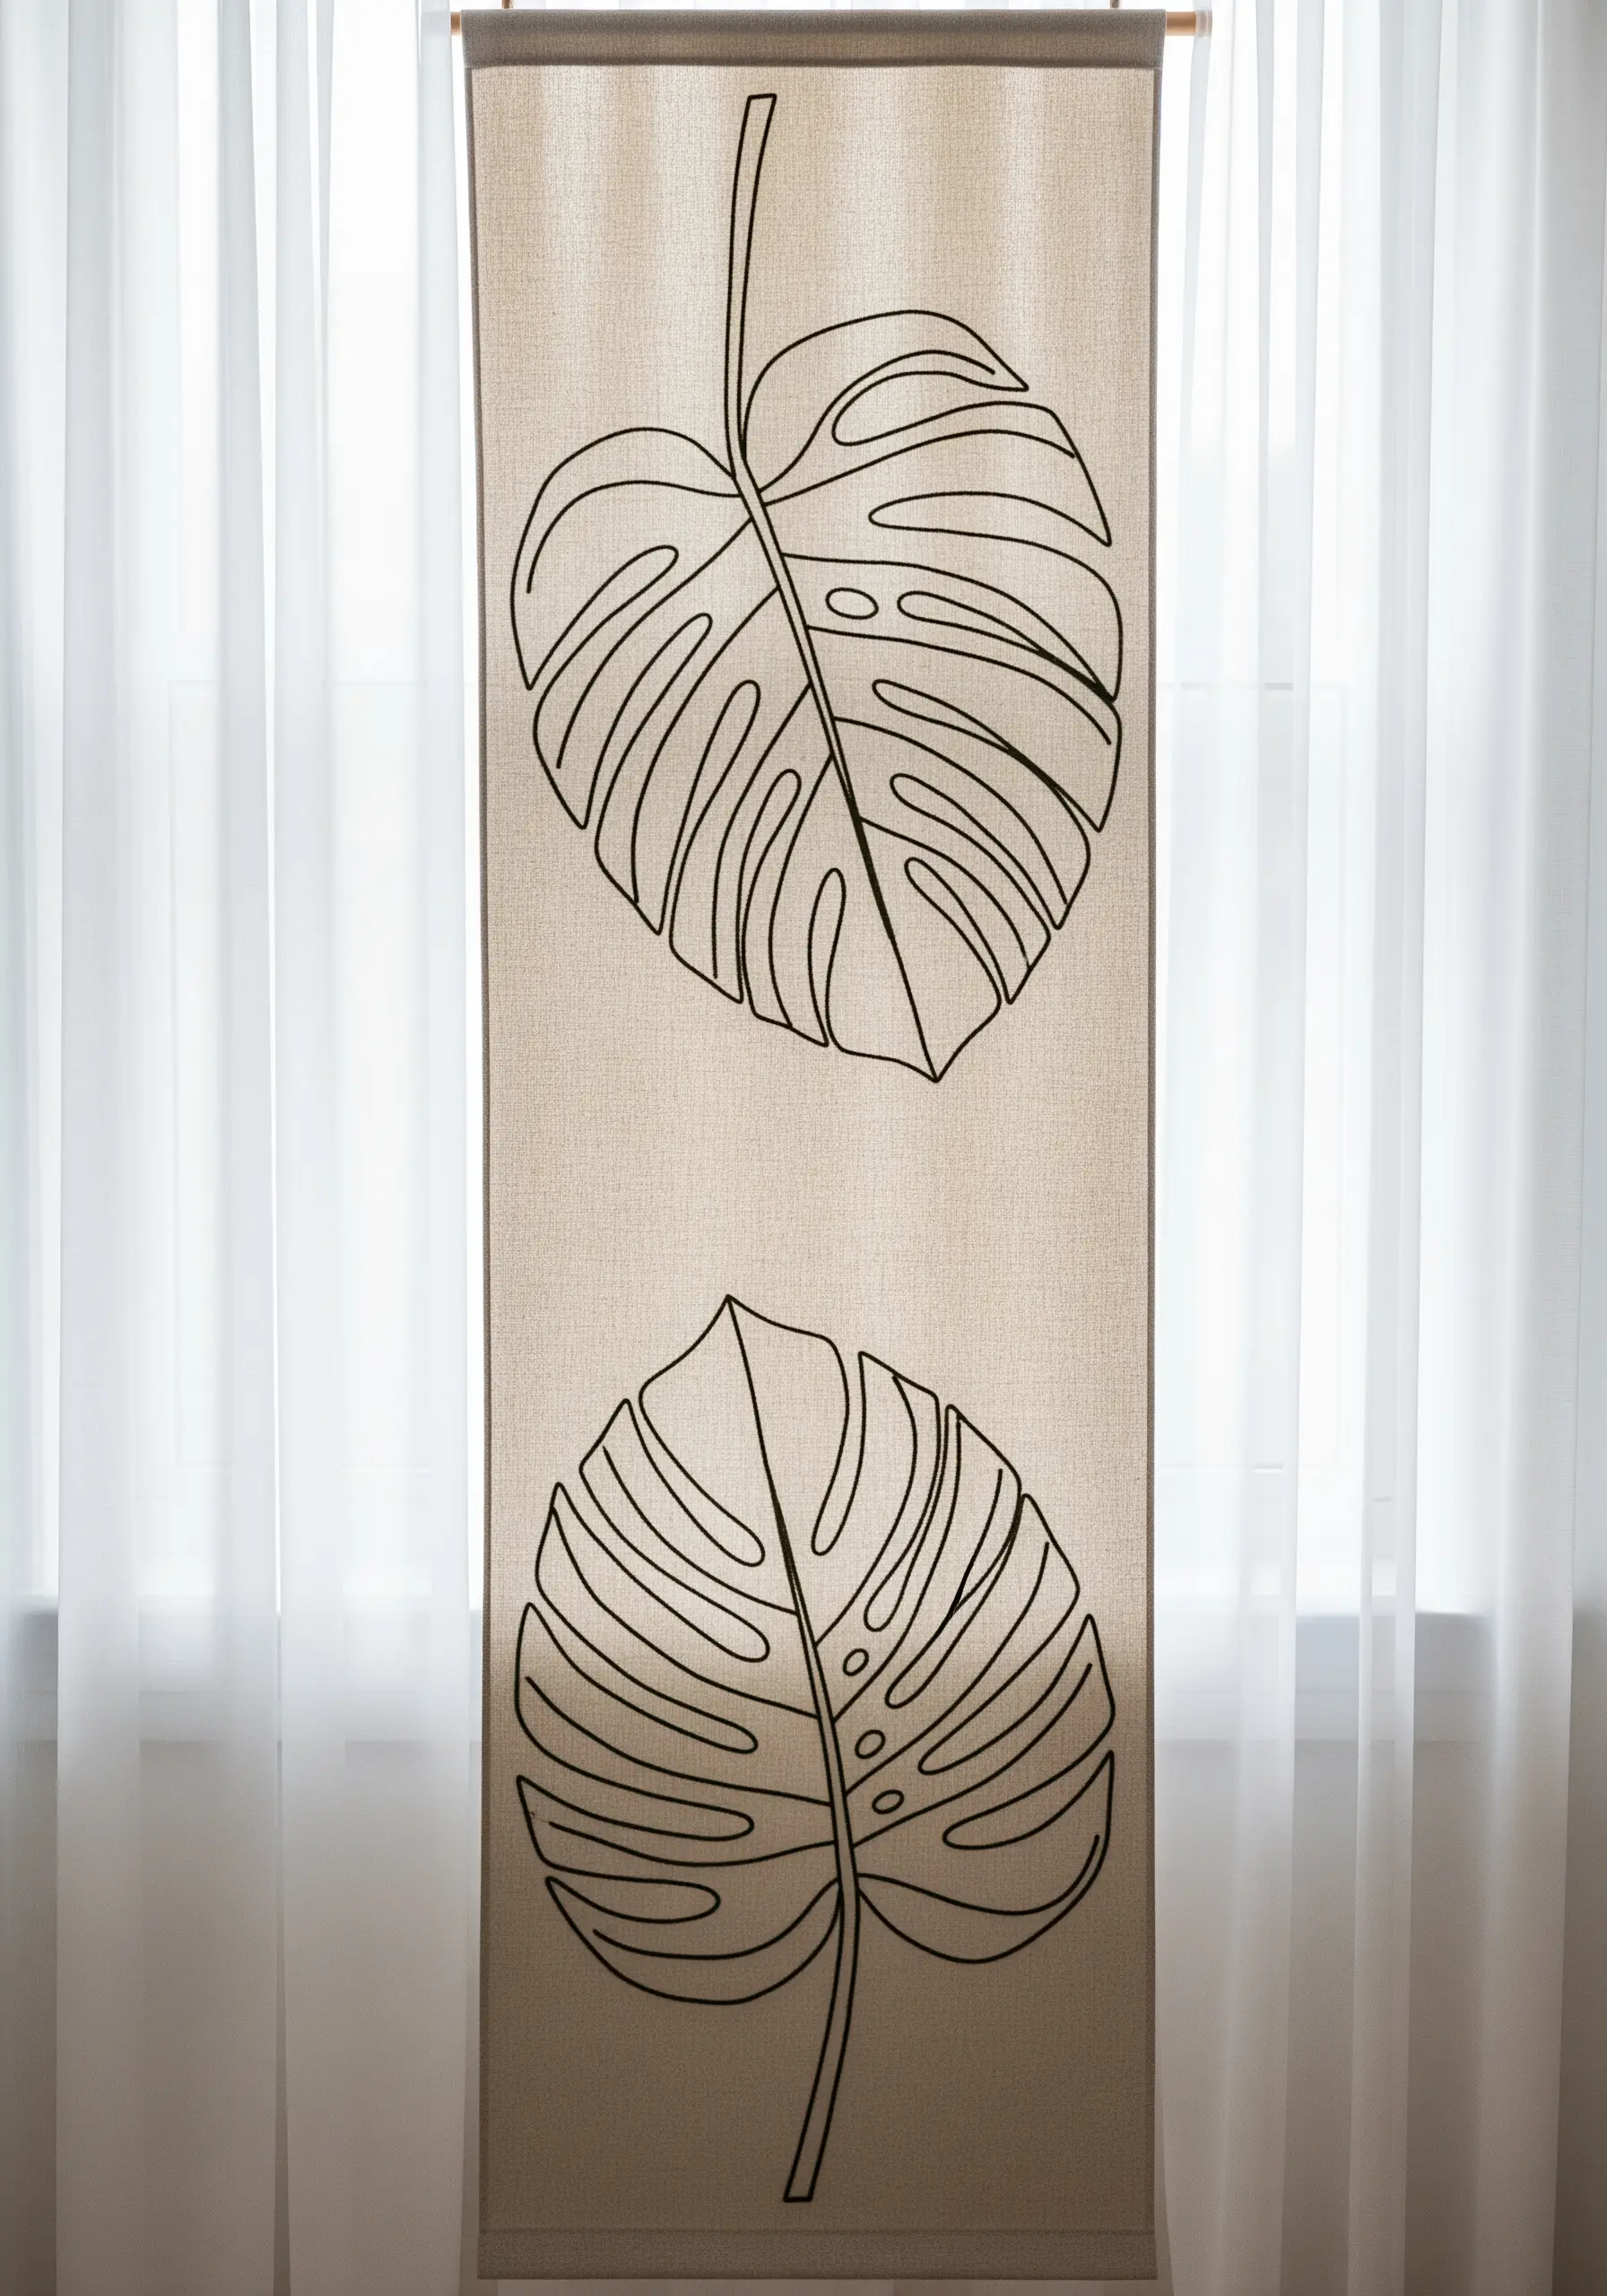
Take your simple line motifs to a larger scale by stitching them onto a long fabric panel, like a curtain or wall hanging.
Use a heavy-duty thread, such as a #5 pearl cotton or even a fine sashiko thread, to ensure the lines have visual impact from a distance.
A simple backstitch or stem stitch works perfectly here; the goal is clarity and graphic boldness, not intricate detail.
Choose an open-weave fabric like linen or a cotton-linen blend, as it has a beautiful drape and is sturdy enough to support the stitching without distortion.
5. Build Graphic Shapes with Directional Satin Stitch
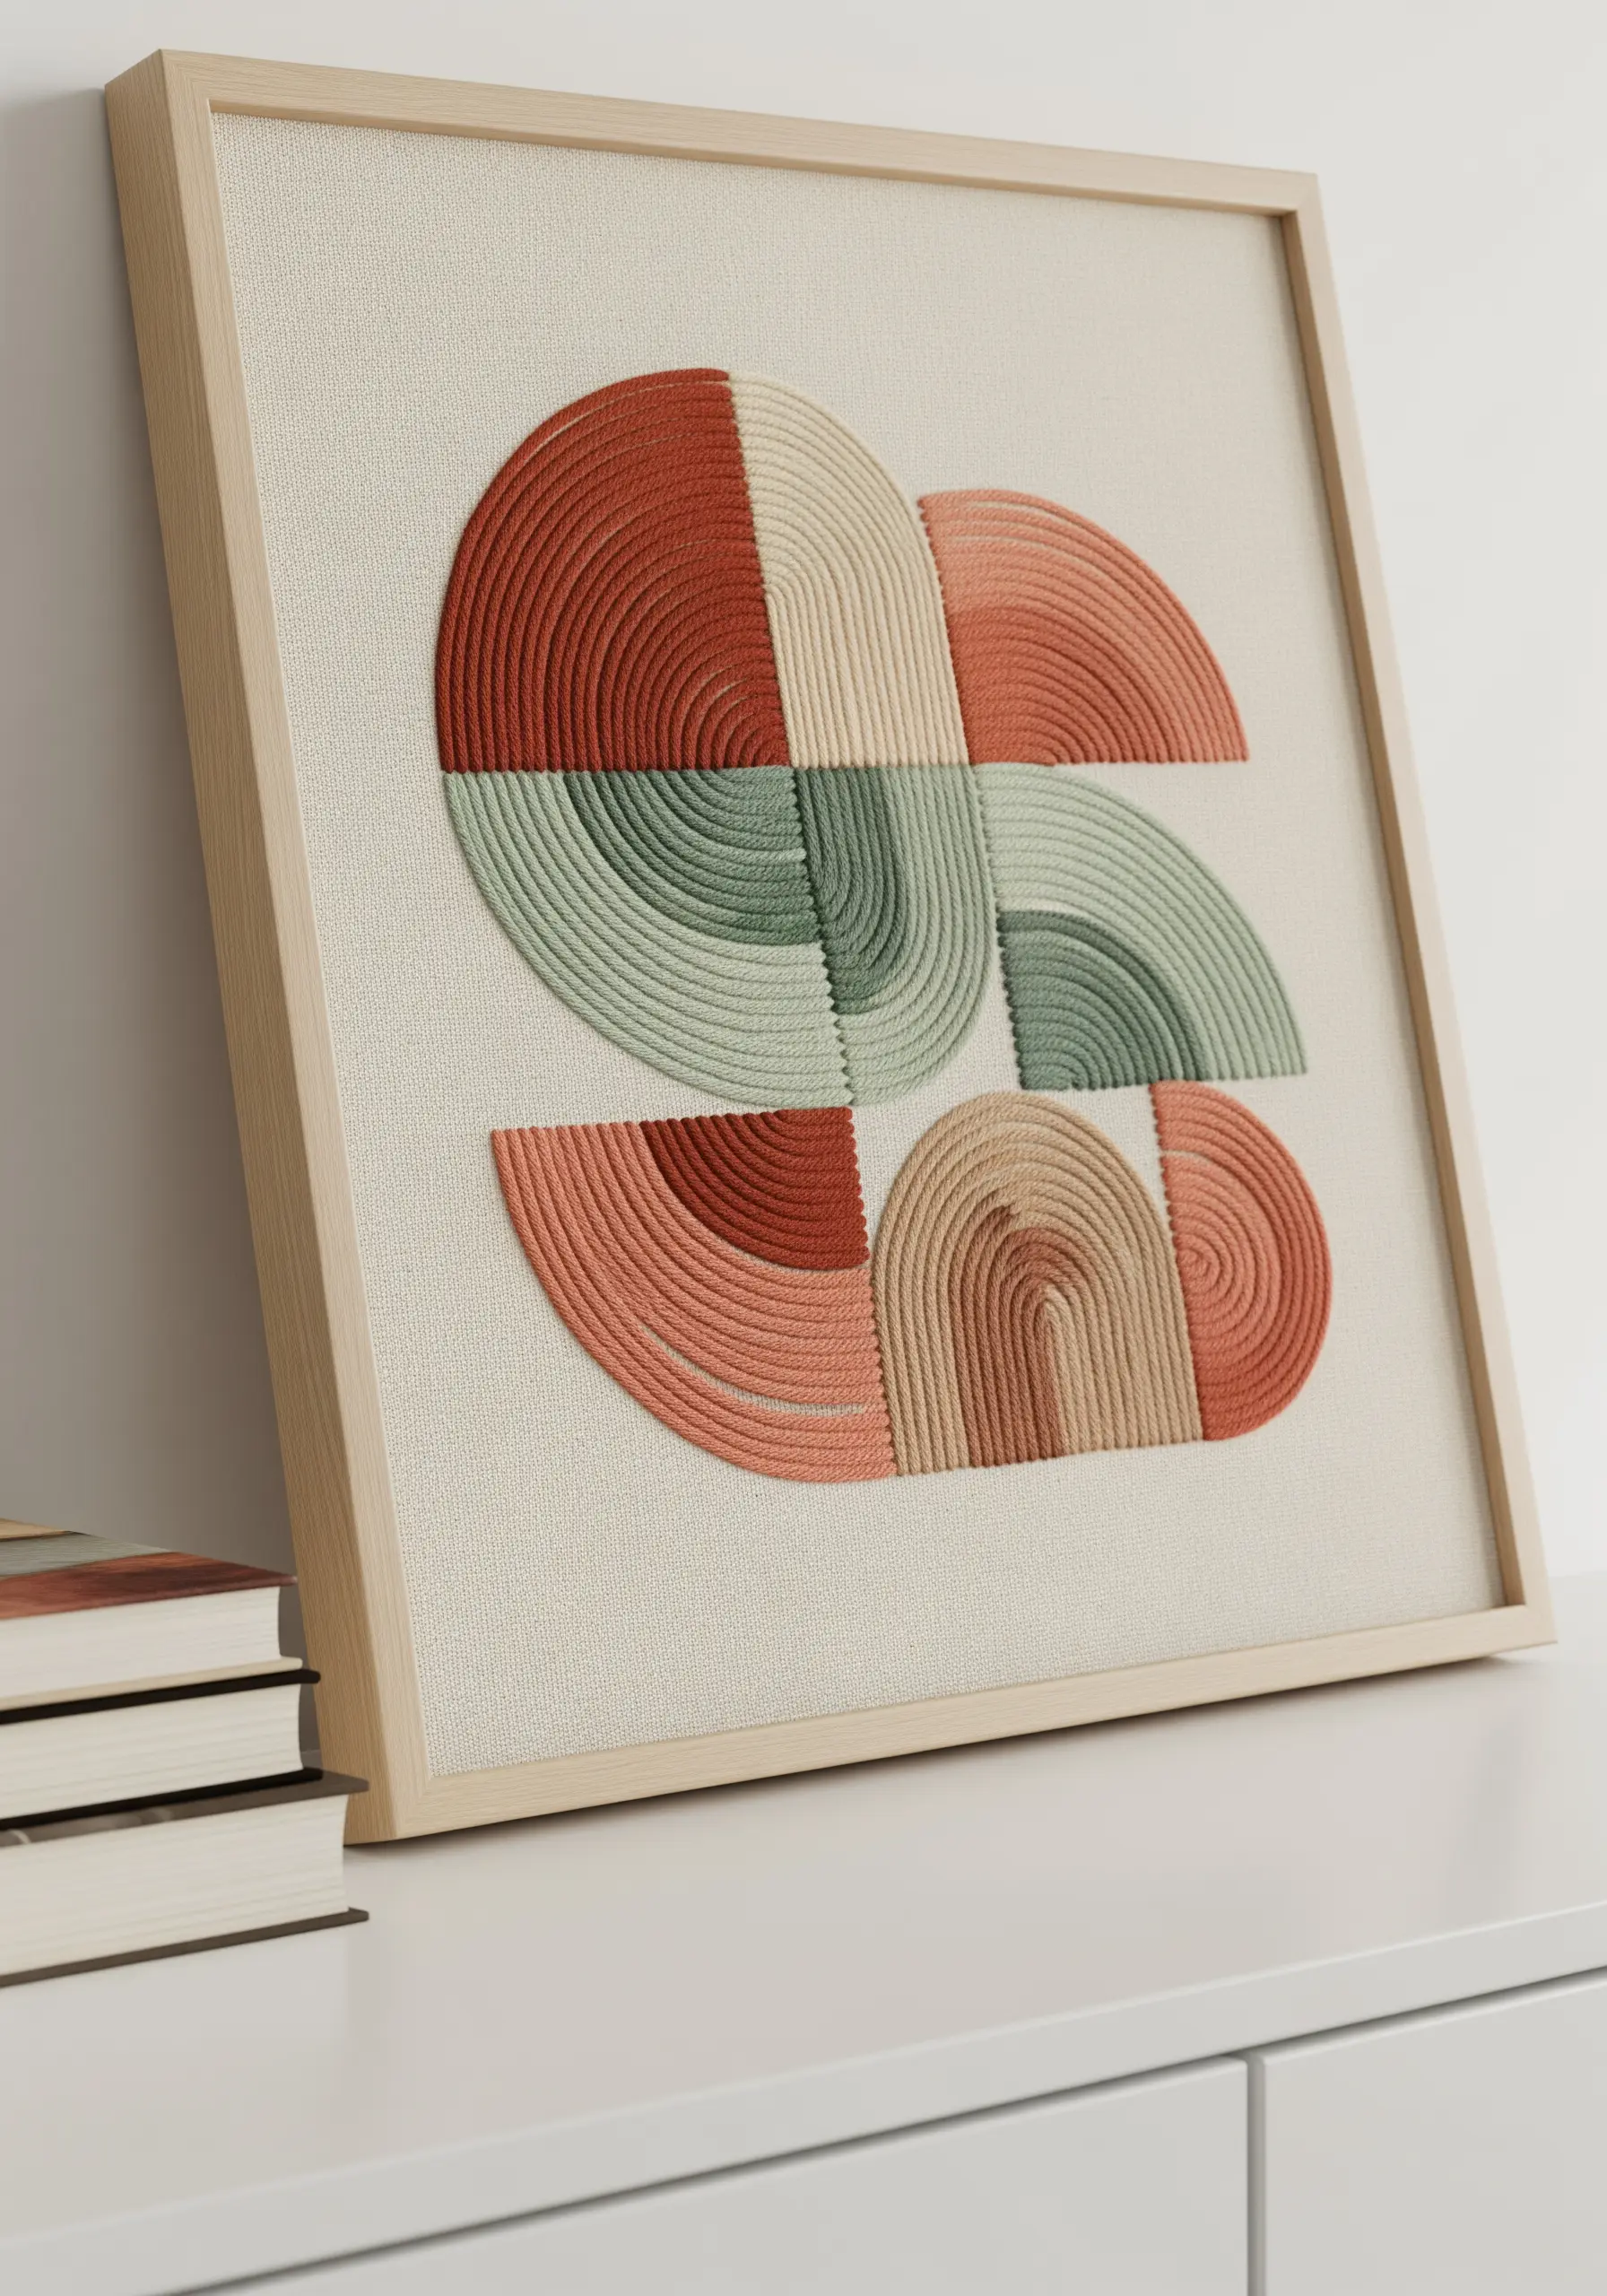
Create these clean, geometric forms by filling them with dense, perfectly aligned satin stitches.
The magic is in the direction: notice how the stitches curve to follow the arc of each shape, creating a sense of movement and dimension.
To keep your edges crisp, outline each segment with a split stitch before filling it in. This acts as a ‘fence’ for your satin stitches to rest against.
A muted, earthy color palette keeps the complex pattern feeling calm and cohesive, making it perfect for modern boho spaces.
6. Weave an Illusion of Depth with Straight Stitches
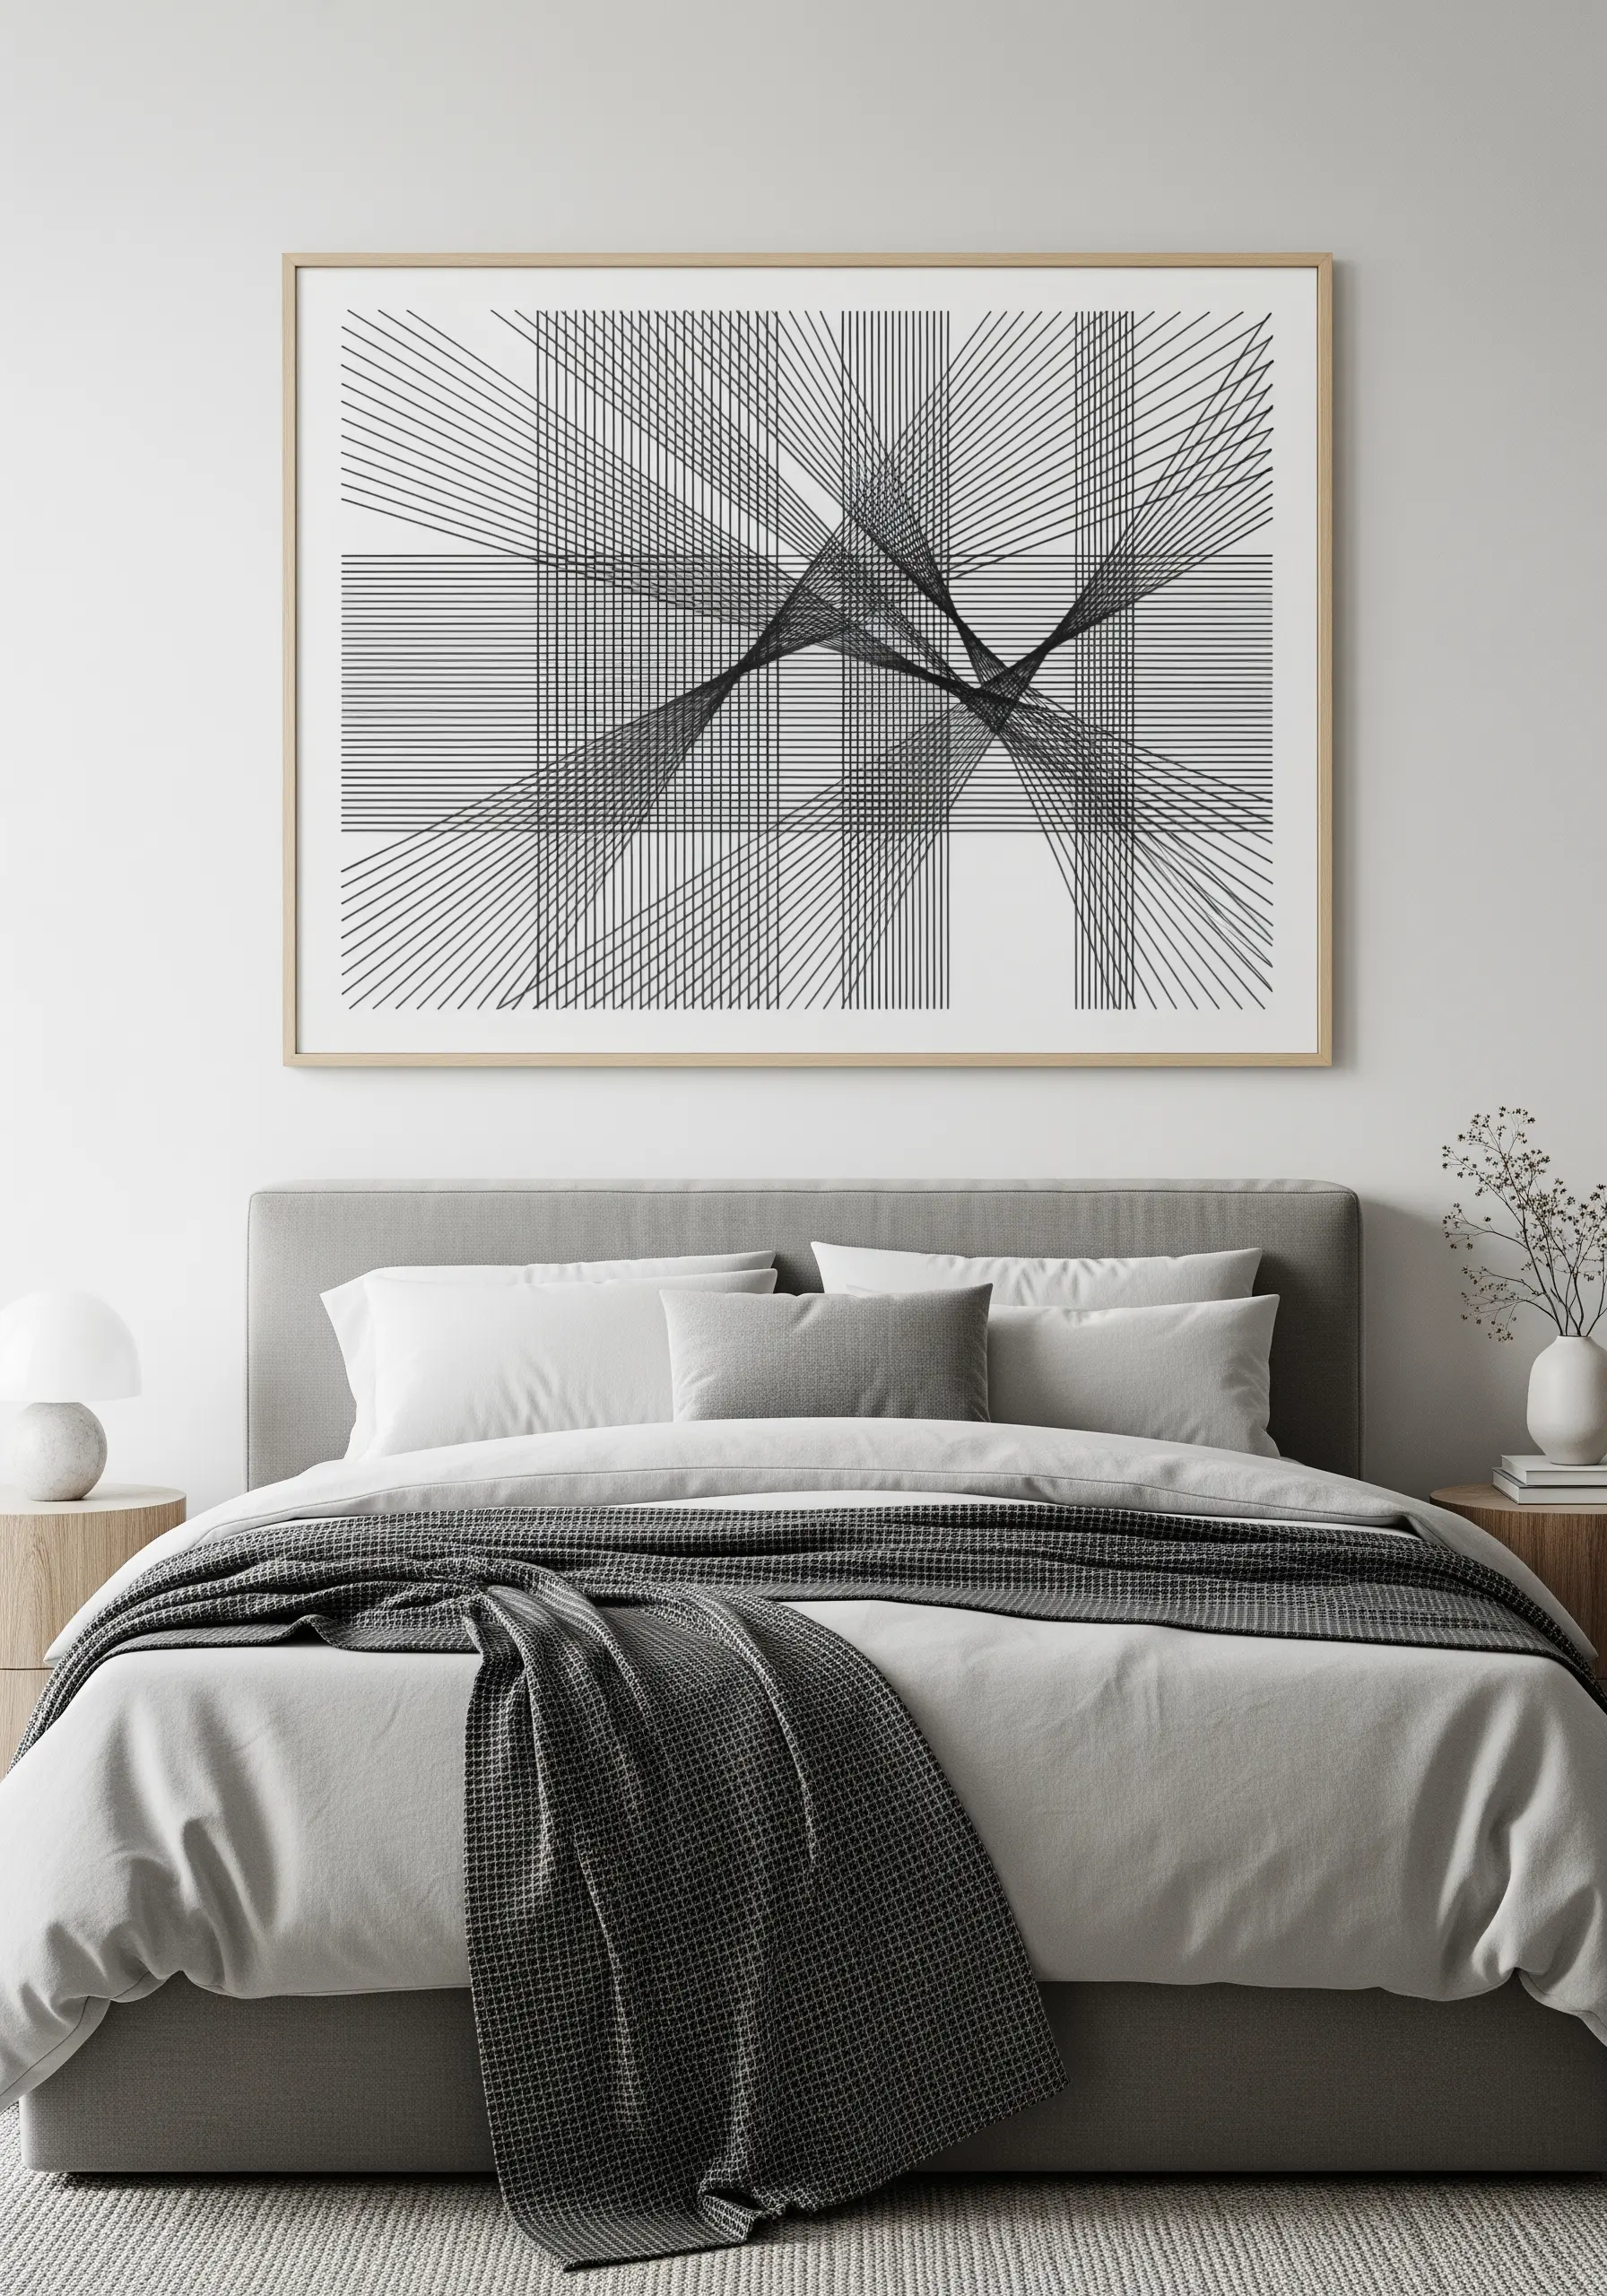
This complex, layered look is achieved with nothing more than carefully planned straight stitches. It’s a perfect example of string art translated to fabric.
To create this, you’ll need to mark a precise grid of points on your fabric and then connect them with thread according to a pattern.
The overlapping lines create optical illusions of curves and depth, a technique known as parabolic stitching.
Use a fine but strong thread, like a single strand of cotton floss, to keep the lines sharp and prevent the artwork from becoming bulky.
7. Capture Ocean Movement with Varied Stitches
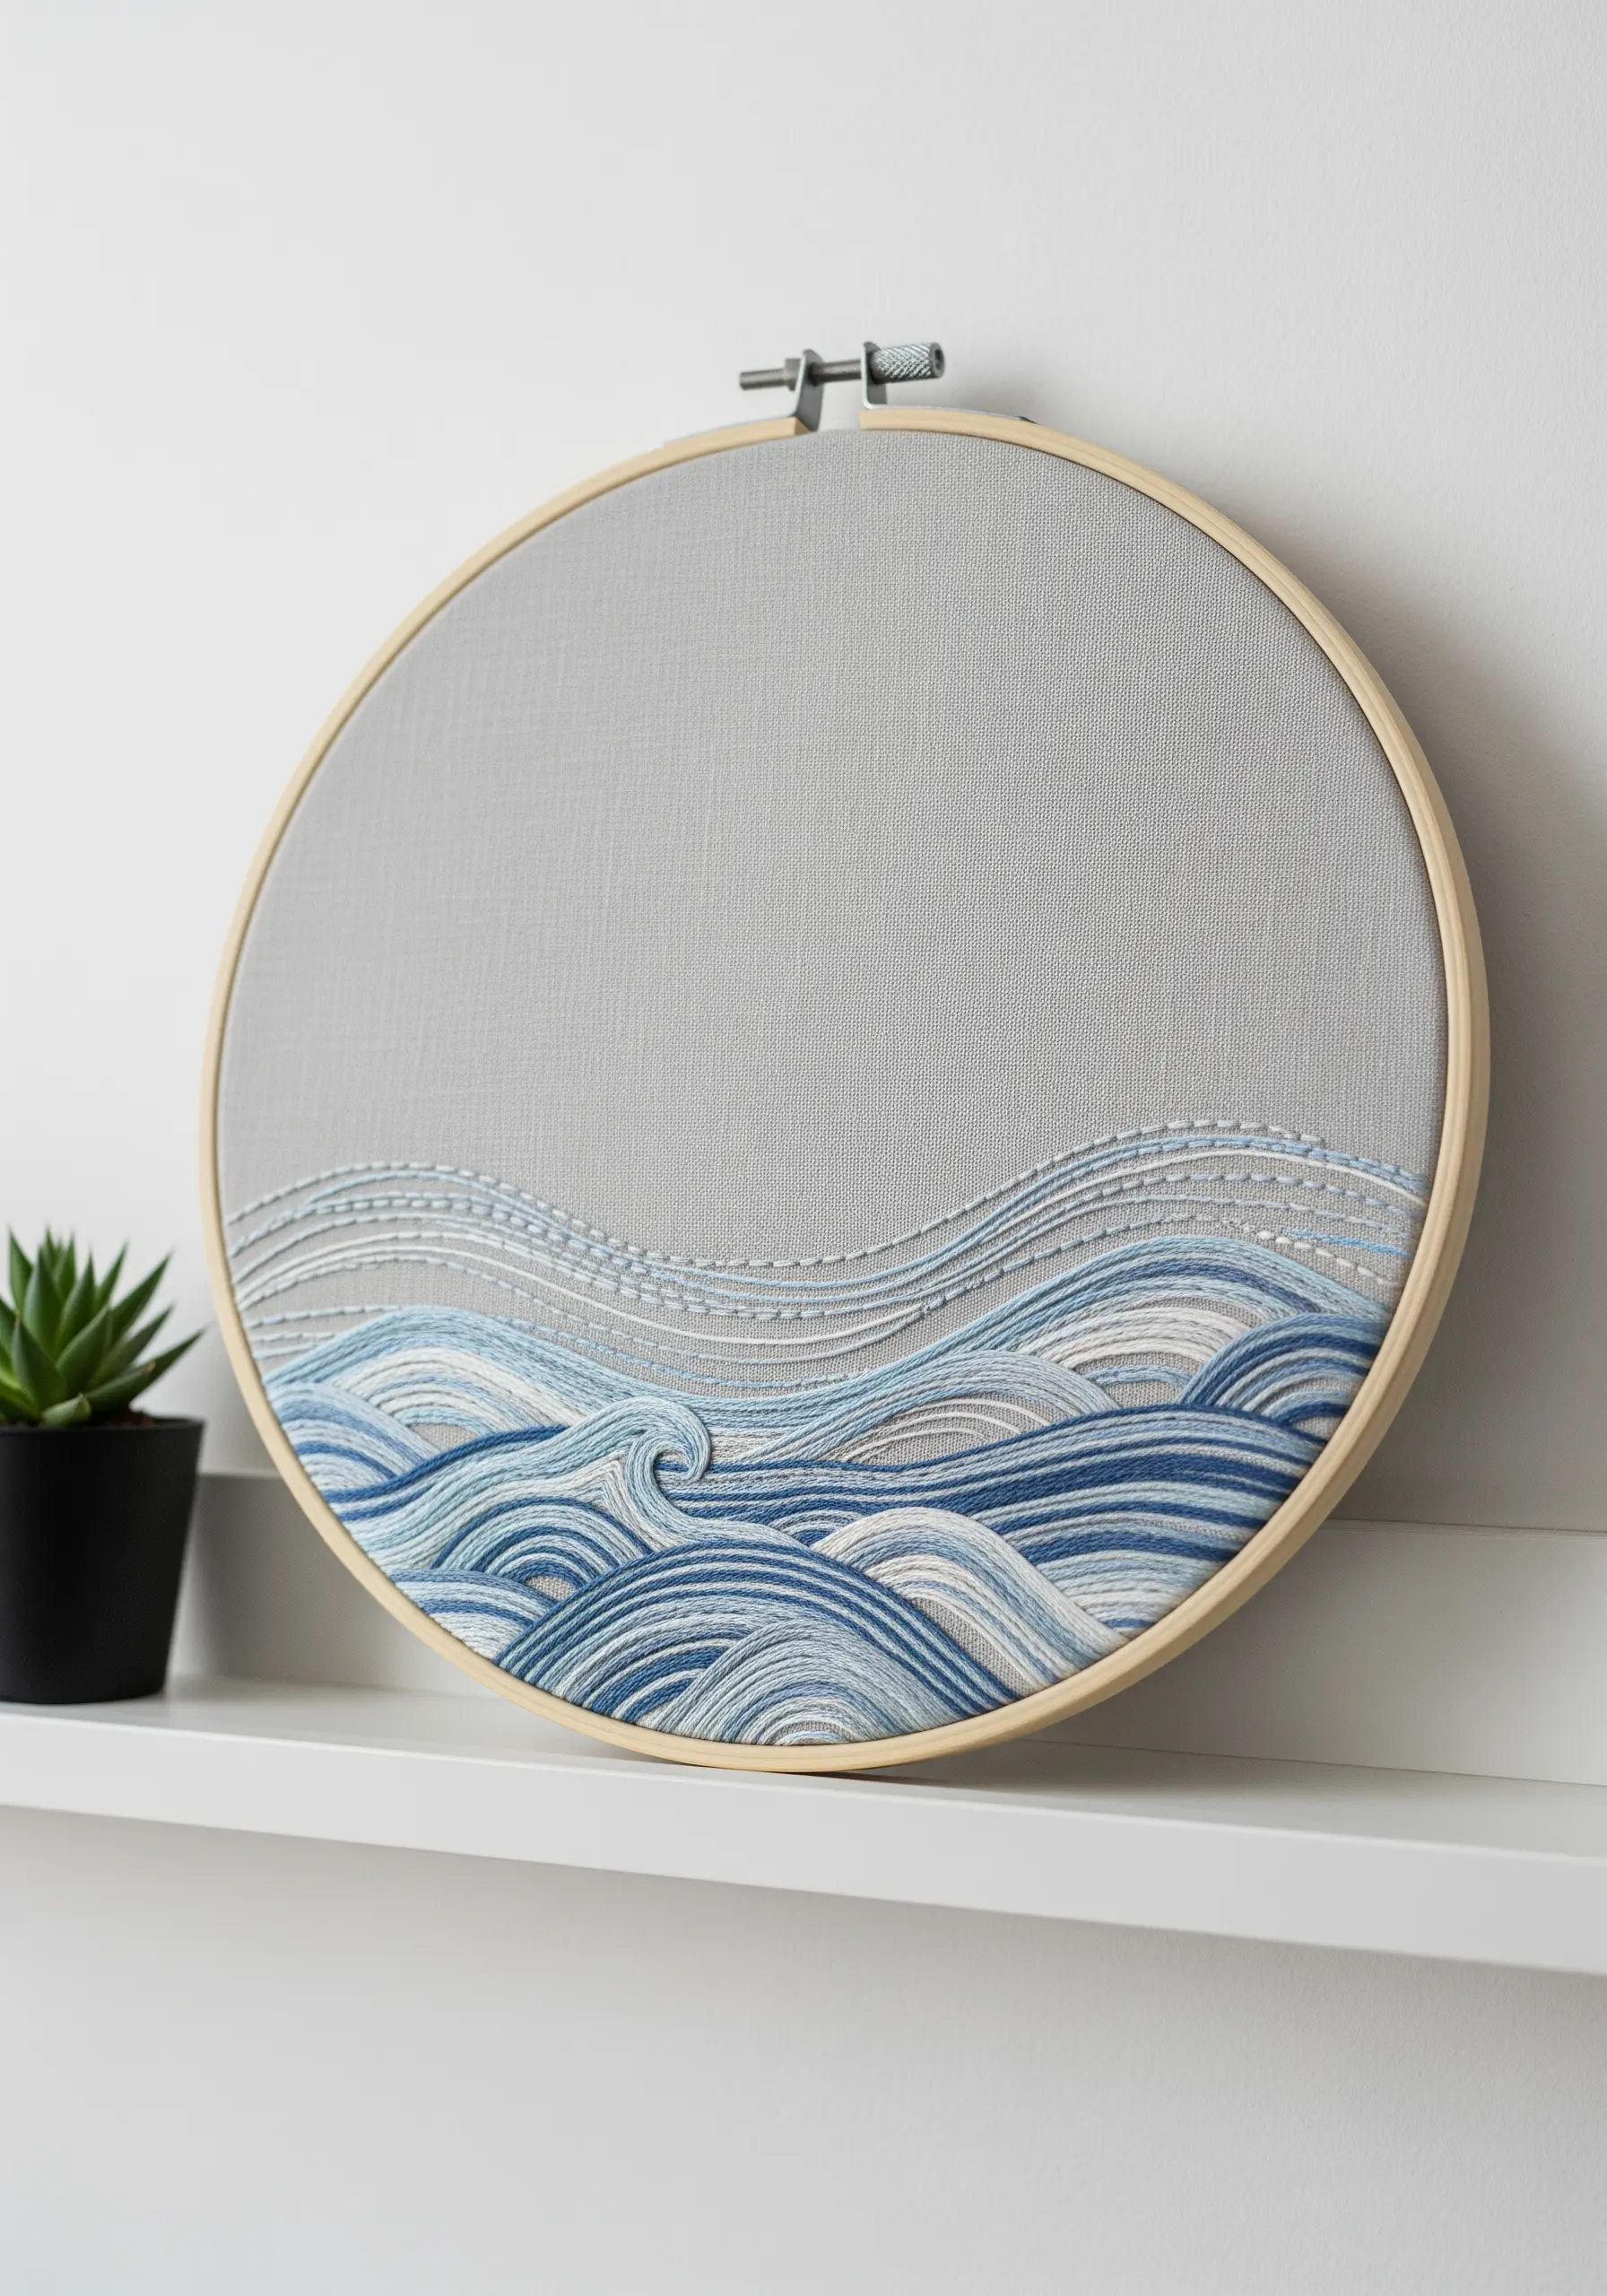
Mimic the rhythm of ocean waves by layering different stitches and thread weights.
Use a simple running stitch for the calmer, distant waves, and switch to a thicker whipped backstitch or chain stitch for the more prominent crests in the foreground.
Blend multiple shades of blue, grey, and white thread within the same wave to create a more natural, dynamic look that suggests light and shadow.
This is a wonderful way to practice abstract thread motions that feel both organic and controlled.
8. Compose a Sampler with a Single Color
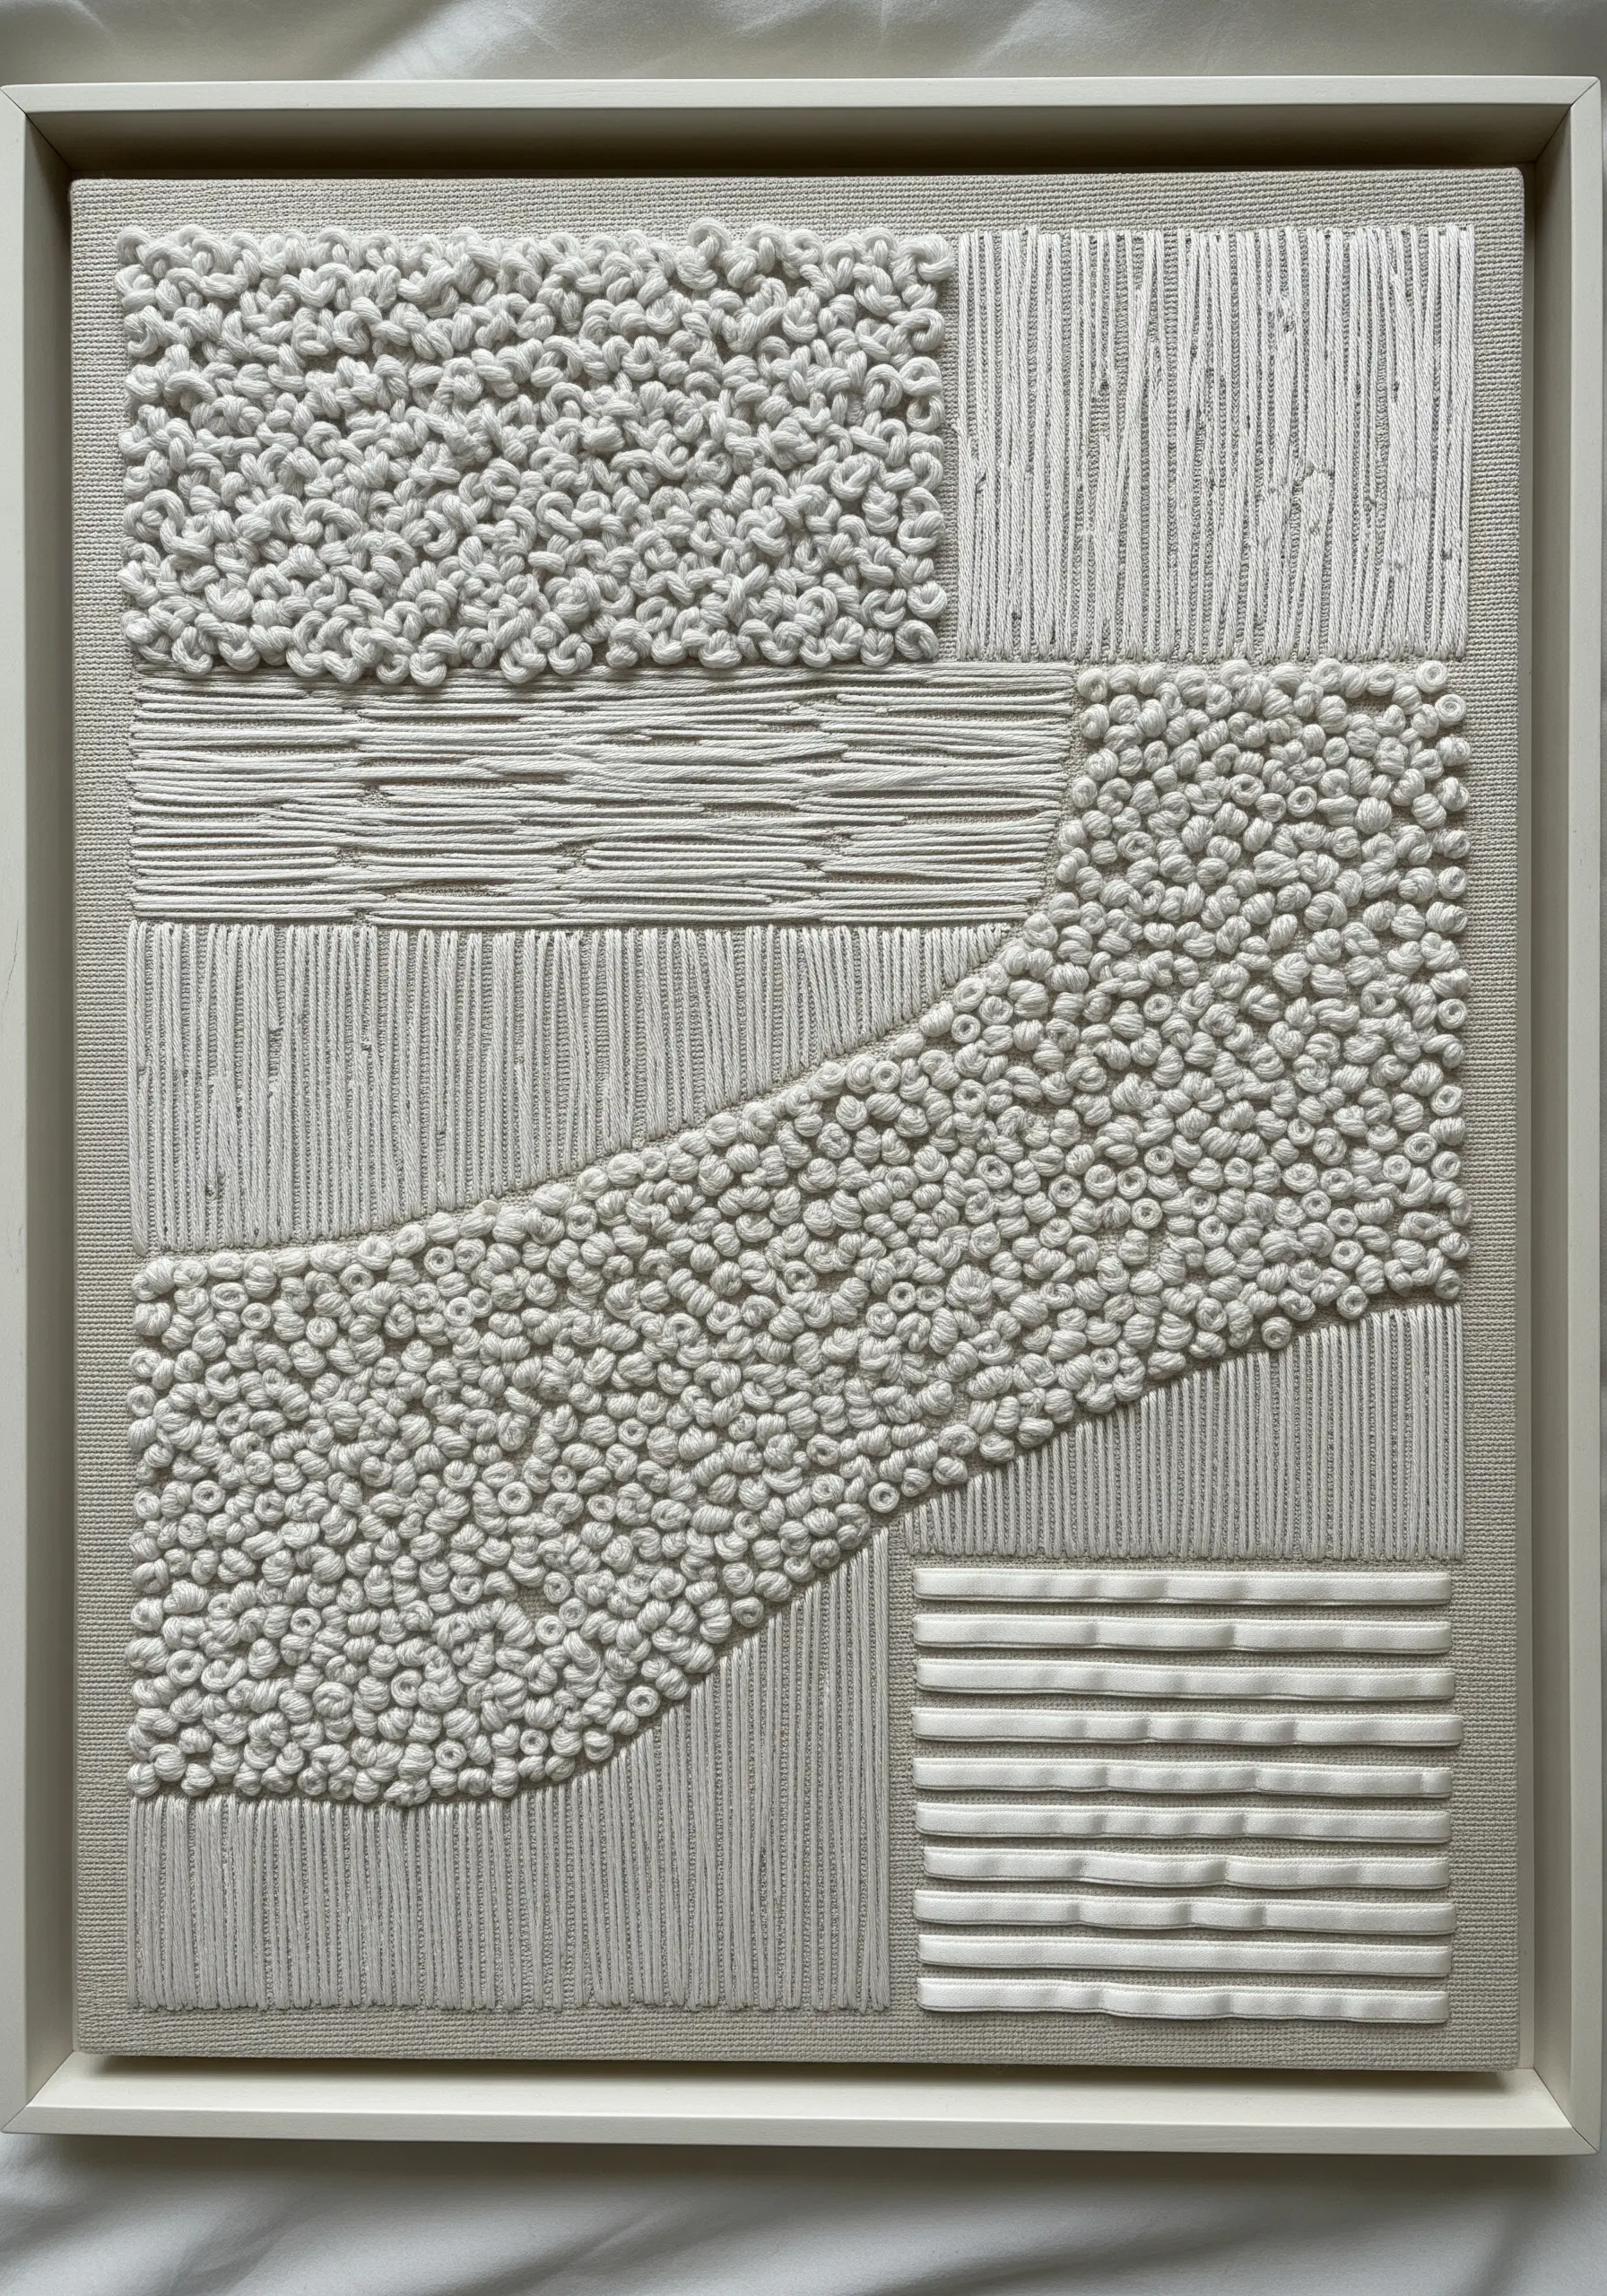
Challenge yourself to create a piece that focuses solely on texture by working in a monochromatic color palette.
Combine stitches with different dimensional qualities: plush French knots, smooth satin stitches, looped bullion knots, and linear couched threads.
Divide your canvas into distinct geometric sections to give the sampler a modern, organized structure.
This exercise sharpens your understanding of how different stitches interact and reflect light, a skill that elevates all future projects.
9. Create Radiating Lines with Metallic Thread
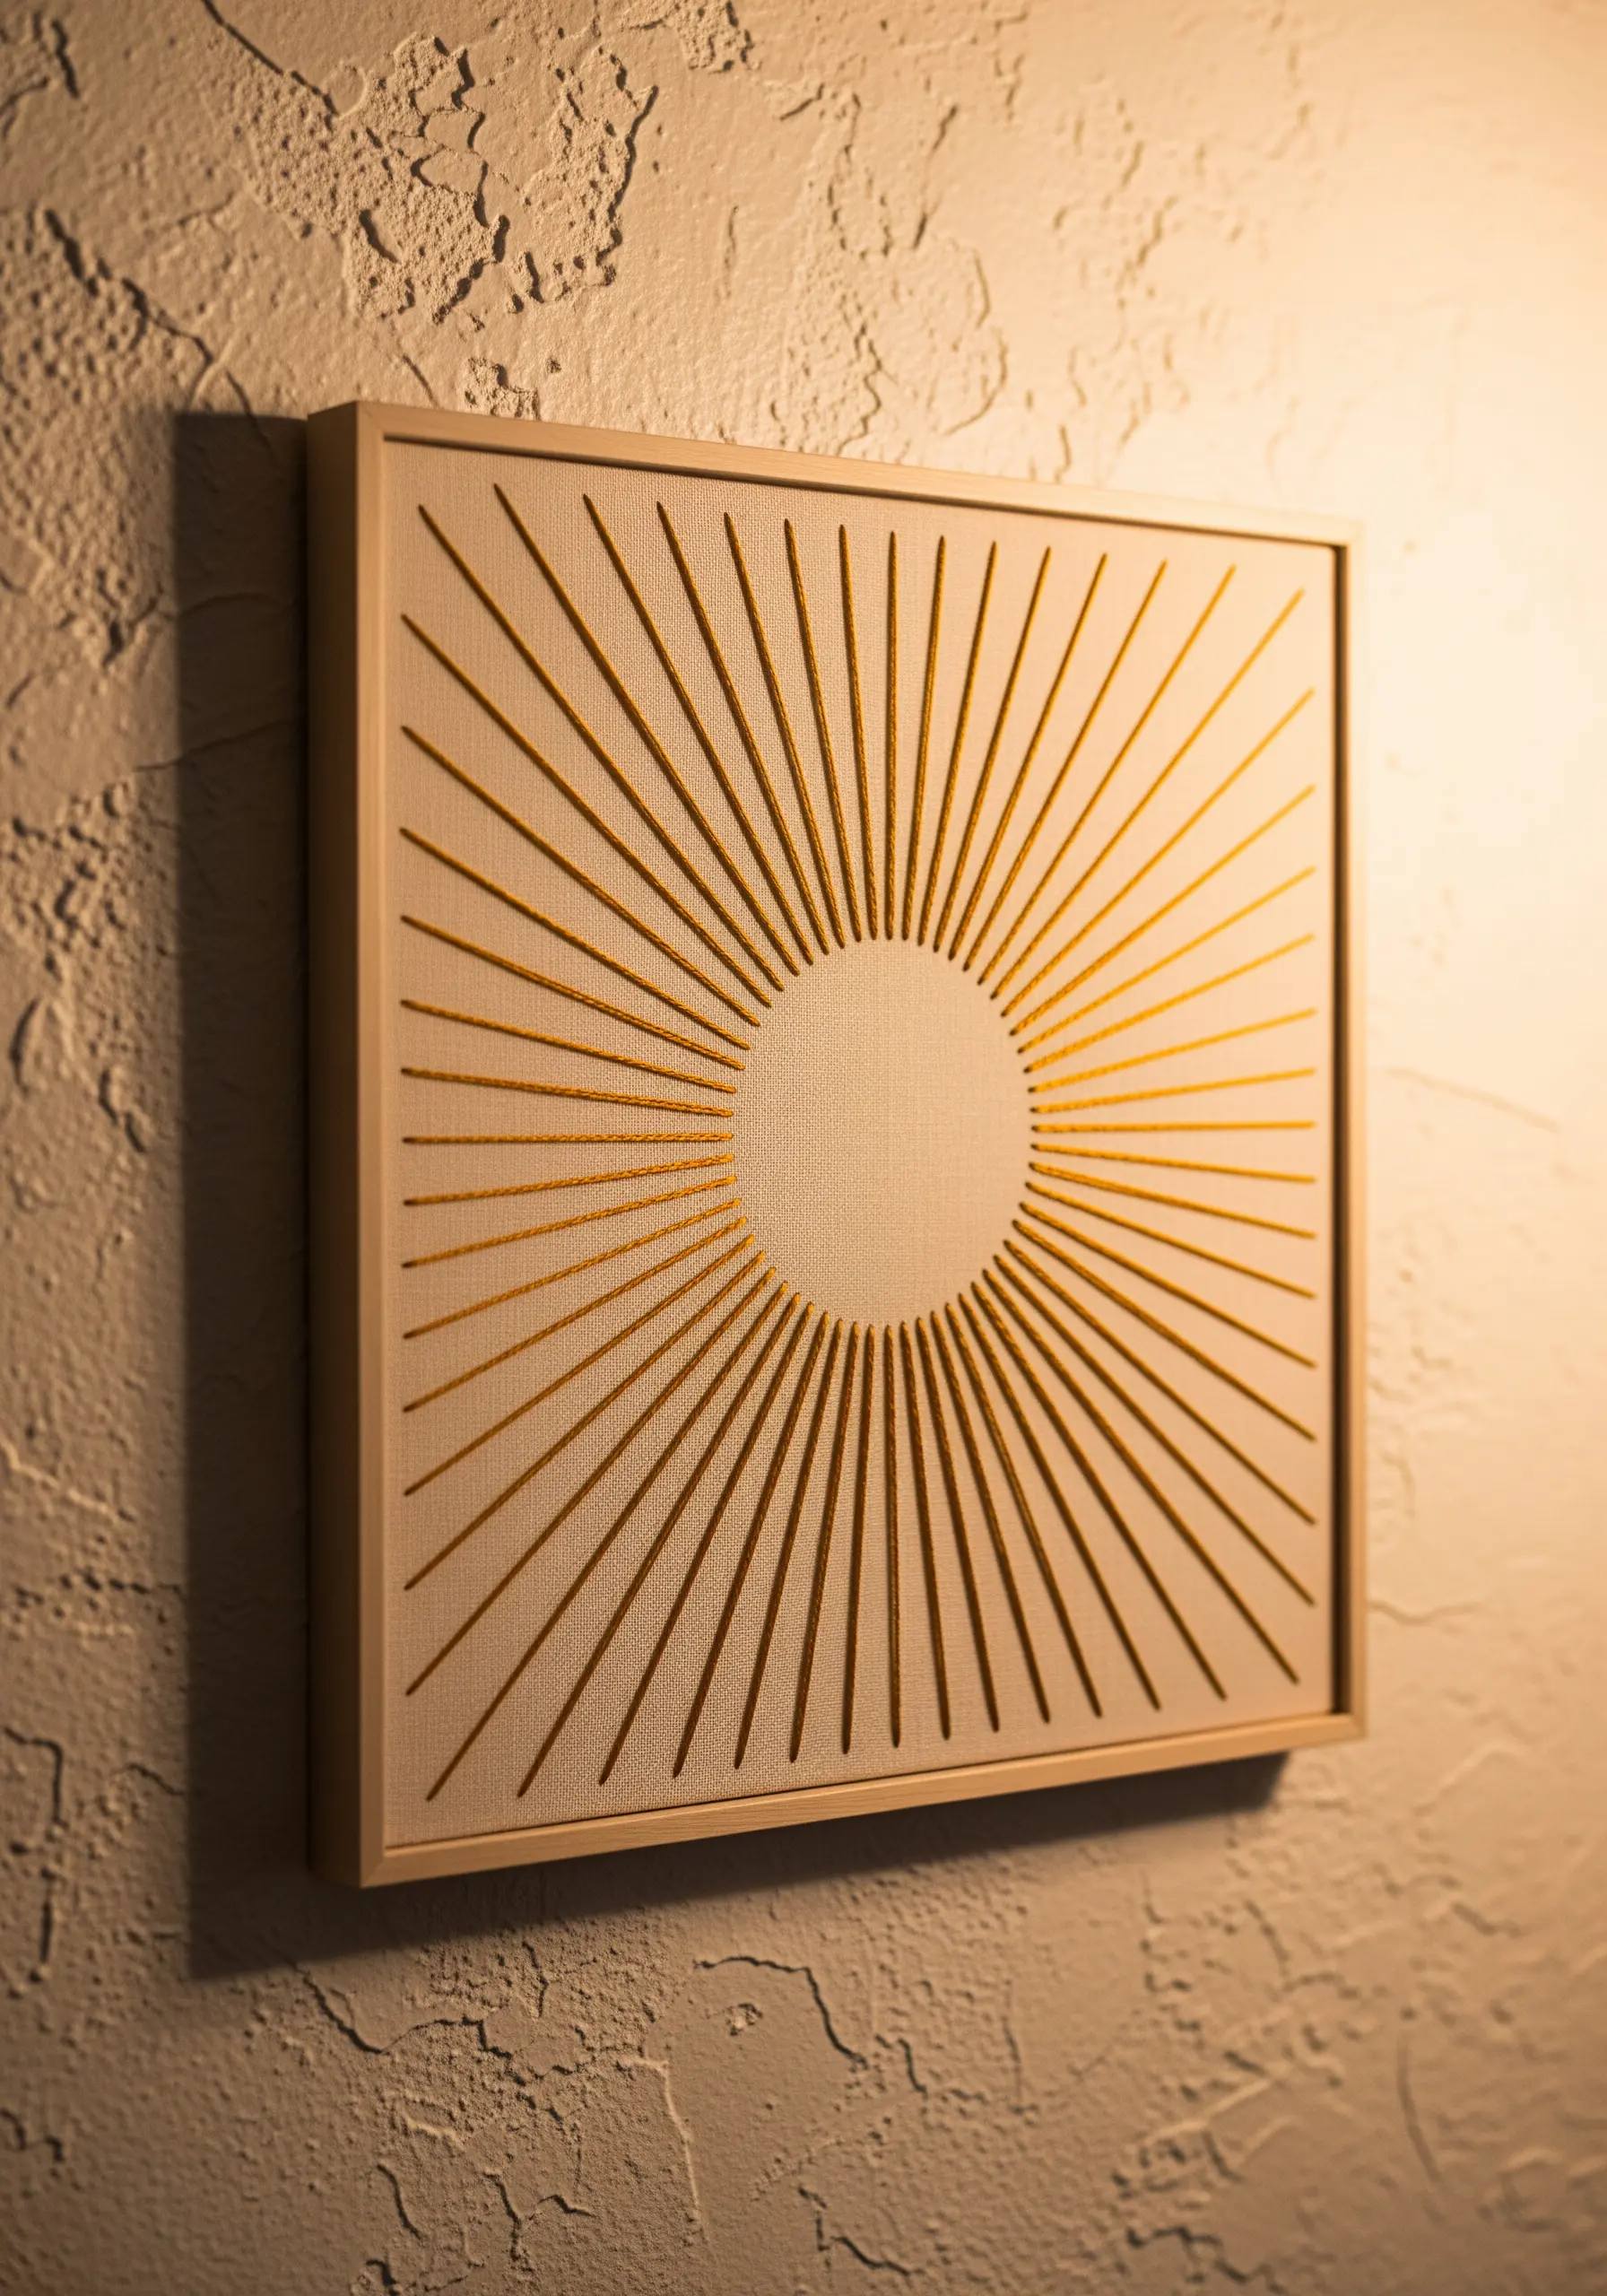
Achieve this luminous sunburst effect using straight stitches anchored at precise intervals around a central circle.
Work with a metallic or silk thread to introduce a subtle shimmer that catches the light beautifully, adding a touch of quiet luxury.
Use a disappearing ink pen to mark your stitch points before you begin, ensuring perfect symmetry and spacing.
Leaving the central circle as negative space gives the design a clean, modern focal point and allows the fabric’s texture to show through.
10. Design with Bold, Color-Blocked Shapes

For large-scale textile wall art, focus on the impact of bold, geometric shapes filled with simple, repetitive stitches.
Fill each block of color with uniform rows of running stitches or darning stitches, letting the texture itself become the art.
The direction of your stitches is critical—keep them consistent within each shape to create a clean, woven appearance.
Choose a heavyweight canvas or linen that can support the density of the stitching without sagging when hung.
11. Isolate a Single Motif for Graphic Impact
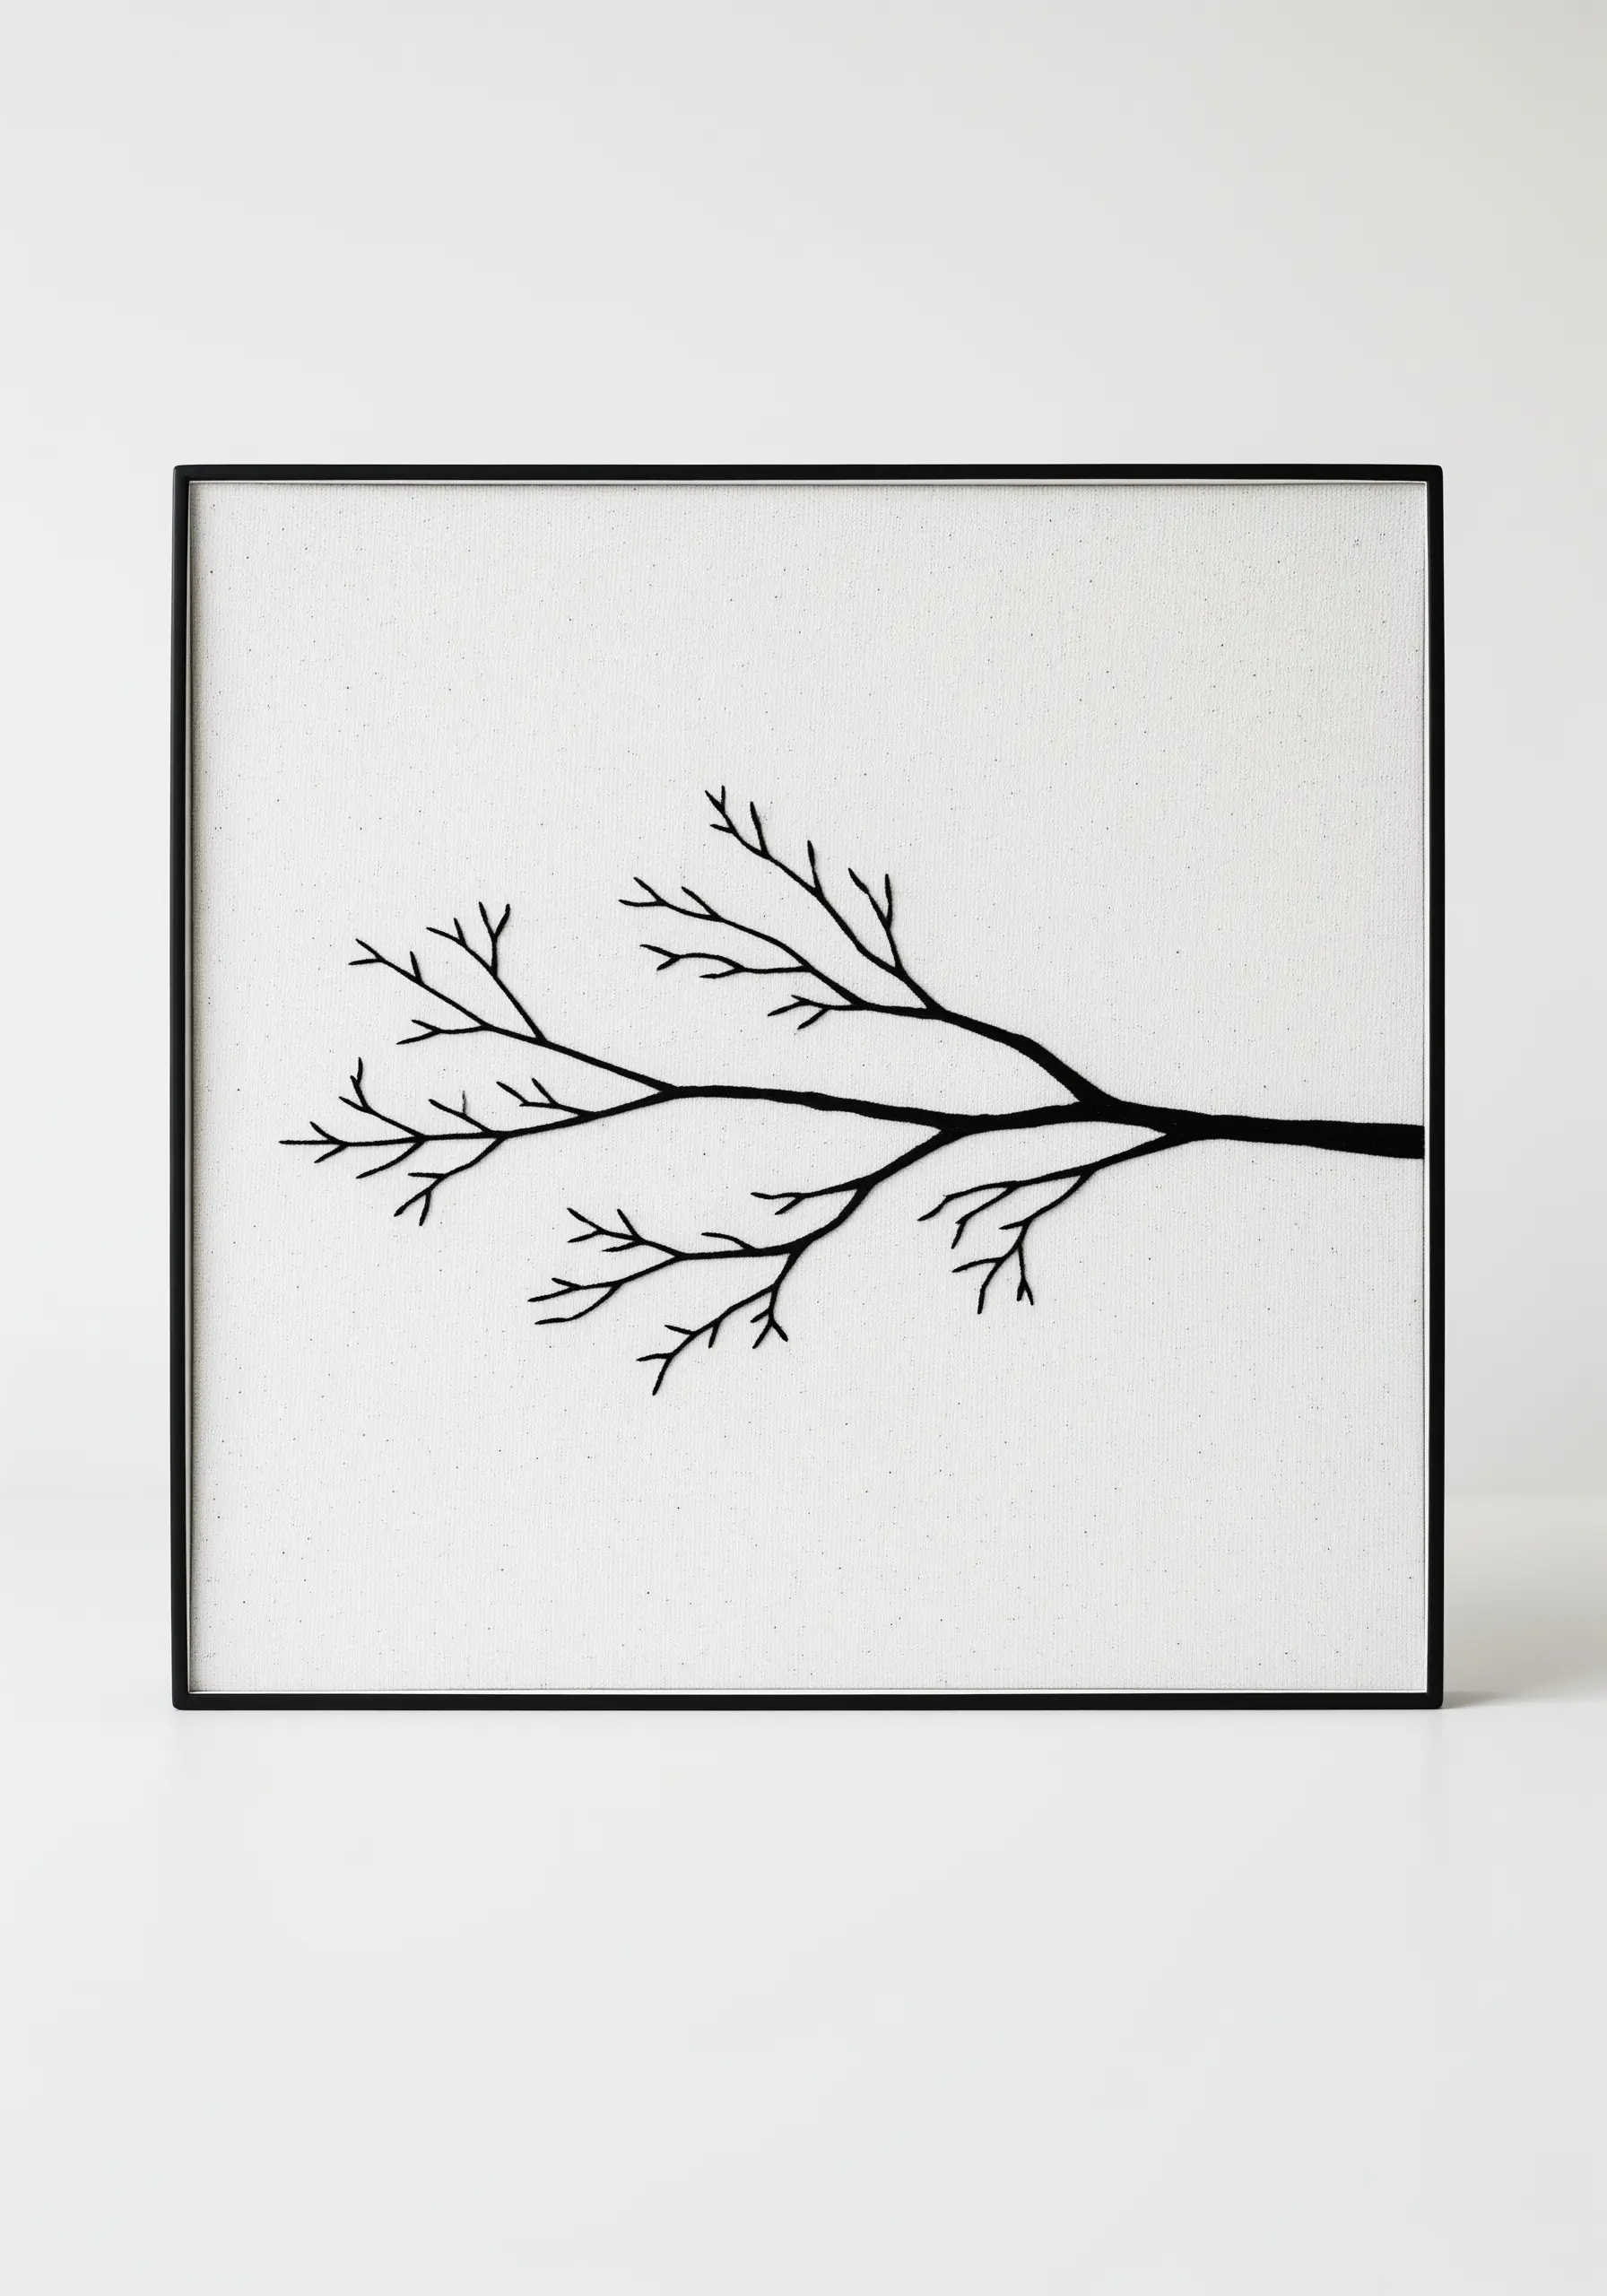
Create a powerful focal point by isolating a single, delicate motif against a clean background.
A bare tree branch is an excellent subject for this, allowing you to focus on the elegant, organic lines without distraction.
Use a stem stitch for the main branches to give them thickness and a split stitch for the finer twigs to maintain their delicate appearance.
Framing the piece with significant white space around the motif enhances its minimalist aesthetic and draws the viewer’s eye inward.
12. Translate Architectural Lines into Thread
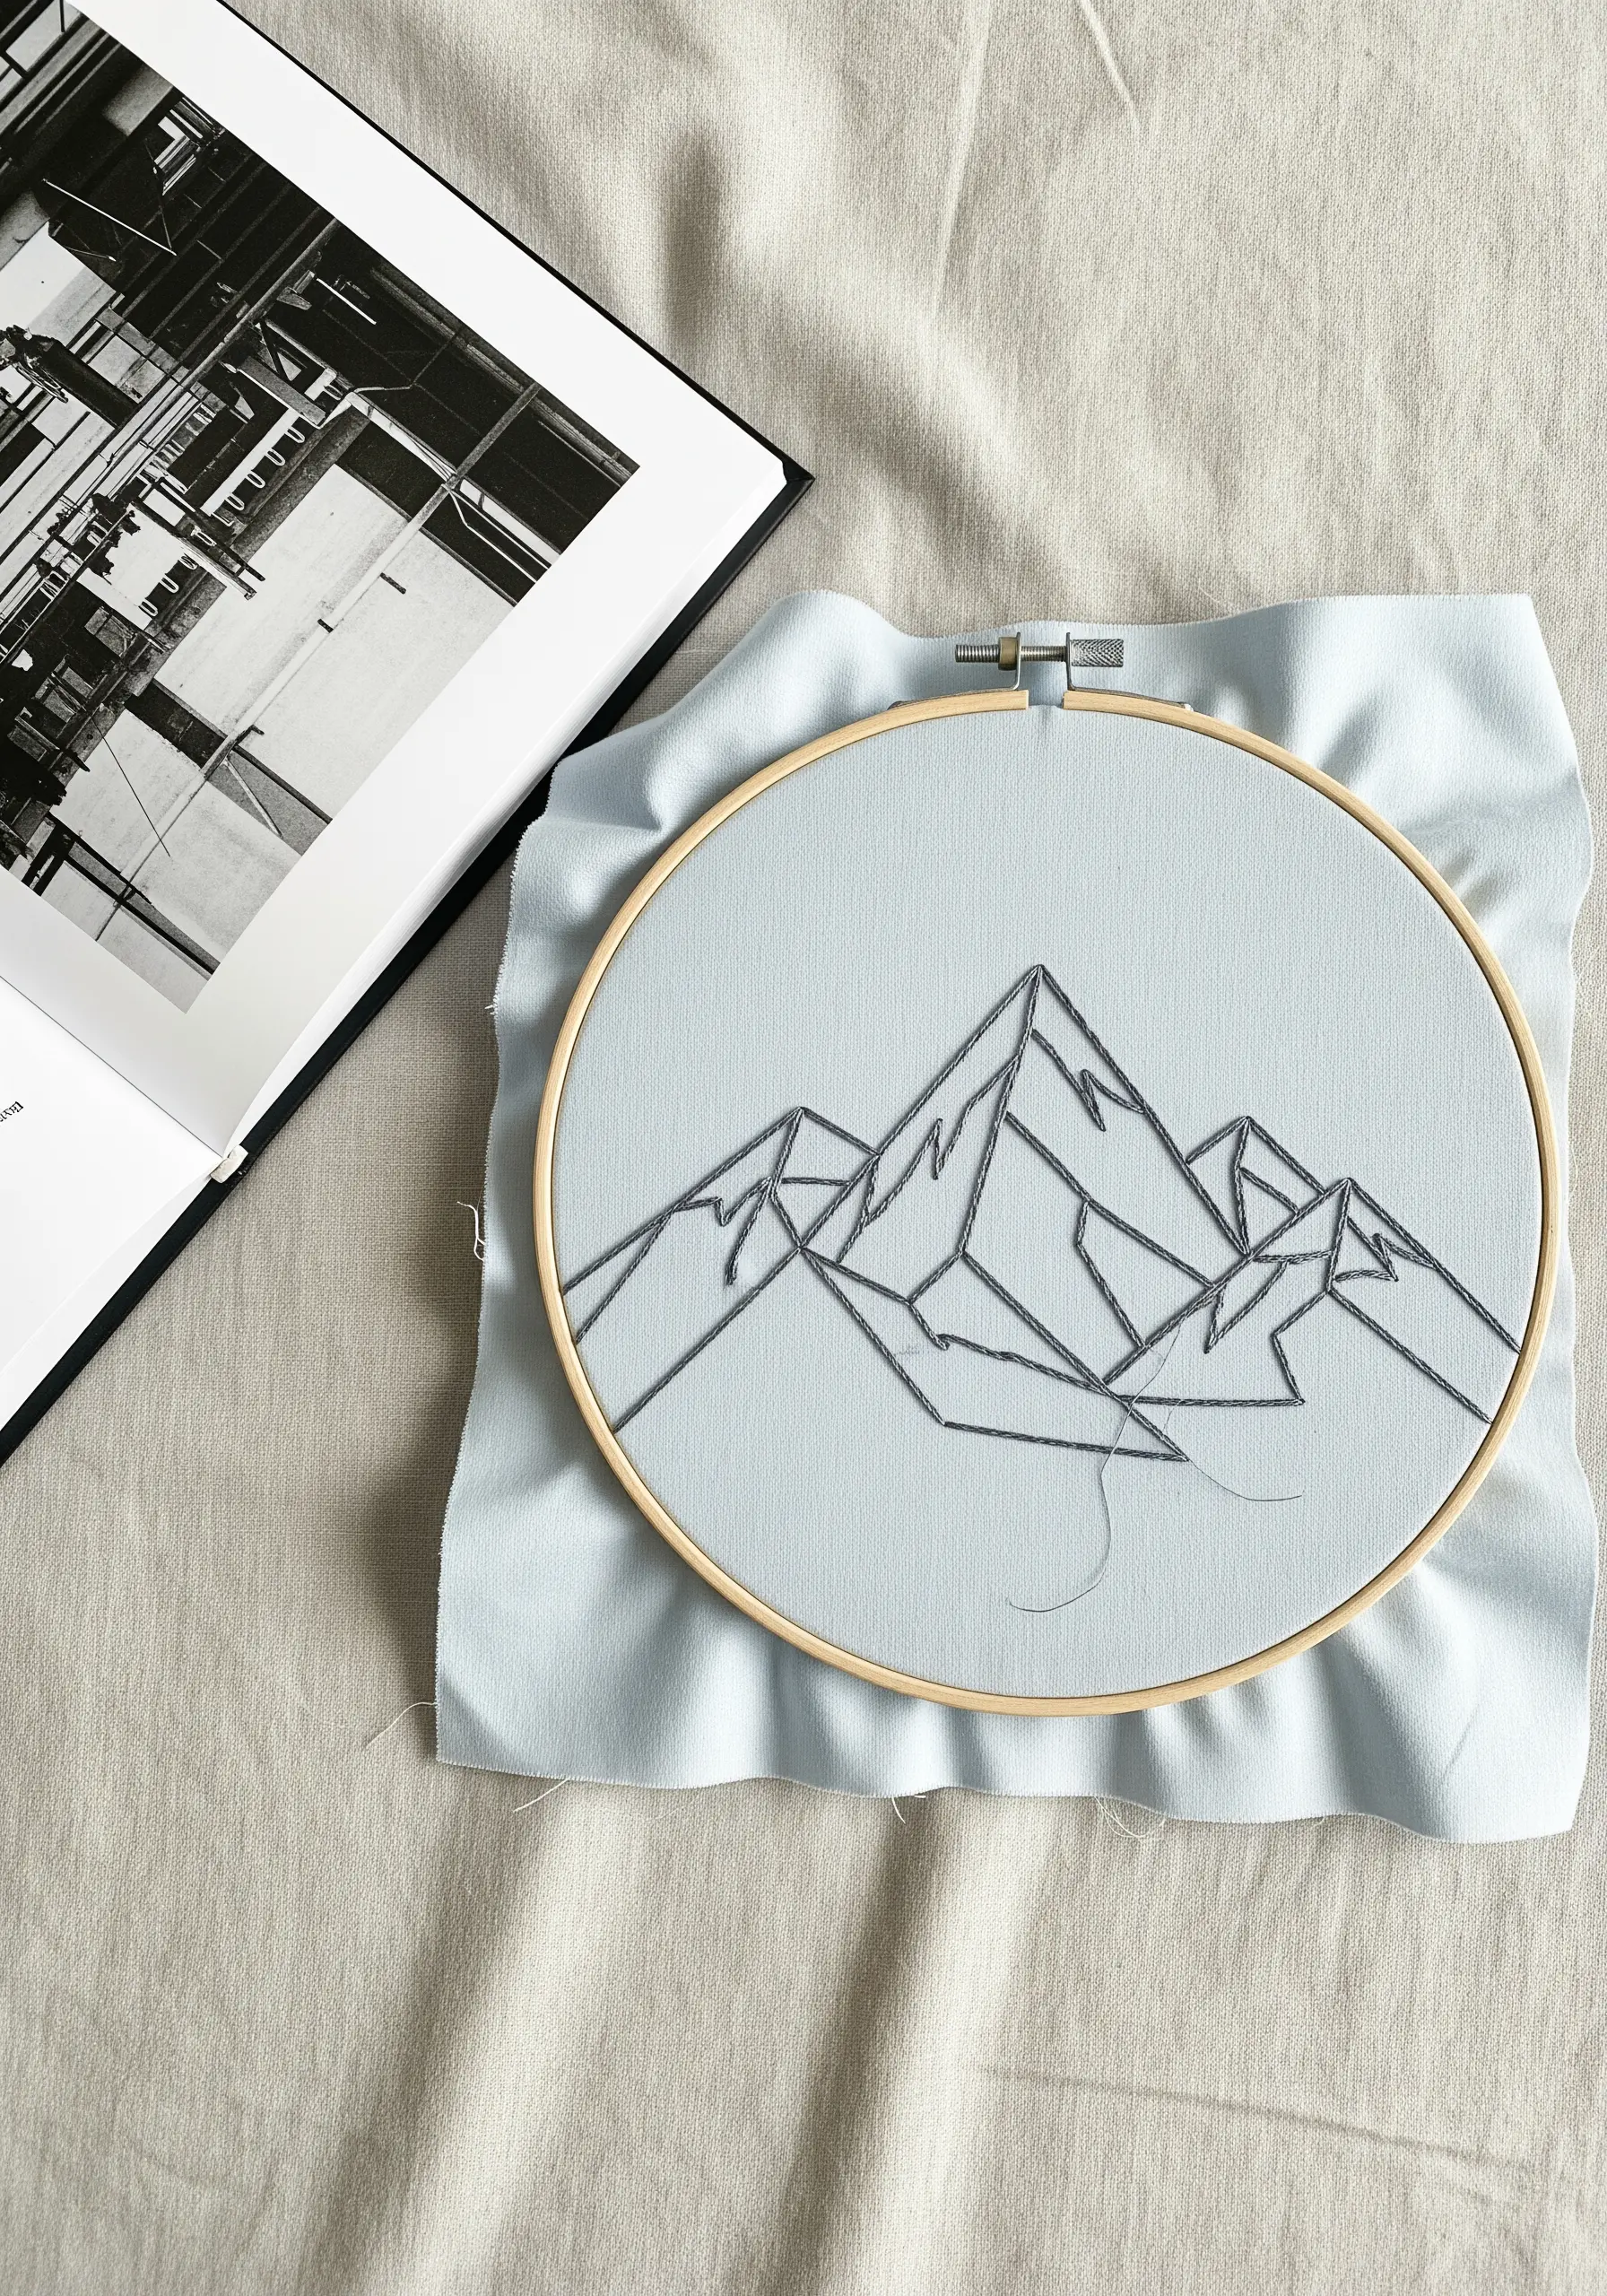
Use photographs of architecture or mountain ranges as inspiration for clean, geometric line art.
Trace the most dominant lines of your source image to create a simplified, abstract design that captures the essence of the structure.
A simple backstitch using three to four strands of floss provides a strong, clear line that defines the shapes effectively.
Stitching on a colored fabric, like this muted blue, adds a layer of depth and atmosphere that complements the starkness of the lines.
13. Add Hypnotic Detail with Spiral Stitching
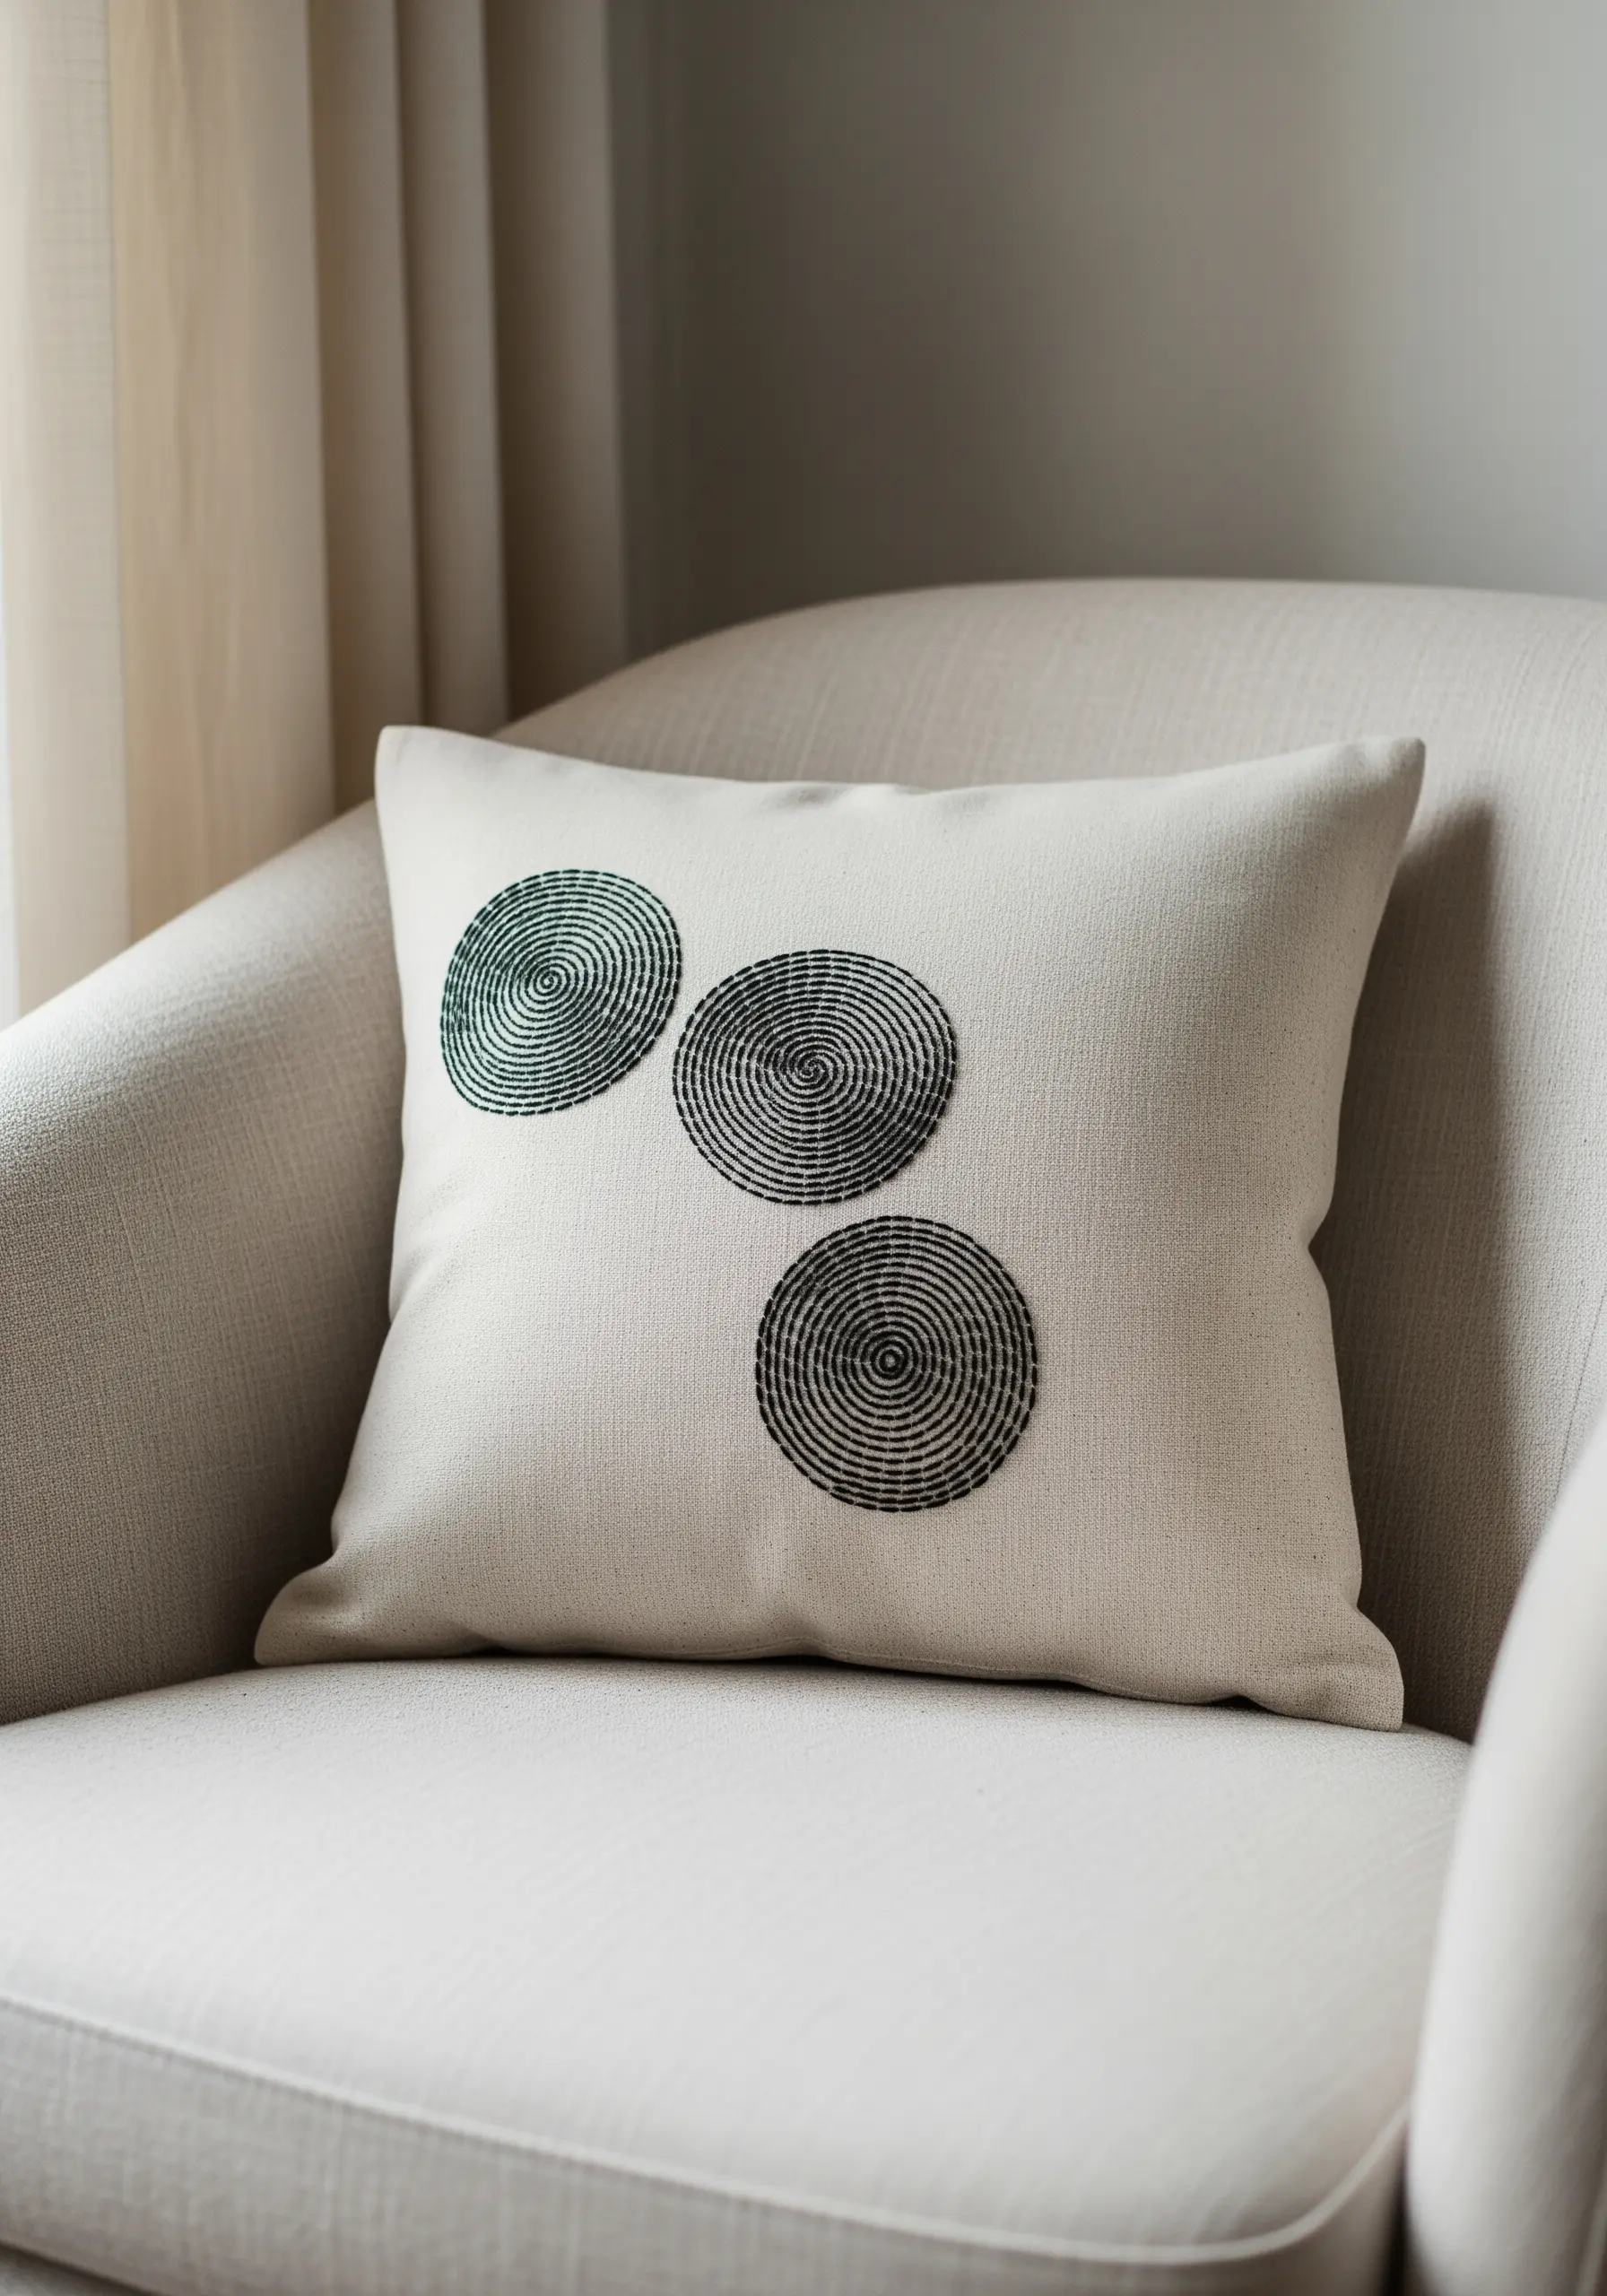
Create these mesmerizing concentric circles using a continuous spiral of backstitches or running stitches.
To keep the spiral even, lightly draw a guide on your fabric with a water-soluble pen before you begin stitching.
This technique adds a sophisticated, graphic element to home décor items like pillows or cushions.
Using a thread that contrasts sharply with the fabric makes the pattern pop and emphasizes the precision of your stitch work.
14. Transform Your Wall with a Soundwave Sculpture
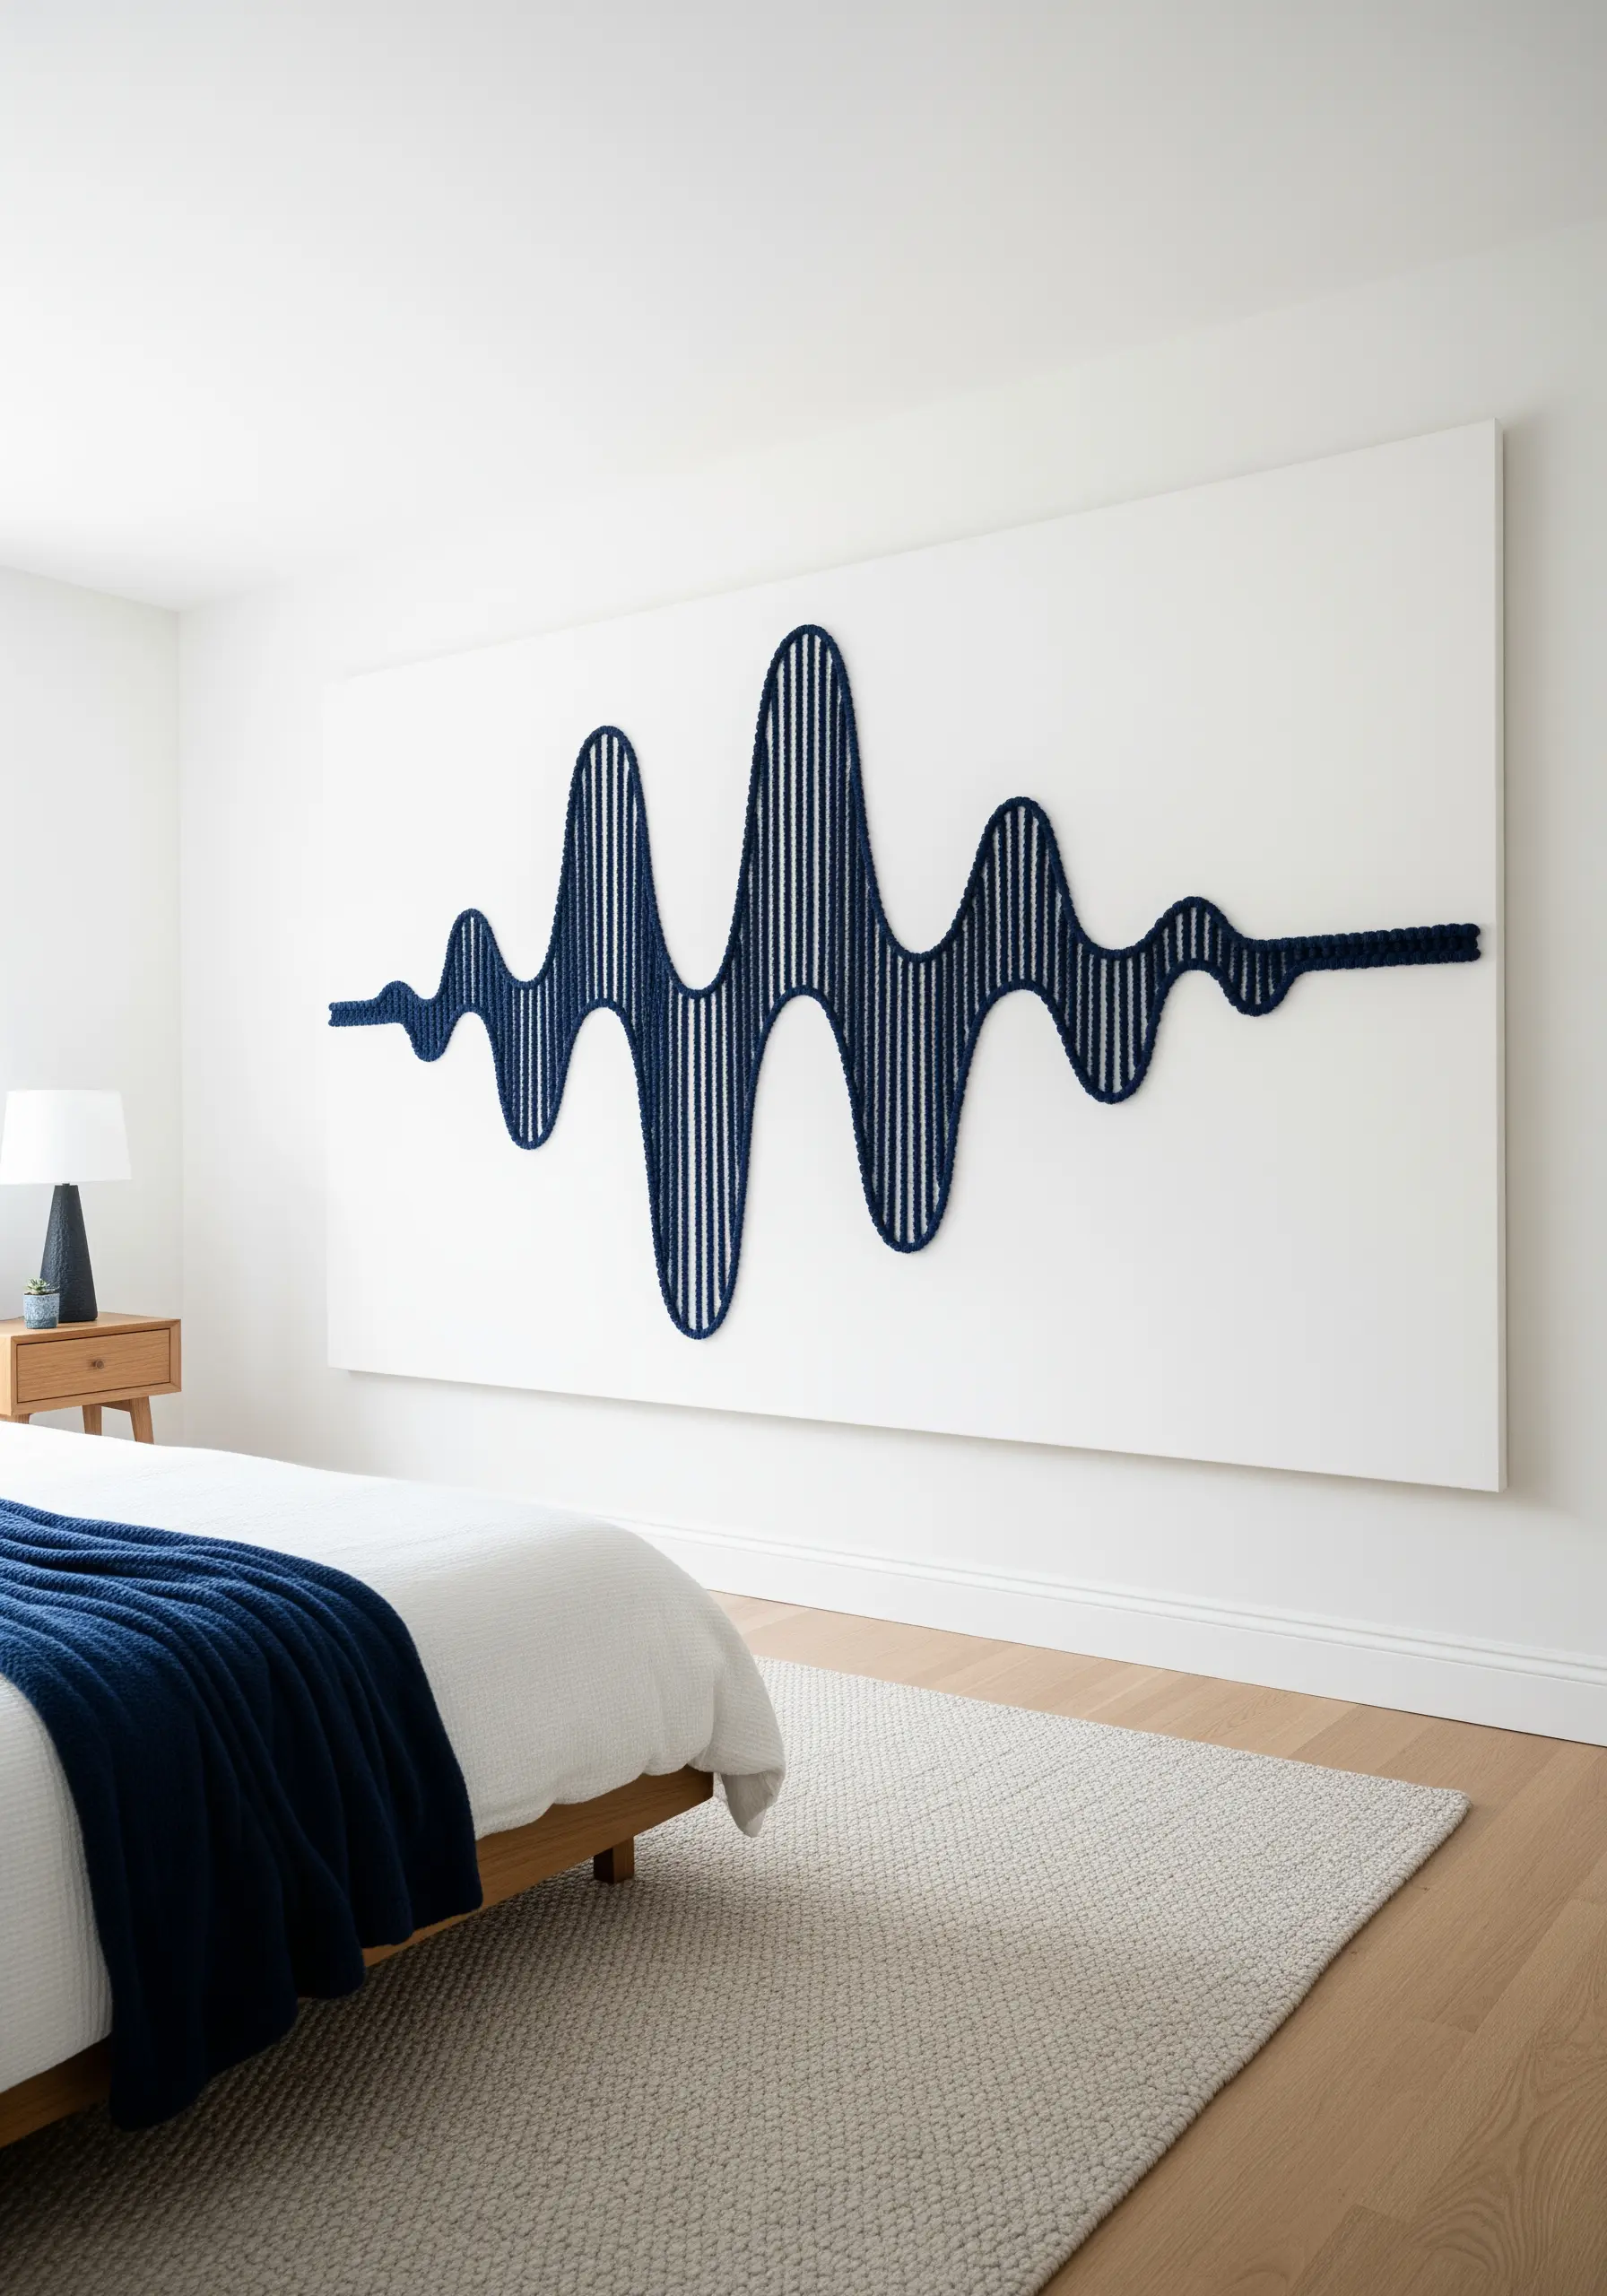
For a truly personal and modern statement piece, translate a meaningful soundwave—like a voice or a song—into a large-scale fiber art installation.
This is created by wrapping yarn or thick cord vertically around a custom-cut wooden base.
The contrast between the soft texture of the yarn and the sharp silhouette of the waveform creates a stunning visual tension.
This technique scales beautifully, making it an ideal choice for a focal point above a bed or sofa.
15. Construct Geometric Forms with String Art
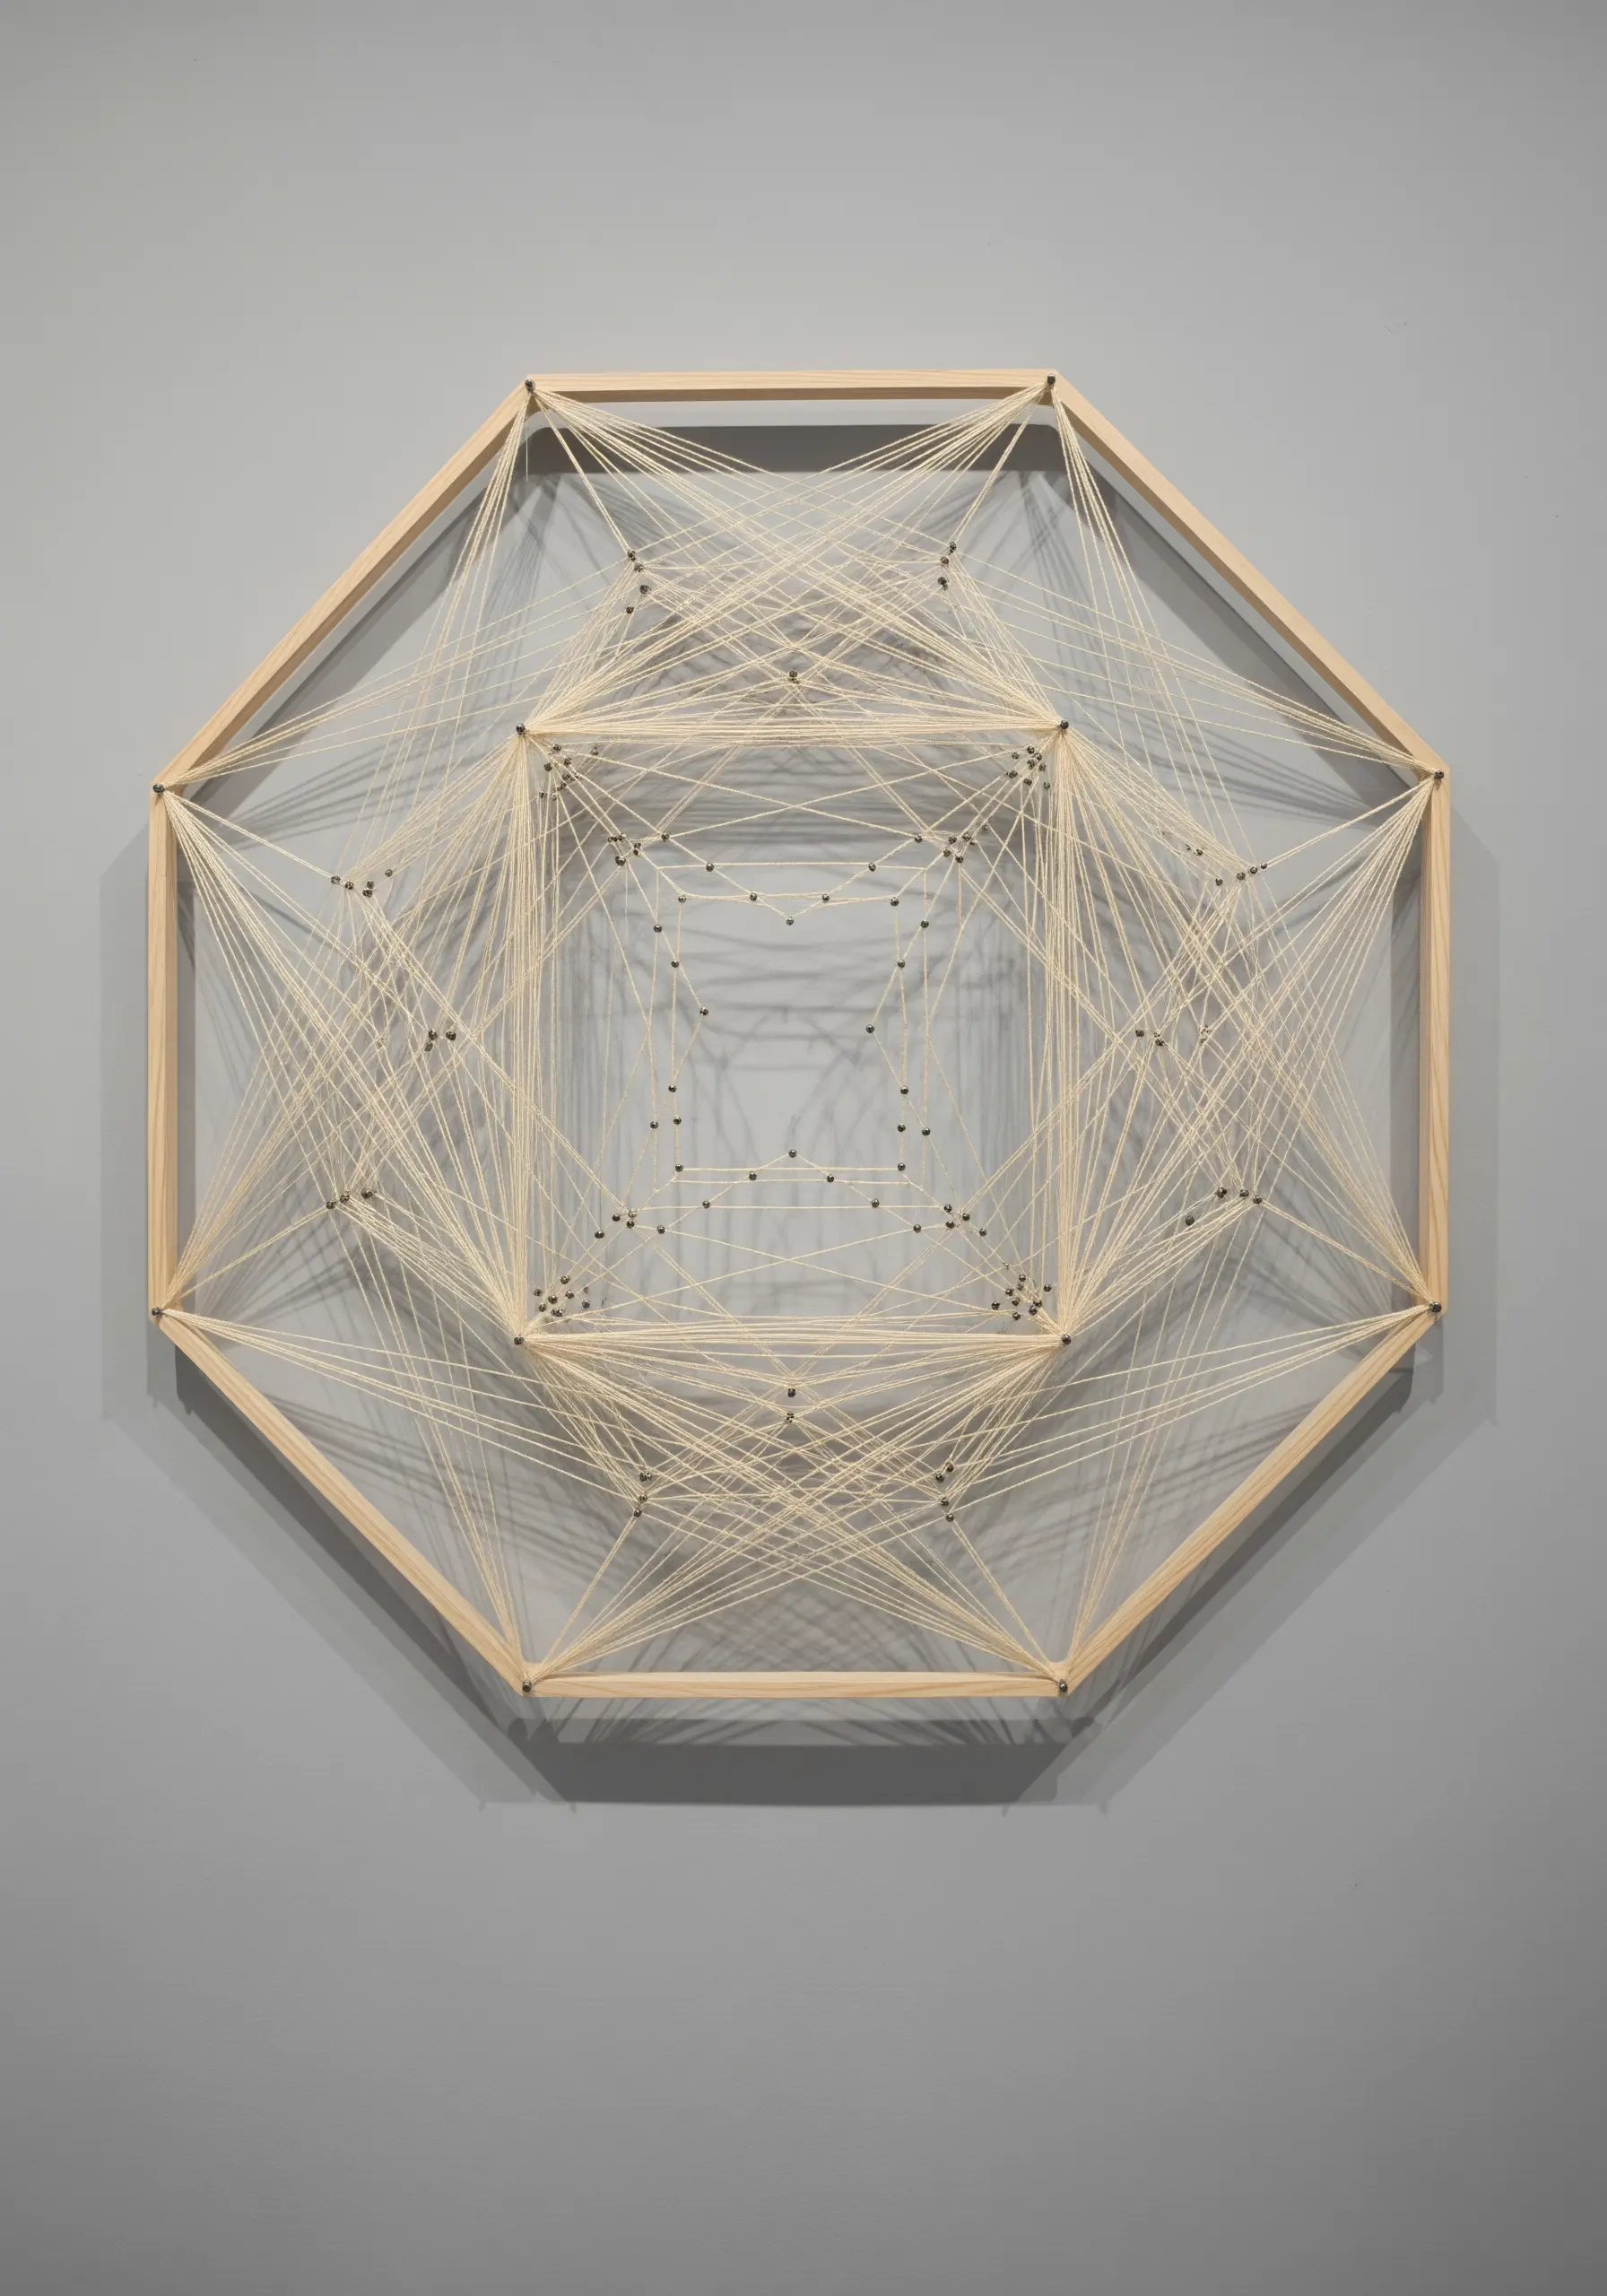
Explore the mathematical beauty of string art by creating designs on a wooden frame with nails or pins.
The technique involves stretching thread or fine string in straight lines between anchor points to form intricate, layered geometric patterns and curves.
The negative space in the center is just as important as the threaded areas, creating a sense of lightness and transparency.
This method is a fantastic way to understand how straight lines can generate complex shapes, a principle you can apply to your fabric embroidery.
16. Map the Stars with Stitched Constellations
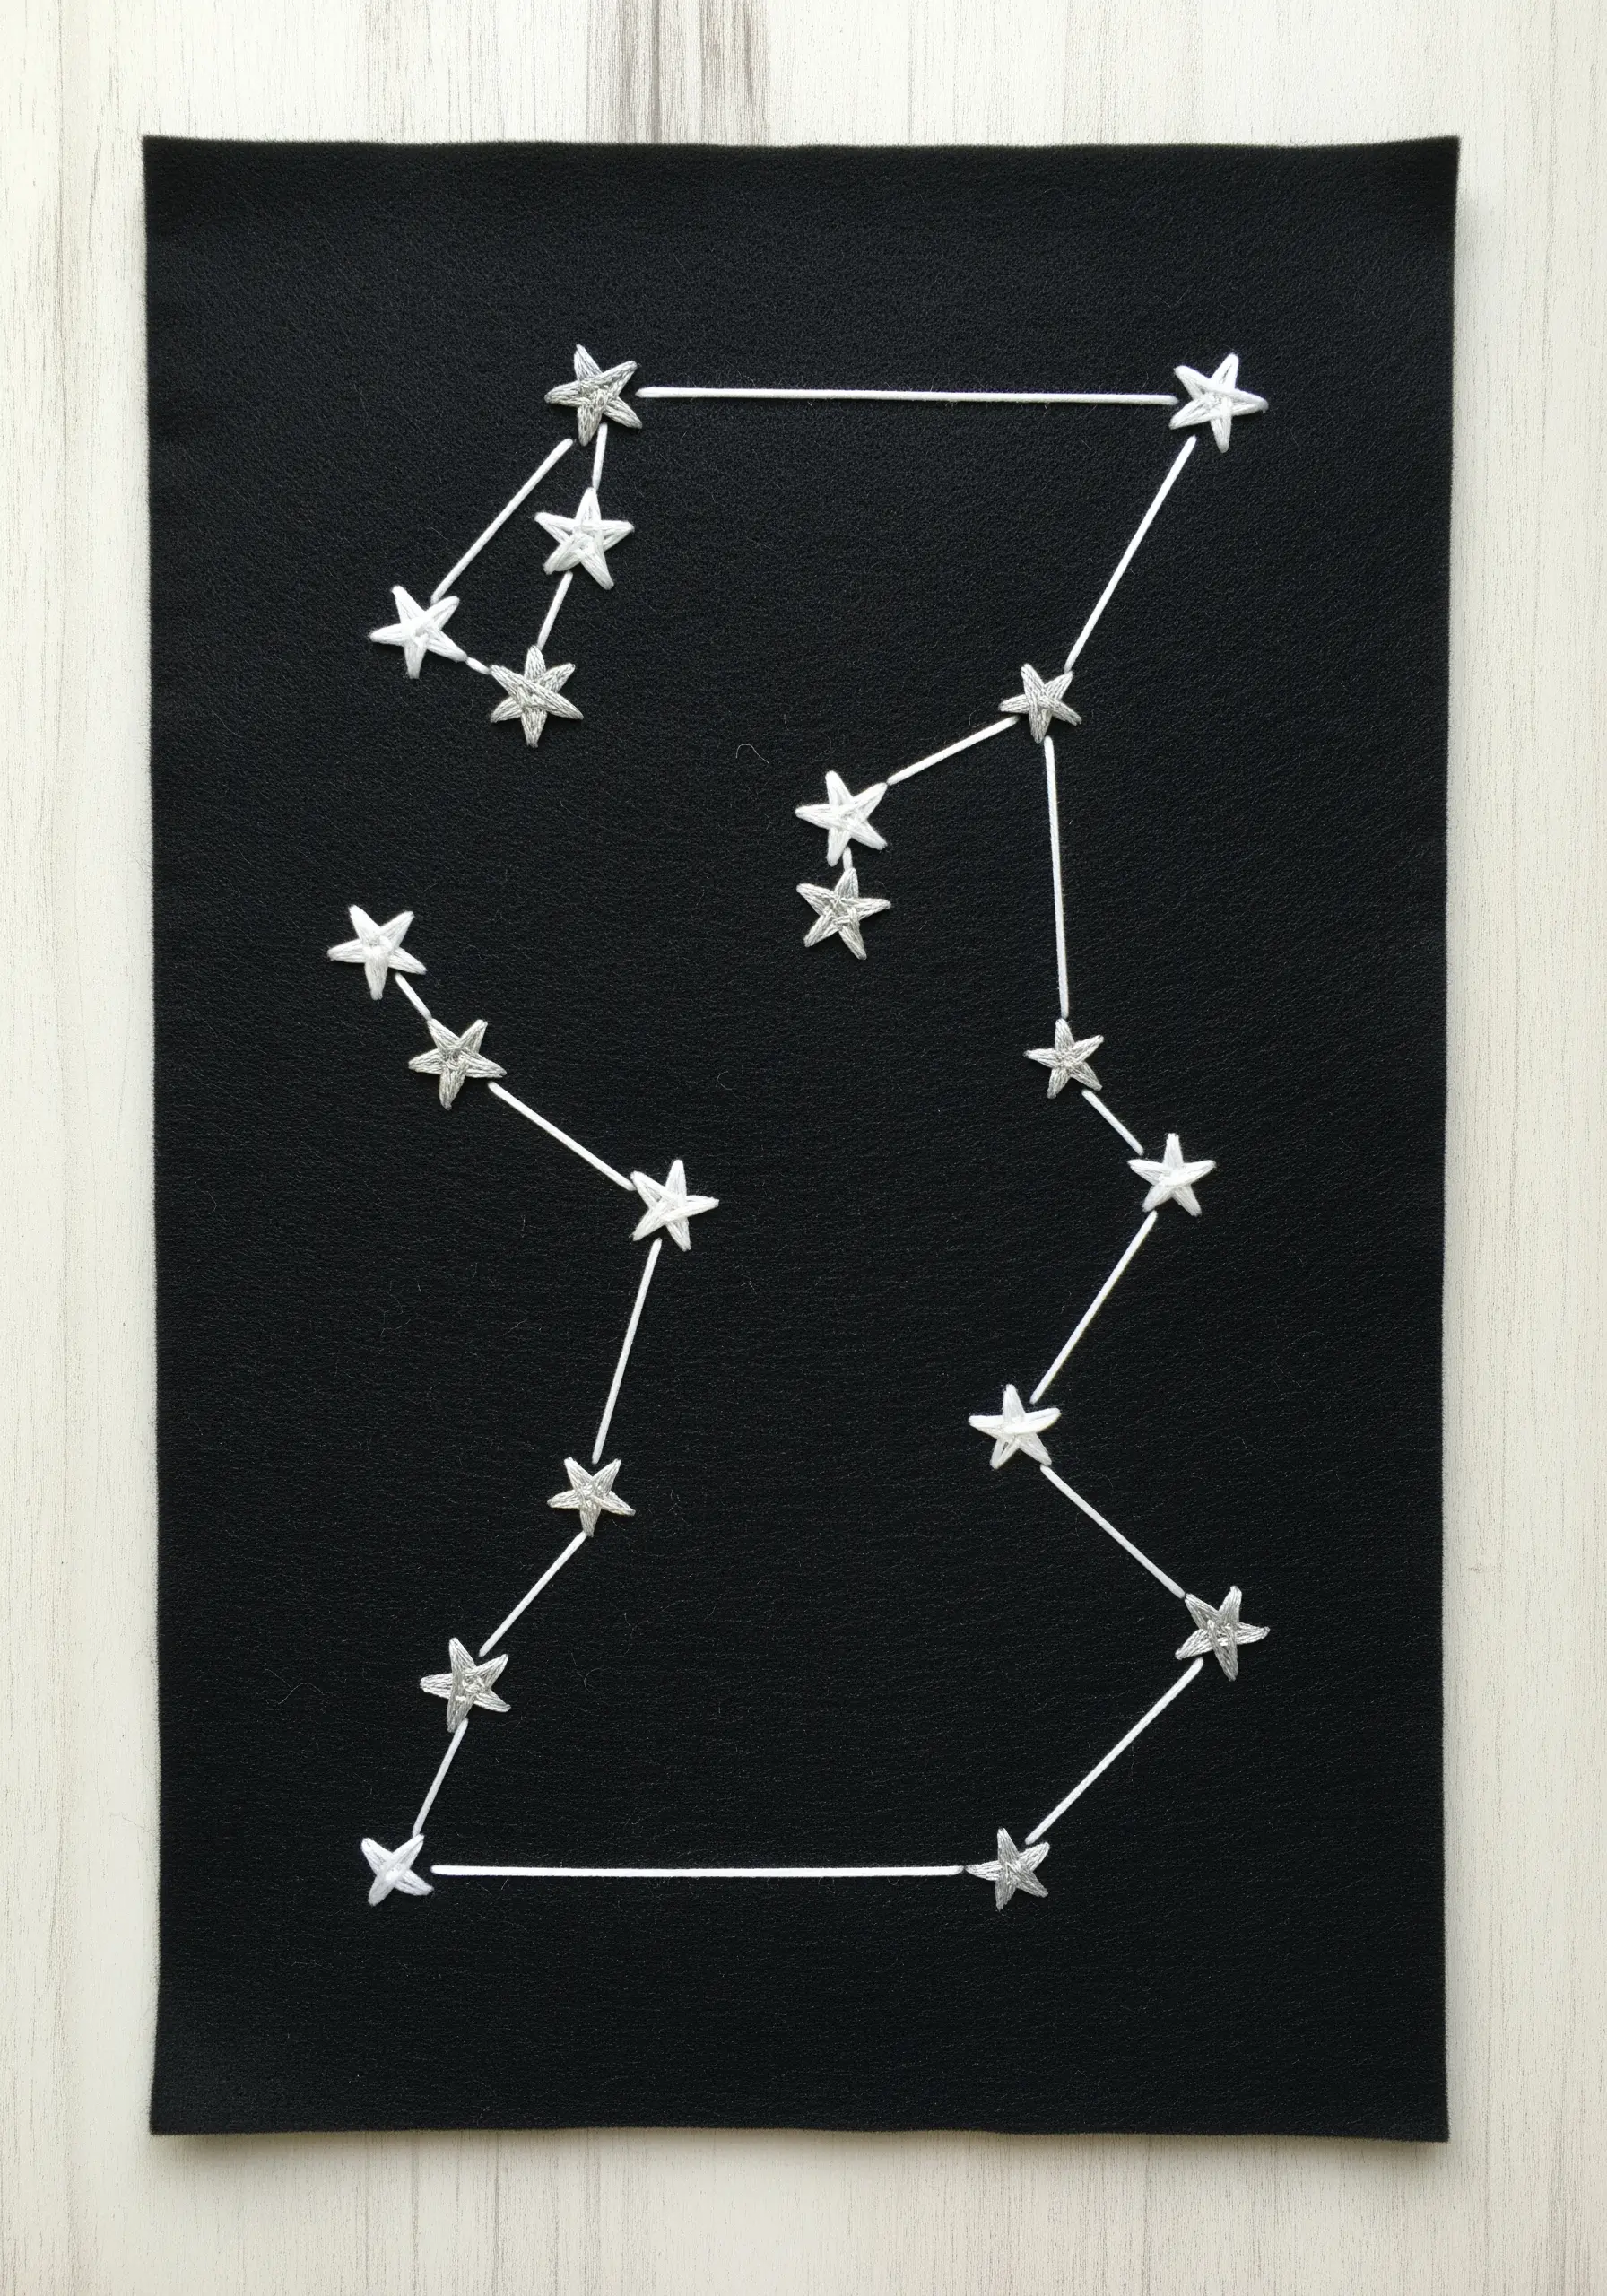
Stitch a personal star map on a piece of dark felt or heavy canvas for a celestial touch.
Use a metallic silver thread for the stars to give them a subtle sparkle against the deep black background.
Create the stars themselves with a simple star stitch or a cluster of three small straight stitches for a more abstract look.
Connect them with a single, clean line of backstitch to delineate the constellation, keeping the focus on the graphic shape.
17. Sculpt Soft Textures with Wool Roving

Create dreamy, three-dimensional shapes by using unspun wool roving instead of traditional thread.
You can achieve this effect by couching—tacking down the thick roving with a finer, matching thread—or by needle-felting it directly onto the base fabric.
Stretching sheer organza or tulle in your hoop provides a nearly invisible background, making your fluffy creation appear to float in mid-air.
This technique from fiber art installations adds incredible softness and dimension, perfect for a serene bedroom.
18. Embrace Asymmetry in Minimalist Designs
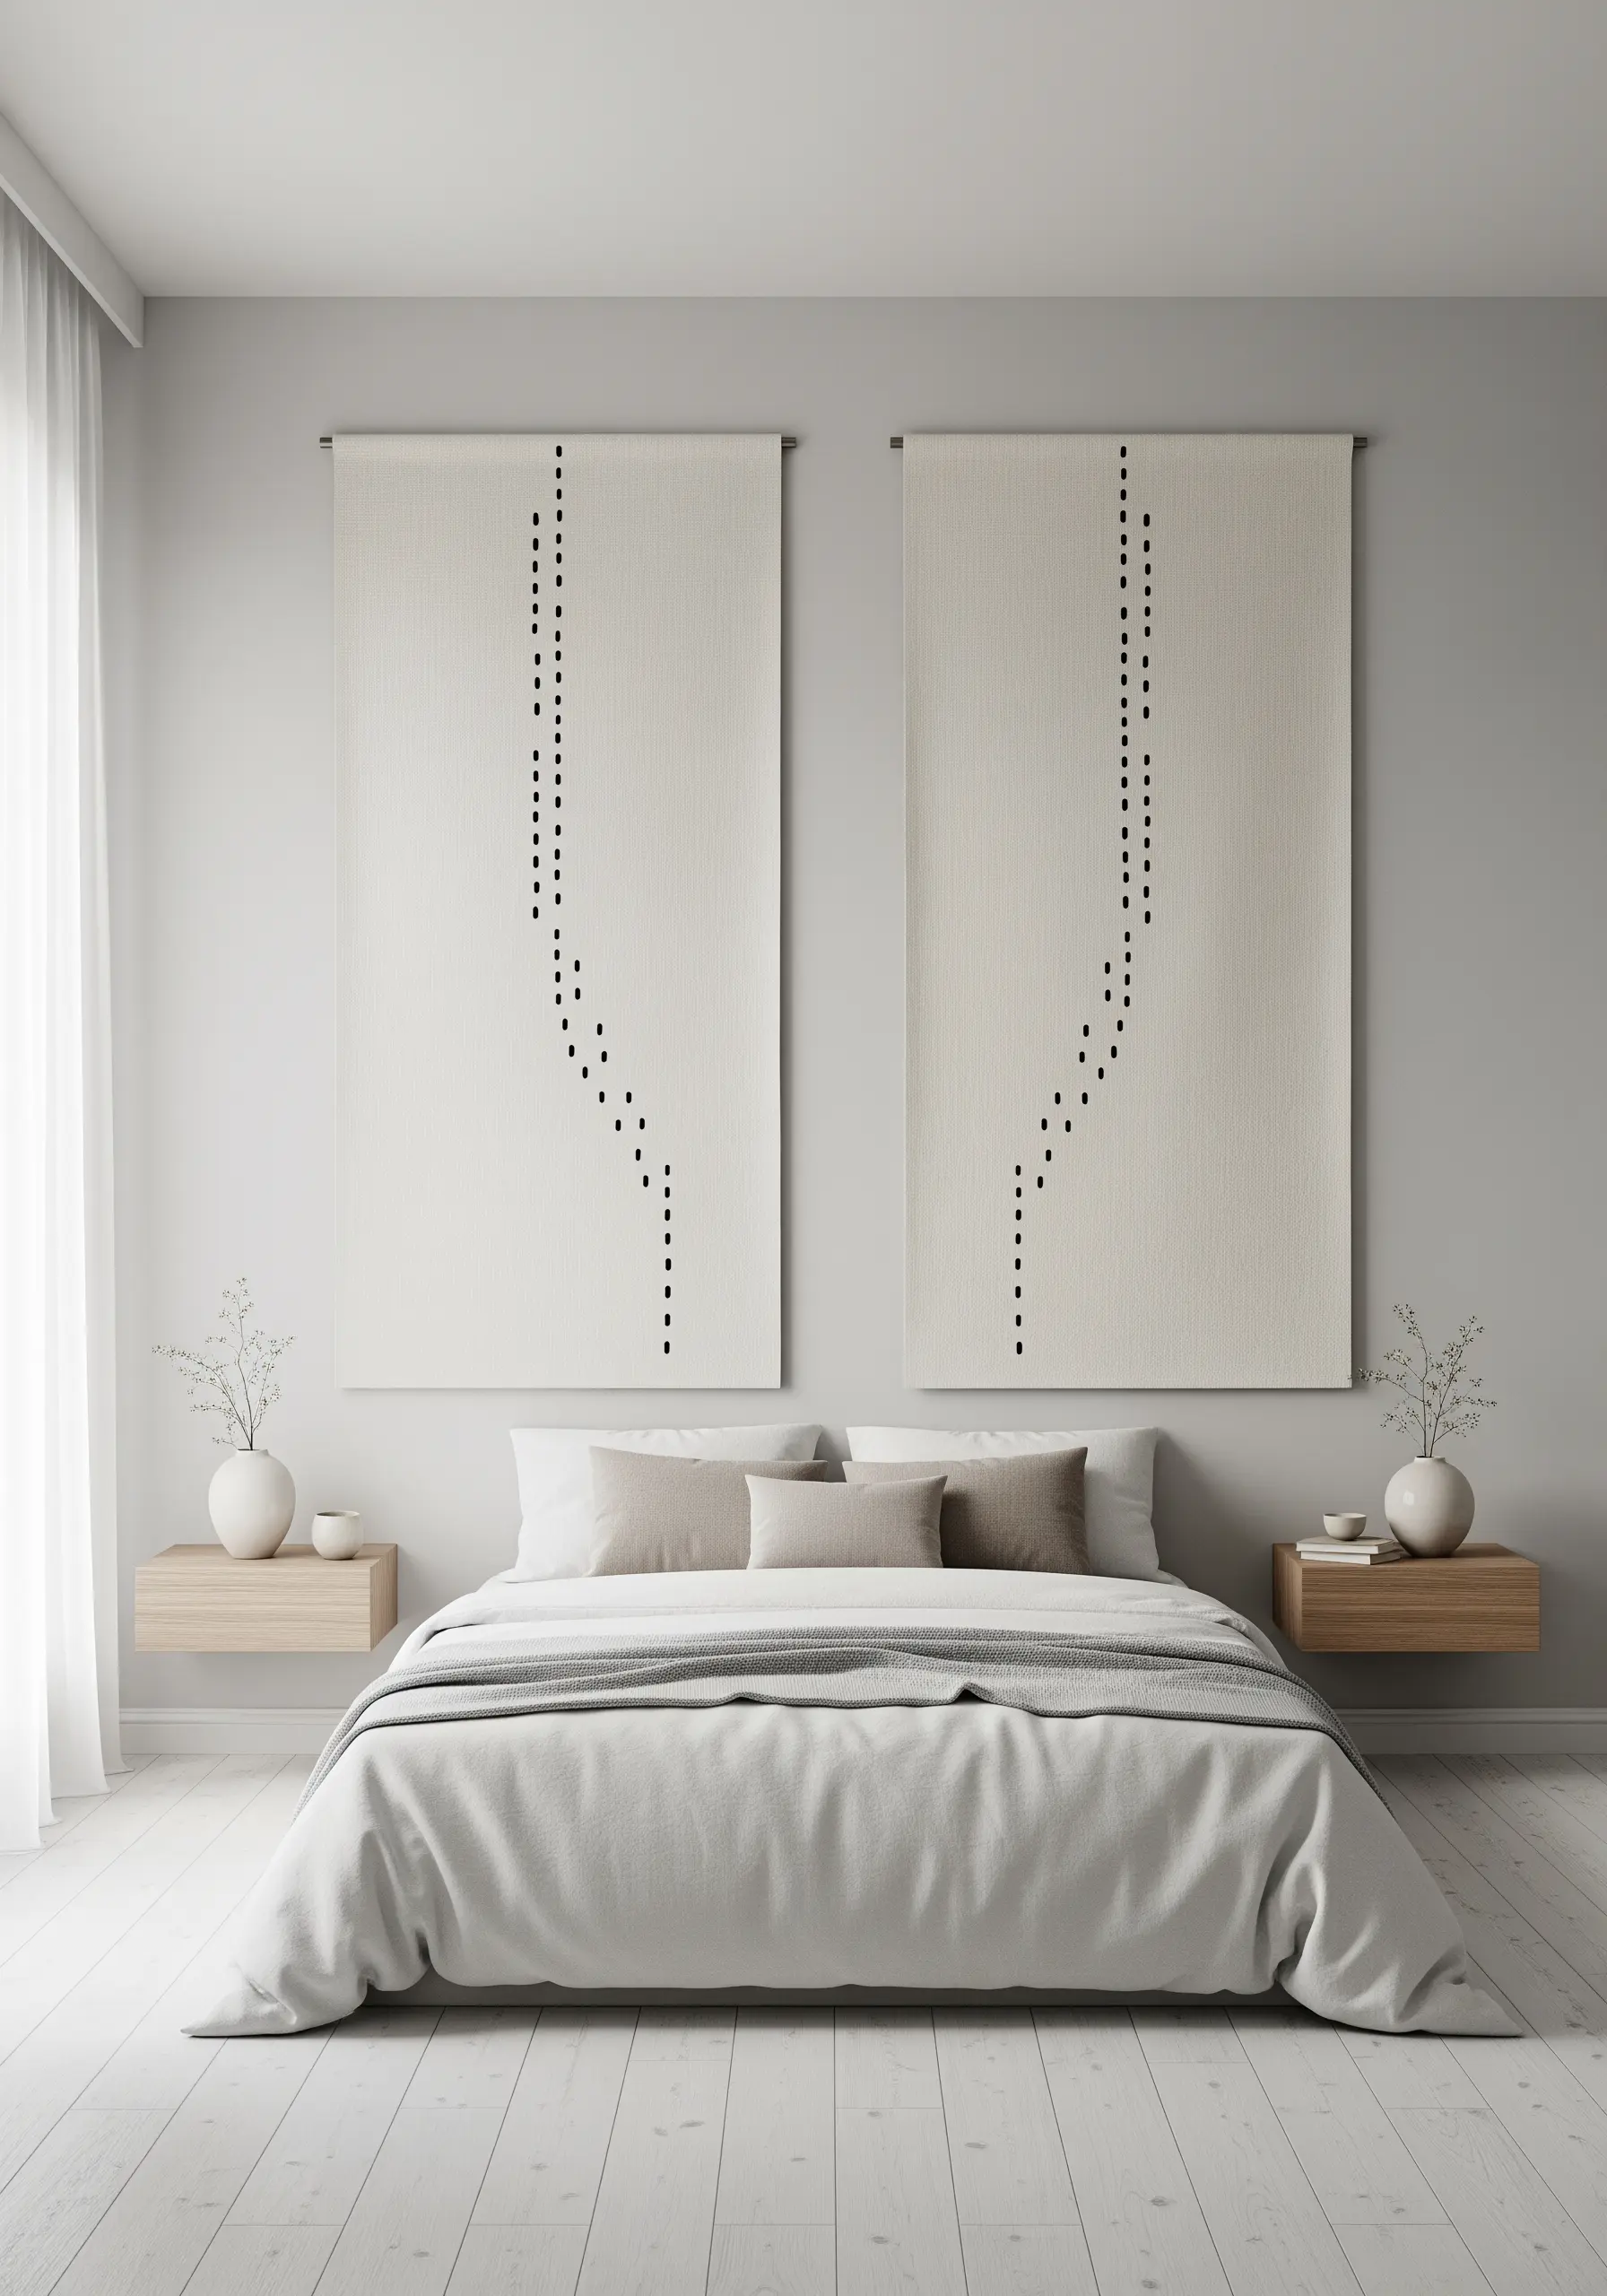
Tell a story with the simplest of marks. These two panels use sparsely placed running stitches to create a sense of movement and connection.
The beauty of this design lies in its asymmetry; the patterns are related but not identical, creating a more dynamic and interesting composition.
By hanging the two panels with a slight gap, you encourage the eye to move between them, engaging with the negative space as part of the artwork.
This is a perfect example of how abstract minimal embroidery pieces can create a large impact.
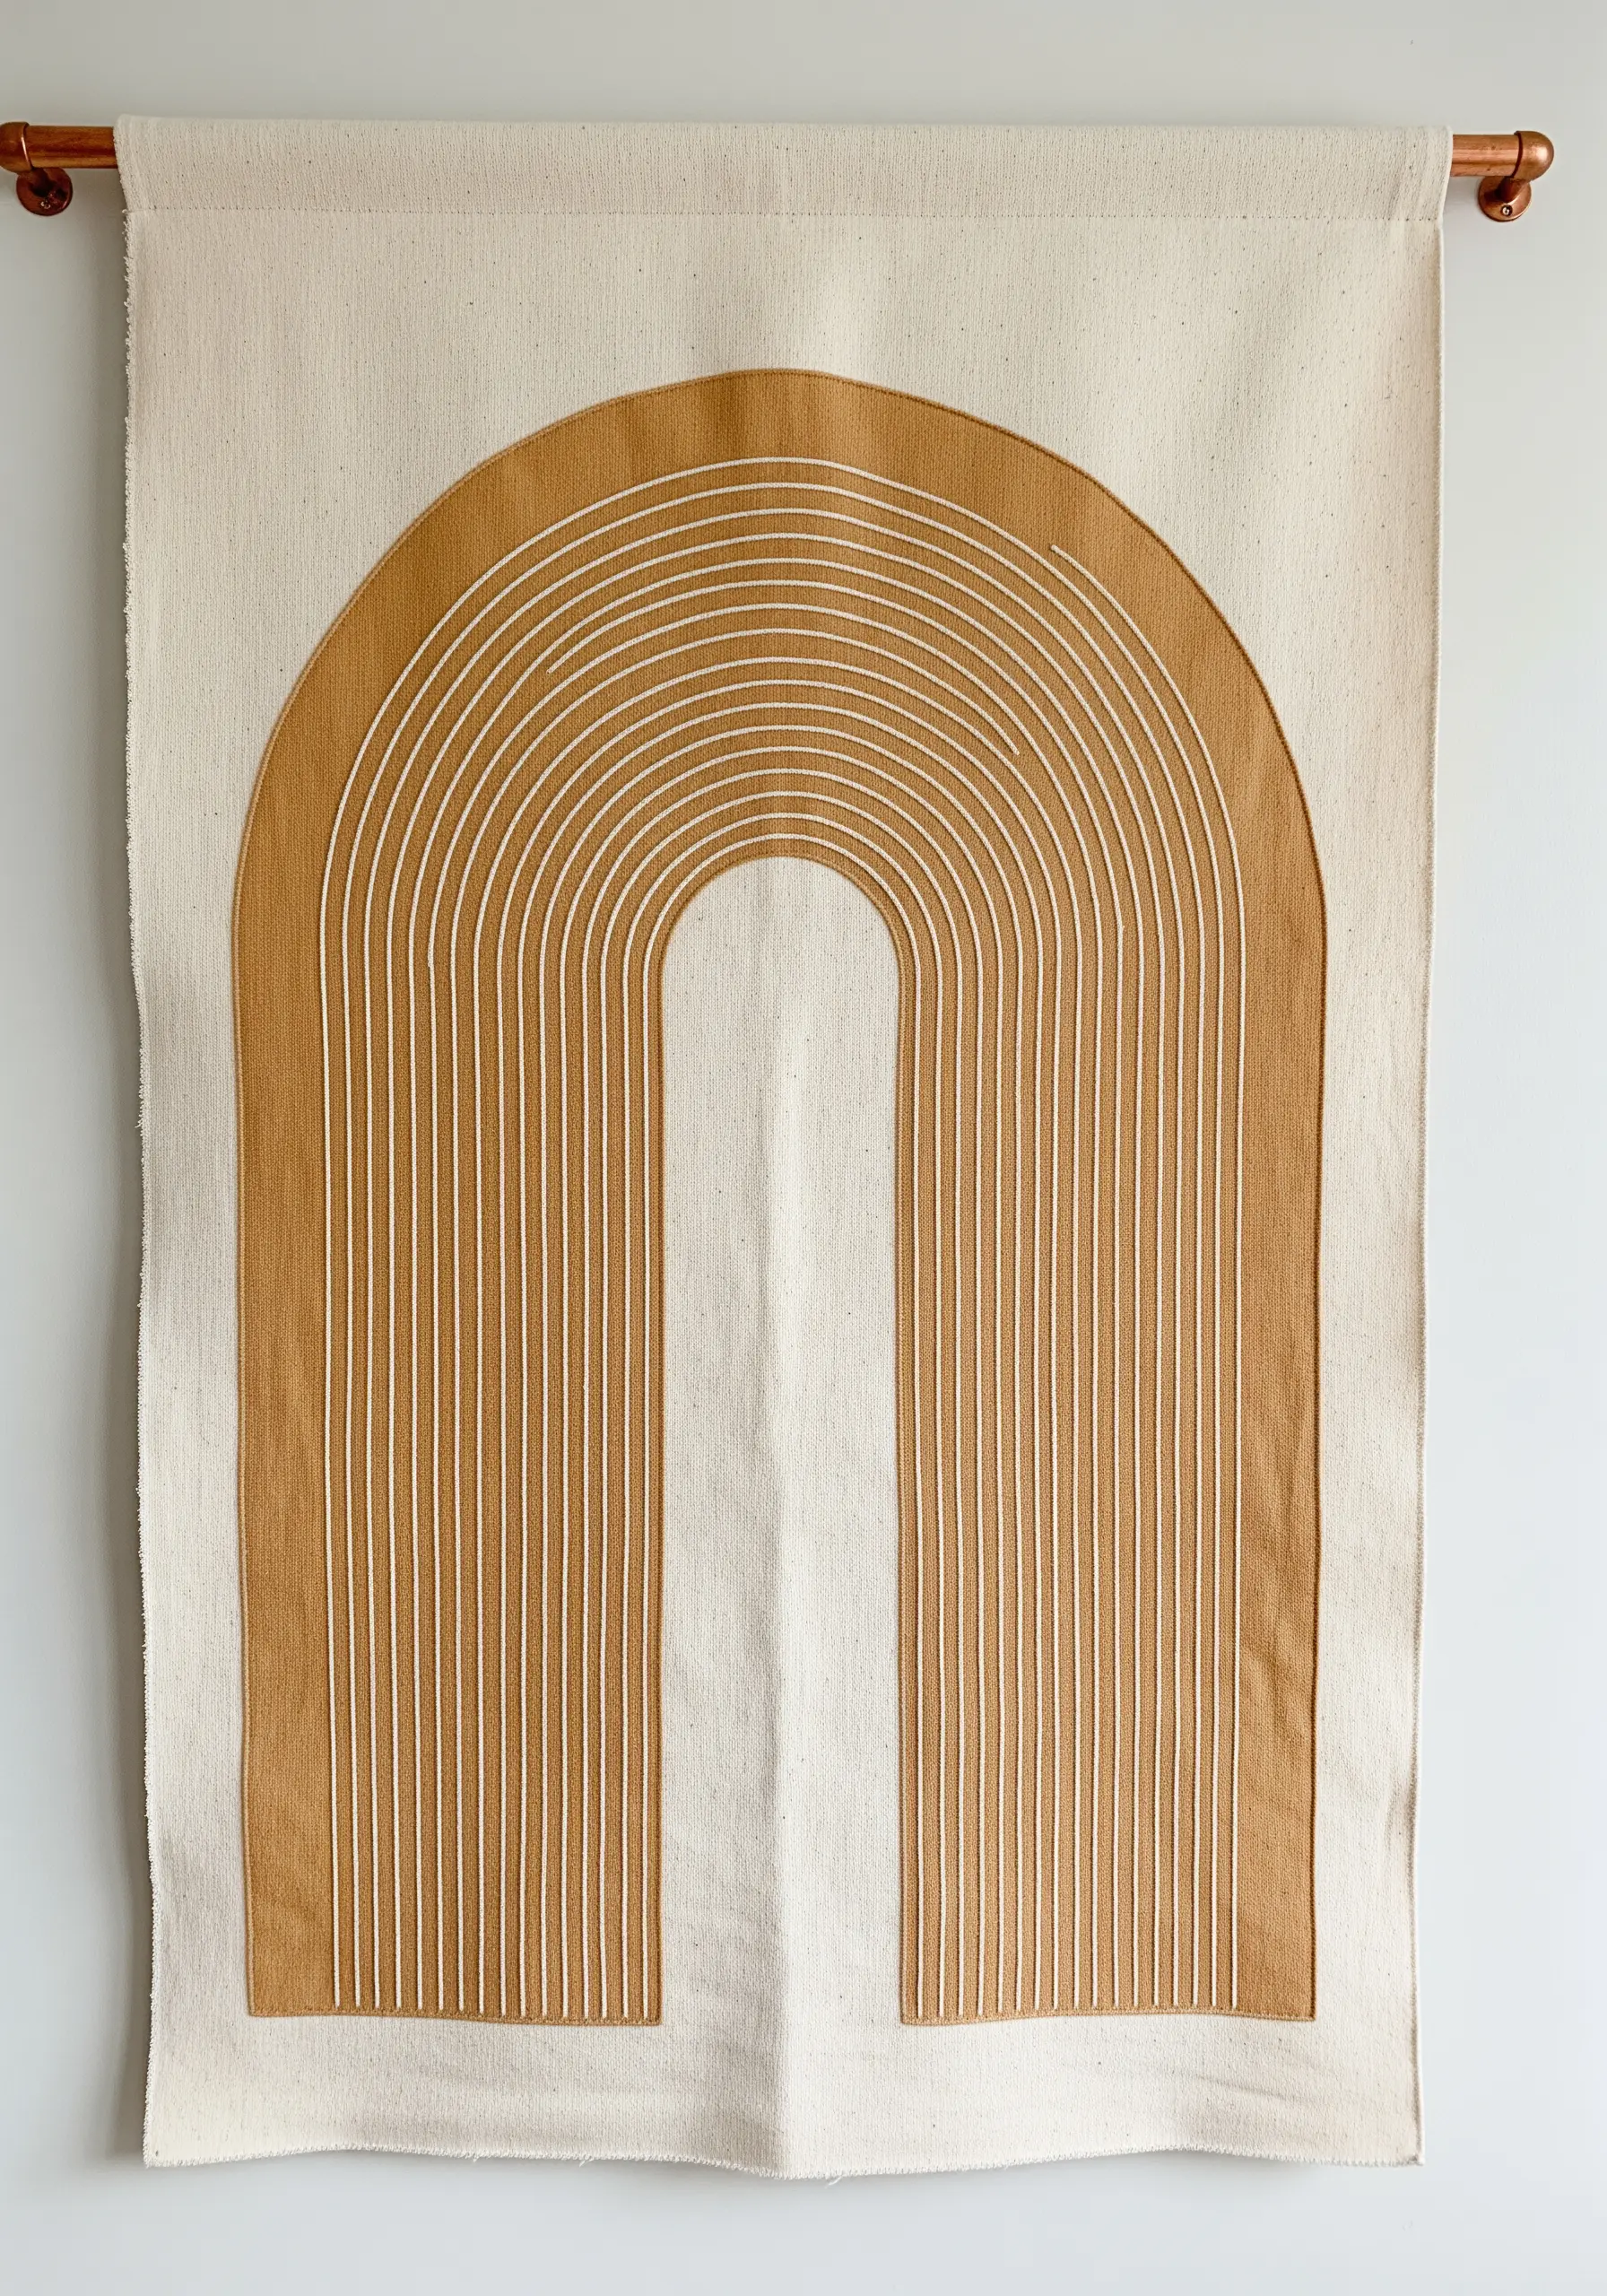
19. Define Arches with Vertical Satin Stitch
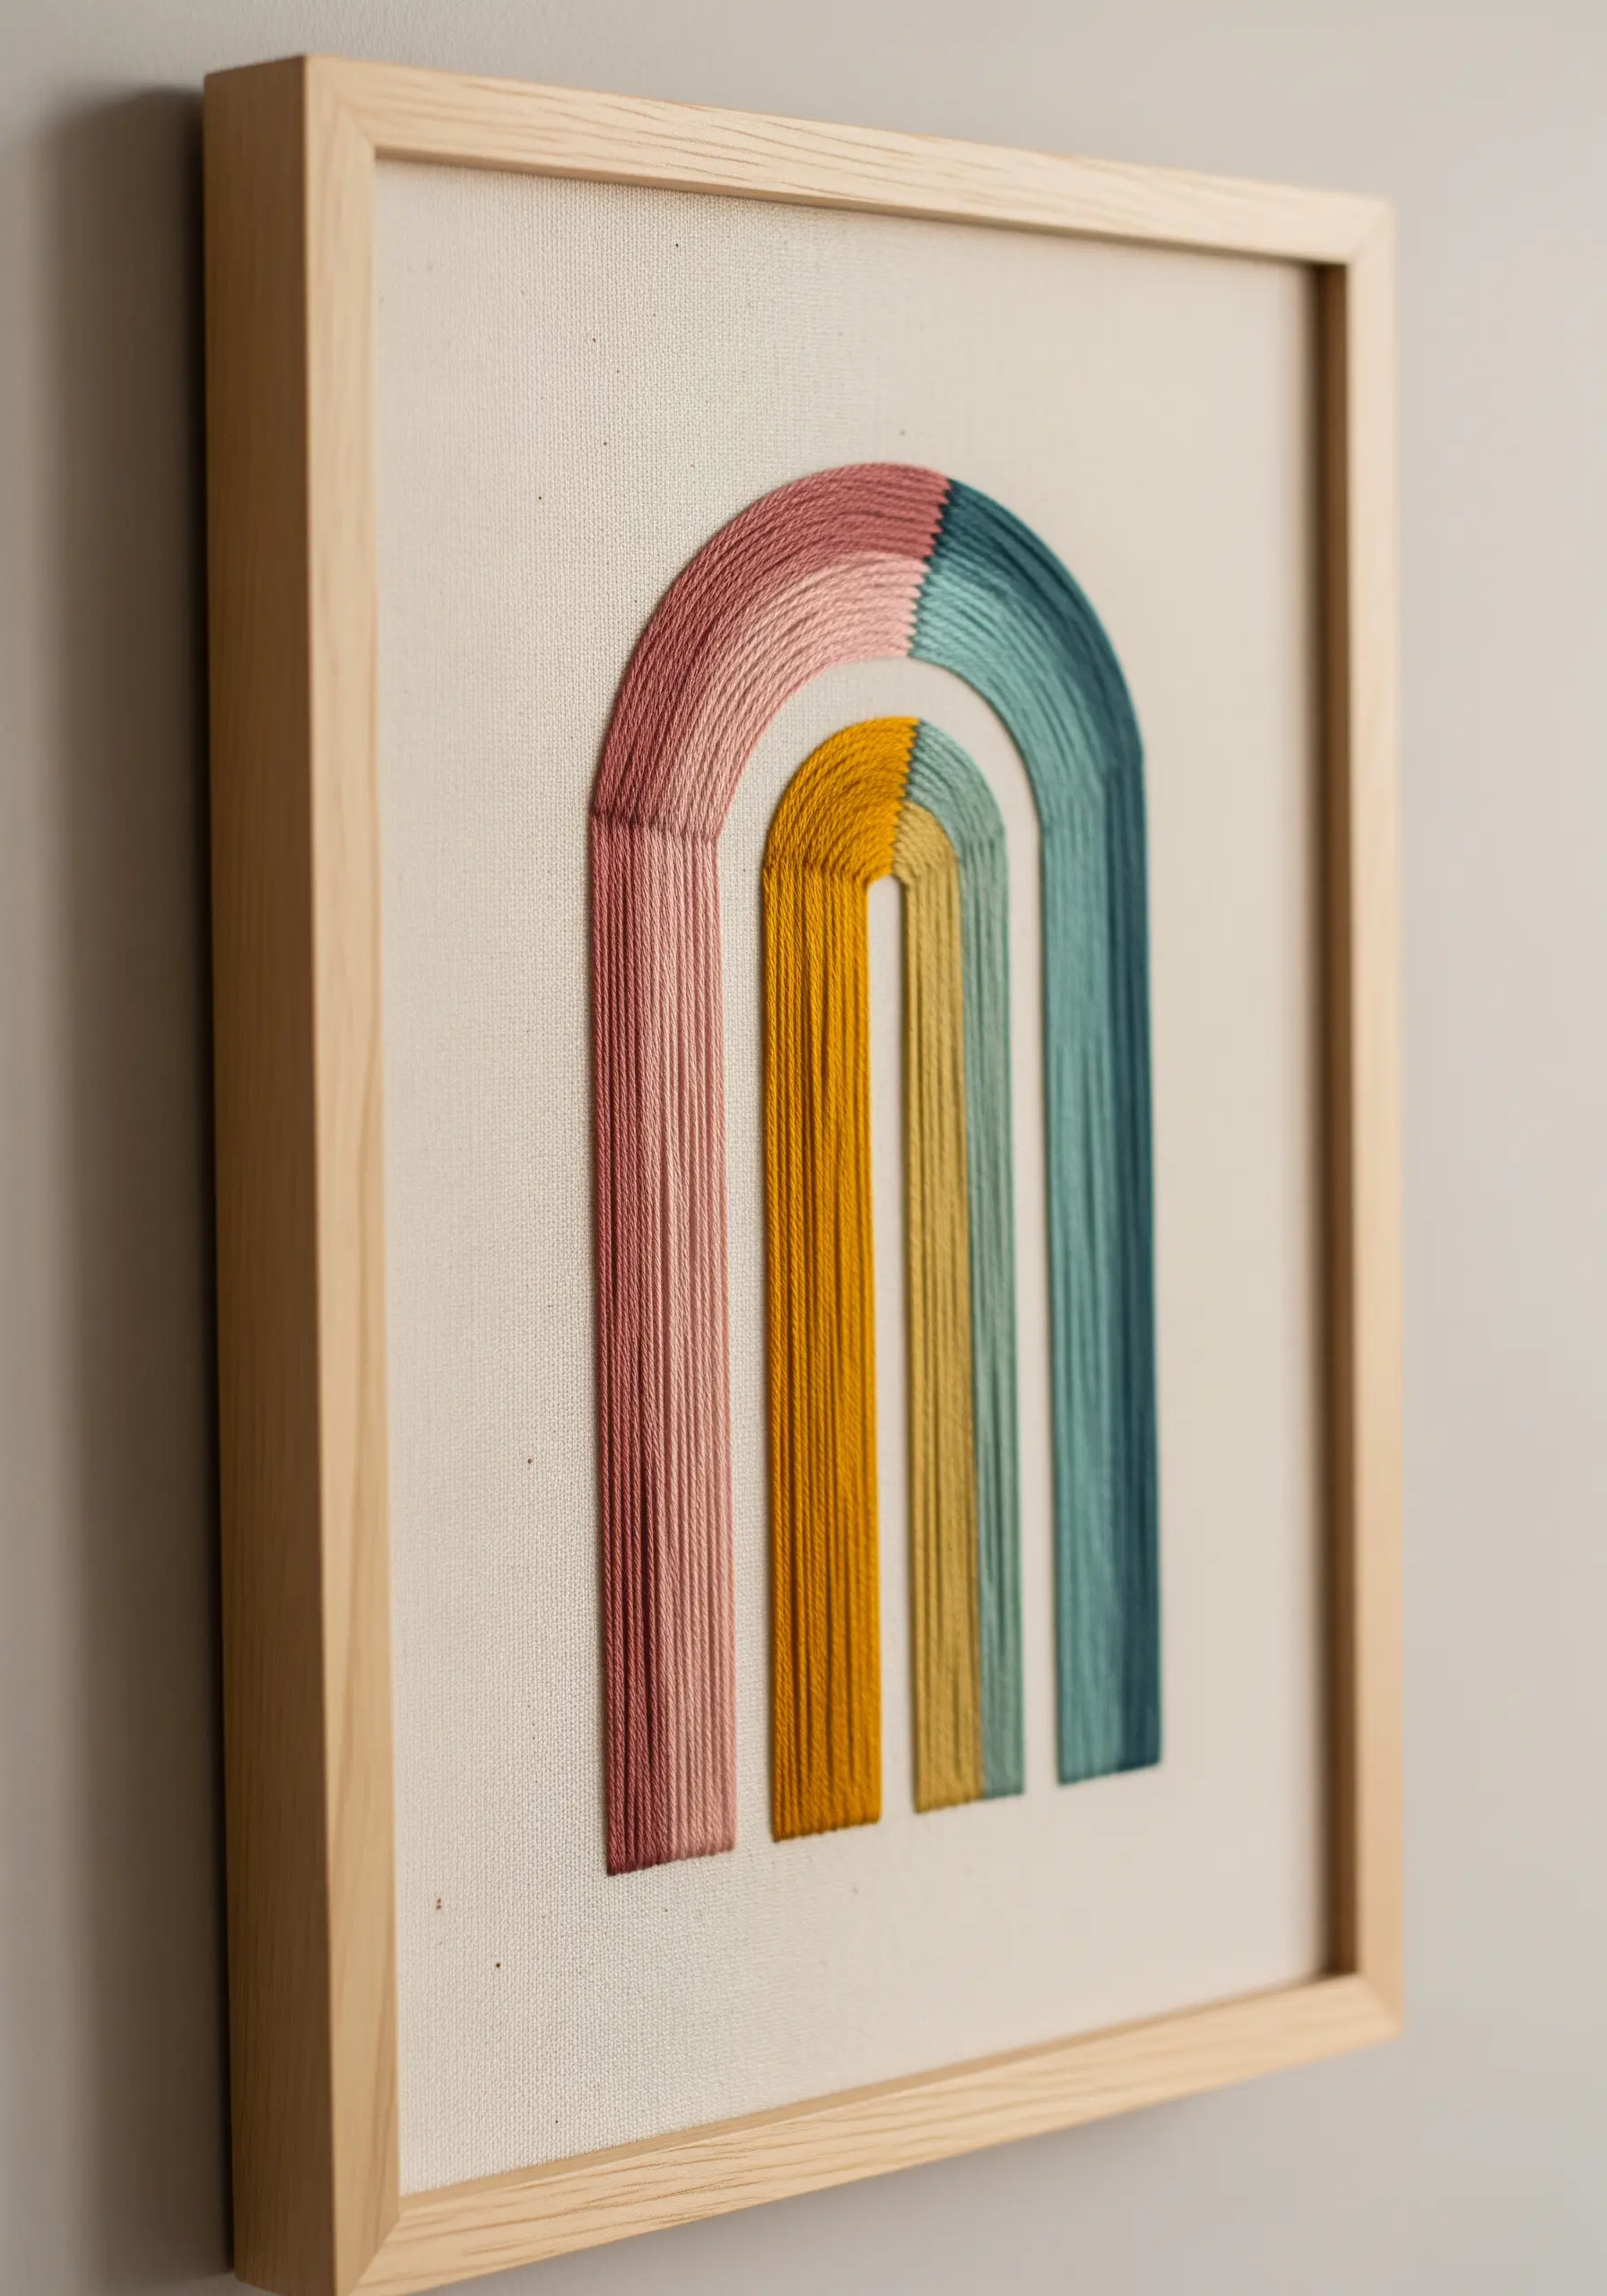
Instead of following the curve, fill these arched shapes with long, vertical satin stitches for a modern, graphic look.
Block your colors cleanly for a contemporary feel. A split stitch outline for each section will ensure your color transitions are perfectly sharp.
The contrast between the curved top of the arch and the straight, rigid stitches creates a compelling visual tension.
Choosing a sophisticated, slightly muted color palette prevents the bold design from overwhelming a calm bedroom space.
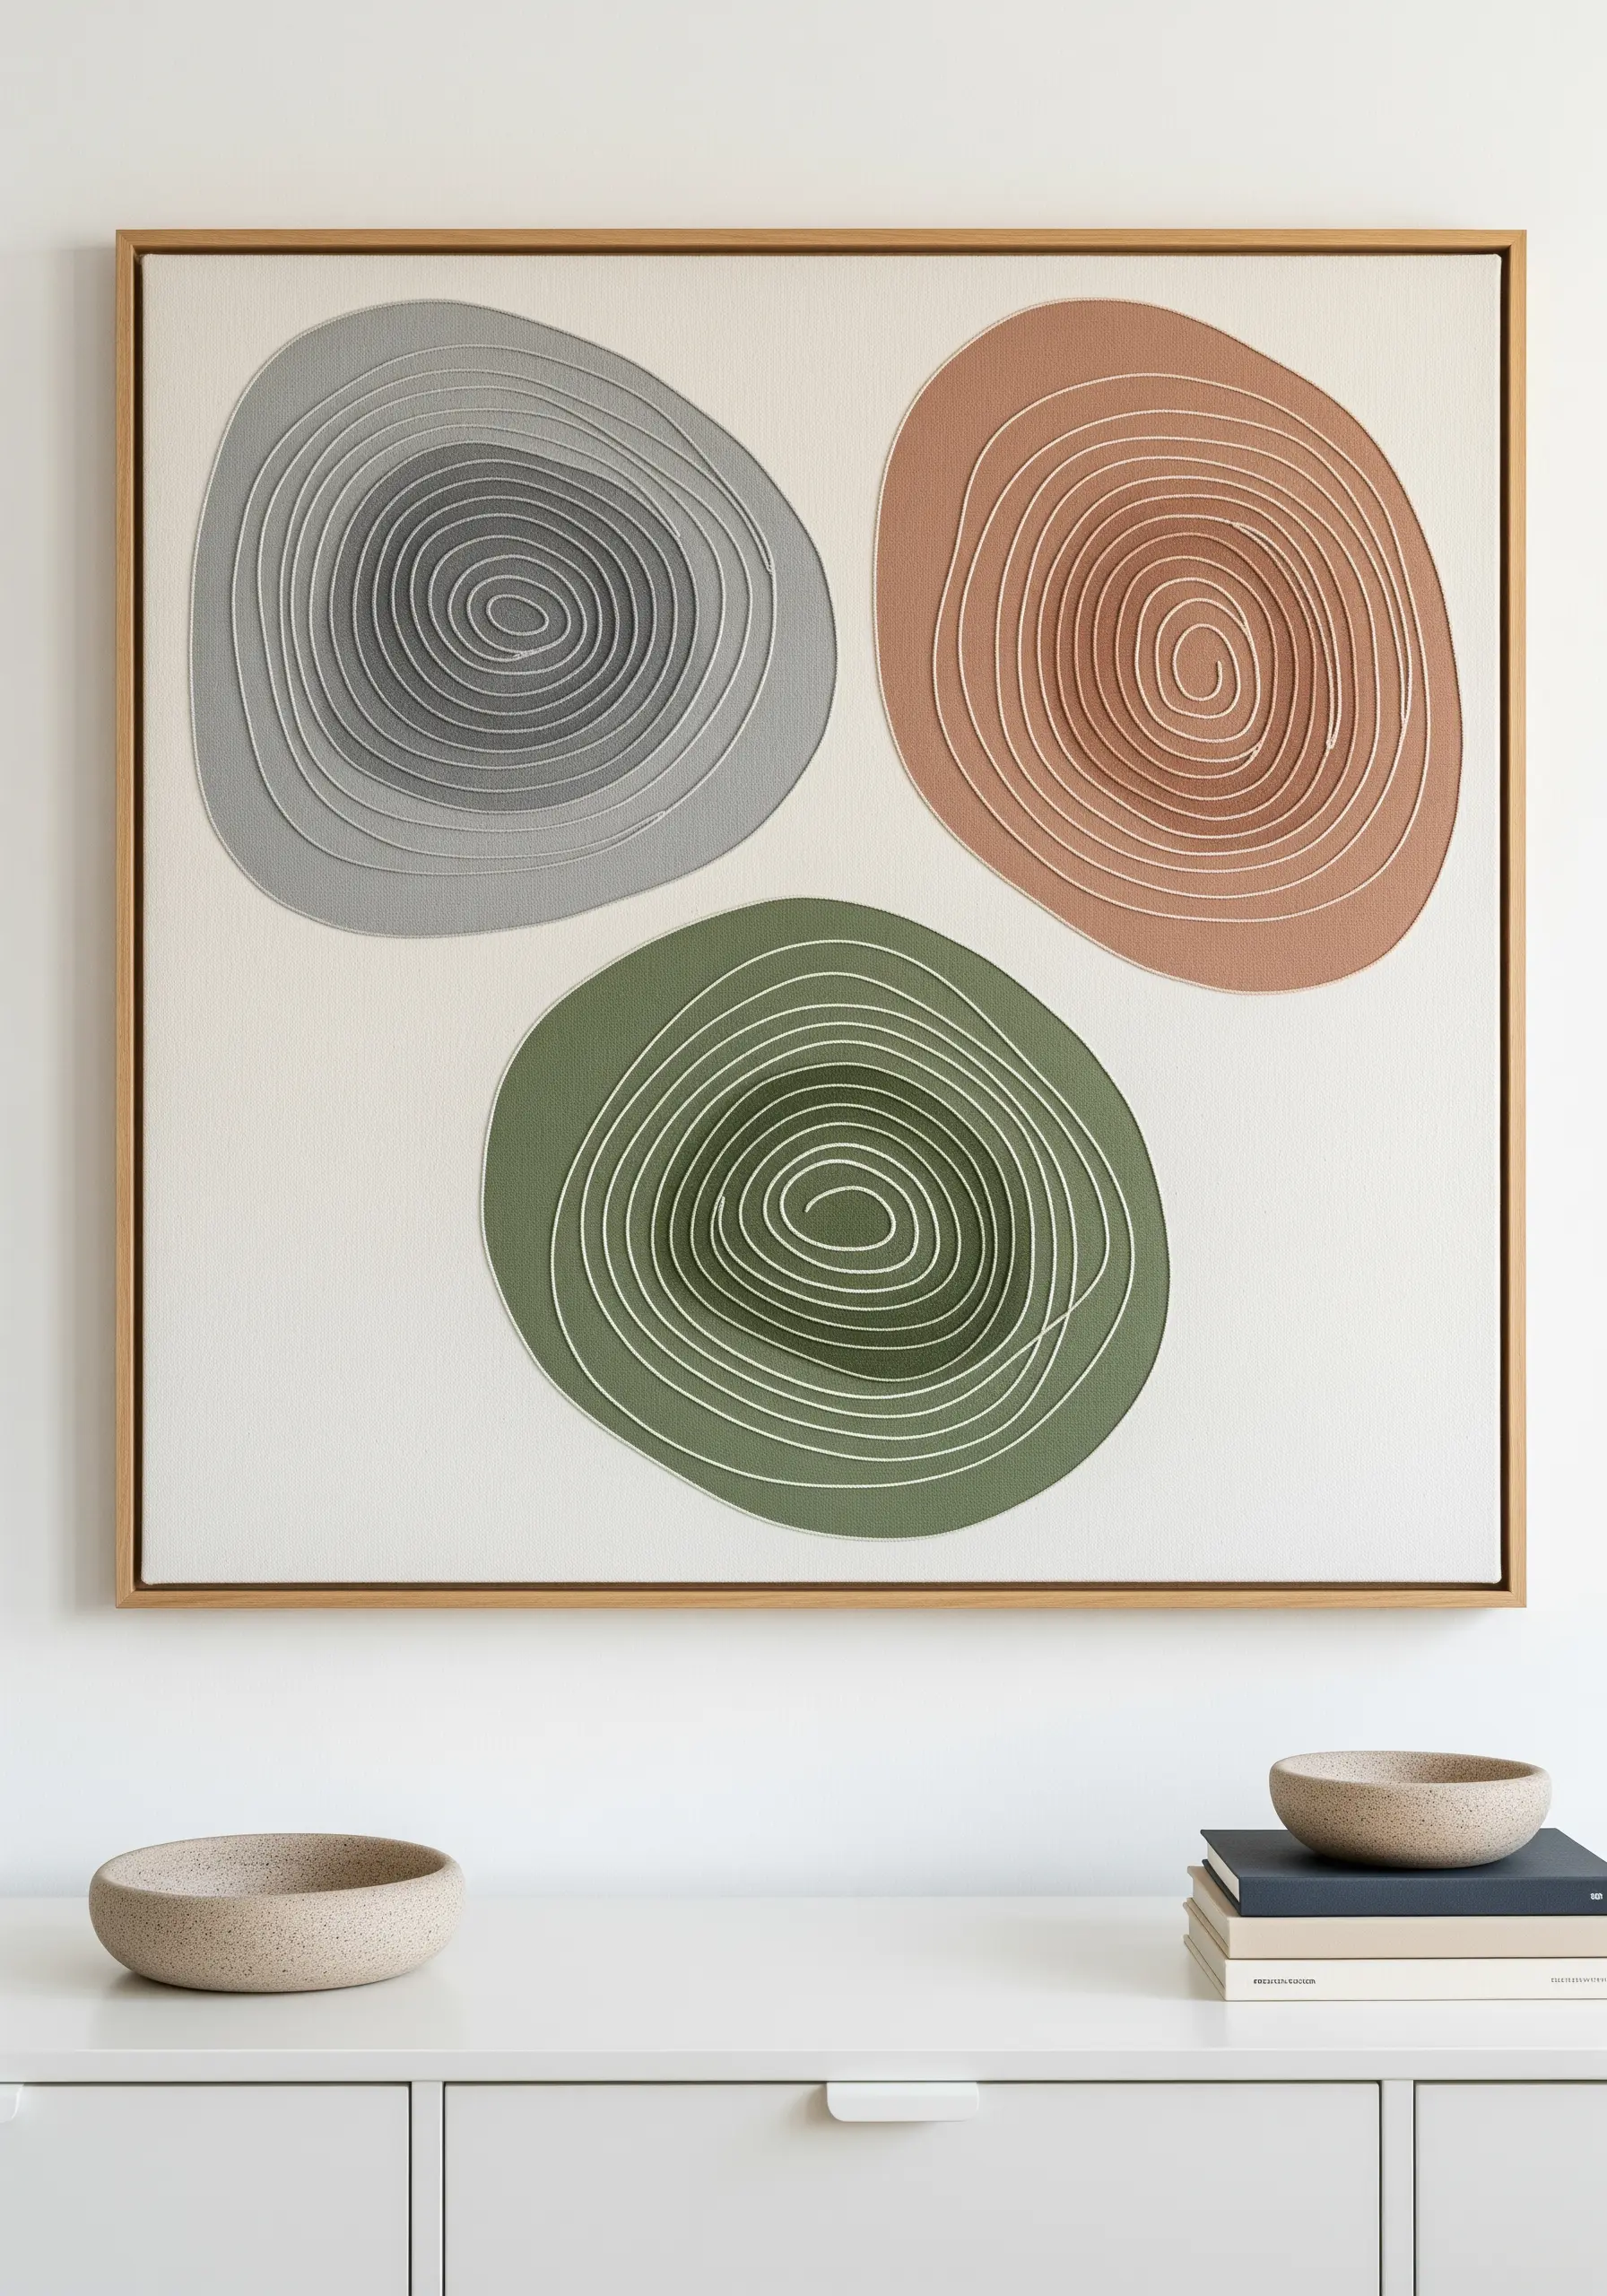
20. Weave a Perfect Circle with Concentric Stitches
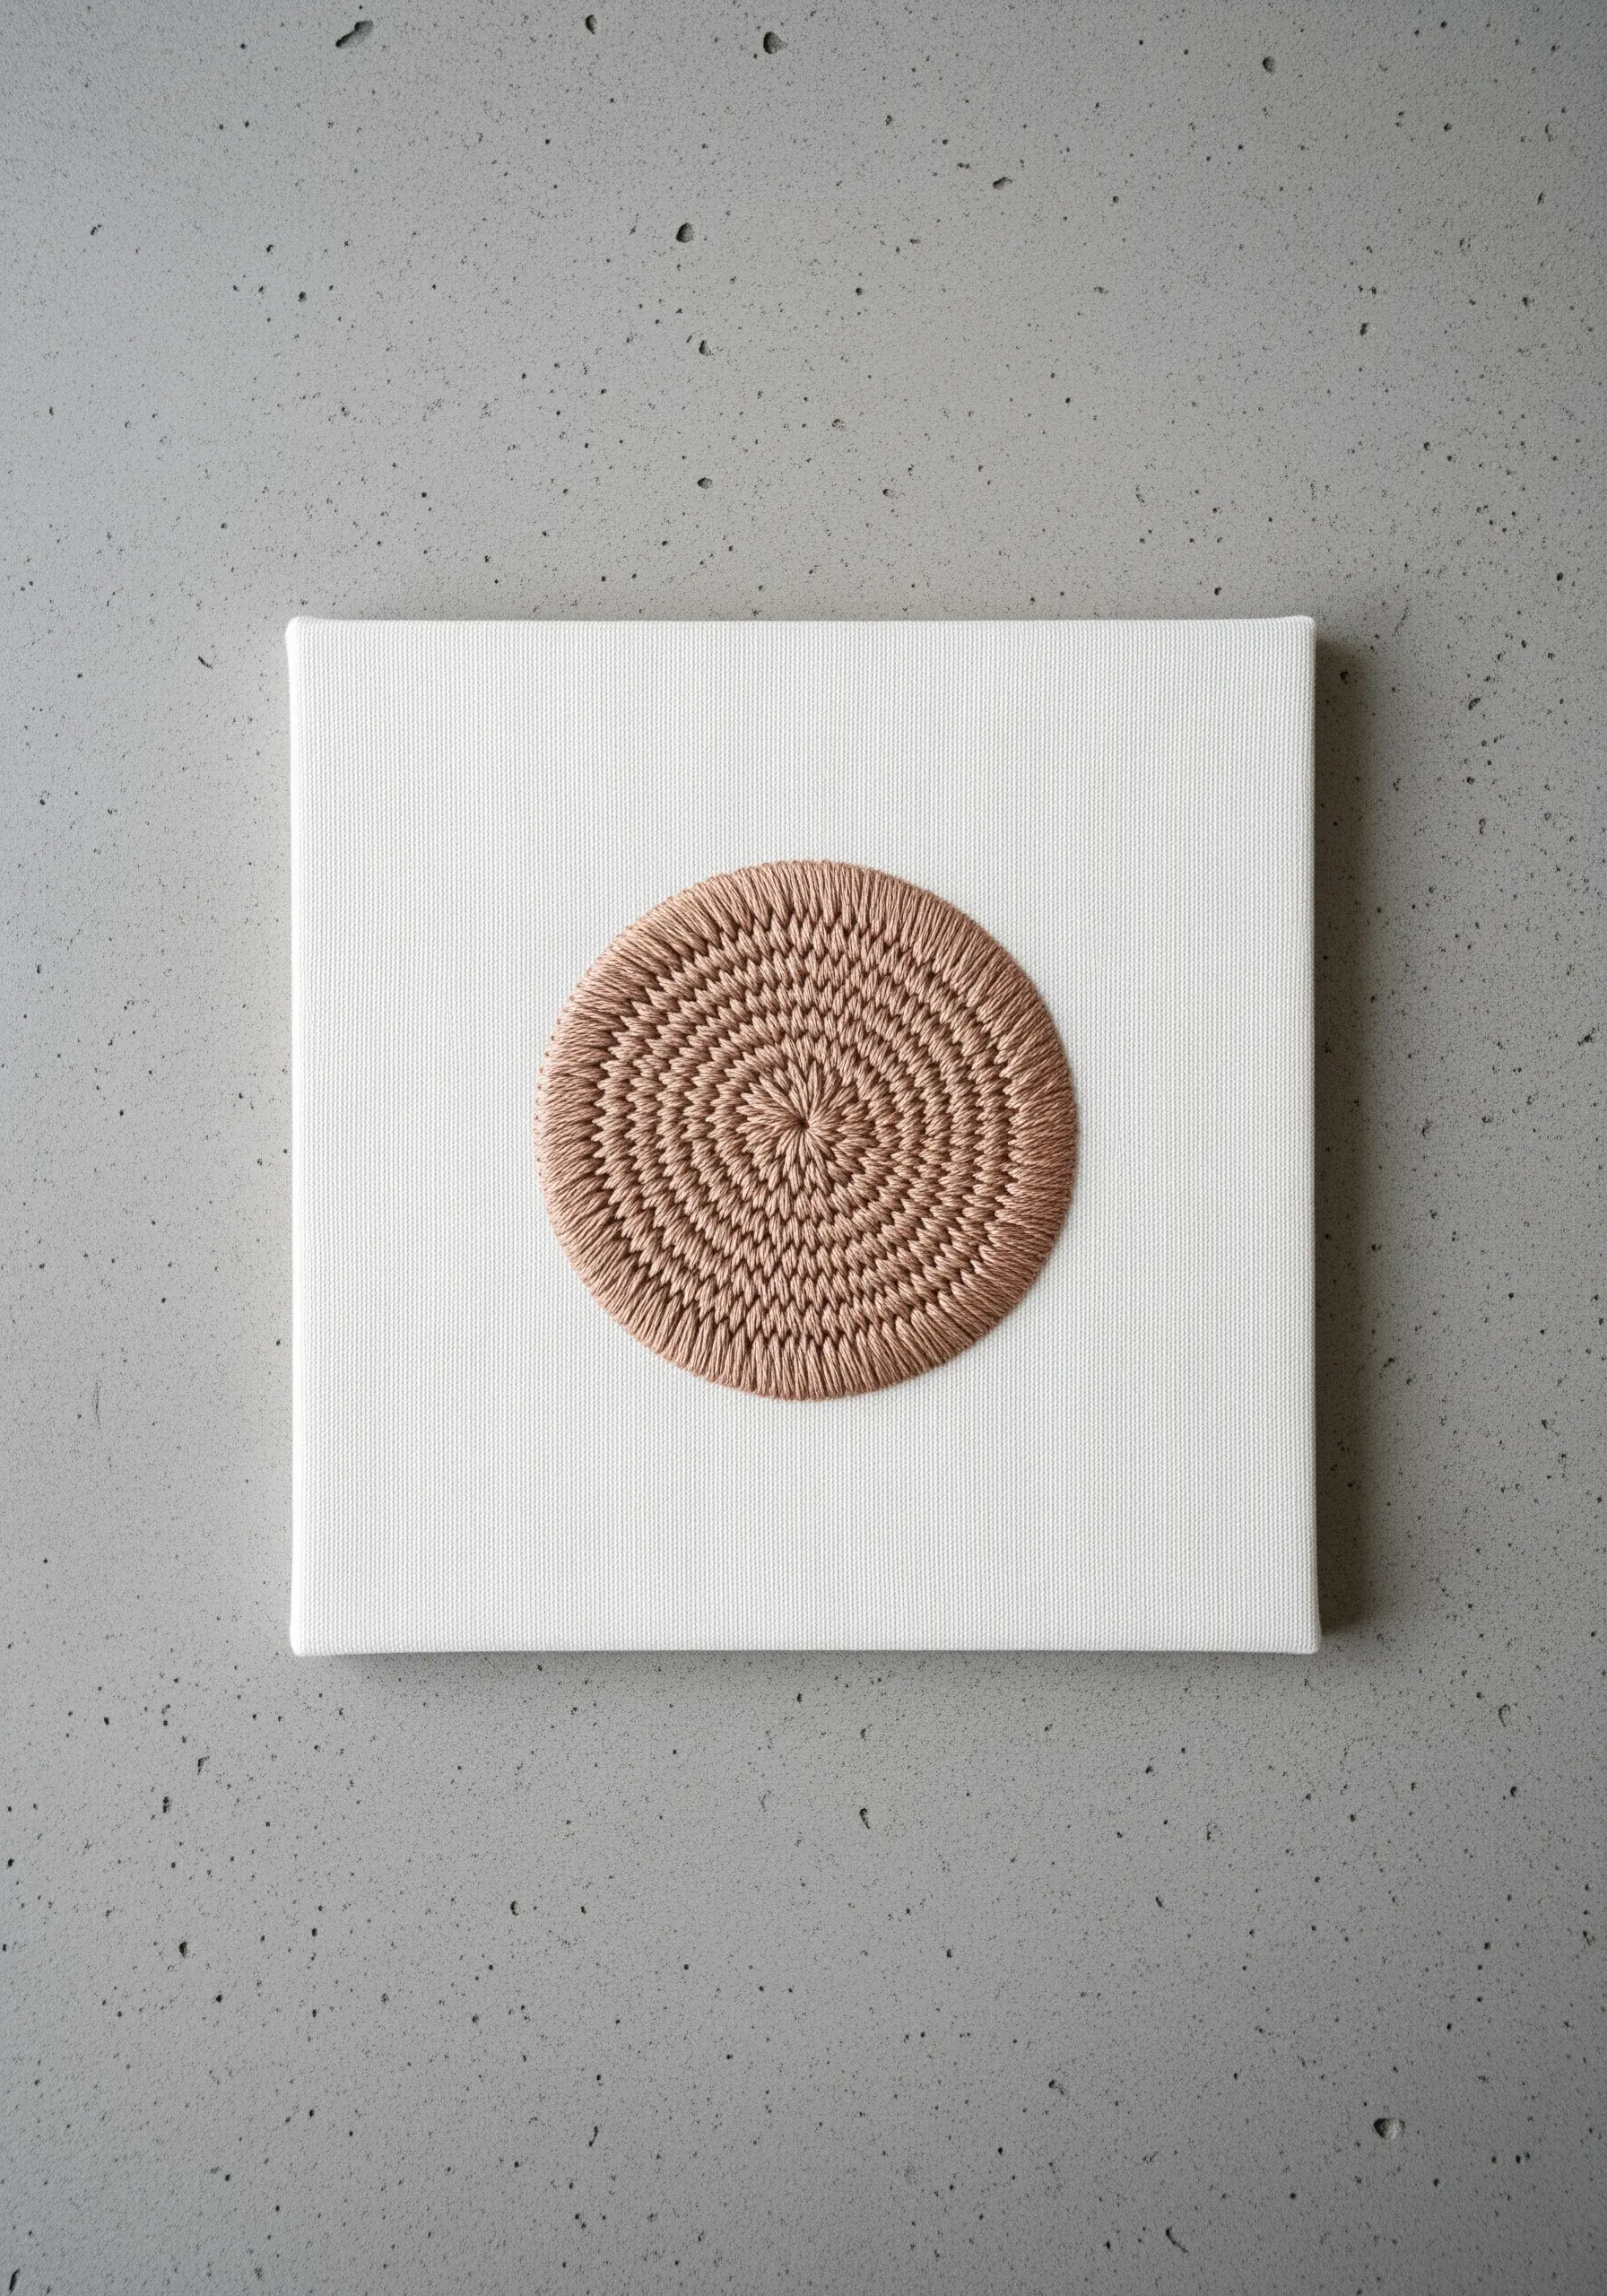
Create a dense, tactile medallion by working a spiral of stitches from the center outwards.
This effect can be achieved with a tightly packed chain stitch or a split stitch, which gives the appearance of a solid, woven surface.
The key is to increase your stitches gradually in each round to ensure the circle lays flat and doesn’t buckle.
Mounting the finished circle on a stark white canvas isolates the shape and transforms it into a powerful, minimalist art piece.
21. Outline Simple Shapes with Chain Stitch
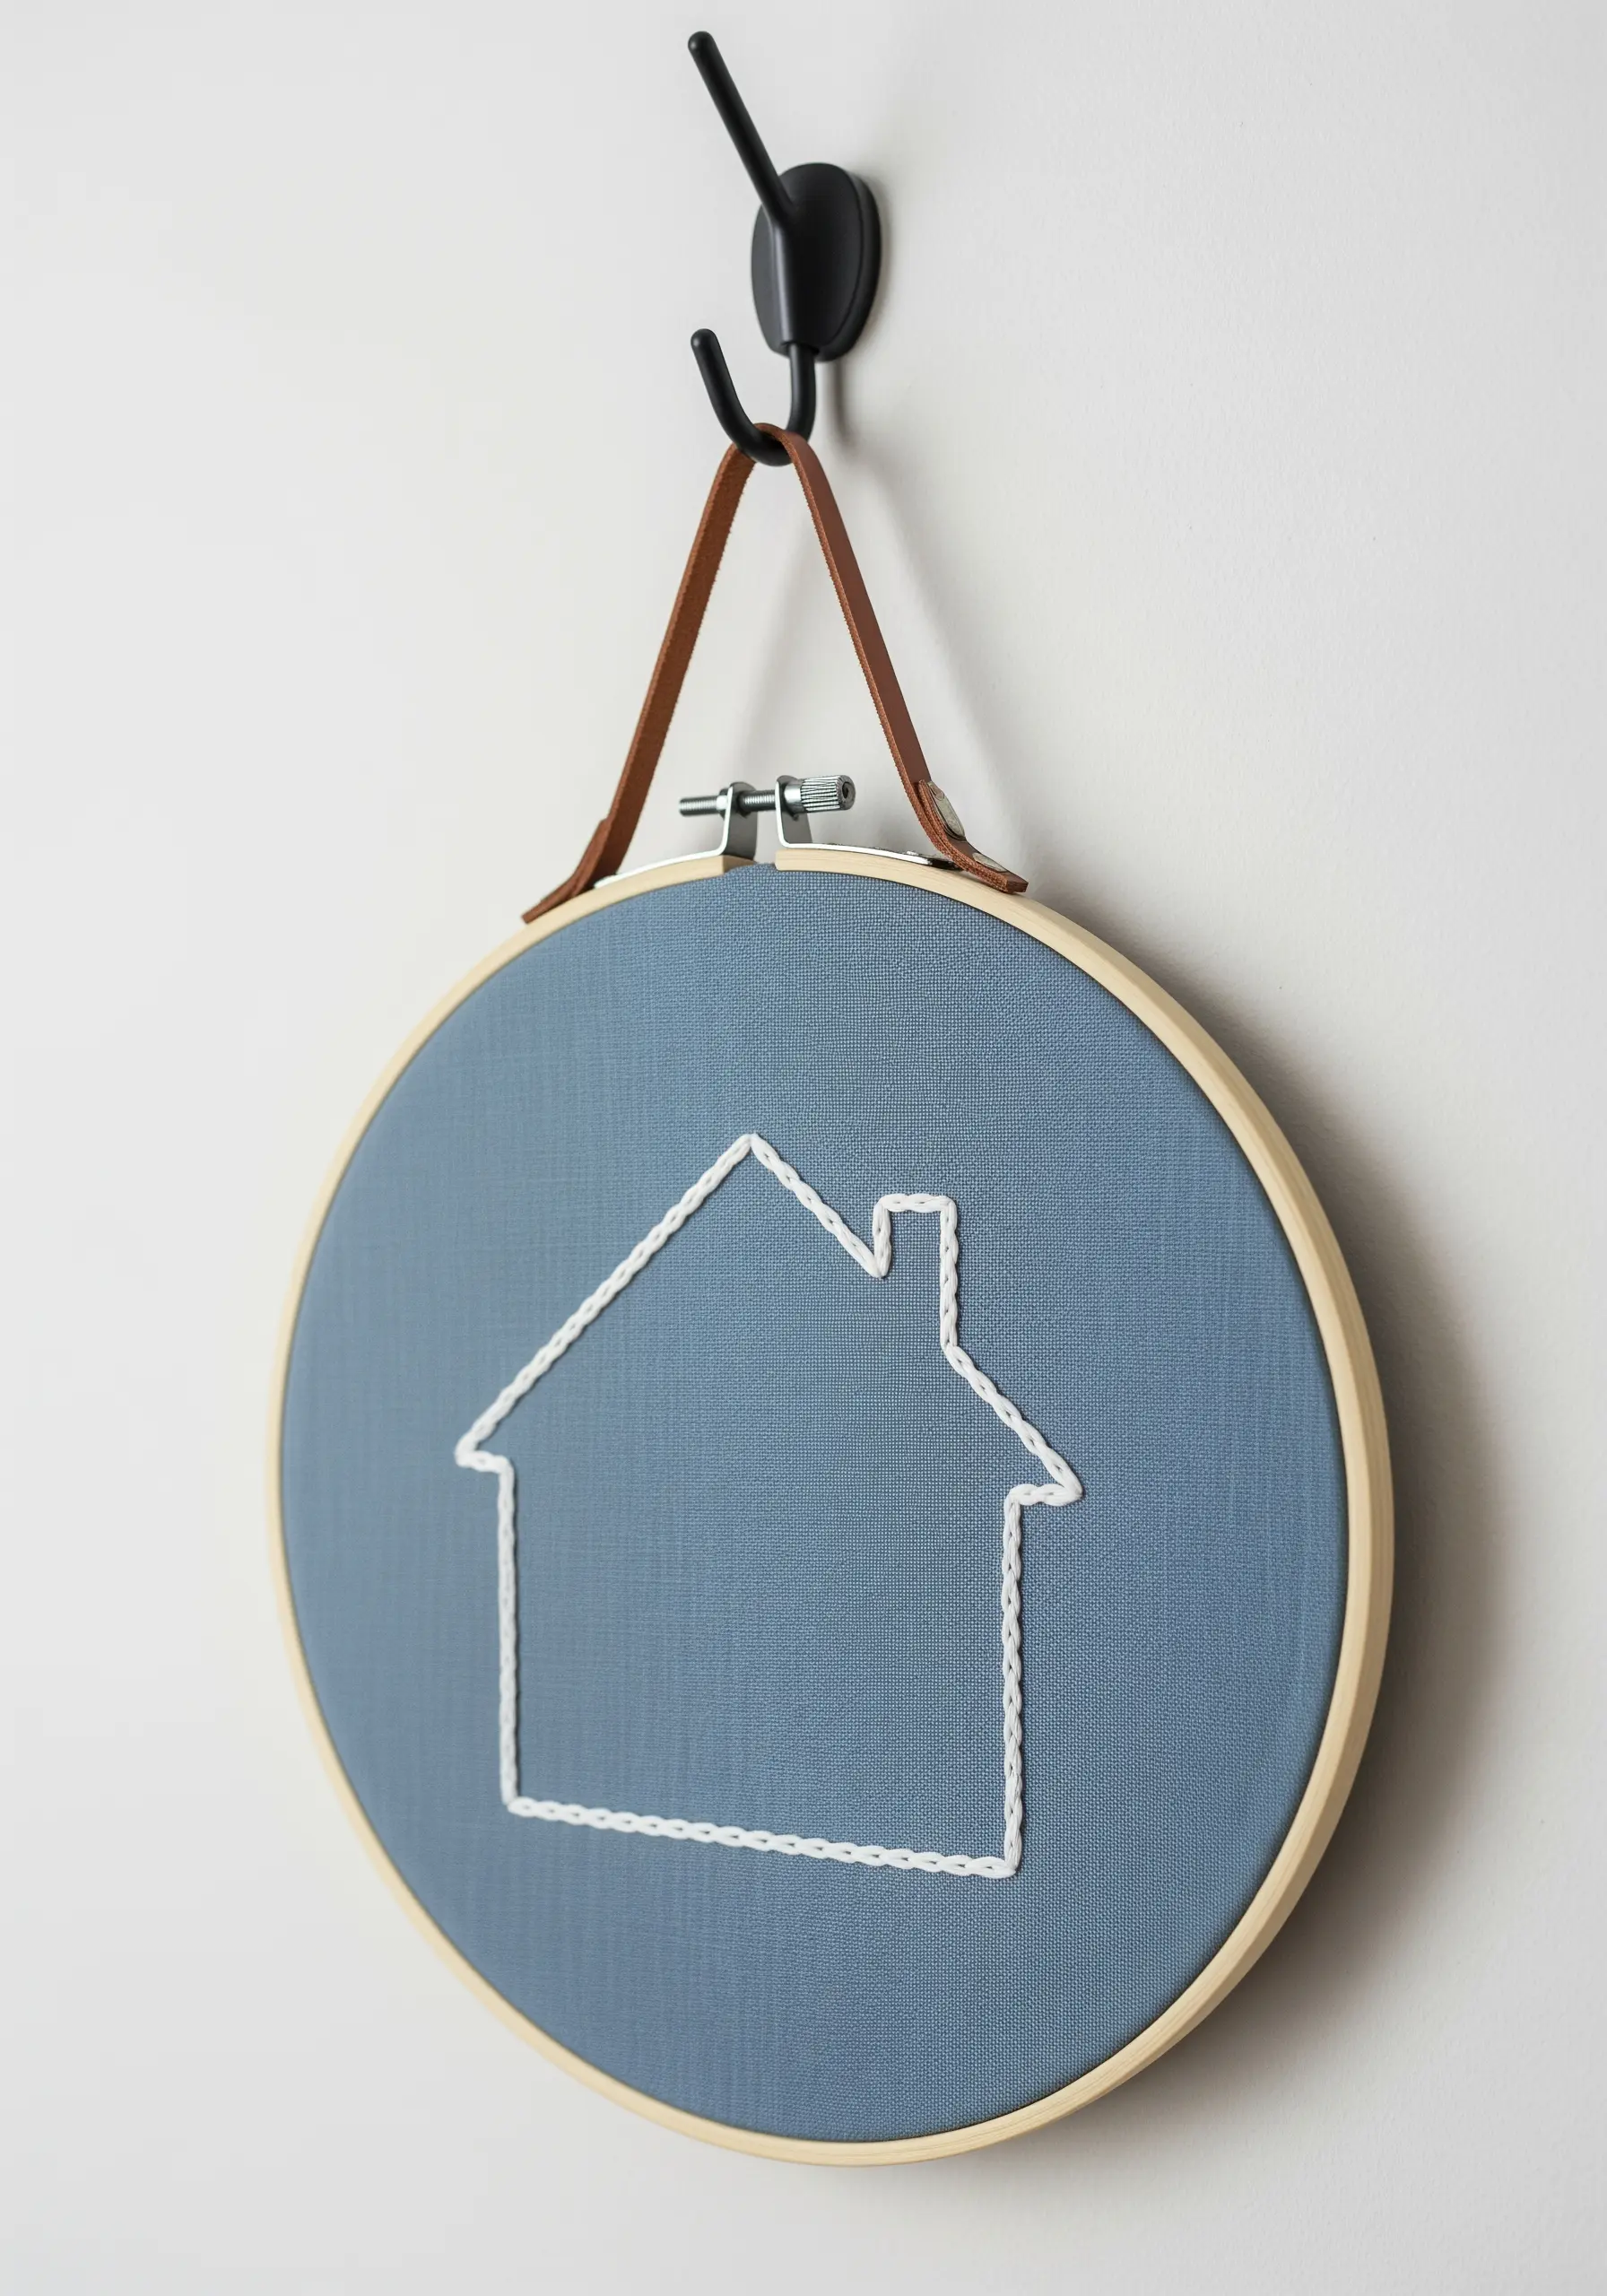
Elevate a simple line drawing by using a chain stitch instead of a backstitch for the outline.
A chain stitch creates a thicker, more substantial line with a braided texture, adding a subtle decorative quality without being overly complex.
The contrast between the slightly rustic texture of the stitch and the clean, modern silhouette of the house is what makes this piece so charming.
Choose a background fabric with a visible weave, like a cotton chambray or linen, to complement the textural stitch.
22. Create a Pattern with a Simple, Repeated Motif
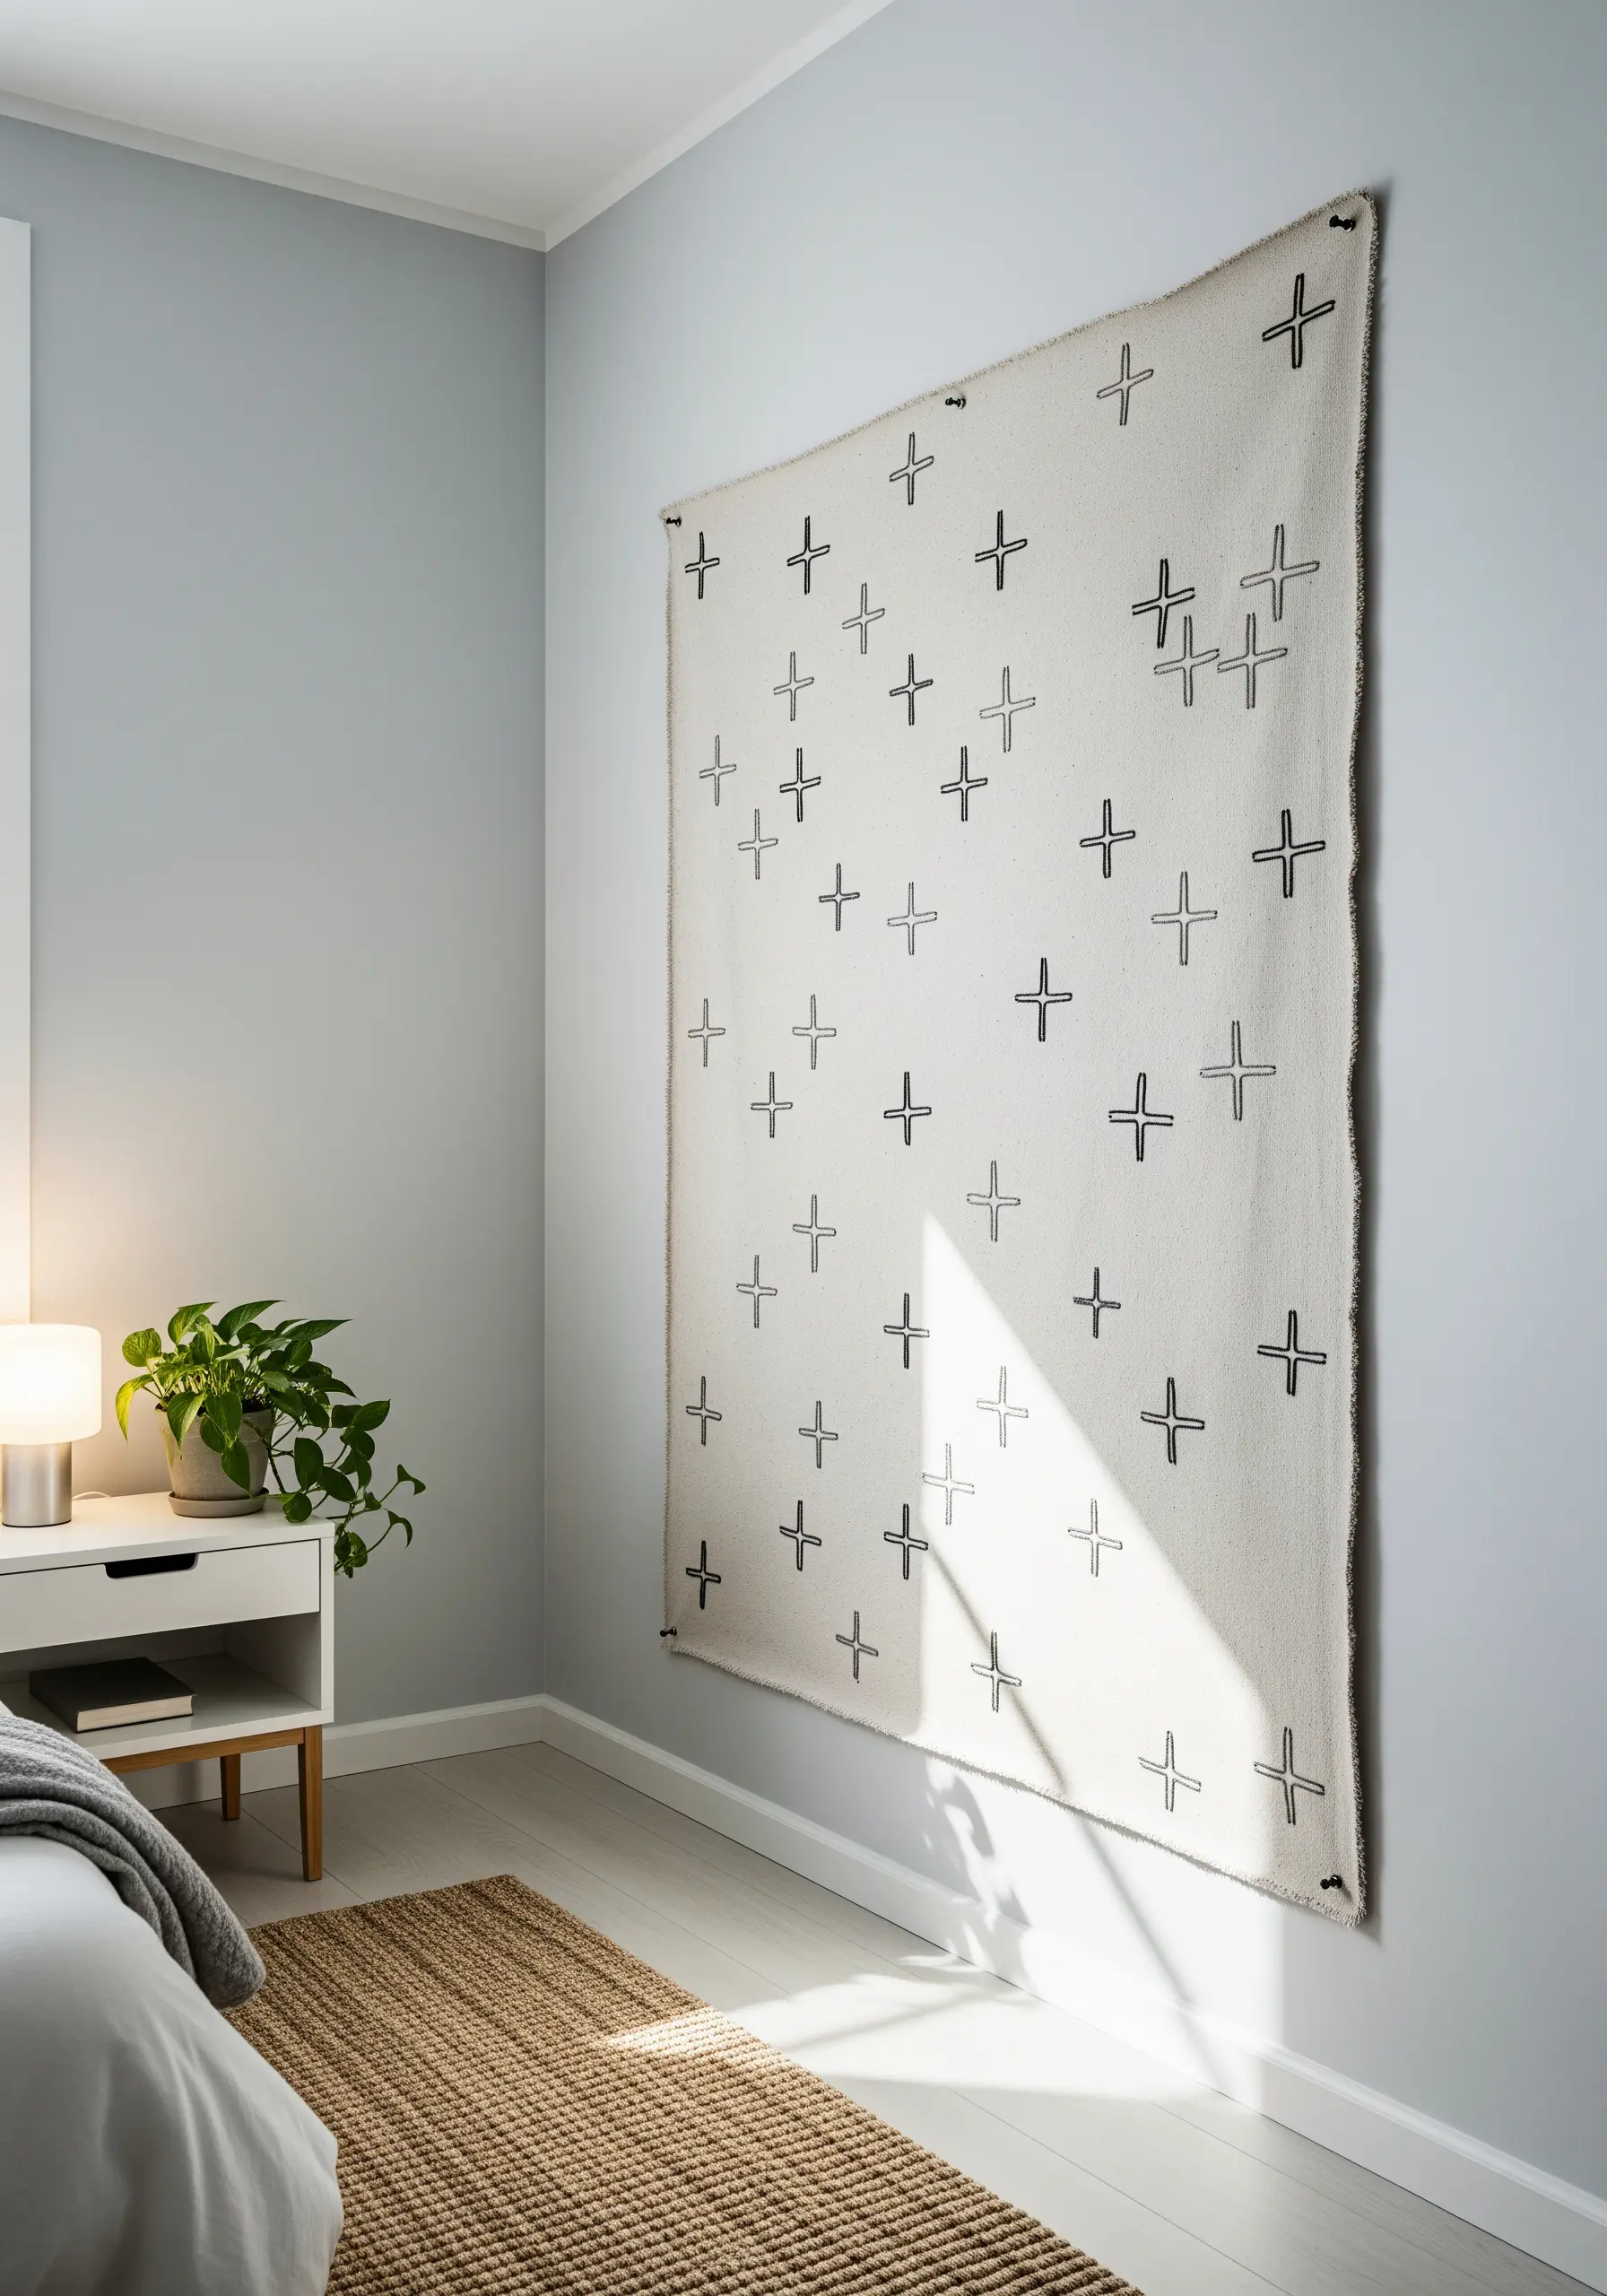
Design a large-scale textile piece by repeating a single, simple stitched motif across the fabric.
The hand-stitched nature of each cross gives the overall pattern a subtle variation and warmth that a printed fabric lacks.
Use a heavyweight, loosely woven fabric like a cotton throw or canvas drop cloth for an organic, slightly rustic feel.
The scattered, irregular placement of the motifs feels more artistic and less rigid than a perfect grid, adding to its handmade charm.
23. Achieve Graphic Contrast on Black Fabric
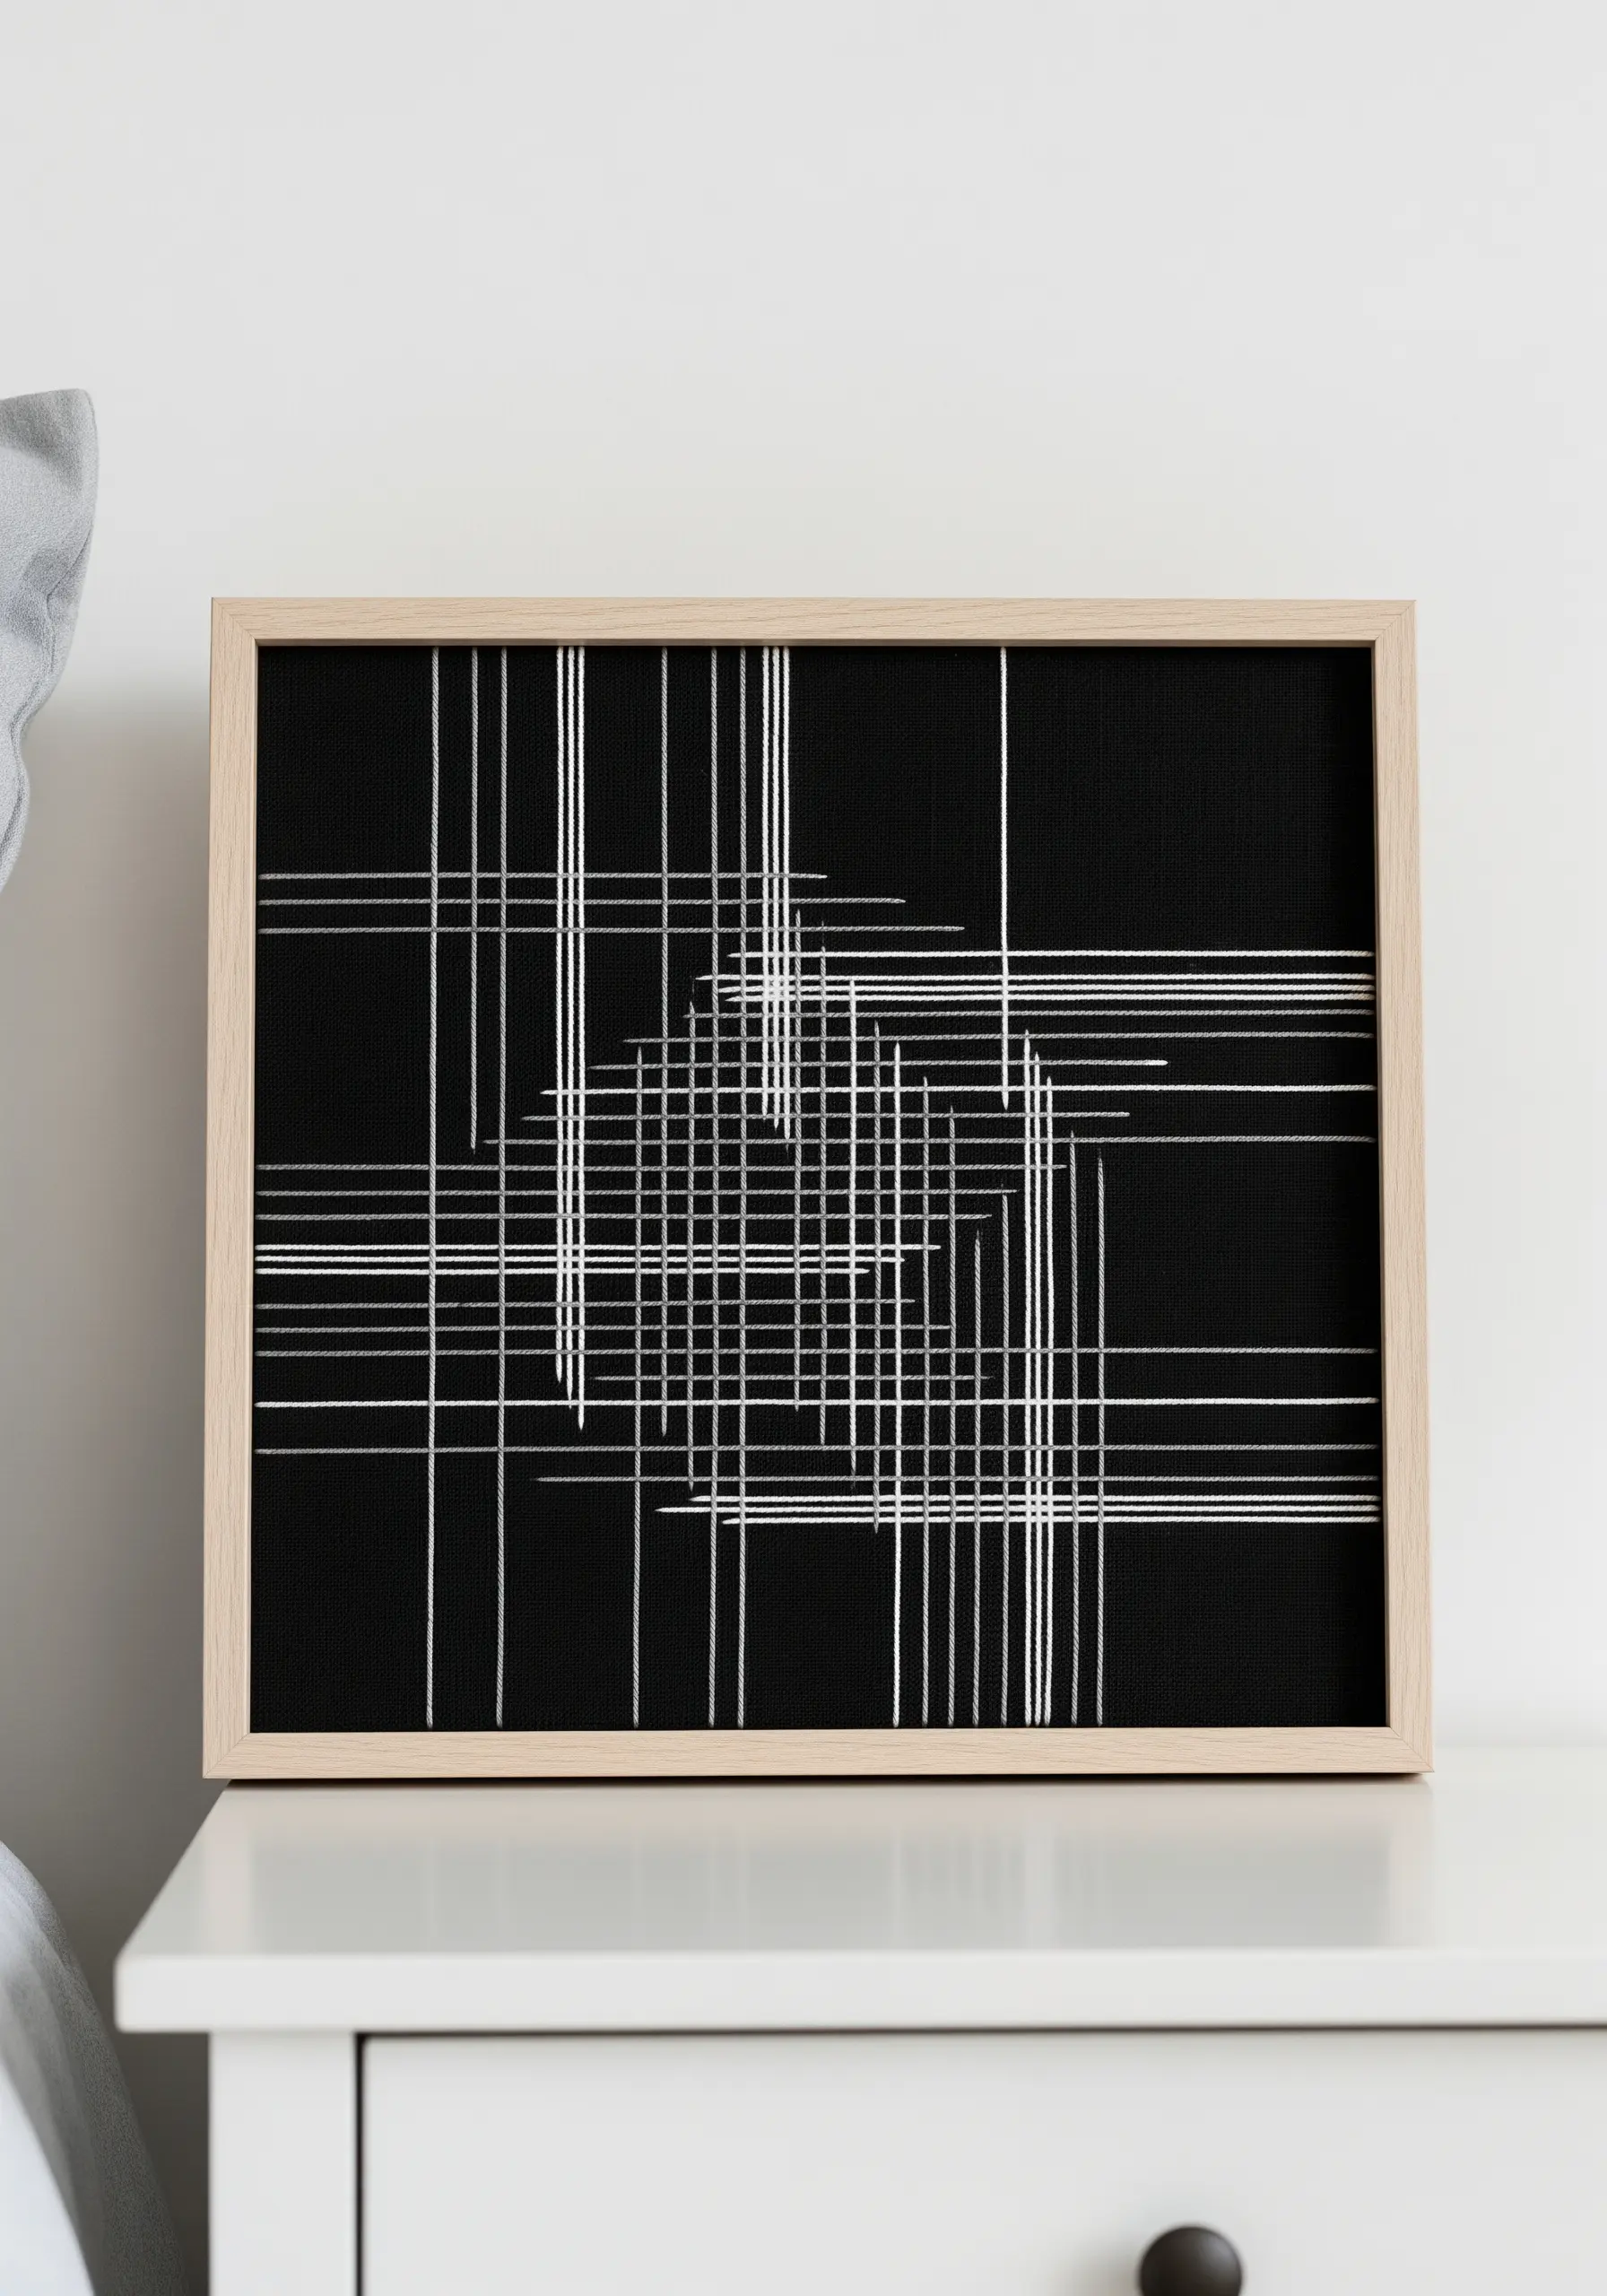
Make a bold statement by stitching with bright white thread on a stark black canvas.
This high-contrast approach is perfect for geometric or linear designs, as it makes every single stitch stand out with graphic clarity.
To keep your white thread pristine while working, wash your hands frequently and consider using a thread conditioner like beeswax to prevent tangles and static.
This technique transforms simple straight stitches into a dynamic piece of abstract art that feels both modern and timeless.
24. Couch Thick Fibers for Sculptural Lines
Add bold, sculptural lines to your work by couching thick yarn, cord, or even braided threads onto your fabric.
Couching is the technique of laying a thick fiber on the surface and tacking it down with a separate, finer thread.
This allows you to create fluid, organic curves that would be impossible with traditional stitches.
The contrast between the heavy, corded line and the flat fabric surface creates a beautiful 3D effect with minimal effort.
25. Combine Appliqué and Stitching for Clean Lines
For large designs with perfect curves, combine appliqué with hand embroidery. The main arch is a piece of colored fabric stitched onto the neutral background.
First, secure the appliqué shape with an iron-on adhesive like Heat’n Bond, then stitch your decorative lines over the top.
The clean, solid color of the appliqué provides a perfect foundation for the delicate, repeating lines of white backstitch.
This method saves a significant amount of time and thread compared to filling the entire shape with satin stitch, while achieving an even cleaner result.
26. Imply Form with Gradient Straight Stitches

Suggest a misty forest landscape using only vertical straight stitches in varying lengths and shades of grey.
Create depth by layering the colors: use darker threads for the trees in the foreground and lighter greys for those fading into the distance.
The uneven, dense lines create a beautiful texture that feels both abstract and representational at the same time.
This is a powerful way to practice color-blending thread patterns without complex stitches, relying entirely on placement and tone.
27. Find Embroidery Inspiration in Natural Forms
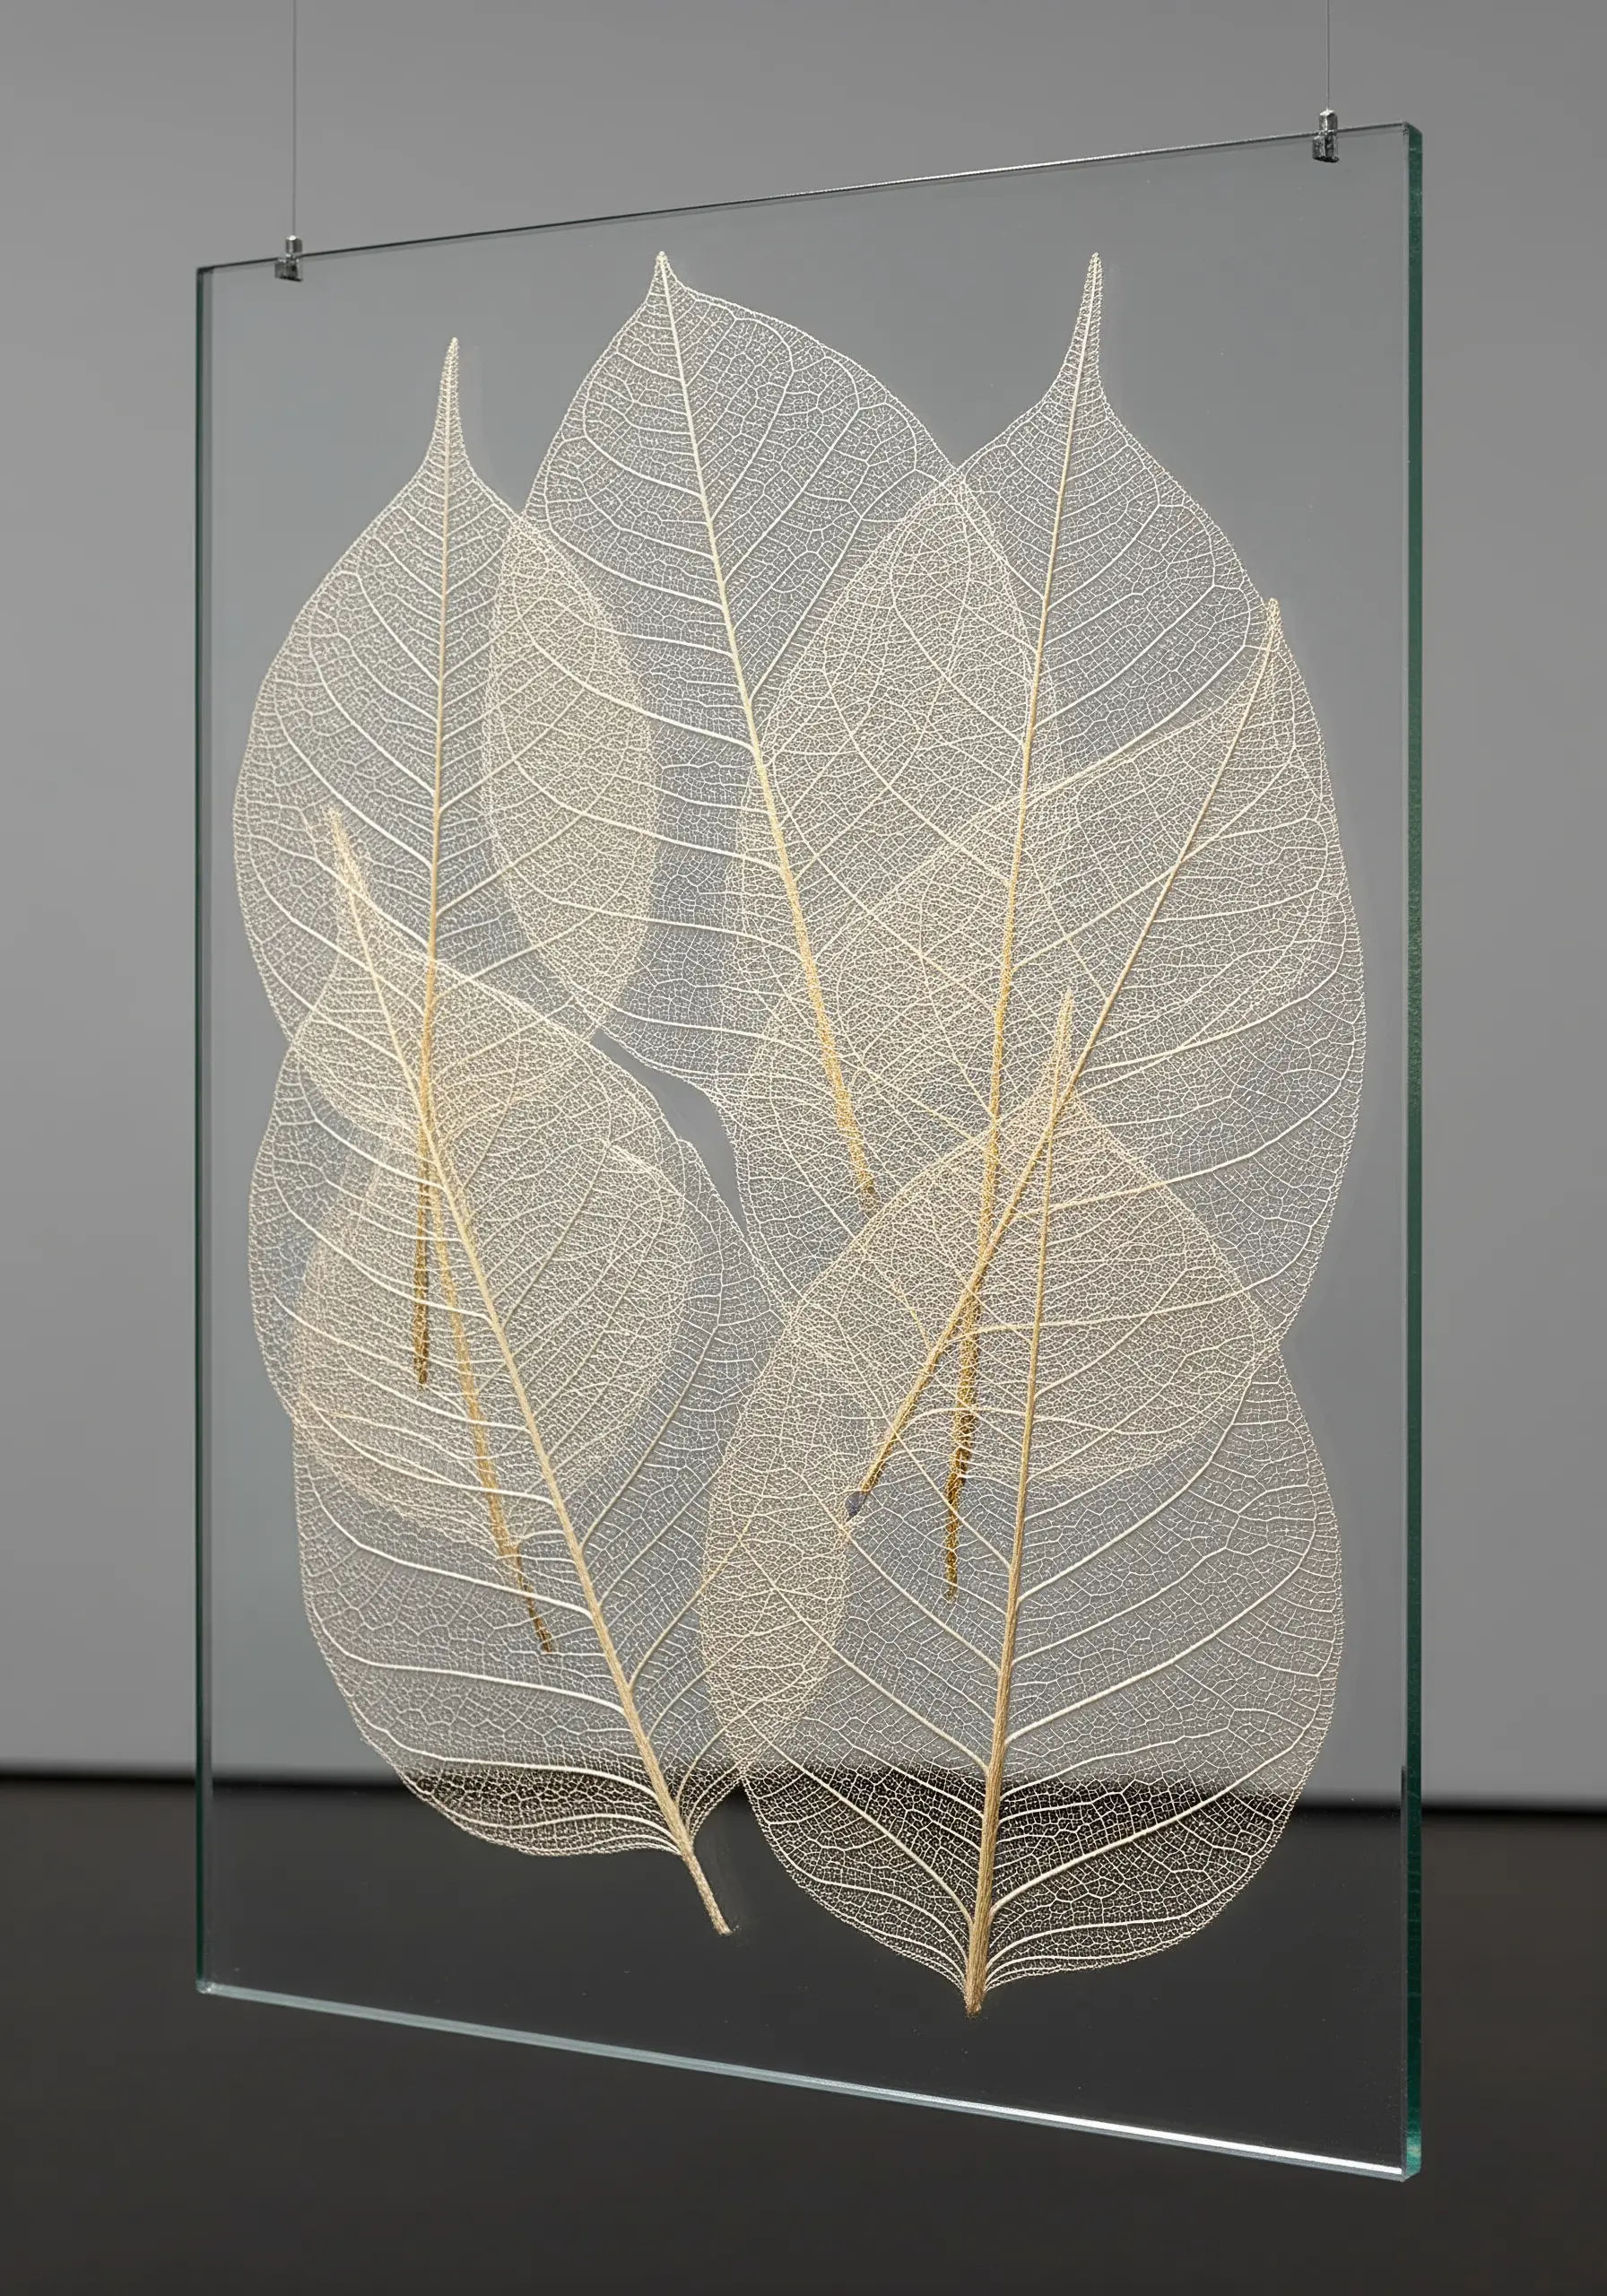
Let nature be your pattern book. The delicate, intricate veins of skeleton leaves provide perfect inspiration for fine-line embroidery.
To translate this to thread, use a single strand of floss in a contrasting color and a simple backstitch or split stitch to trace the organic lines.
This exercise of observing and recreating natural patterns will train your eye for composition and detail.
Consider incorporating pressed flower designs directly by stitching around them on the fabric for a mixed-media approach.
28. Build a Library of Textural Stitches

Dedicate a sampler to mastering decorative stitches that add dimension, like the braided chain stitch or knotted Palestrina stitch.
Working with a thicker thread, like a cotton perle or sashiko thread, will make the texture of each stitch more pronounced and easier to learn.
A stitch sampler isn’t just for practice; a beautifully executed one becomes a piece of art in its own right.
It also serves as a physical reference guide, allowing you to see and feel the effect of a stitch before committing it to a larger project.
29. Achieve a Flawless Satin Stitch Silhouette
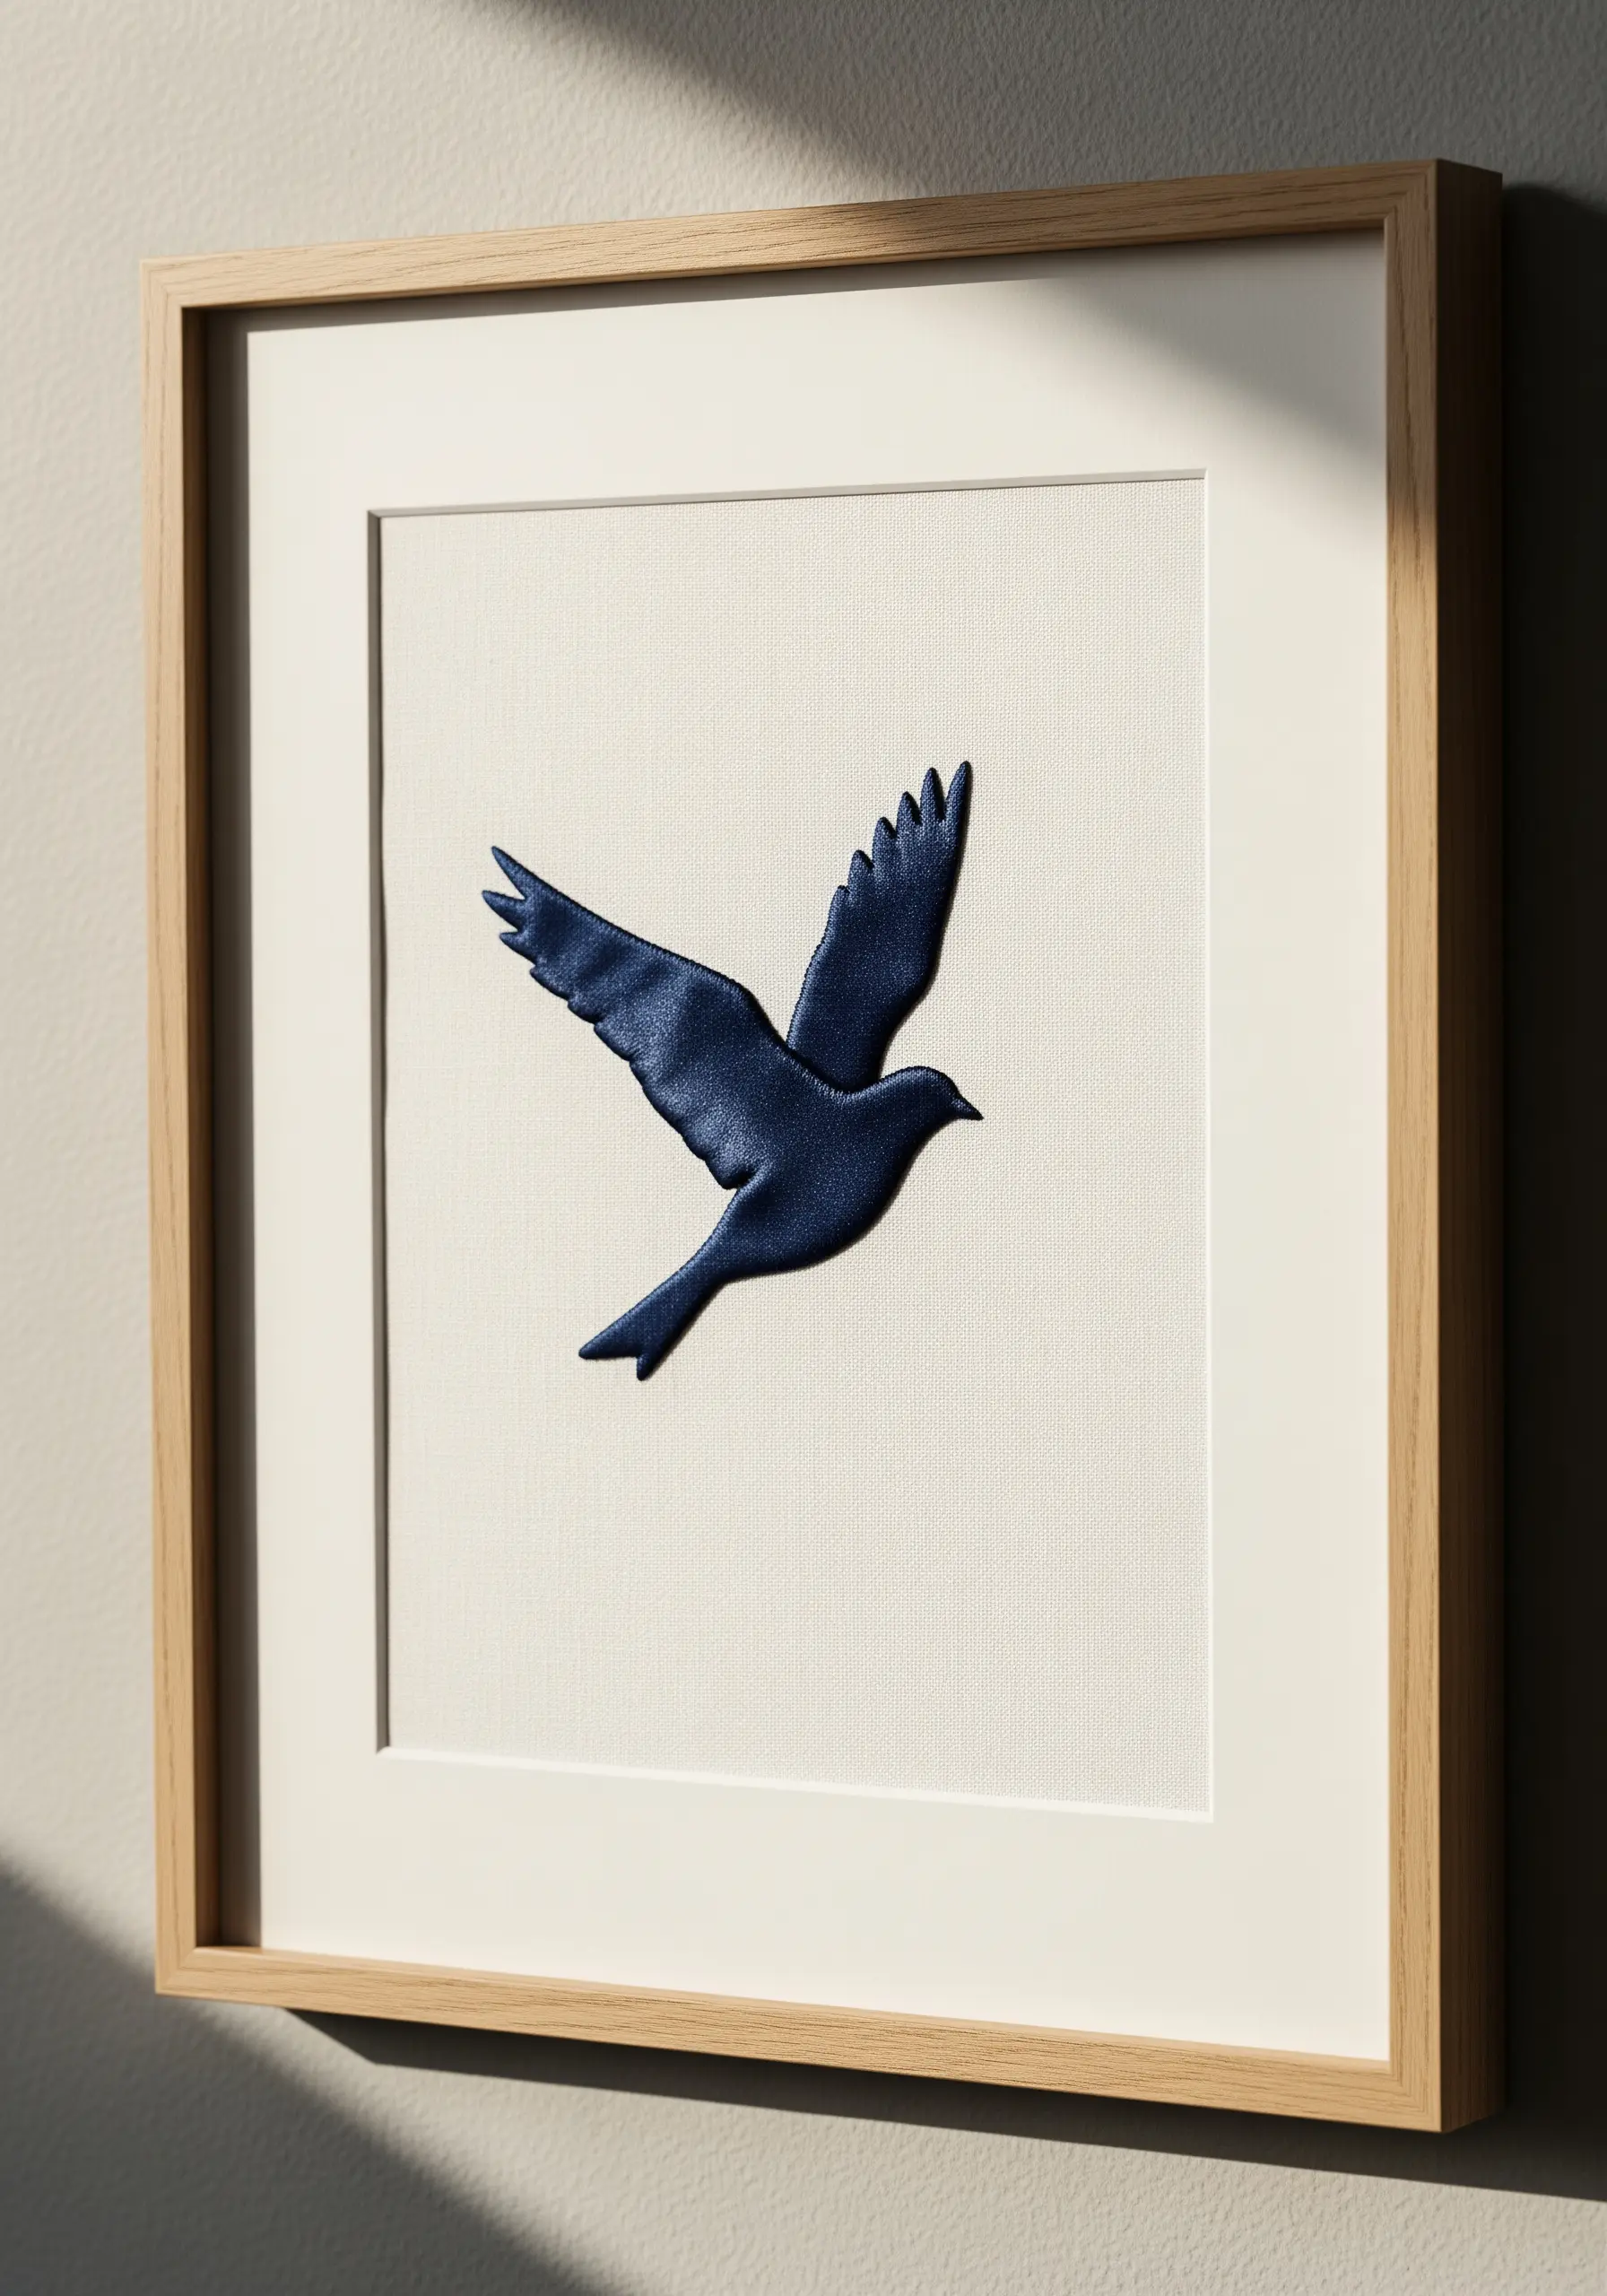
The key to a perfect satin stitch surface, especially on a silhouette, is the direction and tension of your stitches.
For a smooth, light-catching finish, keep all your stitches parallel and angled slightly to follow the form of the shape, like the curve of a wing.
Before you begin, outline the entire shape with a tiny split stitch. This raised edge will help you guide your satin stitches for a razor-sharp outline.
Using a satin or silk floss will enhance the sheen, giving the filled shape a luxurious, almost liquid appearance.
30. Add Subtle Detail to Utilitarian Fabrics
Elevate a simple, functional object like a wall hanging by adding a subtle, repeating geometric pattern.
A simple seed stitch or a small cross stitch is all you need to create this delicate texture.
Using a thread color that is only a few shades lighter than the background fabric creates a sophisticated, low-contrast effect that adds interest without being loud.
This approach transforms a plain textile into a piece of intentional, minimalist embroidery perfect for a serene bedroom corner.
31. Create Gradient Fields with French Knots
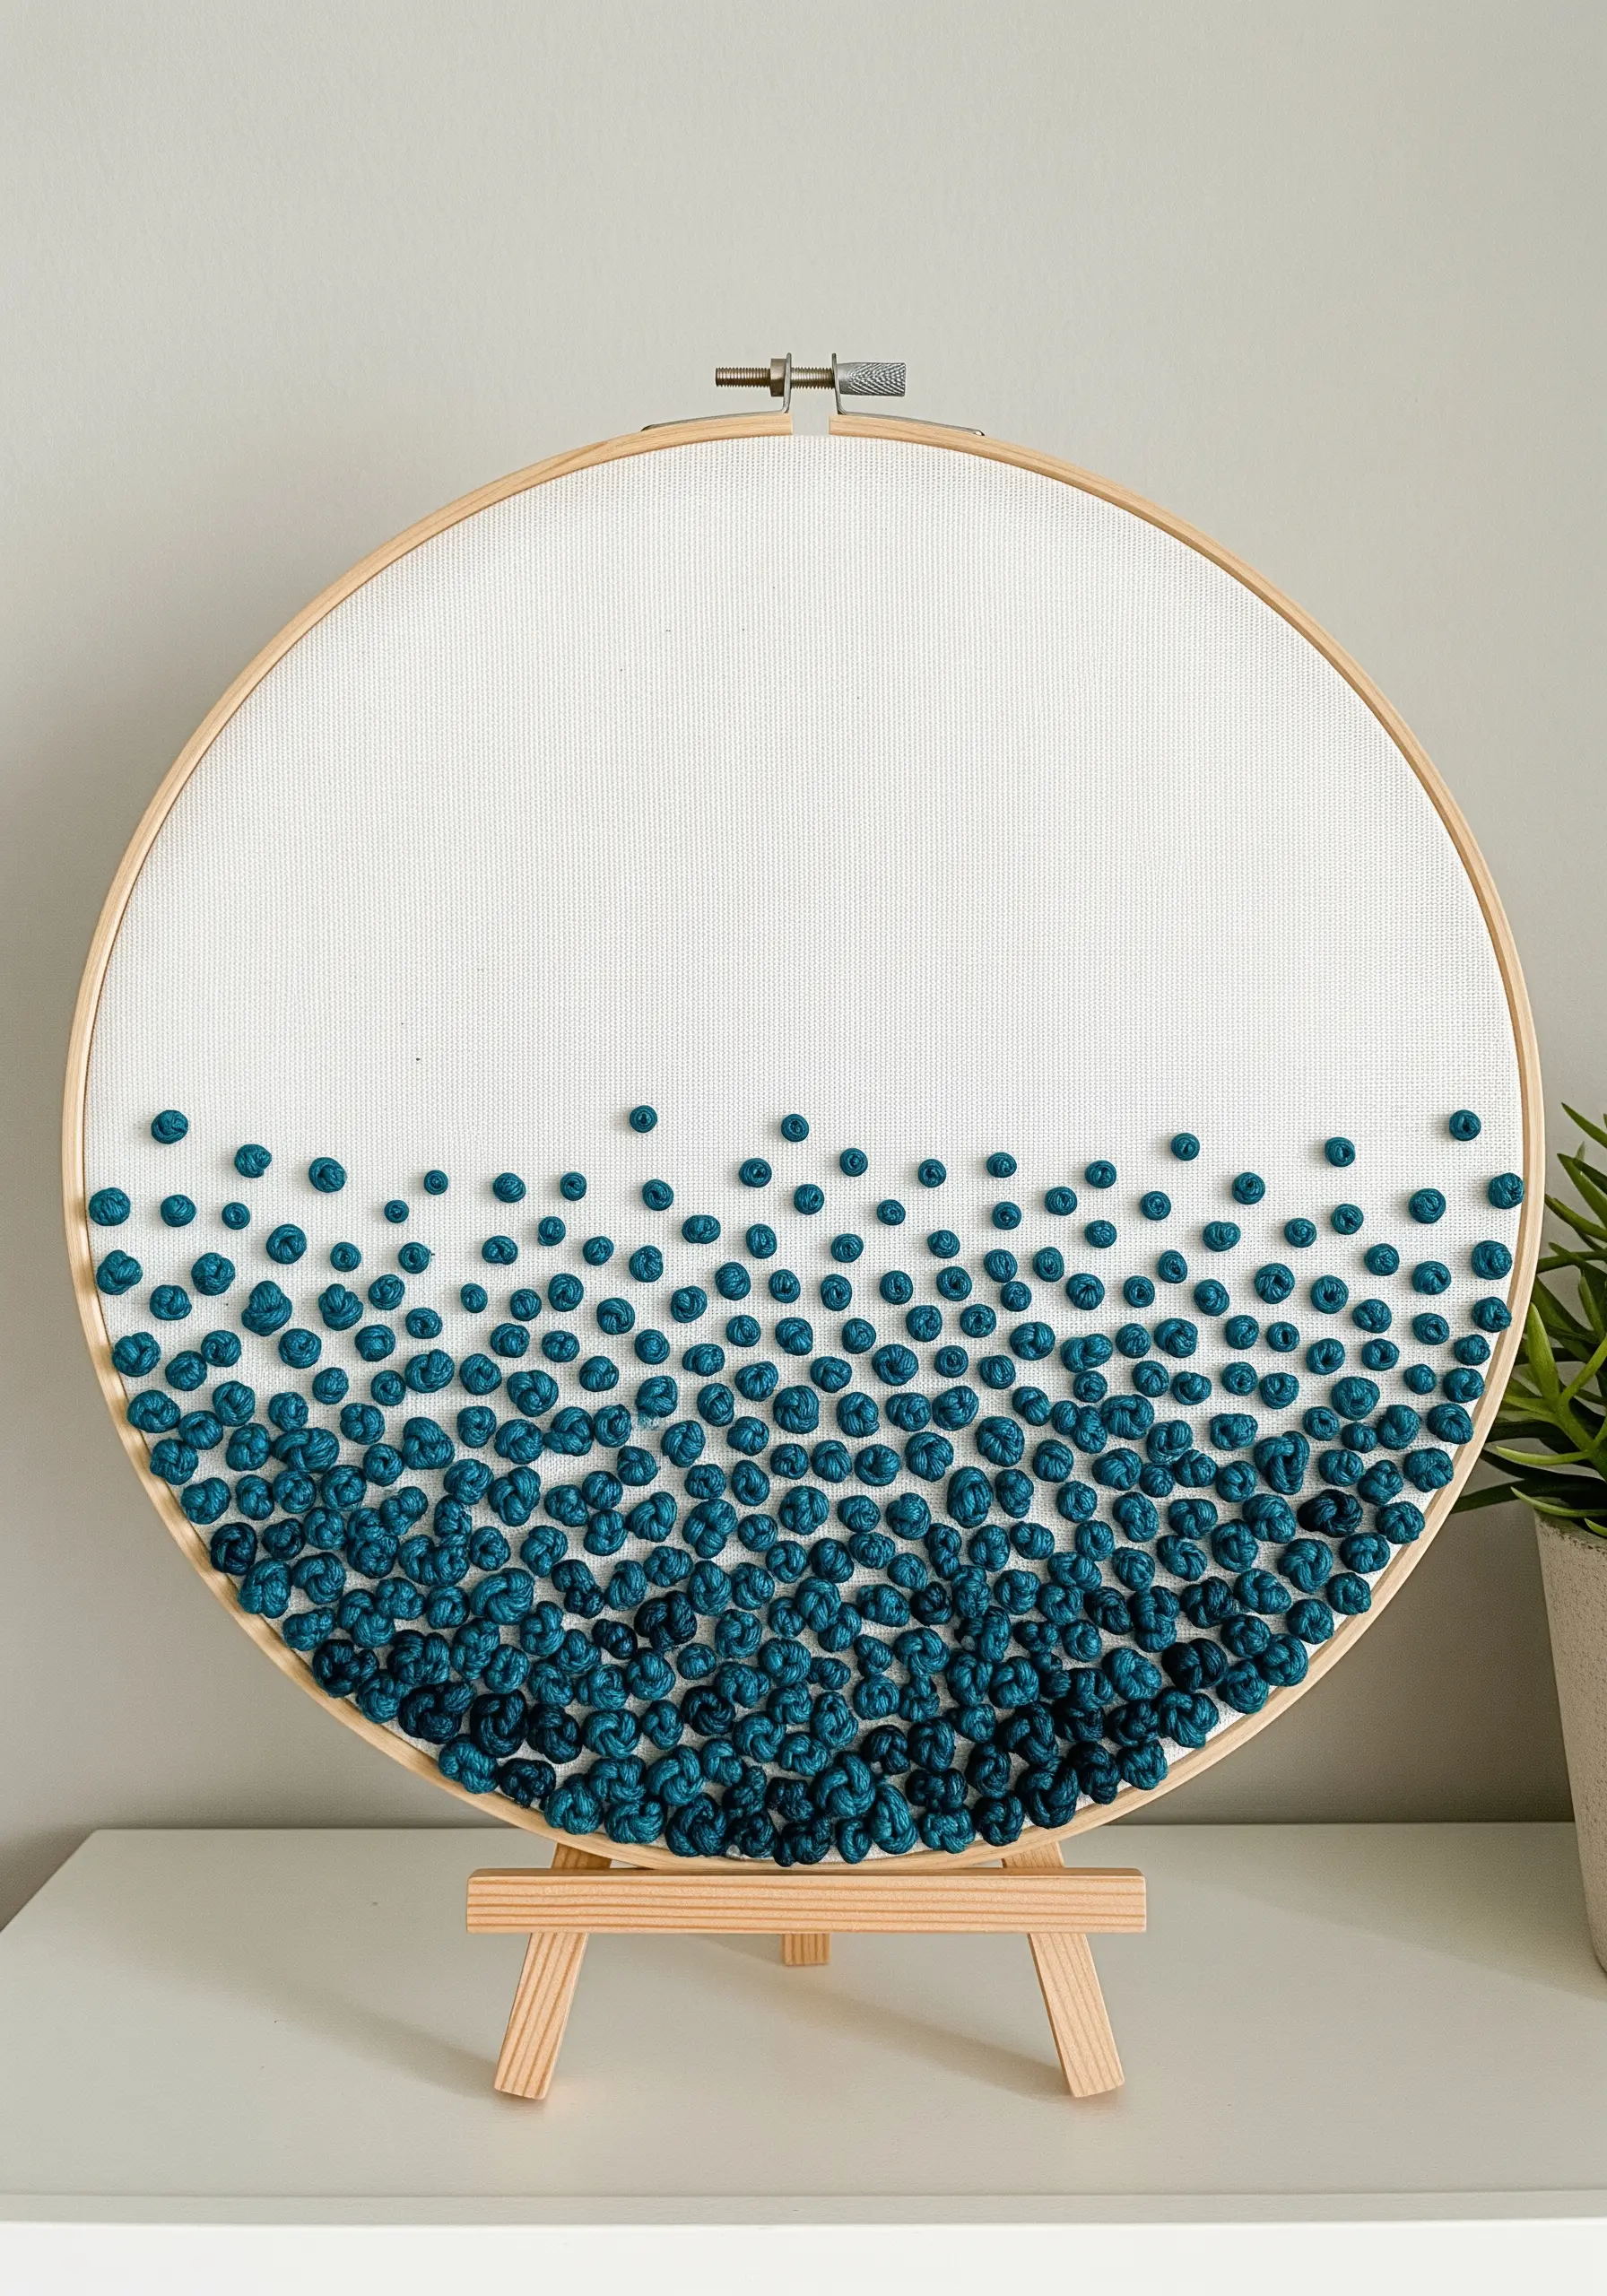
Explore color and density by creating an abstract landscape with French knots.
To achieve a gradient effect, start with your darkest color at the bottom, placing the knots very close together.
As you move up the hoop, gradually introduce lighter shades and increase the space between each knot until they are sparsely scattered at the top.
This technique is a beautiful way to play with texture and color, creating a piece that invites touch and has incredible visual depth.
32. Stitch Delicate Branches for Organic Detail
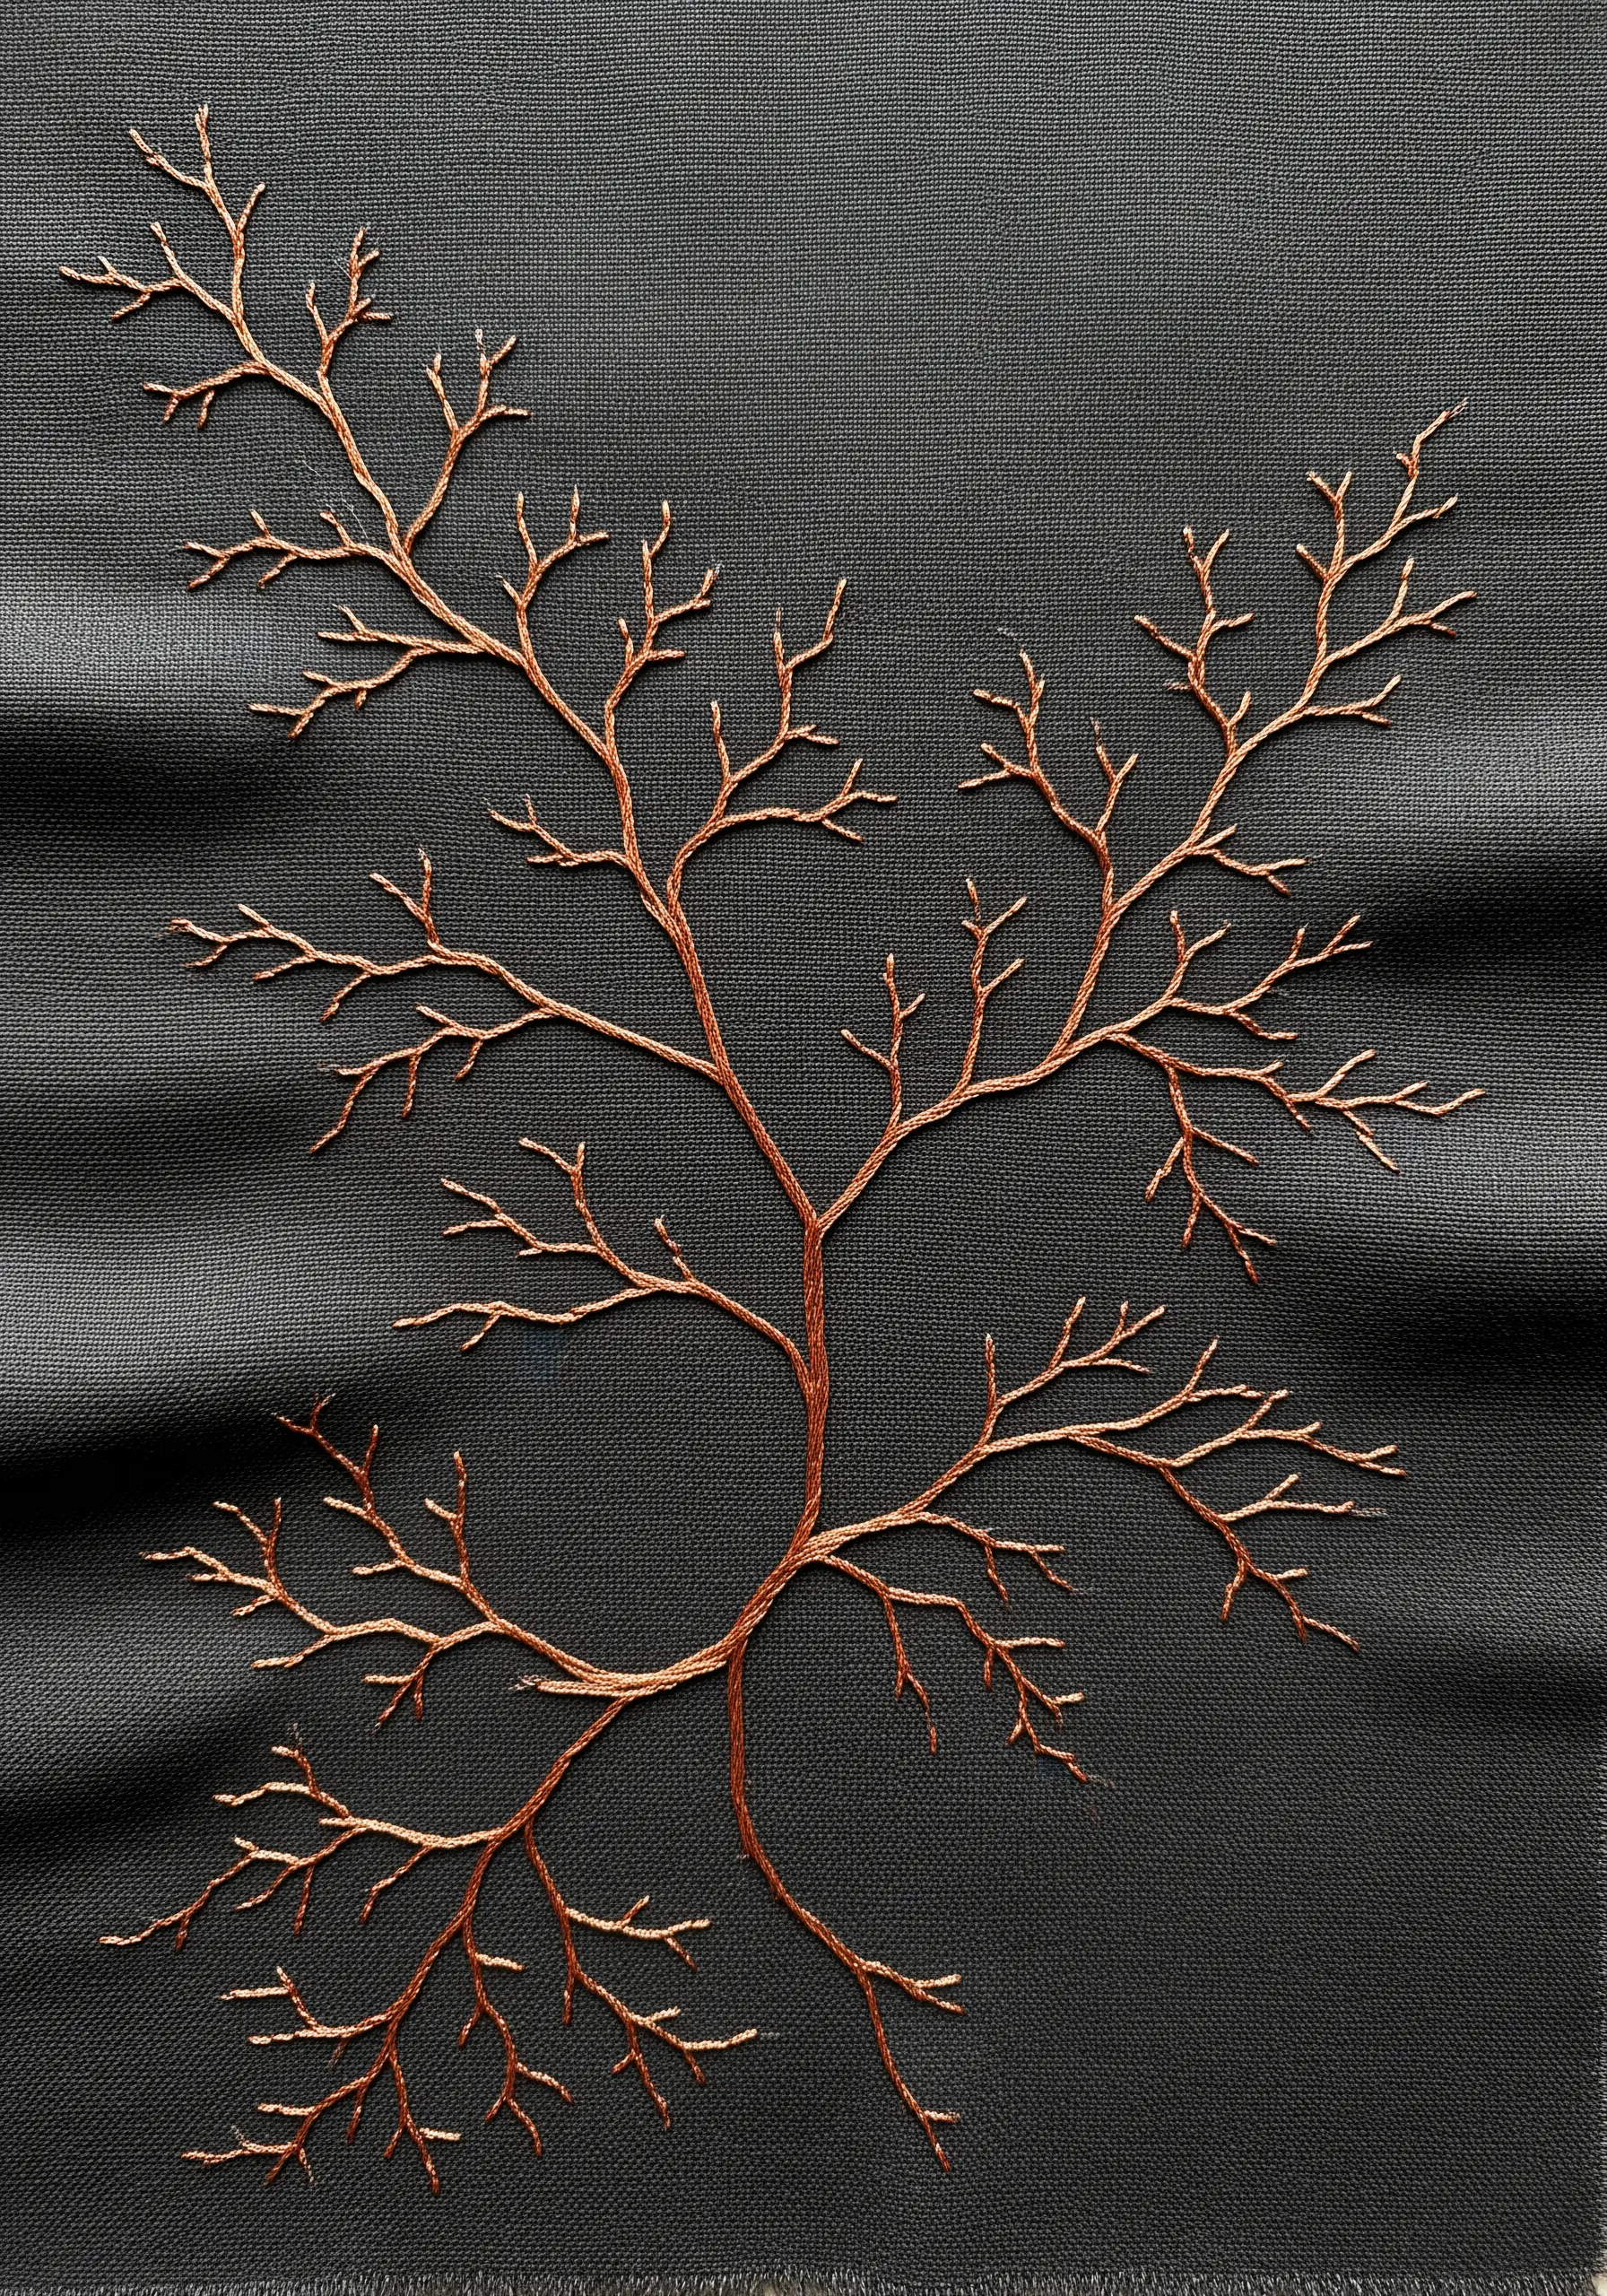
Capture the fine, fractal-like quality of bare branches using a whipped backstitch for the main stems and single straight stitches for the tiniest twigs.
Use a thread with a slight color variation or a variegated floss to give the branches a more natural, multi-tonal appearance.
Stitching on a dark, textured fabric like charcoal grey linen makes the lighter-colored thread stand out and adds a moody, atmospheric quality.
This type of detailed, organic work demonstrates how nature-inspired leaf clusters and branches can become compelling art.
33. Layer Appliqué and Contour Stitching
Create these organic, layered shapes by combining fabric appliqué with precise contour stitching.
Cut your pebble-like shapes from solid-colored cotton fabric and secure them to your base canvas.
Then, using a simple backstitch, stitch concentric lines that echo the shape’s outline, creating a topographical, 3D illusion.
The contrast between the soft, solid fabric and the sharp, graphic lines of the thread makes for a visually compelling piece that feels both handmade and highly designed.


