

A simple canvas tote bag is more than just a practical accessory; it’s a blank canvas waiting for your personal touch. Moving beyond basic stitches is not about complexity, but intention. It’s about seeing your thread and needle as tools for creating texture, depth, and light.
In these designs, you’ll discover how a simple shift in stitch direction can mimic the sheen on a leaf, or how combining different stitches can create a rich, tactile landscape. This isn’t just about decorating a bag—it’s about elevating a simple object into a piece of wearable art that feels uniquely yours.
Let these ideas inspire you to look closer at the natural world and translate its beauty into stitches. Your next trip to the farmer’s market deserves a bag that’s as fresh and vibrant as the produce you bring home in it.
1. Golden Ginkgo Cascade with Split Satin Stitch

To achieve that luminous, sun-kissed gradient, mentally divide each ginkgo leaf into two or three vertical sections before you begin stitching.
Use a long-and-short stitch to blend your golden yellows and pale greens, but keep the stitches tight and parallel to mimic the smooth sheen of satin stitch.
This hybrid approach gives you the seamless blending of thread painting with the polished finish of satin stitch, which is perfect for capturing how light hits a leaf.
Define the delicate central veins with a single strand of a darker thread; this contrast in thread weight adds a layer of professional refinement.
2. Muted Eucalyptus with Satin Stitch Blocking
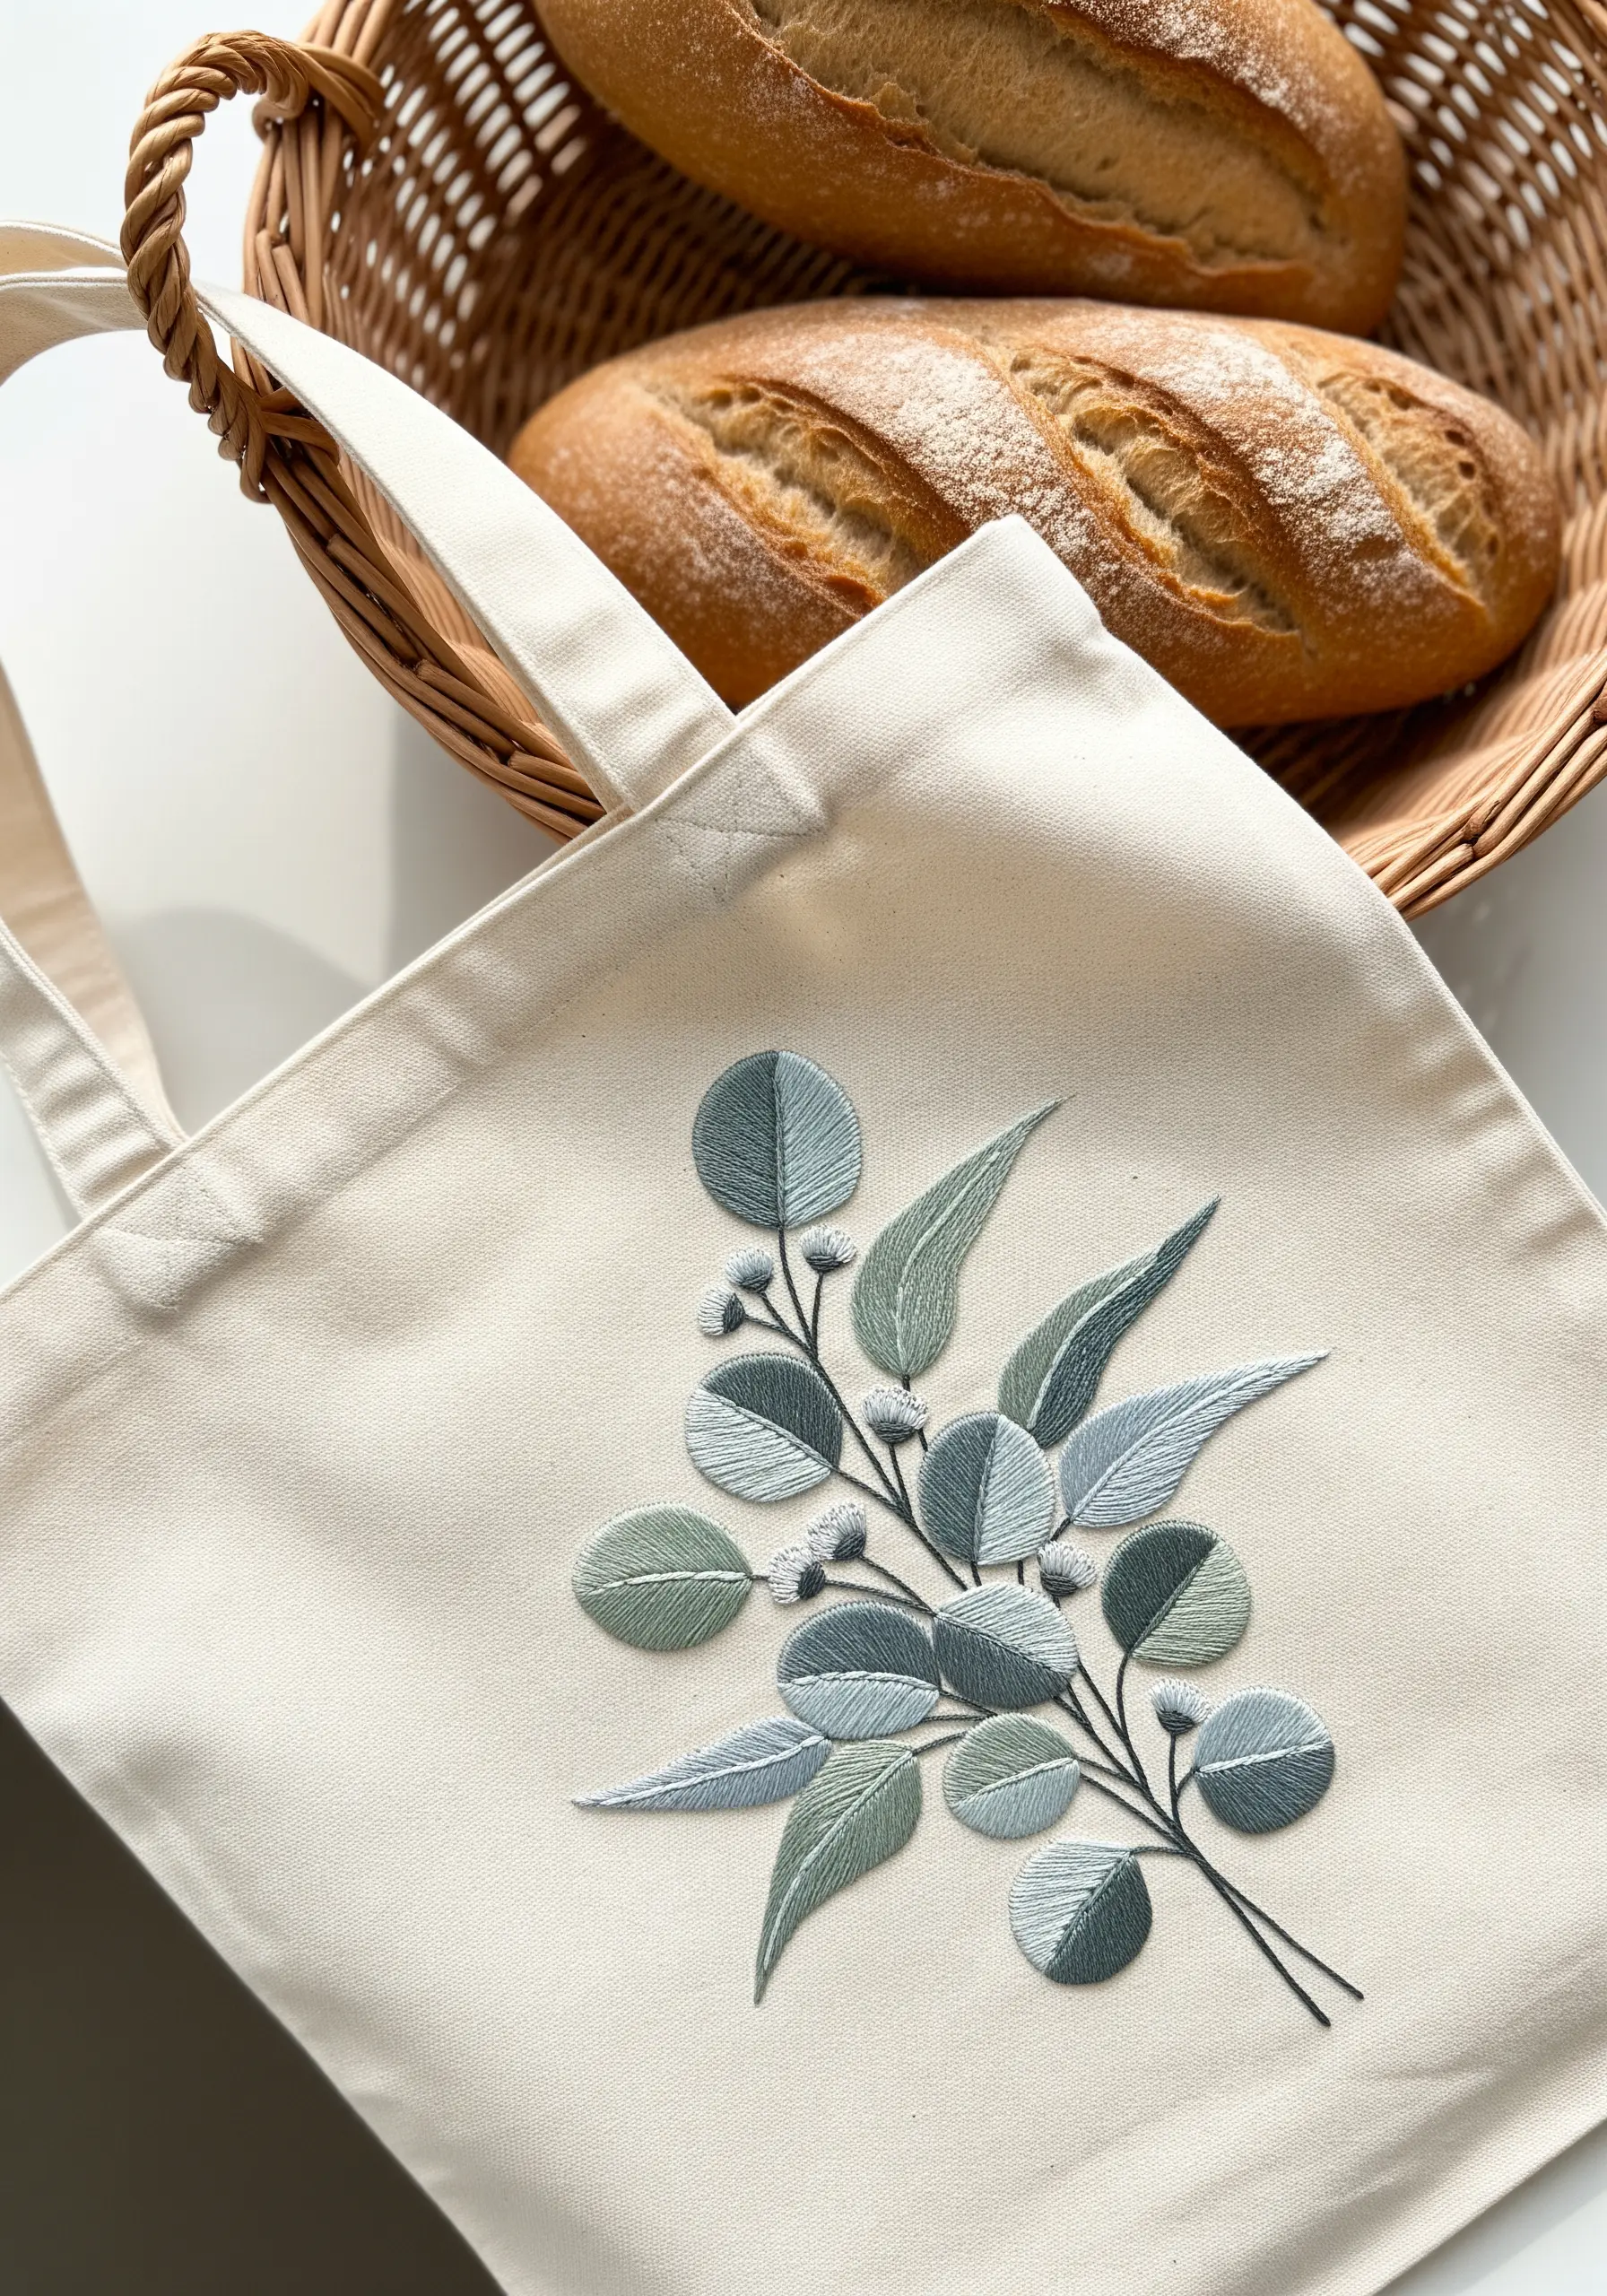
Capture the soft, matte finish of eucalyptus by selecting a desaturated palette of sage, dusty blue, and grey-green.
For the iconic round leaves, use a split satin stitch. Stitch each half separately, angling your threads toward the center line to create a subtle, clean vein without an actual outline.
Contrast the round leaves by using a classic fishbone stitch for the longer, pointed leaves, which builds a naturally raised central vein.
Finish with tiny, tightly packed French knots for the buds, using an off-white or silver thread to create a bright focal point that lifts the entire composition.
3. Layered Monstera with Appliqué-Style Edging
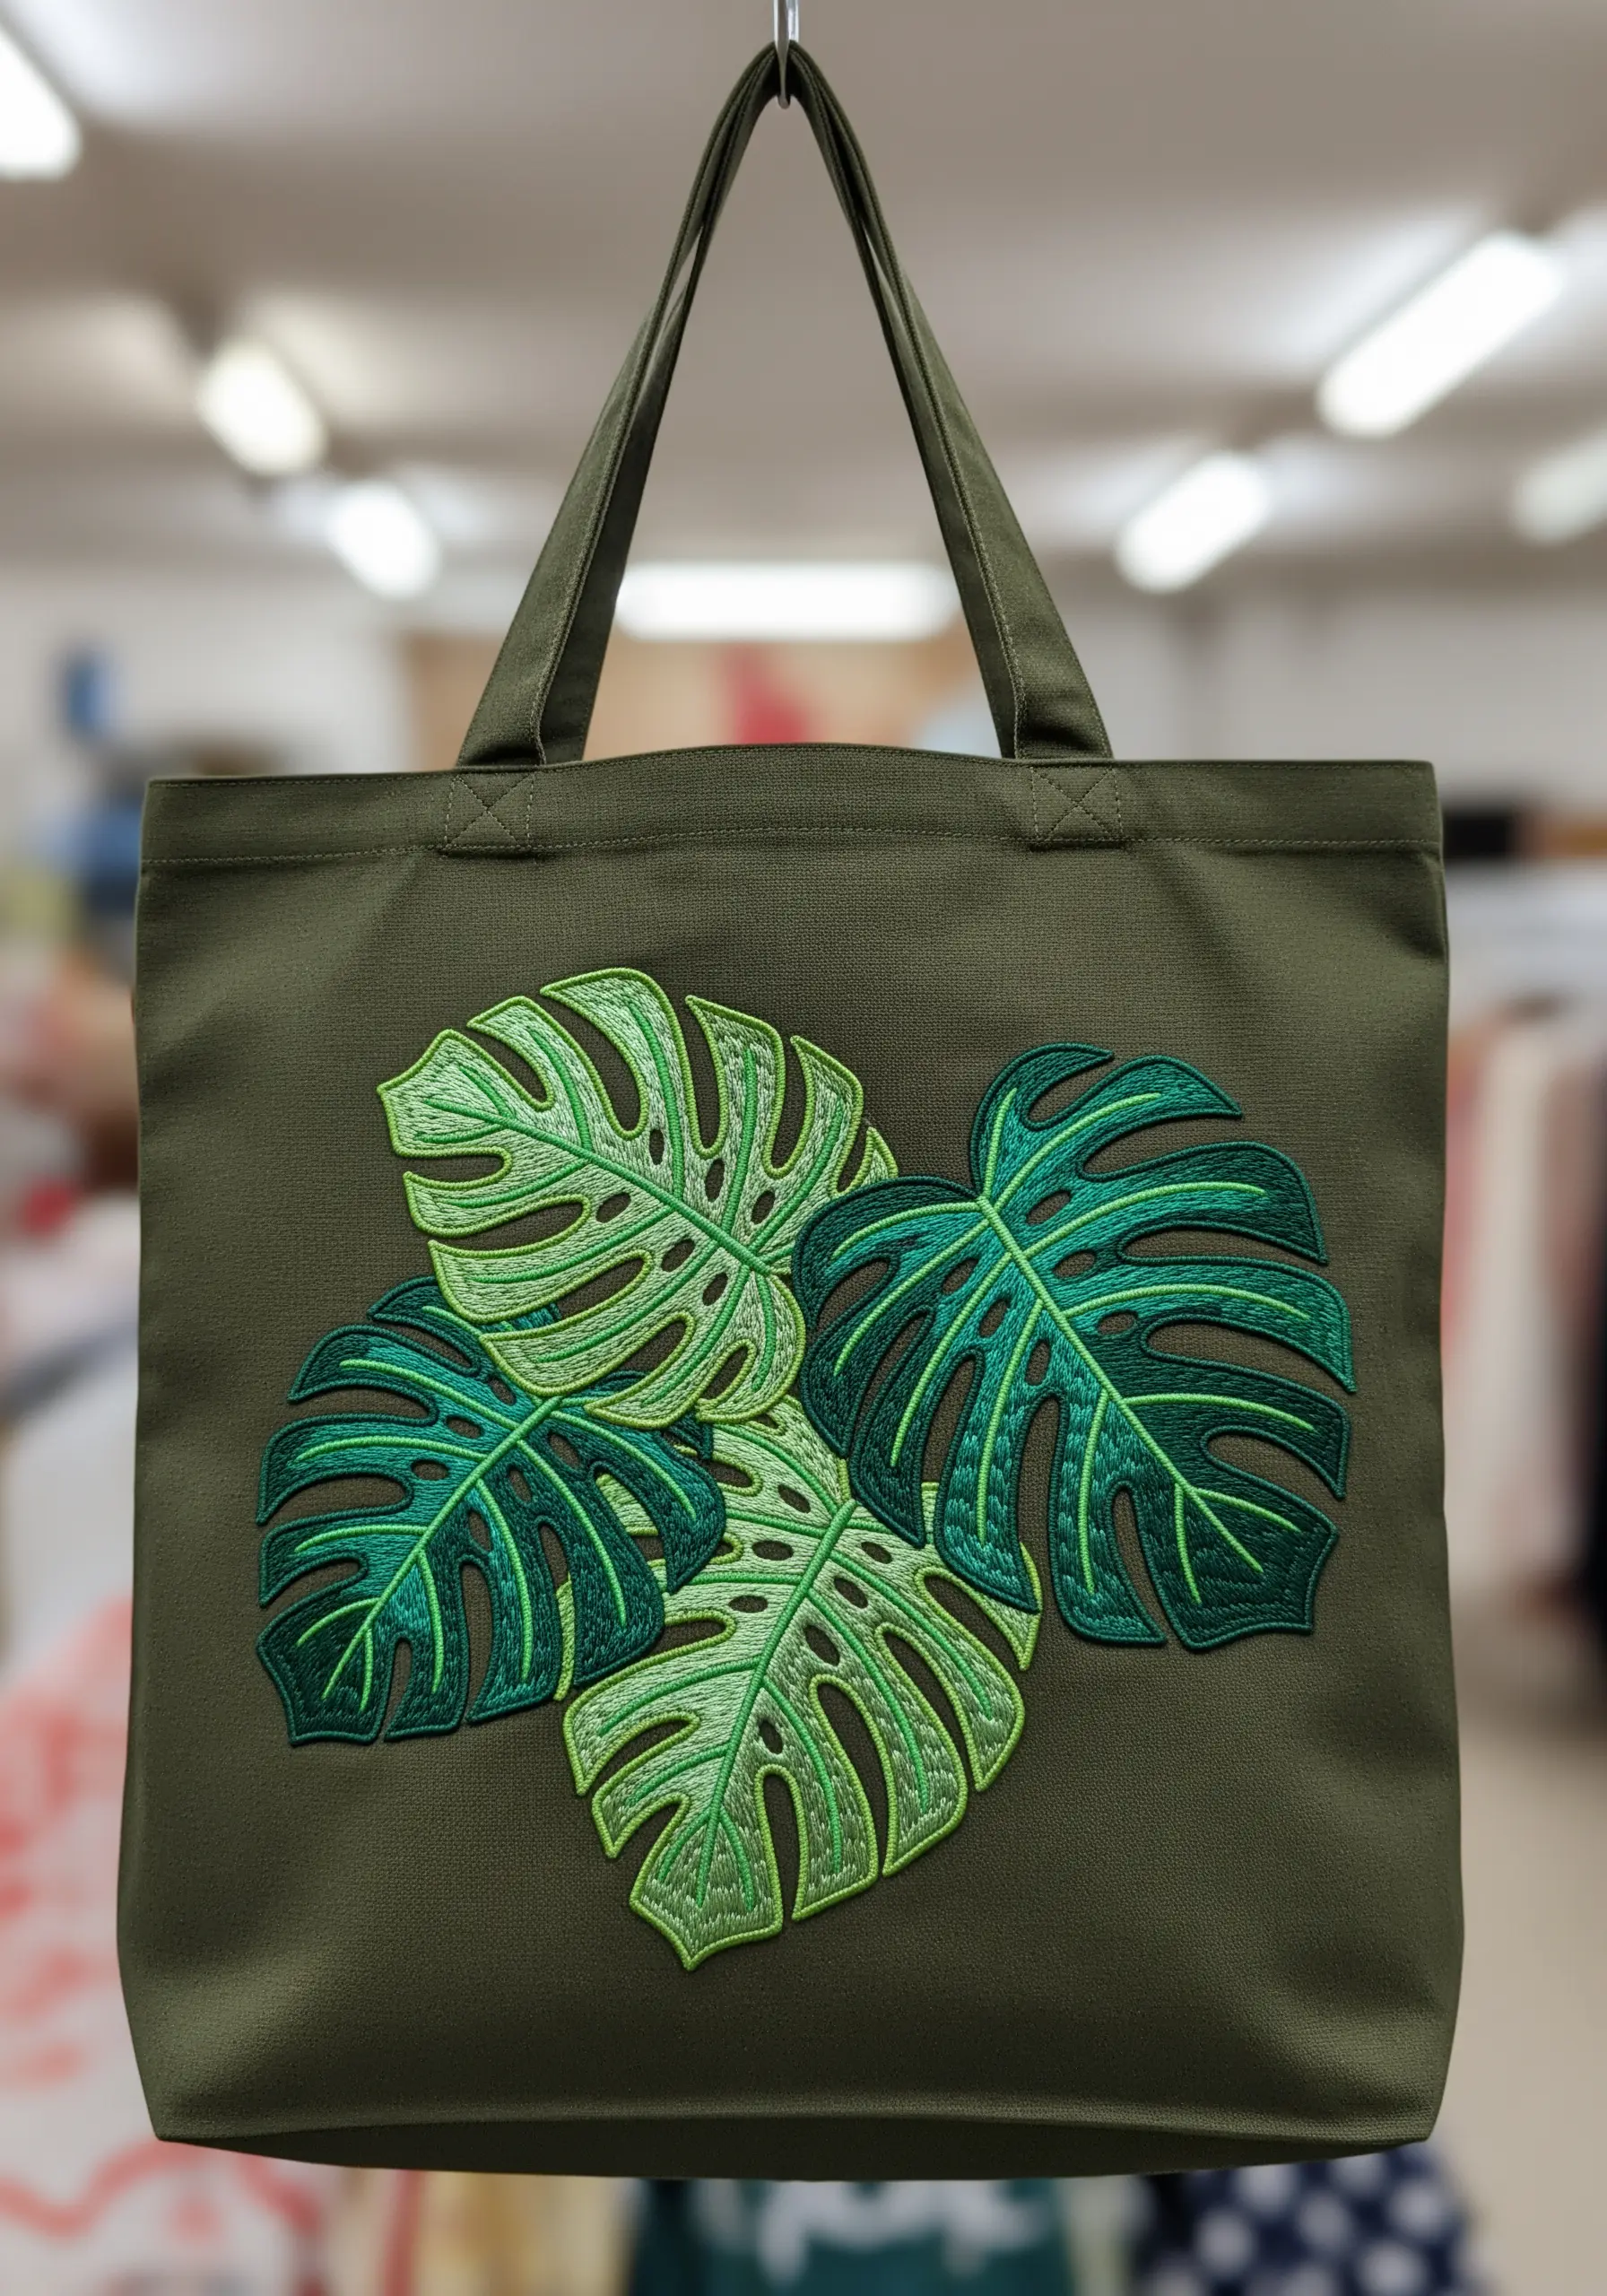
To create that bold, patch-like effect, stitch each leaf as a complete element before starting the next, allowing them to overlap slightly.
Fill the leaves with a dense satin stitch, then frame each one with a thick, raised outline using a whipped backstitch in a darker, contrasting green.
This heavy border contains the fill stitches, prevents fraying on a well-used tote, and creates the crisp edge that gives the design its graphic power.
Varying the greens from lime to forest across the leaves adds depth and prevents the cluster from looking flat.
4. Delicate Fern Fronds on Textured Jute

Working on a coarse fabric like jute requires stitches that sit on the surface rather than sinking into the weave.
Use a whipped backstitch for the central stem of each frond; this technique doubles the thread’s thickness, ensuring the line is bold and visible against the texture.
For the tiny leaflets, opt for single, detached chain stitches or simple straight stitches. They provide the shape you need without pulling or distorting the open weave of the fabric.
Always use a heavy-duty stabilizer on the back of jute or canvas to support the fabric and keep your stitches from puckering.
5. Autumn Oak Cluster with Painterly Shading

Avoid flat, single-color fills by using a long-and-short stitch to blend at least two or three autumnal tones within each leaf.
This thread painting technique creates a rich, realistic gradient that mimics how natural leaves change color.
Give the acorns a subtle, three-dimensional form by using a padded satin stitch for the caps. Simply create a small base of foundation stitches, then cover it with neat satin stitches to create a raised, rounded effect.
A strong backstitched vein in dark brown will ground the vibrant colors and add crucial structure to each leaf.
6. Fiery Maple Leaves with Directional Stitching
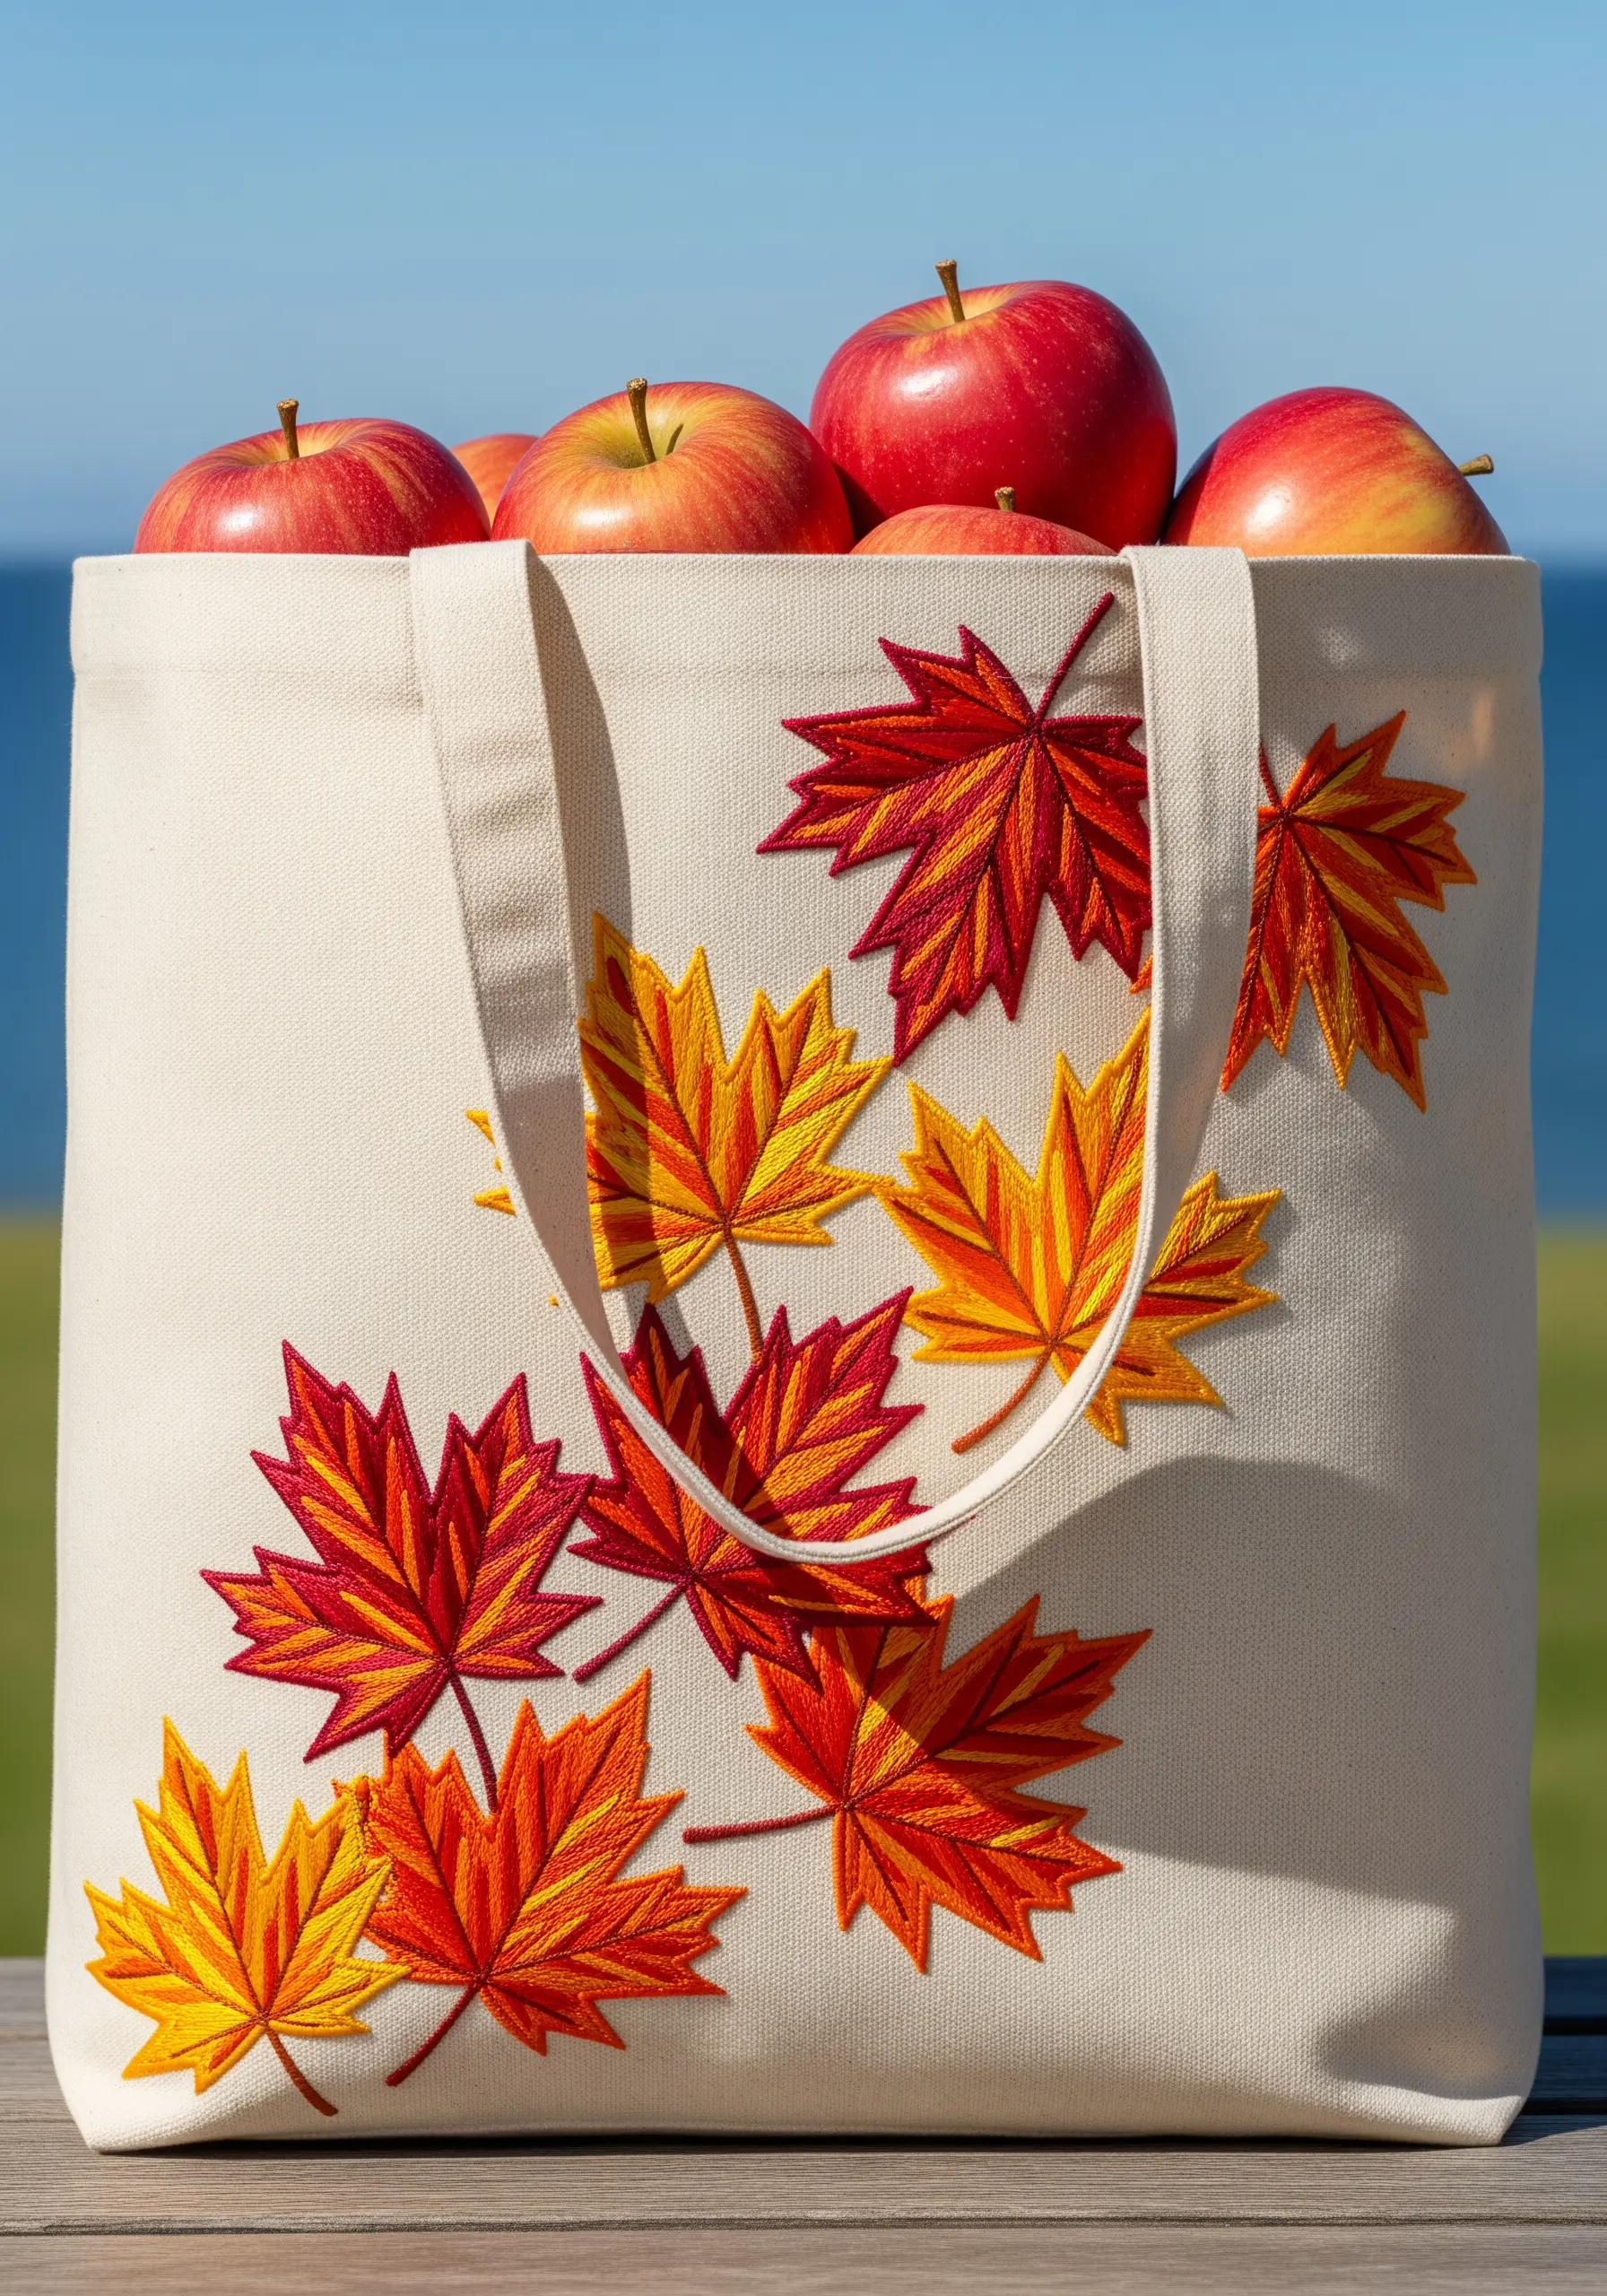
The secret to achieving those sharp, crisp maple leaf points lies in your stitch direction. Angle your long-and-short stitches to follow the natural lines of the leaf, converging neatly at each tip.
Create a vibrant, fiery effect by blending high-contrast colors like crimson, orange, and bright yellow within a single leaf. This creates more visual energy than a simple, smooth gradient.
Use a split stitch for the veins in a darker, contrasting color. This adds structure and definition, preventing the bold colors from overwhelming the leaf’s iconic shape.
7. Elegant Olive Branch with 3D Padded Olives
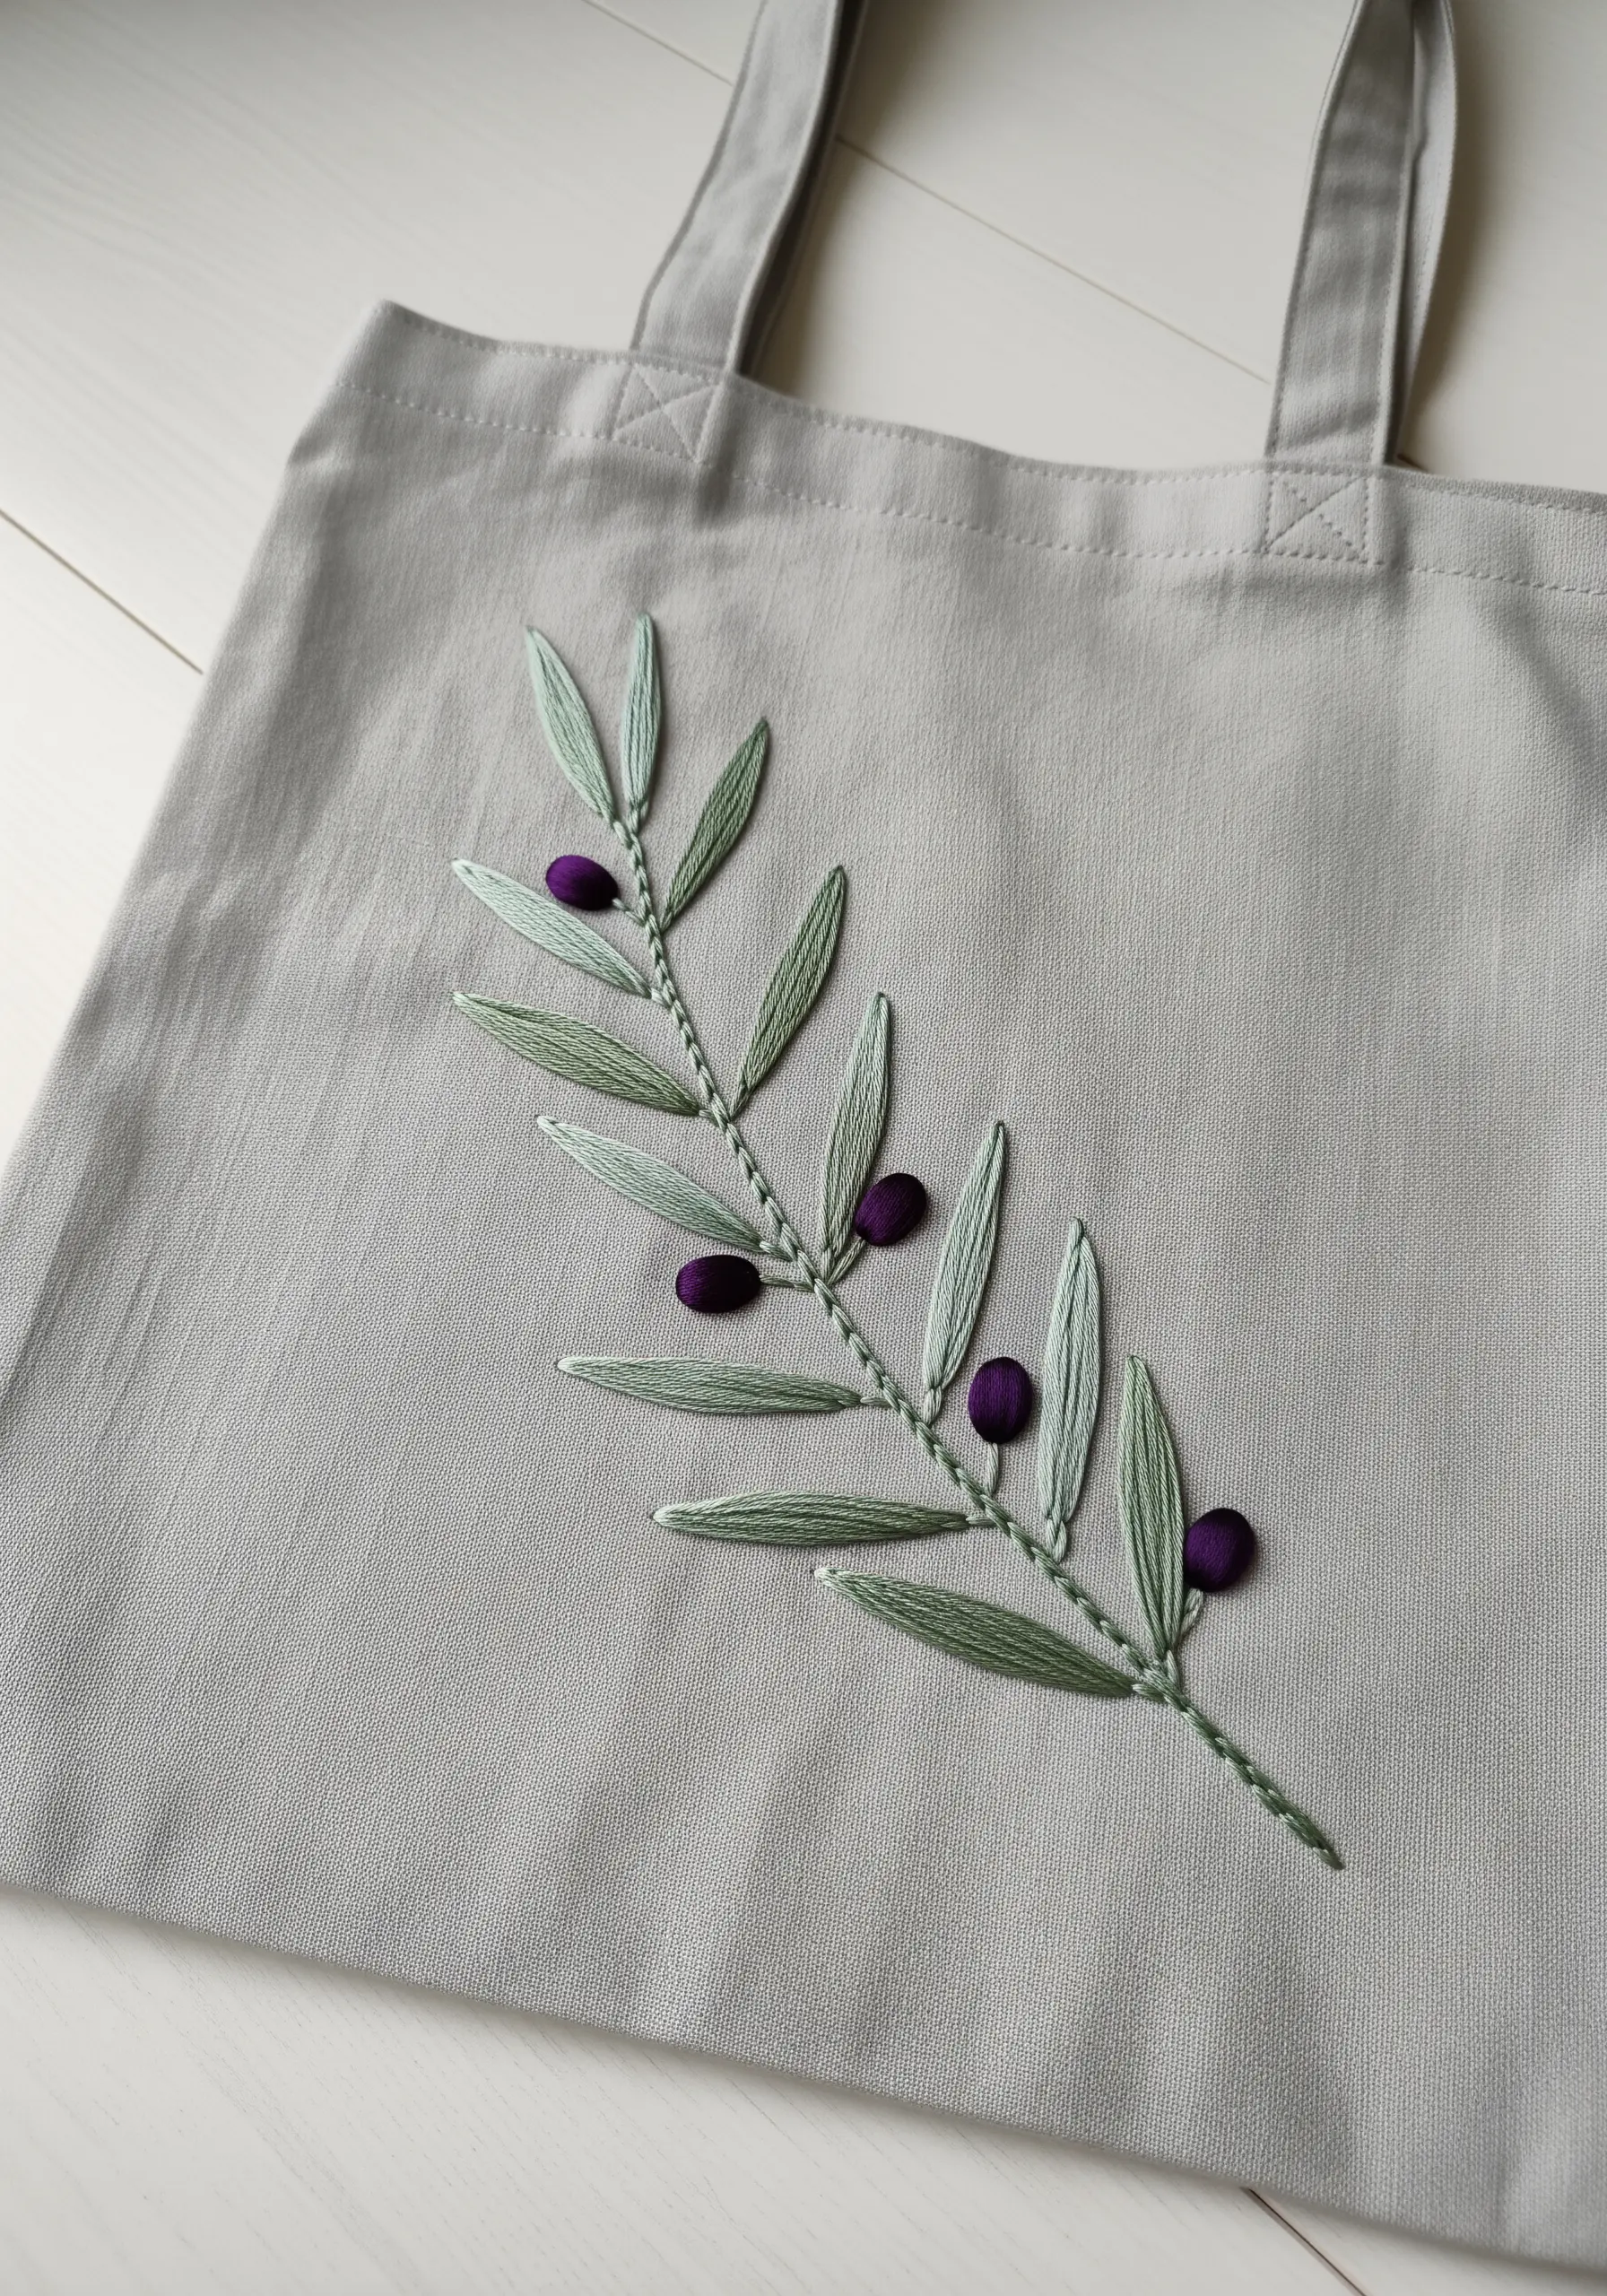
For a minimalist yet impactful design, keep the leaves simple. A classic fishbone stitch in a muted sage green will create both the fill and the central vein in one elegant step.
Make the olives the textural highlight. Use a padded satin stitch by first building a small oval base with foundation stitches, then covering it with vertical satin stitches in a deep, rich purple.
This padding technique lifts the olives off the fabric, creating a beautiful tactile contrast against the flat leaves and the simple backstitched stem.
8. Cascading Ivy with Defined Appliqué Edges

This design’s strength comes from its clean, almost appliqué-like finish, which stands out beautifully against dark fabric.
First, fill each leaf with a blended long-and-short stitch using several shades of green to create highlights and shadows.
Then, meticulously outline every single leaf and vine with a tight, dense satin stitch border in a contrasting shade. This is what creates that sharp, raised edge, making the entire design pop.
Arrange the leaves in a natural, downward flow, varying their sizes and color intensity to suggest movement and light.
9. Aromatic Herb Wreath with Mixed Textures

This design is a sampler of textures, where each herb is defined by a unique stitch. This approach creates a rich, tactile, and visually engaging piece.
Use a broad fishbone stitch for sage leaves, short and sharp straight stitches for rosemary, and tiny French knots for lavender buds.
For the chamomile, a simple lazy daisy stitch for the petals with a French knot center is all you need. This mix of techniques makes the wreath feel dynamic and alive.
An open, asymmetrical composition feels more modern and organic than a perfectly closed circle, adding to the farmer-market charm.
10. Graphic Palm Fronds in High-Contrast Teal

Make a bold, modern statement by pairing an unexpected, vibrant color like teal with a warm, earthy background like mustard canvas.
Use a long, tight satin stitch to fill the fronds, ensuring the stitches are packed closely for a solid, glossy finish that reflects the light.
Define the central stem and each individual leaflet with a sharp outline in a darker, contrasting shade. This illustrative technique is what gives the design its clean, graphic quality and makes it stand out.
11. Windswept Birch with Satin Stitch Leaves

You can create the iconic texture of birch bark with a surprisingly simple technique. First, stitch the trunk in white, then add a series of short, horizontal straight stitches in grey or black.
For the leaves, use a single, teardrop-shaped satin stitch for each one. Scatter a mix of pale yellow, lime green, and off-white leaves to create a sense of light and autumnal transition.
Add a few subtle, vertical straight stitches in the background to suggest rain. This adds atmosphere and tells a story without cluttering the main design, a beautiful example of how negative space embroidery techniques can elevate your work.
12. Lush Grapevine on a Deep Burgundy Canvas

Build realistic grape leaves by blending two shades of green with long-and-short stitch, ensuring your stitches follow the natural direction of the leaf’s veins.
Use French knots for the grapes, clustering them tightly. For added realism, vary the tightness of your knots slightly to create subtle differences in size.
The whimsical, curling tendrils are best stitched with a delicate whipped backstitch using only one or two strands of floss, which gives them a fine, wiry appearance.
Choosing a deep burgundy tote provides a rich, elegant backdrop that makes the greens and purples feel exceptionally luxurious.
13. Stylized Fiddle-Leaf Fig on Natural Jute

Embrace an illustrative style, which is especially effective on a textured fabric like jute that can obscure very fine details.
Fill the leaves with a simple long-and-short stitch. Perfect blending isn’t the goal here; the fabric’s texture will naturally soften the transitions.
The defining feature is the bold, graphic veining. Use a thick stem stitch or chain stitch in a contrasting light green or off-white to make the veins the star of the show.
Finish with a heavy outline in a dark green to contain the shape and give it a clean, polished look that stands up to the coarse fabric.
14. Swirling Autumn Maple Leaves and Samaras
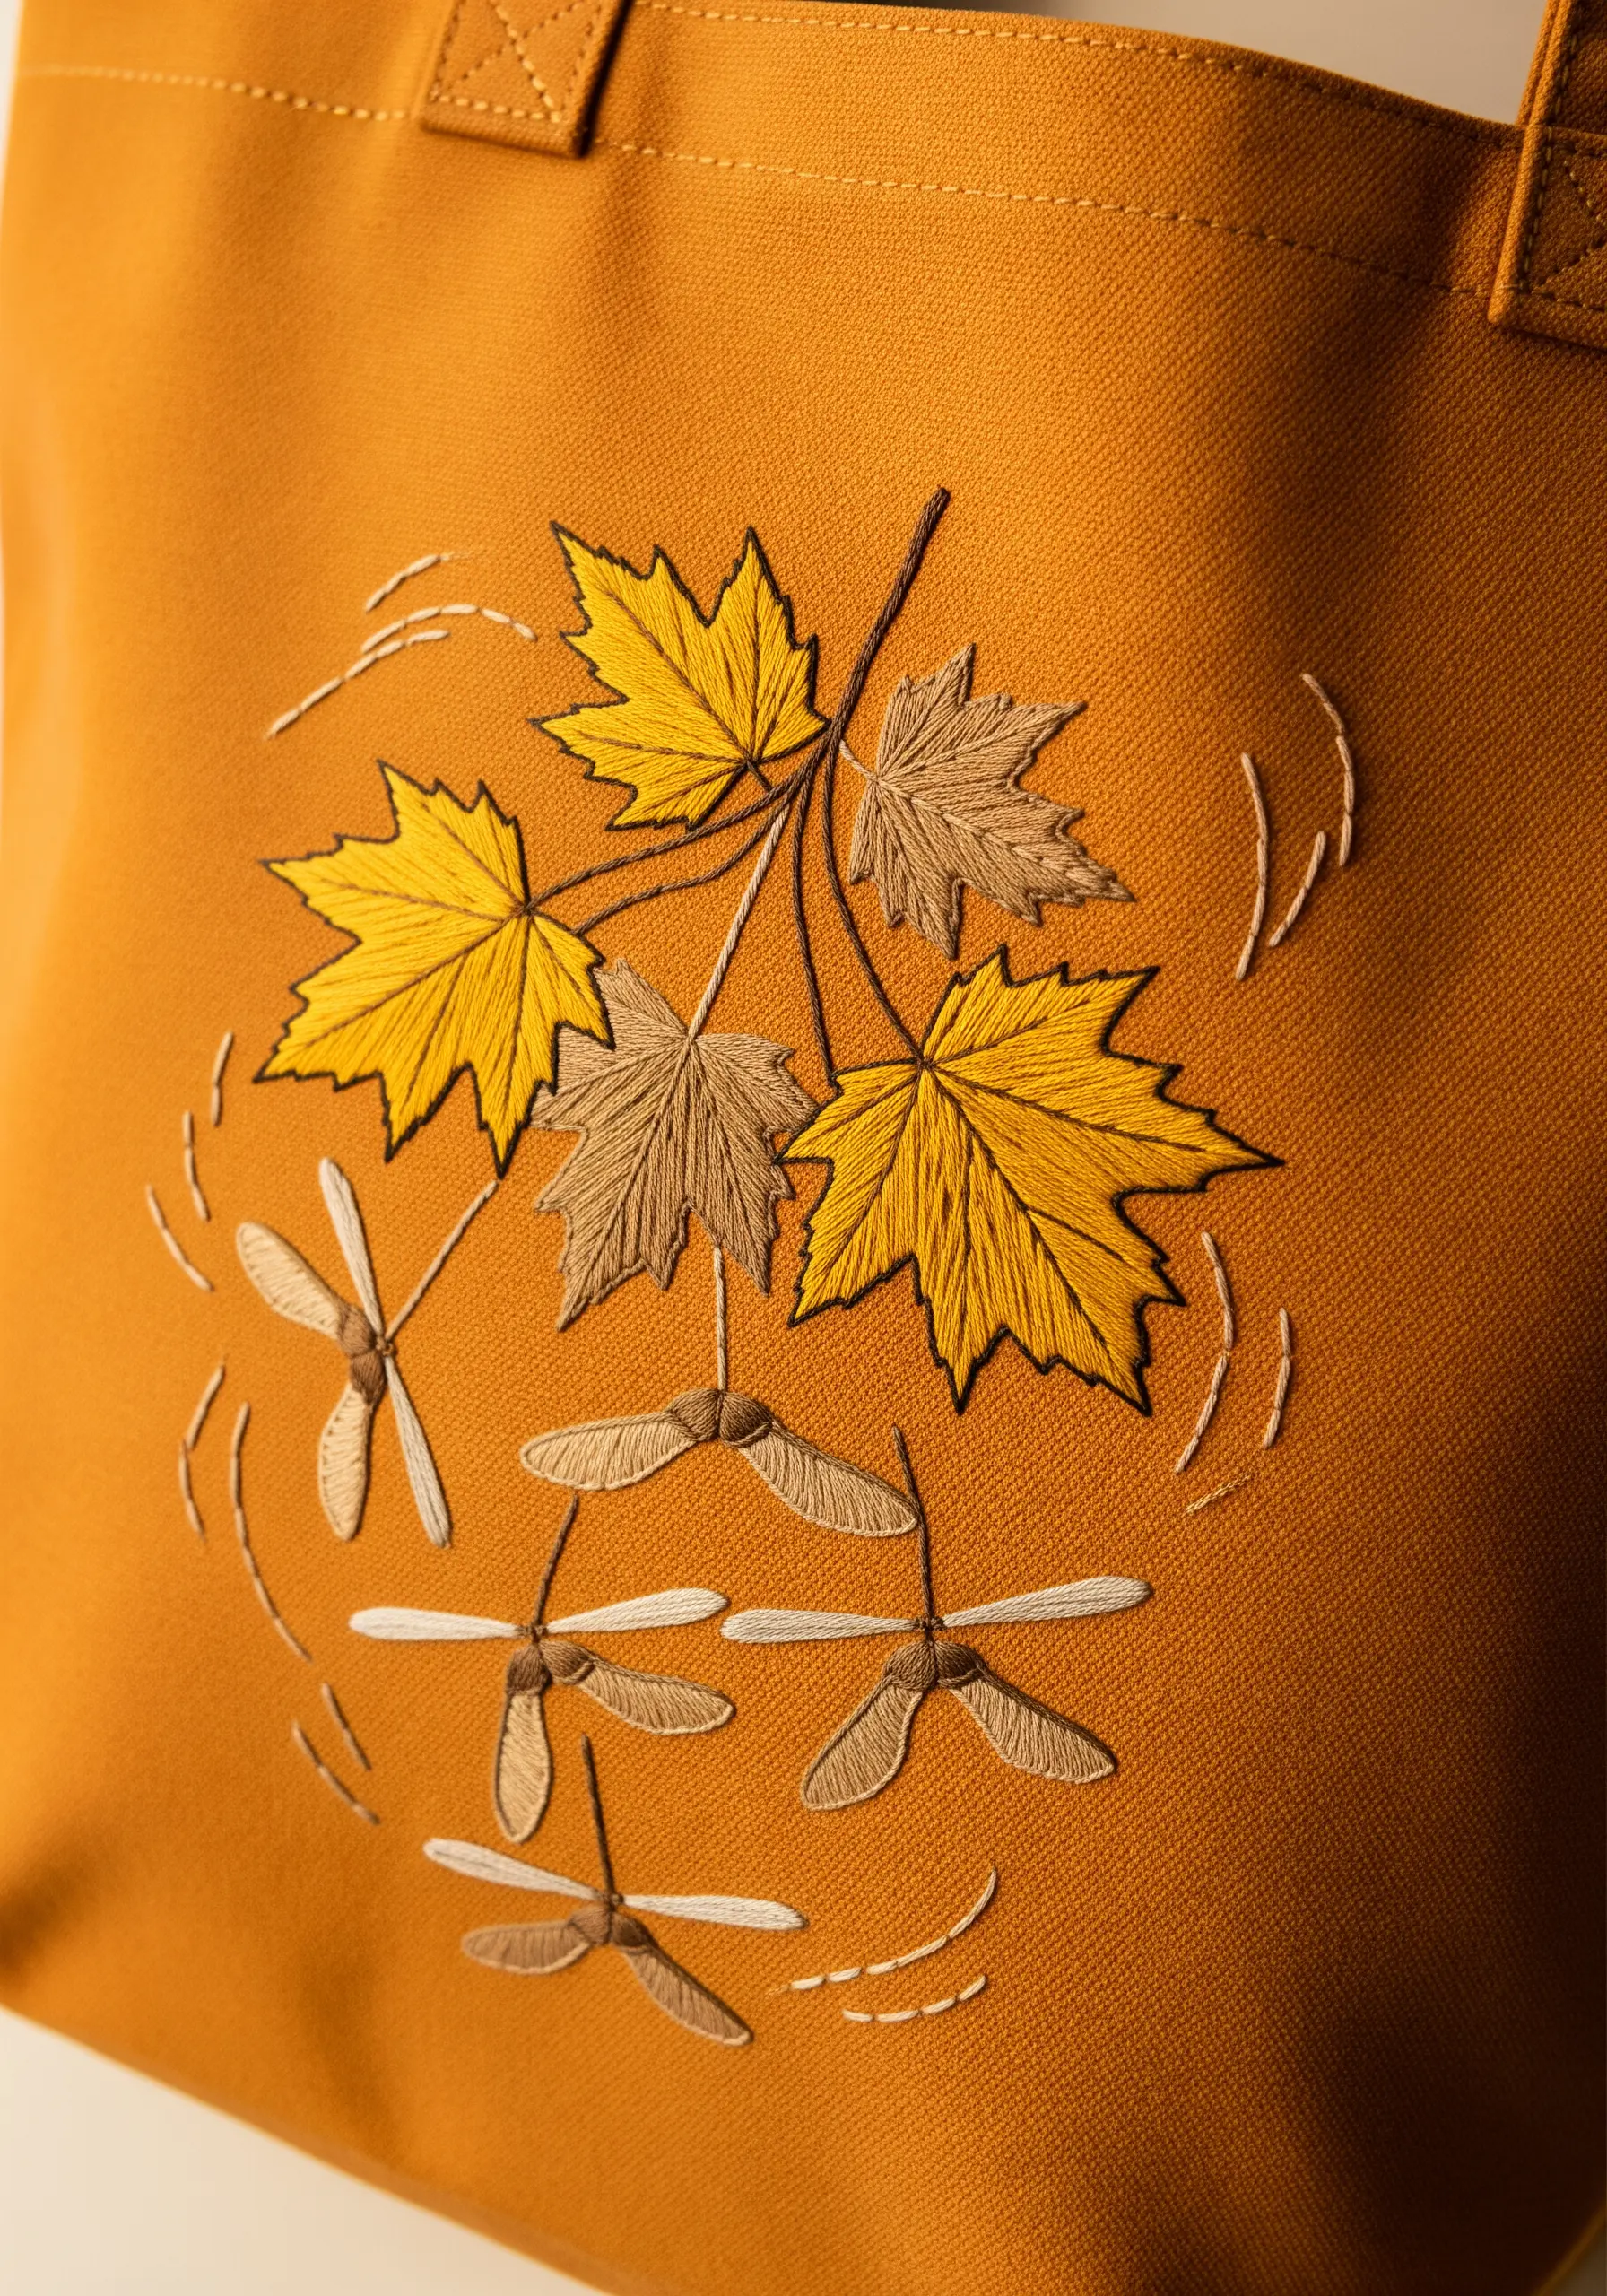
Create a dynamic sense of movement by arranging the leaves and samaras (helicopter seeds) in a gentle, swirling composition across the fabric.
Amplify this feeling of motion with a few delicate, curved running stitches in a light-colored thread, suggesting a soft gust of wind.
Introduce textural contrast by using a solid satin stitch for the shiny golden leaves and a slightly more open long-and-short stitch for the matte beige leaves.
Satin stitch the samaras with a different stitch direction for the wing versus the seed pod to create subtle, realistic definition.
15. Variegated Hosta Cluster with Painterly Blending

Capturing variegation successfully is all about meticulous thread painting. Use a single strand of floss and long-and-short stitch for the smoothest possible color transitions.
Lightly sketch the white and green areas onto your fabric first as a guide. Stitch the lightest areas (white and pale green), then carefully blend the darker greens into them to avoid muddying your colors.
The most critical detail is to angle your stitches to follow the natural curve of the leaf, radiating outwards from the center. This creates a realistic, flowing look.
16. Jewel-Toned Japanese Maple Cluster

Elevate a simple leaf motif by trading realistic colors for a rich, unexpected jewel-toned palette of magenta, deep purple, fiery orange, and even emerald green.
Use a fishbone stitch or a split satin stitch for the leaves. Both techniques create a strong central line and help ensure the sharp, delicate points of the leaves remain crisp and defined.
The real artistry is in the color composition. Place high-contrast colors next to each other—like purple beside orange—to make each individual leaf pop and create a vibrant, energetic cluster.
17. Textured Clover Field with Layered Lazy Daisies
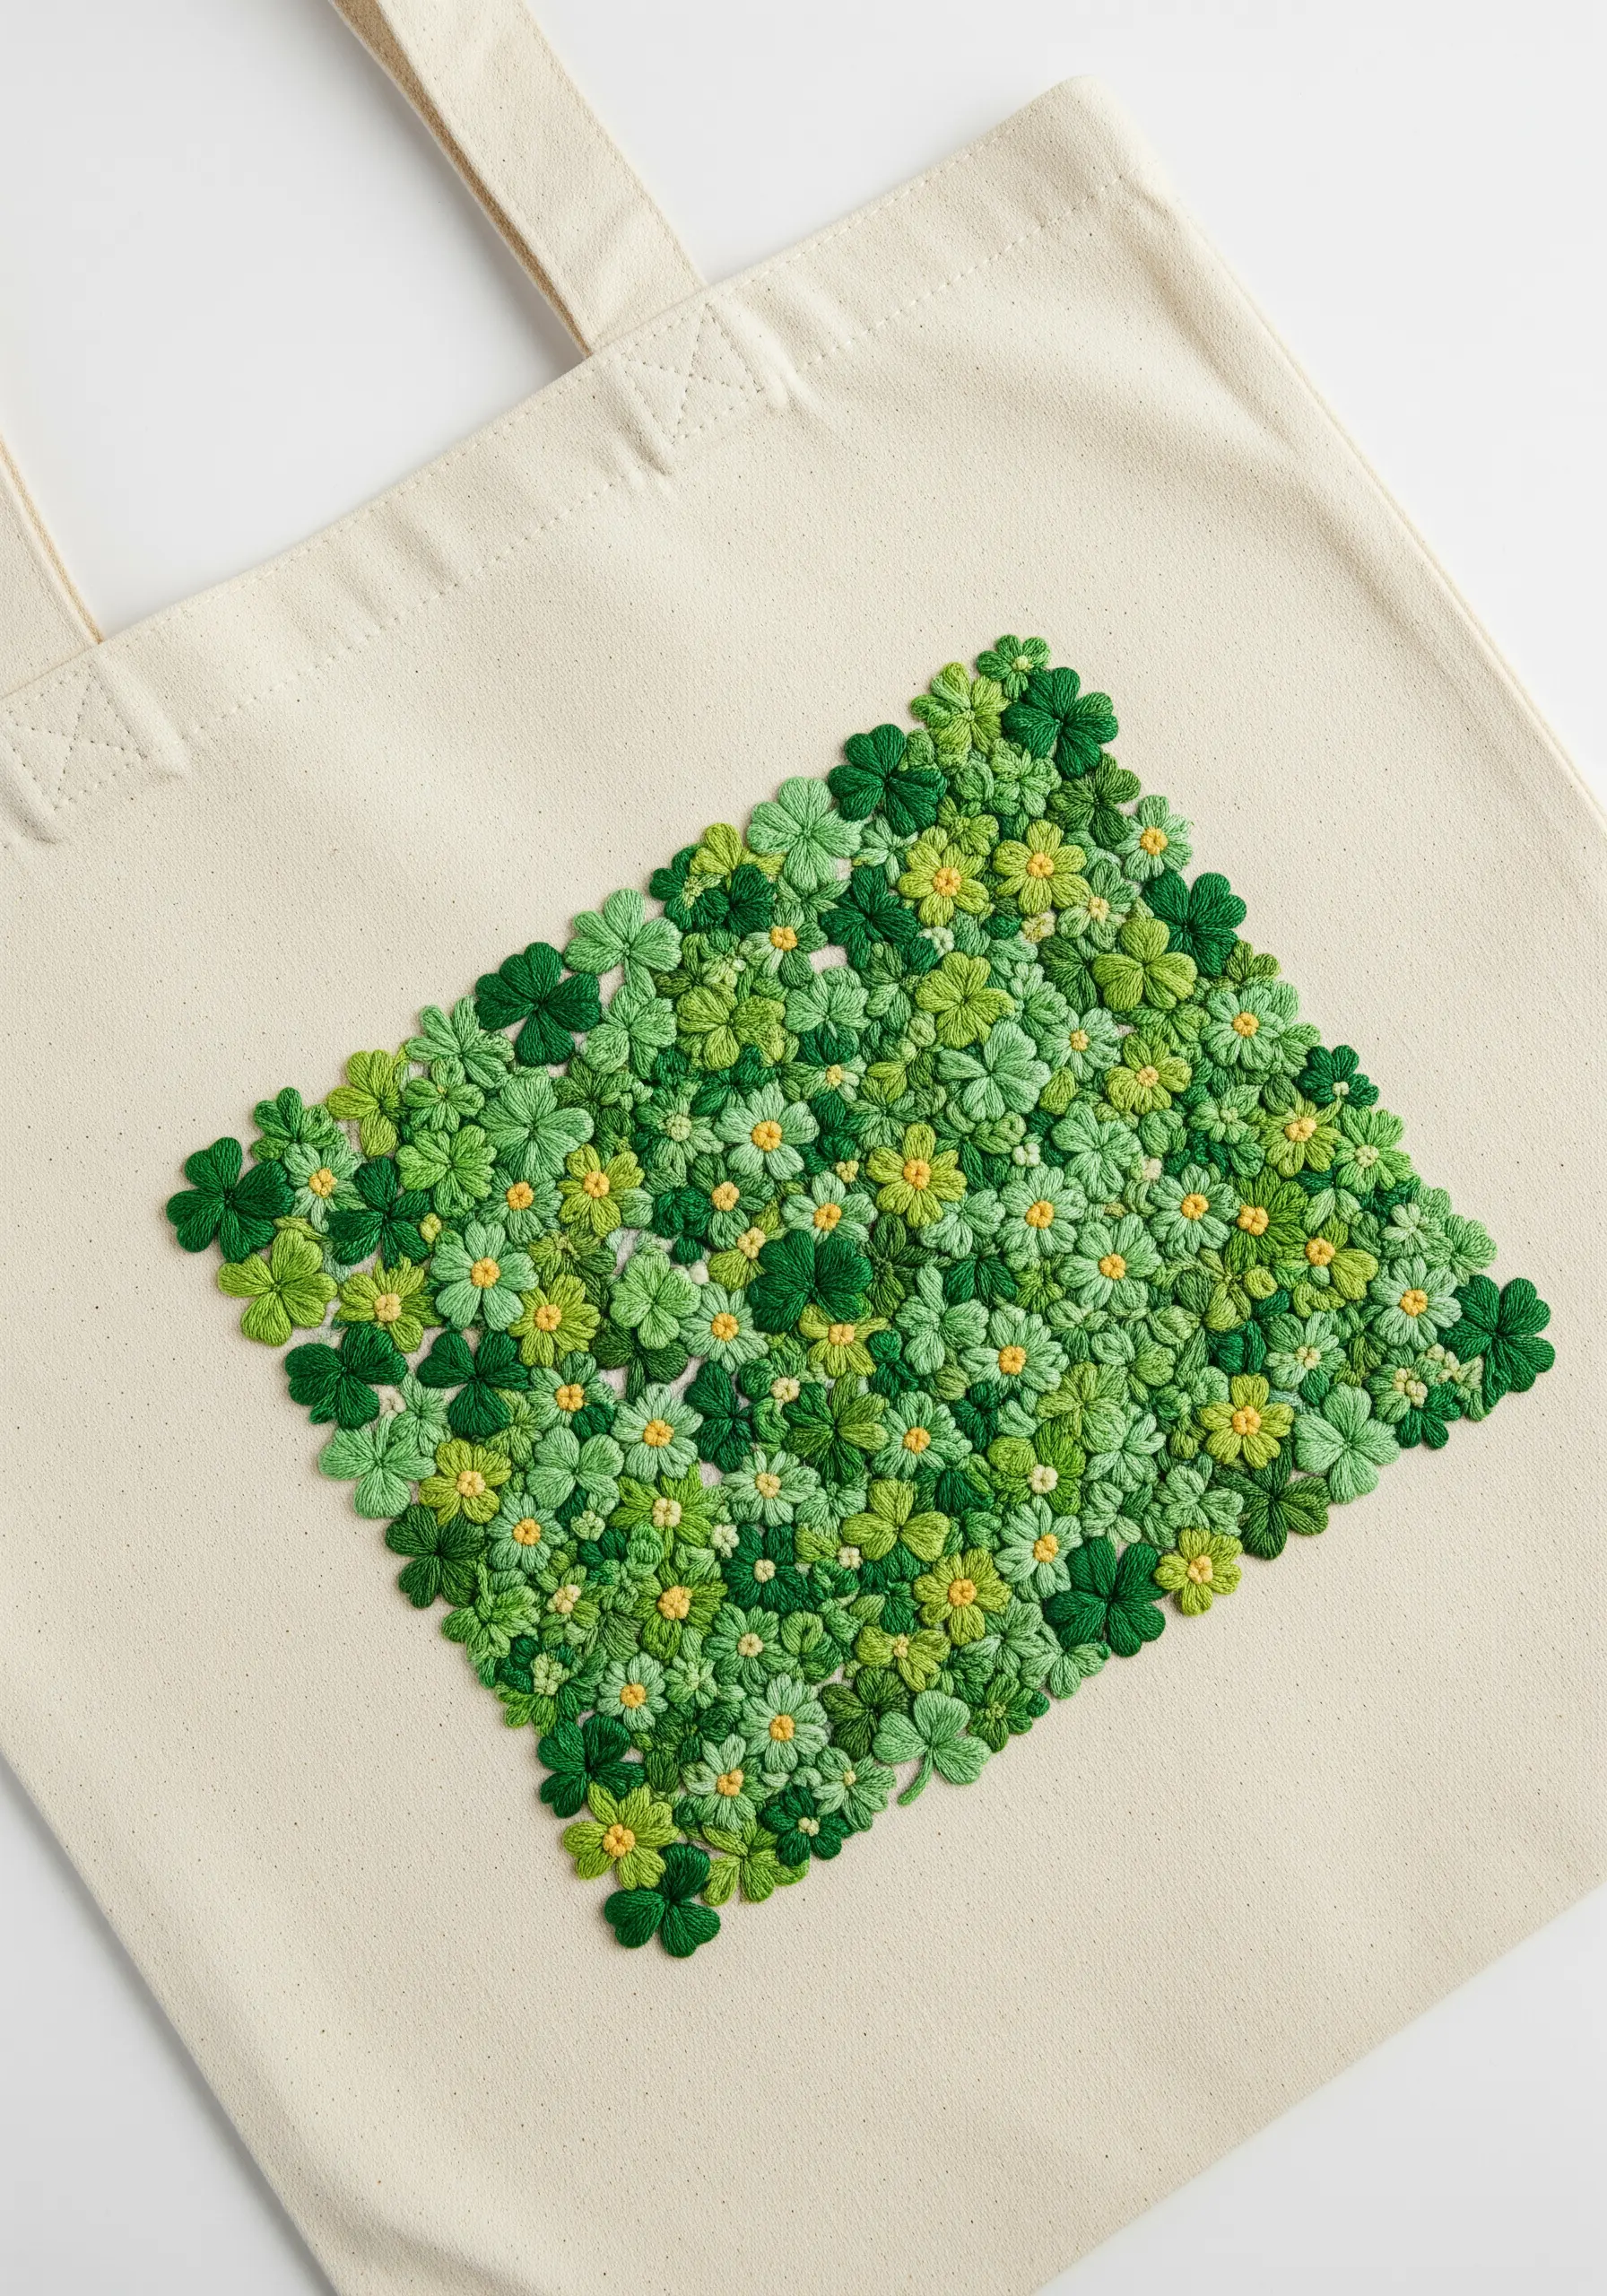
You can build this incredibly lush, dense texture by packing hundreds of lazy daisy stitches together. Each three-leaf clover is simply three individual lazy daisy stitches sharing a common base.
Create depth and realism by using a wide variety of green shades throughout the patch, from bright lime to deep forest green. This prevents the design from looking flat and uniform.
Enhance the sense of a dense, overlapping field by stitching some clovers partially over the top of others.
A tiny French knot in a contrasting yellow at the center of a few clovers adds a final touch of detail and visual interest.
18. Cascading Willow on Faux Leather

Achieve a sleek, modern aesthetic by combining appliqué with minimal stitching on a smooth surface like faux leather or vinyl.
First, cut your leaf shapes from a non-fraying fabric like wool felt in shades of green and white. Use a sharp craft knife for the cleanest edges.
Arrange the leaves in a graceful, cascading pattern and secure each one with a single, central line of backstitching. This stitch both attaches the leaf and creates its vein in one step.
This is one of many creative fabric collage bases that provides a striking contrast between soft thread and a sleek surface.
19. Golden Aspen Grove with Integrated Trunks

Create a beautiful sense of depth by stitching the background elements before the foreground. Use a simple backstitch in white or off-white to create the slim aspen trunks.
Add the characteristic black marks on the bark with a few tiny, strategically placed straight stitches in black or dark grey.
Next, layer the golden aspen leaves on top using a smooth, solid satin stitch. This simple layering technique immediately makes the leaves appear to be in front of the trees, creating dimension.
The composition balances the strong vertical lines of the trunks with the soft, rounded shapes of the leaves.
20. Enchanted Forest Floor with 3D Textures
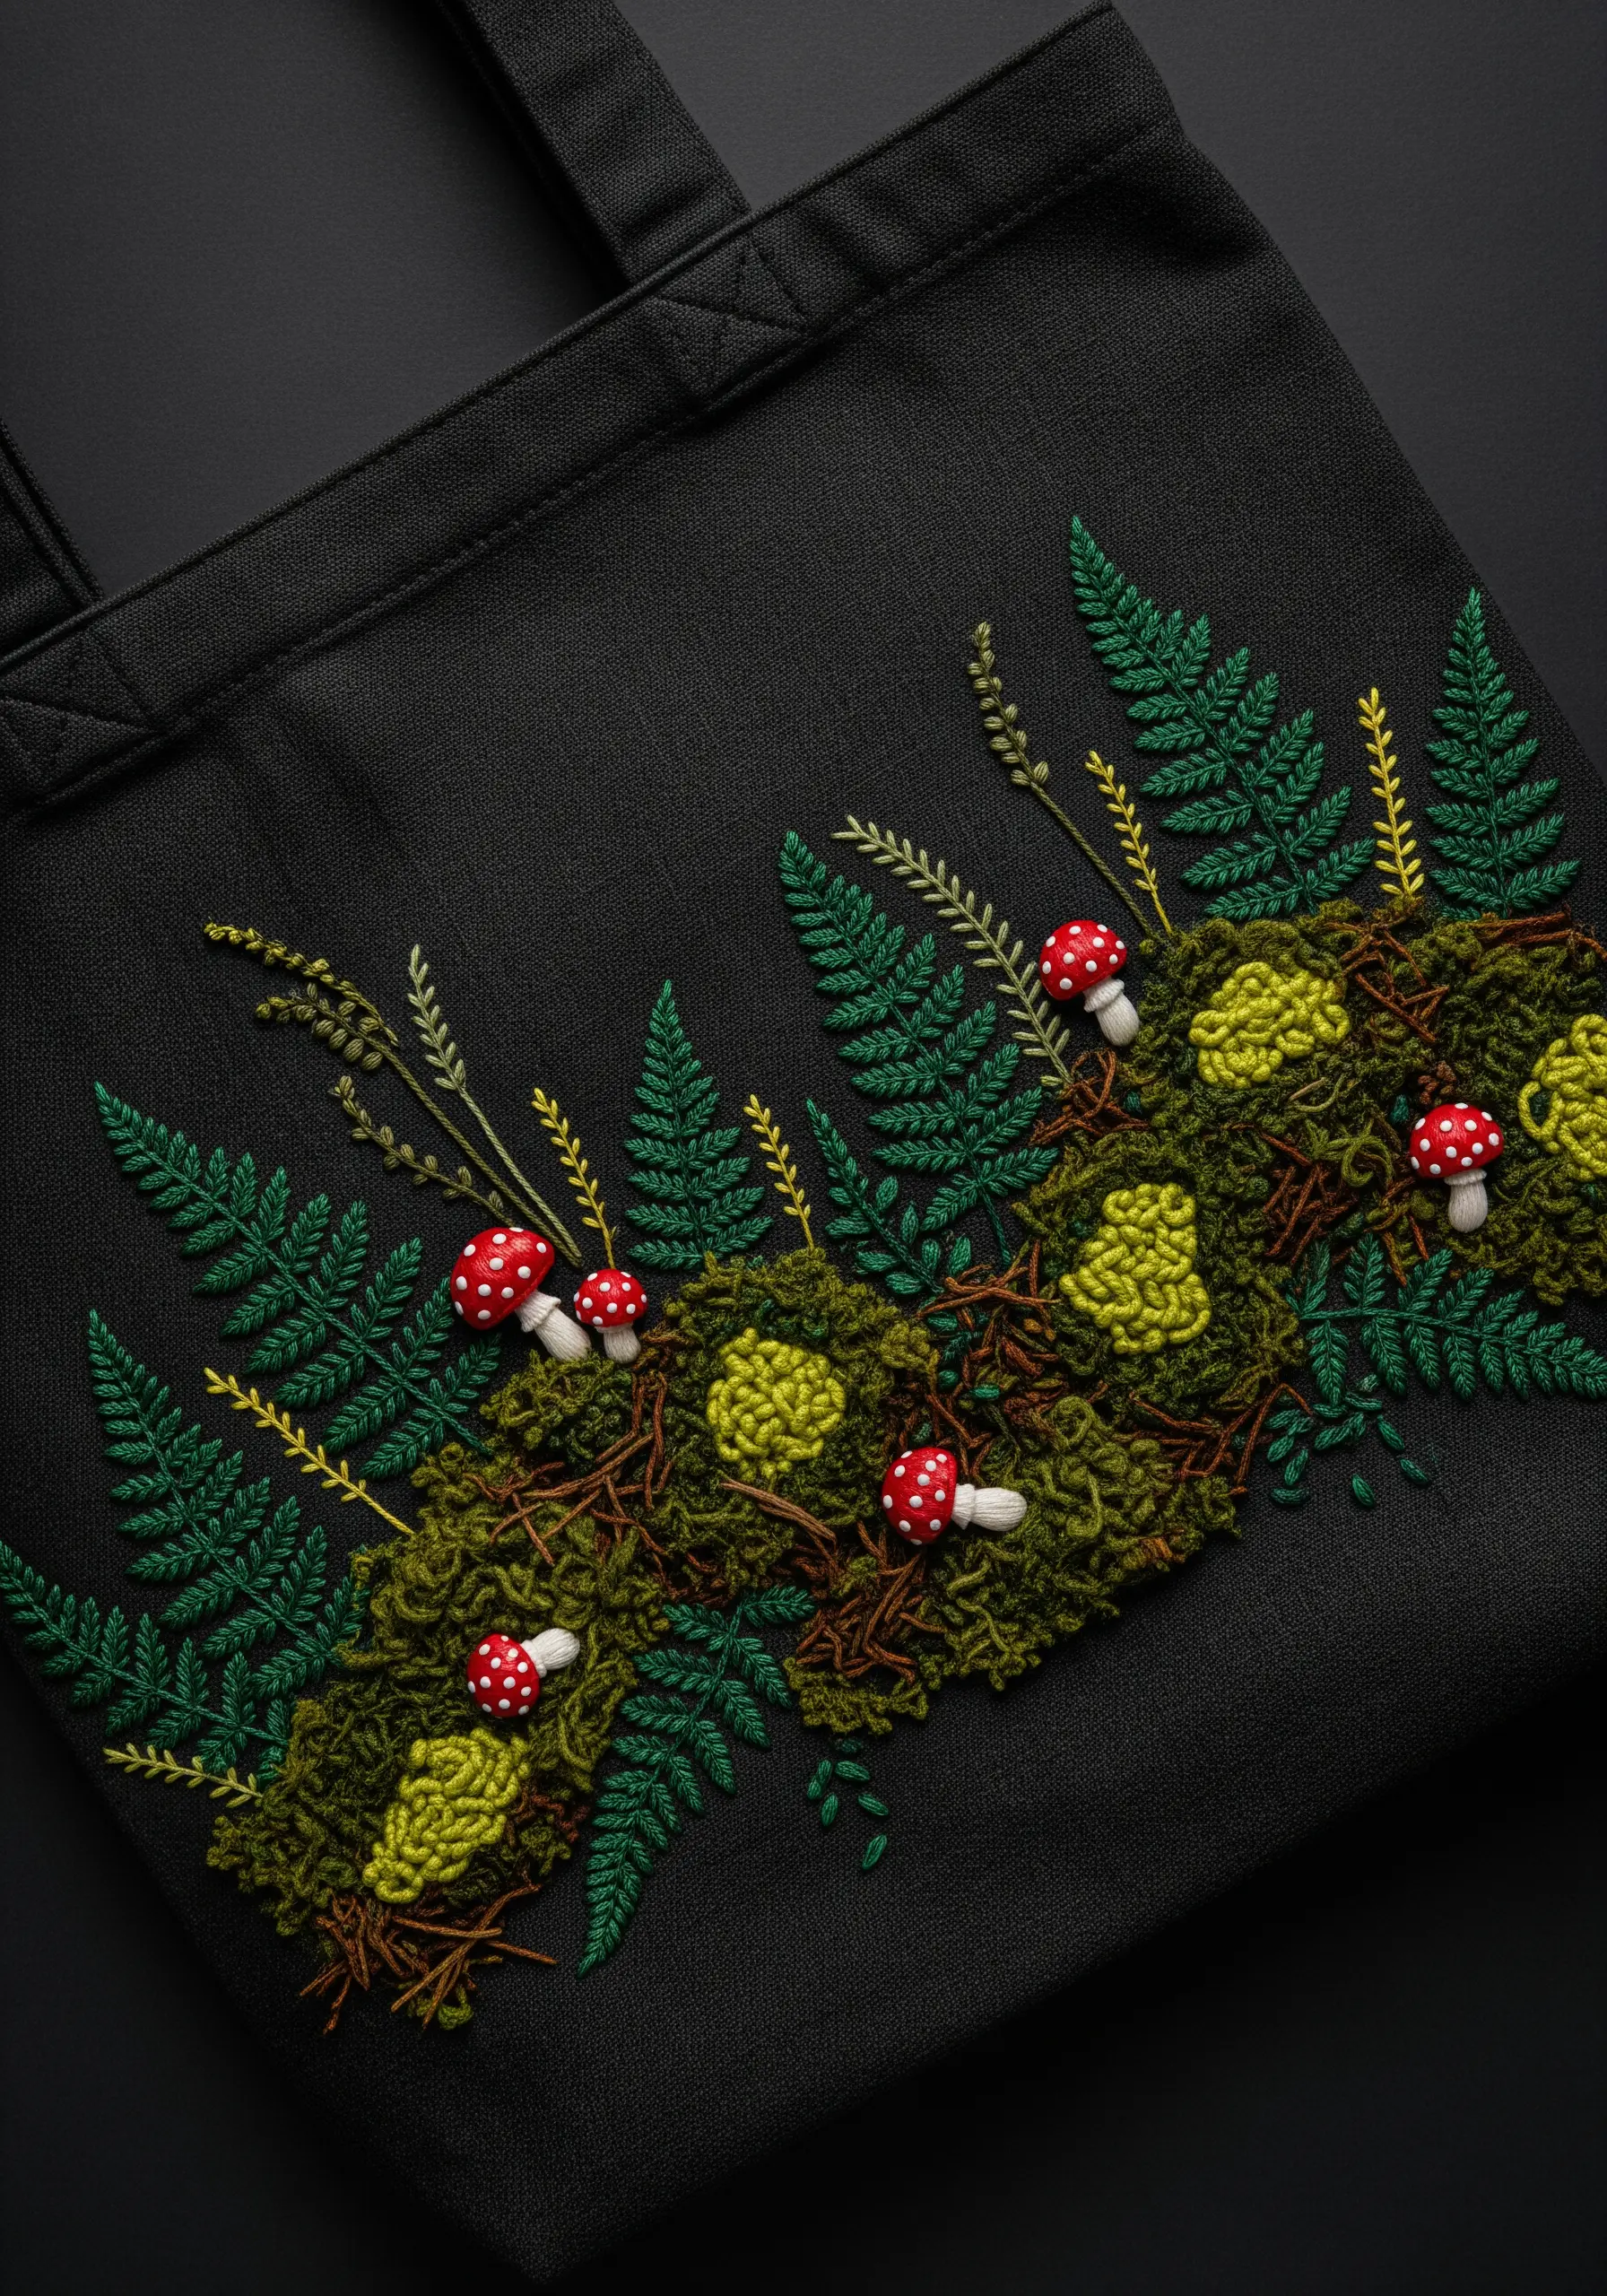
This tactile design is a celebration of texture. Use a combination of advanced stitches to build a rich, three-dimensional scene that begs to be touched.
Create soft moss by packing French knots tightly together, or use a turkey stitch (Ghiordes knot) trimmed short for a plush, carpet-like effect.
The mushrooms are the focal point. Stitch their caps with a padded satin stitch in bright red, then add white French knots on top for the iconic spots. This makes them pop right off the fabric.
Explore more organic texture embroidery ideas to bring even more life to your nature scenes.


