

You’ve mastered the stitches, filled countless hoops, and now you feel a desire for something more—a piece of art that doesn’t just sit on a shelf, but defines a room. Embroidered wall panels are that next step, transforming your quiet craft into a confident statement.
But creating at a larger scale isn’t about stitching more; it’s about stitching smarter. It’s about understanding how texture creates shadow, how stitch direction mimics movement, and how a limited color palette can have more impact than a riot of color.
Think of these ideas not as strict instructions, but as conversations about technique. Here, you will find the methods to create depth, the confidence to work with new materials, and the inspiration to translate your unique vision onto a canvas worthy of your walls.
1. Create a Botanical Mural with Layered Satin Stitch

To achieve this immersive, large-scale botanical effect, focus on thread painting with long and short stitches rather than flat satin stitch.
Use at least three shades of green per leaf—a dark, mid, and light tone—to create realistic highlights and shadows where the leaves overlap.
For the leaf veins, use a single strand of a darker thread in a simple backstitch or split stitch laid over your filled area.
This adds definition without creating bulk, making the leaves feel more delicate and lifelike, even on a massive canvas.
Choose a heavyweight linen or cotton canvas that can support the thread’s weight without puckering, ensuring your panel hangs flat and looks professional.
2. Master Art Deco Elegance with Couching and Metallics
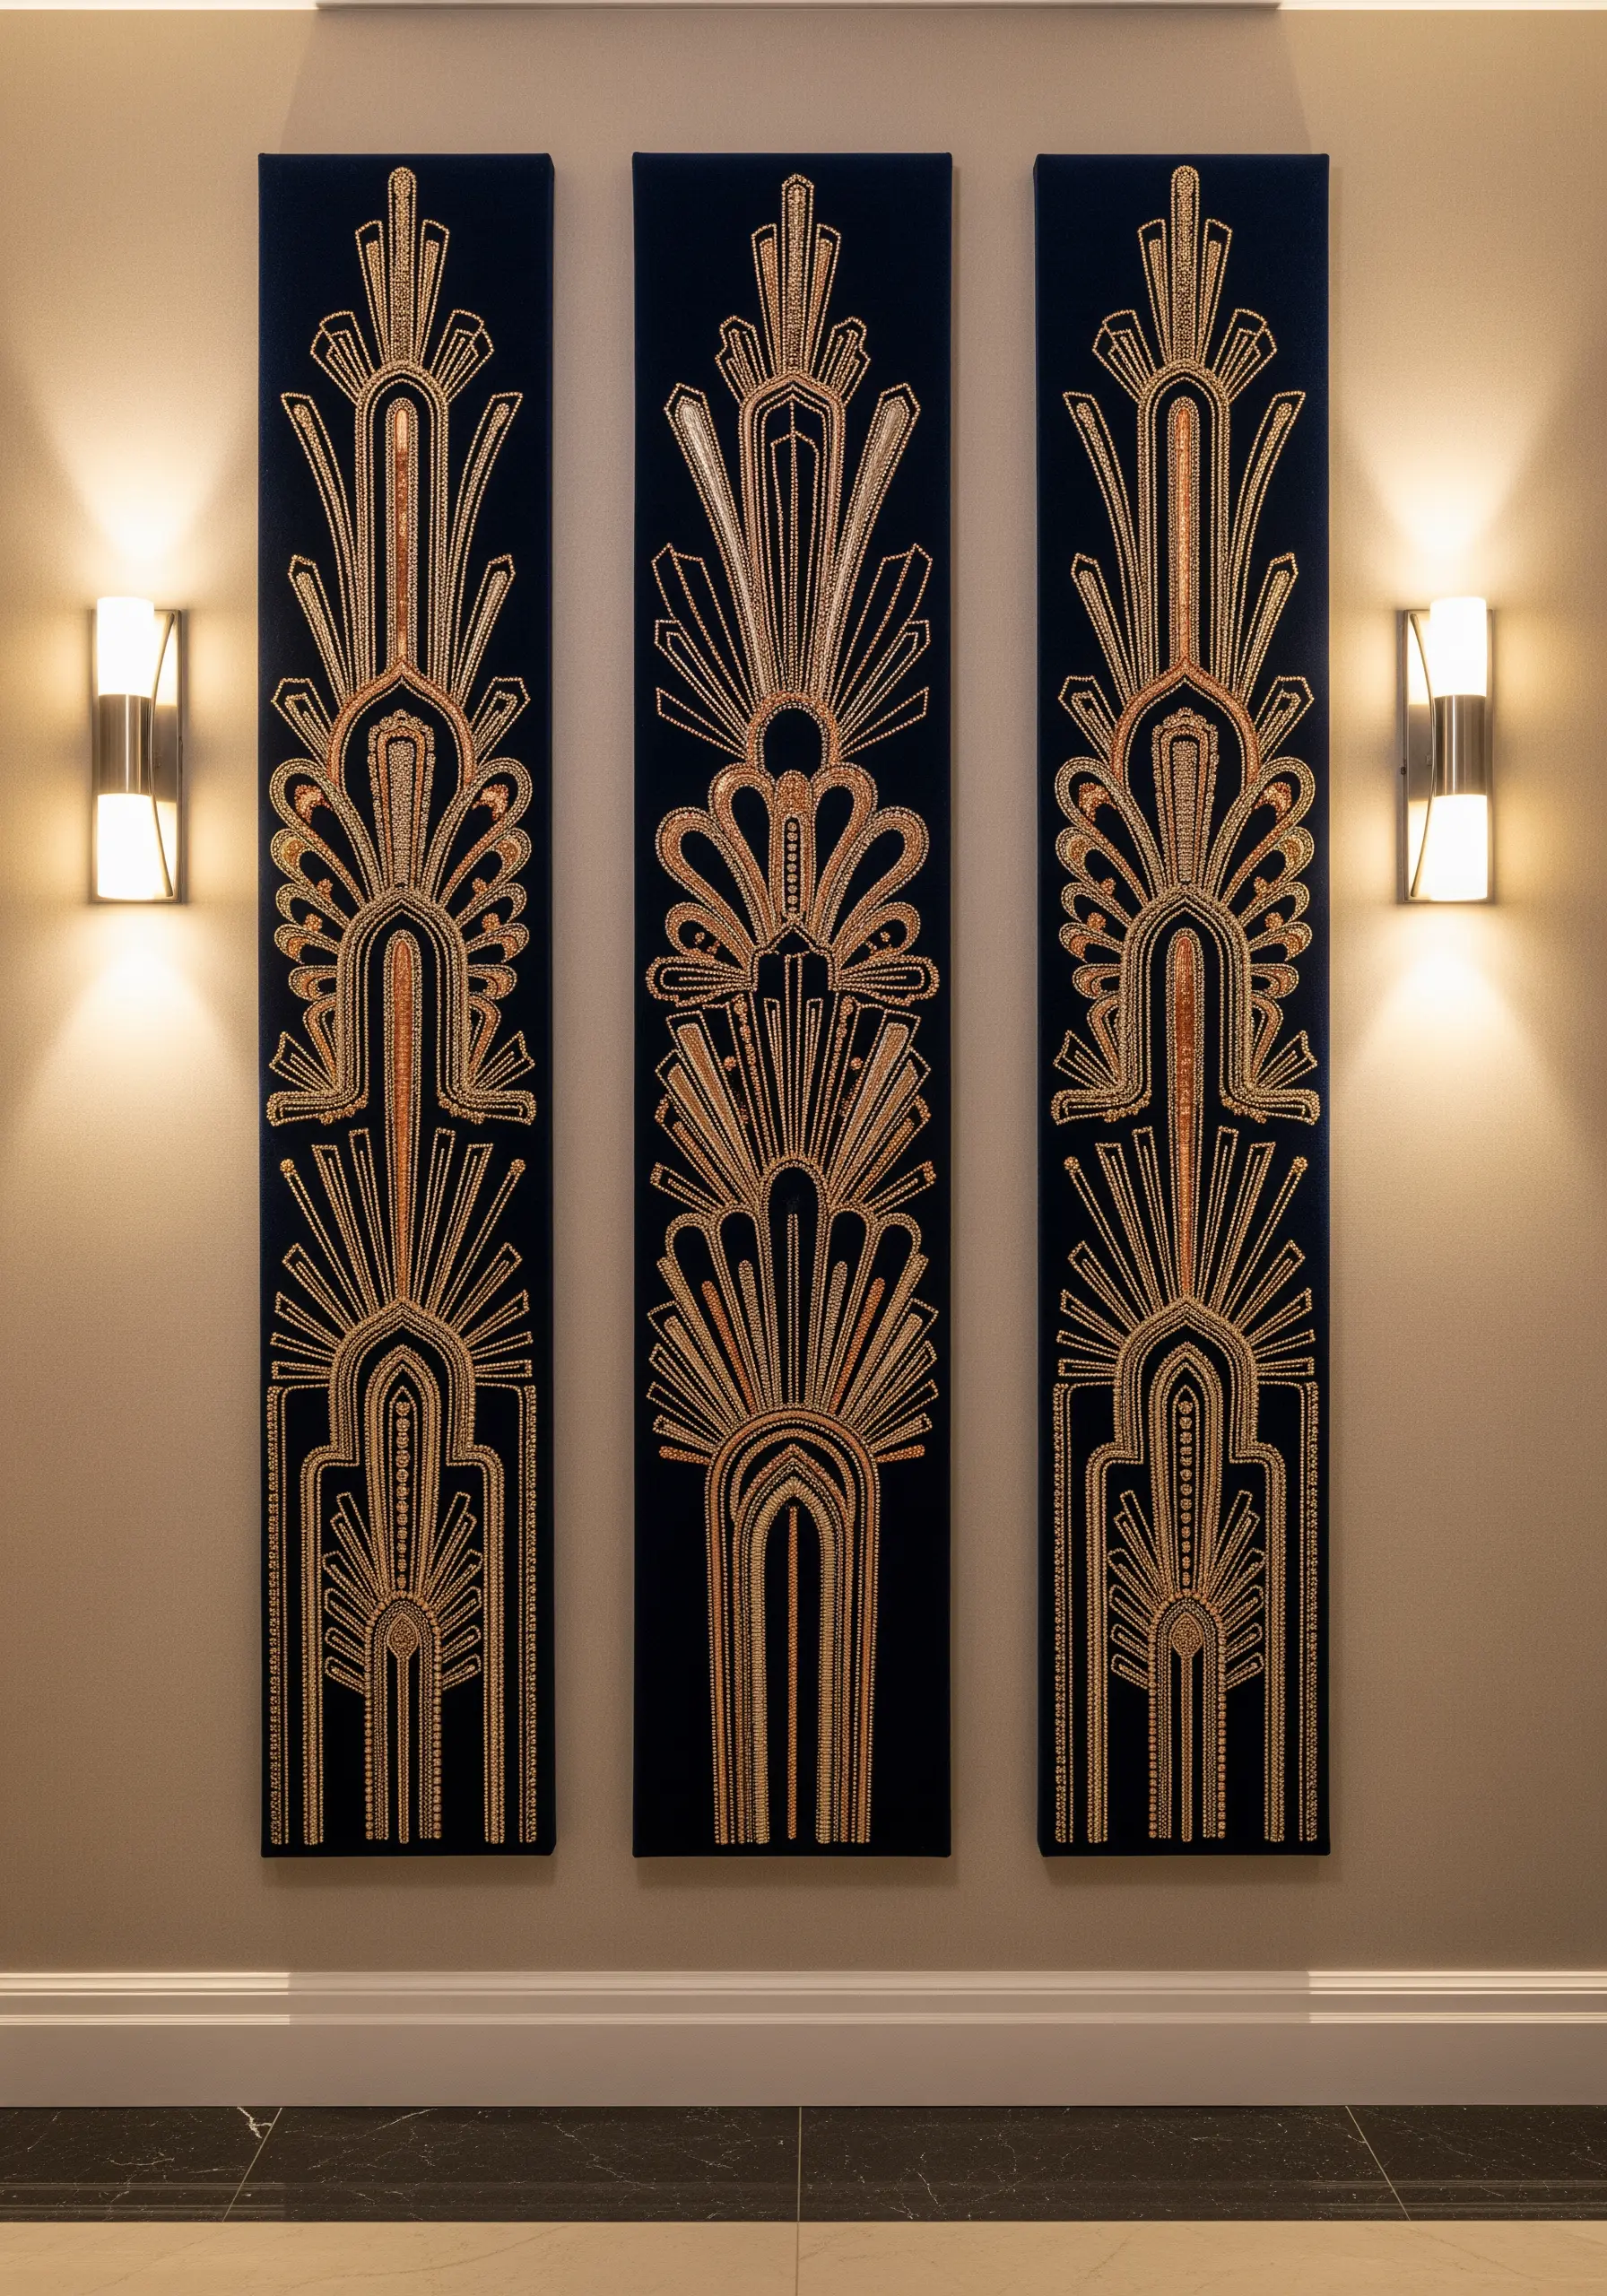
This glamorous Art Deco style relies on pristine outlines and textural contrast, perfect for an entryway or formal space.
Instead of trying to stitch thick lines, use couching: lay down a thicker metallic cord or yarn and tack it in place with a thinner, matching thread.
This technique gives you perfectly smooth, raised curves that catch the light beautifully.
Work on a dark, non-stretch fabric like velvet or heavy canvas to make the gold and silver threads pop with dramatic intensity.
For the beaded textures, use tightly packed French knots or actual seed beads to create a rich, tactile surface that contrasts with the sleek couched lines.
3. Paint a Landscape with Textured Yarn and Directional Stitching
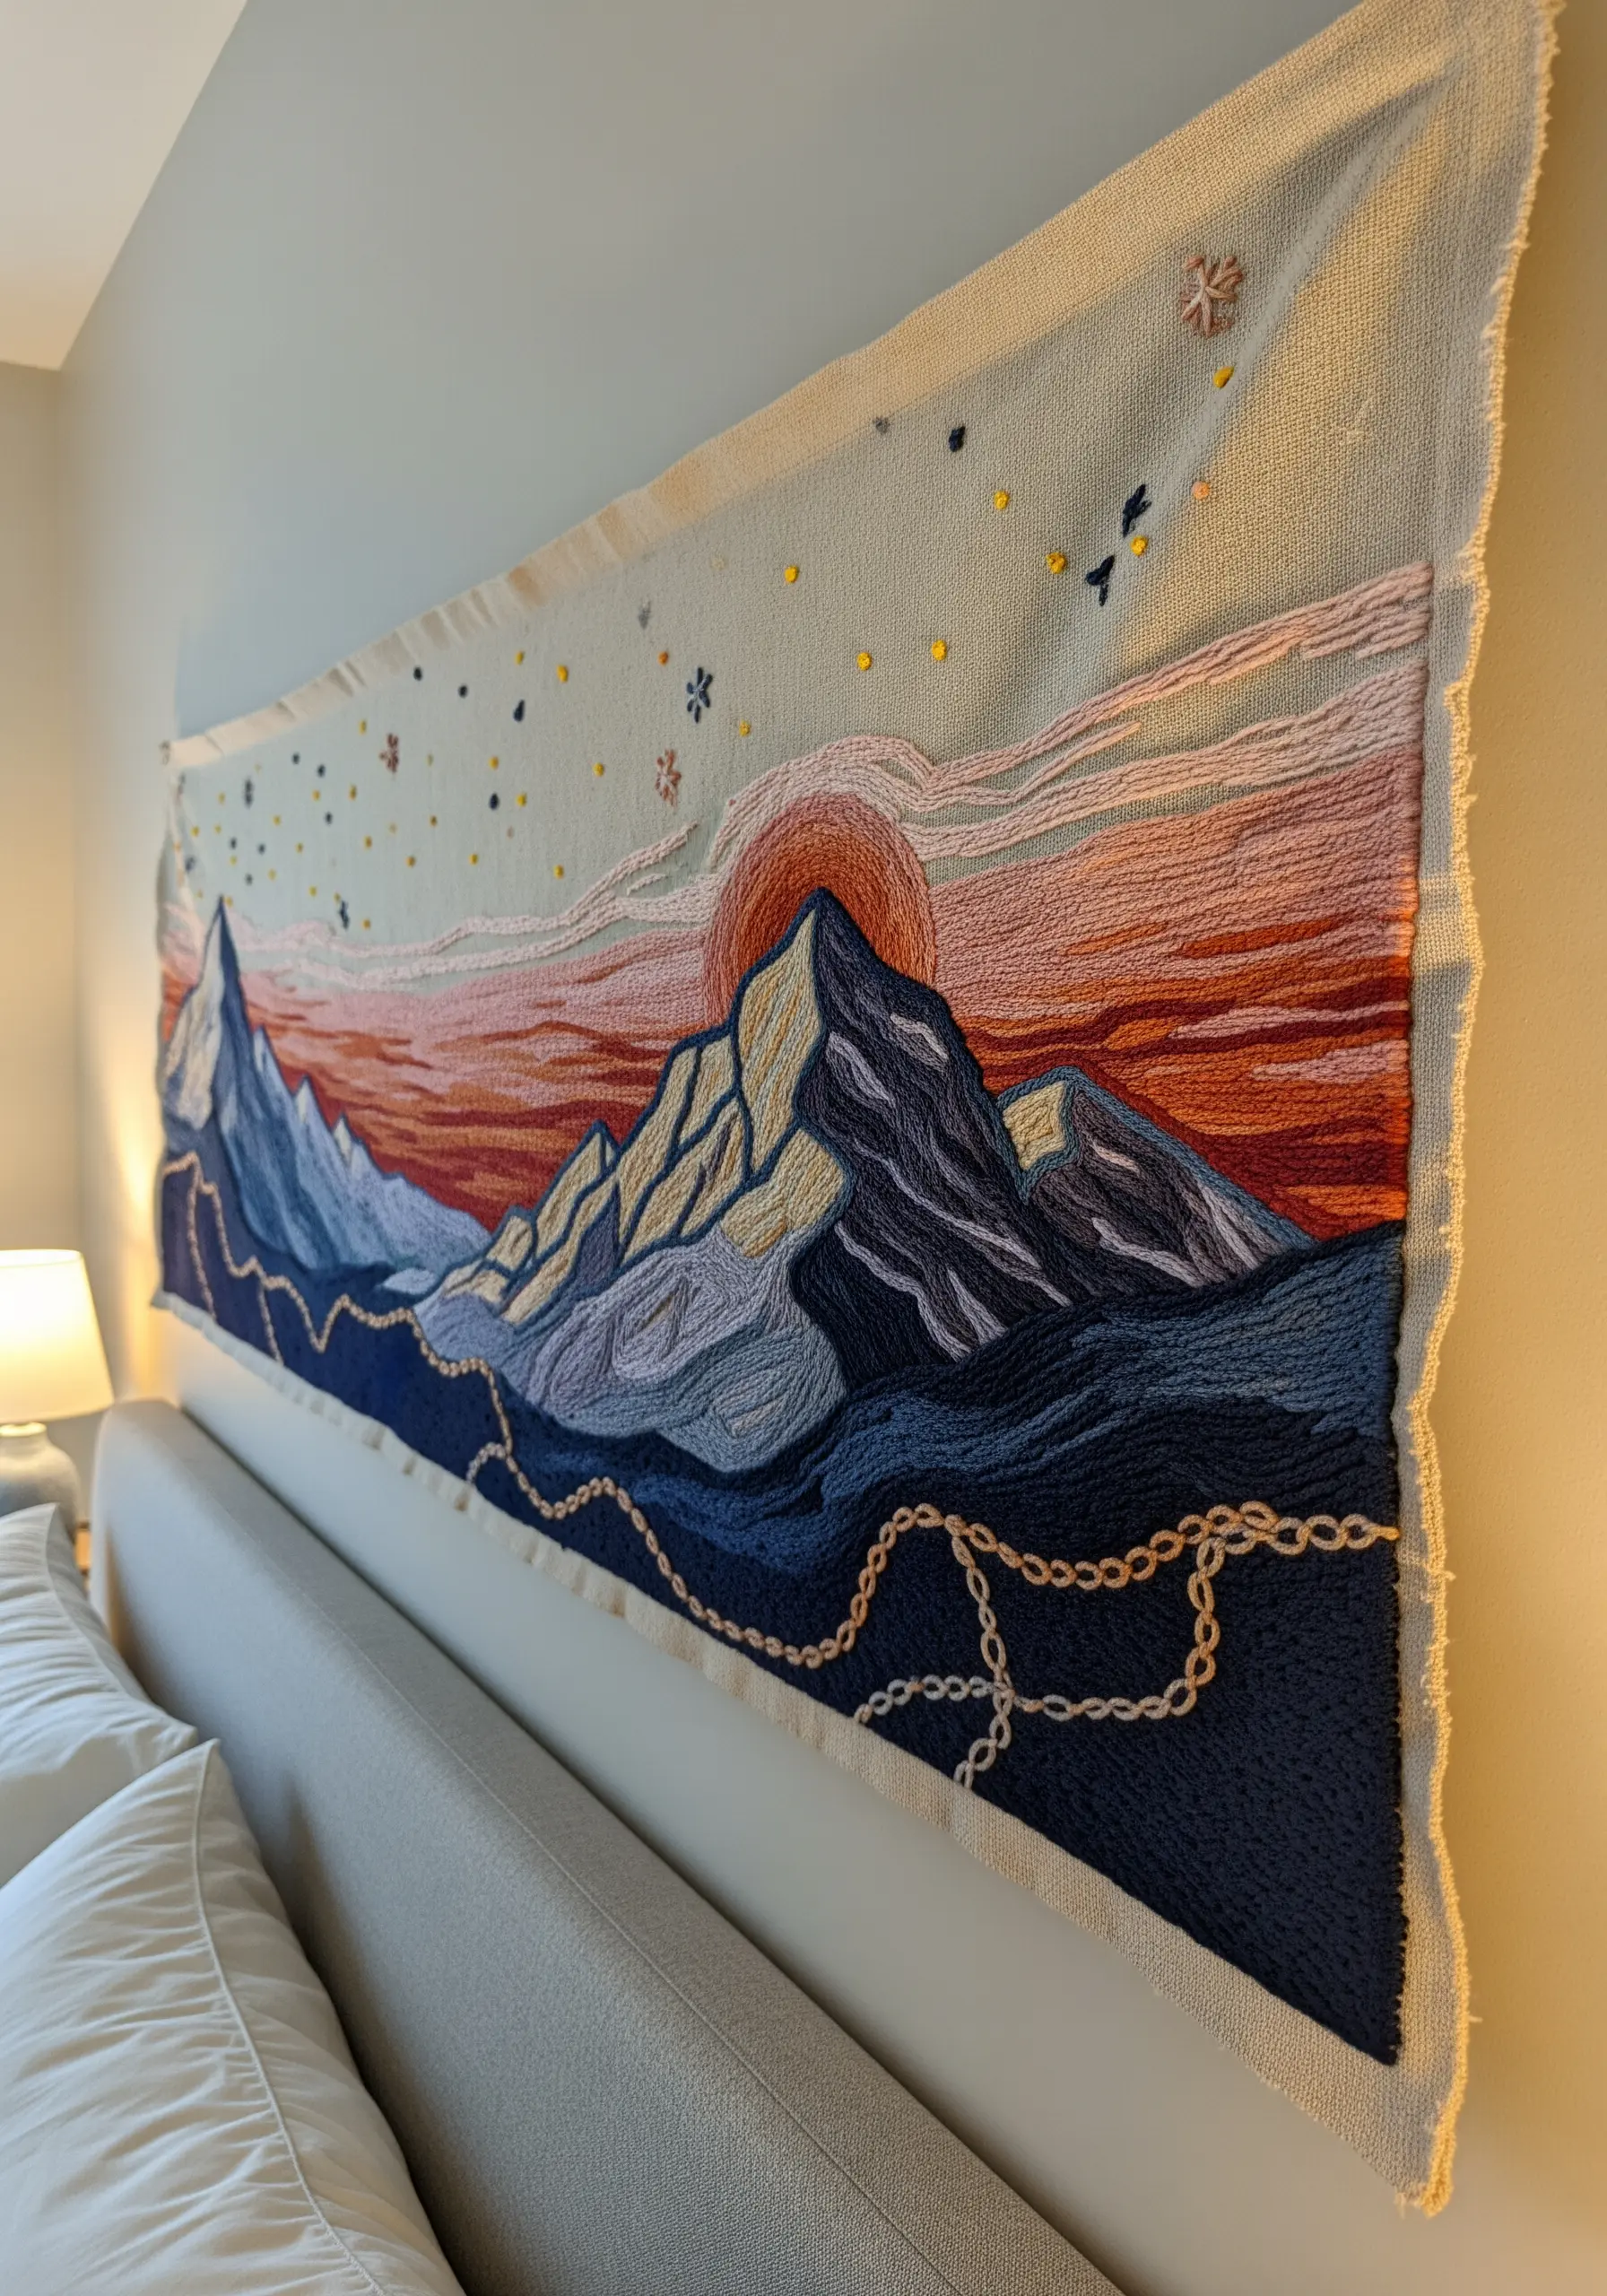
To create an atmospheric embroidered landscape, think like a painter and use your stitches to create movement and depth.
Use thicker fibers like tapestry wool or multiple strands of embroidery floss to fill large areas quickly and build visible texture.
For the sky, orient your long and short stitches horizontally to suggest clouds drifting across the horizon, blending shades of pink, orange, and blue for a soft gradient.
In contrast, stitch the mountains with diagonal or vertical stitches to convey their sharp, rocky angles.
This directional approach turns a simple fill stitch into a powerful storytelling tool, making your landscape feel dynamic and alive.
4. Achieve Graphic Precision with Satin Stitch Blocking
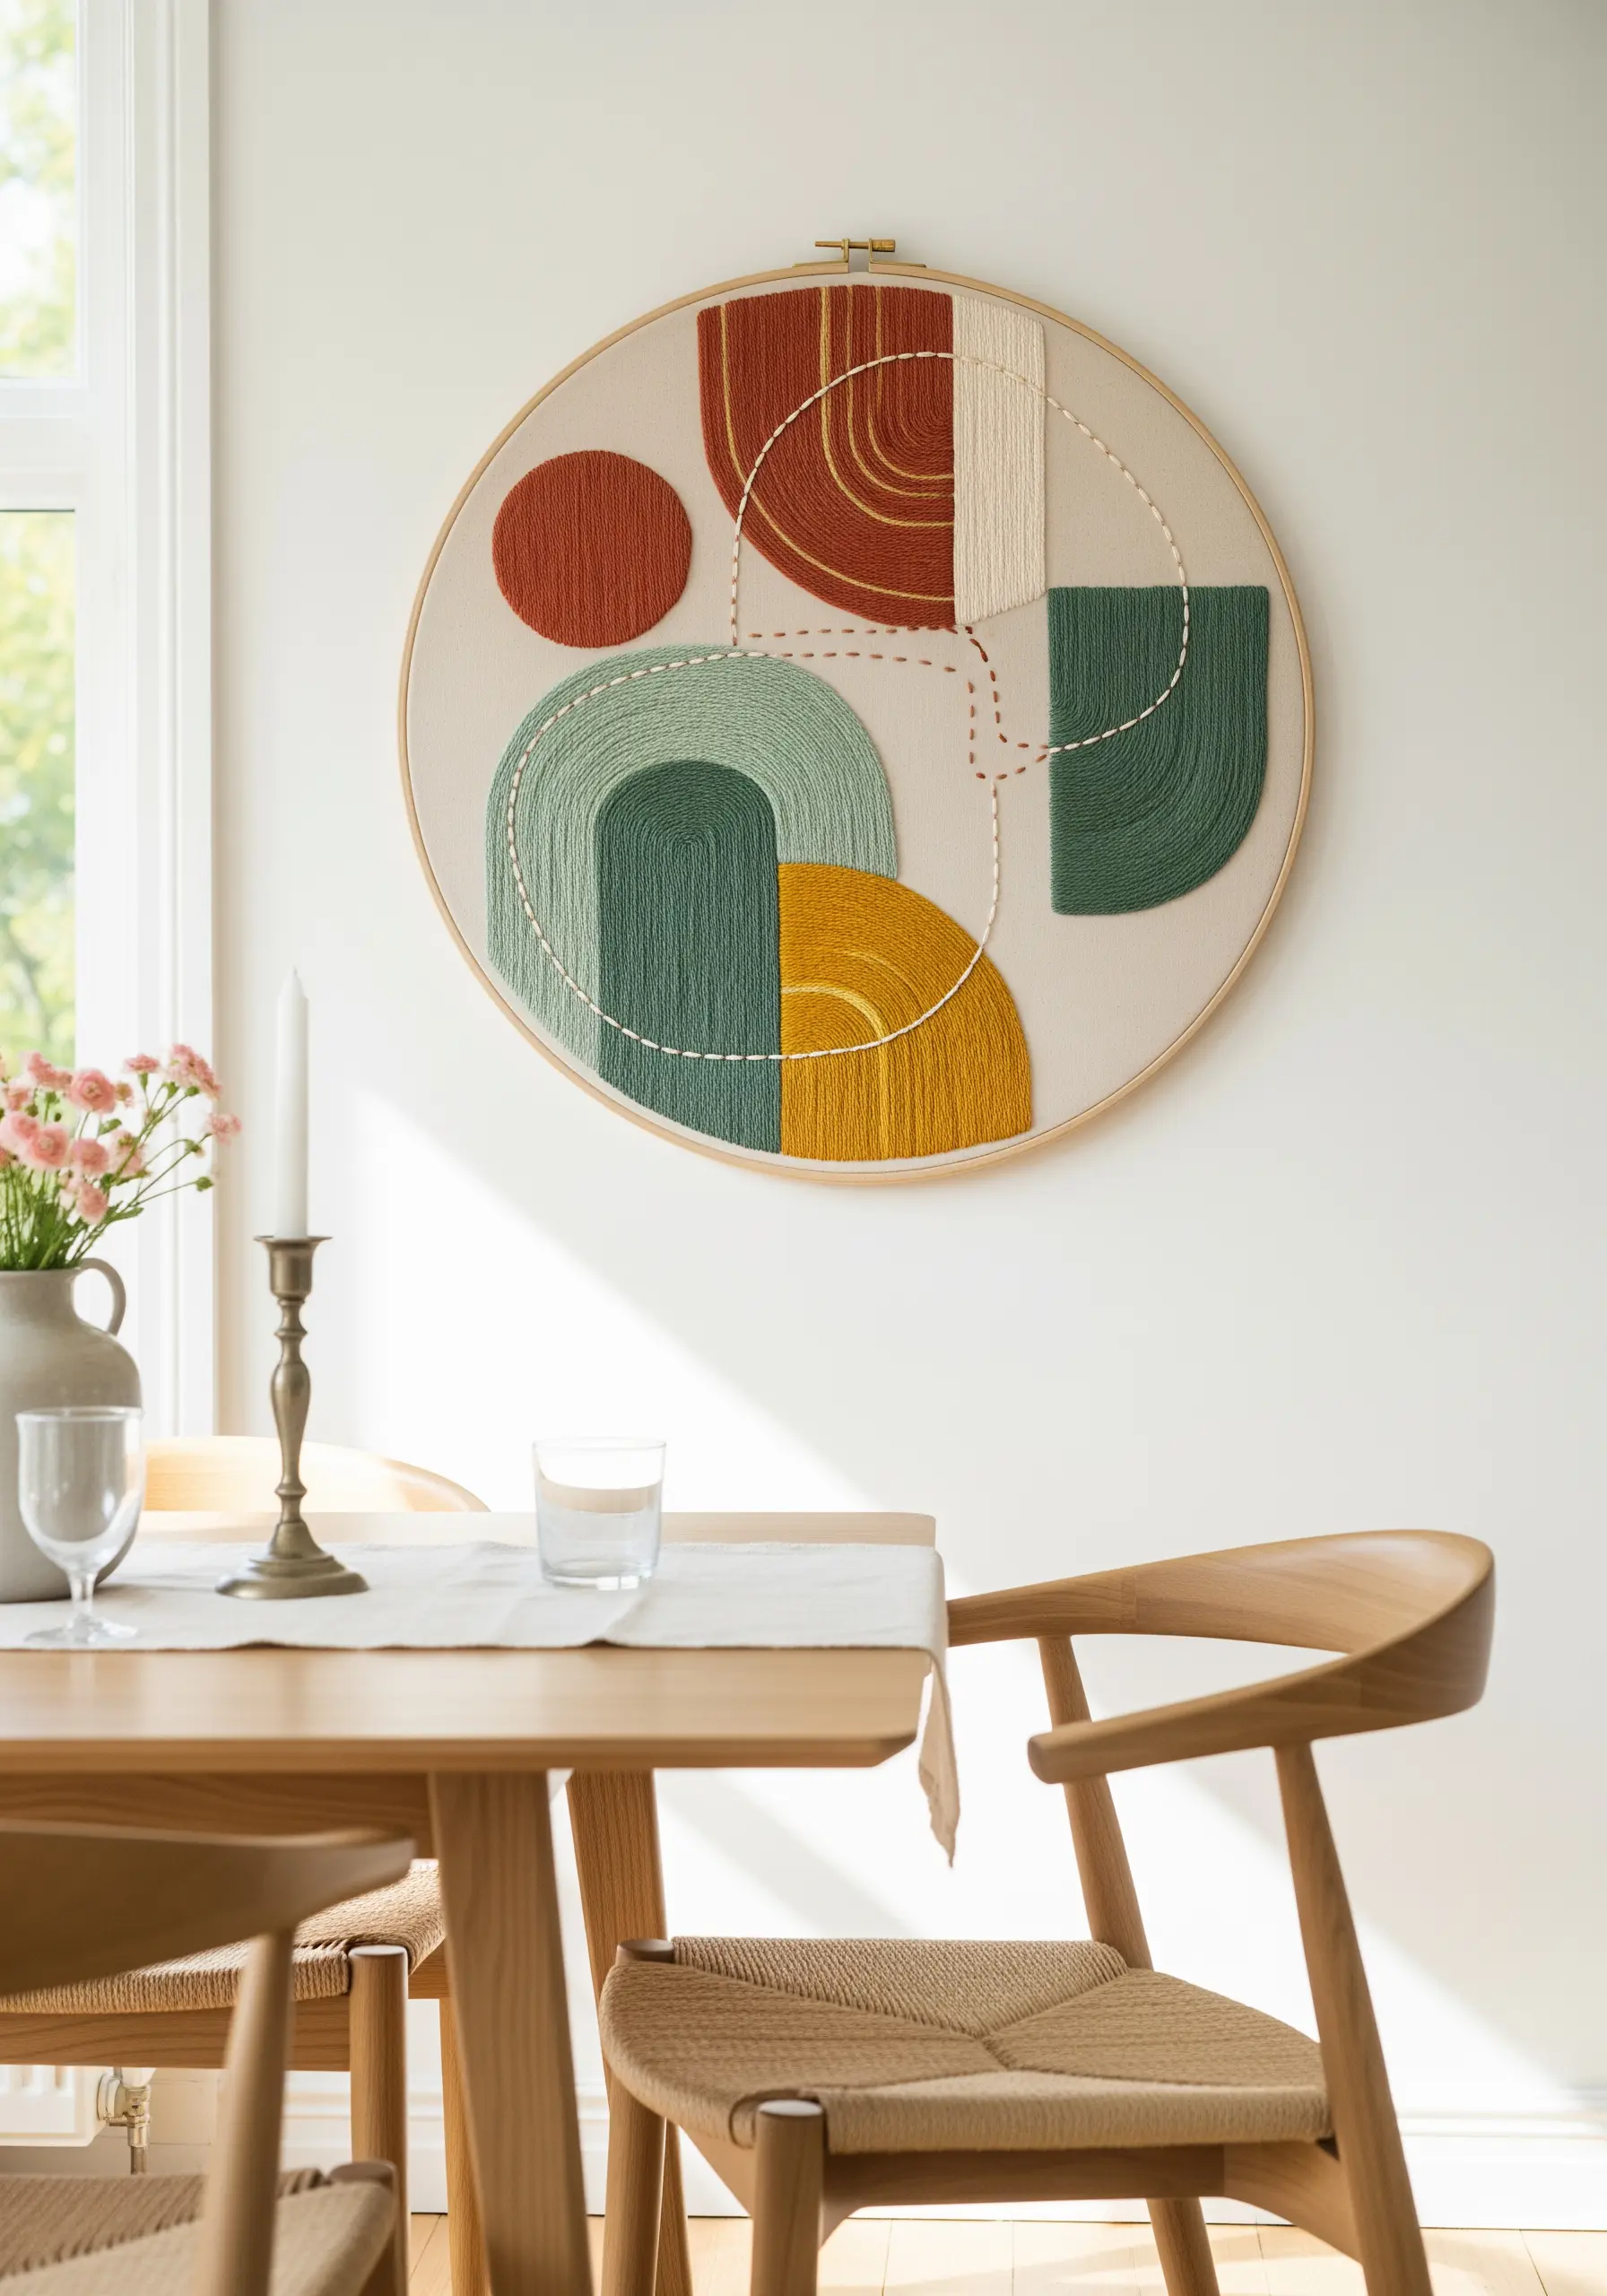
For clean, modern abstract geometric hoops, the key is a flawless satin stitch with sharp, defined edges.
Before filling a shape, outline it with a split stitch using a single strand of the same color. This creates a slightly raised ‘wall’ for your satin stitches to press against, preventing gaps and ensuring a crisp border.
Vary the direction of your satin stitch for each color block. This subtle shift in how the thread reflects light creates visual separation and depth, even between adjacent shapes.
Embrace negative space; the unstitched areas of fabric are just as important as the stitched ones for creating a balanced, uncluttered composition.
5. Go Maximalist with High-Contrast Color and Dense Stitches

To create a vibrant, immersive mural, choose a black or dark navy fabric as your base.
This high-contrast background makes every color appear more saturated and luminous, creating an electrifying effect that instantly draws the eye.
Layer your stitches to create a dense, ‘no-fabric-showing’ texture. Overlap petals and leaves using satin stitch, and fill smaller gaps with seed stitches or French knots.
Use variegated threads for butterflies and flower centers to introduce subtle color shifts without changing your needle, adding complexity and visual interest effortlessly.
6. Elevate Abstract Shapes with Padded Satin Stitch
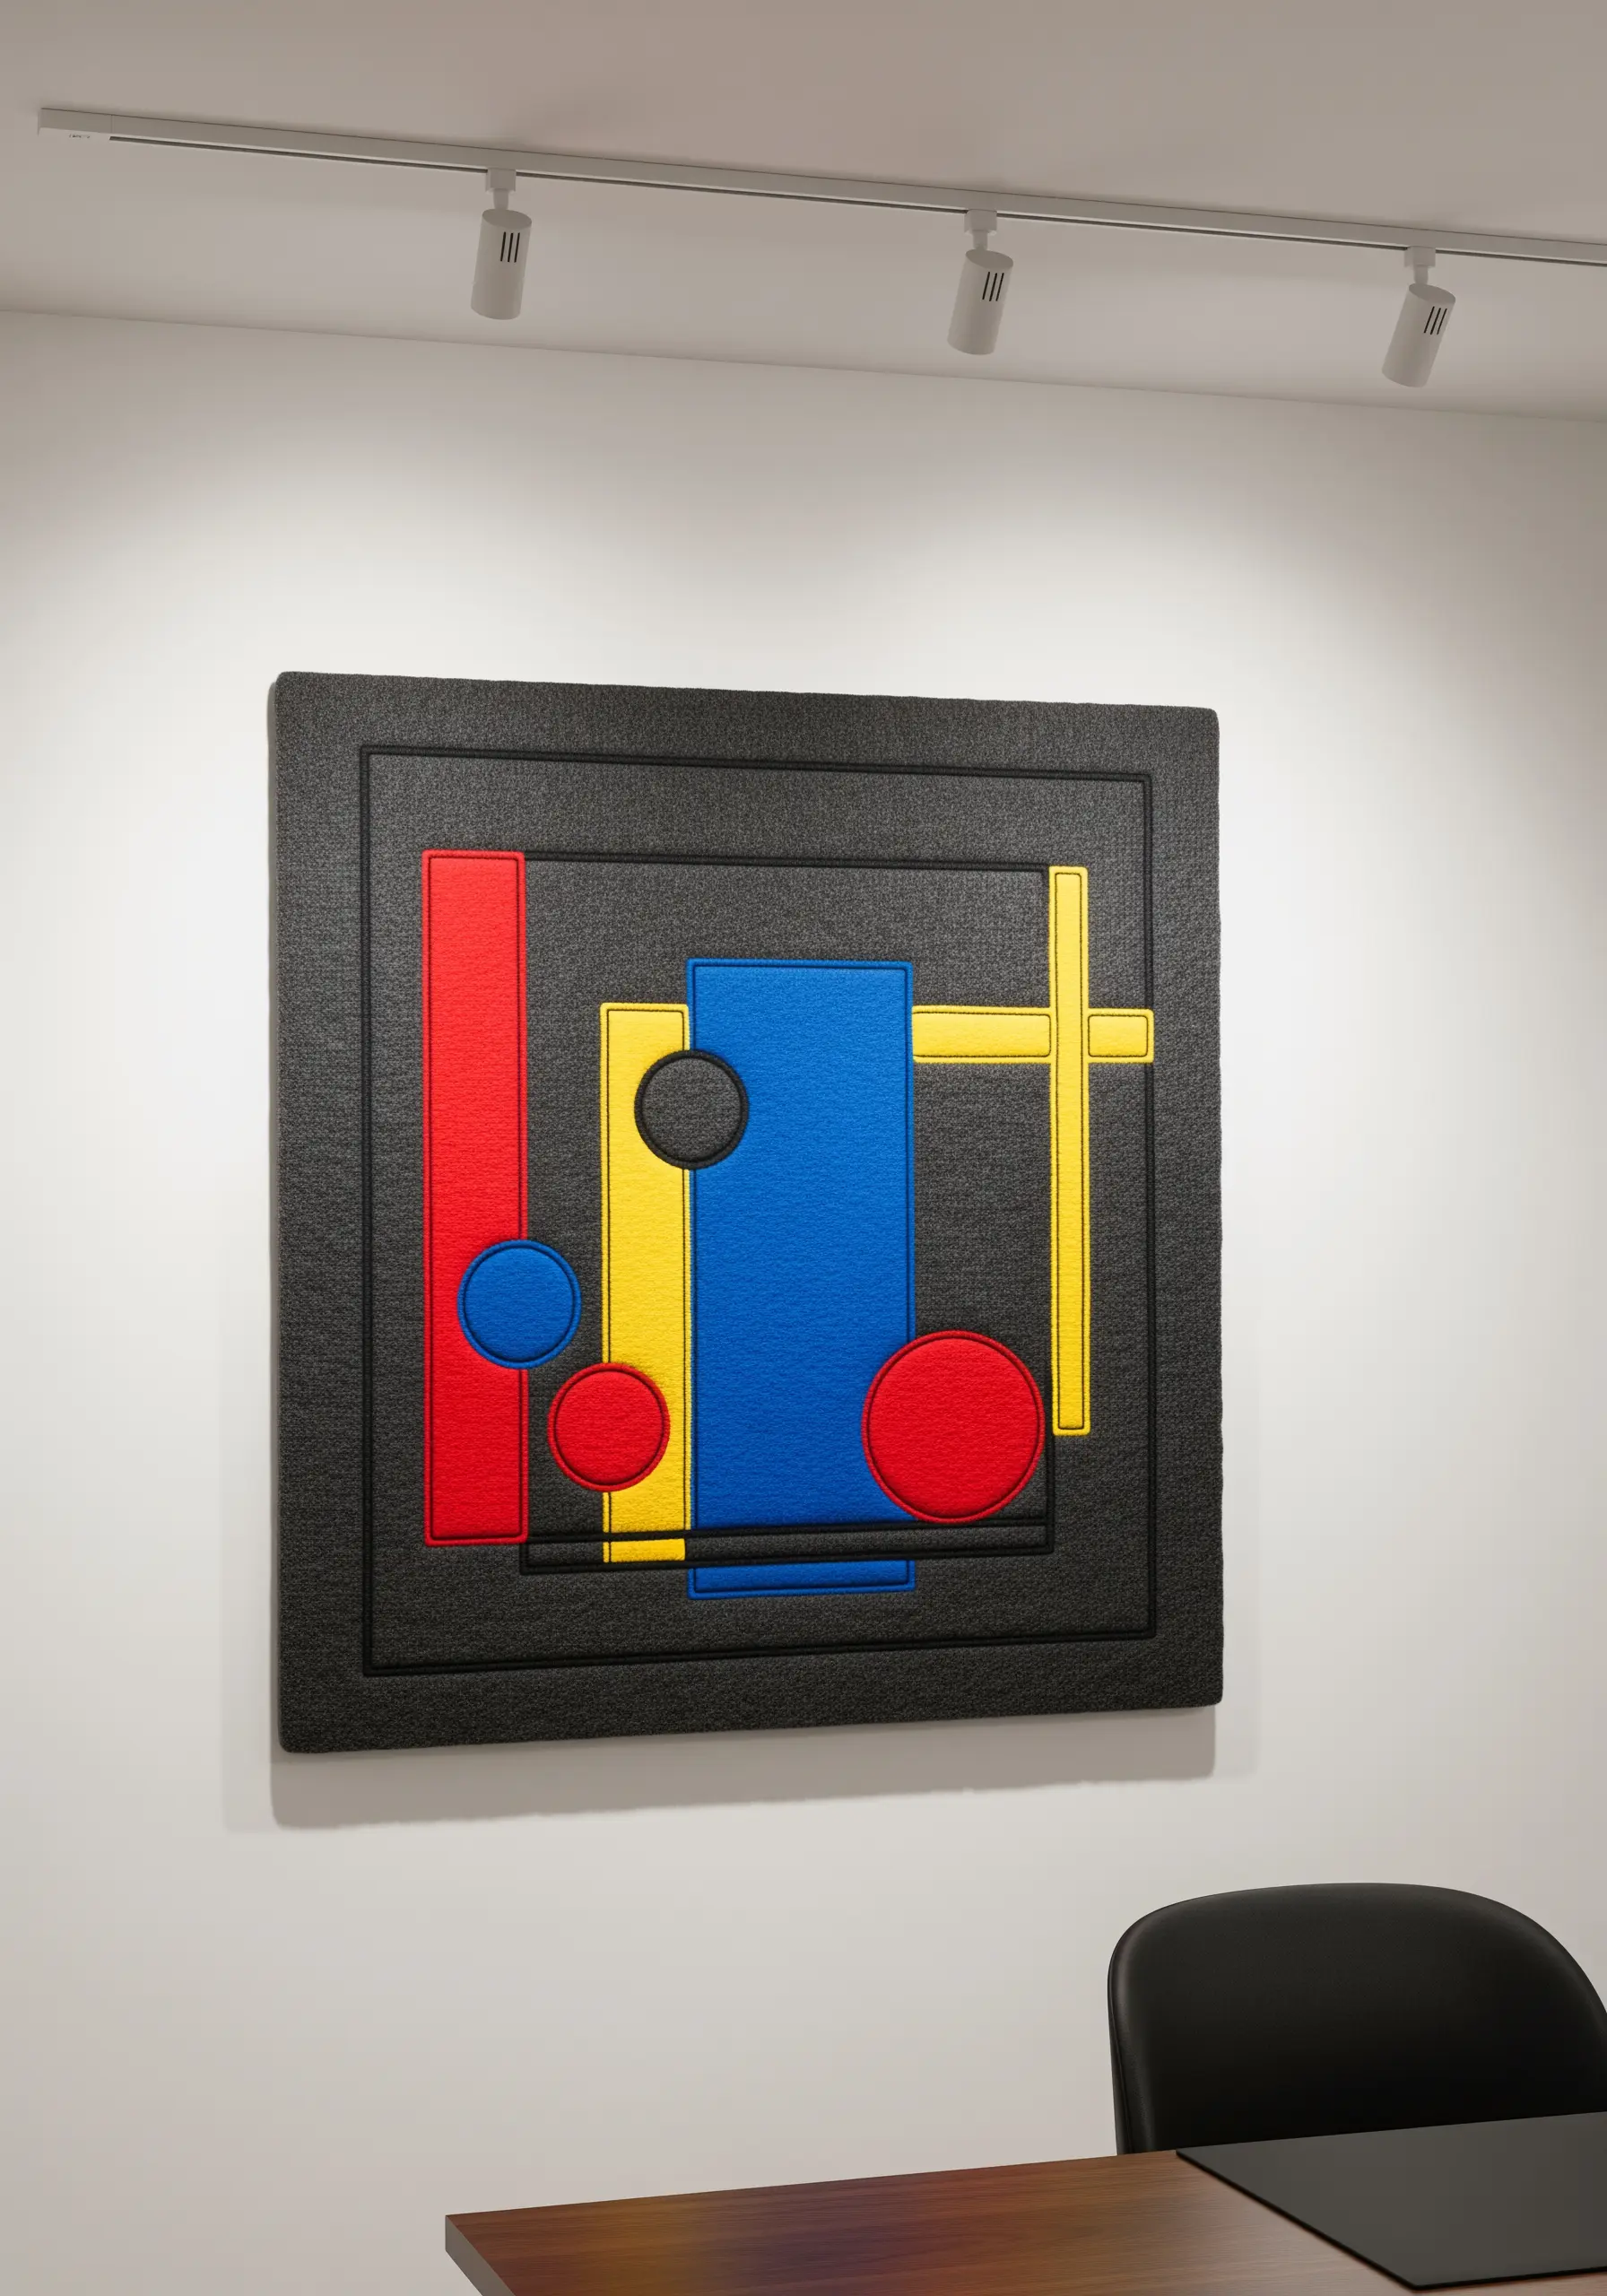
Transform simple geometric shapes into a sculptural statement piece by using padded satin stitch for a raised, 3D effect.
First, fill the shape with a foundation of straight stitches or felt cut-outs, then cover it with satin stitches worked in the opposite direction.
This underlying padding lifts the thread off the fabric surface, creating tangible depth and casting subtle shadows that make the colors feel more substantial.
Use a single, bold backstitch in a contrasting color to outline each shape. This not only defines the edges but also adds a graphic quality reminiscent of modern art.
7. Weave a Galaxy with Couching, Knots, and Beads

Capture the cosmic wonder of a galaxy by combining multiple textures and materials on a dark blue linen canvas.
Create the swirling arms of the nebula by couching down thick, textured yarns in shades of purple and magenta. This technique allows you to create fluid curves that would be impossible with standard stitches.
For the stars, use a mix of metallic silver French knots, seed stitches, and actual silver beads. Varying their size and density creates the illusion of a vast, sparkling starfield with real depth.
This multi-material approach transforms the piece from a flat embroidery into a tactile, dreamy galaxy string art experience.
8. Capture Delicate Realism with Single-Strand Thread Painting
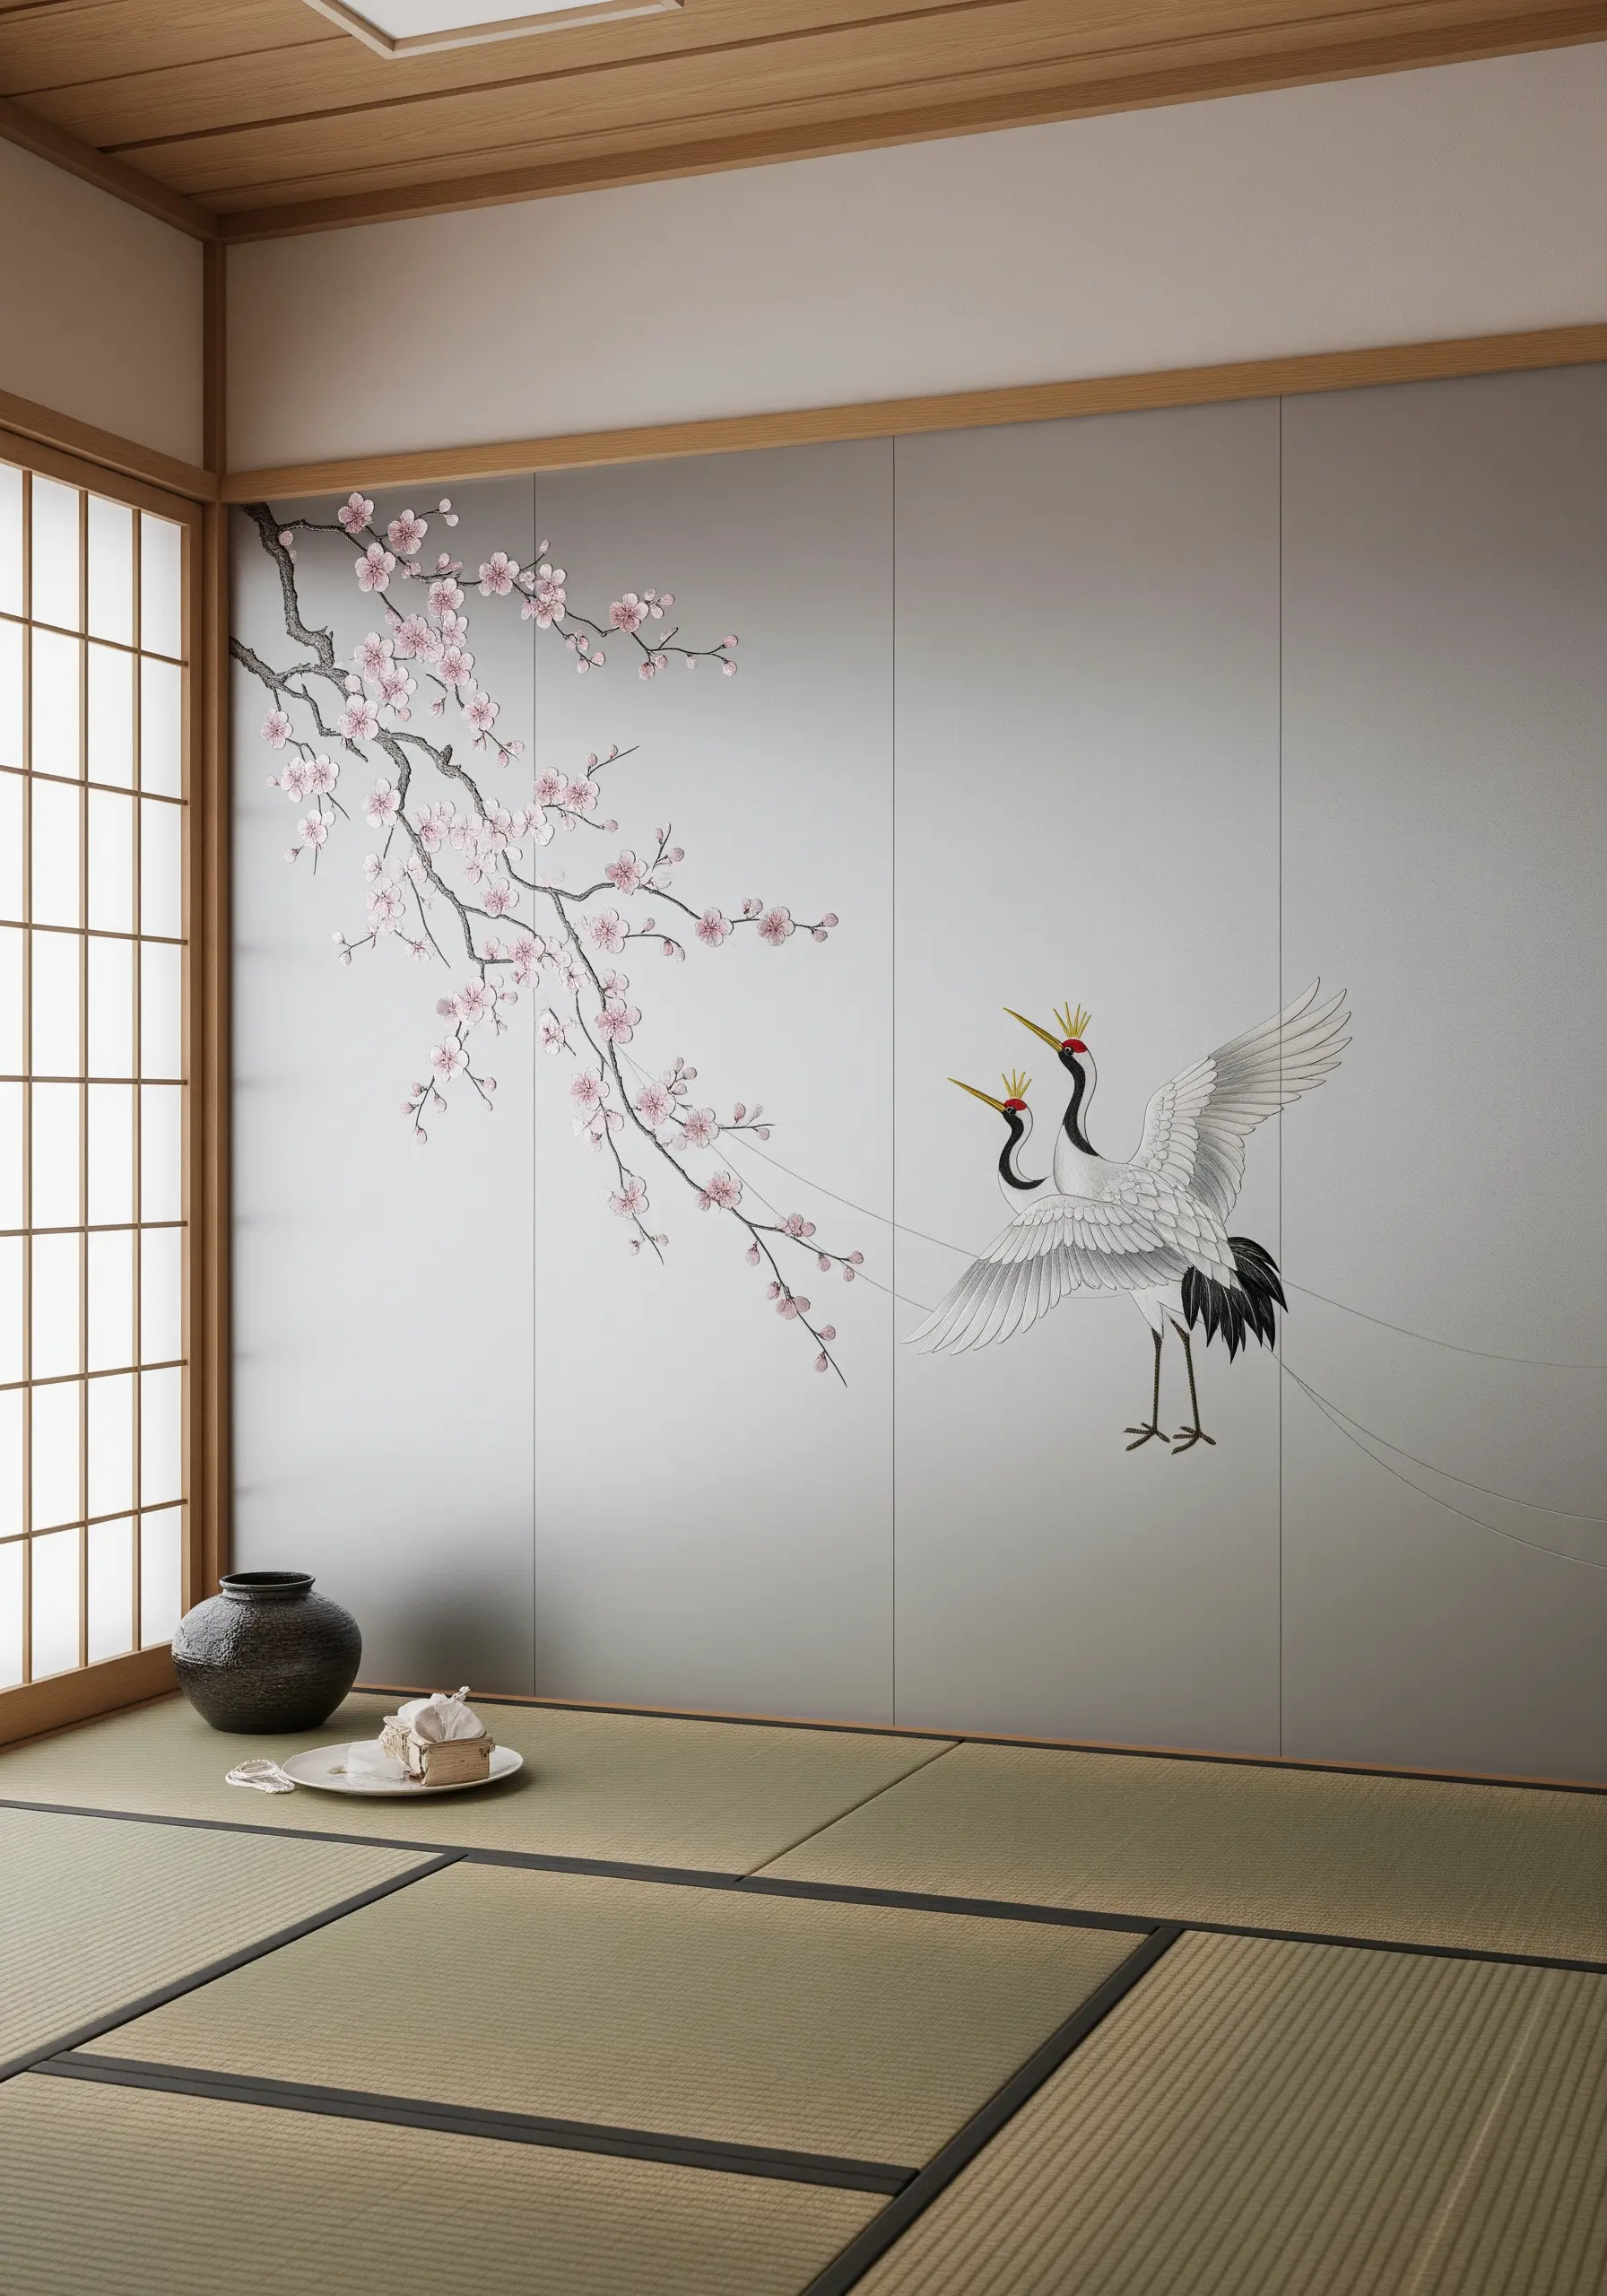
To embroider scenes with the elegance of a traditional ink painting, the secret is to use only a single strand of floss.
This allows for exceptionally fine detail and subtle color blending, perfect for the delicate petals of cherry blossom embroidery projects.
Use long and short stitch to create soft gradients, ensuring each stitch seamlessly merges with the next, avoiding harsh lines.
For the cranes, use directional satin stitch to mimic the flow of feathers, changing the angle of your stitches to define the wings and body.
Working on a silk or high-count cotton fabric provides a smooth surface that enhances the delicacy of the fine threadwork.
9. Build a Sculptural Wall Hanging with Woven Textures
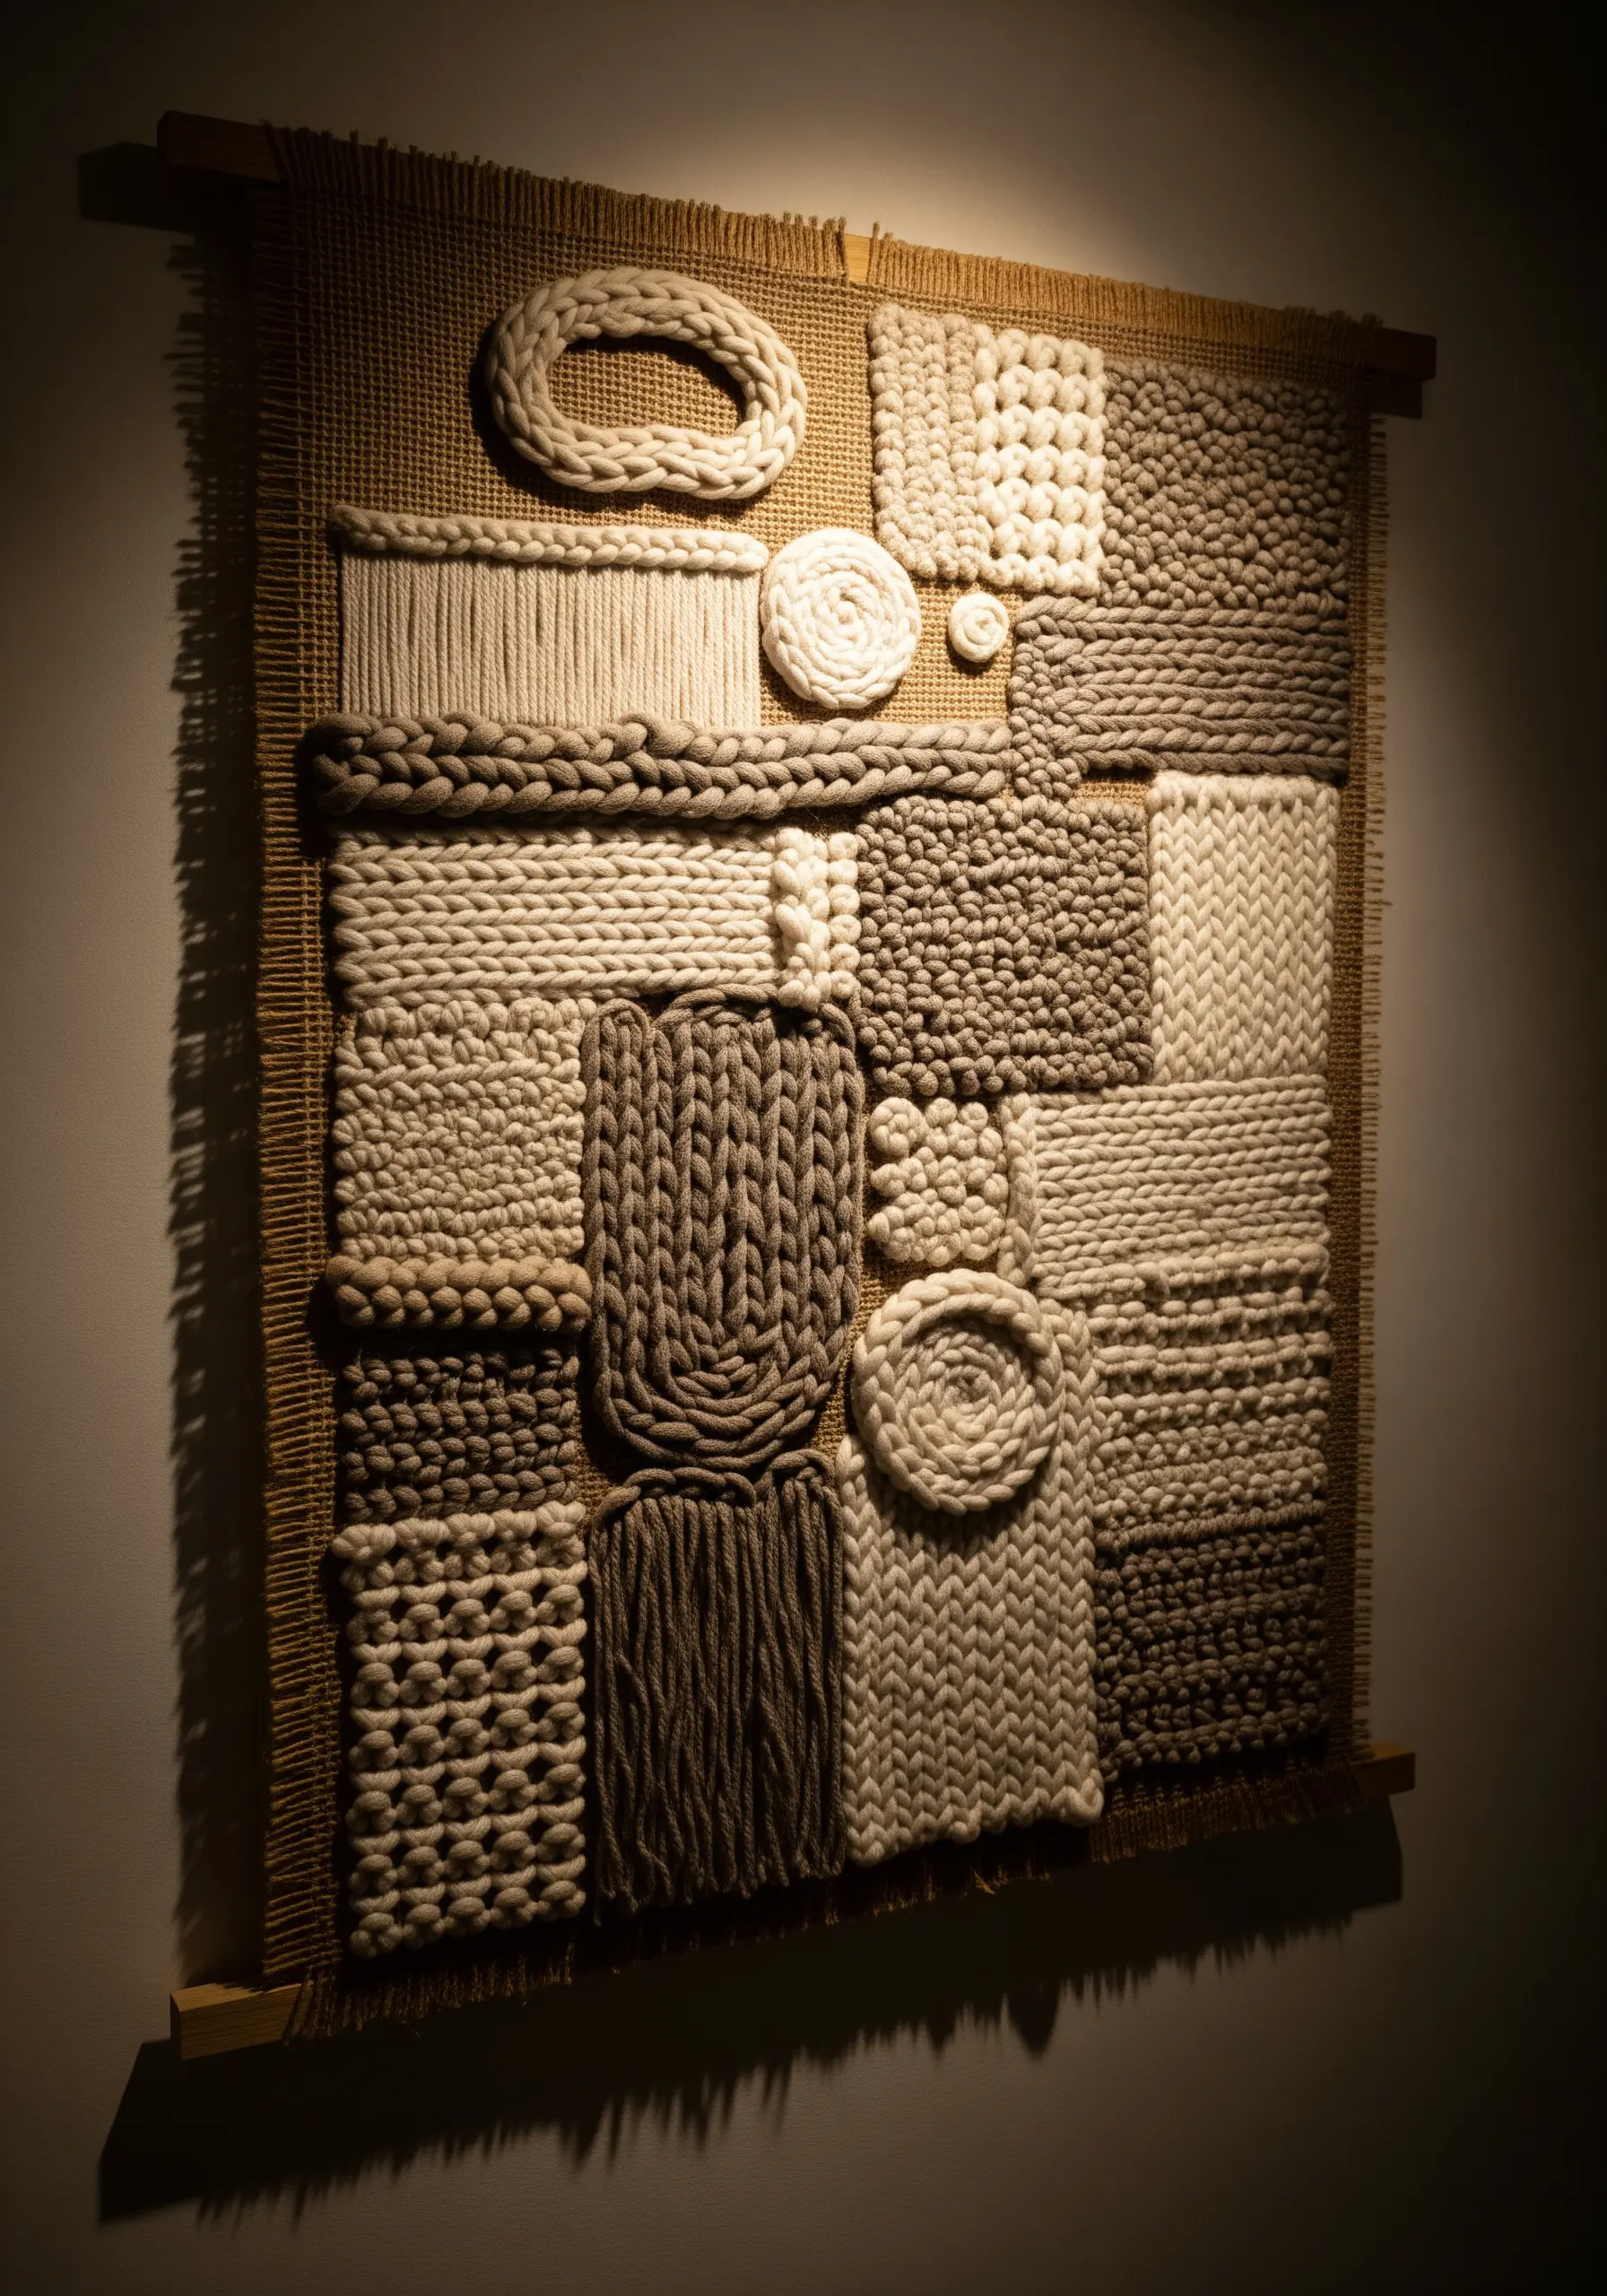
Move beyond stitches and into the realm of weaving to create a deeply tactile, neutral-toned wall panel.
Work on a loose-weave base like burlap or hessian, which allows you to easily incorporate chunky yarns and roving.
Explore different weaving patterns, knotted stitches like the bullion knot, and raised techniques like turkey work to create a patchwork of distinct textures.
By limiting your color palette to creams, grays, and taupes, you allow the textures themselves to become the focus of the artwork, inviting viewers to not just see but also imagine the feel of each section.
These are some of the best ways to embroider natural textures that truly make a statement.
10. Make a Statement with Bold, Continuous Line Art
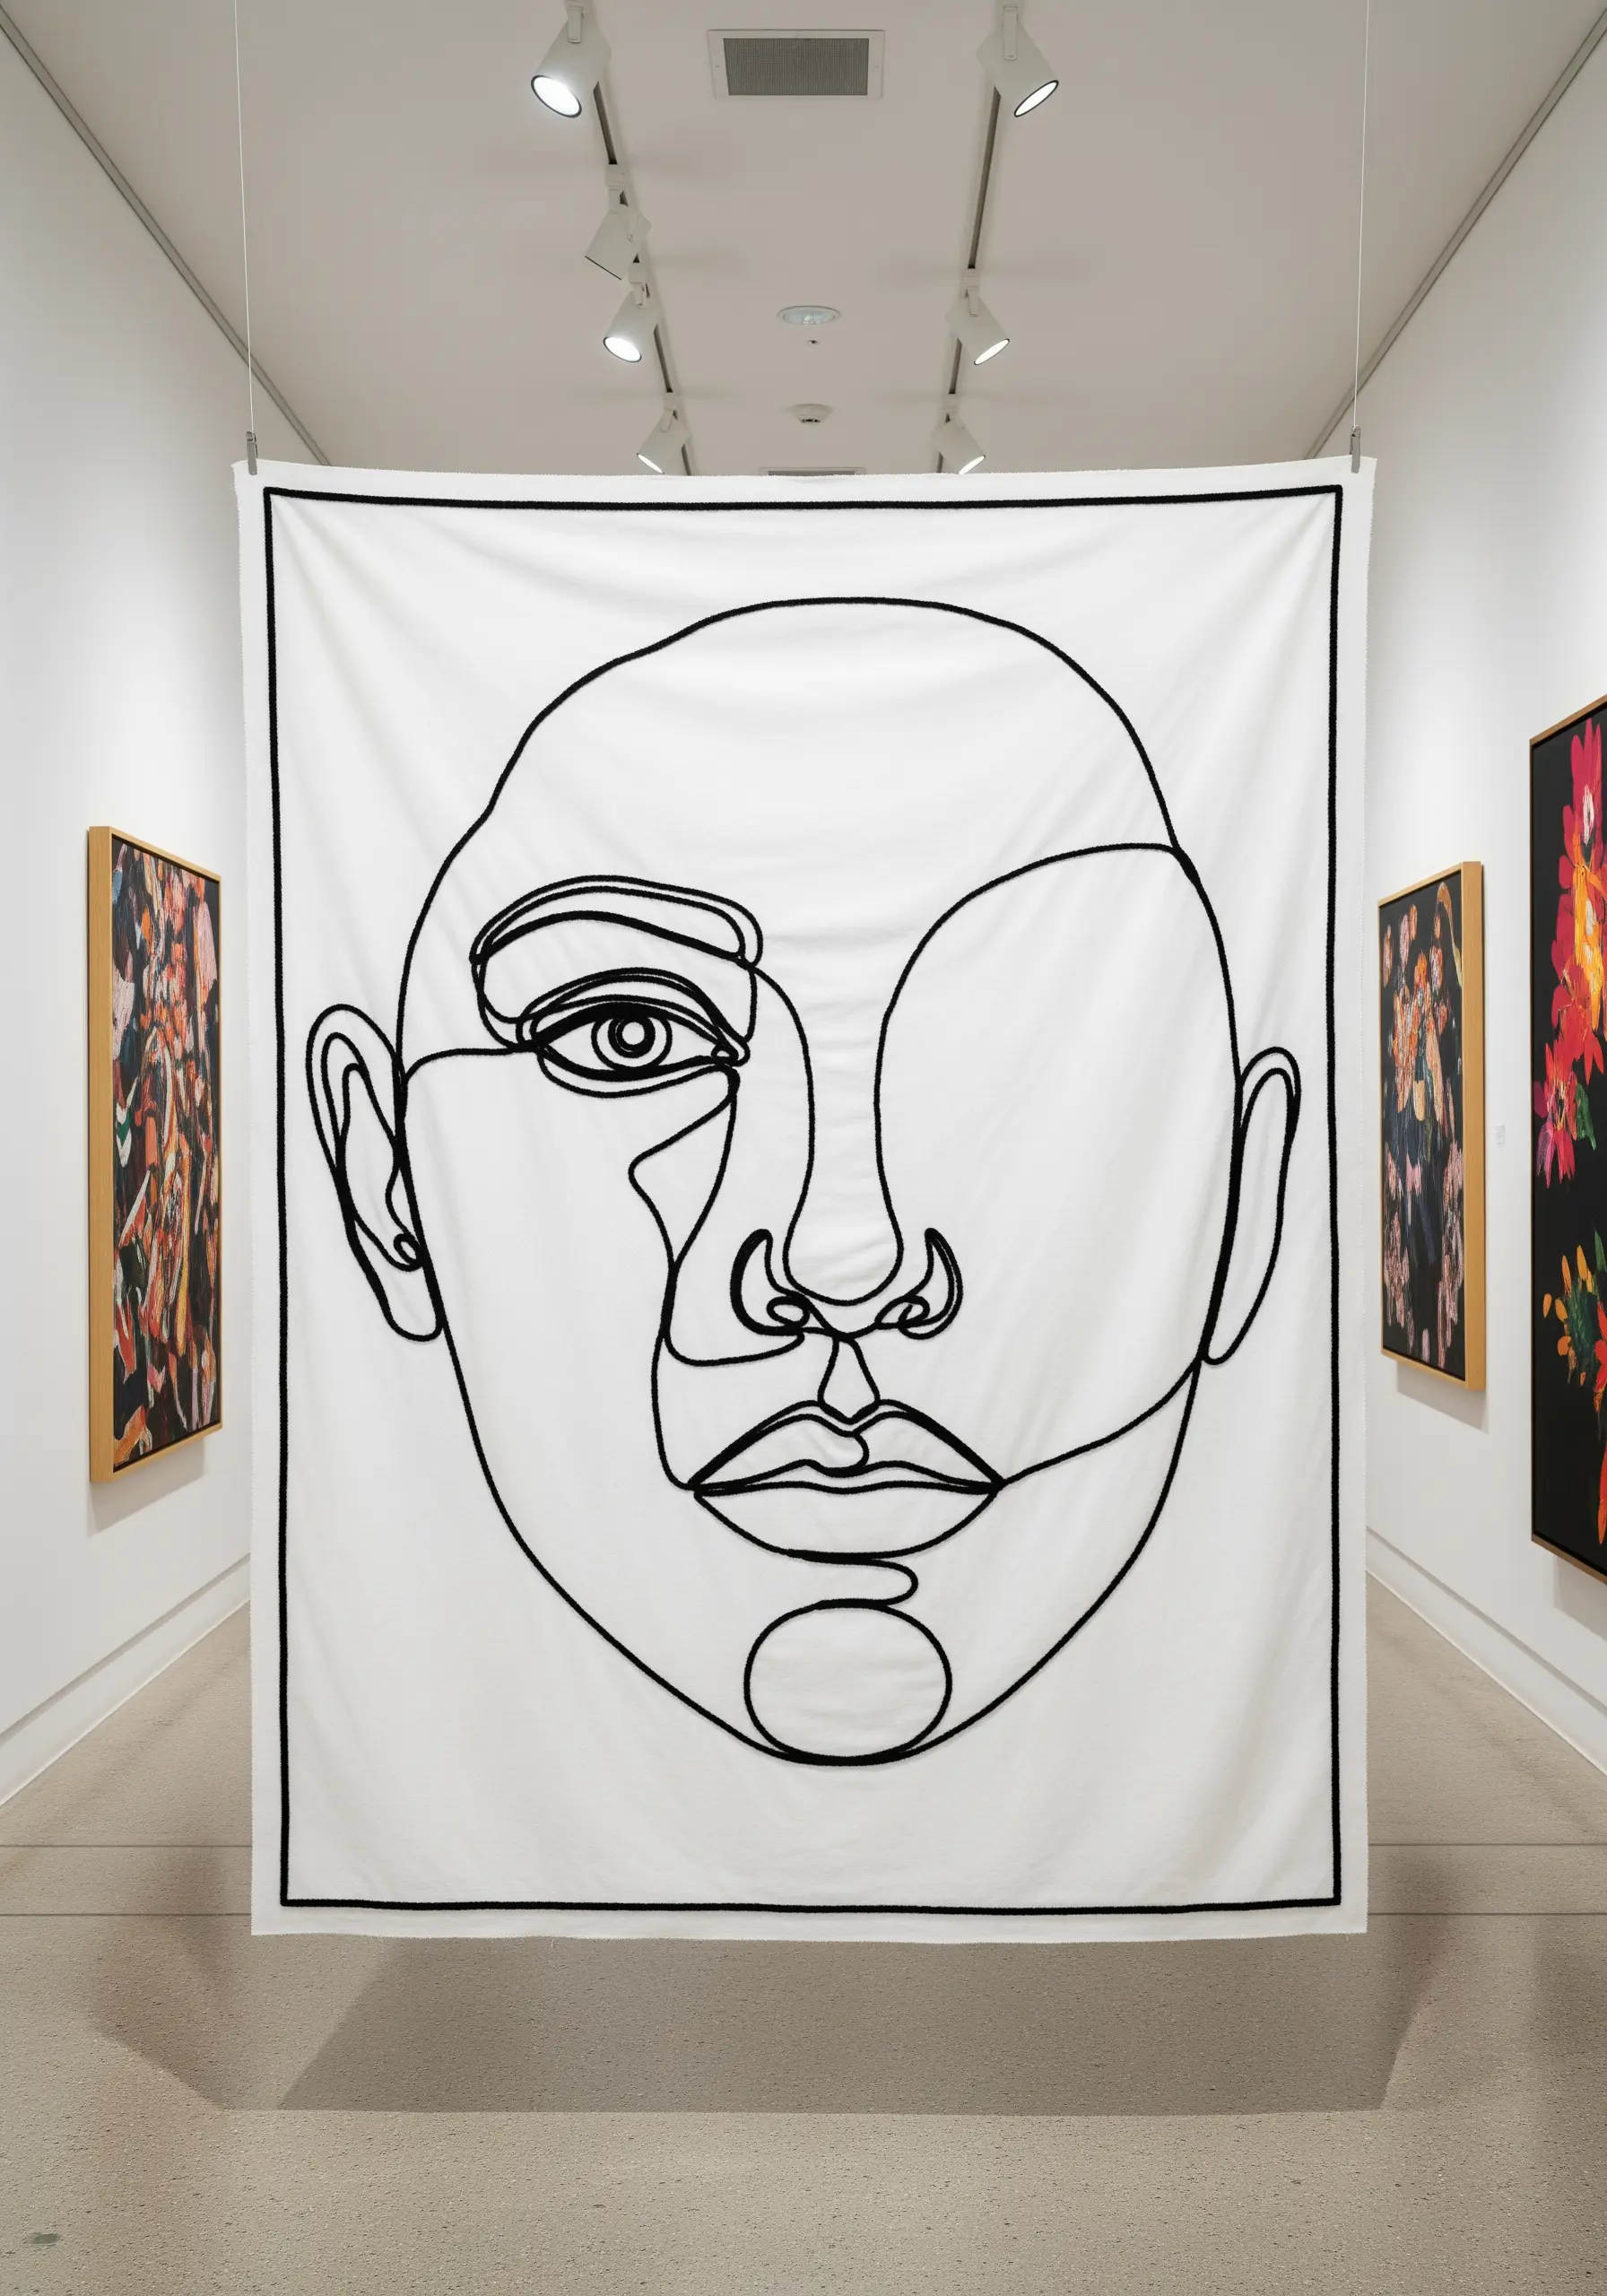
For a powerful, gallery-worthy piece, translate a continuous line drawing into thread on a large scale.
Use a thick, black yarn or cord and couch it onto a plain white cotton or canvas backdrop. This method ensures your line is uniformly thick and gracefully curved, something difficult to achieve with traditional stitches.
The impact comes from the simplicity and scale, making it a perfect project if you want to create stunning modern line art faces.
Carefully transfer your design to the fabric before you begin, as the success of the piece depends entirely on the fluid, unbroken quality of the single line.
11. Embrace Folk Art Charm with Symmetrical Motifs
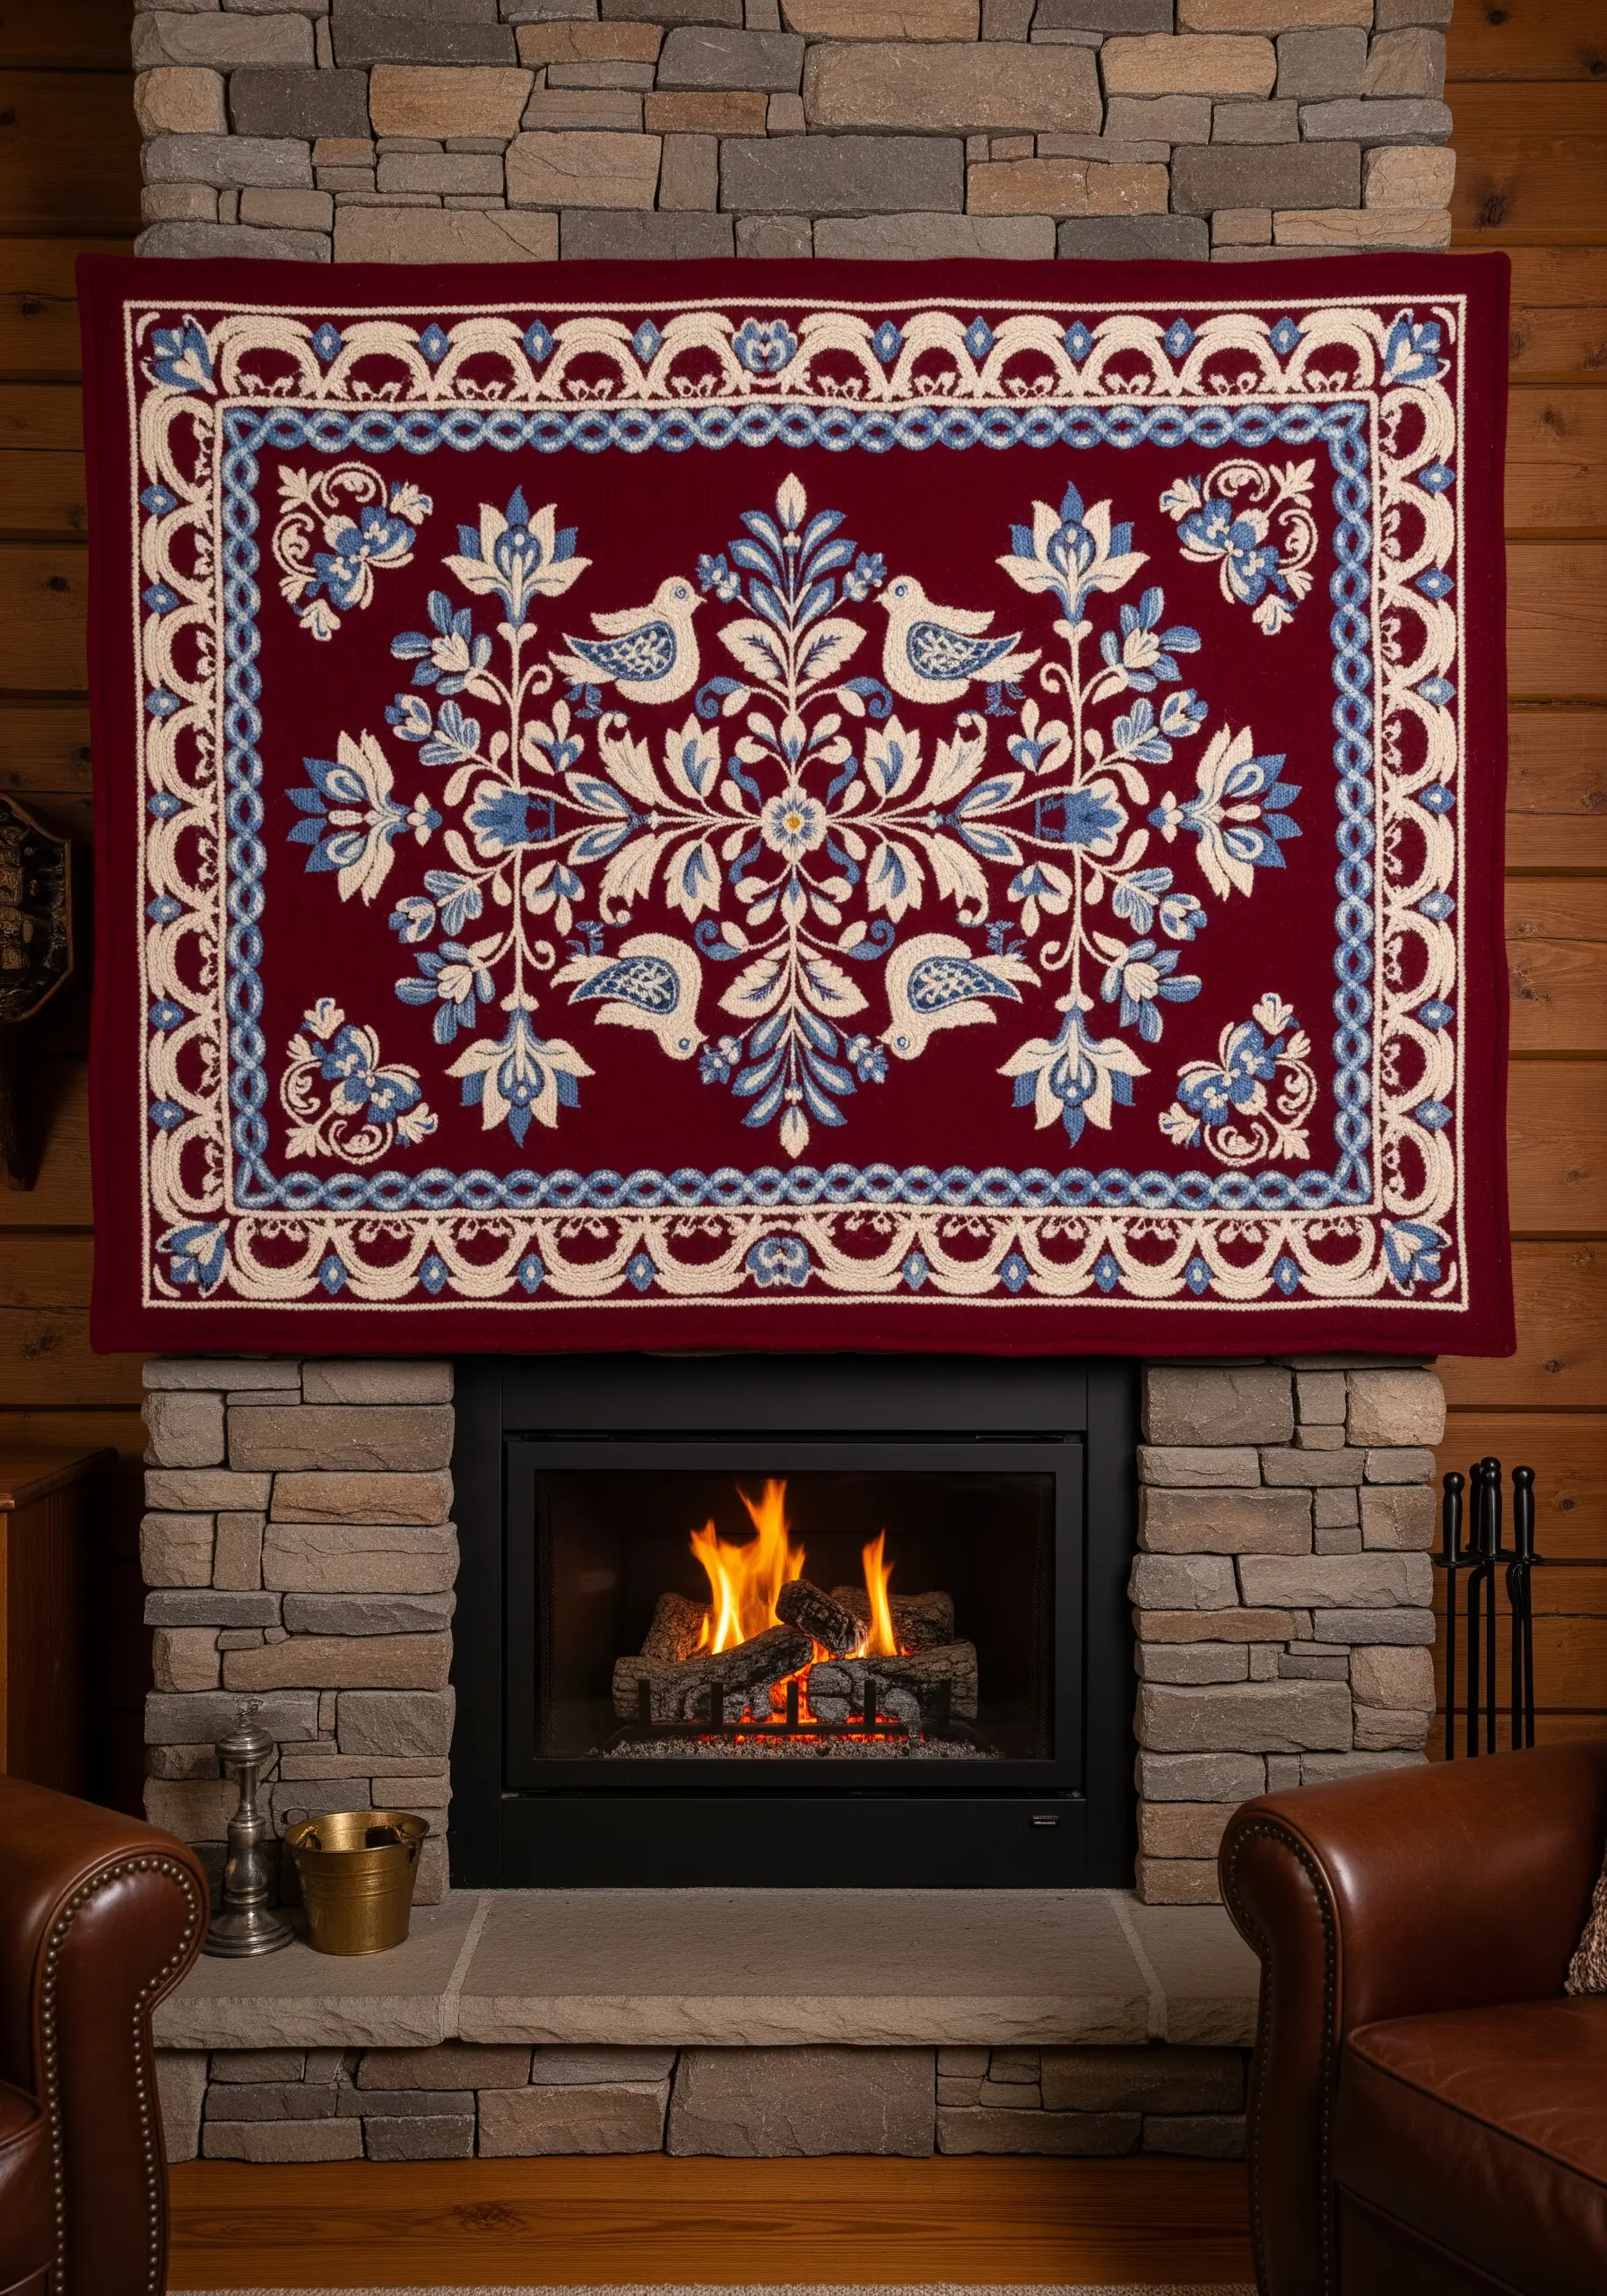
Create a warm, inviting focal point with a folk-art-inspired panel characterized by symmetry and a limited color palette.
Fold your design template in half vertically and horizontally to ensure your motifs—like birds, flowers, and leaves—are perfectly mirrored.
This symmetry is what gives folk art its comforting and balanced aesthetic.
Use basic, strong stitches like chain stitch for outlines and a dense satin stitch for fills. The beauty here isn’t in complex techniques but in clean execution and thoughtful color choices that feel both traditional and timeless.
12. Craft a Succulent Garden with 3D Stitches and Beads
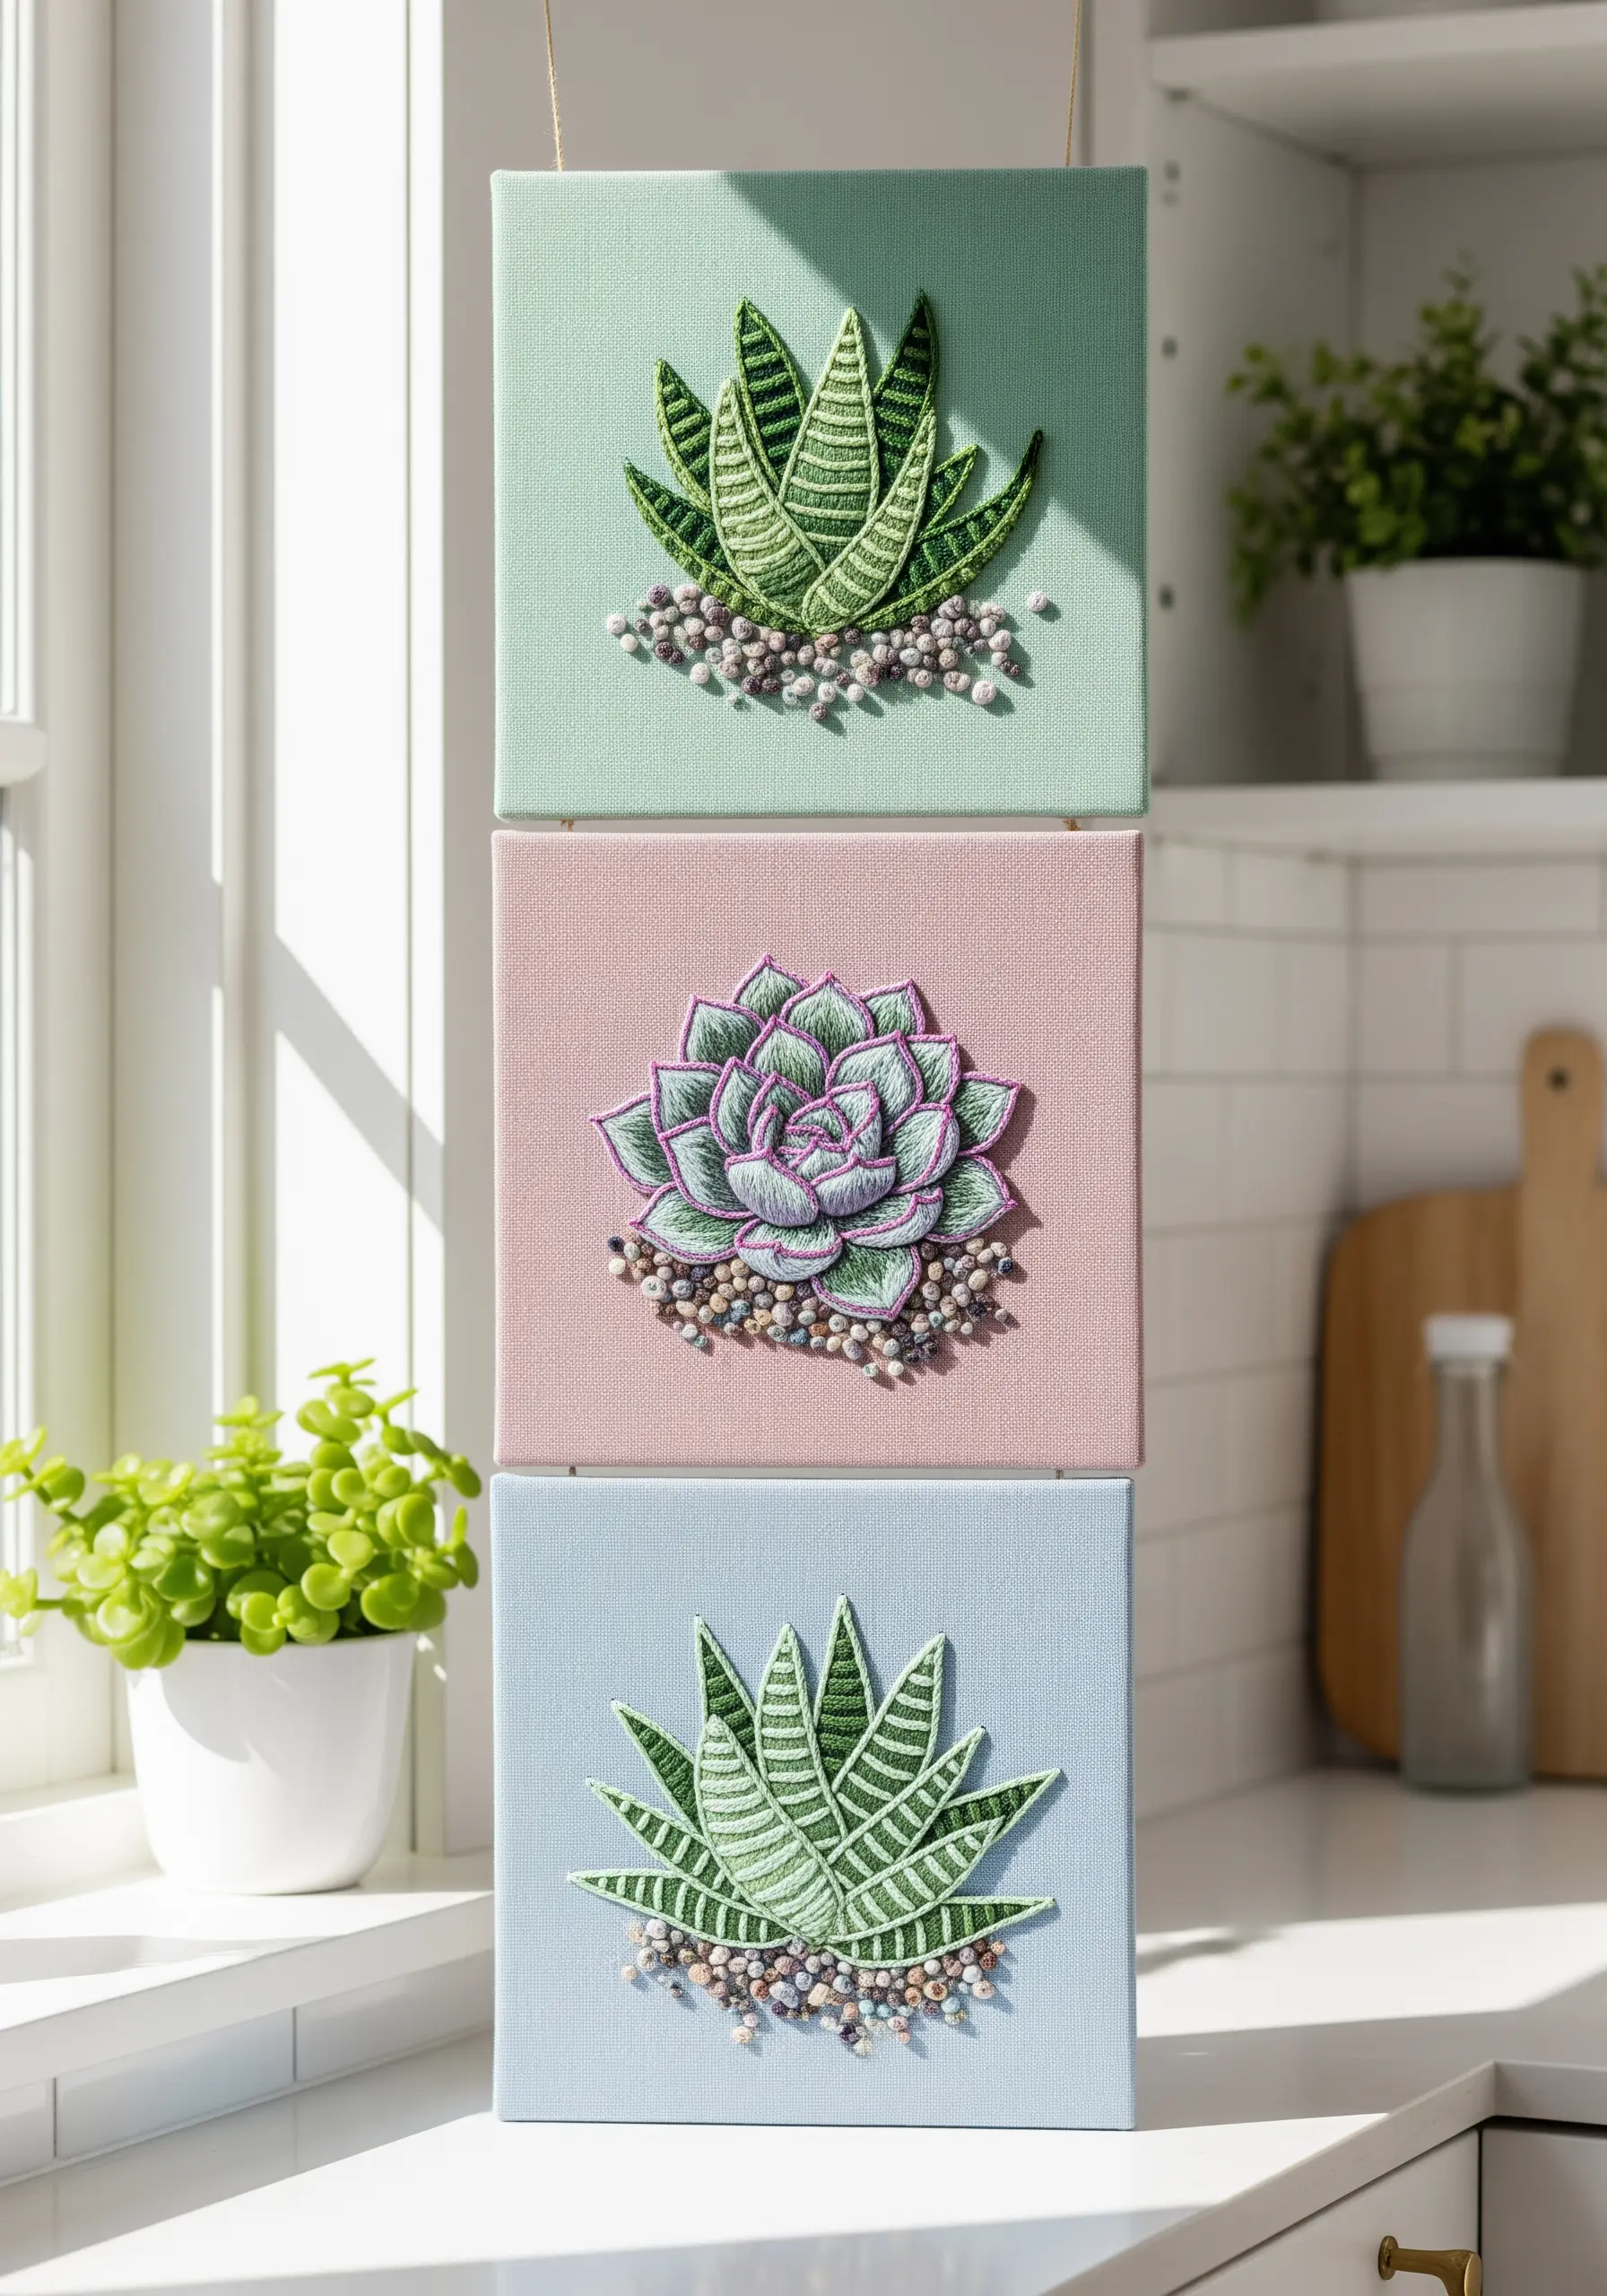
Bring your botanicals to life with stumpwork techniques that lift the embroidery off the canvas.
Create individual succulent leaves with padded satin stitch or by wrapping thread around small wire frames and attaching them to the fabric.
This method gives your plants a realistic, fleshy appearance that standard stitches can’t replicate.
For the gravelly soil, use a dense cluster of French knots in varying neutral shades, mixed with tiny seed beads for a hint of sparkle and texture. This creates a convincing ground for your 3D embroidery wall art pieces to ‘grow’ from.
13. Sculpt an Underwater World with Knots and Loops

Recreate the extraordinary textures of a coral reef using a dense collage of knotted and looped stitches.
Use bullion knots for tubular coral shapes, tightly packed French knots for brain coral, and woven picot stitches to form delicate sea fans.
Don’t be afraid to mix different types and weights of thread—from standard six-strand floss to shiny perle cotton and soft tapestry wool—to give each element a unique finish.
For the background, use long, wavy stitches in different shades of blue to create the illusion of light filtering through water, adding depth to your underwater scene.
14. Achieve Timeless Opulence with Intricate Pattern Work

To create a tapestry with historical grandeur, focus on the rhythm and repetition of an intricate, interlocking pattern.
Break down the complex design into smaller, manageable elements—a single leaf, a flower, a scrolling vine—and perfect the stitches for each one.
Use a combination of satin stitch for bold color fields, stem stitch for flowing outlines, and seed stitch for textured fills. This variety prevents the dense pattern from looking flat.
Choose a sophisticated, muted color palette with deep greens, dusty rose, and cream to evoke a sense of heritage and quiet luxury that complements traditional decor.
15. Define a Cityscape with Precise Line Work
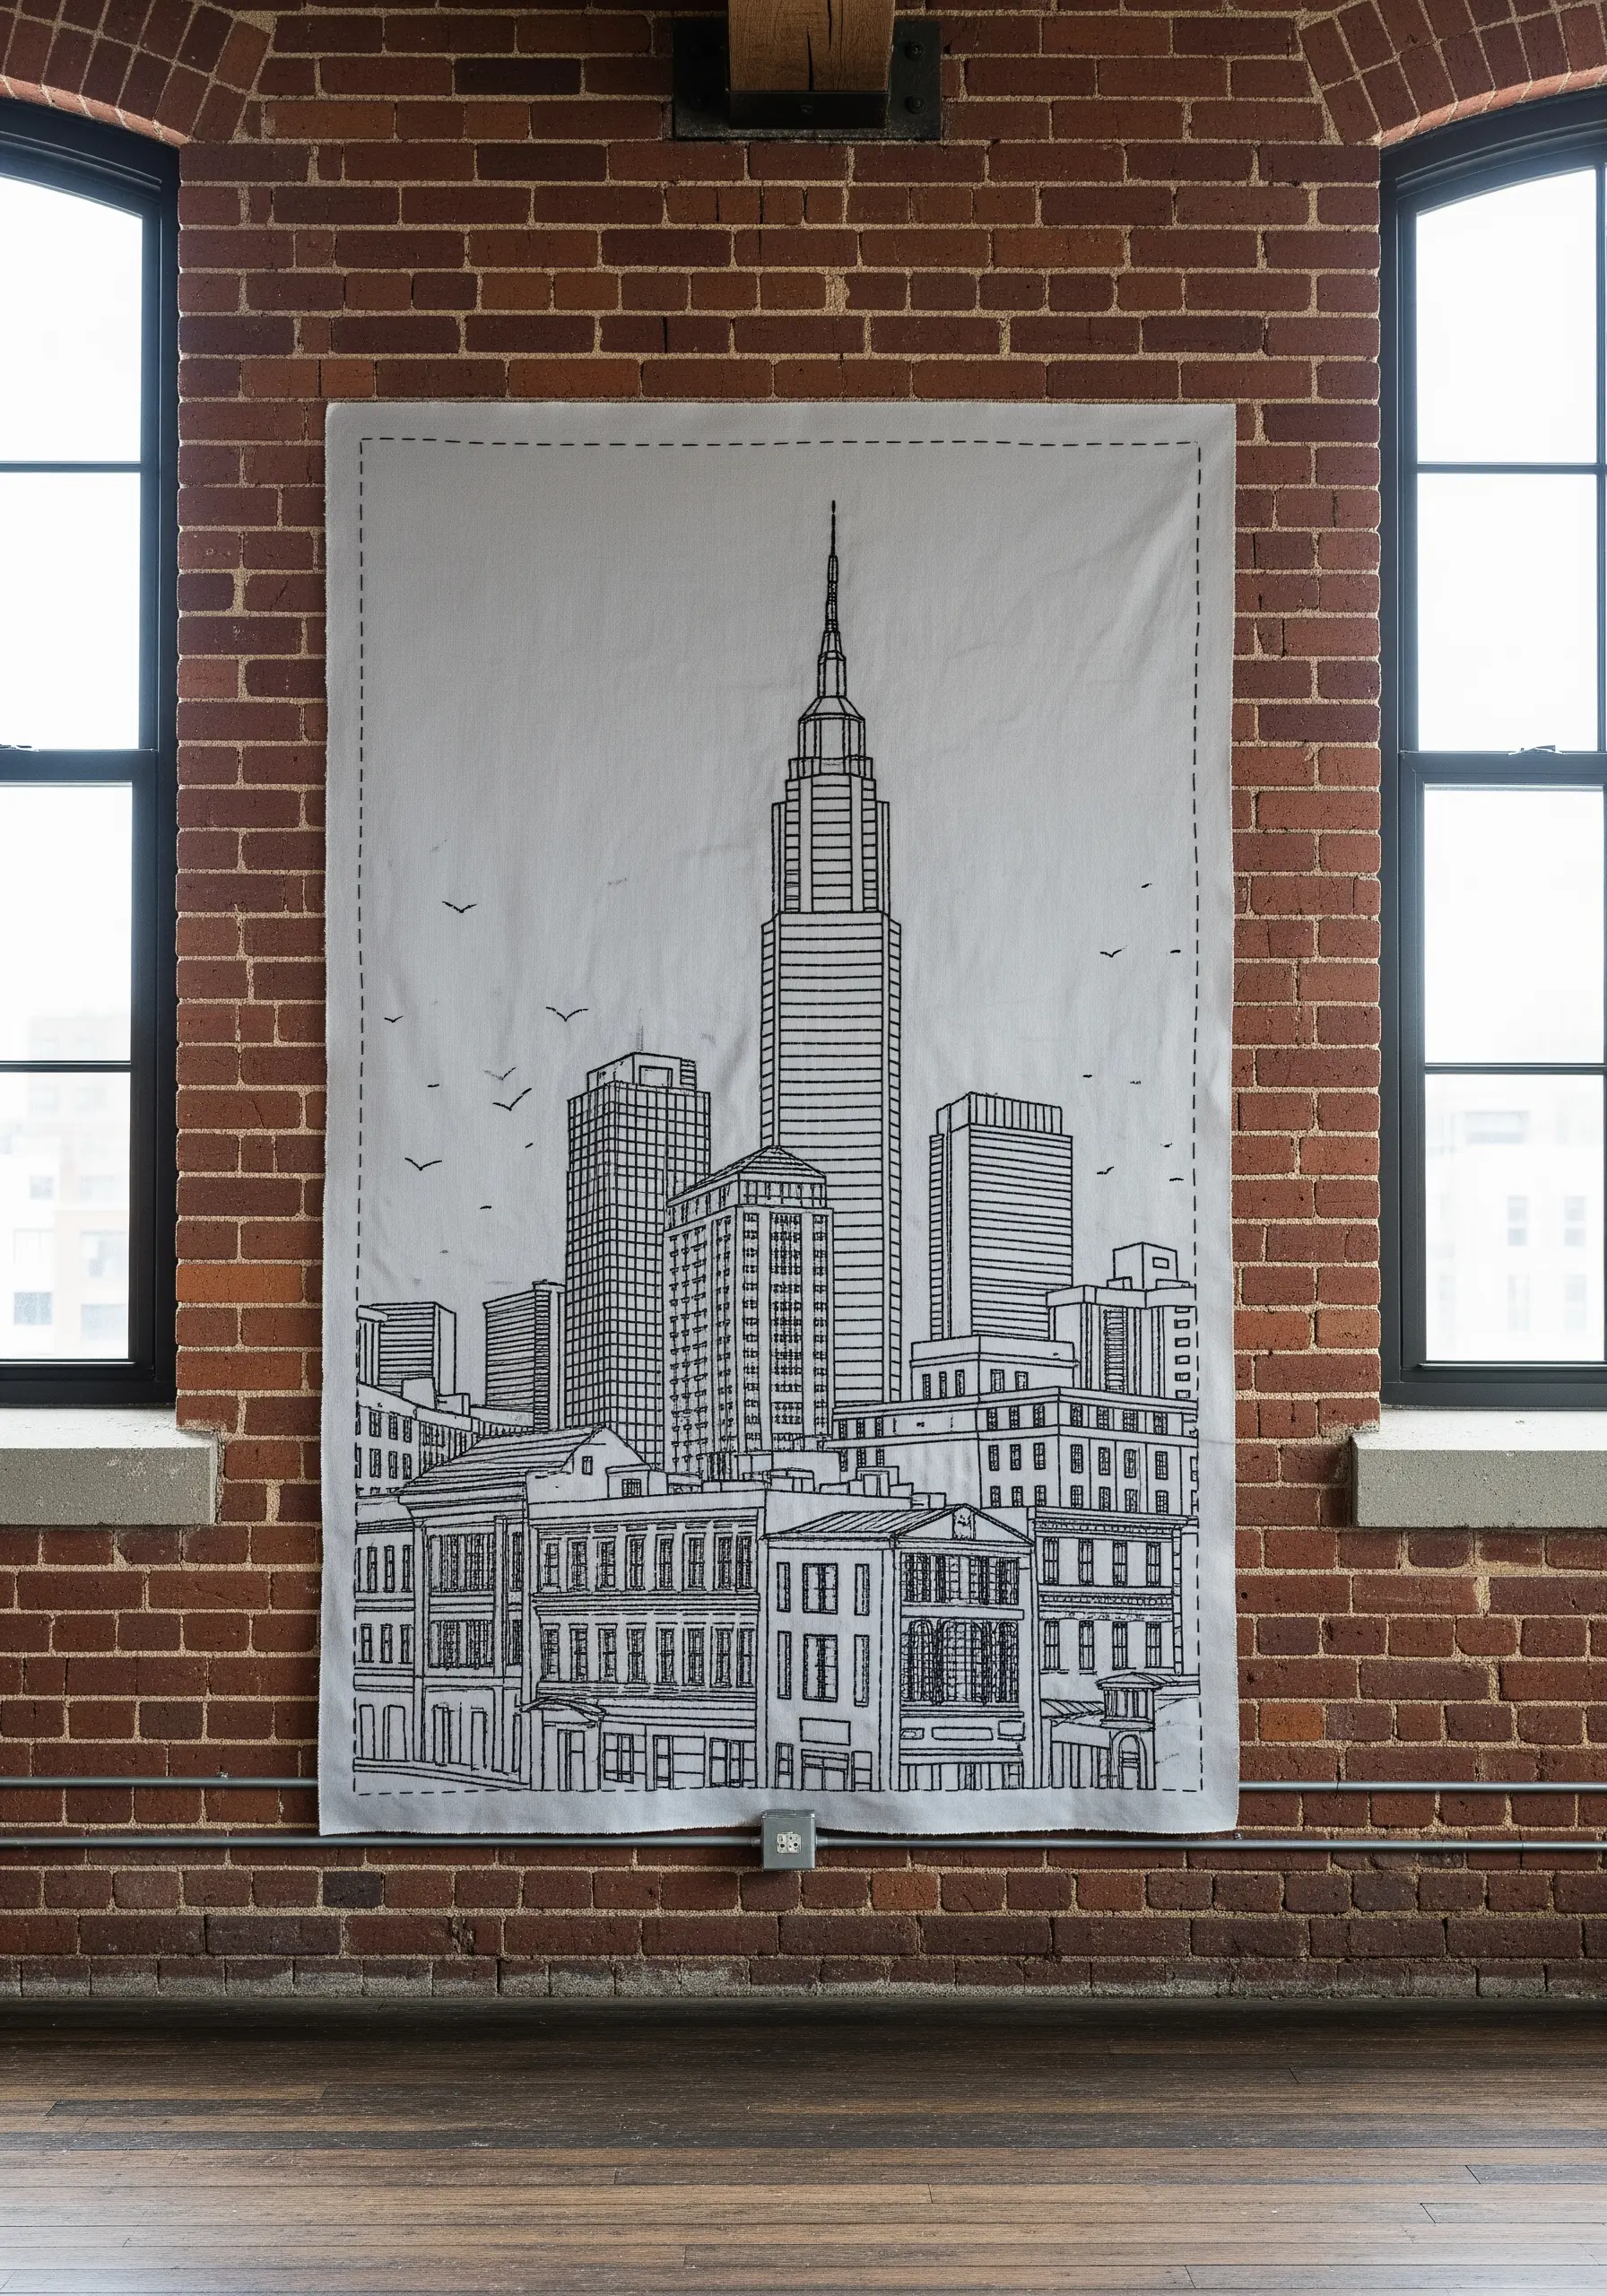
Capture the energy of an urban landscape with clean, architectural lines against an industrial backdrop.
Use a simple backstitch or stem stitch for this style, focusing on maintaining a consistent stitch length to keep your lines looking sharp and deliberate.
Create a sense of depth by varying your thread weight: use three or four strands for the buildings in the foreground and switch to just one or two strands for those in the distance.
This subtle shift in line thickness is a simple but highly effective way to create perspective in minimalist embroidery art pieces.
16. Channel Retro Style with Whipped Outlines

To get that bold, rounded look of 70s graphic design, use a whipped backstitch or chain stitch for all your outlines.
This technique creates a thick, cord-like line that cleanly separates the color-blocked areas and gives the design its characteristic groovy flow.
Commit to a nostalgic color palette—avocado green, harvest gold, burnt orange, and earthy brown—to instantly evoke the era.
The key to this style is density. Fill every shape with a perfectly smooth satin stitch, ensuring no fabric shows through, for a solid, graphic impact.
17. Convey Emotion with Expressive, Painterly Stitches

Create a dynamic, emotionally charged landscape by treating your thread like paint and your needle like a brush.
Lay down long, directional stitches that follow the contours of the landscape—swirling in the sky, jagged on the mountains, and flowing along the river.
Don’t blend your colors; instead, place bold, contrasting hues side-by-side to create energy and vibration. This technique, known as optical blending, allows the viewer’s eye to mix the colors.
Embrace the chaos. The power of these vibrant embroidery wall panels comes from energetic, imperfect stitches rather than precise, controlled ones.
18. Sculpt a Wave with Mixed-Fiber Art Techniques
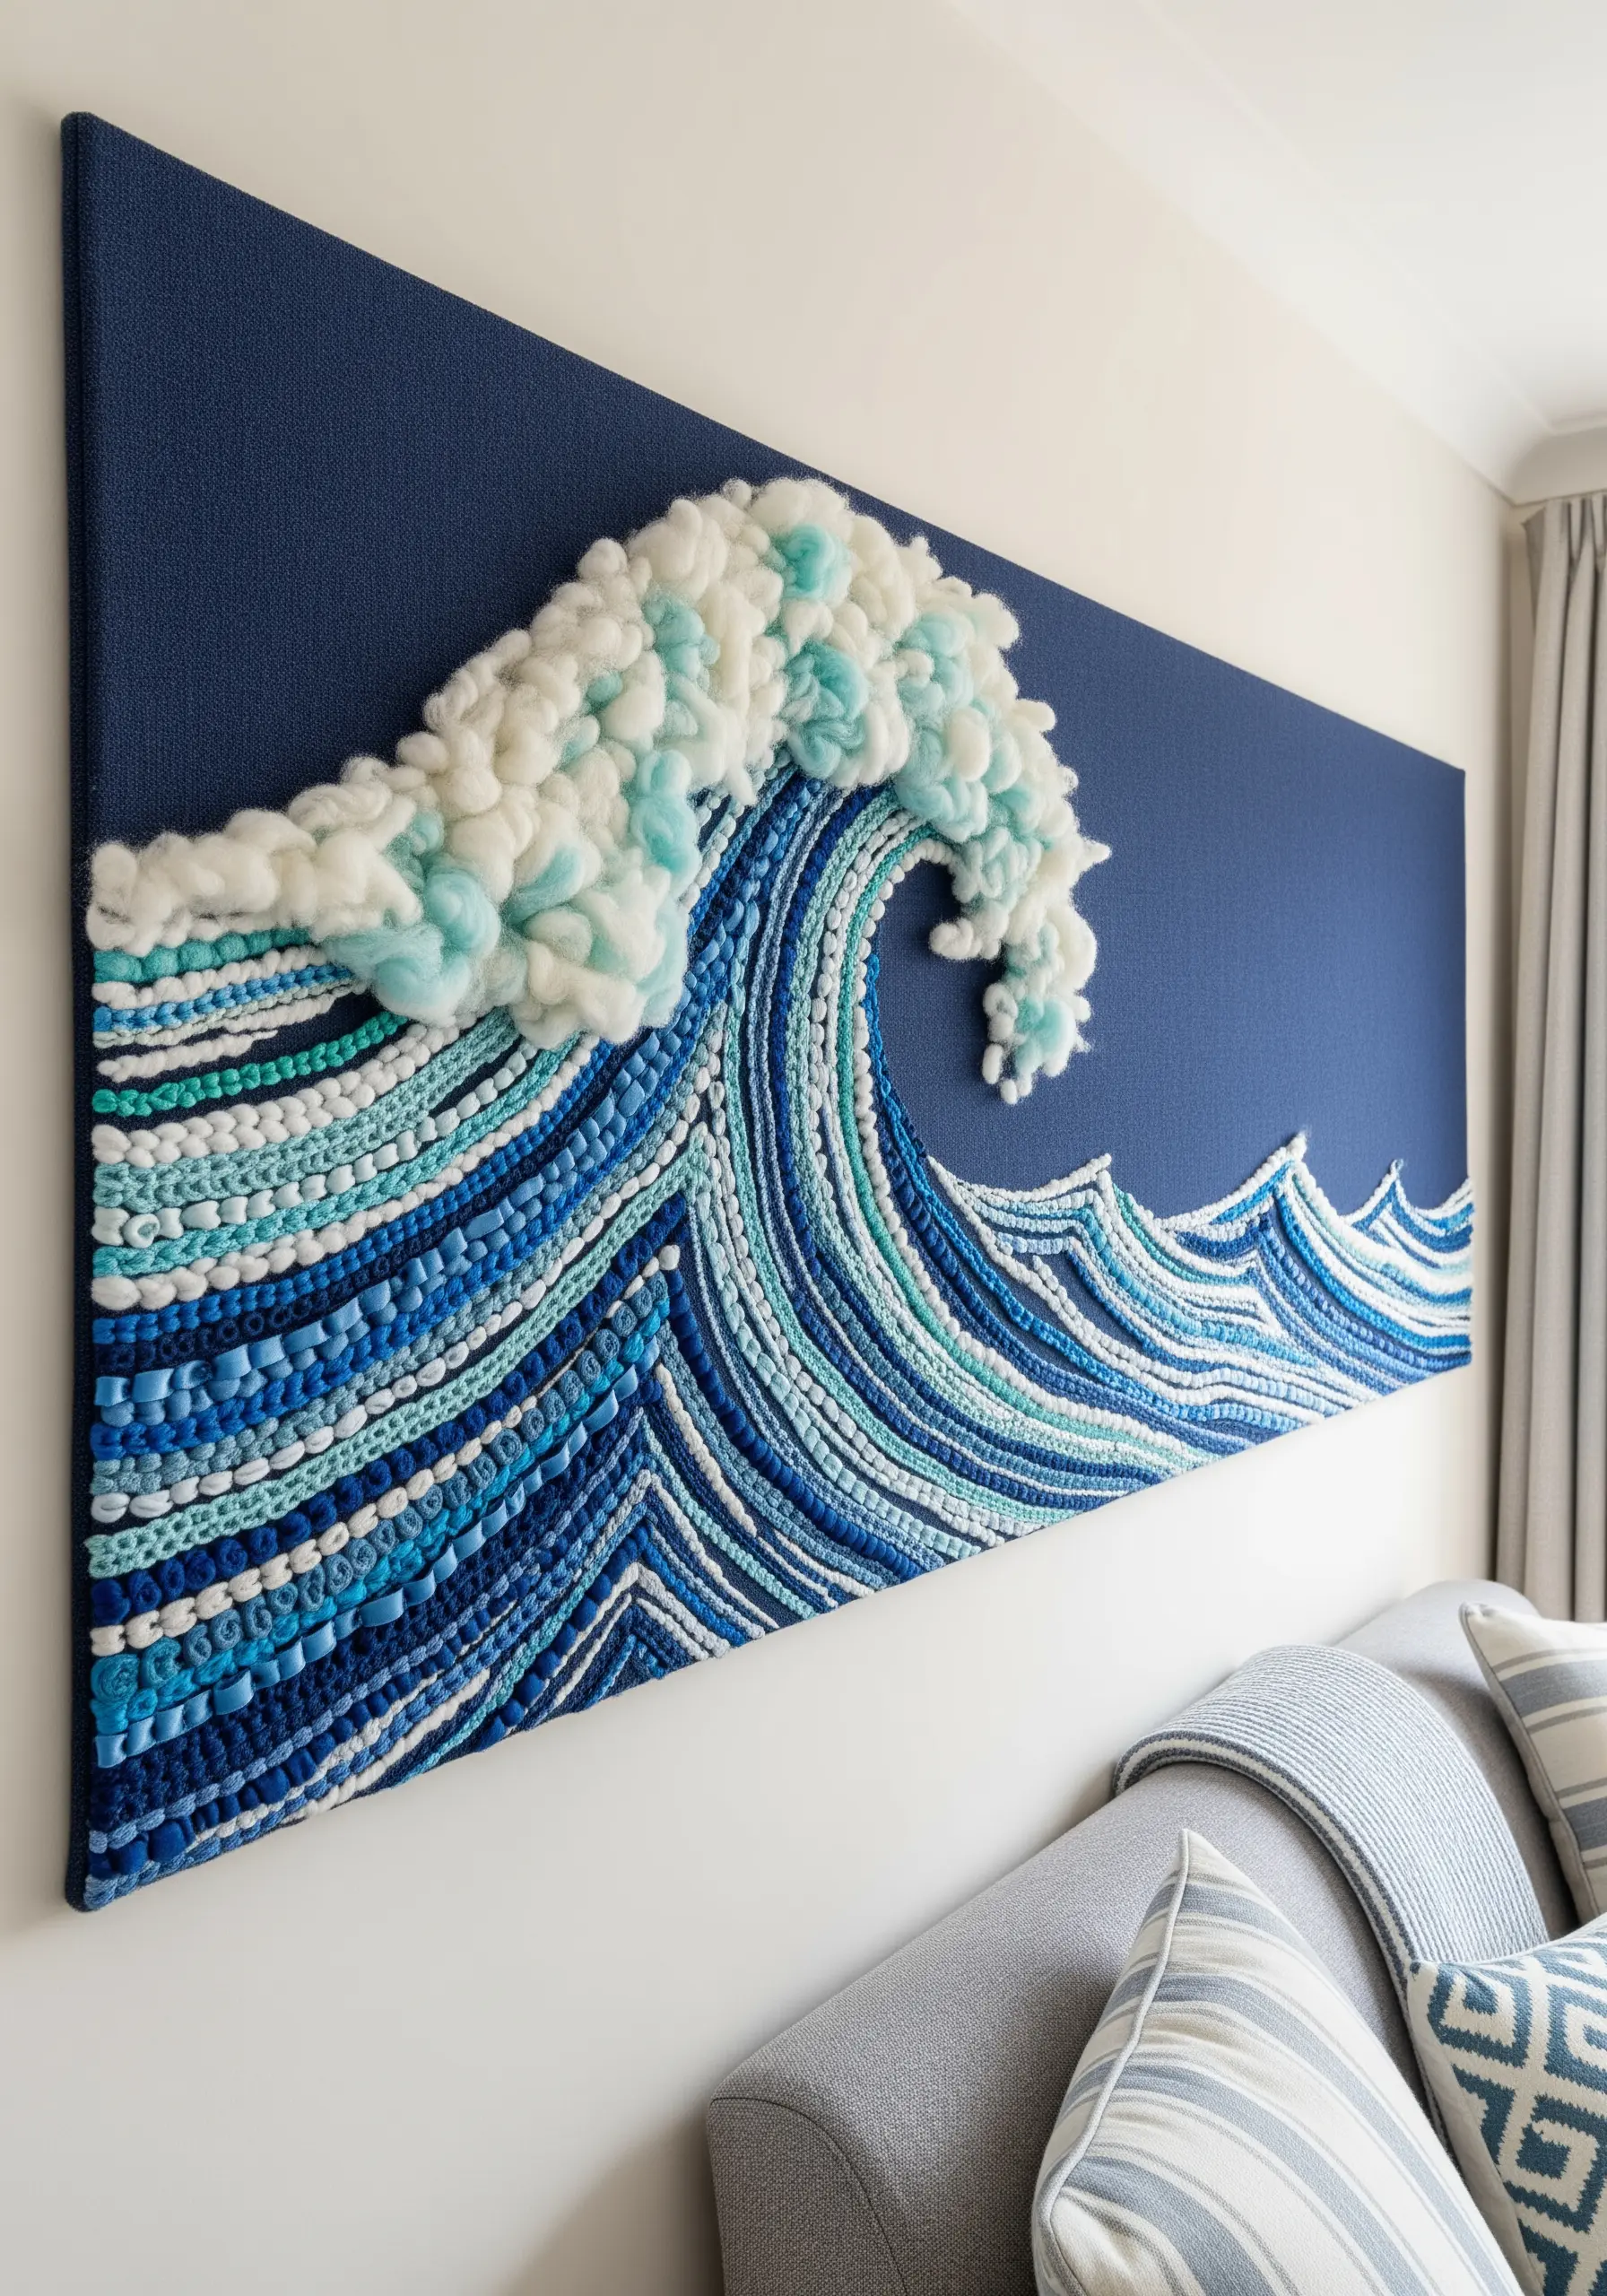
Build a truly sculptural piece by layering different fibers to create extreme texture and dimension.
Start with a base of flat embroidery for the calmer water, then build up the wave by couching down strips of fabric, braids, and thick yarn.
For the crashing foam at the crest, use unspun wool roving, tacking it down loosely to create airy, cloud-like puffs. This is one of the most impactful mixed fiber embroidery techniques you can try.
The progression from flat thread to chunky roving gives the piece a powerful sense of motion, making the wave feel as though it’s about to leap off the canvas.


