
The desire to make a space feel like your own often begins with small, intentional touches. Your embroidery can be more than just a craft; it can be the very thread that ties your home together, infusing warmth and personality into every corner.
You don’t need impossibly complex patterns or years of experience to create something beautiful. The secret to polished, inviting embroidery lies in thoughtful choices: the weight of a thread, the direction of a stitch, the texture of a fabric. It’s about learning to see how these small details can transform an everyday object into a piece of personal art.
Here, you’ll find twenty ideas designed to do just that. They are invitations to pick up your needle and thread, not just to make something, but to create a feeling—of comfort, of beauty, of home. Let’s begin.
1. Create Radiance with Textured Yarn Couching

Give a simple cushion immediate visual weight by swapping floss for thick yarn or wool roving.
To create the dense, spiraling center, use the couching technique: lay your thick yarn on the fabric’s surface and use a thinner, matching thread to tack it down with small, evenly spaced stitches.
This method allows you to control heavy fibers without pulling them through the fabric, ensuring a clean and sculptural finish.
For the sun rays, braid lengths of yarn *before* stitching them down. This adds a bold, three-dimensional texture that makes the entire piece feel more dynamic and inviting.
2. Stitch a Botanical Triptych with Delicate Ferns

Elevate simple botanical motifs by presenting them as a cohesive series.
Stitching the same subject—like a fern—in three different compositions creates a sophisticated gallery wall effect that tells a quiet visual story.
To capture the delicate structure of the fronds, use only a single strand of embroidery floss. This prevents the tiny leaves from looking bulky and achieves a more realistic, airy quality.
For the central stem, switch to two strands or use a whipped backstitch. This gives it just enough definition to stand out, grounding the delicate leaves.
Using a palette of at least five shades of green will make your nature-inspired framed embroidery designs look vibrant and alive.
3. Paint a Serene Landscape with Textured Thread Fills

Tackle a large-scale project by breaking it down into simple, manageable color blocks for hills, fields, and sky.
Fill each section with dense seed stitch or straight stitches, but vary the direction to mimic the contours of the land. This simple adjustment creates a sense of movement and dimension.
For the clouds, use dense French knots or trimmed turkey work loops. This creates a fluffy, raised texture that contrasts beautifully with the flatter landscape, making them appear to float.
This is the perfect project to use up mismatched threads, as slight color variations within each block add a rich, painterly quality to your landscape embroidery wall pieces.
4. Illuminate Your Stitches on a Fabric Lampshade
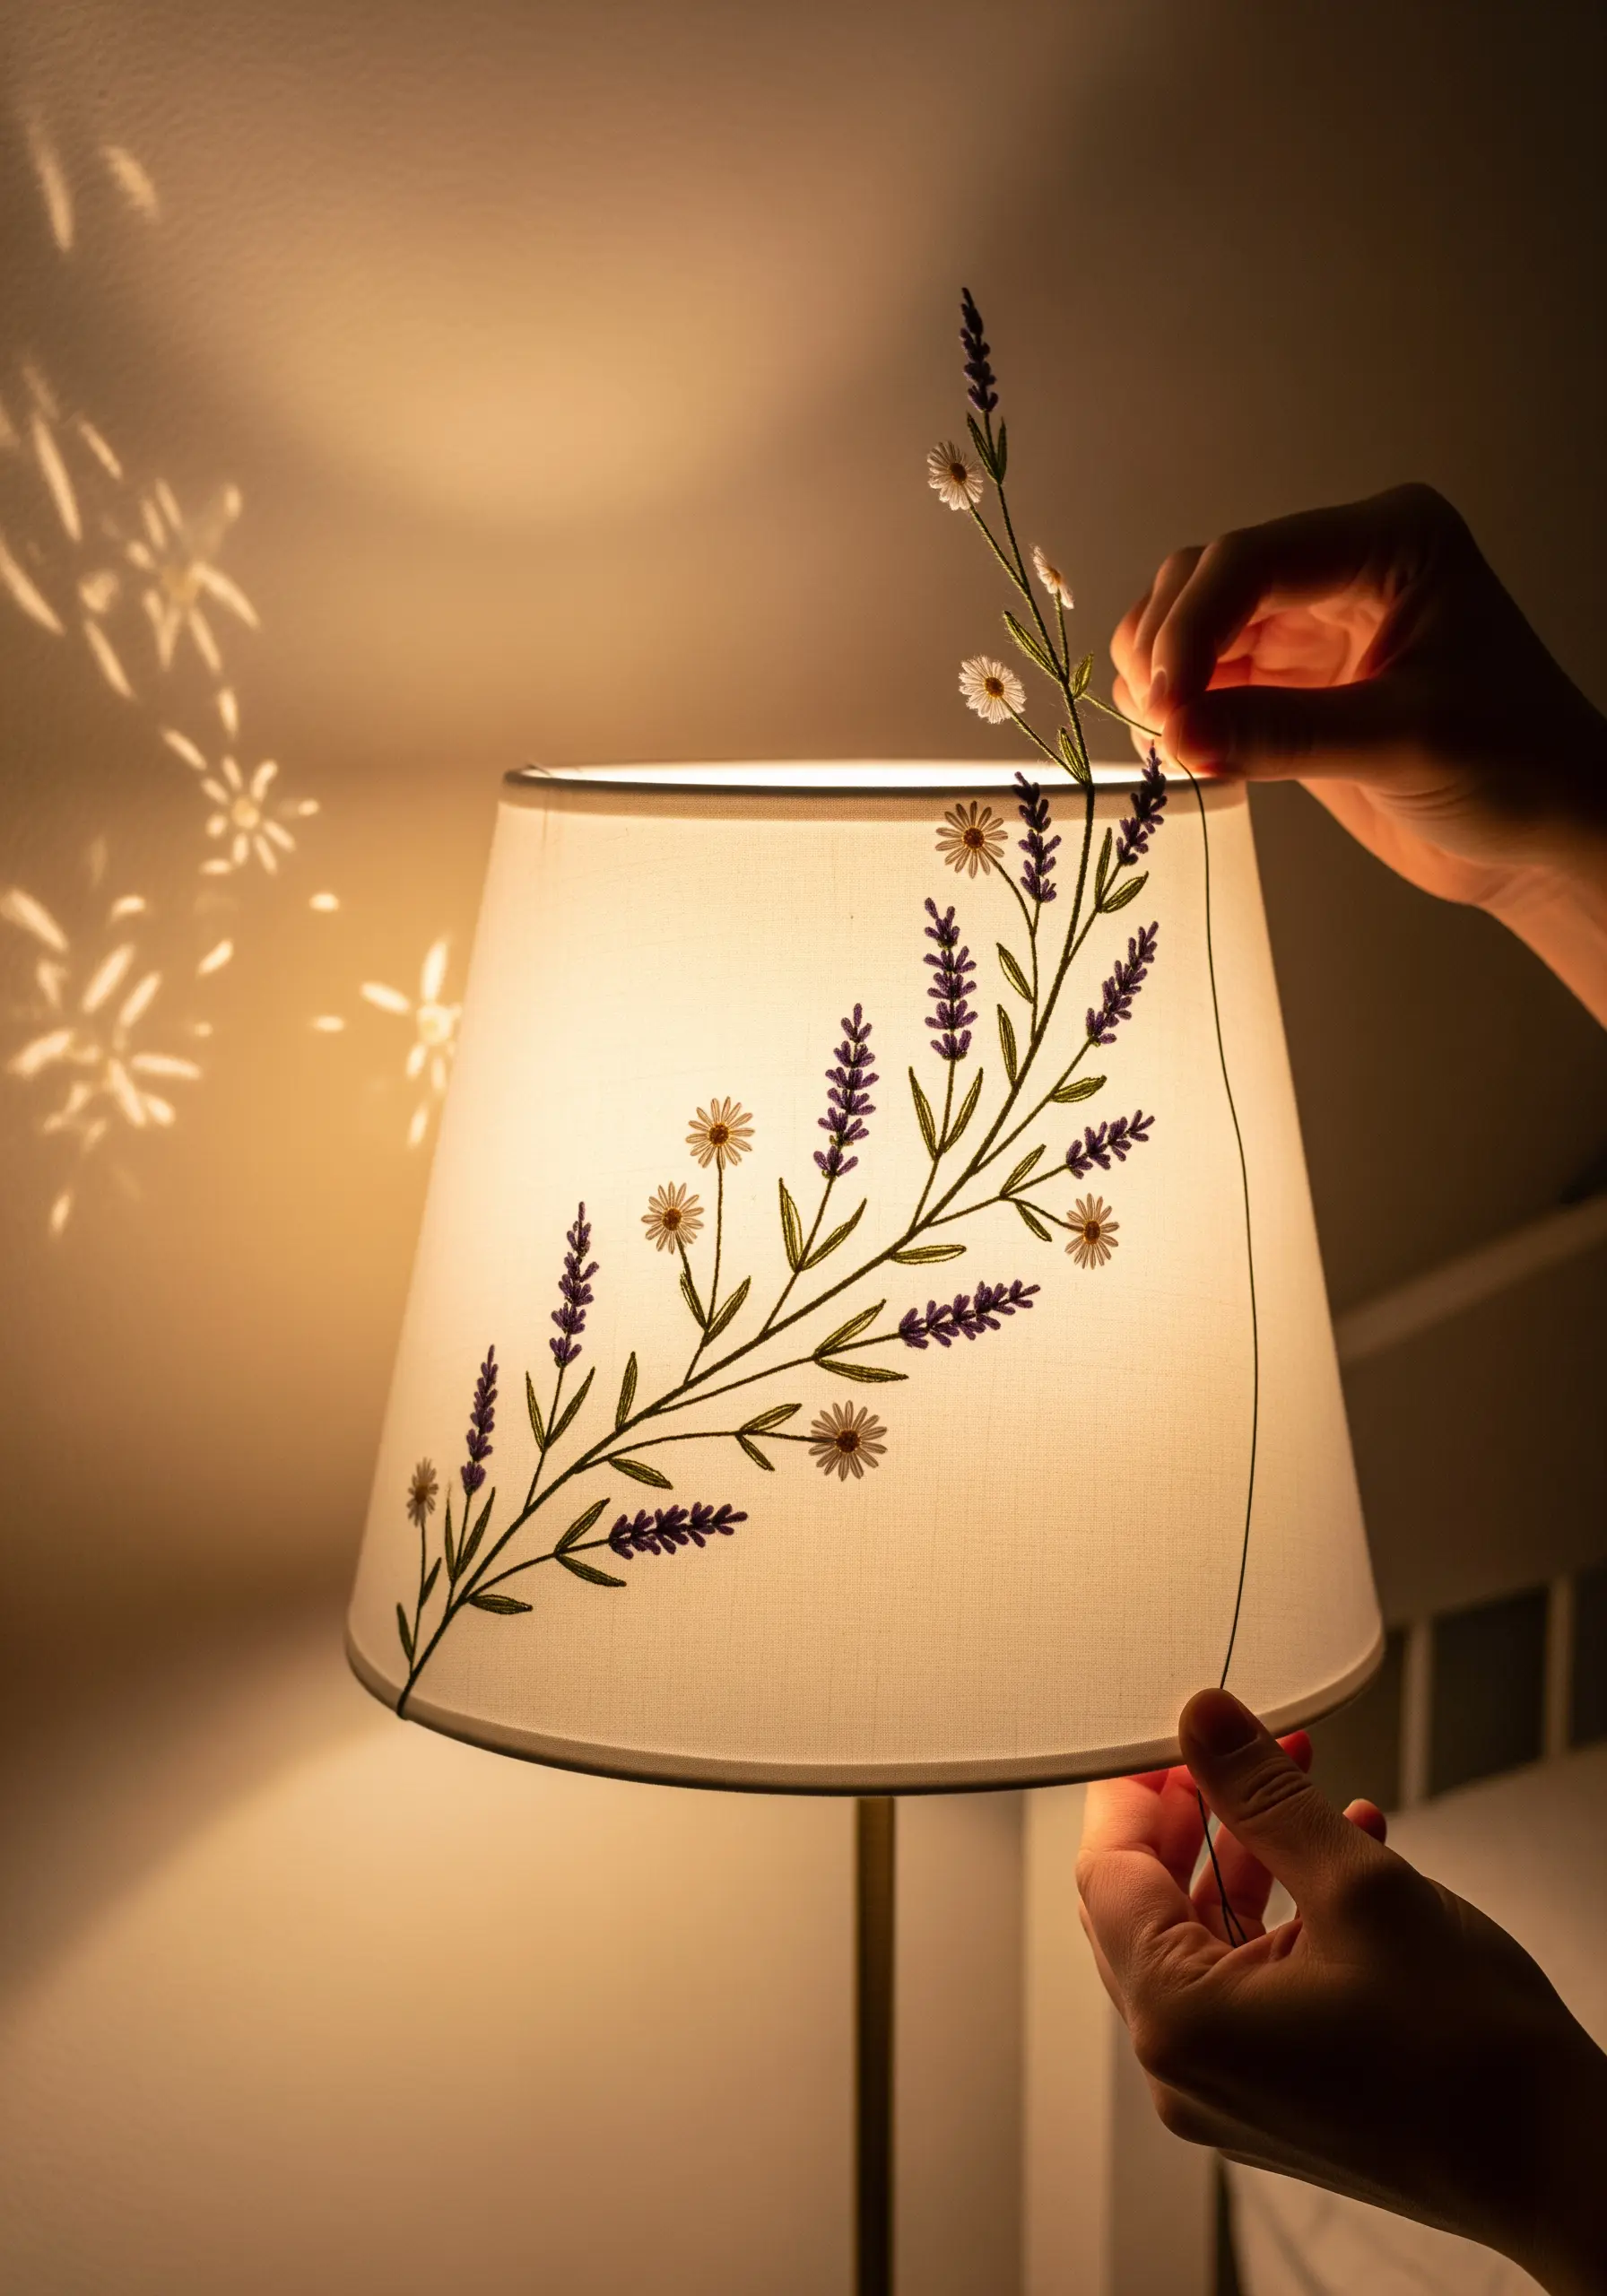
Take your embroidery off the hoop and onto an unexpected surface like a lampshade.
Choose a simple, open design like a climbing vine, as dense stitching will block too much light and can be difficult to execute without a hoop.
Use a fine, sharp needle to pierce the lampshade material cleanly. Keep your tension gentle and even, as the fabric has less give than traditional linen.
The magic happens when the lamp is switched on: your stitches are backlit, creating delicate silhouettes and casting beautiful floral shadows into the room. Lavender-inspired embroidery designs work wonderfully for this purpose.
5. Frame Your Table with an Olive Branch Border

Transform plain table linens with a sophisticated, continuous border design.
Use a stem stitch for the winding branches; its twisted, rope-like effect is perfect for creating smooth, elegant curves.
For the leaves, use detached chain stitches (lazy daisies) arranged in pairs. Add small French knots or a single, plump satin stitch for the olives, giving the design a touch of color and texture.
The key to a professional result is perfect spacing. Use a water-soluble marker and a ruler to ensure your border is flawlessly even, elevating your DIY table linen embroidery upcycles.
6. Stitch Modern Geometric Lines on Felt Coasters
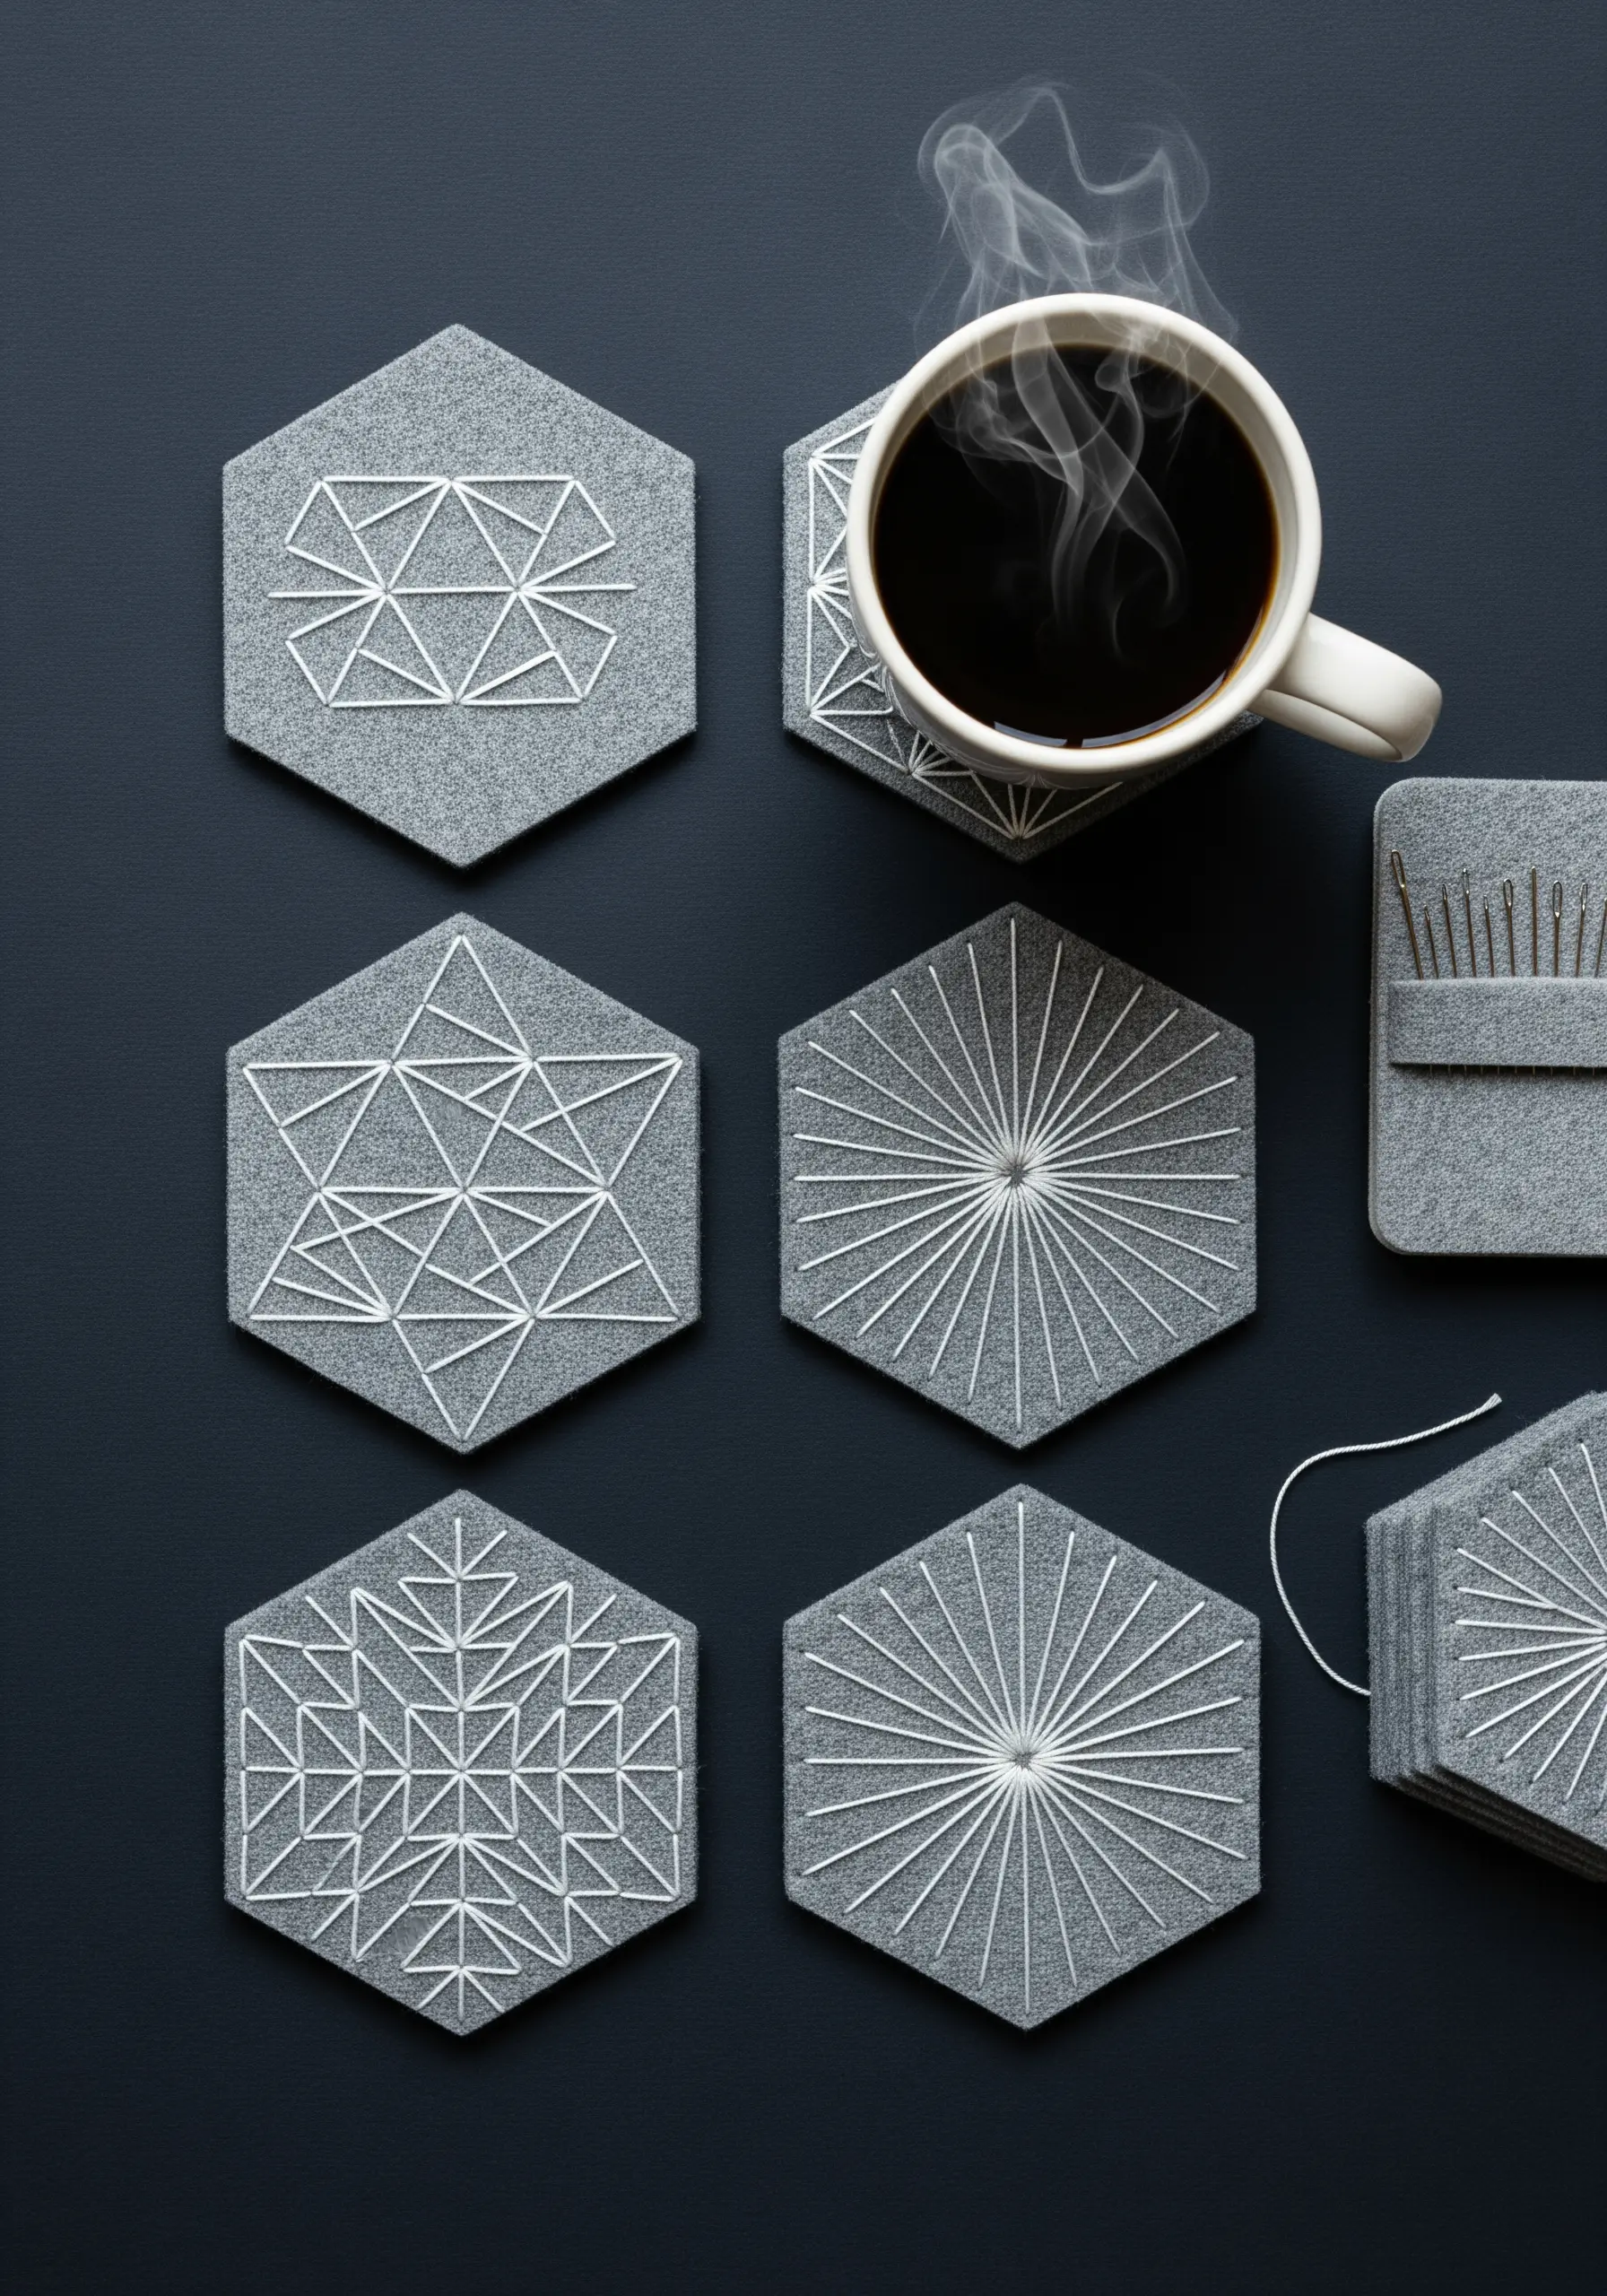
Combine modern aesthetics with a practical object by stitching on felt coasters. Felt is an ideal base for beginners—it’s stable, doesn’t fray, and requires no hoop.
Use a high-contrast thread, like bright white on charcoal gray, to make your geometric lines sharp and intentional.
A perle cotton thread works beautifully here, as its single, twisted ply creates a defined, slightly raised line that emphasizes the clean geometry.
These quick-to-make pieces are perfect examples of minimalist embroidery projects that double as gifts—functional, stylish, and handmade.
7. Embellish a Tote with a Vibrant Wildflower Meadow

Create a sense of depth and realism in your floral embroidery by layering elements from back to front.
Begin with the background stems and grasses, then add mid-ground flowers, and finish with the boldest foreground blossoms, like poppies.
To make certain flowers pop, use a padded satin stitch. Create a small base of seed stitches, then cover it with satin stitch—this slight lift makes the petals look plush and three-dimensional.
Stitching on heavy canvas requires a strong, sharp needle to move through the dense weave without straining your hands. This is key to turning bags into garden-inspired masterpieces.
8. Adorn a Chunky Knit Throw with Woven Yarn Blossoms

Add a cozy, textural element to a chunky knit blanket with oversized yarn flowers.
Create the floral motifs separately by weaving yarn on a small circular loom or a DIY cardboard template. This produces a stable, dense blossom that won’t unravel when handled.
Attach the finished flowers securely using a large tapestry needle and matching yarn, hiding your stitches within the chunky loops of the blanket.
This appliqué technique allows you to add bold, sculptural detail without disrupting the structure of the knit itself, creating beautiful boho soft embroidery textures.
9. Create Buzz-Worthy Curtain Tie-Backs
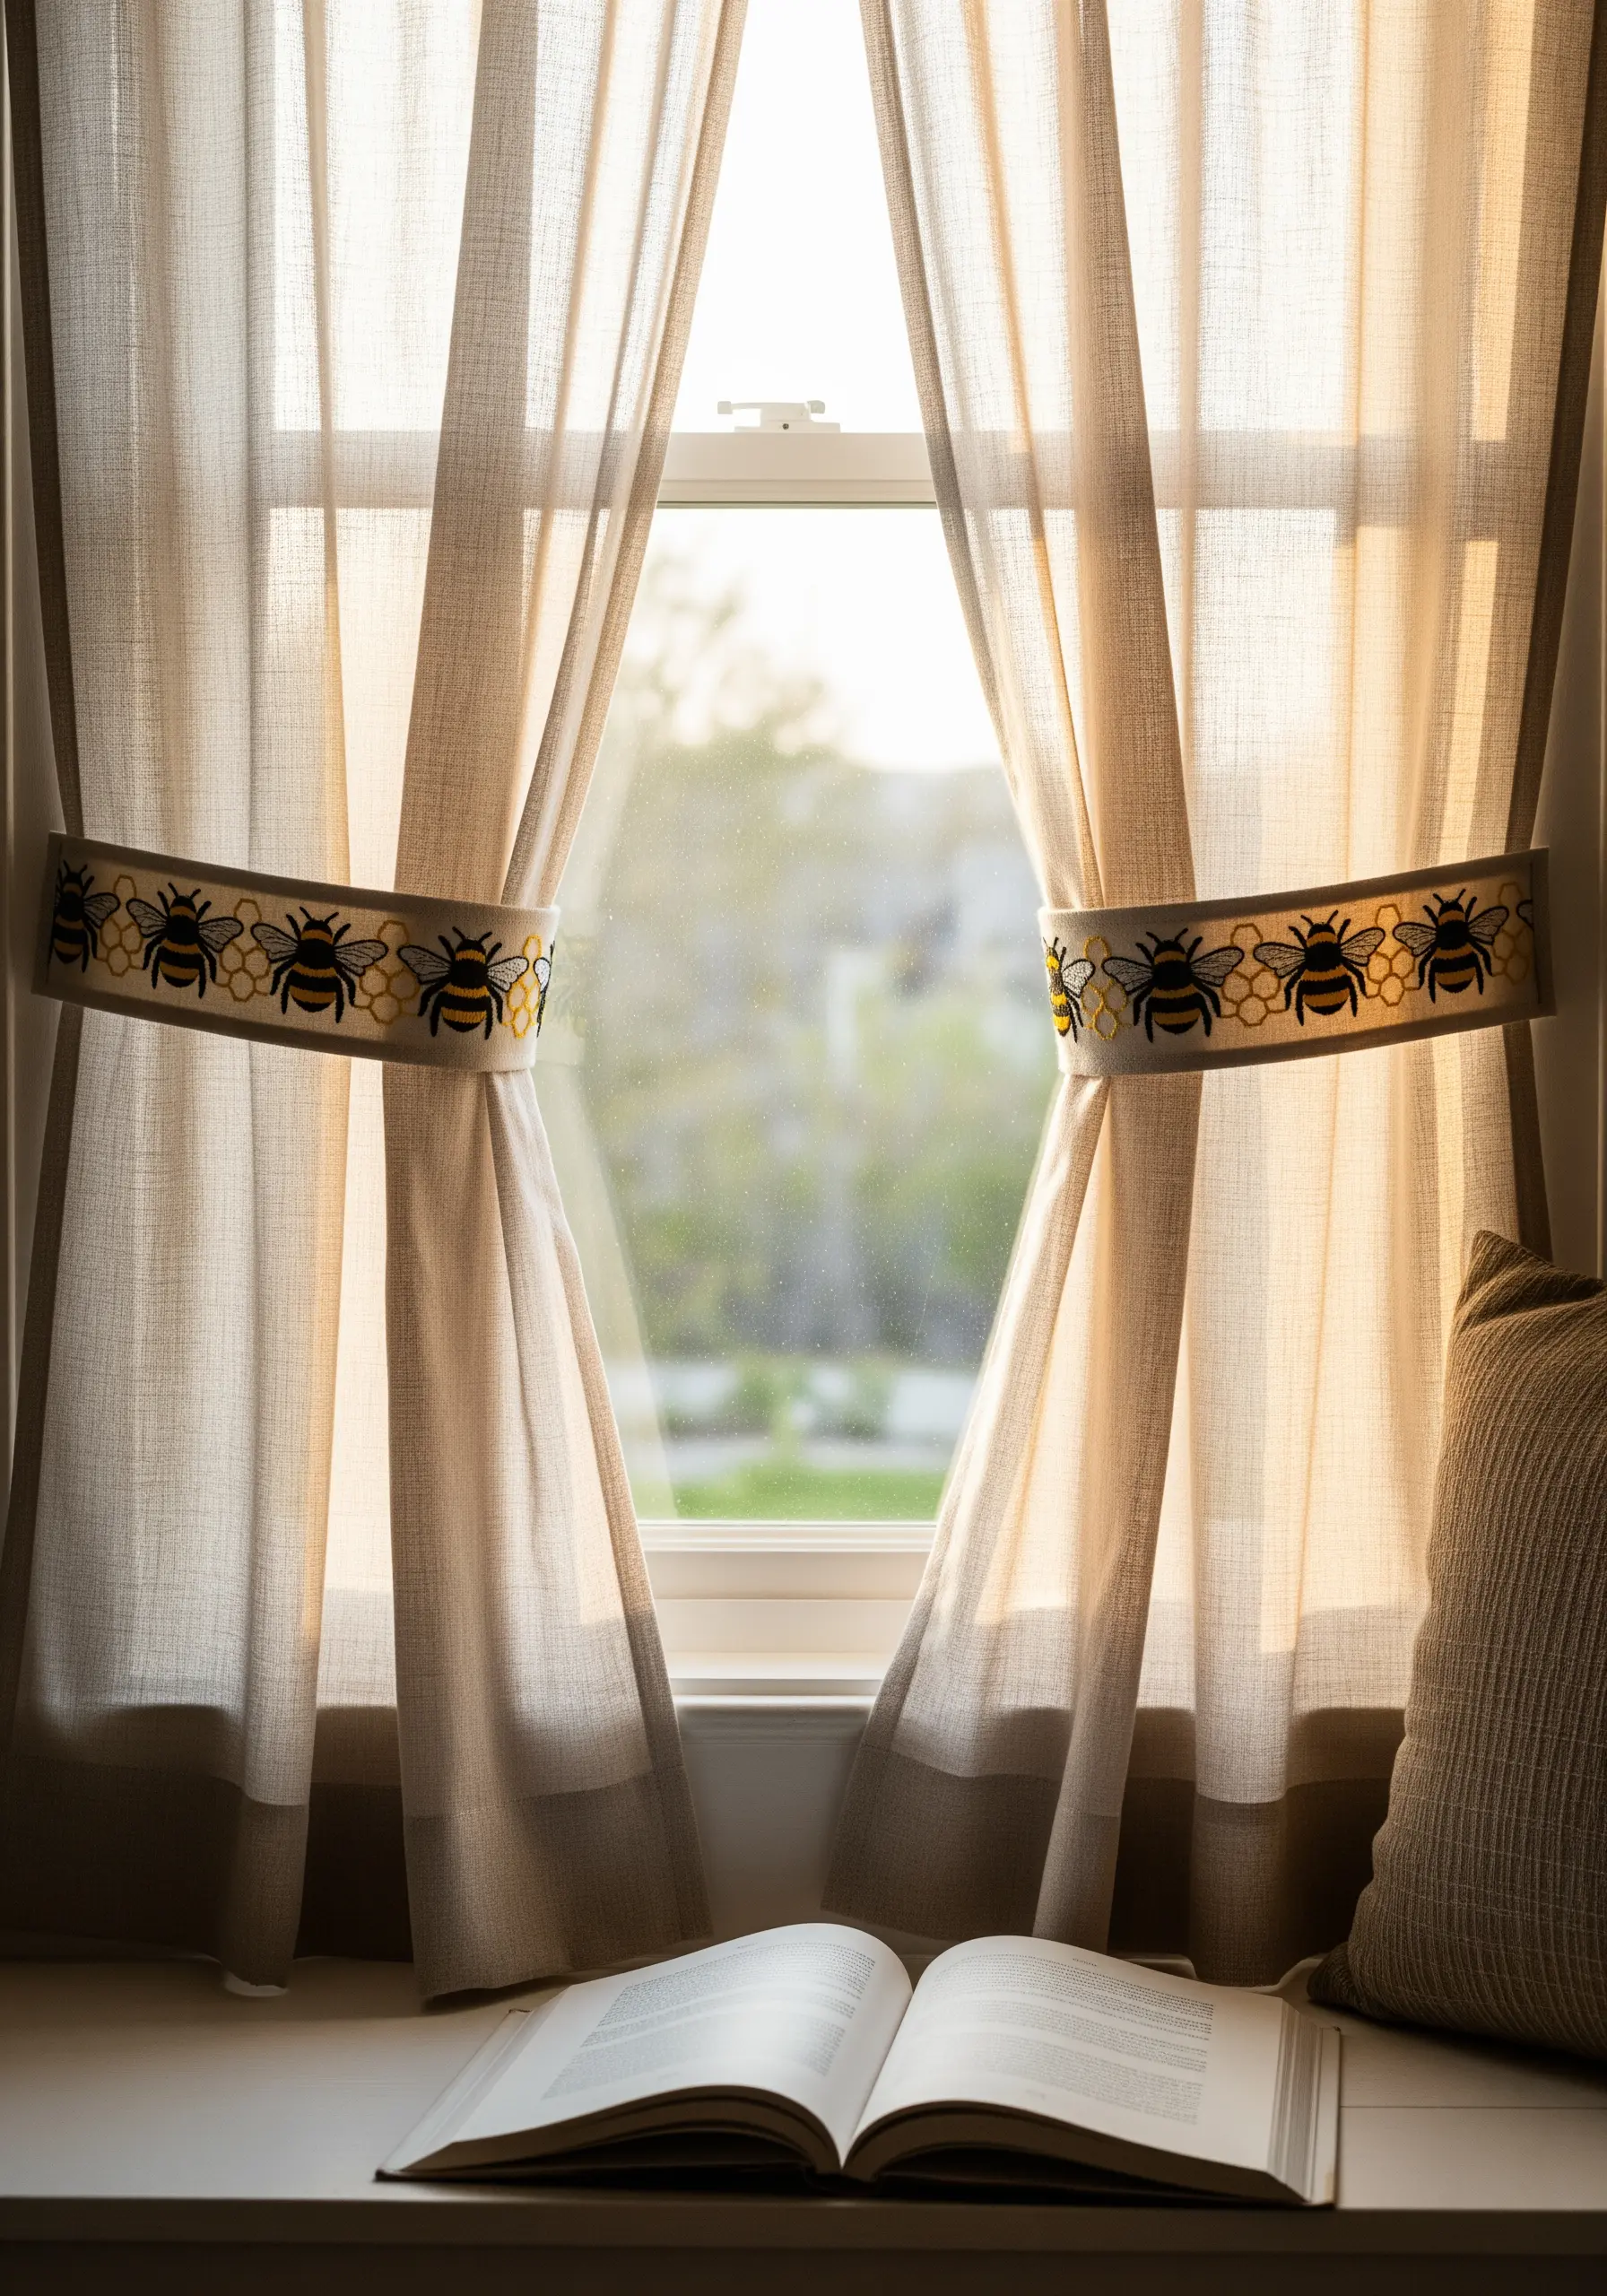
Elevate a purely functional item into a charming decorative accent.
For the bee design, use a combination of stitches to create texture. Fill the body with smooth satin stitch and use delicate, open lazy daisy stitches for the wings to give them a sense of light, airy movement.
Choose a durable base fabric like a linen-cotton blend. It has enough weight to hold back a curtain while still being easy to stitch.
This project is a perfect example of how tiny embroidery details that make big impact on room vibes can be both beautiful and practical.
10. Stitch an Heirloom Fabric Wall Calendar

Create a piece of functional art that is both practical and personal.
You can print a calendar grid directly onto fabric using printable transfer sheets or through an online fabric printing service. This provides a clean, professional base for your stitching.
Embellish the calendar with seasonal motifs. Use fishbone stitch for leaves to create a realistic central vein, and packed satin stitch for acorns to give them a smooth, rounded dimension.
This project becomes a timeless piece of decor, a beautiful personalized embroidery wall piece to use year after year.
11. Adorn a Floor Pouf with Celestial Motifs

Take your embroidery to furniture by stitching a durable floor pouf. Use a heavy-duty needle to handle upholstery-grade fabric.
Create a high-contrast design by using metallic or light-colored threads on a dark navy base. This ensures your celestial motifs feel luminous and magical.
For fine details like the faces on the sun and moon, use a single strand of floss and a simple backstitch for clarity. Fill larger areas with satin stitch, keeping your stitches parallel and even for a smooth finish.
Scatter star stitches and French knots to fill the empty space, transforming the pouf into a miniature cosmos. This is perfect for creating moody, intellectual interiors.
12. Craft Elegant Monogrammed Faux Leather Bookmarks
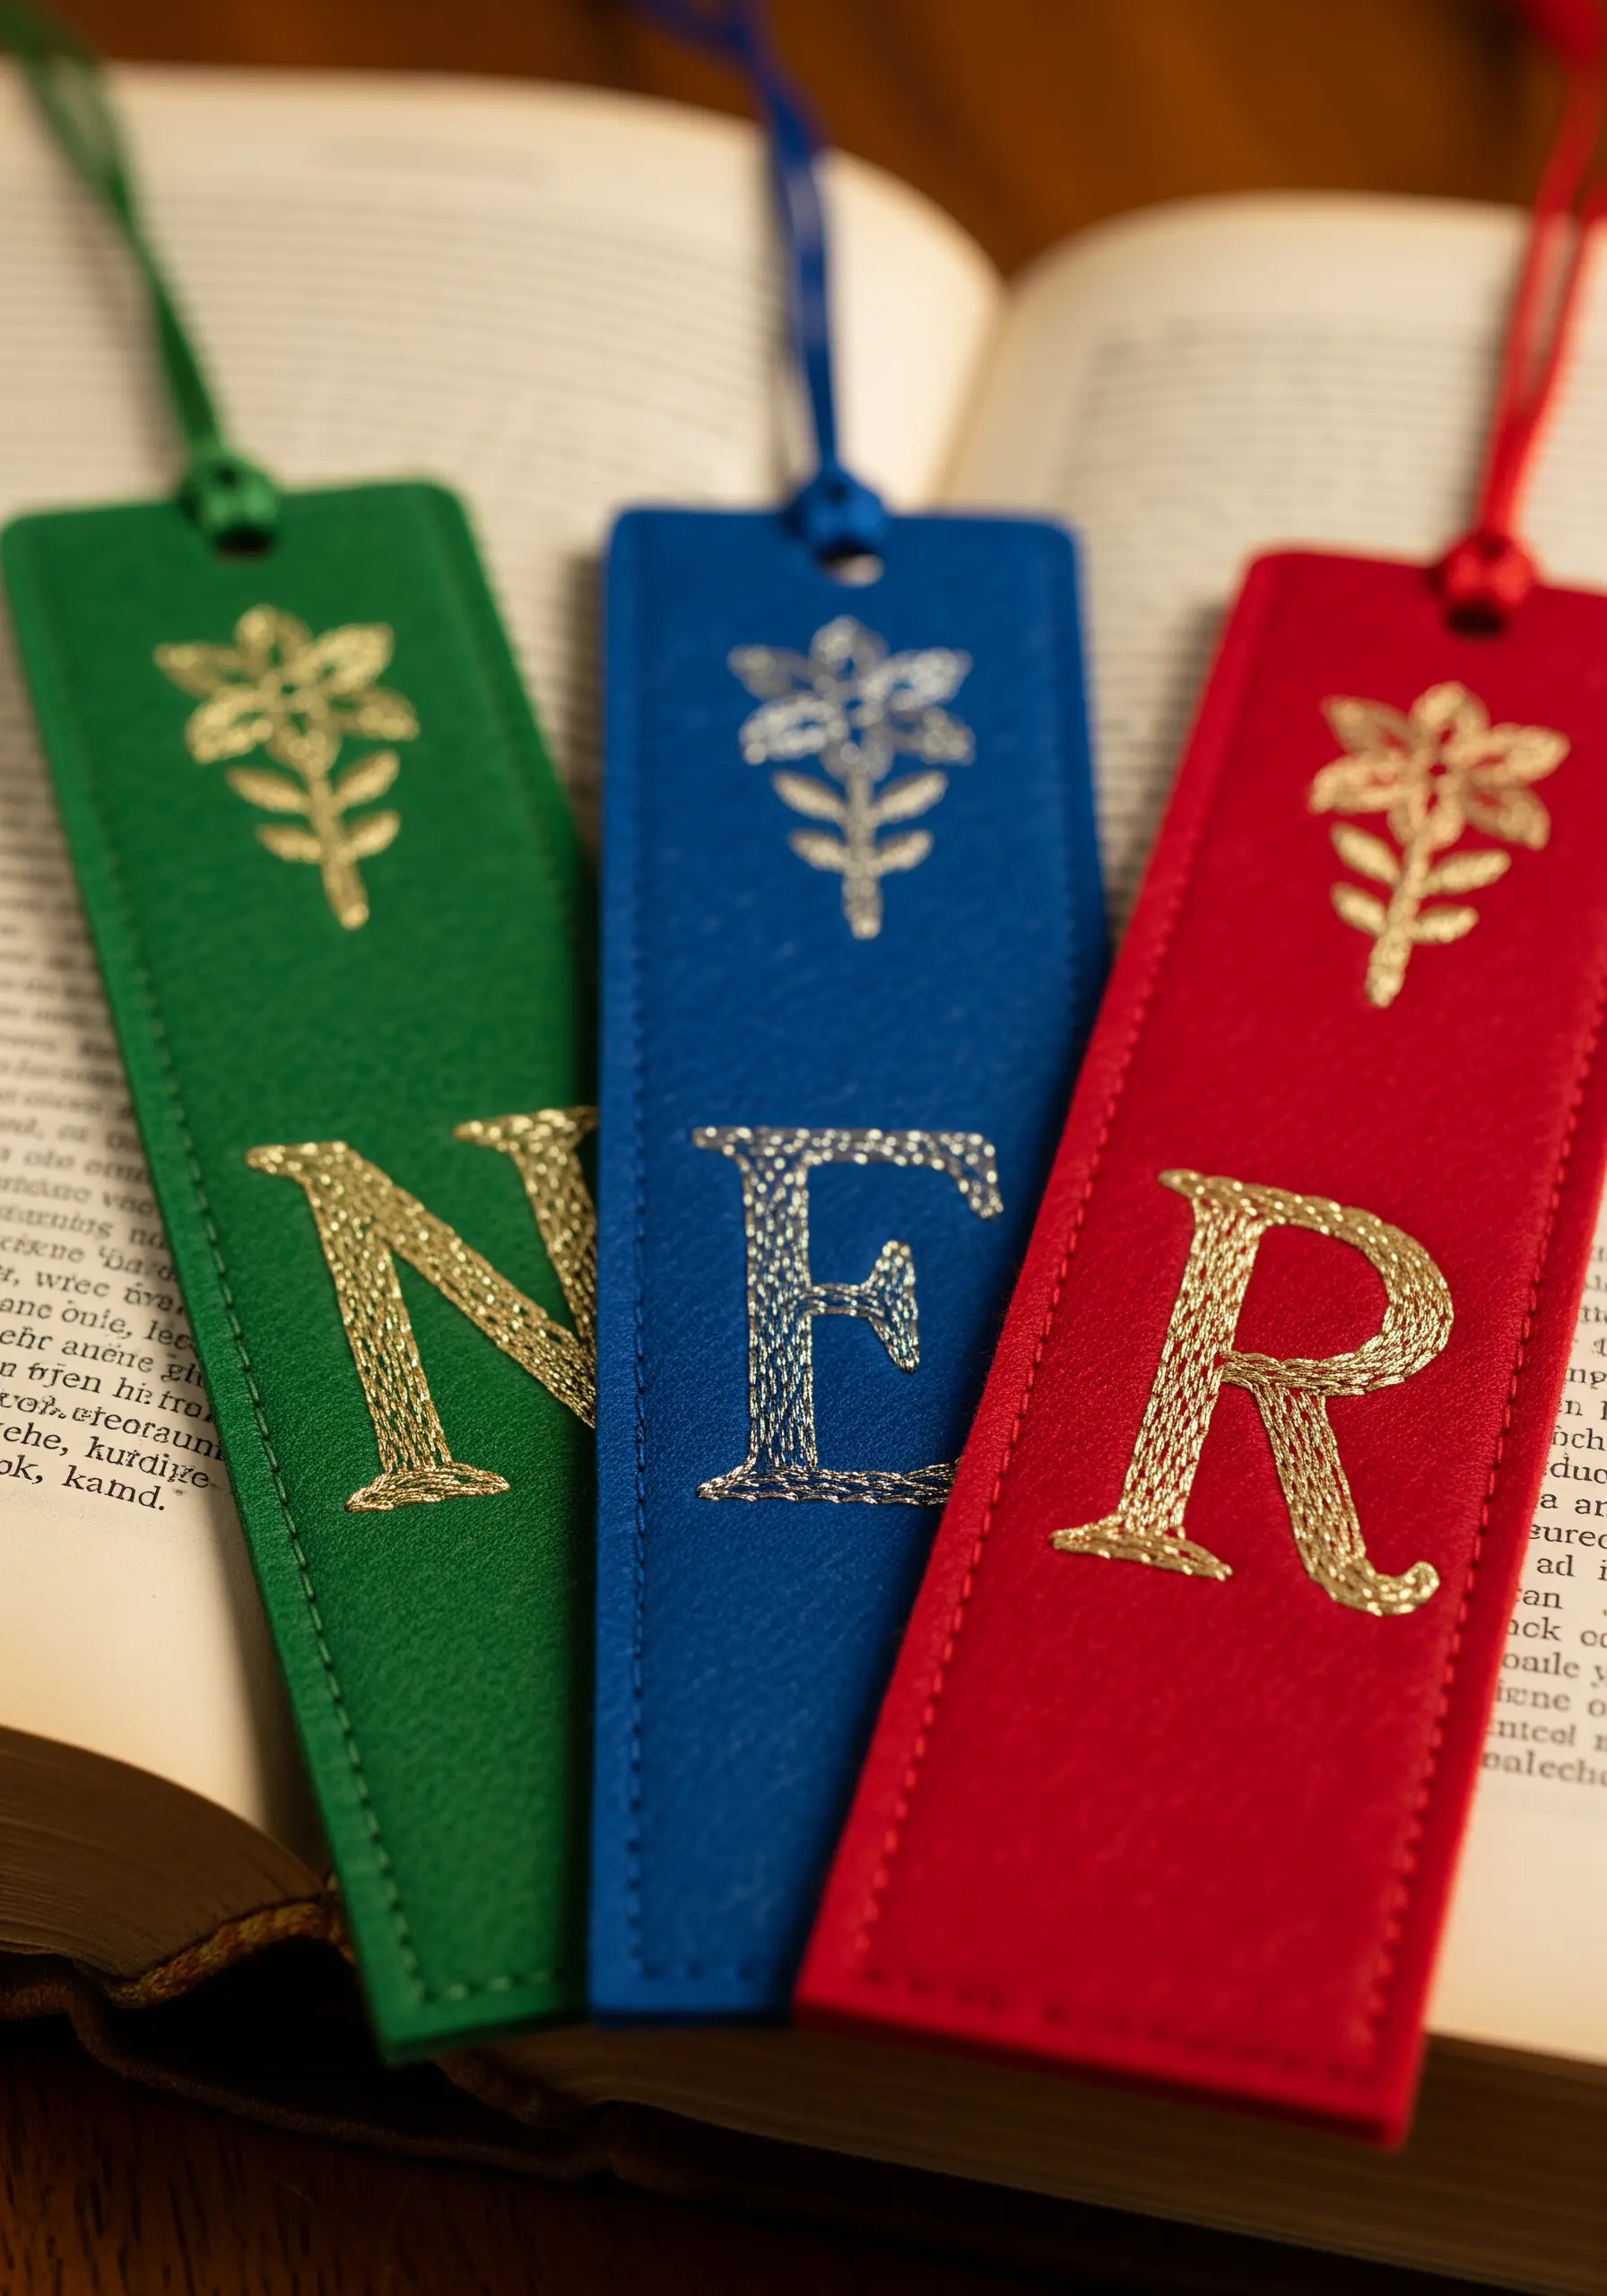
Stitching on faux leather creates a sharp, professional look, but remember that every puncture is permanent, so work with intention.
To achieve a clean, raised monogram, first outline the letter with a split stitch. Then, fill the shape with satin stitches, using the outline as a firm edge to butt your stitches against.
This outlining technique is the secret to perfectly defined embroidered letters.
Using a gold metallic thread elevates the piece, giving it a luxurious, hot-foiled appearance. These make for thoughtful and personalized embroidered gifts you can make in a weekend.
13. Frame Your Memories in a Floral Photo Hoop

Combine decorative embroidery with a functional purpose by creating an interactive photo display.
Stitch a lush floral border directly onto fabric stretched in a large hoop. Use a rich variety of stitches—woven wheel roses, French knots, and lazy daisies—to create a textured, garden-like feel.
After completing the embroidery, stretch thin twine across the back of the hoop, securing it tightly to the wooden frame. This creates the ‘clotheslines’ for your photos.
This turns a static piece of art into a living memory board, one of the most personal embroidered flower frame ideas you can create.
14. Stitch Calming Lavender Sachets

These small sachets are perfect for a quick, mindful stitching session that results in a beautiful and useful object.
For the lavender sprig, use a simple stem stitch for the stalk and tiny French knots for the blossoms. The contrast between the linear stitch and the dotted texture is what makes the motif so effective.
Using two or three shades of purple for the French knots adds subtle dimension and keeps the design from looking flat.
Fill the finished linen pouches with dried lavender for a calming scent. These small embroidery projects that make perfect handmade gifts are always a delight to receive.
15. Combine Macrame and Embroidery for a Boho Plant Hanger

Introduce an unexpected element to your macrame by integrating an embroidered fabric panel.
First, embroider your chosen design—like these cheerful lemons—onto a sturdy piece of canvas. Then, sew the fabric into a sling that will cradle the plant pot.
You can either incorporate this sling into your macrame design as you knot the hanger, or securely attach it to a finished piece.
The blend of knotted cord and stitched fabric adds a unique layer of texture and color, perfect for achieving contemporary boho-style embroidery decor ideas.
16. Capture Your Pet’s Likeness with Thread Painting

The key to a realistic pet portrait is the thread painting technique, which uses long-and-short stitches to blend colors seamlessly.
The most crucial rule is to always stitch in the direction of fur growth. This single detail will instantly make your portrait more lifelike.
Work with a single strand of floss, especially around the eyes and nose, to capture the finest details that convey personality.
Don’t be afraid to select a wide range of colors—at least five shades for each section of fur—to create convincing depth and shadow in these heartfelt small pet portrait embroidery ideas.
17. Create an Heirloom Quilt with a Tree of Life Centerpiece

Anchor a large quilt with a powerful, central embroidered medallion. The contrast between geometric quilting and organic stitchwork creates a stunning focal point.
Use a chain stitch or a heavy, 3-strand backstitch for the tree’s trunk and branches. This gives them a solid, textured presence that stands out against the flat quilt top.
For the leaves, scatter a mix of fishbone and lazy daisy stitches in various autumnal shades. This variation in stitch and color adds life and movement to the design.
This method transforms a bedspread into a meaningful piece of hand-embroidery textile wall art.
18. Explore Abstract Composition with Freeform Thread Art
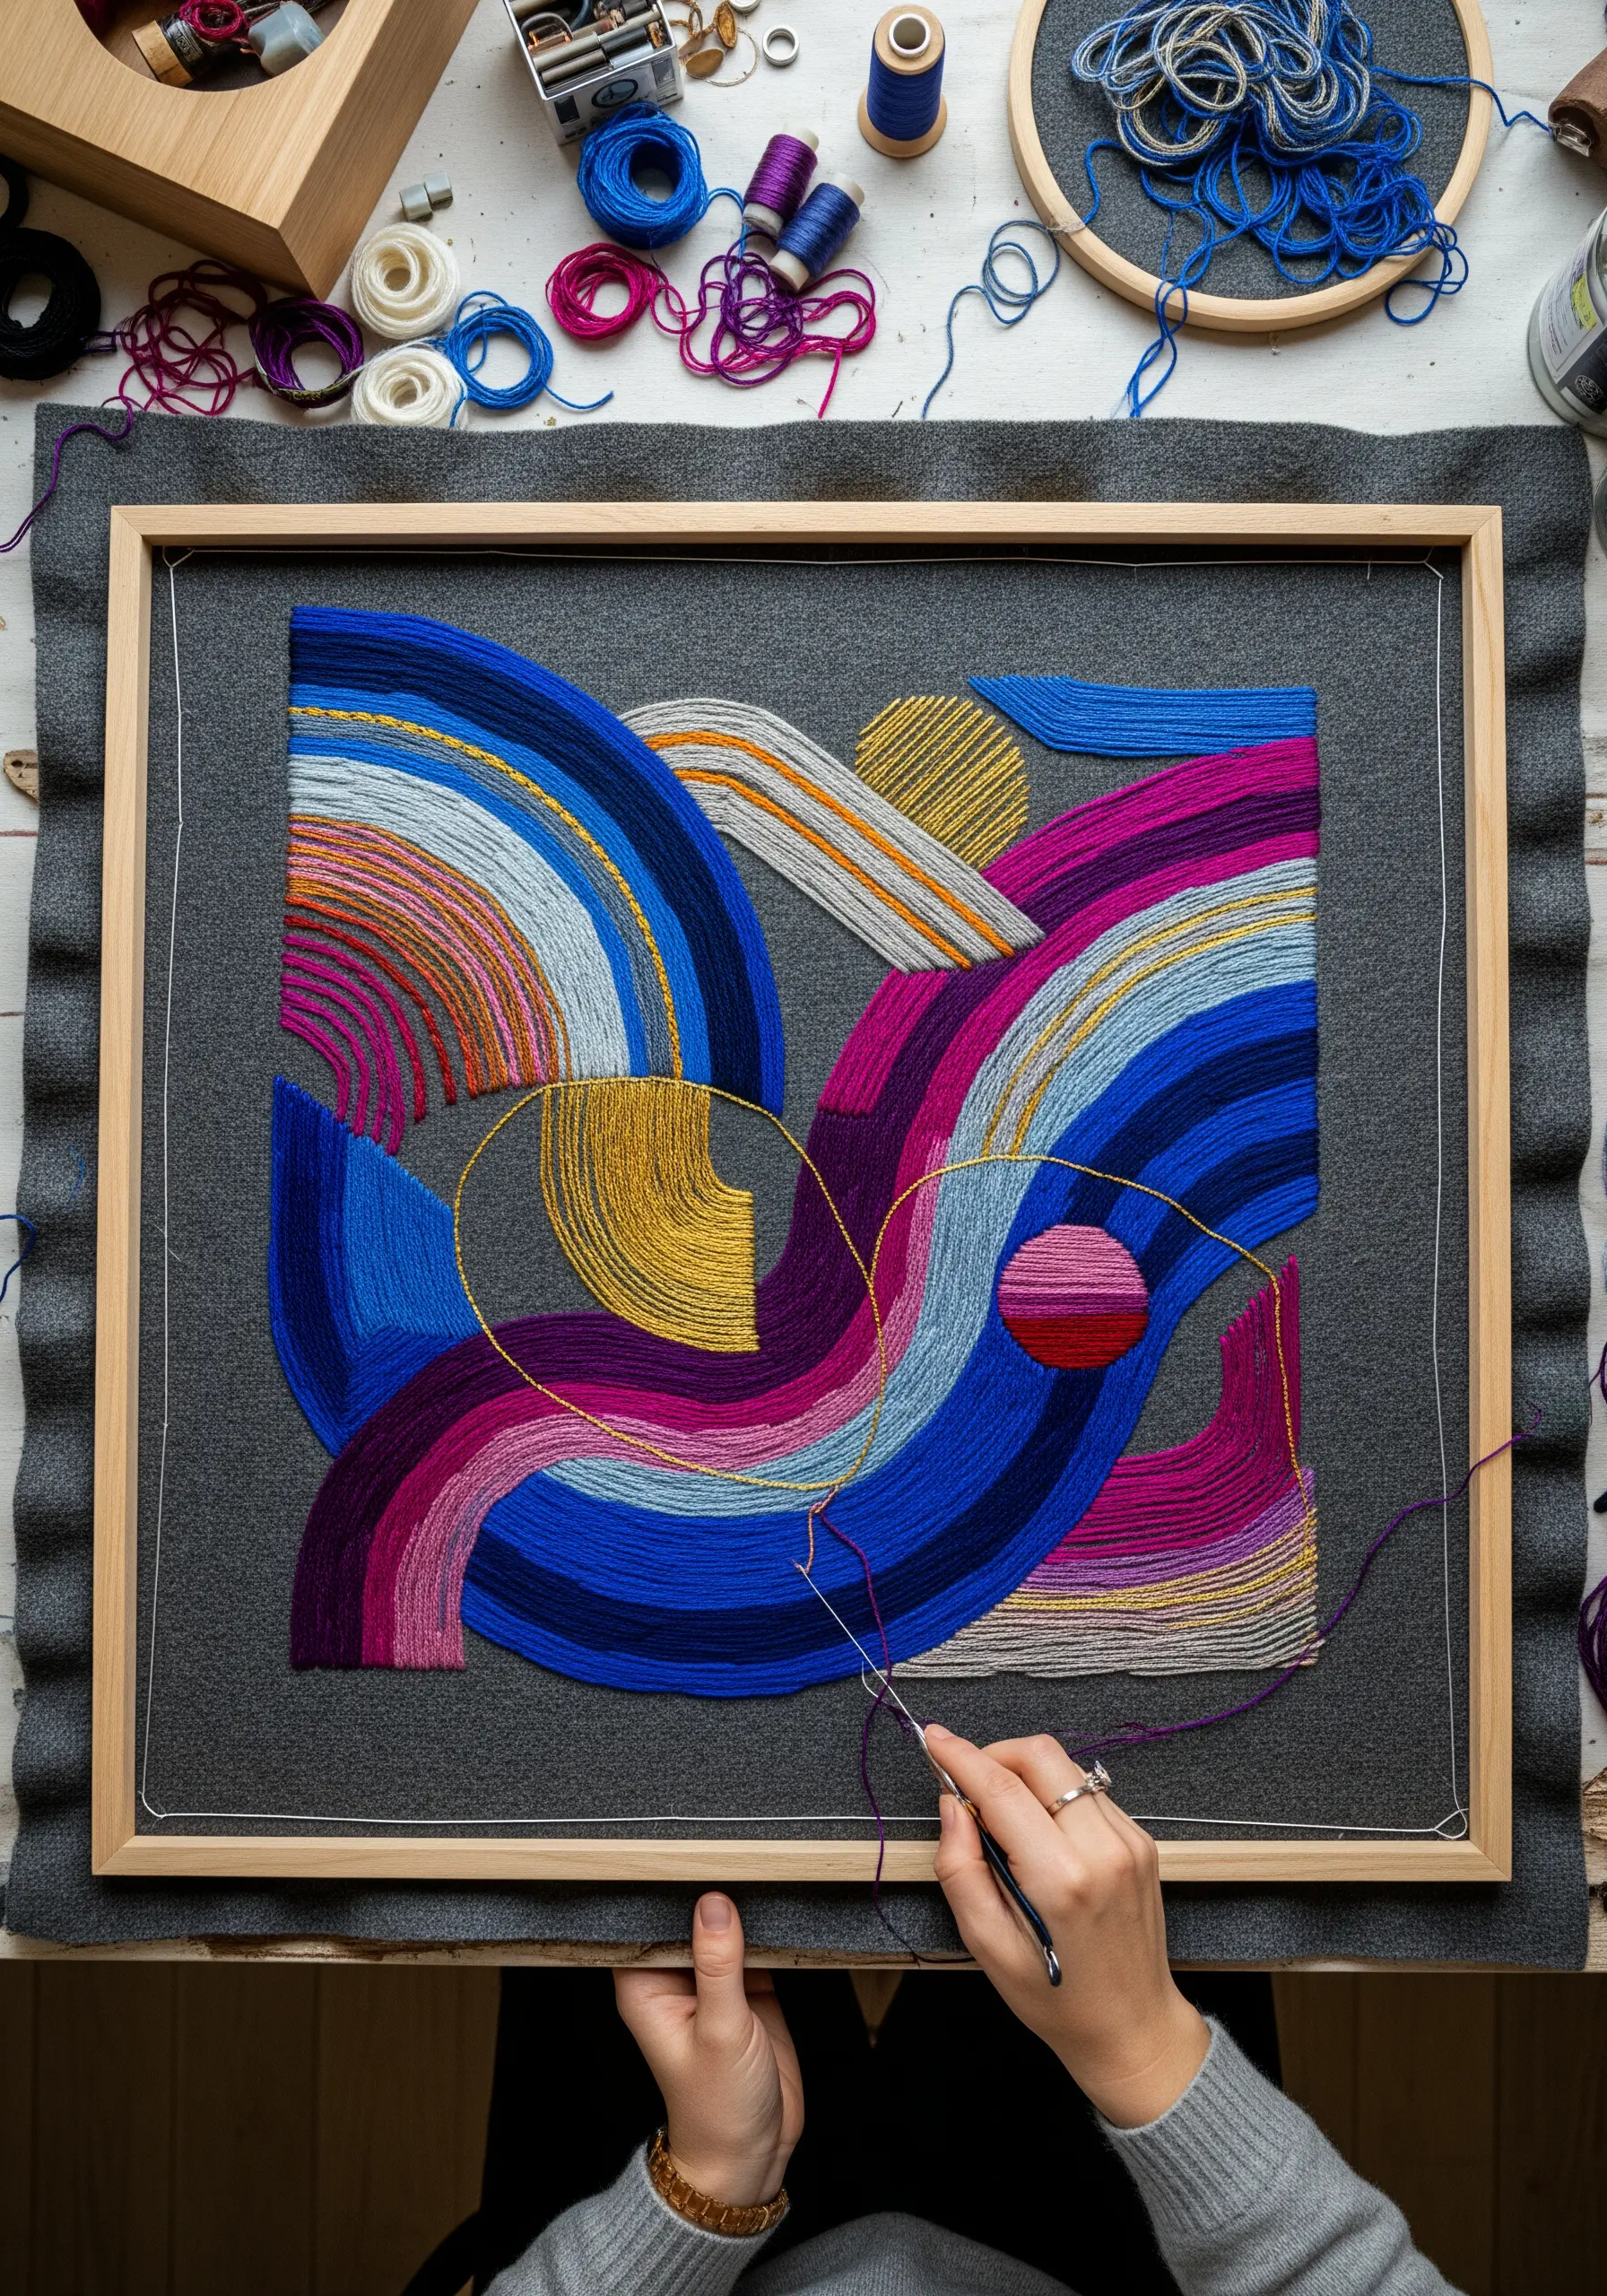
Move beyond patterns and use your needle like a pencil to create a piece of abstract art.
Start by stitching simple lines and curves, focusing on how they interact. Use a running stitch or backstitch to create fluid movement across the fabric.
Create solid blocks of color by packing your stitches closely together, then transition to sparser stitches to create areas of lightness and transparency.
Playing with different thread weights and textures will add even more depth. A single metallic thread can act as a highlight, drawing the eye and balancing the composition of your abstract thread line art creations.
19. Organize in Style with Simply Stitched Wall Pockets

Add a warm, handmade touch to a functional storage piece with a clean, repeating pattern.
A simple motif, like these minimalist rainbows, is all you need. The repetition is what creates the polished, intentional look.
To ensure your pattern is perfectly uniform, create a small stencil from cardboard. Use it with a removable fabric marker to map out your design before you begin stitching.
This project is proof that you don’t need complex stitches for a high-impact result; simple backstitched minimalist embroidery patterns perfect for entryway decoration feel both modern and cozy.
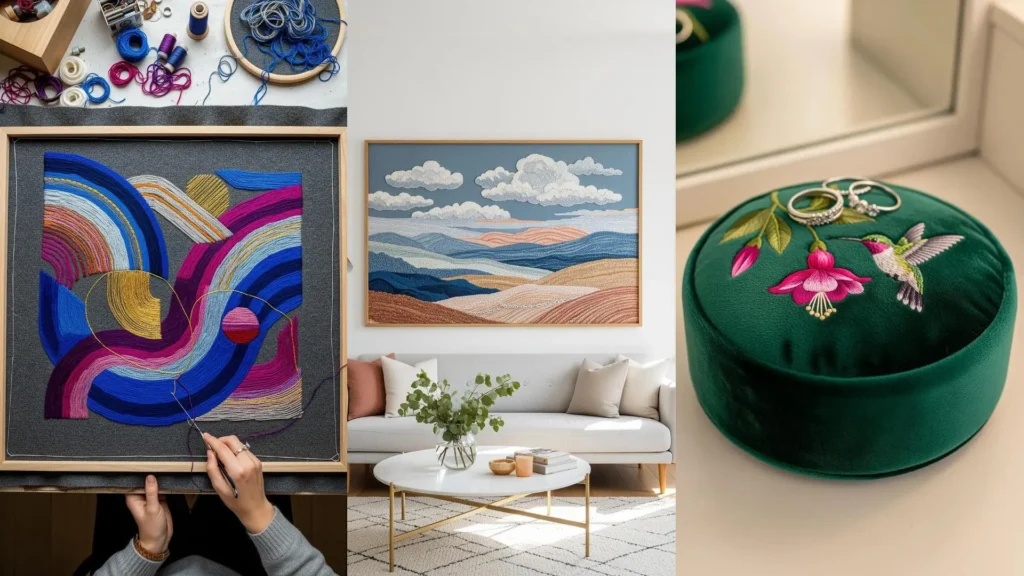
20. Embroider a Luxurious Velvet Keepsake Box

Stitching on velvet yields a uniquely rich and tactile result, but it requires a few key adjustments.
Always use a stabilizer on the back of the velvet to prevent the fabric from shifting and puckering as you stitch. This is non-negotiable for a clean finish.
Use a sharp, new needle and keep your tension slightly looser than usual. This allows your stitches to sit on top of the velvet’s pile rather than sinking into it and getting lost.
The stunning contrast between floss and plush fabric makes for unforgettable creative embroidery gift ideas to wow your best friend.


