

You have the threads, the fabric, and the desire to create something beautiful. But perhaps you feel your work could be more… intentional. More like the art you admire, with a quiet confidence in every stitch.
The secret isn’t in learning dozens of complex new stitches. It’s in refining how you use the ones you already know—adjusting thread weight for perspective, directing your stitches to create movement, or choosing a color palette that brings a whole room into harmony.
Here, you will find ideas that focus on that refinement. We will move beyond just filling in shapes and explore how to build texture, create depth, and design pieces that transform your space into a true sanctuary. This is your invitation to stitch with purpose and see your work in a new, more artistic light.
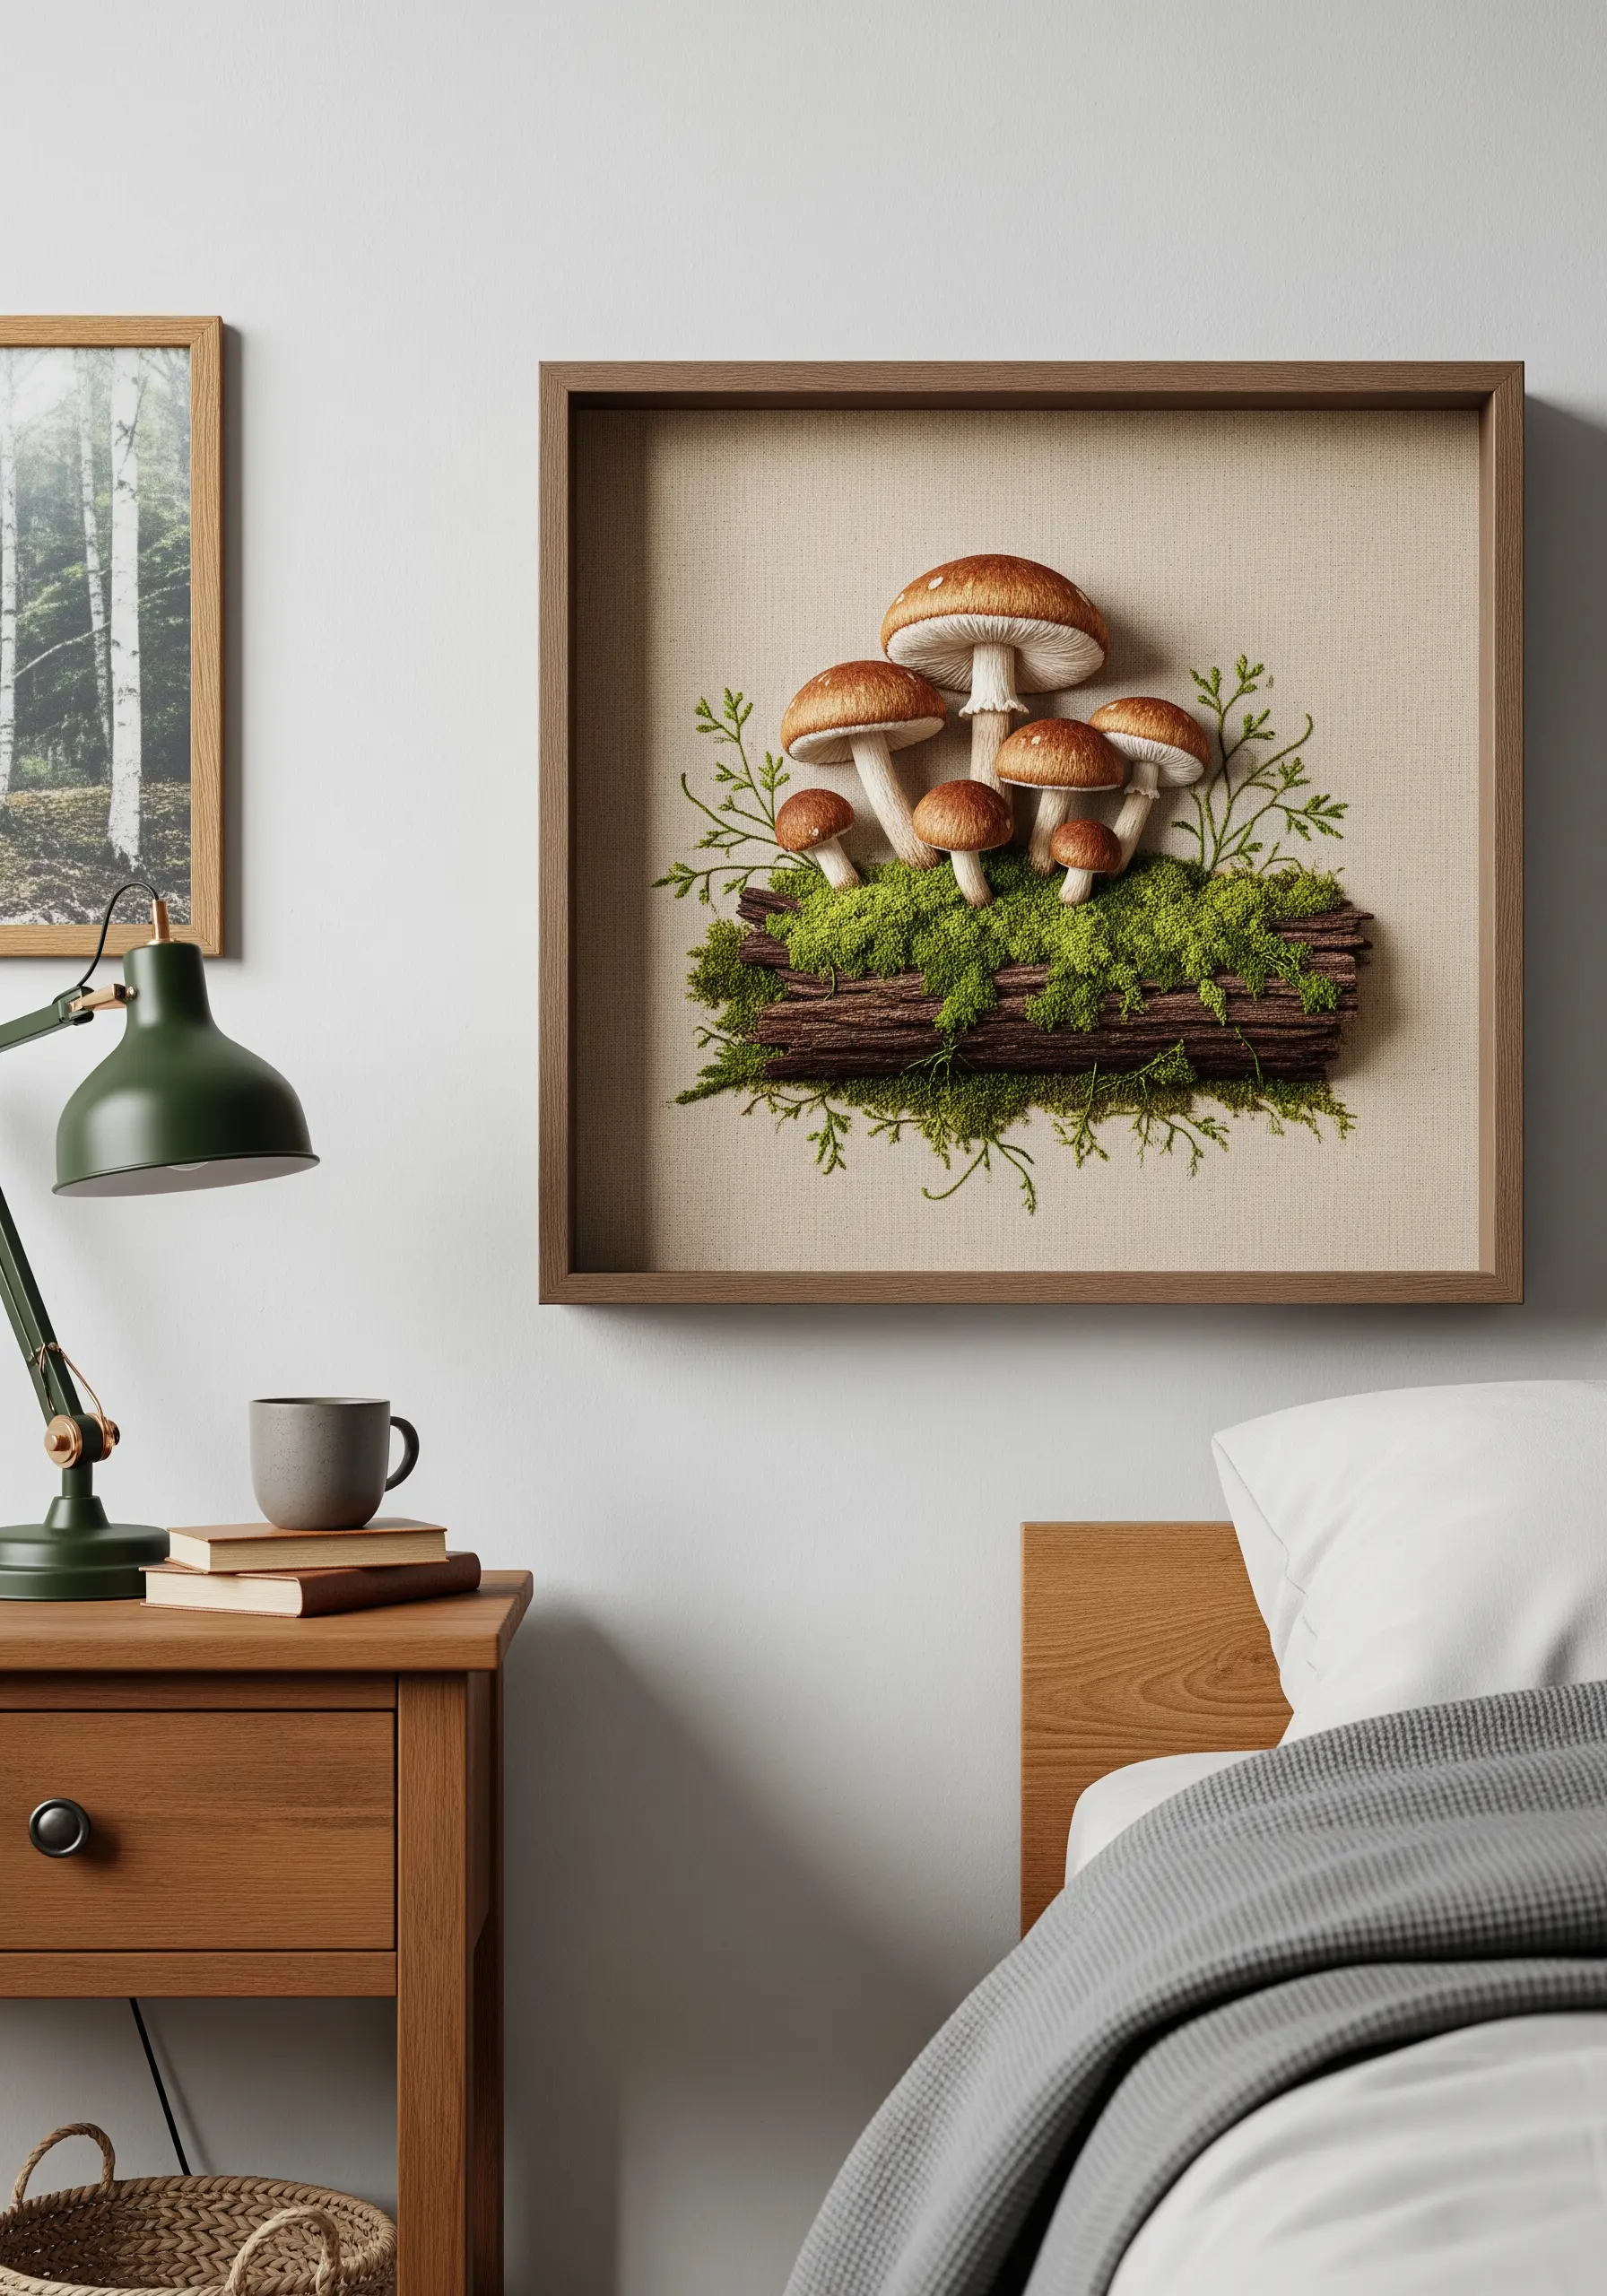
1. Create a Deeply Textured Forest Floor
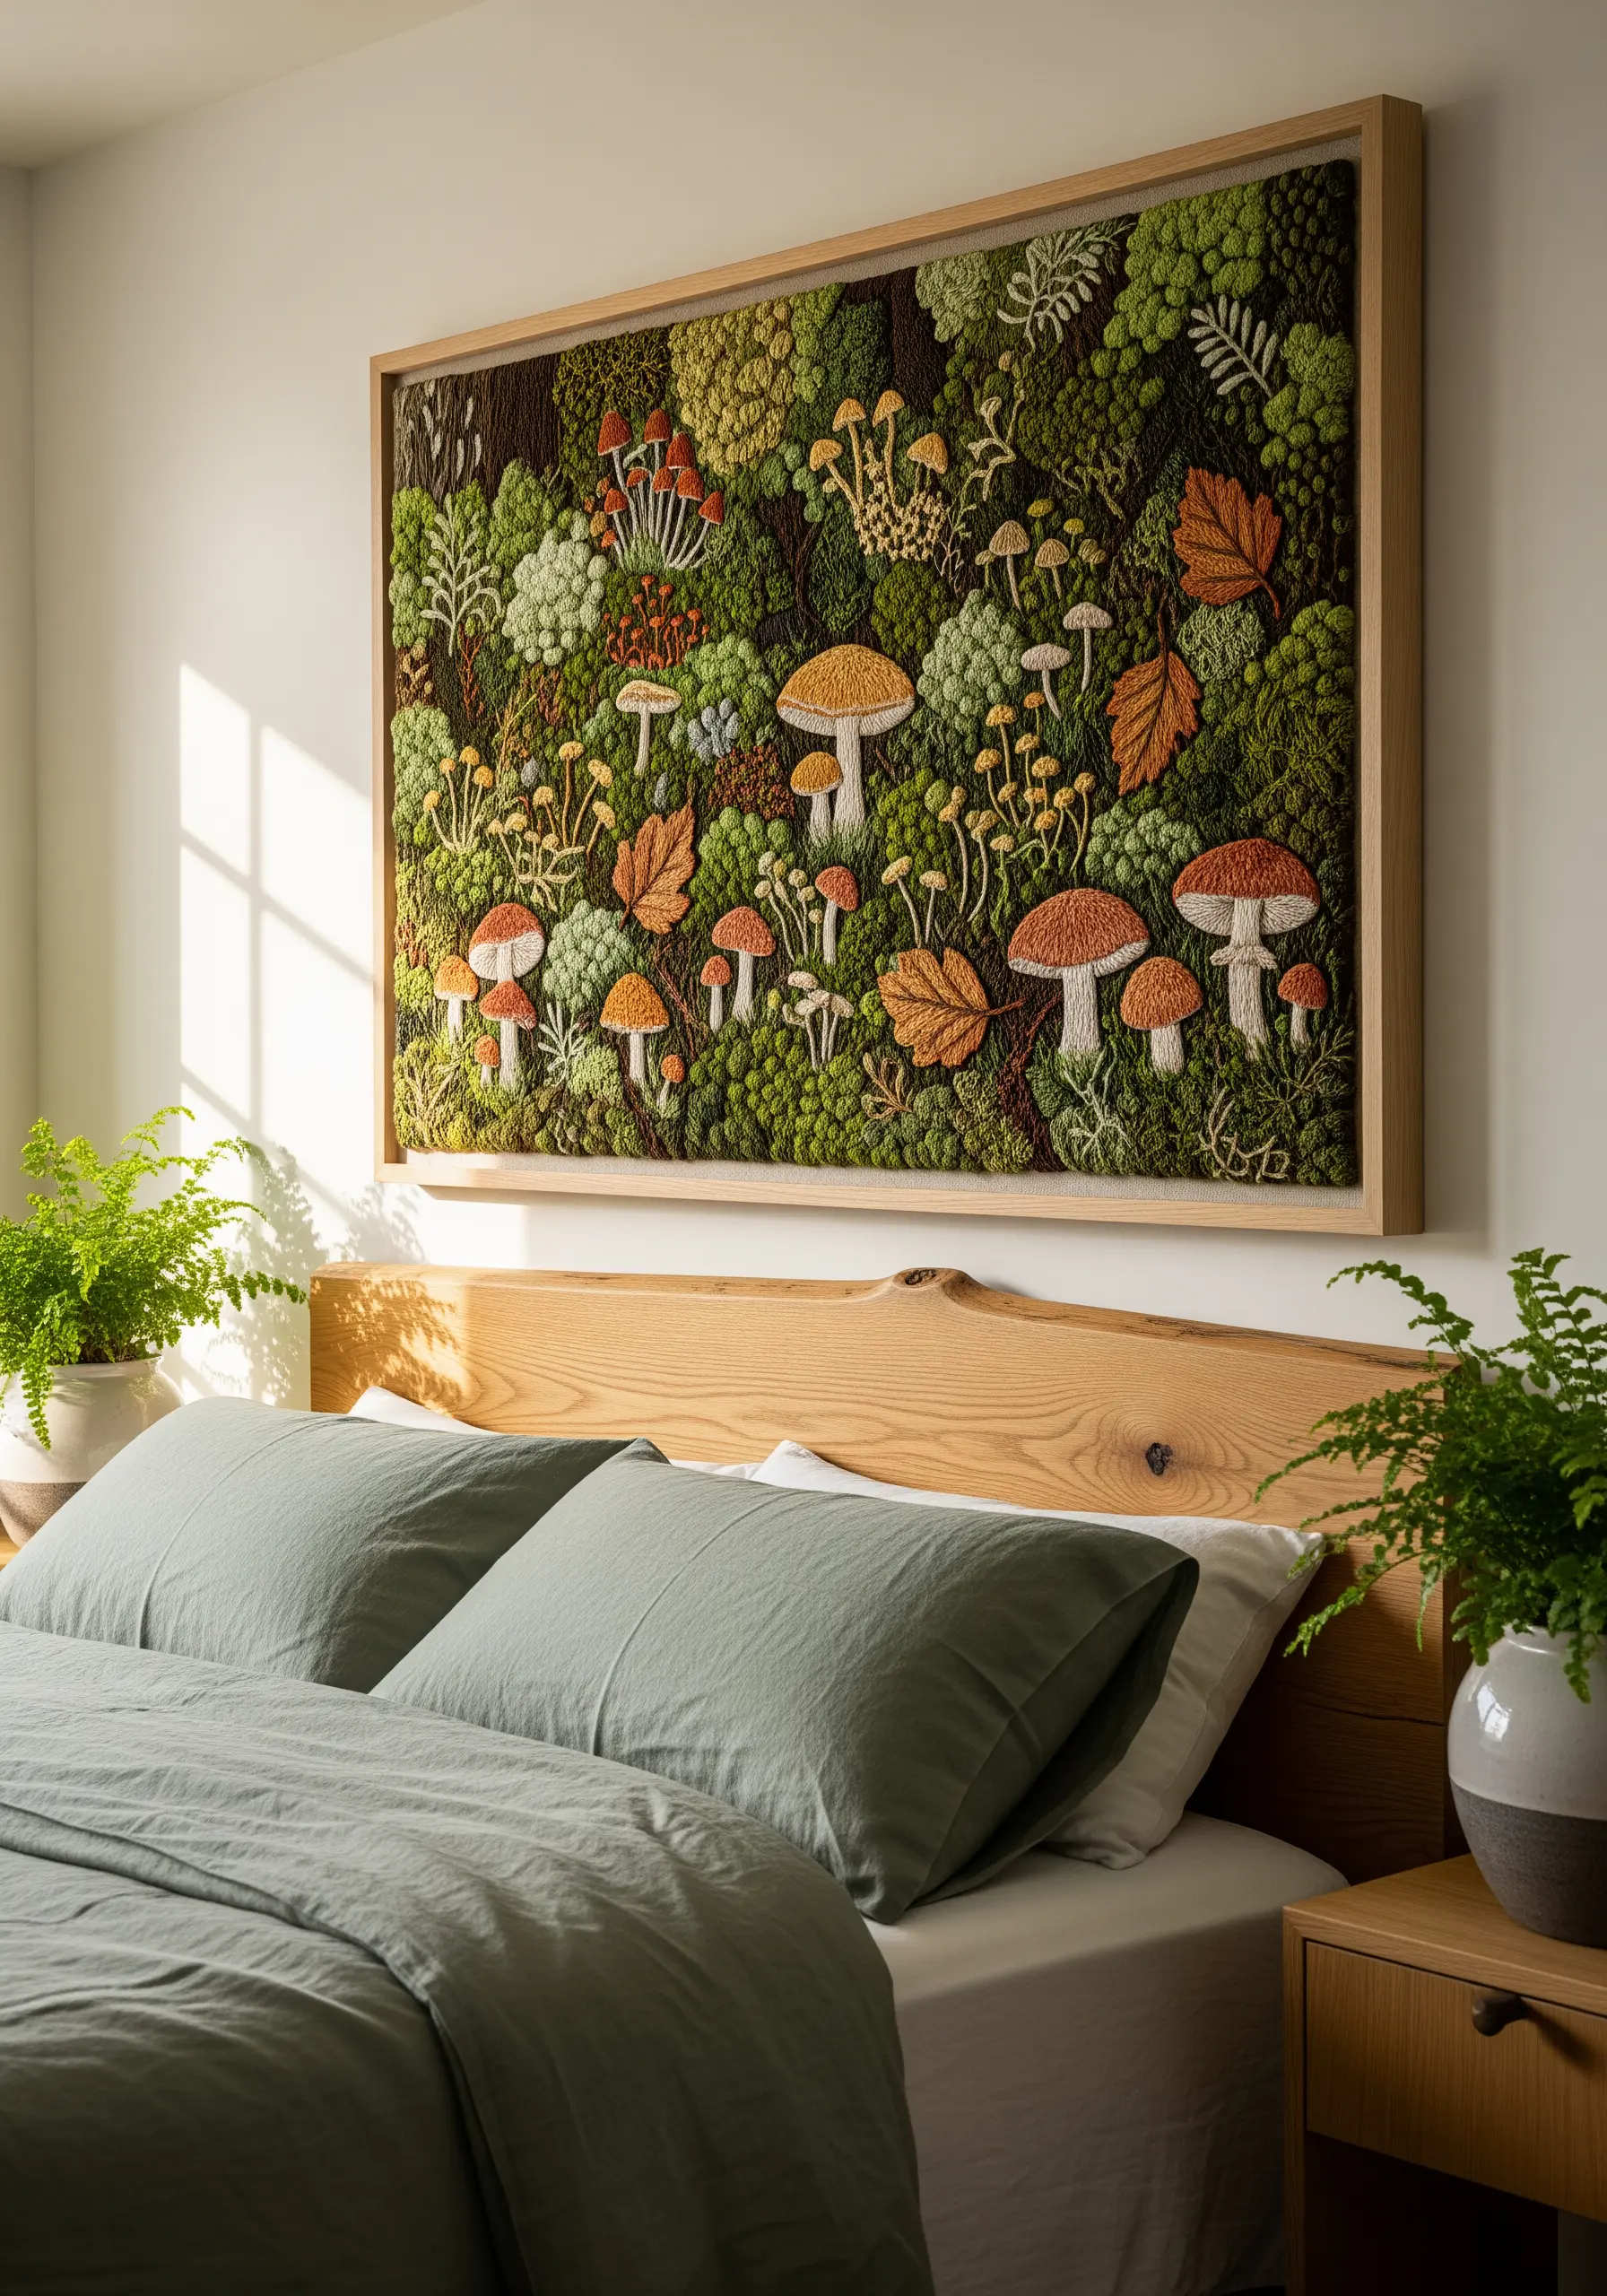
Build a sense of depth by using a dense field of French knots and colonial knots for the mossy background.
Use a single strand of thread for the knots in the distance and a full six strands for those in the foreground to create perspective.
For the mushrooms, use a padded satin stitch by laying down foundation stitches first; this gives them a plump, three-dimensional quality that lifts them from the surface.
This technique turns a flat canvas into a tactile, sculptural piece that invites a closer look.
2. Stitch a Minimalist Triptych Landscape
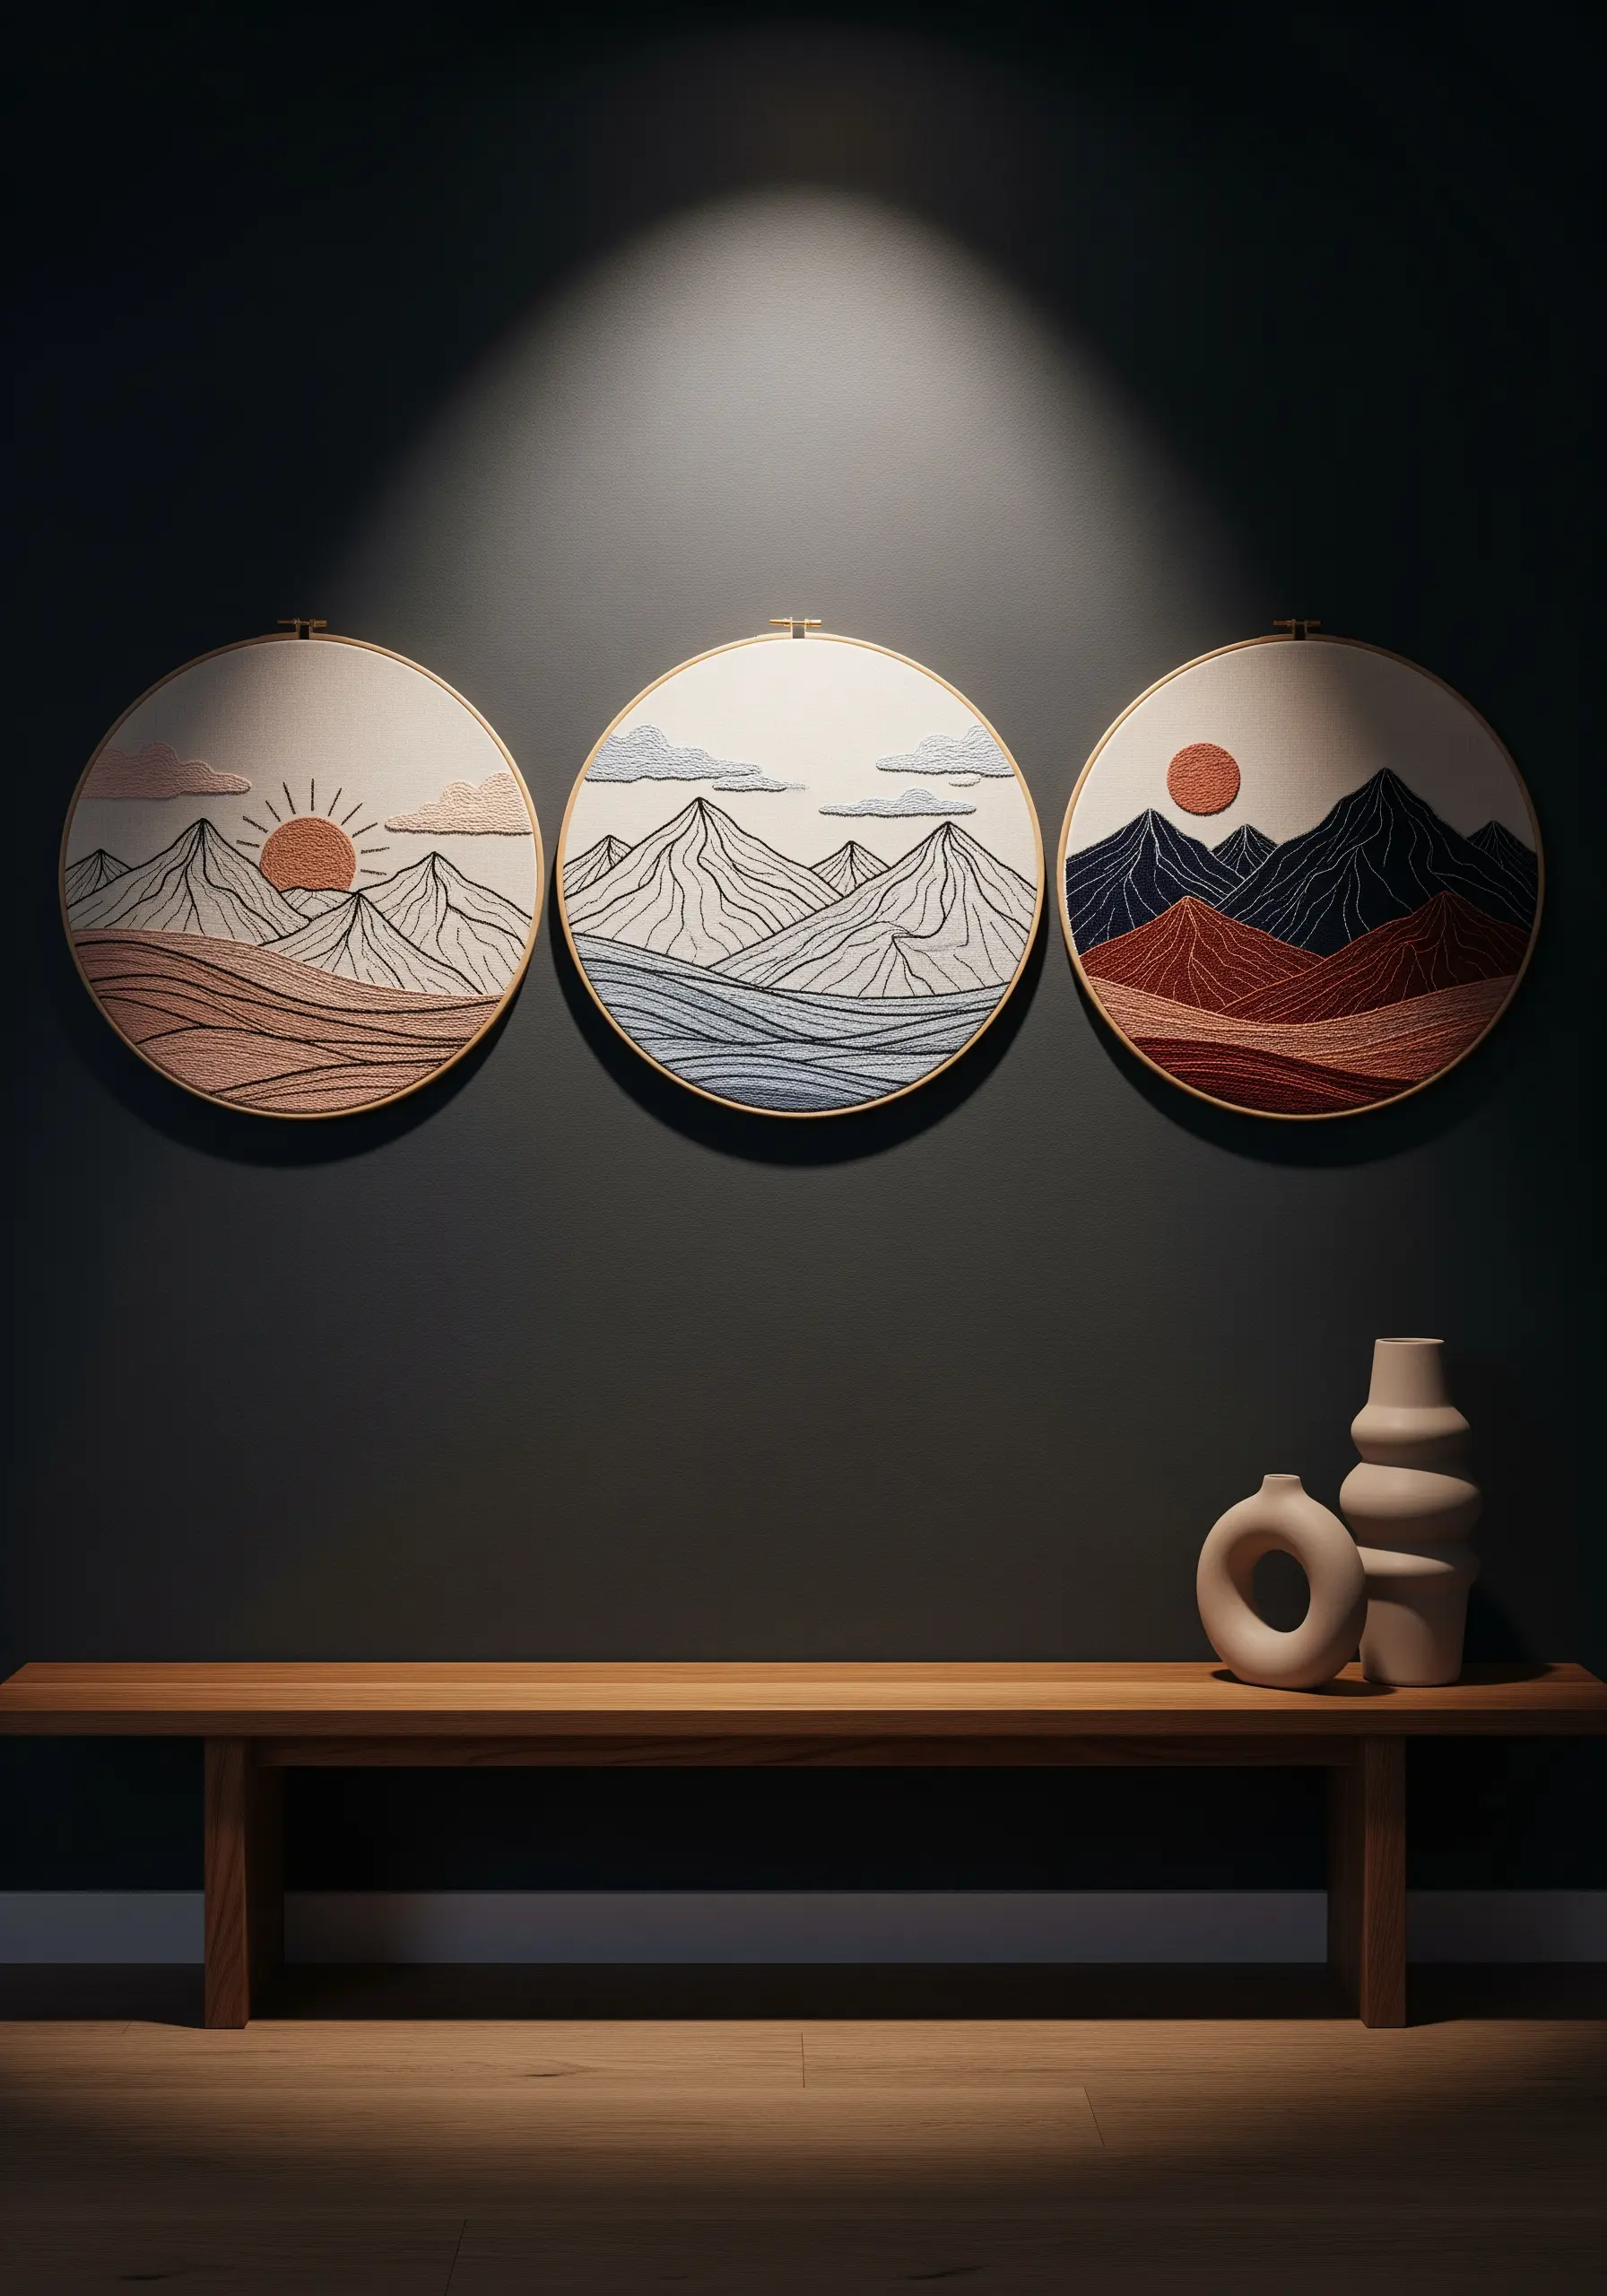
Achieve this clean, modern look by committing to a single, consistent stitch for all your line work, like a two-strand backstitch or stem stitch.
Create three separate designs that share a common horizon line and color palette to ensure they read as a cohesive series.
By limiting your colors to three or four shades per hoop—such as terracotta, sand, and cream—you create a design that feels intentional and graphic.
This approach transforms simple lines into a sophisticated, narrative art piece.
3. Curate a Botanical Hoop Gallery Wall
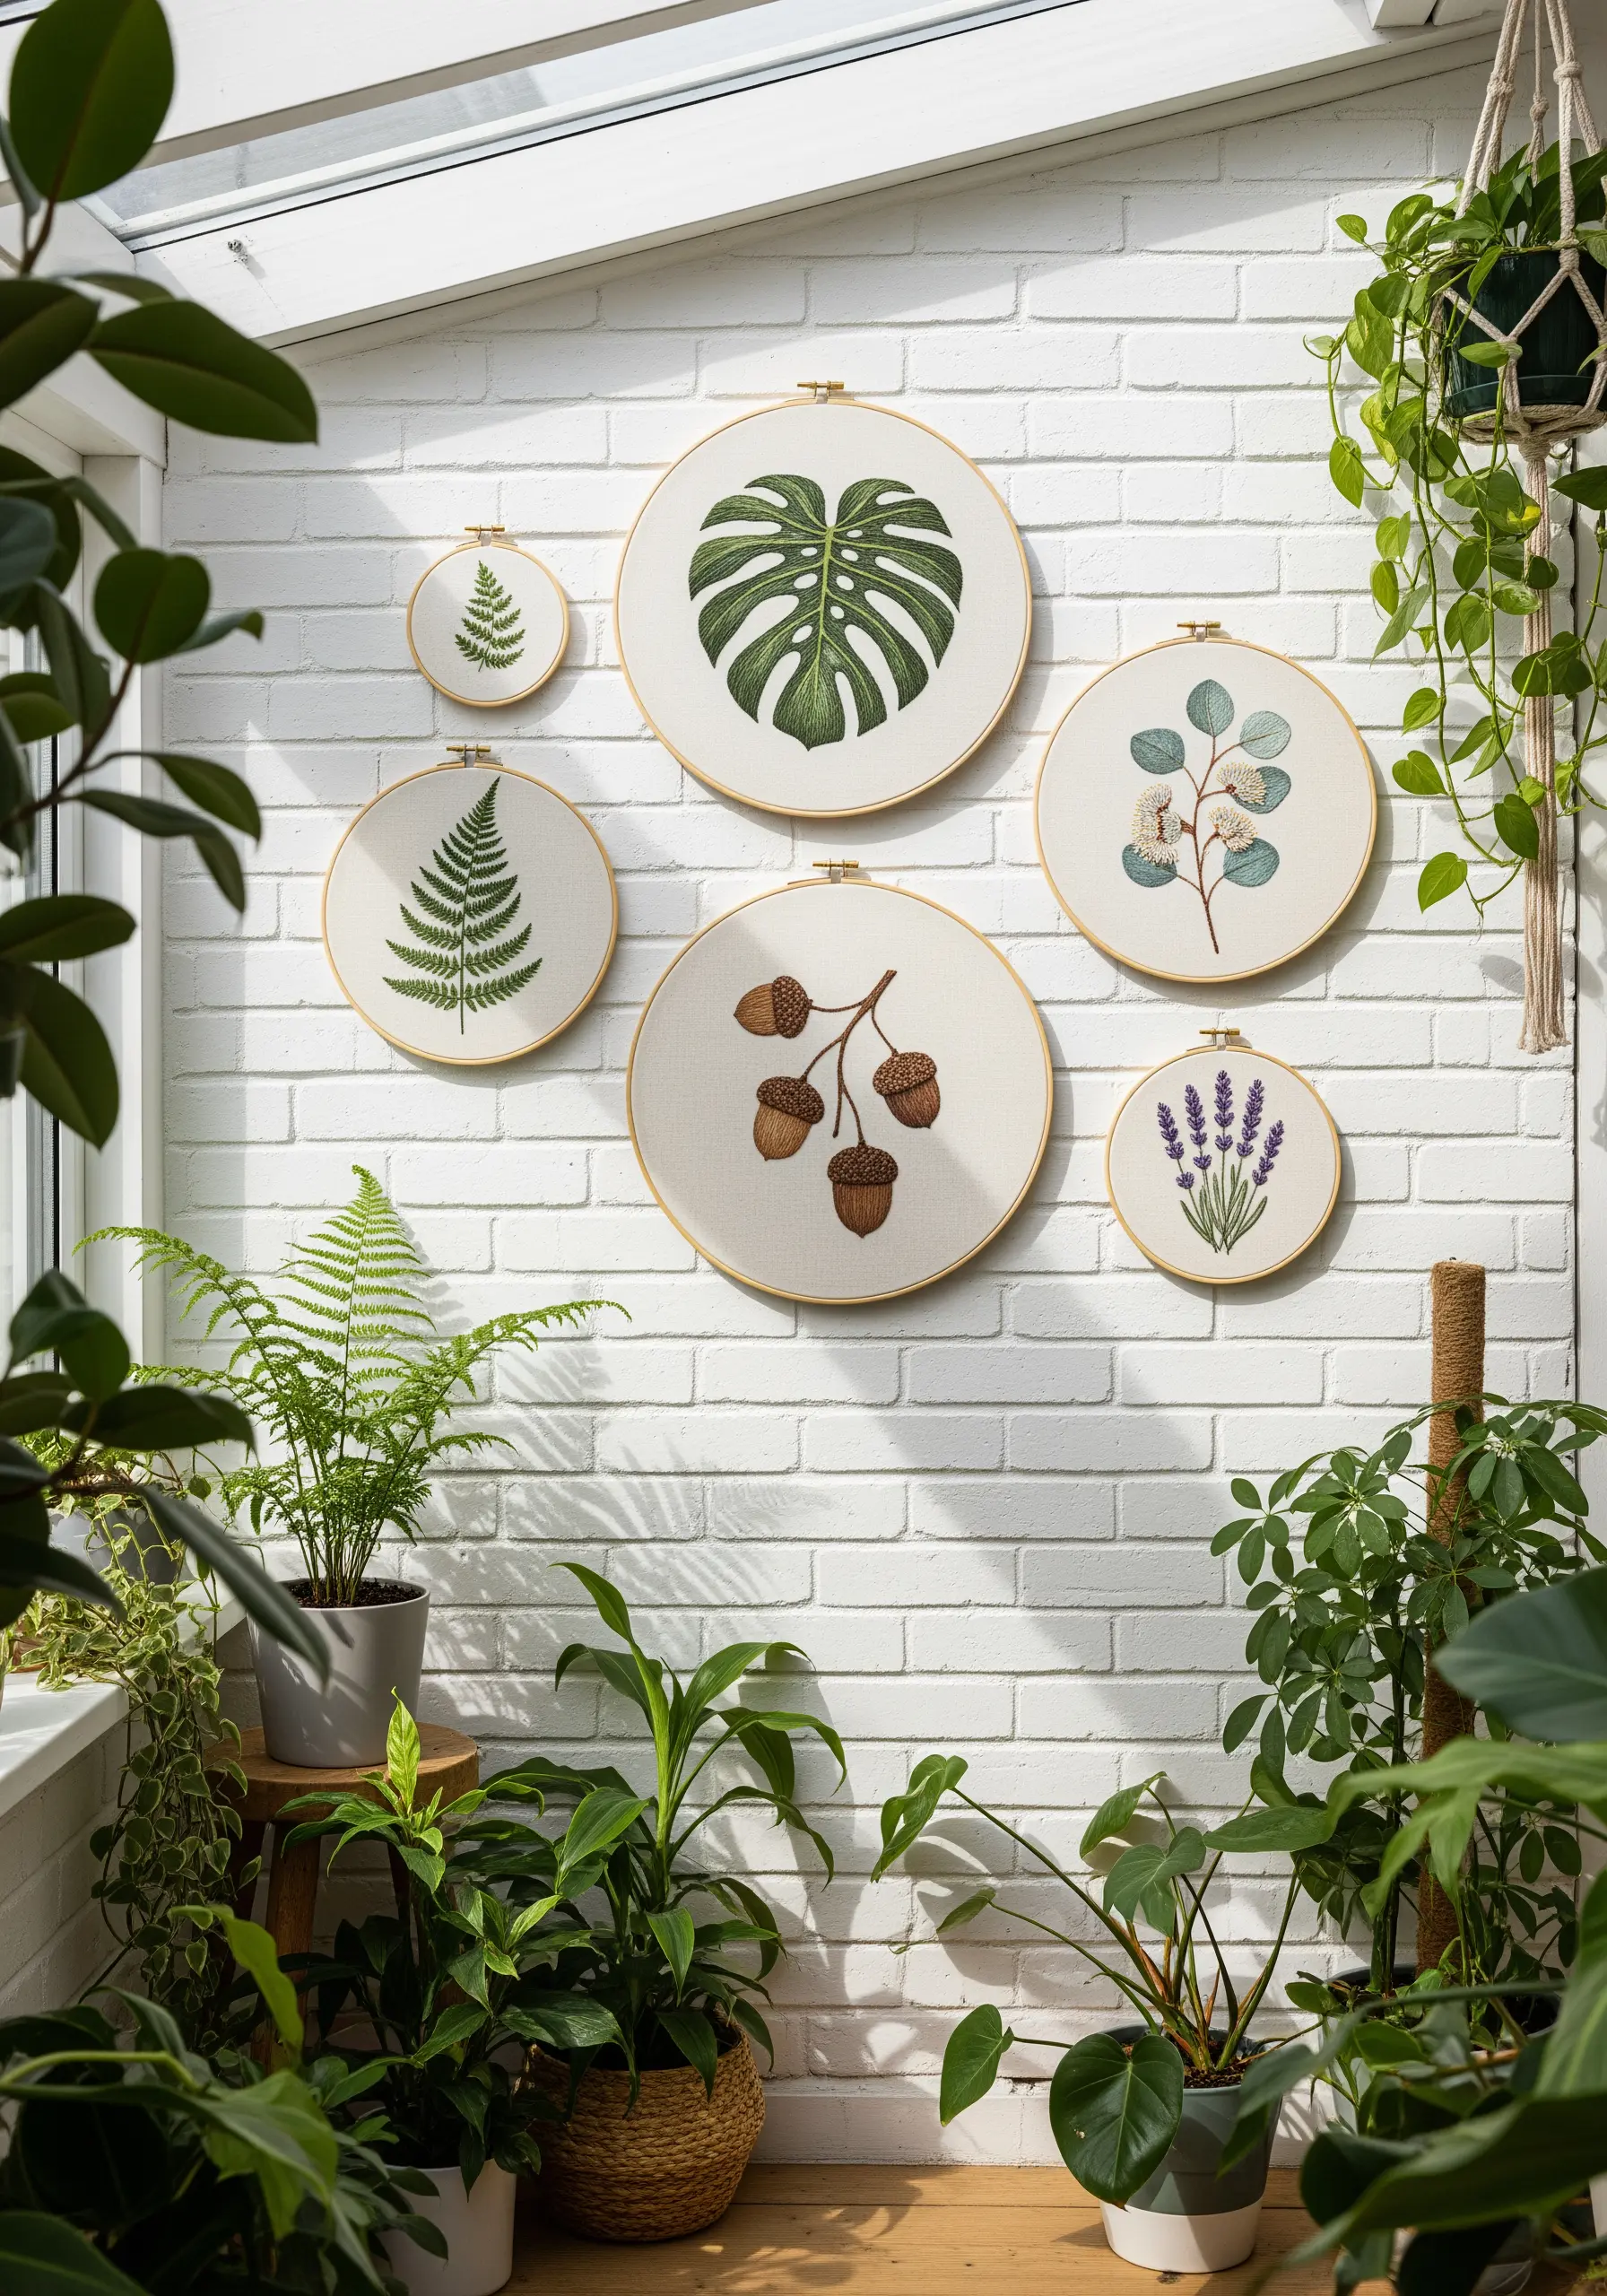
To create a balanced gallery, mix detailed statement pieces with simpler, smaller accents.
Use a fishbone stitch for leaves like the monstera to create a defined central vein and a smooth, illustrative finish.
For delicate botanicals like eucalyptus, use a combination of stem stitch for the branches and lazy daisy stitch for the leaves.
Anchor your collection by using the same natural linen fabric and wooden hoops for all your plant-inspired hoop art designs, which creates visual harmony.
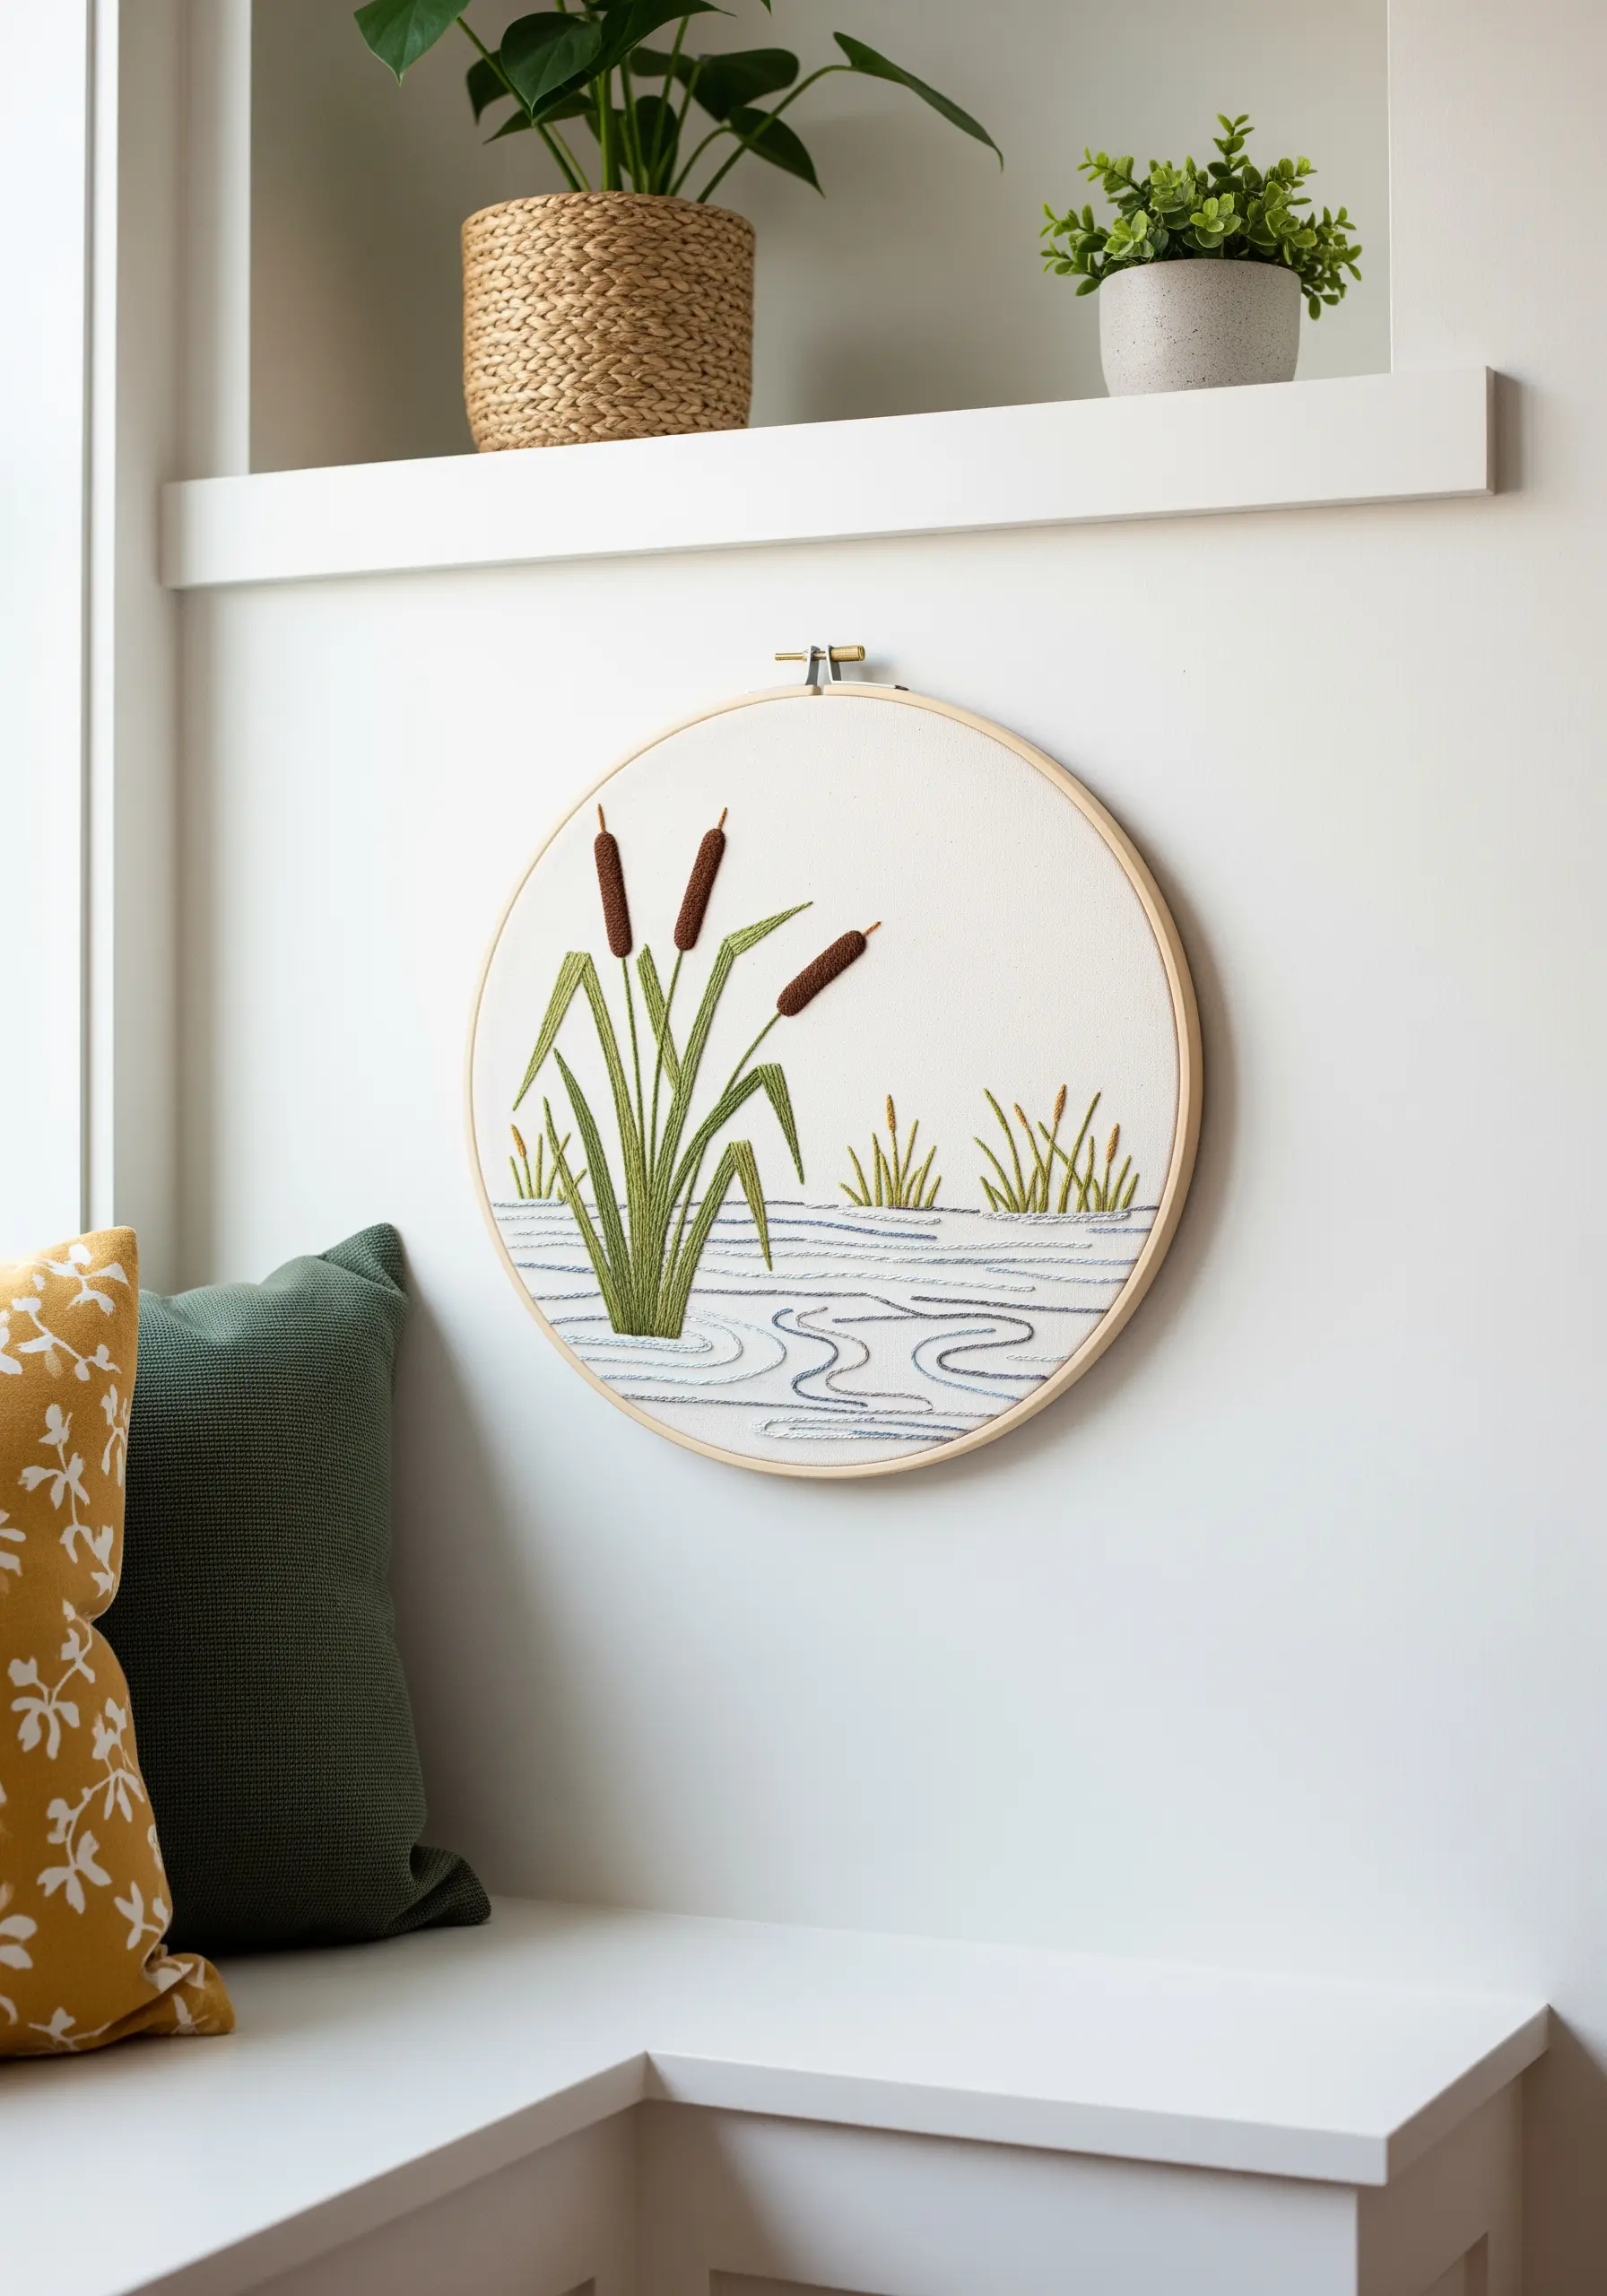
4. Sculpt a Riverbed with Dimensional Stitches
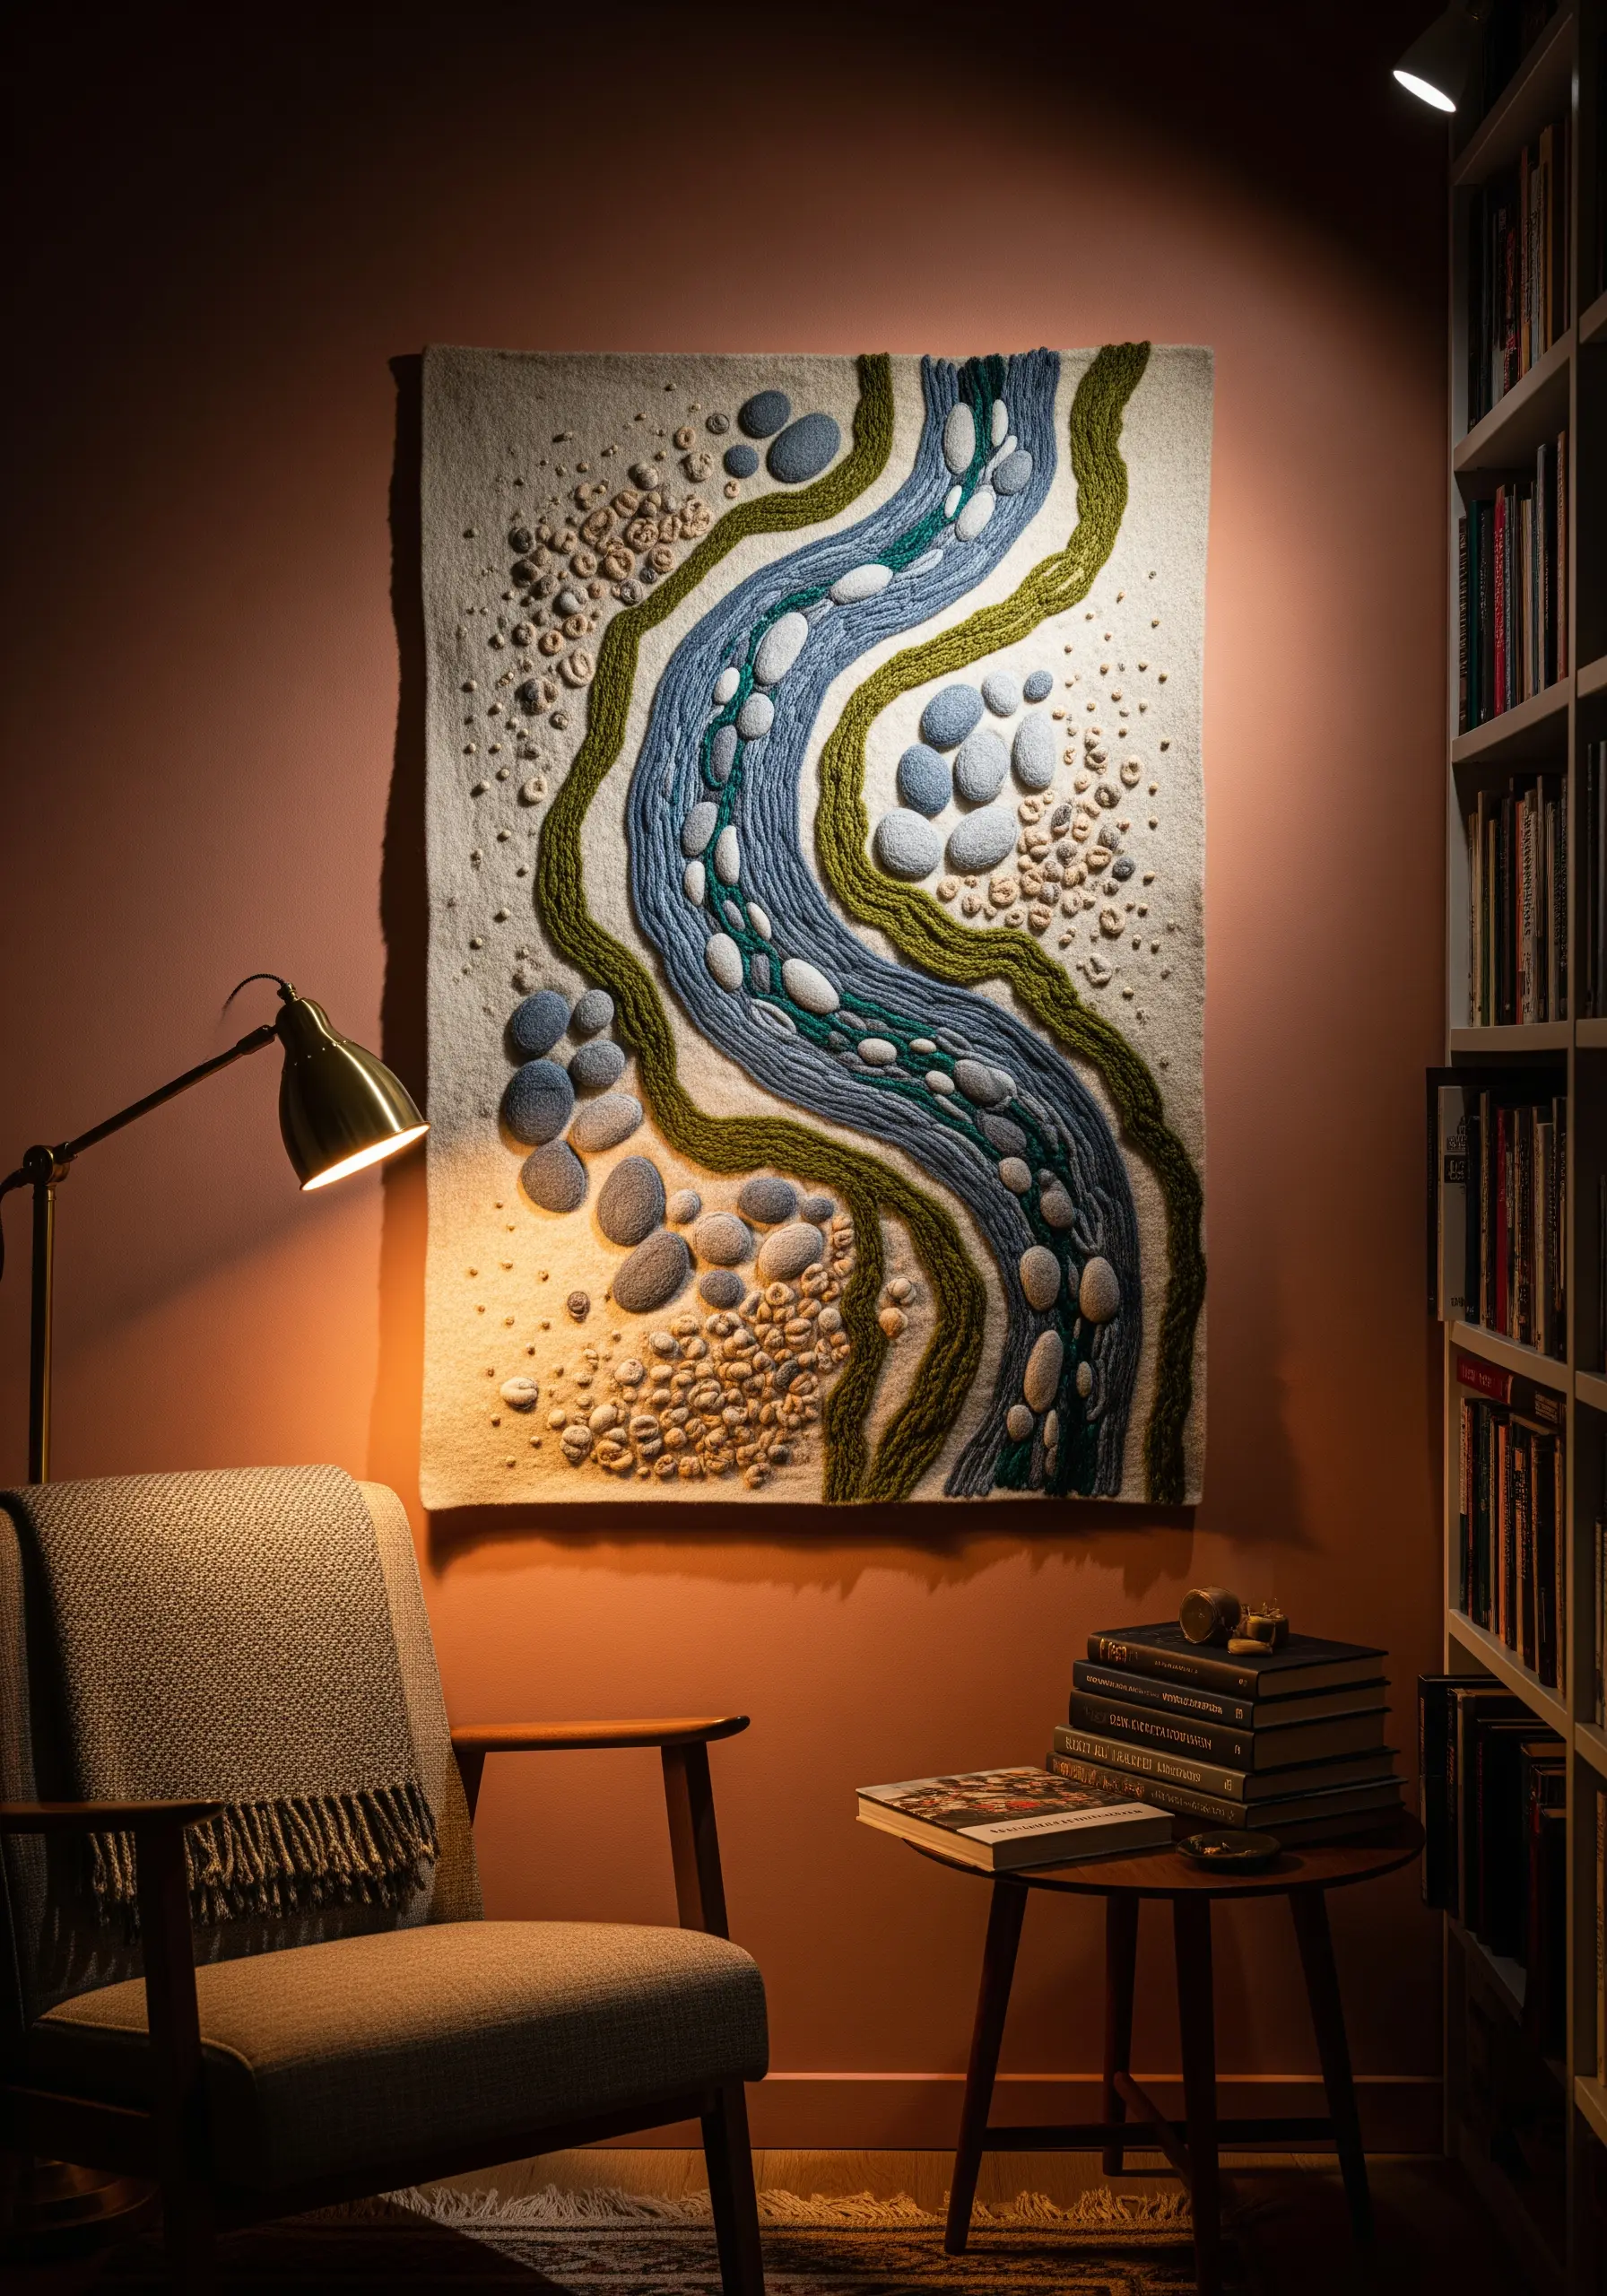
Create the raised river stones using padded satin stitch over felt shapes, a technique known as stumpwork.
For the flowing water, lay down long straight stitches in various shades of blue and silver, then couch over them with a wavy line to suggest movement.
Build the mossy riverbanks by couching thick, textural yarn onto the fabric surface; this adds dramatic relief and a tactile quality that contrasts with the smoother stitches.
5. Paint Sand Dunes with Directional Stitches
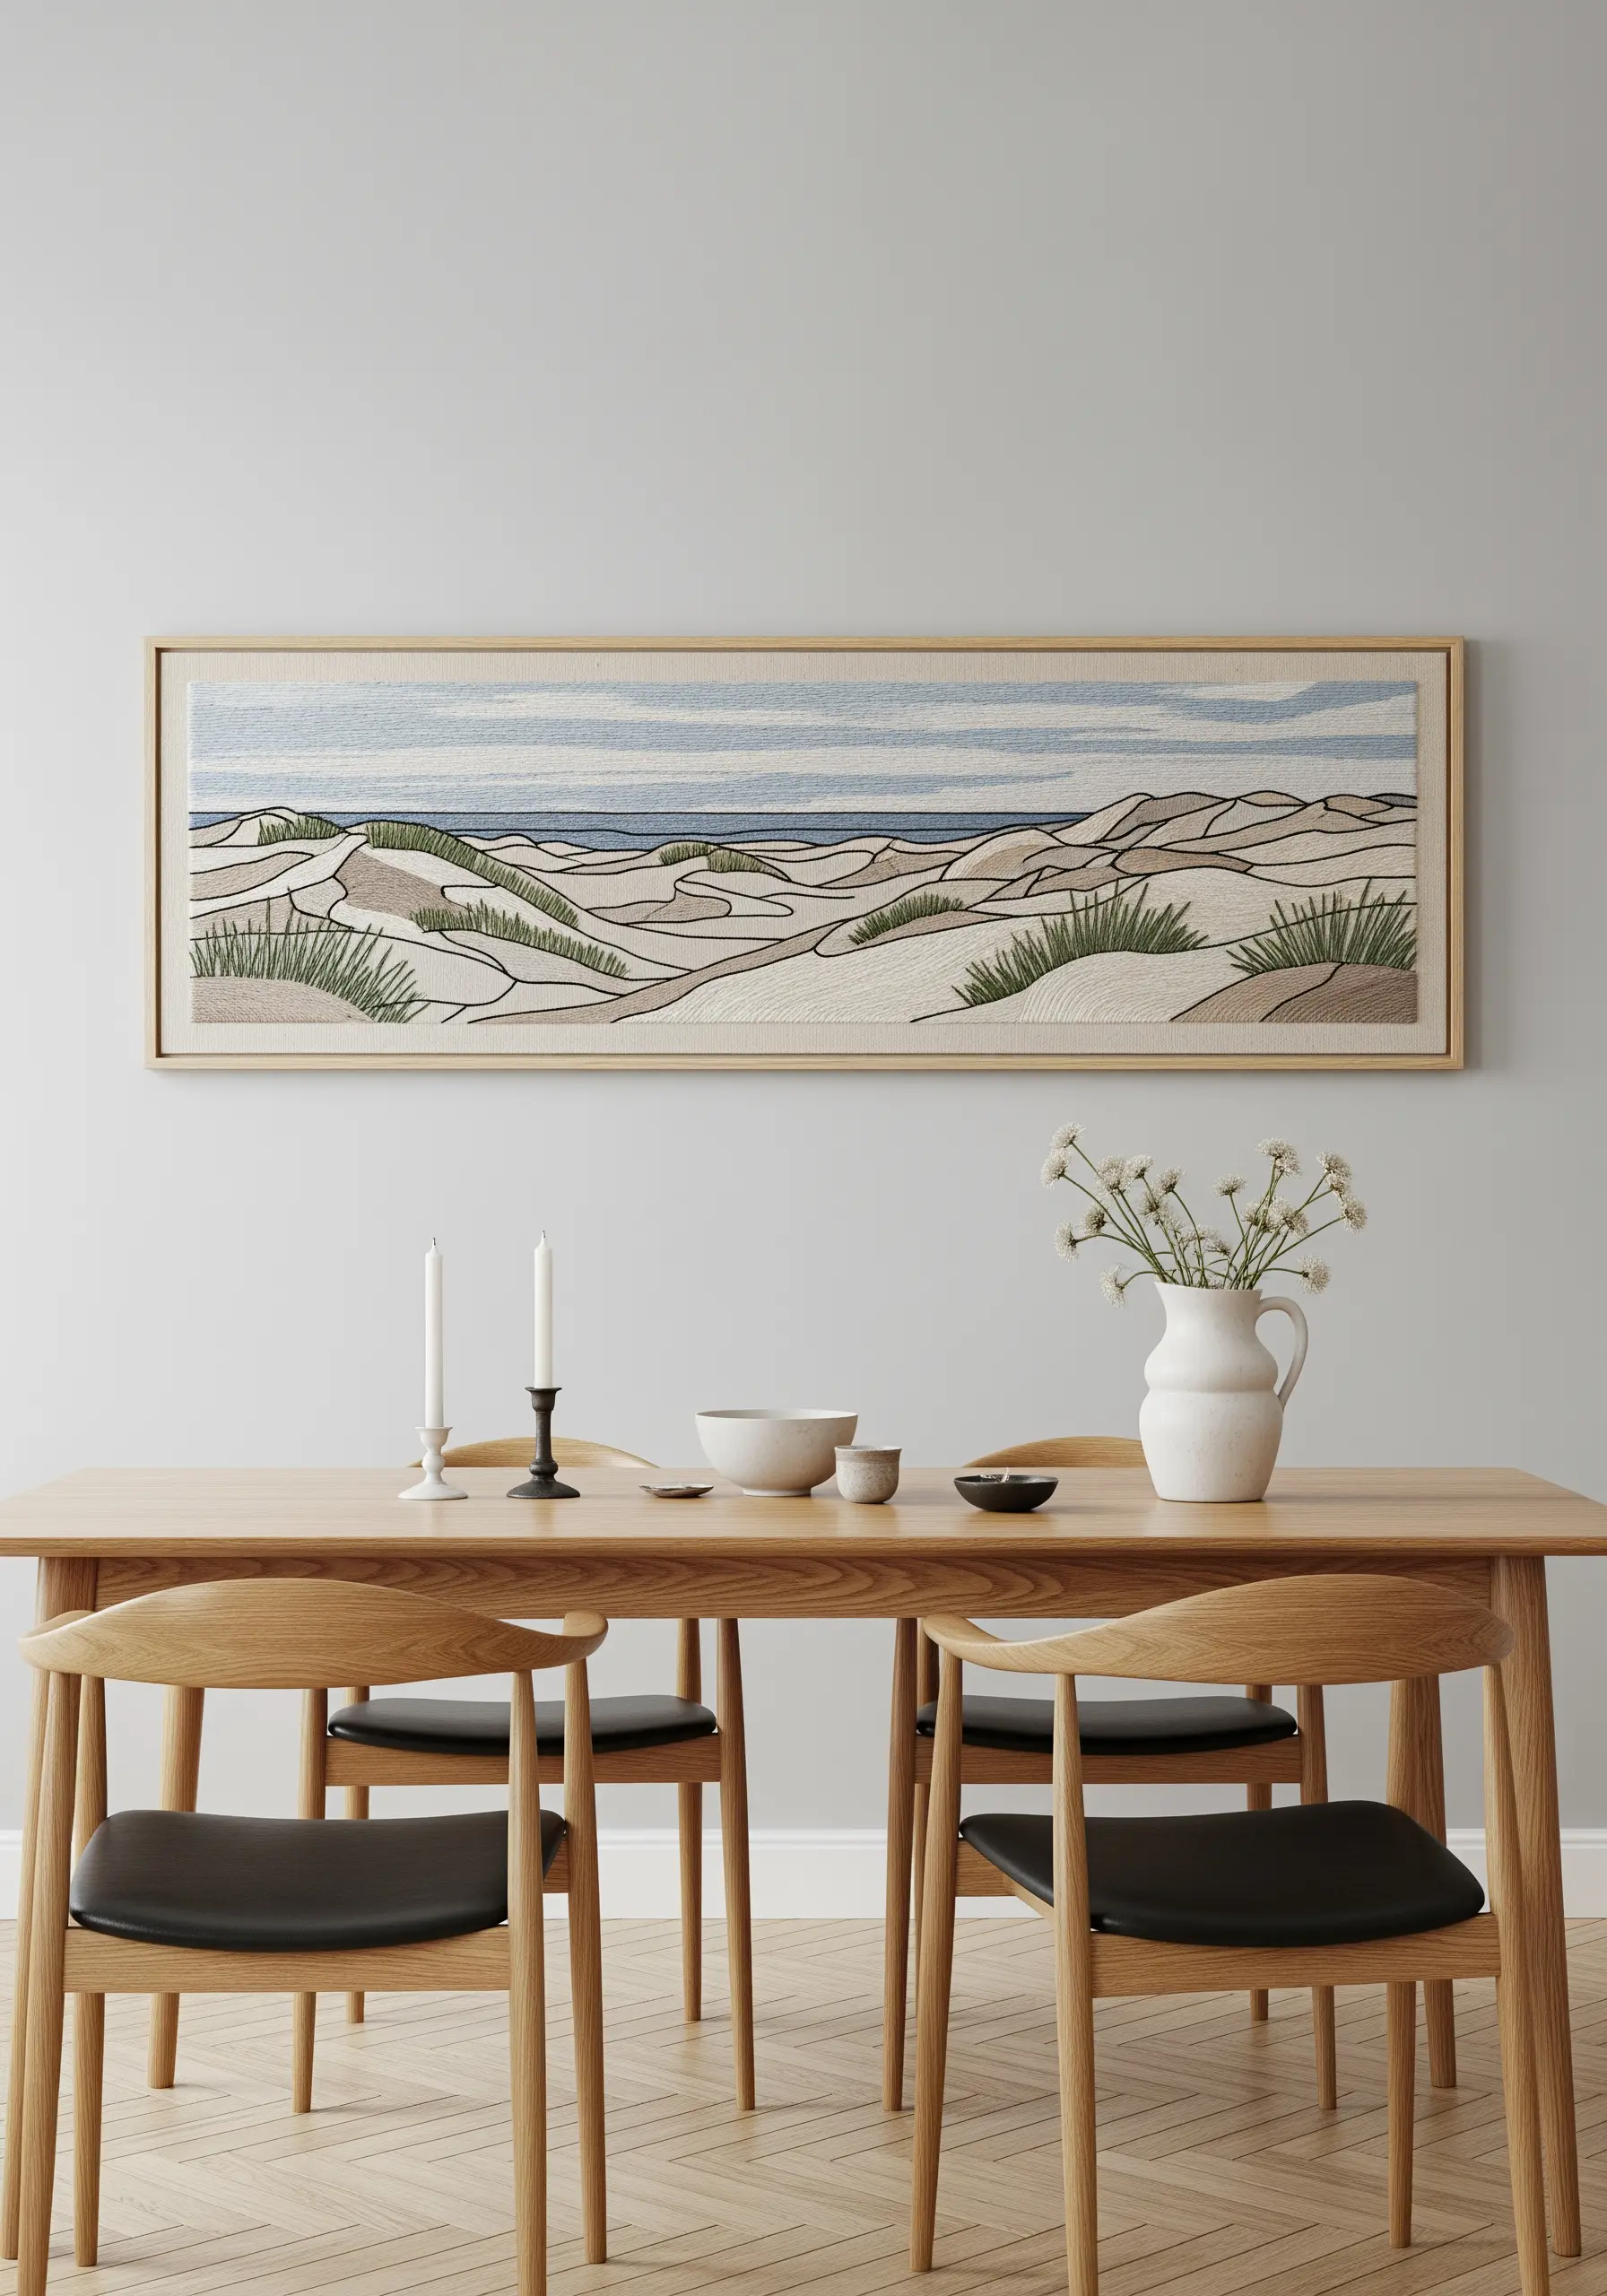
Capture the soft, windswept look of sand dunes by using long-and-short stitch to blend your neutral tones seamlessly.
Pay close attention to the direction of your stitches—angle them to follow the natural curves of the landscape to create a sense of movement and flow.
For the sharp edges of dune grasses, use single, decisive straight stitches in a contrasting dark green.
This technique creates a serene, panoramic piece that feels more like a painting than a stitched work.
6. Illuminate the Night Sky with Delicate Detail
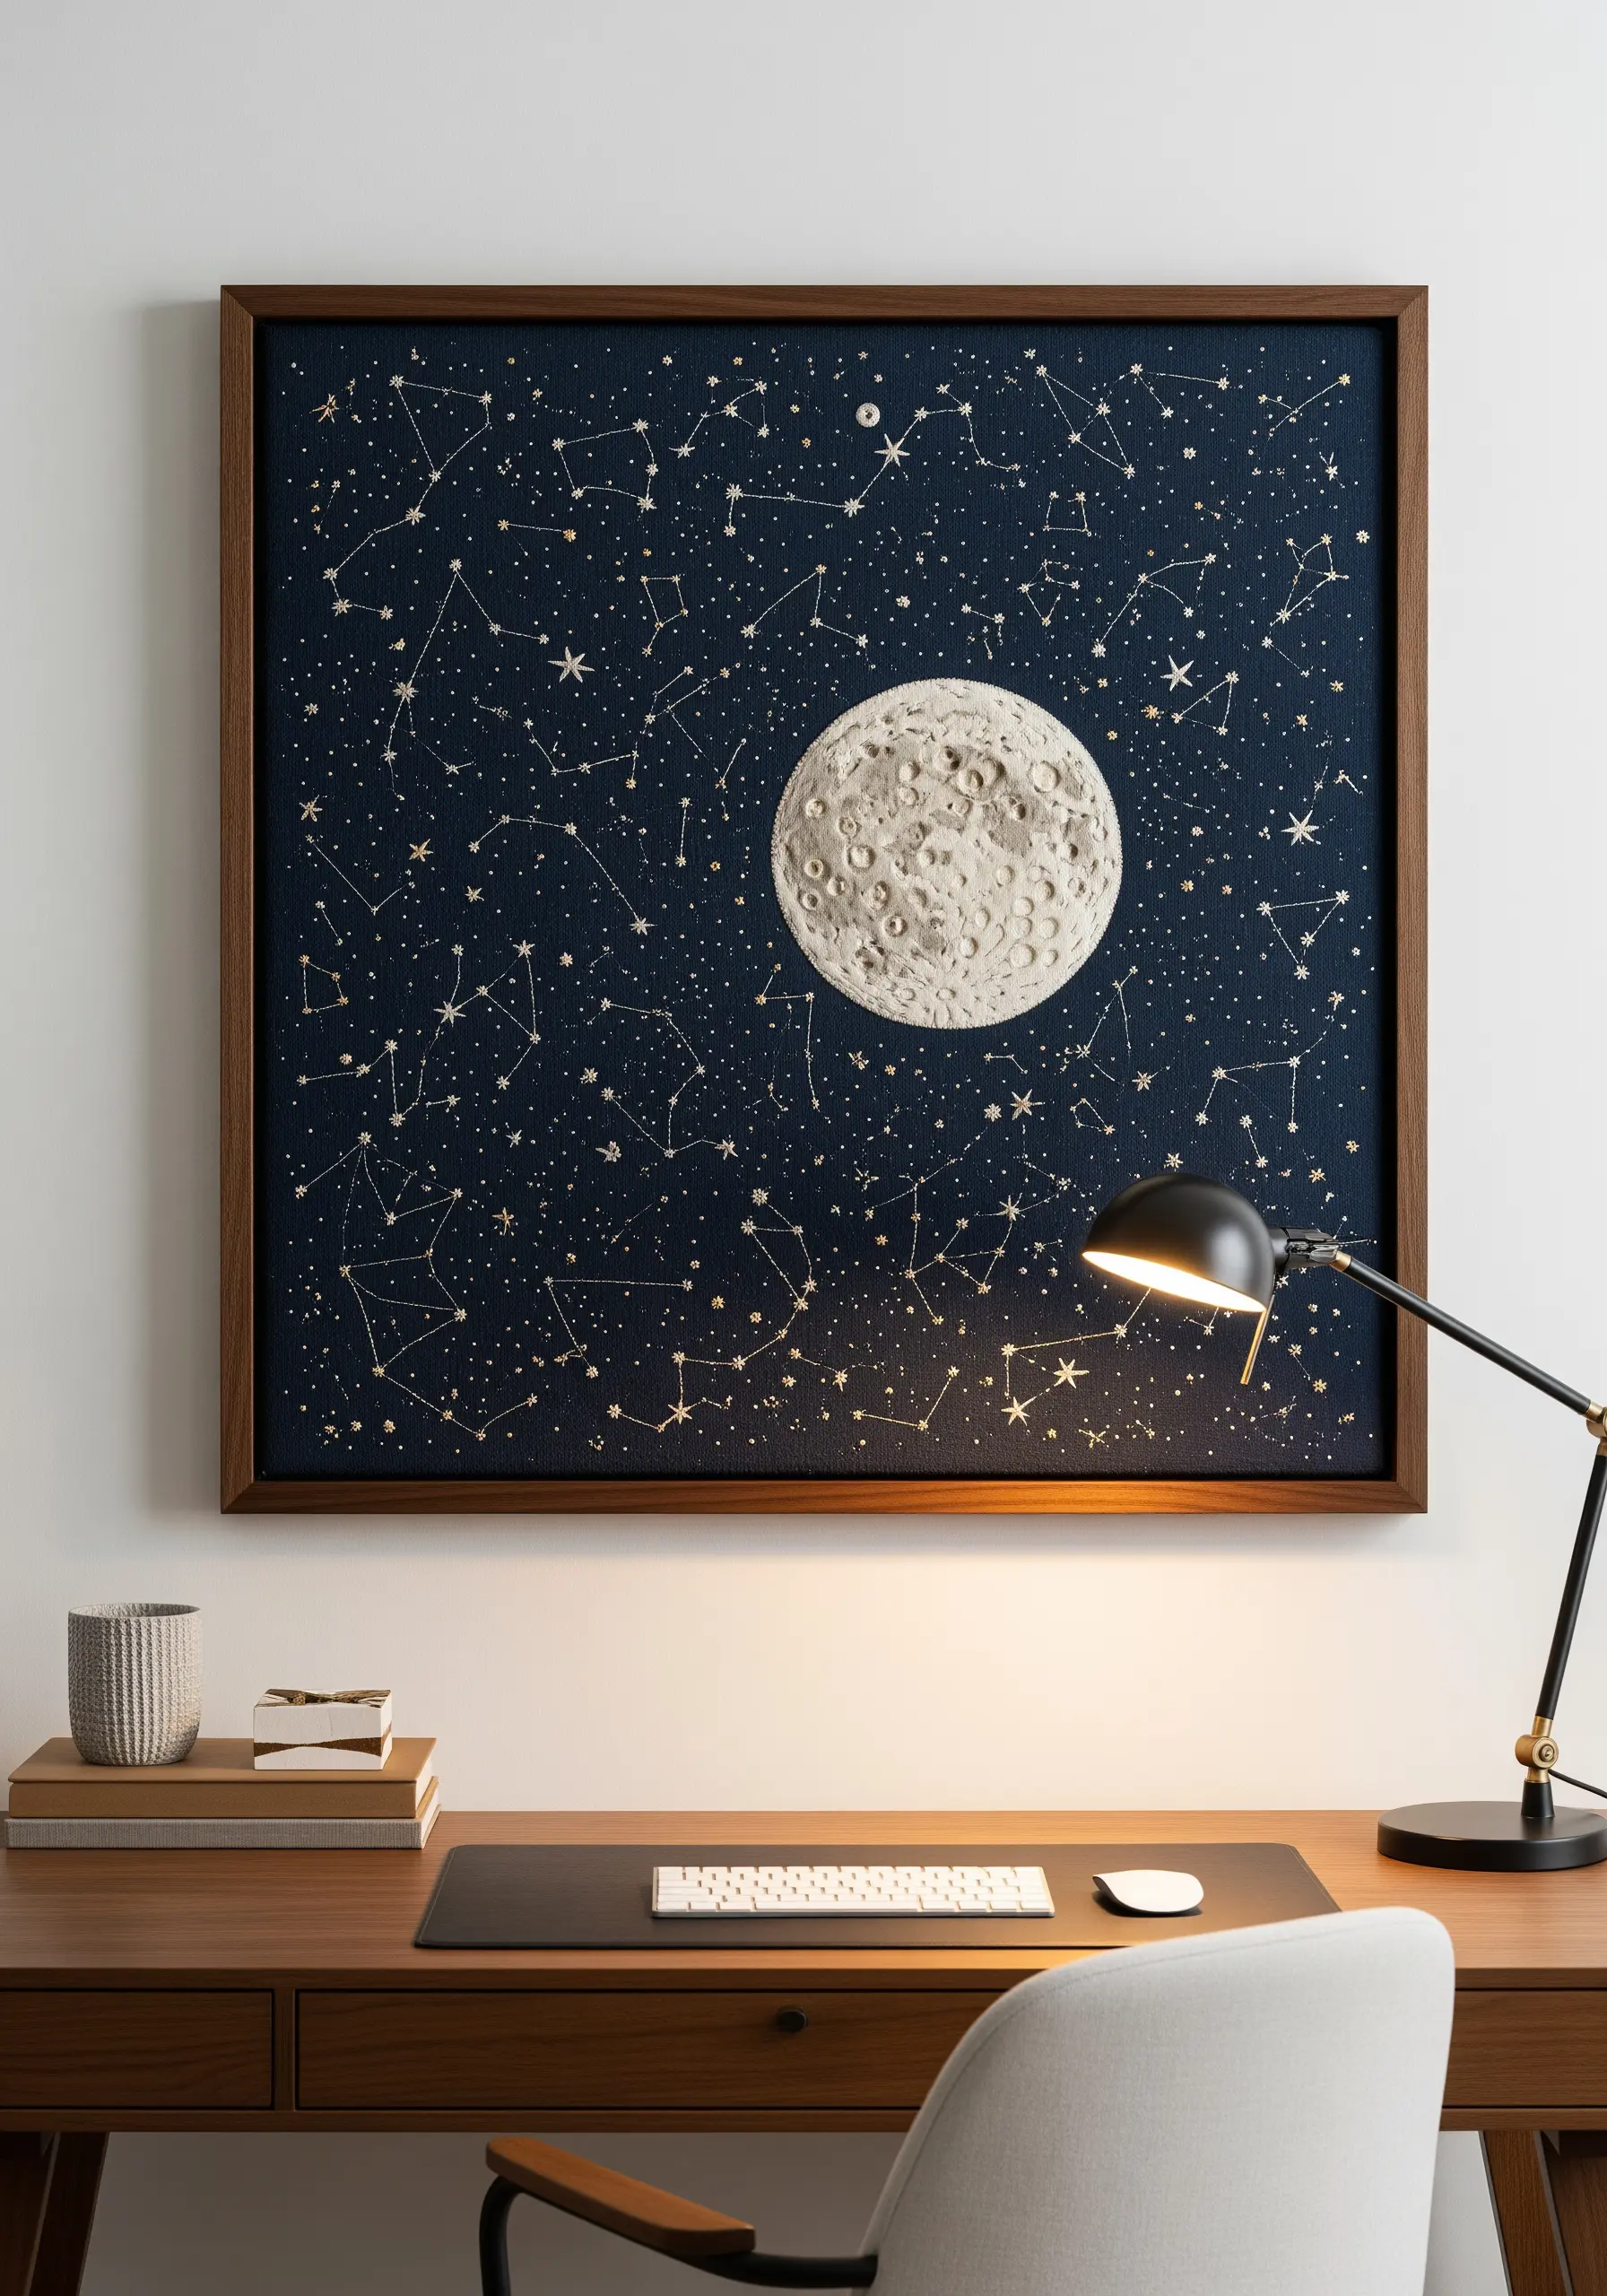
To make your stars pop, work on a dark navy or black linen fabric and use a fine, bright thread like a single strand of white or a shimmery metallic floss.
Create a 3D moon by densely packing French knots within its outline, or for a smoother look, use a padded satin stitch over a felt cutout.
Vary the size of your stars by using tiny straight stitches for some and four-pointed star stitches for others to create a sense of celestial depth.
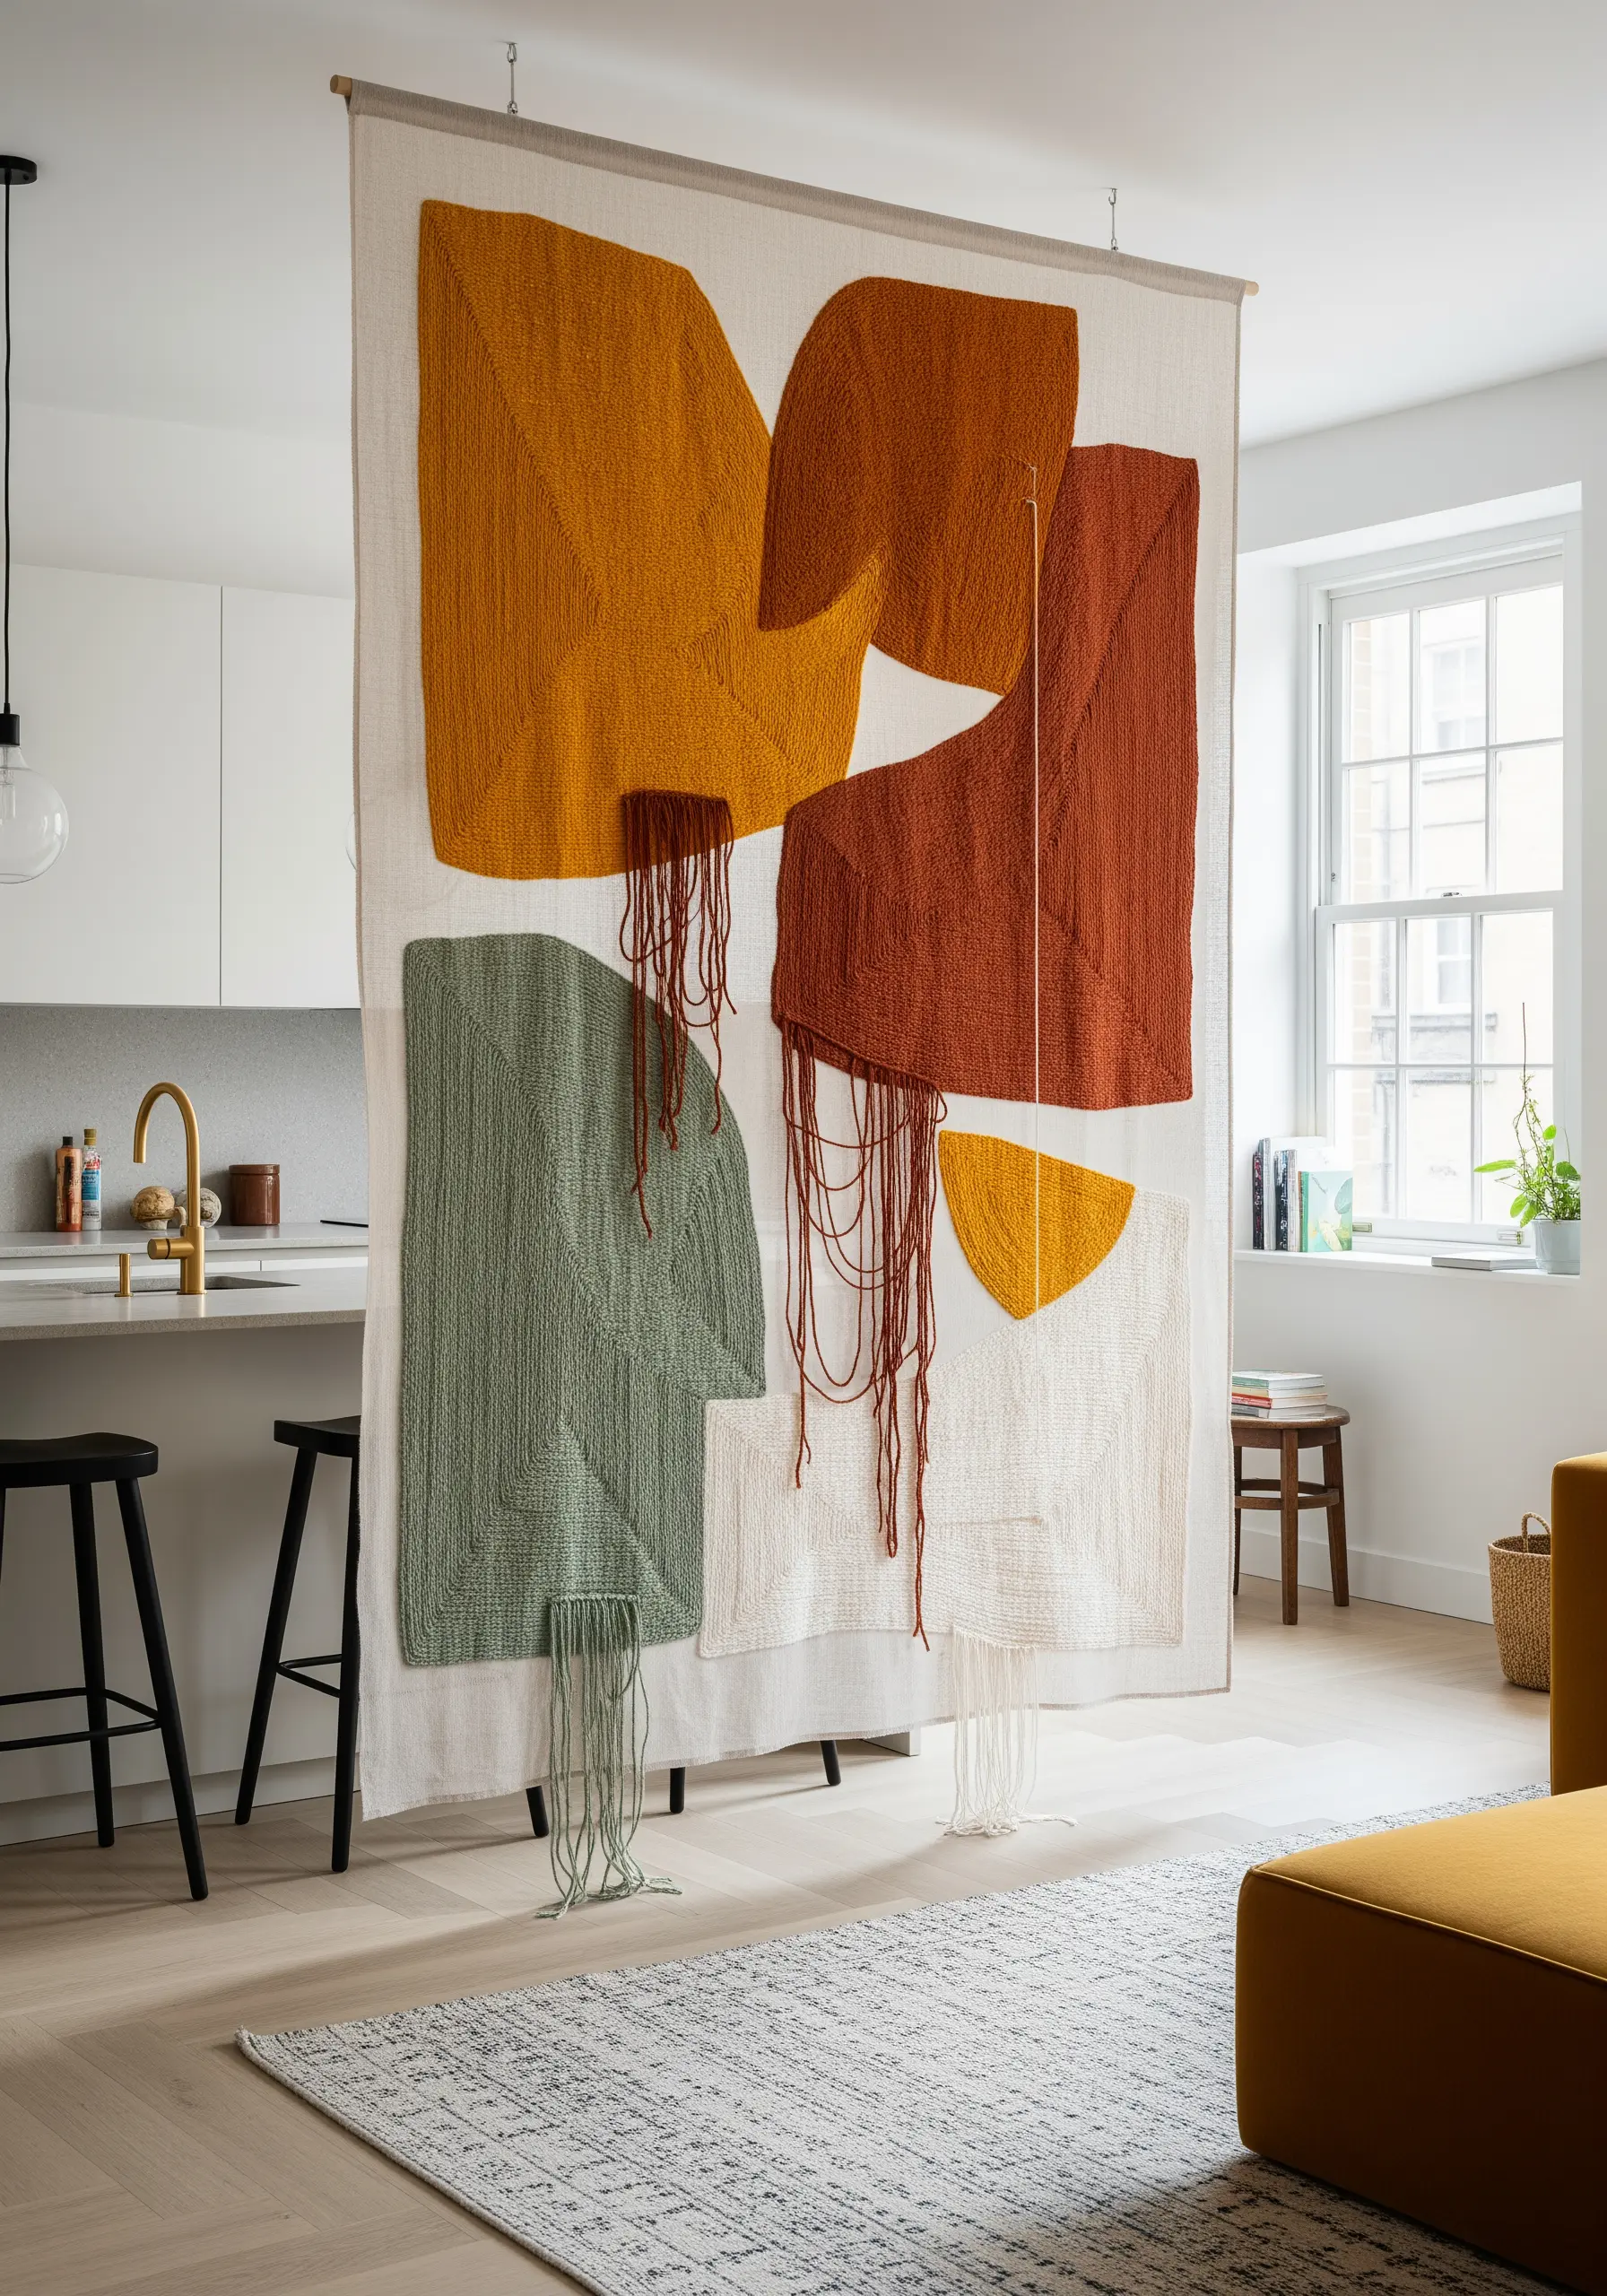
7. Weave a Bold Sunset Tapestry
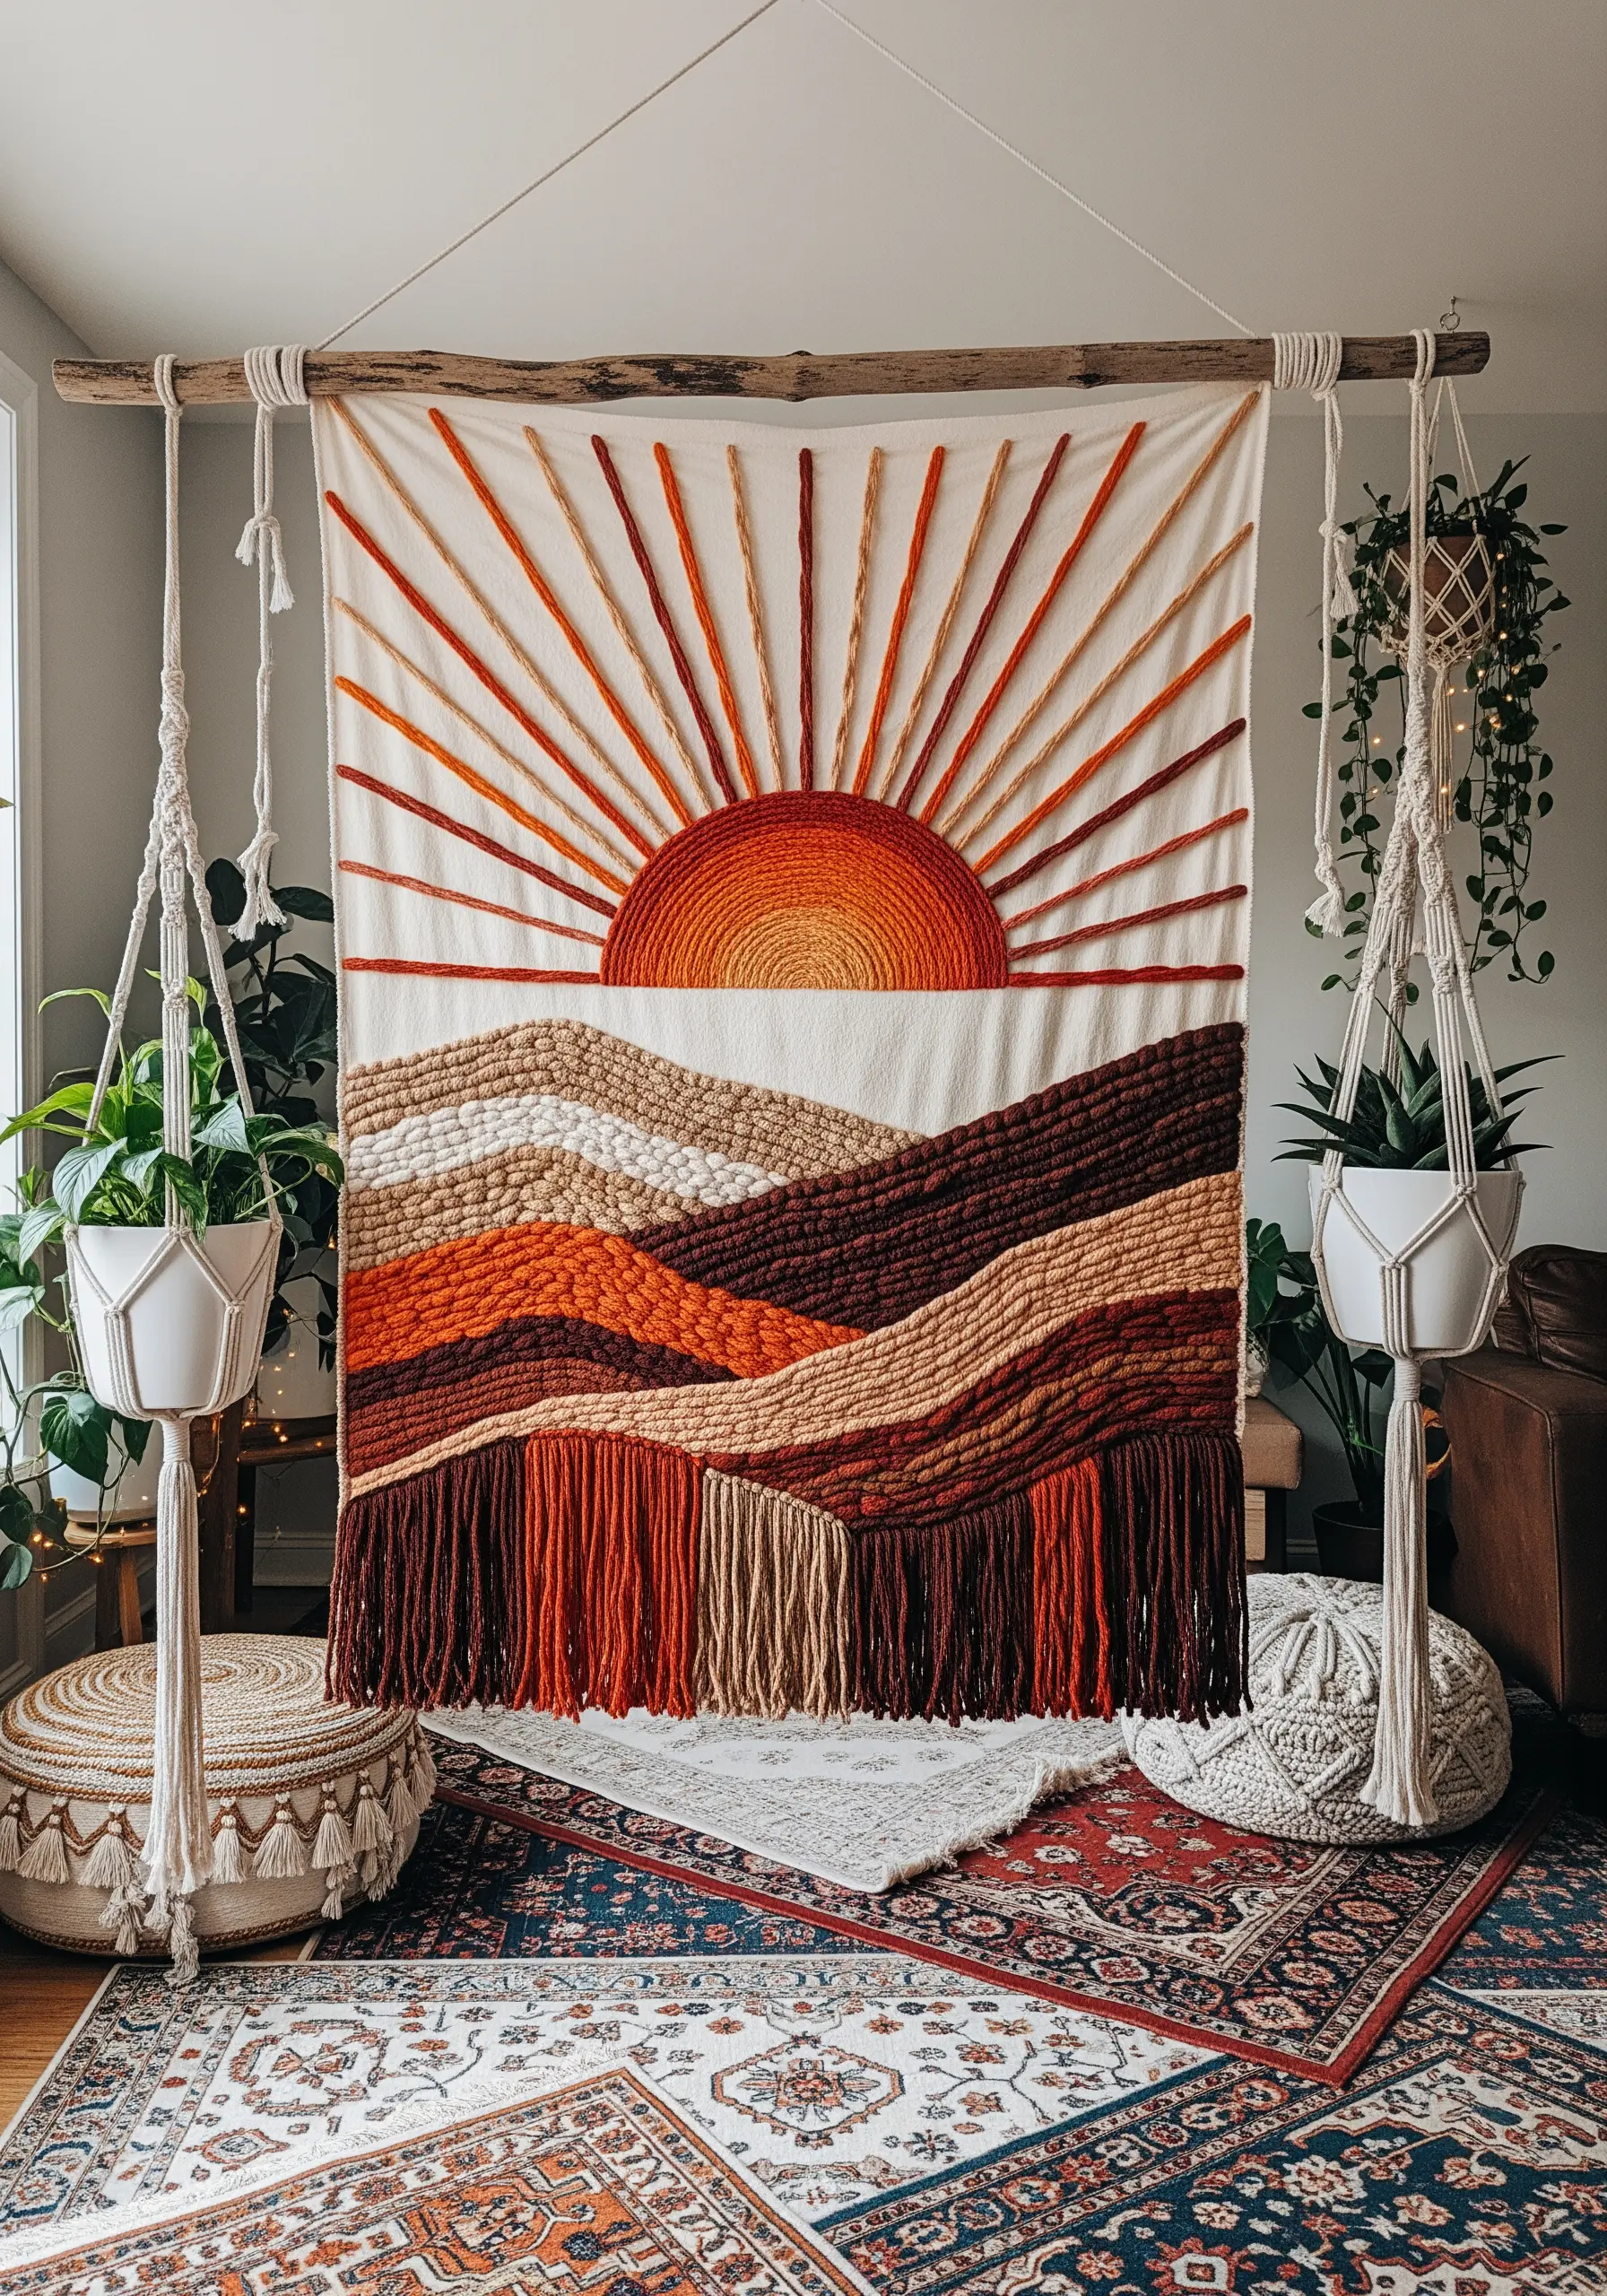
Combine embroidery with weaving techniques for a dramatic, textural statement piece.
Use a circular satin stitch for the sun, radiating outwards to create a perfect gradient.
For the landscape, use chunky yarn and a tapestry needle to create woven sections directly onto the fabric, alternating with thickly embroidered French knots and loop stitches.
Leaving a long fringe at the bottom adds weight and completes the modern-boho aesthetic of these bold yarn wall art patterns.
8. Capture Autumn with Thread Painting
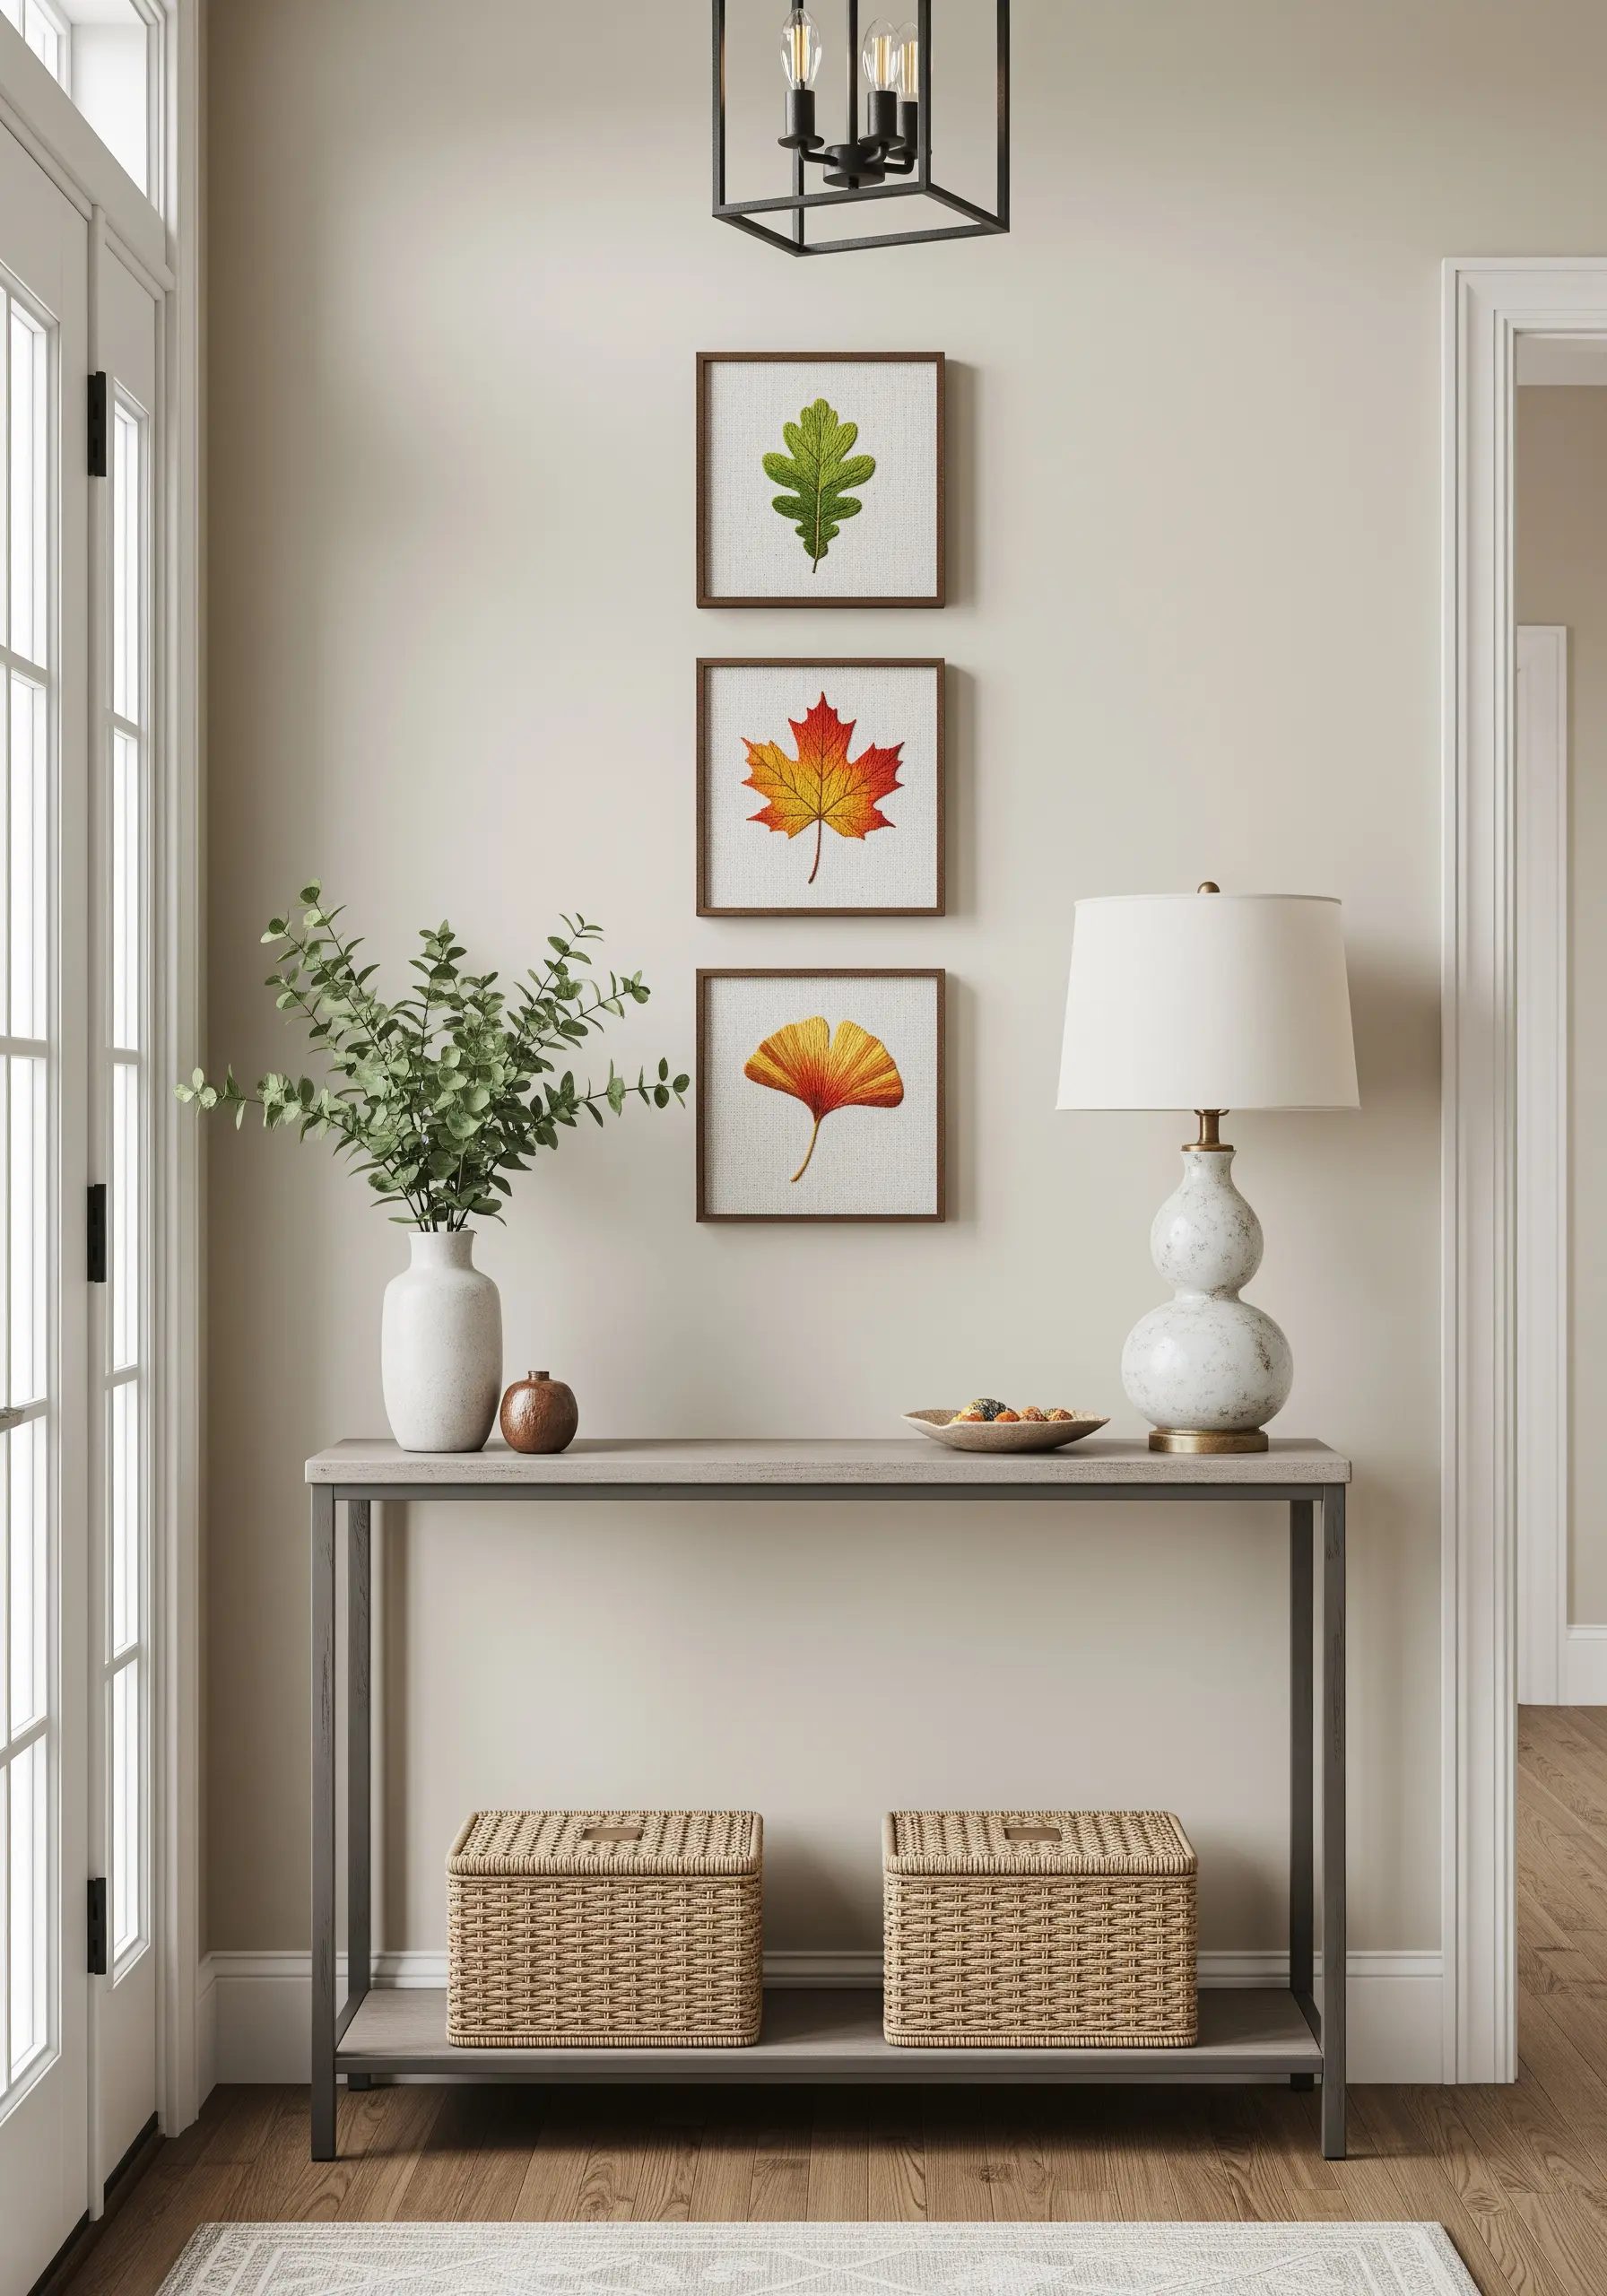
To achieve the realistic color transitions in autumn leaves, use the long-and-short stitch technique.
Start with one color at the base of the leaf, then introduce the next color by bringing your needle up through the existing stitches, blending them seamlessly.
Use just one or two strands of floss for this technique; it allows for subtle, painterly gradients that mimic nature’s artistry.
Framing them individually turns these small studies into elegant, seasonal framed embroidery pieces.
9. Define Form with Elegant Line Work

Emphasize the gnarled, ancient look of the tree trunk by using a whipped backstitch or a heavy chain stitch, which creates a thick, rope-like line.
Use a lighter thread weight for the delicate leaves—small lazy daisy stitches or single straight stitches—to contrast with the solid trunk.
The beauty of this design lies in its use of negative space; by leaving much of the fabric unstitched, you allow the tree’s form to take center stage.
10. Design a Radiant Harvest Mandala
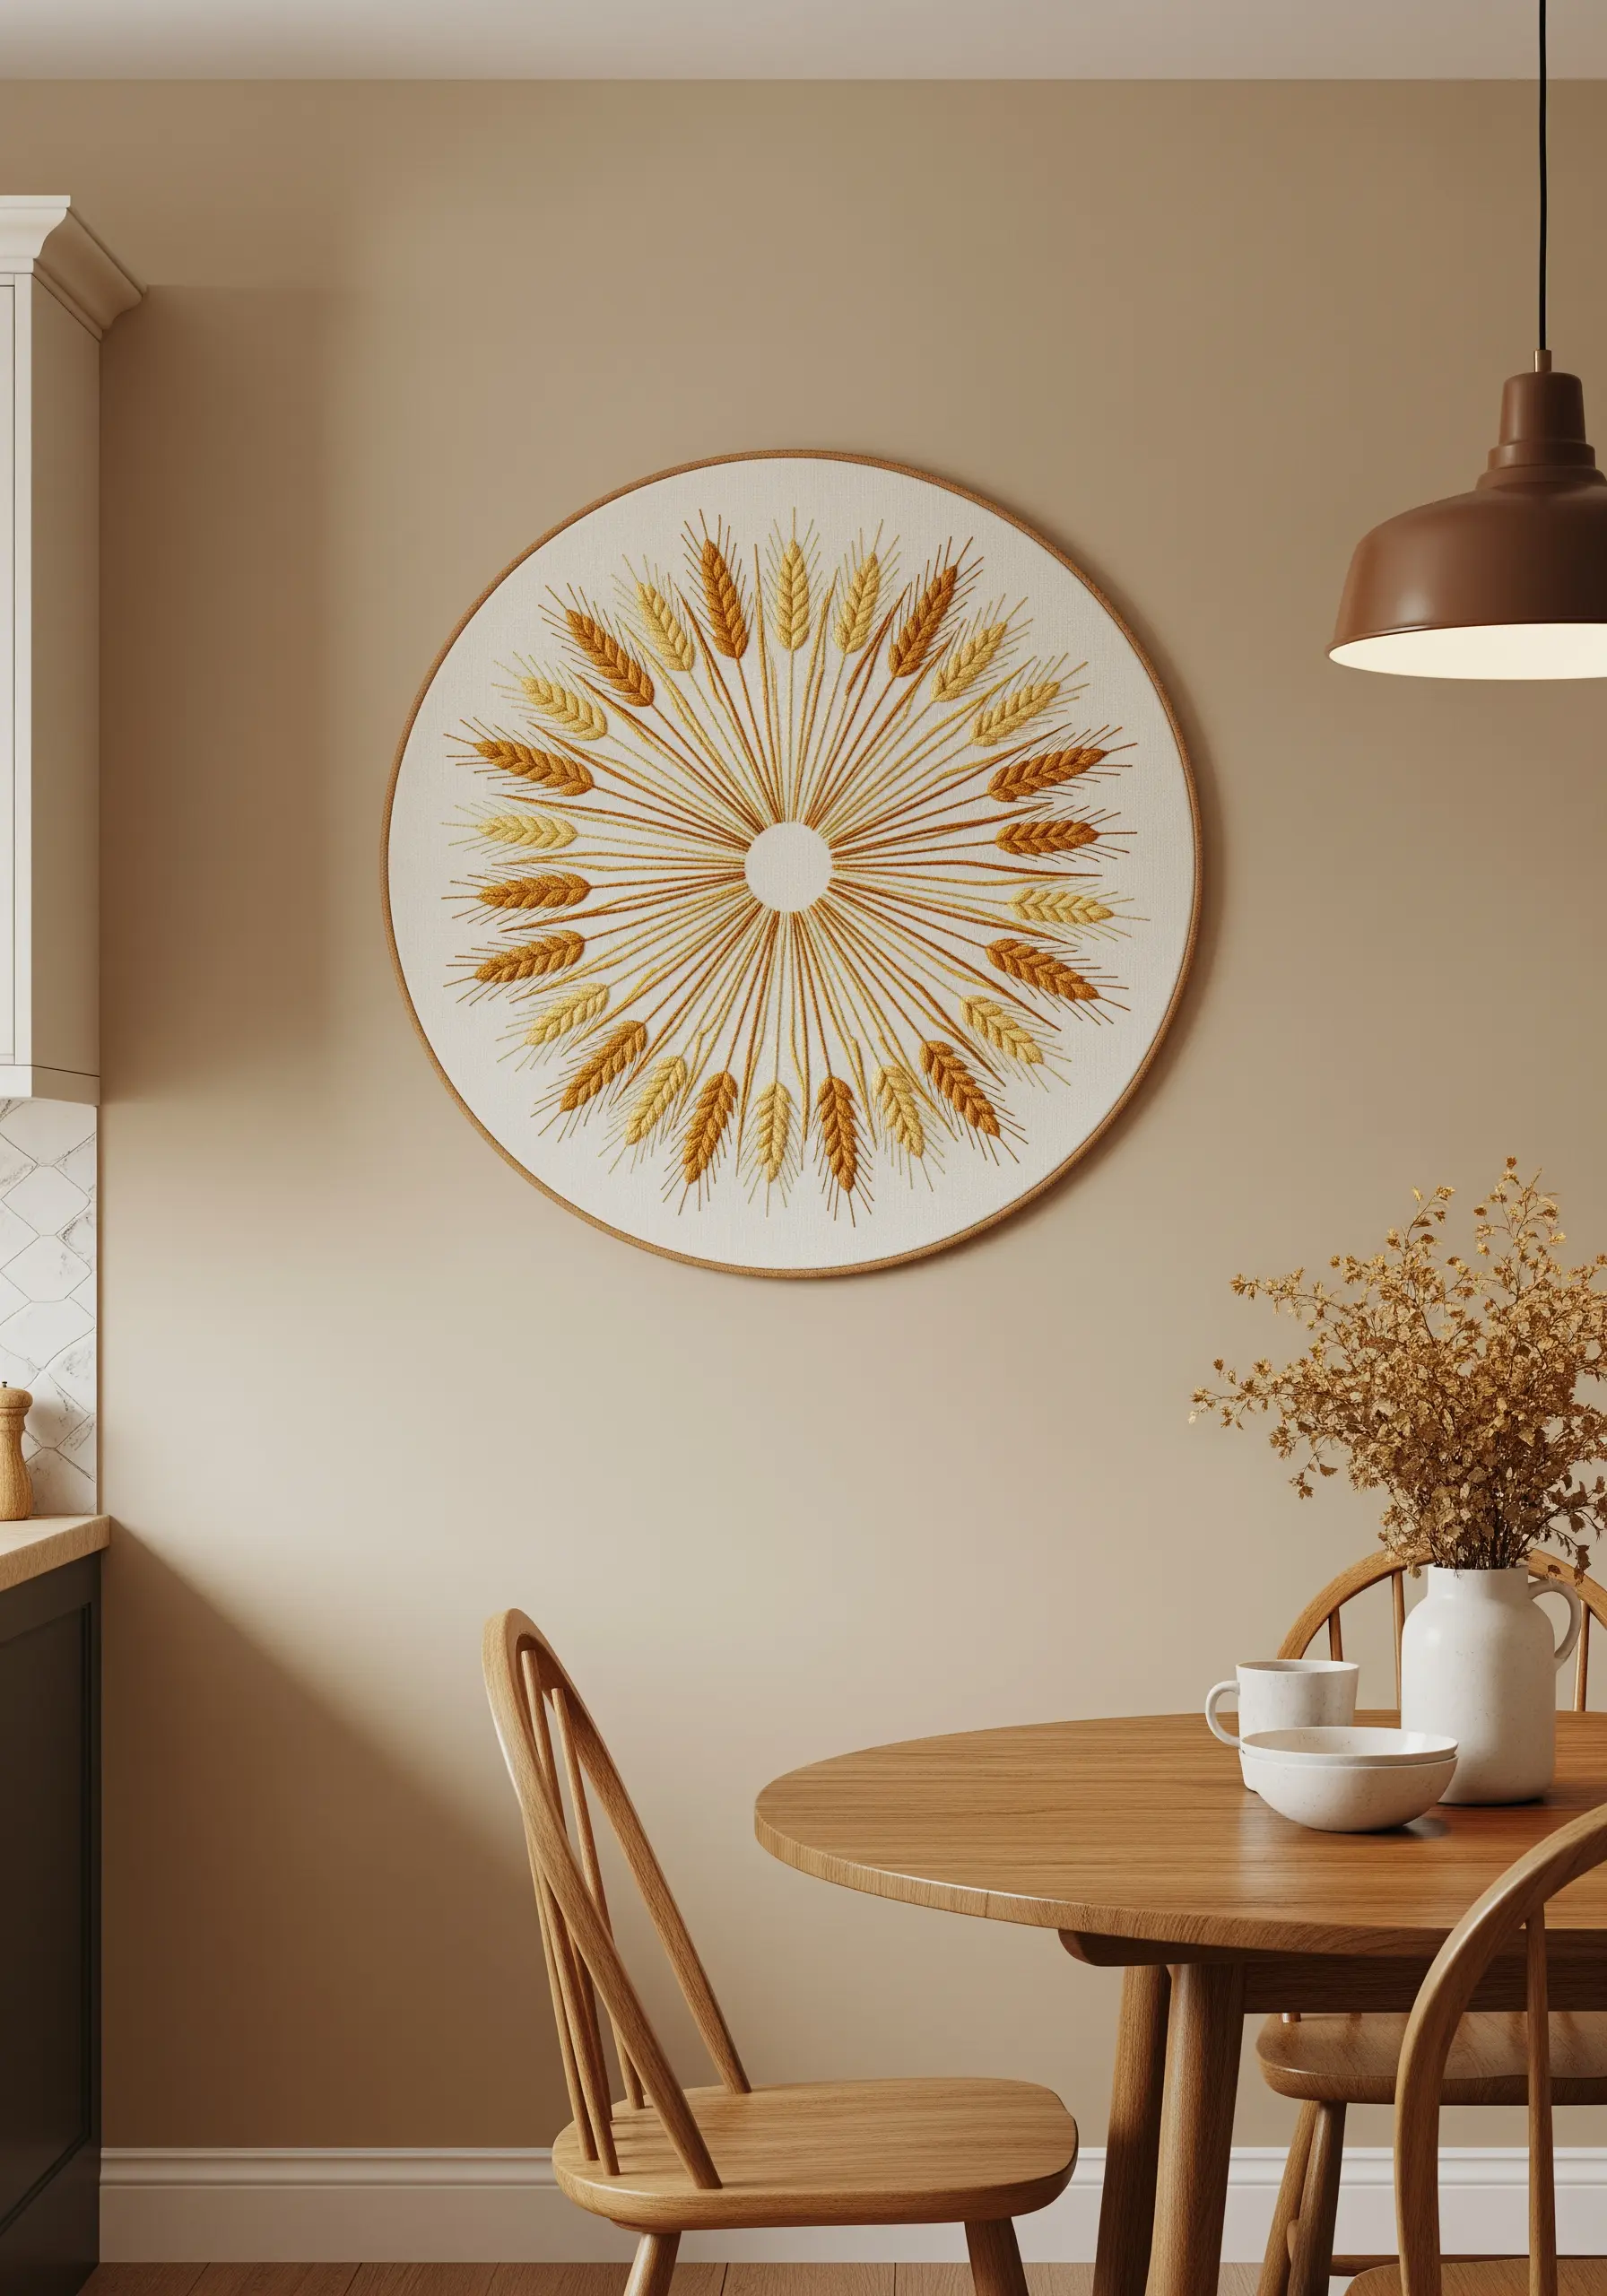
Create the foundational sunburst effect with long, taut straight stitches radiating from a central point.
To give the wheat kernels a plump, dimensional look, use the granitos stitch or a padded fishbone stitch, alternating between golden yellow and warm brown threads.
This design’s power comes from its radial symmetry, so take care to space your elements evenly for a balanced and harmonious composition.
It’s a perfect example of how minimal geometry stitch projects can feel both modern and organic.
11. Explore Nature’s Textures in Monochrome
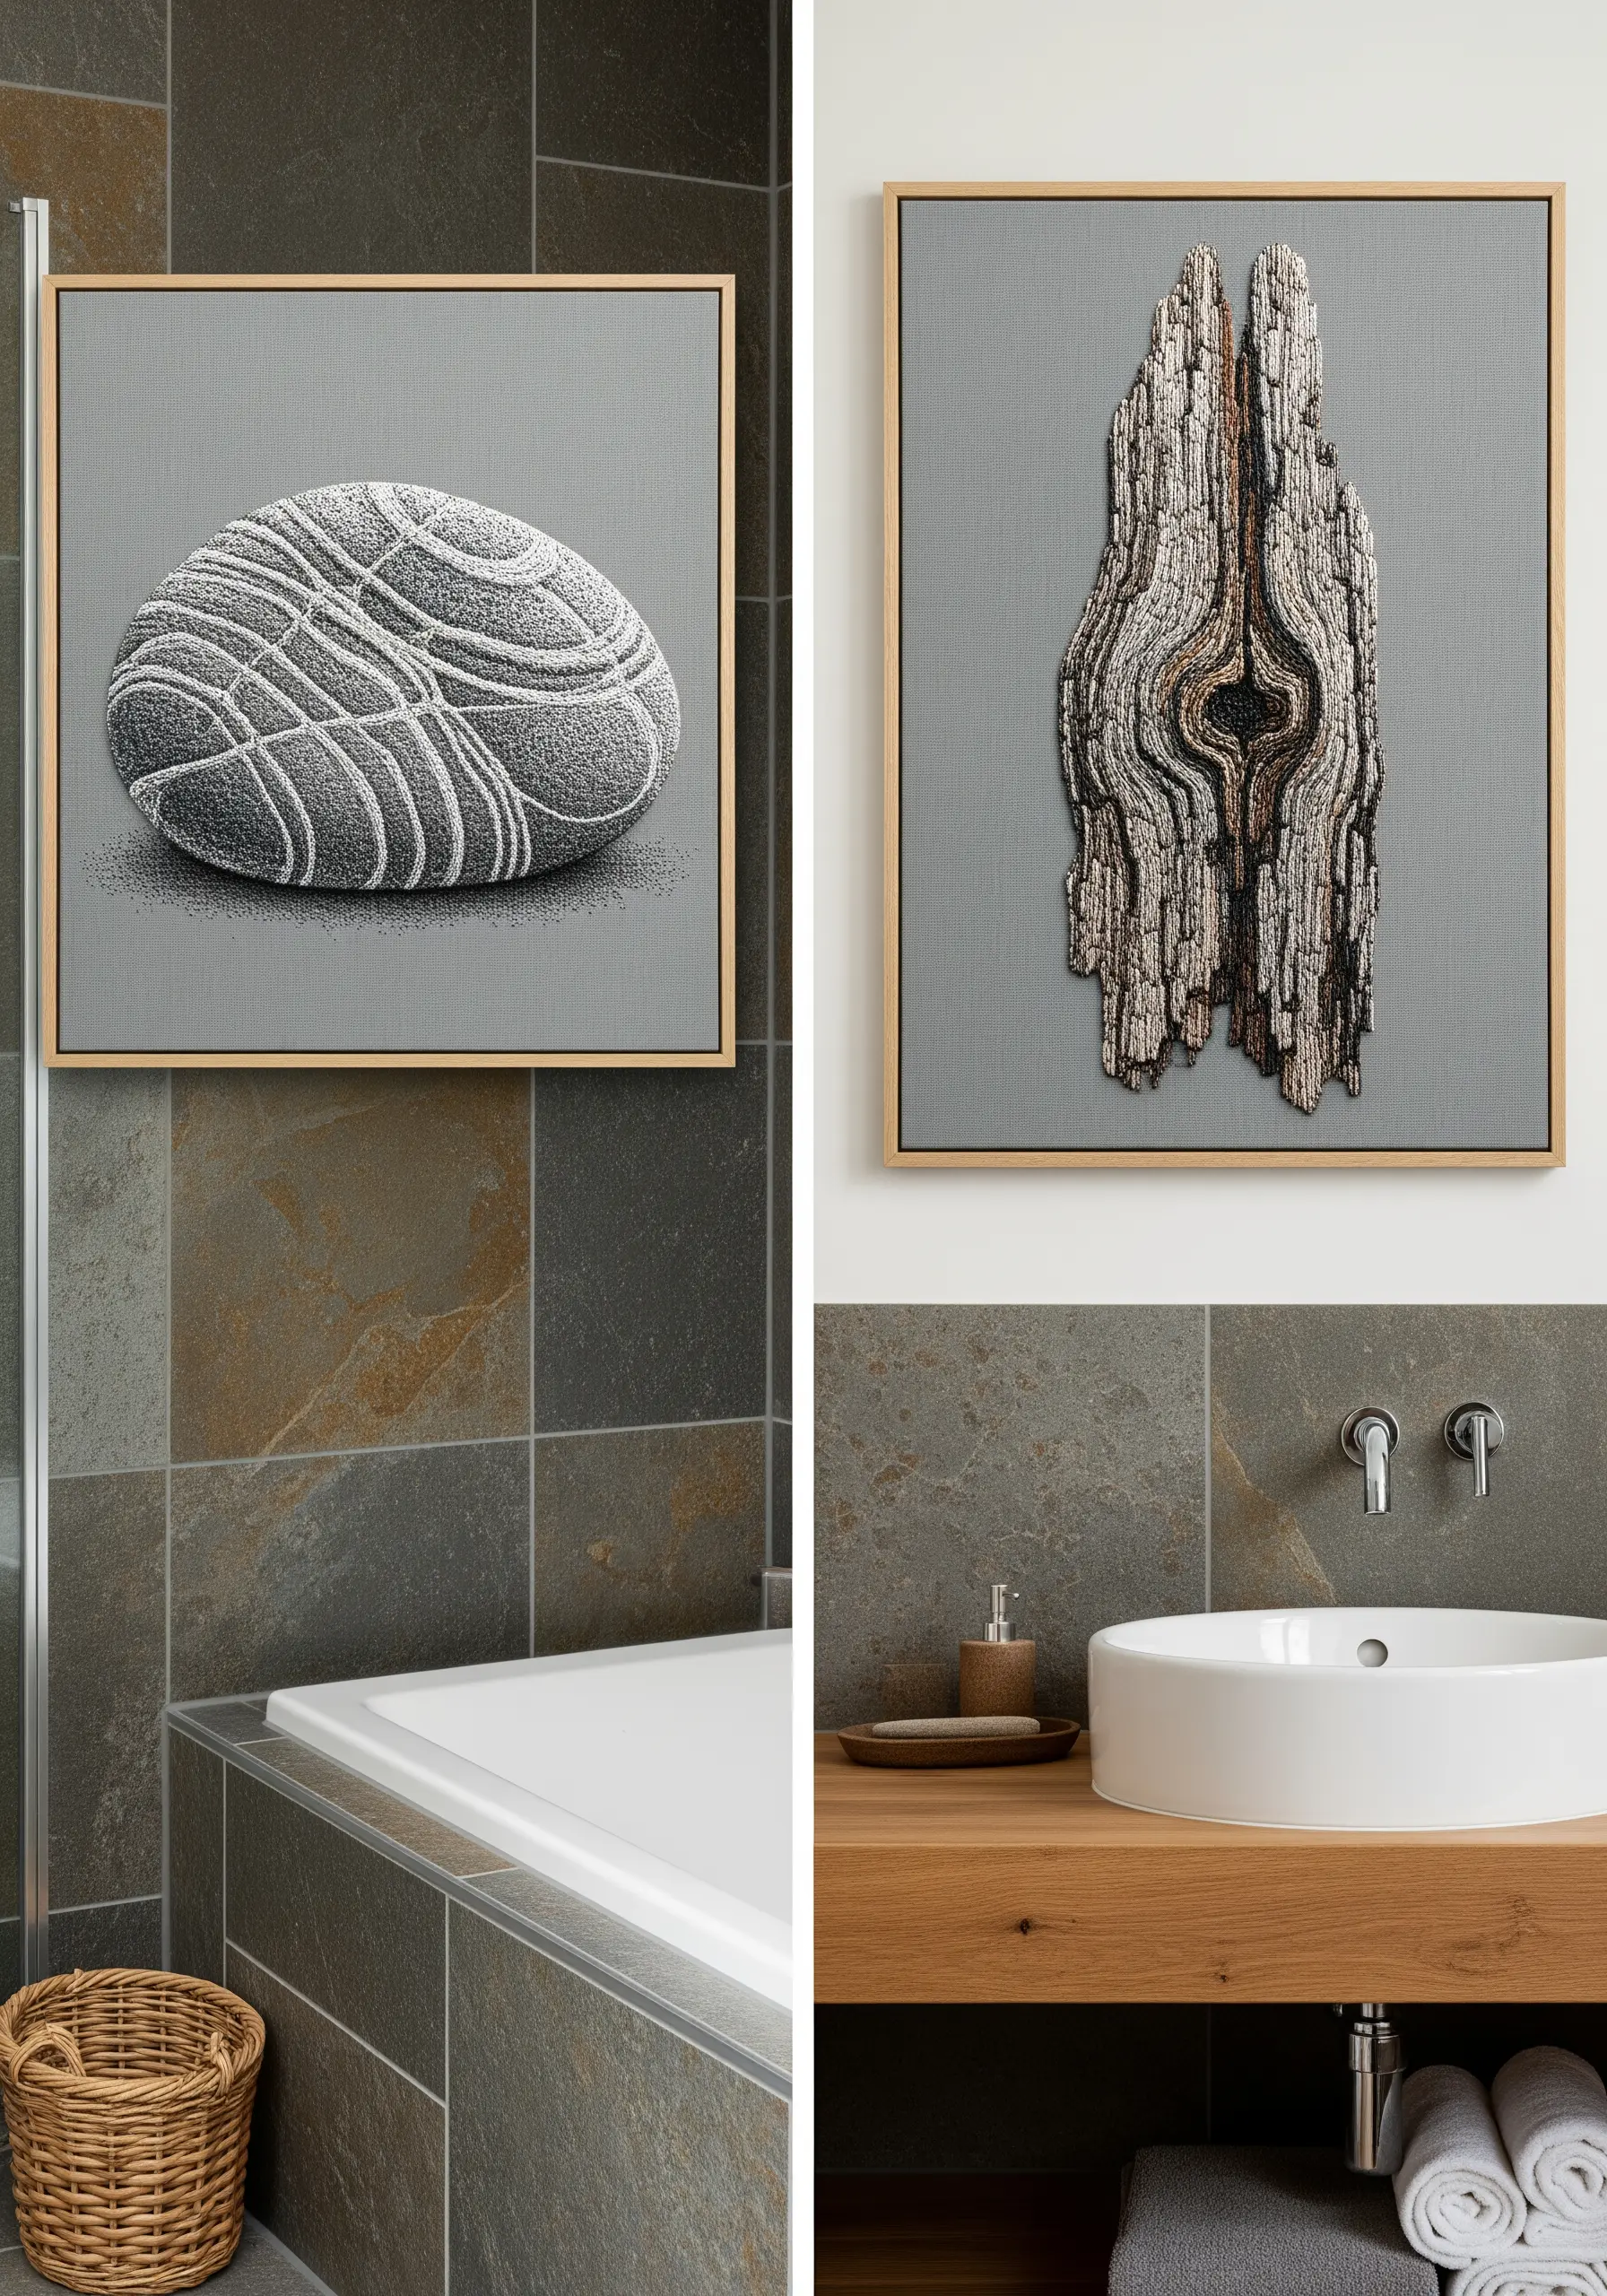
Capture the smooth contours of a river stone by using dense, flowing lines of split stitch or single-strand backstitch that wrap around the form.
To recreate the rough, complex texture of tree bark, build up layers of French knots, straight stitches, and couched threads in varying shades of grey, brown, and black.
By stitching these on a neutral grey fabric, you allow the textural details—not color—to be the primary focus of these organic texture embroidery ideas.
12. Craft a Tactile Felt Appliqué Mural
For a child’s room, prioritize soft textures and simple shapes by using felt appliqué.
Cut your shapes from different colored felt sheets and attach them to a base fabric using a simple blanket stitch around the edges for a clean, handmade finish.
Add small embroidered details—like the fox’s eyes or mushroom spots—with a few simple straight stitches or French knots.
Nursery stitch art wall ideas like this are wonderfully tactile and visually gentle.
13. Integrate Hoop Art into a Gallery Wall
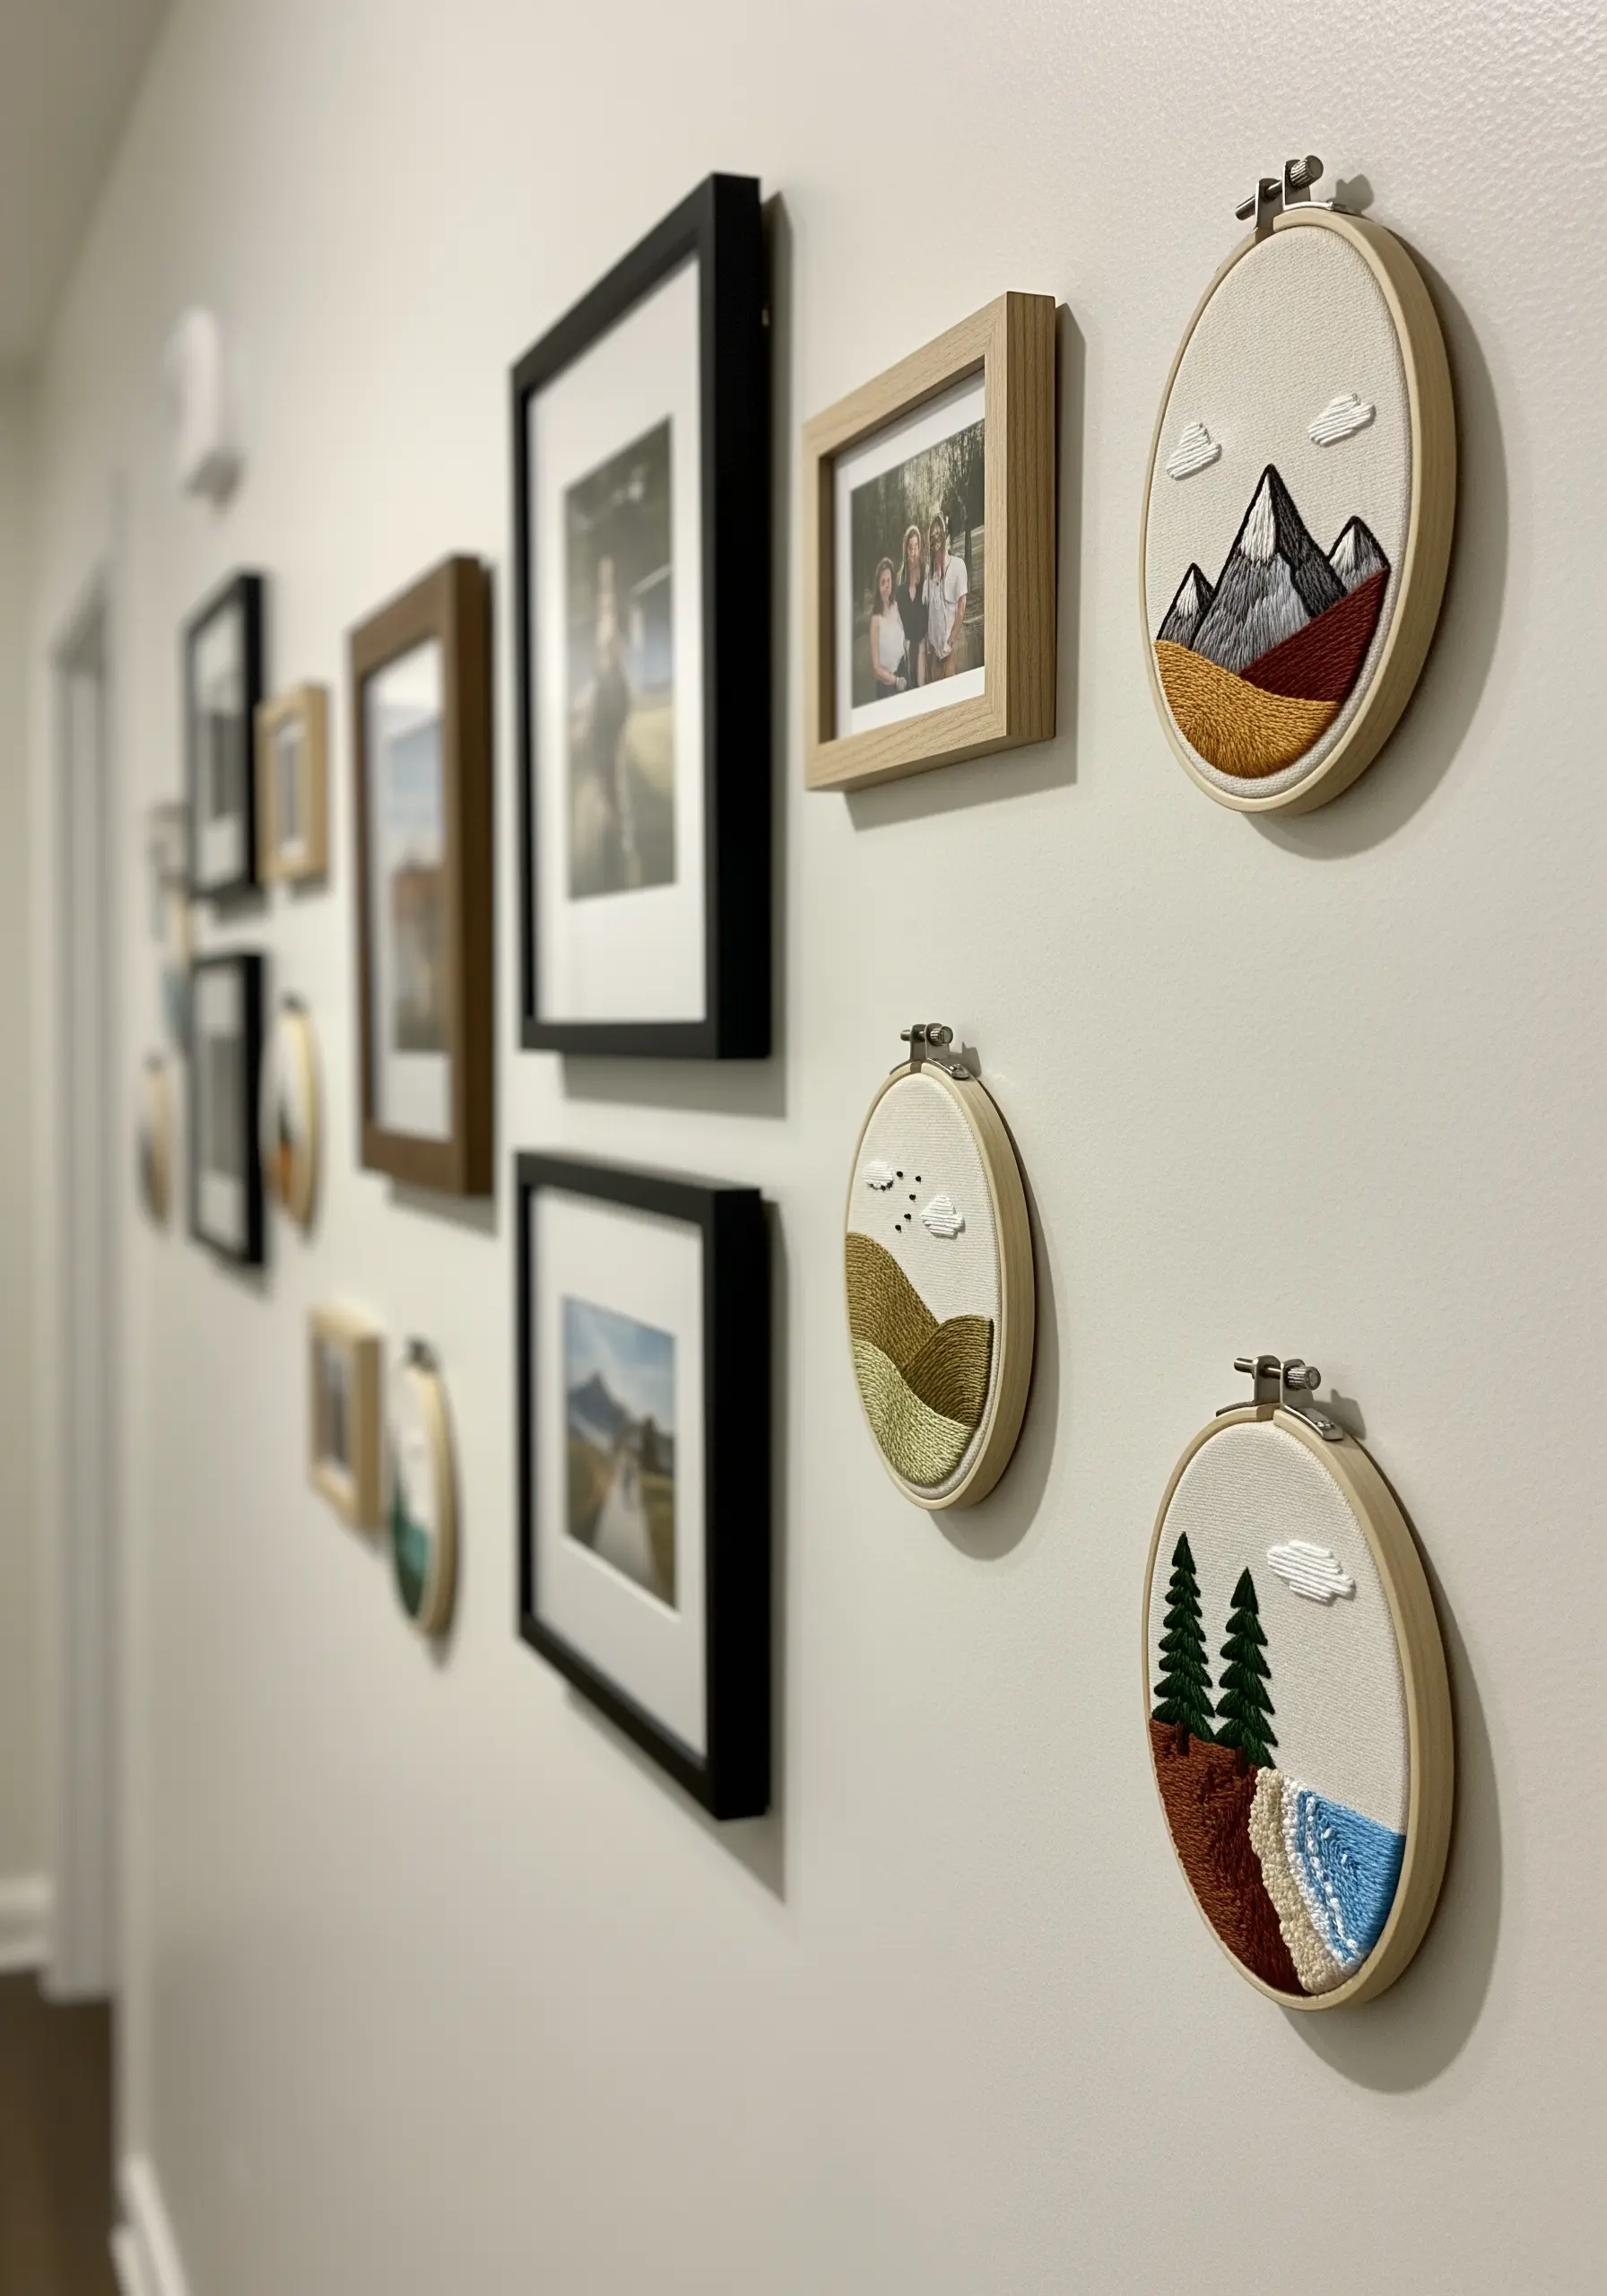
To make your embroidery feel at home next to framed photographs, choose a complementary color palette drawn from the photos themselves.
Keep your embroidered motifs simple and graphic—like these minimalist landscapes—so they act as textural accents rather than overwhelming the display.
Varying the size of your hoops adds rhythm and interest, preventing the gallery wall from feeling too static.
This is a beautiful way to personalize your walls and blend your craft with family memories.
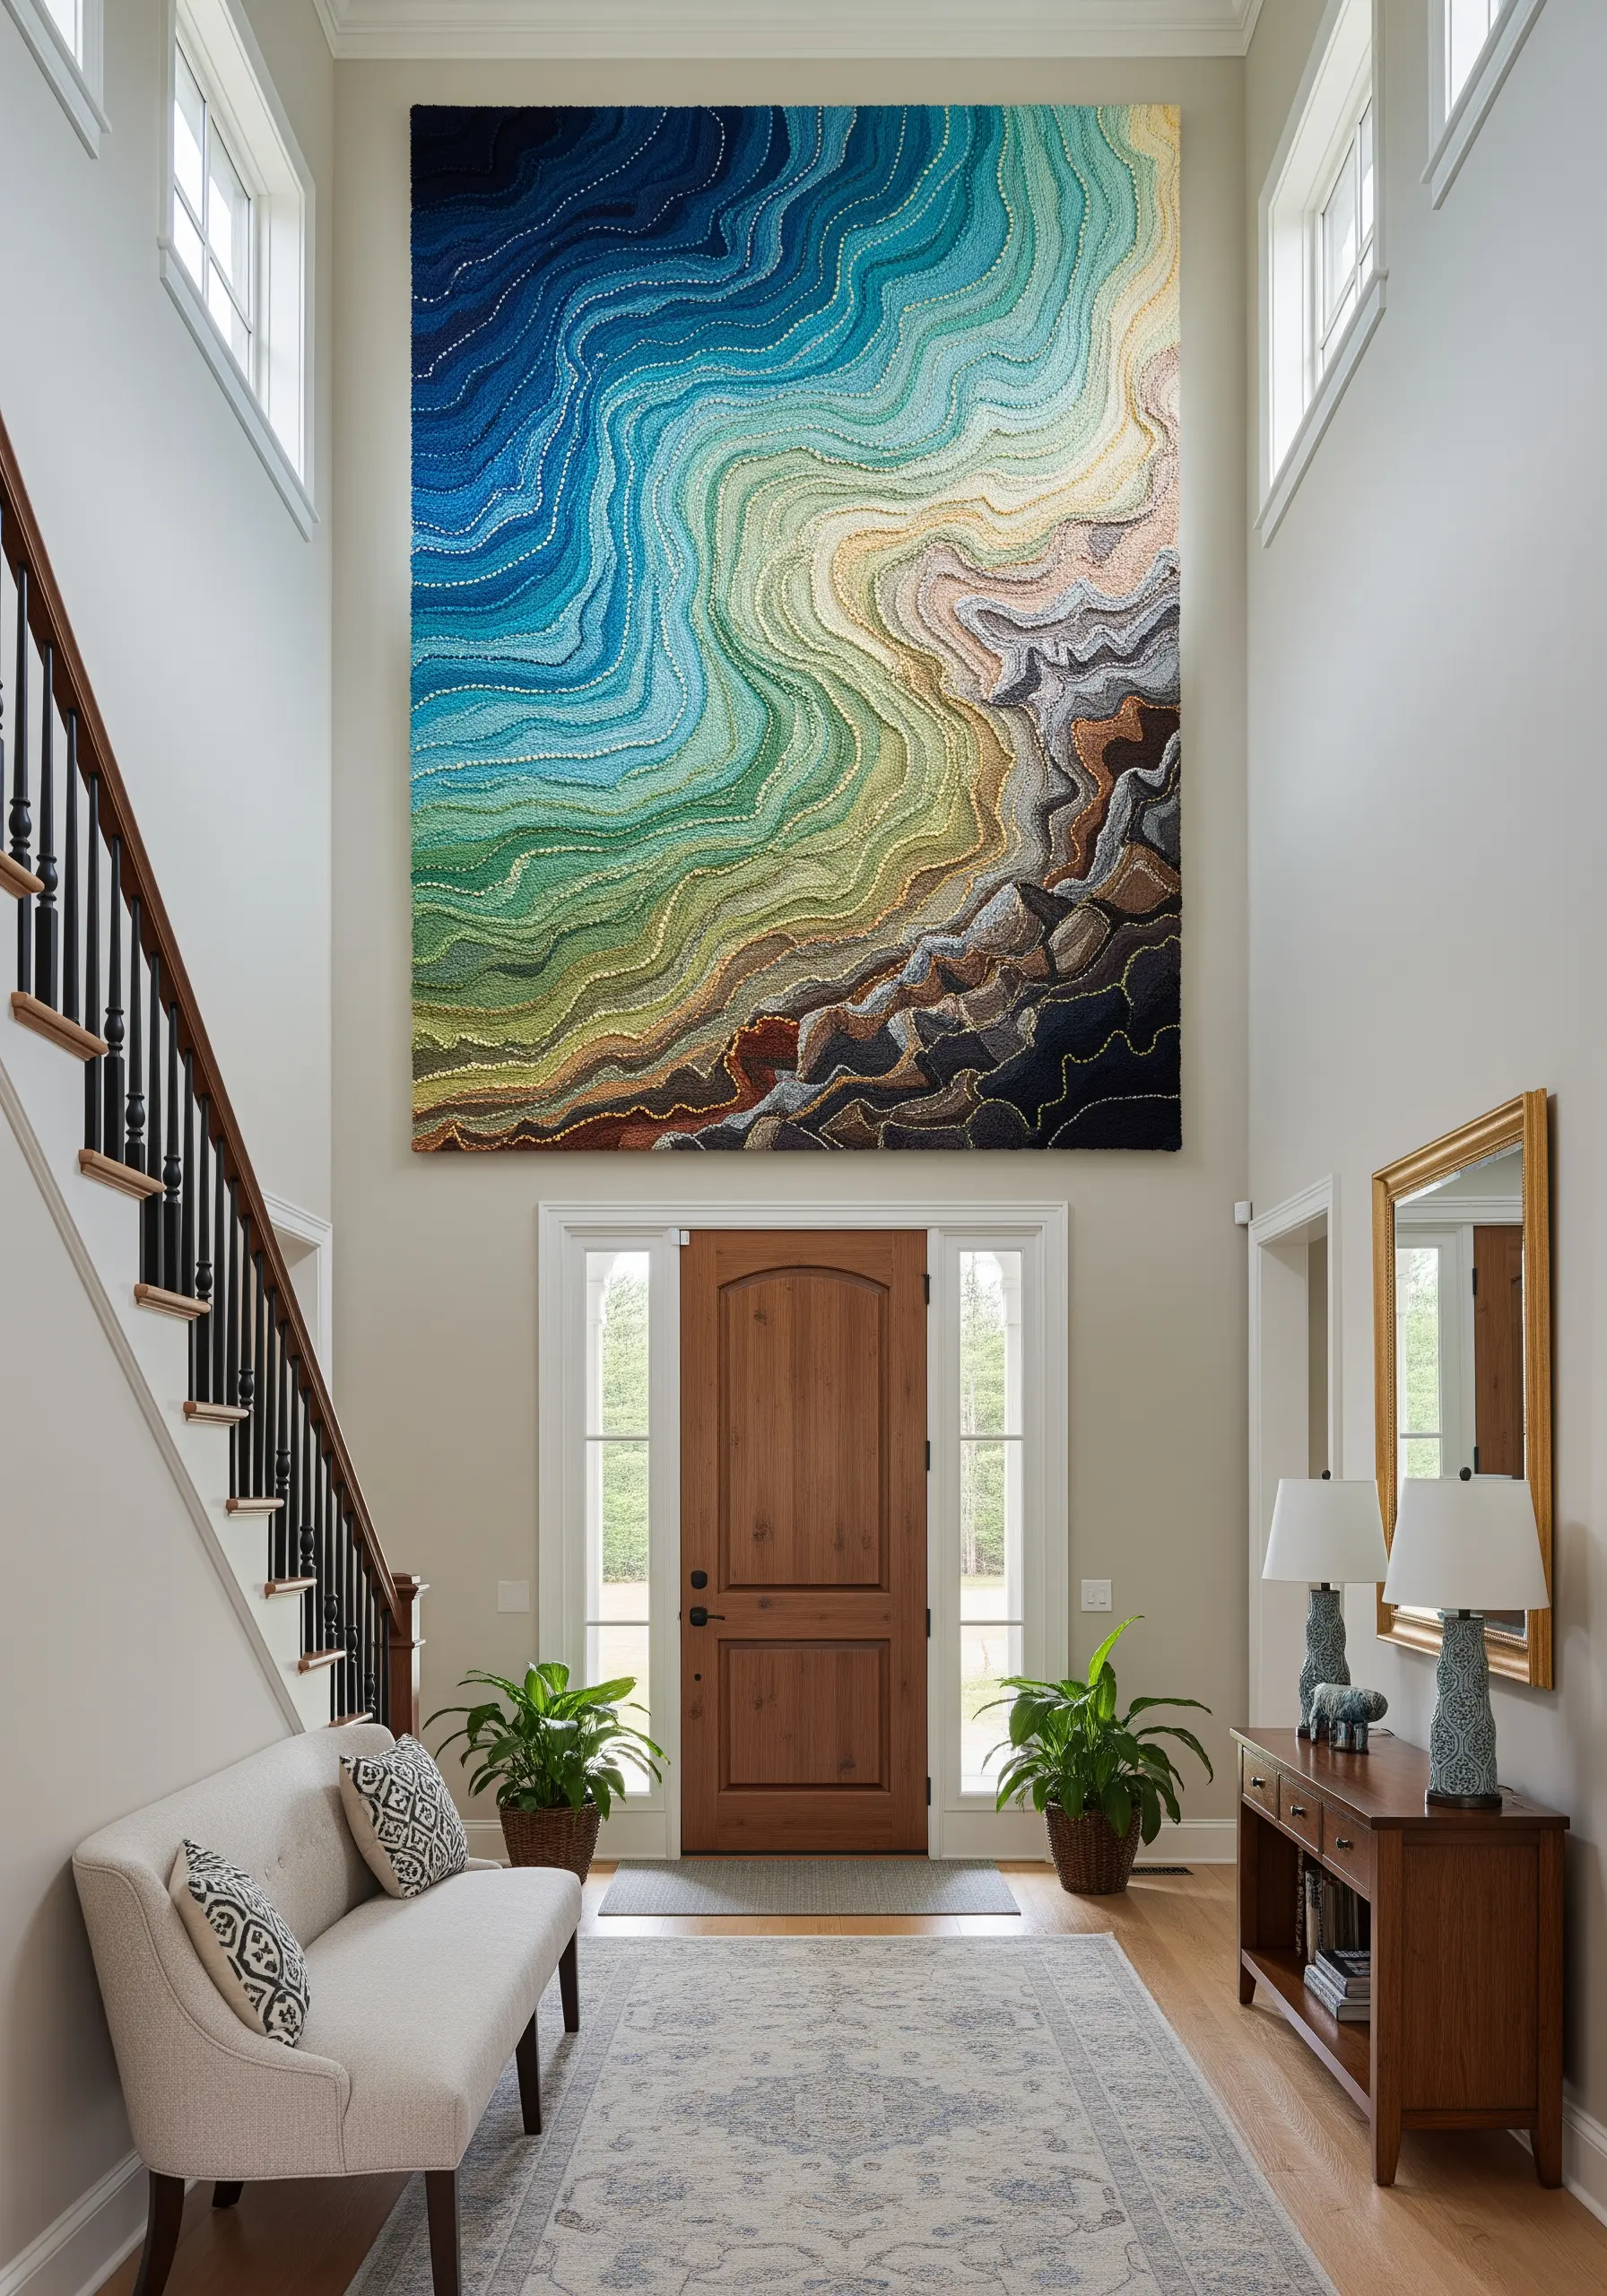
14. Build an Abstract Topographical Tapestry
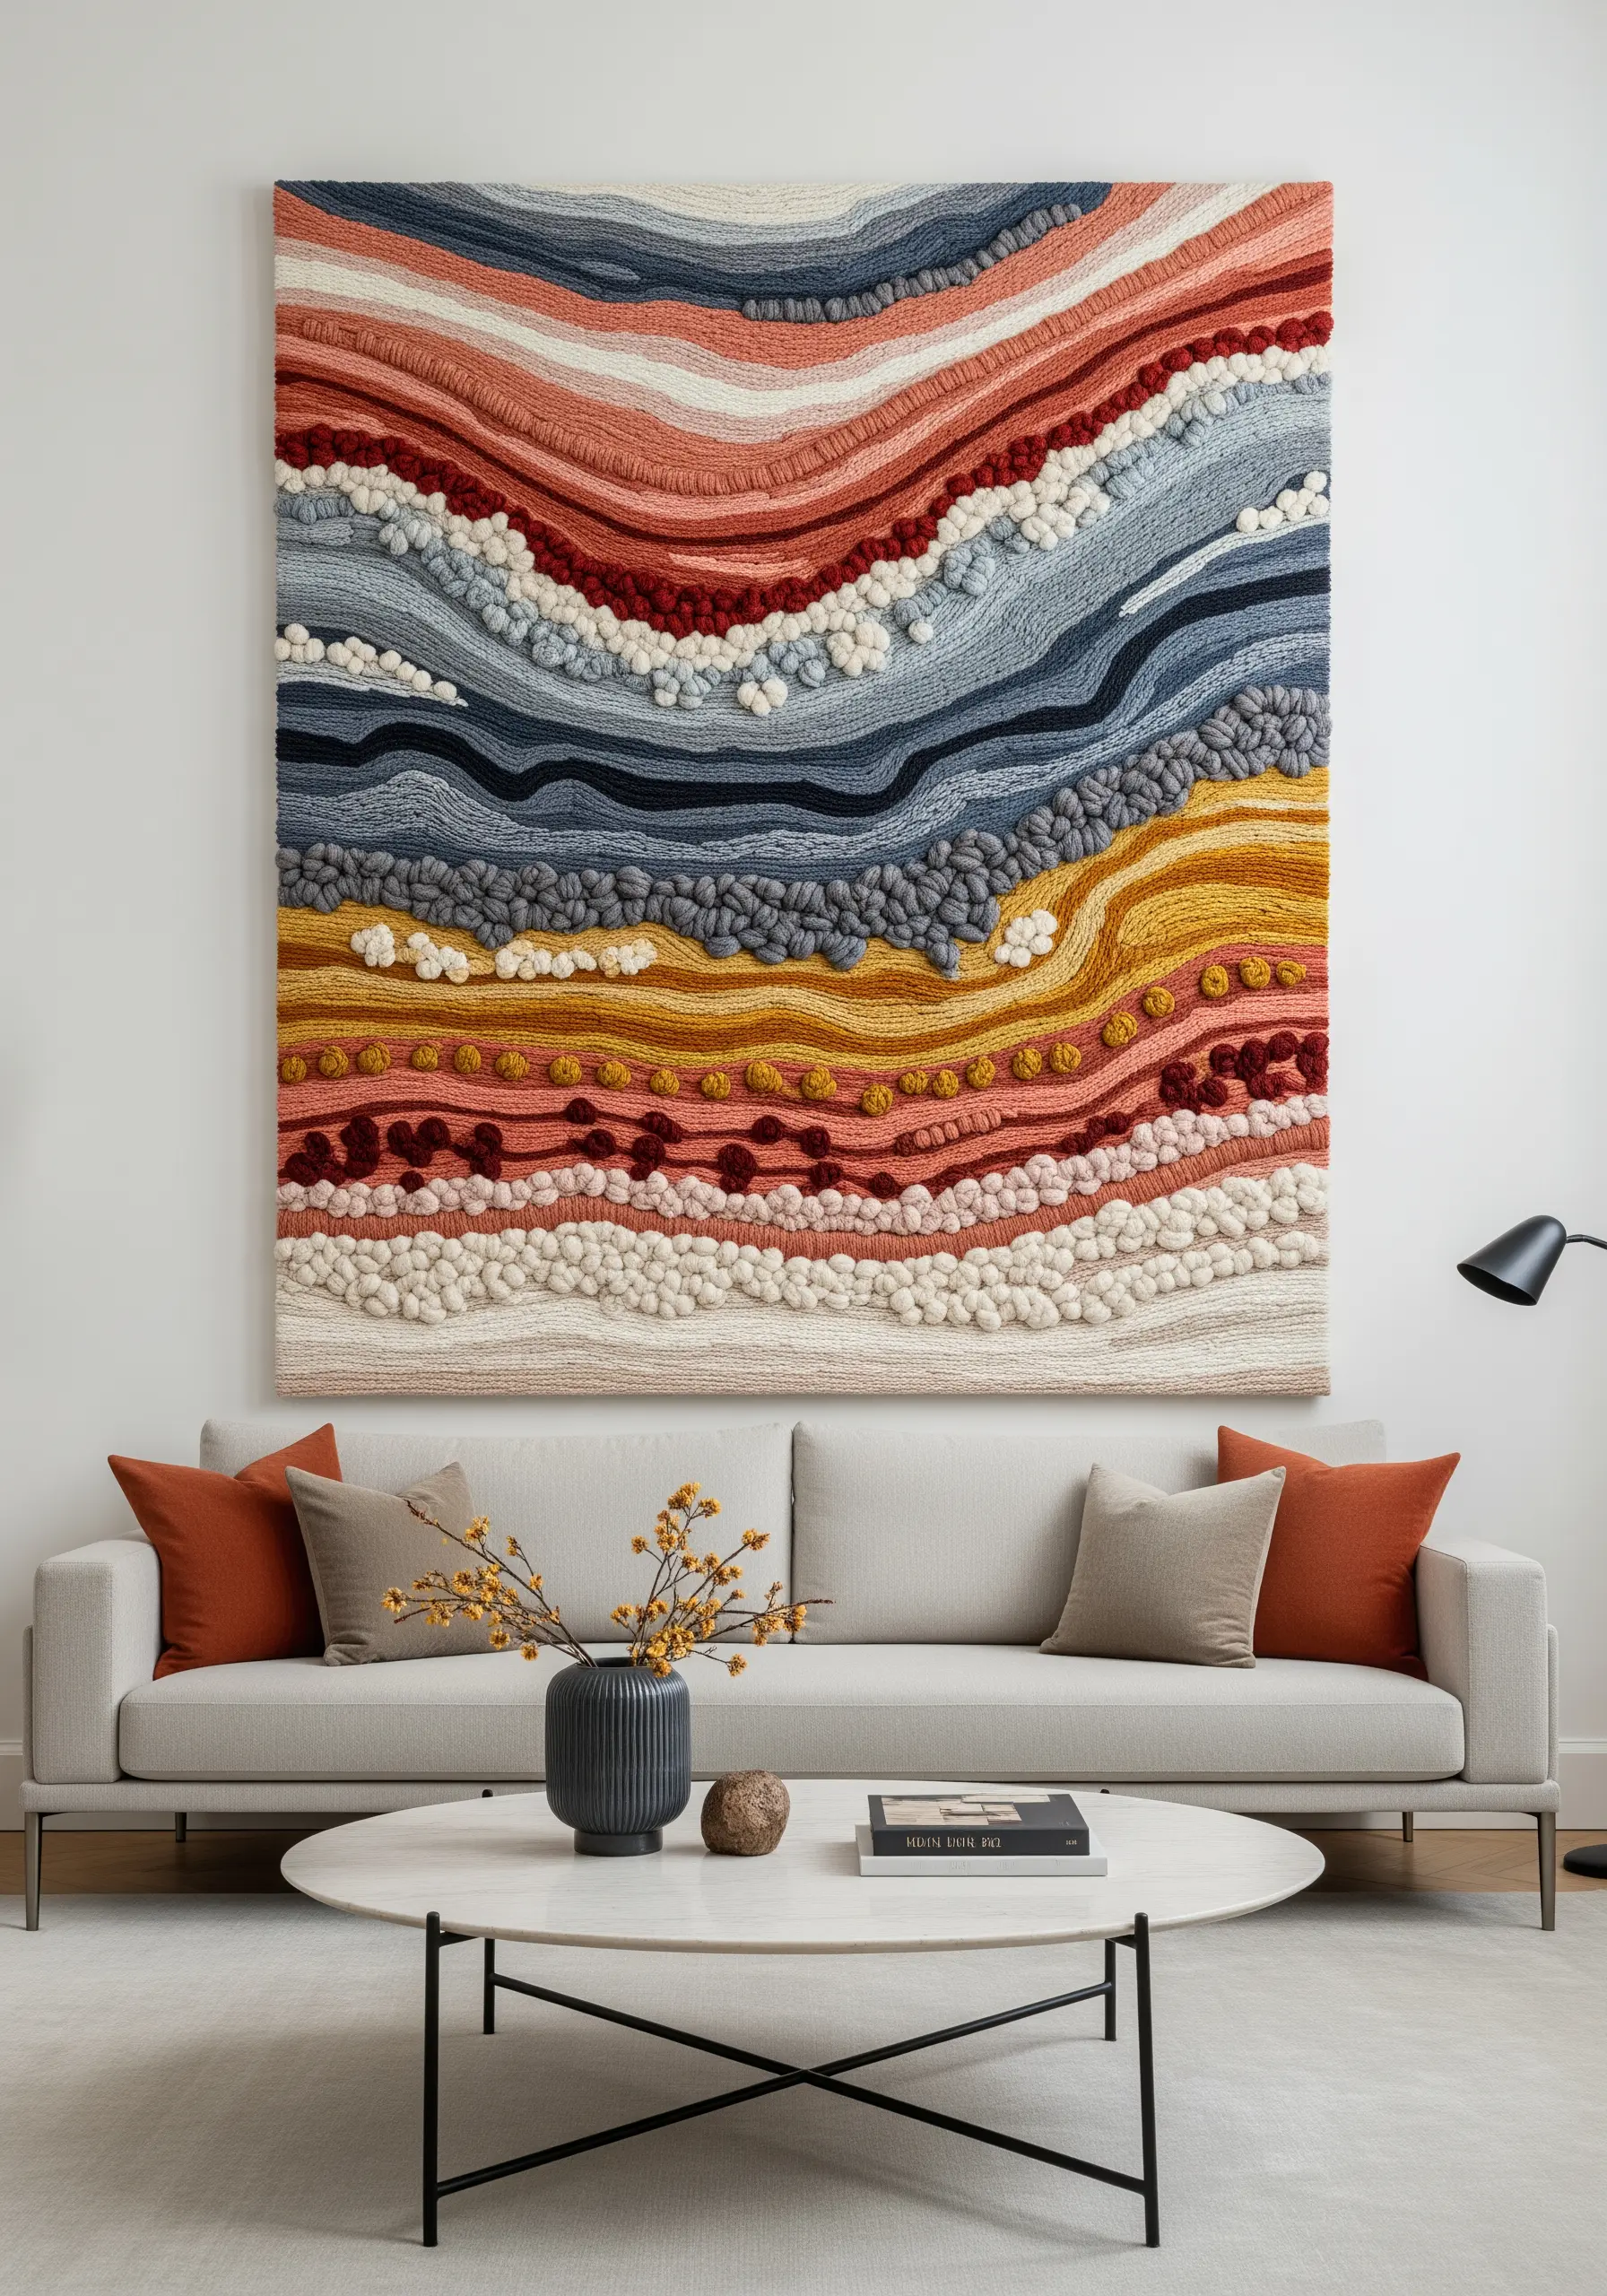
Create geological layers by combining different yarn weights and textural stitches.
Use thick, chunky yarn and a punch needle for the heavily textured areas, and standard six-strand floss for smoother, flatter sections.
Incorporate dense clusters of French knots and bullion knots to represent varied terrain, adding pockets of high-relief detail.
This large-scale approach to fiber art turns an abstract concept into a powerful, tactile statement piece for your wall.
15. Stitch a Meadow on Sheer Fabric
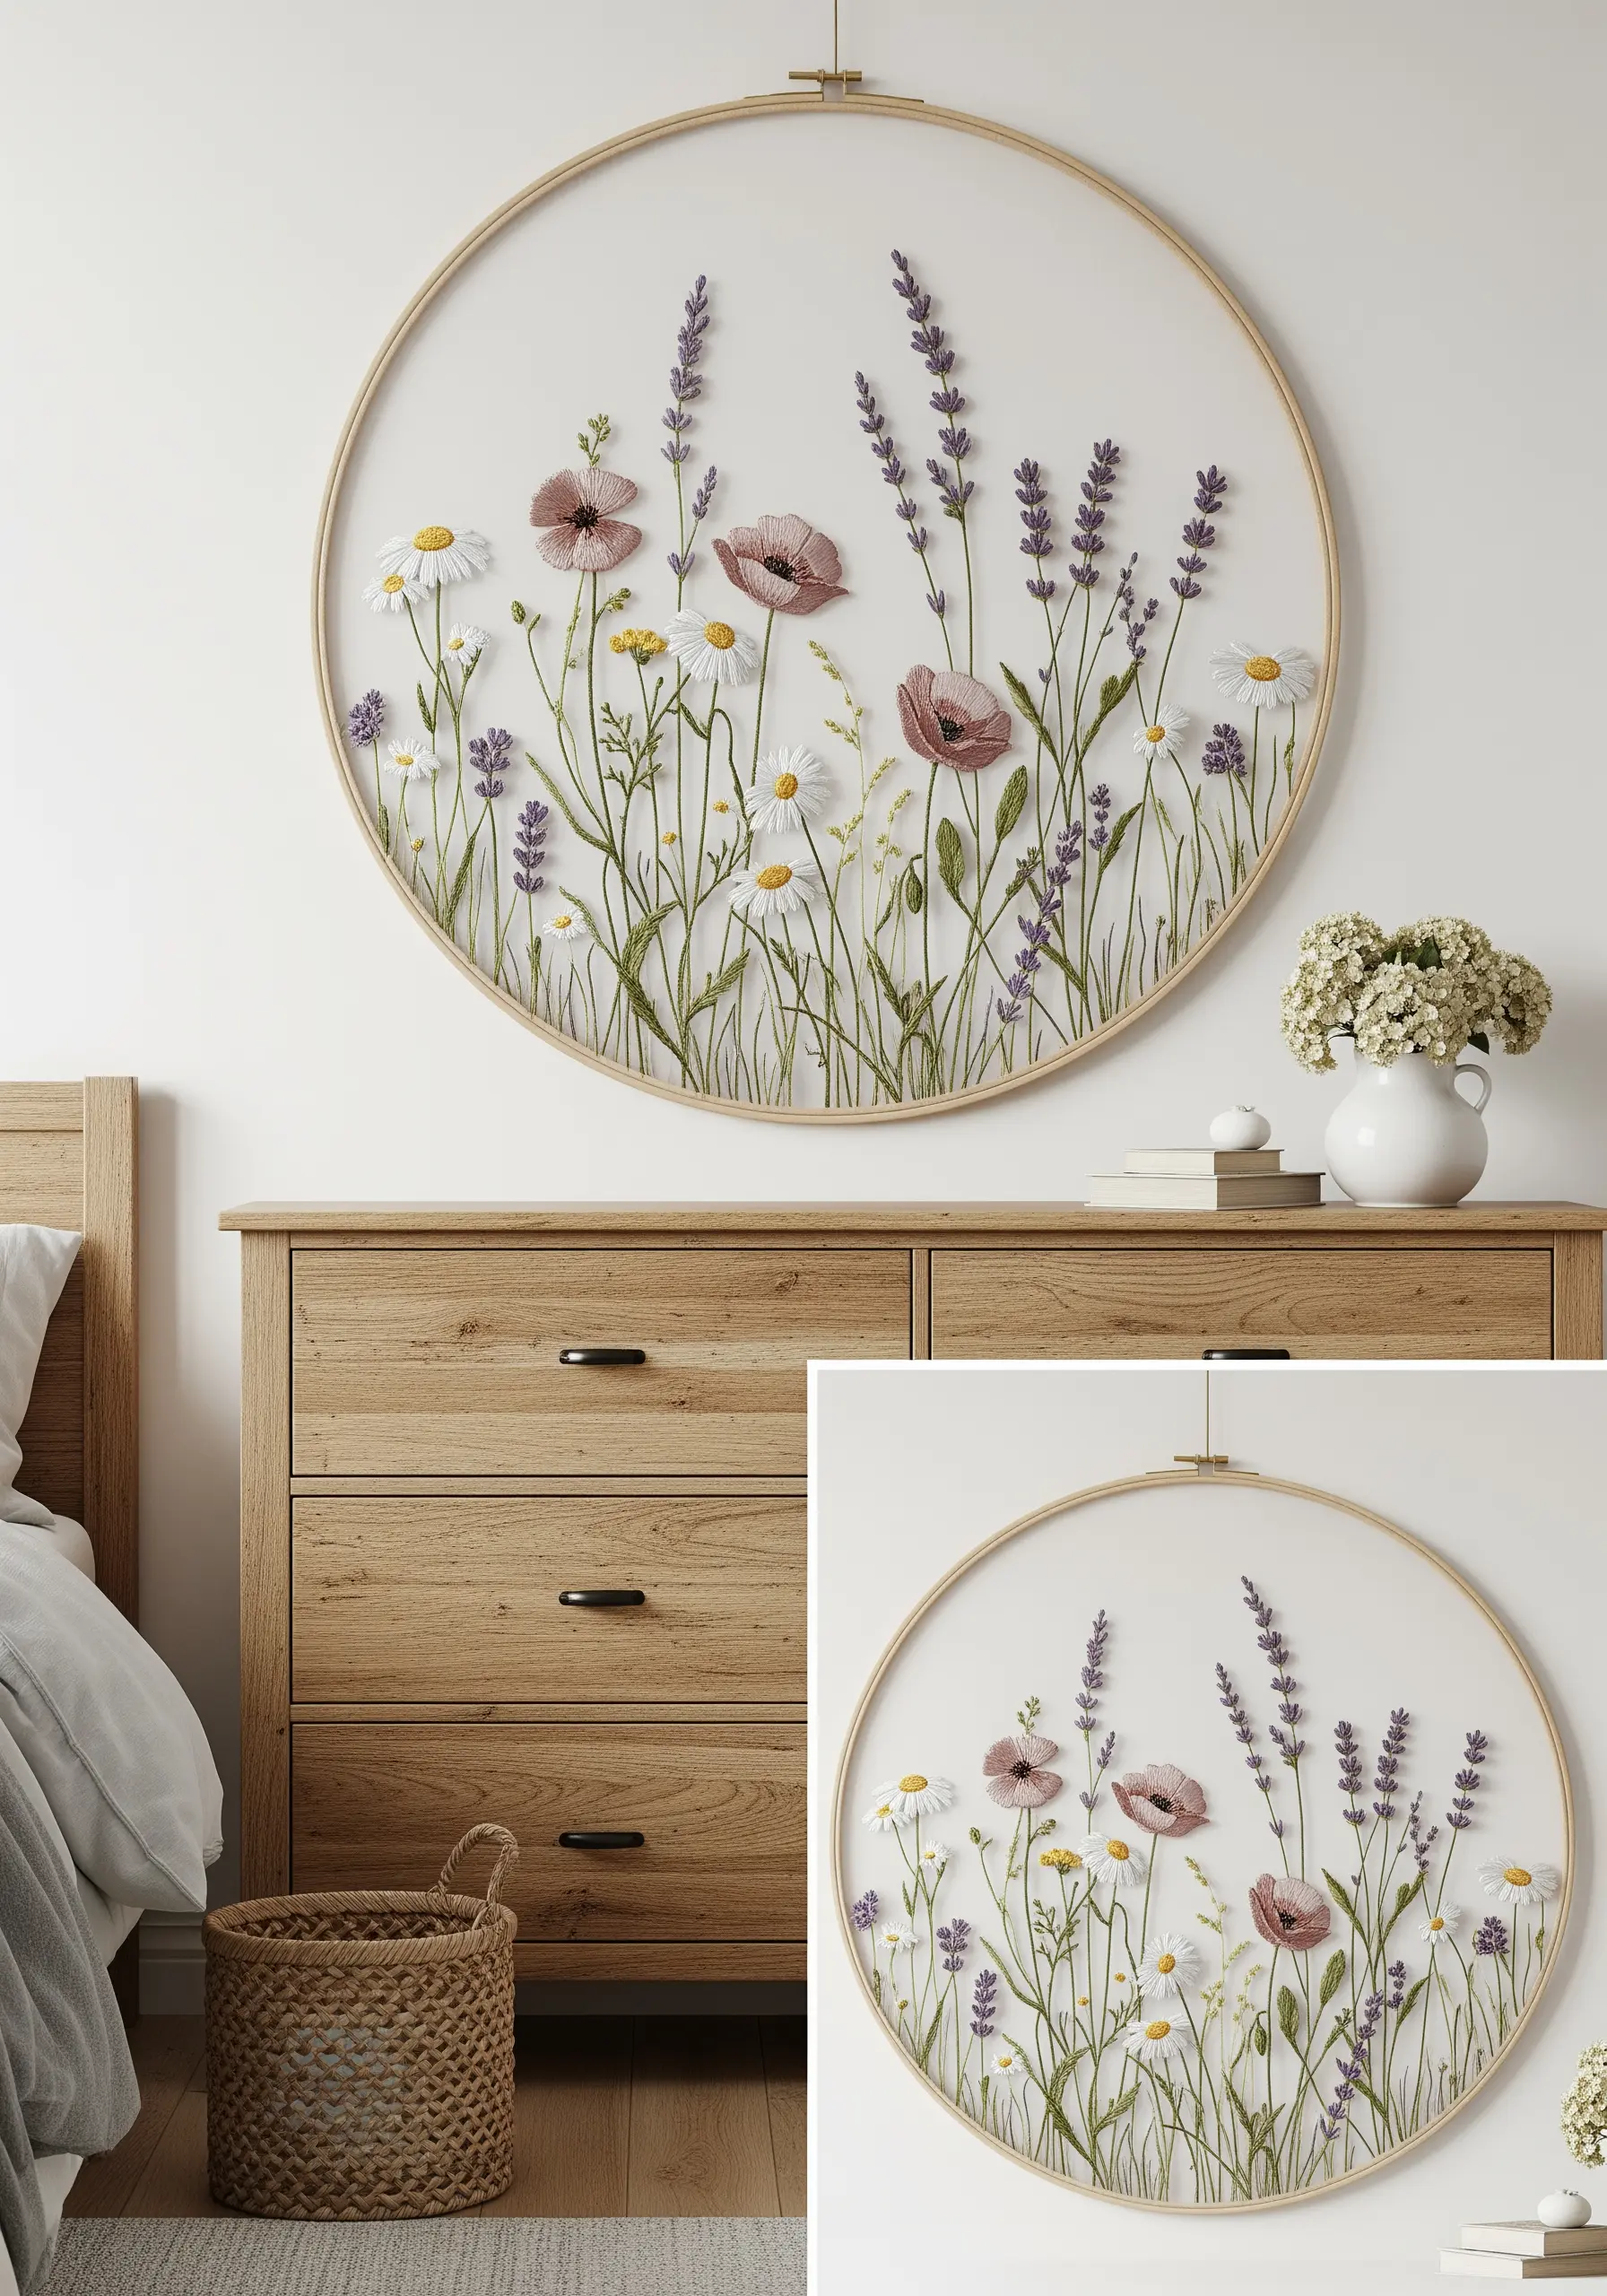
Achieve an ethereal, floating effect by embroidering directly onto a sheer fabric like tulle or organza stretched in a hoop.
To prevent puckering, use a lightweight tear-away or water-soluble stabilizer on the back while you stitch, then remove it once you’re finished.
Use delicate stitches like lazy daisy for petals and stem stitch for stems, as heavy stitches can tear the delicate fabric.
These wildflower hoop art projects look stunning when hung in a window where light can filter through.
16. Create an Heirloom Tree Portrait
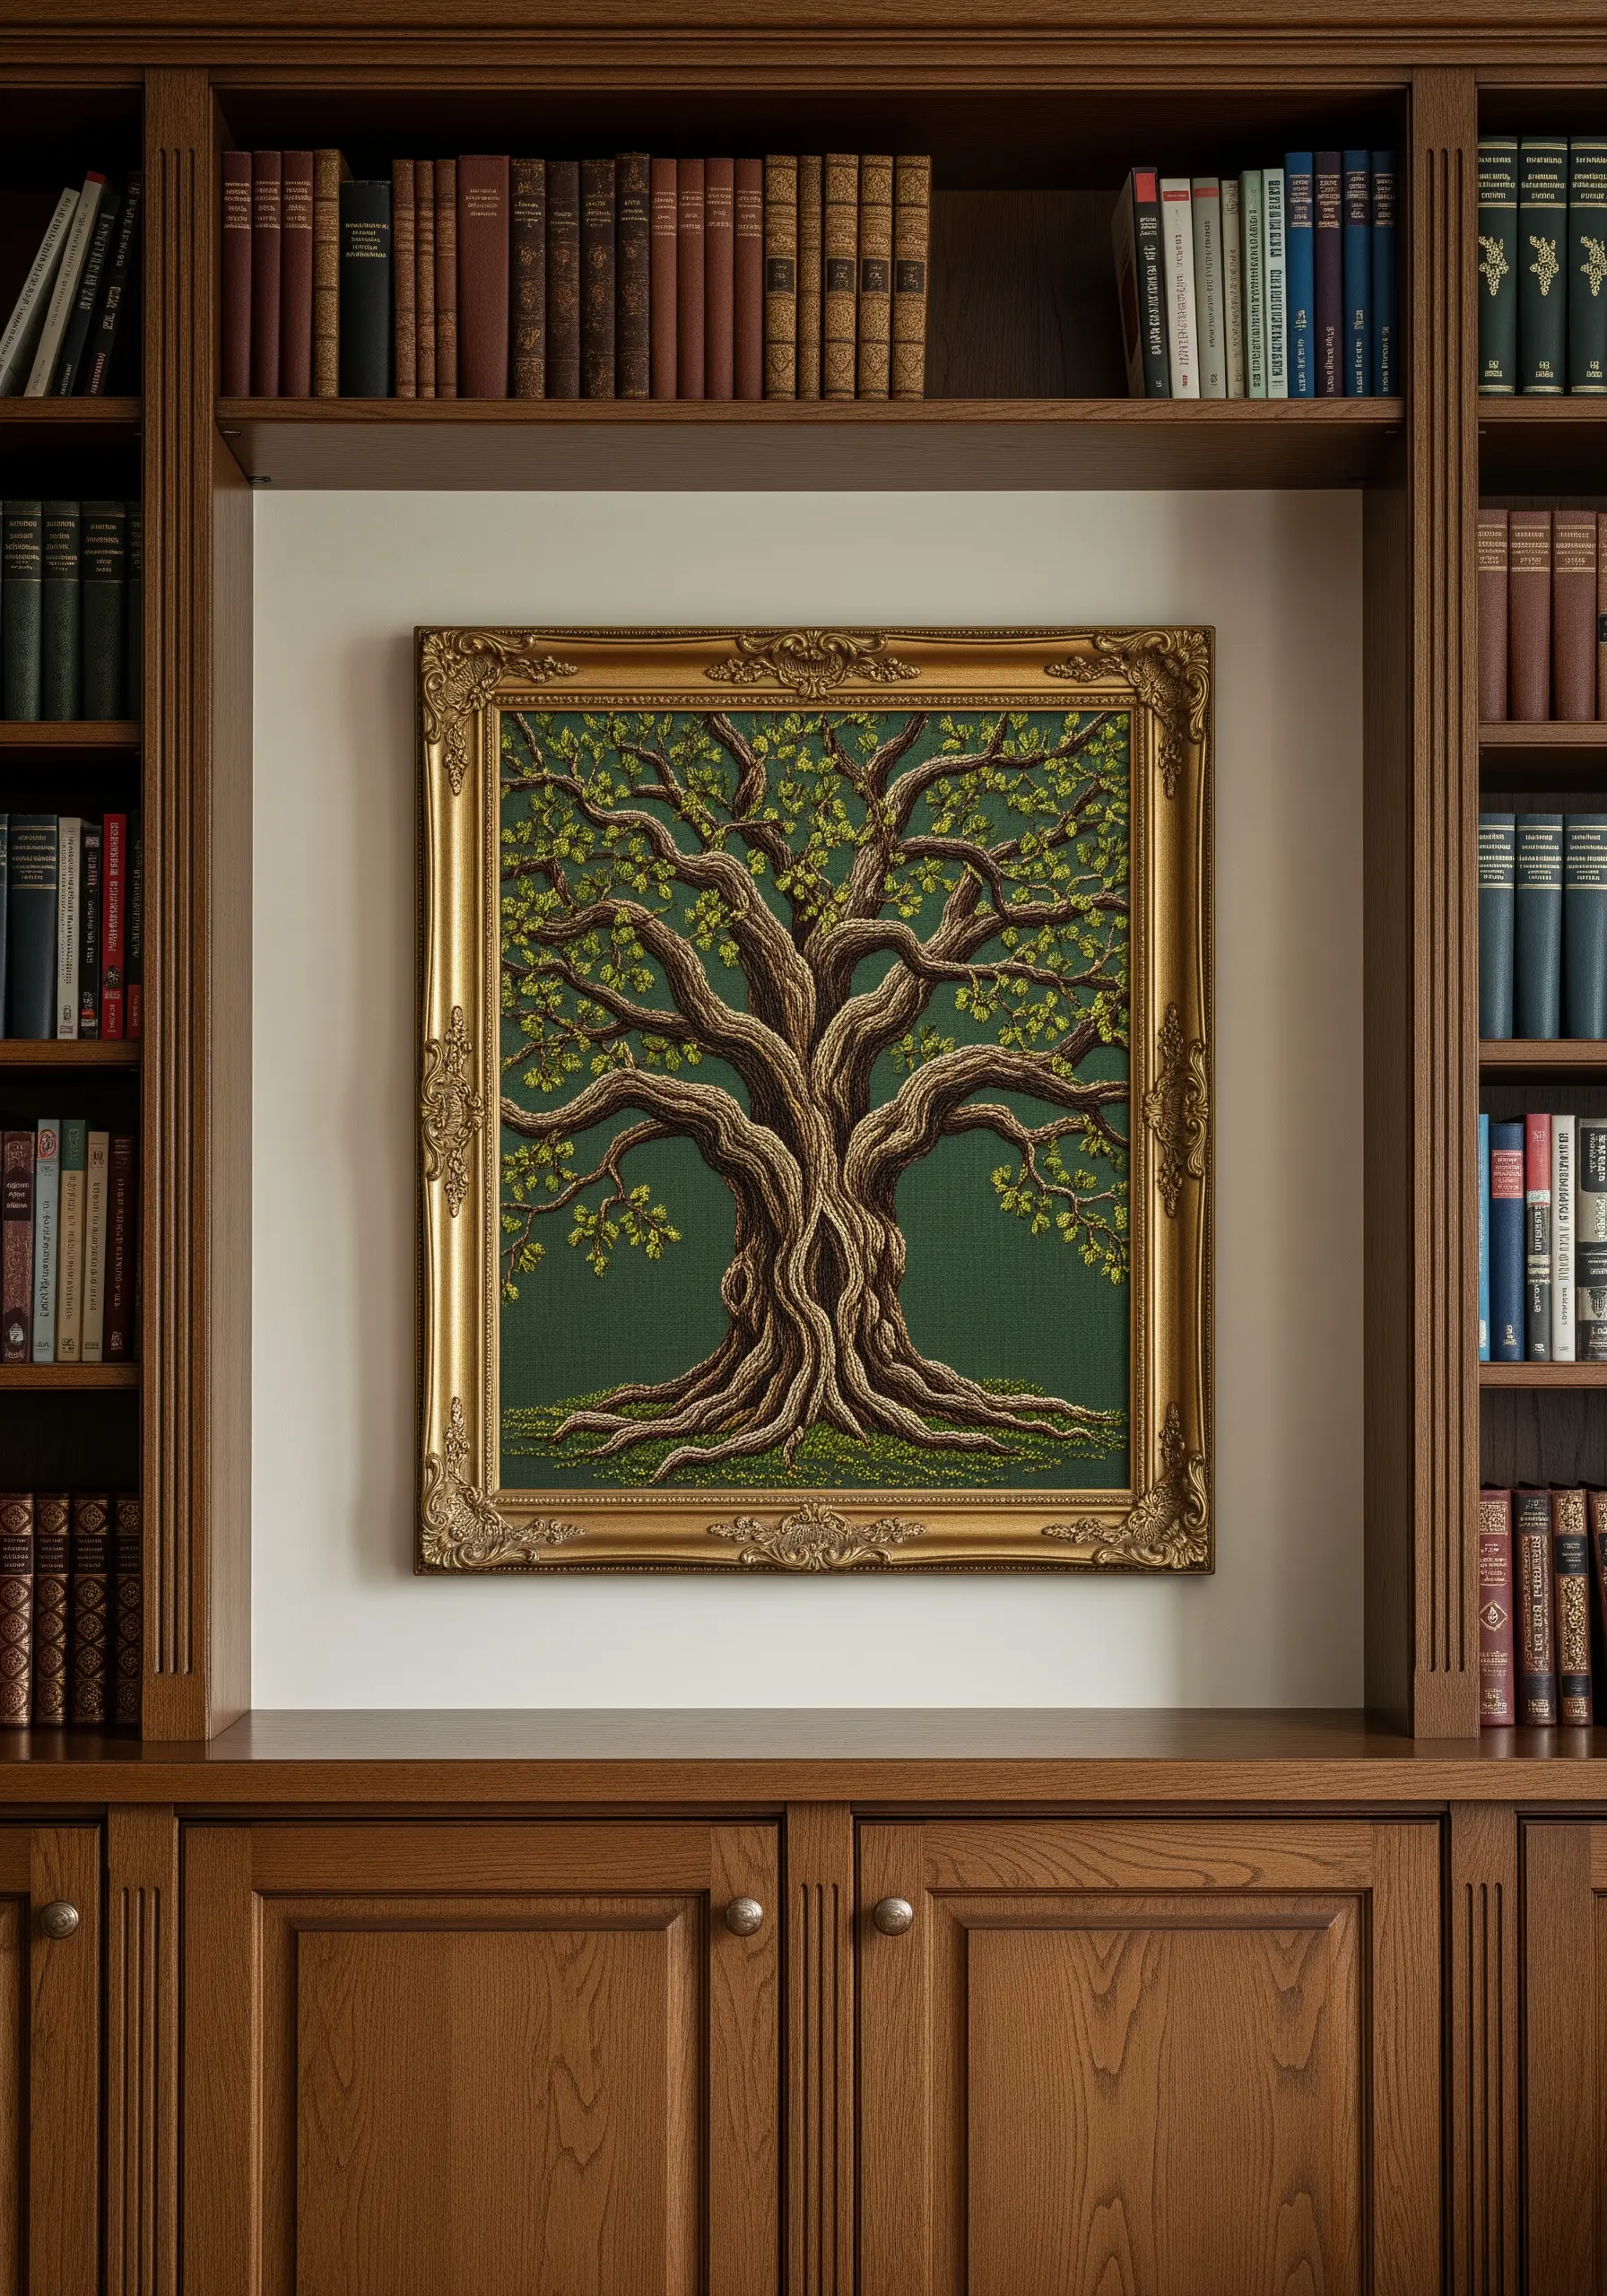
Give your work a sense of grandeur by filling the background fabric completely with a single, textural stitch, such as seed stitch or tiny straight stitches.
This technique, known as blackwork or pattern darning, makes the central motif stand out dramatically.
For the tree itself, use a thick, variegated brown thread in a chain stitch to capture the texture of the bark.
Finishing the piece in an ornate, gilded frame transforms it from a craft project into a timeless work of art.
17. Master the Art of the Negative Space Silhouette
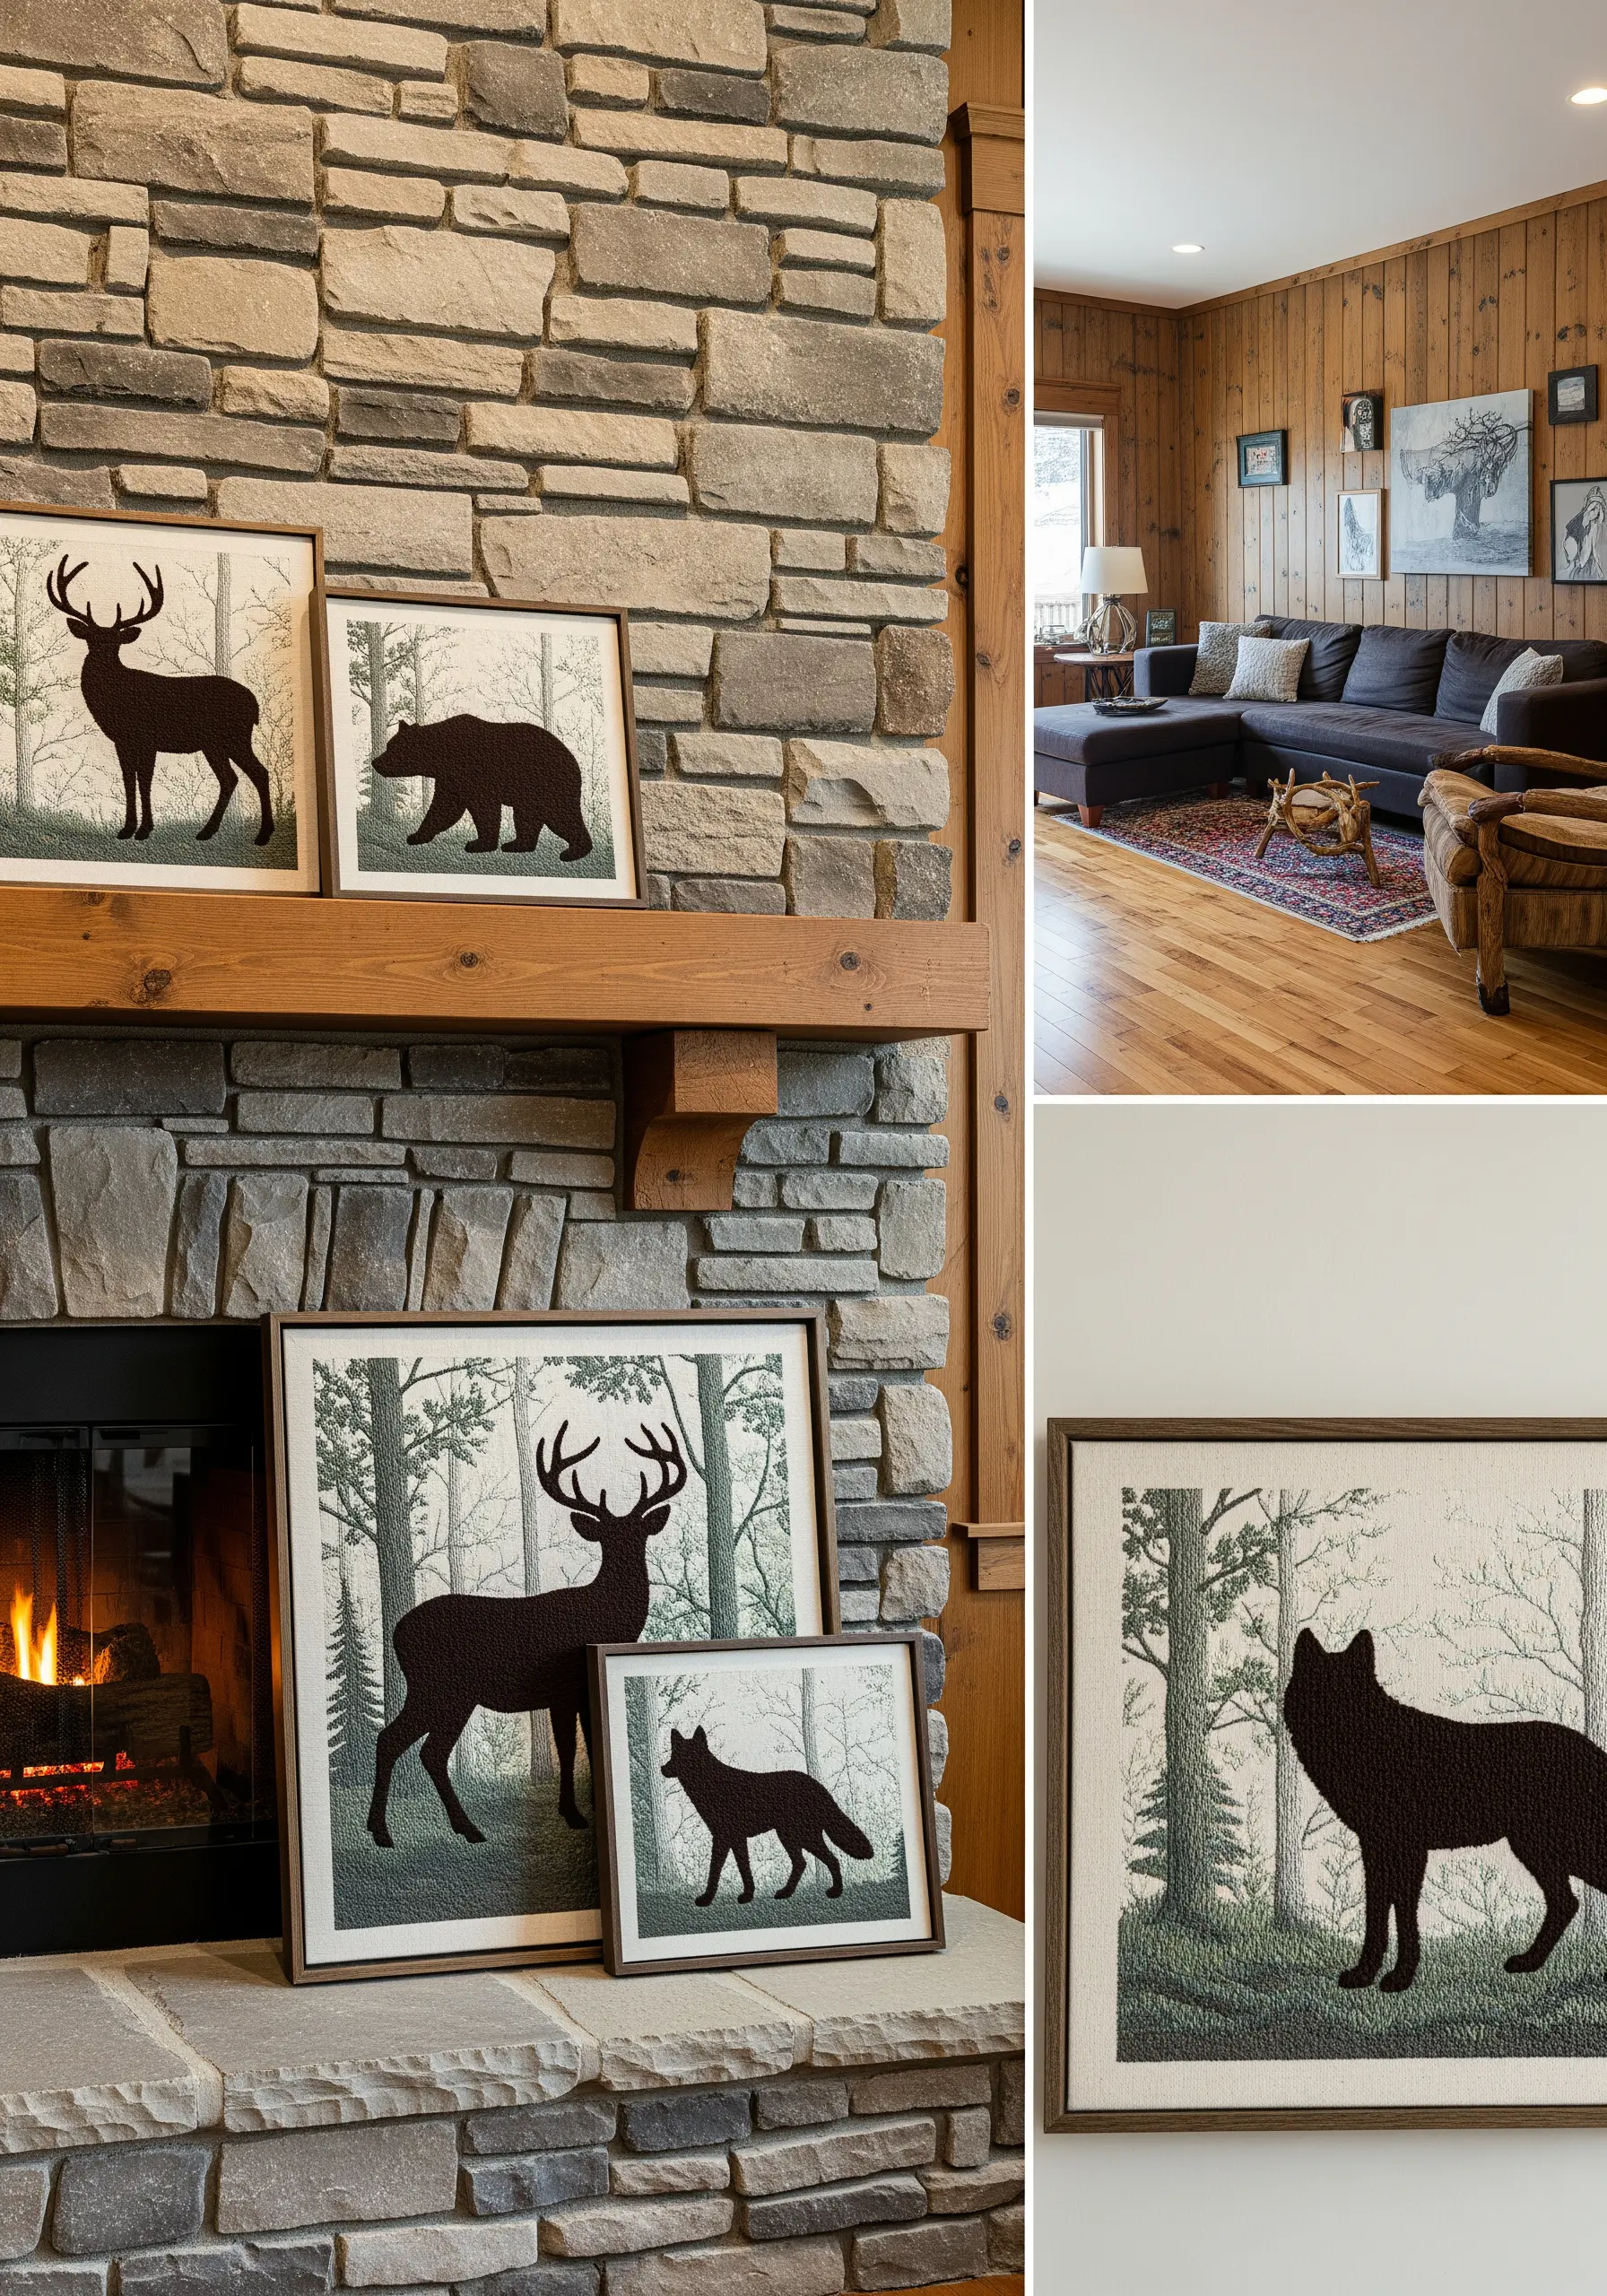
Create a crisp, bold silhouette by first outlining the shape with a precise split stitch.
Fill the shape with a dense, smooth satin stitch, ensuring your stitches are parallel and lie flat for a uniform, block-color effect.
For the background forest, use sparse, single-strand straight stitches in varying lengths and shades of green and grey to suggest trees without distracting from the main subject.
This technique creates a powerful graphic composition that feels both rustic and modern.
18. Develop a Botanical Stitch Lexicon
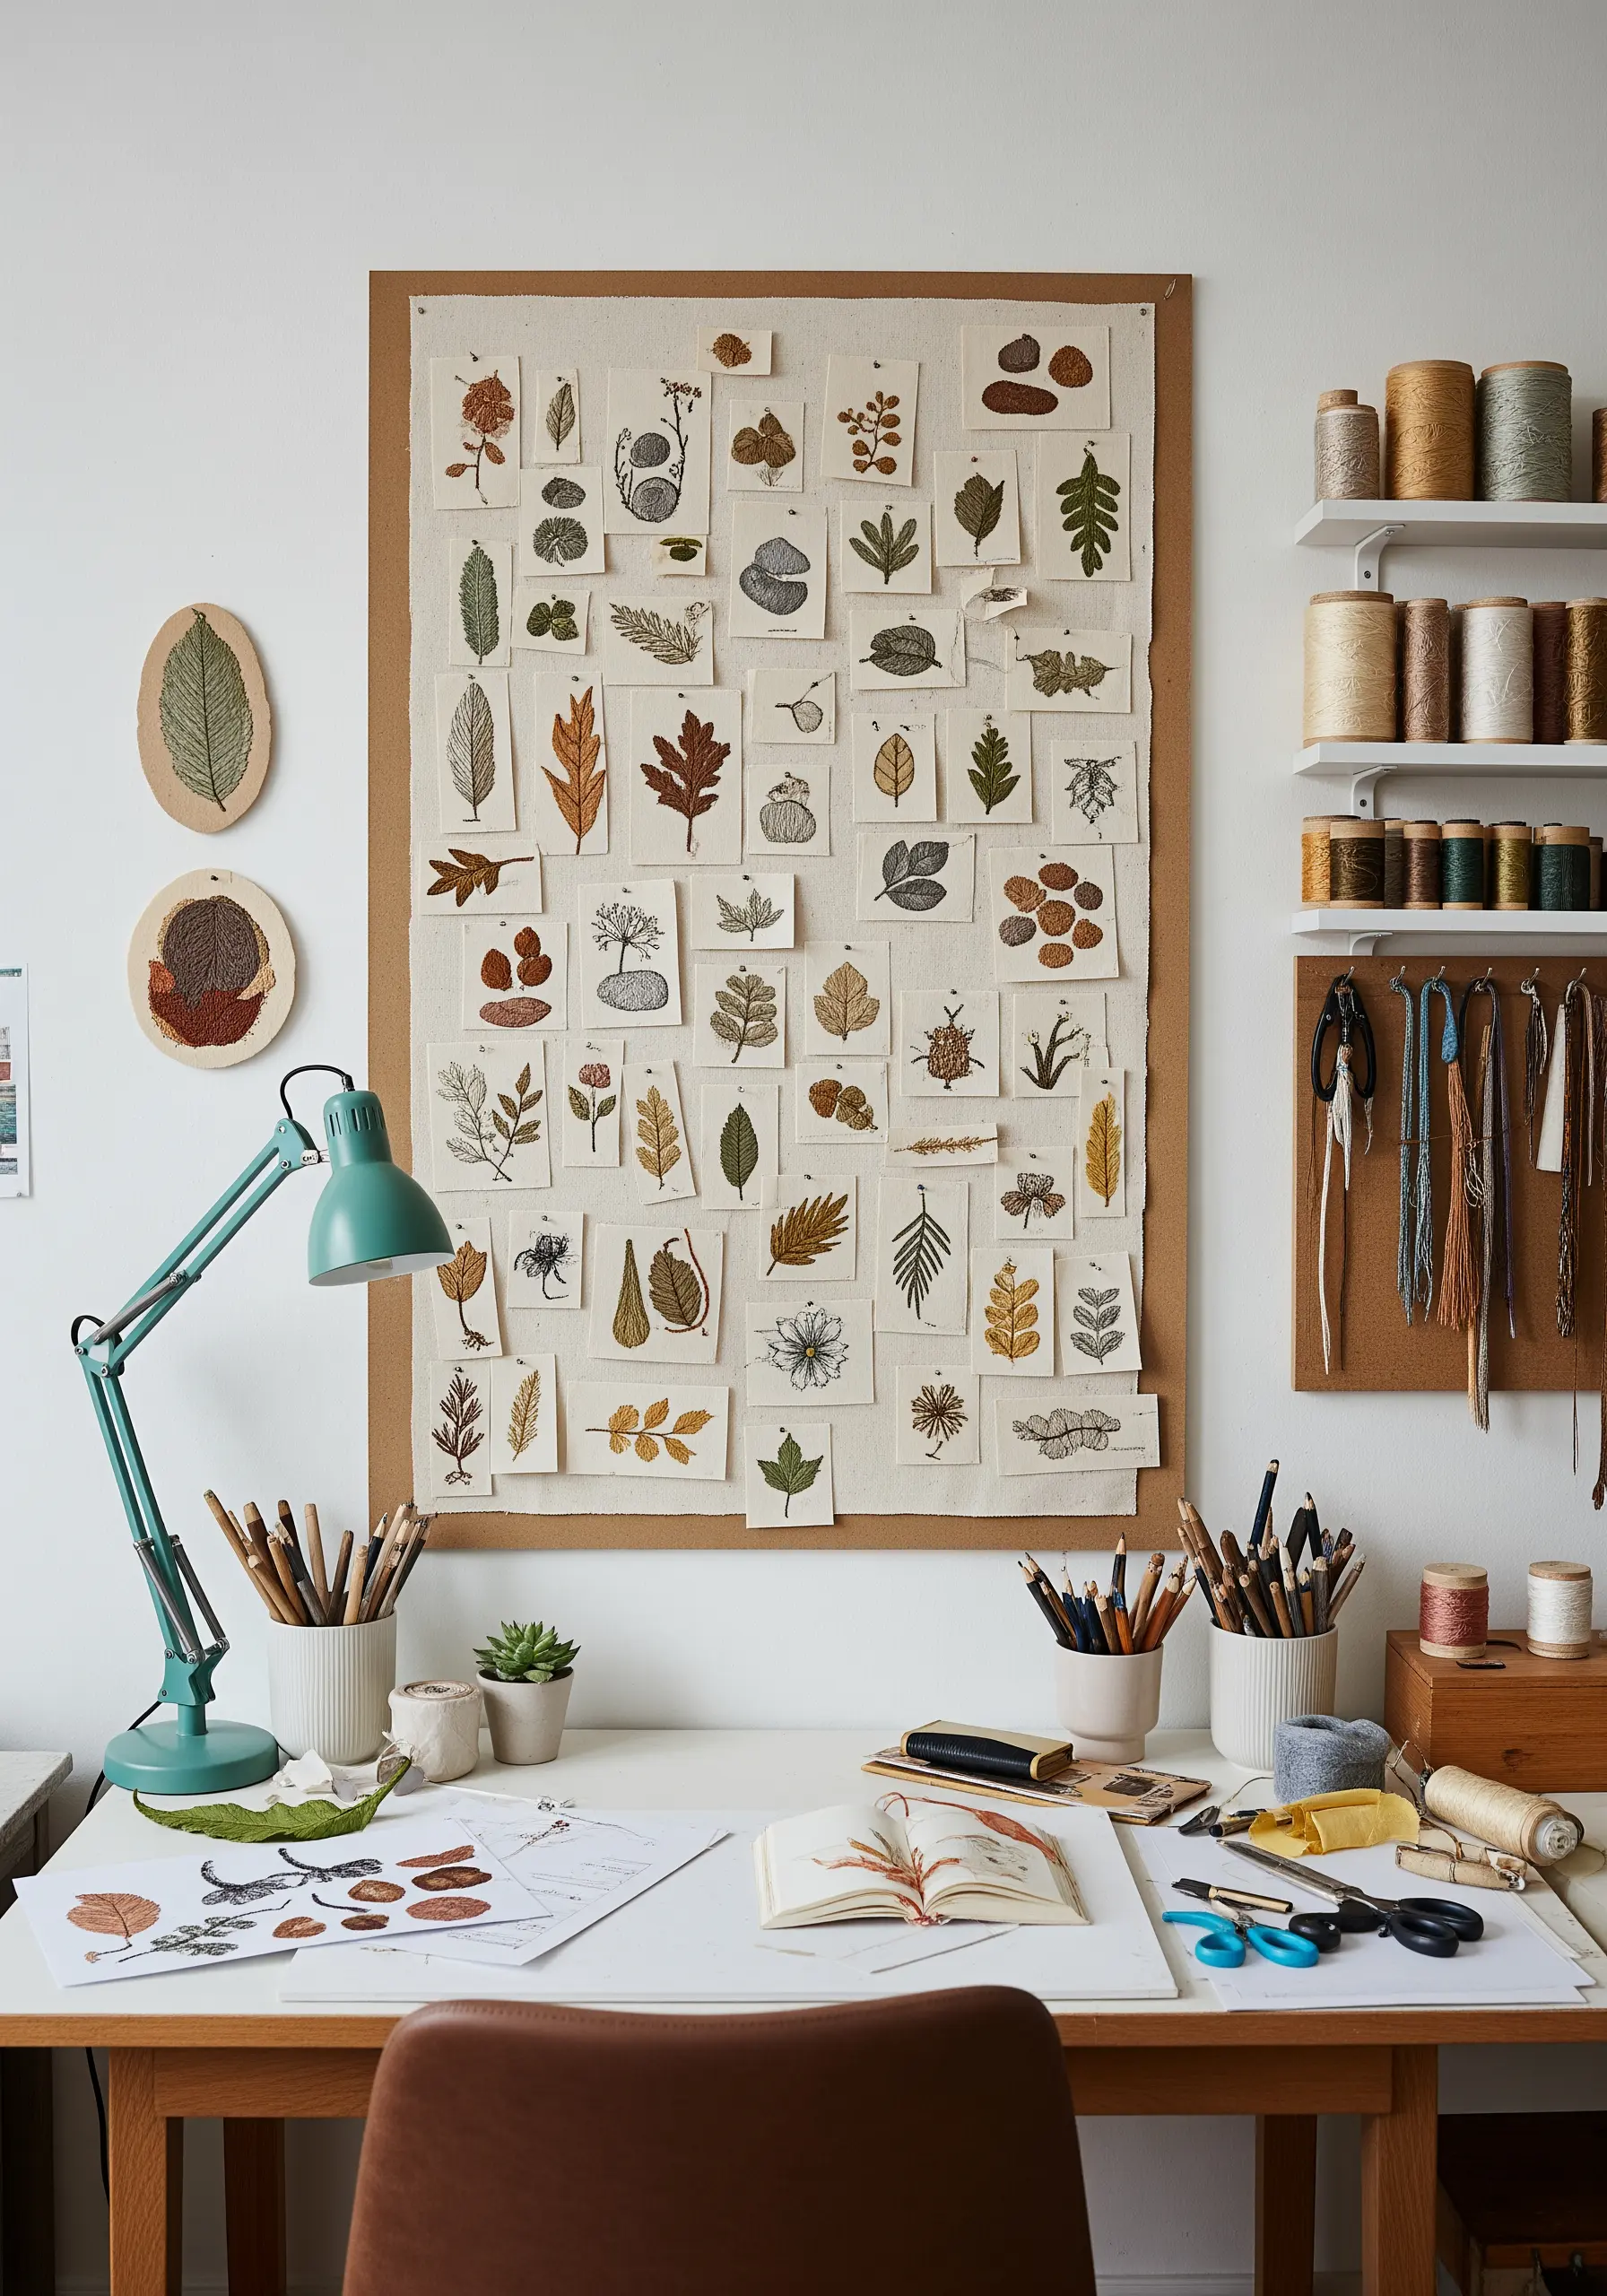
Create a beautiful reference board by stitching small studies of leaves, seeds, and insects on individual scraps of linen or cotton.
This is a perfect opportunity to practice different stitches: fishbone stitch for veined leaves, French knots for berries, and simple backstitch for delicate stems and insect legs.
Pinning them to a corkboard turns your practice swatches into a dynamic, evolving piece of wall art that celebrates the creative process.
This is one of the most organic earth-tone DIY embroidery designs you can create.
19. Create a Meditative Mandala Banner
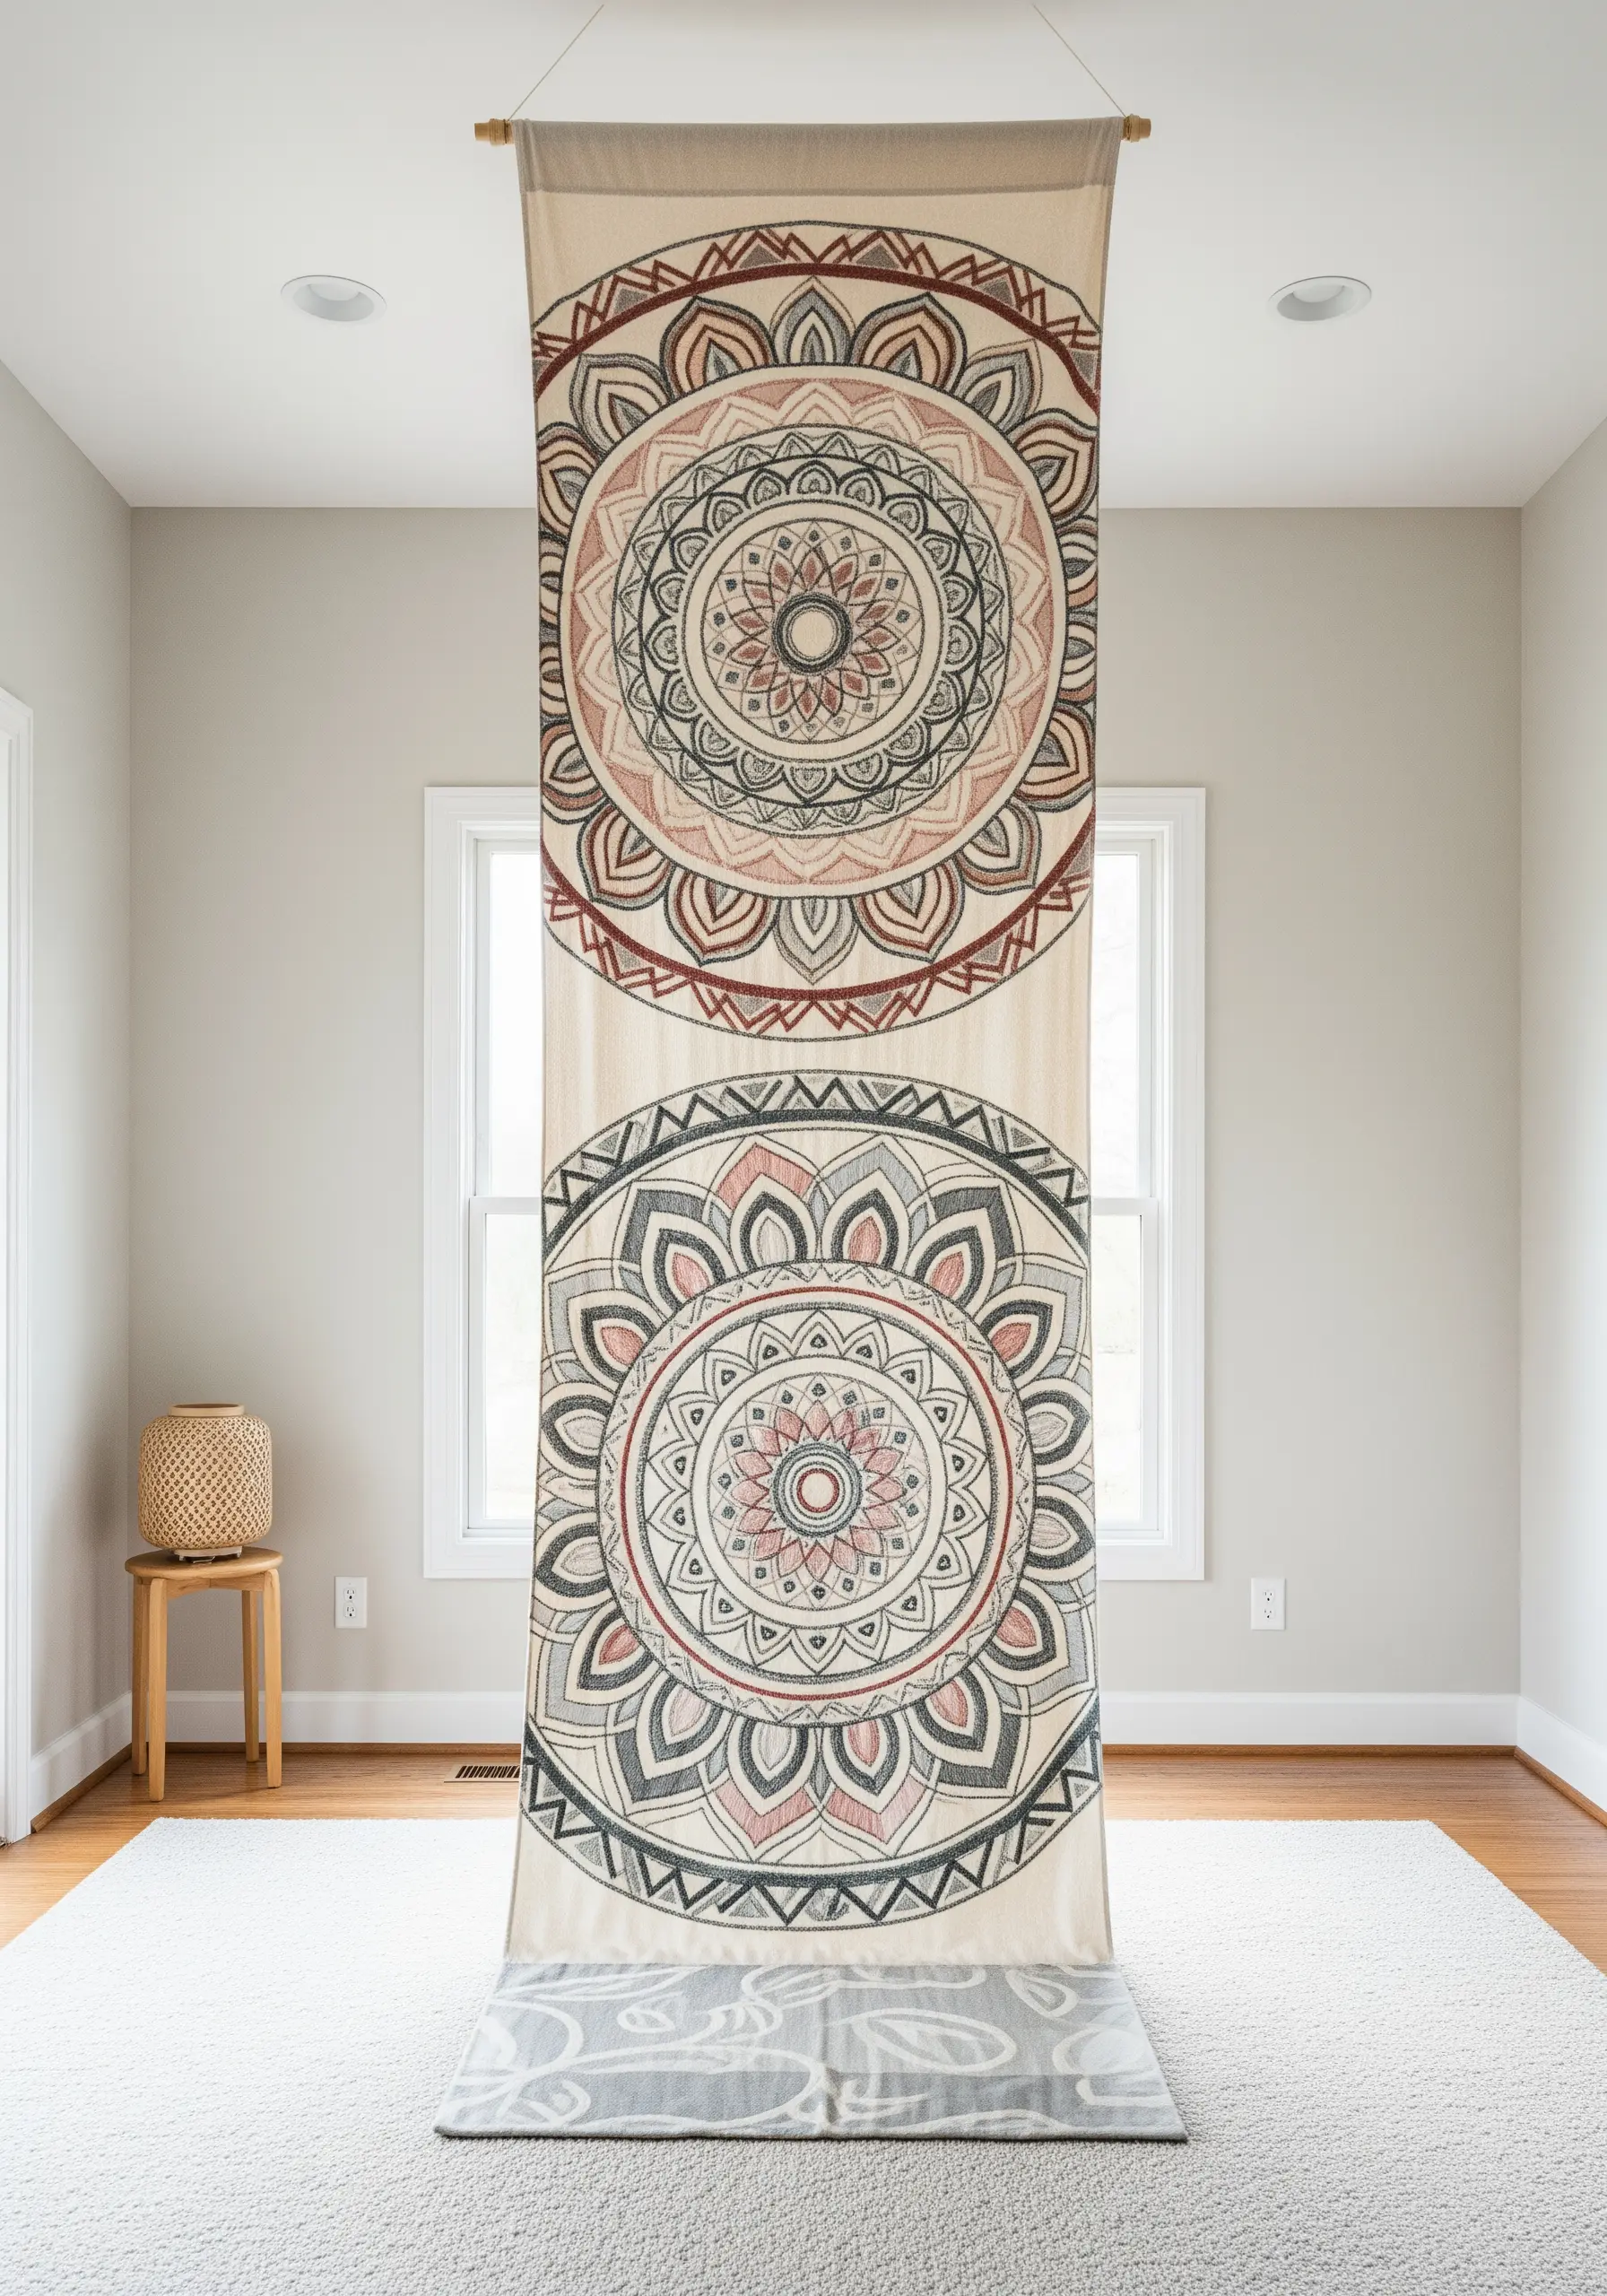
To ensure perfect symmetry in your mandala, fold your fabric into quarters to find the center, then use a water-soluble pen and a compass to draw your guide circles.
Work your design from the center outwards, using a consistent stitch like chain stitch or whipped backstitch for all your outlines to maintain a clean, graphic look.
Using a limited, earthy color palette of charcoal, rust, and dusty rose gives the intricate pattern a calm, sophisticated feel perfect for a meditation space.
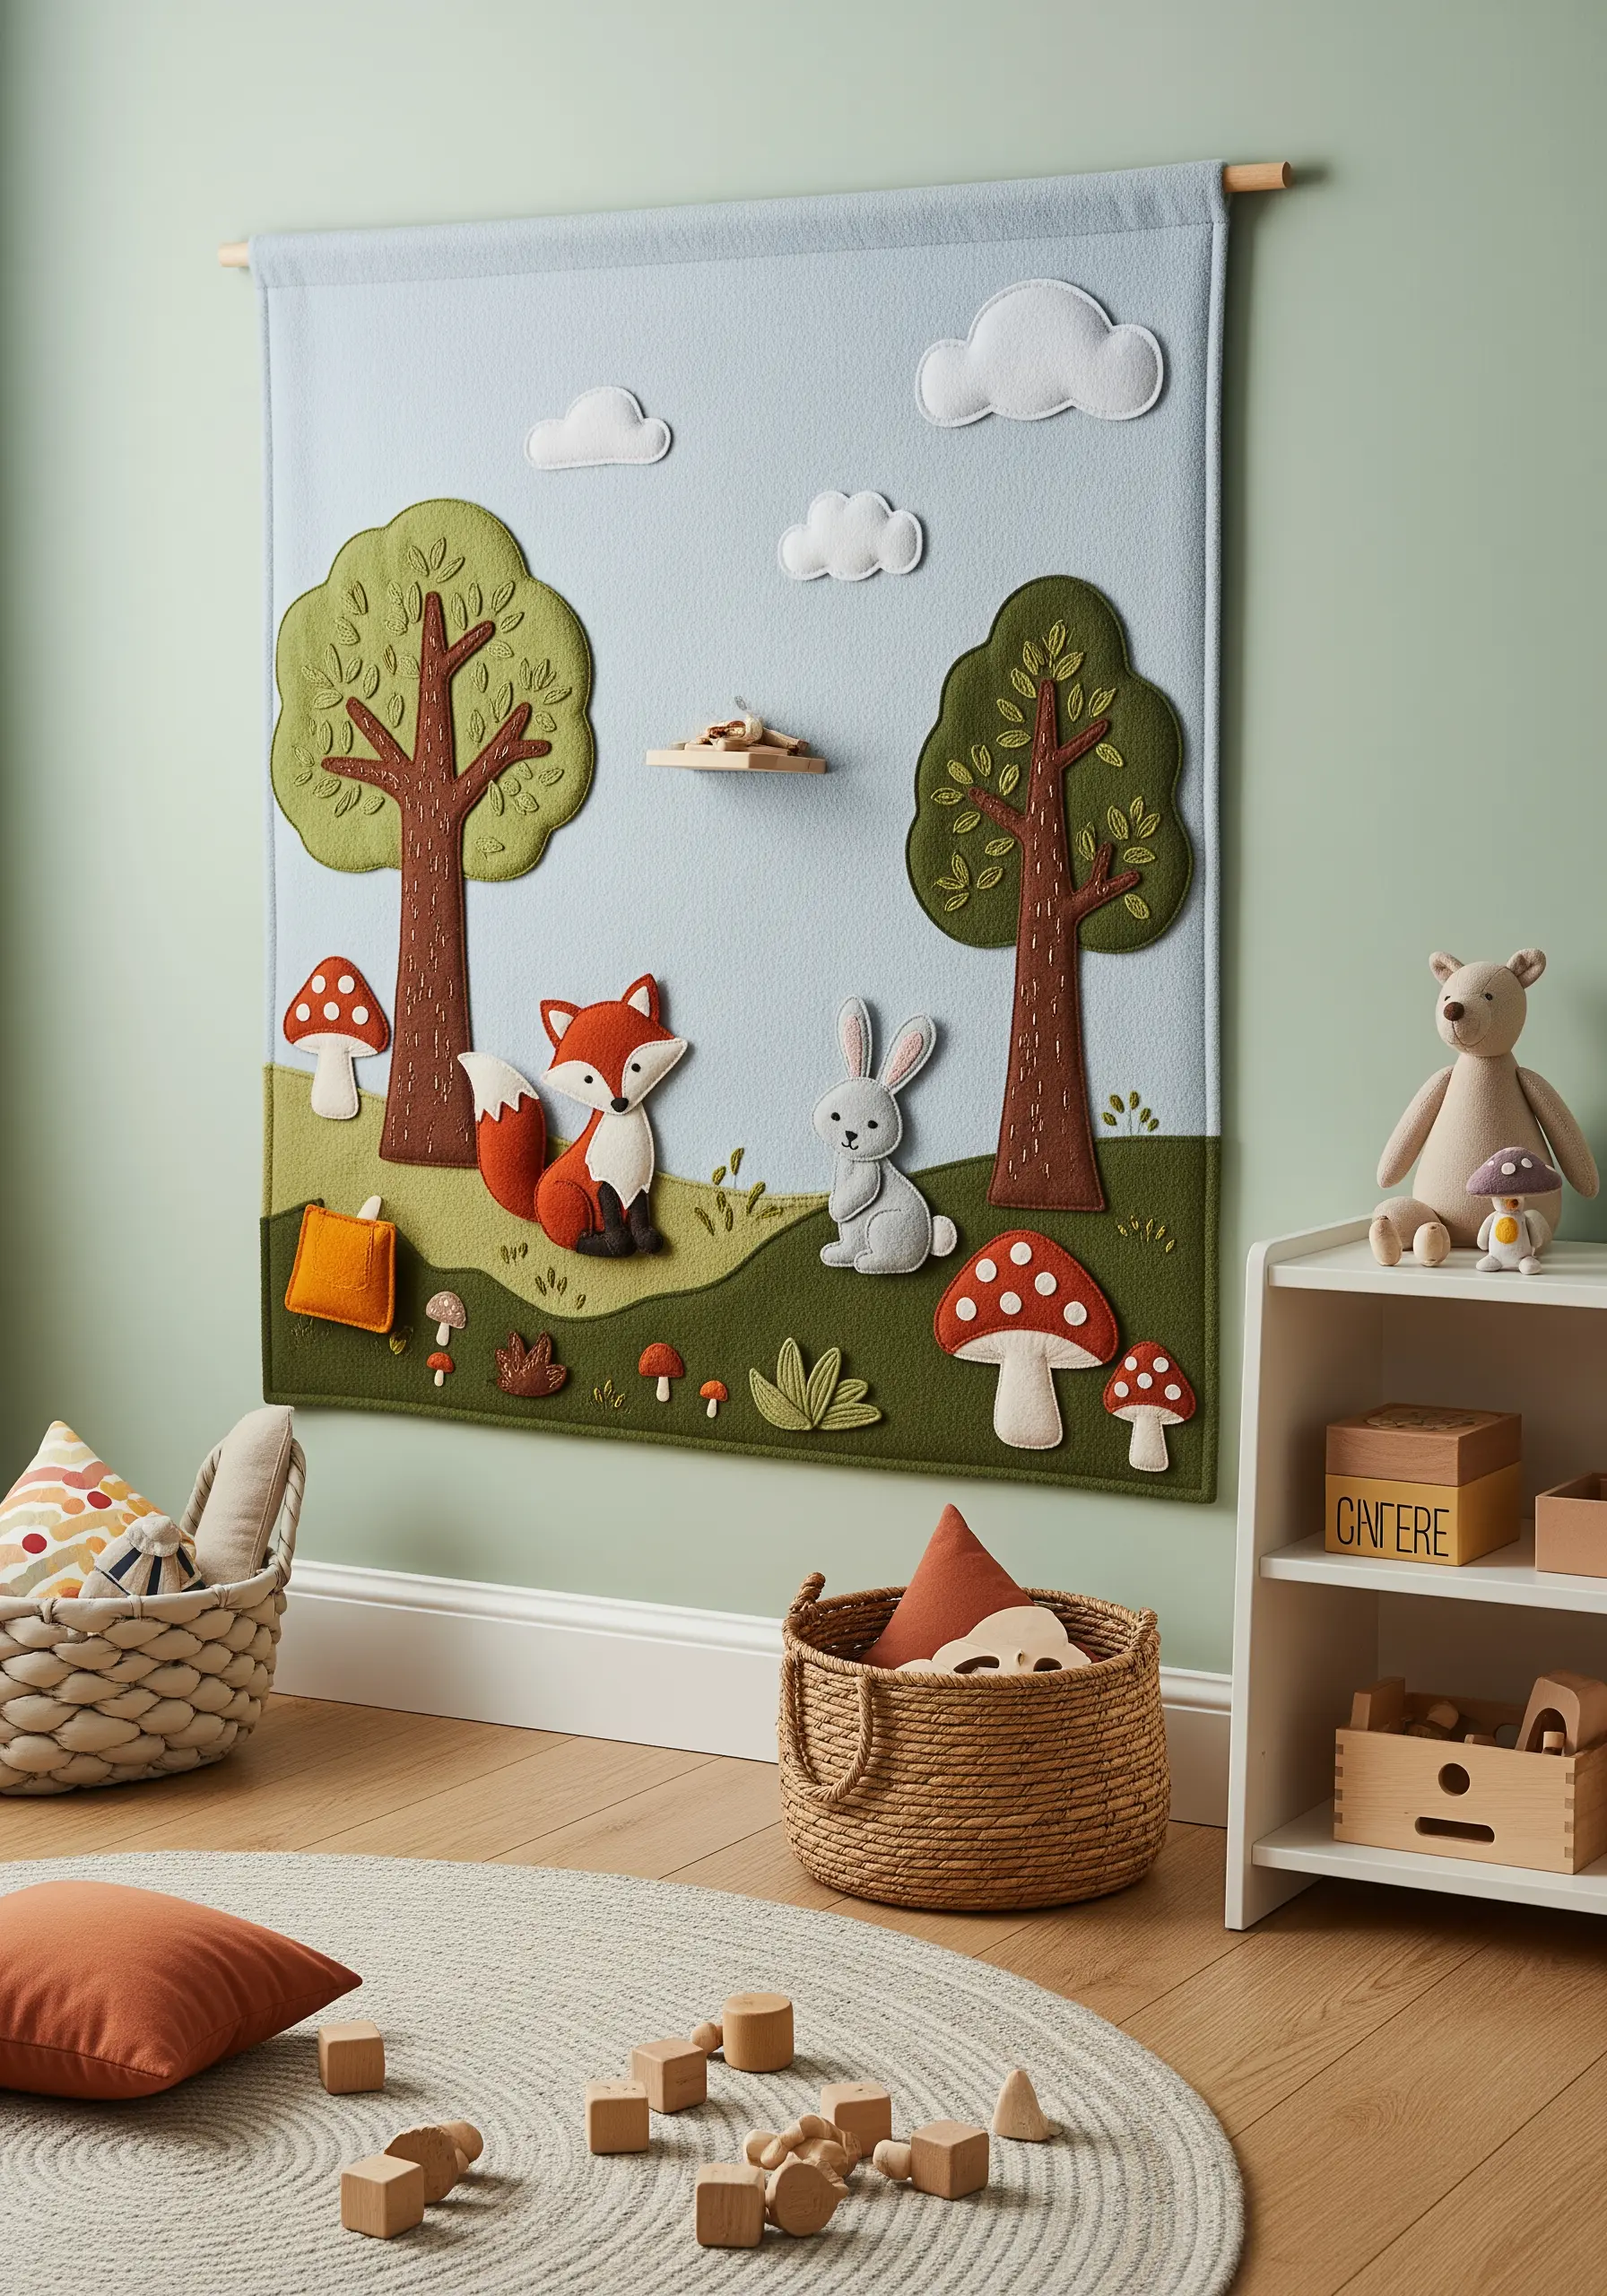
20. Design a Dreamy Woodland Nursery Scene
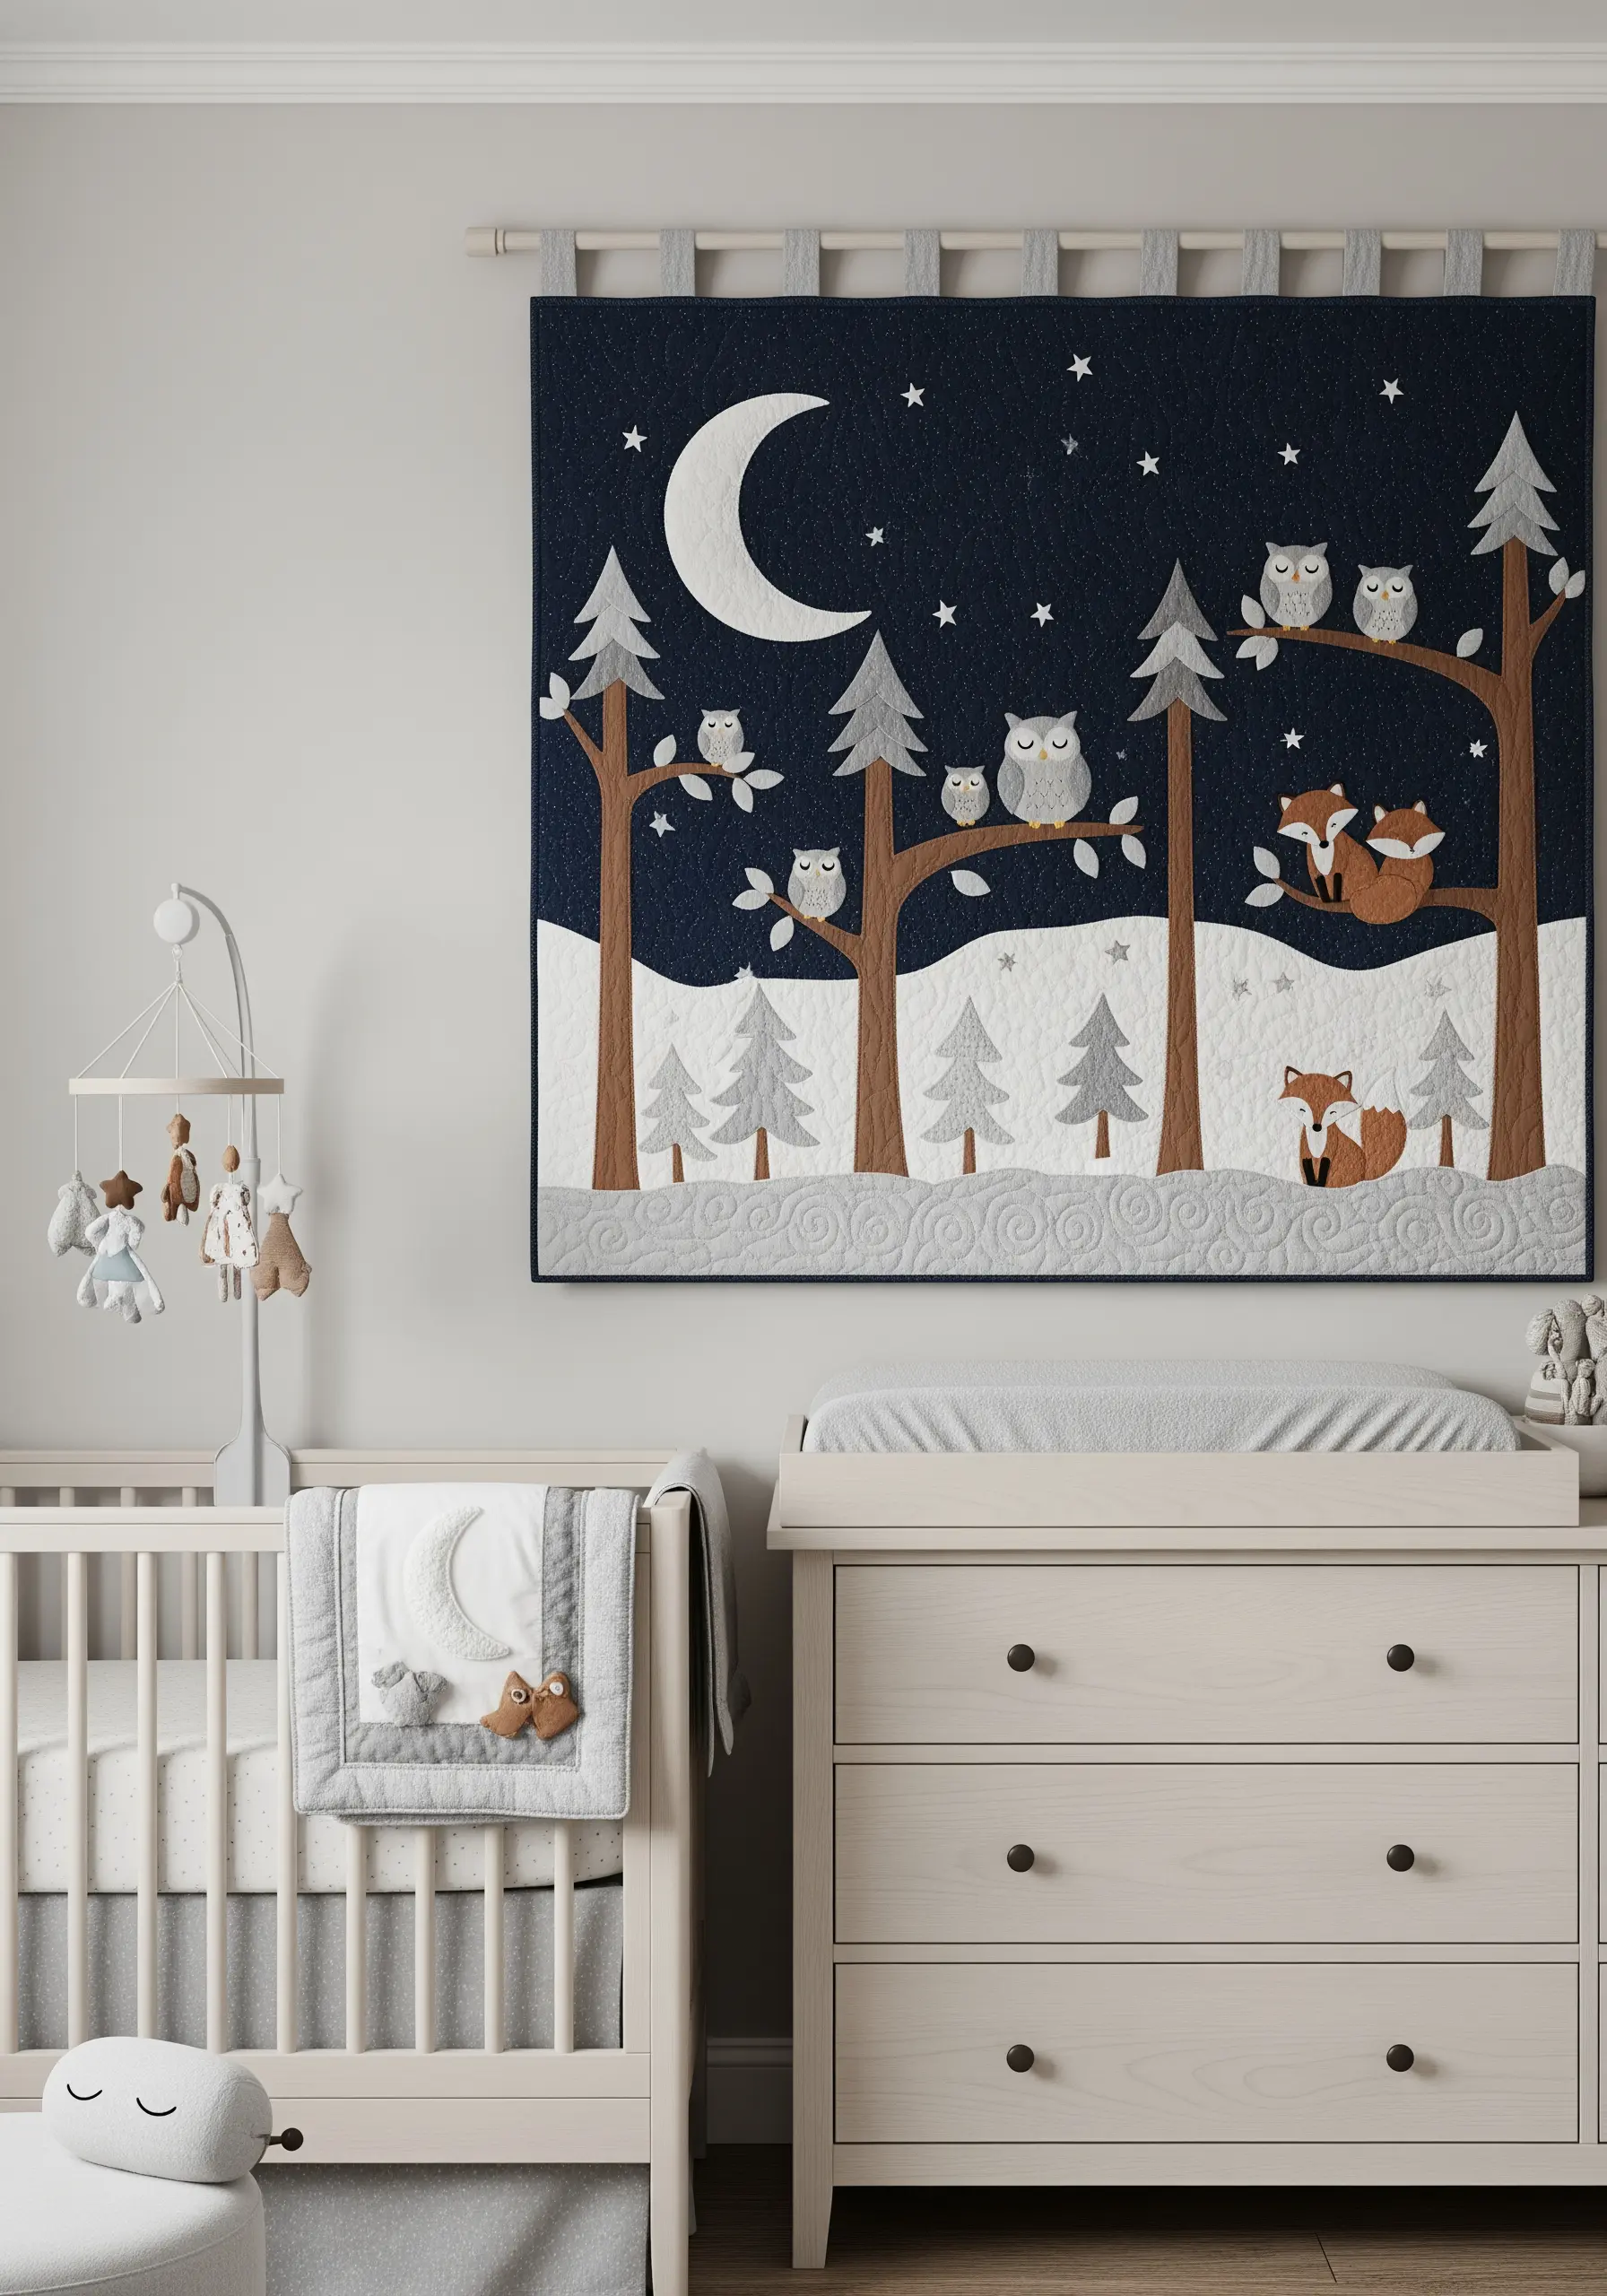
Combine appliqué with simple quilting to create a soft, storybook wall hanging.
Use fusible webbing to place your felt or cotton appliqué pieces, then stitch them down with a decorative blanket stitch for a charming, handmade touch.
Add a layer of batting behind your main fabric and create a simple quilted pattern—like wavy lines for hills—to add soft dimension and texture.
This creates a cozy, heirloom-quality piece perfect for a nursery.
21. Stitch the Four Seasons in a Series
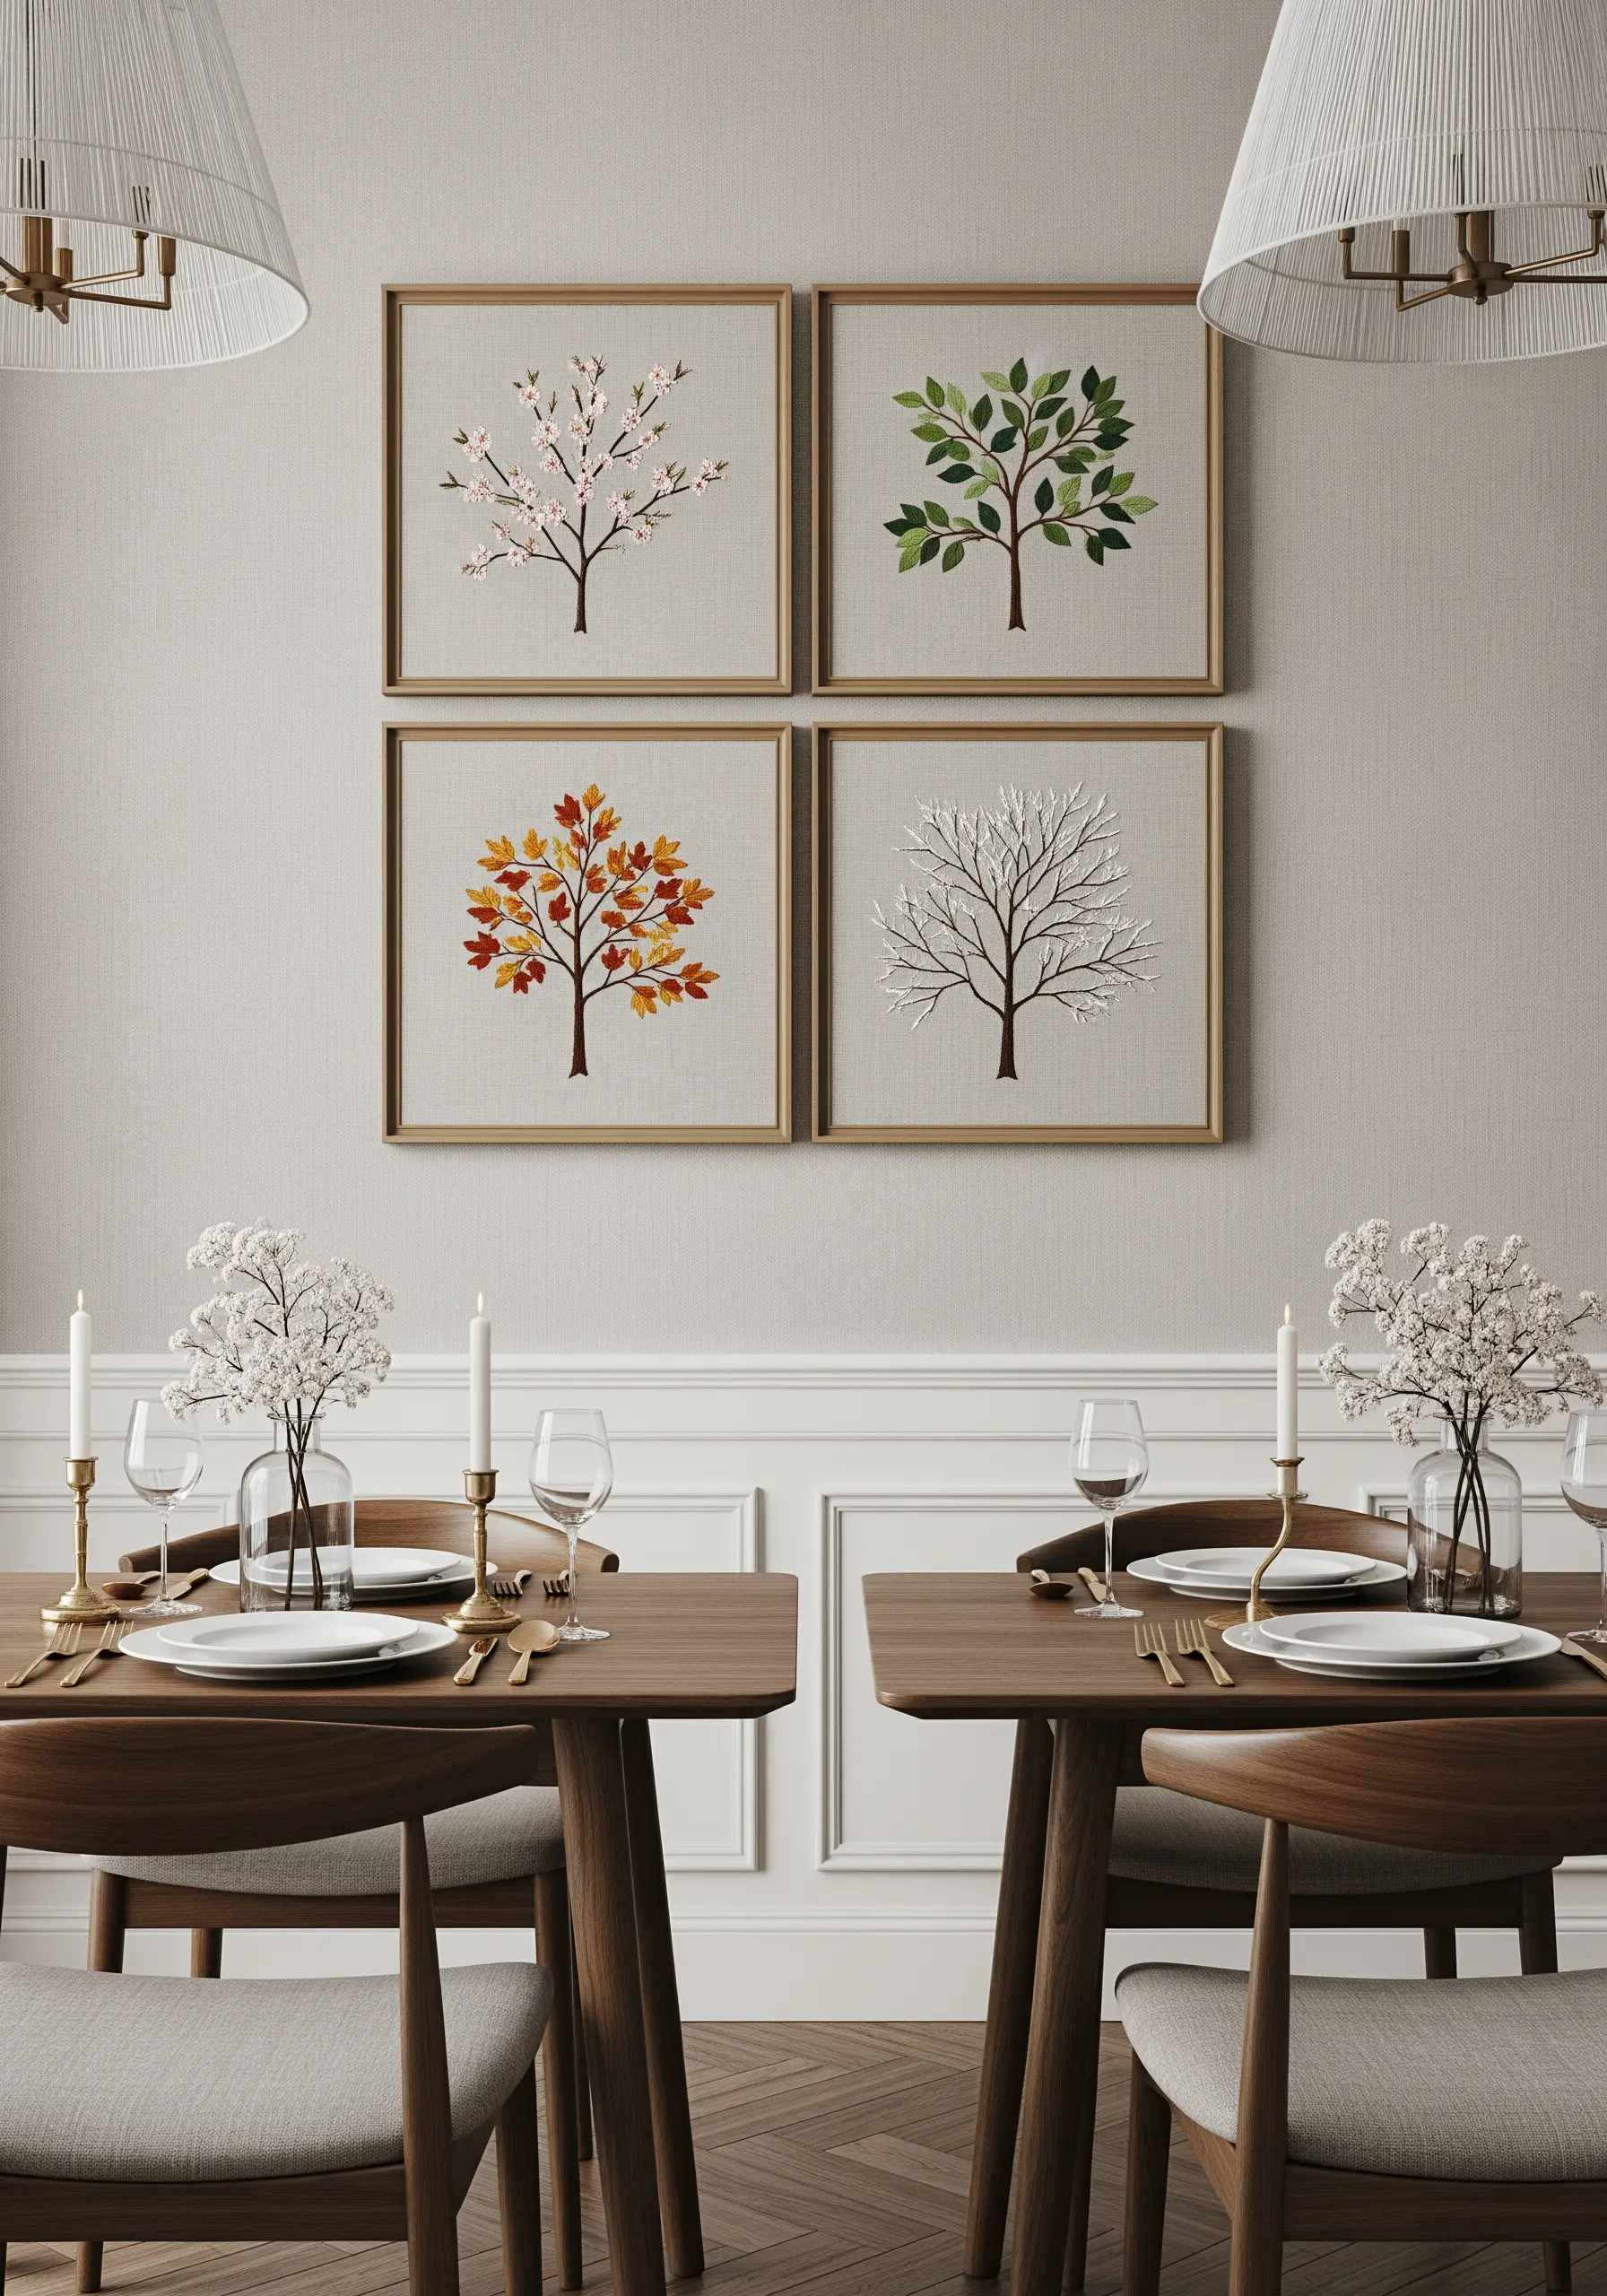
Tell a year-long story by creating a set of four identical tree silhouettes, each stitched to represent a different season.
Use French knots in pinks and whites for spring blossoms, and lush green satin-stitched leaves for summer.
Capture autumn with a vibrant mix of red, orange, and yellow lazy daisy stitches.
For winter, leave the branches bare, stitched in a stark brown or grey backstitch, perhaps adding a few white seed stitches for snow.
22. Cultivate a Vertical Vine Embroidery
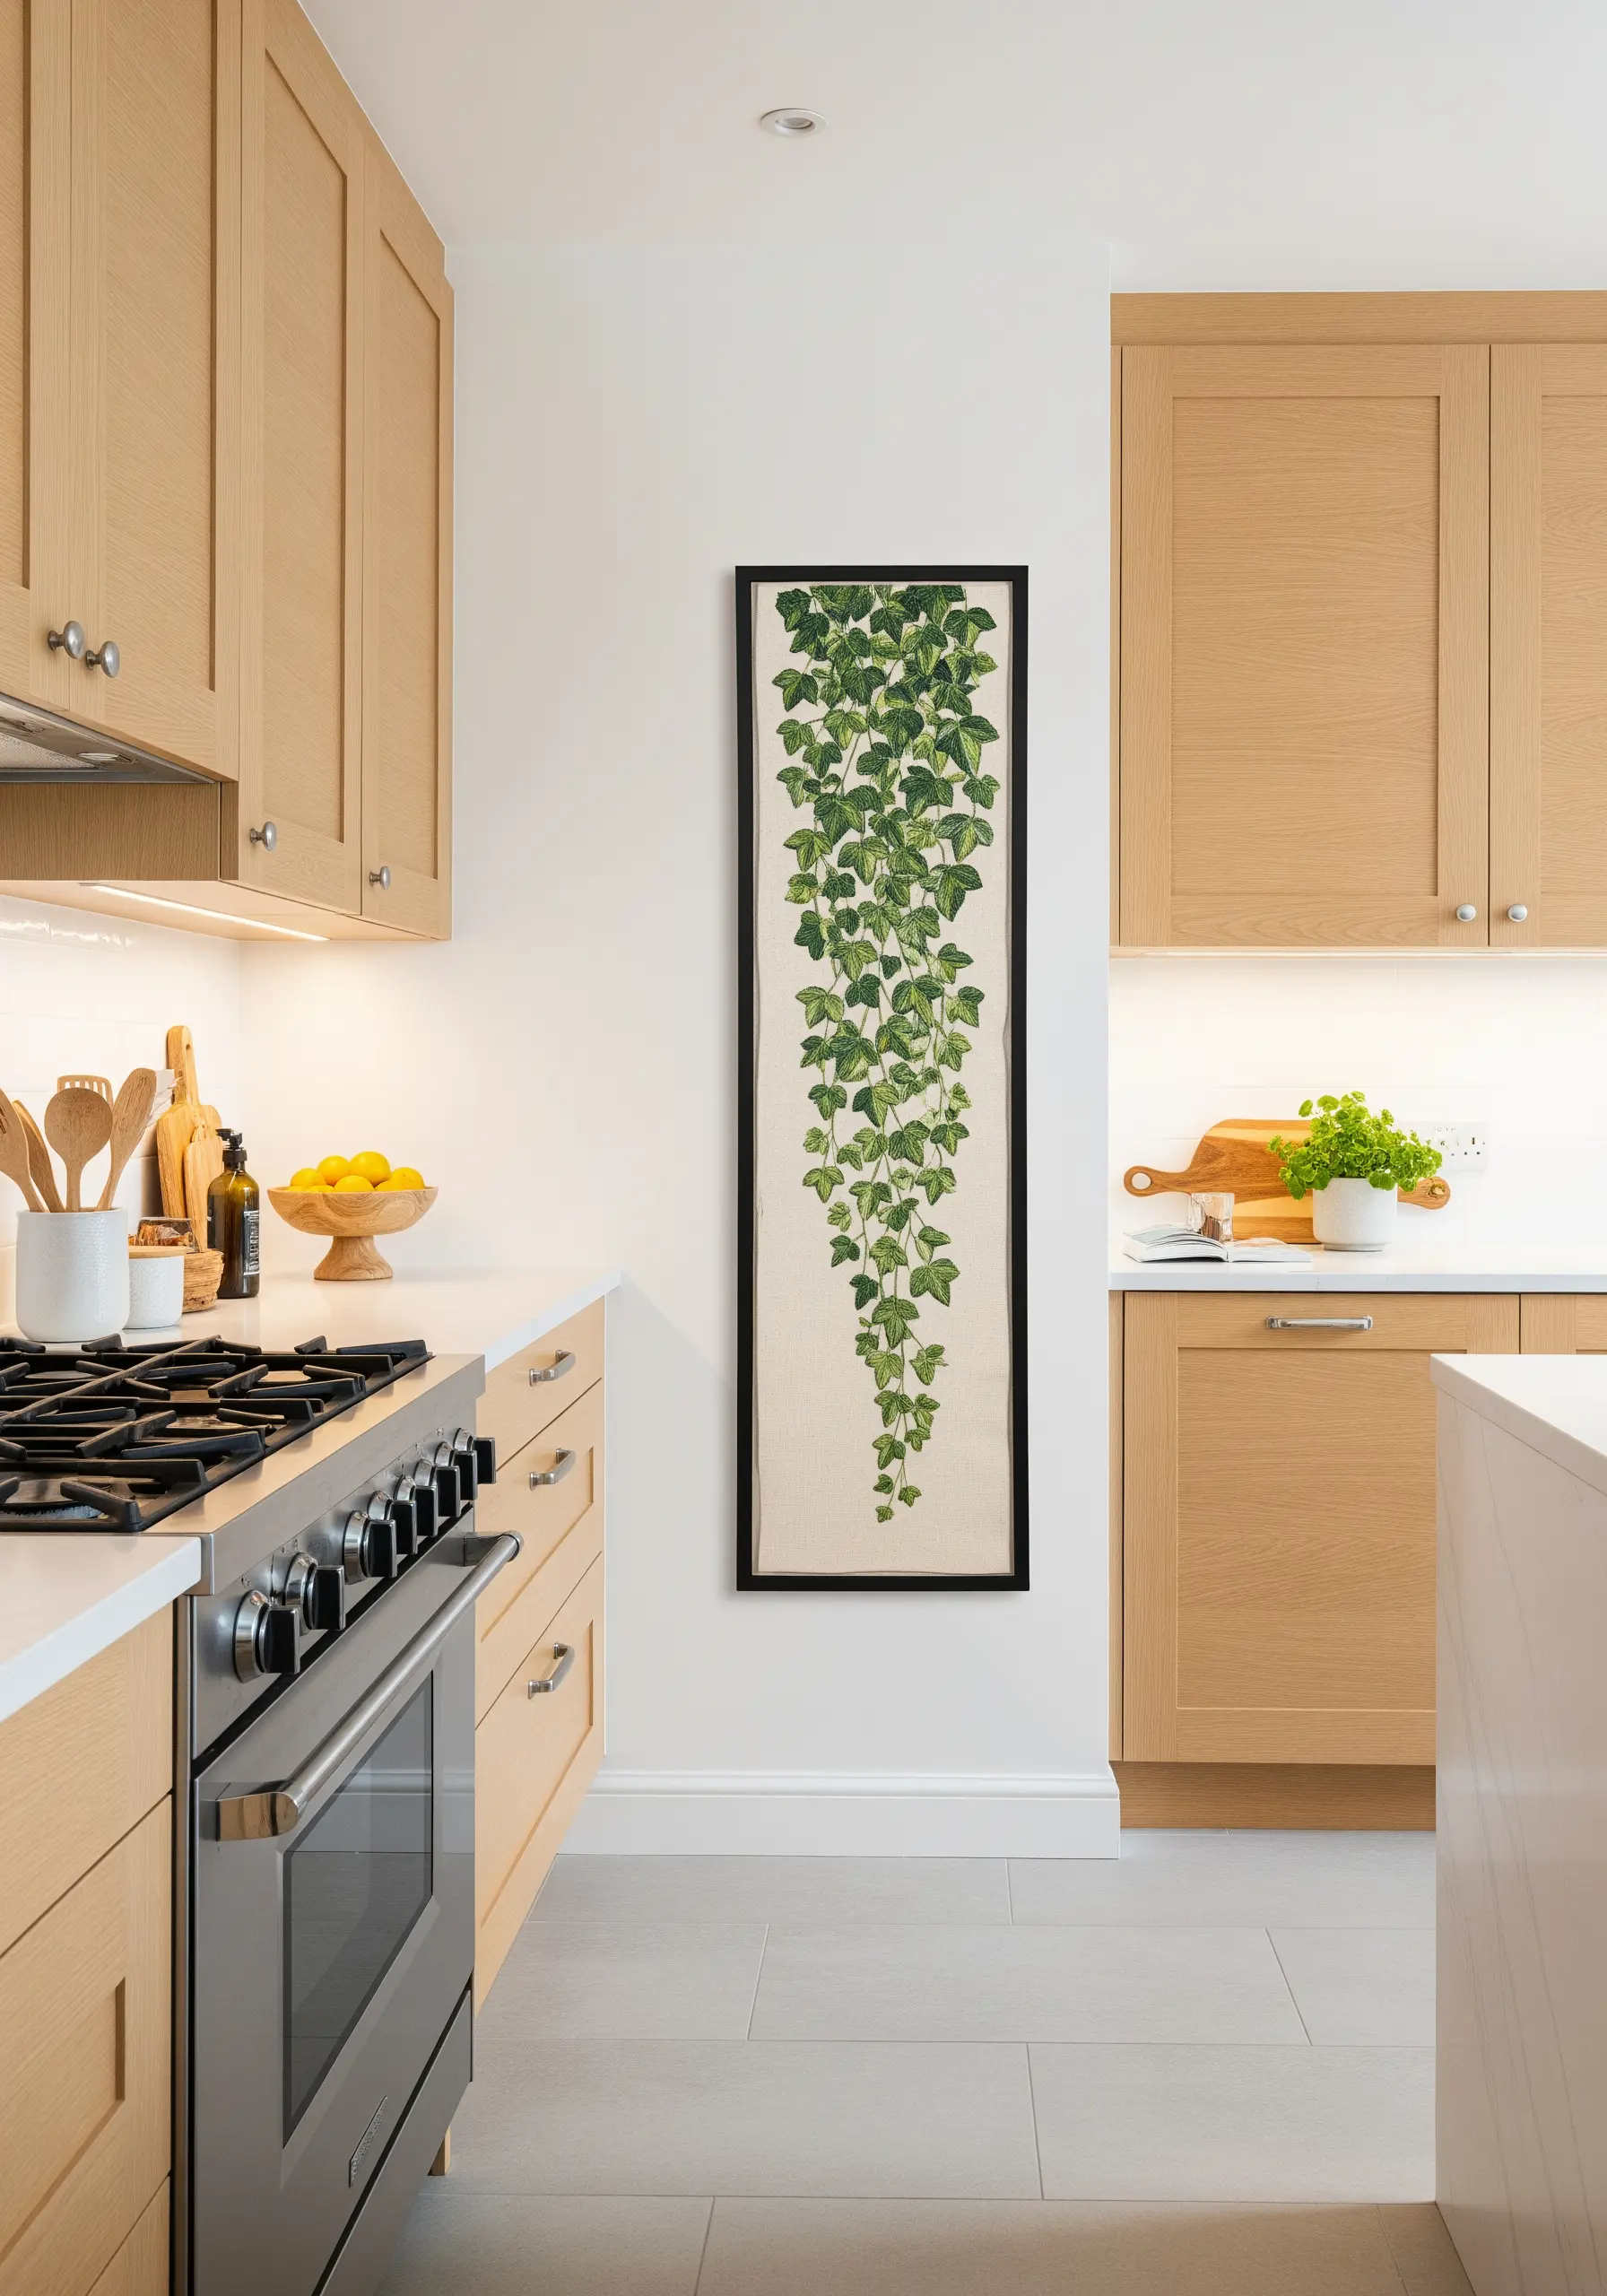
For a tall, narrow space, a vertical design like trailing ivy creates an elegant focal point.
Use a single, continuous line of stem stitch or chain stitch for the main vine to give it a graceful, organic flow.
Stitch the leaves using a variegated green thread in a fishbone or satin stitch; the subtle color shifts in the thread will give the foliage natural dimension without extra effort.
This is one of the most effective climbing plant stitch designs for small spaces.
23. Map a Landscape with Pointillist Stitches
To create a large-scale piece with a blended, painterly effect, rely on the power of the simple French knot.
Think like a pointillist painter, using dense clusters of knots in different colors to build up fields of color and create soft gradients.
Work on a sturdy backing fabric like cotton canvas or burlap that can support the weight of thousands of stitches.
This meditative technique turns simple dots of thread into a breathtaking, large-scale abstract landscape.
24. Achieve Hyperrealism with 3D Stumpwork
Bring your embroidery to life by using stumpwork techniques to make elements physically lift off the fabric.
For the mushroom caps, embroider them on a separate piece of fabric, insert a thin wire around the edge, and cut them out.
You can then bend the wired shape and stitch it onto your main piece, creating true 3D embroidery wall art pieces.
Use turkey work for the moss to create a fuzzy, three-dimensional texture that you can trim and shape.
25. Fuse Macrame and Embroidery for a Boho Sun
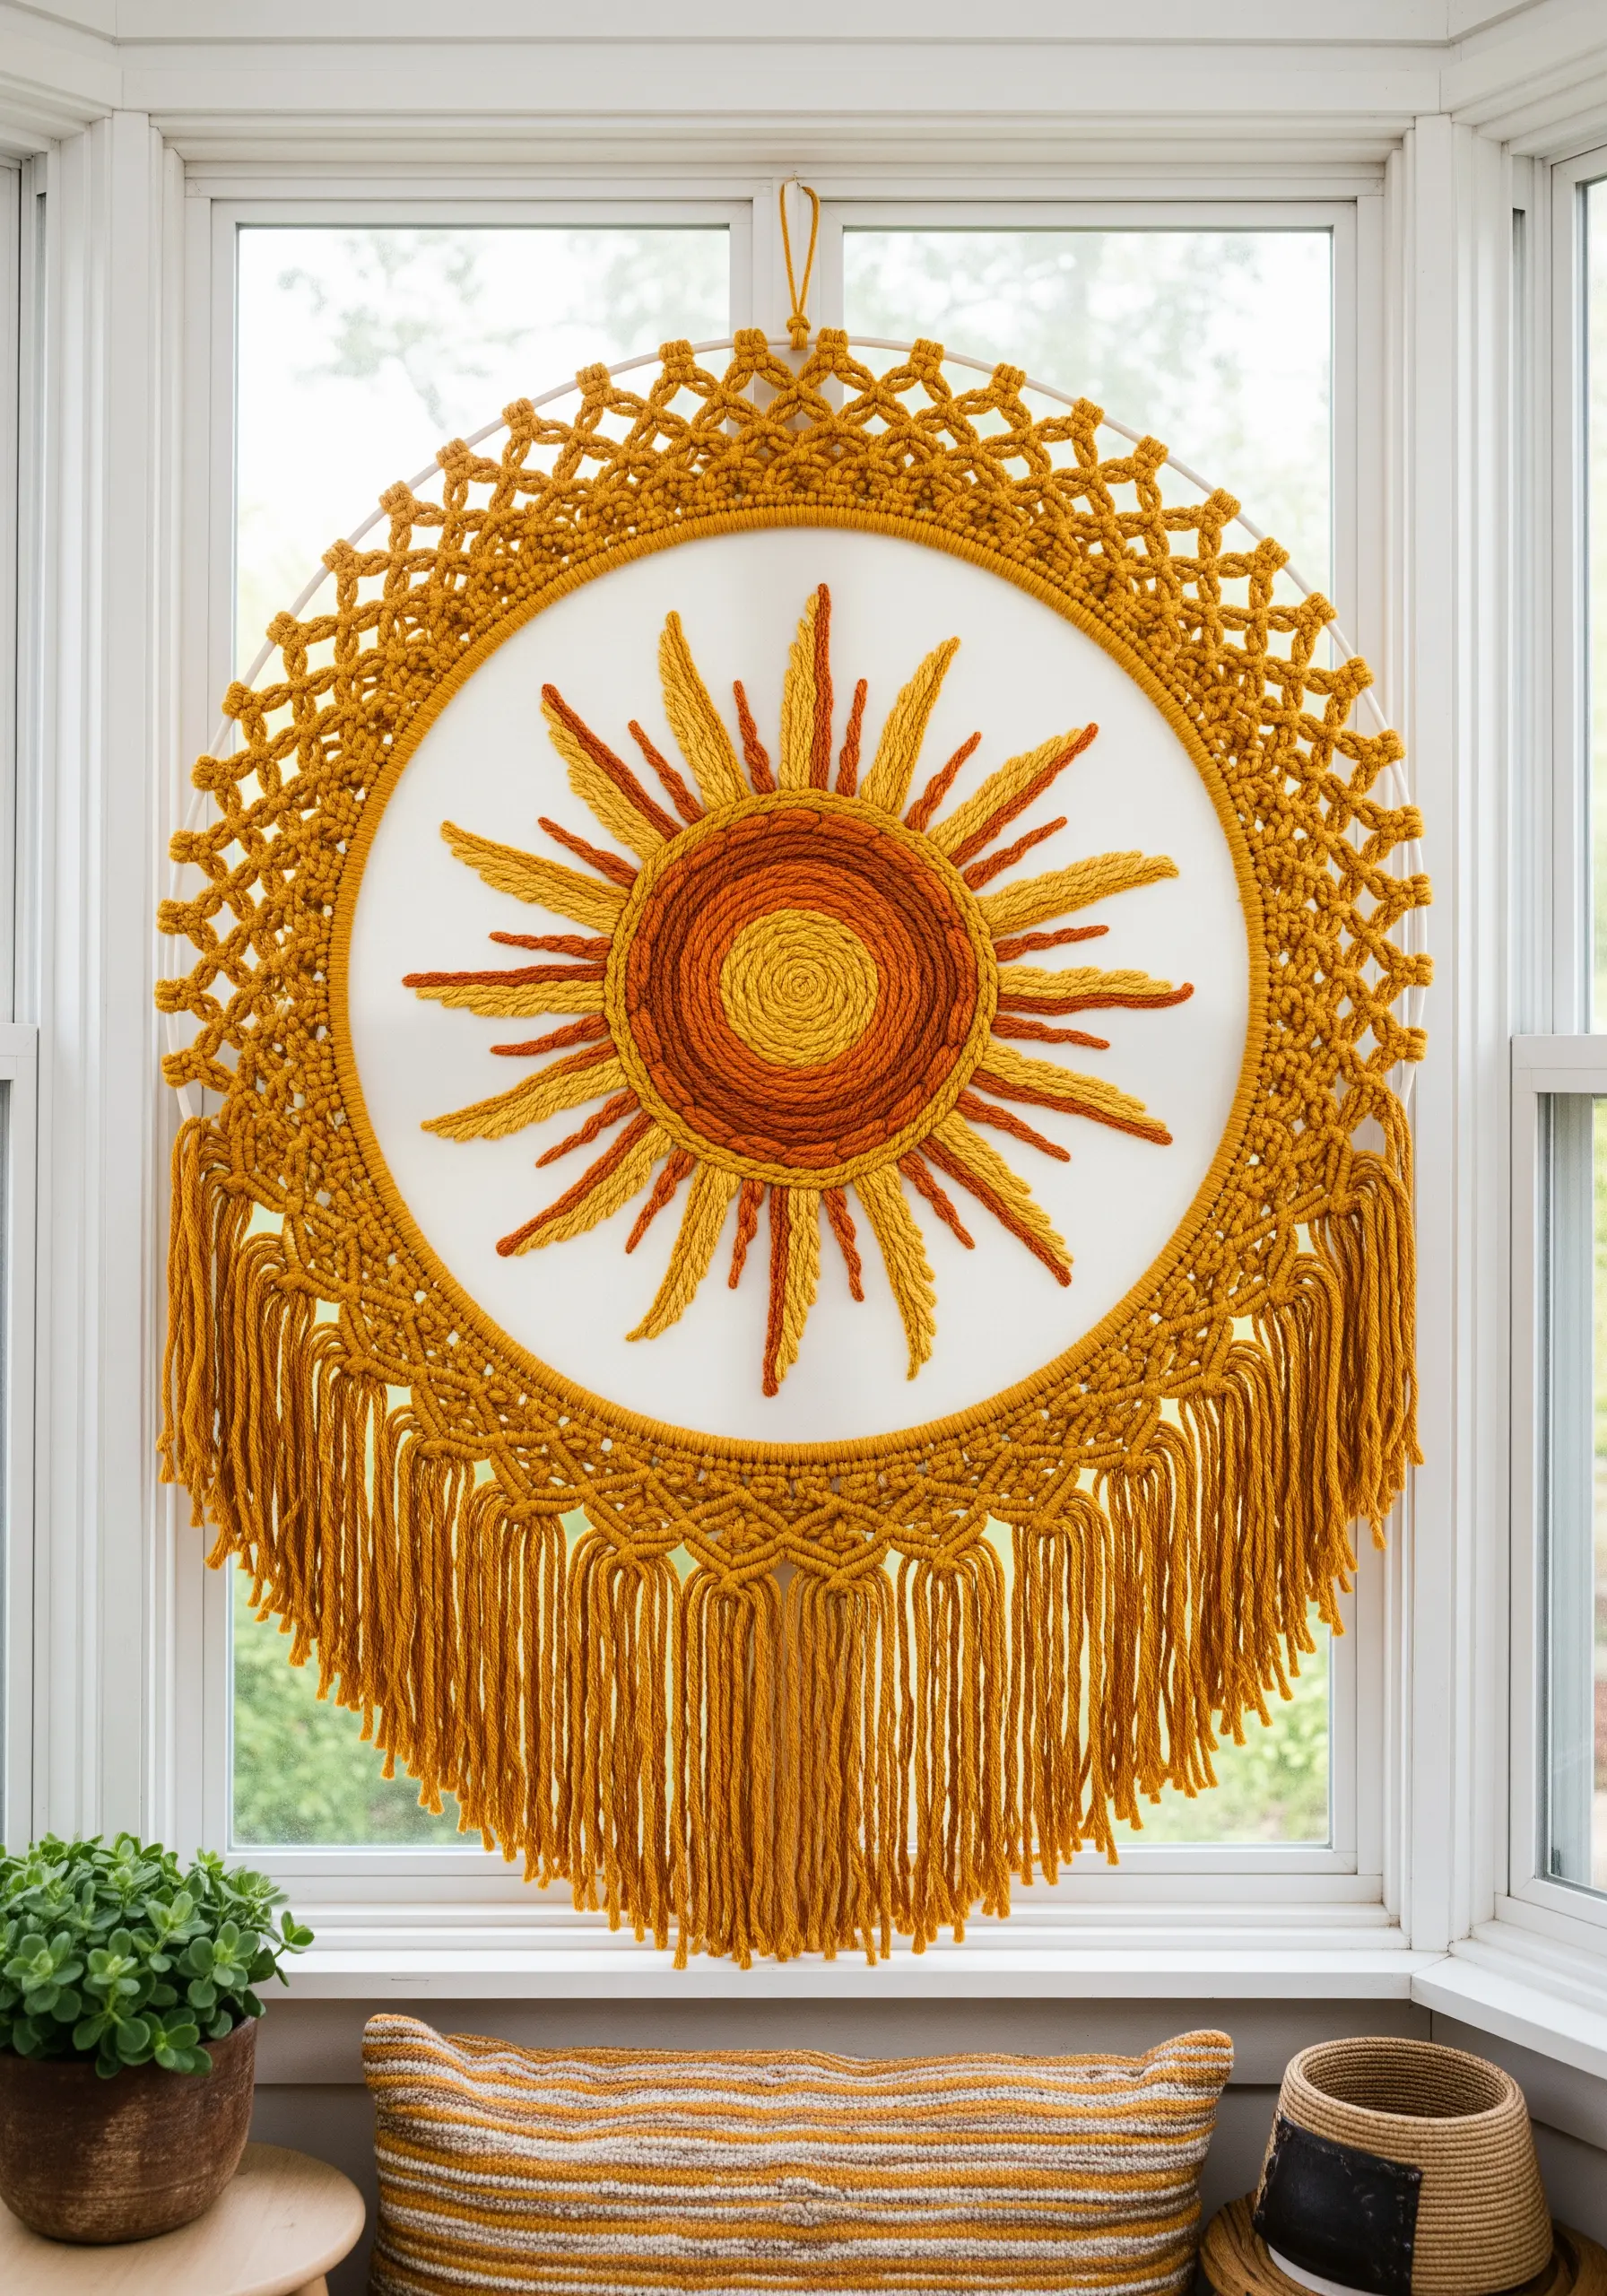
Create a stunning suncatcher by combining the structure of macrame with the detail of embroidery.
First, complete your embroidered sun design on fabric stretched within an inner hoop.
Then, place a second, larger hoop around the first and use the space between them as a frame for your macrame work, using knots like the lark’s head and square knot to attach cord.
This mixed-fiber approach results in a radiant, textural piece that plays beautifully with light.
26. Sketch with Thread to Convey Motion
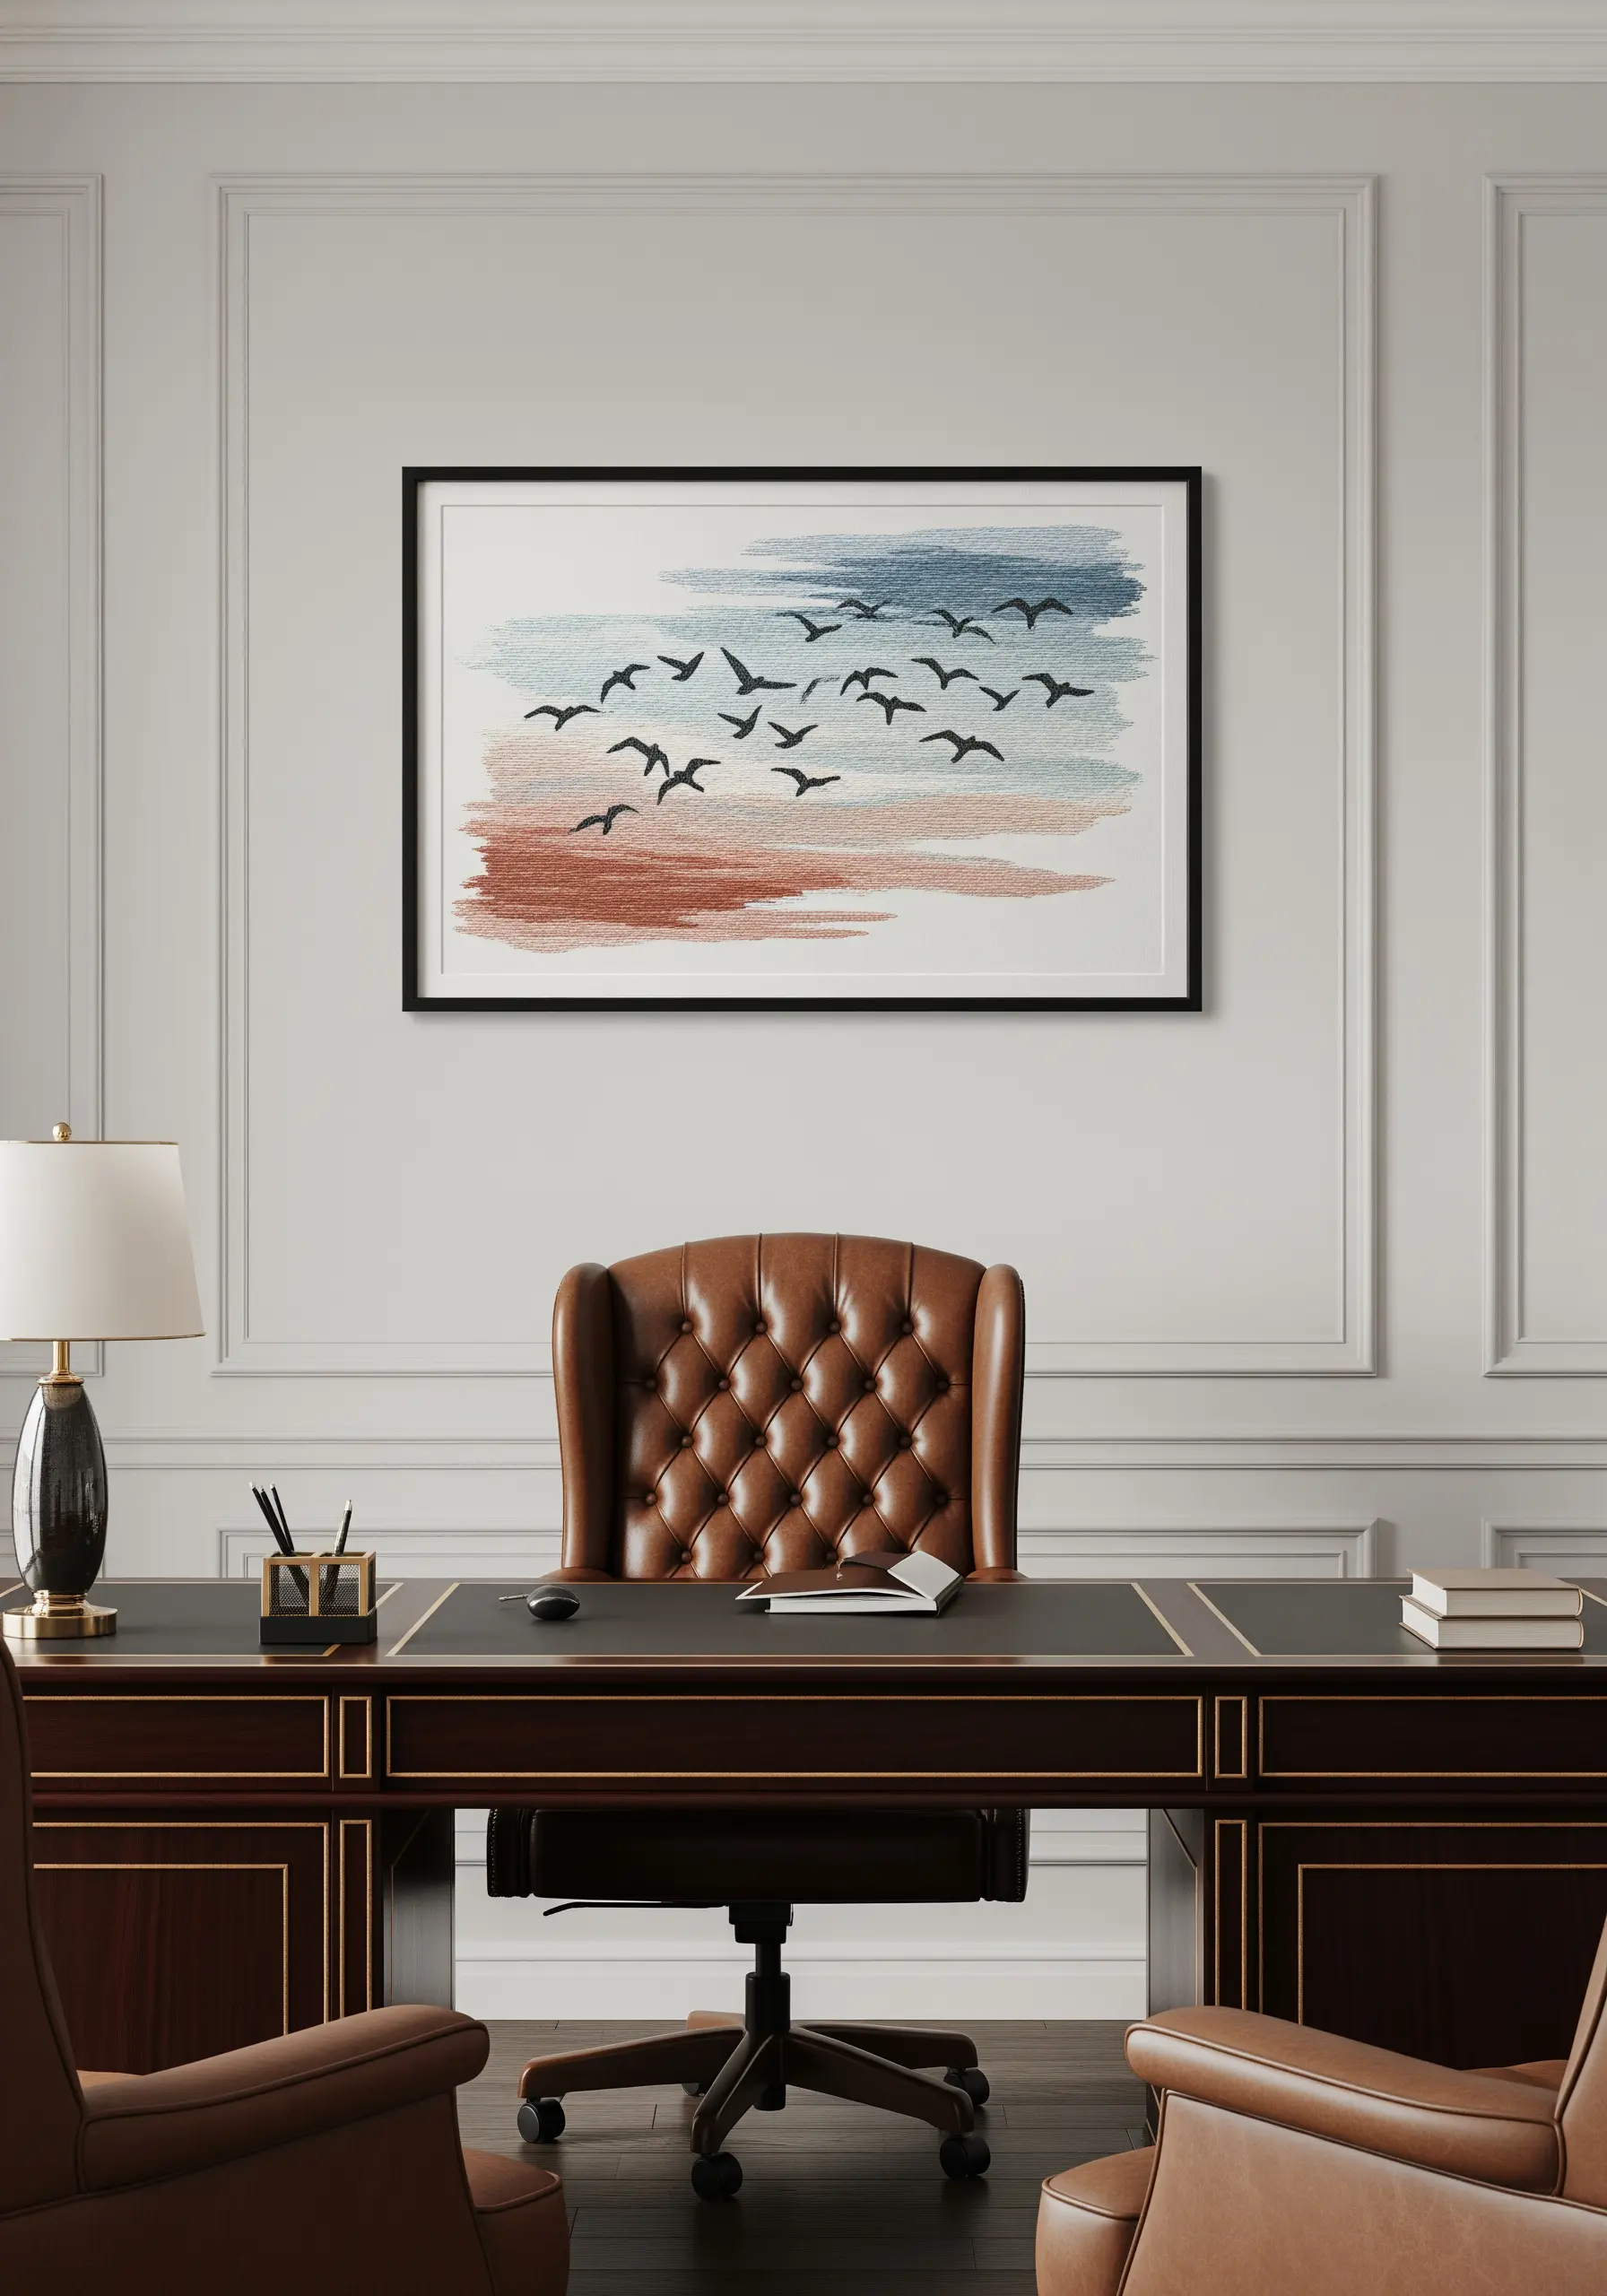
Capture the feeling of movement by using loose, expressive stitches that mimic a quick pencil sketch.
Use short, directional straight stitches or seed stitches for the colored background, allowing the fabric to show through.
For the birds, use a simple, dark backstitch, focusing on the gestural shape rather than perfect detail.
This technique proves that you don’t need dense, perfect stitches to create an evocative and artistic piece.
27. Embrace Hypnotic Lines with Concentric Stitches
For a bold, graphic piece inspired by natural patterns like tree rings, focus on flawless, repetitive line work.
Use a whipped backstitch or a heavy chain stitch in a high-contrast palette (like cream on dark brown) to create solid, uninterrupted circles.
The key to success is consistency in your stitch length and tension to ensure the lines are smooth and evenly spaced.
This disciplined approach to stitching results in a modern, meditative, and visually powerful work of art.
28. Create Balance with Symmetrical Botanicals
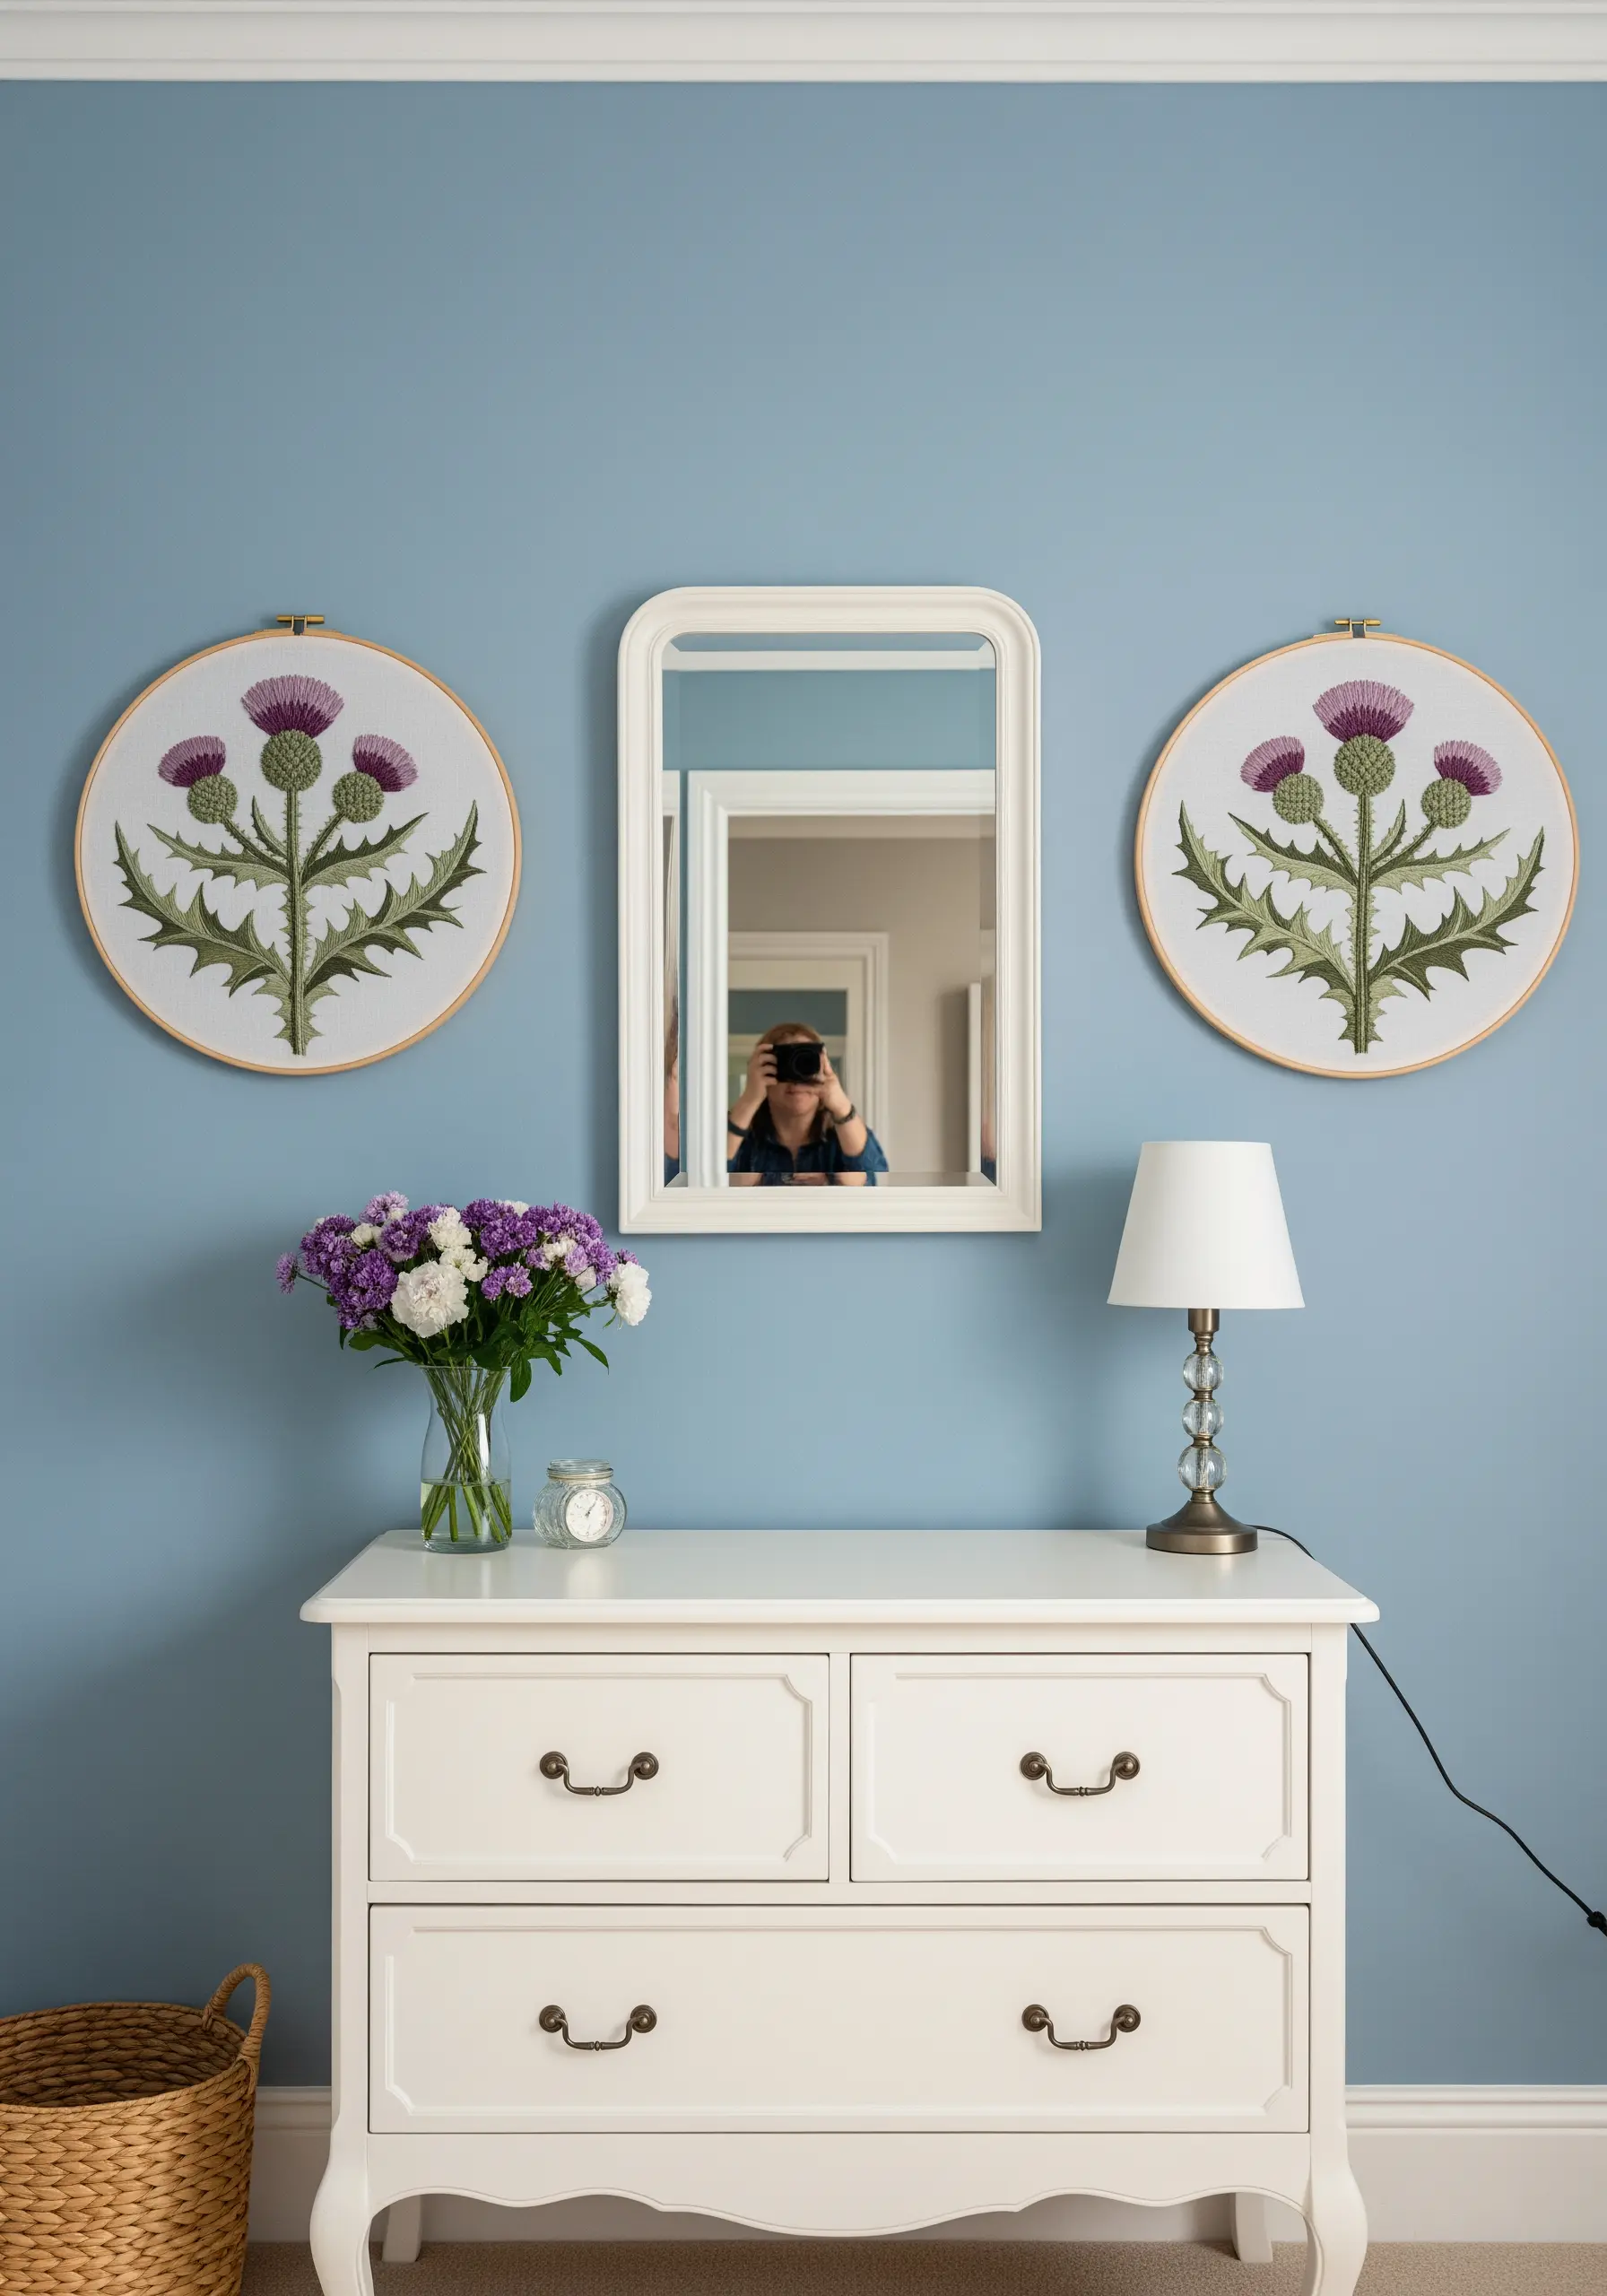
Flank a mirror, window, or piece of furniture with two identical embroideries to create a powerful sense of symmetry and order.
For the thistle flowers, use bullion knots or turkey work for a fluffy, textured top, and outline the spiky leaves with a sharp split stitch.
Using the exact same pattern and color palette for both pieces ensures they act as a perfect pair, bringing a classic, intentional design element to your space.
29. Layer Appliqué for a Rustic Statement Piece
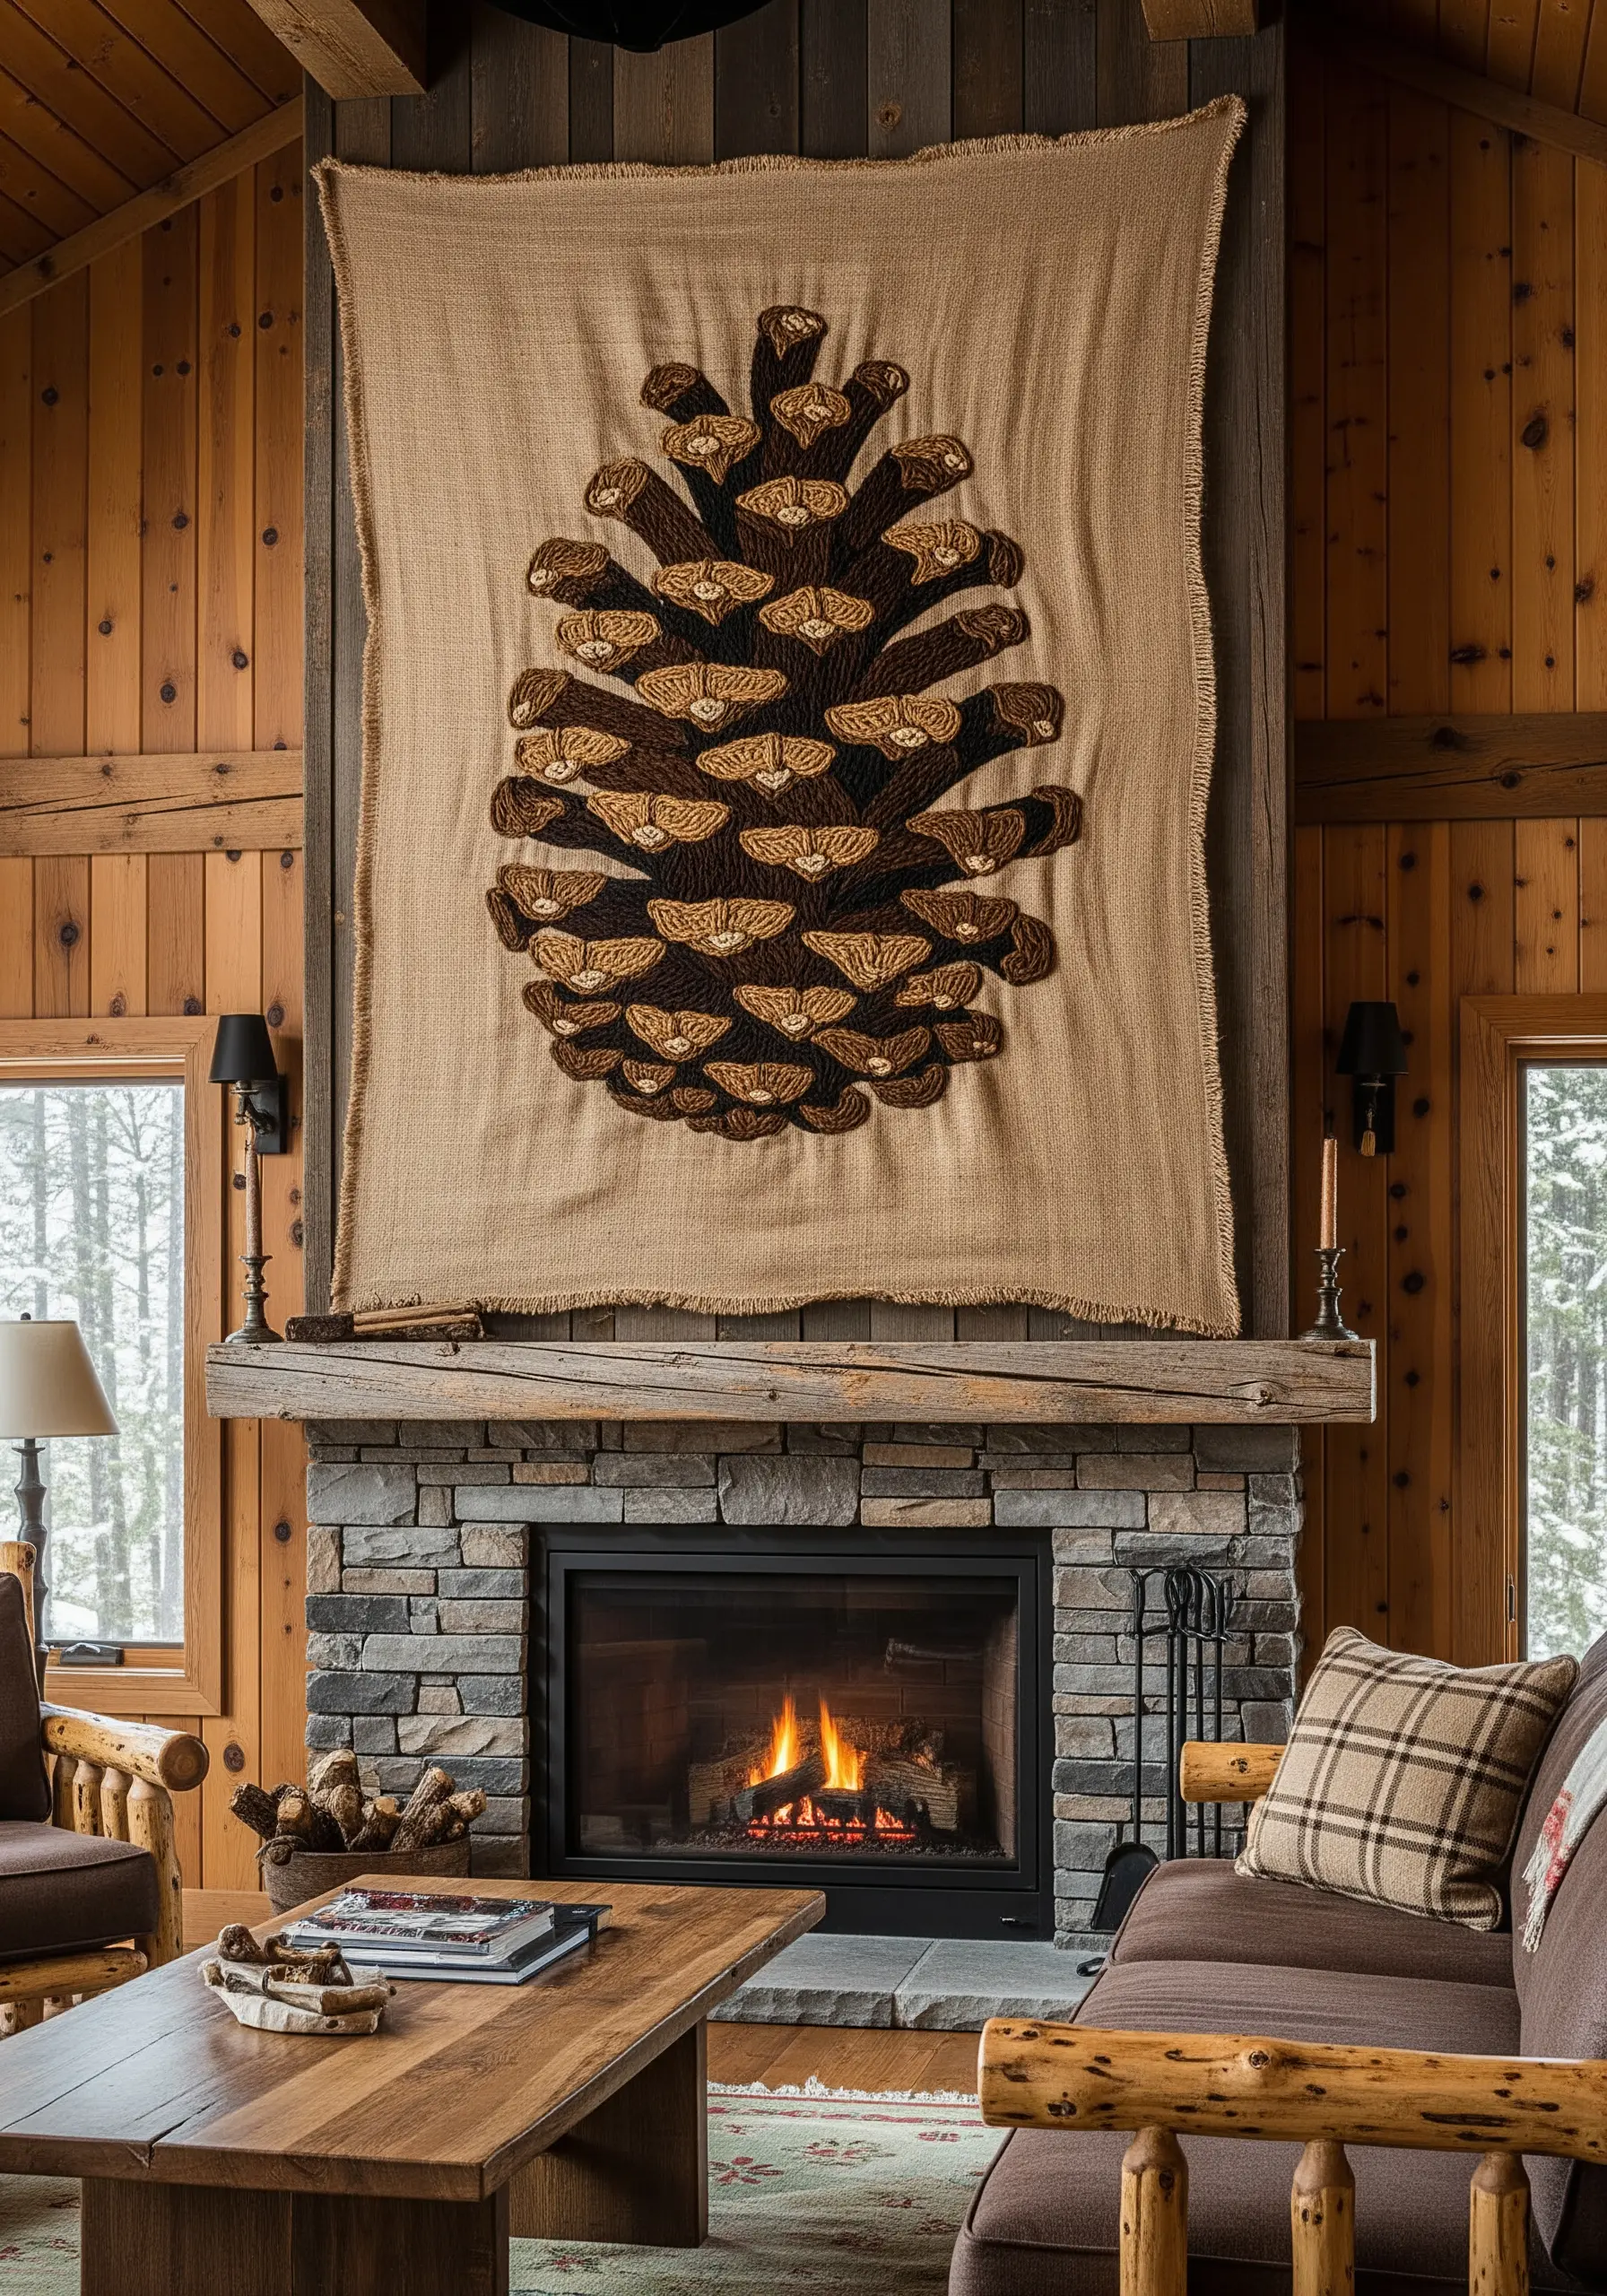
For a large-scale design on a rustic fabric like burlap, start with appliqué to block in your main shapes.
Cut the pinecone scales from felt or dark cotton and stitch them down, layering them to create natural depth.
Then, add embroidered details on top of the appliqué, using a lighter-colored thread and simple straight stitches to define the edges and add texture.
This layering technique adds dimension and detail without having to fill the entire massive area with dense stitching.
30. Suggest Water with Minimalist Stitches
You don’t need to fill an entire area with blue to represent water; simple, suggestive lines are often more elegant.
Use a few wavy lines of backstitch or running stitch in a light blue or grey thread to mimic the gentle ripples of a pond.
Let the unstitched fabric become part of the composition, creating a calm scene that feels light and airy.
This minimalist approach is a masterclass in using negative space effectively.
31. Deconstruct Form with Abstract Appliqué
Create a modern, abstract composition by stitching large, organic shapes of colored fabric onto a sheer or semi-sheer base.
Fill each shape with a different textural darning stitch, running your threads in different directions to create visual interest.
Introduce a deconstructed element by letting some threads hang loose, which adds movement and a raw, artistic feel.
This technique transforms a simple room divider into a piece of abstract textile wall art.
32. Add a Touch of Whimsy with Raised Stitches
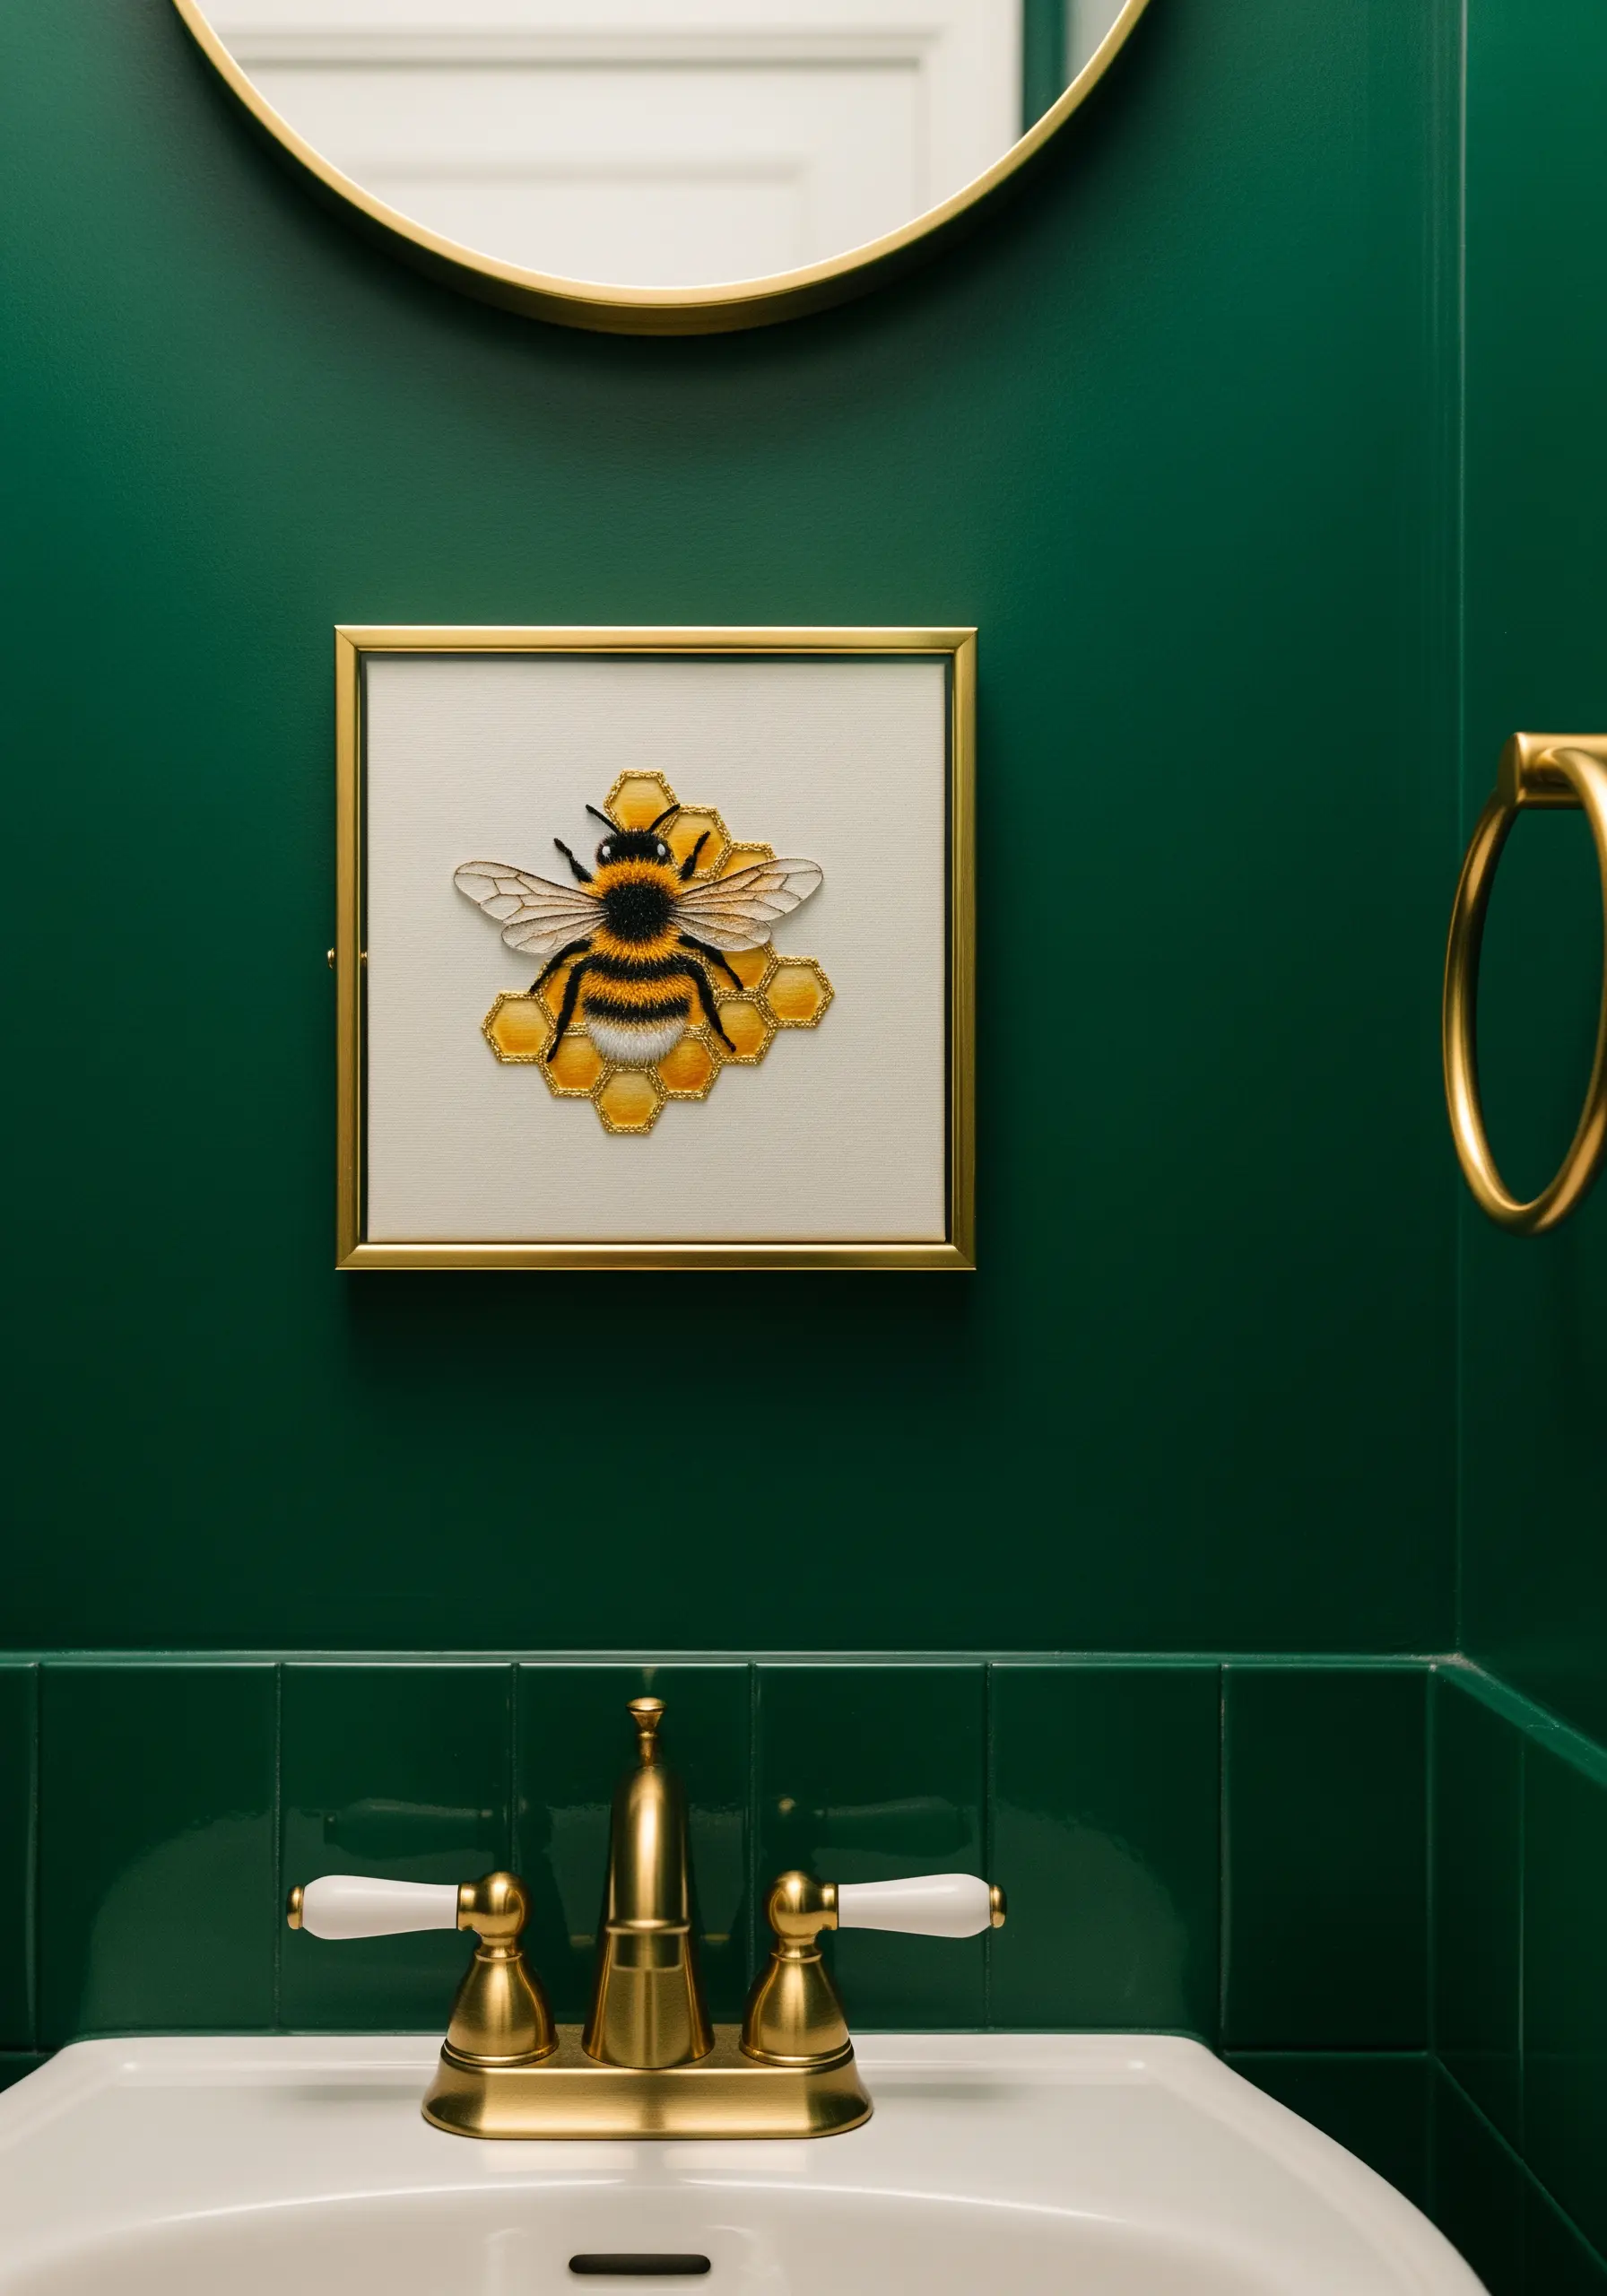
Give your bee a fuzzy, realistic texture by using the turkey work stitch for its body. This creates loops that you can trim to your desired length for a plush, 3D effect.
For the honeycomb, create a clean geometric background with a simple backstitch in a contrasting gold thread.
To make the wings appear translucent, use a small piece of organza fabric attached with tiny, nearly invisible stitches.
These small details transform a simple motif into a jewel-like piece of art.
33. Weave Thread for Purely Textural Art

Explore the art of texture by limiting your palette to just one or two neutral colors.
In one frame, create a field of tightly packed French knots or beaded stitches. In another, weave your thread over and under foundation stitches to create a woven, basket-like effect.
This exercise forces you to focus on how different stitches reflect light and create shadow, resulting in a sophisticated, minimalist triptych that celebrates the medium itself.
34. Illustrate a Modern Kitchen Herbarium
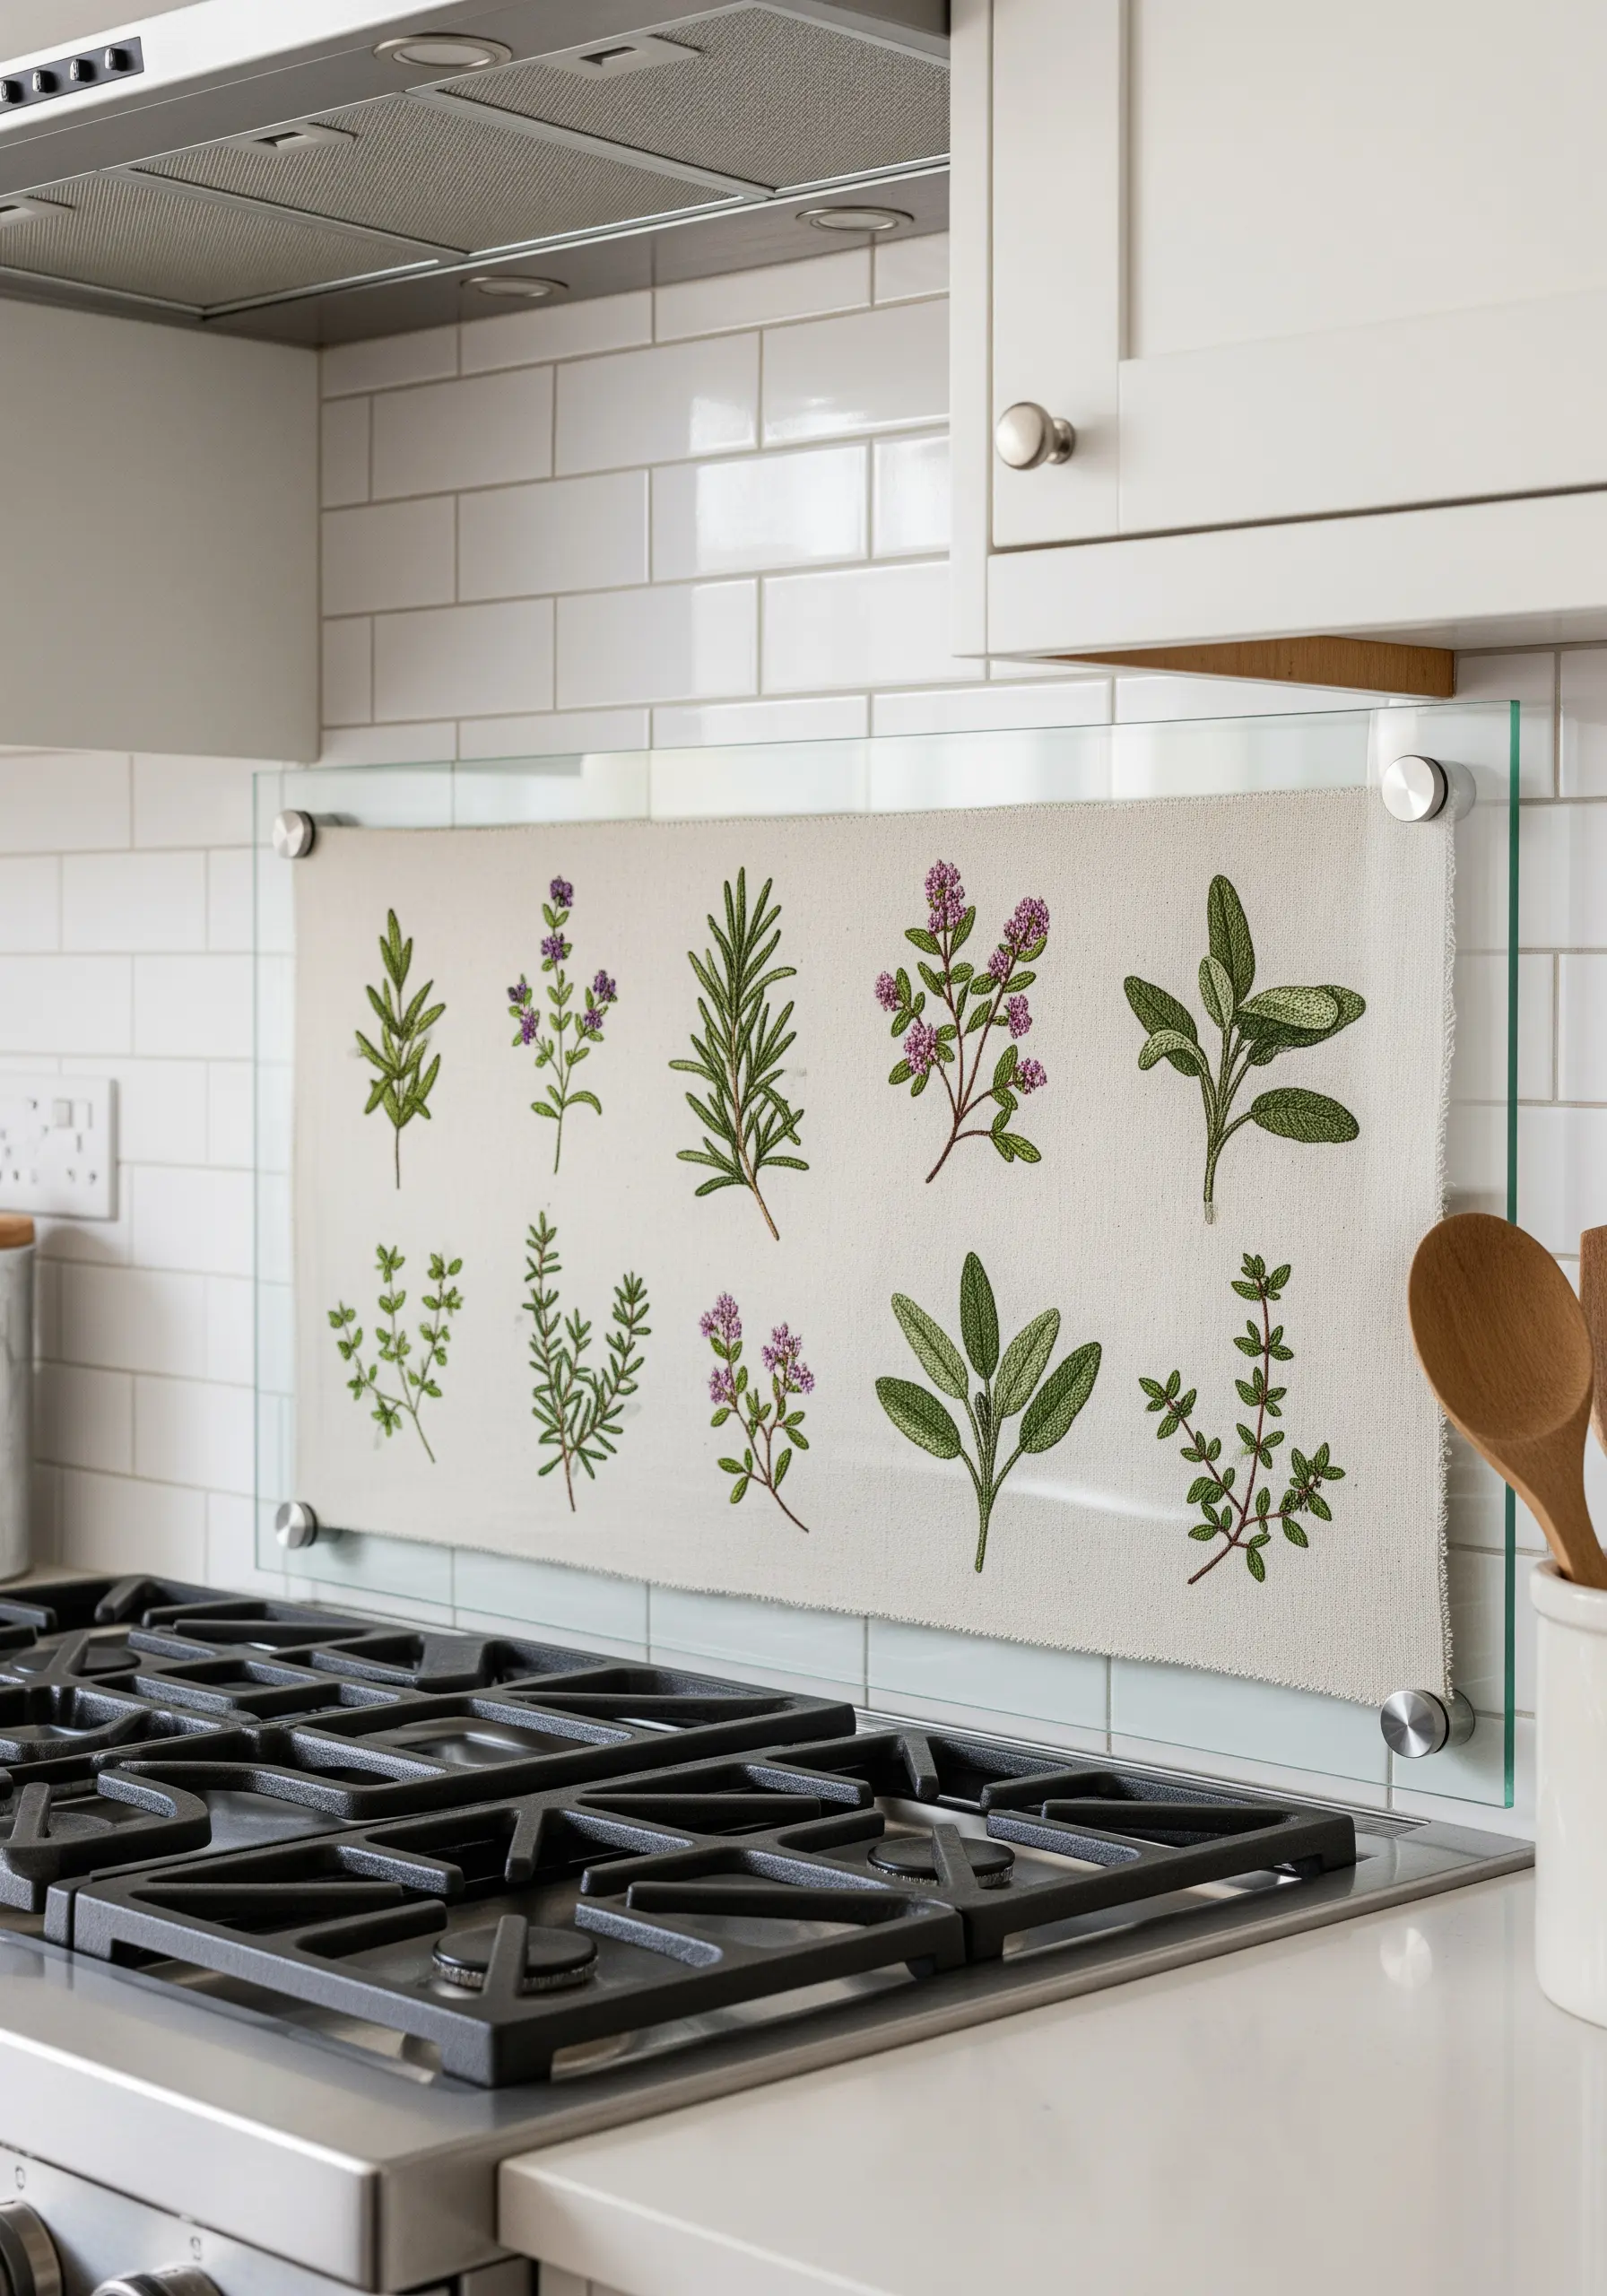
Capture the delicate forms of kitchen herbs using fine, single-strand embroidery floss for a look that mimics botanical illustration.
Use a simple stem stitch for the main stalks and tiny lazy daisy stitches or straight stitches for the leaves of herbs like thyme and lavender.
Arranging them in a grid creates a clean, scientific-chart aesthetic that is both beautiful and educational.
It’s one of the most elegant embroidered kitchen towel designs, easily adapted for framed art.
35. Create Atmosphere with Thread Density
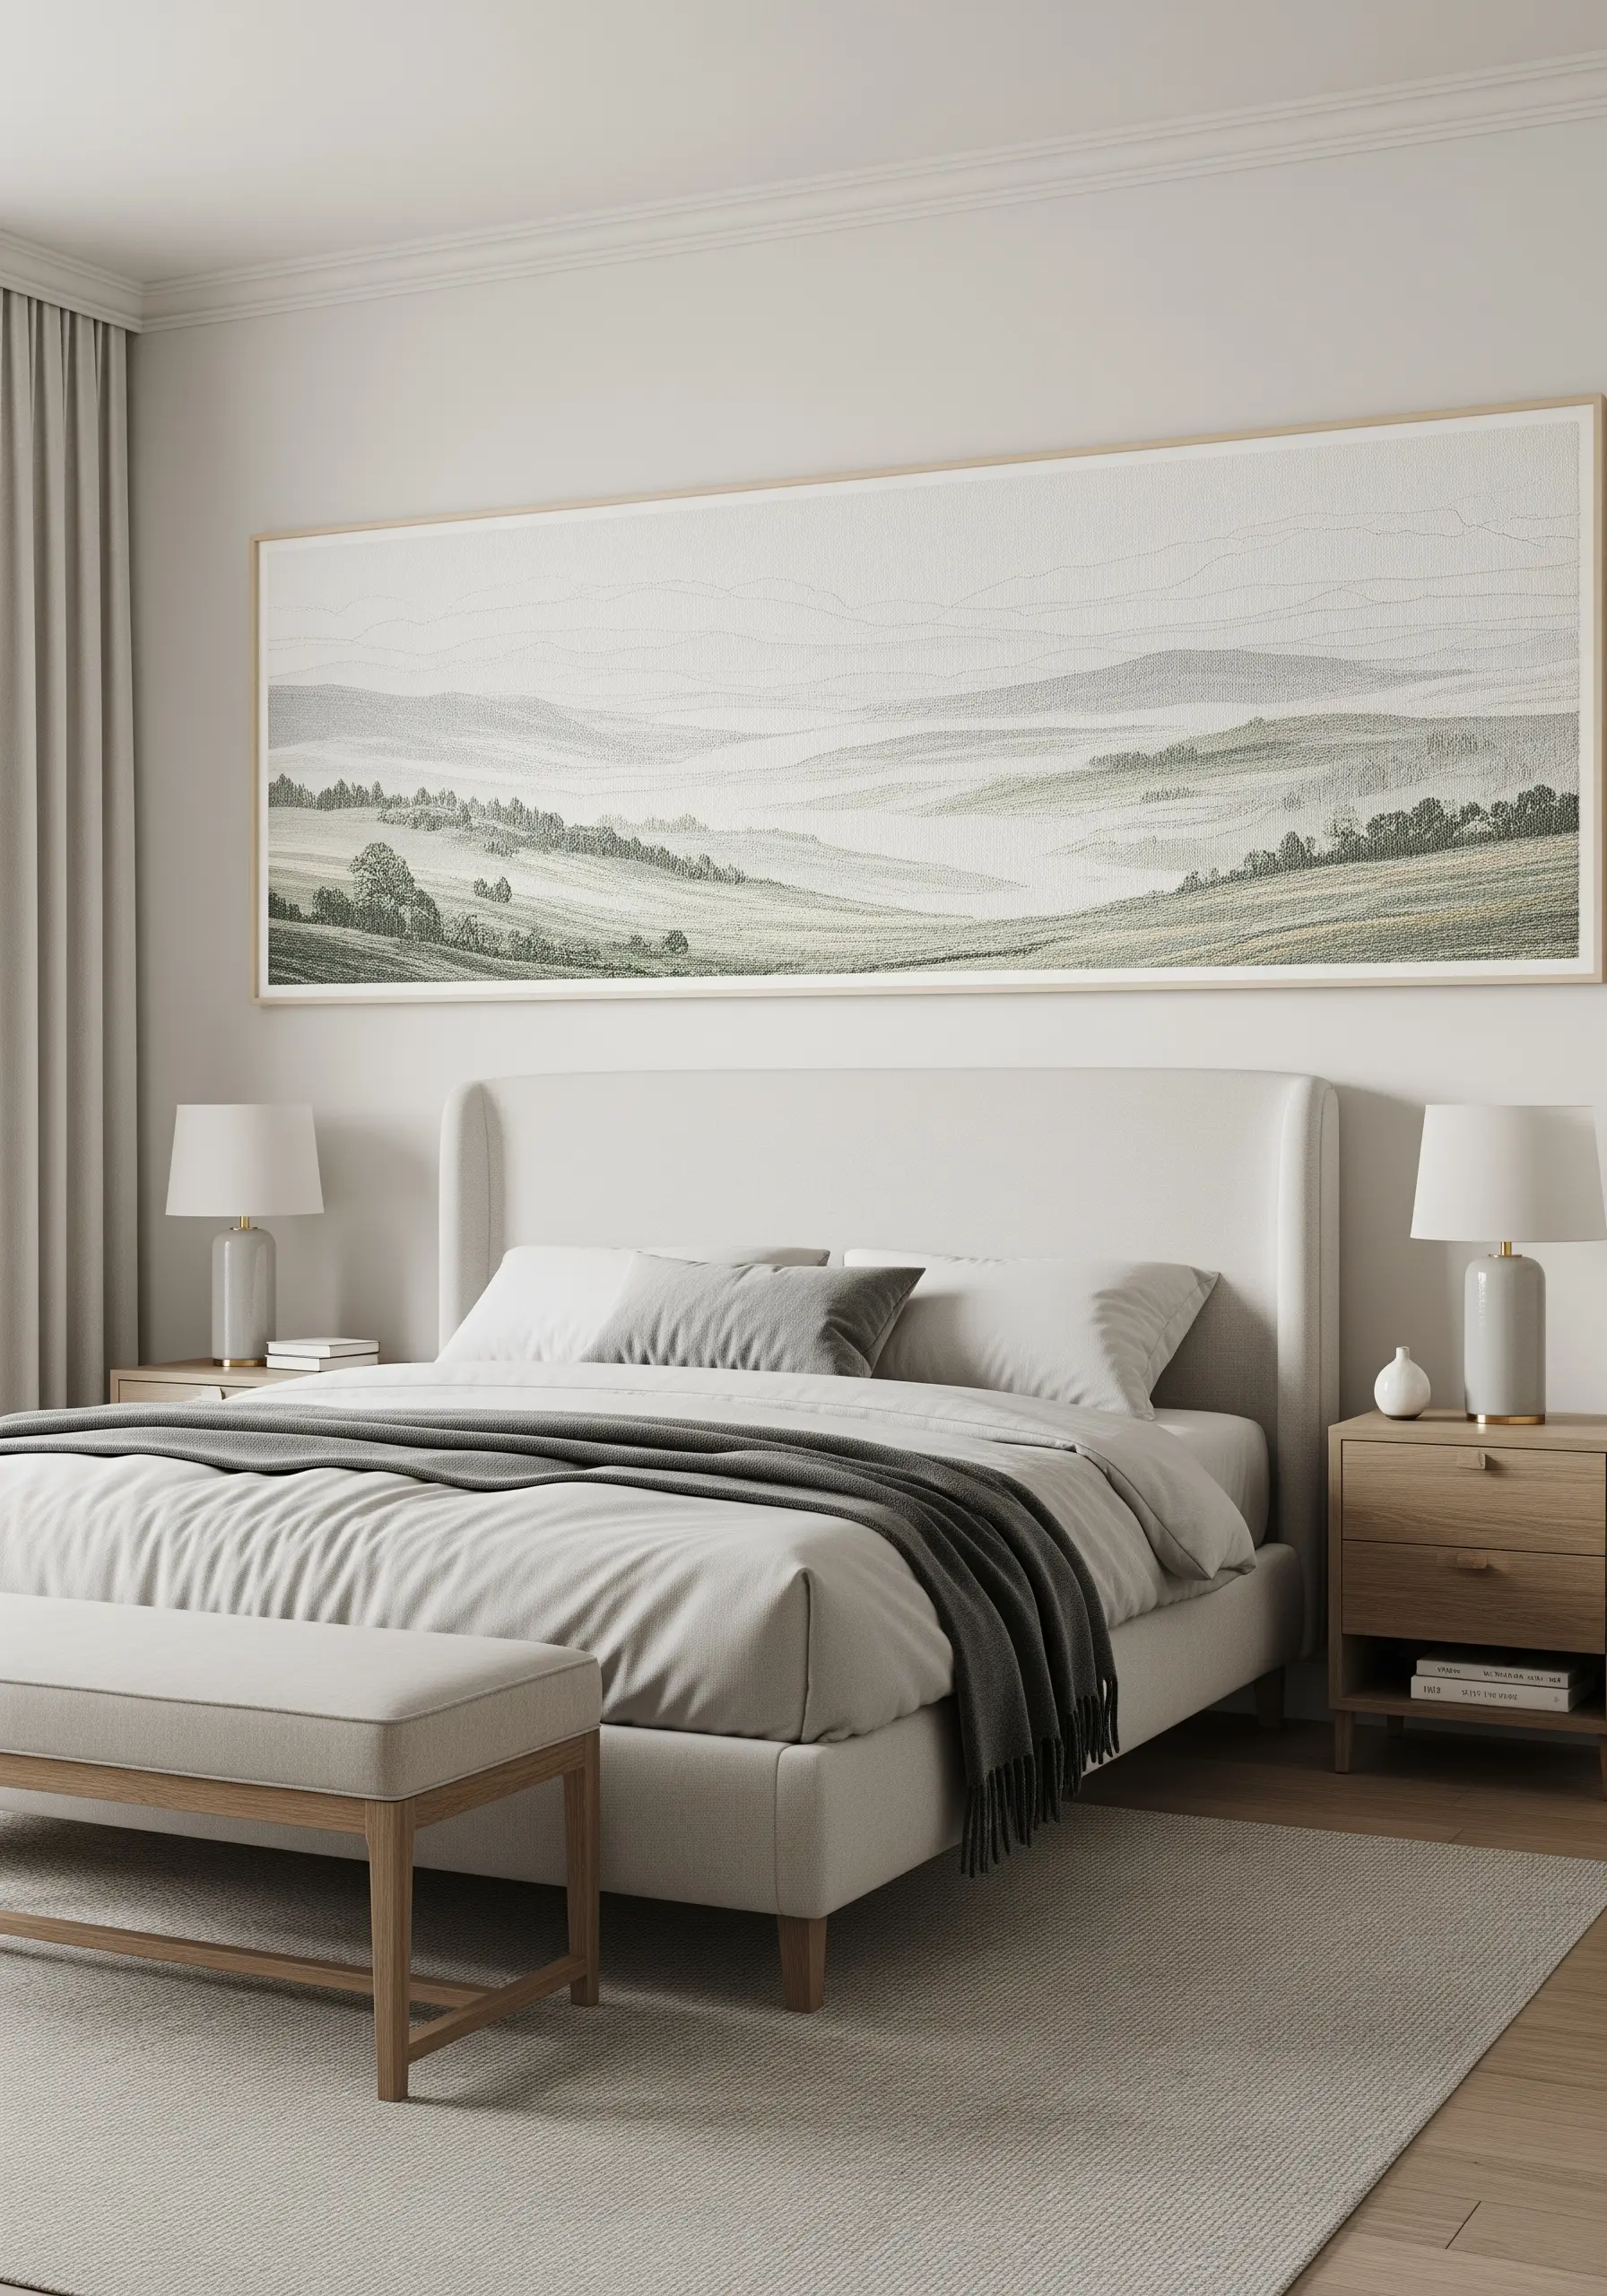
To achieve the misty, layered look of a distant landscape, use the density of your stitches to create atmospheric perspective.
In the foreground, use multiple strands of floss and dense stitches like satin stitch or French knots to create solid, dark forms.
For the rolling hills in the background, switch to a single strand of thread and use a sparse seed stitch or scattered straight stitches.
This allows the fabric color to show through, perfectly mimicking the effect of mist and distance.


