

That blank wall in the corner of your room isn’t an afterthought—it’s a canvas waiting for a story. Before you reach for a generic print, consider the unique warmth and texture that only a handmade piece of embroidery can offer. It’s more than decoration; it’s a quiet testament to your time, your skill, and your personal style.
You don’t need to be a master painter to create stunning visual art. With a needle and thread, you can ‘paint’ with texture, blend colors with surprising subtlety, and build entire worlds within the simple circle of a hoop. The ideas that follow aren’t just patterns to copy; they are techniques and approaches designed to elevate your work and give you the confidence to transform your own ideas into polished, intentional art.
From minimalist line drawings that breathe elegance into a hallway to lush, textured landscapes that invite you to touch them, each project holds a key to unlocking a new level of artistry. Let’s explore how to turn that empty space into your own personal gallery, one thoughtful stitch at a time.
1. Curate a Botanical Triptych

Create a cohesive series by selecting three related botanical motifs—like a leaf, a fungus, and a flower from the same ecosystem.
Use the same neutral linen fabric and simple wooden hoops for all three pieces to ensure they feel like a unified collection, not random projects.
For fine details, like the veins on the fern, use a single strand of floss and tiny backstitches to achieve a delicate, illustrative quality.
Achieve realistic shading on the mushrooms by using the long-and-short stitch, blending three to four shades of brown from dark to light to create convincing depth.
2. Frame Architectural Line Art
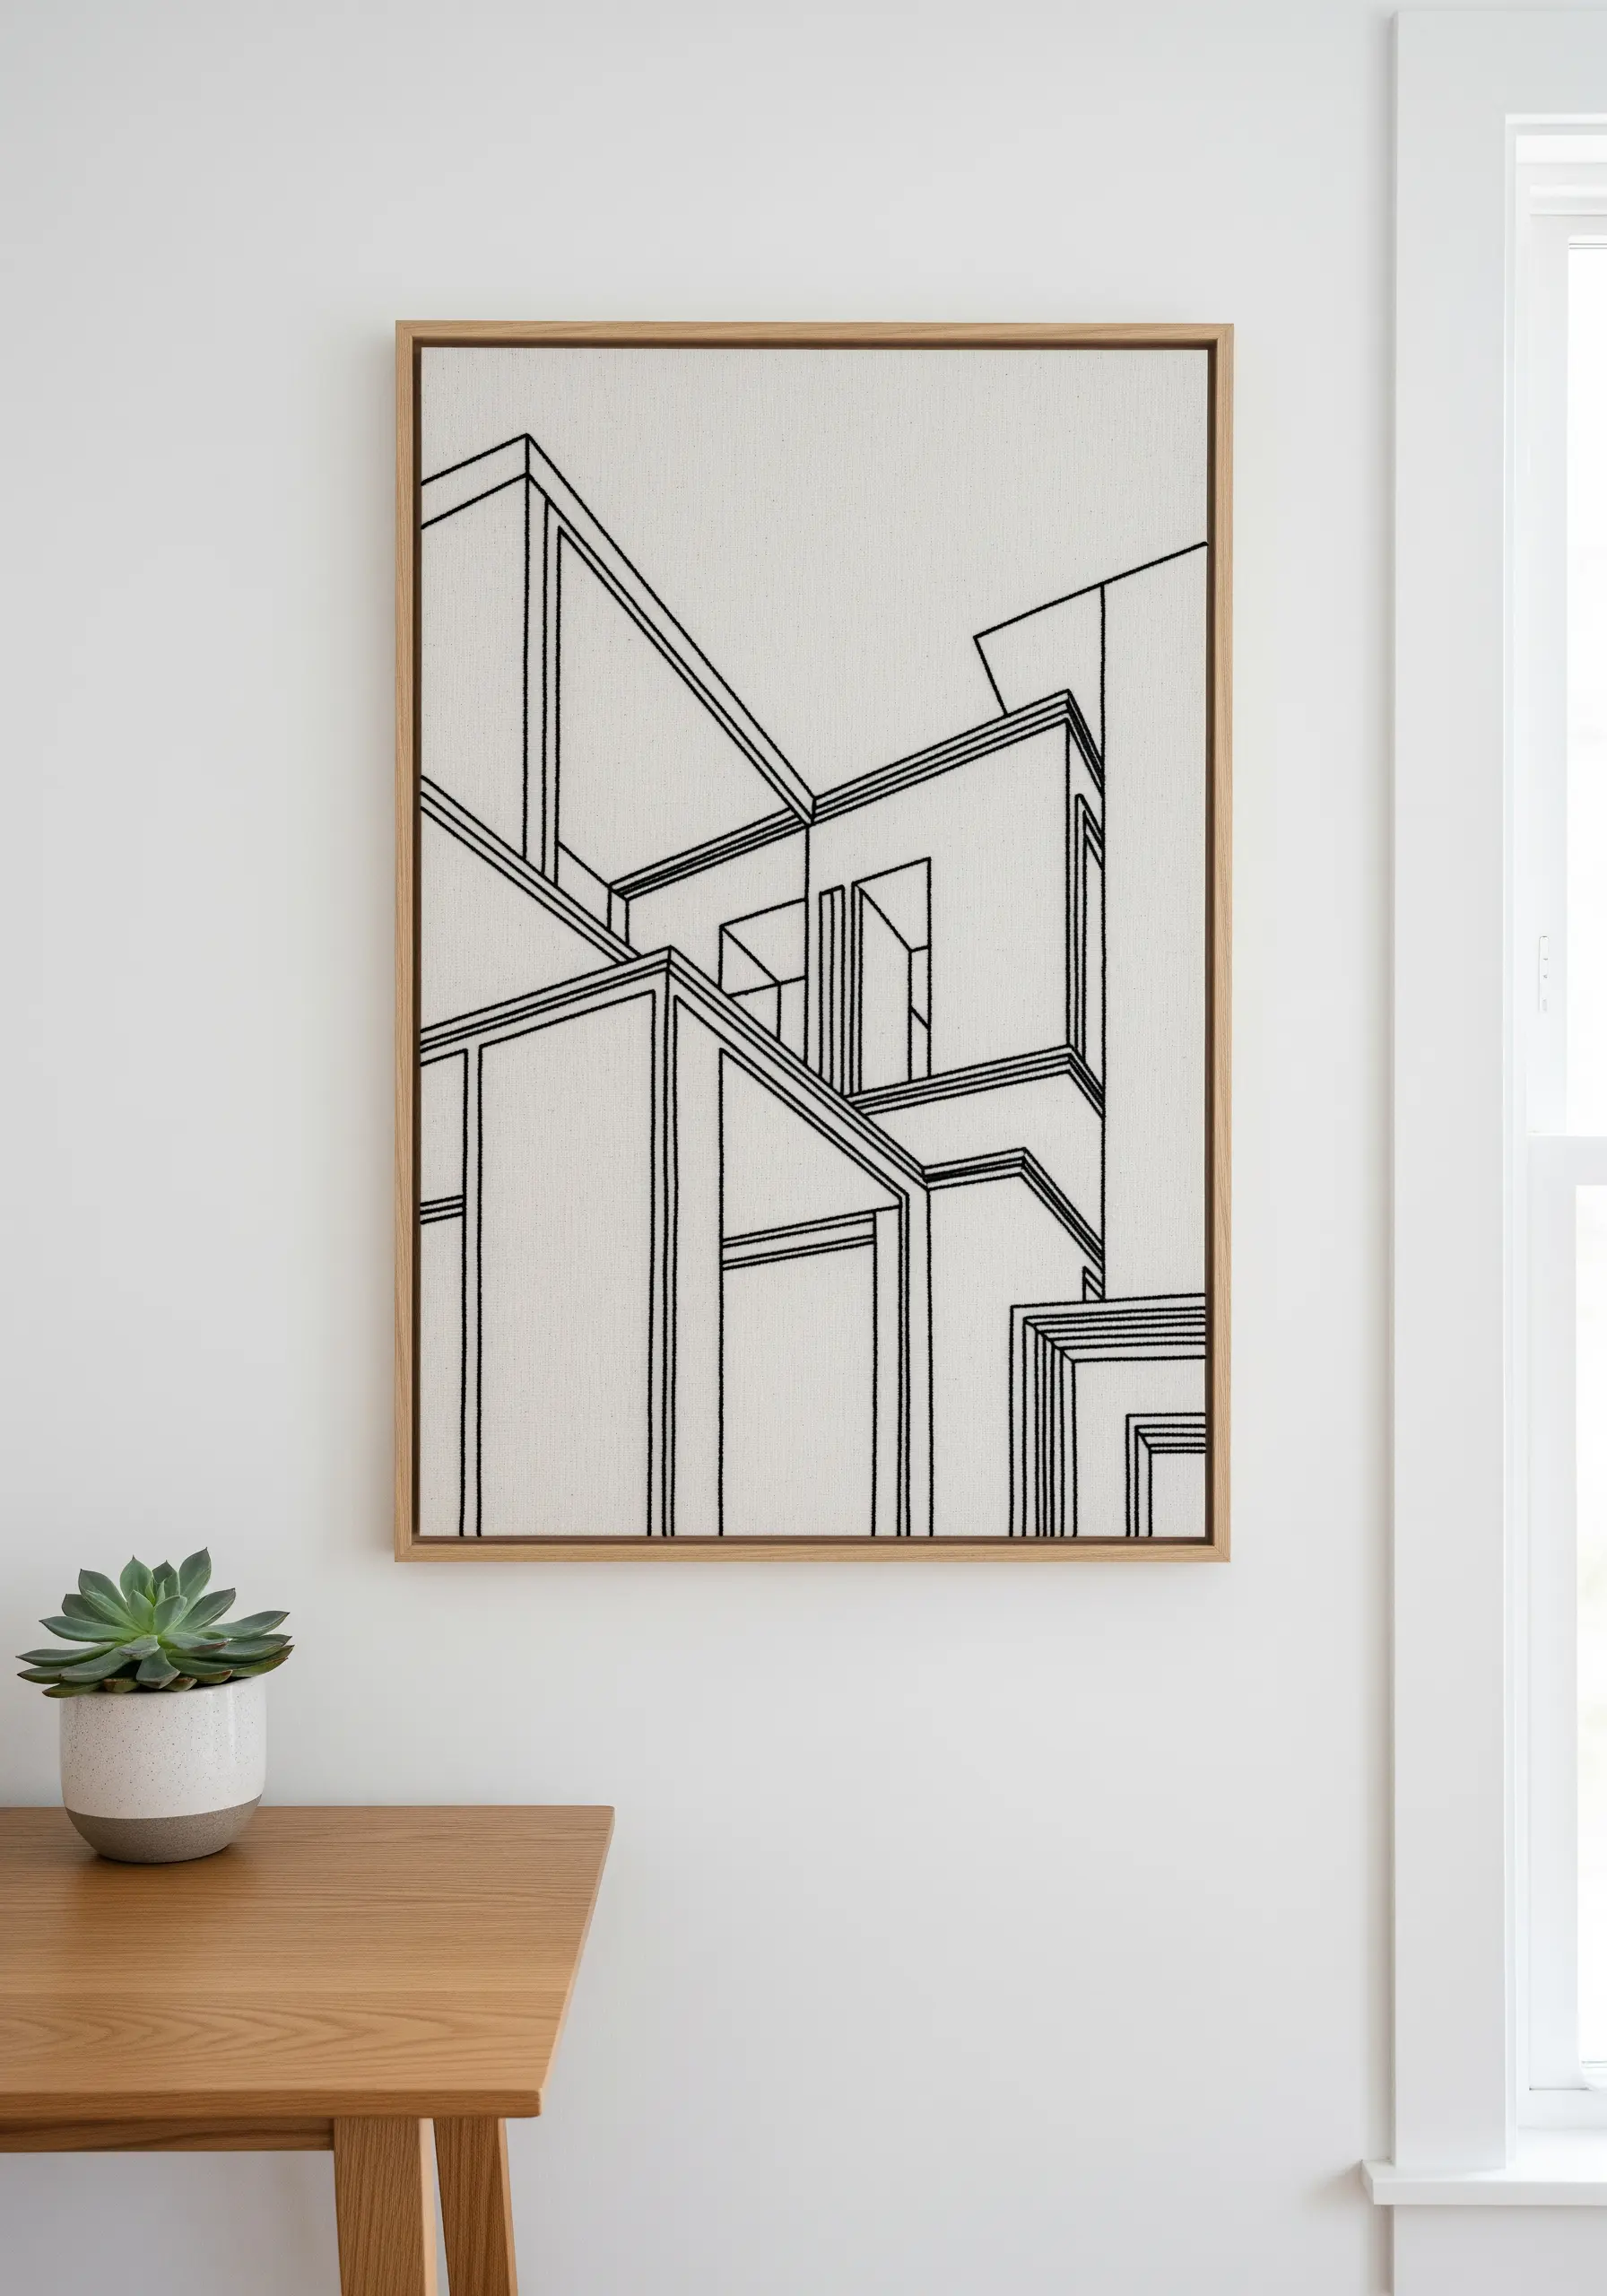
Transform a simple architectural sketch into a statement piece by focusing on clean, confident lines.
Use a thick, non-divisible thread like Perle cotton #8 to give your outlines weight and presence against a textured fabric like cotton Aida or evenweave linen.
Ensure your lines remain crisp by using a consistent backstitch or stem stitch, pulling each stitch taut but not so tight that it puckers the fabric.
Mounting the finished piece in a floating frame elevates it from a craft project to sophisticated minimalist wall art.
3. Assemble a Celestial Gallery Wall
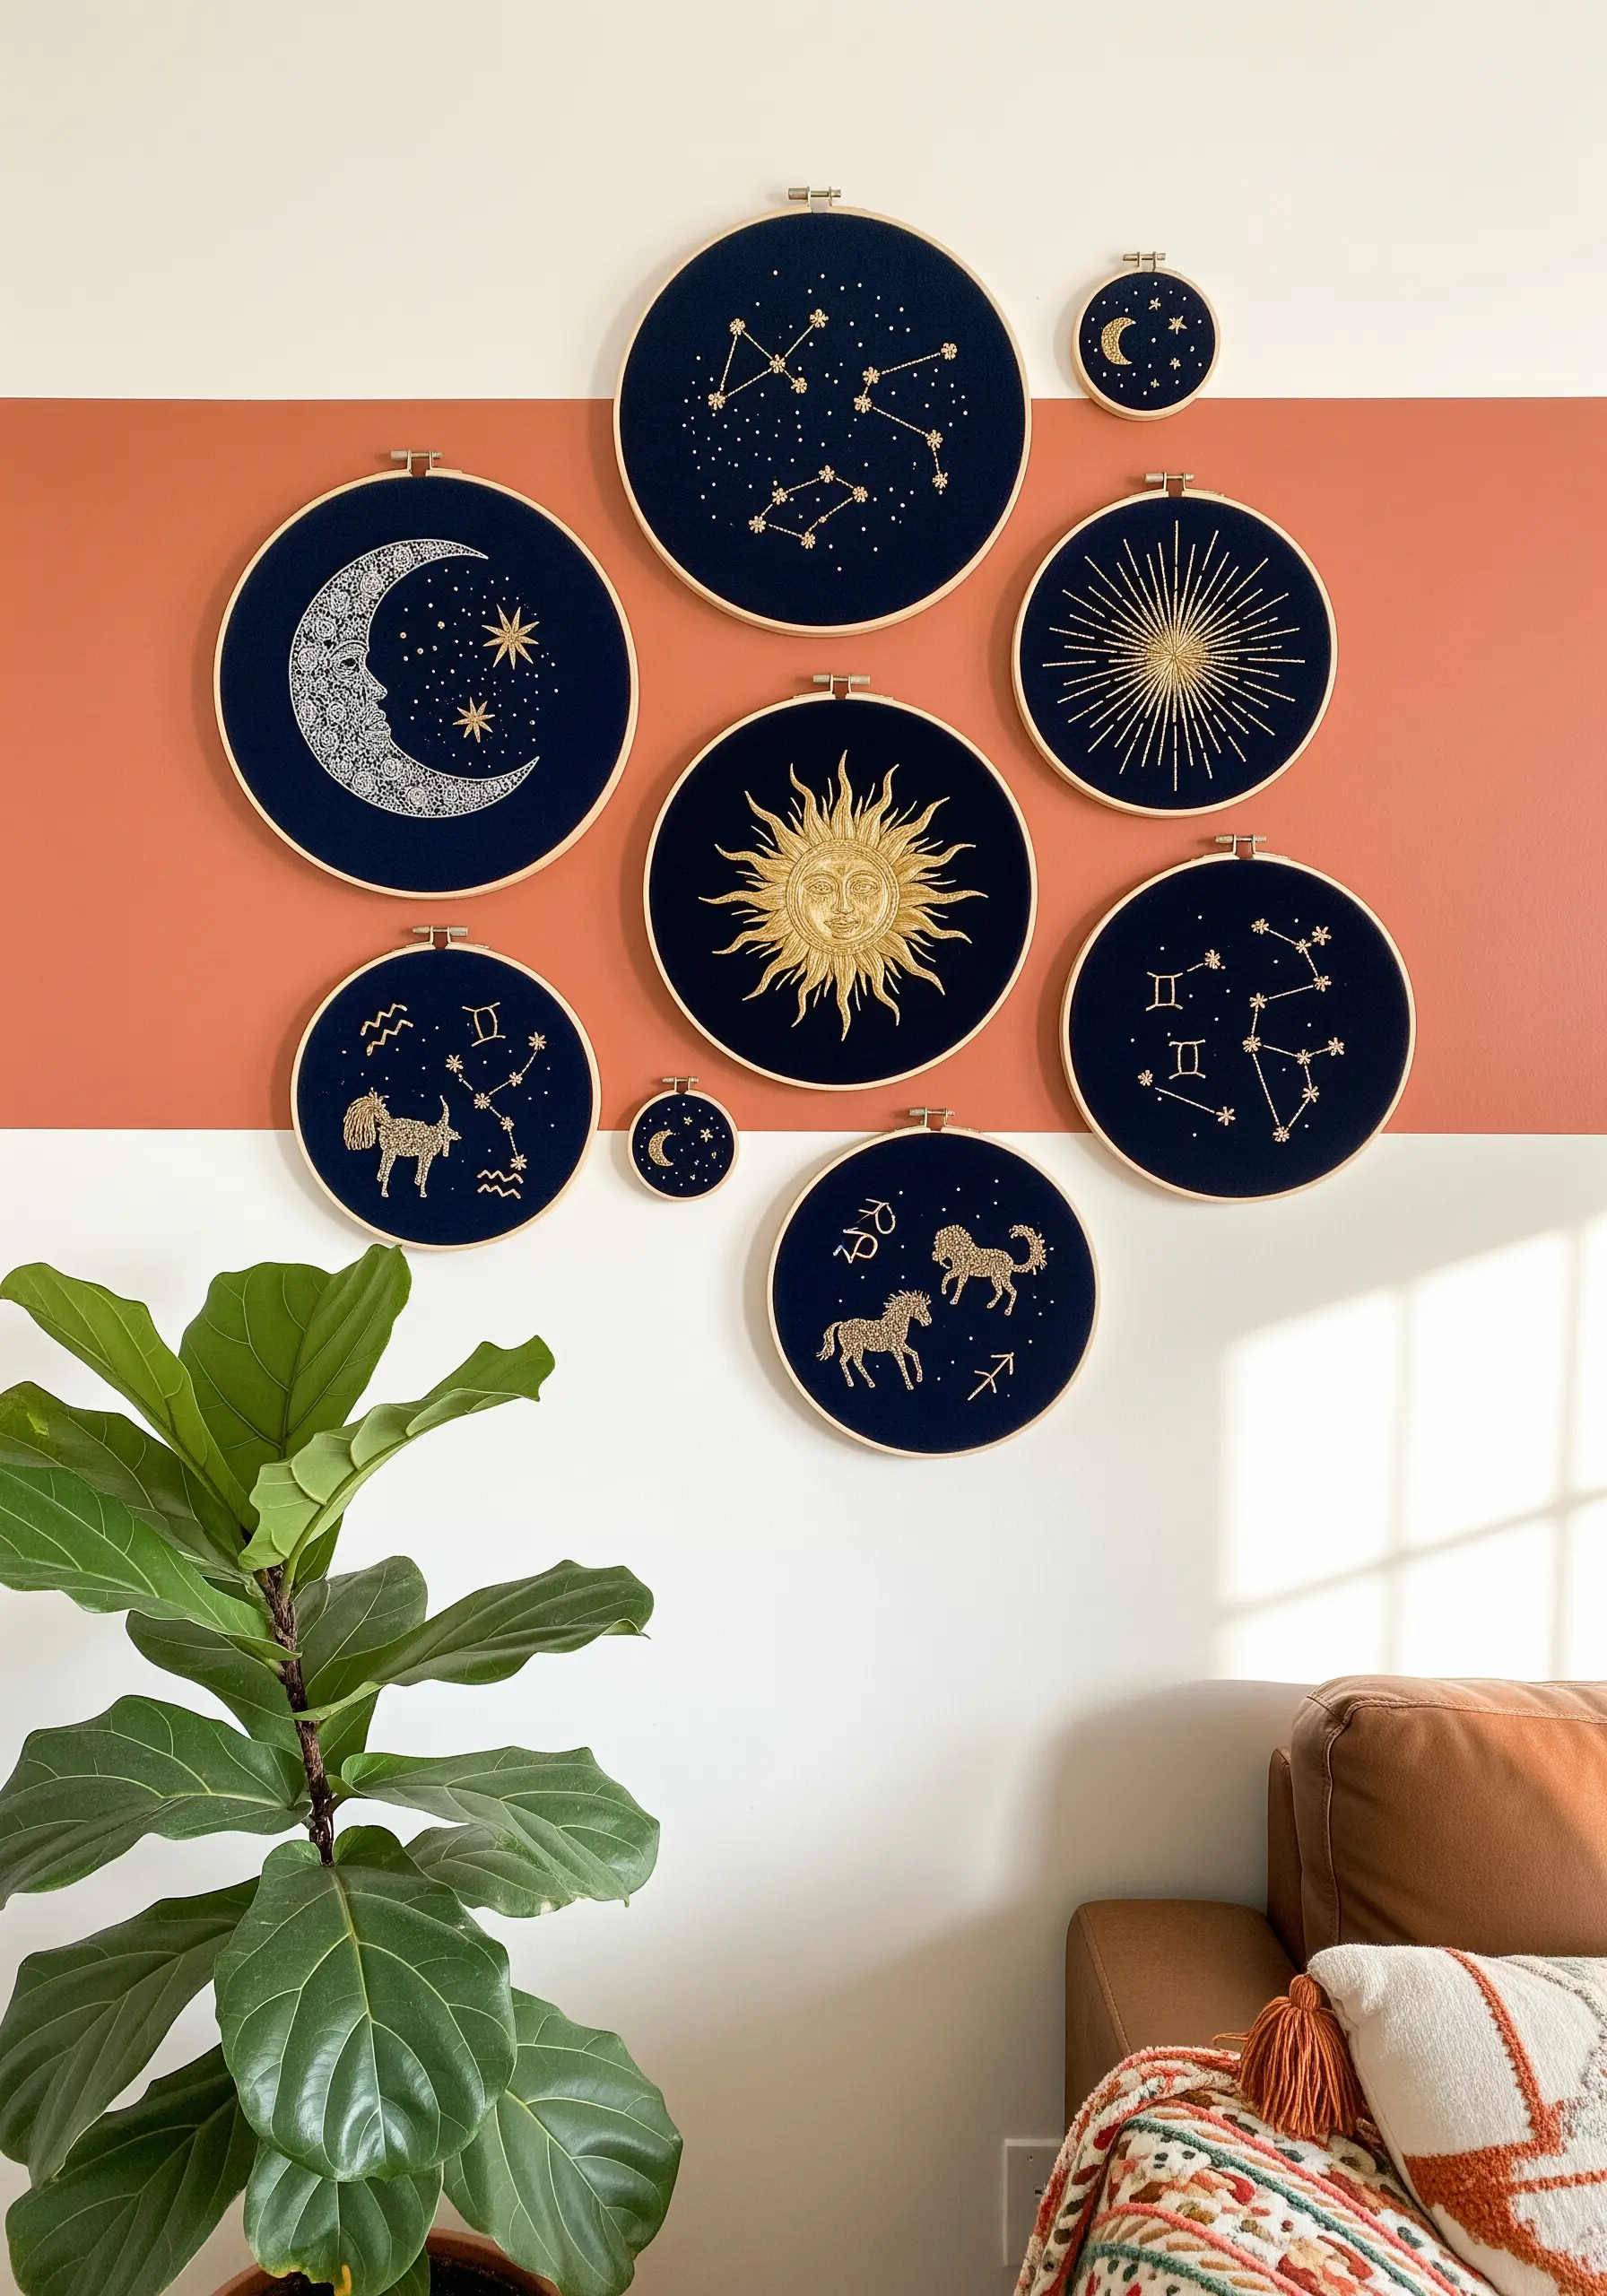
Design a dynamic gallery wall by mixing hoops of various sizes, creating a sense of movement and discovery.
Stitch with a high-shine metallic thread on a dark navy or black cotton fabric to make the constellations pop with celestial light.
To make metallic floss easier to work with, use shorter thread lengths (no more than 12 inches) and a thread conditioner like beeswax to prevent tangling and fraying.
For a fully integrated look, paint your embroidery hoops black or a deep navy to match the fabric, making the frame disappear and the stitched design shine.
4. Stitch a Linear Herbarium
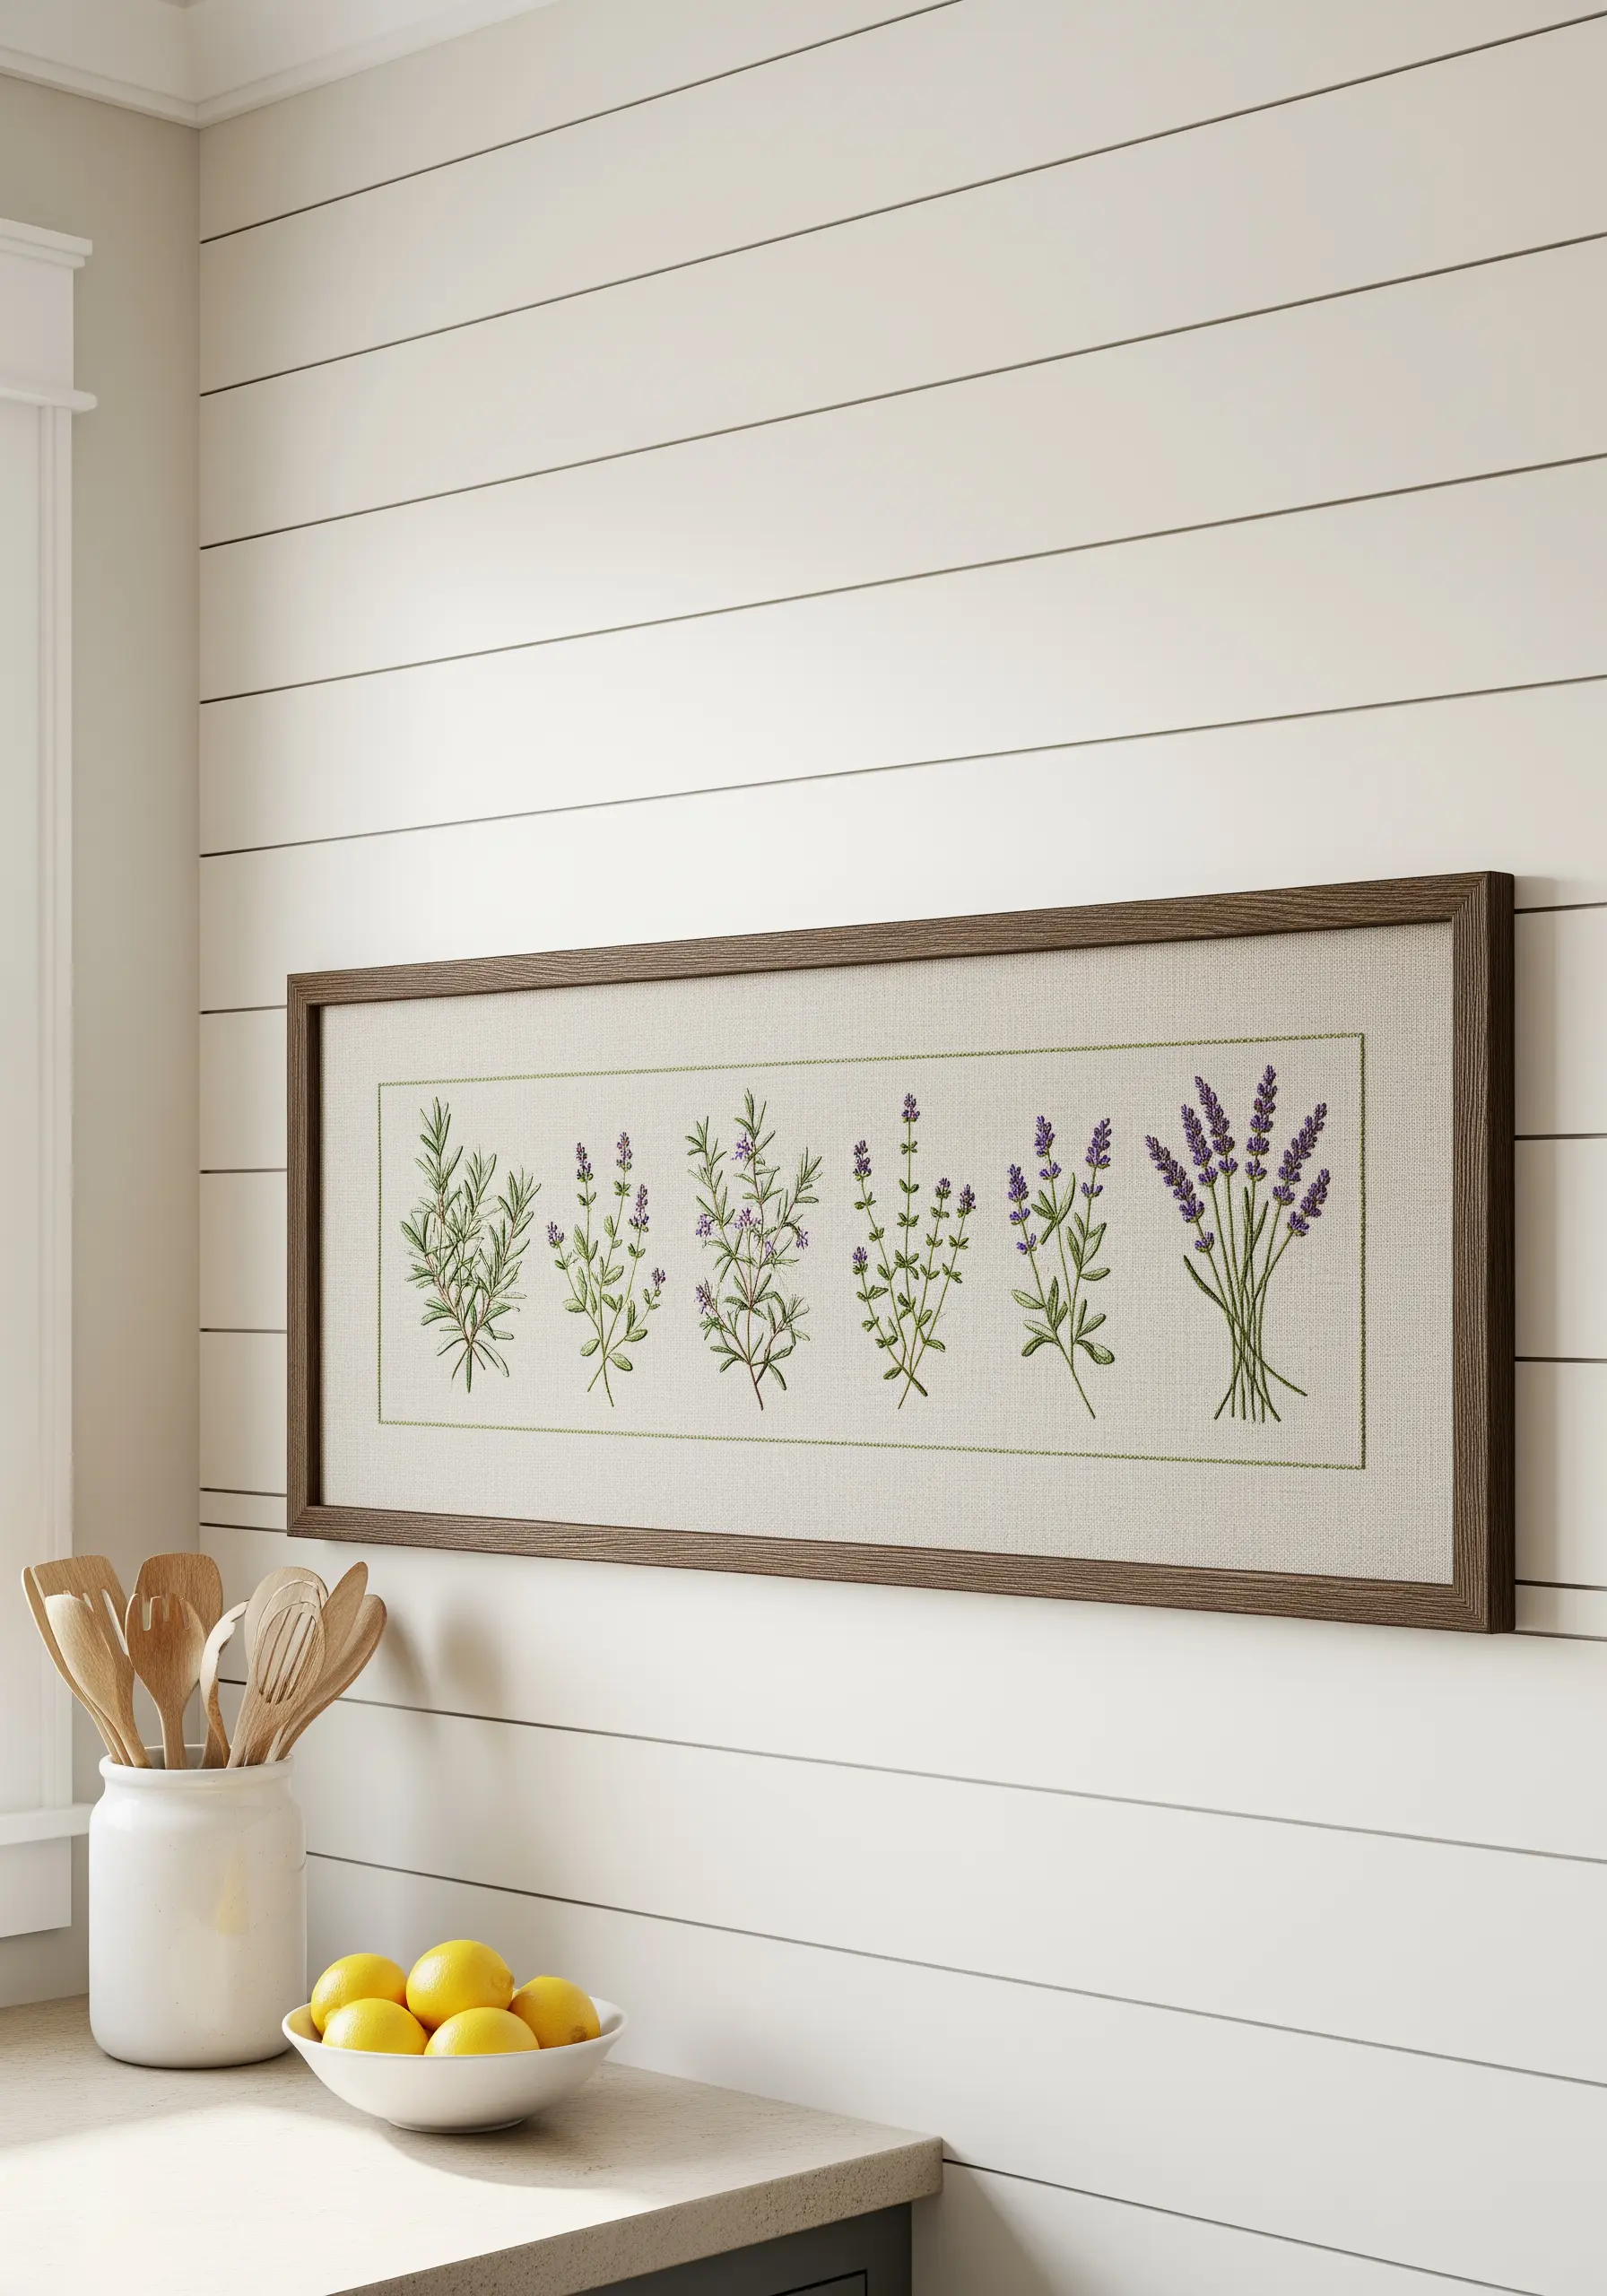
For a clean, farmhouse-inspired piece, arrange several botanical motifs in a single horizontal line.
Define the space by stitching a simple, two-strand running stitch border around the entire composition before you begin the motifs; this creates structure and a professional finish.
Vary your stitch textures to give each herb its unique character—use delicate lazy daisy stitches for rosemary leaves and dense French knots for lavender blossoms.
This composition works beautifully for herbal plant embroidery motifs, turning a simple sampler into elegant kitchen art.
5. Paint a Landscape with French Knots
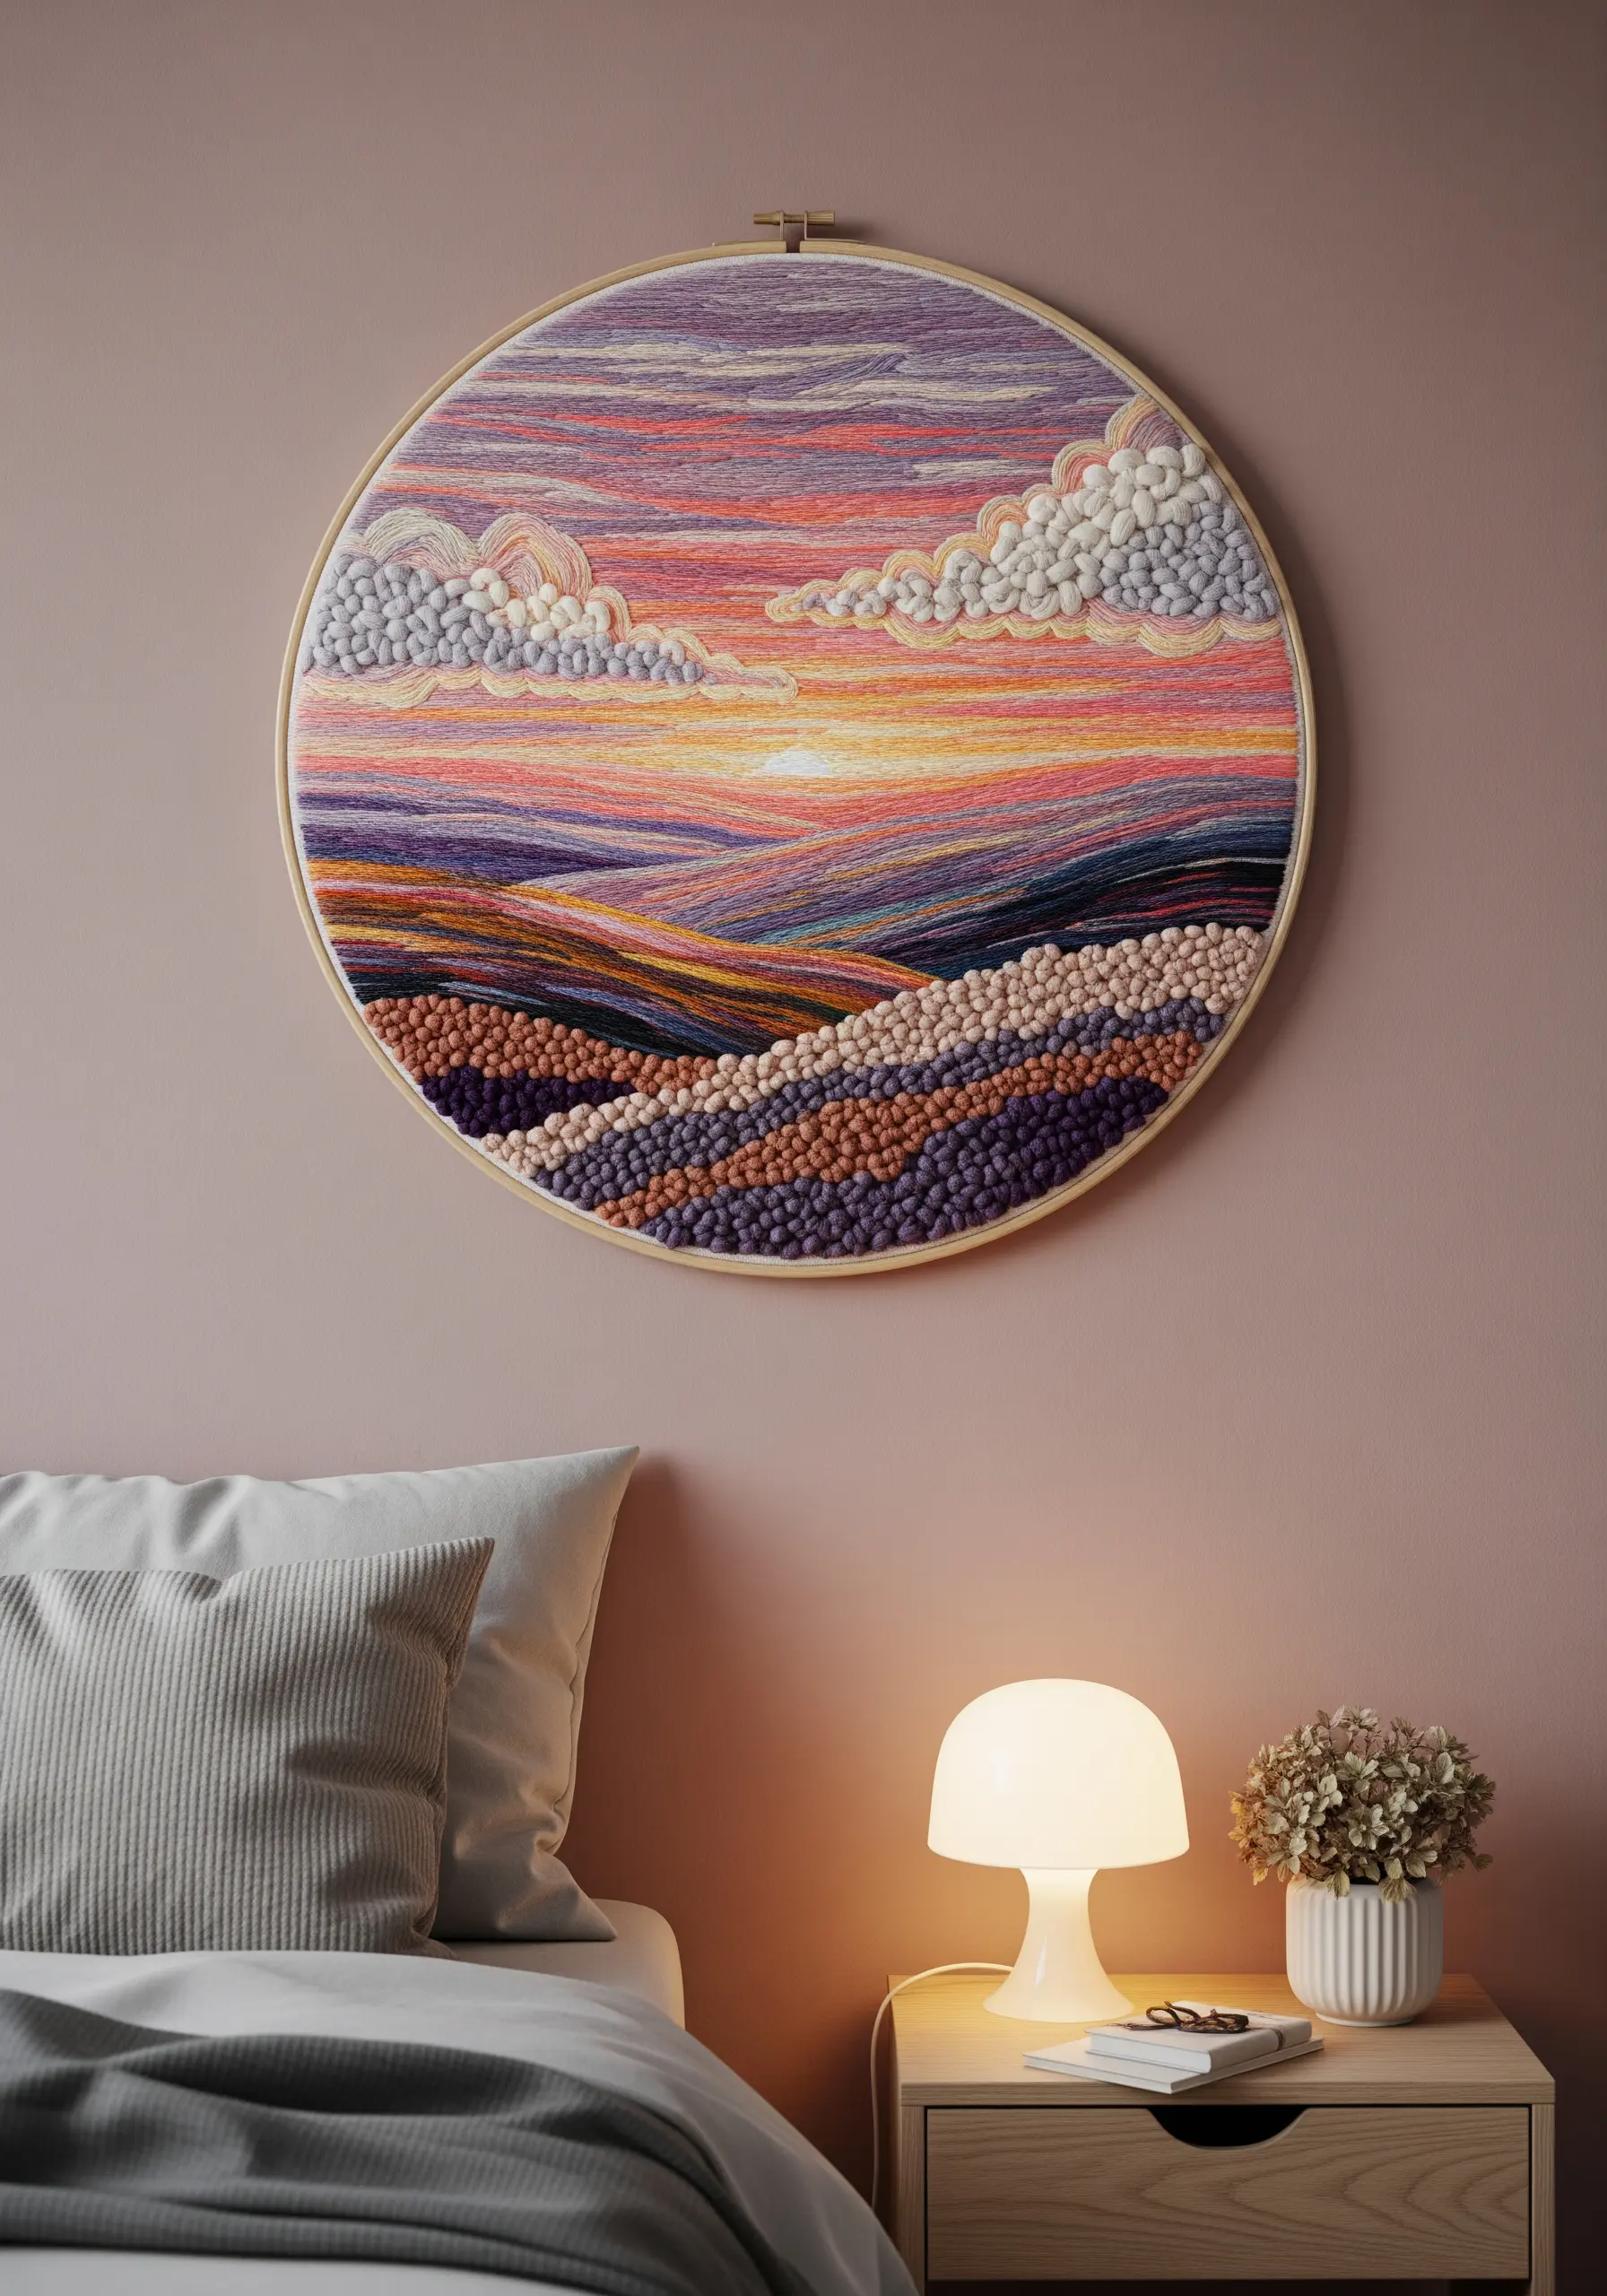
Move beyond flat stitches and build a tactile landscape using textural techniques for a stunning, three-dimensional effect.
Create fluffy, dimensional clouds by clustering hundreds of French knots together using a soft, thick yarn or all six strands of cotton floss.
For the rolling hills and sunset, use a dense satin stitch or long-and-short stitch, but intentionally angle your stitches to follow the curves of the land, enhancing the sense of movement.
The contrast between the smooth satin-stitched sky and the bumpy knotted ground is what gives this piece its captivating depth and makes it one of those 3D embroidery wall art pieces that invites touch.
6. Create Graphic Punch Needle Critters
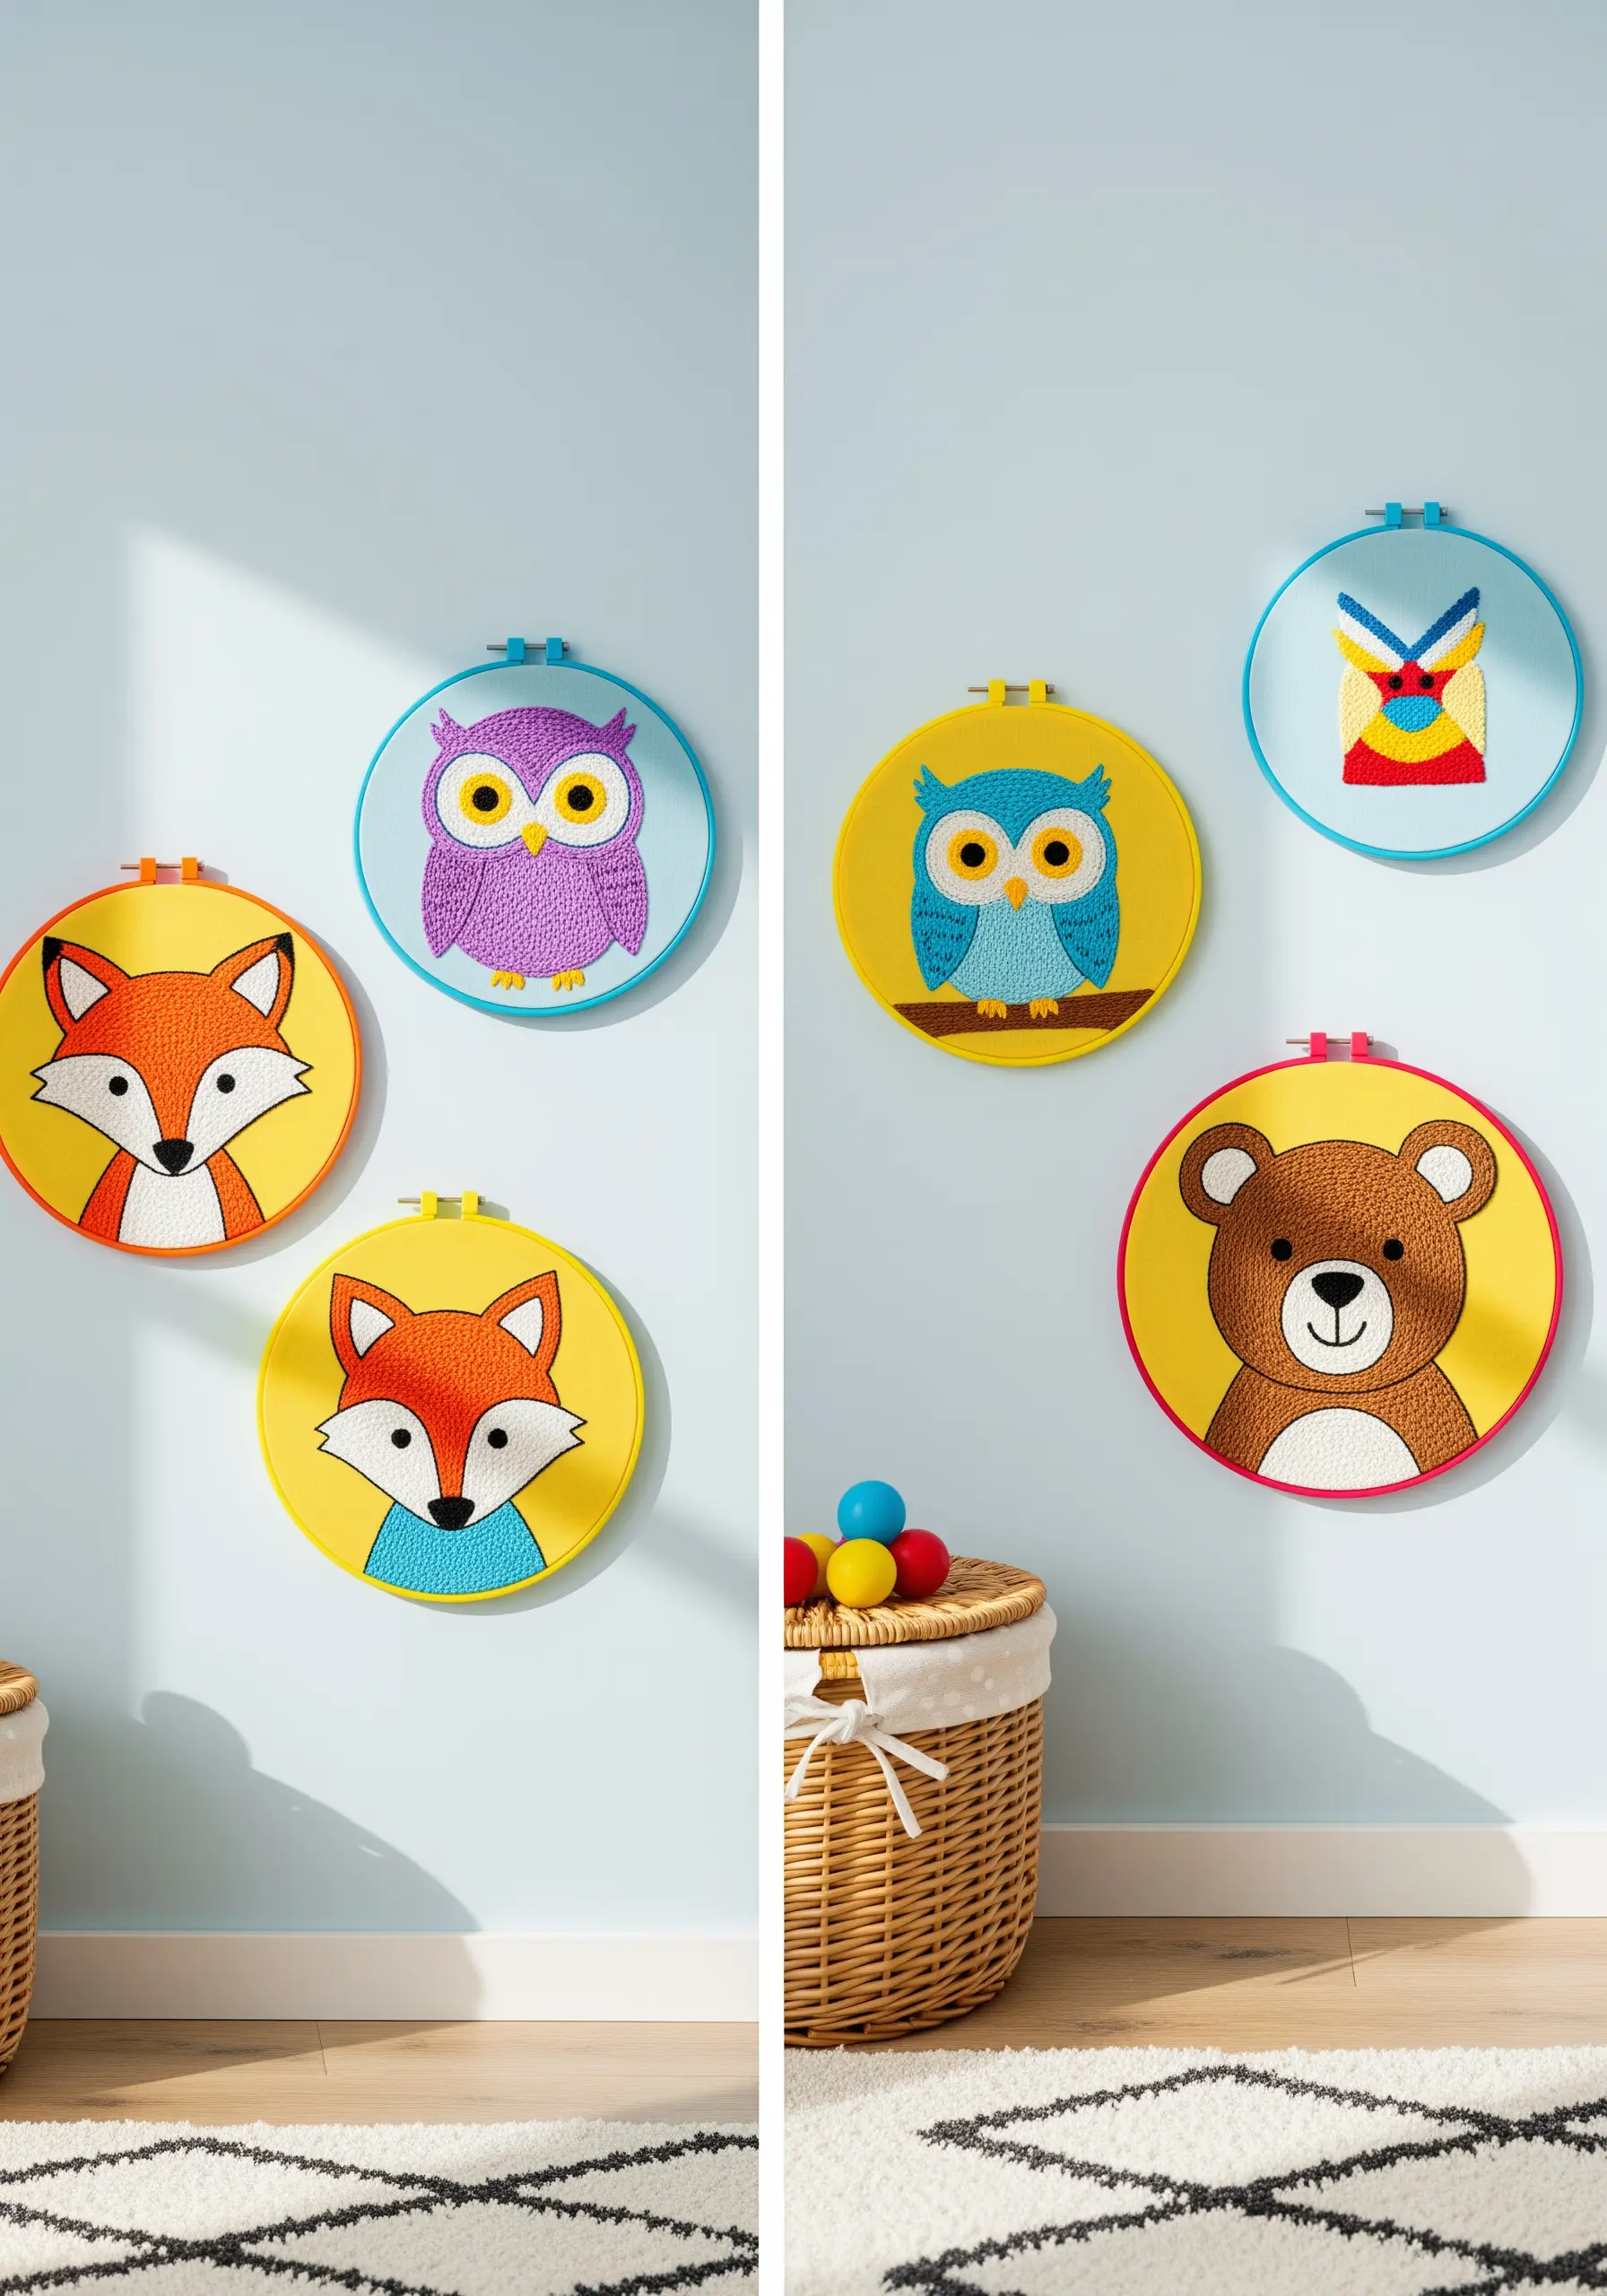
Explore the bold, graphic style of punch needle to create playful wall art with a satisfying, rug-like texture.
This technique uses a special tool to push loops of yarn through fabric, creating a look that is much faster to fill than traditional embroidery.
To get those sharp, clean edges between colors, work your outlines first and then fill inwards—this creates a crisp border that defines the character’s shape.
These cute animal embroidery hoops are perfect for a child’s room, offering both vibrant color and a soft, touchable surface.
7. Design an Heirloom Gallery Wall
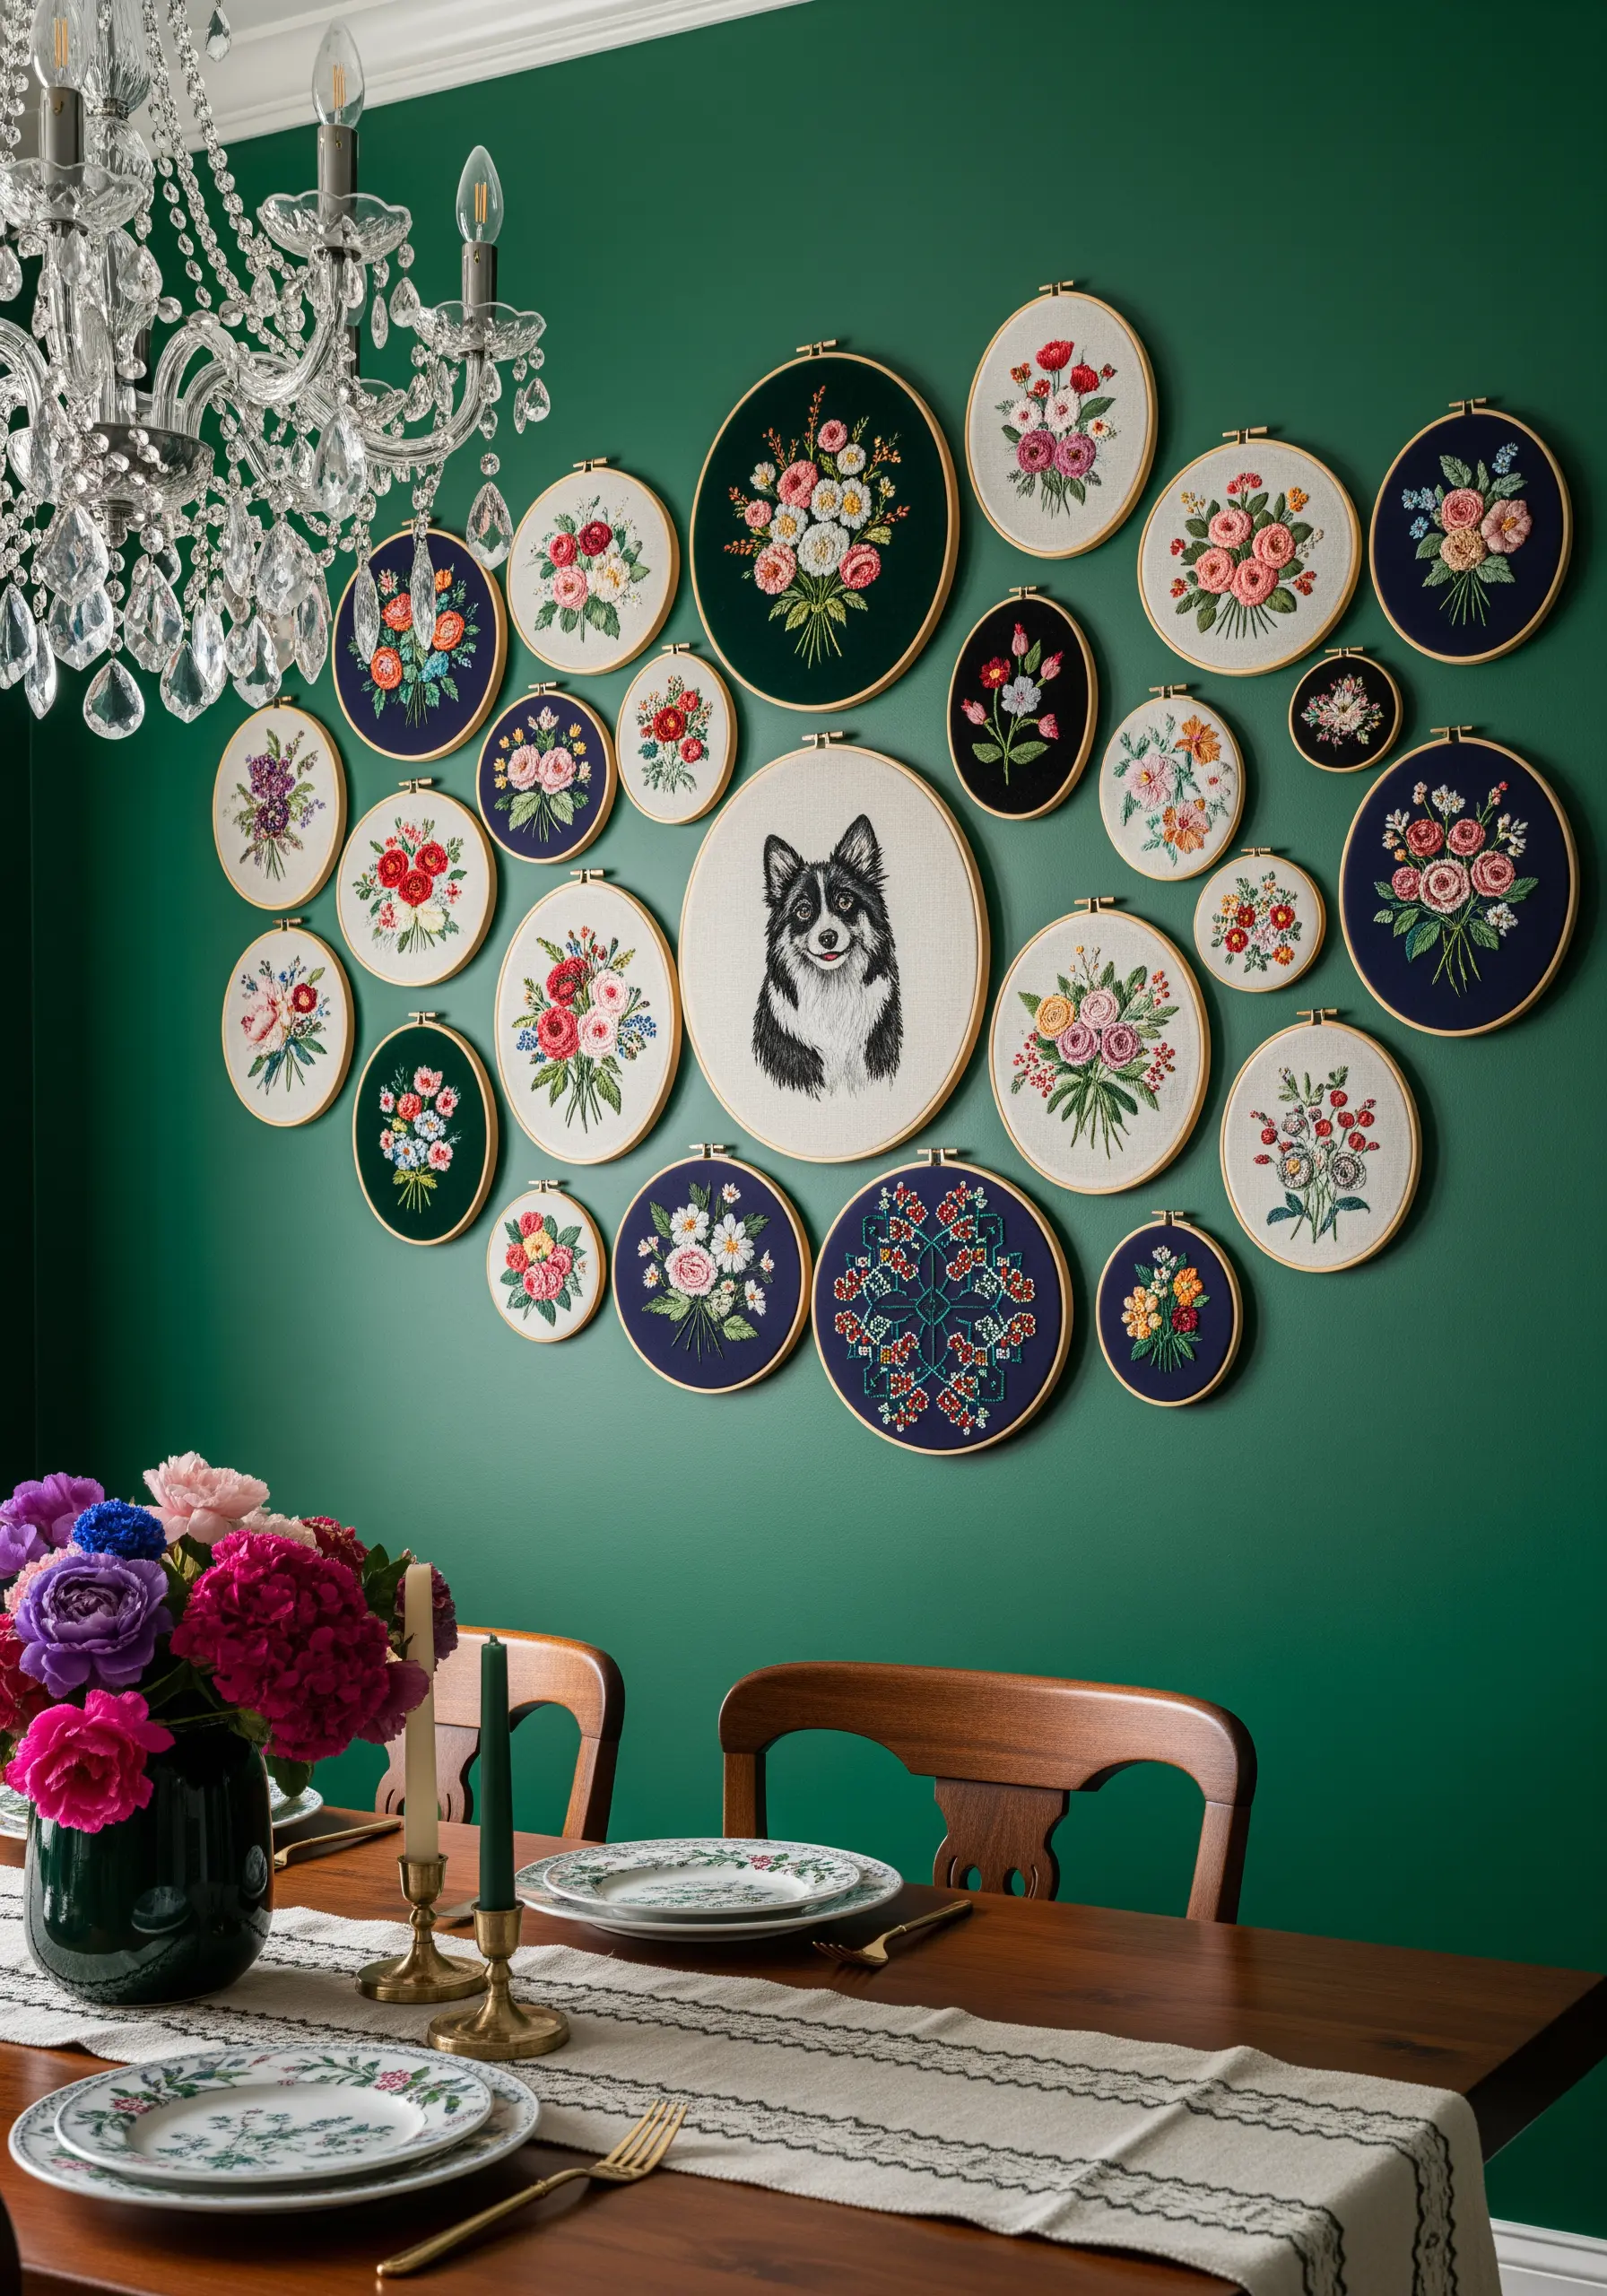
Tell a personal story by building a gallery wall around a central, meaningful piece, like a beloved pet’s portrait.
Surround the focal point with smaller floral hoops of varying sizes and patterns to create a lush, garden-like arrangement that feels both abundant and curated.
Create visual harmony by limiting your fabric colors—notice how the mix of ivory and navy backgrounds allows the diverse floral palettes to shine without clashing.
This approach transforms a collection of individual projects into a single, breathtaking statement piece that anchors the entire room.
8. Capture Elegance with a Single Line
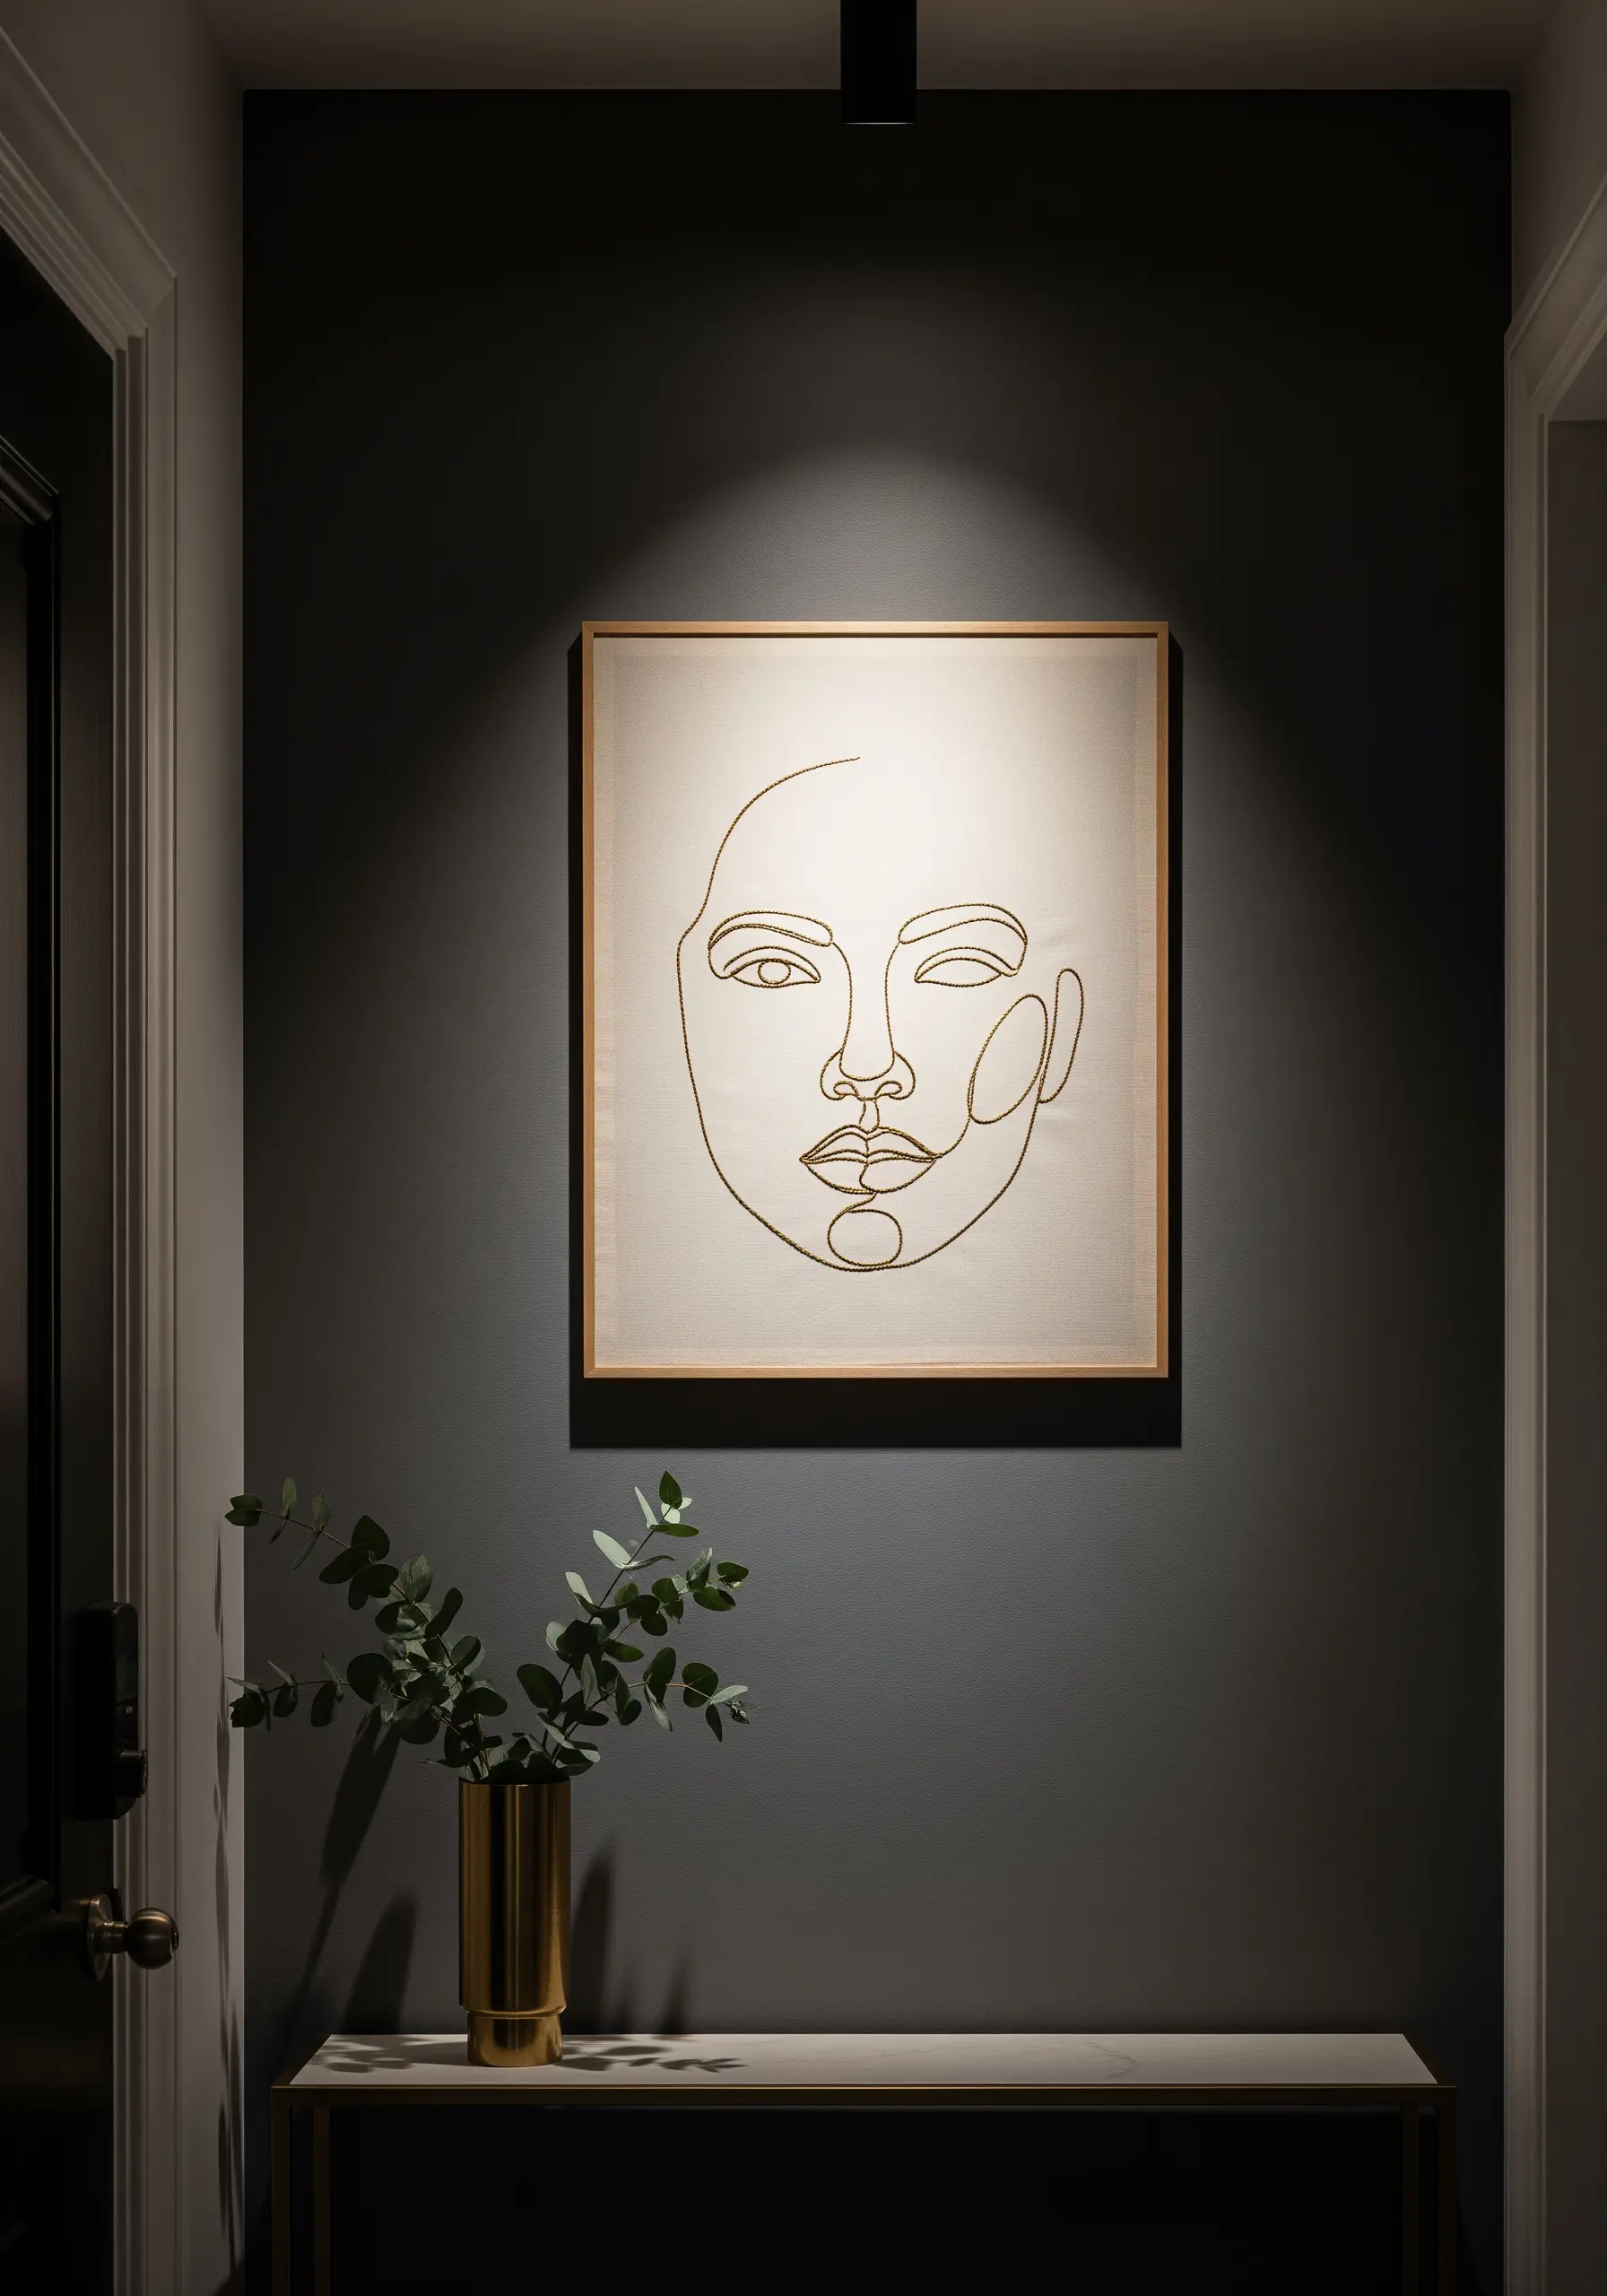
Achieve a sophisticated, modern aesthetic by stitching a continuous line art portrait.
The key is to create the illusion of a single, unbroken line, even if you need to stop and restart your thread.
To maintain that fluid look, use a whipped backstitch or a stem stitch, which creates a smooth, rope-like line without visible breaks between stitches.
Stitch with a dark, contrasting thread on a light, neutral fabric to make the modern line art the undisputed focus of the piece.
9. Document Your Stitches on a Sampler Board
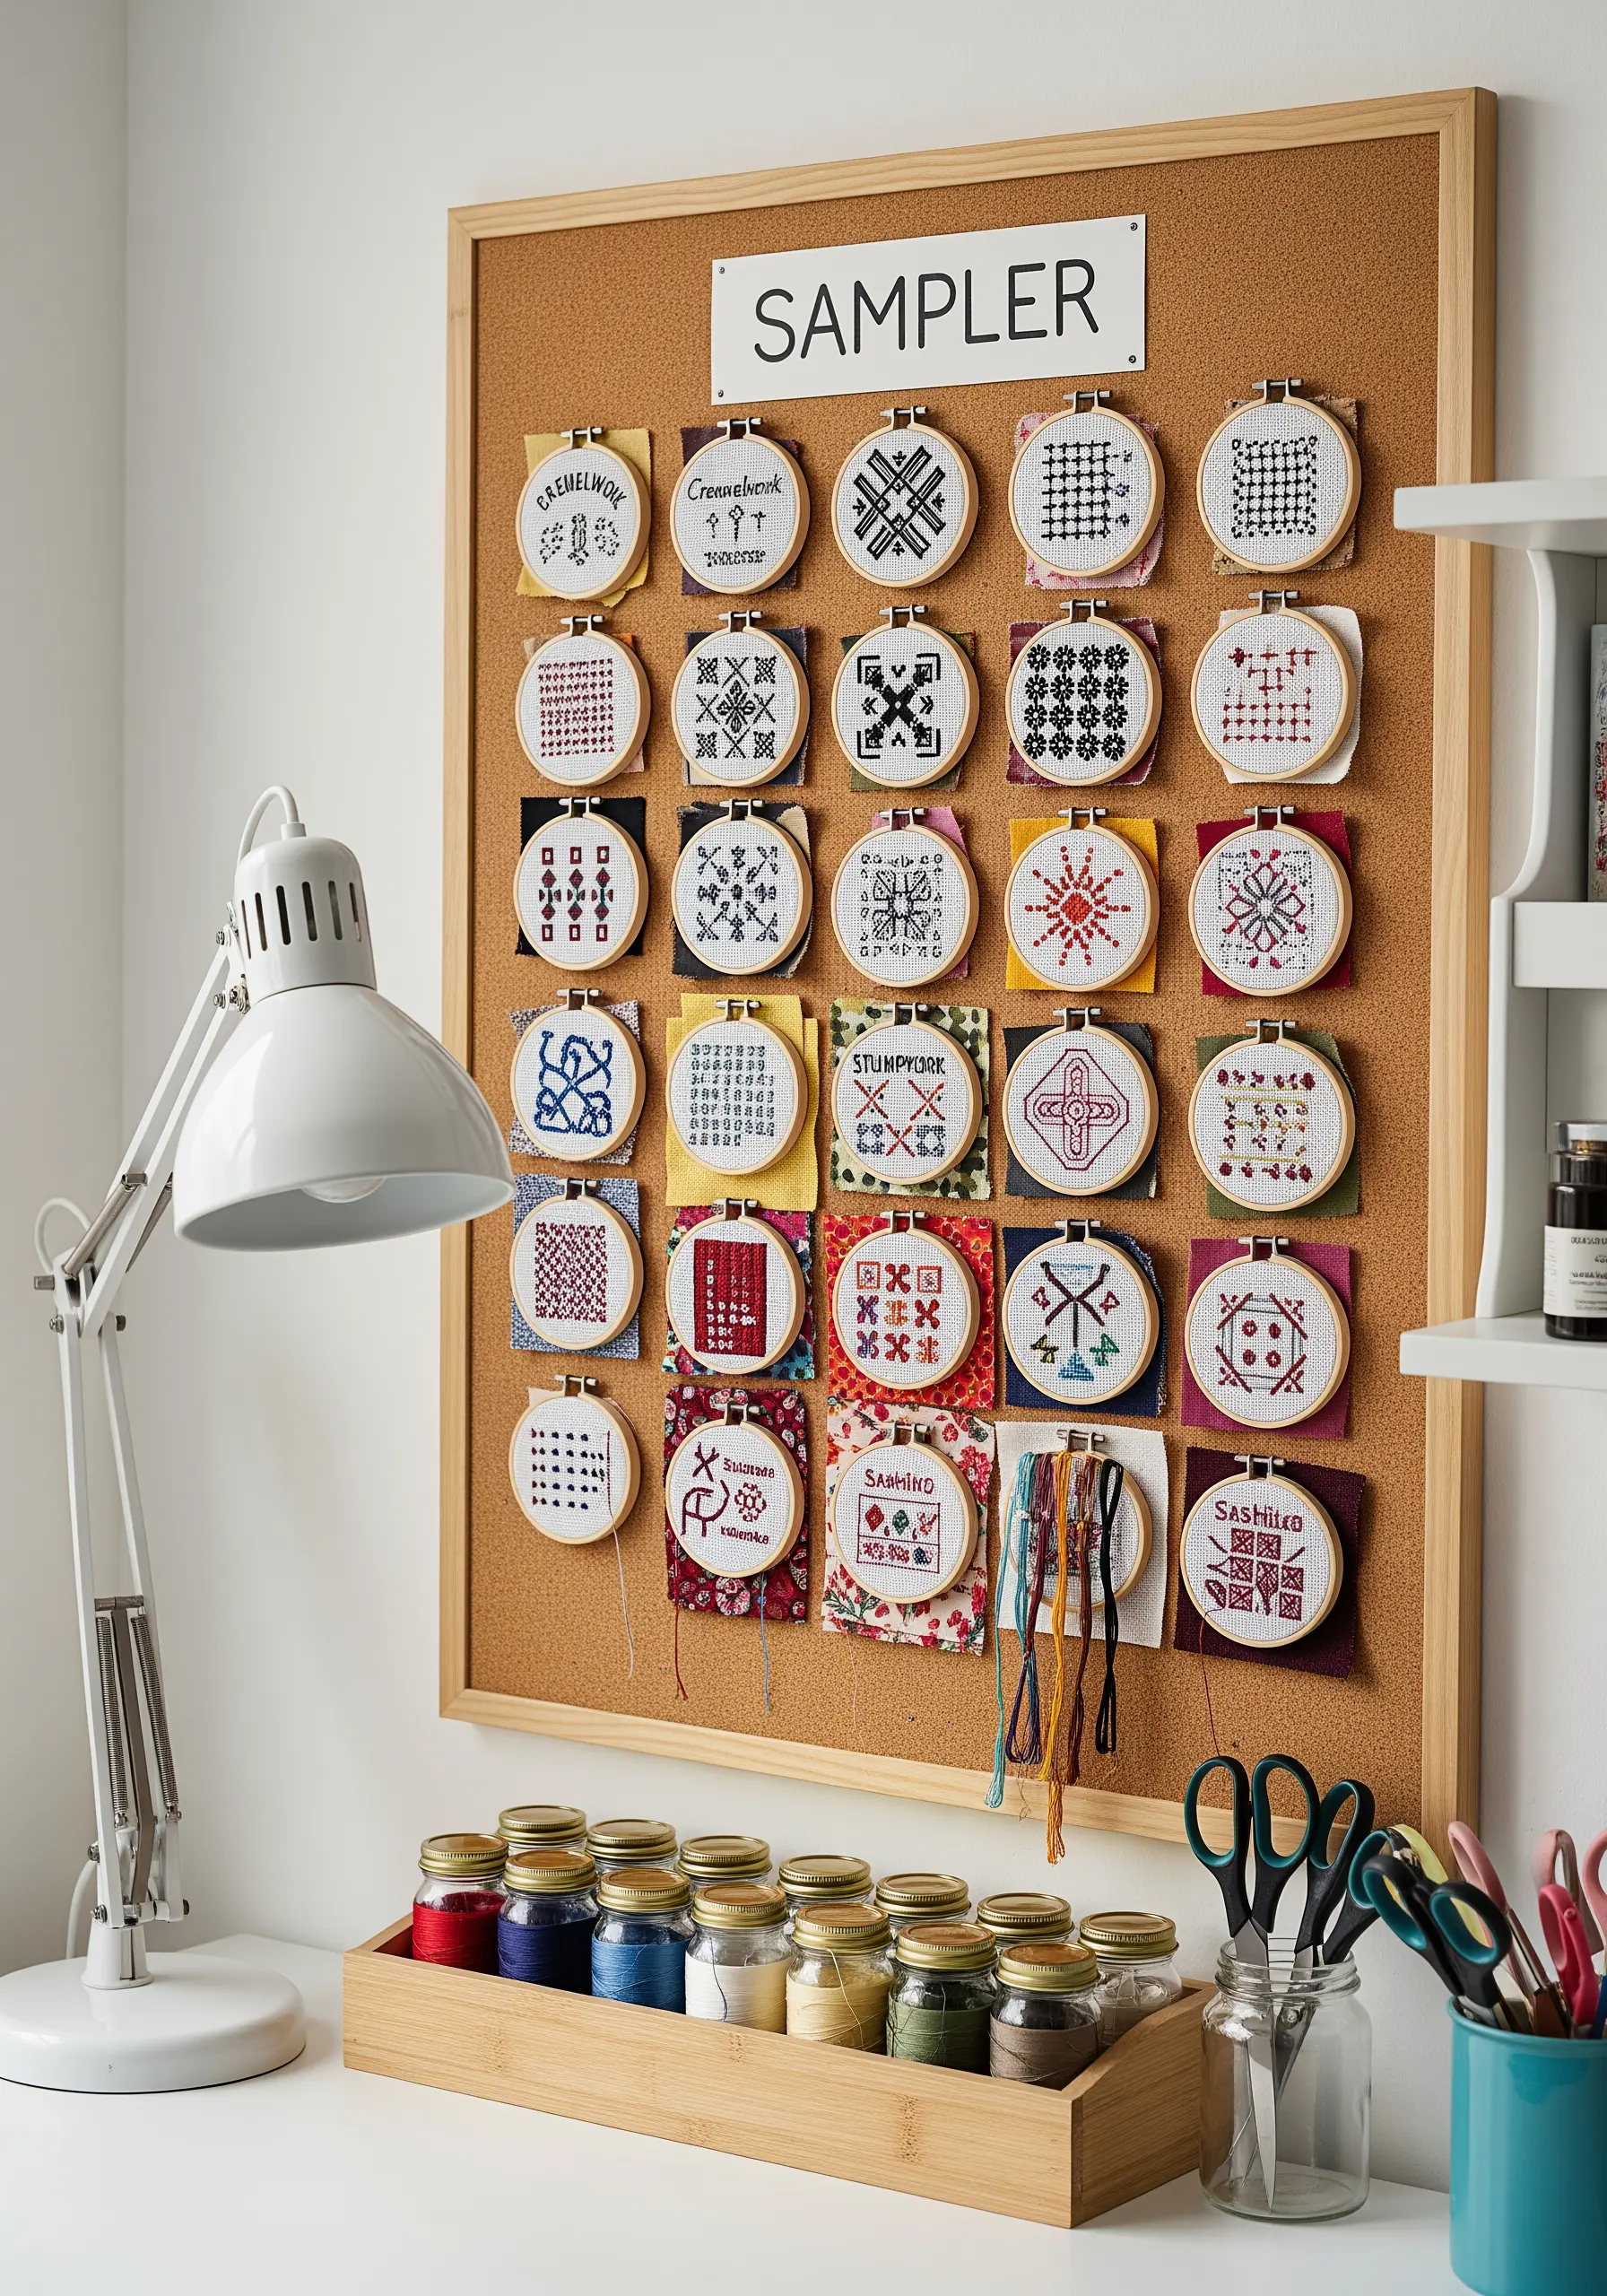
Turn your stitch practice into a piece of decorative art by creating a sampler library on a corkboard.
Work small stitch studies on scrap fabric squares, then mount each one in a tiny 3-inch hoop.
This isn’t just a display; it’s a functional reference guide. Add small labels to identify each stitch or technique, making it a resource for future projects.
Mounting them on a corkboard allows you to rearrange and add to your collection, creating an ever-evolving piece of personal handmade wall art.
10. Craft a Geometric Nursery Mobile
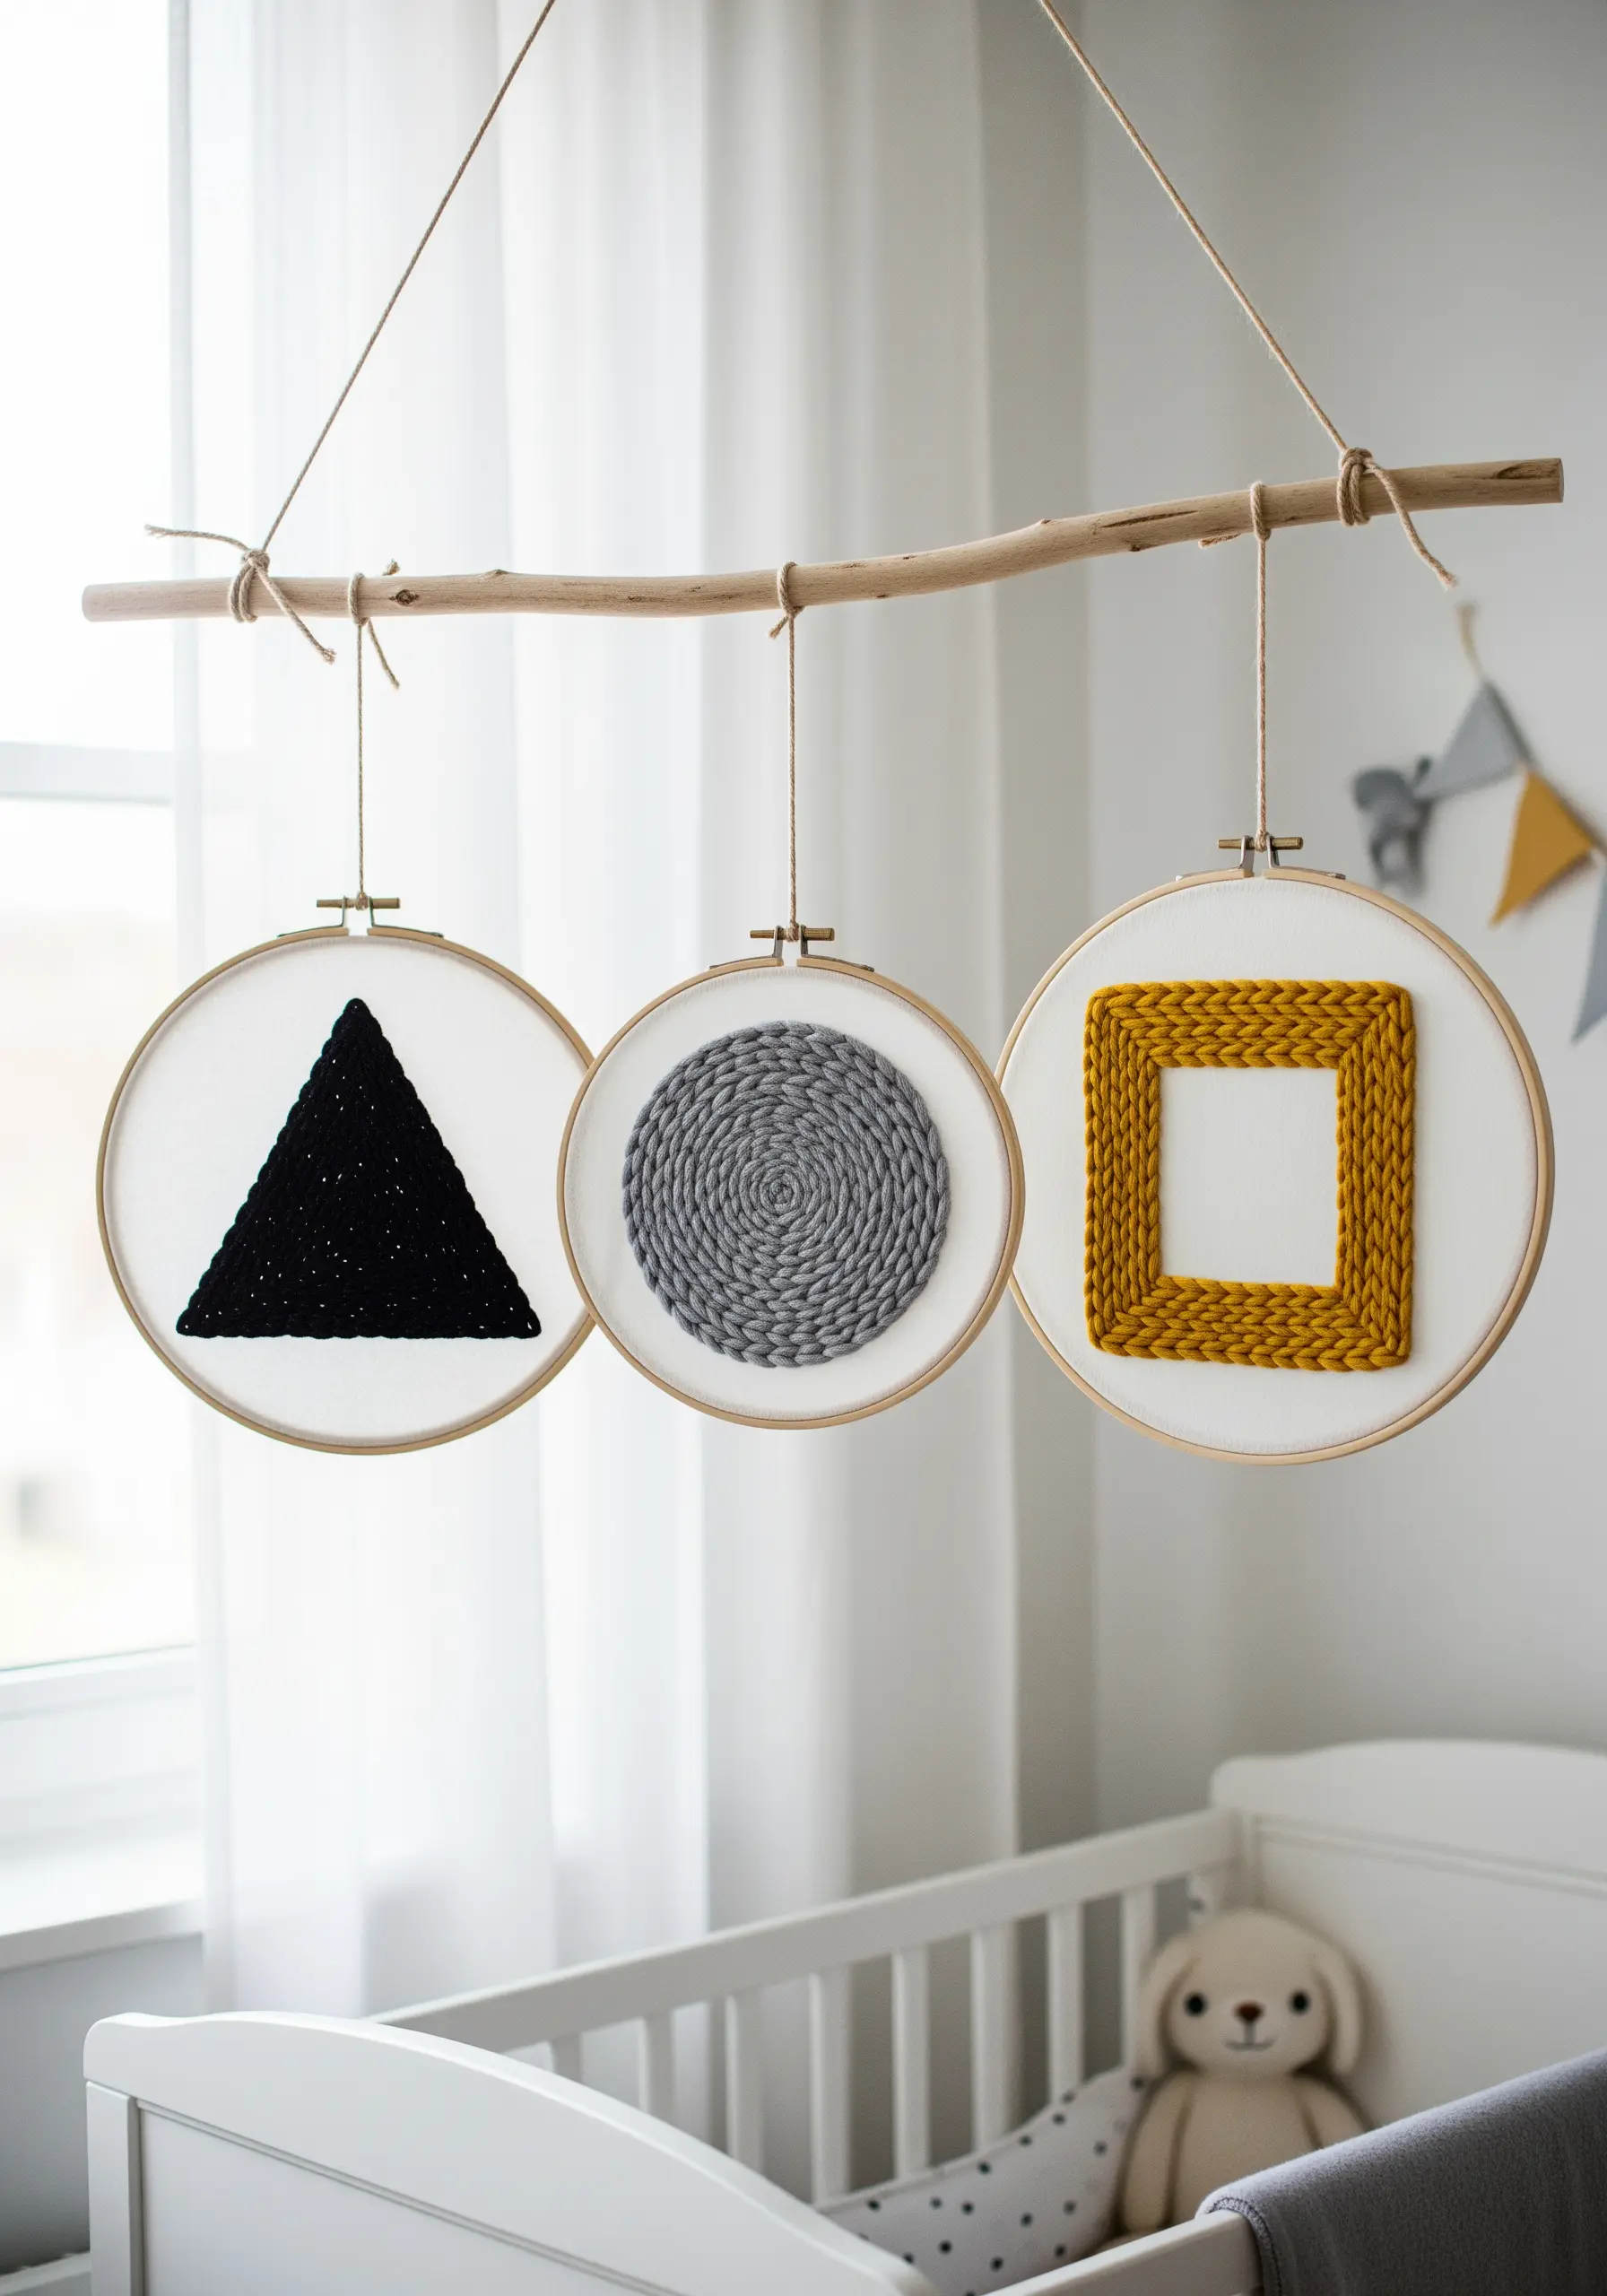
Create a sophisticated and modern nursery mobile by focusing on simple shapes and textures.
Instead of traditional embroidery floss, use chunky yarn or soft cotton rope and couch it onto the fabric—laying it on the surface and tacking it down with a matching thin thread.
Fill your shapes with different textures: a tightly coiled circle, a densely filled triangle, and a woven square for tactile interest.
Using a neutral color palette with one accent color, like this mustard yellow, keeps the design calm and stylish, perfect for soft baby room decor.
11. Go Big with Abstract Yarn Art
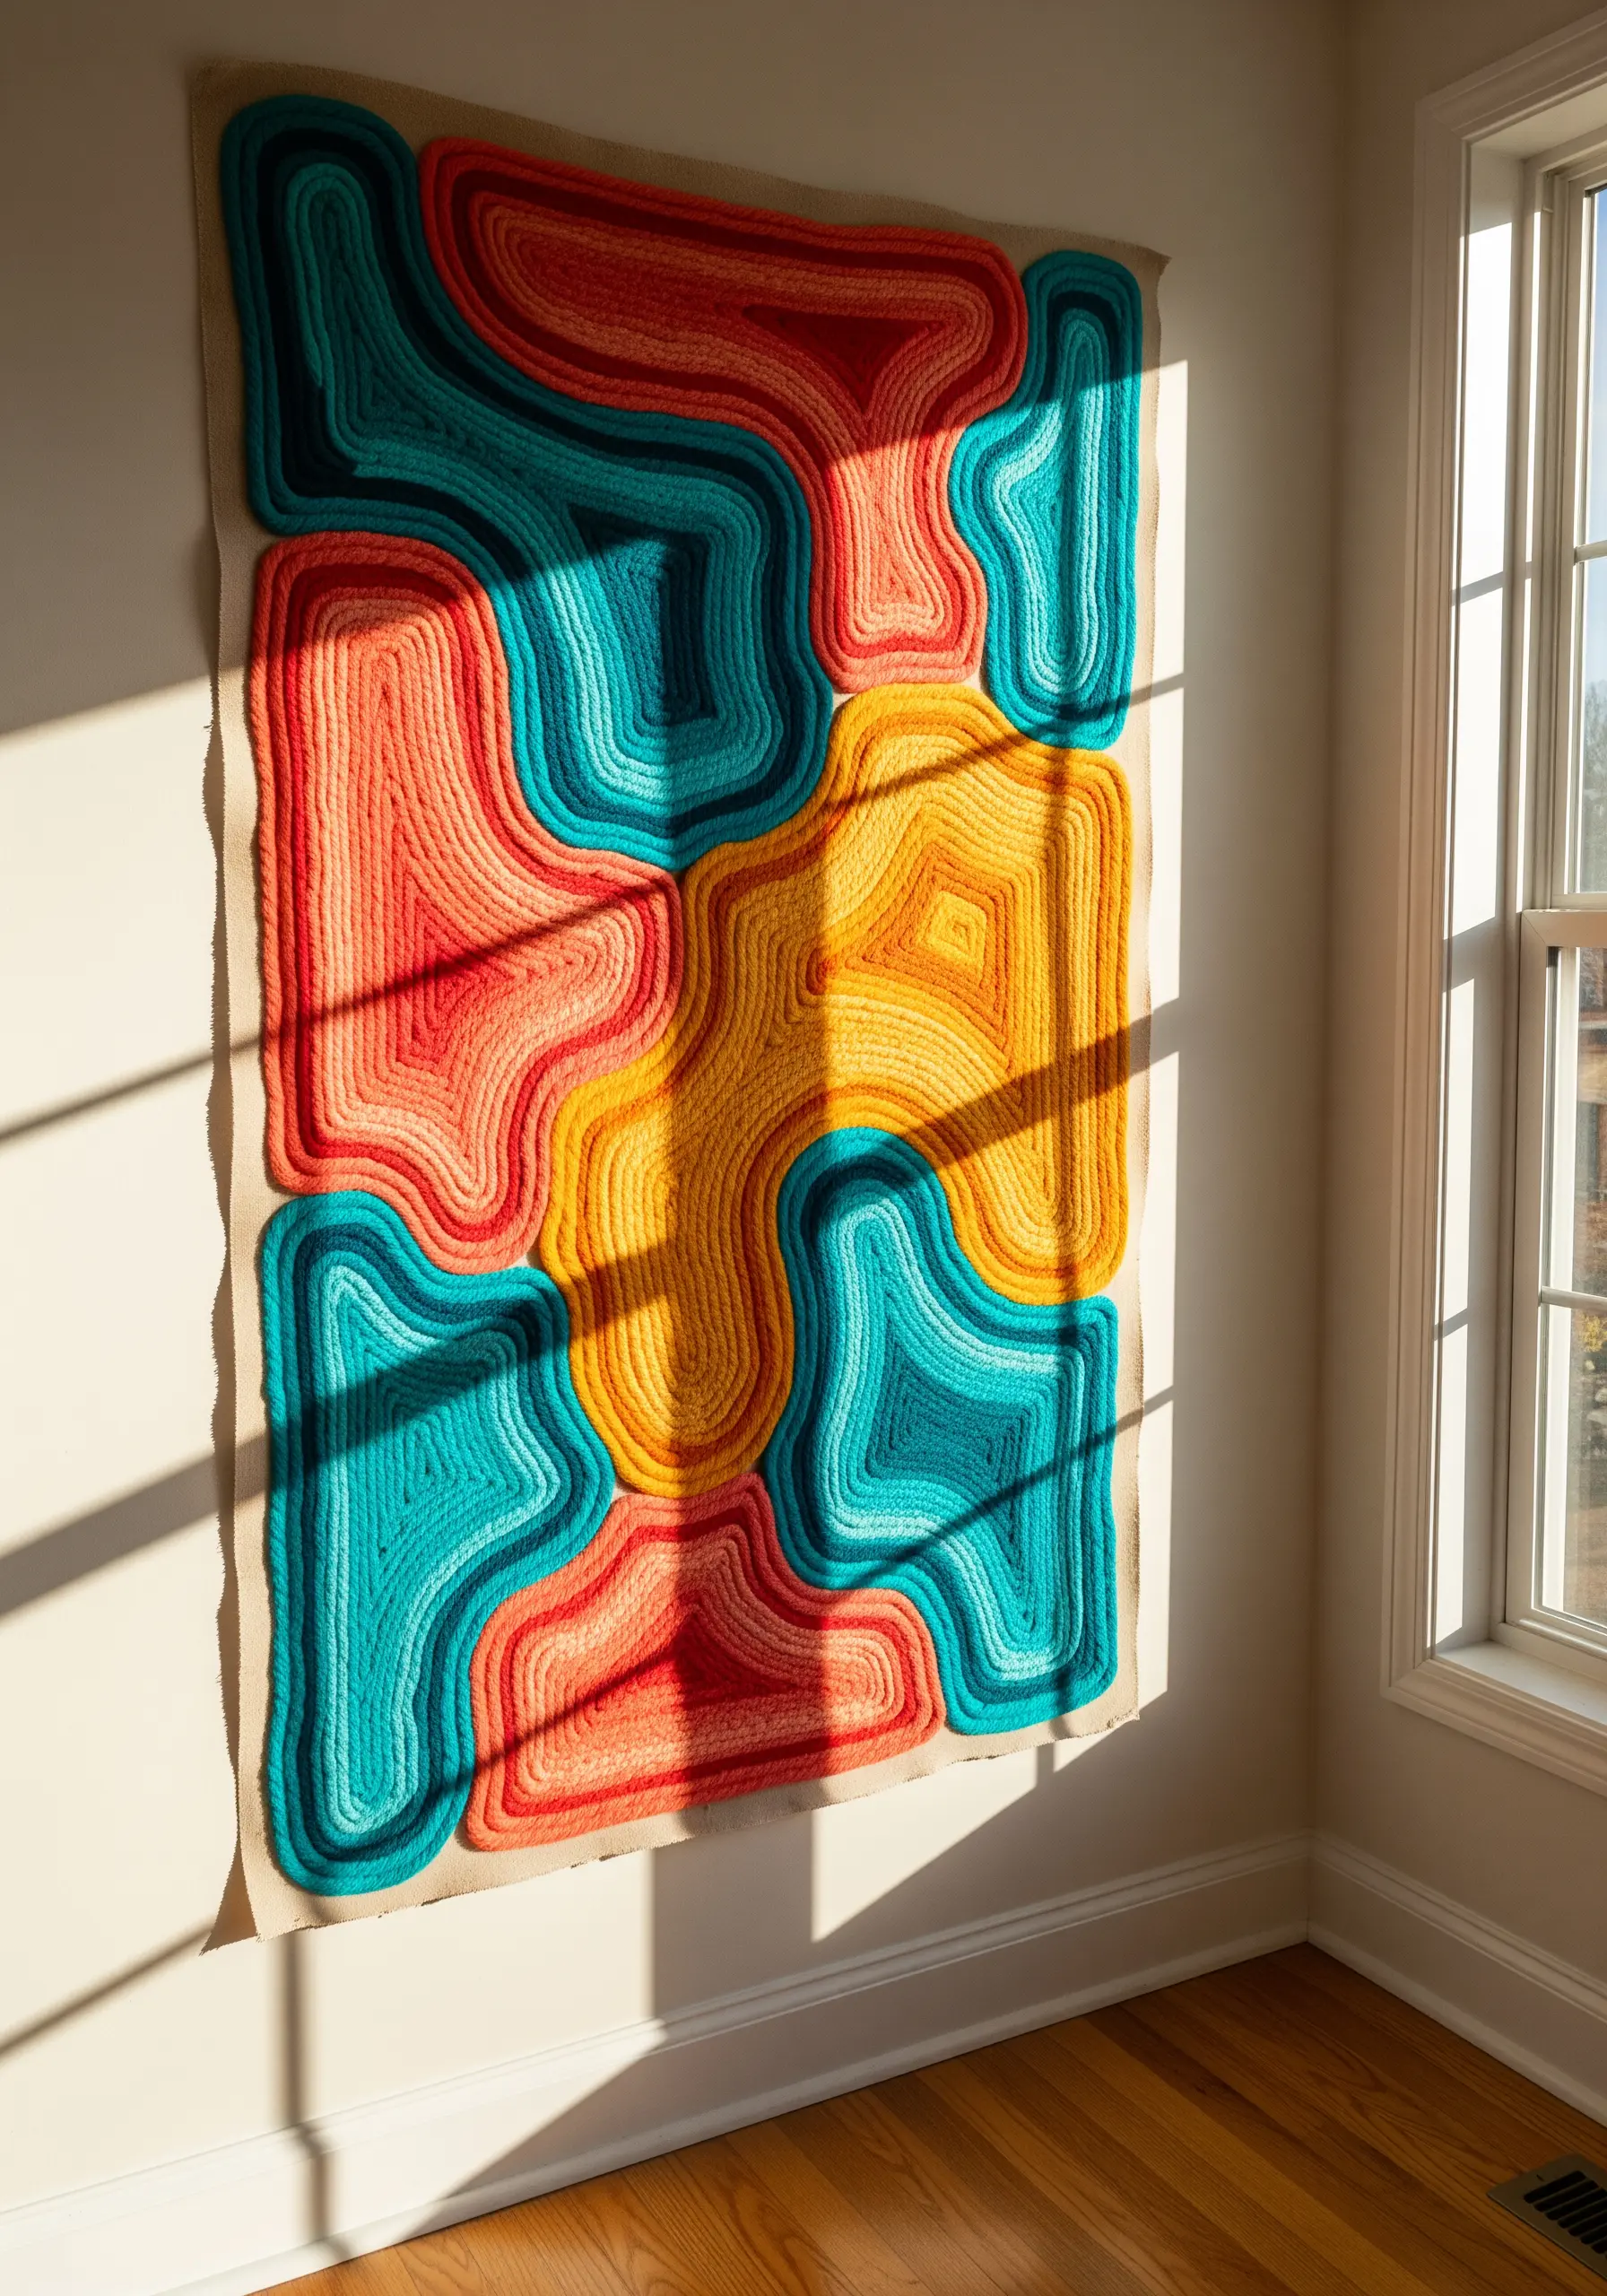
Make a bold statement by trading your hoop for a large canvas and your floss for thick, colorful yarn.
This technique, known as couching, involves laying down thick yarn along your pattern and stitching over it with a thinner, matching thread to hold it in place.
Plan your color flow by starting from the center of a shape and working your way out, creating concentric lines that look like a topographical map.
This large-scale abstract thread collage becomes a powerful focal point, adding warmth, texture, and vibrant color to a minimalist space.
12. Add a Touch of Coastal Serenity
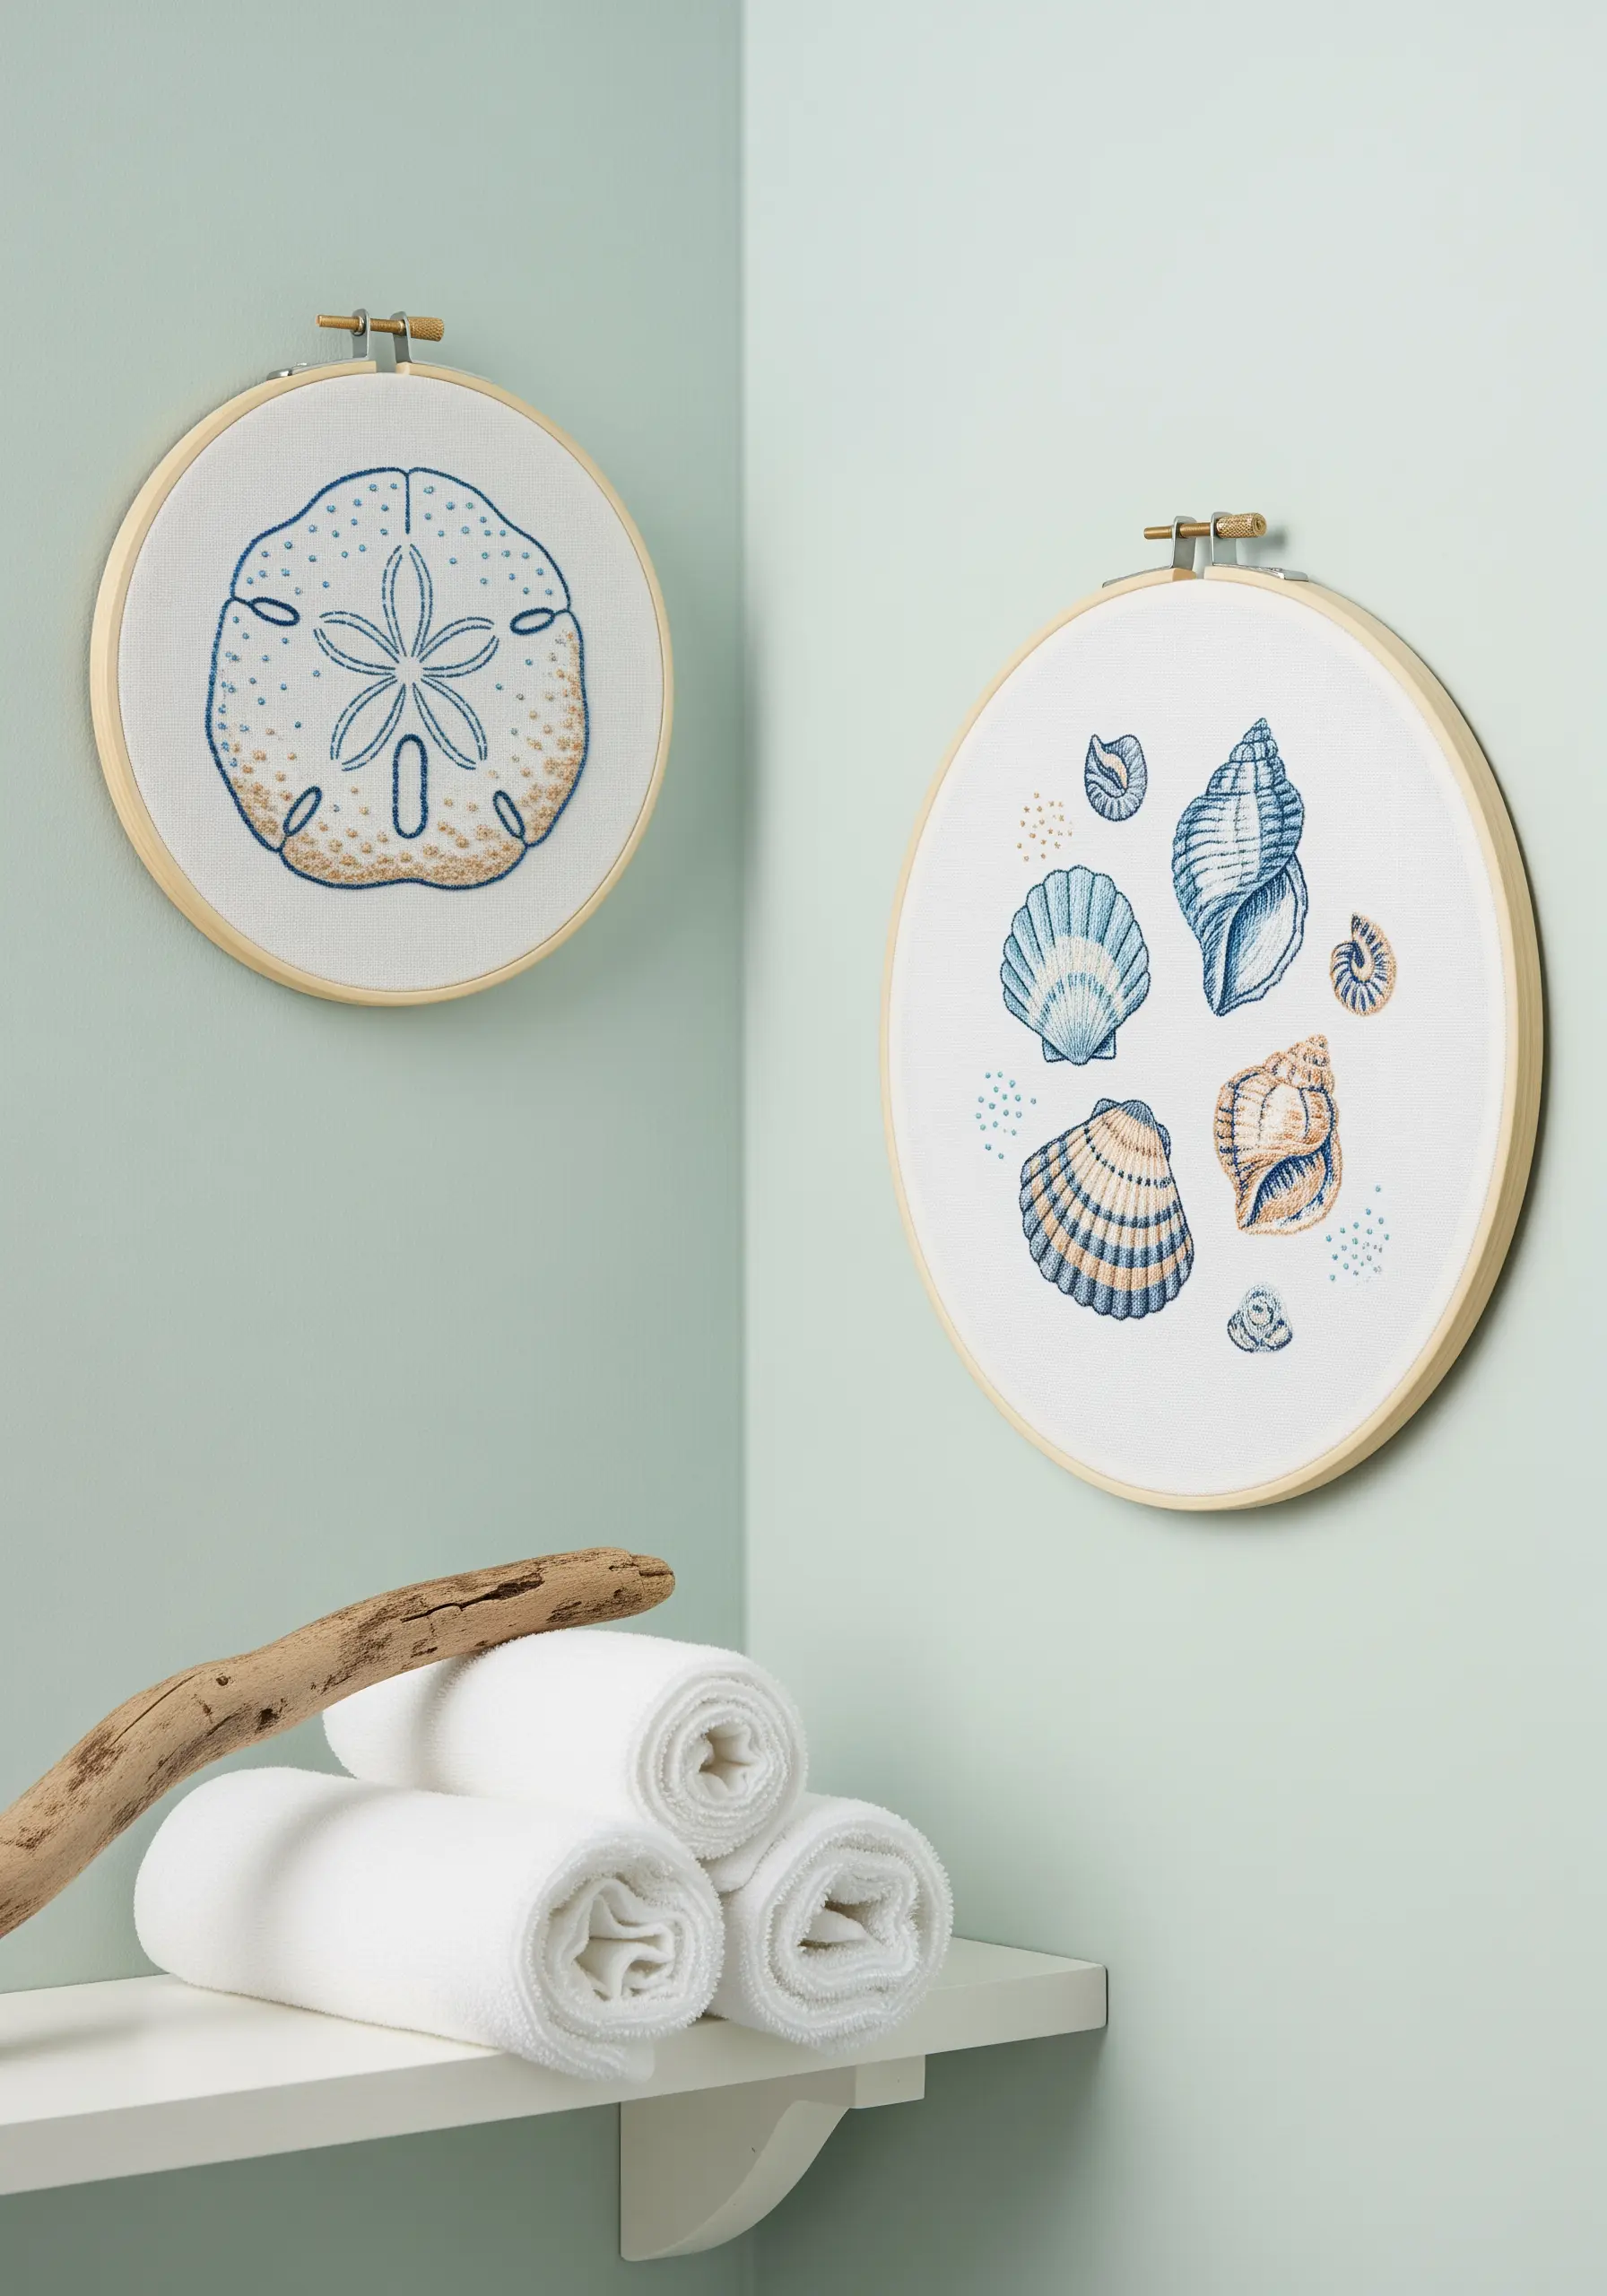
Evoke a sense of calm by stitching delicate, sea-inspired motifs for a bathroom or powder room.
Use a limited, water-inspired color palette—shades of blue, sandy beige, and crisp white—to create a serene and cohesive look.
Incorporate tiny seed stitches or French knots scattered around your main motifs to suggest grains of sand or sea spray, adding subtle texture and detail.
These tiny sea-inspired embroidery ideas are perfect for transforming a small, functional space into a peaceful retreat.
13. Re-imagine a Vintage Anatomical Chart
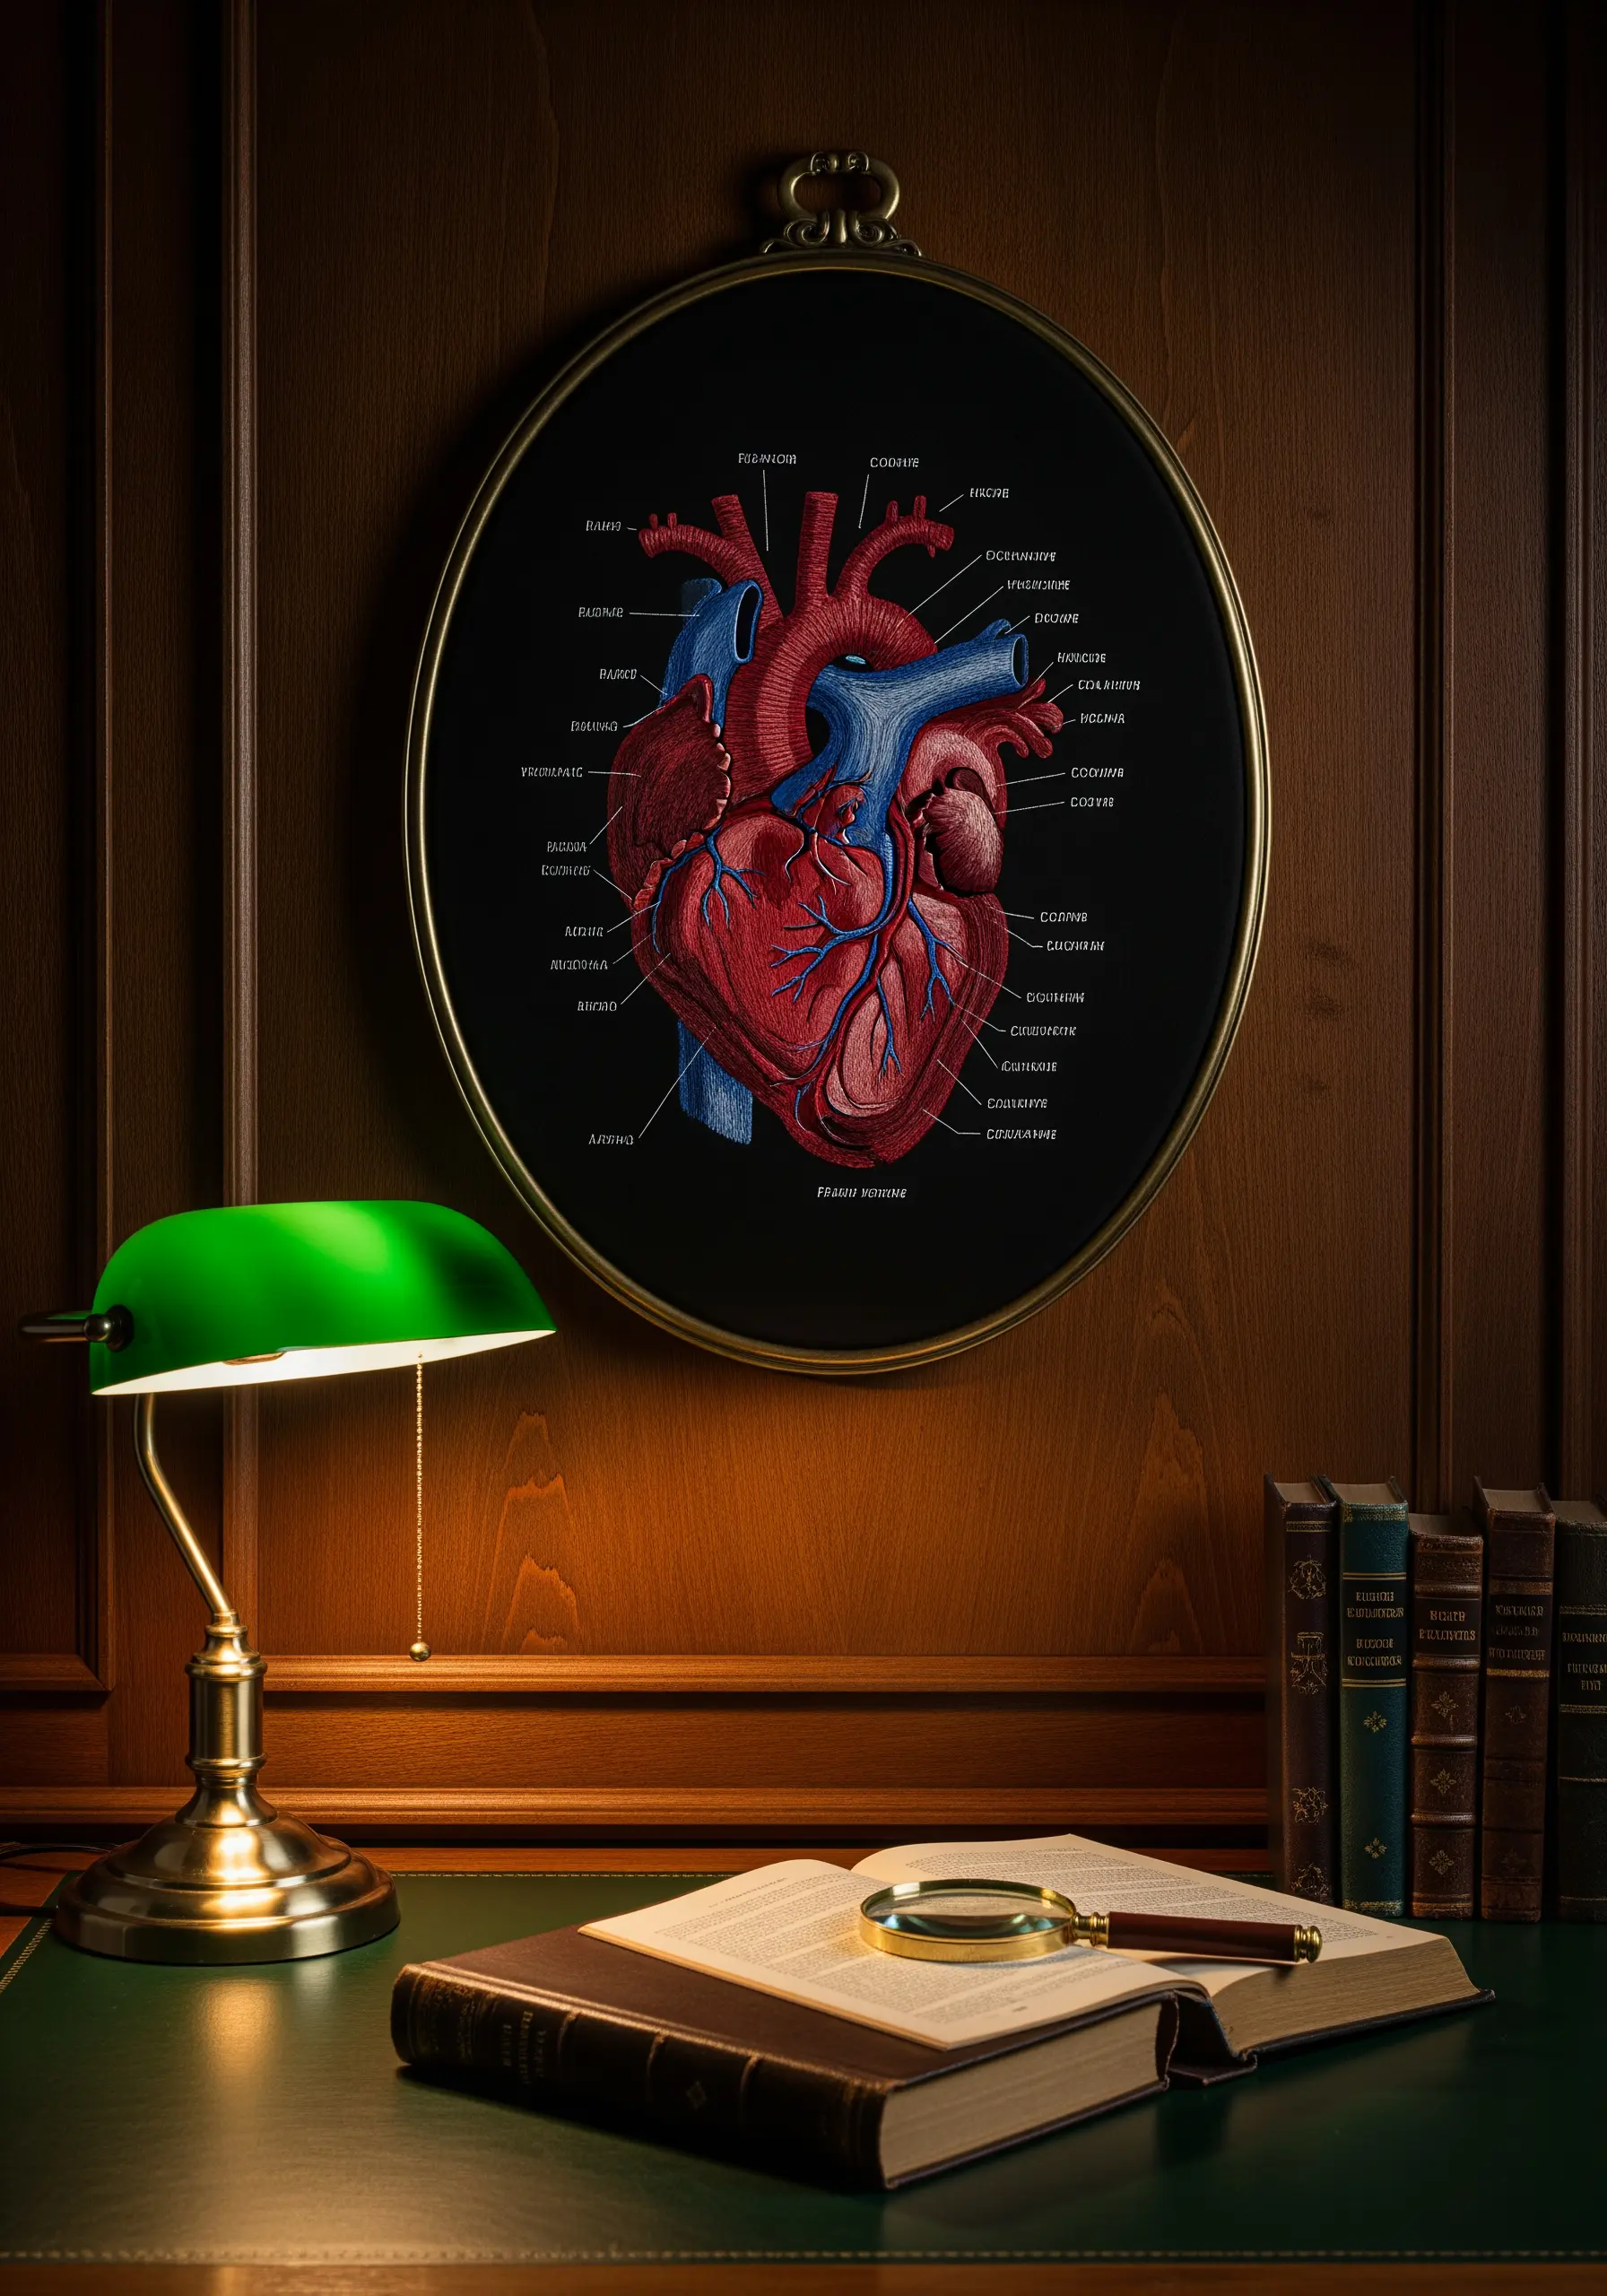
Give a classic scientific illustration a contemporary twist by recreating it with thread on dark fabric.
Use a long-and-short stitch to fill the large areas, blending reds and blues just as you would with colored pencils to create smooth, realistic shading.
For the delicate veins and arteries, switch to a fine, single-strand backstitch to achieve the precision of an inked line.
Mounting the finished piece in an ornate oval frame completes the sophisticated, vintage-cabinet-of-curiosities aesthetic.
14. Add a Playful Typographic Accent
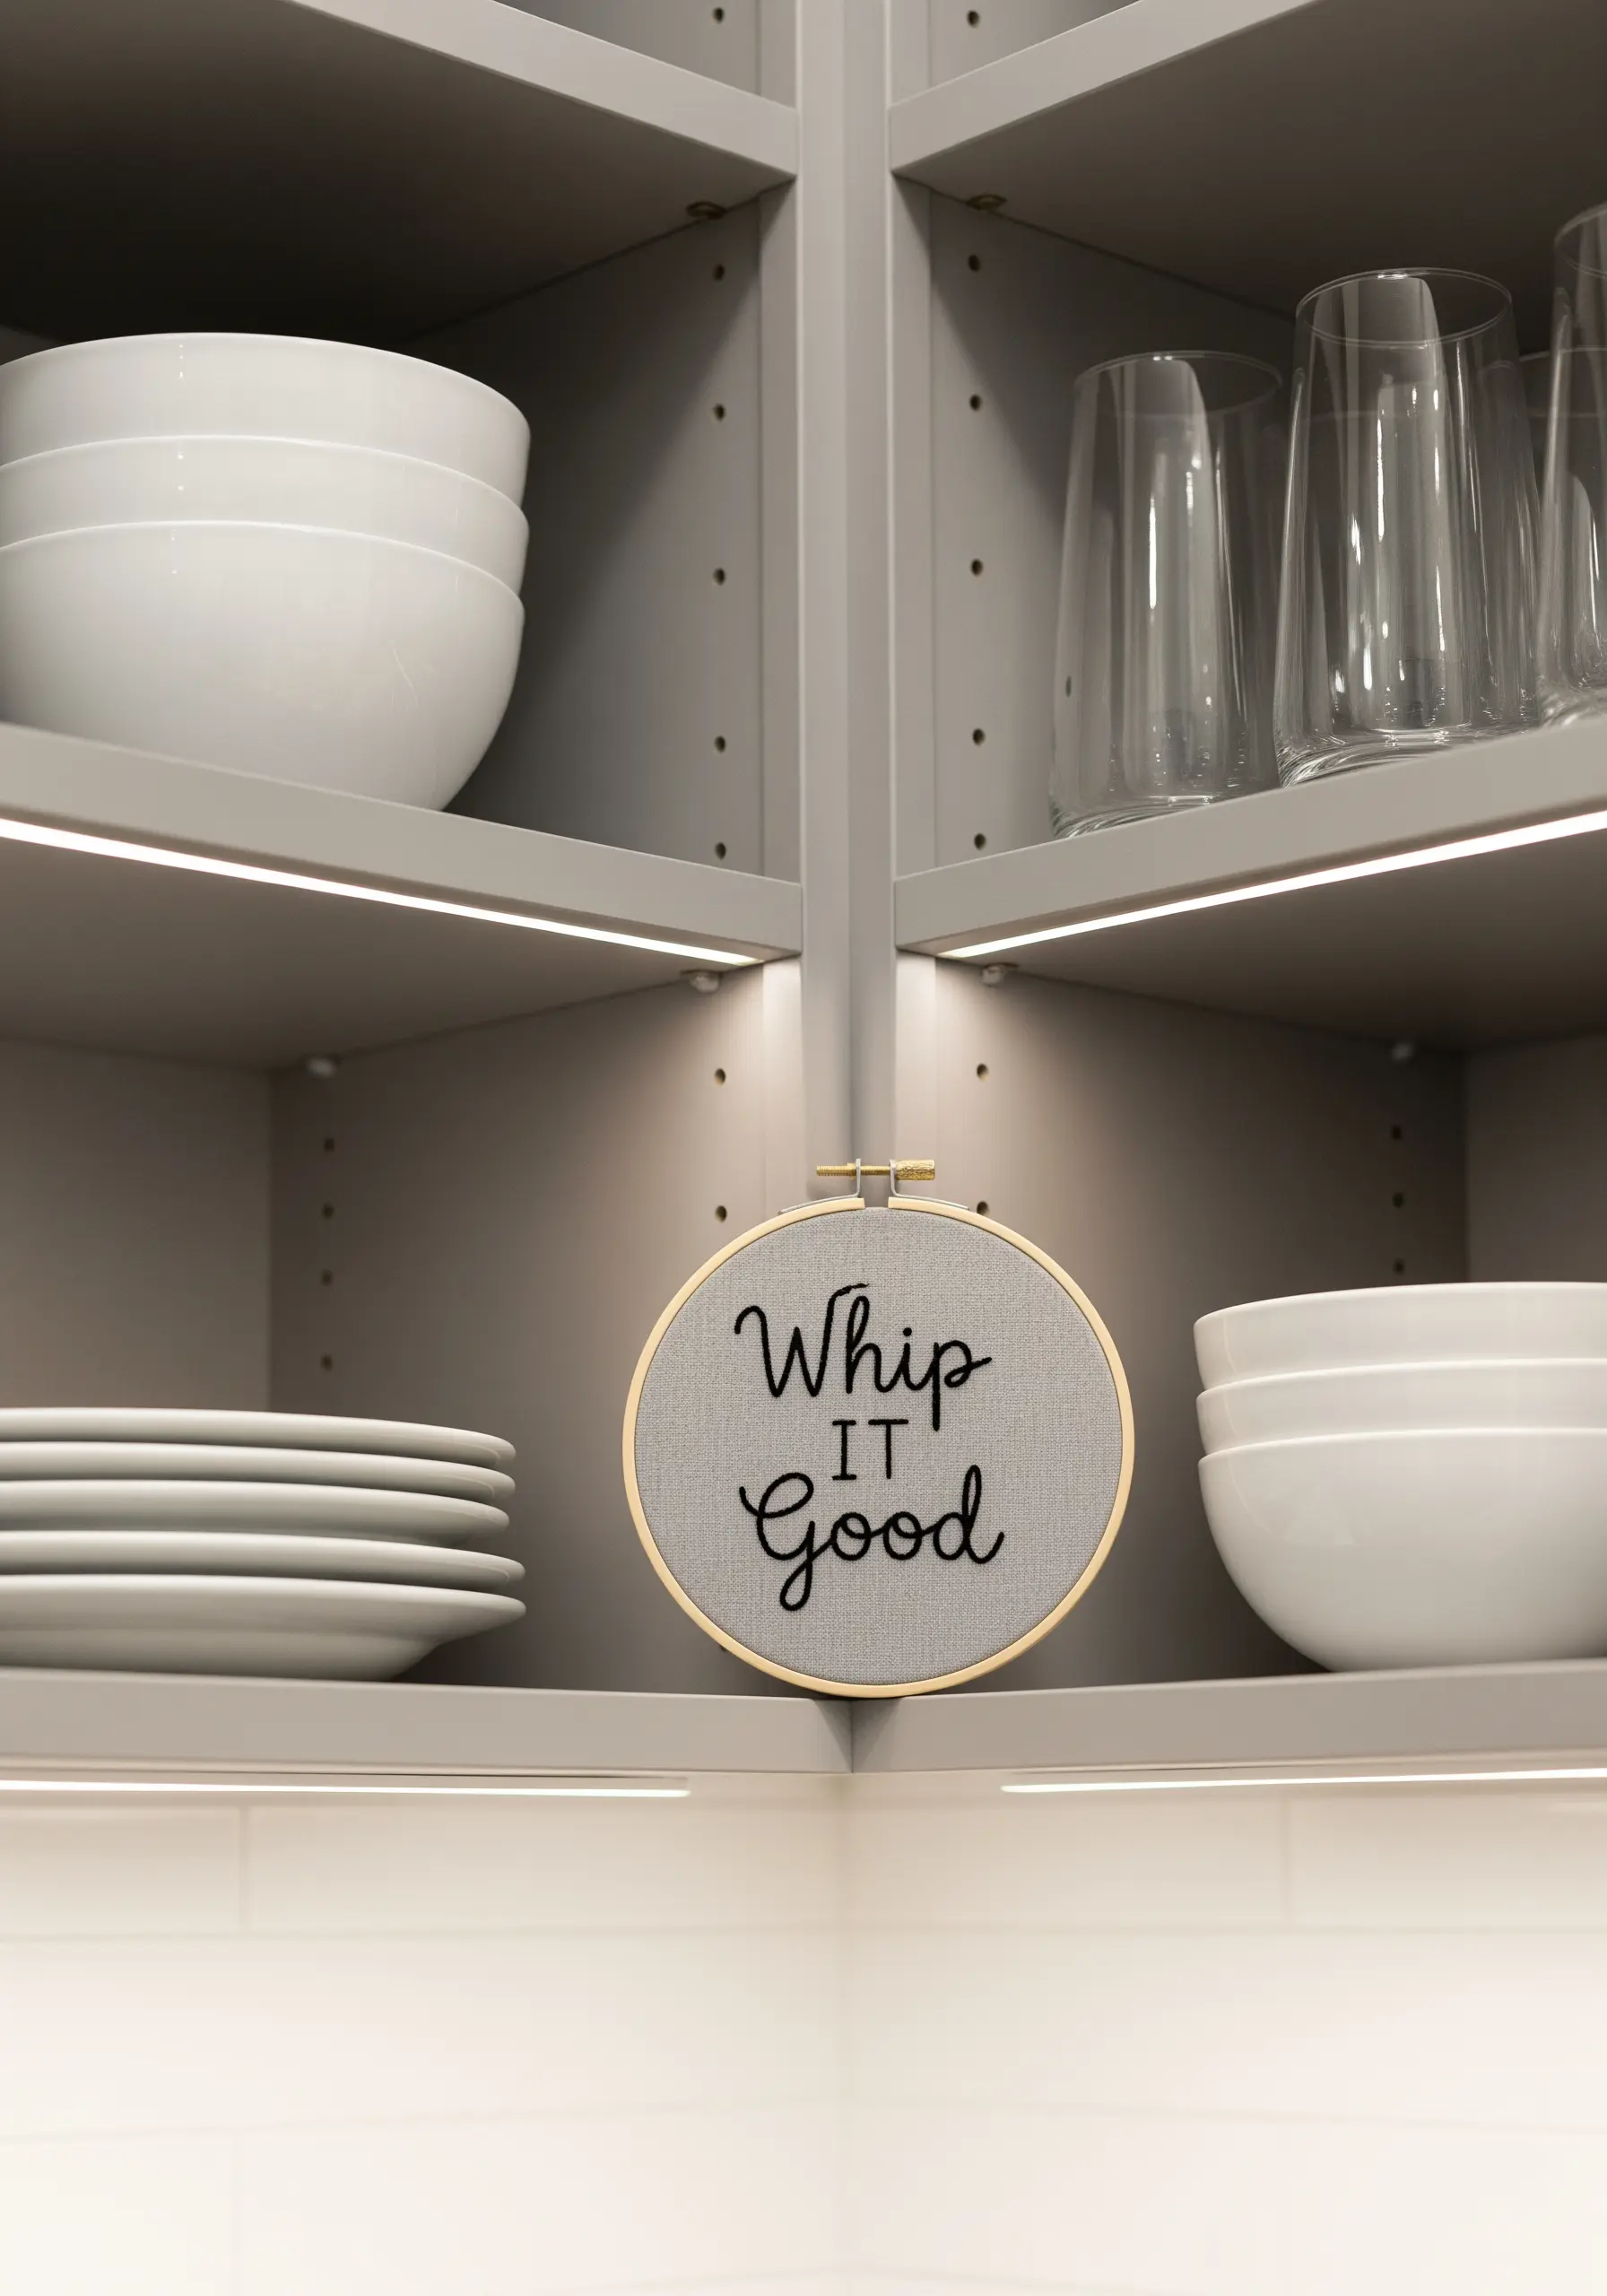
Inject a bit of humor and personality into an unexpected space, like a kitchen cabinet, with a simple, typographic hoop.
Choose a font that complements the message—a playful script works well for a lighthearted quote.
To create smooth curves on your letters, use a stem stitch or a split stitch; they wrap around bends more cleanly than a standard backstitch.
Tuck these small hooped wall quotes into shelves or nooks for a delightful, unexpected discovery.
15. Capture a Landscape Memory
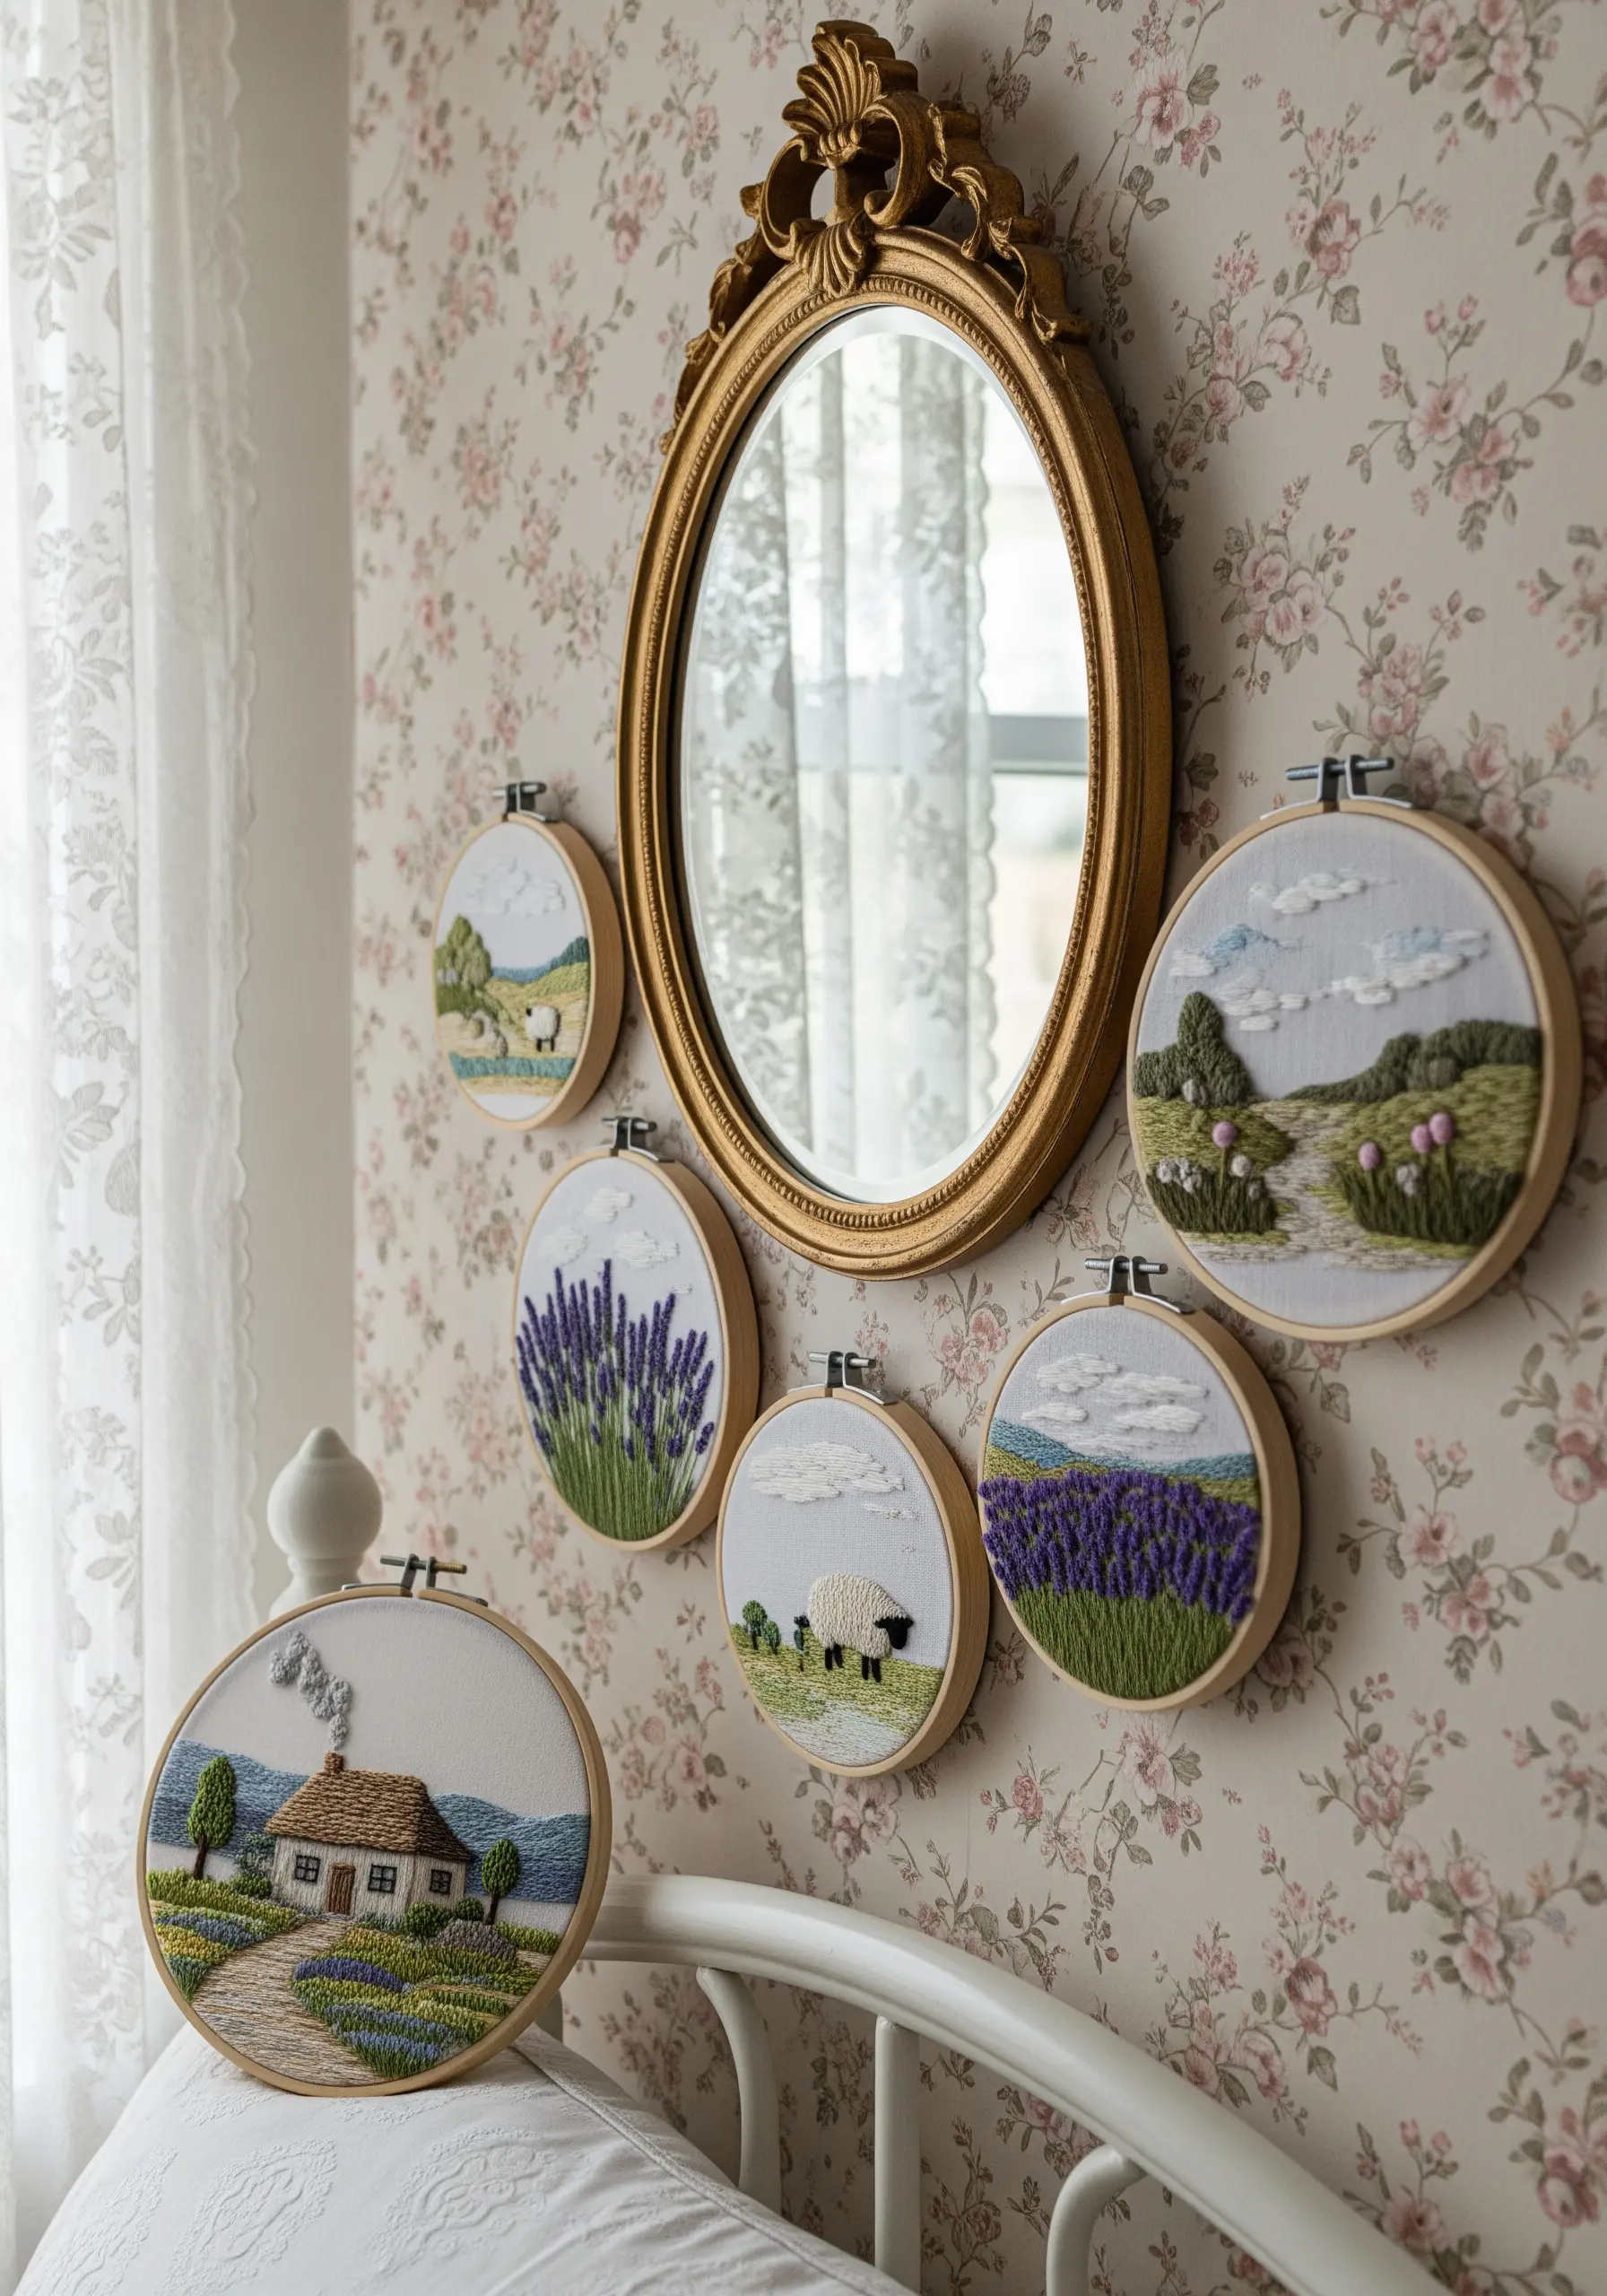
Stitch a series of miniature landscape vignettes to capture the feeling of a favorite place or a cherished memory.
Instead of filling the entire hoop, let the scene exist as a small, contained circle, which draws the viewer’s eye inward.
Create depth by using a combination of stitches: satin stitch for smooth fields, French knots for fluffy sheep or flowers, and lazy daisy stitches for distant trees.
Grouping these relaxing nature scene embroidery hoops around a central object, like a vintage mirror, creates a charming and personal wall display.
16. Embrace Sculptural Minimalism
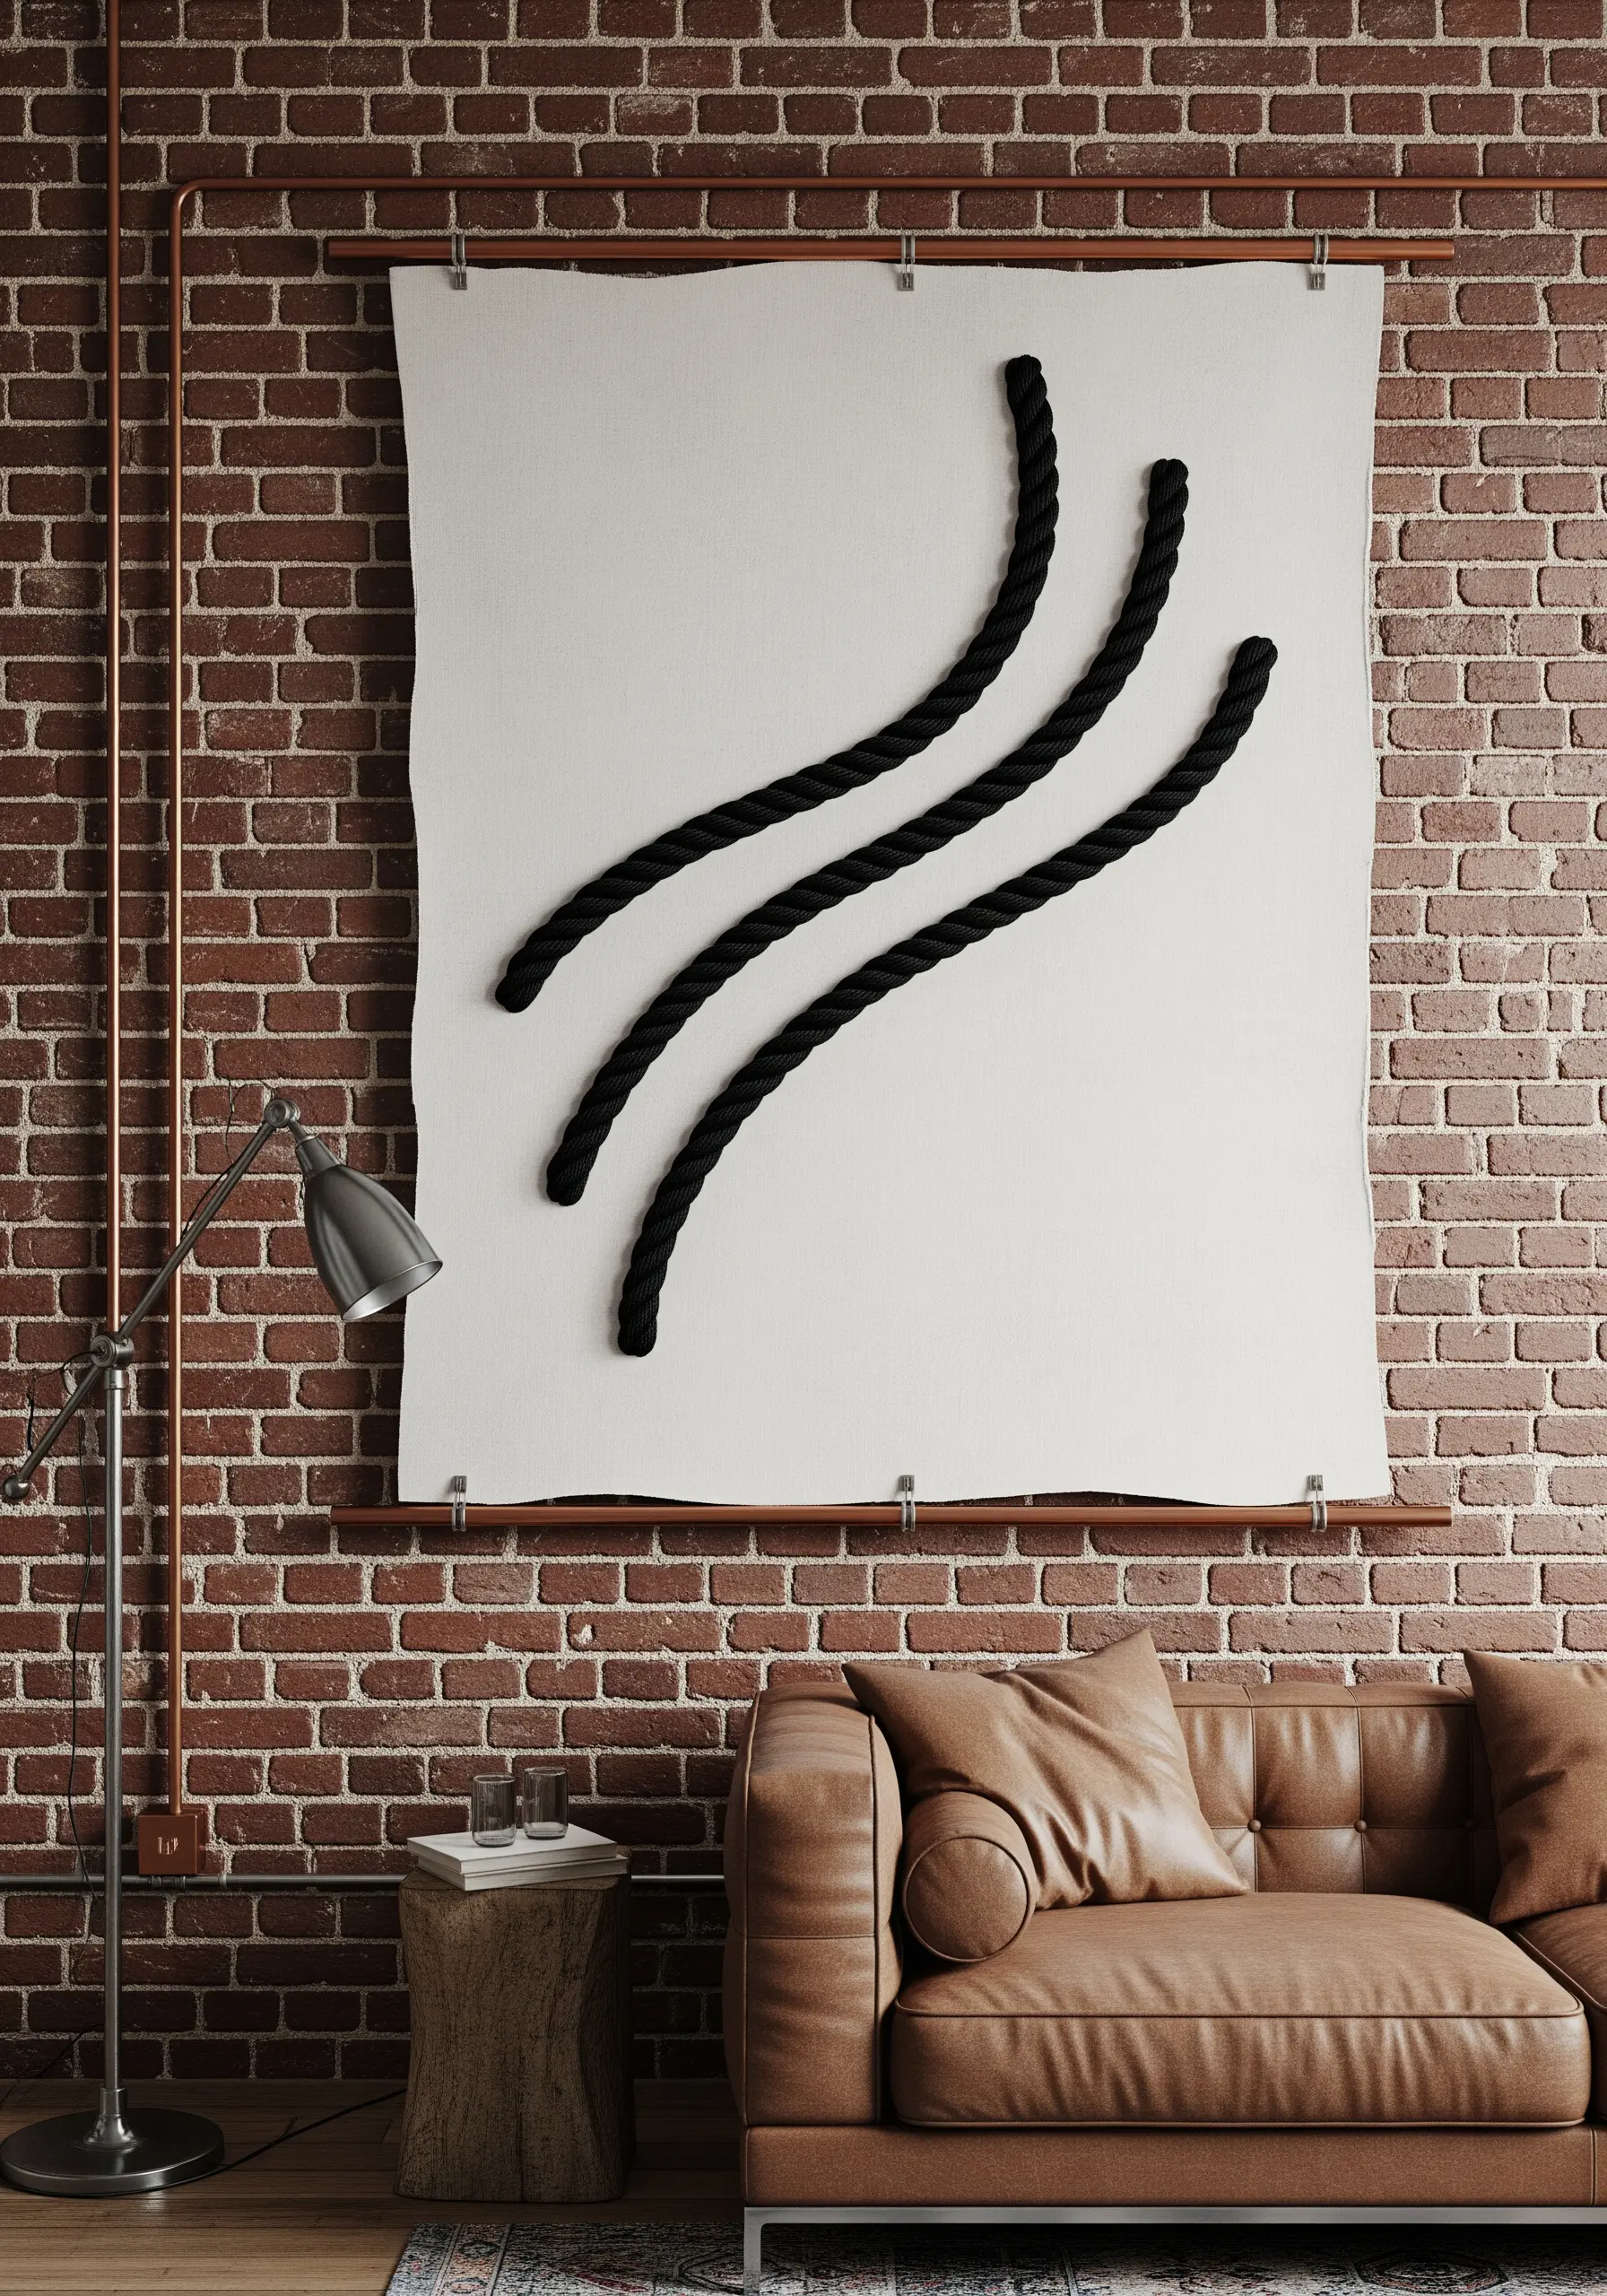
Create a powerful, minimalist statement piece using thick rope or cord on a large, raw canvas.
This technique involves shaping the rope into your desired form and then carefully couching it down with a strong, matching thread that becomes invisible from a distance.
The texture and shadow created by the three-dimensional rope are the main focus, so keep the background simple and uncluttered.
Hanging the canvas from a copper pipe adds an industrial-chic element that complements the raw, organic feel of the rope and brick.
17. Stitch a Meditative Mandala
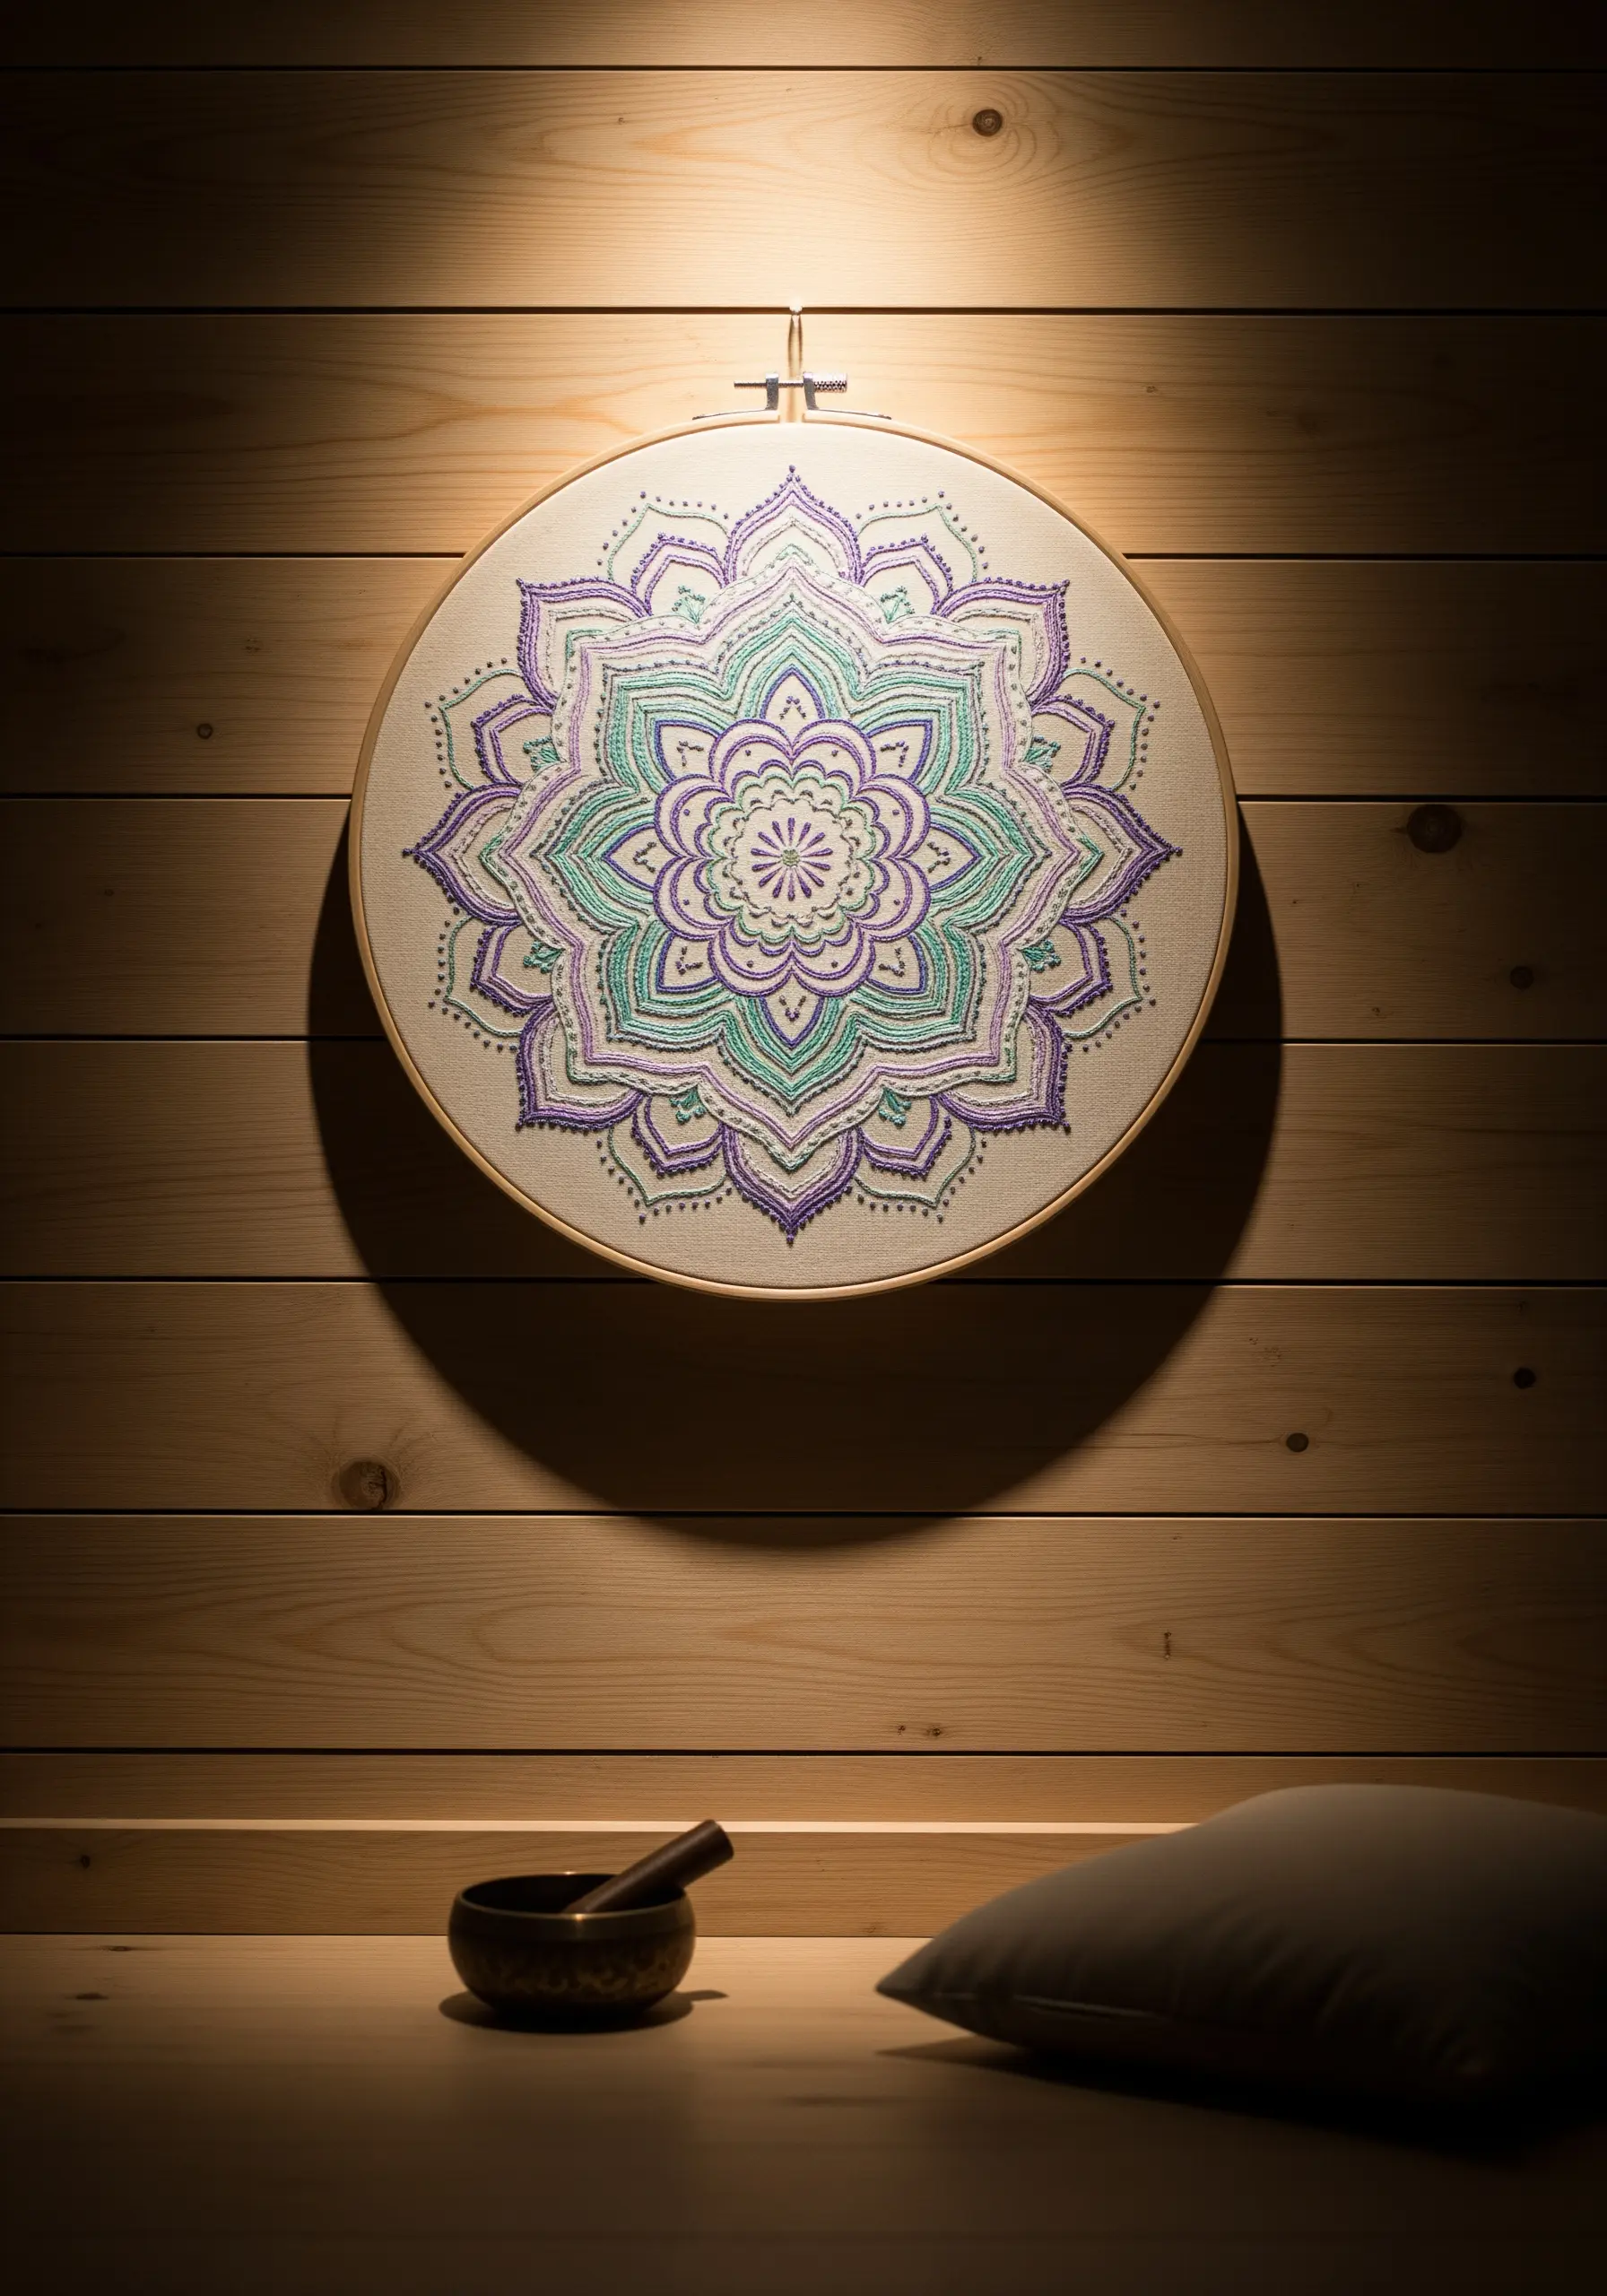
Channel a sense of calm and focus by stitching a complex, symmetrical mandala pattern.
The repetitive nature of the stitches—like the thousands of seed stitches or backstitches that form the pattern—can be incredibly relaxing and meditative.
Work from the center outwards to ensure your pattern remains symmetrical and evenly spaced.
Choose a soothing color palette of purples, teals, and greens to enhance the design’s tranquil quality, making it a perfect centerpiece for a meditation corner or a calm retreat.
18. Channel Retro Vibes with Geometric Yarn Art
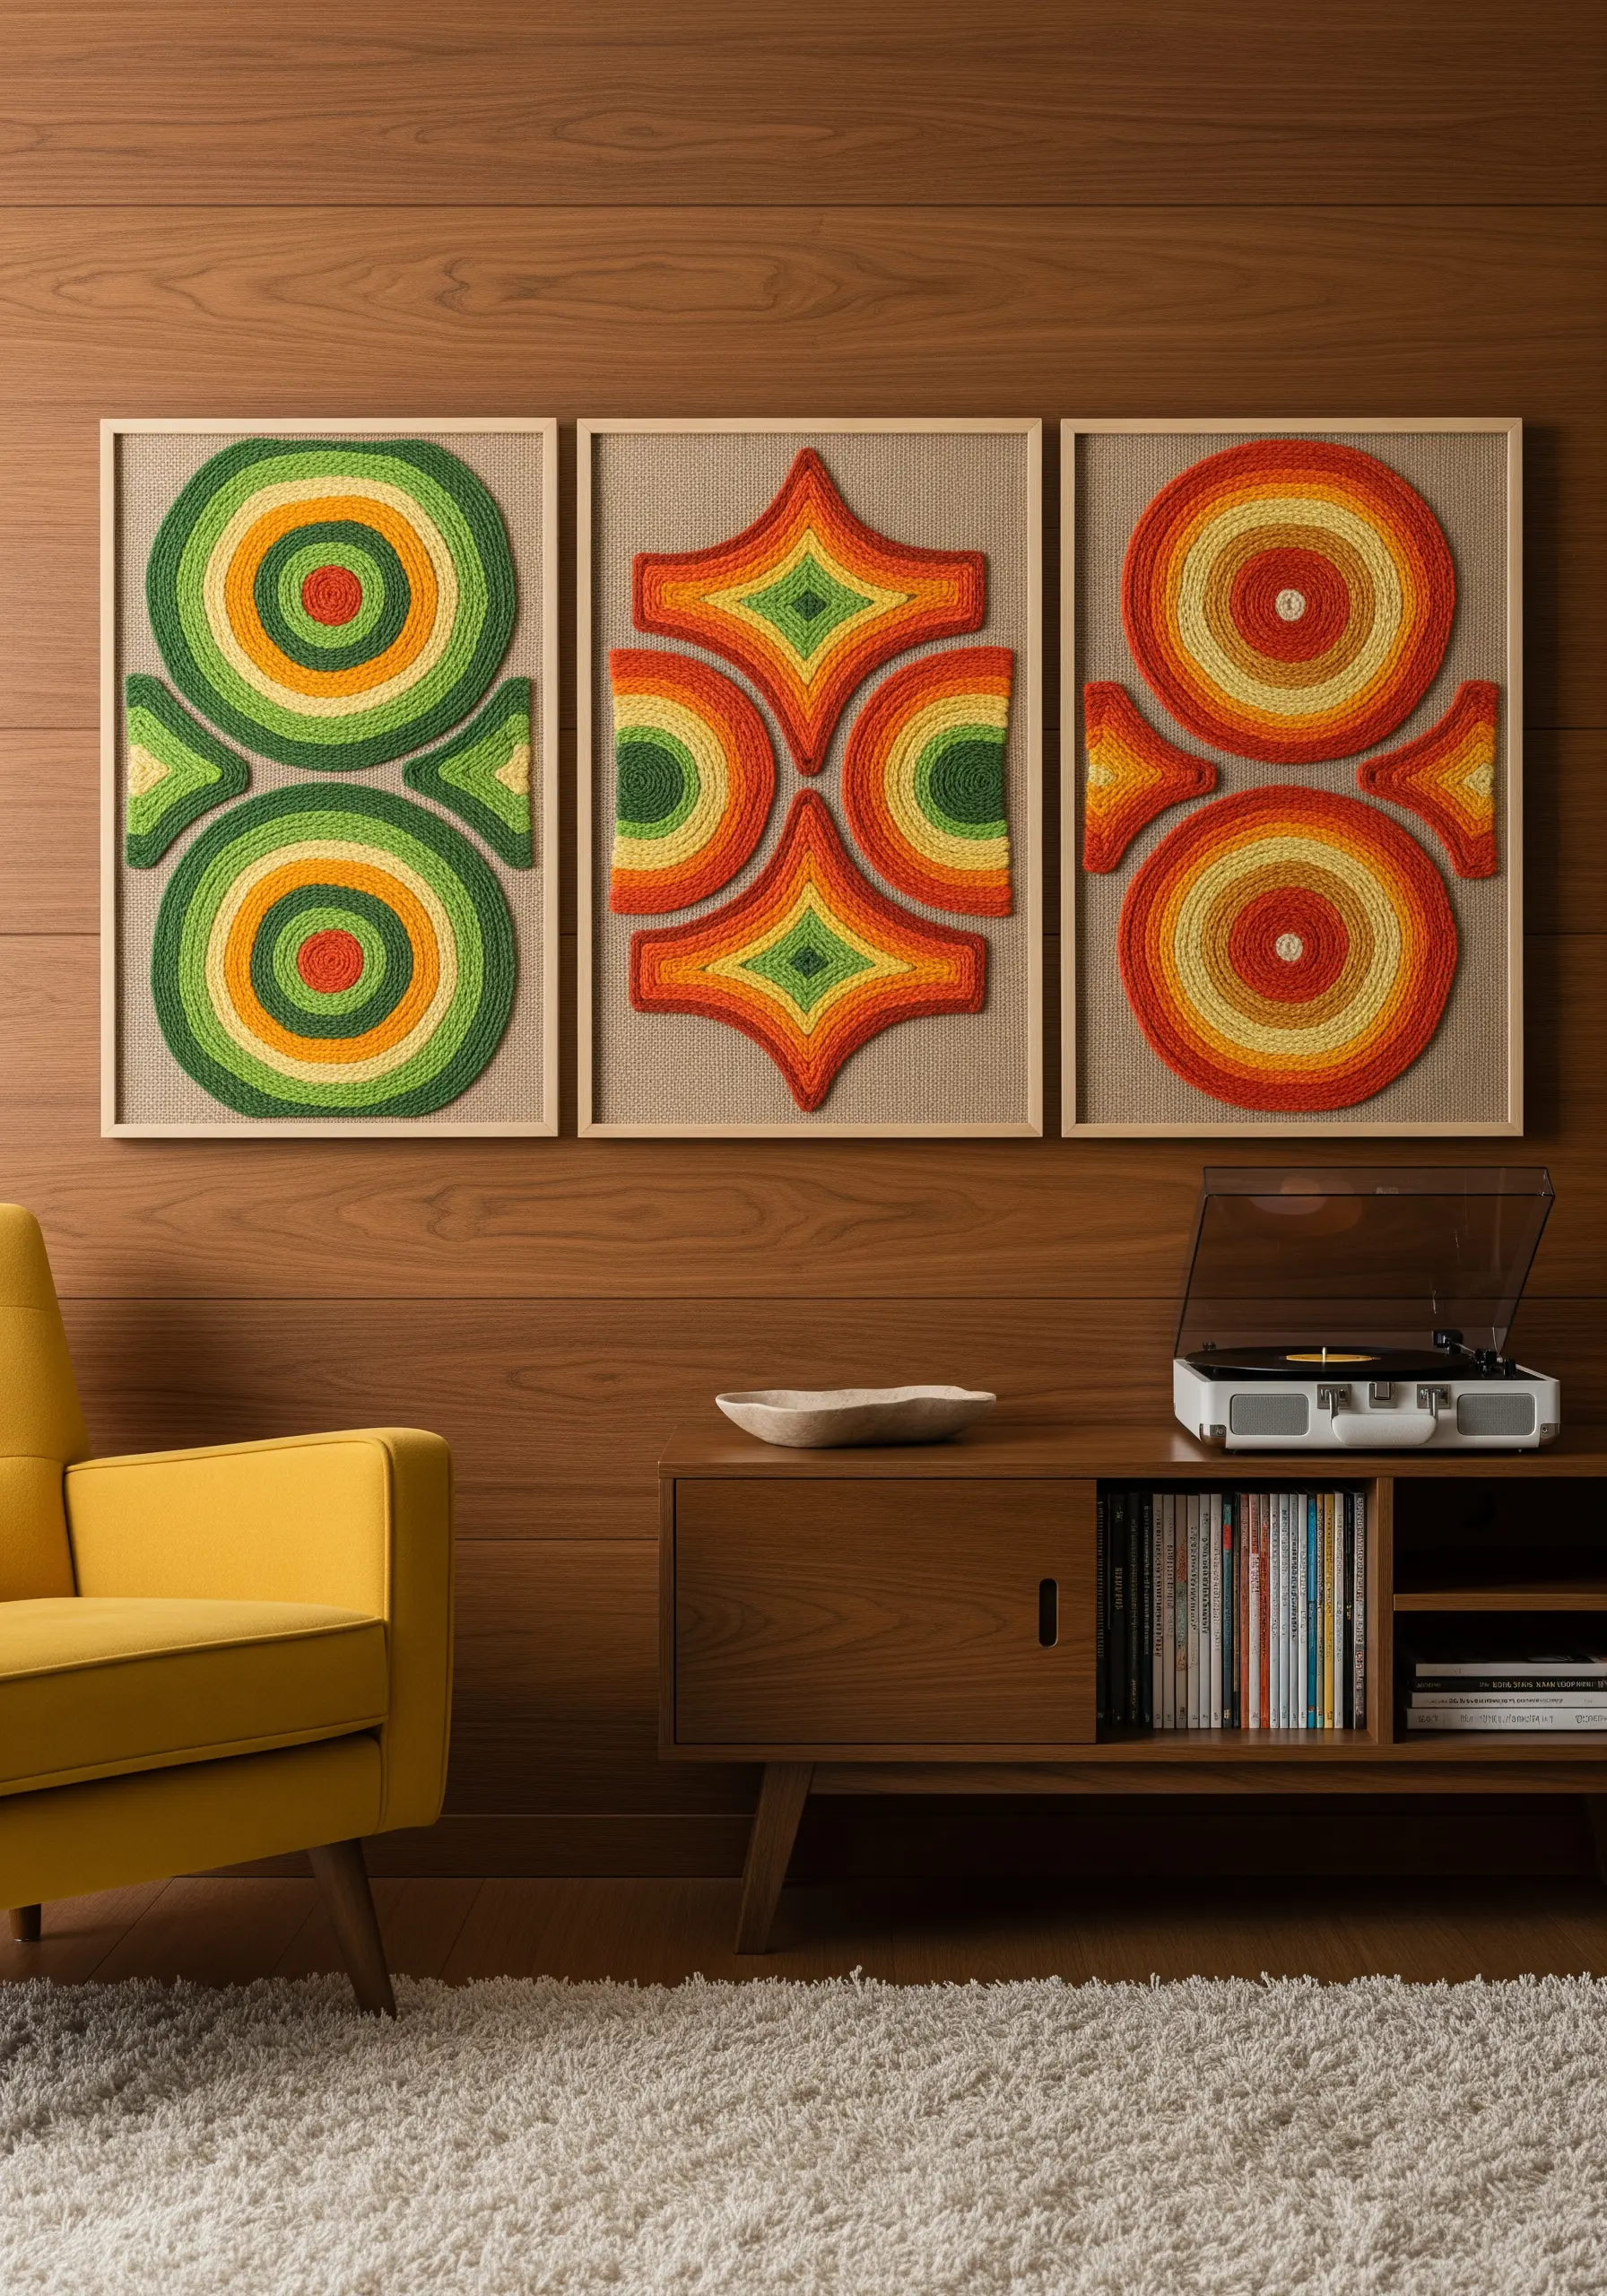
Capture the spirit of ’70s design by creating a triptych of bold, geometric patterns using yarn couching.
The key to this style is the color palette—think harvest gold, avocado green, and burnt orange for an authentic retro feel.
Create each piece on a separate stretched canvas or frame, but design them to work together as a single, cohesive unit.
This type of modern yarn wall art adds a warm, nostalgic, and highly graphic element to your decor.
19. Create an Ethereal Insect Mobile
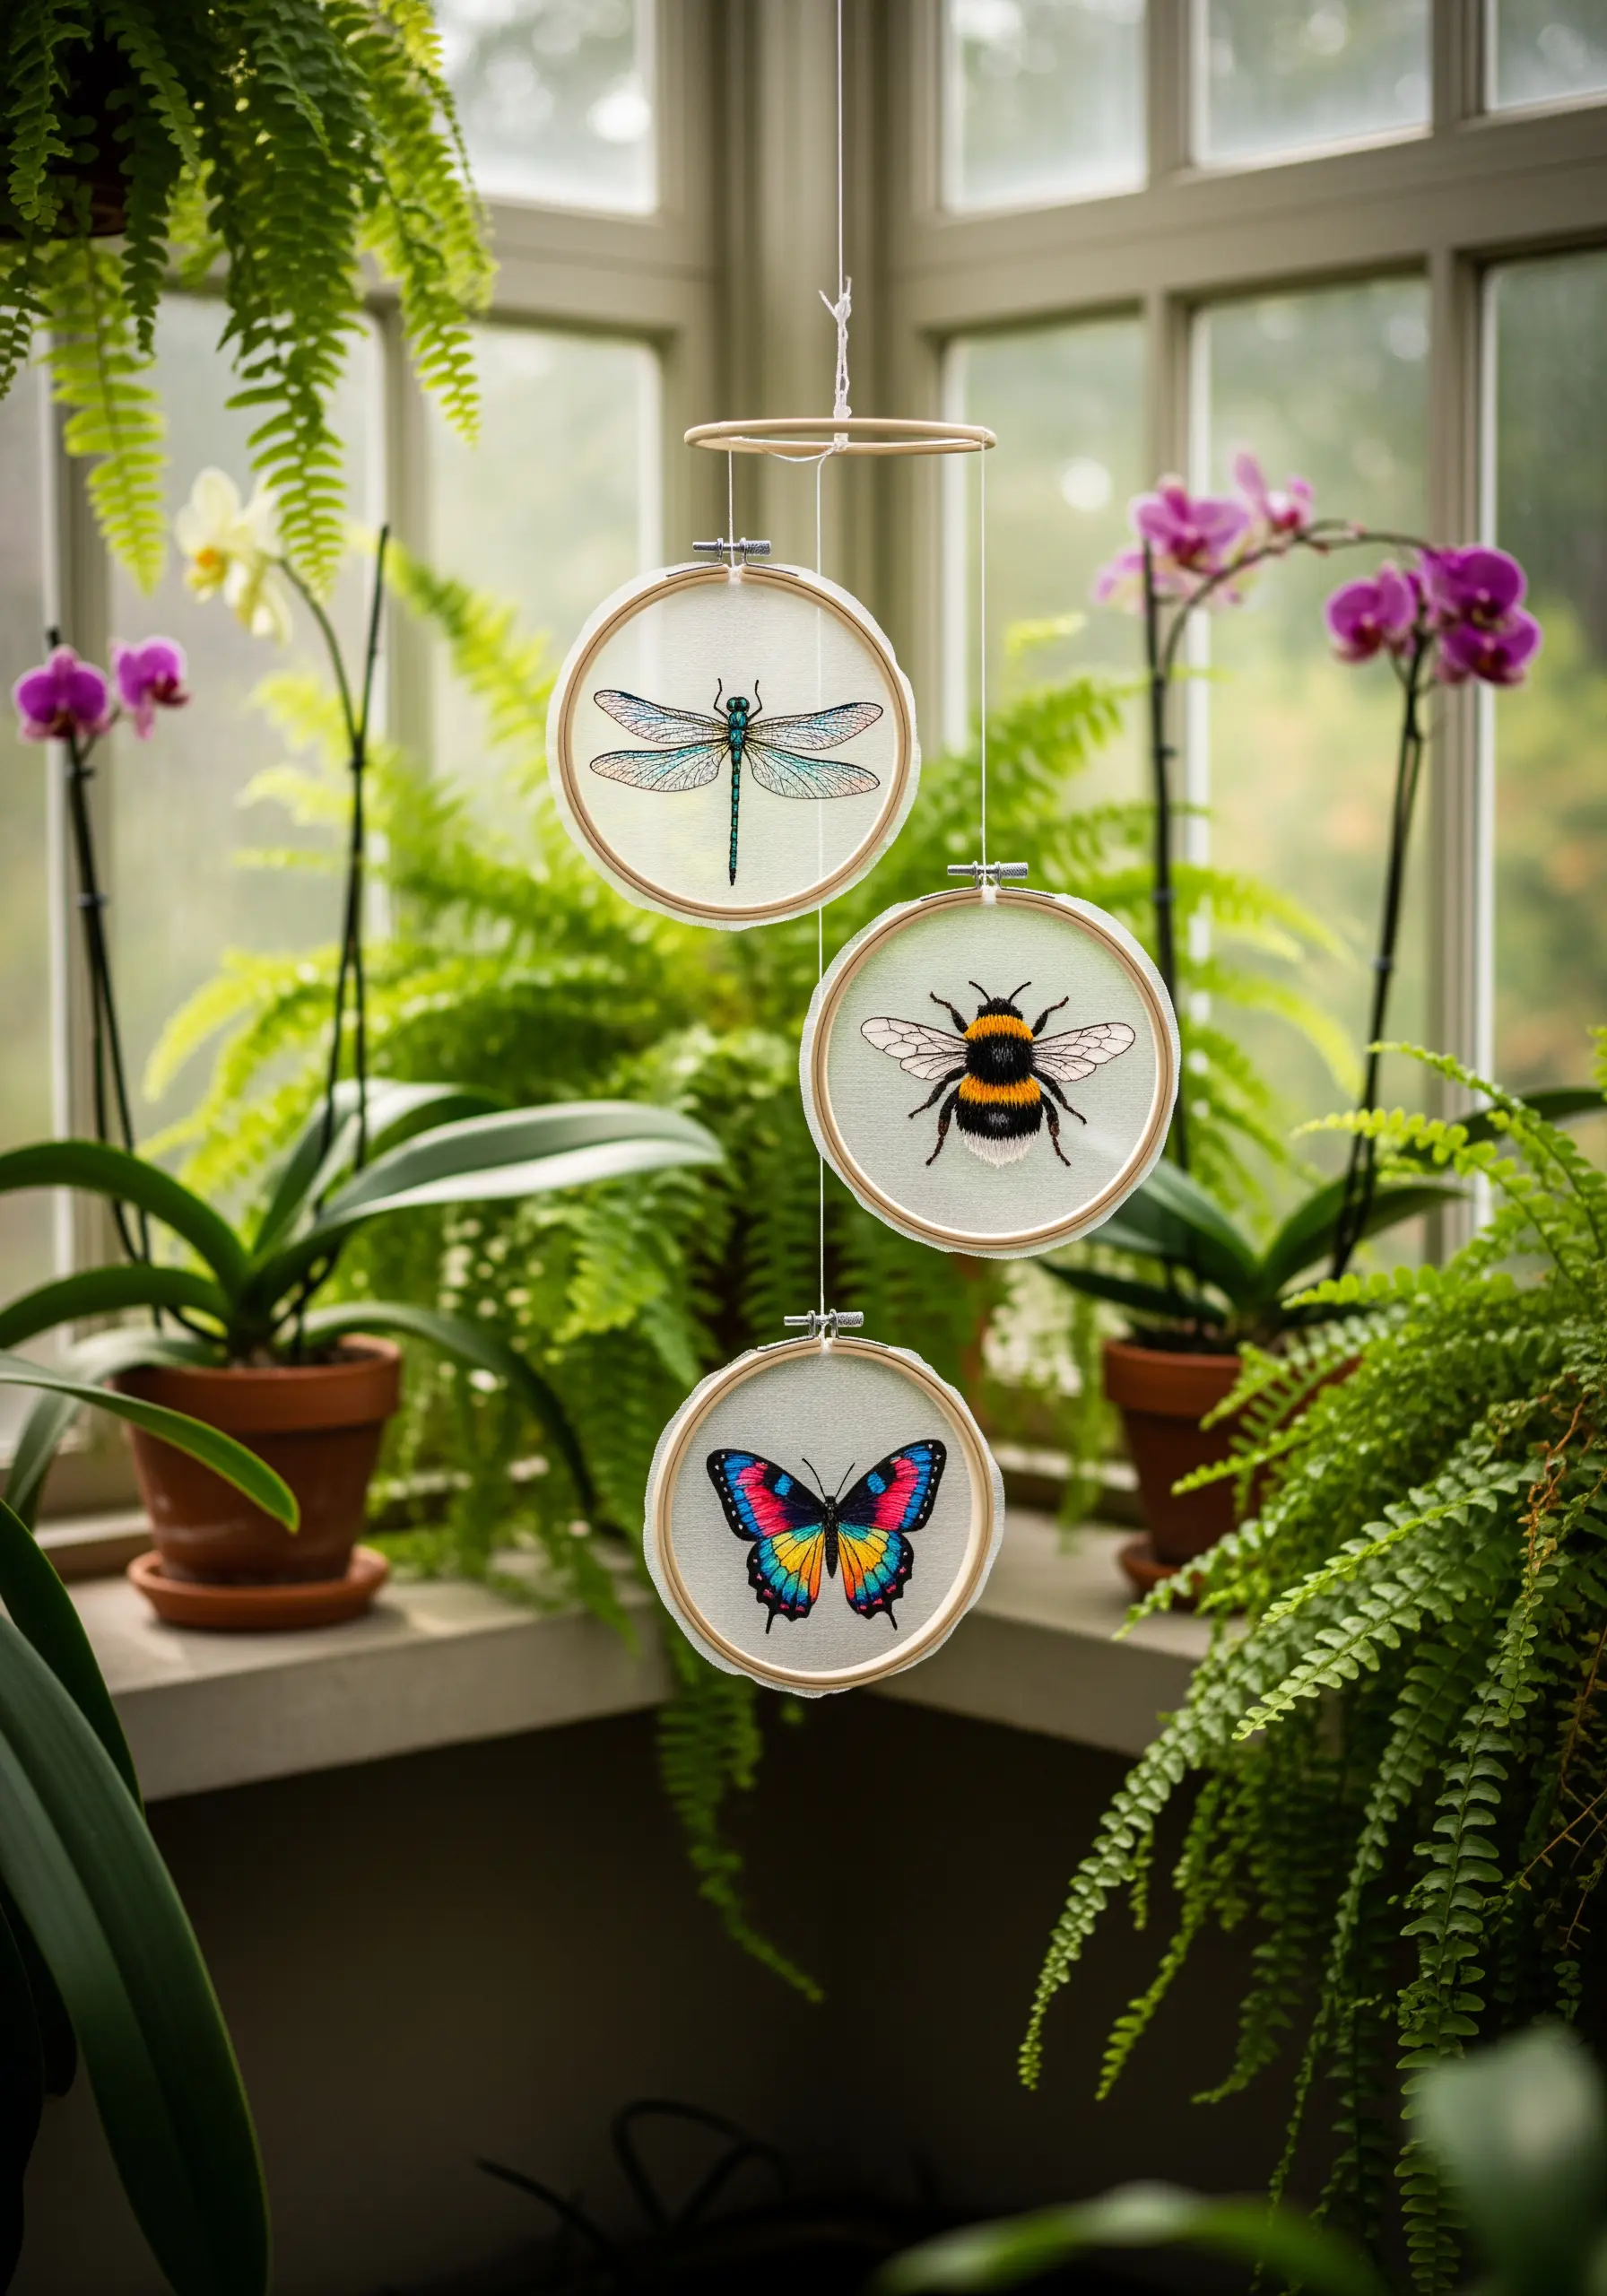
Give delicate insect motifs an ethereal quality by stitching them onto sheer organza or tulle.
To stitch on sheer fabric, use a water-soluble stabilizer on the back for support; once you’re finished, it dissolves in water, leaving only the stitches behind.
Use a single strand of thread for the wings to create a translucent, gossamer effect, mimicking the delicacy of the real thing.
Hang the finished hoops at different heights to create a mobile that seems to float and dance in the light.
20. Design a Grand Literary Banner
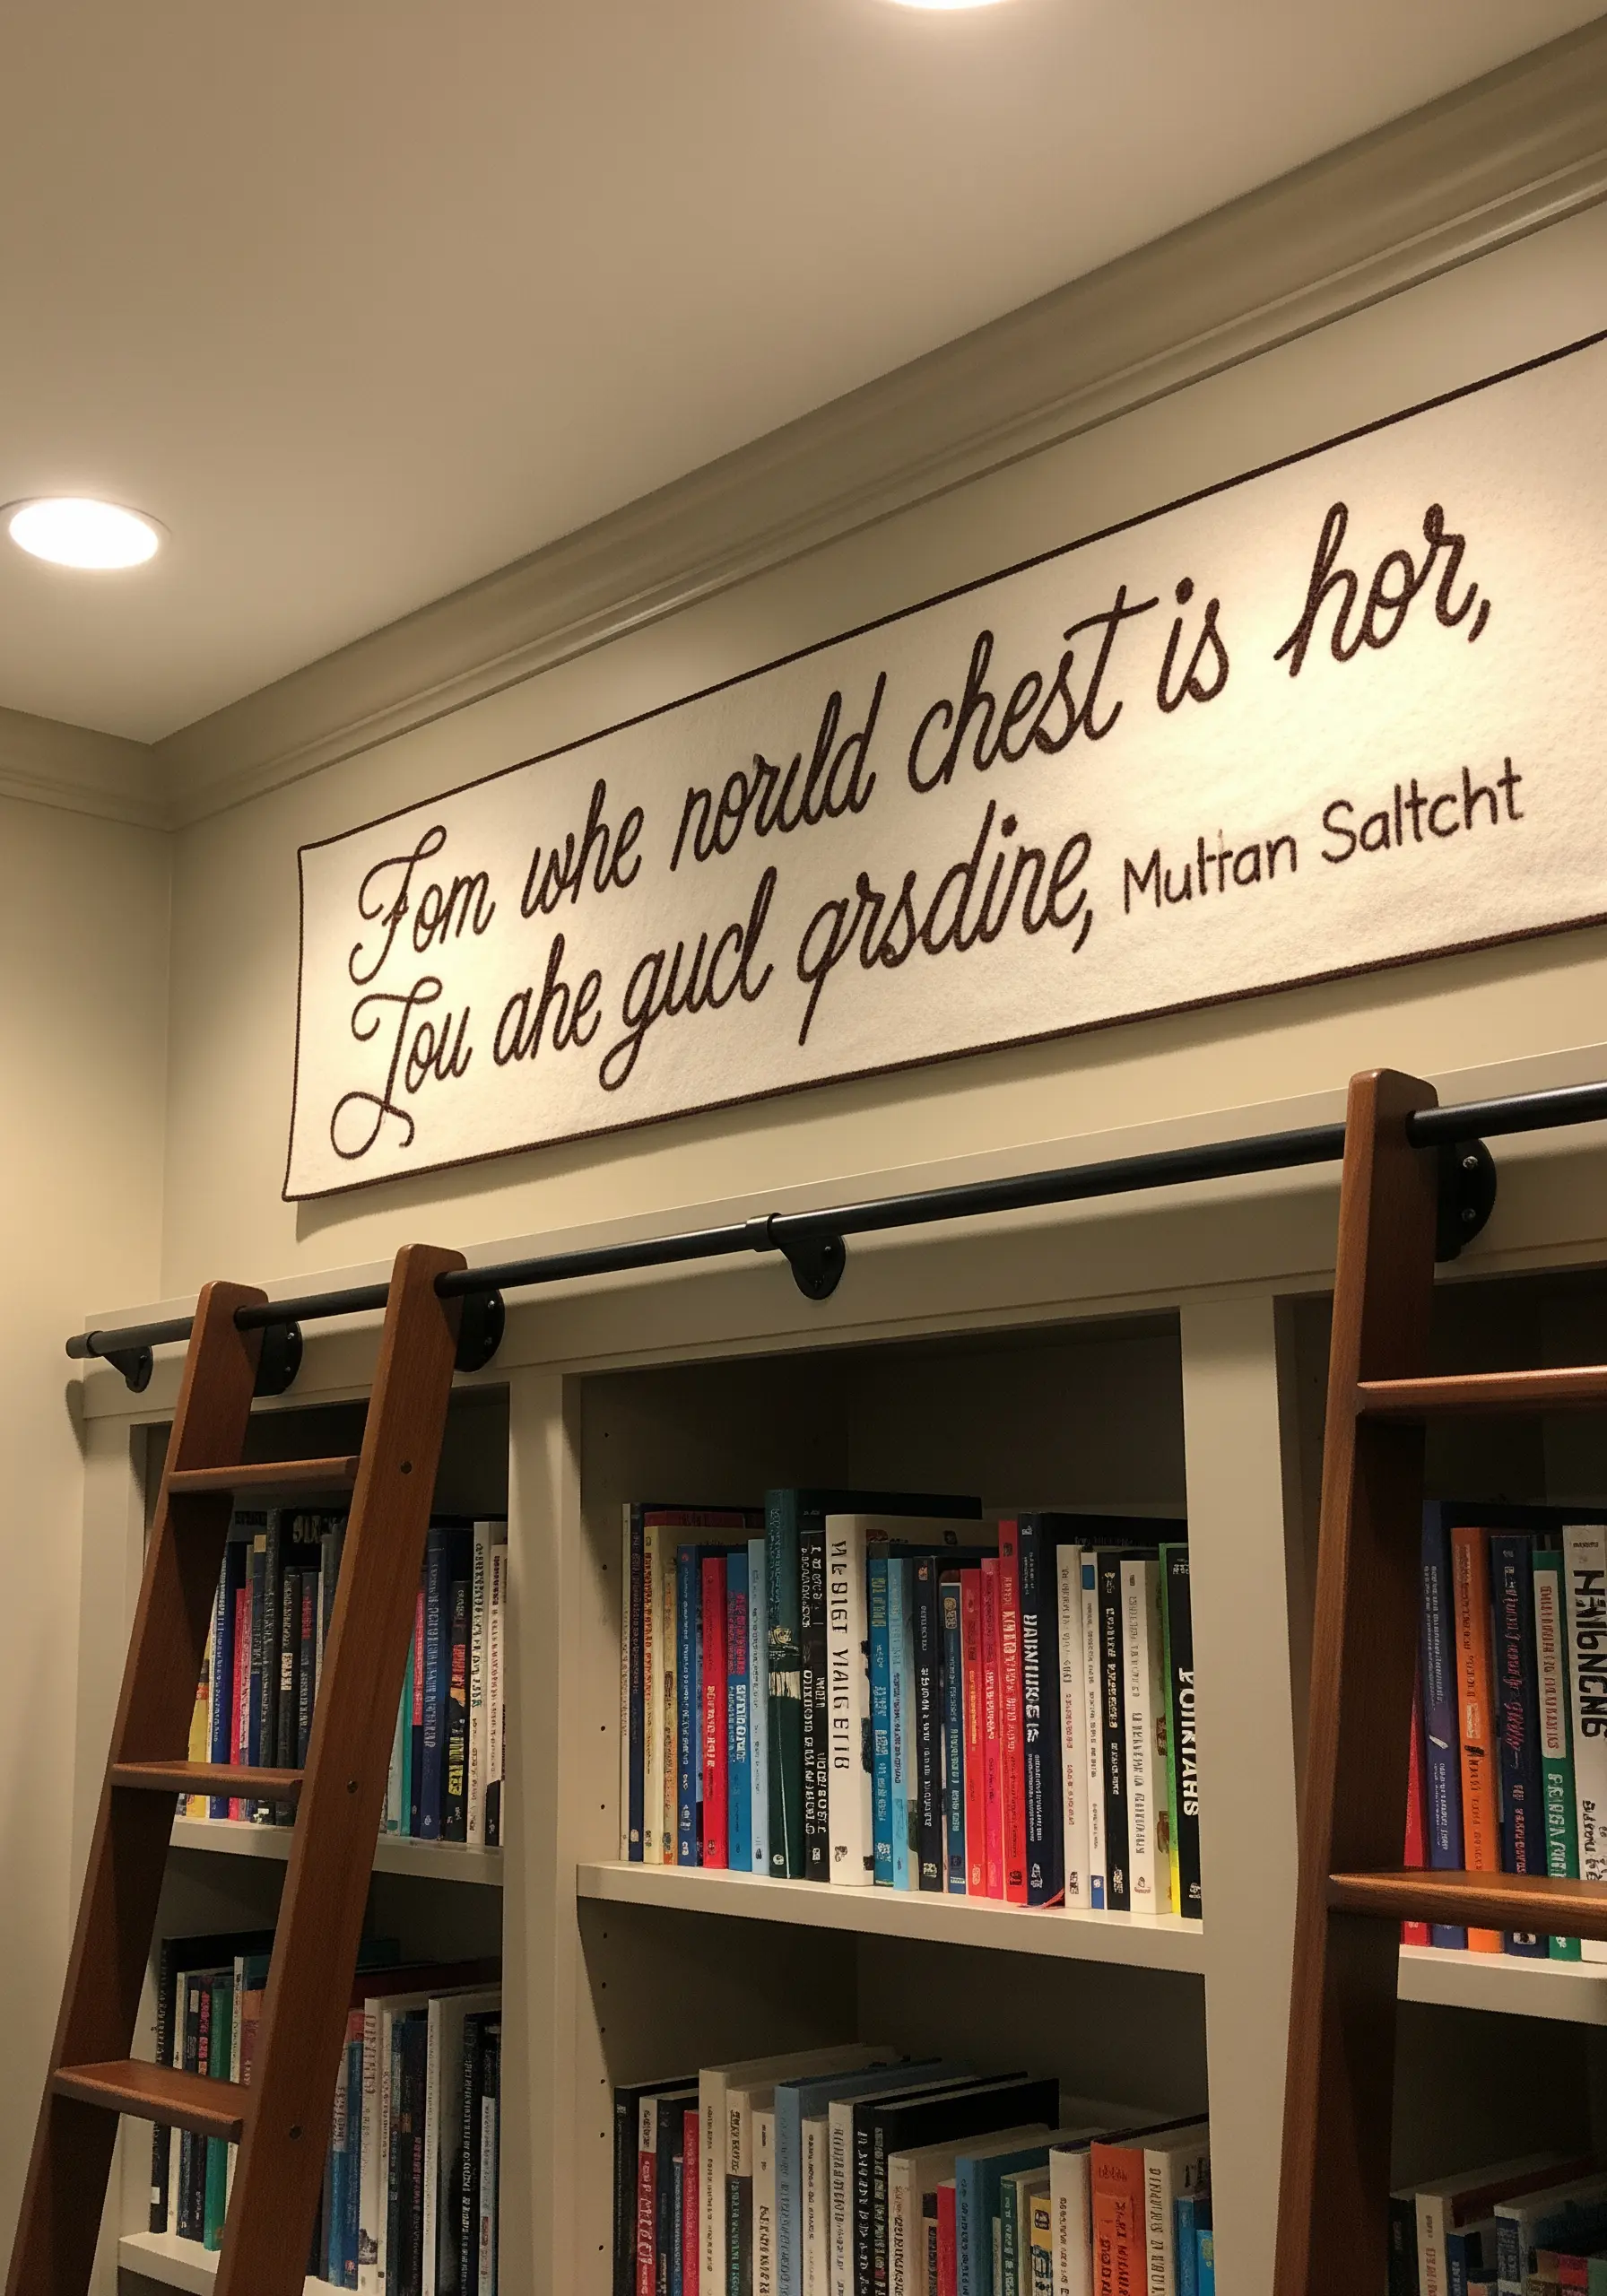
Elevate a favorite quote from a simple hoop to a grand statement by creating a long, fabric banner.
Use a projector to trace your chosen text onto a large piece of felt or heavy canvas, ensuring perfect letterforms and spacing.
Fill the letters with a dense satin stitch for a bold, blocky look, or outline them with a stem stitch for a more delicate, calligraphic style.
This is one of those vintage-style embroidery banners that can transform a home library or reading nook into a truly personal sanctuary.
21. Make a Modern Statement with a Portrait Cluster
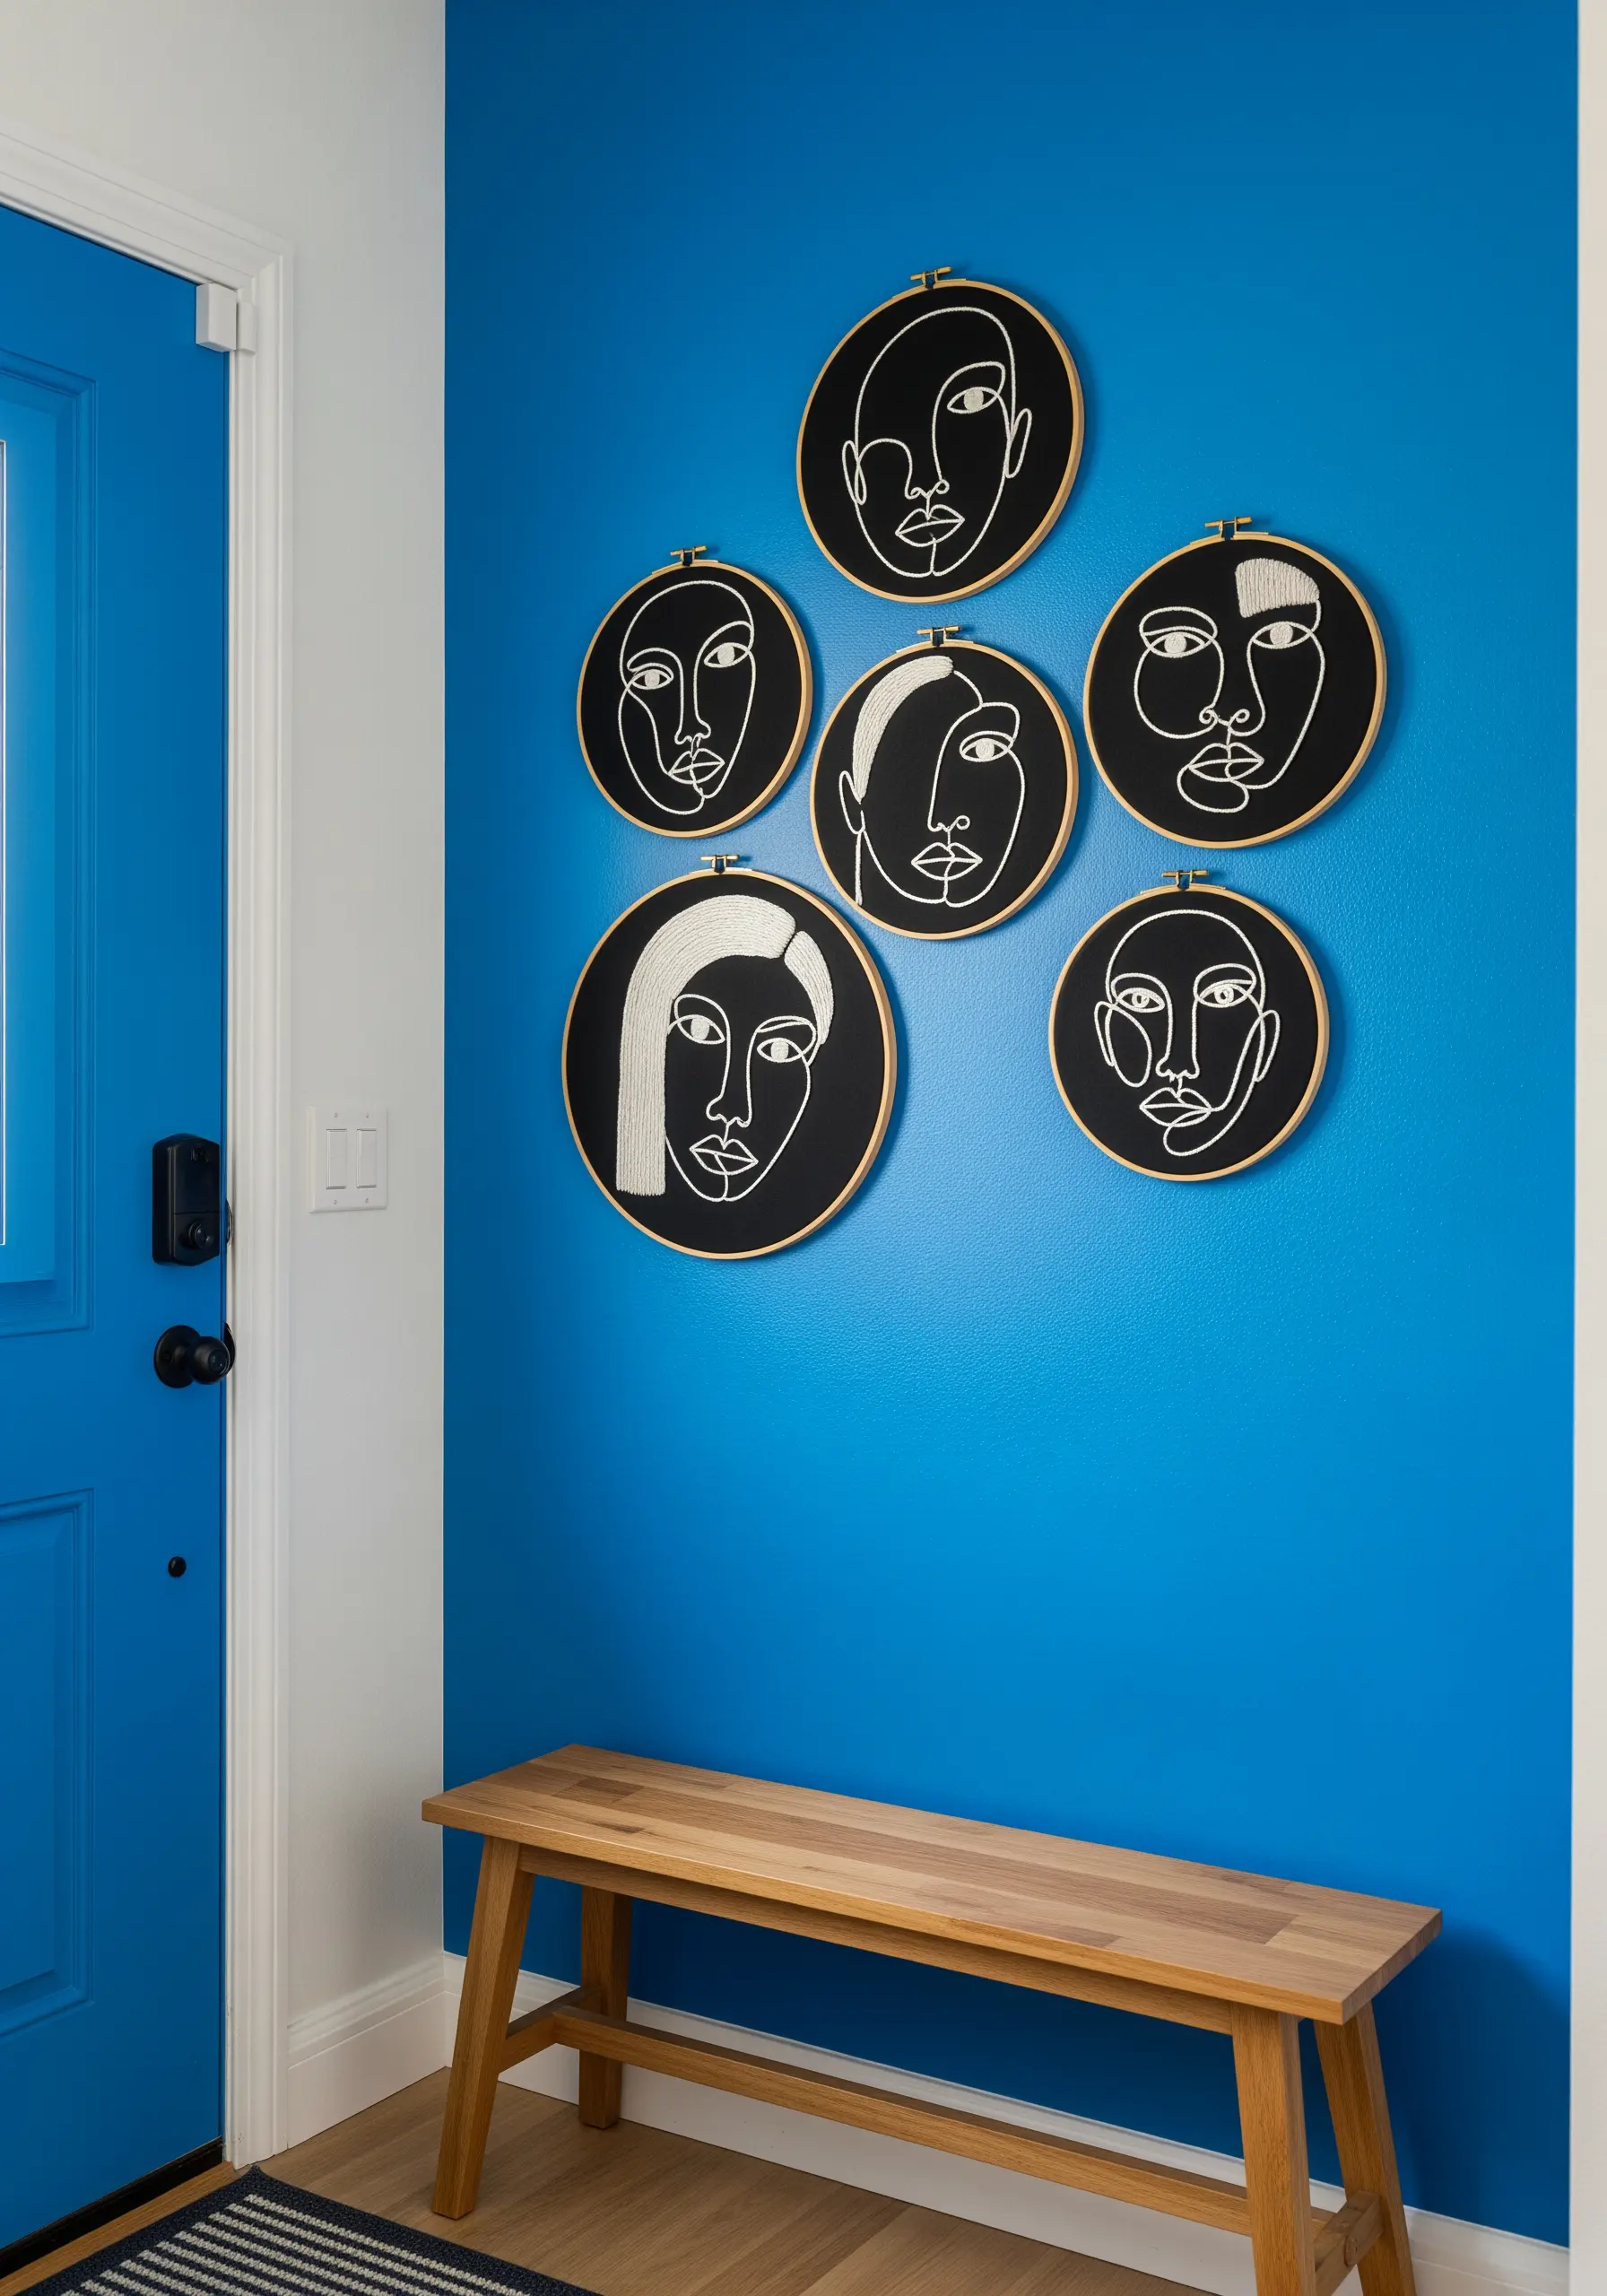
Create a striking entryway display by grouping several abstract line-art portraits together.
Unify the collection by using a consistent technique: bold white thread on black fabric, with all hoops the same size.
Vary the designs within this framework—some filled with satin stitch, others pure outline—to give each piece its own personality while maintaining a cohesive aesthetic.
Arranging the hoops in a tight, organic cluster on a brightly colored wall makes the black-and-white art pop dramatically.
22. Add a Touch of Glamour with Metallic Thread

Elevate a simple design, like this vintage perfume bottle, by incorporating shimmering metallic threads.
Use a gold metallic floss for the hardware and atomizer to create a realistic, reflective shine that catches the light.
For the ‘spray,’ use spaced-out French knots and seed beads in a matching gold tone to create a sense of effervescent movement.
Stitching on a soft pastel fabric enhances the delicate, feminine feel, making it perfect for a vanity or dressing area.
23. Craft a Bohemian Fabric Tapestry
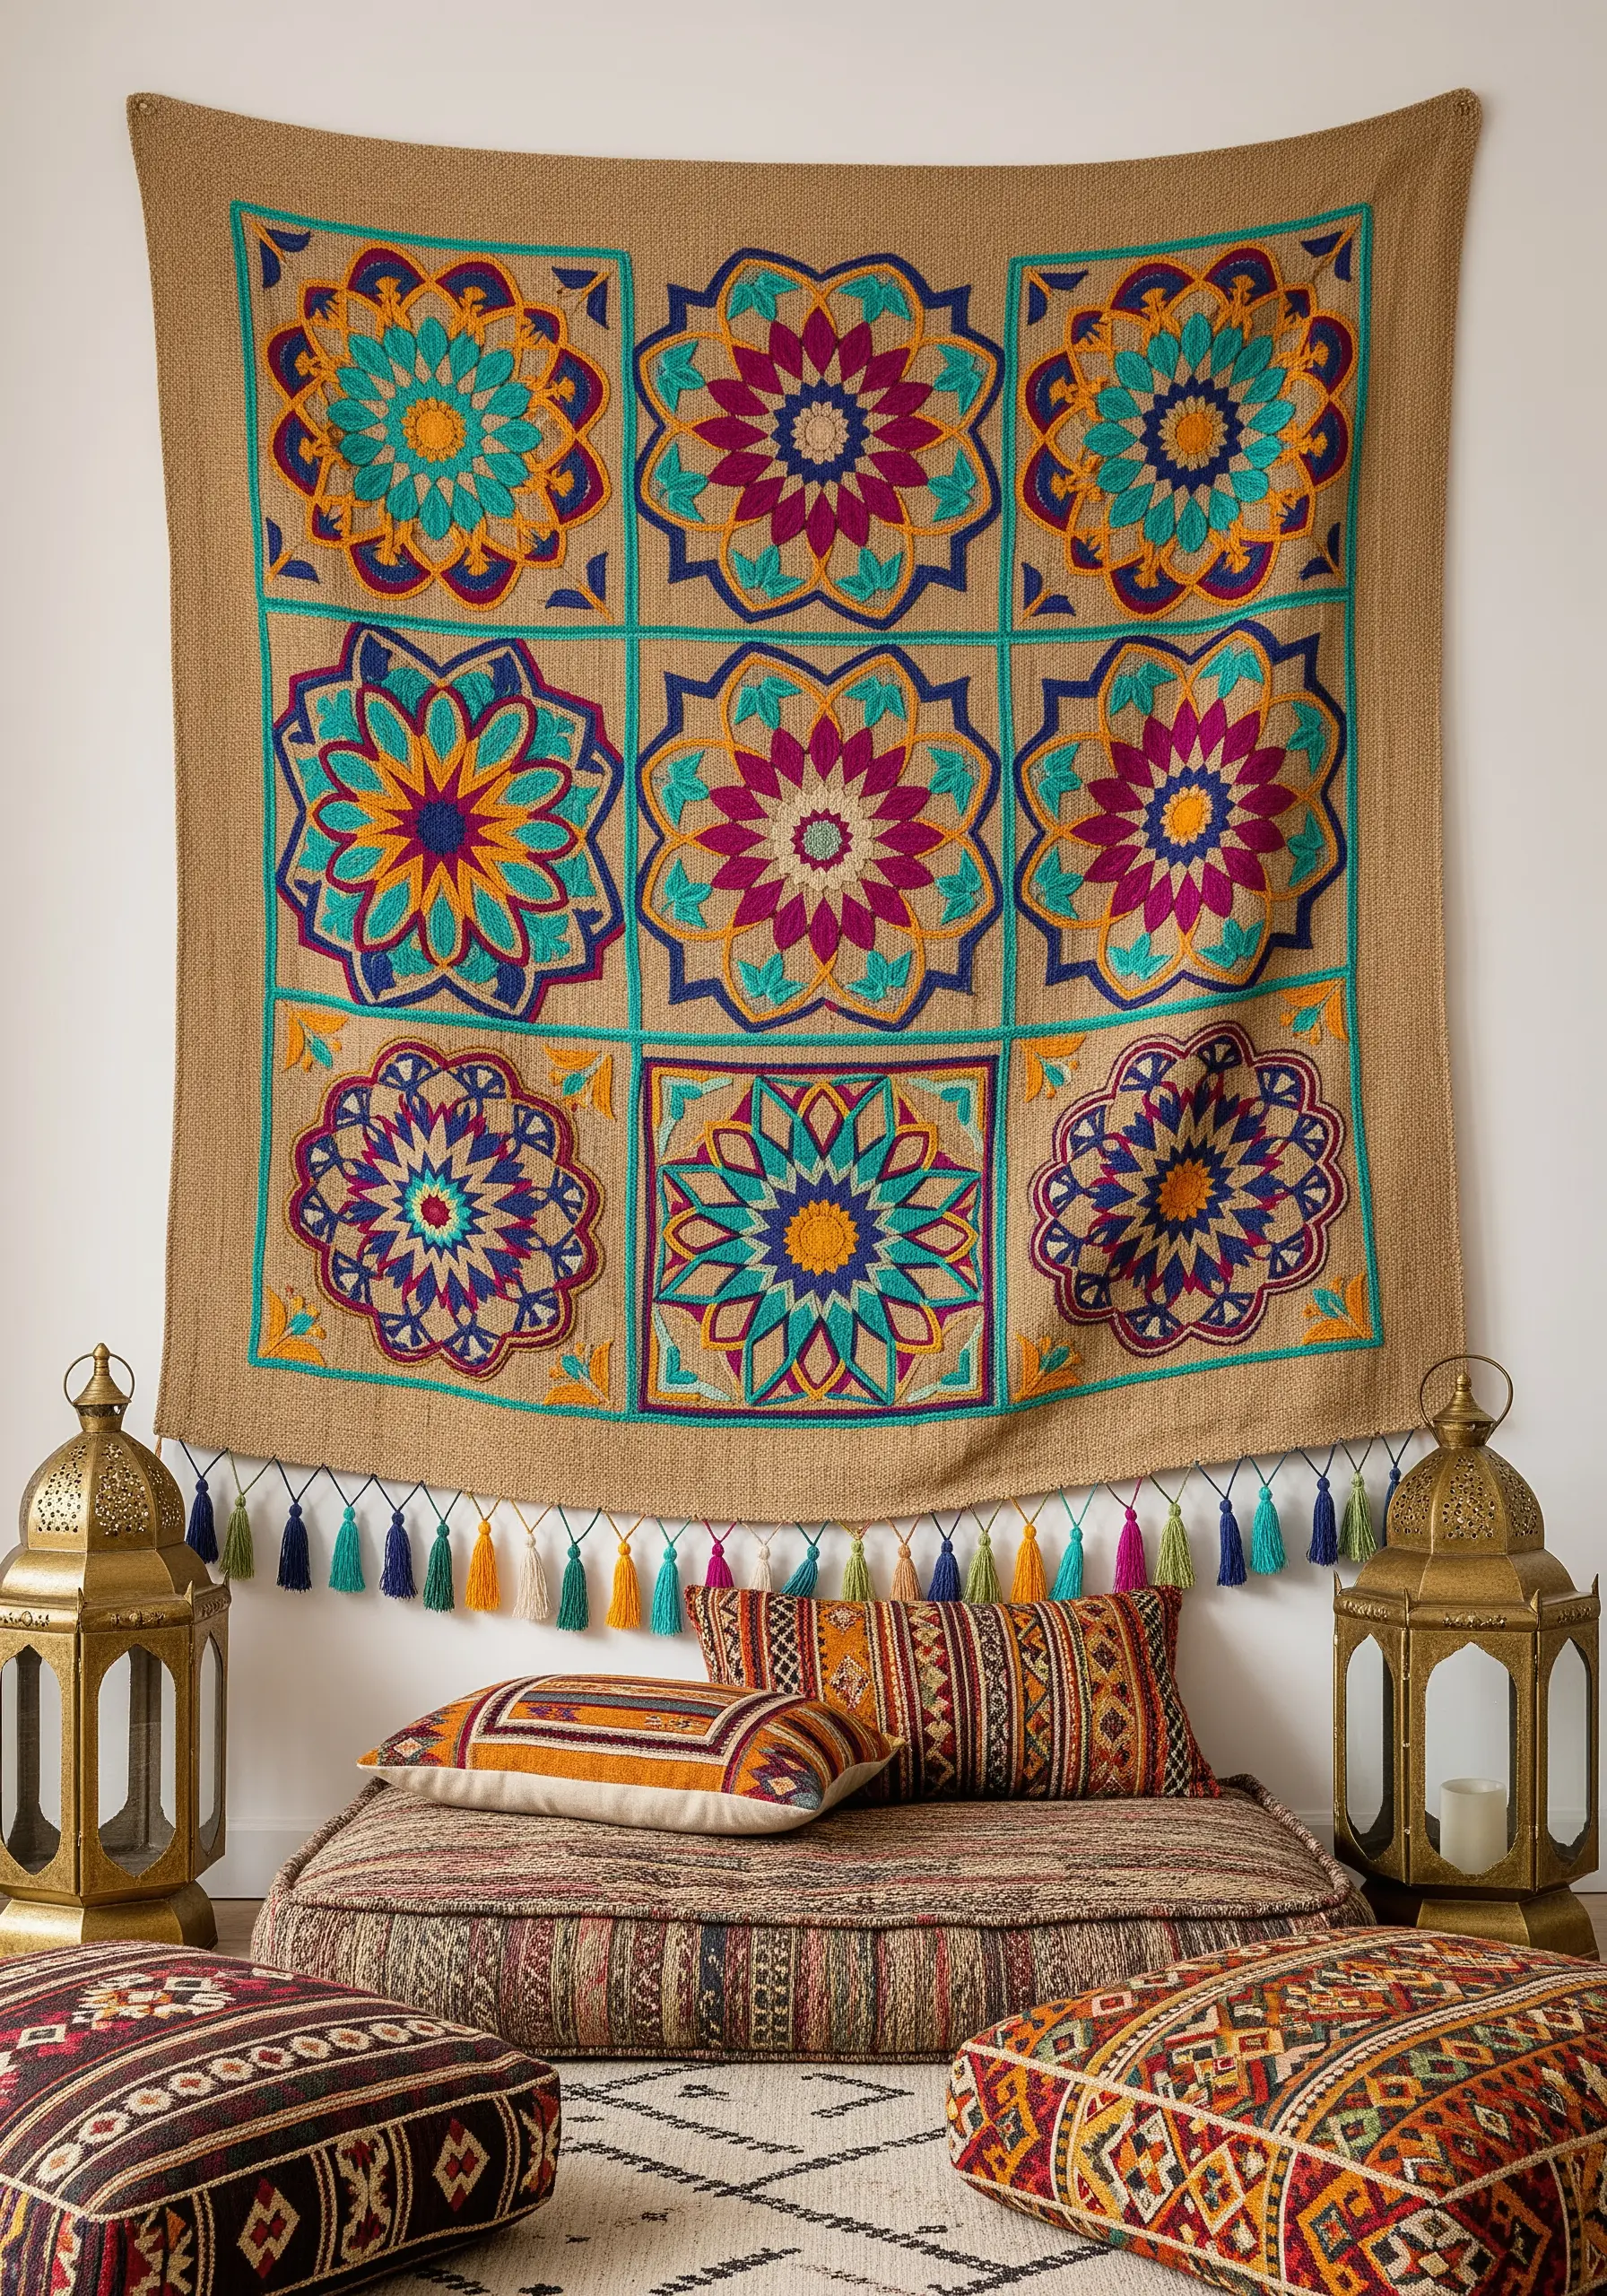
Create a large, impactful wall hanging that mimics the look of a quilt without the complex piecing.
Start with a large piece of burlap or coarse linen as your base, then appliqué squares of patterned fabric onto it.
Use embroidery as the decorative element that ties it all together, outlining the squares and filling the mandalas with vibrant, contrasting colors.
Finish with tassels along the bottom edge to complete the rich, bohemian aesthetic that makes your space feel like a well-traveled sanctuary.
24. Capture the Motion of Water
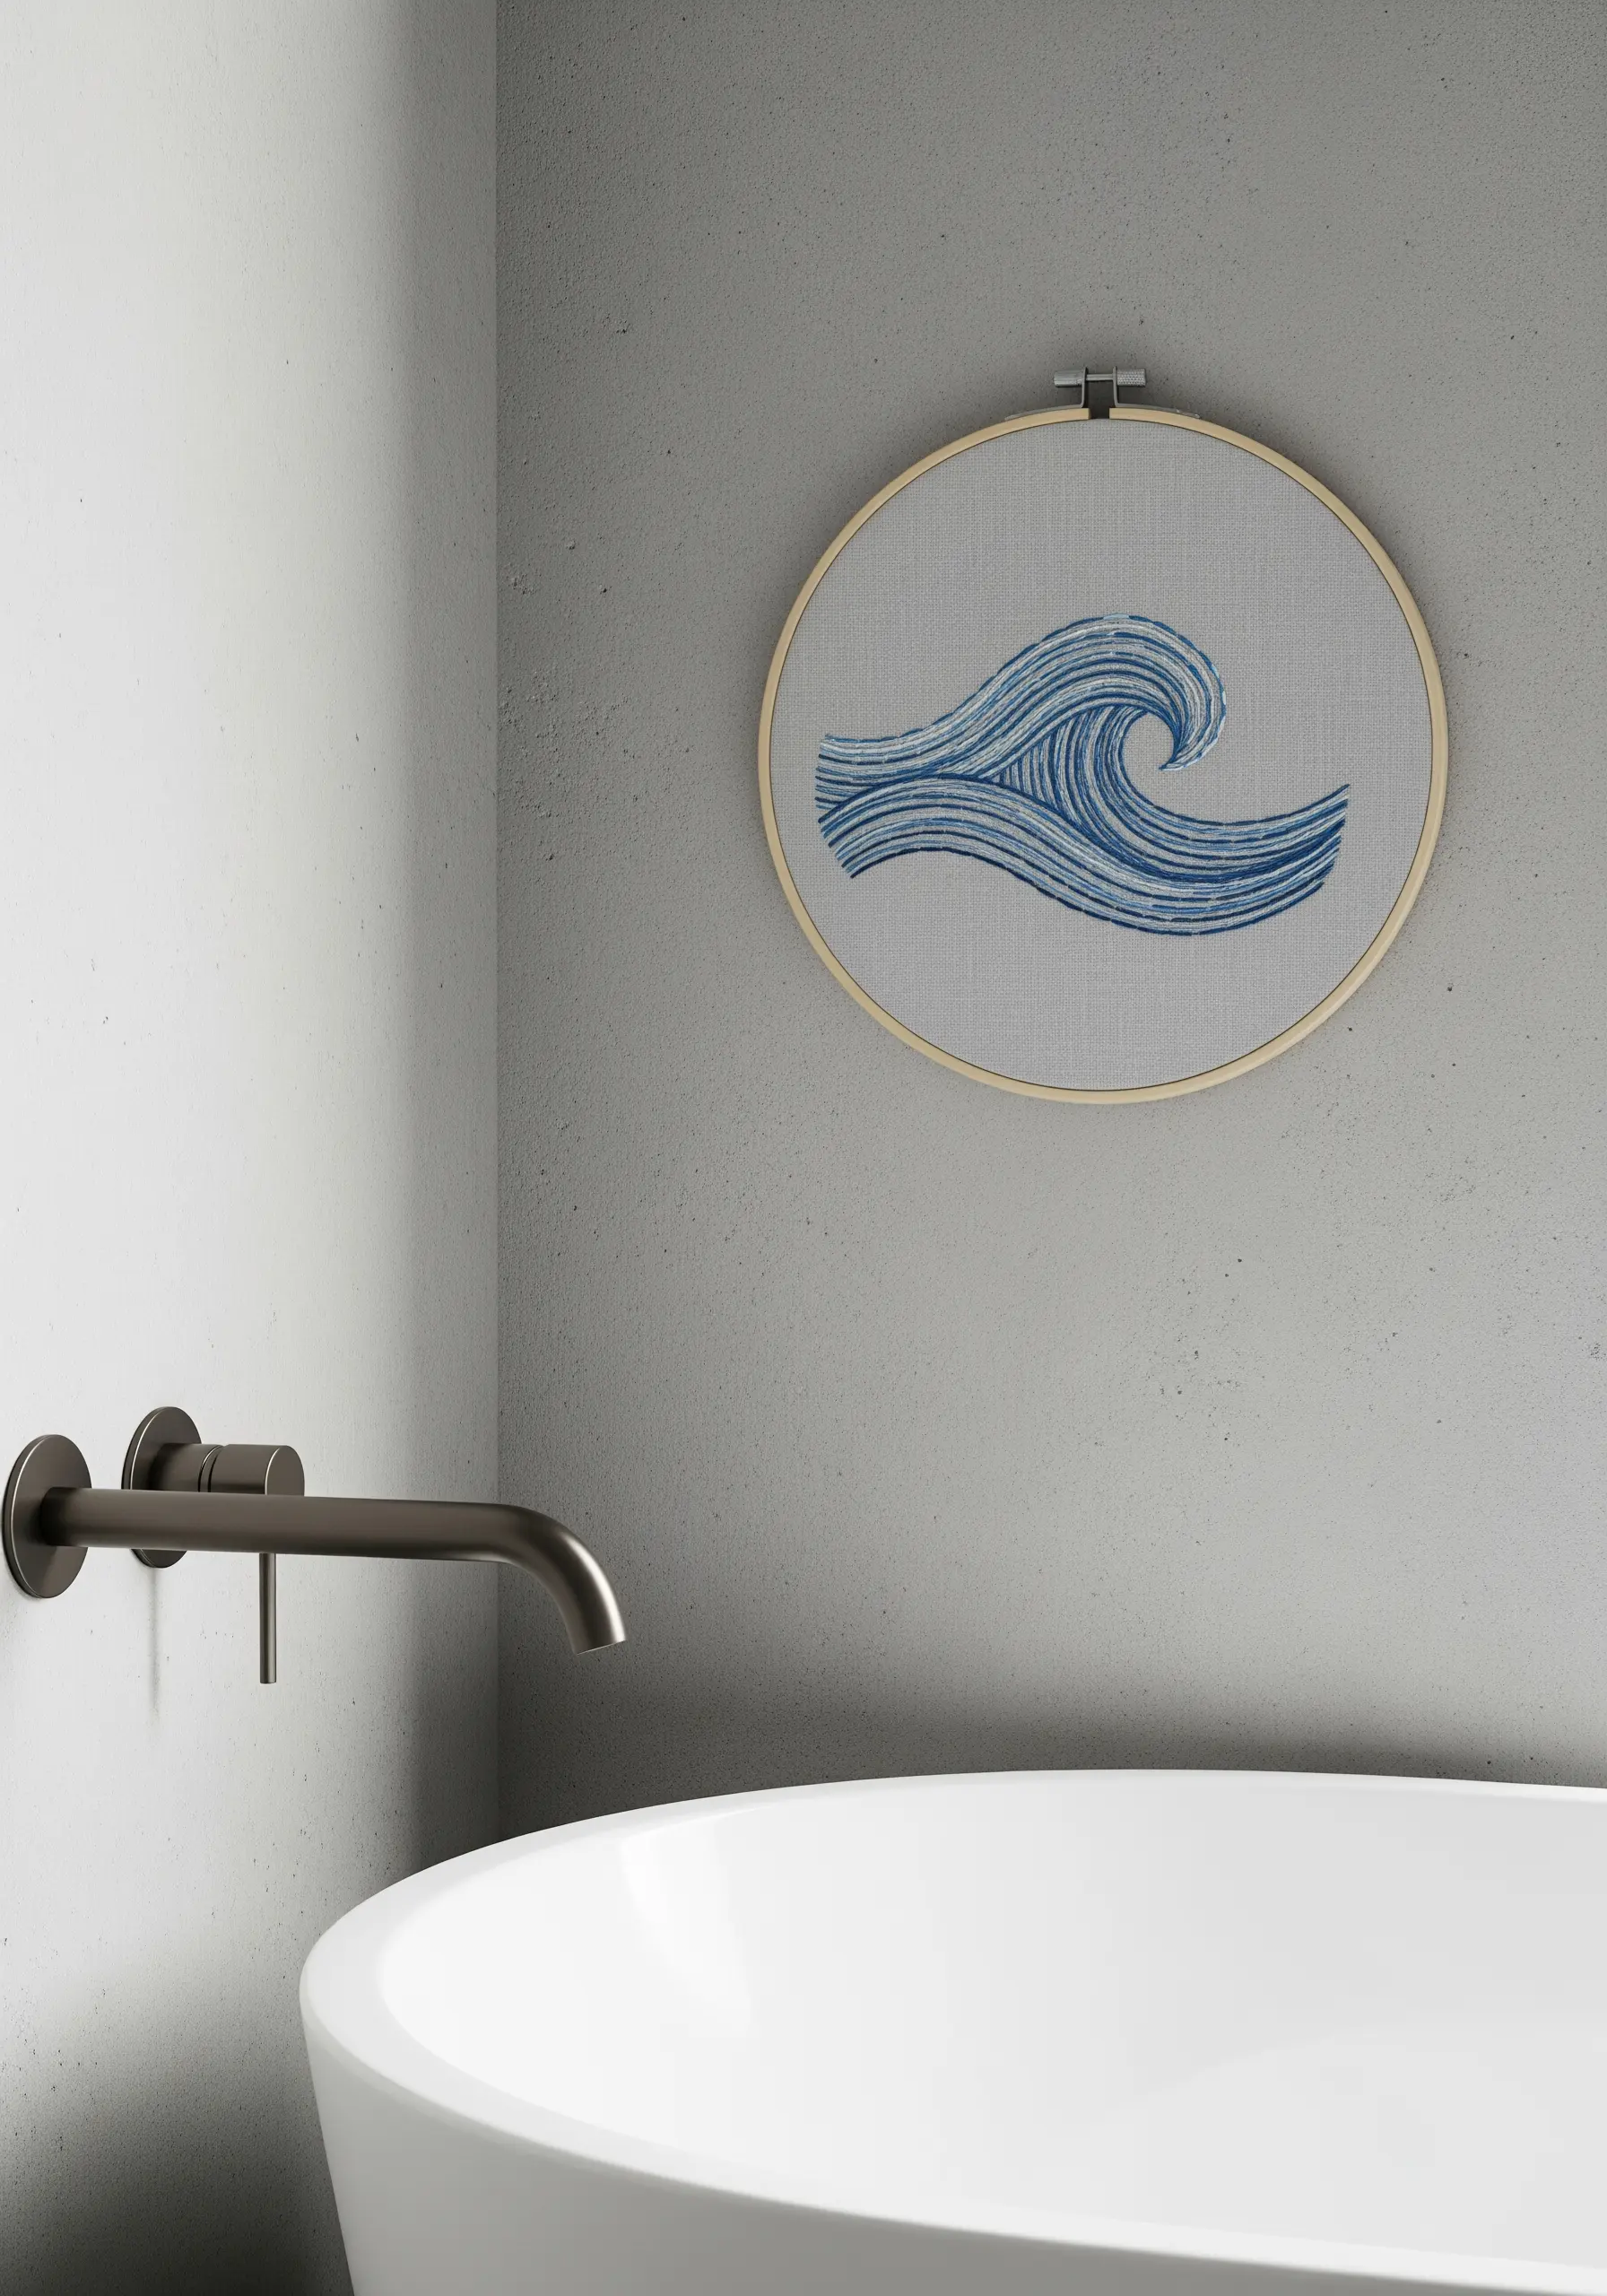
Suggest the fluid movement of a wave using nothing more than directional stitching.
Instead of a simple backstitch outline, fill the entire shape with lines of running stitches or backstitches, all flowing in the same direction as the water’s curl.
Vary the density of your lines—placing them closer together in the shadows and further apart at the crest—to create a sense of light and depth.
This minimal embroidery project proves that you don’t need complex techniques to create something dynamic and evocative.
25. Let Your Work-in-Progress Shine
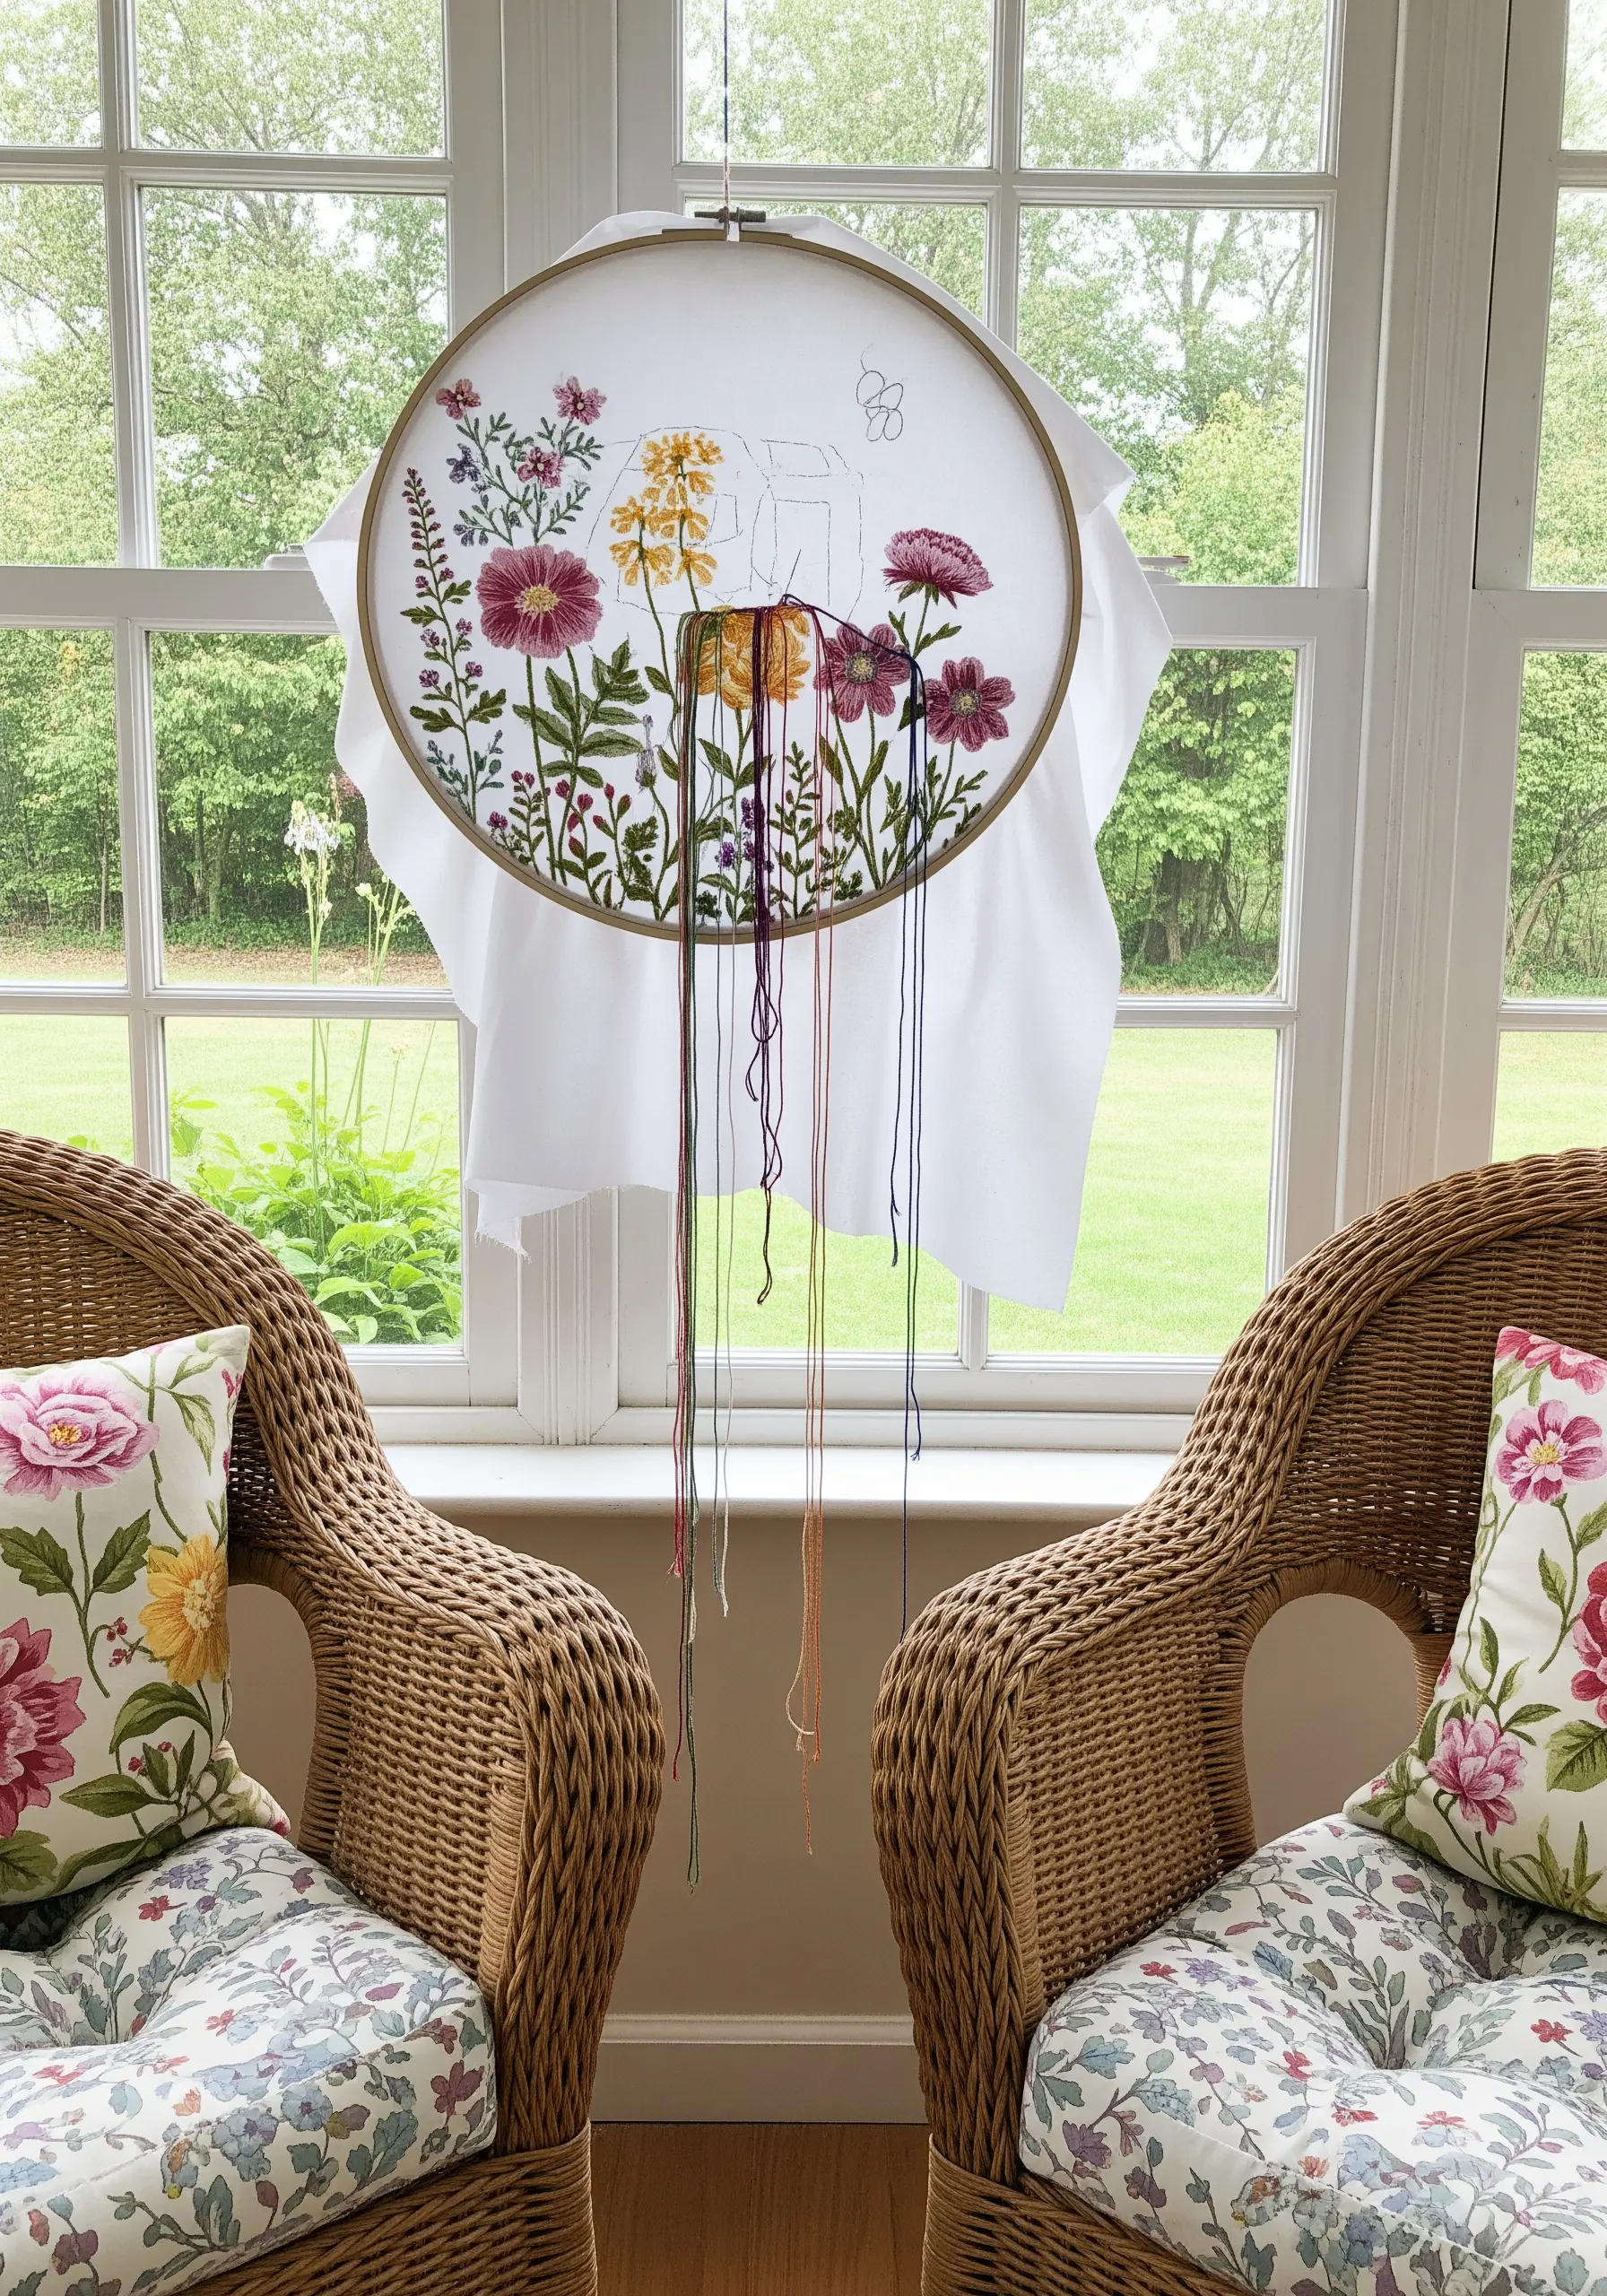
Embrace the beauty of the creative process by displaying your embroidery as a work-in-progress.
Leaving the excess fabric untrimmed and the threads hanging long tells a story of the time, care, and color choices that go into your art.
This approach works especially well for pieces with rich color palettes, as the dangling threads become a part of the artwork itself, like a painter’s palette.
Hanging it in a window allows the light to filter through the fabric, highlighting the delicate stitches and the vibrant threads.
26. Curate a Personal Pop-Culture Wall

Turn a passion for games, movies, or music into a unique gallery wall that reflects your personality.
Translate logos, characters, and symbols into simplified, stitchable designs. Use a dense satin stitch for a bold, graphic-novel feel.
Give the collection a cohesive look by using the same fabric color for every piece, even if the thread colors and hoop sizes vary.
Wrapping the hoops in matching fabric creates a clean, modern edge that makes the designs stand out, especially against a dark wall.
27. Frame Your Stitches Like Fine Art
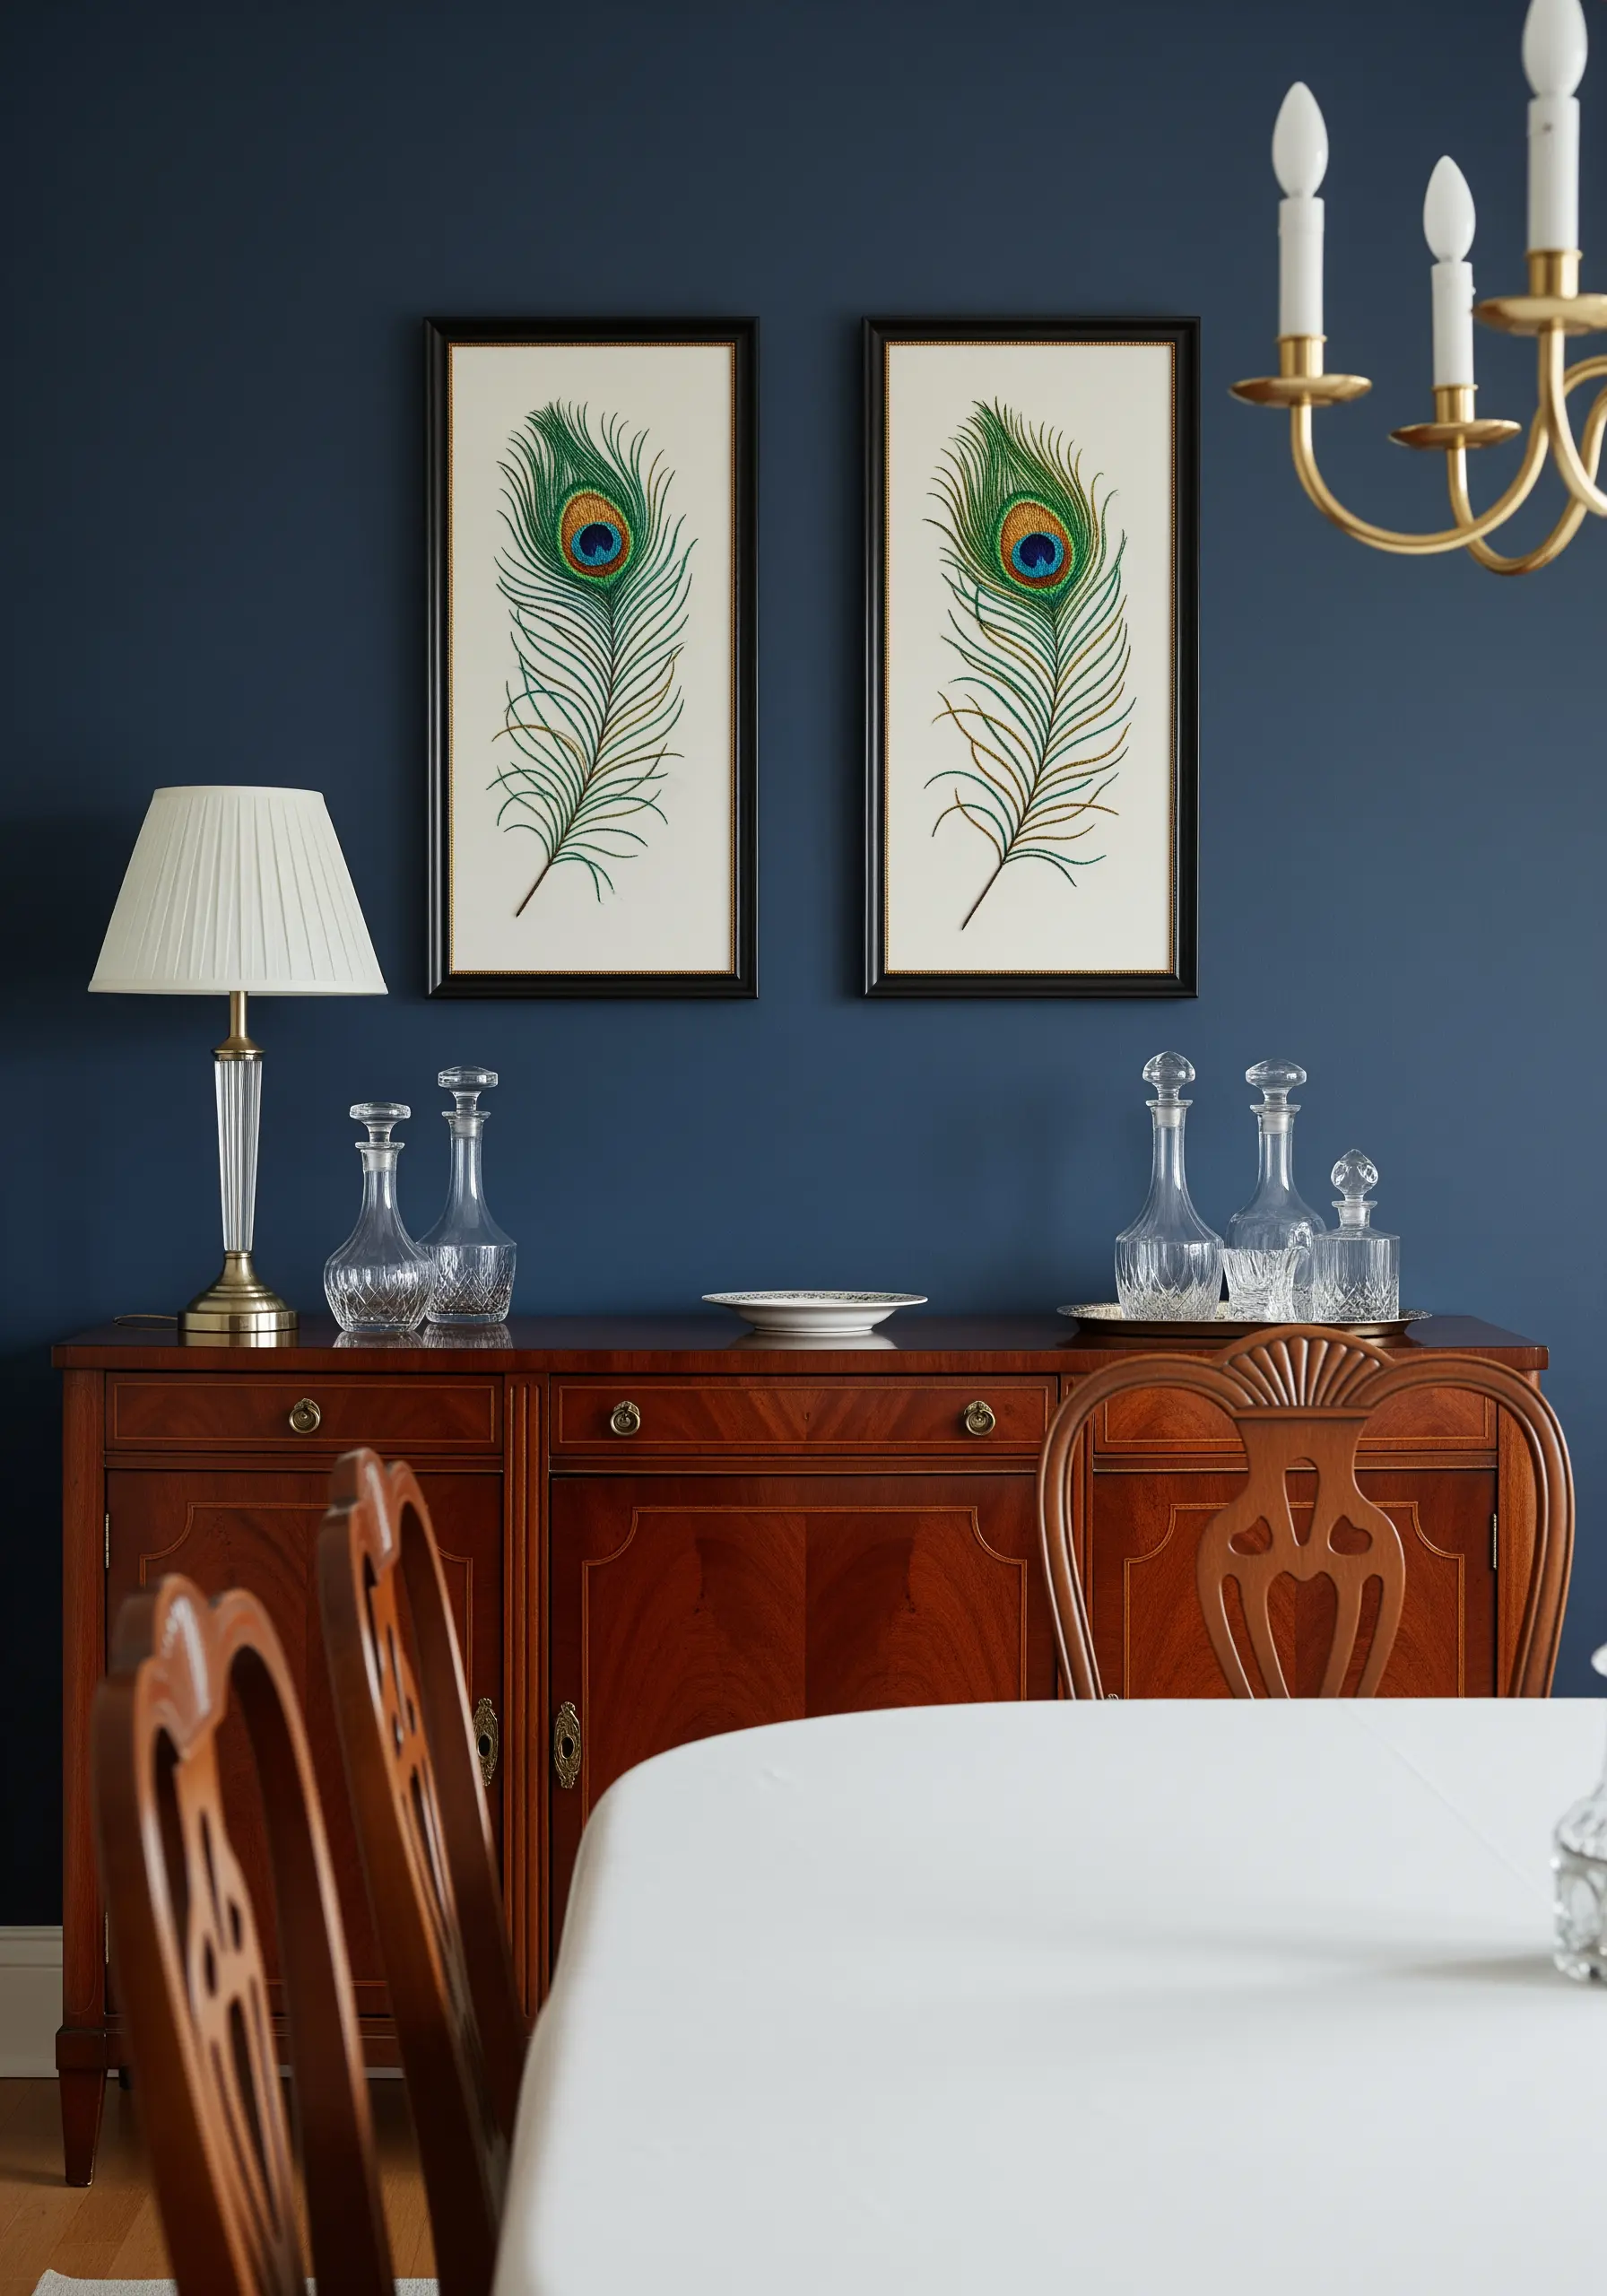
Give your detailed embroidery the presentation it deserves by framing it professionally.
Stitching a subject with fine, delicate lines, like these peacock feathers, demands to be viewed up close.
Mount your finished embroidery on acid-free foam core and use a mat to create separation between the textile and the glass—this prevents moisture buildup and flattening of your stitches.
Choosing a simple, elegant frame ensures that the focus remains on the incredible detail and artistry of your thread work.
28. Fill a Corner with Zesty Color
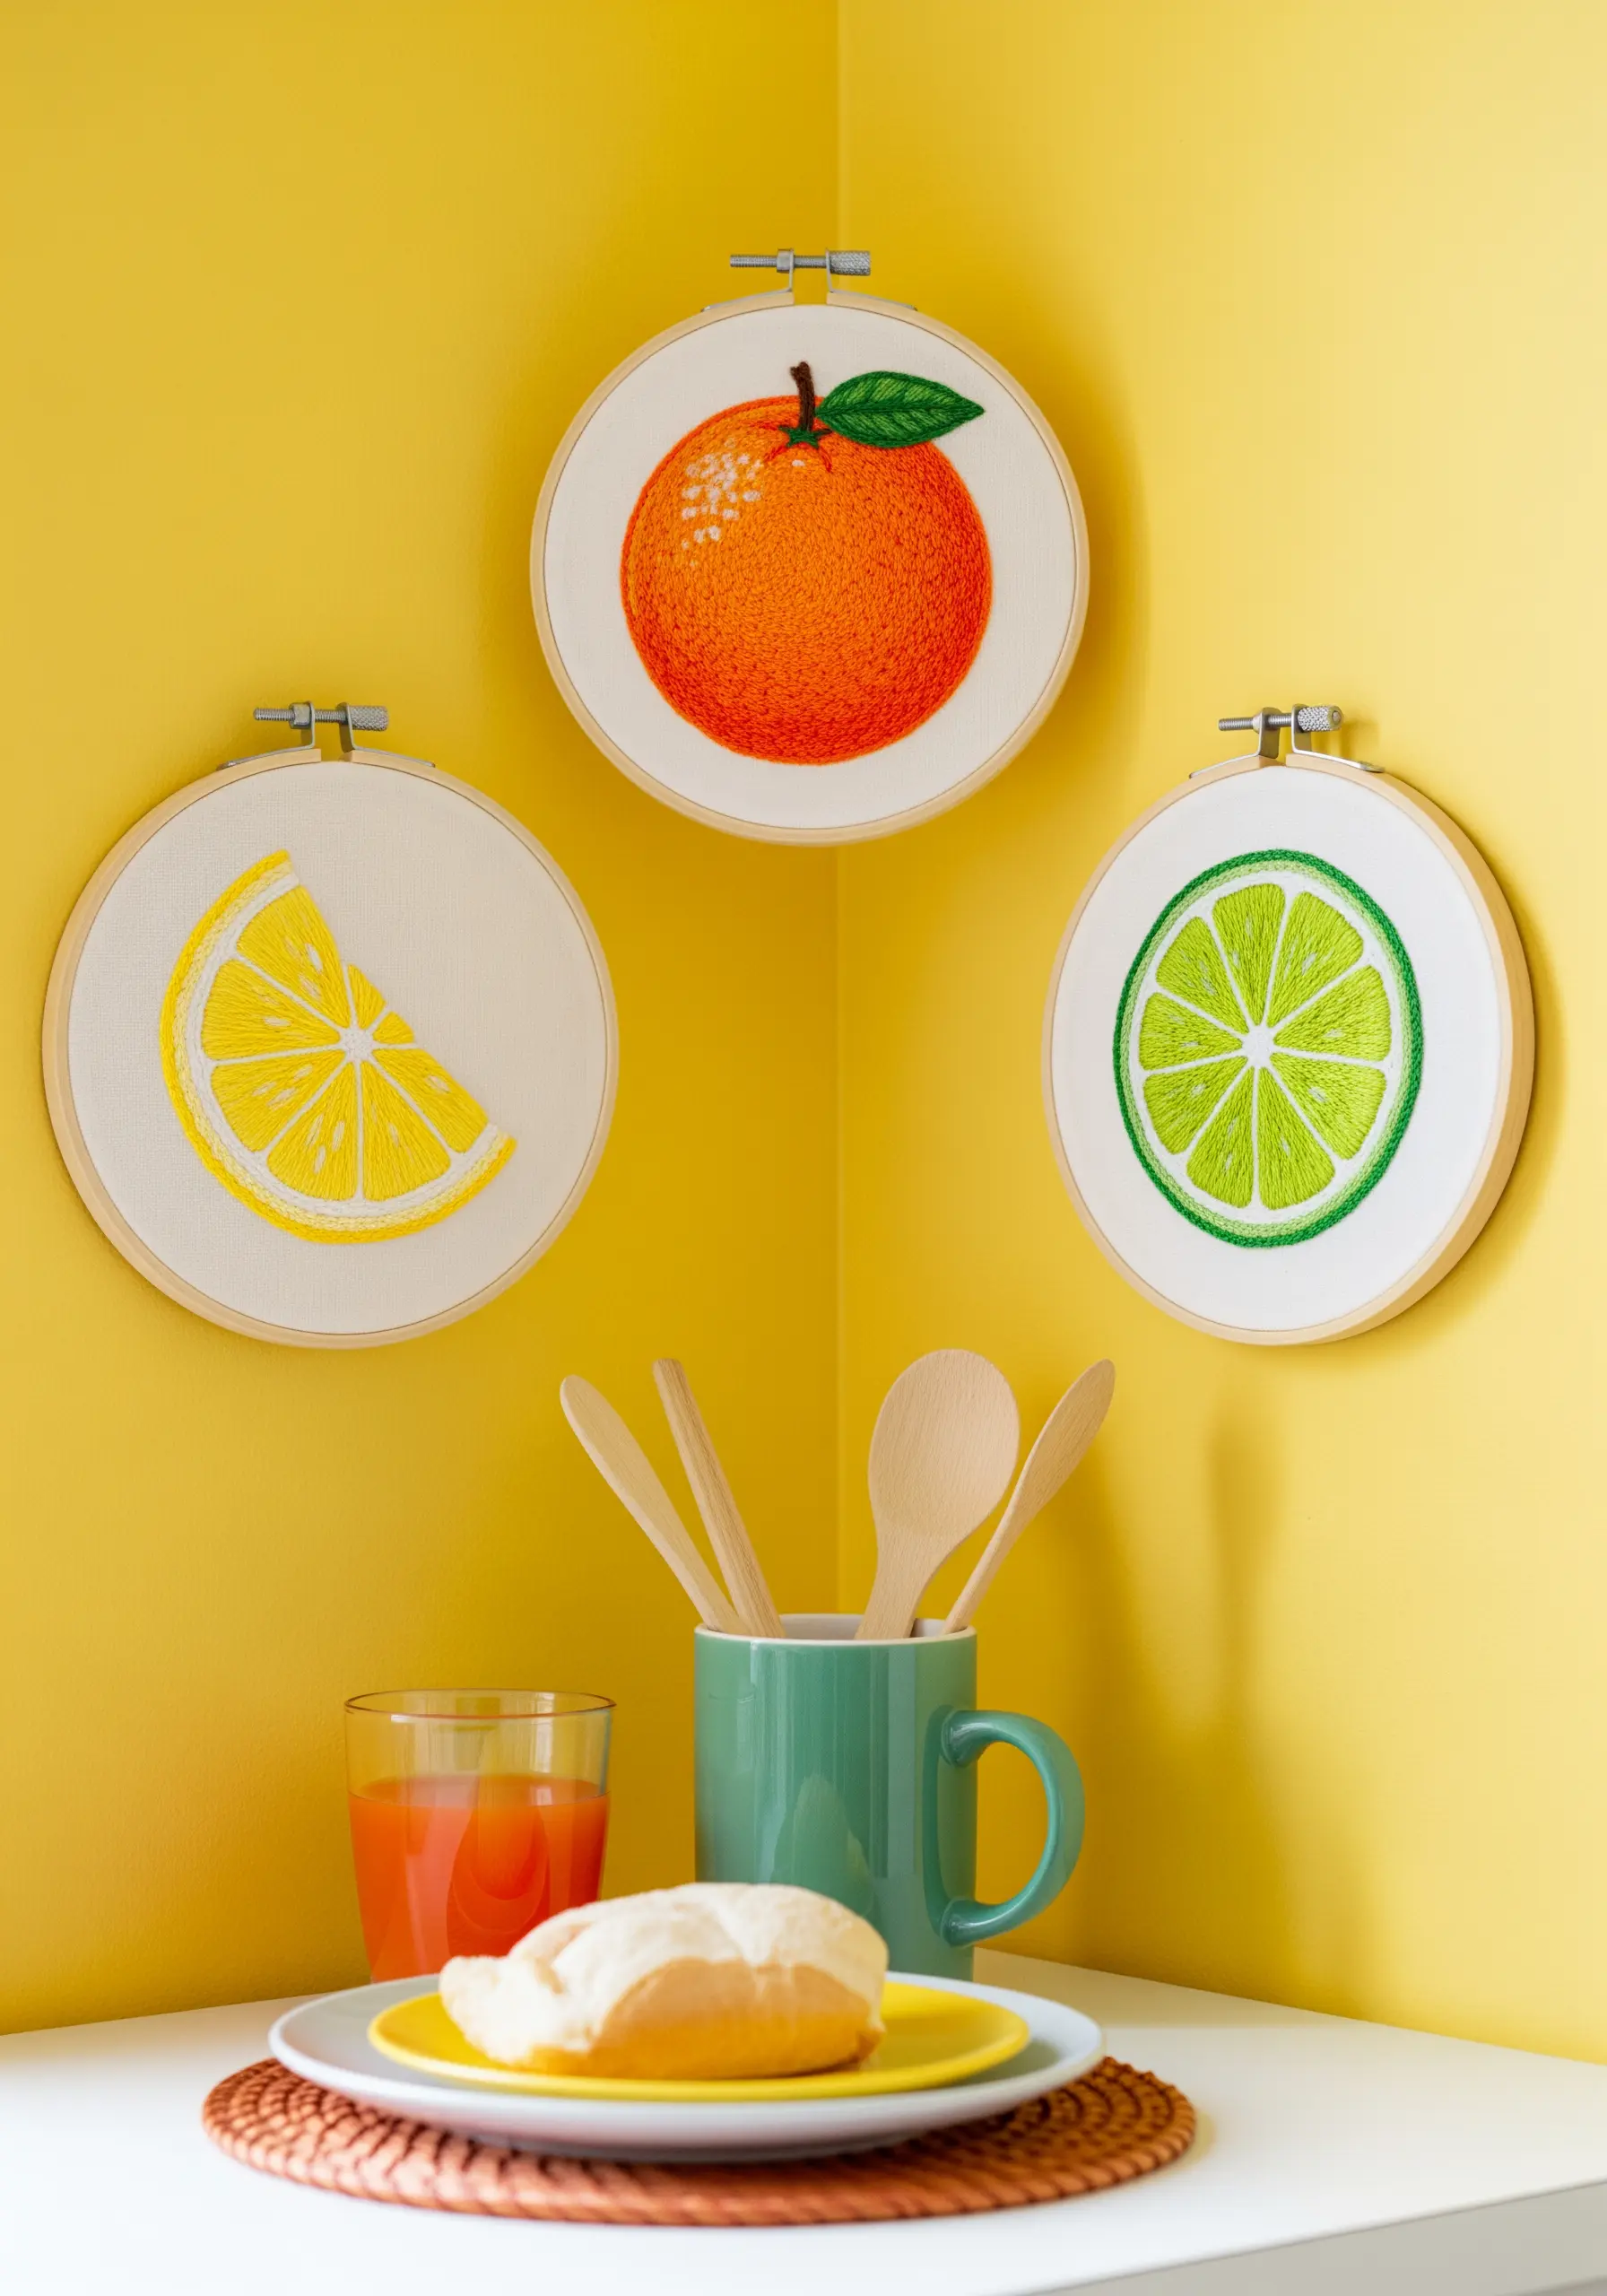
Brighten up a small kitchen corner with a vibrant, citrus-themed trio of hoop art.
To create the juicy texture of the fruit pulp, use a long-and-short stitch, blending three or four closely related shades to create a realistic, gradient effect.
Outline the segments with a crisp white backstitch to make the colors pop and give the design a clean, graphic look.
Displaying them in a tight cluster against a colorful wall creates a cheerful, high-energy focal point in a small space.
29. Create a Rustic Silhouette
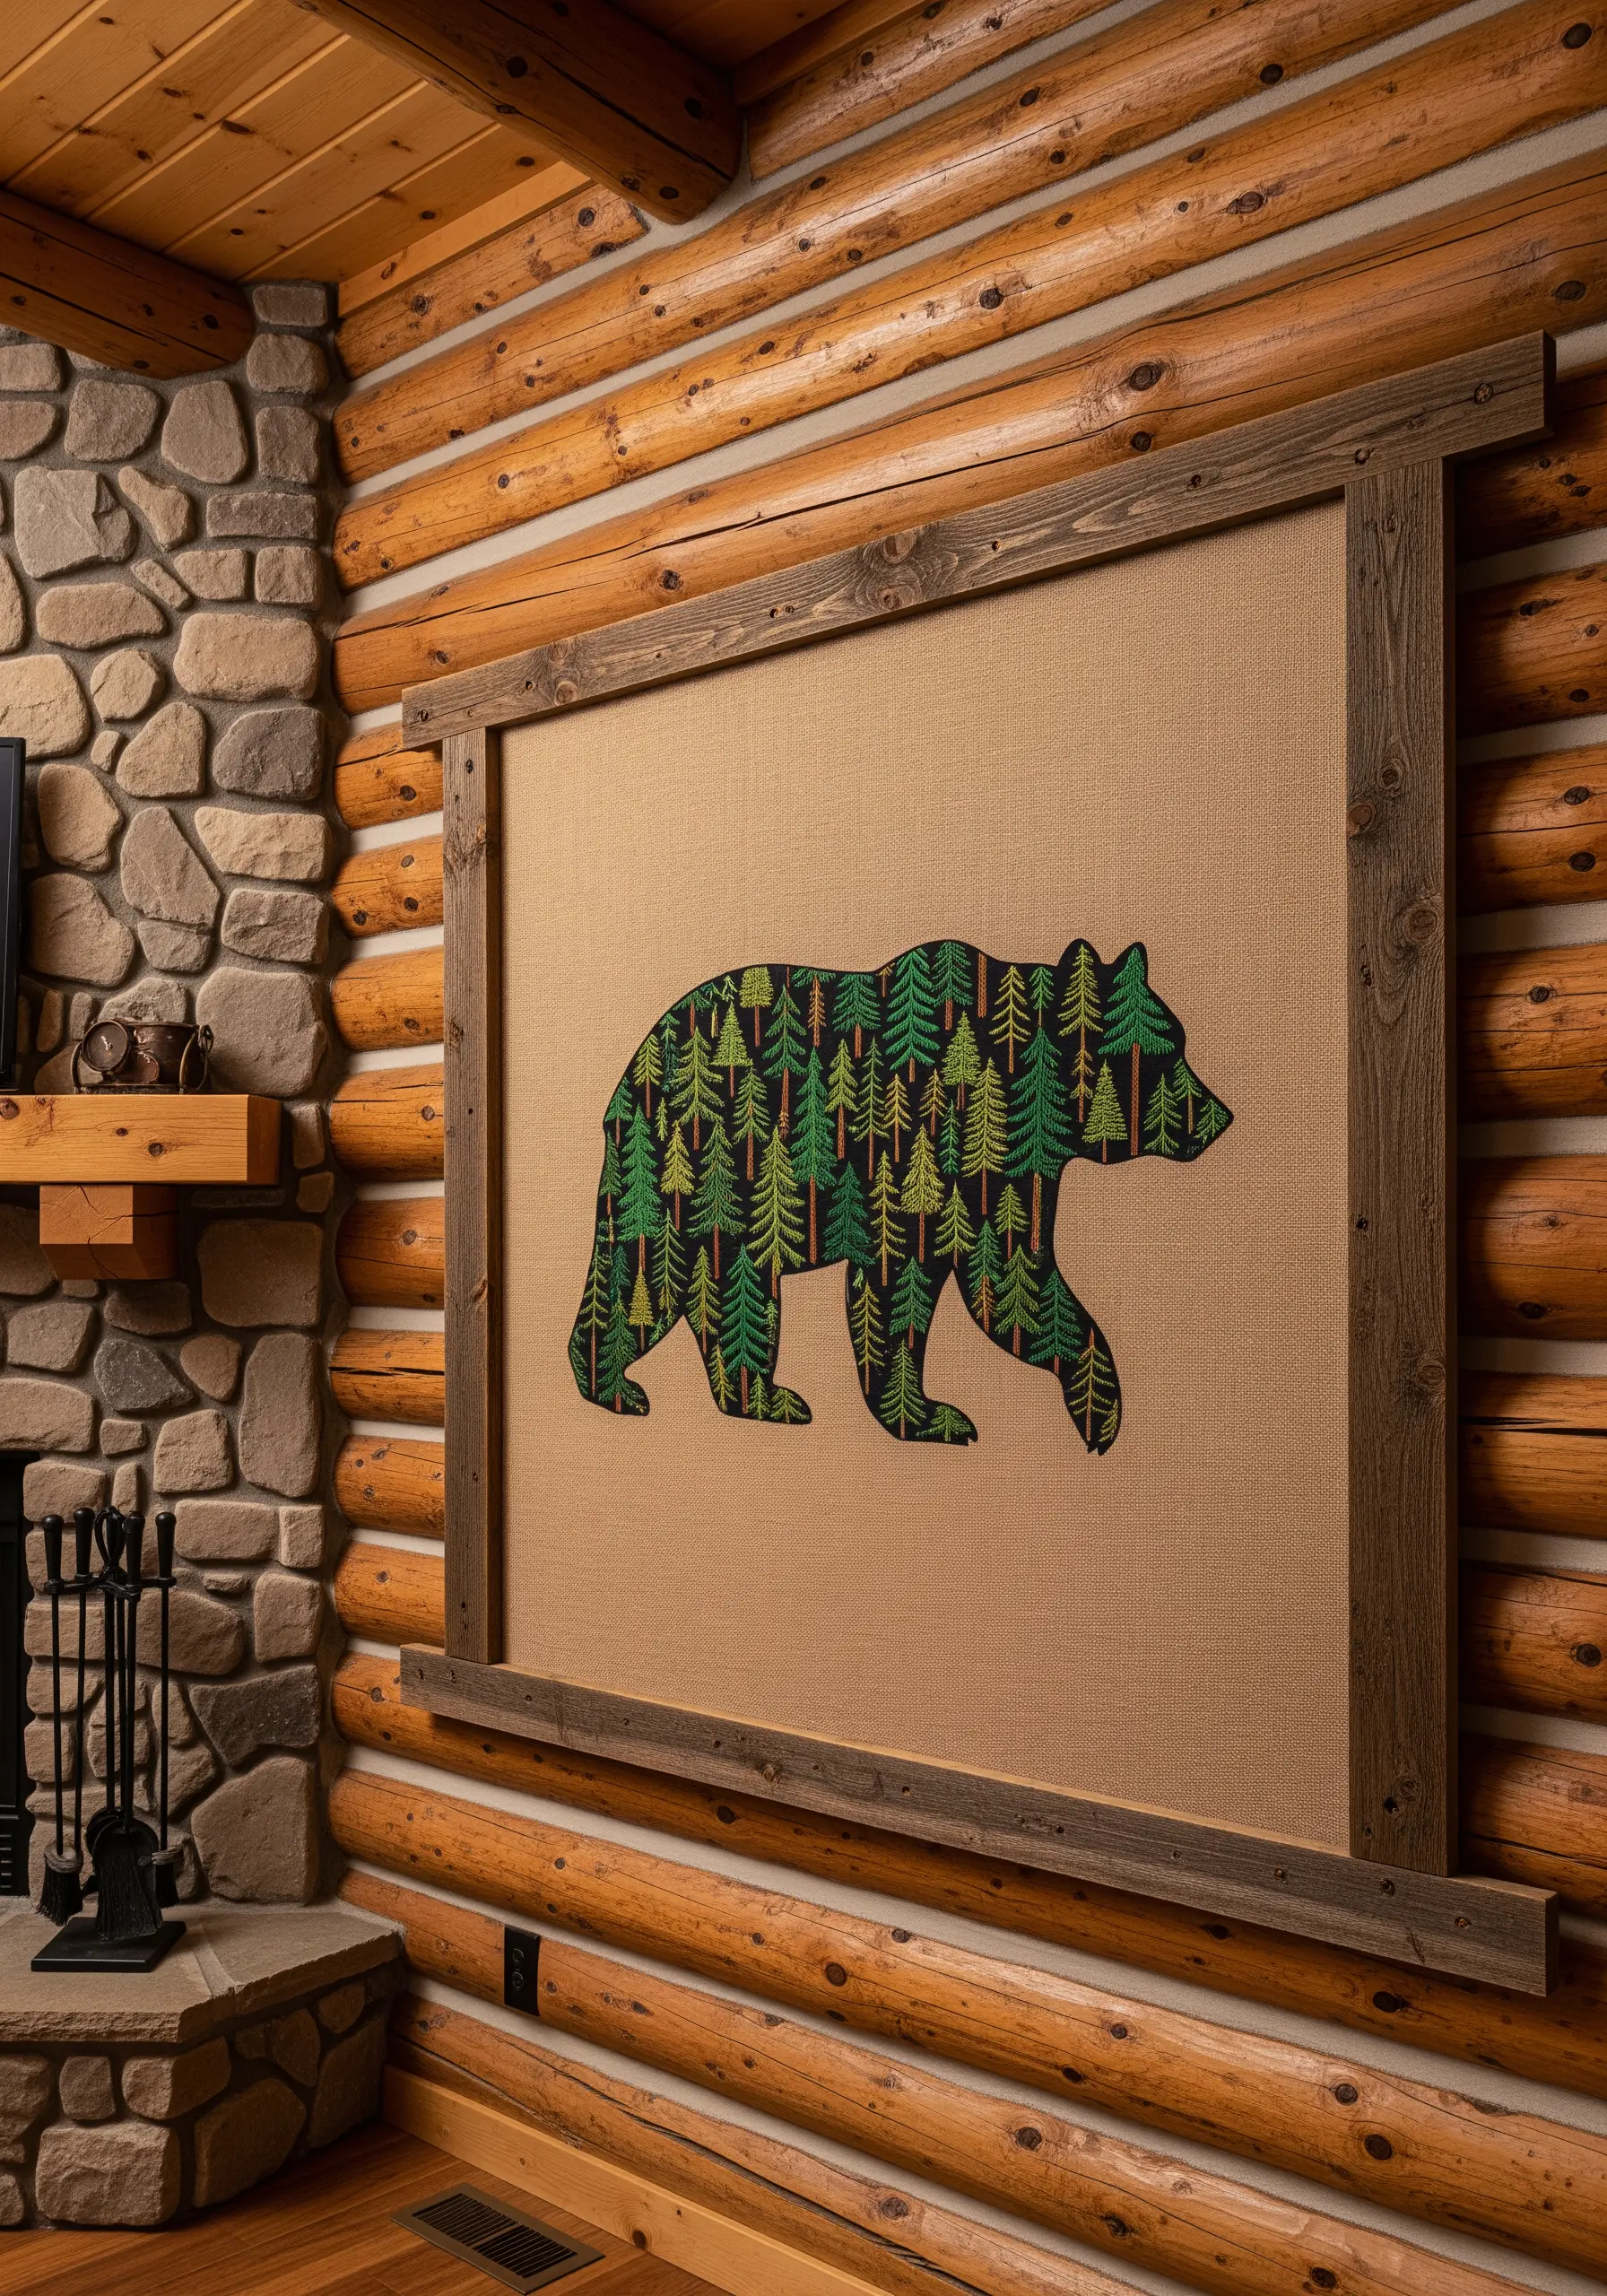
Combine bold graphic design with rustic texture for a piece that feels both modern and grounded.
Instead of stitching a complex, detailed animal, use a simple, strong silhouette as your canvas.
Fill the silhouette with a repeating pattern, like these tiny evergreen trees, using simple backstitches or satin stitches.
Mount the finished piece on a large, coarse burlap-covered board and frame it with reclaimed wood to complete the cozy, log-cabin aesthetic.
30. Stitch a Lighthearted Laundry Room Joke
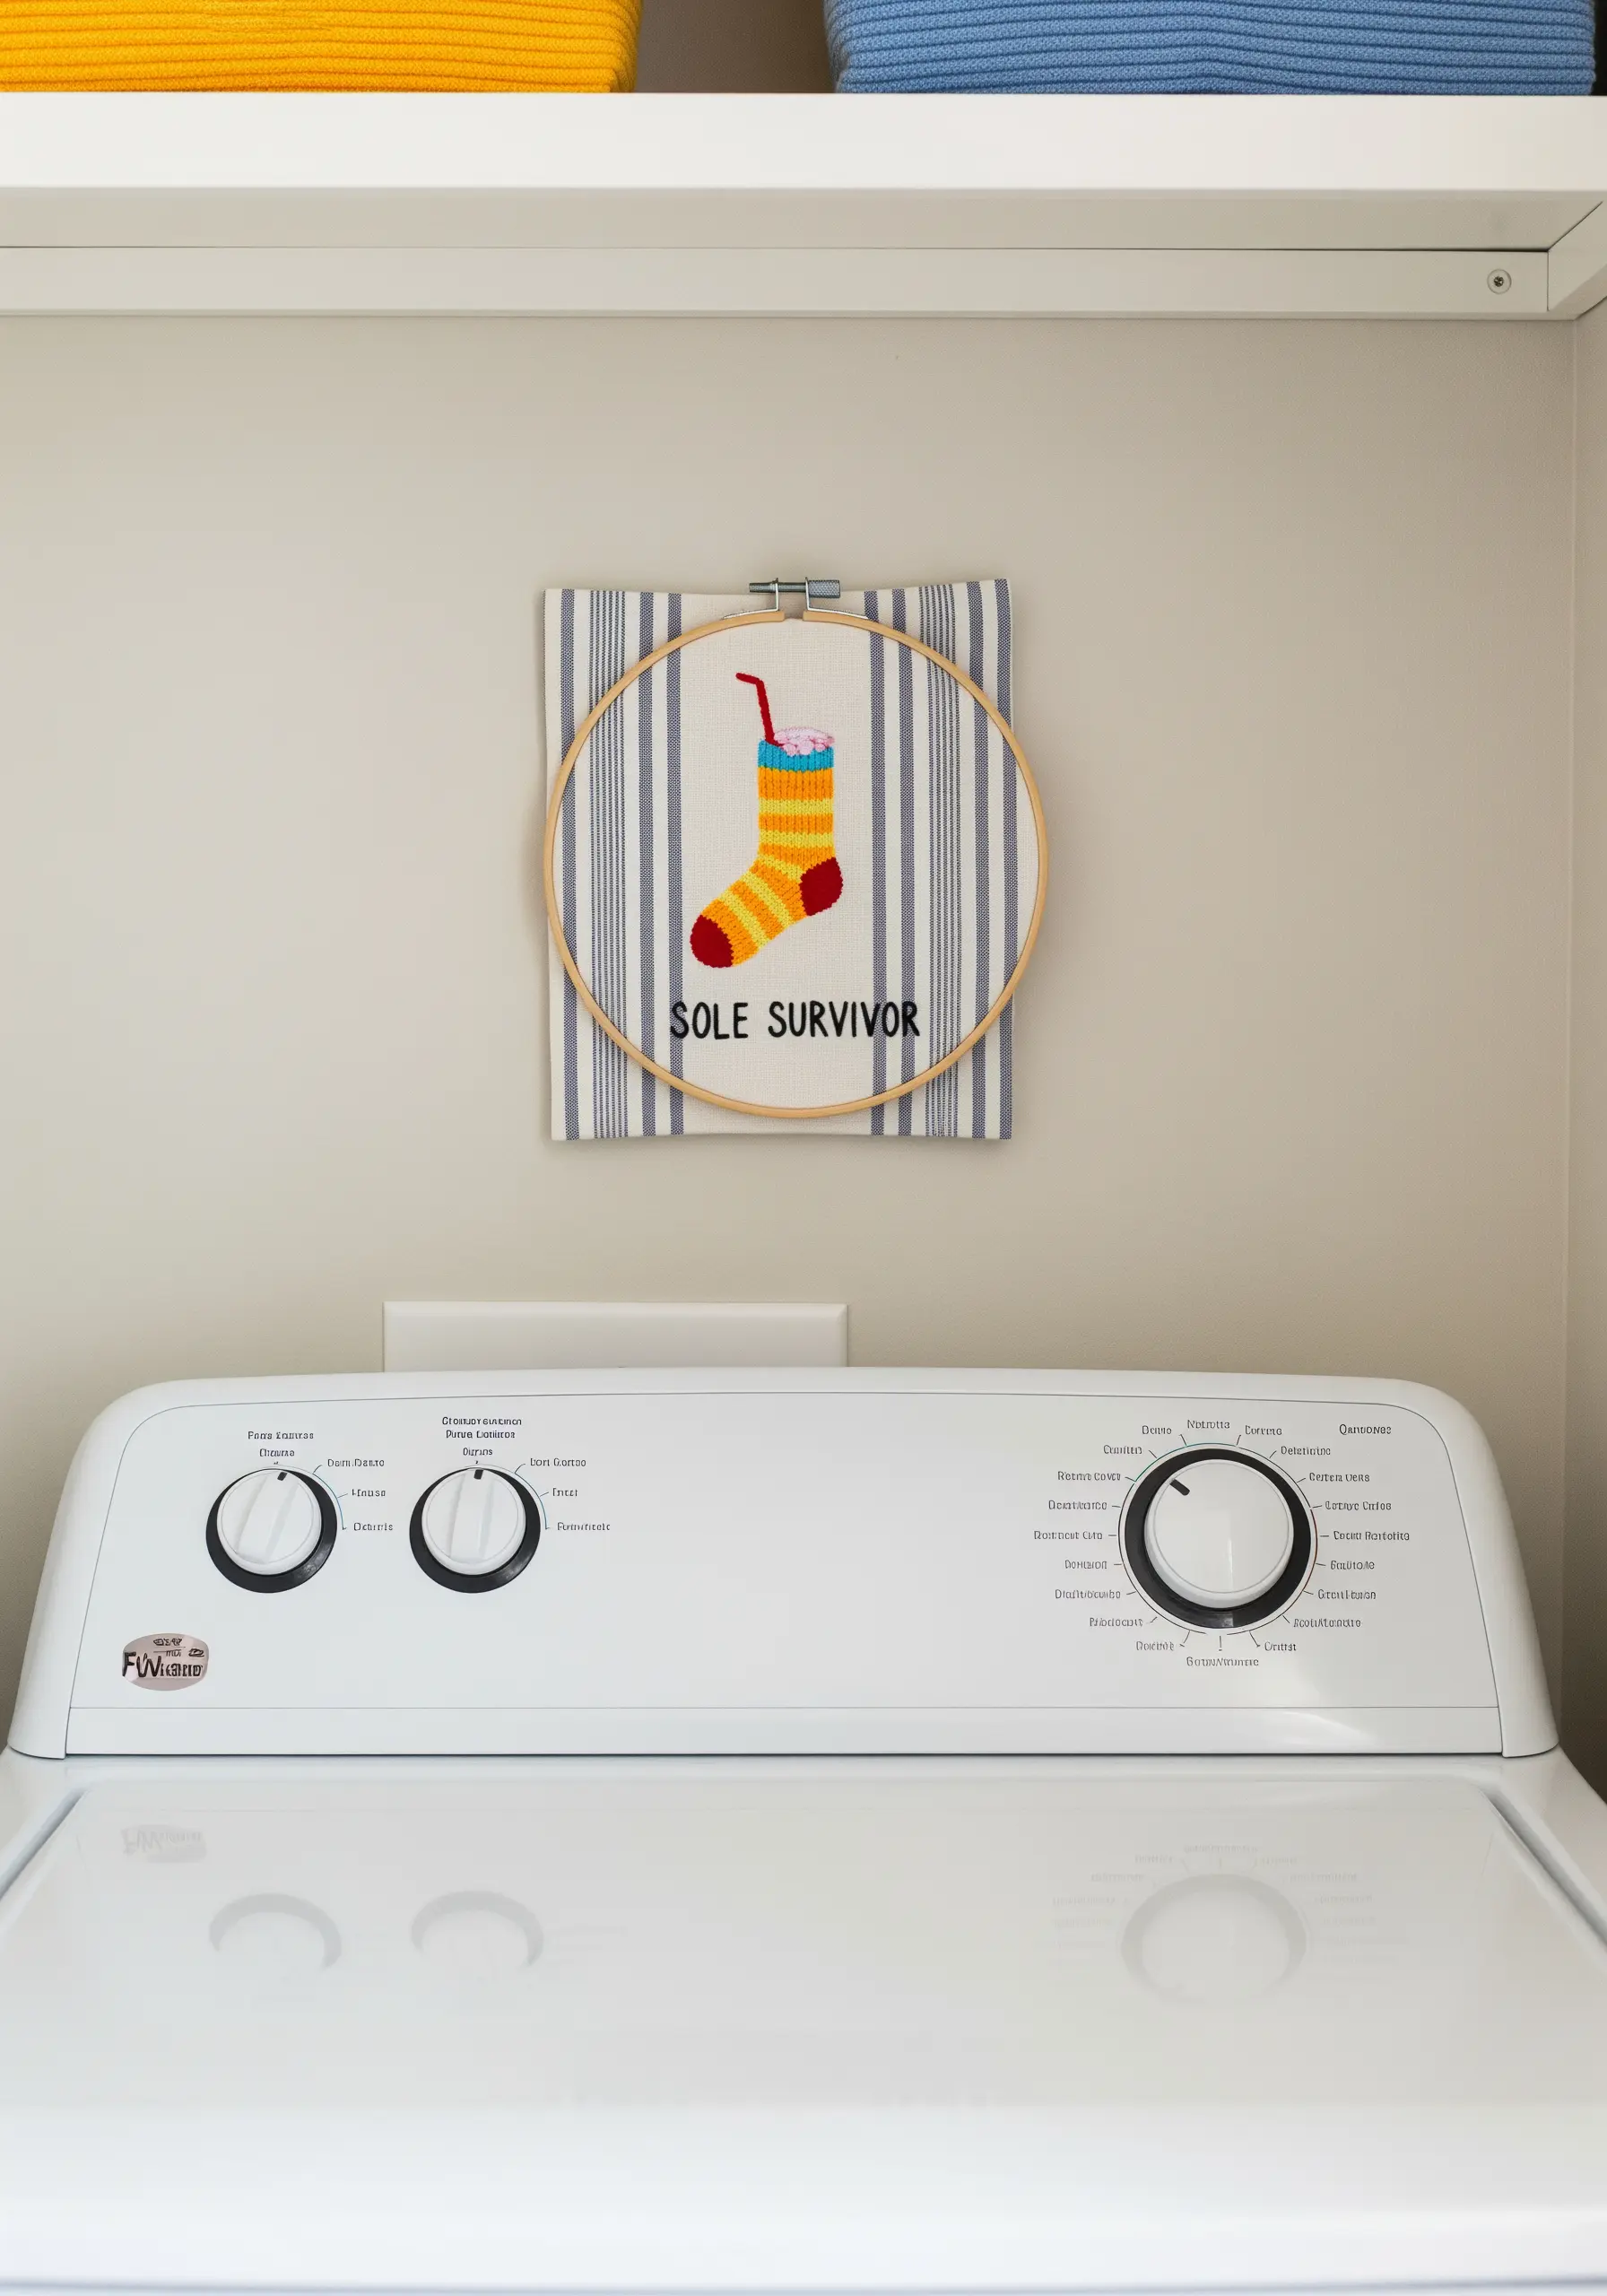
Add a touch of humor to a utilitarian space like the laundry room with a witty, embroidered piece.
Choose a patterned fabric, like this simple stripe, as your background to add visual interest without overwhelming the design.
A combination of satin stitch for the colorful sock and a clean backstitch for the text ensures the joke is both eye-catching and easy to read.
This small, simple project is a perfect way to use up fabric scraps and spare thread while adding personality to an often-overlooked room.
31. Curate a Moody Cocktail Gallery
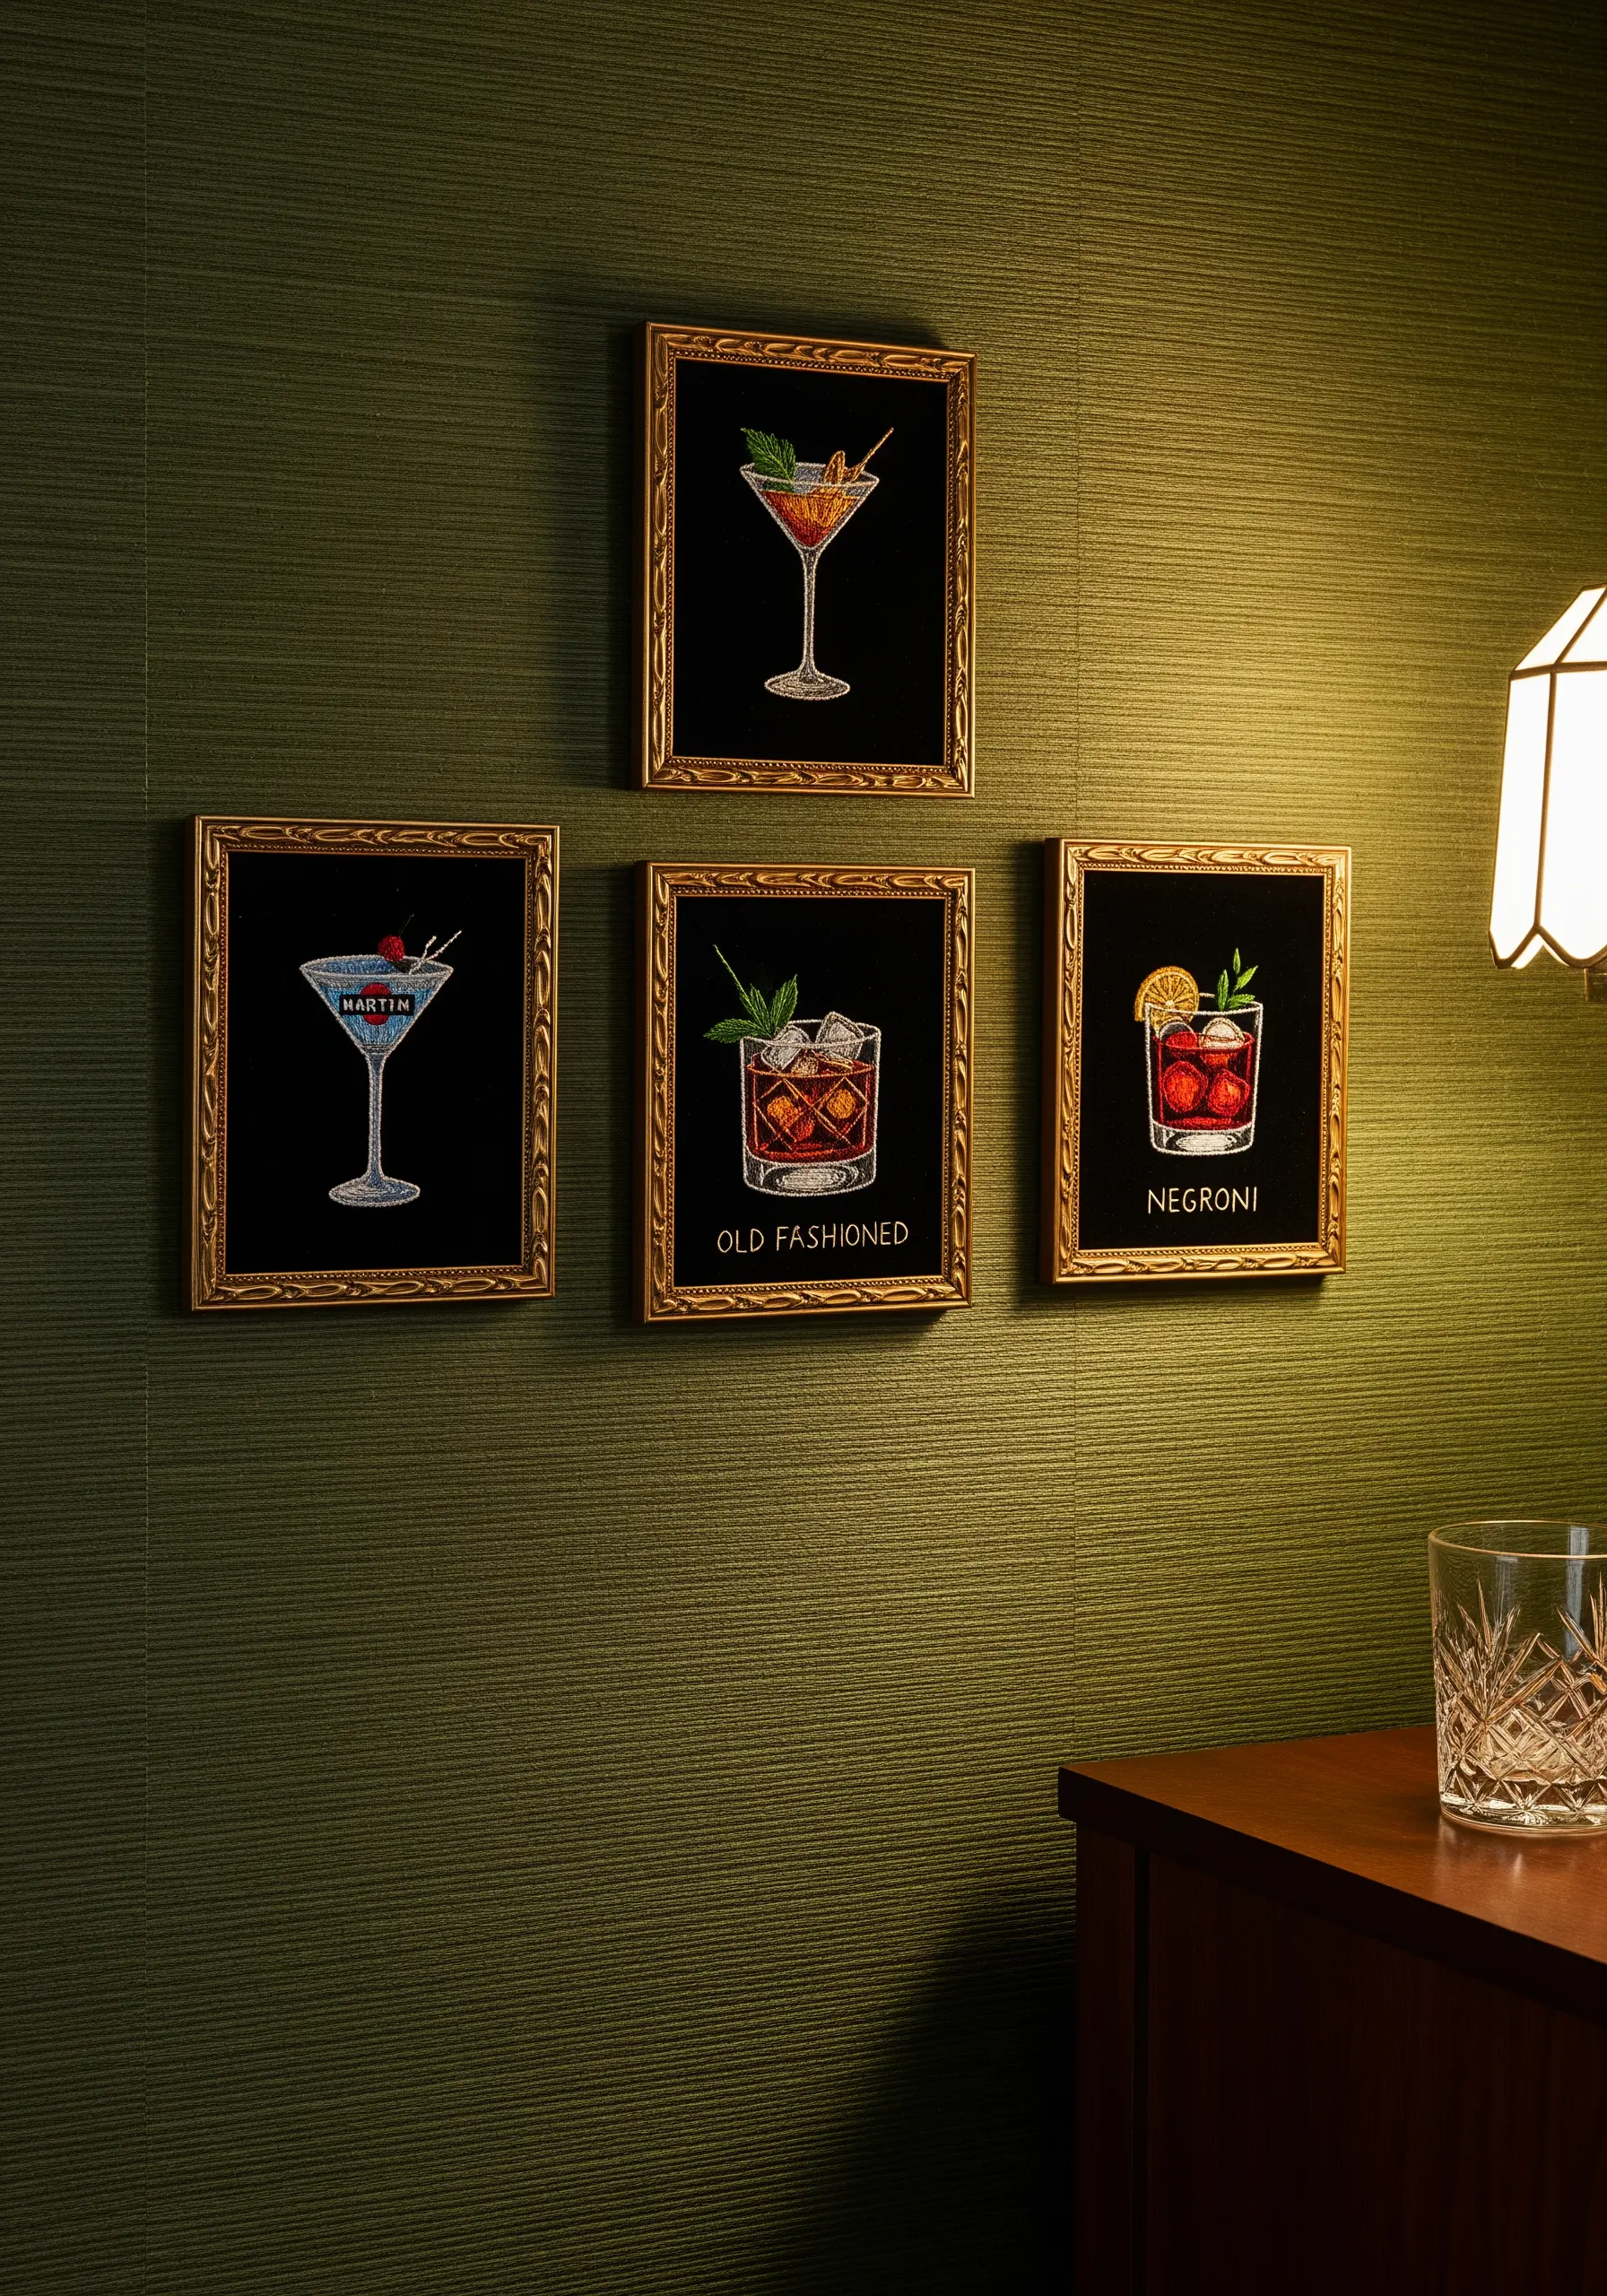
Create a sophisticated, speakeasy vibe in a home bar or den with a gallery of embroidered cocktails.
Stitching on black velvet or velveteen adds a luxurious depth and makes the colors of the thread appear richer and more vibrant.
Use fine, single-strand stitches to capture the delicate details of glassware, garnishes, and ice cubes, making them look realistic and refreshing.
Grouping four similar-sized pieces in ornate gold frames creates a cohesive and elegant collection with a touch of old-world charm.
32. Celebrate a Hobby with Detailed Line Work
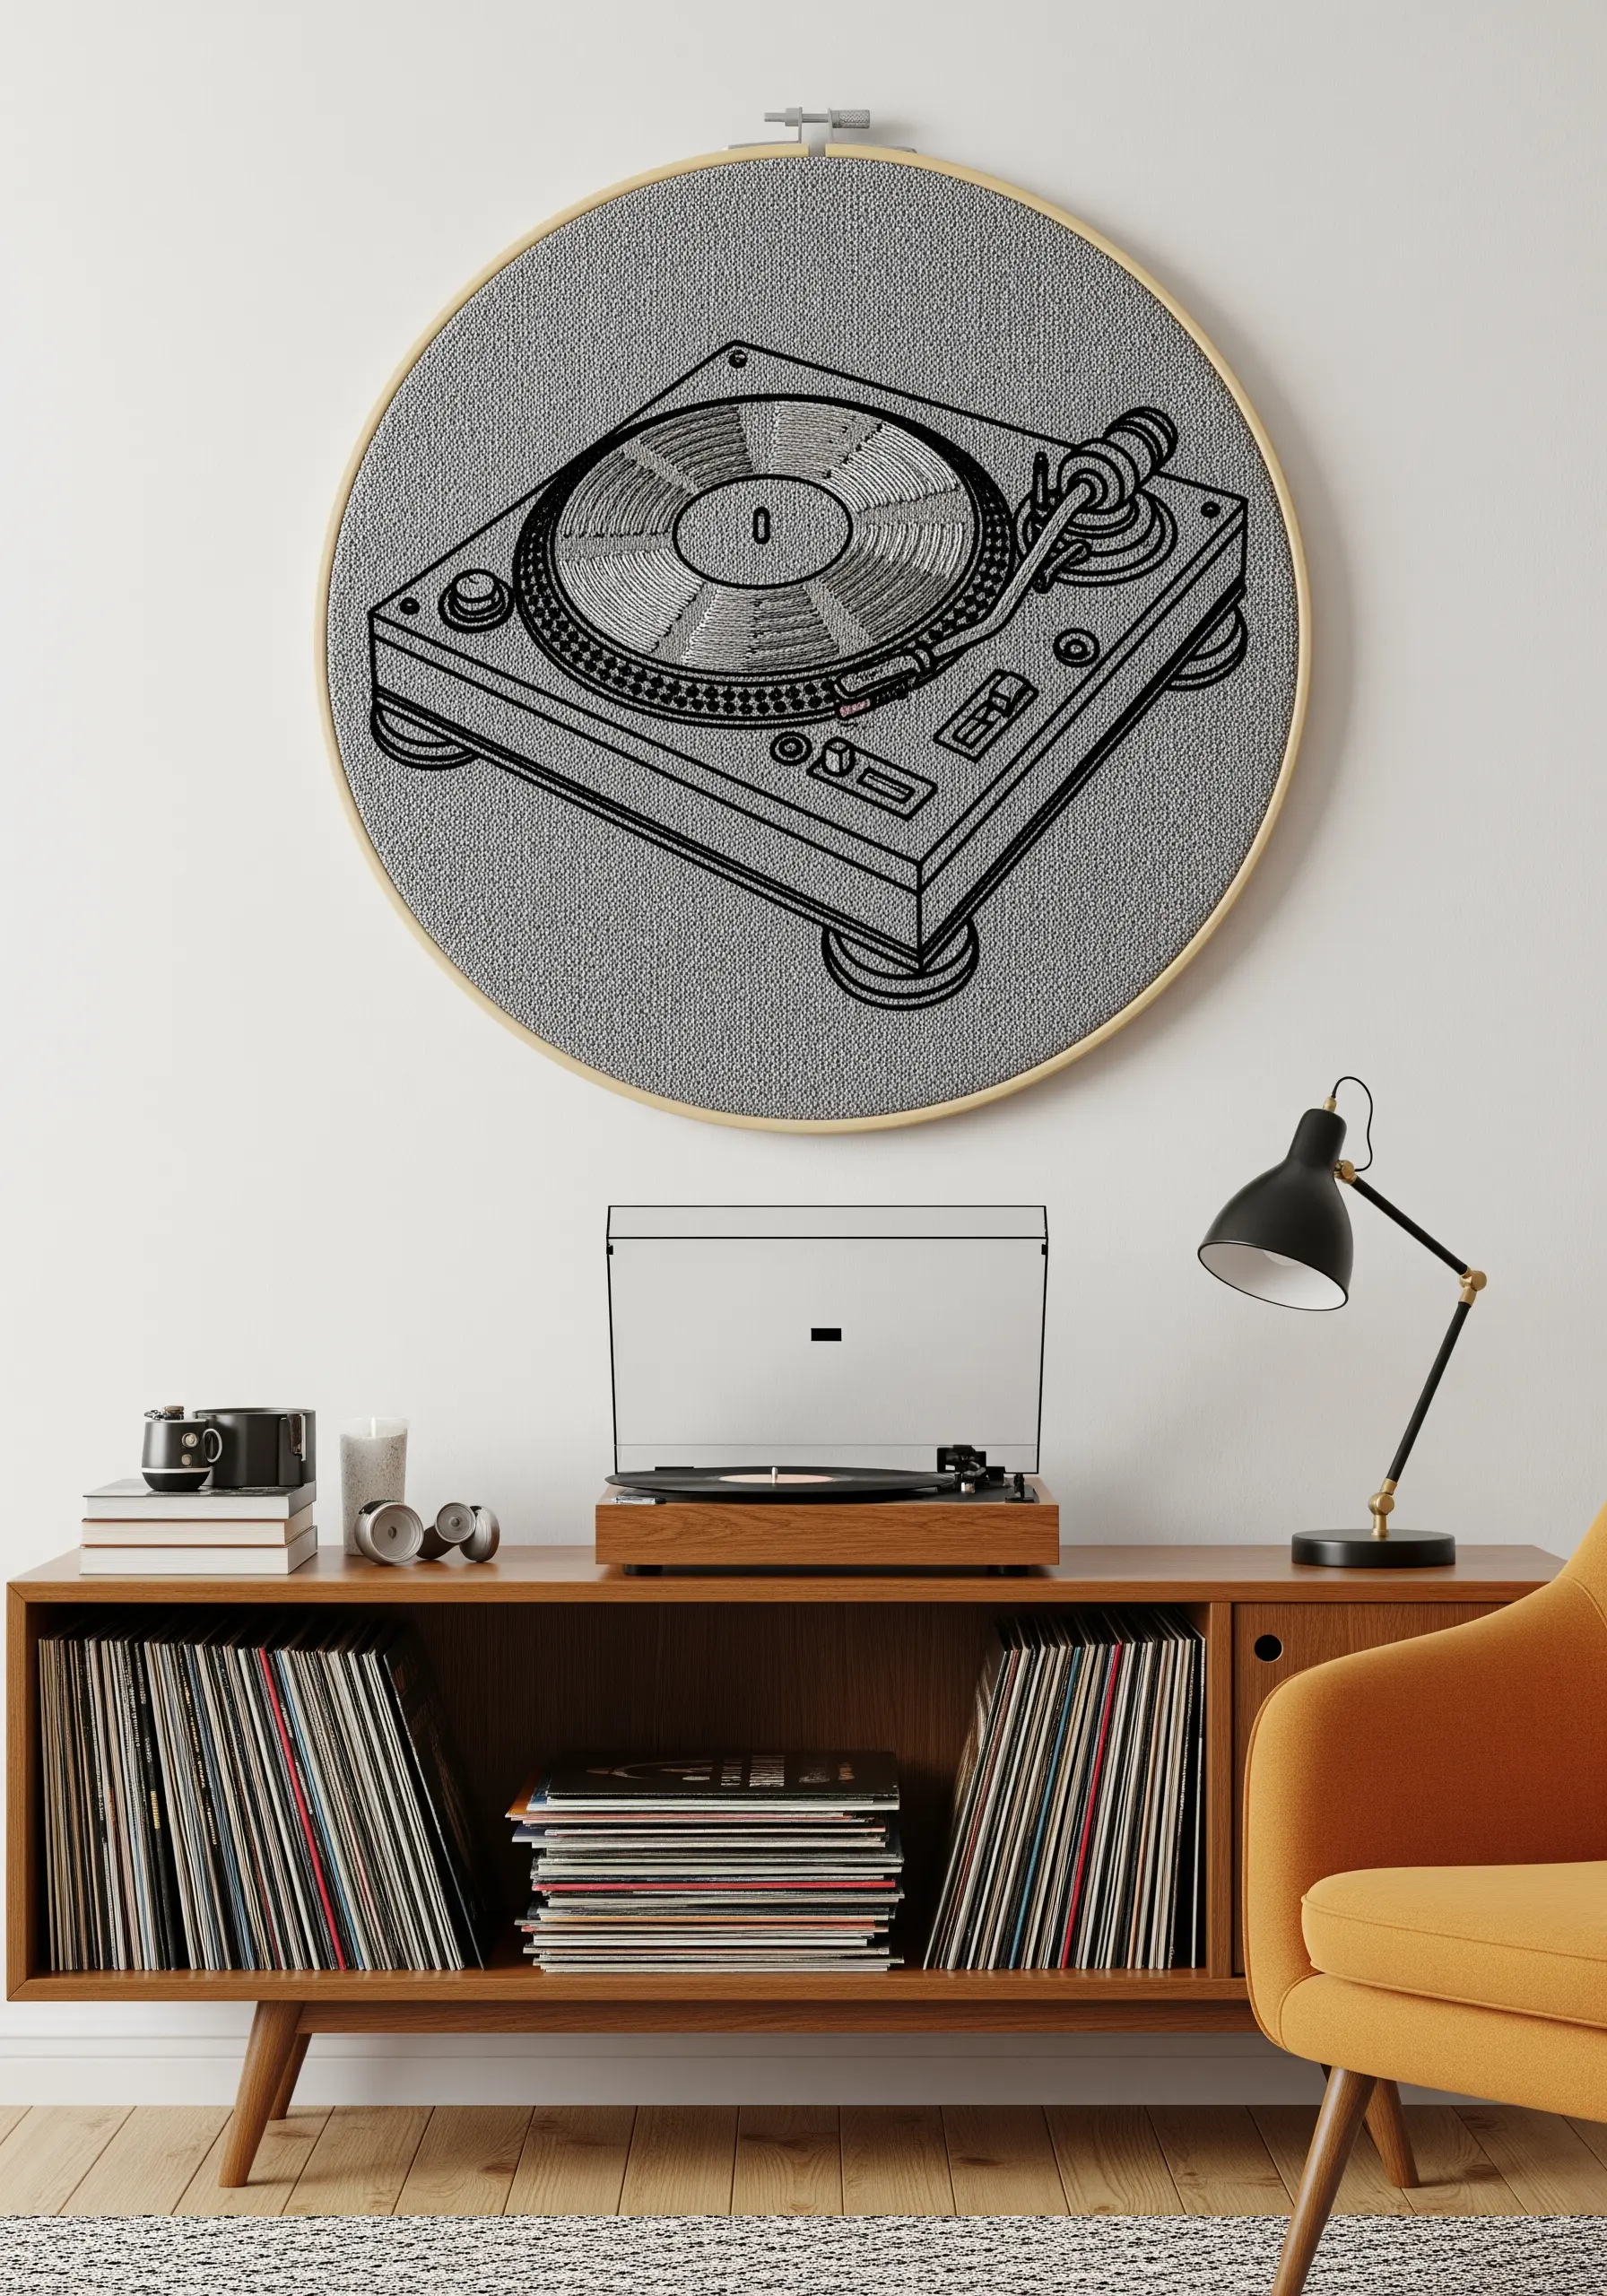
Pay homage to a favorite object or hobby by recreating it as a detailed, technical illustration in thread.
To achieve this level of precision, use a fine-tipped, heat-erasable pen to transfer your design onto the fabric.
Use a single strand of black or gray floss and a tiny backstitch to mimic the clean lines of an ink drawing.
For areas of texture, like the vinyl record, use concentric circles of split stitch to create a sense of depth and realistic detail.
33. Think Outside the Hoop with Shaped Hangings
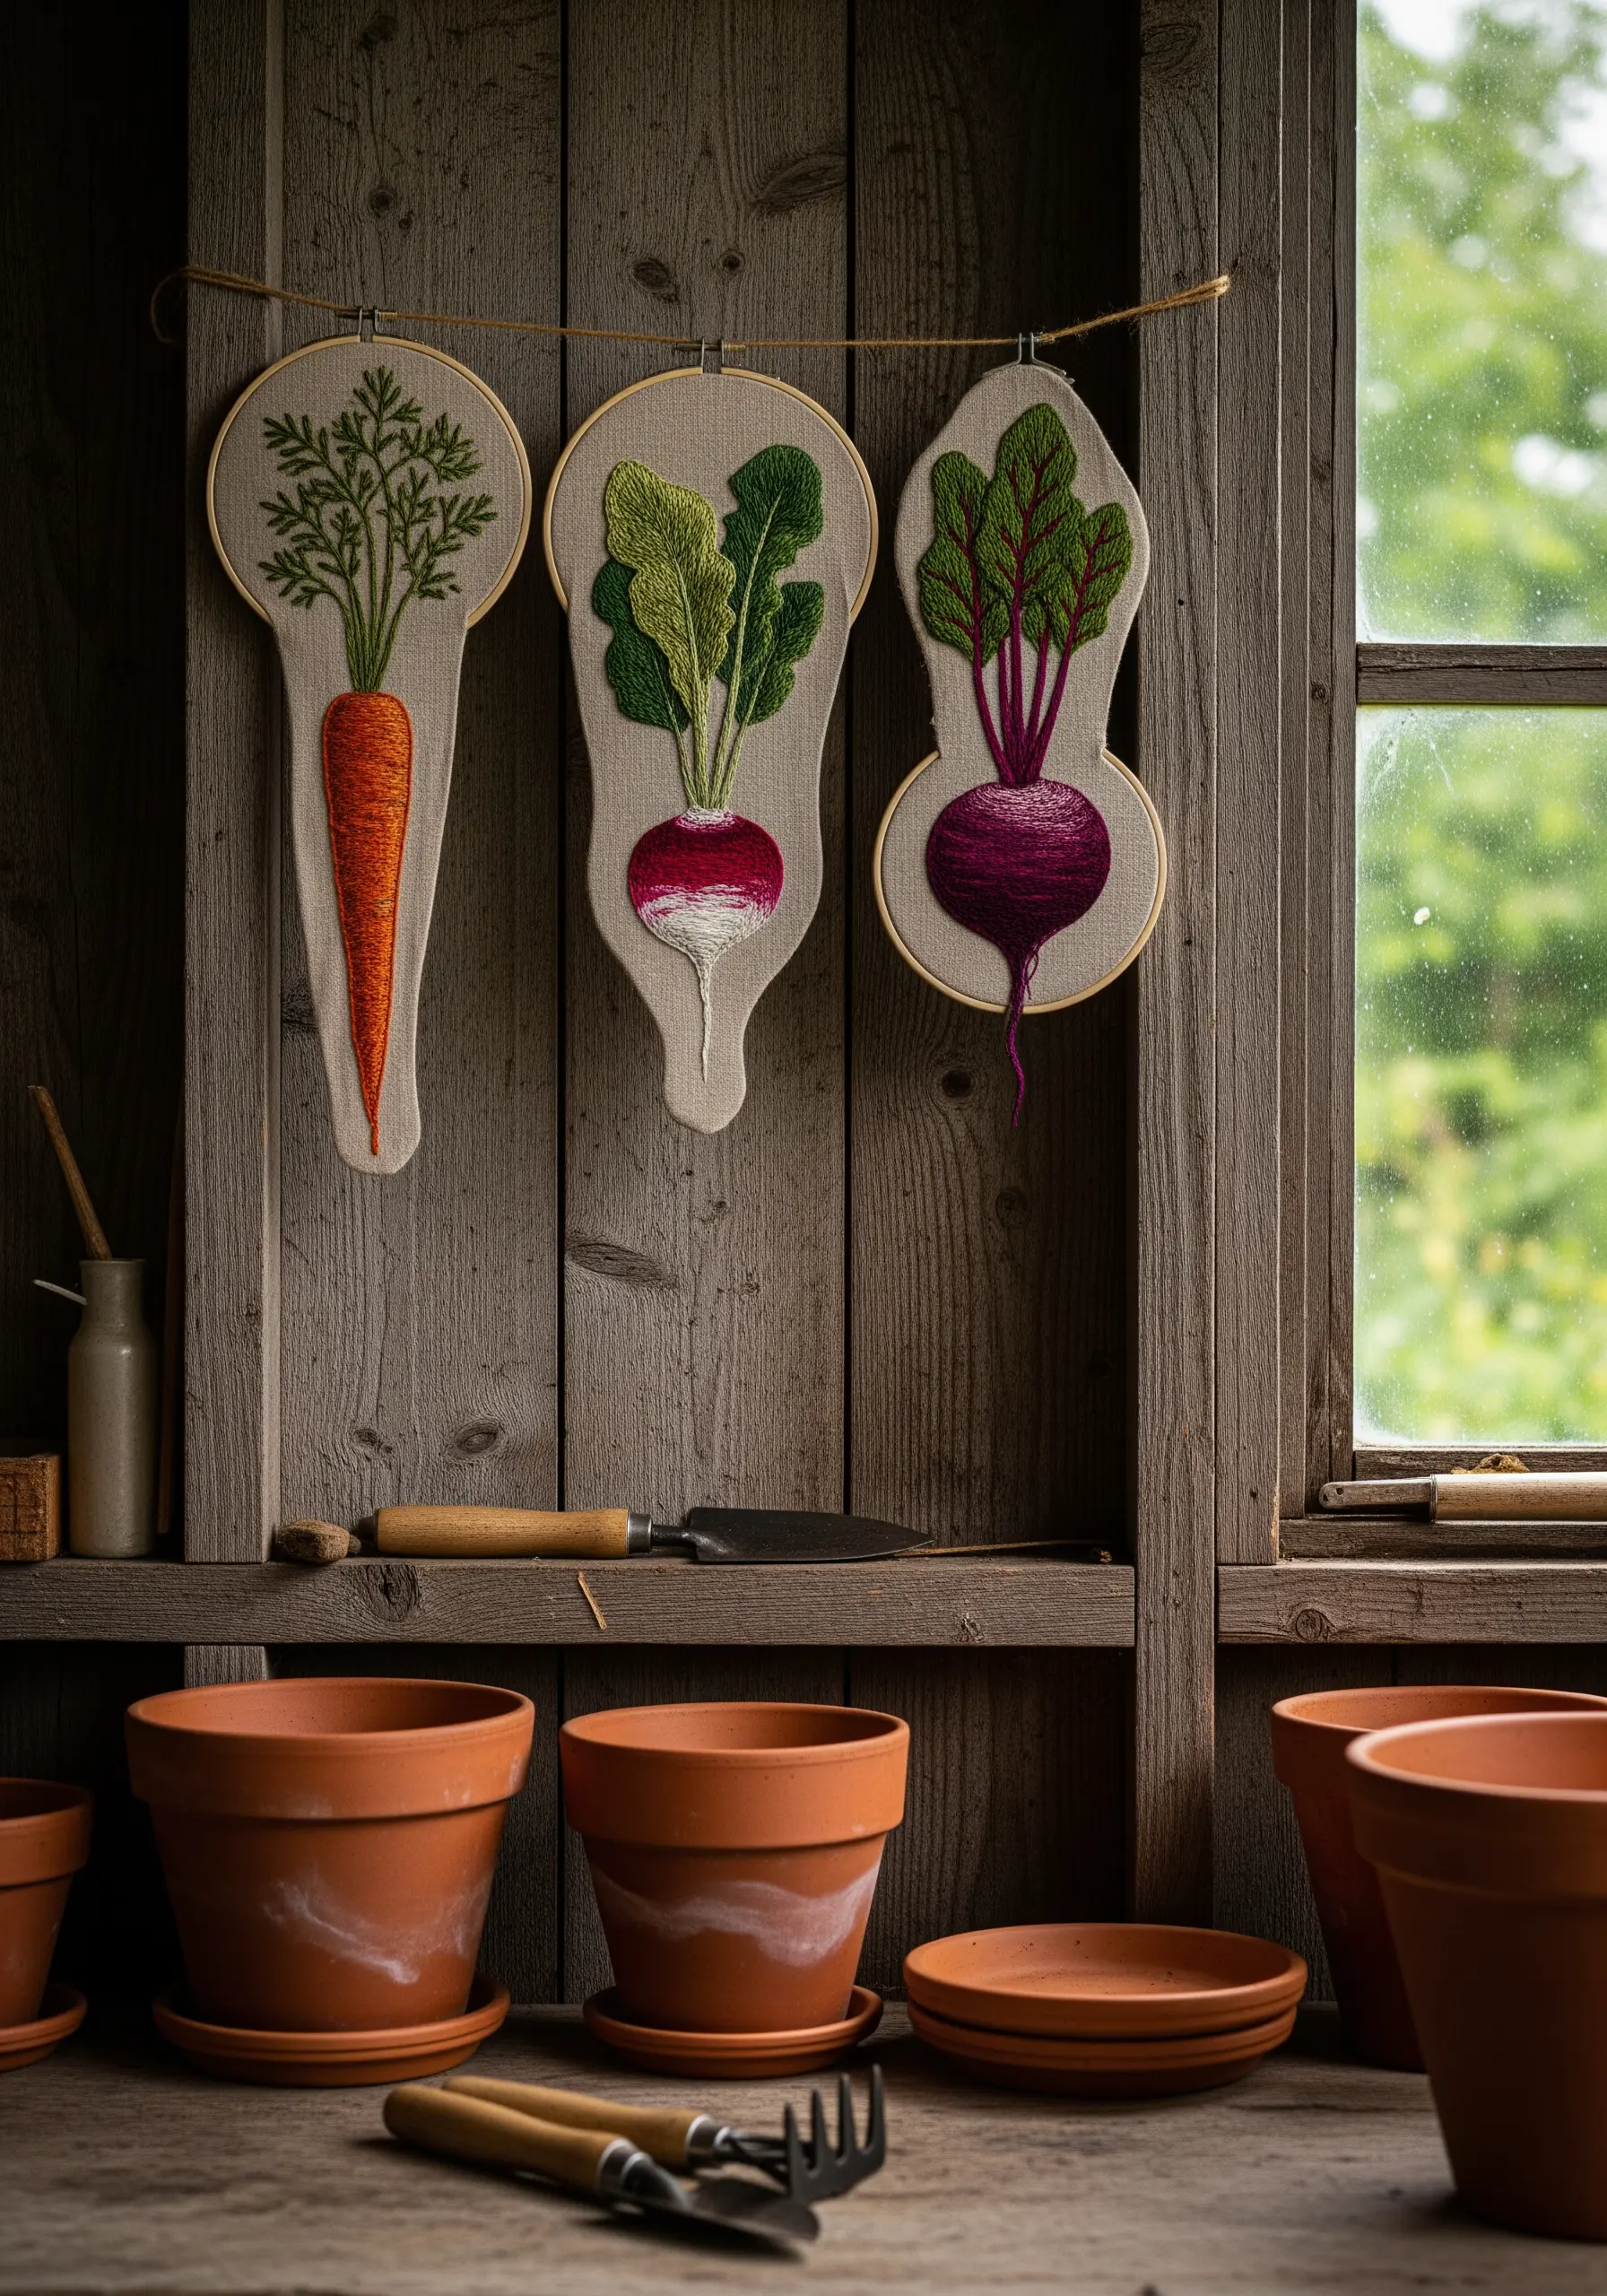
Break free from the traditional circle by creating wall hangings in custom, organic shapes that reflect your subject matter.
Stitch your design as usual in a standard hoop, leaving plenty of extra fabric around the edges.
After stitching, create a backing from sturdy felt or foam core in your desired shape. Wrap the embroidered fabric around it and secure it tightly on the back.
This technique allows your root vegetables to feel more sculptural and unique, turning them into charming, rustic art pieces.
34. Design a Cascading Fiber Art Installation
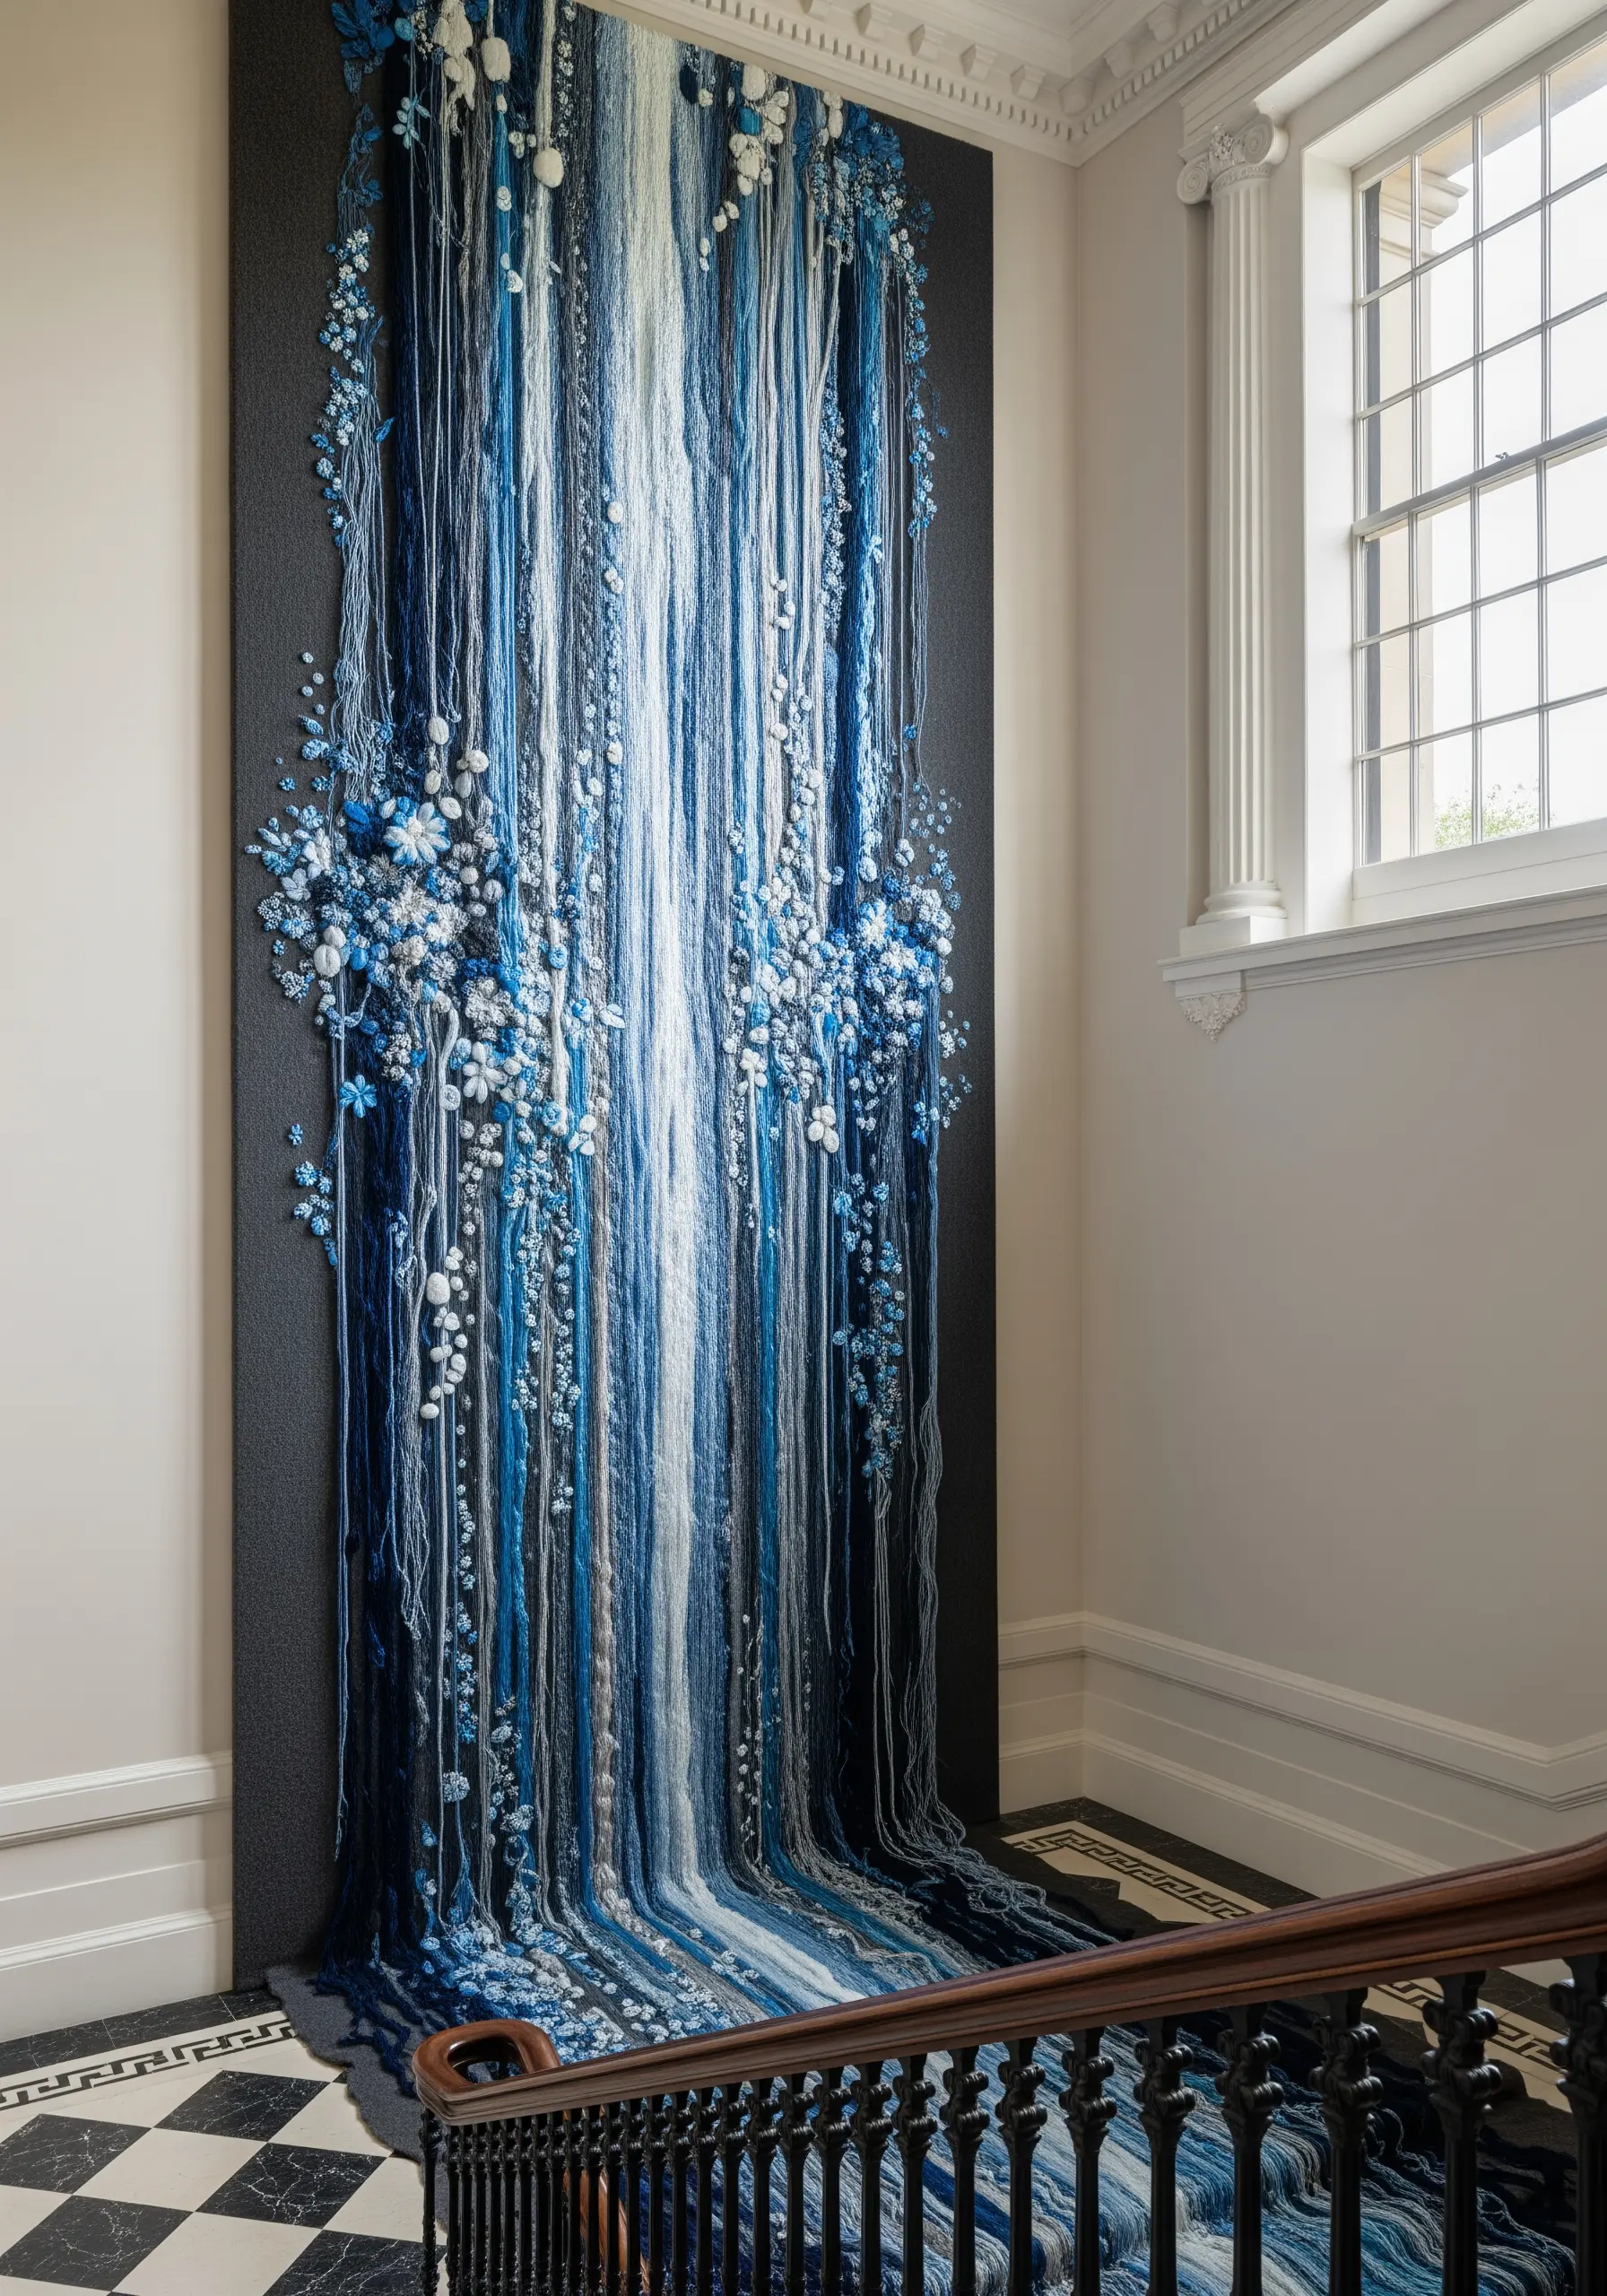
For a truly breathtaking statement piece, move beyond the frame and create a large-scale, sculptural fiber art installation.
This advanced project involves securing hundreds of strands of yarn, ribbon, and thread of varying textures and thicknesses to a large backing board.
Create dimension and focal points by incorporating 3D stitched elements, like woven picot flowers, bullion knots, and tufted pom-poms, throughout the cascade.
Let the fibers flow down the wall and pool onto the floor, breaking the traditional boundaries of wall art and creating a sense of organic, untamed beauty.


