

Your entryway, no matter how small, is the first hello and the last goodbye of your home. It deserves to feel intentional and personal. With embroidery hoops, you have the perfect frame to tell a story that can change with your mood or the season.
Forget thinking of embroidery as just stitches on fabric. Instead, see each hoop as a miniature canvas for texture, color, and composition. The techniques we’ll explore are not about complexity; they are about making smart, deliberate choices that elevate a simple motif into a small work of art.
Here, you’ll discover how to use stitch direction to create movement, how a simple change in fabric can transform a design’s entire mood, and how to combine different textures to create a display that feels both cohesive and alive. This is your space to create a welcome that is truly, beautifully yours.
1. Spring Welcome: Layered Florals & Typography

Create depth in your cherry blossoms by using French knots for the centers and satin stitch for the petals.
Varying the number of thread wraps in your knots will give the blossoms a more natural, textured appearance.
For the ‘hello,’ use a whipped backstitch instead of a simple backstitch—it creates a smoother, more defined line that looks professionally finished.
This combination of delicate texture and clean lettering provides a balanced and inviting seasonal greeting.
2. Summer Shoreline: Dynamic Texture & Line Art
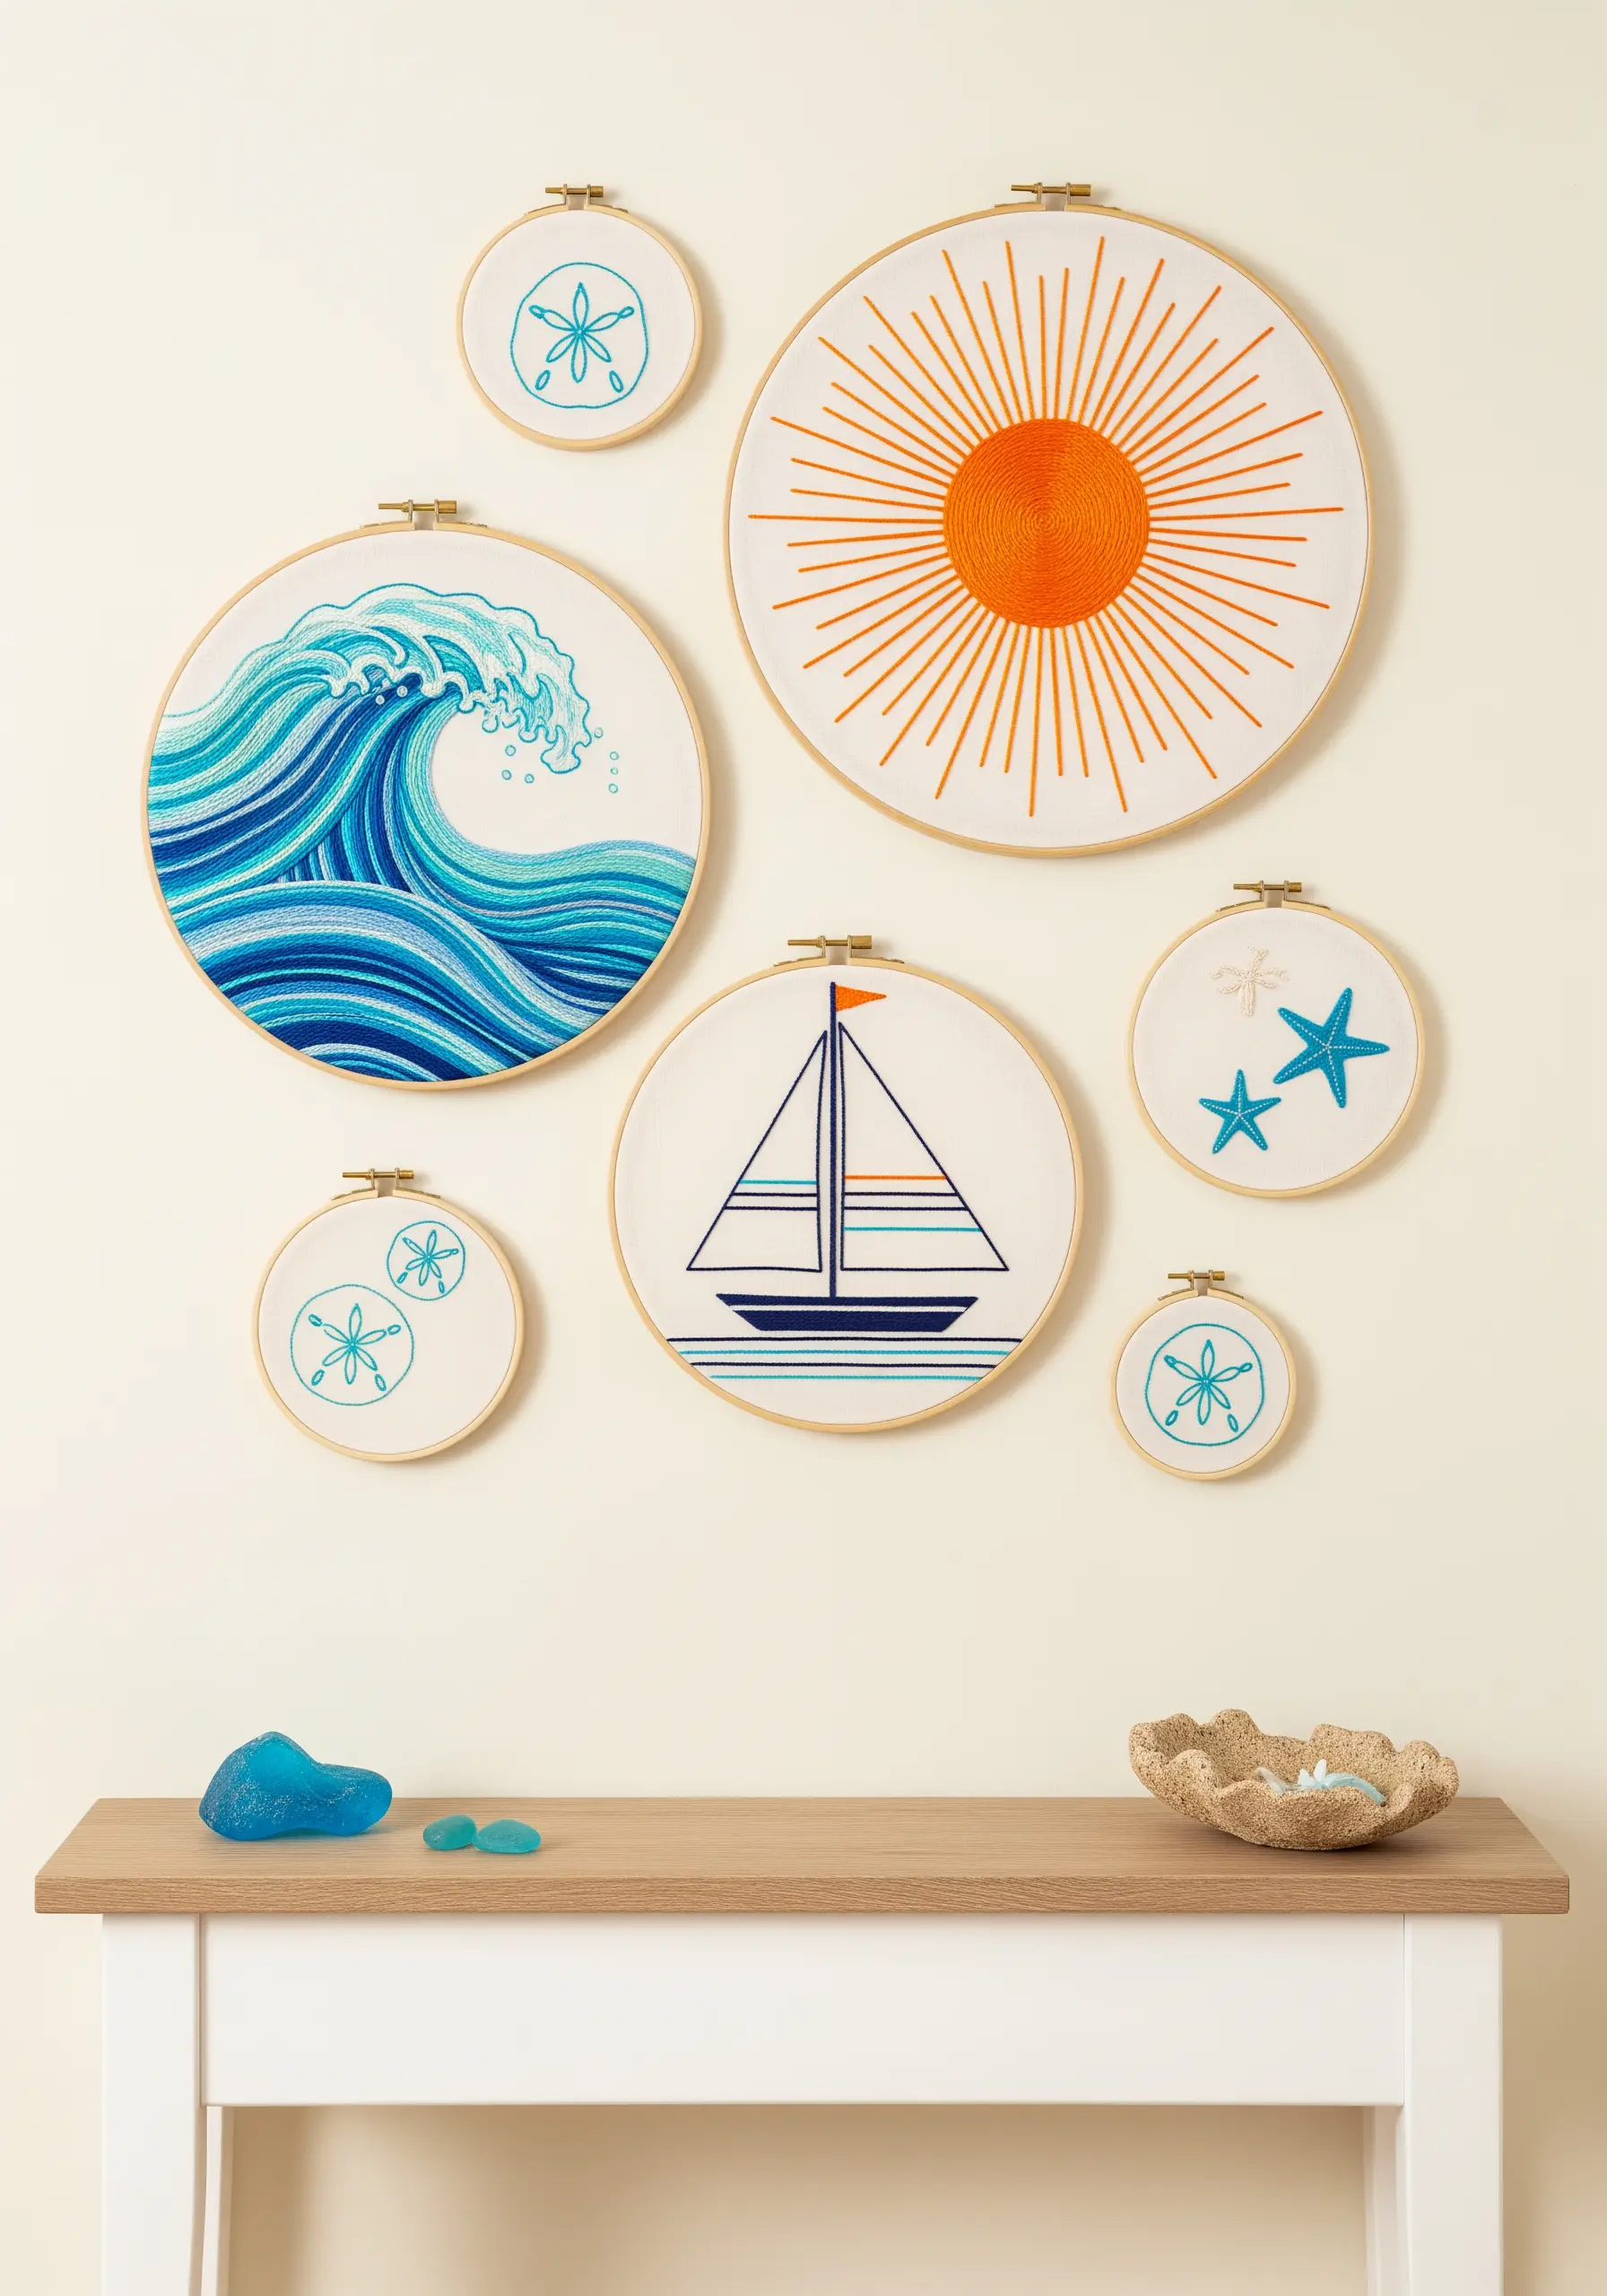
To capture the movement of the wave, use a directional long-and-short stitch, blending multiple shades of blue and turquoise floss.
Contrast the dense, textural wave with the graphic simplicity of the sun, filled with a tight, radiating satin stitch for a bold impact.
By pairing these detailed pieces with minimalist line art for the smaller motifs, you create a balanced composition that feels both energetic and uncluttered.
3. Autumn Hearth: Warm Tones & Earthy Fabric

Enhance the cozy, rustic feel of your autumn hoops by stitching on a neutral, visibly woven fabric like linen or oatmeal aida.
For the fox’s fur, use long-and-short stitch to seamlessly blend shades of orange, rust, and white for a soft, realistic effect.
Define the maple leaves by outlining them with a dark backstitch after filling them with satin stitch; this simple step prevents the shapes from looking flat and undefined.
This collection harmonizes through its warm, earthy color palette and tactile surfaces.
4. Winter Solstice: High-Contrast Minimalism

Make your stitches pop by using a high-contrast combination: bright white thread on a dark navy or black cotton fabric.
For intricate snowflake designs, use only one or two strands of floss to achieve crisp, delicate lines.
To add a touch of subtle magic, twist a single strand of silver metallic thread with your white floss. It will catch the light beautifully without being overwhelming.
This technique turns simple motifs into a dramatic and elegant entryway statement.
5. Indoor Garden: Stitching Realistic Foliage
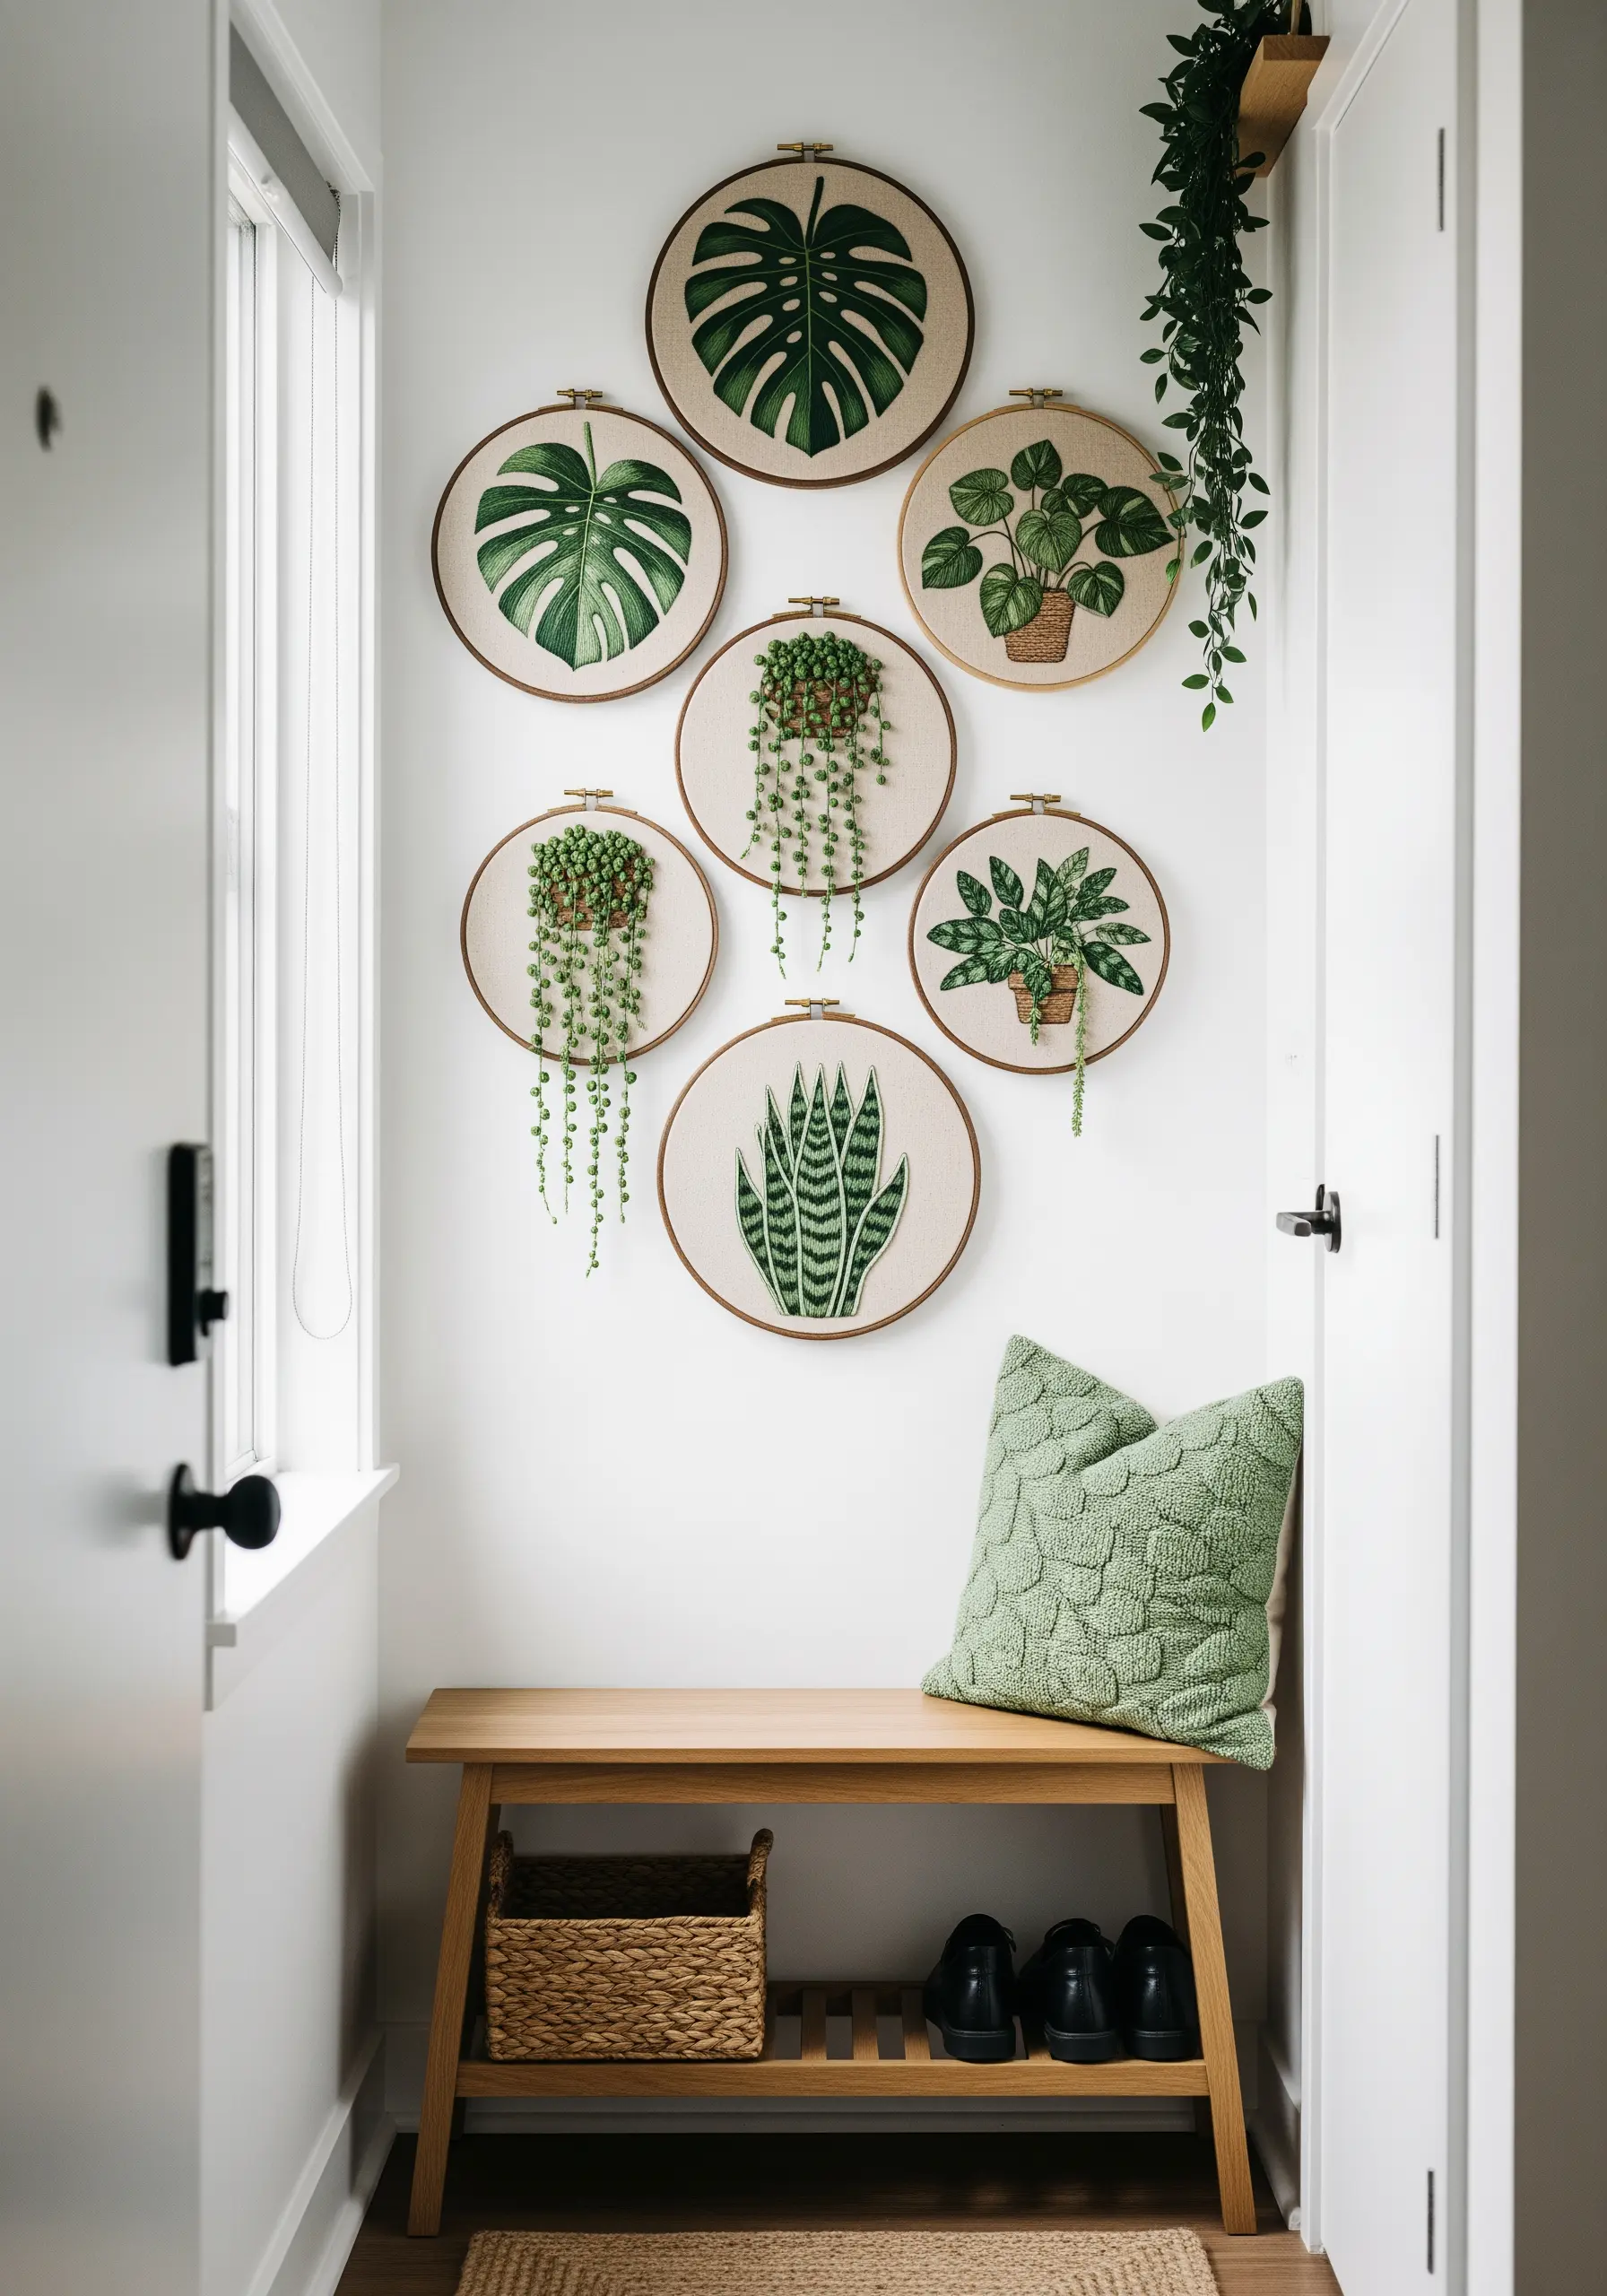
The secret to realistic leaves is directional satin stitch; always angle your stitches to follow the natural growth of the veins.
To create variegation in leaves like the monstera, use a long-and-short stitch to softly blend two or more shades of green.
For the cascading string of pearls, alternate tiny French knots with short straight stitches along a single thread to create the illusion of trailing succulents.
These techniques will help you cultivate a permanent, lush indoor garden.
6. Modern Fiber Art: Sculptural Color Blocking

Move beyond thread and use the hoop itself as a structural element for a contemporary art piece.
Start by painting your hoops black for a graphic, modern frame.
Wrap dense sections of yarn directly across the open space, securing the ends tightly in the back. Maintaining high tension is crucial for achieving those clean, sharp lines.
This is a fast and impactful way to create abstract fiber art with bold color and texture.
7. Cottage Charm: Stitching on Patterned Fabric
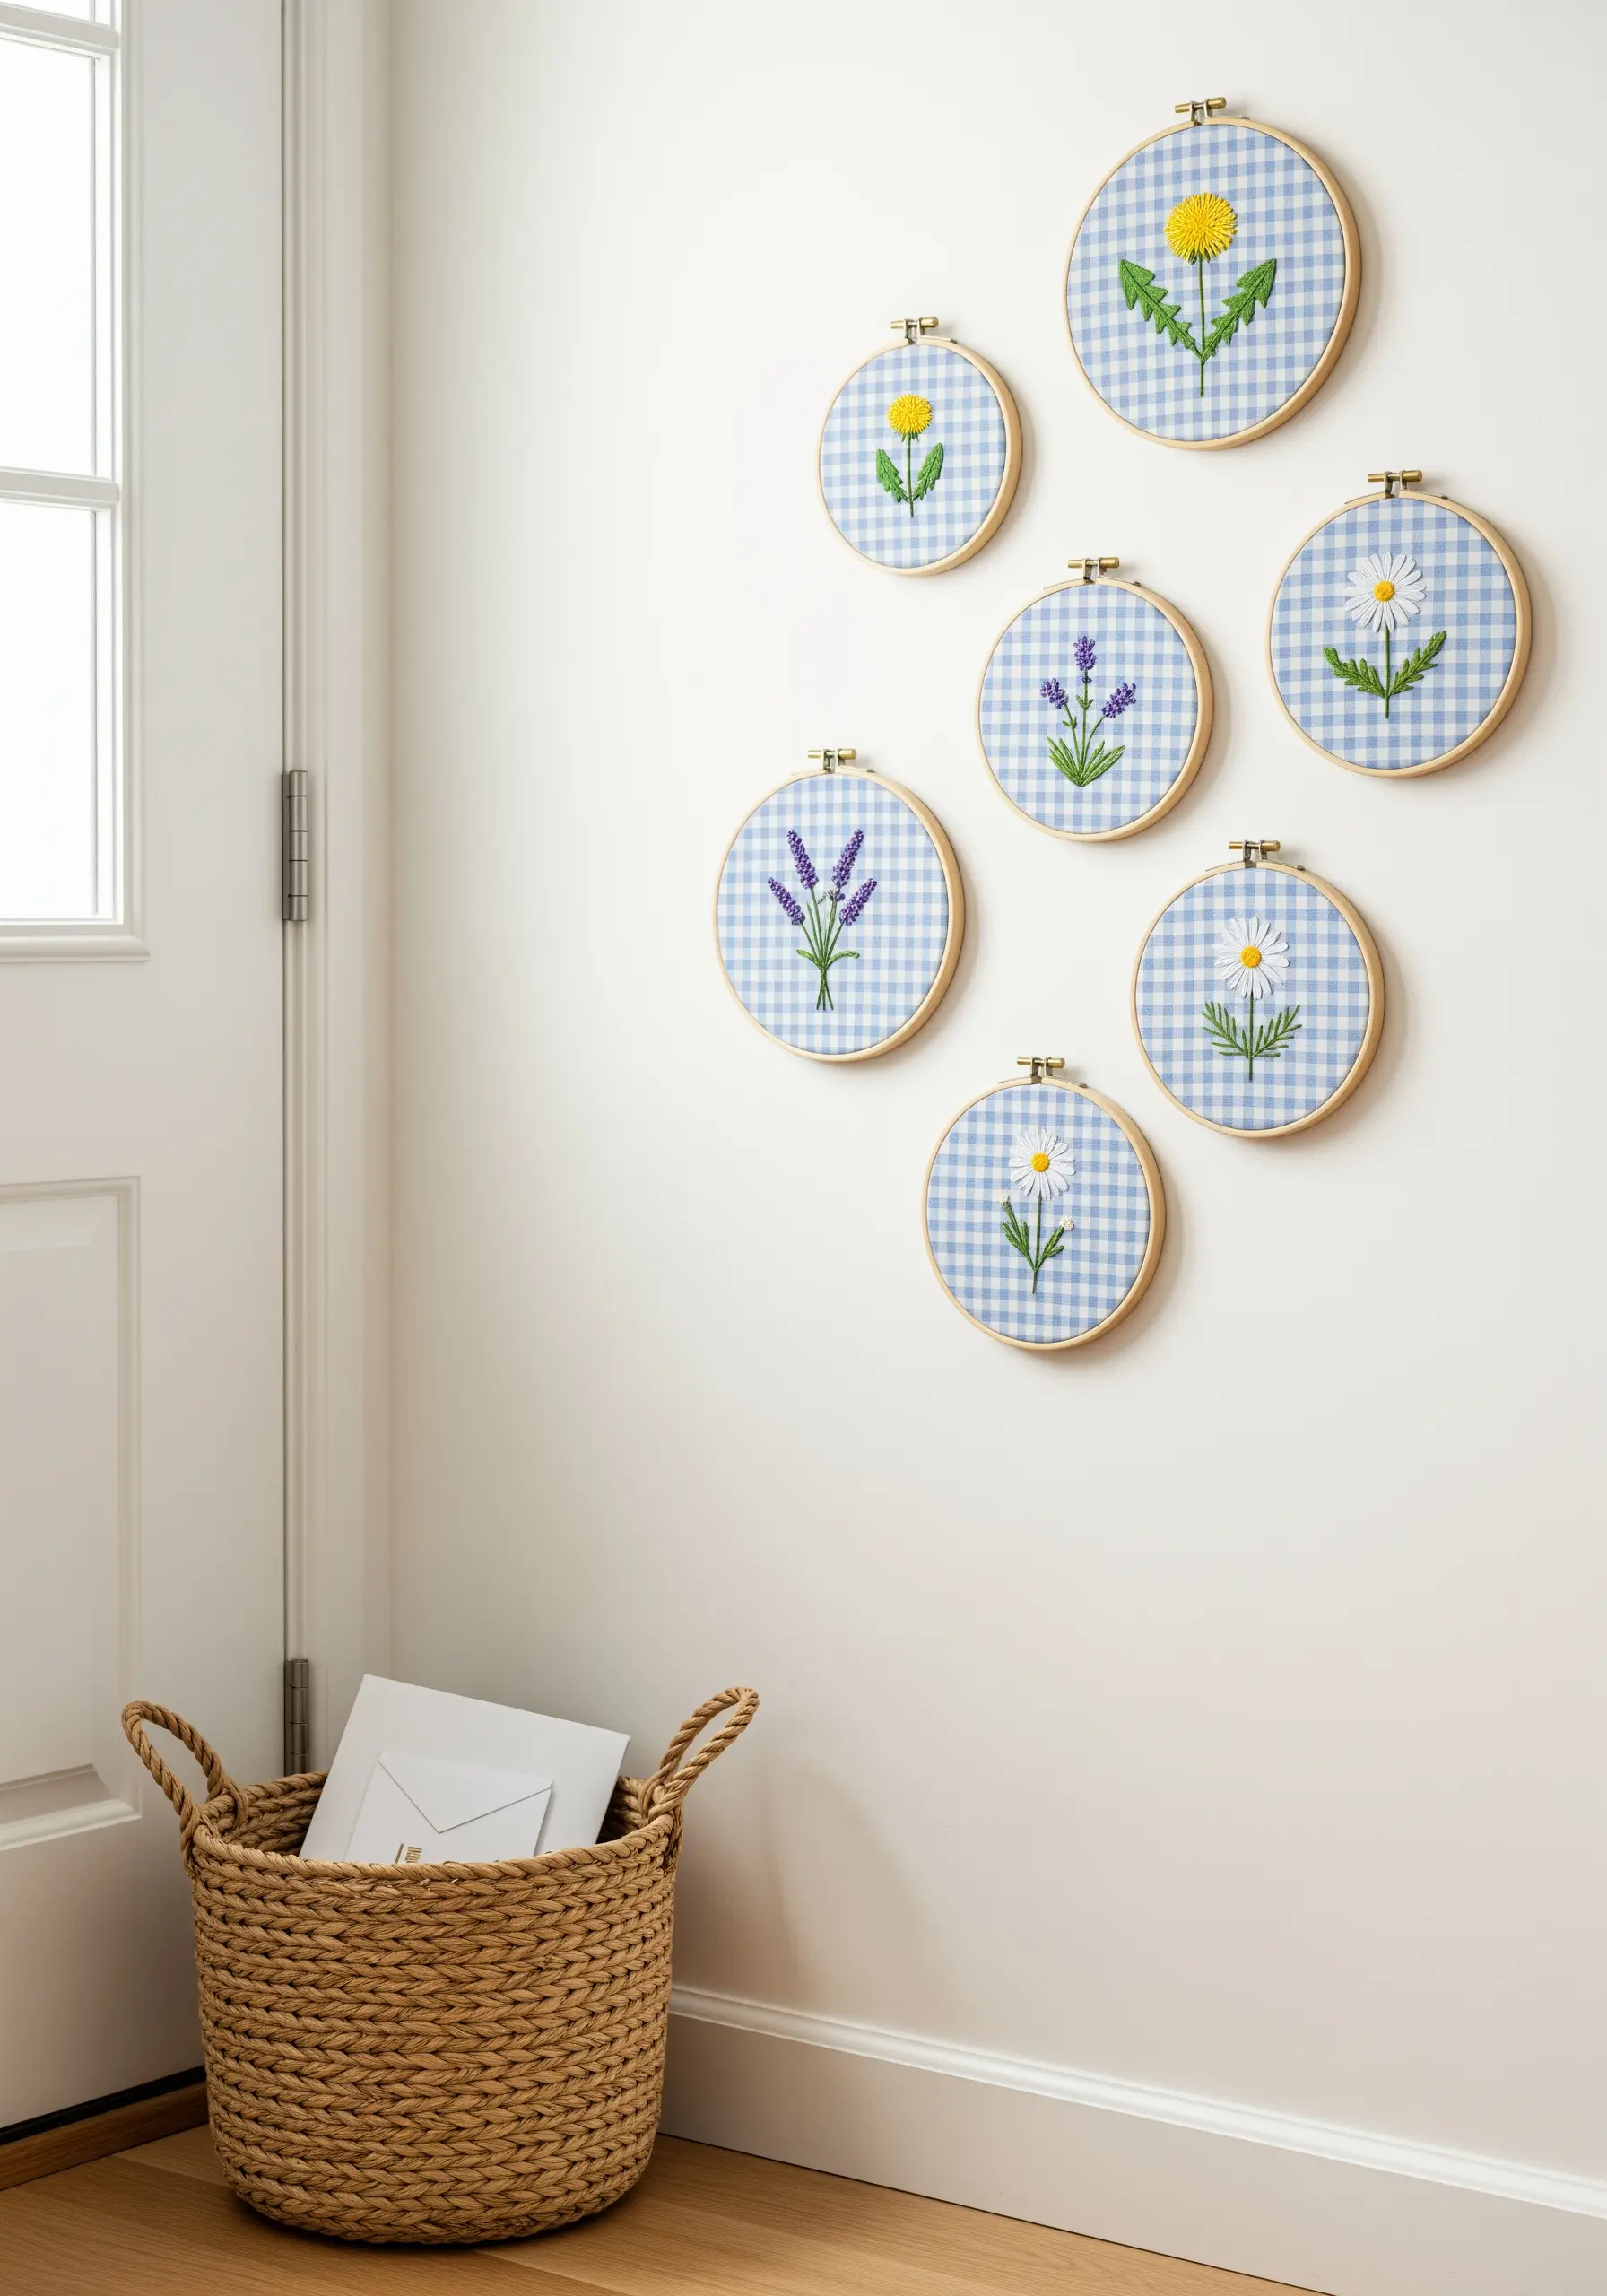
Using a patterned fabric like gingham instantly adds depth and personality to your work before you even make a stitch.
To ensure your embroidery is the star, choose high-contrast thread colors that stand out against both colors in the pattern.
Use all six strands of your floss or outline your motifs with a darker backstitch. This technique gives your design a clear, defined edge so it doesn’t get lost in the background.
This method is perfect for creating quick and charming decor.
8. Zesty Summer Welcome: Vibrant Satin Stitch Fills

To achieve perfectly smooth, professional-looking satin stitches for these citrus slices, first create a split-stitch outline.
This raised edge gives your needle a firm boundary to stitch against, resulting in incredibly neat and uniform fills.
For added realism, use two or three closely related shades to create a subtle gradient from the center to the rind.
This technique adds a juicy pop of color that is perfect for summer.
9. Midnight Forest: Moody Illustration on Black Canvas

Create a narrative triptych by stitching a cohesive scene across multiple hoops.
Using white and light grey thread on black fabric creates a dramatic, woodcut-inspired aesthetic that feels both modern and timeless.
For the owl’s feathers, use short, varied straight stitches angled in different directions to mimic natural texture. Fill the moon with tiny seed stitches for a subtle, shimmering effect.
This approach transforms simple stitches into a compelling visual story.
10. Scandinavian Winter: The Power of a Single Line
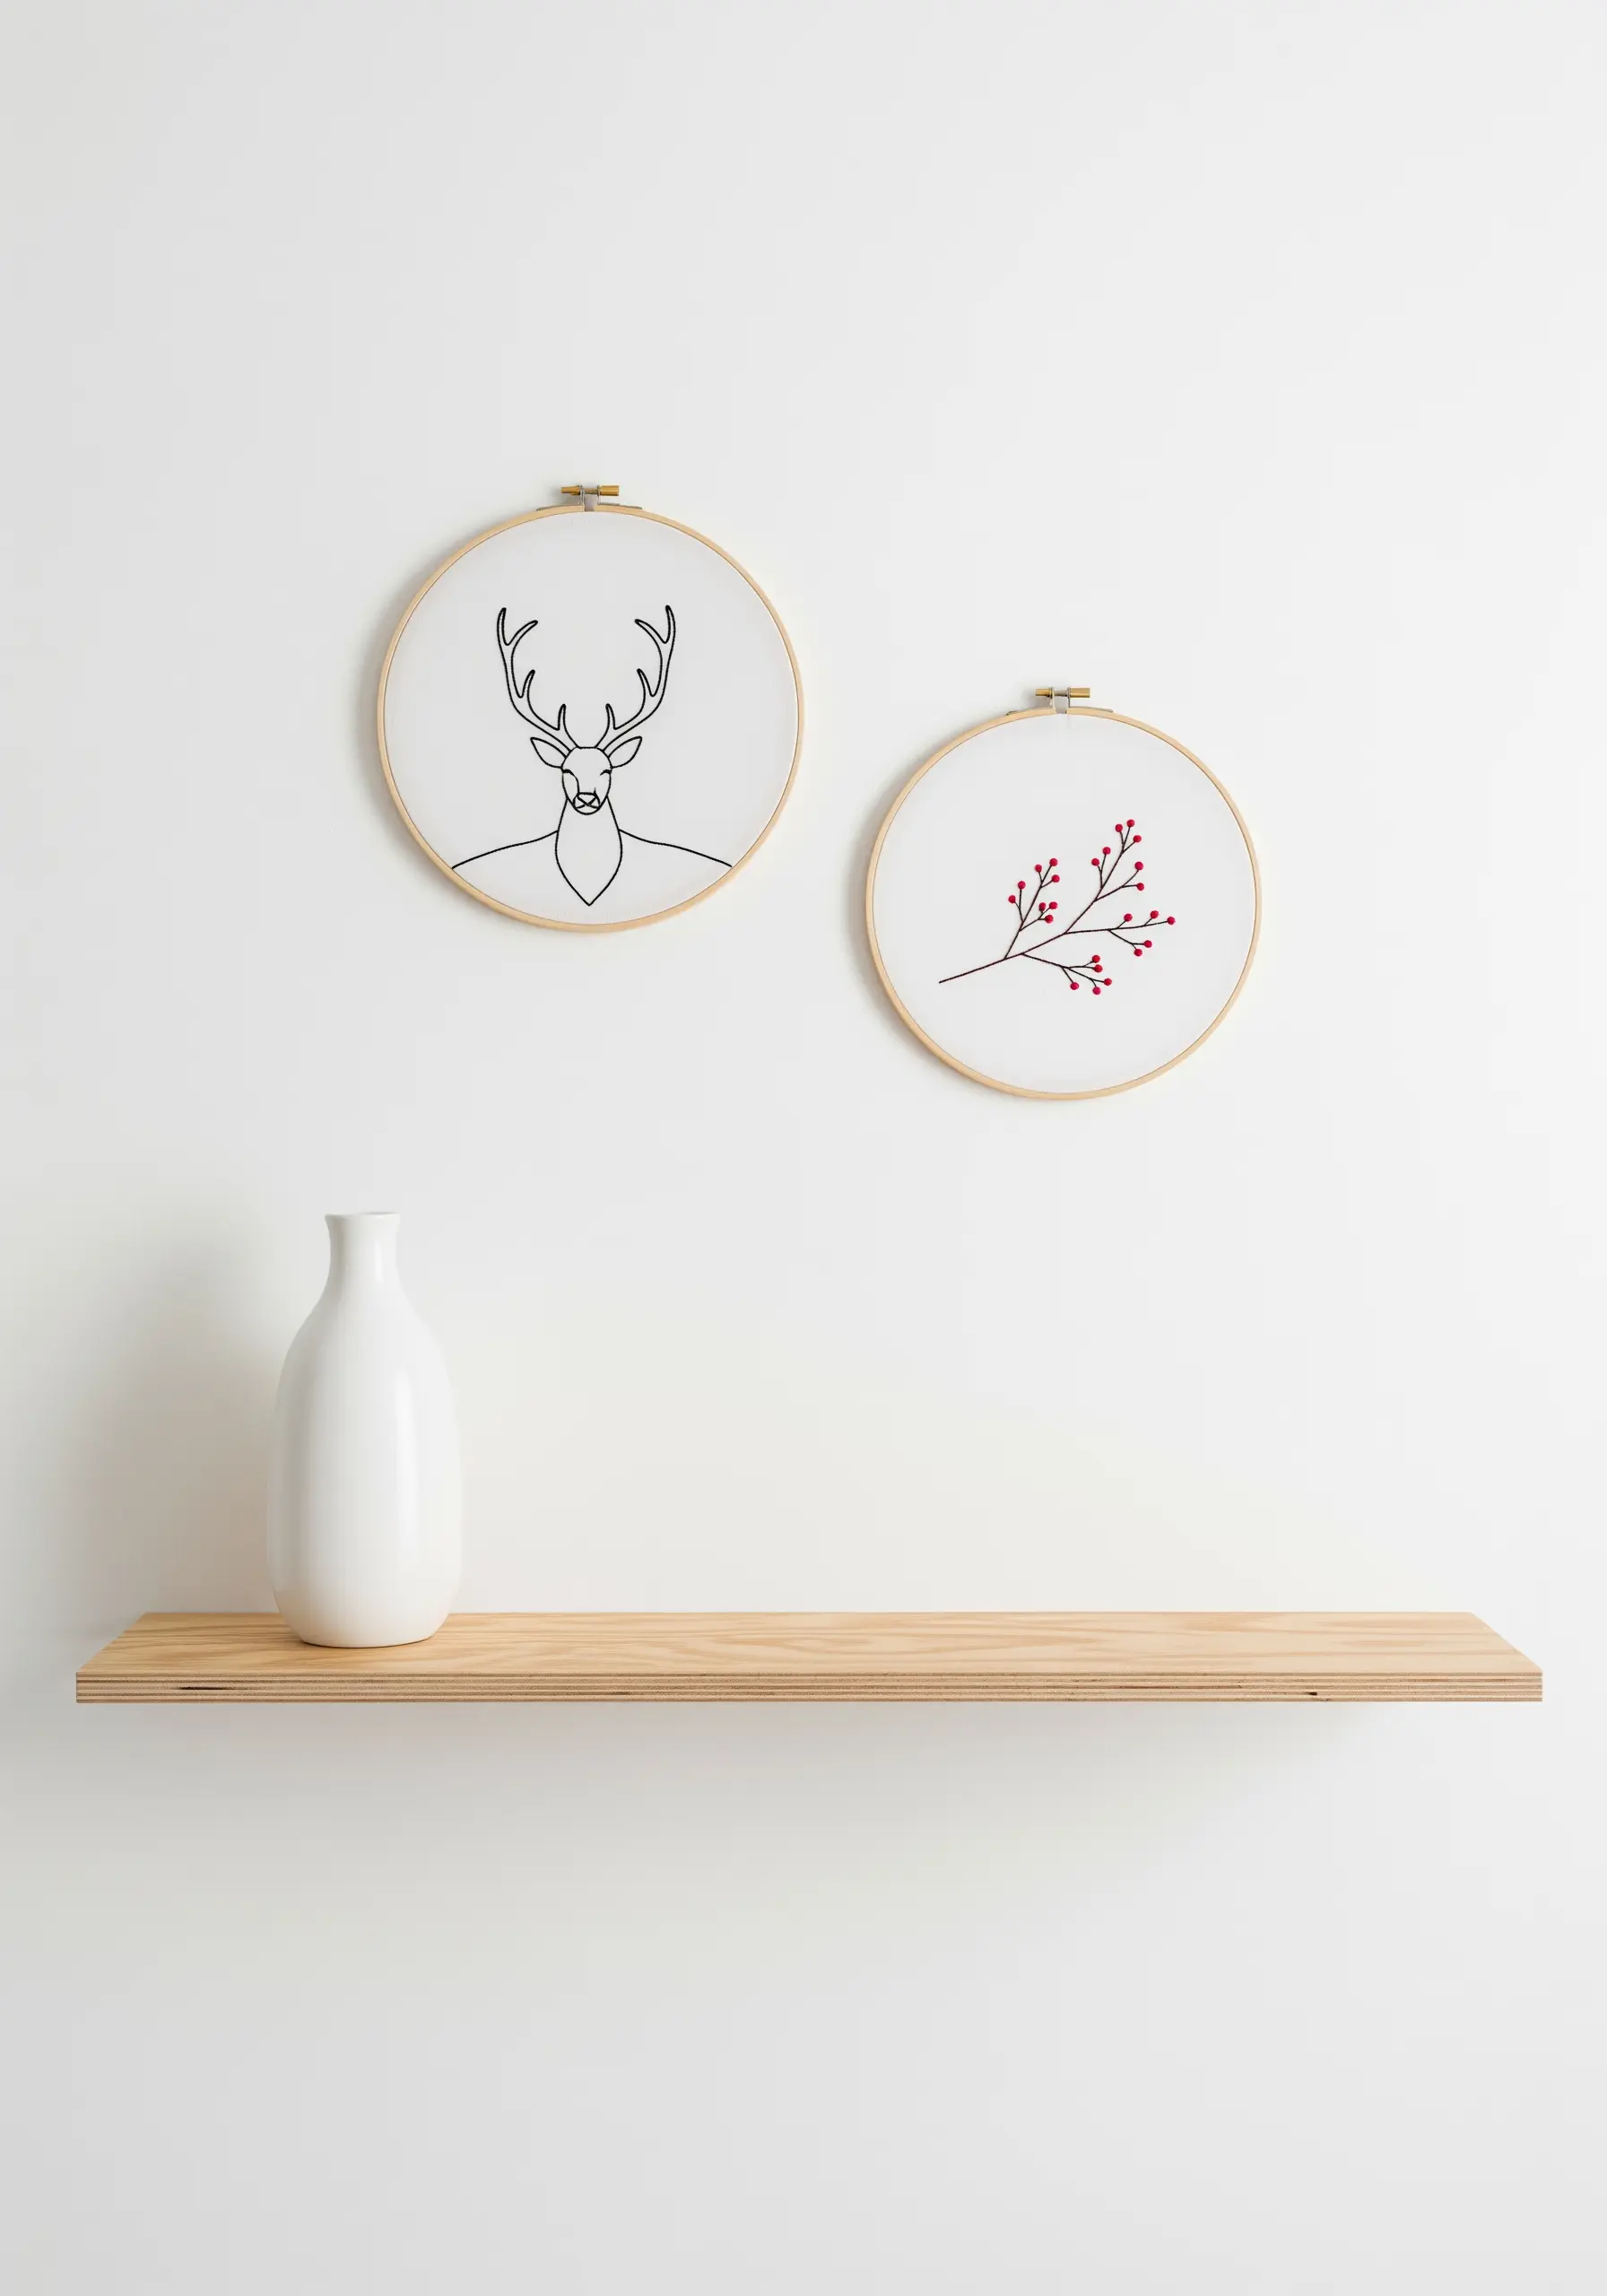
Embrace a minimalist aesthetic by focusing on clean, continuous line art.
Use a simple backstitch or stem stitch with just two strands of black floss to achieve a delicate, hand-drawn look.
The key to success is maintaining consistent stitch length and even tension to ensure the line flows smoothly.
Add a single pop of color with French knots for the berries, creating a focal point that enhances the design’s elegant simplicity.
11. Bohemian Solstice: Integrating Macrame & Stitch

Transform a simple embroidered piece into a statement wall hanging by incorporating other fiber arts.
After completing your line-art sun and moon with a clean backstitch, attach macrame elements to the bottom edge of the hoop.
Simple lark’s head knots and a few square knots are all you need to create tassels that add beautiful weight, texture, and movement.
This combination creates a rich, bohemian-inspired artwork.
12. Modern Typography: Bold Lettering as Decor
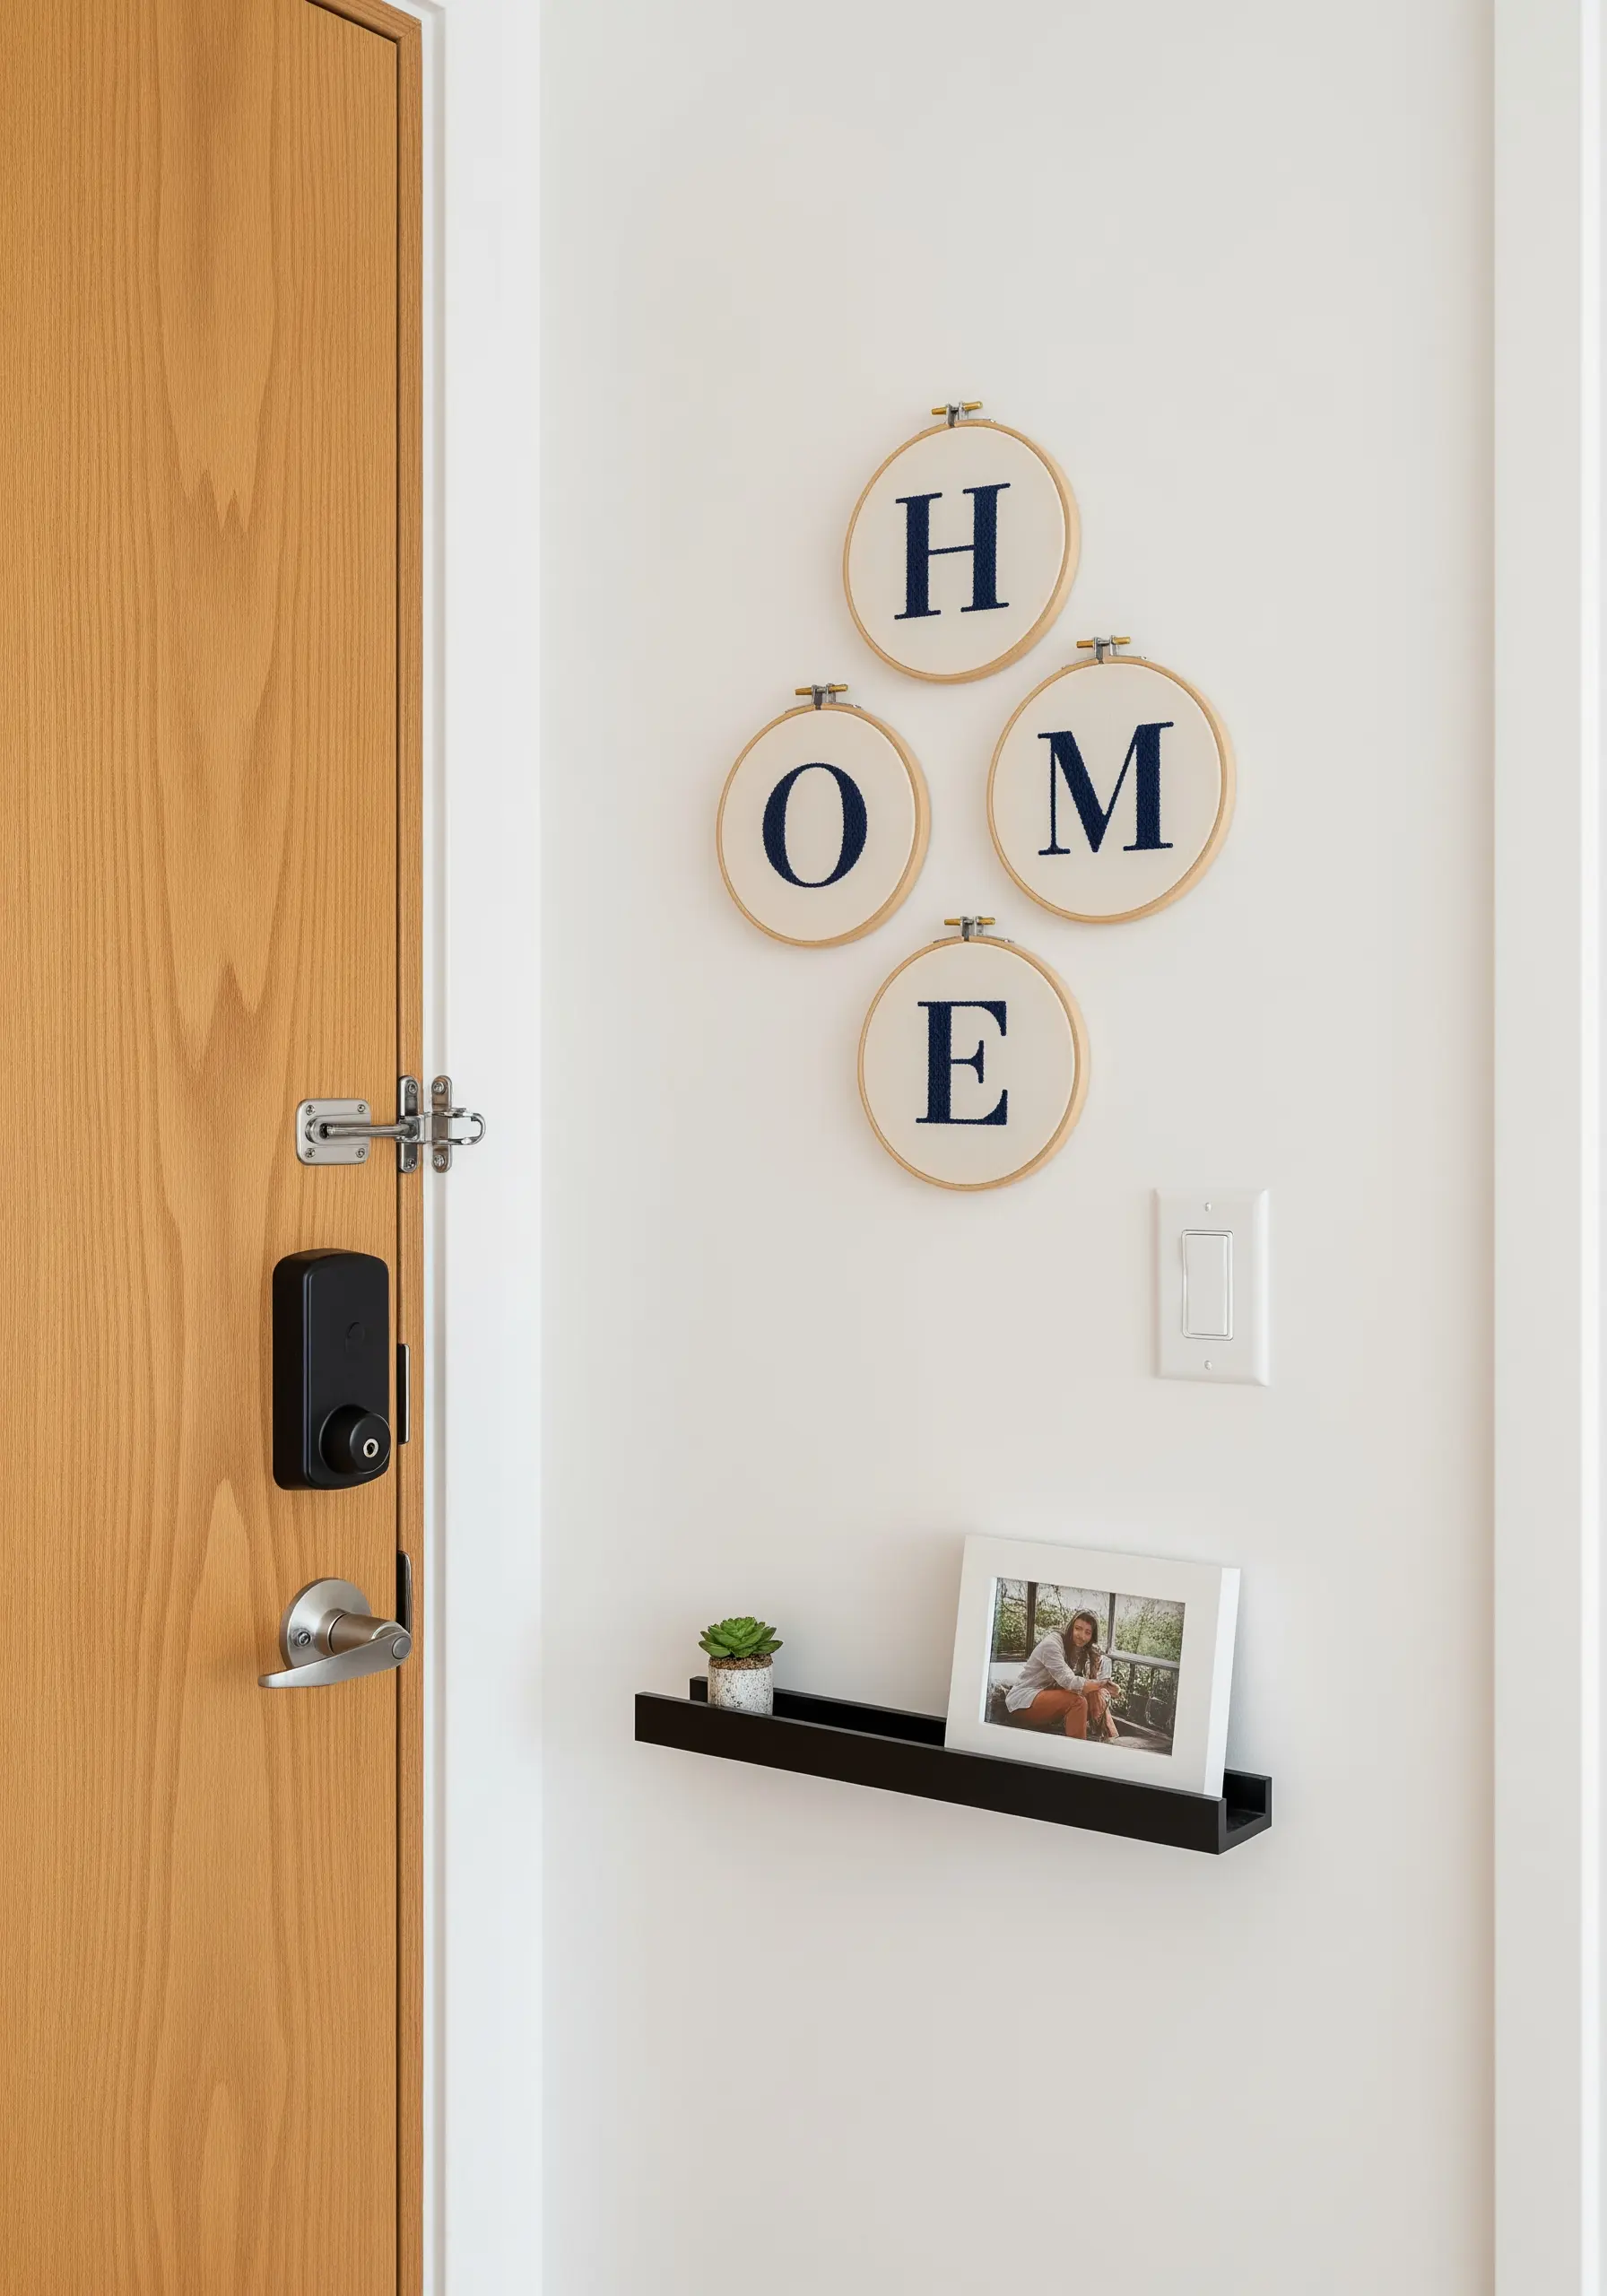
When using embroidery for typography, a padded satin stitch will give your letters a bold, three-dimensional quality.
First, fill the shape of the letter with a foundation of straight stitches or seed stitches.
Then, cover this padding with satin stitches laid perpendicular to the foundation stitches. This technique ensures your letters are plump, defined, and have a high-end finish.
This method is perfect for creating impactful, personalized entryway decor.
13. Sculptural Bouquet: Dimensional Stitches for Tactile Art

Create a floral arrangement that literally pops off the wall by using highly textural, dimensional stitches.
For the hydrangea, pack French knots tightly together, using slightly different shades of pink and white to create depth.
The red roses are created with a woven wheel stitch, which builds up into a beautiful, raised spiral.
Connect the display by wrapping green yarn around the hoop screws and letting it hang down as stems, turning individual hoops into a single bouquet.
14. Retro Revival: 70s-Inspired Graphics & Color
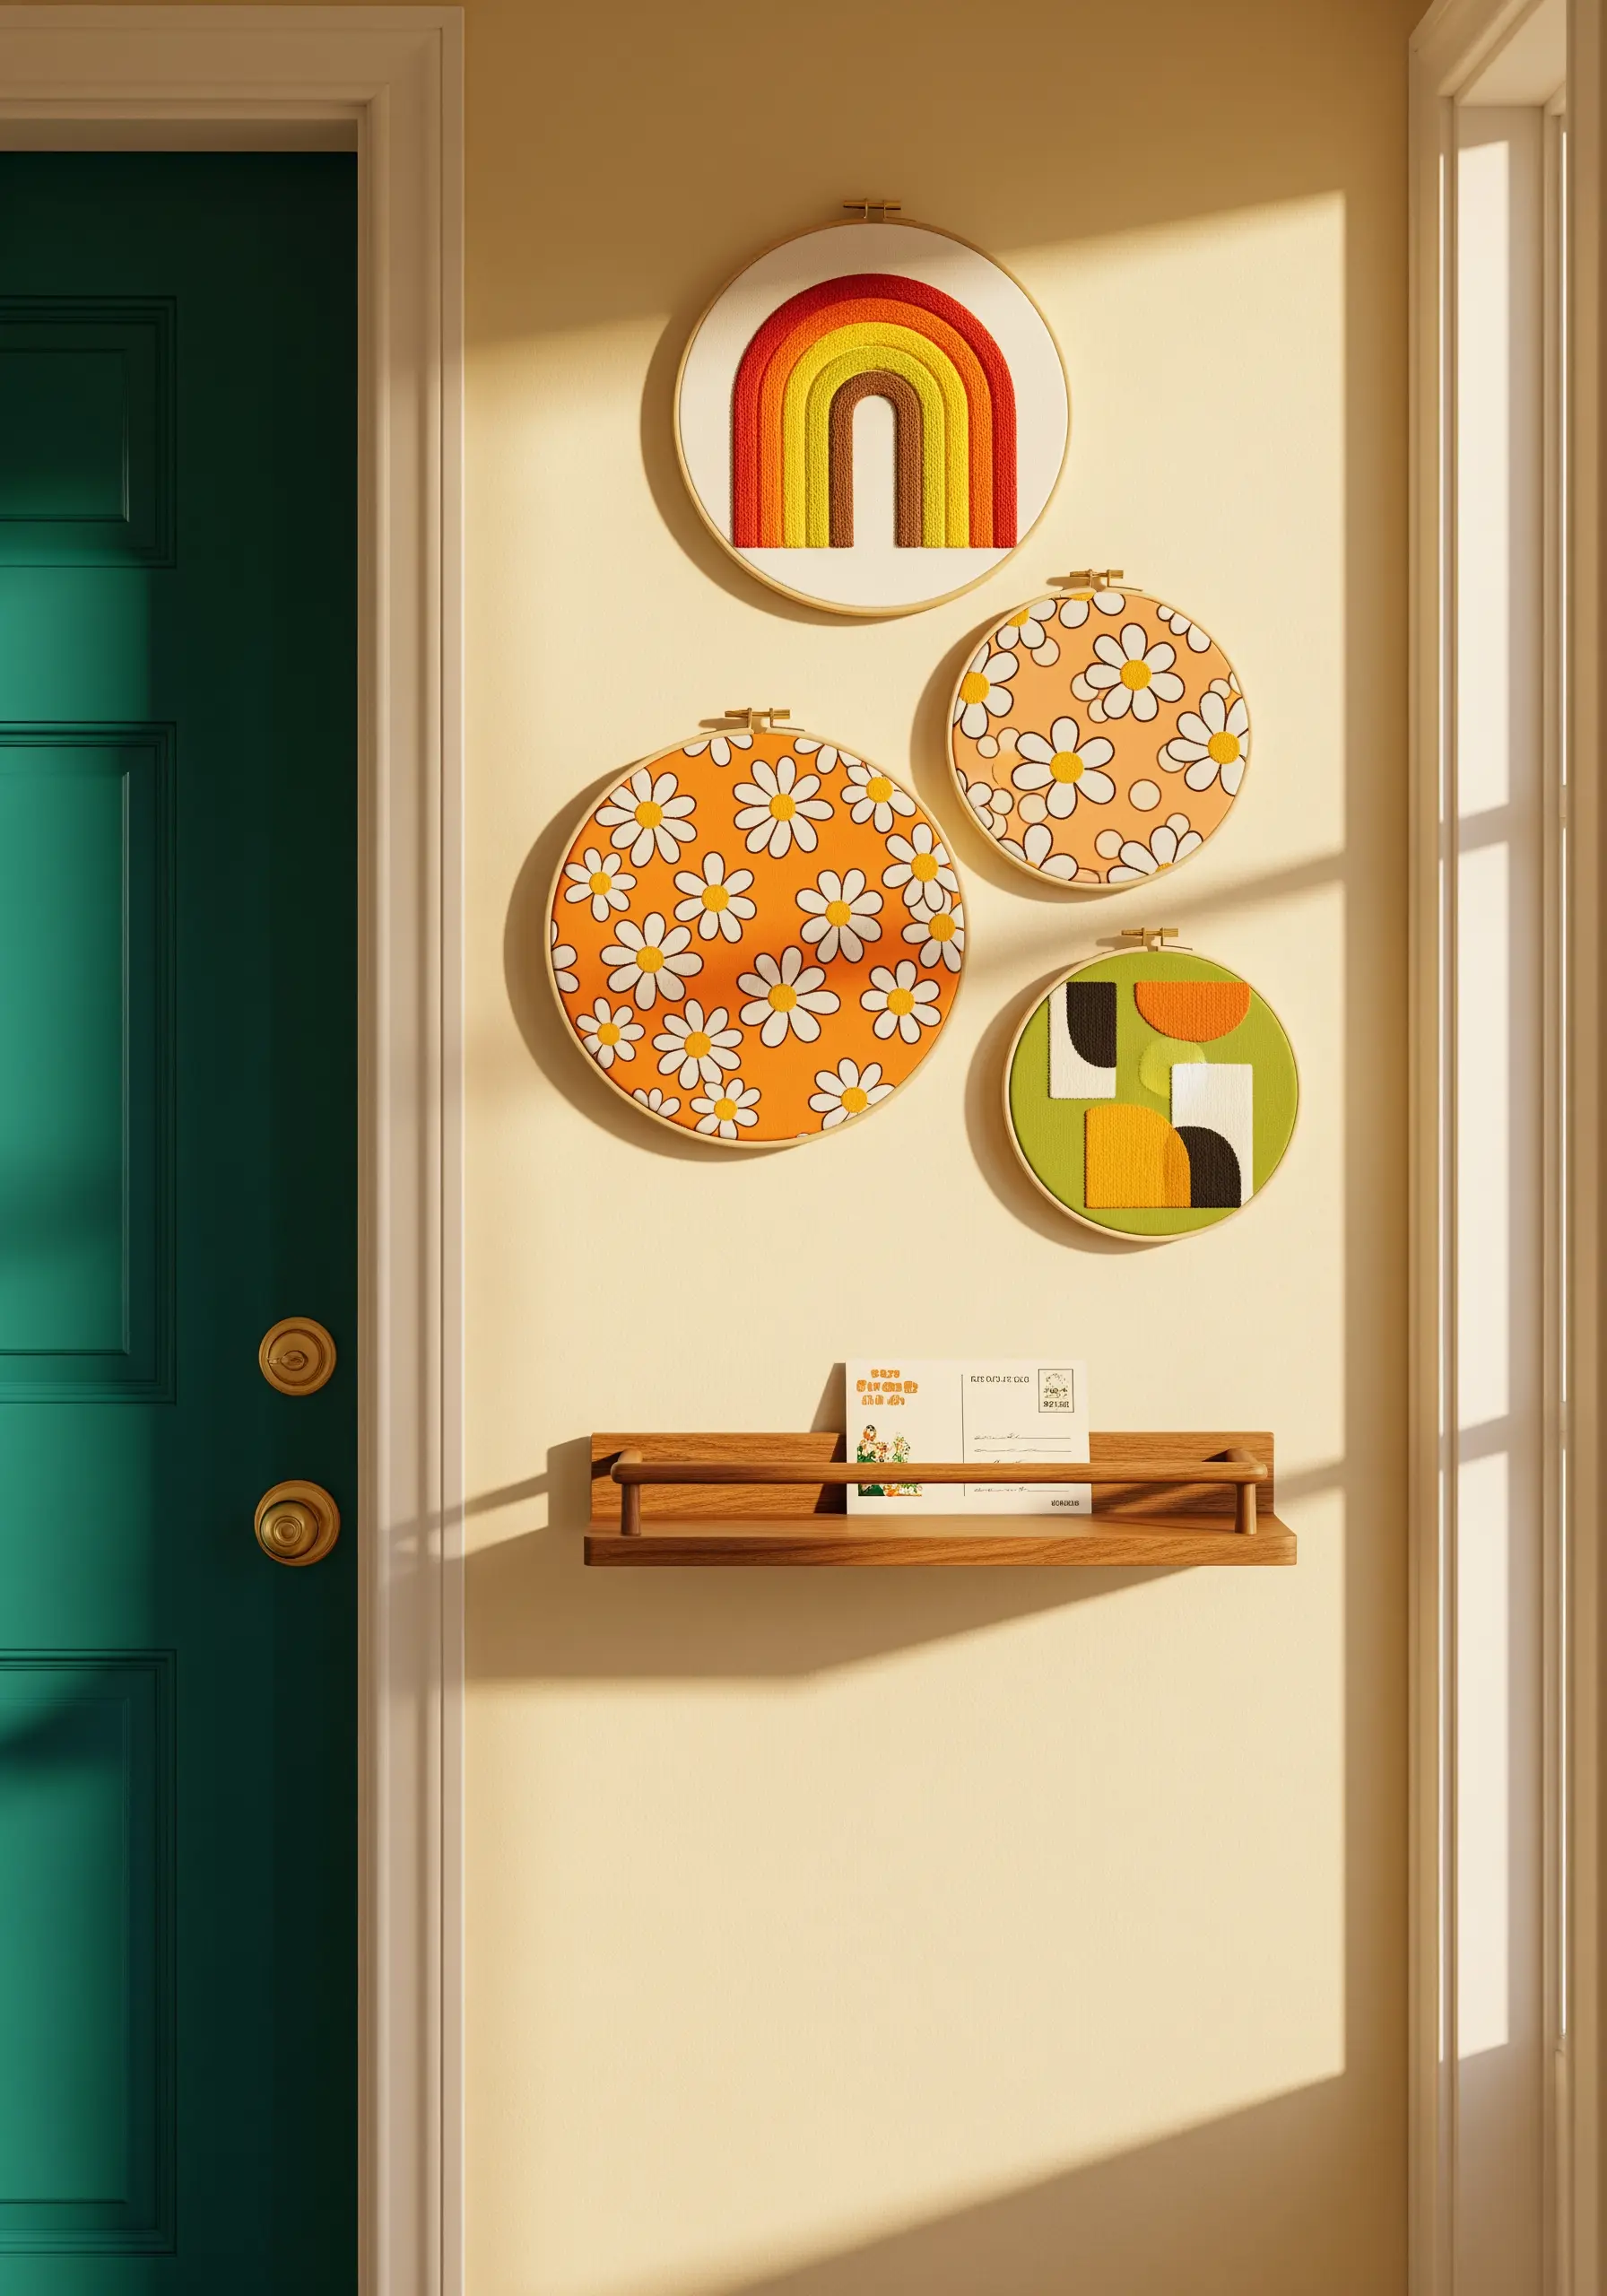
Capture a playful, vintage vibe by selecting a 70s-inspired color palette of harvest gold, avocado green, and burnt orange.
You can find pre-printed fabric with retro patterns, which does most of the visual work for you.
Use simple stitches to accent the design: a clean satin stitch for the rainbow’s arches and lazy daisy stitches for the flower petals. The embroidery adds a layer of authentic, handmade texture.
It’s a joyful nod to a beloved design era.
15. Autumn Harvest: Thread Painting for Rich Gradients

Elevate simple autumn motifs by using thread painting to create realistic dimension and color blending.
For the pumpkin, use a long-and-short stitch with at least three shades of orange and yellow. By blending these colors, you can create natural-looking highlights and shadows that make the shape feel round and full.
Stitching on a fabric with a rustic texture, like burlap or linen, further enhances the authentic, harvest feel of the collection.
16. Celestial Map: A Clustered Hoop Constellation
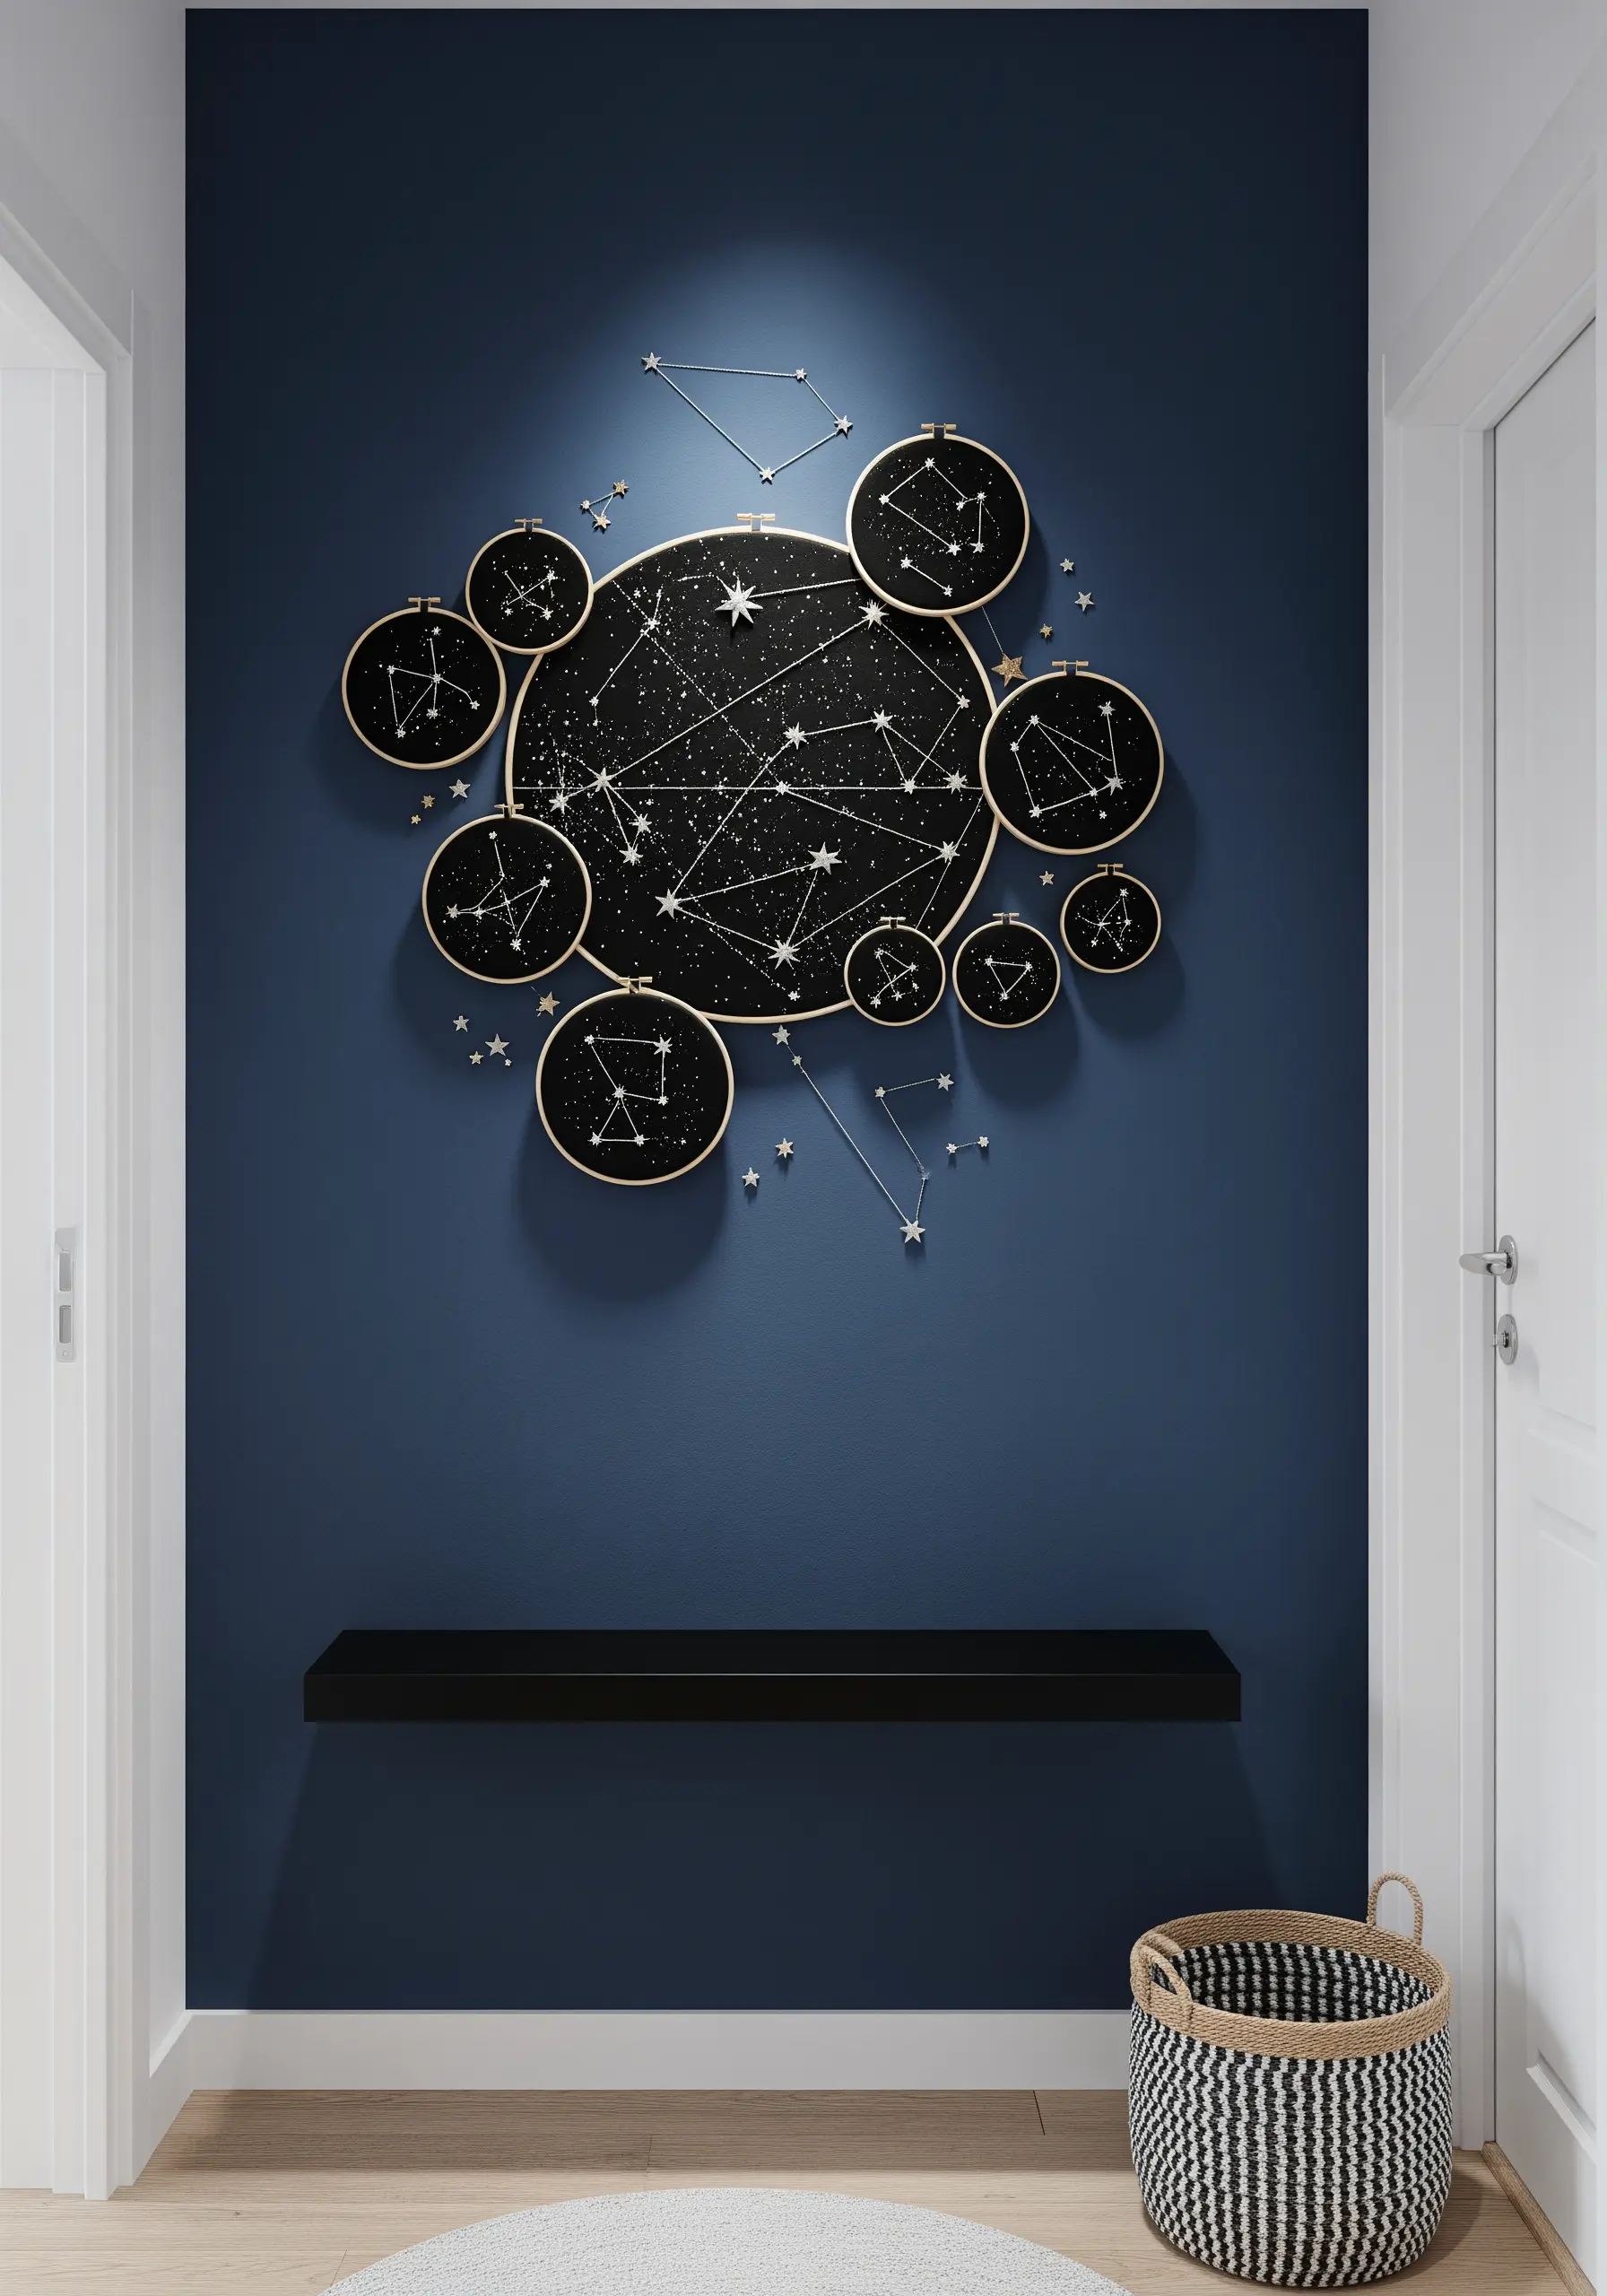
Create a dramatic focal point by arranging hoops of various sizes into a clustered galaxy.
On black fabric, use a simple backstitch for the constellation lines and a mix of French knots and single star stitches for the stars.
For an extra touch of magic, use a metallic silver or a glow-in-the-dark thread. You can even extend a few stitches from one hoop to another to visually connect your celestial map.
17. Ethereal Botanicals: Stitching on Sheer Fabric

Embroidering on a sheer fabric like tulle or organza creates a stunning, floating effect.
To keep the delicate fabric from puckering, you must use a stabilizer—a water-soluble or tear-away version works perfectly.
Since knots will be visible, secure your threads by carefully weaving the tails into the back of your stitches.
The result is a light, airy piece where the stitches cast beautiful, subtle shadows on the wall, adding another layer to your botanical art.
18. Tropical Oasis: Layered Felt & Mixed Media
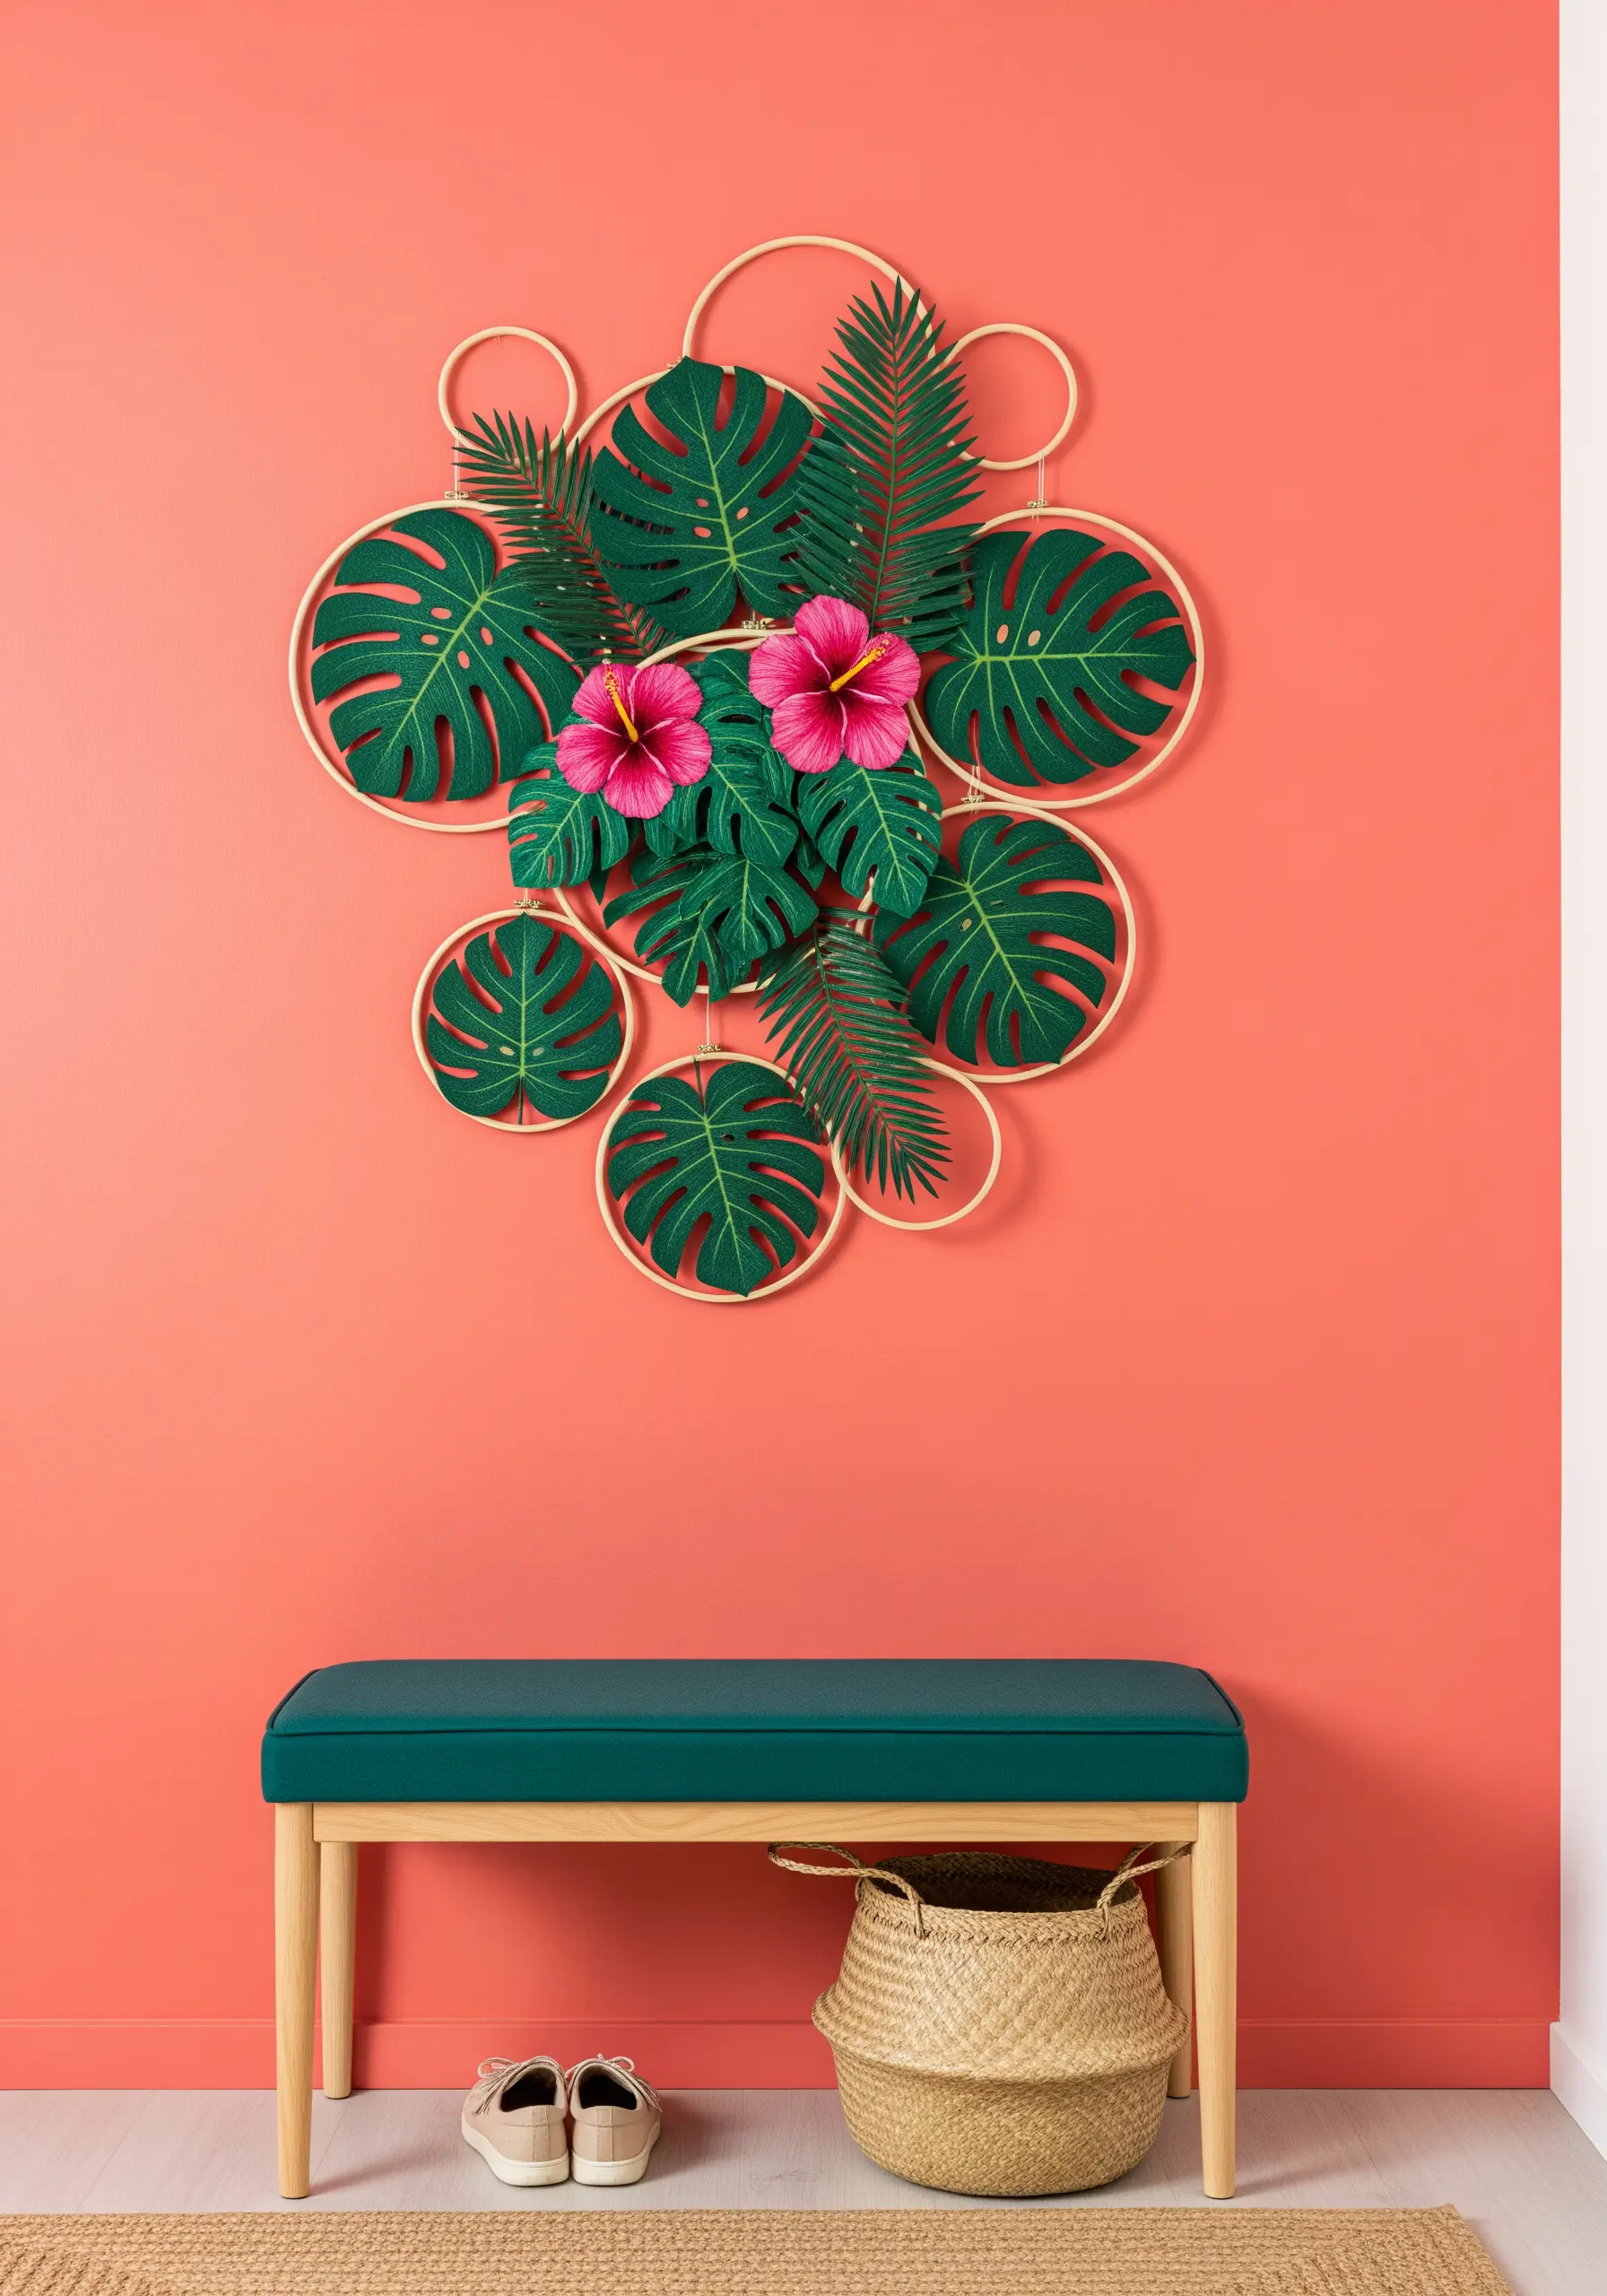
Build a lush, dimensional tropical display by combining embroidery with other materials.
Cut various leaf shapes from different shades of green felt and arrange them in overlapping layers inside the hoops.
You can secure the felt pieces with a few small, anchoring stitches or a dot of fabric glue.
Add embroidered details like leaf veins on top to seamlessly integrate the felt into a cohesive, tactile art piece.
19. Dark Academia Study: Still Life in Stitches

Curate a collection of motifs that evoke the feeling of a cozy, vintage study for a sophisticated entryway.
Choose a dark, textured fabric like a charcoal grey tweed or linen to enhance the moody atmosphere.
Use a single strand of floss and a fine backstitch for detailed objects like the glasses and feather, ensuring the lines are crisp and clean.
A limited color palette of off-white, sepia, and deep red gives this Dark Academia collection a cohesive, curated look.
20. Festive Vignettes: Simple Holiday Motifs
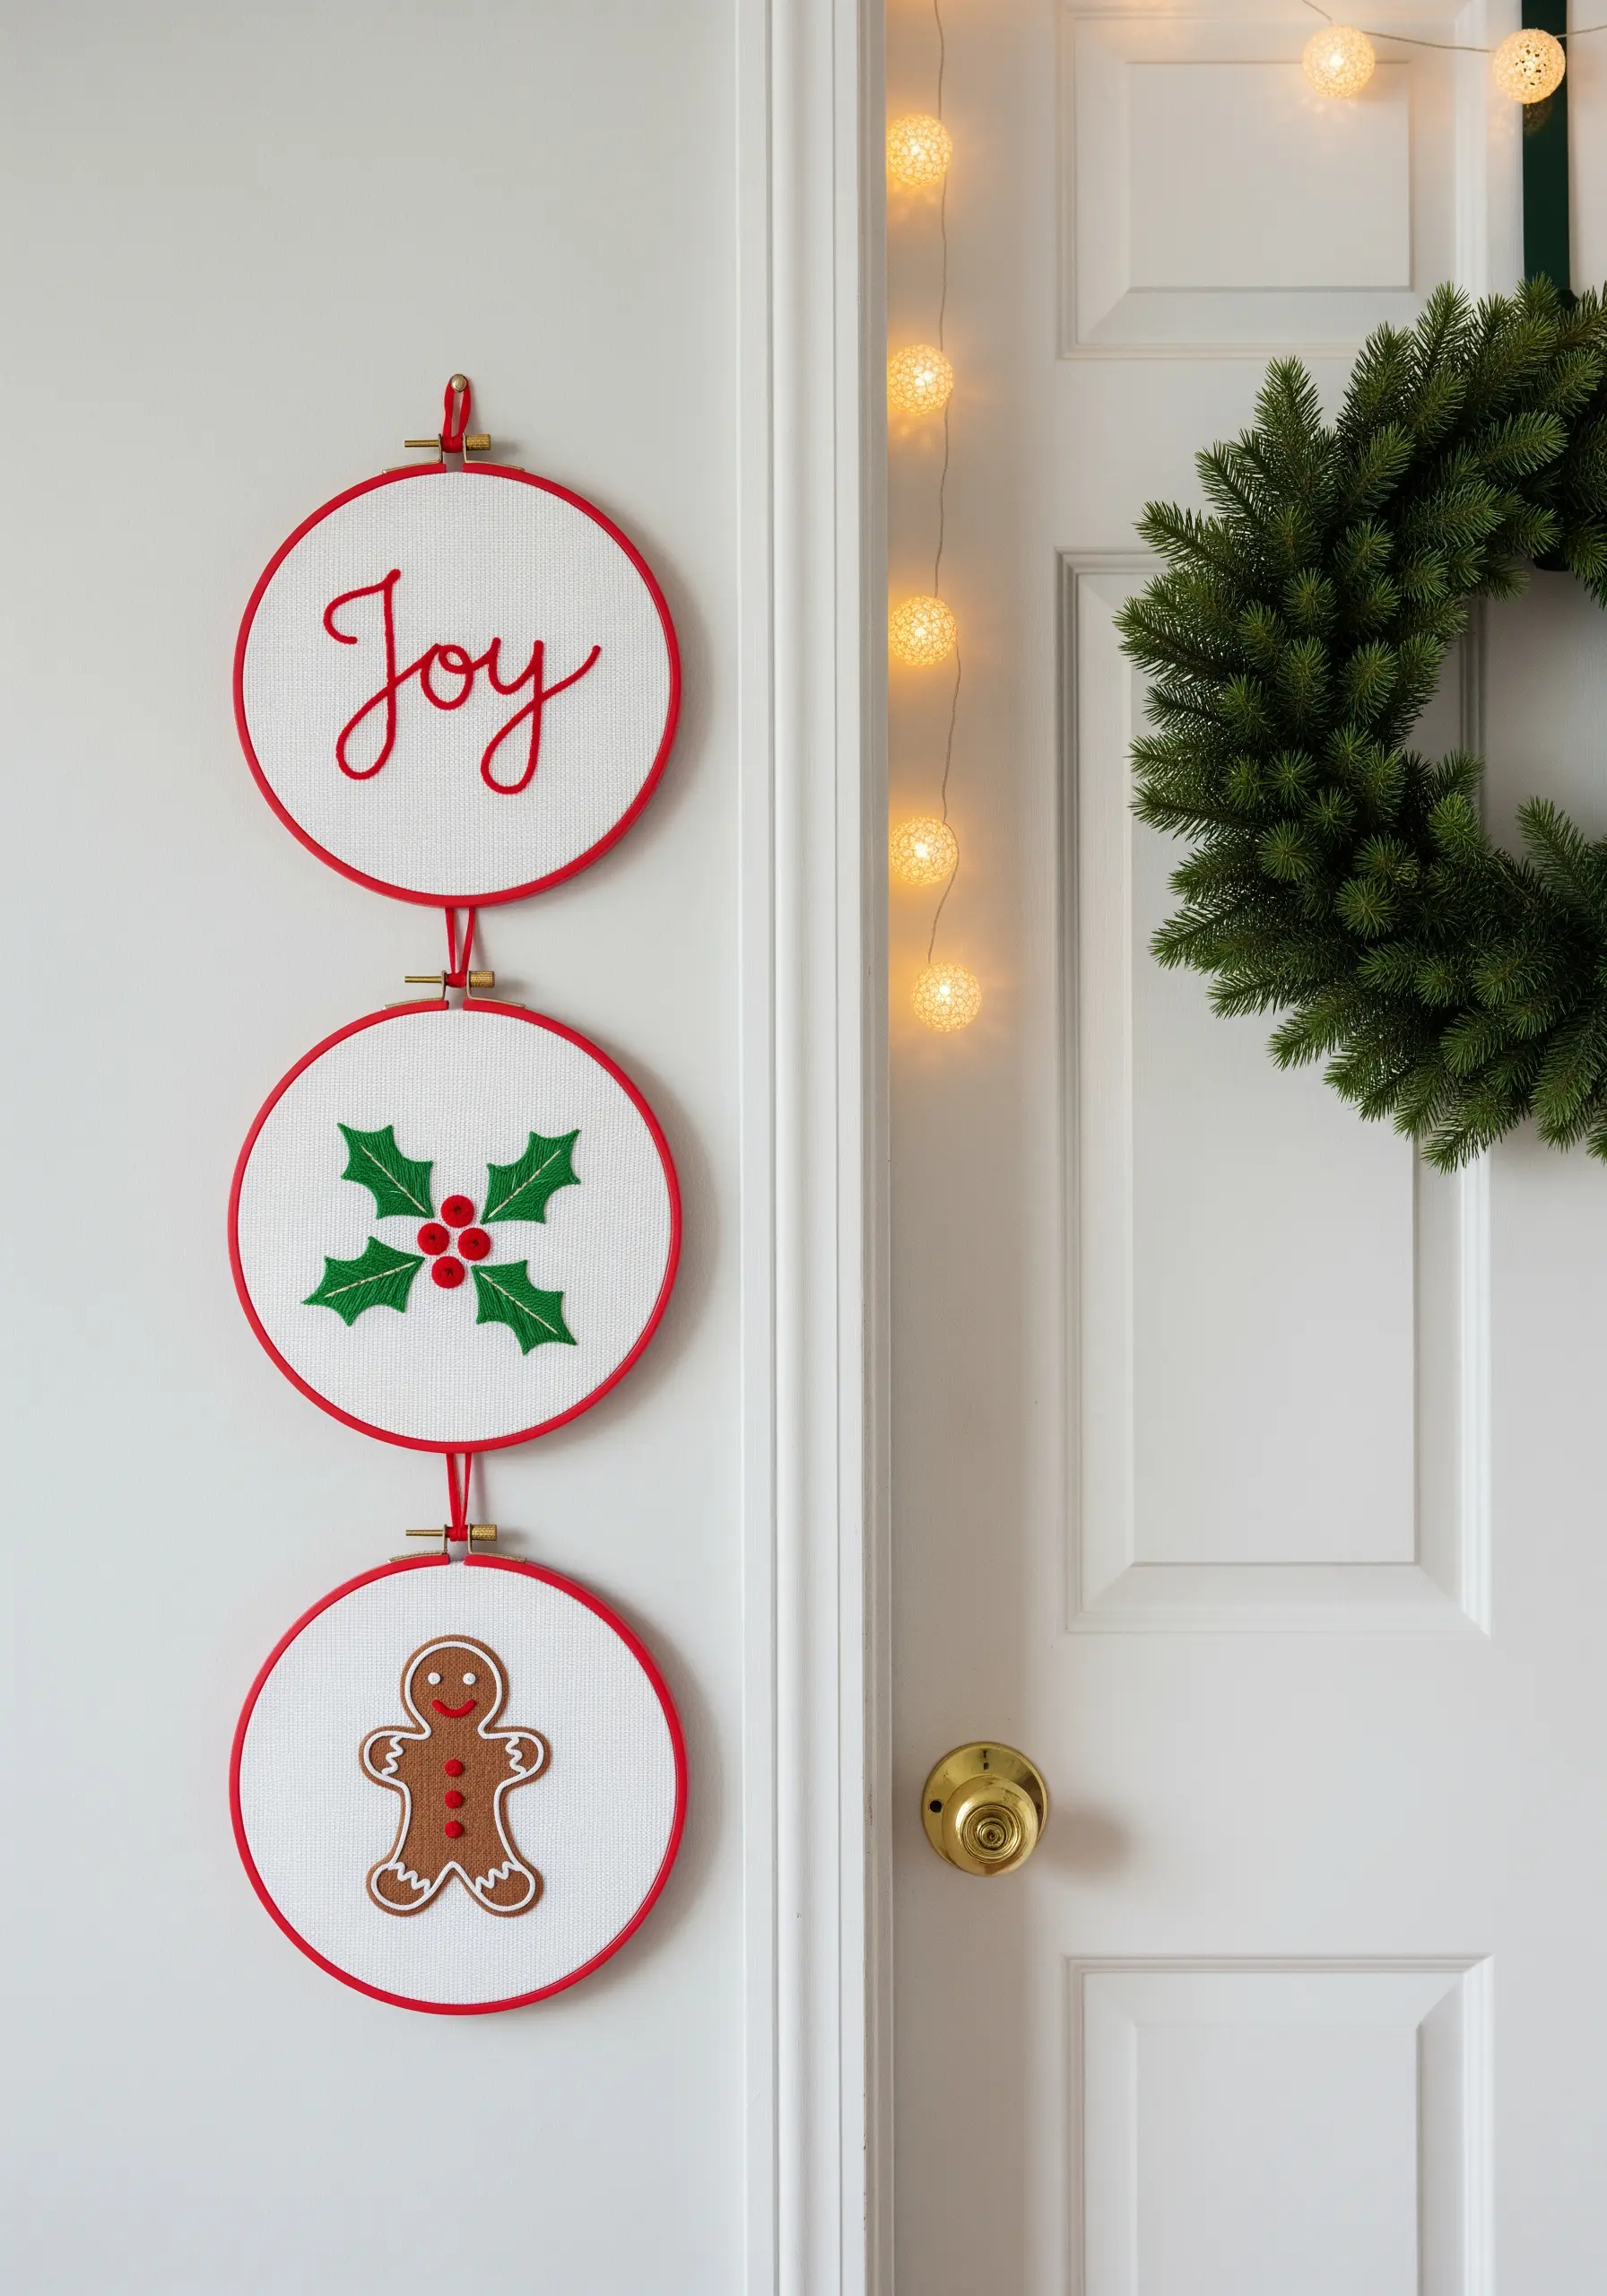
For a narrow entryway or door, a vertical display of hoops is a space-saving solution.
Instead of stitching, use felt appliqué for the main shapes of the holly and gingerbread man; it’s faster and provides a bold, clean look. Add small embroidered details on top.
For the script ‘Joy,’ use couching: lay down a thick piece of yarn and tack it in place with a thinner, matching thread for a perfectly smooth, calligraphic line.
These simple holiday motifs are quick to make and easy to display.
21. Elegant Monogram: A Personalized Welcome
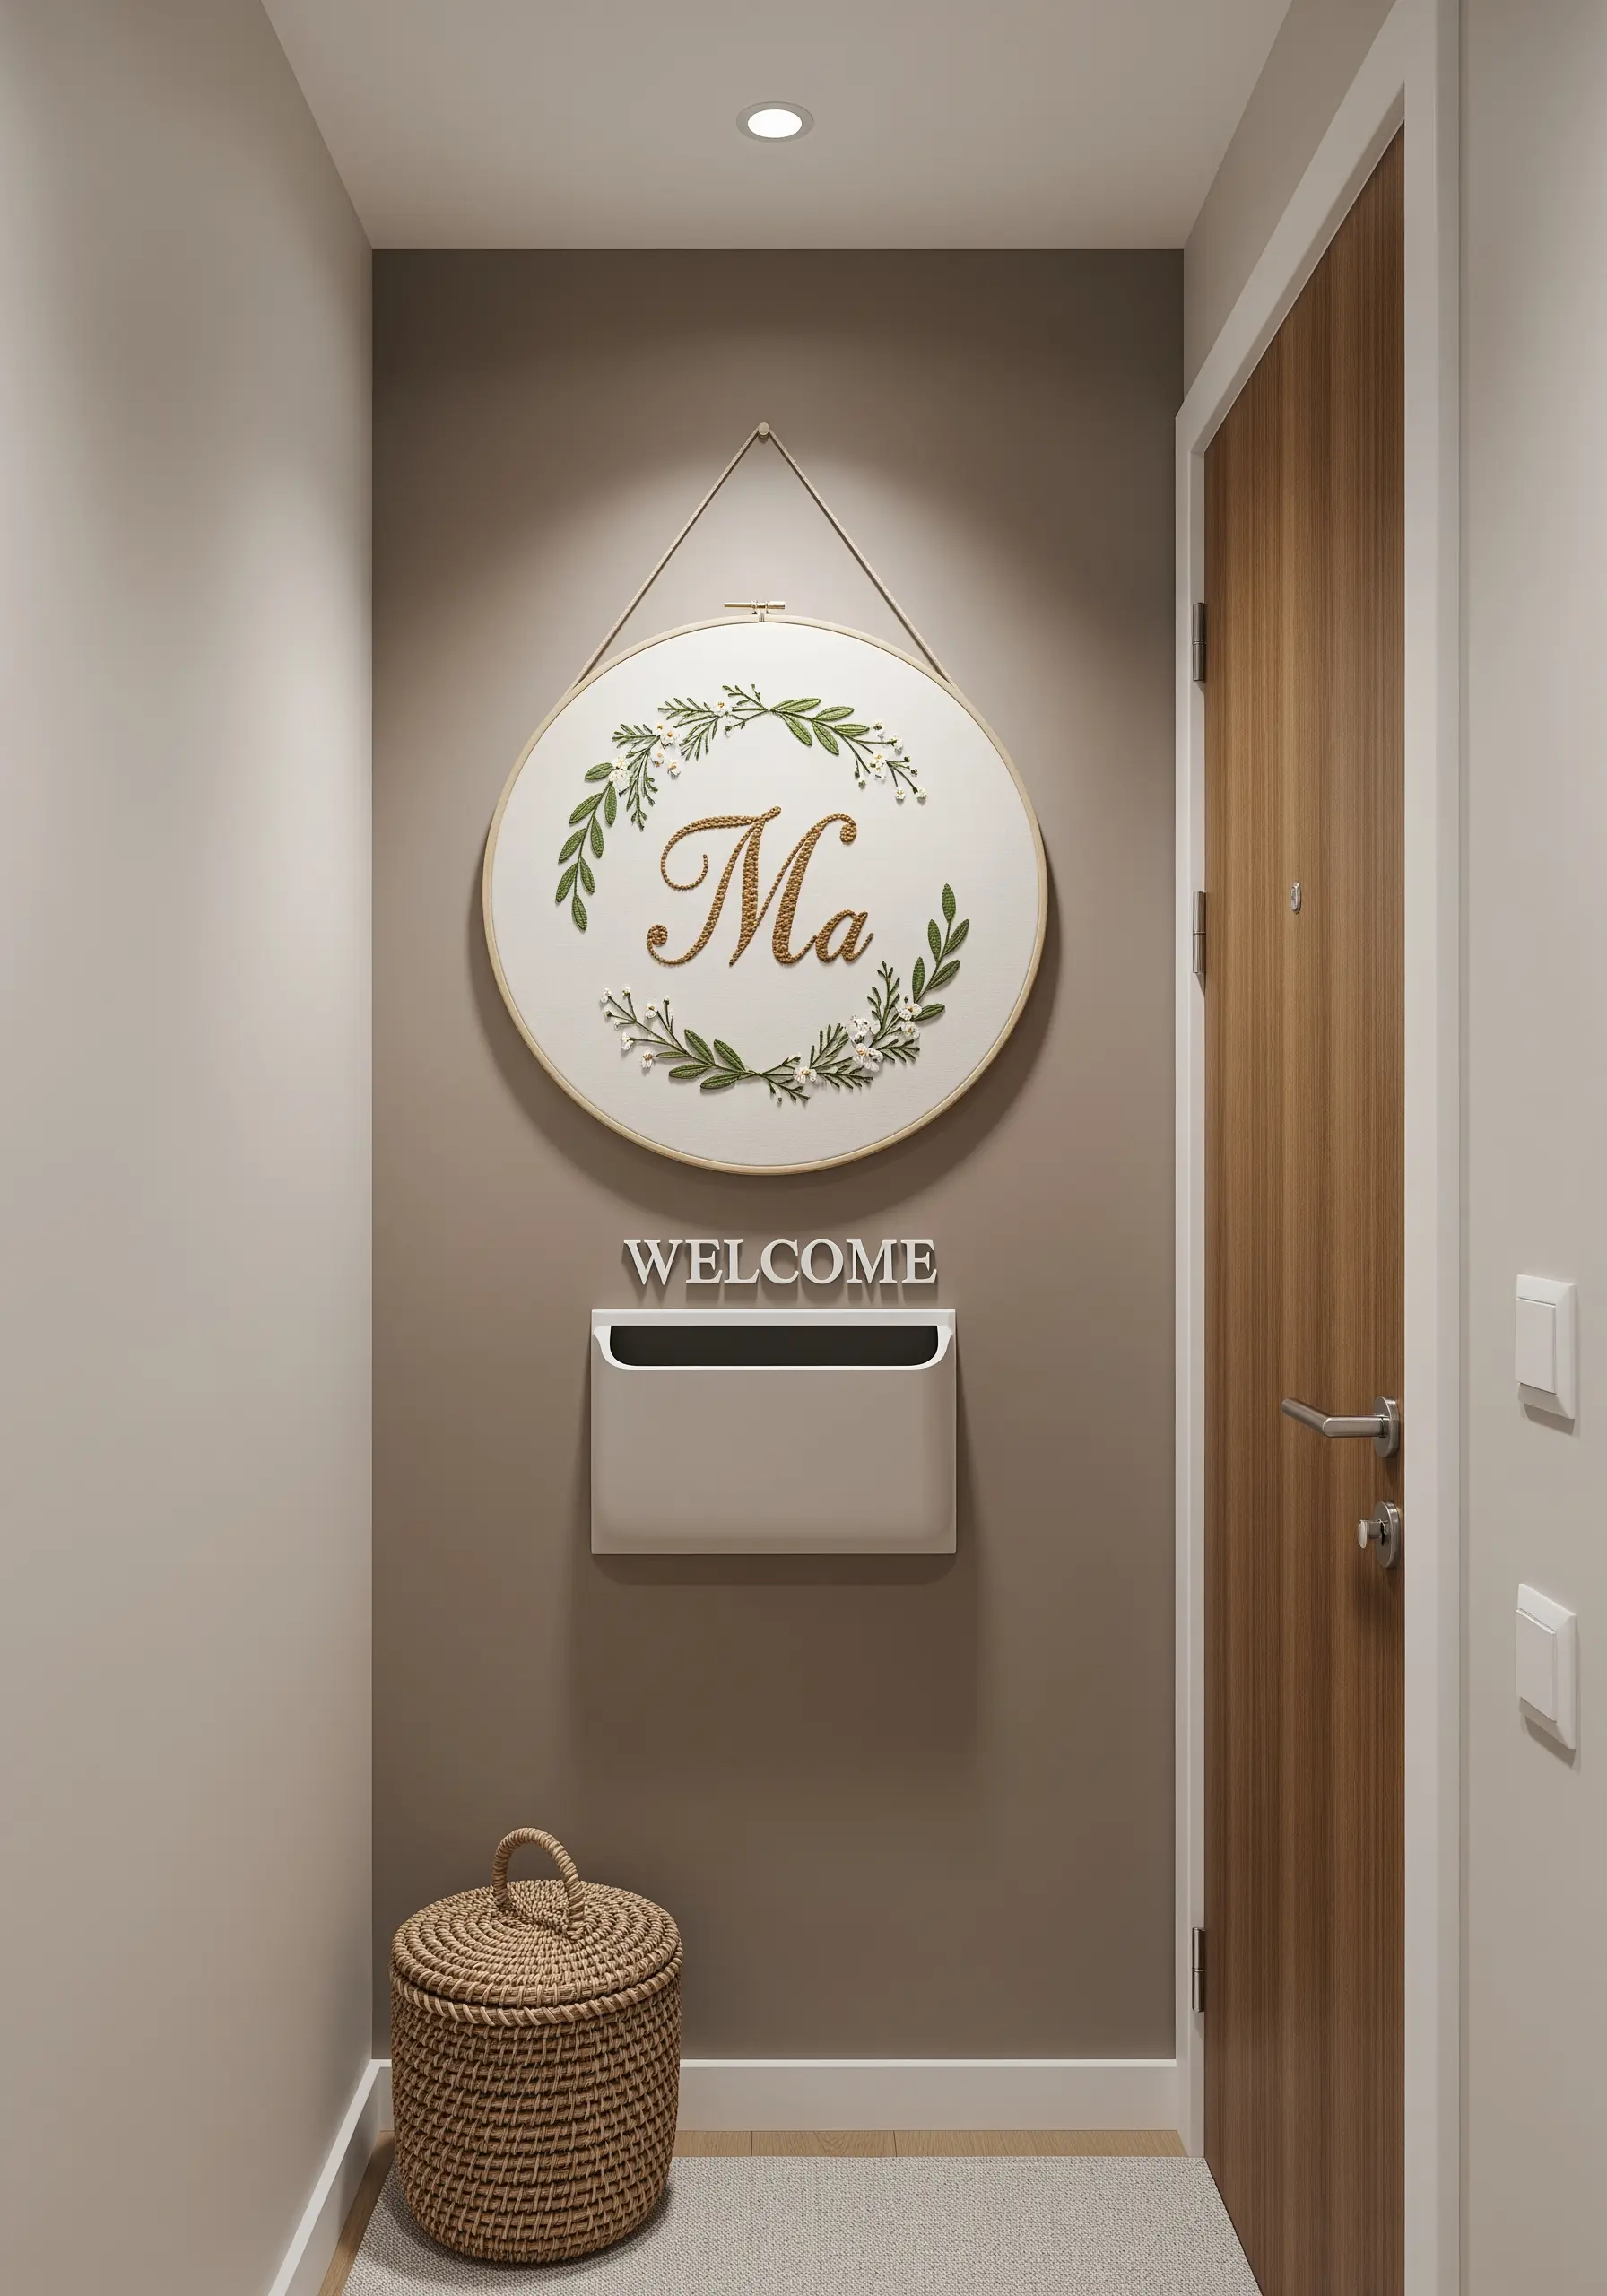
A personalized monogram offers a timeless and sophisticated greeting for your entryway.
For a luxurious, raised finish on the initial, use a padded satin stitch. A metallic gold thread will add a touch of classic elegance.
Frame the letter with a delicate wreath stitched using lazy daisy stitches for the leaves and tiny French knots for berries.
This thoughtful combination creates a beautiful, personalized art piece.
22. Graphic Geometry: Monochrome Pattern Play
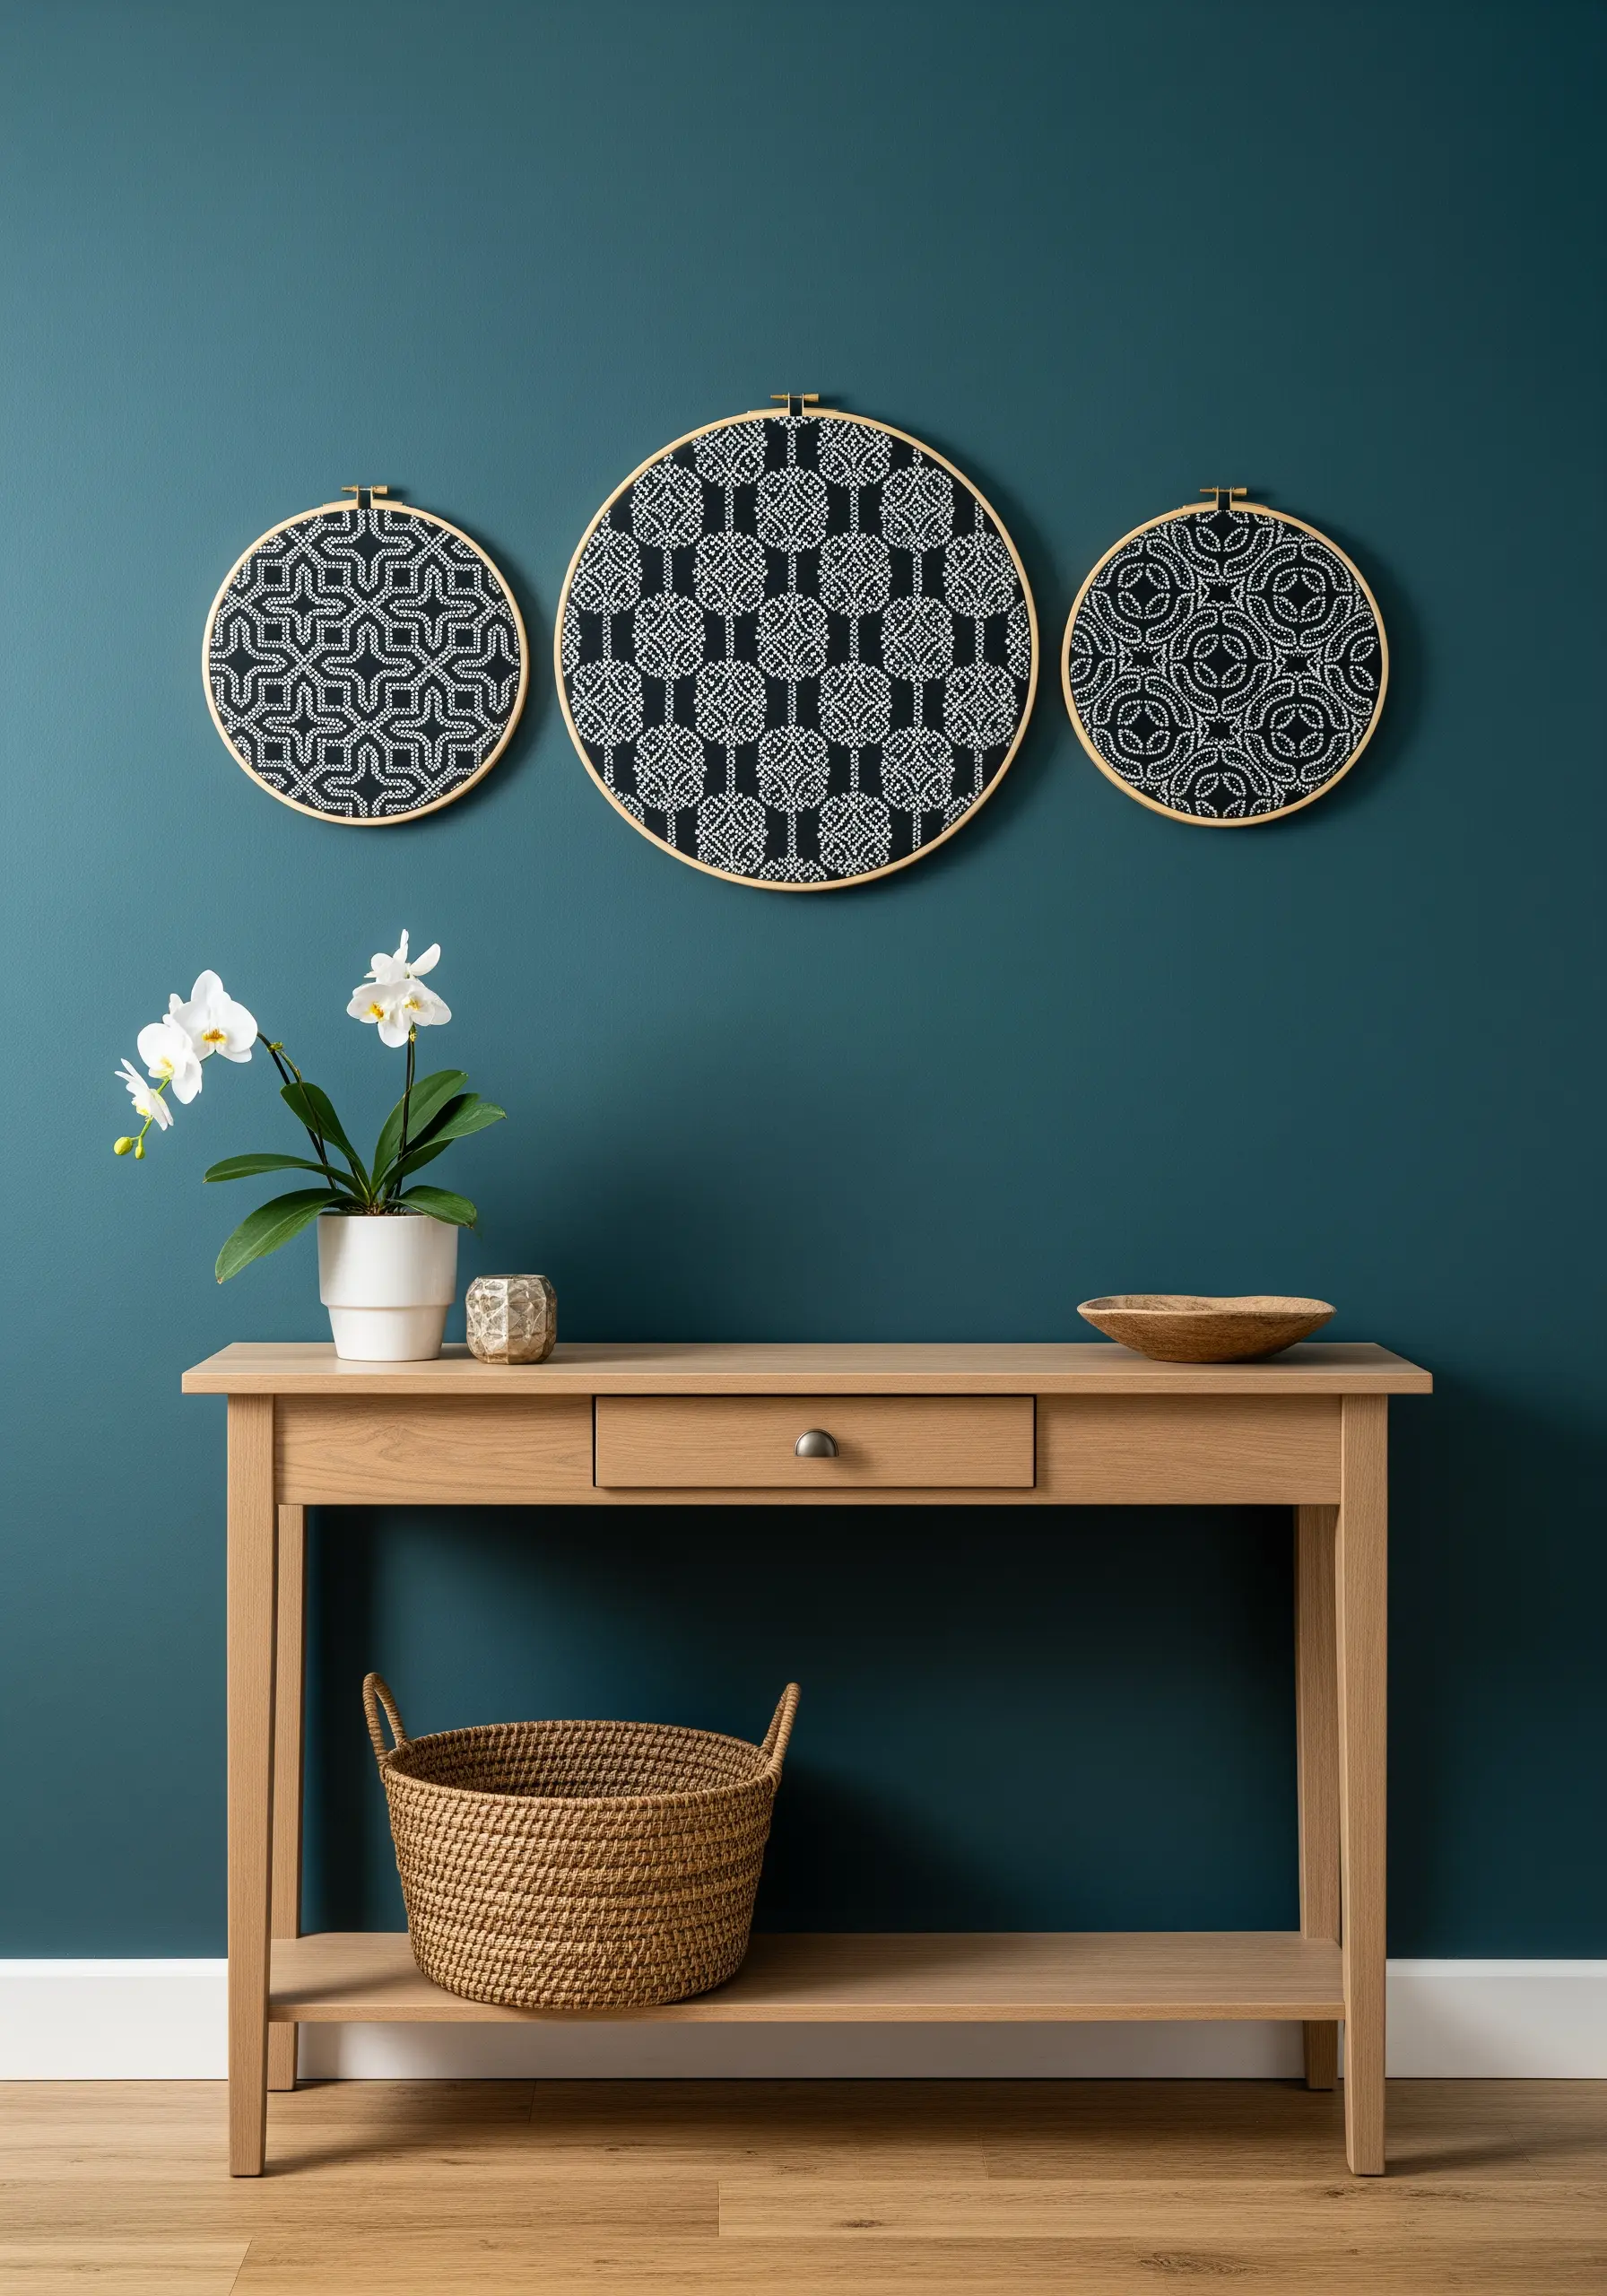
Explore the powerful visual impact of repeating geometric designs for a modern entryway.
Using a bright white thread on a dark, solid-colored fabric creates a striking contrast that highlights the pattern.
The key to a successful geometric piece is consistency. Focus on maintaining uniform stitch length and tension to ensure the pattern is crisp, clean, and visually balanced.
These intricate, tile-like patterns offer timeless sophistication.
23. Wanderlust Wall: Minimalist Travel Icons
Create a personal gallery of your favorite travels or dream destinations using simple line-art icons.
A clean backstitch using two or three strands of black floss is all you need for these sharp, minimalist designs.
To unify the collection and add a modern touch, incorporate a single pop of a bright accent color—like the yellow sun—across a few of the hoops.
This creates a cohesive and deeply personal wall display.
24. Cozy Cabin Style: Appliqué on Plaid

Instantly evoke a rustic, cabin-like feel by using plaid flannel as your background fabric.
Instead of filling large areas with thread, use felt or wool appliqué for the main silhouettes like the tree and moose.
Secure the appliqué pieces with a decorative blanket stitch around the edges, which adds another layer of handmade texture and charm.
This technique is a fast and effective way to achieve a cozy, layered look.
25. Summer Meadow: A Mixed Botanical Collection
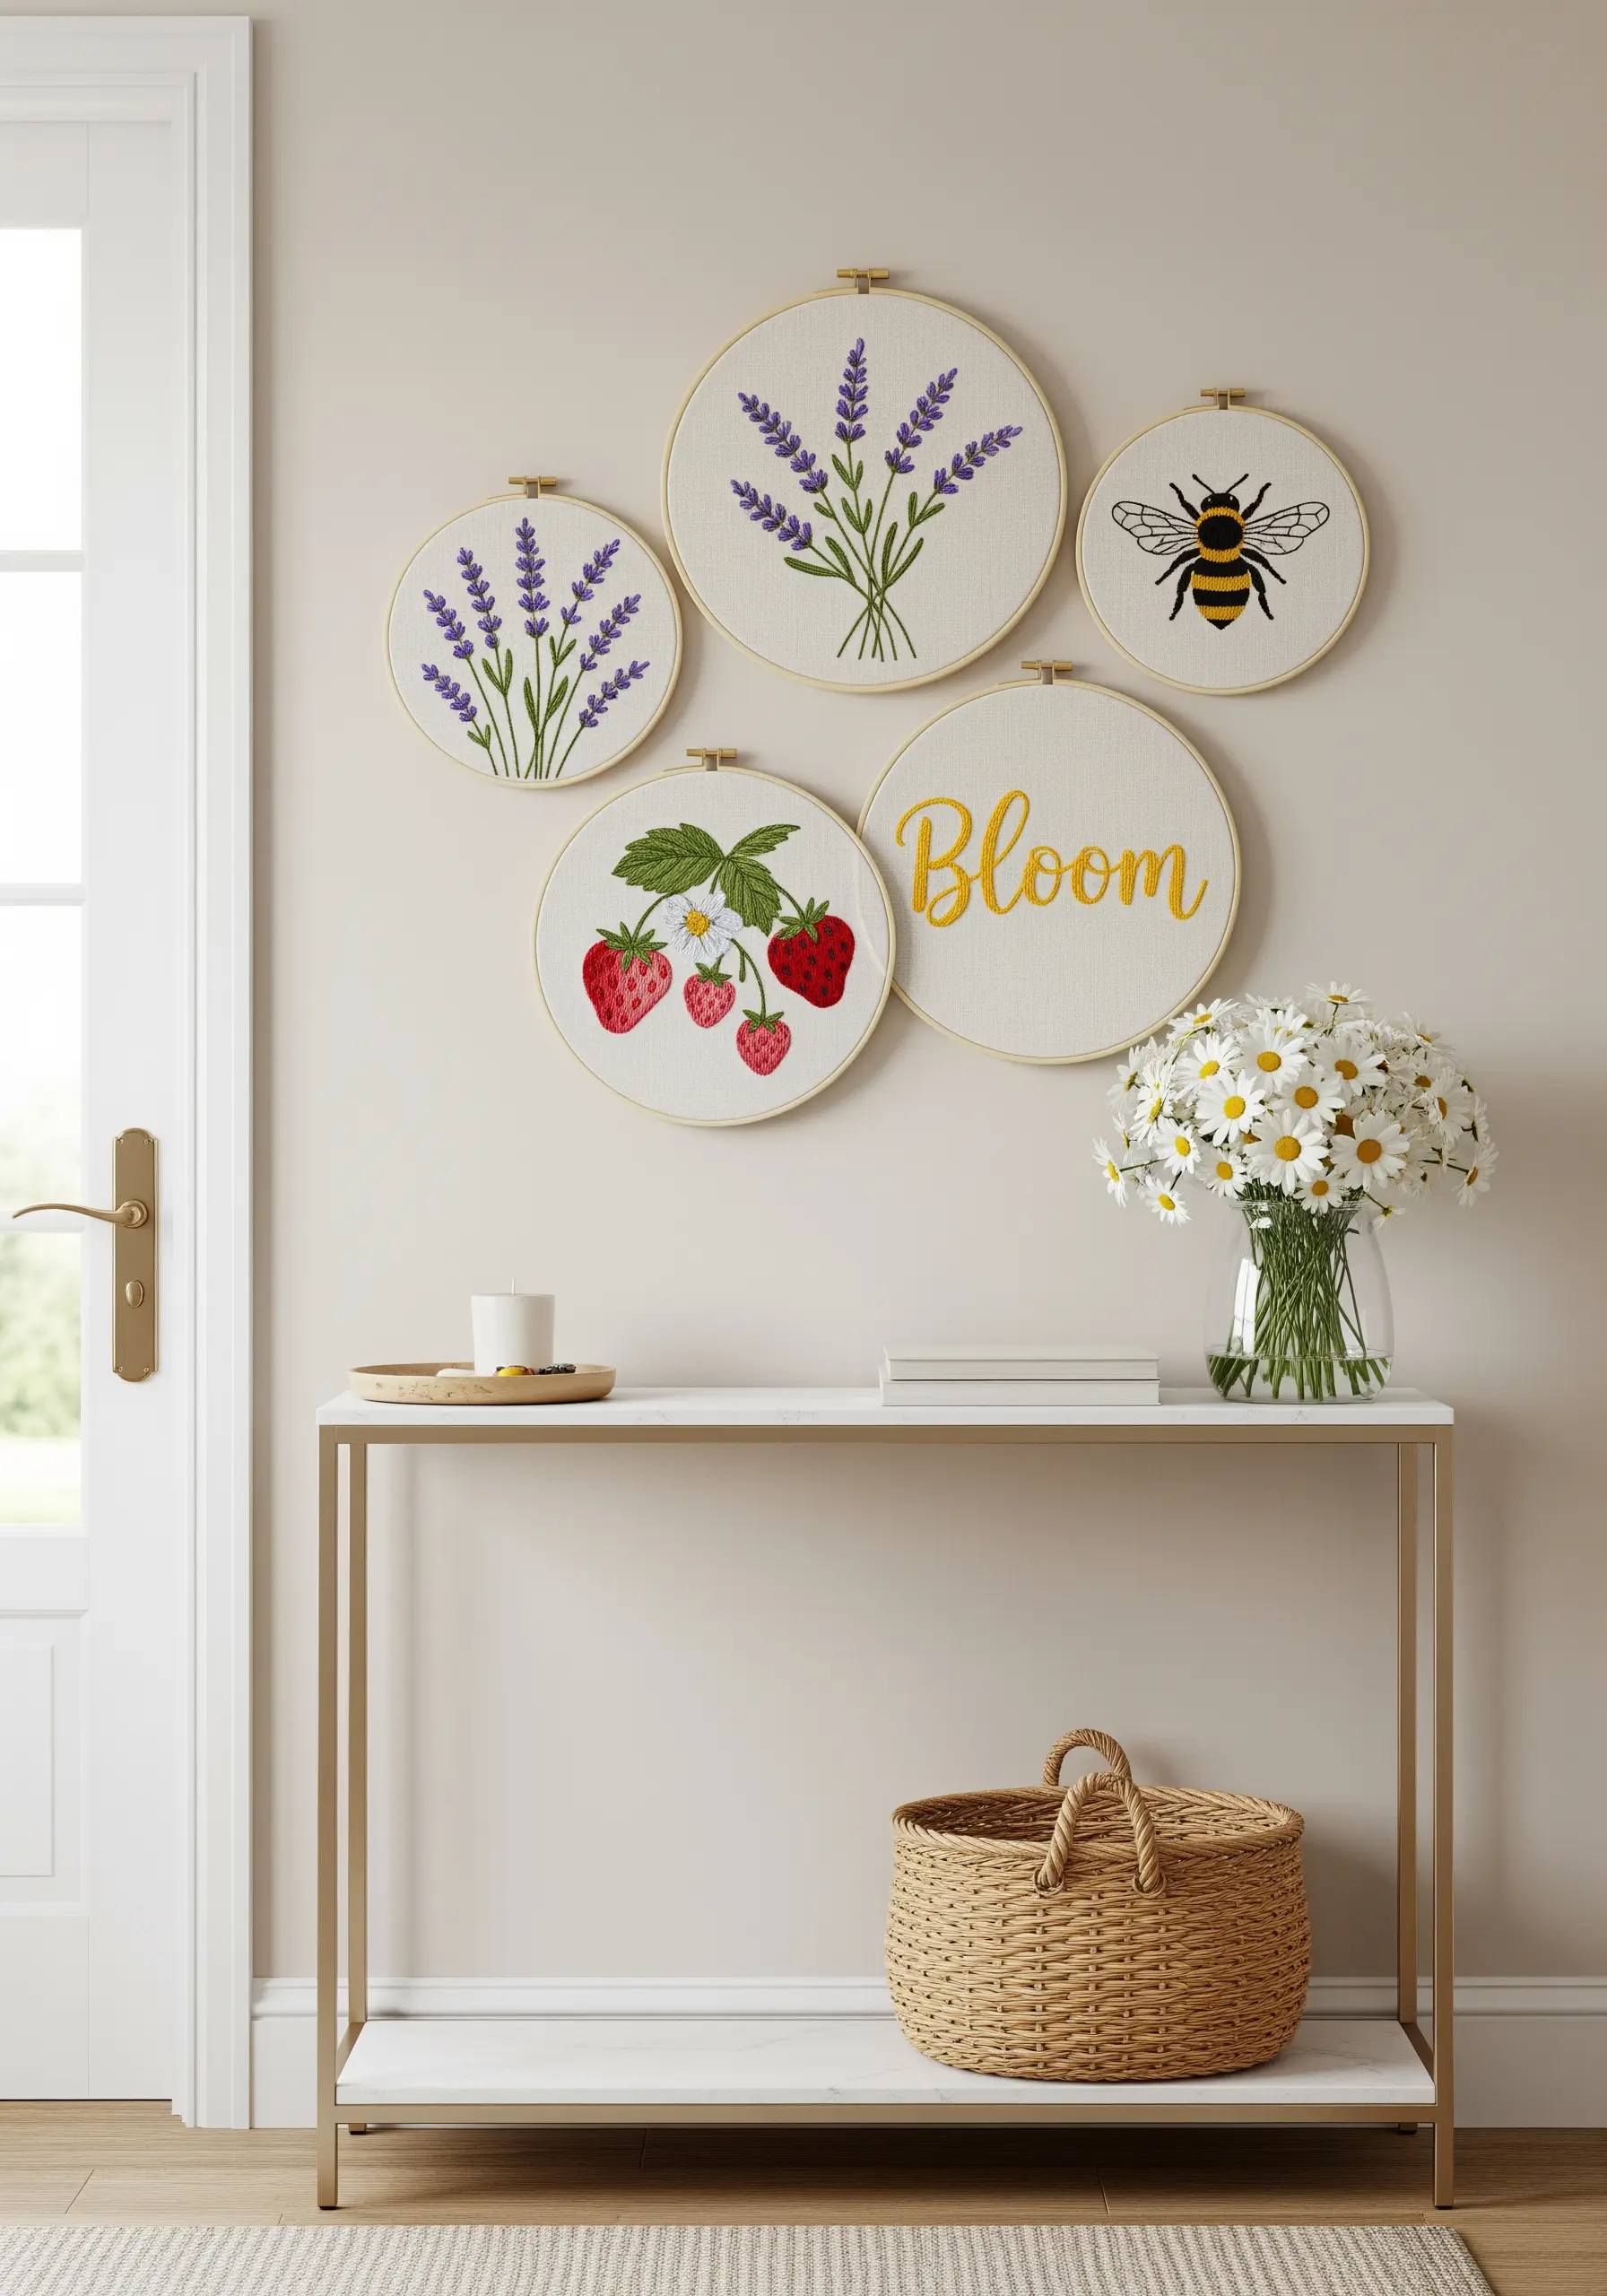
Curate a beautiful gallery wall that captures the essence of a summer garden.
Incorporate a variety of stitches to create interest: French knots for the lavender, satin stitch for the strawberry bodies, and seed stitches for their seeds.
By varying the textures across the different hoops, from the smooth, whipped backstitch of the word ‘Bloom’ to the bumpy texture of the berries, the entire collection becomes more dynamic and lifelike.
It’s a perfect way to celebrate the season with a meadow on your wall.


