

You don’t always need more colors, more stitches, or more complexity to create something beautiful. Sometimes, all you need is a single, perfectly placed line. The principles of string art—tension, geometry, and the power of a straight line—can completely transform your embroidery, guiding you toward a more modern, intentional, and clean aesthetic.
Think of your thread not just as a tool for filling shapes, but as a graphic element in itself. How can one line define a form? How can a series of lines create texture, depth, or the illusion of a curve? By focusing on these fundamentals, you’ll start to see your fabric as a canvas for a more refined, architectural style of stitching.
Let these designs inspire you to simplify. To embrace negative space. To see the elegance in a limited color palette and the impact of flawless execution. This is your invitation to create work that is quiet, confident, and deeply captivating.
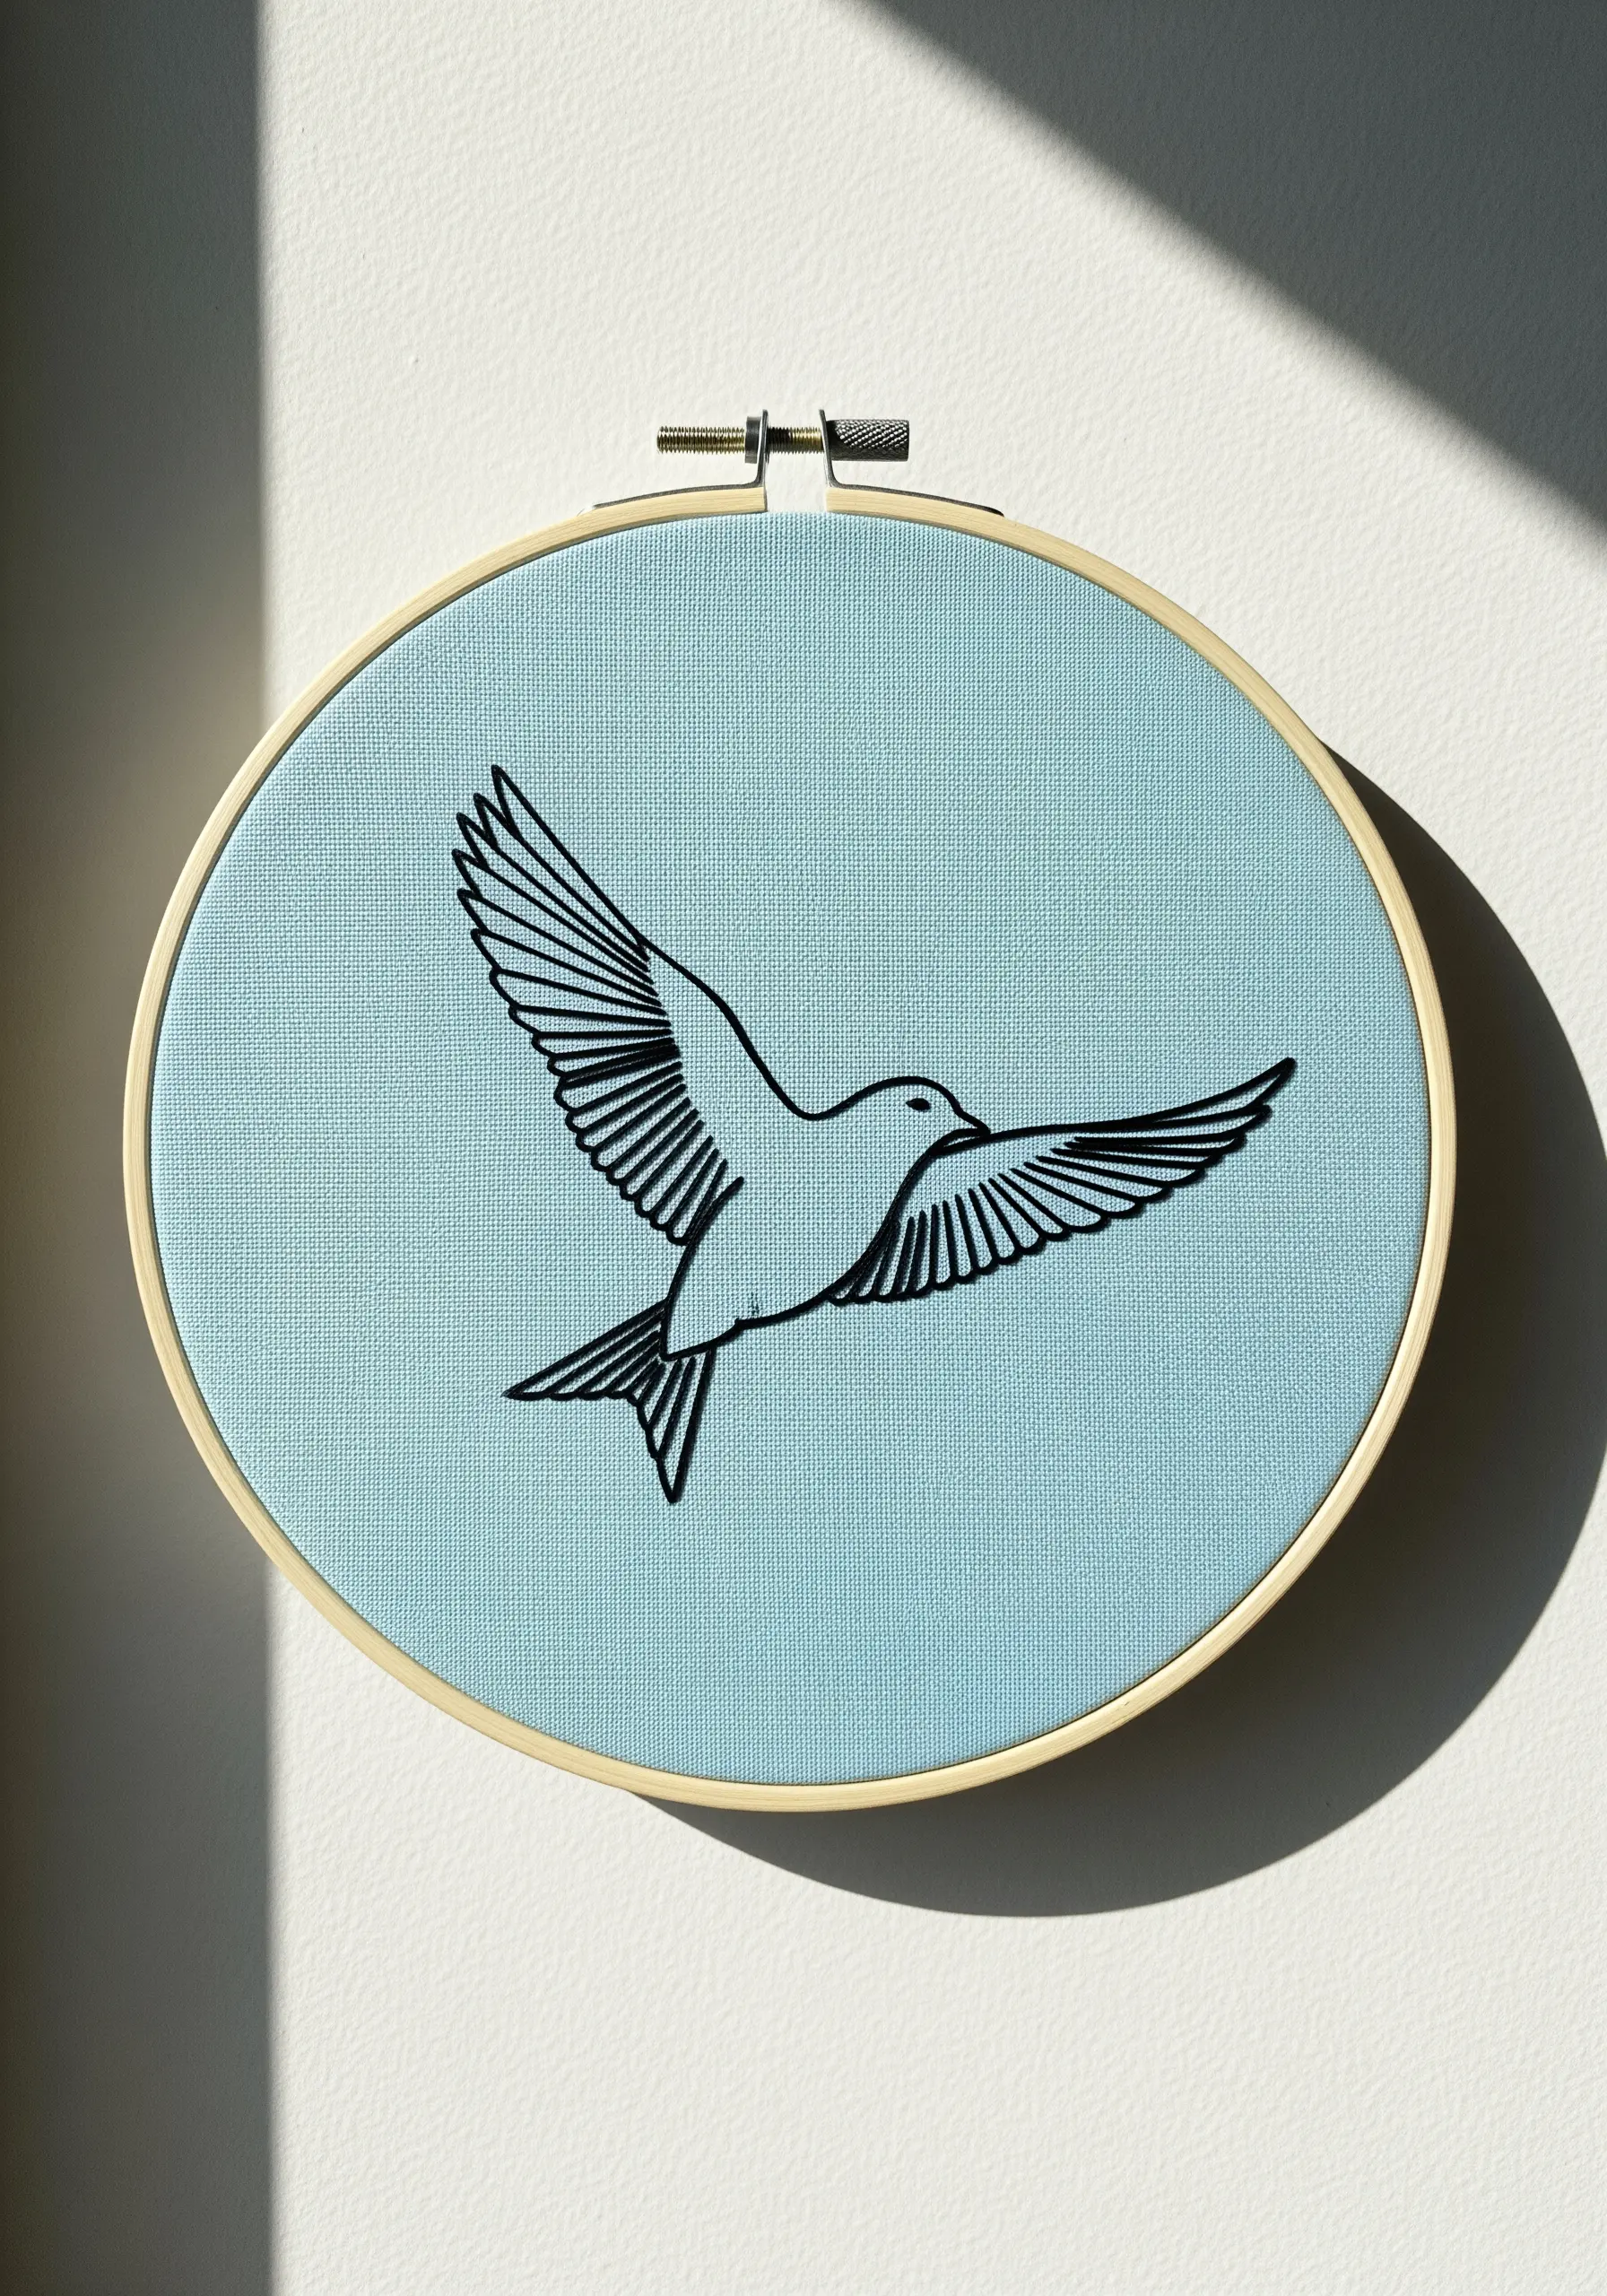
1. Render Mountain Light with Metallic Threads
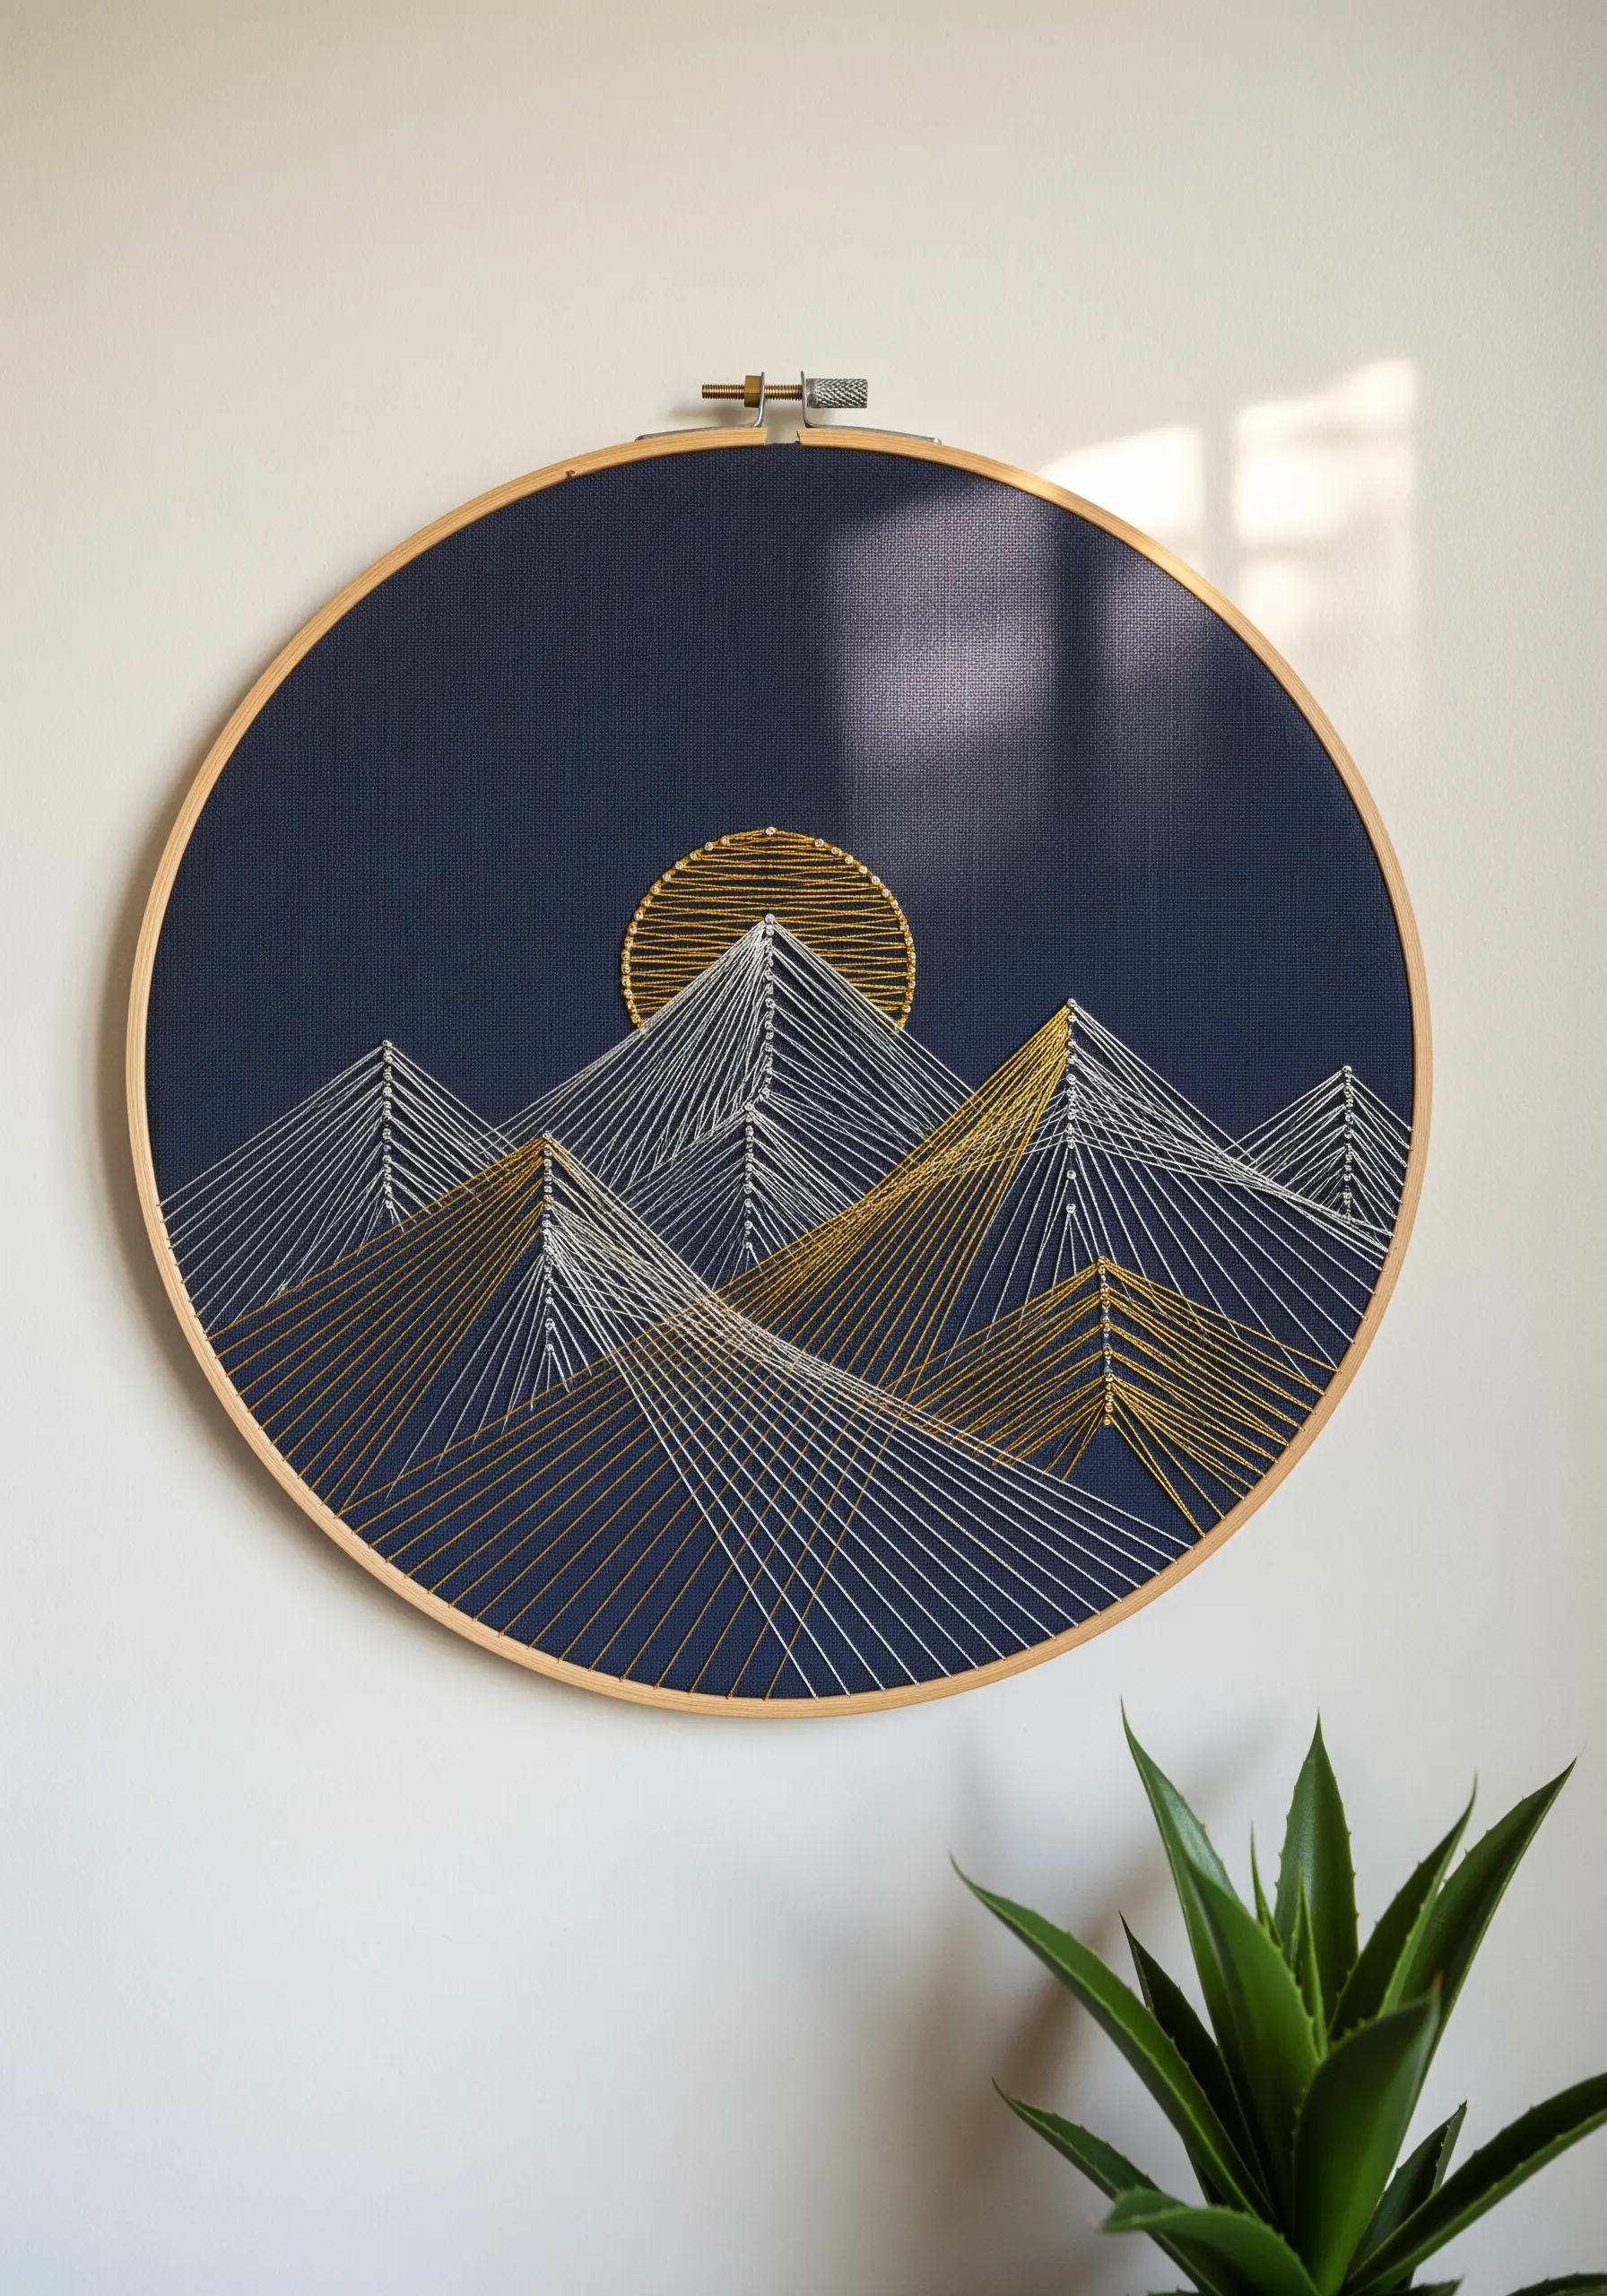
You can translate the sharp, geometric quality of string art into embroidery by using high-contrast metallic and matte threads.
Choose a dark, tightly woven fabric like navy linen or cotton canvas to ensure your anchor points are secure and the thread’s sheen stands out.
To create the layered effect, stitch the farthest mountains first using a single strand of white floss for subtlety.
Bring the foreground peaks forward by switching to a bolder gold metallic thread or a thicker cotton perle, which catches the light and creates a sense of depth.
The sun’s rays are simply long straight stitches radiating from a central point, but their power comes from perfect tension—not too tight to pucker the fabric, not too loose to sag.
2. Deconstruct Geometry with Intersecting Lines

This style of art challenges you to think about lines not just as outlines, but as elements that create form and transparency through intersection.
To adapt this for embroidery, begin by drawing a simple grid of squares on your fabric with a water-soluble marker.
Stitch the arcs and circles using a whipped backstitch in a bold, single color to ensure the curves are perfectly smooth and continuous.
Where lines overlap, allow the thread to create a subtle, tangible layer—this physical depth is something unique to embroidery.
Framing the piece on a stretched canvas elevates it from a craft project to minimalist textile wall art, emphasizing the clean, architectural feel.
3. Create Fluid Motion with Graduated Color
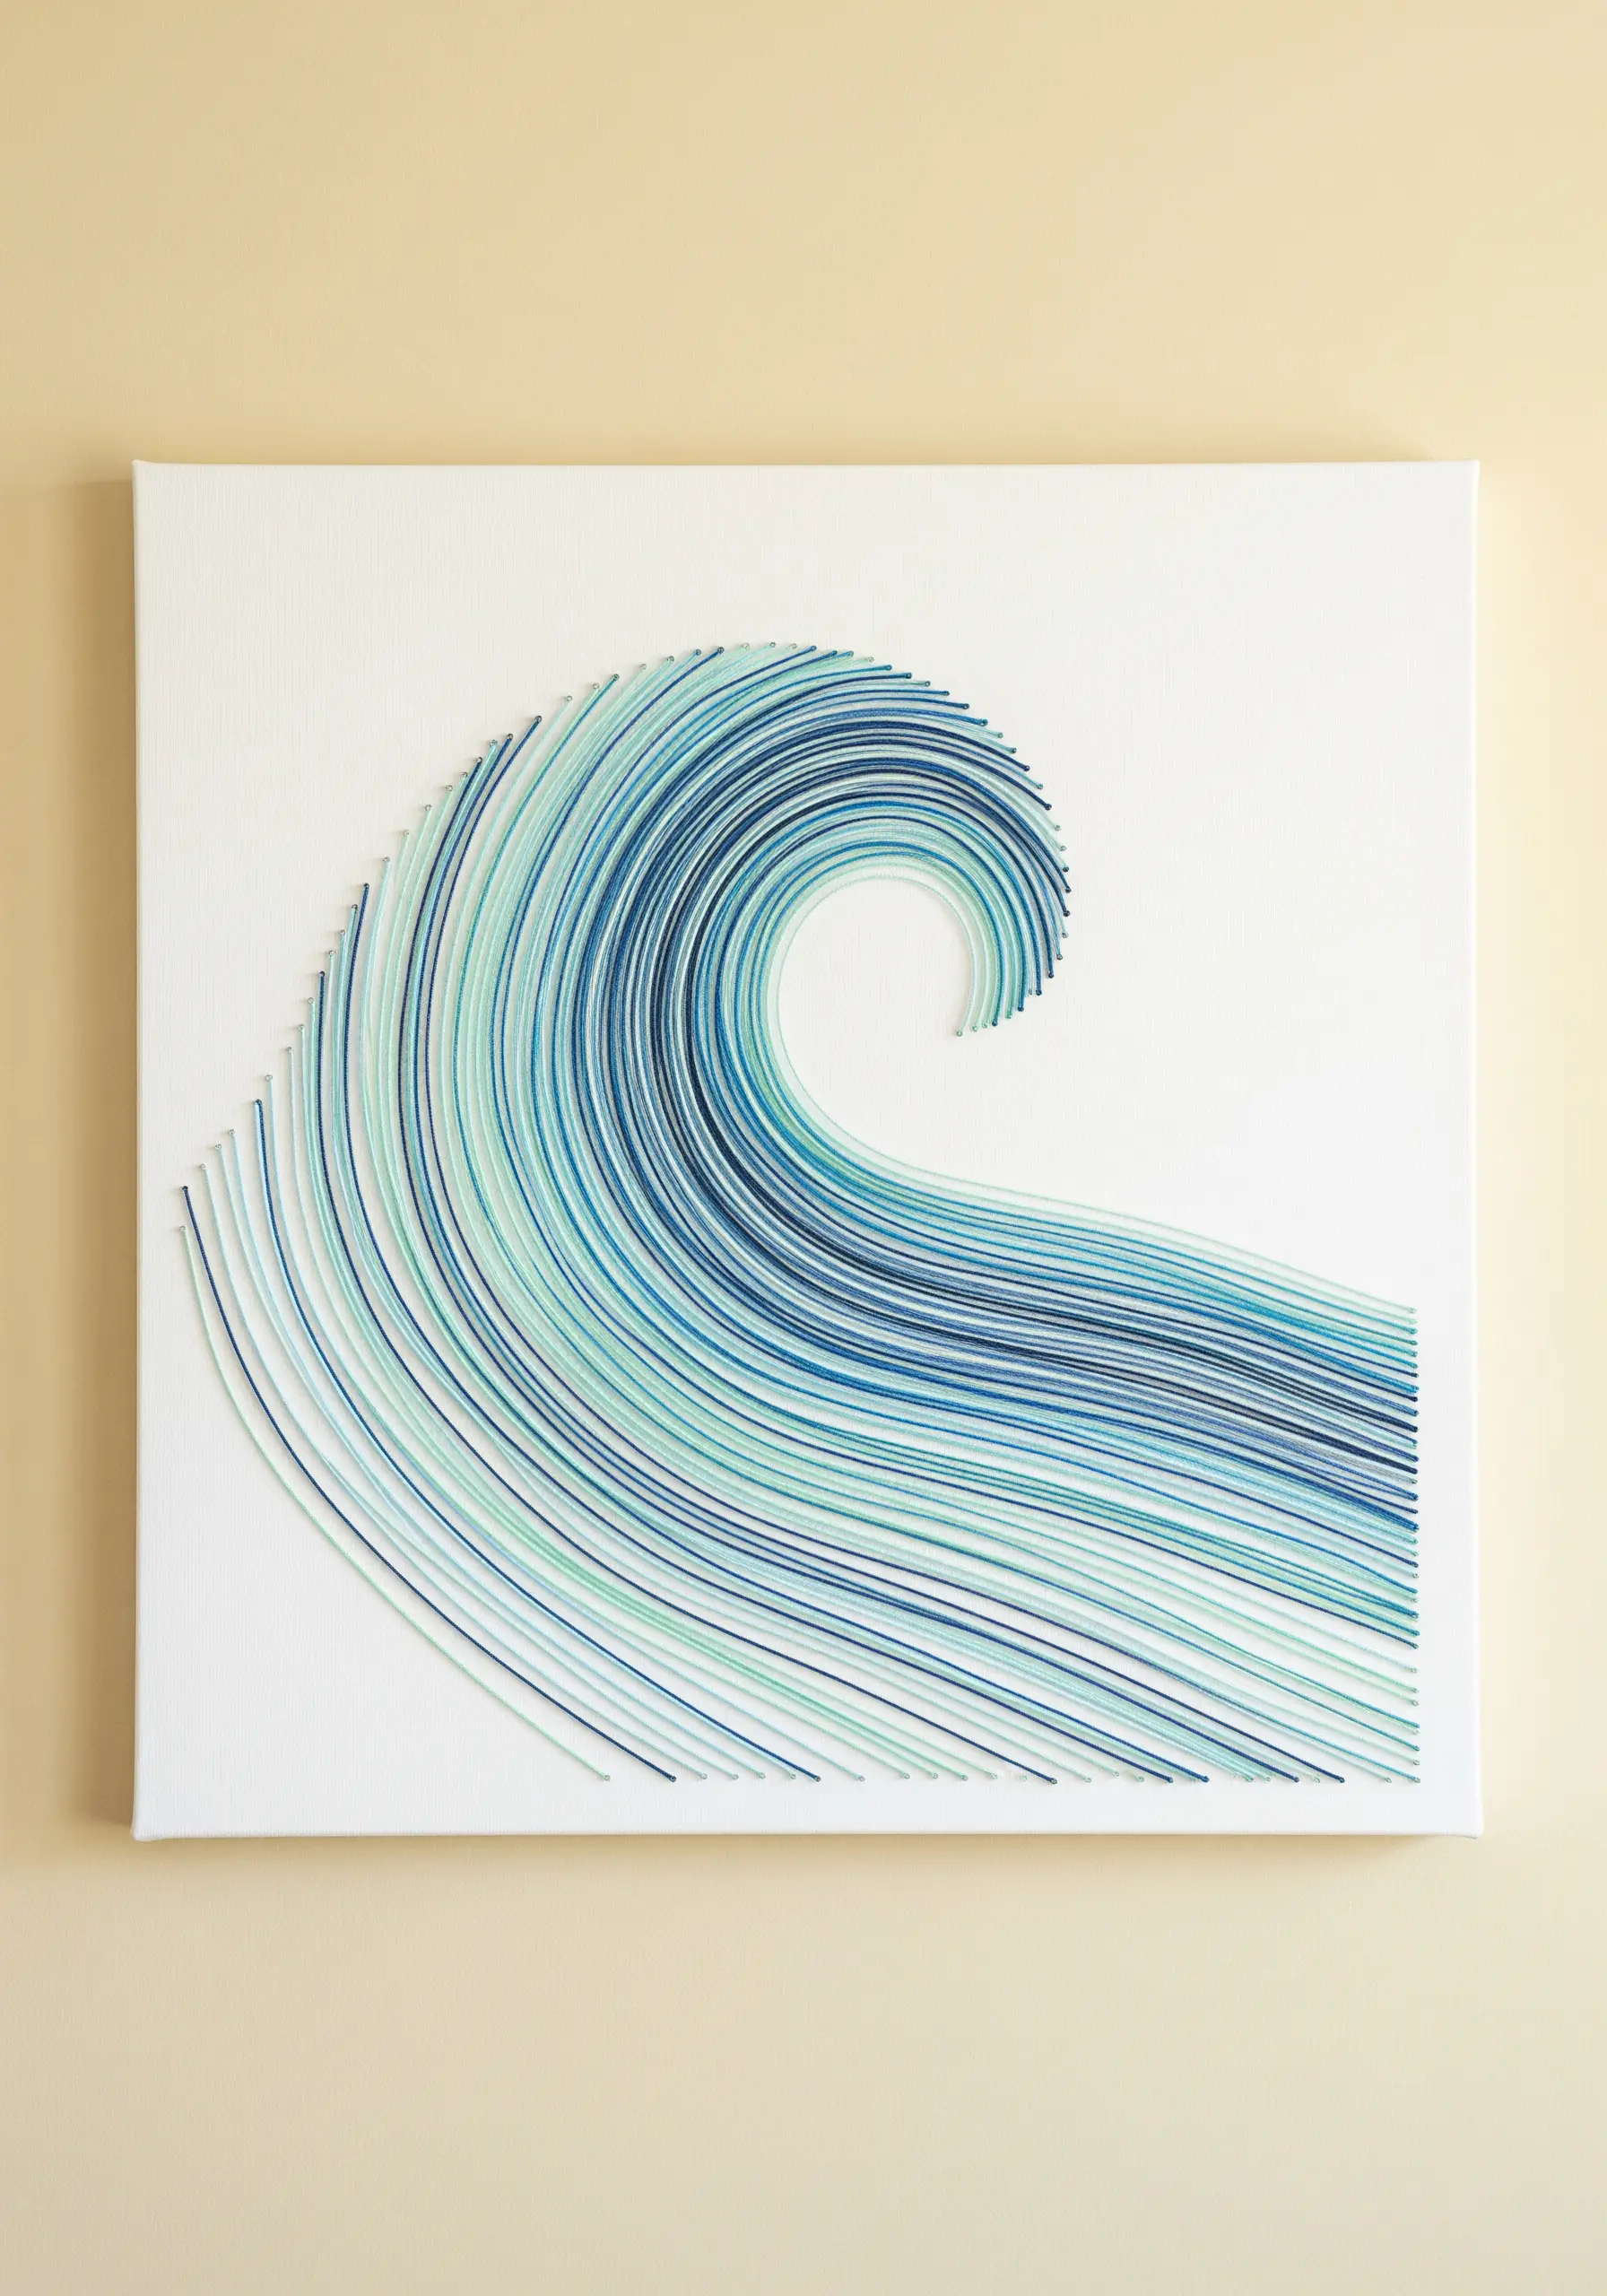
The illusion of a cresting wave is achieved not with curved stitches, but with hundreds of straight lines arranged along a curve.
To create this ombre effect, select five or six shades of blue and turquoise, from deep navy to pale seafoam.
Begin stitching the darkest color at the base of the wave, placing your parallel straight stitches very close together.
As you move up, gradually introduce the next shade, blending them for a few rows before switching completely.
The key is the density of the stitches—the closer they are, the more fluid and solid the color appears, mimicking the power of water.
4. Stitch a Sunburst with Radiant Energy
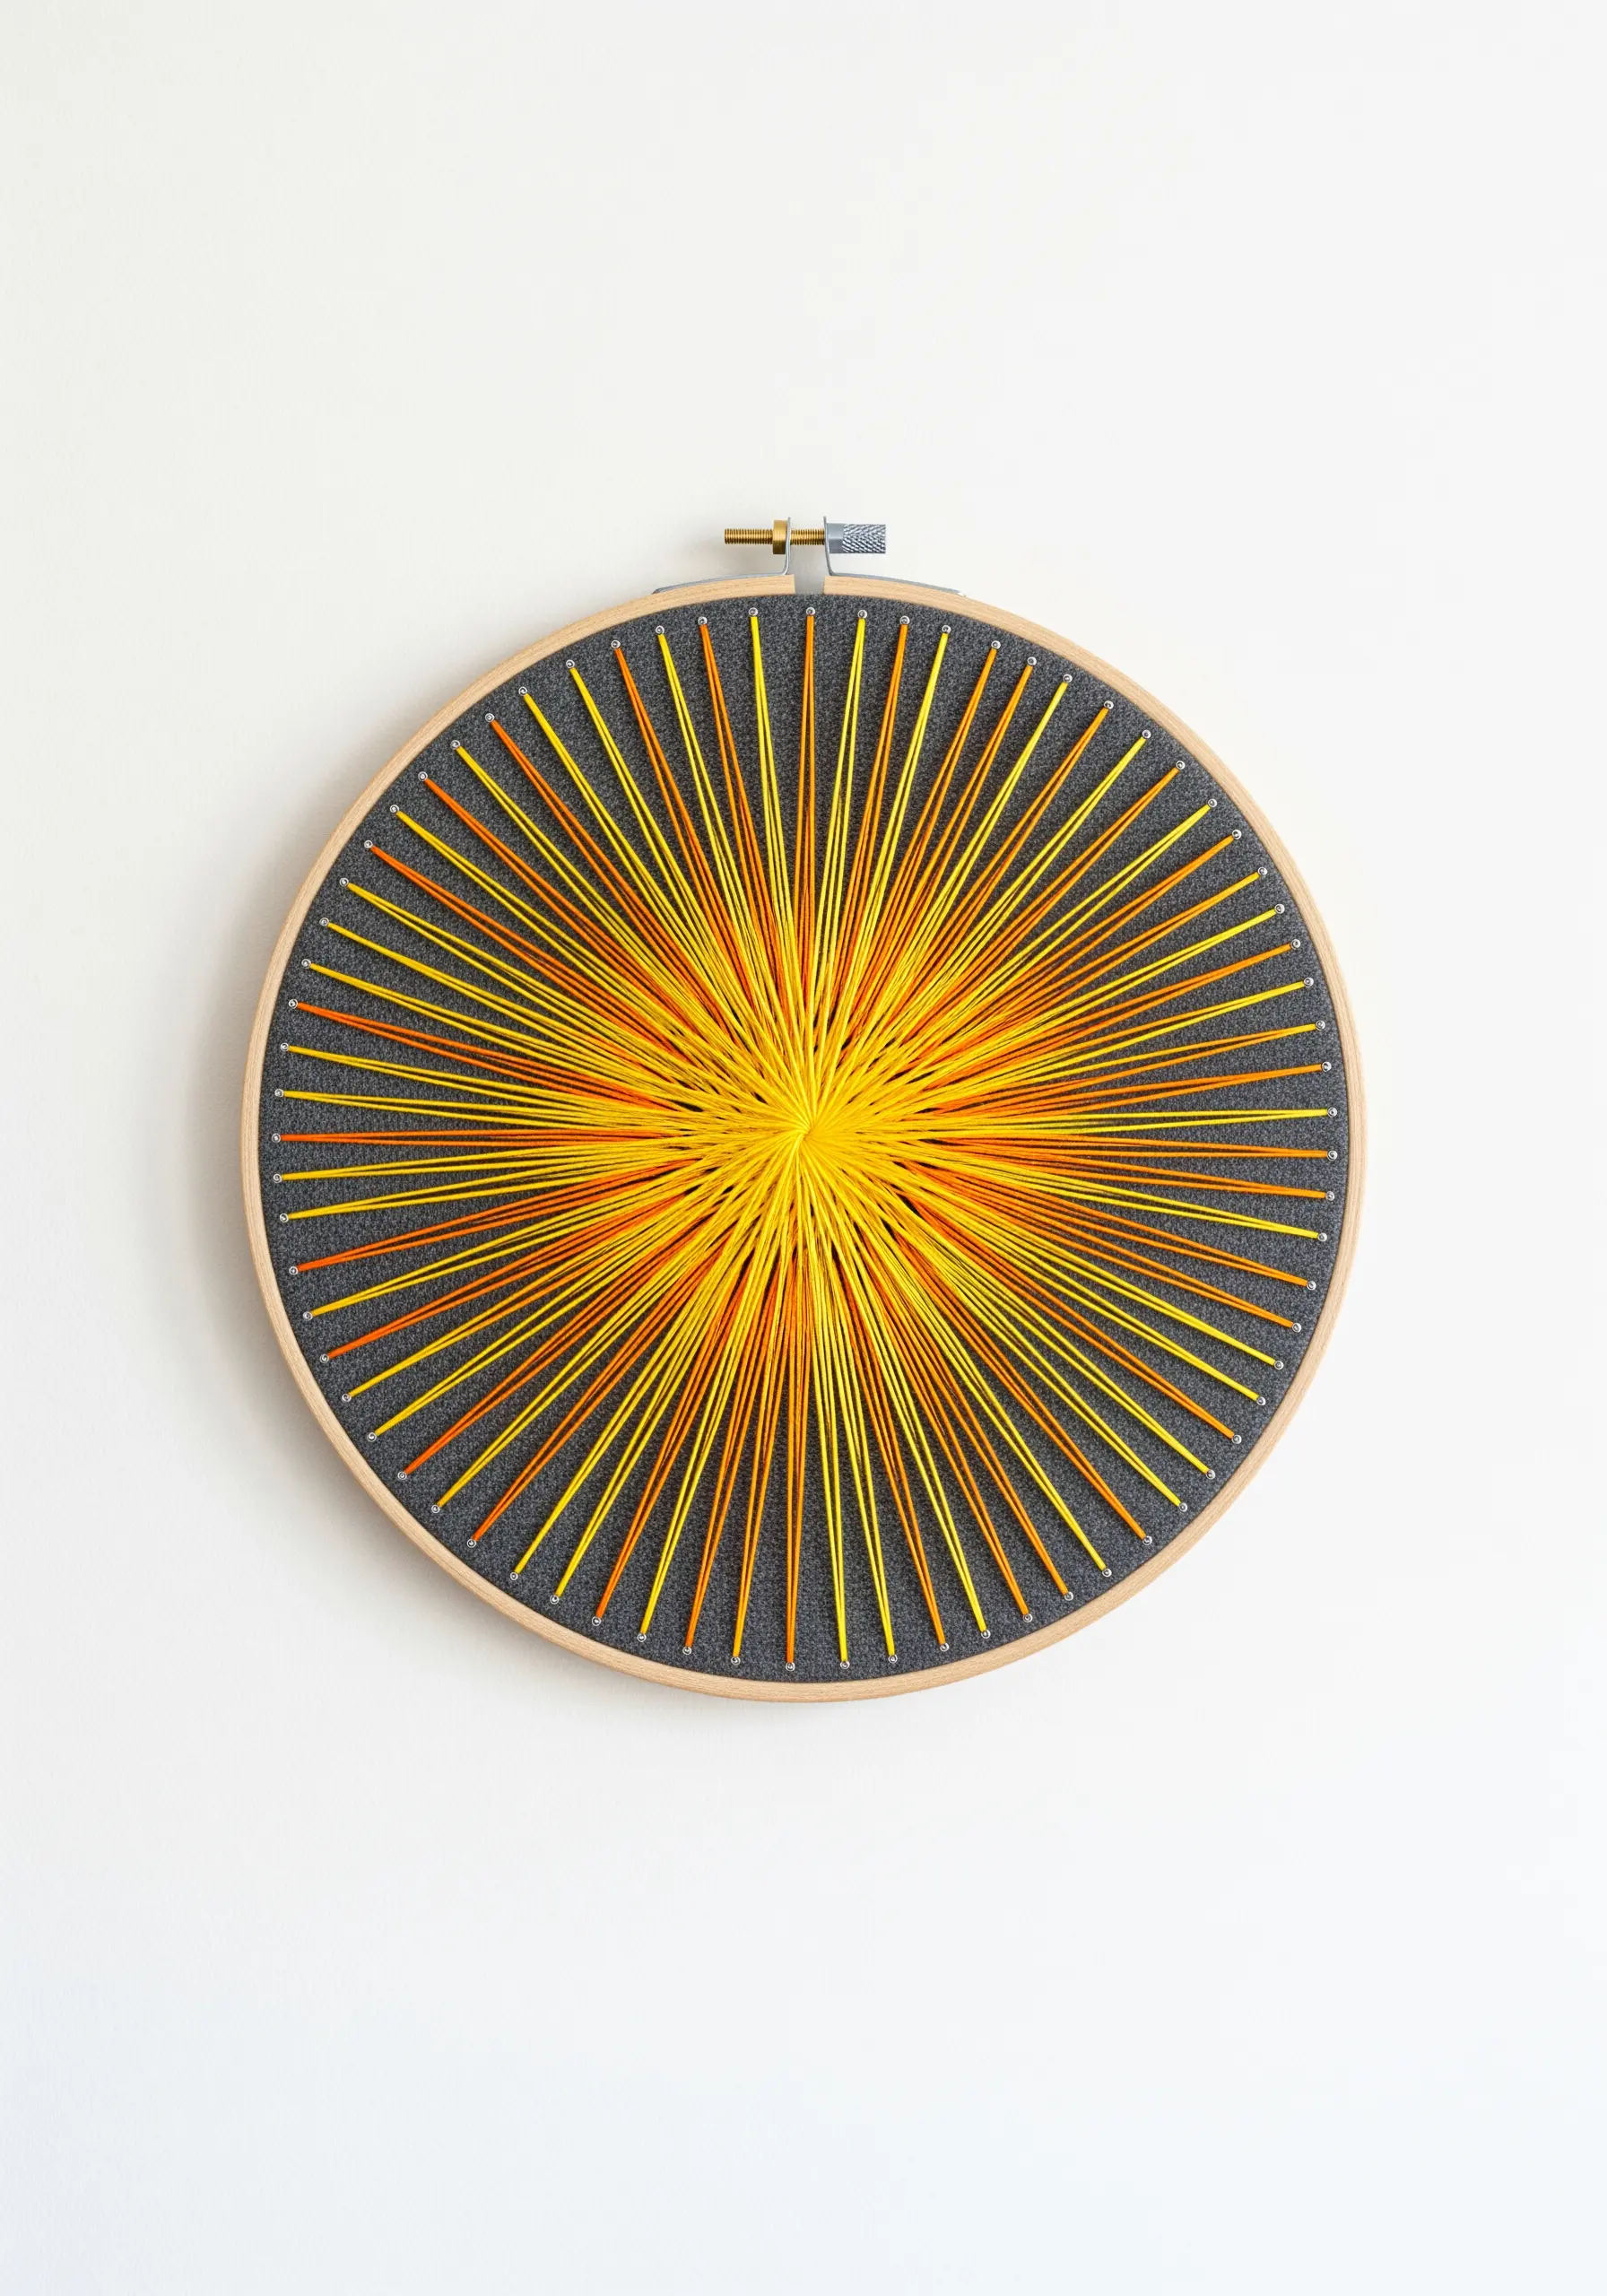
A radial design is one of the most direct ways to translate string art principles into hoop art.
Instead of using pins, you can mark evenly spaced anchor points around the circumference of your hoop.
Work with two or three high-contrast colors, like yellow and orange, and alternate them as you stitch from the edge to the center.
This creates a vibrant, energetic blend that feels more dynamic than a solid color.
To achieve the dense center, overlap your final stitches slightly. This builds a beautiful textural hub that draws the eye inward.
5. Explore Lunar Phases with Negative Space
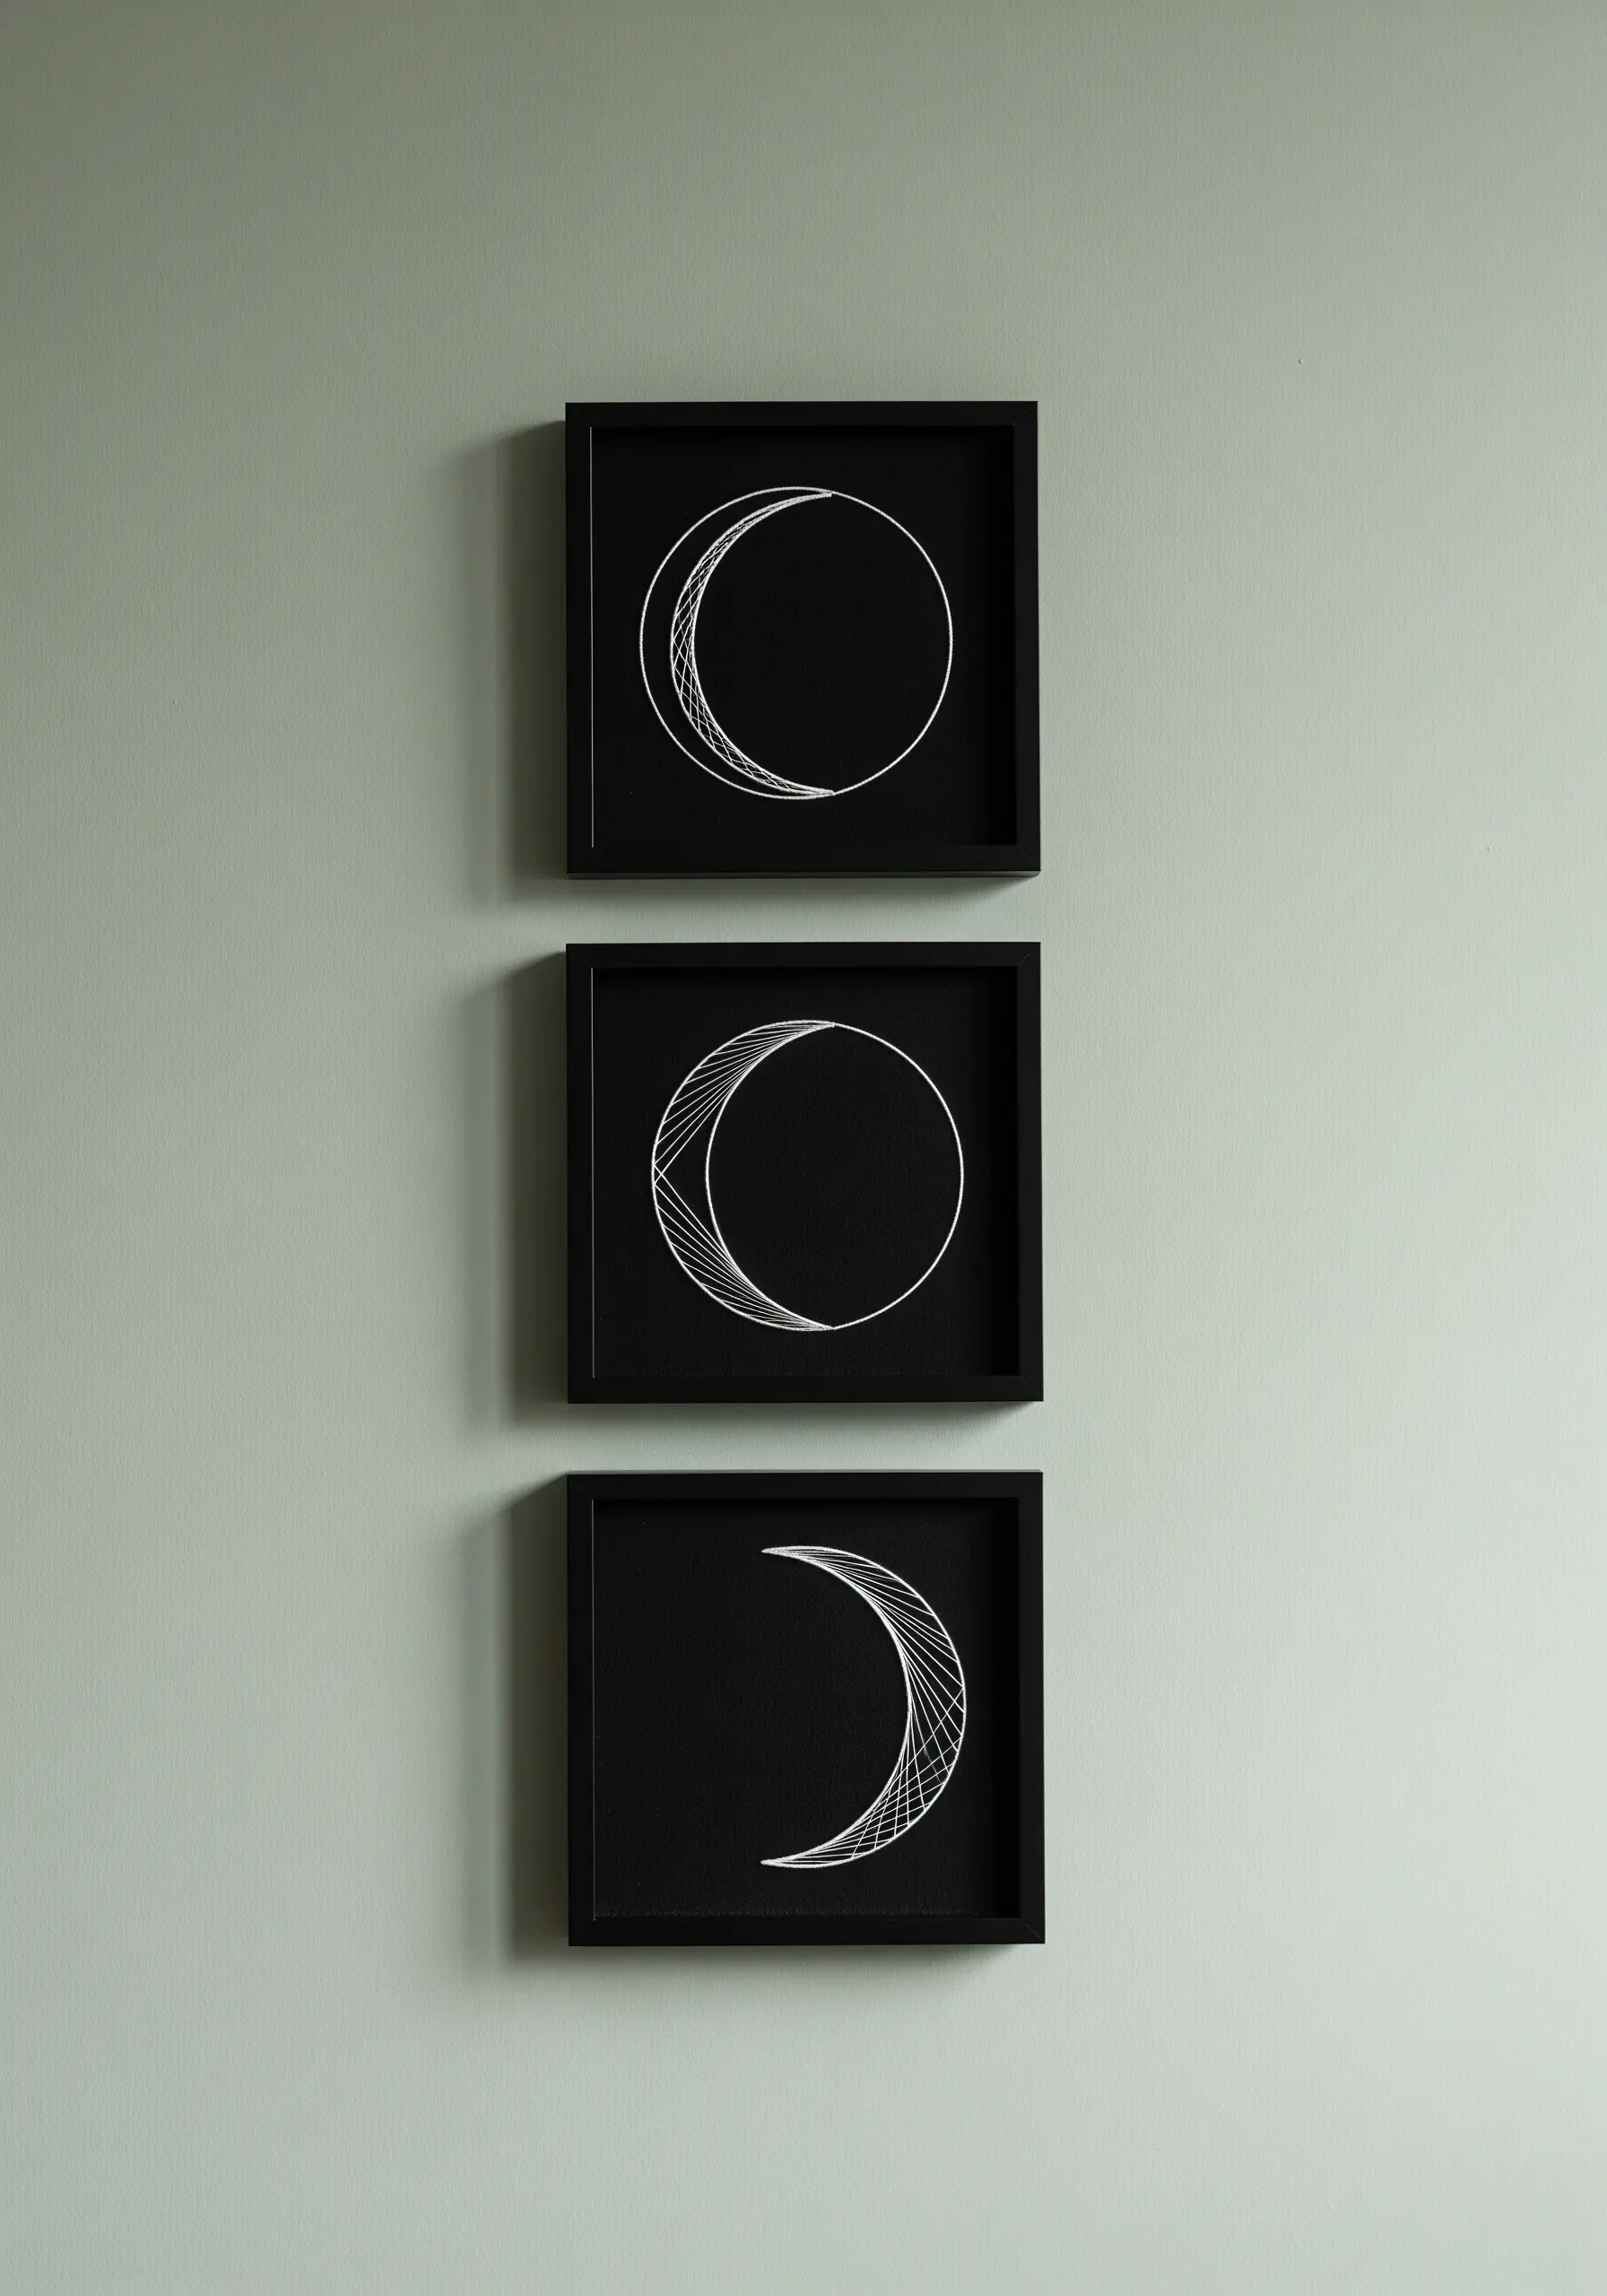
This triptych demonstrates how powerful negative space can be in minimalist embroidery.
Instead of filling the shape, you define it by stitching only a small, textured portion.
Mount black fabric in three identical square frames to create a cohesive series.
Use a bright white or silver thread to stitch the outer circle of each moon with a simple backstitch.
Then, create the crescent’s texture with straight stitches pulled across the shape’s interior. The tension and angle of these lines are what create the subtle, web-like pattern that gives the design its elegance.
6. Build an Architectural Skyline with Line Density
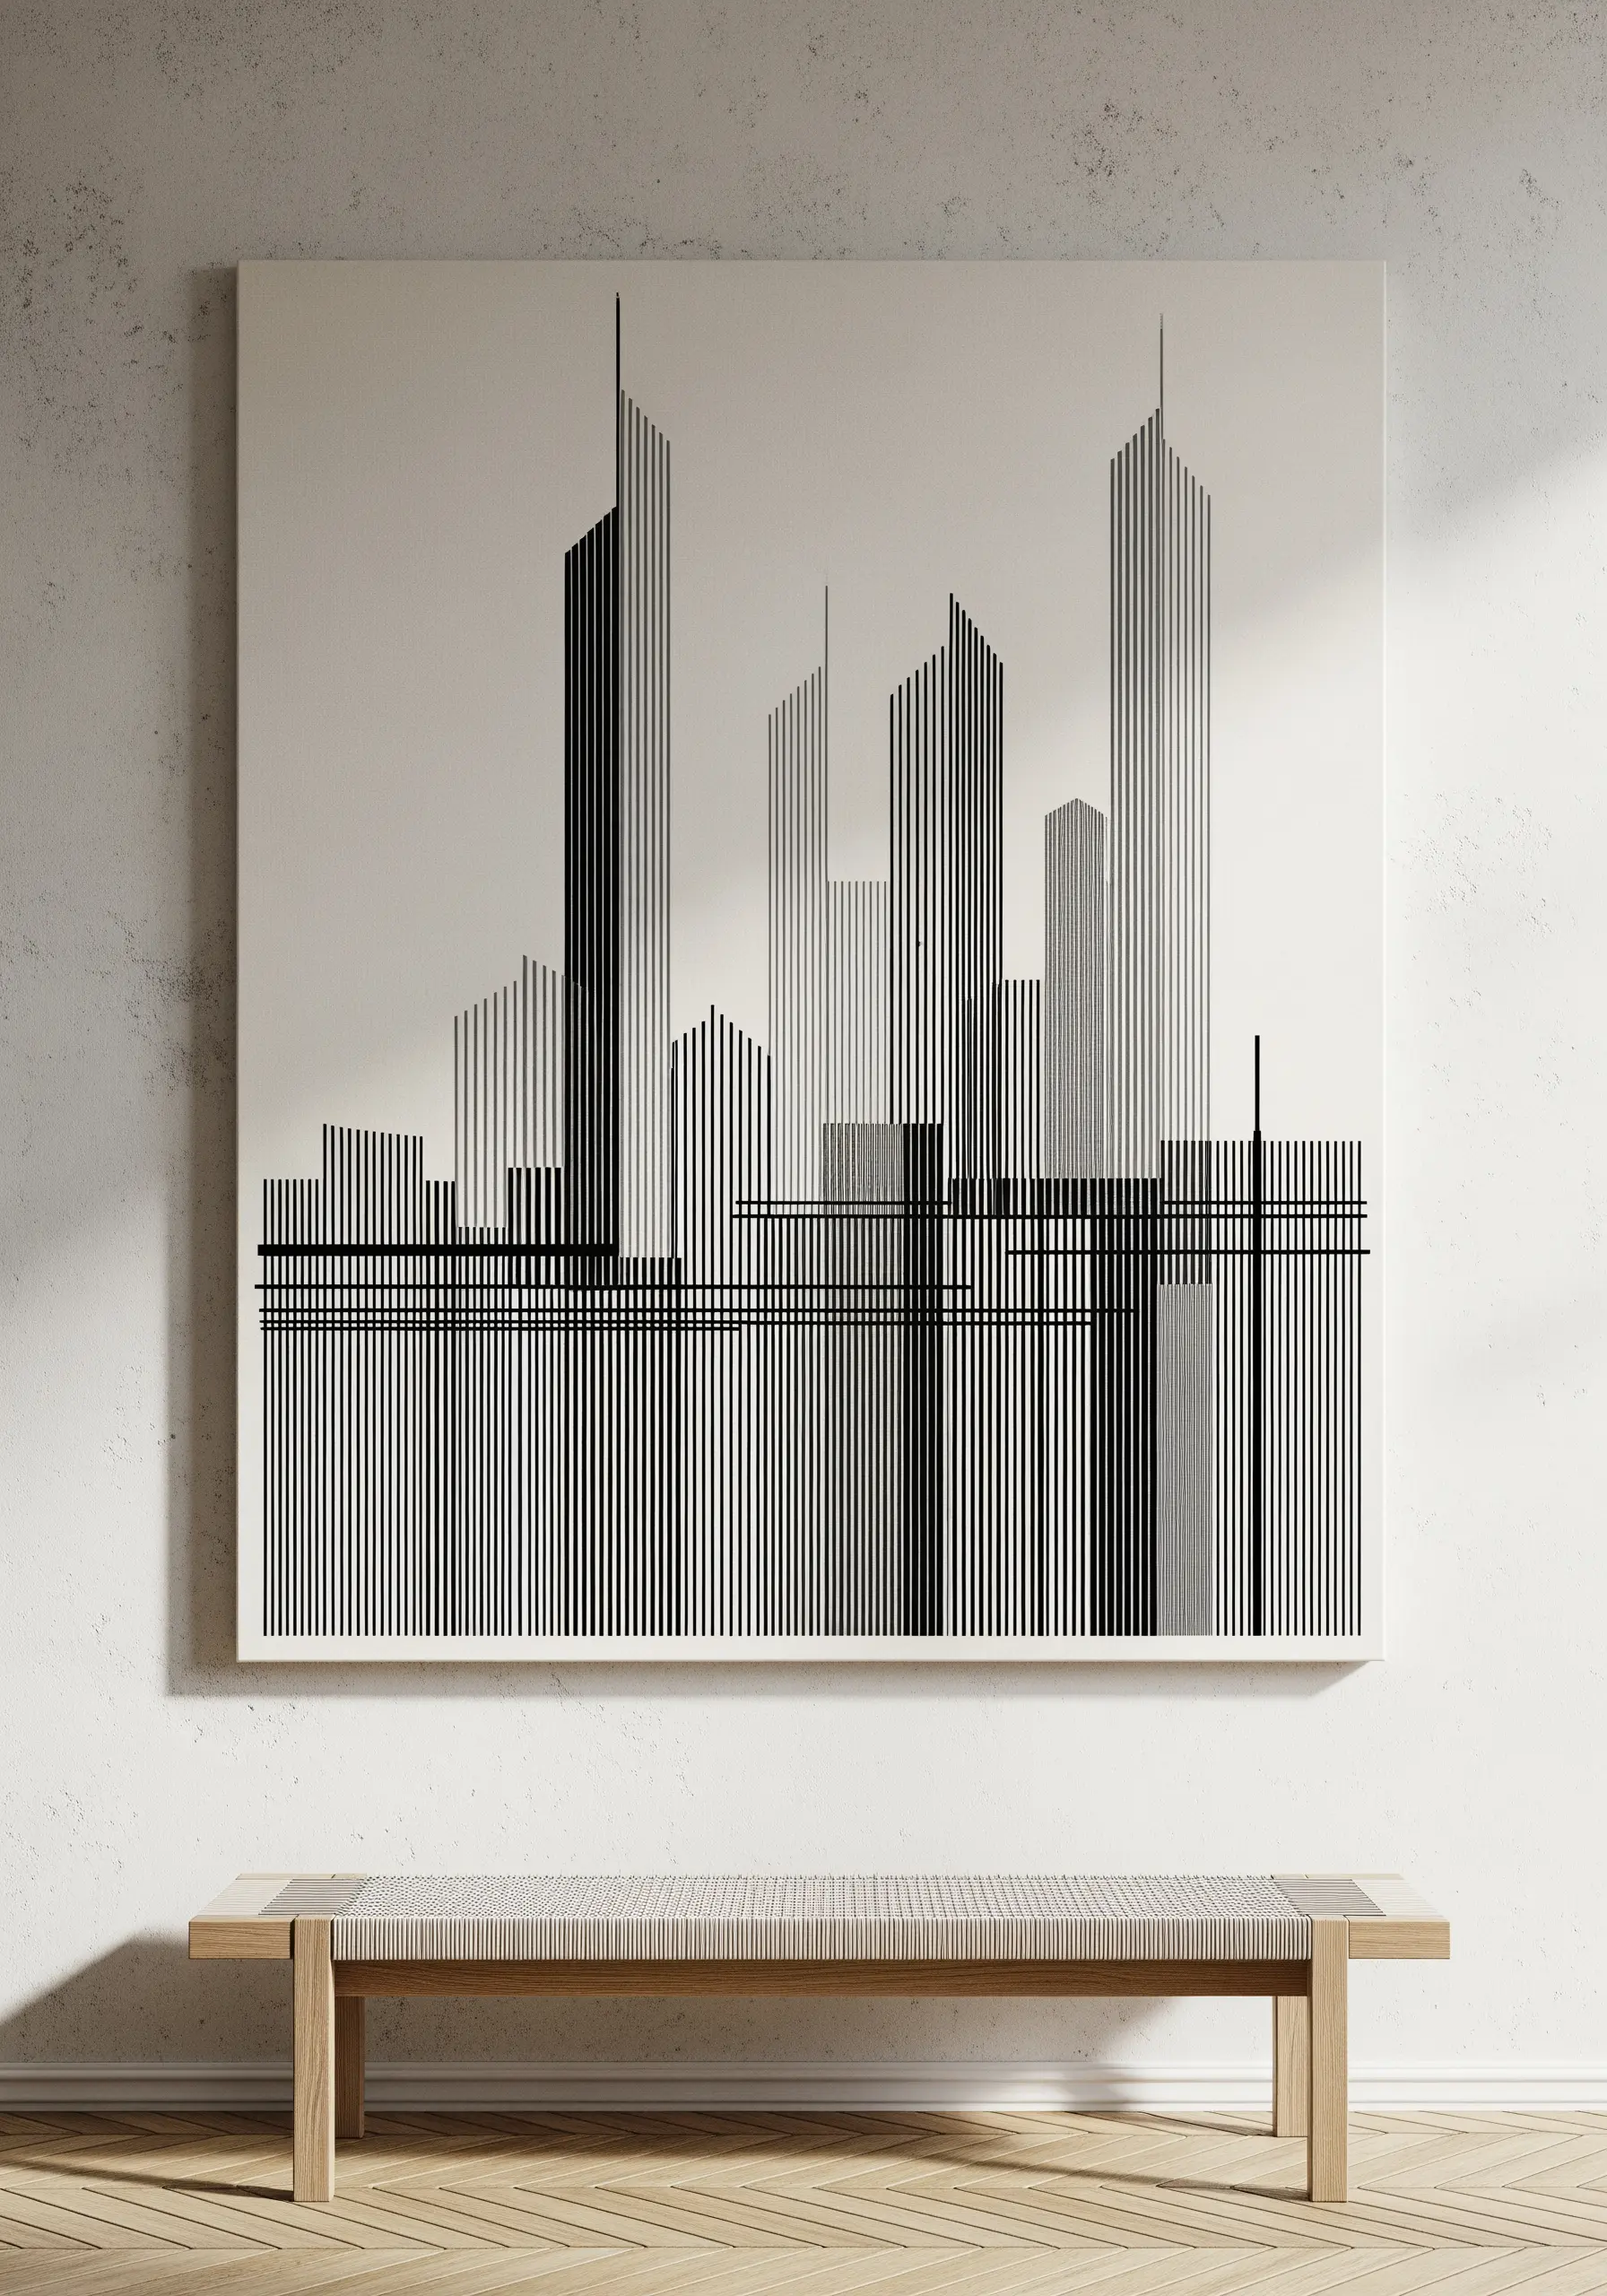
You don’t need complex stitches to create a sense of architectural perspective; all you need is control over line spacing.
This abstract cityscape is built entirely from vertical straight stitches.
The illusion of solid buildings is created by packing stitches tightly together, while the more distant or transparent structures are suggested by spacing them farther apart.
Work on a large, stretched canvas for a gallery-worthy finish.
A single color, like black or charcoal grey, keeps the focus purely on form and density, resulting in a sophisticated, abstract monochrome thread design.
7. Visualize Sound with Overlapping Thread Colors
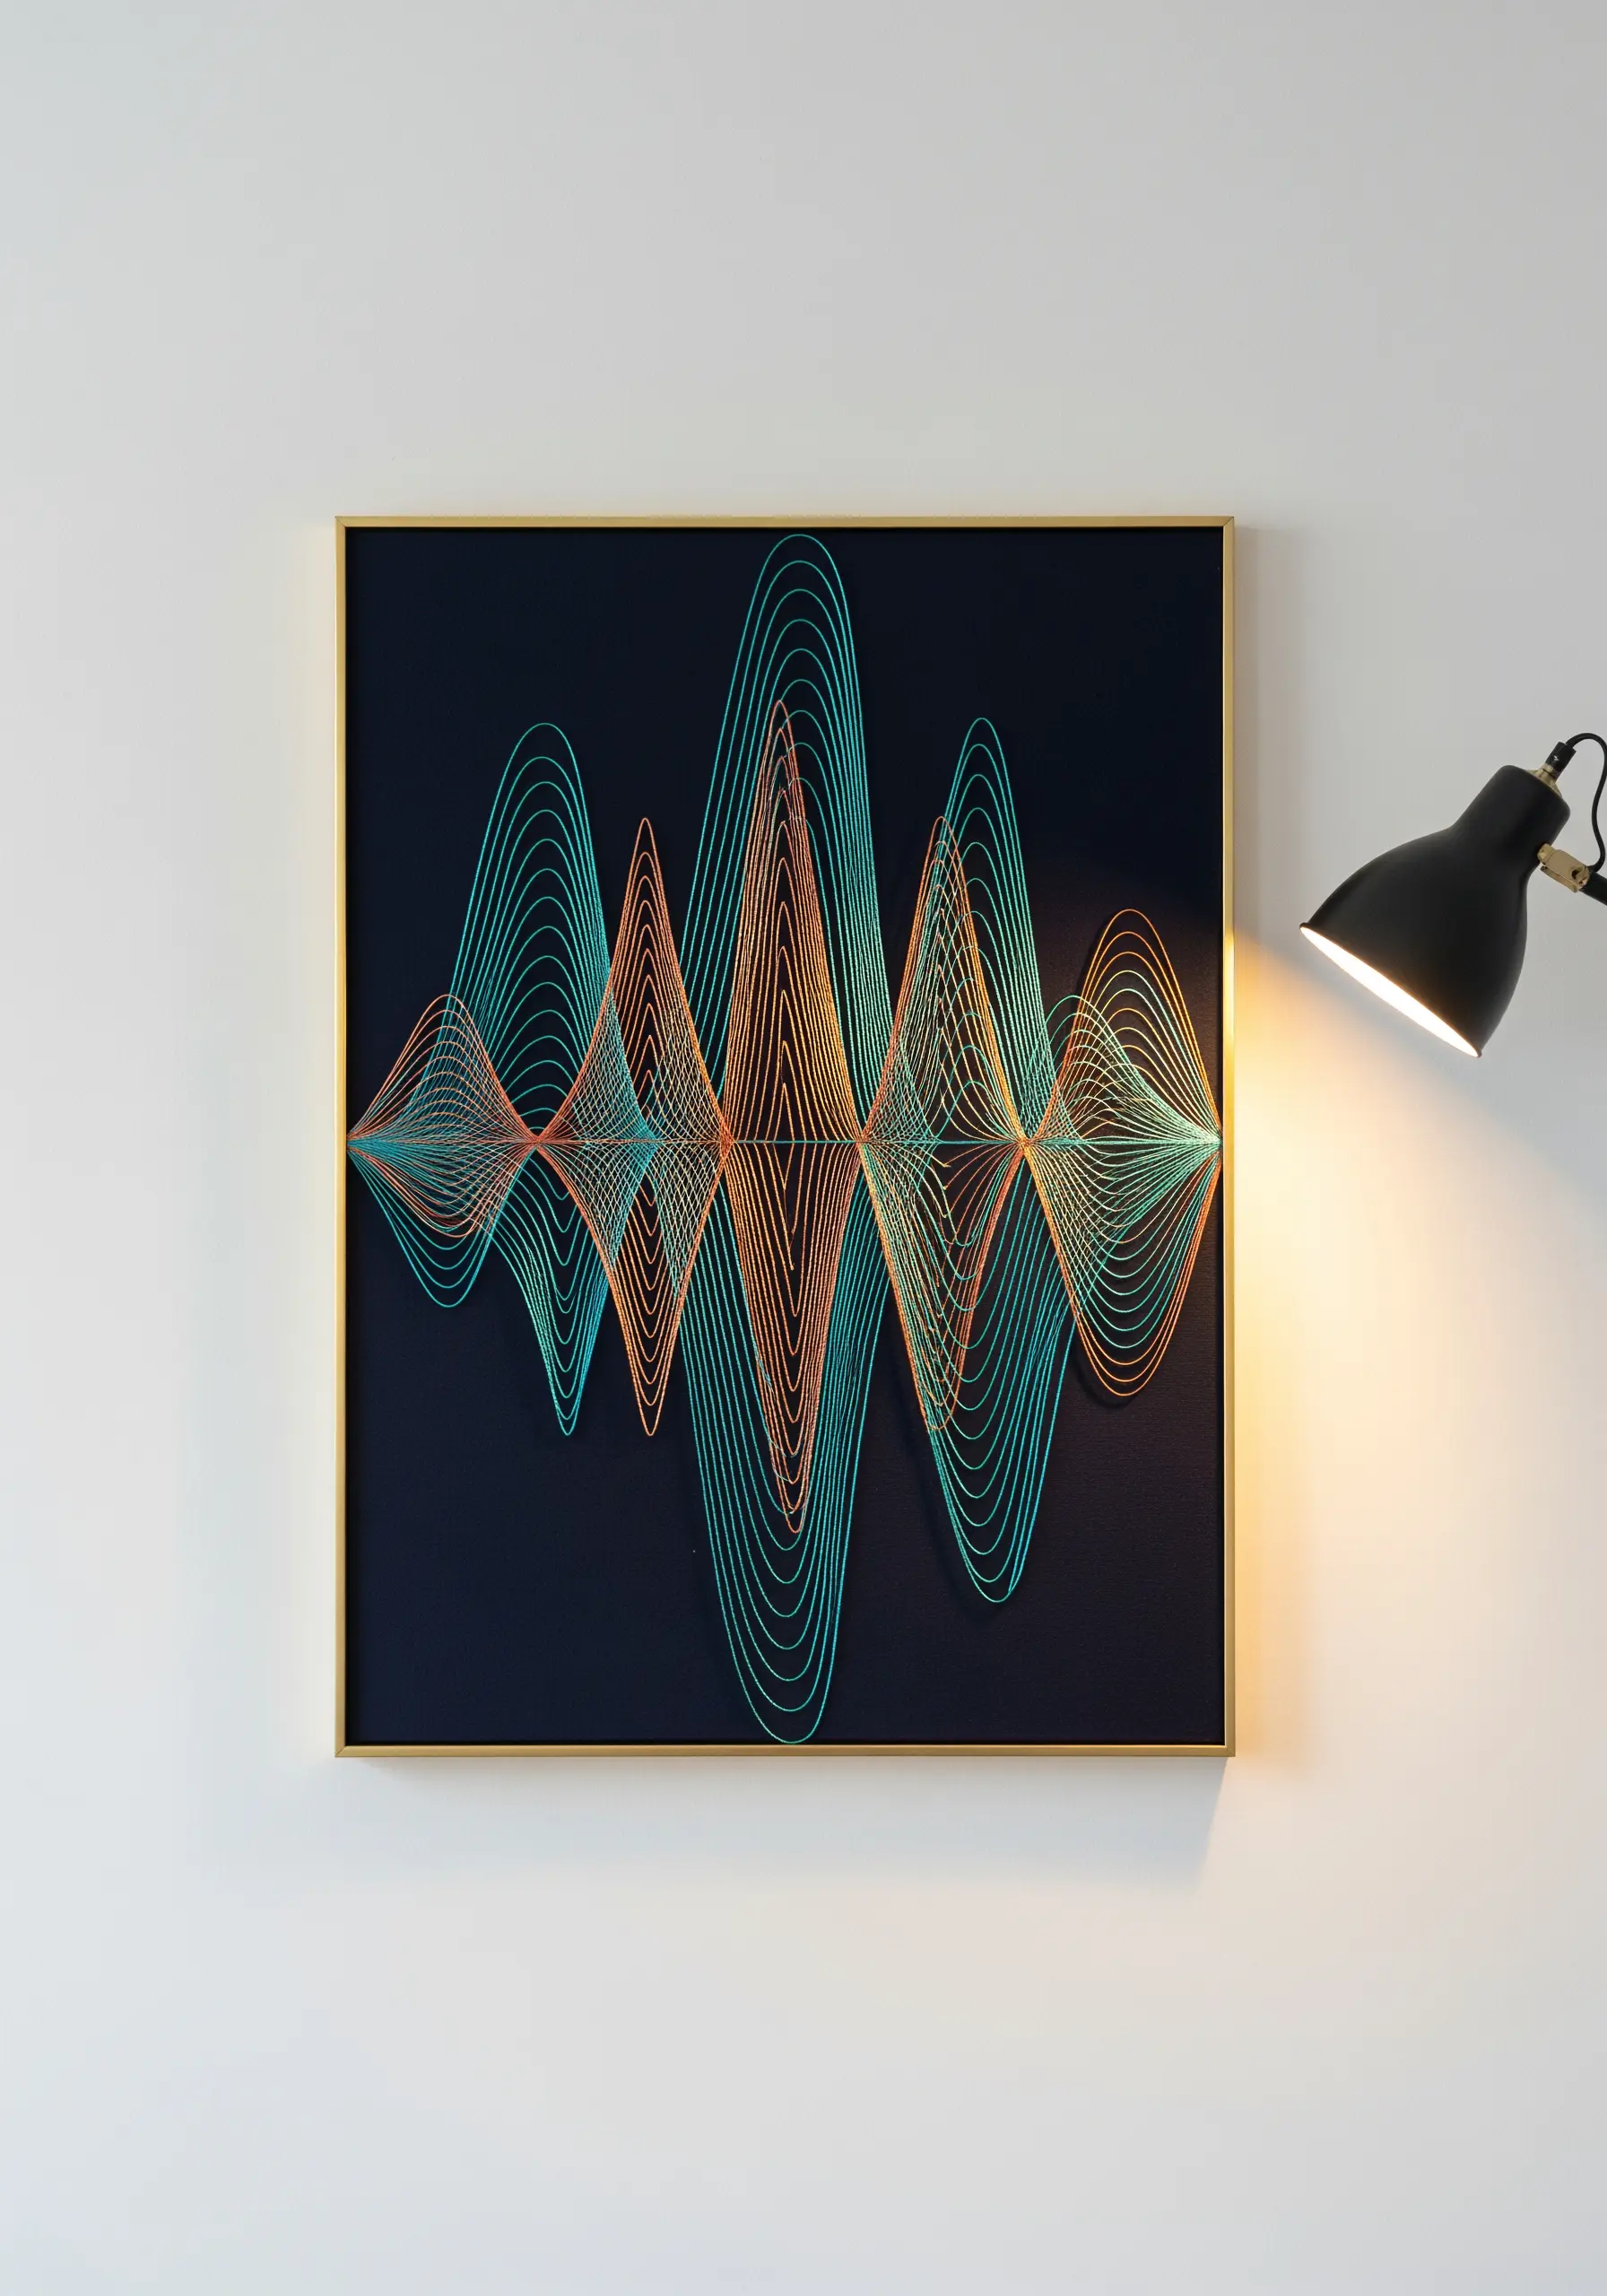
This piece brilliantly captures the look of transparent, overlapping waves of energy or sound.
To achieve this, choose two contrasting but harmonious colors, like teal and amber.
Stitch the entire first color form completely. Then, stitch the second color form directly over it.
Where the threads intersect, the eye will automatically blend the colors, creating a third, muted tone and a beautiful illusion of transparency.
Using a fine, high-sheen rayon or silk thread will enhance this effect, as the light will reflect differently off each layer.
8. Map Botanical Forms with Anchor Points
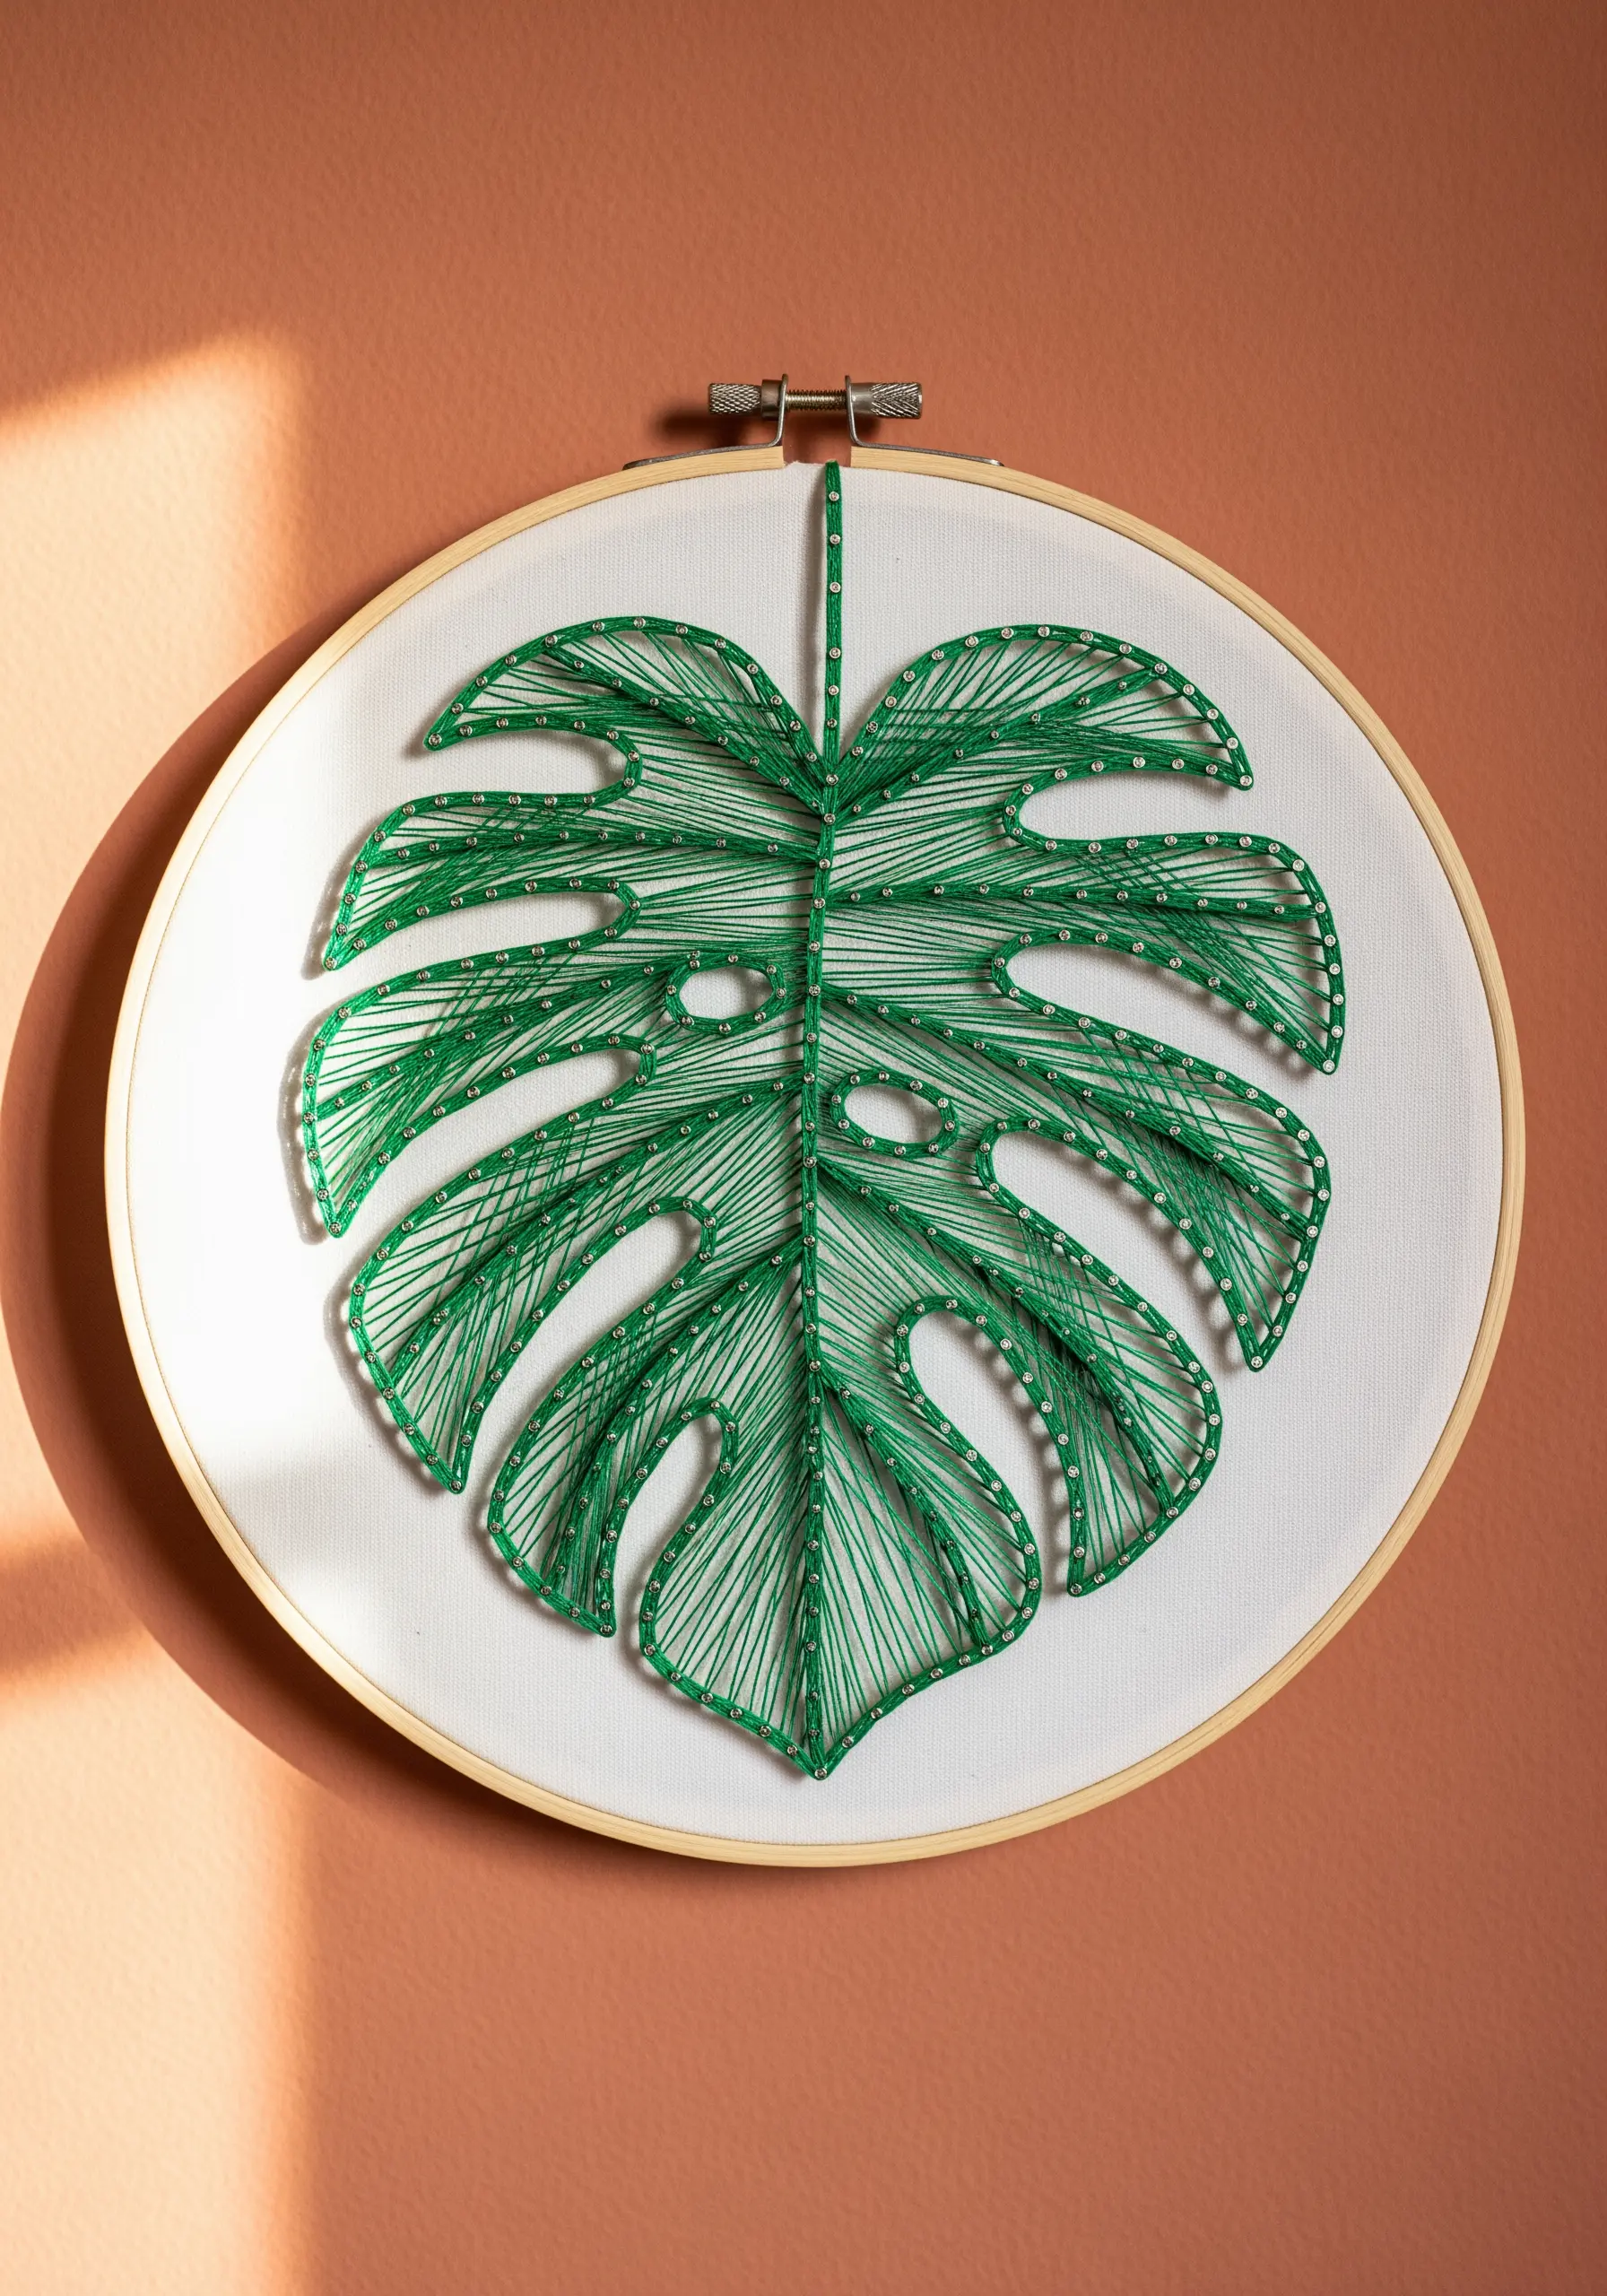
Translating a complex organic shape like a monstera leaf into string art embroidery requires careful planning of your anchor points.
Instead of stitching directly through the fabric for every line, use tiny, discreet couching stitches or small seed beads to tack down the main outline.
These anchor points then serve as the ‘pins’ around which you wrap your thread to create the interior veins and patterns.
This technique allows you to maintain incredible tension and achieve the sharp, crisp lines that define the string art aesthetic, even on a soft fabric surface.
9. Create Balance and Symmetry with a Diptych
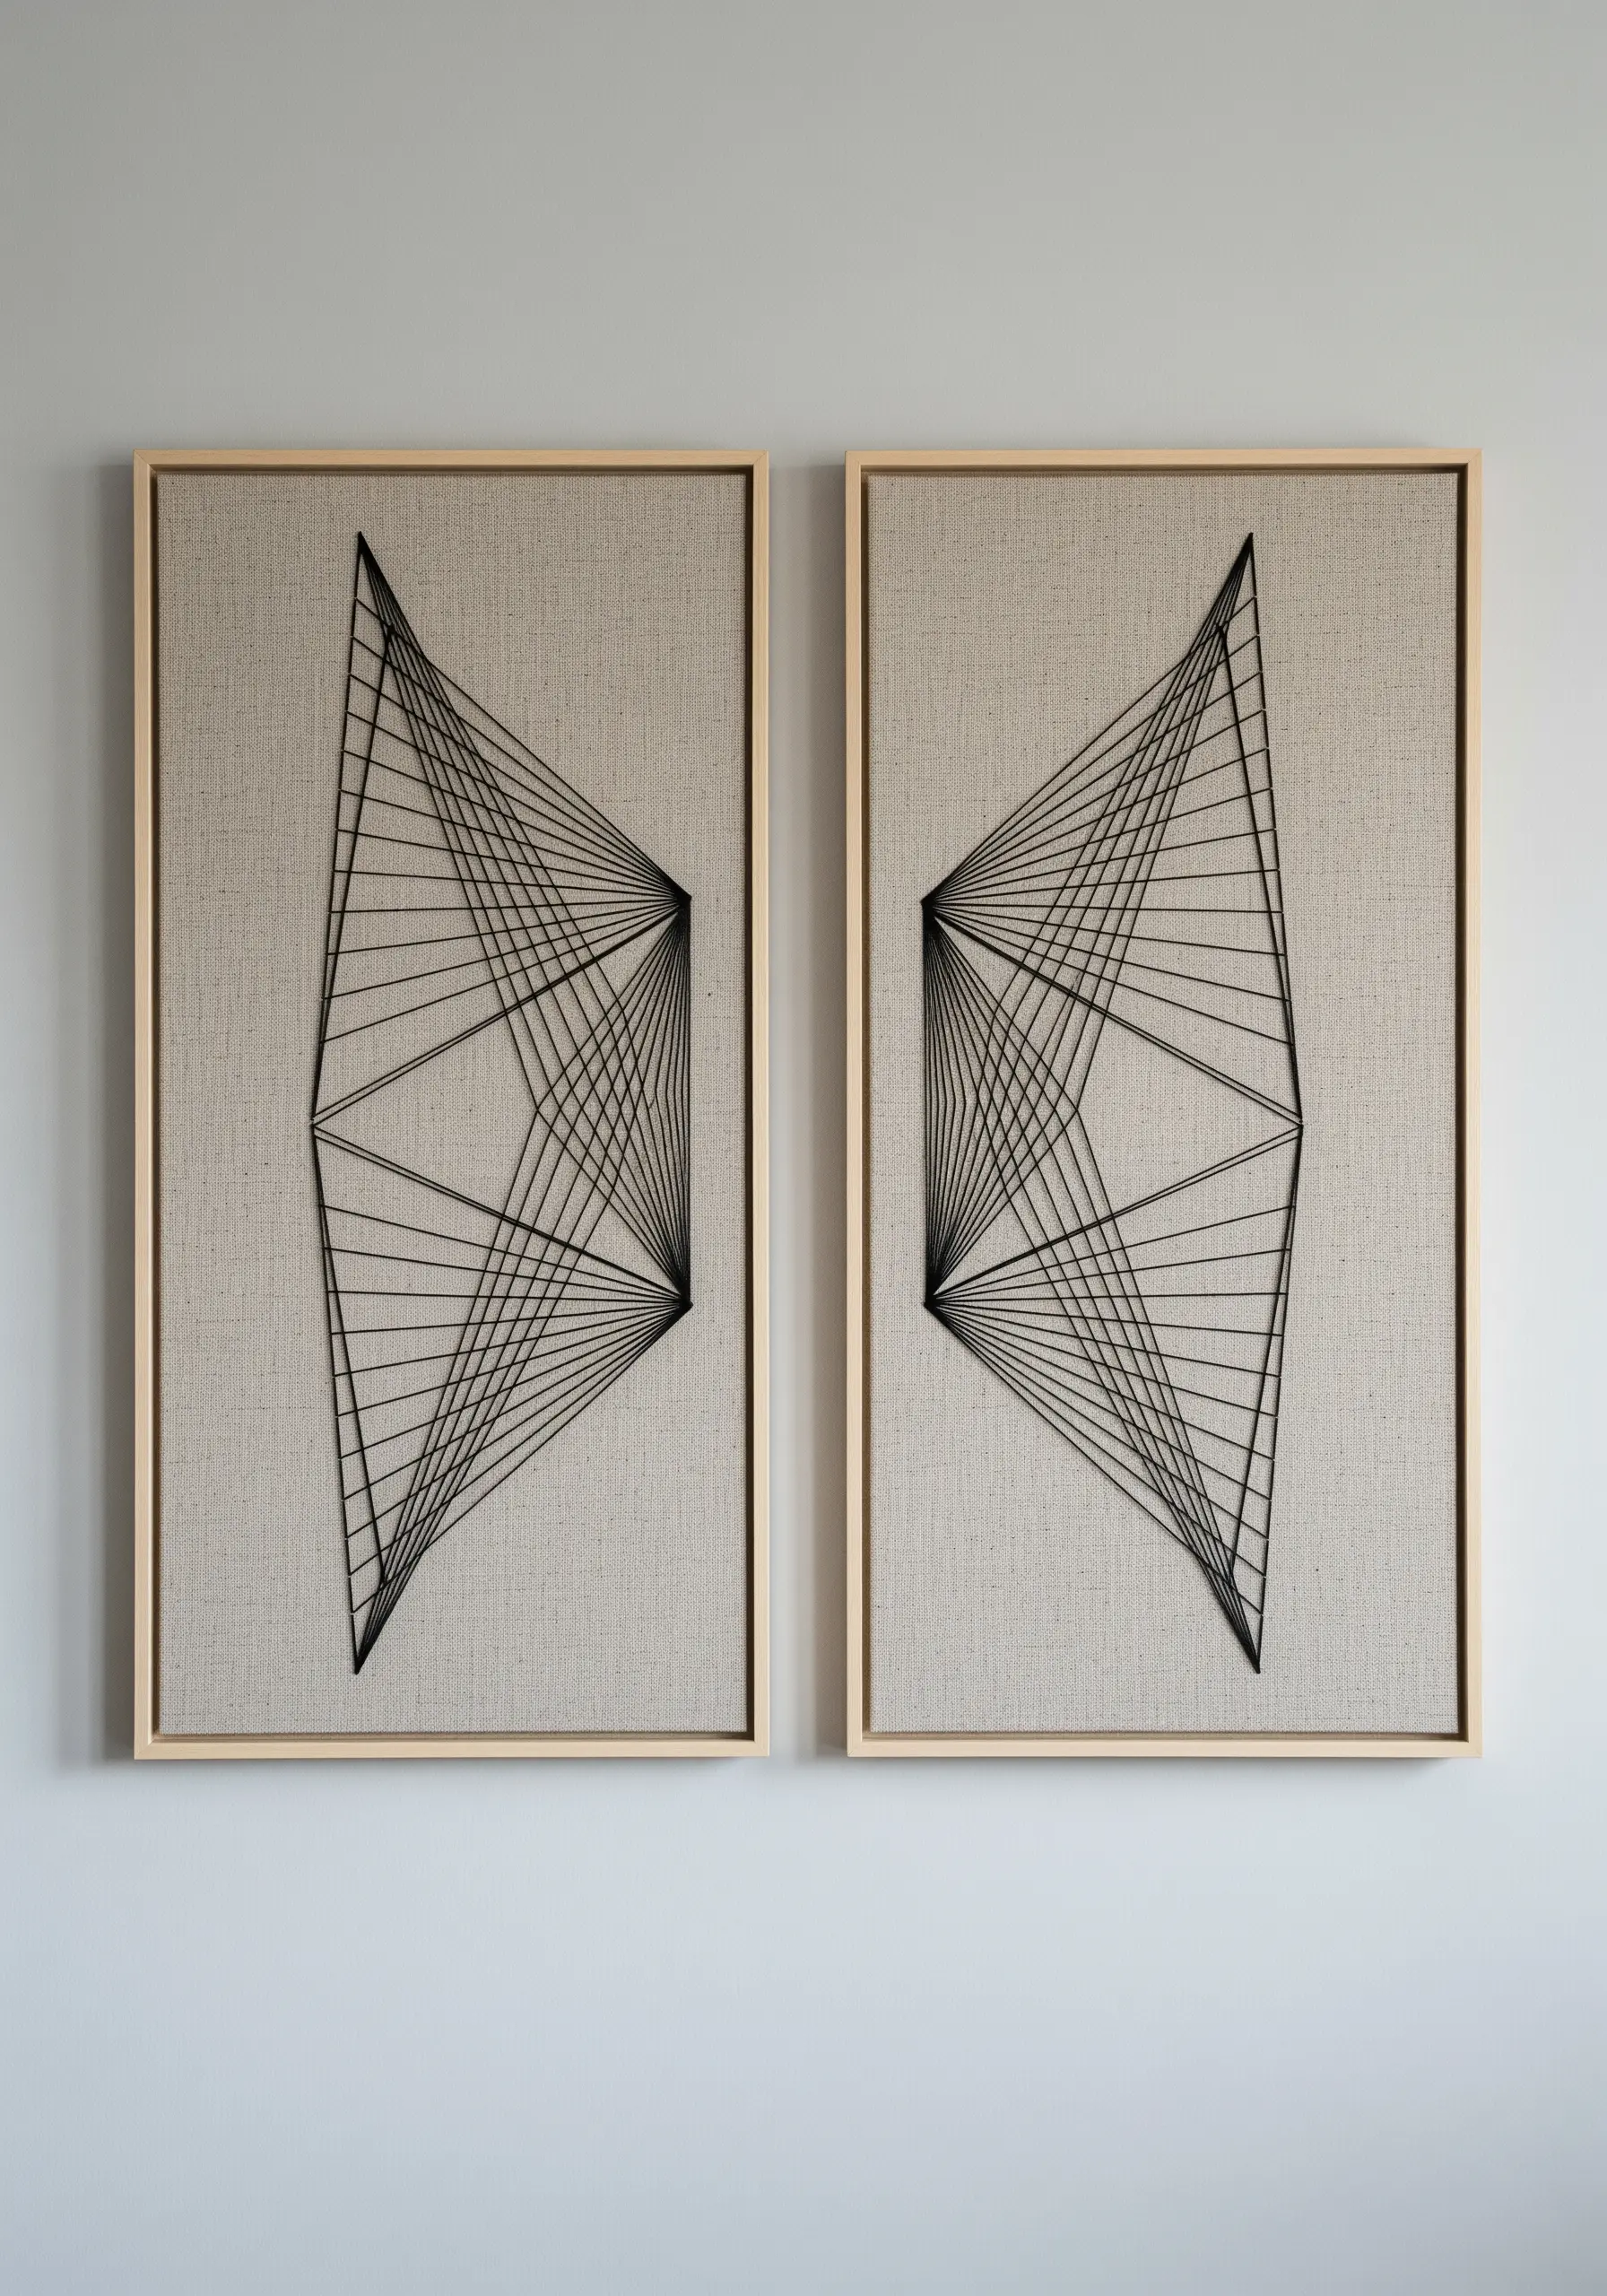
Splitting a single design across two panels, or creating a mirrored diptych, instantly adds a sense of formality and intention to your work.
Choose a textured, neutral fabric like raw linen to provide a tactile backdrop that doesn’t compete with the bold lines.
The key here is precision. Ensure the frames are identical and the designs are perfectly mirrored copies of each other.
Using a single, dark thread color forces the viewer to focus entirely on the architectural form and the clean, taut lines that carve through the space.
10. Master the Simplicity of a Single Line
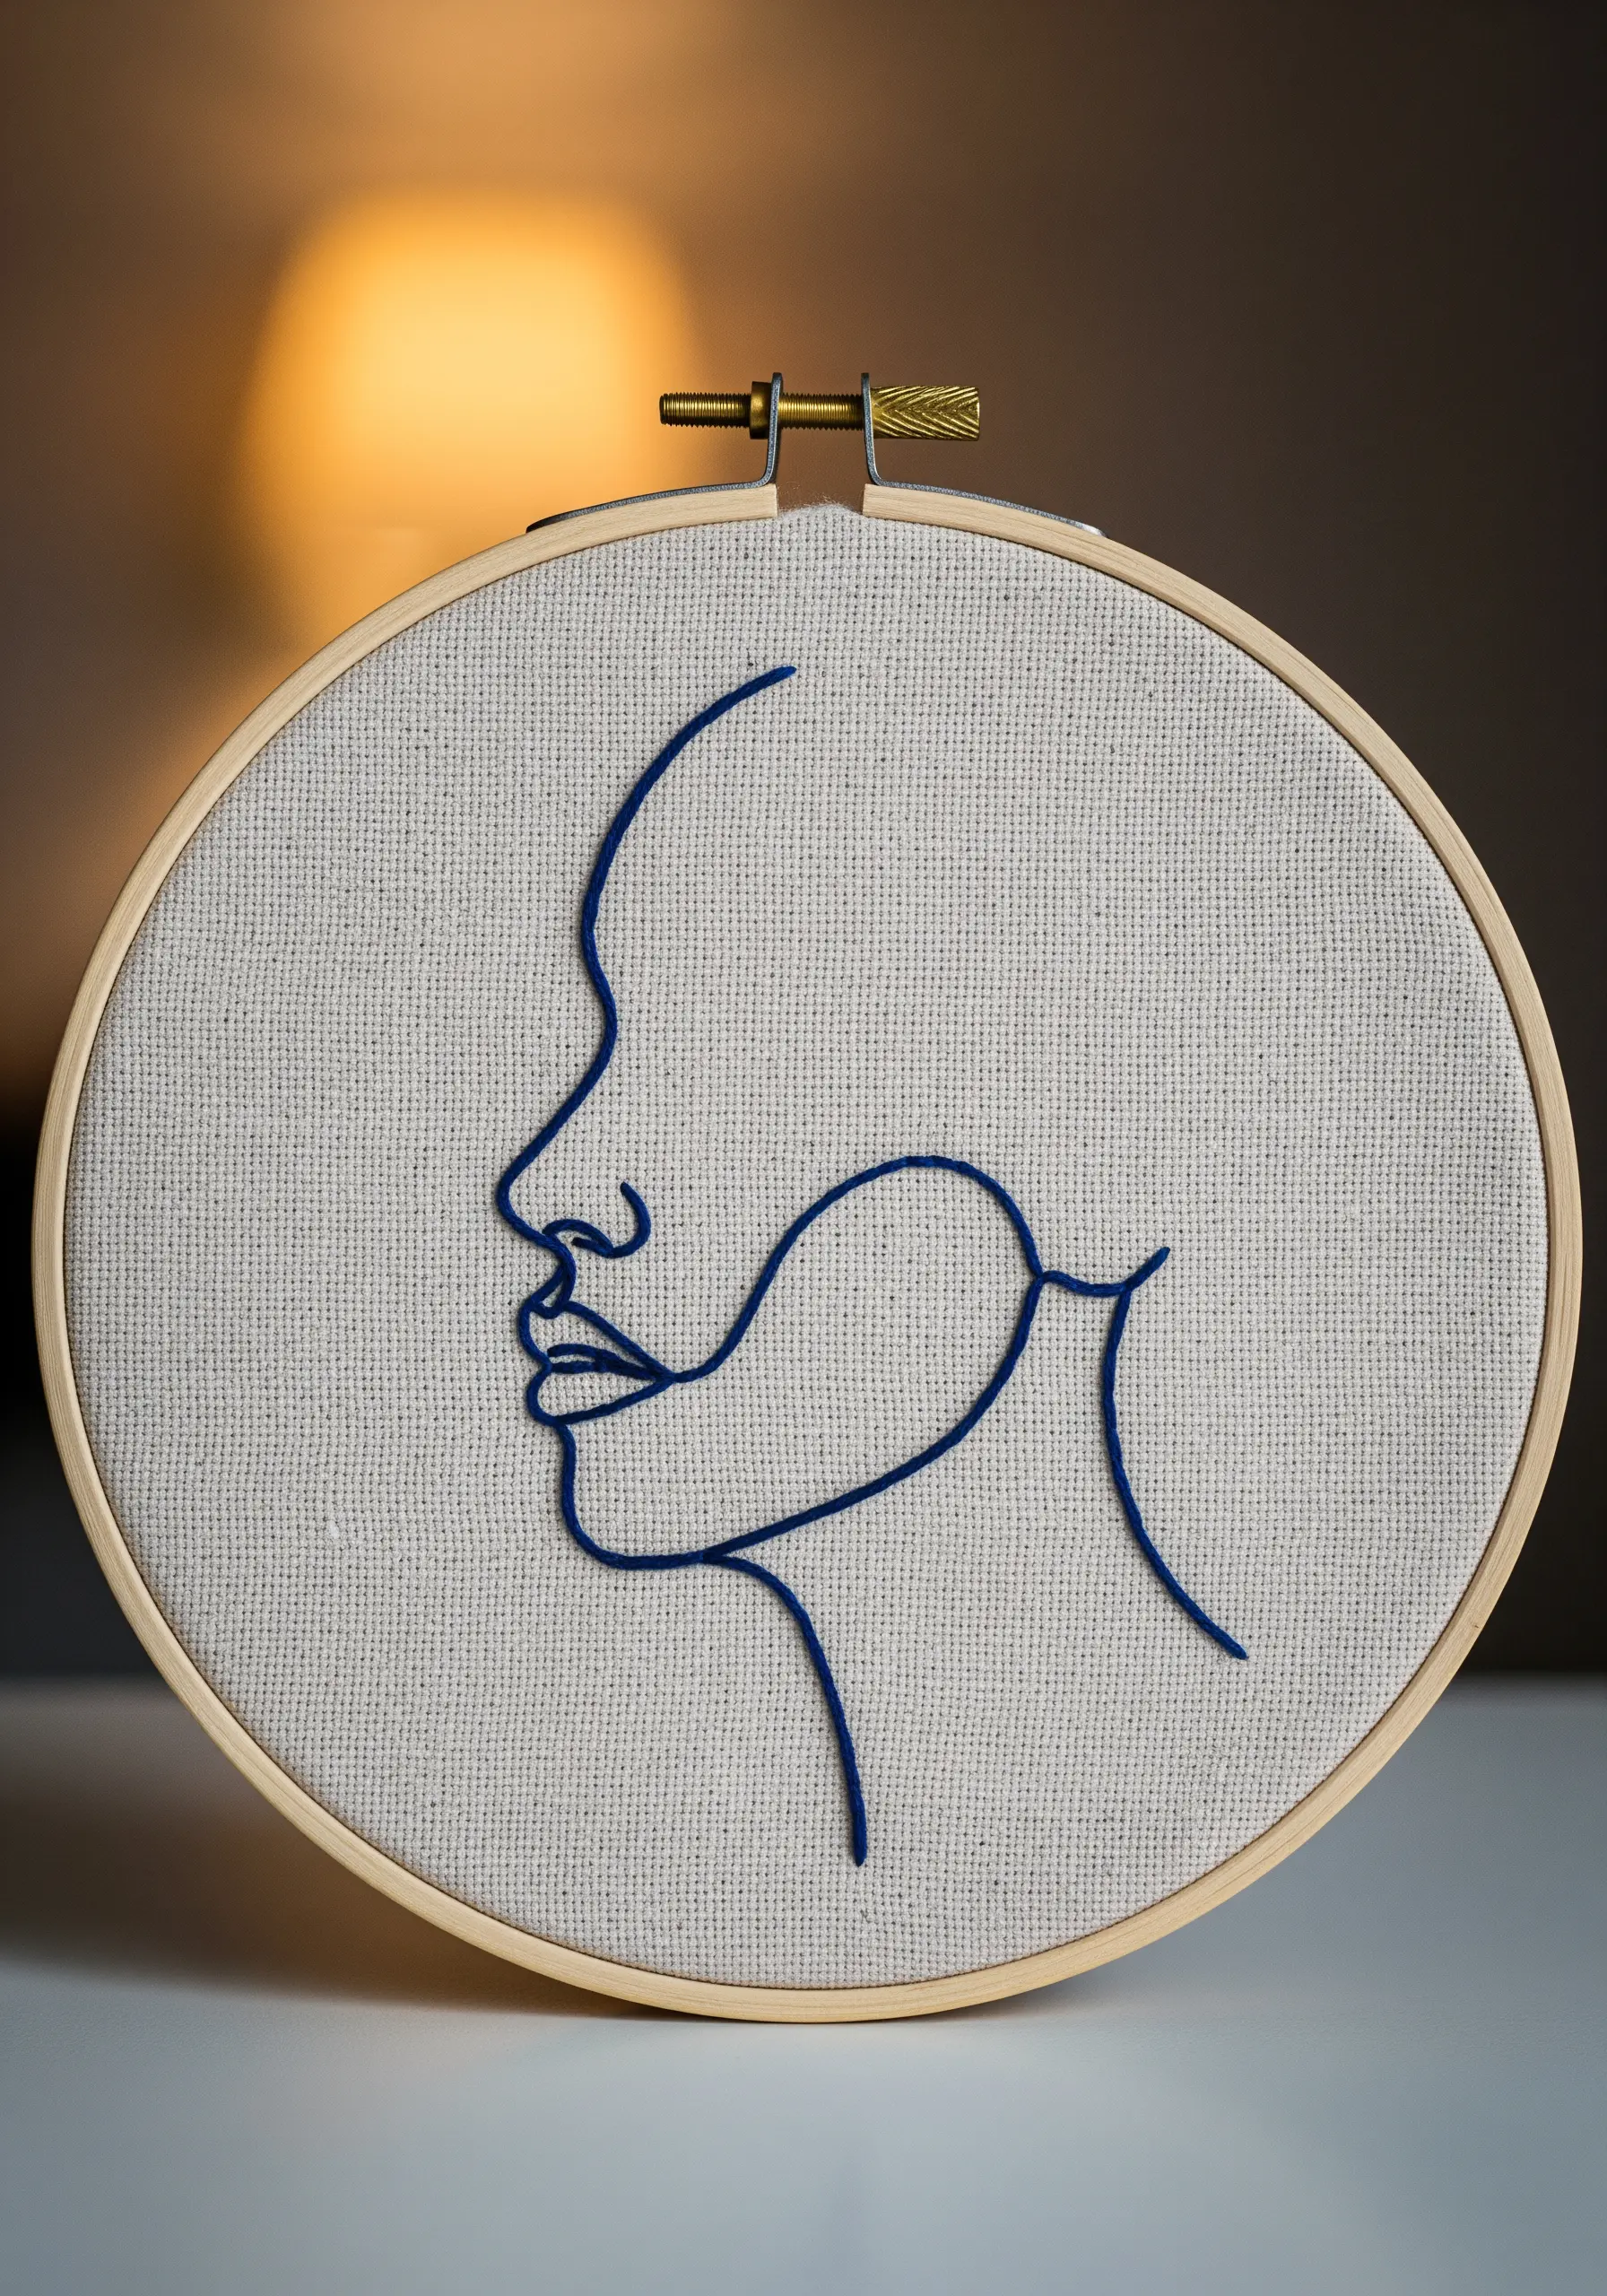
The ultimate challenge in minimalist embroidery is to convey a complete idea with a single, unbroken line.
To achieve this fluid, ink-like quality, use a whipped backstitch or a stem stitch, which creates a smooth, rope-like line without the jagged edges of a standard backstitch.
Choose a thread with a bit more weight, like a cotton perle #8 or two strands of floss, to give the line presence.
The beauty of this style is its confidence; it relies on the purity of the contour, making it perfect for modern line art portraits and figures.
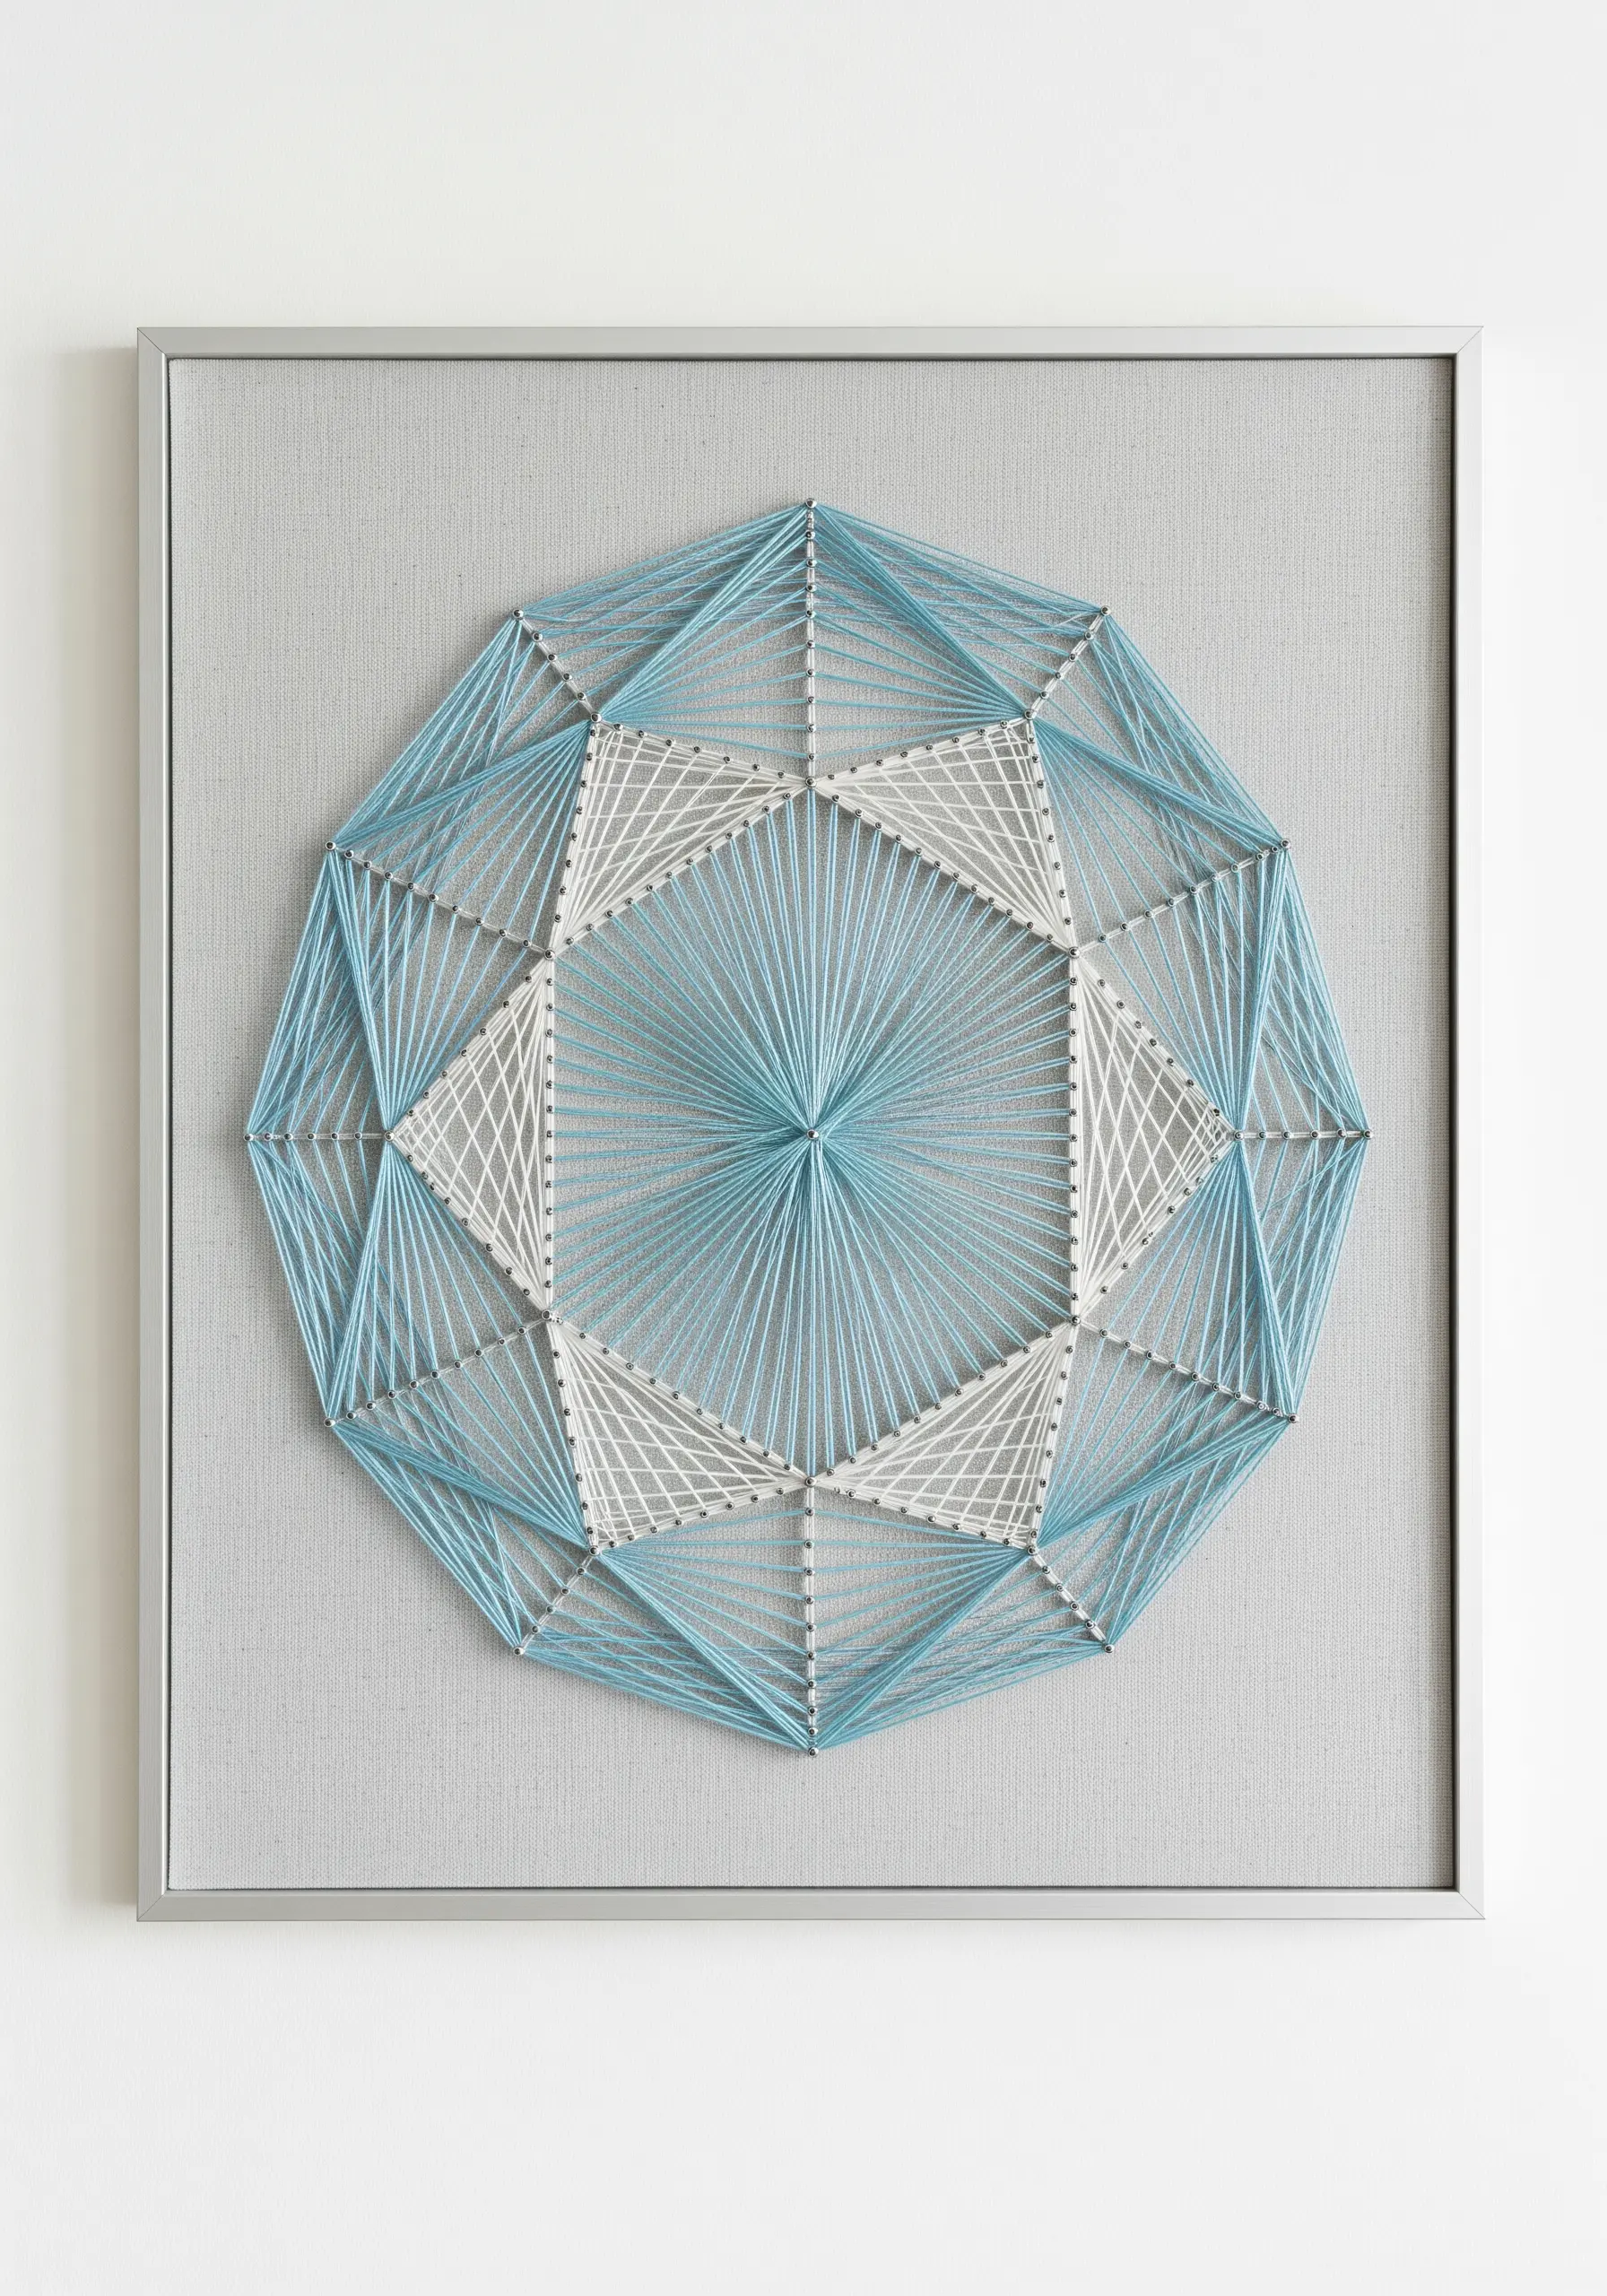
11. Build Tessellations from Simple Geometric Units
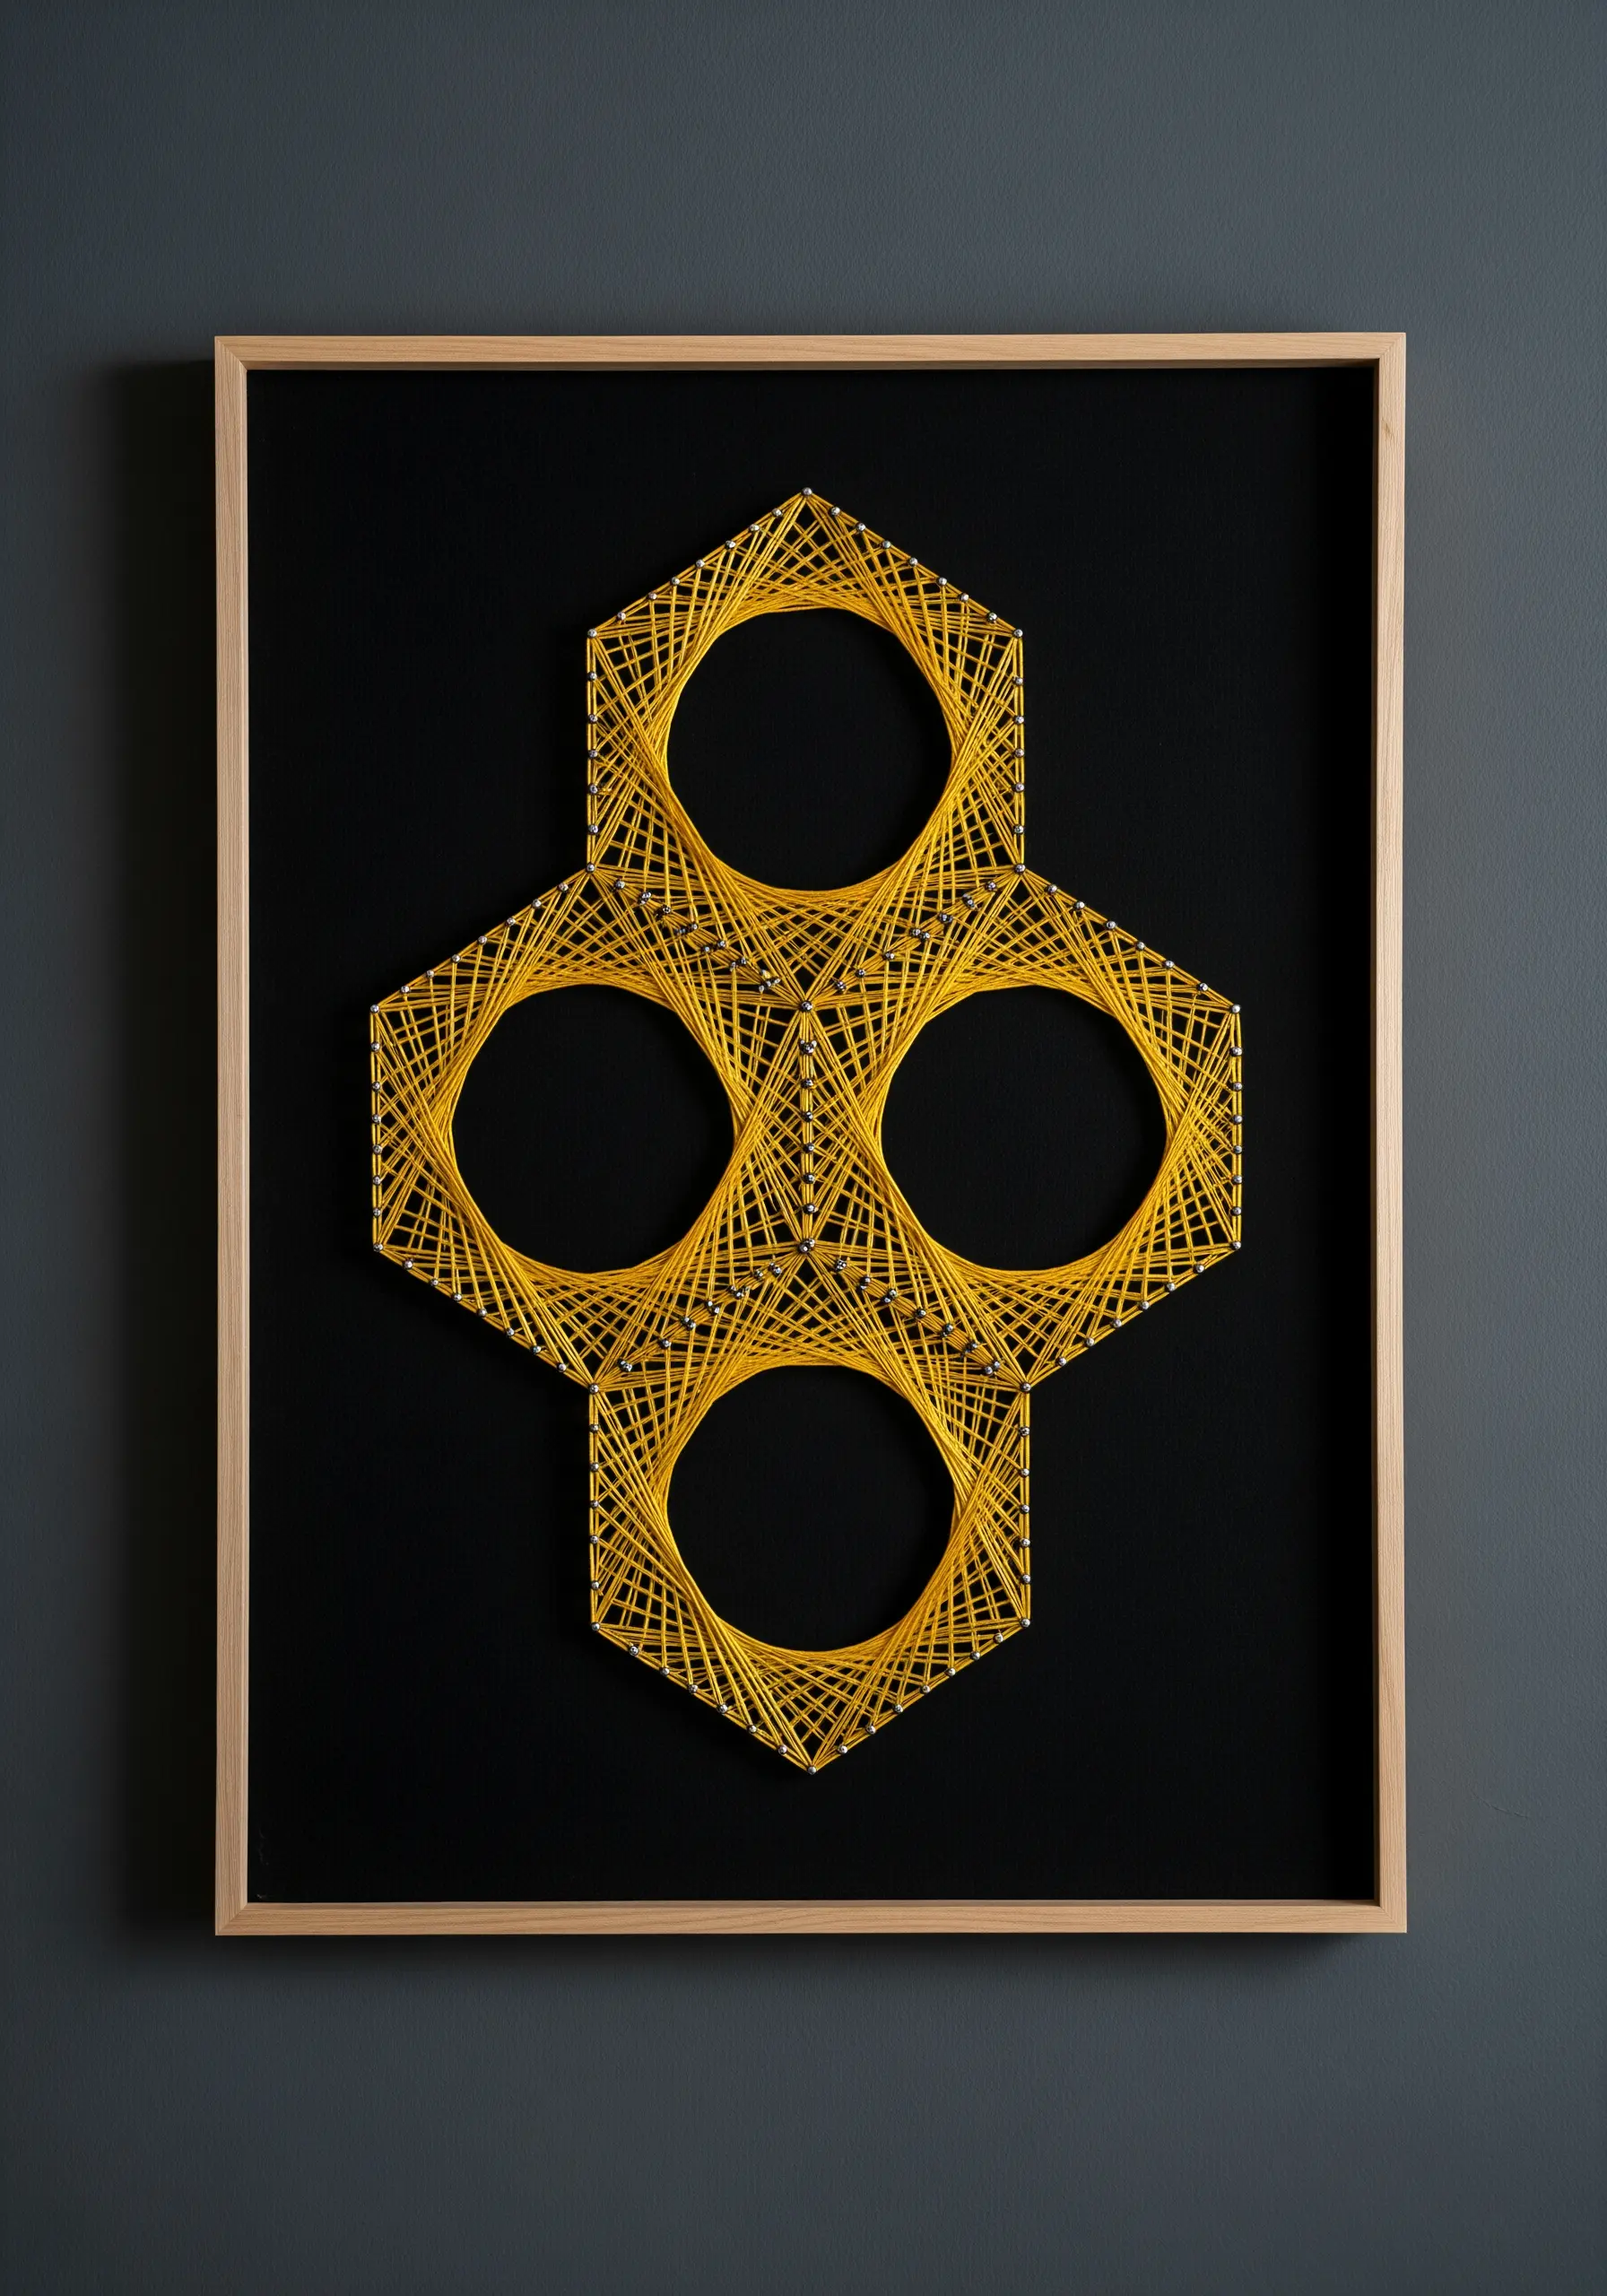
Complex patterns often begin with the simplest shapes. This piece is a masterclass in using repeated hexagons to build a larger, interconnected design.
The technique relies on creating an underlying grid of anchor points—small pins or nails on a board, or carefully marked dots on fabric.
By wrapping thread from one side of the hexagon to the other, you create those beautiful, curved illusions within the straight lines.
Using a single, vibrant color against a dark background emphasizes the pattern’s structure and the almost hypnotic, spiraling effect within each shape.
12. Give Dandelions Dimensionality and Movement
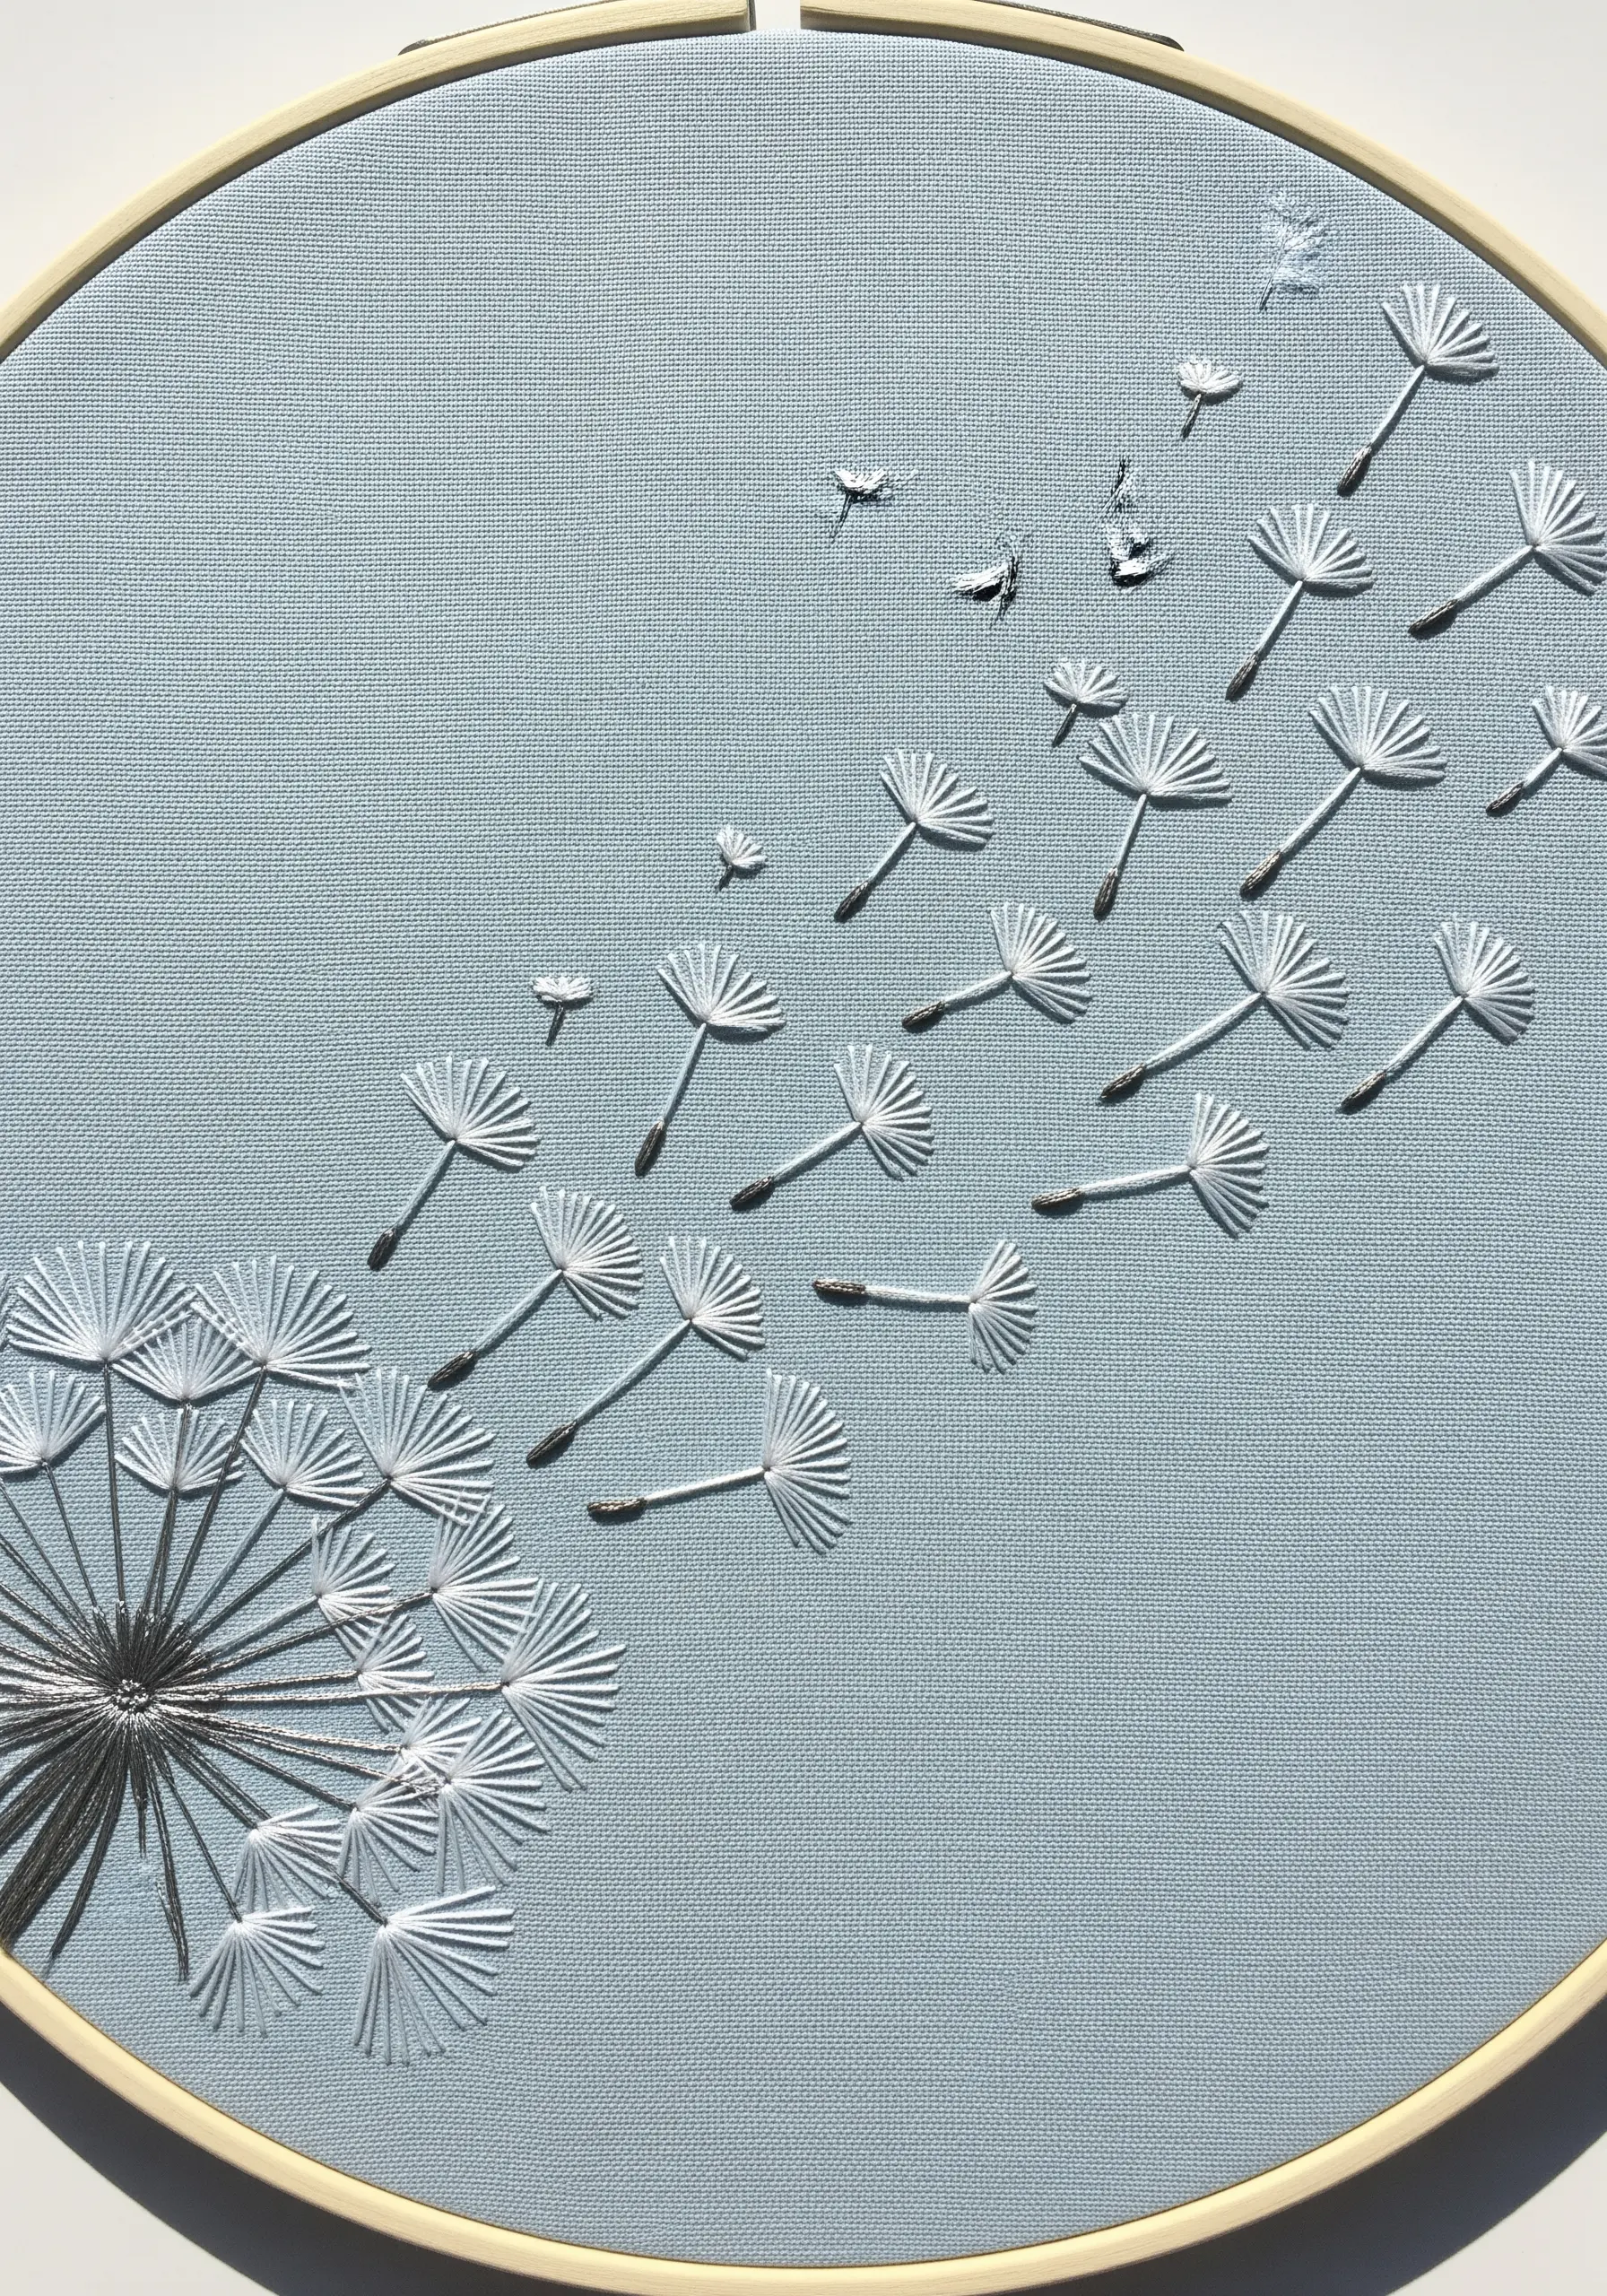
Combine two simple techniques to give your stitched botanicals a realistic, airy quality.
For the main dandelion head, use straight stitches radiating from a central point, varying their length and density to create a spherical look.
For the delicate flying seeds, use a single straight stitch for the stem and a detached chain stitch (or lazy daisy) for the parachute.
Stitching on a soft, muted blue fabric enhances the feeling of seeds drifting against a summer sky. This approach turns a flat design into a story of movement.
13. Craft an Optical Illusion with a Vortex Spiral

This powerful design uses the Moiré effect, where intersecting lines create the illusion of depth and motion.
To create this, you need a perfect circle of evenly spaced anchor points. You then stretch thread from one point to another, slightly offsetting the connection each time.
As the lines build up, the dense, overlapping center appears to recede, pulling the viewer’s eye into the vortex.
This requires immense precision and patience, but the result is a piece of modern thread illusion that feels both mathematical and mesmerizing.
14. Design a Graphic Forest with Satin Stitch Blocks
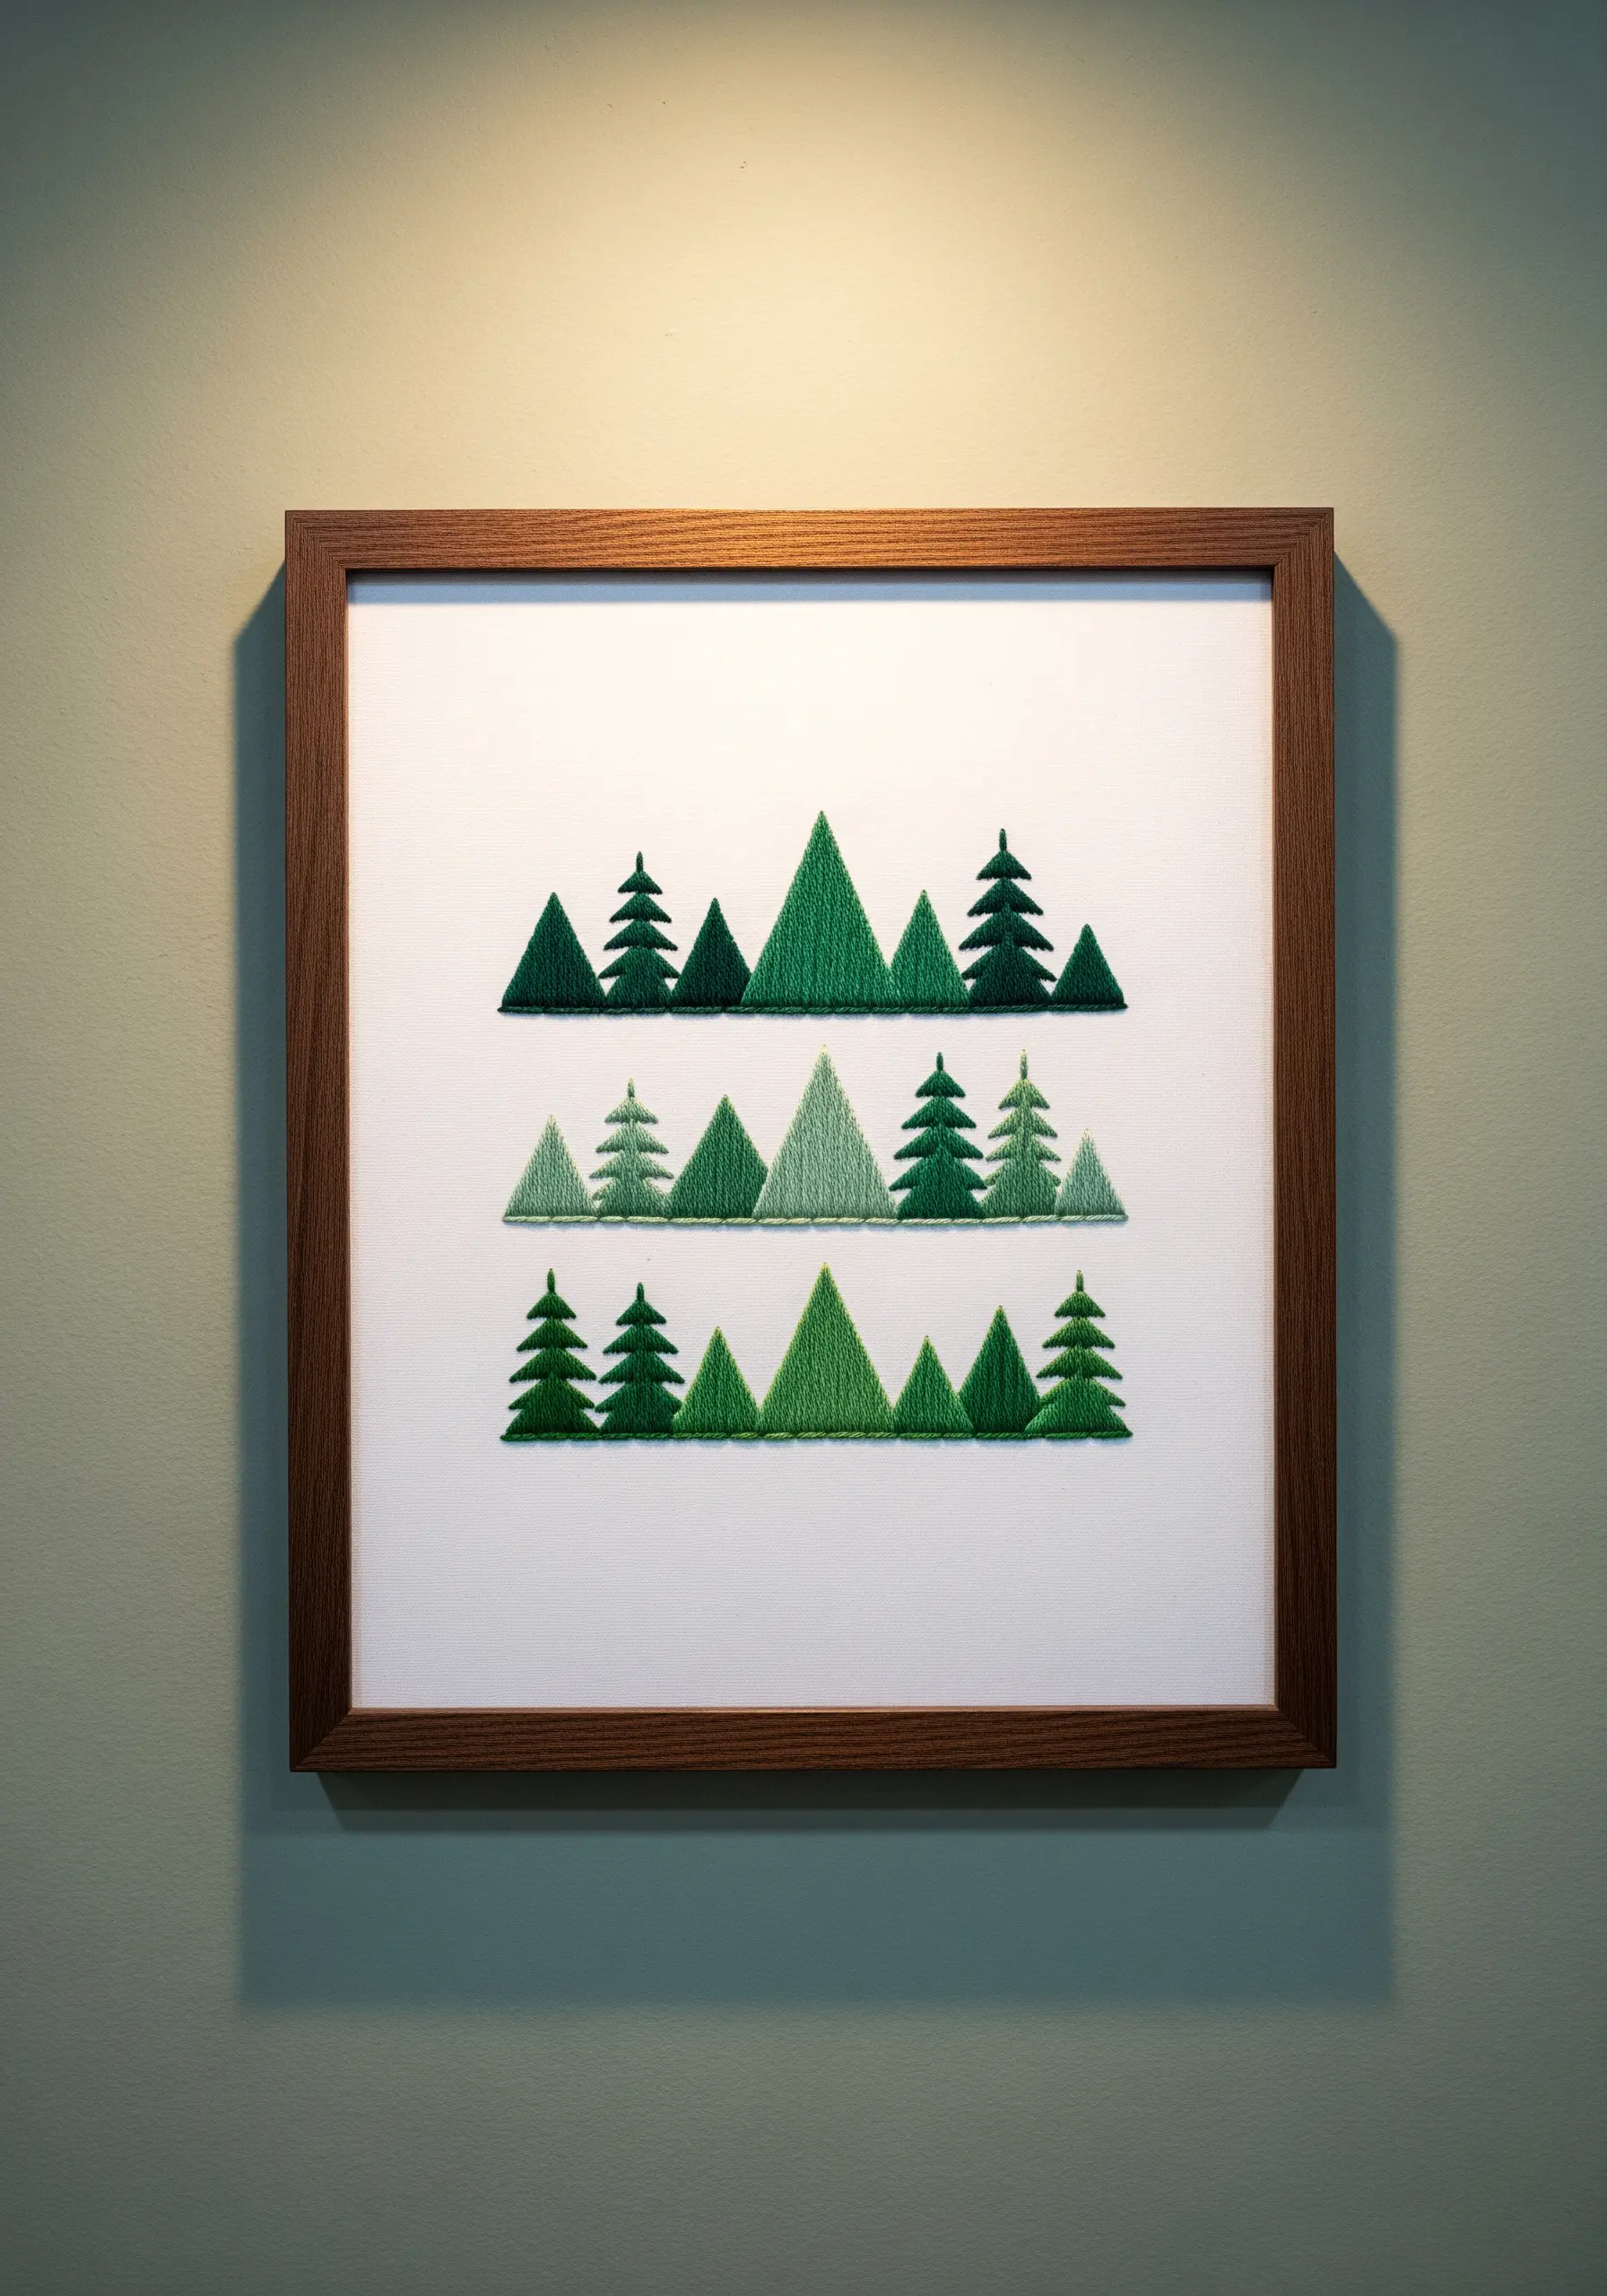
Simplify a complex landscape into clean, graphic shapes by using satin stitch as a color-blocking tool.
Sketch out simple triangles and stylized tree forms, then fill each shape with dense, parallel satin stitches.
To create a sense of depth, use a different shade of green for each row of the forest, moving from darker tones to lighter ones.
Keep your stitch direction consistent within each block (e.g., all vertical or all horizontal) to maintain a clean, organized aesthetic. This technique is perfect for creating nature-inspired framed embroidery with a modern, minimalist feel.
15. Explore Texture and Color with Woven Blocks
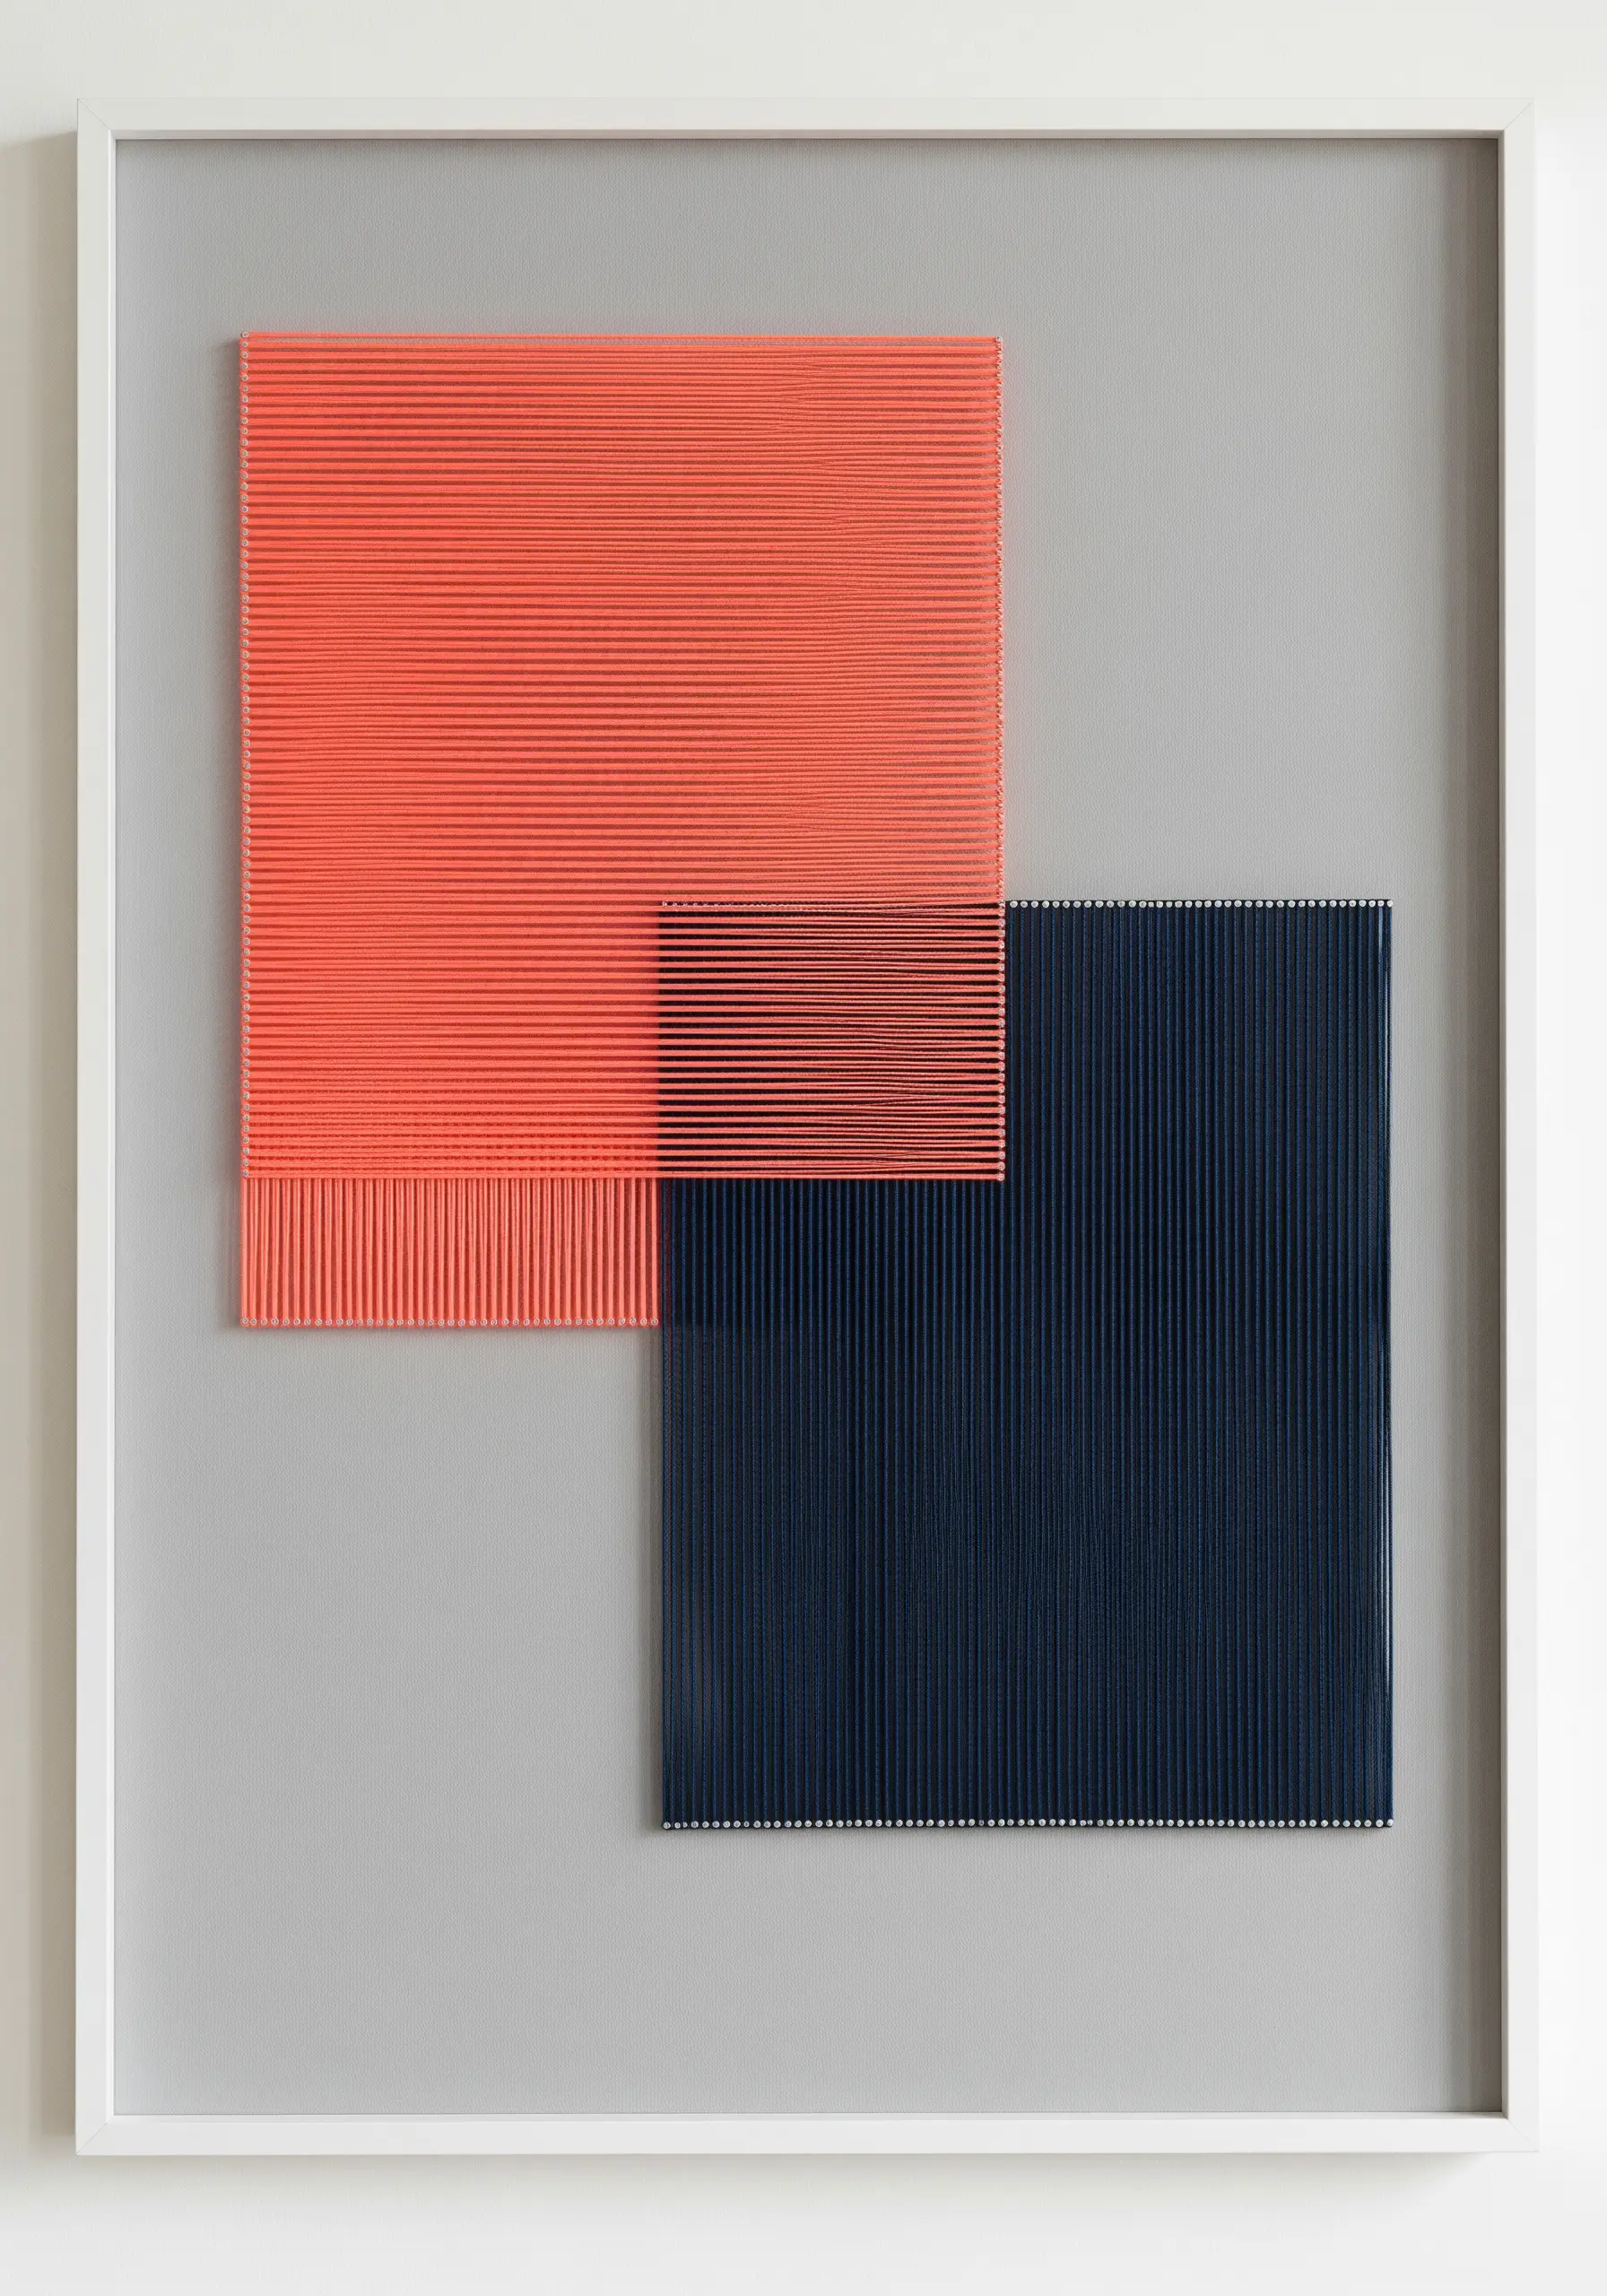
Create a stunning, tactile surface by filling geometric shapes with dense, vertical straight stitches.
This technique mimics the look of woven fabric, turning simple thread into a solid block of color and texture.
The key is to keep your stitches perfectly parallel and uniformly taut. This creates a smooth, almost shimmering surface.
By overlapping two blocks of contrasting colors, like this vibrant coral and deep navy, you create a sense of layering and dimension. It’s a powerful way to make a statement with minimalism.
16. Map the Stars with Radiating Stitches
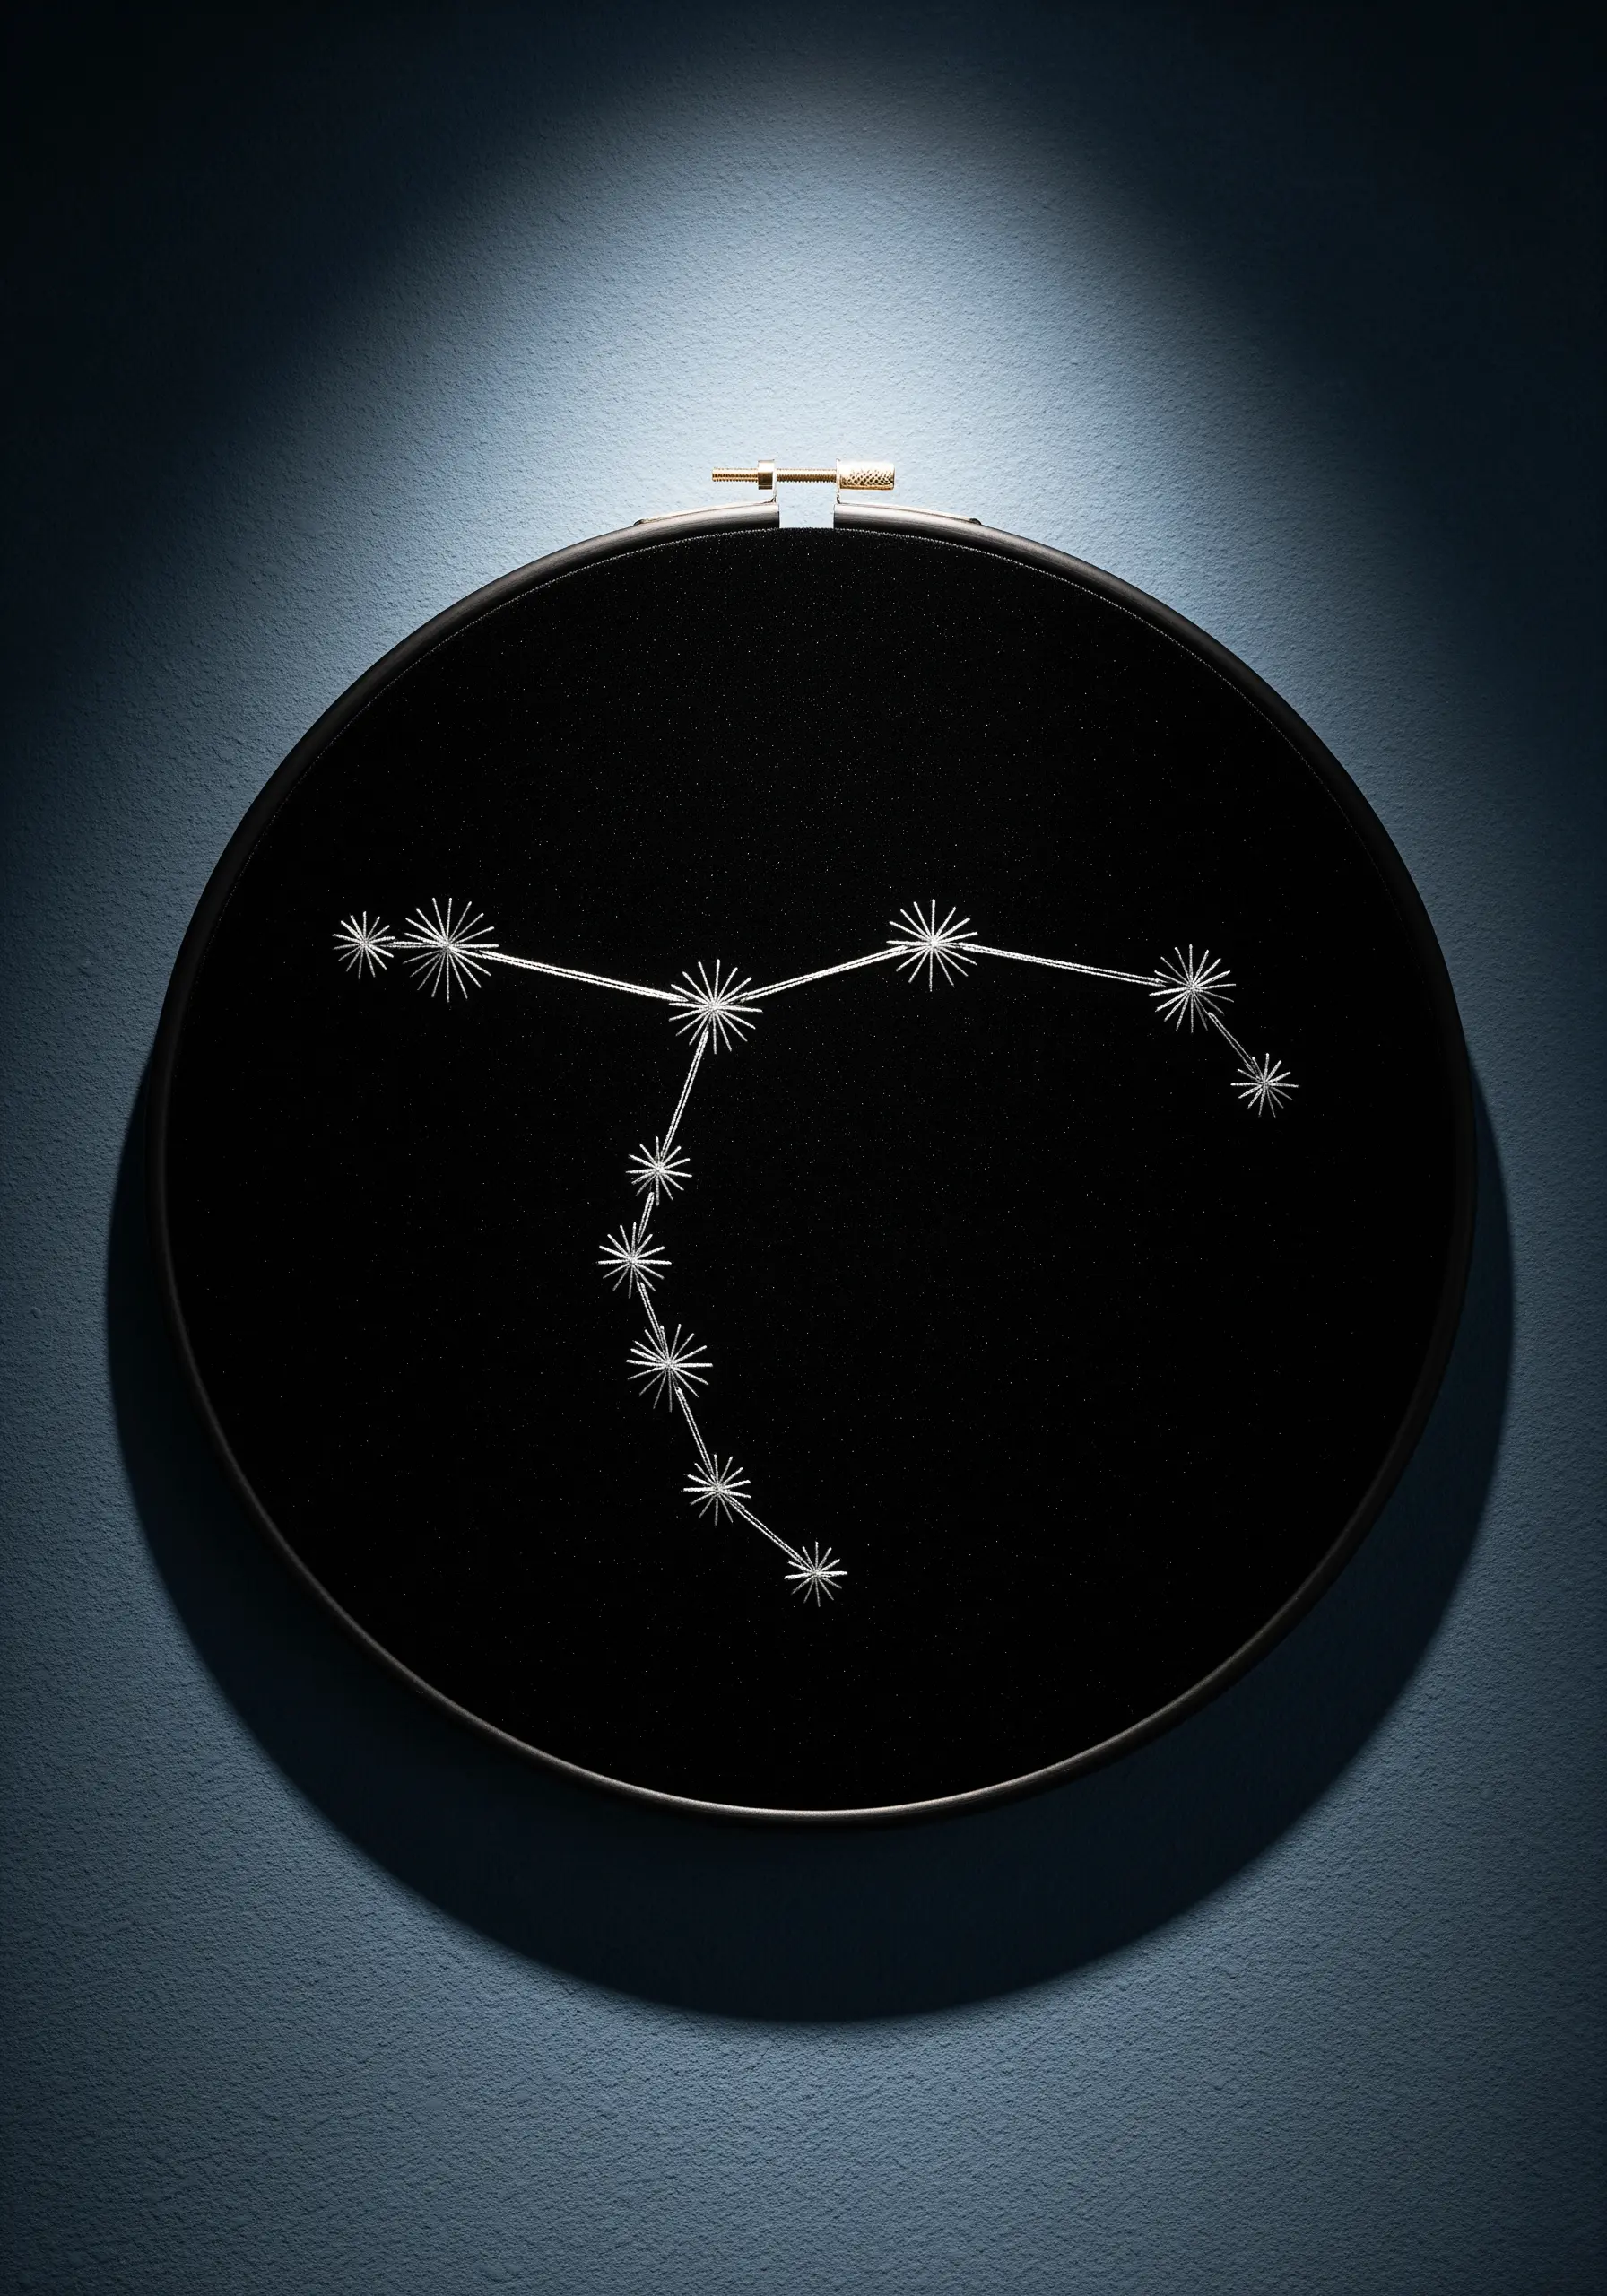
Elevate a simple constellation pattern by giving each star its own dimensionality.
Instead of using a French knot, create each star with a series of straight stitches radiating from a central hole, forming a starburst or an eyelet stitch.
This makes each point of light feel more significant and dynamic.
Connect these stellar points with clean, sharp backstitches using a bright white or silver metallic thread on a black or navy fabric. The high contrast is what brings this minimal celestial embroidery to life.
17. Deconstruct the Grid with Bold Primary Colors
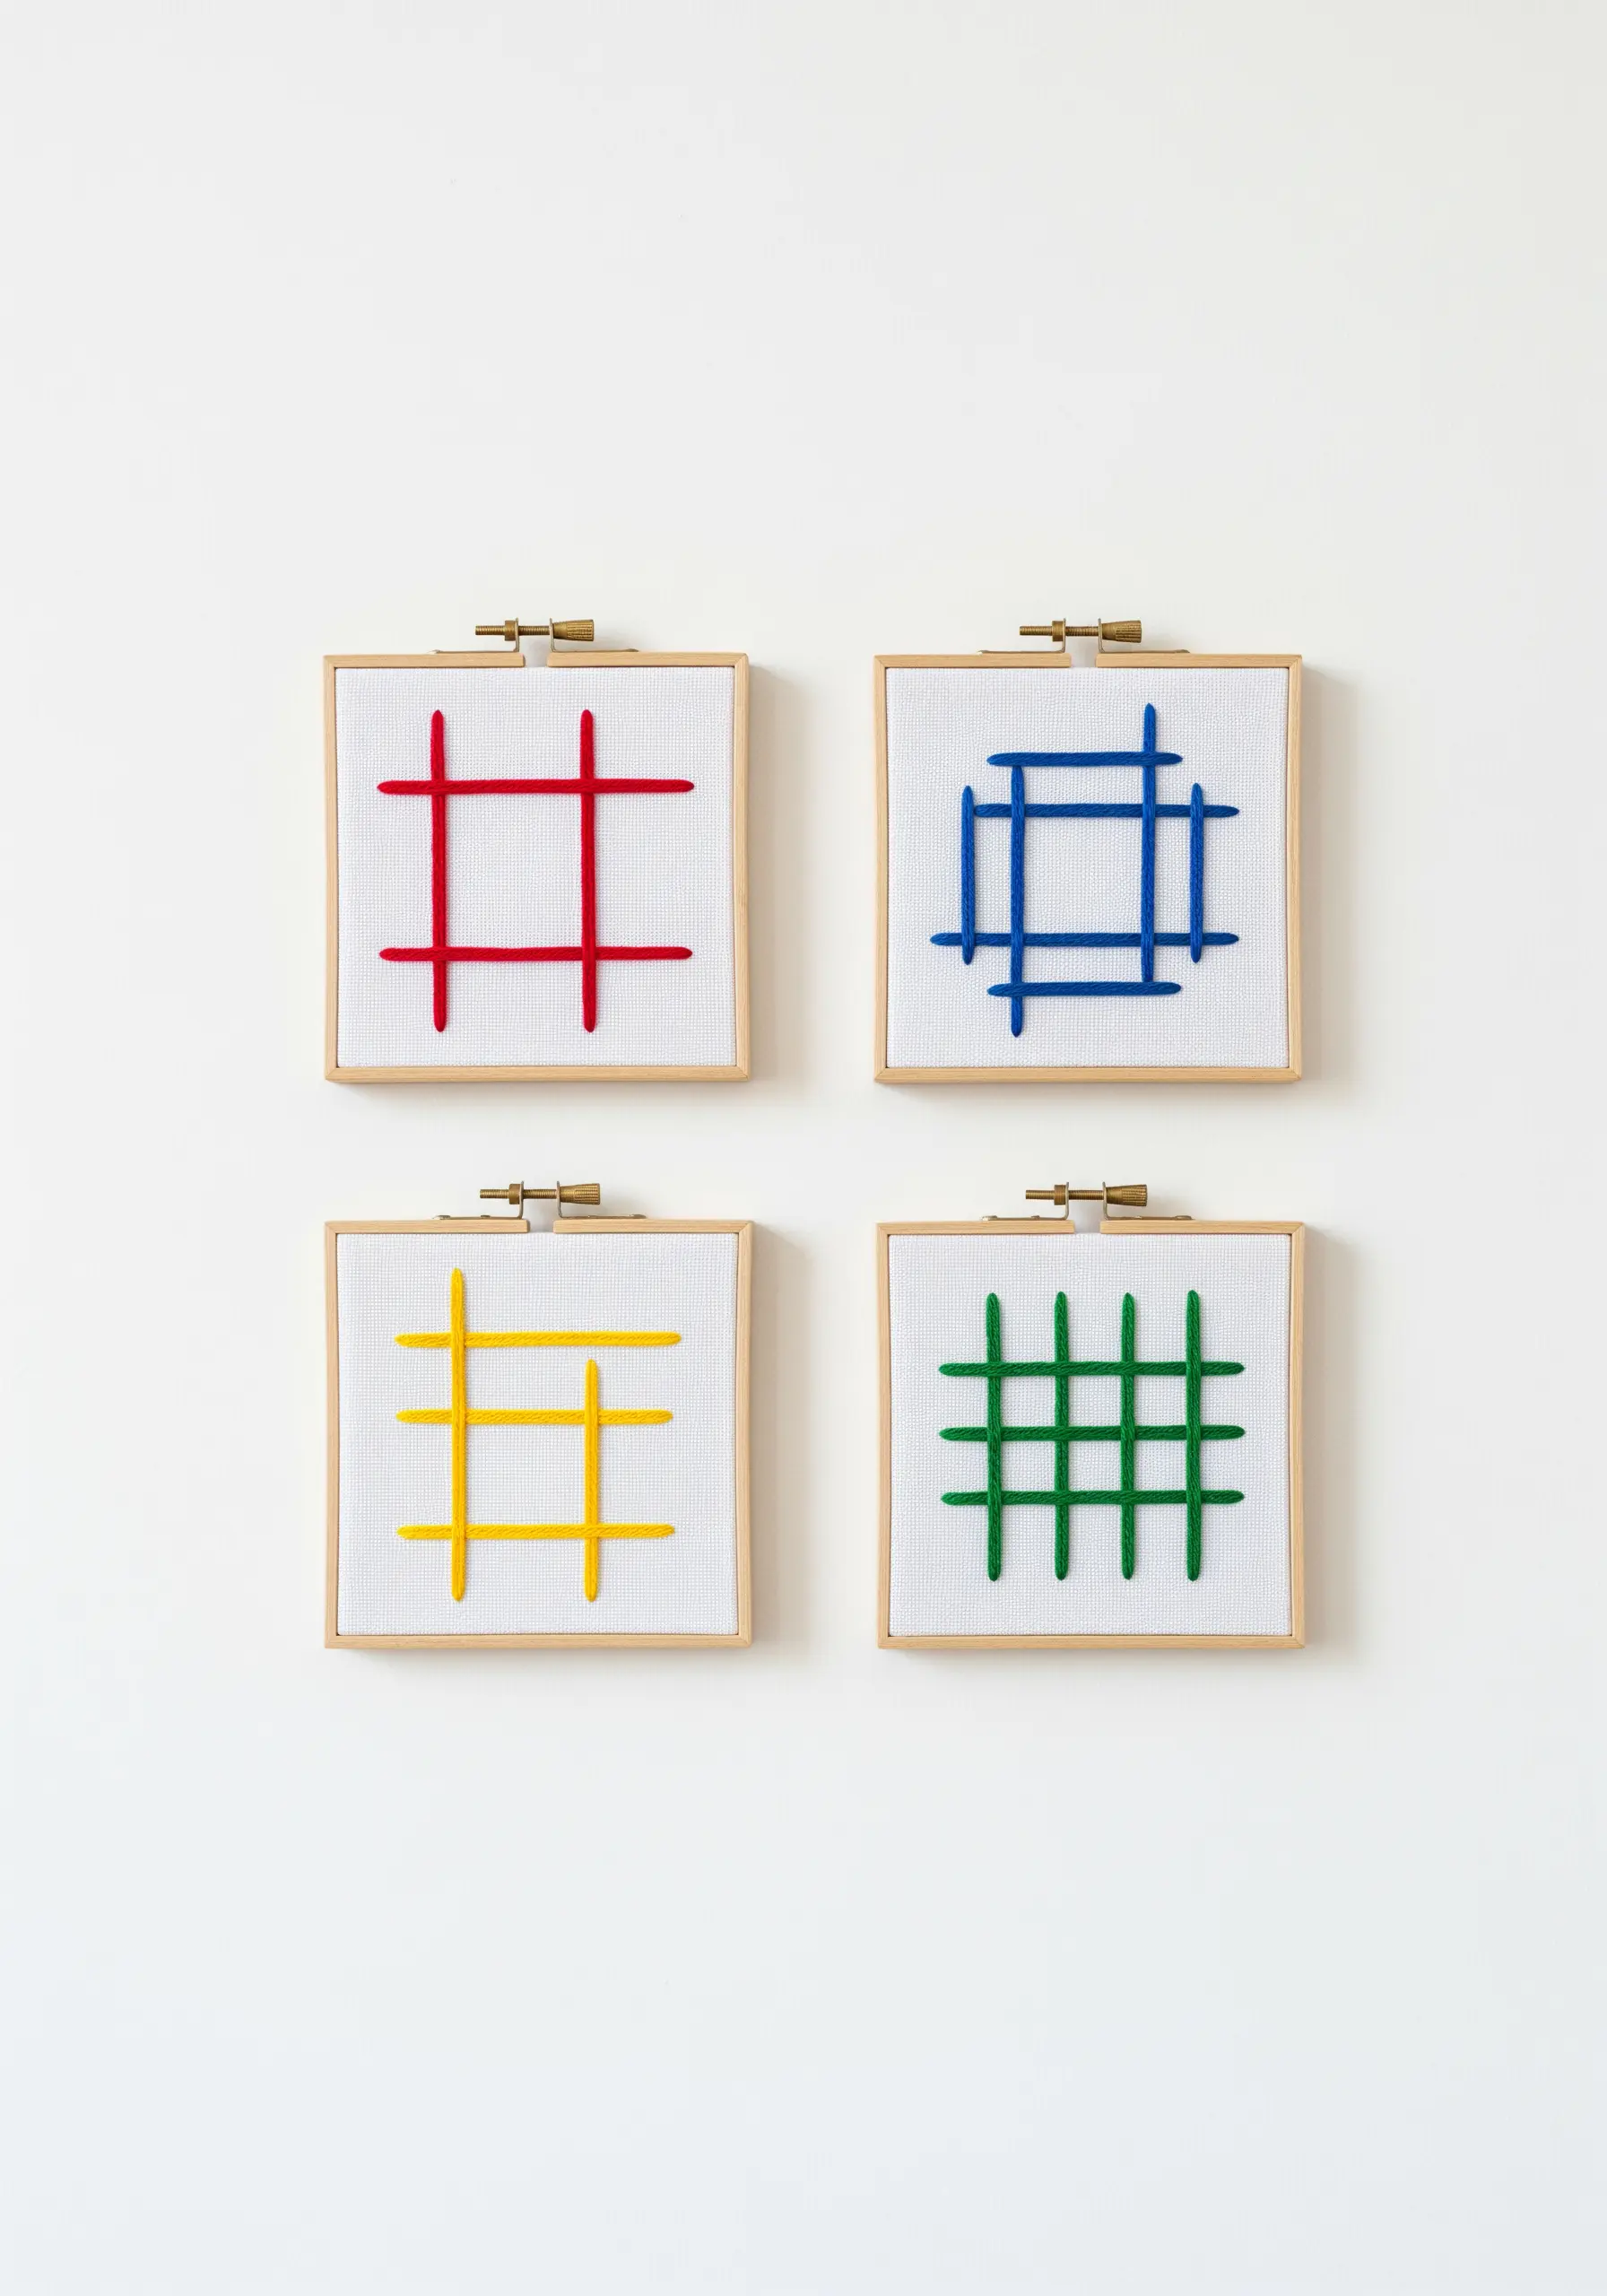
This design is a nod to modern art movements like De Stijl, proving that simple lines and primary colors can be incredibly sophisticated.
Use a heavy-weight thread, like a cotton perle or even fine yarn, to give your lines a bold, graphic presence.
Wrap the thread around the frame or canvas to ensure perfectly straight, taut lines without stitching through the fabric.
Arranging these simple grids as a set of four transforms them from individual studies into a cohesive, gallery-style installation for your wall.
18. Layer Geometric Forms with Contrasting Colors
Create visual complexity within a symmetrical design by using color to define different layers.
This piece uses a base of straight white stitches to form a diamond pattern, which is then overlaid with blue thread to create a central, star-like octagon.
The contrast between the two colors makes the geometric shapes pop, allowing the eye to see multiple patterns at once.
When planning your design, think in layers. Stitch the background geometry first, then add the foreground elements on top for a clean, sharp finish.
19. Achieve Crisp Outlines with a Split Stitch Base
For minimalist line art, the quality of your outline is everything. A wobbly or uneven line can ruin the entire effect.
To ensure your outlines are flawlessly clean, first stitch the entire design with a single-thread split stitch. This creates a stable, narrow foundation.
Then, go over that foundation with a satin stitch or a thicker stem stitch. The base layer prevents your final stitches from sinking into the fabric weave, resulting in a raised, sharp, and perfectly defined edge.
20. Explore a World of Texture in Monochrome

Working with a single color, like white-on-white, forces you to focus entirely on texture and the way light interacts with your stitches.
This piece uses thousands of tiny, dense seed stitches to create a smooth, fabric-like background.
The central circle is defined by changing the direction of the stitches, causing the light to hit them differently and creating a subtle, embossed effect.
This is a quiet, meditative form of embroidery that results in a sophisticated piece of textured neutral art.
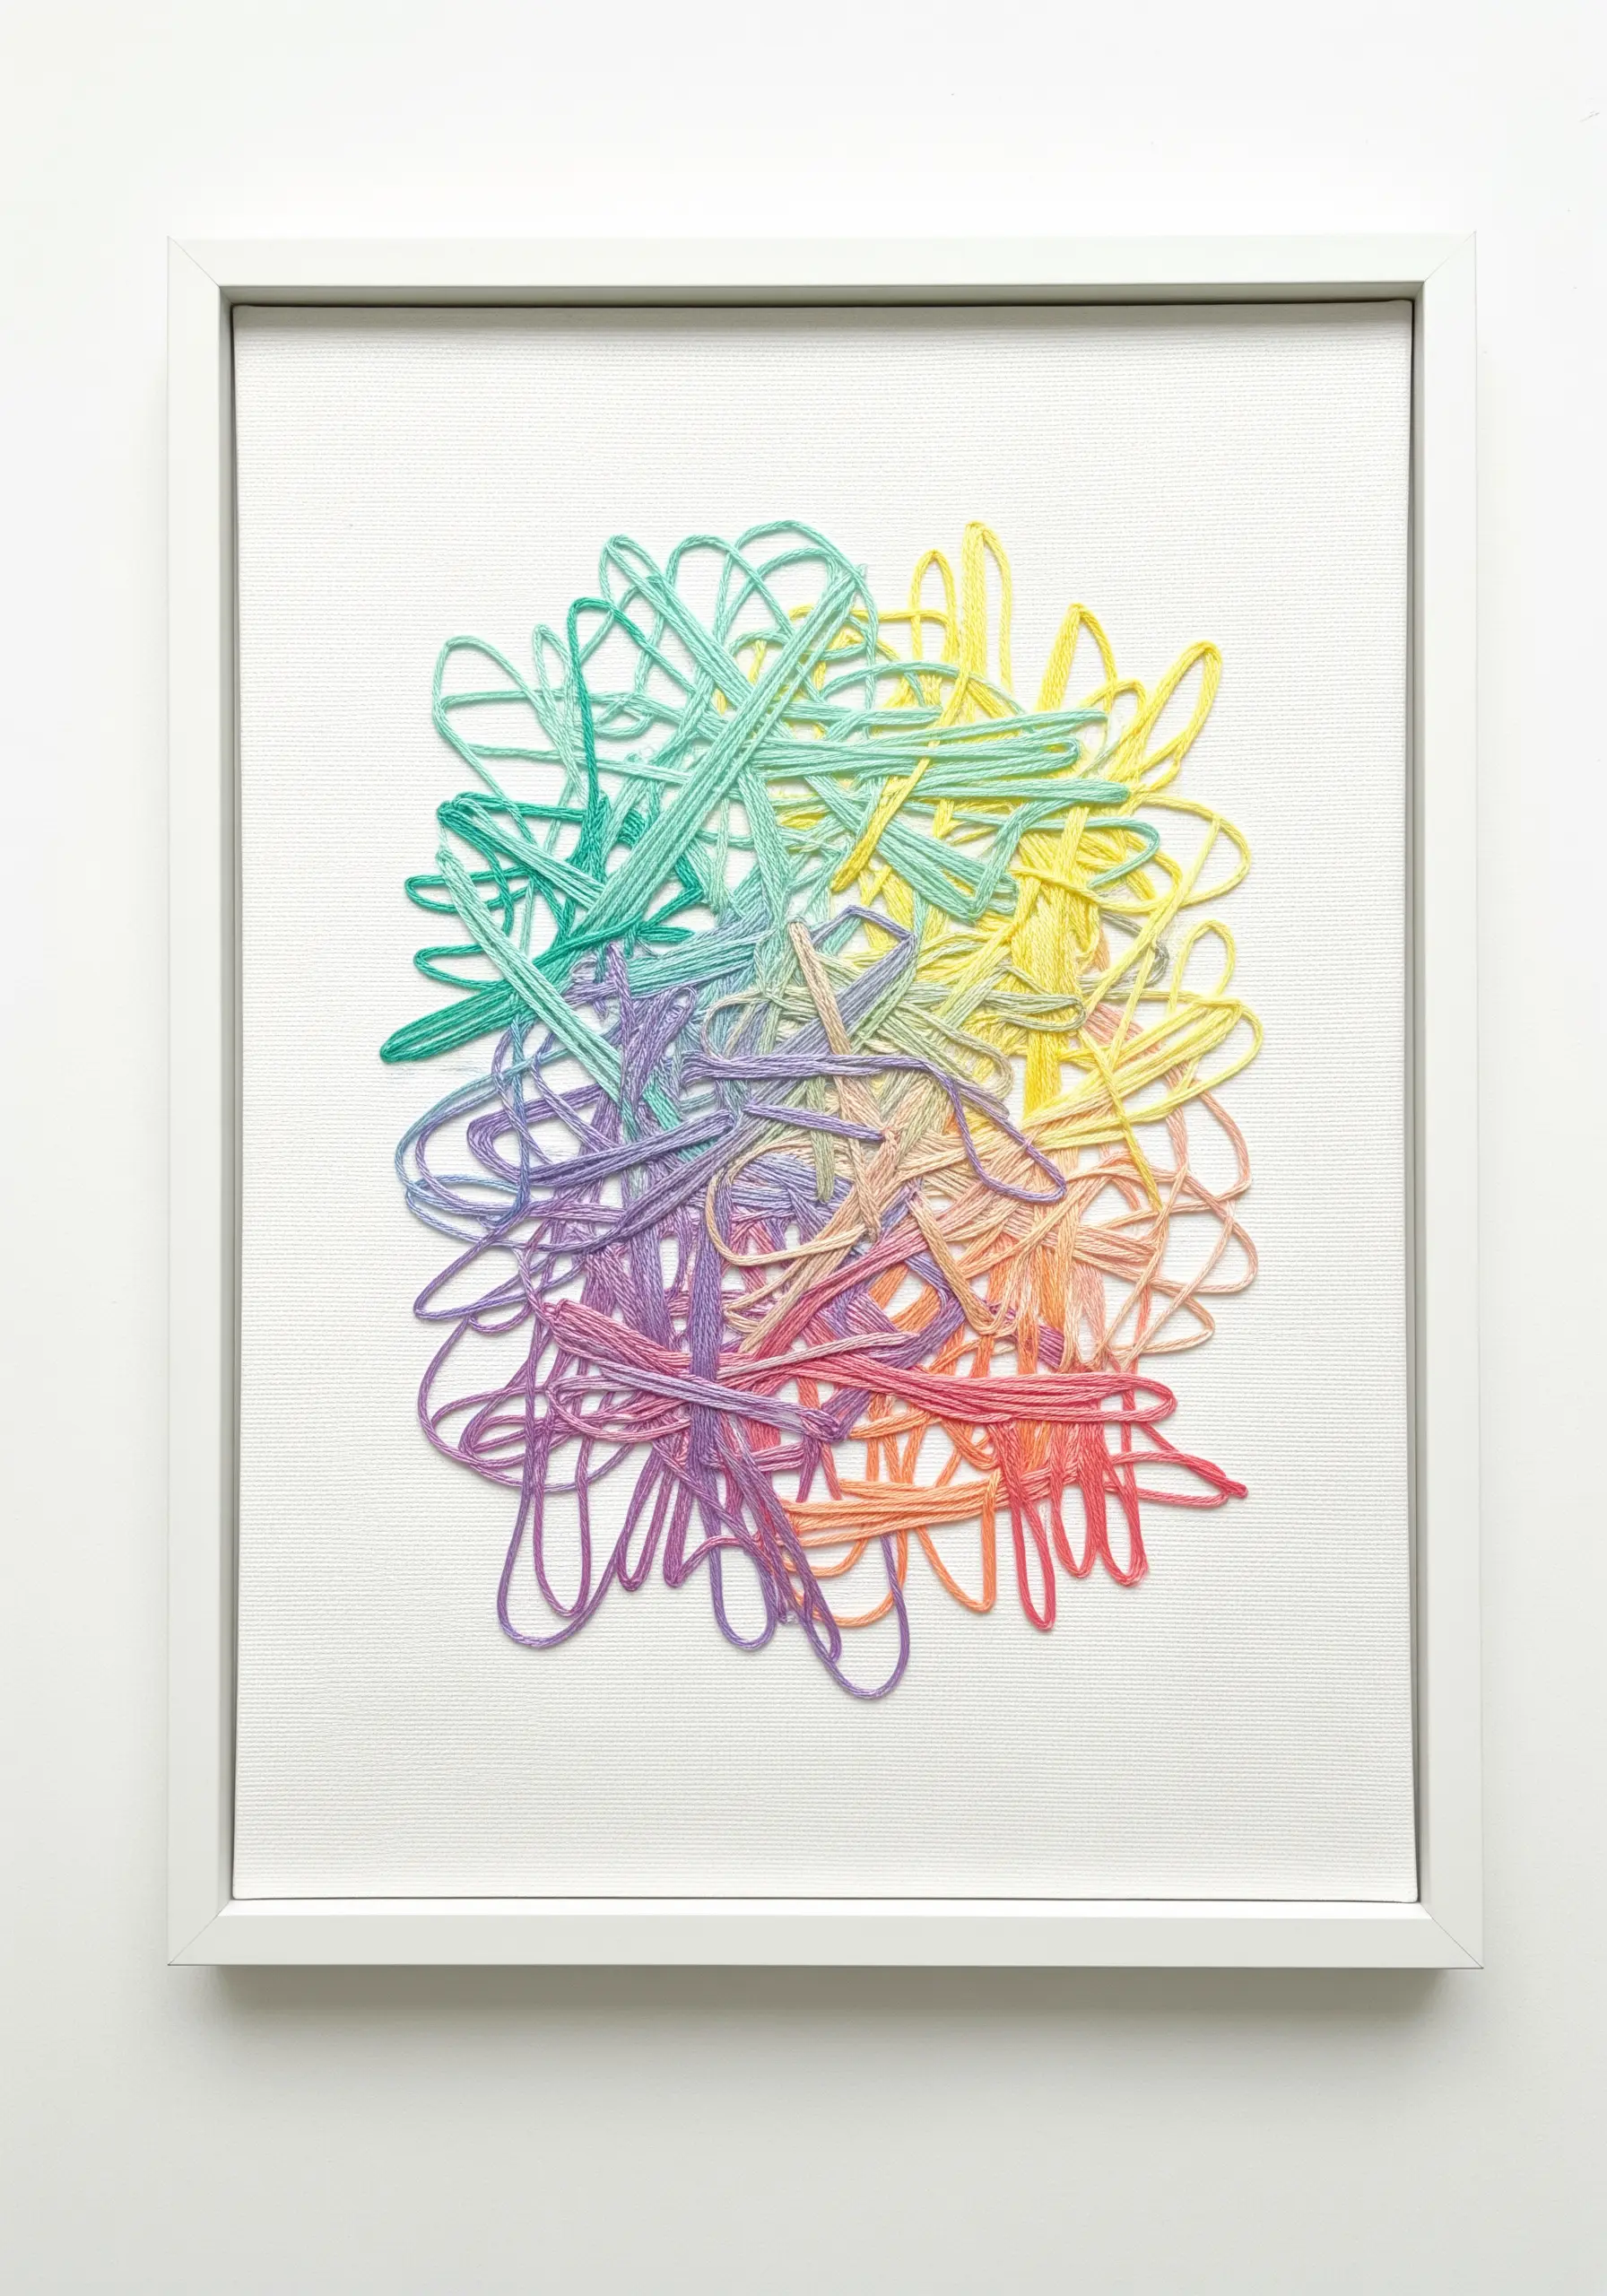
21. Paint with Thread Using Color Gradient Wings

Achieve a smooth, painterly gradient by carefully planning your thread colors.
Select a range of at least four or five shades within the same color family, moving from dark to light.
Divide the wing shape into sections for each color. Start by stitching the darkest color at the base.
To blend the transition, allow the stitches of the two adjacent colors to intermingle slightly, just as you would blend paint.
The tiny white beads at the anchor points add a touch of sparkle and help define the shape’s scalloped edges.
22. Define a Serene Horizon with Line and Color

This panoramic piece shows how to create a vast, peaceful landscape with the simplest elements: horizontal and radiating lines.
The key to the ocean’s calm is the perfectly parallel, horizontal stitches in graduated shades of blue. Use a ruler and a fabric marker to ensure they are flawless.
The sun is created with two elements: a dense, satin-stitched semi-circle and long, radiating straight stitches for the rays.
The limited color palette and clean composition give this large-scale piece a serene and modern feel, perfect for hanging above a sofa.
23. Capture Natural Spirals with Negative Space
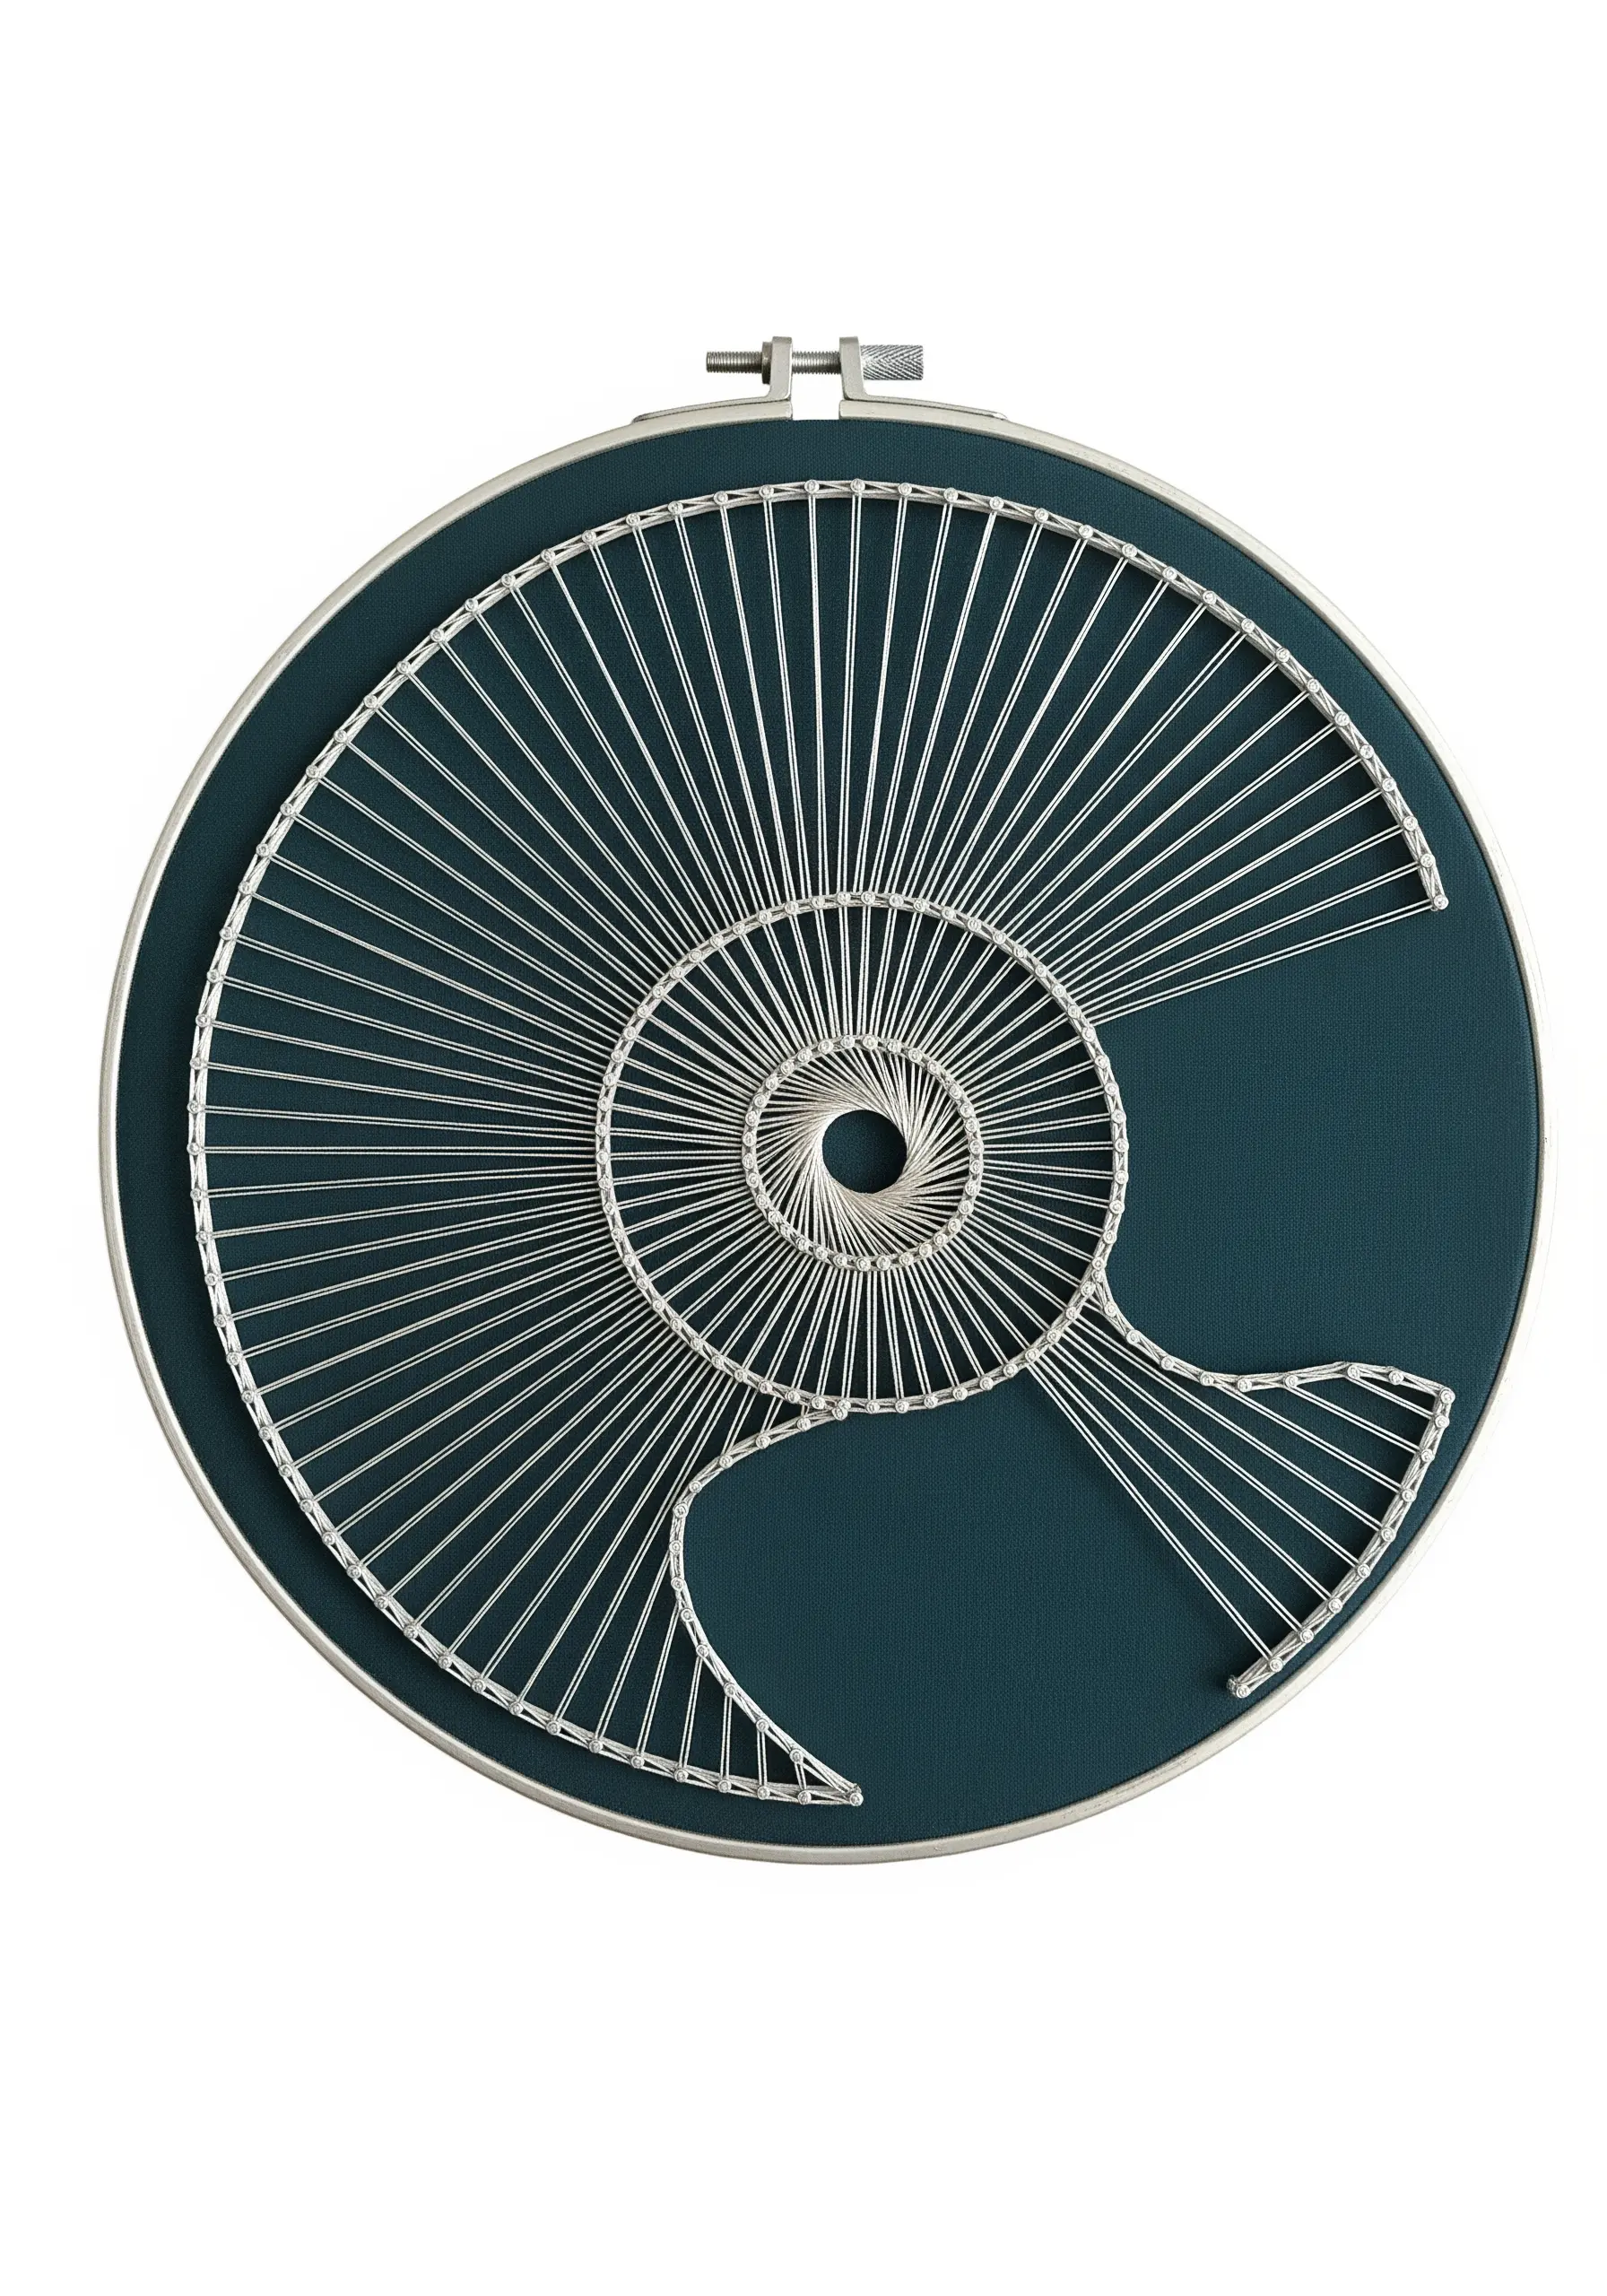
The elegant curve of a nautilus shell is defined as much by the empty space as it is by the stitched lines.
To recreate this, you are not outlining the shell, but rather using straight stitches to connect points on its inner and outer spirals.
It’s the empty, un-stitched area that forms the beautiful, curving chambers of the shell.
This is an advanced application of negative space embroidery techniques, where your brain fills in the gaps to see the complete form.
24. Create Freeform Texture with Couched Yarn
To achieve a playful, tangled effect that feels spontaneous, embrace the couching technique with a soft, variegated yarn.
Lay your colorful yarn on the fabric in a random, looping pattern. Don’t think too much—let it fall naturally.
Then, using a single strand of matching or invisible sewing thread, make tiny, discreet stitches over the yarn to tack it down to the background fabric.
This allows you to create bold, textural lines and organic shapes that would be impossible with traditional embroidery stitches, perfect for abstract thread collage ideas.
25. Make a Bold Statement with Architectural Yarn
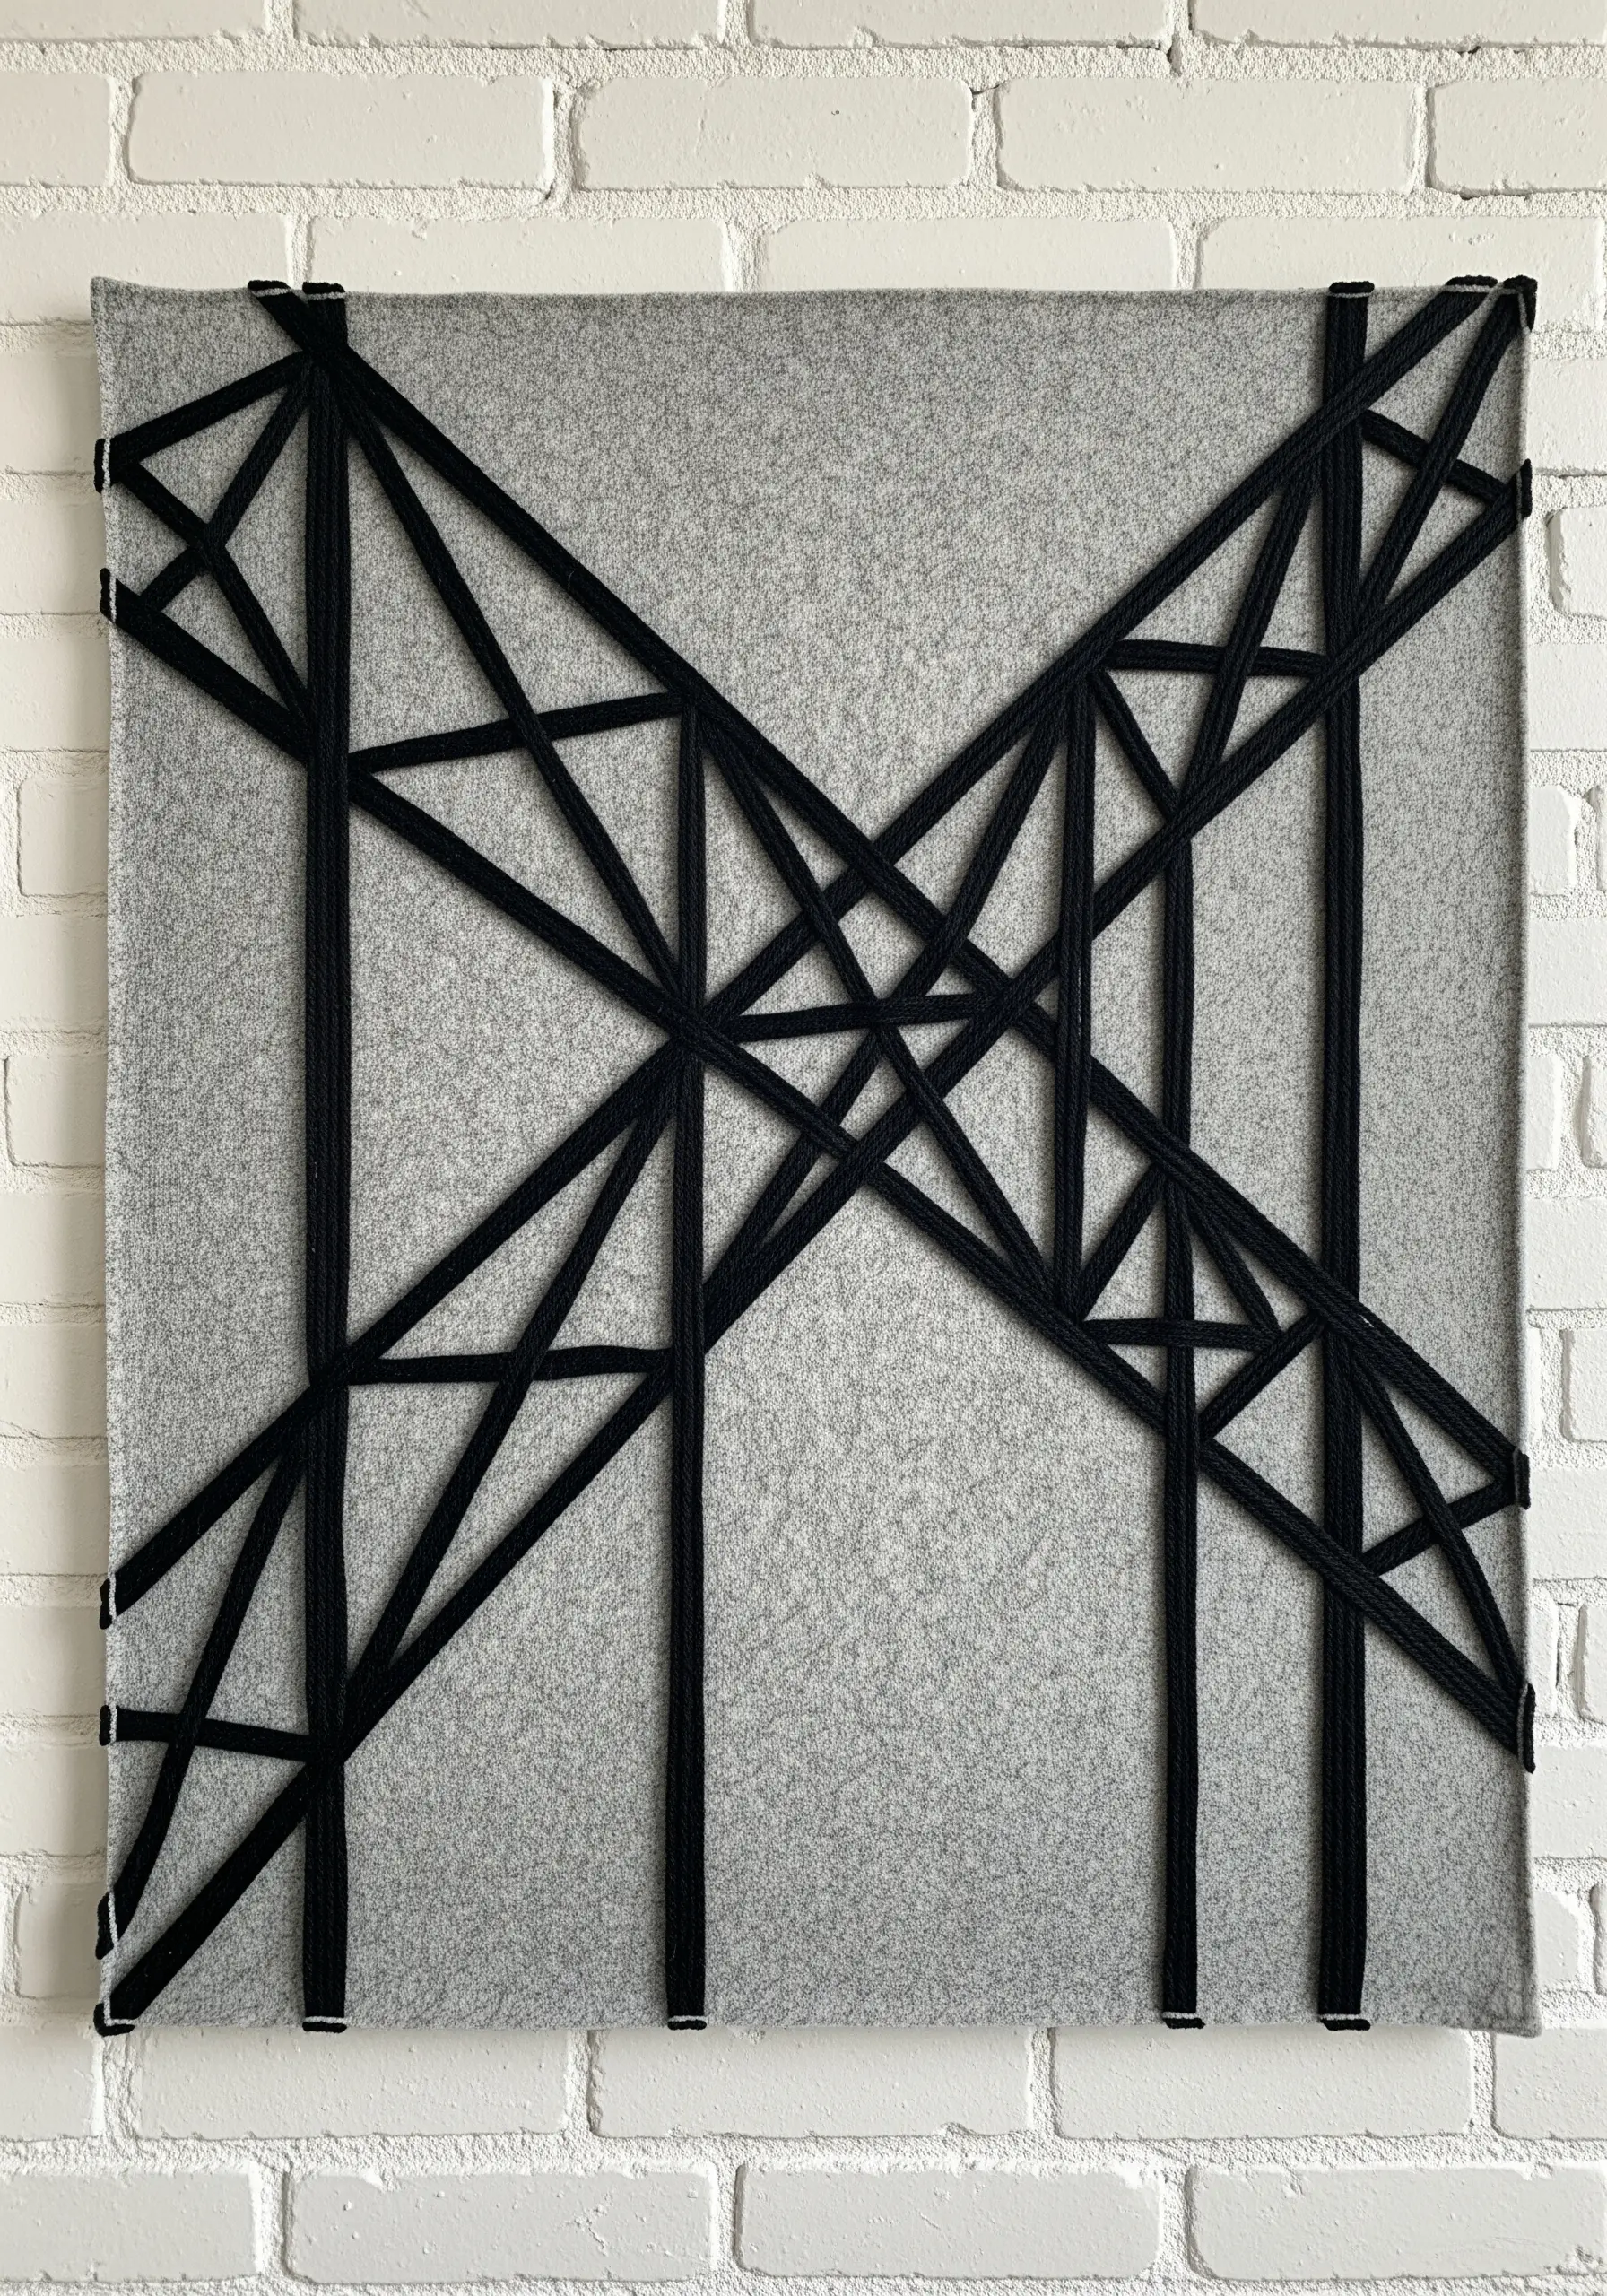
Switch from fine floss to thick, chunky yarn to give your line art a powerful, architectural presence.
Work on a rigid surface like a felt-covered board or stretched canvas, using pins or staples at the corners to hold the yarn.
The thickness of the yarn creates immediate visual weight and a soft, sculptural quality.
This technique is perfect for large-scale abstract pieces where you want the lines themselves to be the dominant feature, not just the shape they create. This is a great way to try yarn wall art techniques.
26. Stitch Gemstone Facets with Metallic Thread
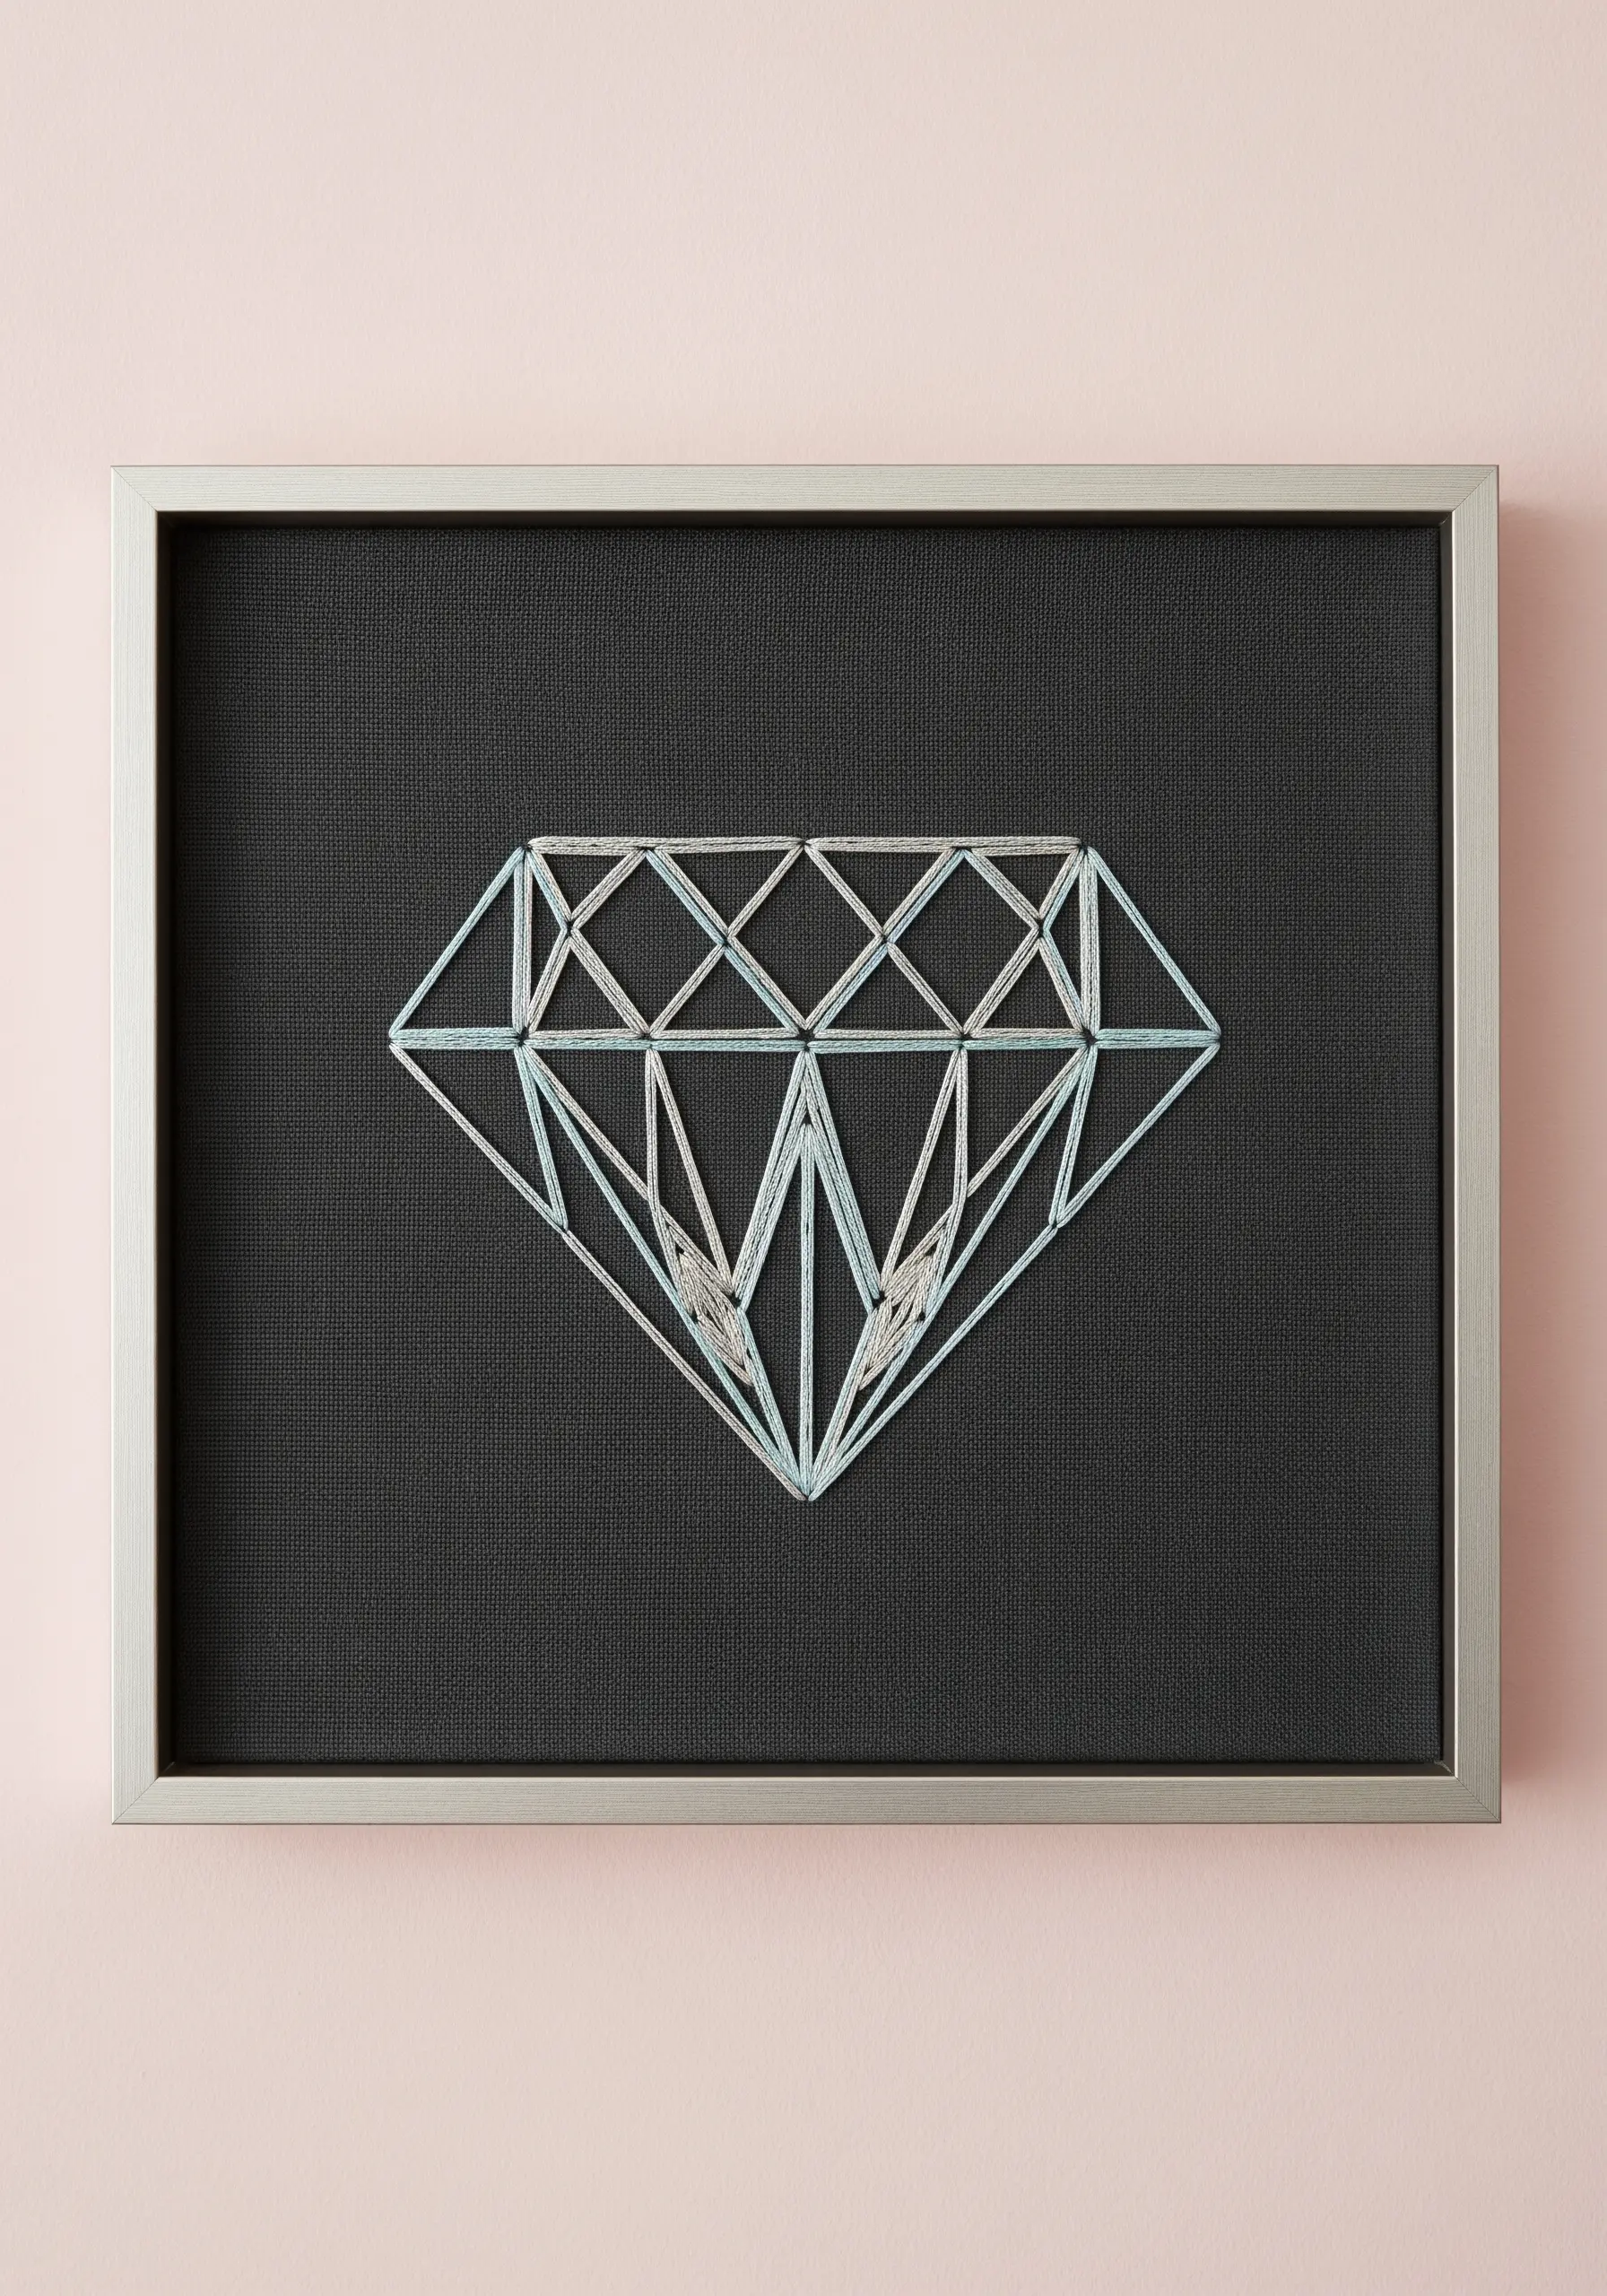
The key to making a stitched gemstone look like it’s sparkling is to convincingly render its facets.
Draw a clear, geometric diamond pattern on your fabric. Then, fill each facet with straight stitches, changing the direction of the stitches for each adjacent facet.
This variation in stitch direction will catch the light differently, creating the illusion of planes and angles.
Using a mix of matte and metallic threads in similar shades will enhance the effect, suggesting both shadow and shimmer.
27. Elevate Your Space with Large-Scale Fiber Art
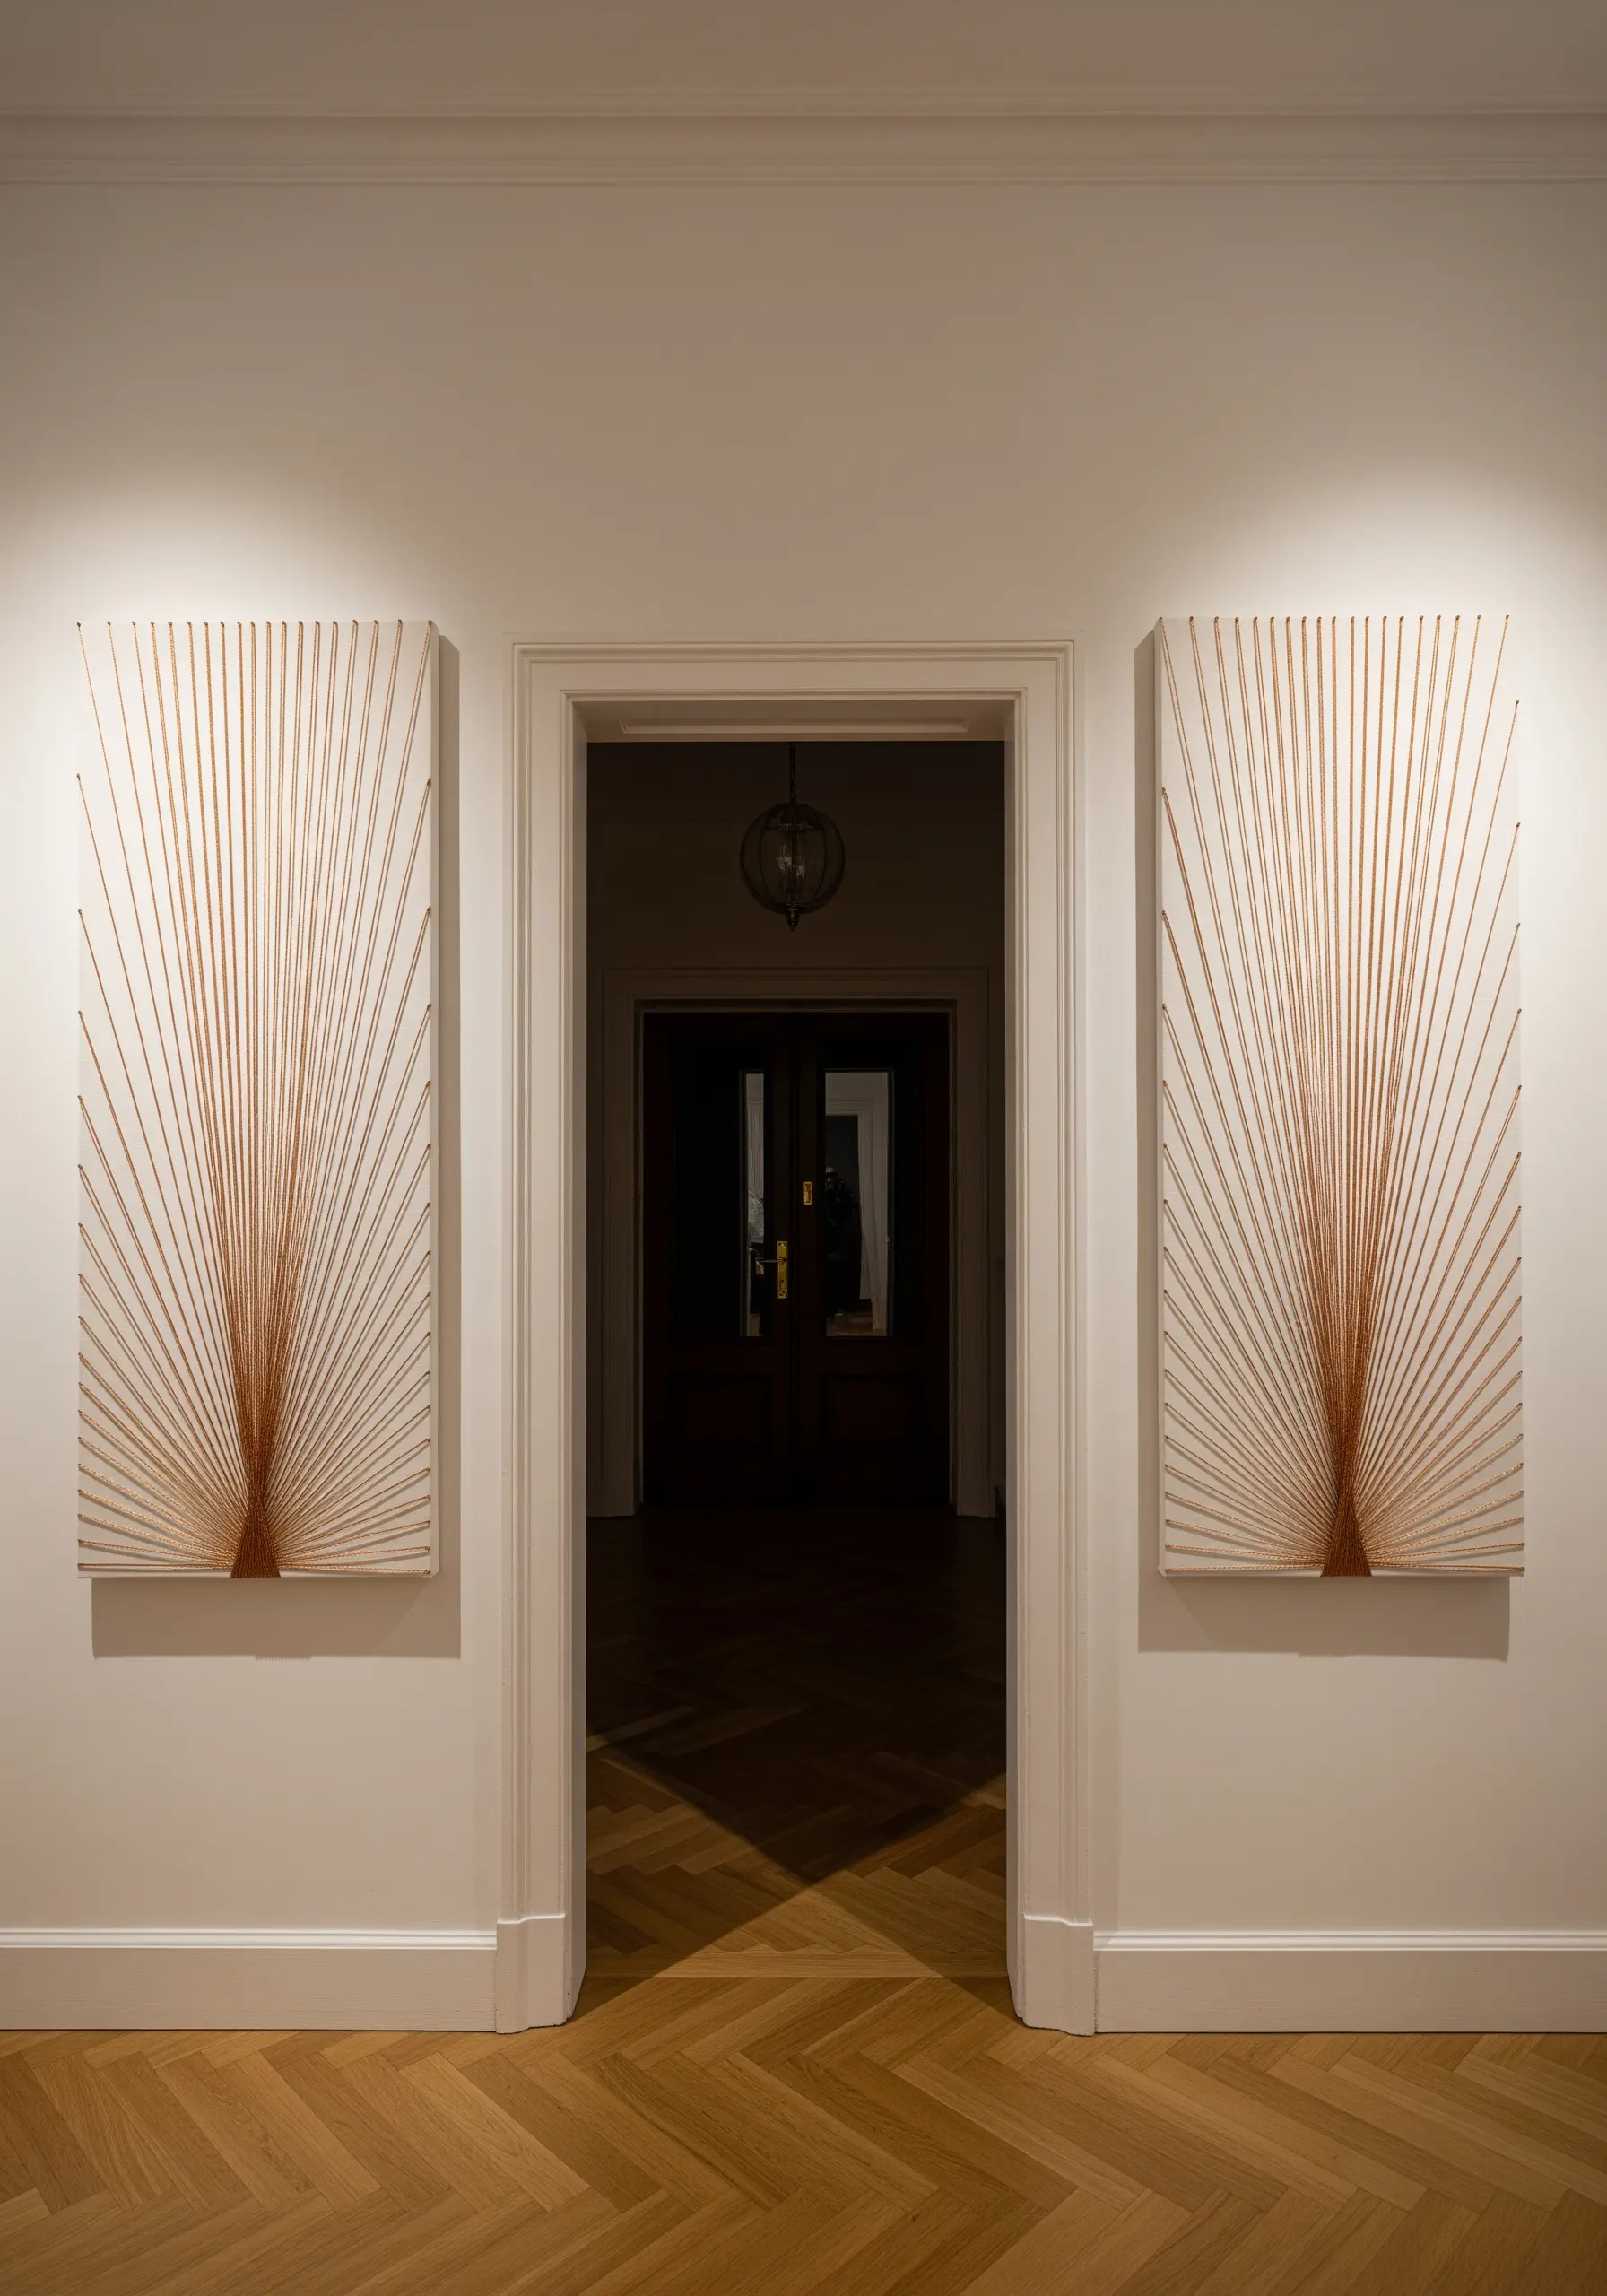
Take your embroidery off the hoop and onto the wall with a large-scale installation.
This technique uses nails or hooks at the top and bottom of a canvas or wall, stretching thread tightly between them.
The beauty of this diptych comes from its scale and simplicity. The radiating lines create a sense of expansion and elegance.
Choose a thread with a subtle sheen, like silk or rayon, in a color that complements your wall decor for a sophisticated, integrated look. This is how you create true fiber art installations.
28. Weave Texture with Densely Packed Stitches
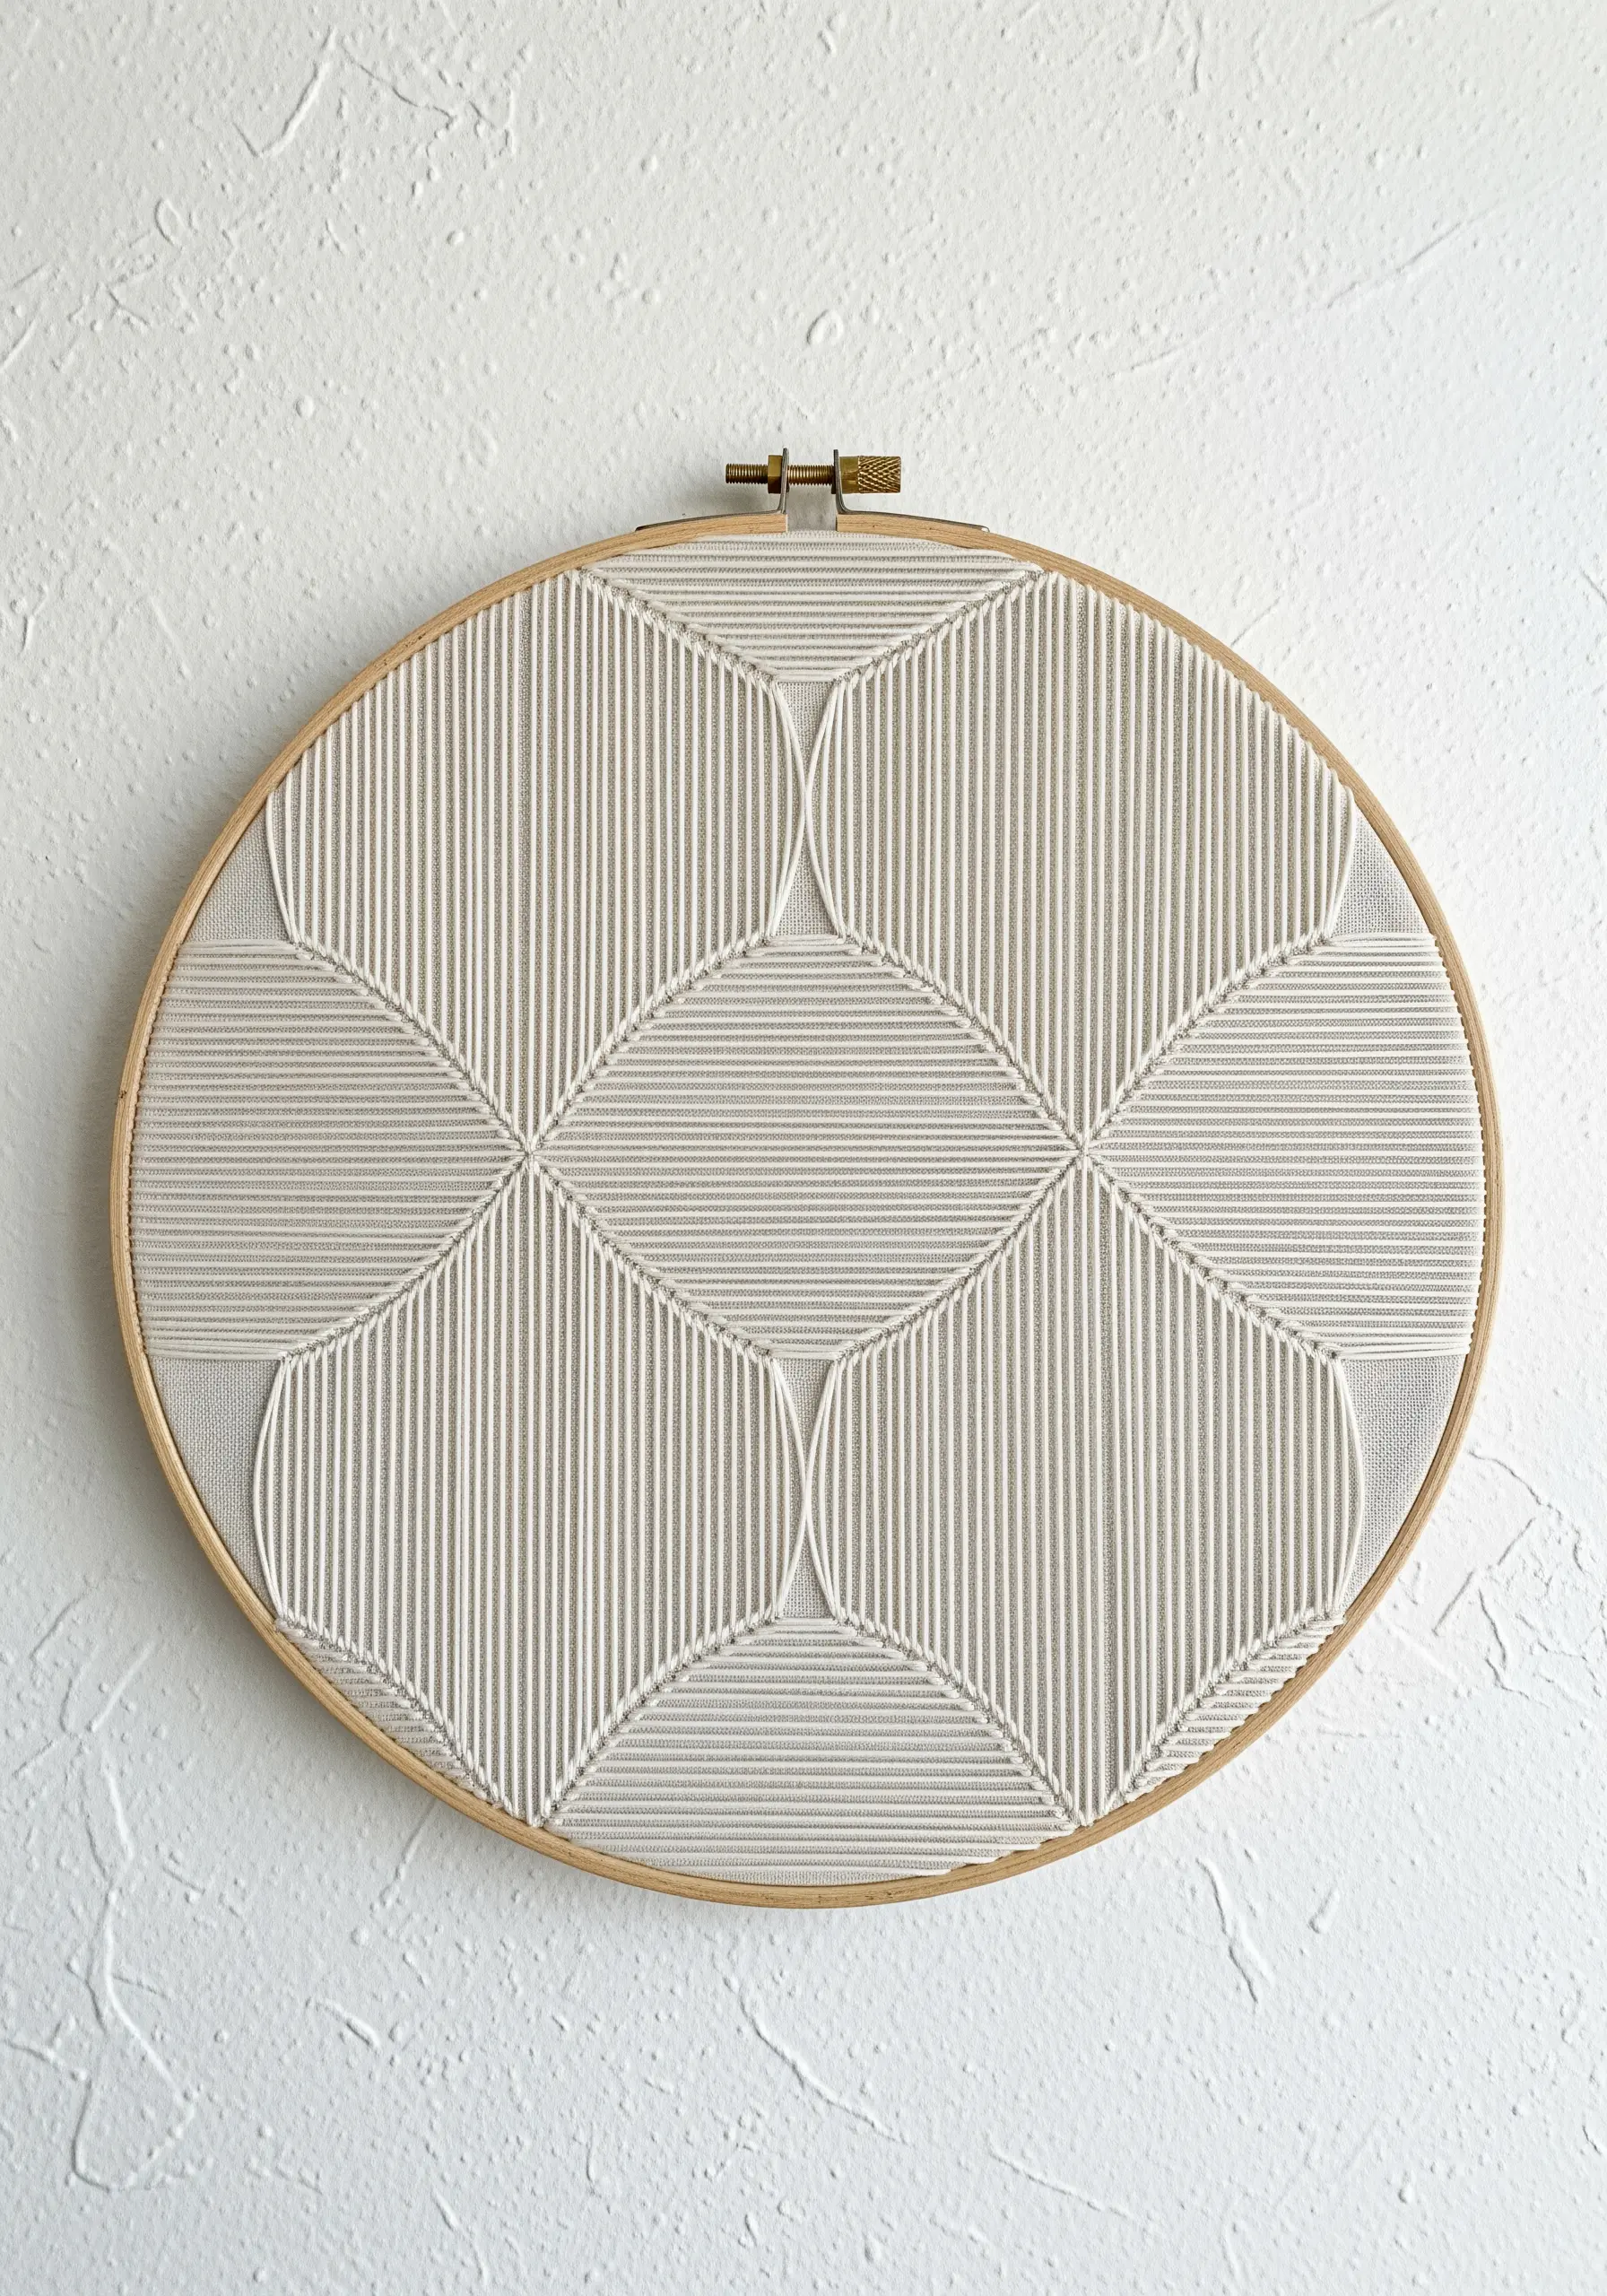
You can create a fabric-like, woven texture using nothing but straight stitches.
Fill your entire hoop with dense, vertical straight stitches. Then, using the same color, stitch your geometric pattern horizontally directly over the top.
The second layer of stitches will sit on top of the first, creating a subtle, embossed pattern with a beautiful, tactile quality.
Working in a single neutral color keeps the focus entirely on this play of texture and light, resulting in a piece that feels both minimal and complex.
29. Create a Cosmic Map with Mixed Media
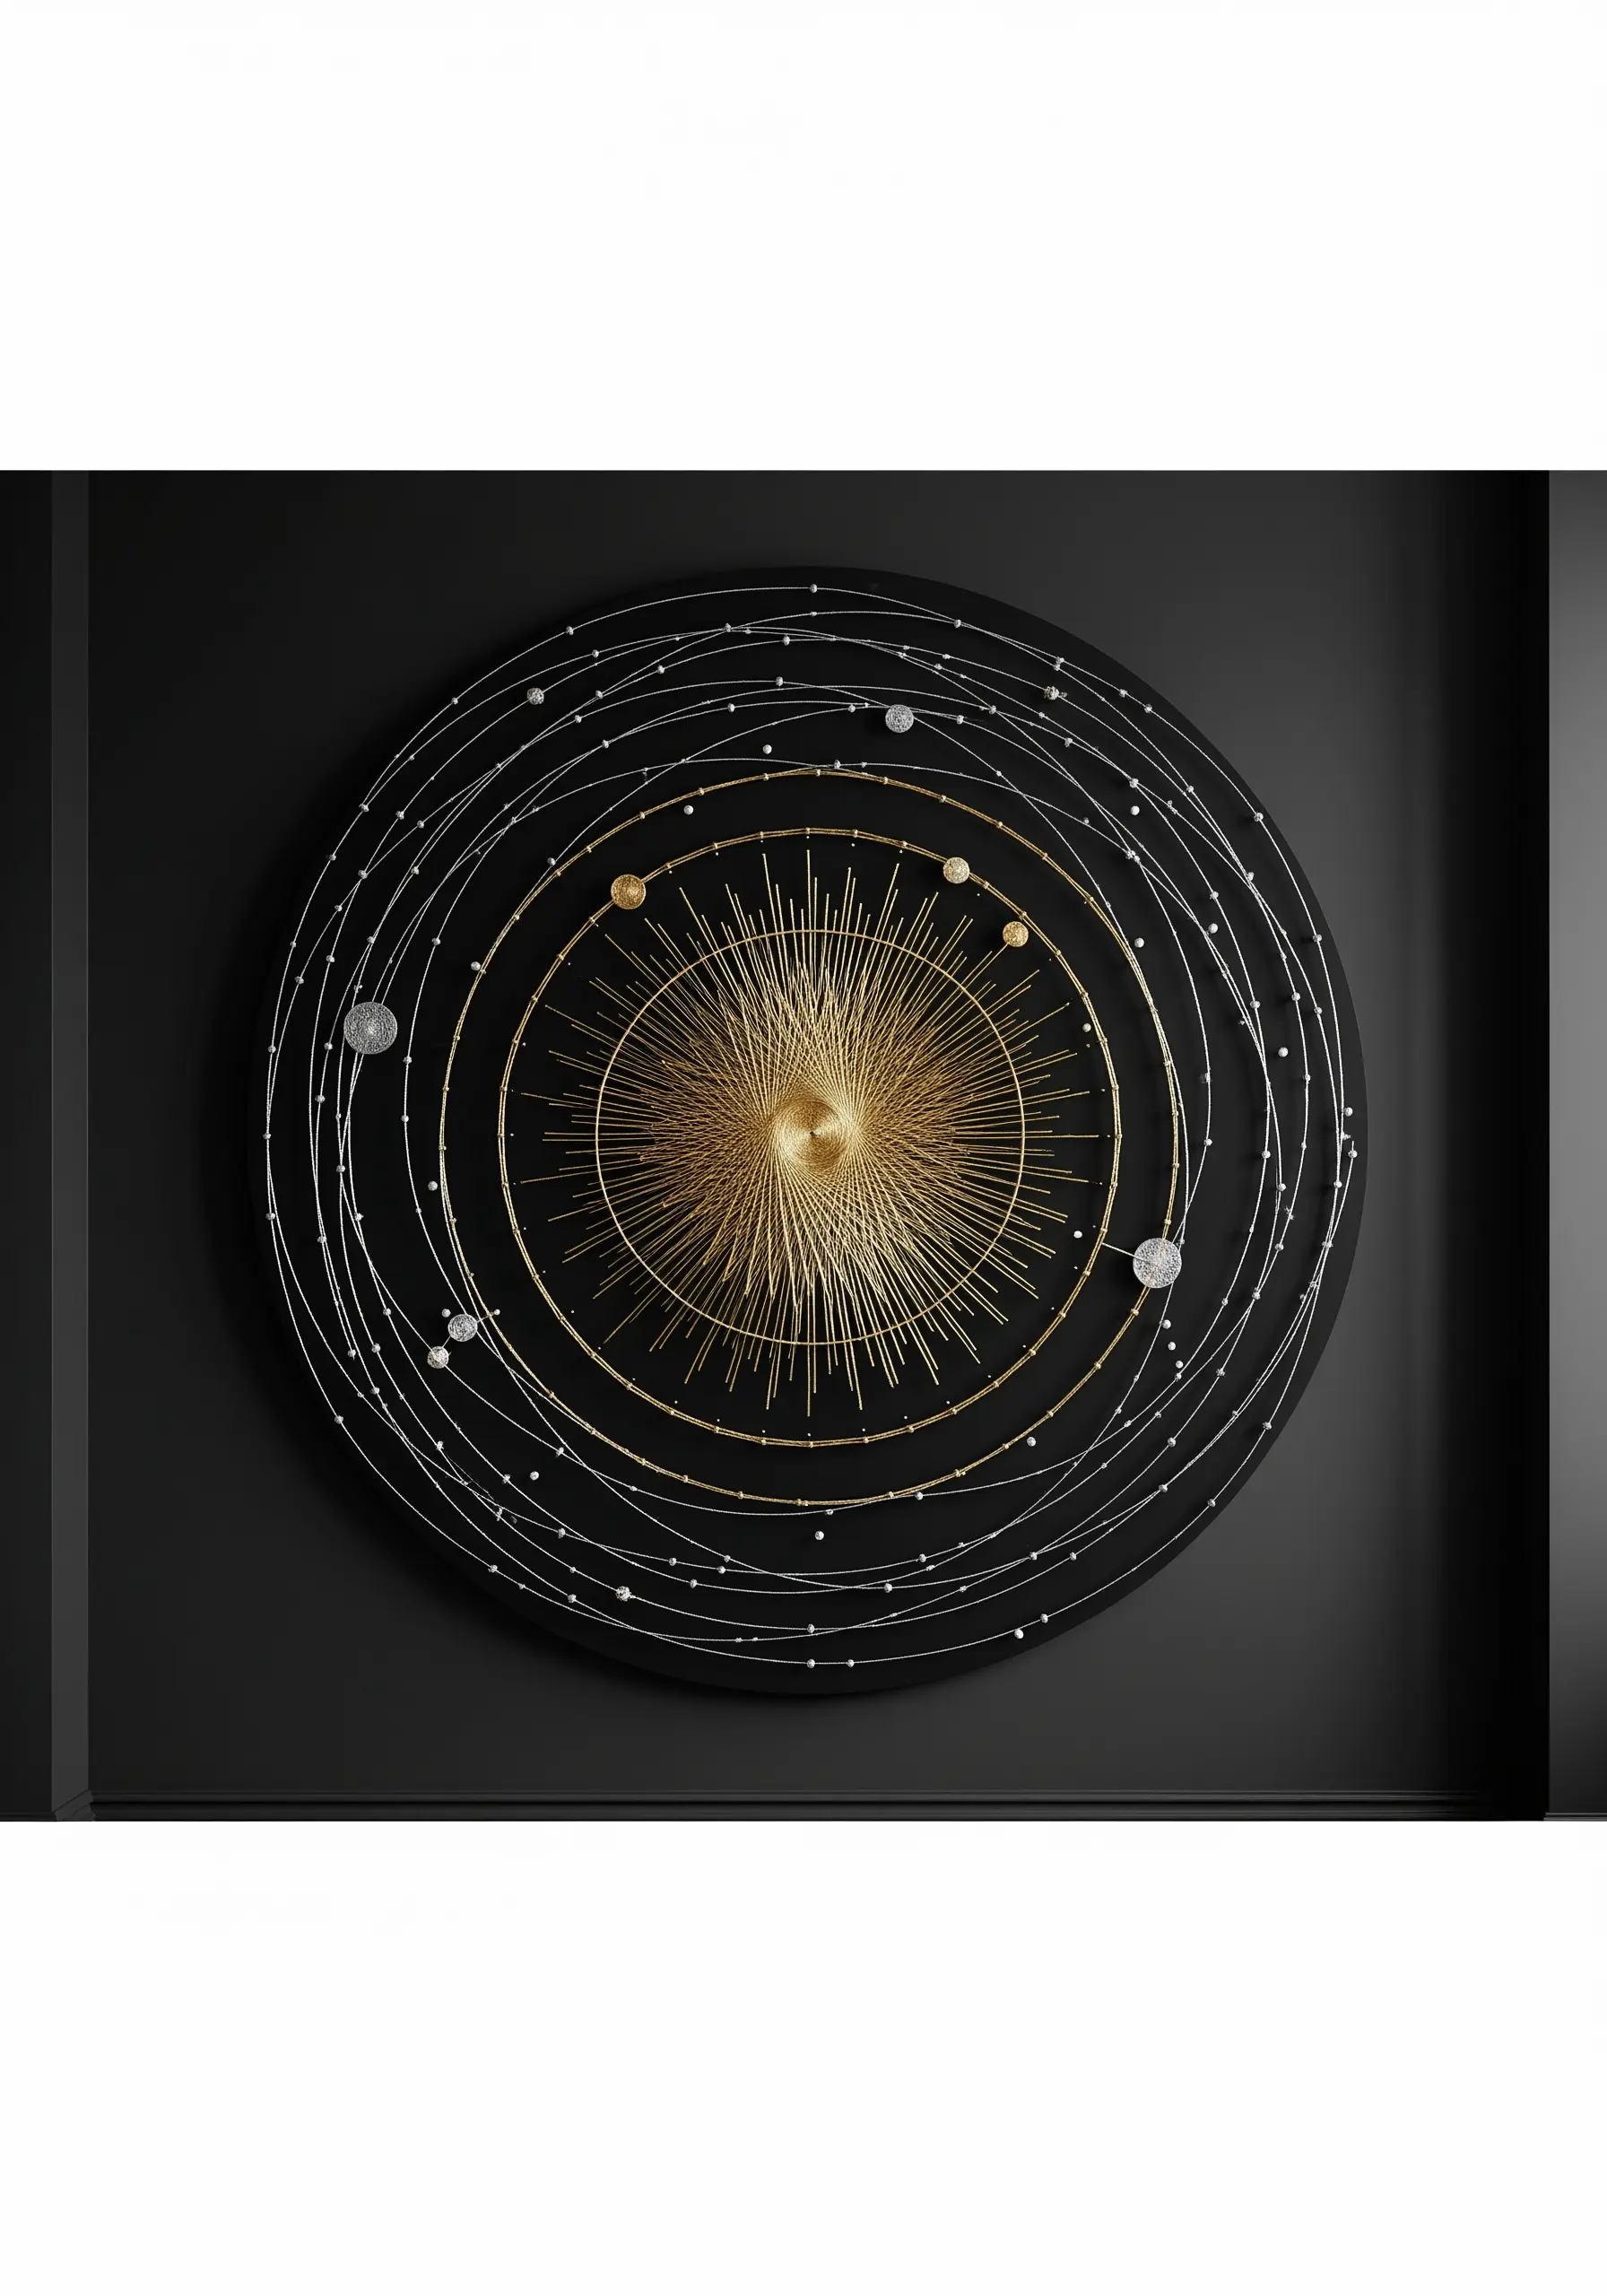
Bring a celestial design to life by combining linear stitching with textural elements.
Use fine metallic thread in gold and silver to stitch the radiating lines of the sun and the elliptical orbits of the planets.
For the planets and stars, move beyond simple stitches. Use French knots of varying sizes, or incorporate tiny beads, sequins, or seed pearls.
This mix of smooth lines and textured points creates a dynamic, multi-dimensional piece that captures the vastness and magic of a dreamy galaxy string art concept.


