

Your bedroom should be a sanctuary, a place where you can truly rest. And sometimes, the quiet, repetitive motion of a needle and thread is the perfect way to build that calm, stitch by intentional stitch.
But perhaps you’ve felt that your projects, while lovely, are missing a certain polish. The secret to elevating your work isn’t about mastering hundreds of complex stitches. It’s about learning why a particular stitch works best for a texture, how a single strand of thread can convey delicacy, or how the direction of your stitches can create light and shadow.
Here, you’ll find projects that are not just beautiful but are also designed to be gentle lessons in technique. Each one offers a small, manageable way to refine your skills, giving you the confidence to turn simple fabrics and threads into pieces of quiet, personal art for the most important room in your home.
1. Render Fern Fronds with a Single Stitch
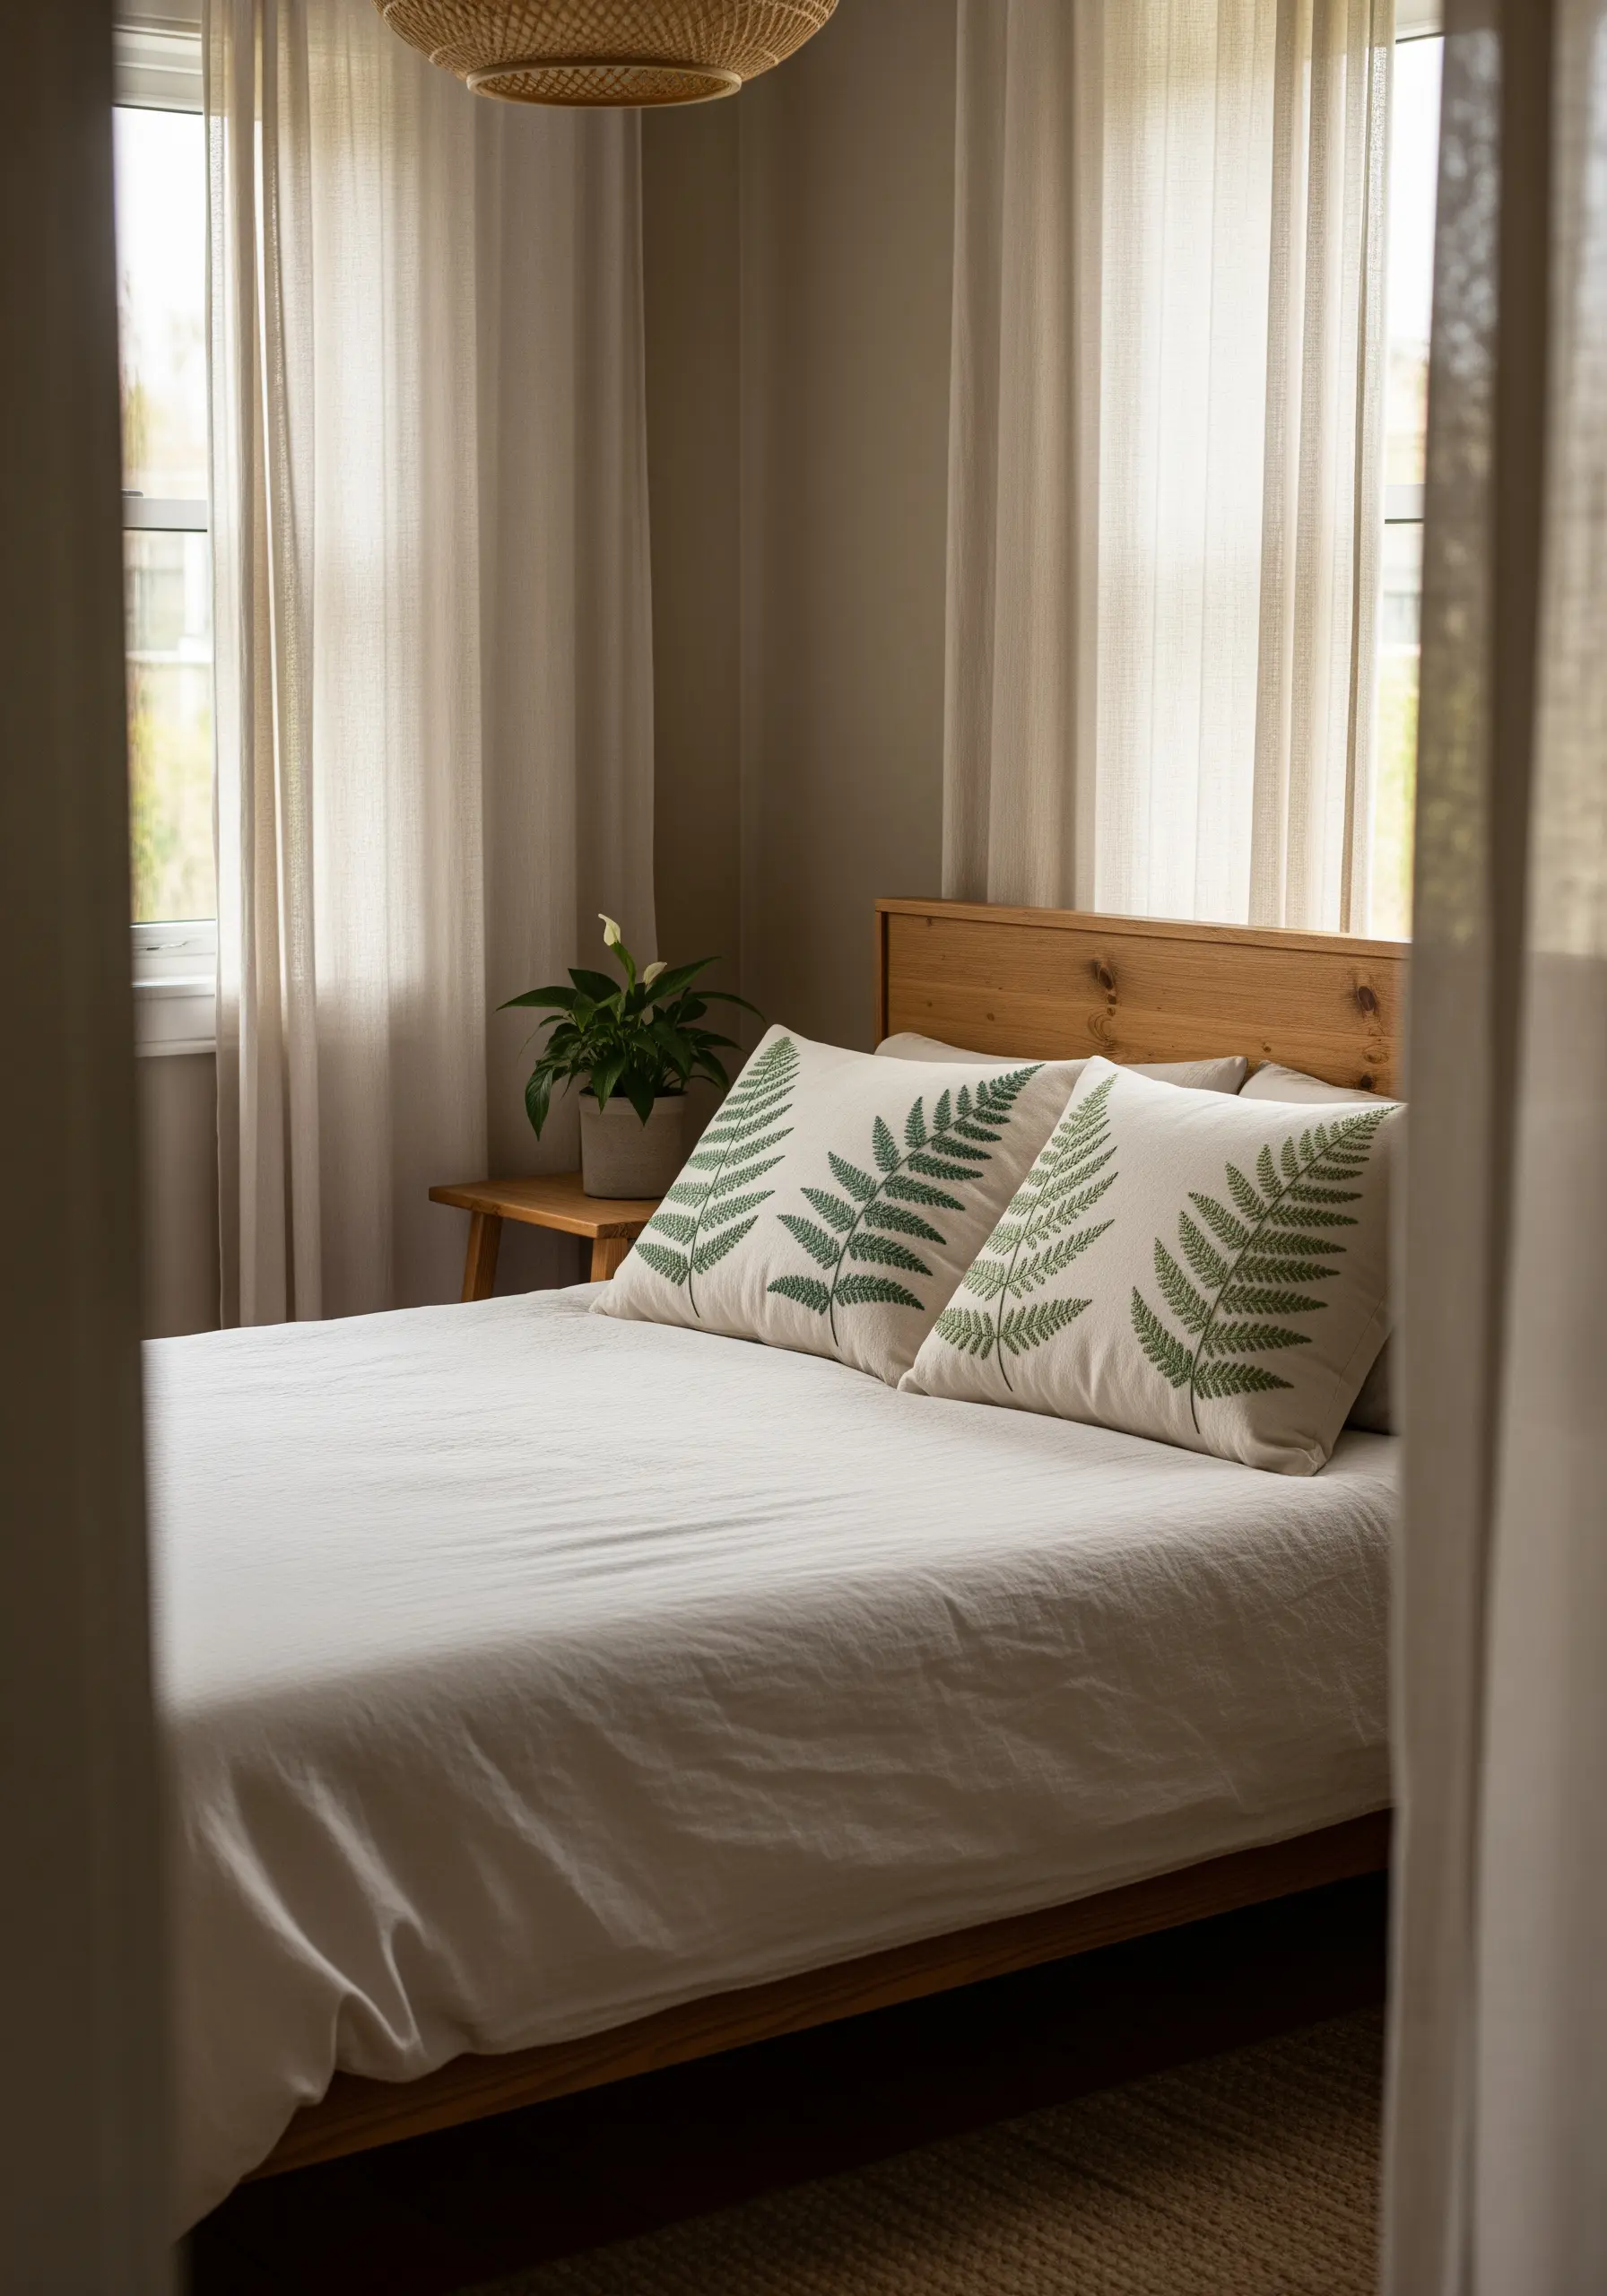
To create these serene botanical pillows, rely on the fishbone stitch for the fern’s leafy structure.
This single stitch creates the central vein and the angled leaflets simultaneously, giving you a remarkably realistic result with minimal effort.
Work with a matte cotton floss in a muted green on a natural linen or cotton canvas base.
Using a tear-away stabilizer behind the fabric will prevent puckering and keep your stitches smooth on the larger surface of a pillow cover, resulting in handmade embroidery touches that make every room feel natural.
2. Embroider a Constellation onto a Chunky Knit
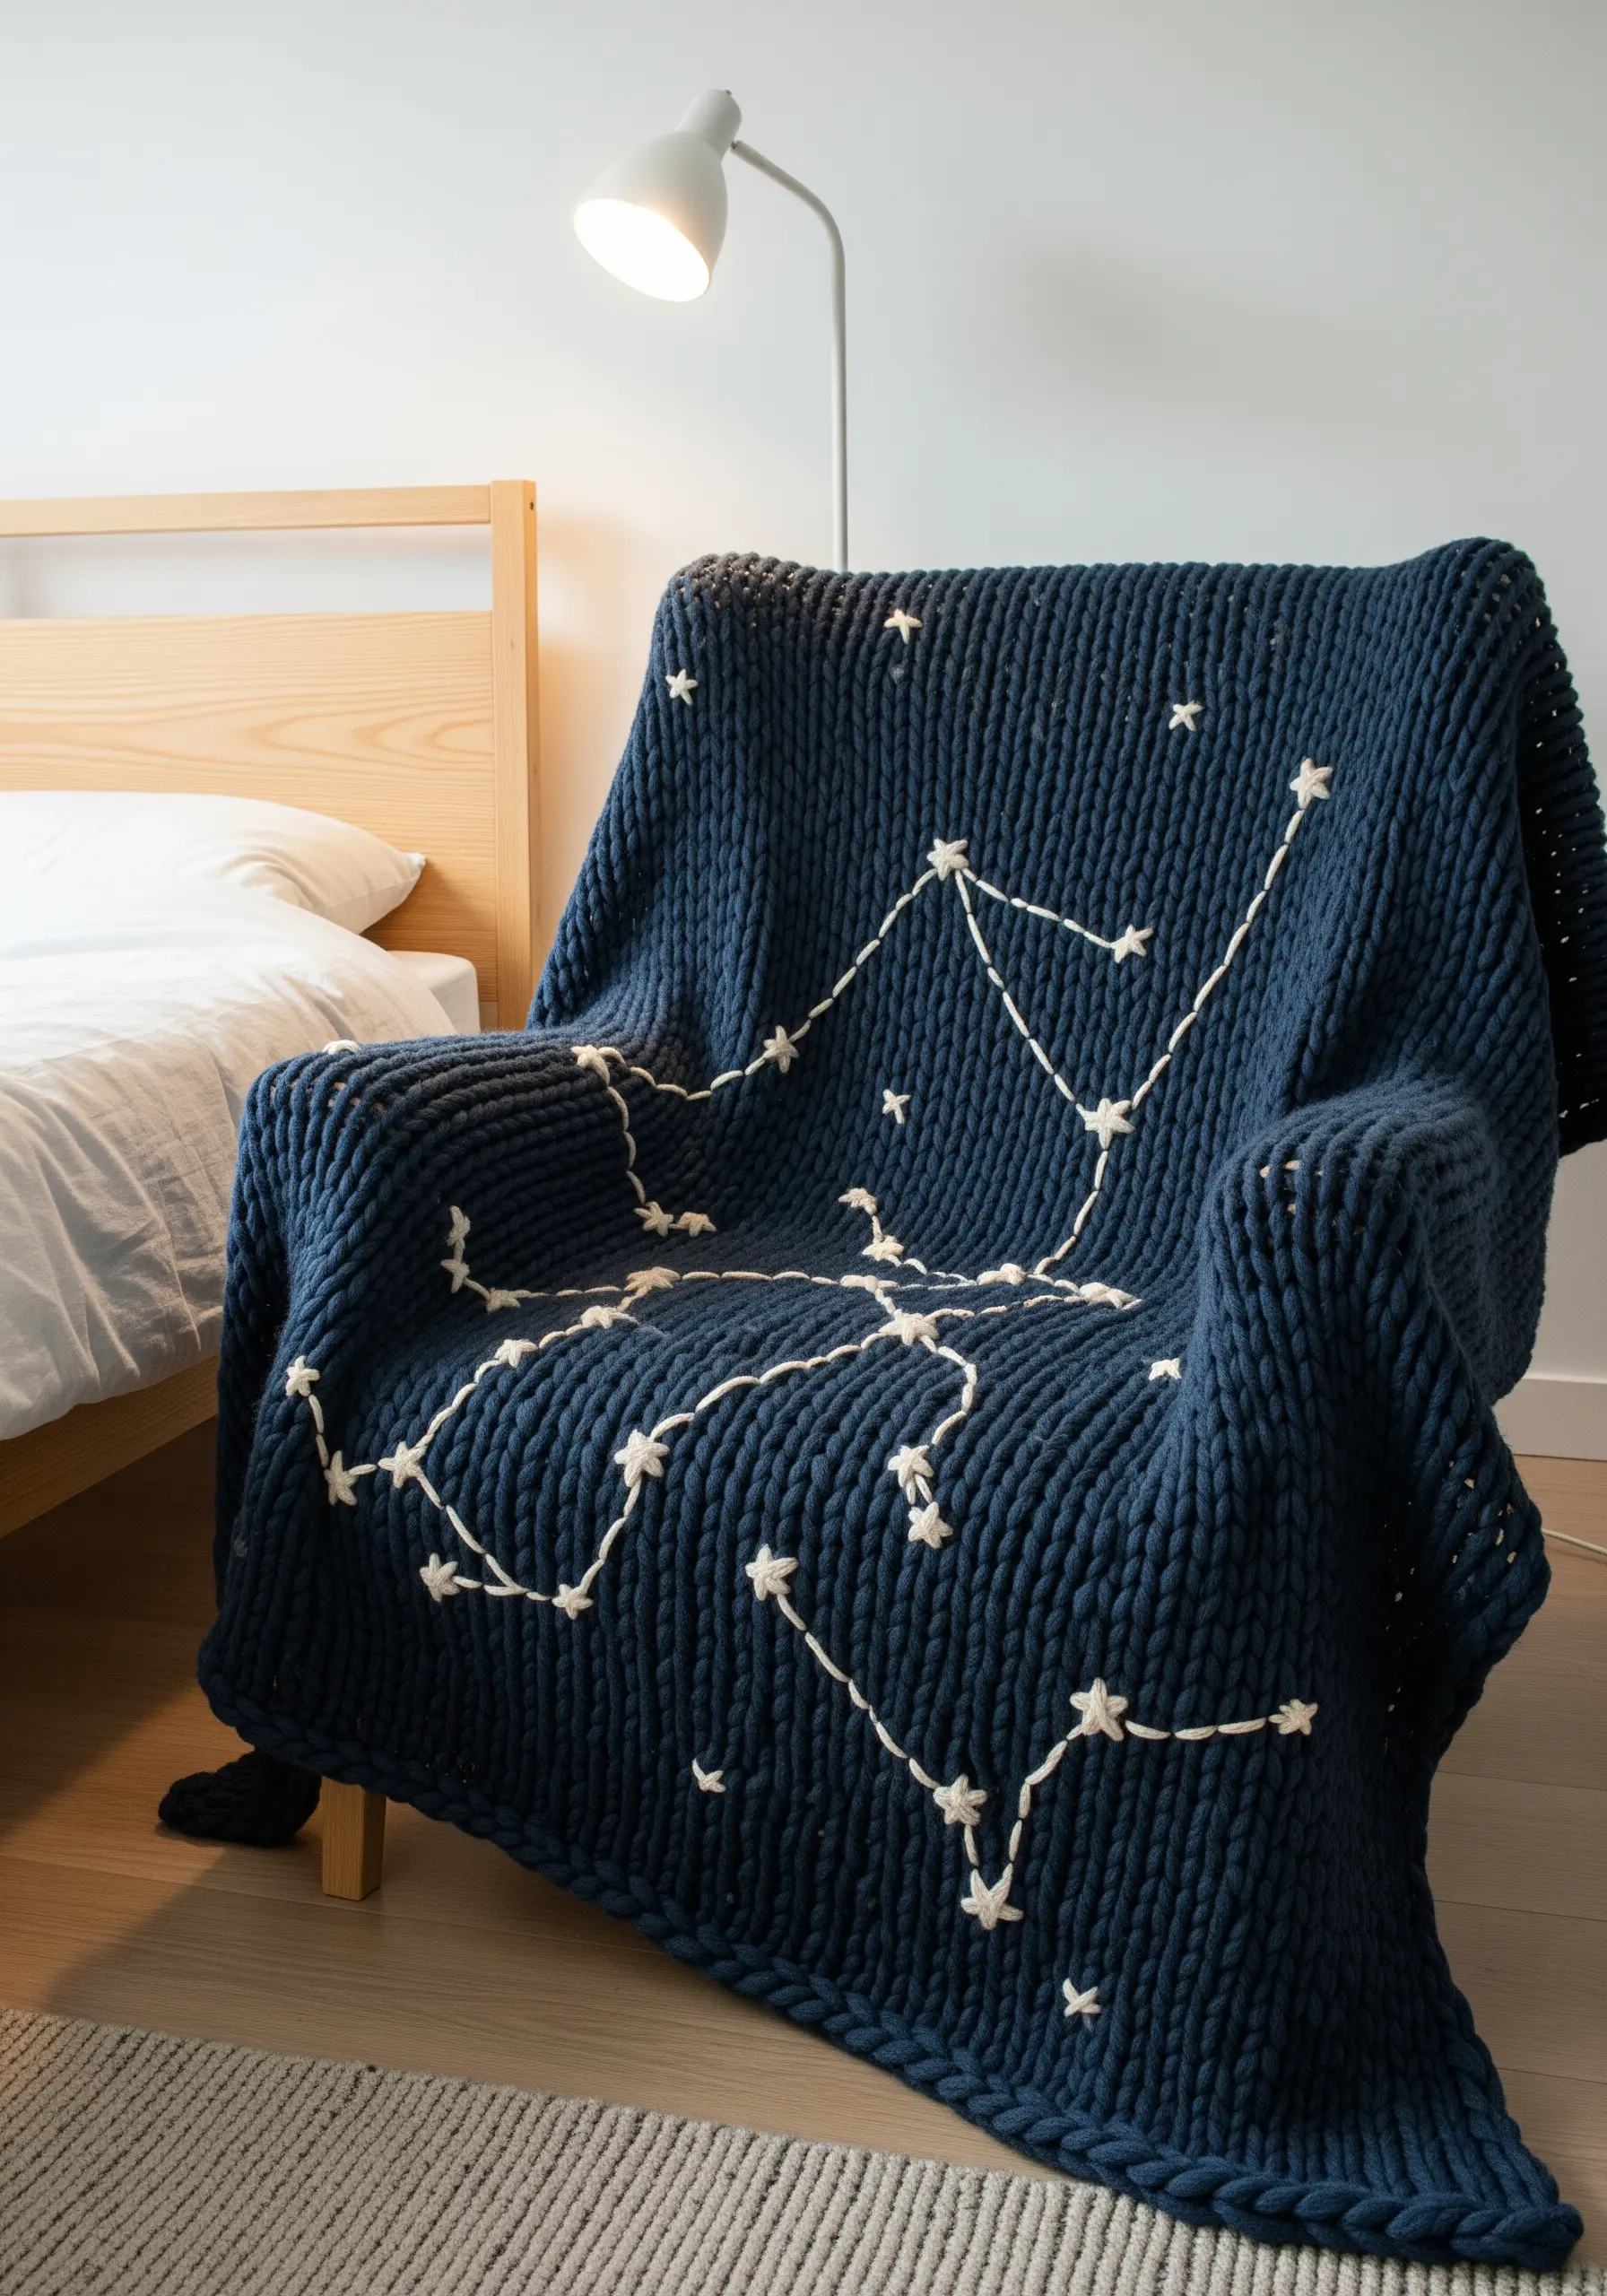
Stitching on a highly textured surface like a chunky knit blanket requires a specific technique to ensure your design stays visible.
Use a thick yarn for the constellation lines and couch it onto the blanket with a thinner, matching thread.
This involves laying the thick yarn on the surface and tacking it down with small, perpendicular stitches, which prevents it from sinking into the knit’s deep texture.
For the stars, use bullion knots or star stitches to create dimensional points of light on your cozy, embroidered throws and blankets.
3. Create Depth with Layered Mountainscapes
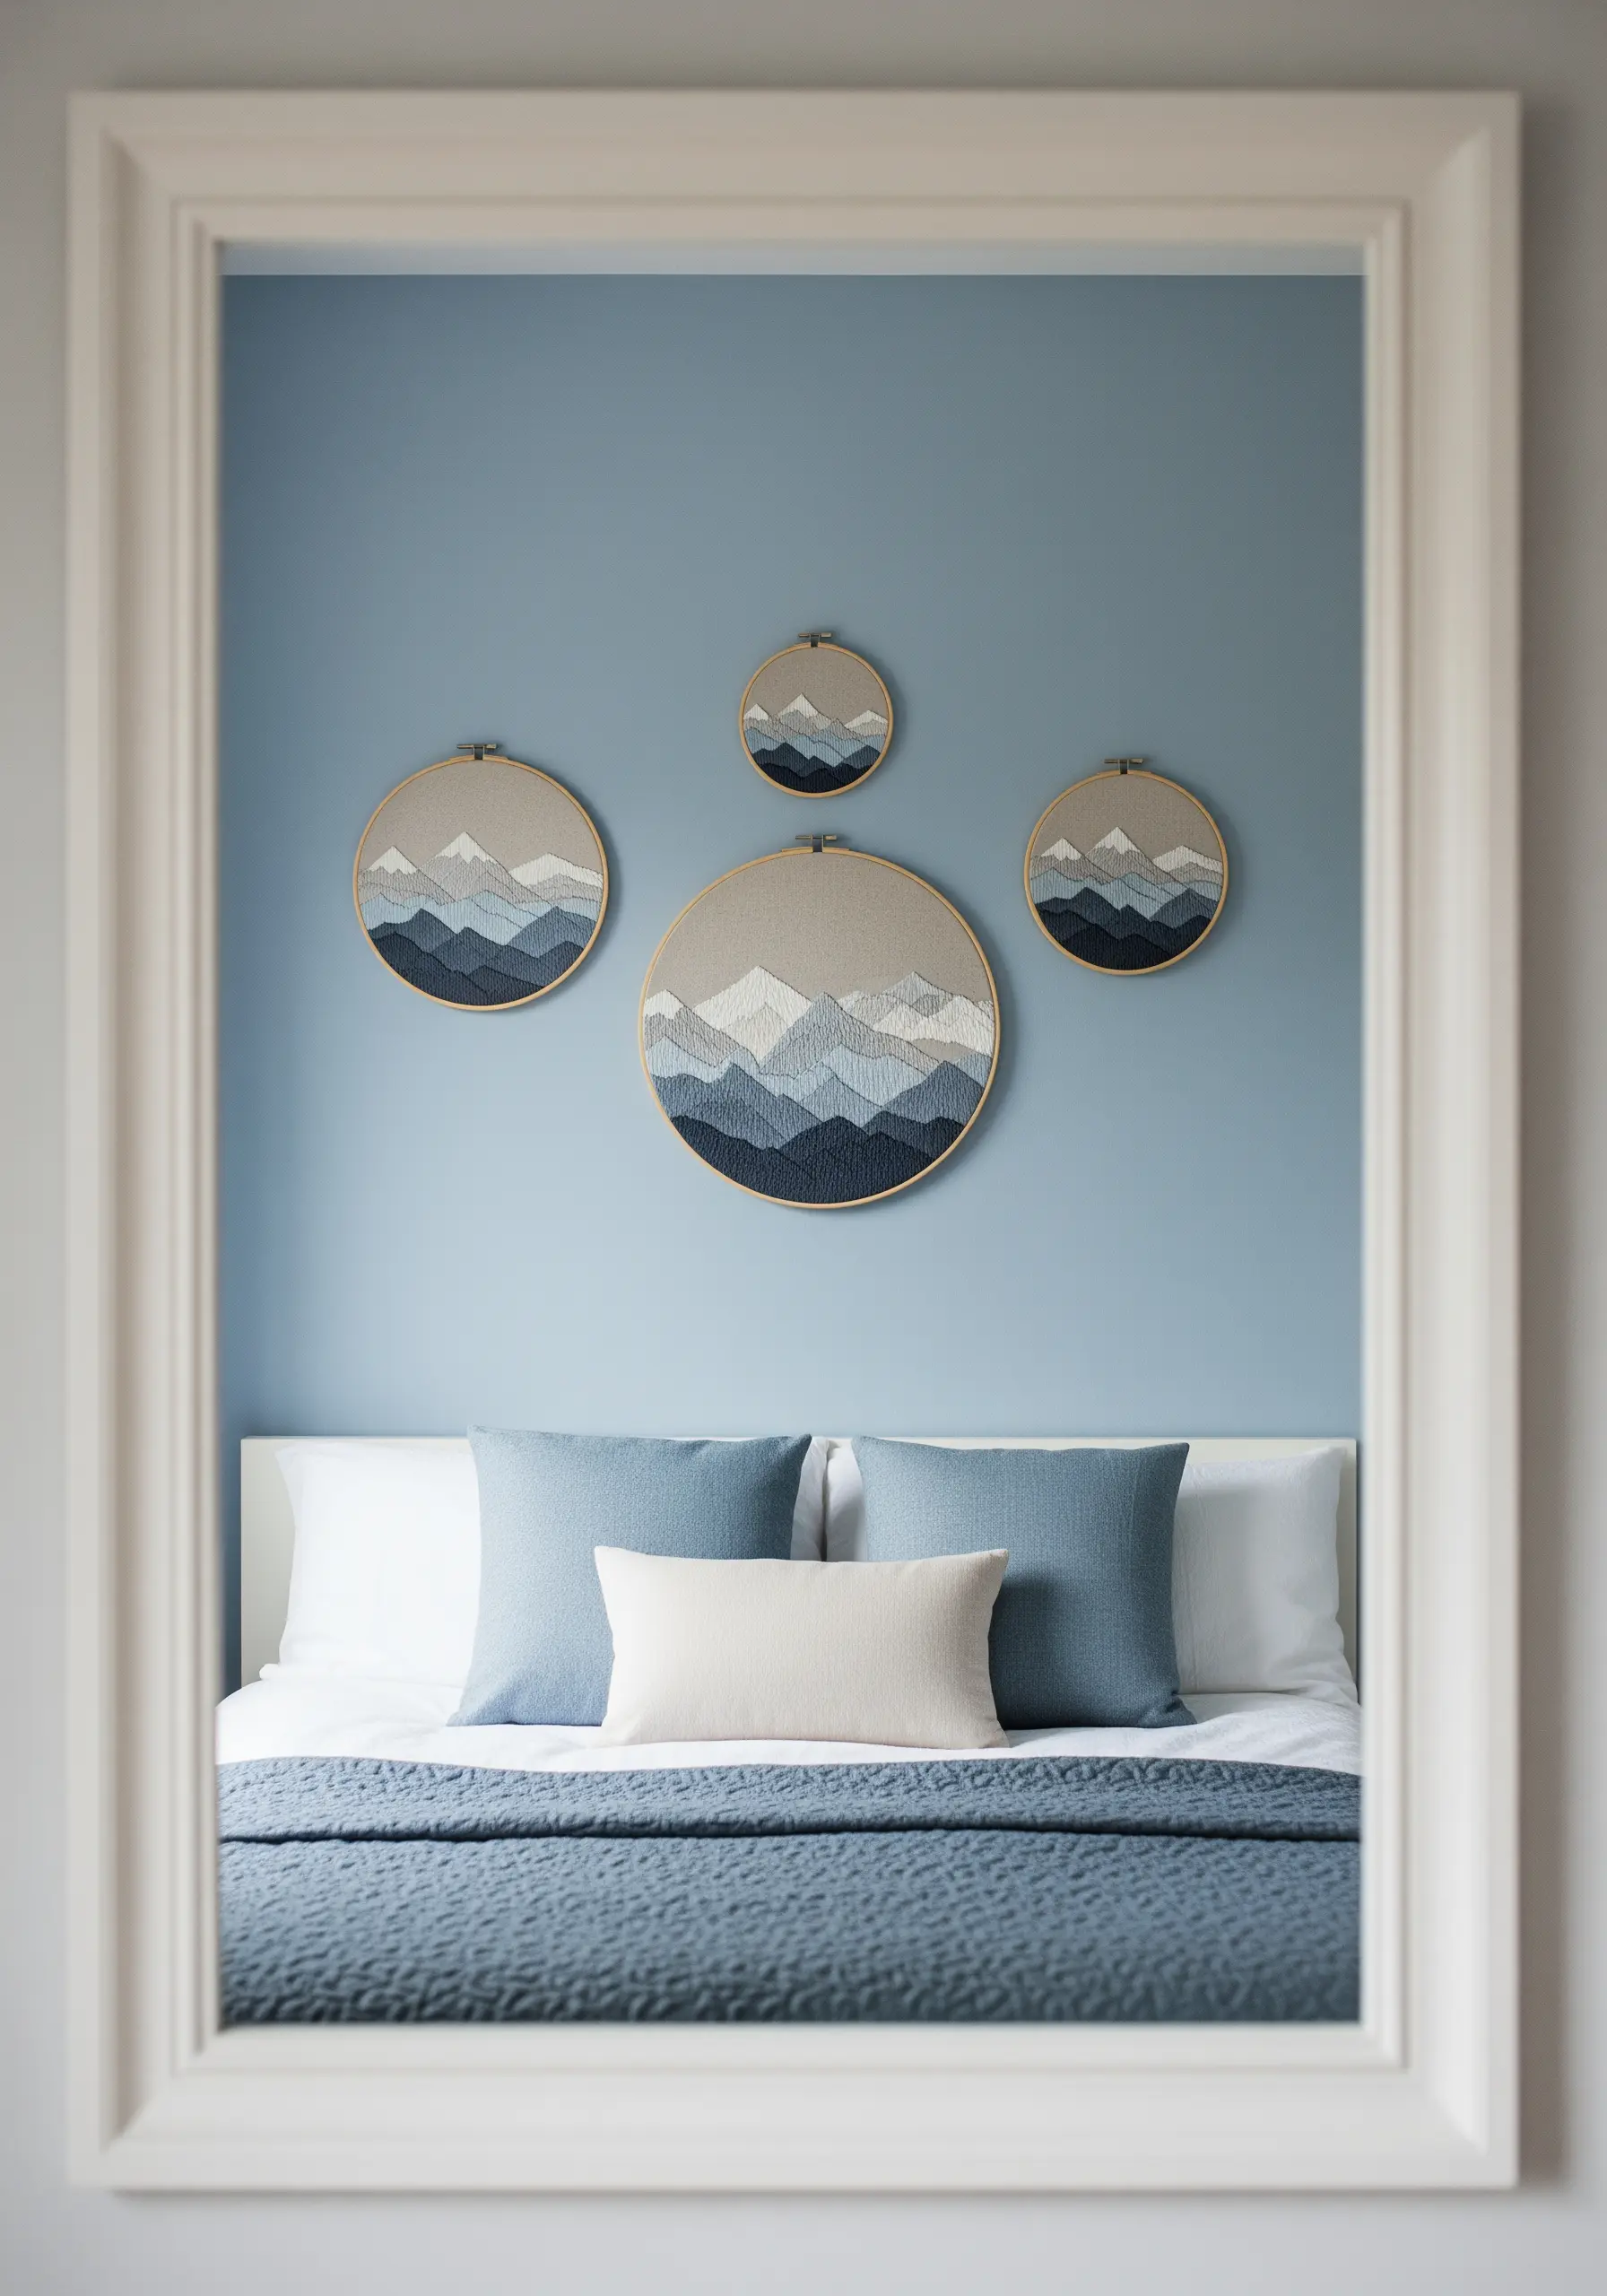
To achieve this clean, layered landscape, the key is defining sharp edges between each color block.
Before filling each mountain range with satin stitch, outline its top edge with a precise split stitch.
This creates a firm boundary for your satin stitches to press against, preventing gaps and ensuring a crisp, graphic separation between the tonal layers.
Slightly angle the direction of your satin stitch in each section to create subtle shifts in texture and light reflection, turning your hoops into oversized hoop wall displays that create statement walls.
4. Stitch Dandelion Wisps on Sheer Curtains
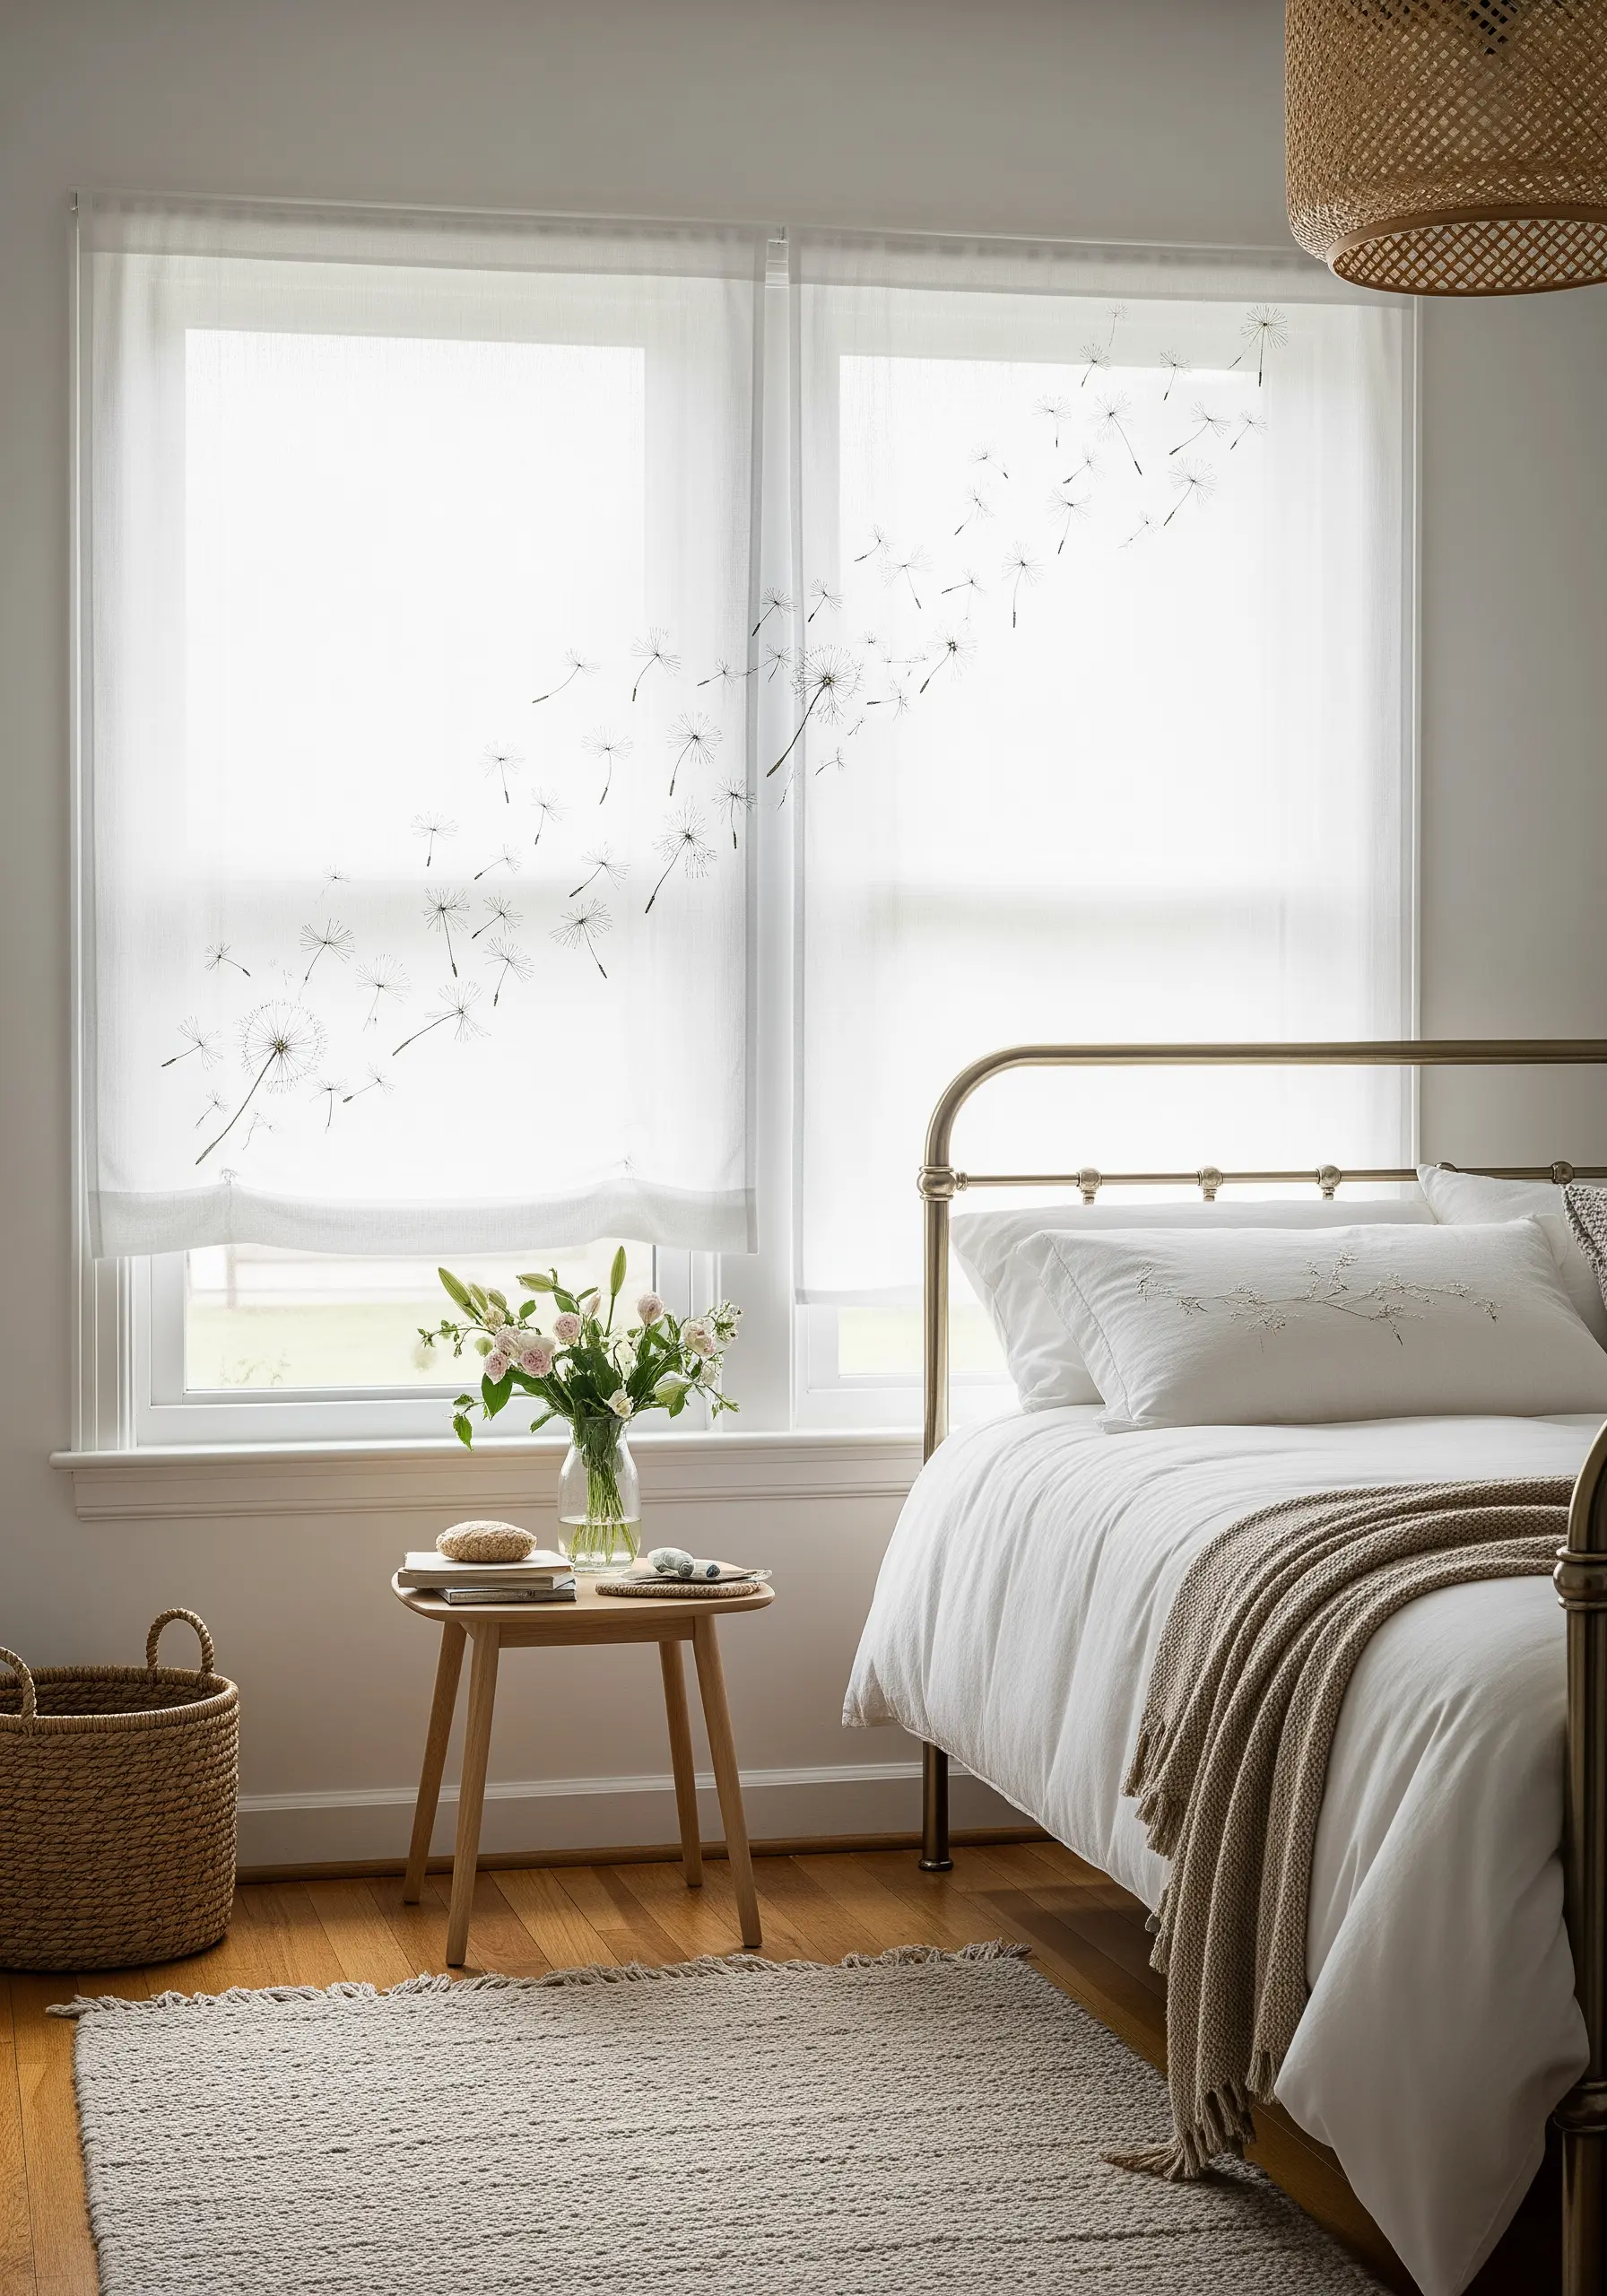
Embroidering on sheer fabric creates an ethereal, light-filled effect that feels weightless.
Use a single strand of white or off-white floss on linen or voile curtains, and rely on a water-soluble stabilizer for support during stitching; it will rinse away completely, leaving no trace.
Use tiny straight stitches and detached chain stitches to form the dandelion seeds, letting them drift across the fabric.
The negative space is crucial here, as it allows the delicate stitched details that make plain walls pop elegantly to float in the light.
5. Illustrate a Wildflower Meadow Tapestry
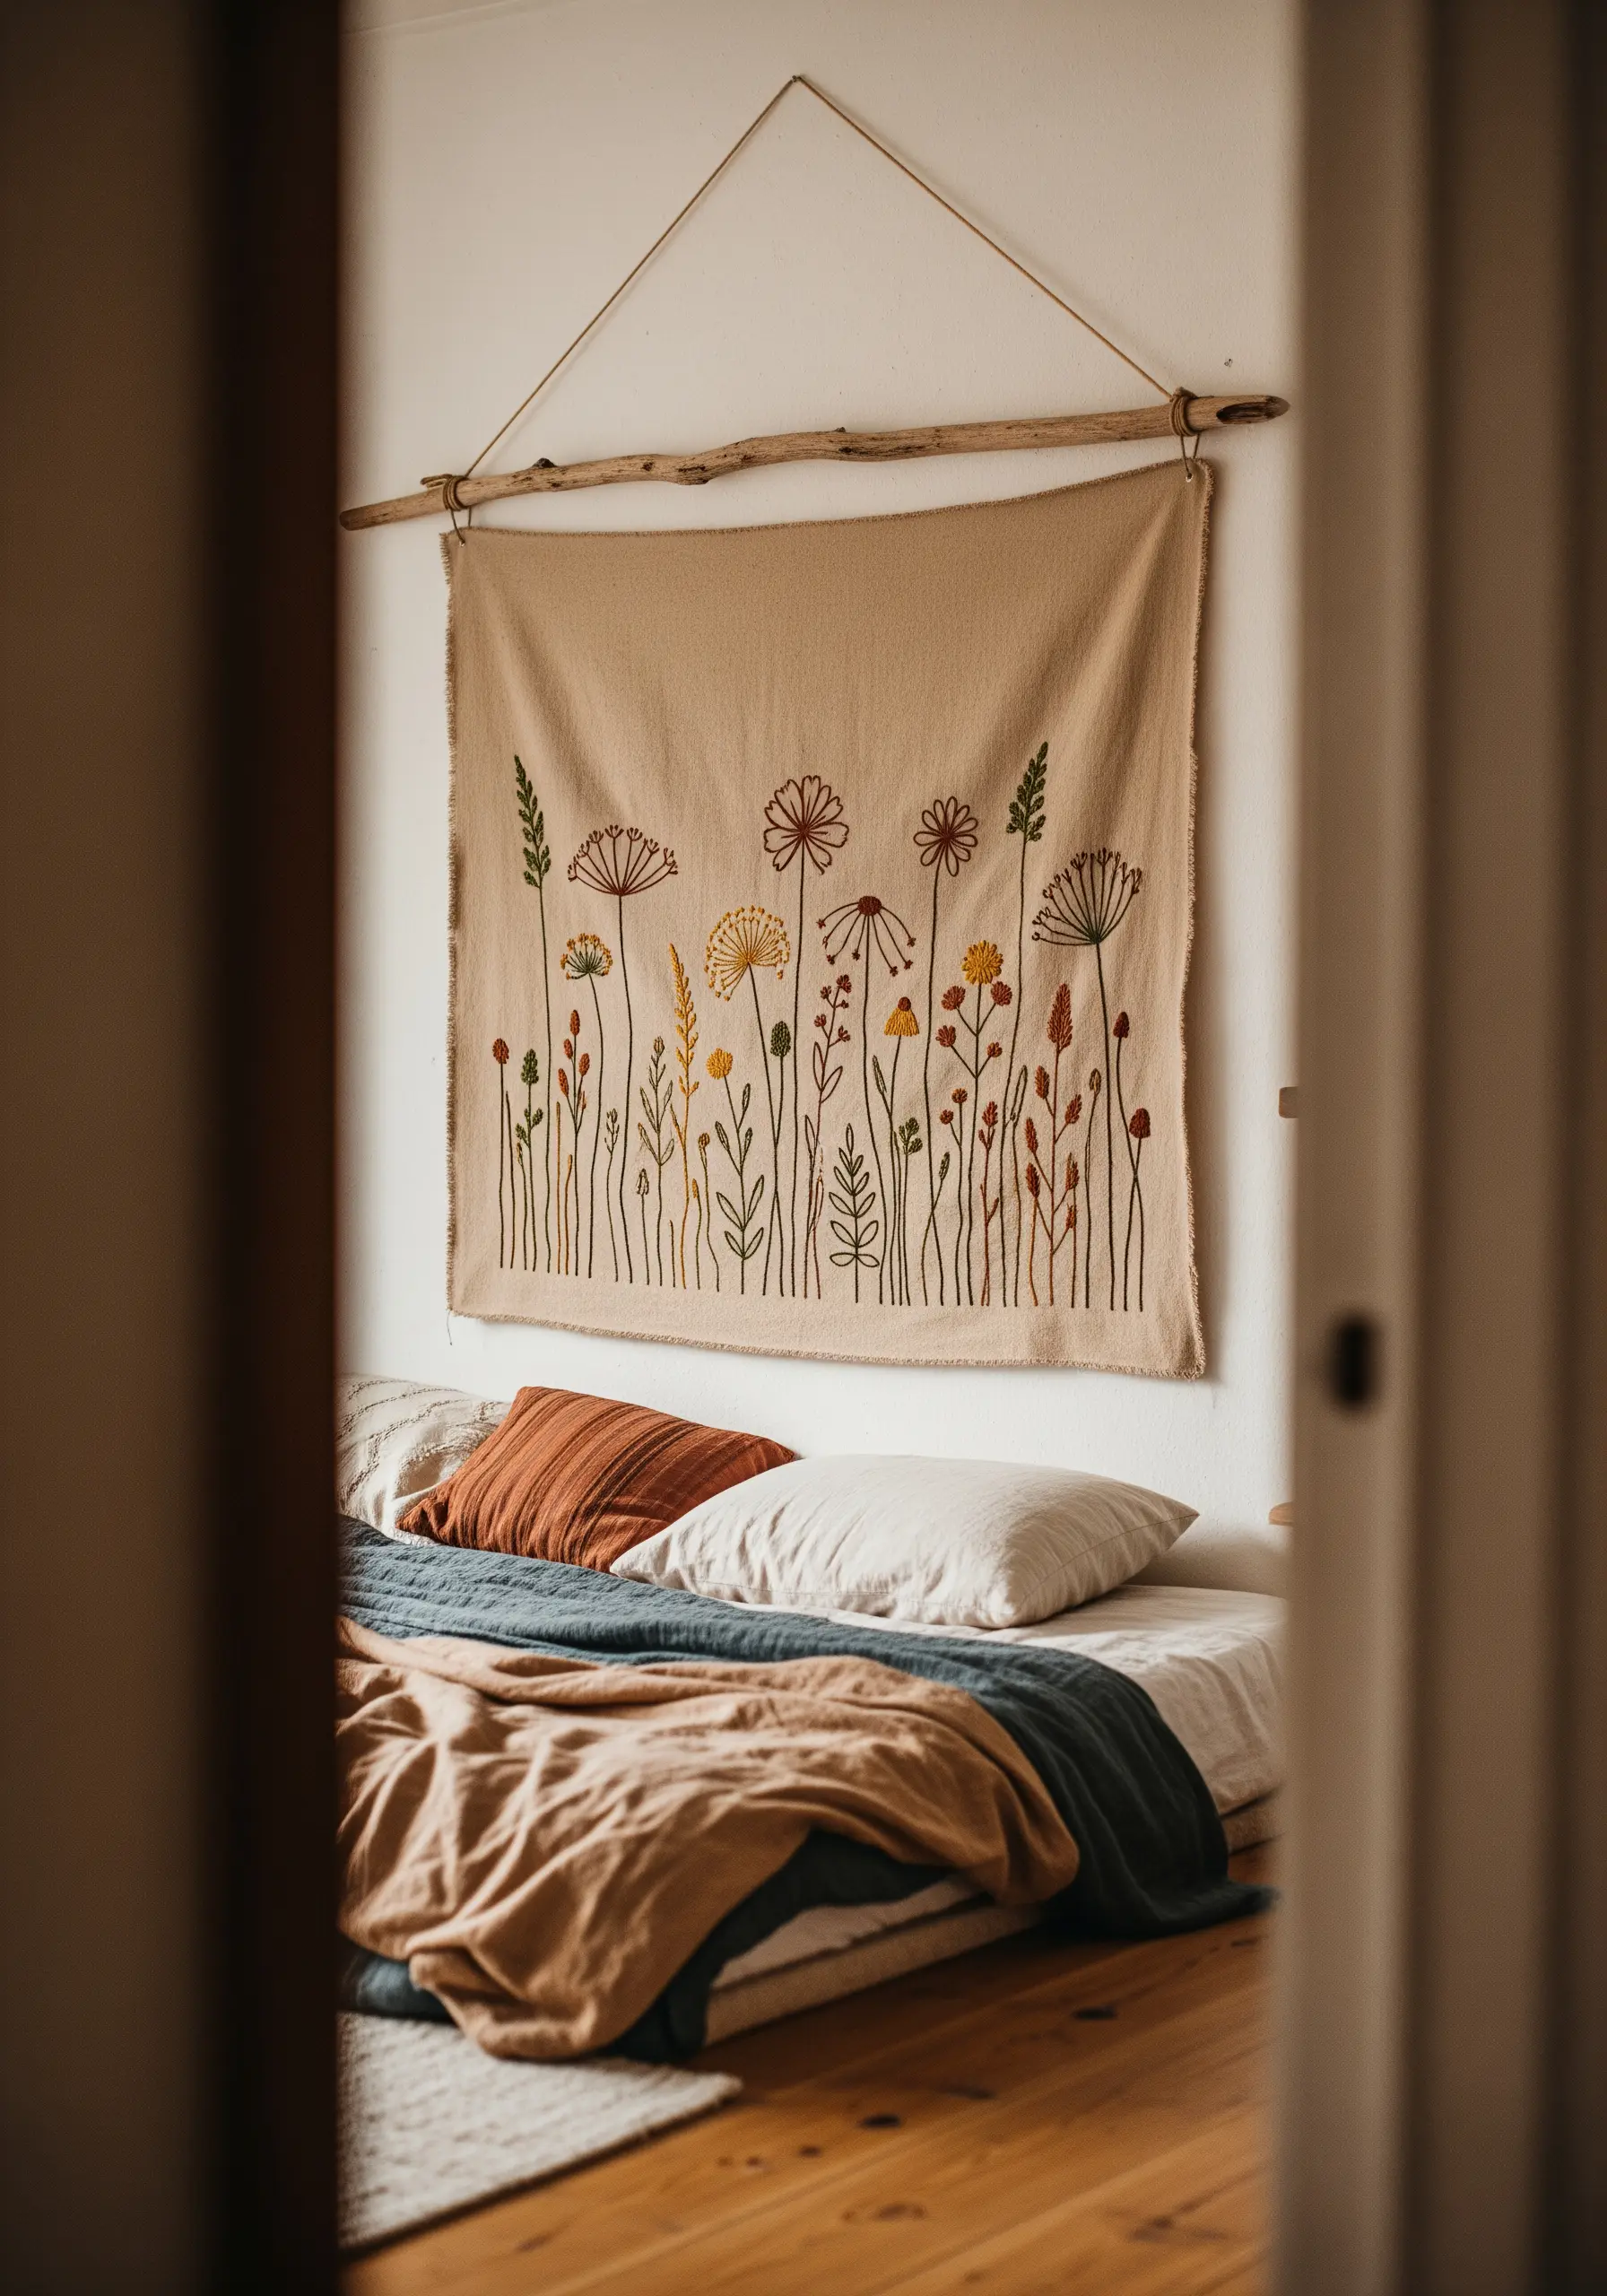
For a large-scale wall hanging, focus on the clean elegance of illustrative line work to avoid overwhelming the piece.
Use a consistent three strands of cotton floss and a simple backstitch for all outlines to give it a cohesive, hand-drawn feel.
Introduce pops of color with satin-stitched flower heads or a few French knots, but allow the line work to be the hero.
Mounting the finished canvas on a natural branch completes the rustic, organic aesthetic of these botanical line art embroidery patterns.
6. Master Fur Texture with Thread Painting
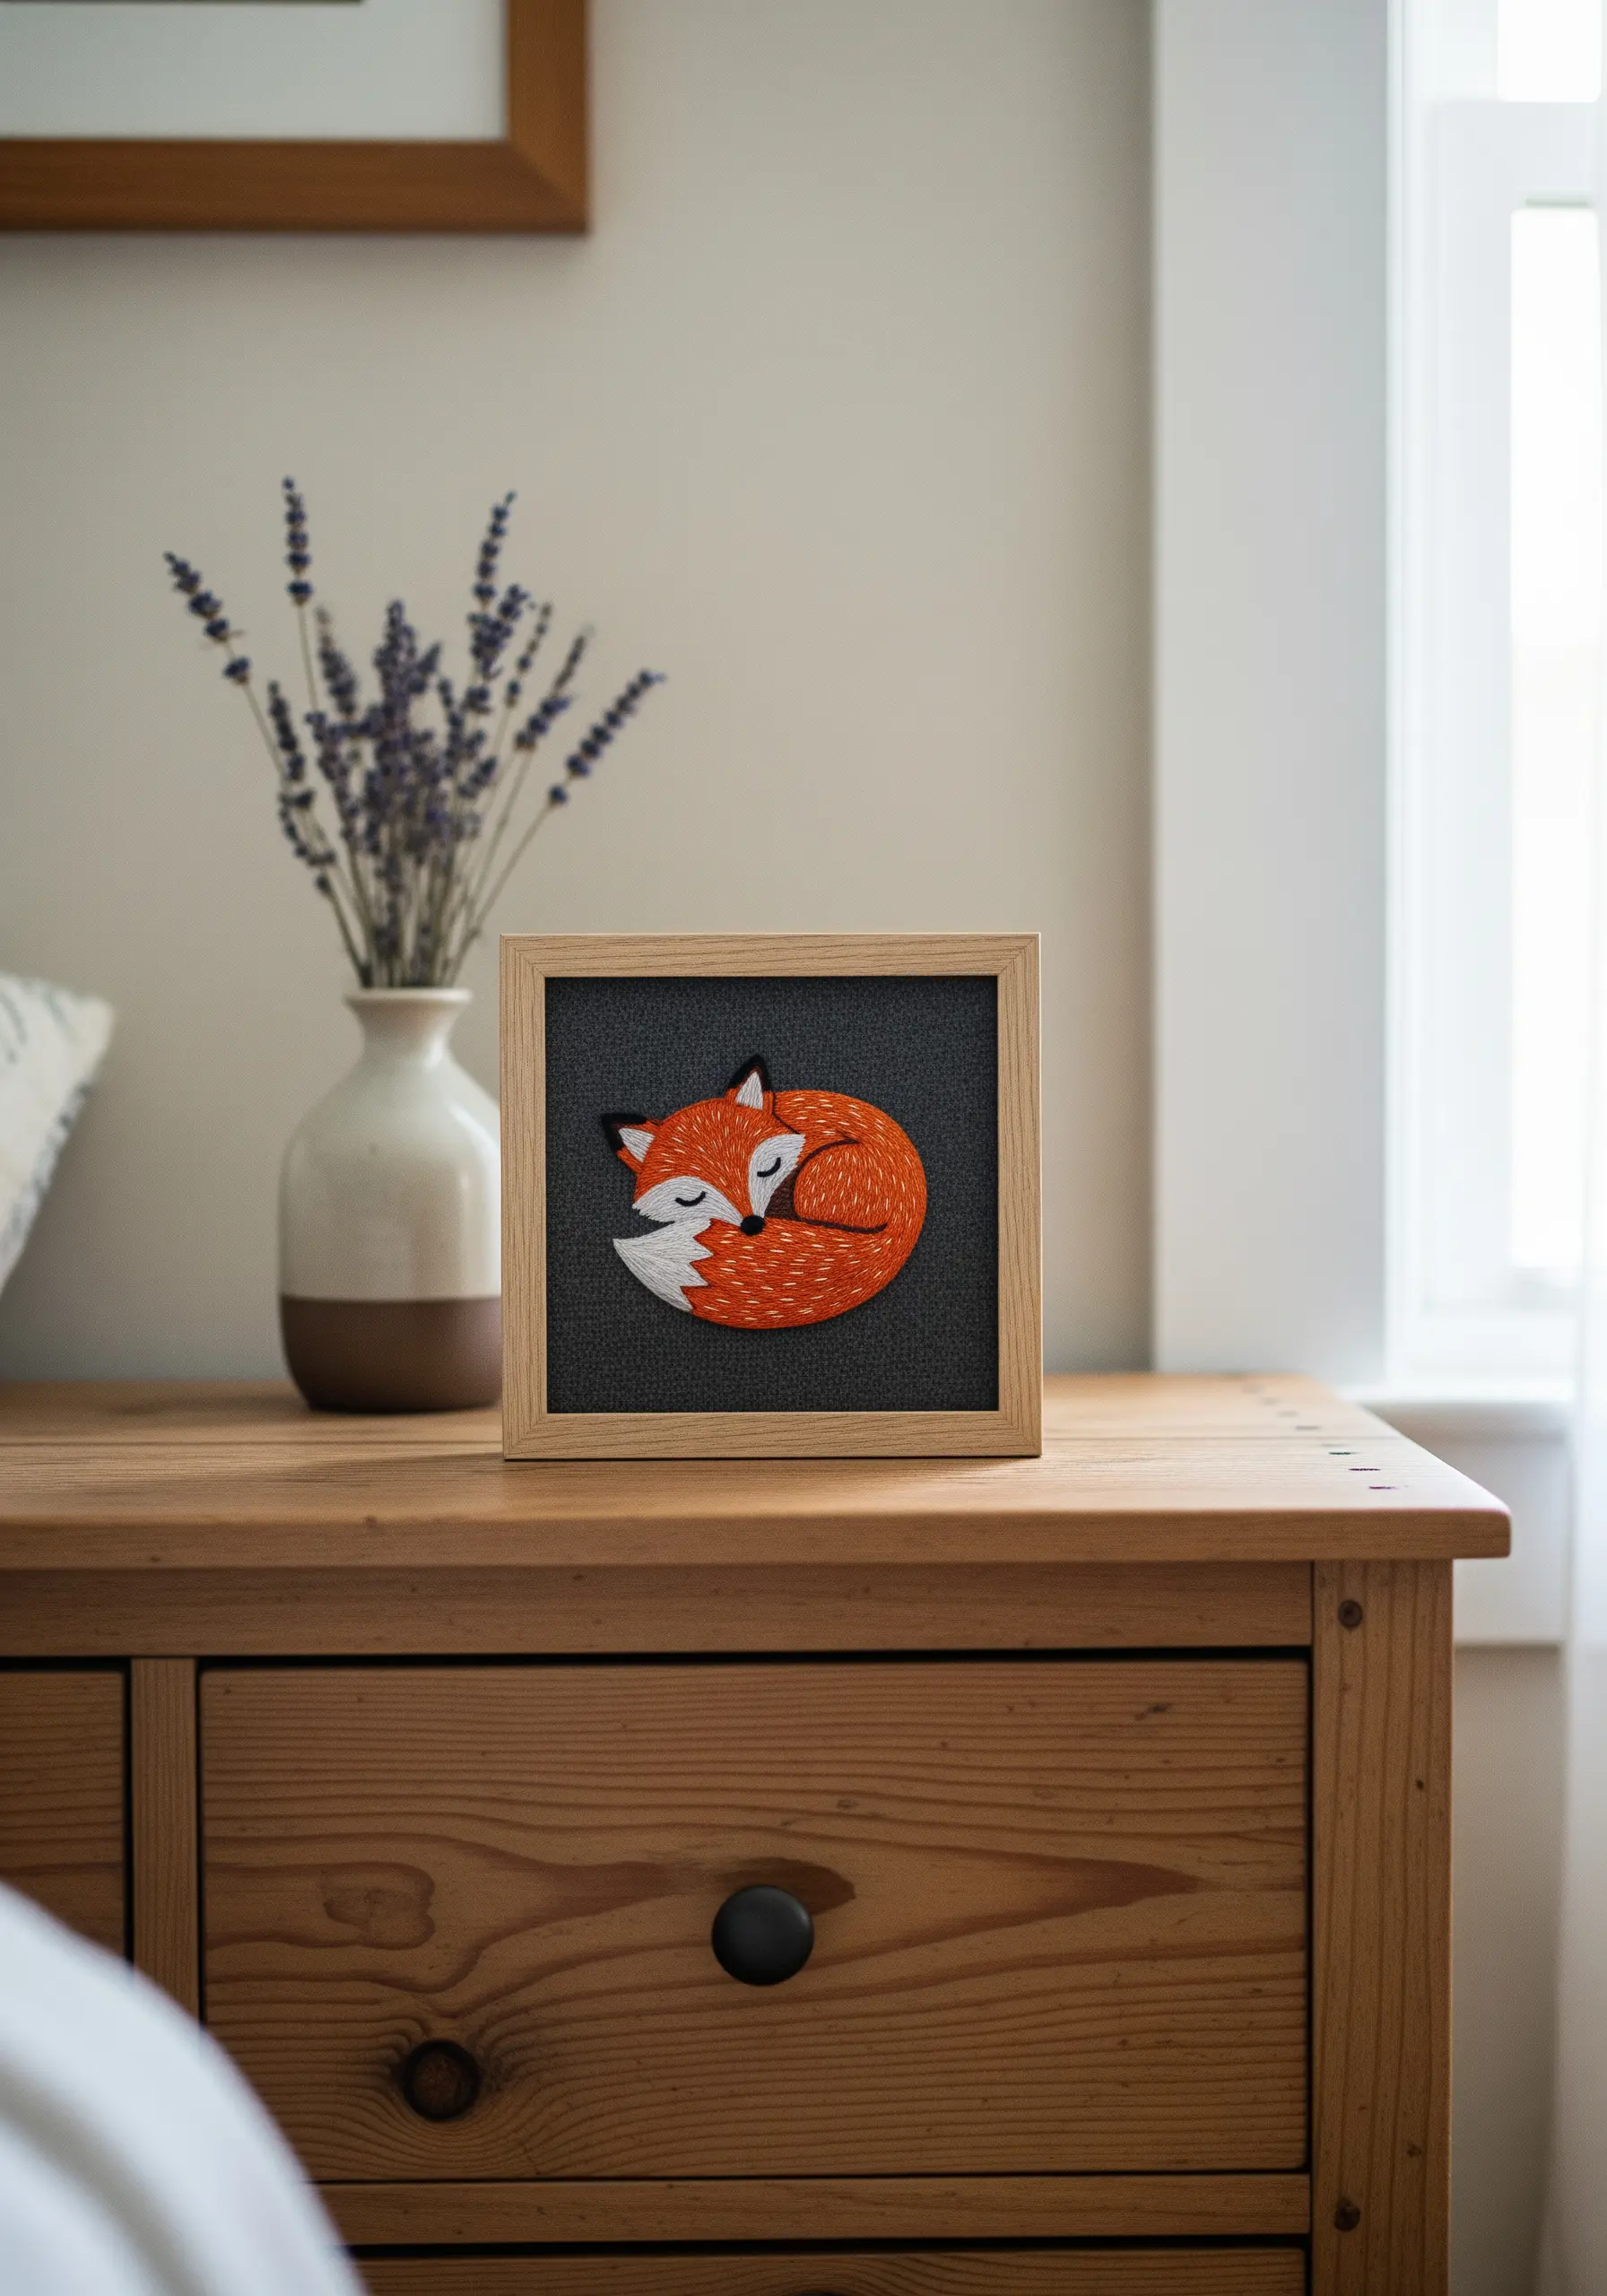
To bring this sleeping fox to life, move beyond simple fill stitches and embrace thread painting with the long-and-short stitch.
Use a single strand of floss and blend shades of orange, cream, and brown to create realistic softness.
The most important detail is the direction of your stitches—angle them to mimic the natural growth of fur on the animal’s body.
This directional stitching is what creates the illusion of dimension and transforms a flat image into one of many lifelike animal-themed pillow stitching ideas.
7. Weave Rhythmic Patterns with Sashiko-Style Stitches
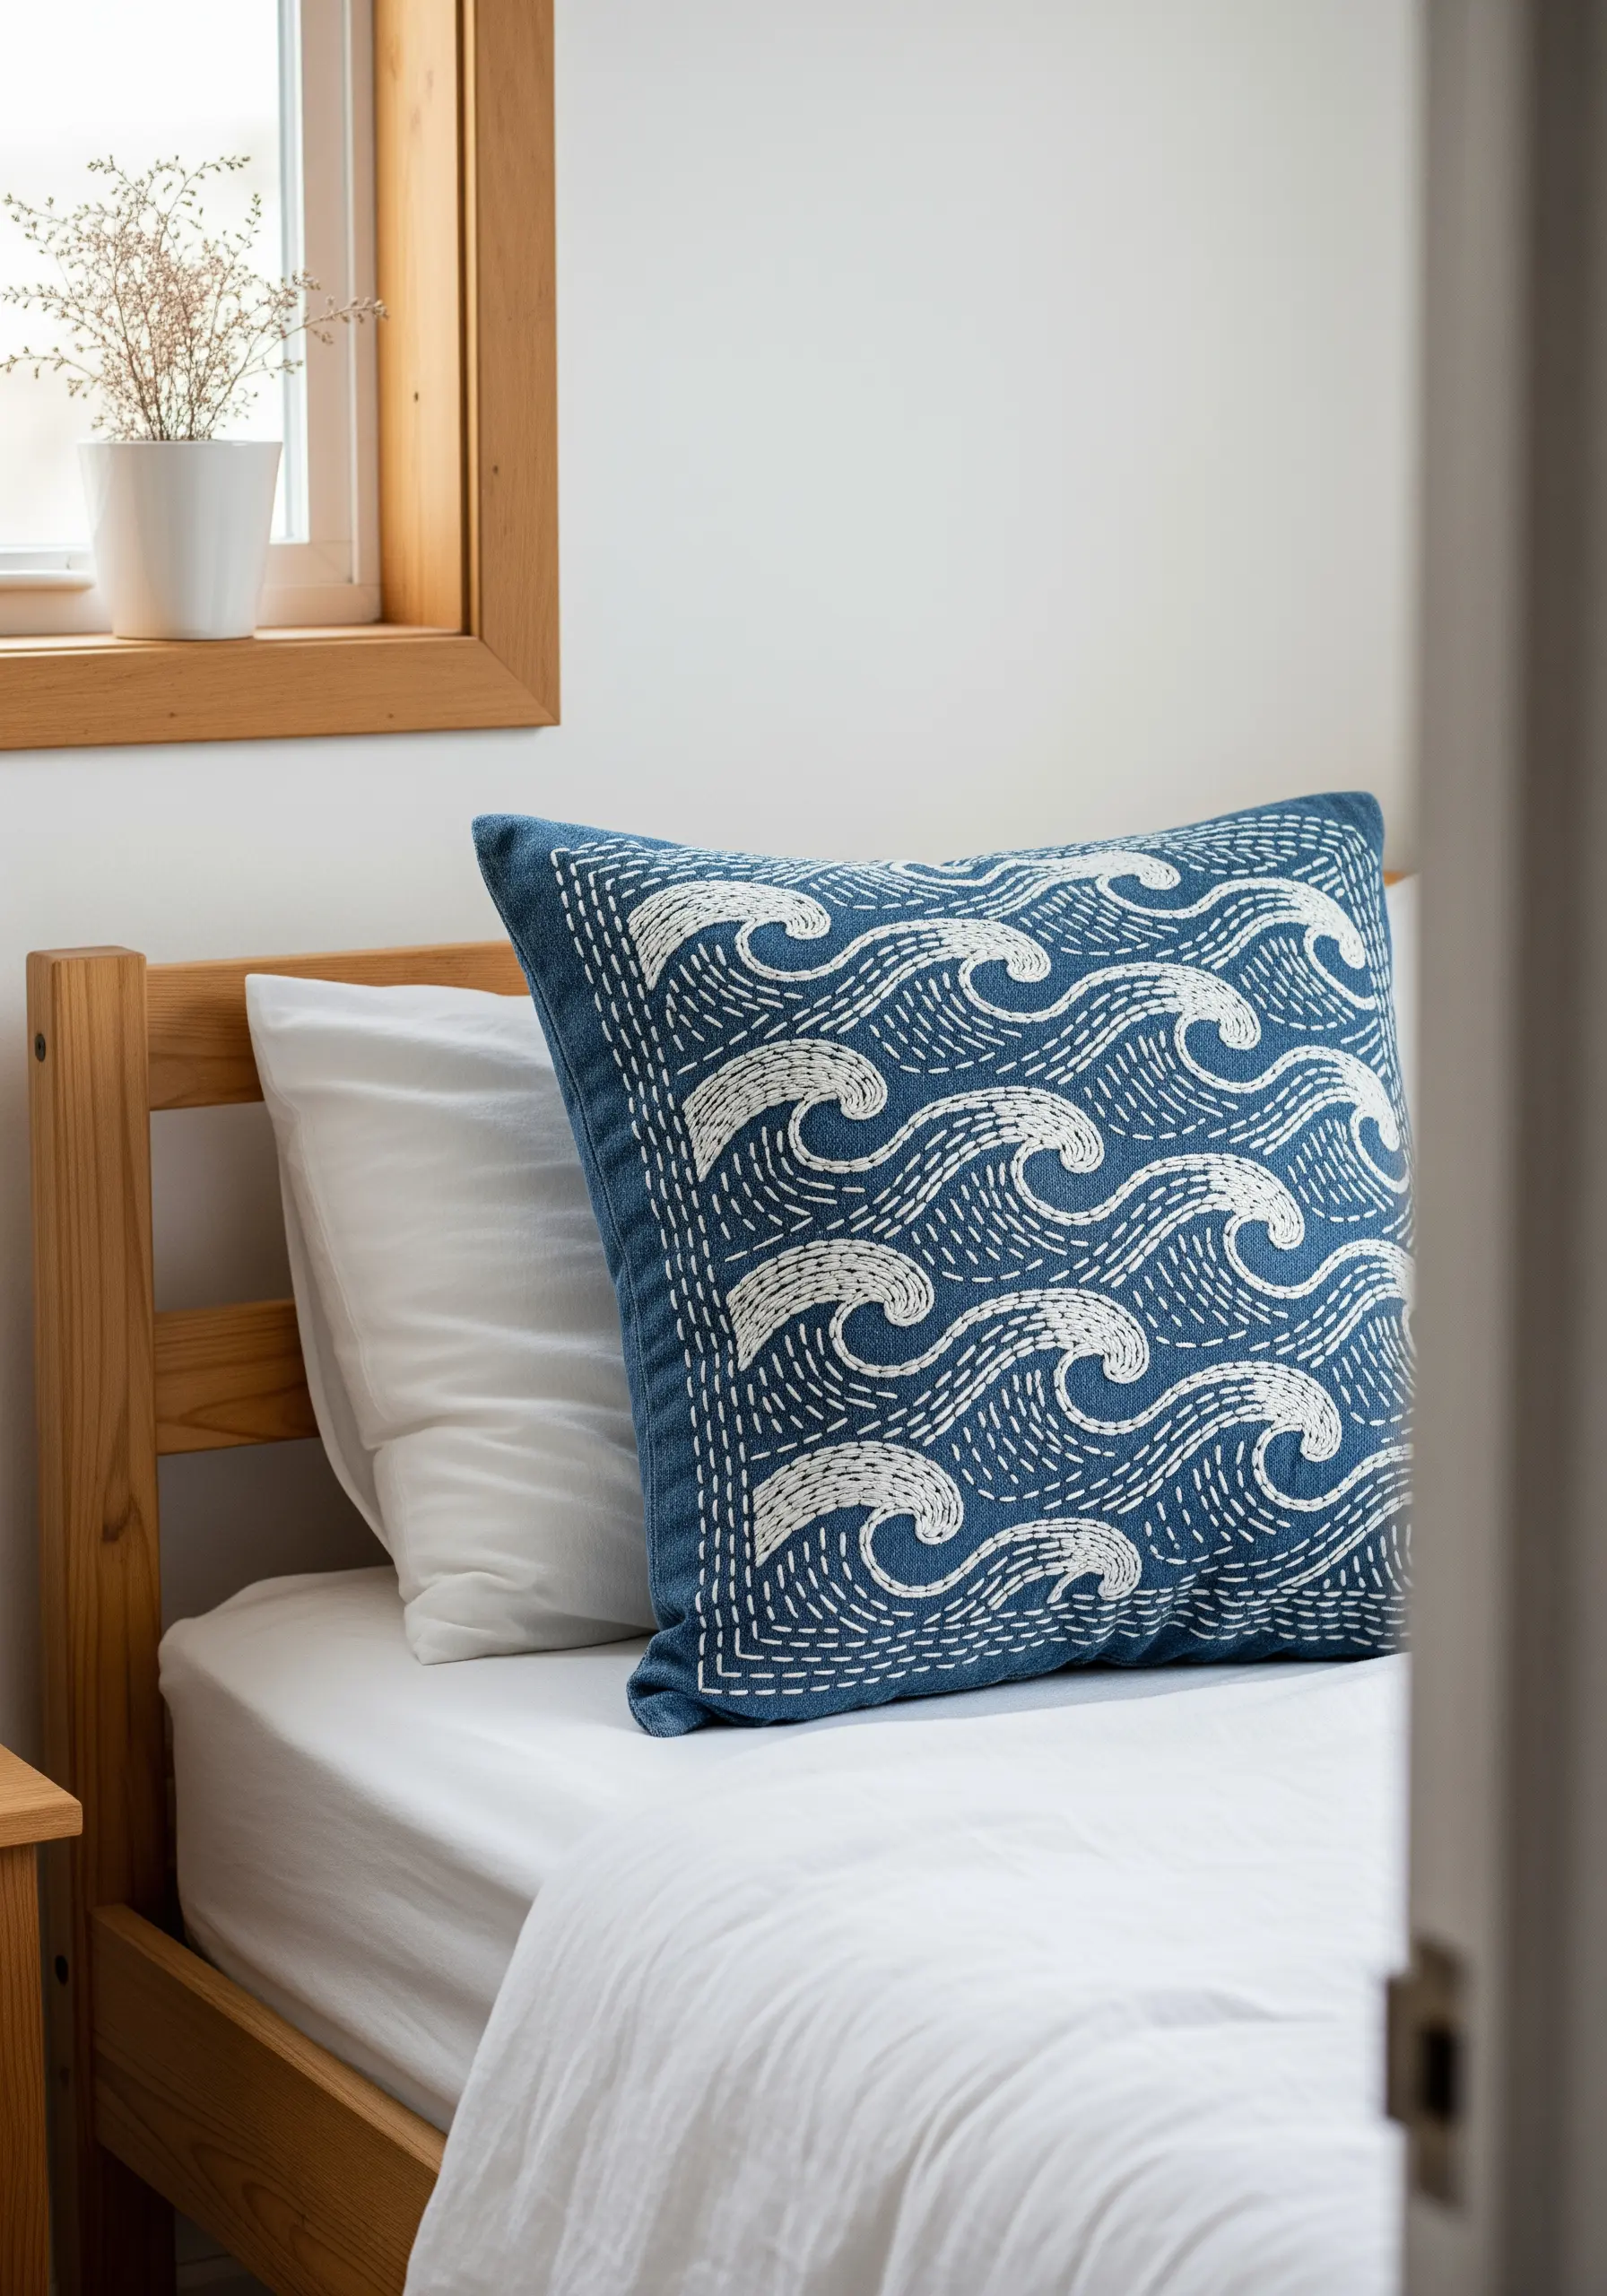
This high-impact wave pillow relies on the graphic power of rhythmic, repeated stitches.
Instead of standard floss, use a thicker sashiko thread or pearl cotton to ensure your stitches stand out against the sturdy denim or canvas fabric.
Mark your wave pattern carefully with a water-soluble pen or chalk pencil before you begin.
The key to a polished finish is maintaining a consistent stitch and gap length, turning a simple running stitch into a powerful design element for beige and blush embroidery pillow ideas.
8. Add Subtle Elegance to Bed Linens
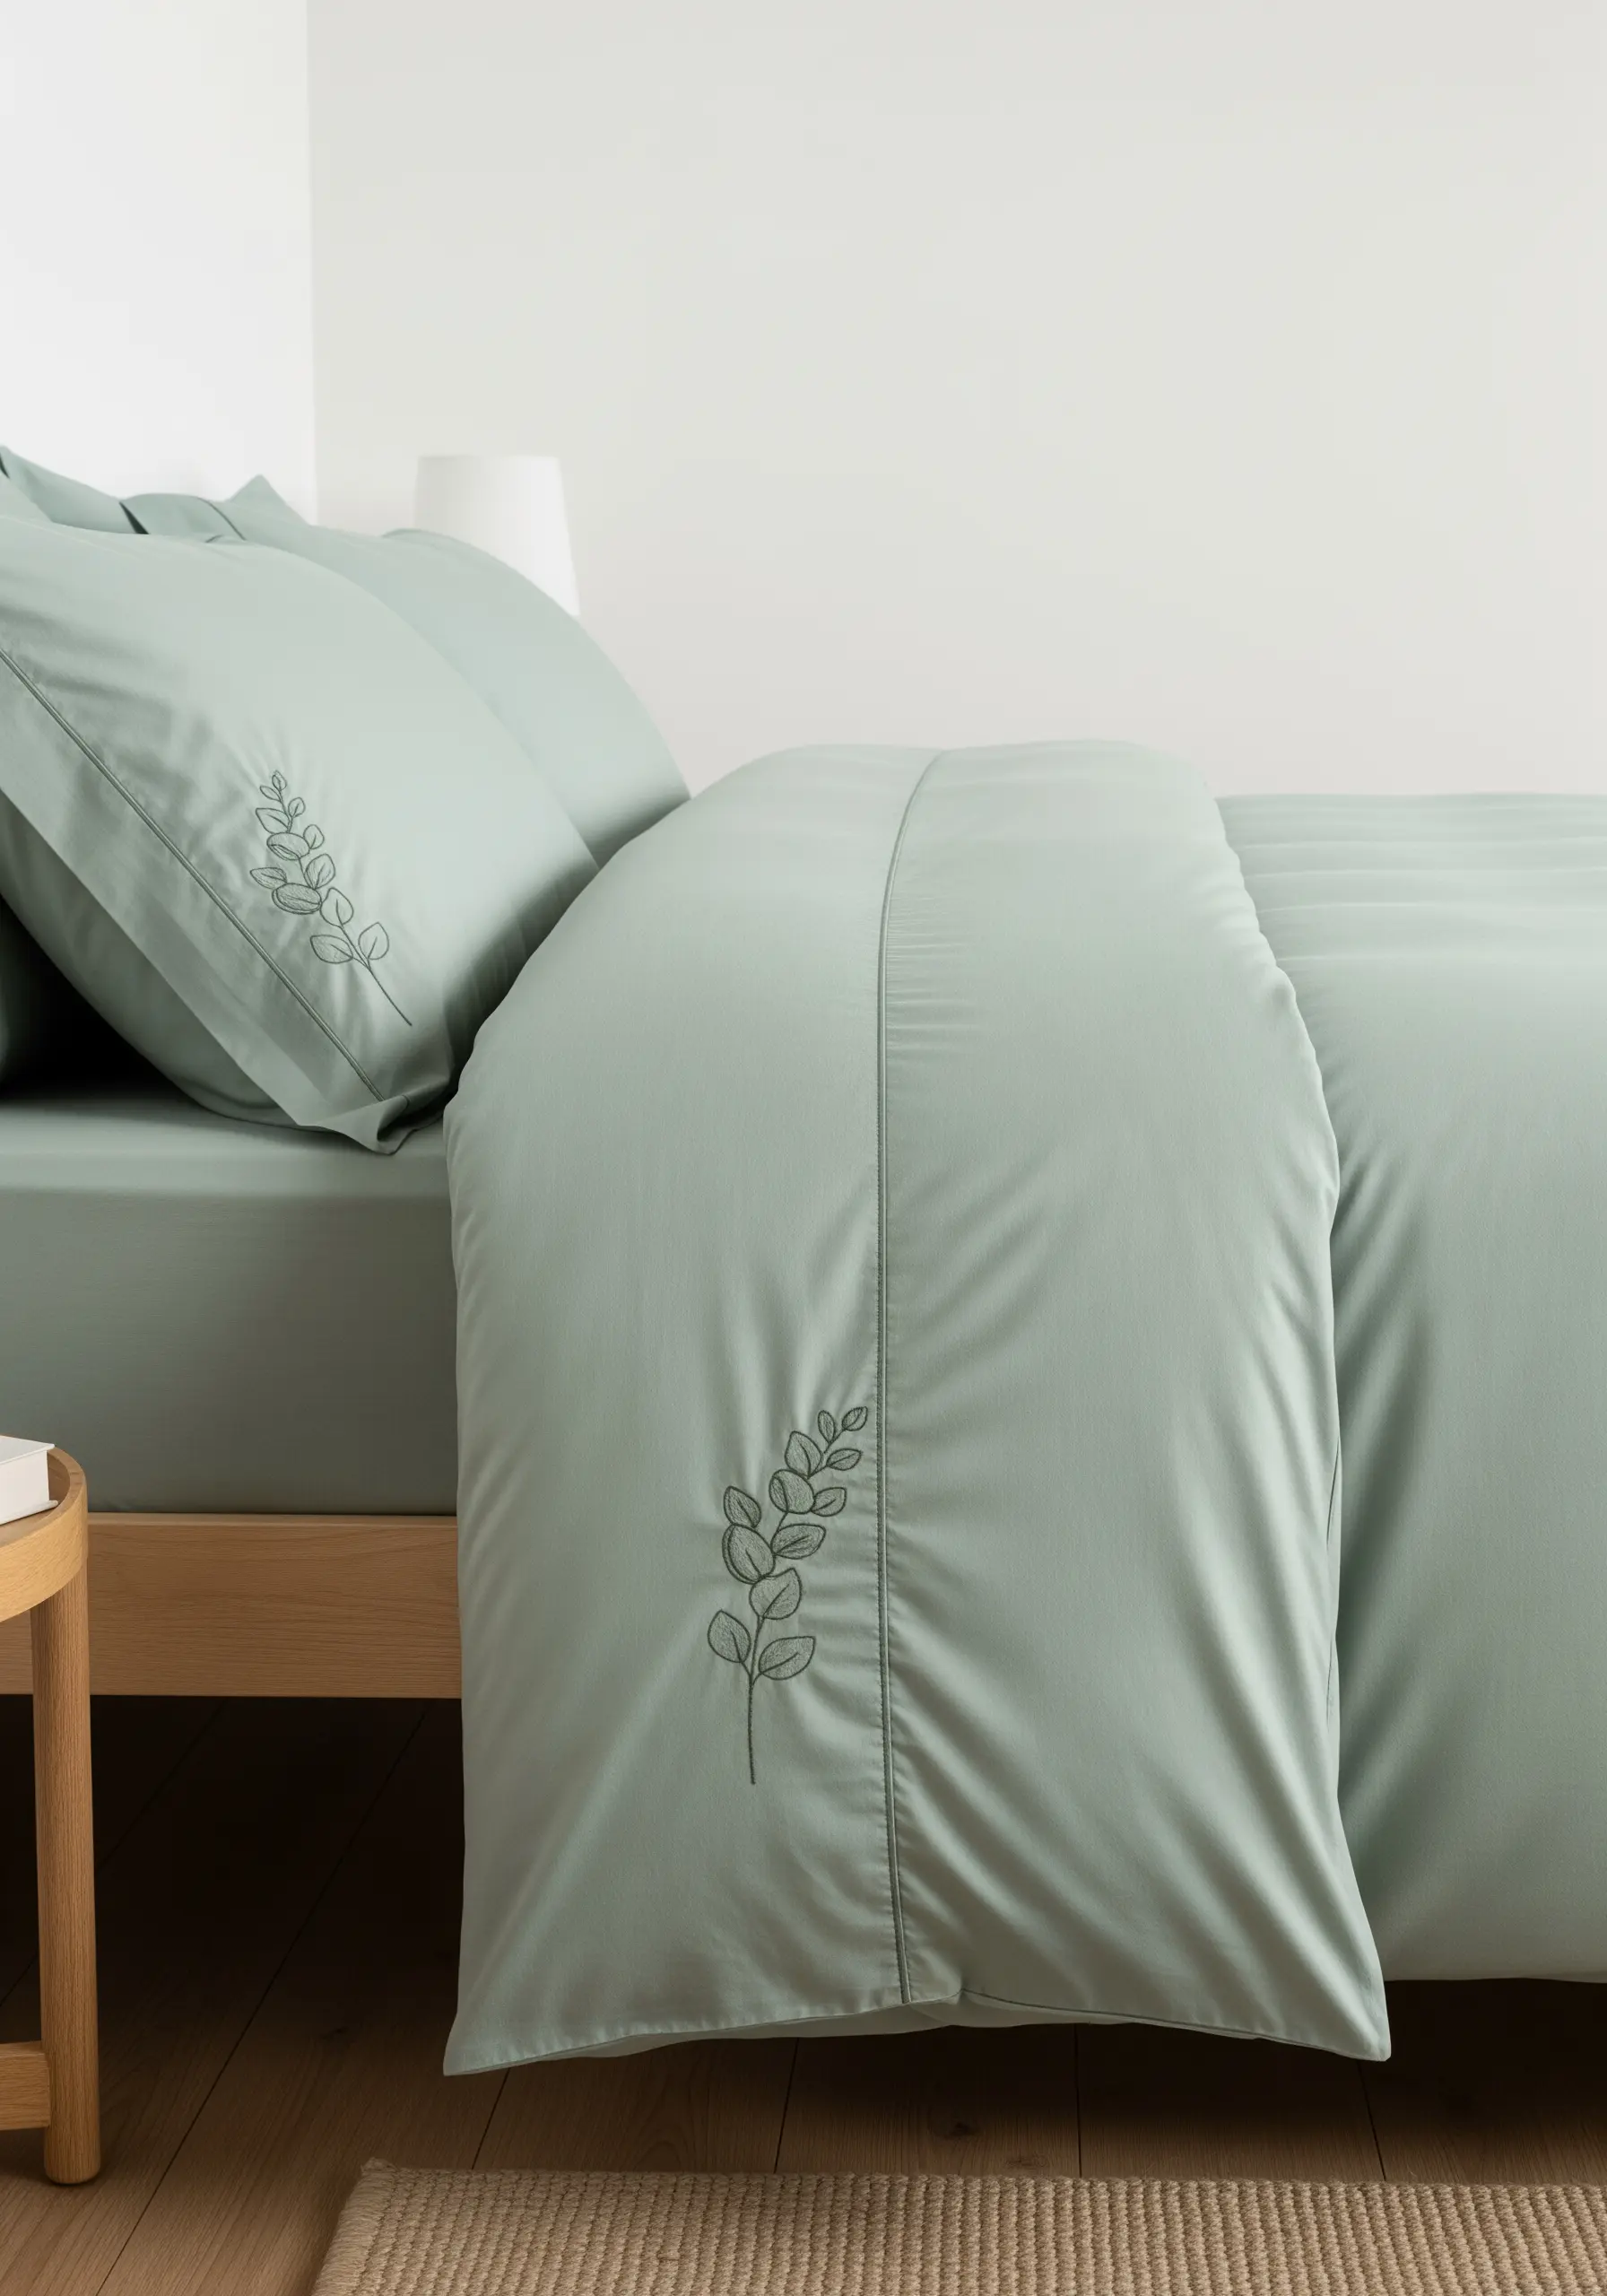
Elevate your bedding with a single, exquisitely placed motif for a touch of bespoke luxury.
When stitching on high-thread-count sateen or percale, use a sharp, fine needle to glide through the tight weave without snagging.
Choose a thread color that is just a few shades darker than your fabric for a tone-on-tone effect that is sophisticated and subtle.
This restraint is the secret behind creating easy small embroidery patterns that look effortlessly high-end.
9. Create a Sunrise with Architectural String Art

Adapt embroidery techniques for a large-scale, dramatic headboard using principles from string art.
Plan your design and mark anchor points for the yarn at the top and base of the headboard.
Use a strong upholstery needle and thick, colorful yarn, ensuring each strand is pulled taut to maintain tension and create crisp, graphic sunrays.
This project blends fiber art with furniture design, creating a functional statement piece inspired by retro string art patterns.
10. Craft a Scented Lavender Sachet
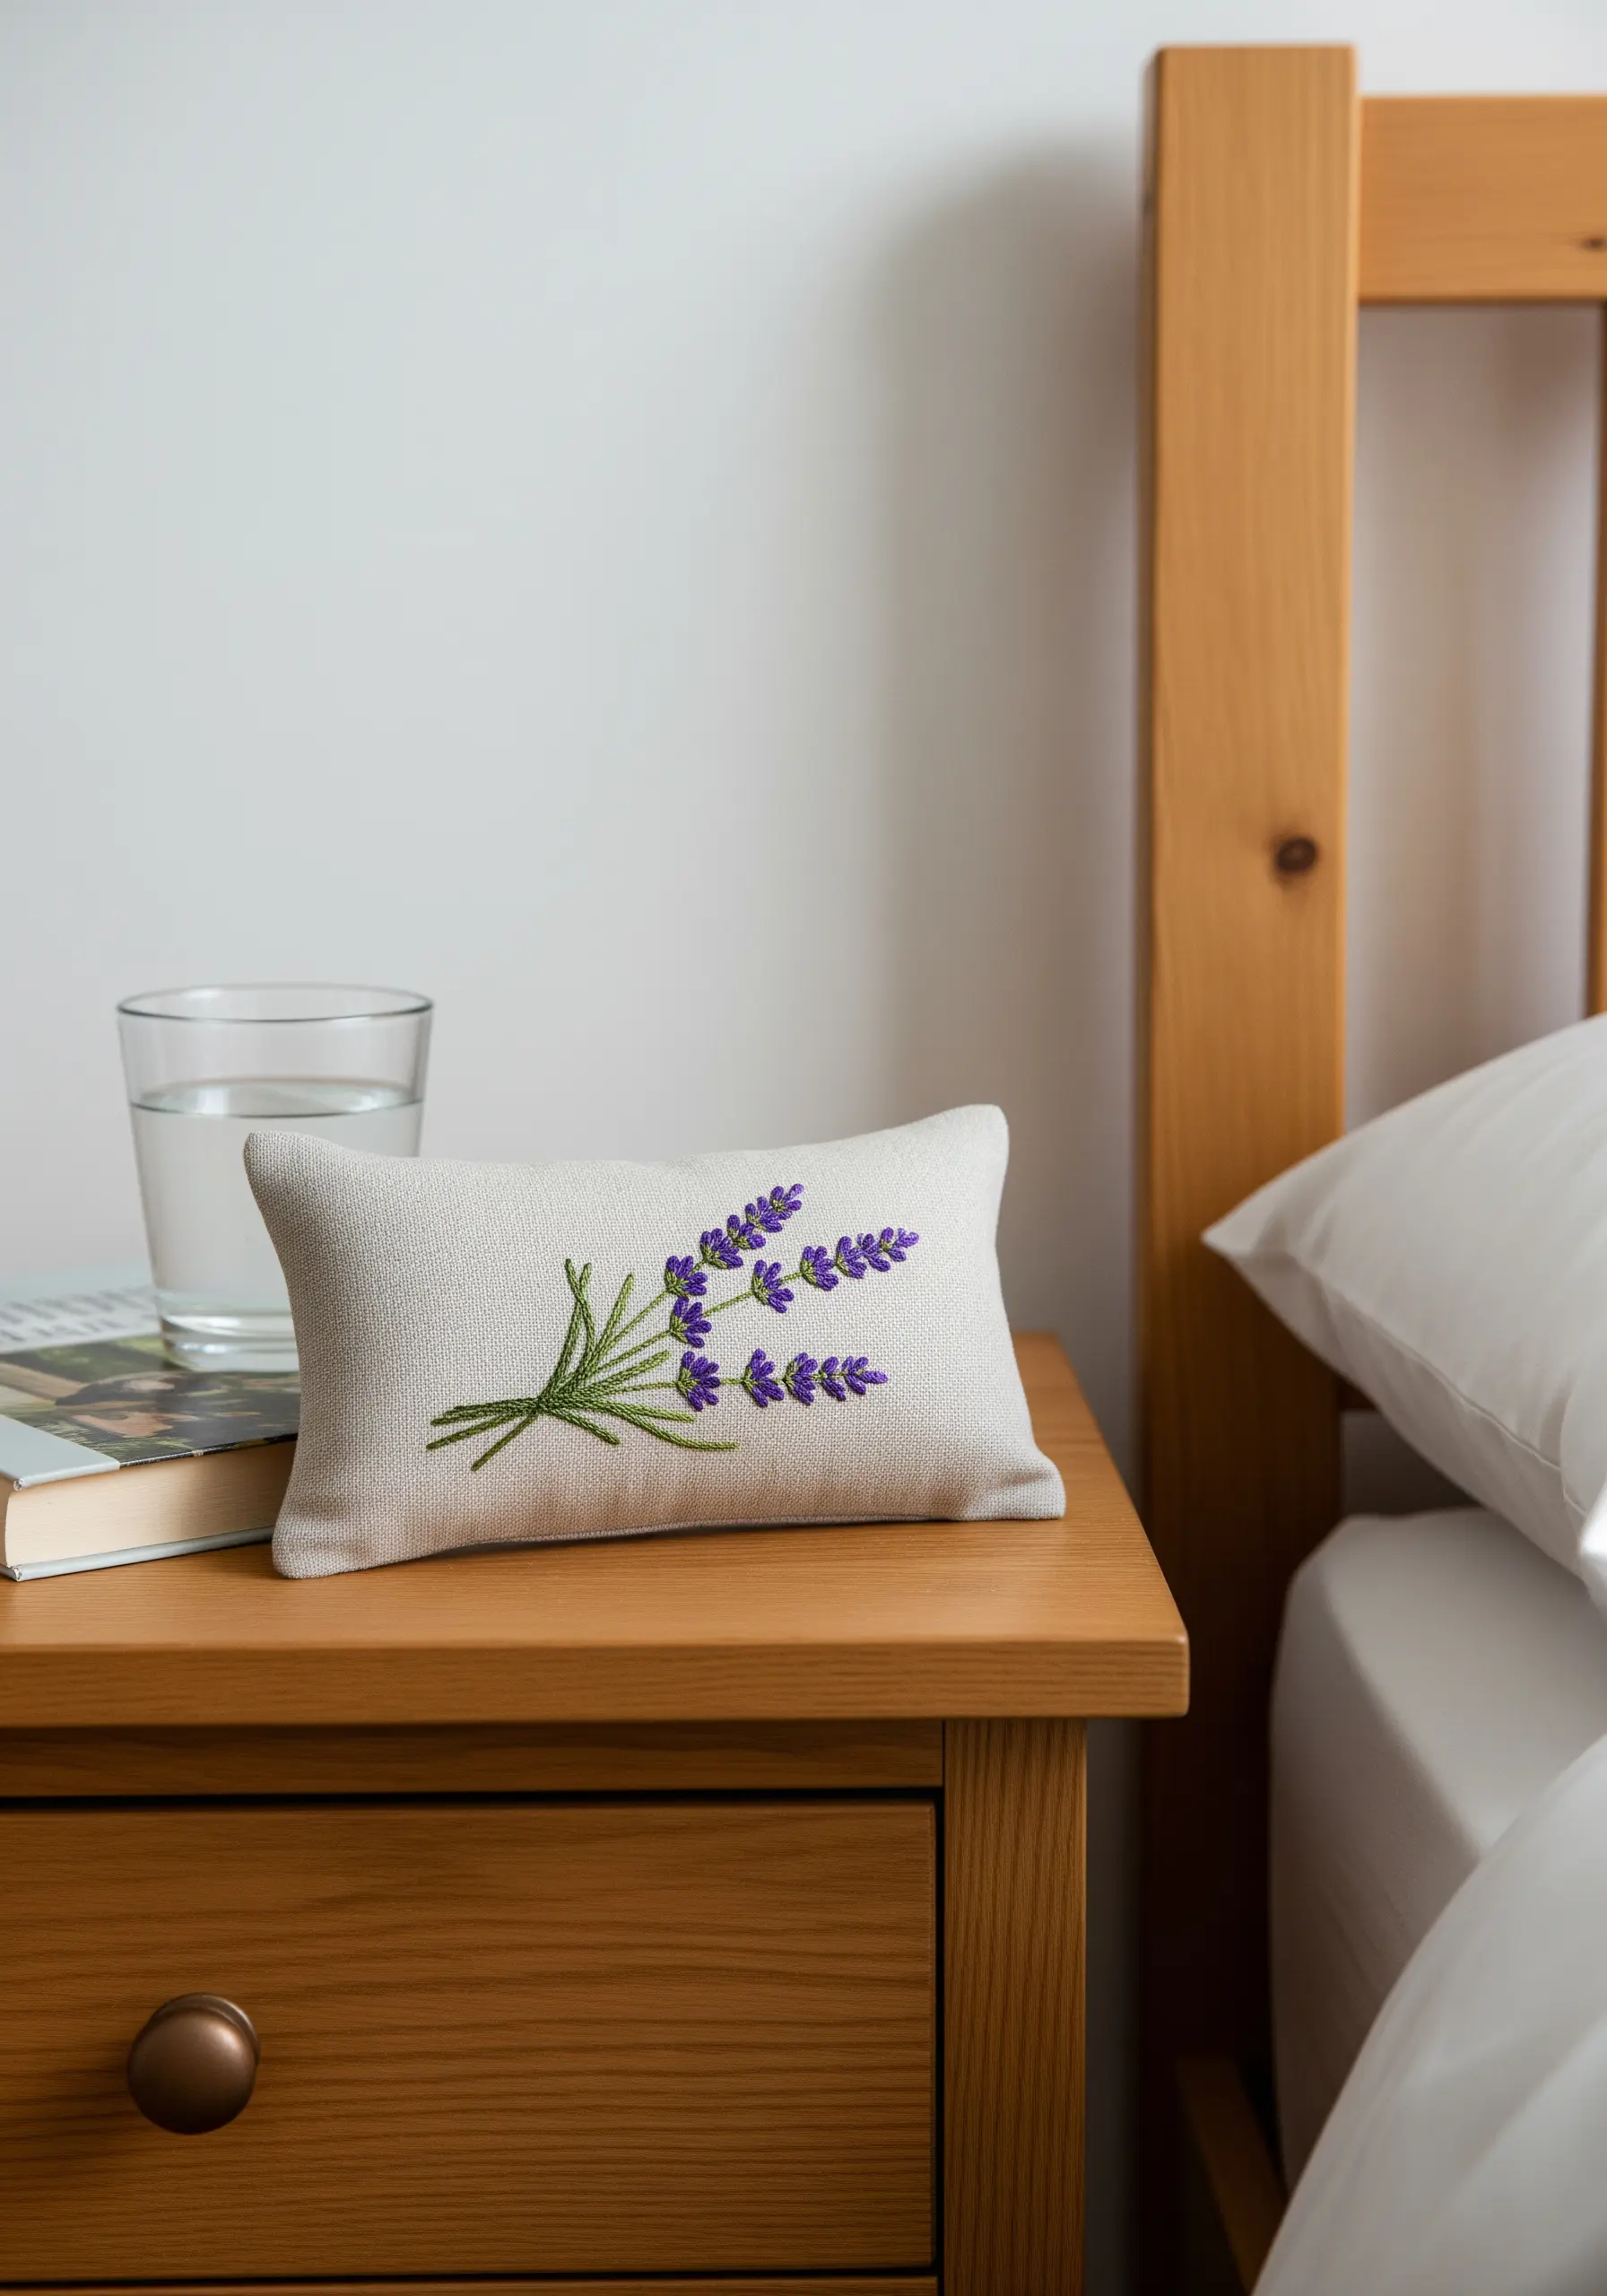
To capture the texture of a lavender sprig, use densely packed French knots for the flower buds.
Create realistic dimension by using two or three shades of purple floss and varying the number of wraps around your needle (two for smaller knots, three for larger ones).
This subtle variation mimics the look of a natural bloom.
Fill the finished linen pouch with dried lavender to create beautiful handmade embroidery projects to give as thoughtful birthday gifts that engage multiple senses.
11. Organize with Botanical Illustrations
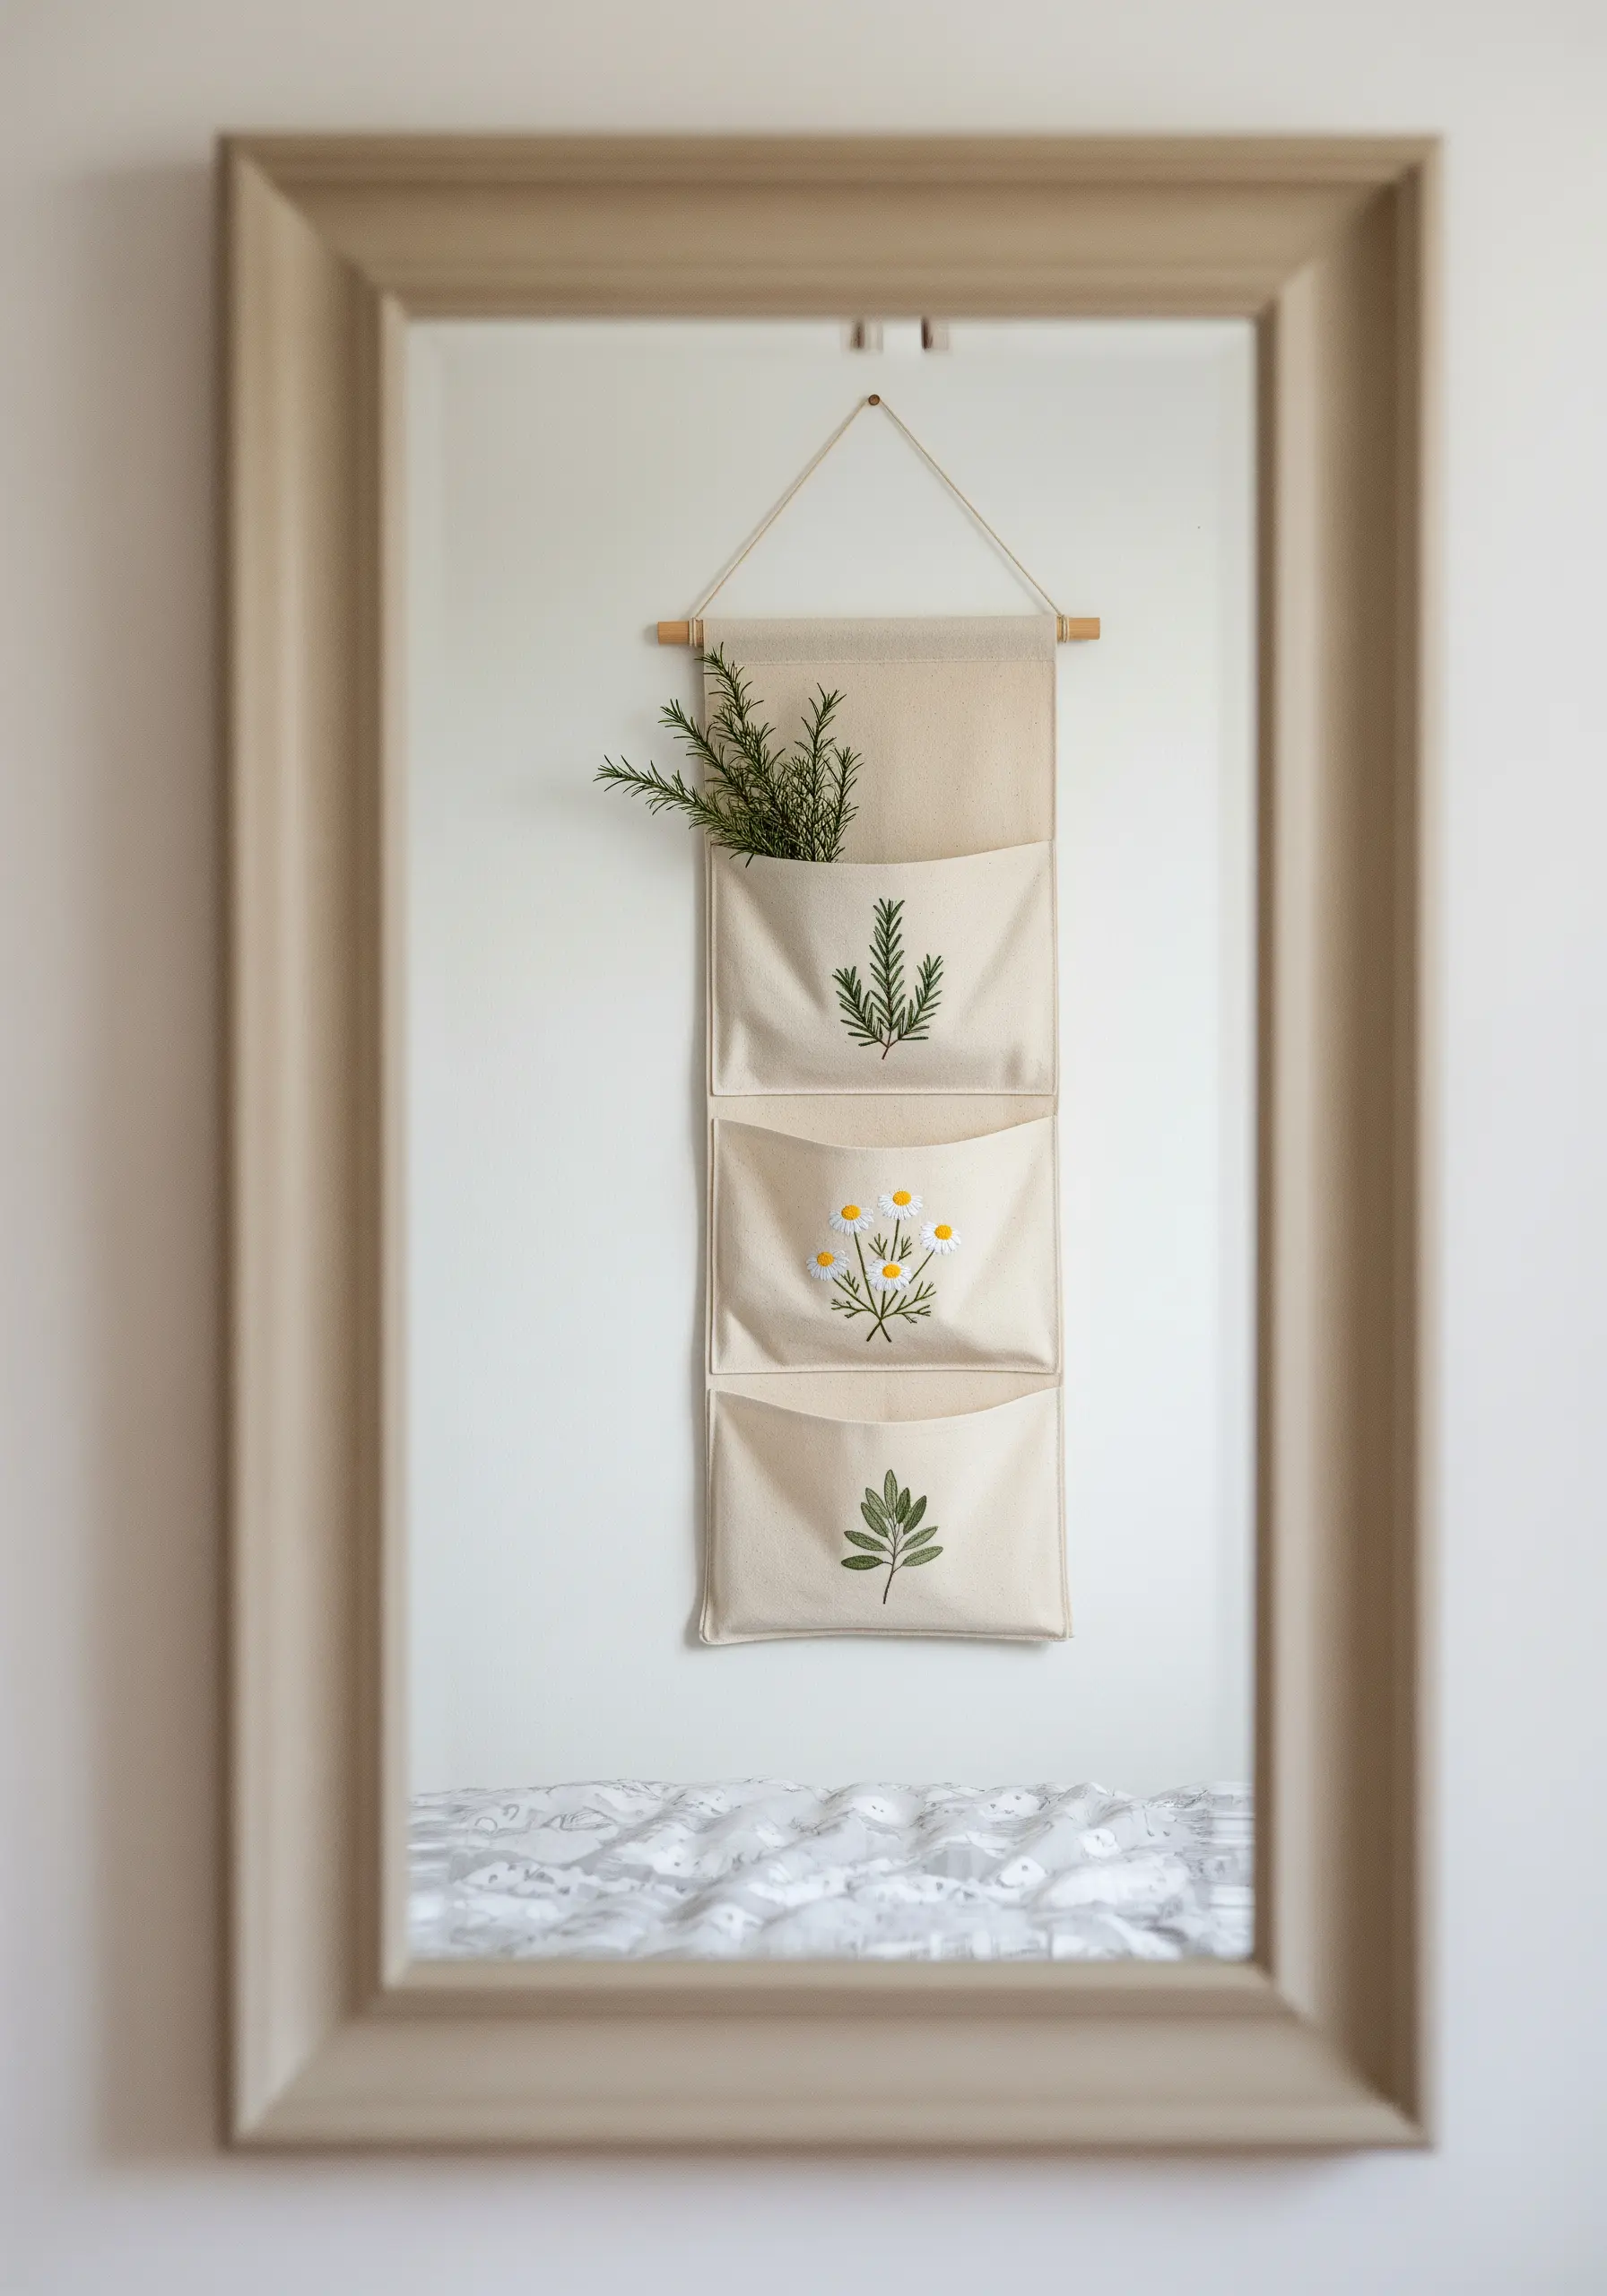
Transform a functional wall organizer into a piece of charming decor with simple, embroidered botanical labels.
Use basic stitches like stem stitch for outlines and a few lazy daisy or satin stitches for leaves and petals.
By keeping the motifs clean and the color palette limited to natural greens and whites, you create a cohesive and calming organizational system.
These are tiny embroidery designs inspired by everyday life that blend beauty with utility.
12. Stitch a Meditative Mandala Floor Cushion
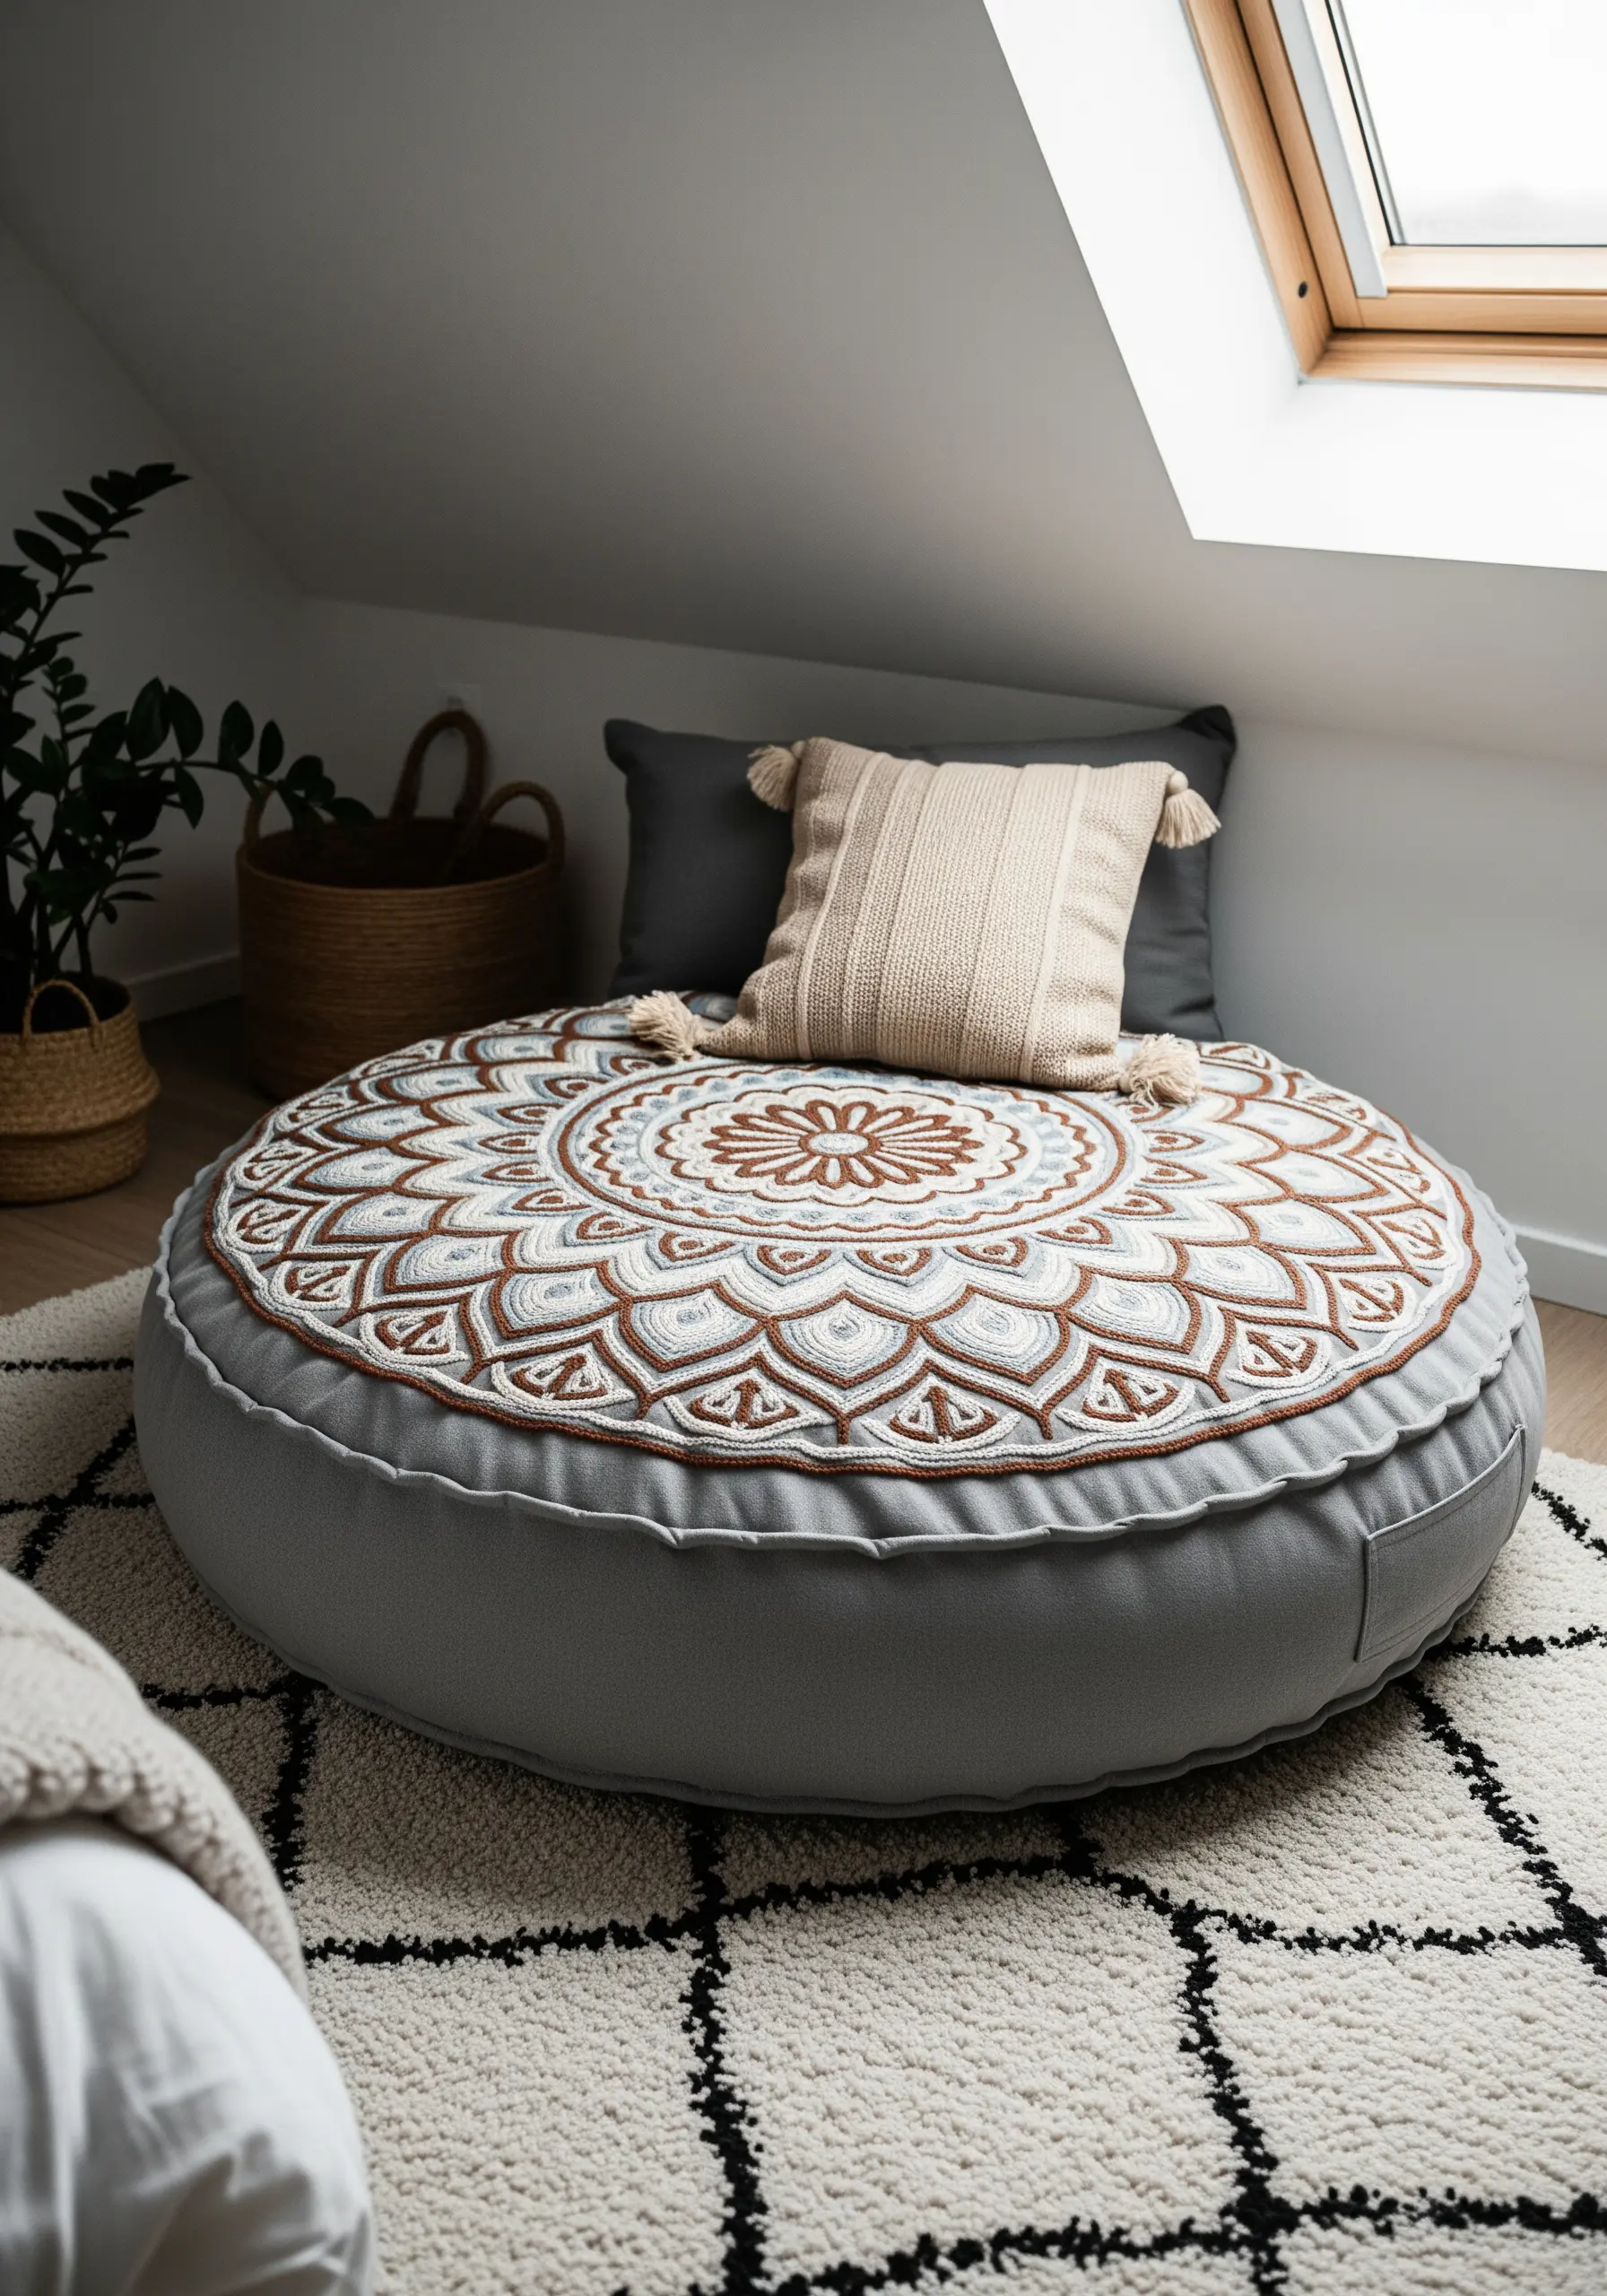
For a project of this scale, choose your materials wisely to ensure both beauty and durability.
Work on a heavy cotton canvas or upholstery-grade fabric that can withstand use.
Use thicker threads, like pearl cotton No. 5 or tapestry wool, to fill the large areas more efficiently and to add a pleasing, tactile dimension.
Stitching an embroidered mandala is a meditative process, so work from the center out to keep your fabric tension even.
13. Combine Appliqué and Stitching for Autumn Leaves
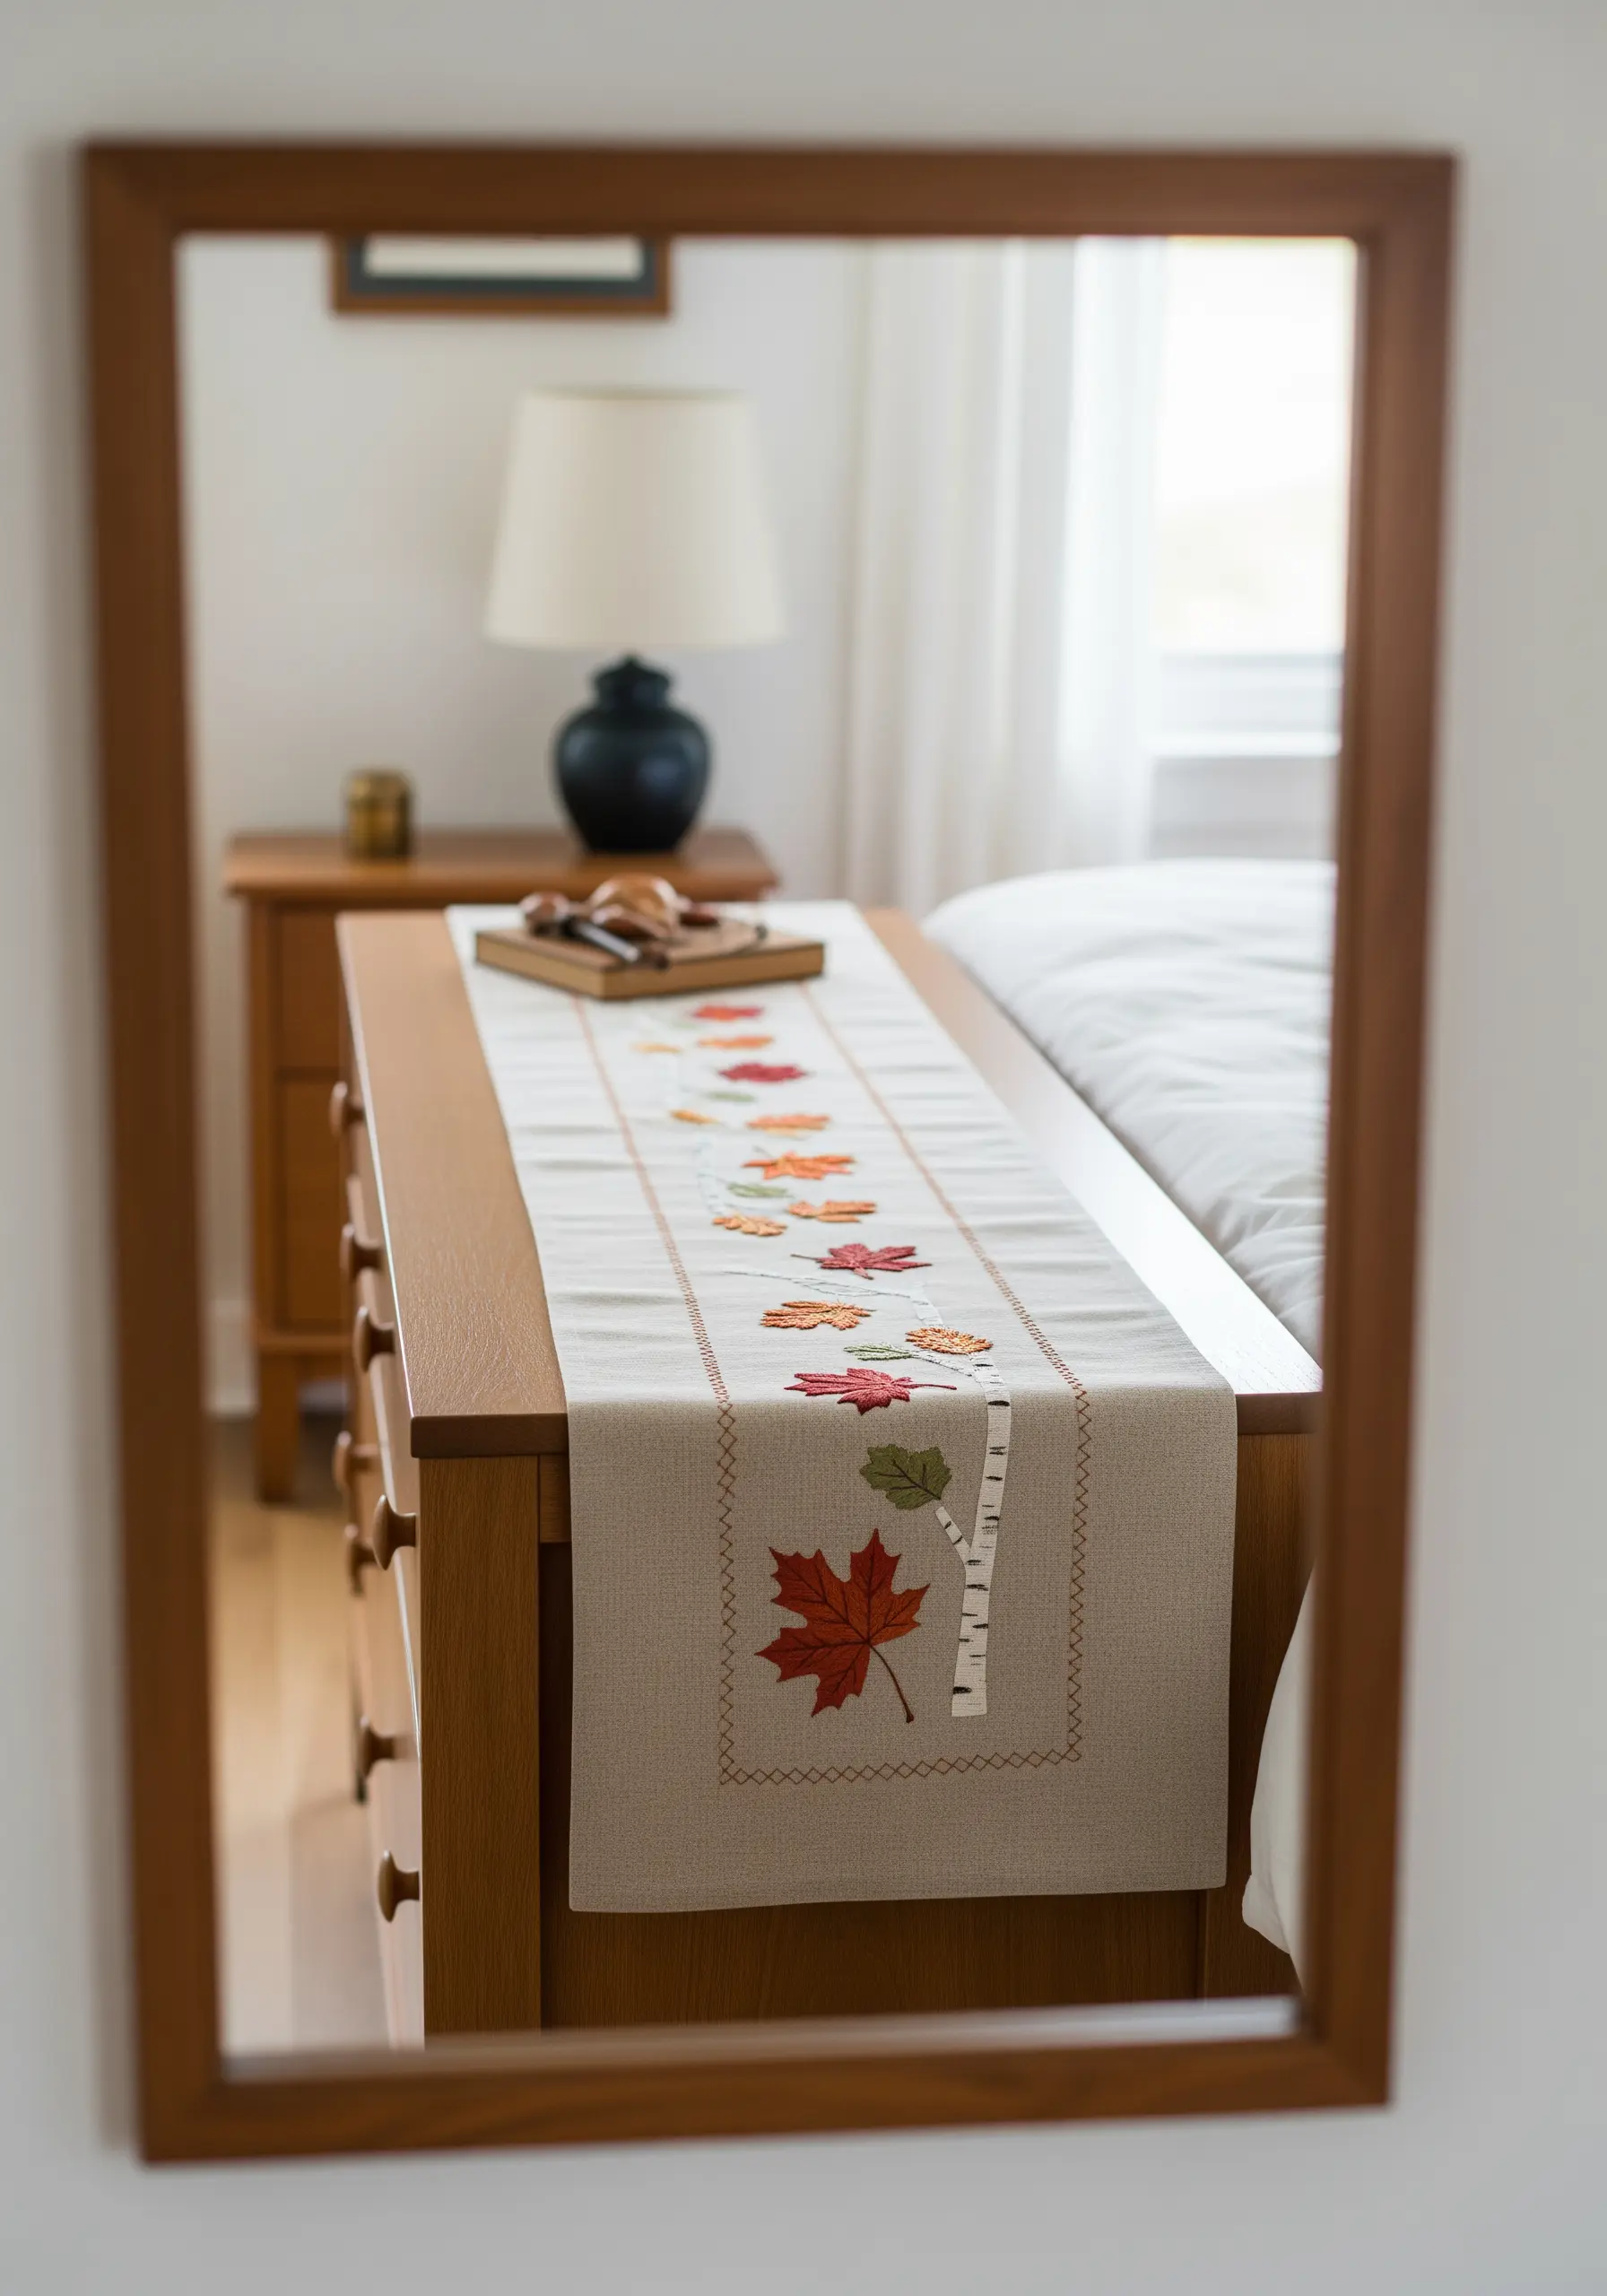
Create richly textured autumn leaves by combining fabric appliqué with embroidered details.
First, cut your leaf shapes from felt or cotton scraps and secure them to your table runner with a lightweight fusible webbing.
Edge each leaf with a decorative blanket stitch for a clean finish, then add veins with a simple backstitch.
This layering of materials adds depth and interest, transforming simple line art garden motifs into tactile art.
14. Illuminate a Lampshade with Stitched Fireflies
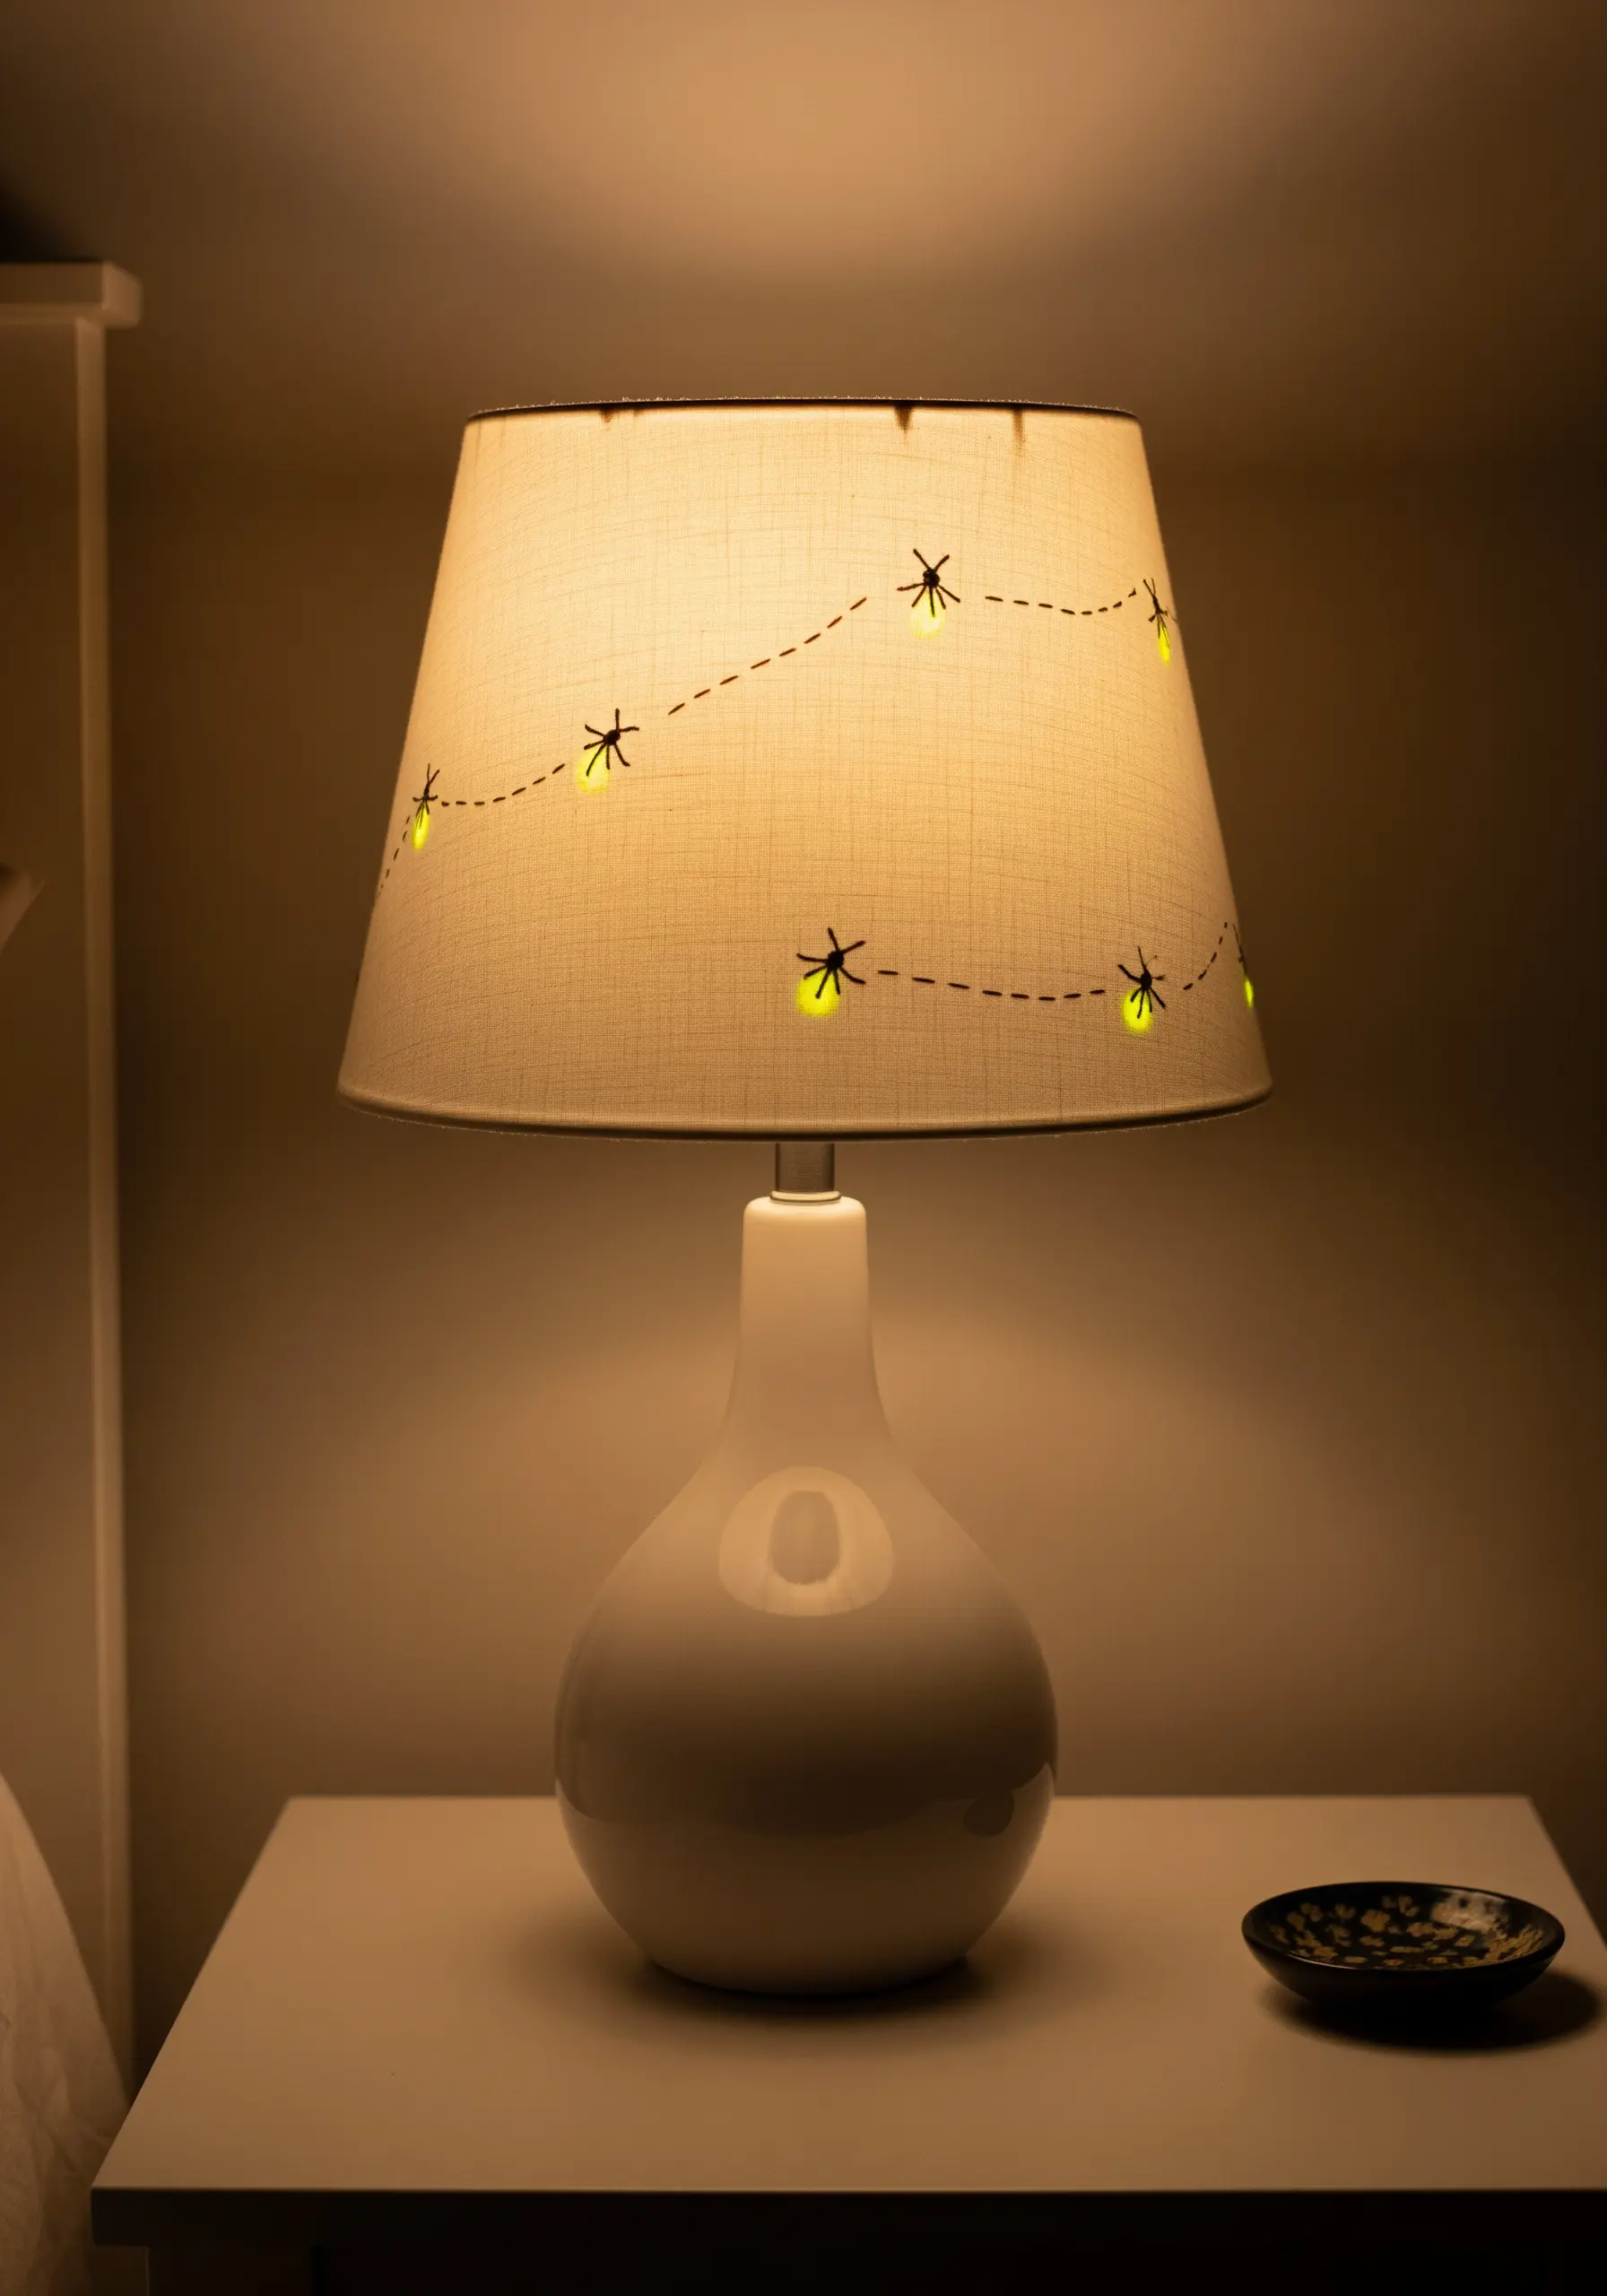
Play with light by embroidering directly onto a plain fabric lampshade.
For a magical touch, use glow-in-the-dark floss for the bodies of the fireflies and a simple black thread for their legs and flight paths.
When the lamp is on, the design is a charming accent; when it’s off in a dark room, the fireflies emit a soft glow.
This unexpected detail turns a simple light fixture into one of your favorite mini handmade objects that bring life to any tabletop.
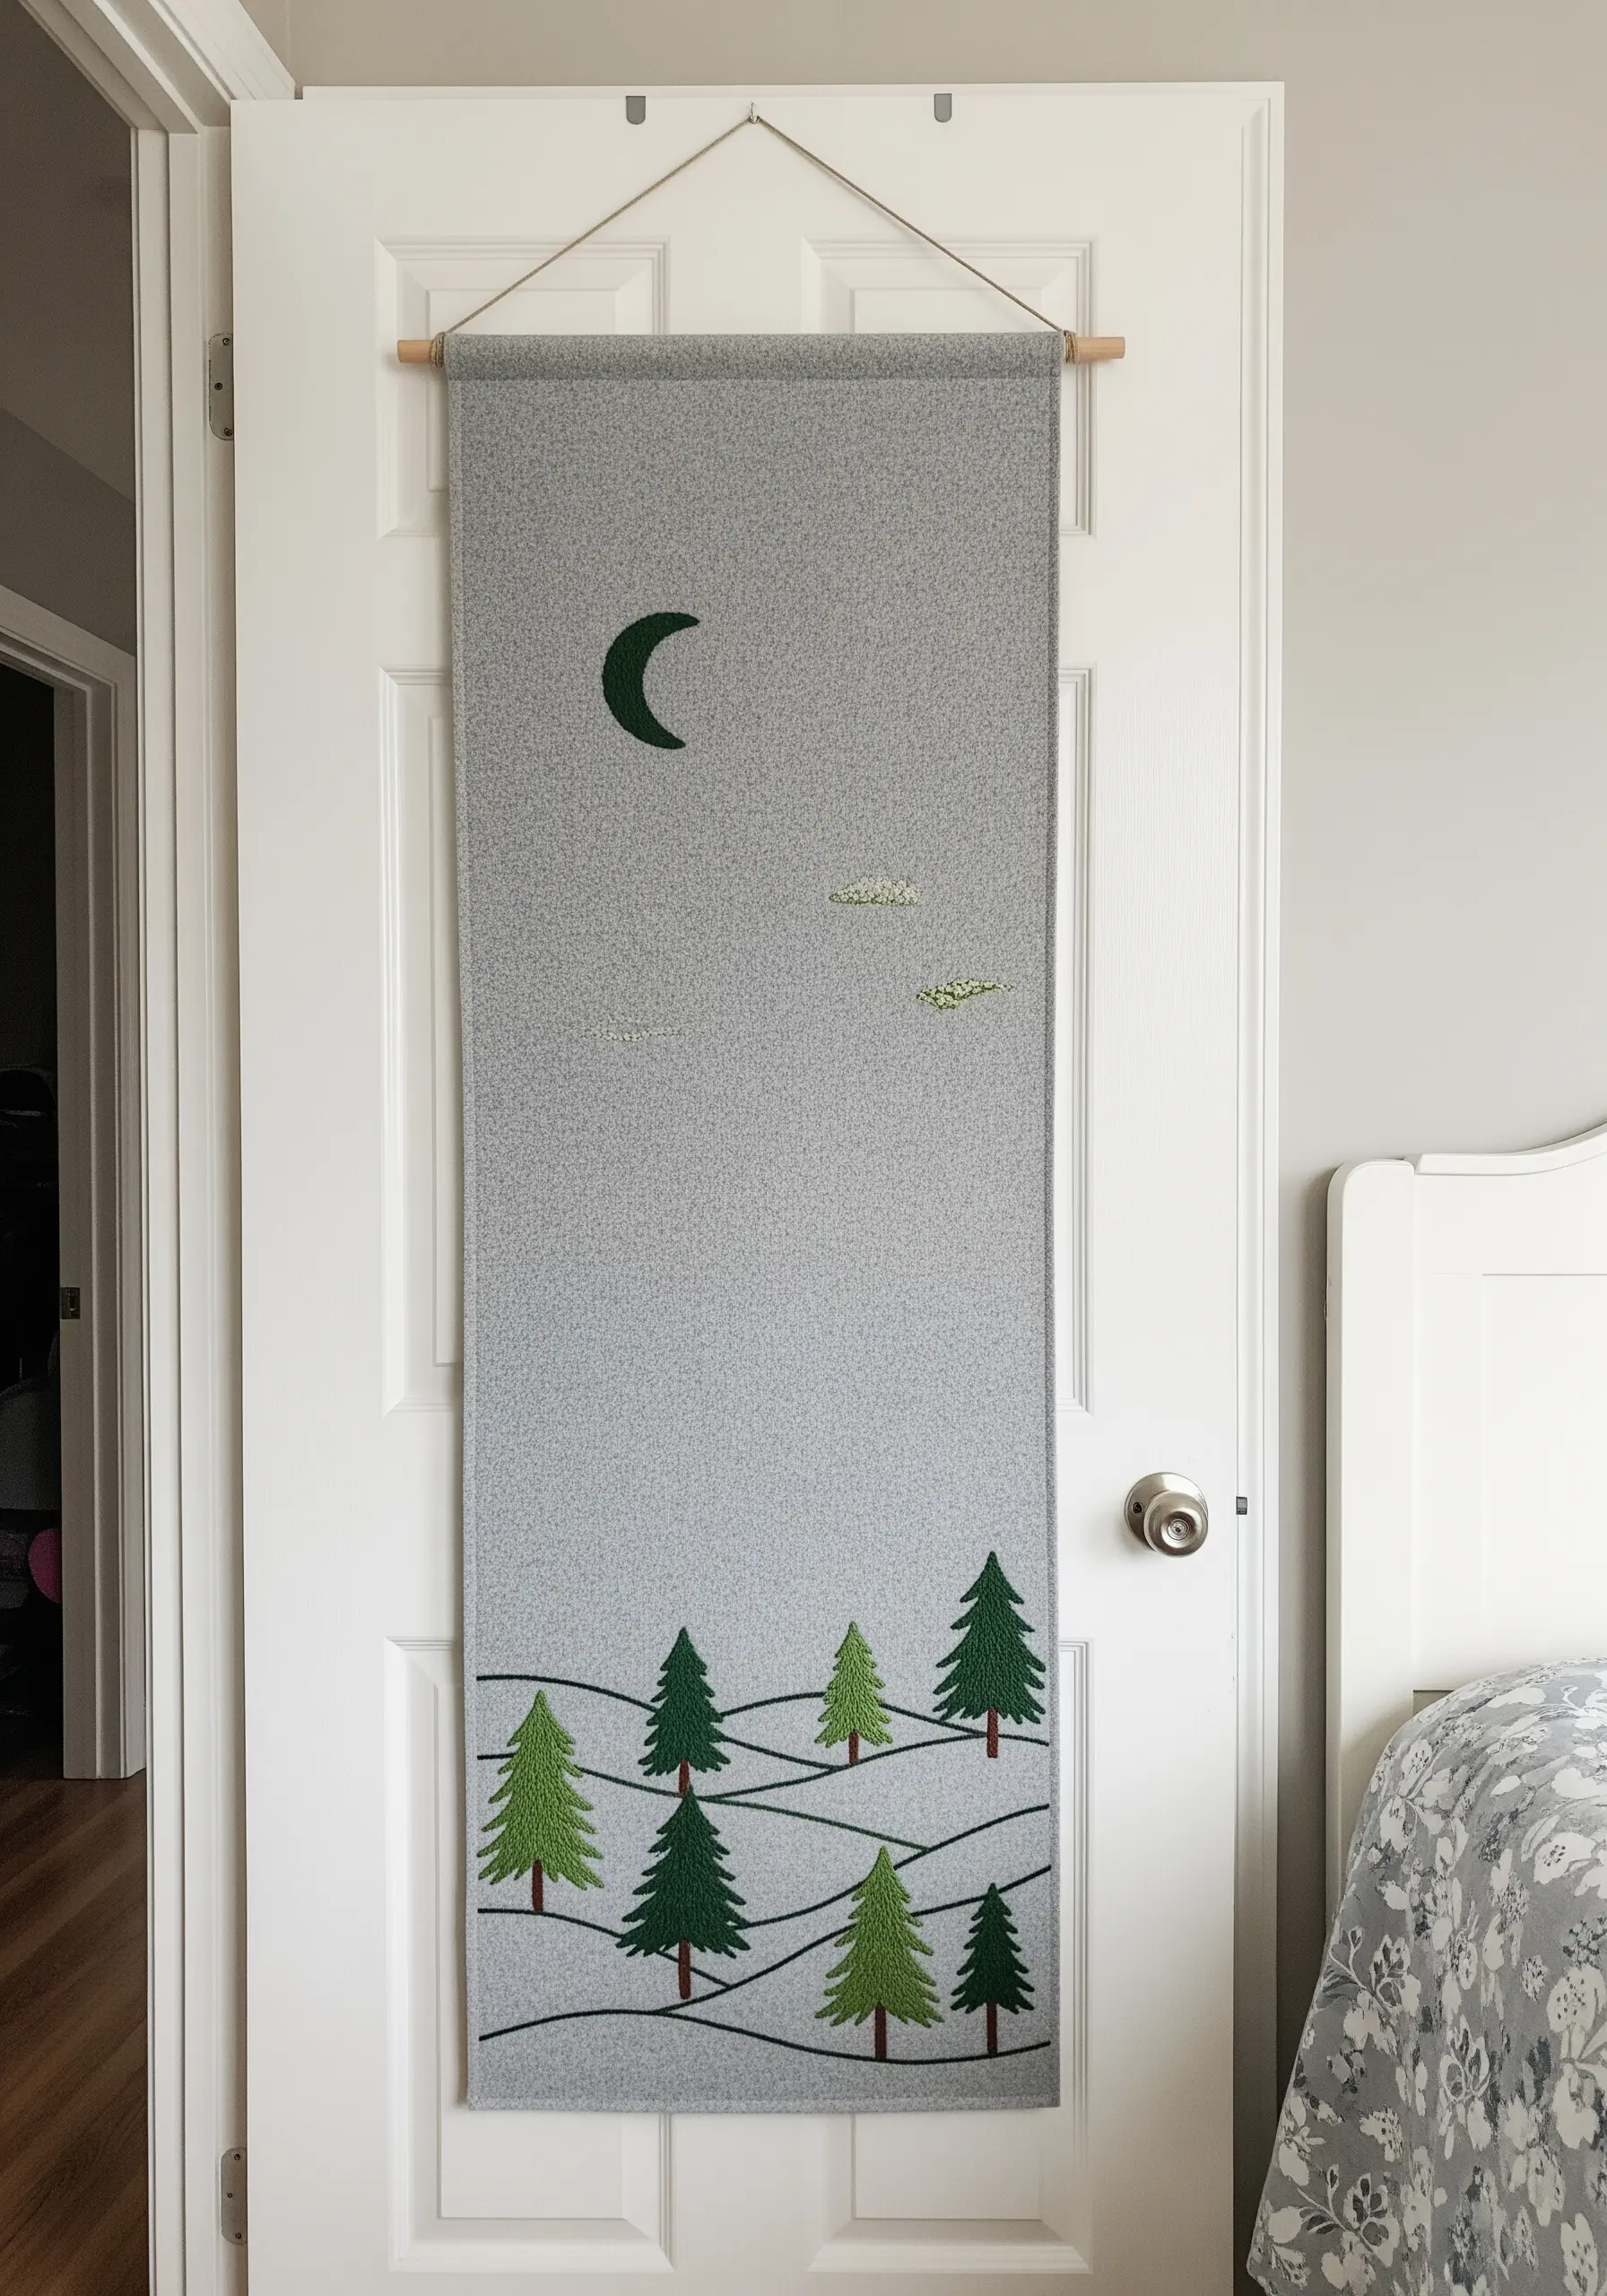
15. Capture the Moon’s Texture in a Wall Hanging
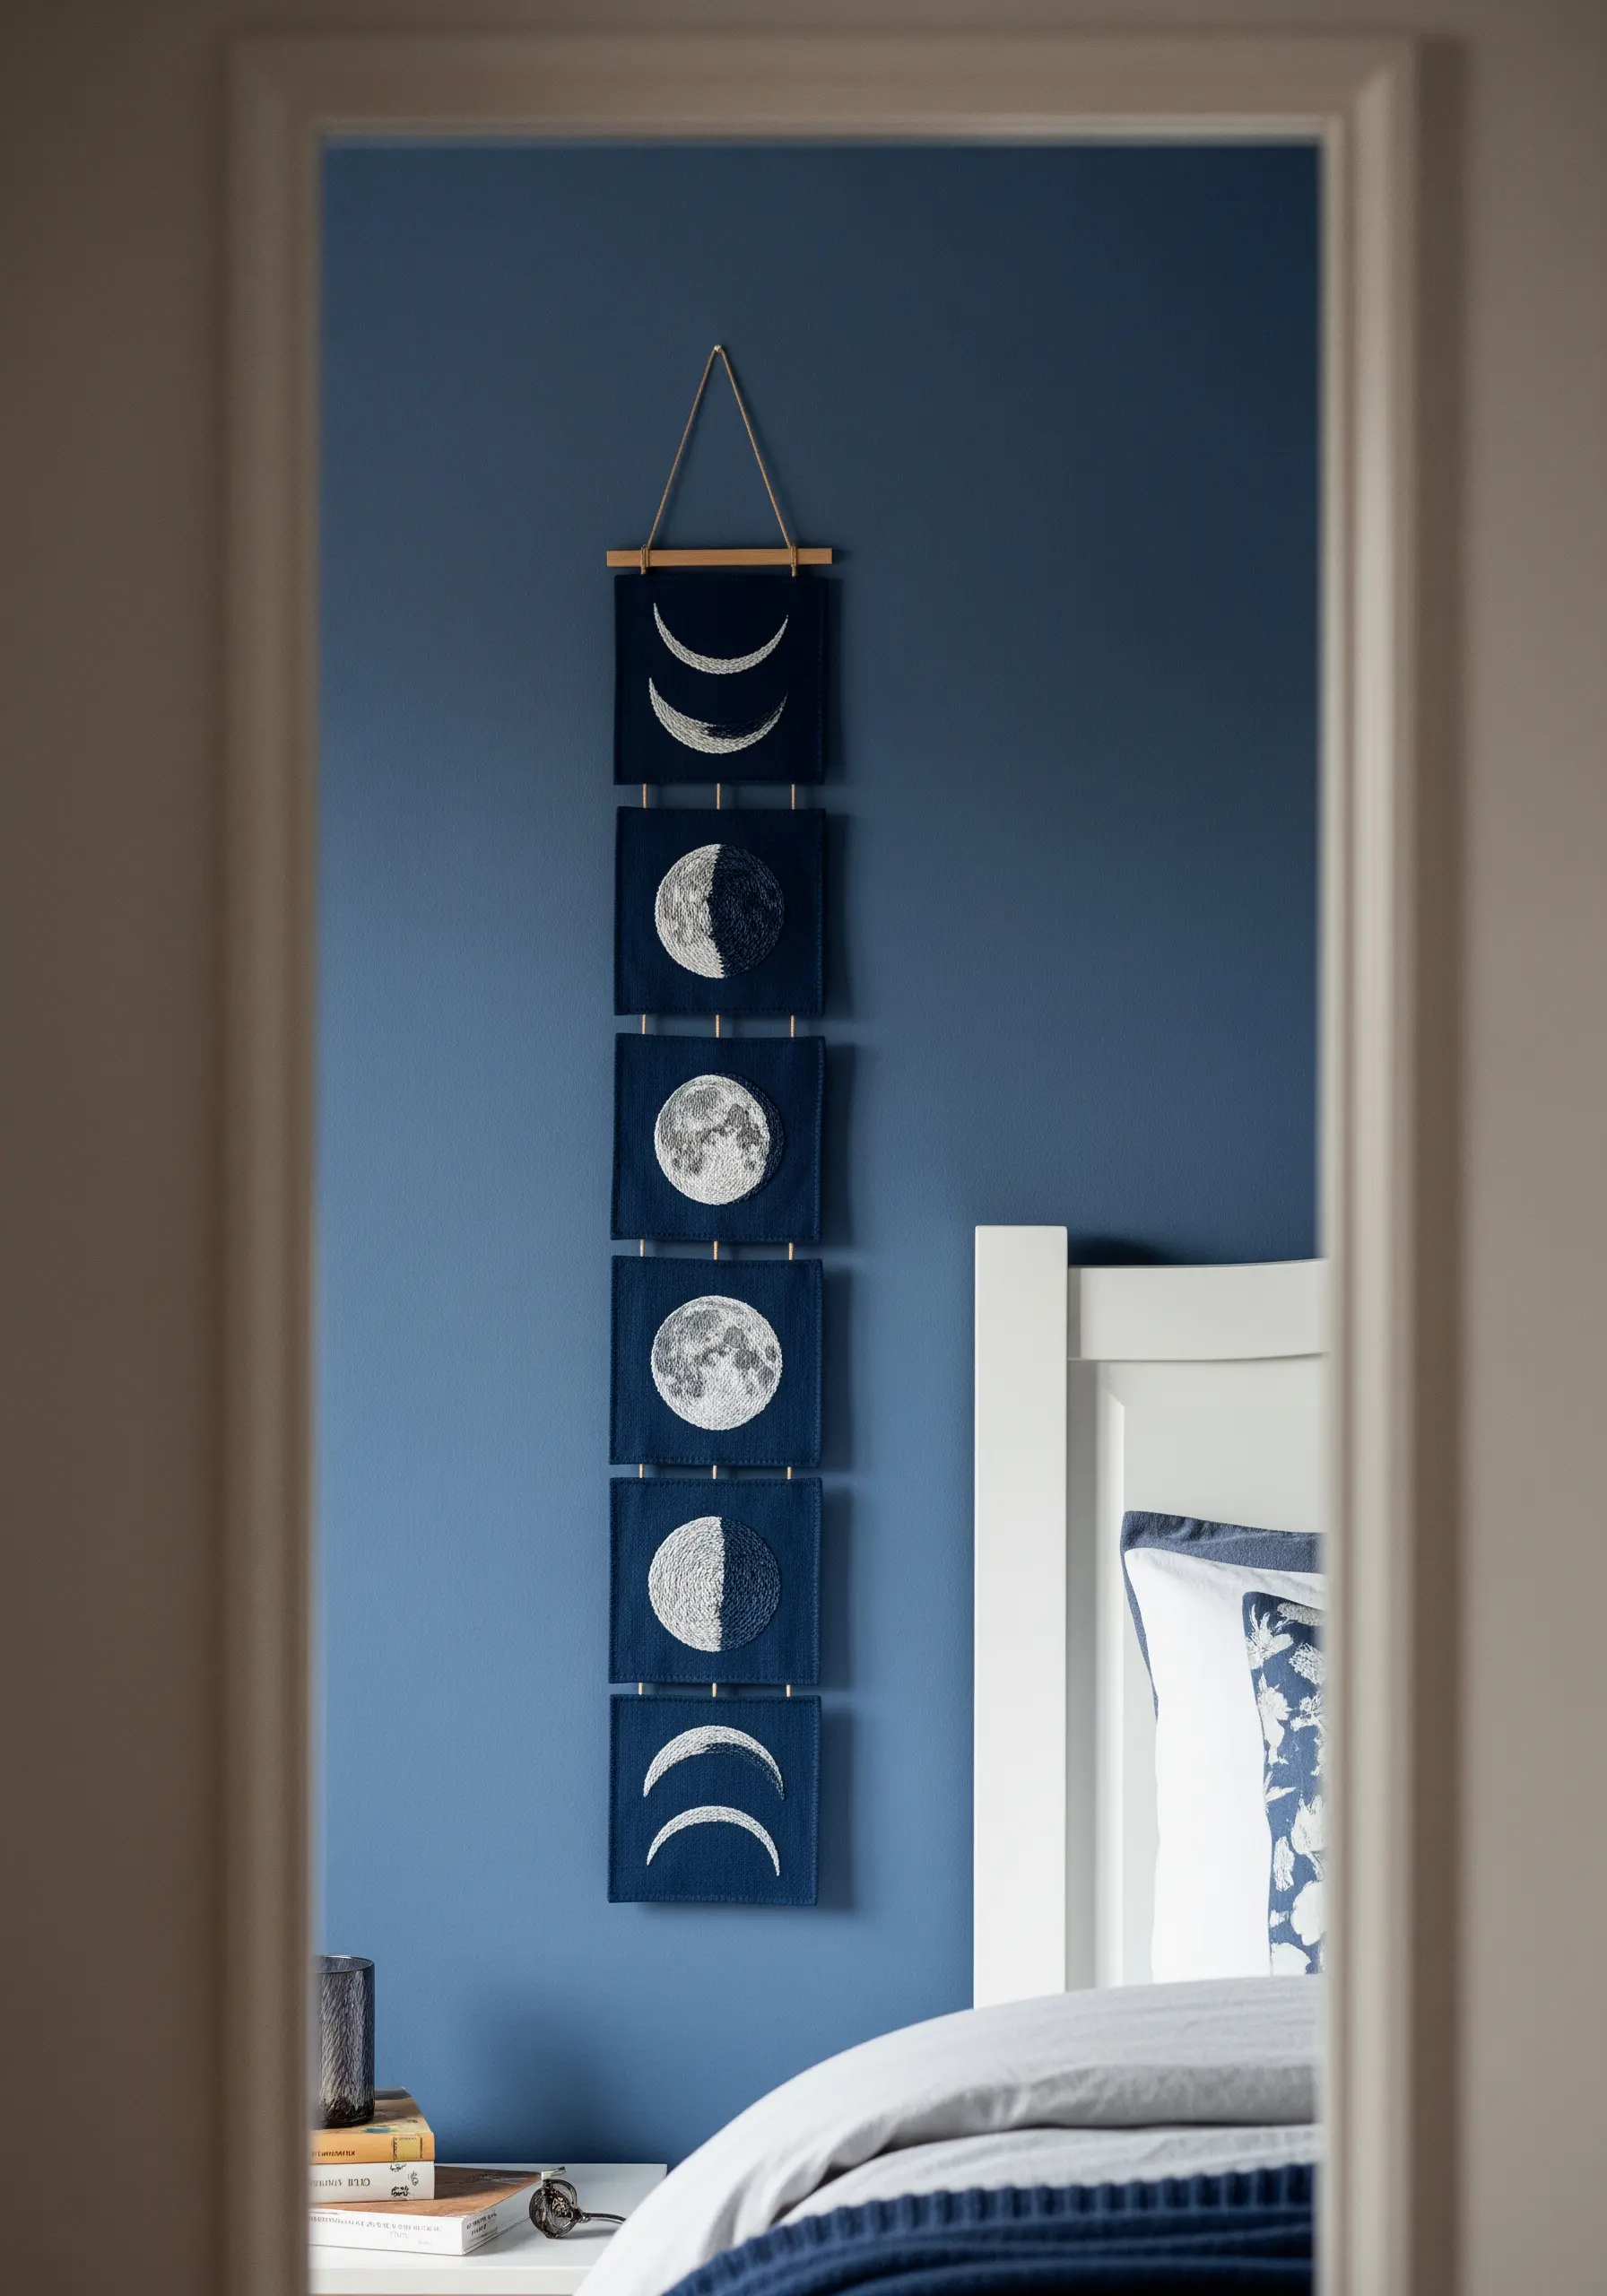
To replicate the cratered surface of the moon, move beyond flat satin stitch and embrace textural fills.
Use a dense concentration of French knots in varying sizes, or fill the lunar shapes with a field of seed stitches (tiny, randomly placed straight stitches).
Incorporate shades of white, cream, and silver metallic floss to add depth and a subtle shimmer.
These tactile details create beautiful framed embroidery ideas that pair perfectly with rustic interiors and celestial themes.
16. Embroider a Message on a Wooden Plaque
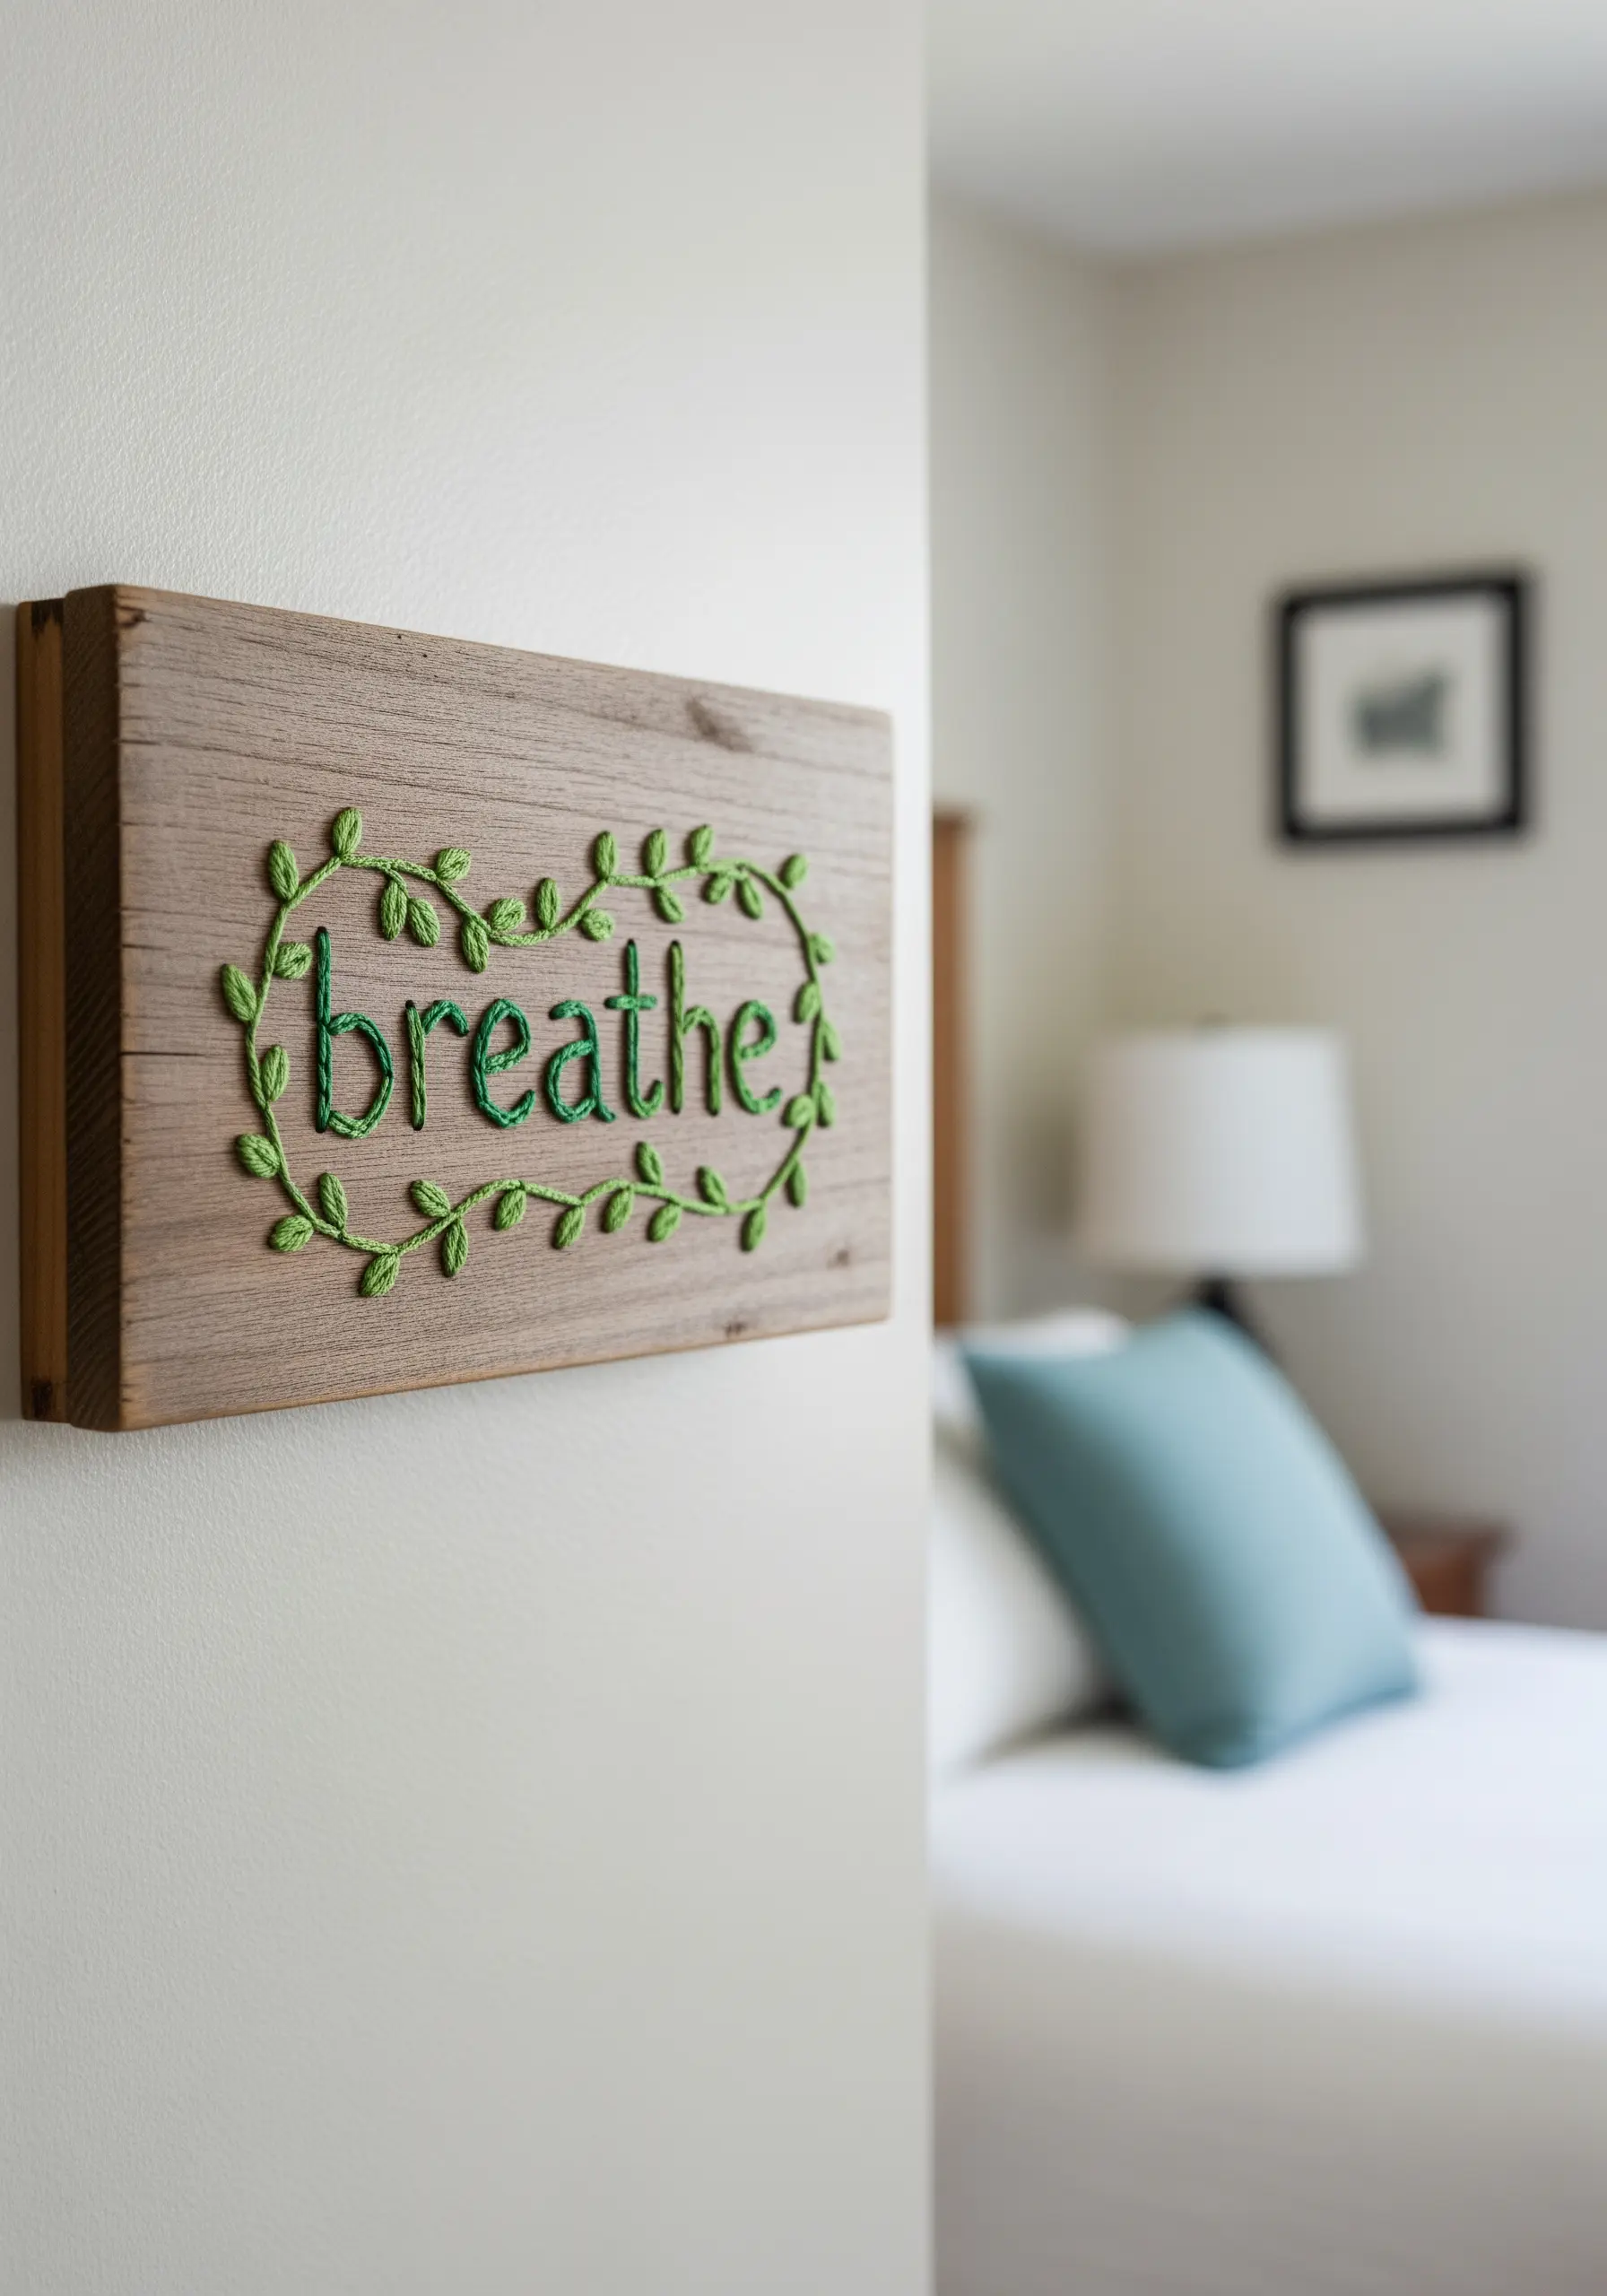
Take your embroidery off the fabric and onto an unexpected surface like wood for a rustic, modern piece of art.
Carefully drill a series of small, evenly spaced holes along your design outline using a micro drill bit.
Then, use a blunt-tipped tapestry needle to stitch through the holes with thick yarn or multiple strands of floss.
The contrast of soft thread against hard wood makes these inspirational quote string art designs incredibly striking.
17. Design a Cohesive Woodland Quilt
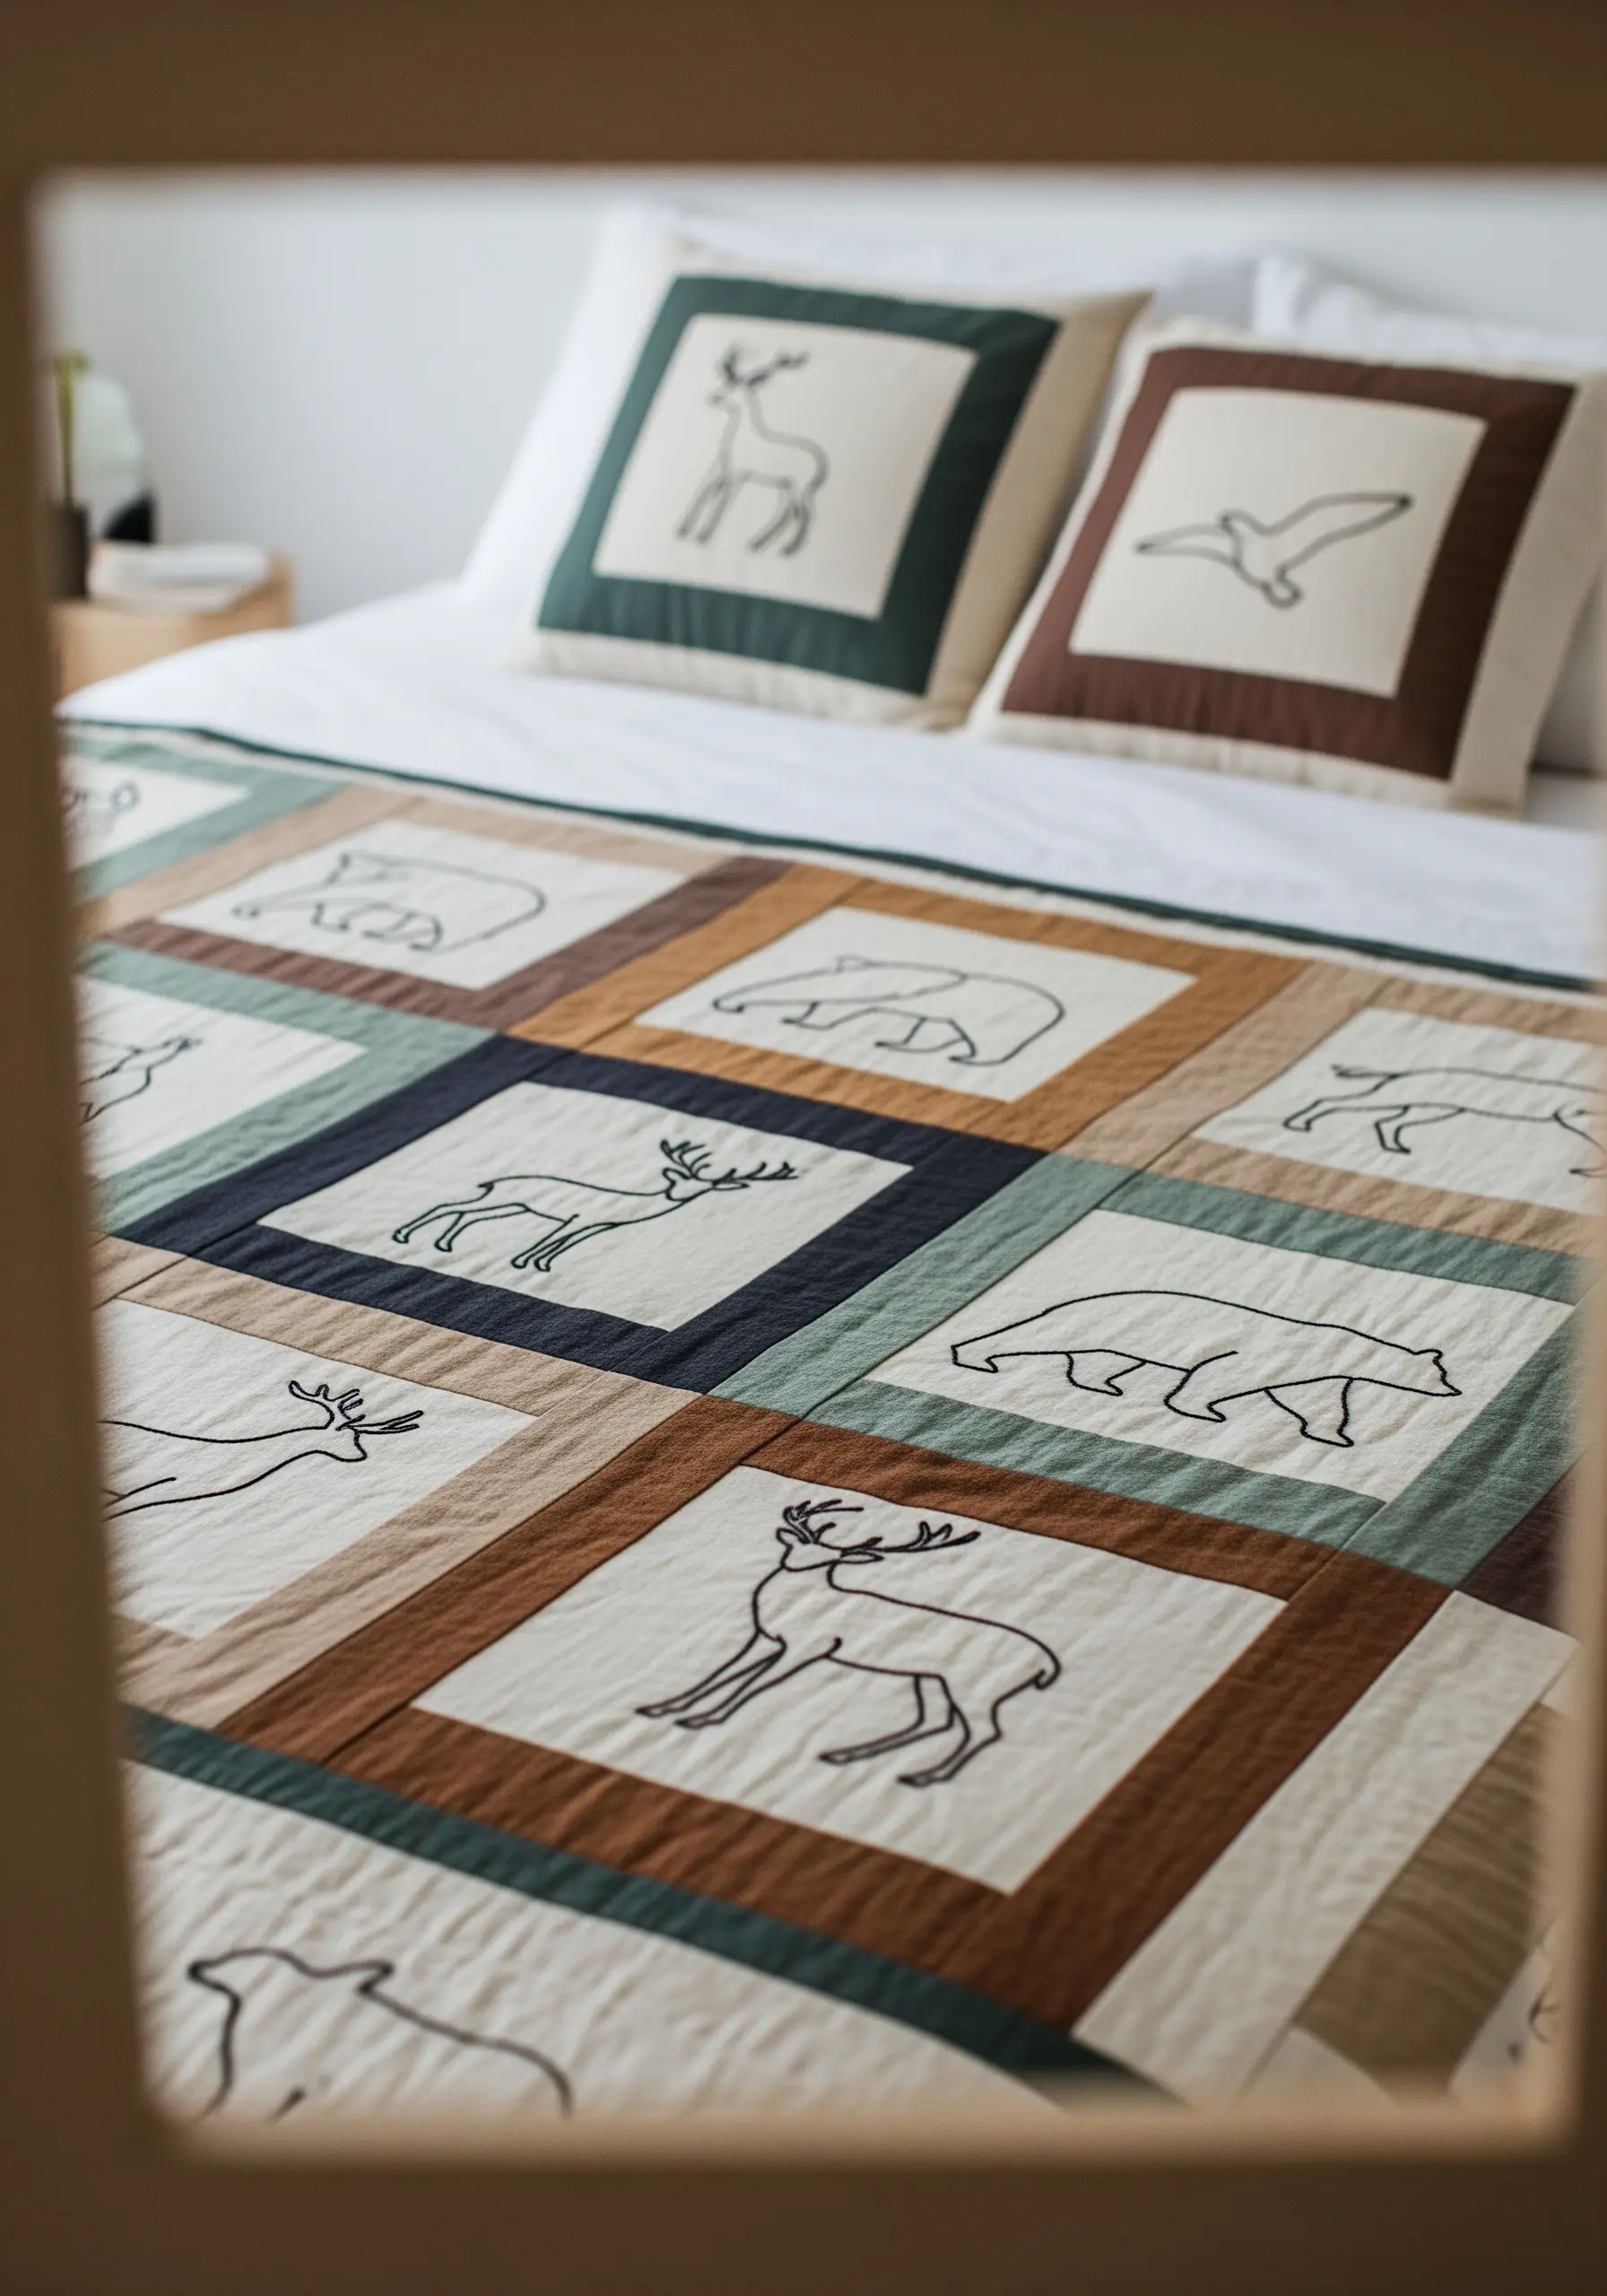
To create a modern, graphic quilt, unify your patchwork with a consistent embroidery style.
Choose simple, continuous-line animal motifs and stitch them all using the same technique, such as a clean backstitch or stem stitch in a single dark color.
This creates a cohesive visual language that ties the different colored blocks together, making the quilt feel intentional and thoughtfully designed.
It’s a way of using aesthetic embroidery ideas to turn your old clothes into art, or in this case, new fabric into a family heirloom.
18. Add Dimension with Directional Satin Stitch
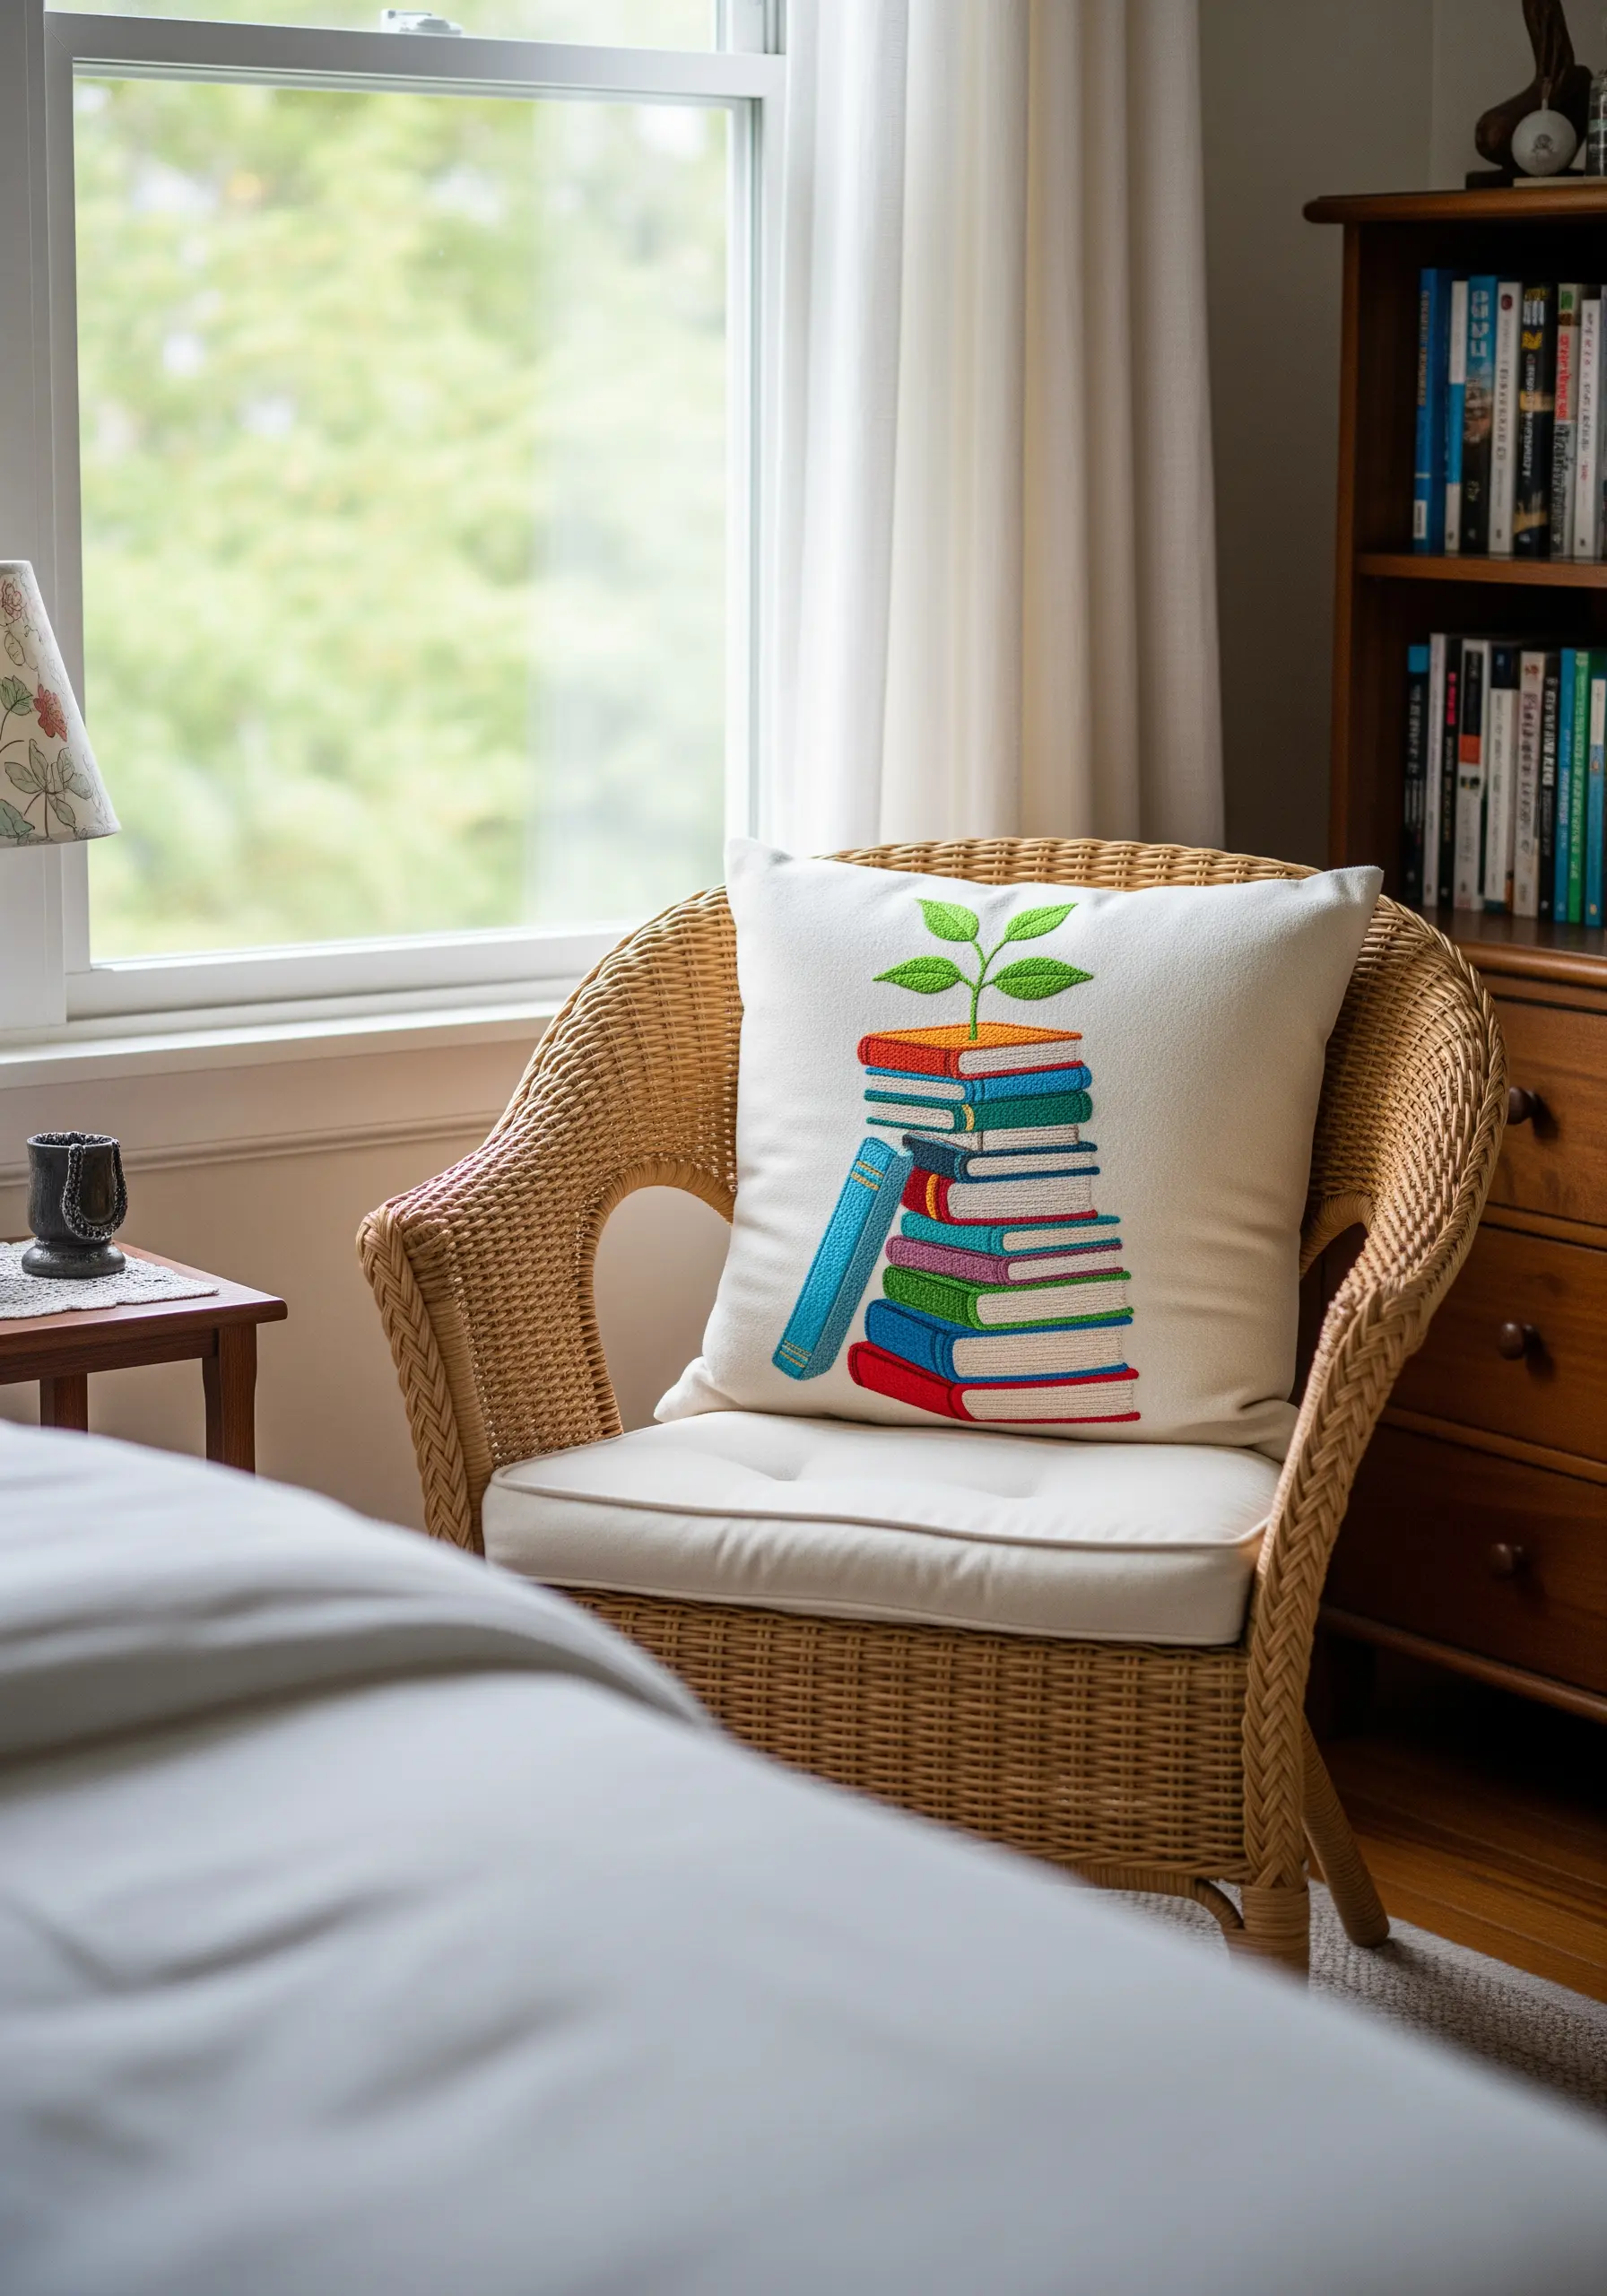
When filling solid shapes like this stack of books, use the direction of your satin stitch to create subtle dimension.
Stitch the book covers with horizontal stitches and the visible parts of the spines with vertical ones.
This slight shift in direction causes the light to reflect differently, which clearly defines each object without needing outlines.
It’s one of many simple embroidery crafts that make every fabric piece special by adding a layer of technical skill.
19. Label Storage with Minimalist Motifs
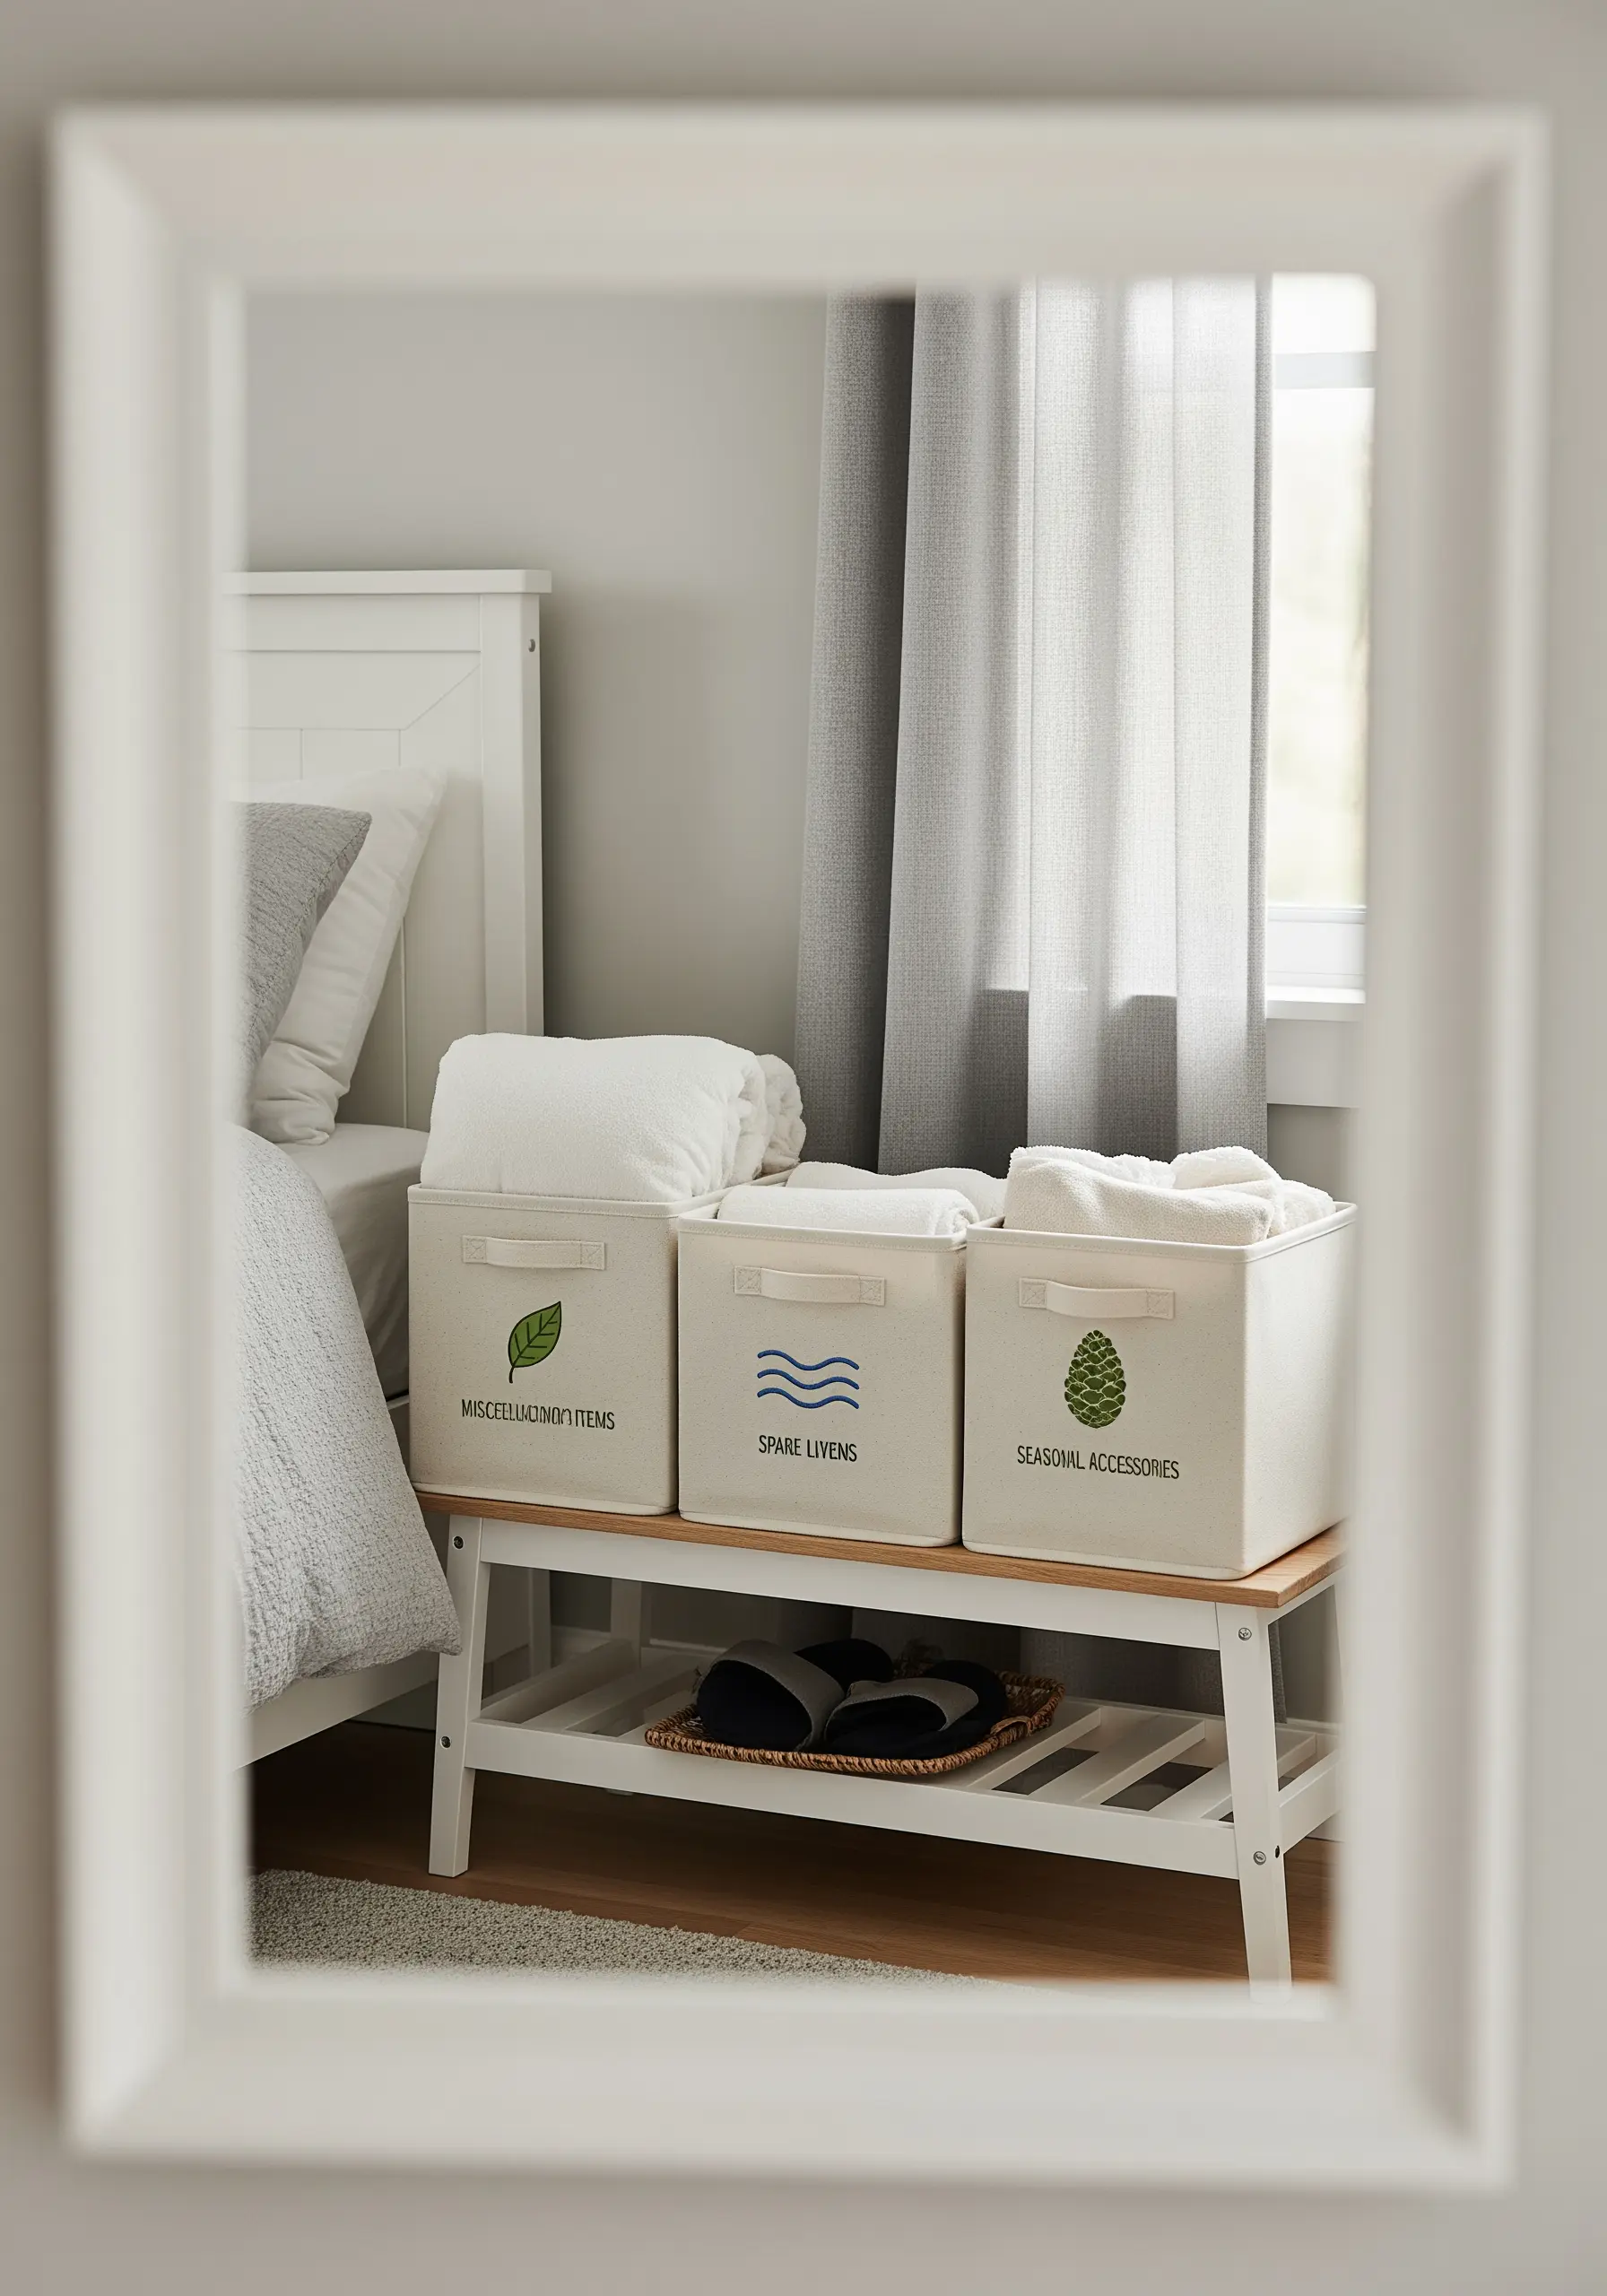
Elevate your bedroom organization with embroidered labels that are both beautiful and functional.
Pair a simple, color-blocked motif with clean, sans-serif text stitched in backstitch for a modern look.
To ensure your stitches are neat on the flexible canvas of a storage bin, hoop a piece of tear-away stabilizer on the inside before you begin.
This technique allows you to add tiny embroidery patterns that make your clothes look custom-made—or in this case, custom-organized.
20. Recreate Mossy Textures with 3D Stitches
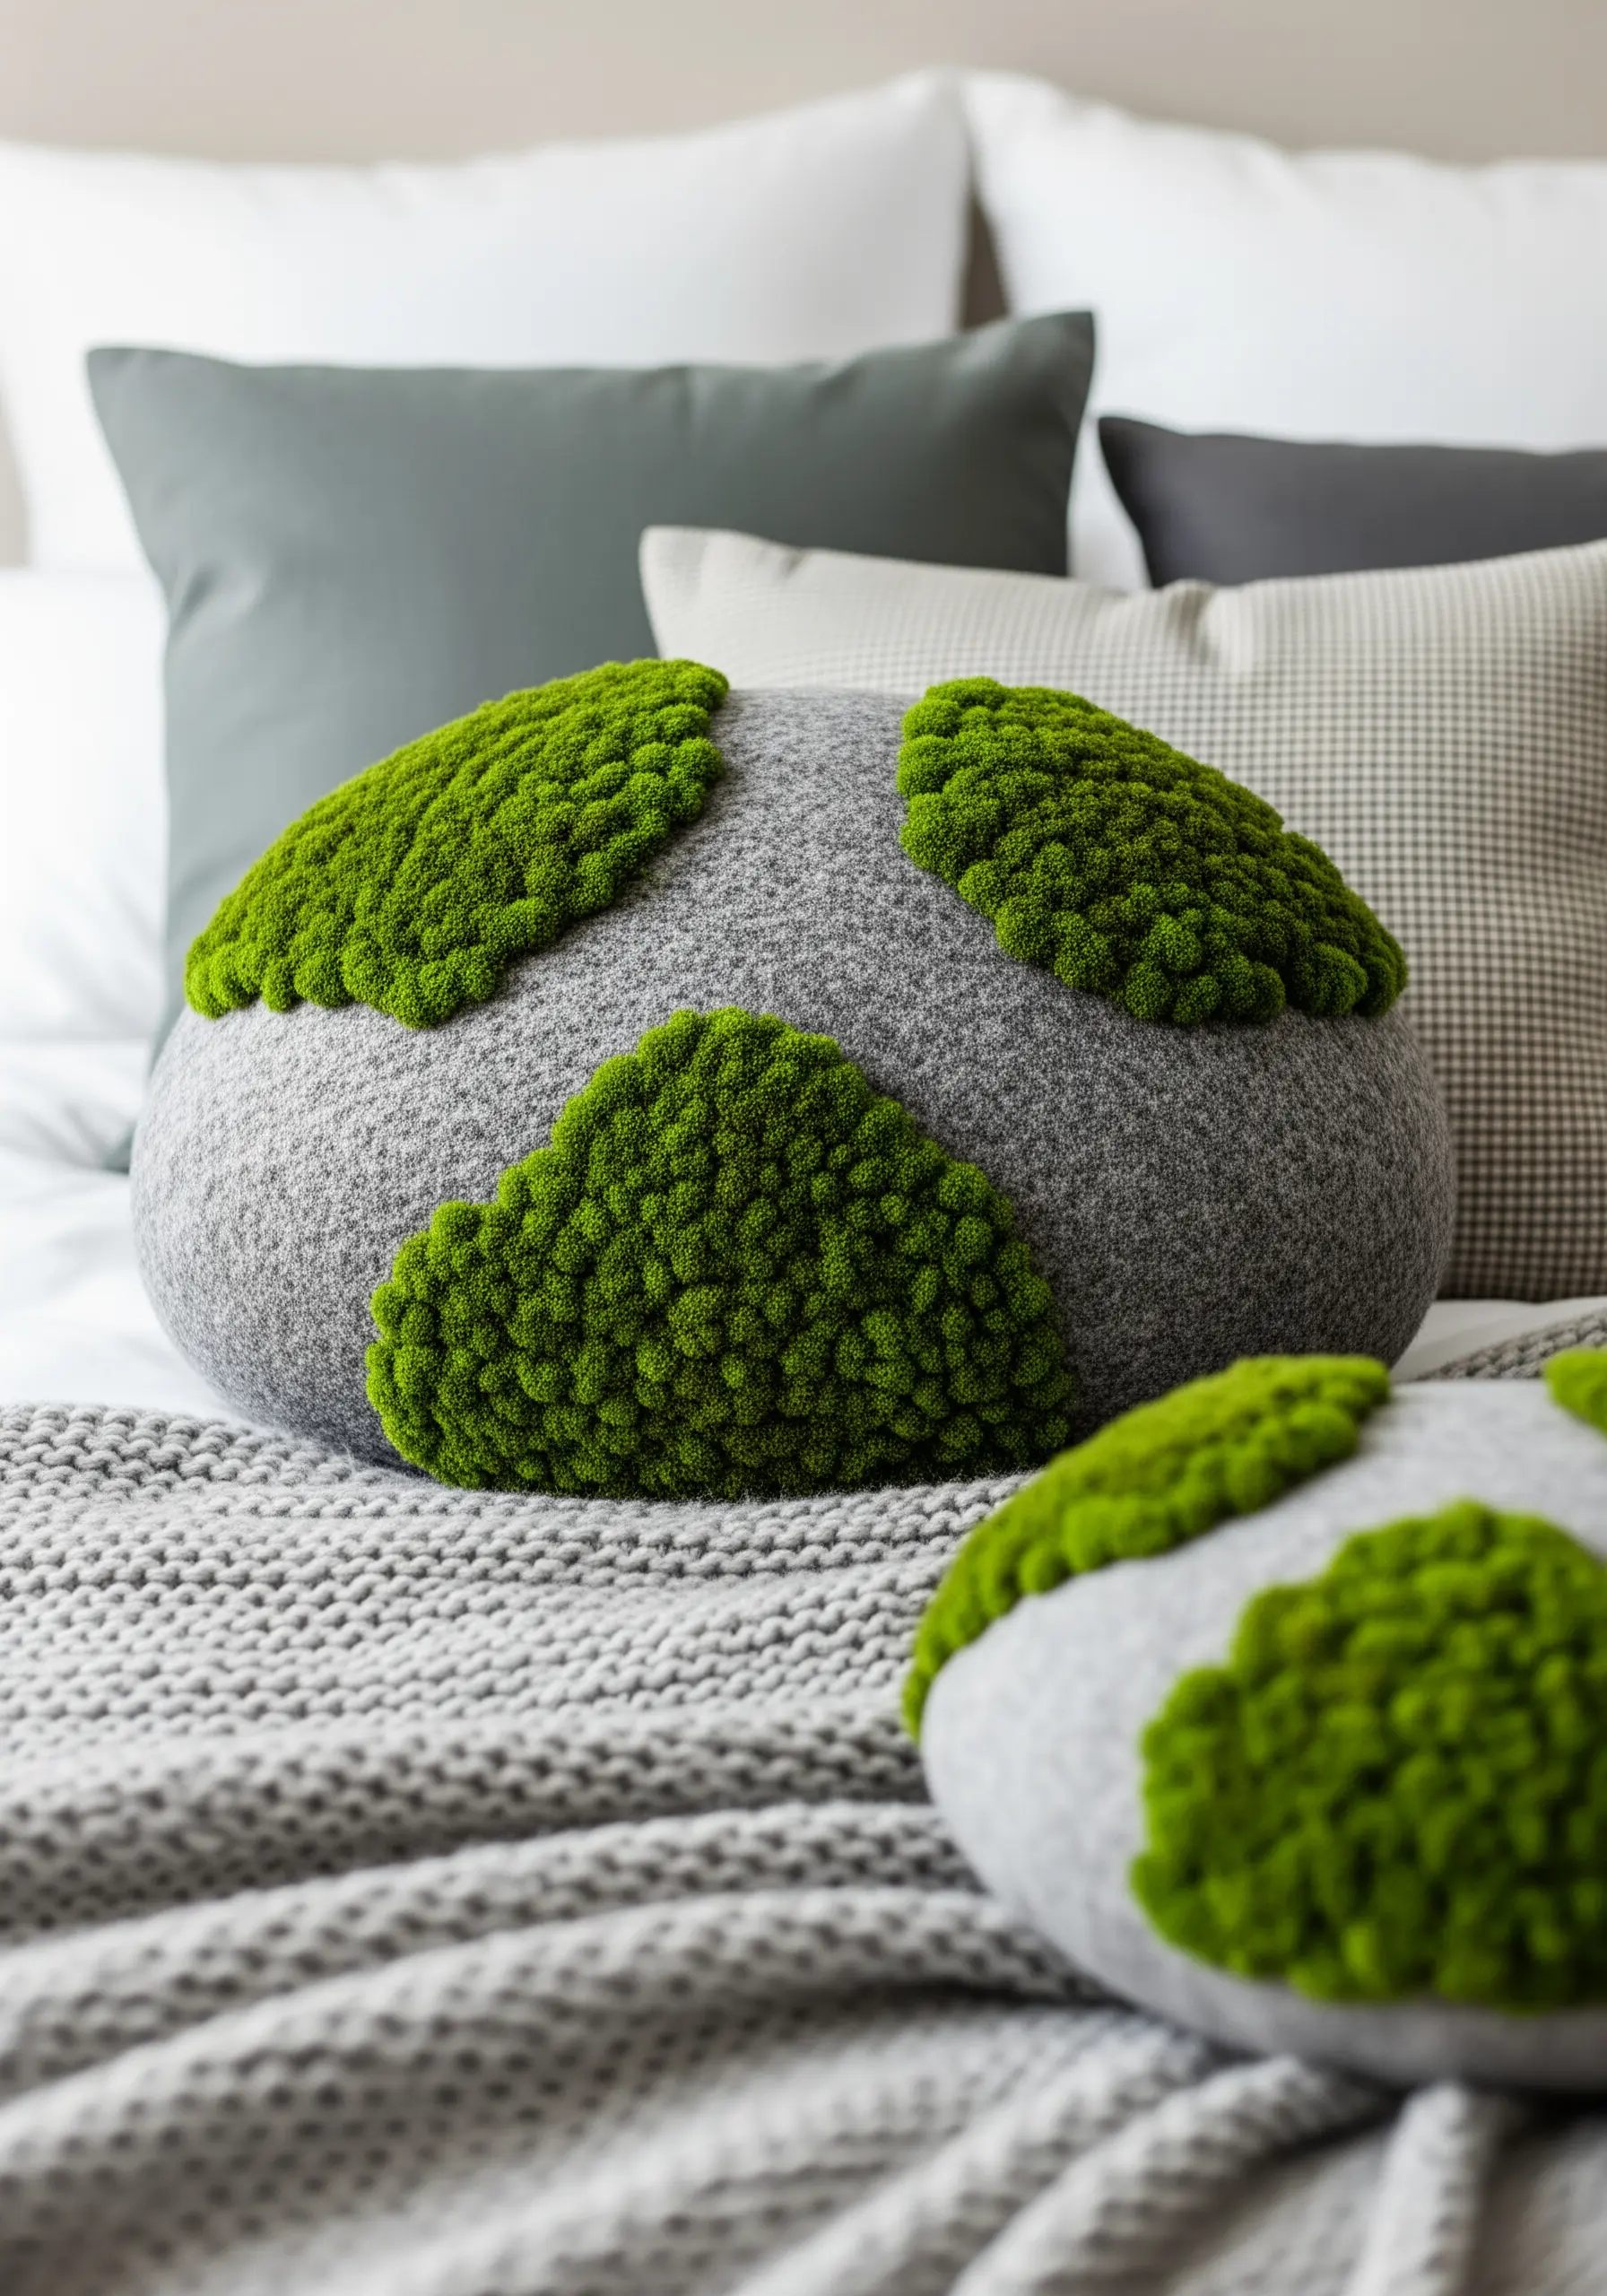
To achieve the lush, three-dimensional texture of moss on these stone-like pillows, the Turkey work stitch is your best friend.
This technique creates loops of thread that you can then trim to a desired height, forming a dense, velvety pile.
Use several shades of green yarn or floss together in your needle to create a natural, variegated color that mimics real moss, making for a standout piece in any collection of high-texture fabric collage embroidery projects.
21. Frame a Dragonfly on Translucent Fabric
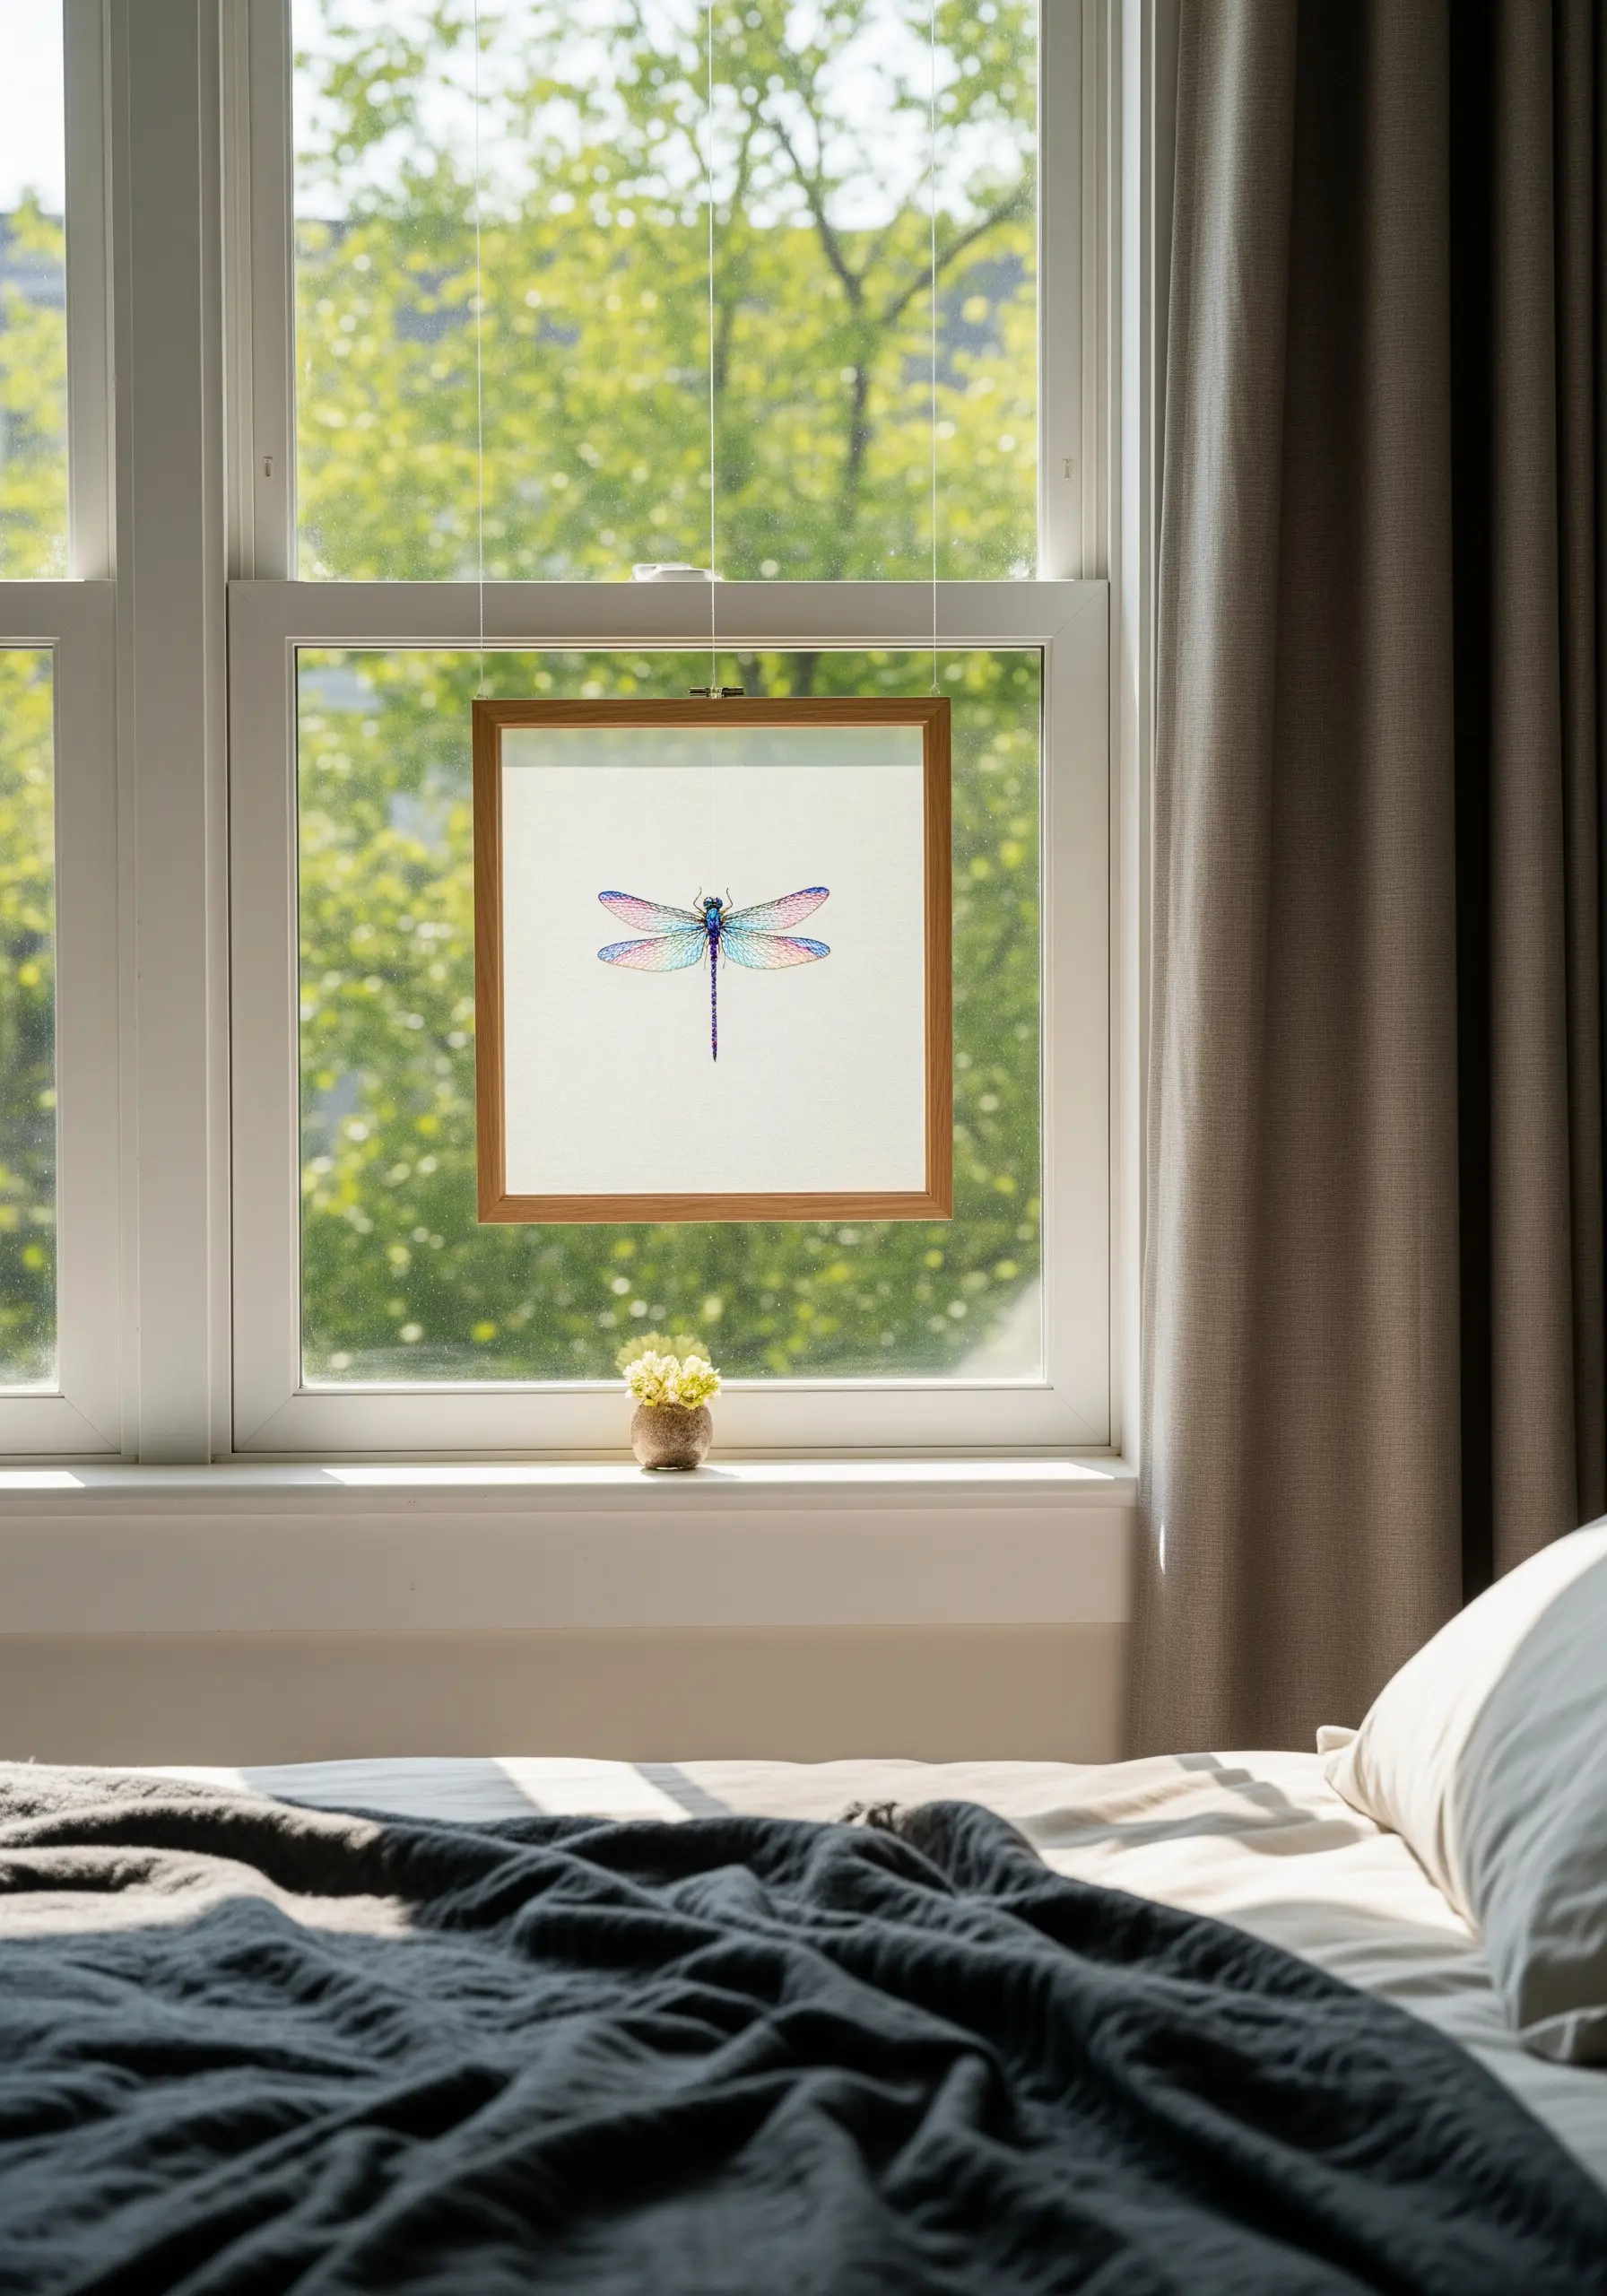
Create a stunning, ethereal effect by stitching your motif on a sheer fabric like organza or tulle and displaying it in a floating frame.
The transparent background makes your embroidery appear suspended in air, allowing light to pass through the stitches.
Use silk or rayon threads, as their high sheen will catch the light and replicate the natural iridescence of a dragonfly’s wings, perfect for exploring gradient color floral embroidery ideas on a different subject.
22. Design a Dreamy Star-Scattered Canopy
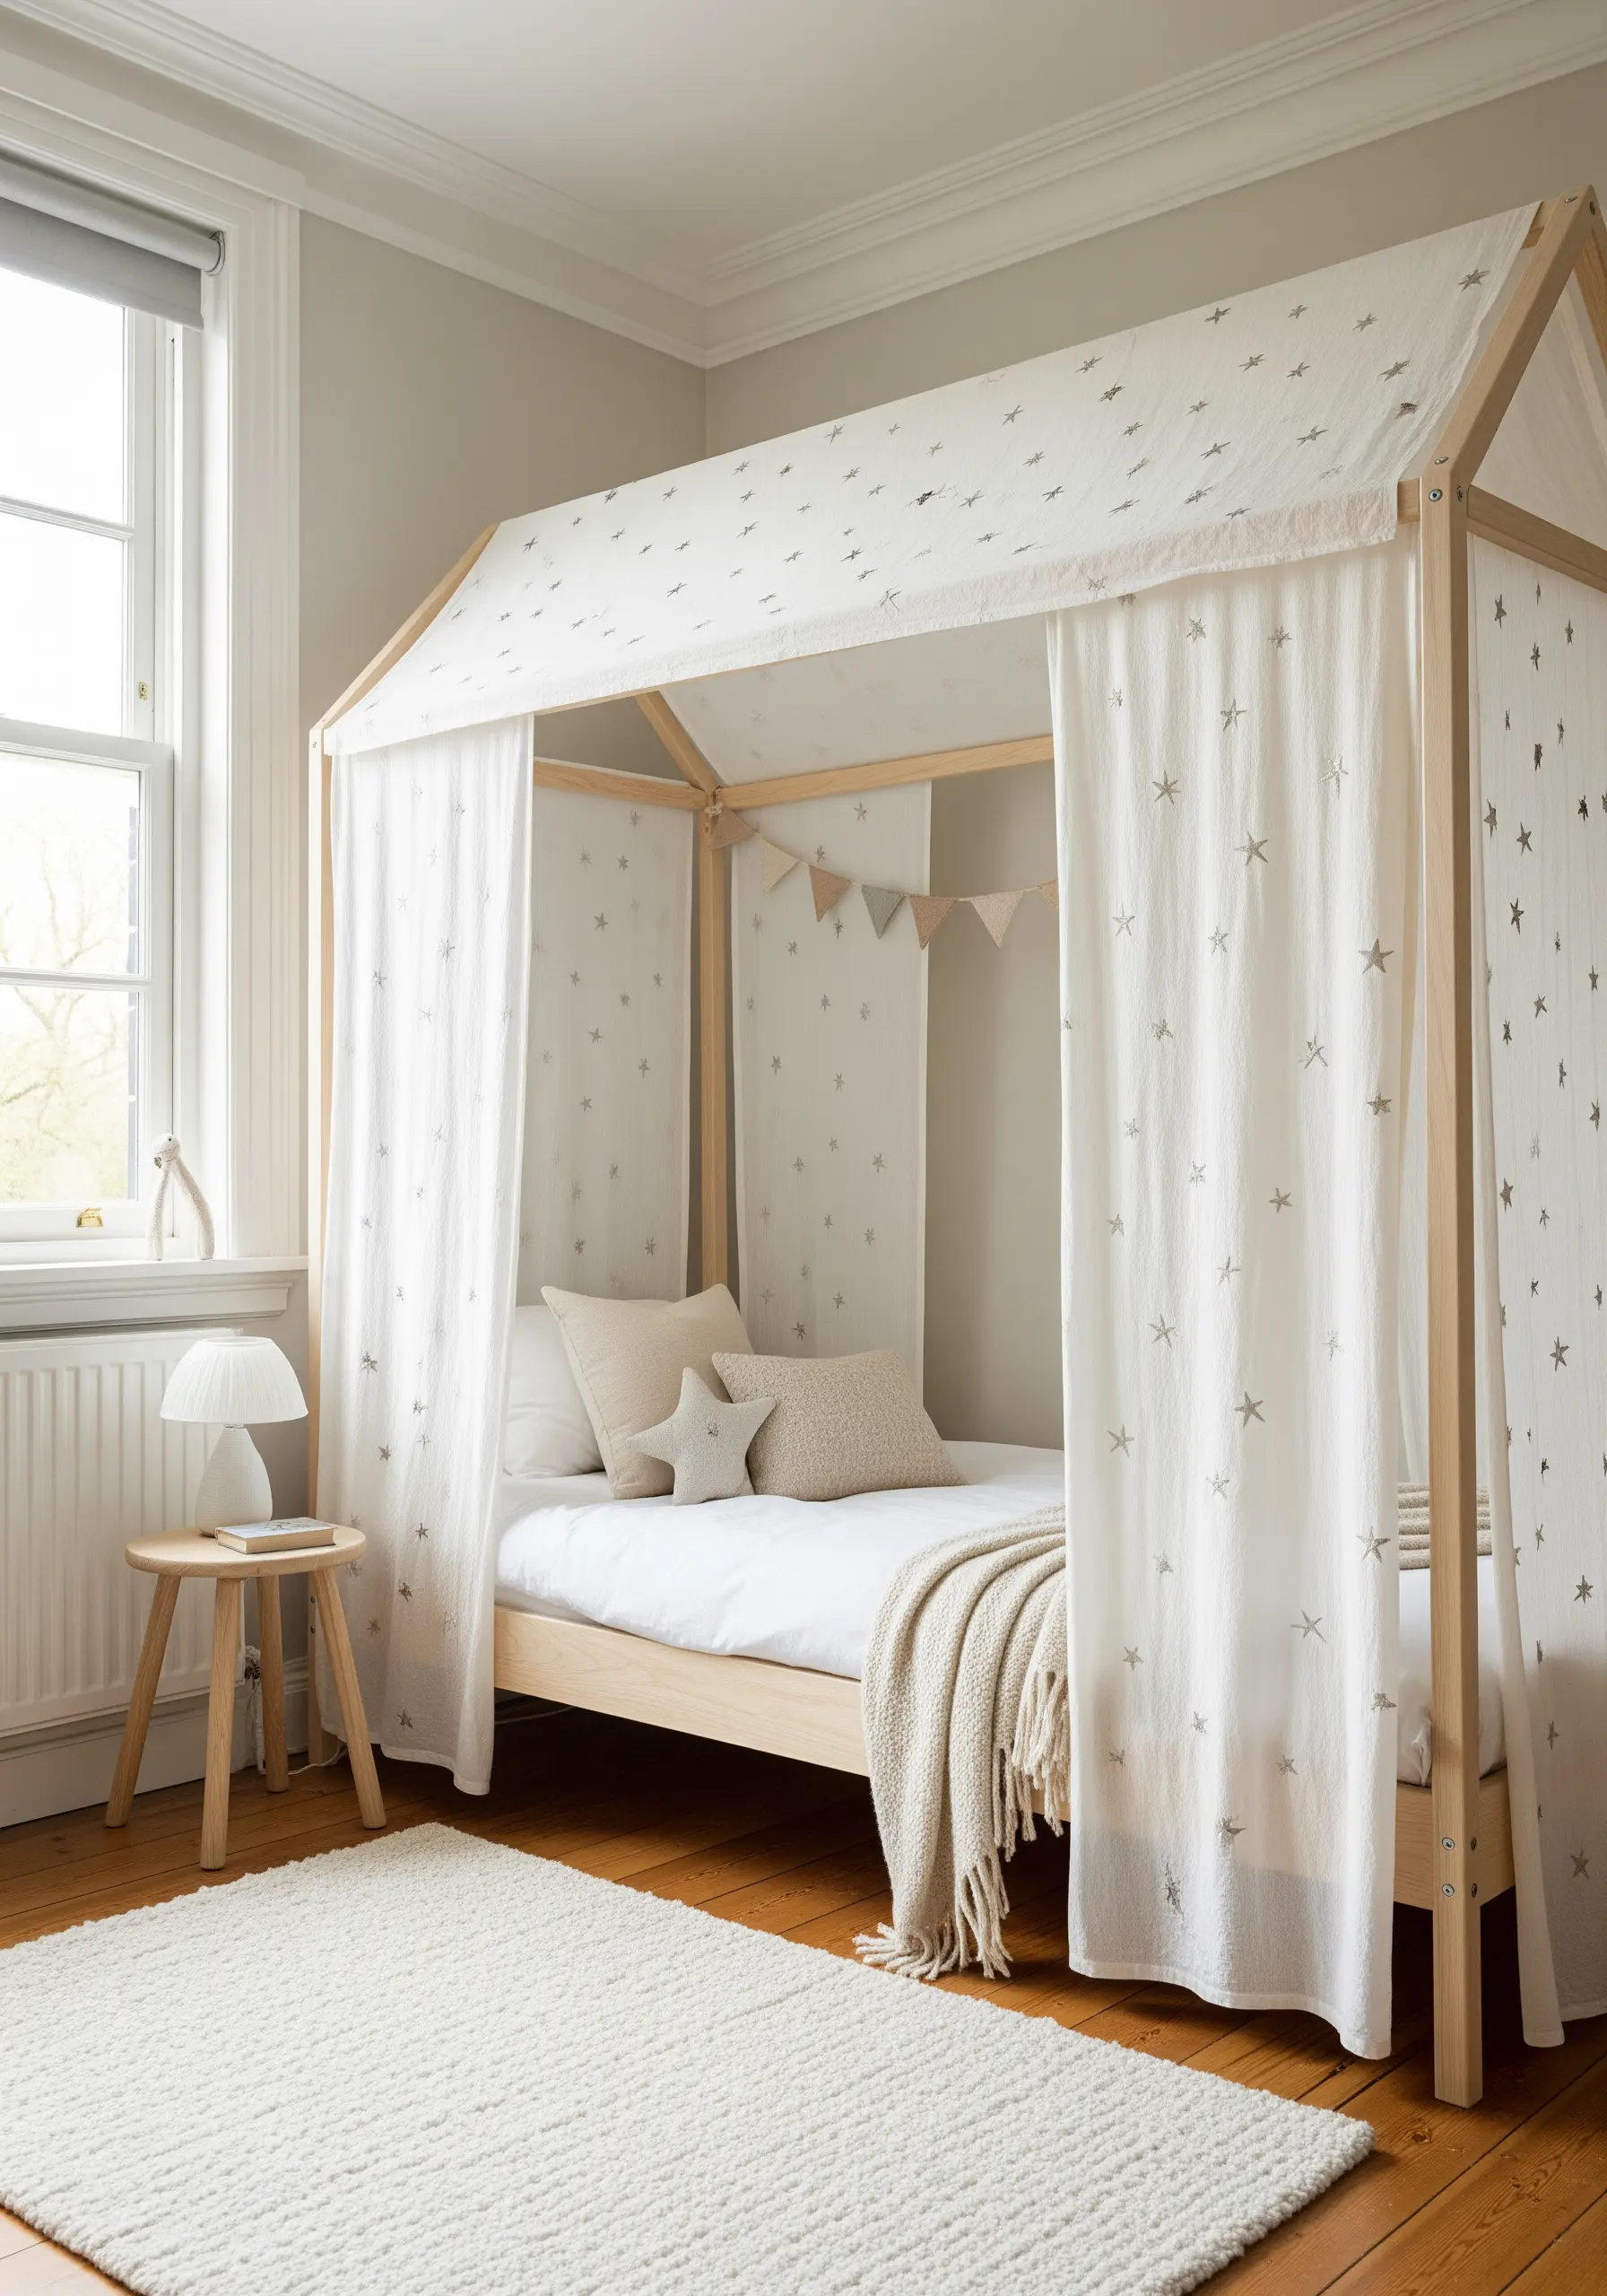
Transform a simple bed canopy into a magical retreat by scattering a constellation of tiny embroidered stars across the fabric.
Use a metallic floss in a soft gold, silver, or champagne for a subtle glimmer that catches the light.
The key to a natural look is to avoid a rigid grid; instead, vary the placement, spacing, and orientation of each star stitch randomly.
This simple addition is one of many boho embroidery patterns to bring a free-spirited feel to your bedroom.
23. Create a Botanical Alphabet Heirloom

An alphabet sampler is the perfect project to practice and showcase a wide range of stitches and color blending techniques.
Approach each letter as a miniature botanical study, using stem stitch for vines, satin stitch for petals, and French knots for flower centers.
Stitching on a single, continuous piece of neutral linen provides a cohesive background that unifies the diverse floral motifs into a stunning, harmonious piece of art.
This is a beautiful way to create nature-themed embroidery samplers to practice real plant shapes.
24. Build a Landscape with Felt Appliqué
For a bold, graphic wall hanging, combine felt appliqué with minimal embroidery.
Cut clean shapes for your hills and trees from different colors of felt and layer them to create a sense of depth.
Secure the pieces with a simple running stitch or add details like pine needles using straight stitches.
The inherent texture and clean edges of felt make it ideal for creating modern, minimalist landscapes and stunning framed embroidery pieces without complex stitching.
25. Give Script a Raised, Corded Finish

To make embroidered lettering look smooth, raised, and continuous, use a whipped backstitch.
First, create your lettering with a standard backstitch.
Then, take a new length of the same thread and, using a tapestry needle, weave it under and over each backstitch without piercing the fabric.
This technique covers the gaps in the backstitch, resulting in a clean, cord-like line that gives your words professional polish, much like you see in minimal embroidery designs.
26. Curate a Gallery of Botanical Studies
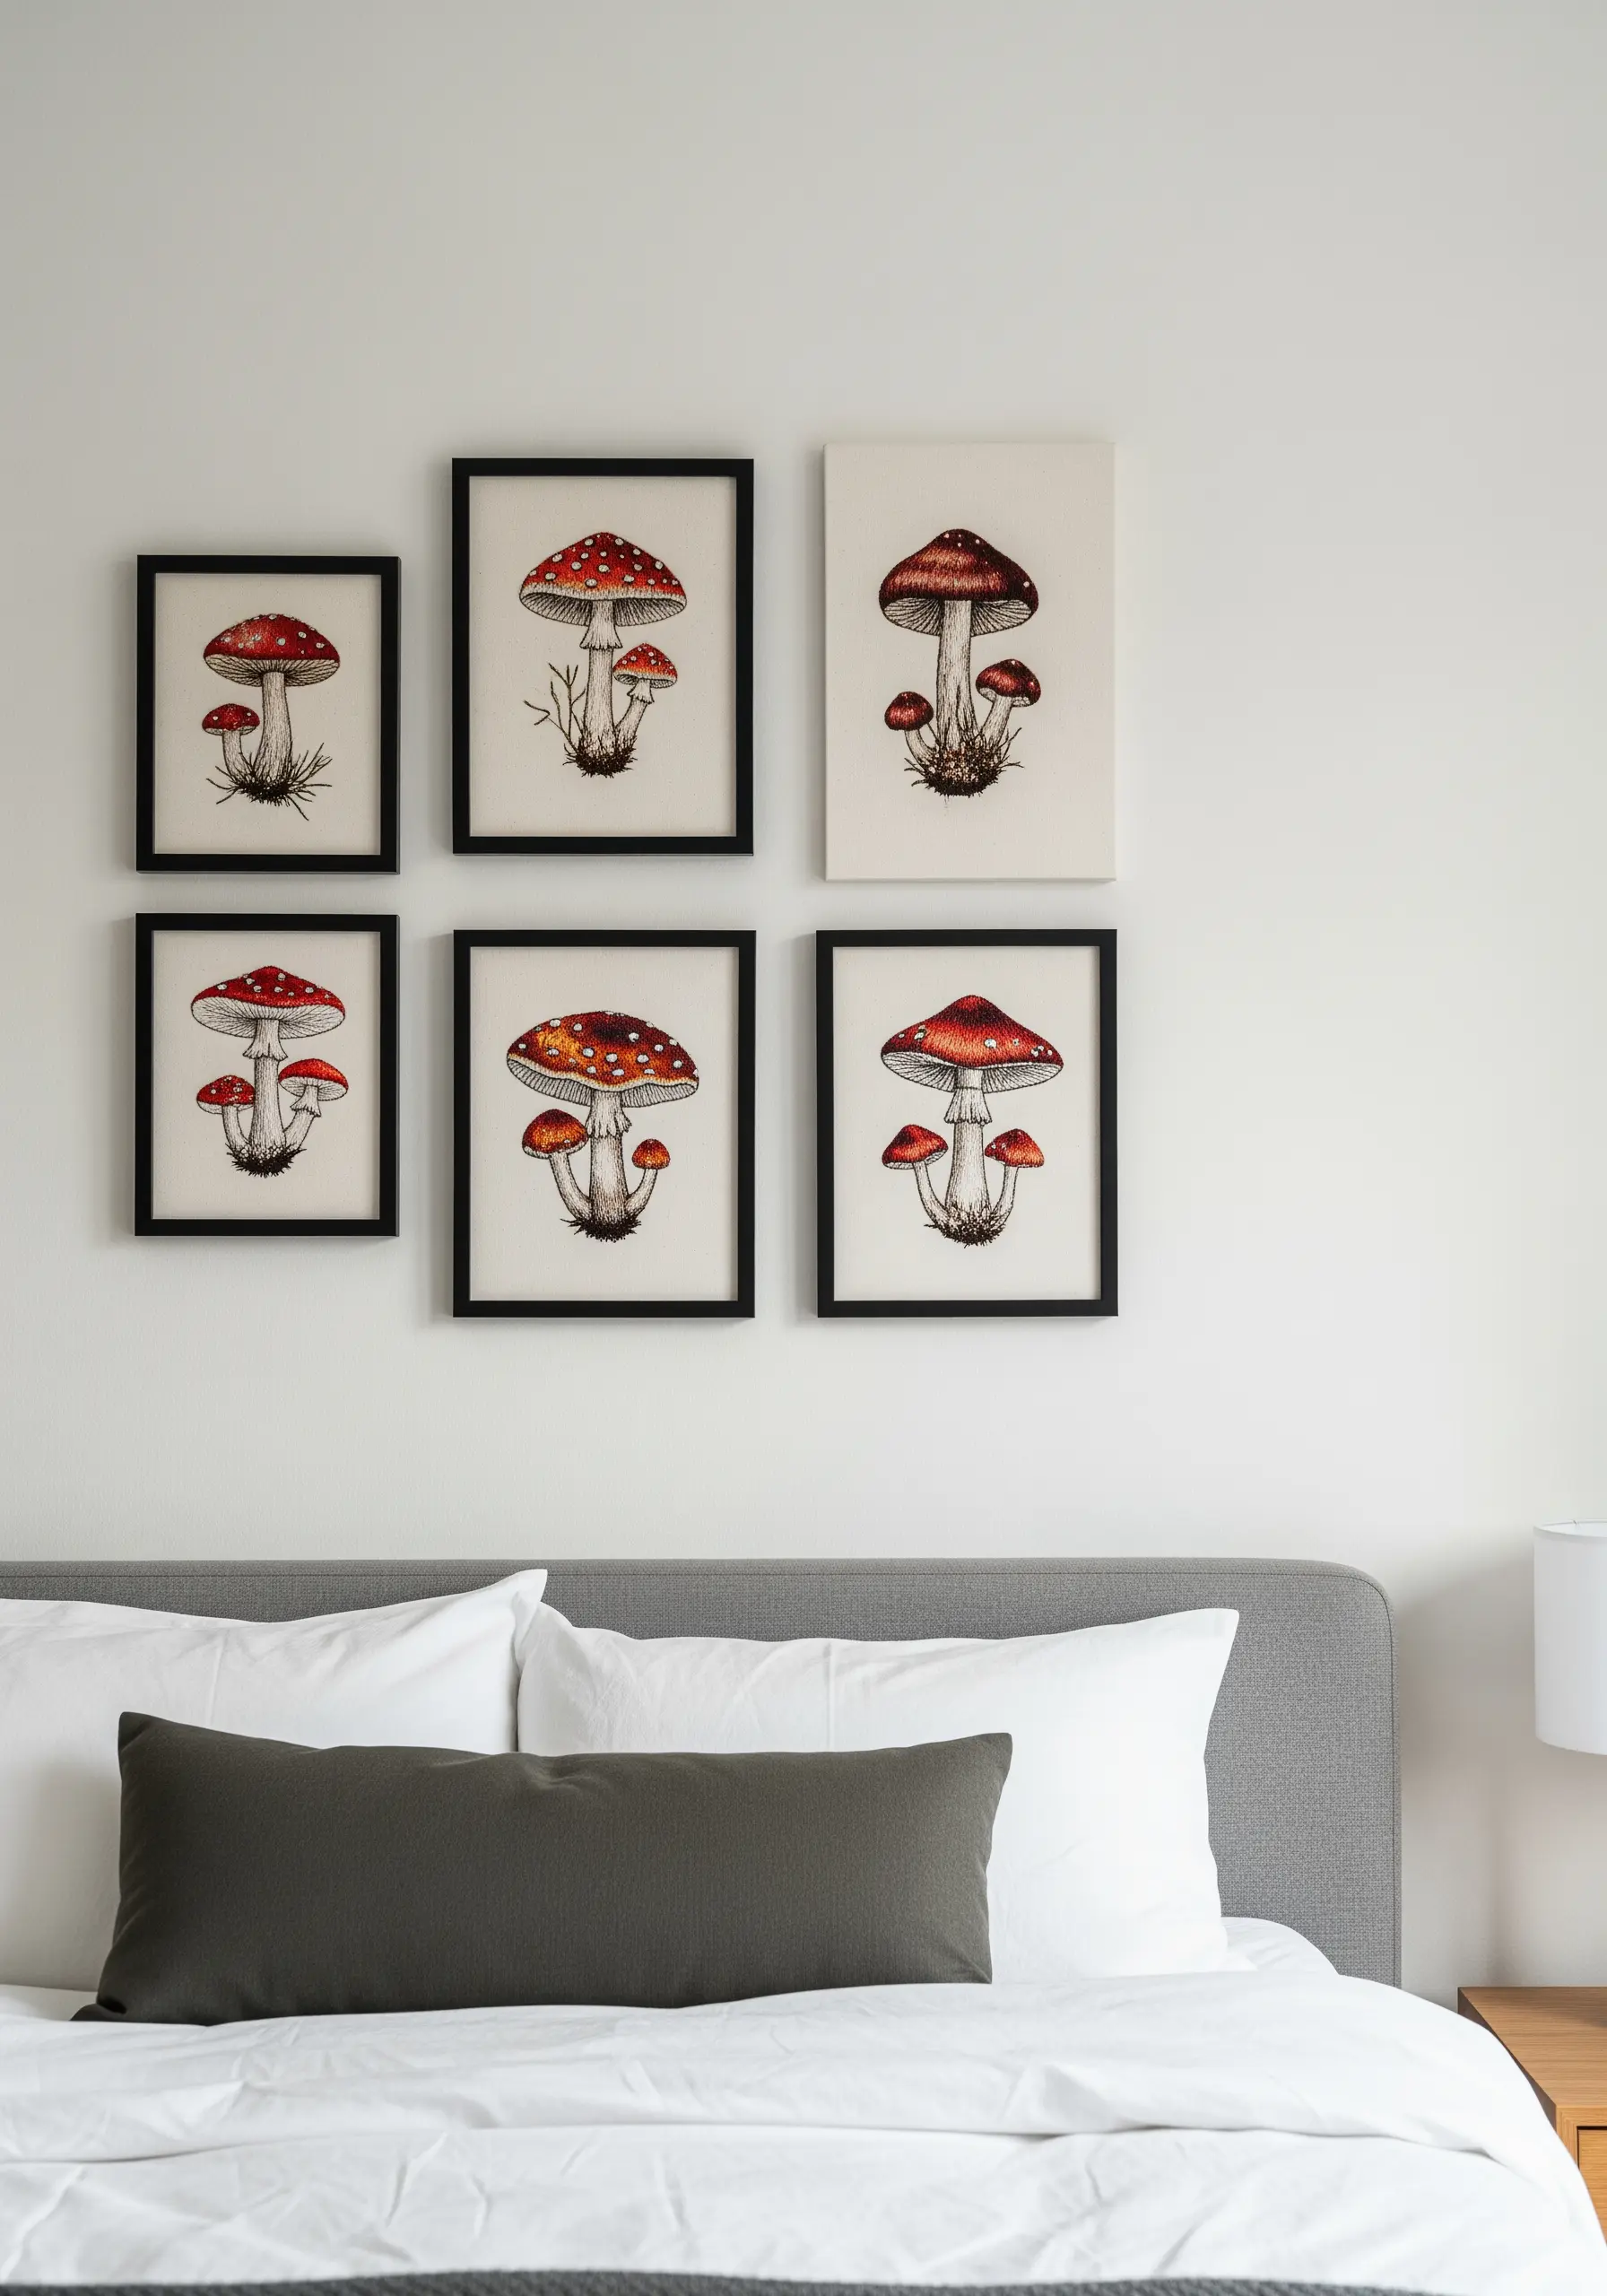
Create a high-impact art installation by stitching a series of small, related subjects, like these vintage-style mushroom illustrations.
The key to making the collection feel cohesive is consistency: use the same background fabric, frame style, and general color palette for each piece.
This approach allows you to build a stunning gallery wall over time and is perfect for practicing how to embroider realistic shadows under leaves for depth, or in this case, under mushroom caps.
27. Define a Landscape with a Single Line
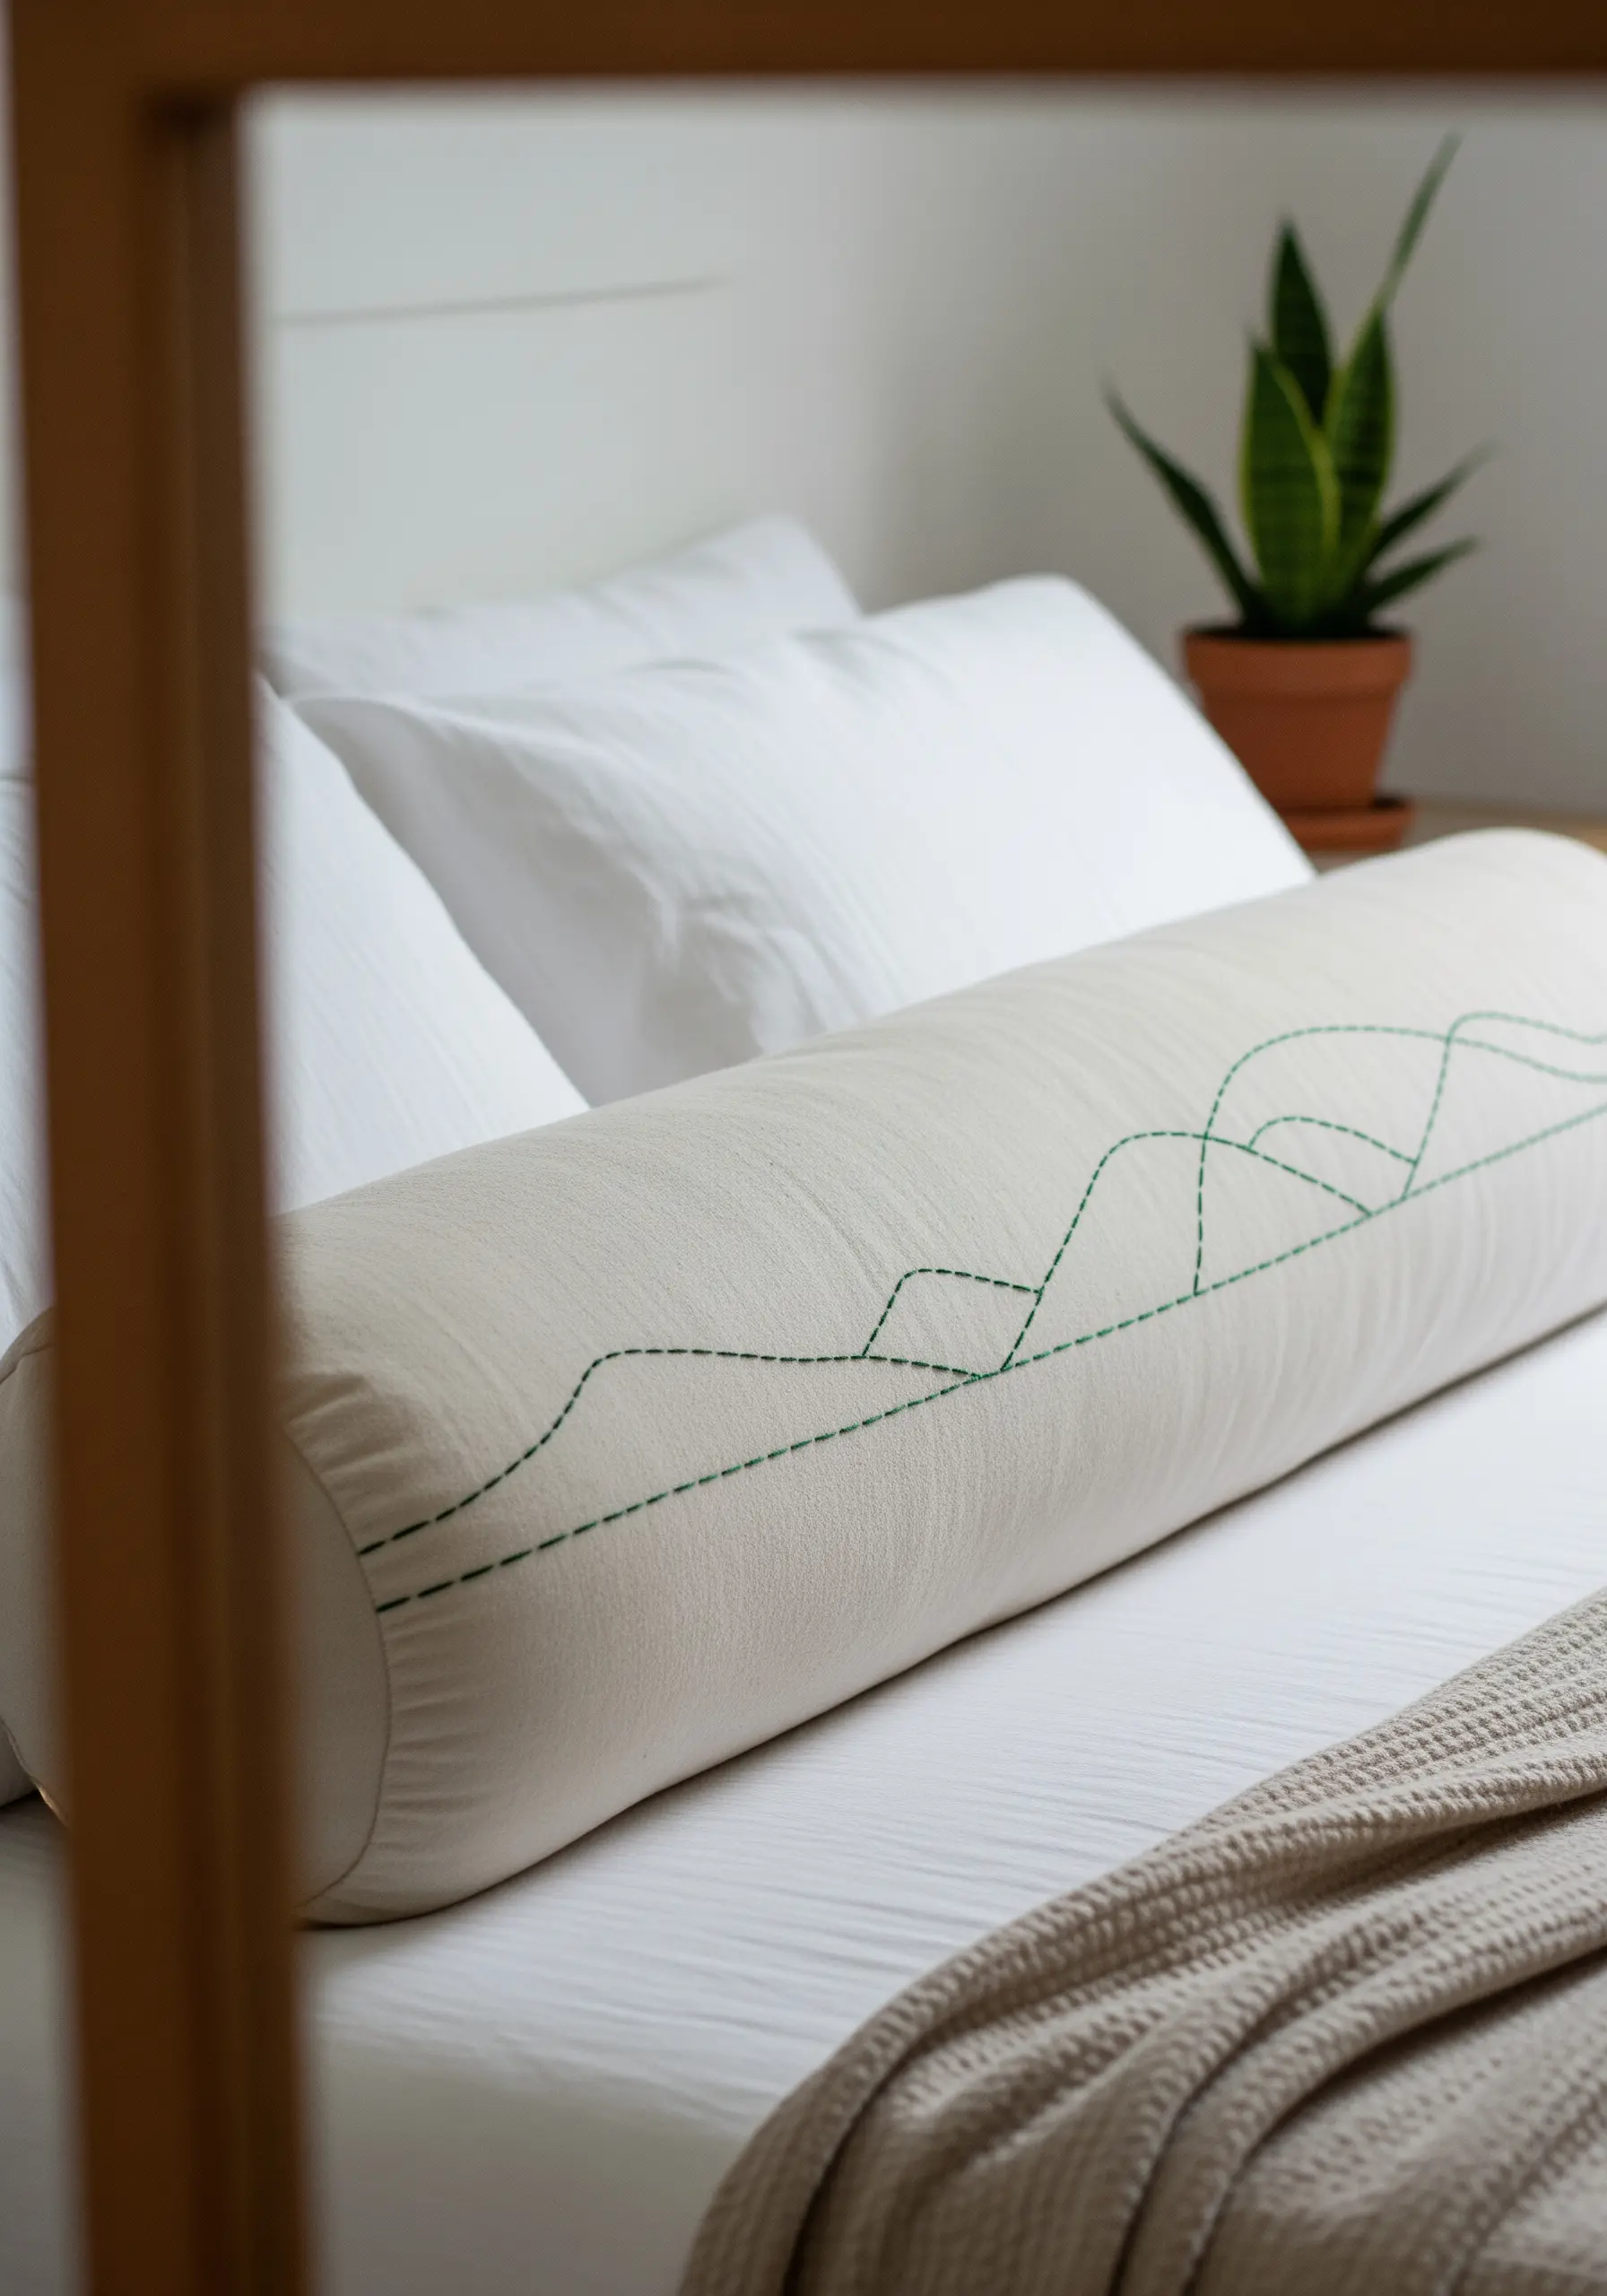
Sometimes, the most impactful design is the simplest.
Suggest a rolling mountain range or a distant horizon on a bolster pillow using nothing more than a single, continuous line of running stitch.
Choose a thread color that provides high contrast with your fabric for a crisp, graphic statement.
Focus on maintaining a consistent stitch length to ensure the final piece looks intentional and refined, like minimalist line-art travel adventure symbols for your home.
28. Sculpt a 3D Bee with Stumpwork Techniques
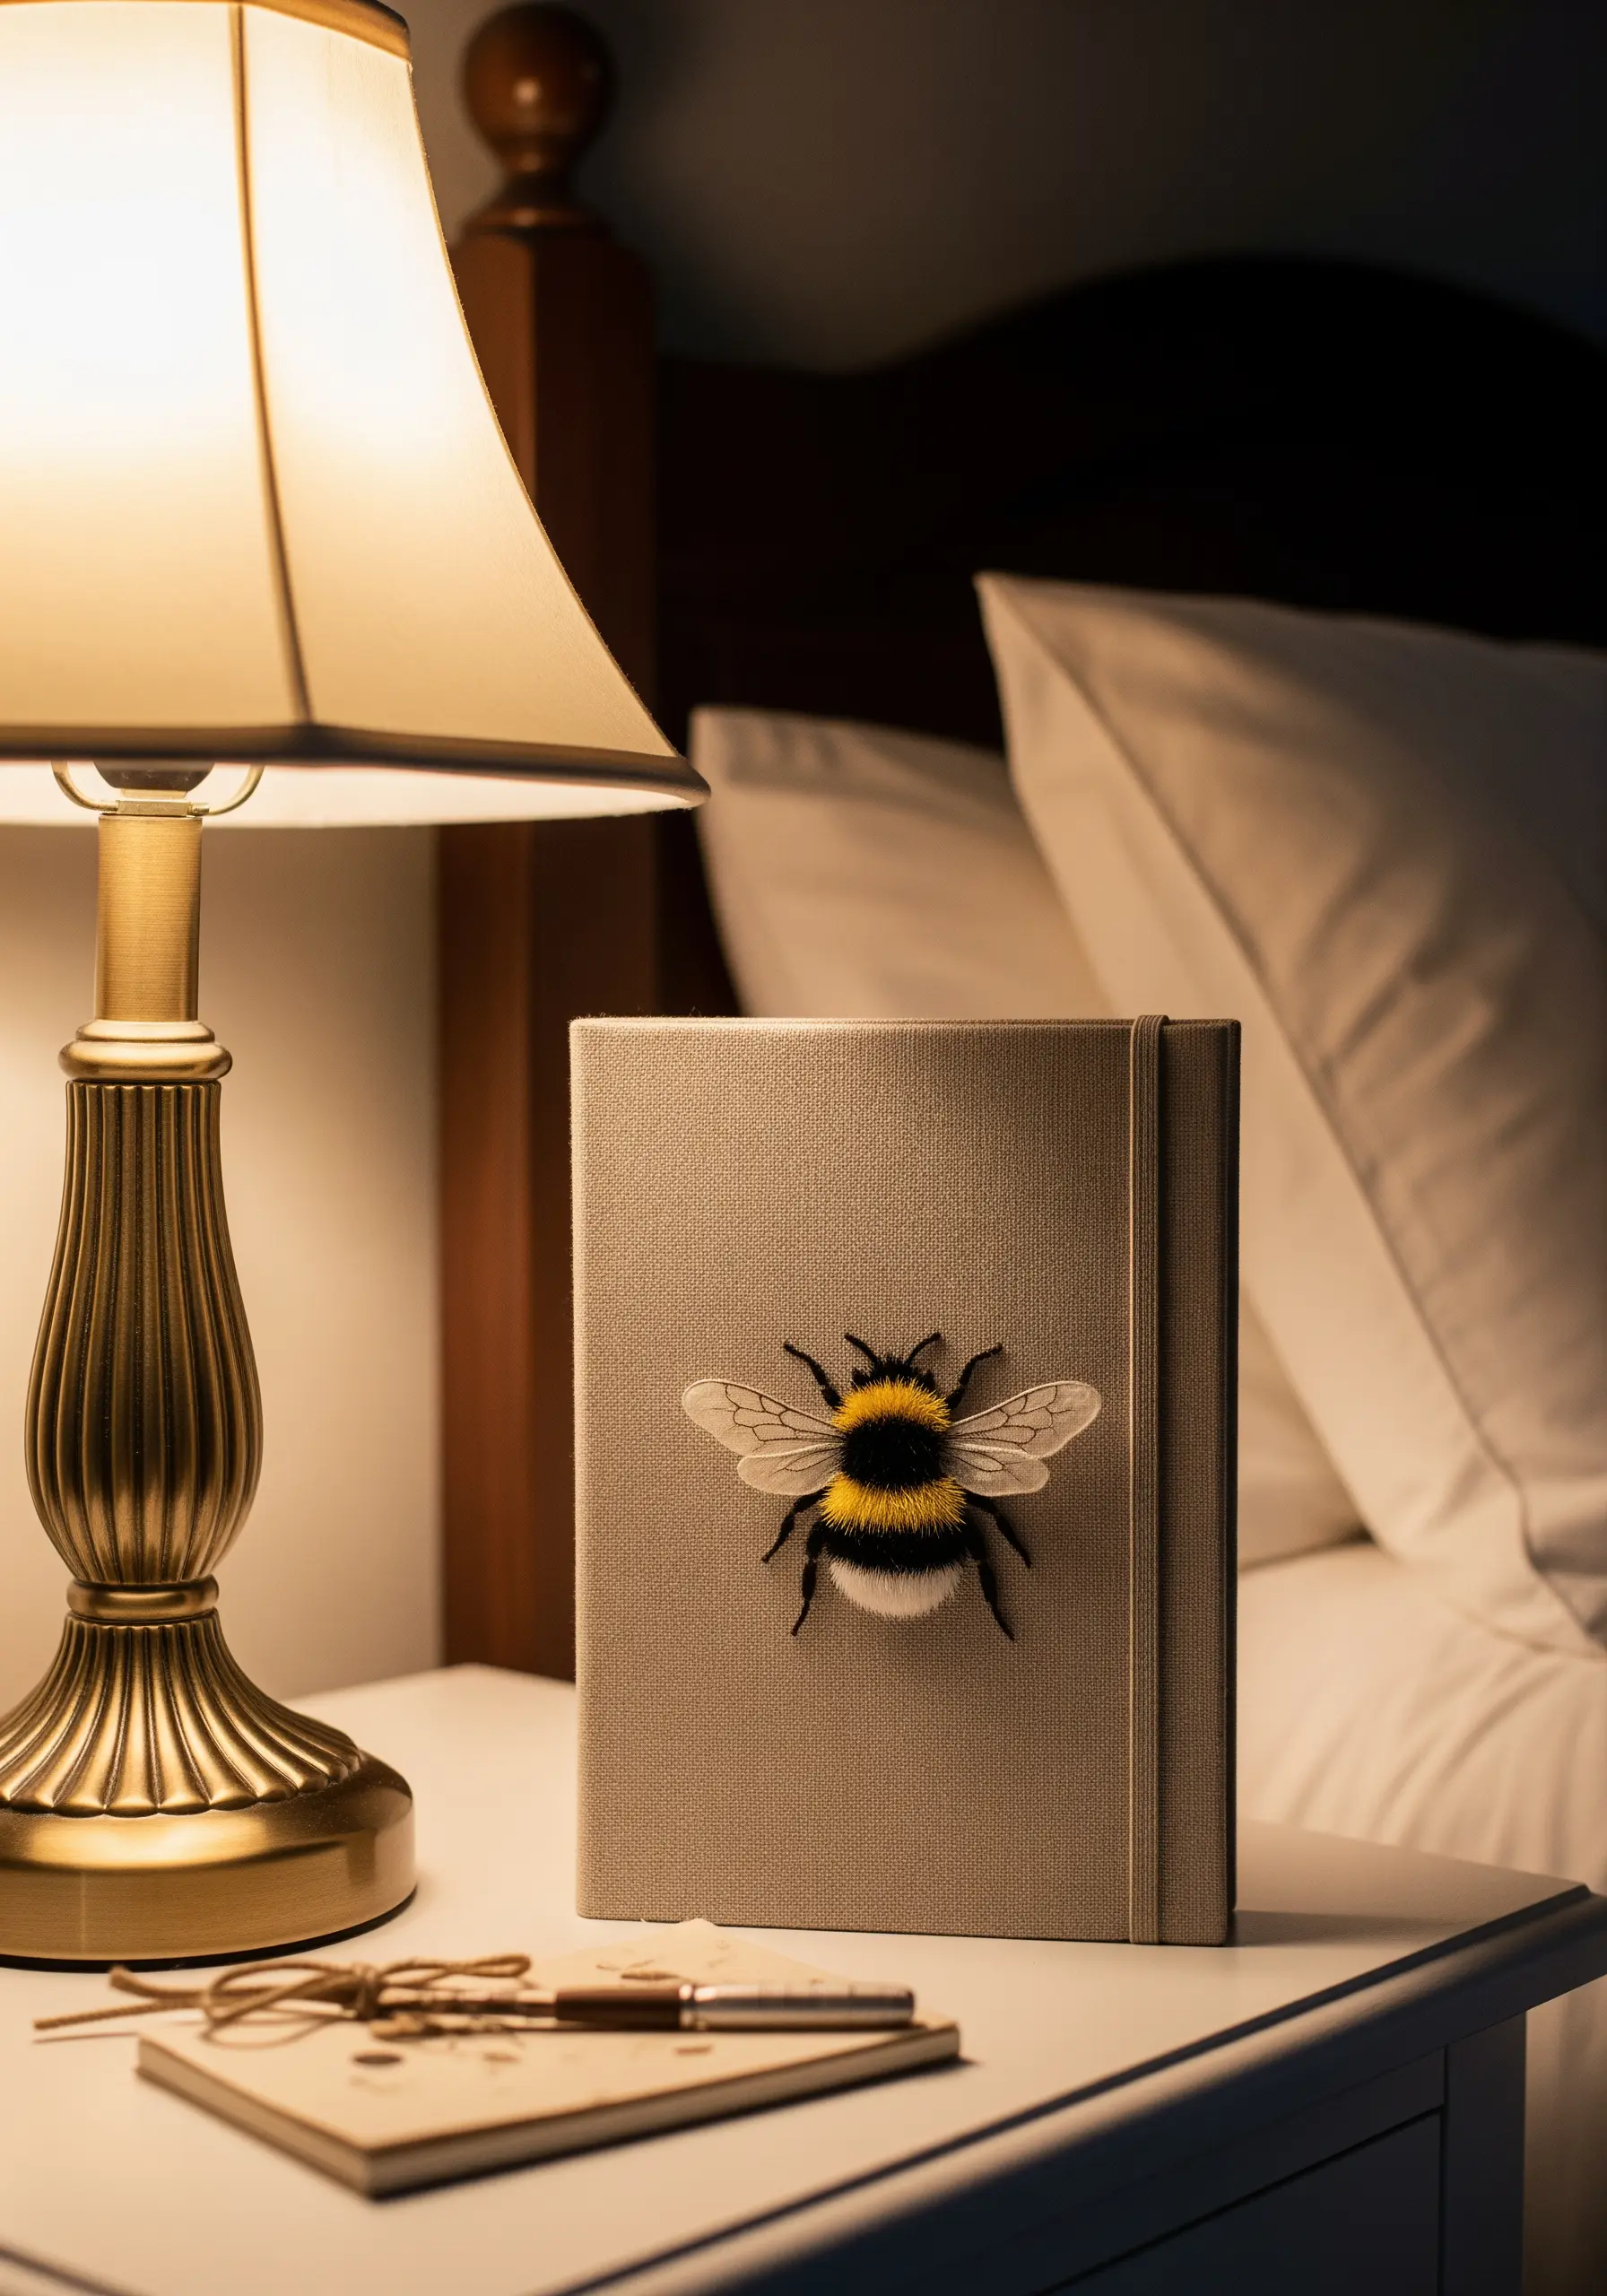
Bring a motif off the surface with stumpwork, a form of raised embroidery.
Create the bee’s fuzzy body using the Turkey work stitch with thick wool or yarn, then carefully trim the loops into a rounded, three-dimensional shape.
For the delicate wings, embroider their outlines with wire onto a separate piece of sheer organza, cut them out, and then stitch them onto the journal cover so they stand free from the surface.
This project uses creative collage art ideas that use thread, paper, and tiny hand-stitched details to build dimension.
29. Embrace Visible Mending on a Knit Blanket
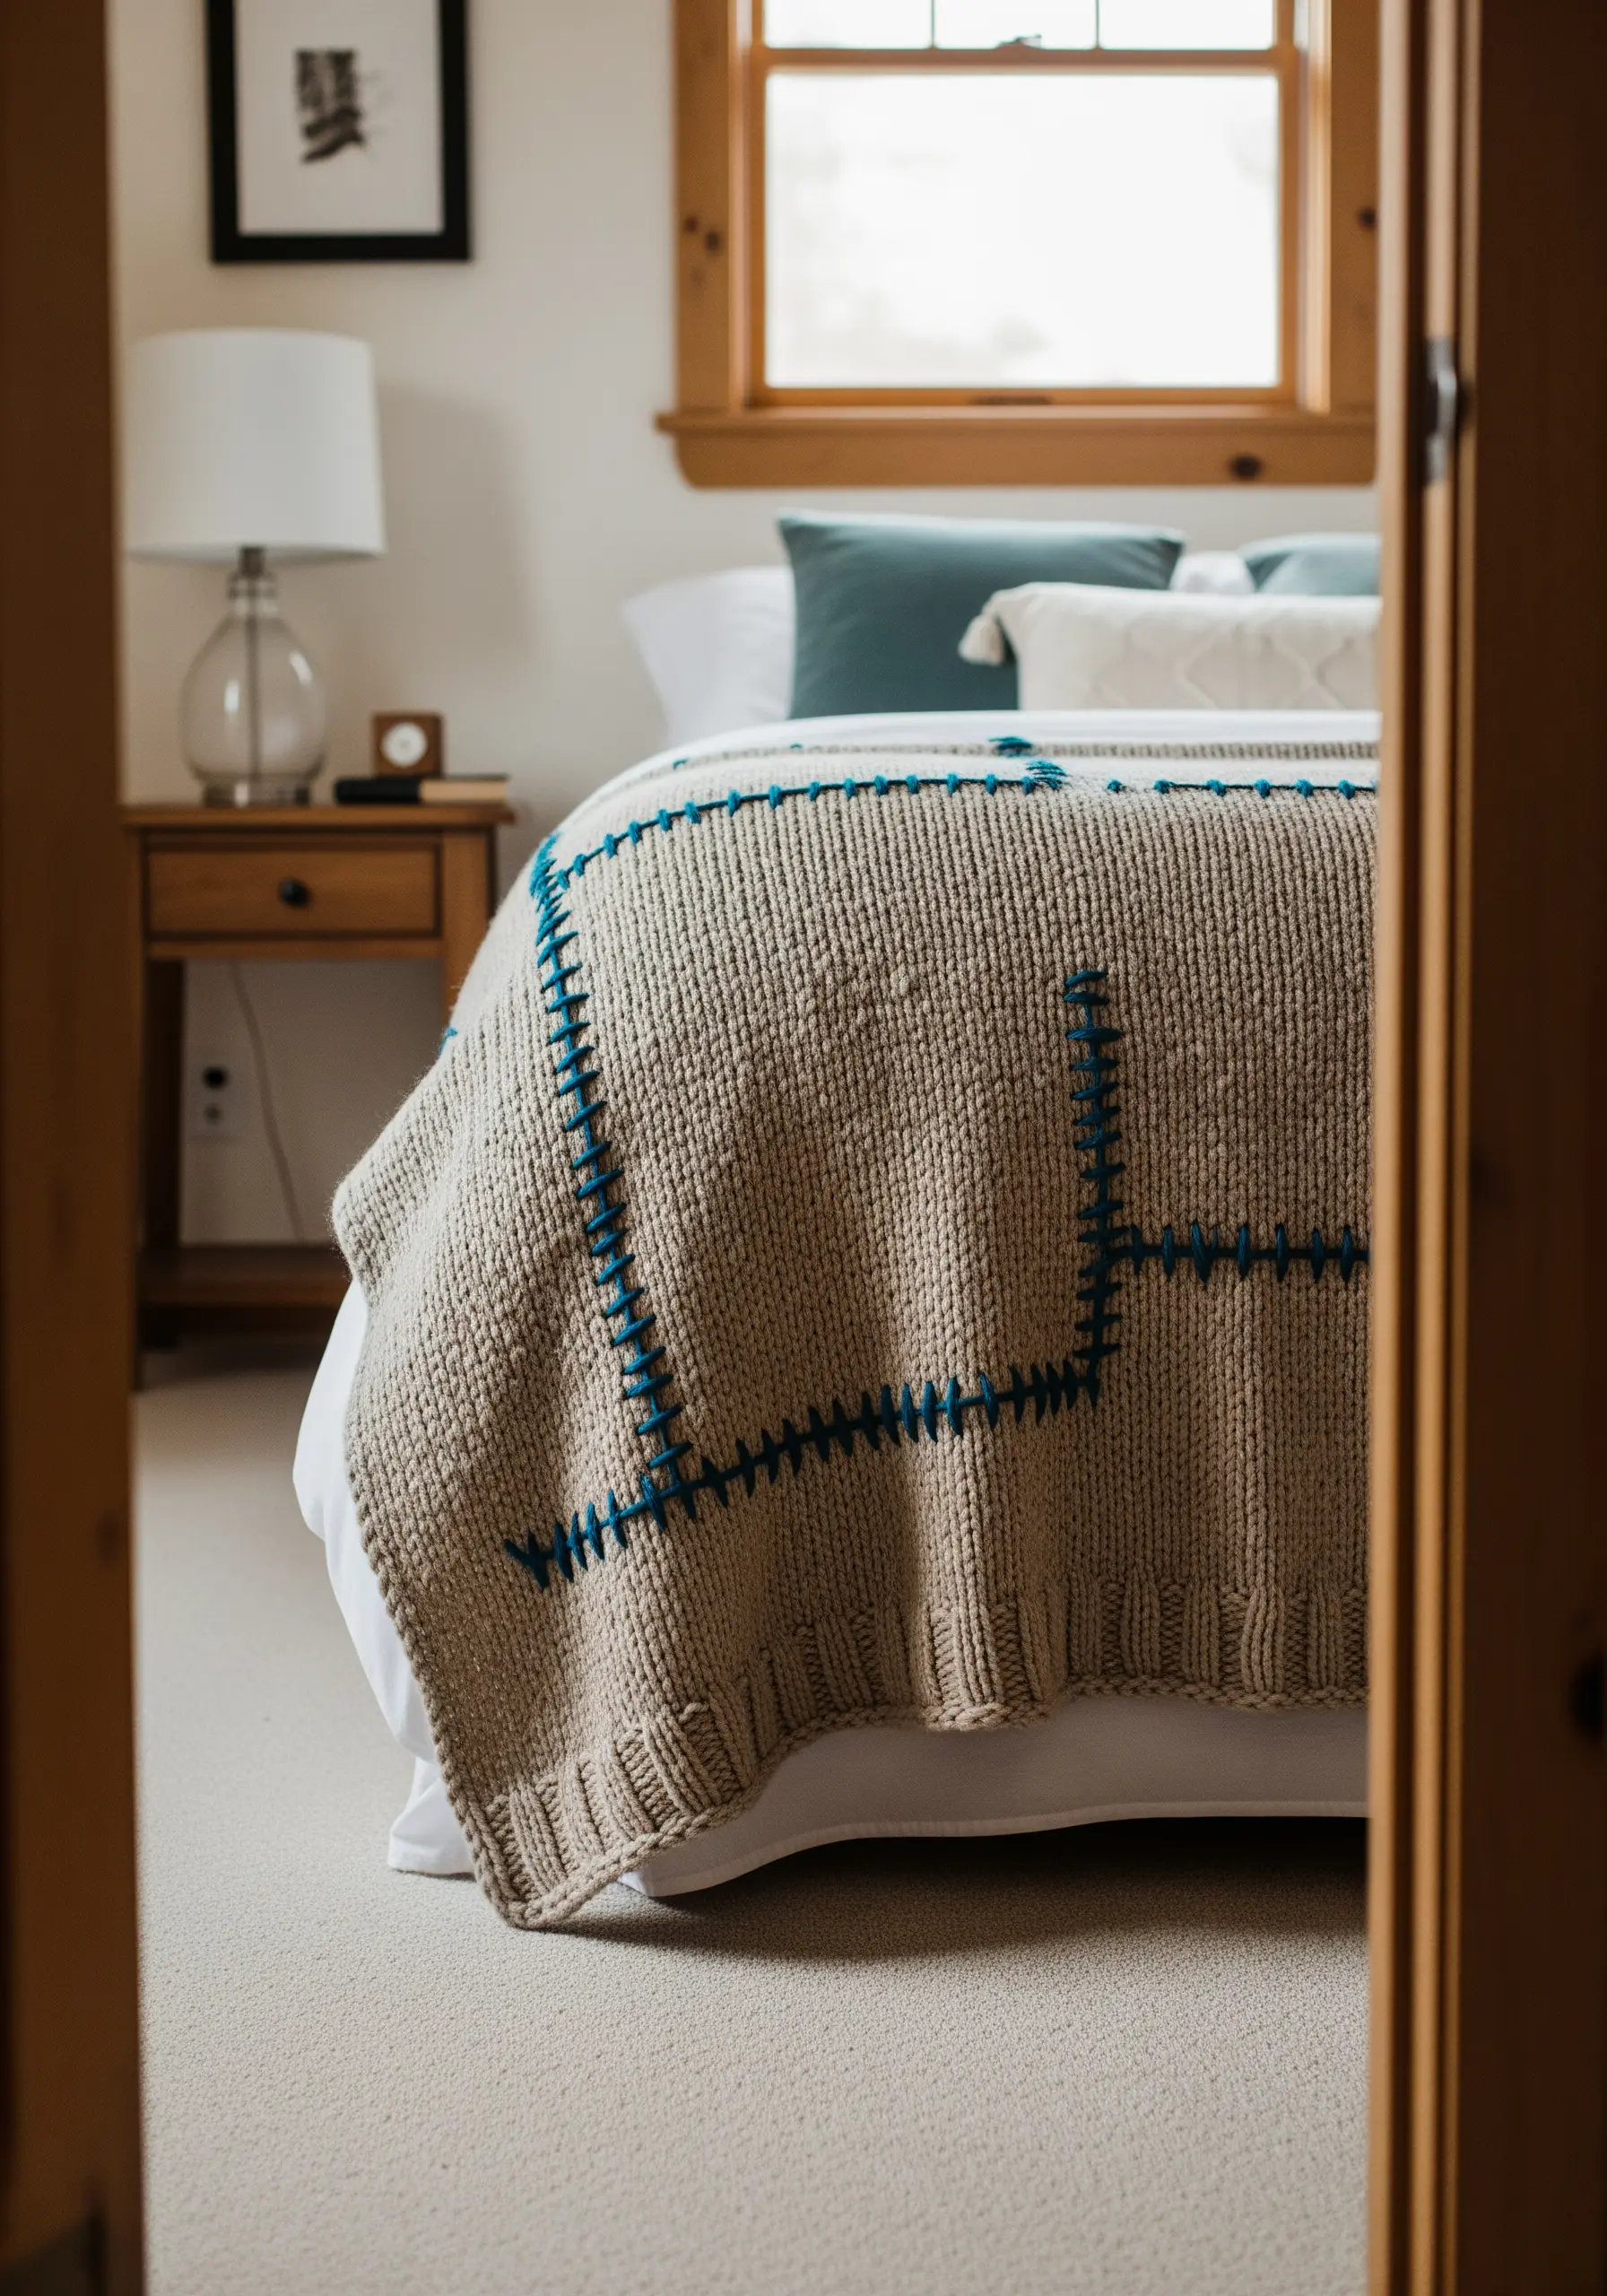
Elevate a simple knit blanket by adding bold, decorative stitches inspired by the visible mending movement.
Use a thick yarn in a high-contrast color to create graphic patterns with oversized blanket stitches or large cross stitches.
This technique not only adds a unique, handmade touch but also celebrates imperfection and craftsmanship.
It’s a perfect way to experiment with abstract mixed media embroidery ideas using fabric scraps or, in this case, just bold thread.
30. Map an Abstract Landscape with Texture
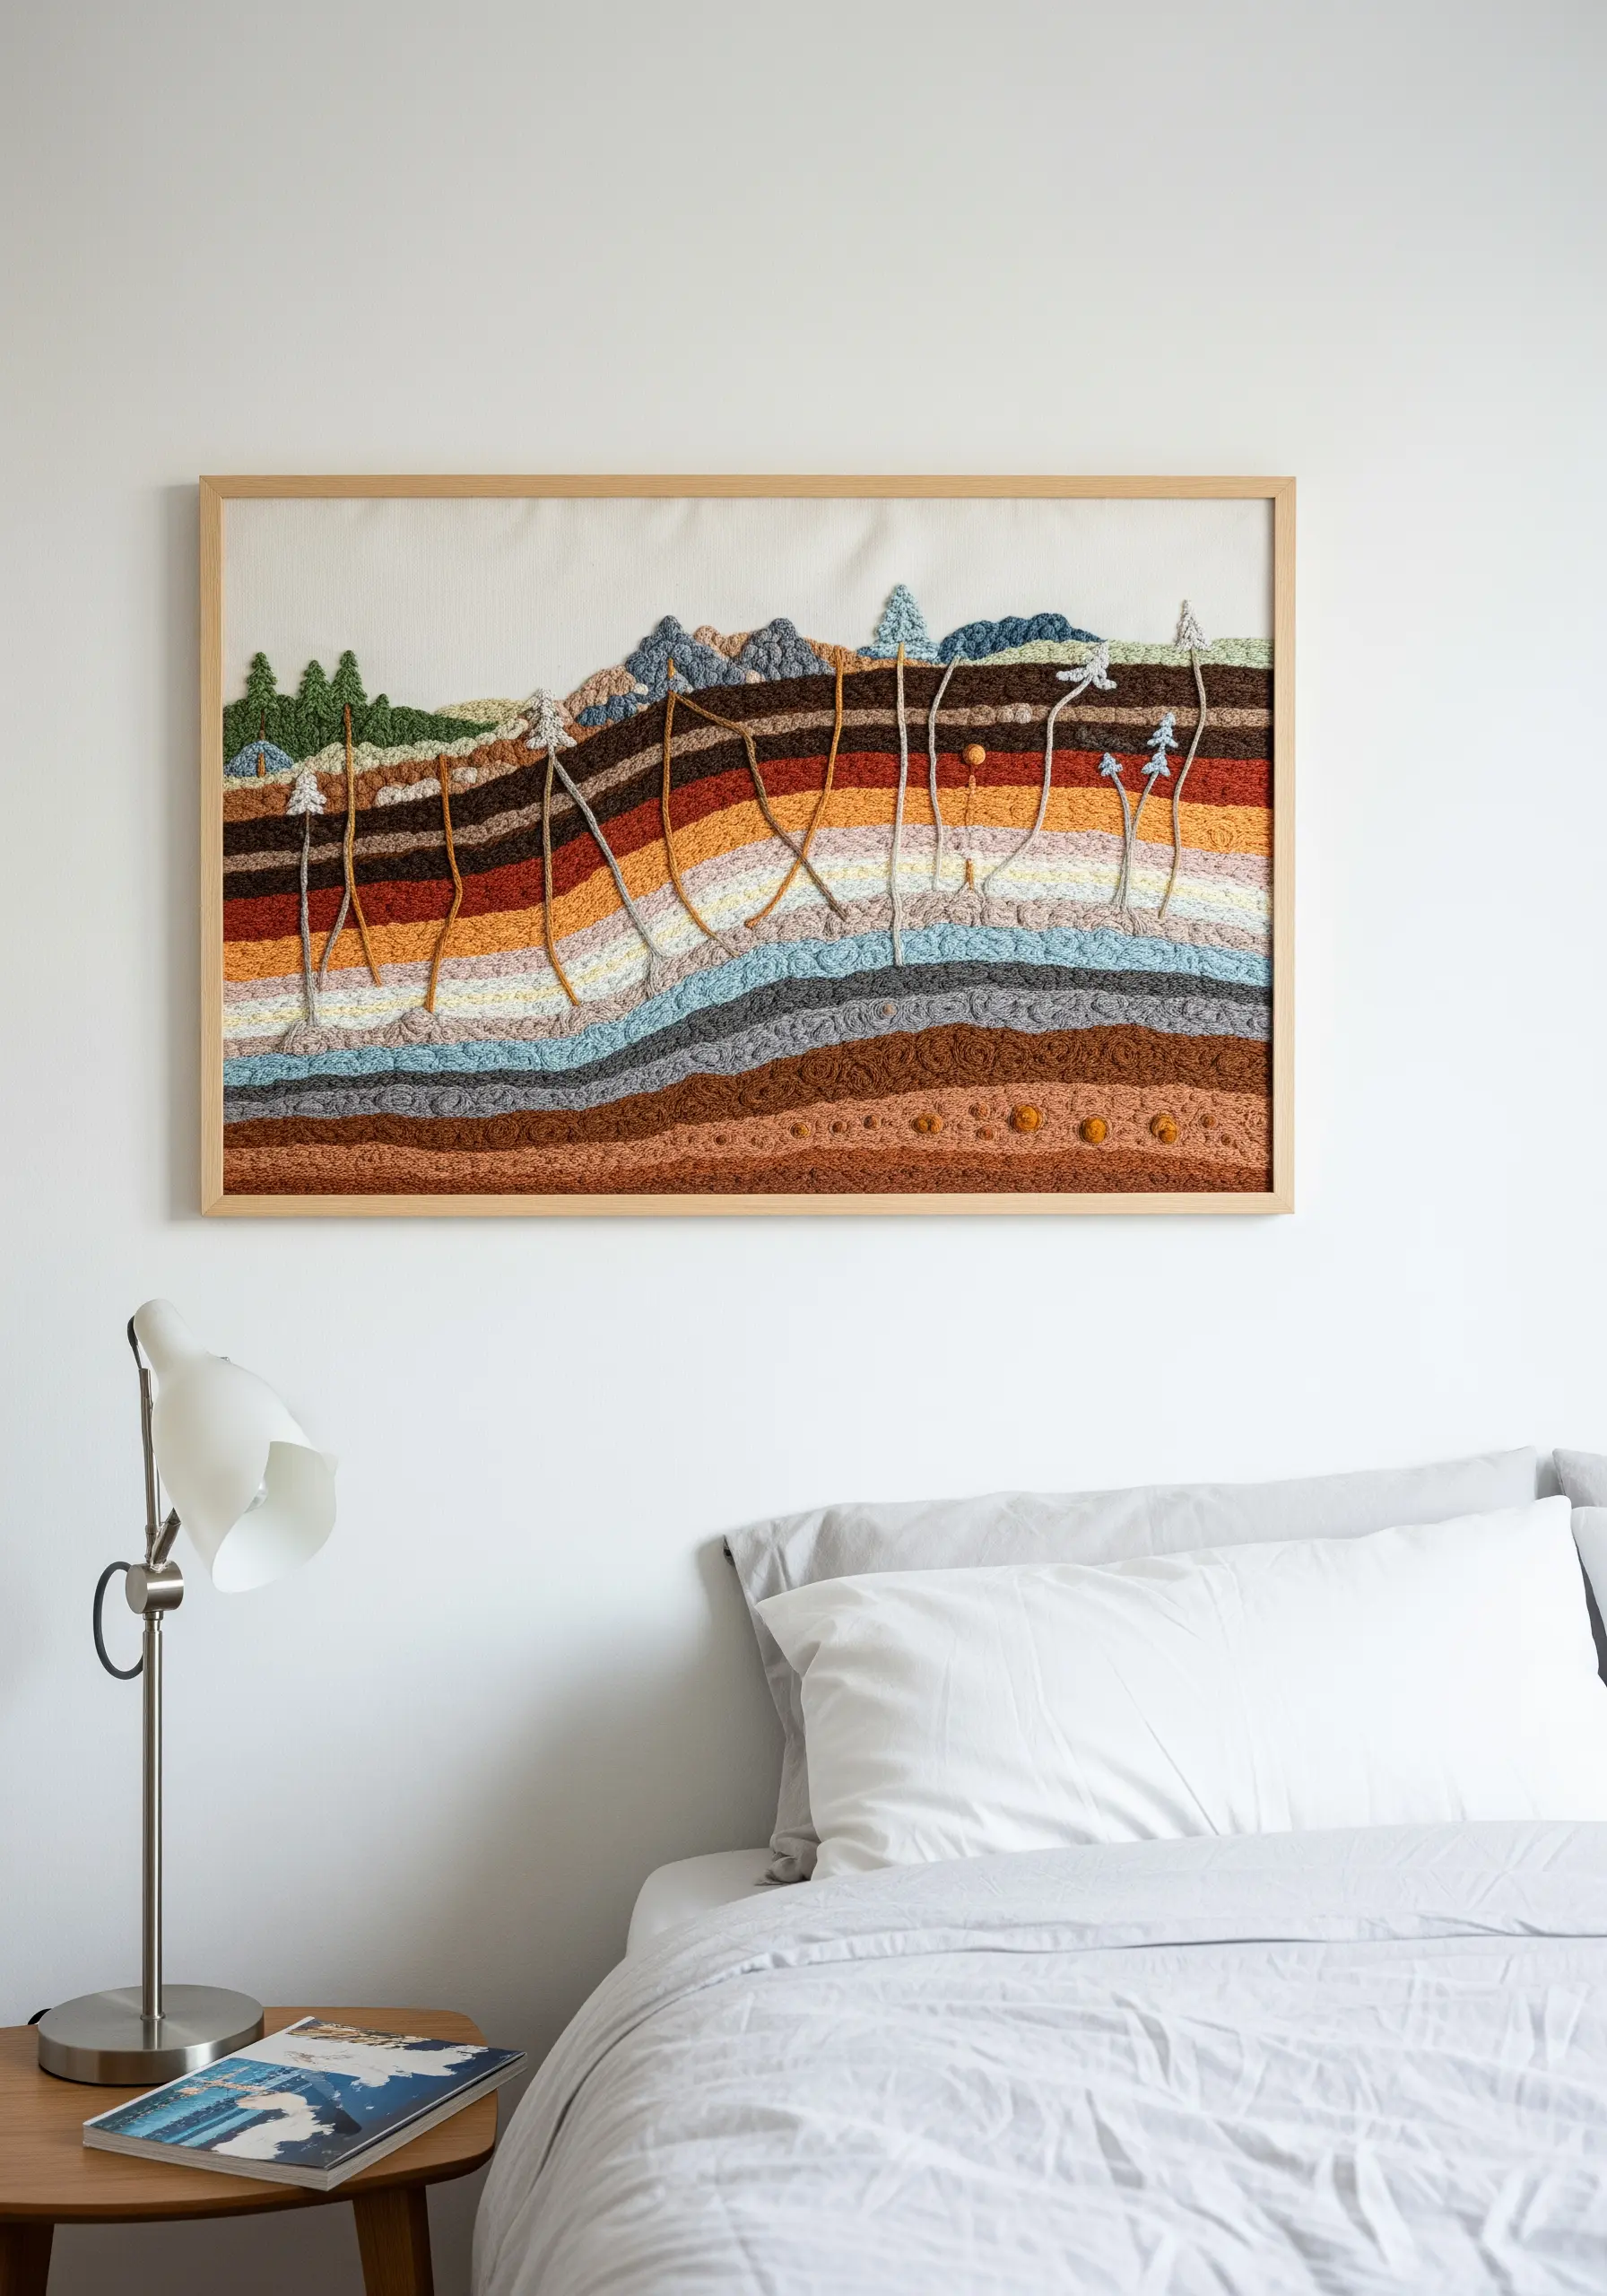
Create a captivating piece of art by translating a geological cross-section into a textural landscape.
Assign a different stitch to each layer of soil to represent its unique texture: dense French knots for rocky strata, smooth satin stitch for clay, and linear chain stitches for root systems.
Using a variety of thread types like wool, chenille, and cotton will further enhance the tactile quality, making for one of the most compelling embroidery projects inspired by textures you’d find on a nature walk.
31. Stitch a Series of Realistic Birds
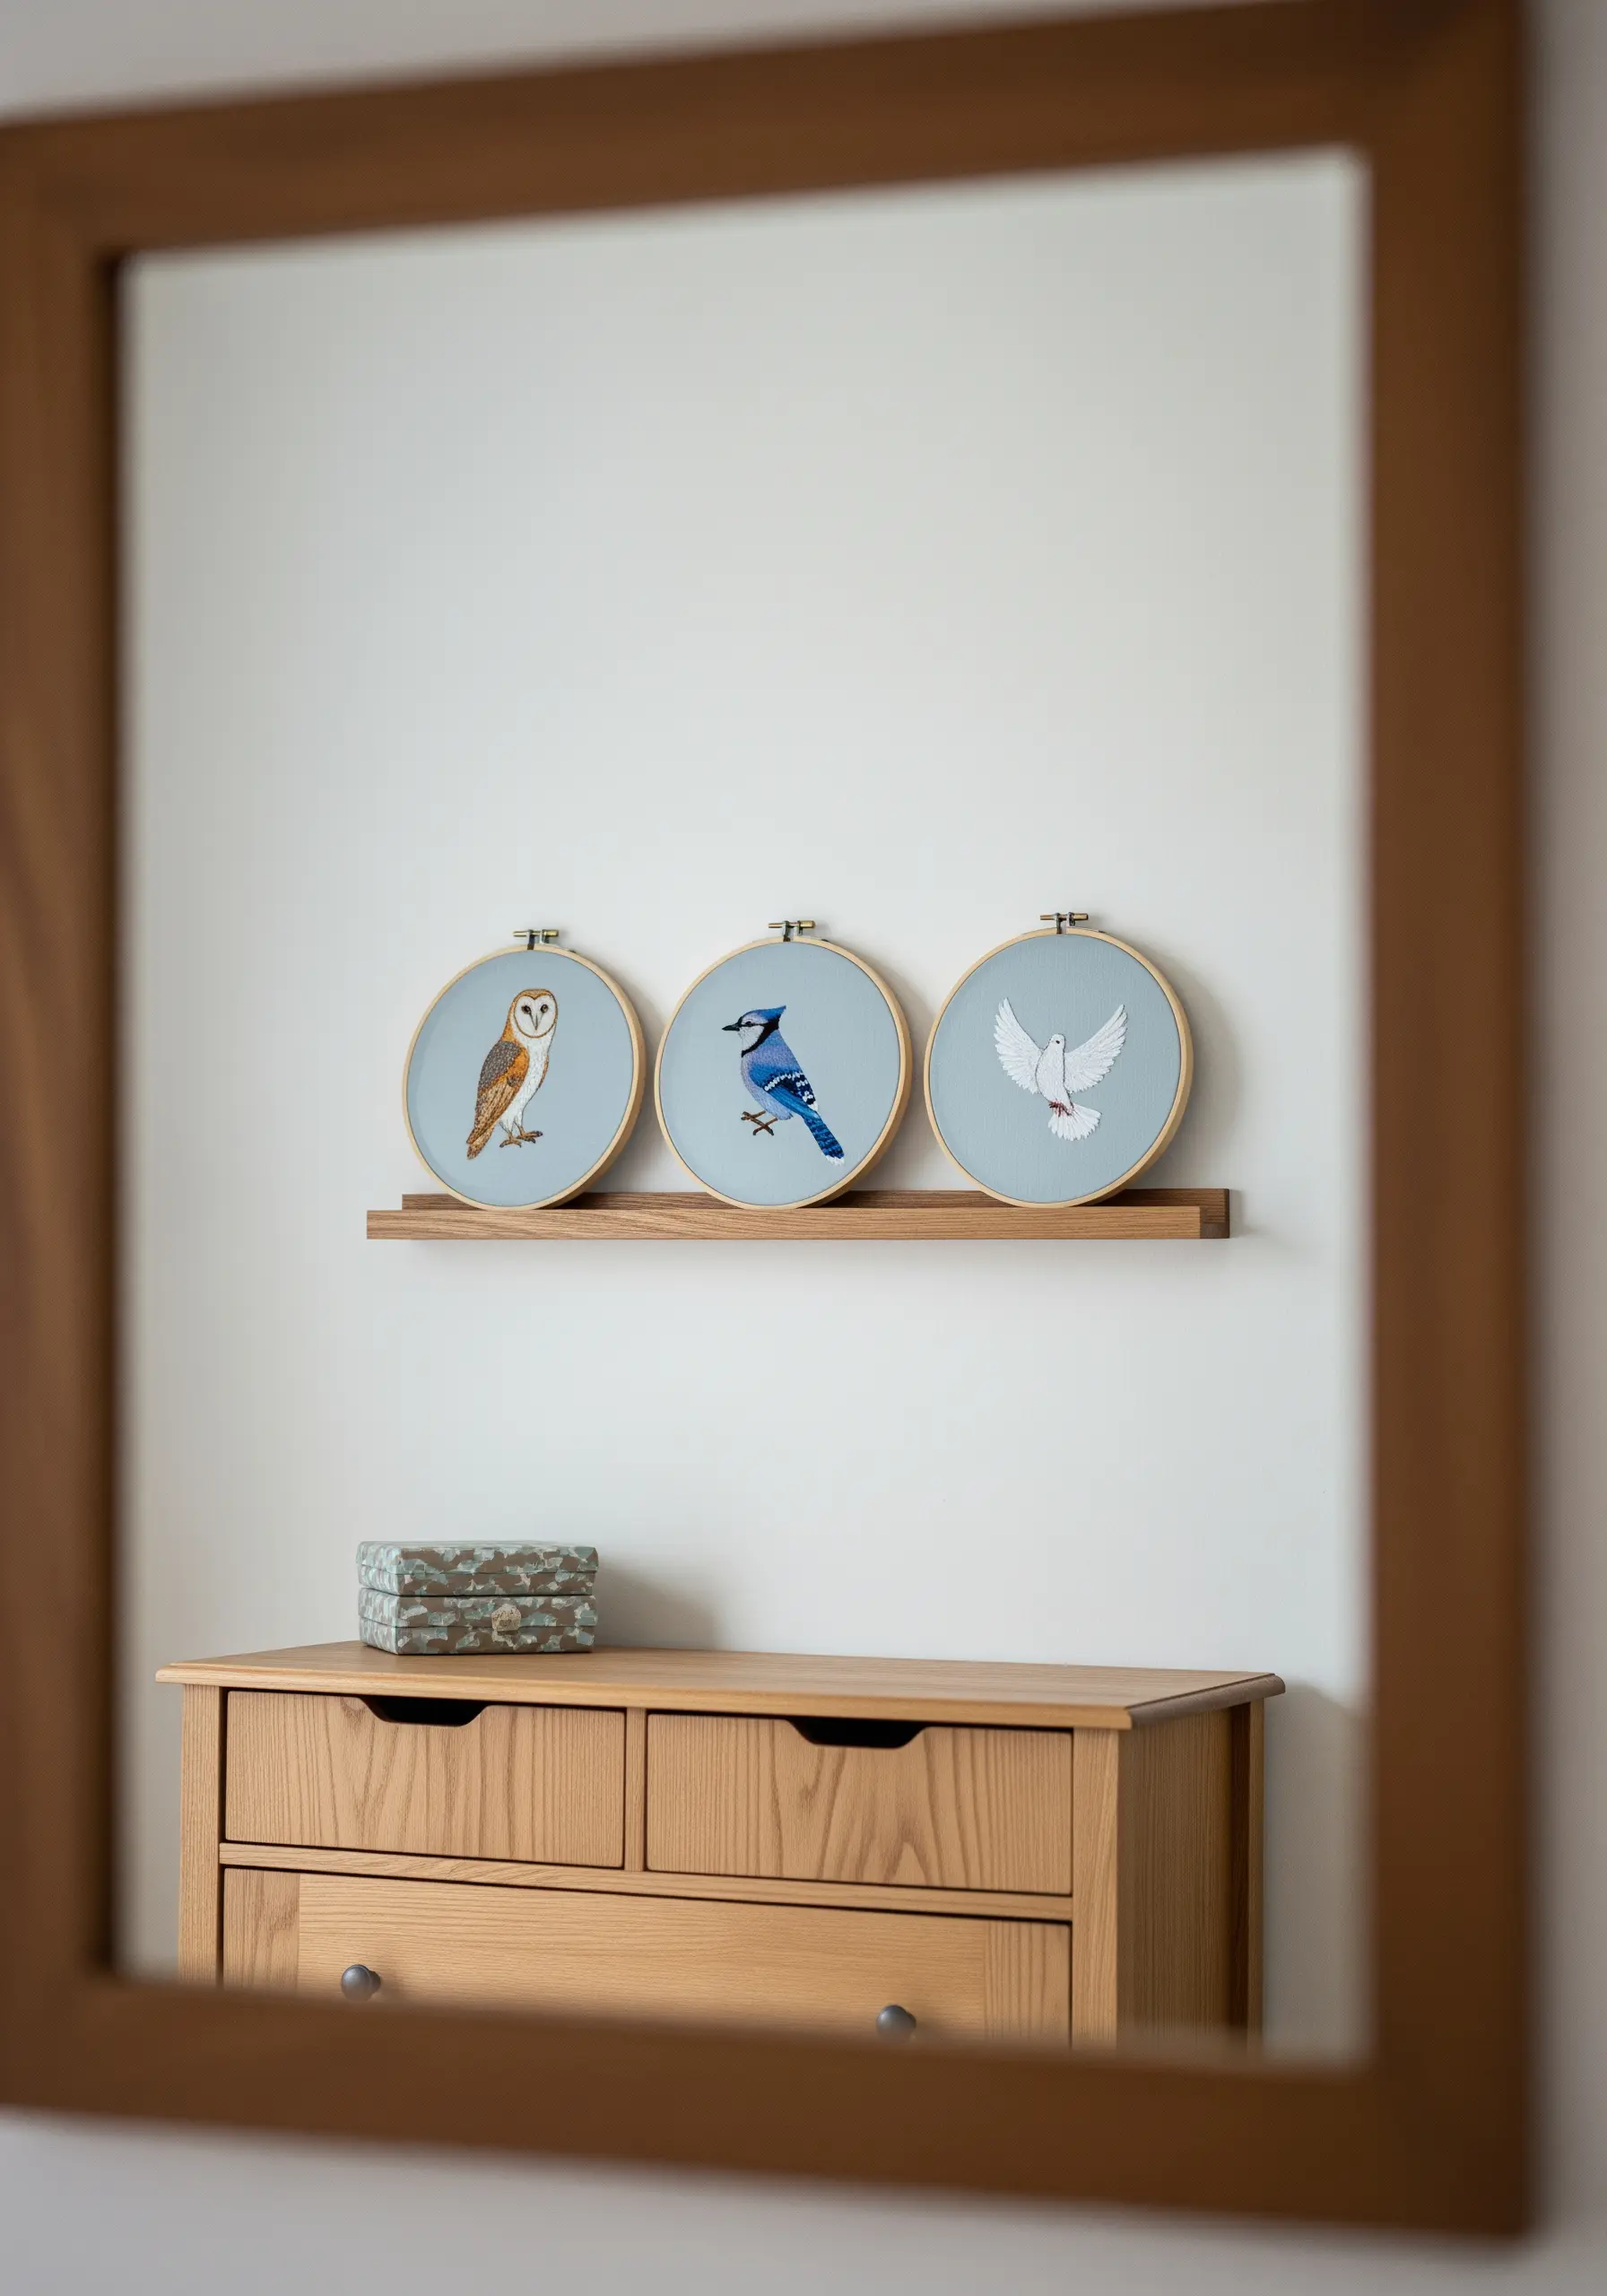
When thread painting realistic subjects like birds, the magic is in the subtle blending of colors.
Work with a single strand of embroidery floss and use the long-and-short stitch to seamlessly transition between shades, creating the soft, feathered look of plumage.
Mounting your finished birds in simple hoops against a consistent background color allows their individual details and vibrant colors to shine.
It’s a perfect way to practice making contemporary rainbow blend stitches that create magical ombre effects on a natural subject.
32. Carve a River’s Path with Seed Stitches
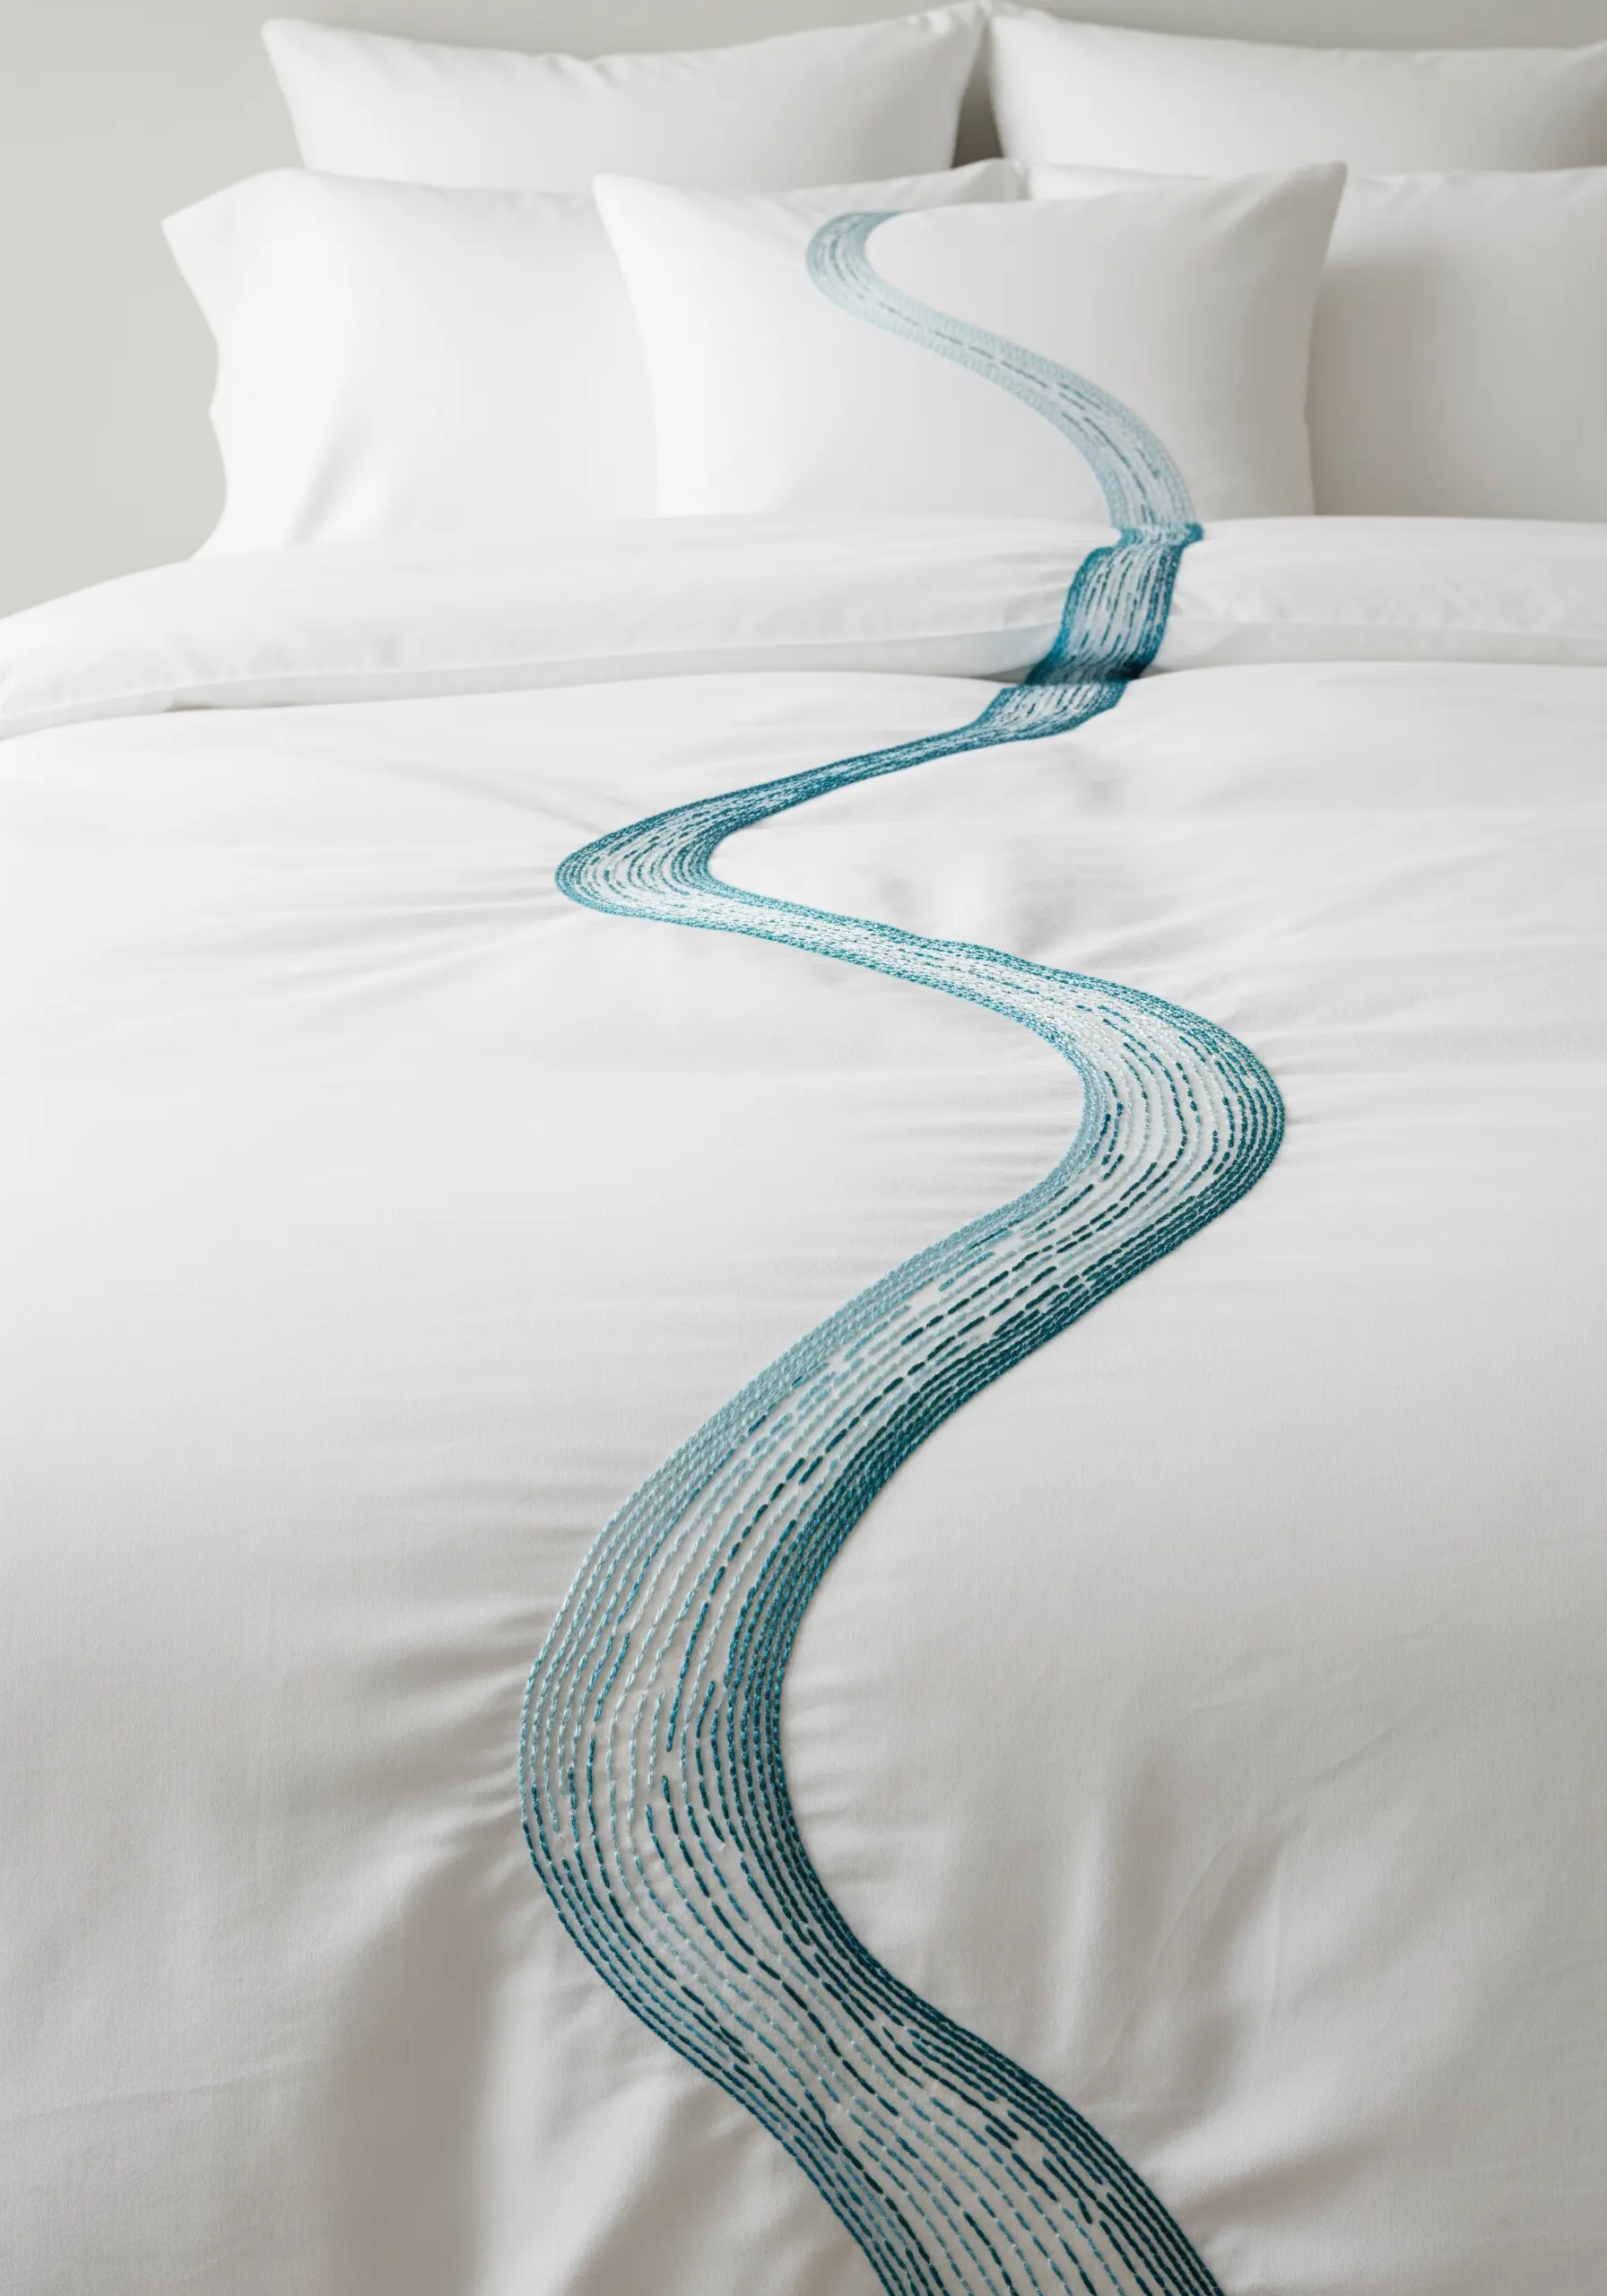
Suggest the shimmer and movement of water by filling a winding river shape with thousands of tiny, dense seed stitches.
To create a realistic gradient, gradually blend different shades of blue, teal, and aqua thread as you work your way down the duvet cover.
Varying the direction of these small straight stitches will catch the light differently, mimicking the dynamic surface of flowing water.
This is a great example of mixed fiber creations inspired by nature you’ll want to copy into your own space.
33. Upholster with Golden Ginkgo Leaves
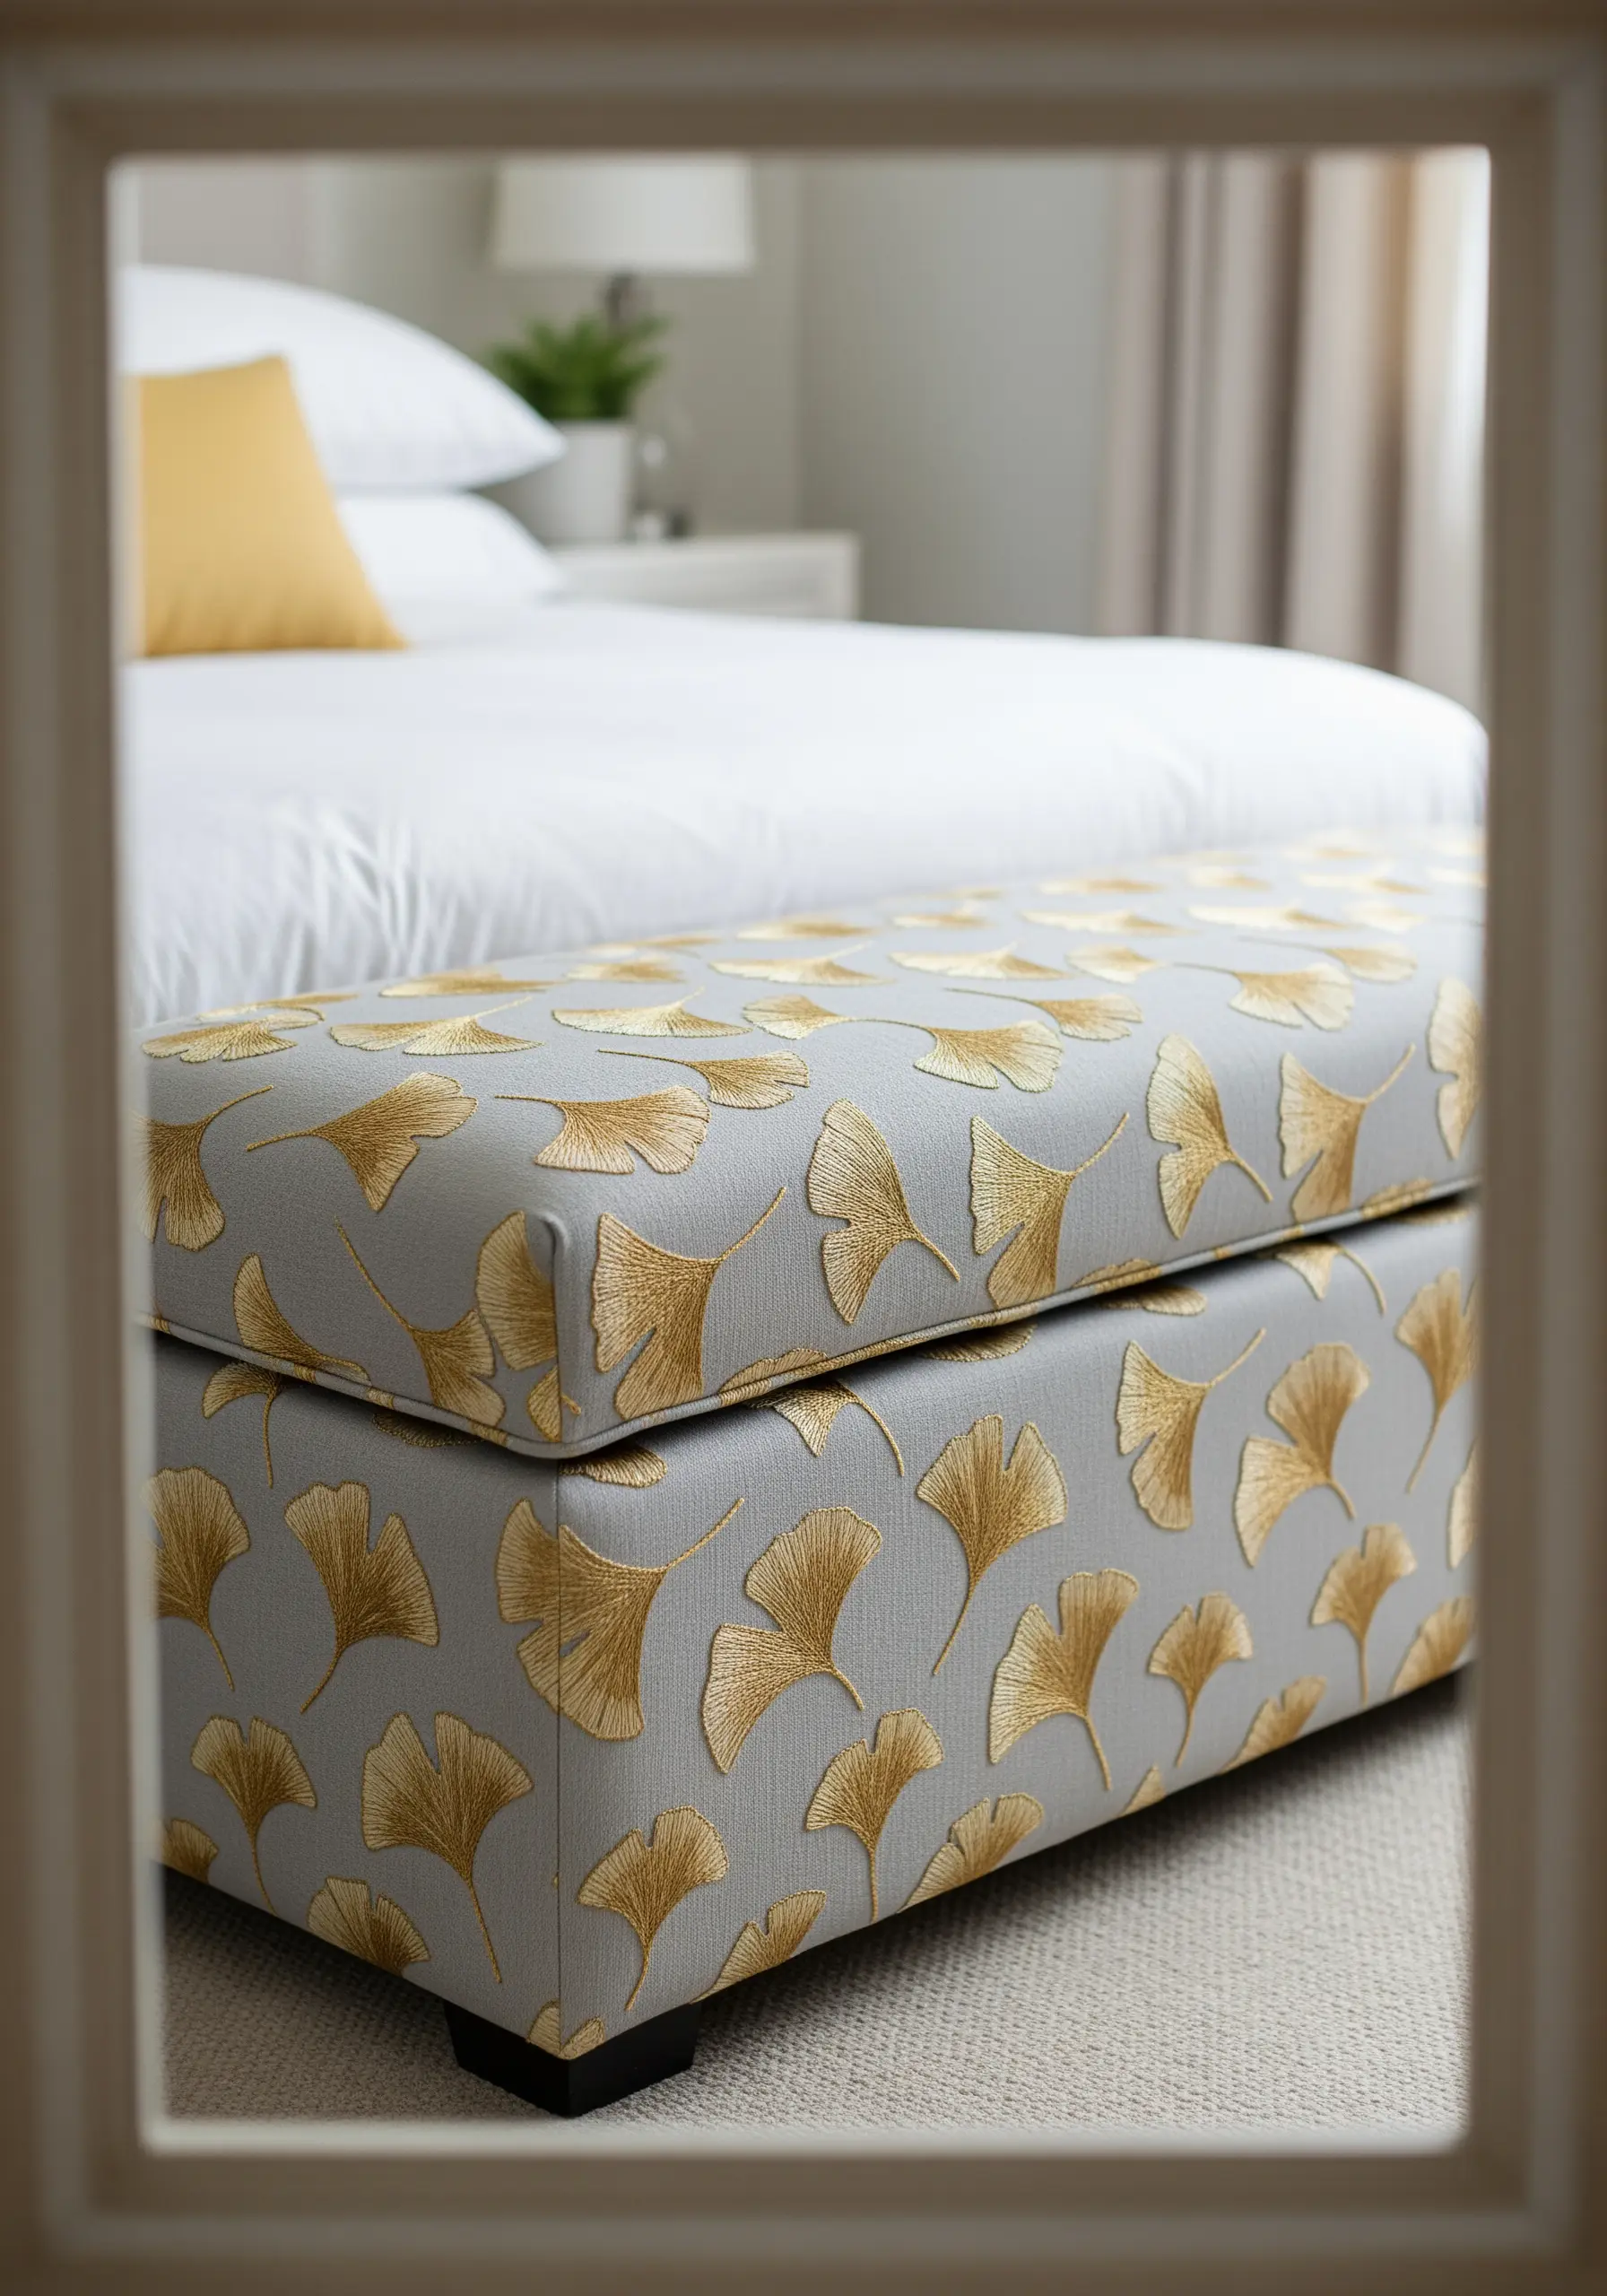
For a truly luxurious and custom piece of furniture, embroider your own upholstery fabric with a repeating motif.
The elegant shape of the ginkgo leaf, stitched in a shimmering gold metallic thread, creates a timeless art deco pattern.
When embroidering on heavy fabric, be sure to use a strong needle and a high-quality stabilizer to prevent puckering and ensure your stitches remain smooth and even.
This project elevates botanical motifs into something truly glamorous, much like detailed floral mandala embroidery ideas.
34. Piece a Landscape Quilt with Visible Seams
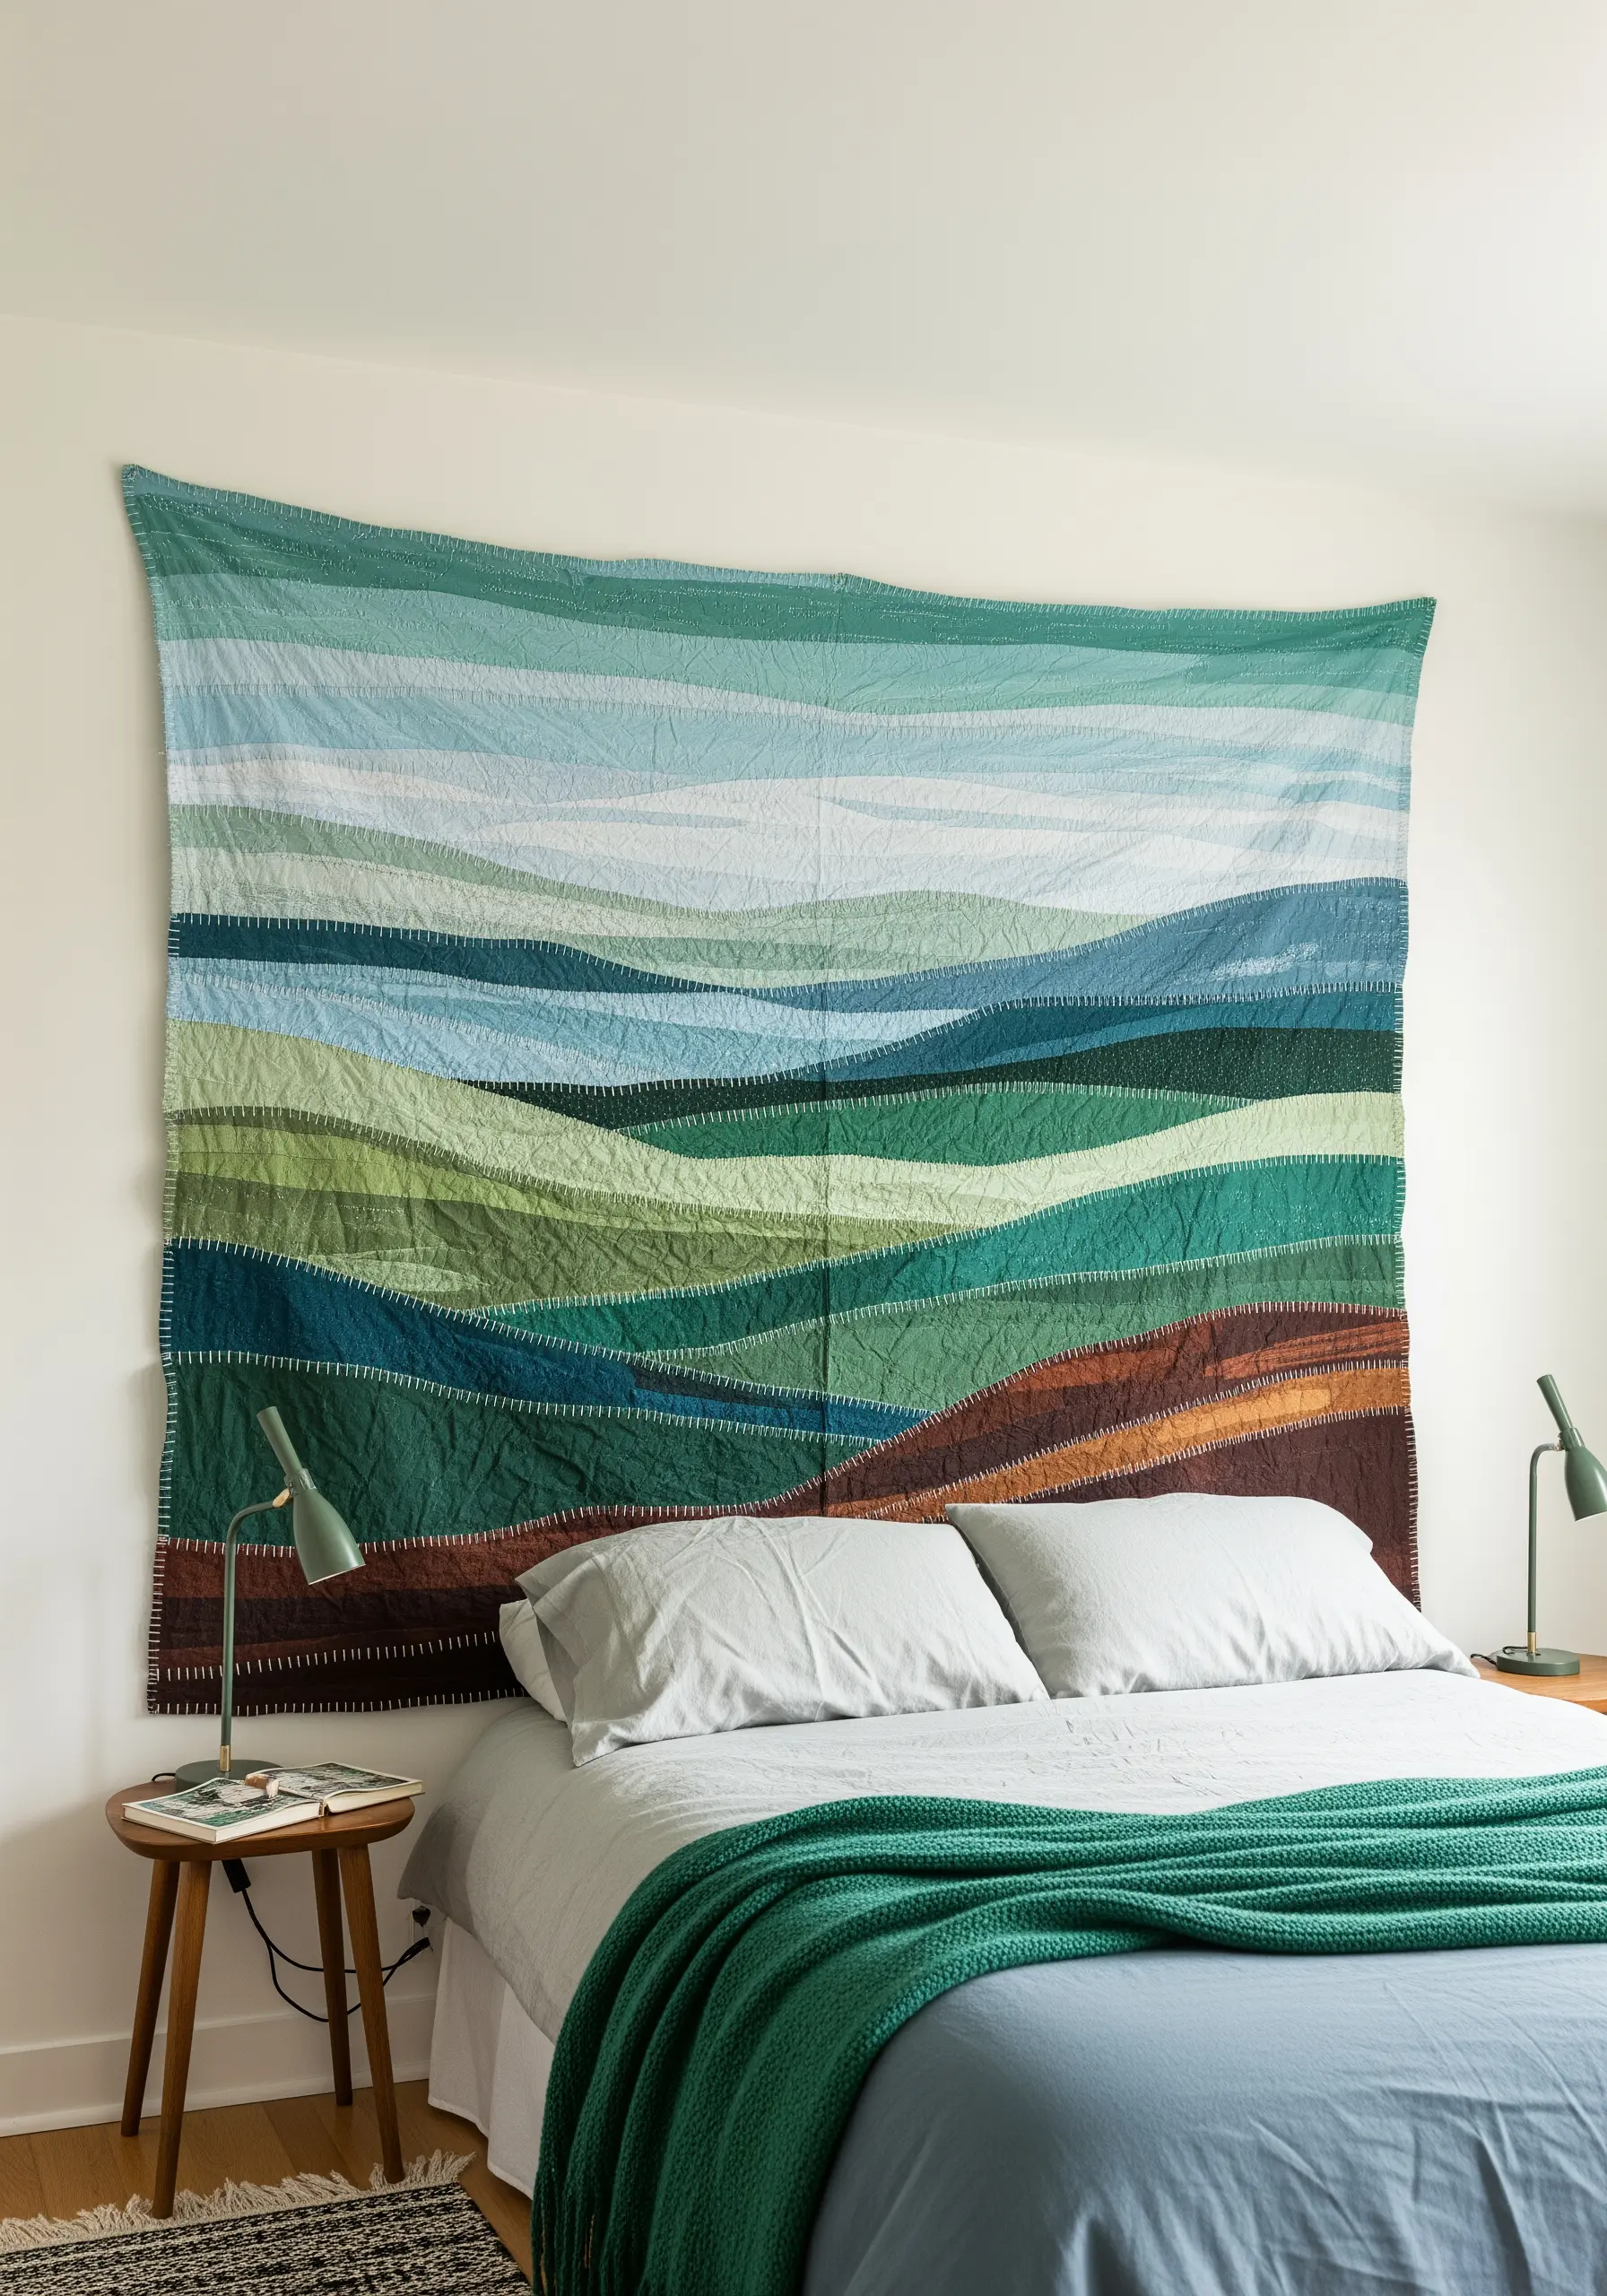
Create a stunning, large-scale textile headboard by piecing together strips of hand-dyed fabric to form an abstract landscape.
Instead of trying to hide your construction, celebrate it by using a thick, contrasting thread to join the pieces with a decorative and visible running stitch.
This technique adds a layer of texture and a rustic, handmade quality that turns the quilt into a work of art.
It draws from creative collage inspirations for combining paper layers with subtle embroidery, but uses fabric instead.
35. Illustrate a Whimsical Map Blanket
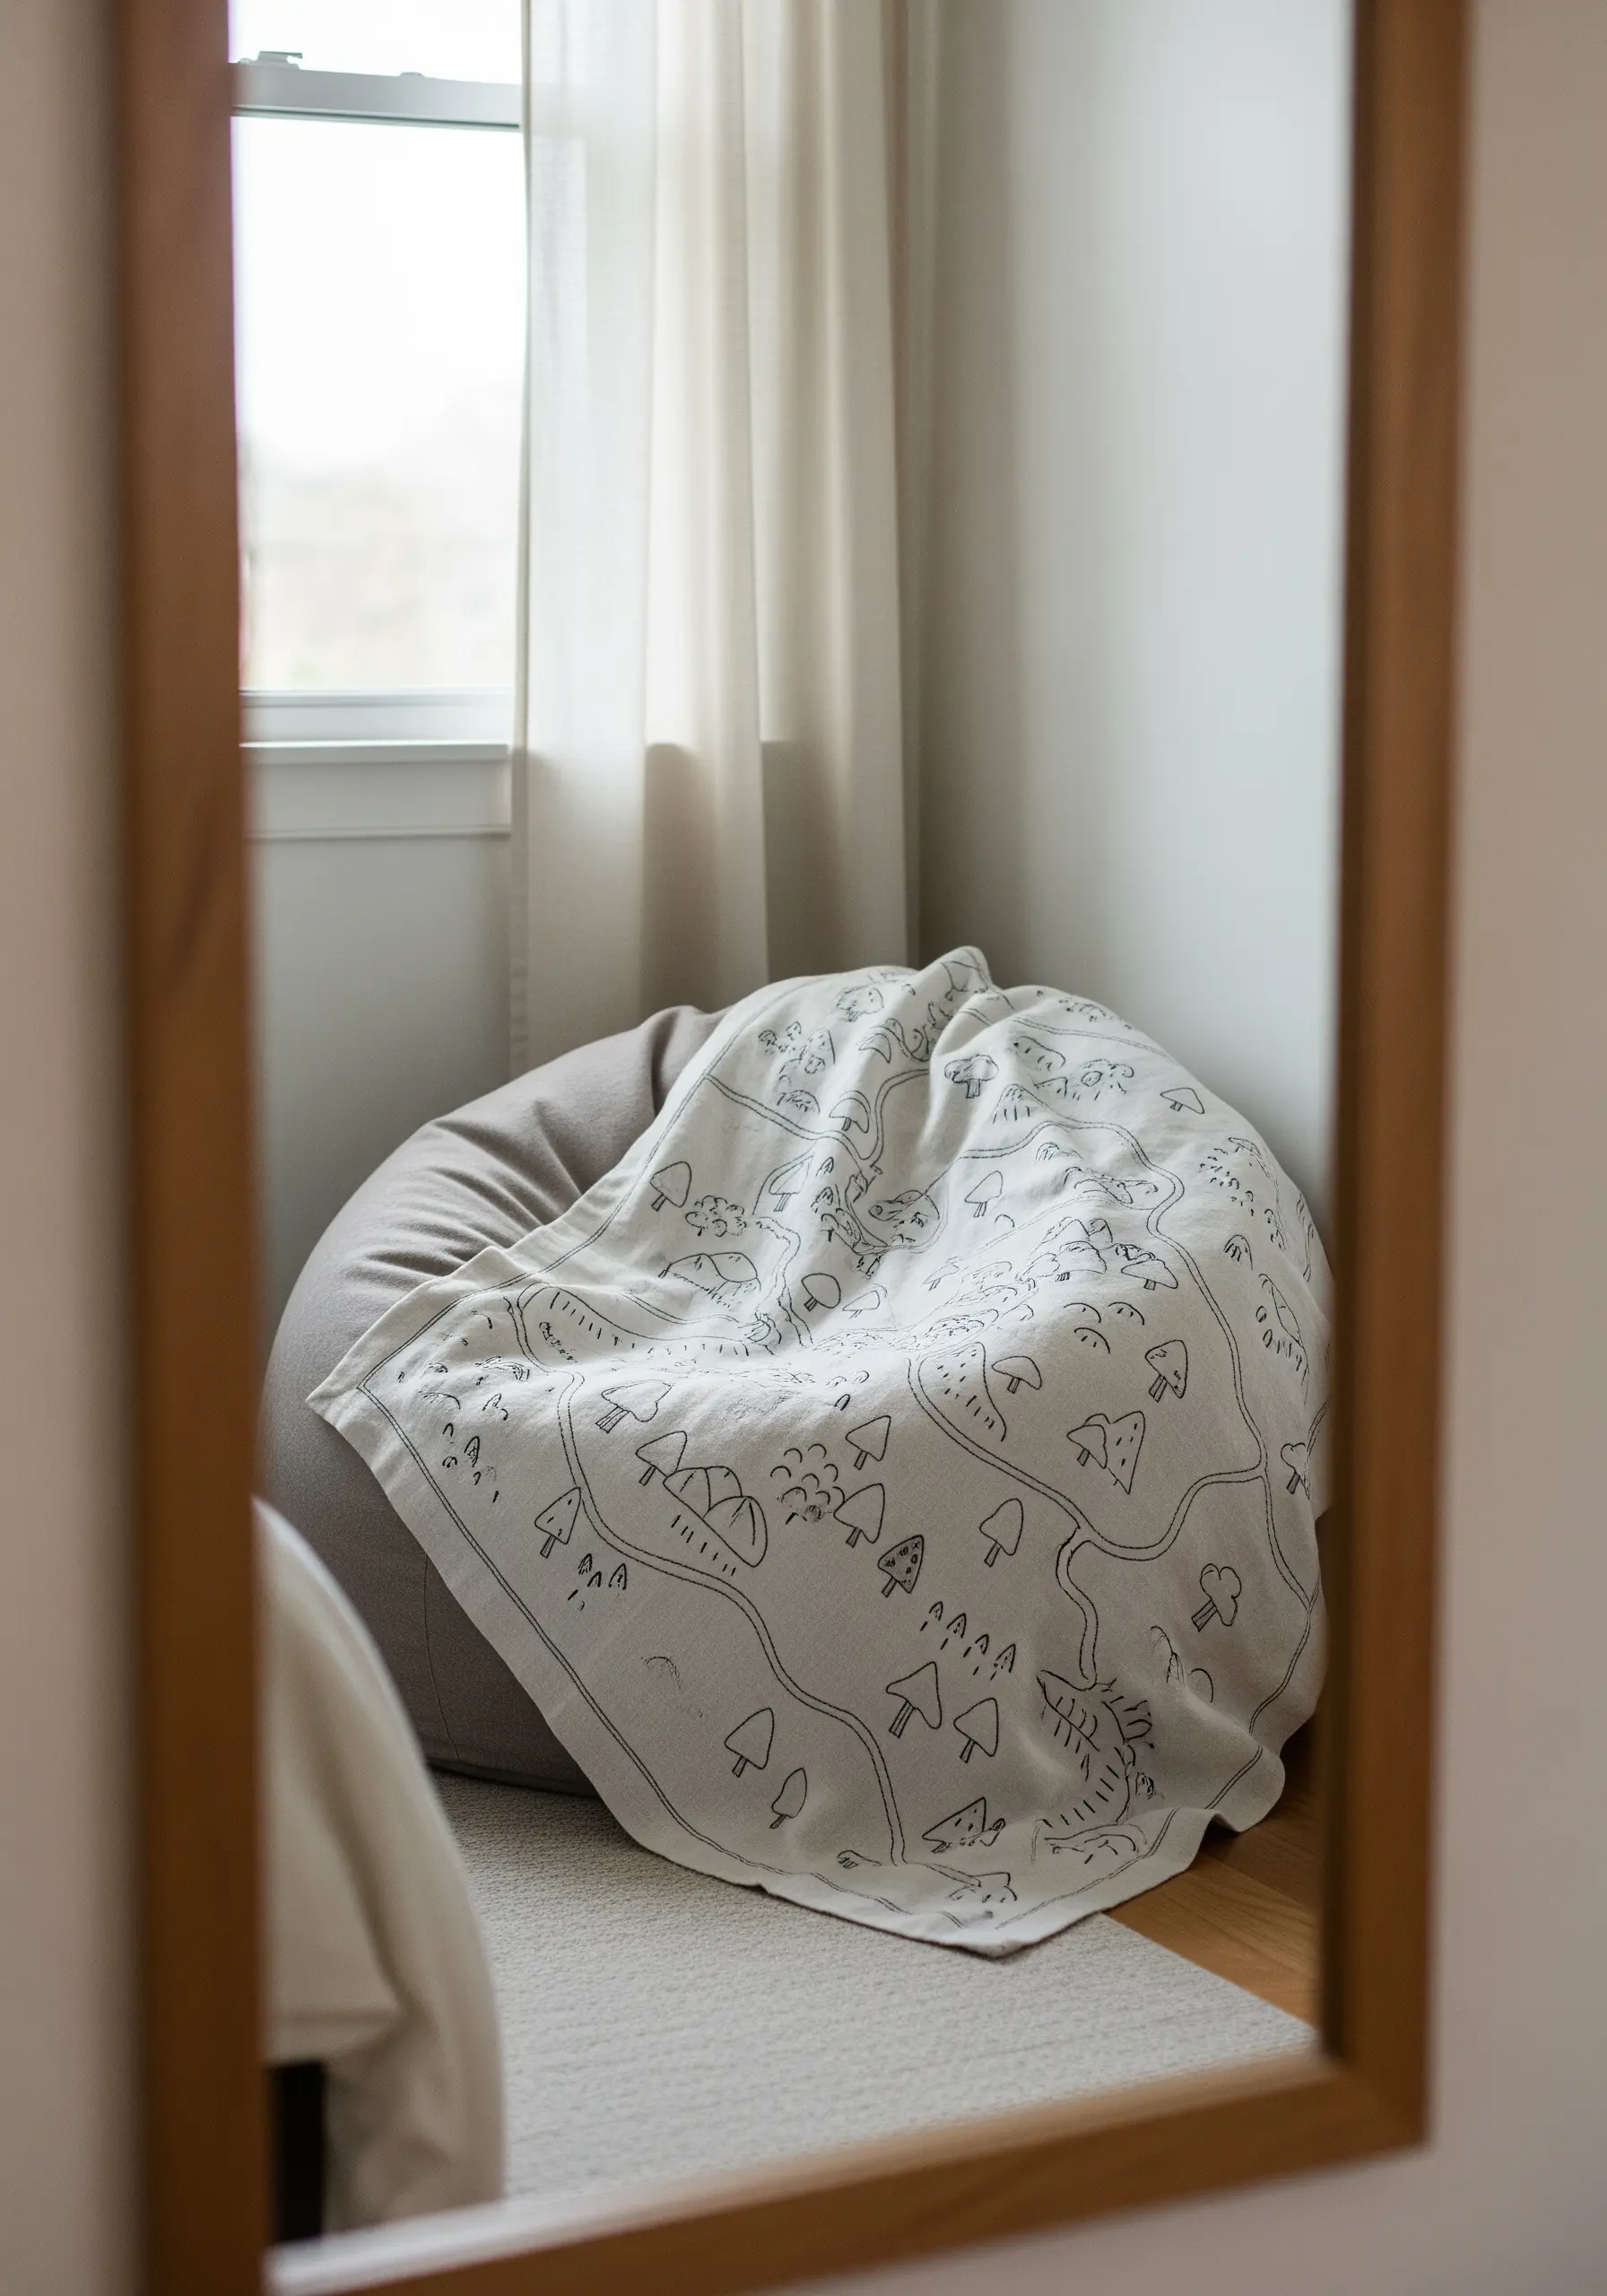
Turn a simple throw blanket into a canvas for storytelling with a hand-stitched map.
Use a heat-erasable fabric pen to draw a playful, imaginative landscape, then trace your lines with a clean and simple backstitch.
Choosing a dark thread on a light-colored blanket creates a strong, graphic contrast that gives the design an illustrative, storybook quality.
This is one of those cartoon-style embroidery ideas that feels just as magical in an adult’s space.


