

Have you ever held a pressed flower, admiring its delicate, paper-thin beauty and wishing you could make that fleeting moment last forever? This is where your needle and thread come in. By combining the tangible memory of a pressed botanical with the timeless craft of embroidery, you can create art that is deeply personal and alive with texture.
But this isn’t about simply stitching around a flower. It’s about interpretation. It’s about learning to see the curve of a petal and translating it into a directional satin stitch, or capturing the airy lightness of a seed head with a single, perfectly placed thread. It’s about using real flowers as a guide for your color palette or even incorporating them directly into your work.
Here, you’ll find techniques that move beyond basic patterns. You will learn how to add dimension, work on challenging fabrics, and compose pieces that feel balanced and intentional. Let these ideas give you the confidence to not just copy nature, but to collaborate with it.
1. Build Texture in a Lavender Wreath
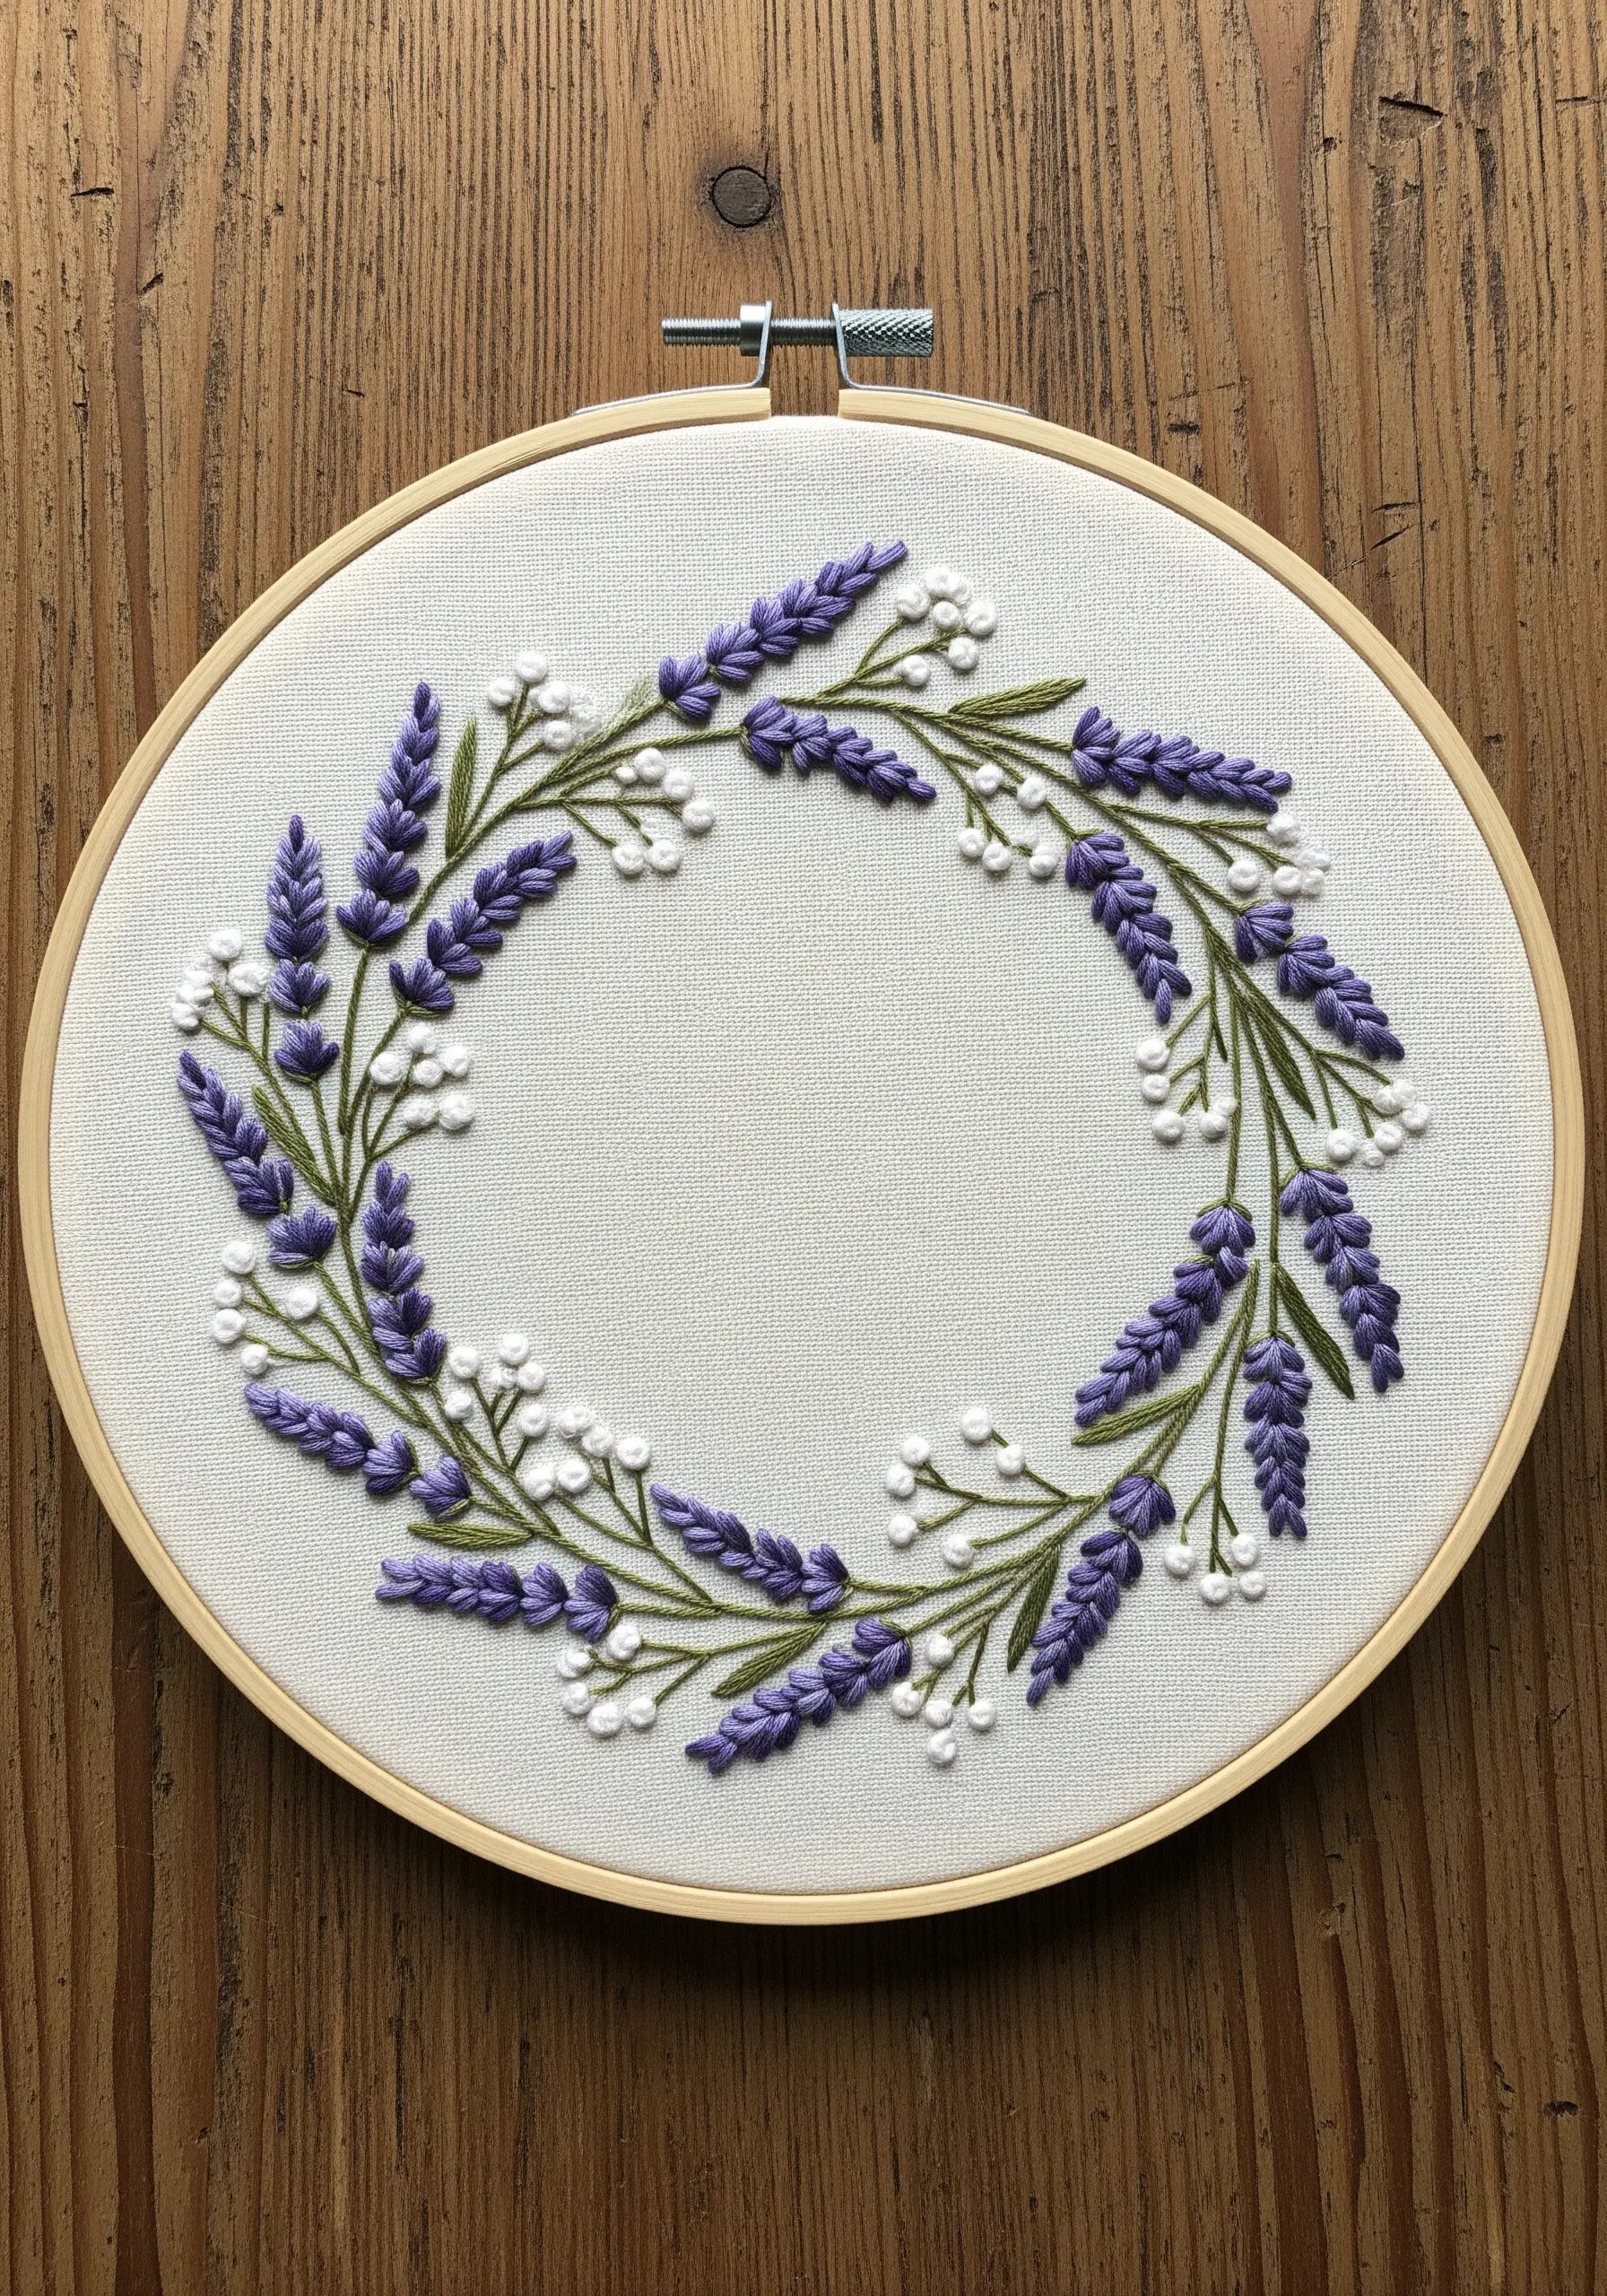
To give your lavender realistic volume, use a combination of straight stitches and French knots.
Work the purple buds with three strands of floss in a dense satin stitch, angling your stitches slightly outward to mimic natural growth.
For the delicate white baby’s breath, use single-strand floss to make scattered French knots, varying the tension to create buds of different sizes.
This contrast between the smooth lavender and the dotted texture of the knots creates a wreath that feels both structured and effortlessly wild.
2. Create 3D Pansies with Padded Satin Stitch
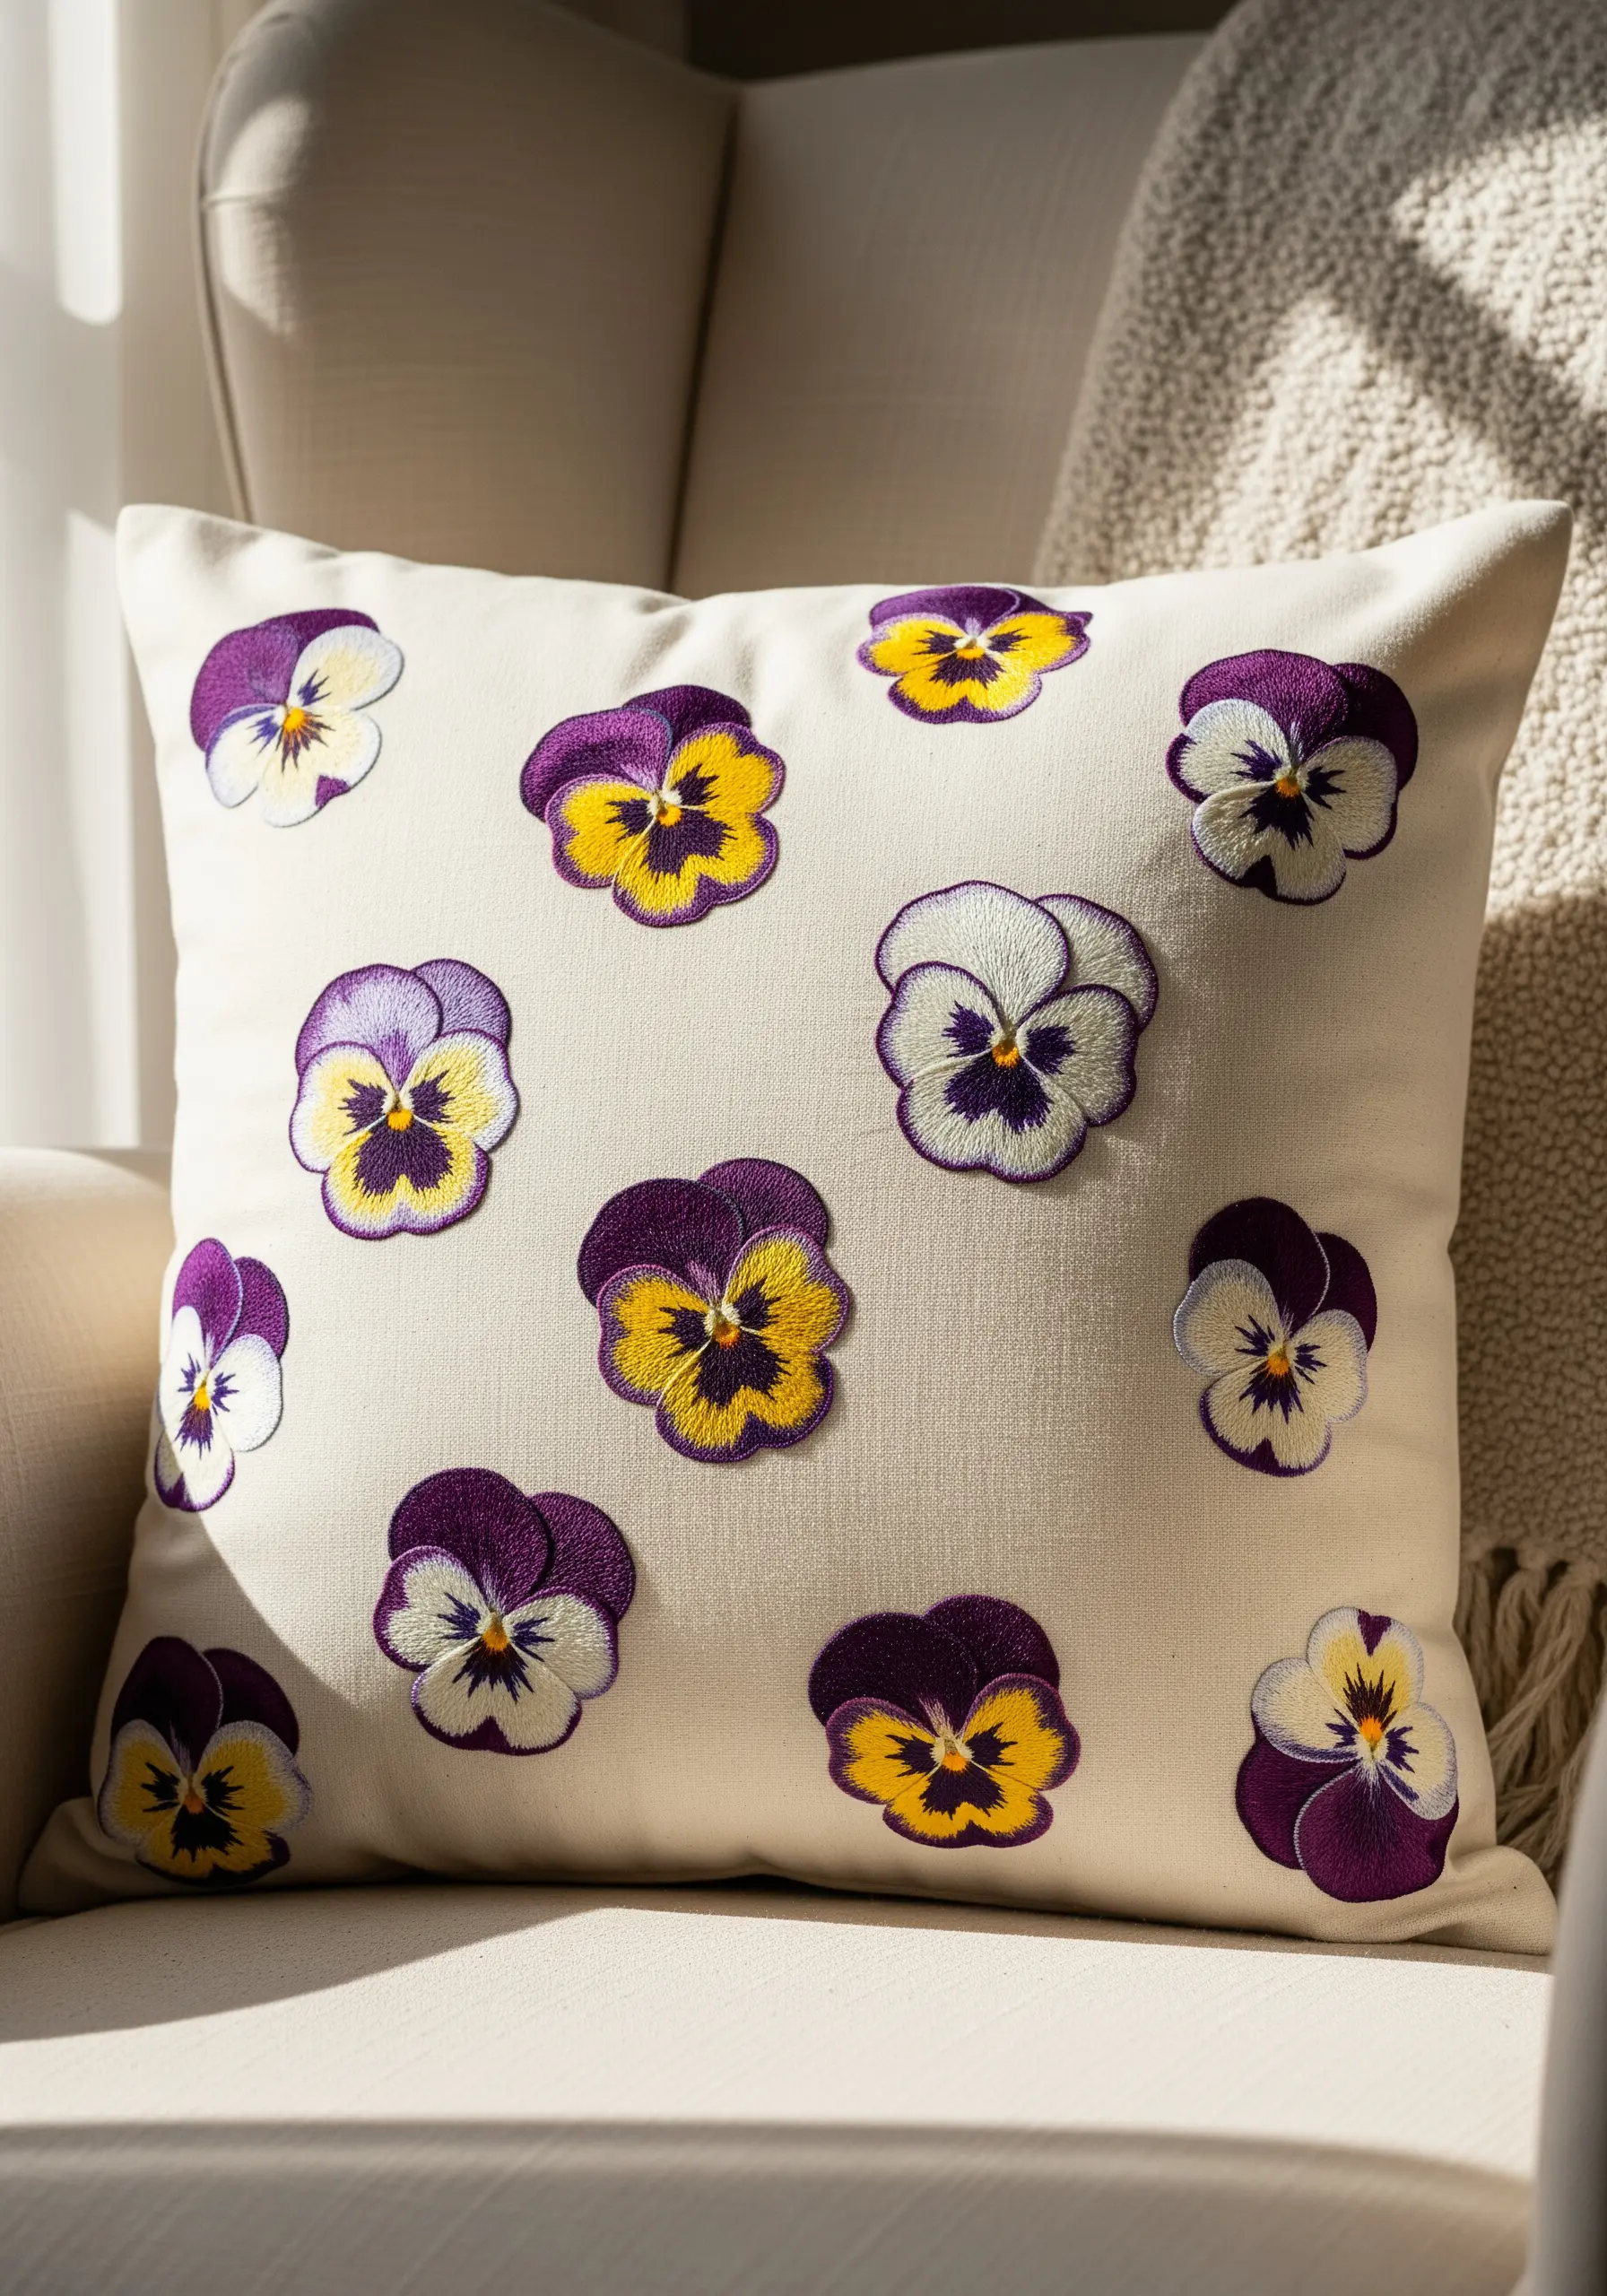
To make your embroidered pansies pop from the fabric, use a padding technique before you begin the satin stitch.
First, cut a small piece of felt just slightly smaller than the petal shape and secure it to your fabric with a few simple stitches.
Then, work your long-and-short stitch directly over the felt using two strands of floss.
This underlayer raises the embroidery, creating shadows and highlights that give the flowers a lifelike, three-dimensional quality perfect for embroidered cushion covers.
3. Replicate Pressed Botanicals with Thread
Instead of using real botanicals, challenge yourself to replicate their delicate structure with thread alone.
Use a single strand of green floss and the fern stitch to create the intricate fronds of the leaves.
For the airy Queen Anne’s lace, build up clusters of tiny French knots or seed stitches using an off-white thread.
The key is to embrace imperfection and slight asymmetry, which will make your stitched composition feel more organic and true to nature.
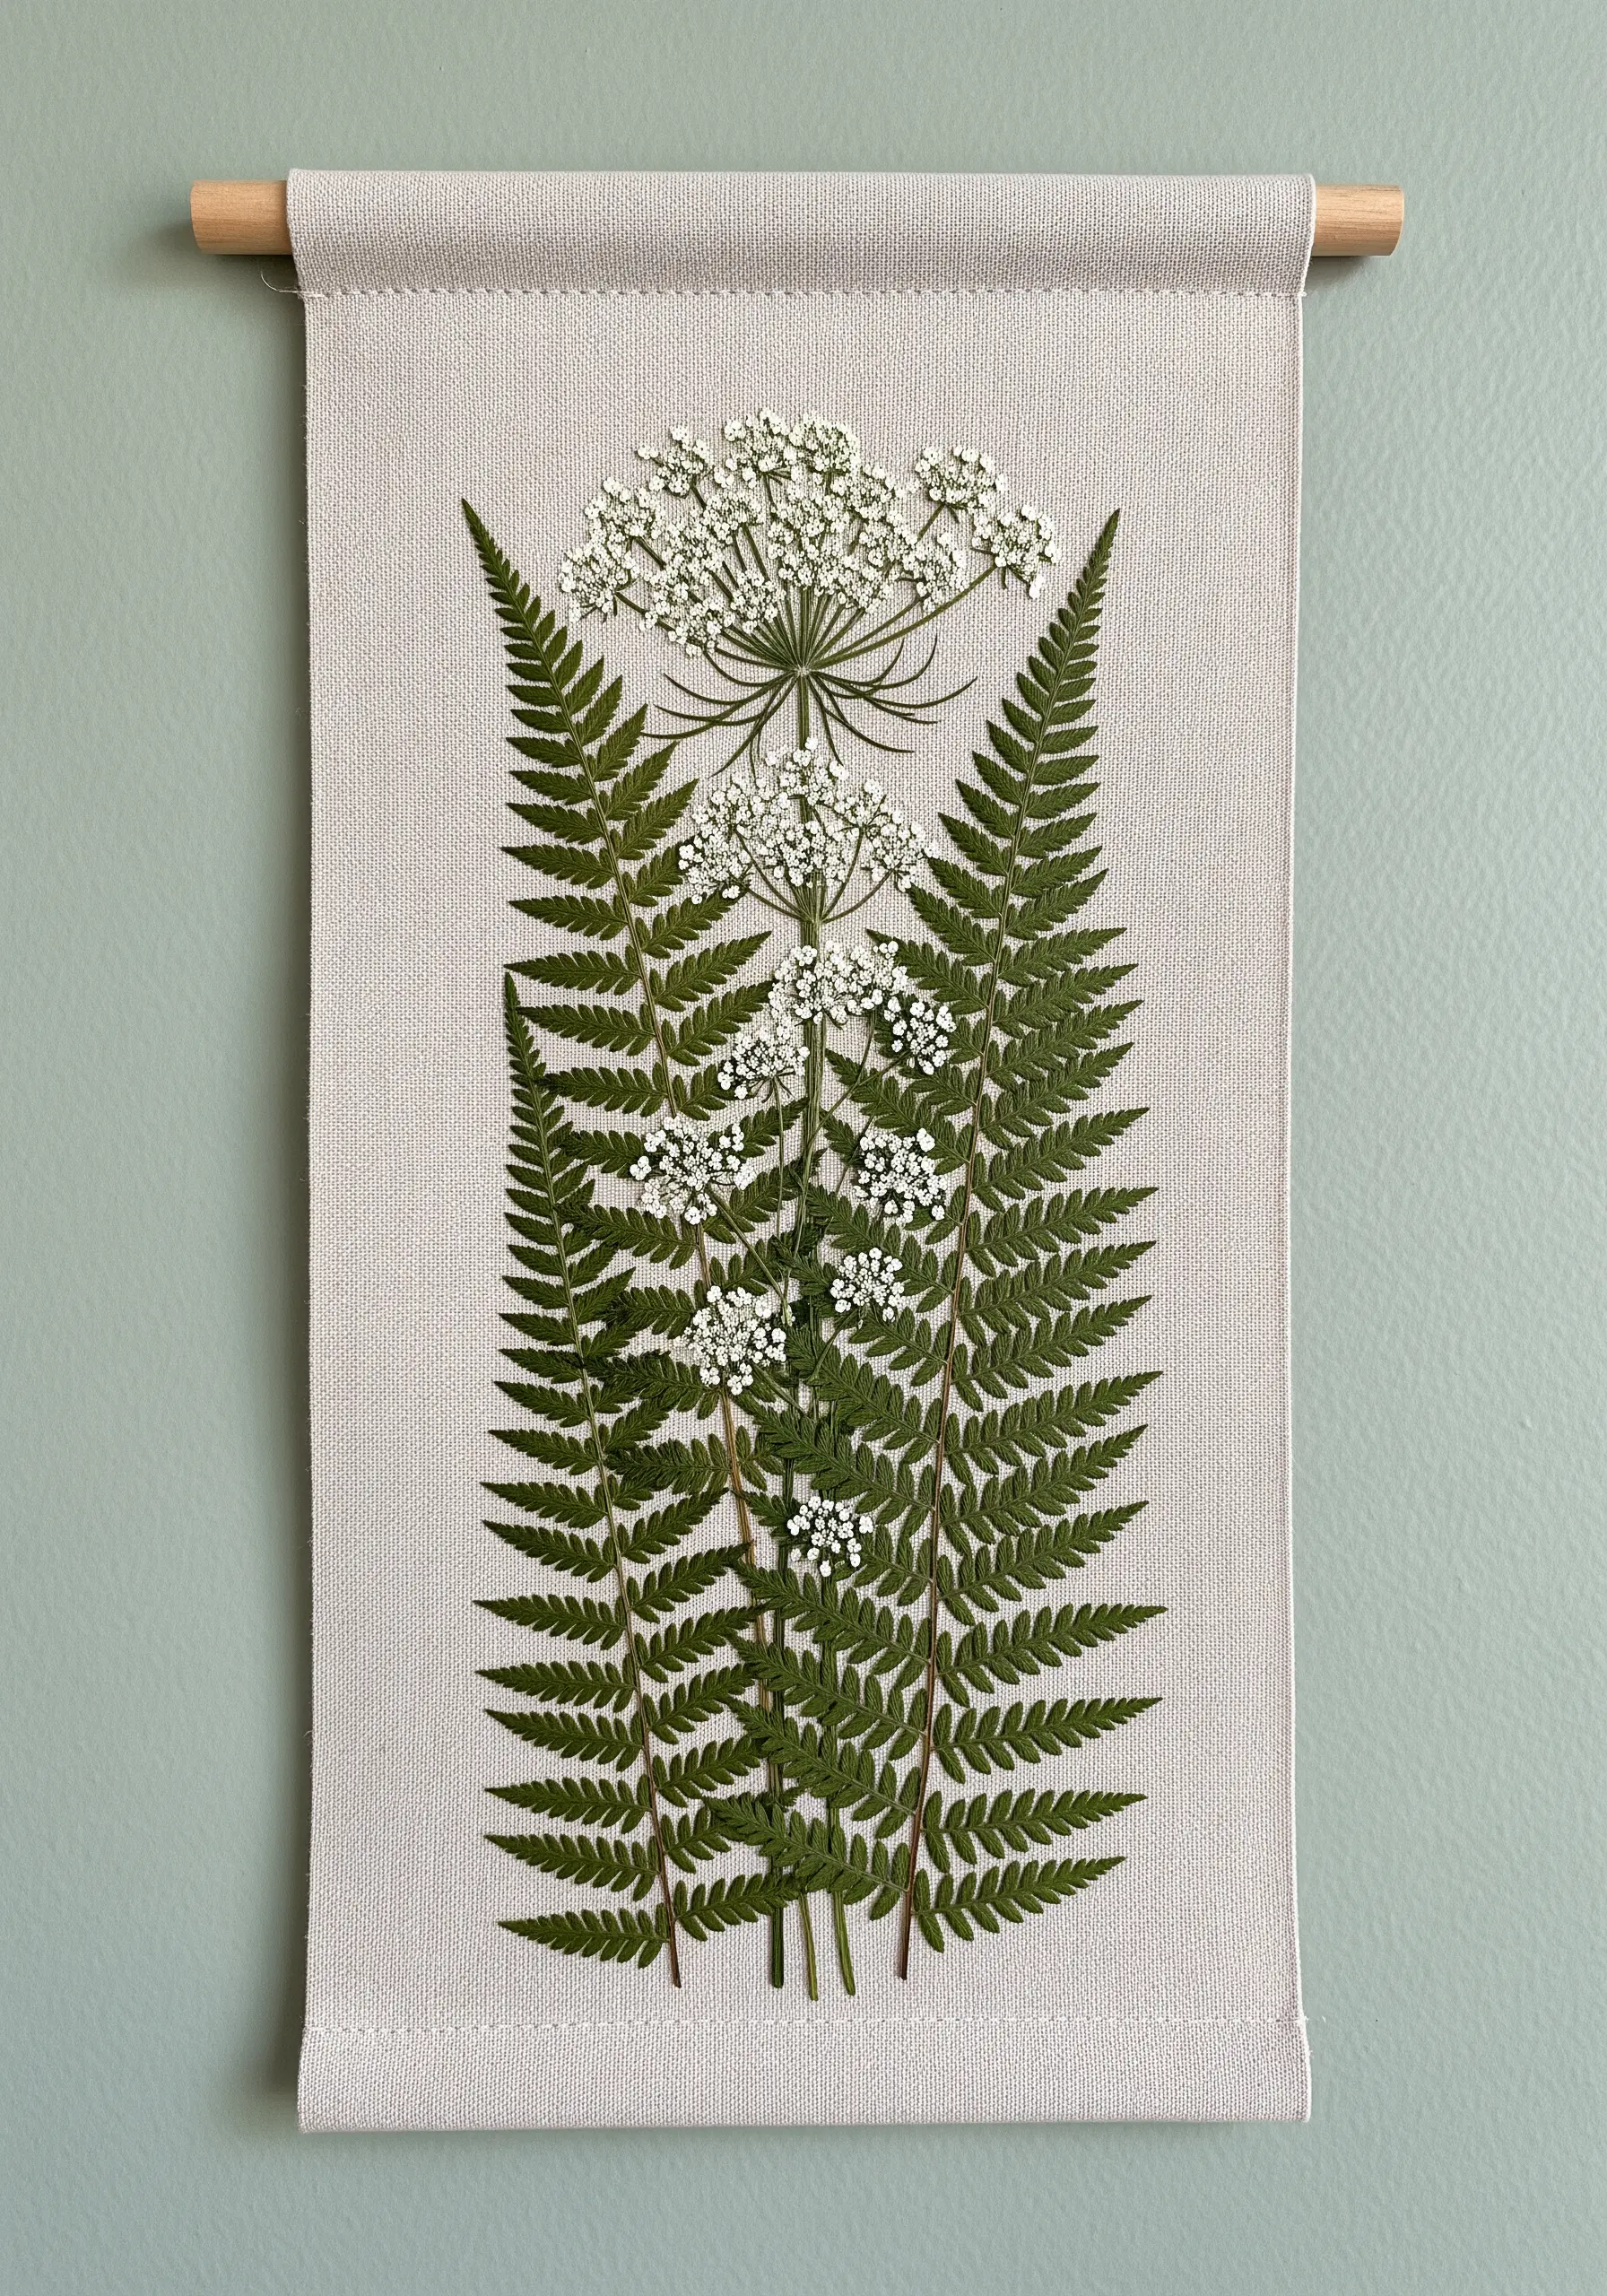
4. Combine Real Flowers with Stitches on Tulle

Working on sheer organza or tulle allows you to create floating, ethereal designs by combining real pressed flowers with minimal embroidery.
Carefully arrange your pressed forget-me-nots on the fabric and use a single strand of matching thread to secure them with tiny couching stitches over the stems and petals.
Add a few scattered French knots in yellow to suggest pollen or distant buds.
This technique turns the fabric’s transparency into a design element, creating a piece that feels incredibly light and delicate.
5. Master Bold Florals on Denim
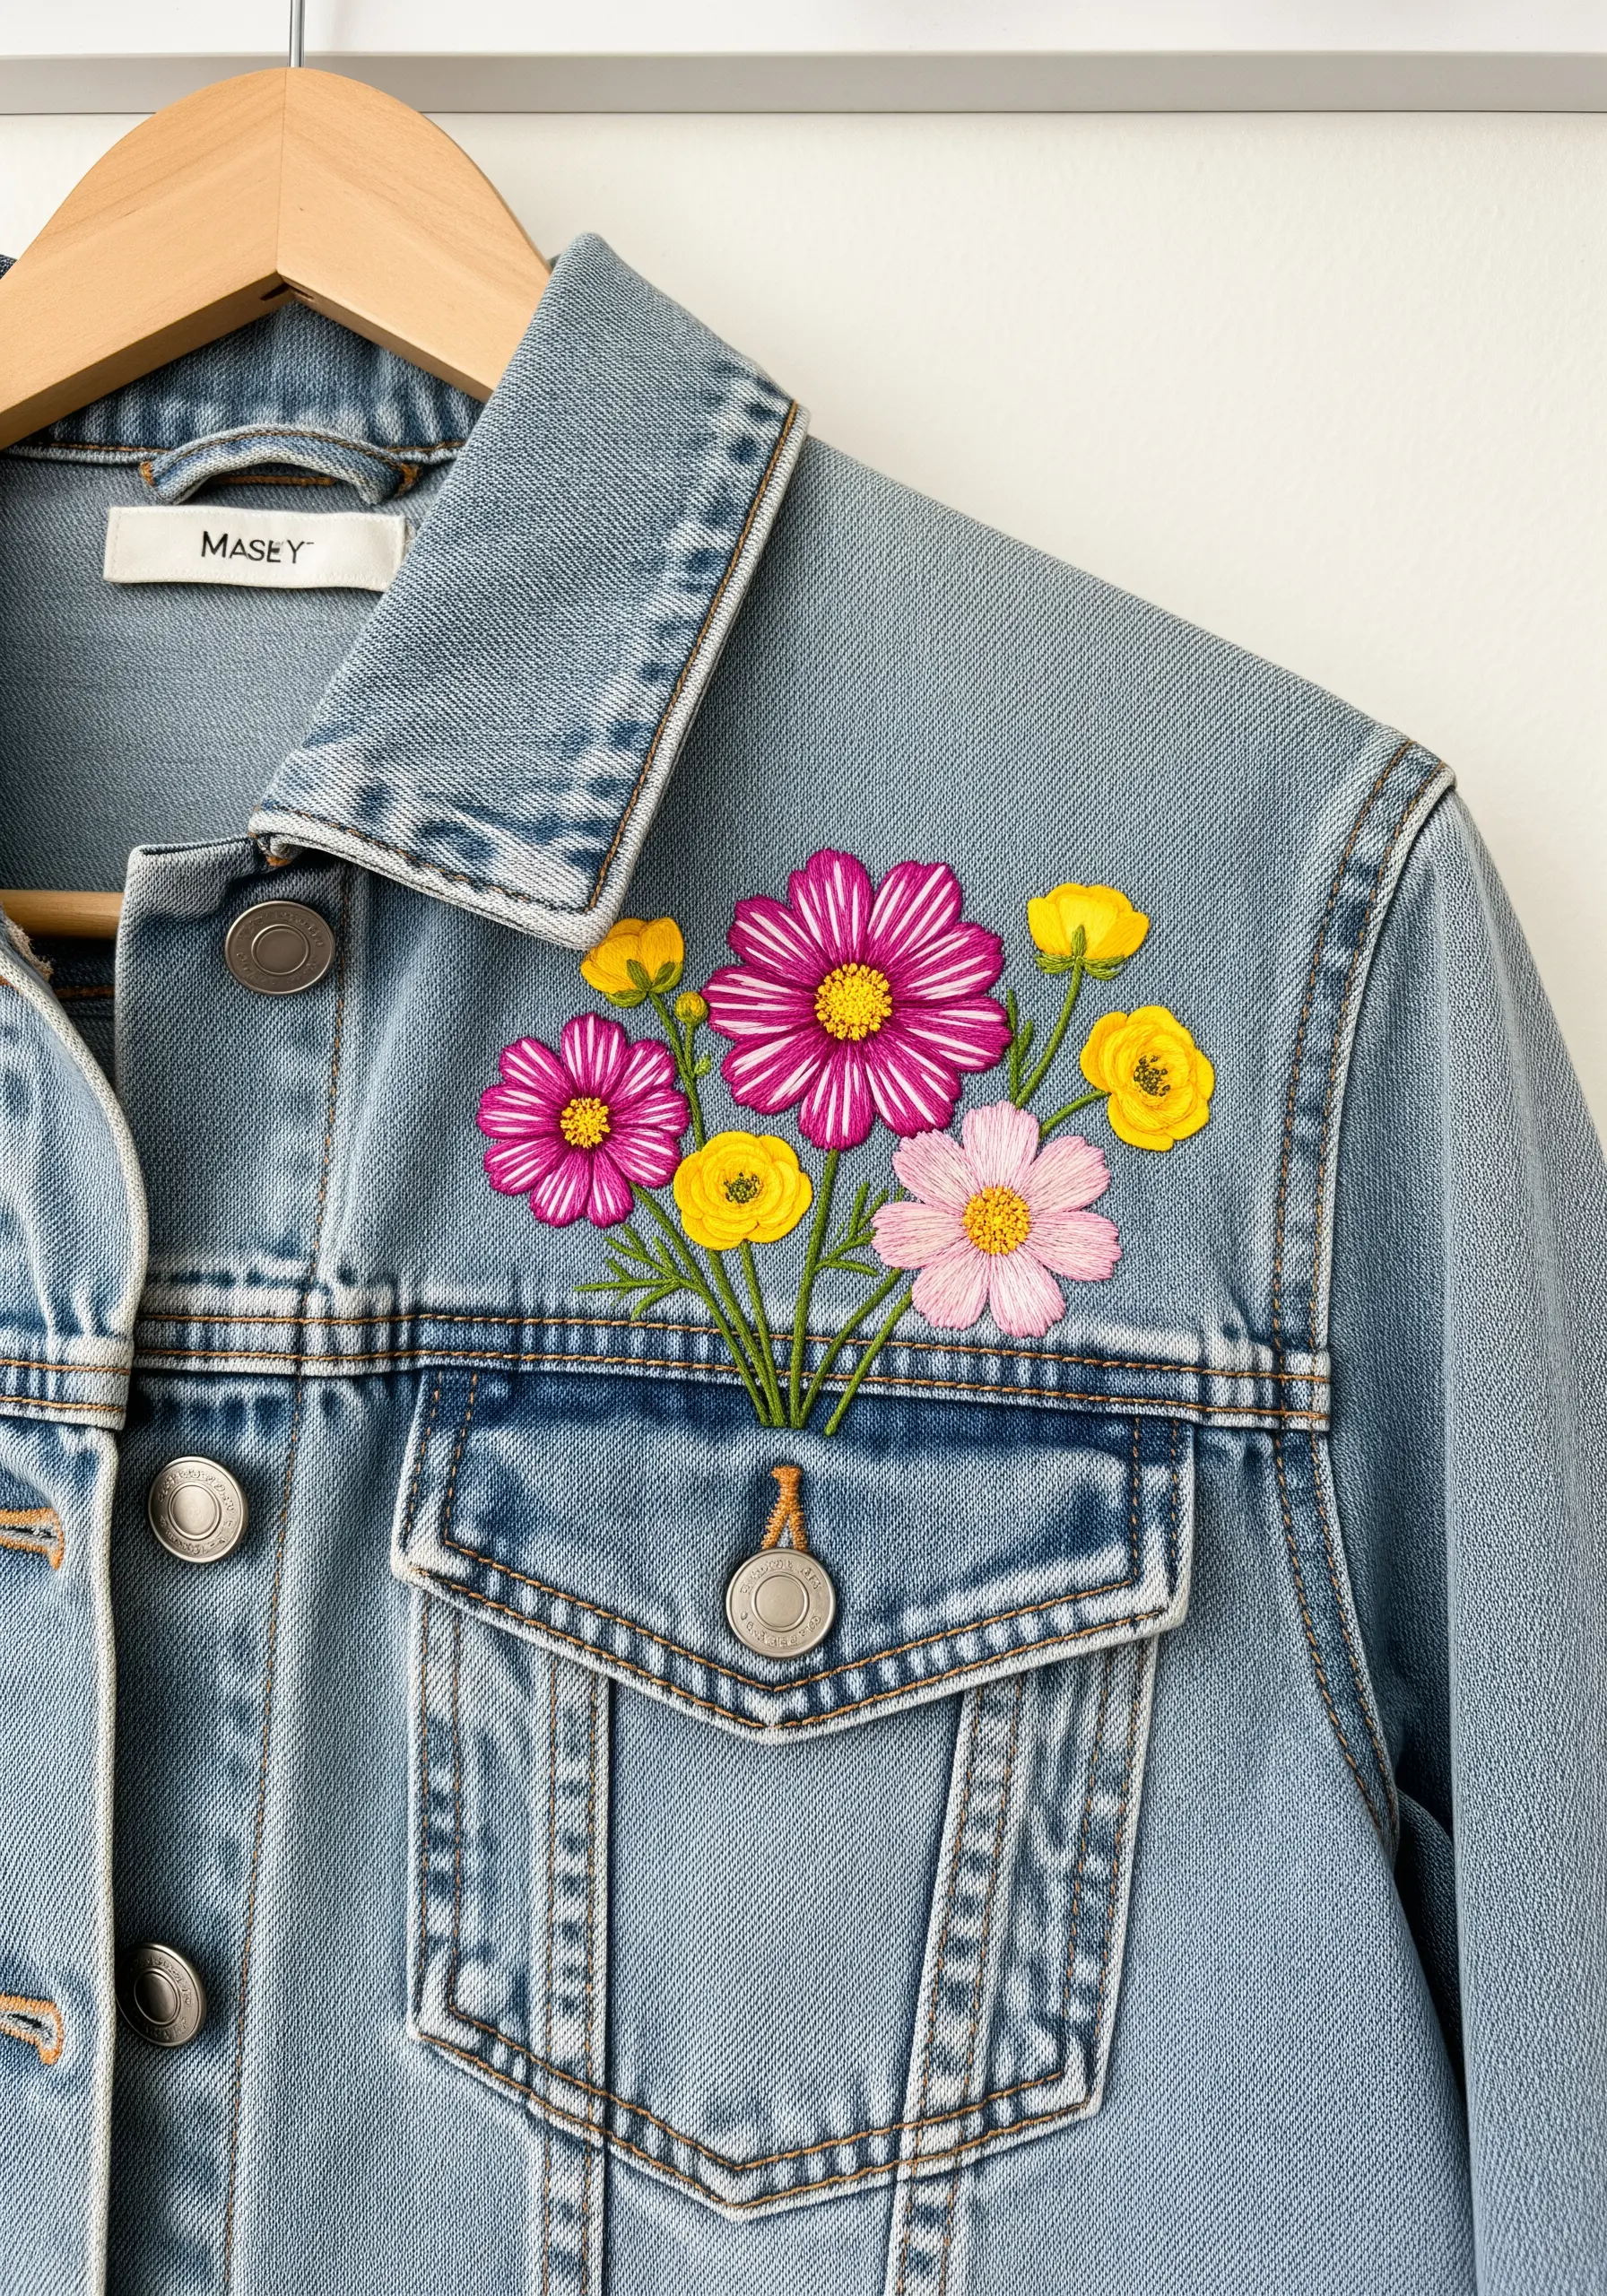
Embroidering on denim requires a few adjustments for a clean, professional finish.
Always use a tear-away stabilizer on the back to prevent the fabric from puckering under the tension of dense stitches.
To make your colors pop, outline each petal with a split stitch before filling it with a long-and-short stitch.
This outline acts as a defined border, ensuring your floral shapes look crisp and intentional against the heavy texture of the denim jacket.
6. Achieve Realism with Thread Painting

The key to a realistic poppy is directional thread painting that follows the natural curve of the petals.
Using a single strand of floss, blend several shades of red with the long-and-short stitch, ensuring your stitches sweep from the center outwards.
This technique creates the illusion of light and shadow, giving the petals depth and movement.
For the dark center, layer satin stitches and French knots to build a dense, velvety texture that contrasts beautifully with the delicate petals.
7. Design Minimalist Embroidered Herb Linens
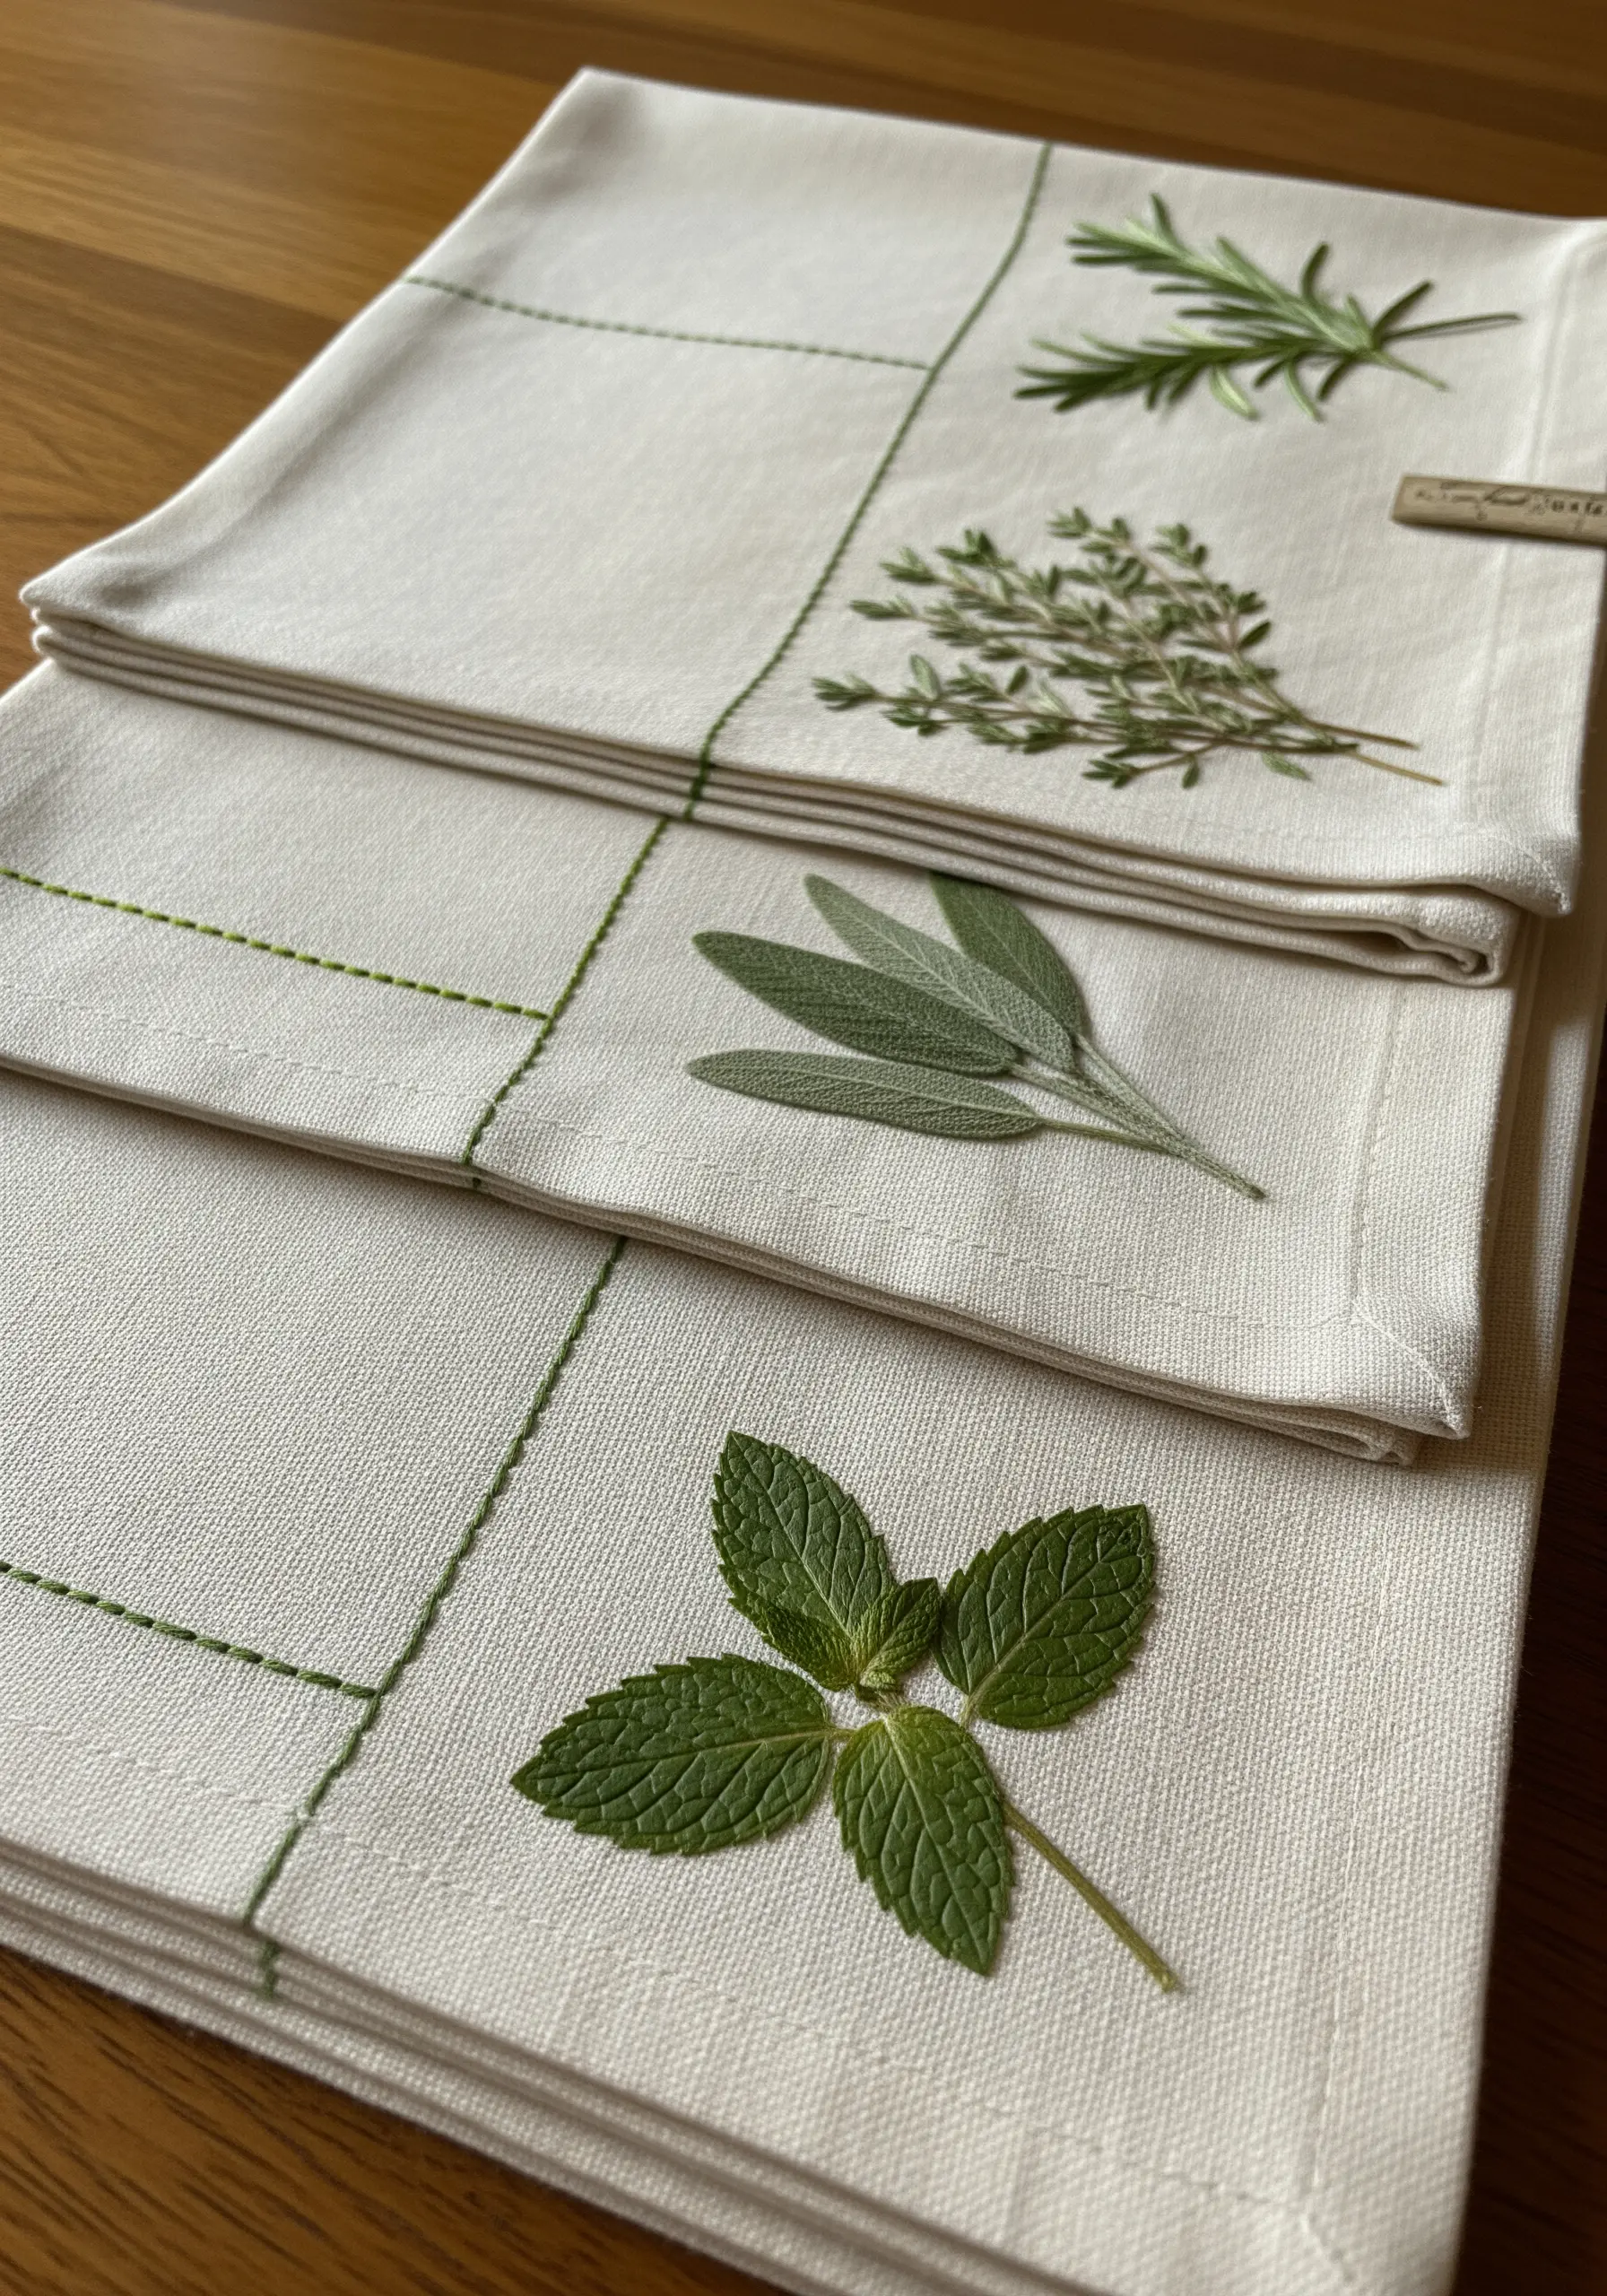
For an understated and elegant table setting, embroider simple geometric borders inspired by pressed herbs.
Use a running stitch or backstitch in a soft green to create clean lines that frame the placement for each napkin’s botanical element.
Instead of stitching the entire herb, you can add a tiny, single sprig of embroidered rosemary or thyme in a corner.
This minimalist approach celebrates the beauty of the linen itself while adding a thoughtful, handmade touch.
8. Scale Up Line Art for Dramatic Wall Decor
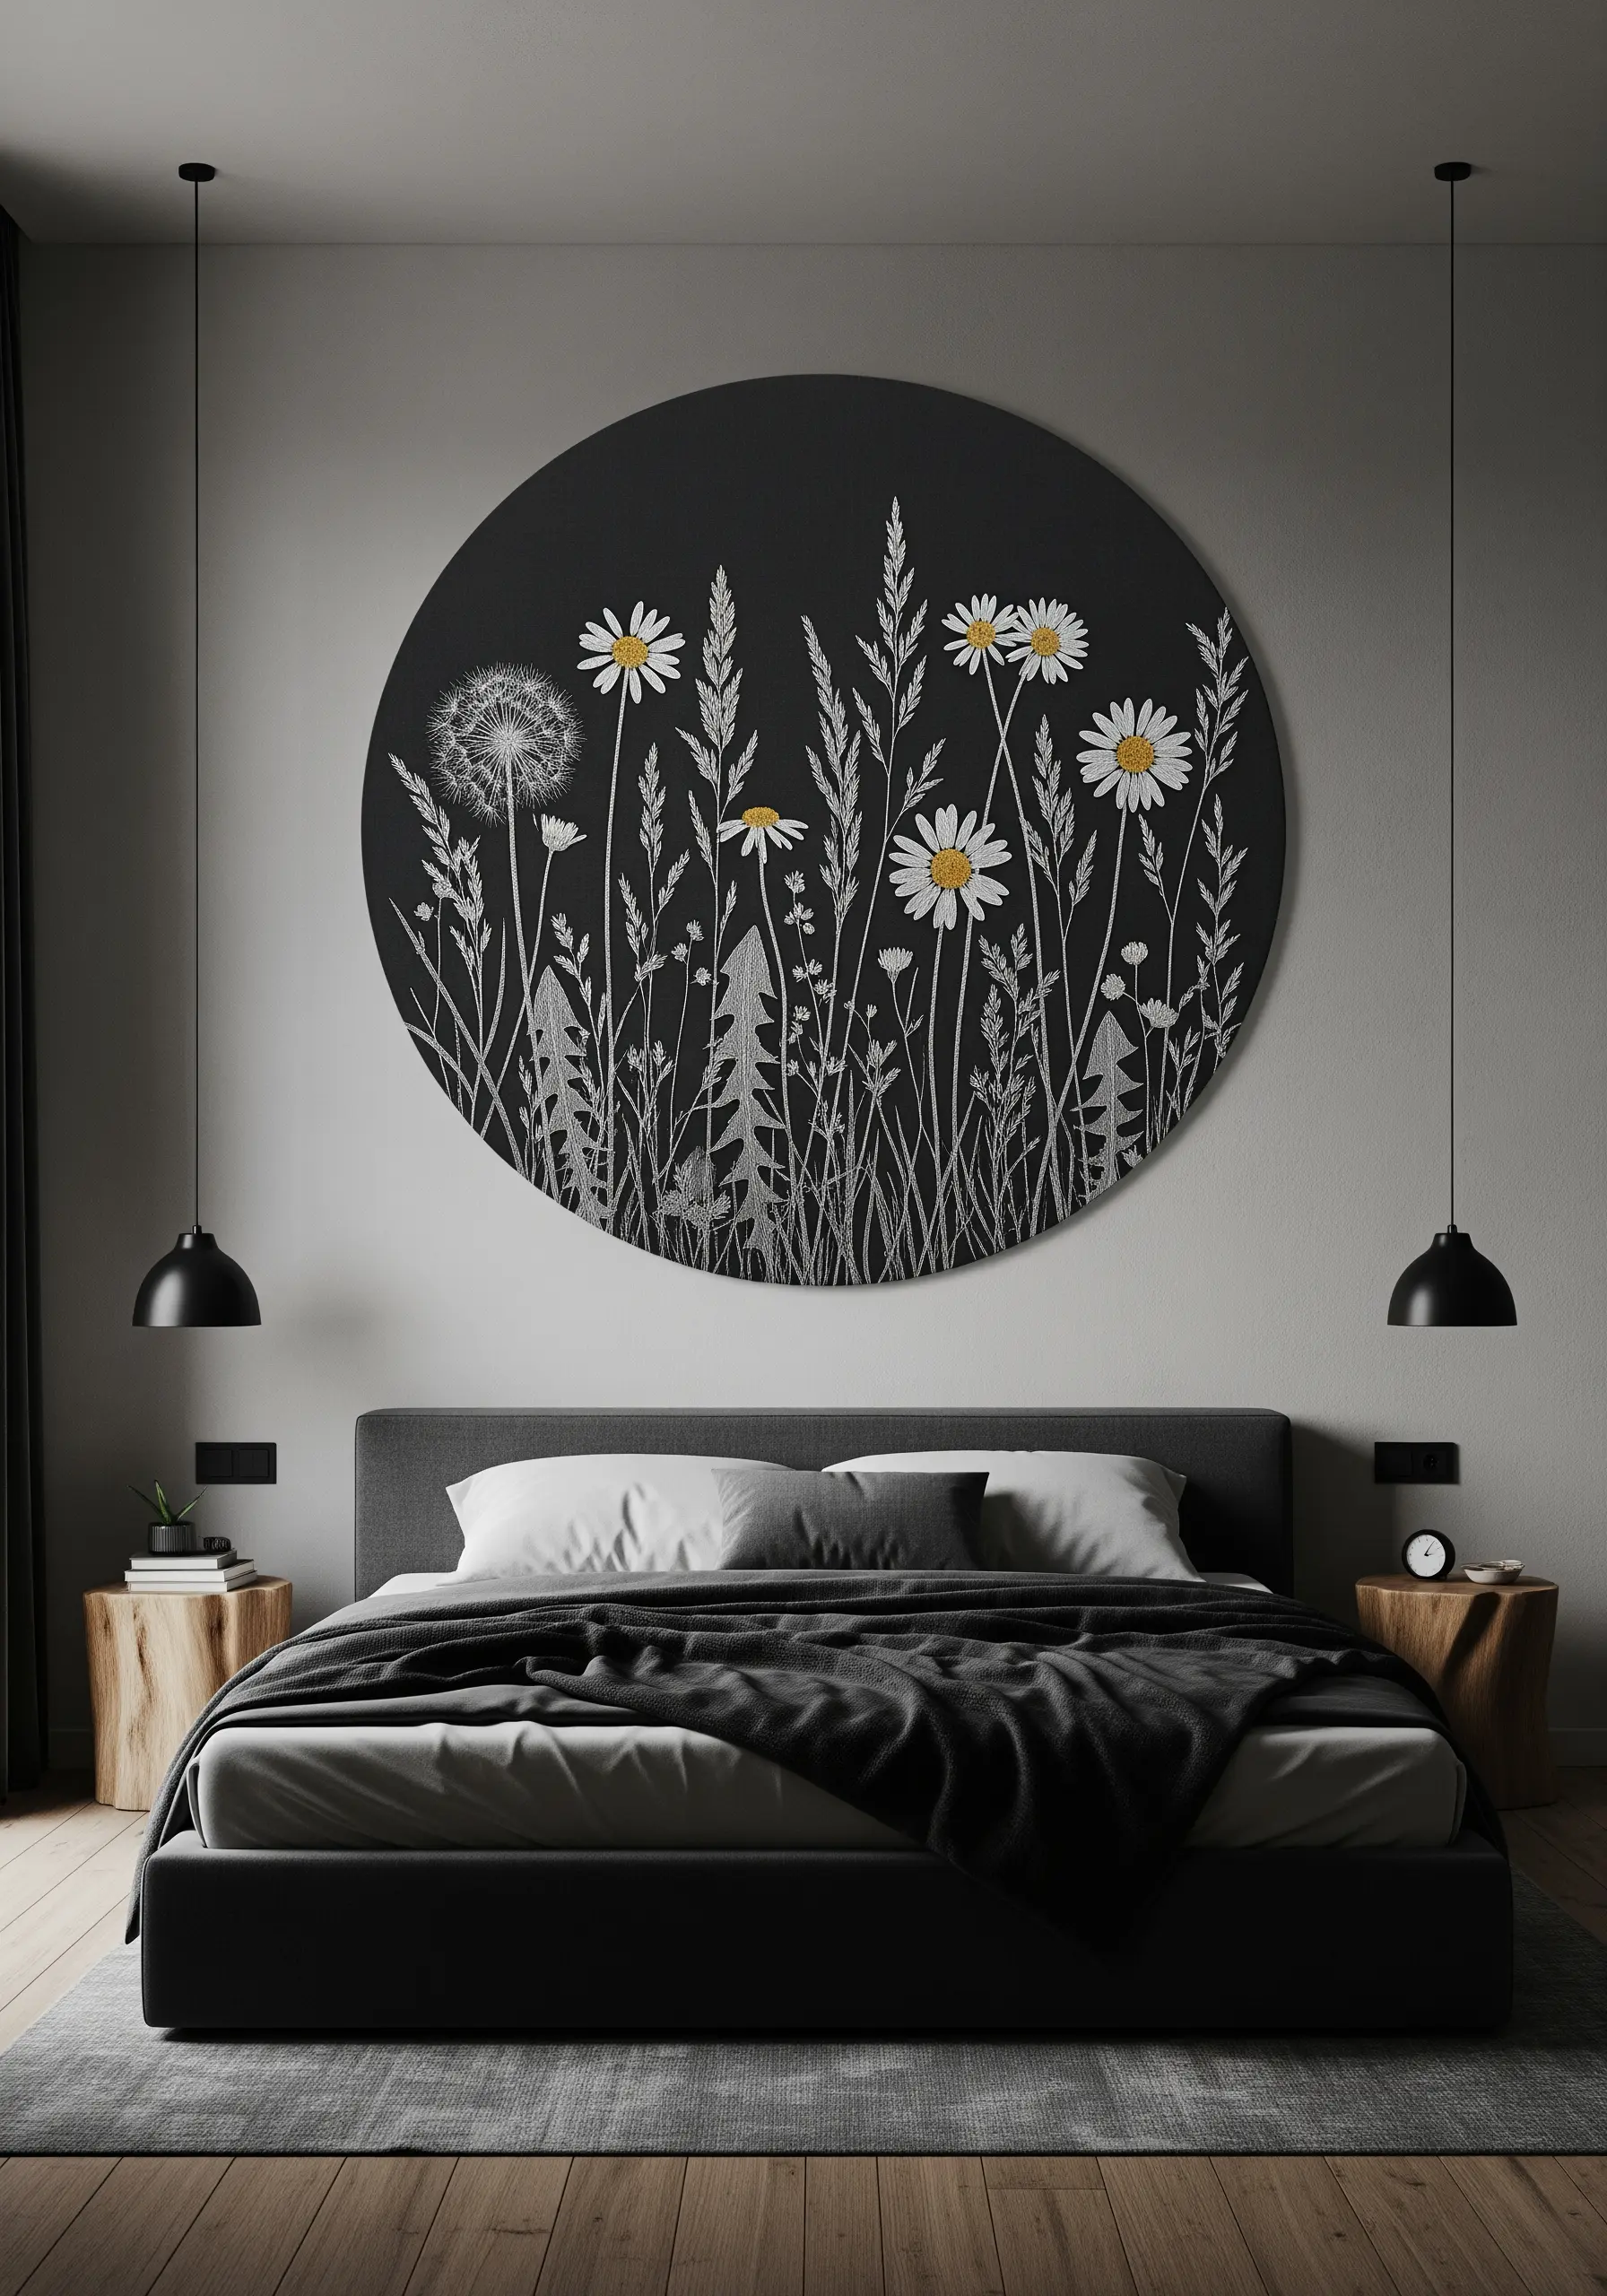
Transform a simple line drawing of wildflowers into a large-scale piece of art by focusing on high contrast and negative space.
Choose a dark background fabric, like black or charcoal linen, and stitch your design using a bright white or silver thread.
Use a basic backstitch or stem stitch to keep the lines clean and graphic.
This technique makes the artwork feel modern and impactful, turning a simple embroidery concept into a stunning focal point for a room.
9. Add Dimension to Small-Scale Florals
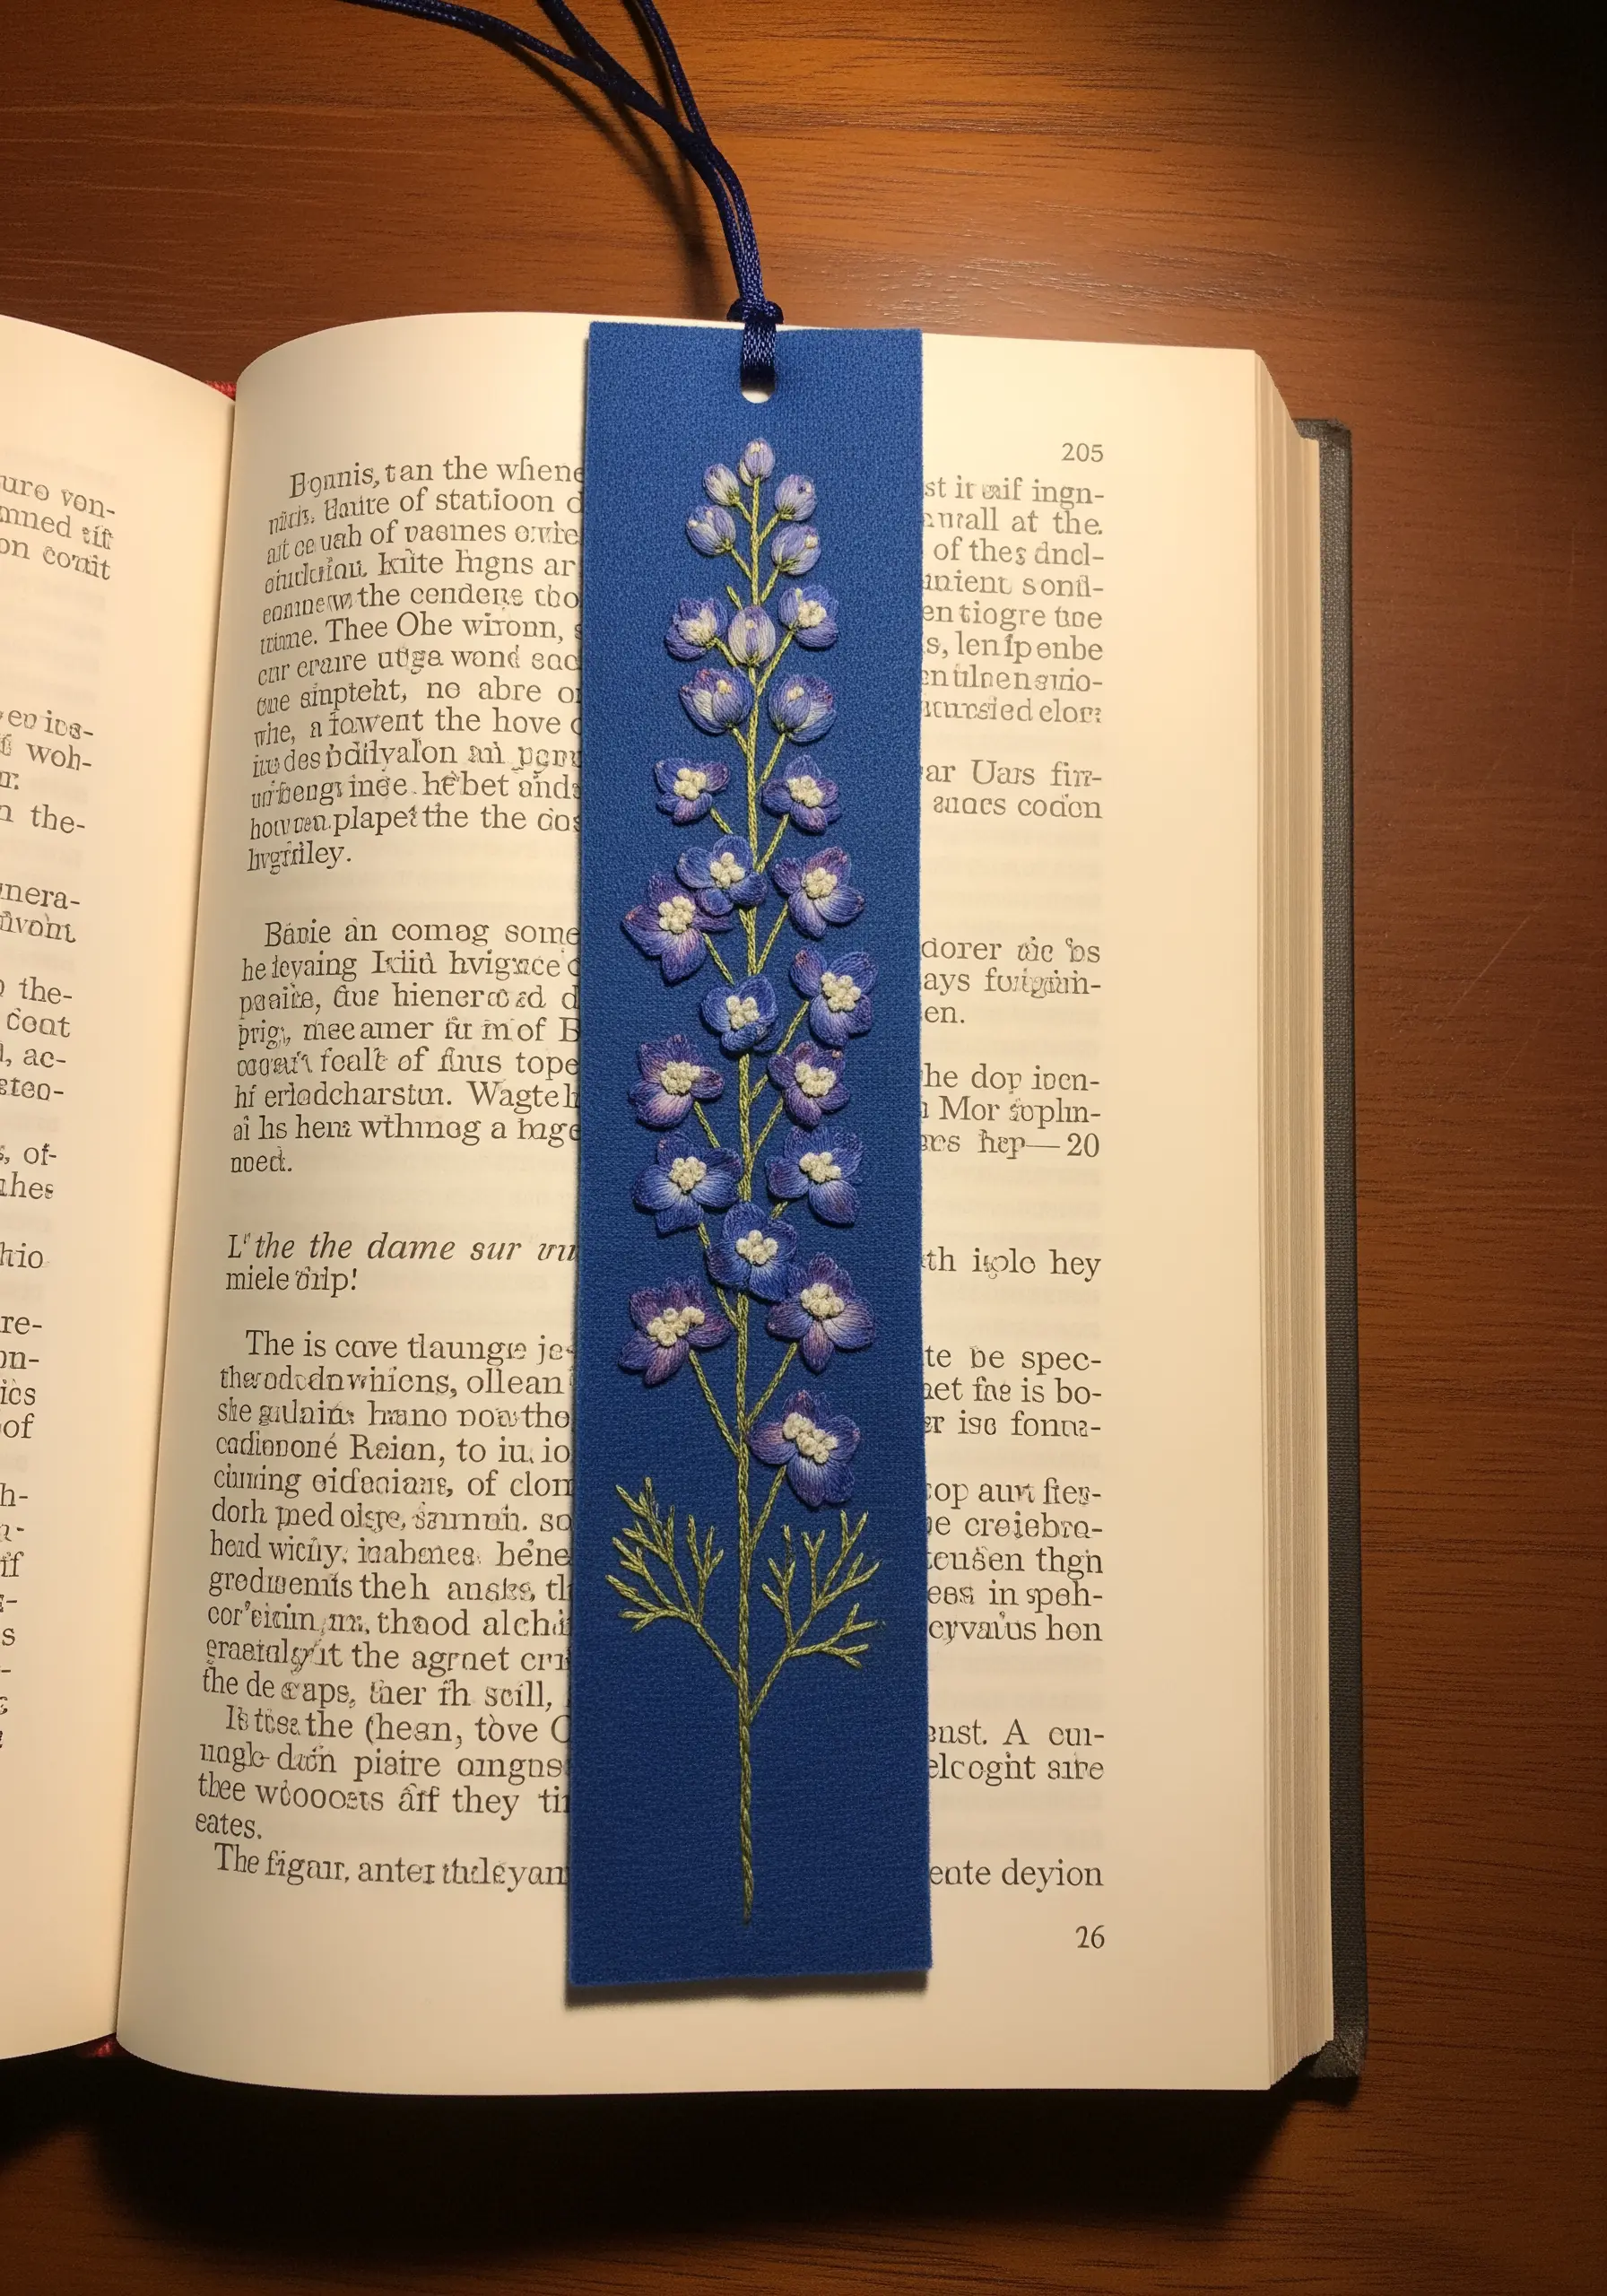
On a small project like a bookmark, adding dimension makes the design feel more luxurious.
Create the delphinium petals using detached chain stitches (lazy daisies) layered closely together.
For the flower centers, use a contrasting color to make a single French knot, which will help lift the petals slightly.
Use a single strand of thread for the stem and leaves to maintain a sense of delicacy, ensuring the textured flowers remain the focal point.
10. Secure Your Stitches on a Tote Bag

When embroidering a functional item like a tote bag, protecting your work is crucial.
After completing your satin stitch bougainvillea, iron a fusible interfacing to the inside of the bag.
This layer covers the back of your stitches, preventing them from snagging on keys, books, or anything else you carry.
It’s a simple step that ensures your beautiful, detailed embroidery will last for years.
11. Create a Quilted Hoop with Pressed Flowers
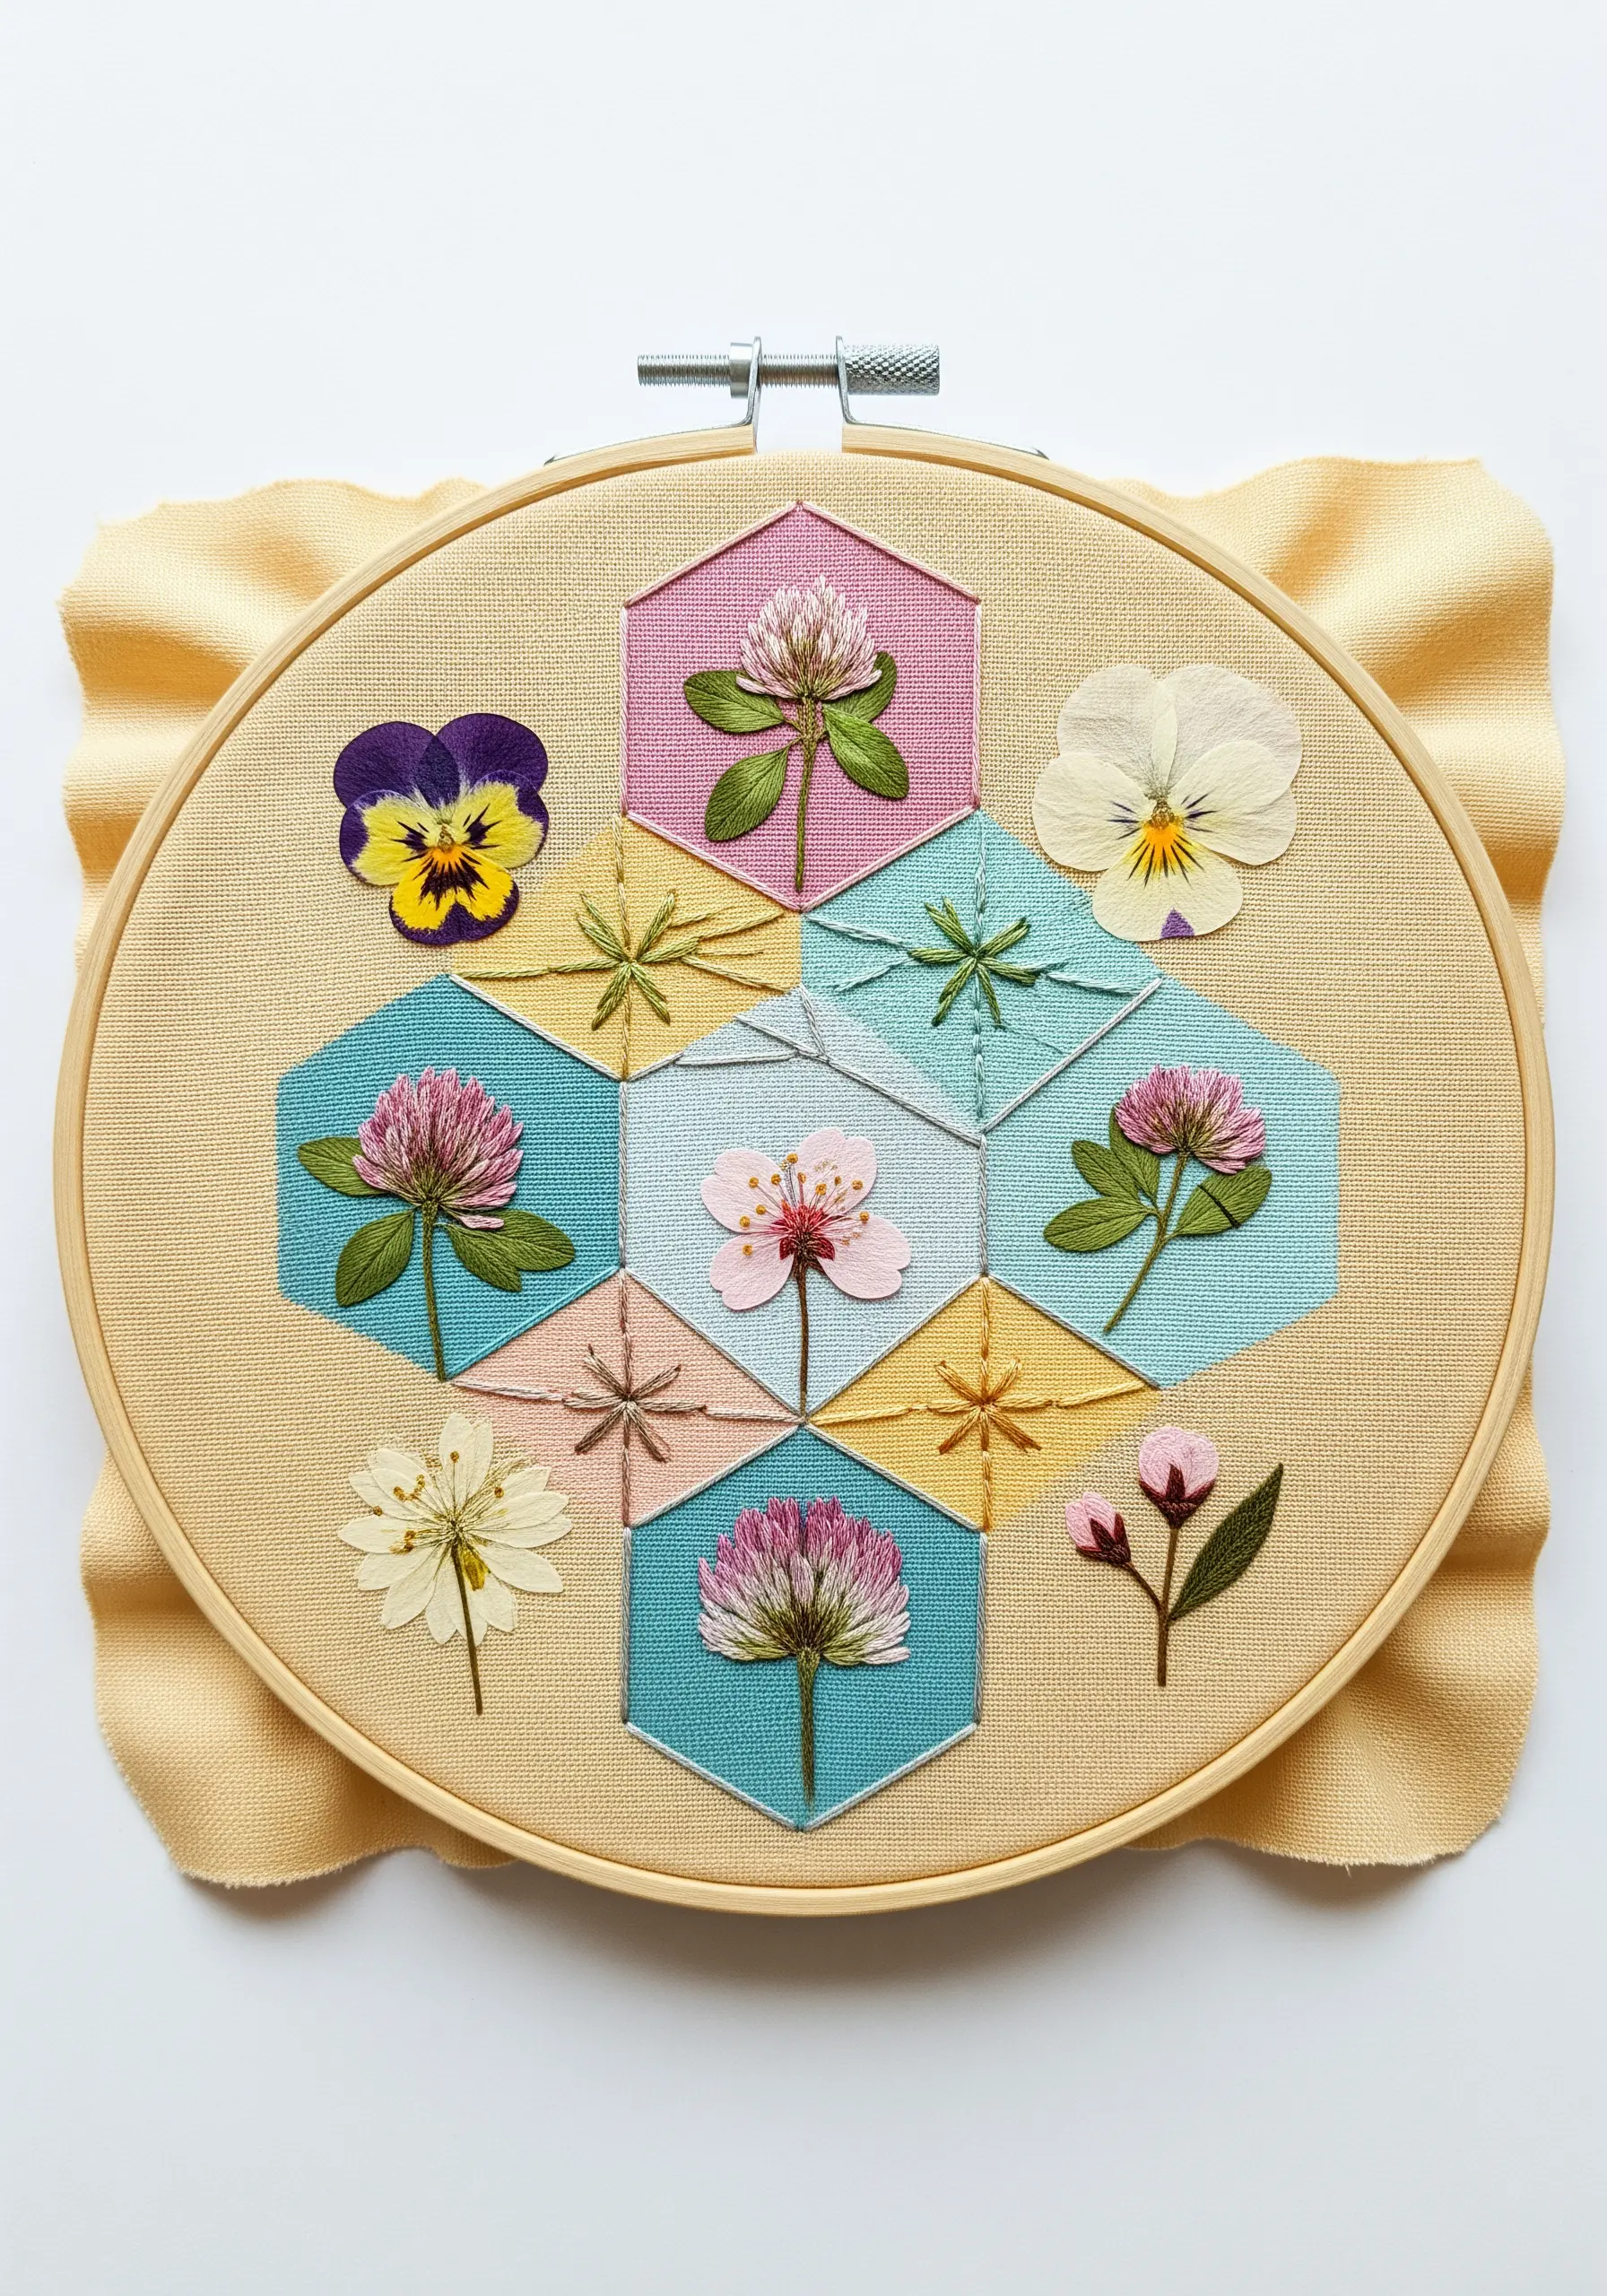
Combine fabric collage, simple stitching, and pressed botanicals for a unique, quilt-inspired piece.
First, appliqué different colored fabric hexagons onto your base fabric.
Then, use a simple running stitch in a contrasting thread to create decorative lines, mimicking a quilting pattern.
Finally, attach your pressed flowers within the hexagons using tiny, almost invisible couching stitches. This layered approach creates a rich, textural piece with personal meaning.
12. Embroider a Botanical Lampshade
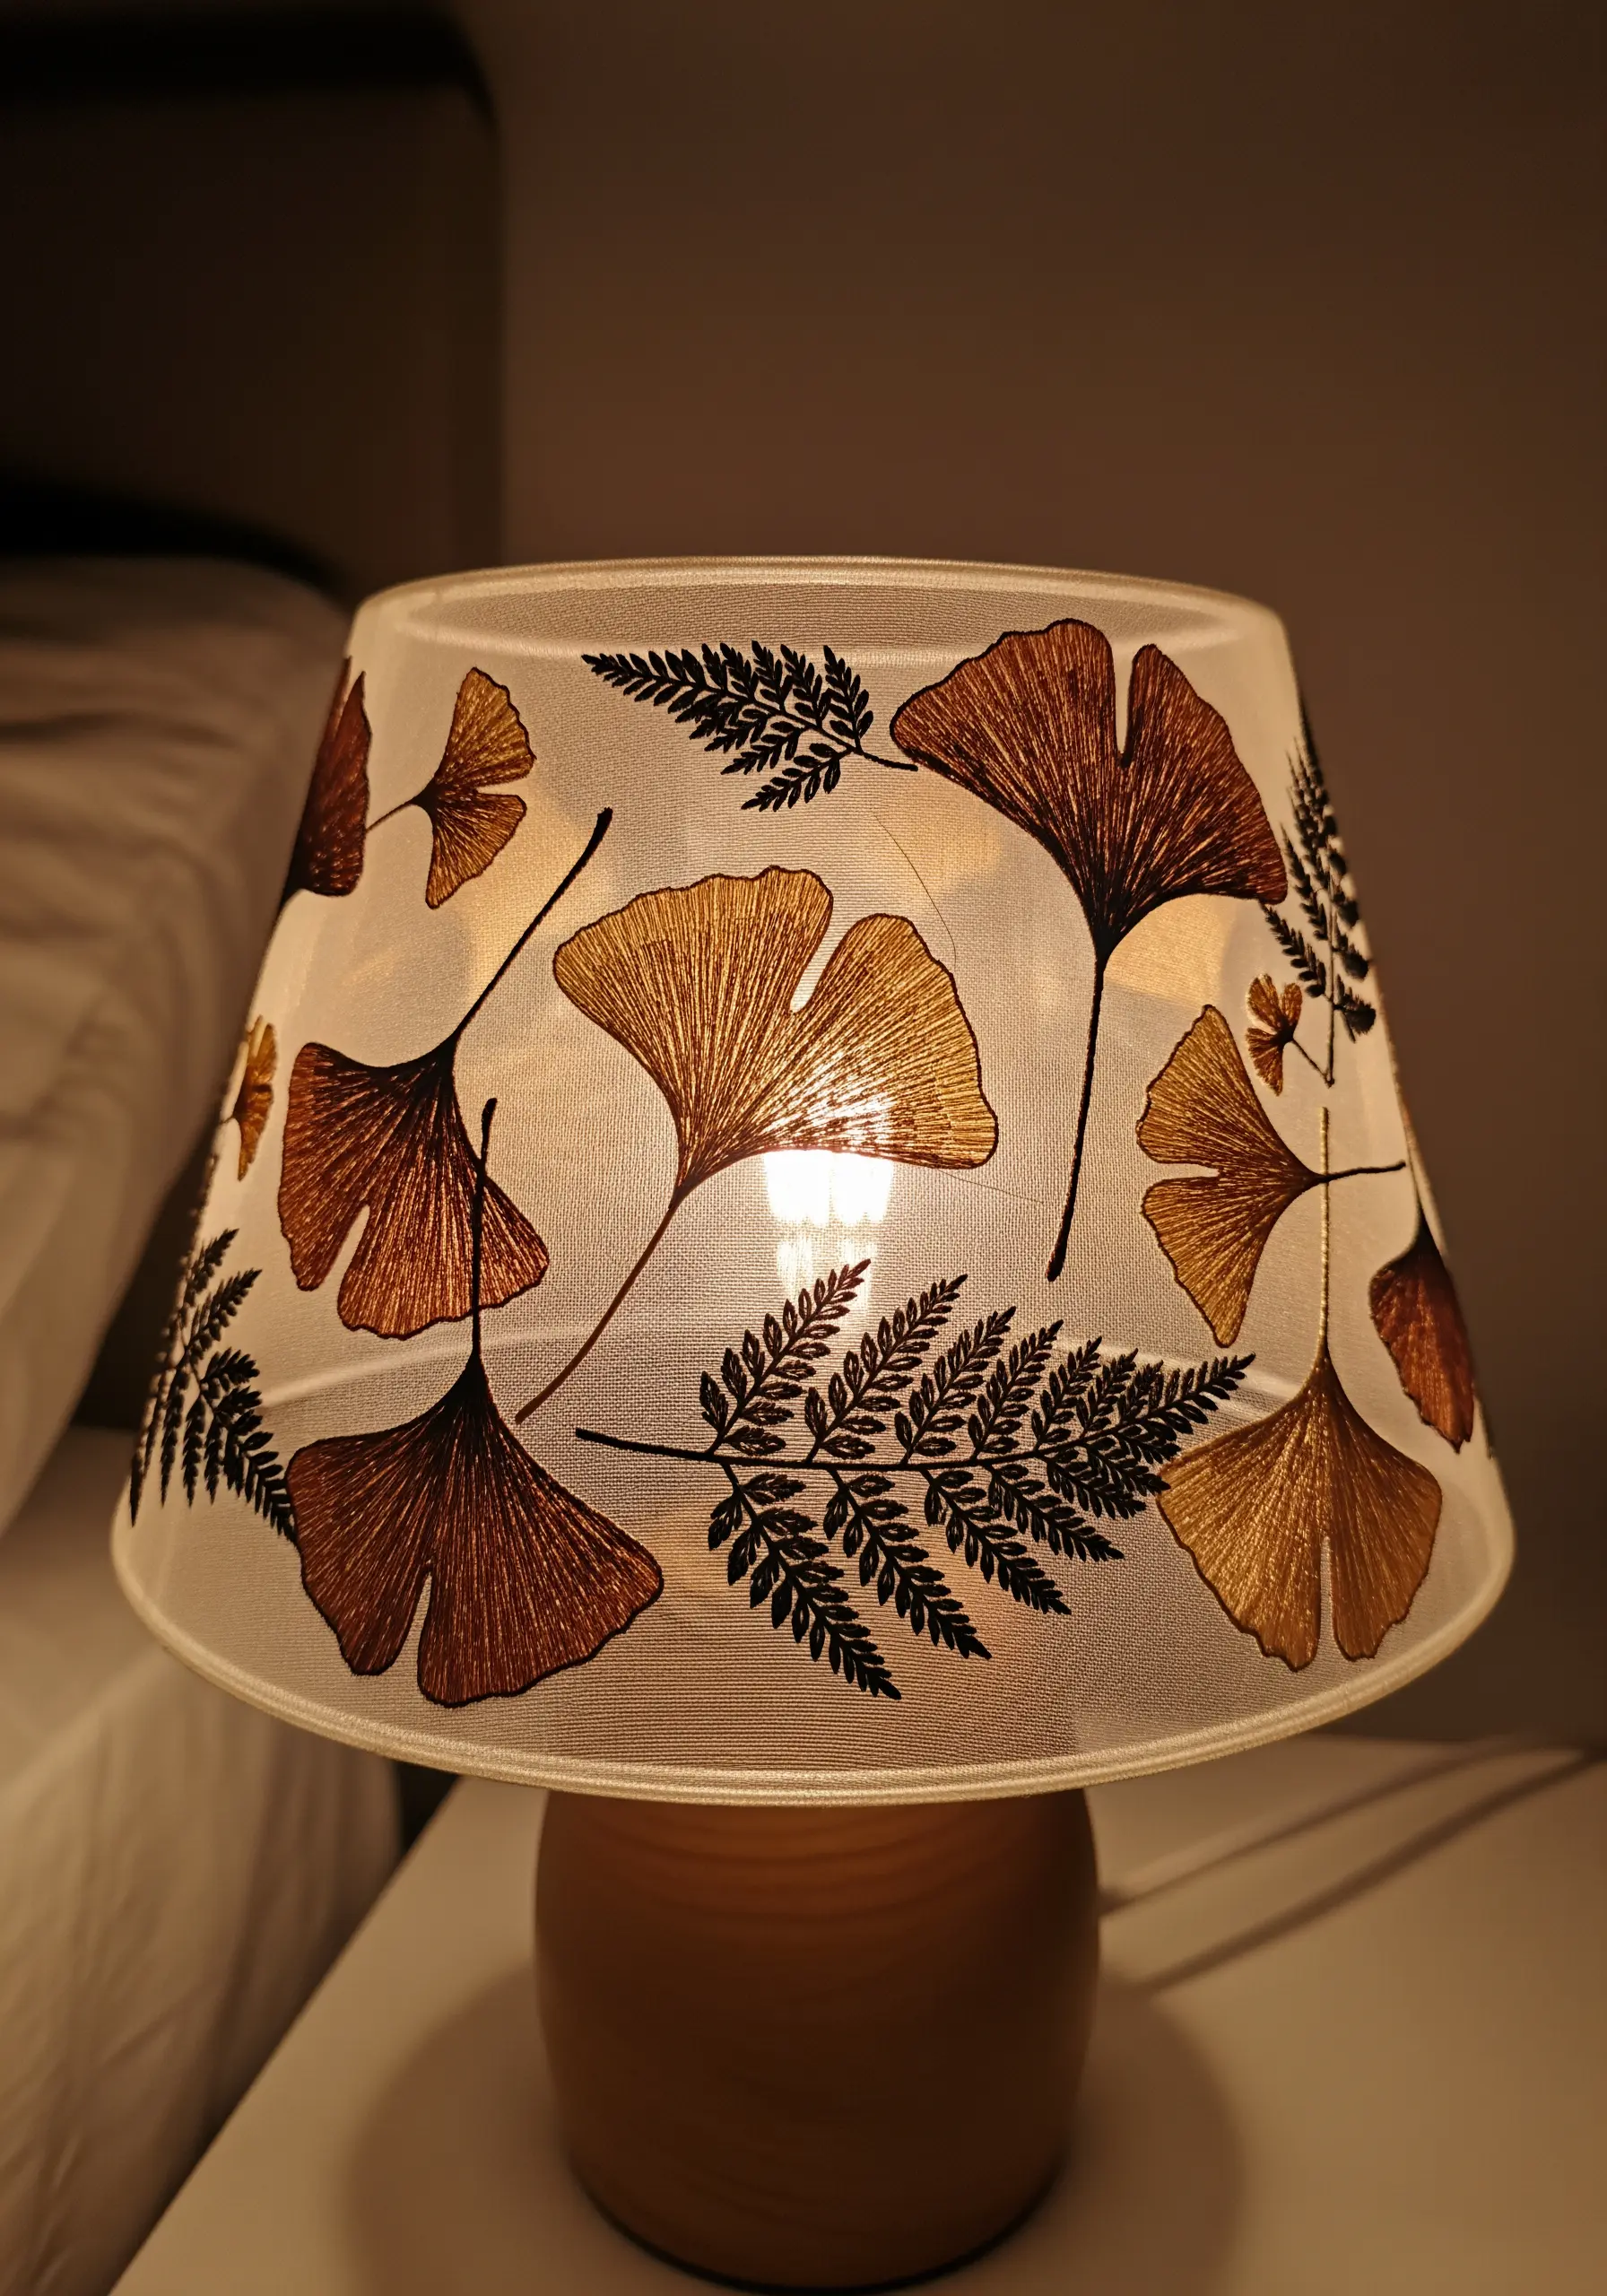
Create a design that truly comes to life with light by embroidering on a translucent fabric for a lampshade.
Choose a pattern of ginkgo leaves and ferns, using a simple backstitch for the outlines and a light seed stitch fill for texture.
When the lamp is turned on, the light will shine through the fabric, illuminating your stitches and casting beautiful botanical shadows.
Use heat-resistant lampshade backing to safely construct your final piece.
13. Design a Cohesive Botanical Sampler
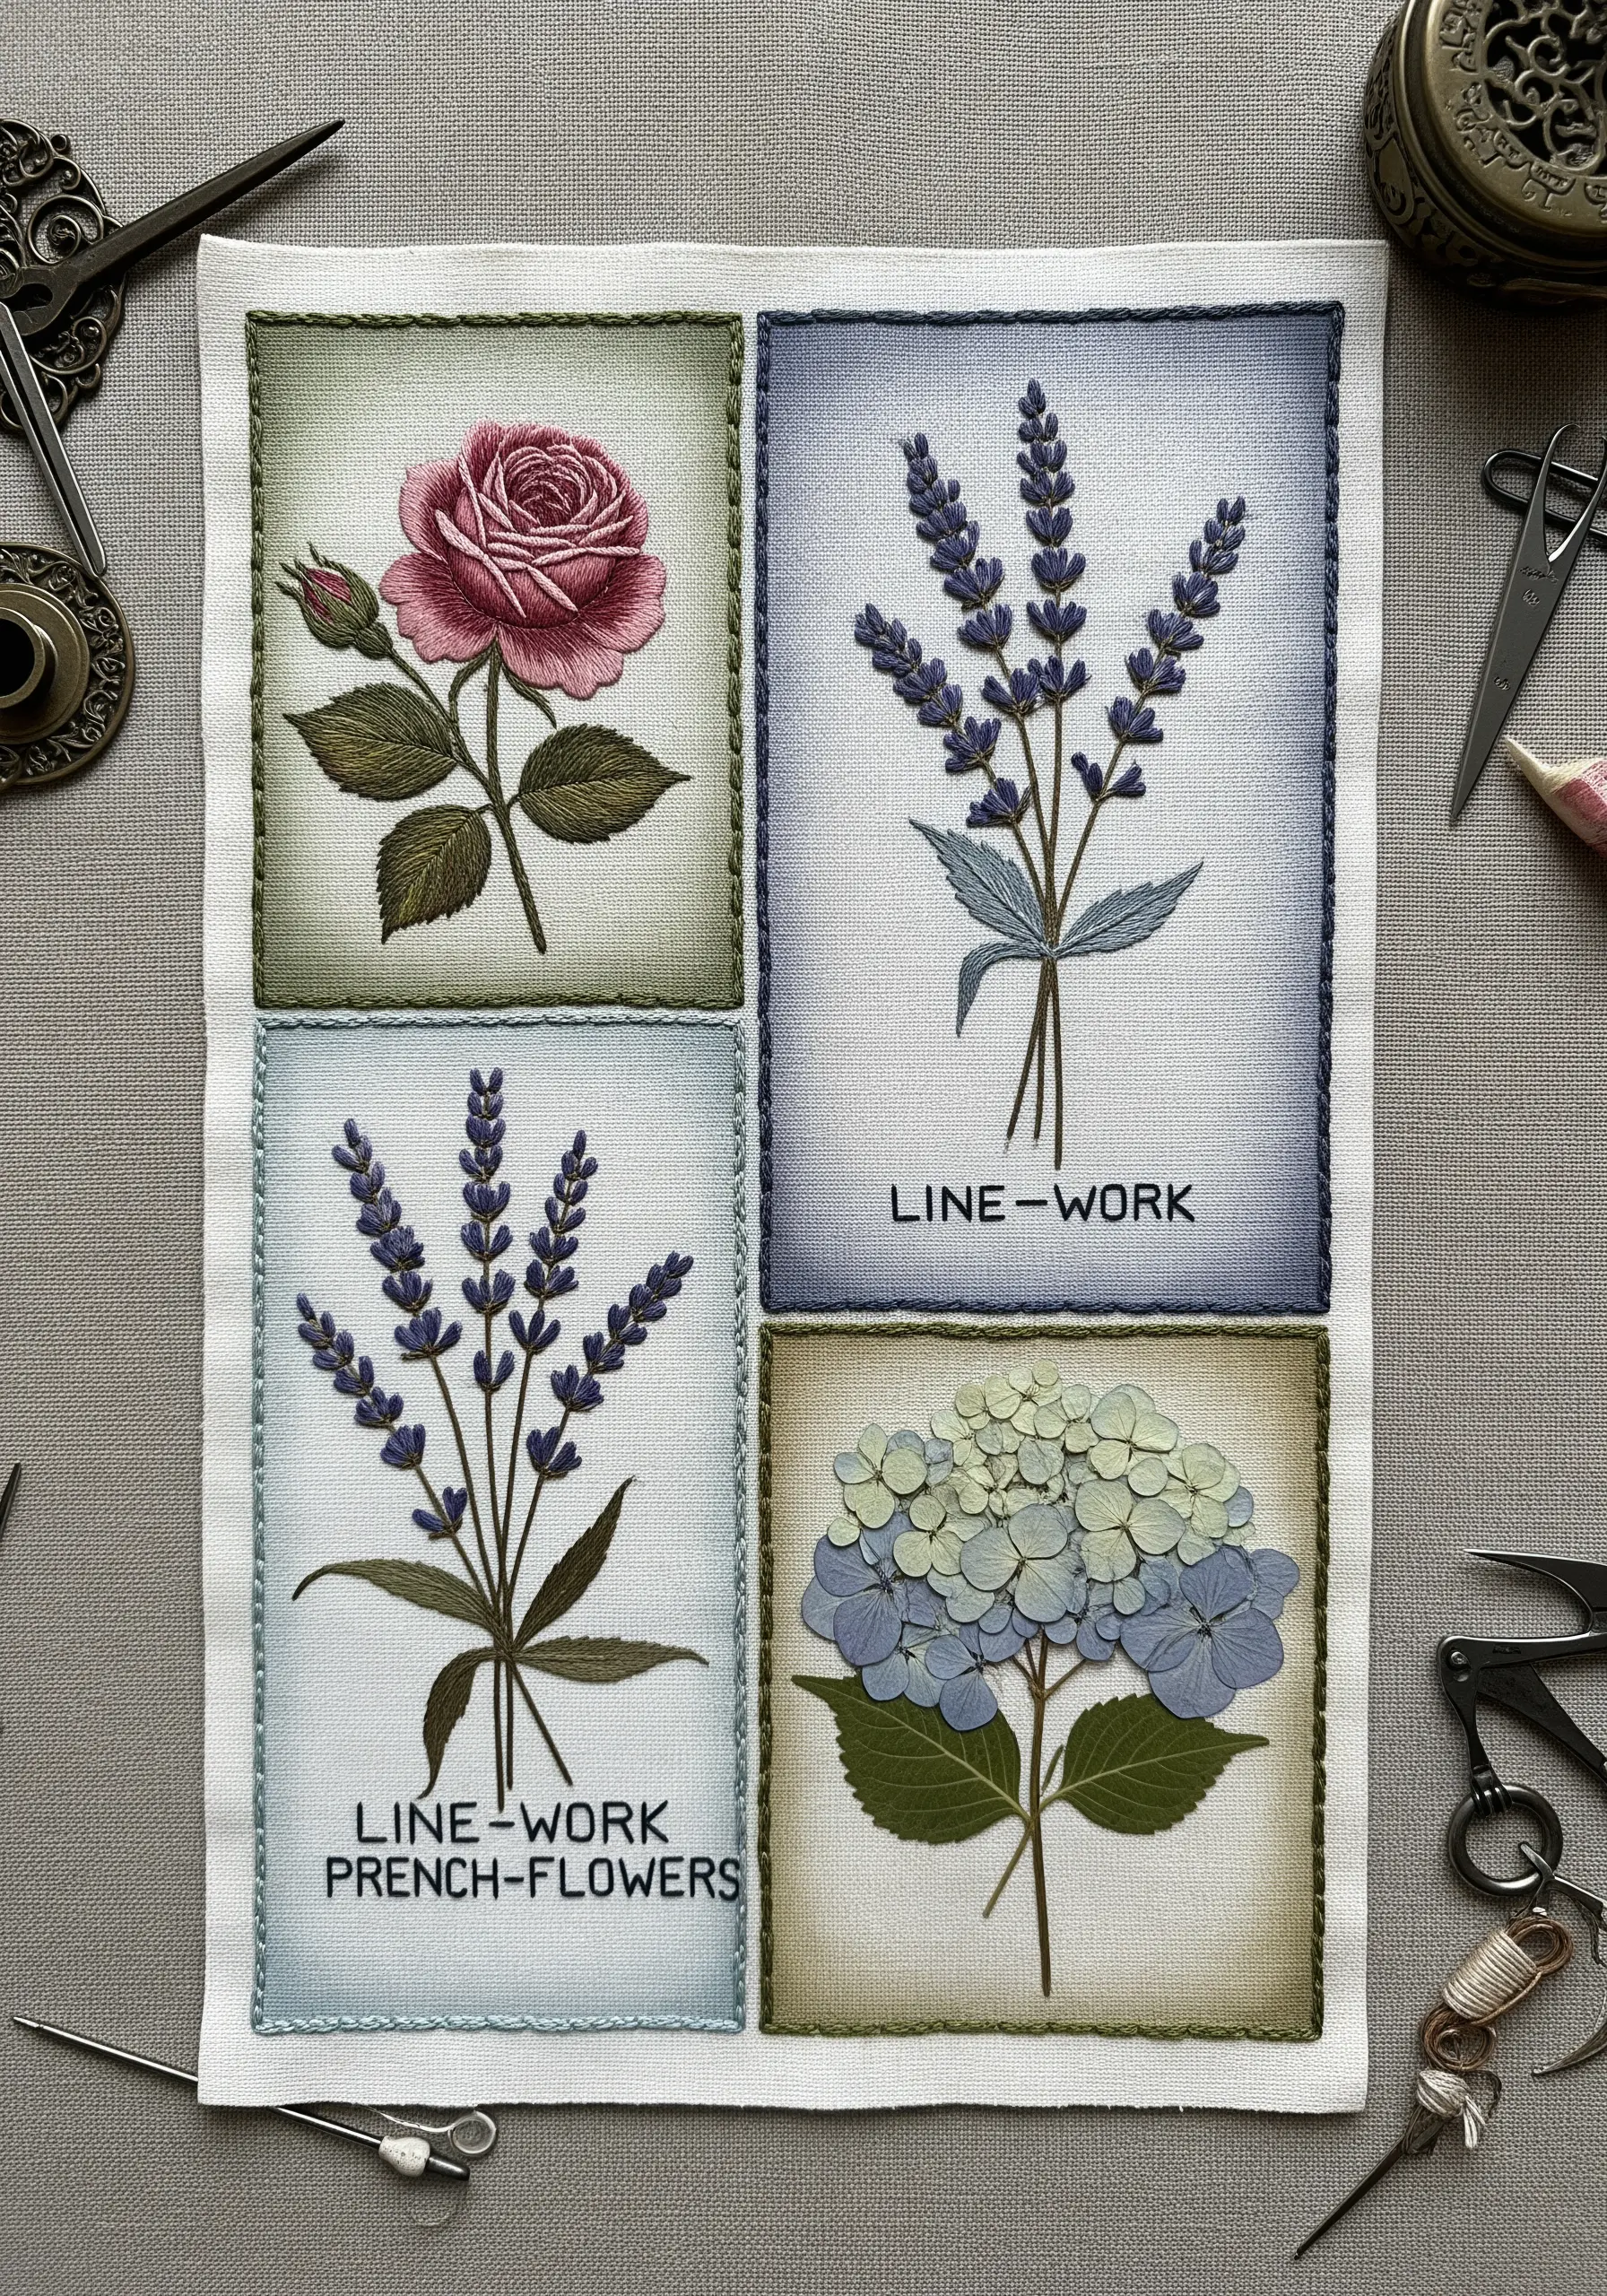
Turn individual floral studies into a unified piece of art by framing them with embroidered borders.
Plan your composition with four or more squares, leaving even space between them.
Stitch each botanical motif, then use a simple backstitch or chain stitch to create a frame around it.
You can add a subtle wash of watercolor paint inside the frames before you stitch to create even more depth and a vintage, collected feel.
14. Embellish a Collar with Delicate Blossoms
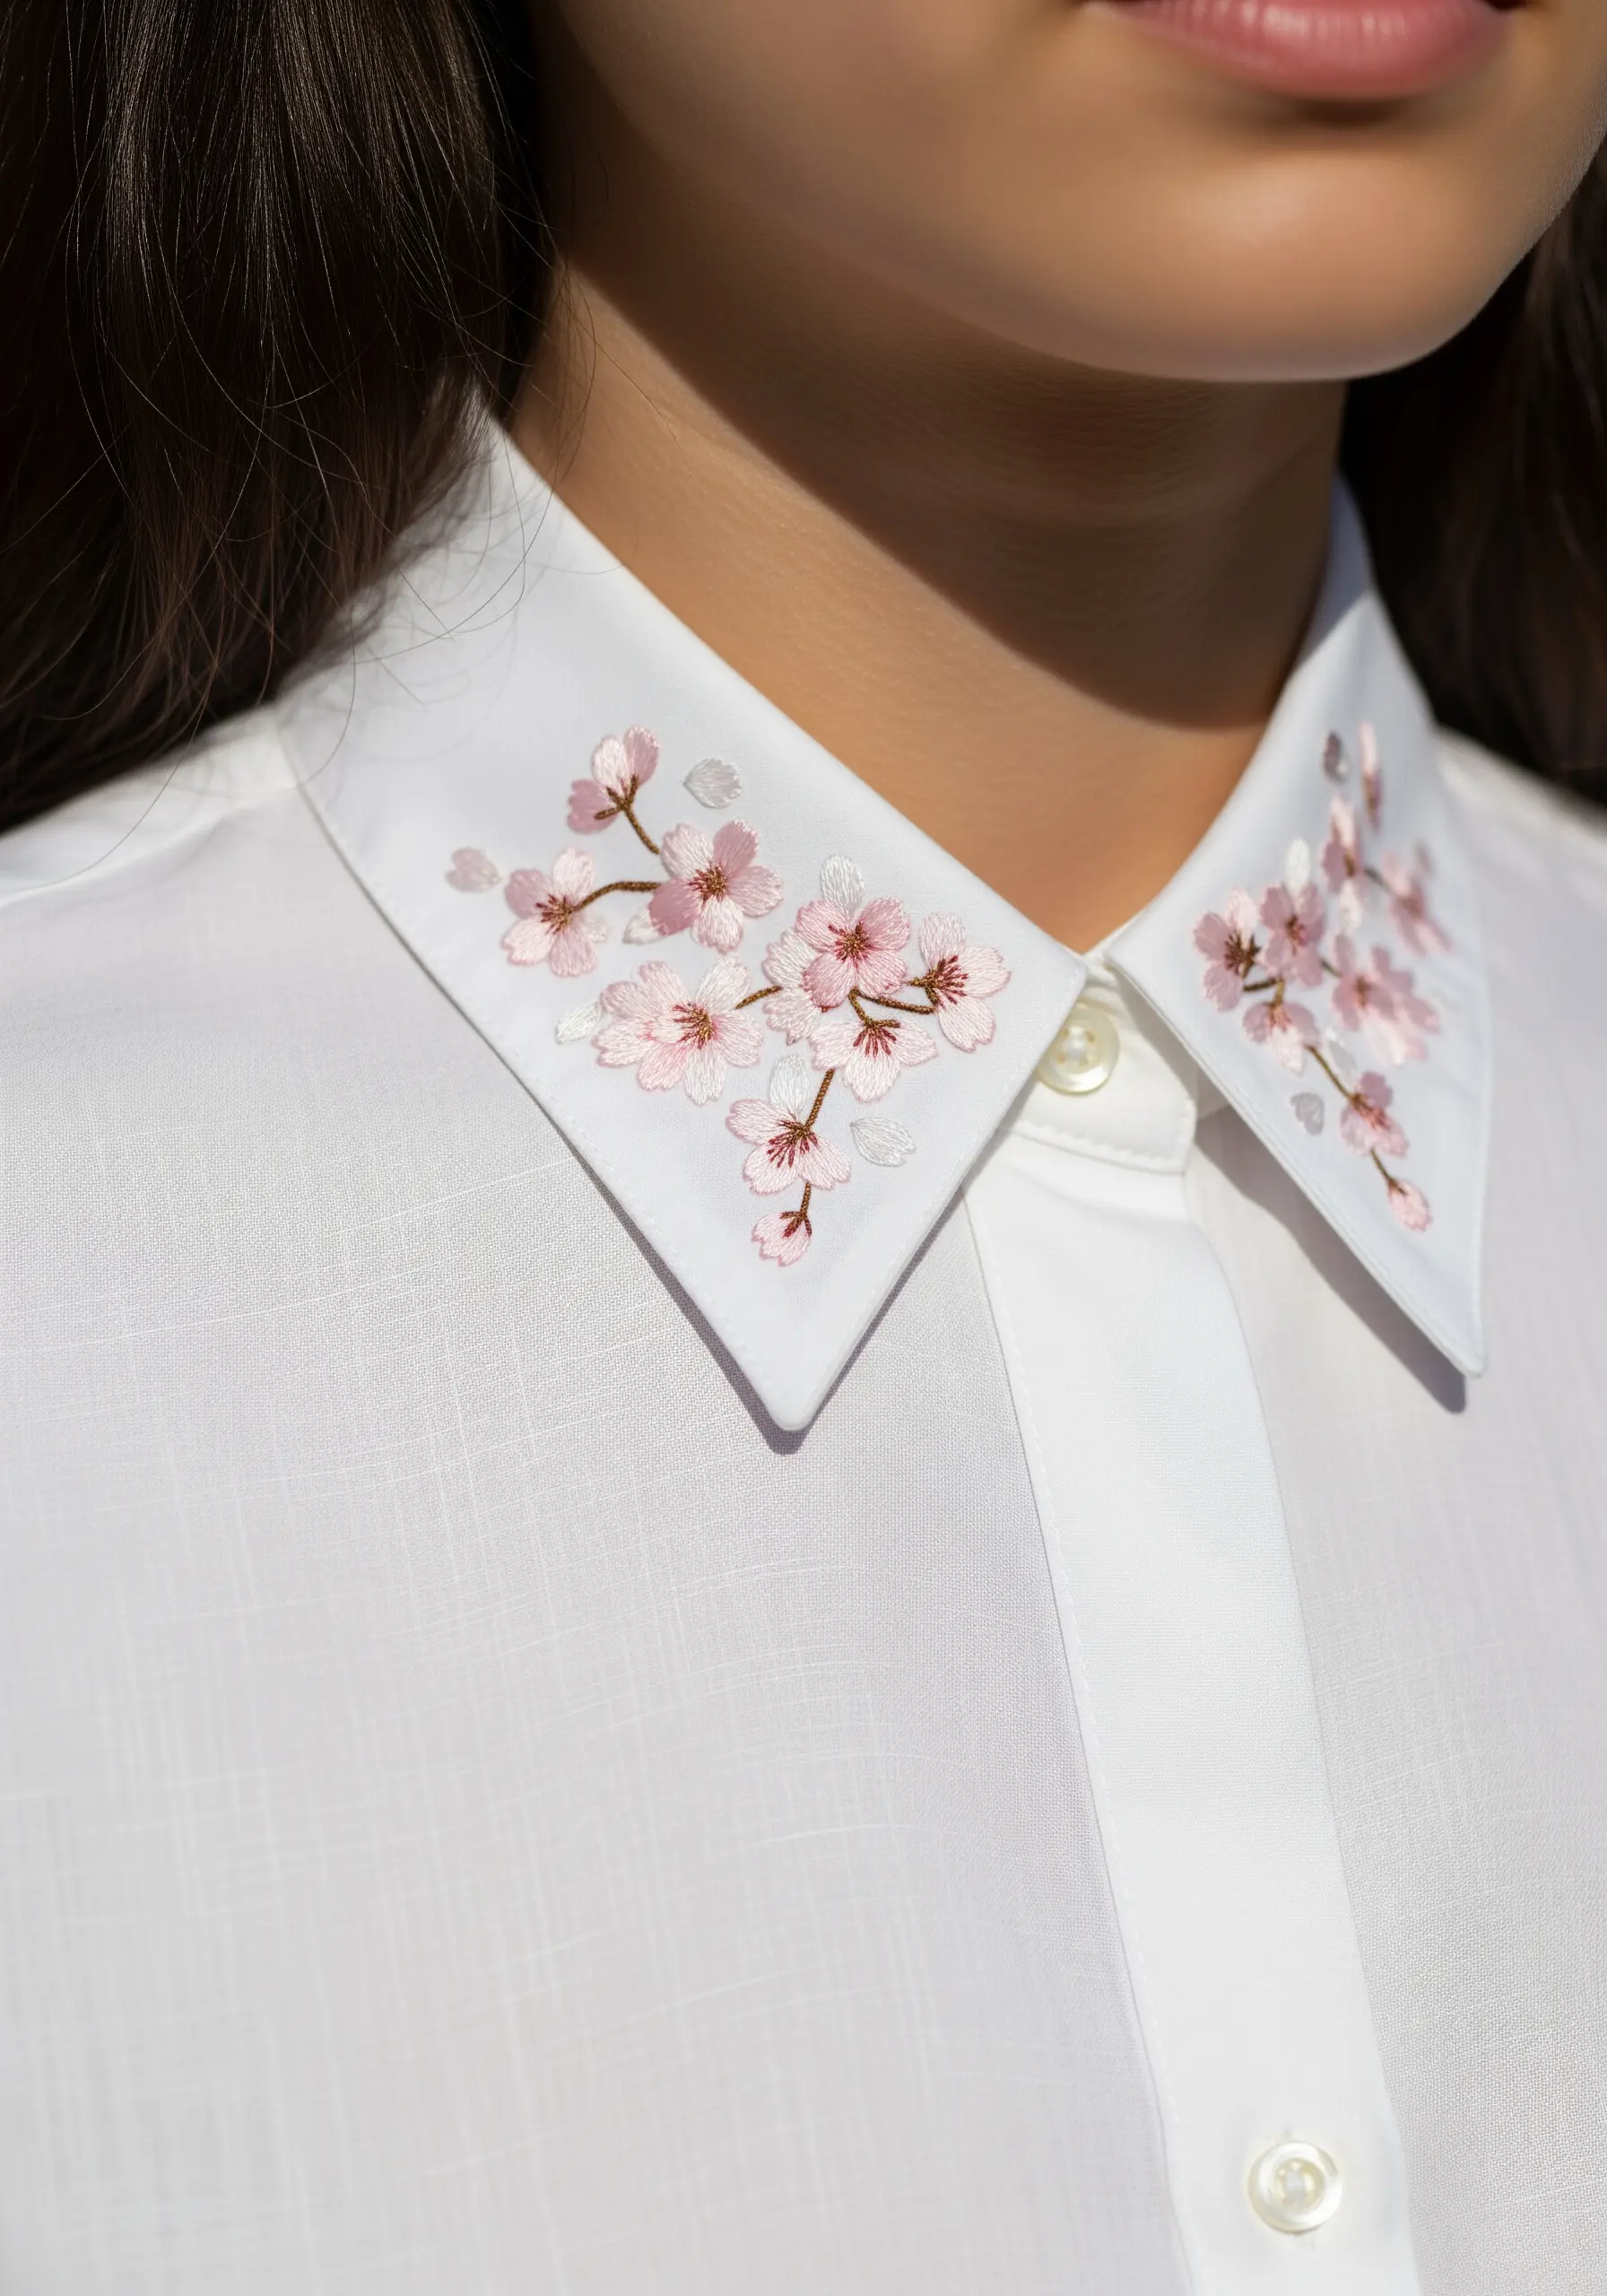
When stitching on a defined space like a shirt collar, the key is delicate scale and thoughtful placement.
Use a water-soluble stabilizer to transfer your cherry blossom pattern precisely onto the collar points.
Stitch the branches with a single strand of brown thread in a split stitch, and use just two strands for the pink petals.
This restraint prevents the design from overwhelming the garment, resulting in an elegant, customized piece of clothing.
15. Create Reversible Botanical Coasters
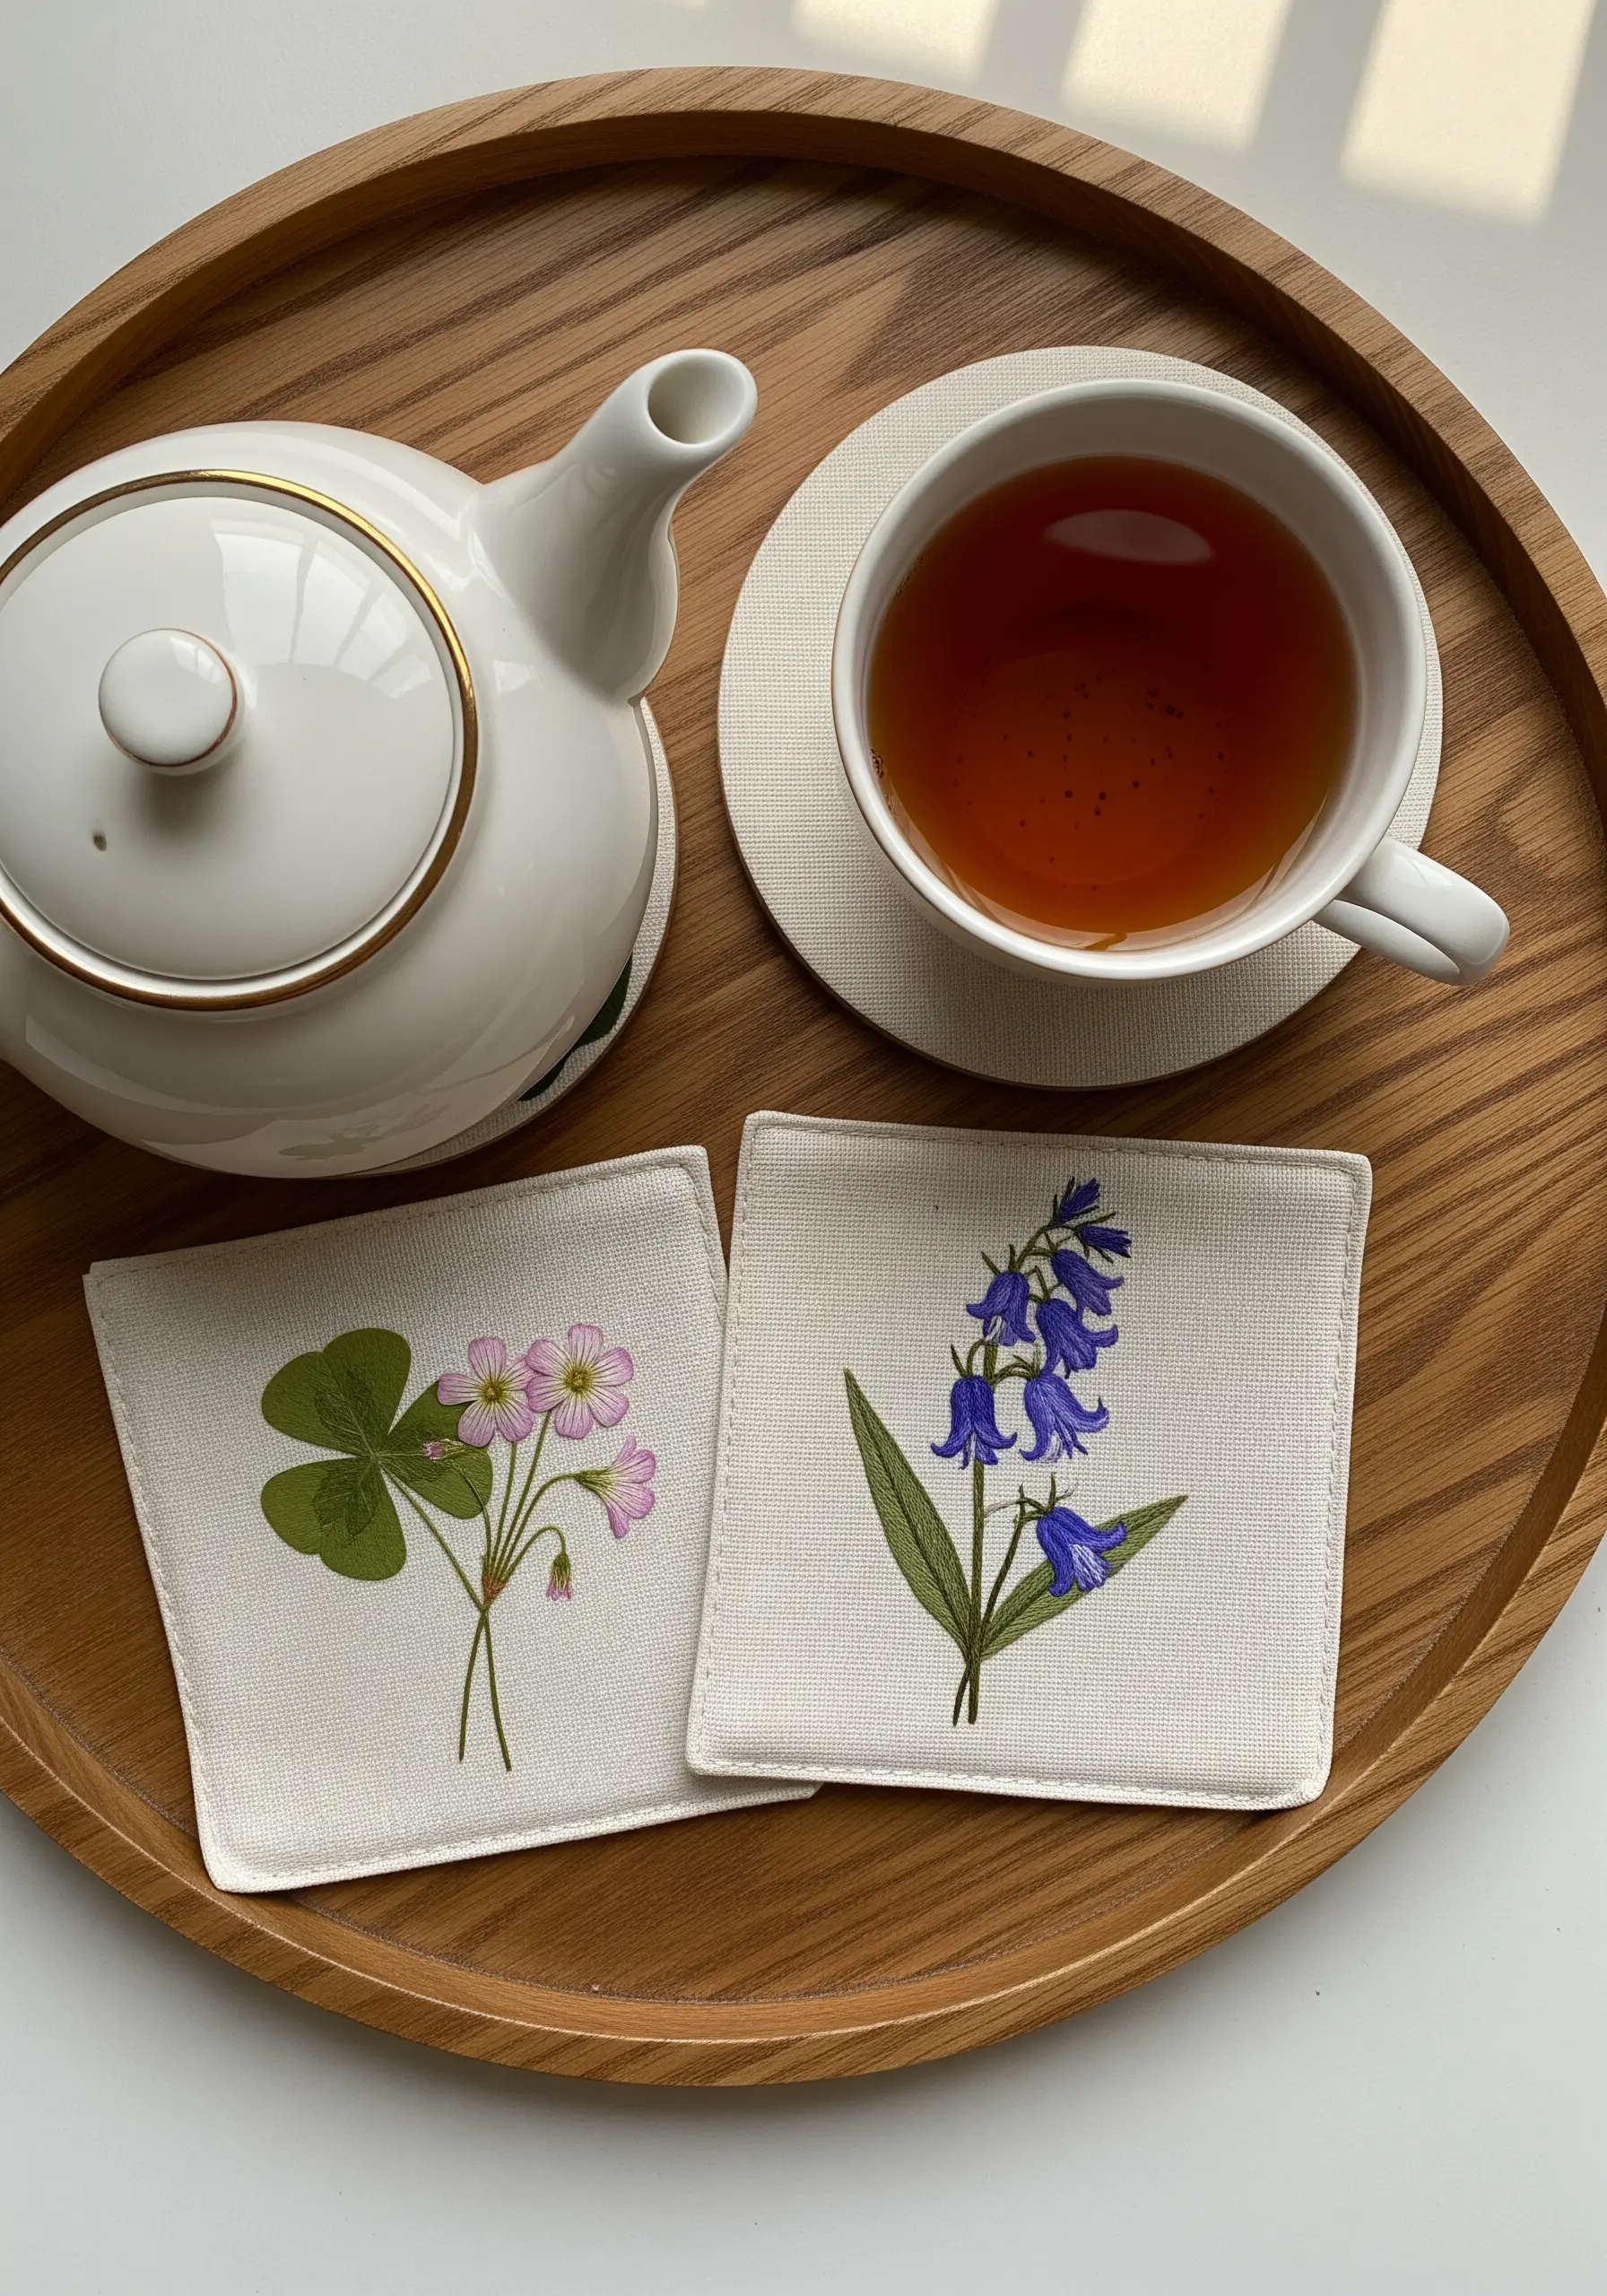
To get a clean, double-sided finish on functional items like coasters, embroider your design on one piece of fabric, then sew it to a backing piece.
Complete your stitching of the bluebells or clover, then place the backing fabric on top, right sides together.
Sew around the edges, leaving a small gap for turning. Once you’ve turned it right-side out, press it flat and stitch the opening closed.
This method hides all the messy knots and thread tails, giving you a professional-quality finish.
16. Choose a Soft Palette for Nursery Textiles
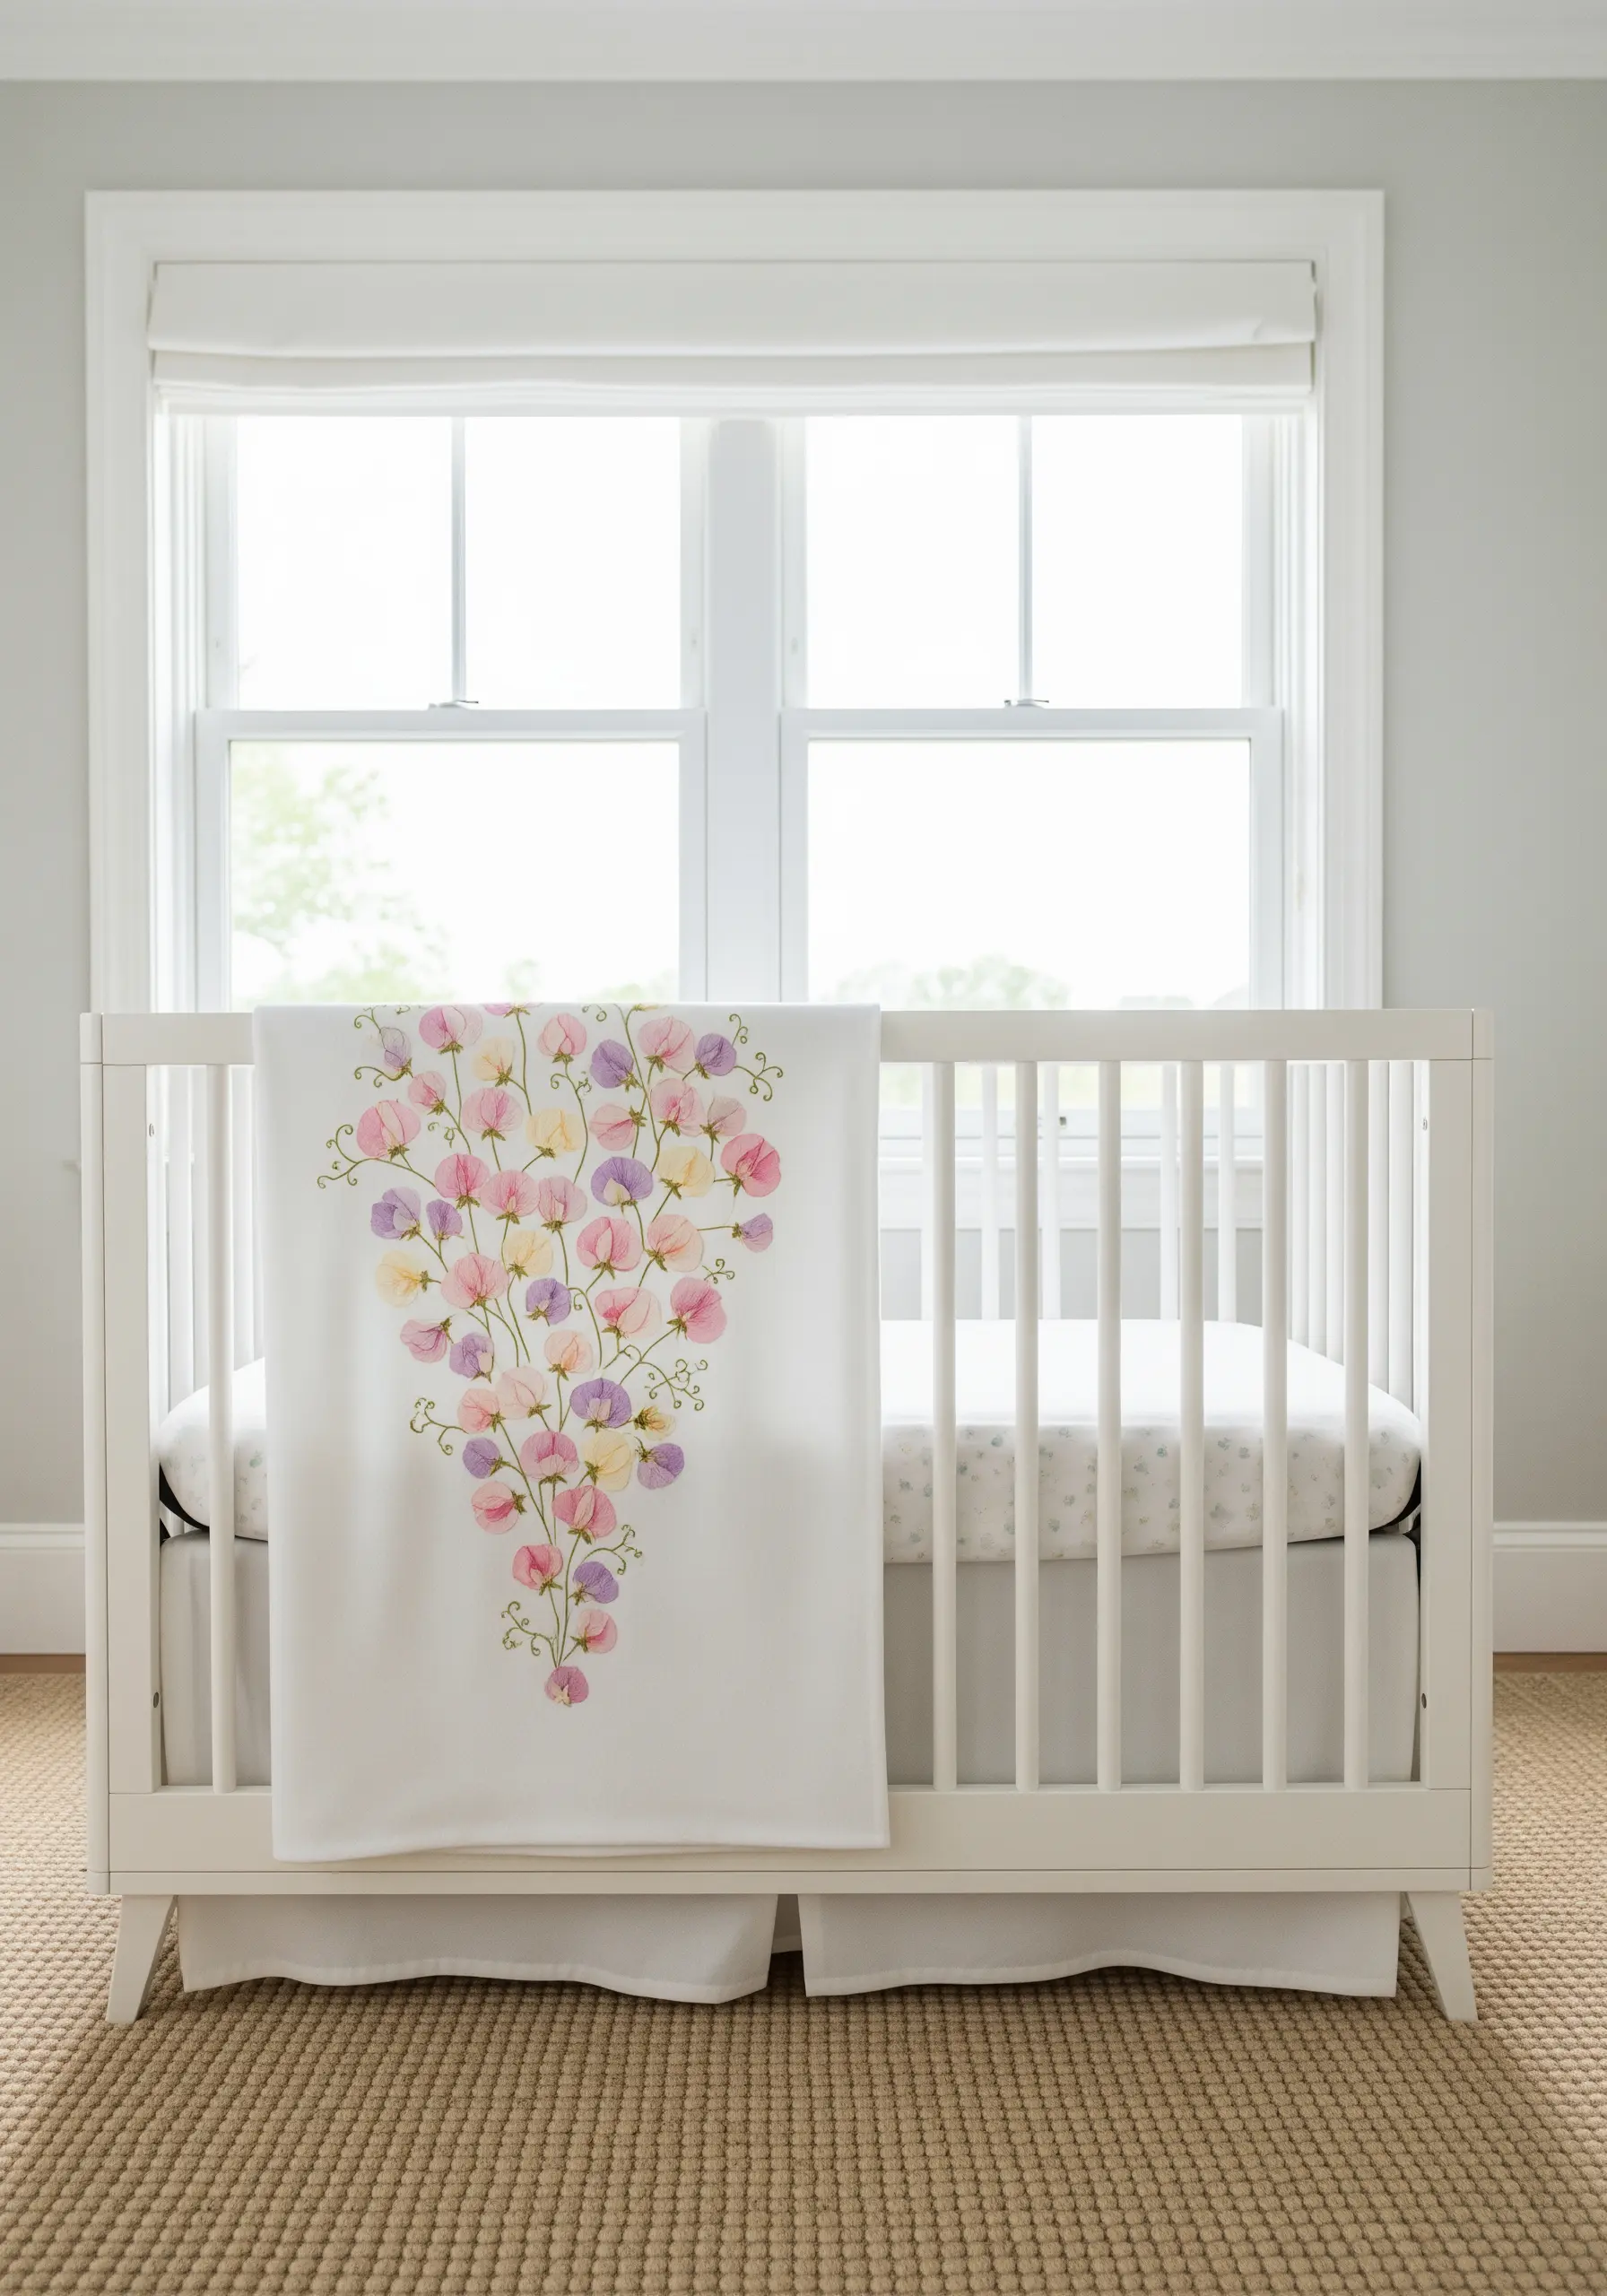
When embroidering for a nursery, a soft, harmonious color palette creates a calming and gentle atmosphere.
For a design like sweet peas, choose five or six pastel shades of pink, yellow, and lavender that blend seamlessly.
Use the long-and-short stitch to create soft gradients within each petal.
This gentle transition of color is more restful on the eyes and contributes to a serene nursery decor, perfect for a baby blanket or wall hanging.
17. Capture the Soft Sheen of Eucalyptus
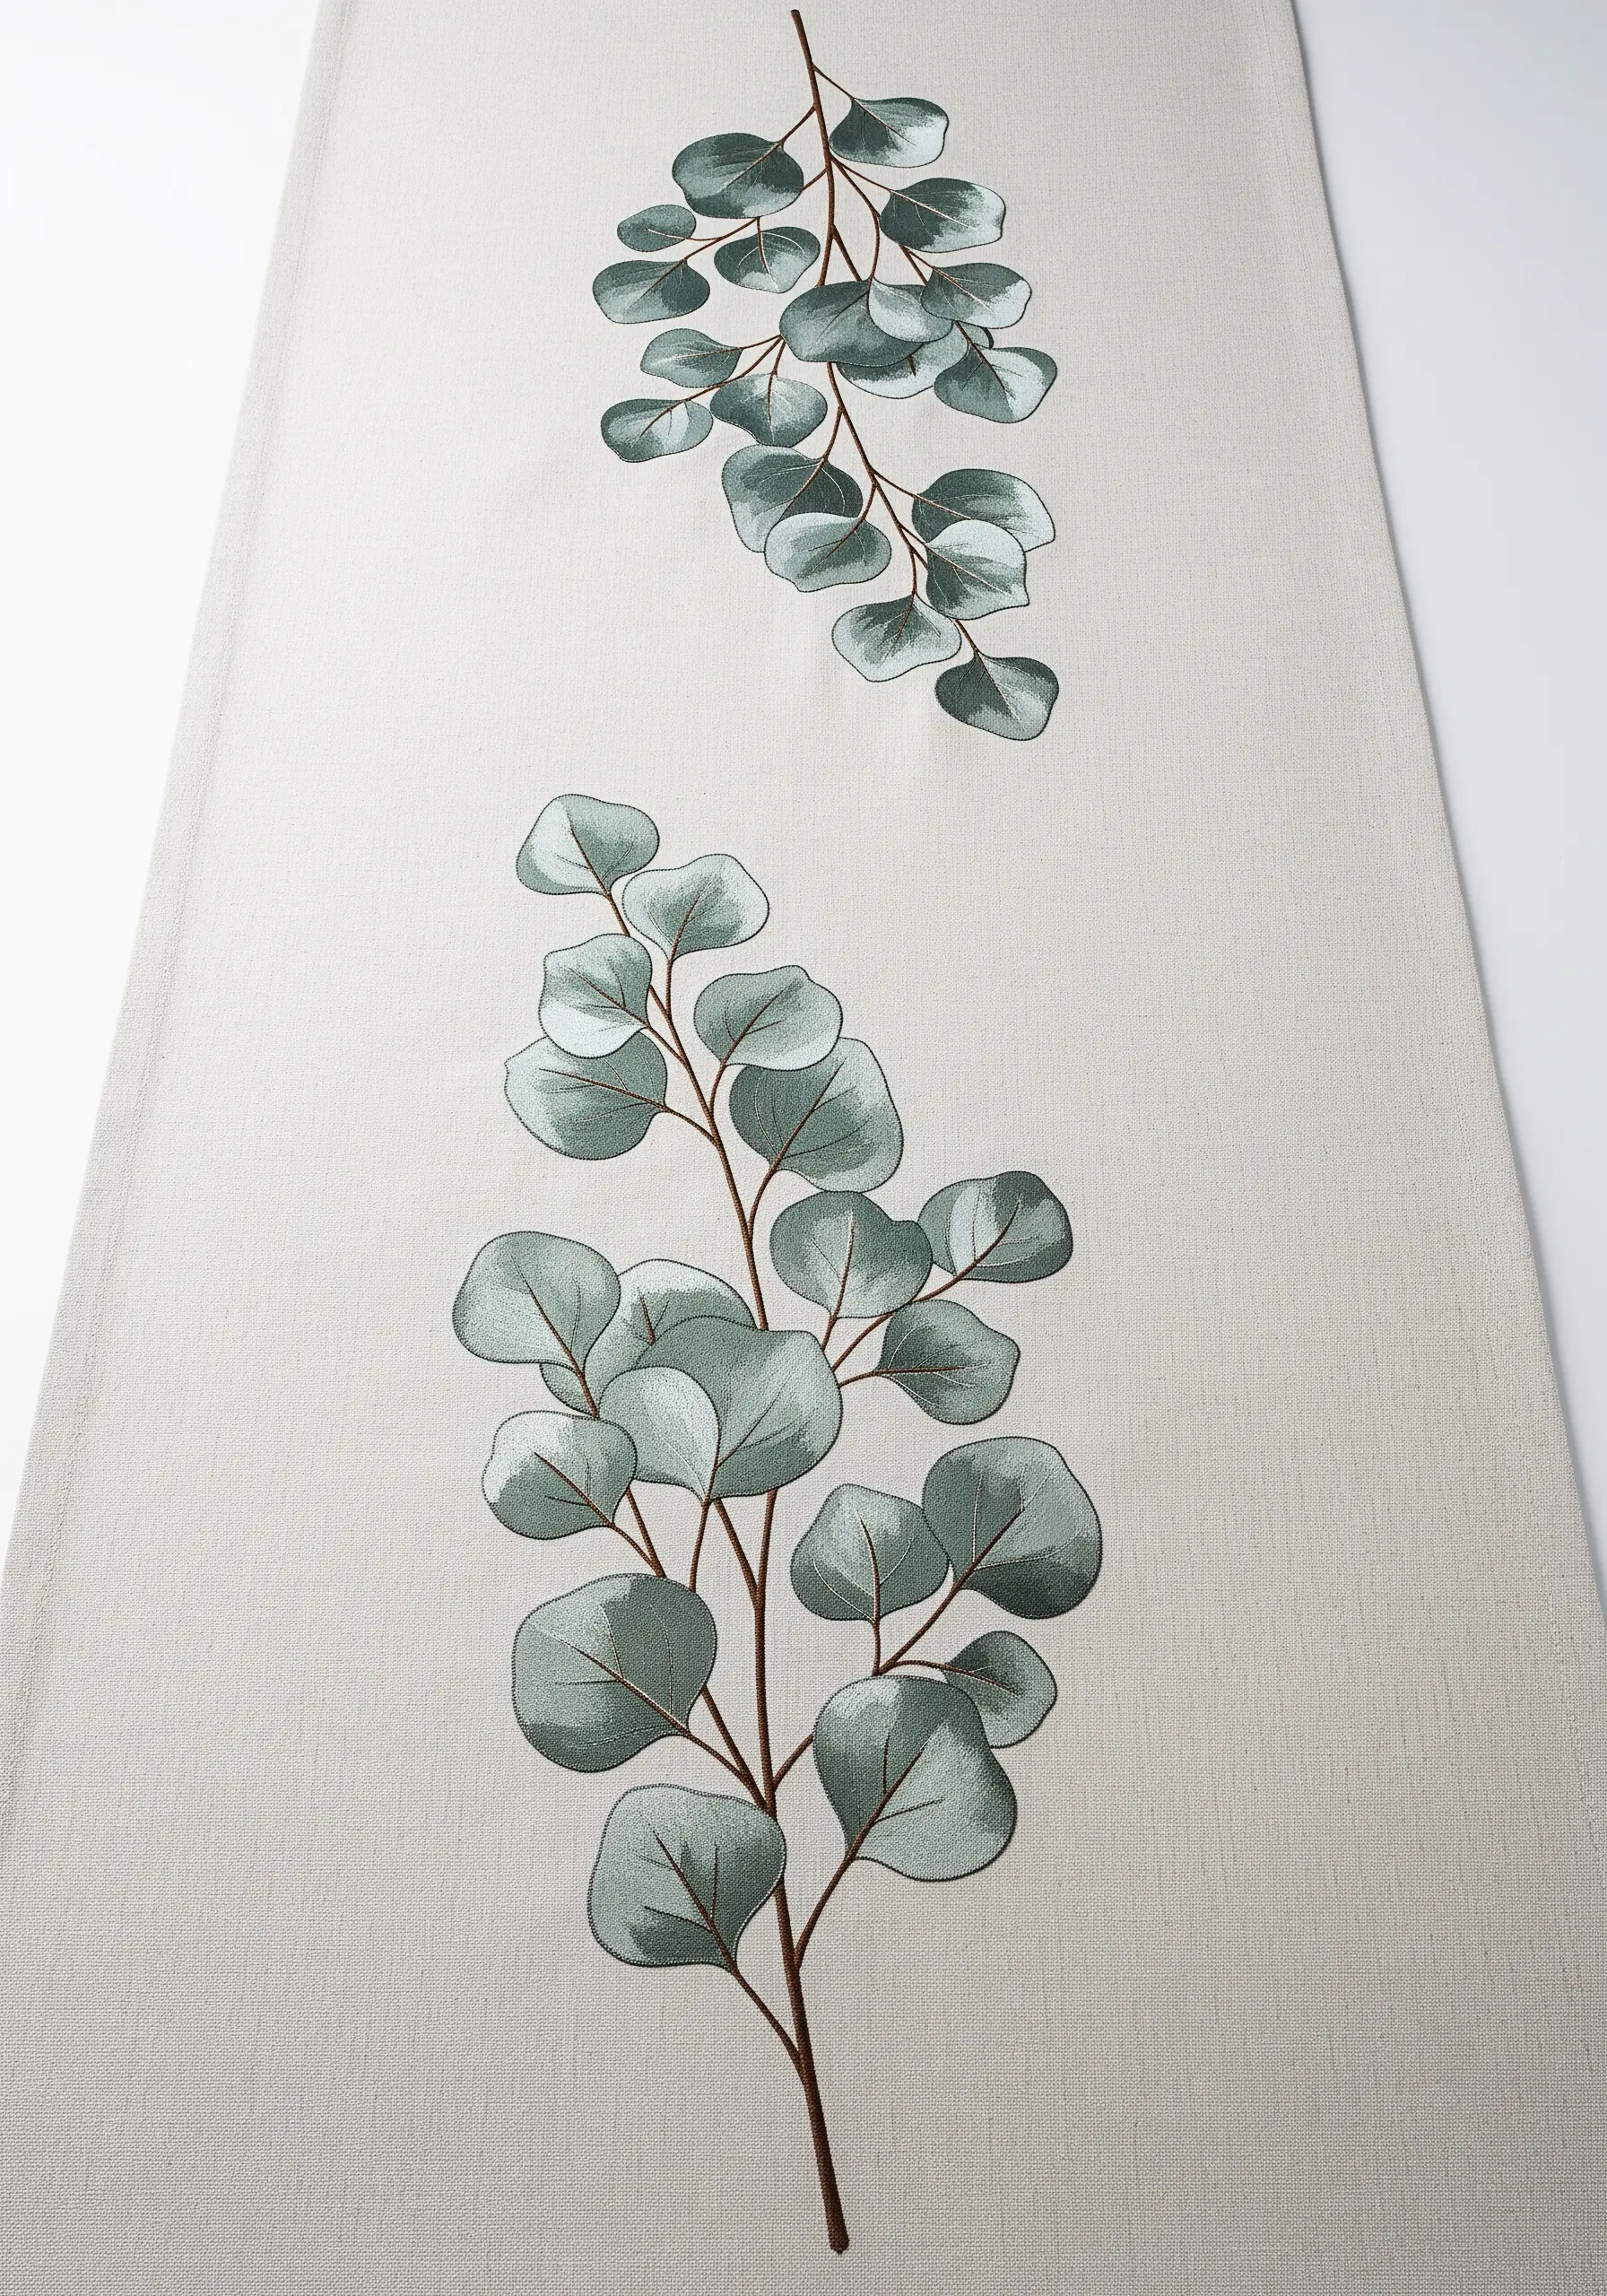
To replicate the muted, silvery-green of eucalyptus leaves, choose your threads carefully.
Select three adjacent shades of dusty green or grey-blue floss.
Fill each leaf with a directional satin stitch, using the lightest color for the center where light would hit, and the darker shades for the edges.
This subtle blending technique is what gives the leaves their realistic, soft appearance, making them look almost three-dimensional on a table runner or wall hanging.
18. Enhance Pressed Leaves with Metallic Thread
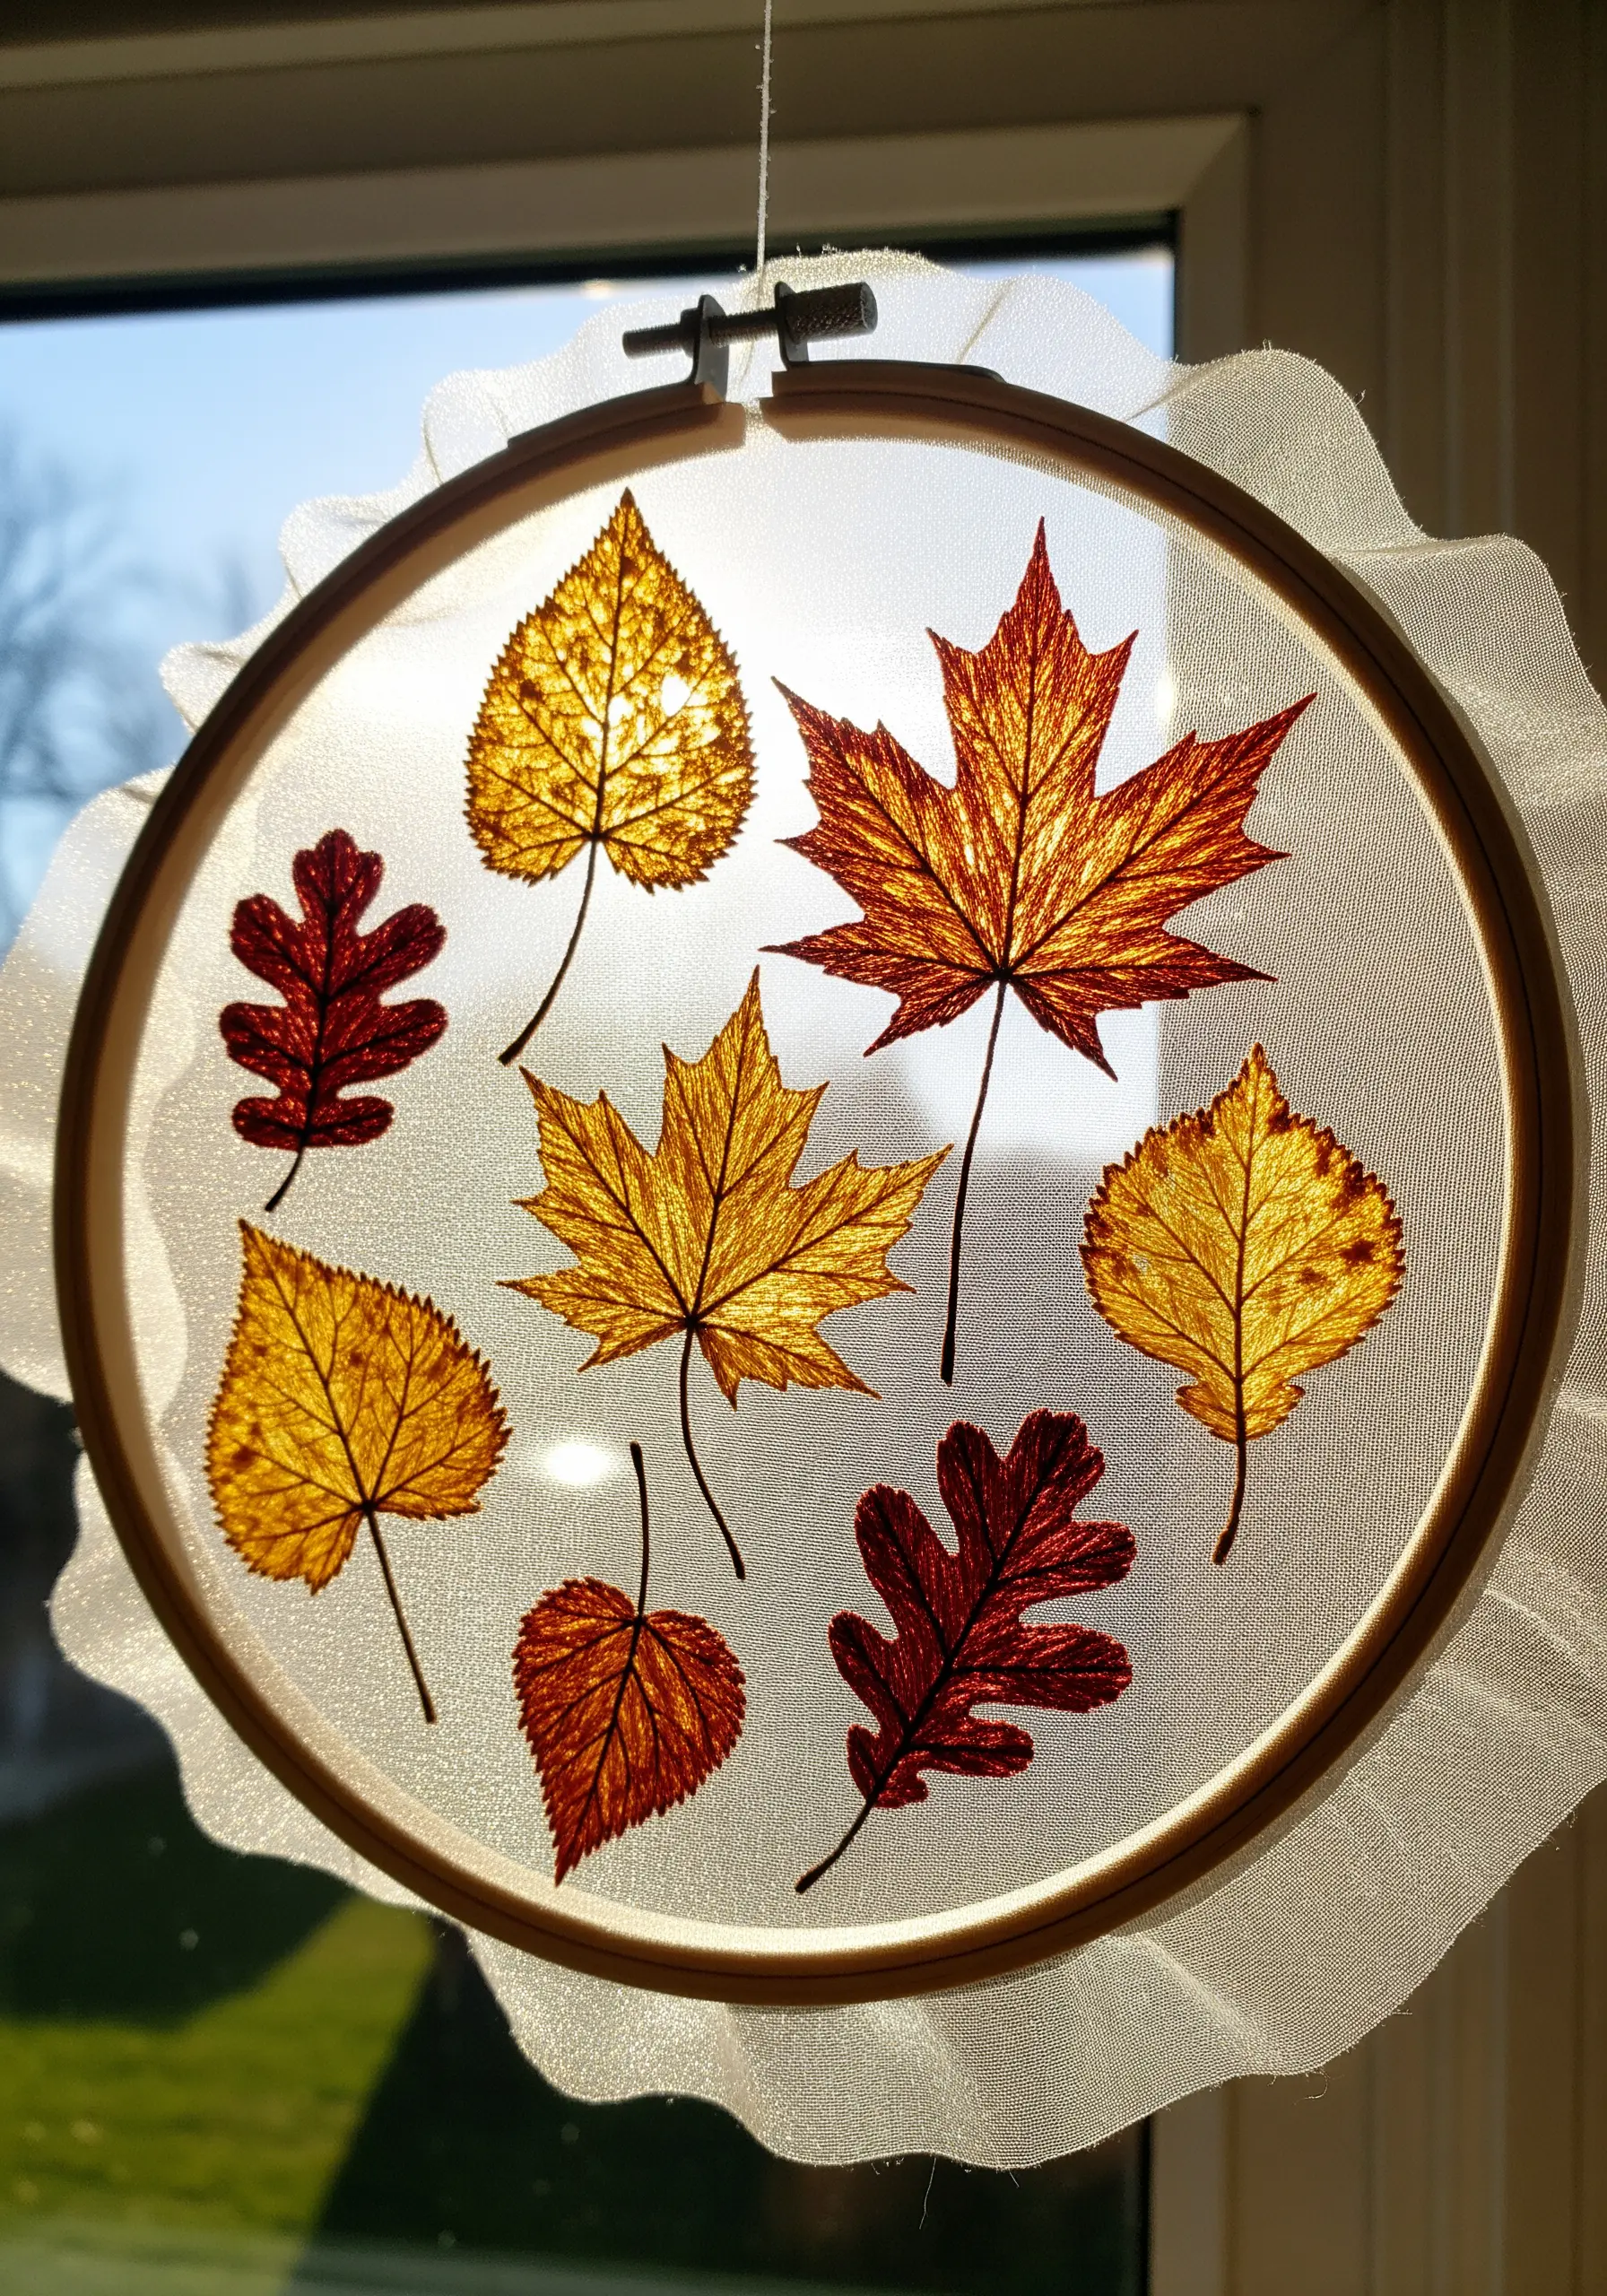
Elevate real pressed autumn leaves by adding delicate embroidered details.
After arranging and securing your leaves on a sheer fabric background, use a single strand of metallic gold or copper thread to trace the central veins with a simple backstitch.
This subtle addition catches the light beautifully and adds a touch of unexpected elegance.
It also helps to further secure the leaves to the fabric, making your piece more durable while highlighting nature’s own perfect patterns.
19. Build Hydrangea Clusters with Layered Knots
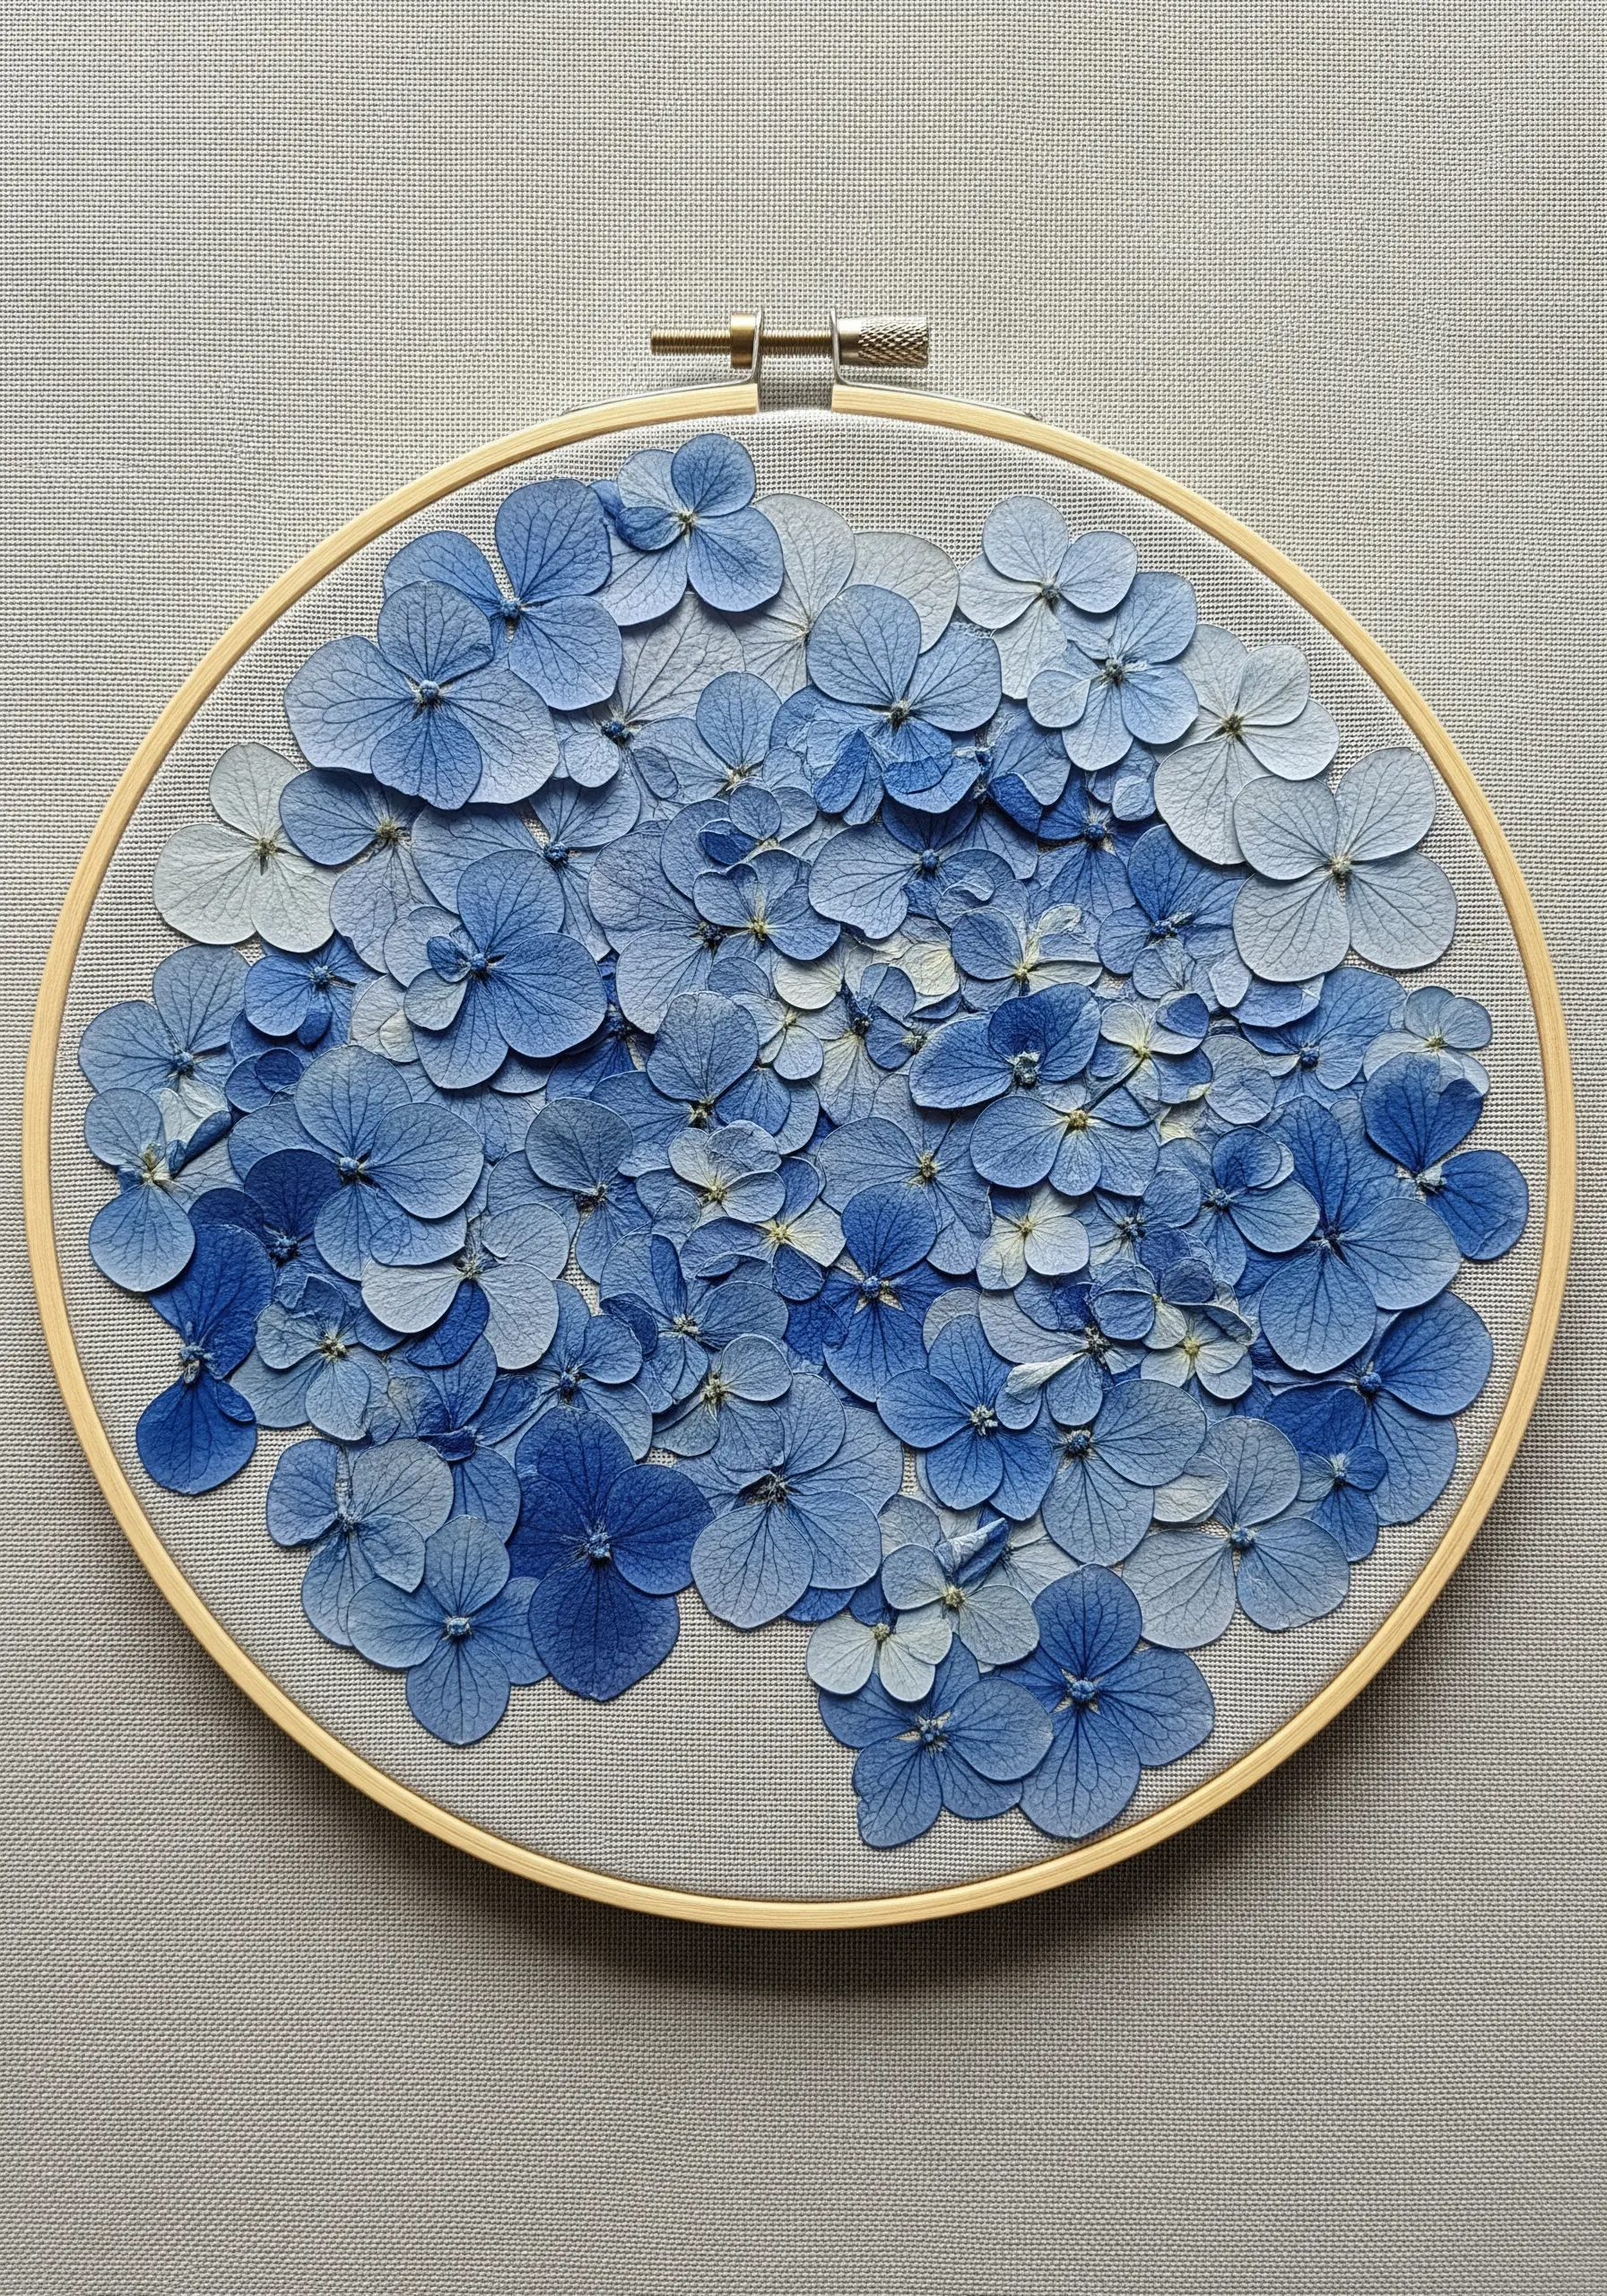
The key to a full, lush hydrangea is building texture through layering.
Instead of trying to stitch each tiny flower perfectly, create the illusion of a dense cluster using French knots in varying sizes.
Use three strands of floss for larger knots at the base and one or two strands for smaller ones on top.
Work in a mix of blues, purples, and whites to give the bloom natural color variation and incredible depth, much like a real hydrangea blossom.
20. Frame a Statement Fabric in a Monogram
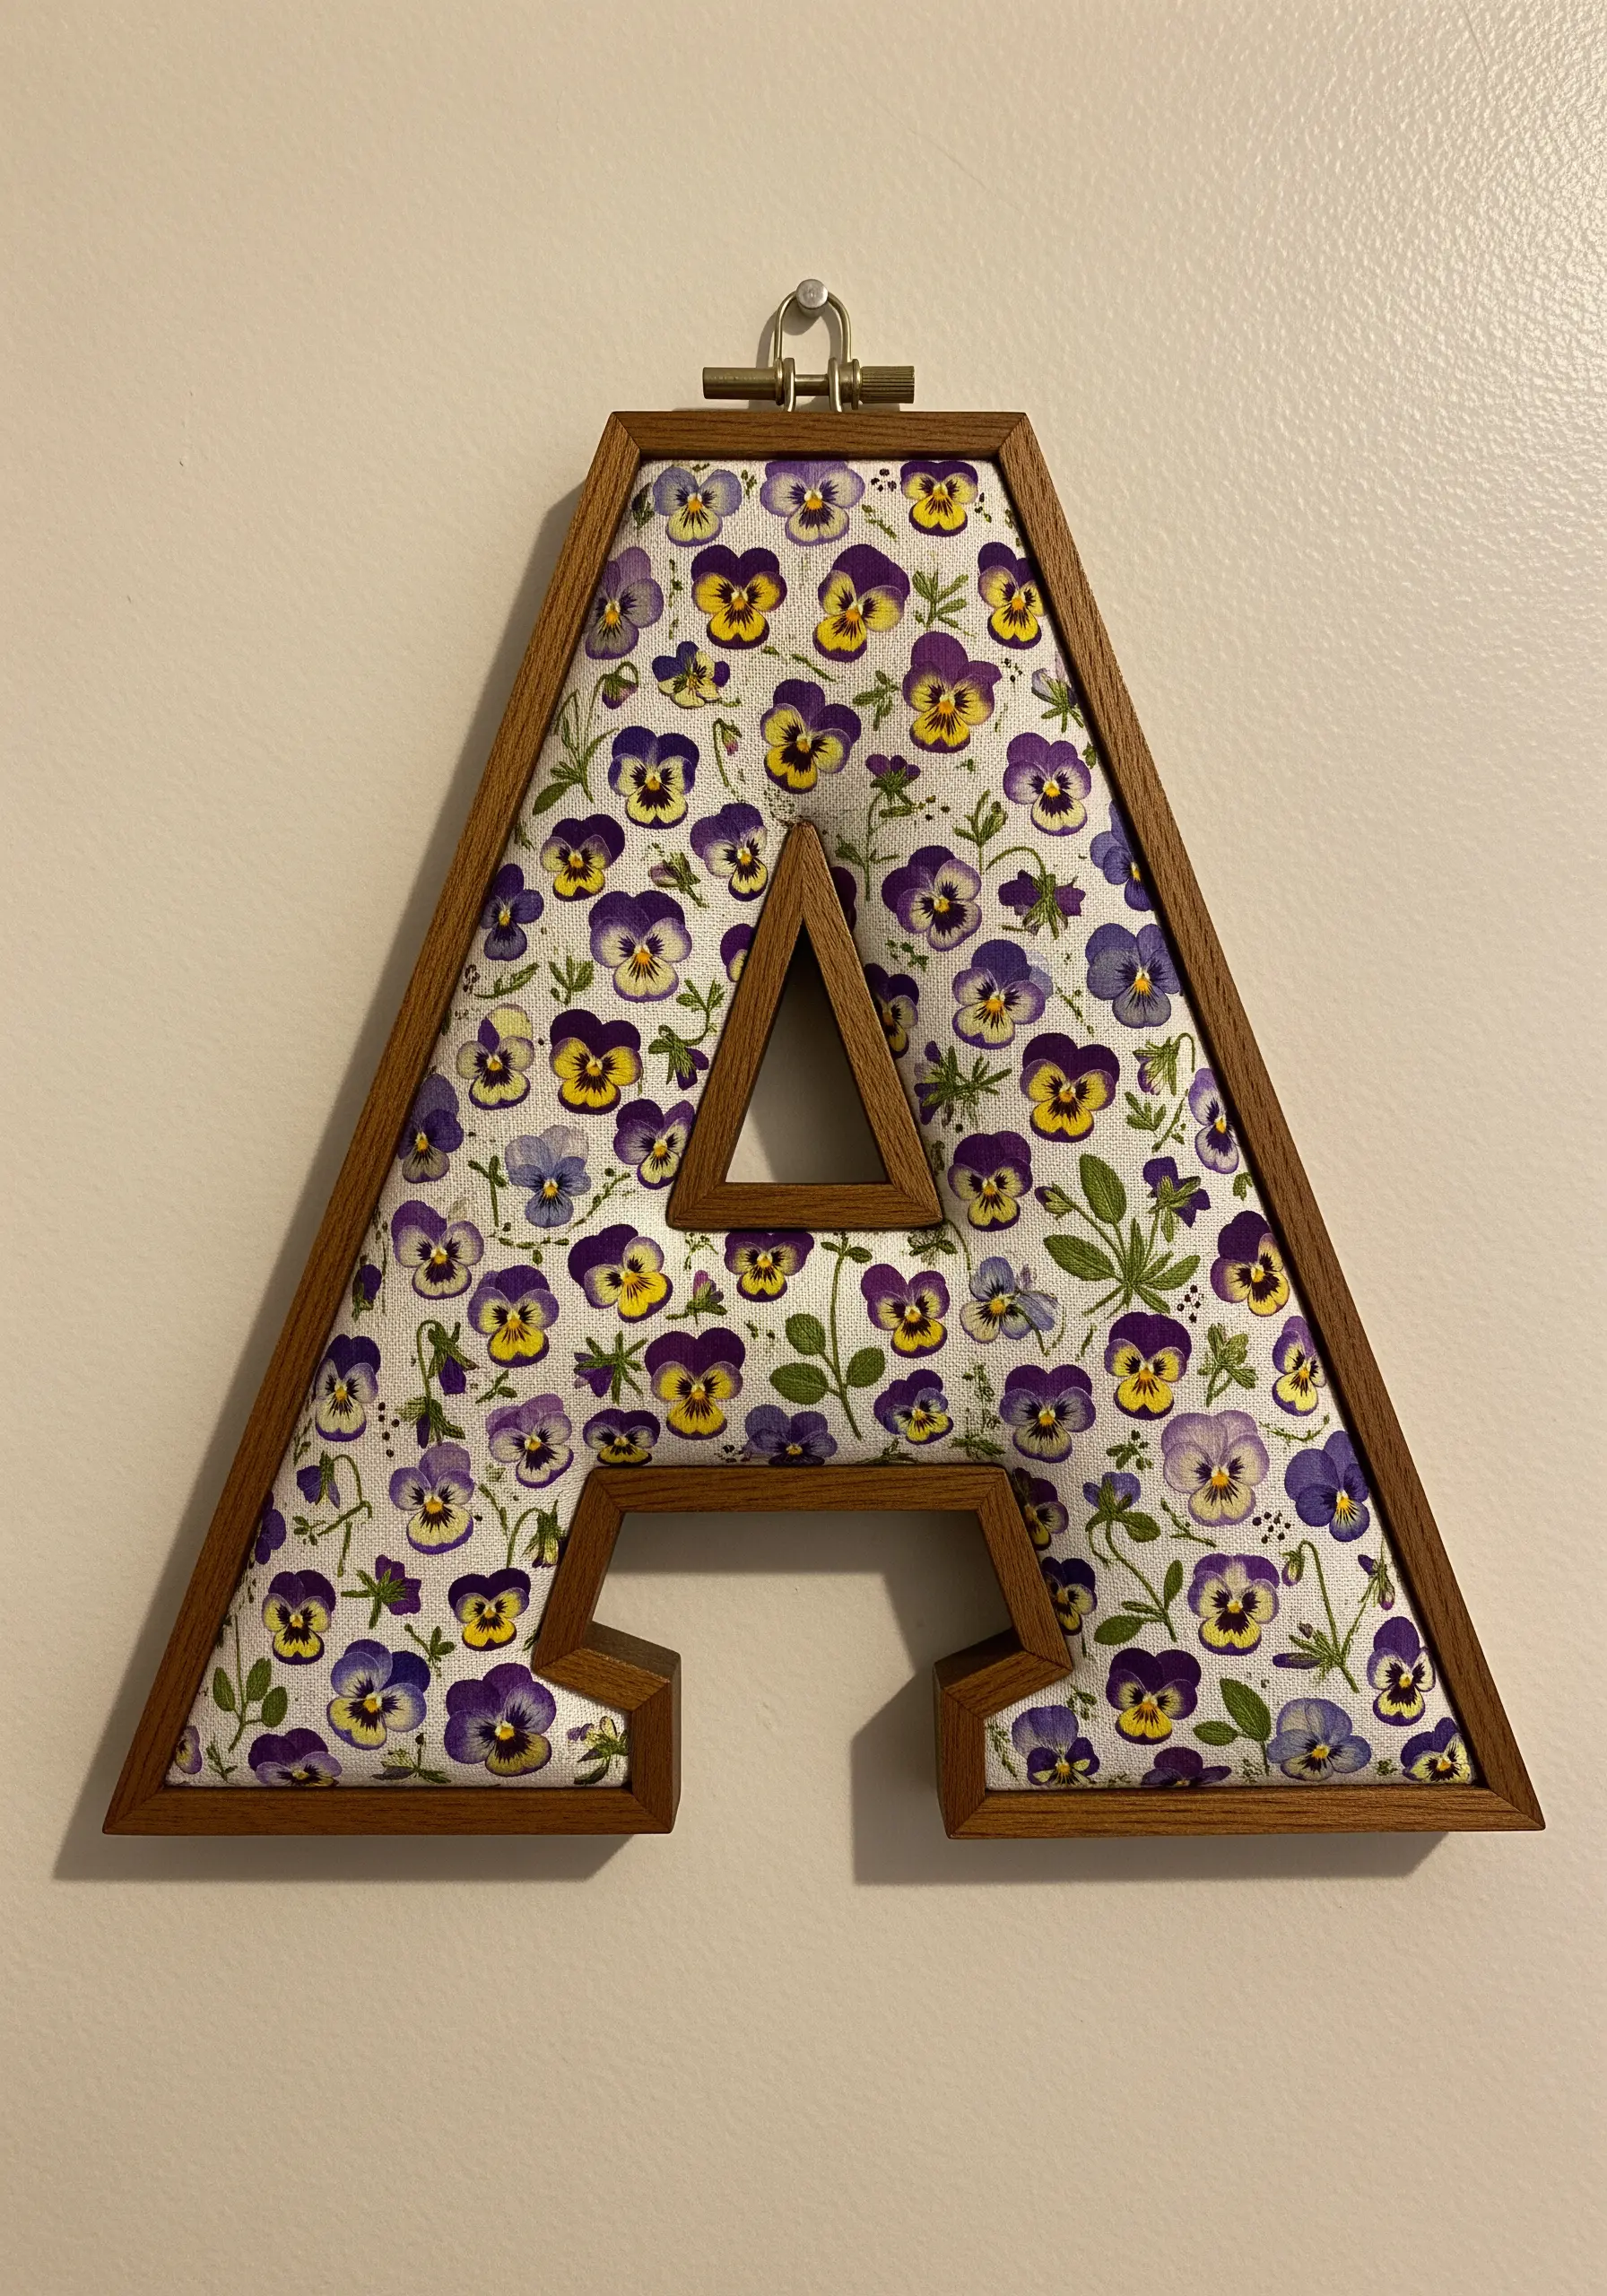
Let a beautiful floral fabric do the work for you by using it as the fill for a bold monogram.
Instead of stitching, find a special frame in the shape of a letter.
Carefully stretch your chosen fabric over the included insert or backboard, ensuring the pattern is centered and the fabric is taut.
This is a fast yet highly effective way to create personalized decor, perfect for using precious fabric scraps you’ve been saving.
21. Add Detail to Classic Strawberry Motifs
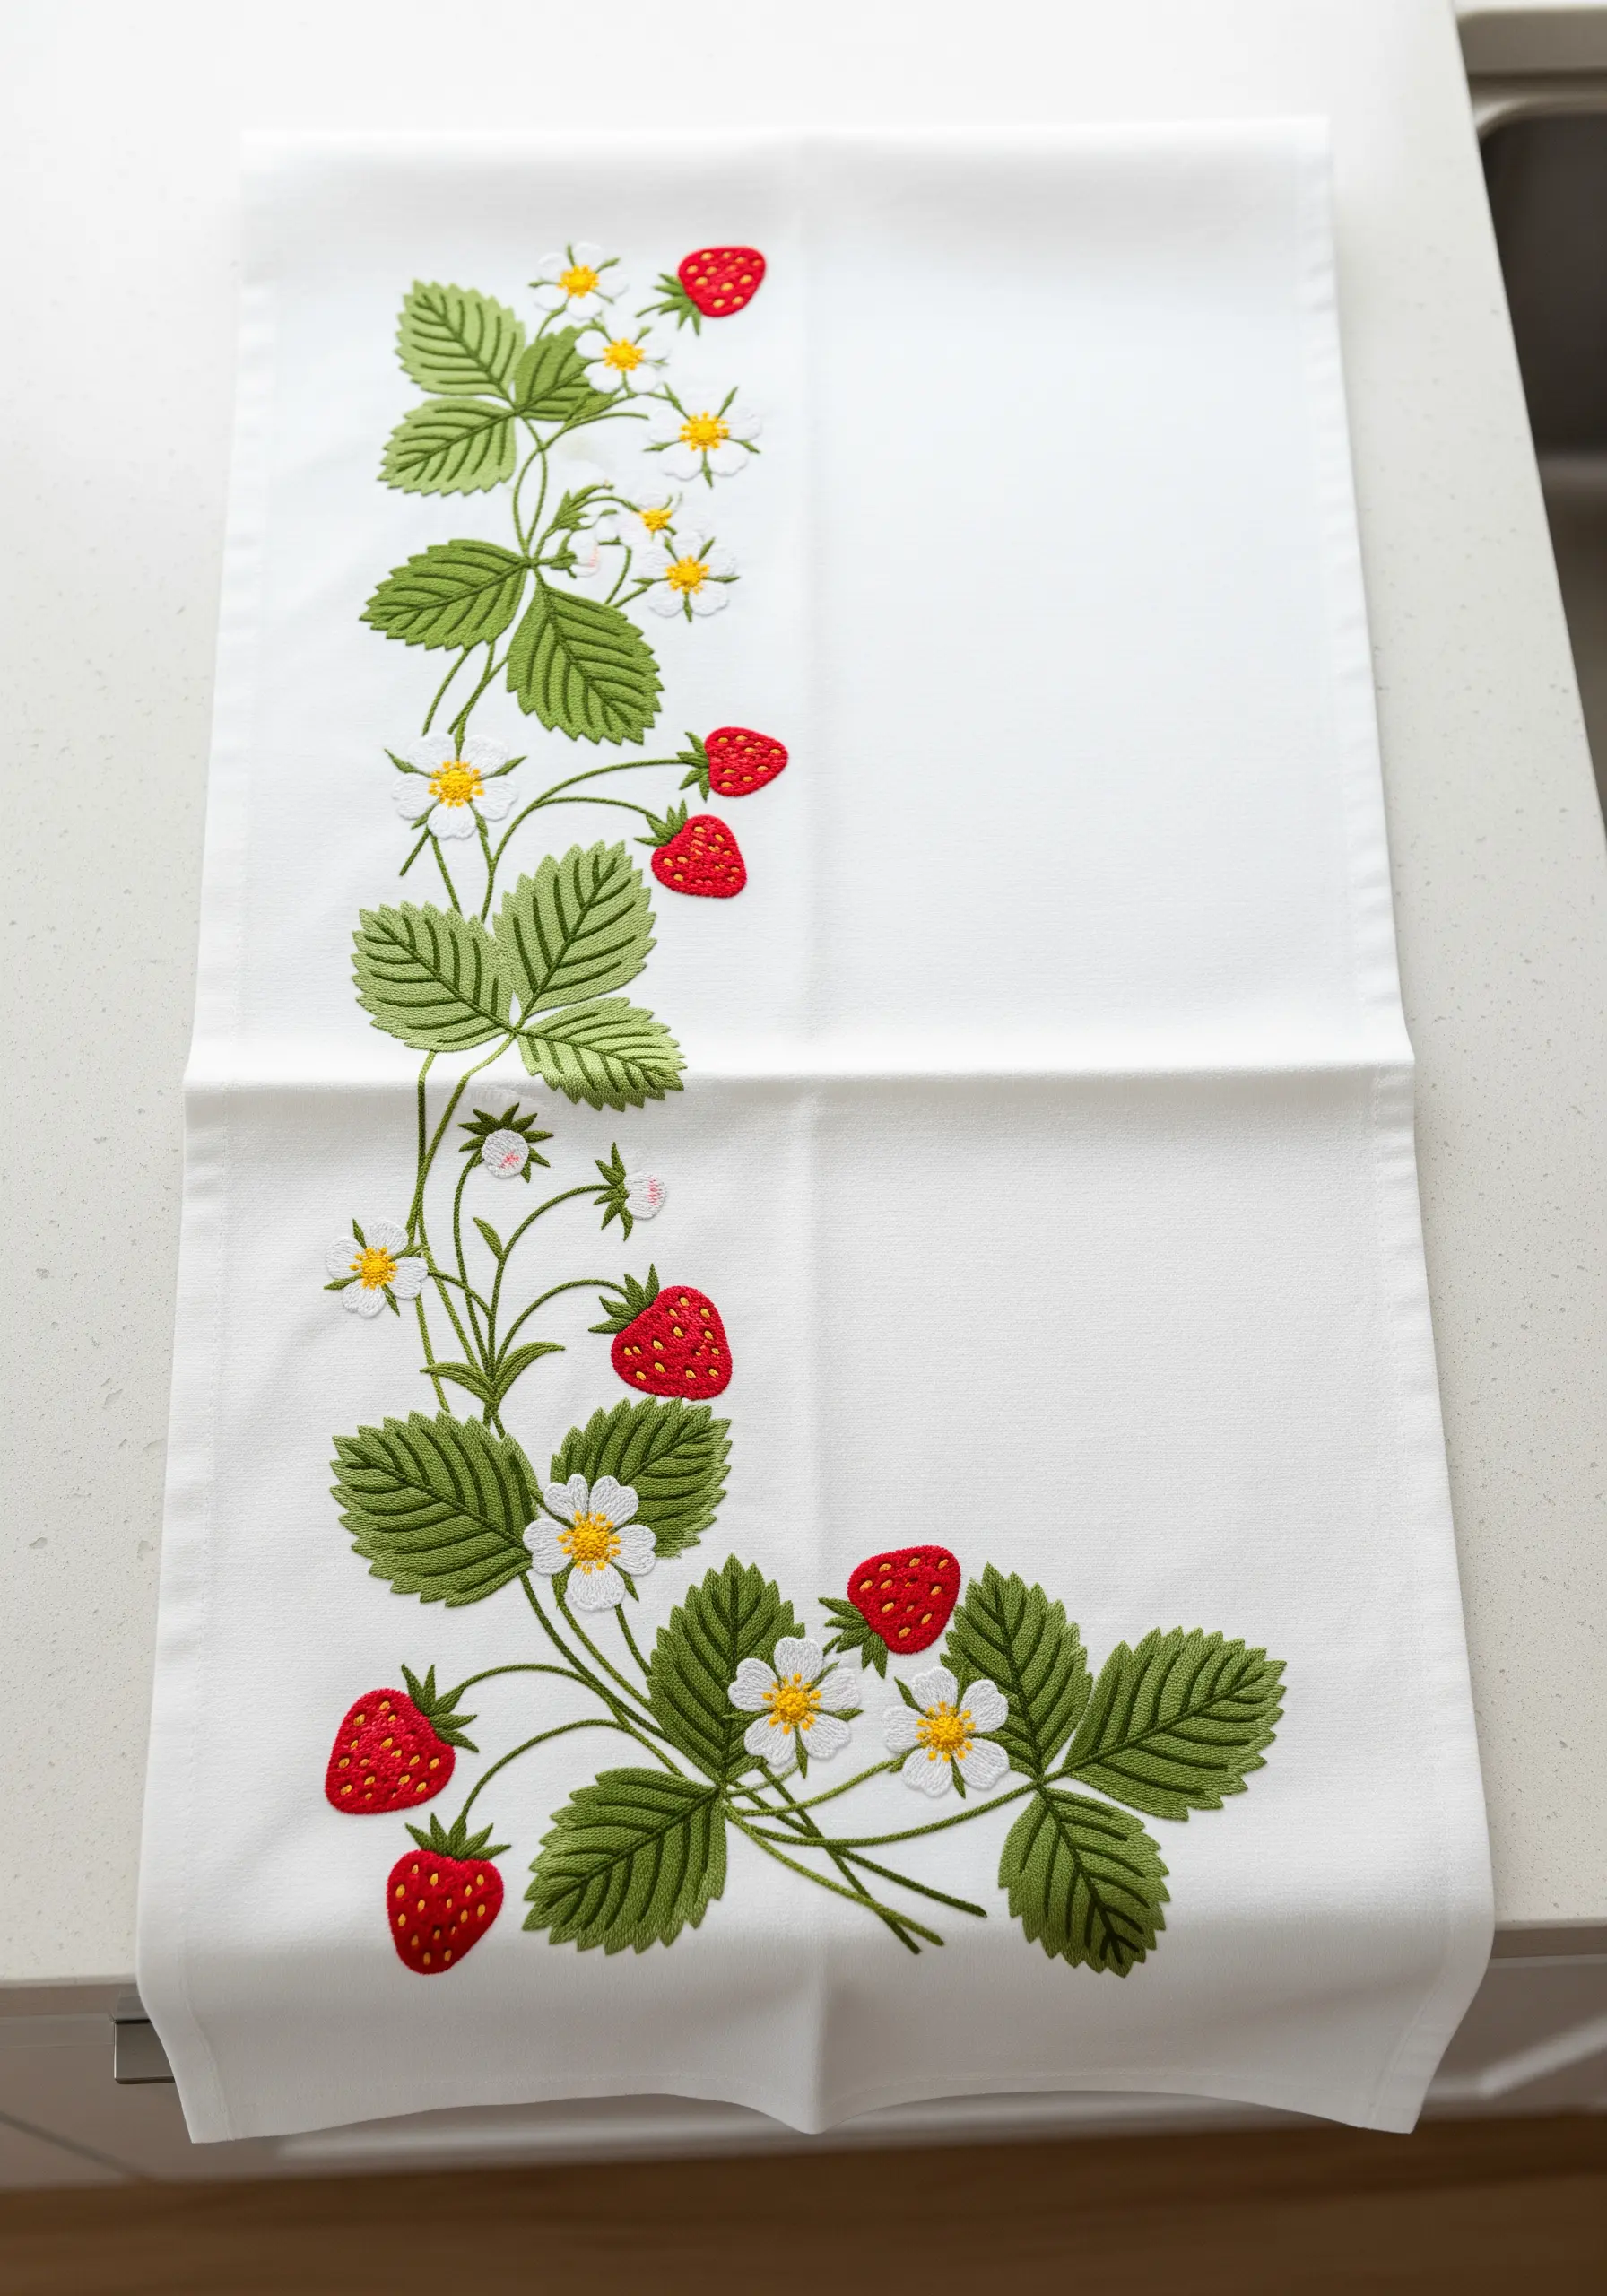
Elevate a traditional strawberry design with attention to the smallest details.
For the leaves, use a fishbone stitch to create a prominent central vein and a natural, textured appearance.
After filling the strawberries with a smooth satin stitch, add the seeds using tiny, single-strand French knots in a contrasting pale yellow.
These small additions are what separate a simple motif from a refined piece of botanical embroidery.
22. Create a Celestial Scene with Mixed Media

Combine fabric appliqué, embroidery, and embellishments to craft a magical night sky scene.
First, appliqué a crescent moon shape from a dark navy fabric onto a lighter blue base.
Next, embroider the delicate stems and leaves emerging from the moon.
Finally, attach translucent pressed flowers and add tiny seed beads or metallic French knots for stars. This layering of materials creates a dreamlike composition with captivating depth and sparkle.
23. Stitch a Series of Wildflower Studies
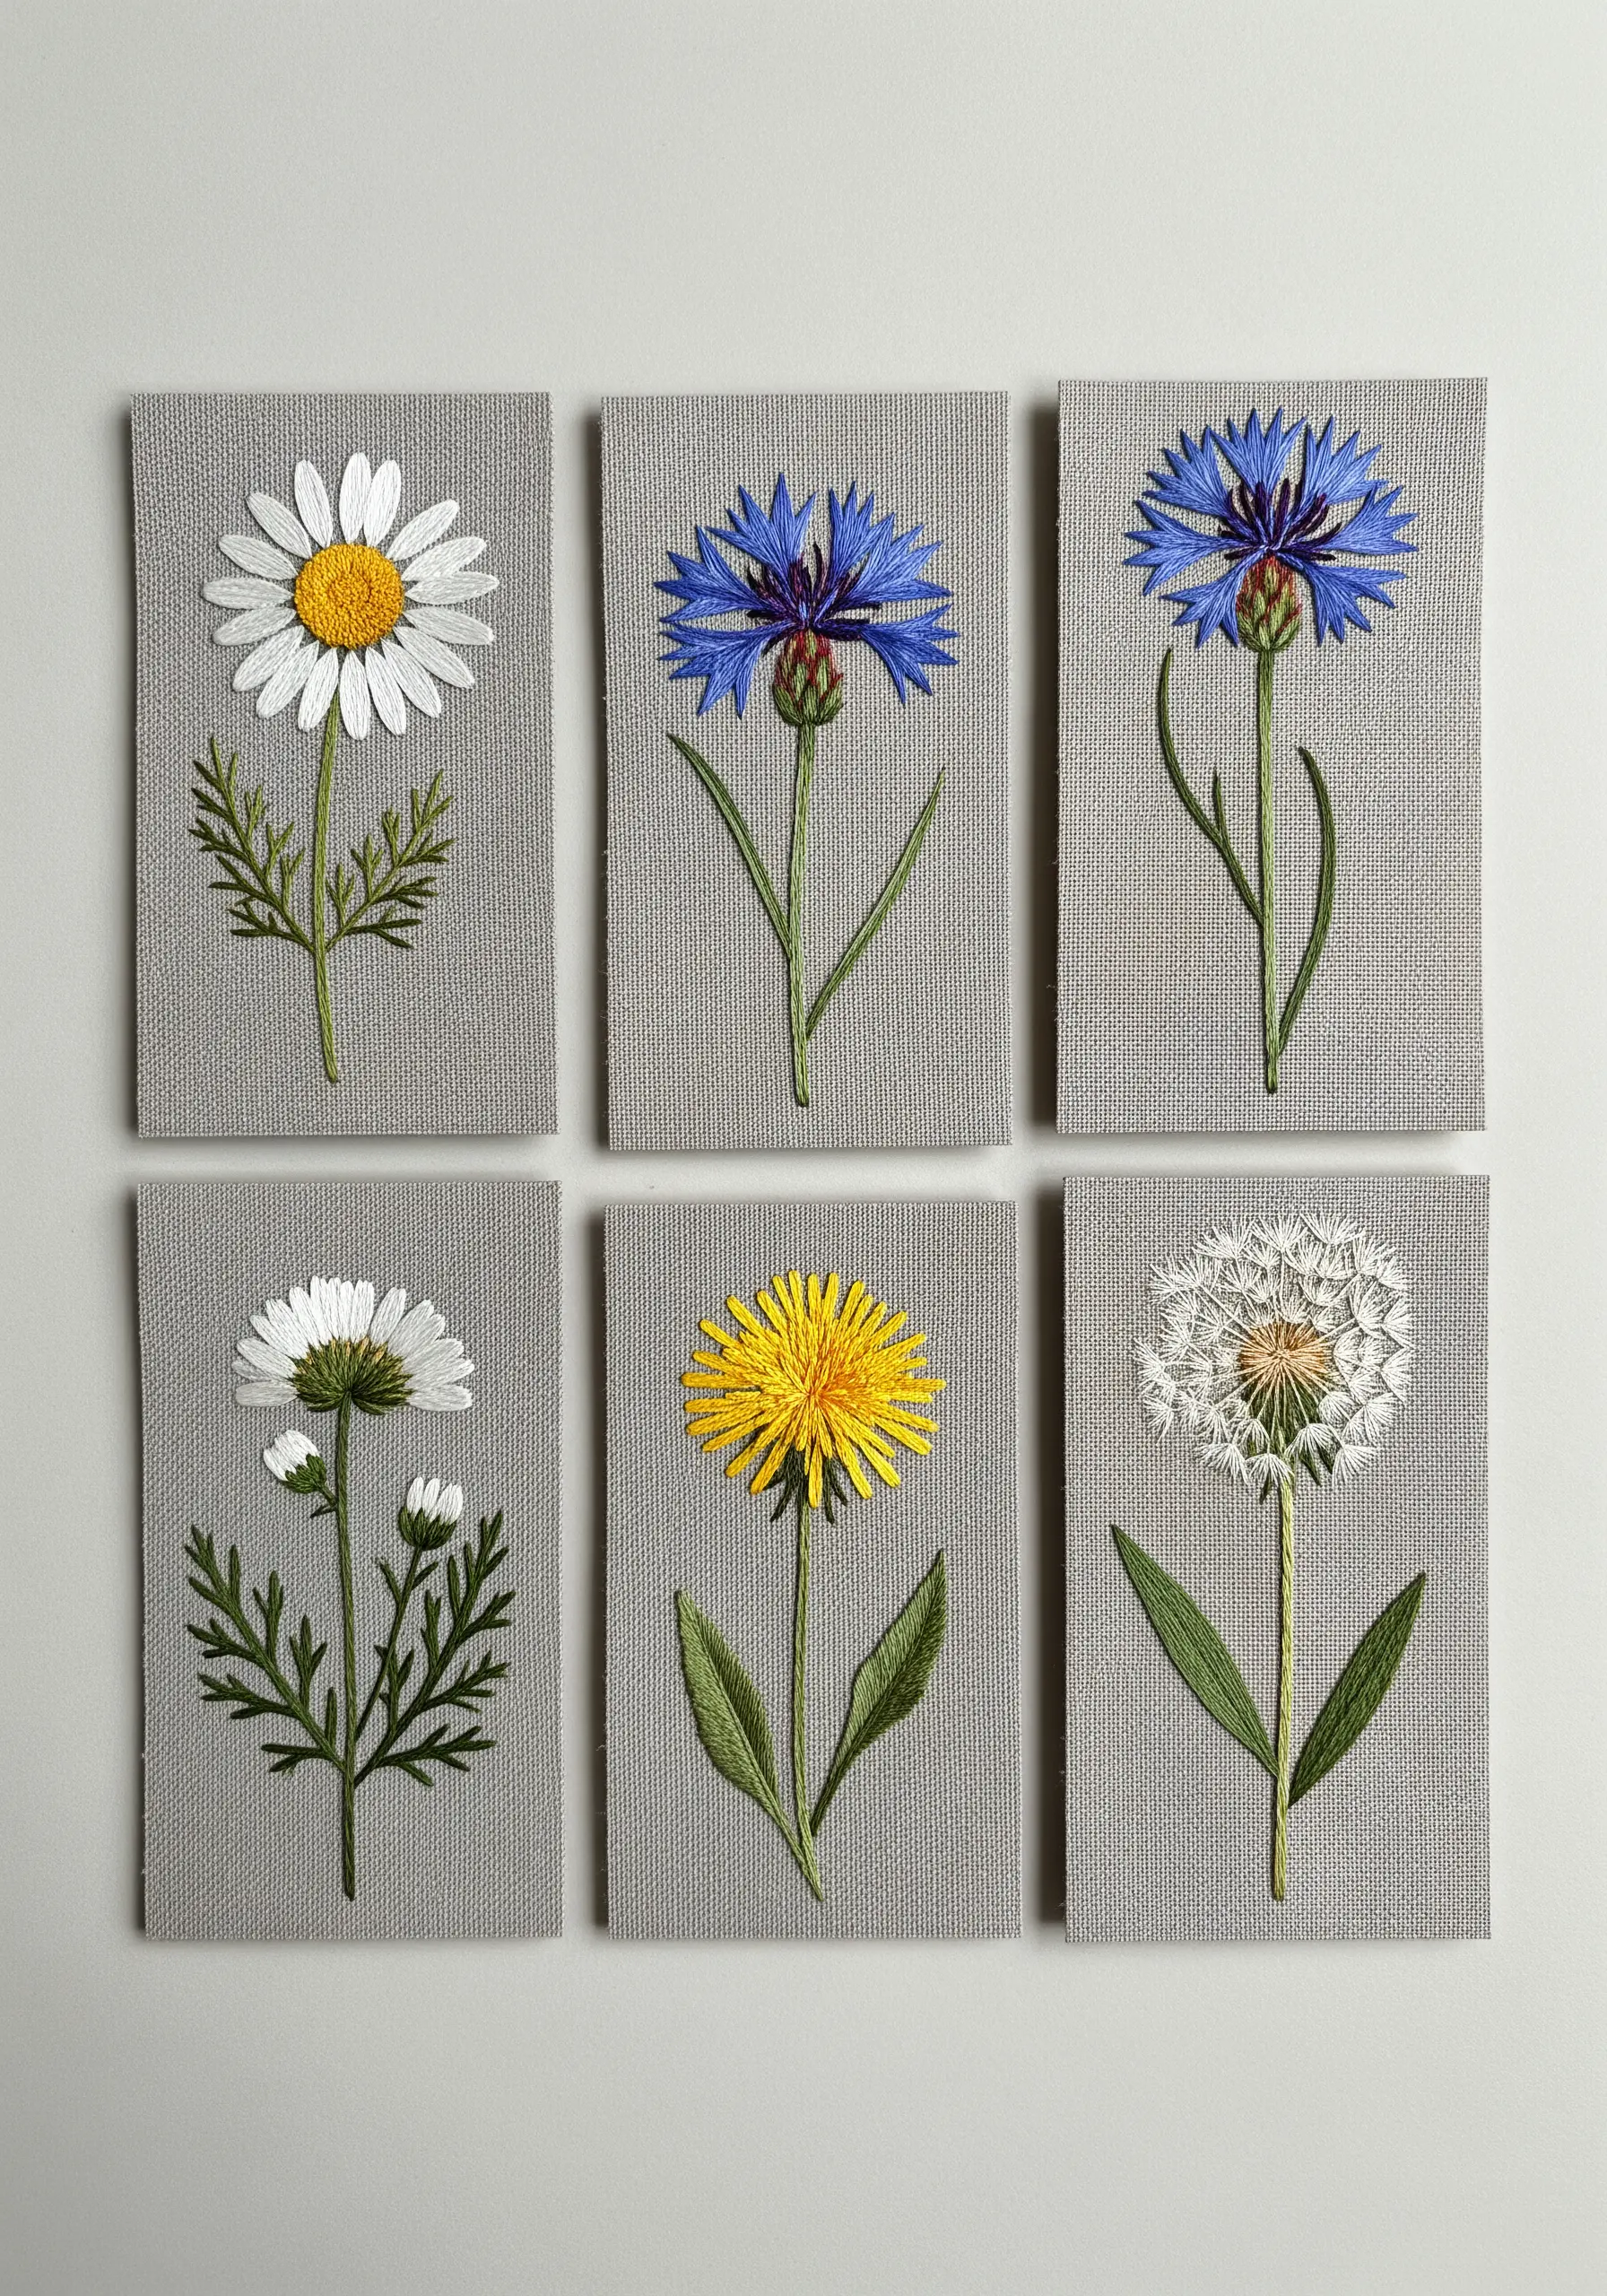
Create a sophisticated gallery wall by stitching a series of individual wildflower studies on matching fabric panels.
Choose a high-quality linen in a neutral color, like grey or oatmeal, as your consistent background.
Stitch a different wildflower—a daisy, a cornflower, a dandelion—on each panel, paying close attention to botanical accuracy.
Mounting them as a group of six transforms simple embroideries into a curated, impactful art installation.
24. Make a Statement with Large-Scale Embroidery
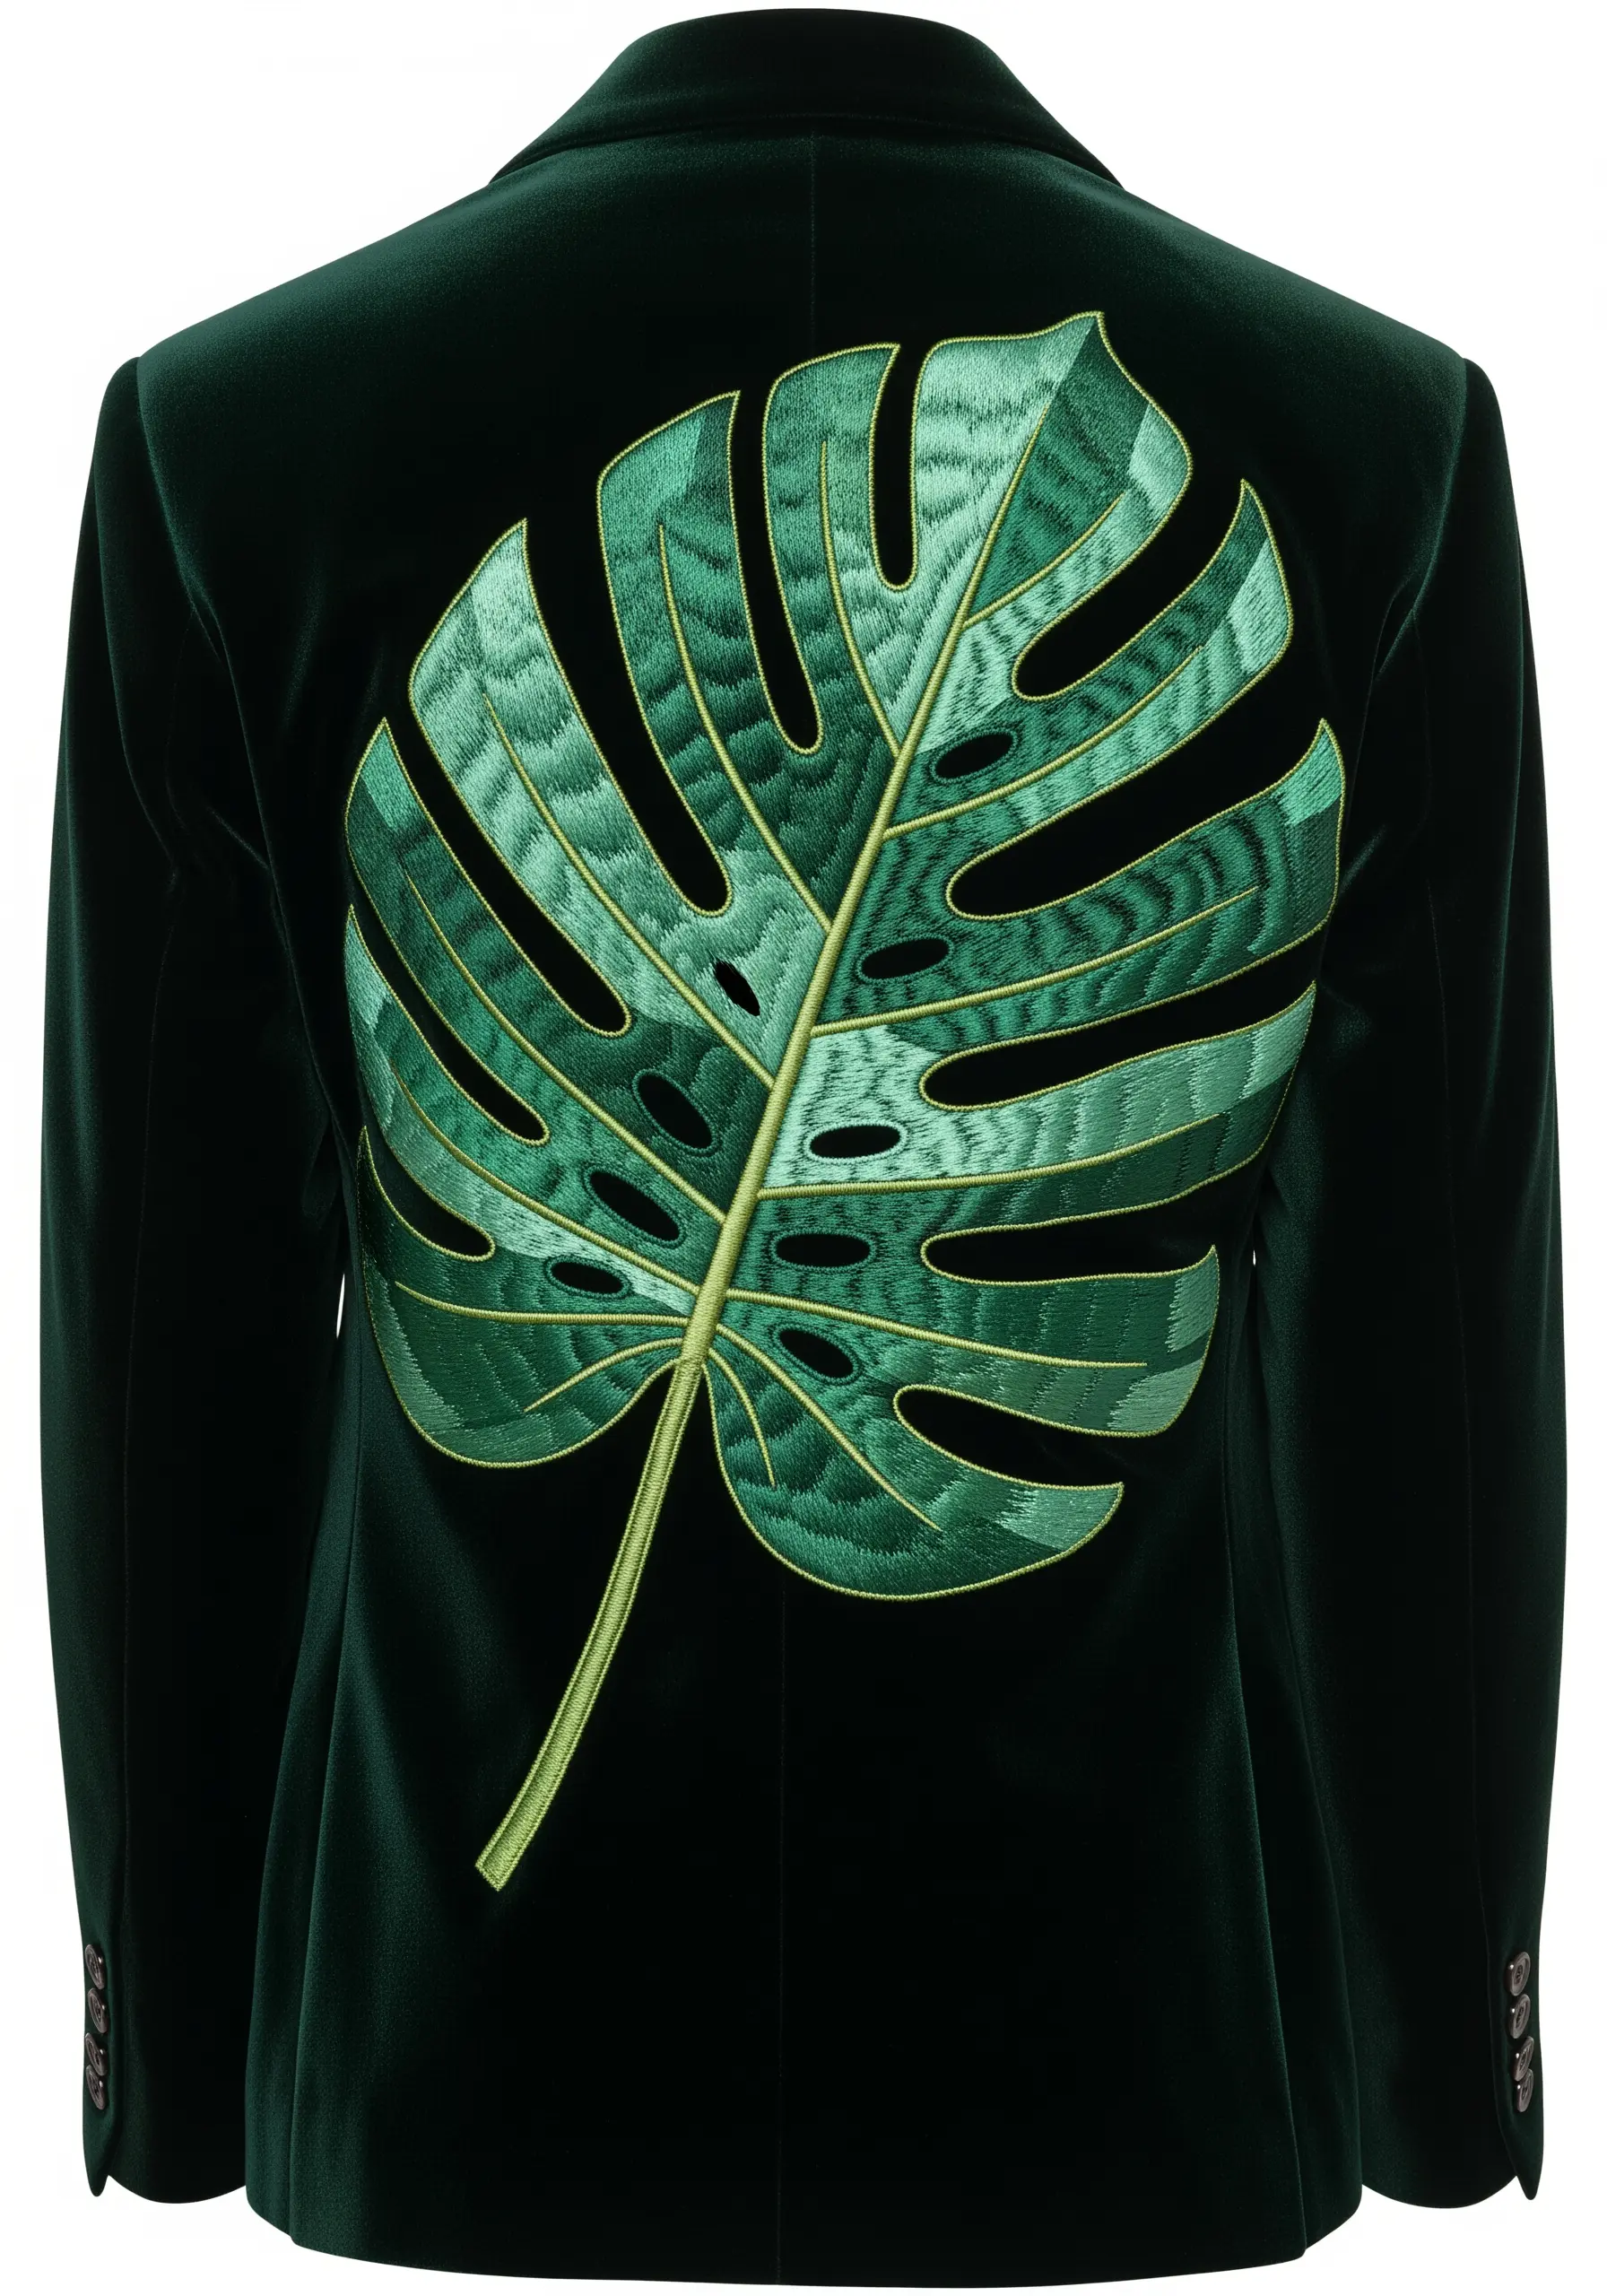
For a design that covers a large area, like the back of a jacket, structure is everything.
Break down the large monstera leaf into smaller, manageable sections.
Use a long-and-short stitch to fill each section, creating a smooth gradient of color.
Then, go back and outline each section and the entire leaf with a bold, couched stitch. This technique adds definition and a clean, graphic quality to the design, preventing it from looking flat.
25. Build a Landscape with Textural Stitches
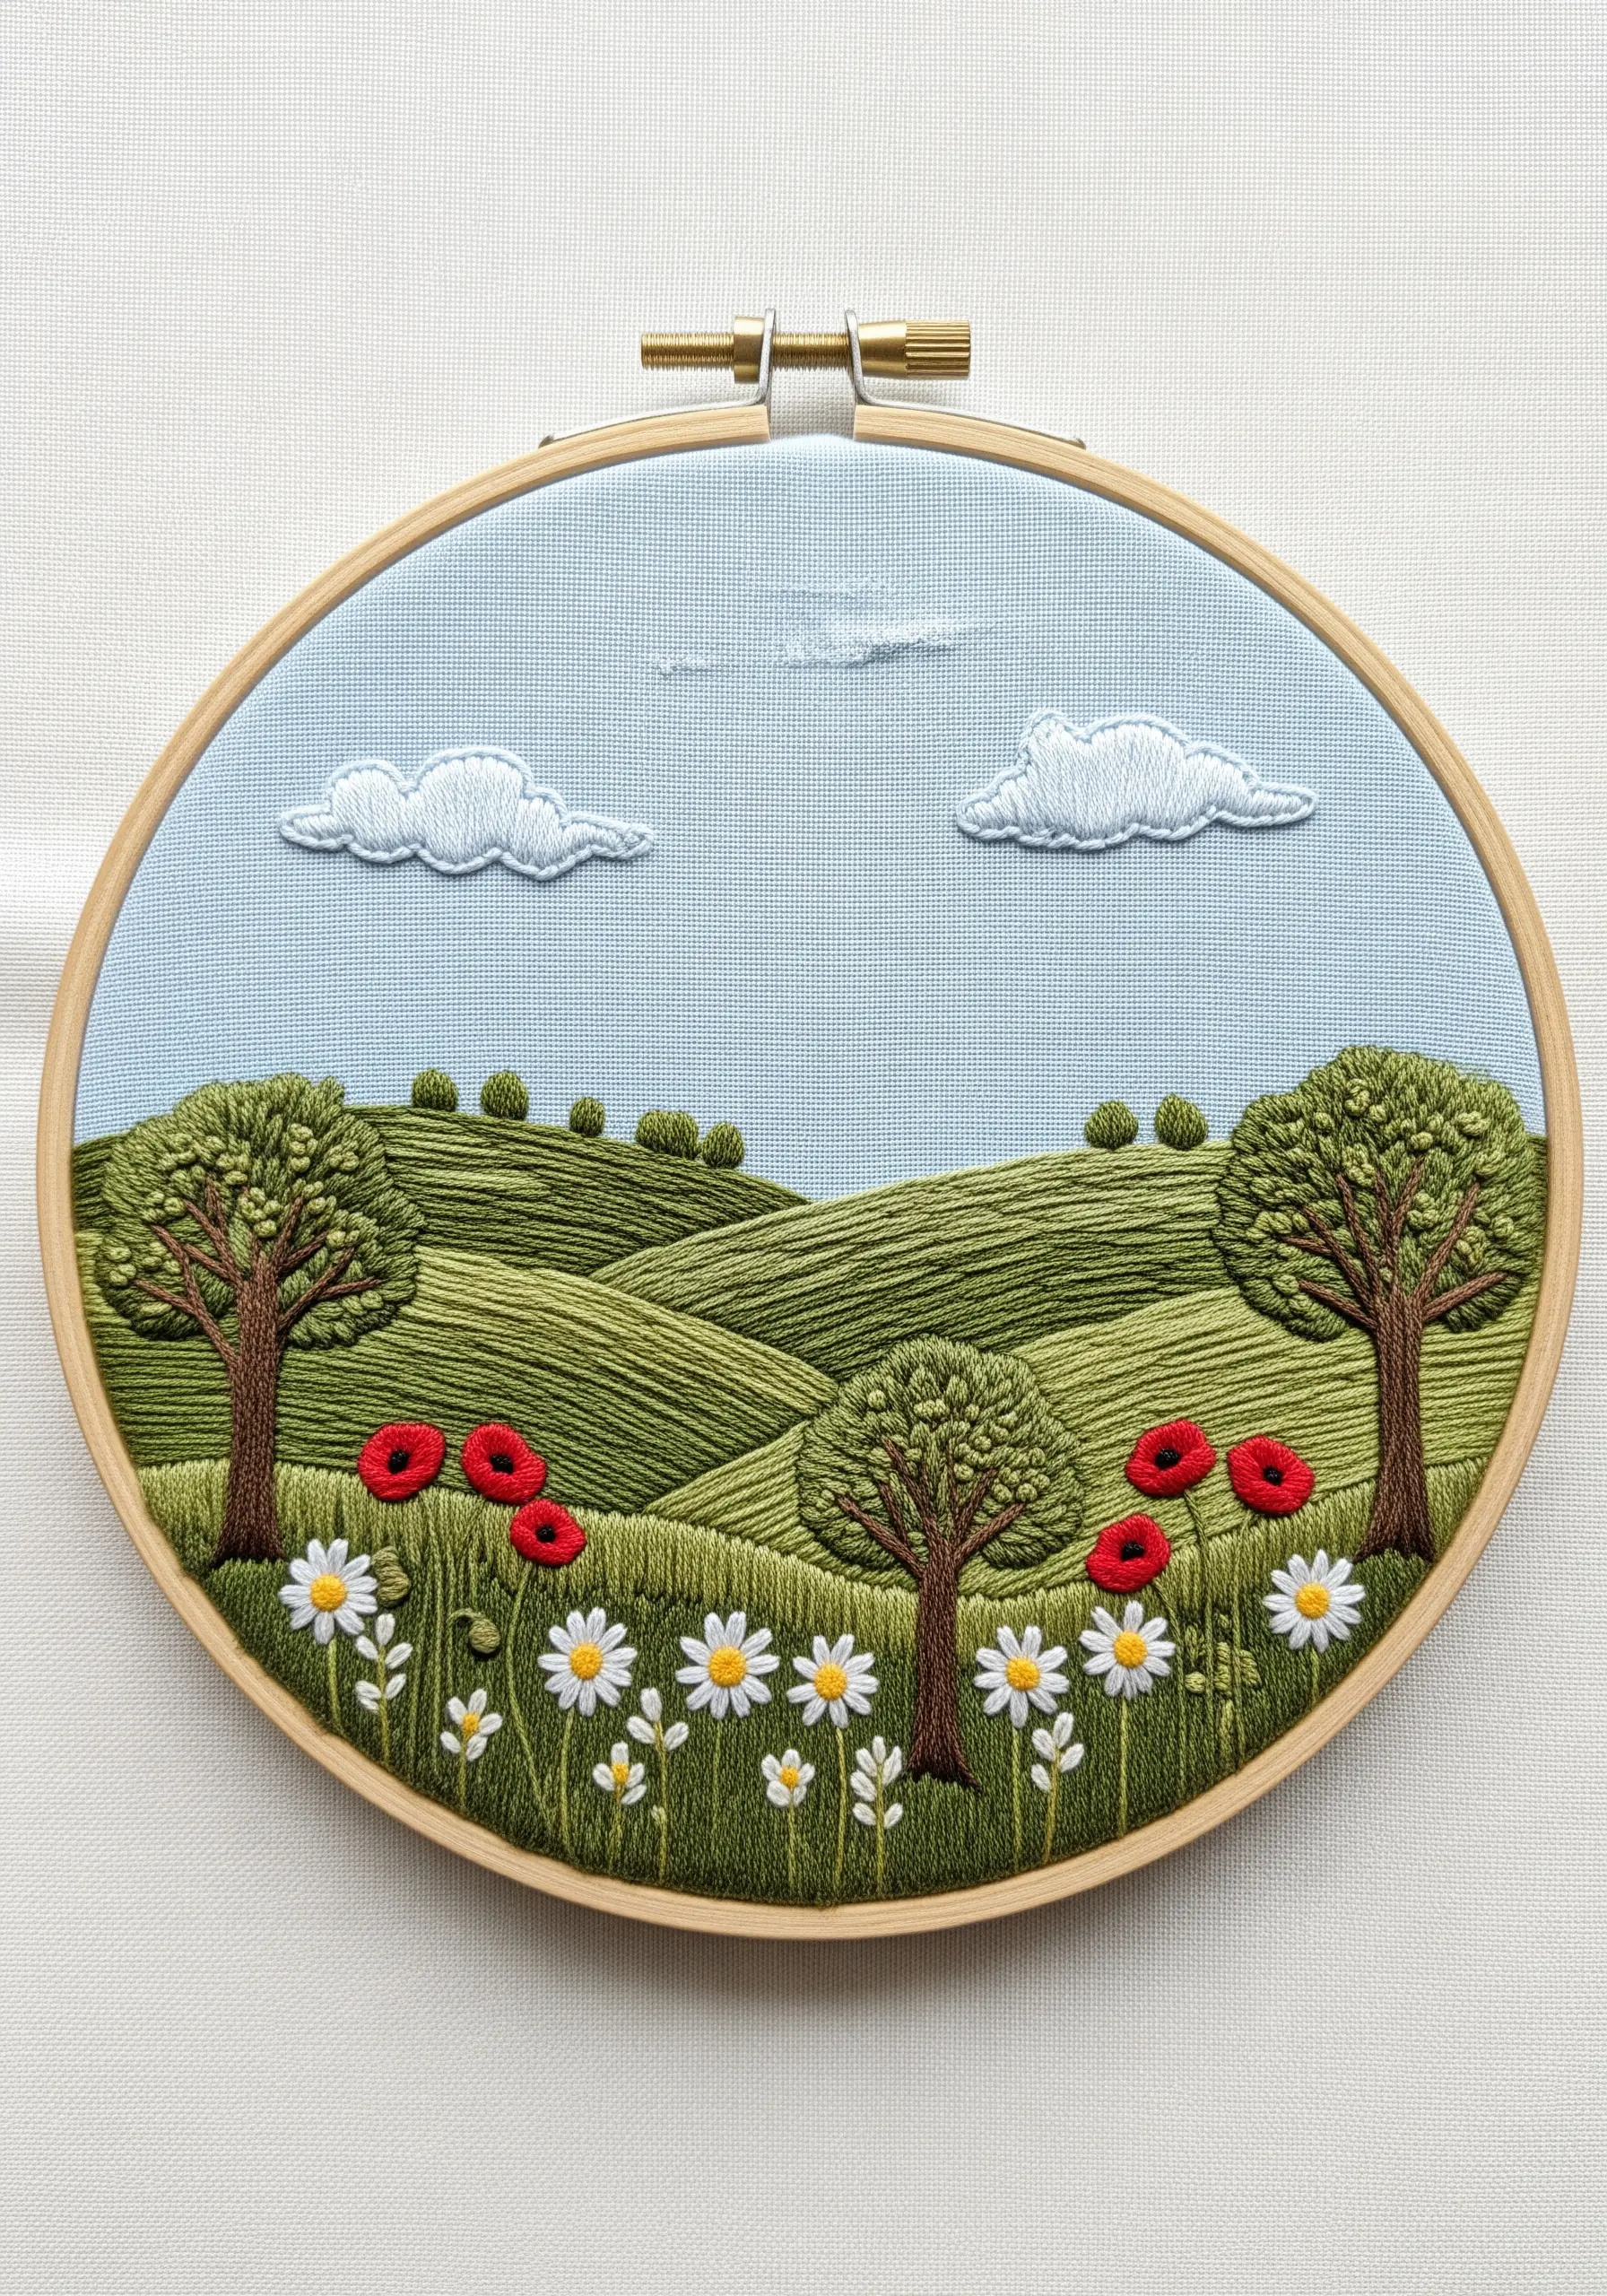
Create a sense of depth and perspective in an embroidered landscape by assigning a different stitch to each element.
Use a smooth satin stitch for the rolling hills to make them recede into the distance.
In the foreground, use highly textural stitches like French knots for the treetops and detached chain stitches for the flowers.
This variation in texture tricks the eye, making the foreground feel closer and the background more distant.
26. Use Negative Space to Frame Pressed Flowers
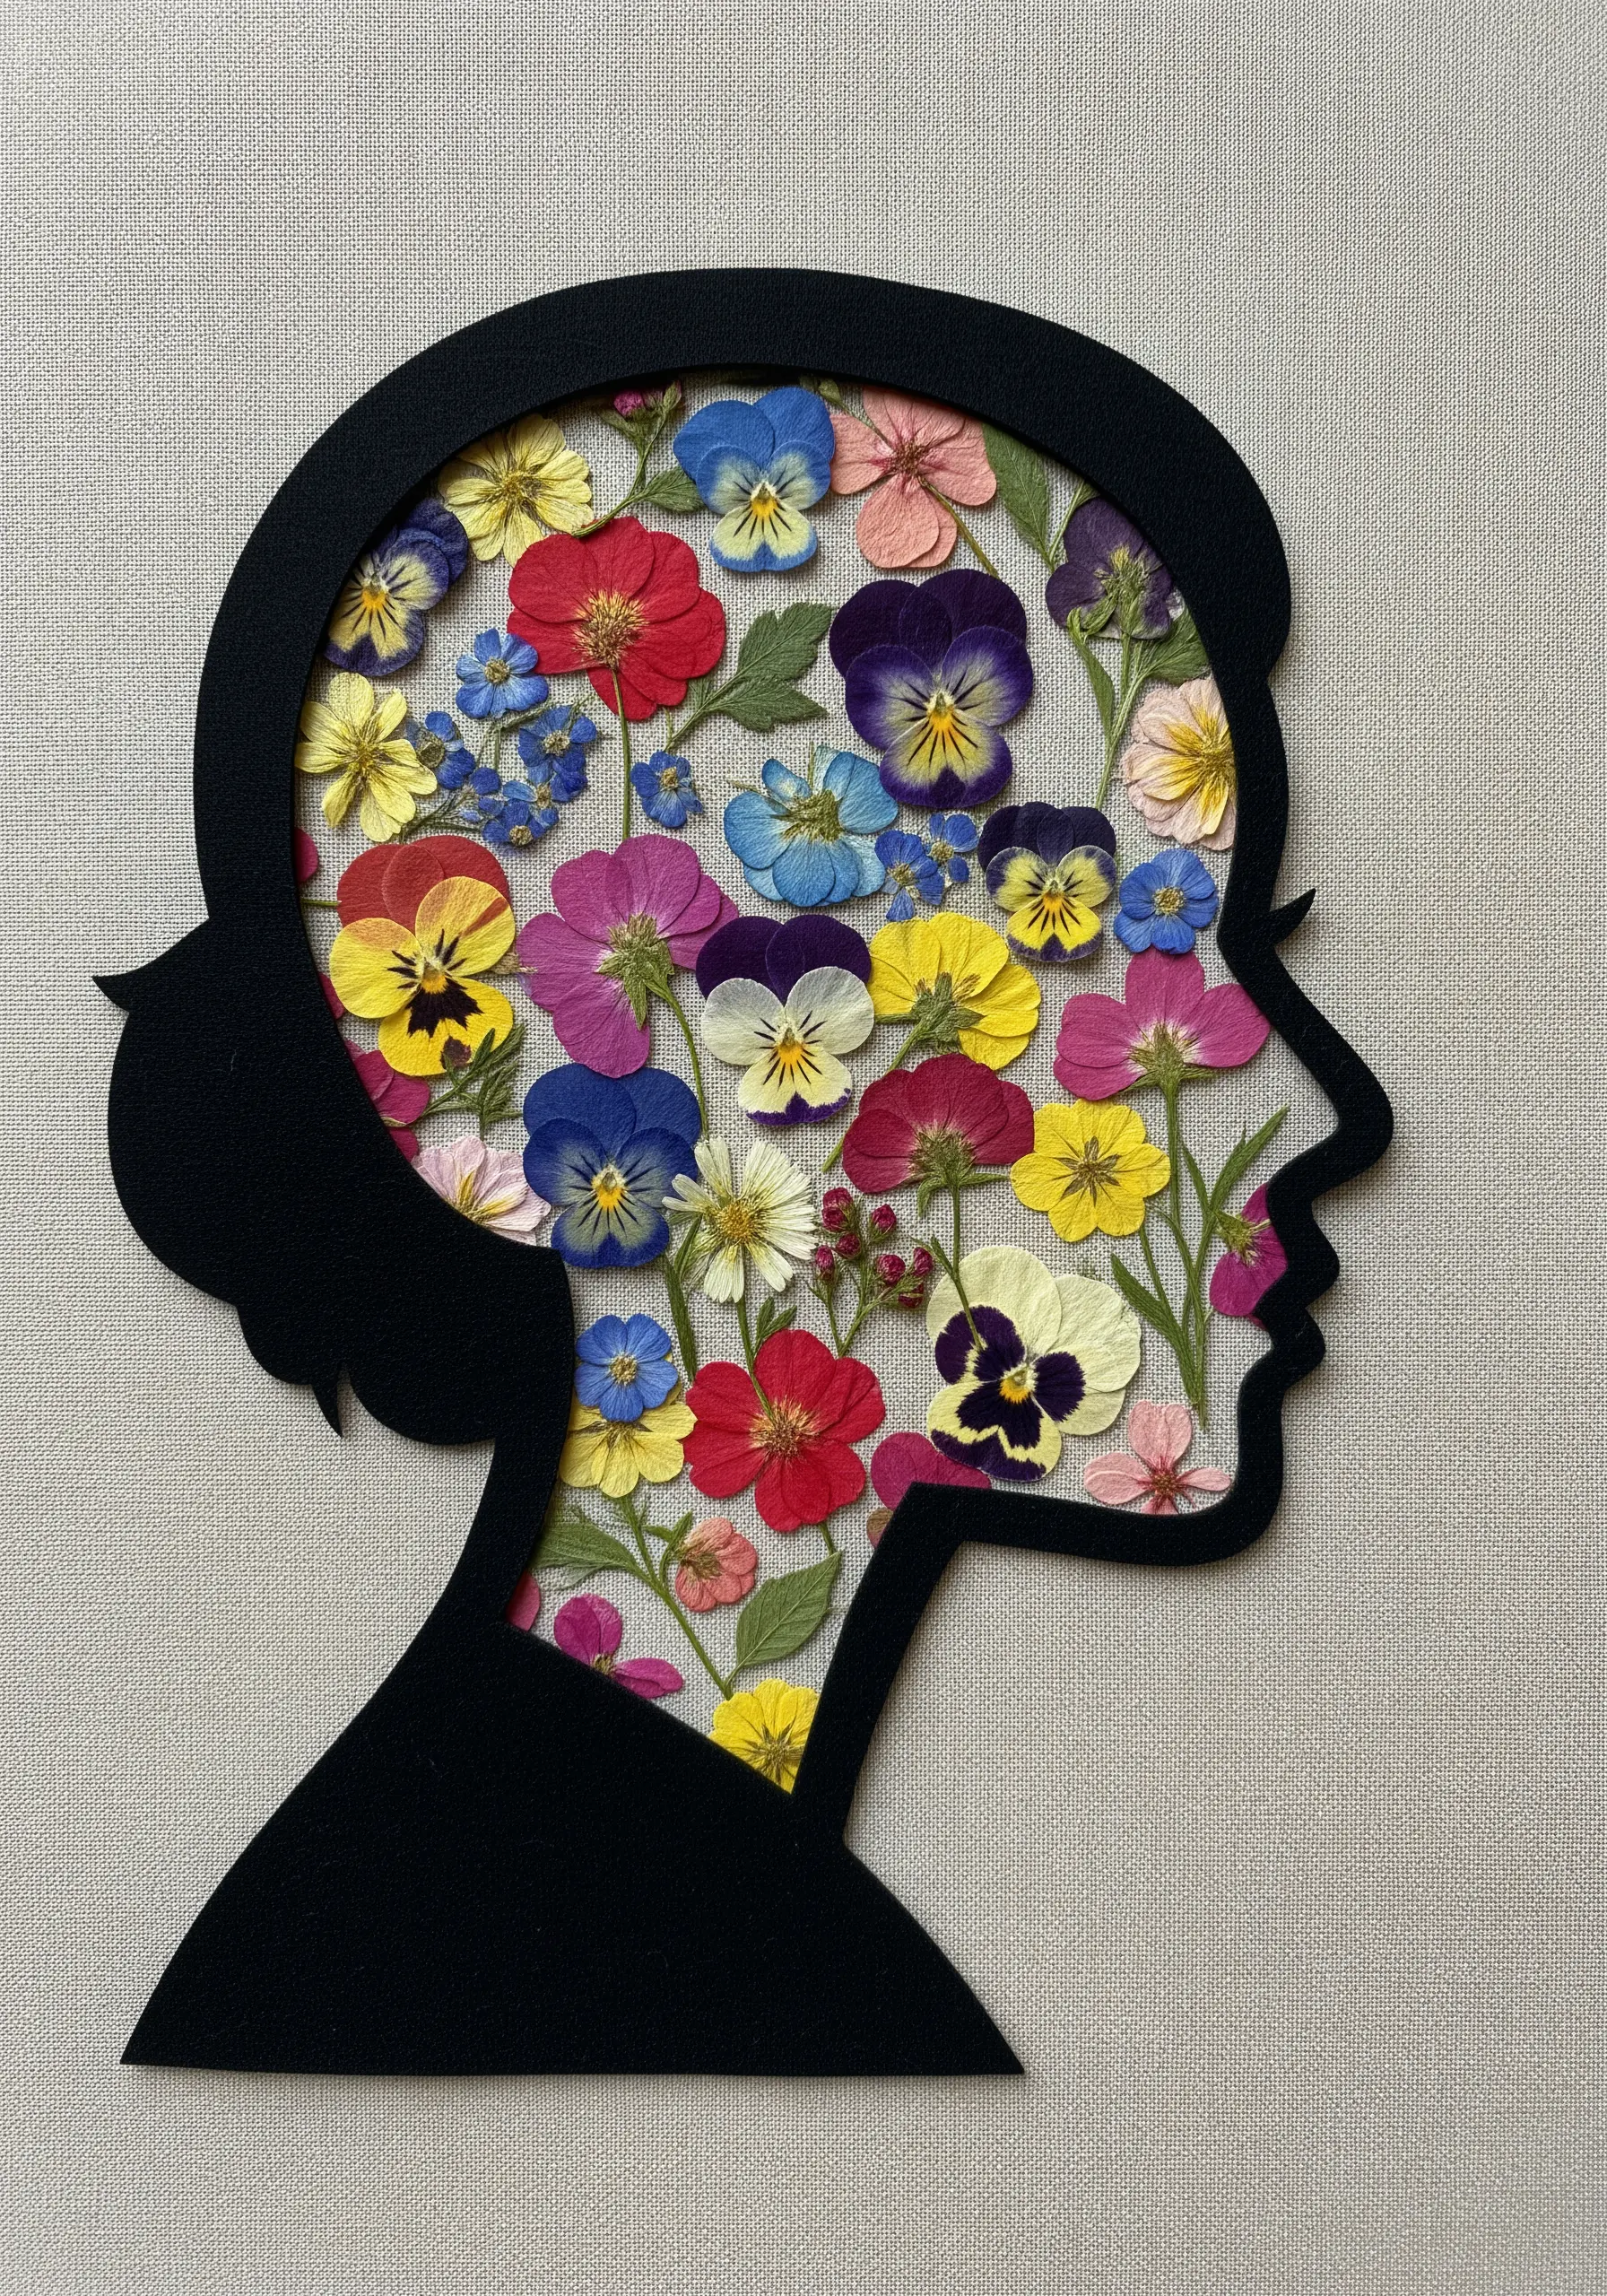
Create a striking composition by using a silhouette to frame a collage of colorful pressed flowers.
Cut your desired shape—like this profile—from a piece of dark, sturdy cardstock.
Arrange your pressed florals on a light background fabric, then carefully lay the cardstock silhouette over the top, securing it at the edges.
The contrast between the sharp, dark outline and the vibrant, delicate flowers inside creates a powerful and deeply personal piece of art.
27. Capture the Delicacy of a Dandelion Clock
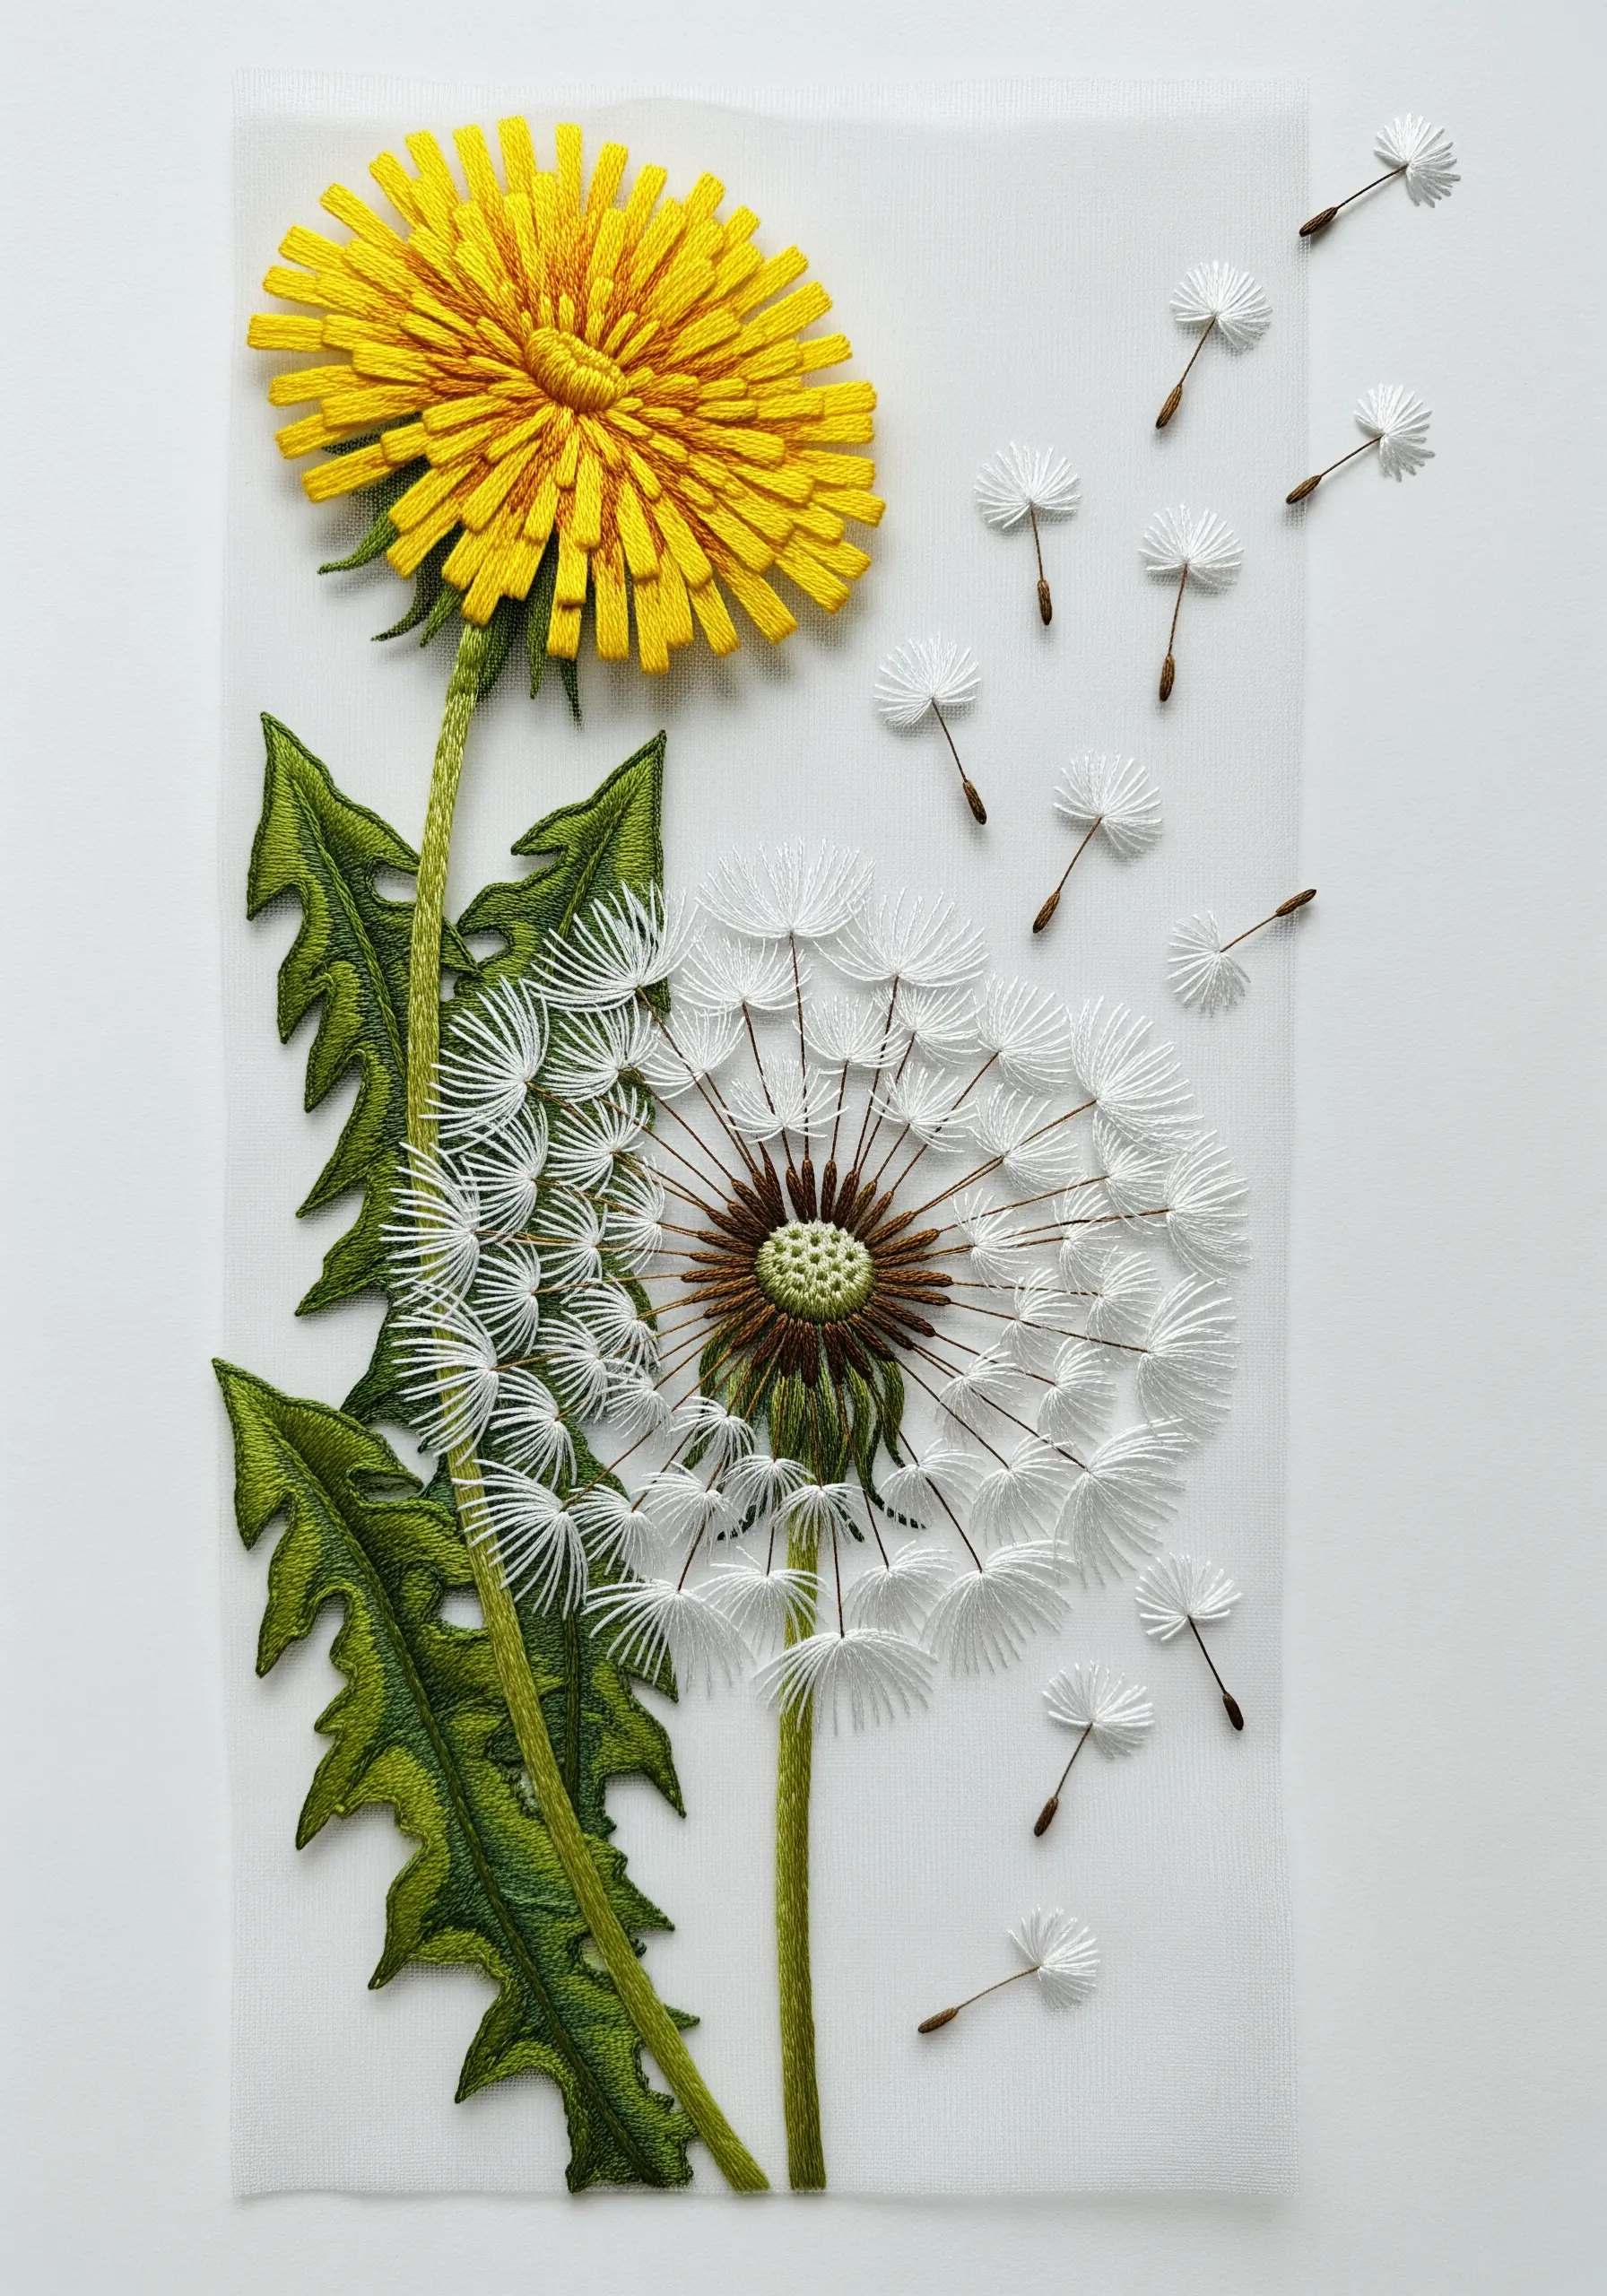
The magic of a dandelion seed head is its weightlessness, which you can capture with careful stitching.
For the central core, use a dense satin stitch or French knots in browns and greens.
Radiate single strands of white floss outwards for the pappus, finishing each one with a tiny V-shape or detached chain stitch.
To create the illusion of seeds floating away, add a few detached, free-floating seed stitches scattered across the fabric.
28. Add a Subtle Border to Sheer Curtains
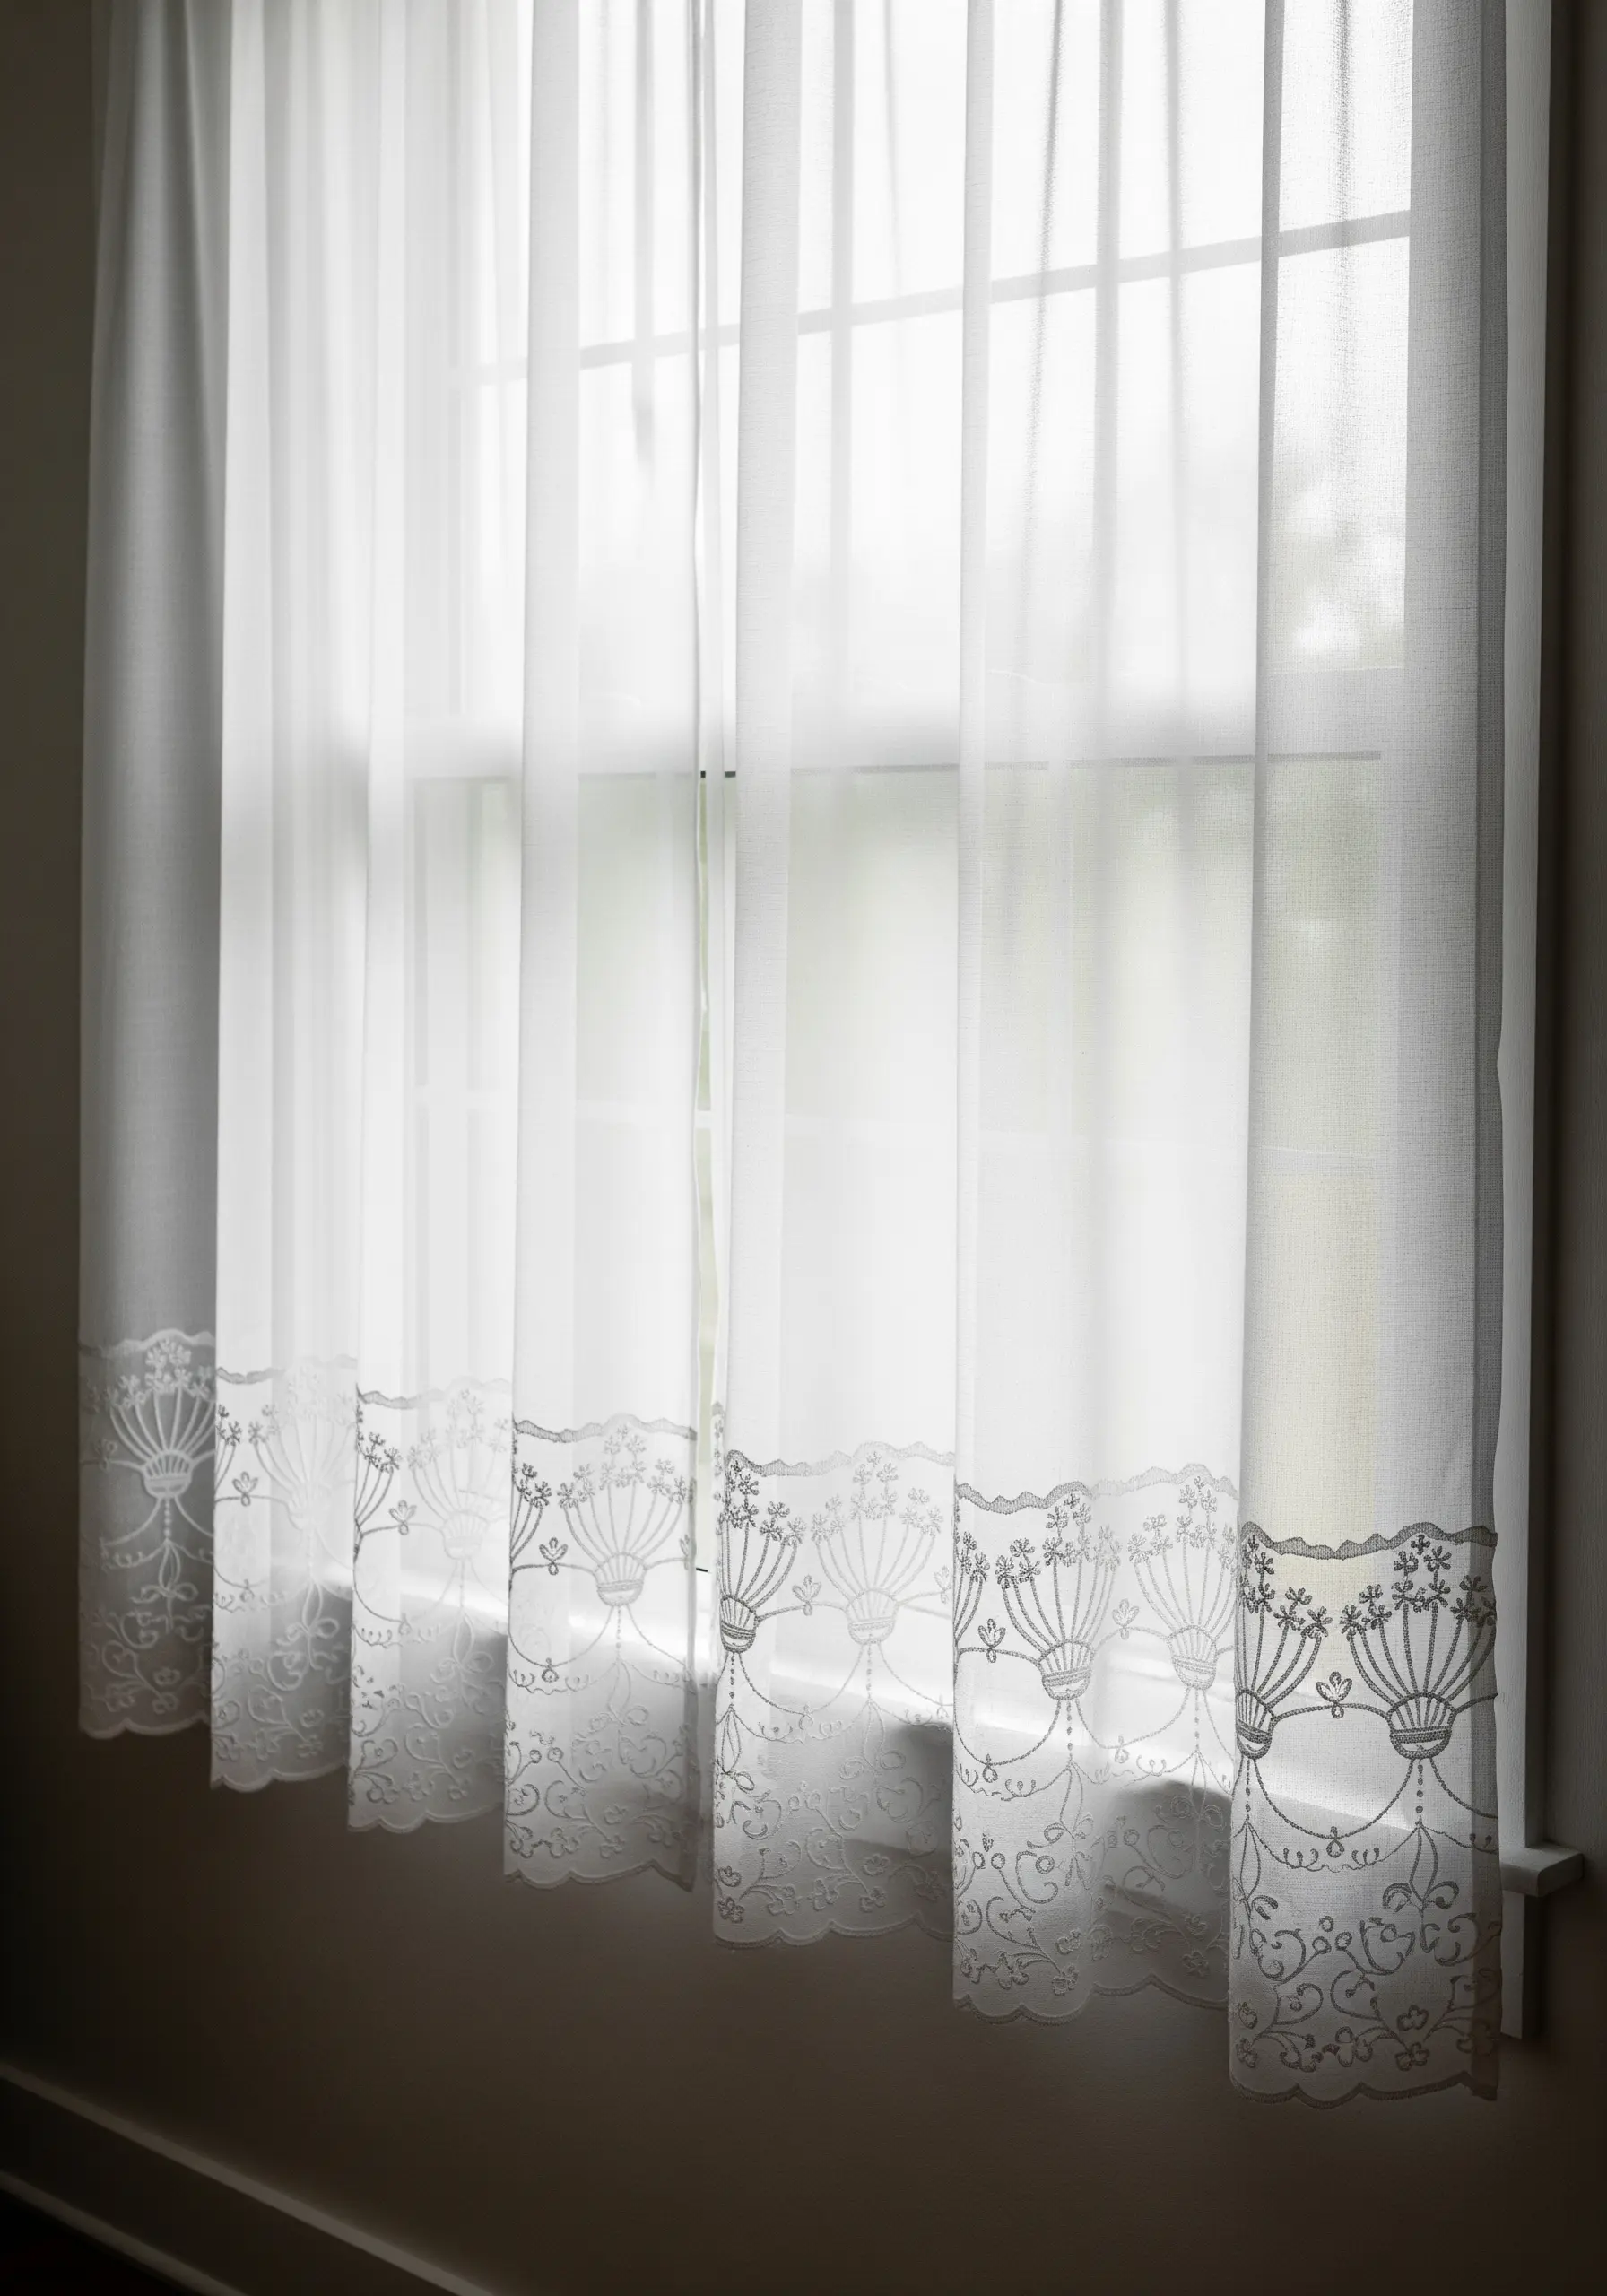
Embroidering on sheer fabric requires a design that is as beautiful from the back as it is from the front.
Choose a reversible stitch like the stem stitch or Holbein stitch (double running stitch) for your pattern.
A simple, tone-on-tone color scheme—white thread on white fabric—creates an elegant, light-filtering effect without sacrificing privacy.
The result is a custom detail that feels both timeless and deeply personal.
29. Design a Symmetrical Pressed Flower Mandala

The calming beauty of a mandala comes from its perfect symmetry, which requires careful planning.
Before you begin, use a water-soluble fabric pen to lightly draw guidelines on your fabric—a central point, circles, and dividing lines.
Use these lines to perfectly mirror the placement of your ferns, pansies, and lavender sprigs on each side.
This structured approach is the key to achieving a balanced, harmonious composition that radiates peace and precision.
30. Stitch on Satin for a Touch of Luxury

Working on satin can be challenging, but the lustrous result is worth it.
To prevent the delicate fabric from snagging or puckering, always use a very fine, sharp needle (like a size 10) and bind the inner ring of your embroidery hoop with cotton twill tape.
For the orchid’s petals, use silk or rayon floss, as its high sheen will complement the satin background beautifully.
Take your time and keep your tension even for a smooth, flawless finish.
31. Use Real Flowers as Your Color Palette
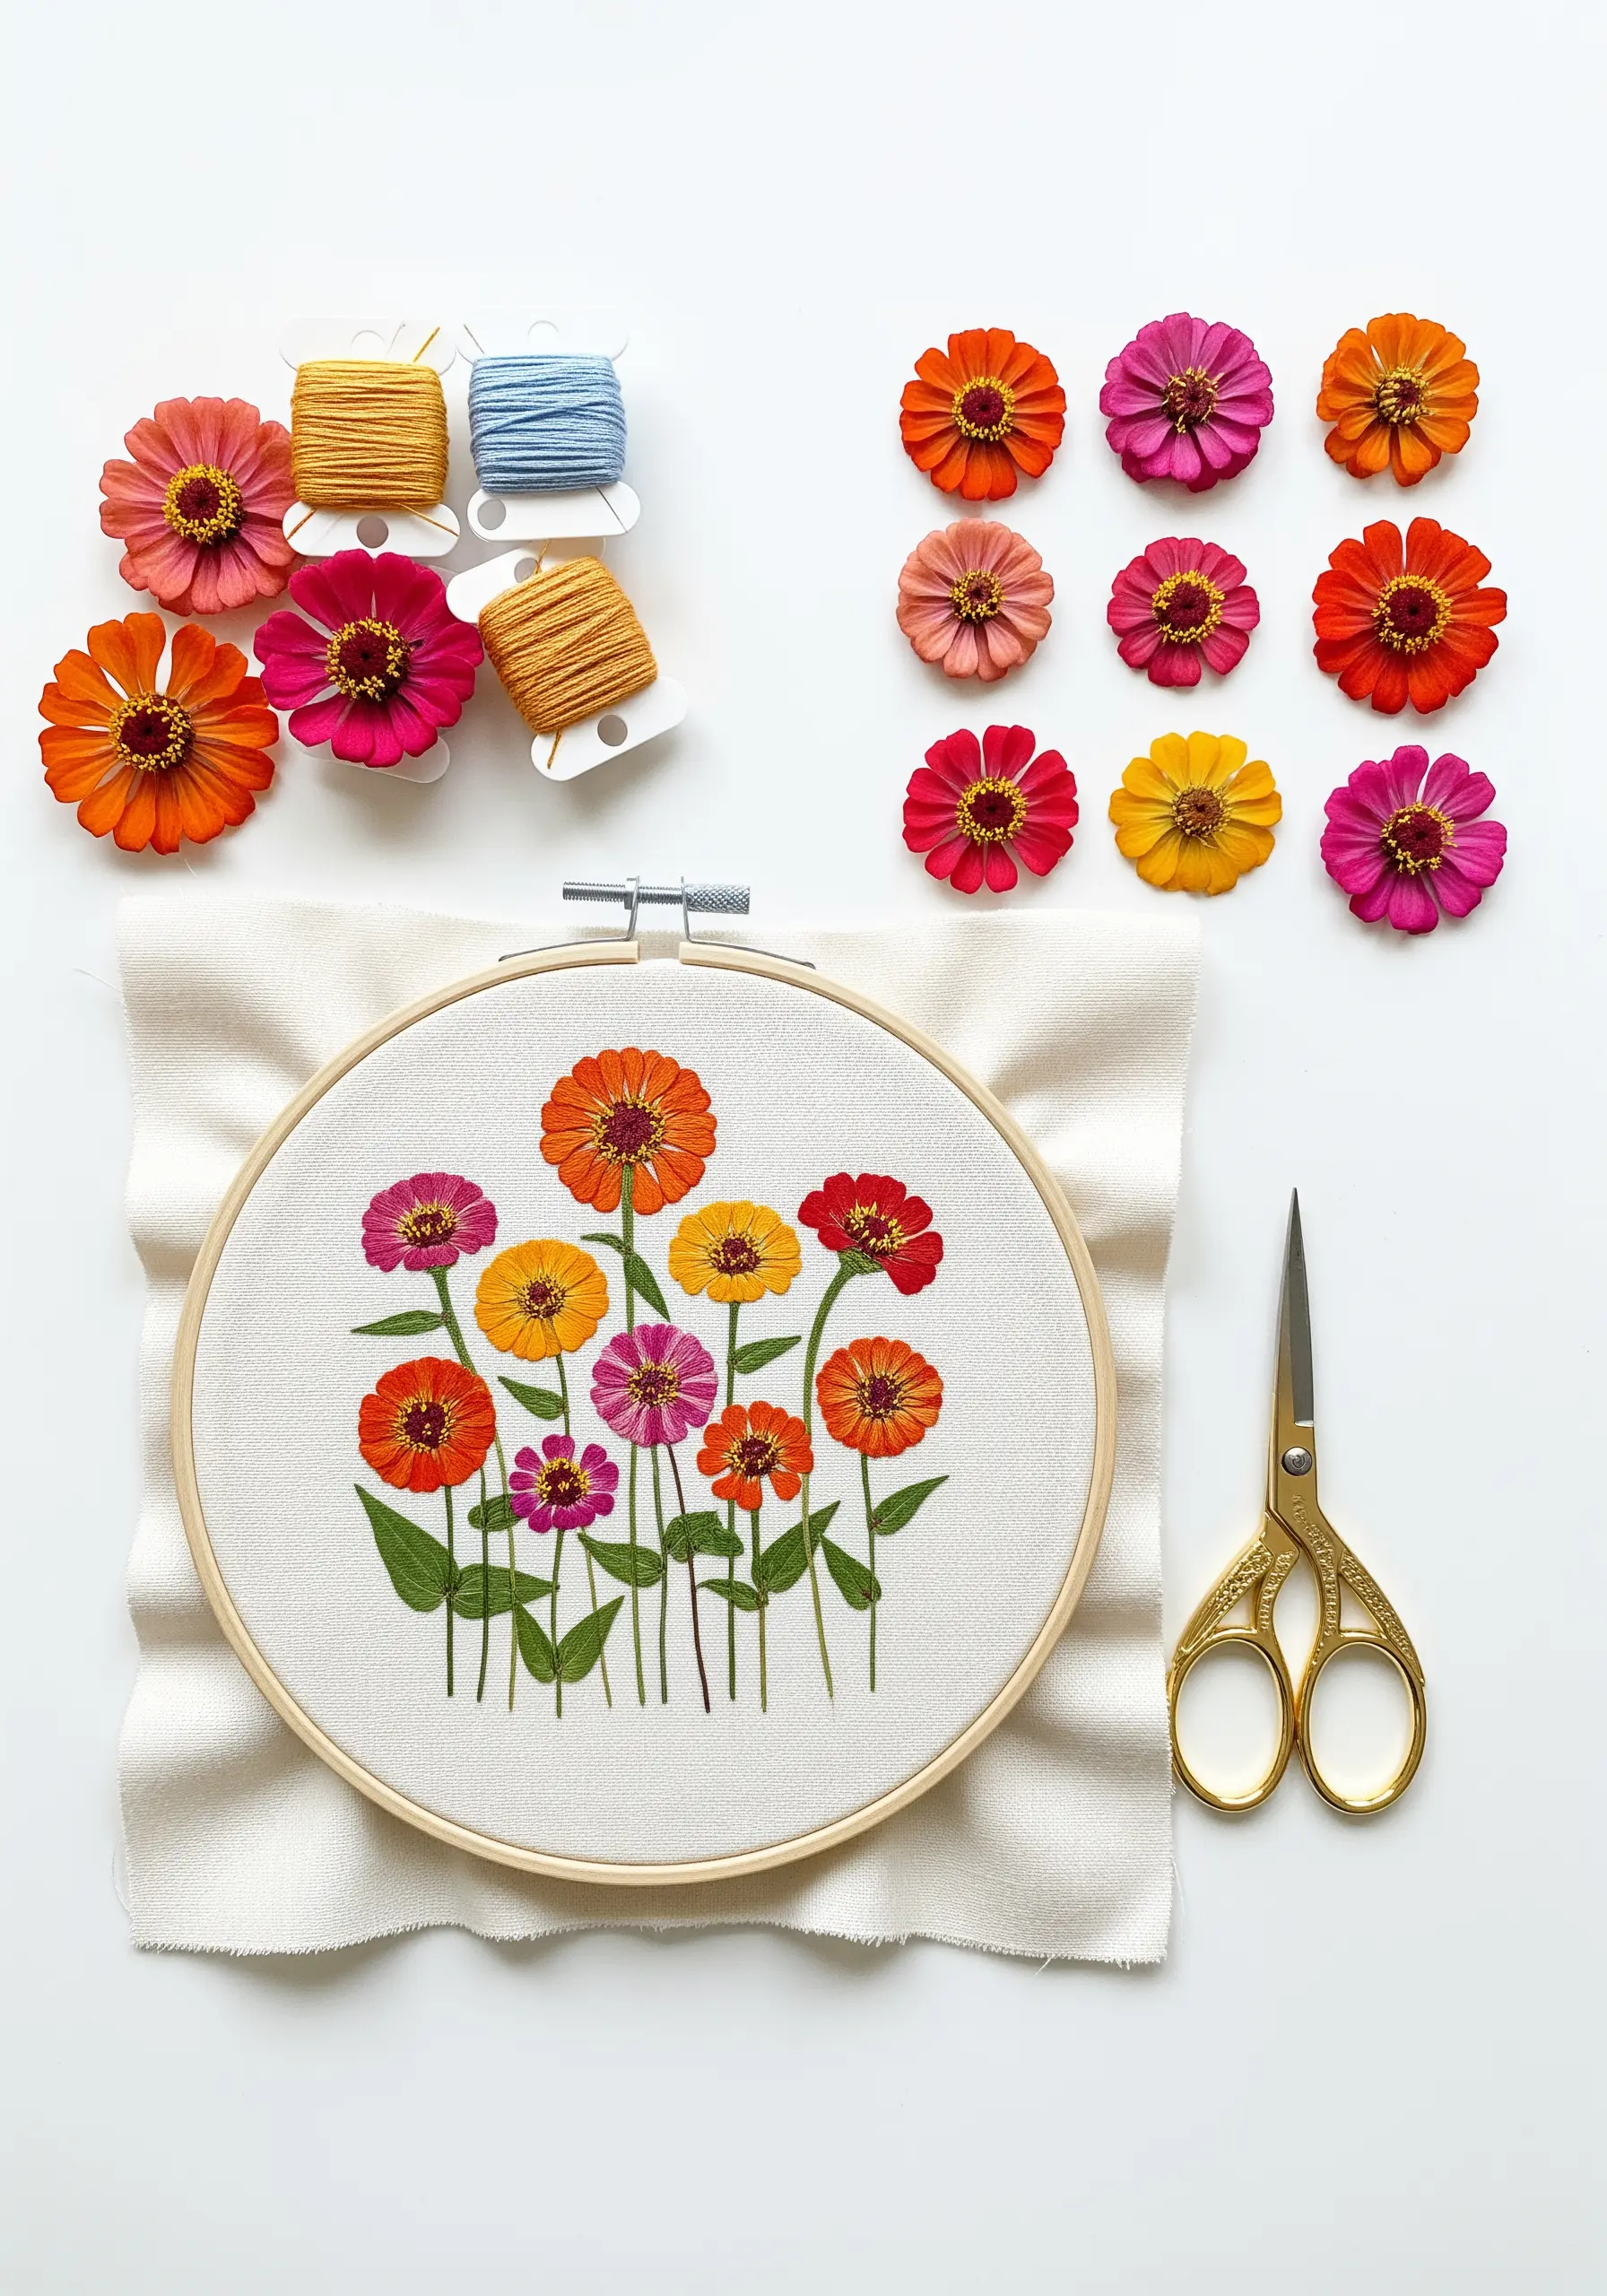
Let nature guide your thread choices by using real pressed or dried flowers as your reference.
Before you begin stitching your zinnia garden, lay out the actual flowers to observe their subtle color variations and gradients.
Match your floss to these tones to create a stitched version that feels vibrant and true to life.
You can even stitch directly from observation, translating the forms and colors into layered straight stitches or woven wheel stitches for a wonderfully textured result.


