
You have likely stared at a blank hoop or a piece of wood, knowing exactly what you want to say, but unsure of how to give those words the weight they deserve. Typography in fiber art isn’t just about spelling a word; it is about texture, tension, and the way light hits the thread.
Whether you are hammering nails for a geometric string art piece or pulling a needle through denim, the principles of good design remain the same: contrast, negative space, and flow. It is time to move beyond simple backstitch lettering and explore techniques that turn text into a sculptural element.
From creating faux-neon signs with wrapped cord to using negative space to let the fabric speak, these ideas are designed to challenge your hands and refine your eye. Let’s look at how you can make your next quote not just legible, but unforgettable.
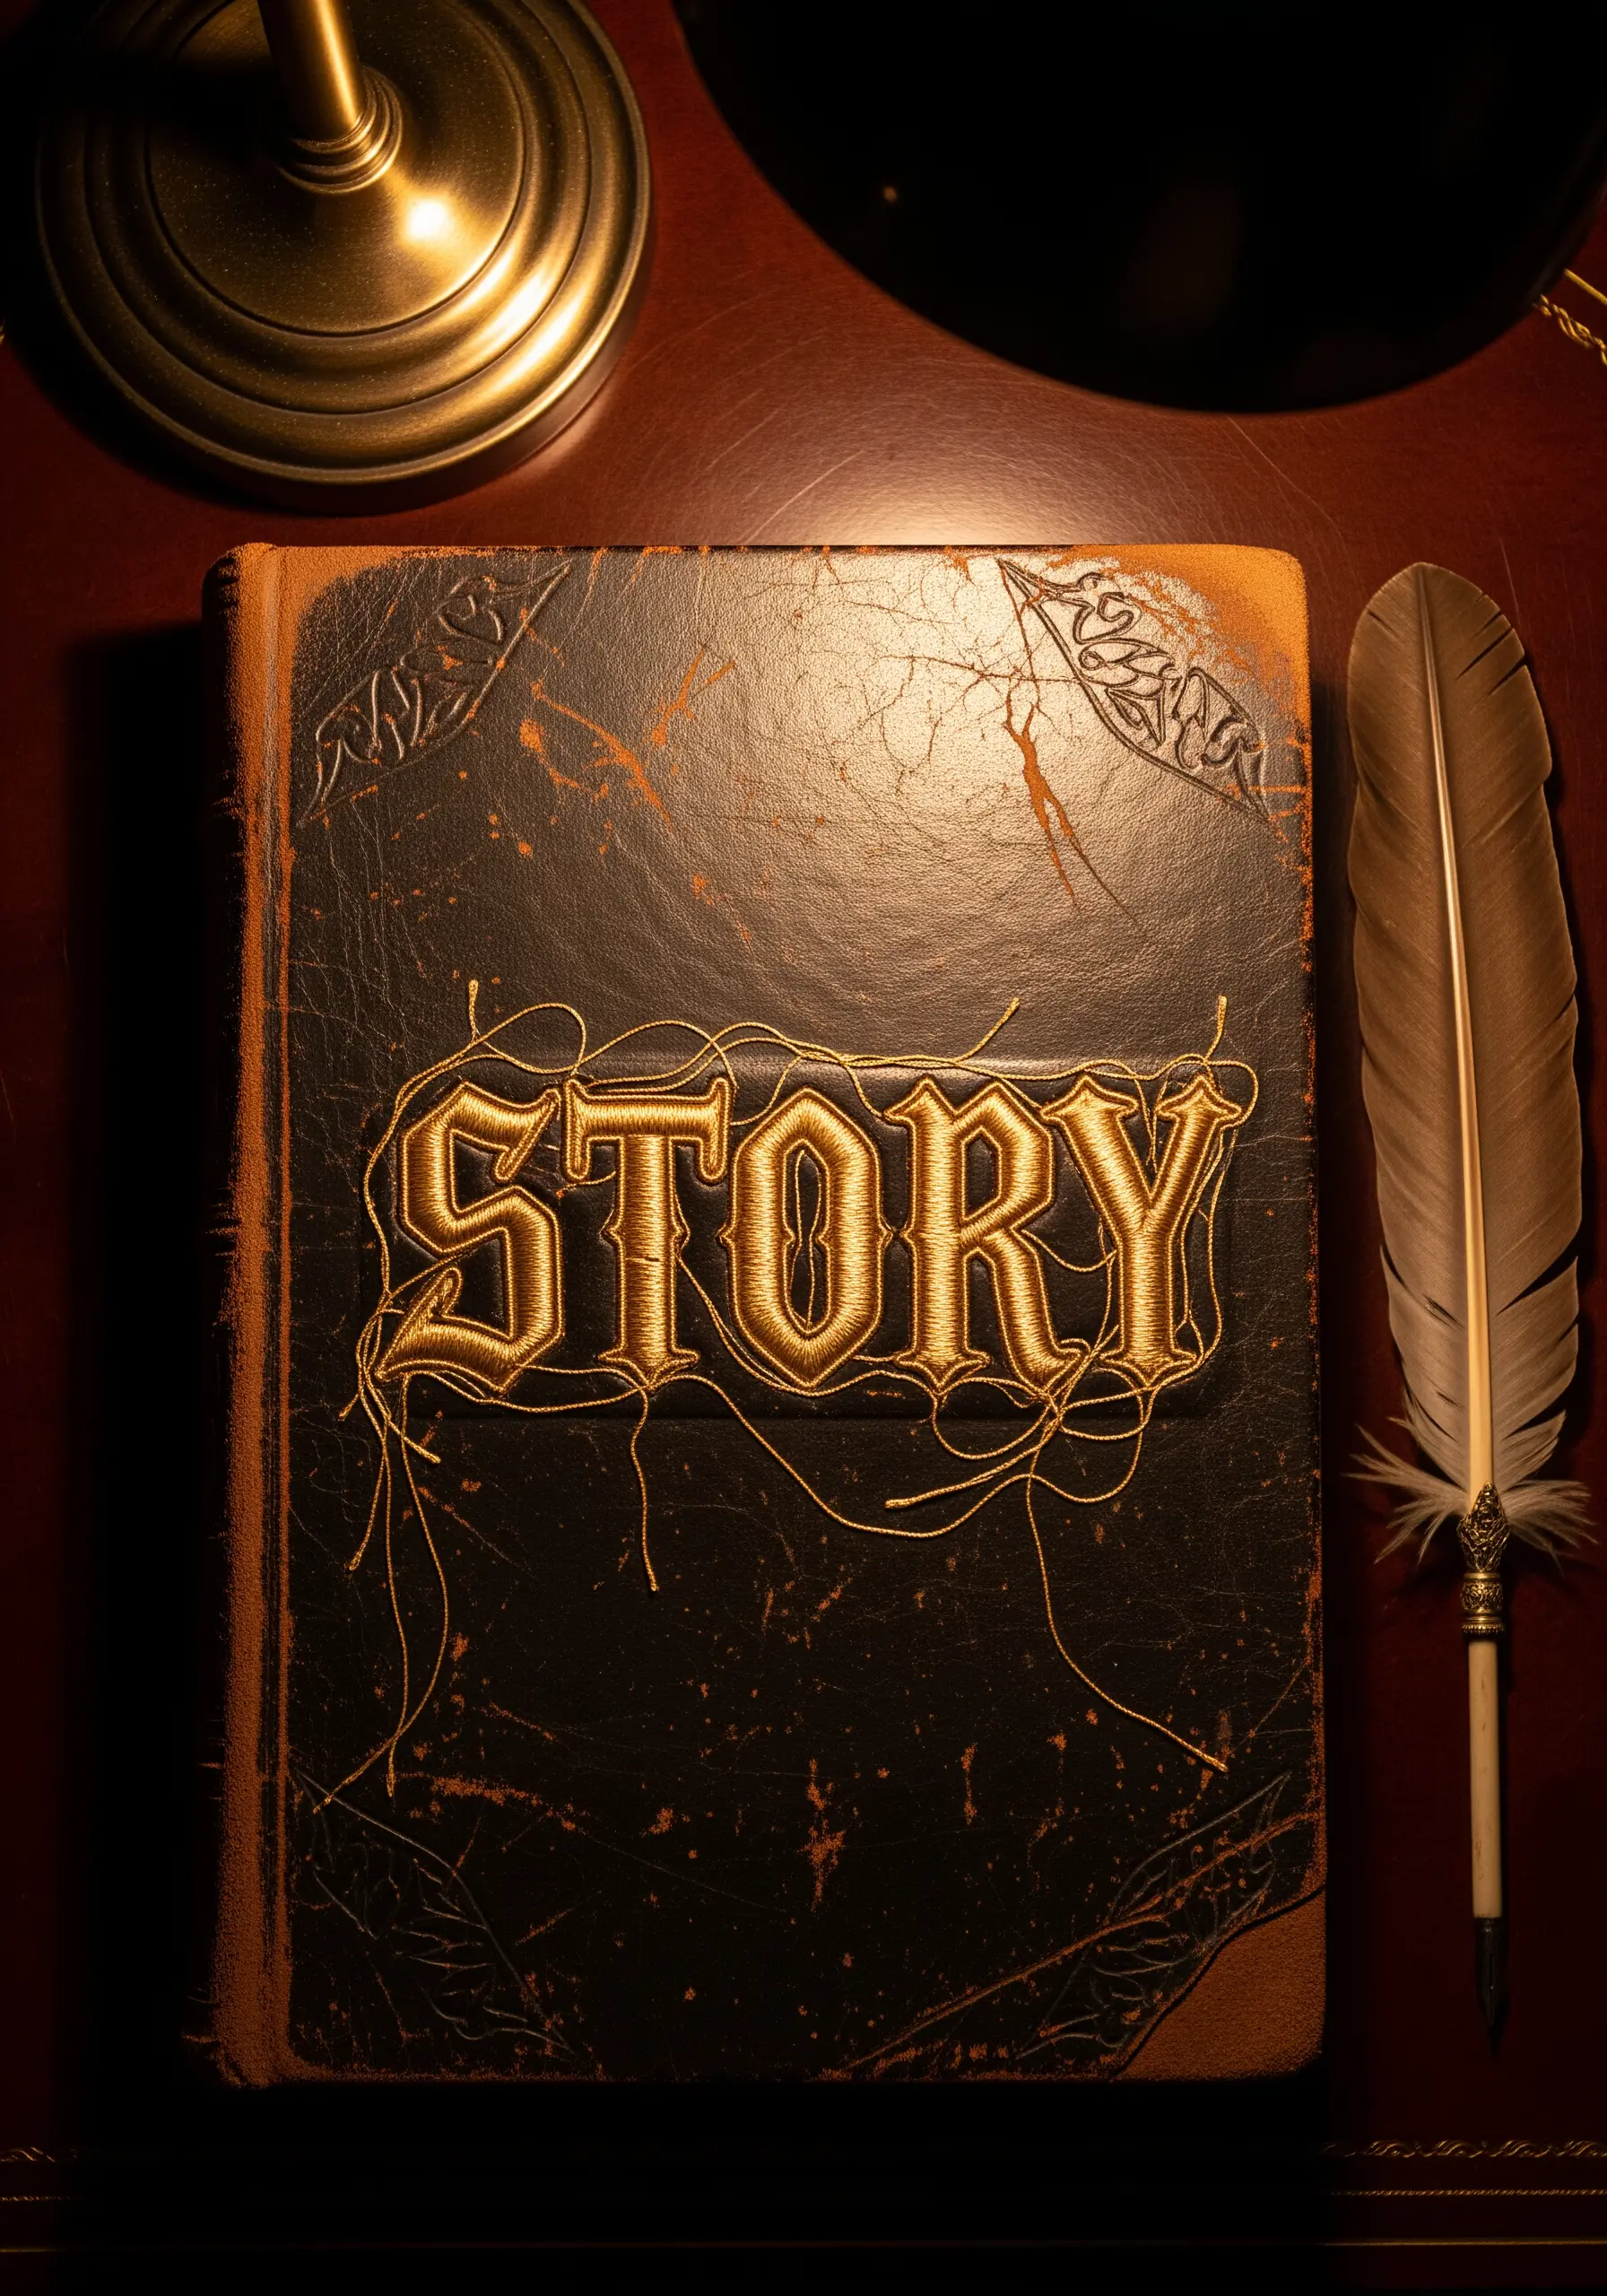
1. Dimensional outlining on rustic wood

When working with wood as your canvas, contrast is your most powerful tool.
Don’t just fill the letter; outline the character in a contrasting hue—like this electric blue against orange—to create a distinct border that prevents visual bleeding.
Keep your nail spacing tight on the curves to ensure the typography remains legible rather than blocky.
This technique turns neon color string art concepts into sophisticated signage.
2. Negative space floral typography
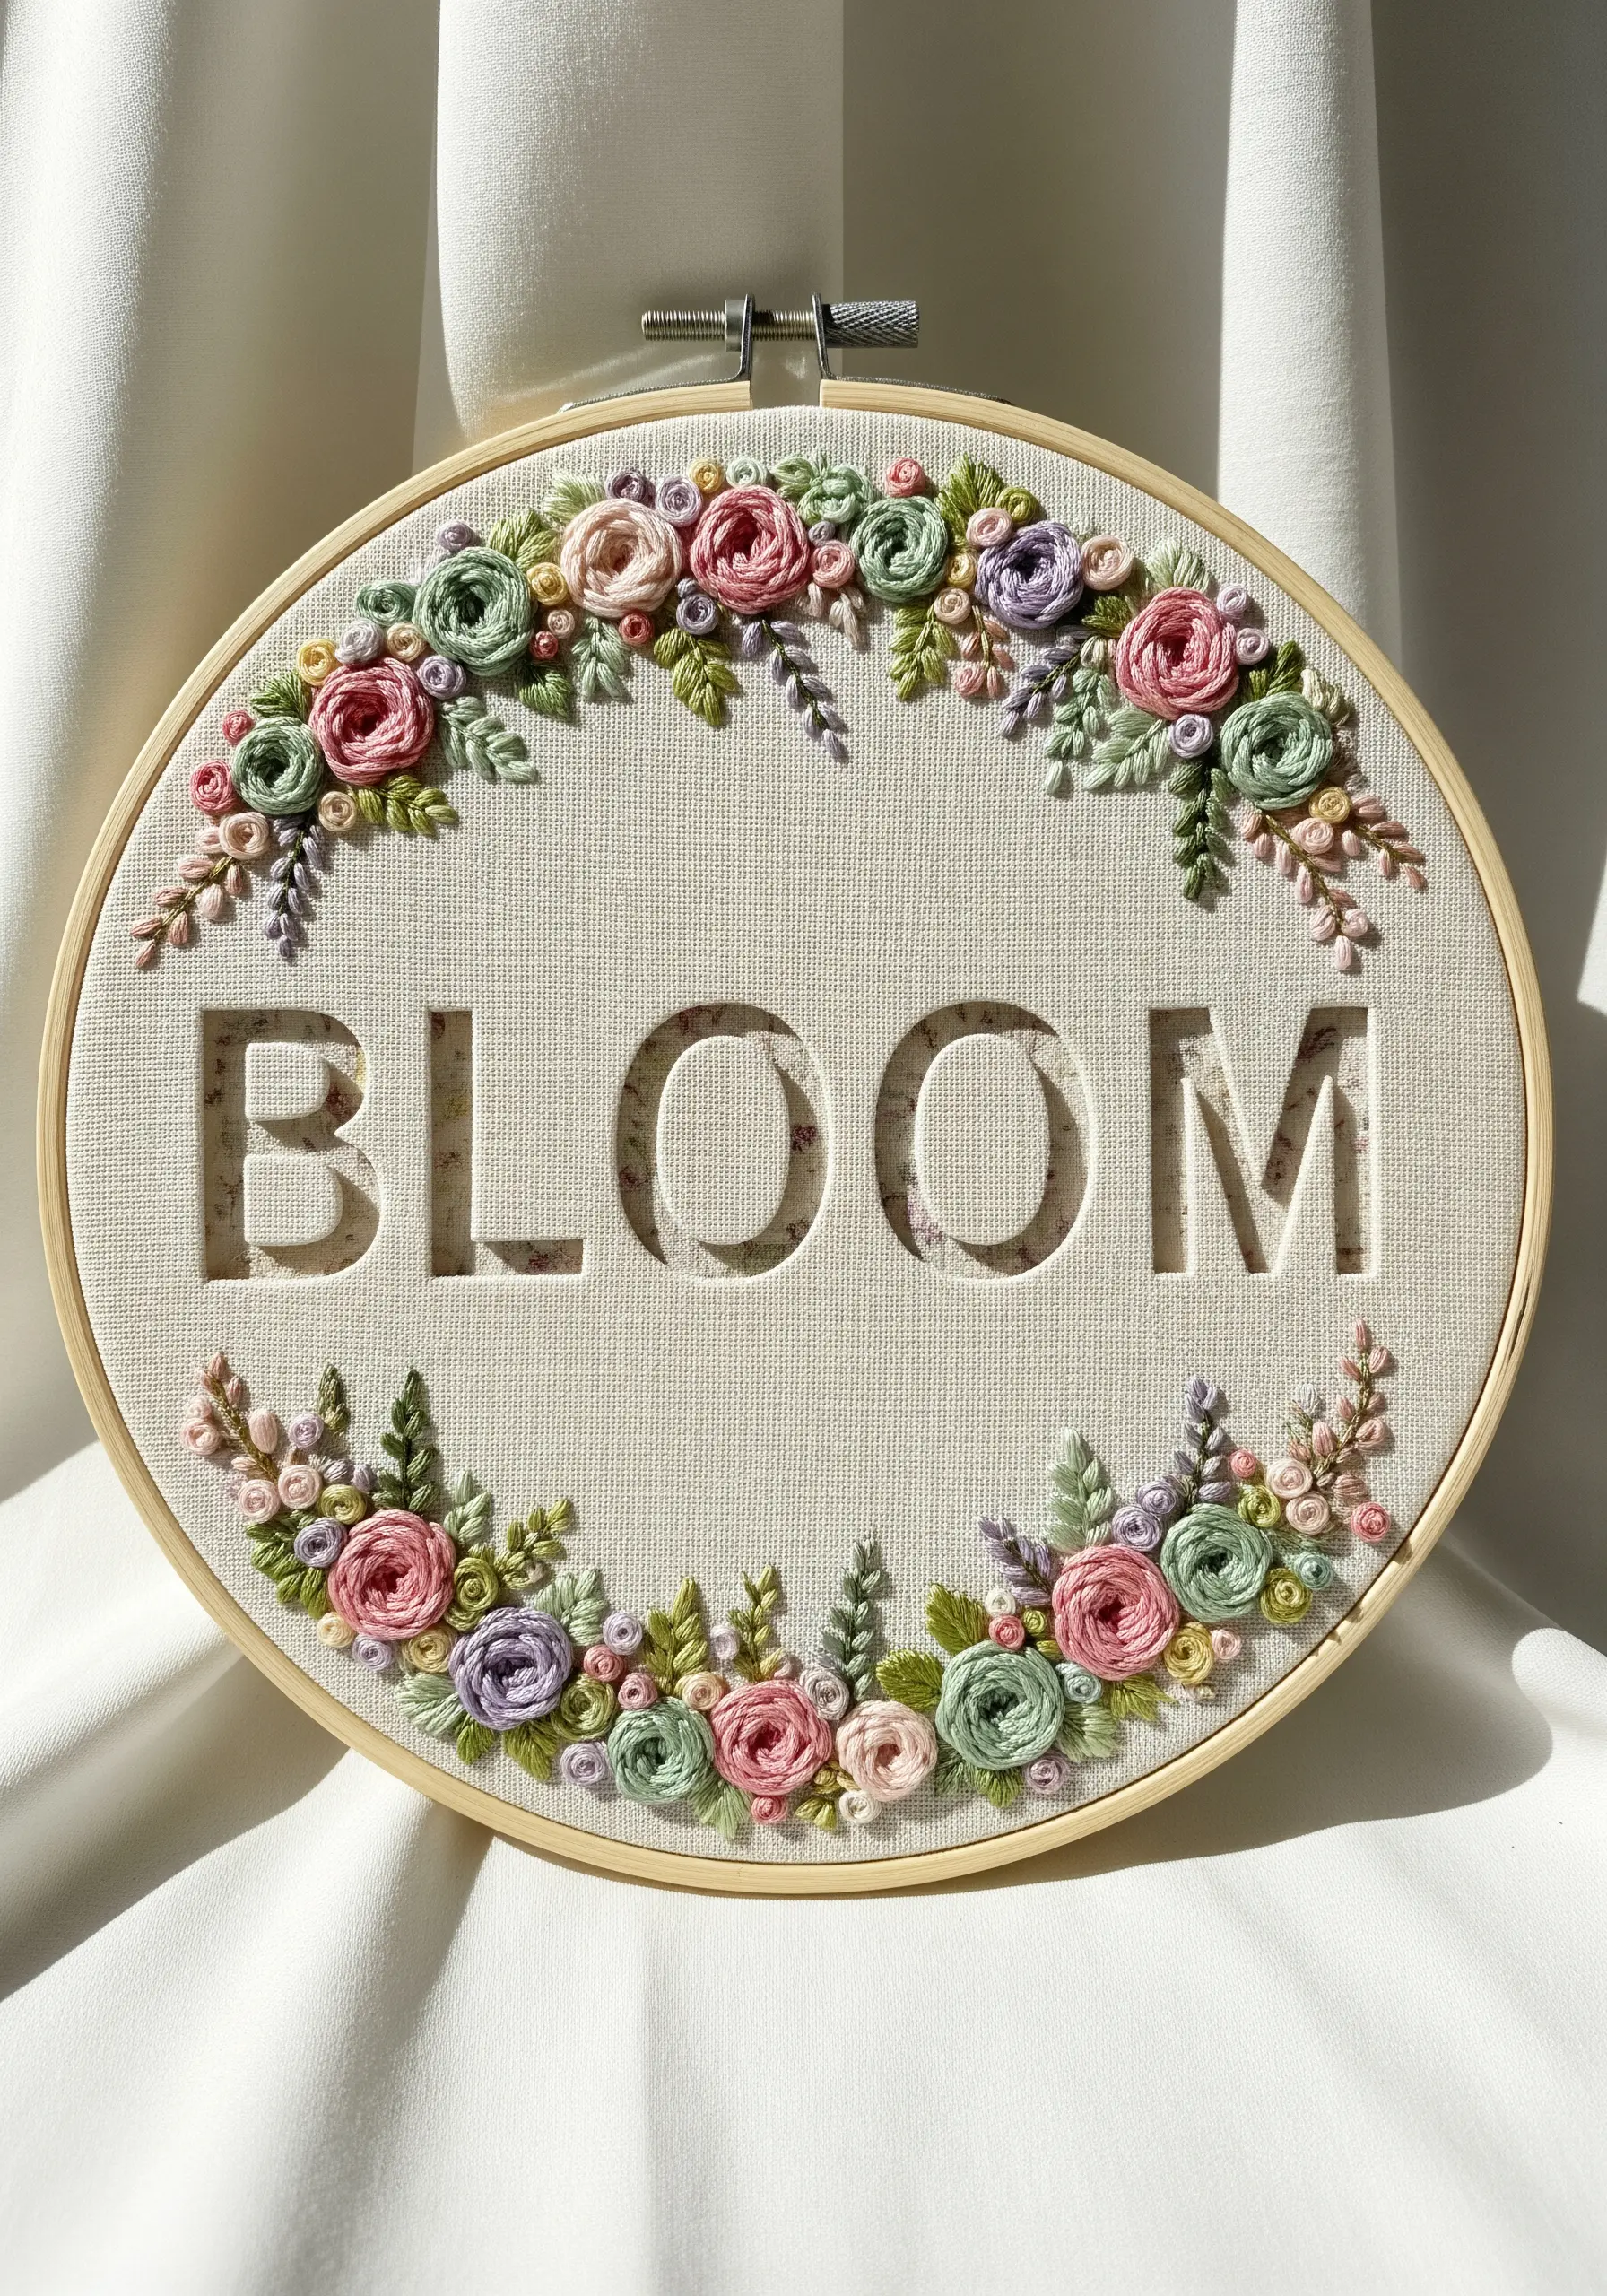
Instead of stitching the letters, let the linen breathe and define the text through negative space.
The trick here is density; your floral border must be compact and lush right up to the imaginary edge of the letter.
Use French knots and bullion roses to build texture at the boundary, ensuring the word ‘BLOOM’ reads clearly without a single drawn line.
It’s a perfect execution of floral embroidery wall decor projects.
3. Gradient flows on dark substrates
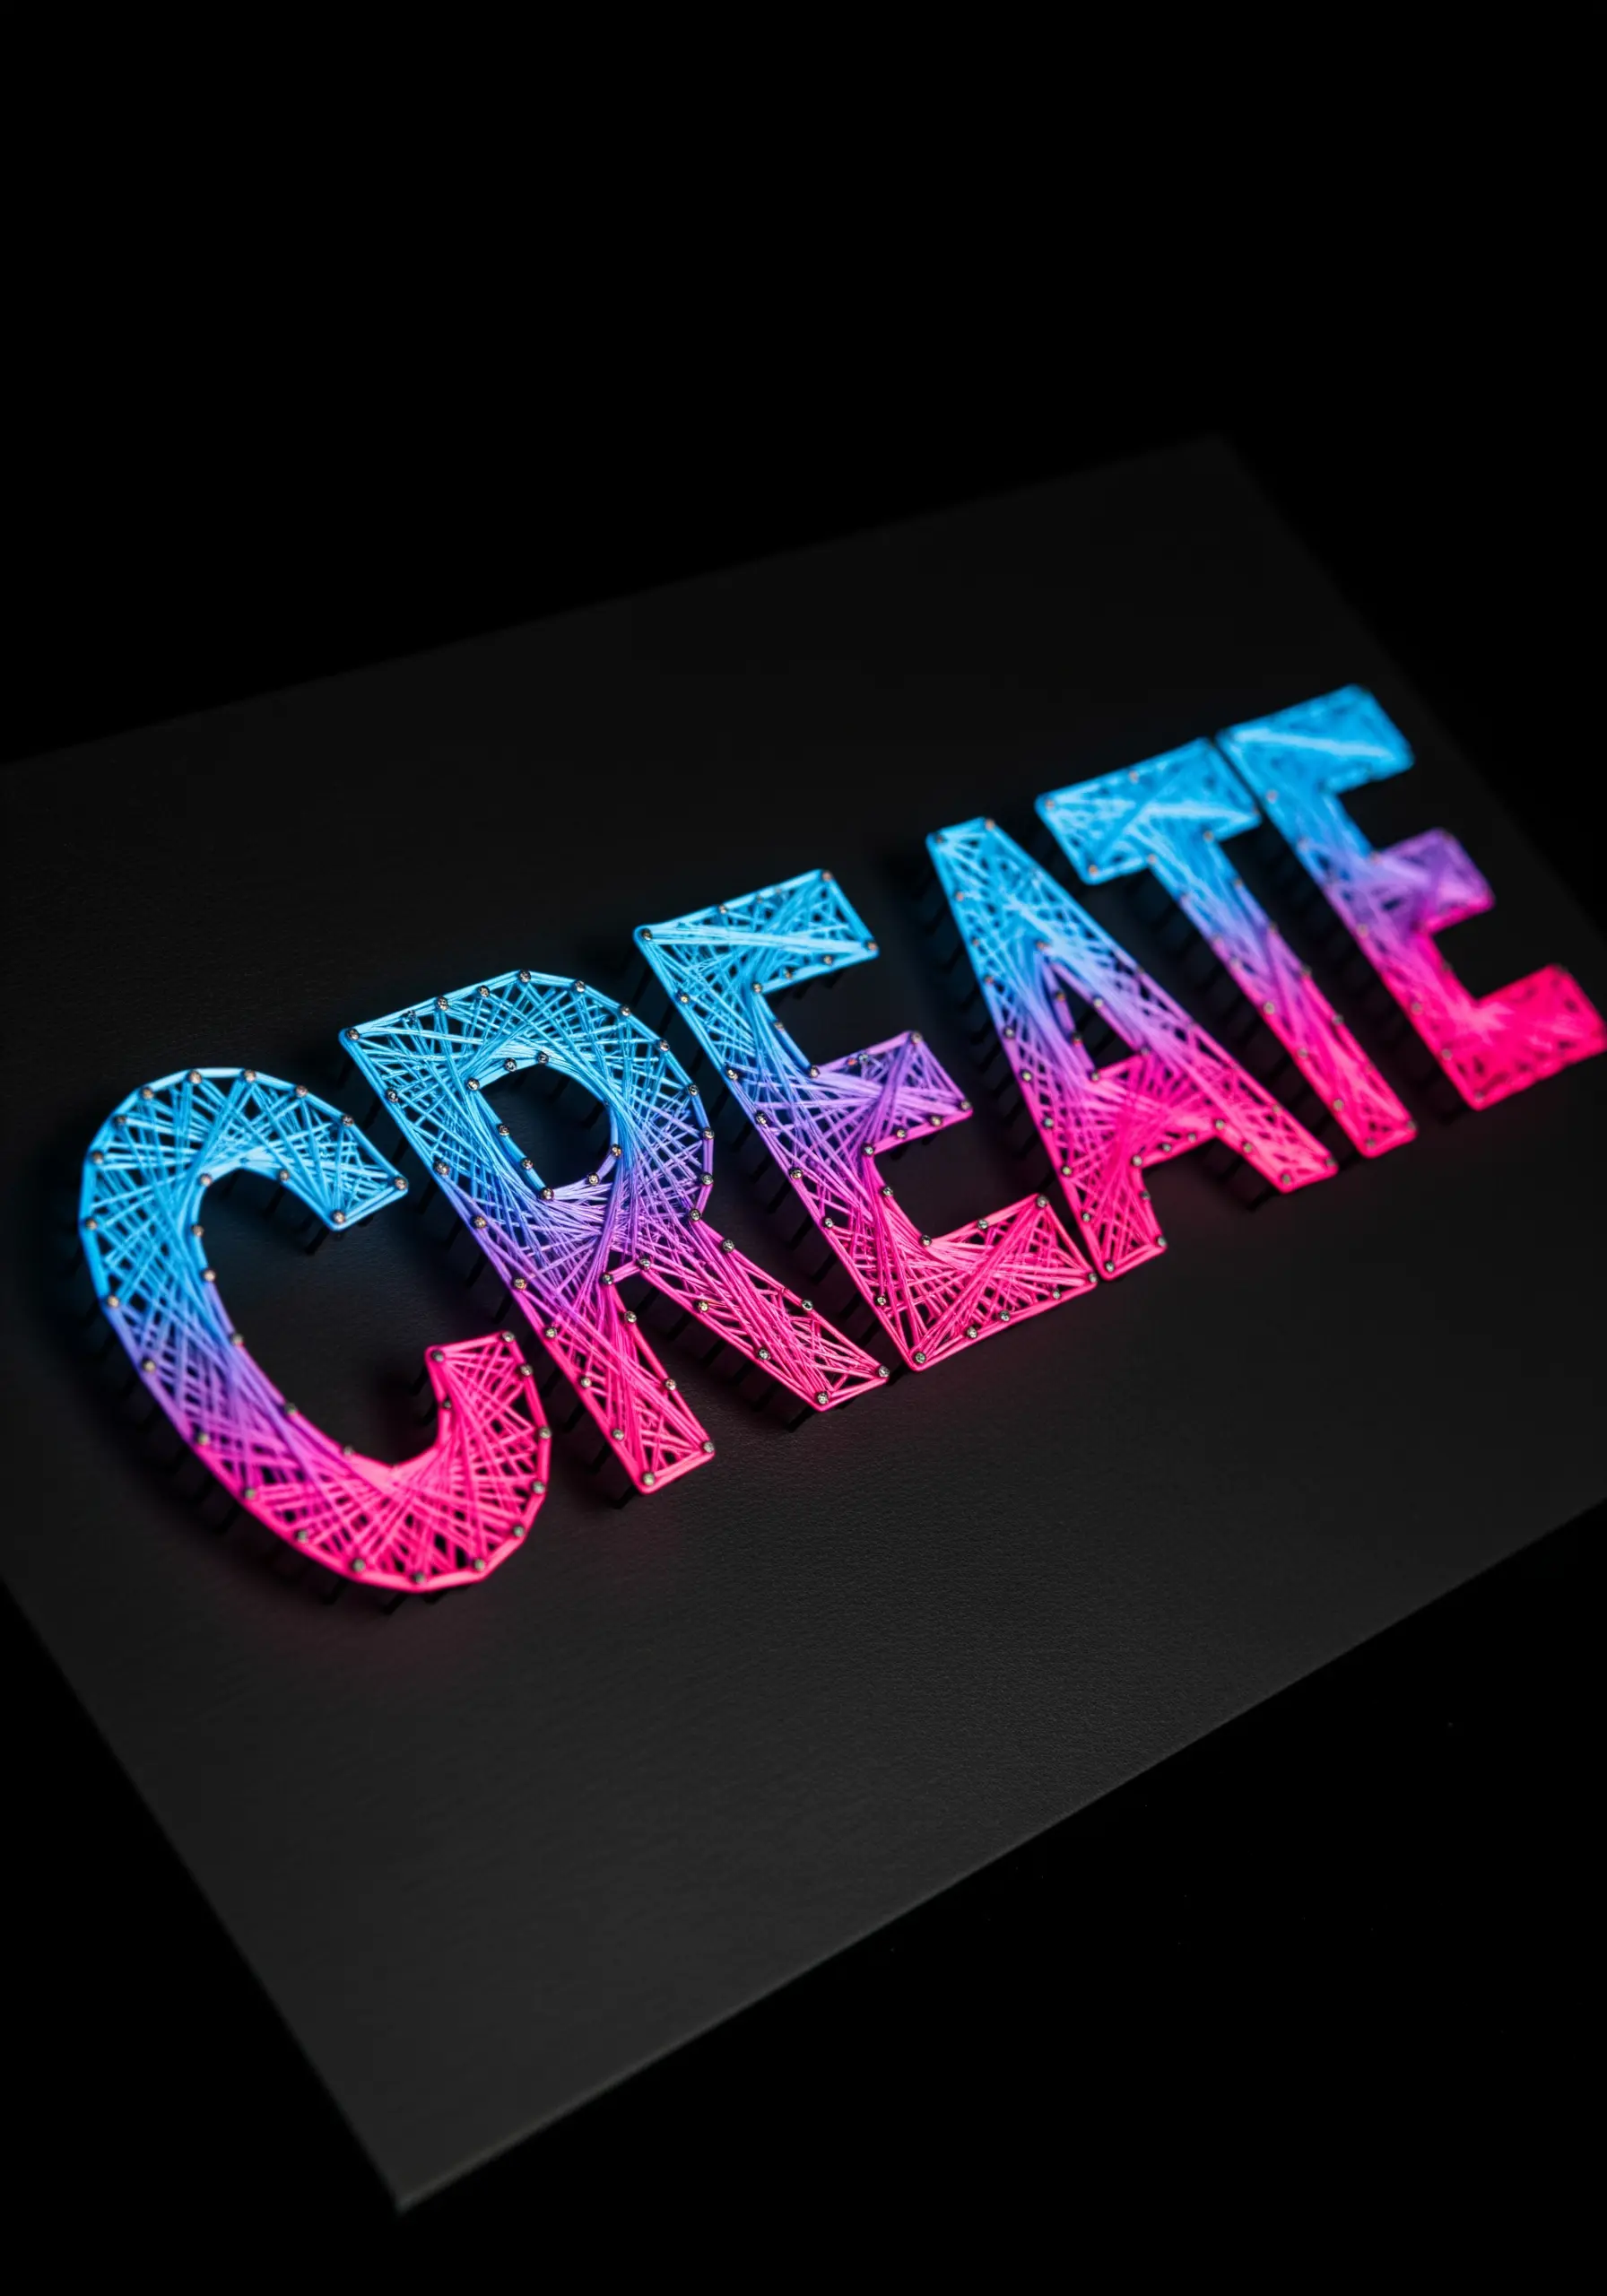
Black backgrounds require threads that possess high luminosity to avoid disappearing.
Create a sense of movement by changing your thread color gradually from blue to purple to pink, mimicking a digital gradient.
Ensure your tension is high; on a dark board, any slack in the string kills the illusion of laser-like precision found in modern neon on black thread art ideas.
4. Heavy chain stitch on denim

Denim is a heavy fabric that swallows delicate threads, so you need a stitch with backbone.
Use a heavy chain stitch or a whipped running stitch to create thick, rope-like letters that stand up to wear.
Notice the directional fill; stitching vertically within the letters contrasts with the horizontal weave of the denim, enhancing readability.
This is essential for line art portrait embroidery ideas to personalize denim jackets.
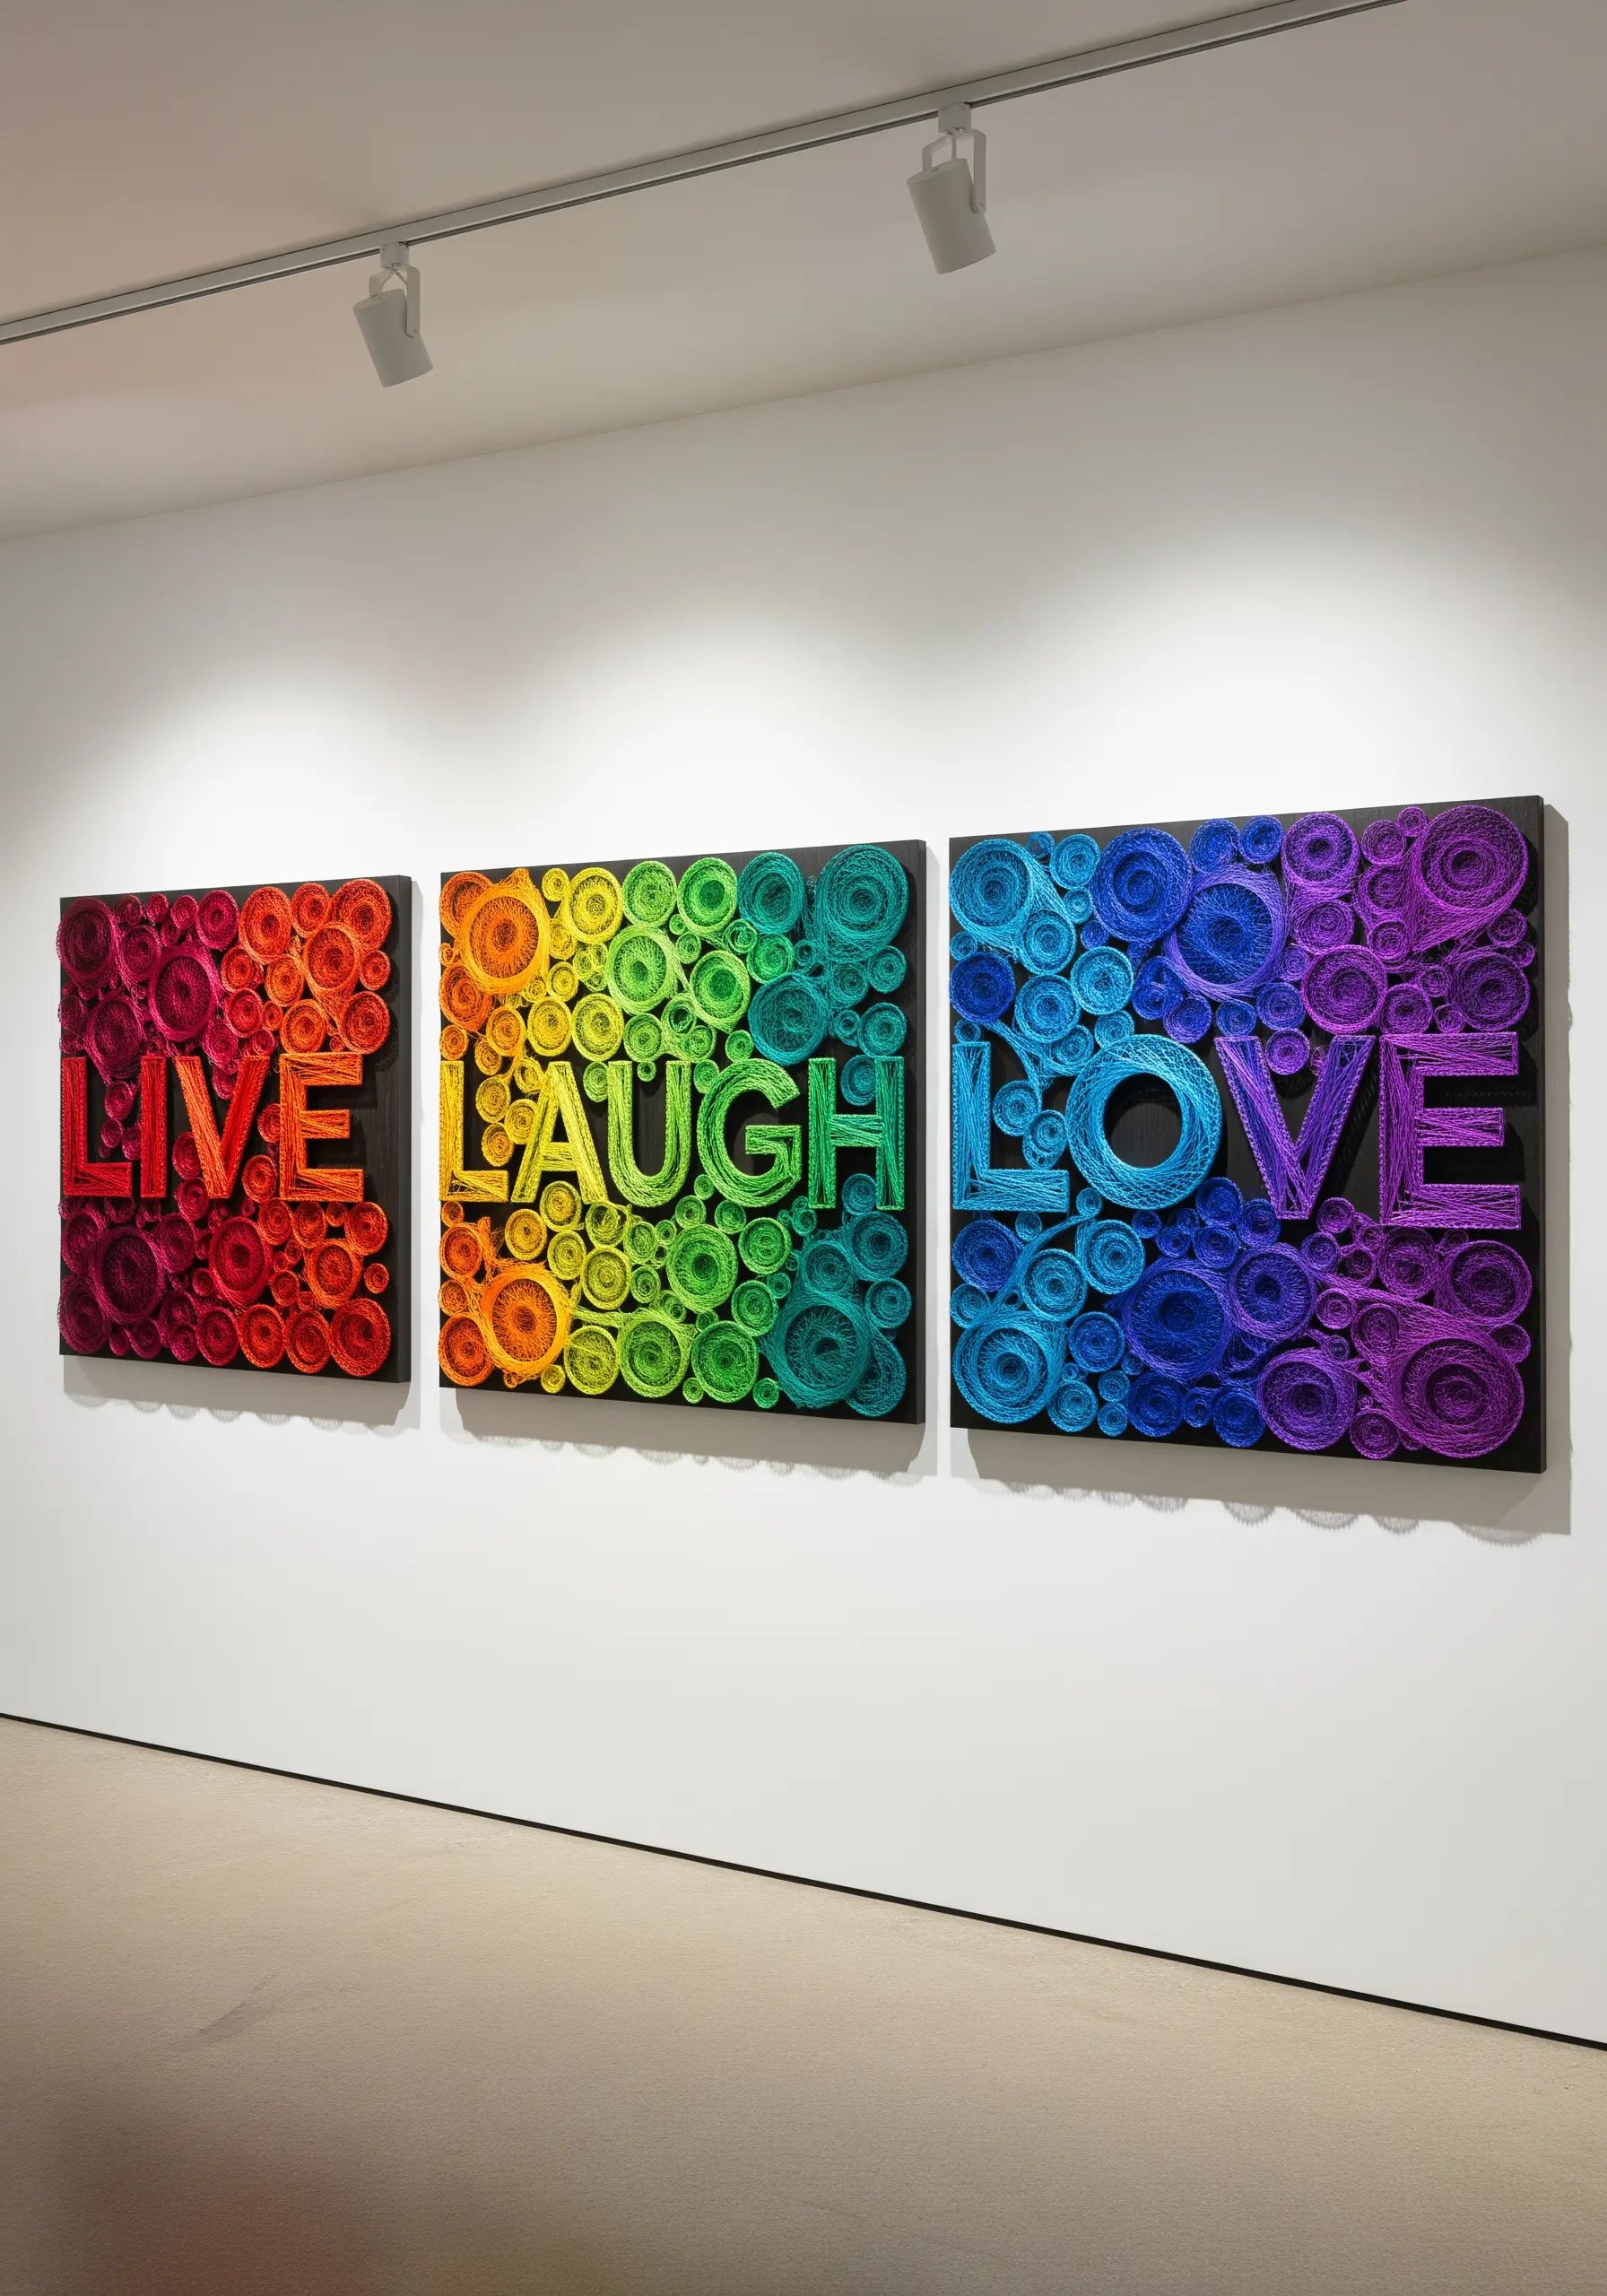
5. Architectural linear precision
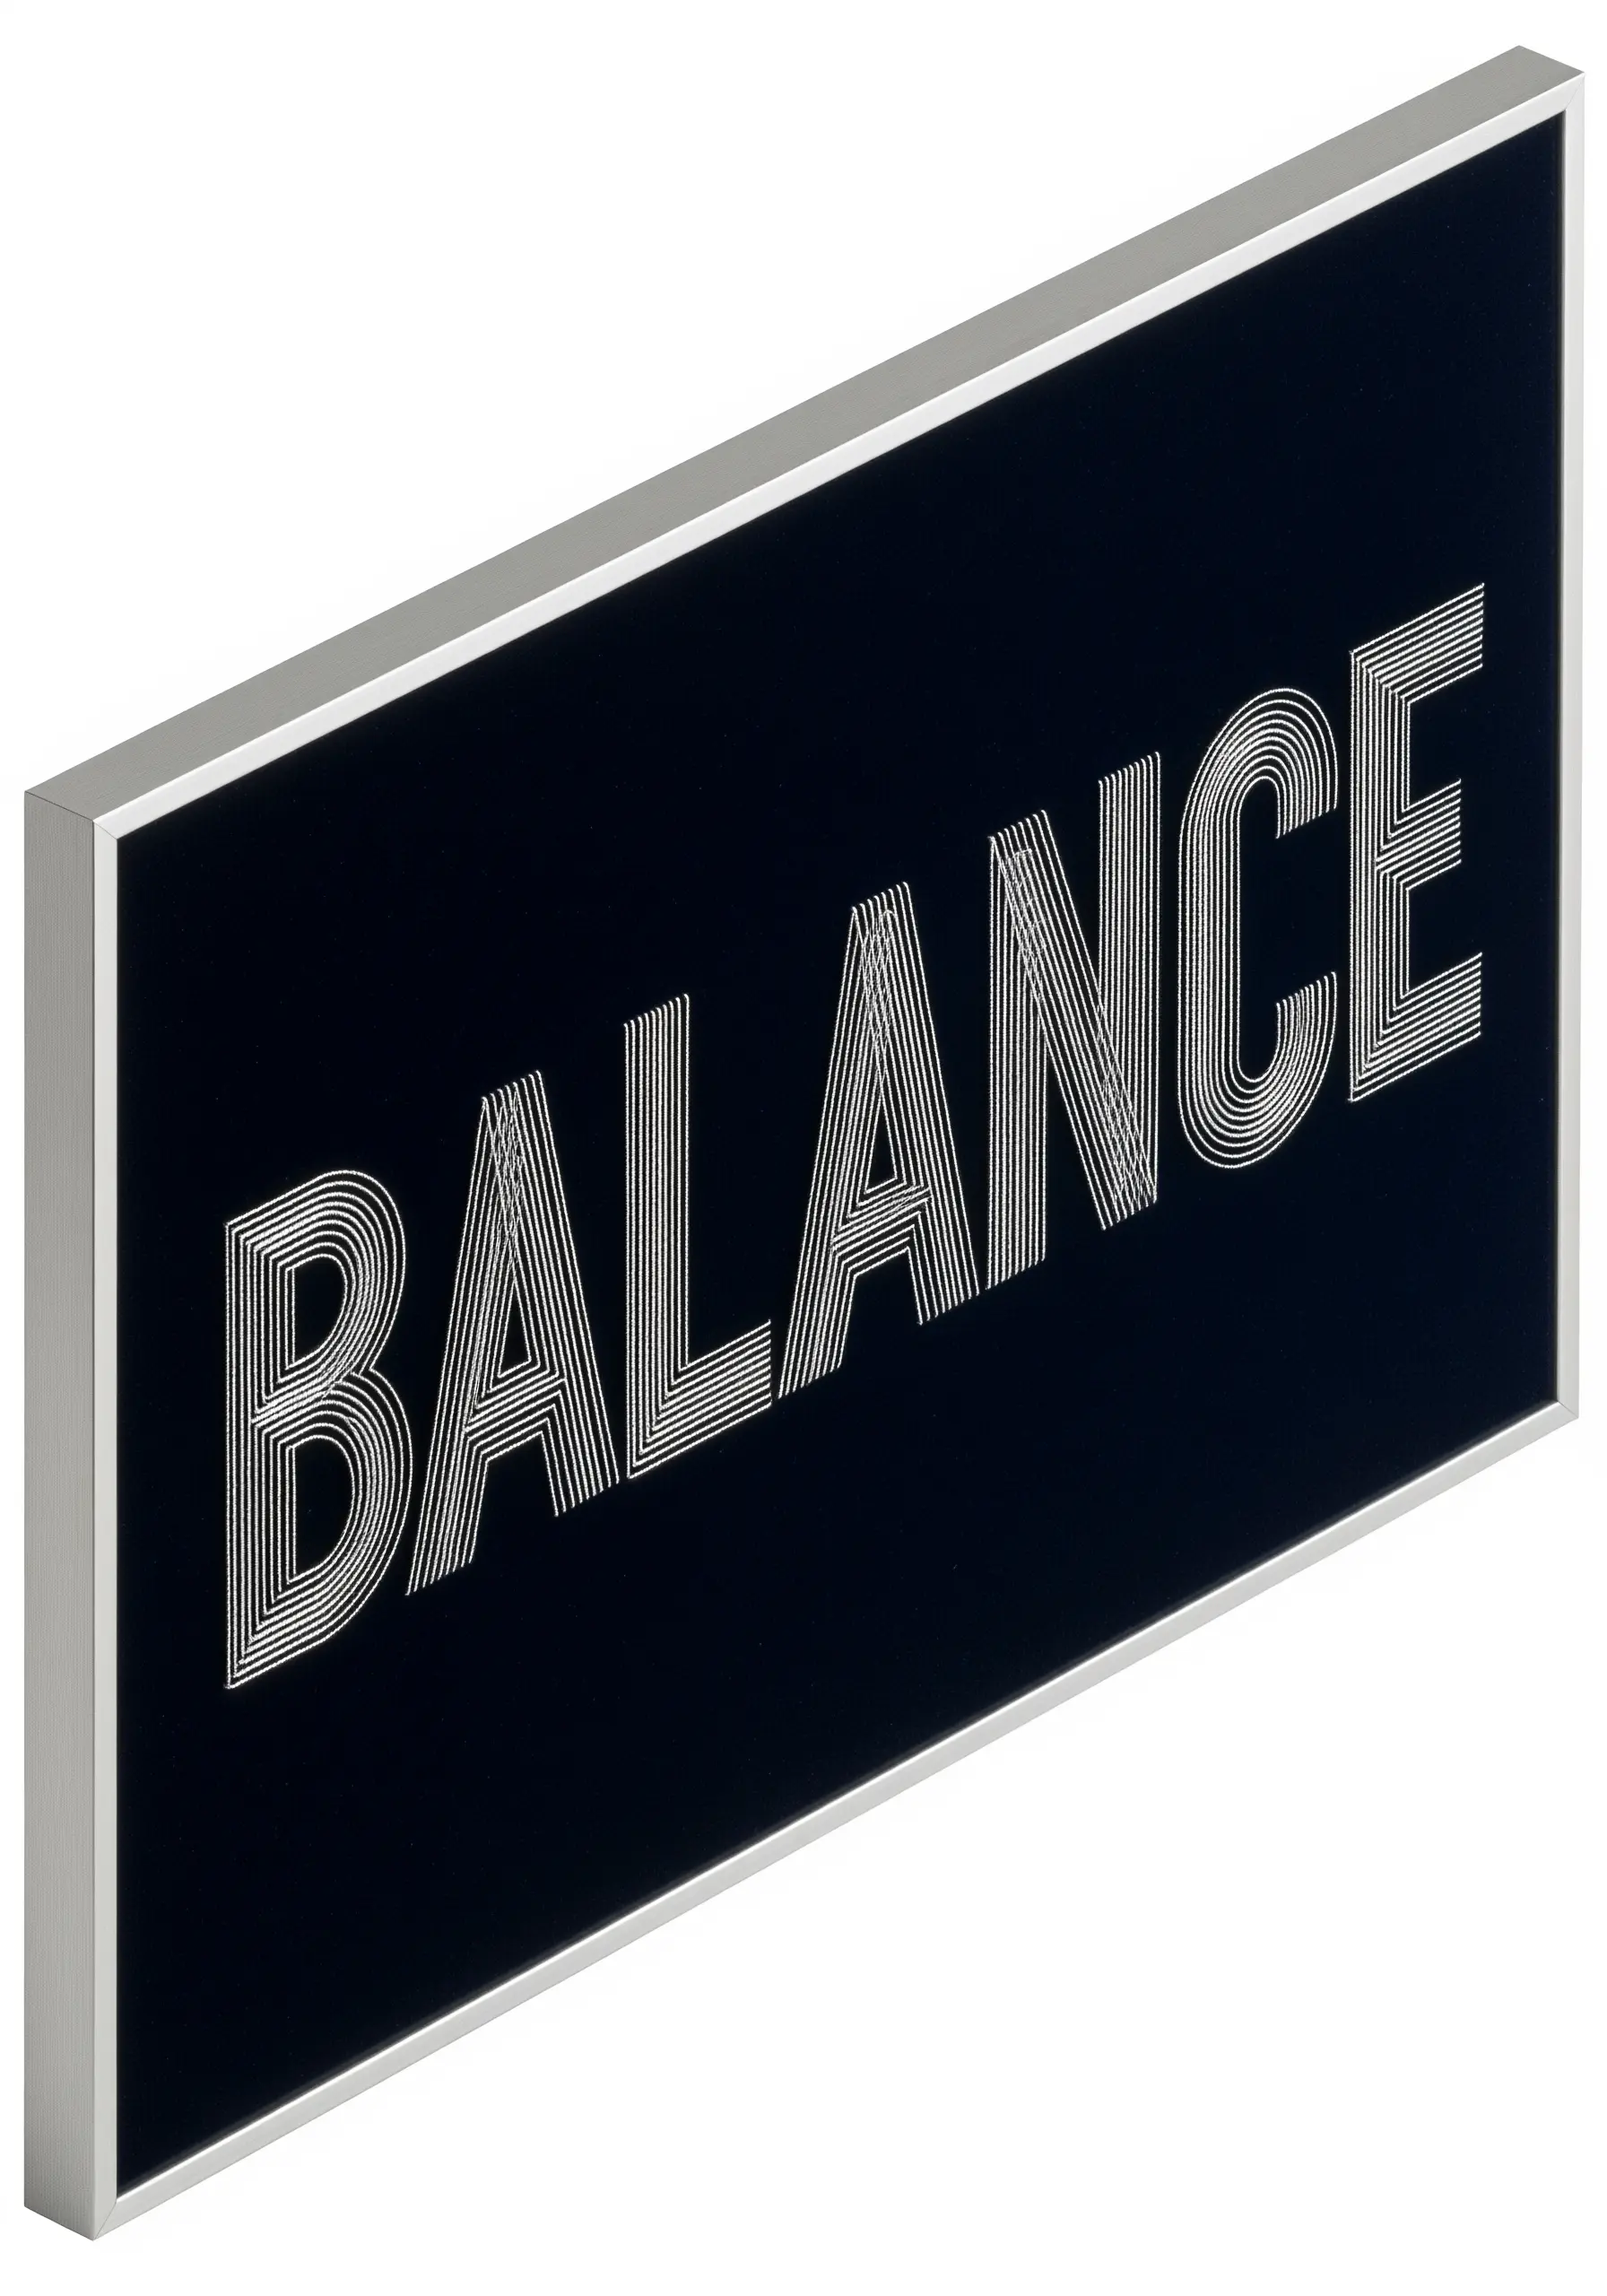
For a clean, modernist look, abandon chaotic fillers and opt for strictly parallel lines.
The success of this design relies on mathematical nail placement; if one nail is off by a millimeter, the parallel effect collapses.
Use a single weight of silver or white thread to maintain that sleek, industrial feel typical of simple line art embroidery patterns.
6. Mixed media watercolor base

Soften the rigidity of geometric string art by introducing a fluid watercolor background.
Paint your canvas first, allowing the colors to bleed and blend, before hammering your nails.
The white thread acts as a crisp overlay, floating above the color wash, a technique often seen in mixed media embroidery crafts.
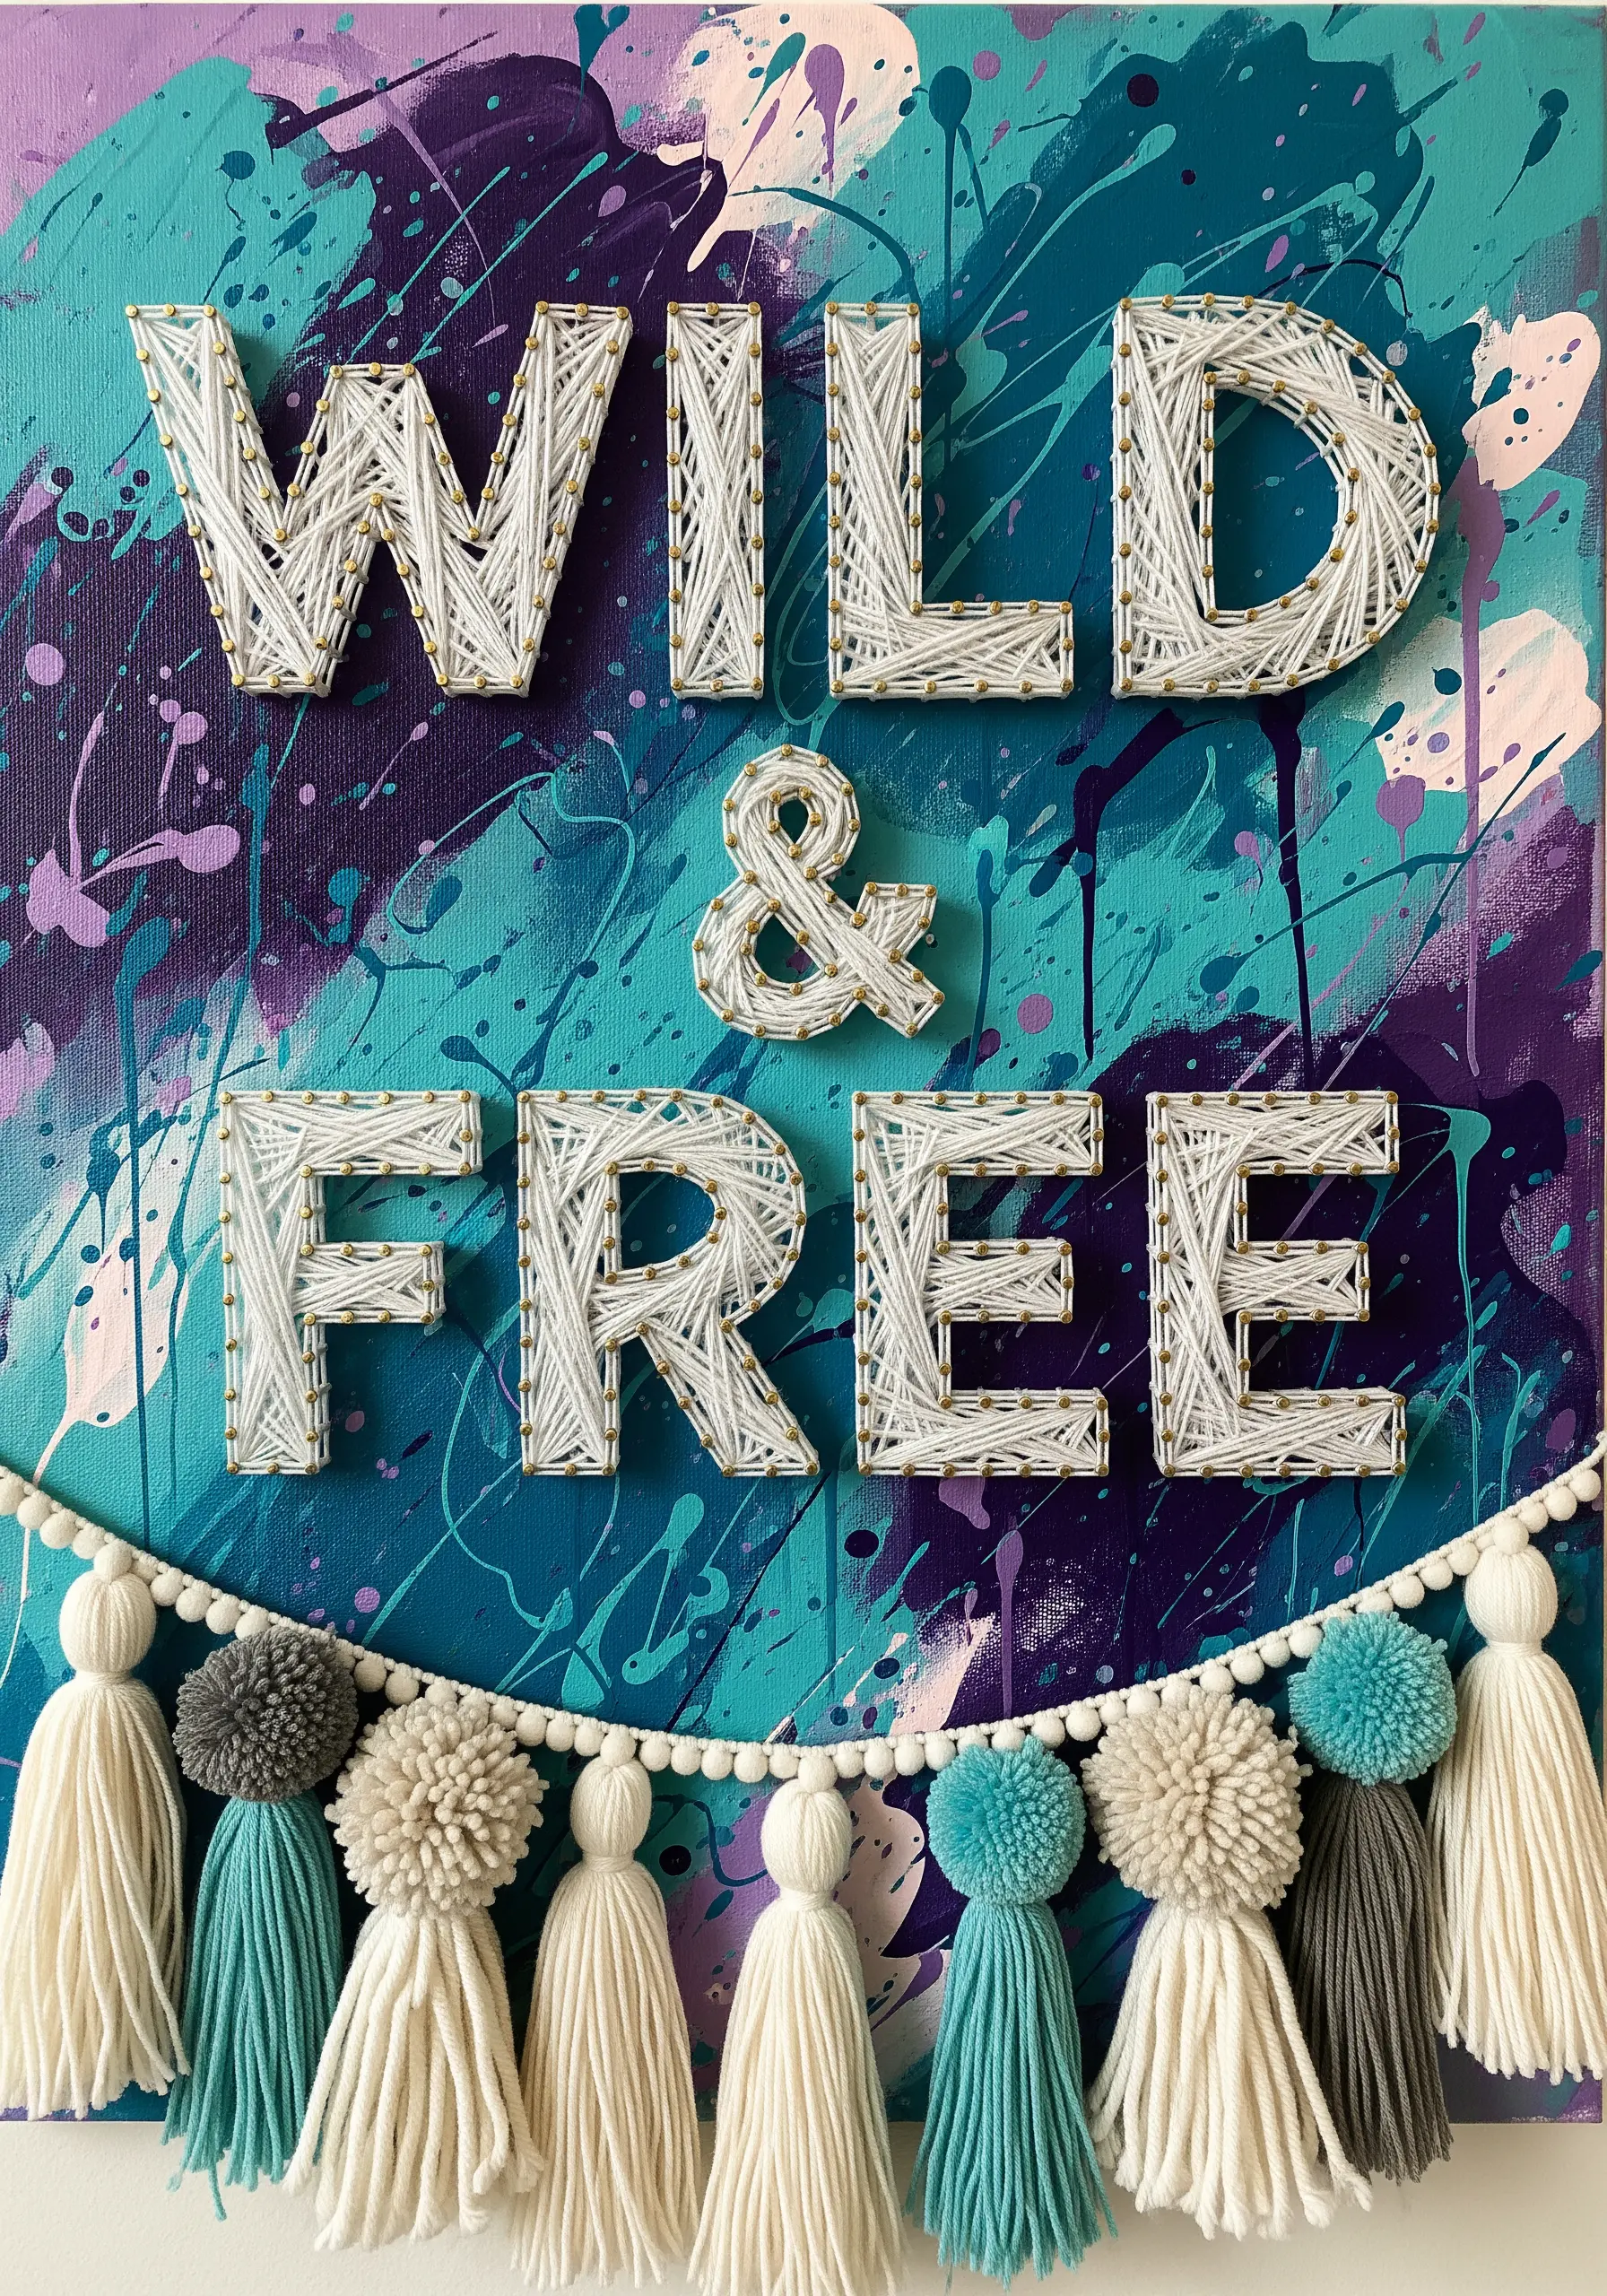
7. Chunky yarn loop tapestry
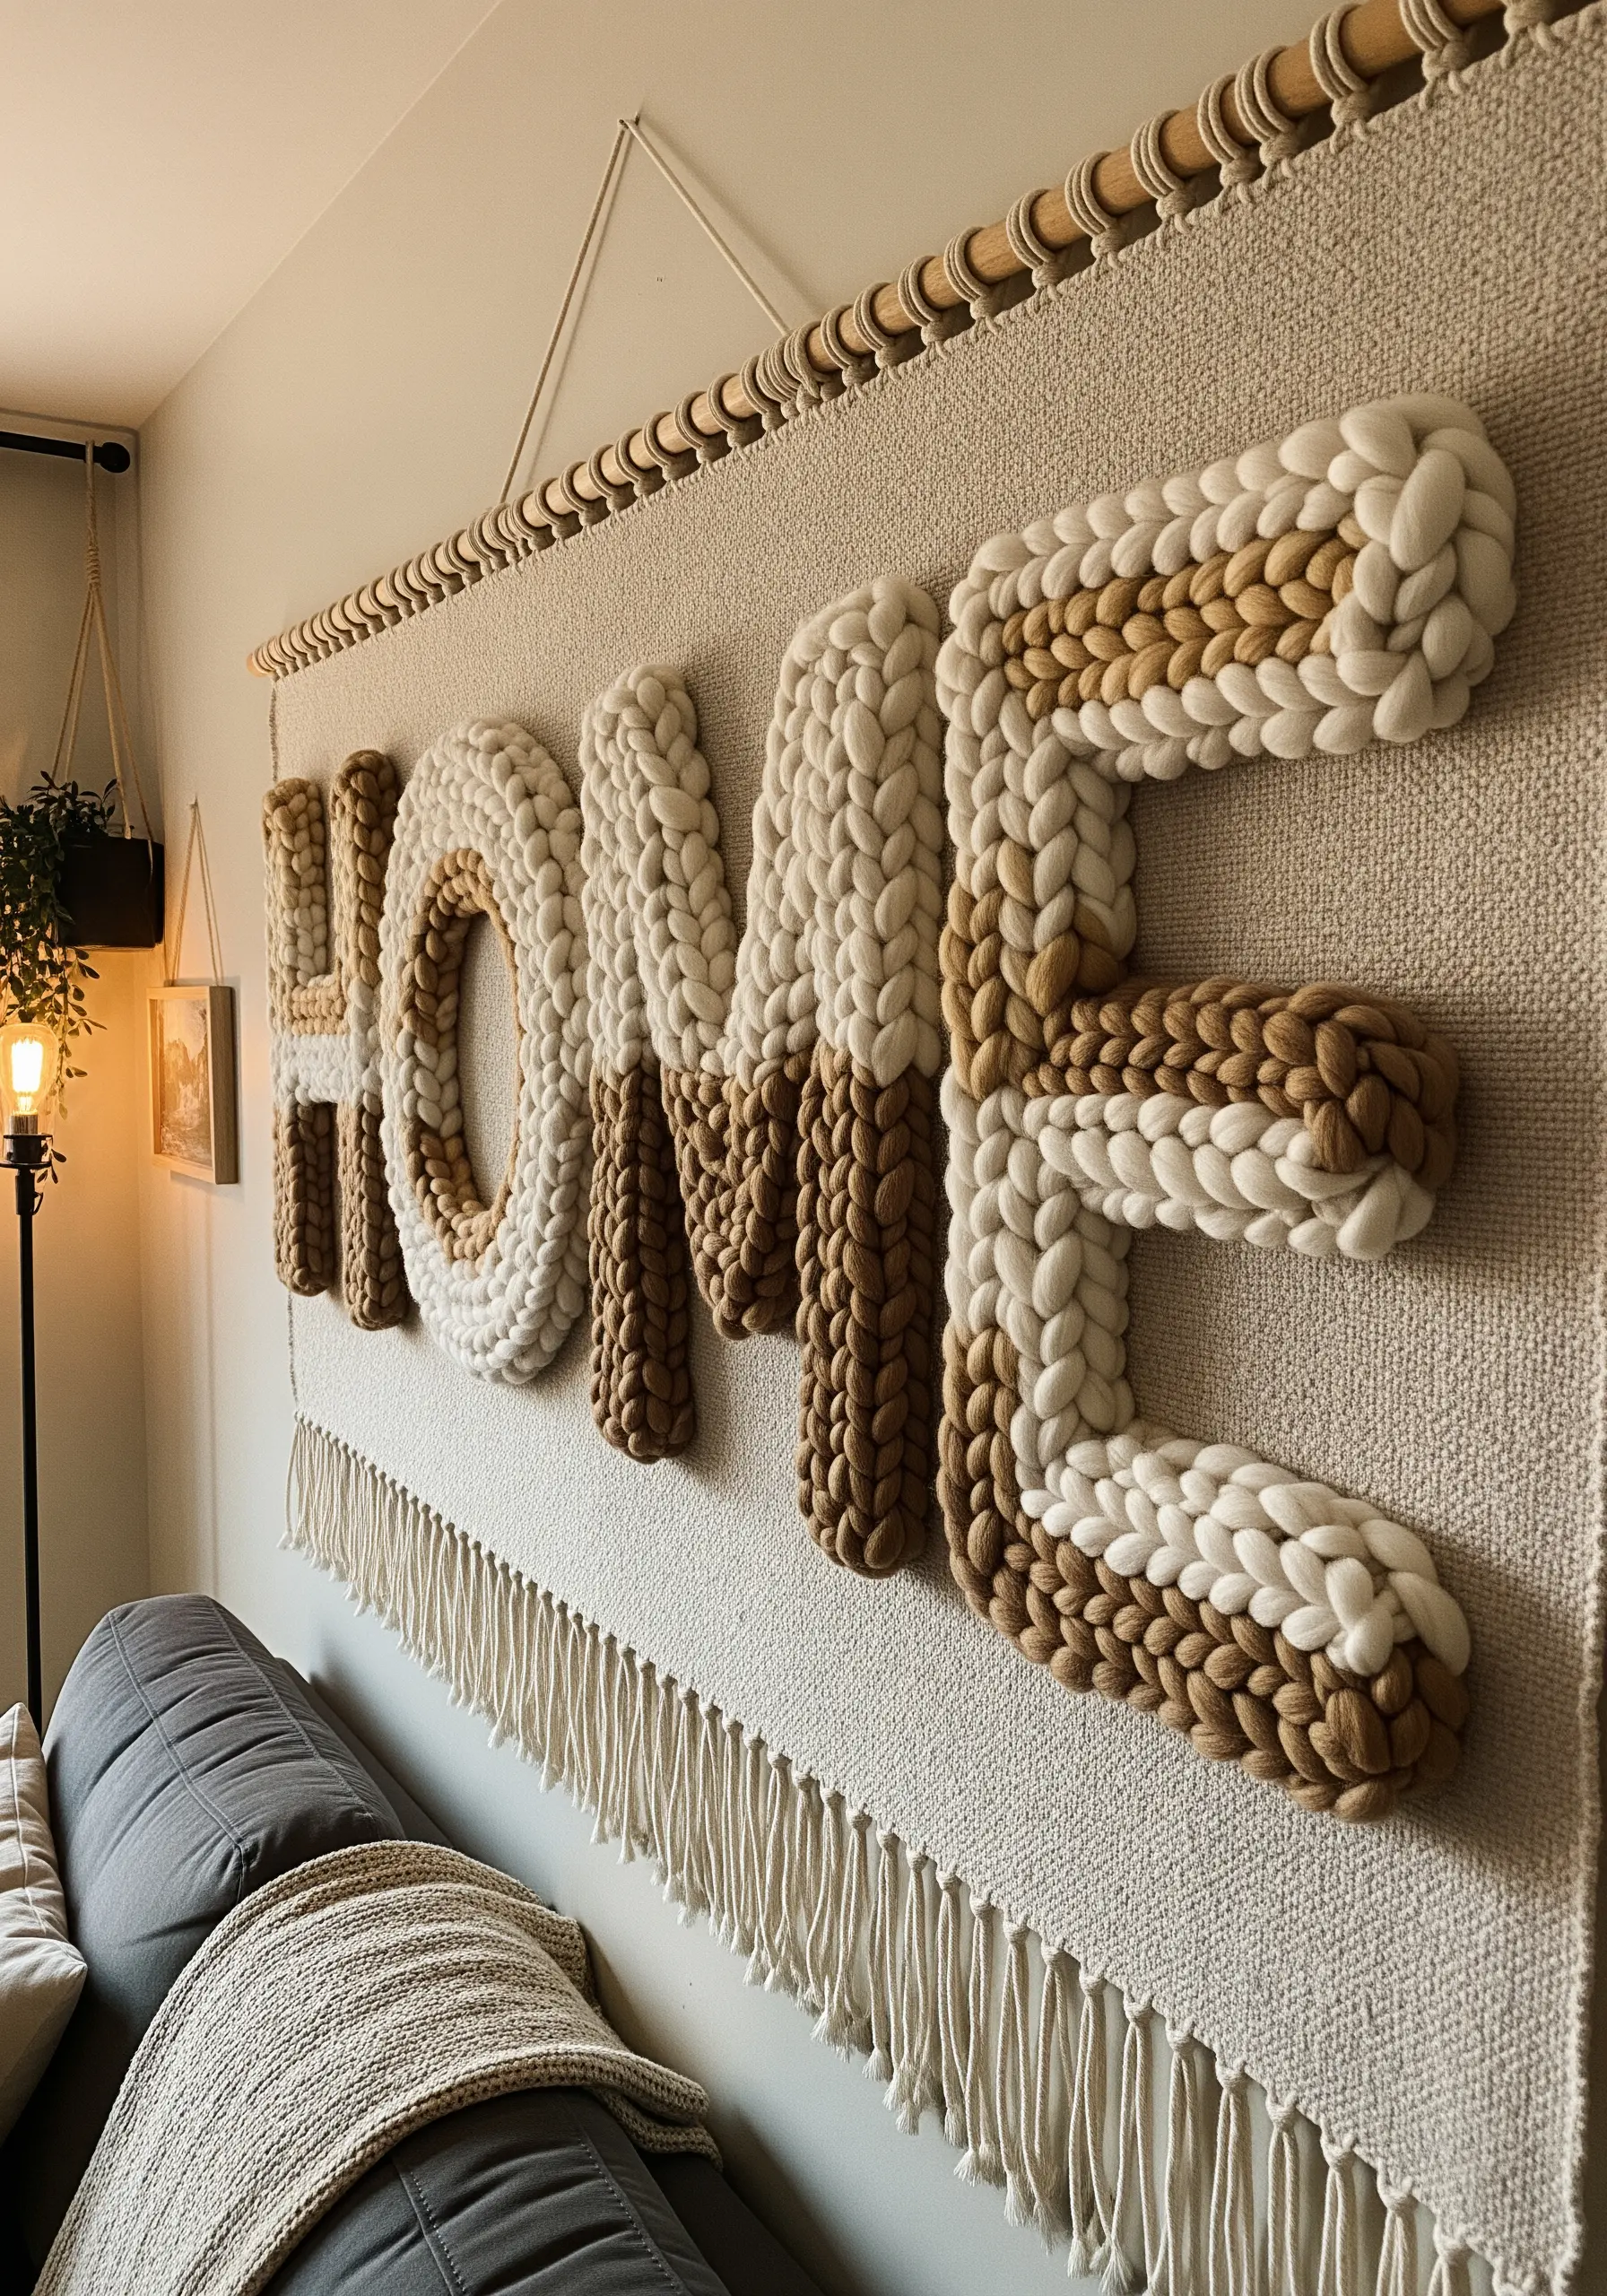
Scale up your embroidery by swapping floss for roving or chunky wool yarn.
Use a punch needle or latch hook technique to create these dense, carpet-like loops that add massive acoustic and visual softness to a room.
This approach transforms text into a sculptural relief, similar to textured yarn wall art techniques.
8. Wire armature and metallic wrapping

Sometimes thread alone isn’t enough to support a structure; use a wire armature to create 3D script.
Bend a heavy-gauge wire into your desired cursive, then wrap it tightly with gold metallic floss or thin brass wire.
This creates a free-standing object that casts its own shadow, elevating it beyond flat surfaces like typical luxury metallic thread wall decor.
9. Retro directional satin stitch

Channel the 70s by using color blocking and changing the angle of your satin stitch.
Stitch each color segment in a different direction (fanning out) to catch the light differently, creating a dynamic sunburst effect within the letters.
This technique adds movement to bold color pop embroidery ideas without needing complex shading.
10. Layered depth in monochromatic string

Create a tunnel effect by layering your string art from the outside in.
By building up the density on the outer edges and leaving the center open or lighter, you create a 3D architectural perspective.
This requires a deep frame or shadow box to accommodate the physical depth of the contemporary thread sculptures.
11. Integrating organic vines on wood
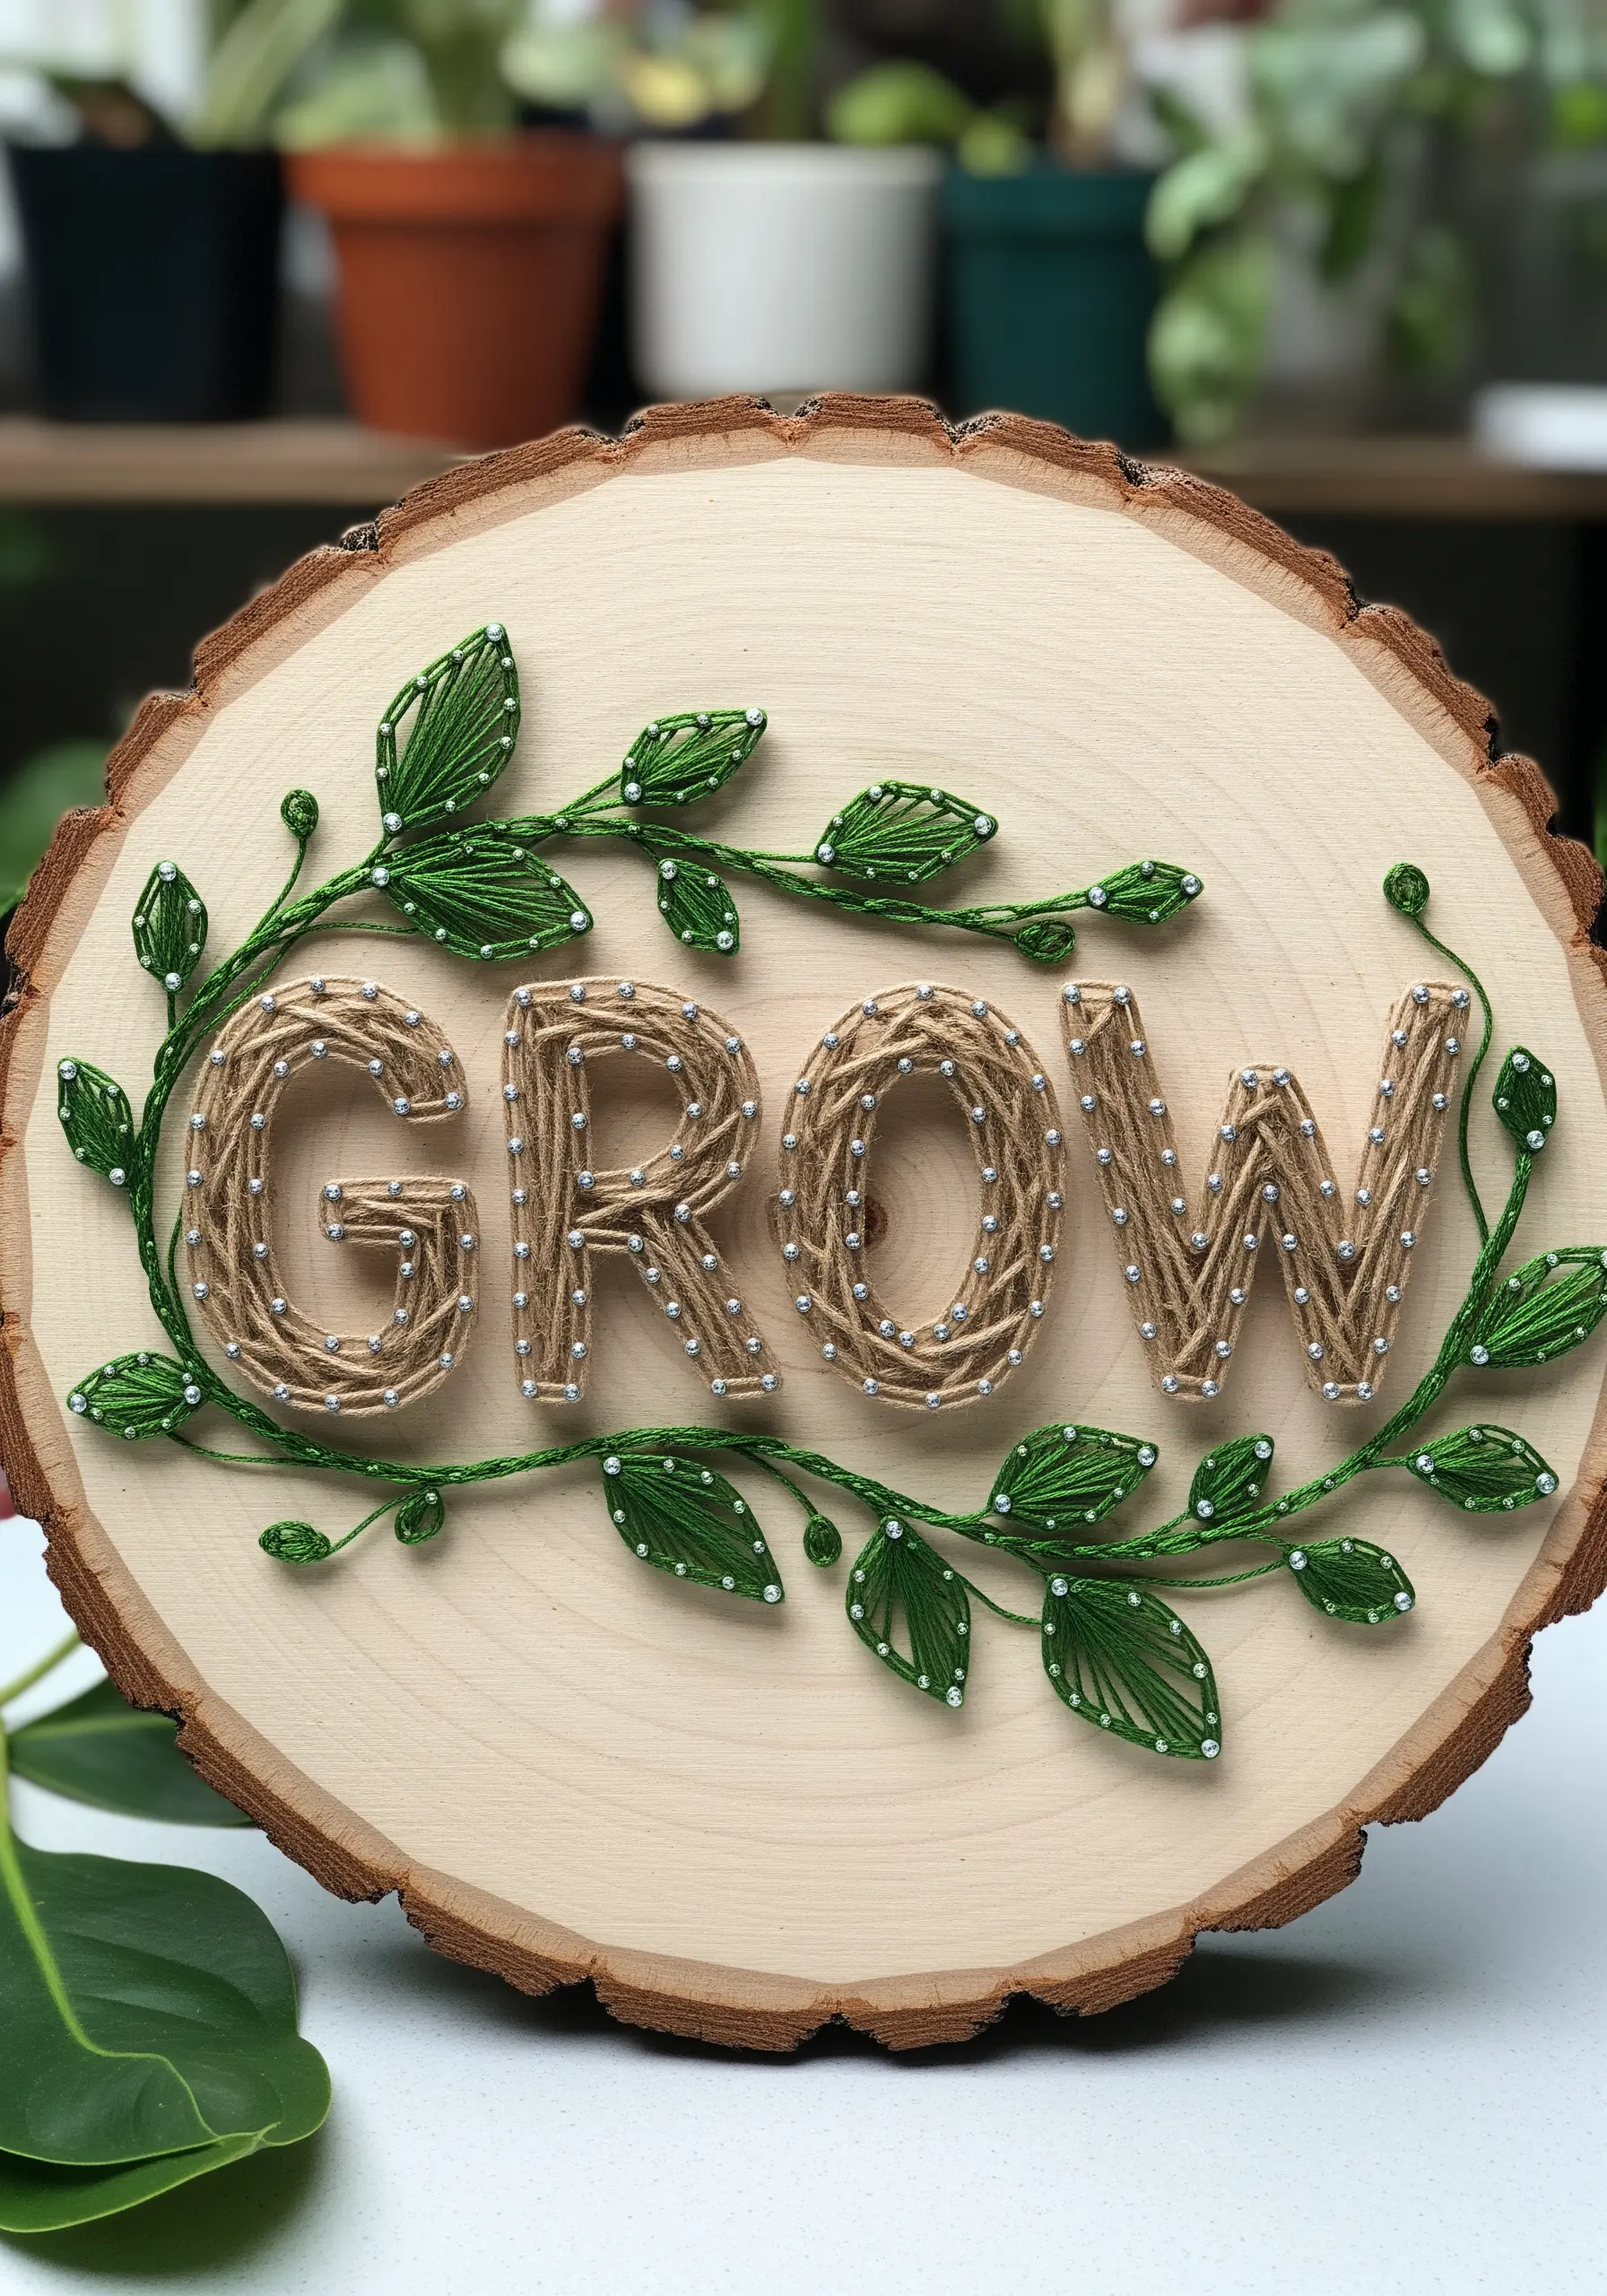
When using wood slices, pre-drill your holes carefully to avoid splitting the grain.
Intertwine embroidered vines through and around the string letters to marry the typography with the natural substrate.
The green thread needs to be slightly looser to mimic organic growth, contrasting with the tight tension of the letters, a staple in tree ring bark texture embroidery patterns.
12. Padded satin stitch trapunto

achieve this pillow-like 3D effect, you must use padding underneath your final layer.
Cut felt shapes of your letters and stitch over them (stumpwork or trapunto style) to create significant relief.
The monochromatic white-on-white palette relies entirely on the shadows cast by this raised texture, a sophisticated trick for modern thread illusion techniques.
13. Tone-on-tone texture play

Red on red can be incredibly striking if you play with sheen and texture.
Use a glossy pearl cotton or silk thread against a matte felt background to ensure legibility through light reflection.
The geometric web pattern creates enough shadow difference to make the word readable, perfect for romantic embroidery patterns.
14. Coiled thread quilling simulation
Mimic the look of paper quilling by tightly coiling your thread into circular swirls.
This requires gluing or stitching the coils down onto a stiff backing to maintain their shape.
The result is a vibrant, bubbling texture that fills the space more energetically than straight lines, adding complexity to abstract thread overlapping patterns.
15. Illuminating with LED integration
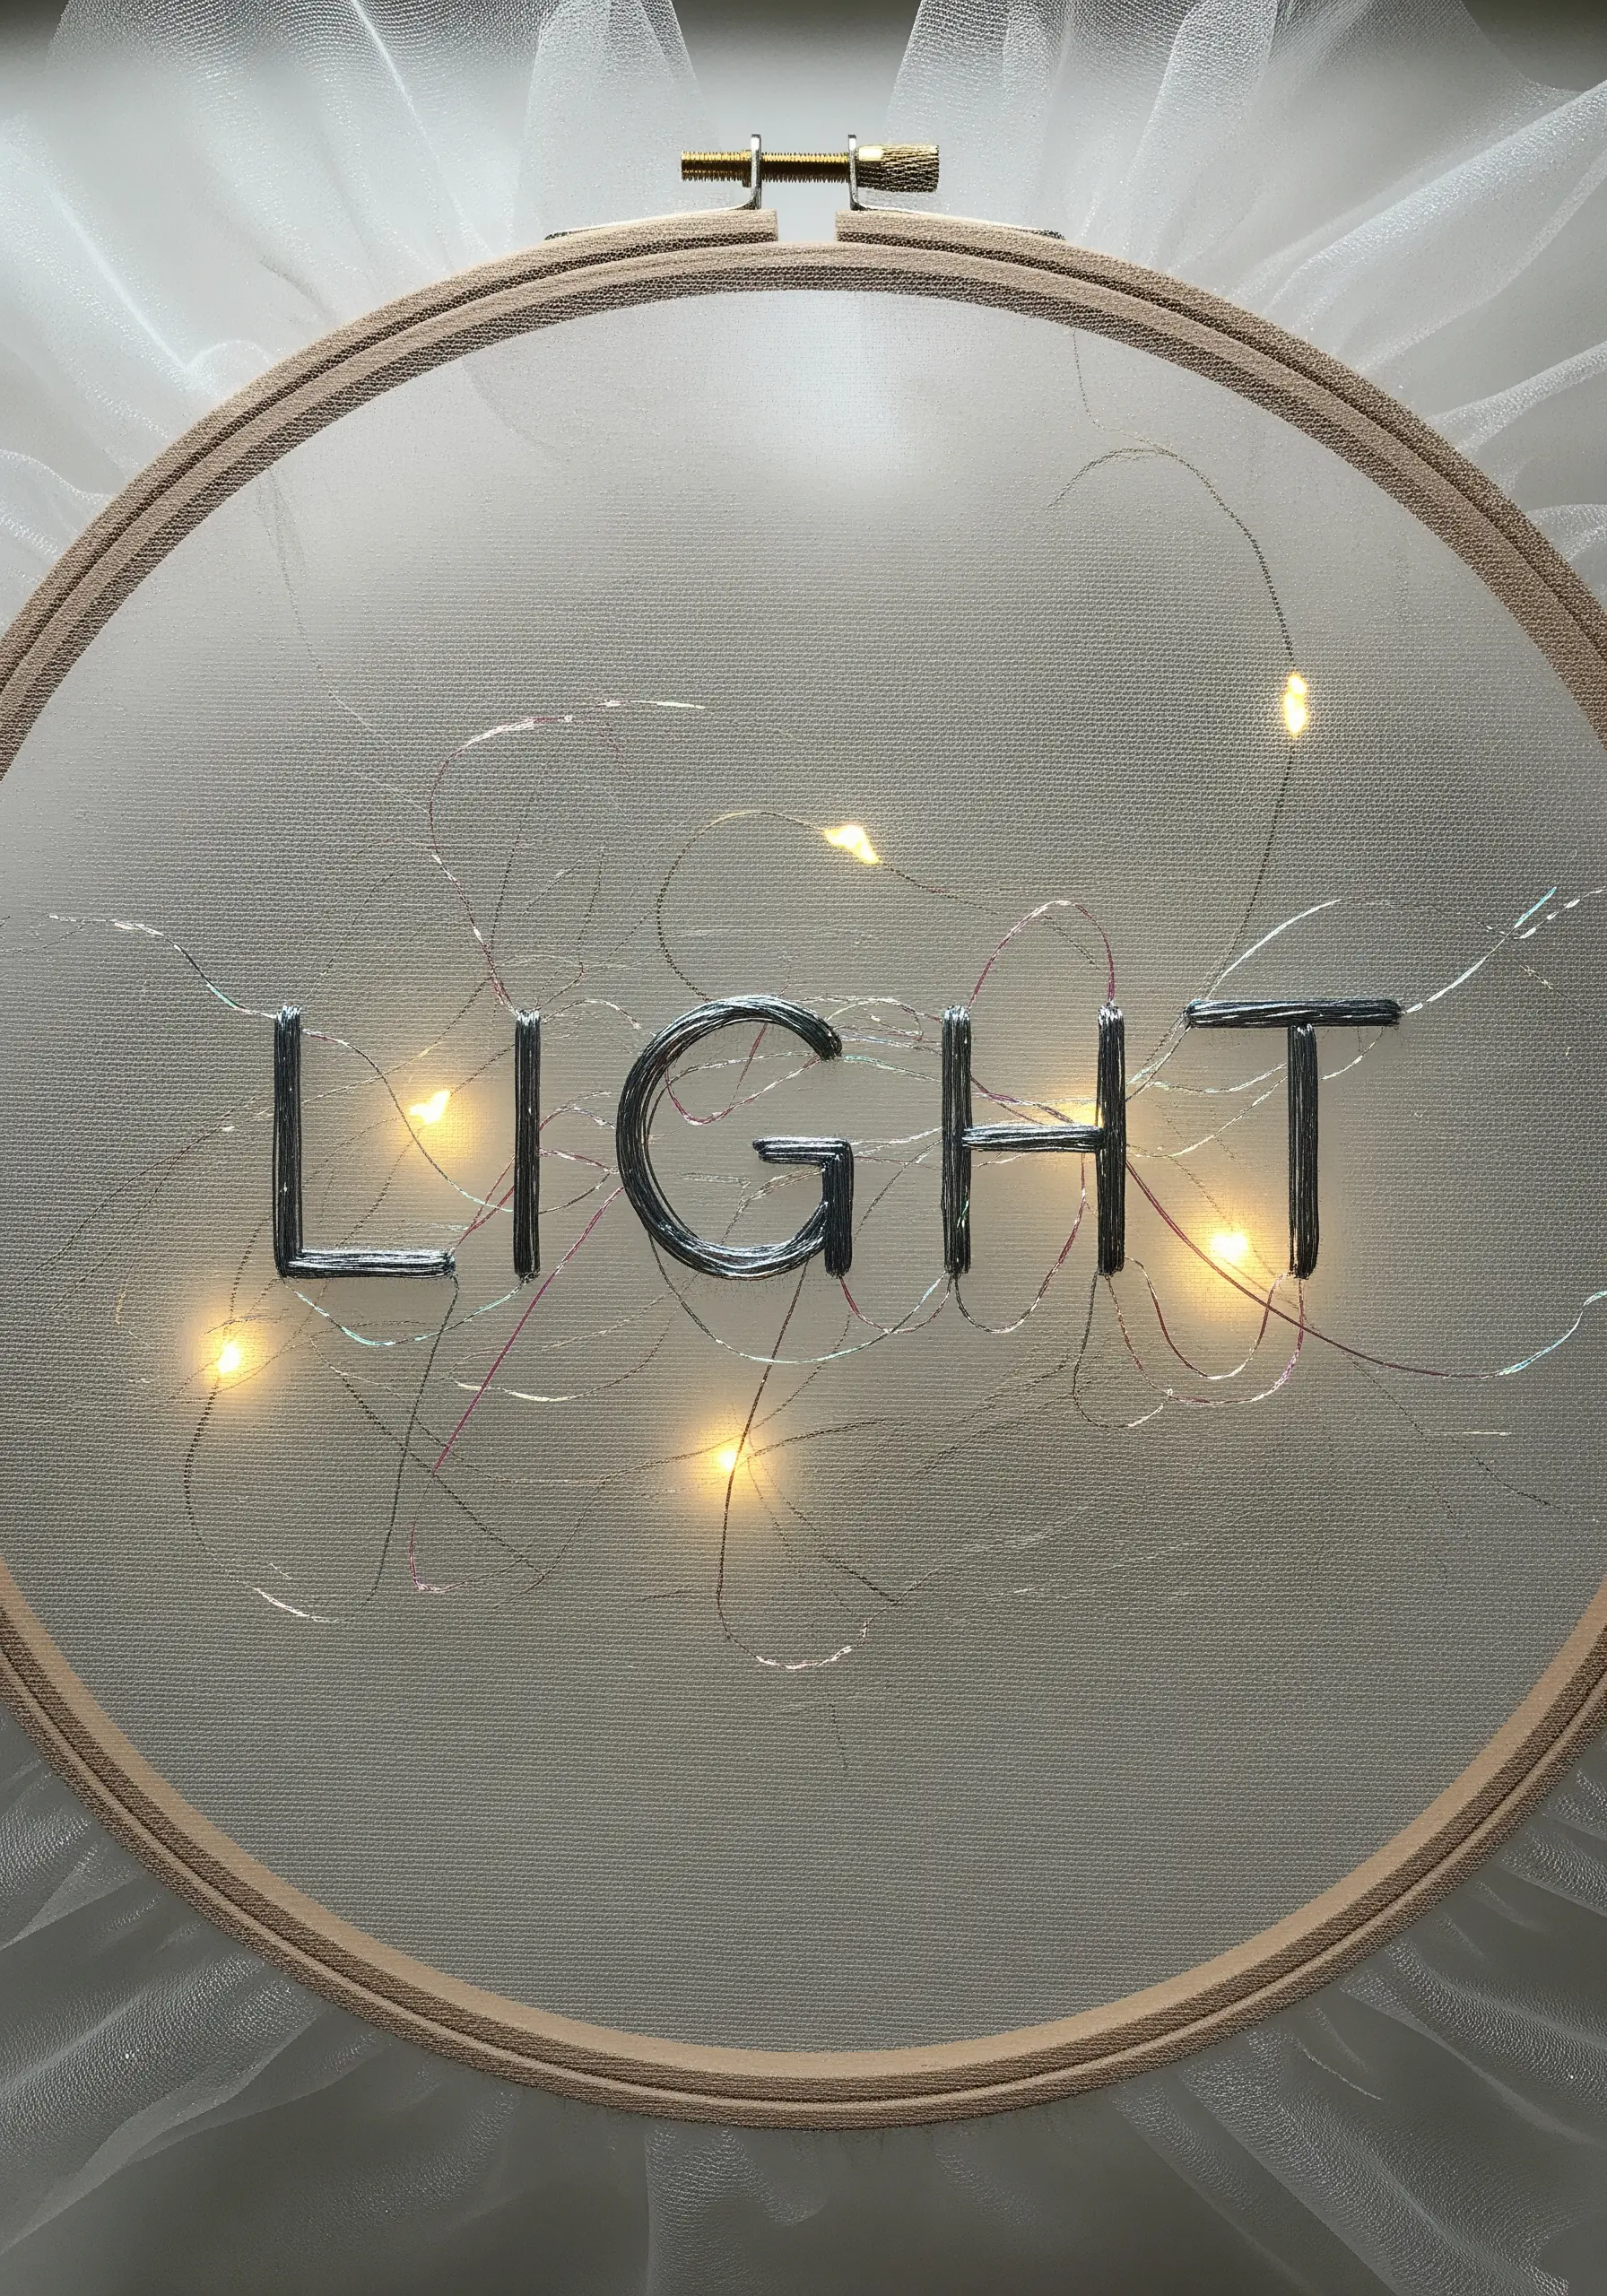
Take your embroidery literally into the light by incorporating micro LEDs or electroluminescent wire.
Stitch on a sheer organza or tulle to allow the light to diffuse from behind the text.
This transforms the hoop into a functional lamp and works beautifully with modern neon thread designs.
16. Loop pile punch needle texture

For a tactile, rug-like finish on tote bags, use a punch needle to create loop pile embroidery.
Pack your loops tightly to create dense, durable letters that can withstand daily use.
The chaotic, confetti-style color mix hides minor imperfections and adds a playful vibe to tote bag embroidery stitch combos.
17. Geometric interference patterns

Utilize the angles of a hexagon or geometric base to dictate your string path.
By layering straight lines at slightly shifting angles, you create a moiré interference pattern that shimmers.
This approach turns simple math into visual art, ideal for geometric hoop art designs.
18. Goldwork on leather binding
Elevate a journal or album by stitching directly onto the leather cover using goldwork techniques.
You must pre-punch holes with an awl as the needle won’t pass through easily; spacing is permanent.
Using metallic thread gives it a timeless, gilded age appearance, reminiscent of vintage style embroidery banners.
19. Structured text over chaotic splatter
Balance is key when working with busy mixed-media backgrounds.
If you splatter paint your canvas, keep the string art typography bold, white, and blocky to ensure it reads clearly.
The sharp geometric lines of the thread rein in the energy of the paint, a concept used in abstract patchwork embroidery mashup ideas.
20. Faux-embossed couching technique
Create the look of embossed leather without heavy machinery by using a couching technique.
Lay down a thick cord for the outline, then stitch tightly over the surrounding fabric to make the letters rise up.
This “reverse” texture is sleek and modern, fitting perfectly with dramatic dark thread embroidery designs.
21. Patterned appliqué with blanket stitch

For bold, graphic letters that cover large areas, use appliqué rather than solid stitching.
Cut your letters from a floral fabric and secure the raw edges with a thick, black blanket stitch.
This frames the pattern like a comic book illustration and is a great way to use scraps for fabric collage embroidery ideas.
22. Wrapped cord neon sign effect

To achieve a fluid, neon-sign aesthetic, don’t stitch through the fabric—wrap onto it.
Wrap embroidery floss tightly around a thick wire or cording, then shape it into words and tack it down.
This creates a tubular, 3D line that mimics glass neon tubes, a trick often found in abstract thread sculpting tricks.
23. Radial tension mandala center
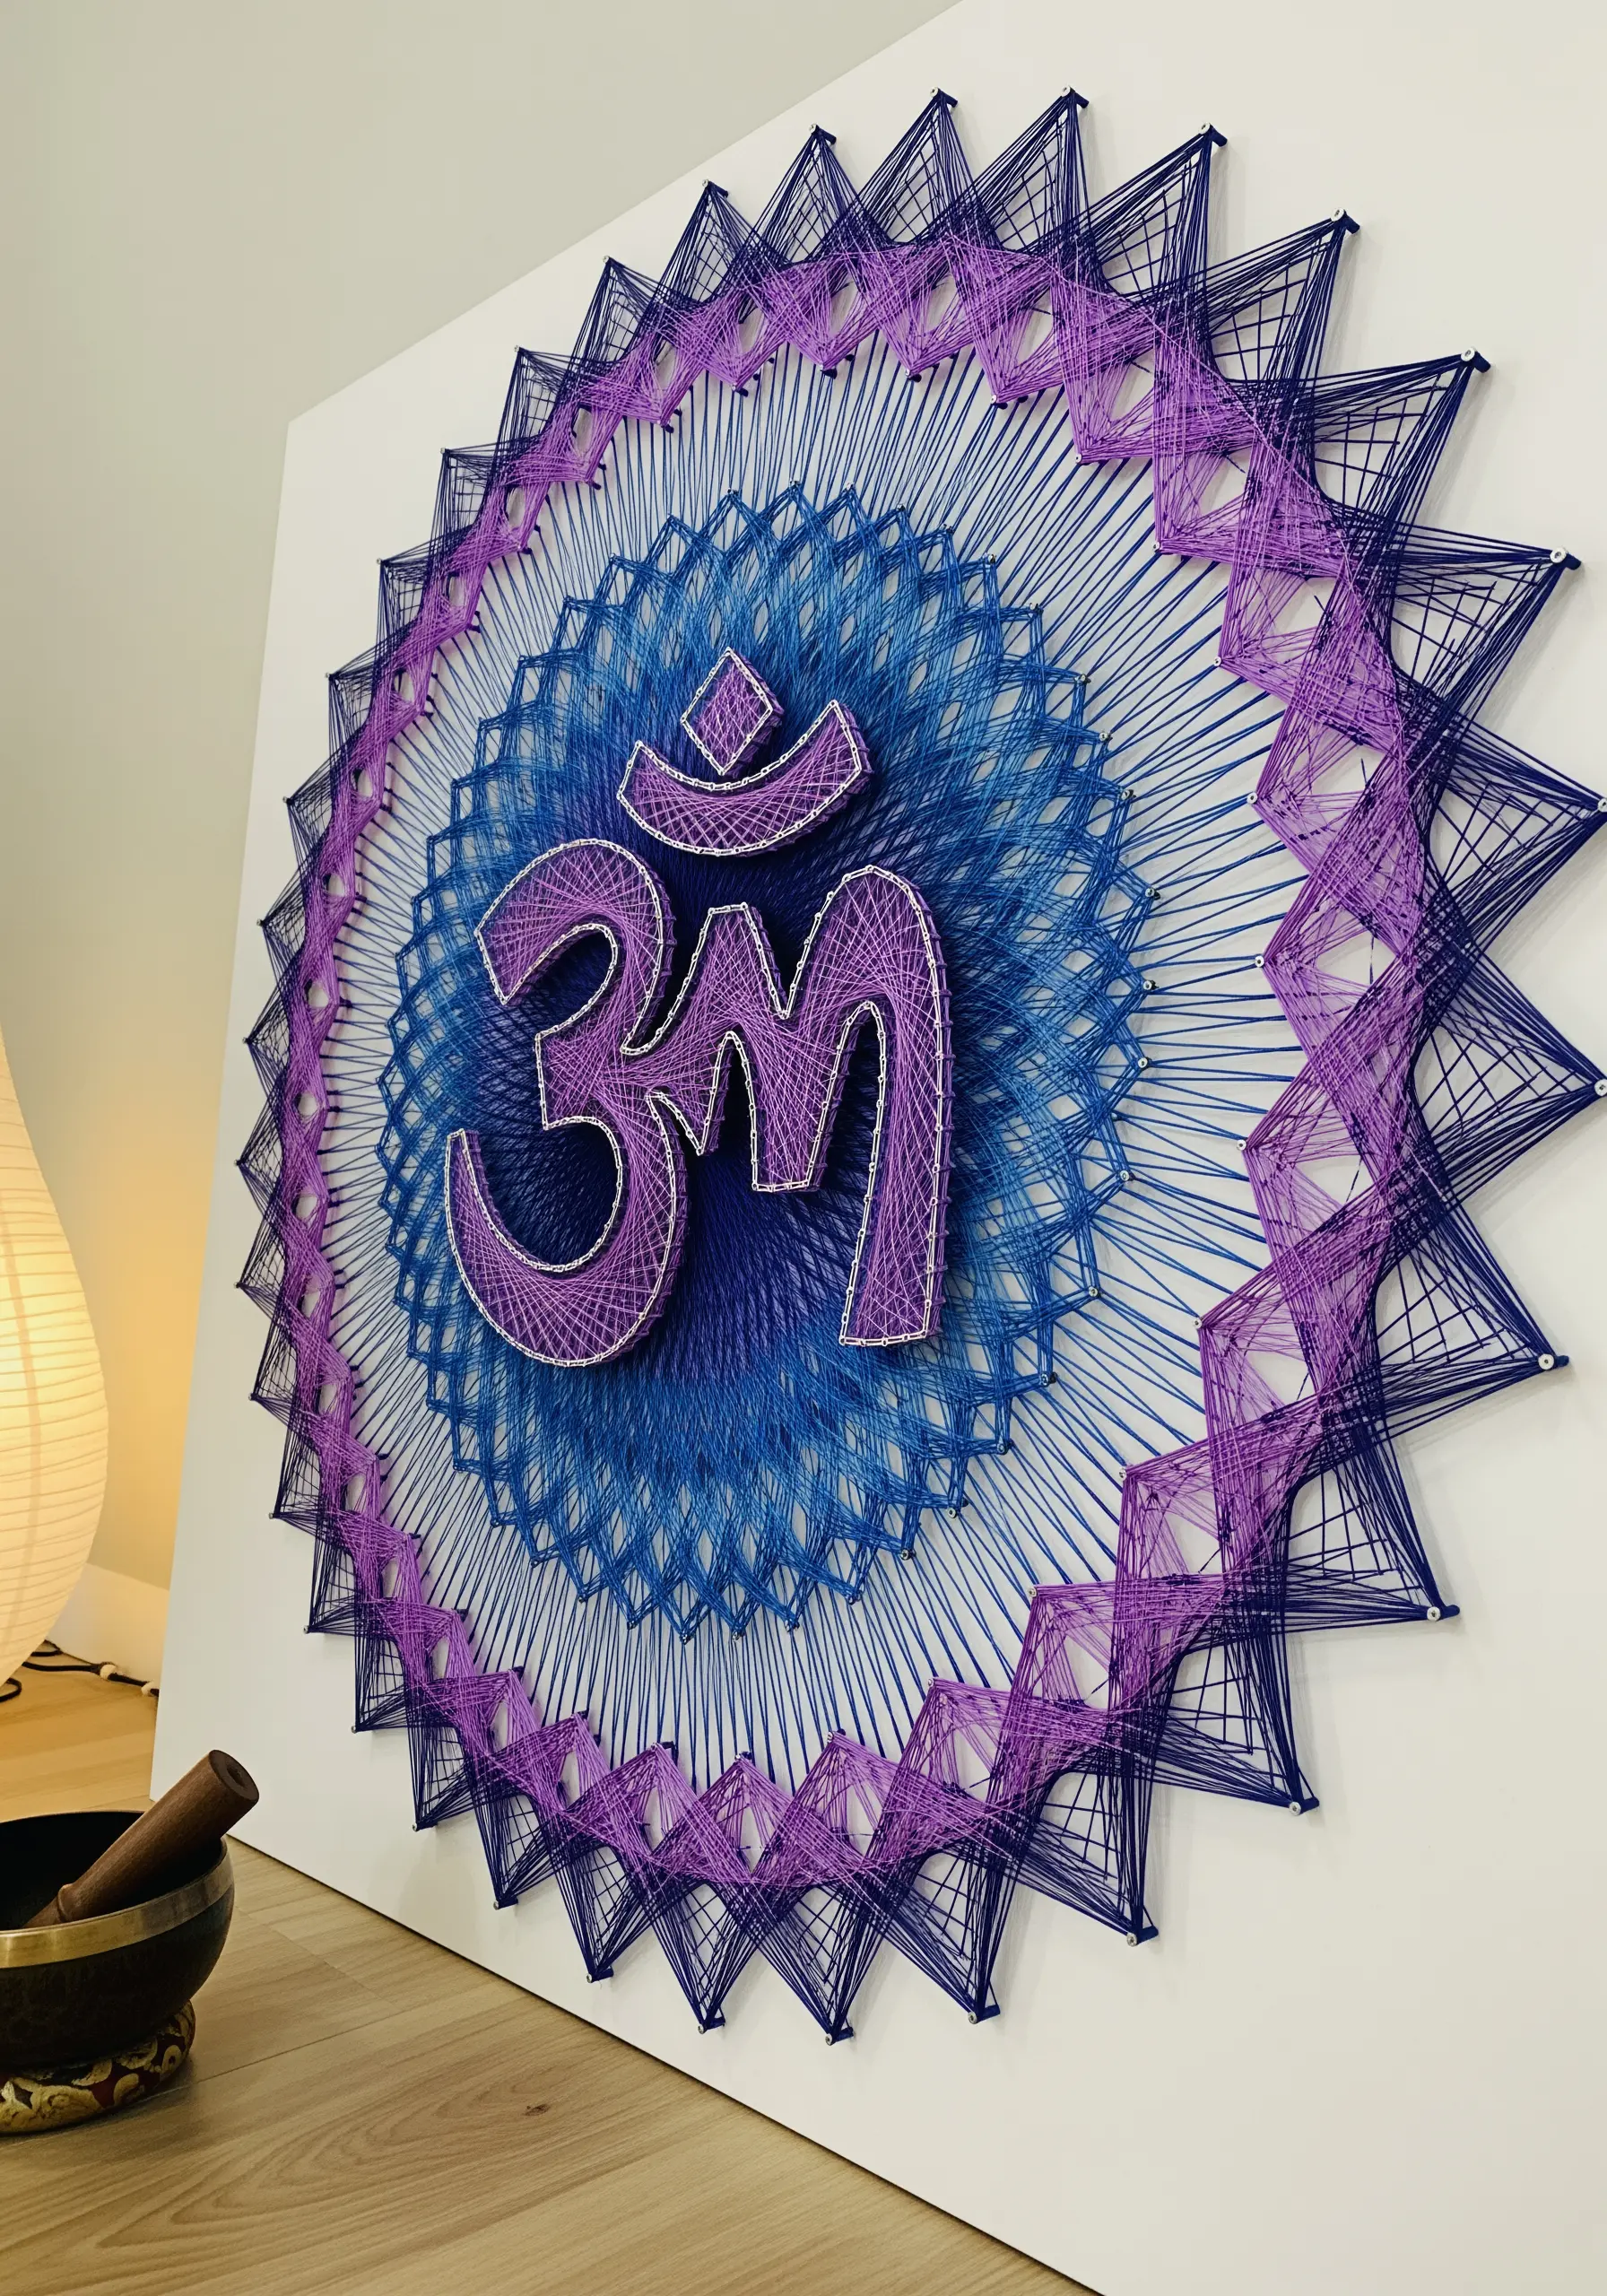
Positioning typography in the center of a radial design requires extreme anchoring.
The central symbol ‘Om’ floats because the background radial threads pull the eye inward.
Ensure your center nails are deeply secured to withstand the tension of hundreds of converging threads, a core principle of small hoop mandala patterns.


