

You’ve mastered the basic stitches, and now you feel a pull toward creating something bolder, something with more presence. But how do you bridge the gap between a simple motif and a true statement piece? The answer lies not in learning more complex stitches, but in changing how you see your fabric.
Think of your fabric not as a blank page, but as the first layer of your art. By combining patchwork—the art of composing with fabric—and embroidery, you unlock a new language of texture, color, and depth. This isn’t about making your work more complicated; it’s about making it more intentional.
These ideas are designed to help you explore that powerful intersection. You’ll learn to build compositions with fabric, then use thread to unify, accentuate, and transform them. Let this be your permission slip to cut up your fabric, play with raw edges, and stitch across seams. Your most expressive work is waiting.
1. Unify Contrasting Textures with Bold Yarn Couching
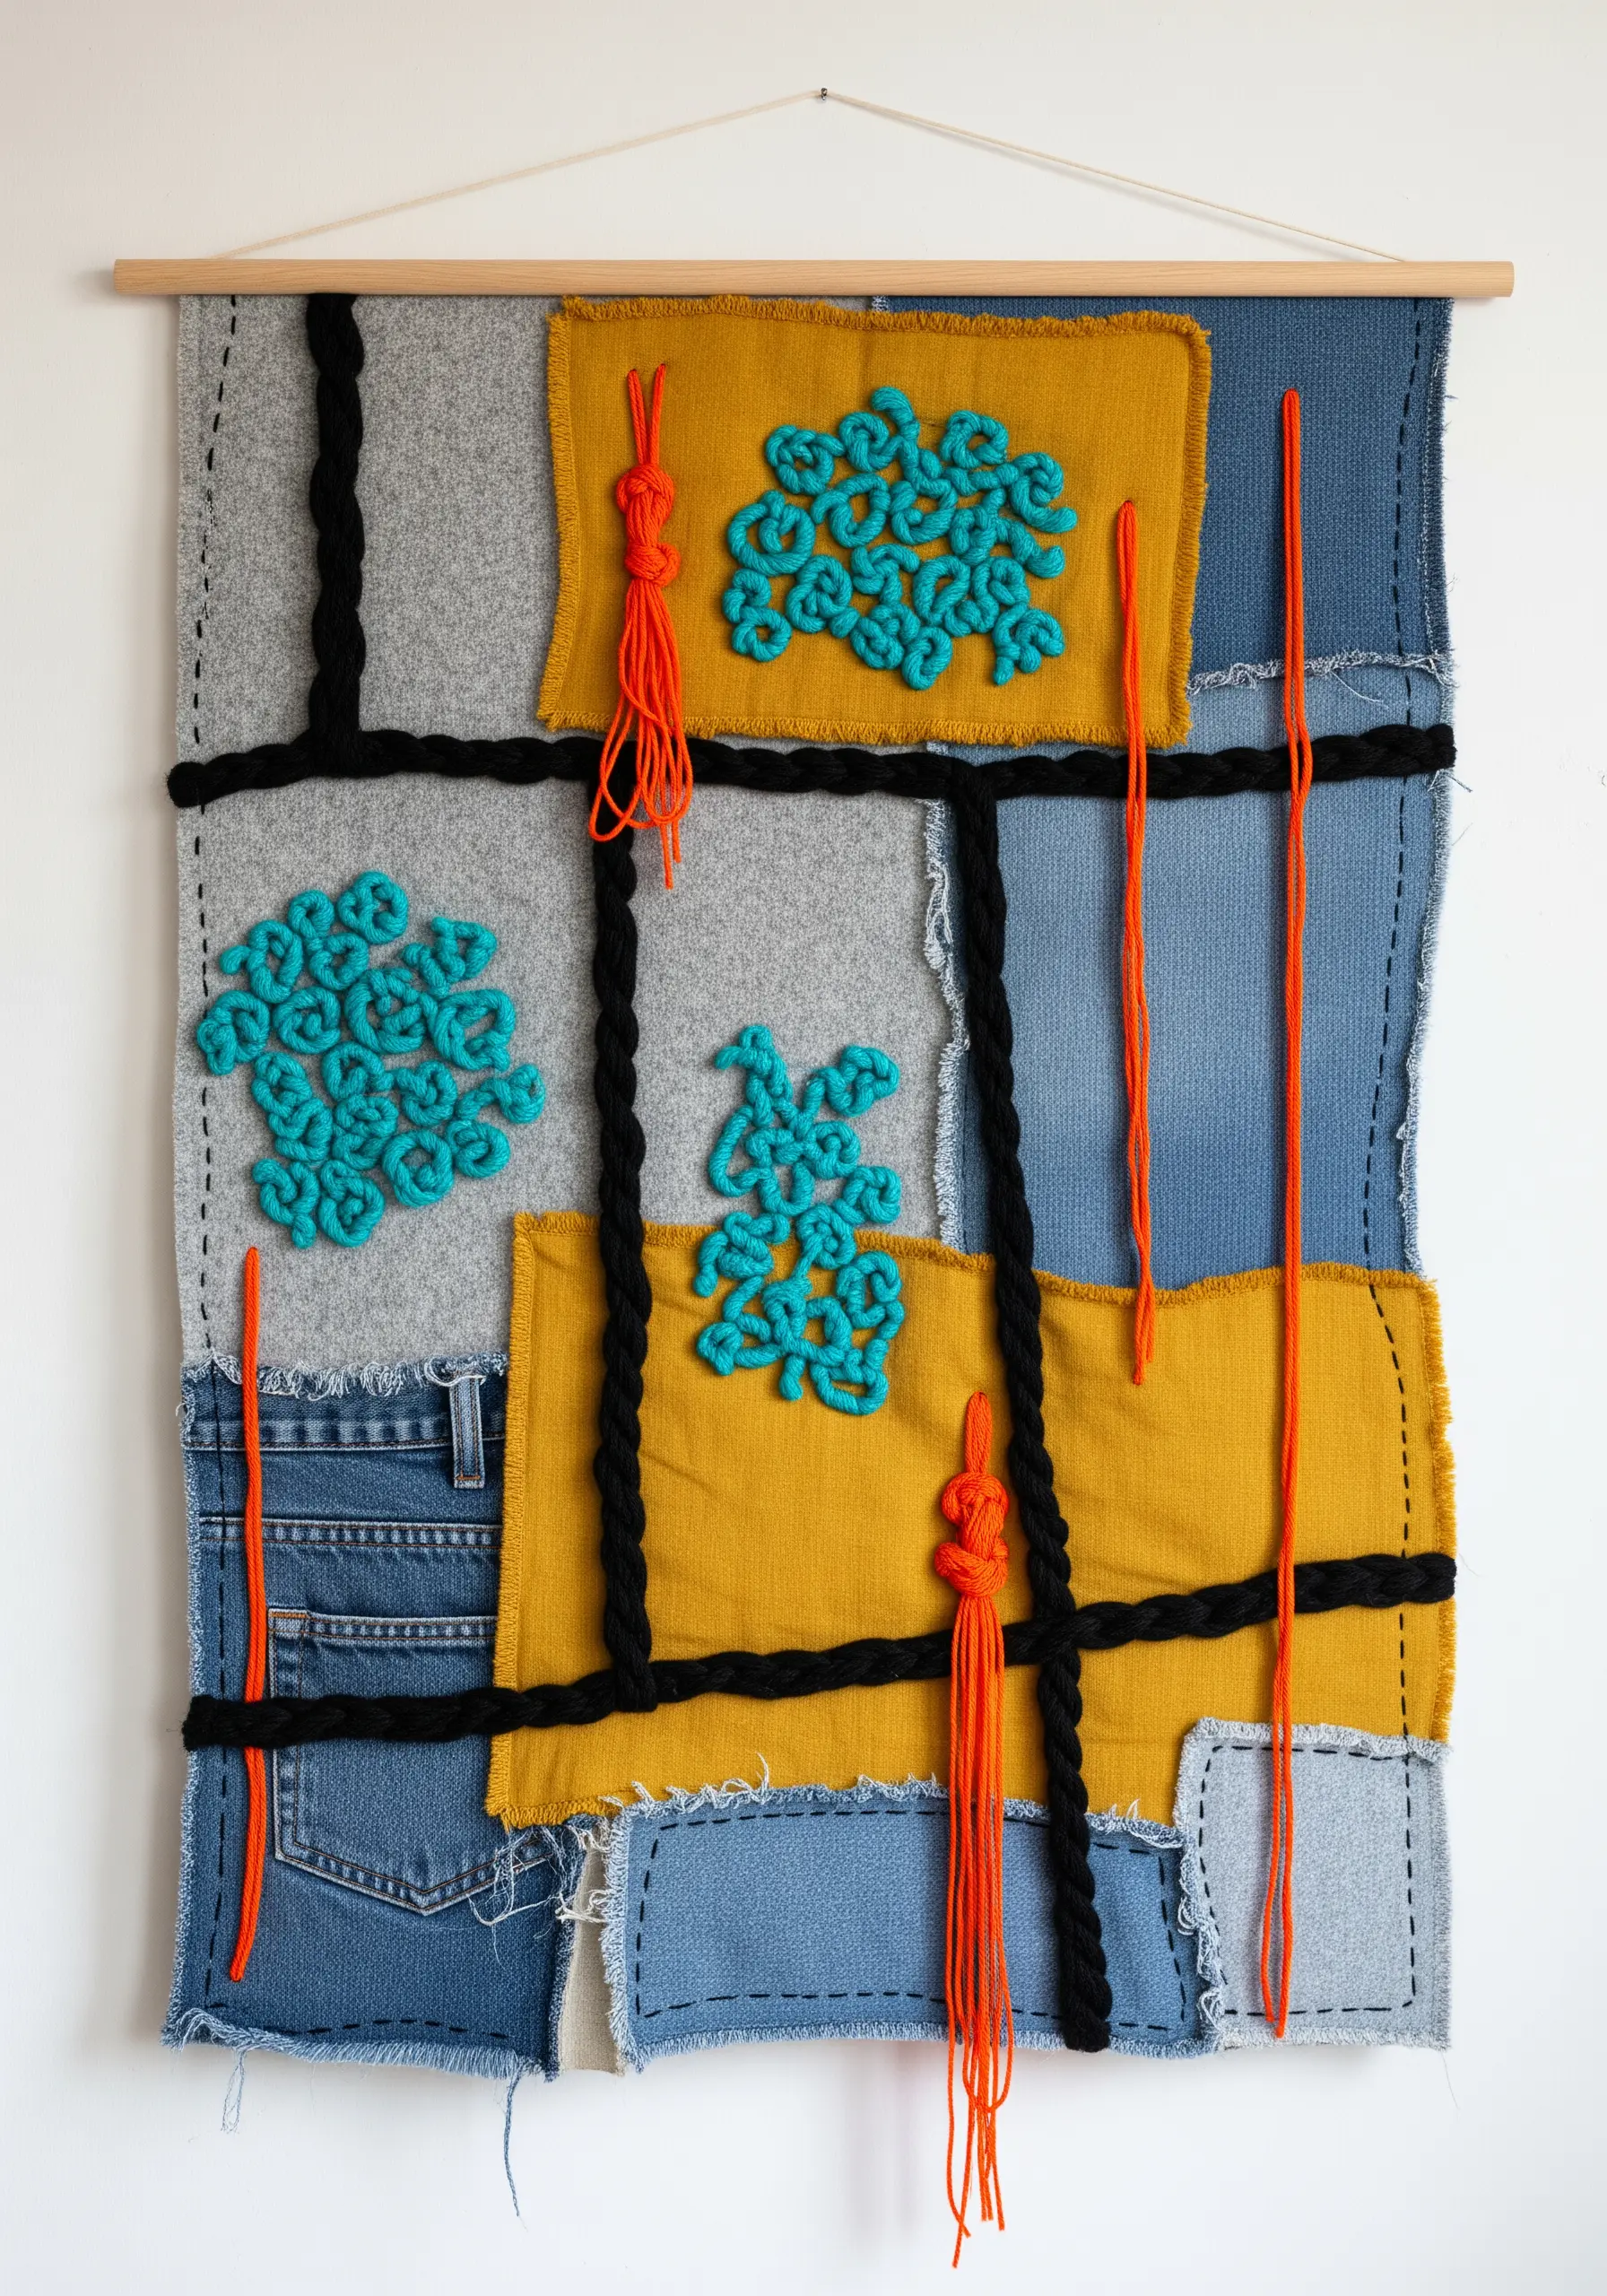
Combine rugged denim, soft felt, and textured linen to create a rich textile landscape.
Instead of hiding seams, highlight them by leaving raw, frayed edges on your fabric patches—this adds an organic, deconstructed feel that contrasts beautifully with structured lines.
Use thick, chunky yarn for couching to create a bold grid that visually connects the disparate fabric blocks.
Secure the yarn with a simple, widely spaced whipstitch in a contrasting color to add another layer of detail without overwhelming the composition.
This technique turns your fabric scraps into intentional, gallery-worthy yarn wall art.
2. Layer Celestial Motifs Over Velvet and Corduroy

Create a luxurious foundation by color-blocking with fabrics that have a distinct nap, like velvet and corduroy.
Use metallic seed beads alongside your thread to stitch constellations; the beads catch the light and add a subtle, three-dimensional shimmer that thread alone cannot achieve.
For a central statement, couch a heavy metallic trim or chain instead of stitching a solid line.
This adds dramatic weight and texture, turning a simple hoop into a tactile piece of art.
Balance the sparkle with soft, sculptural bullions or French knots to create small, vibrant focal points. These moon and stars embroidery ideas work best when textures are varied.
3. Frame Large-Scale Apparel Art with a Blanket Stitch

When working on a large garment piece like a jacket, use fabric appliqué to block in your main colors first.
Secure the edges of each fabric panel with a decorative blanket stitch in a contrasting color, like white against dark tones, to create a clean, graphic outline that defines the shapes.
For the sun rays, use a long, single-ply metallic thread and stitch them as straight lines radiating from a central point.
To prevent puckering on such long stitches, always use a heavy-duty tear-away stabilizer on the back of the fabric.
Fill in the mountain details with directional satin stitch to mimic the angles and shadows of rock formations, adding depth and realism to your bold back panel embroidery designs.
4. Sculpt with Thread for 3D Topographical Lines

Transform a simple cushion cover by using yarn couching to create a bold, sculptural surface.
Lay down bundles of embroidery floss or fine yarn and secure them with a single, nearly invisible tacking stitch in a matching color every inch or so.
Plan your swirling lines on paper first to ensure the design flows naturally across the fabric panels.
By varying the thickness of the yarn bundles, you can create a sense of depth and movement, making some lines appear closer and others further away.
This is one of the most effective ways to make embroidered cushion covers feel like functional sculptures.
5. Juxtapose Order and Chaos with Free-Motion Scribbles
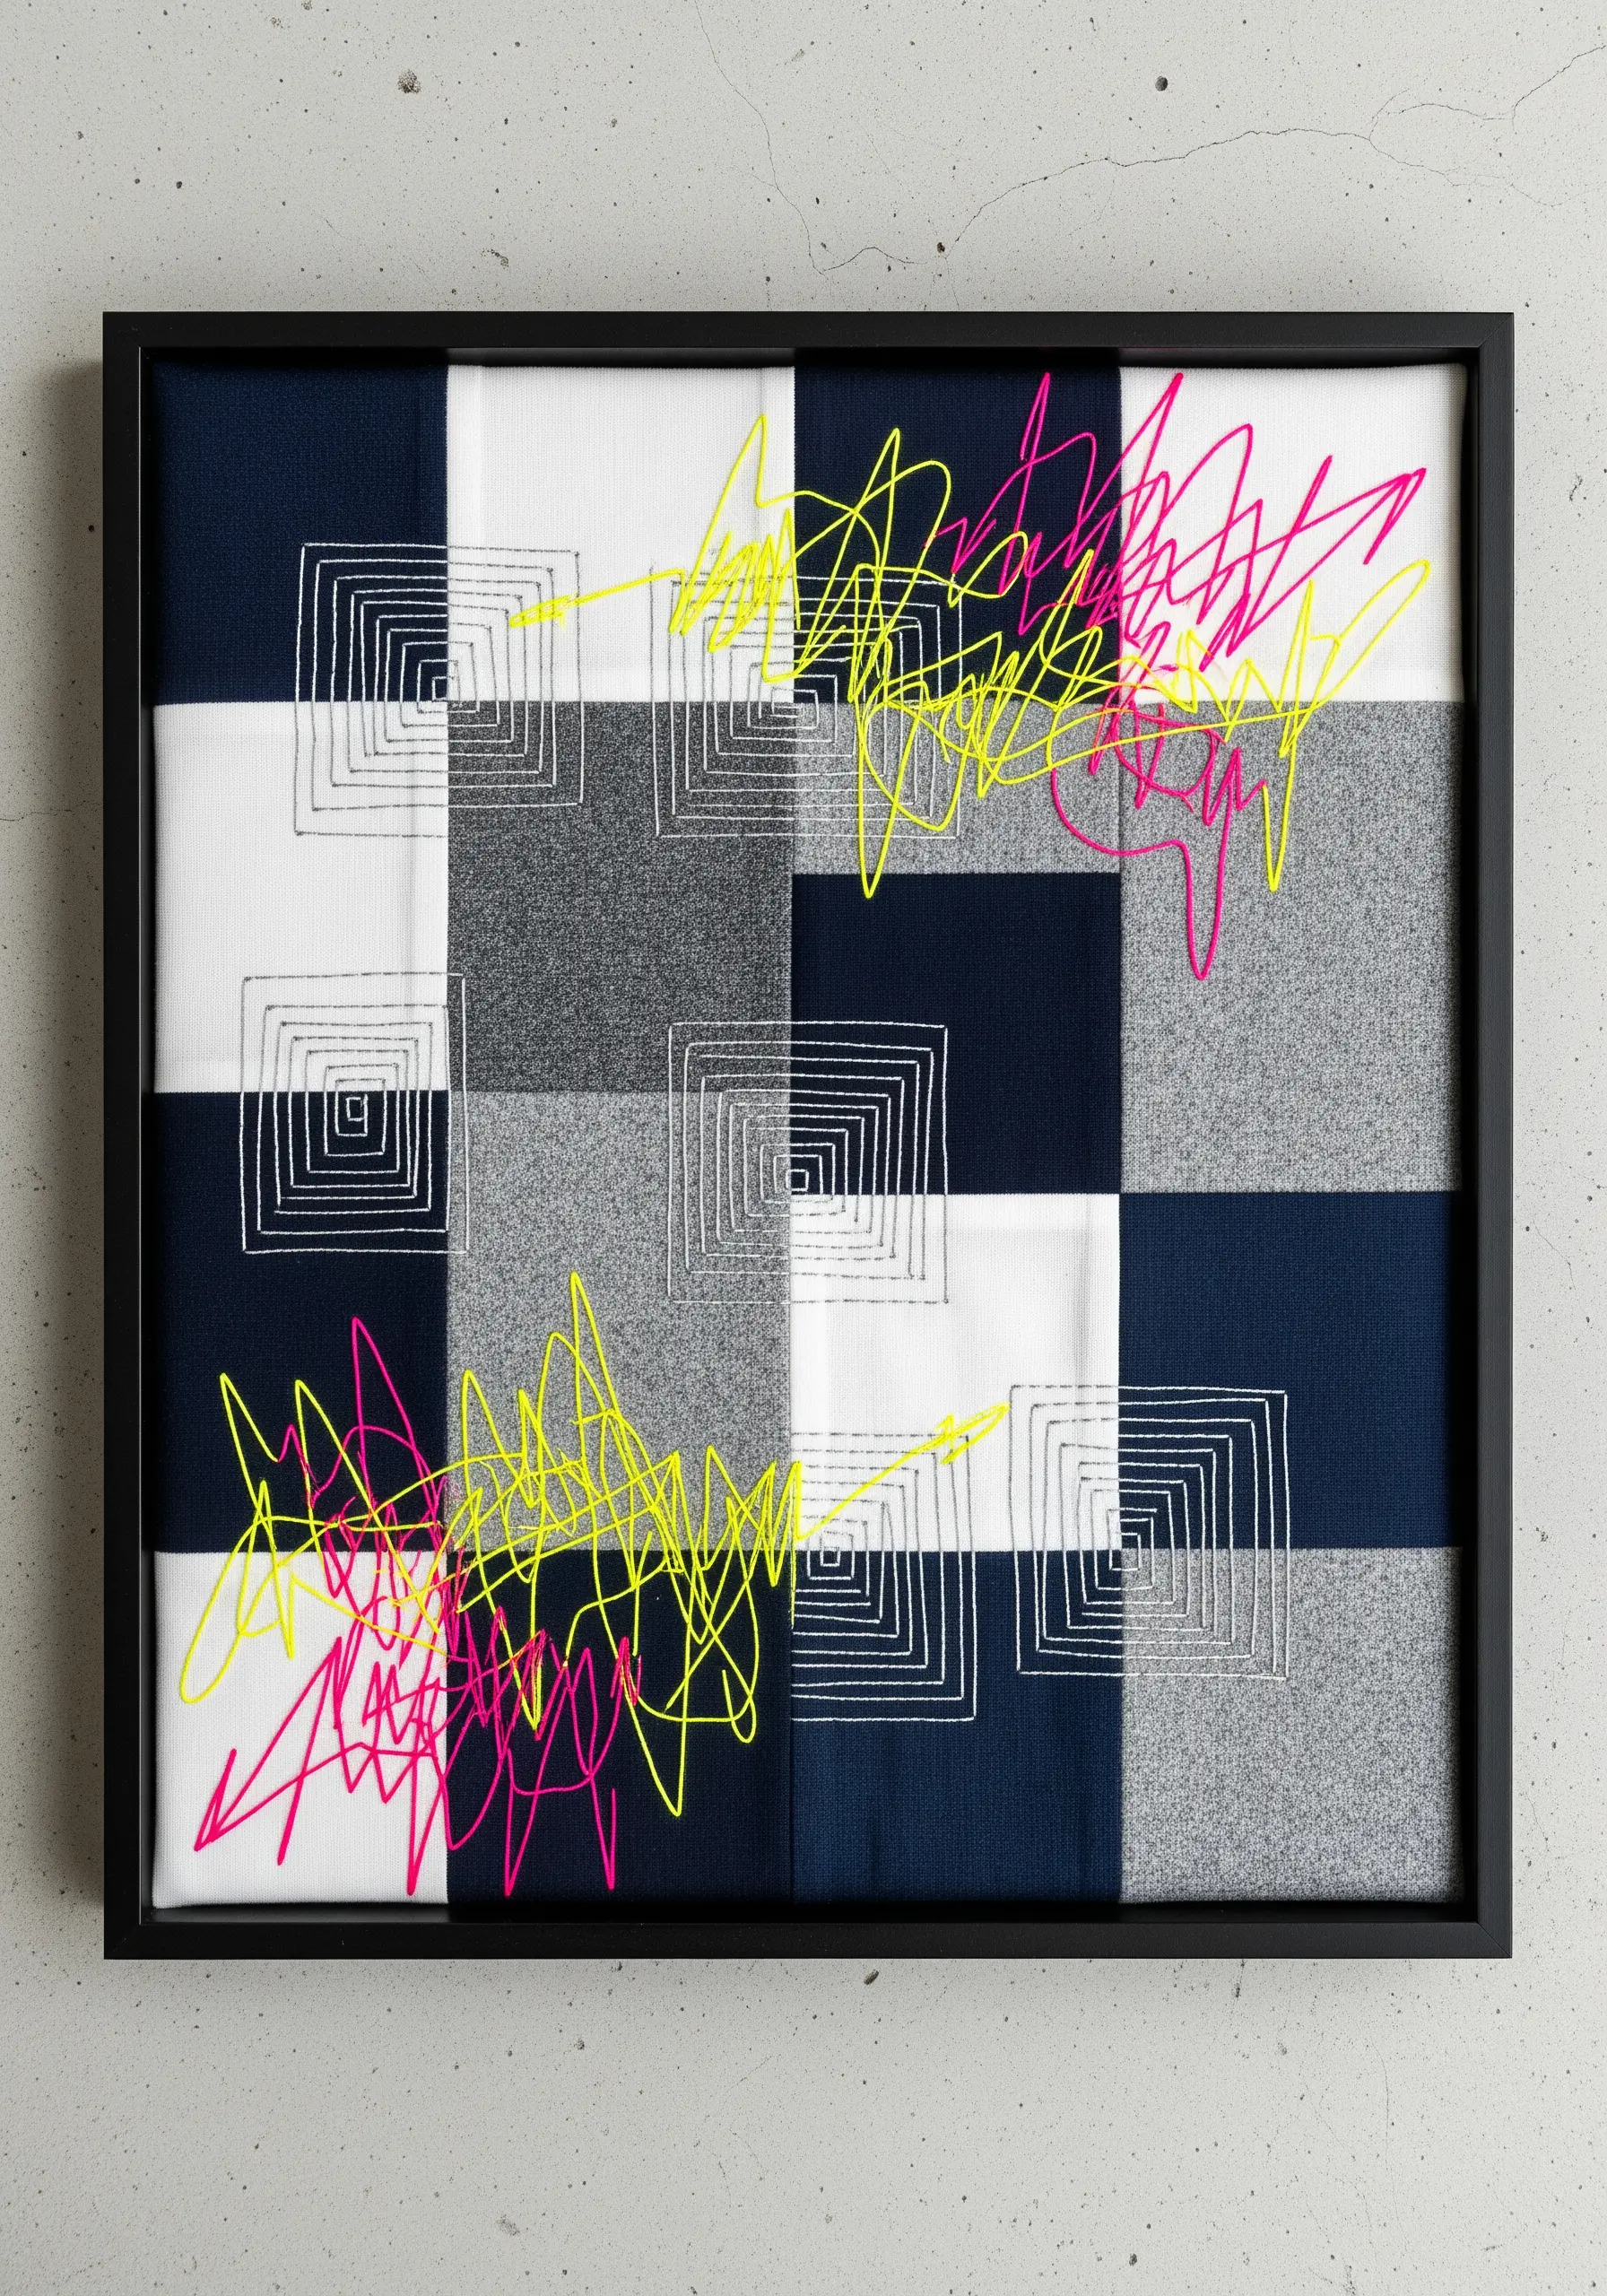
Create a foundation of disciplined geometry by piecing together a simple checkerboard of neutral fabrics.
Stitch precise, repeating geometric shapes over this grid using a standard sewing machine or by hand with a simple backstitch for a clean, architectural look.
Then, introduce a blast of chaotic energy by adding free-motion embroidery.
To do this on your machine, drop the feed dogs and use a darning foot, allowing you to move the fabric freely in any direction to create expressive, graffiti-like scribbles.
Choose a high-contrast neon thread to ensure the chaotic layer pops dramatically against the orderly background, turning it into one of your favorite modern framed embroidery designs.
6. Build Depth in Seascapes with Layered Fabric and Beads
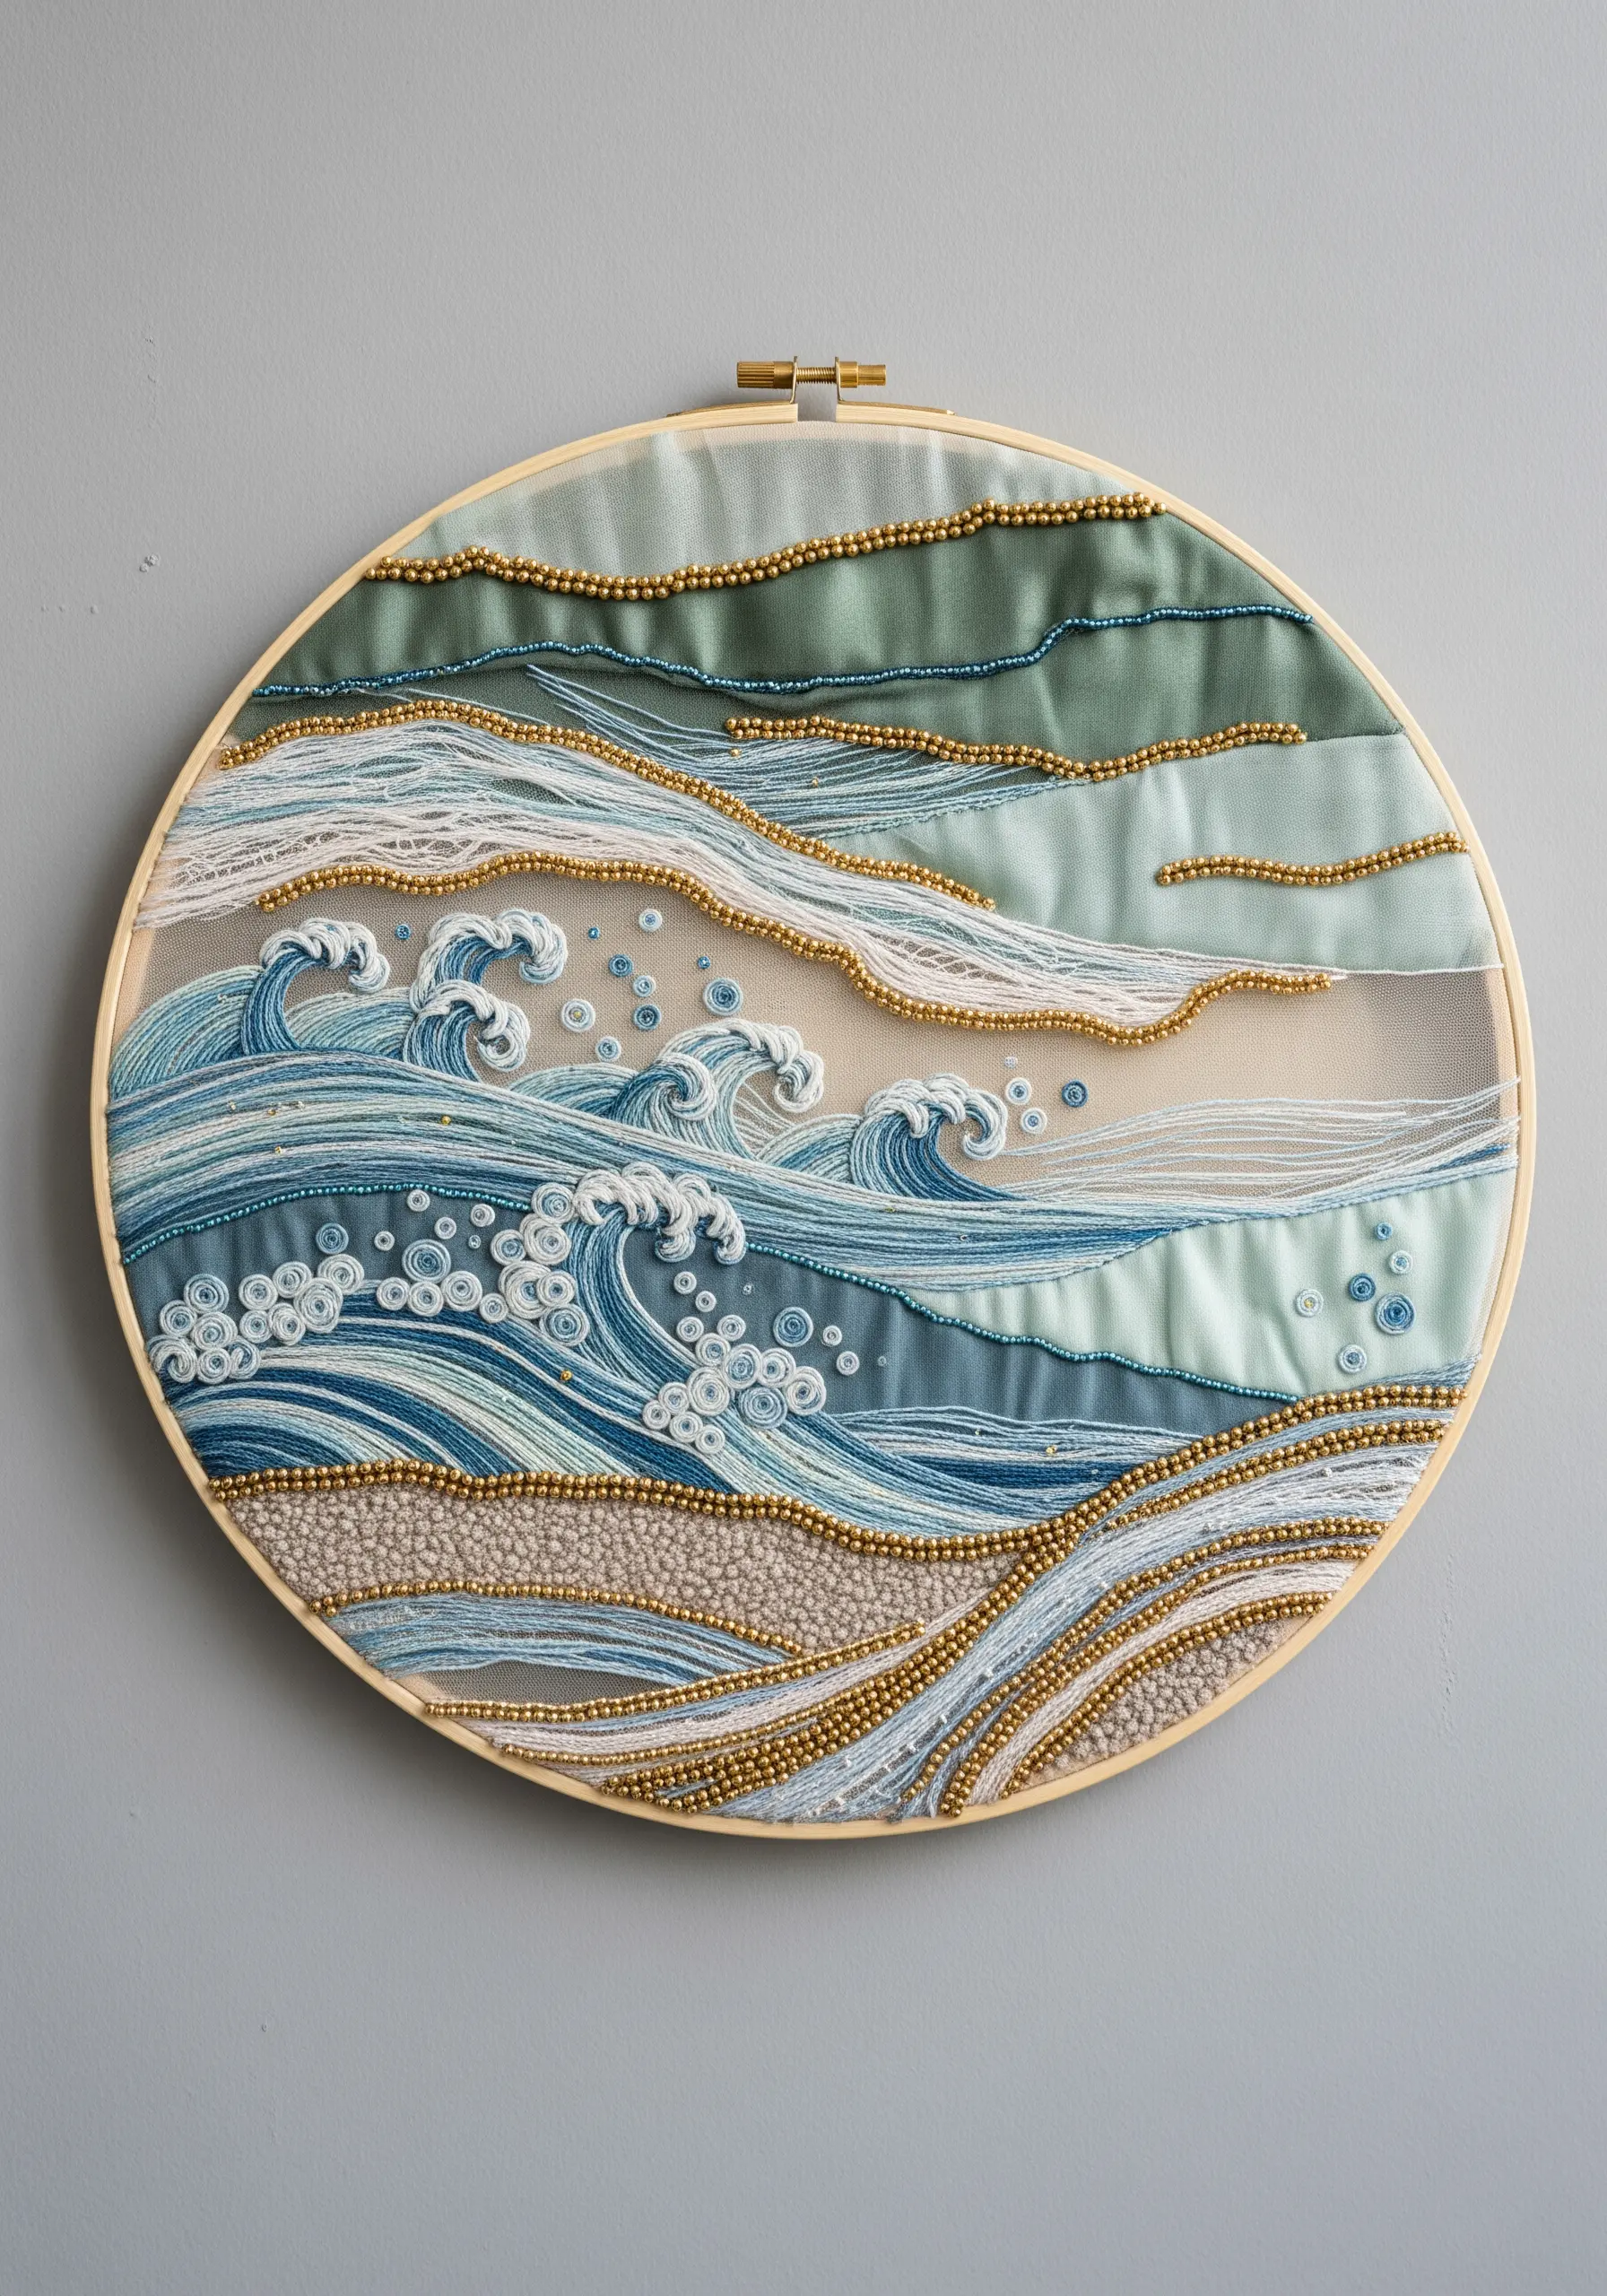
Instead of stitching a solid background, build your ocean scene with layered strips of translucent and opaque fabrics like organza, silk, and cotton.
Allow the raw edges to show and overlap them to create soft, organic lines that mimic the movement of water.
Use dense seed beading (or French knots) to create a pebbled shore effect, which provides a powerful textural contrast to the smooth fabrics.
For the sea foam, use a whipped backstitch or stem stitch with a lustrous white rayon thread to create delicate, swirling lines that stand out.
This layered approach is perfect for ocean marine embroidery wall themes, giving them an almost liquid depth.
7. Define Bold Florals with a Padded Satin Stitch
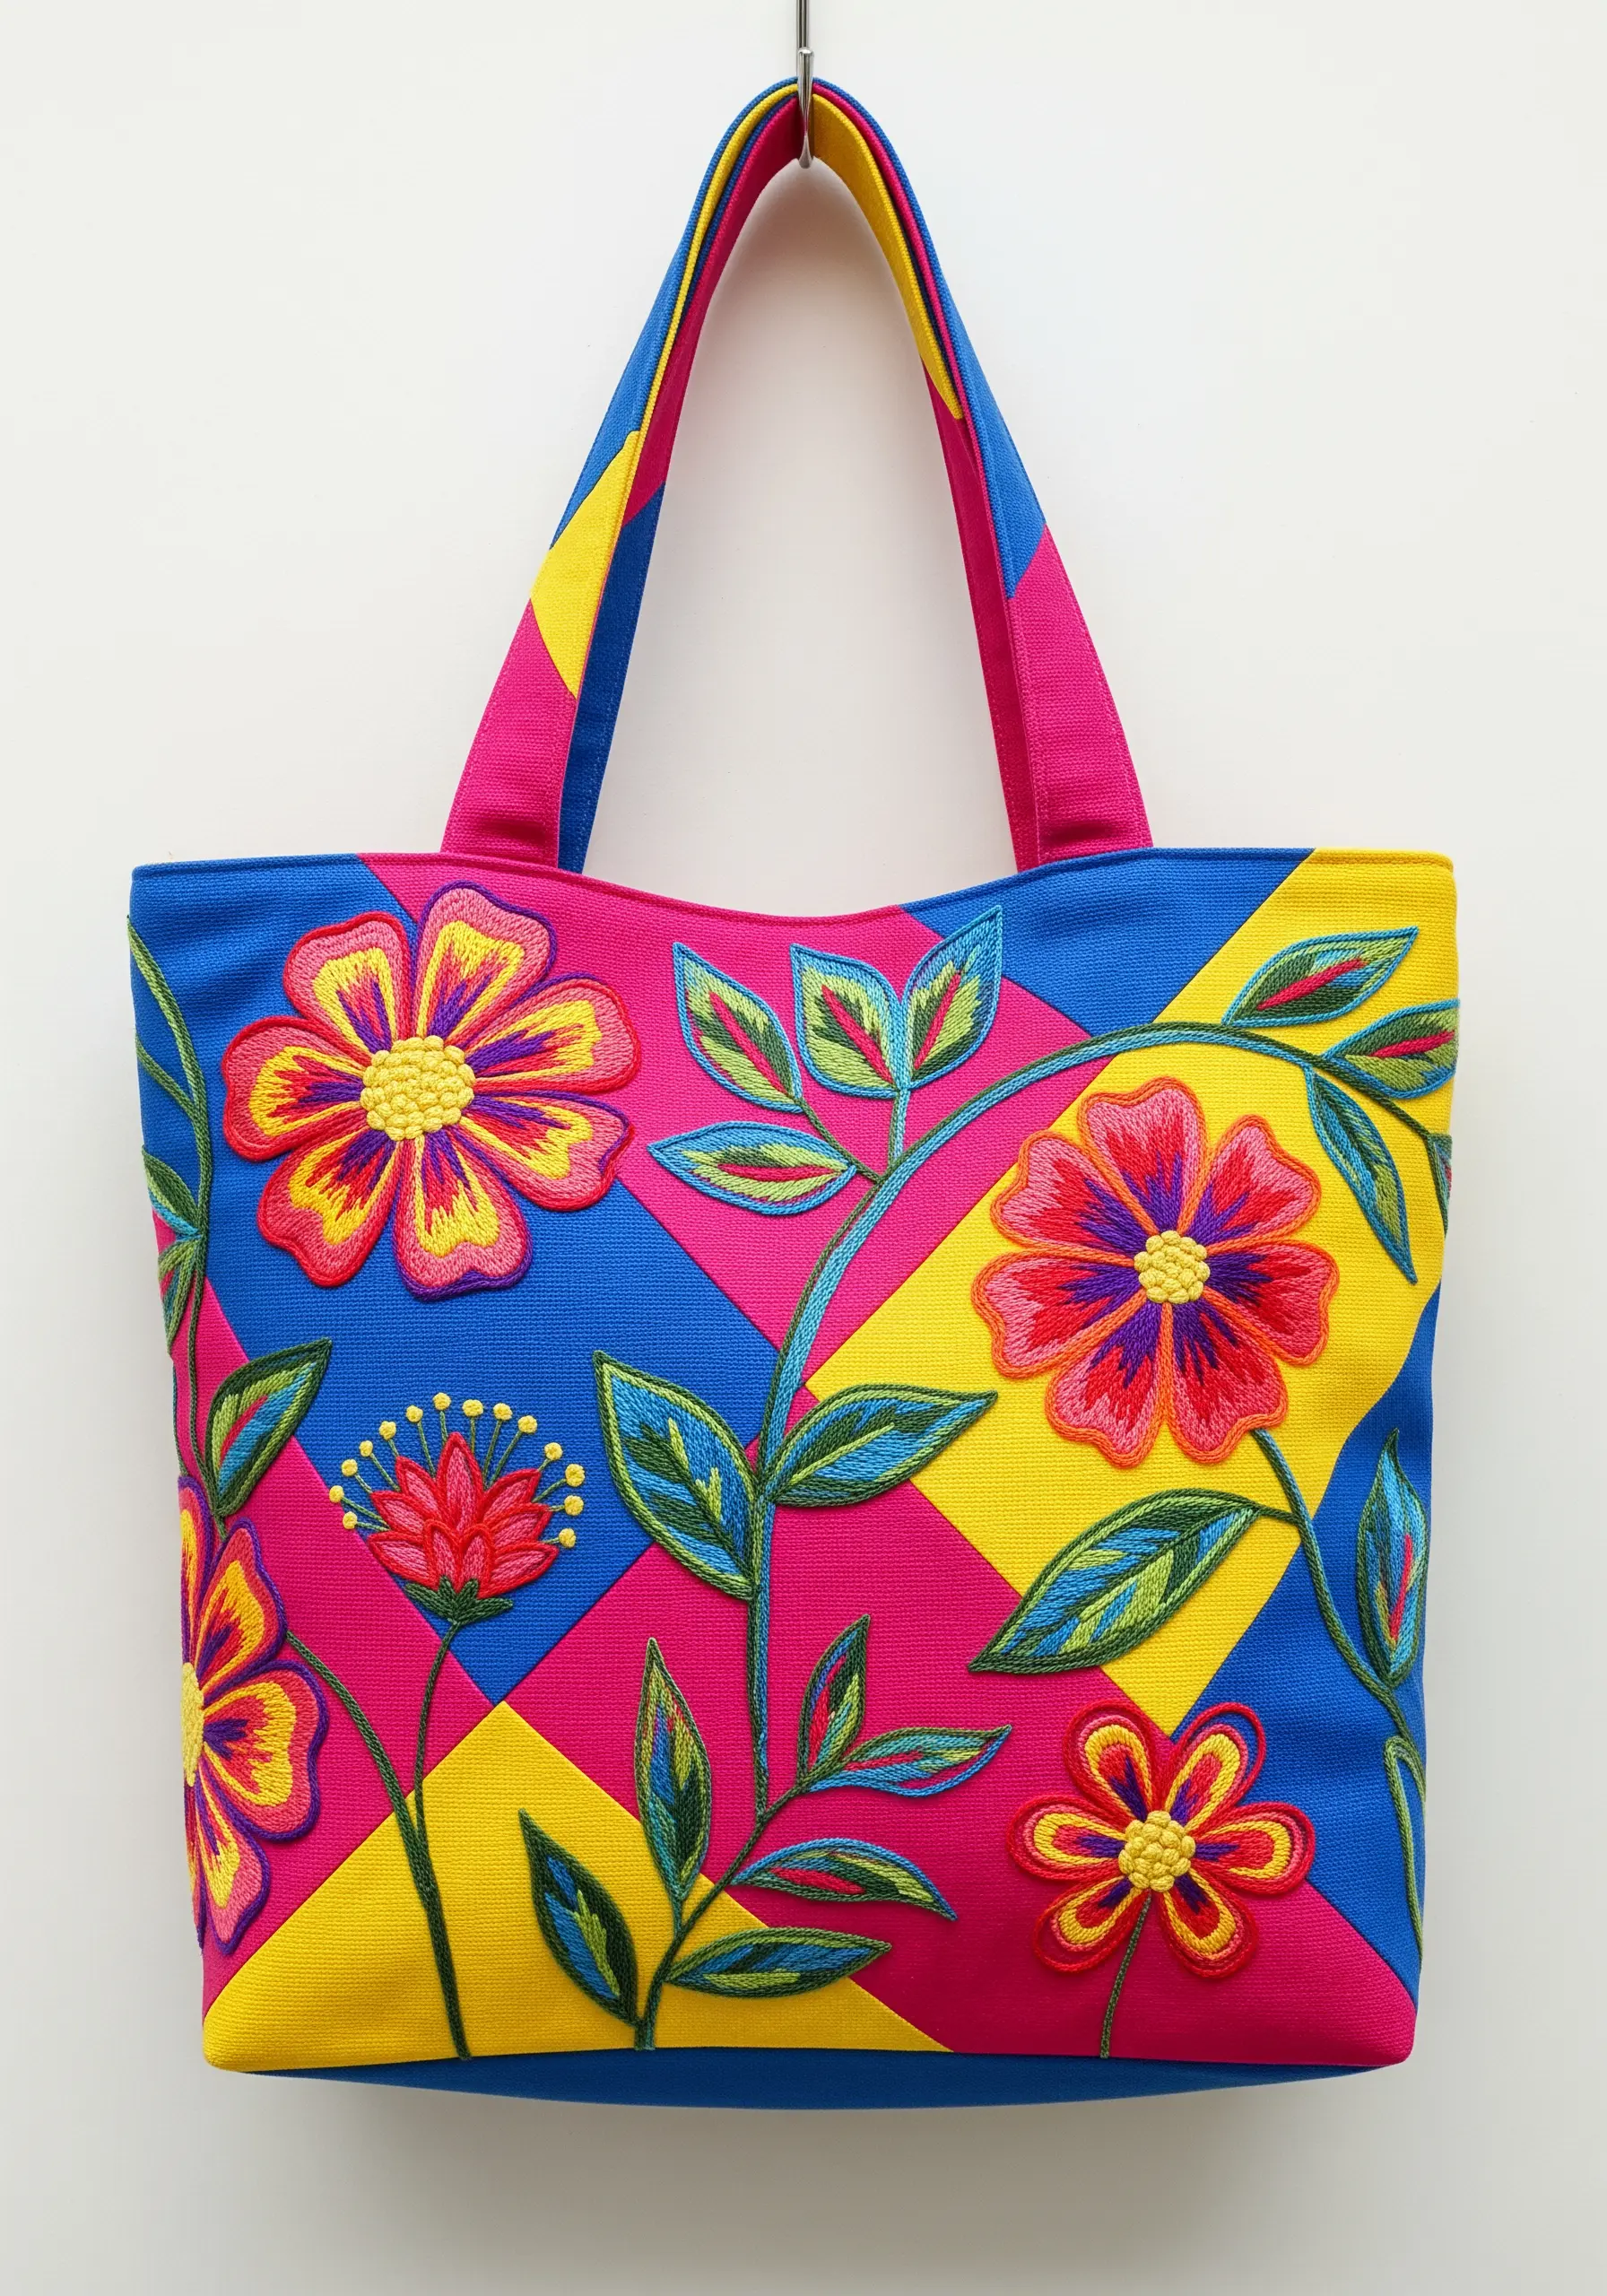
To make your embroidered flowers pop from a vibrant, color-blocked background, use a padded satin stitch.
First, fill the shape of the petal or leaf with a series of small, underlying stitches (like split stitches) before covering it with the final satin stitch.
This underlayer raises the surface, creating a subtle 3D effect that catches the light and adds dimension.
Outline each element with a clean, dark backstitch to contain the colors and give your botanicals a crisp, illustrative quality.
This technique elevates simple small embroidery designs on accessories into bold, professional-looking statements.
8. Explore Minimalist Texture on a Geometric Canvas
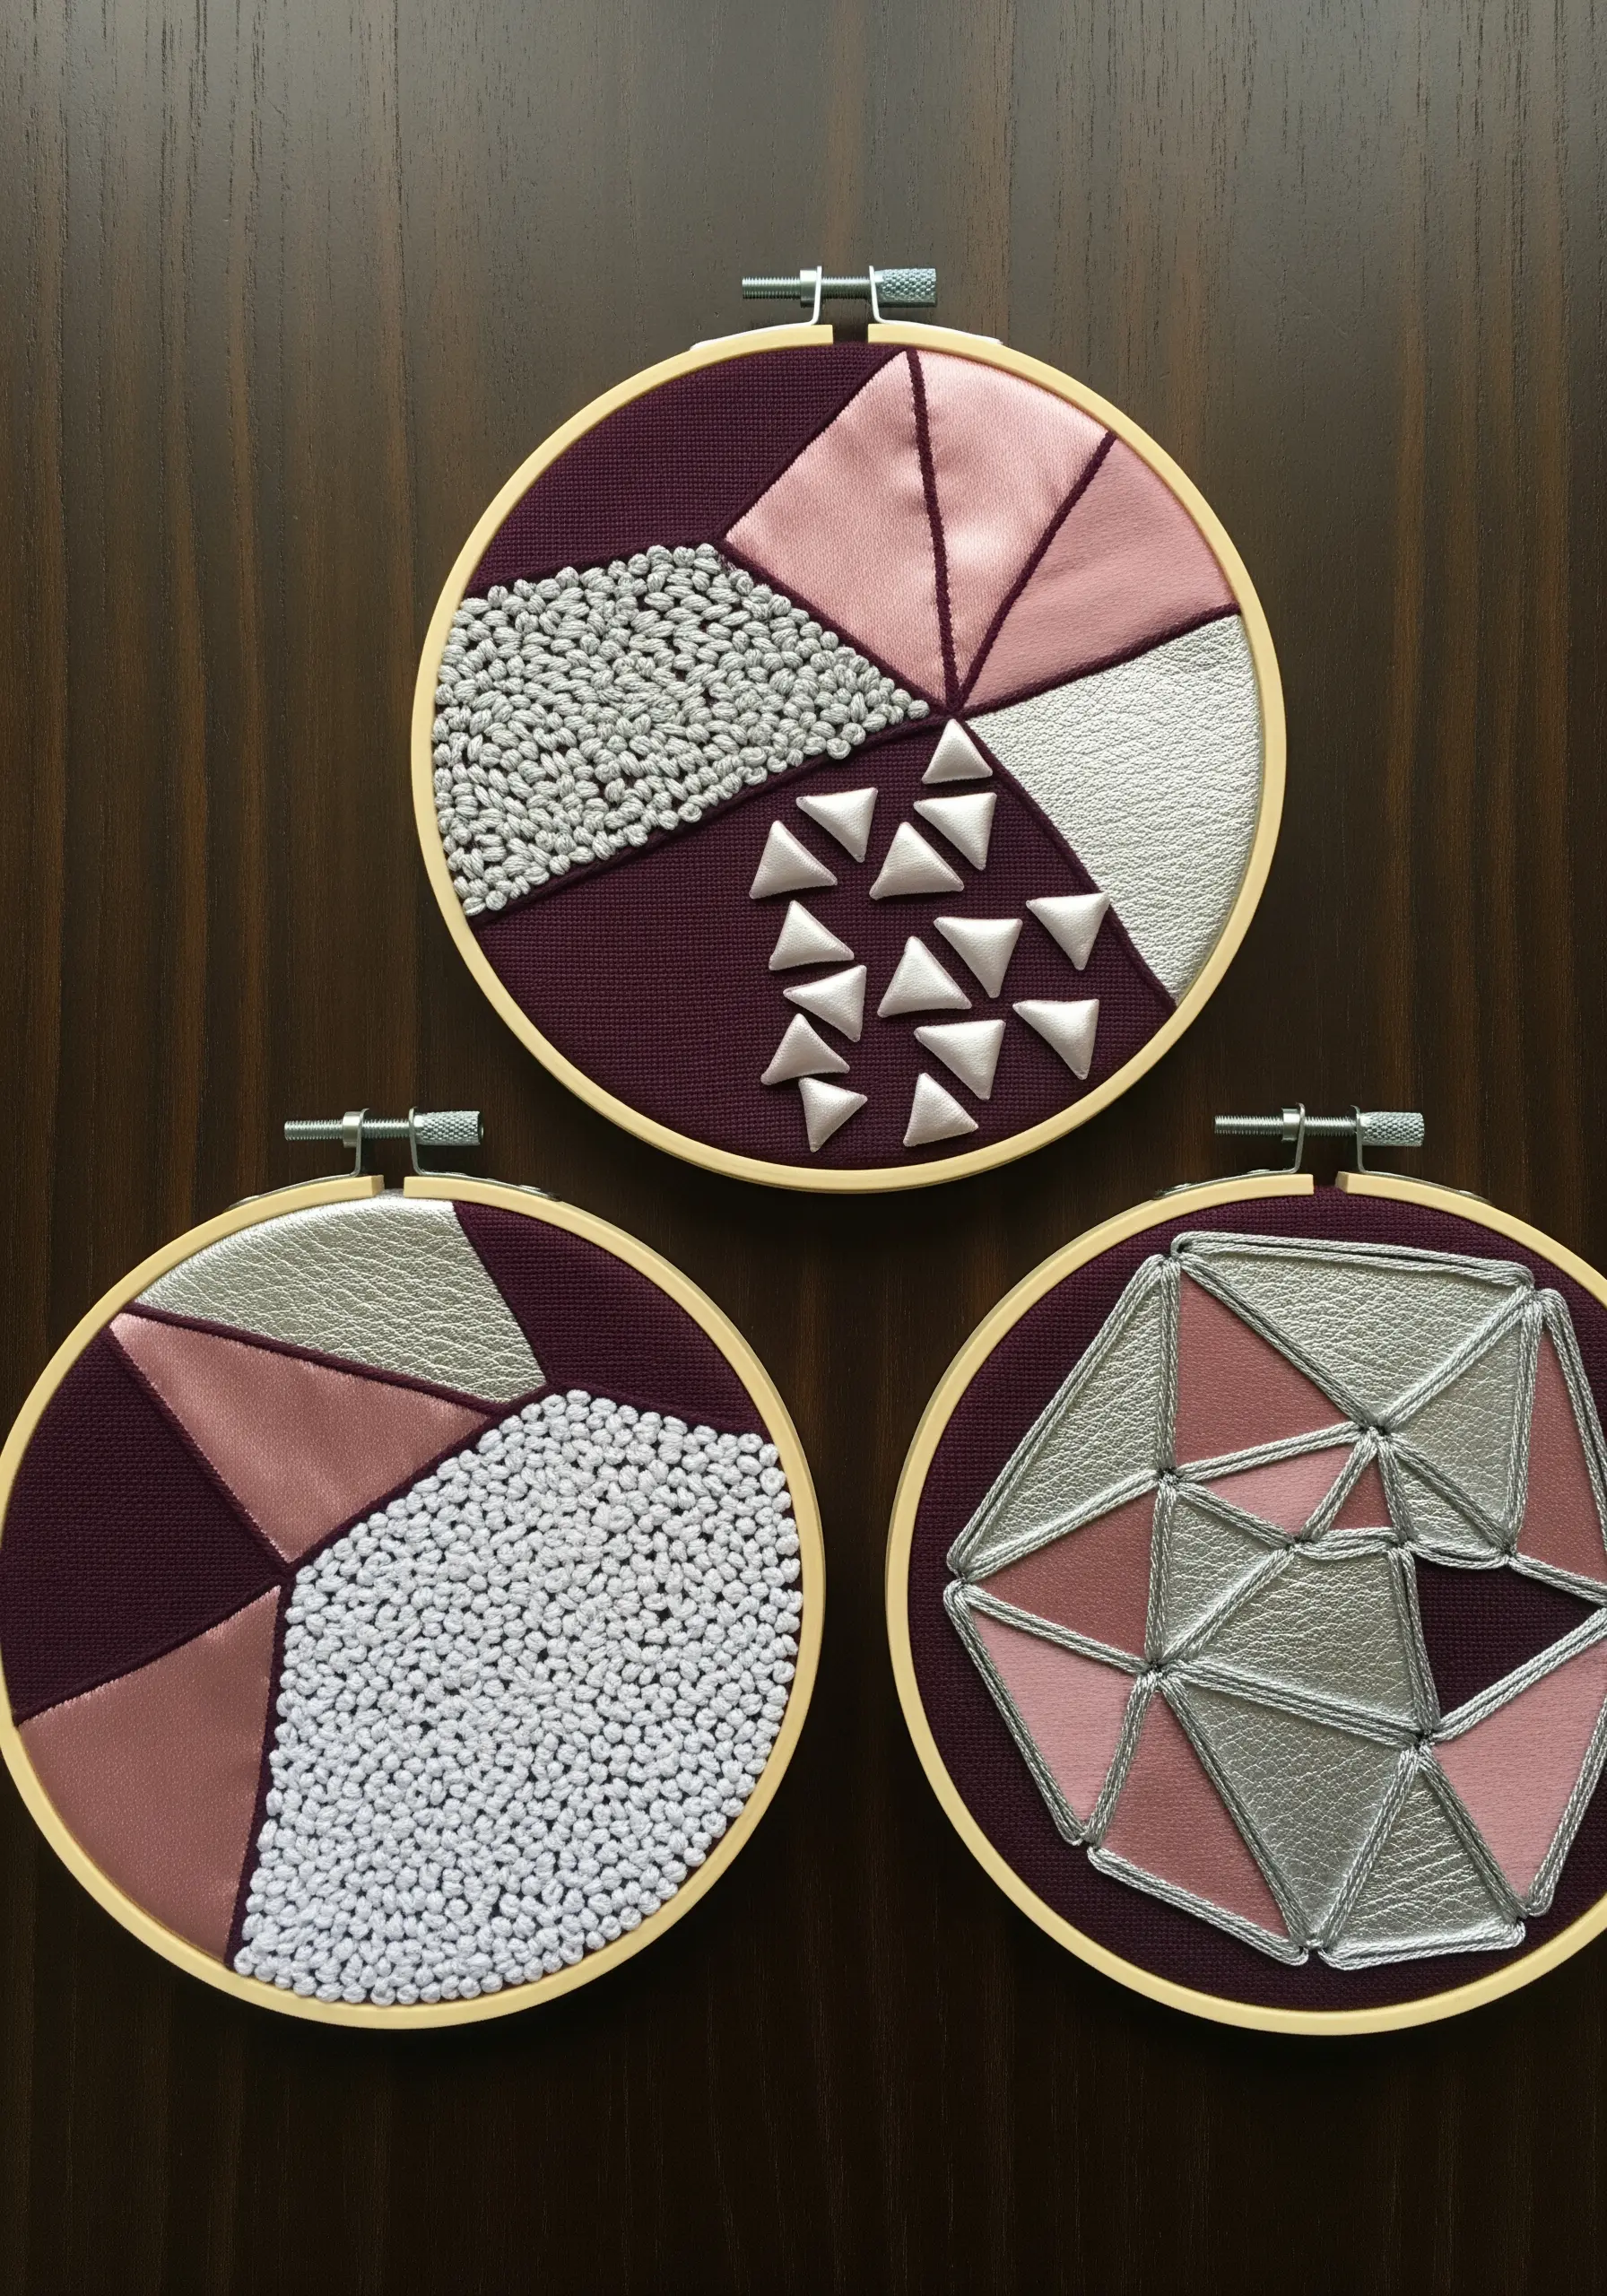
Limit your color palette to two or three harmonious tones—like blush, silver, and plum—to let texture become the star.
Use different materials for your patchwork sections, such as matte cotton, faux leather, and satin, to create visual interest through their unique light-reflecting properties.
Fill one section entirely with seed beads or French knots for a dense, pointillist texture.
In another, experiment with stumpwork by creating padded, raised triangles from satin fabric and stitching them down for a sculptural effect.
These geometric hoop art designs prove that texture can be more powerful than color.
9. Integrate Appliqué and Line Work for Mid-Century Modern Art
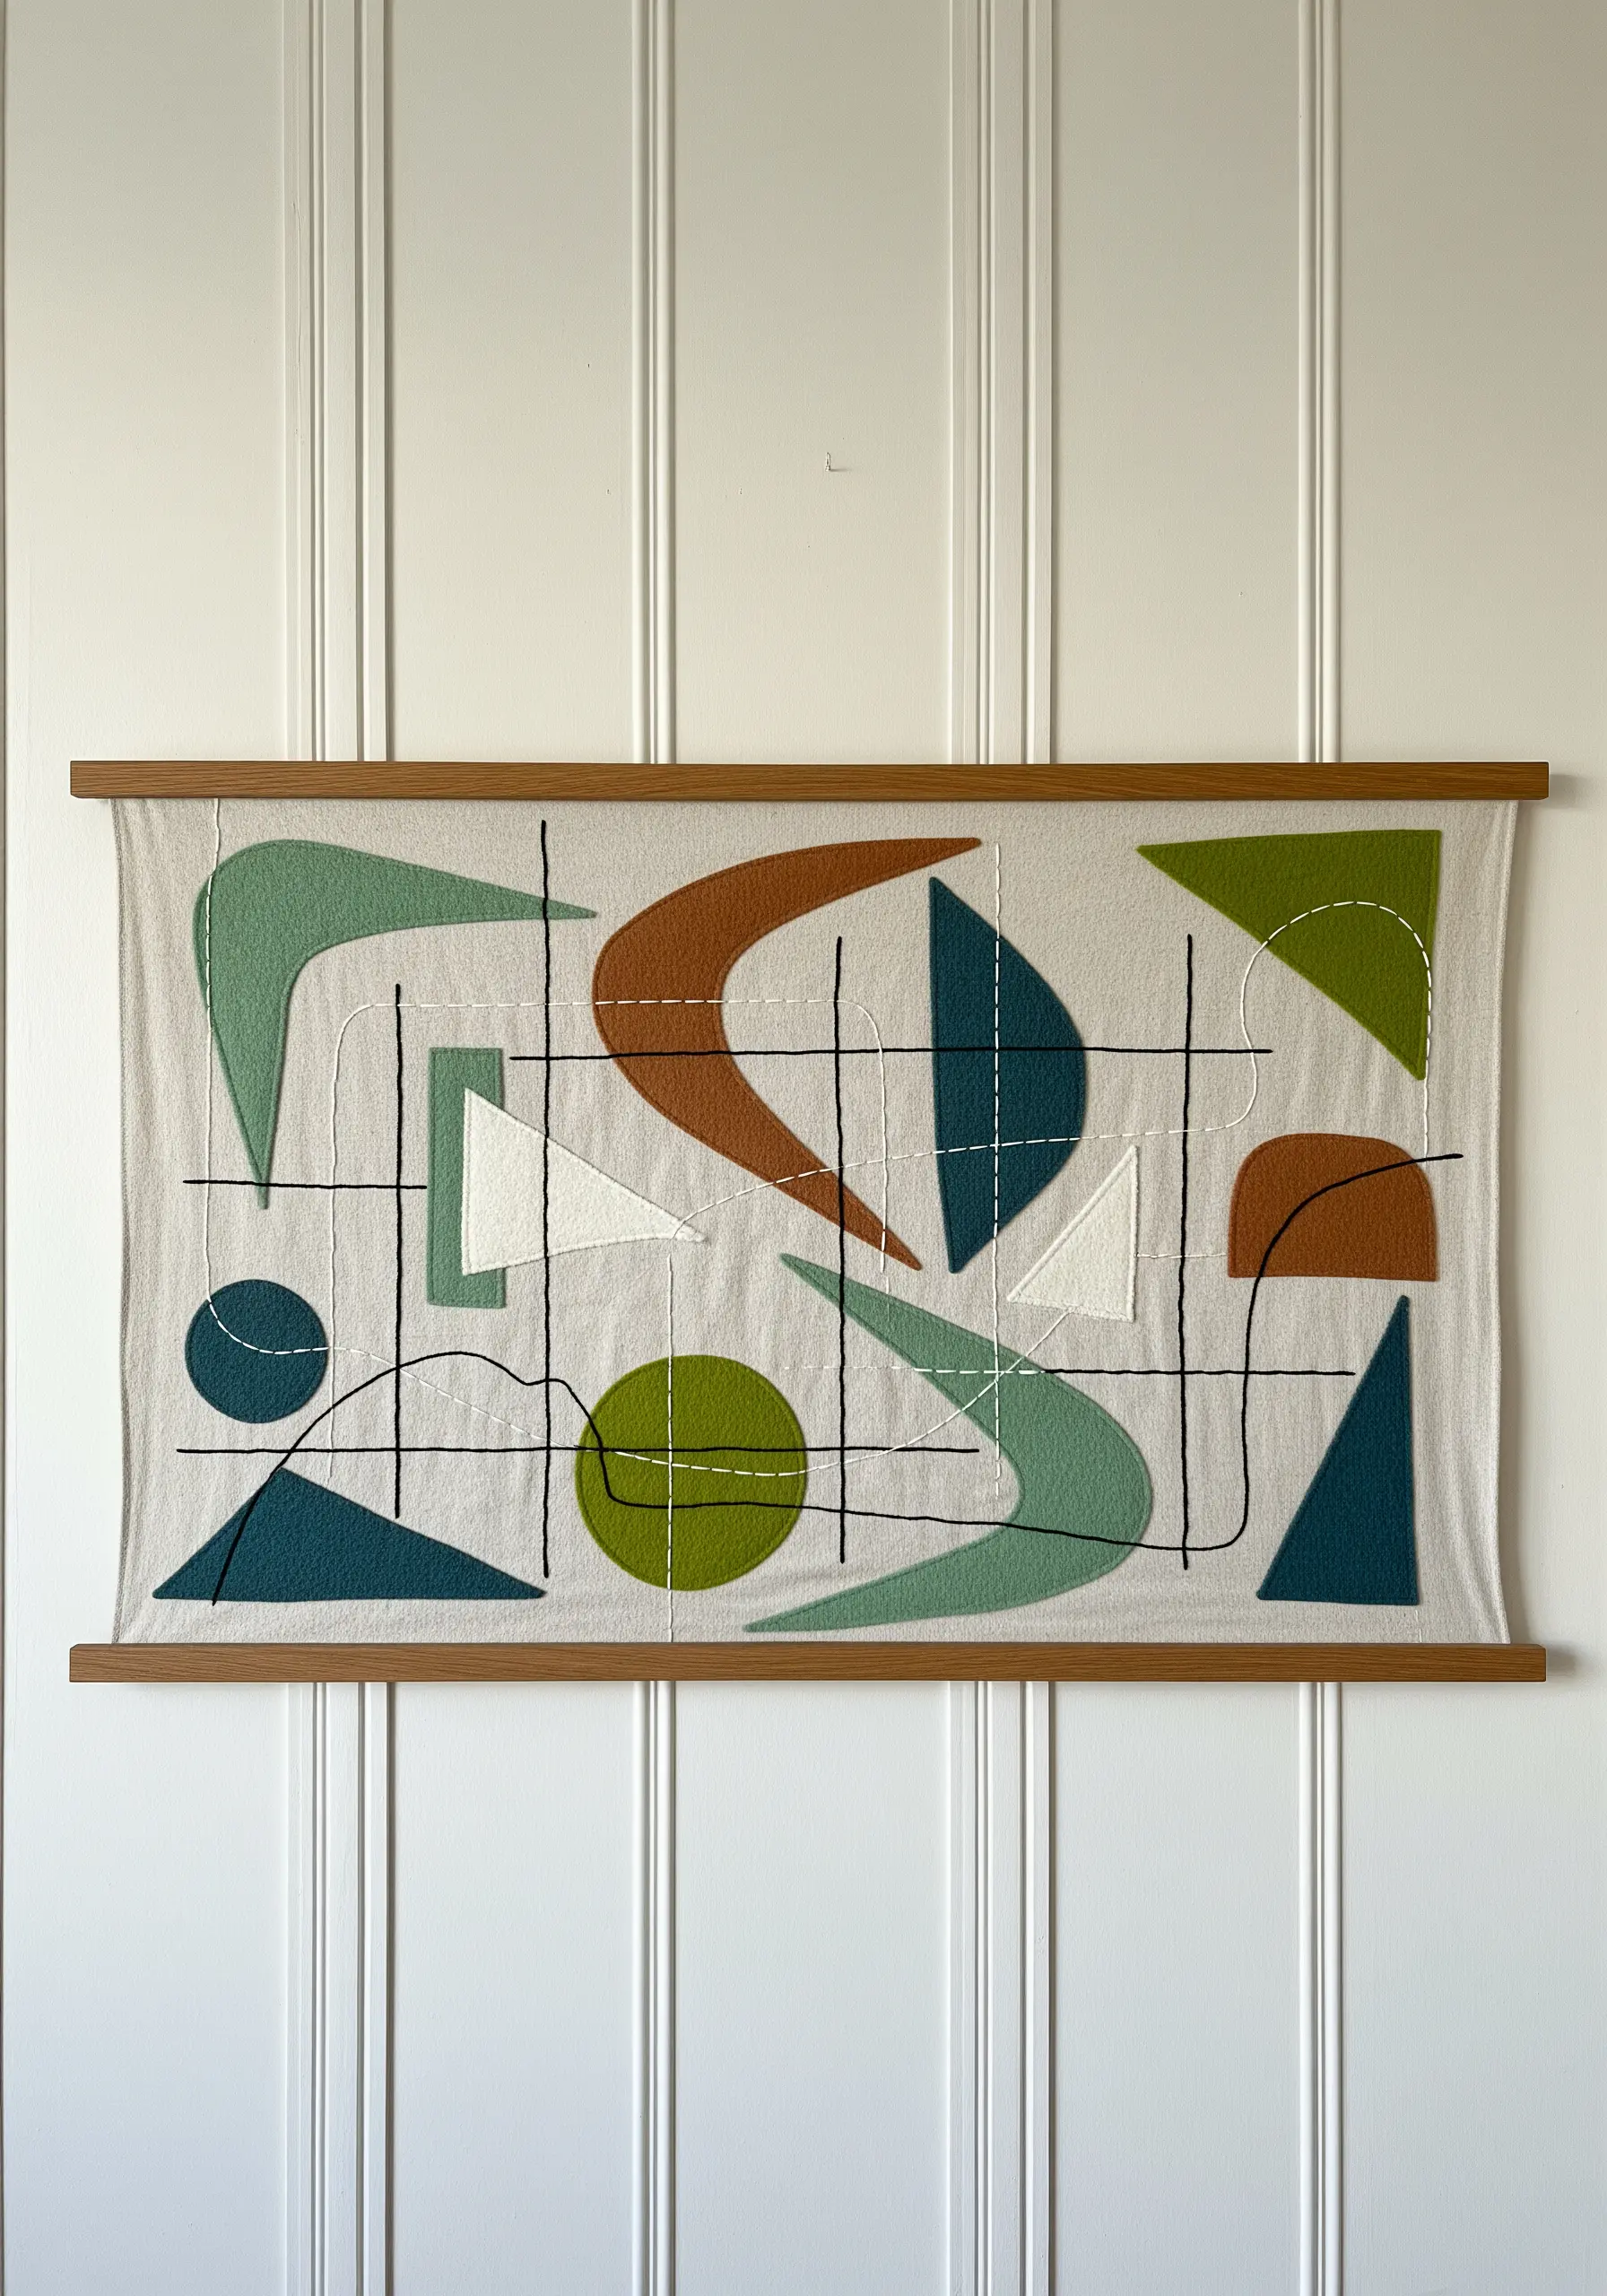
Design your composition with clean, abstract shapes reminiscent of mid-century modern art, cutting them from felt or wool blend fabrics.
Use appliqué to attach the shapes to your base fabric, securing them with a small, neat whipstitch in a matching thread color for an almost invisible finish.
Once your shapes are in place, stitch a loose, intersecting grid of thin black lines using a simple backstitch.
Allow the lines to wander over and under the appliqué shapes, which creates a sense of depth and connects the disparate elements into a cohesive whole.
This blend of bold shapes and delicate lines is the key to creating compelling modern minimalist textile wall art.
10. Create Pop Art Energy with Sequins and Padded Appliqué
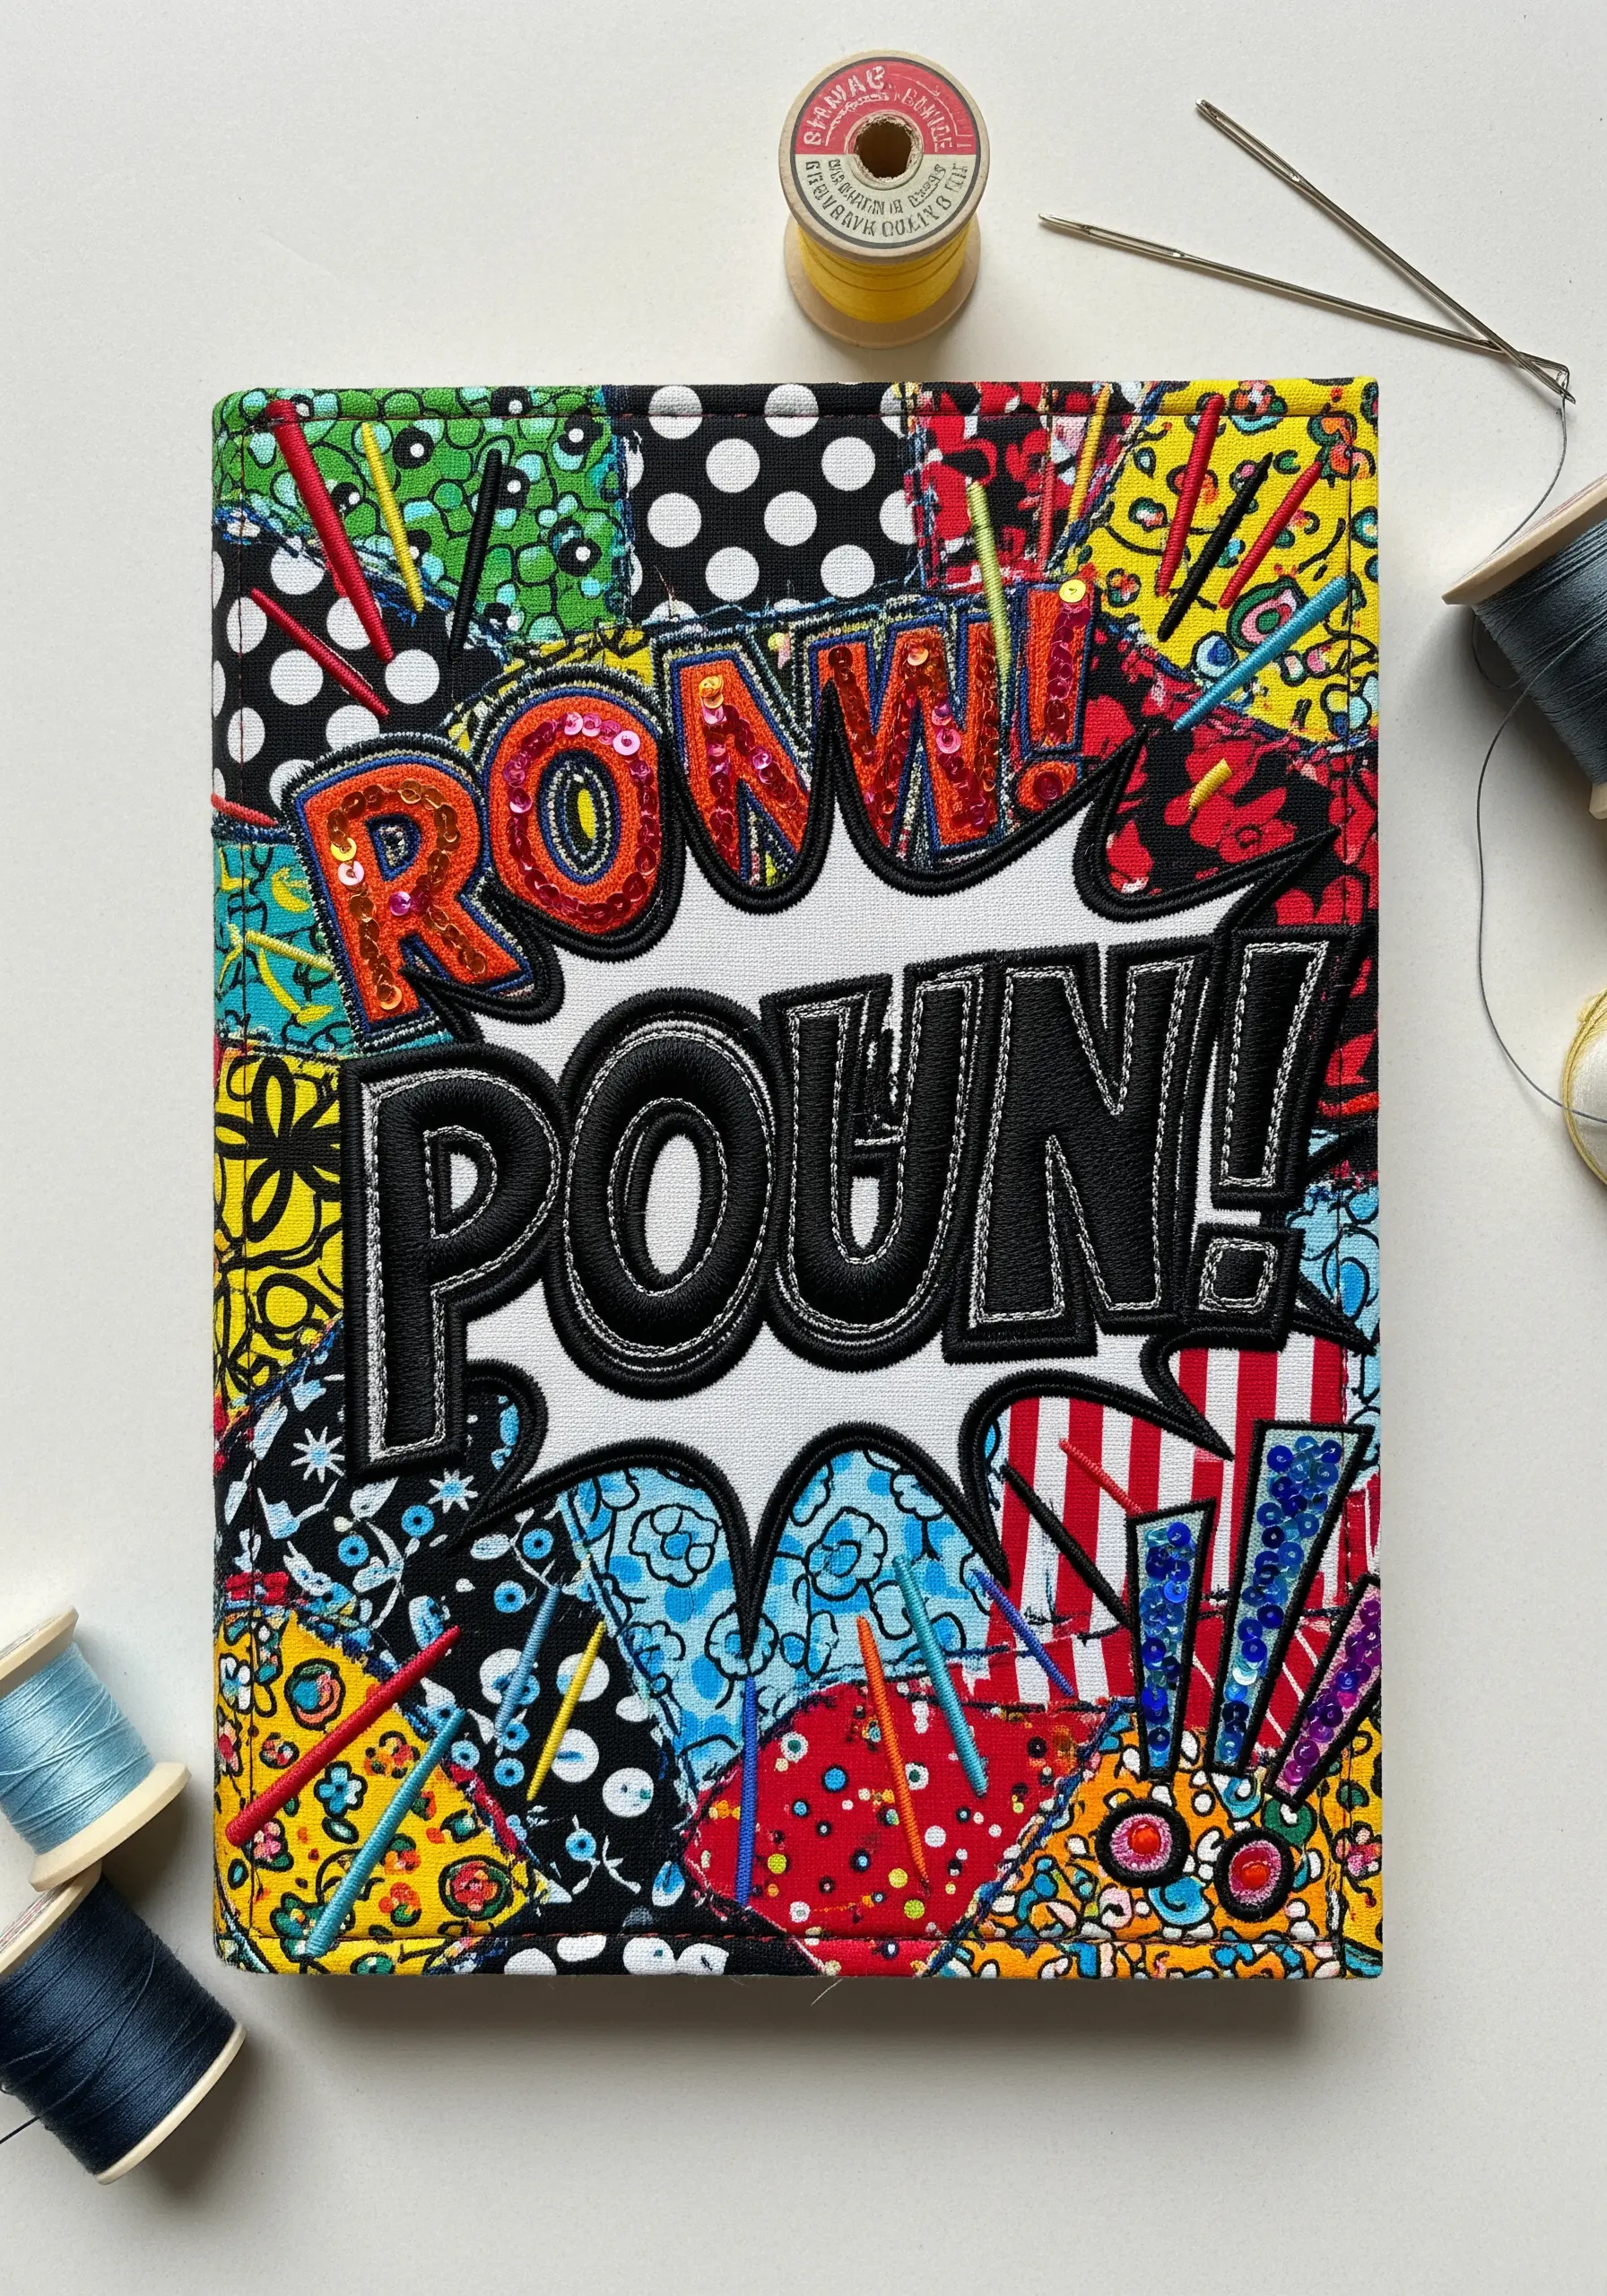
Channel a comic book aesthetic by using a riot of bold, patterned fabric scraps as your patchwork base.
For the central text, use padded appliqué: cut the letter shapes from faux leather, stitch them onto a layer of felt or batting, and then cut them out again before applying to the background.
This gives the letters a puffy, 3D quality that stands out dramatically.
Outline everything with a thick, heavy satin stitch in black to mimic bold comic book ink lines.
Finally, add hand-sewn sequins to select areas to introduce sparkle and draw the eye, turning a simple cover into a dynamic piece of mixed media art.
11. Blend Patchwork and Quilting with Echo Stitching
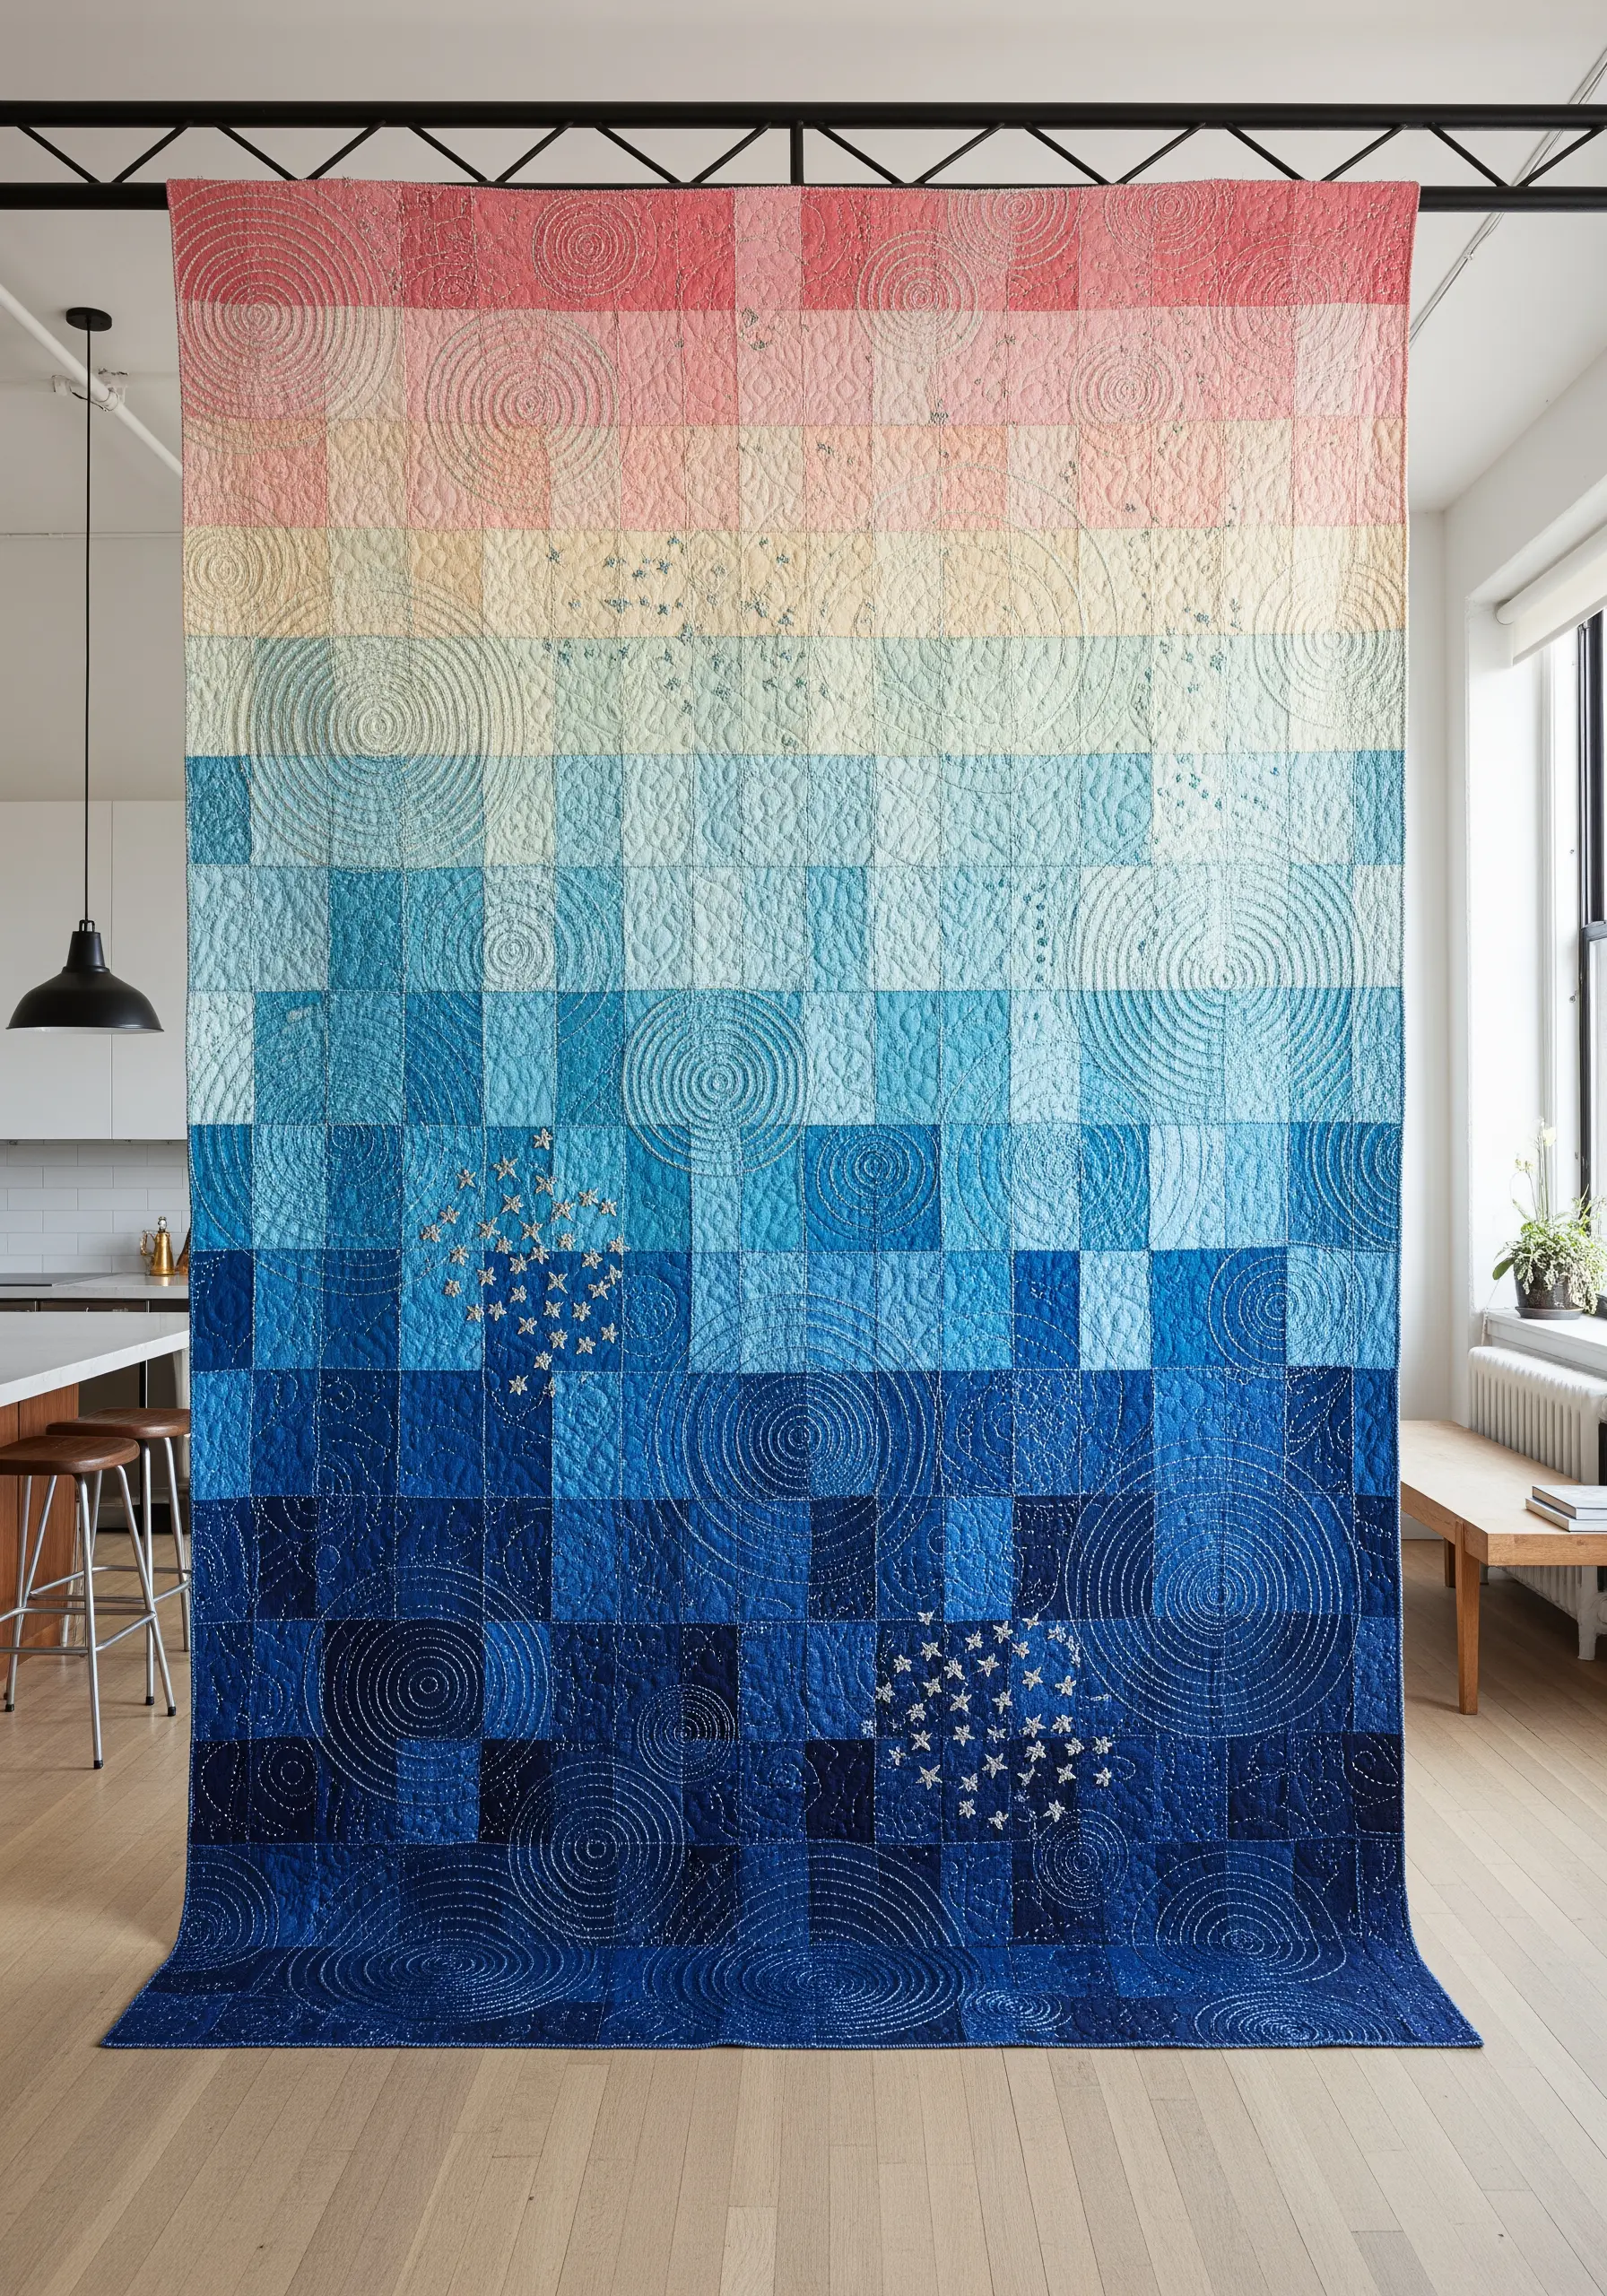
Create a stunning gradient effect by arranging square fabric patches in a smooth color transition, from warm to cool tones.
Instead of just stitching in the ditch, add echo quilting—concentric circles or spirals stitched across multiple patches.
This machine-stitching technique uses the seams of the patchwork as a guide but isn’t confined by them, creating a secondary pattern of ripples that adds motion and texture.
Introduce small, hand-embroidered star clusters using a simple straight stitch in a contrasting metallic thread to add tiny, thoughtful focal points within the larger design. It’s a beautiful way to elevate embroidery wall tapestries.
12. Create a Delicate Web with Goldwork and Stem Stitch

Combine luxurious fabrics like black velvet and grey satin to create a sophisticated, color-blocked base.
Lay down a structural grid using couched gold cord, which provides a bold, metallic frame for your more delicate stitches.
Within the grid, use a fine metallic thread to stitch organic, branching lines that resemble veins or cracks, using a simple stem stitch or split stitch.
This contrast between the heavy, structural cord and the delicate, wandering stitches creates a beautiful tension, showing how unexpected ways to use metallic thread can yield stunning results.
13. Define Upholstery with Sculptural Cord Wrapping

Instead of embroidery *on* the fabric, make the thread a structural element *around* it.
Upholster a piece of furniture, like a dining chair, with solid-colored, textured fabric blocks to create a clean patchwork effect.
Then, wrap the entire piece with a thick, architectural cord in a high-contrast color like ivory or white.
This technique, known as wrapping or binding, uses tension to create a grid that defines the patchwork sections and adds a bold, graphic, and sculptural dimension.
It’s a powerful way to turn simple textiles into statement pieces without a single stitch.
14. Stitch Architectural Blueprints onto Felt

Use a sturdy, non-woven material like felt as your base; its stability prevents puckering from dense line work and requires no stabilizer.
Create a simple, color-blocked background with squares of black, white, and grey felt.
Then, using a vibrant, high-contrast thread like electric blue, stitch geometric 3D cube outlines across the different colored blocks.
Let the lines cross the seams freely, which unifies the patchwork and creates the illusion of a transparent blueprint layered over the surface.
This transforms a simple valet tray into a piece of functional minimal line drawing embroidery.
15. Illuminate Patchwork with Blackwork Embroidery
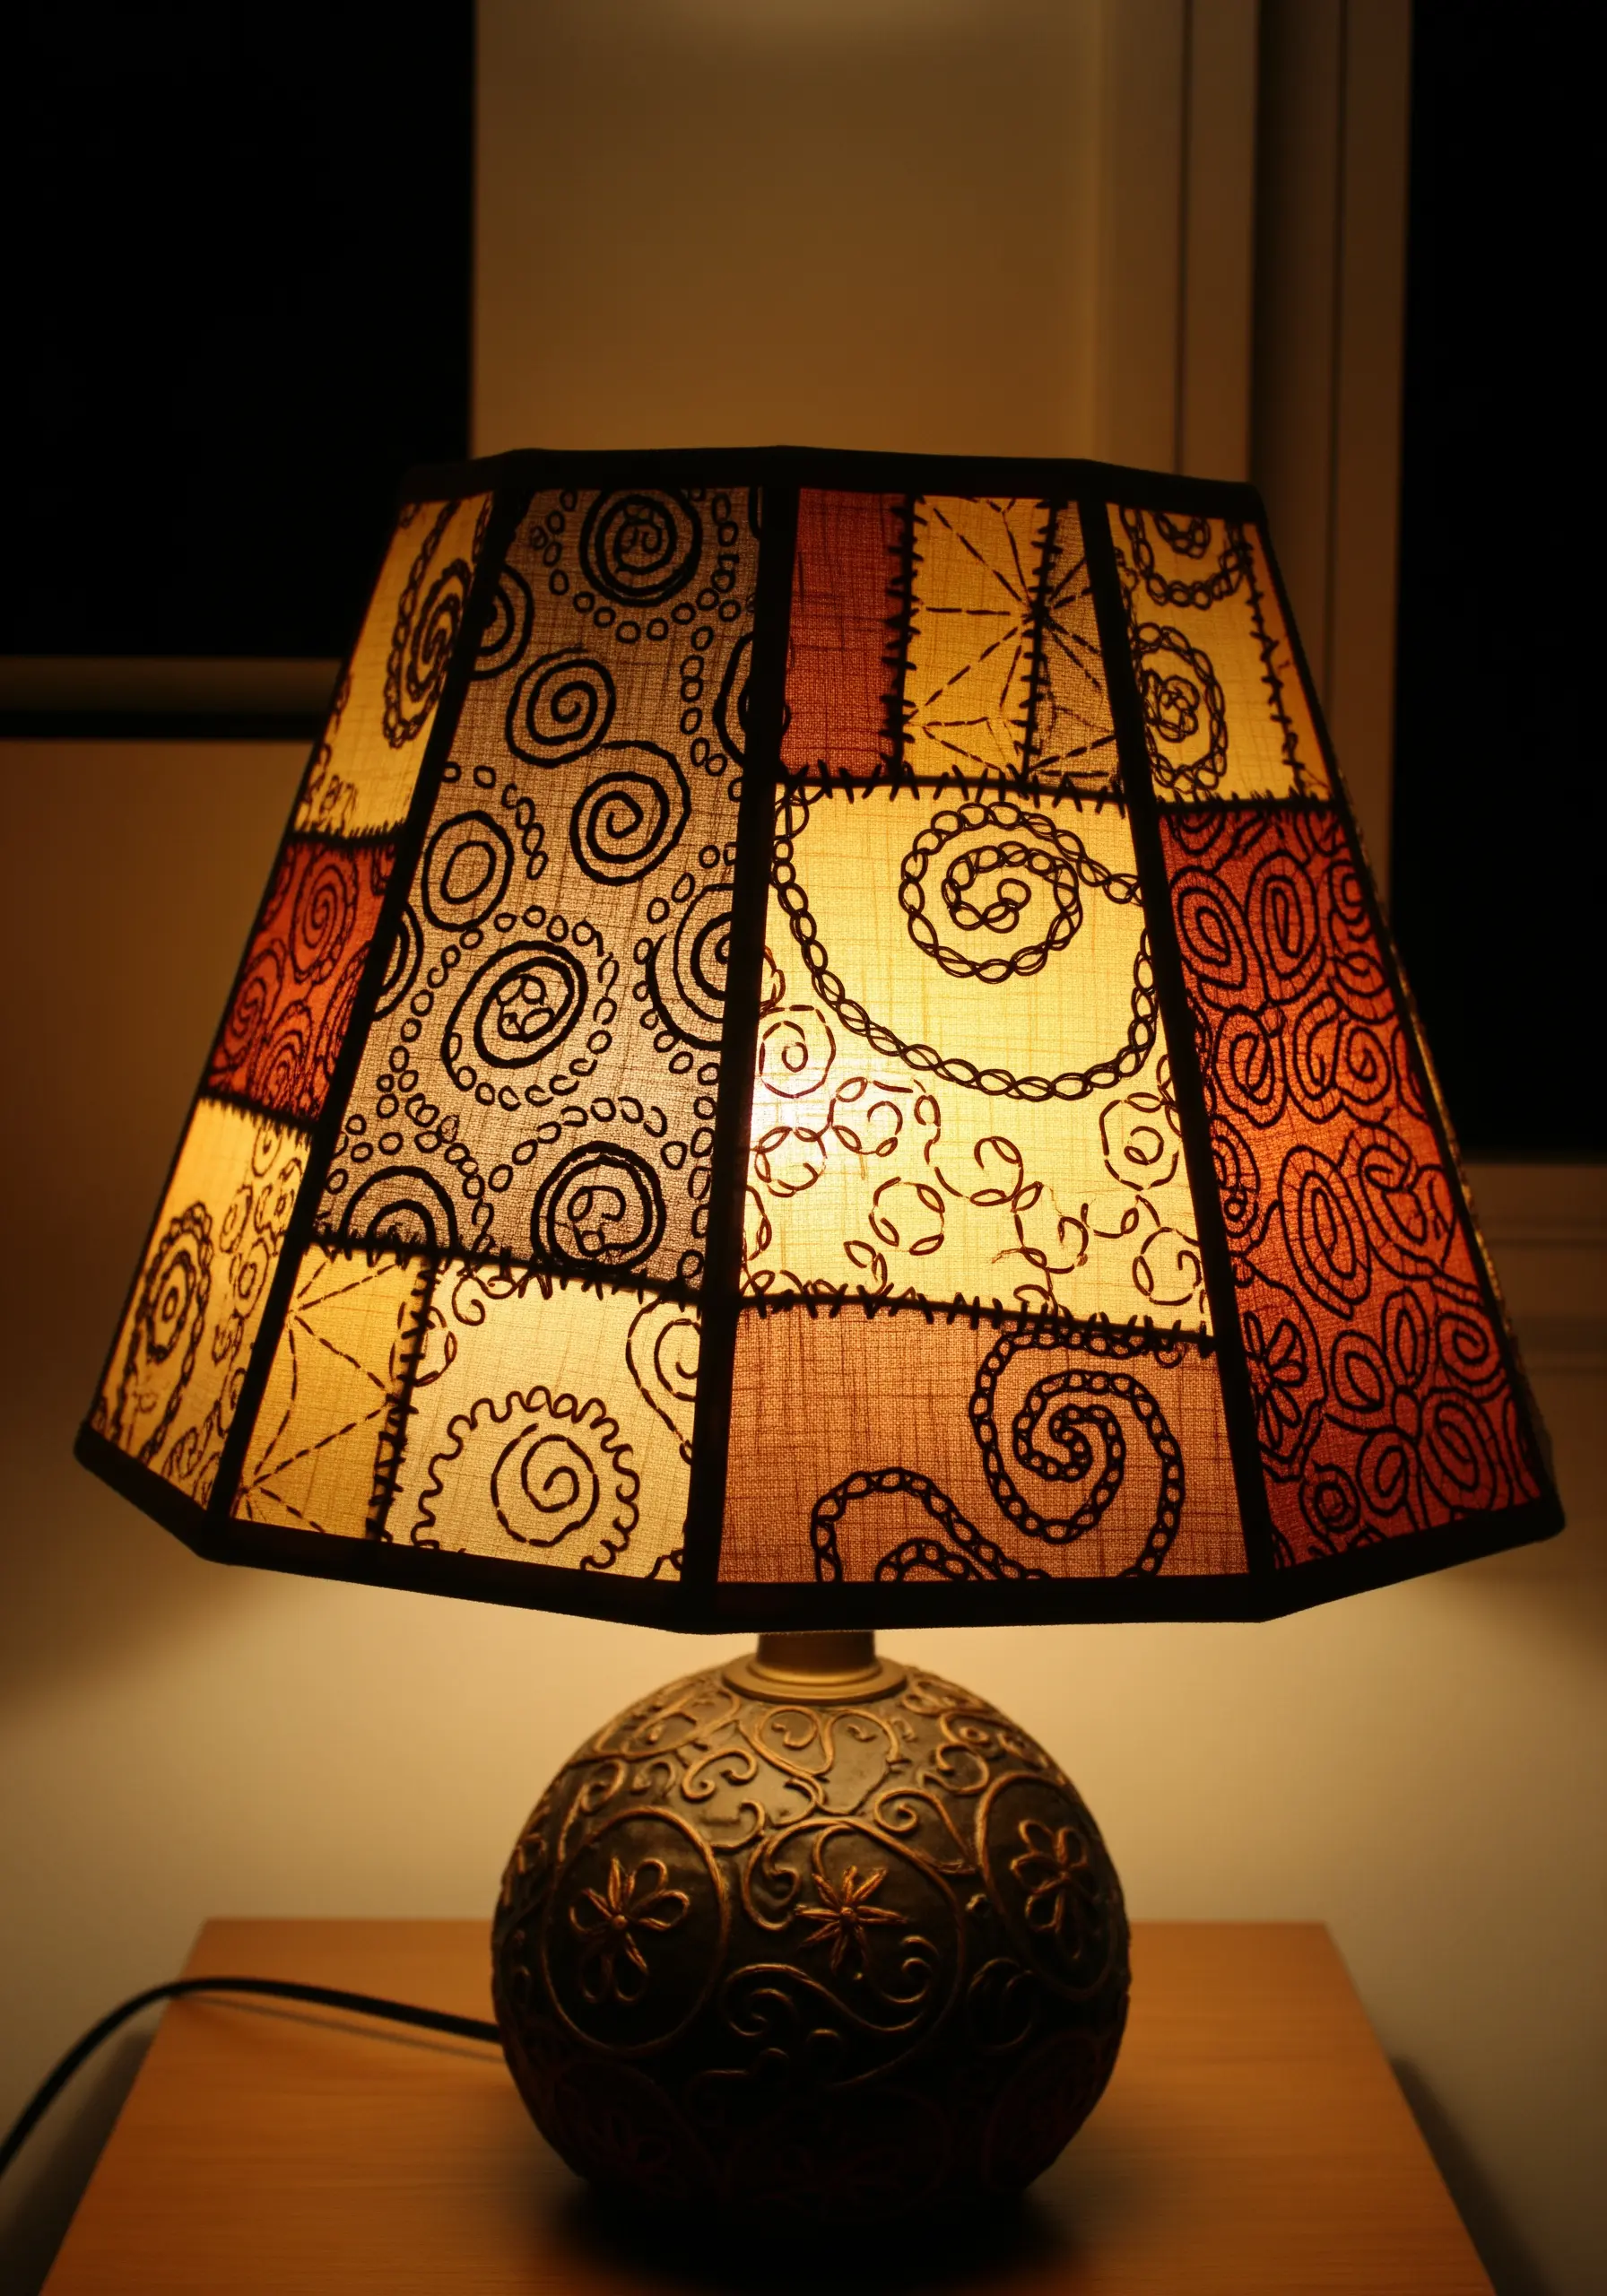
Combine translucent, lightweight fabrics like linen or muslin in warm, earthy tones to construct a lampshade.
Instead of using colored thread, choose a bold black floss to create intricate, repeating patterns on each panel.
This technique, inspired by traditional blackwork, creates a striking silhouette effect when the lamp is turned on.
The light shines through the fabric, highlighting the dark, graphic stitchwork and turning each pattern into a detailed shadow play. It’s a perfect way to elevate your dining space or living room.
16. Add a Pop of Sculptural Cord to Graphic Patterns
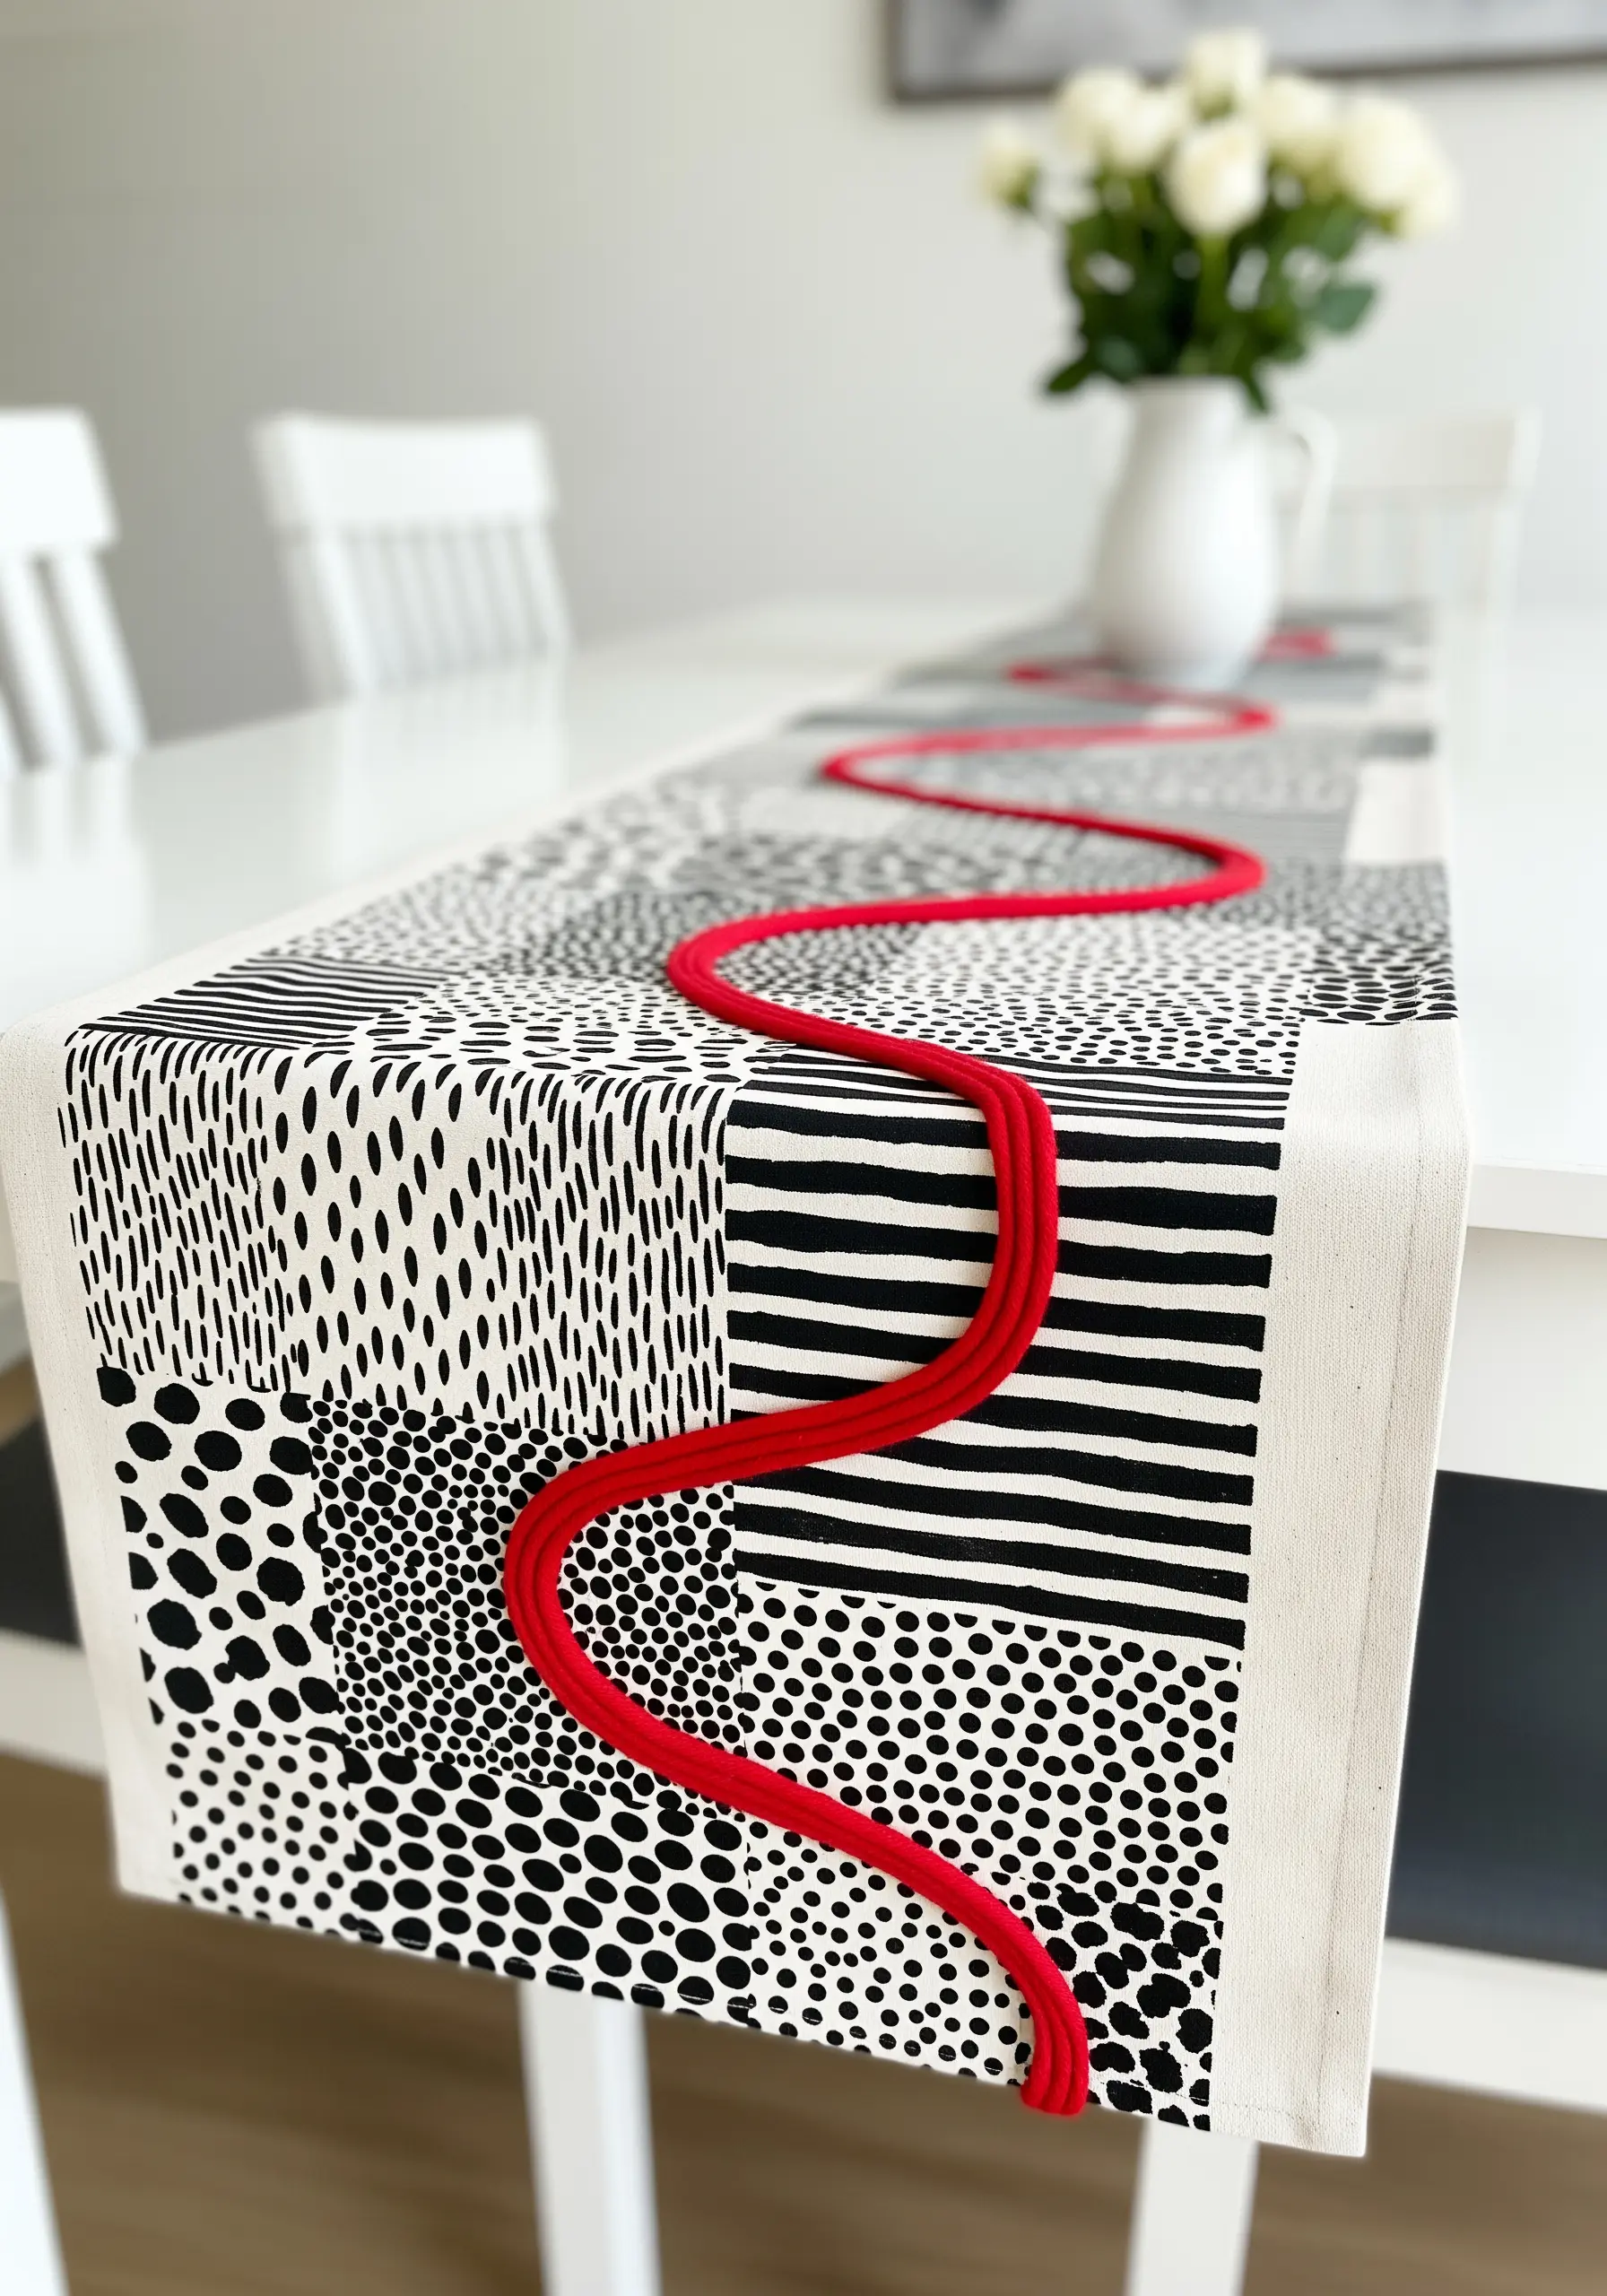
Start with a base of bold, black-and-white patterned fabrics, arranged in a simple block patchwork design.
The high contrast of the patterns provides a dynamic and energetic canvas.
Then, introduce a single, powerful line of color using a thick, sculptural cord.
Couch the cord onto the surface in a meandering, organic path that flows across the geometric fabric blocks.
This technique creates a dramatic focal point, as the three-dimensional, colorful cord stands in sharp relief against the flat, monochrome background, instantly upgrading your embroidery table runner.
17. Create Geological Layers with Raw-Edge Appliqué

Build a textural landscape by layering strips of fabric with their raw edges exposed.
Choose fabrics with different weights and textures—like suede, linen, and cotton—in an earthy, analogous color scheme to mimic natural strata.
Stitch down each layer with a simple running stitch using a slightly contrasting thread color to emphasize the contours.
Finally, create clusters of hand-stitched Dorset buttons or woven picot stitches to represent geodes or rock formations.
These dense, circular elements provide a focal point and a textural counterpoint to the linear fabric layers. This is how you create organic texture embroidery designs with depth.
18. Embellish Detachable Collars with Beading and Soft Sculpture
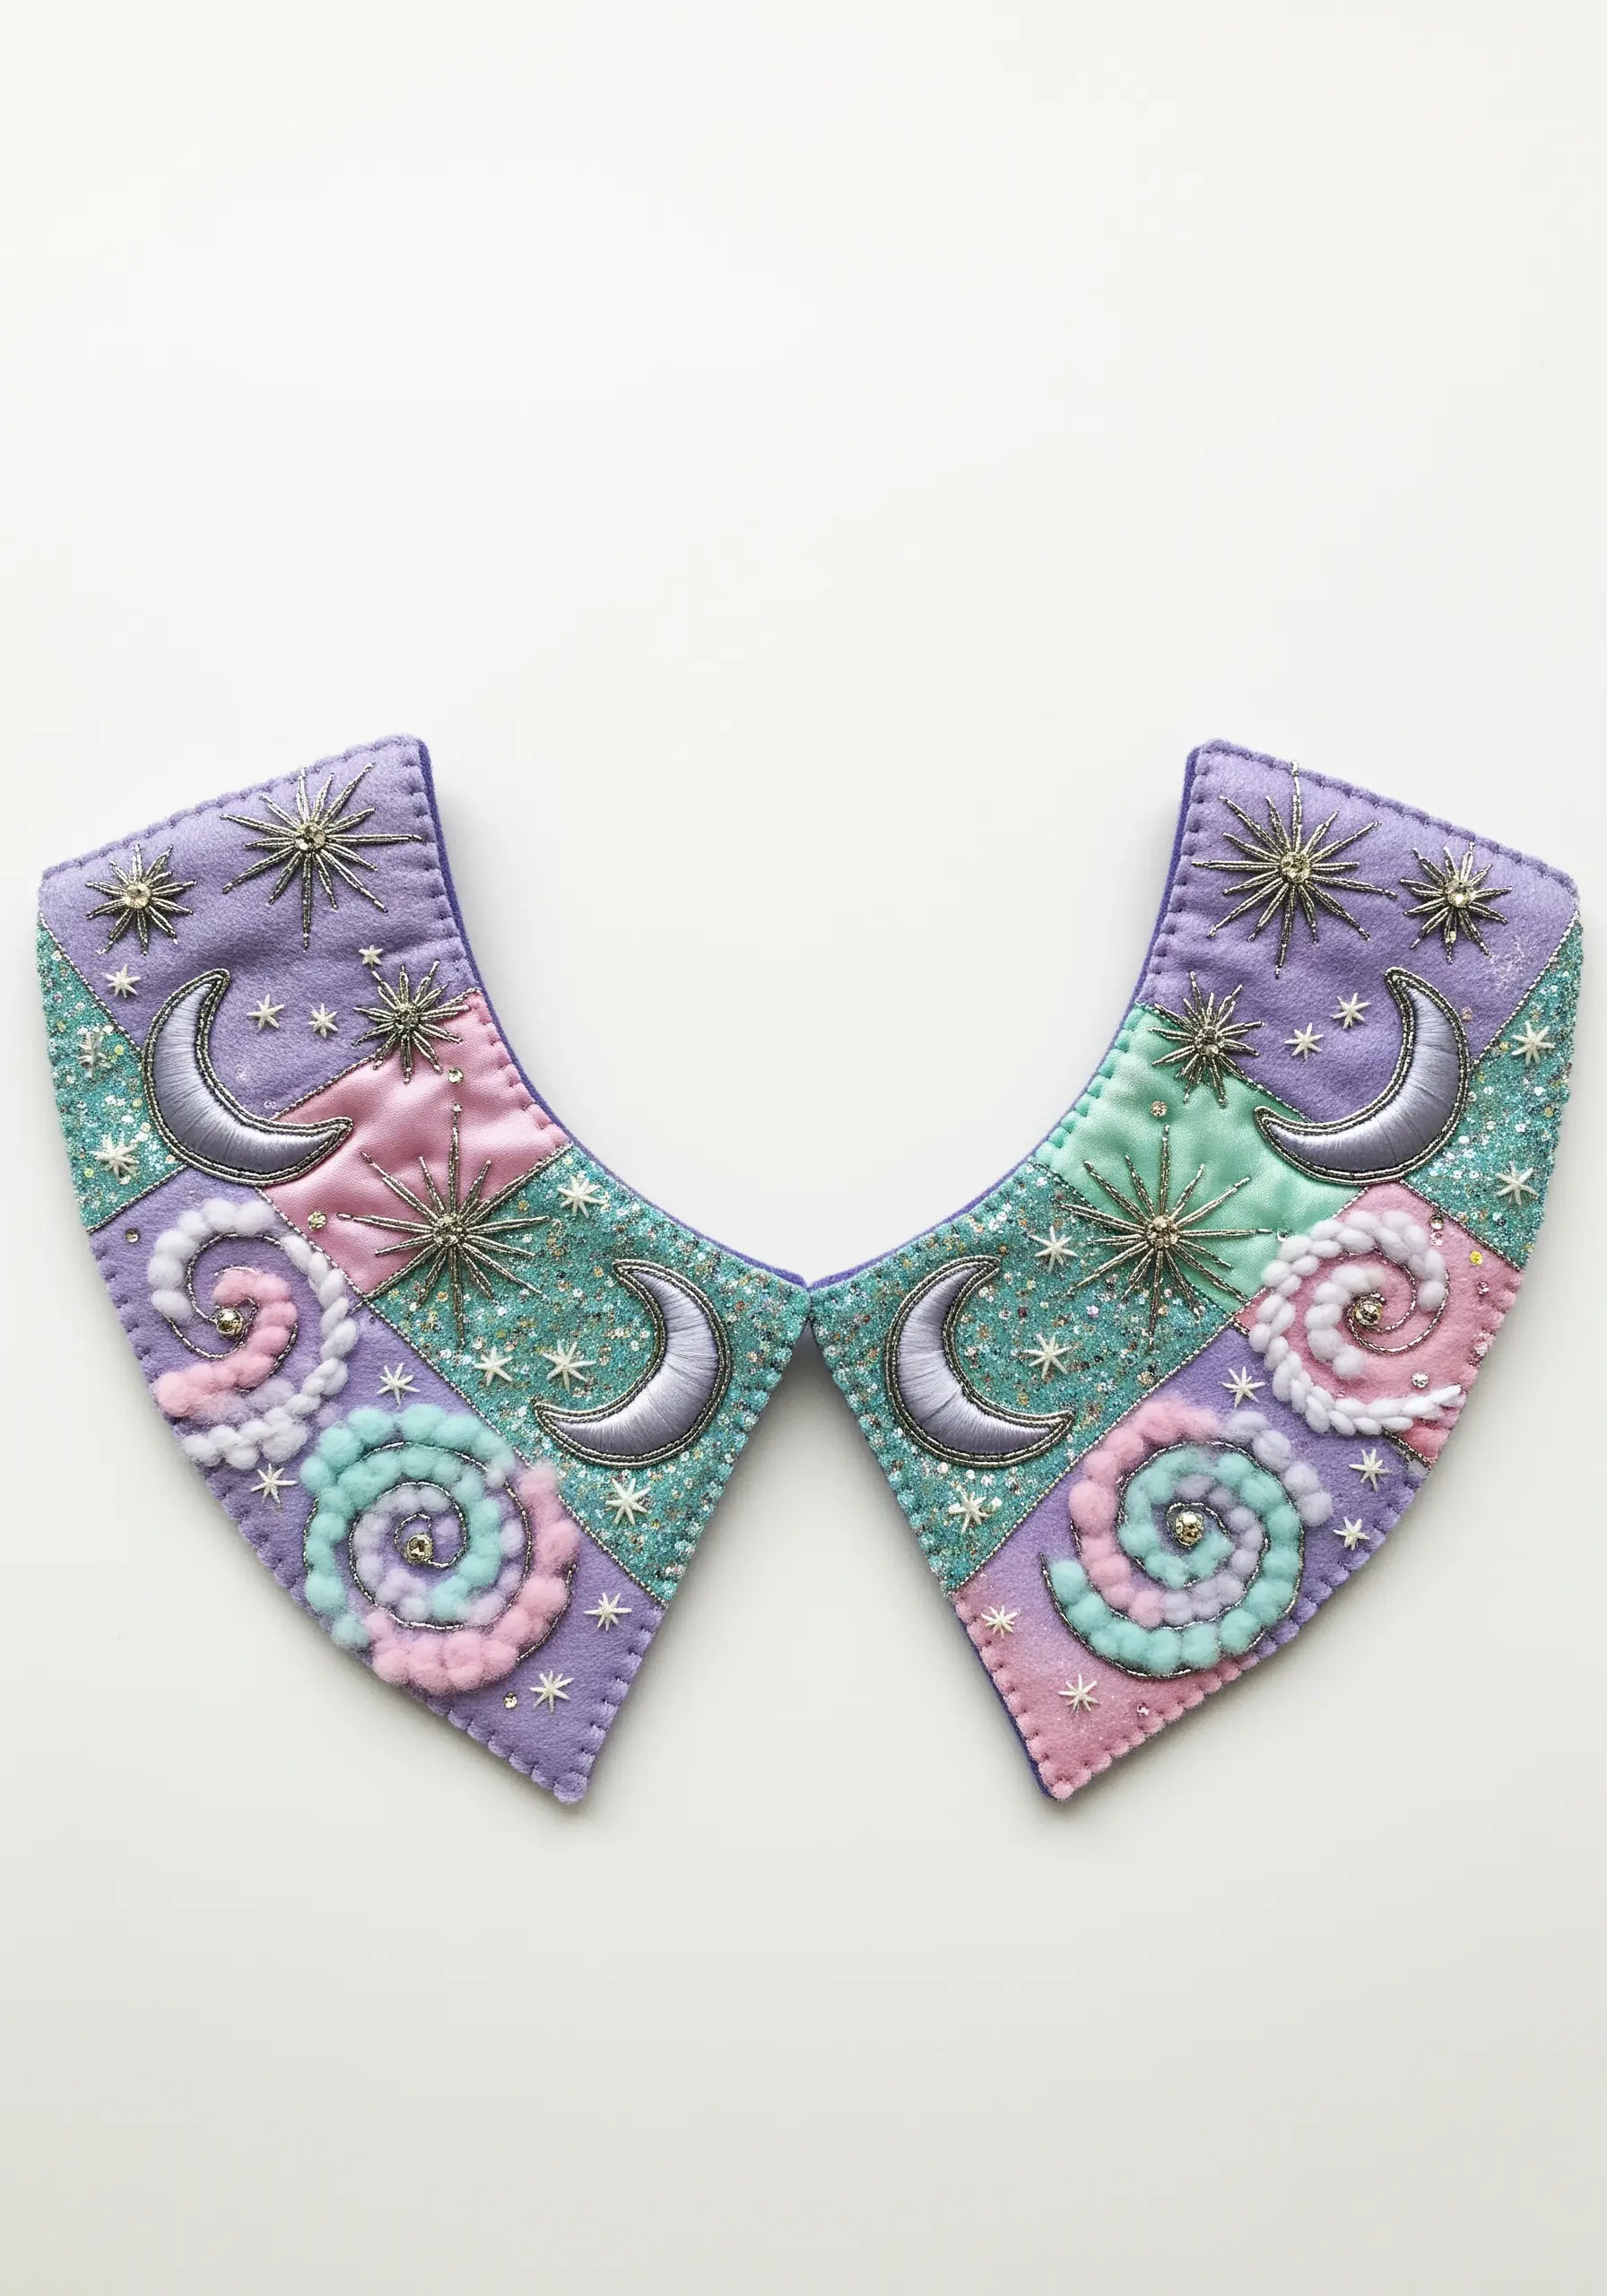
Craft a detachable collar from pastel felt or suedecloth, using different colors for each patchwork section.
Create soft, dimensional swirls by rolling strips of wool roving or thick yarn and securing them with tiny stitches.
For celestial sparkle, stitch silver crescent moon appliqués and use radiating straight stitches for stars, adding beads or metallic thread for extra shimmer.
Use a dense application of glitter or seed beads along the edges to define the patchwork sections and add a magical finish. This is one of the most small embroidery ideas that turn ordinary clothes into art.
19. Play with Transparency and Suspension in Textile Panels
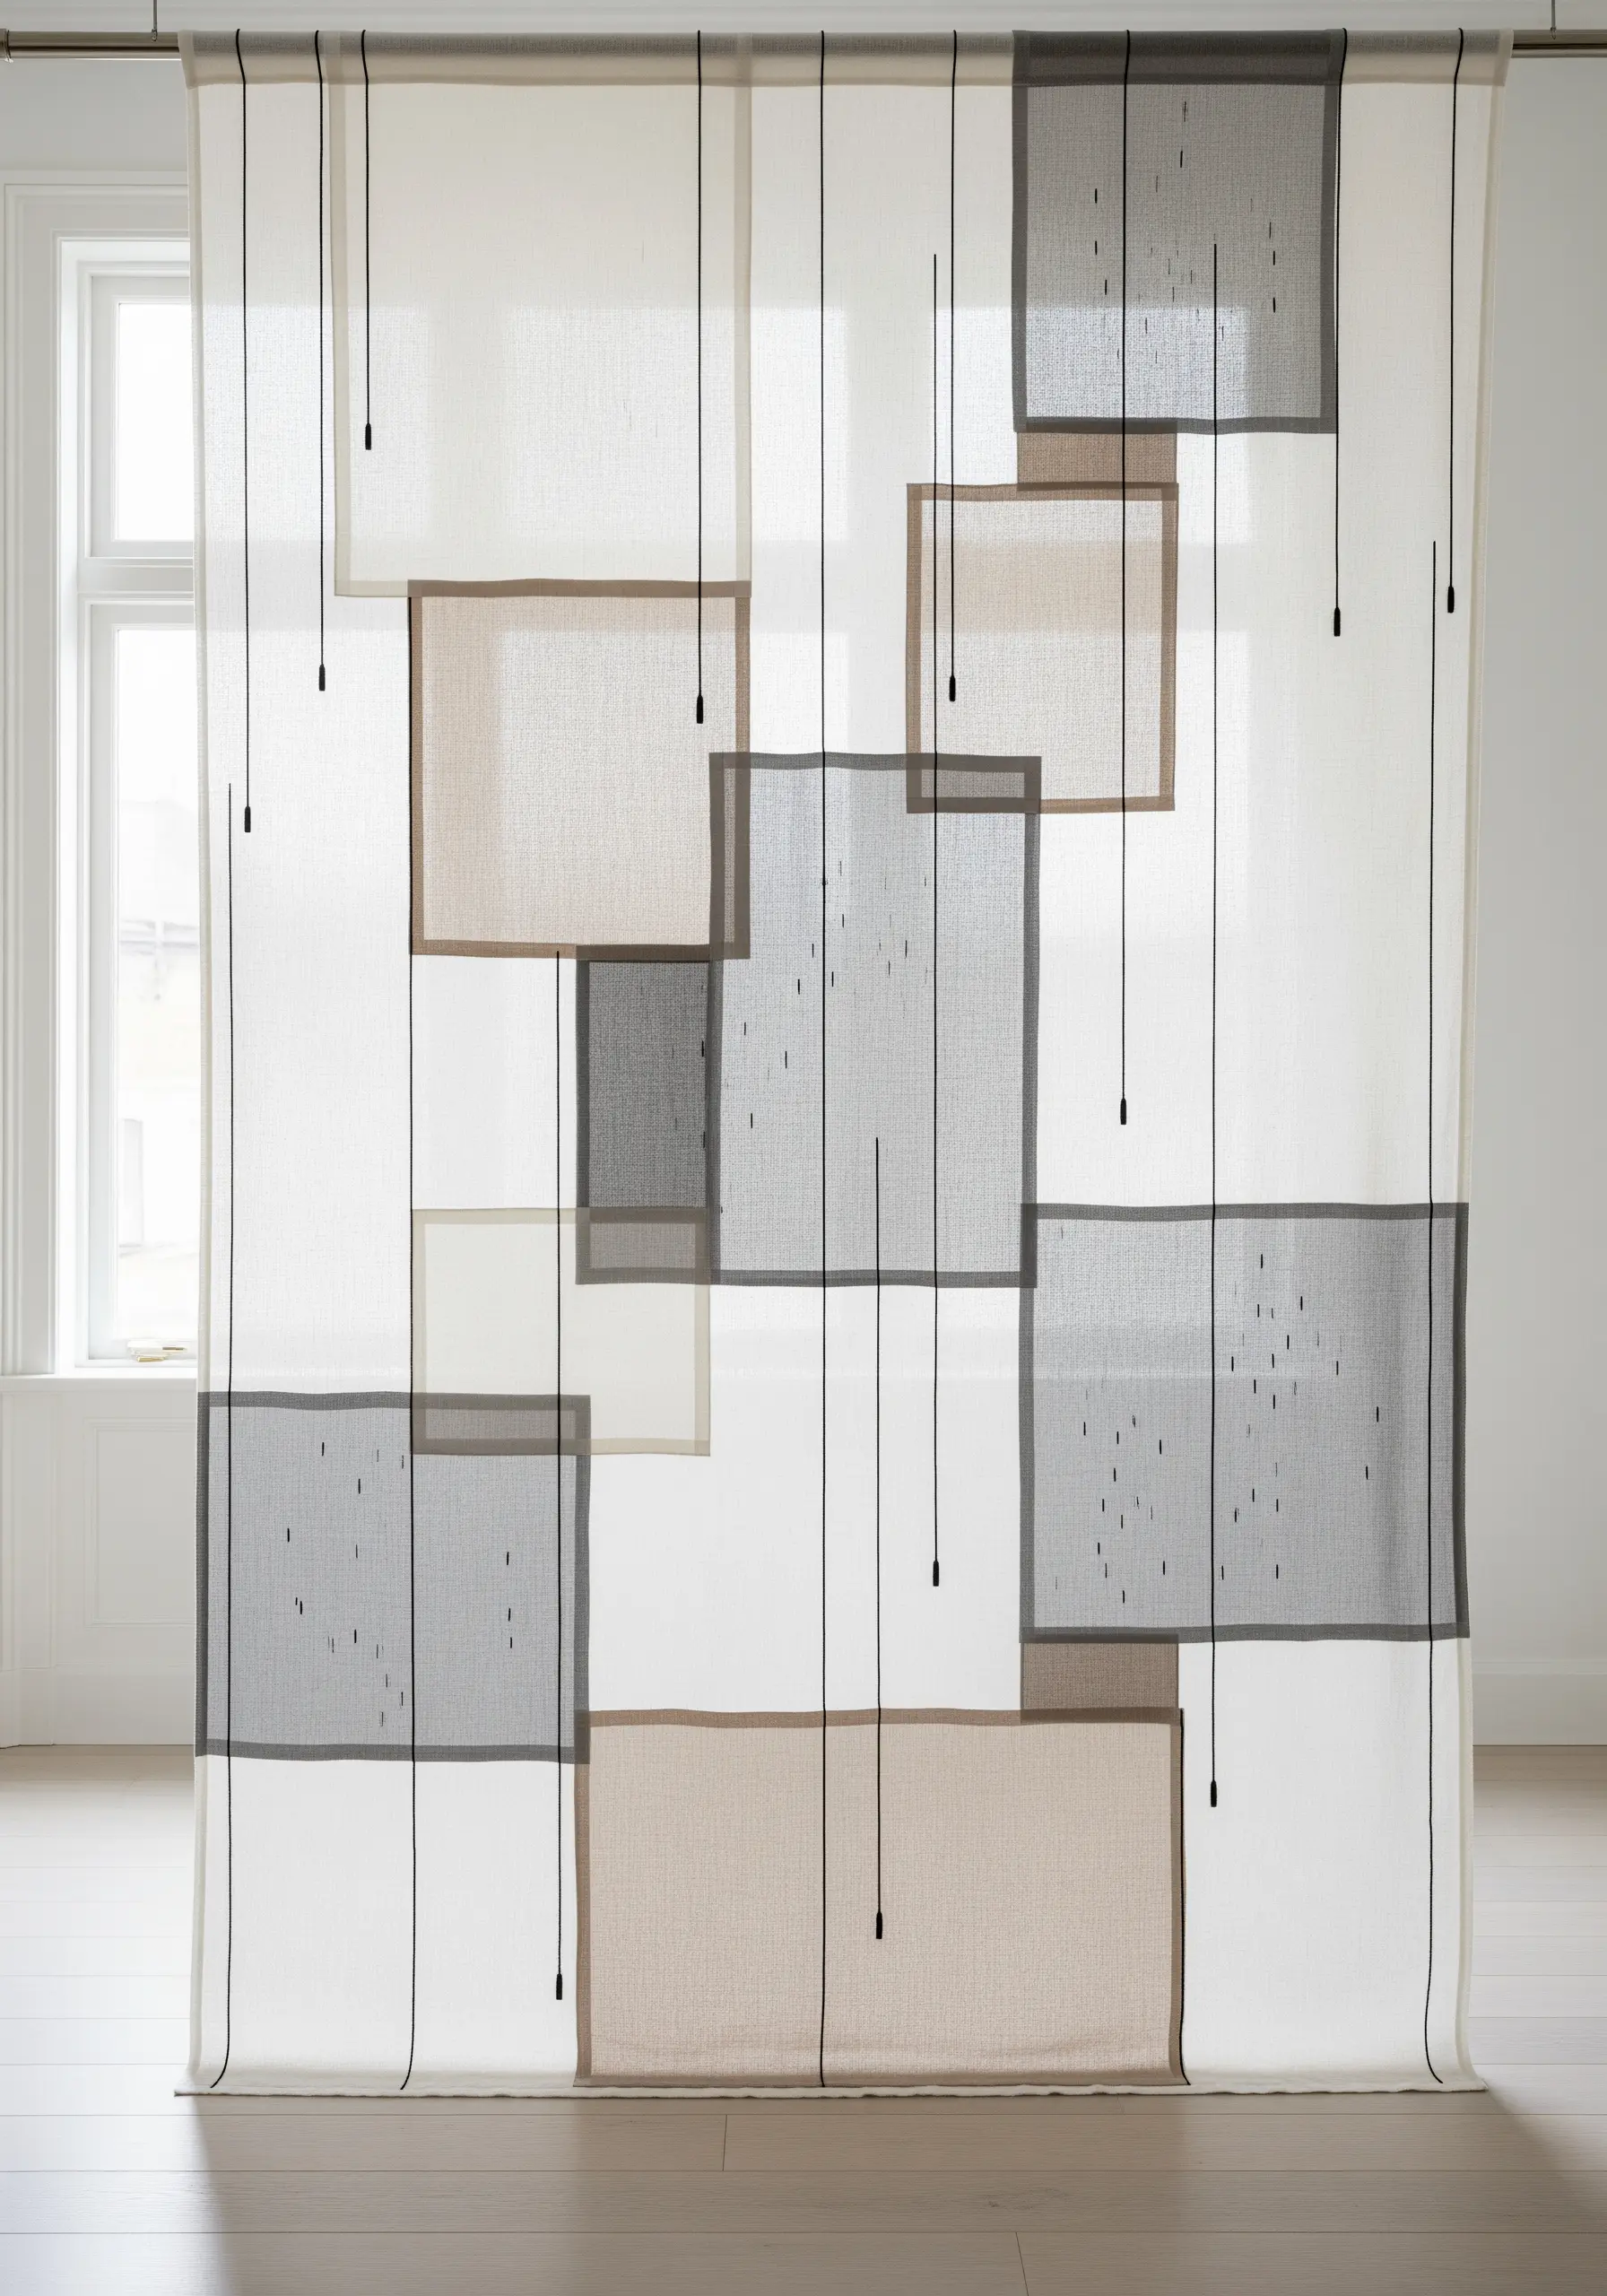
Instead of a solid piece, construct your art from multiple, overlapping panels of semi-sheer fabric like linen or gauze.
Stitch these panels onto a transparent base fabric, creating a layered, ethereal effect where colors and shapes shift depending on the viewing angle.
Embroider small, subtle details onto the panels, like scattered straight stitches or seed stitches, to mimic rain or falling seeds.
Add long, weighted threads that hang from the top support, passing through or behind the panels. This introduces a strong vertical element and a sense of gentle tension, perfect for large-scale fiber art installations.
20. Explore Stitch Variations on a Simple Felt Grid
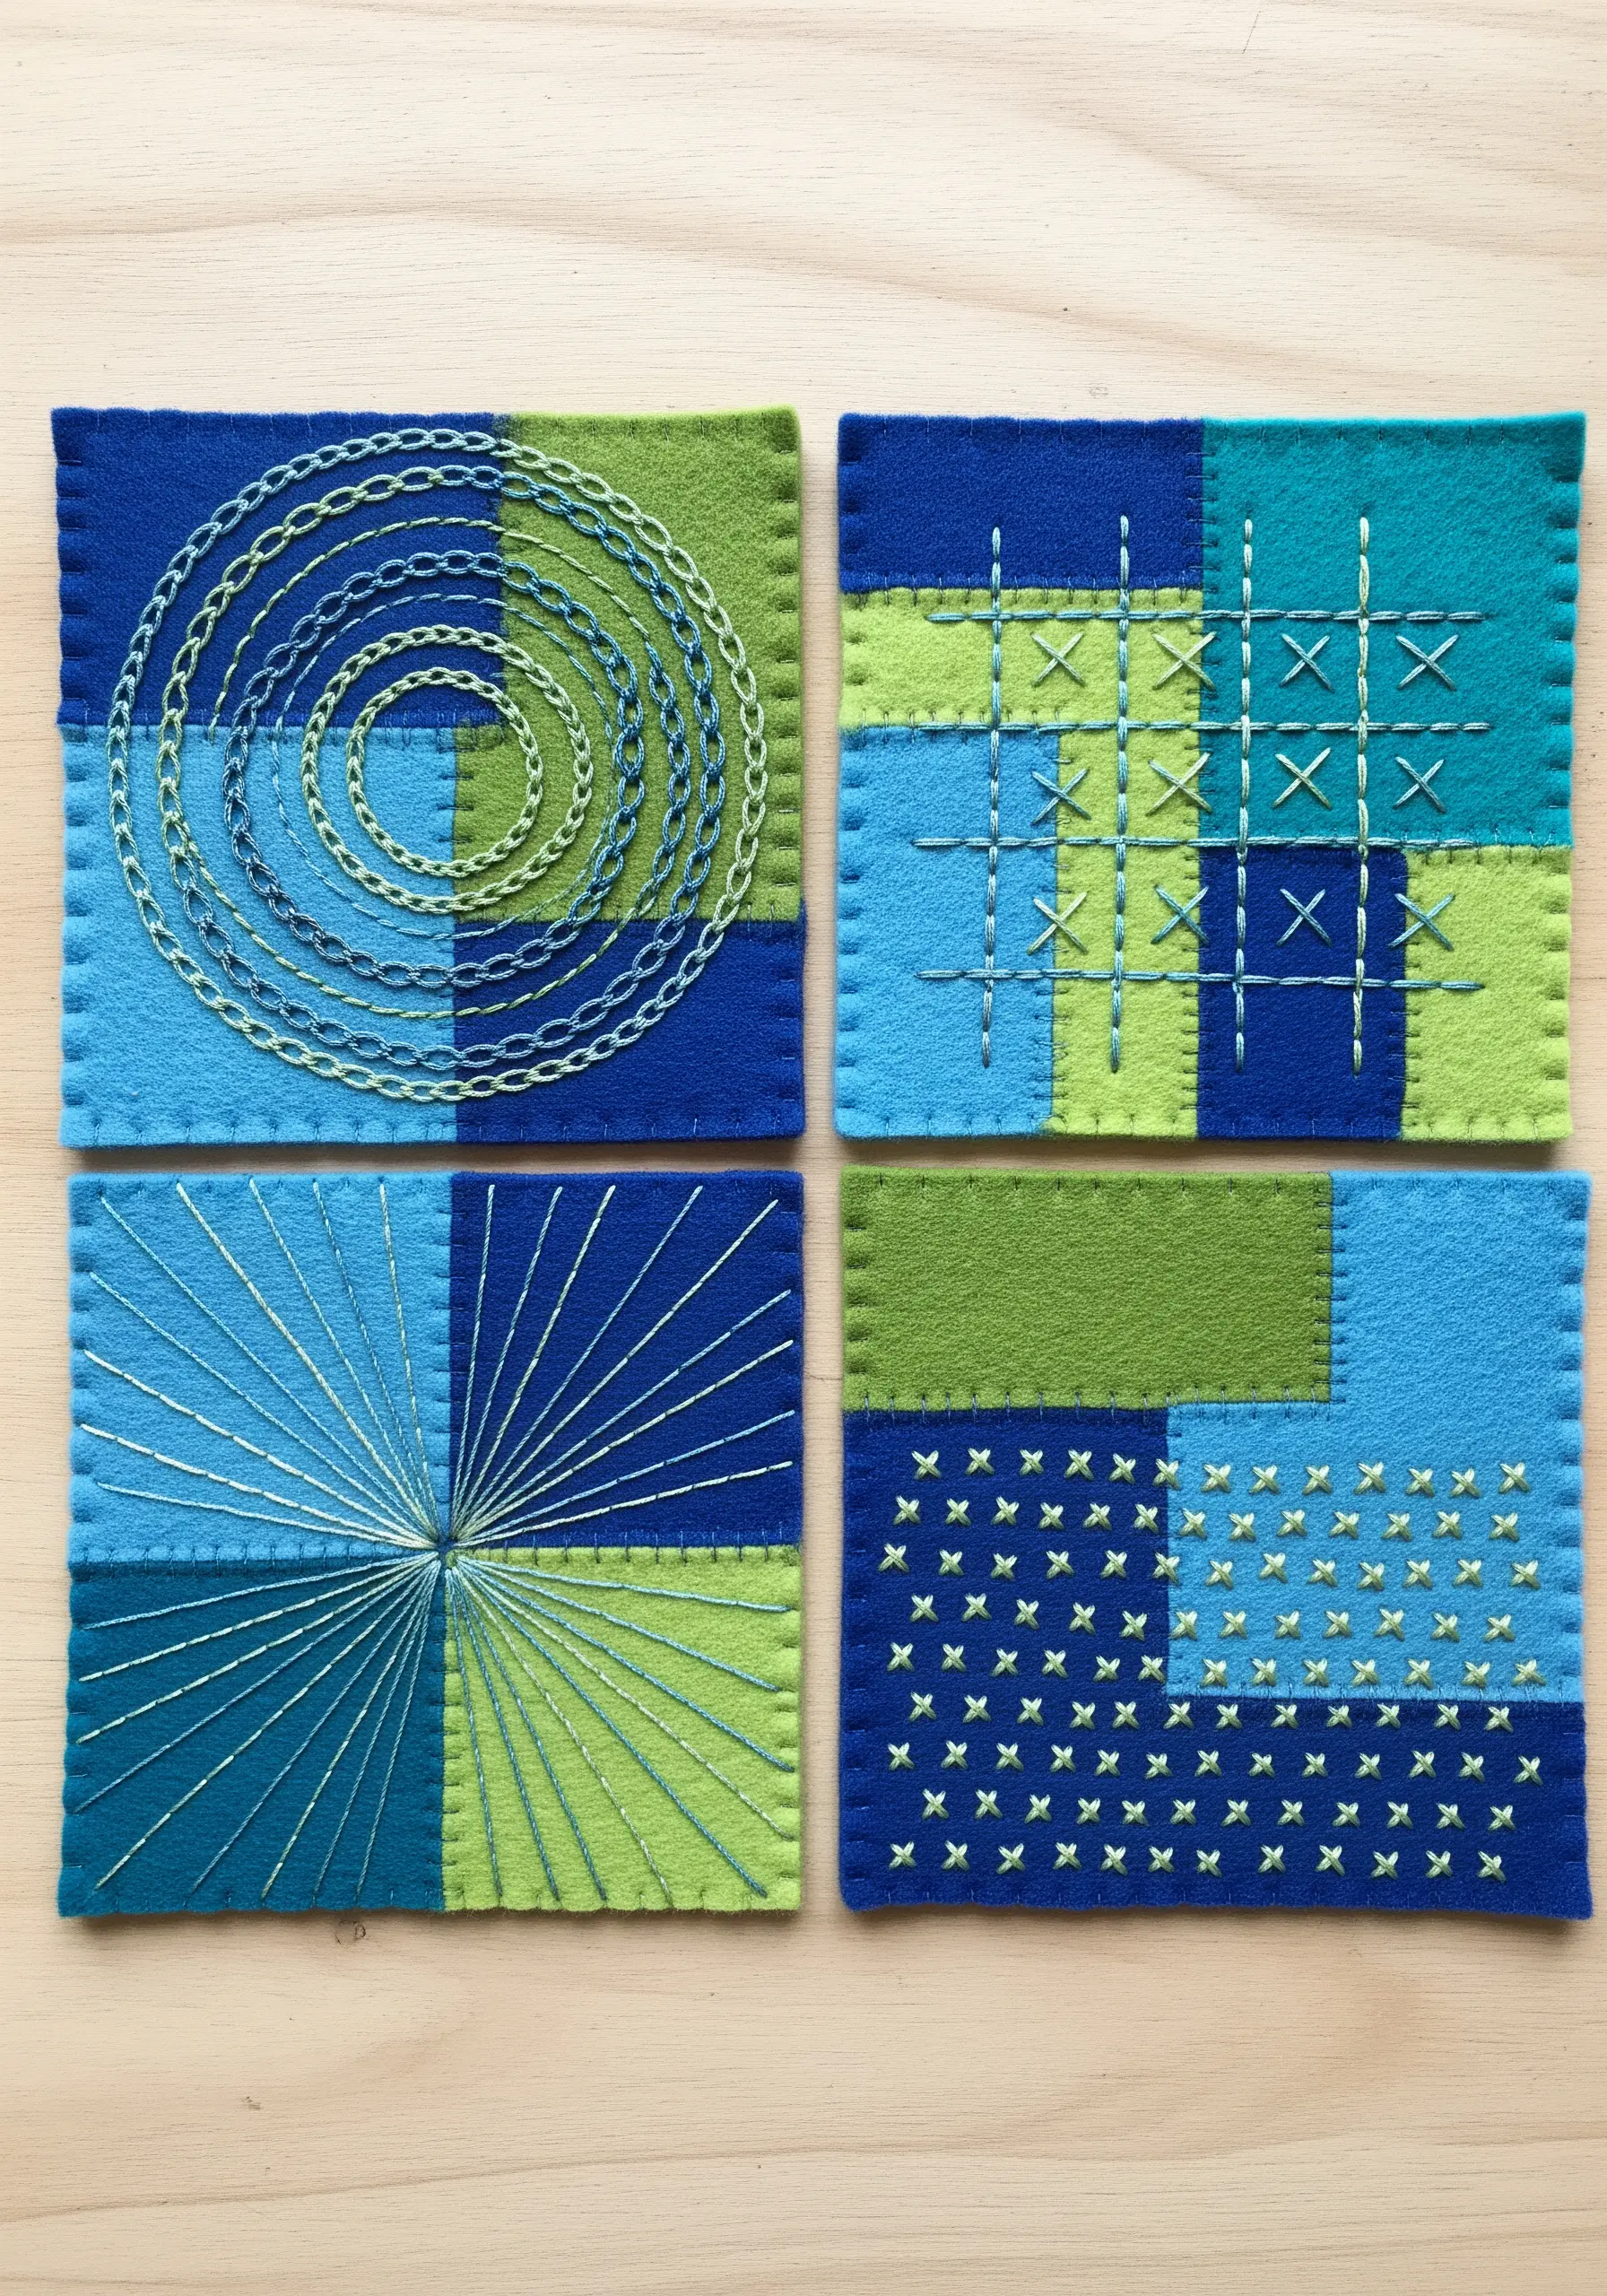
Create four small, identical patchwork bases using four squares of colored felt. This gives you a consistent canvas for experimentation.
On each coaster, explore a different way to use simple stitches to create complex patterns.
Try radiating straight stitches to form a sunburst, a grid of cross stitches for a pixelated look, or a spiral of chain stitches for texture and movement.
By using the same thread colors across all four designs, you create a cohesive set where the focus is entirely on the beauty of the stitch variations. These are simple embroidery decor ideas that double as a technical sampler.
21. Unify Bold Colors with Gold Couching

Embrace a maximalist color palette by piecing together rich, saturated jewel tones like ruby, sapphire, and amethyst velvet or cotton sateen.
To prevent the bold colors from competing, unify the entire piece with a single, continuous line of gold thread embroidery.
Use a couching stitch with a thick, metallic cord to outline abstract, paisley-inspired motifs that flow across the patchwork seams.
The consistent gold line work acts as a visual frame, tying all the disparate colors together and giving the piece a cohesive, luxurious finish. This is a key technique for high-end gold thread cushion designs.
22. Deconstruct the Canvas with Floating Patches and Bold Stitches
Challenge the traditional flat surface by creating floating patches.
Cut several small rectangles of canvas or linen, fray the edges, and then mount them onto a larger backing canvas with a few central stitches, leaving the edges loose.
This creates shadows and a sense of depth that a single layer cannot achieve.
Then, use a thick, contrasting yarn to stitch bold, expressive marks that cross over both the backing fabric and the floating patches.
The yarn physically and visually connects the layers, creating a powerful, deconstructed piece that makes viewers look twice. These are the kind of handmade art pieces that add instant personality.
23. Interrupt Geometric Quilting with a Padded Appliqué

Create a sophisticated, low-volume background with a patchwork of black, white, and grey patterned fabrics.
Quilt the piece with a subtle stitch that complements the geometric patterns, adding quiet texture.
Introduce a dramatic focal point by adding a padded appliqué shape in a single, vibrant color.
To create the ‘splat’ shape, layer your colored fabric over a piece of batting, stitch the outline, and then trim away the excess.
This technique, called trapunto, makes the appliqué pop from the surface with a soft, sculptural quality, making your work one of those creative embroidery projects that look expensive but are quite accessible.
24. Trace Watercolor Washes with Metallic Running Stitch
Start with a fabric that has a fluid, watercolor, or tie-dye effect. This provides an organic, unpredictable base for your stitching.
Instead of fighting the pattern, enhance it. Use a fine, shimmering metallic thread to add horizontal lines of simple running stitches that follow the color shifts in the fabric.
Vary the length and spacing of your stitches to create a subtle texture that catches the light.
This technique adds a delicate layer of structure and sparkle without overpowering the beauty of the printed or dyed fabric. It is one of the most elegant ways to embroider fabric for a modern aesthetic.
25. Map a Circuit Board with Felt Appliqué and Neon Stitches
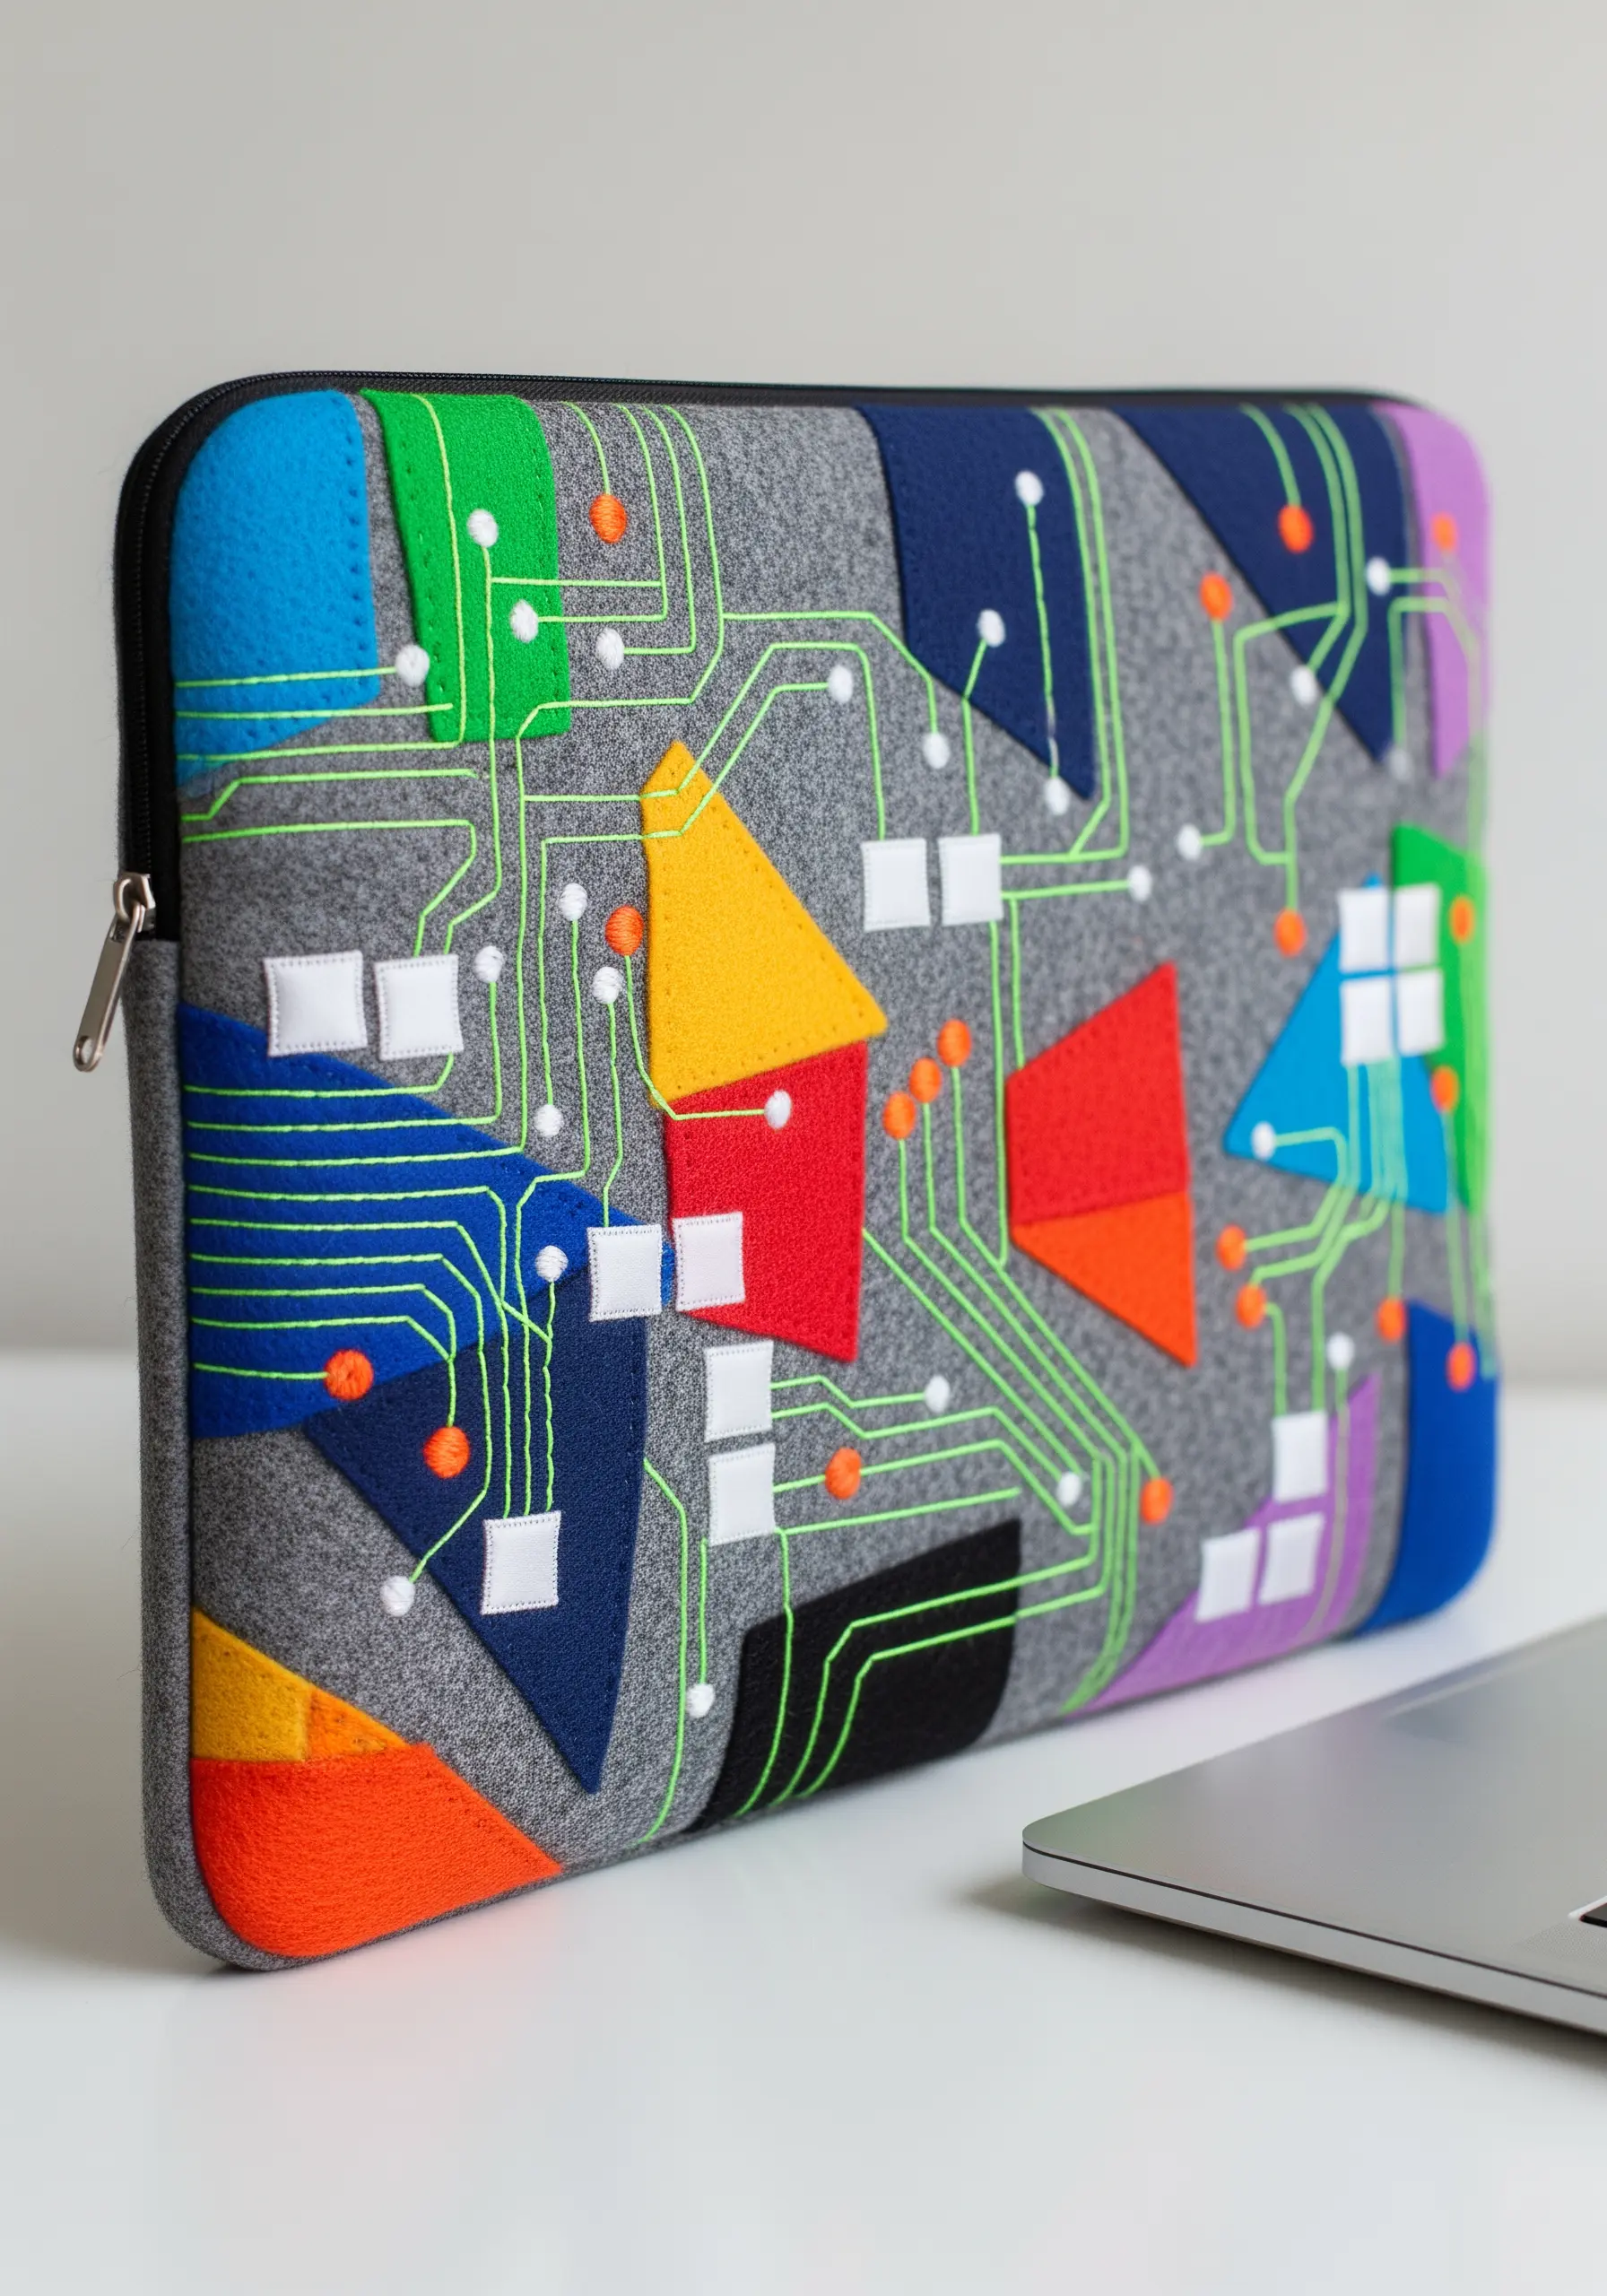
Use grey felt as a neutral, tech-inspired base for a laptop sleeve or portfolio.
Cut geometric shapes and circuit-like paths from brightly colored felt and appliqué them onto the surface.
Then, use a neon green or electric yellow thread to stitch the circuit pathways, connecting the different colored components with sharp, clean lines of backstitch.
Add small French knots in a contrasting color, like orange, to represent connection points or LED lights.
This project transforms a functional item into a vibrant piece of geek-chic art, making for one of the best creative embroidery gift projects.


