

Your embroidery can do more than just depict the ocean—it can capture its very essence.
Think beyond simple anchors and seashells. Consider the texture of seafoam, the graceful drift of seaweed, the pearlescent light on a shell. These are the details that transform a simple craft into a piece of art that resonates with the calm and power of the coast.
Here, you’ll find techniques that focus on texture, light, and composition. You will learn to choose fabrics that enhance your threads, to layer stitches for depth, and to arrange your work in ways that tell a story. Let’s move your stitching from simply decorative to truly expressive.
1. Elevate Motifs with Beaded Contours
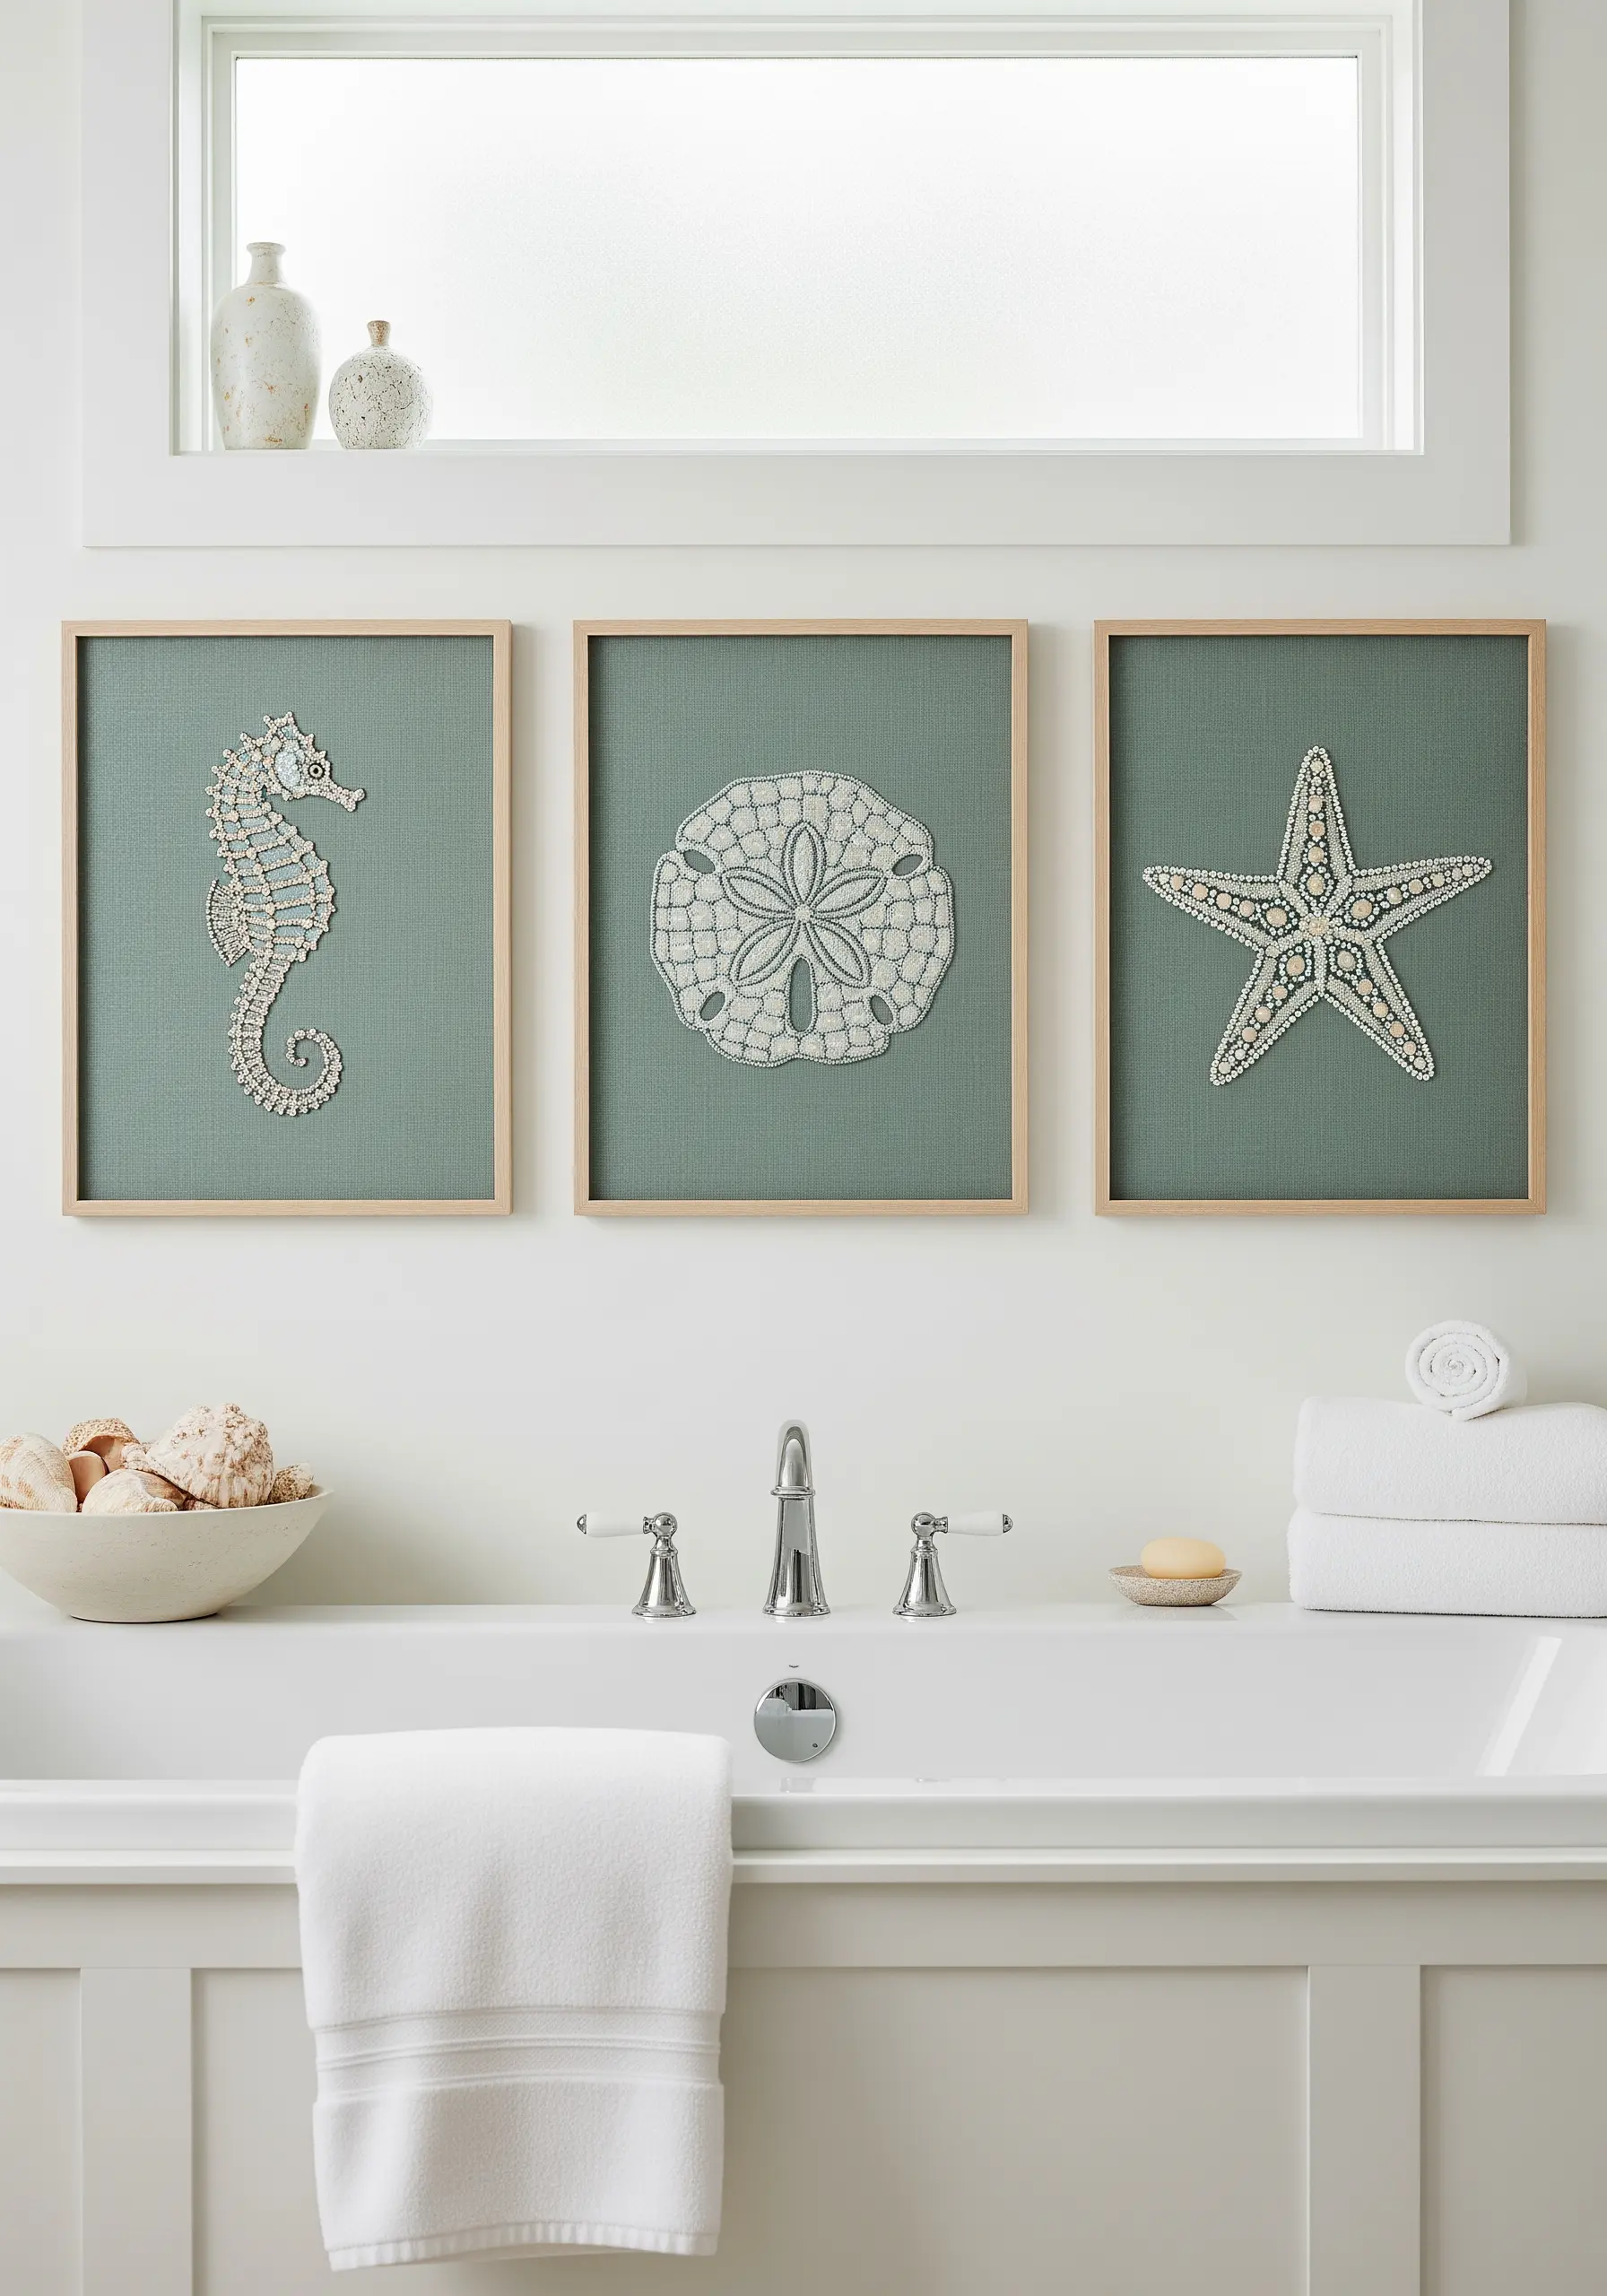
Instead of outlining your shapes with thread, use a single strand of floss to couch a line of pearlescent seed beads.
This technique adds a subtle, three-dimensional shimmer that elevates simple motifs, making them feel more like precious objects.
Work on a medium-weight, textured fabric like a cotton-linen blend in a muted color; the fabric’s matte finish will make the beads pop.
For a triptych like this, ensure your fabric is from the same dye lot and stretched with even tension for a cohesive, professional display.
2. Sculptural Waves with Mixed Fibers
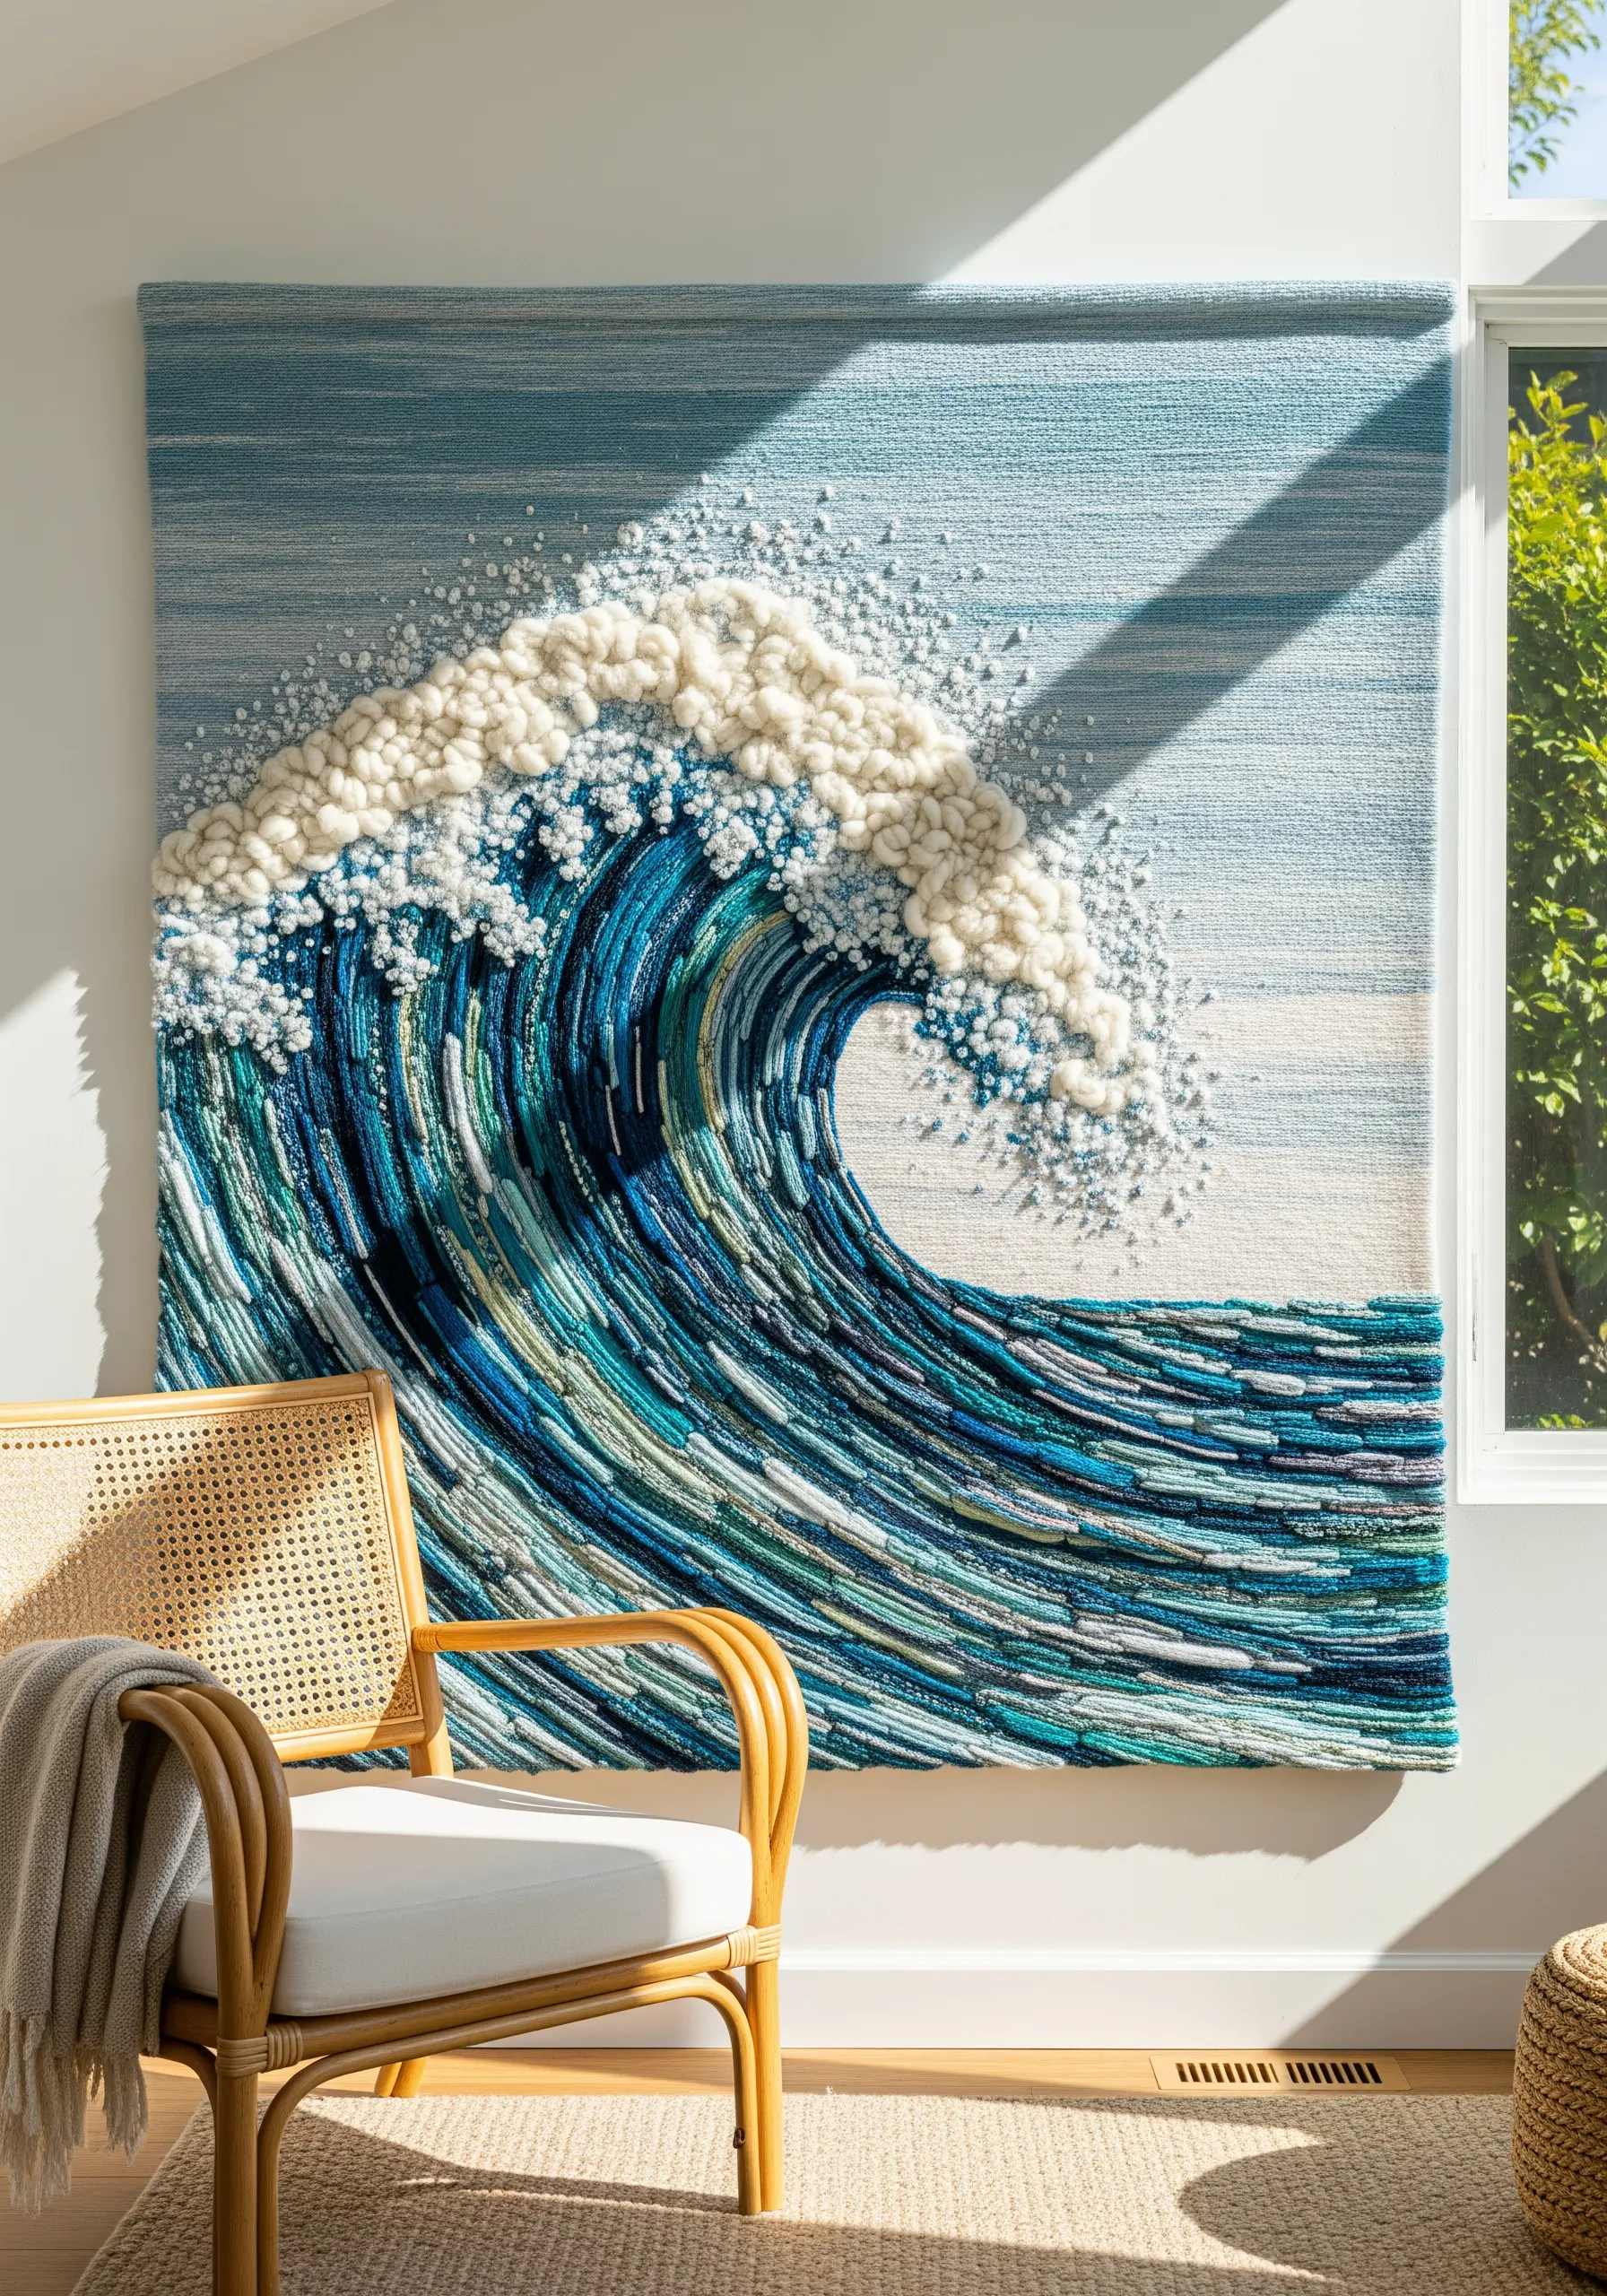
To build dramatic, touchable texture, move beyond standard floss and incorporate thicker fibers like wool roving, chunky yarn, and fabric strips.
Create the body of the wave by couching down various blue and green fabric strips, letting them twist and overlap to mimic chaotic water.
For the sea foam, use a base of densely packed French knots in off-white, then weave loops of thick wool roving through the foundation to create a foamy, sculptural crest that casts its own shadow.
This approach transforms a flat surface into a dynamic piece that engages with light and invites touch.
3. Curate a Specimen Wall with Hoop Art
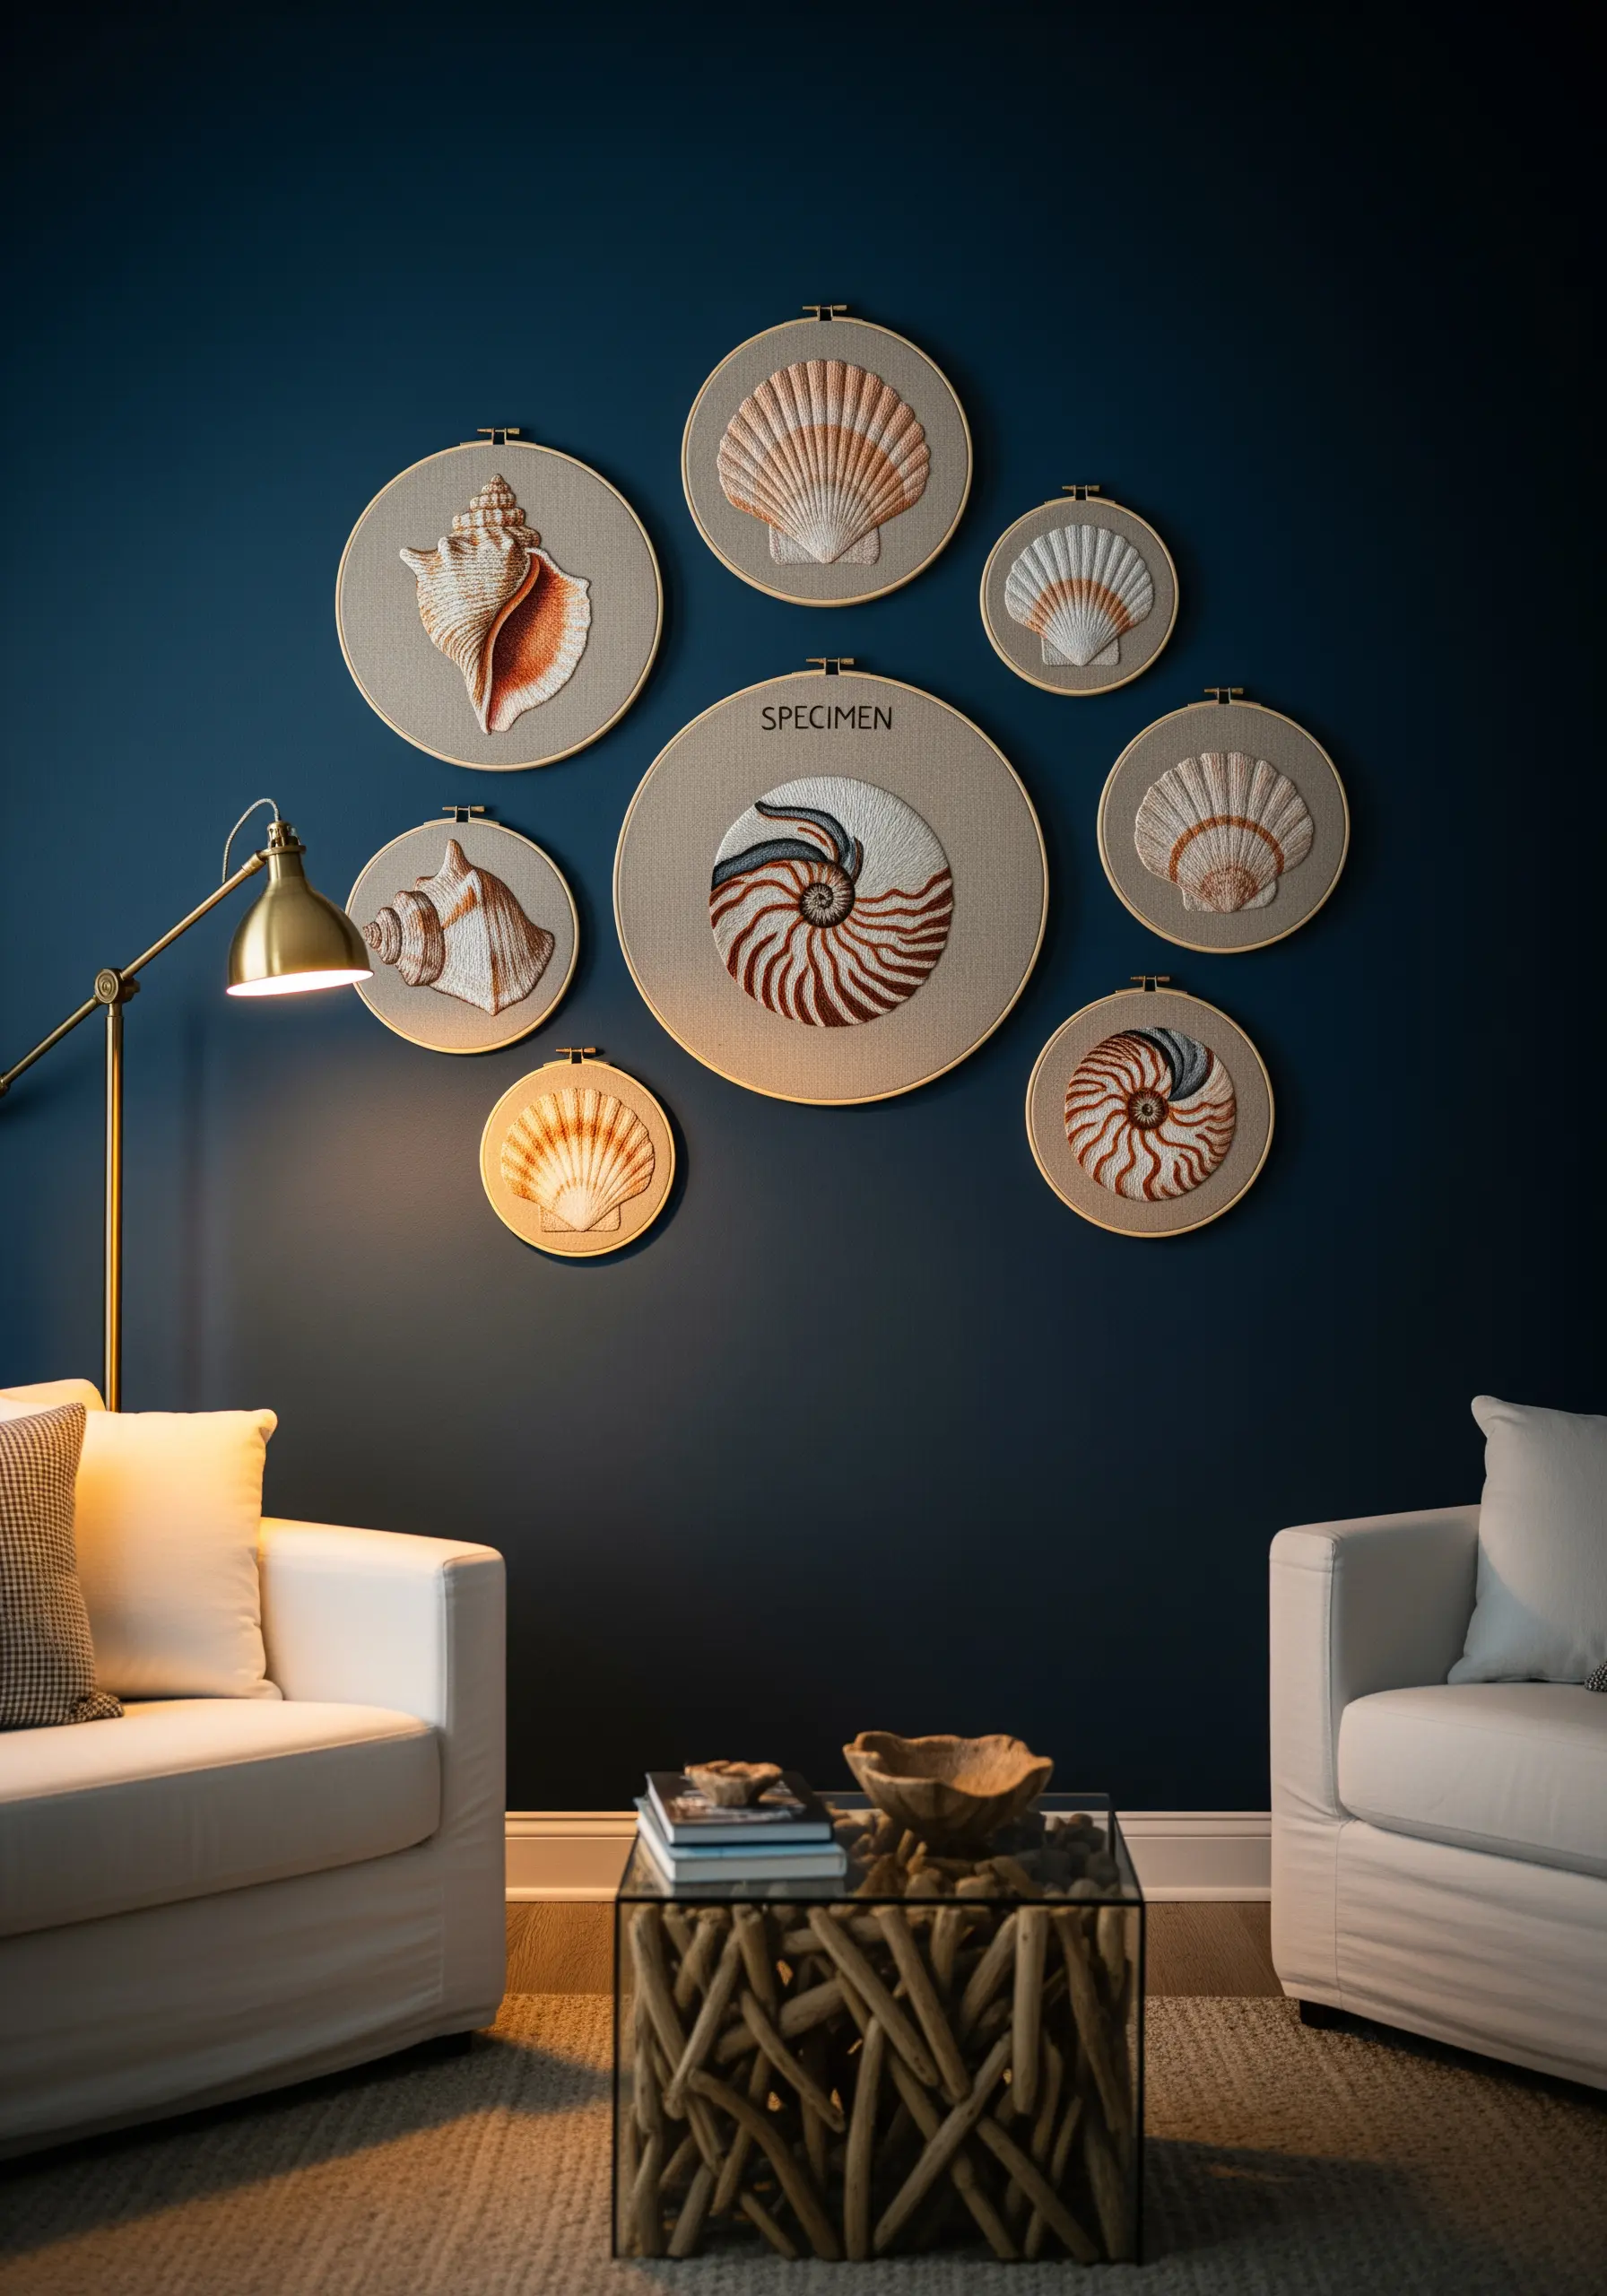
Group a series of hoops to create a gallery wall that feels curated and intentional, like a naturalist’s collection.
To achieve the smooth, realistic shading on the shells, use the long-and-short stitch technique with just two or three shades of a single color family.
Varying the hoop sizes creates a dynamic rhythm, drawing the eye across the composition.
Use a consistent, high-quality linen across all pieces to unify the collection, and add a simple backstitch label like ‘Specimen’ to one hoop for a touch of academic charm.
4. A Modern Take on Nautical Motifs
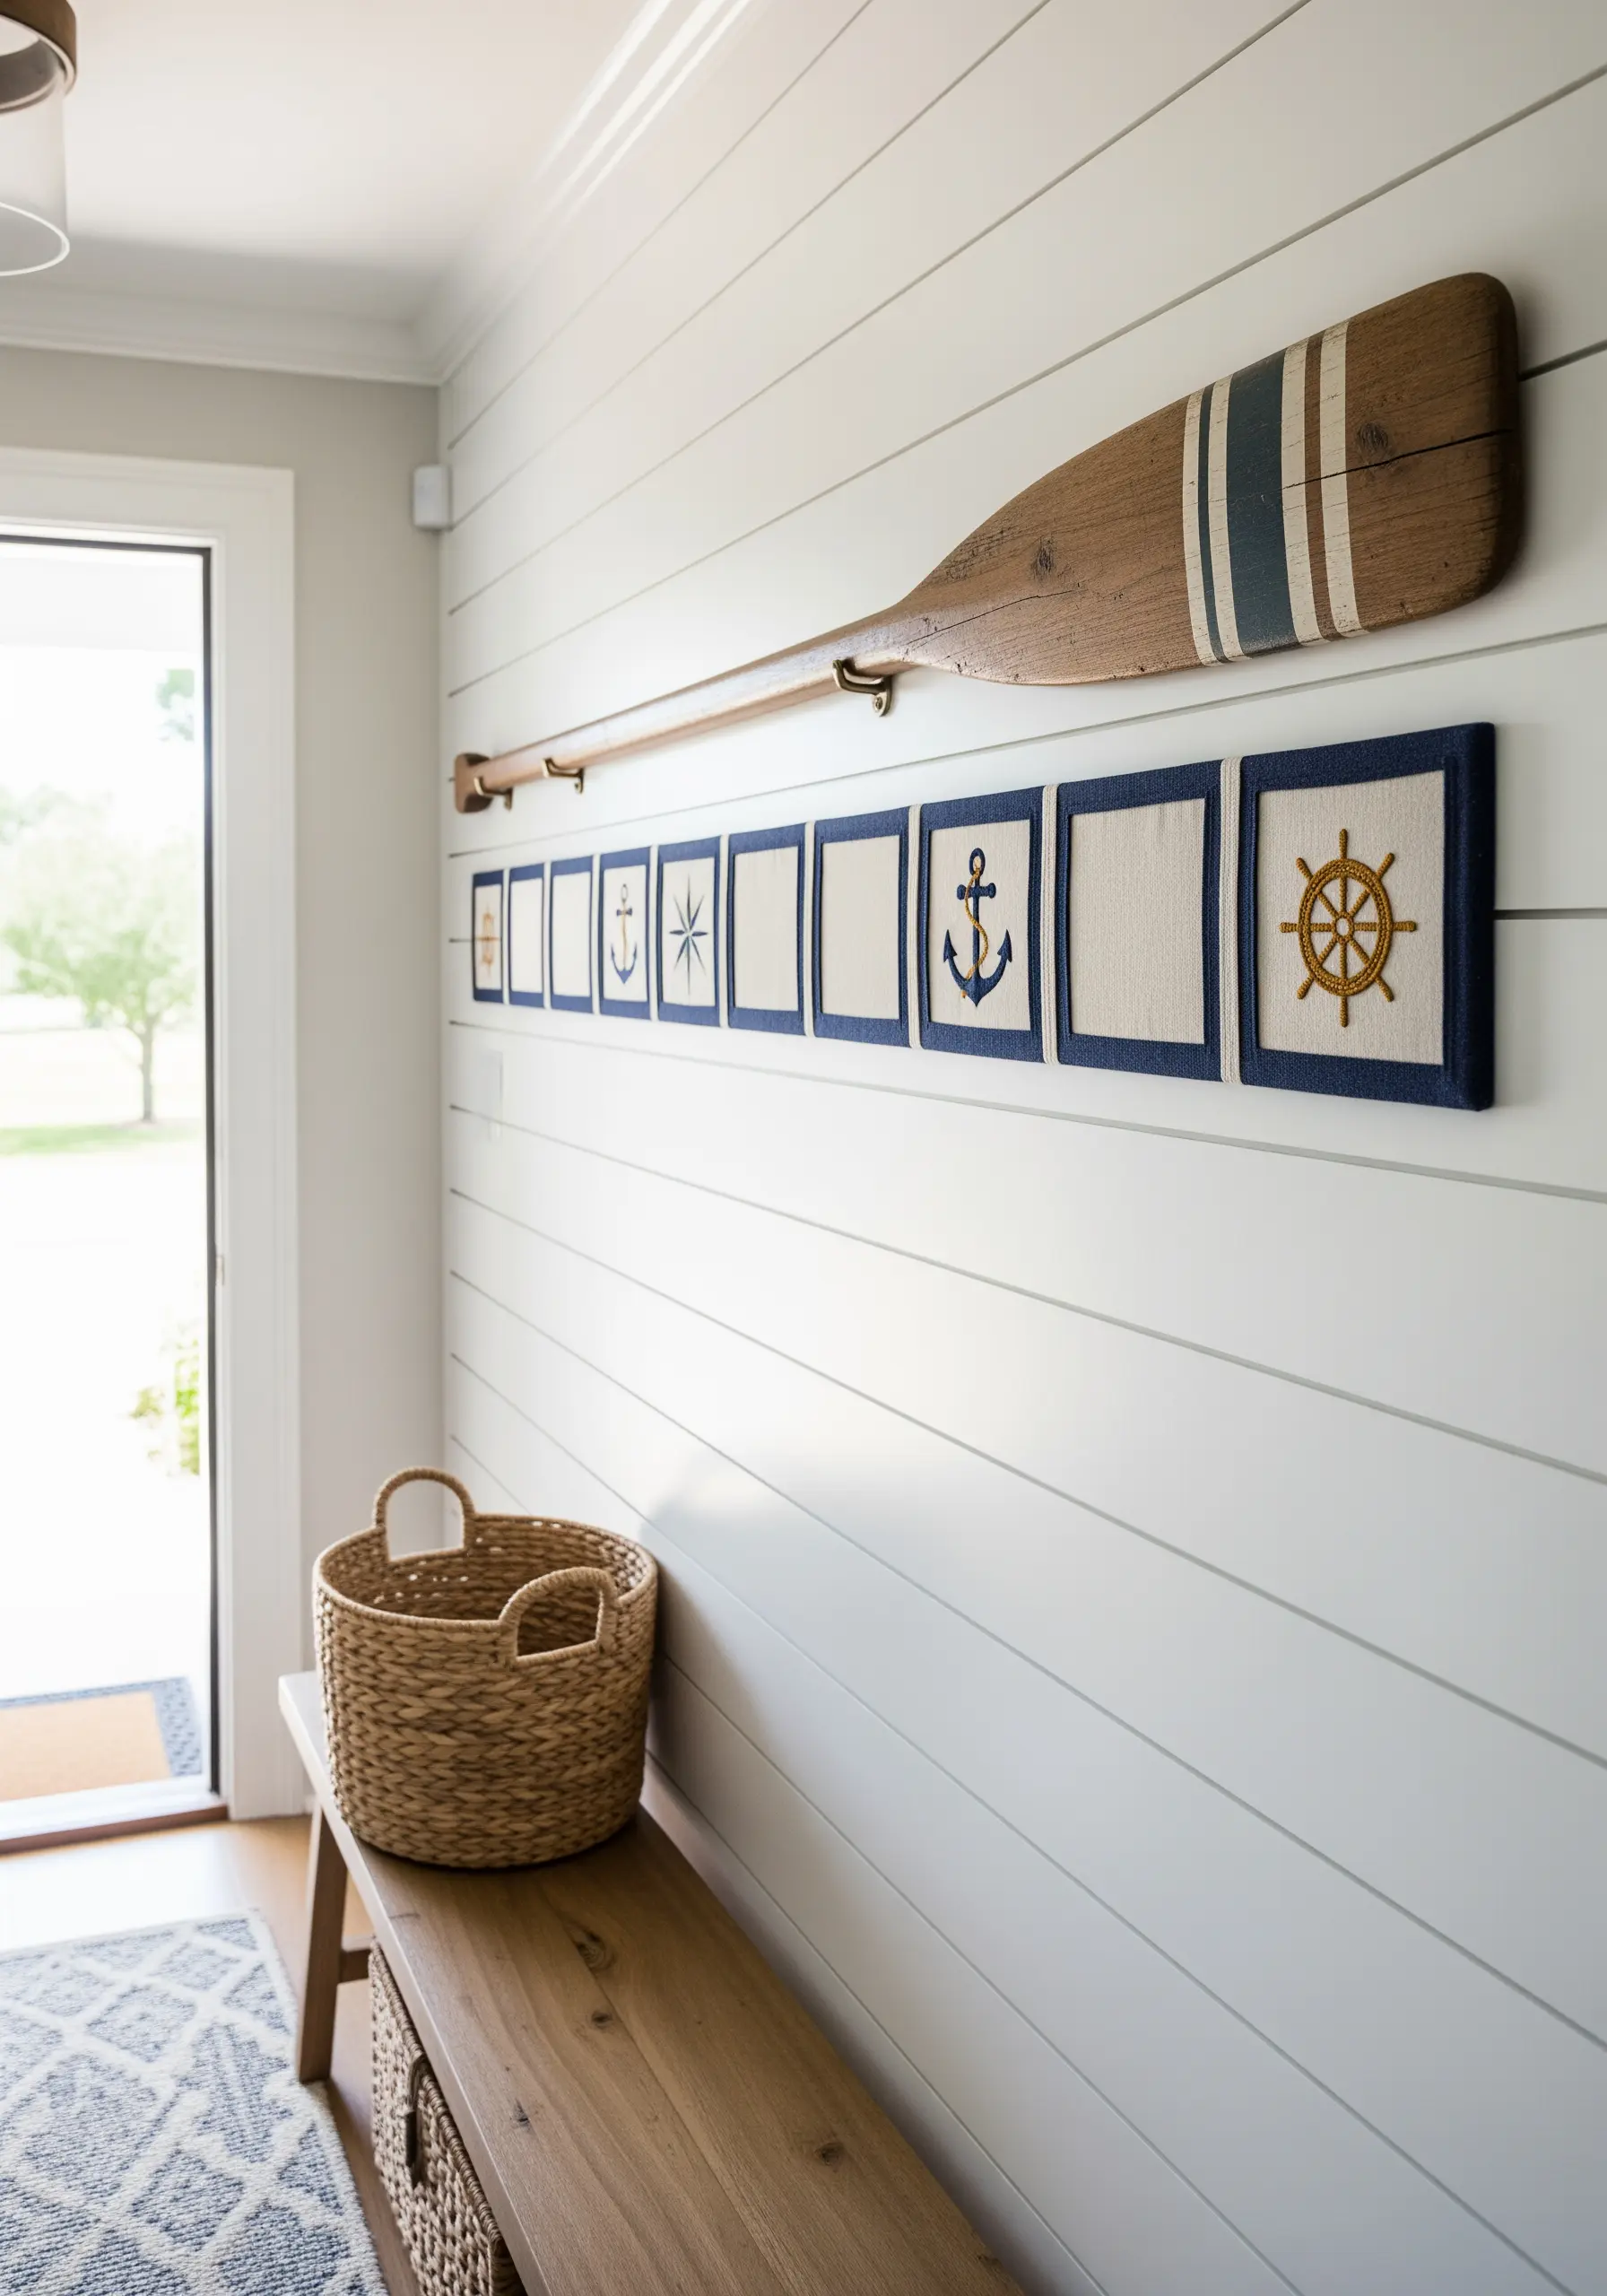
For a clean, contemporary look, move your embroidery off the hoop and onto fabric-wrapped mounting boards or small canvases.
Choose simple, iconic motifs—an anchor, a ship’s wheel, a compass rose—and stitch them in a single, high-contrast color like navy on a crisp off-white fabric.
The power of this display lies in its repetition and uniformity.
By arranging the identically framed pieces in a straight, rhythmic line, you create a graphic statement that feels more like modern art than traditional craft.
5. Define Form with Negative Space
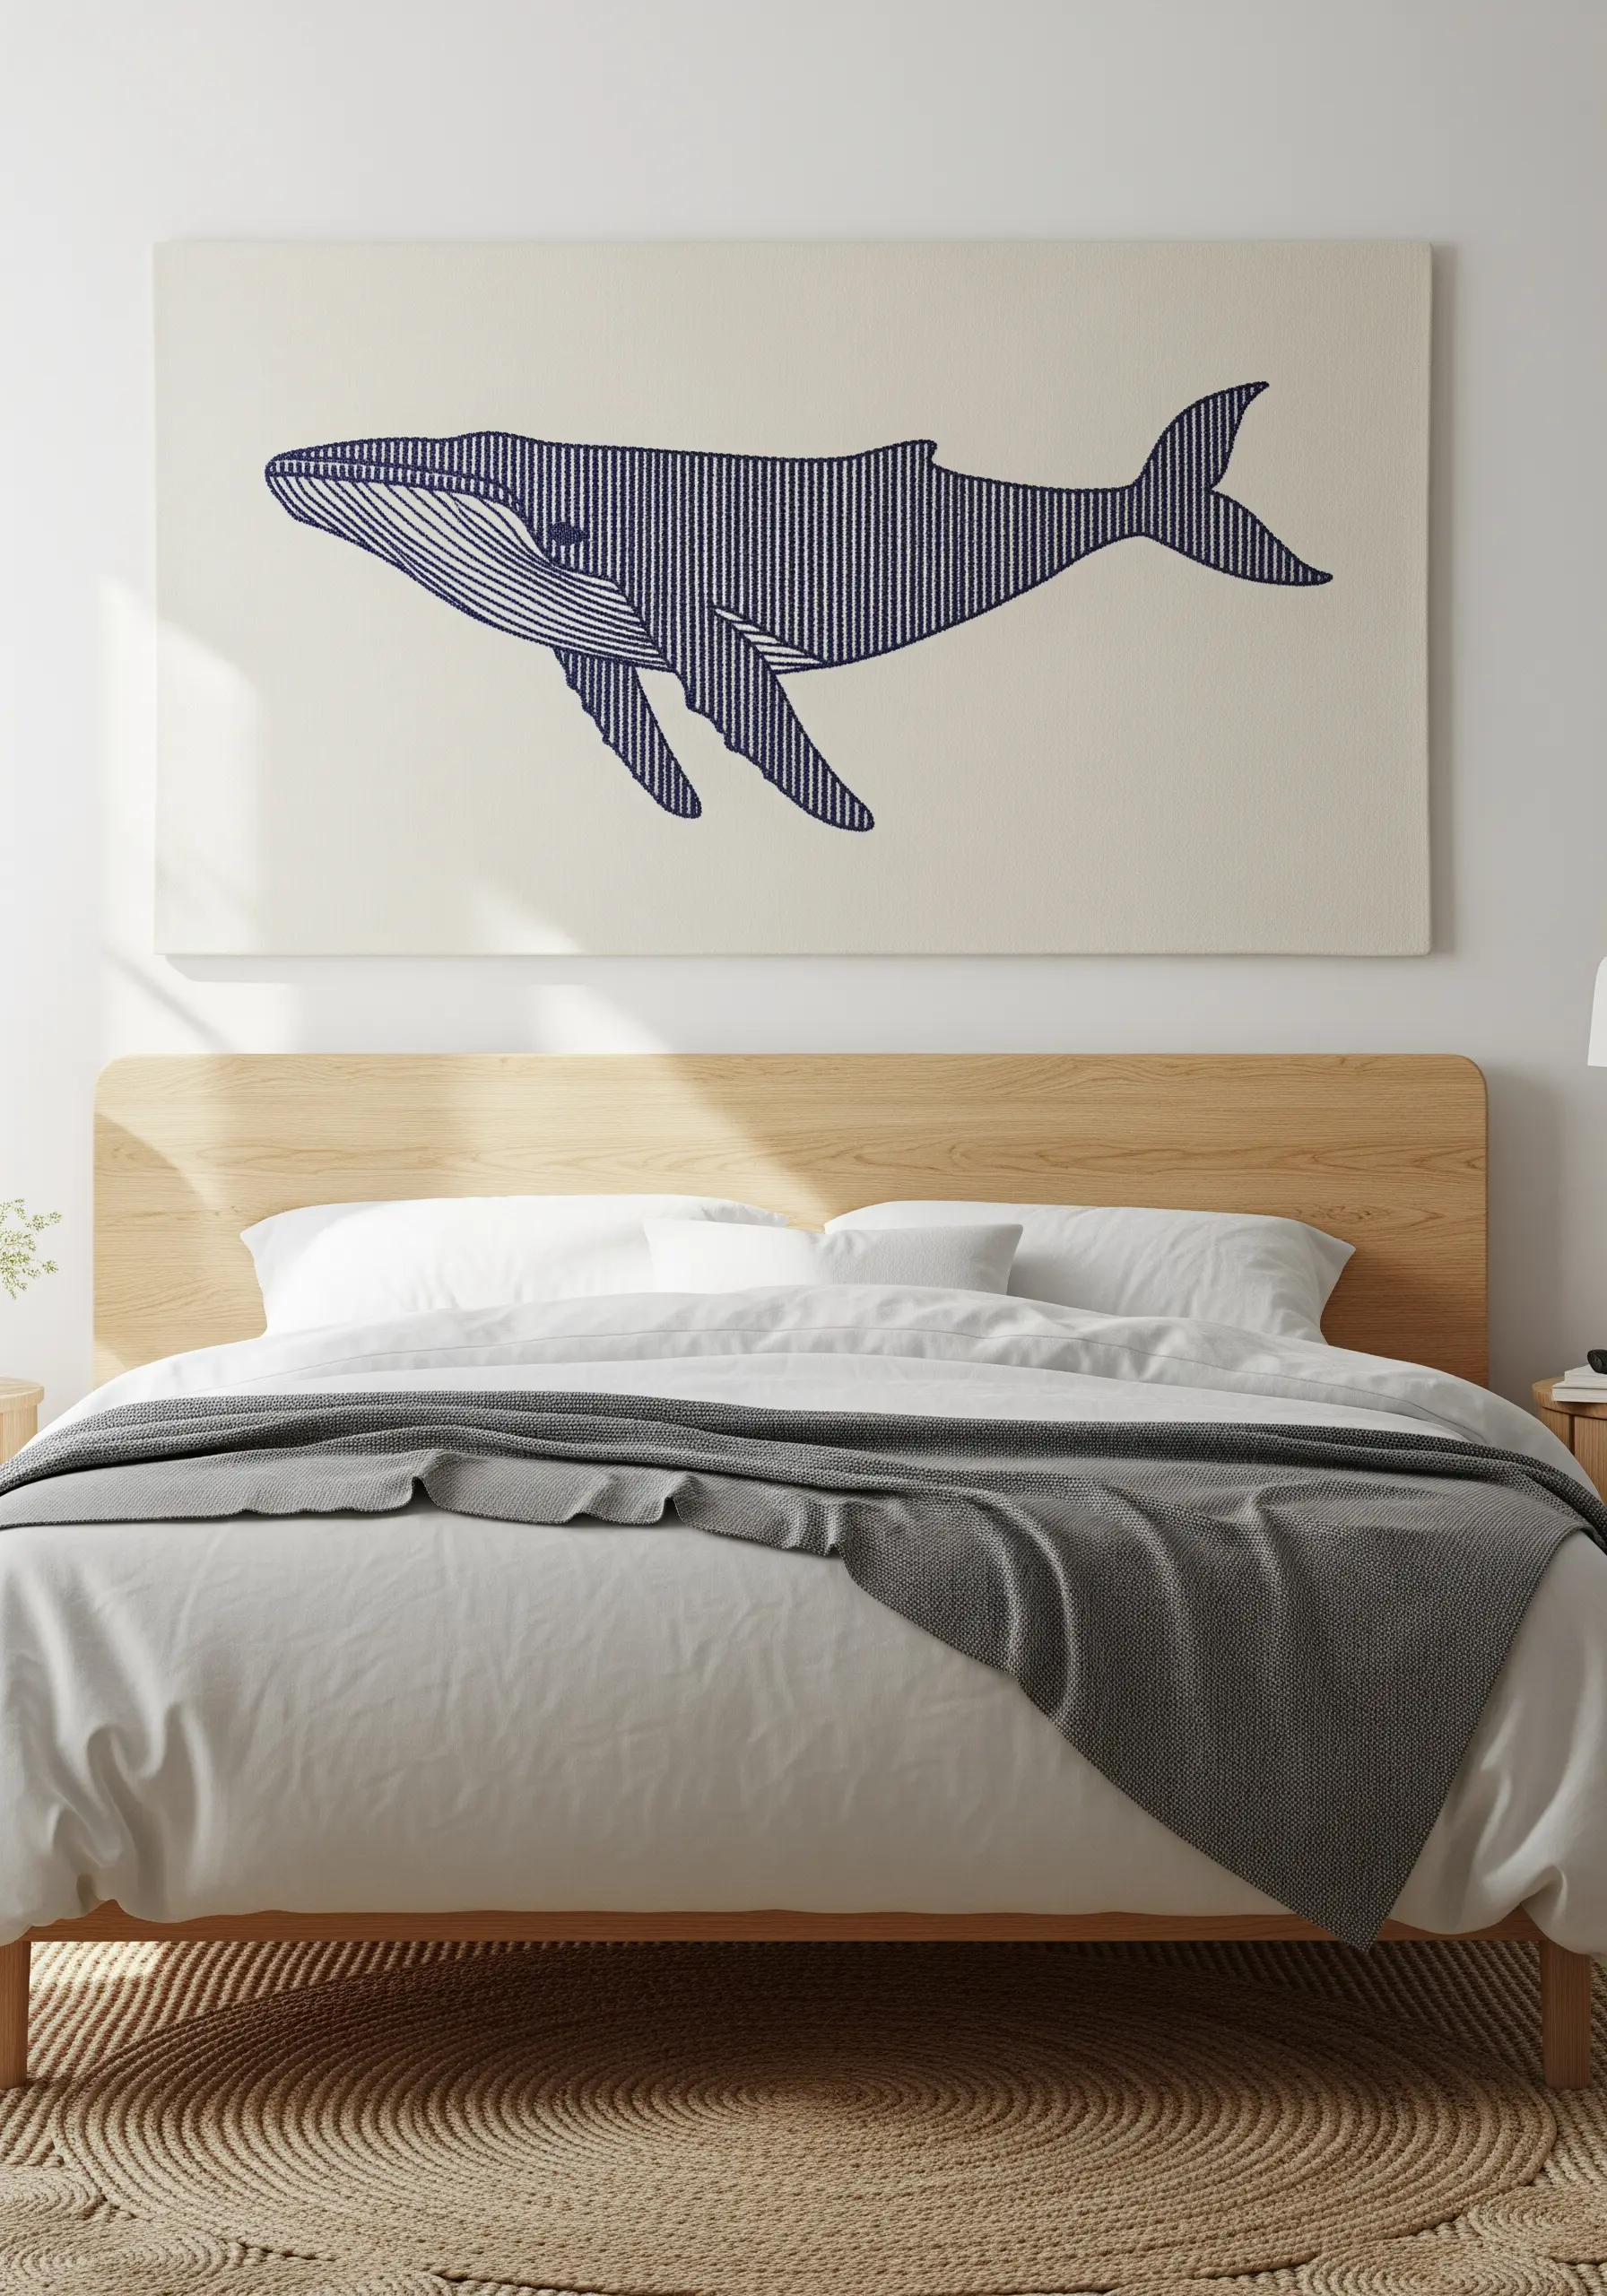
Create a powerful silhouette not by filling a shape, but by outlining its volume with methodical lines.
Use parallel vertical stitches—either running stitch or backstitch—to build the whale’s form, allowing the unstiched fabric to show through.
This technique relies on the brain’s ability to complete the shape, making the final piece feel light and graphic.
Use a single, bold thread color on a neutral, large-scale canvas for maximum visual impact, turning simple stitches into a minimalist statement.
6. Chart Your World with Stitched Details

Transform a printed fabric map into a personalized heirloom by embellishing it with tiny, embroidered details.
Rather than stitching every element, focus on adding small, colorful motifs like fish, whales, and octopuses to the oceans.
Use simple satin stitches for the bodies and a few straight stitches for tails and fins to keep the motifs clear and readable.
This project becomes a living document, allowing you to add more stitches over time to mark travels or memories.
7. Create a Flowing Composition with Hoop Art
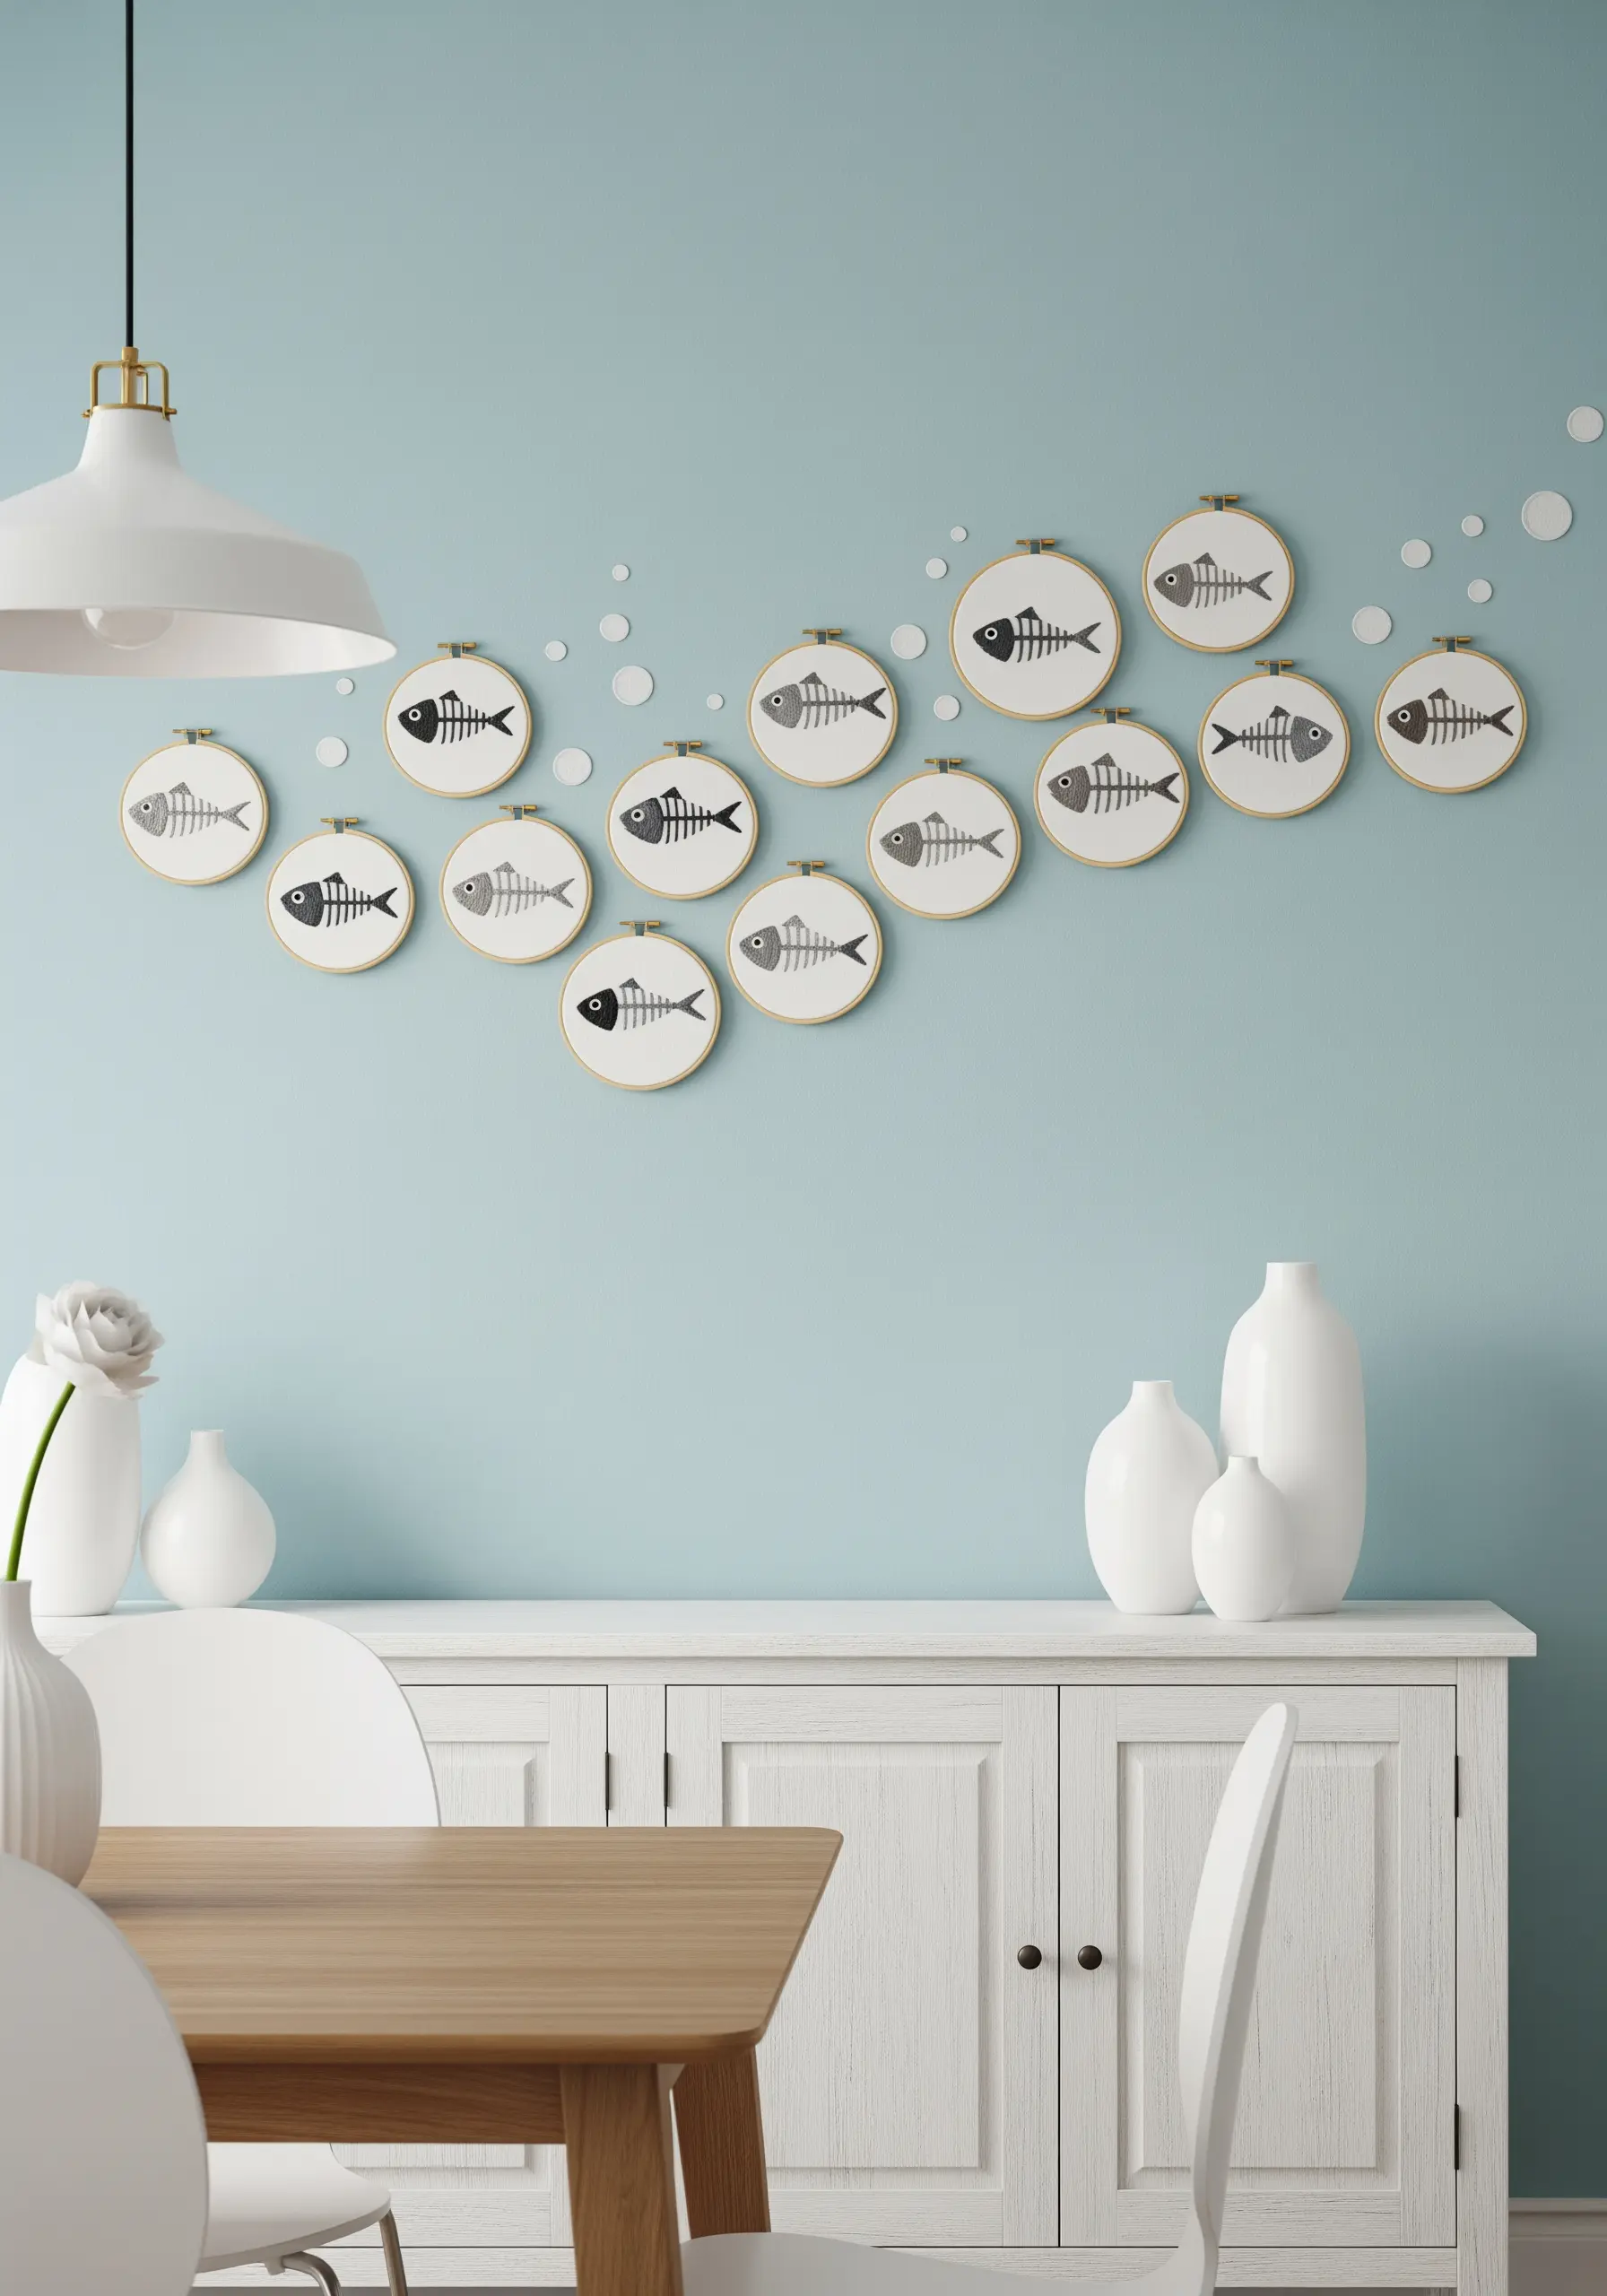
Use a collection of hoops to create the illusion of movement across a wall.
Arrange the hoops in a gentle, undulating curve to mimic a school of fish swimming through water.
The motifs are simple and graphic, so the arrangement is what brings the piece to life.
By varying the thread color from light grey to charcoal, you can add subtle depth and variation, making the composition feel more organic and alive.
8. Capture Underwater Forests with Flowing Stitches
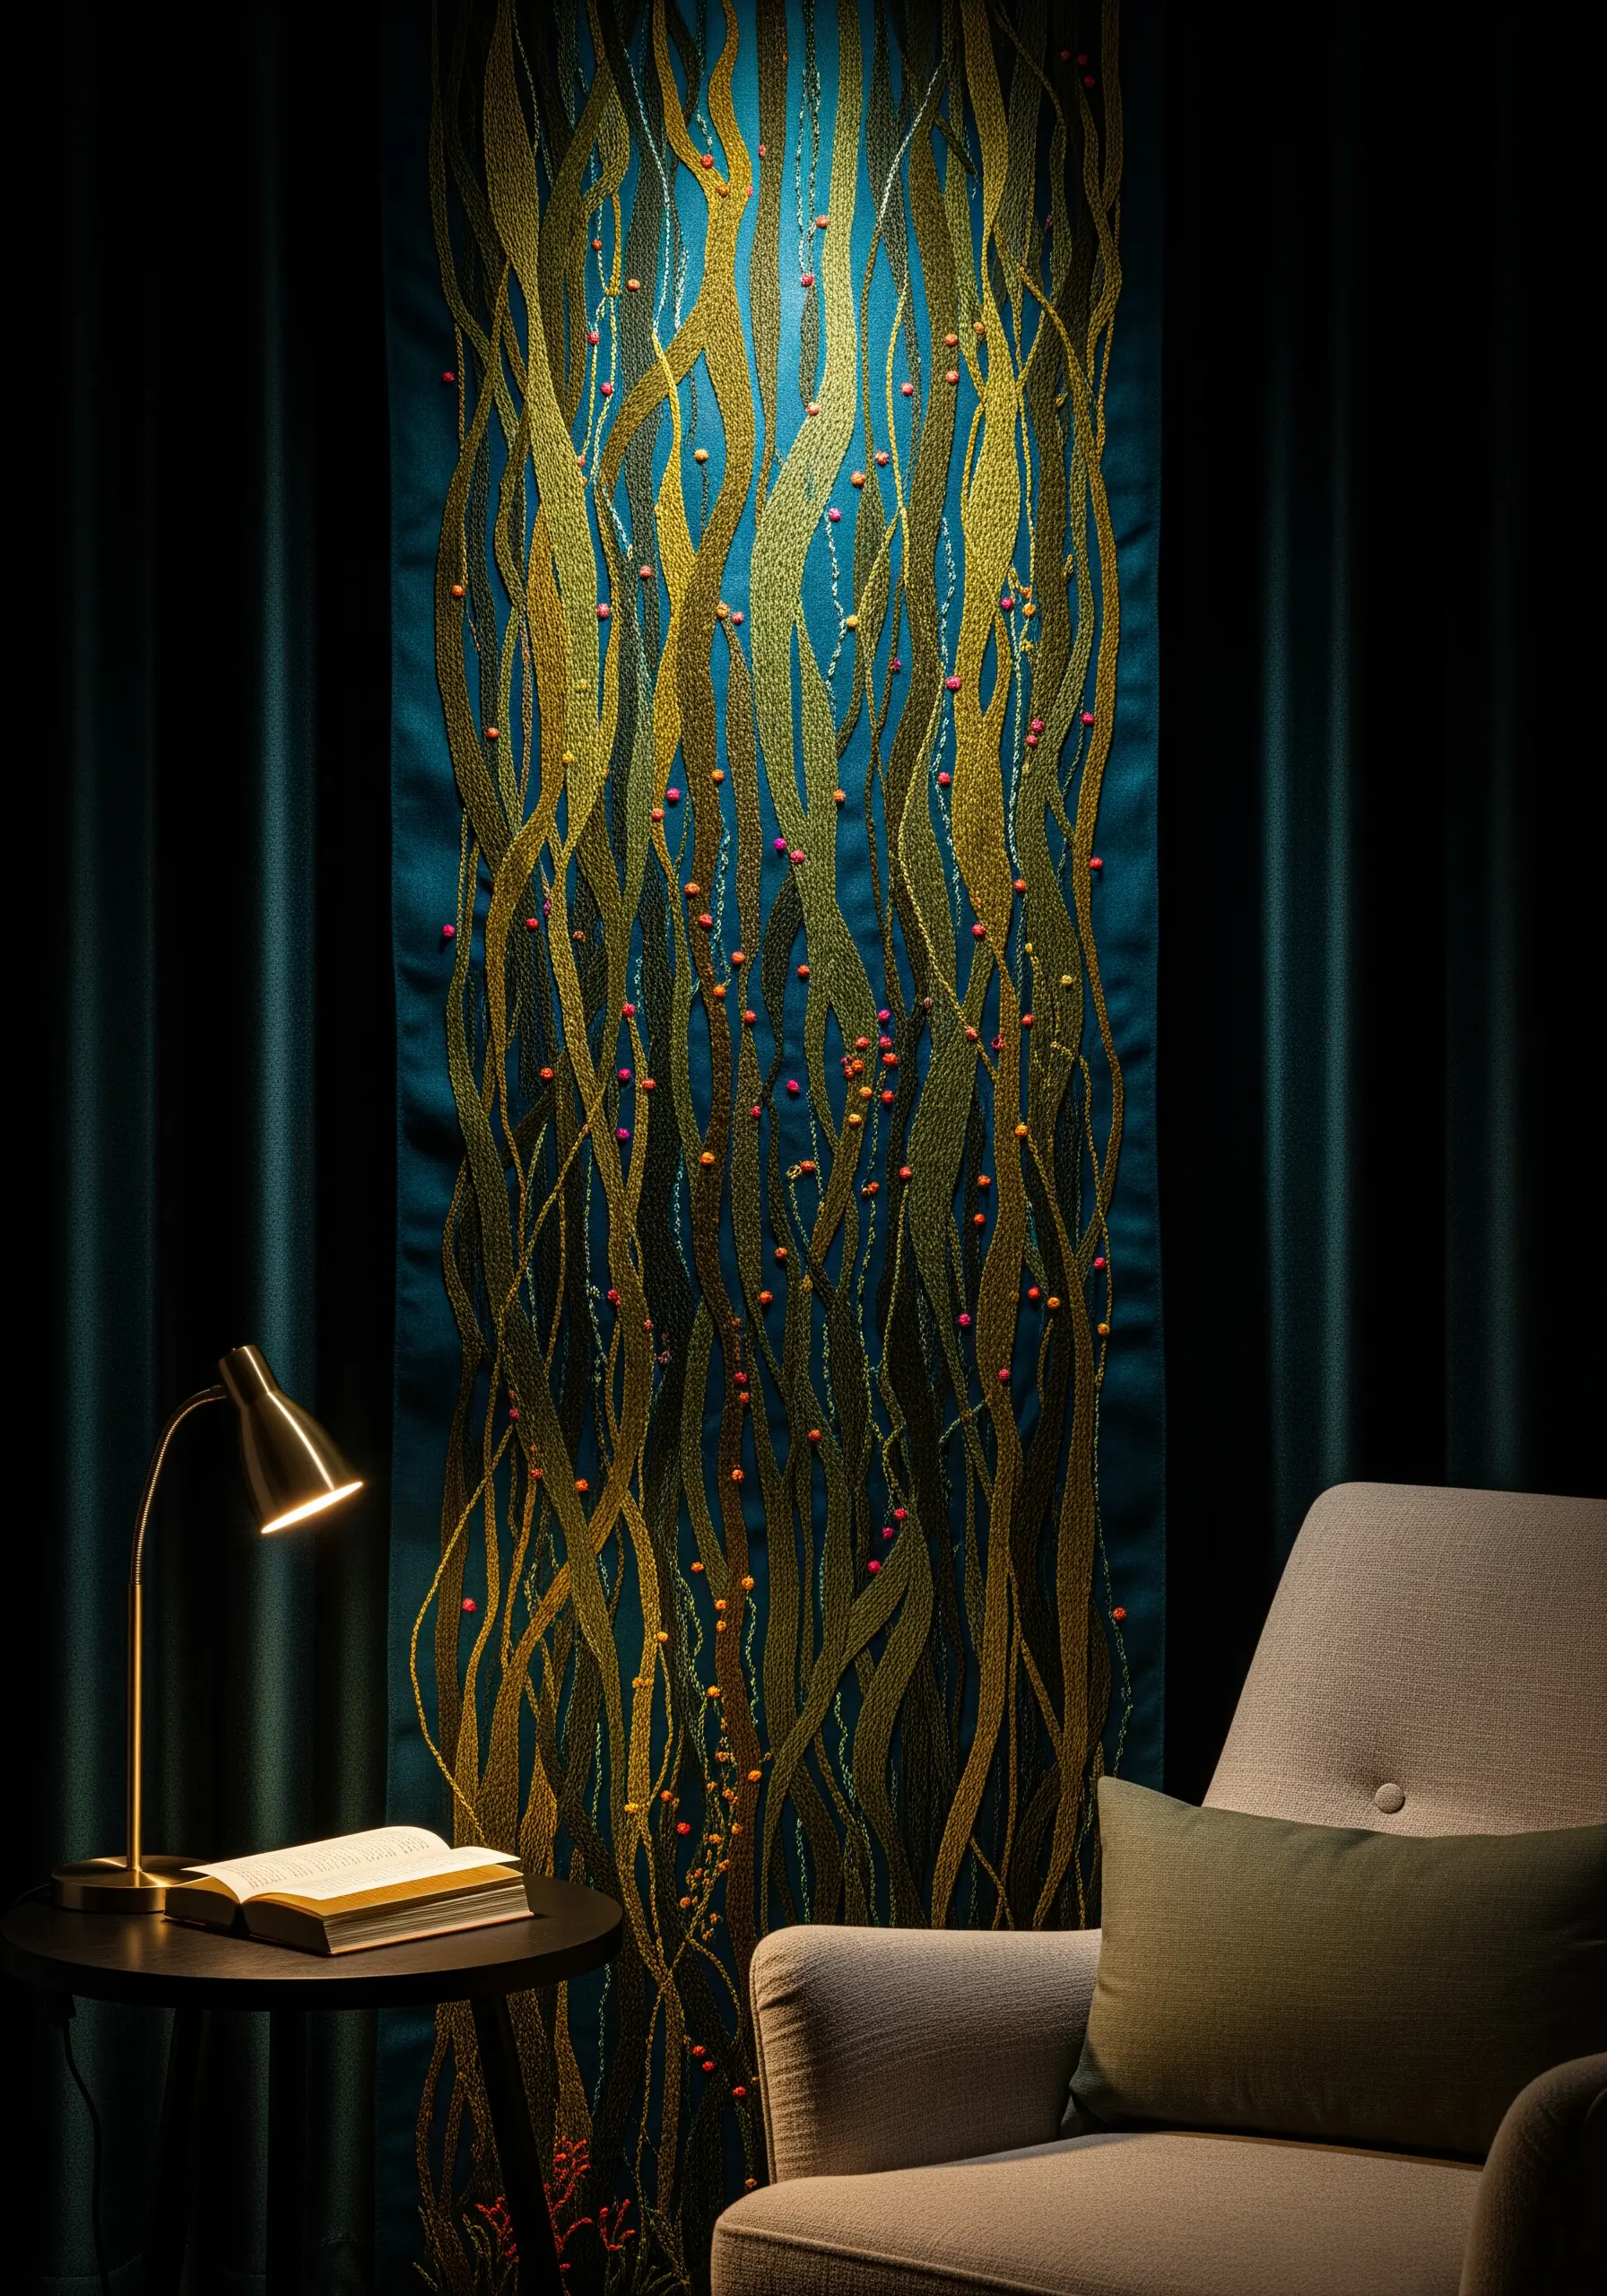
To evoke the graceful sway of seaweed, use long, vertical stitches that have a natural, gentle wave.
Stem stitch, split stitch, and whipped backstitch are perfect for creating these flowing lines.
Vary the weight of your thread (from two to six strands) and blend similar colors like gold, olive, and ochre to create the illusion of depth and light filtering through water.
The small pops of color from French knots or beads suggest marine life without being too literal, adding a final layer of delicate detail.
9. Render Detail with High-Contrast Thread Painting
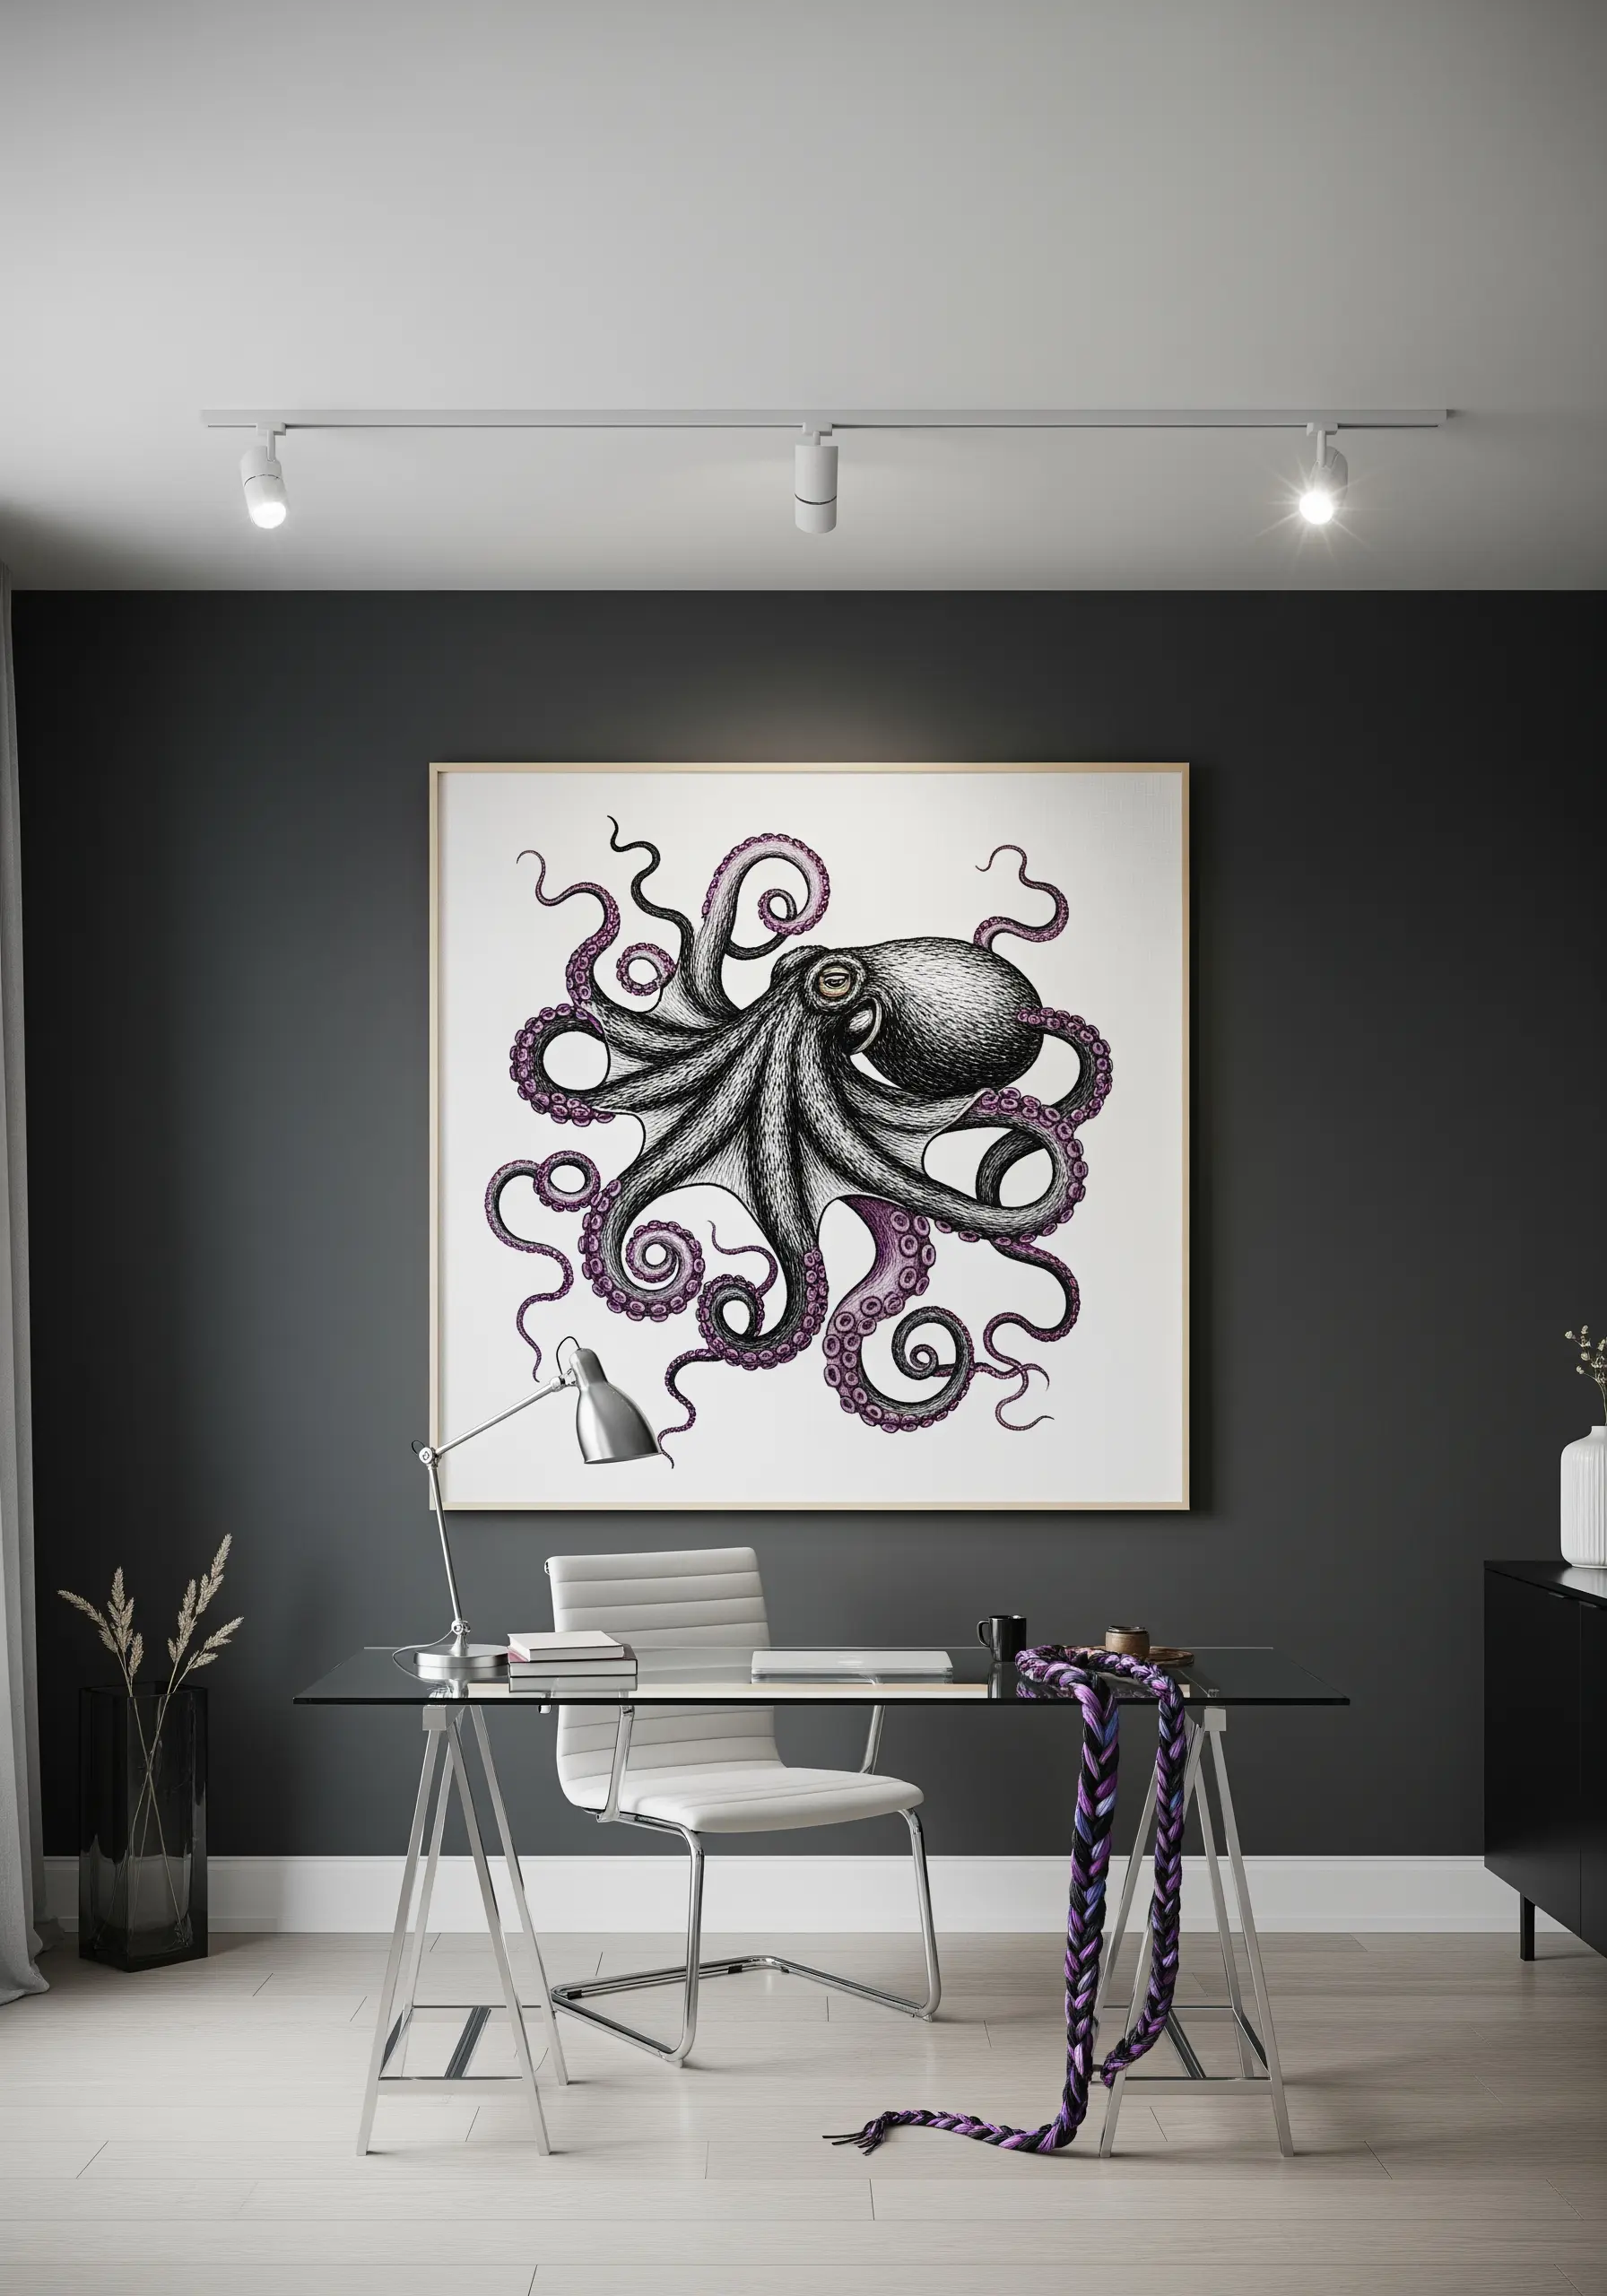
Treat your needle like a fine-tipped ink pen by using a single strand of black floss to create intricate details.
Use fine lines, cross-hatching, and stippling with tiny seed stitches to build shadows and textures on the octopus’s body.
This illustrative style gains immense power when paired with a single, unexpected pop of color for the tentacles.
Stitching on a crisp, bright white fabric ensures that every single detailed stitch stands out with graphic clarity.
10. Paint a Sunset Sky with Thread Gradients
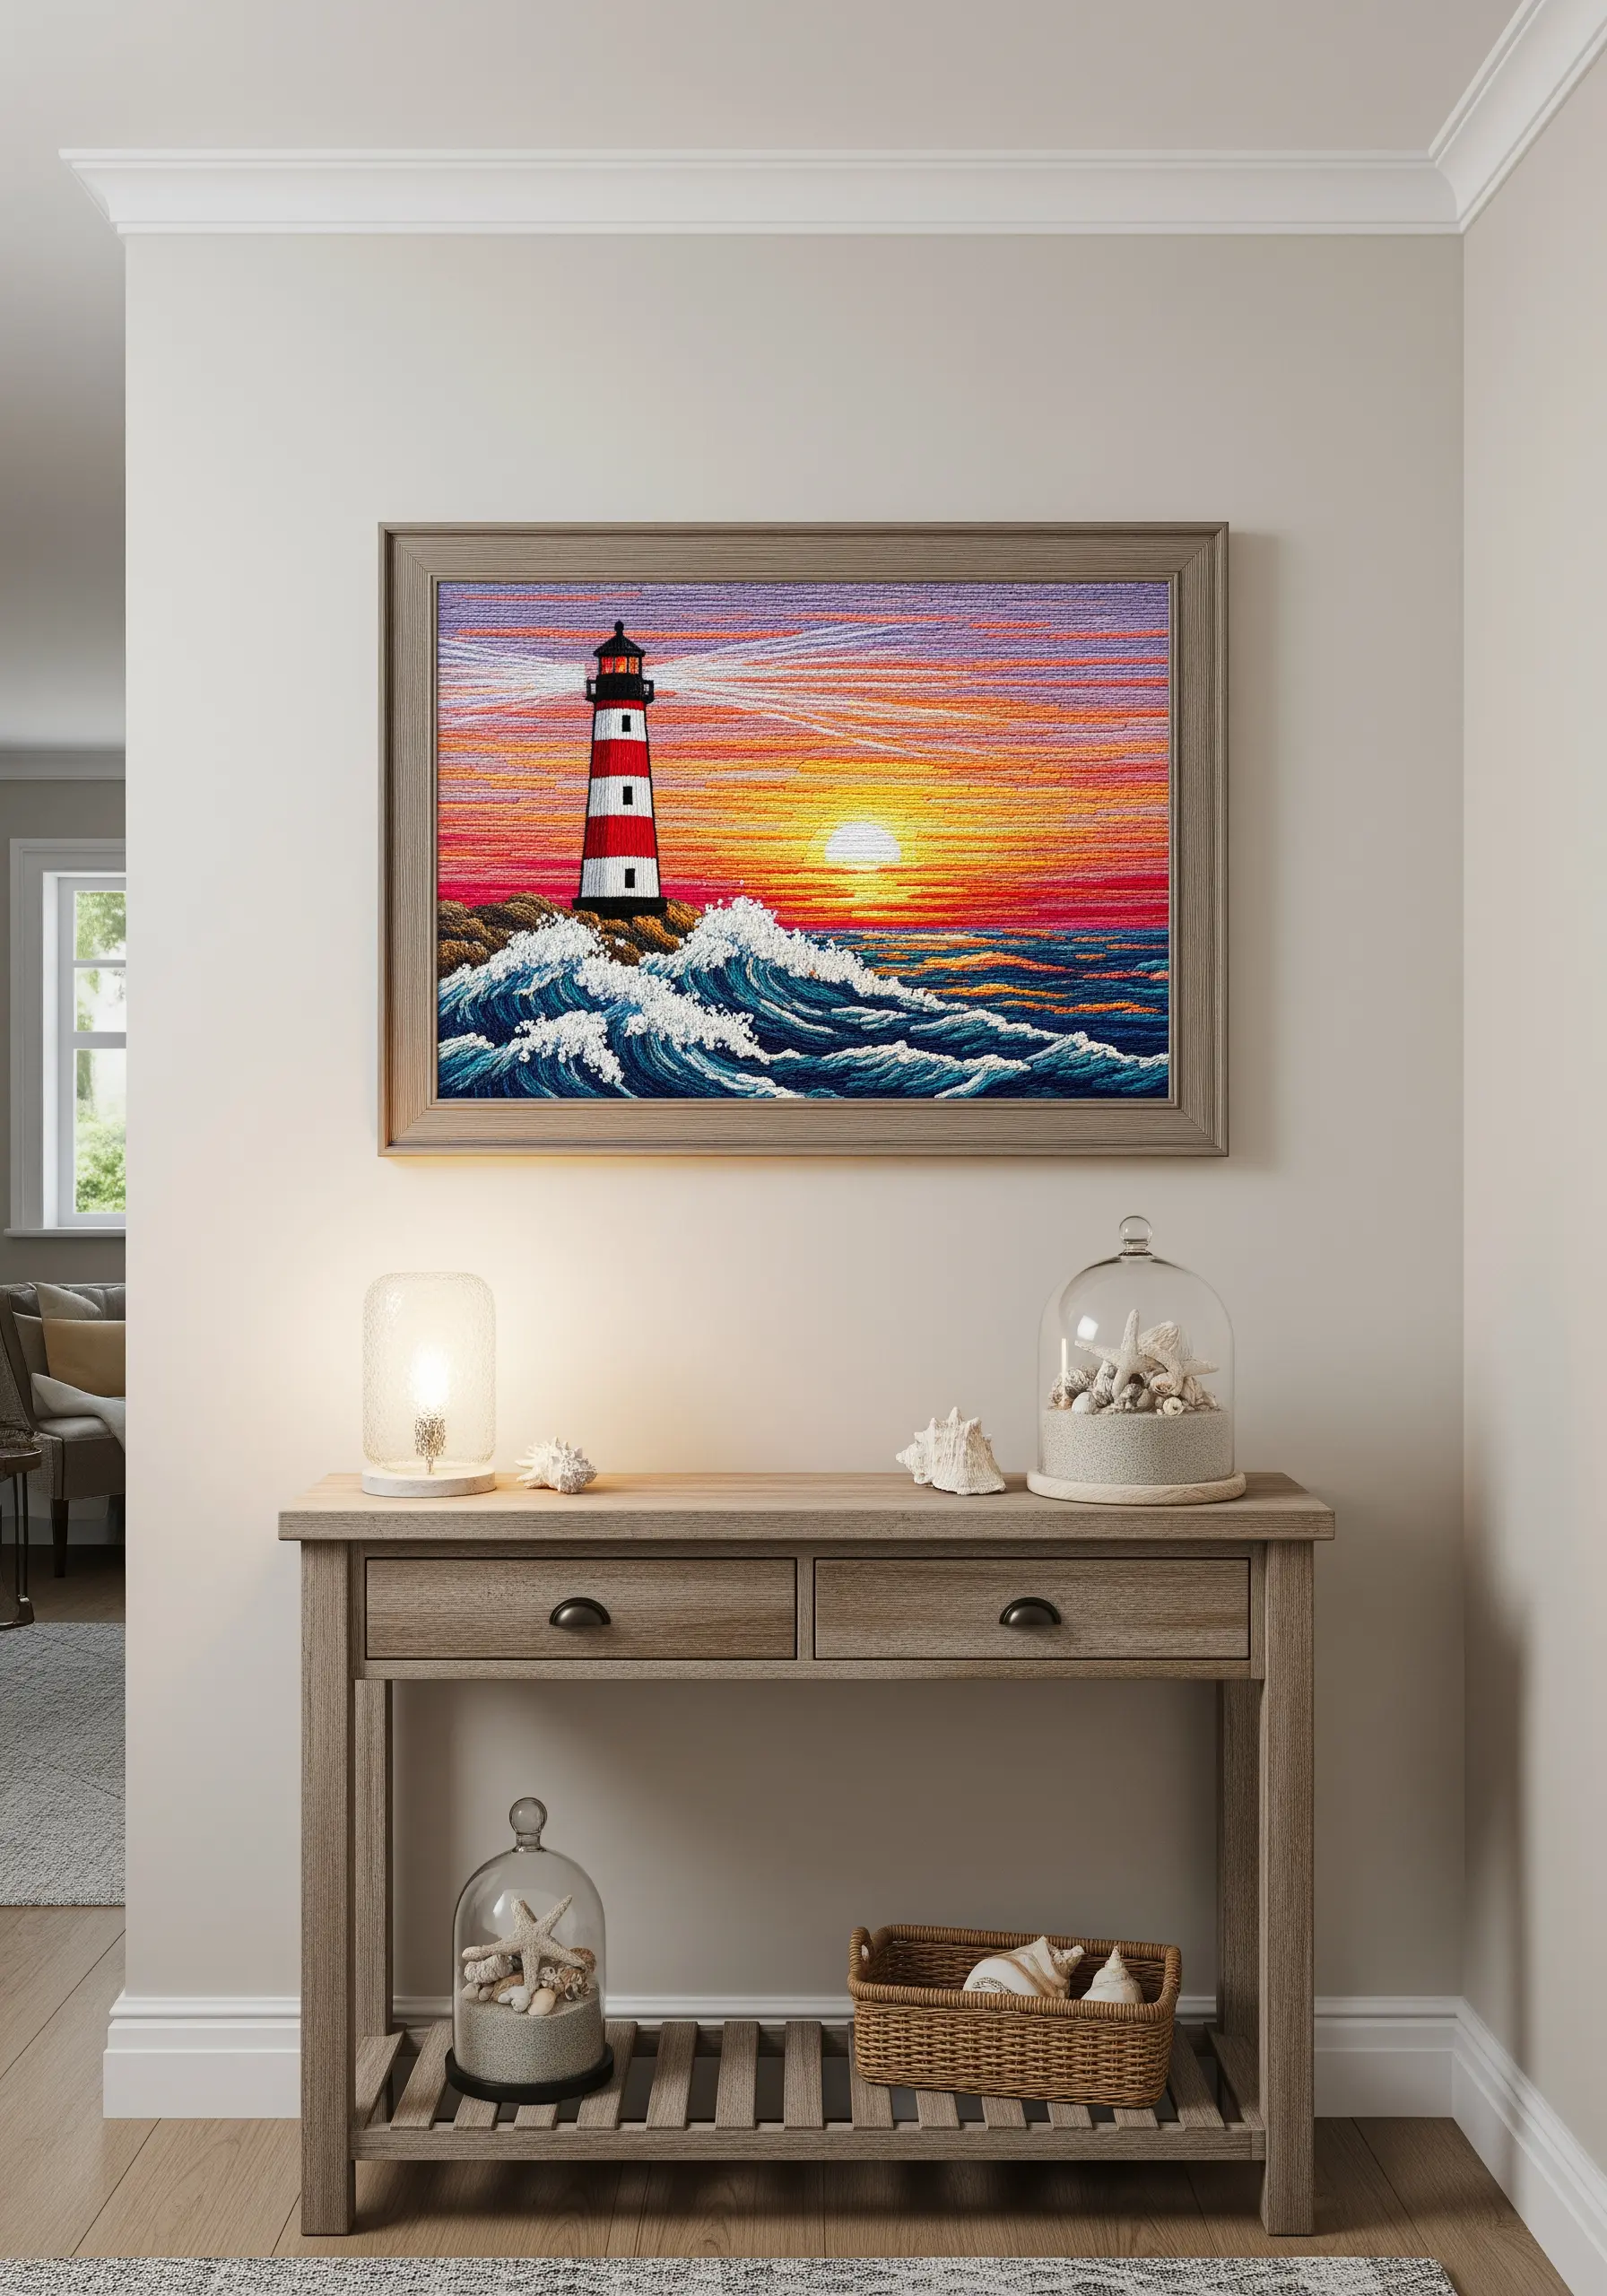
To achieve a painterly effect, use long-and-short stitch to seamlessly blend a wide spectrum of colors.
For a sunset, map out your color zones first, then work from lightest (yellow) to darkest (purple), overlapping your stitch sections to create a soft, natural gradient.
Always angle your stitches toward the light source—in this case, radiating outward from the sun—to enhance the sense of luminosity.
This technique requires patience, but it transforms your thread into paint, allowing for incredible depth and realism.
11. Achieve Realism with Subtle Shading
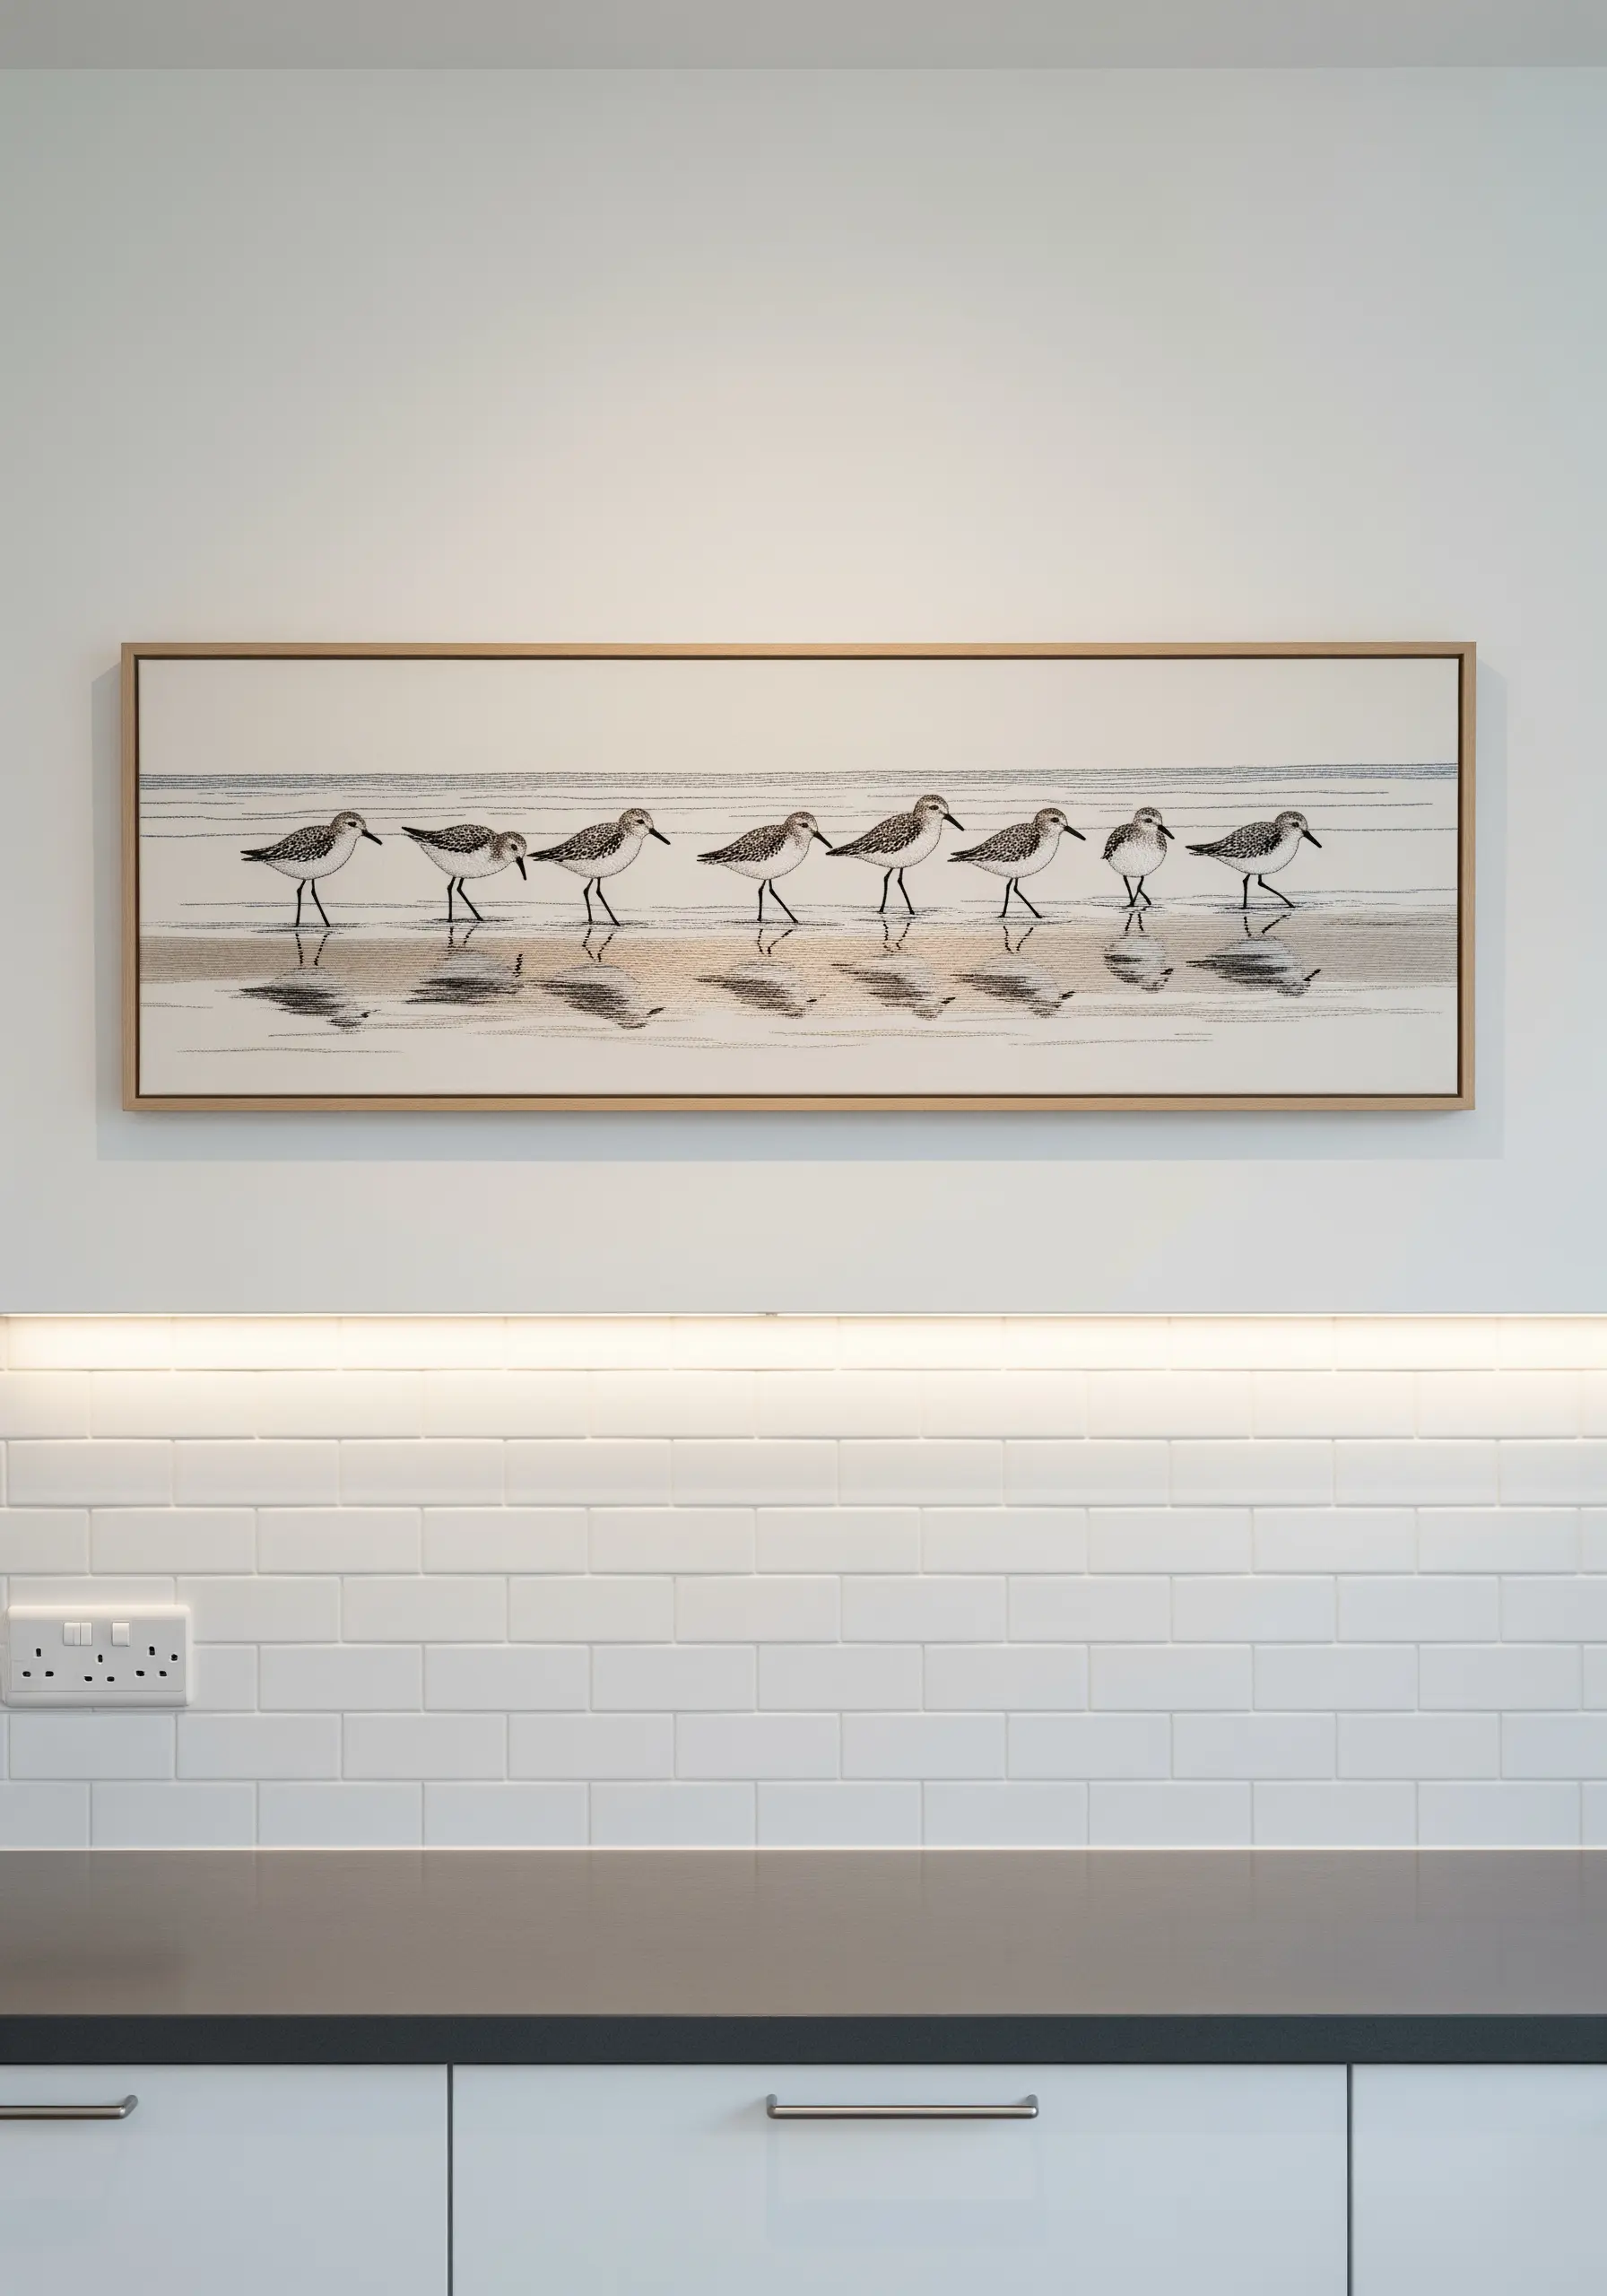
Photorealism in embroidery is less about stitch type and more about precise color choice and placement.
Work from a reference photo and use single-strand floss in closely related shades of grey, taupe, and white to build the birds’ forms.
Place tiny, directional seed stitches to mimic the texture of feathers and capture how light hits the body.
The reflection in the sand is crucial; create it with sparse, horizontal stitches in a slightly darker tone than the bird itself.
12. Stitch Ethereal Forms with Translucent Threads
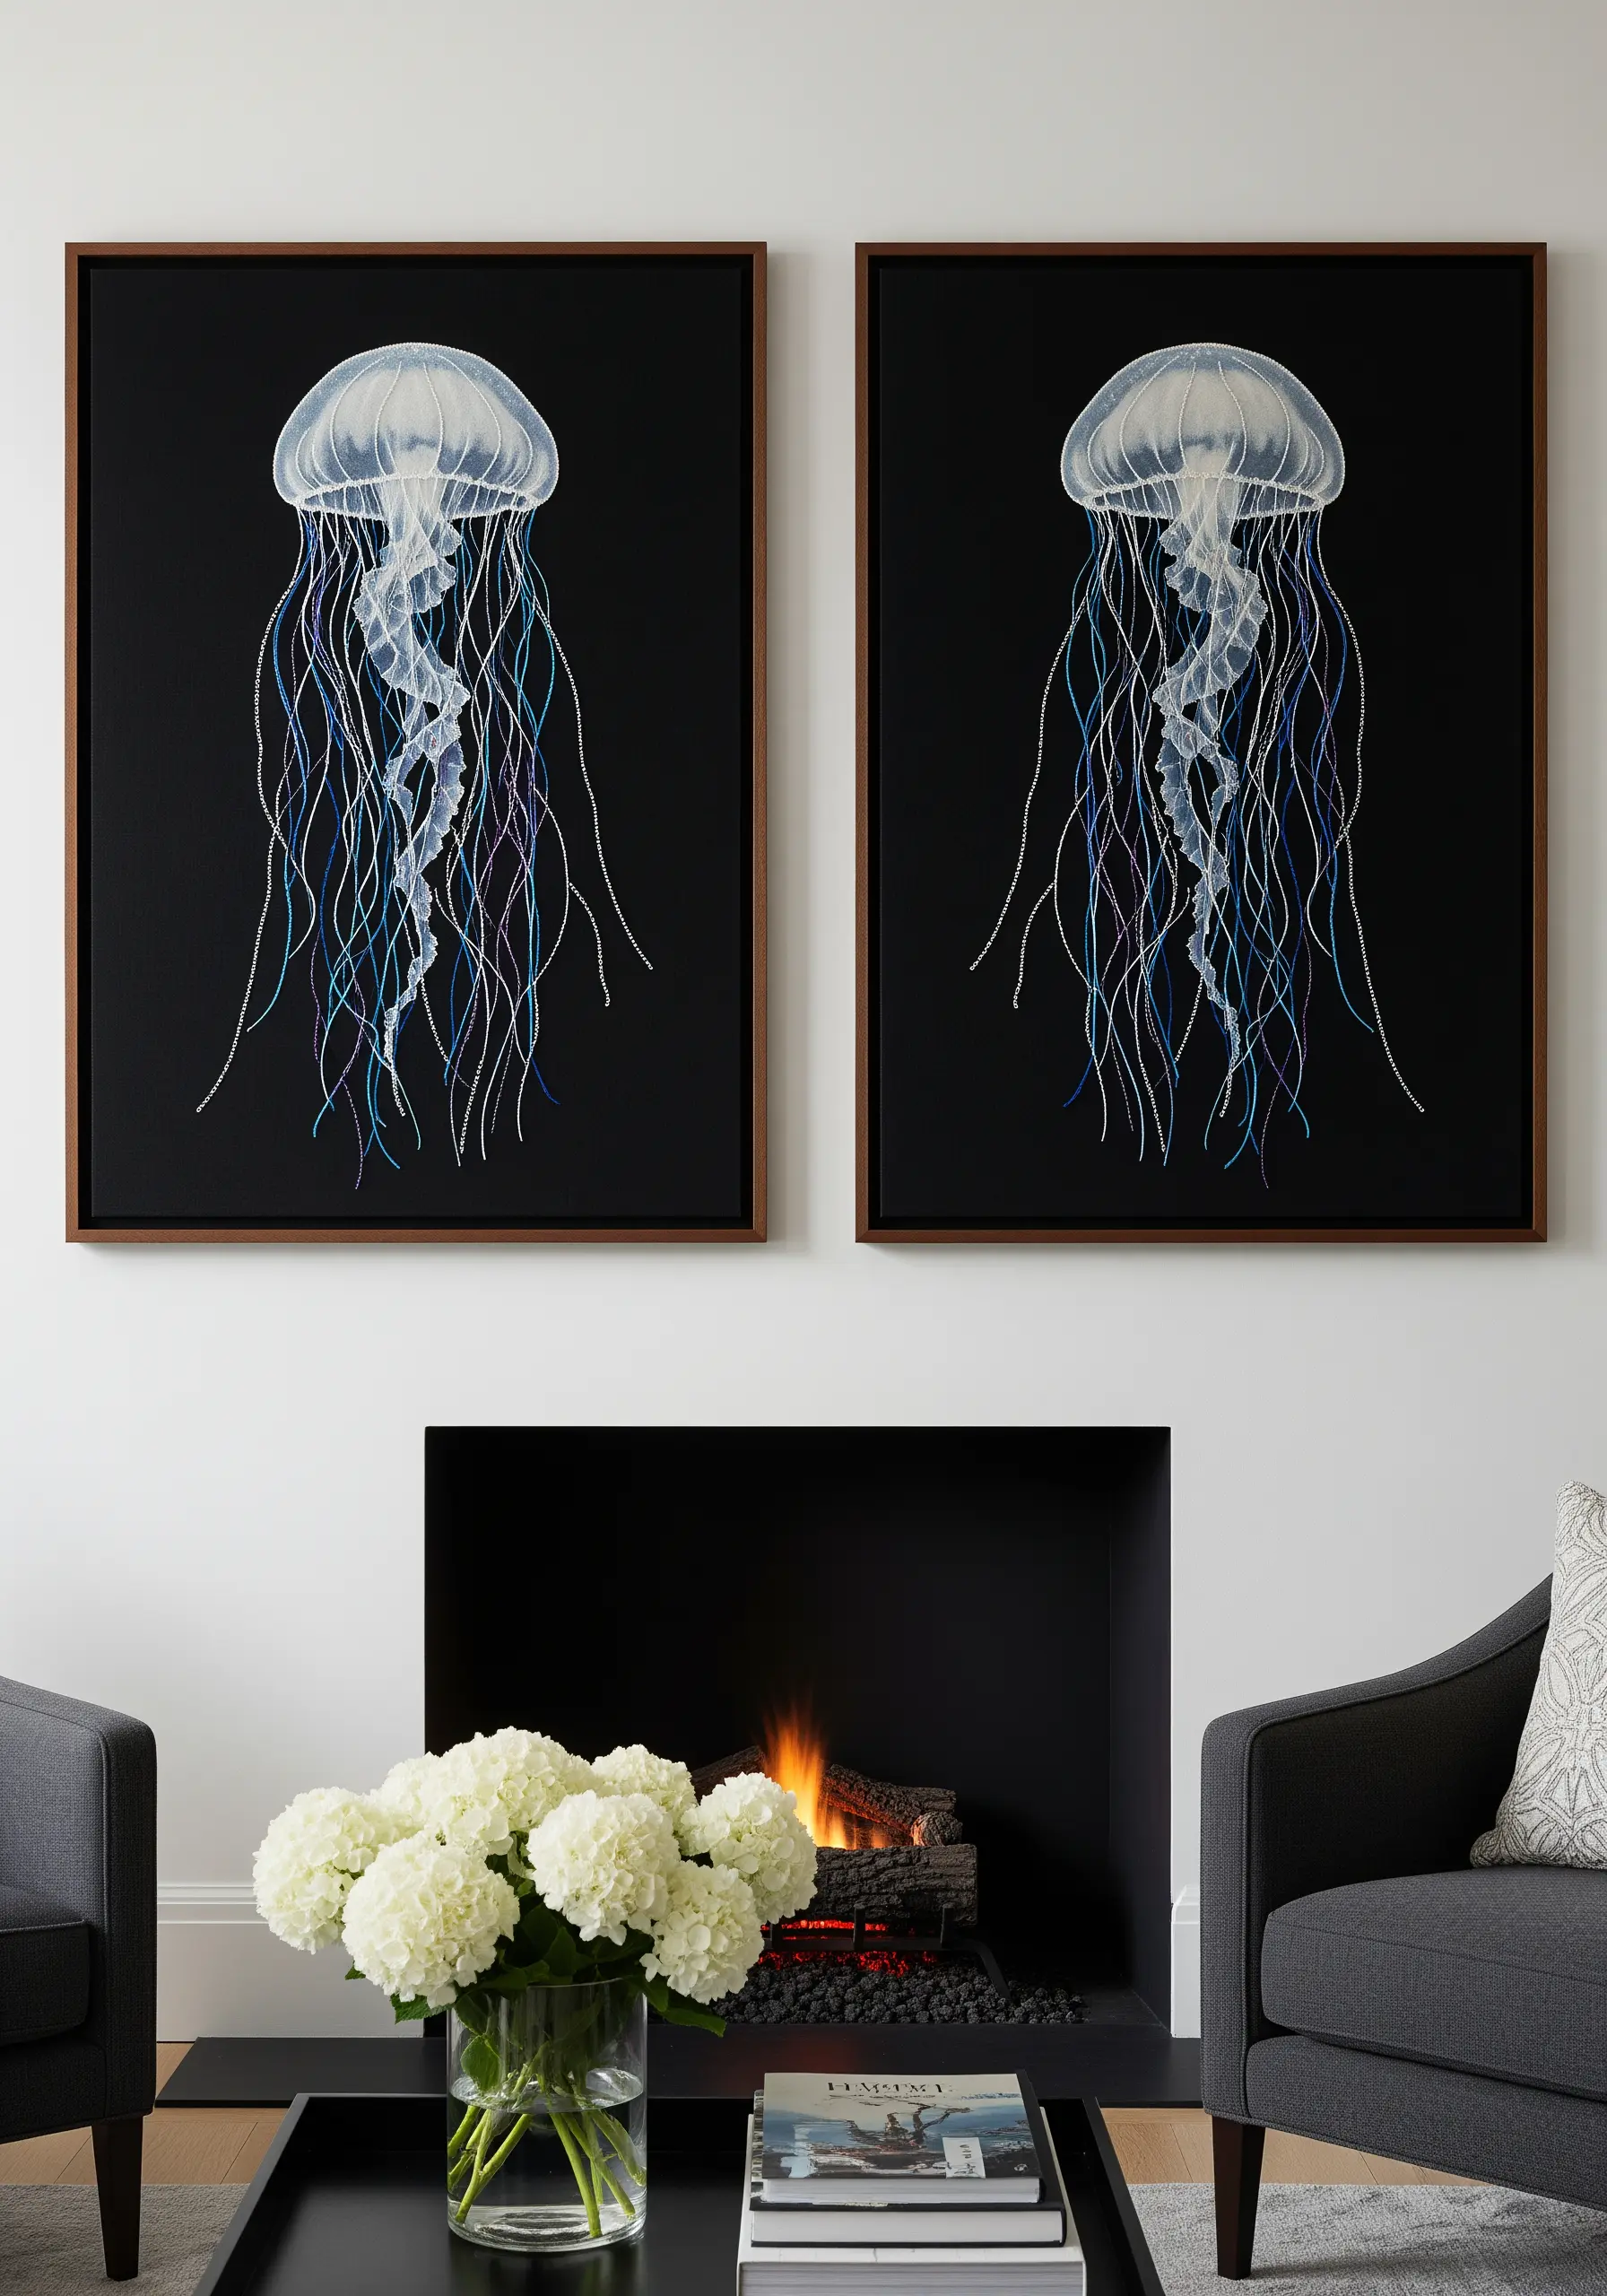
To capture the ghost-like quality of a jellyfish, work on a dark, high-contrast background like black cotton or linen.
Use specialty threads: a single strand of white for the body, and long, trailing stitches of iridescent and fine metallic threads for the tentacles.
Don’t pull your tentacle stitches too tight; allow them a little slack so they can catch the light and create a sense of floating, fluid movement.
This is a perfect example of how material choice can define the entire mood of a piece.
13. Build a Landscape with Layered Textural Stitches
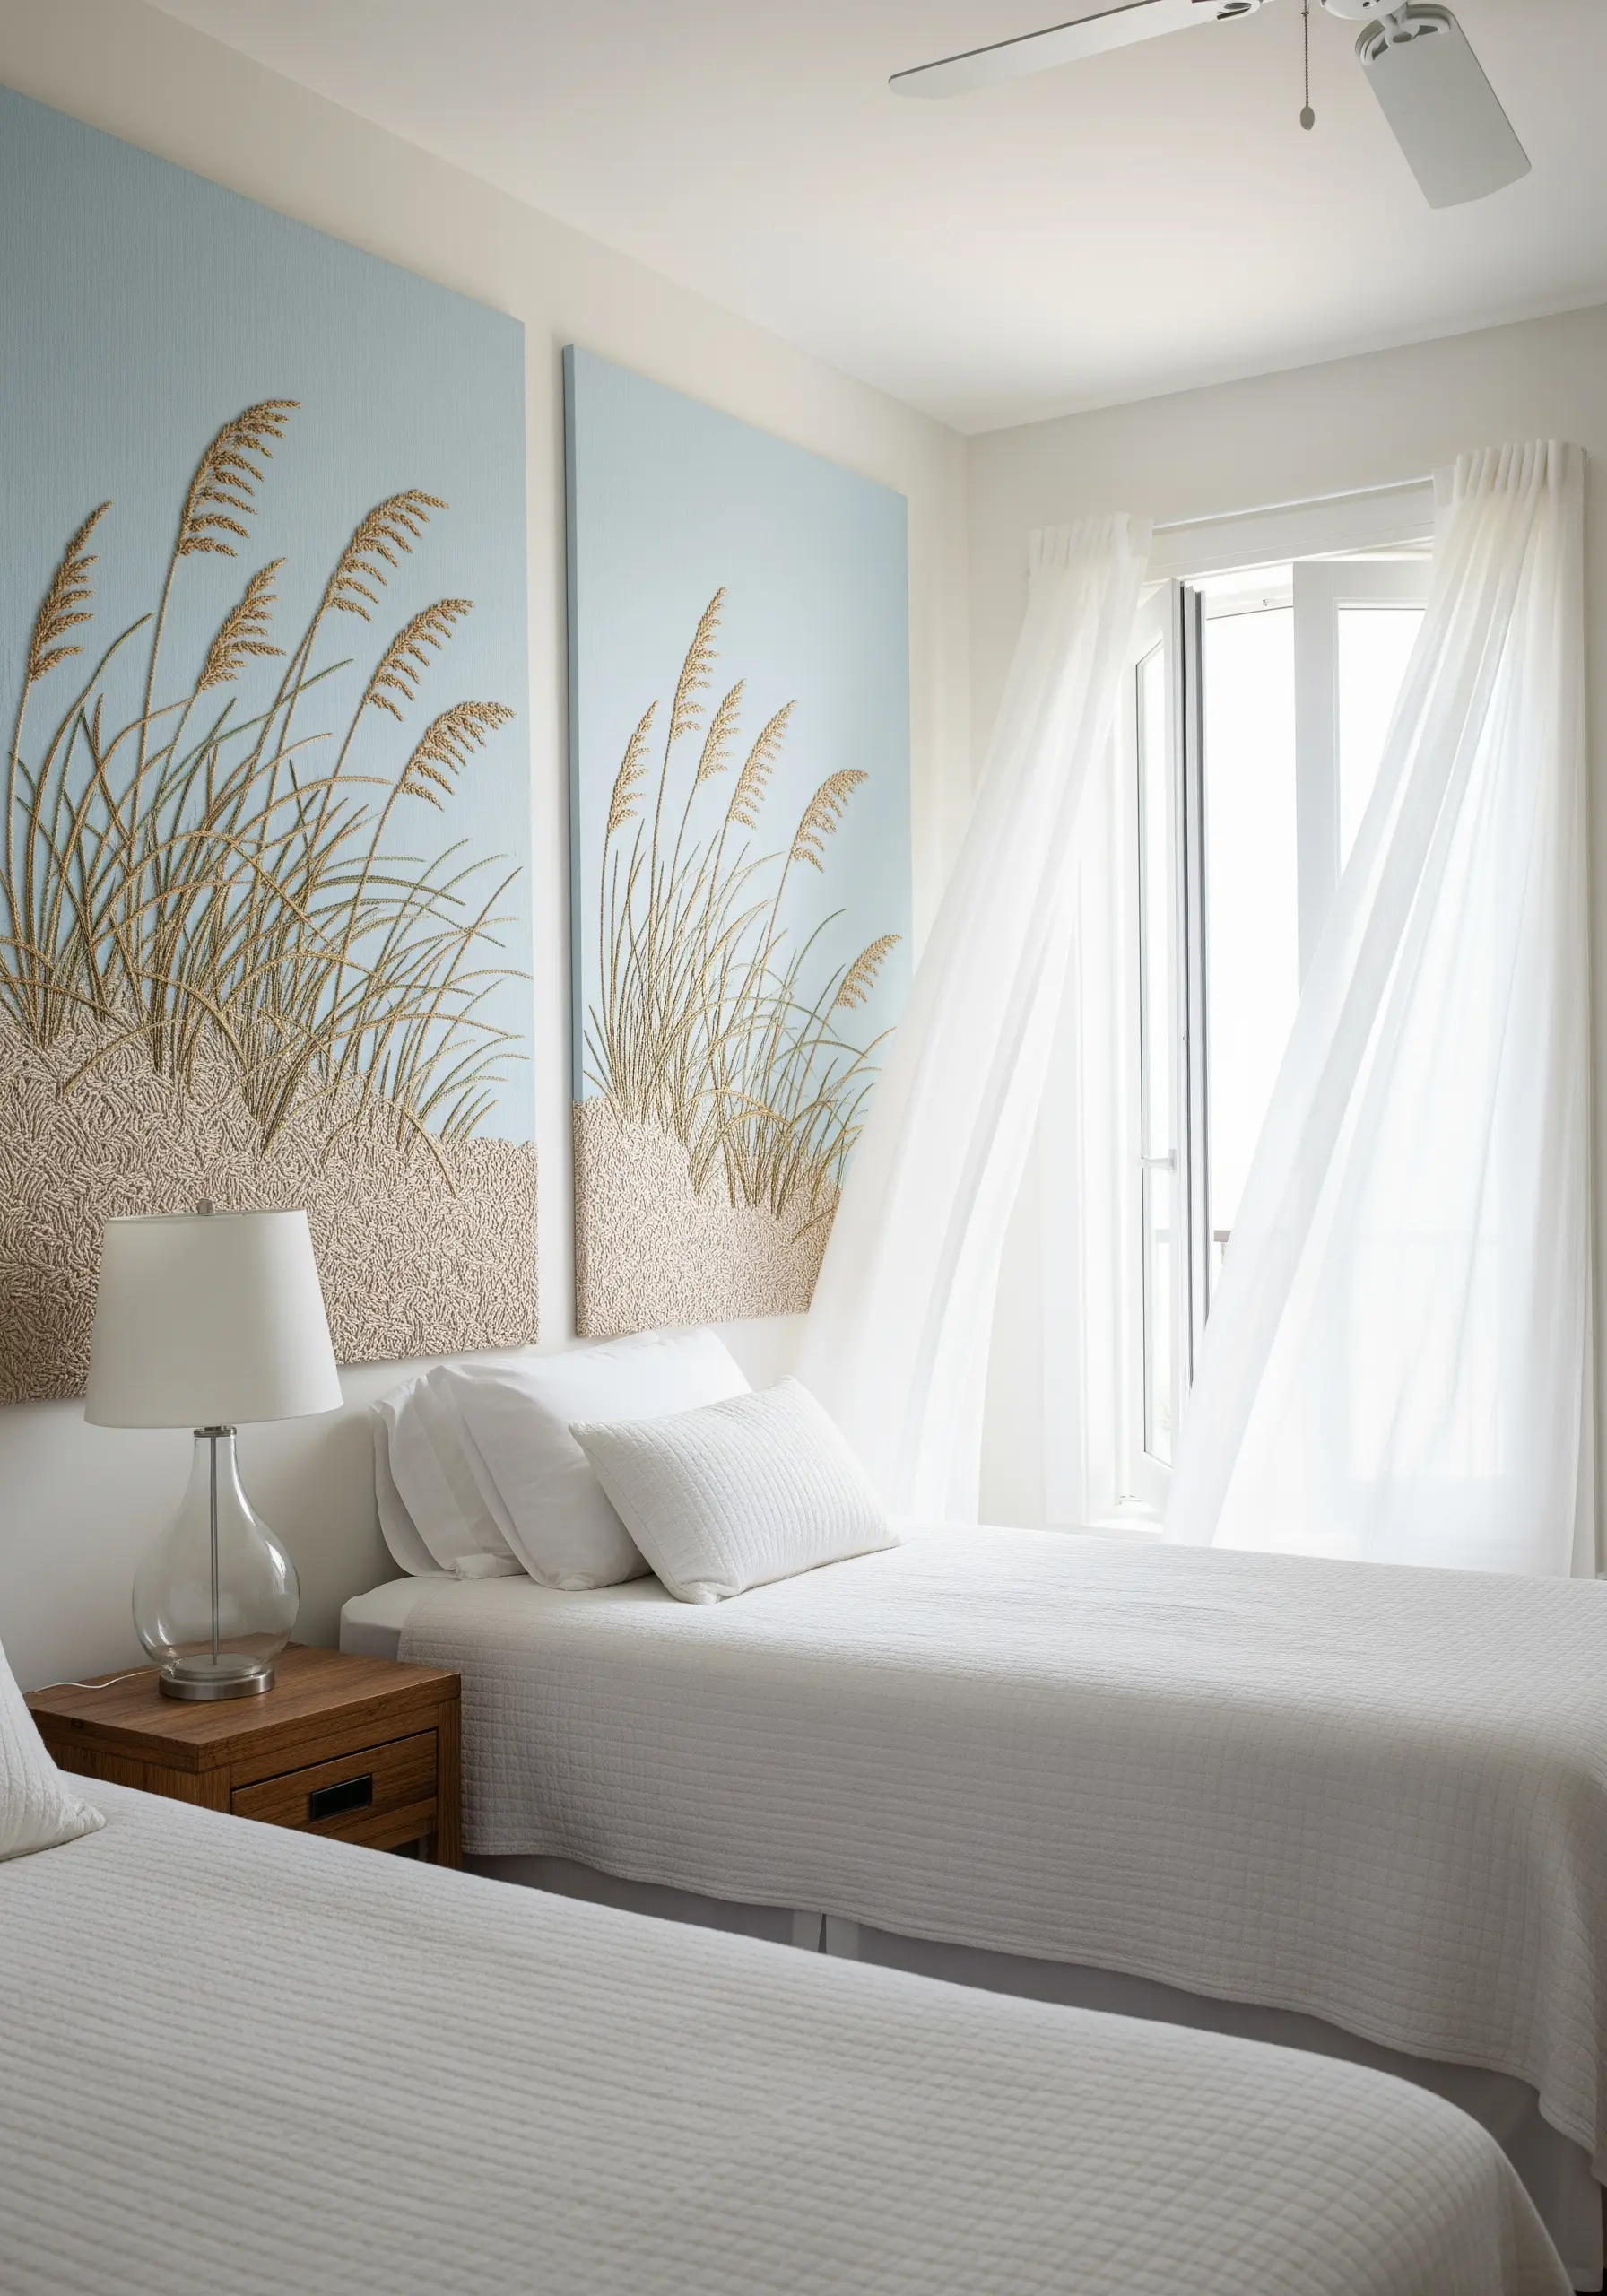
Create a tangible sense of a sandy dune by building texture in layers.
For the foreground sand, use a dense field of French knots or colonial knots in various shades of beige and cream to create a bumpy, uneven surface.
Stitch the sea oats over the top using stem stitch for the stalks and long, fanned-out straight stitches for the plumes.
By physically layering your stitches, you create natural depth and shadow, making the scene feel immersive.
14. Assemble a Tide Pool Mobile from Stitched Hoops
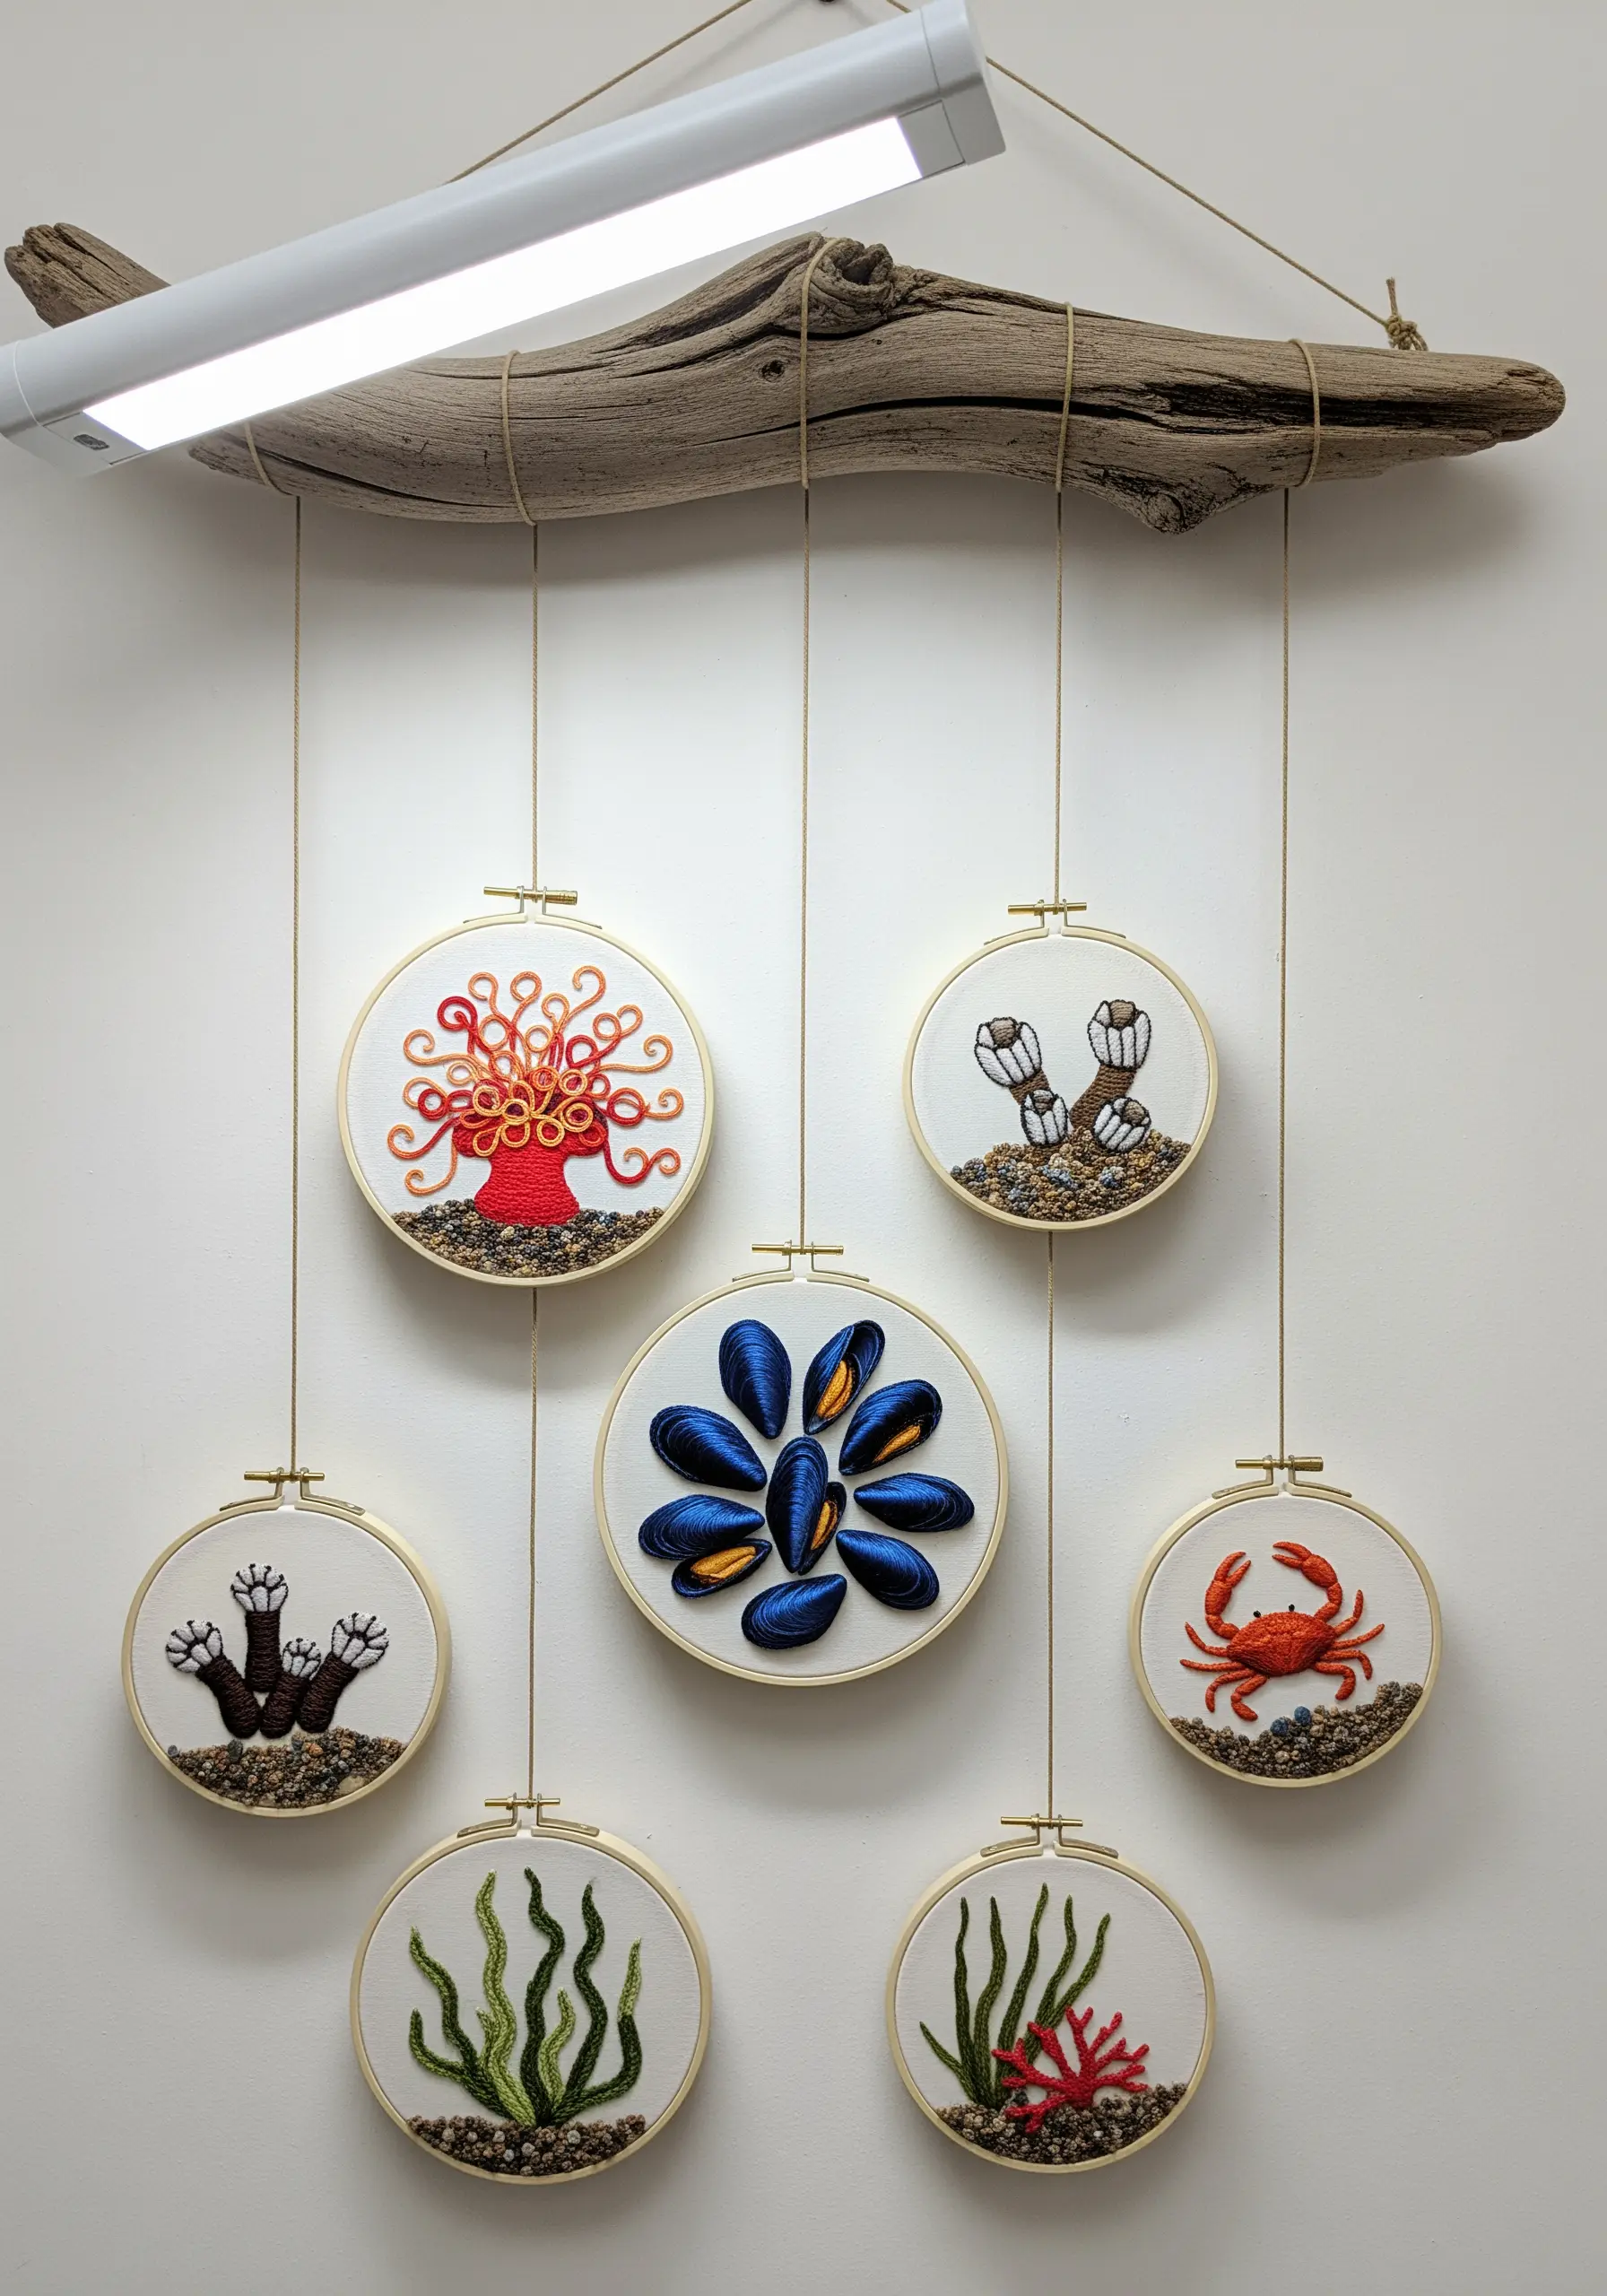
This project is about combining small, finished embroideries into a larger, kinetic sculpture.
Incorporate 3D elements for a more dynamic result. The mussels can be created using stumpwork: stitch them on a separate piece of fabric, pad them from behind, and then apply the raised shape to your main hoop.
Use real pebbles or sand fixed with PVA glue for the bases to add authentic texture.
Hang the finished hoops at varying lengths from a piece of driftwood to create balance and movement.
15. Amplify Detail with High-Contrast Velvet
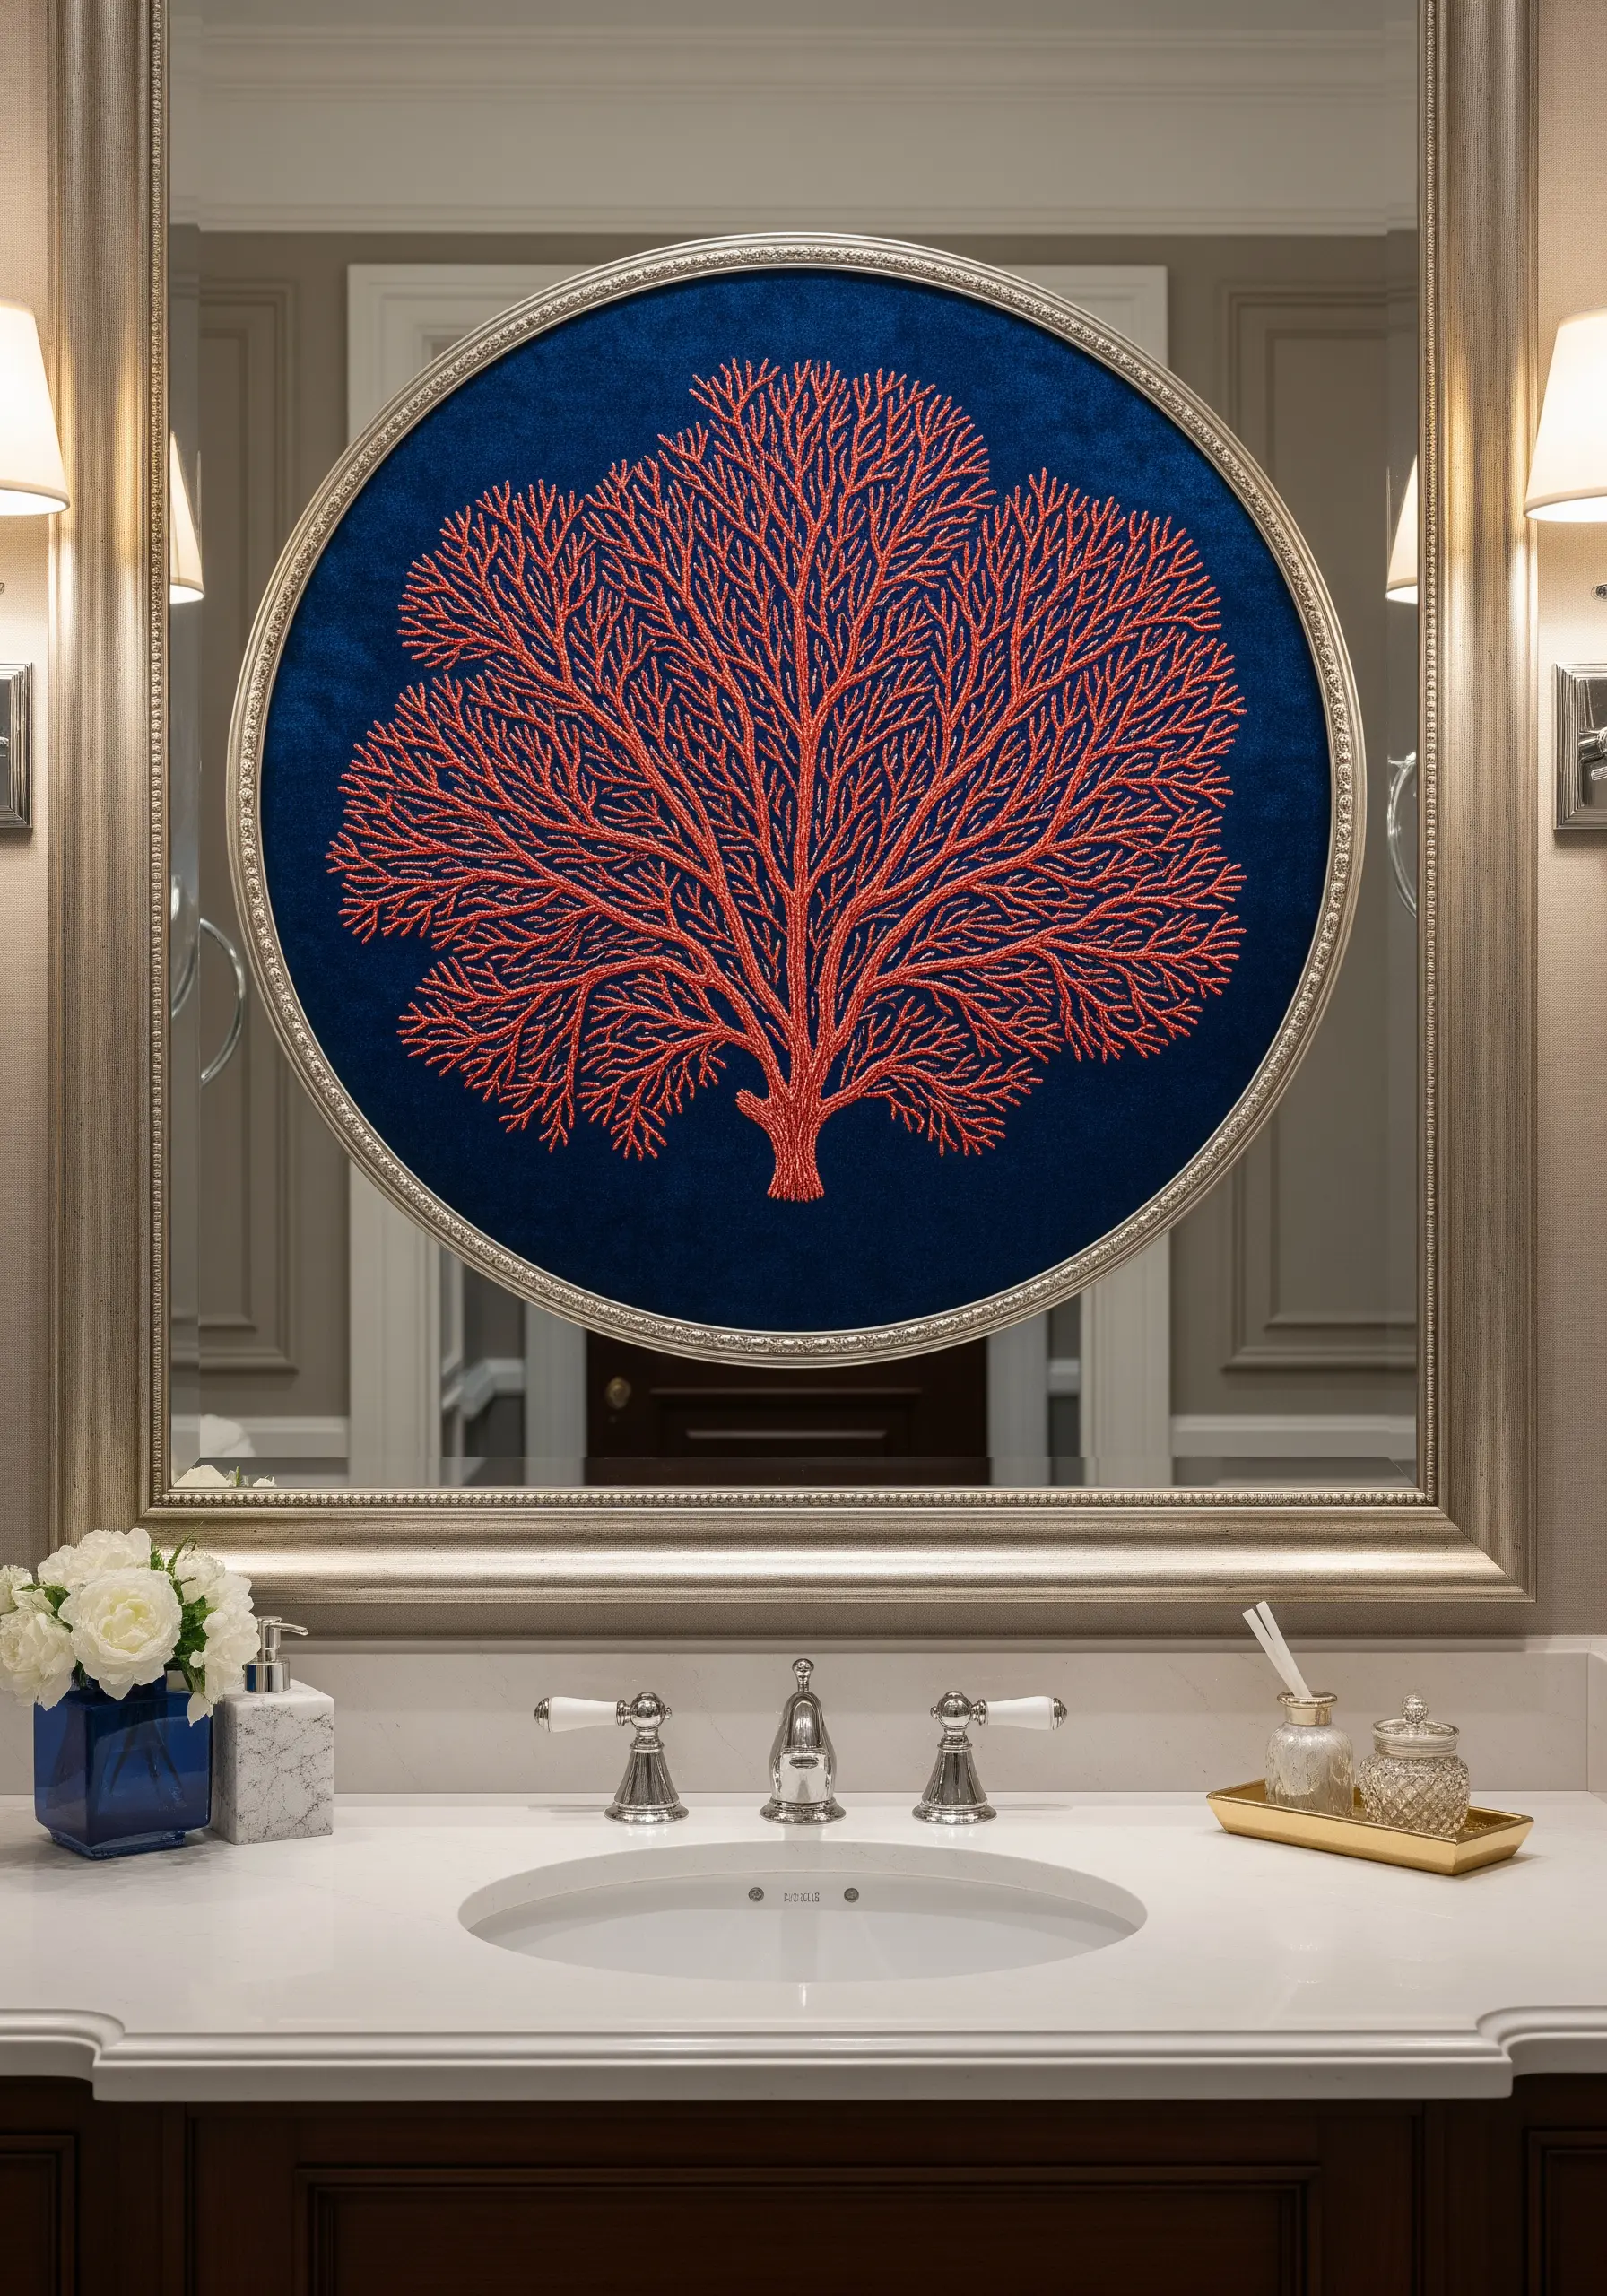
Your choice of fabric can dramatically enhance your stitching.
A deep navy or black velvet is the perfect canvas for intricate, bright designs like this fan coral.
The fabric’s plush pile absorbs light, which makes the vibrant red thread appear to almost glow and float above the surface.
Use a dense split stitch or chain stitch for the coral branches; this creates a solid, raised line that won’t get lost in the velvet’s texture.
16. Tell a Story Across a Large Canvas
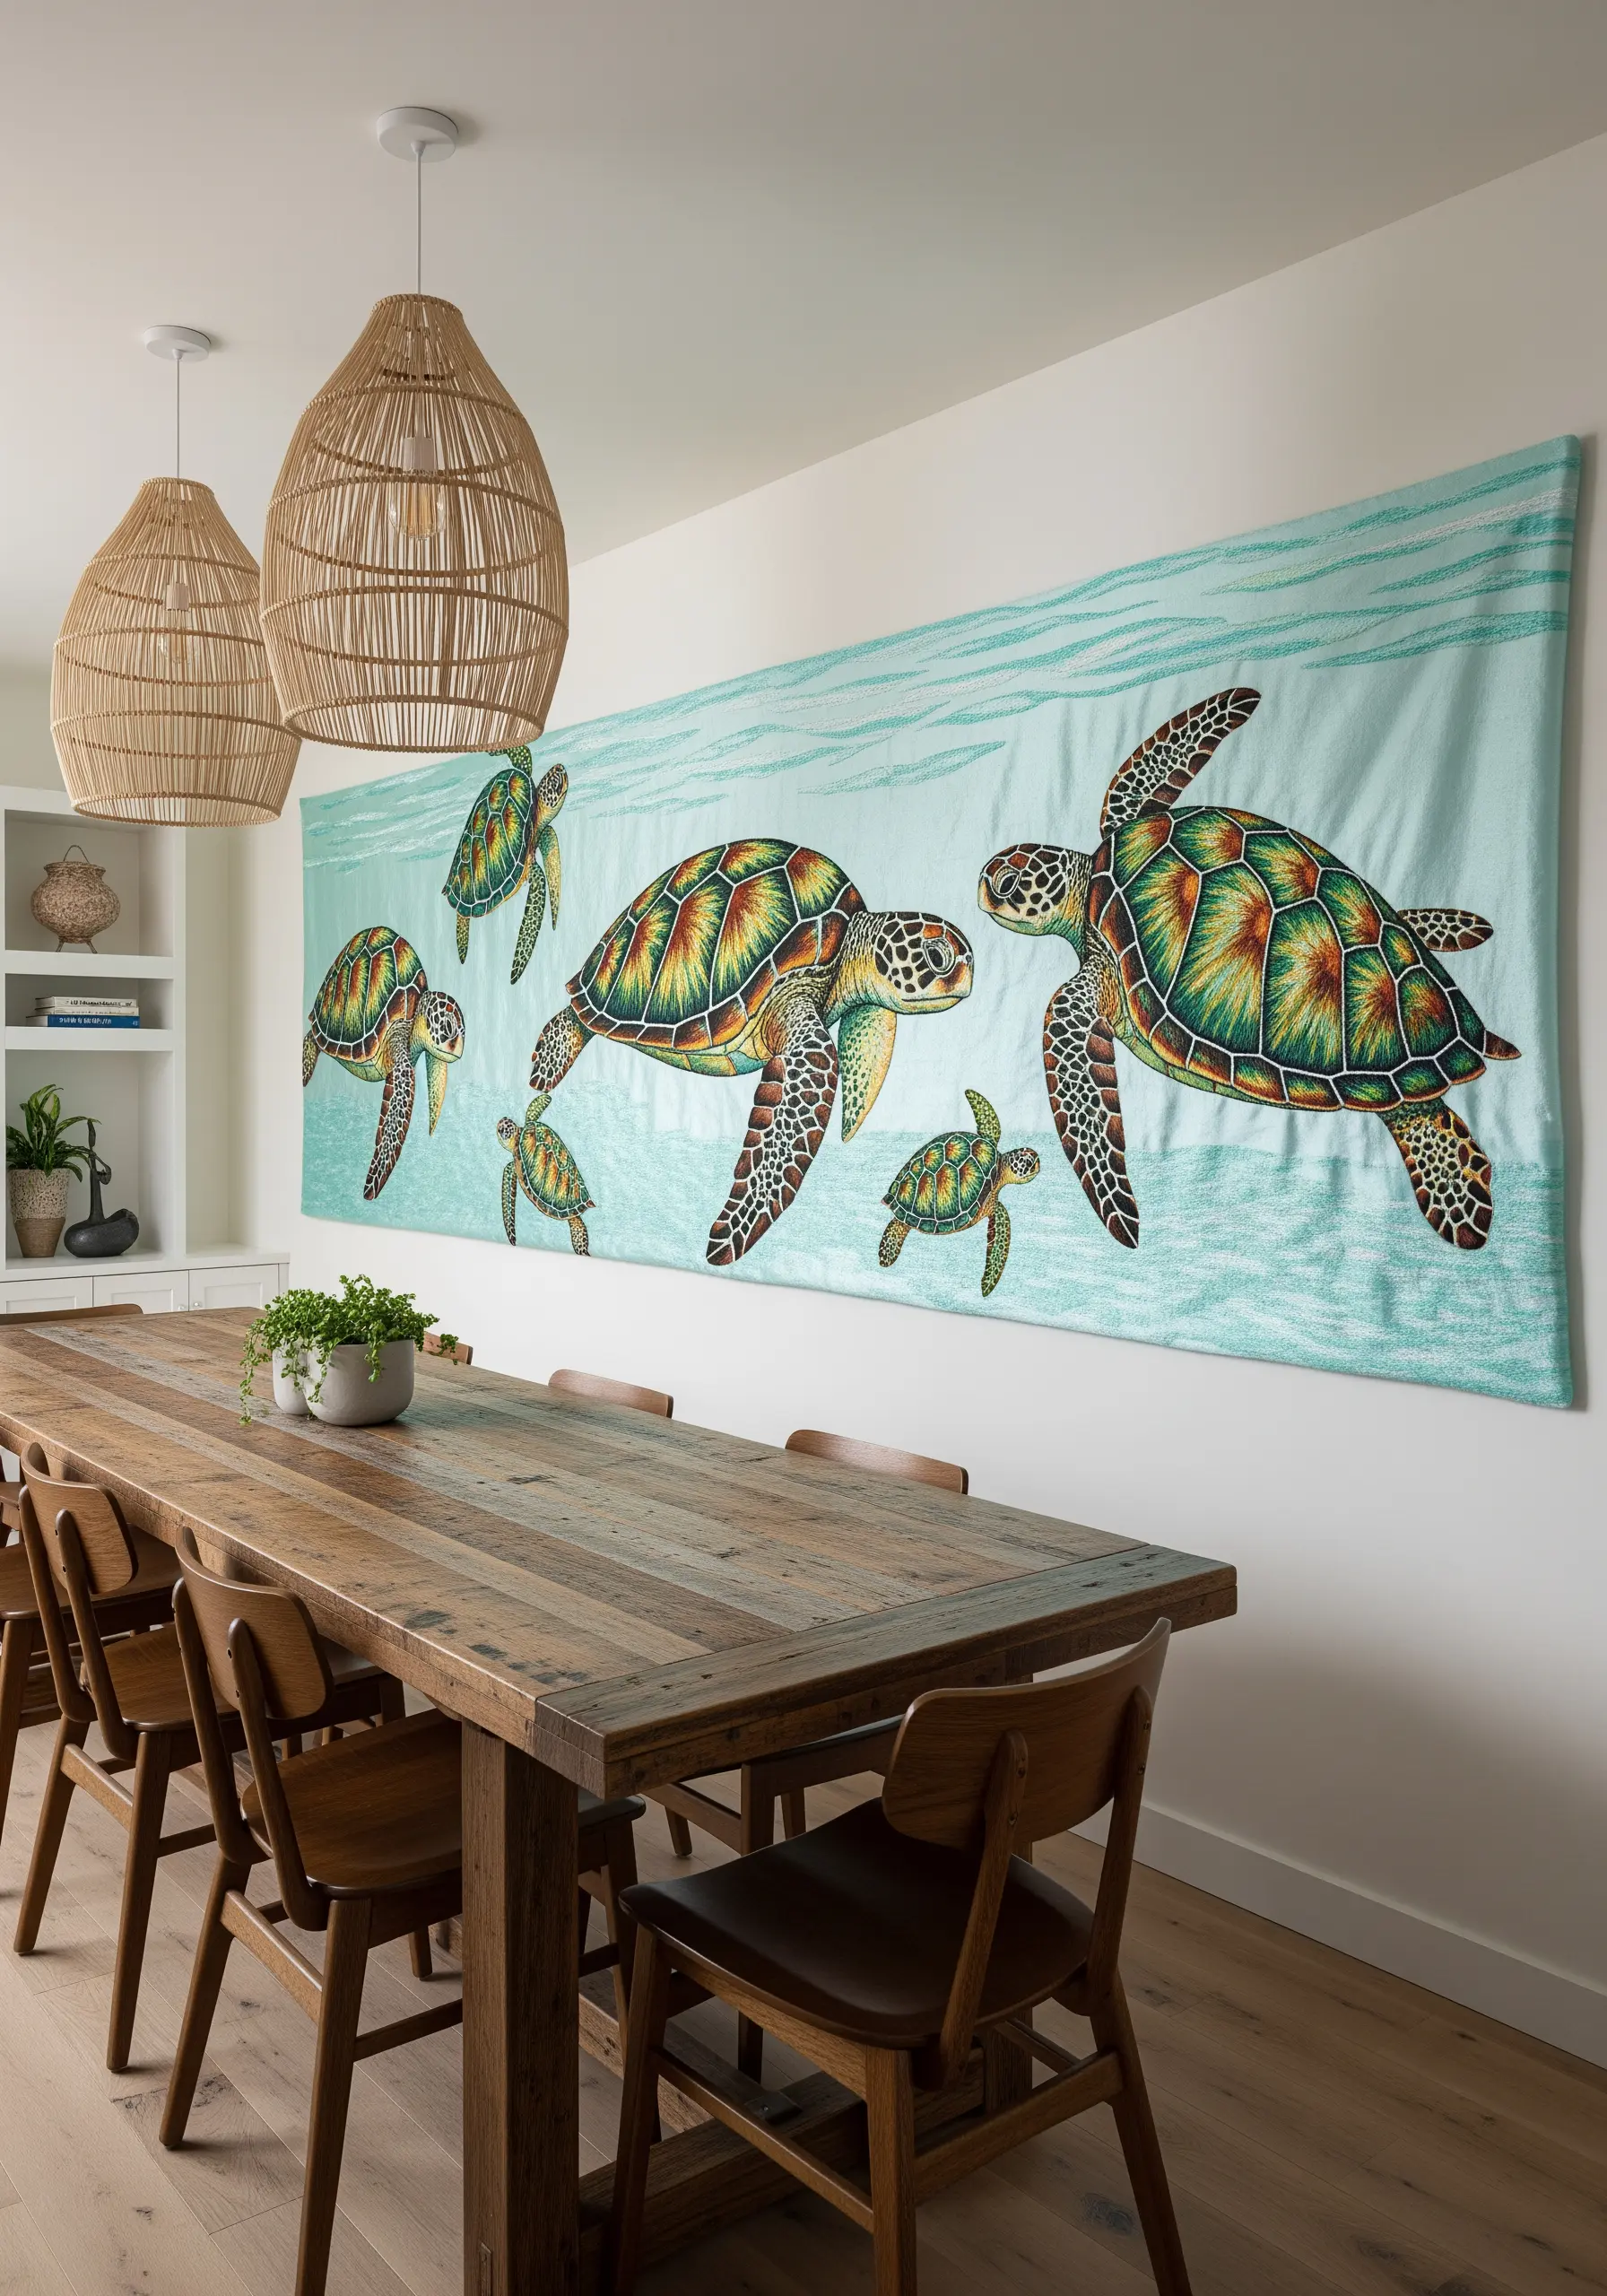
For a large-scale piece like this, simplify your technique to focus on color and form.
Use strong backstitch outlines to define each shape clearly, then fill the sections with smooth, directional satin stitch.
Pay attention to the direction of your satin stitches; on the turtle shells, they should radiate from the center of each scute, and in the water, they should be horizontal to suggest calmness.
This approach keeps the narrative clear and the visual impact high, even from a distance.
17. Create an Underwater Atmosphere with Muted Tones
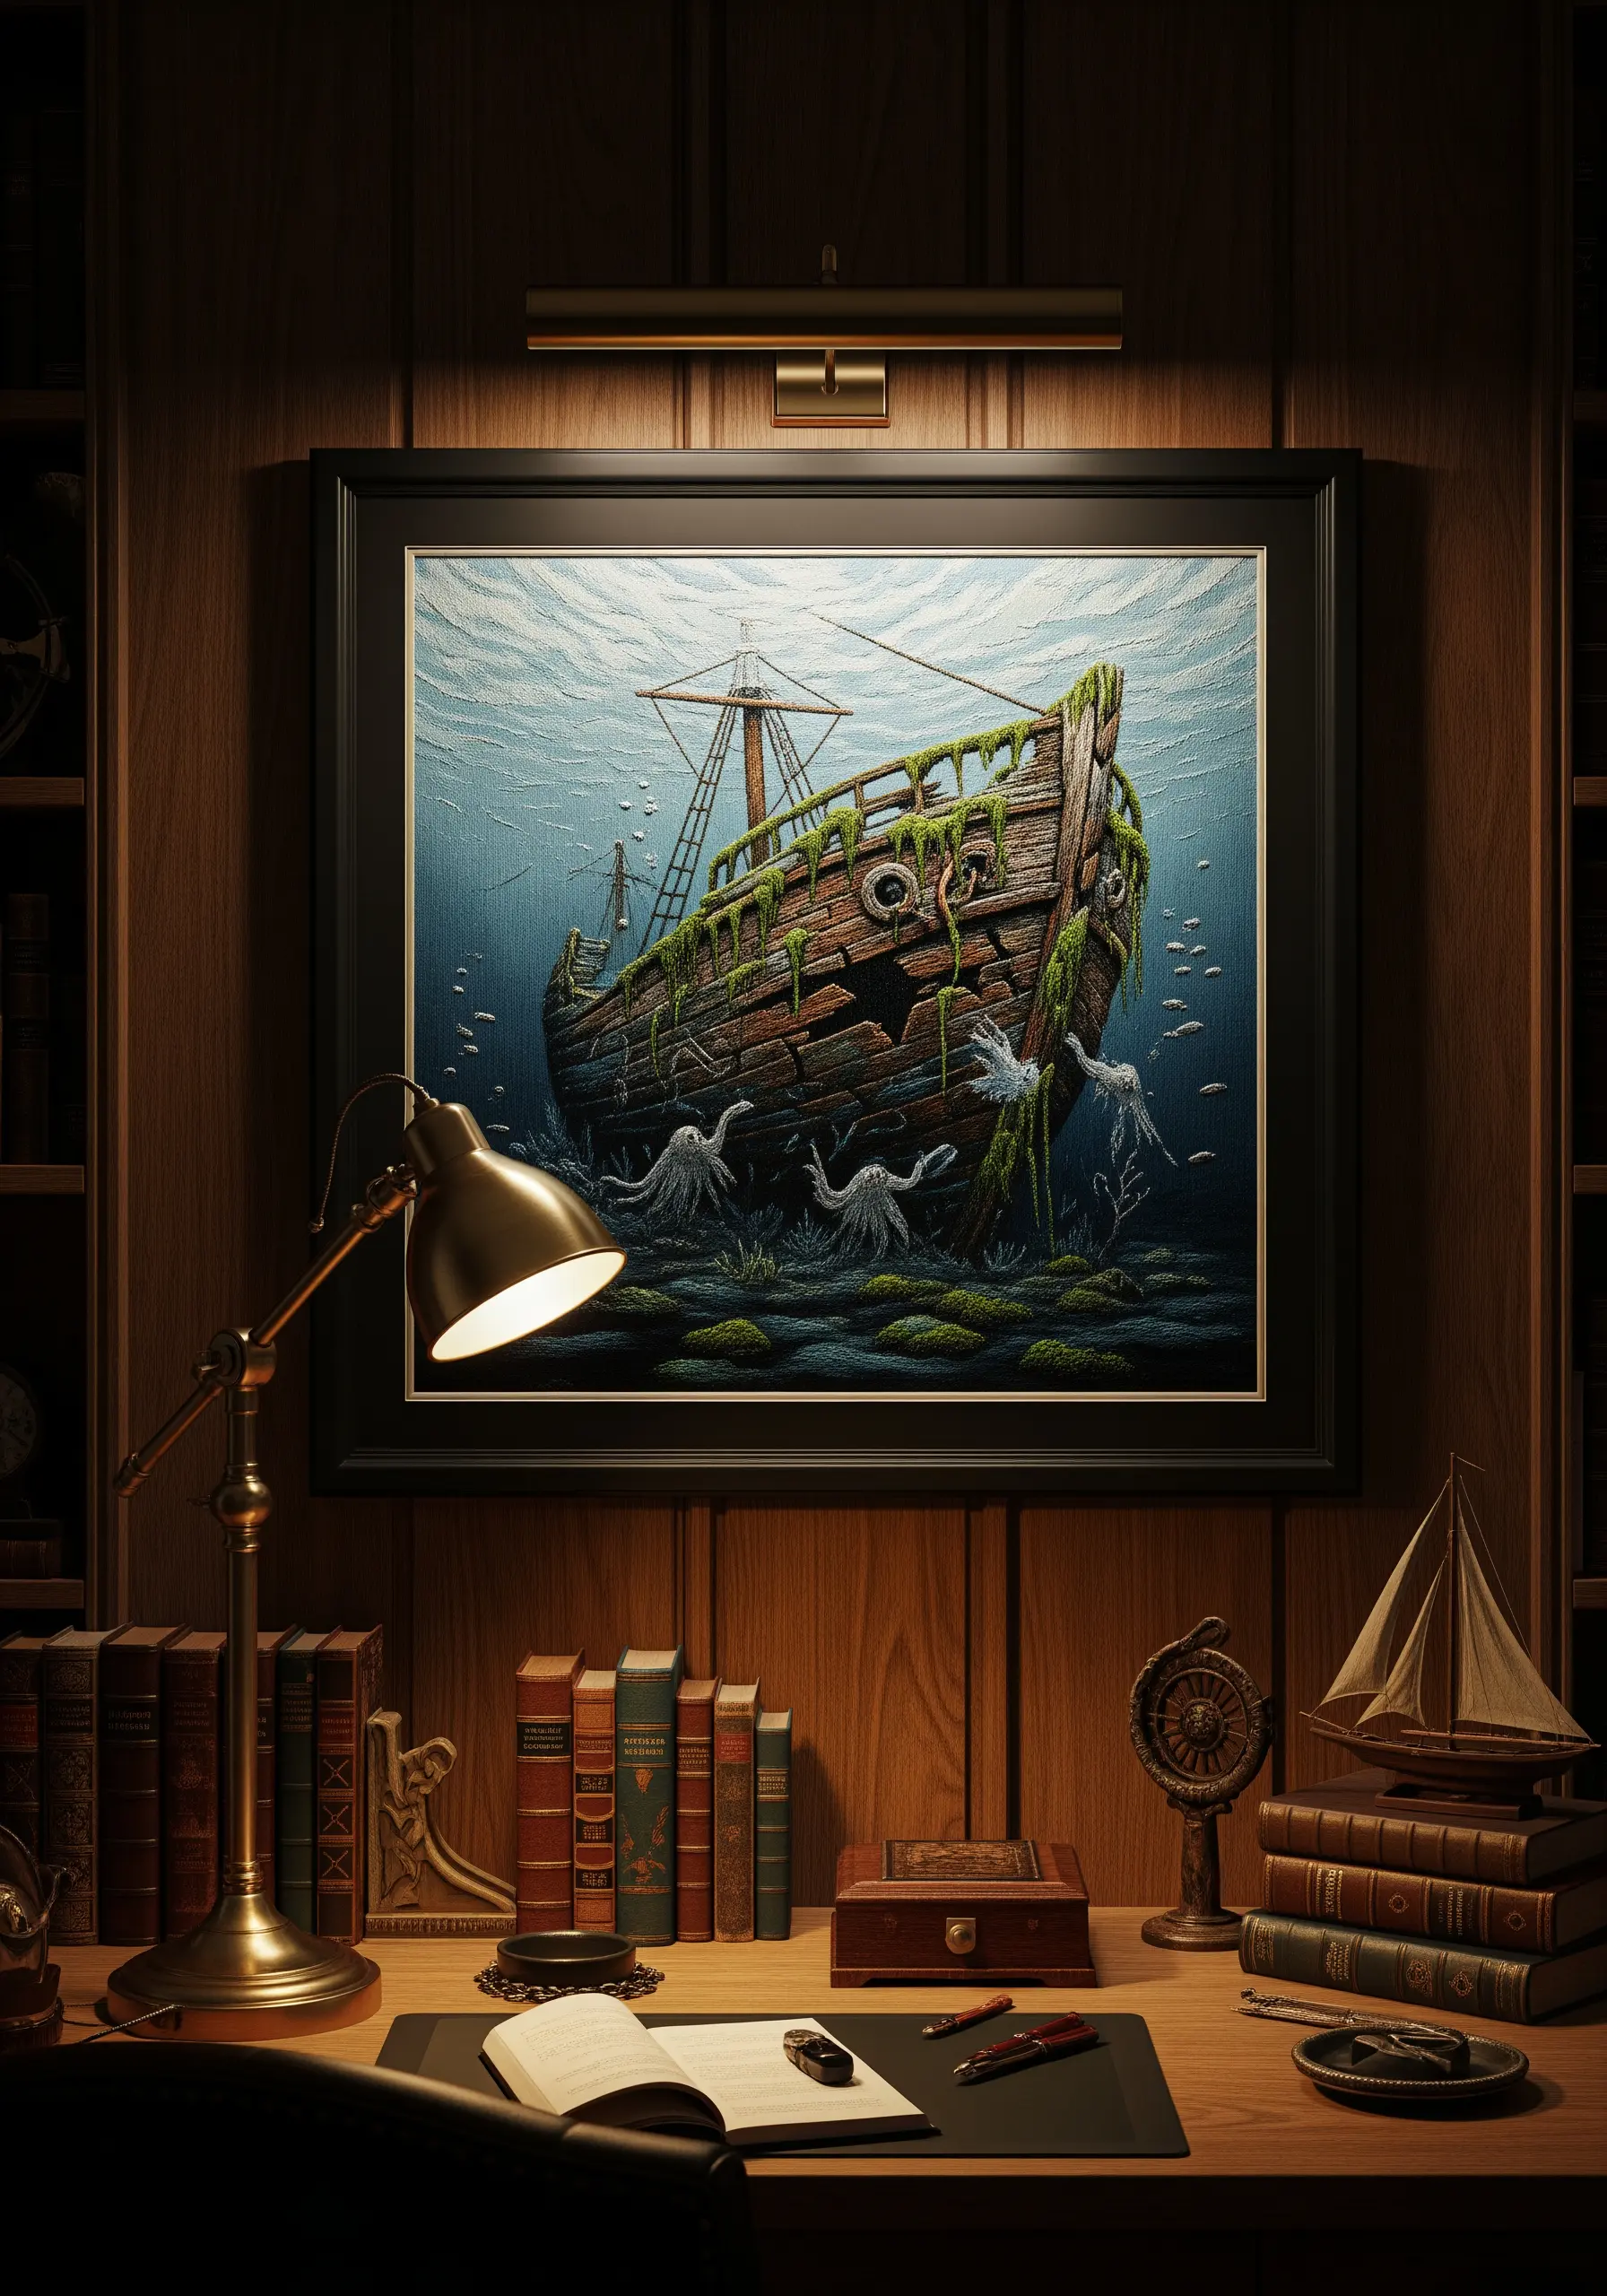
The mood of a piece is controlled by its color palette.
To create a deep, mysterious underwater scene, work with a desaturated range of mossy greens, murky browns, and shadowy blues.
For the overgrown algae, use a mix of French knots and randomly placed single straight stitches to create an organic, untamed texture.
The ghostly apparitions are stitched with just one or two strands of a pale, blue-grey floss in a simple running stitch, making them feel ephemeral and transparent.
18. Incorporate Soft Textures for Nursery Art
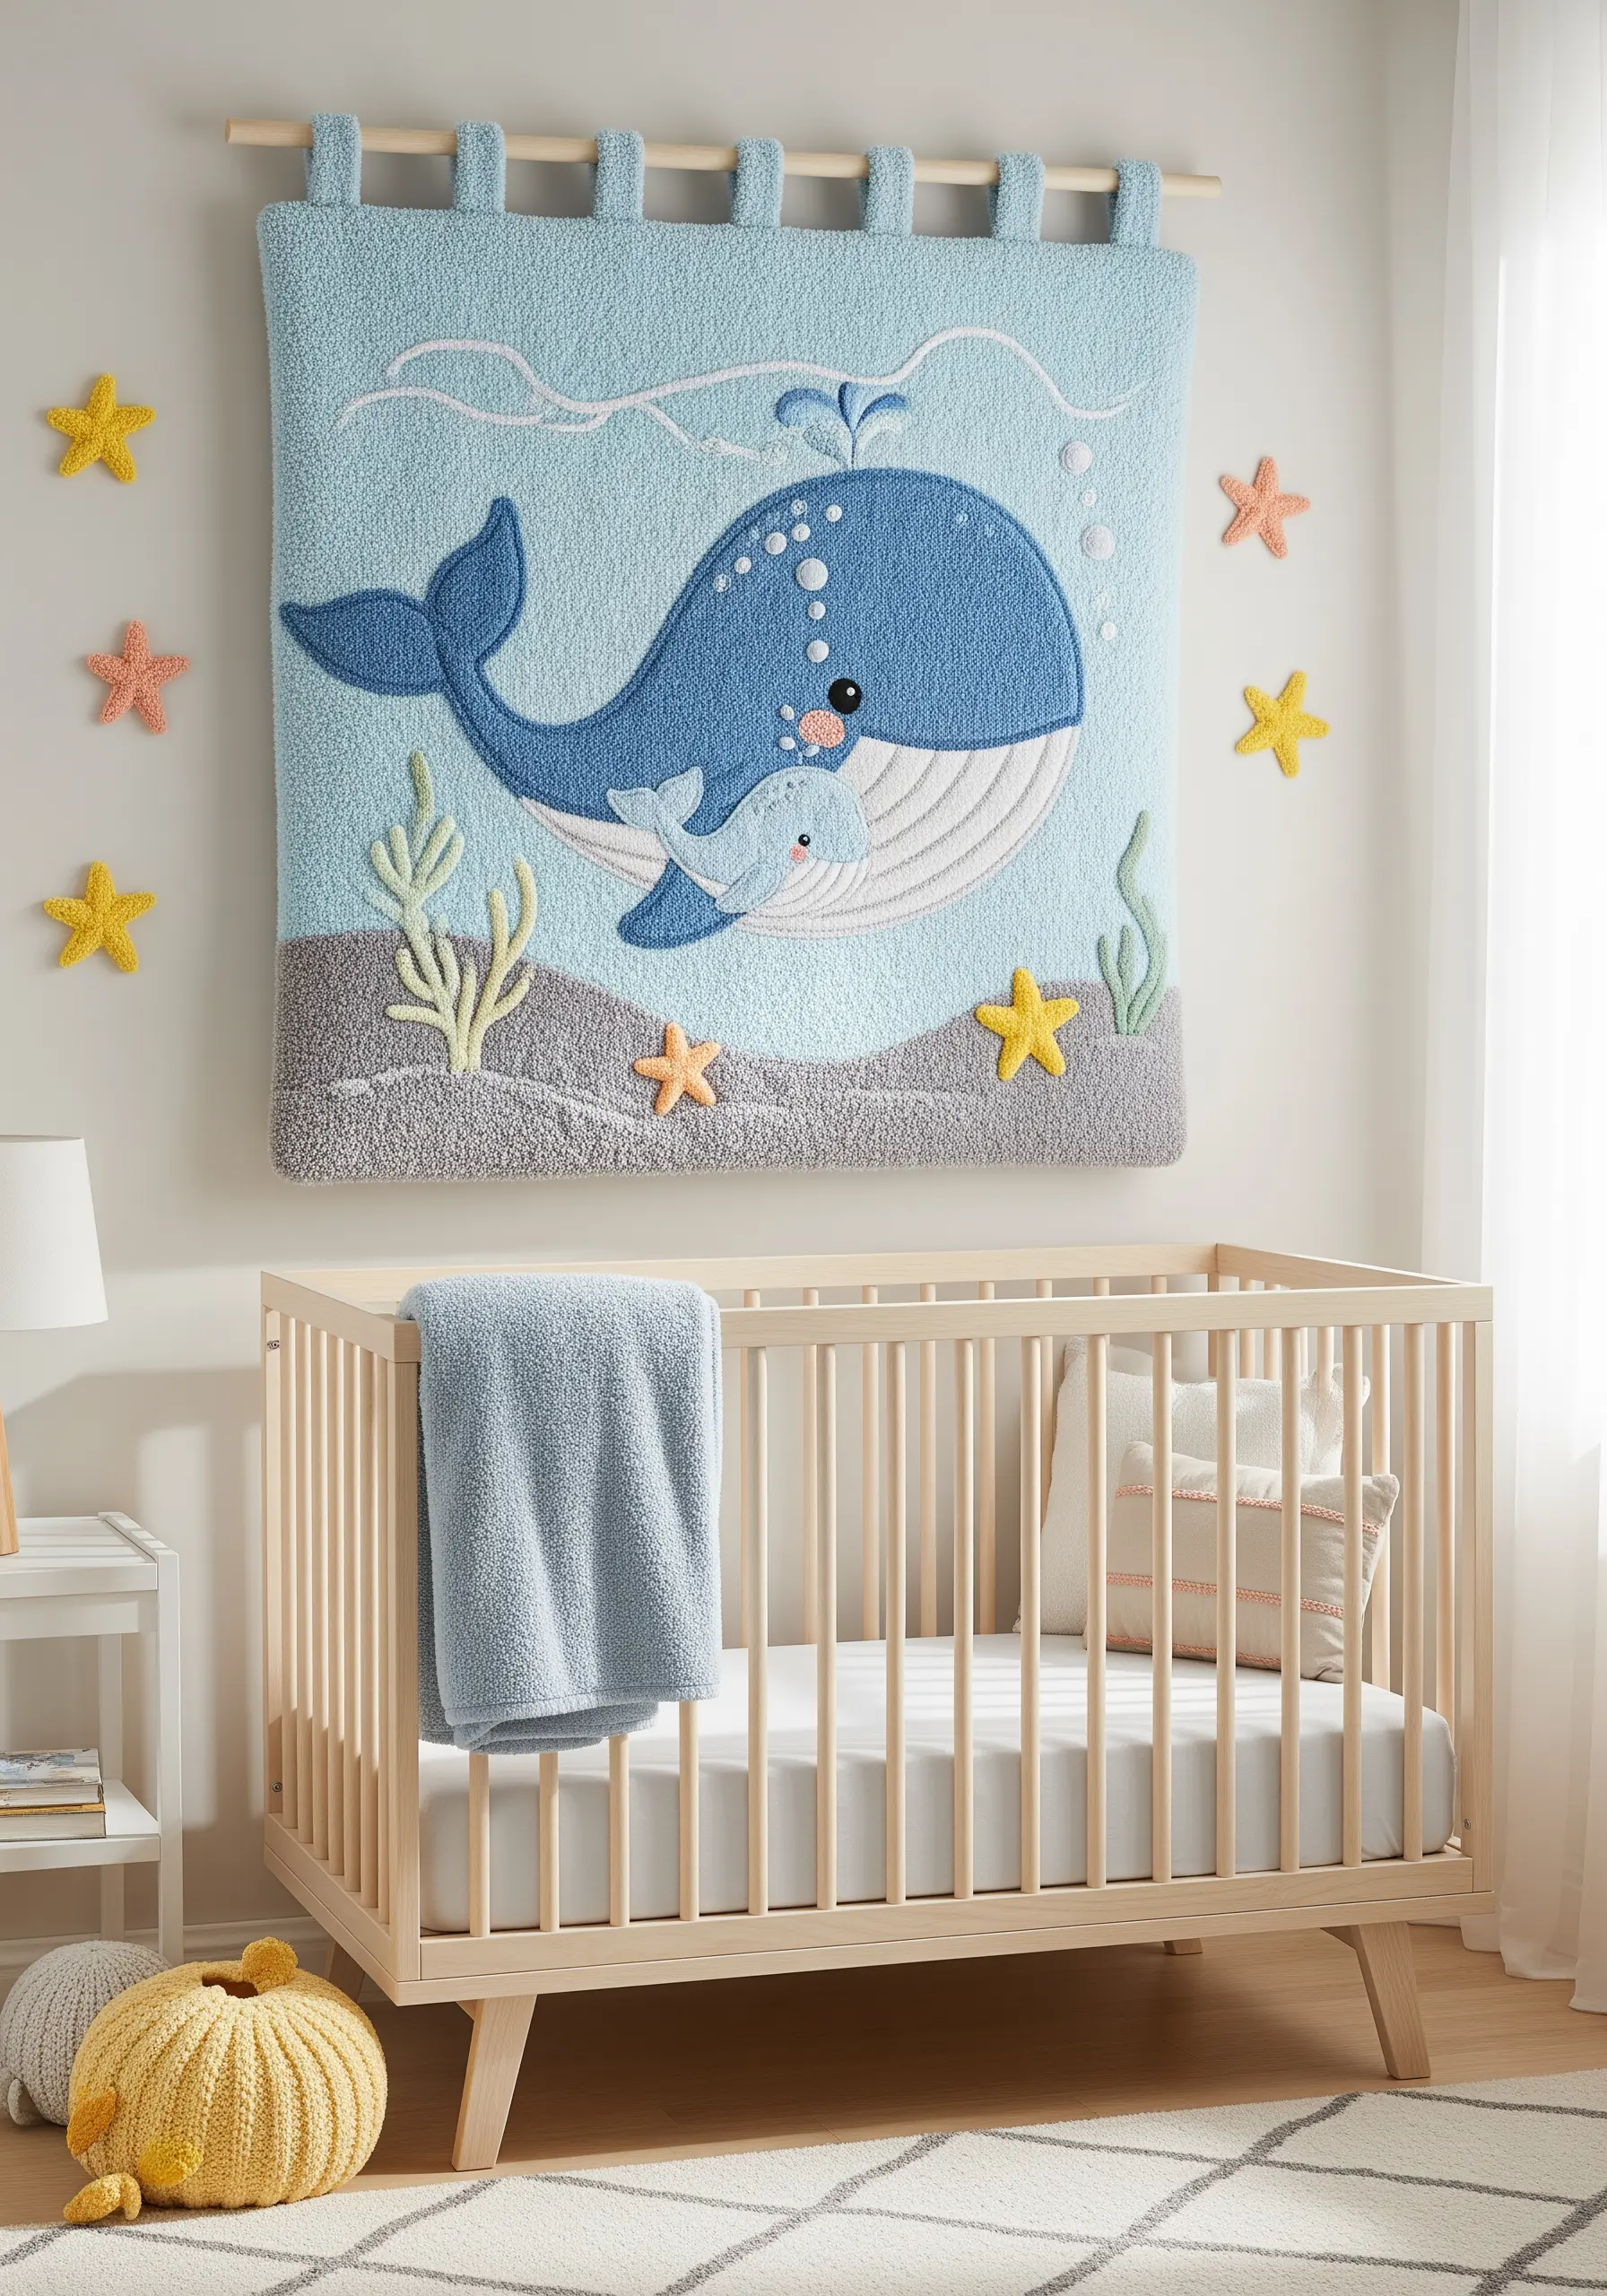
When stitching for a child’s room, think about tactile appeal.
Use plush, textural stitches like the turkey work knot, which can be trimmed to create a soft, carpet-like surface perfect for the whale’s body or the sandy floor.
You can also use chenille thread, which is naturally fuzzy and soft to the touch.
Combining these soft fills with simple backstitch outlines and appliqué shapes creates a piece that is visually gentle and wonderfully touchable.
19. Illuminate the Deep Sea with Glow-in-the-Dark Thread

Create a piece of art with a secret life by incorporating fluorescent or glow-in-the-dark embroidery floss.
Stitch your design on black fabric to make the neon colors pop even in daylight.
For the best glowing effect, use the specialty thread for the most important details, like the anglerfish’s lure or the jellyfish’s bell.
Layer these threads over regular floss or use them on their own with a dense satin stitch to ensure they absorb enough light to truly shine in the dark.


