

Color is where embroidery transforms from a craft into an art form. It’s the language you use to convey mood, create dimension, and breathe life into every stitch. But choosing the right palette can feel intimidating, as if you’re staring at a blank canvas with too many options.
Forget the guesswork. Think of these parrot and macaw-inspired palettes not just as color combinations, but as complete visual recipes. Each one is a lesson in how contrast, harmony, and texture work together to create something extraordinary.
Here, you will find more than just inspiration. You will discover practical techniques for blending threads, choosing background fabrics that make your colors sing, and using stitch direction to sculpt with light. It’s time to pick up your needle and stitch with the confidence of an artist.
1. Create Feathers That Defy the Hoop
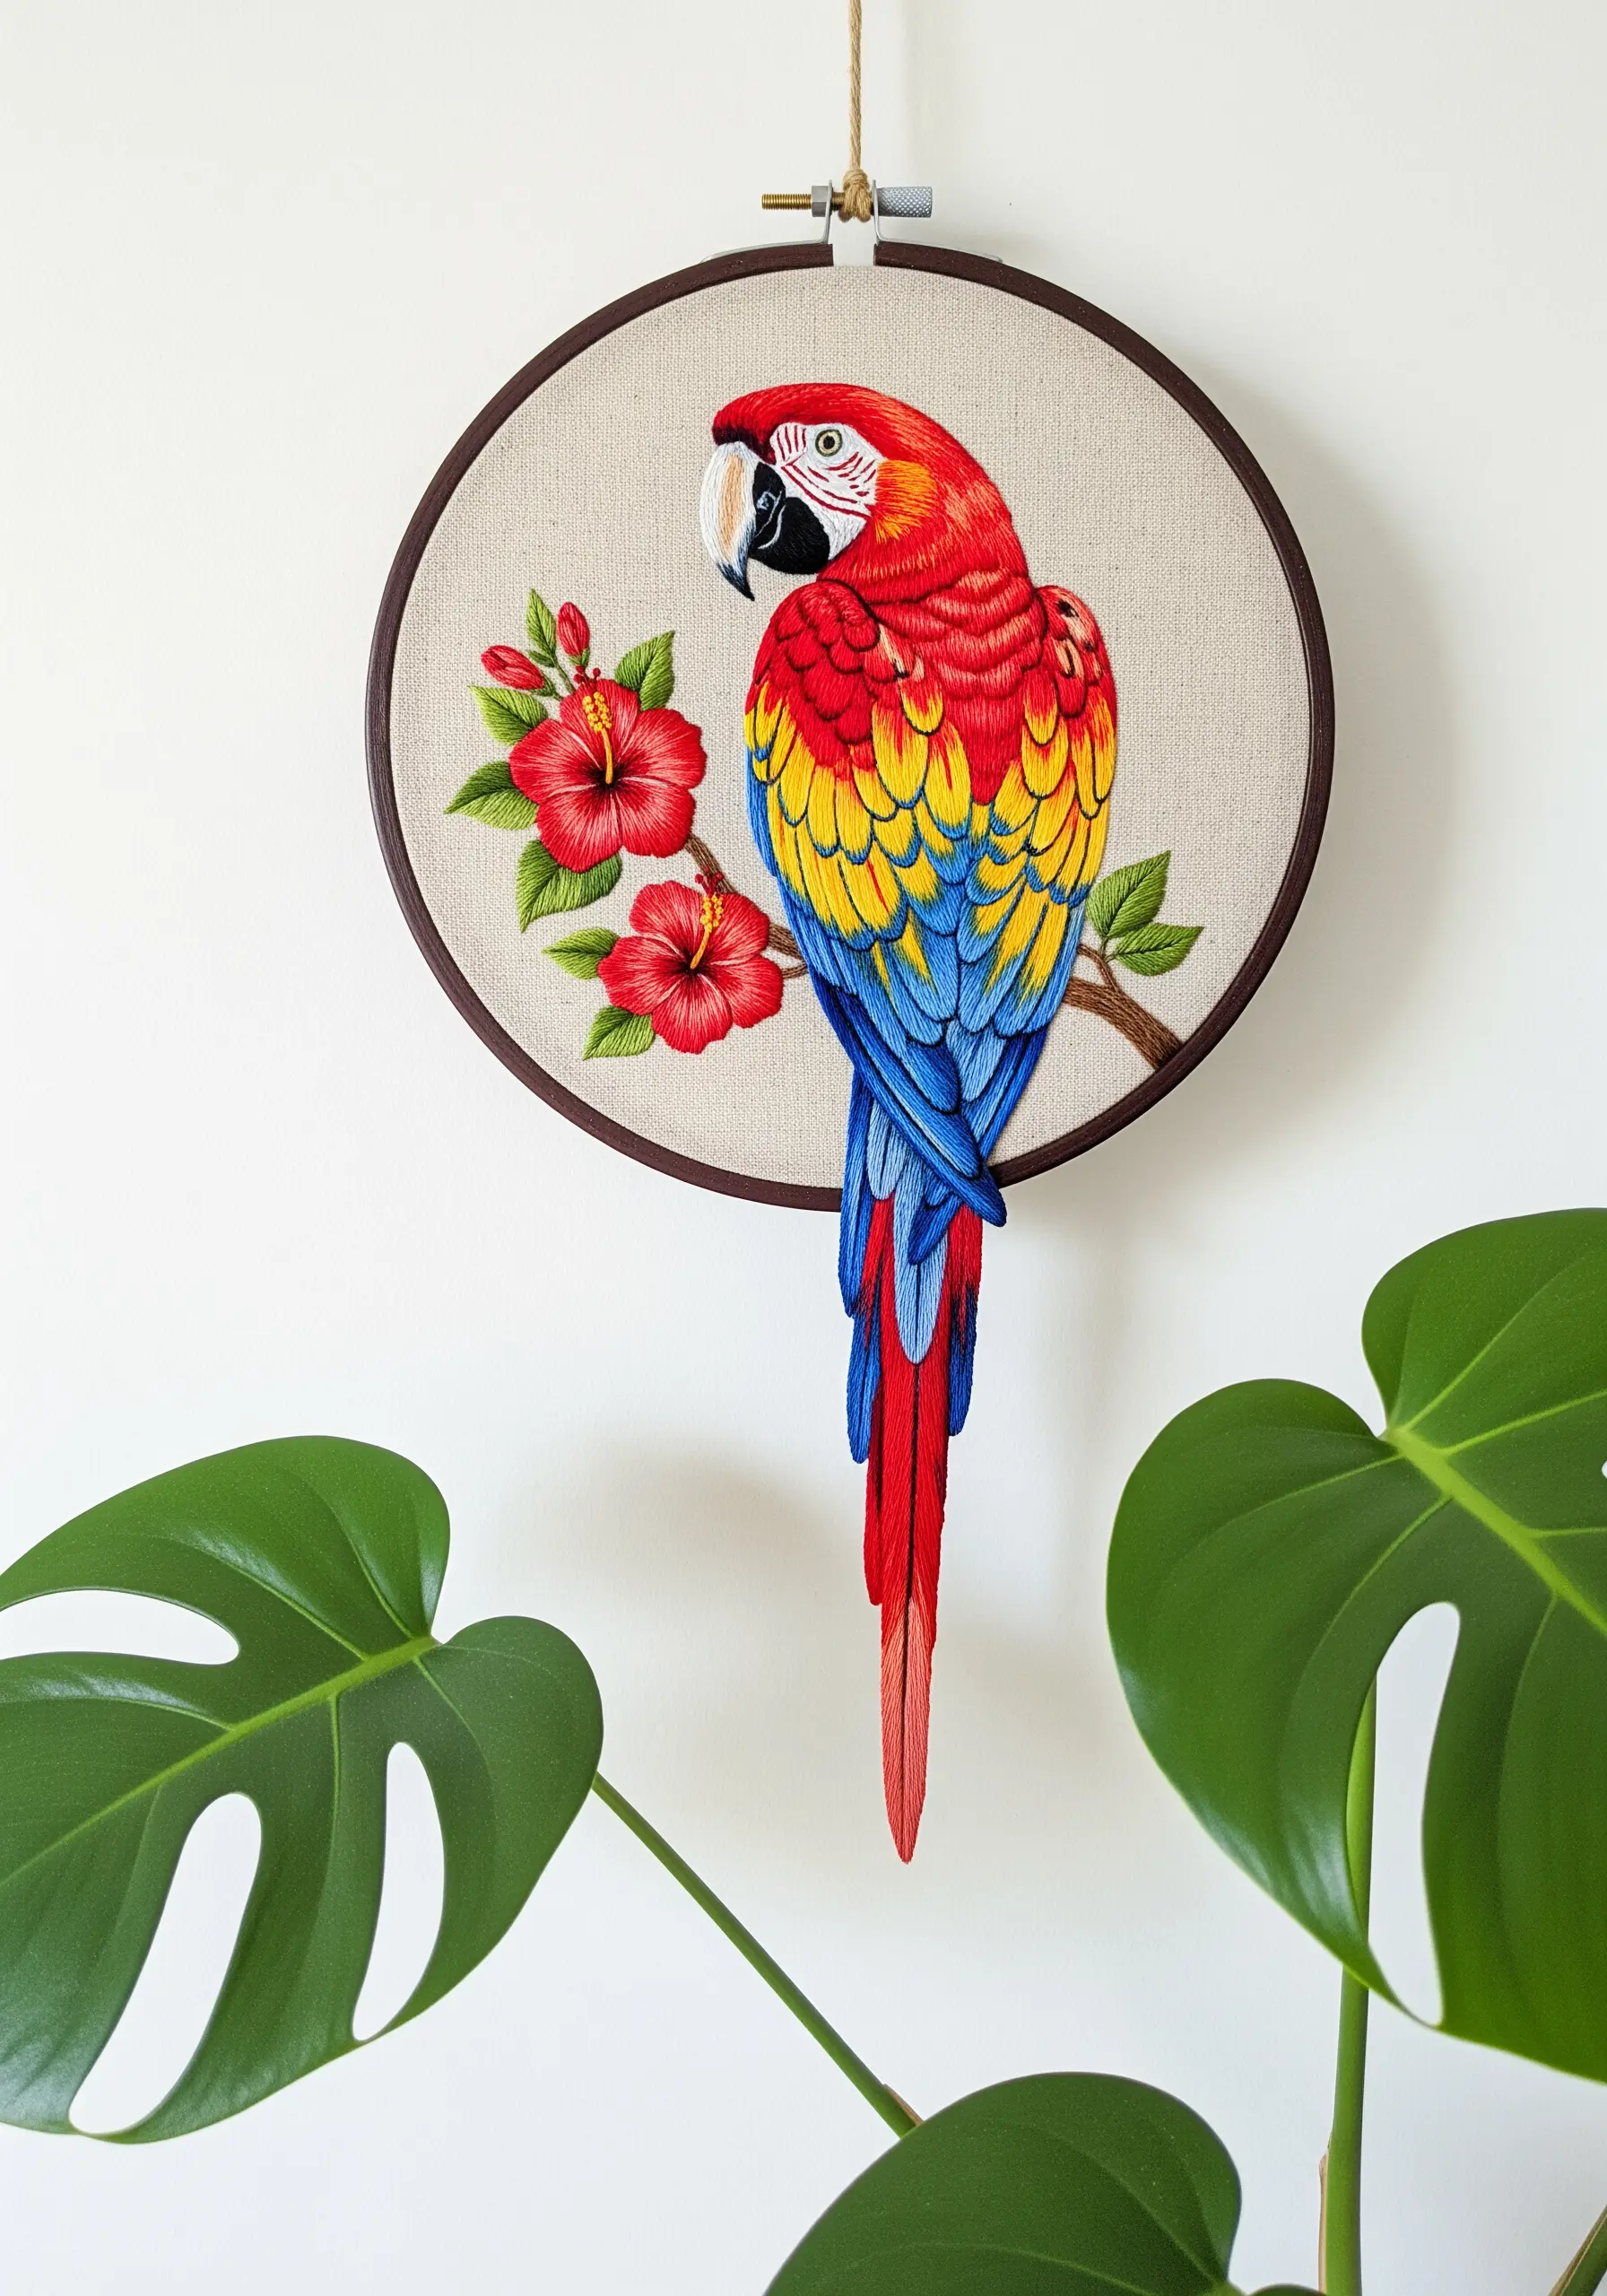
To achieve this stunning three-dimensional effect, complete the main body of the parrot within the hoop as usual, focusing on smooth long-and-short stitches for the blended feathers.
For the tail, stitch the feathers onto a separate piece of stiff, felt-like stabilizer that has been hooped independently.
Once finished, carefully cut out the tail feathers, leaving a small margin of stabilizer that you can discreetly tuck under the bird’s body and secure with a few hidden stitches.
This technique adds unexpected depth and transforms your hoop art into a sculptural piece.
2. Use a Cool-Toned Fabric to Ignite Your Colors
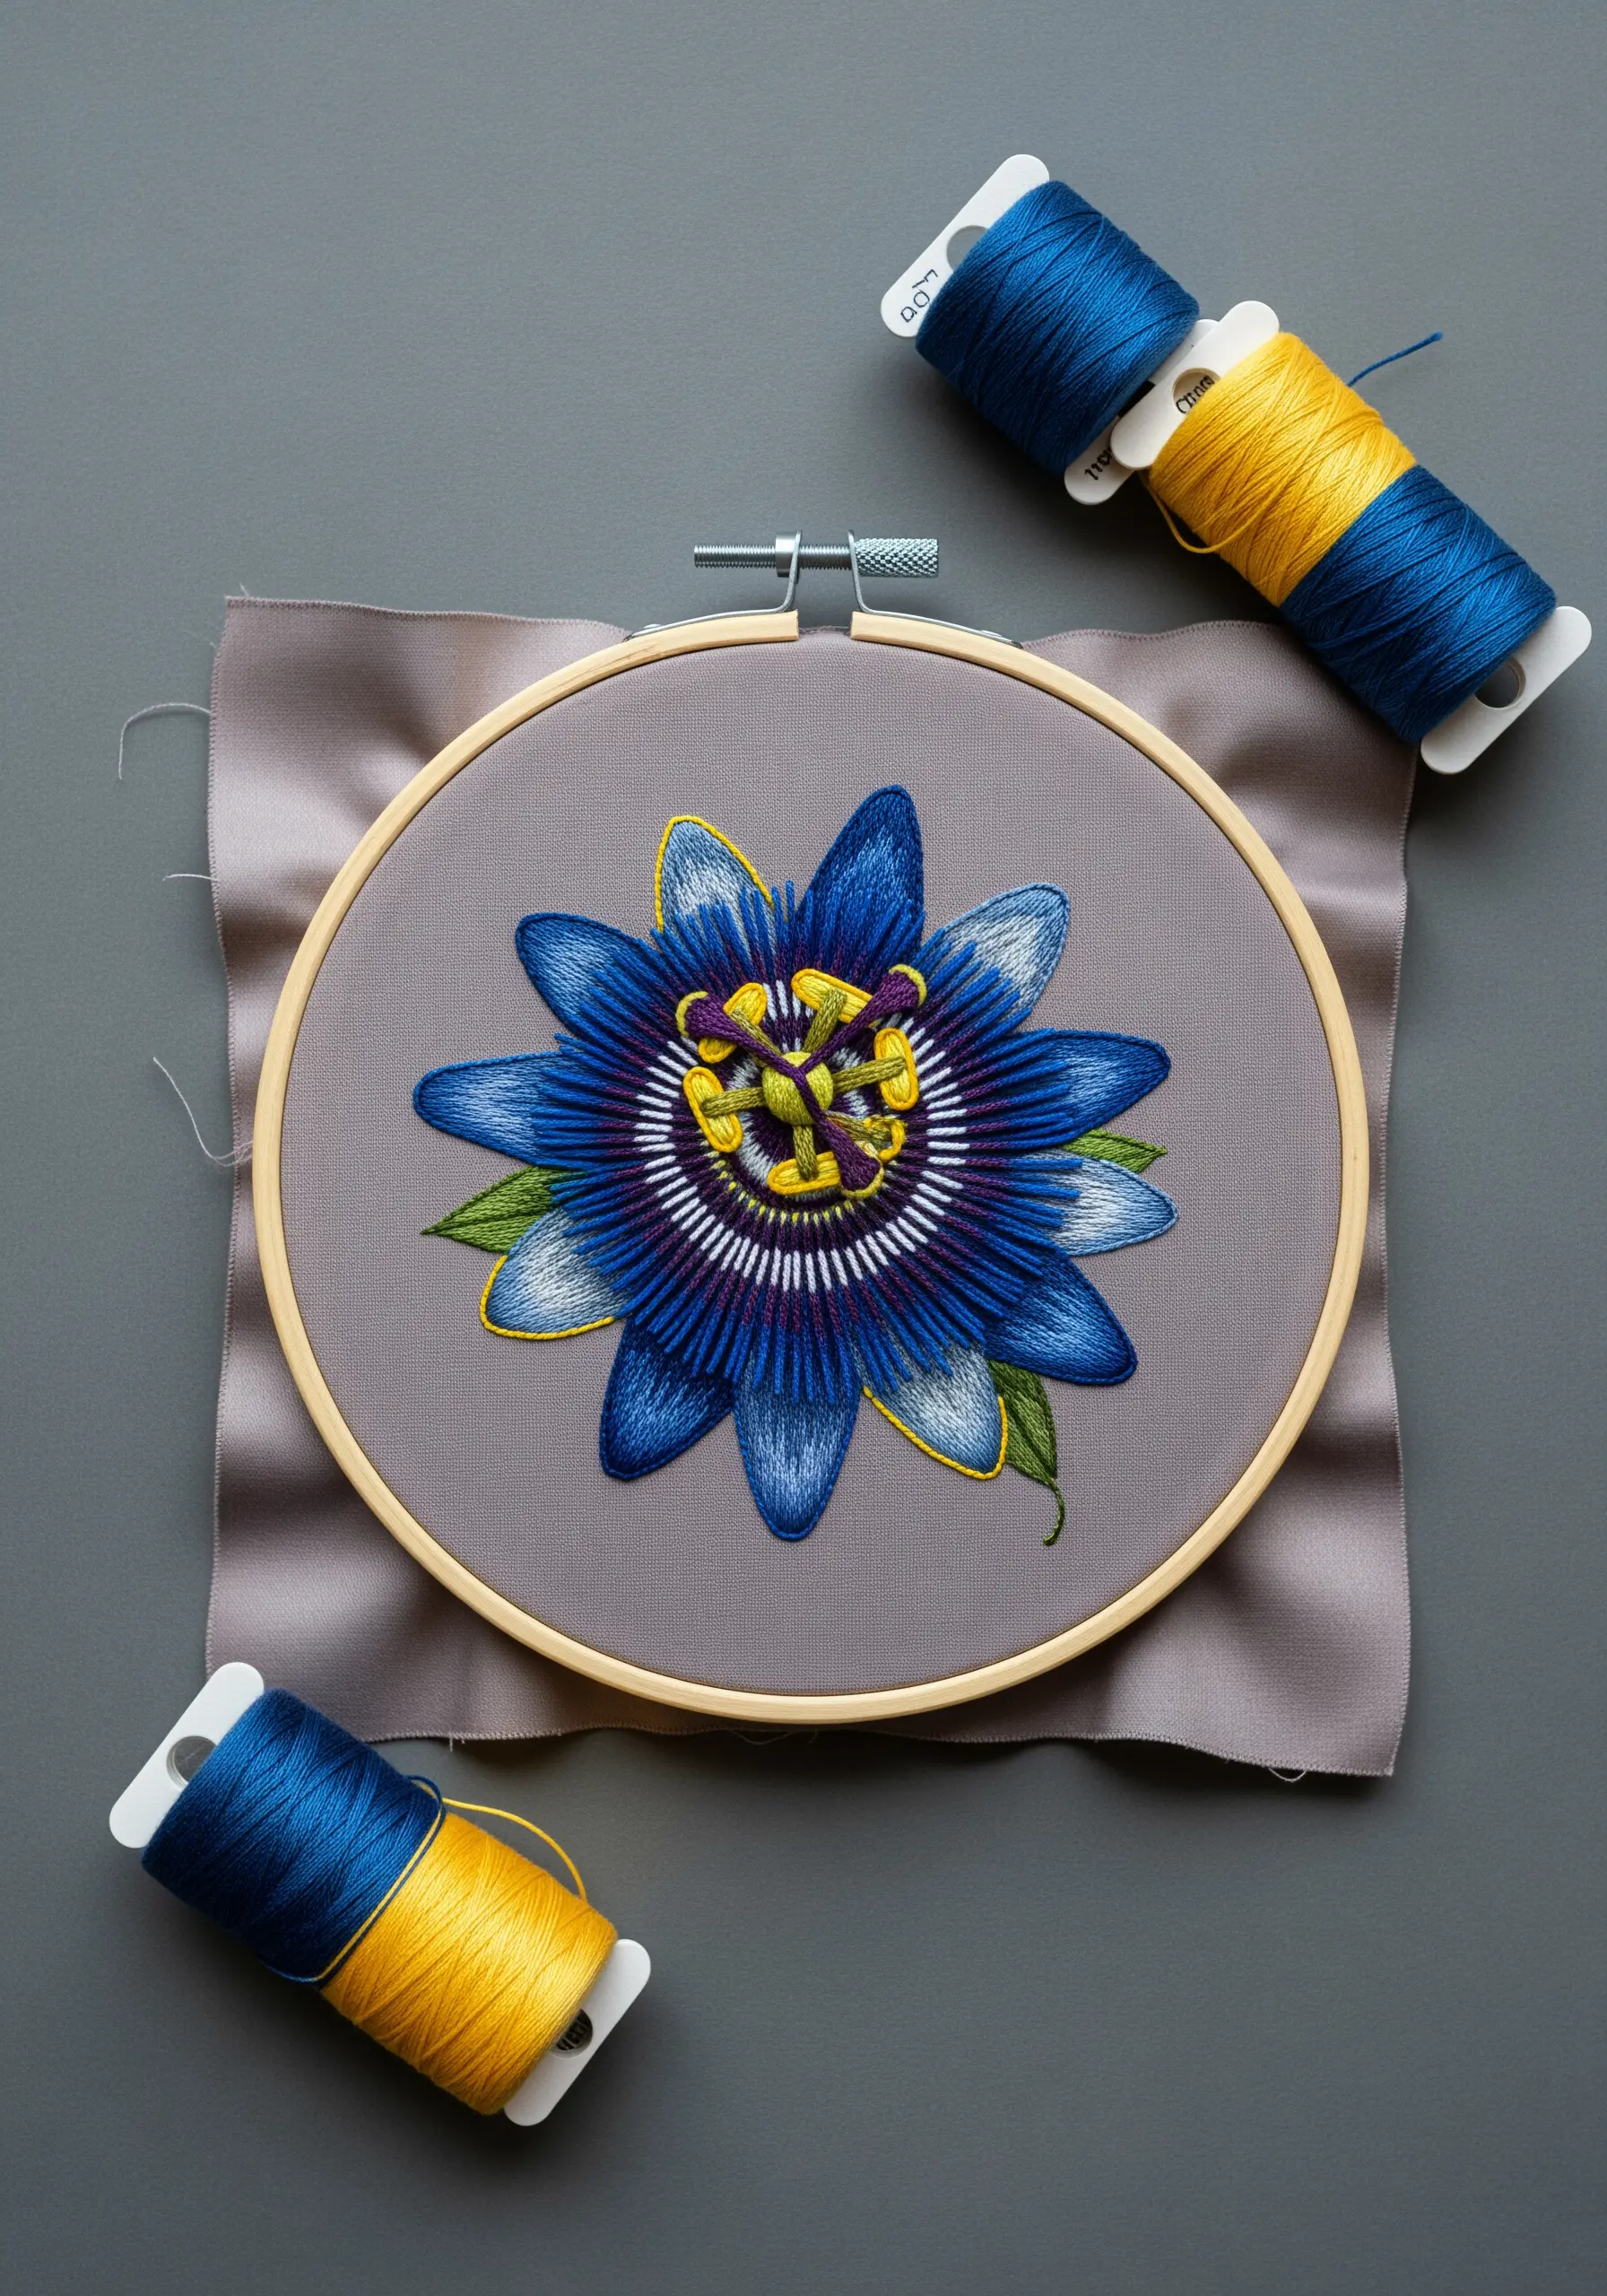
Notice how the vibrant cobalt blue and electric yellow of the passion flower seem to vibrate against the muted grey fabric.
This is a classic color theory principle in action: a cool, desaturated background makes warm, saturated colors appear more luminous and intense.
Instead of defaulting to white or cream linen, test your boldest threads on charcoal, slate grey, or dusty blue fabric.
The contrast will give your work an immediate sense of modern sophistication and visual power.
3. Stitch with Explosive Energy Using Straight Stitches
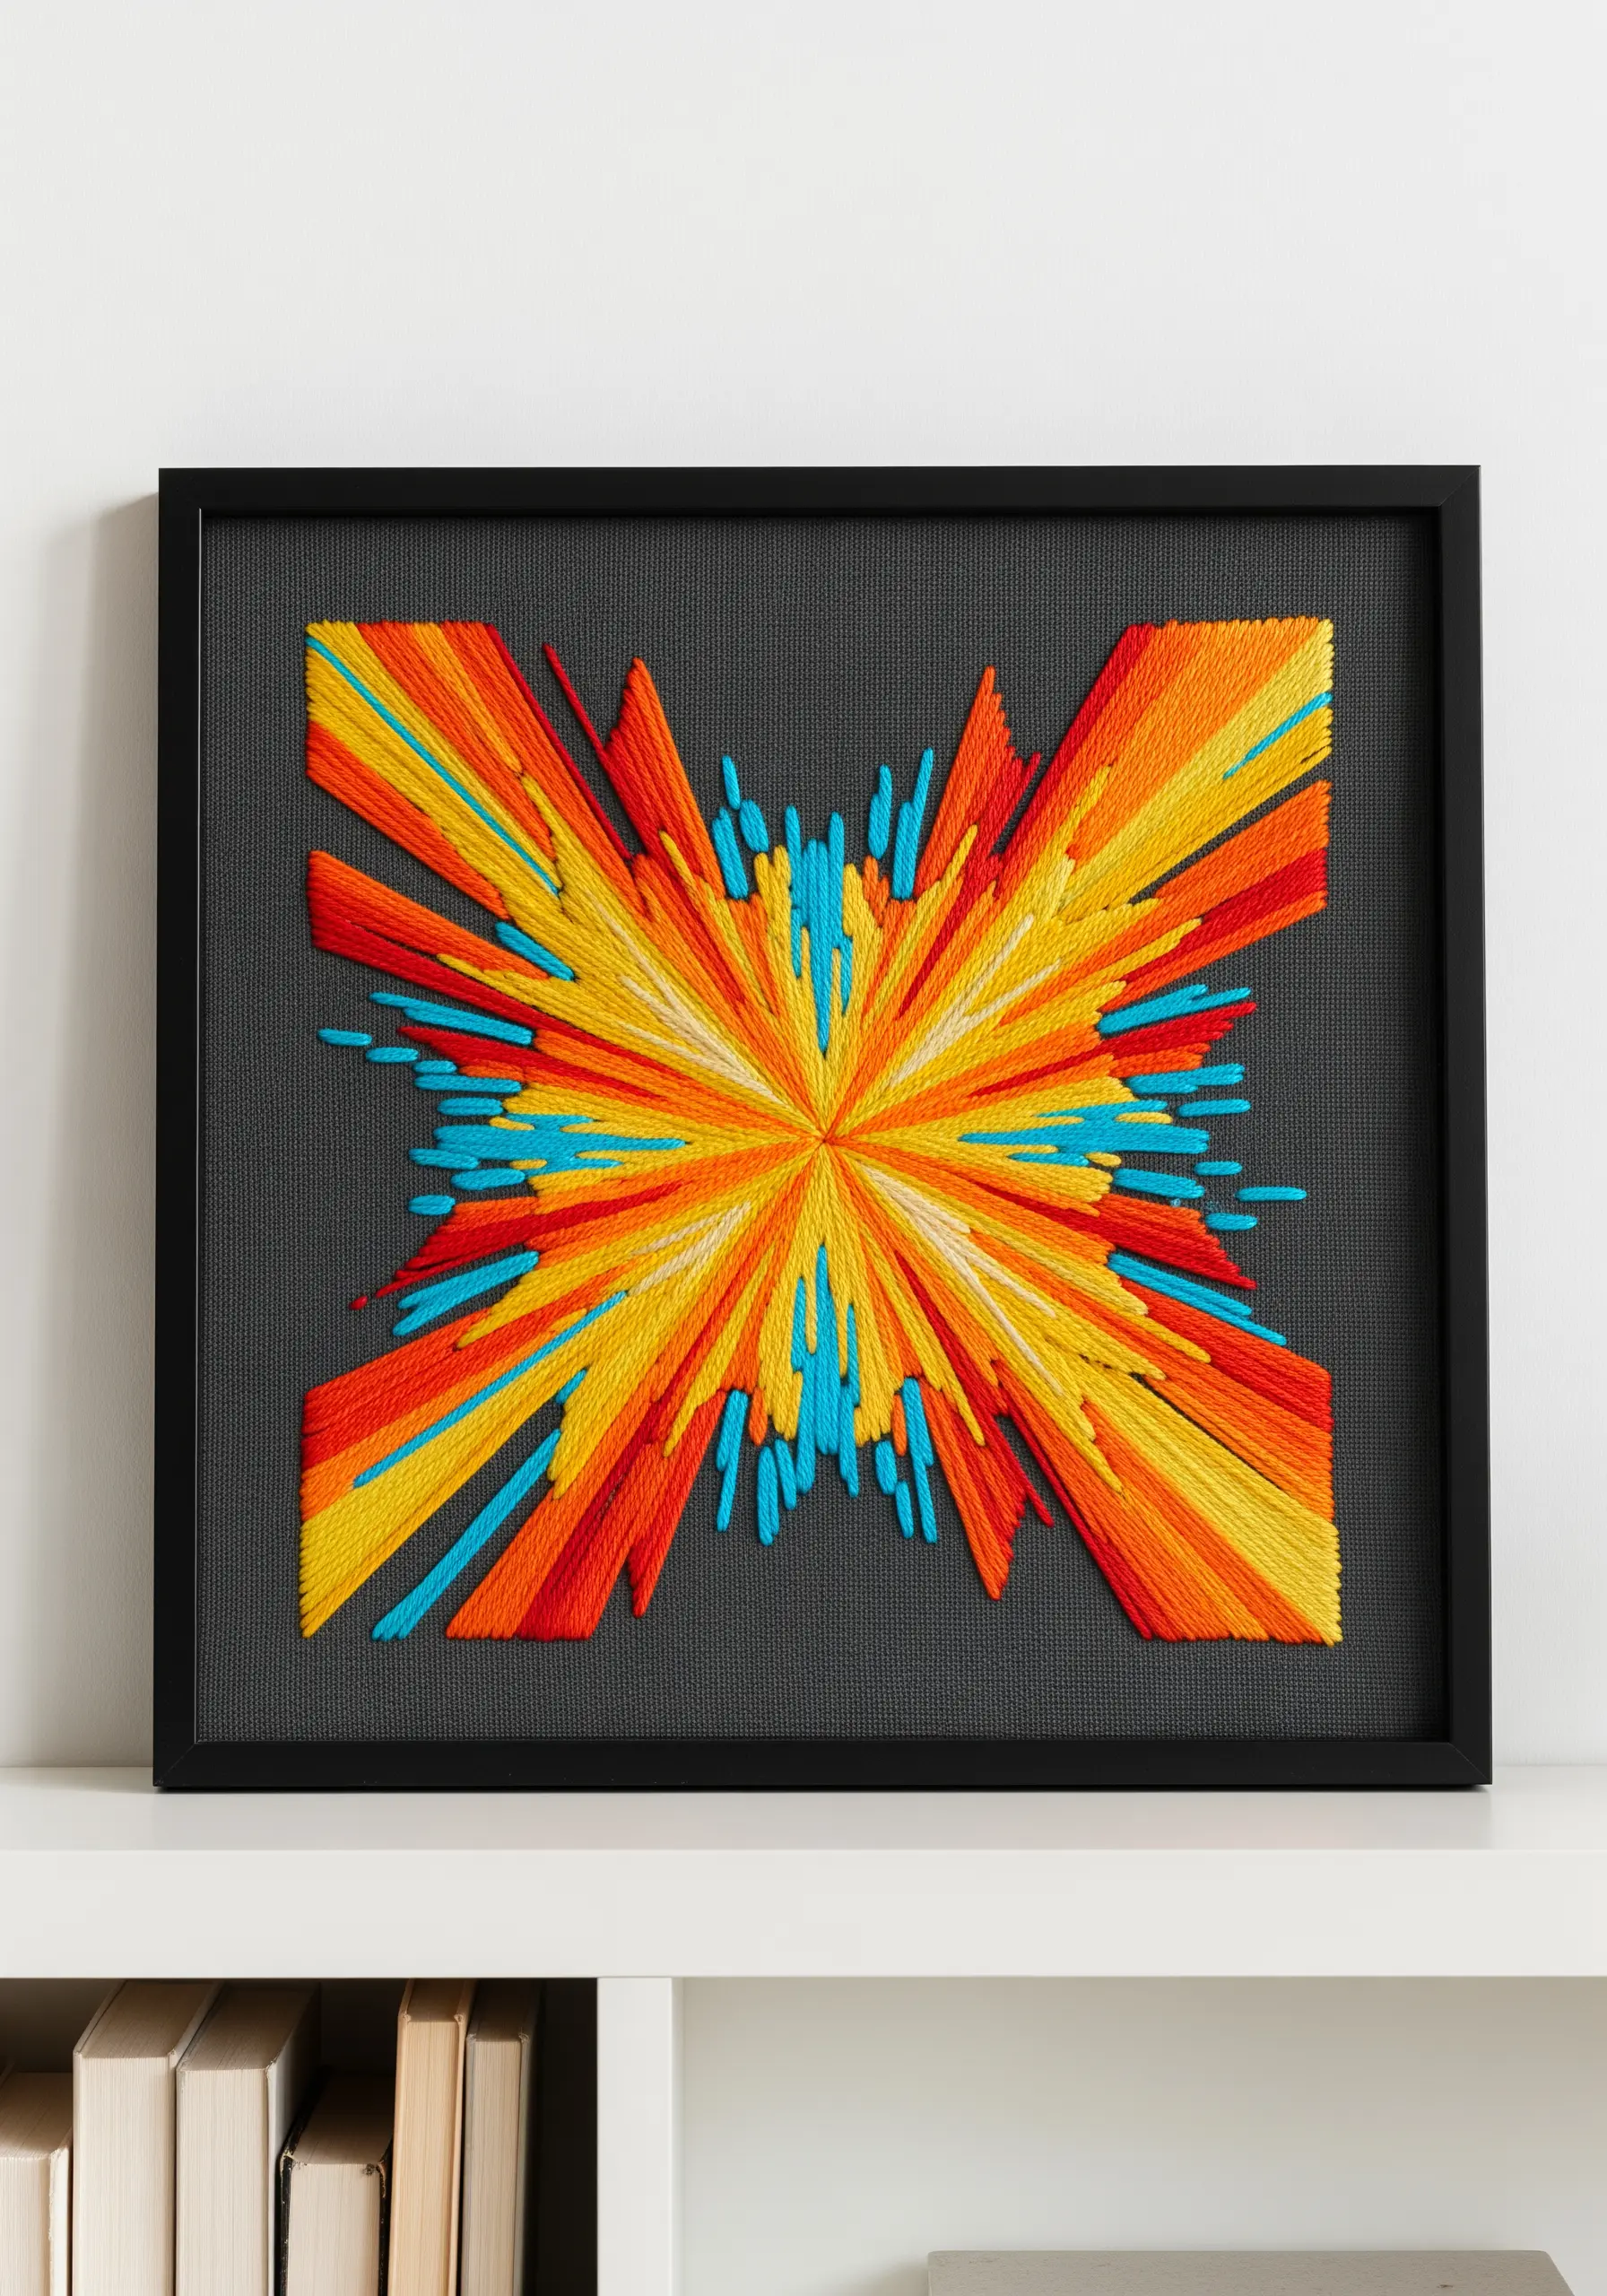
Capture a sense of dynamic motion by using only straight stitches radiating from a central point.
Vary the length and density of your stitches, layering colors to build intensity—this creates an effect of a color burst or explosion.
Place pops of a contrasting color, like the turquoise against the warm oranges and yellows, to create focal points and guide the viewer’s eye.
This abstract approach is perfect for modern thread art projects and works beautifully when framed in a simple, black gallery frame.
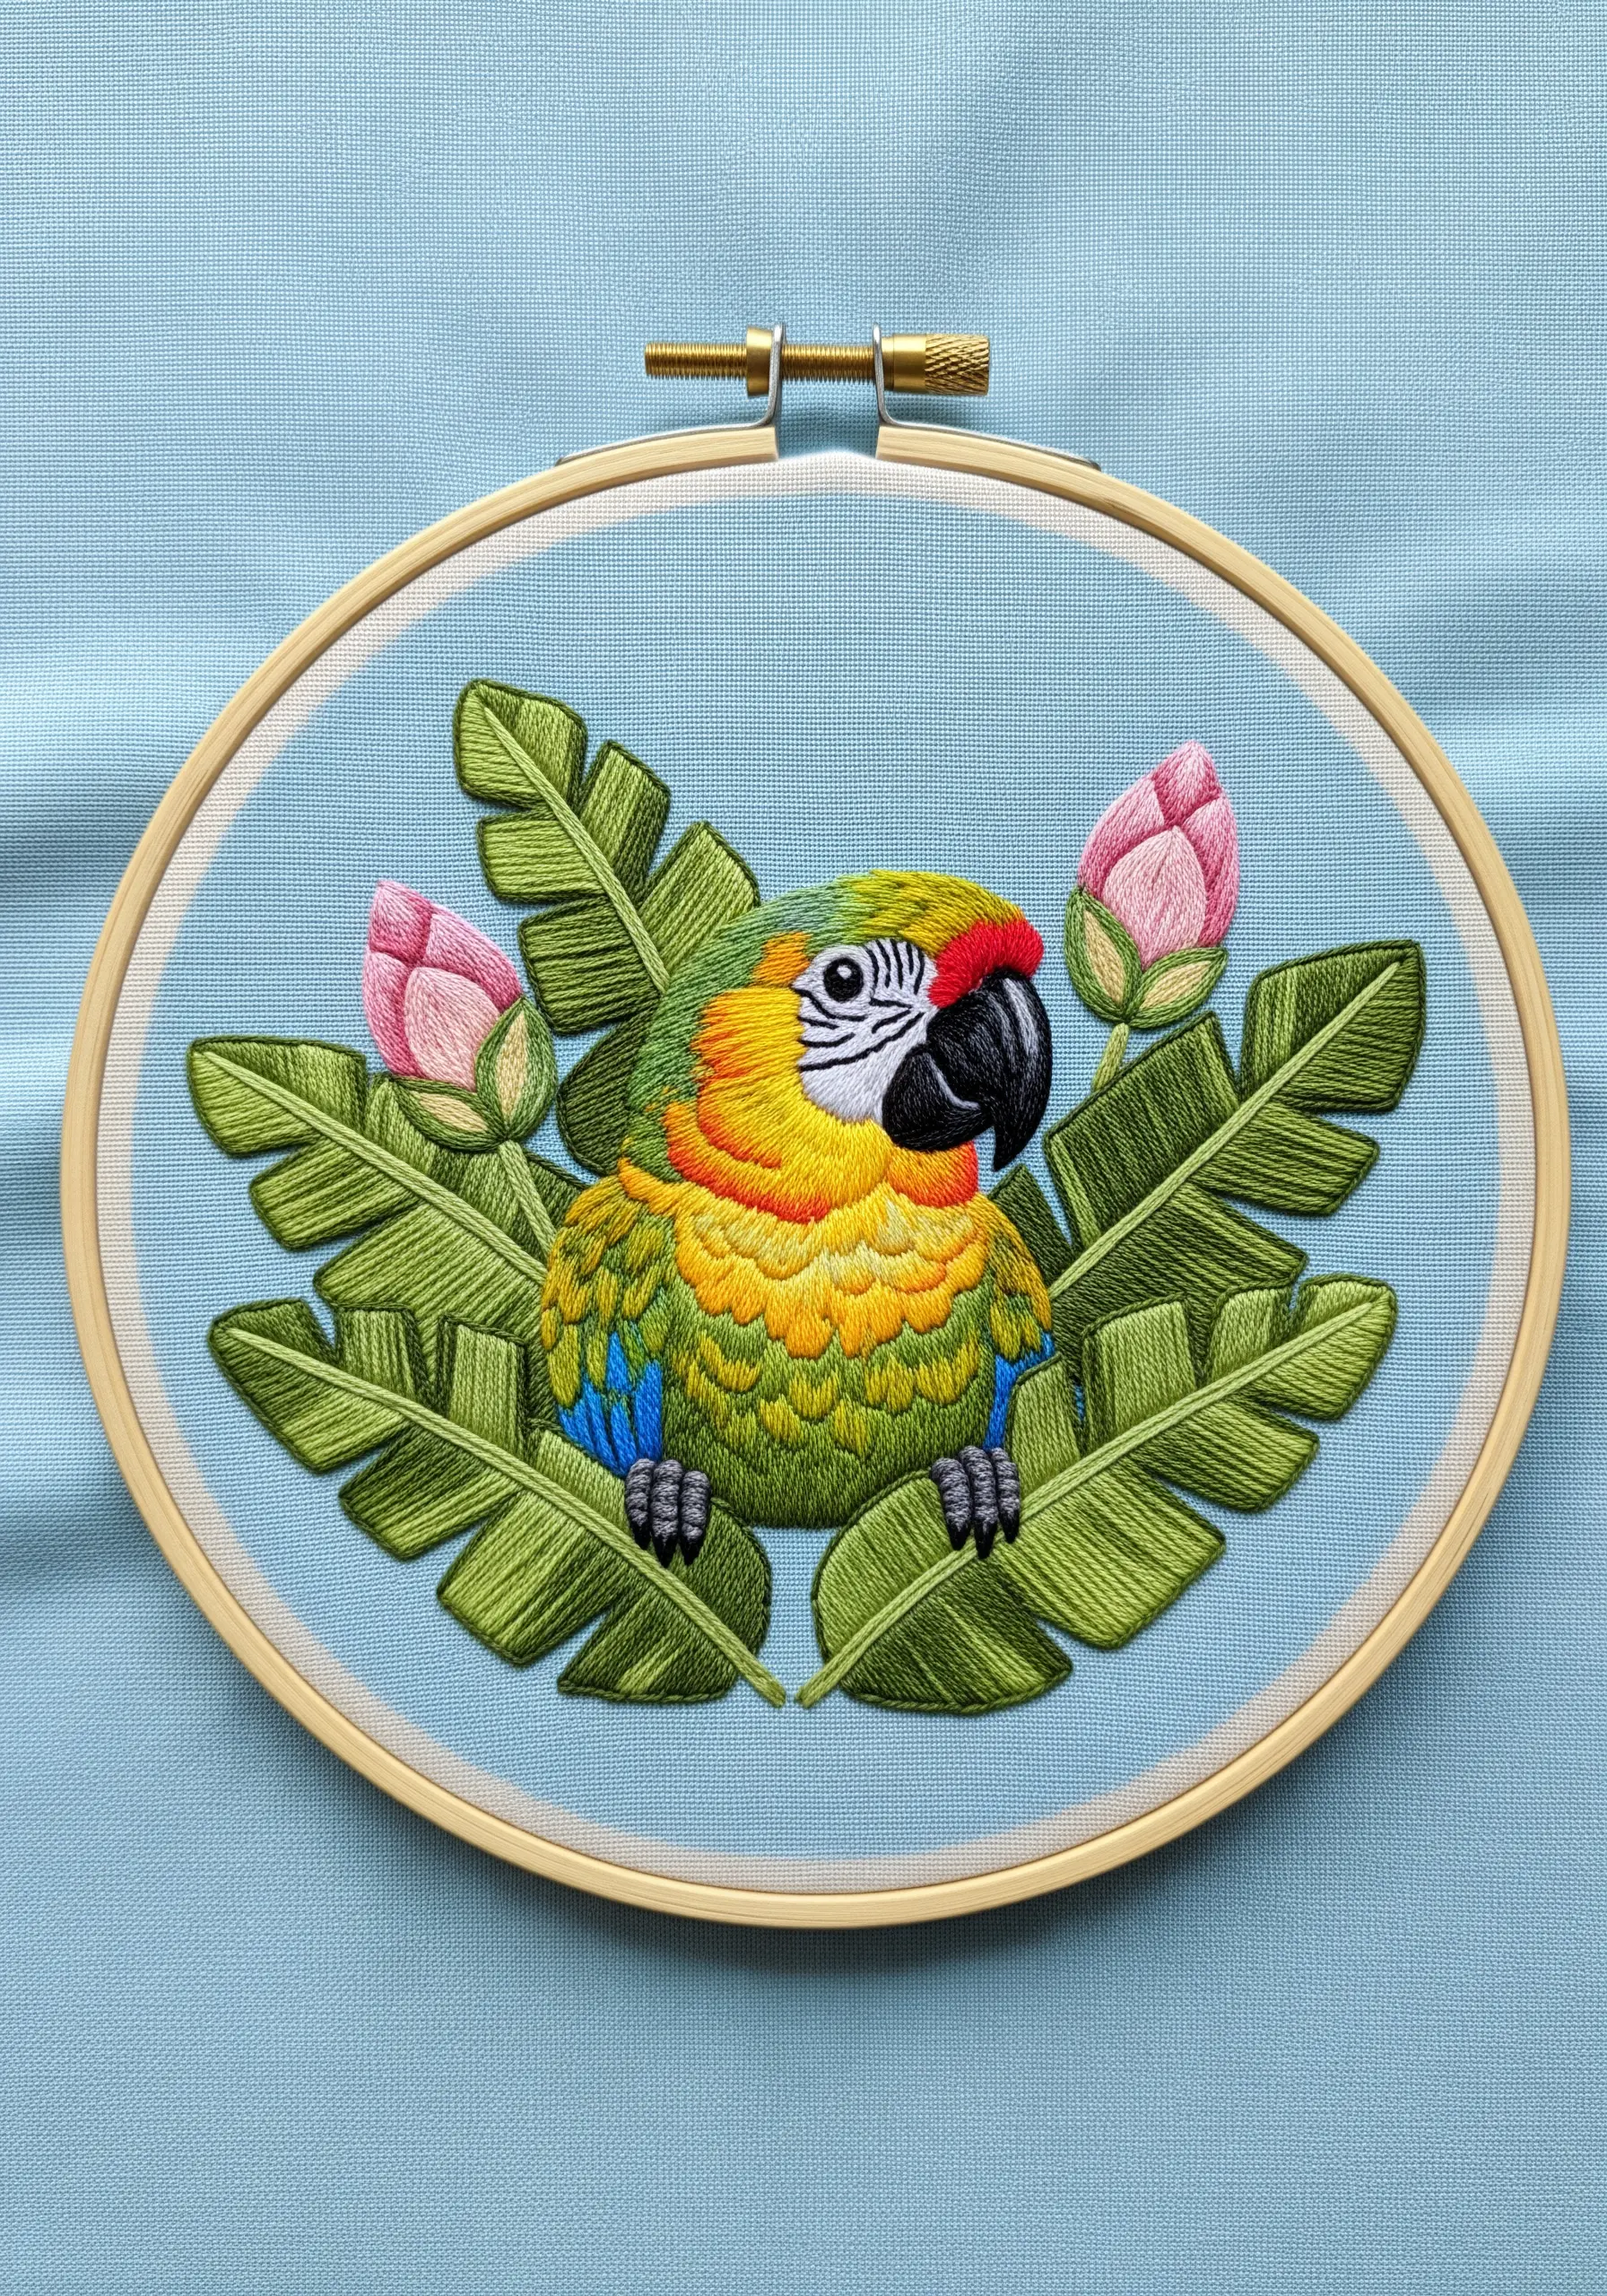
4. Weave a Tapestry of Analogous Greens and Blues
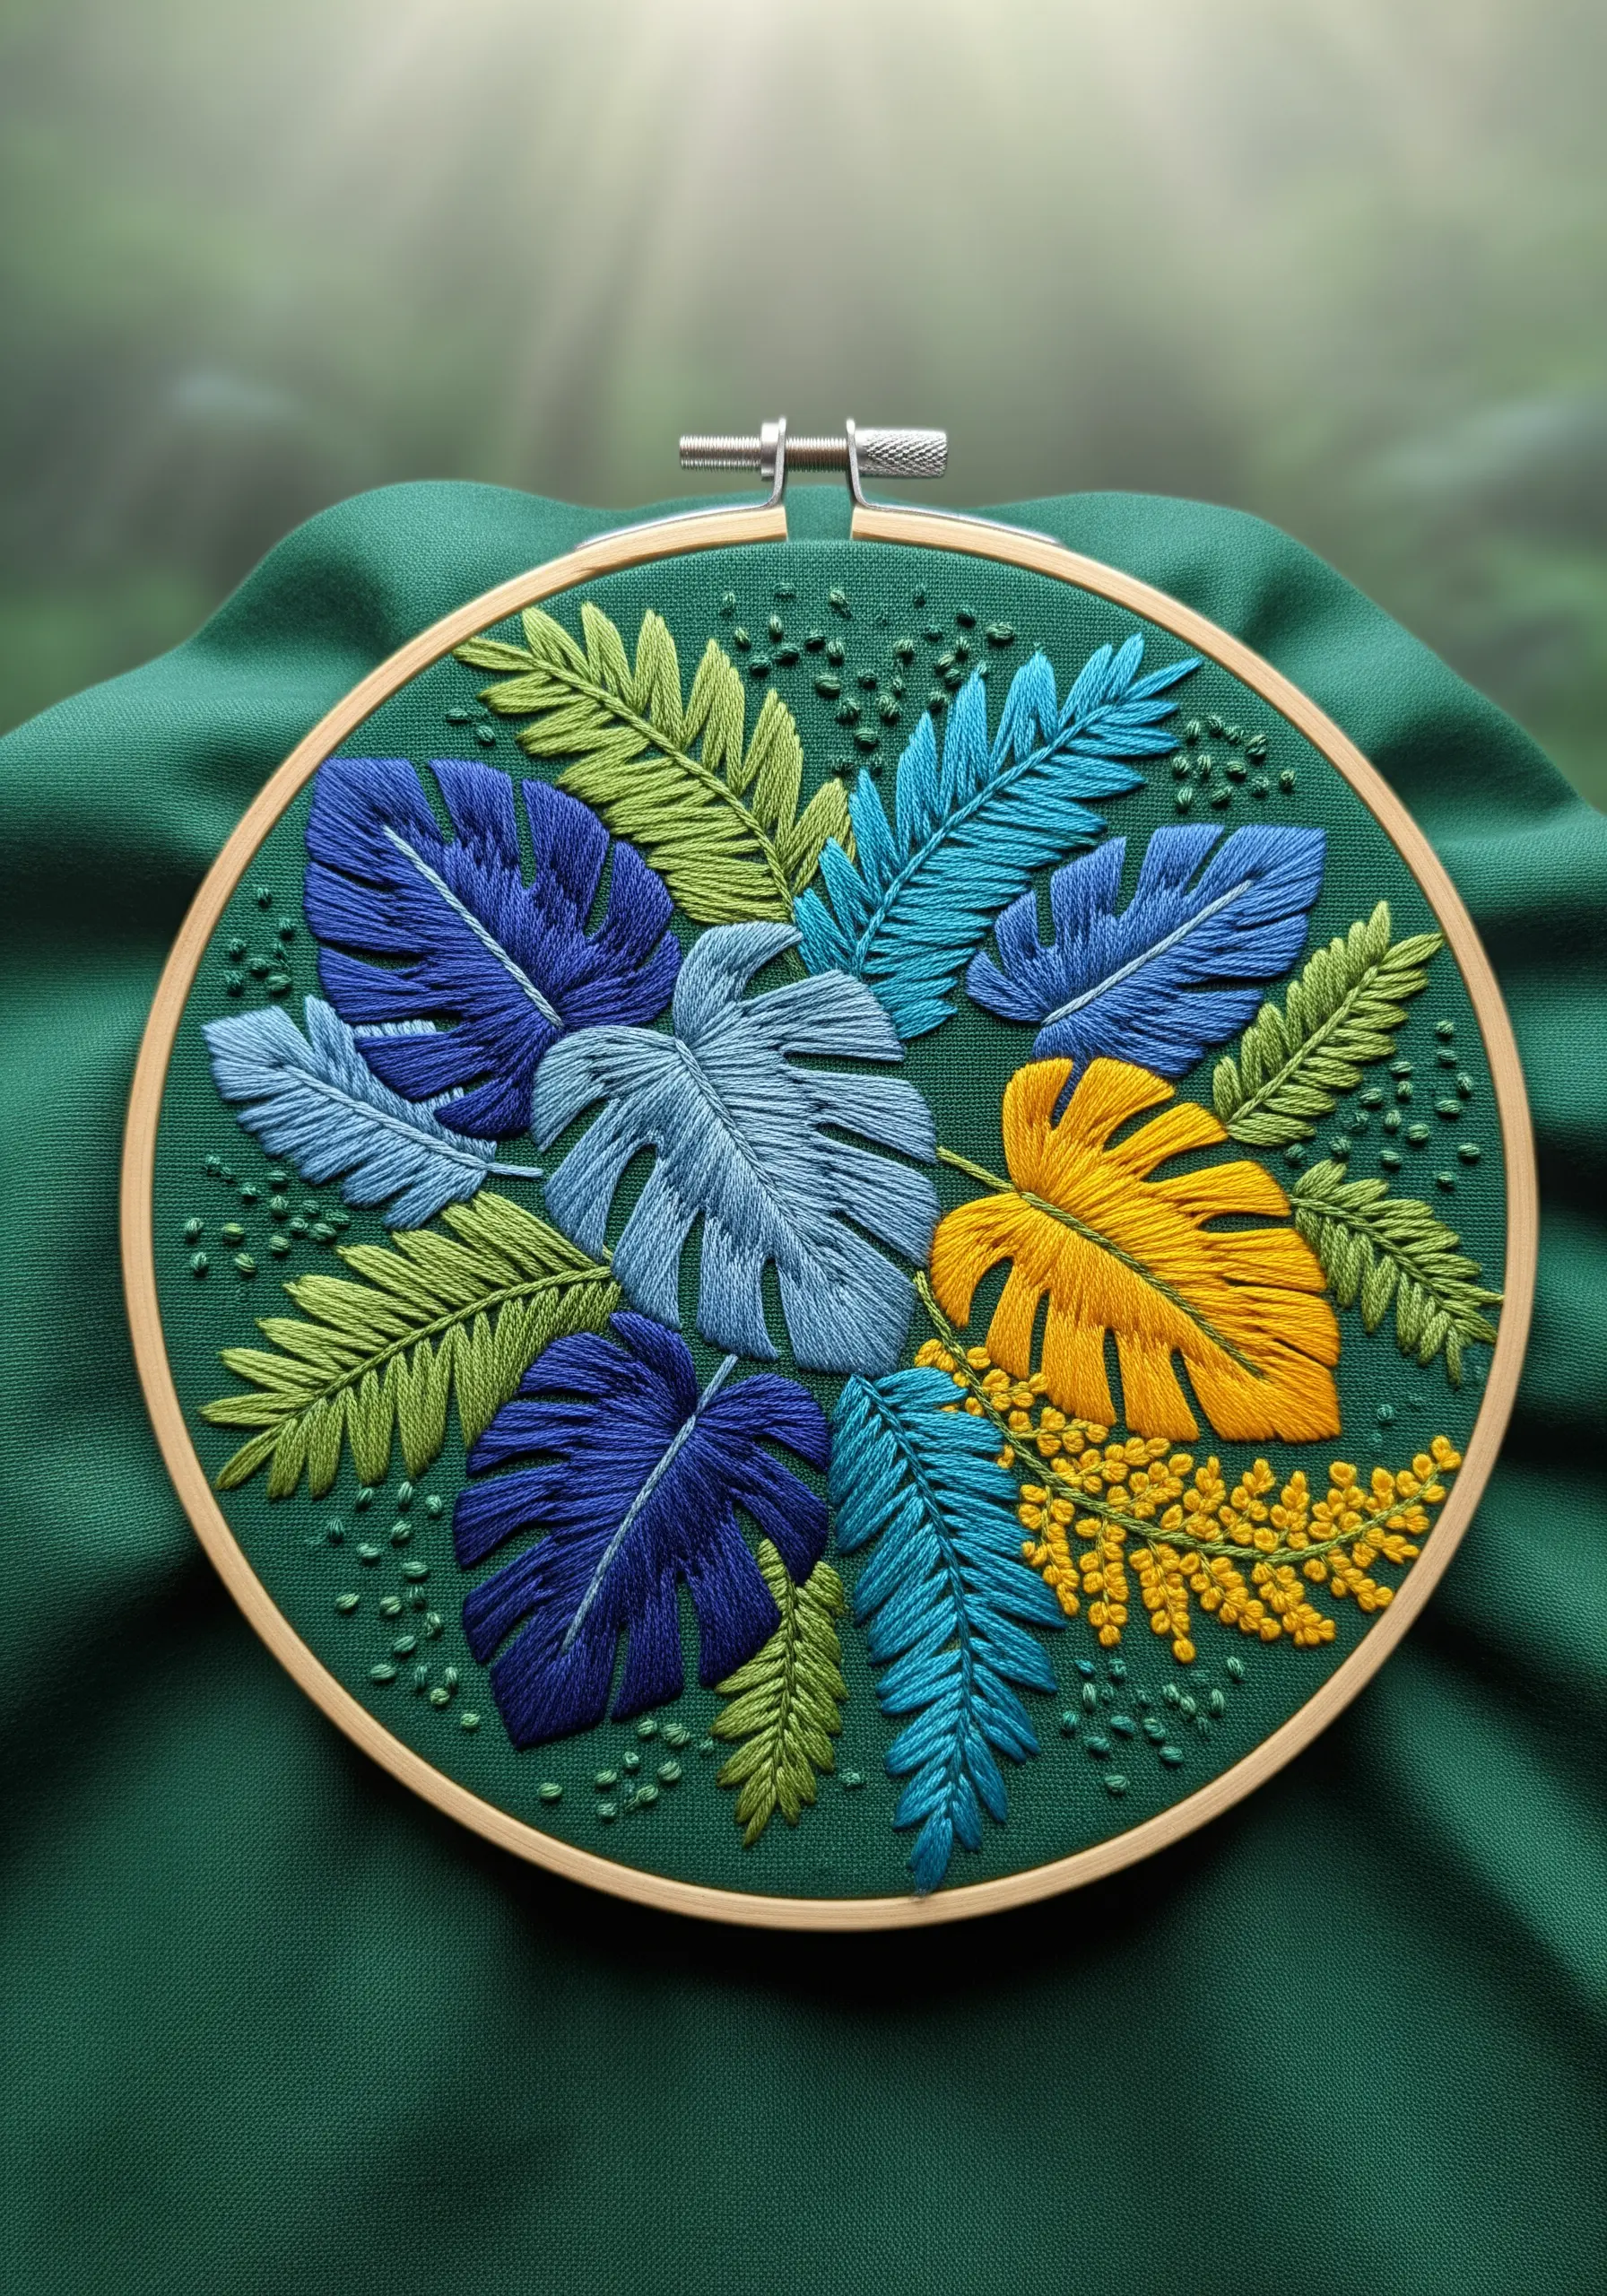
Create a lush, harmonious botanical scene by building a palette of analogous colors—colors that sit next to each other on the color wheel, like the greens and blues here.
Introduce a single, unexpected warm color, like the golden yellow leaf, to serve as a focal point that prevents the design from feeling flat.
Scatter French knots in a coordinating green throughout the background to add subtle texture and depth, suggesting a dense jungle floor without drawing attention from the main leaves.
5. Master Clean Color Blocking with Long-and-Short Stitch
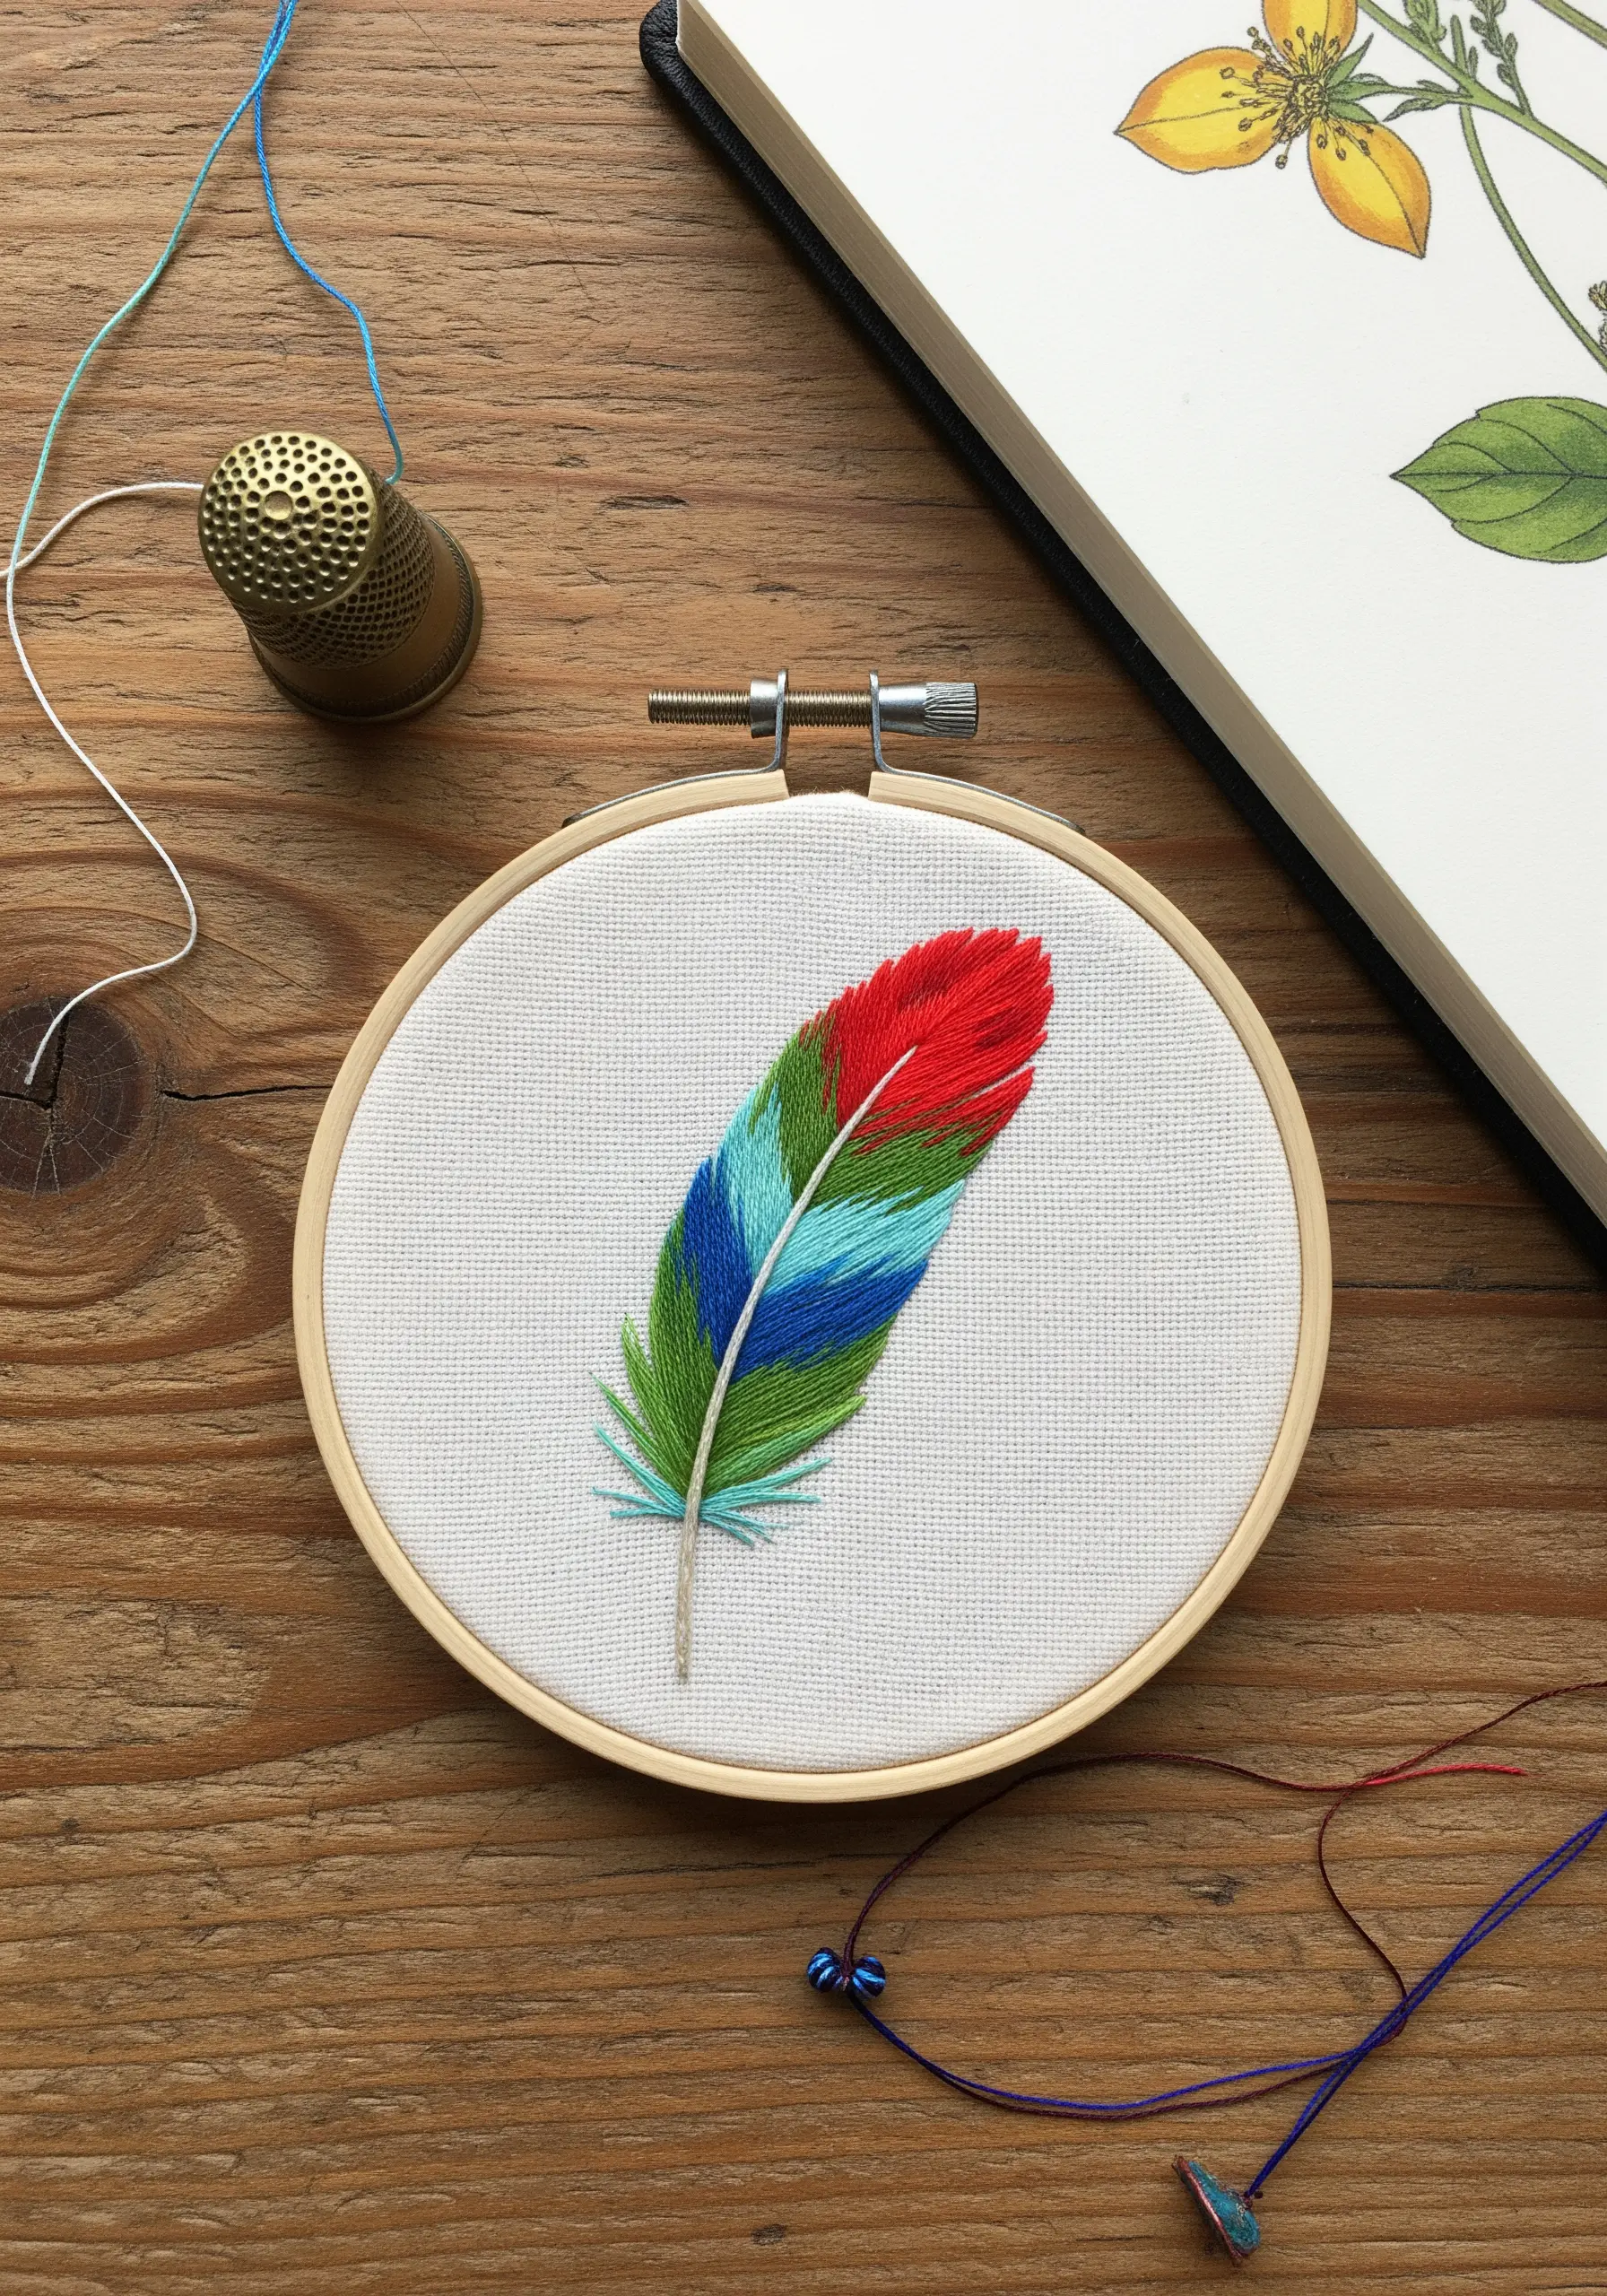
To achieve the crisp, clean sections of color in this feather, use a technique called thread painting, or long-and-short stitch.
Work each color block separately, ensuring your stitches are tight and uniform in direction to create a smooth, satin-like finish.
For the delicate center quill, use a single strand of floss and a simple split stitch. This contrast in weight and texture makes the feather feel both bold and delicate at the same time.
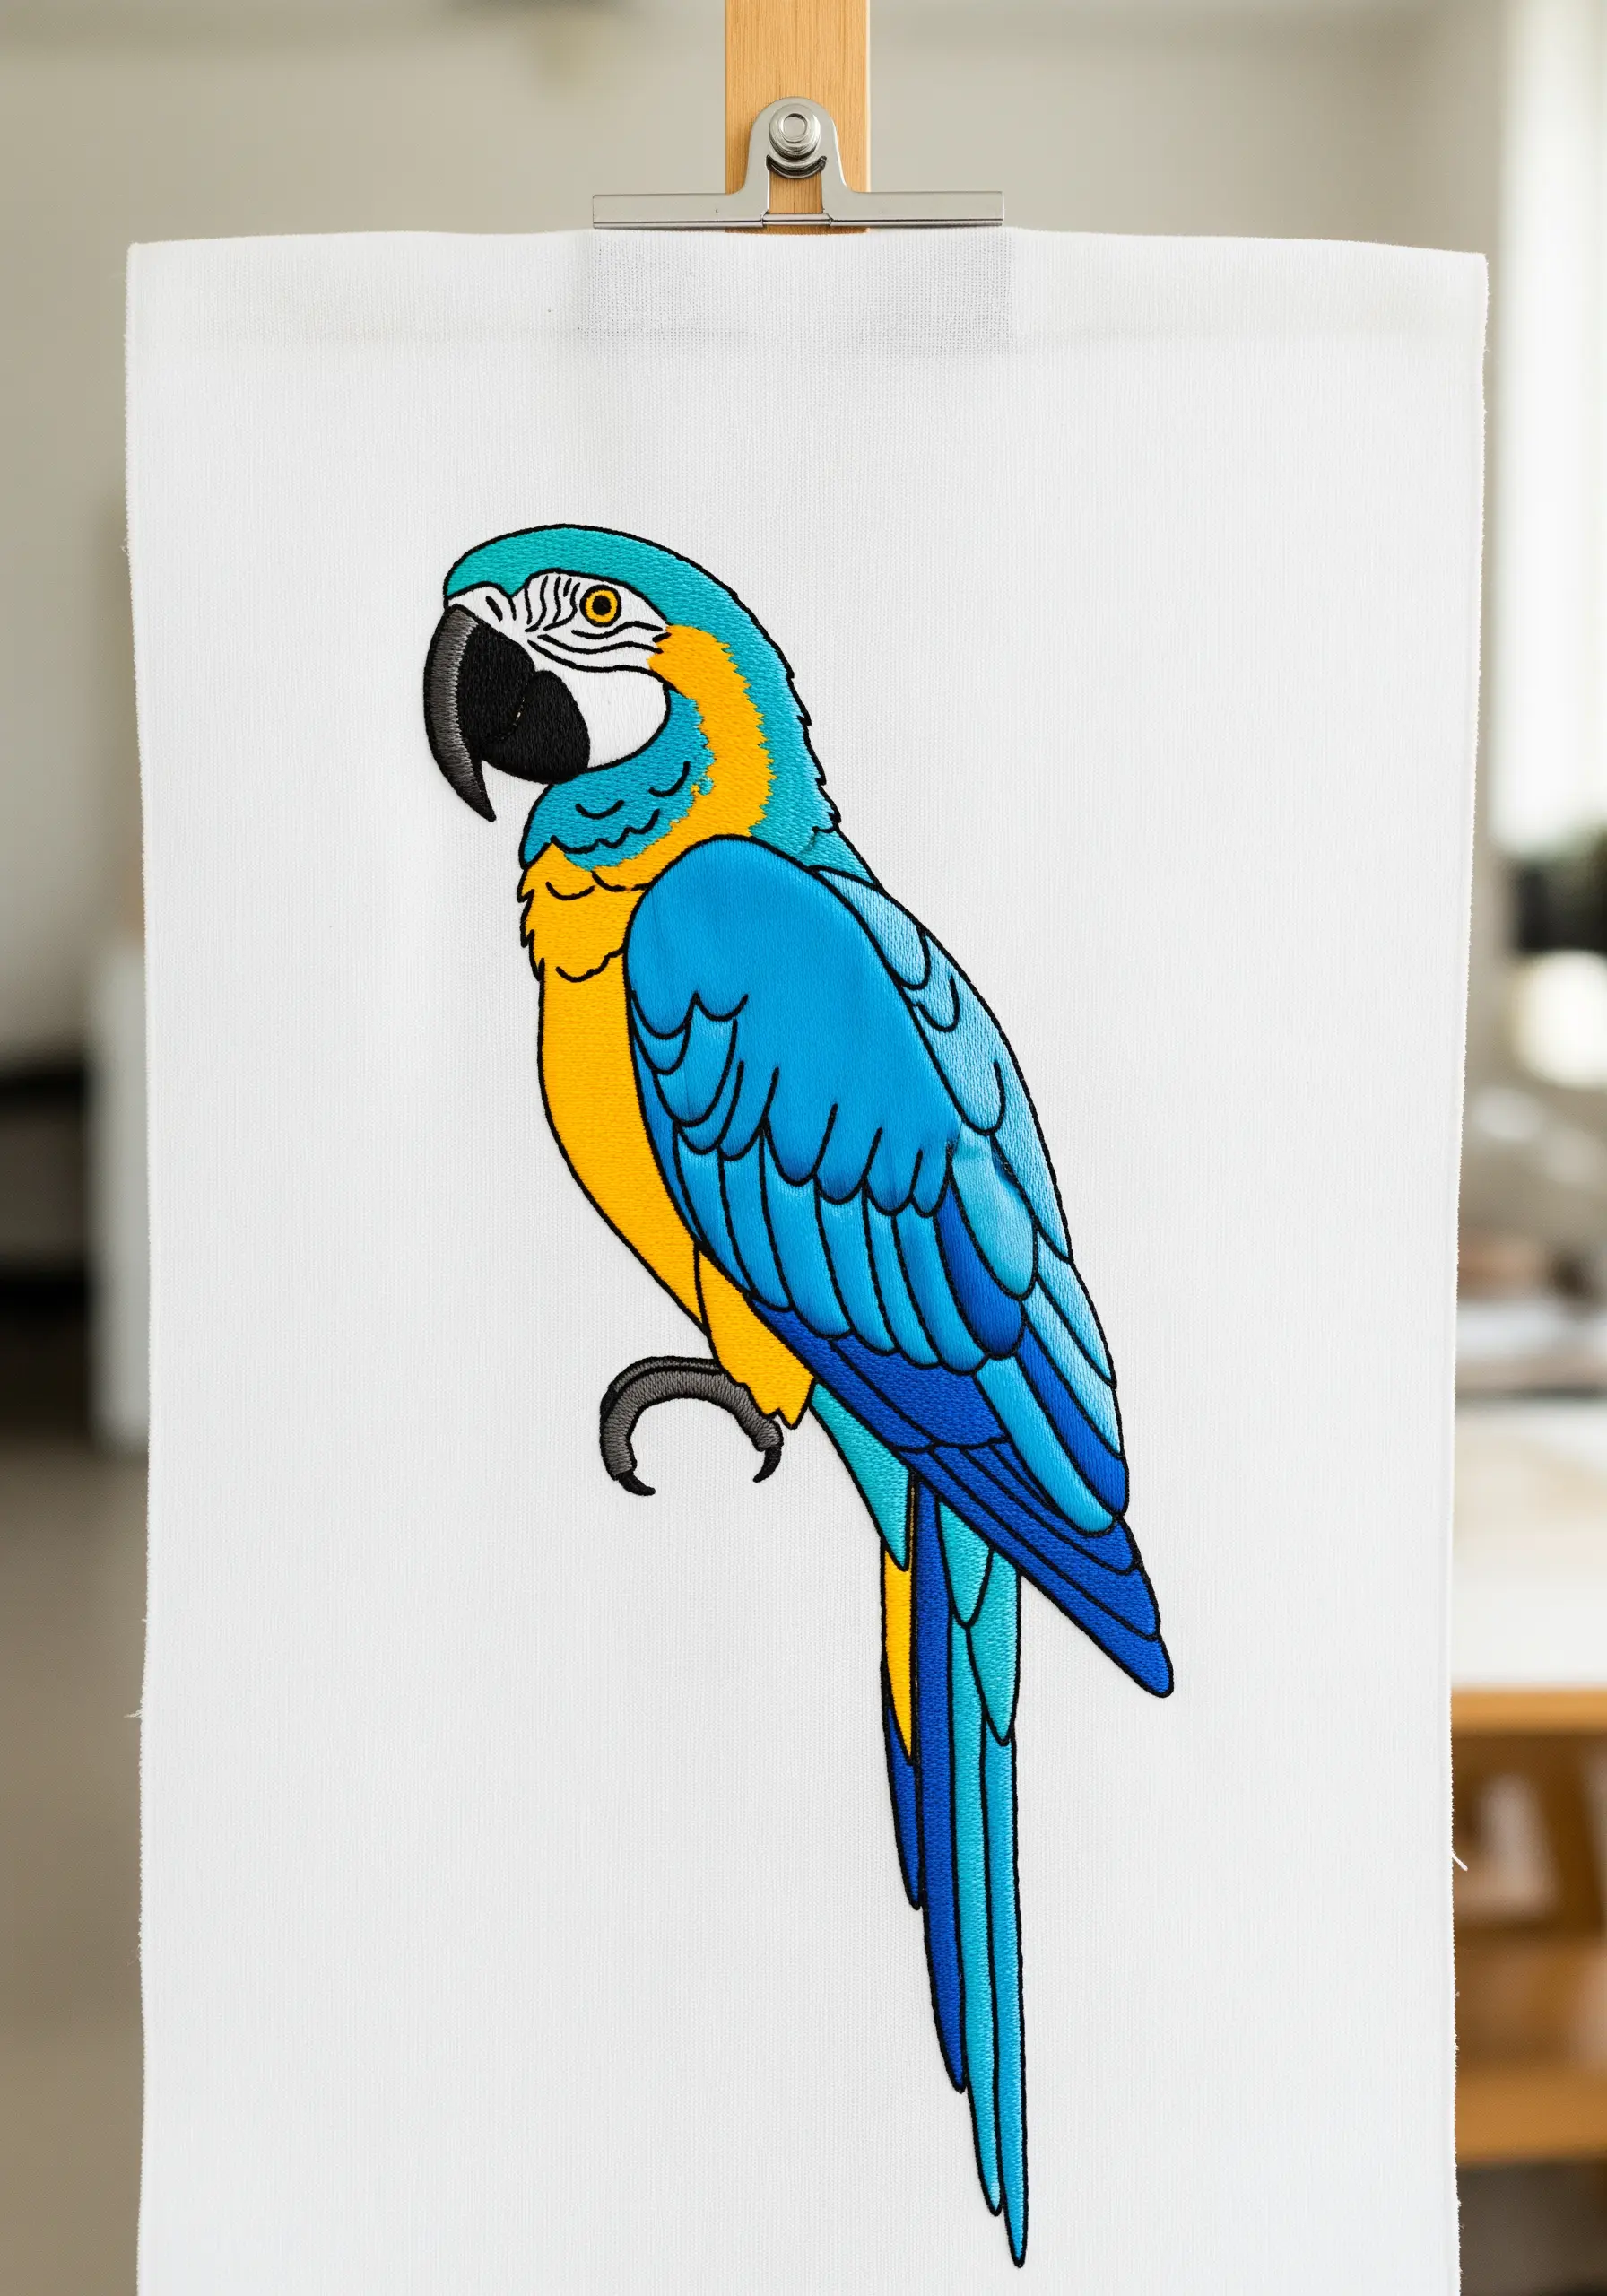
6. Define Graphic Motifs with a Bold Outline
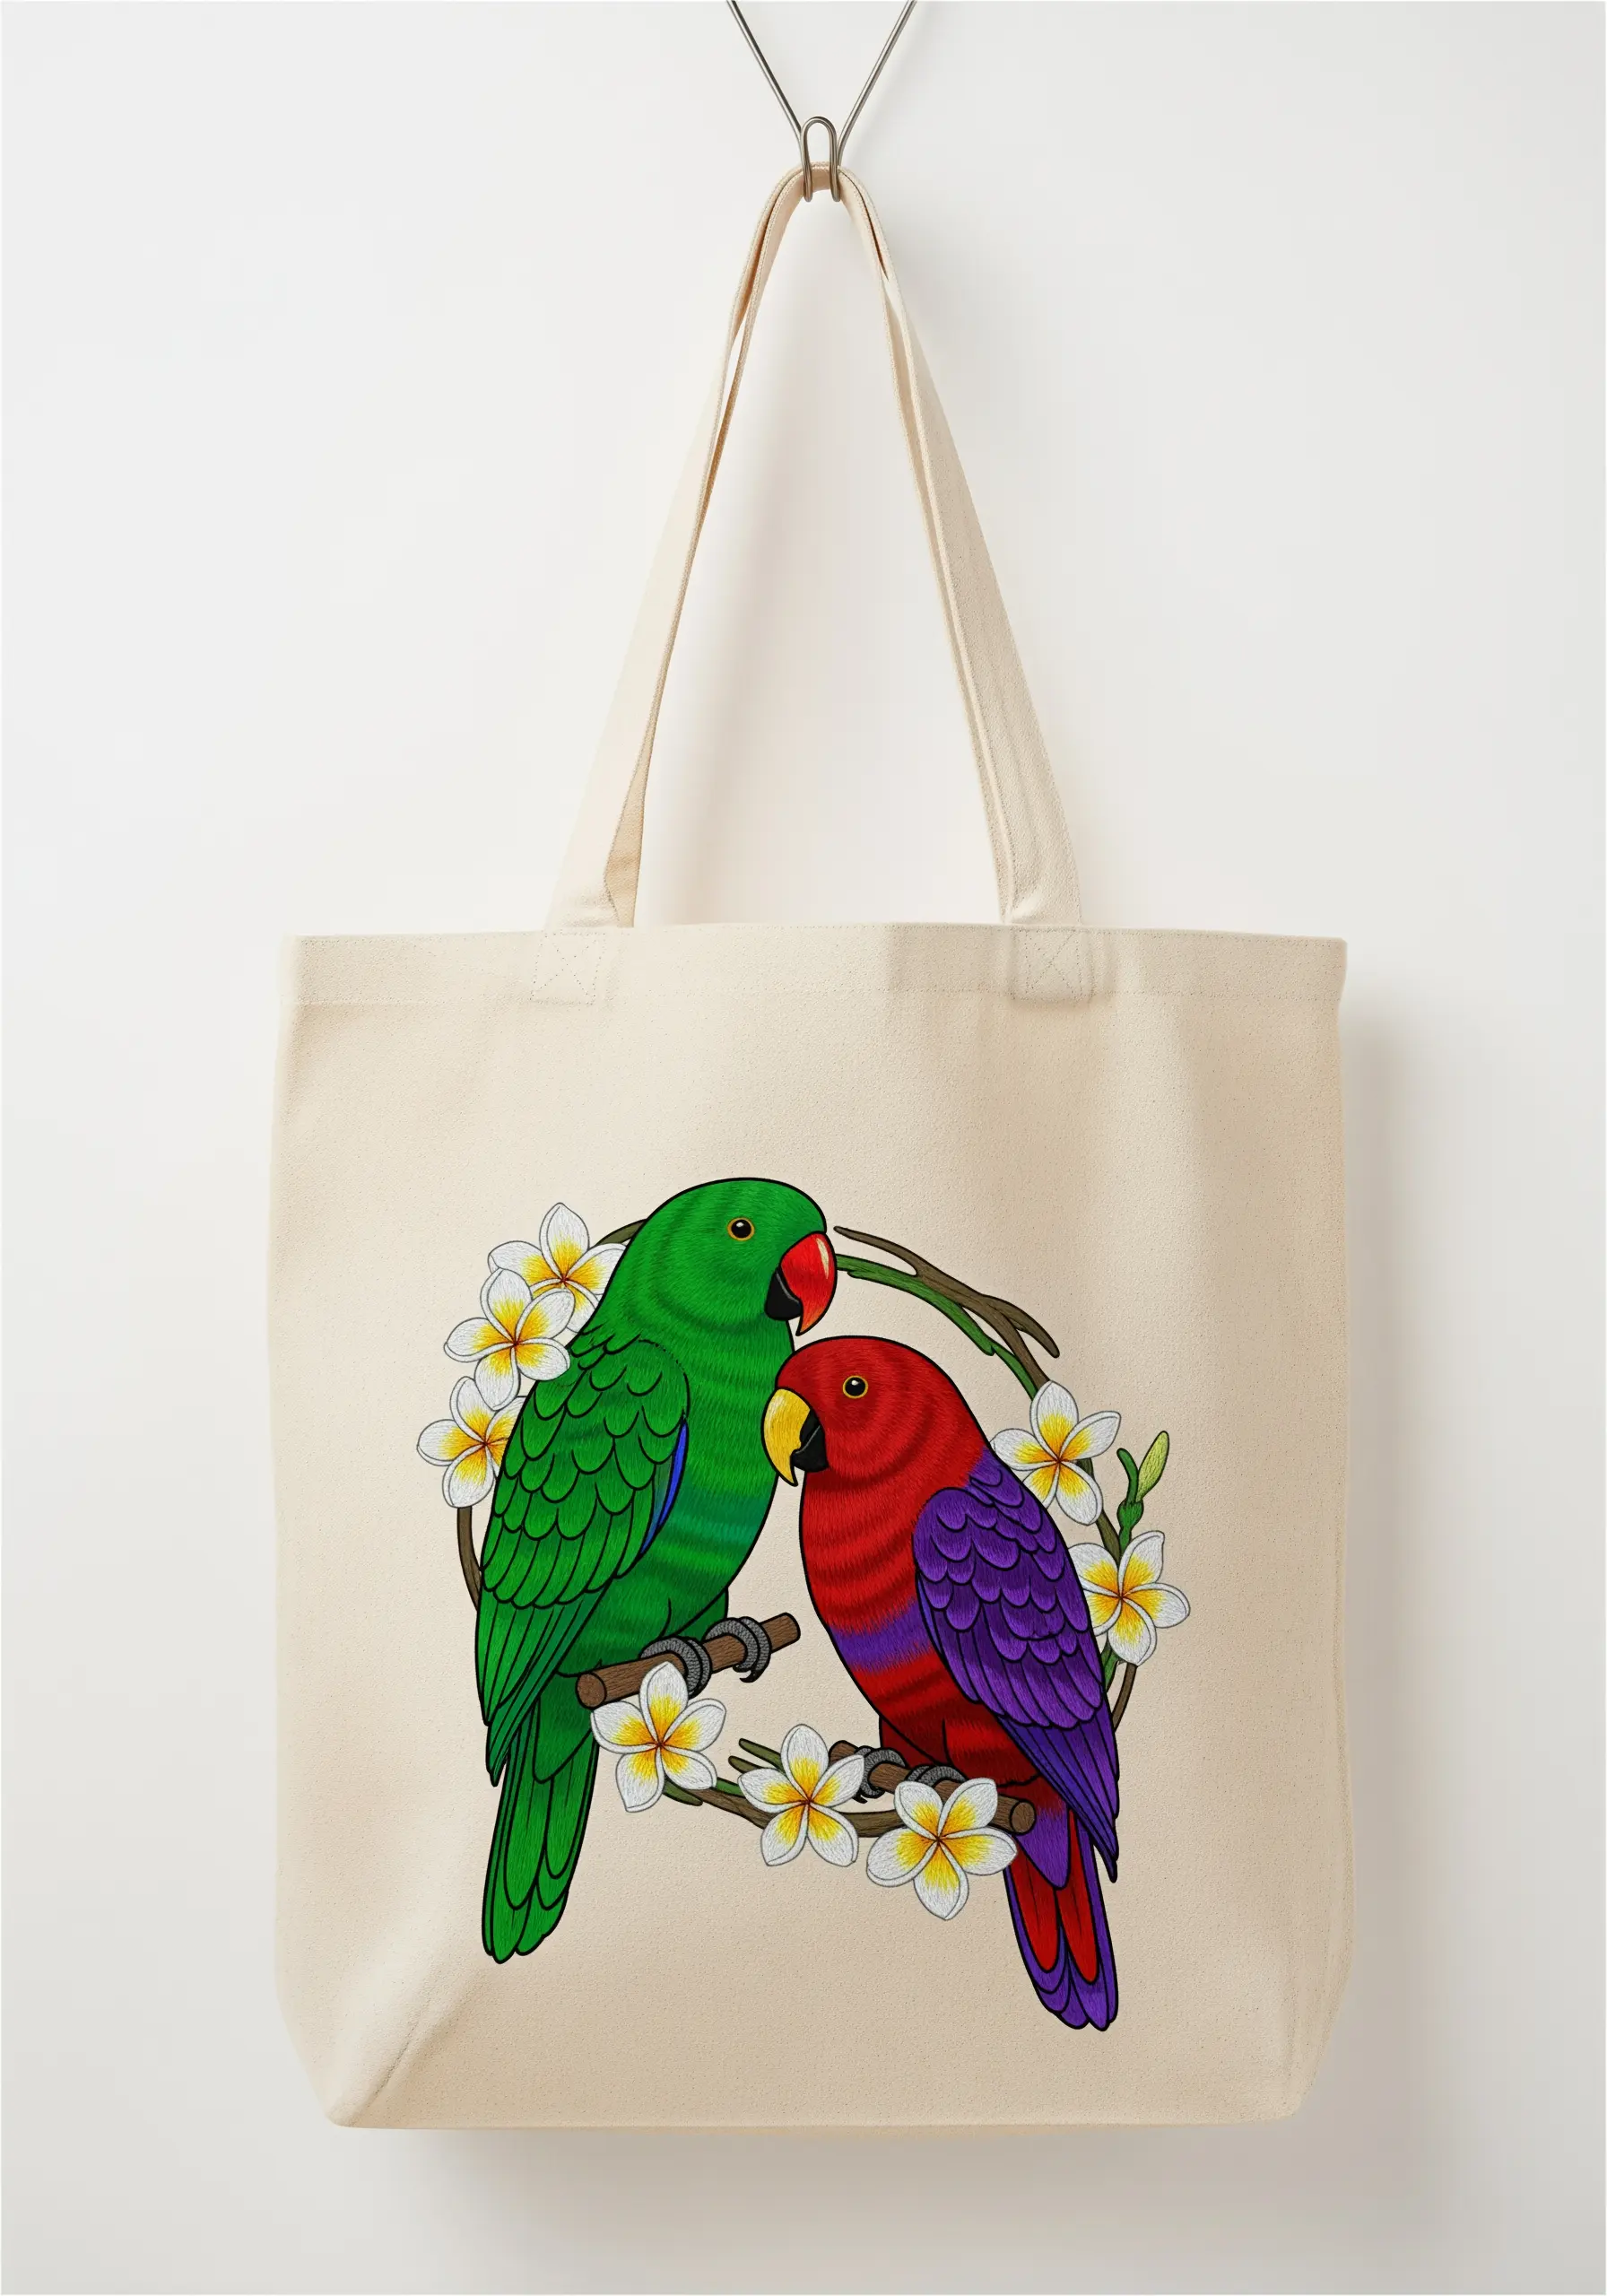
When embroidering on a high-use item like a tote bag, you need your design to be clear and durable.
Give your graphic parrot motifs a sharp, illustrative quality by first filling the shapes with satin stitch and then enclosing them with a heavy outline.
Use a three-strand backstitch or, for even more definition, a whipped backstitch. This technique not only makes the colors pop but also reinforces the edges of your satin stitches, protecting them from snagging.
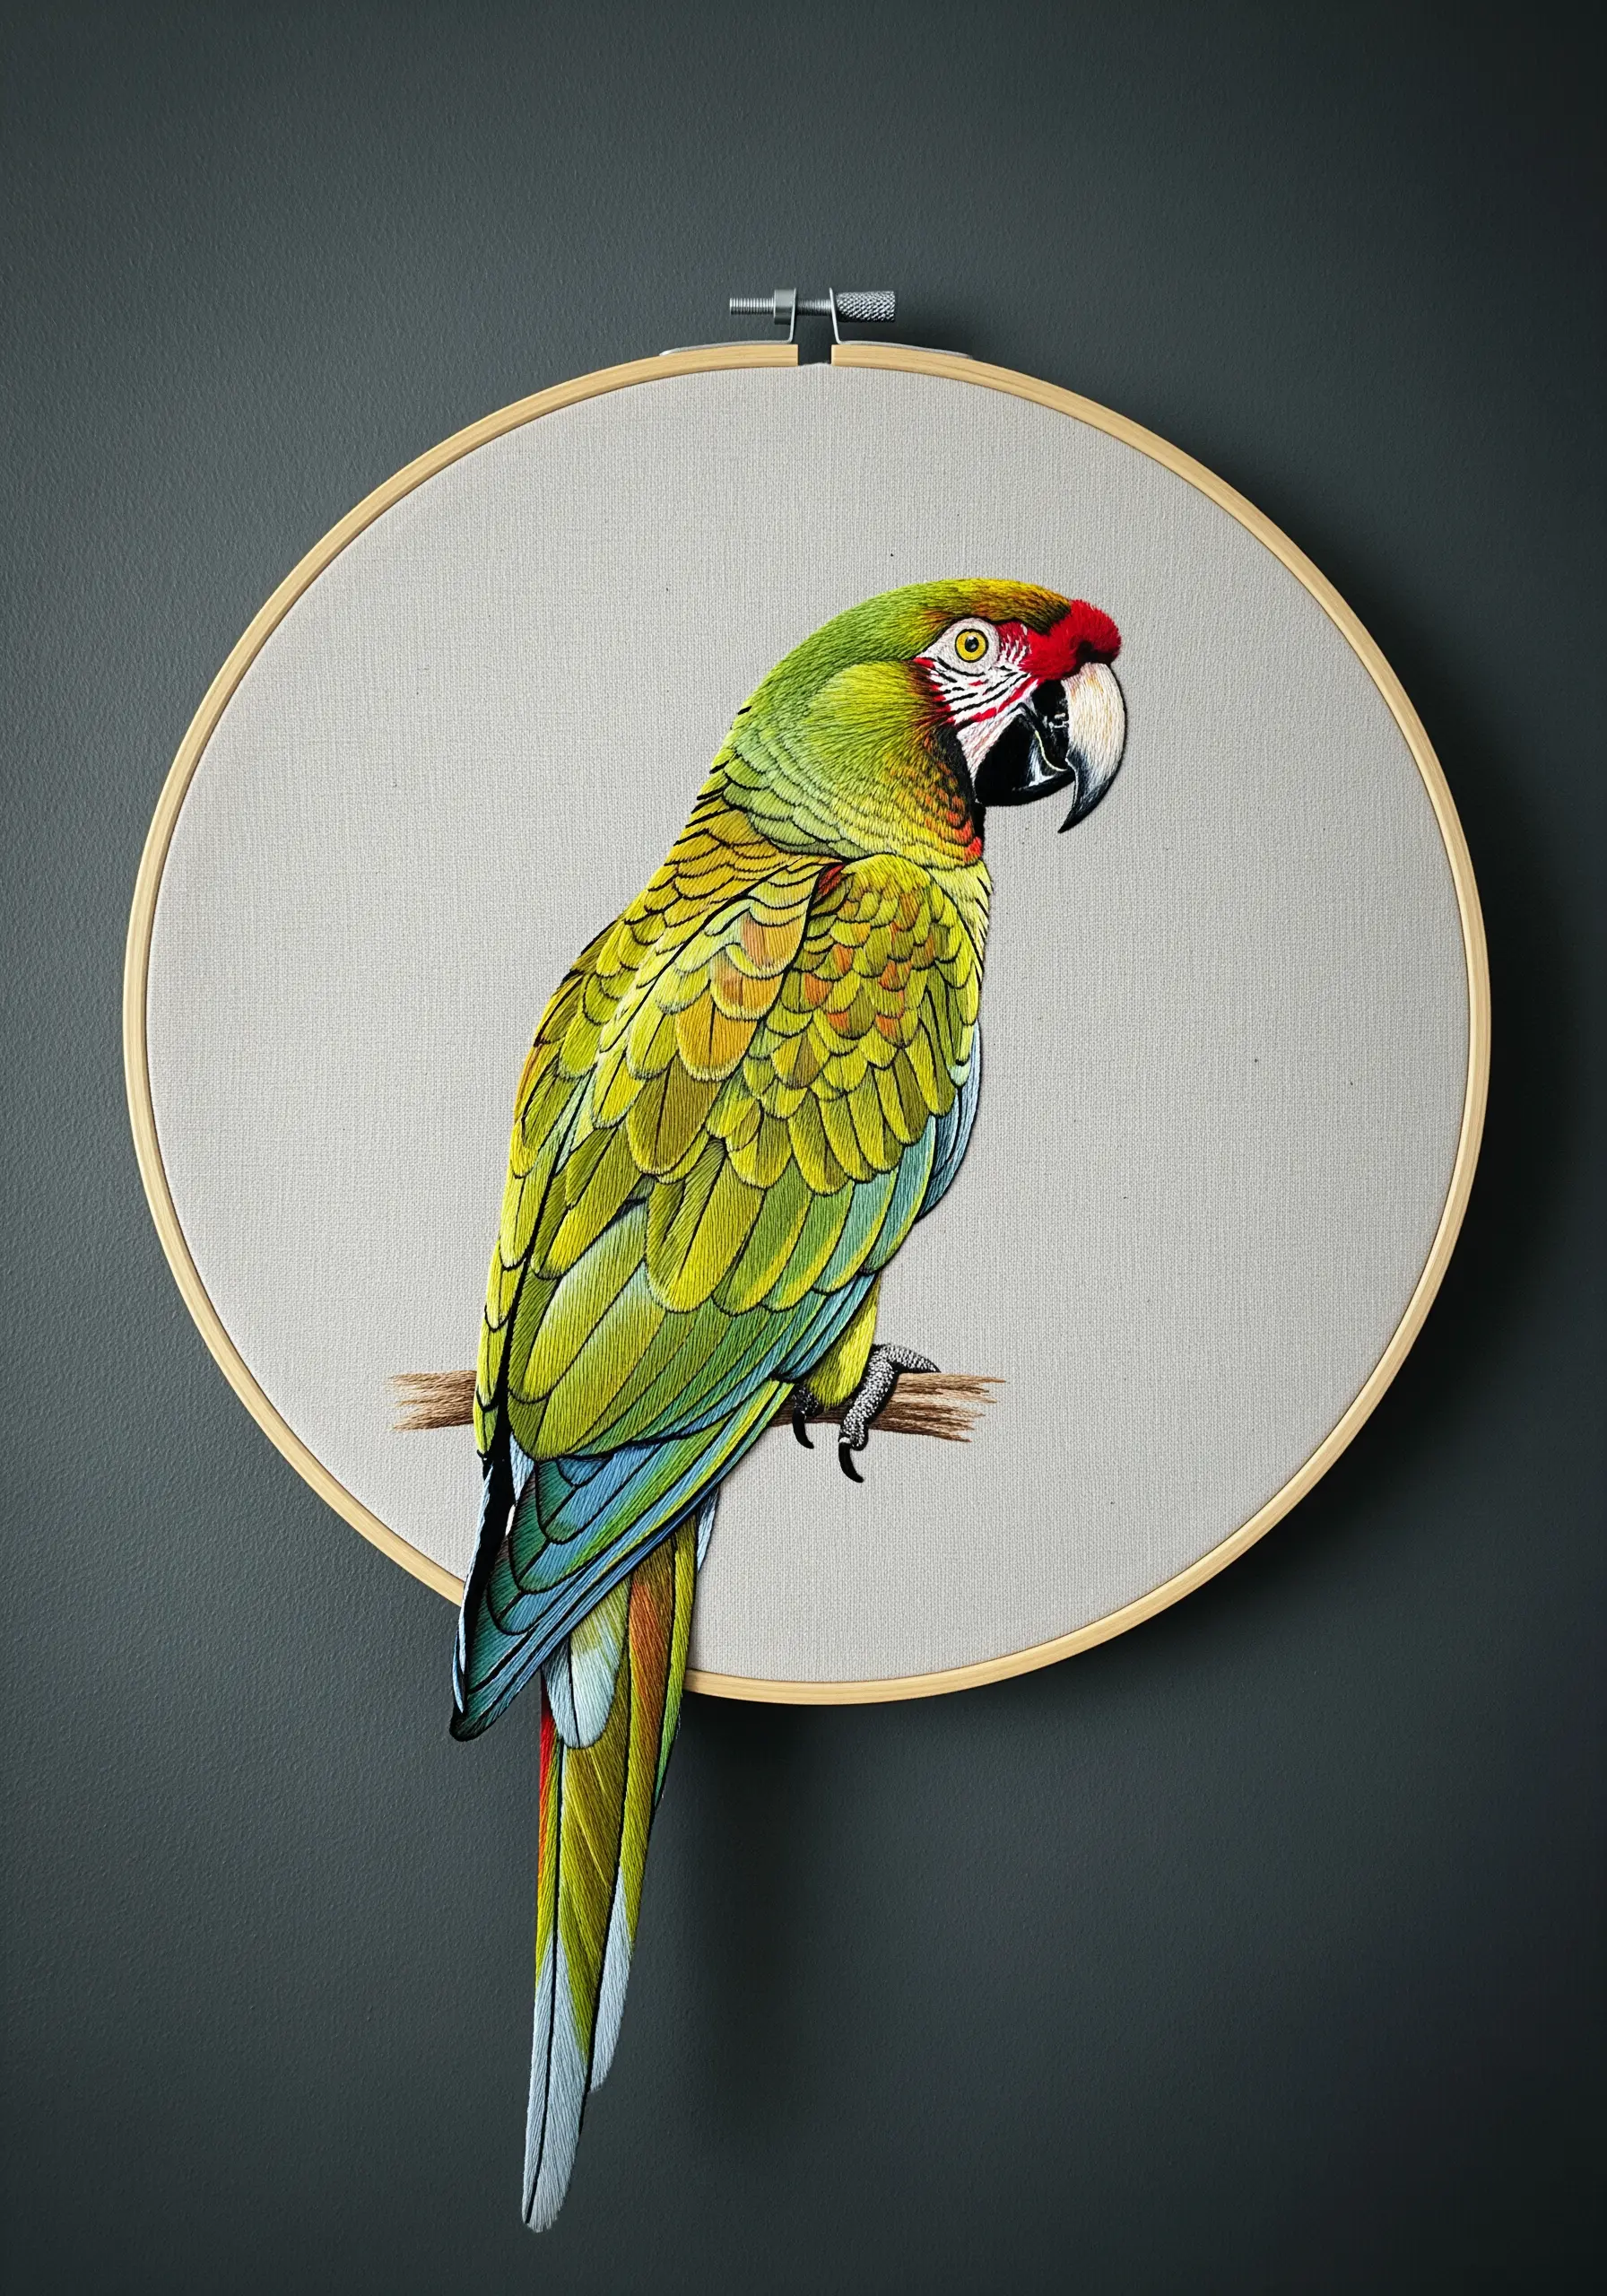
7. Unify Your Design with a Monochromatic Background
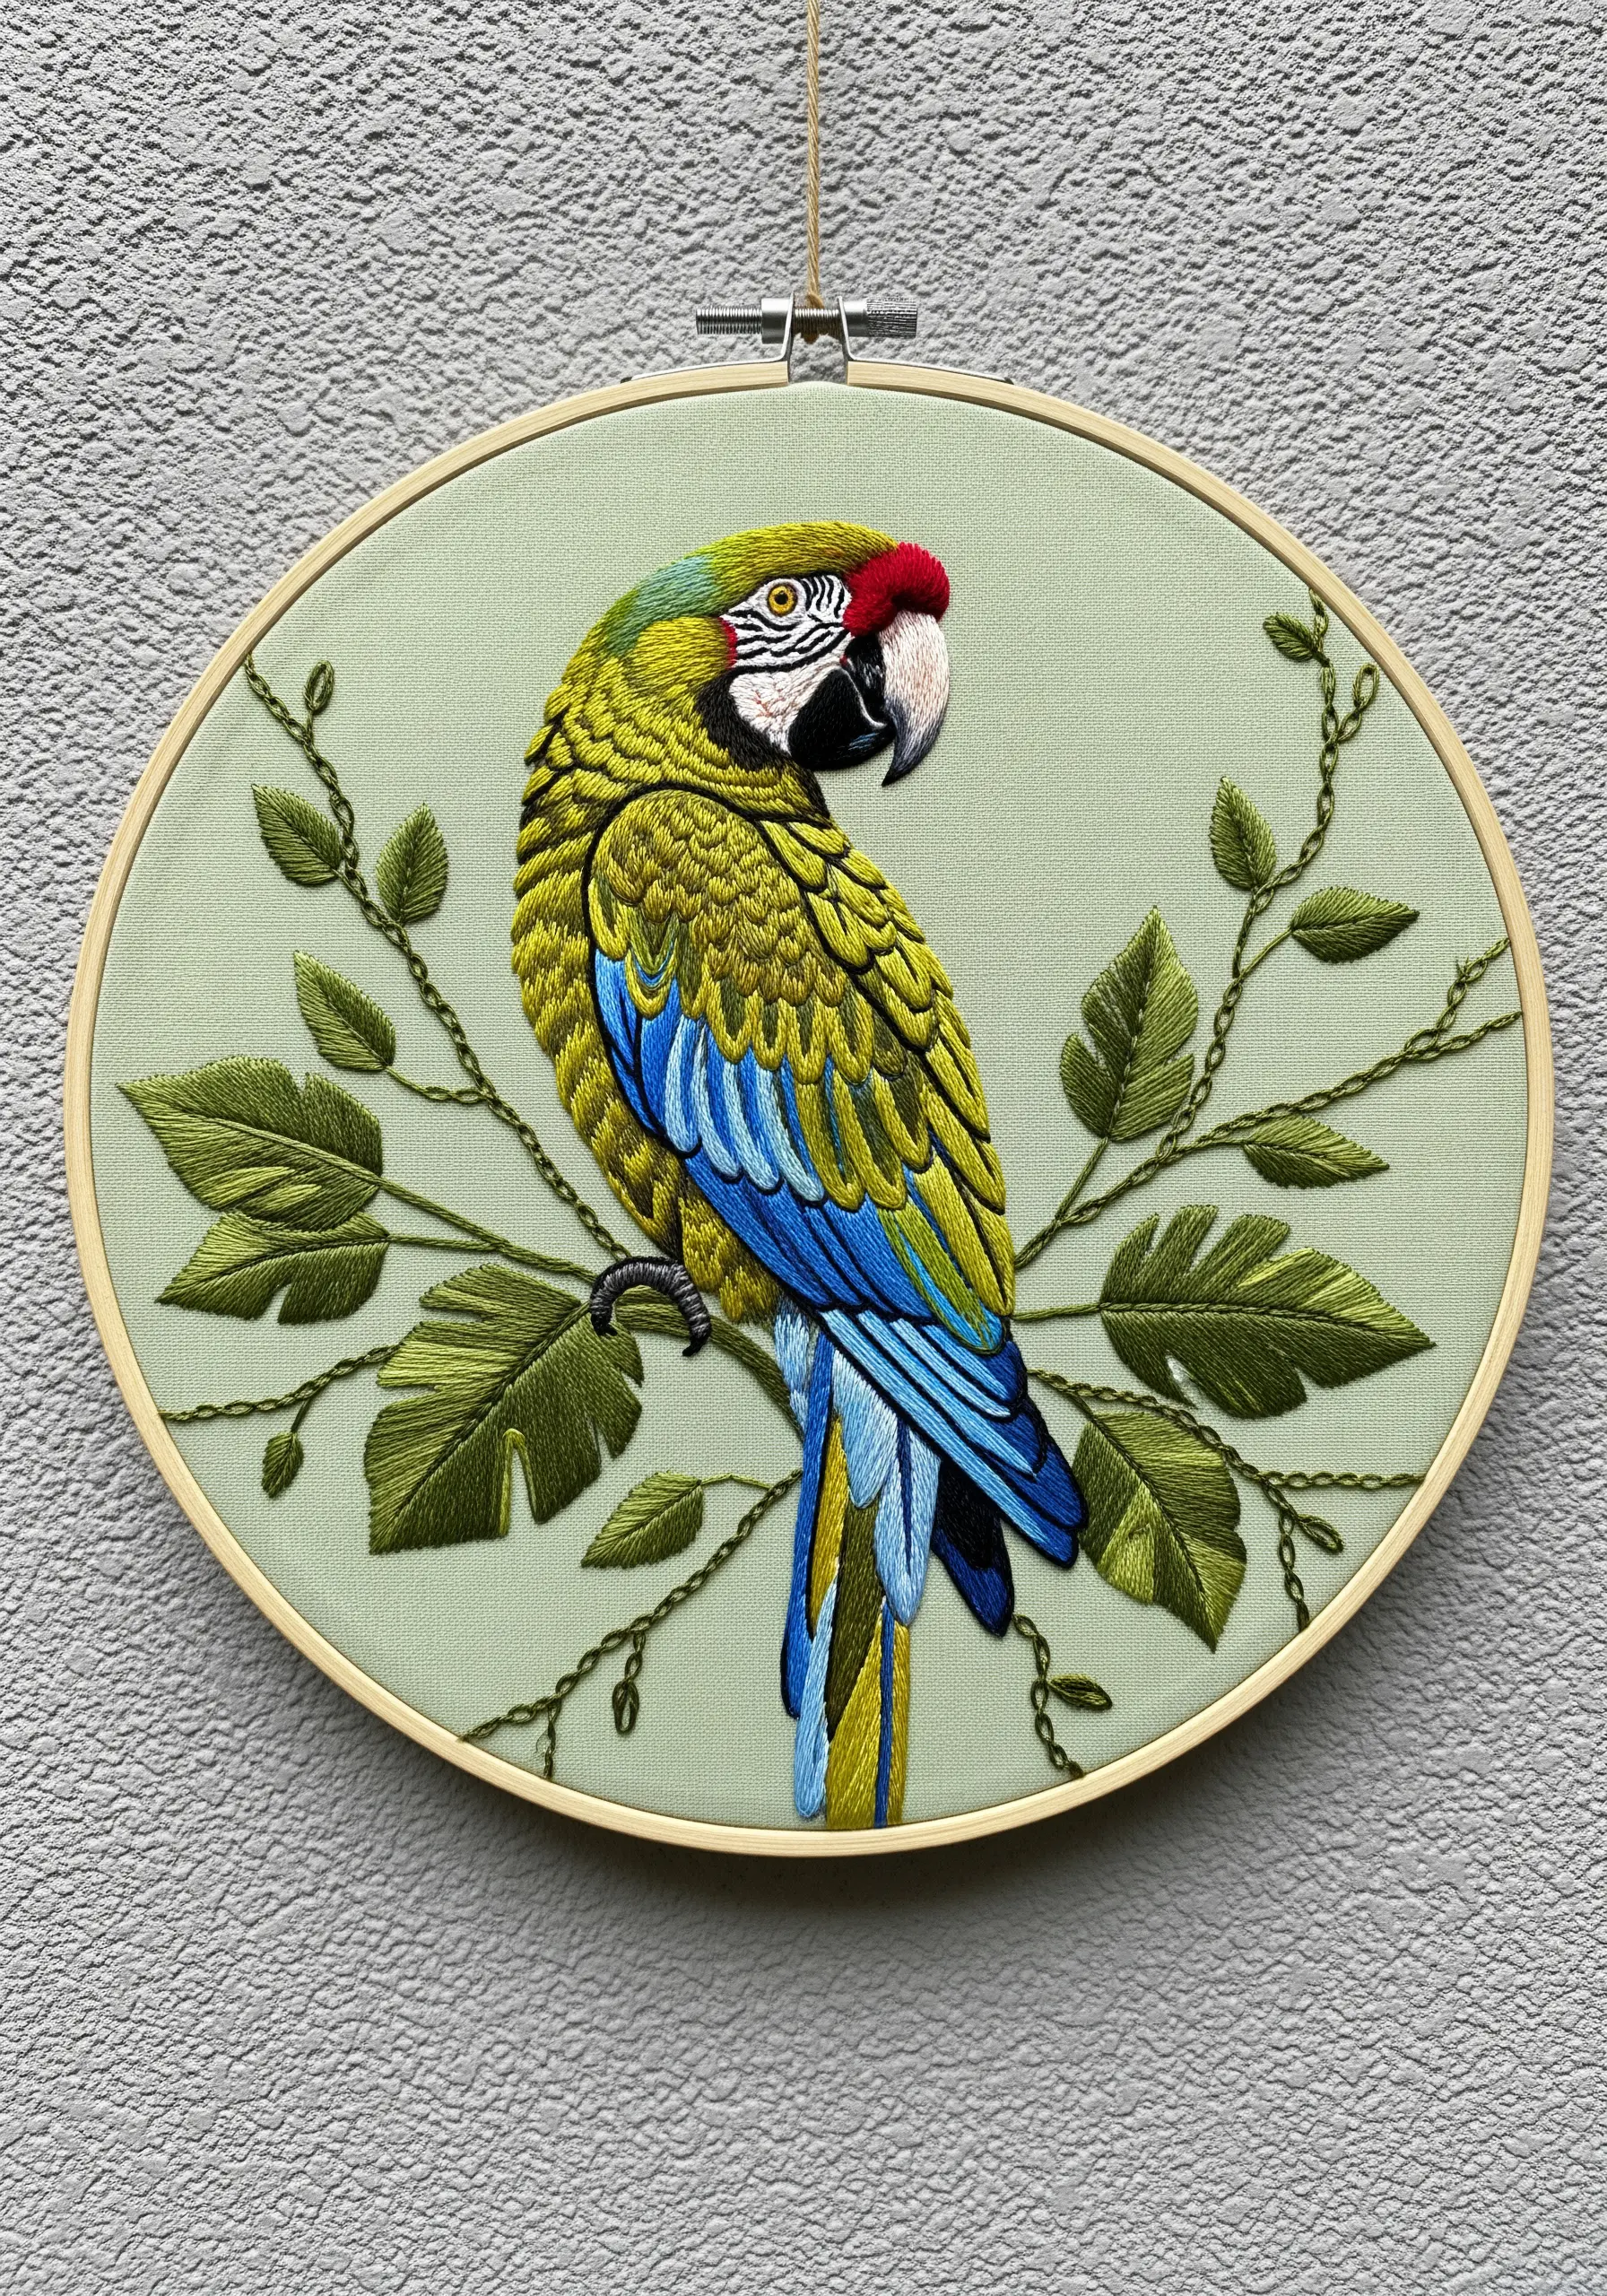
Elevate your parrot embroidery by choosing a background fabric that shares a root color with your subject, like this soft sage green that echoes the greens in the macaw’s feathers.
This creates a sophisticated, monochromatic foundation that allows the contrasting blues and yellows to stand out without competing for attention.
Stitch the surrounding foliage in slightly darker shades of the same background color to create depth that feels organic and intentional.
8. Frame Your Textiles with Asymmetrical Corner Designs
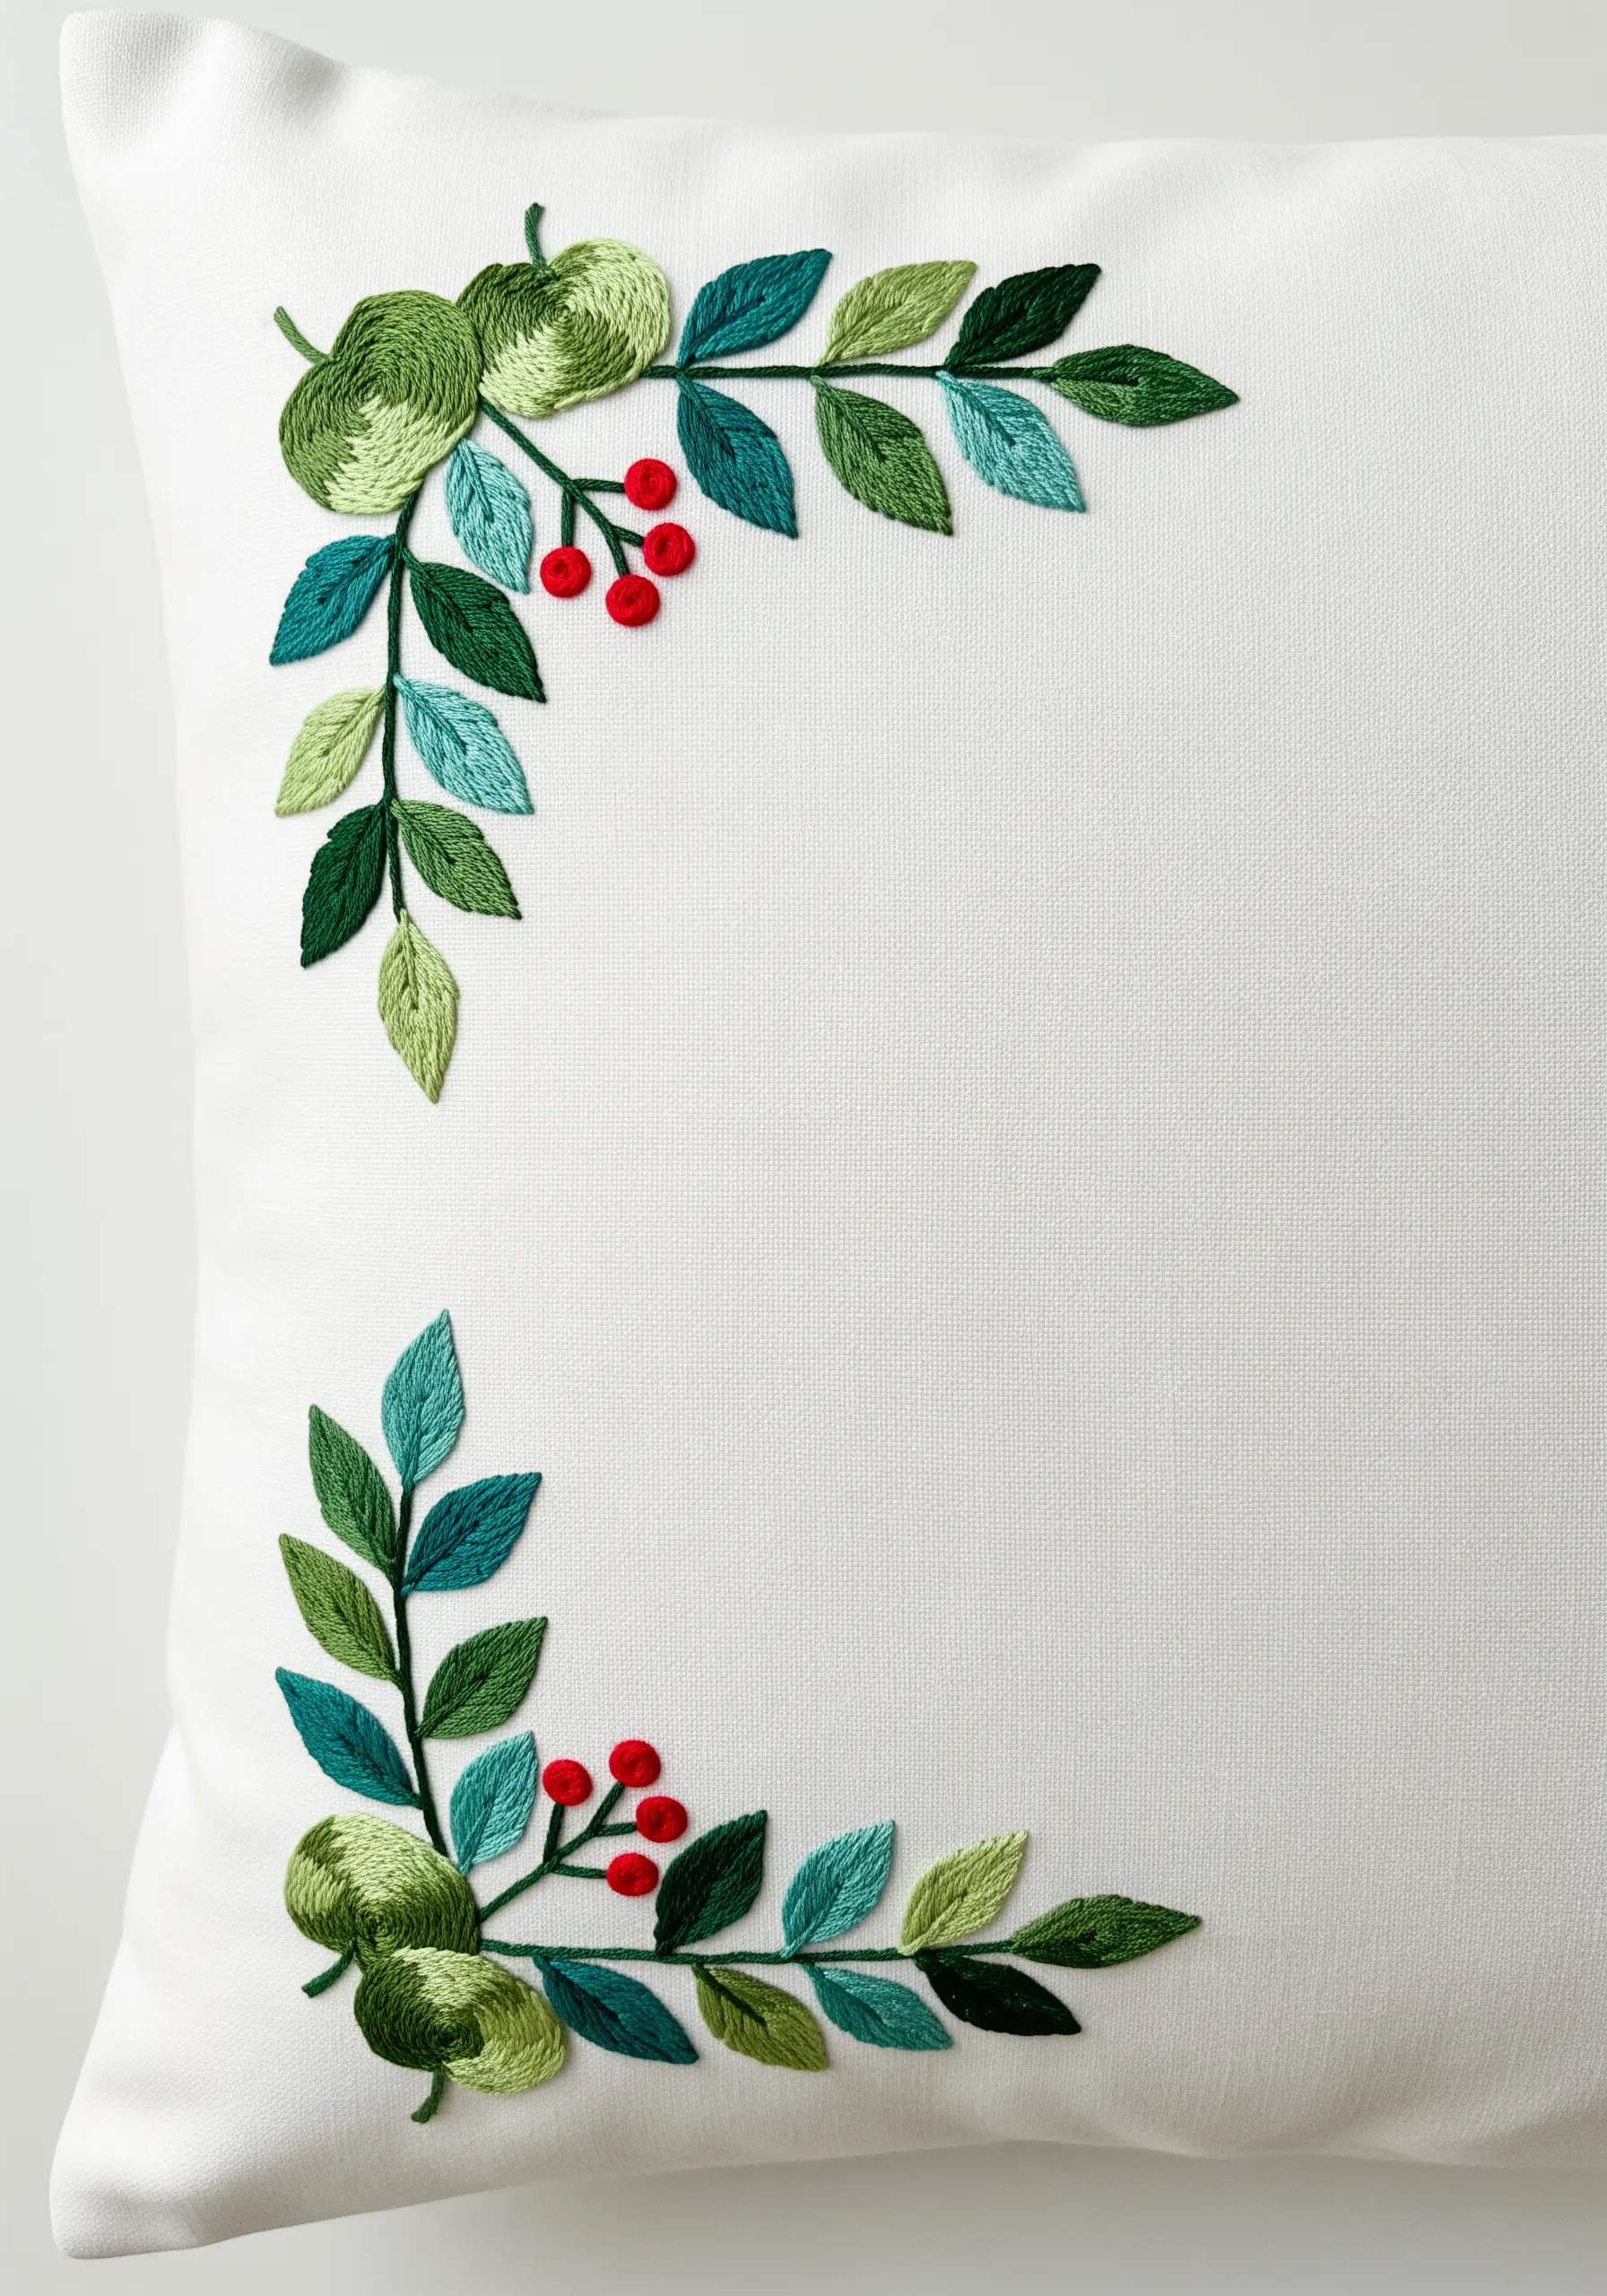
Transform a plain pillowcase or napkin into a piece of art with an elegant corner design.
To create visual interest, vary the direction of your satin stitch on each leaf. This simple adjustment allows the leaves to catch the light differently, creating the illusion of movement and dimension.
Use a cluster of bright red French knots as a vibrant accent, drawing the eye and balancing the composition.
This technique is perfect for stitching ideas that transform plain pillowcases into bespoke home decor.
9. Create the Illusion of Depth with Gradient Fills
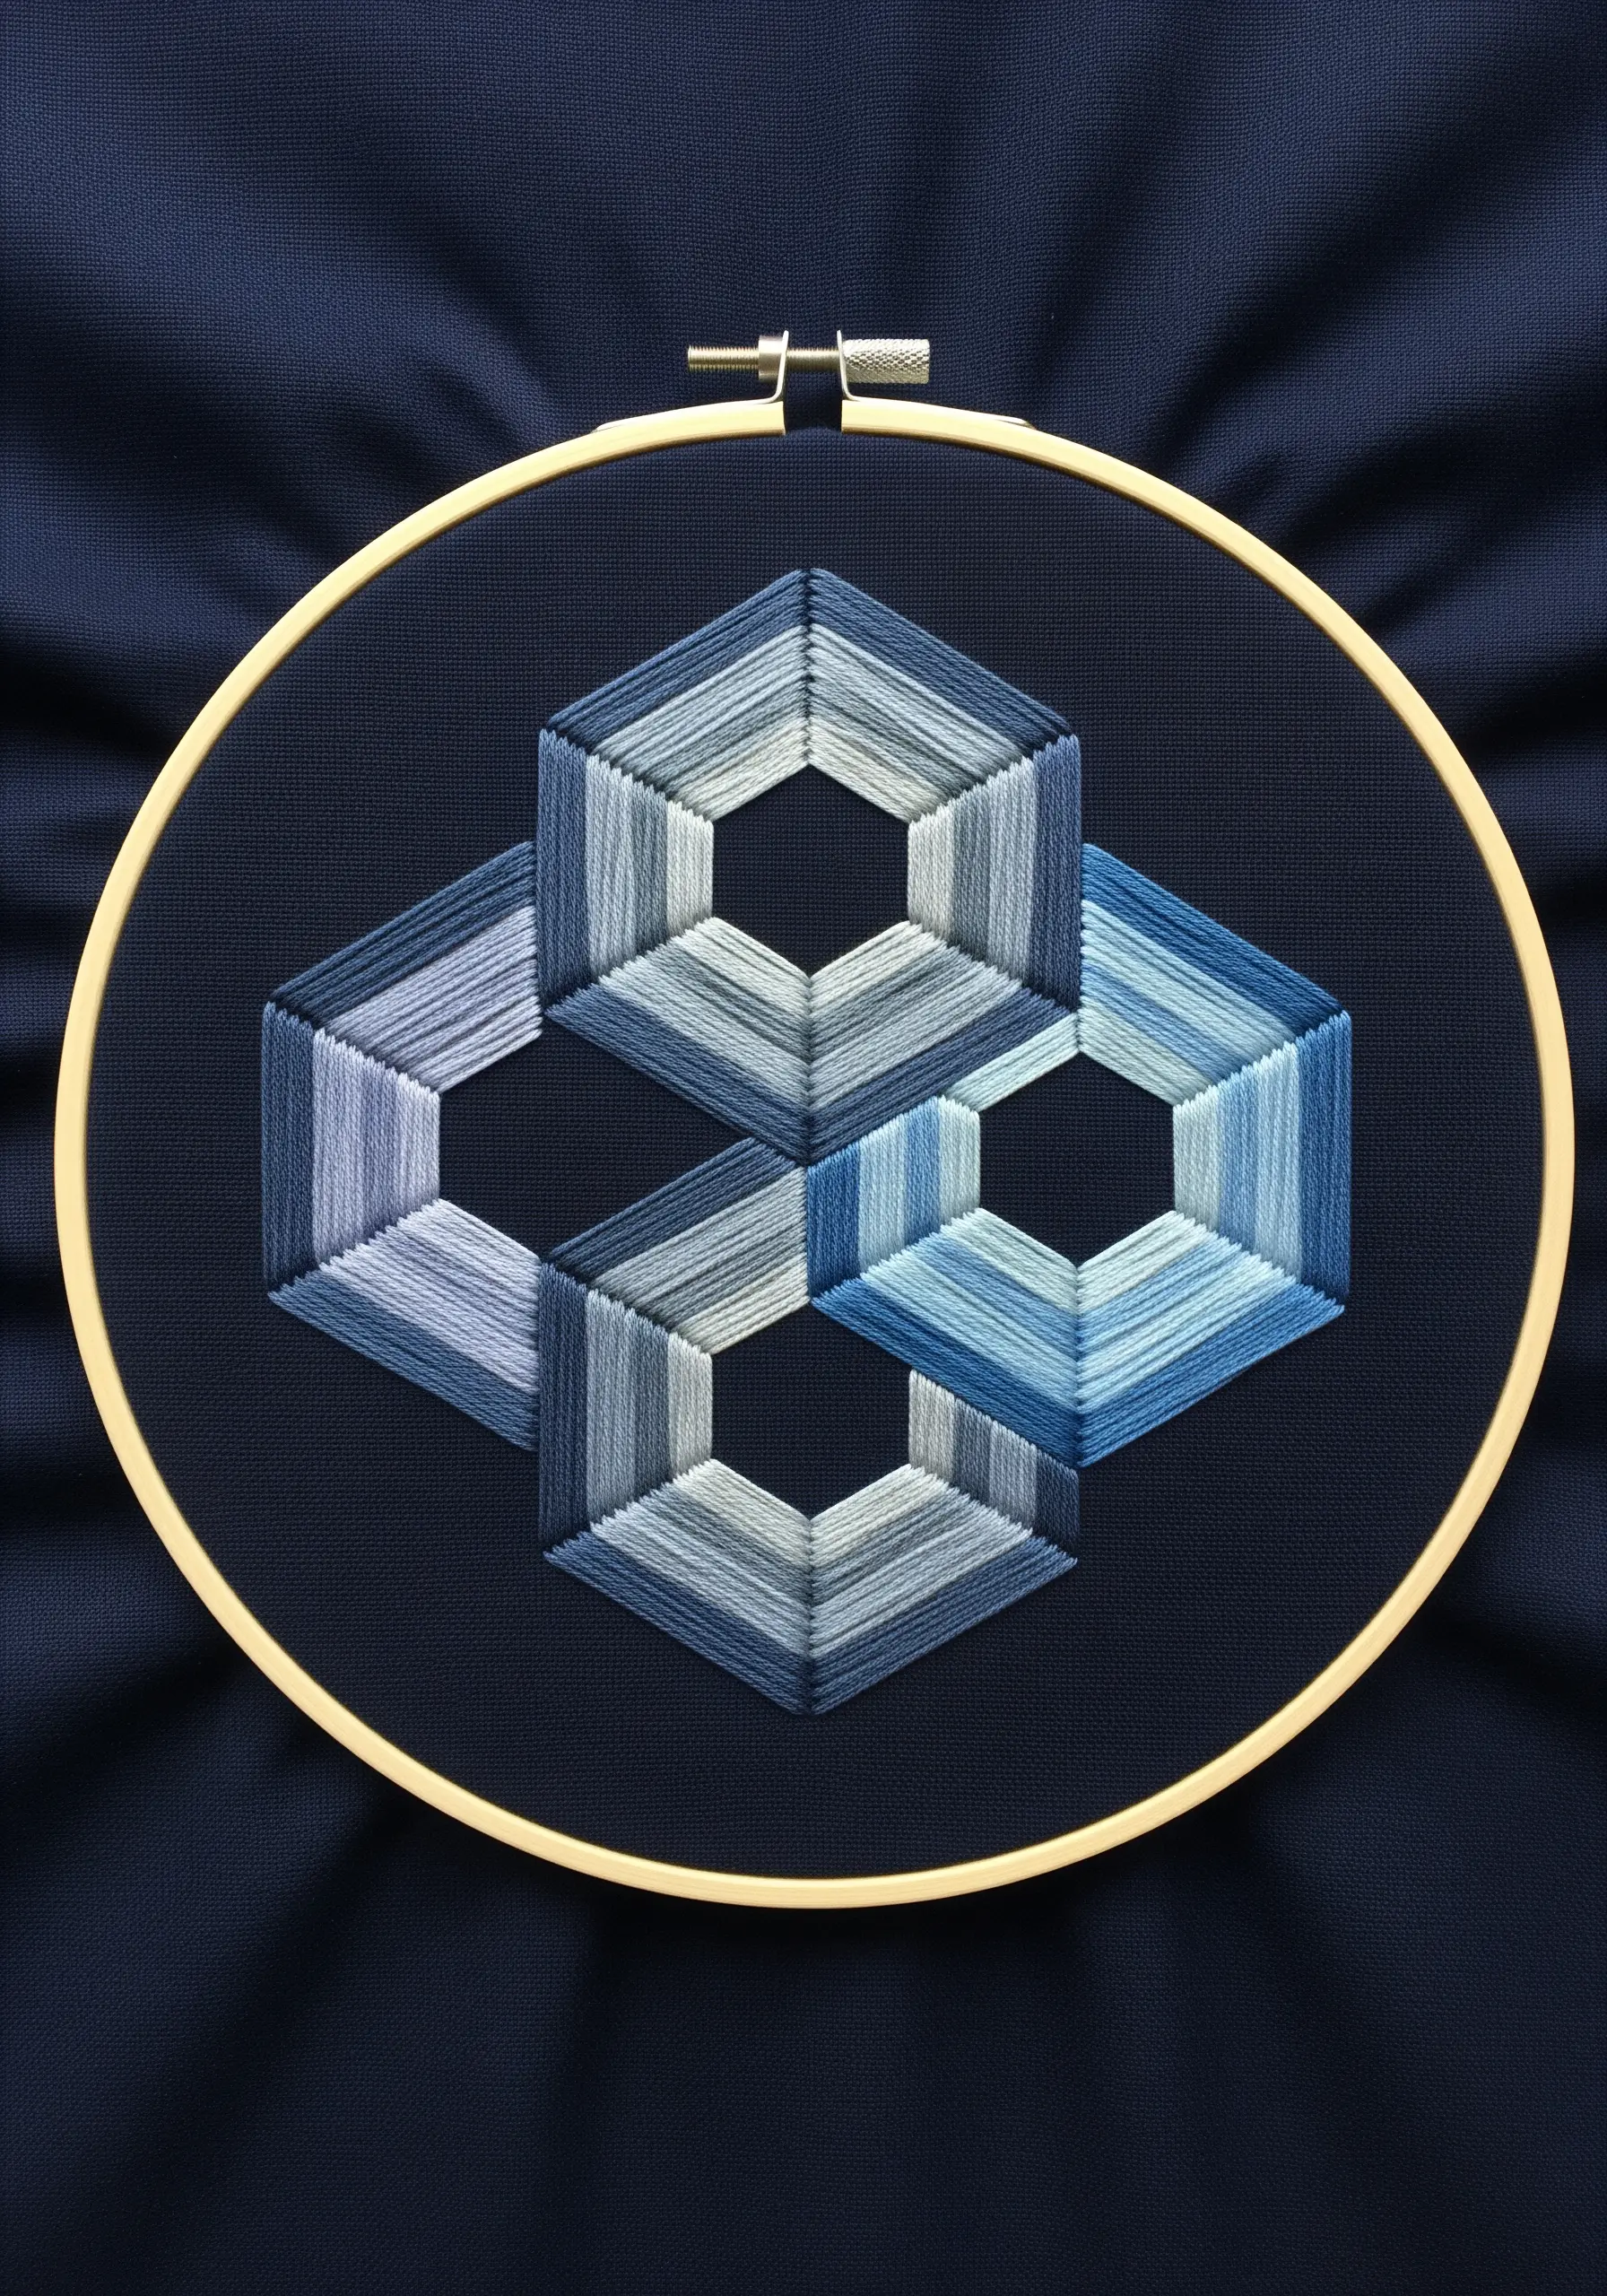
This seemingly complex geometric design is achieved with simple, straight satin stitches and a clever use of color gradients.
To create the illusion of overlapping, transparent shapes, fill each section with threads that move from light to dark within the same color family.
Stitching on a dark navy or black fabric enhances the effect, making the lighter shades appear to advance while the darker shades recede. This gives your flat stitches a compelling, three-dimensional quality.
10. Capture Personality with Expressive Stitch Direction
Bring your embroidered animals to life by paying close attention to the direction of your stitches, especially on the face.
Use curved stitches that radiate outwards from the eye to mimic the natural growth of feathers and create a sense of roundness in the cheeks.
A single, well-placed stitch or a tiny French knot can serve as a highlight in the eye, instantly giving your parrot a curious and engaging expression.
This is a core technique for successful pet portrait embroidery ideas.
11. Design a Statement Piece with a Back Panel Appliqué
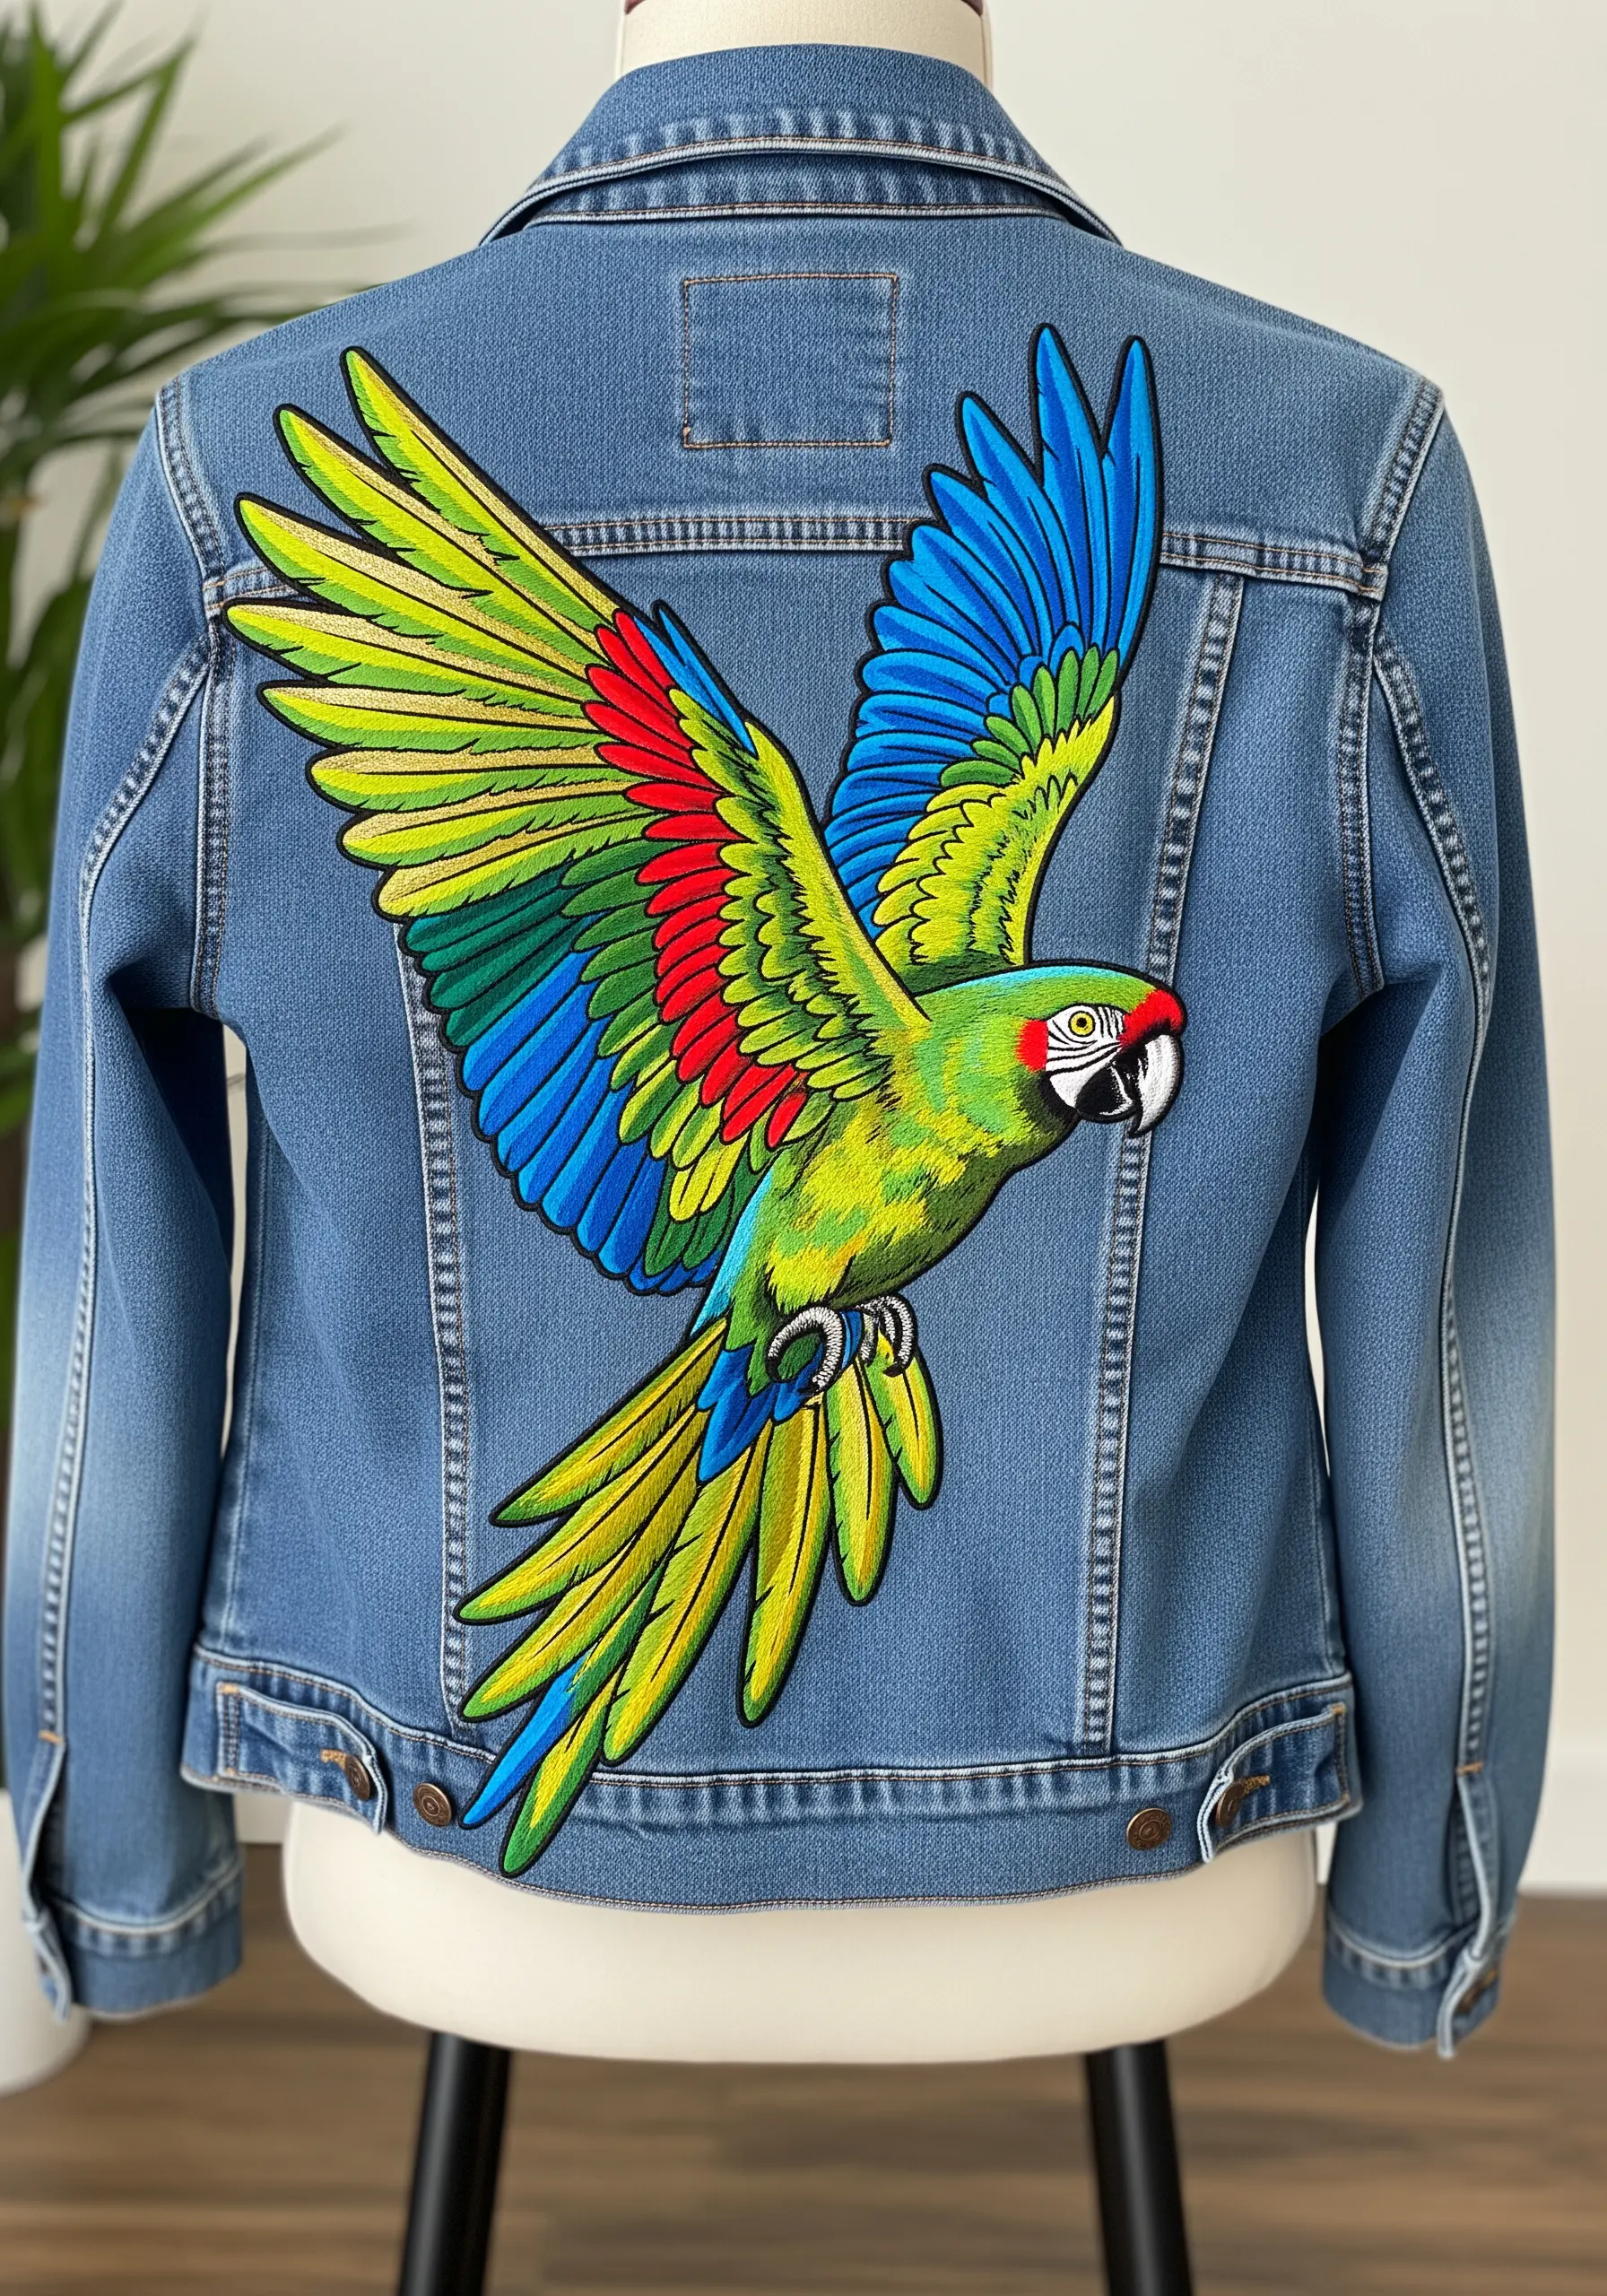
Transform a simple denim jacket into a wearable work of art by creating a large-scale embroidered patch.
Stitch your vibrant macaw design onto a separate piece of heavy-duty fabric, like felt or canvas, using a dense satin stitch for full coverage.
Once complete, trim the design, leaving a small border. You can then either stitch it directly onto the jacket panel or add an iron-on adhesive backing for easier application.
Finish with a tight satin stitch border around the entire patch for a clean, professional edge.
12. Paint a Landscape with Atmospheric Perspective
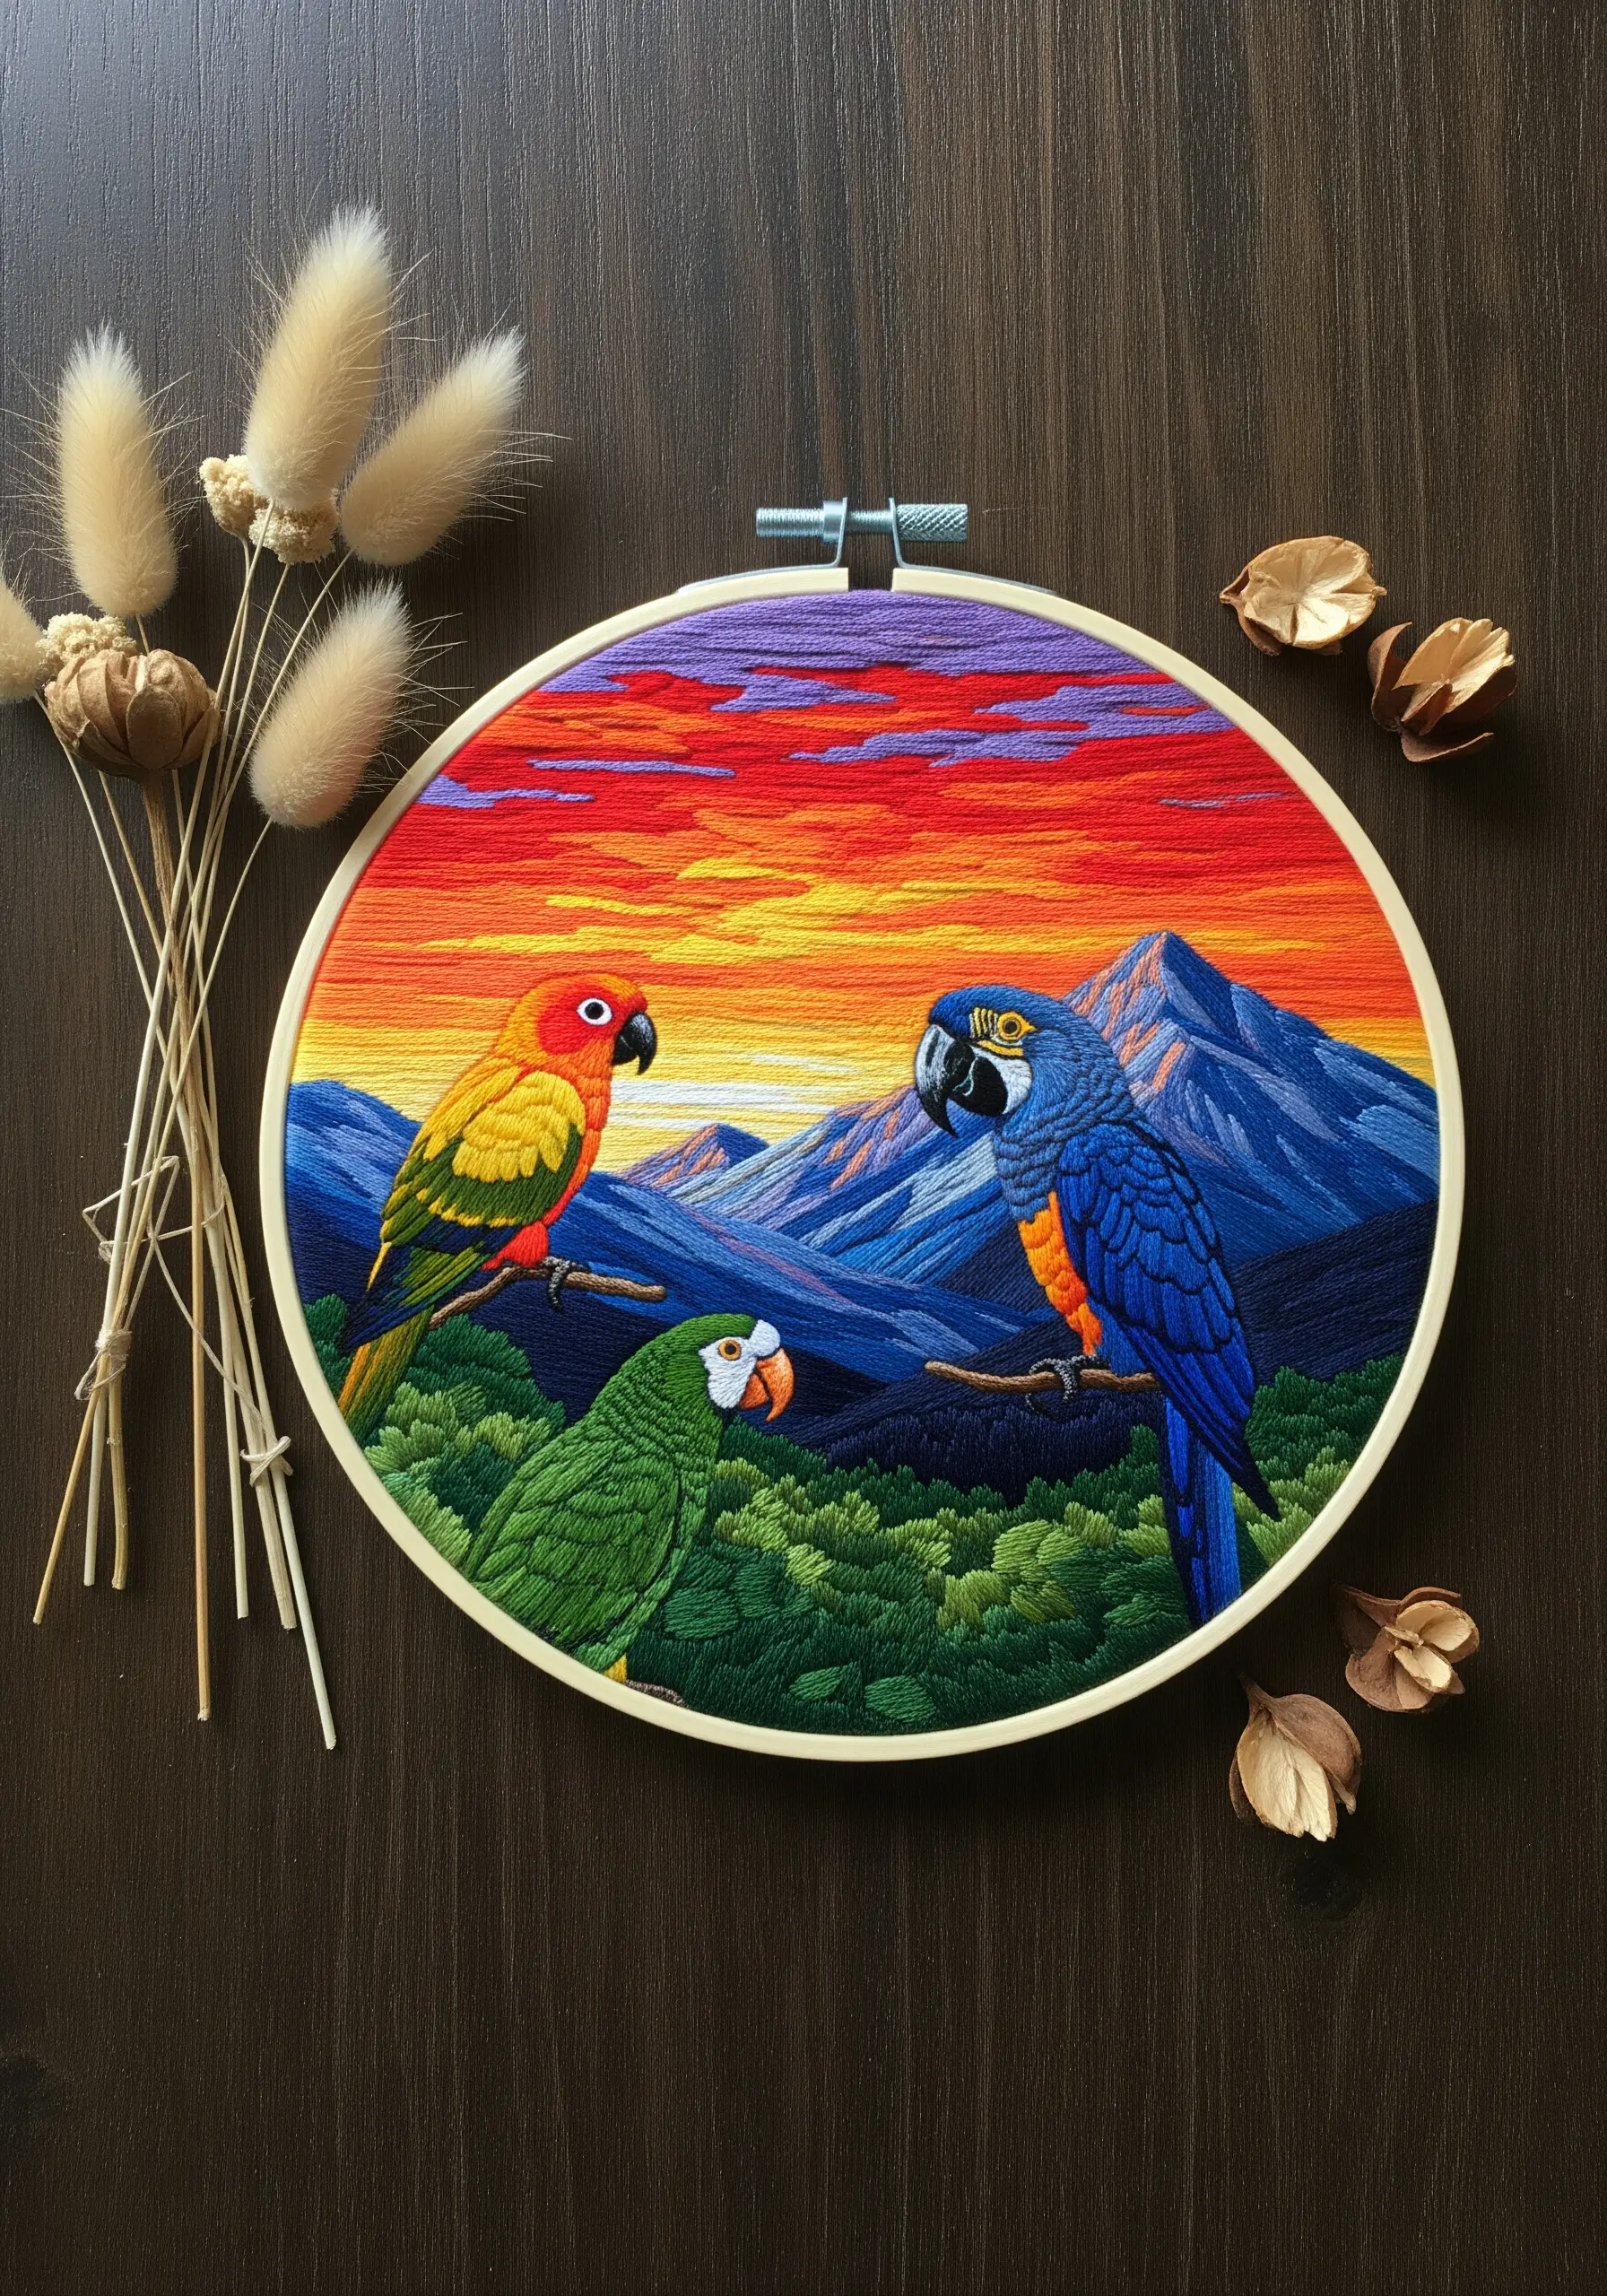
To create a sense of depth in an embroidered landscape, use the principles of atmospheric perspective.
Stitch the farthest elements, like the mountains, in cooler, muted colors like blues and purples. This makes them appear to recede.
As you move to the foreground, switch to warmer, more saturated colors for the birds and foliage. This brings them forward visually, creating a rich, layered scene with a clear sense of distance and space.
13. Amplify Tropical Hues Against a Black Canvas
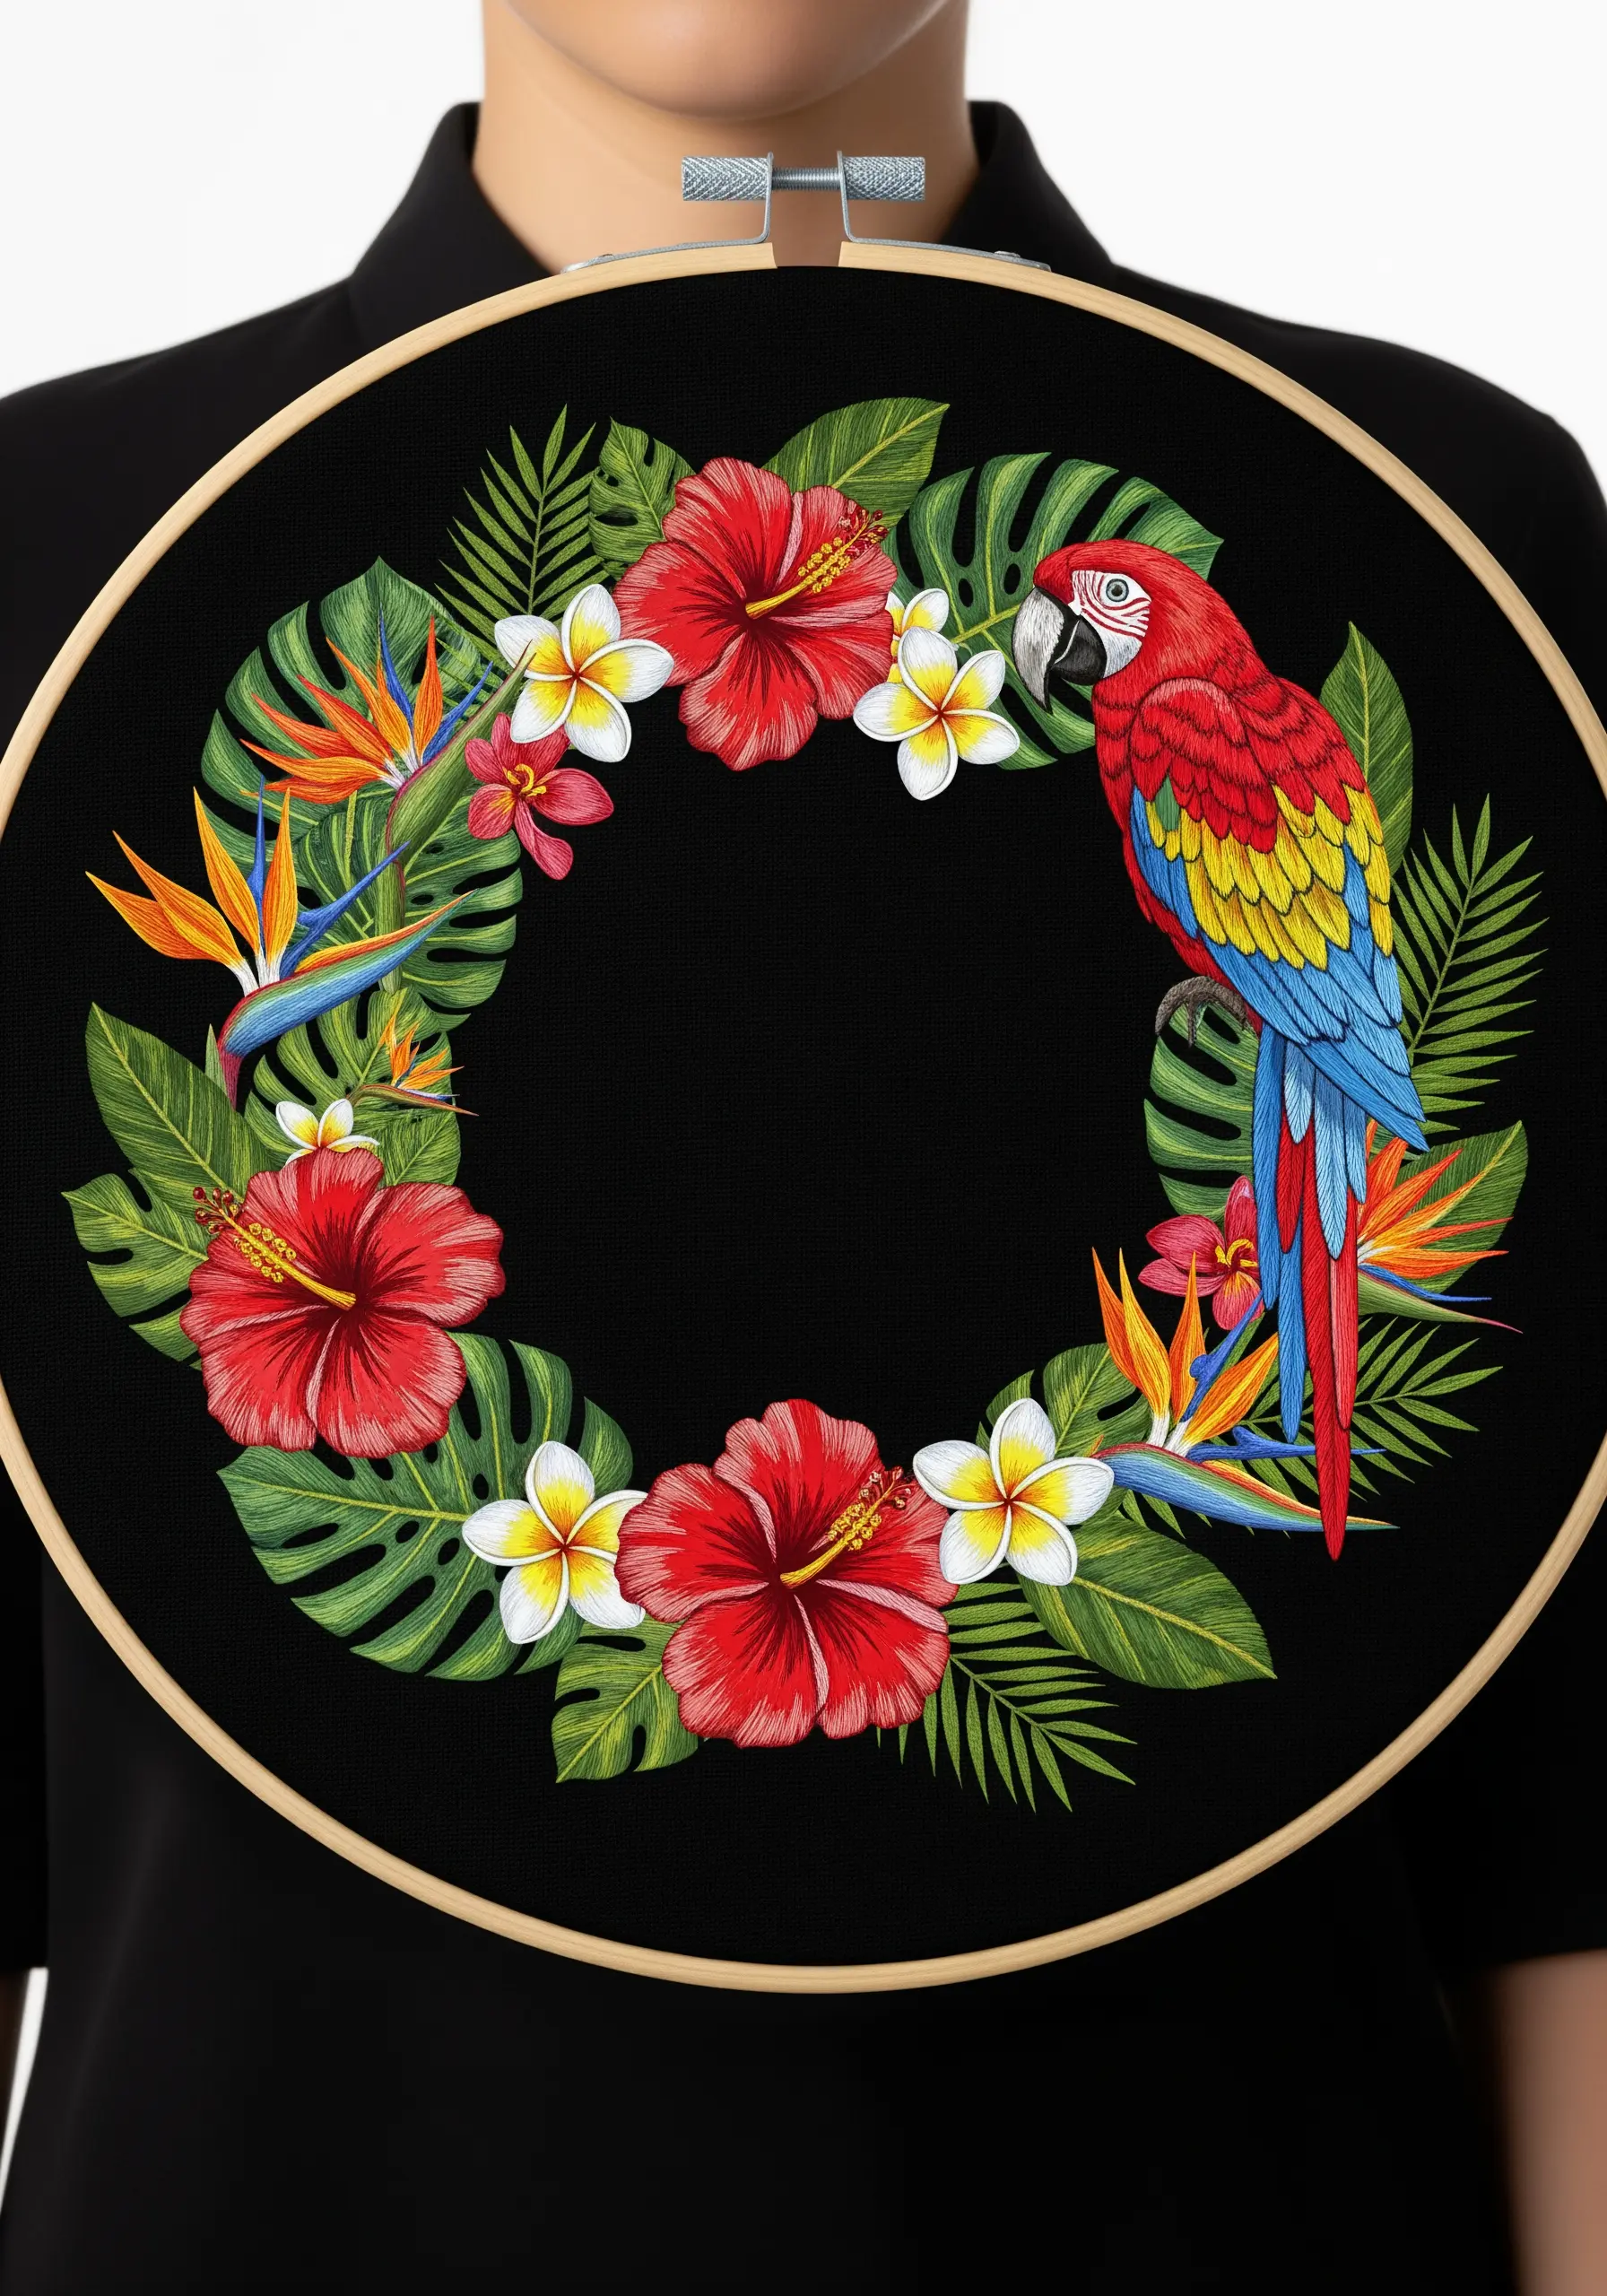
For the most vibrant and dramatic tropical designs, stitch on black fabric. The deep, dark background eliminates visual noise and makes every color—from the fiery reds of the hibiscus to the bright whites of the frangipani—pop with electric intensity.
This high-contrast approach gives your work a luxurious, focused feel.
When working on black, ensure you have good lighting to see your stitches clearly and consider using a white transfer pencil for your pattern.
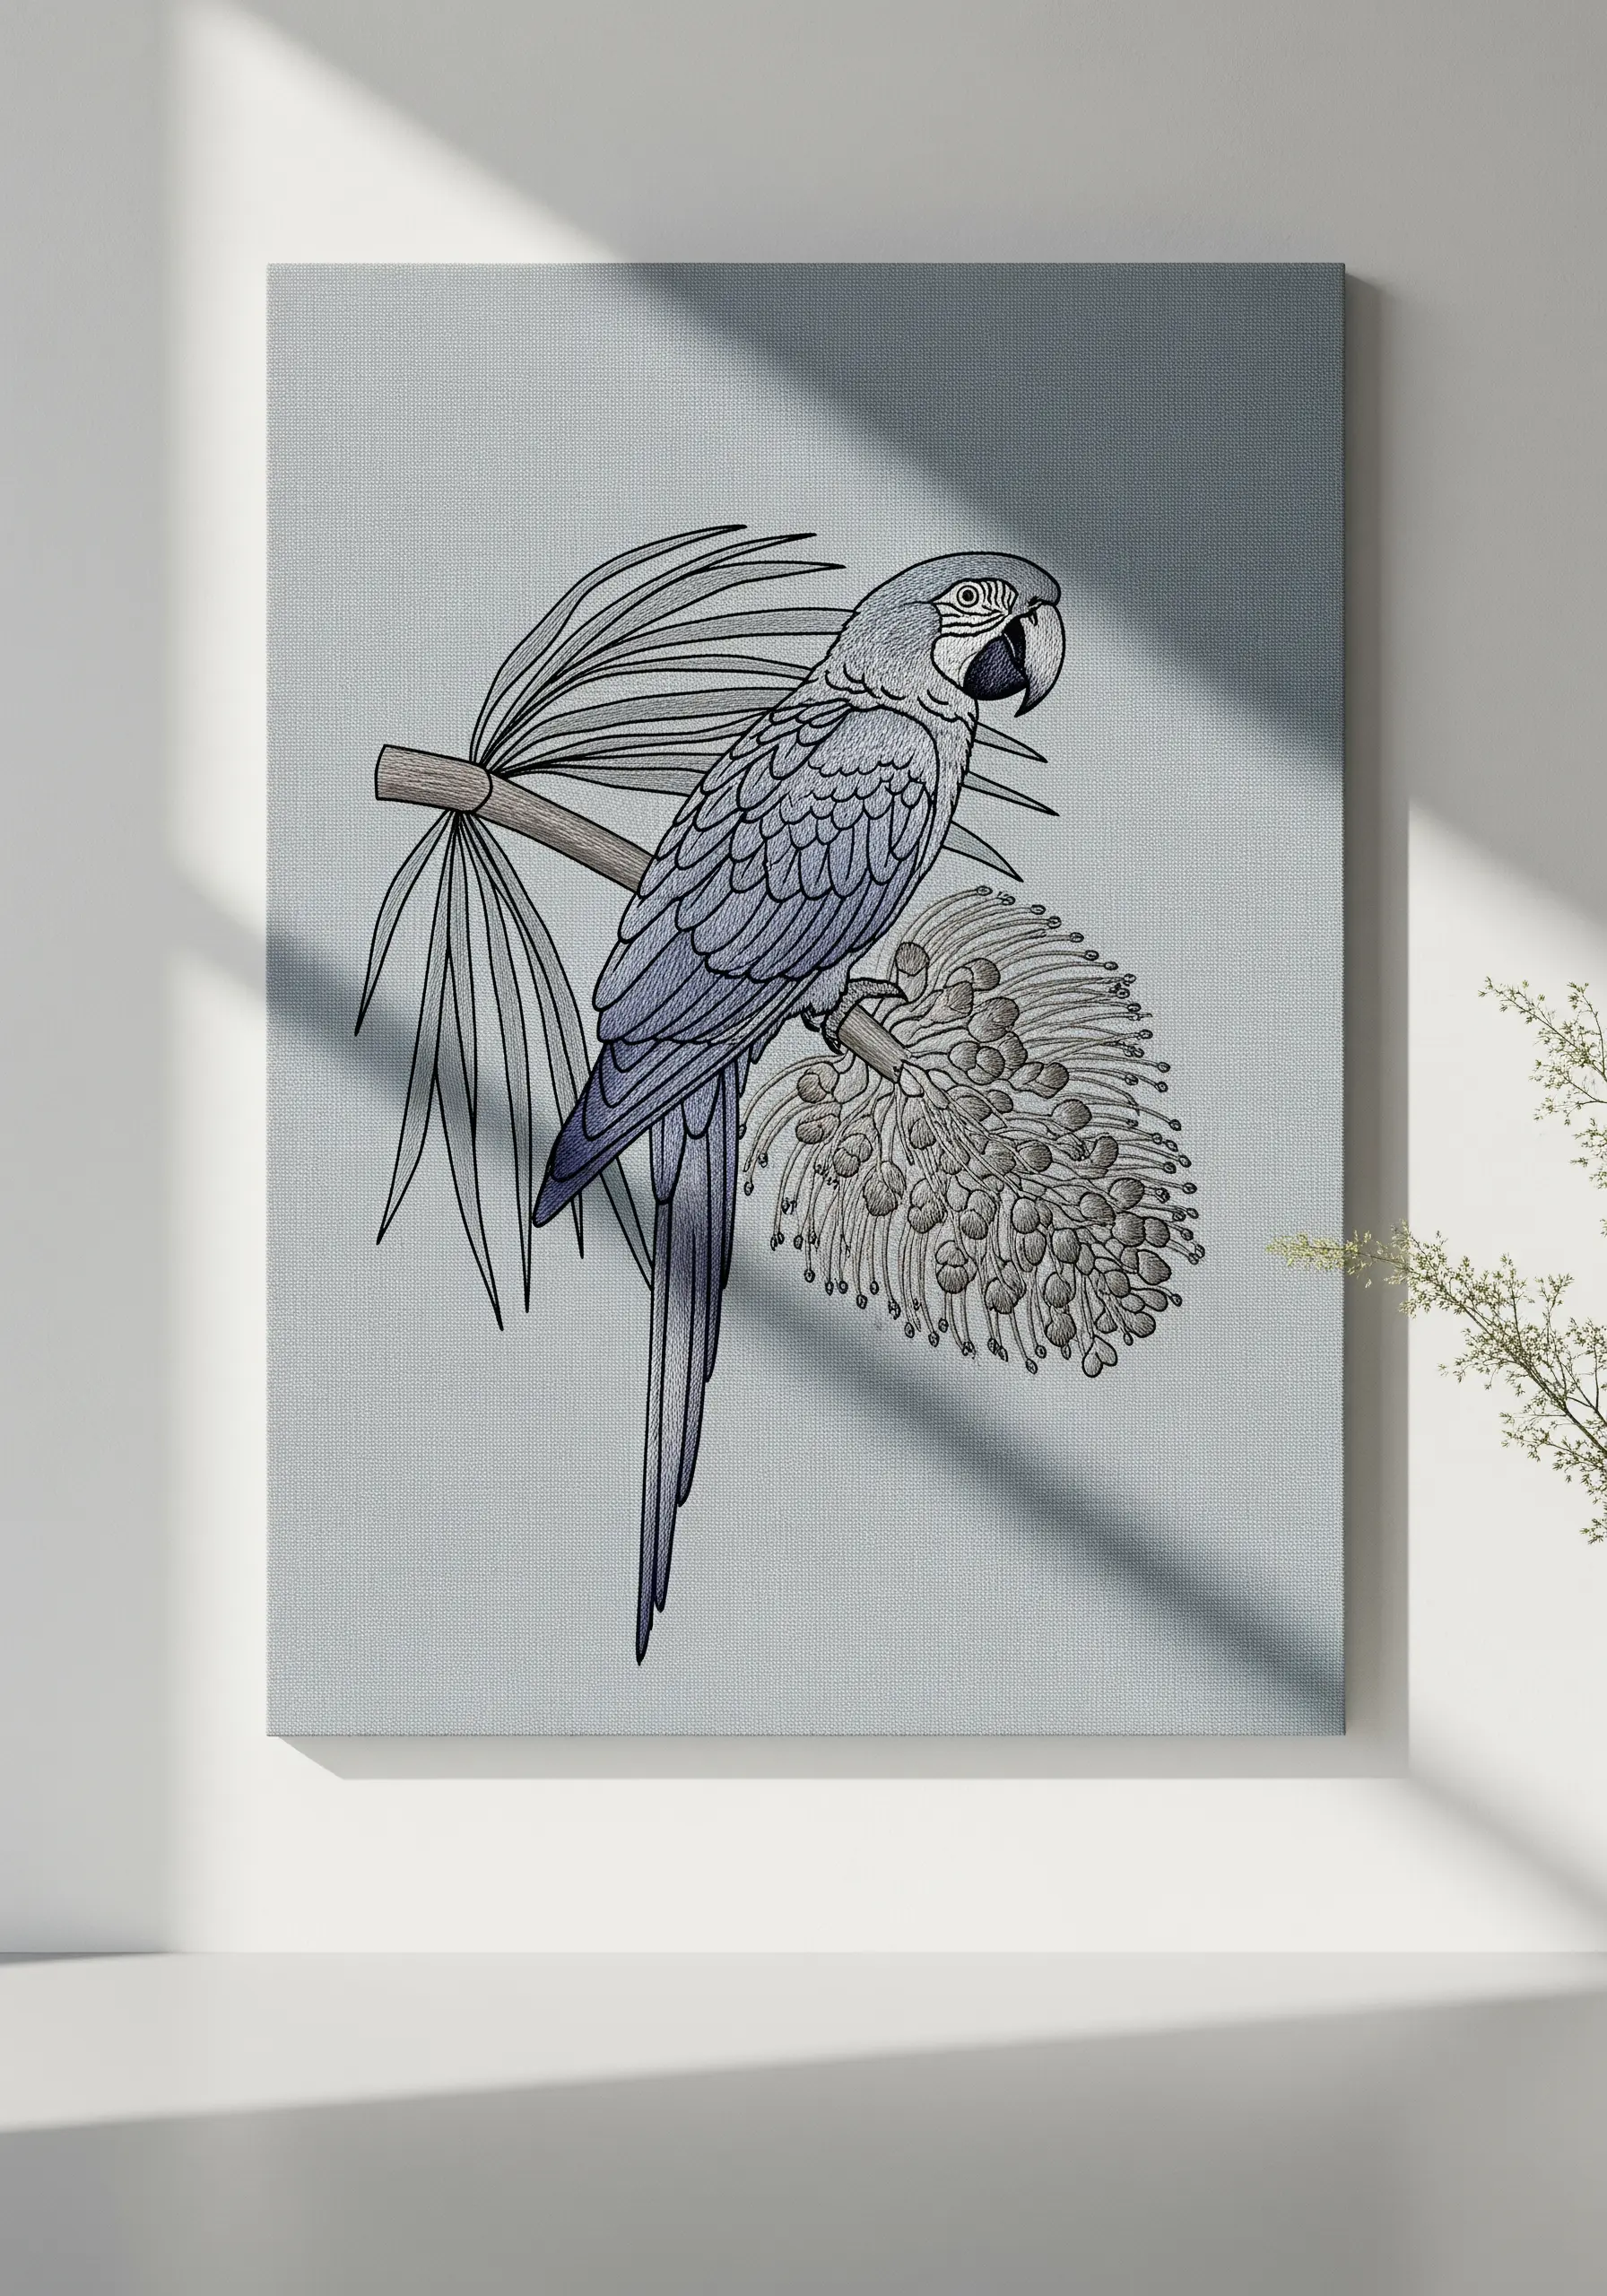
14. Convey Texture Through a Monochromatic Palette
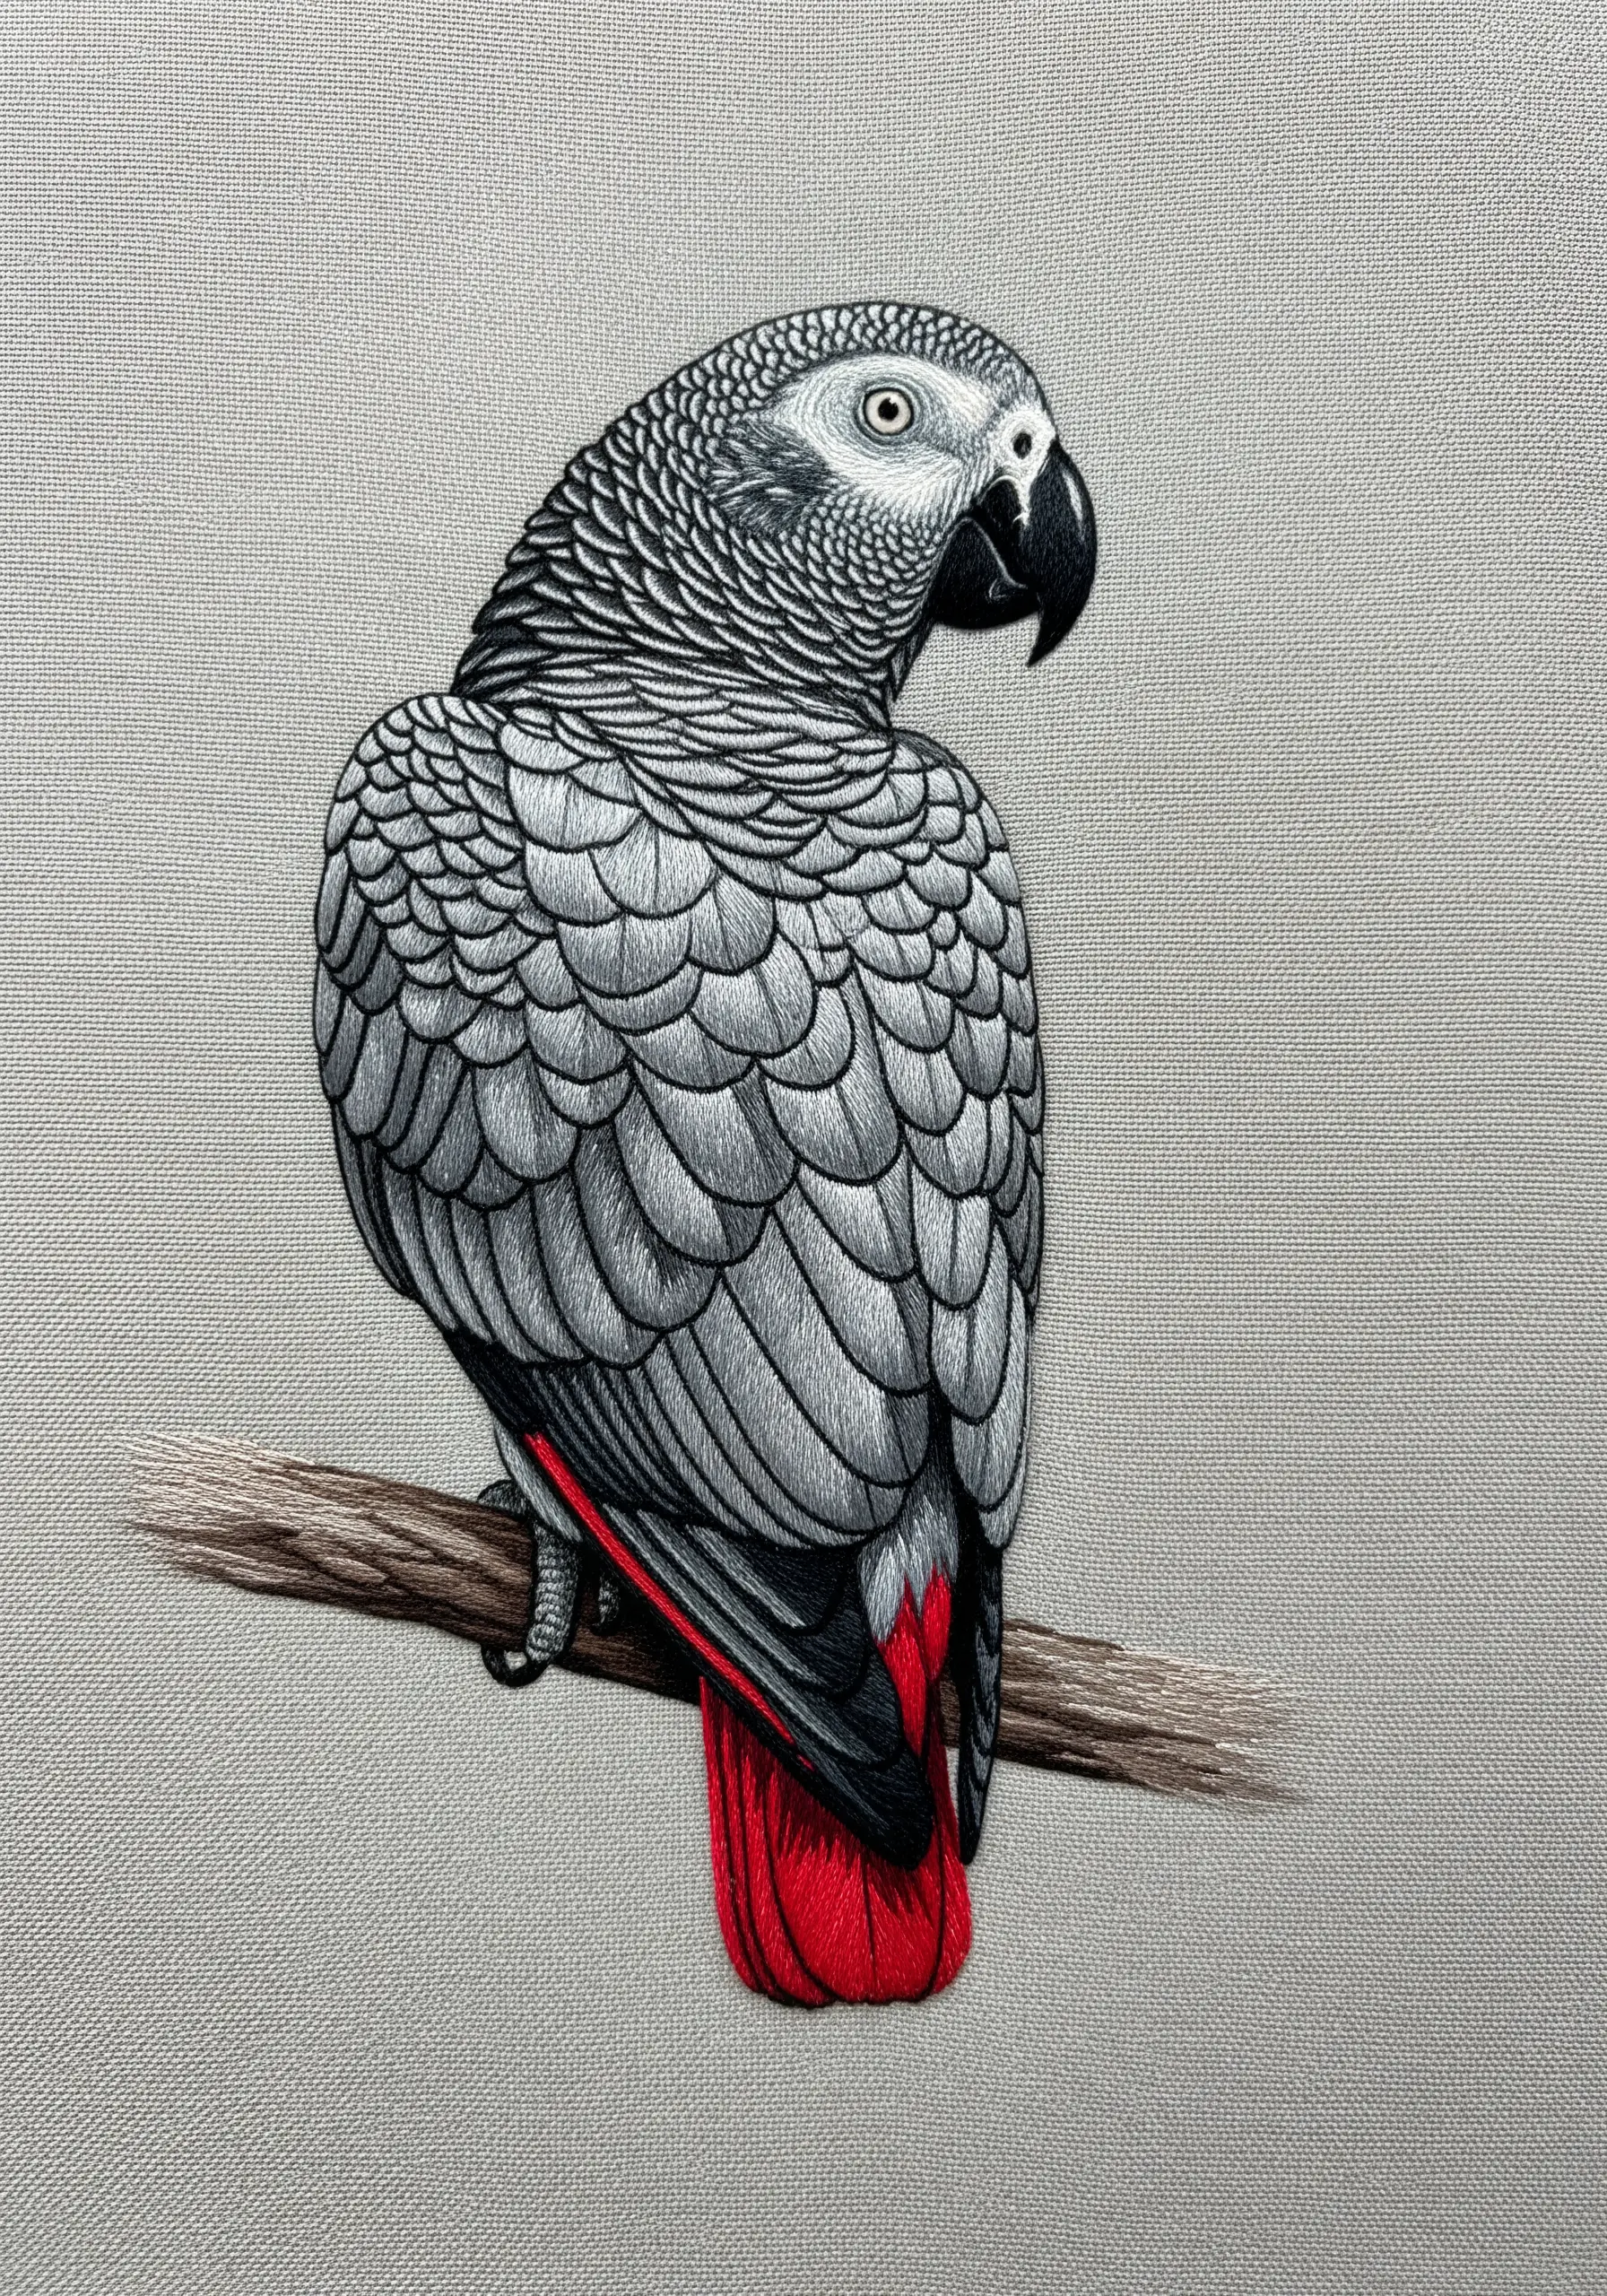
You don’t need a full spectrum of color to create a realistic and engaging portrait. For an African Grey, the magic is in the texture.
Use several shades of grey, from light silver to deep charcoal, to define the scalloped edges of each feather. Vary the direction and length of your stitches to mimic how light hits the plumage.
A single pop of vibrant red for the tail feathers creates a stunning focal point and completes the portrait with dramatic flair.
15. Arrange Simple Motifs into a Modern Sampler

Create a striking piece of wall art by stitching a collection of simplified motifs in a clean grid.
Using cross-stitch for these parrots gives them a charming, pixelated quality that feels both classic and contemporary.
Plan your layout on graph paper first to ensure perfect spacing. This disciplined arrangement transforms simple individual designs into a cohesive and impressive work of art, perfect for gallery-style decor.
16. Achieve Hyperrealism with Single-Strand Thread Painting
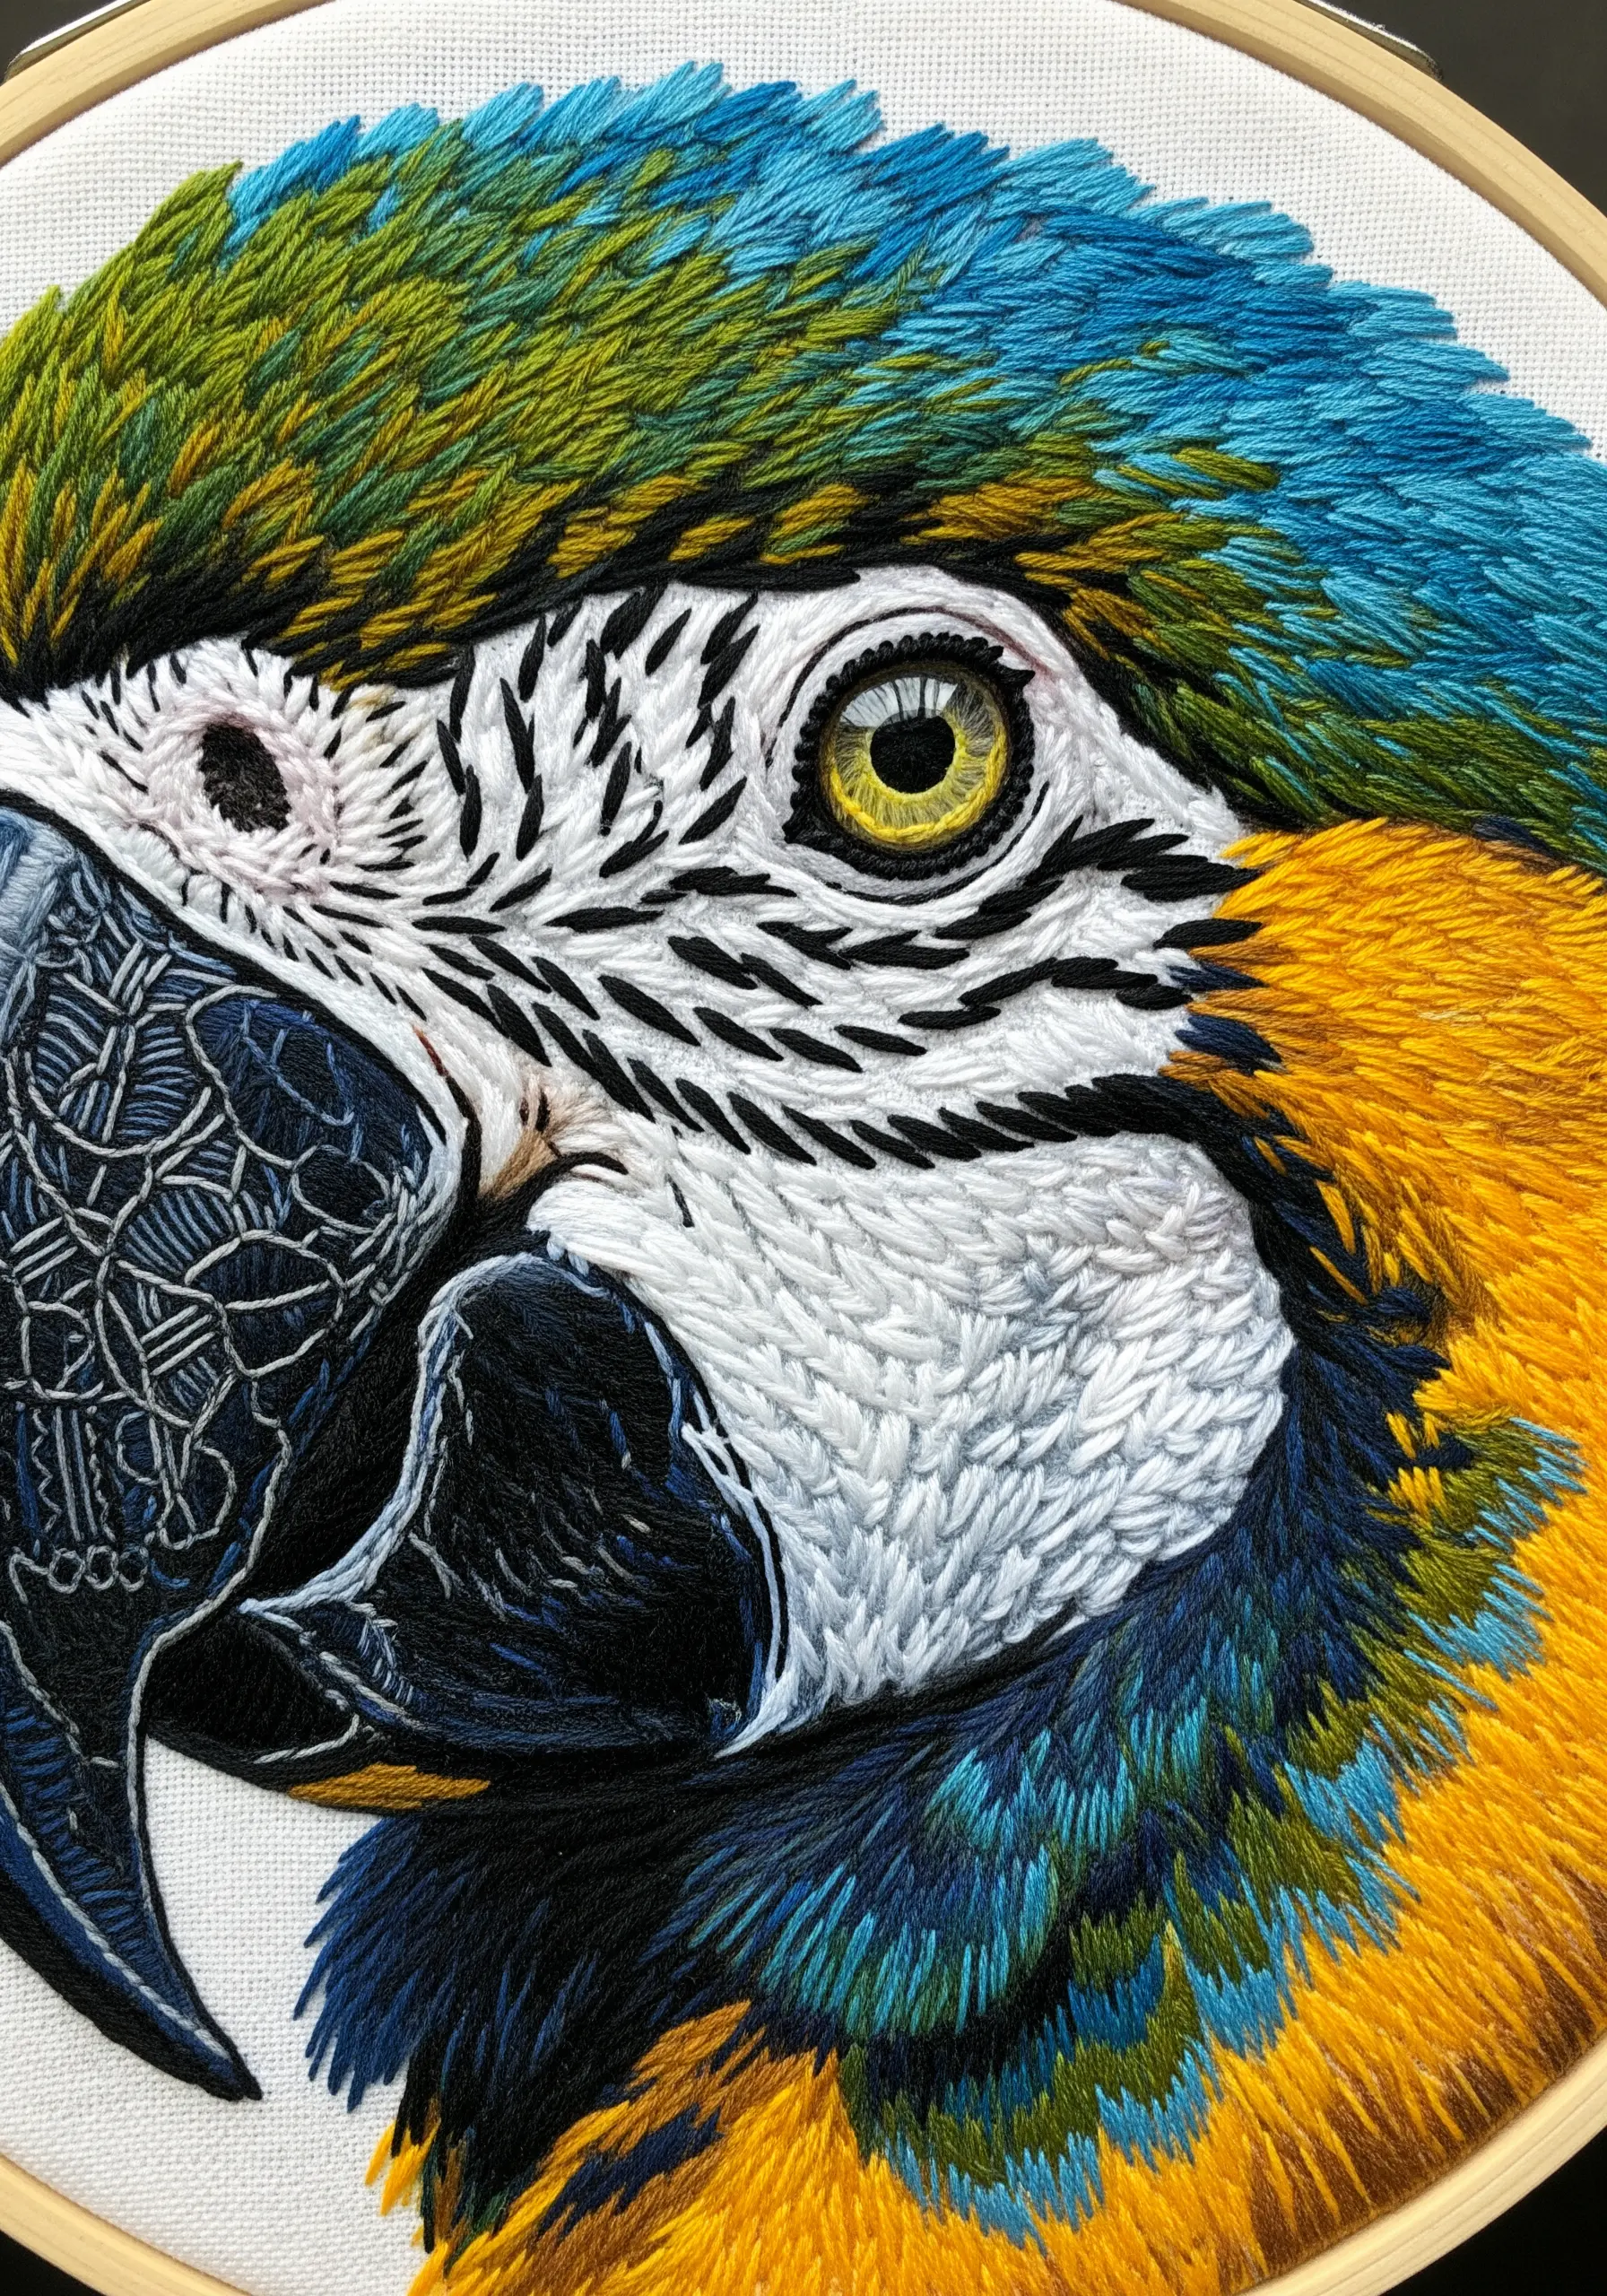
For incredibly detailed work, like the eye of this macaw, switch to using only a single strand of six-strand embroidery floss.
This allows you to make tiny, precise stitches that blend together seamlessly, much like brushstrokes in a painting.
Use this micro-stitching technique to capture the subtle color shifts in the iris, the delicate texture of the surrounding skin, and the glint of light that brings the eye to life. Patience is key, but the realistic result is unmatched.
17. Craft a Cascading Rainbow Wall Hanging
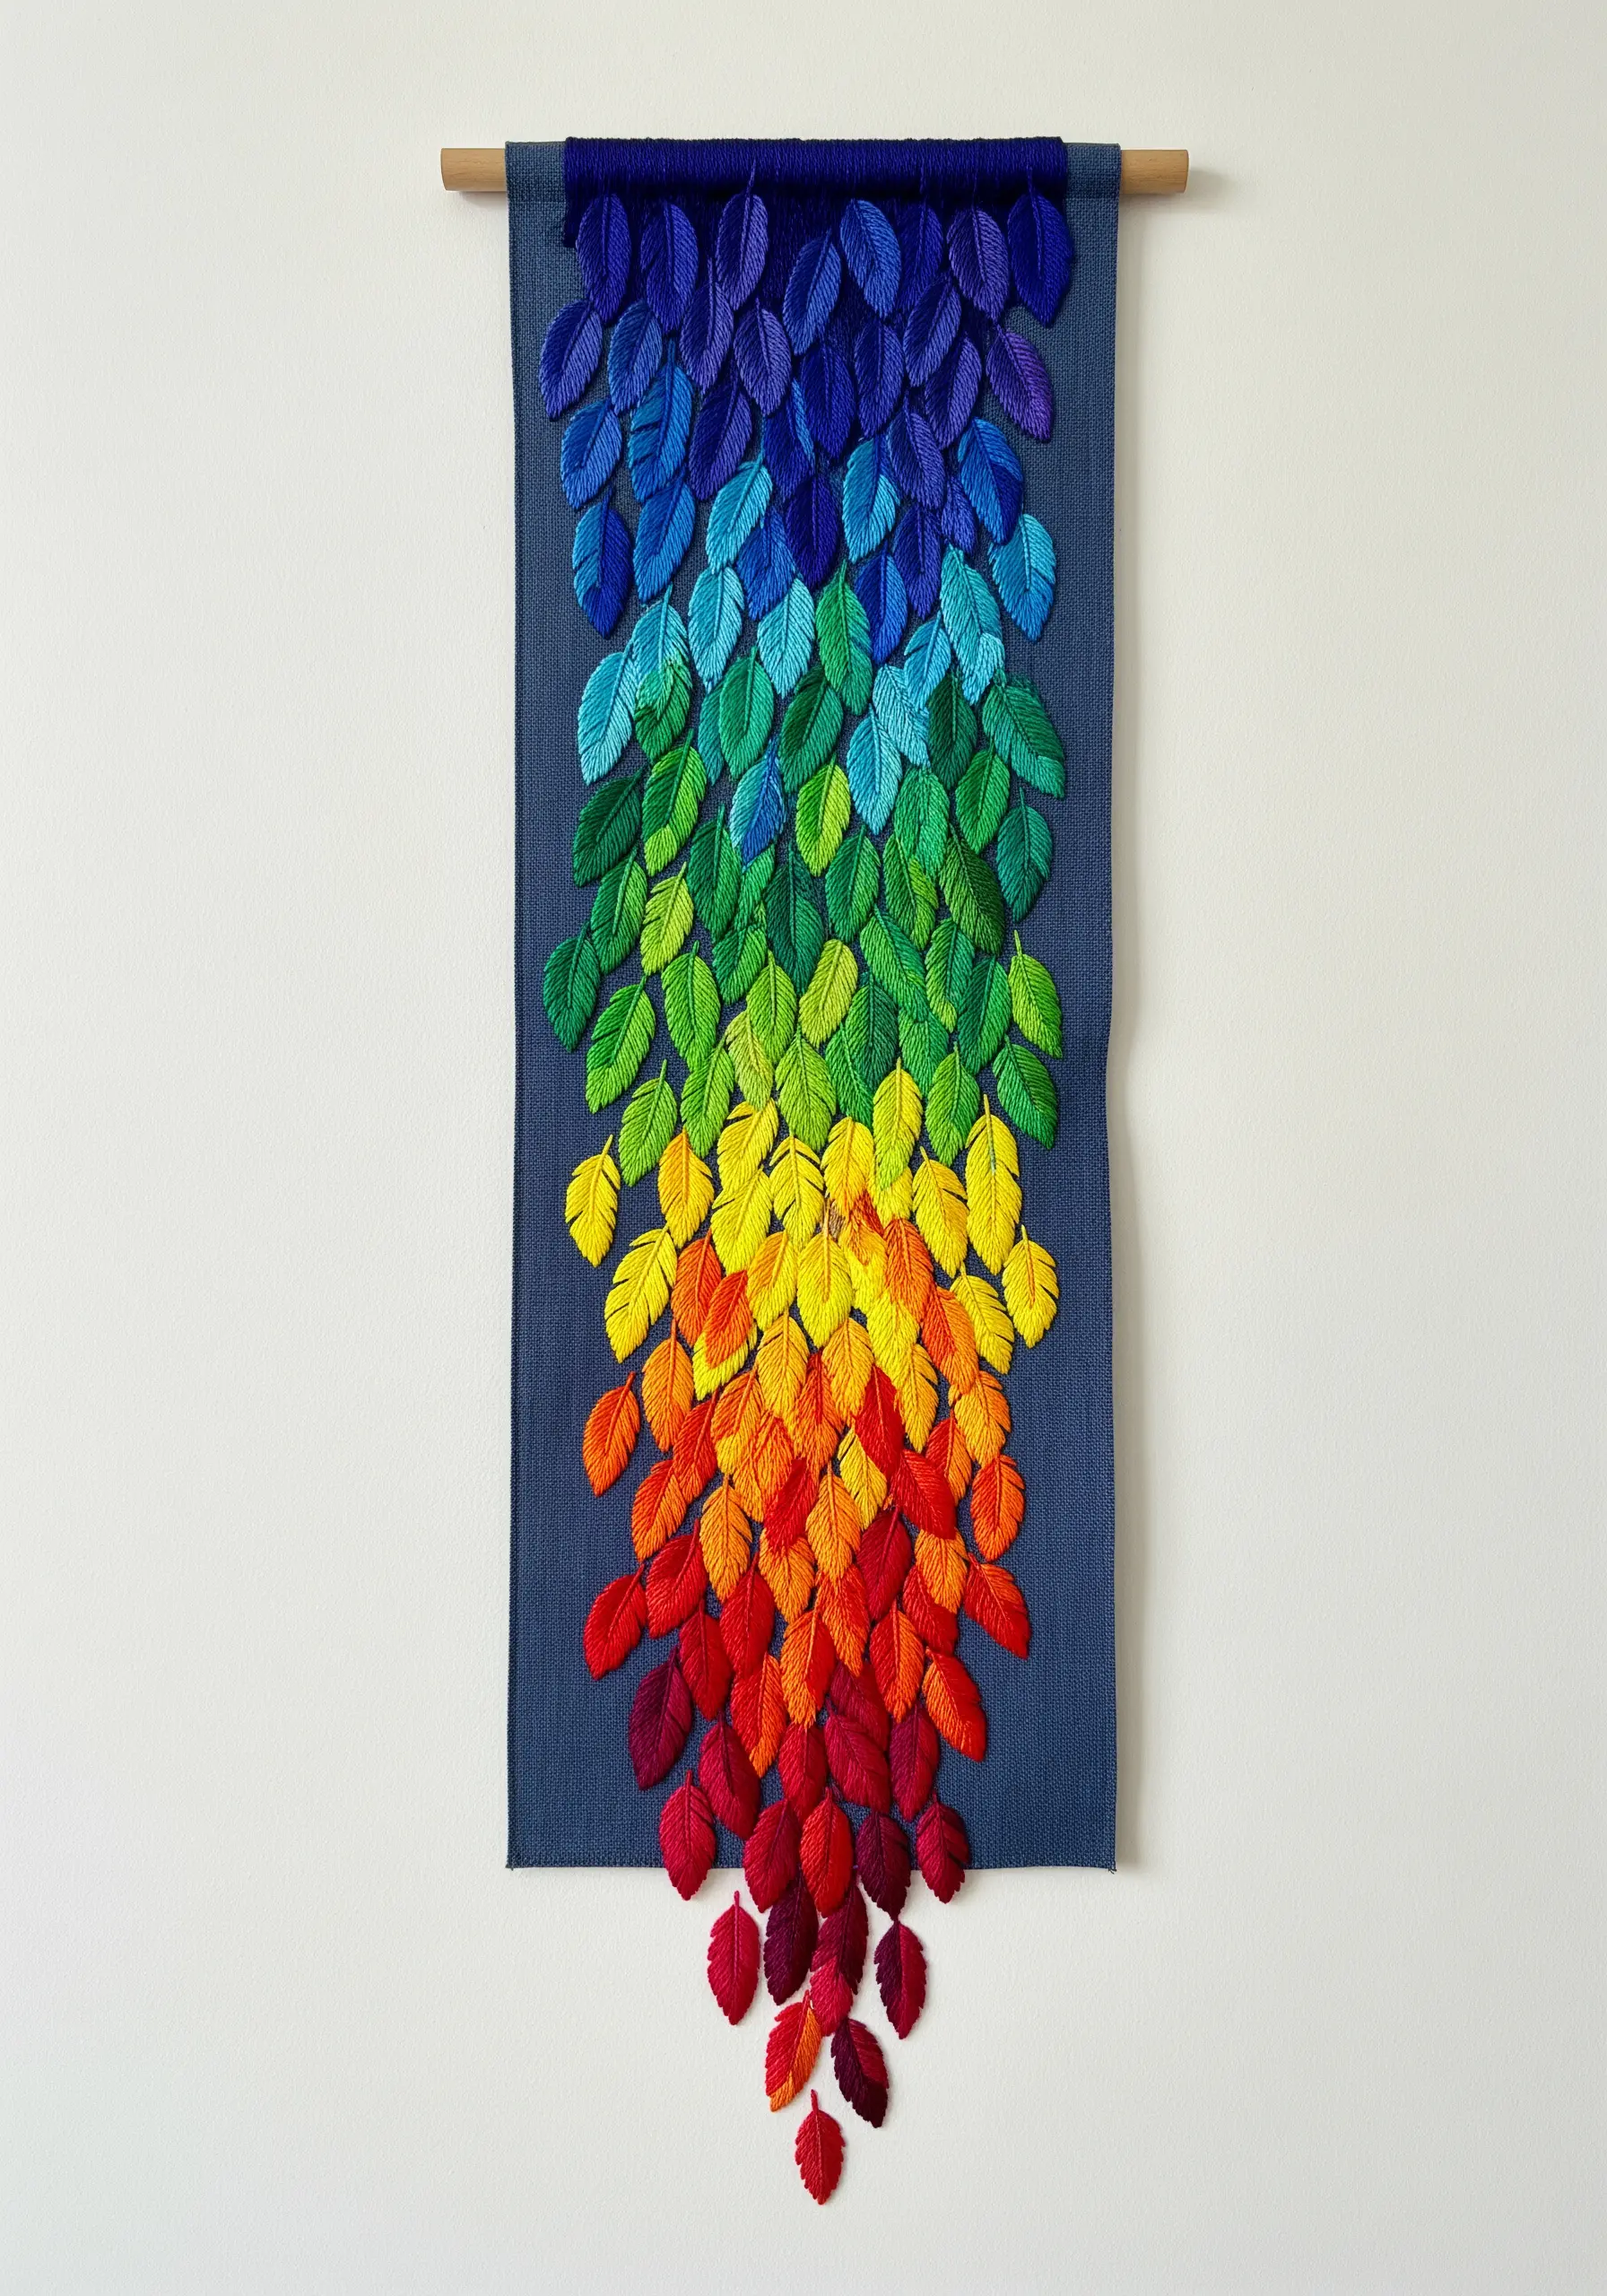
Take your embroidery off the wall hoop and create a stunning textile wall hanging.
Stitch individual leaves using a padded satin stitch to give them dimension, then carefully cut them out.
Arrange the leaves in a seamless rainbow gradient and attach them to a long strip of fabric, layering them to create a cascading, waterfall effect.
This method turns simple motifs into a large-scale, impactful piece of fiber art.
18. Create Softness with a Muted, Earthy Palette
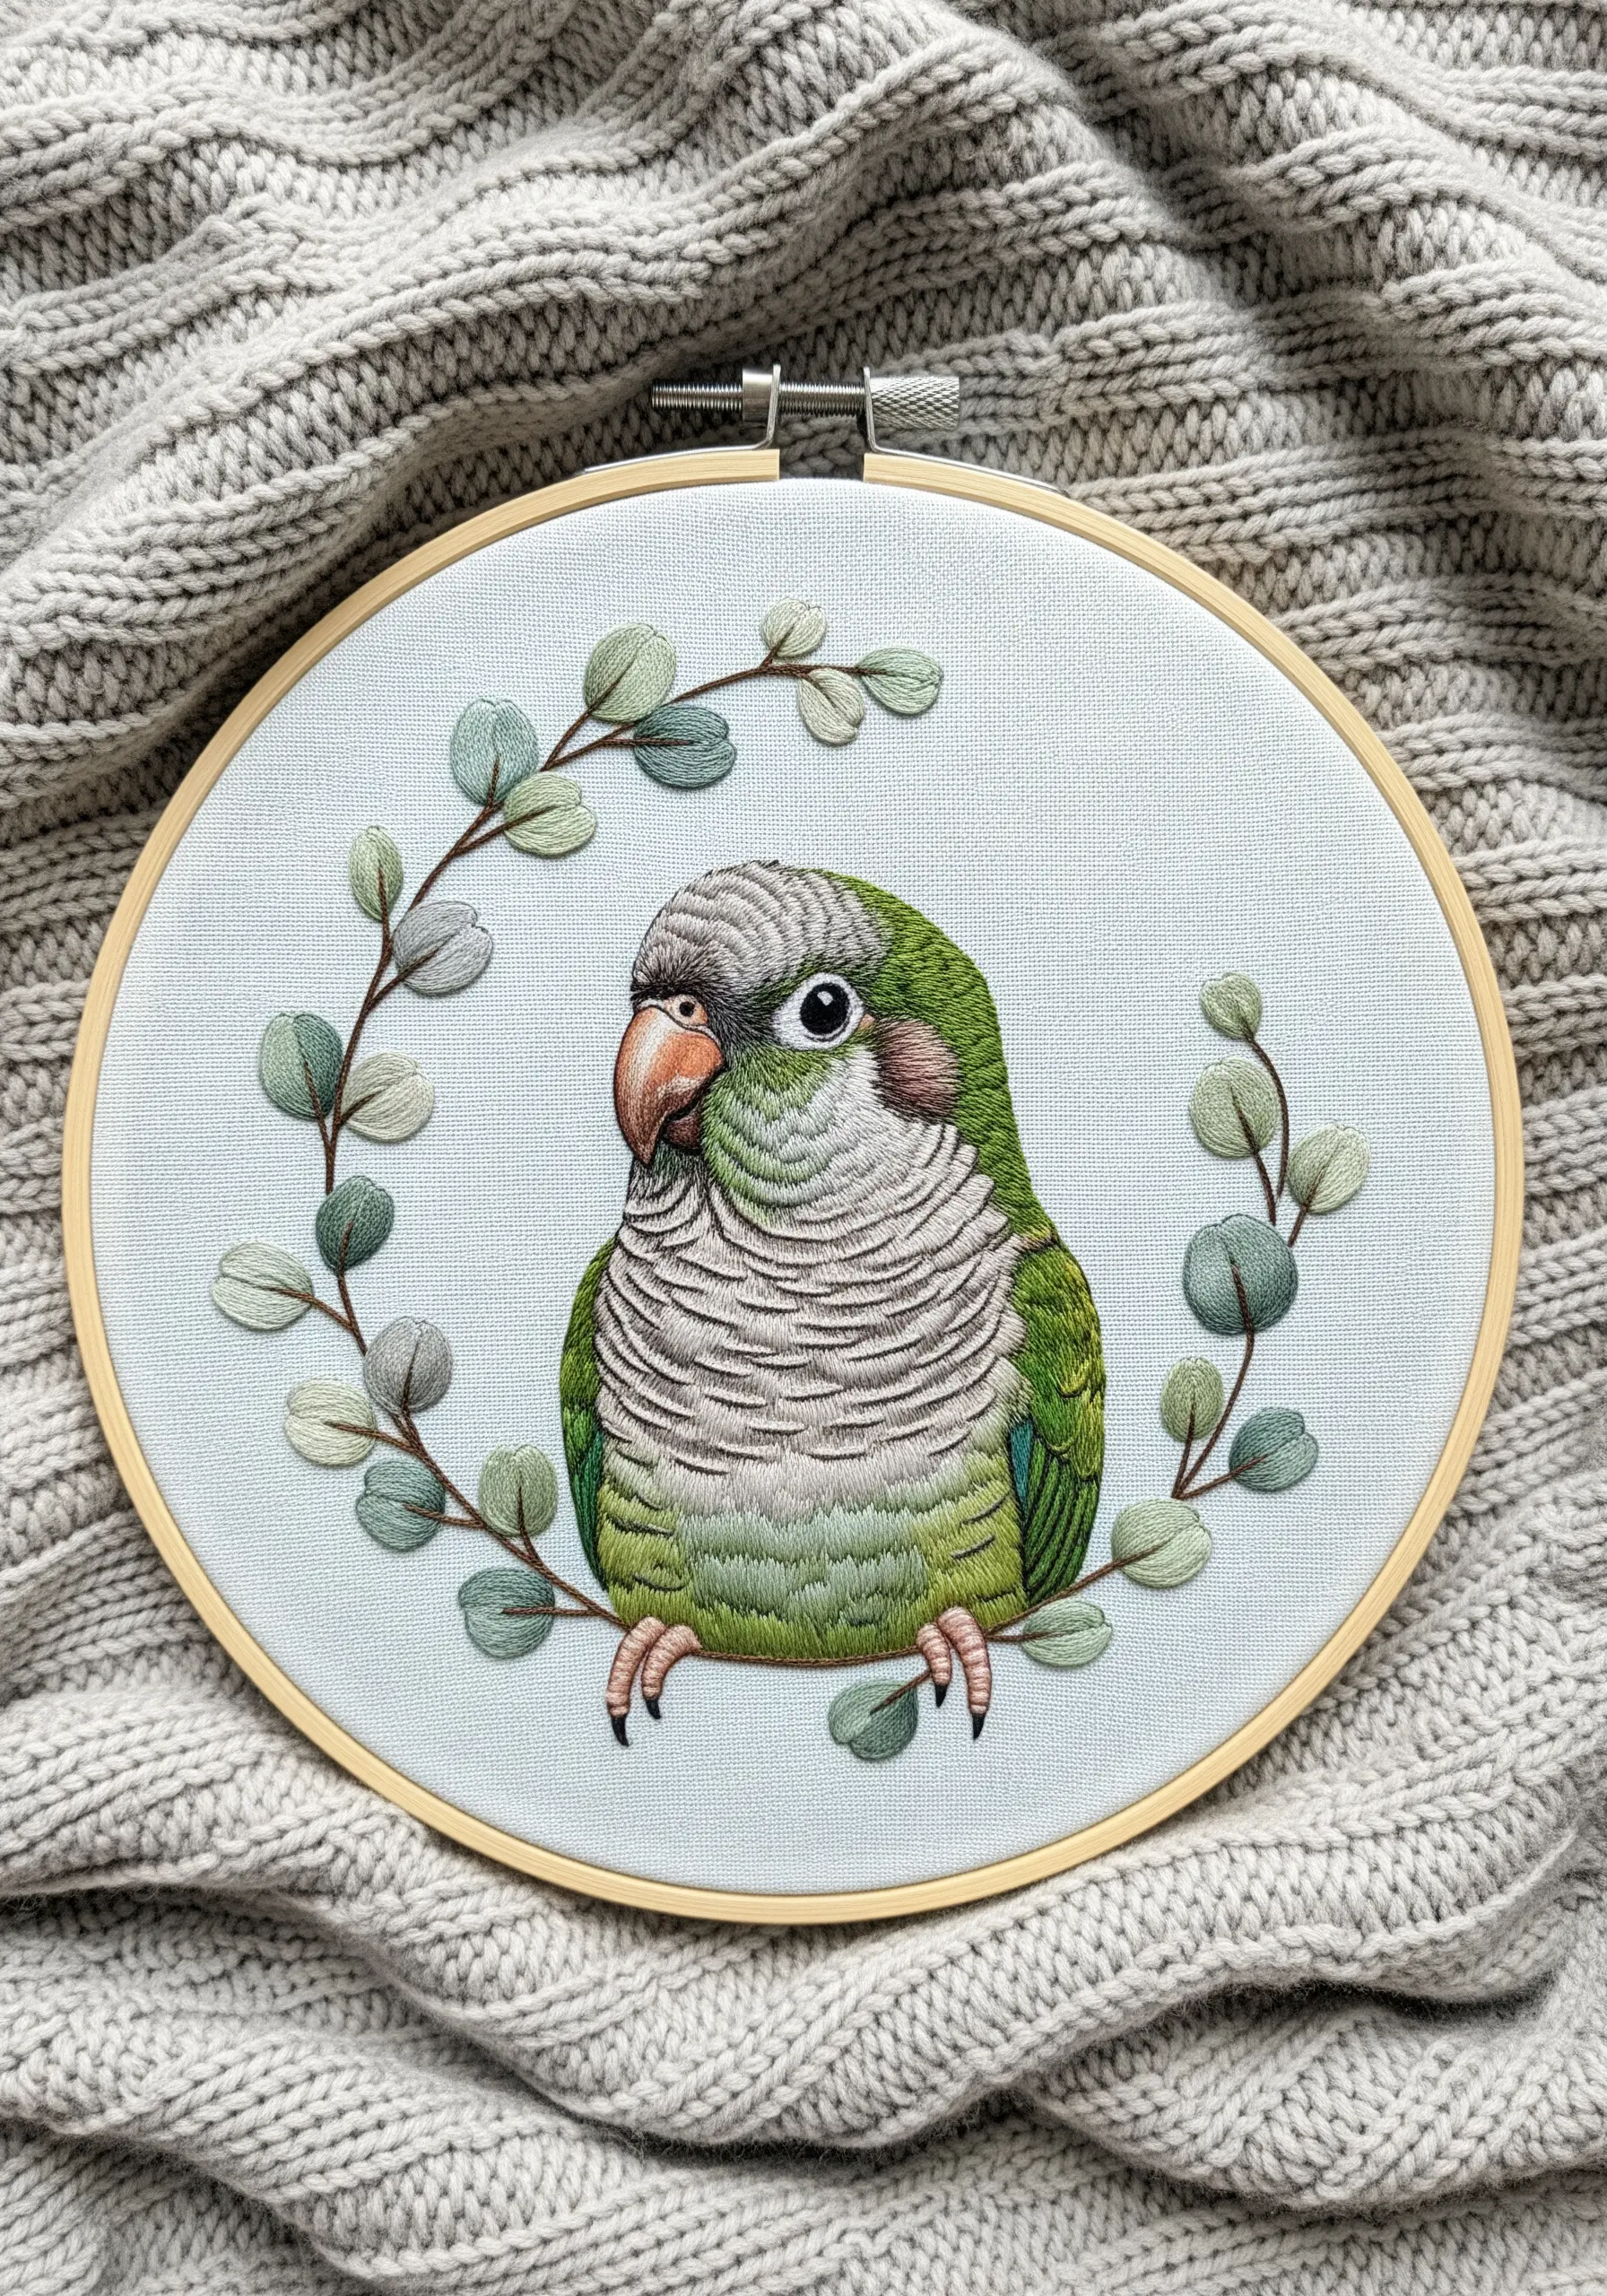
Capture a gentle, quiet mood by selecting a color palette of soft, muted tones. The desaturated greens and greys of the eucalyptus leaves create a calm, natural frame for the Quaker parrot.
Stitch on a pale blue or grey fabric to maintain the soft aesthetic.
Use a delicate split stitch for the bird’s chest feathers to suggest fine texture without adding heavy detail, enhancing the overall feeling of tranquility.
19. Use Directional Stitching to Create Form and Contour
Before you even thread your needle, study the object you plan to stitch. Notice the direction in which lines and shadows naturally fall.
For these tropical leaves, orient your satin stitches to follow the veins, and for the flower petals, angle them to curve around the form.
This simple act of matching your stitch direction to the object’s natural contours is the key to creating dimension and realism, making your embroidery look less like a flat fill-in and more like a sculpture of thread.
20. Build a Striking Design with a Two-Color Palette

You don’t need dozens of colors to create a powerful design. Limit your palette to two high-contrast, complementary colors like this brilliant cobalt blue and sunny yellow.
This focused approach creates instant visual harmony and impact.
To add interest within the limited palette, use one color for the fill (the blue parrot) and the other for delicate line work (the yellow branch), creating a beautiful balance between solid form and fine detail.
21. Weave Surrealism into Your Botanical Art
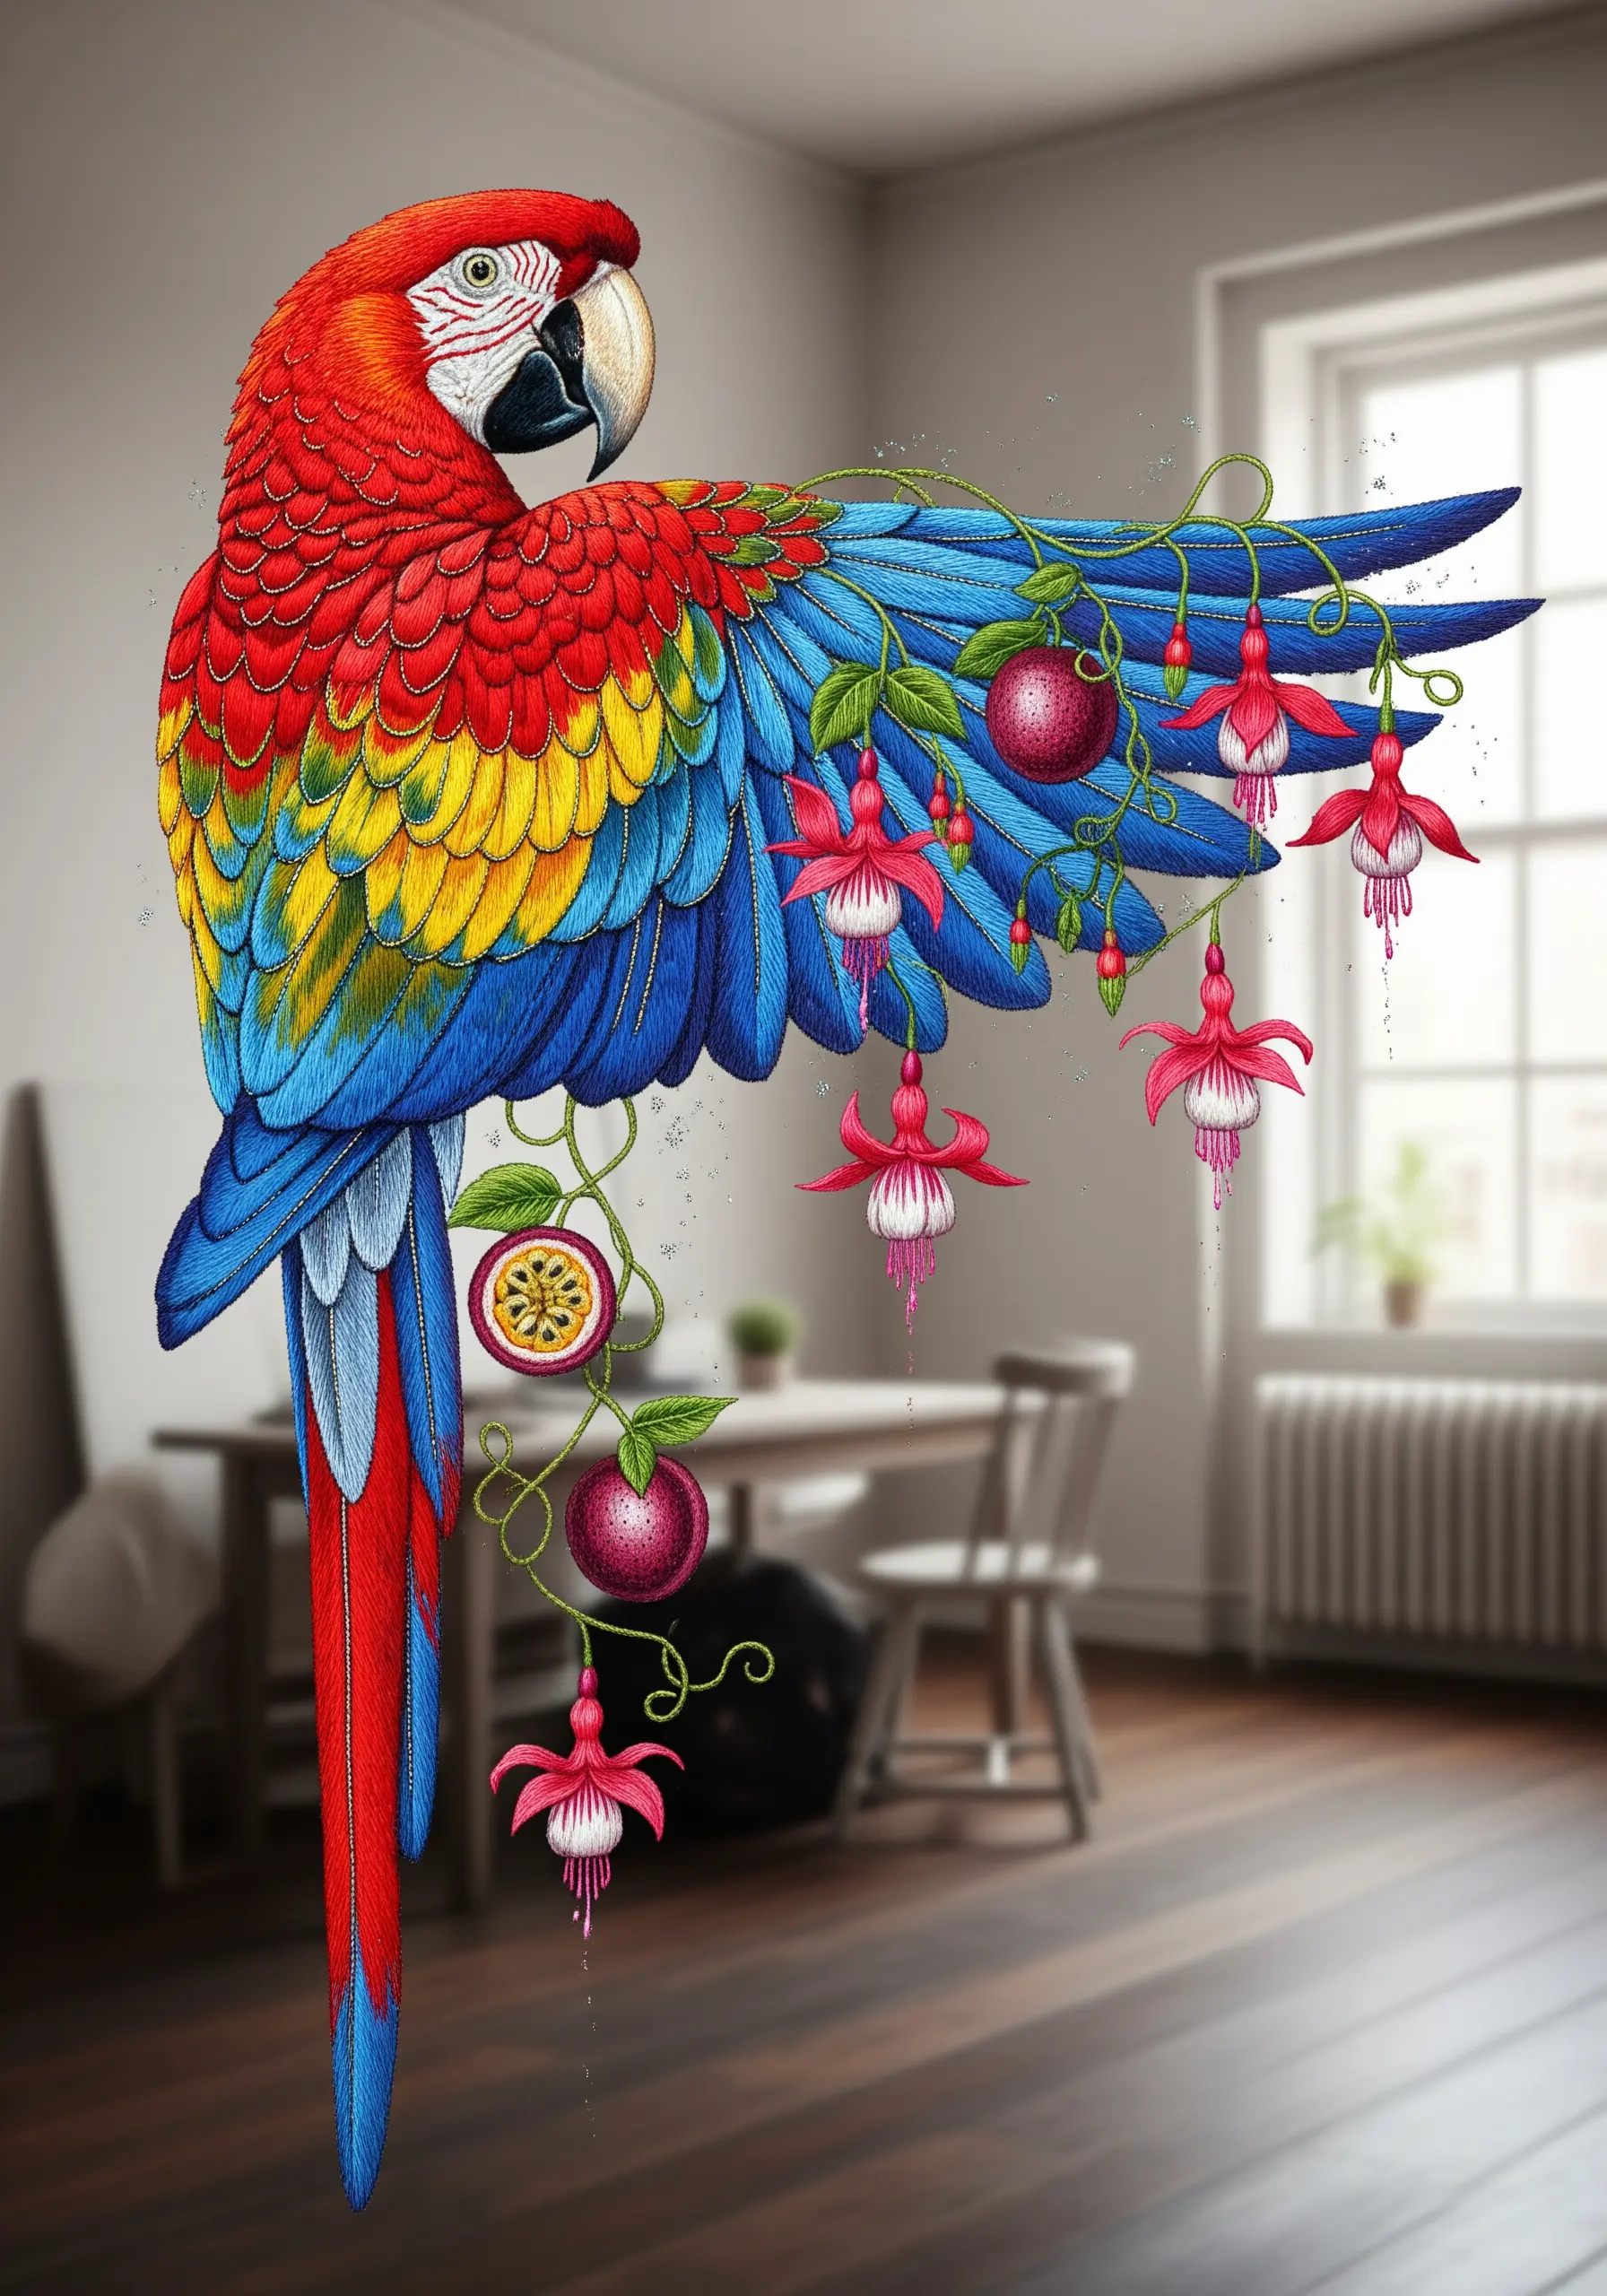
Push your creative boundaries by merging animal and botanical elements into a single, surreal composition.
Instead of placing flowers around the parrot, imagine them growing directly from its wings. Use thread painting to seamlessly blend the base of the stems into the feathers, making the transition feel organic and magical.
This technique allows you to tell a story and create a piece of art that is uniquely yours, transforming a simple portrait into a conversation starter.
22. Adapt Your Embroidery for Functional Home Decor
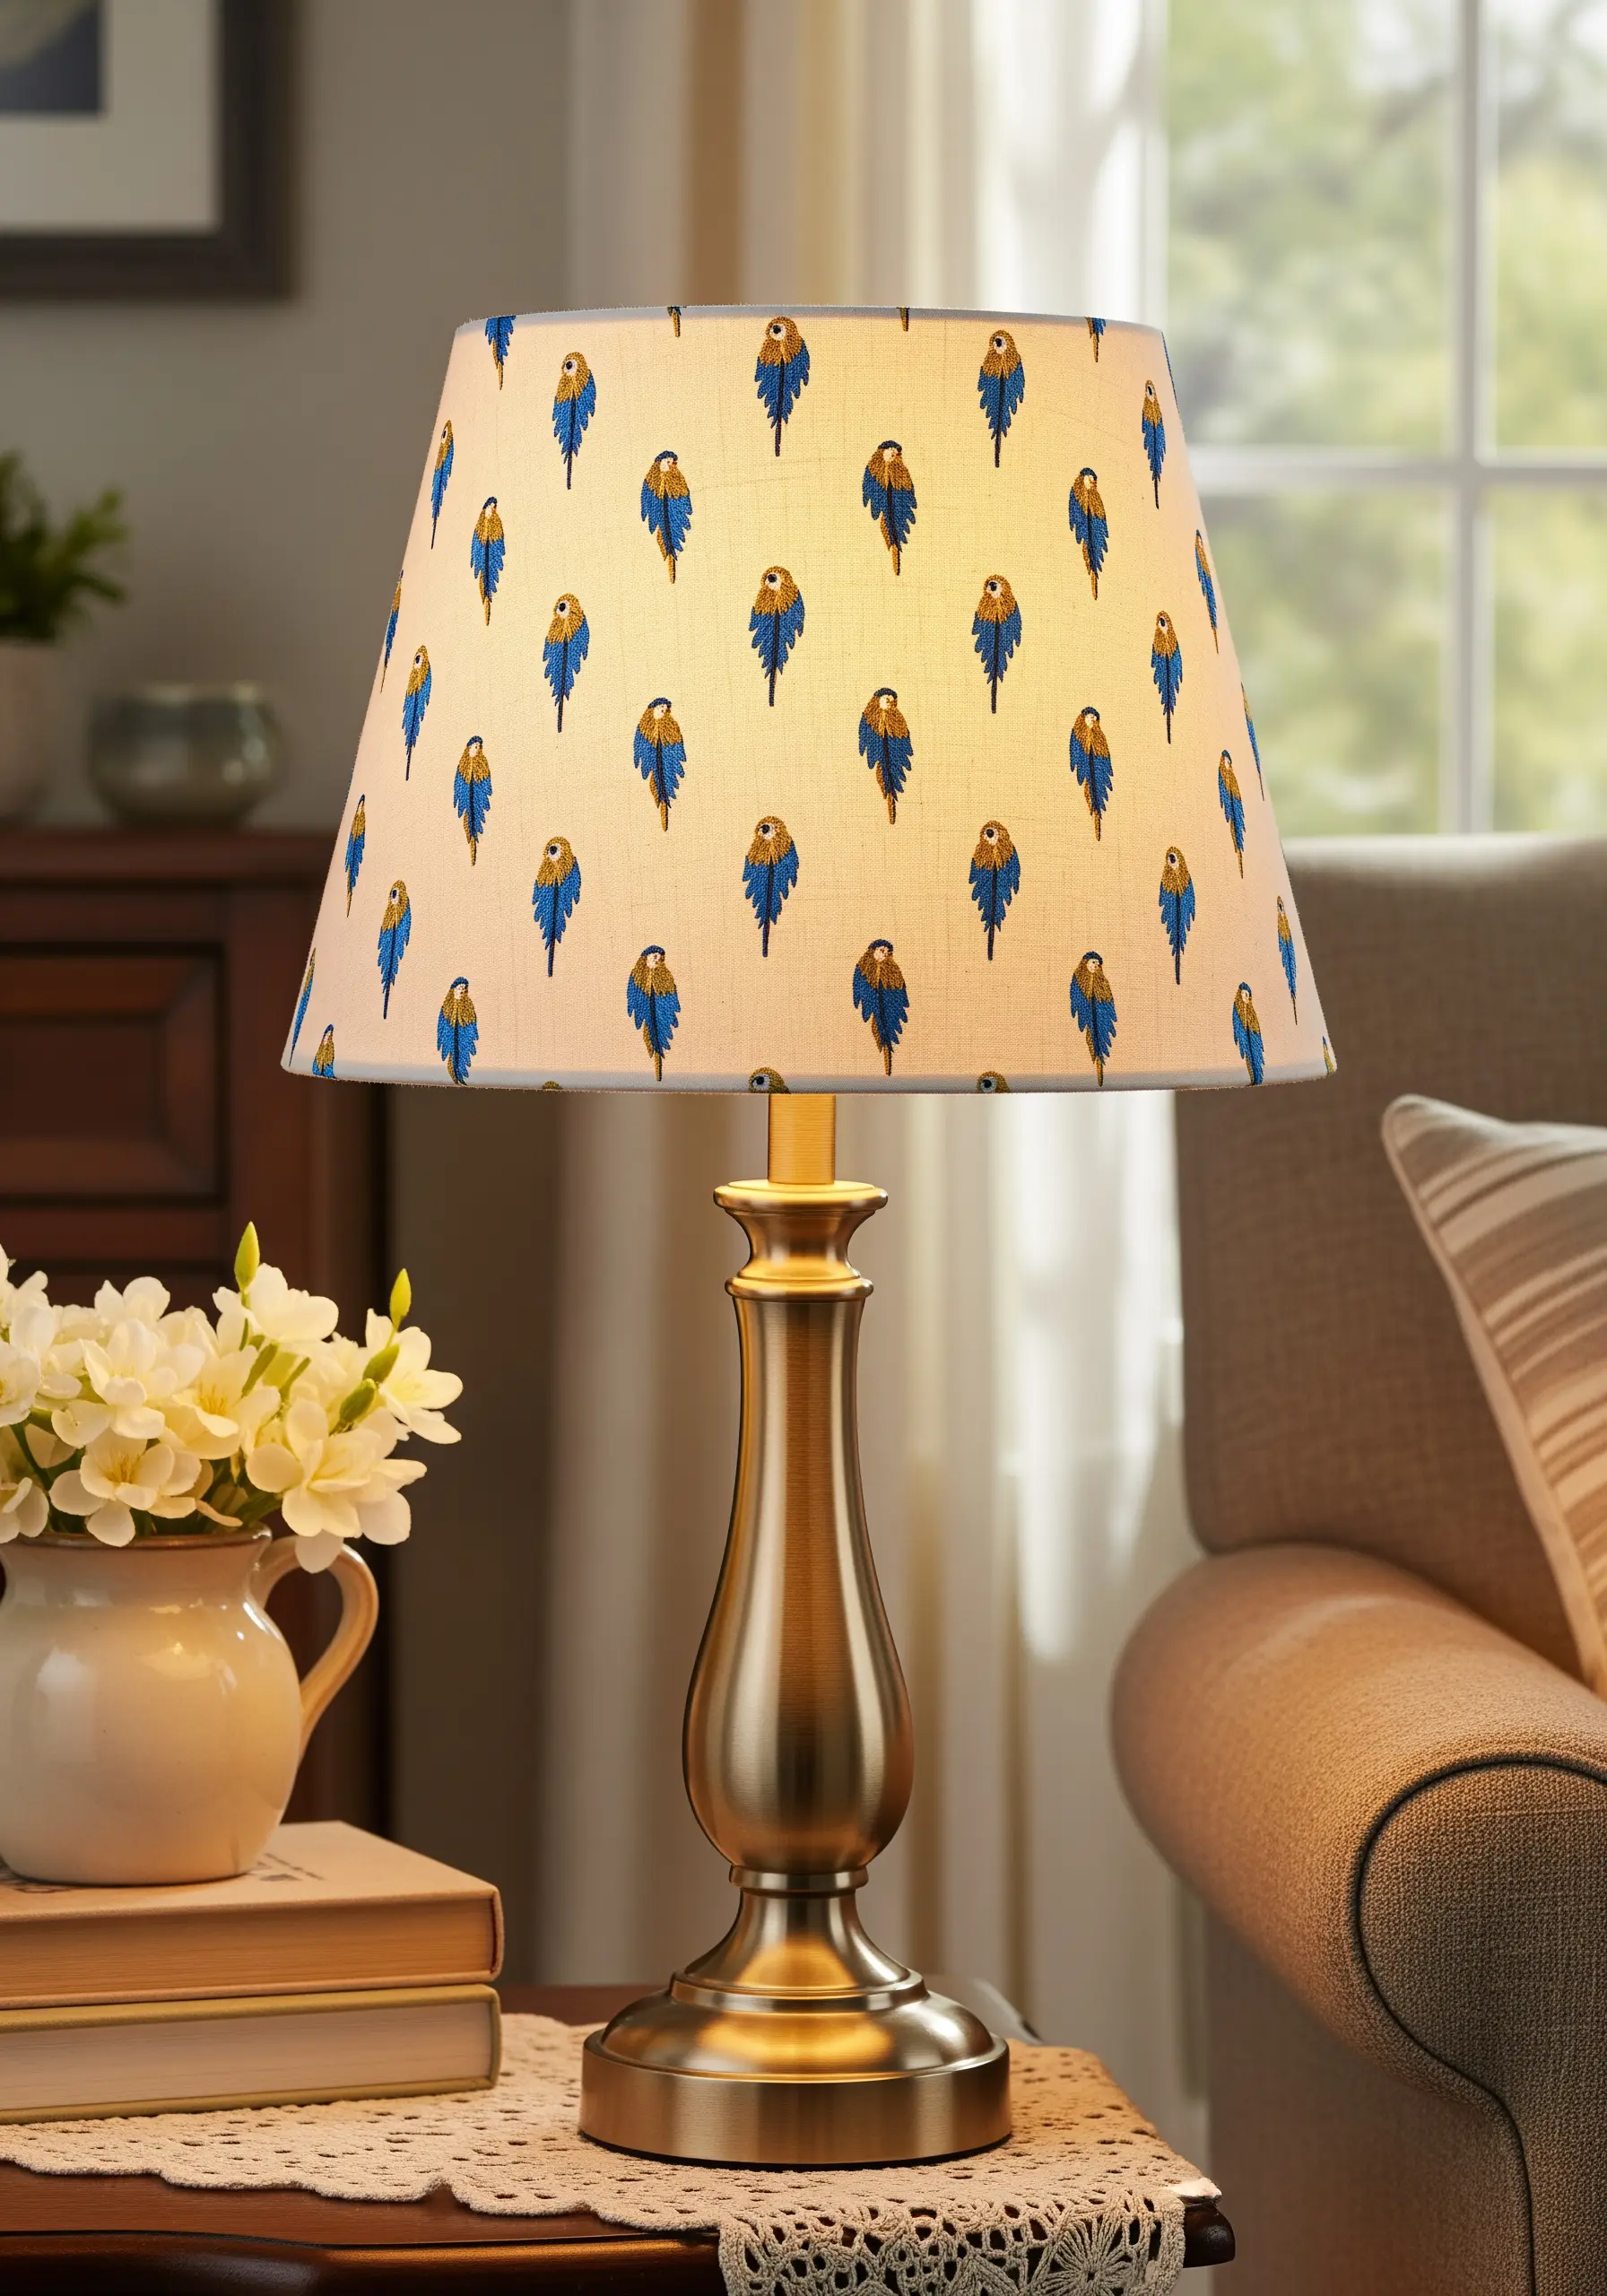
Extend your embroidery beyond wall art by creating patterns for functional items like lampshades.
To ensure a professional finish, plan your repeating pattern carefully so it aligns perfectly where the fabric meets. Use a light, heat-erasable pen to mark your design.
Before stitching, iron a lightweight fusible interfacing to the back of your fabric. This provides stability, prevents puckering, and hides the messy back of your work when the lamp is turned on.
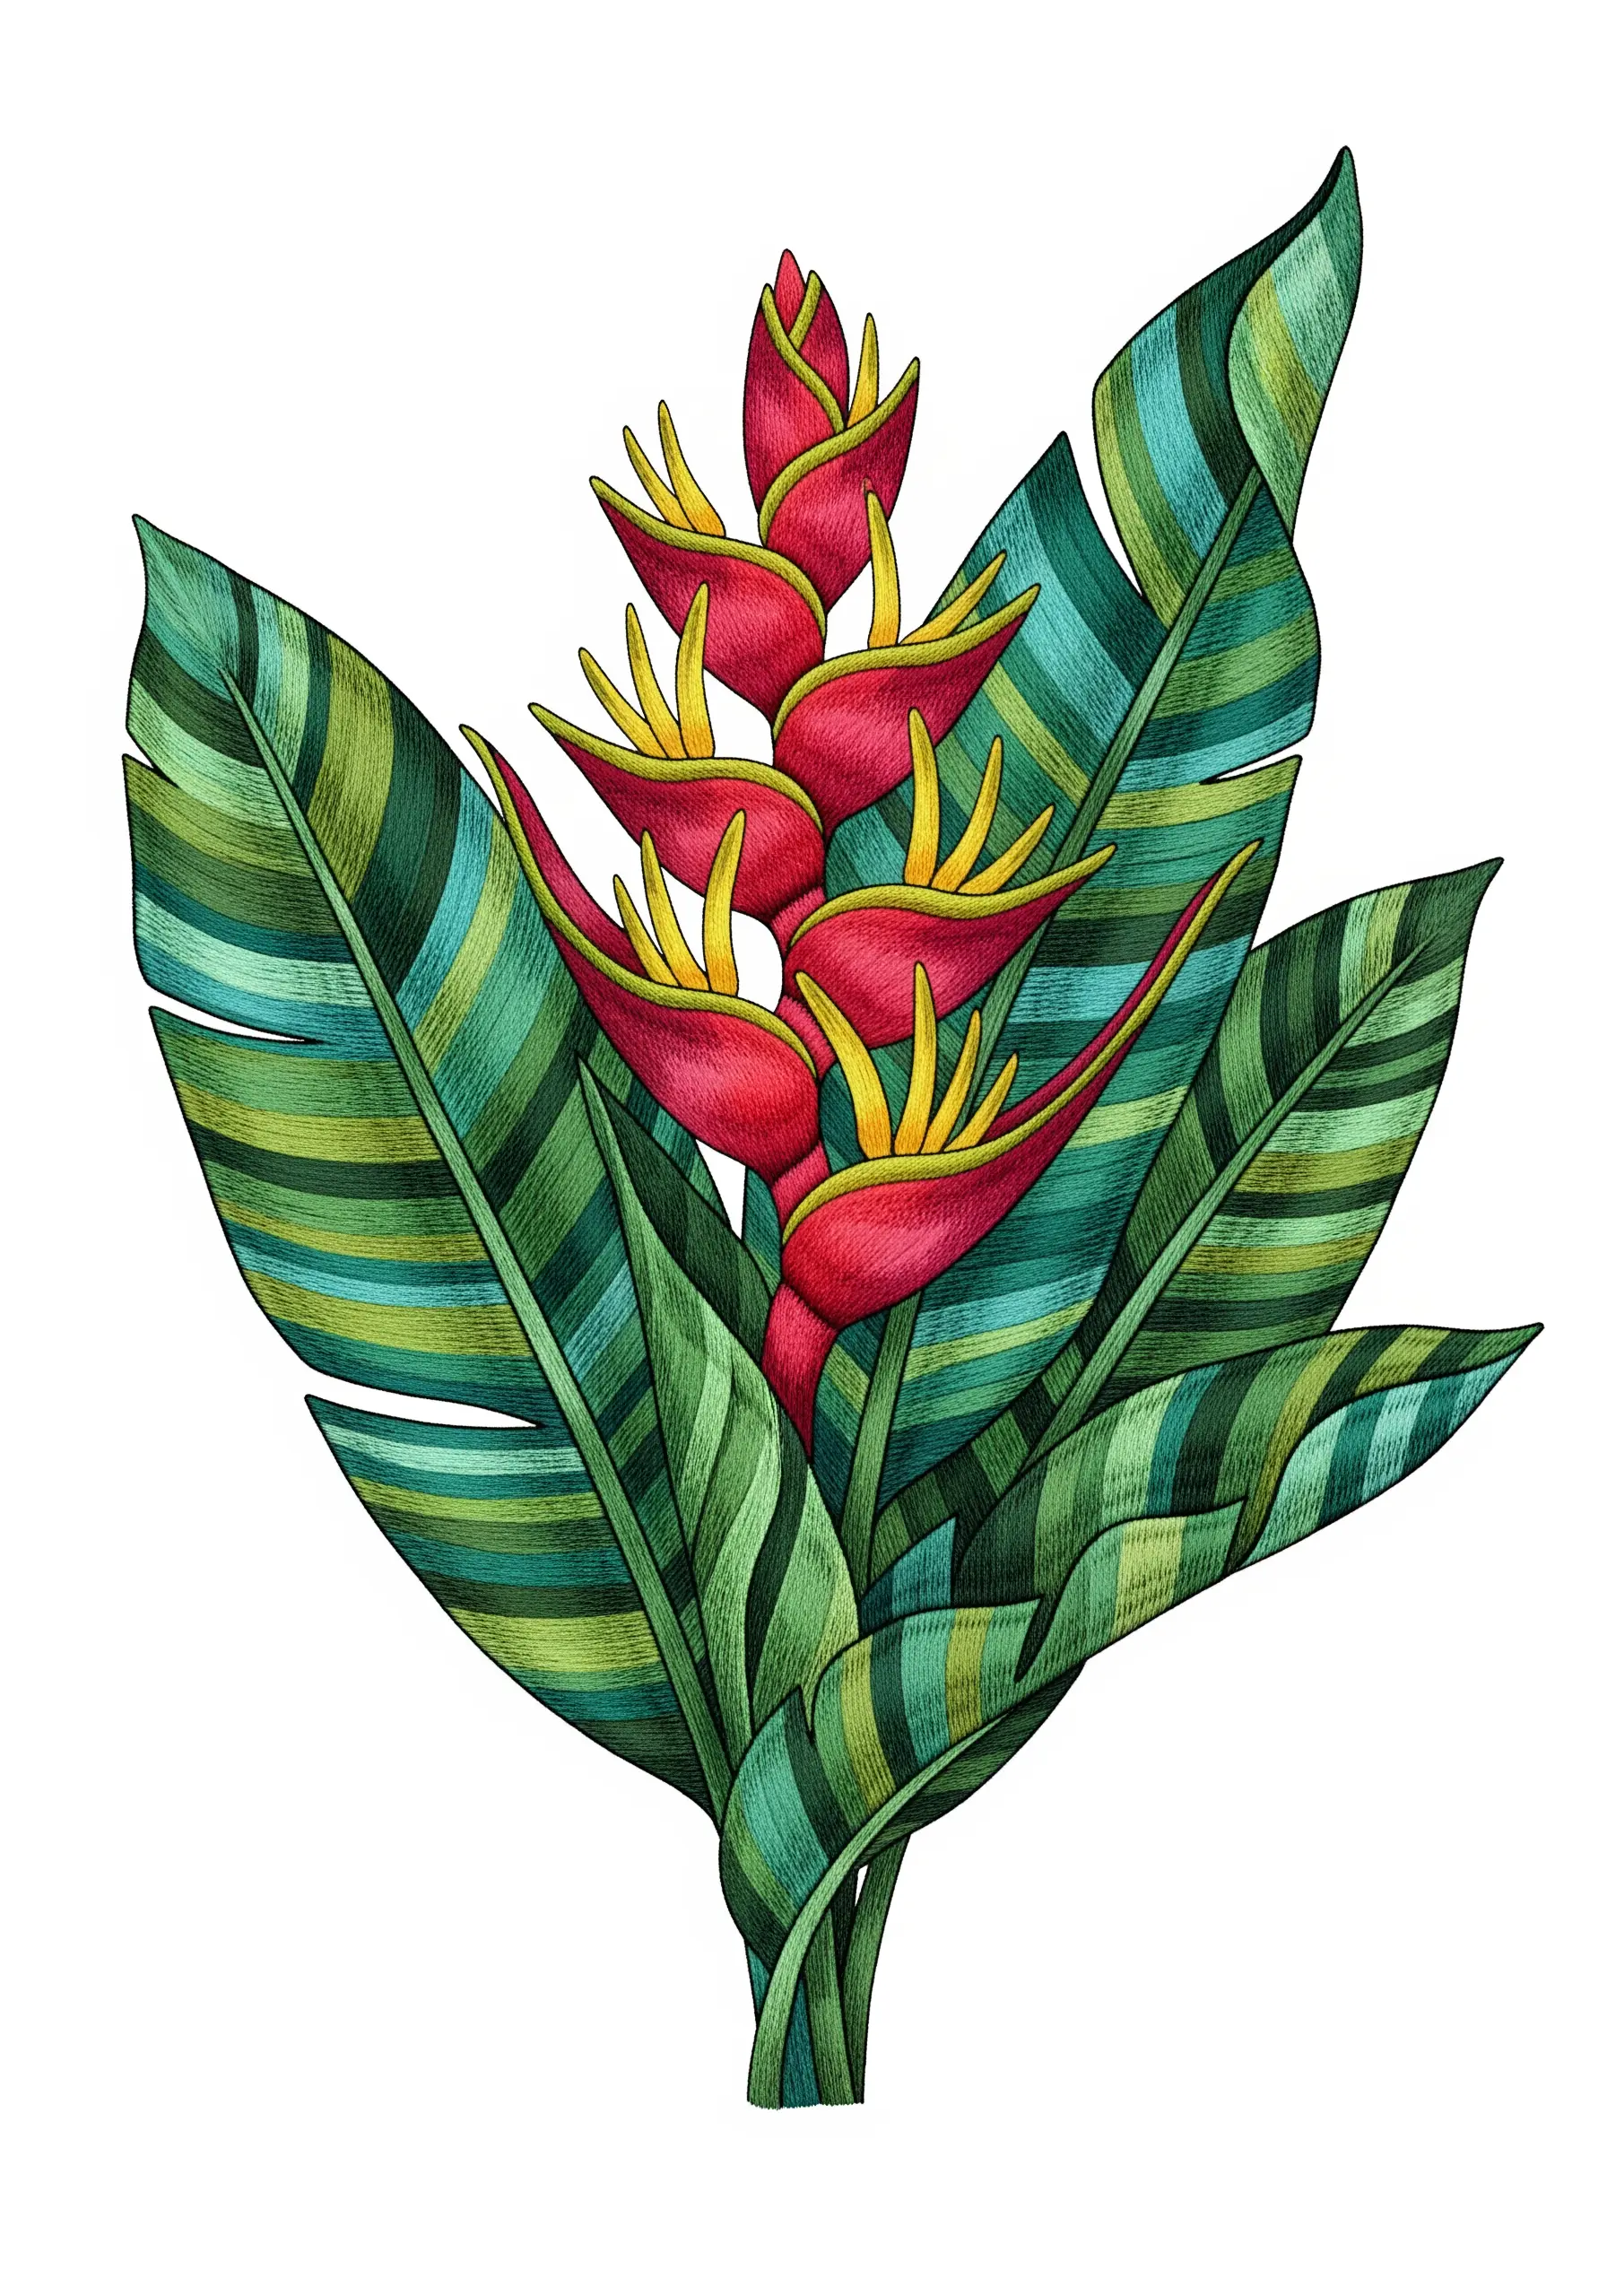
23. Create Warmth with an Analogous Sunset Palette
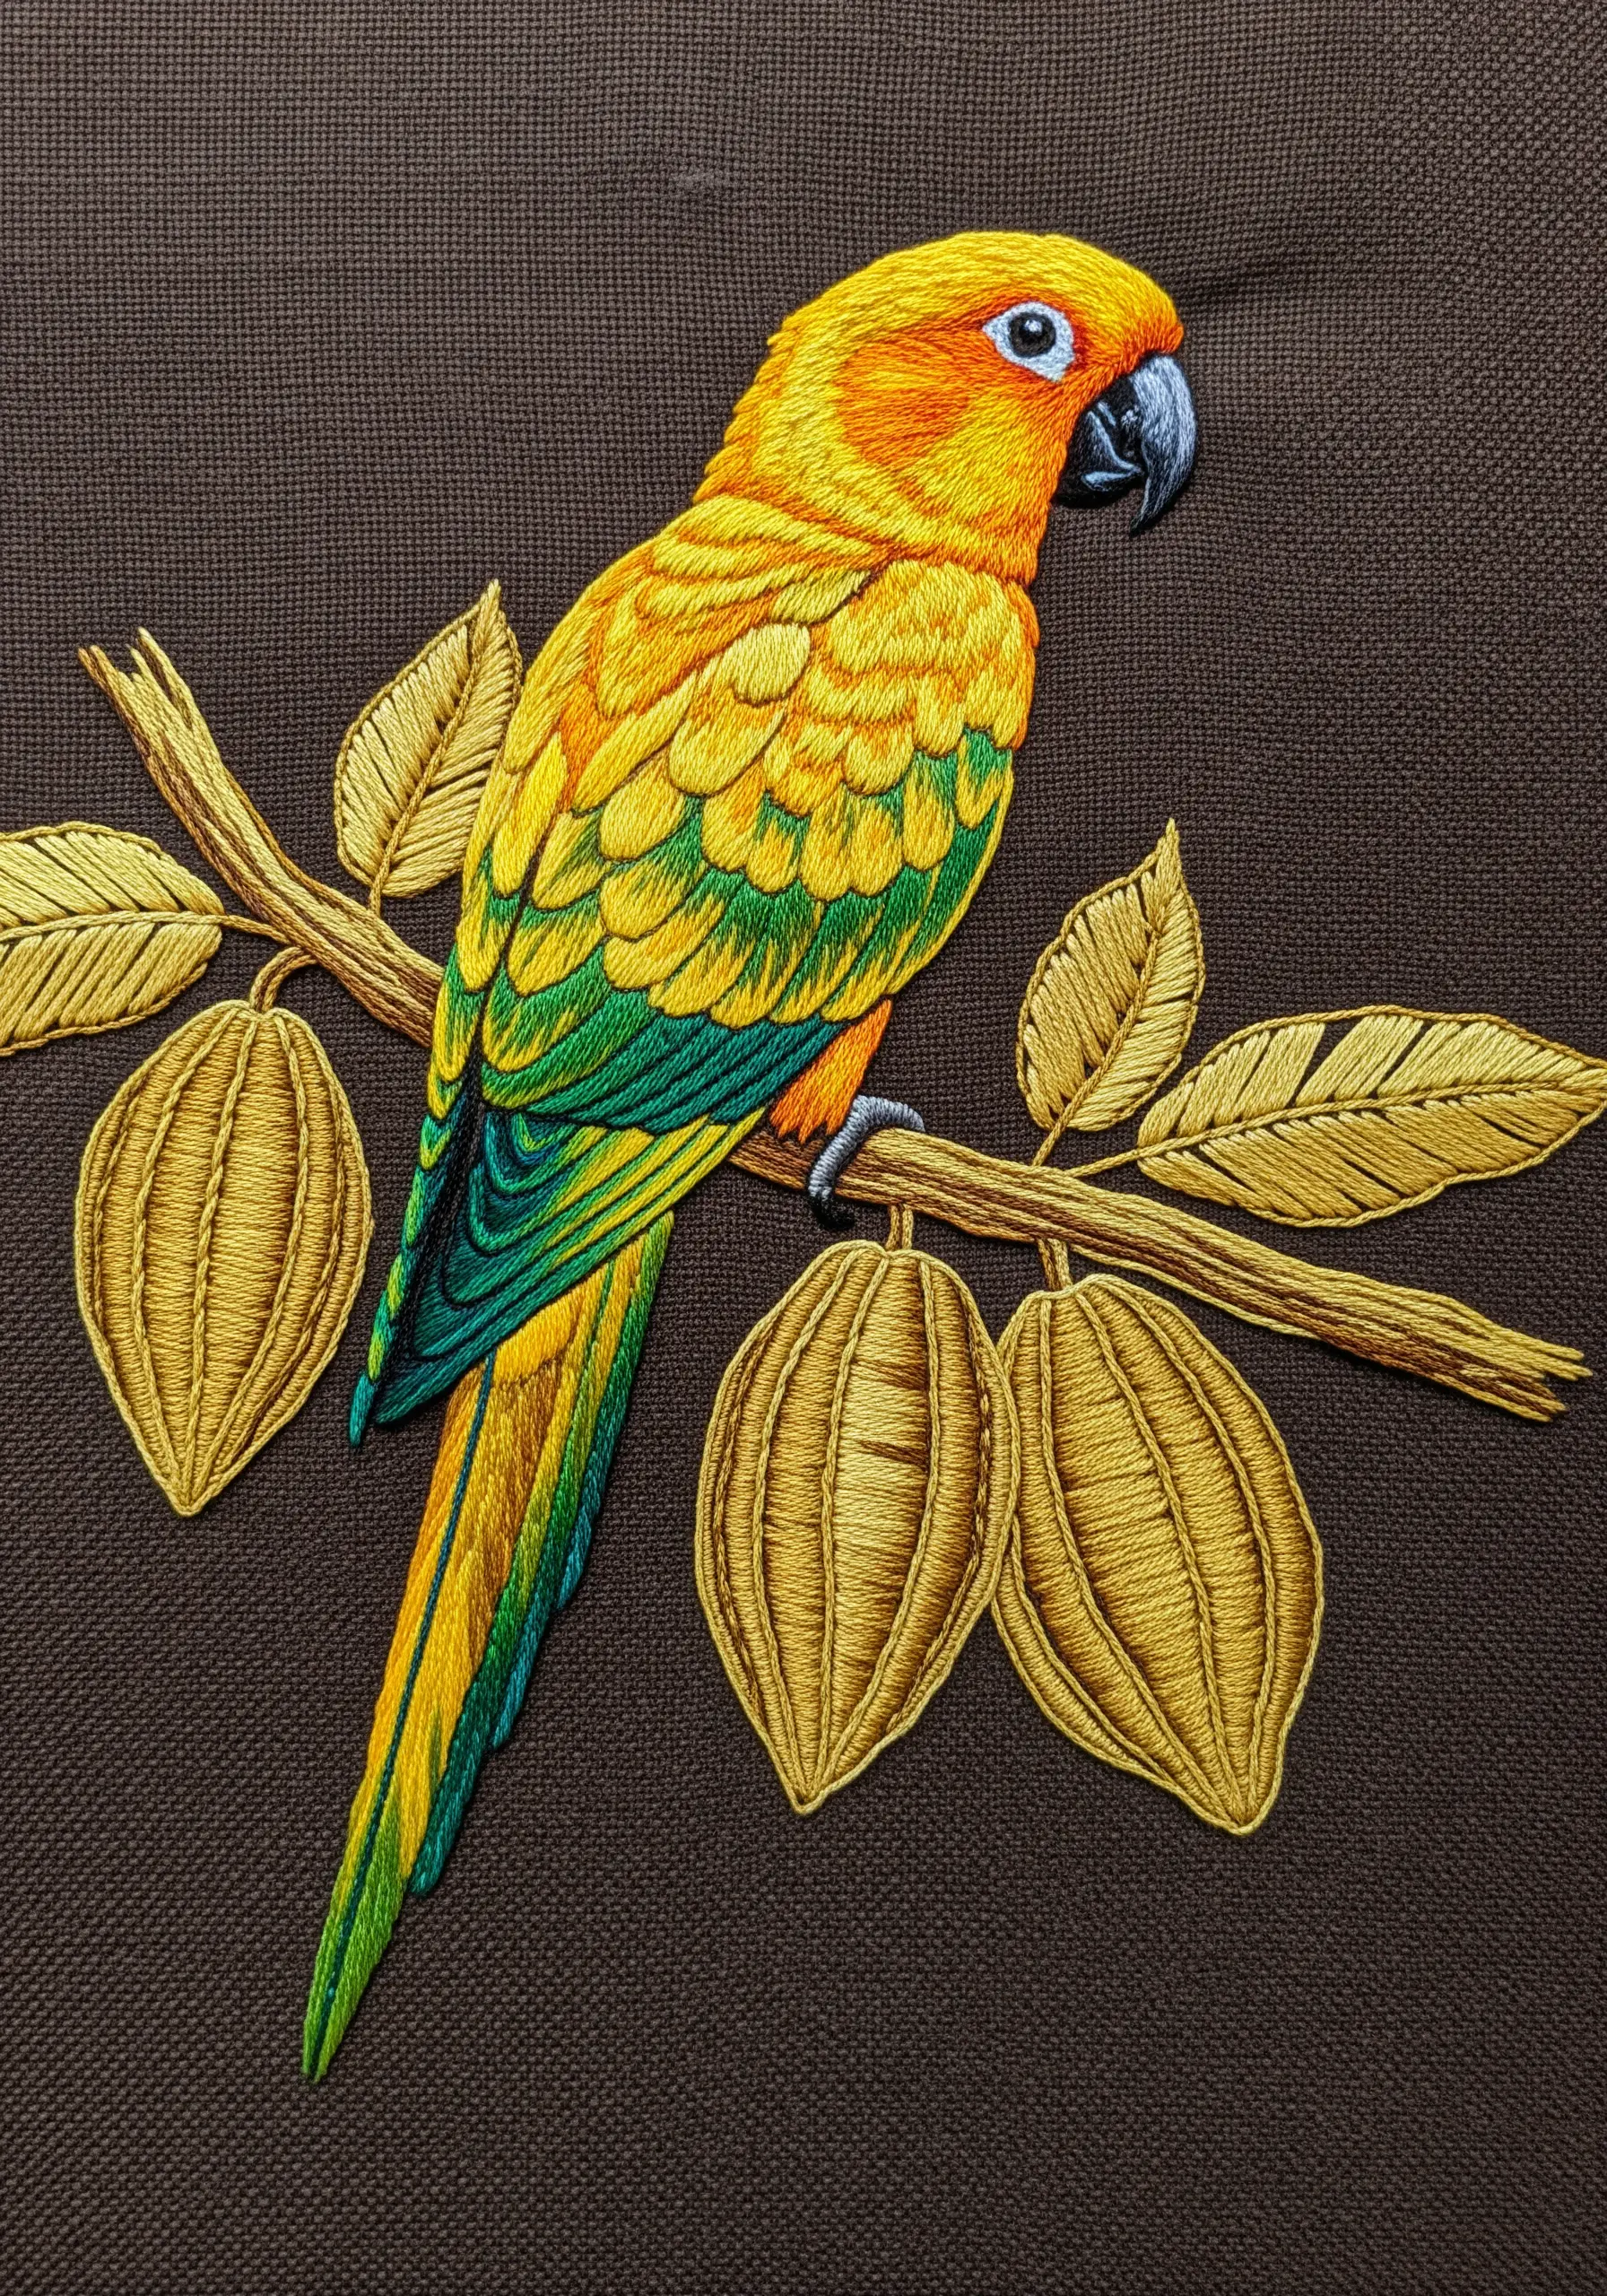
Bathe your subject in a warm, golden glow by choosing an analogous color scheme based on yellows, oranges, and warm greens.
Stitching this sunny palette on a deep brown fabric makes the colors feel even richer and more saturated, reminiscent of a golden hour sunset.
Use a slightly lighter shade of brown for the branch to distinguish it from the background while maintaining the overall cohesive, warm tonality of the piece.
24. Combine Outline and Abstract Fill for a Celestial Effect
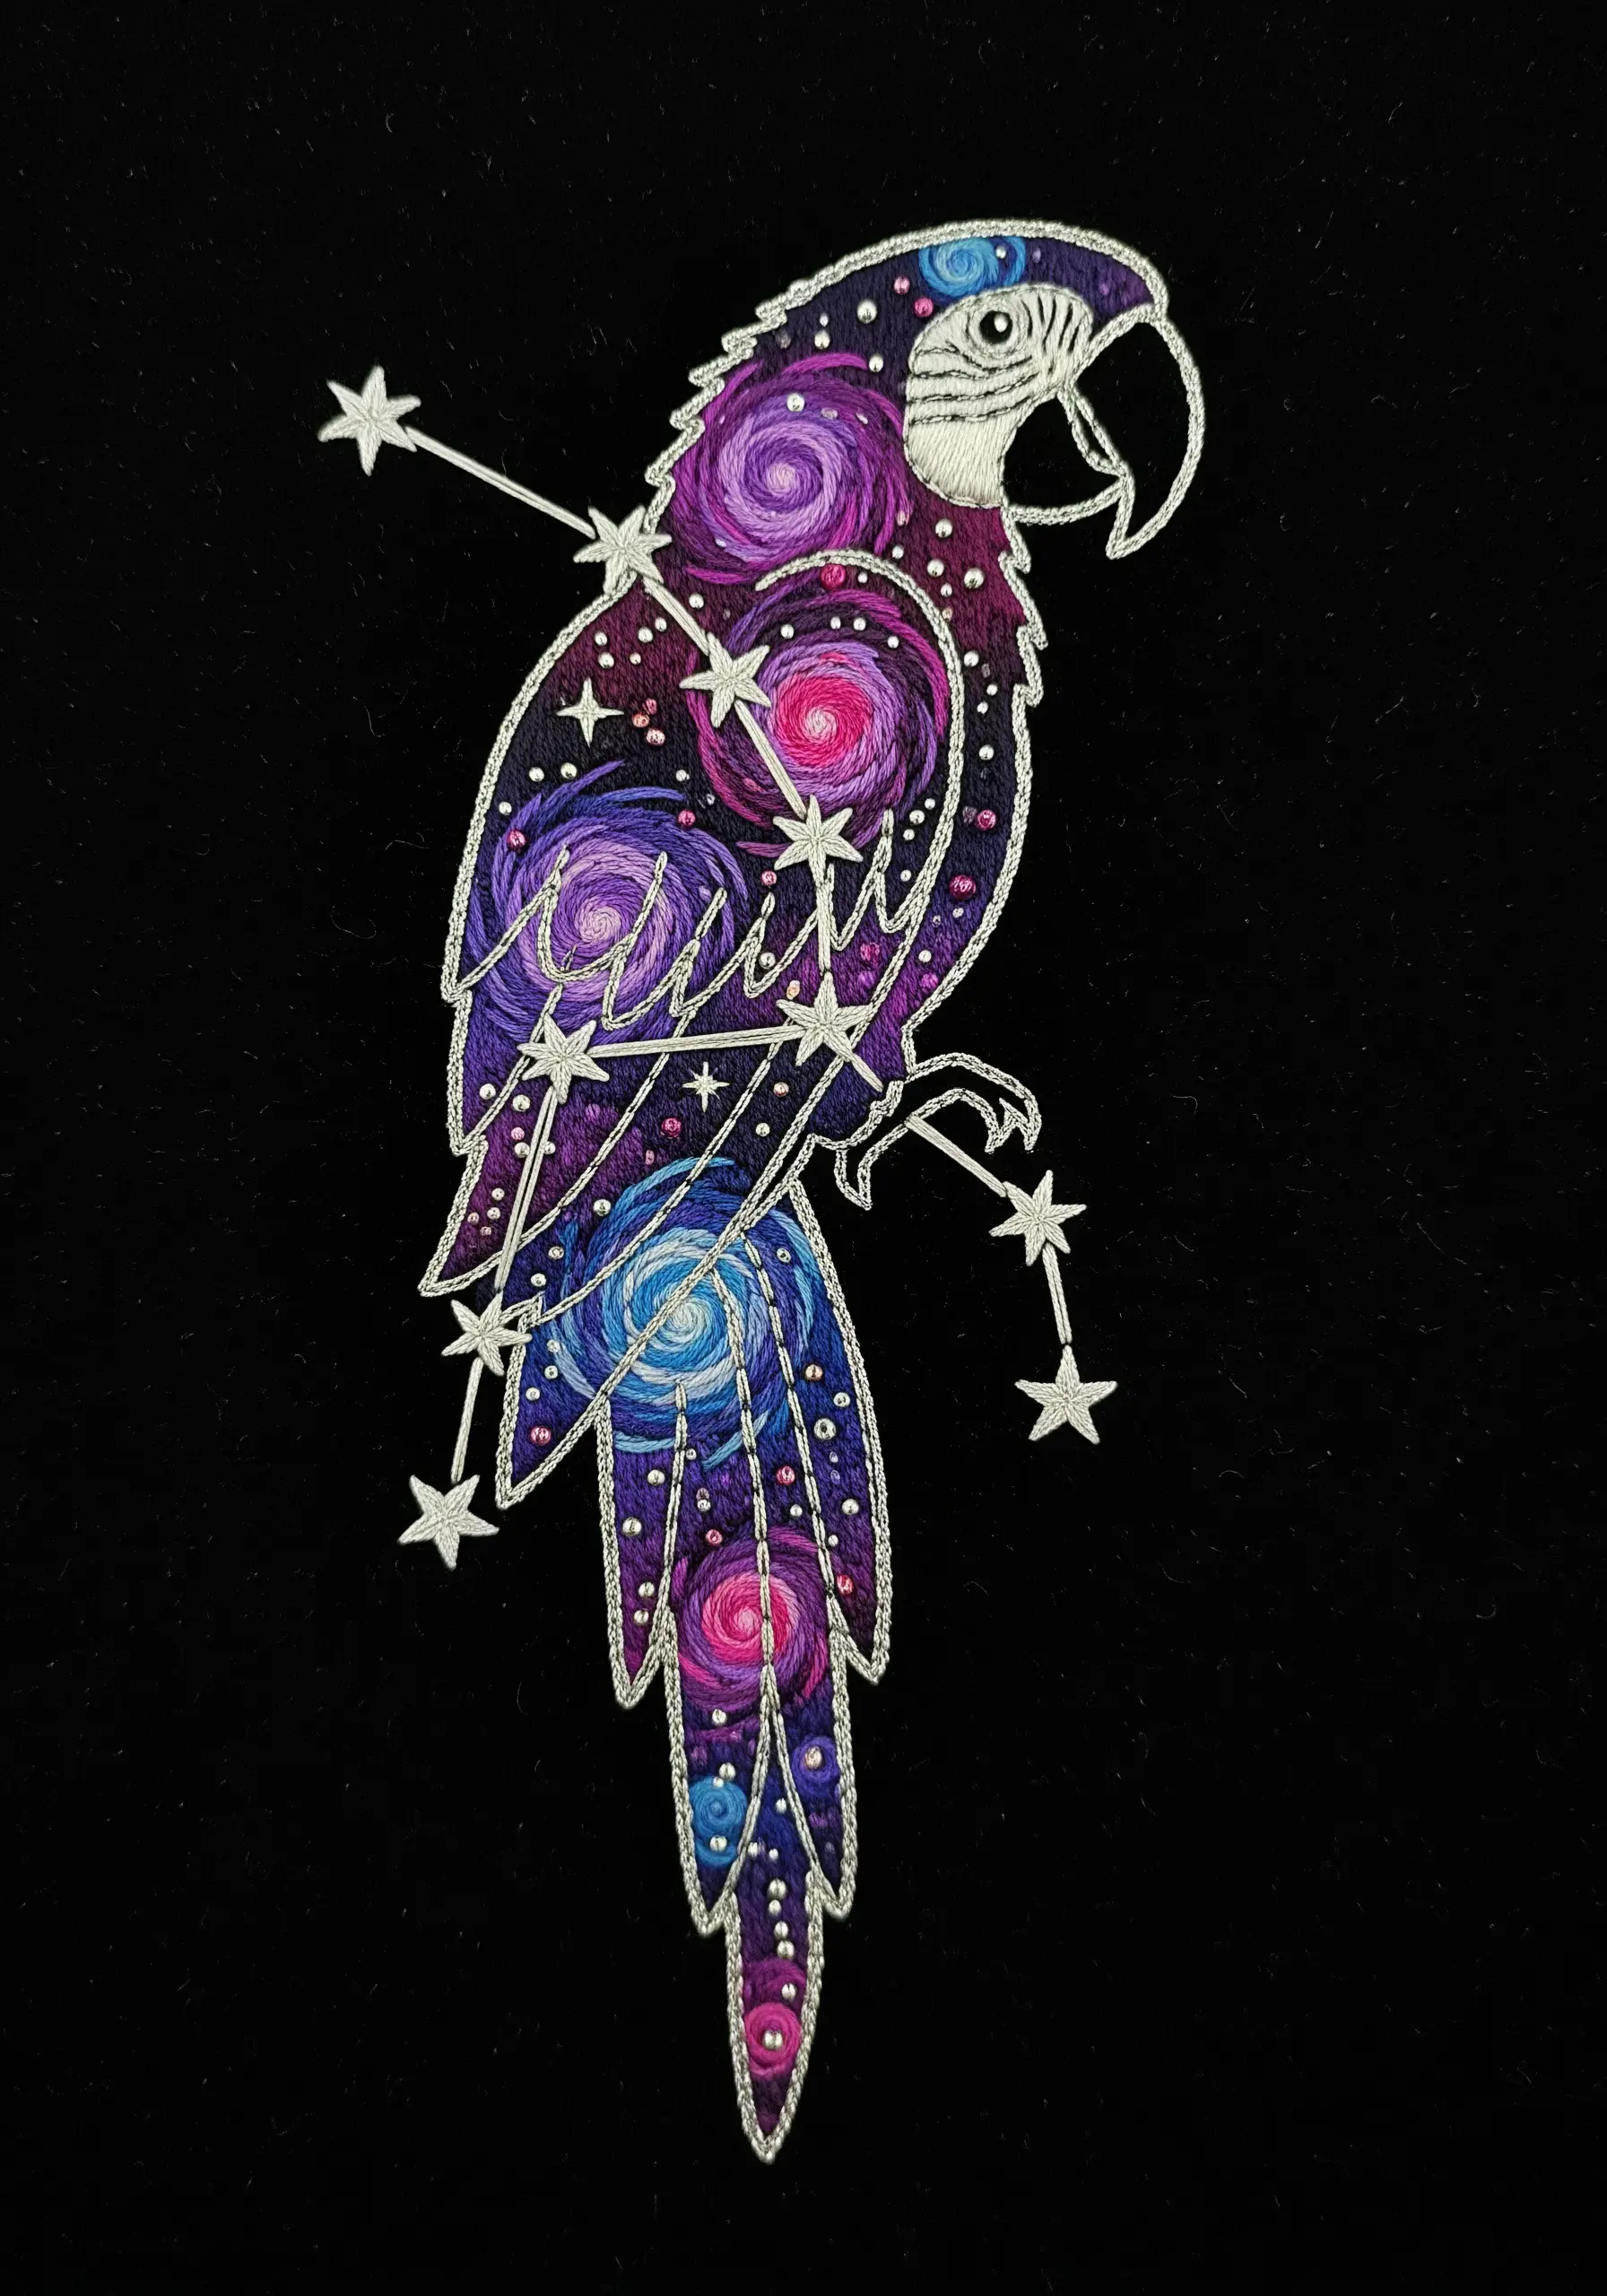
Create a cosmic work of art by using the parrot’s silhouette as a window into a galaxy.
First, establish the outline using a strong, visible stitch like a whipped backstitch with a silver metallic thread. This defines the shape clearly.
Inside the outline, fill the space with a mix of free-form techniques: swirling satin stitches in purple and pink for nebulae, and scattered French knots or colonial knots in white and silver for stars. This contrast between rigid outline and fluid fill is visually captivating.
25. Stitch a Textured Background That Complements Your Subject
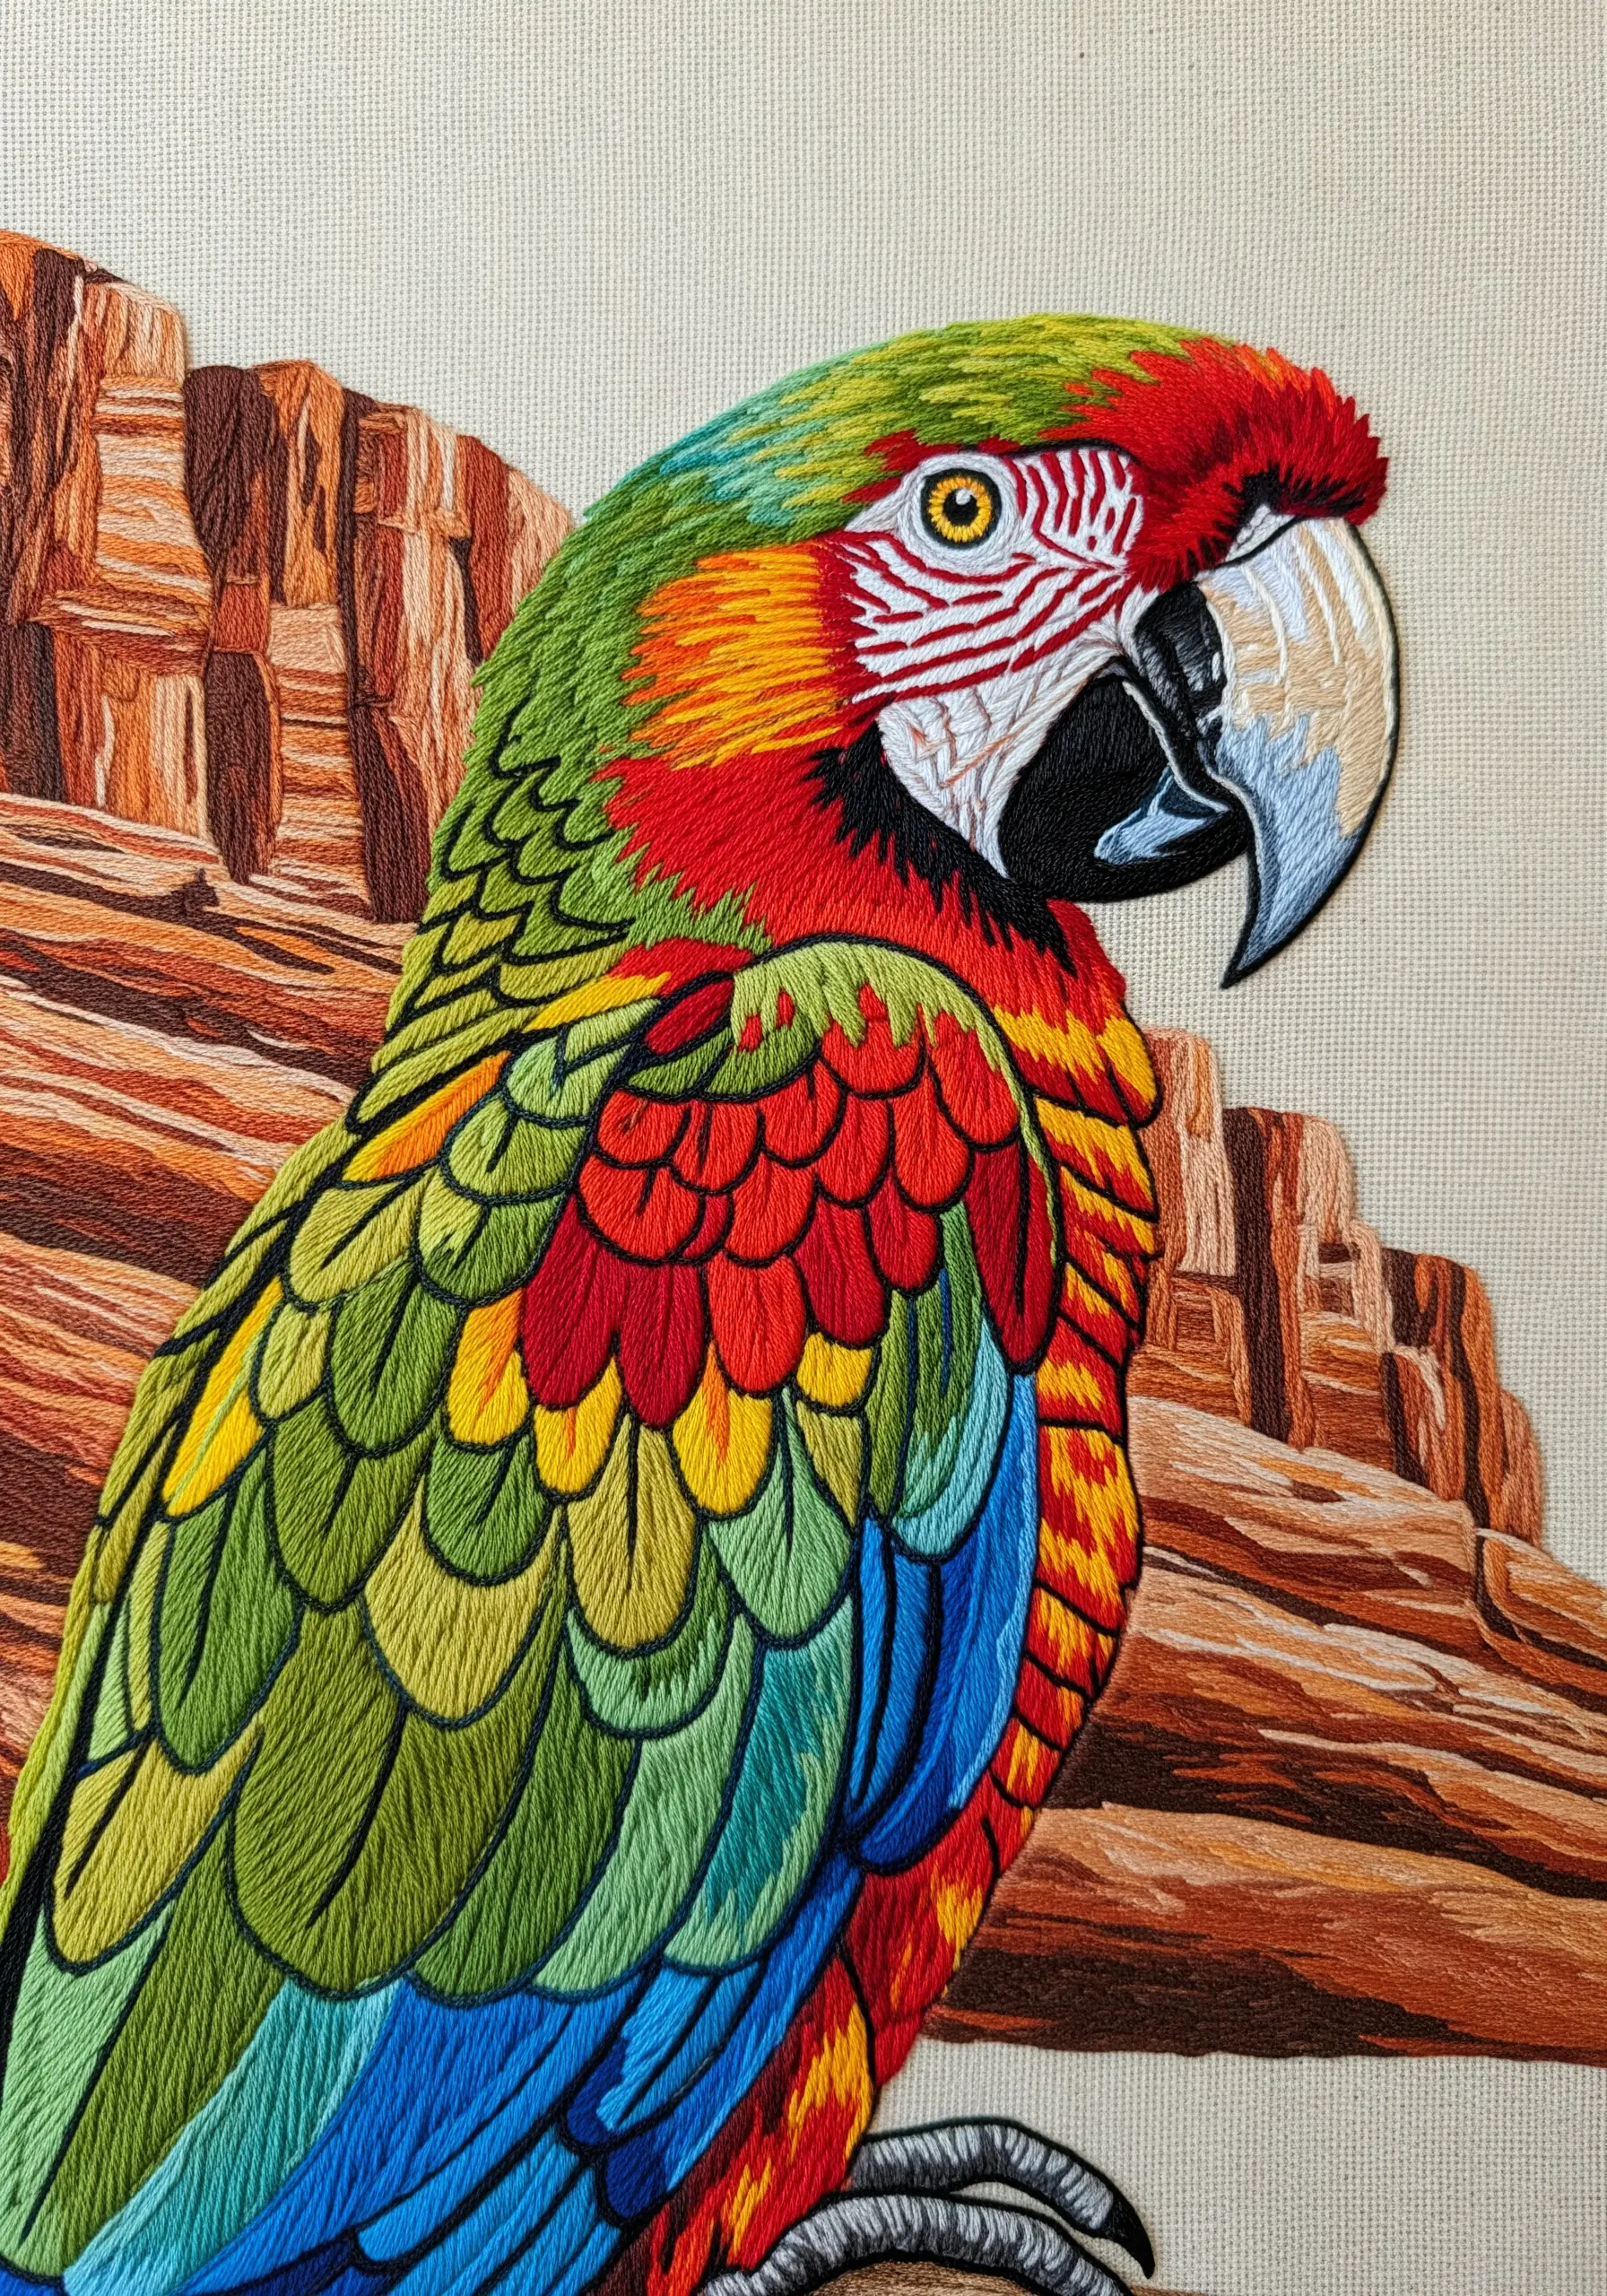
Create a background that adds context and depth without overpowering your main subject.
For these canyon walls, use long, vertical straight stitches in several shades of earthy brown and orange. Overlap the stitches slightly and vary their lengths to mimic the texture of rock strata.
By keeping the background tones more muted than the vibrant colors of the macaw, you ensure the bird remains the clear focal point of the composition.
26. Blend Threads to Capture Feather Iridescence
Parrot feathers are rarely a single, flat color. To capture their subtle iridescence, blend multiple shades of thread within a single feather.
Use the long-and-short stitch technique, but instead of using one color at a time, use a needle with two strands of slightly different colors (e.g., one strand of olive green and one strand of lime green).
This creates a subtle, complex color mix that more accurately mimics the way light reflects off a real feather, adding a layer of sophisticated realism to your work.
27. Deconstruct Your Palette into an Abstract Companion Piece
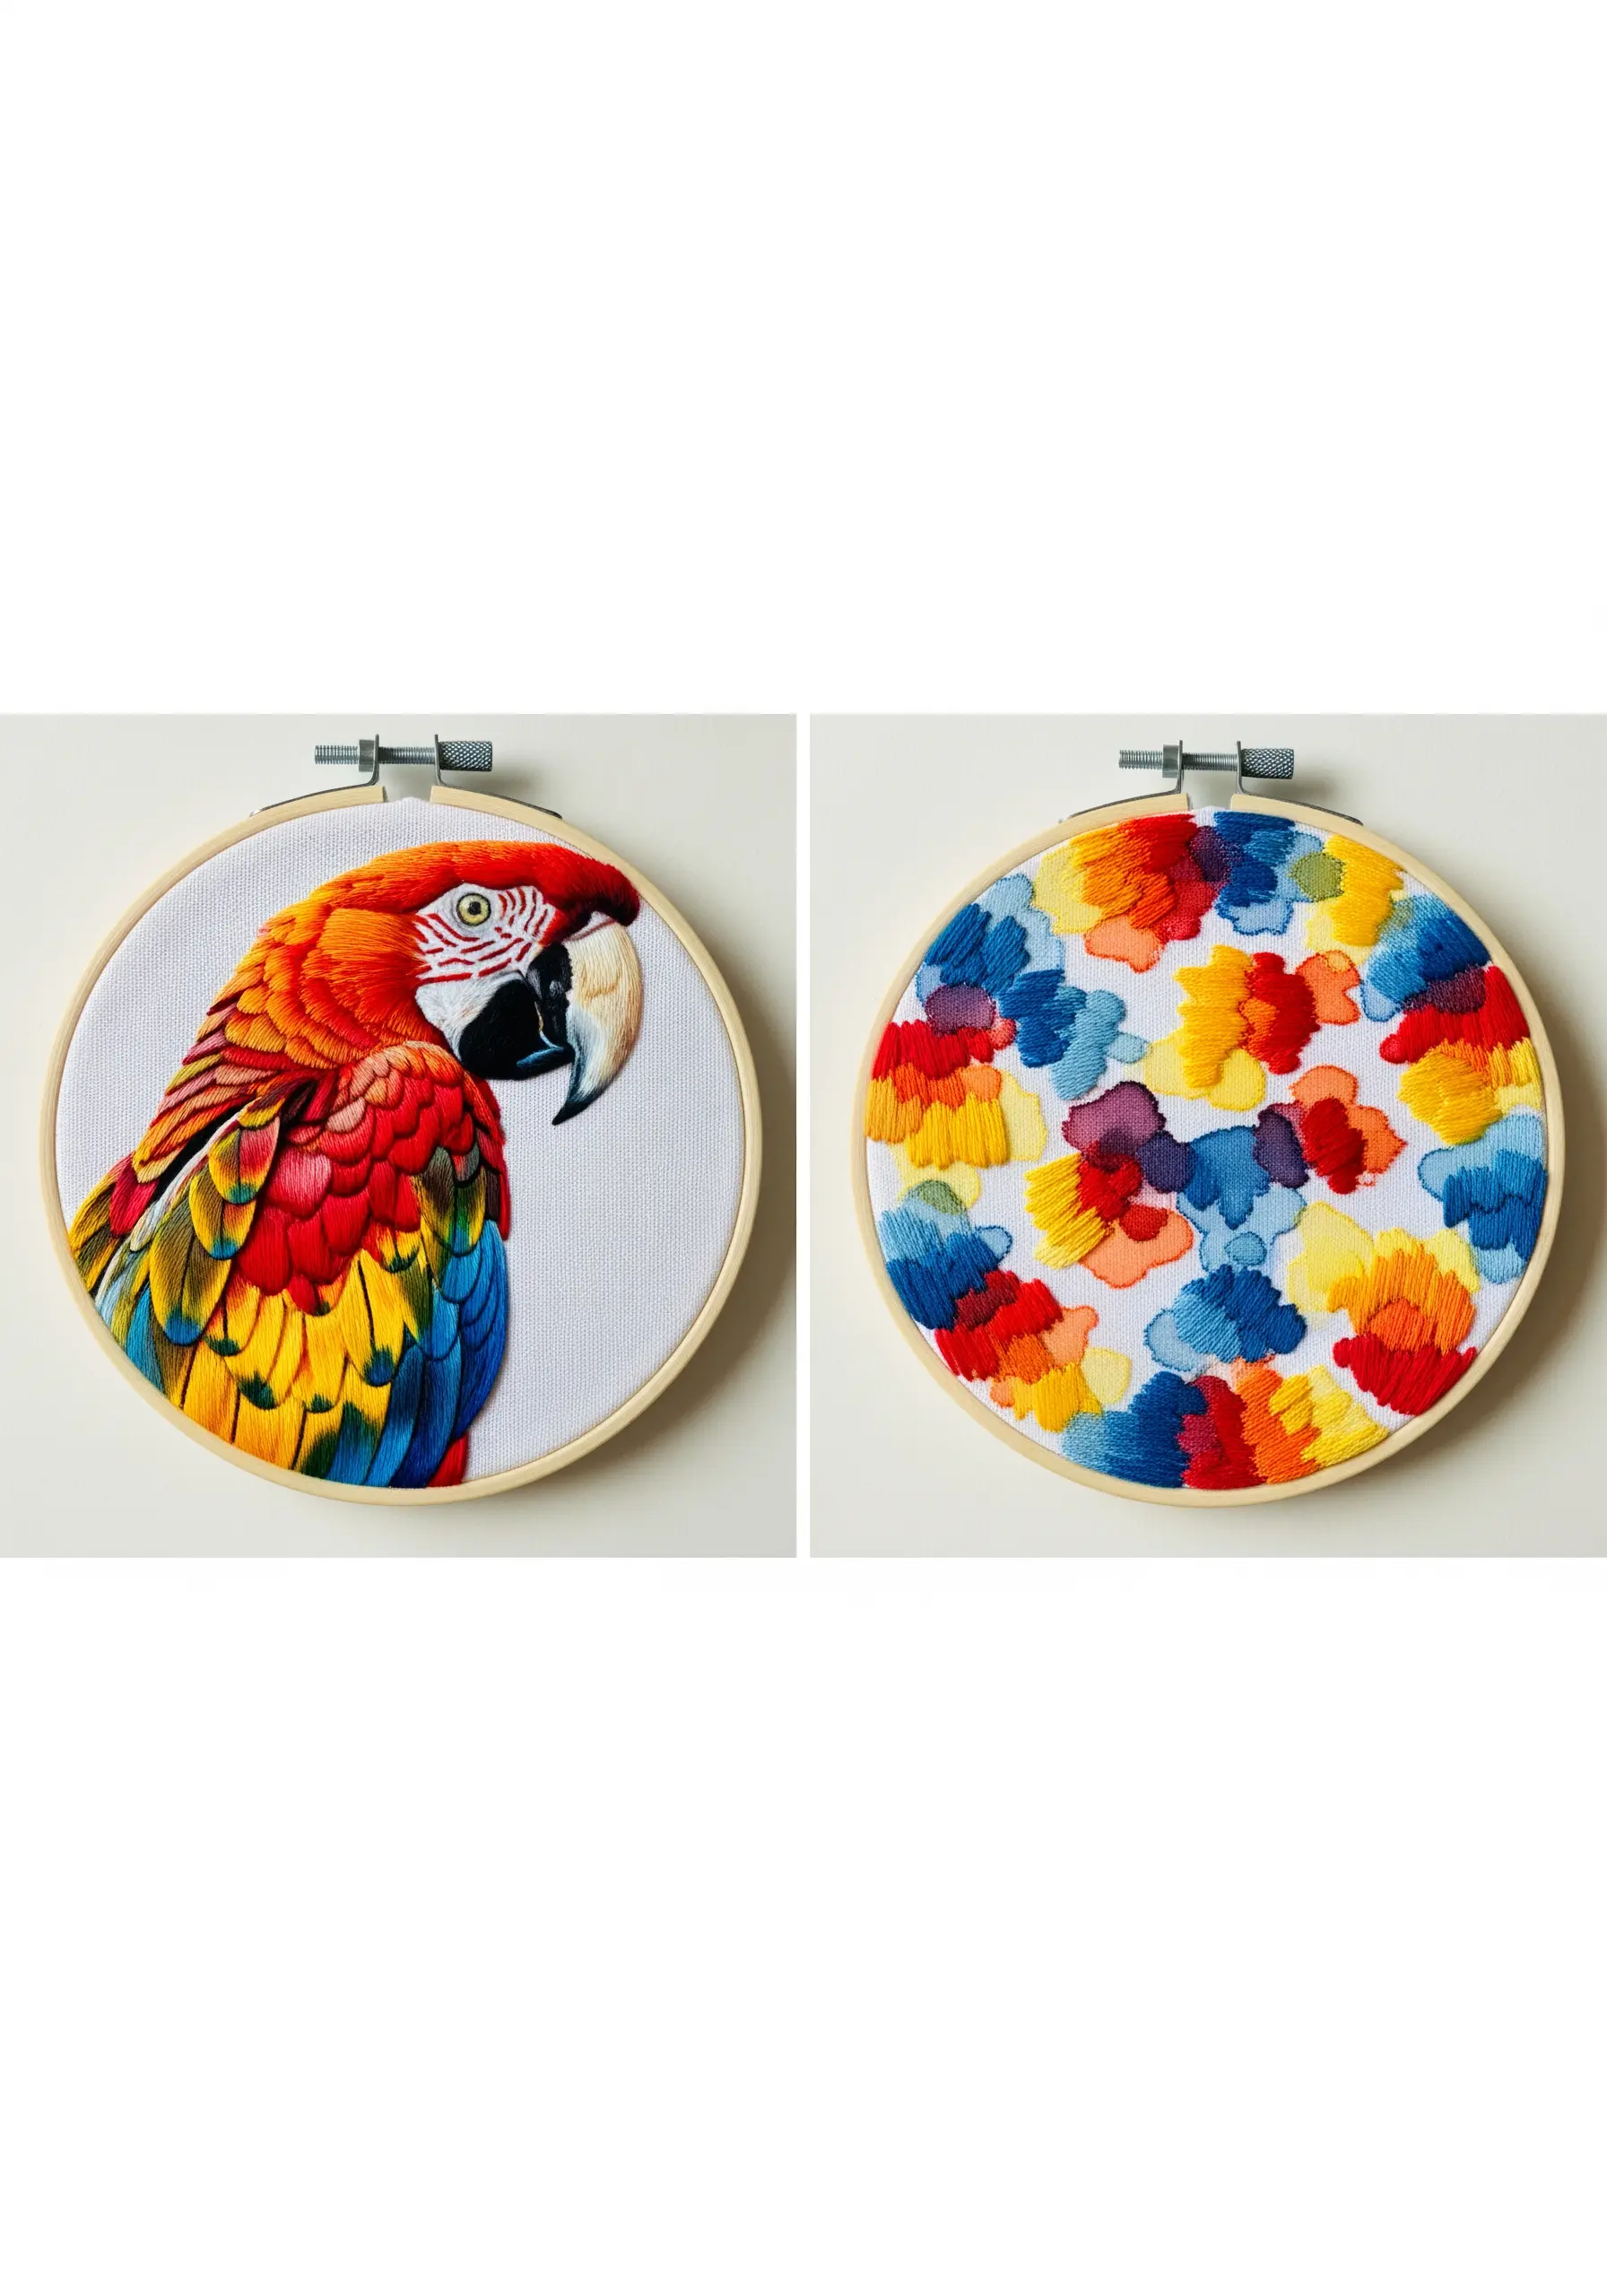
Deepen your understanding of color by creating a diptych: one hoop with your realistic subject, and a second with its deconstructed color palette.
In the second hoop, stitch abstract swatches of each color used in the main portrait. This is not only a beautiful way to display your palette but also a powerful creative exercise.
It forces you to analyze your color choices and presents a modern, artistic way to create a set of sophisticated minimalist looks.
28. Embellish Everyday Objects with a Single Motif
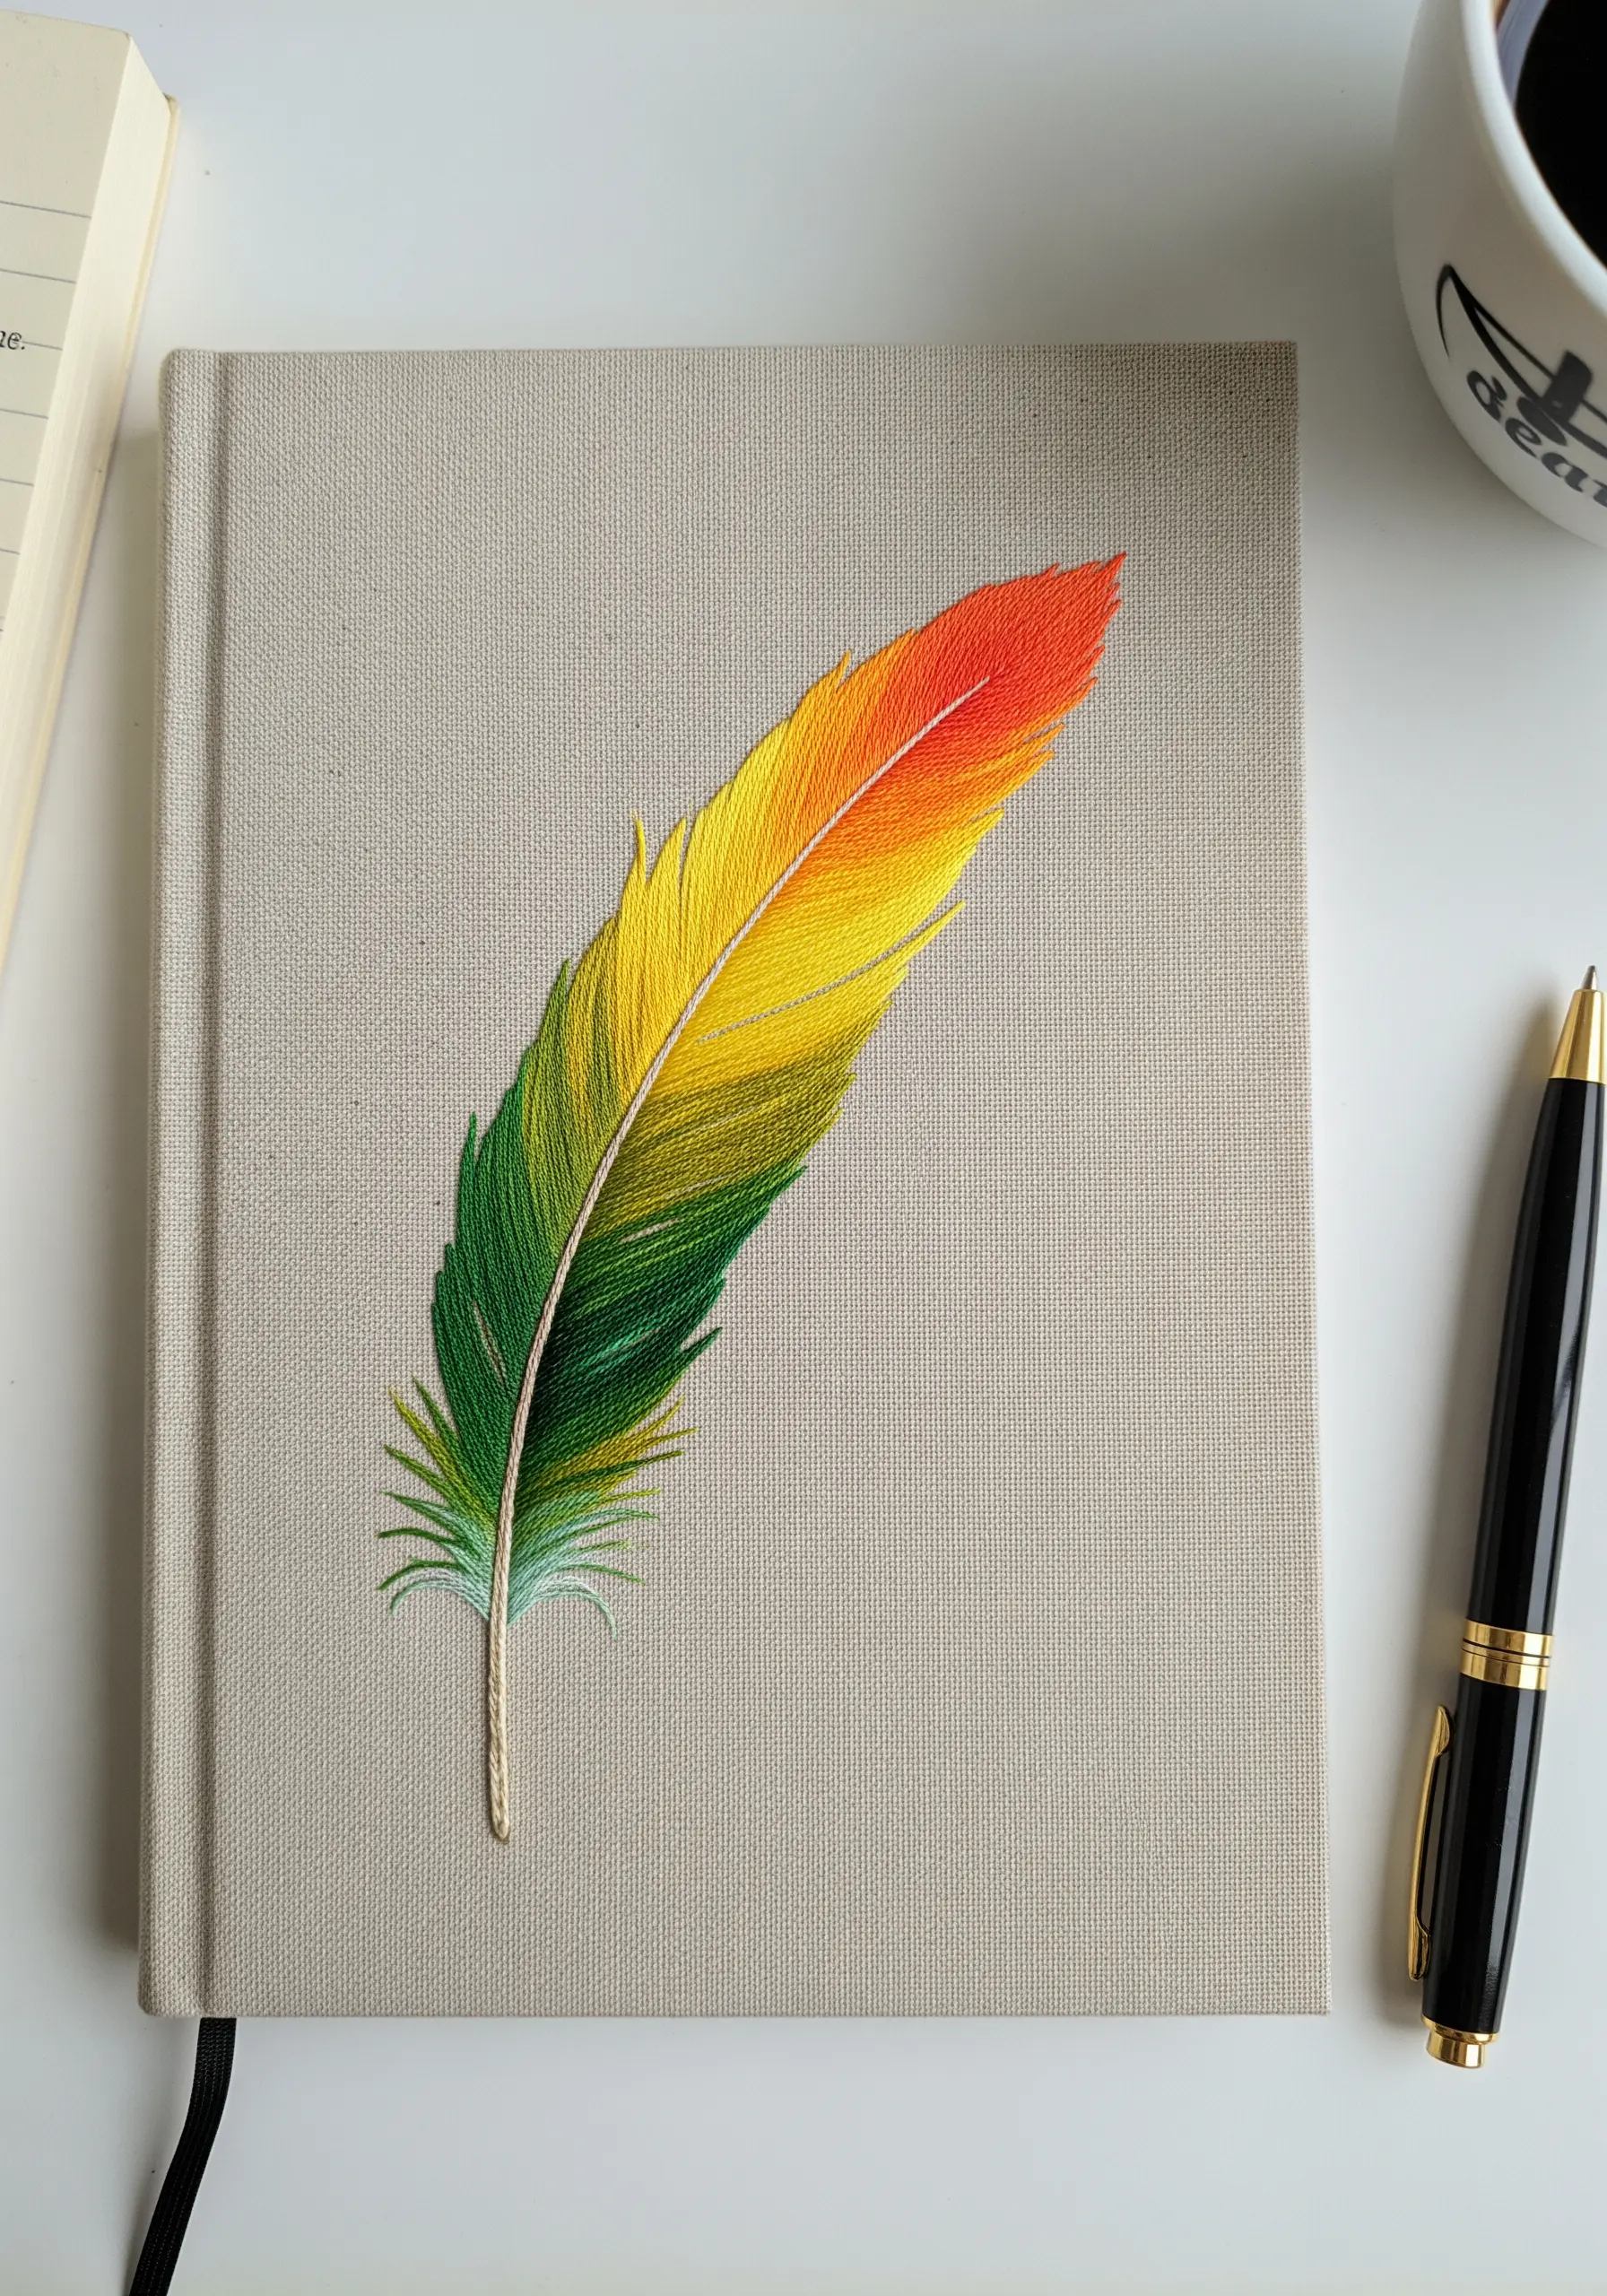
Elevate a simple object like a journal by adding a single, beautifully executed embroidery motif.
To stitch on a hard surface like a book cover, you must first prepare it. Use a strong, sharp needle and a thimble to protect your fingers.
For a seamless gradient effect on the feather, use long-and-short stitch, blending each color into the next. The smooth transition from red to green gives the simple shape a dynamic, painterly quality that feels luxurious.
29. Embrace the Elegance of Minimalist Line Art
Convey the essence of a subject with just a few well-placed lines. This minimalist approach relies on the purity of the line to create form and character.
Choose a clean, continuous stitch like a stem stitch or a whipped backstitch to ensure your outlines are smooth and unbroken.
By limiting your detail and focusing on the silhouette and key features, you create a sophisticated piece of art that celebrates negative space and feels effortlessly modern.
30. Curate a Thematic Collection of Embroidered Patches
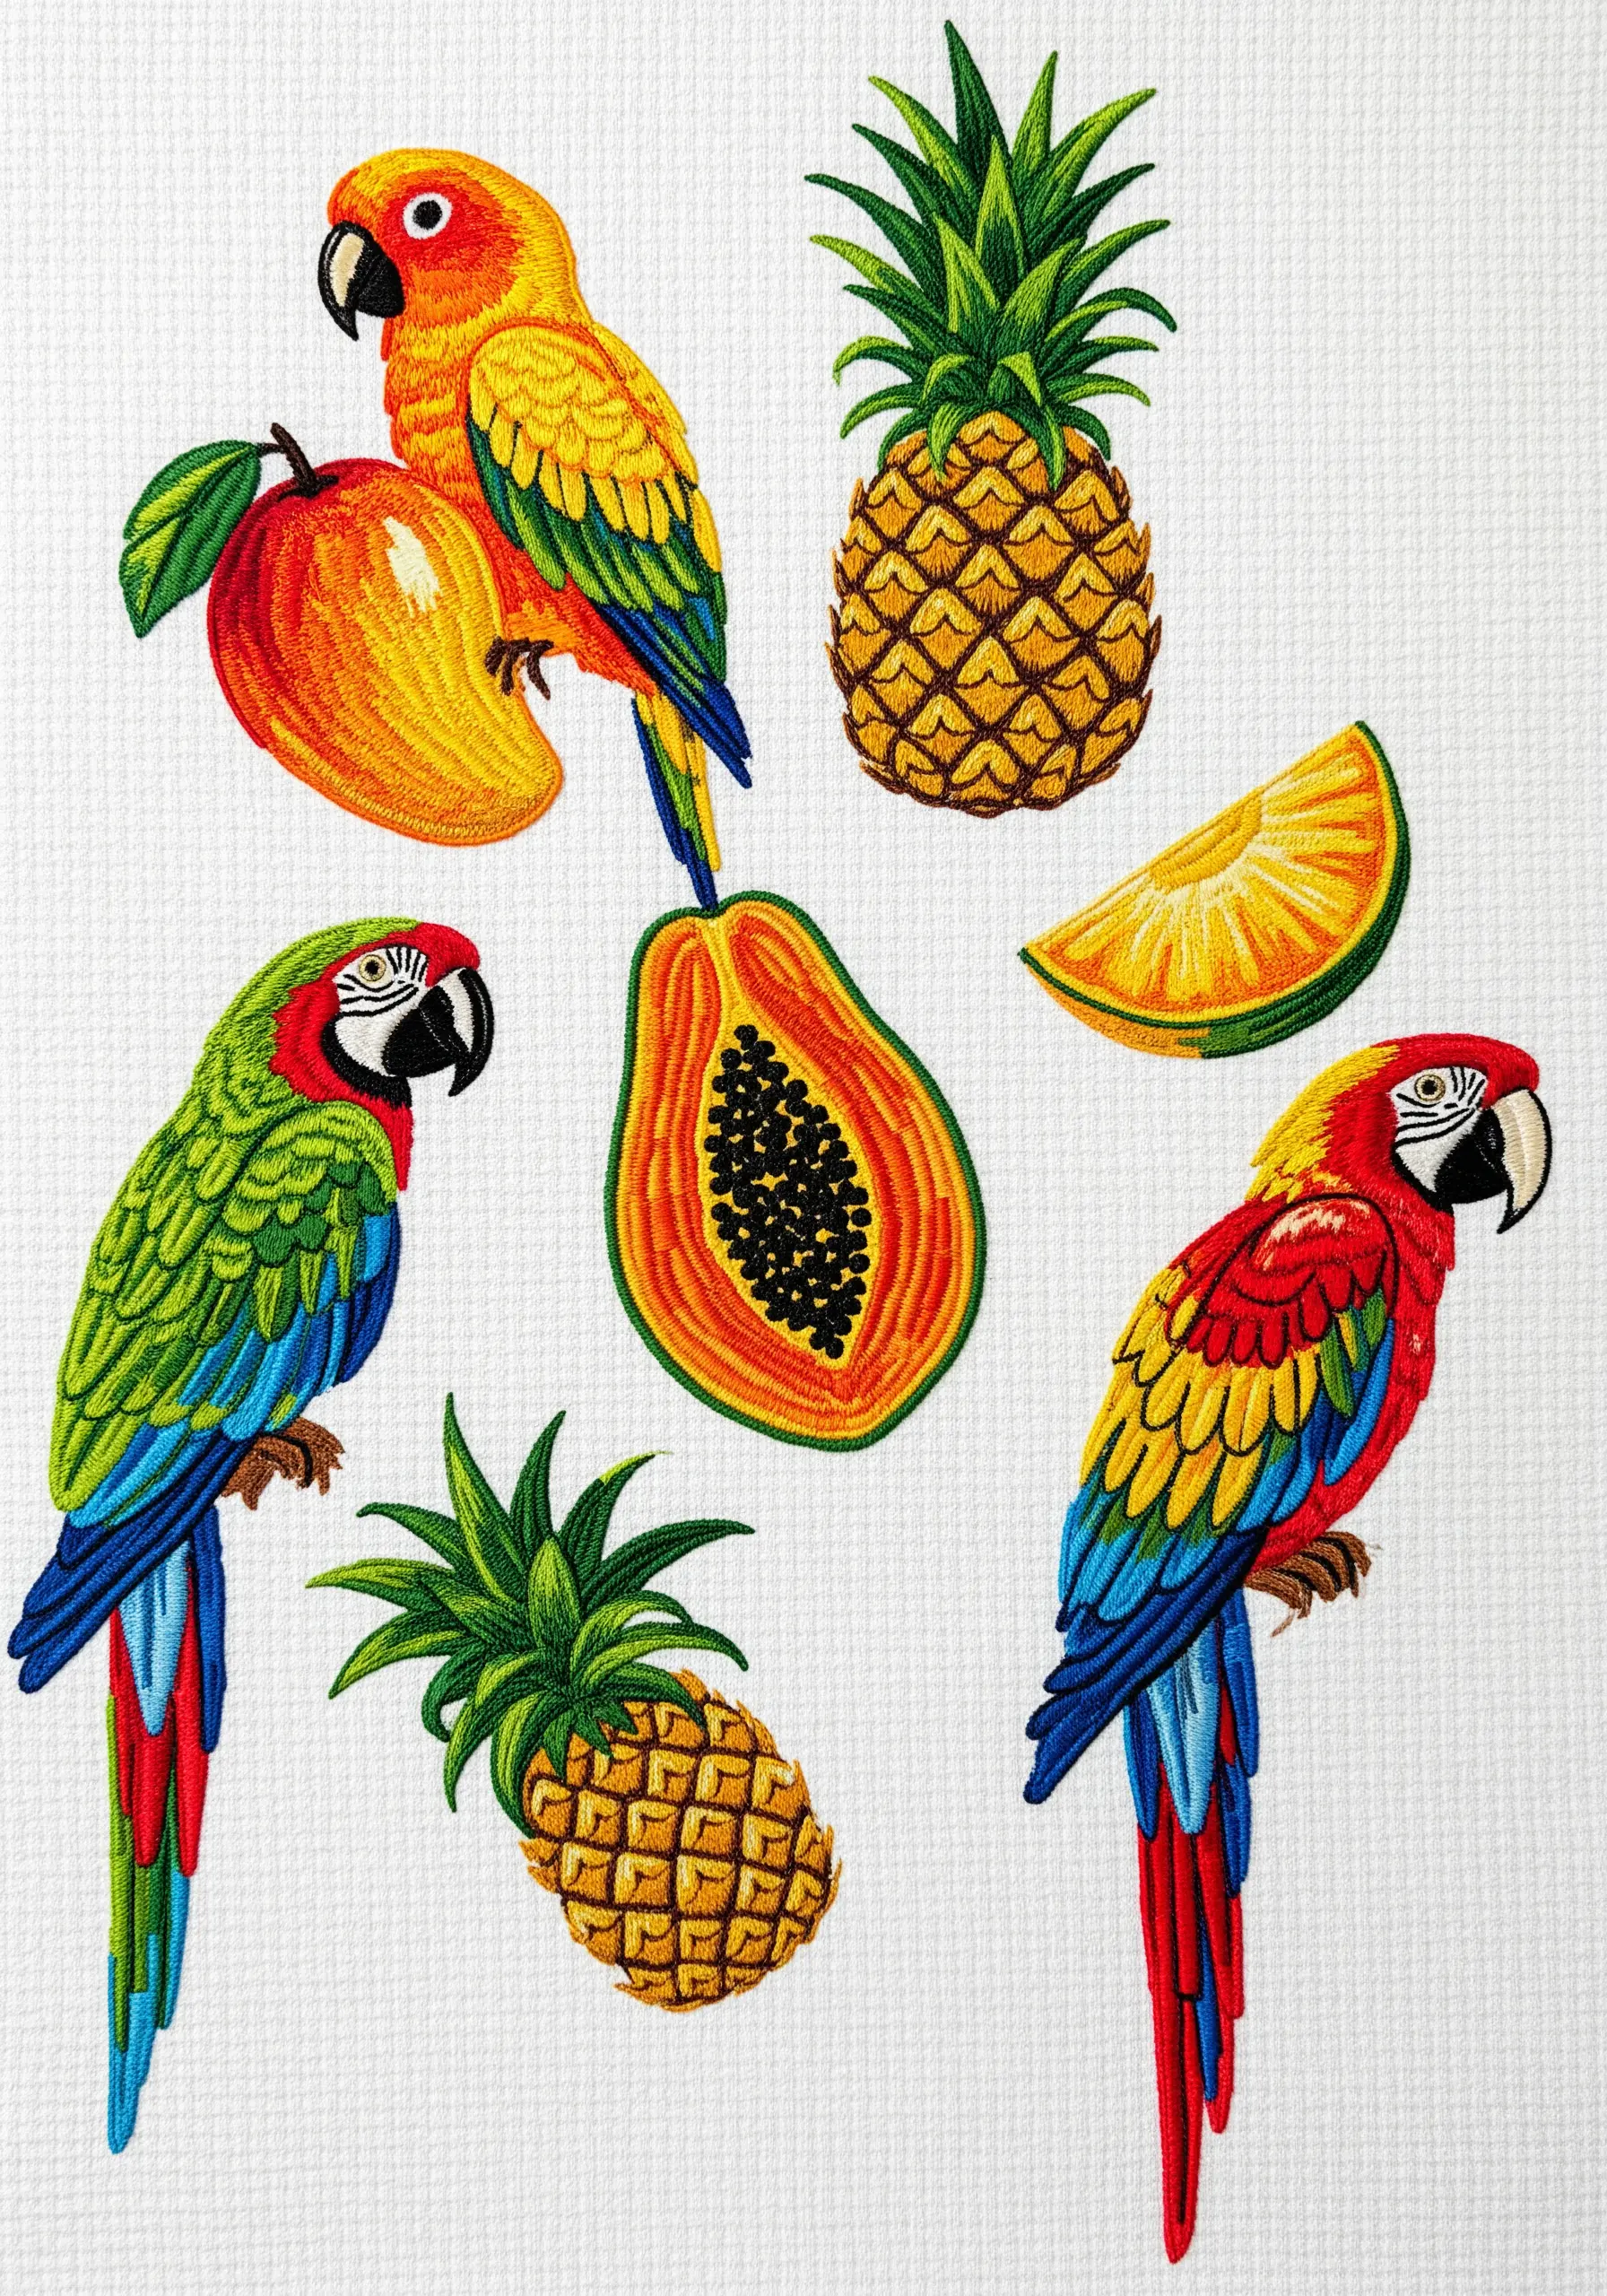
Instead of a single large scene, create a collection of smaller, related motifs. Stitch each parrot and fruit individually on felt or heavy-duty stabilizer.
To ensure they look like a cohesive set, use a consistent style—for example, use the same thick black backstitch outline for every piece.
Once finished, you can cut them out and arrange them as a collage in a frame, apply them to a jacket, or use them to decorate a set of kitchen towels.
31. Use Layered Stitches to Sculpt Hyper-Realistic Feathers
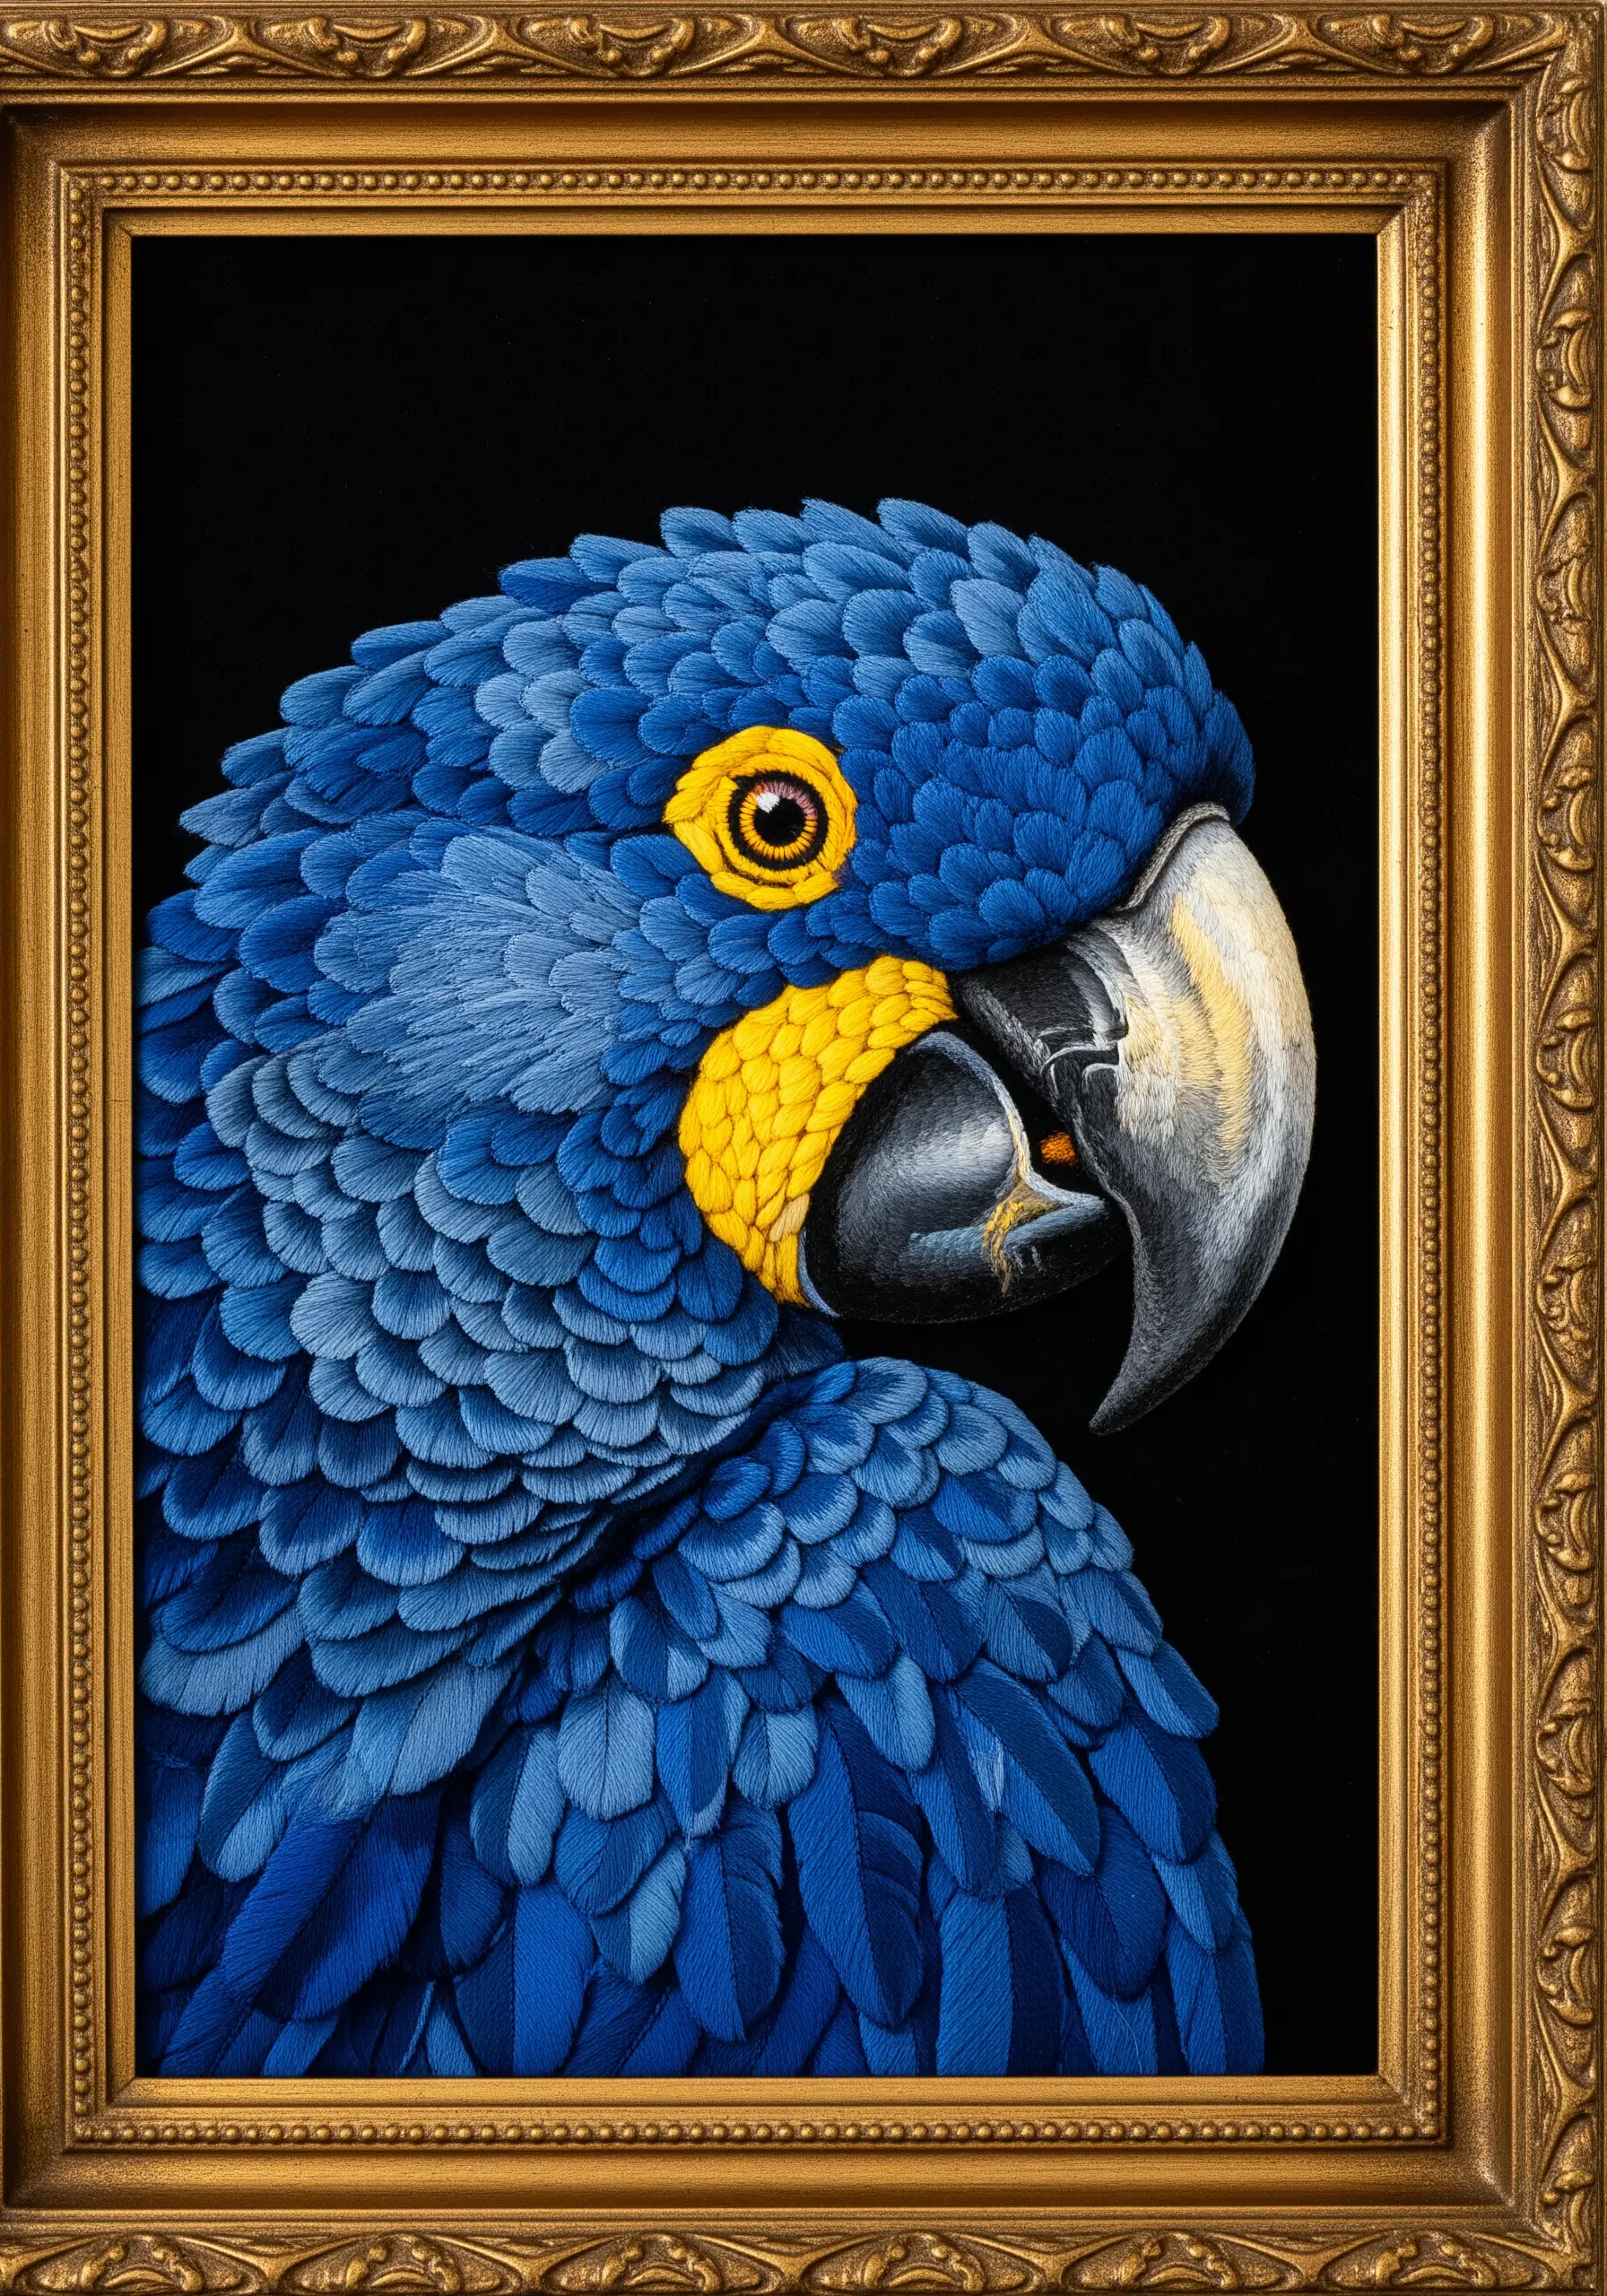
To achieve this breathtakingly realistic texture, think of yourself as a sculptor, not just a stitcher. Each feather is a separate, small shape built with layers of tiny stitches.
Work from the bottom up, allowing the stitches of each new feather to slightly overlap the one beneath it. This creates real, physical layers that mimic the structure of a bird’s plumage.
Using a single strand of floss is essential for this technique, as it allows for the fine detail and control needed to build such intricate texture.
32. Achieve a Clean, Illustrative Look with Satin Stitch Fills
For a bold, graphic style that feels clean and modern, rely on two fundamental techniques: dense satin stitch fills and crisp backstitch outlines.
Ensure your satin stitches are laid closely together with no fabric showing through for a solid, opaque block of color. Keep the stitch direction consistent within each shape.
Frame each color block with a neat backstitch outline to define the edges and give the entire piece a sharp, polished, illustrative finish.
33. Create a Cohesive Series with a Shared Theme
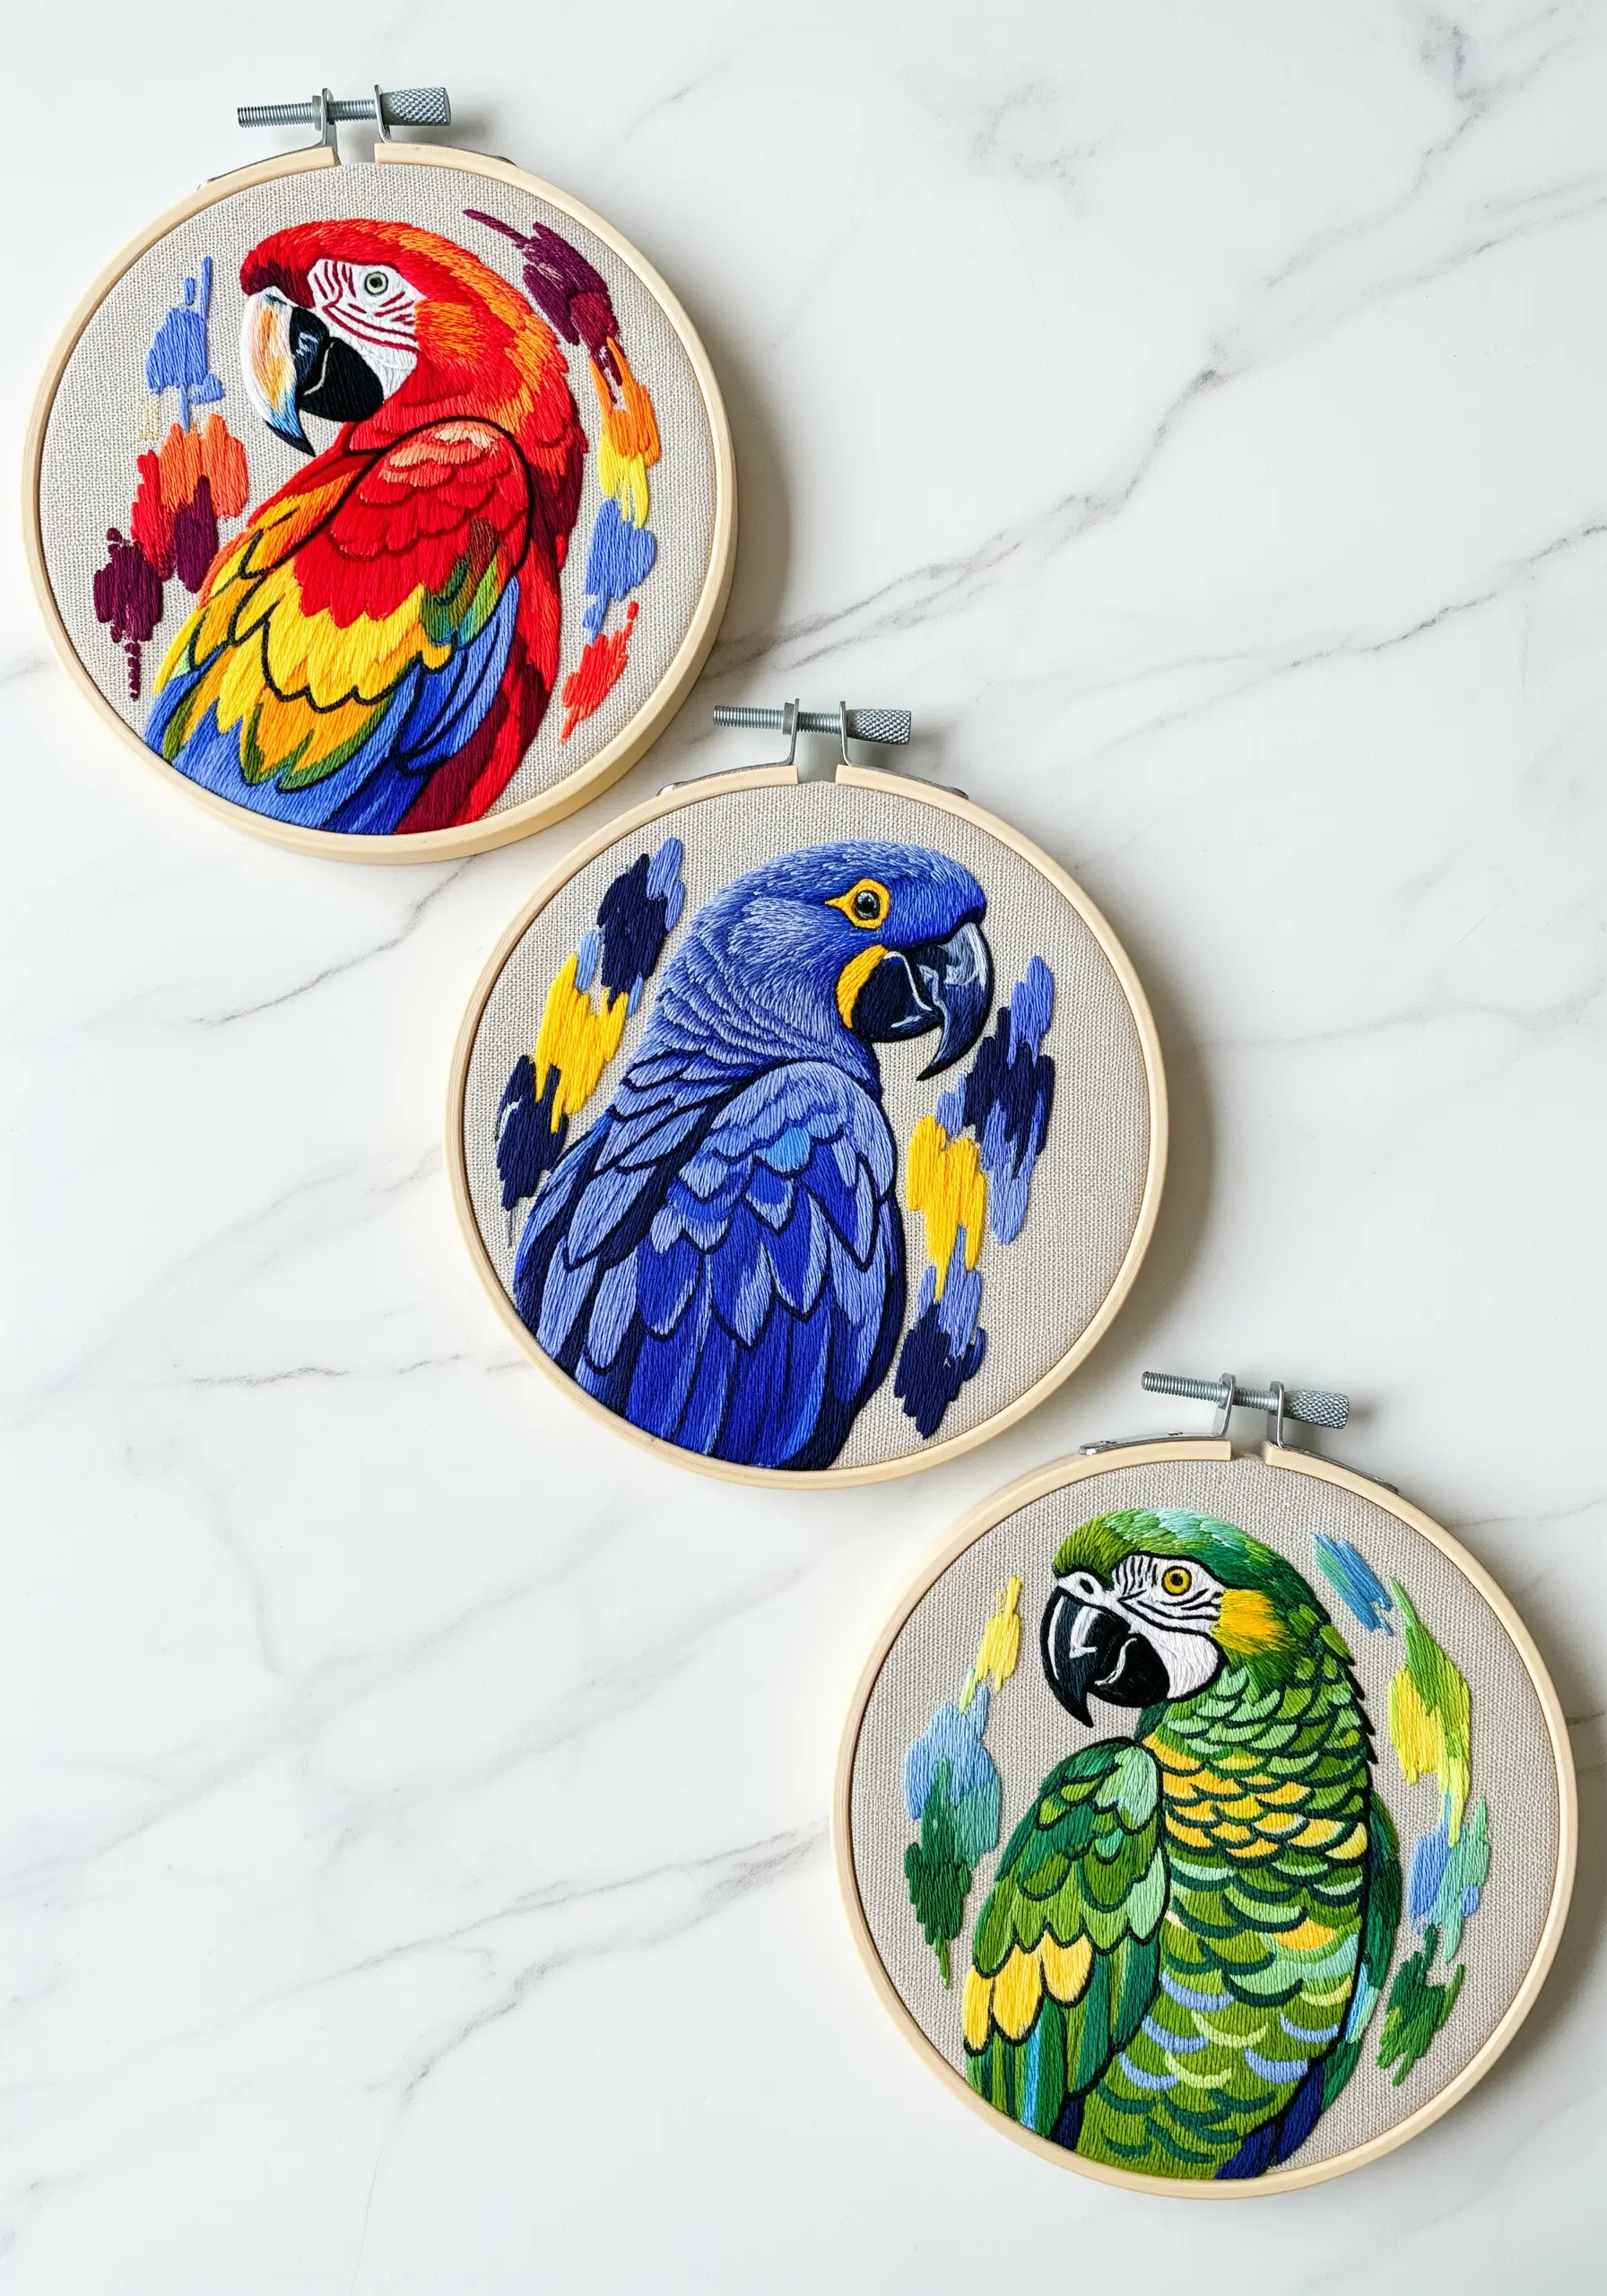
Develop your artistic voice by creating a series of embroideries based on a single theme. Here, the macaw portrait is the constant, but each piece is made unique through its distinct color palette and background treatment.
The abstract, painterly brushstrokes in the background unify the series aesthetically while giving each piece its own personality.
Displaying them together as a triptych creates a powerful visual statement and is a fantastic way to build a cozy, artistic wall display.
34. Design Dynamic Compositions with Circular Flow
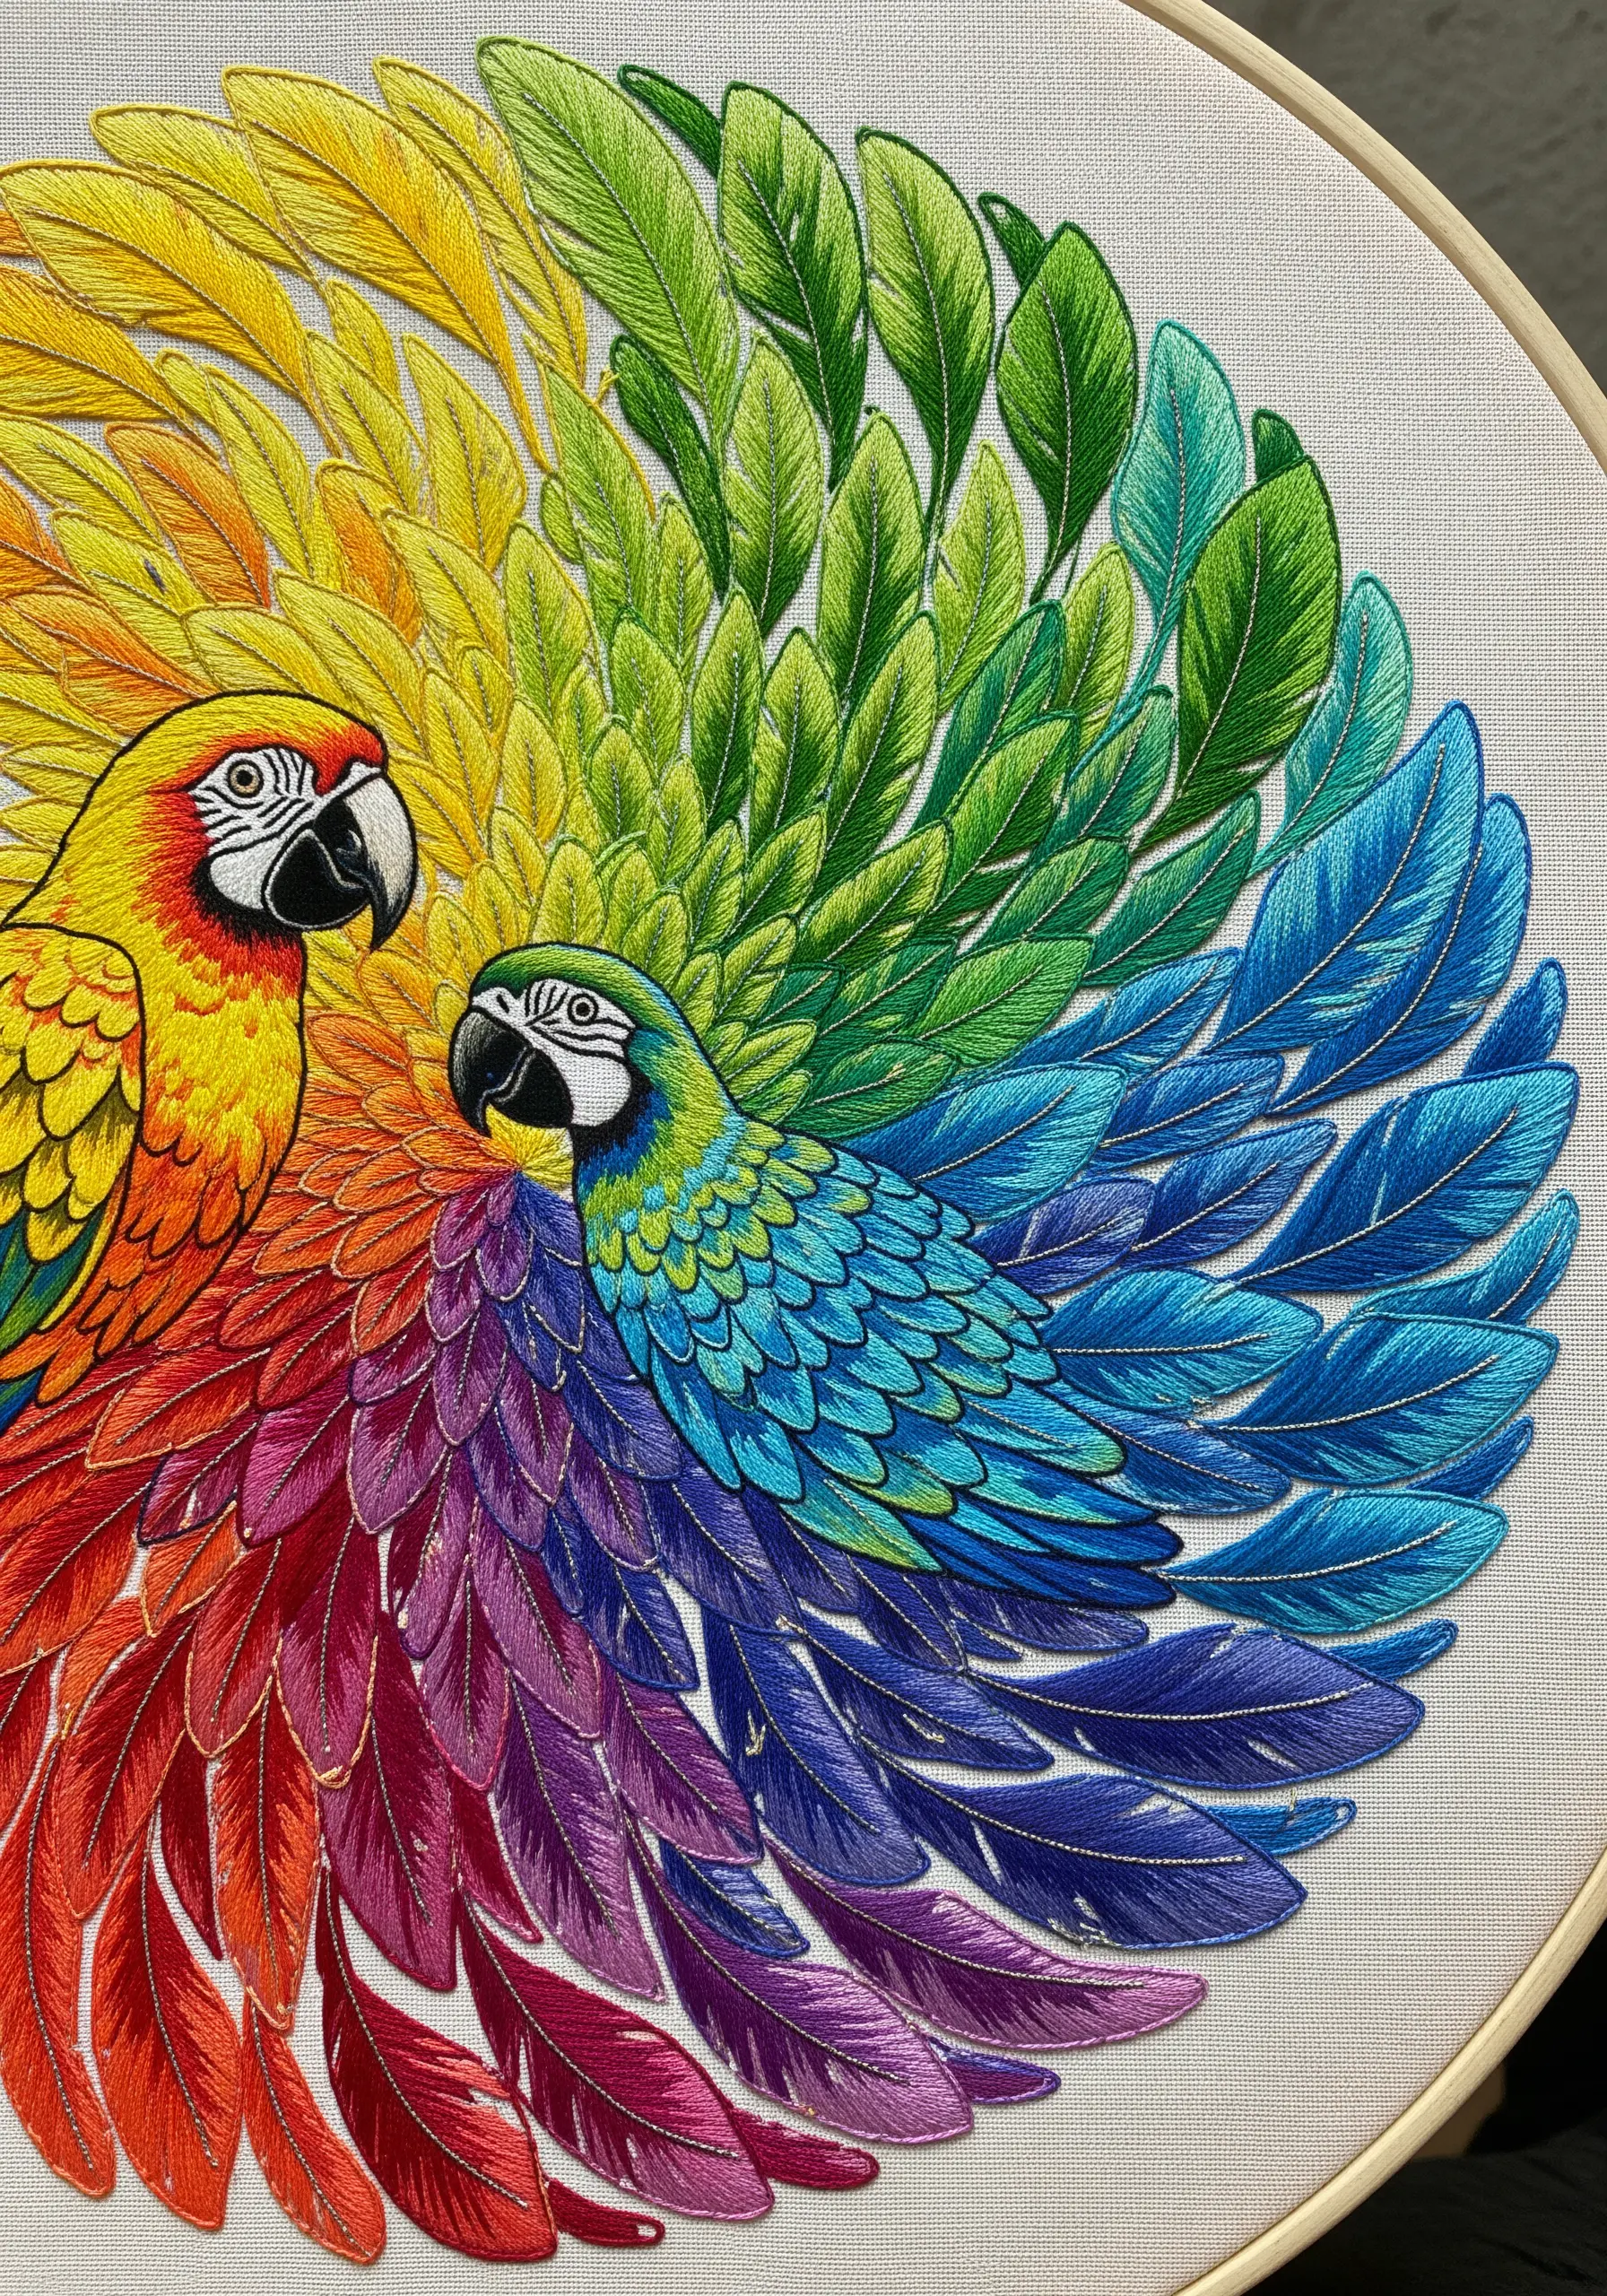
Guide the viewer’s eye and create a sense of harmony by arranging your elements in a circular composition.
Here, the fanned-out feathers of the two macaws create a wheel of color that feels both energetic and balanced.
To execute the flawless rainbow gradient, map out your color transitions before you begin. The seamless flow from yellow to green to blue to purple is what gives this piece its mesmerizing quality. This method makes color palette tips for hoop art feel alive.
35. Blend Portraiture and Nature for a Surreal Masterpiece
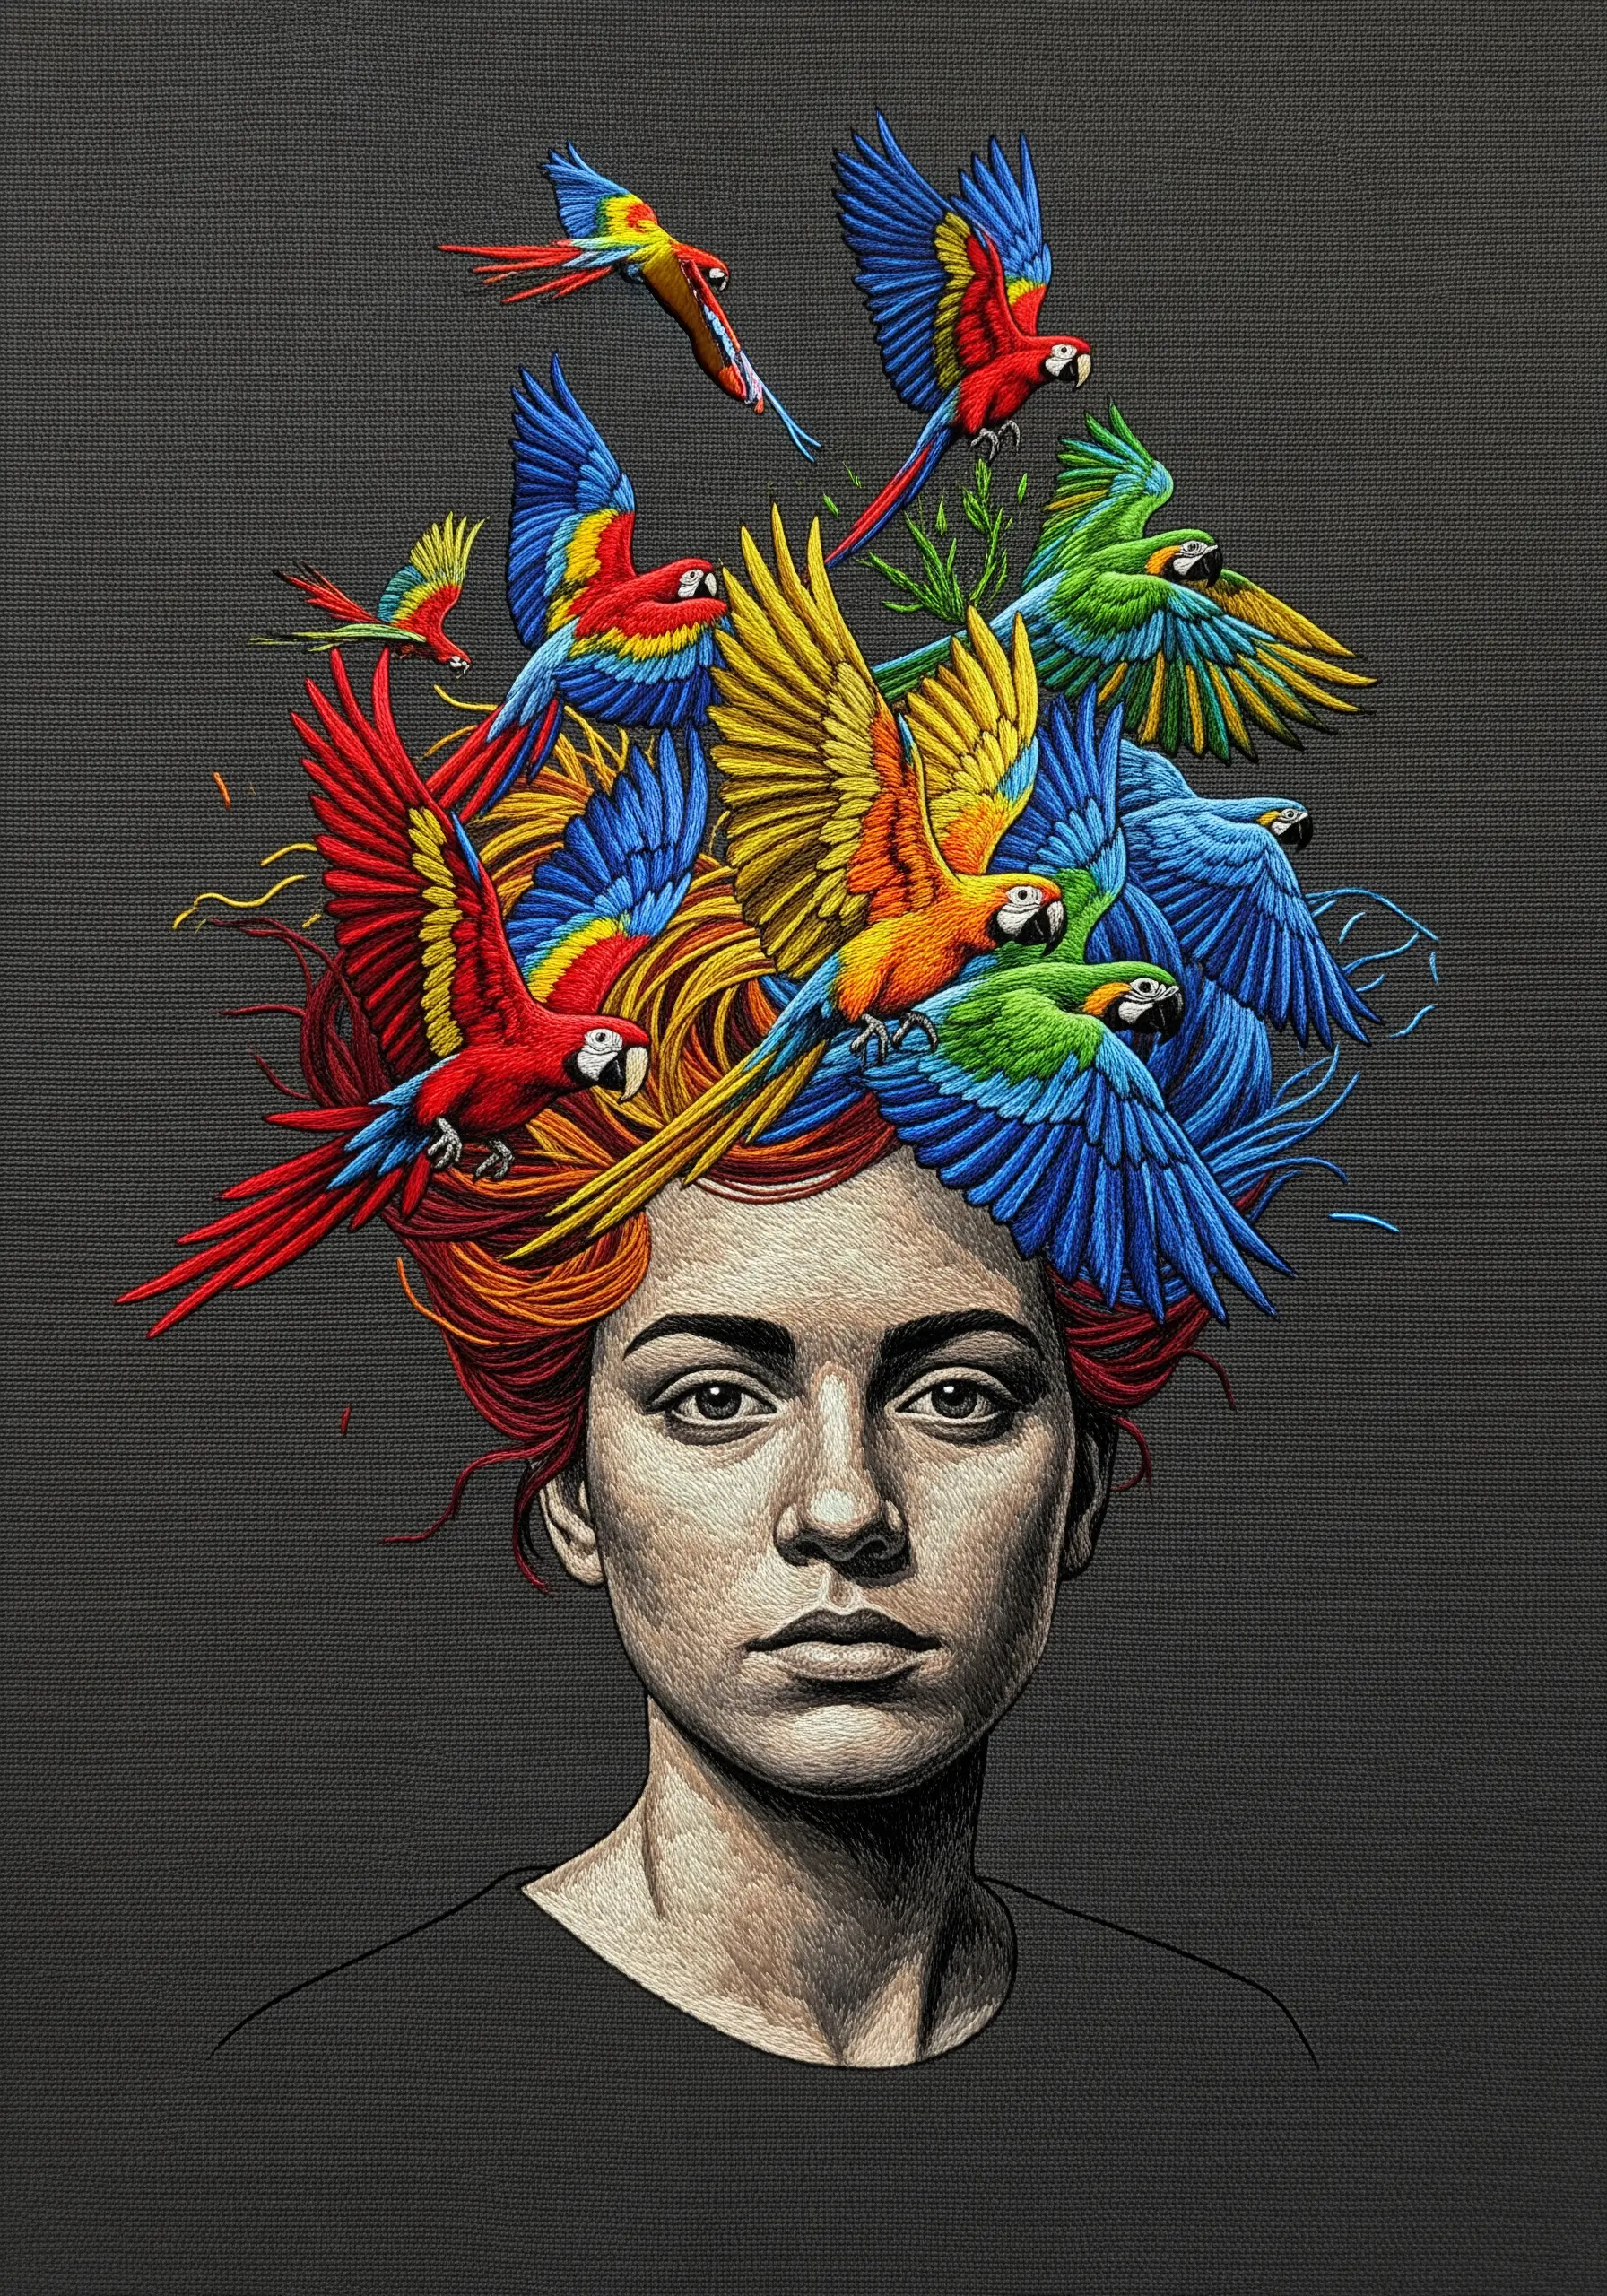
Create a truly unforgettable piece by integrating complex elements, like these parrots, into a portrait. The key is to make the addition feel intentional, not just placed on top.
Achieve this by having the birds weave through the subject’s hair. Use directional stitching to ensure the hair and feathers flow together naturally.
This advanced composition challenges your skills and results in a powerful piece of narrative art that merges human and natural worlds.


