

The secret to stitching leaves that look truly alive isn’t a vast collection of threads or a mastery of complex stitches. It’s about seeing color differently—observing the subtle shifts in tone, the way light creates highlights, and how a single, unexpected hue can define an entire shape.
Before you make your next stitch, pause. Look closer at the plant you want to create. Is that green a true emerald, or does it have hints of blue or yellow? Are the veins lighter or darker than the leaf itself? This careful observation is the foundation of all great embroidery.
Here, you’ll find 21 specific color palettes and the simple techniques that bring them to life. Think of them not as strict rules, but as starting points to help you translate the beauty of the natural world into thread, with intention and confidence.
1. The Split-Tone Monstera Palette
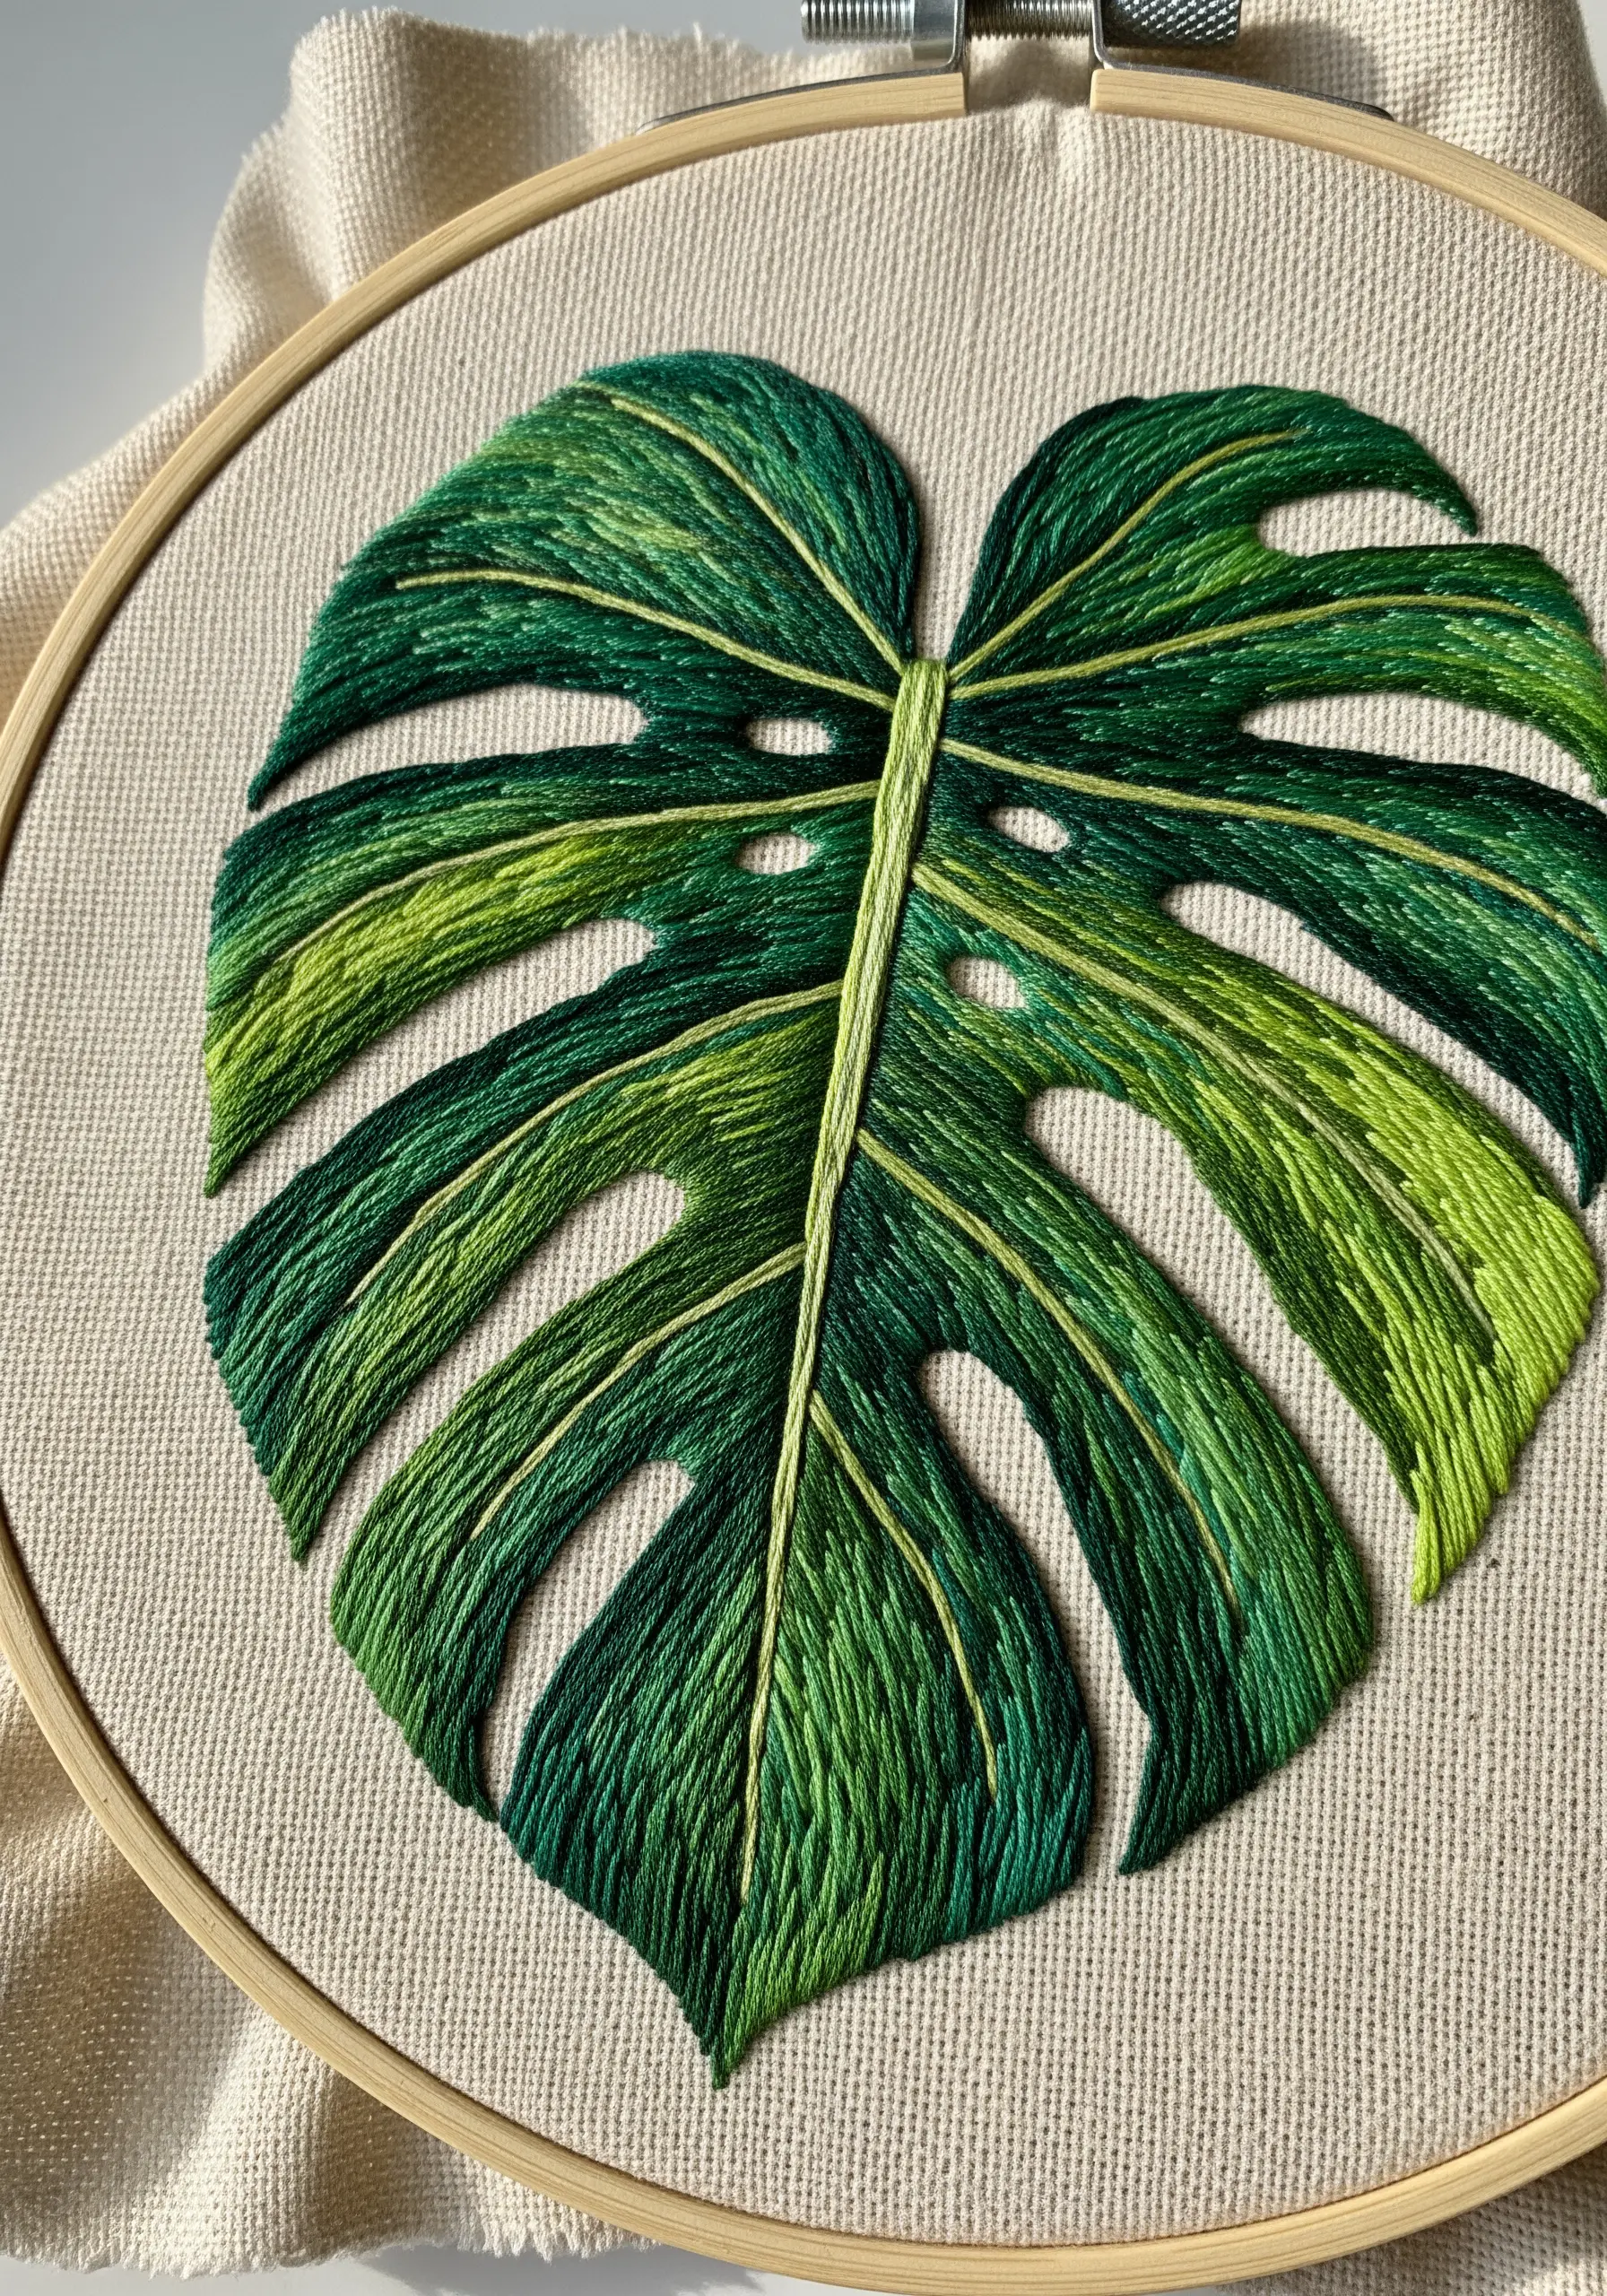
To capture the vibrant, sun-drenched look of a Monstera leaf, divide each section with two distinct greens: a bright lime and a deep forest green.
Use a long-and-short stitch, angling your stitches towards the central vein to mimic natural growth.
This directional stitching creates a subtle light-play effect, making the flat surface appear dimensional and alive.
For the central stem, use a single strand of the lime green and wrap it with a darker shade to create a raised, defined line.
2. The Fiddle Leaf’s Leathery Sheen
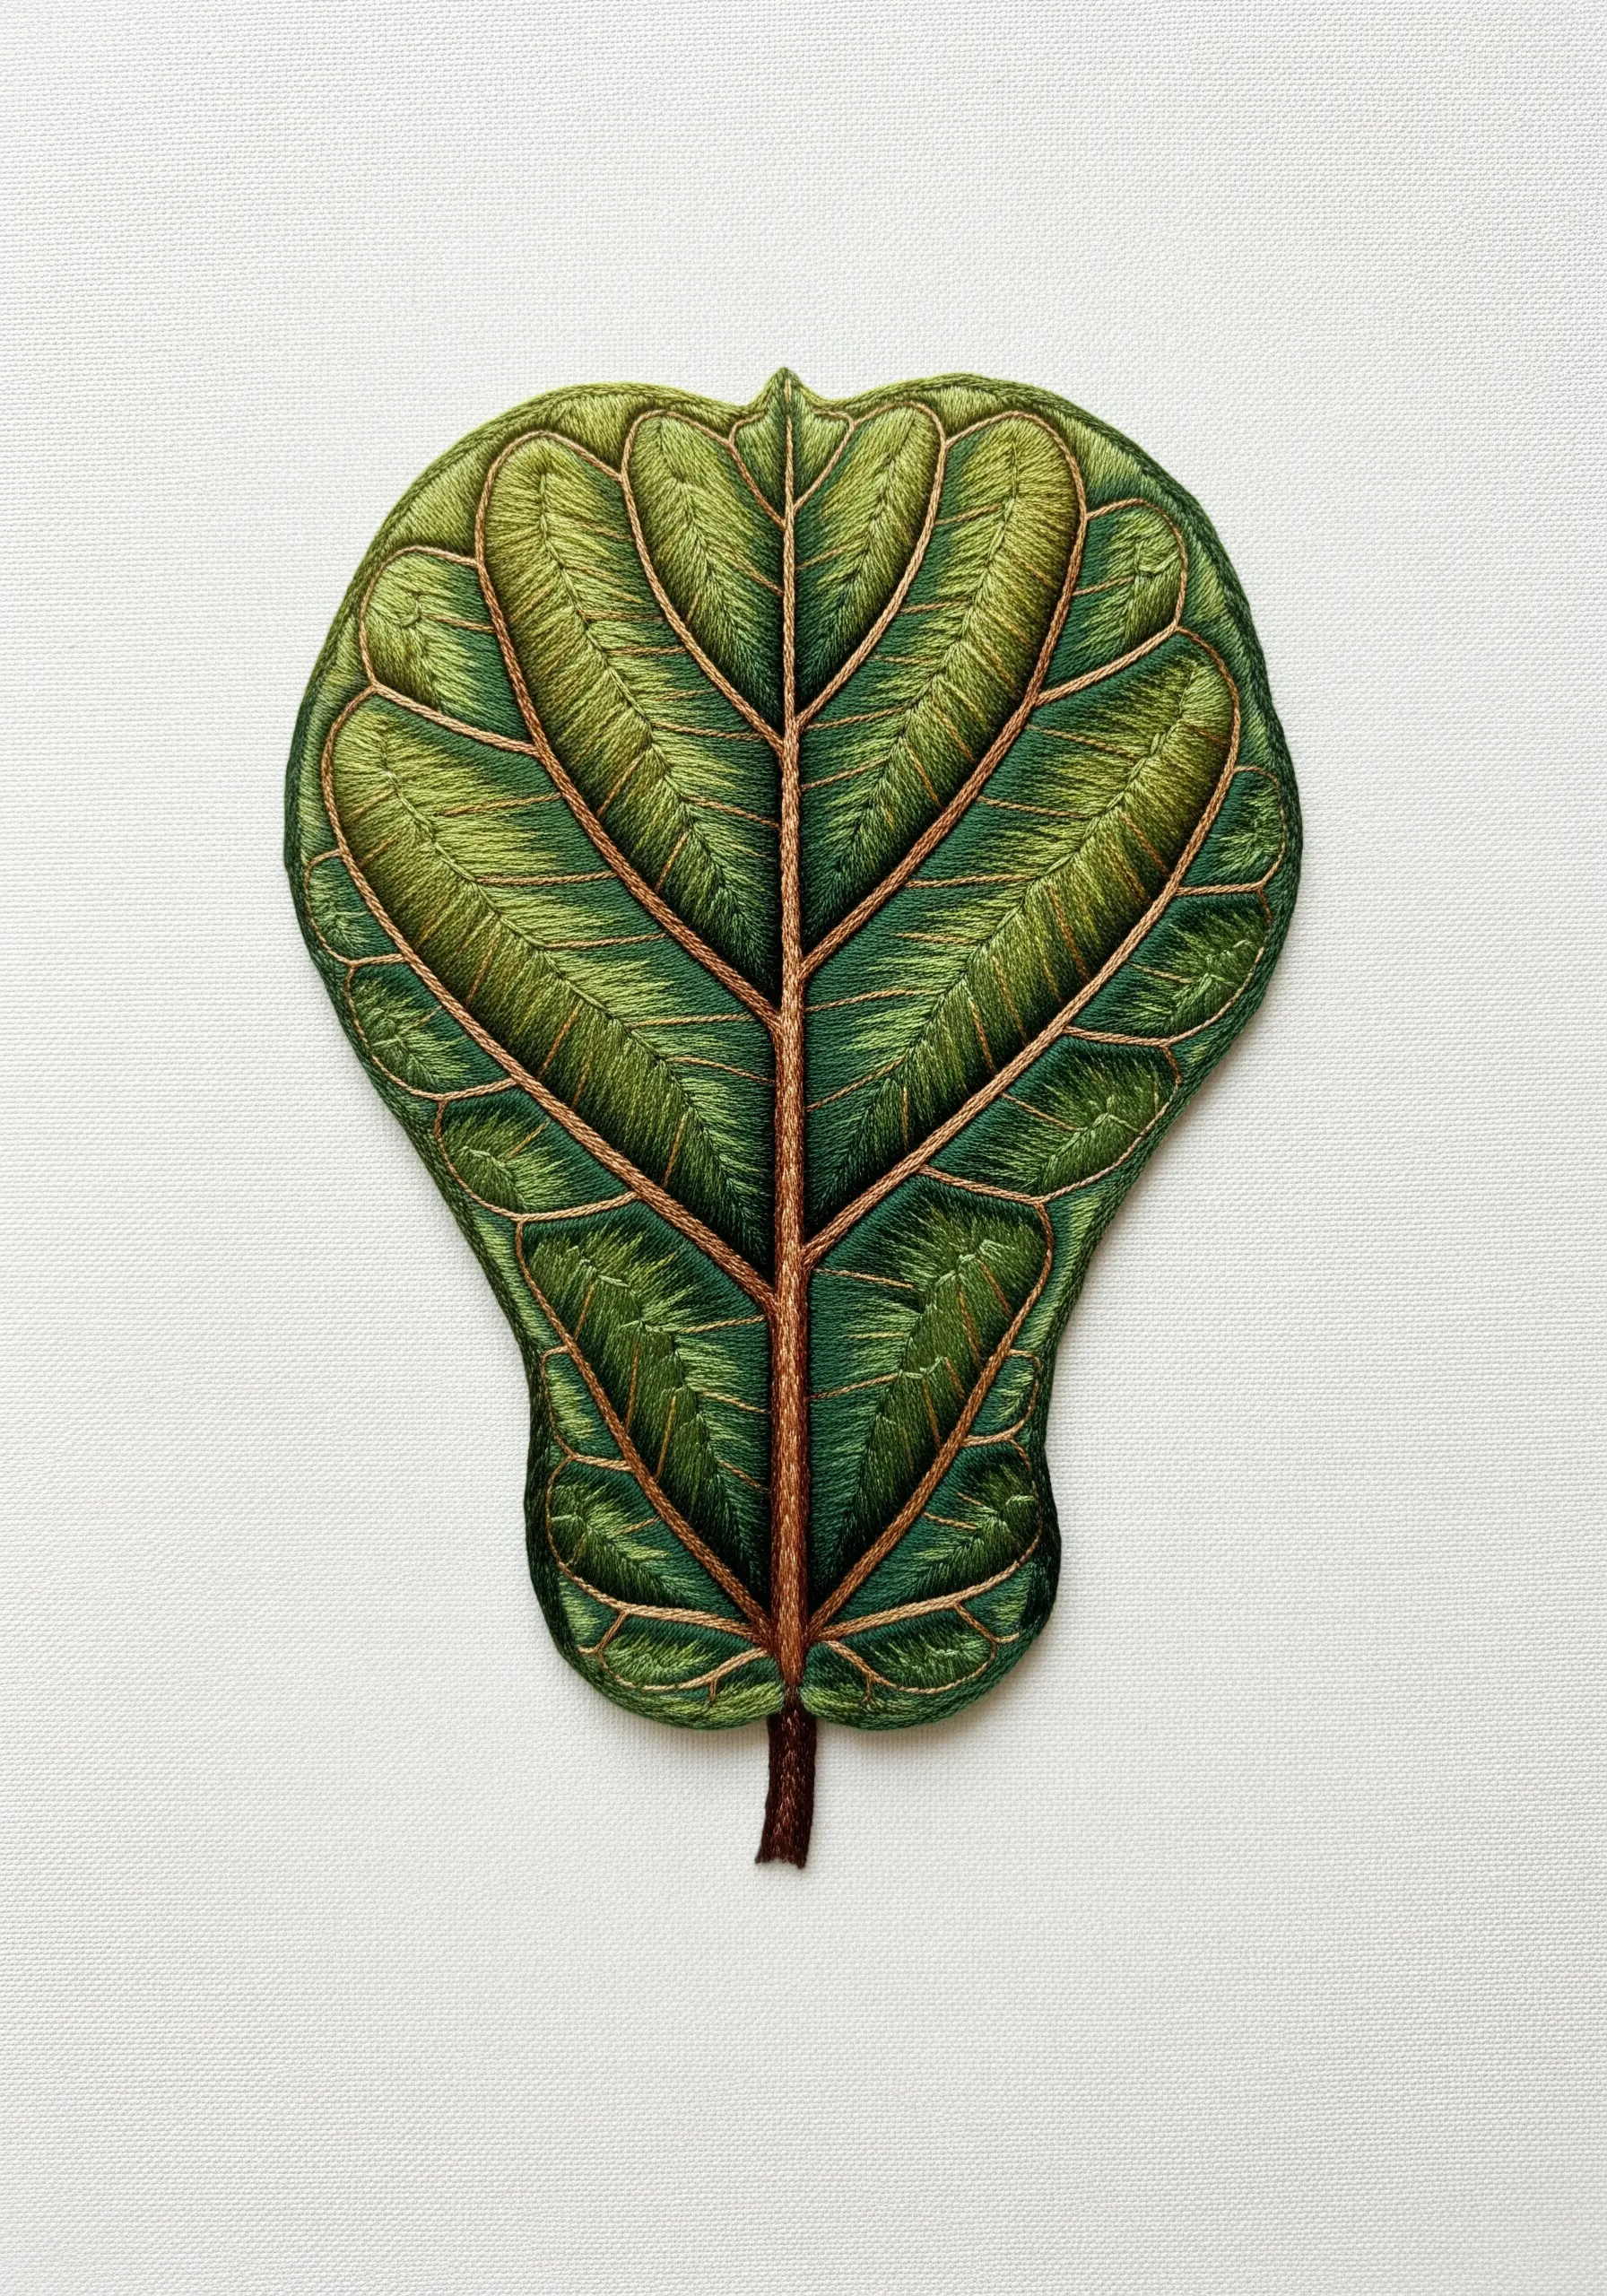
A Fiddle Leaf Fig has a waxy, robust texture that you can replicate with a dense satin stitch in muted olive and khaki greens.
Instead of bright green, select earthier tones with subtle brown or grey undertones to convey maturity and depth.
For the veins, use a single strand of light taupe or golden brown in a simple backstitch, stitched *after* the leaf is filled.
This technique makes the veins appear slightly recessed, just as they are in nature, giving your work an instant boost of realism.
3. The Cool and Serene Eucalyptus Branch
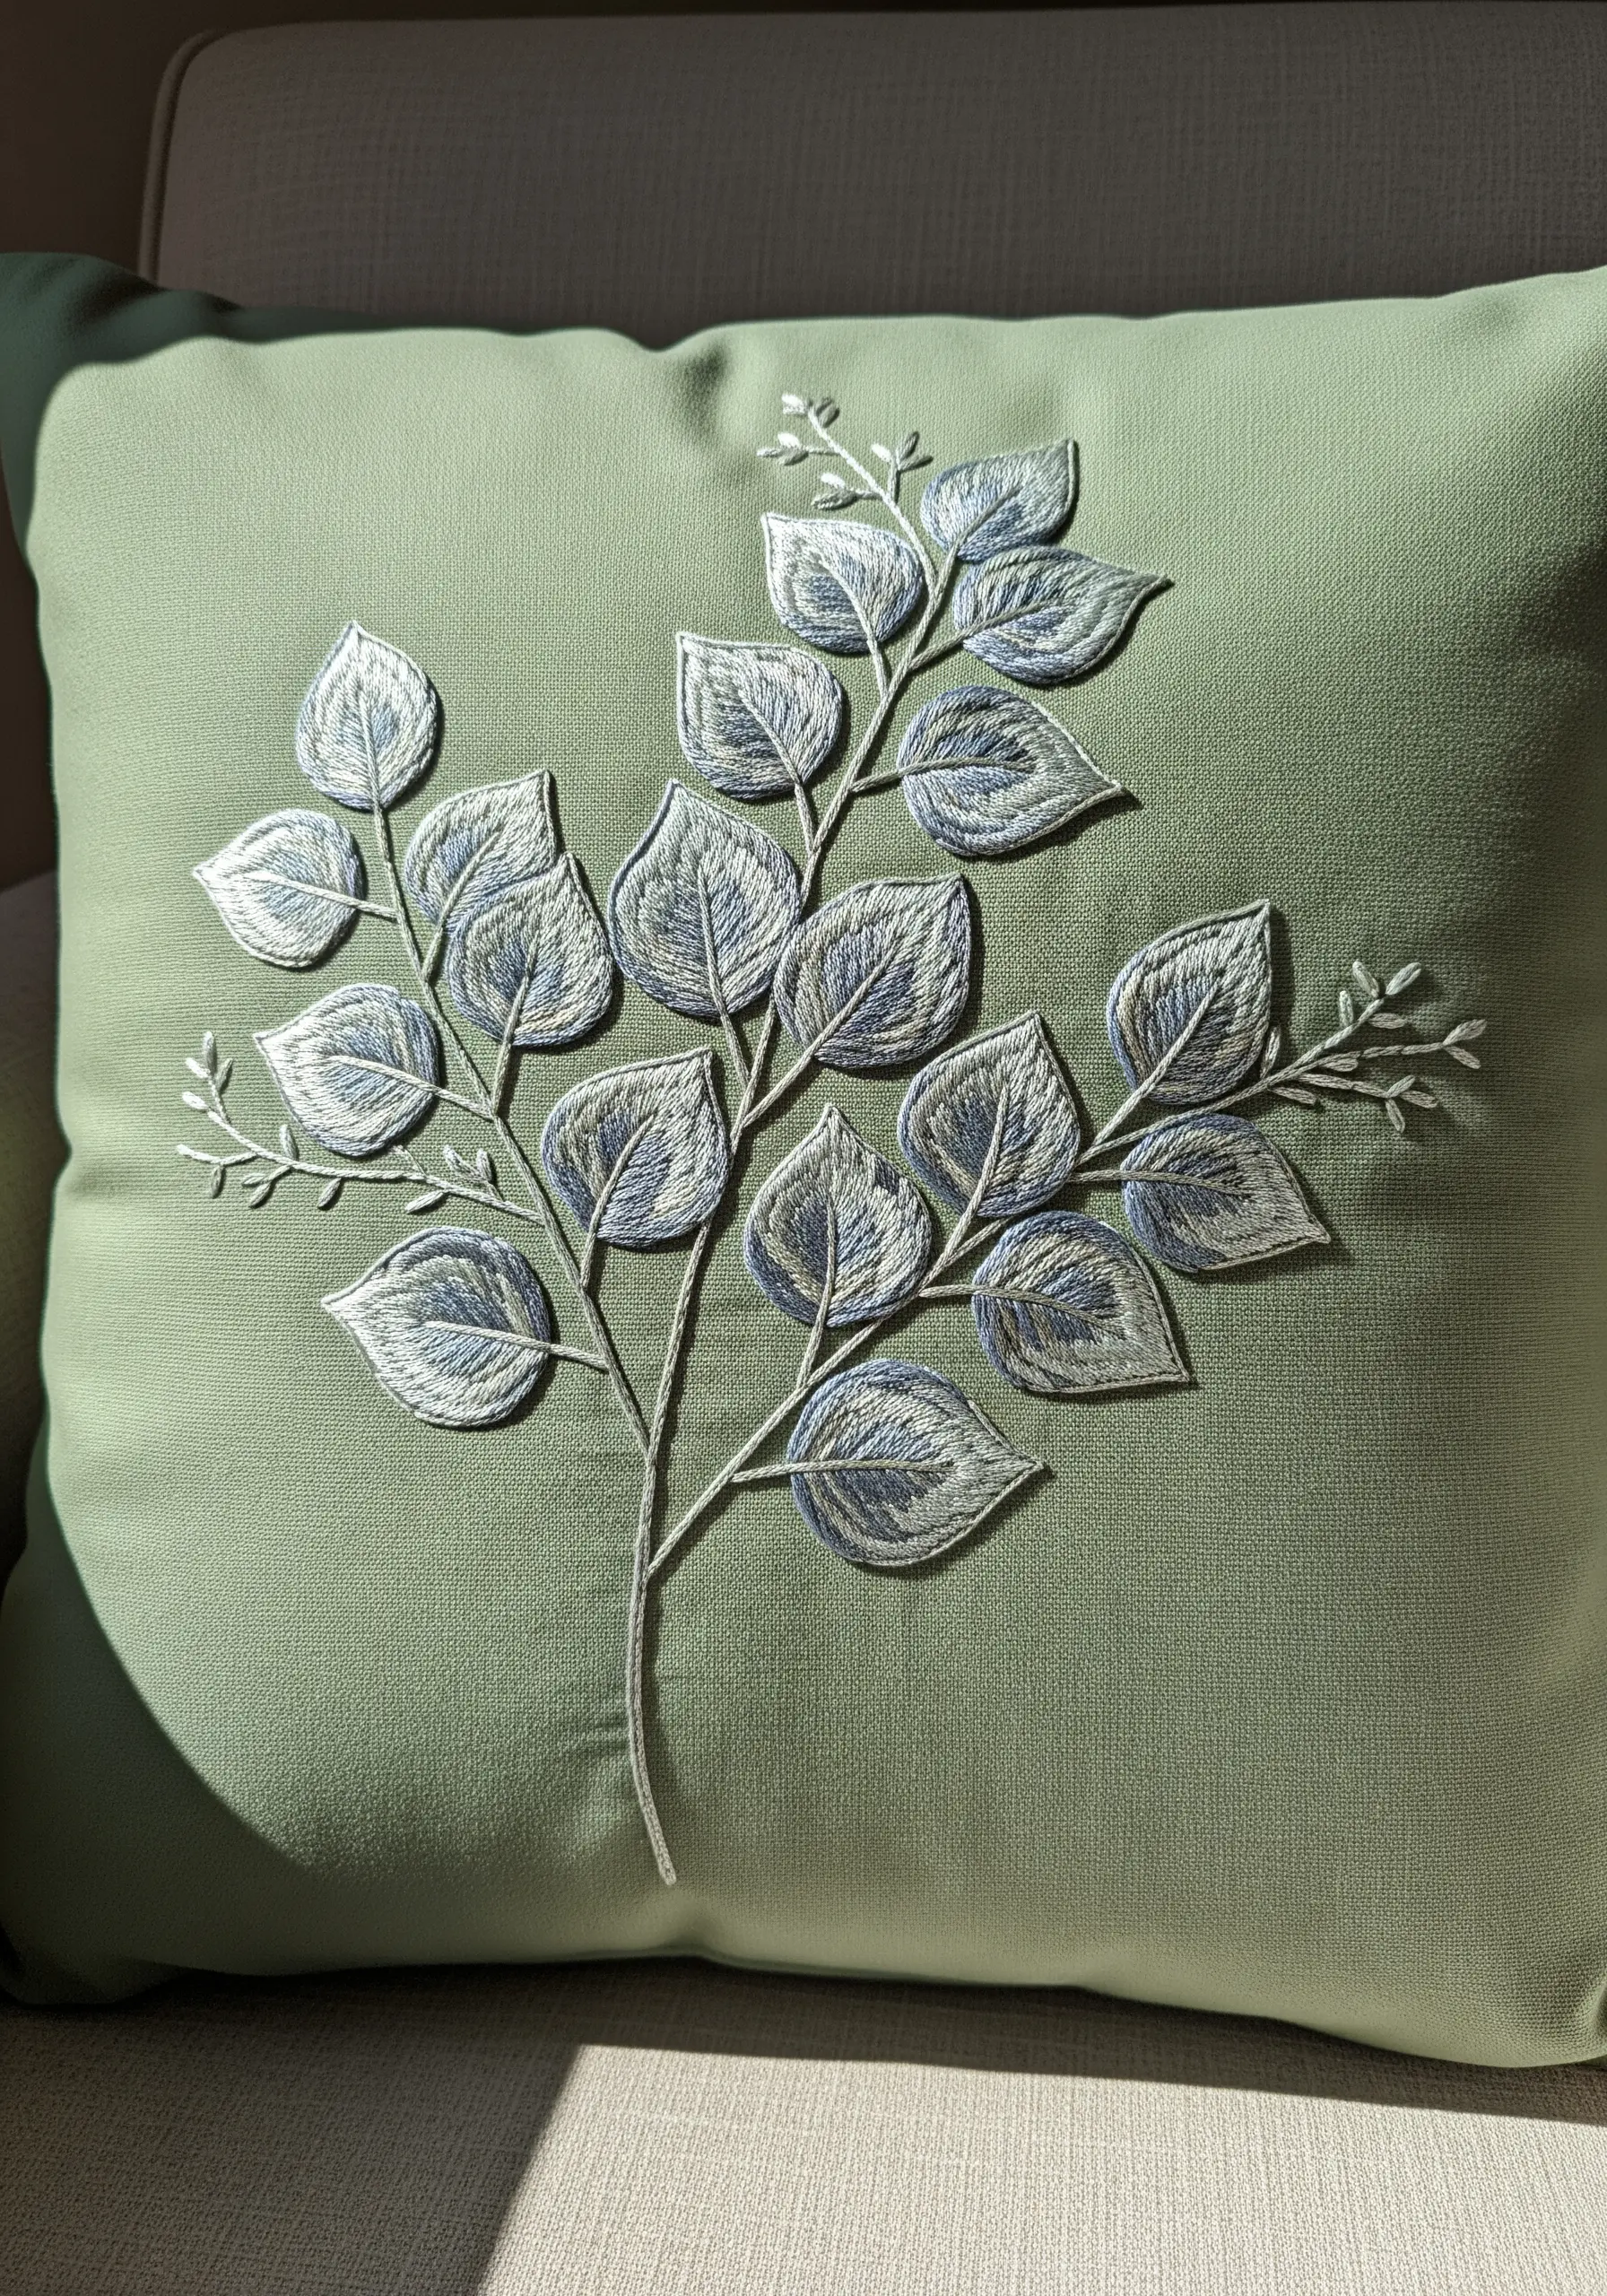
For elegant plant-inspired embroidery patterns on home decor, a simplified palette often has the most impact.
Use just three colors: a dusty blue-grey, a soft off-white, and a slightly darker grey for shadows.
Fill the leaves with a split stitch, allowing some of the background fabric to show through for a light, airy feel.
This combination feels calm and modern, proving that hyper-realism isn’t always about packing in dozens of colors.
4. High-Contrast Calathea on Dark Fabric
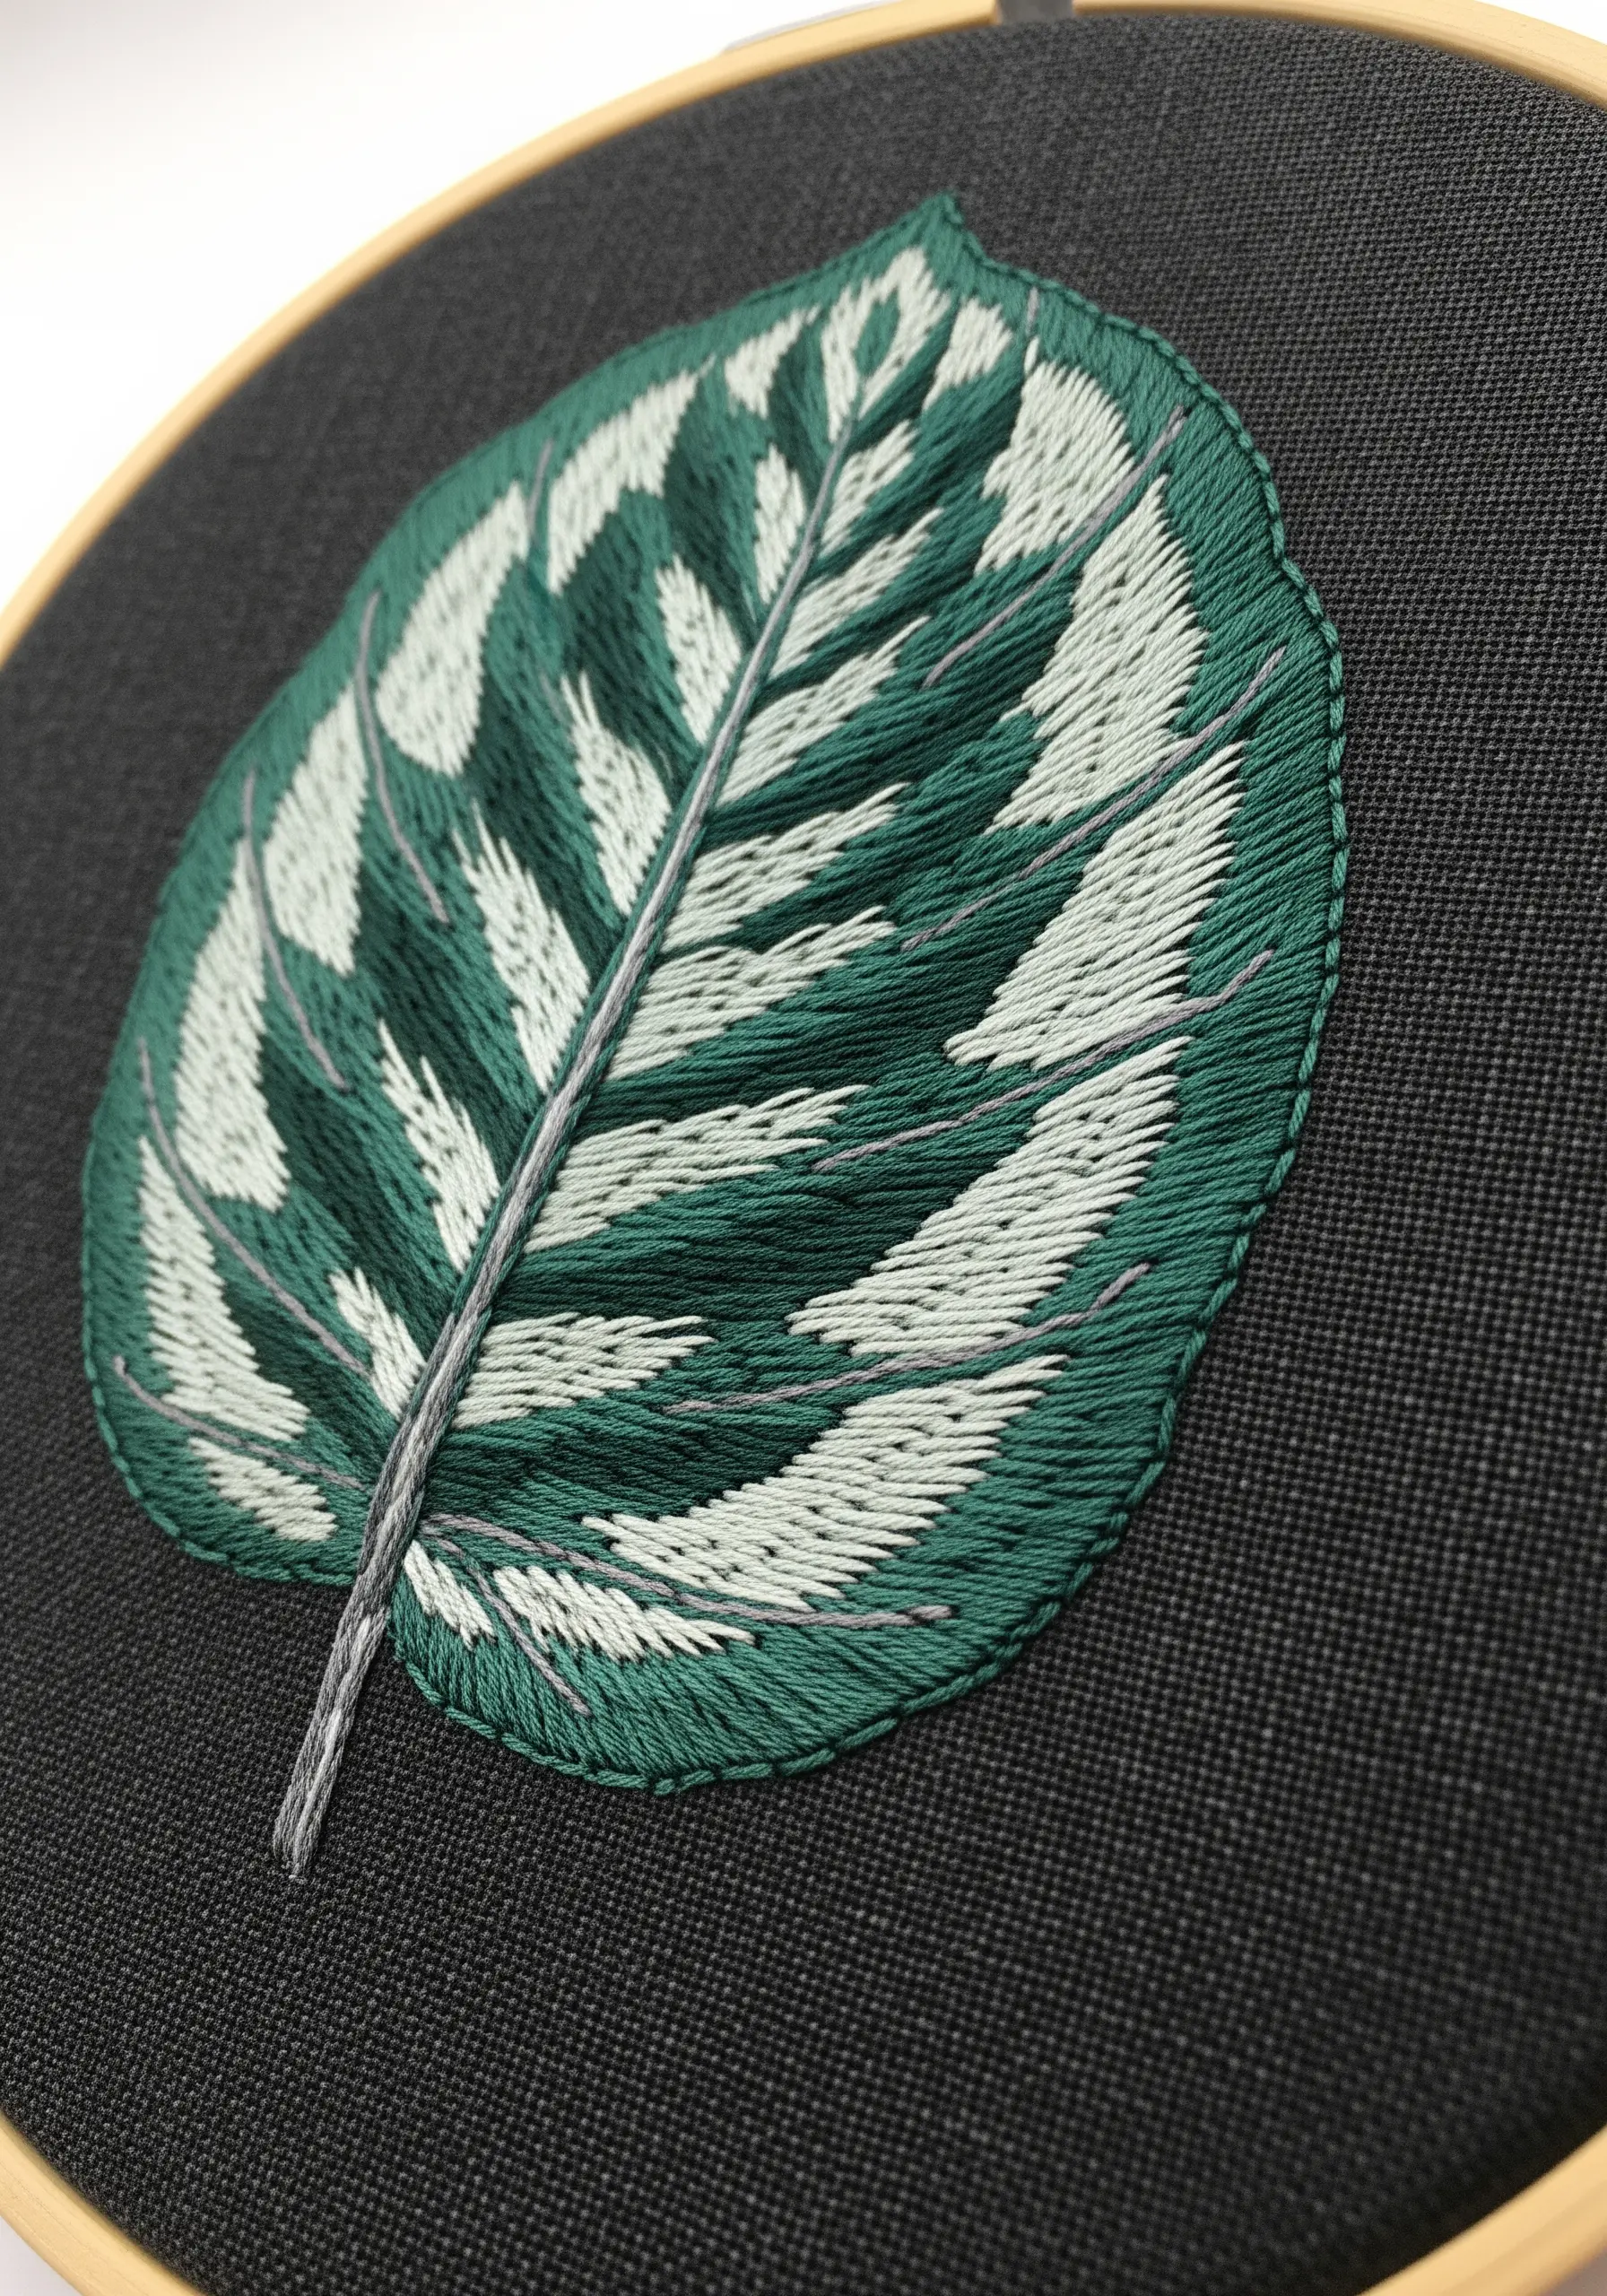
Make your colors vibrate by stitching on black or charcoal fabric. This Calathea uses a stark palette of deep emerald and a cool, minty white.
To achieve those crisp, clean edges, always outline your shapes with a split stitch before filling them with satin stitch.
The dark background absorbs light, making your thread colors appear more saturated and intense than they would on a lighter fabric.
This is a powerful choice for creating dramatic, graphic botanicals that command attention.
5. The Autumnal Maple Leaf Gradient
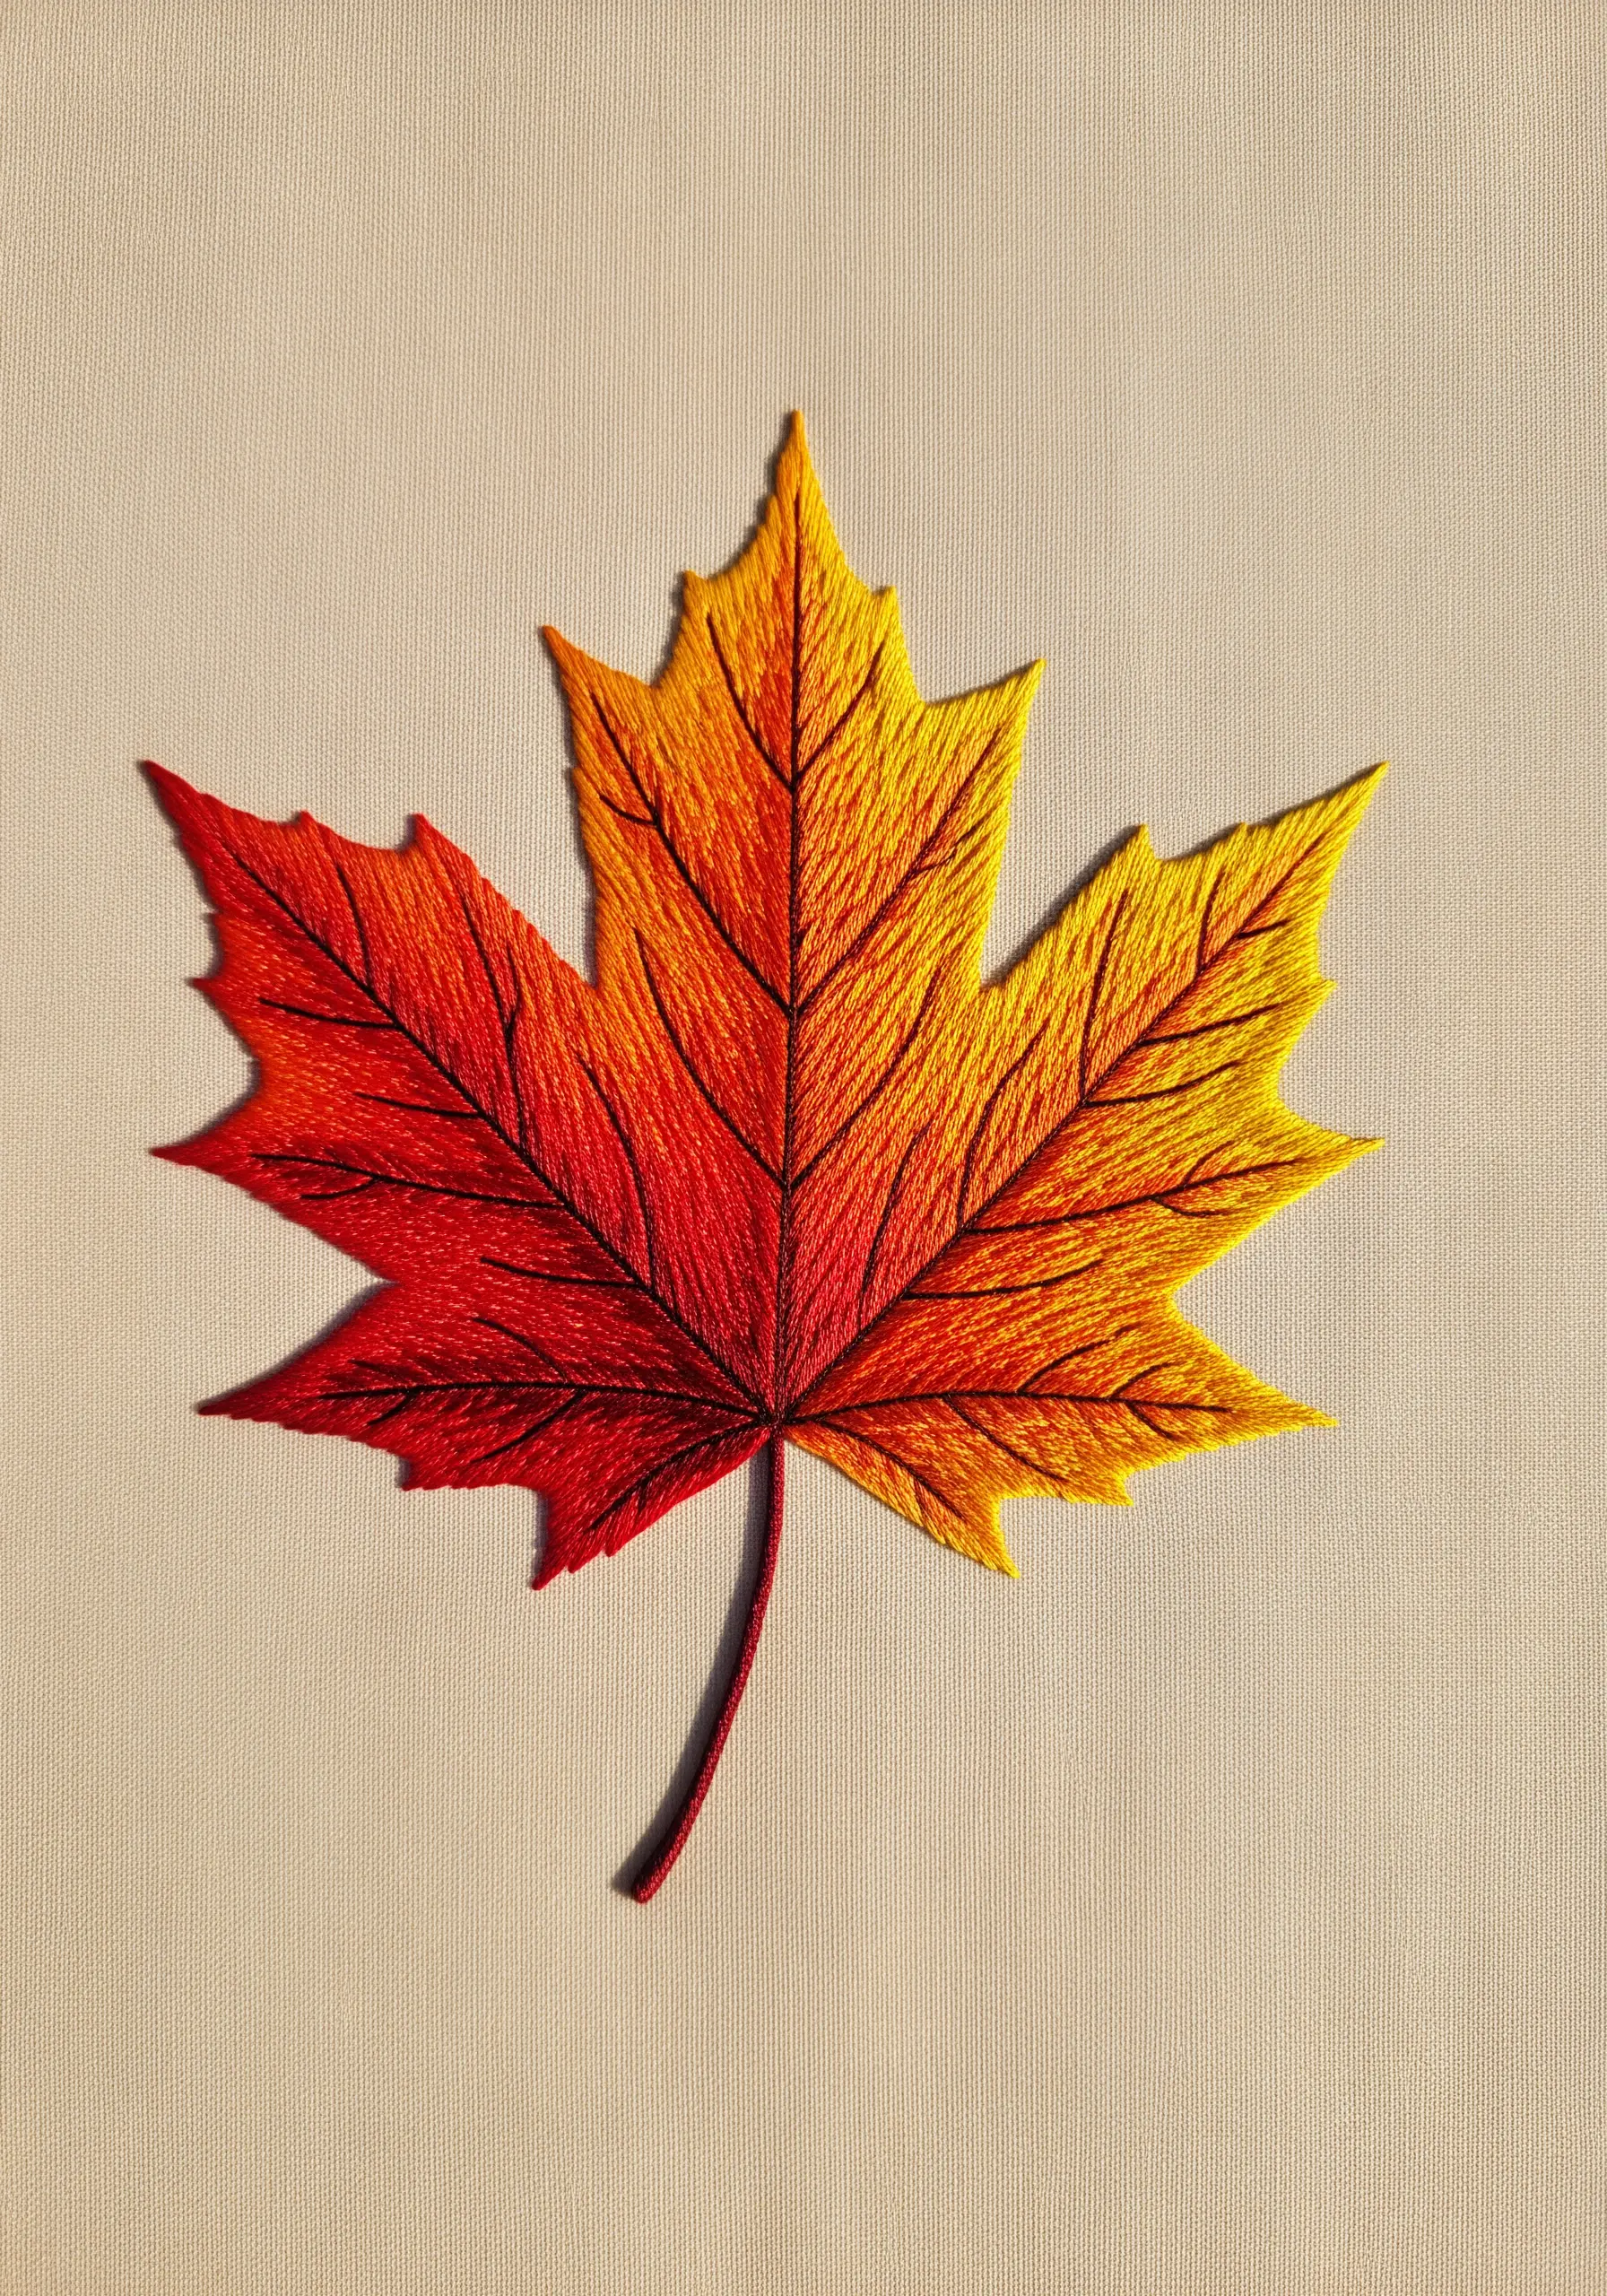
Mastering a smooth color transition is the key to realistic autumnal leaves. Choose a fiery palette of deep red, vibrant orange, and golden yellow.
Using a long-and-short stitch, blend the colors by scattering the entry points of your stitches randomly where two shades meet.
Avoid stitching in rigid rows, which creates harsh lines. Instead, think of it as painting with thread, letting the colors feather into one another organically.
Finish with veins in a single strand of dark brown to ground the vibrant colors.
6. Variegated Leaves for Wearable Art
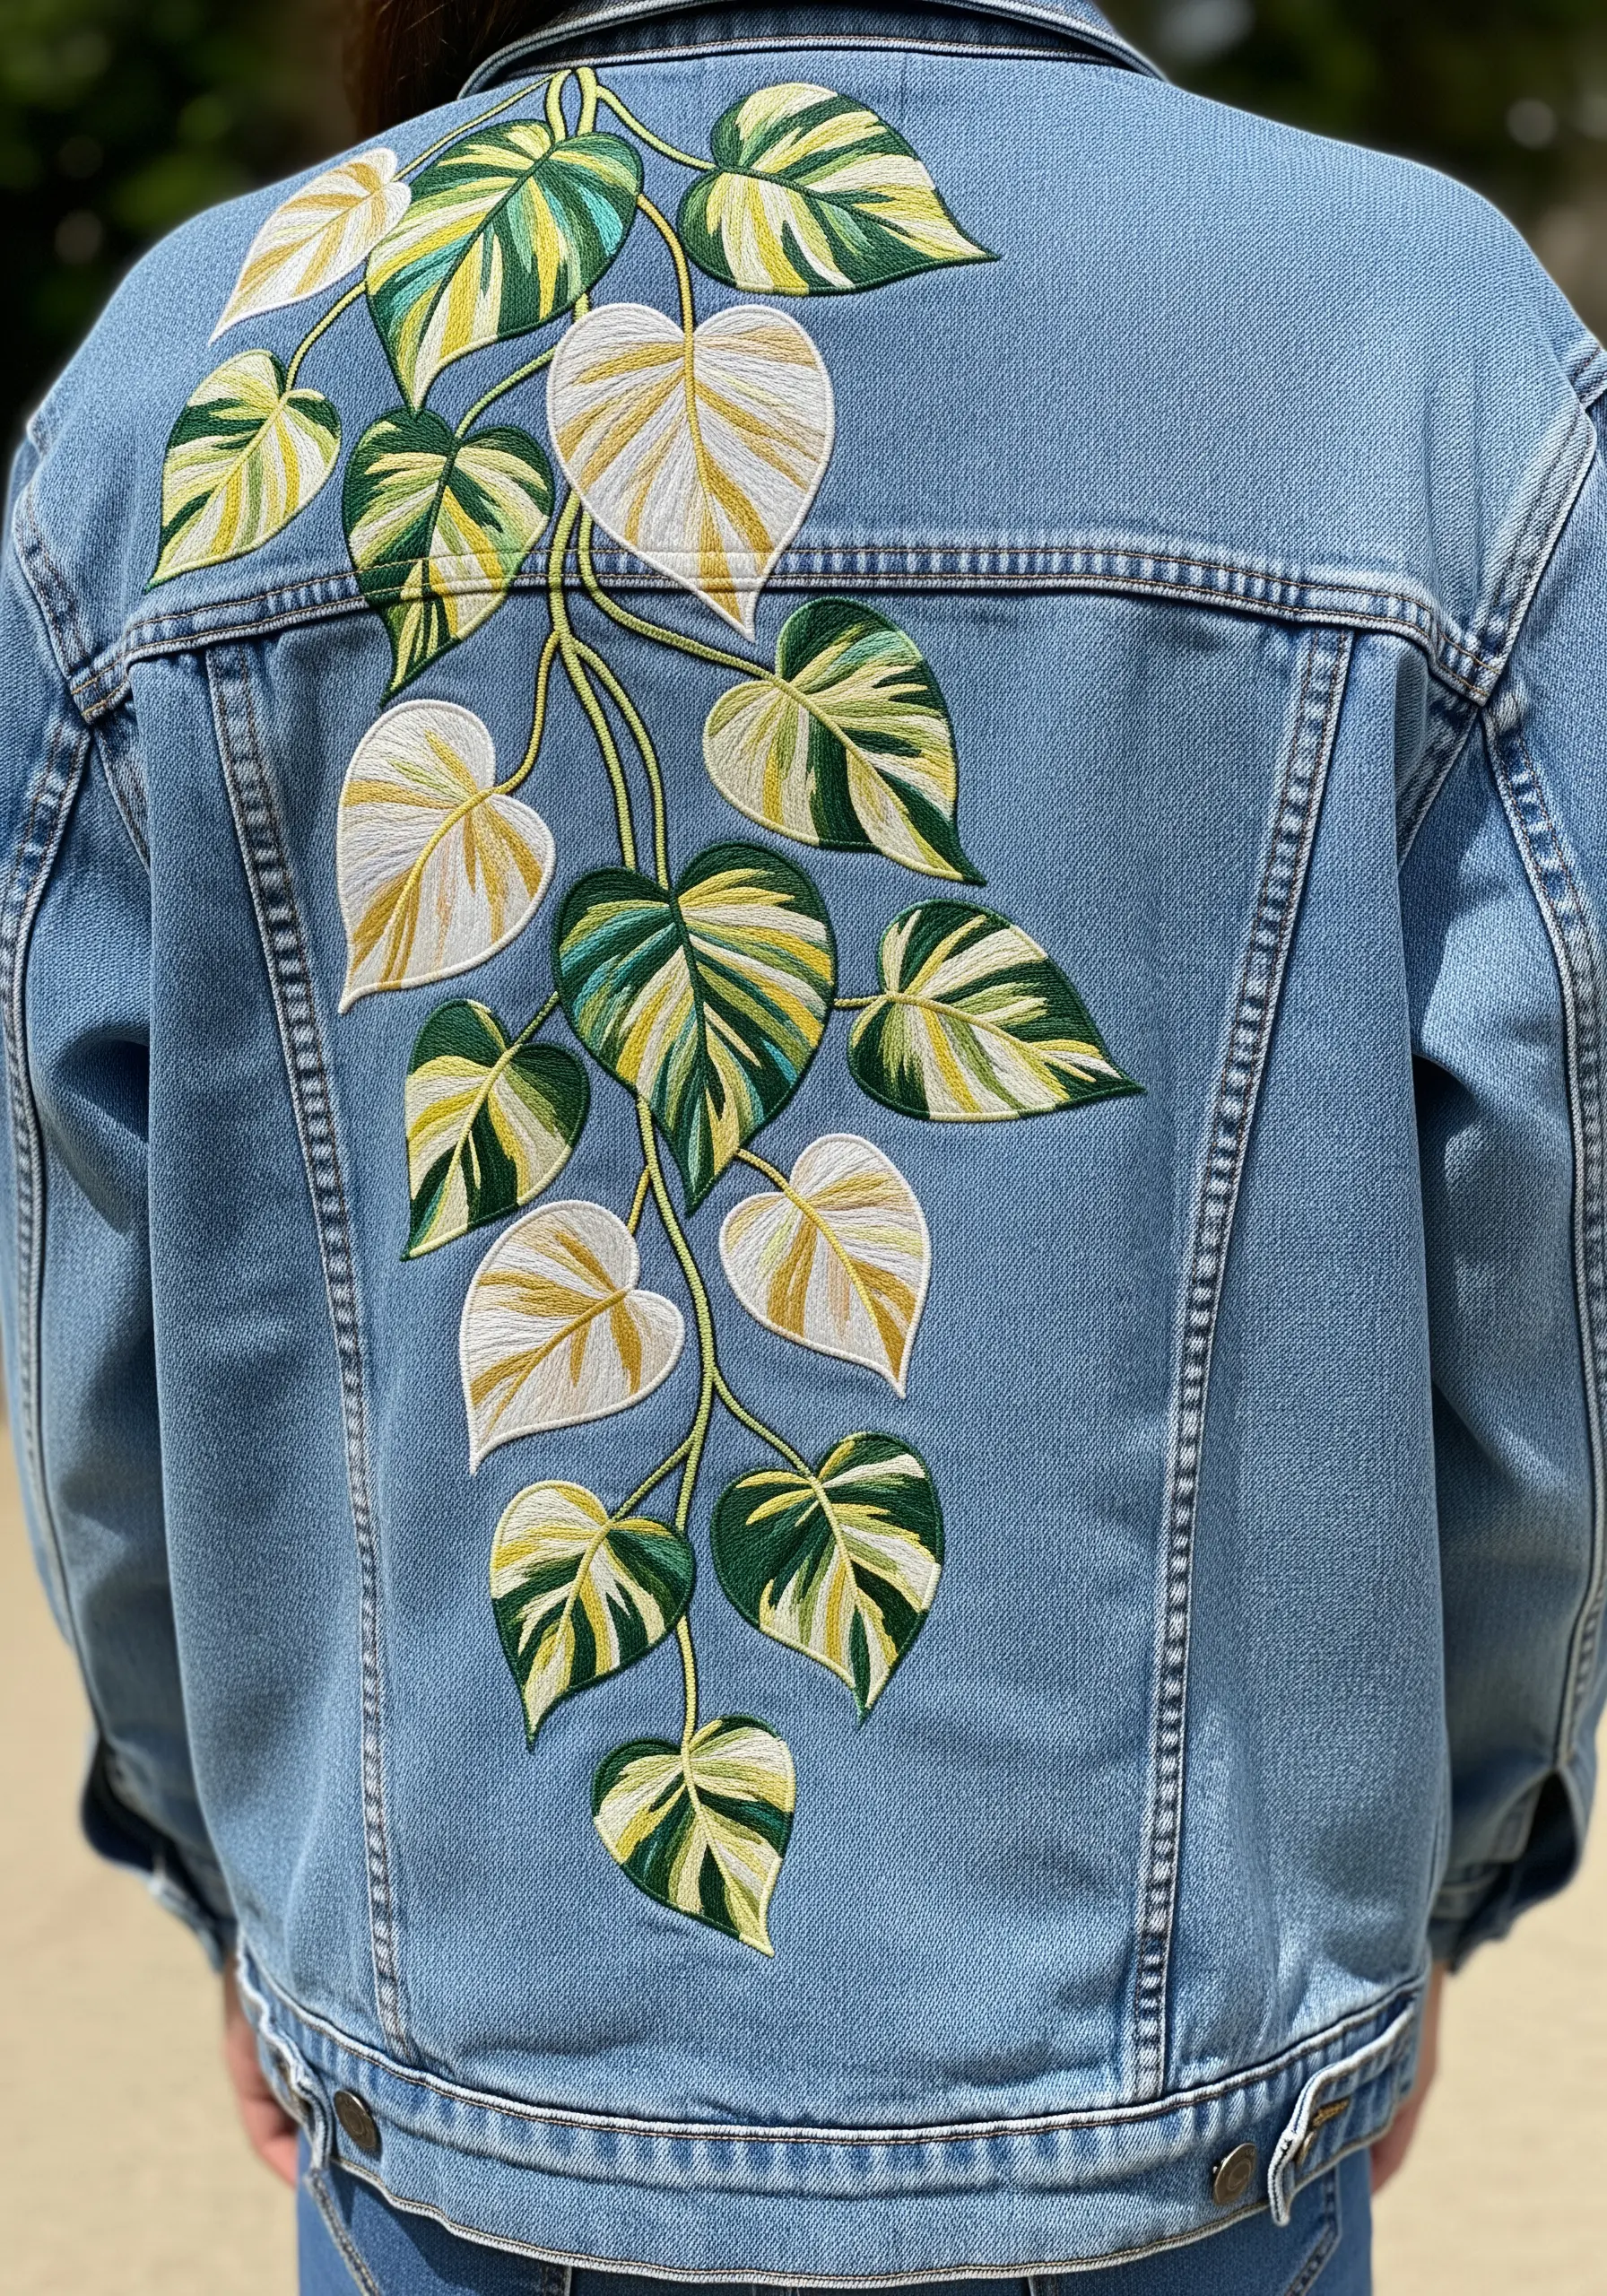
For botanical embroidery ideas for turning plain denim jackets into art, embrace the beauty of variegated leaves.
This requires a palette of creamy white, chartreuse, and at least two other shades of green.
Instead of blending smoothly, create distinct patches and blocks of color within each leaf, letting the shapes be irregular and unpredictable.
This mimics the natural, imperfect patterns of plants like Pothos or Philodendrons and adds a dynamic, artistic flair to any garment.
7. The Delicate Fern on Sheer Fabric

Stitching on a sheer fabric like organza or tulle creates a magical, floating effect perfect for delicate plants like ferns.
Use a simple gradient of three greens, from a light spring green to a darker mossy hue.
Work with only one or two strands of floss to keep the design from becoming heavy and to honor the transparency of the fabric.
Always use a water-soluble stabilizer while stitching; it provides the necessary support and washes away completely, leaving only your beautiful, ethereal design.
8. The Electric Croton Color Explosion
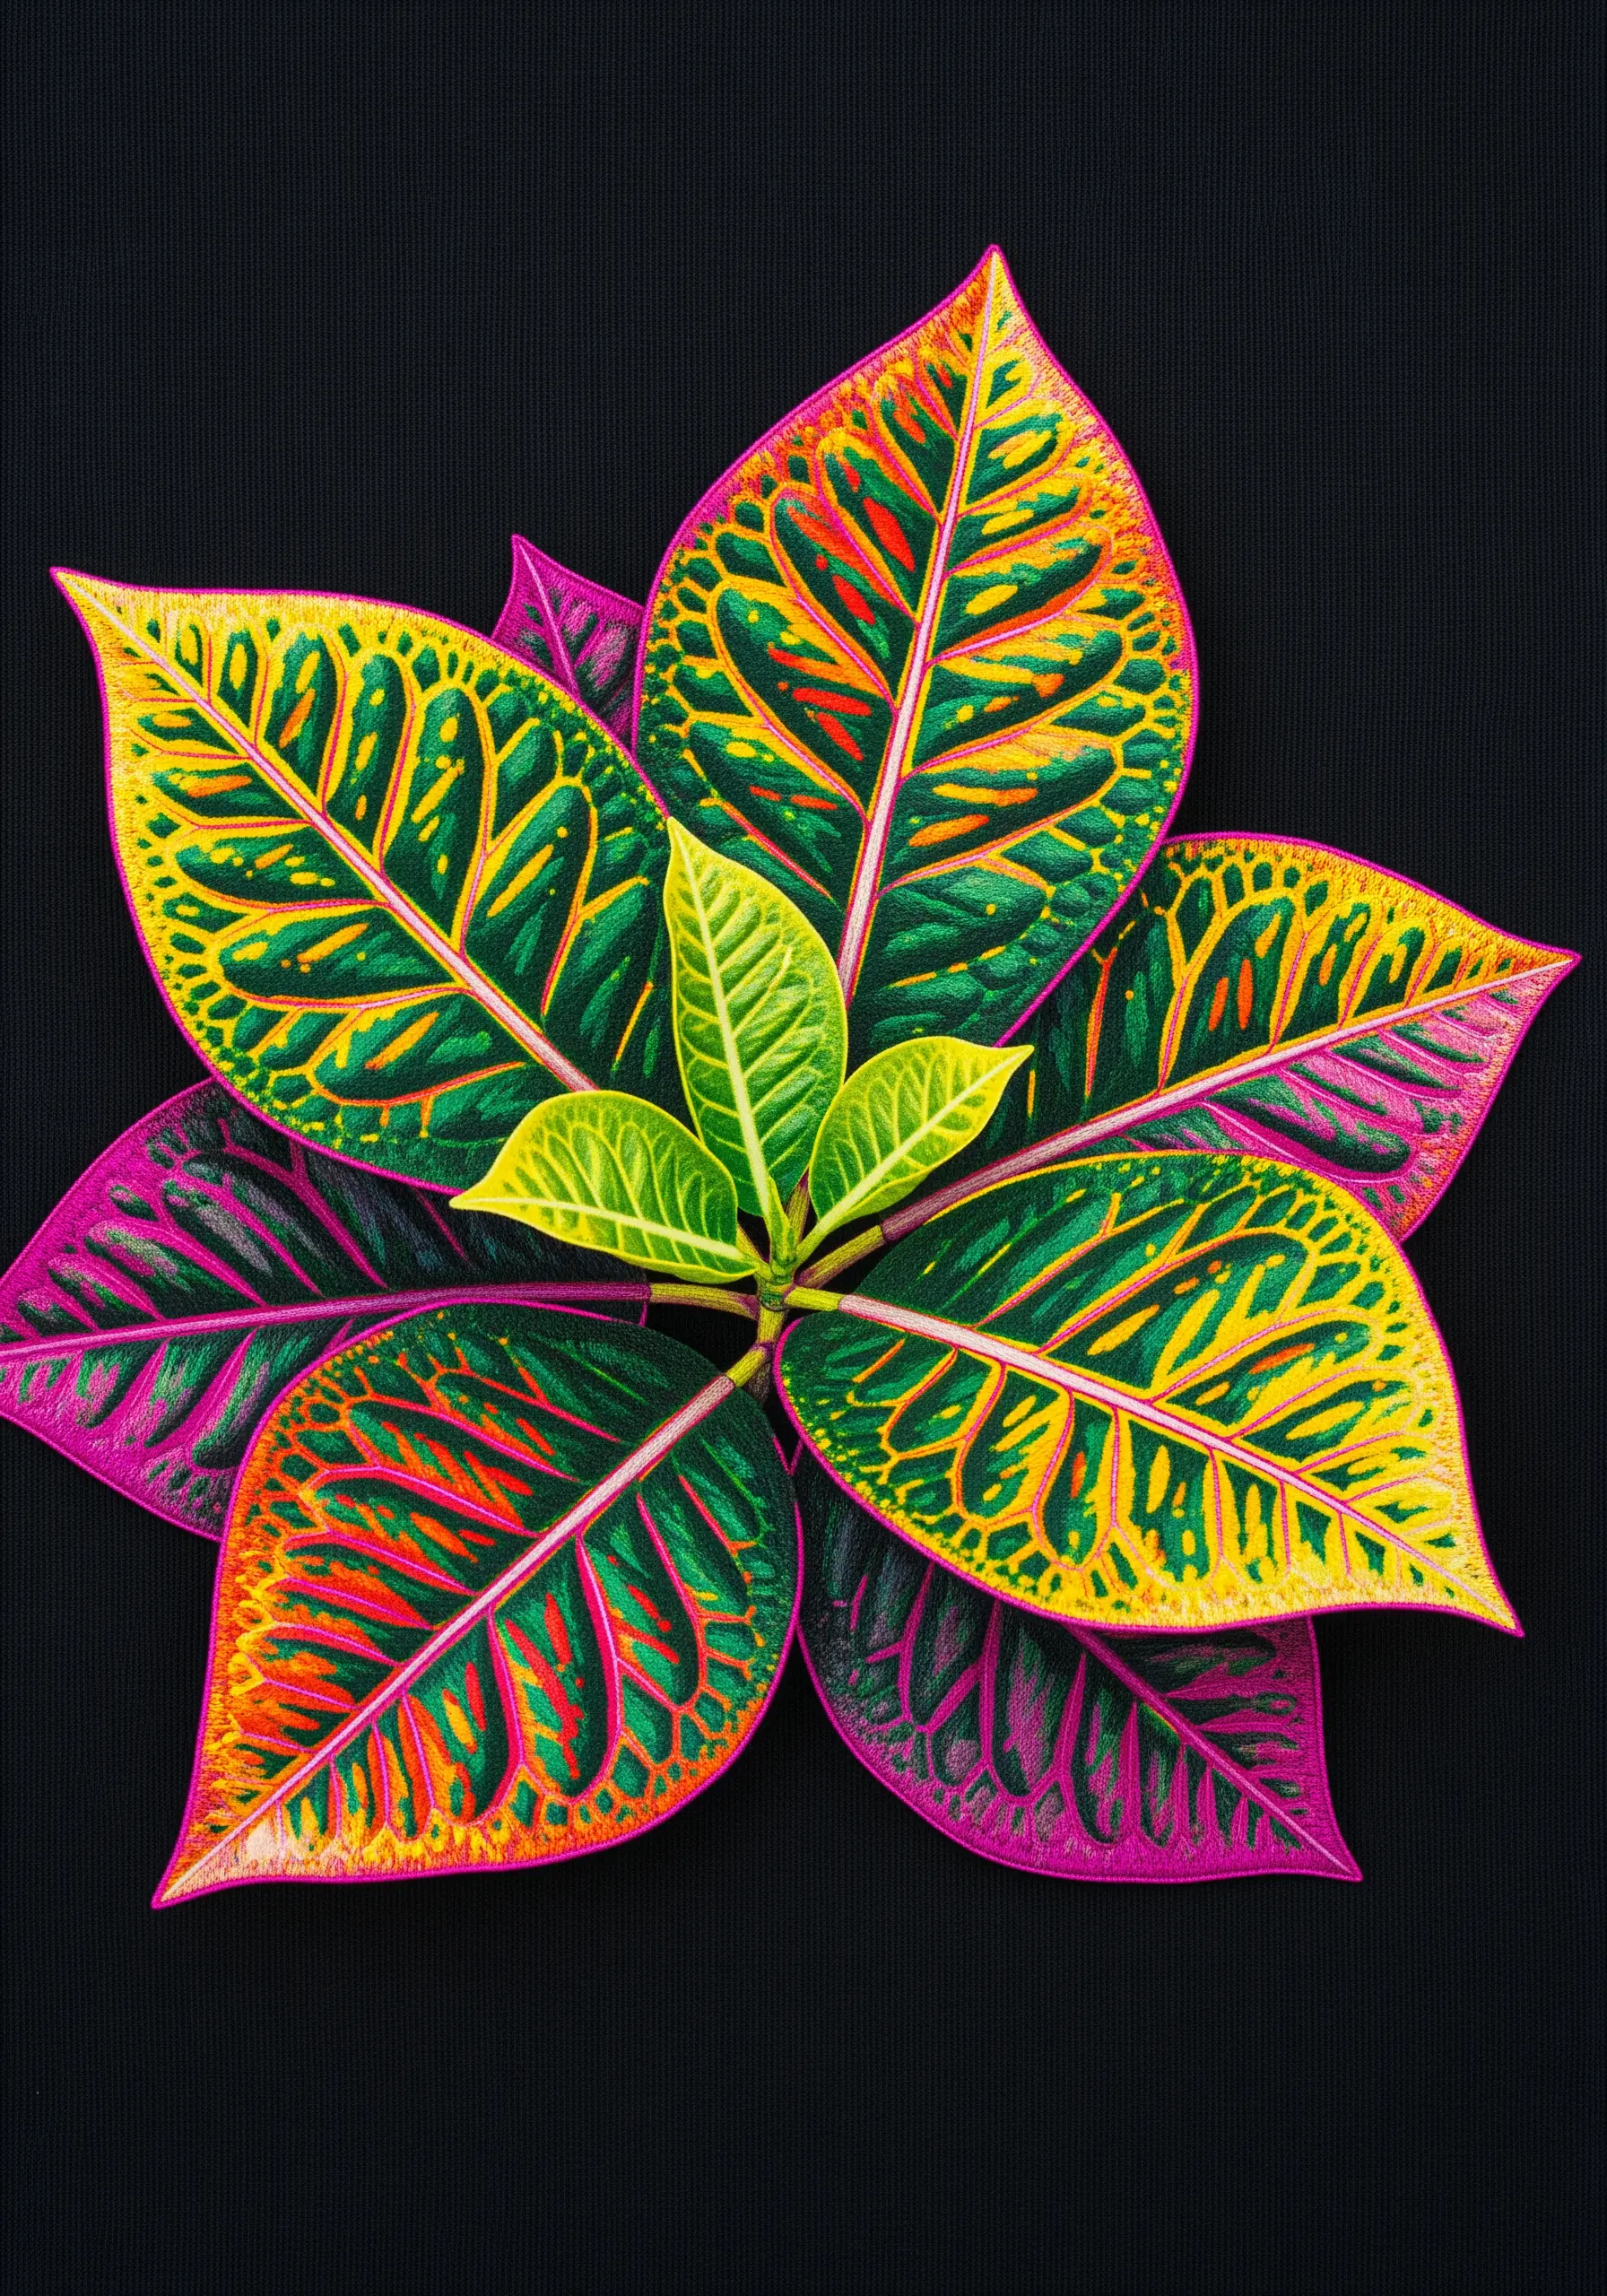
Some plants are meant to be loud. For a Croton, assemble a bold palette of magenta, primary red, sunshine yellow, and deep green.
The key here is color separation, not blending. Use small, tight satin stitches to create speckles and patches of pure, unmixed color.
This technique allows each vibrant hue to stand on its own, creating the visual energy and complexity that these plants are known for.
Place it on a black background to make the colors feel even more electric and alive.
9. The Striped and Waxy Hosta Leaf
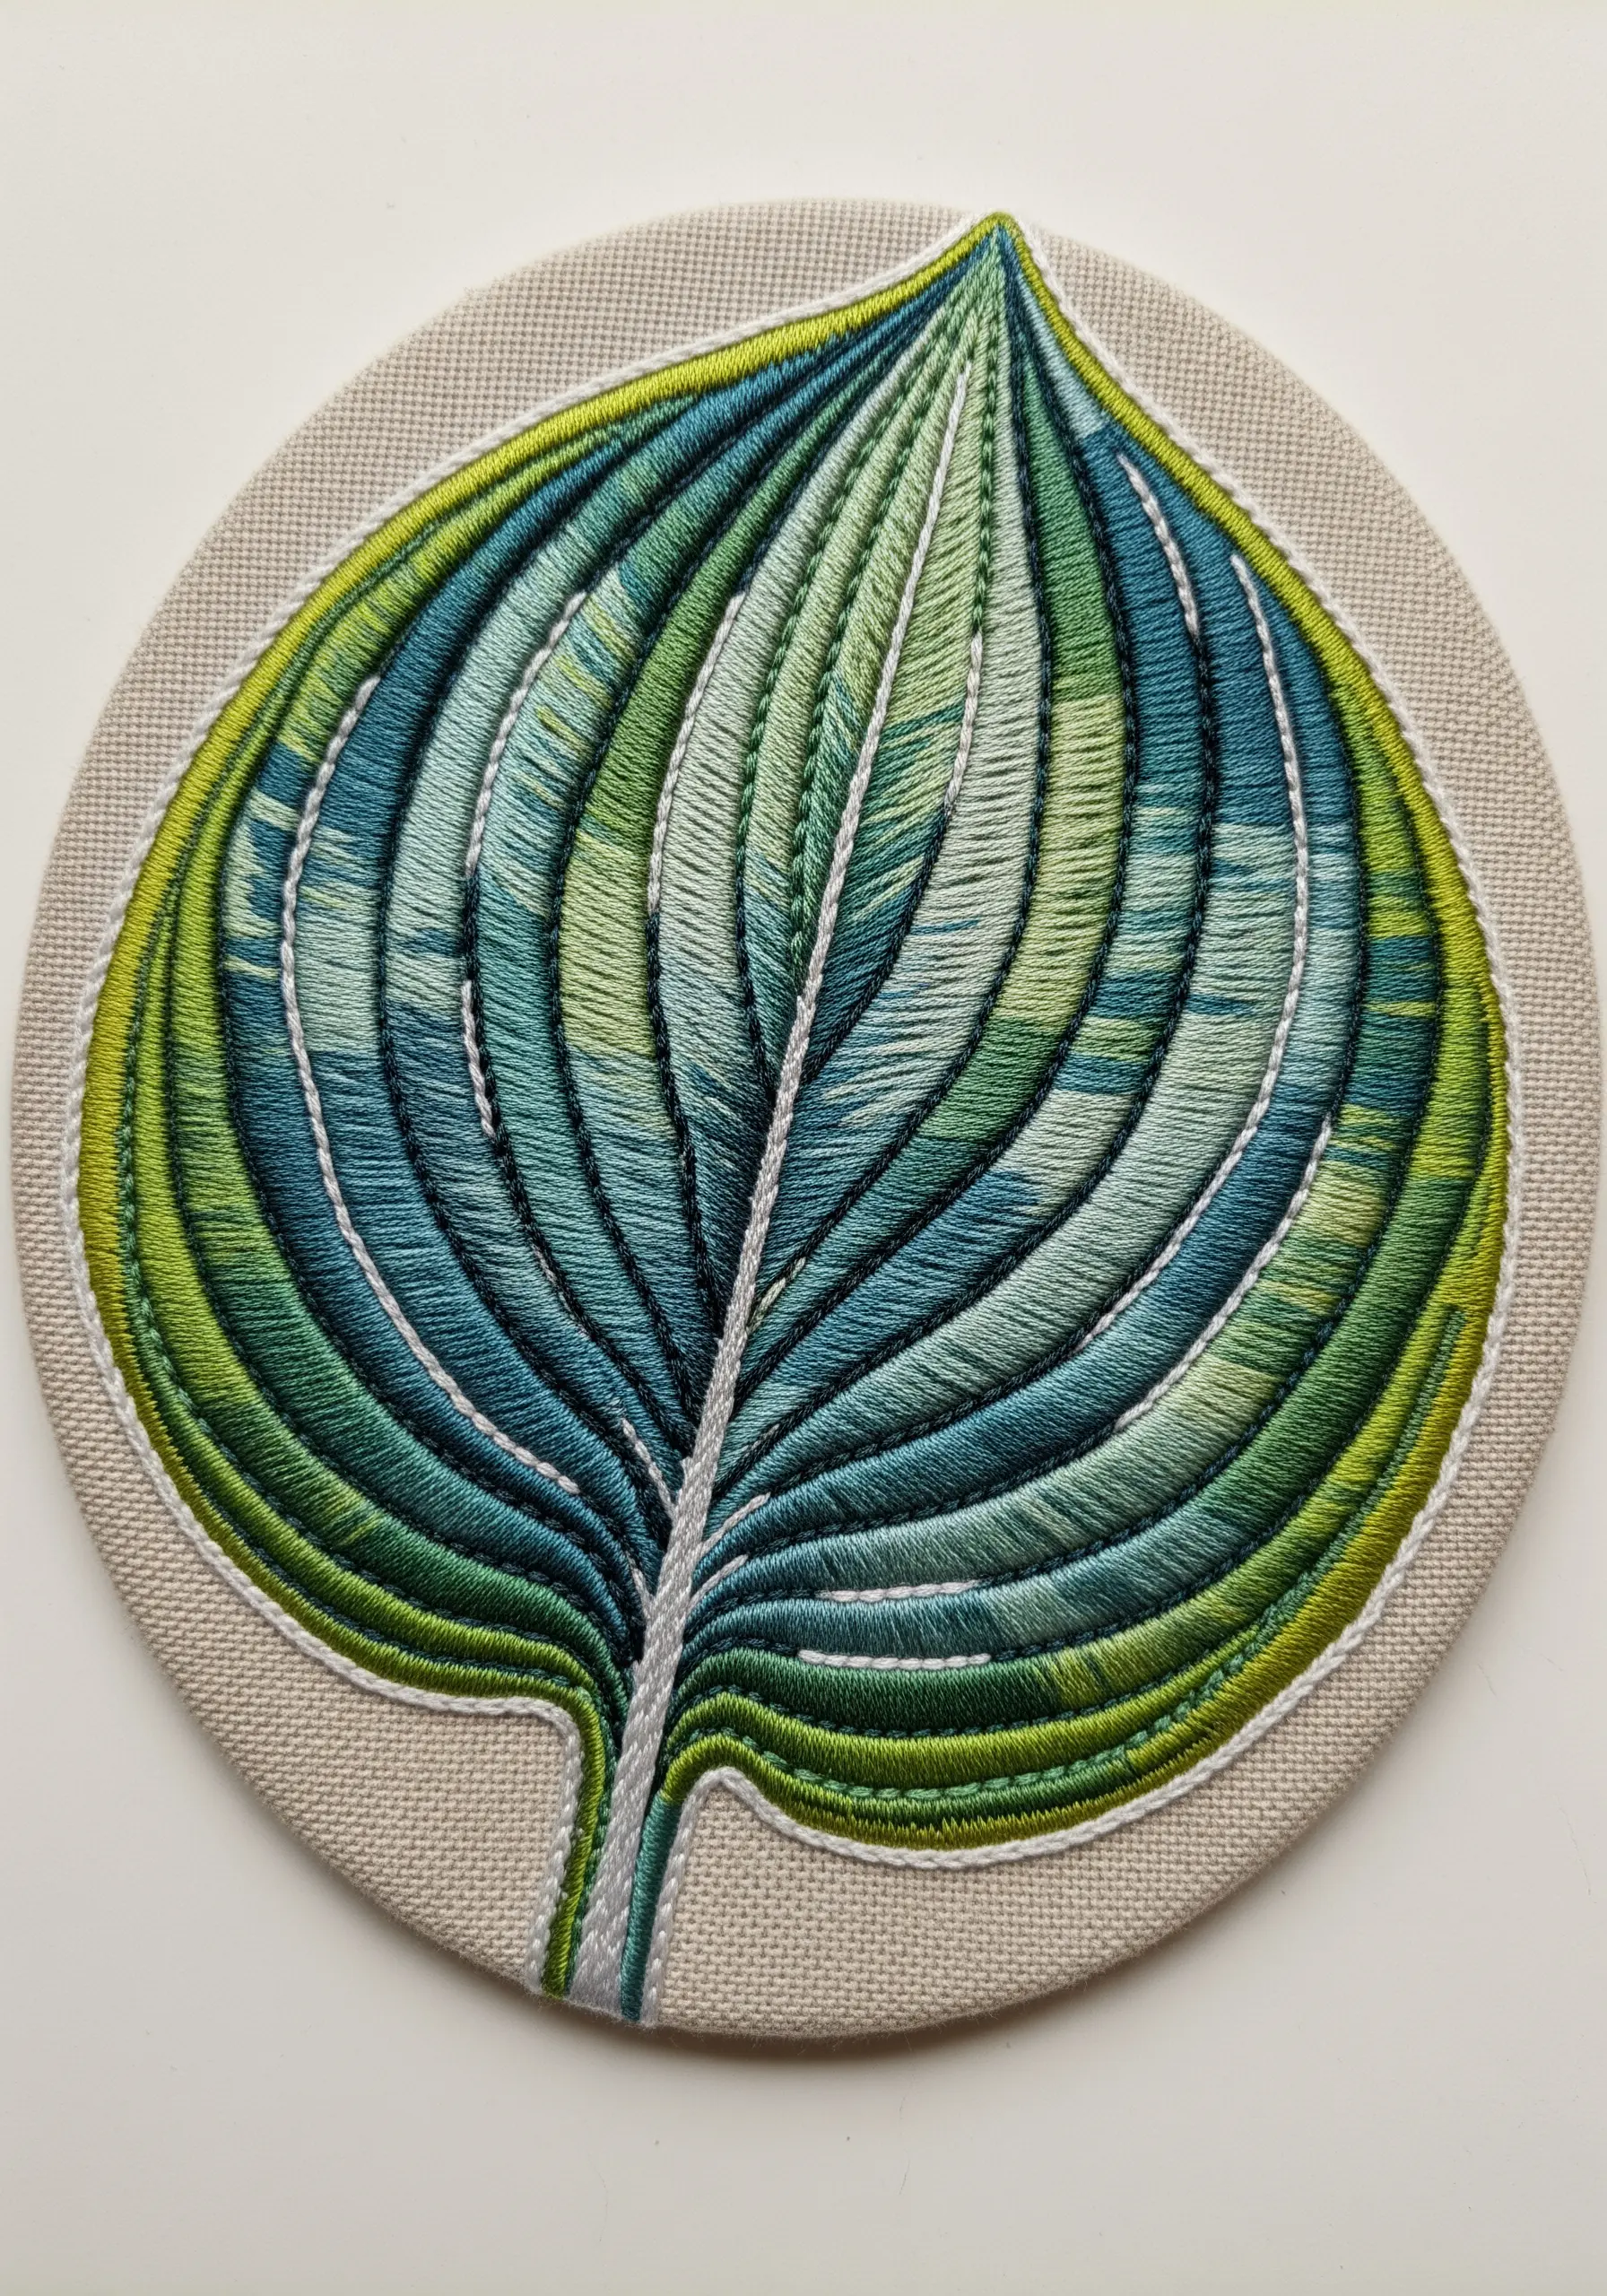
Capture the unique, painted look of a Hosta leaf by focusing on concentric color bands rather than a soft gradient.
Use a cool-toned palette of deep teal, seafoam green, and a fine line of chartreuse along the edge.
Lay your satin stitches following the curved shape of each color band. This directional work is crucial for realism.
A single, crisp white backstitch for the central vein adds a highlight that makes the entire leaf feel fresh and dewy.
10. The Neon-Edged Coleus Composition
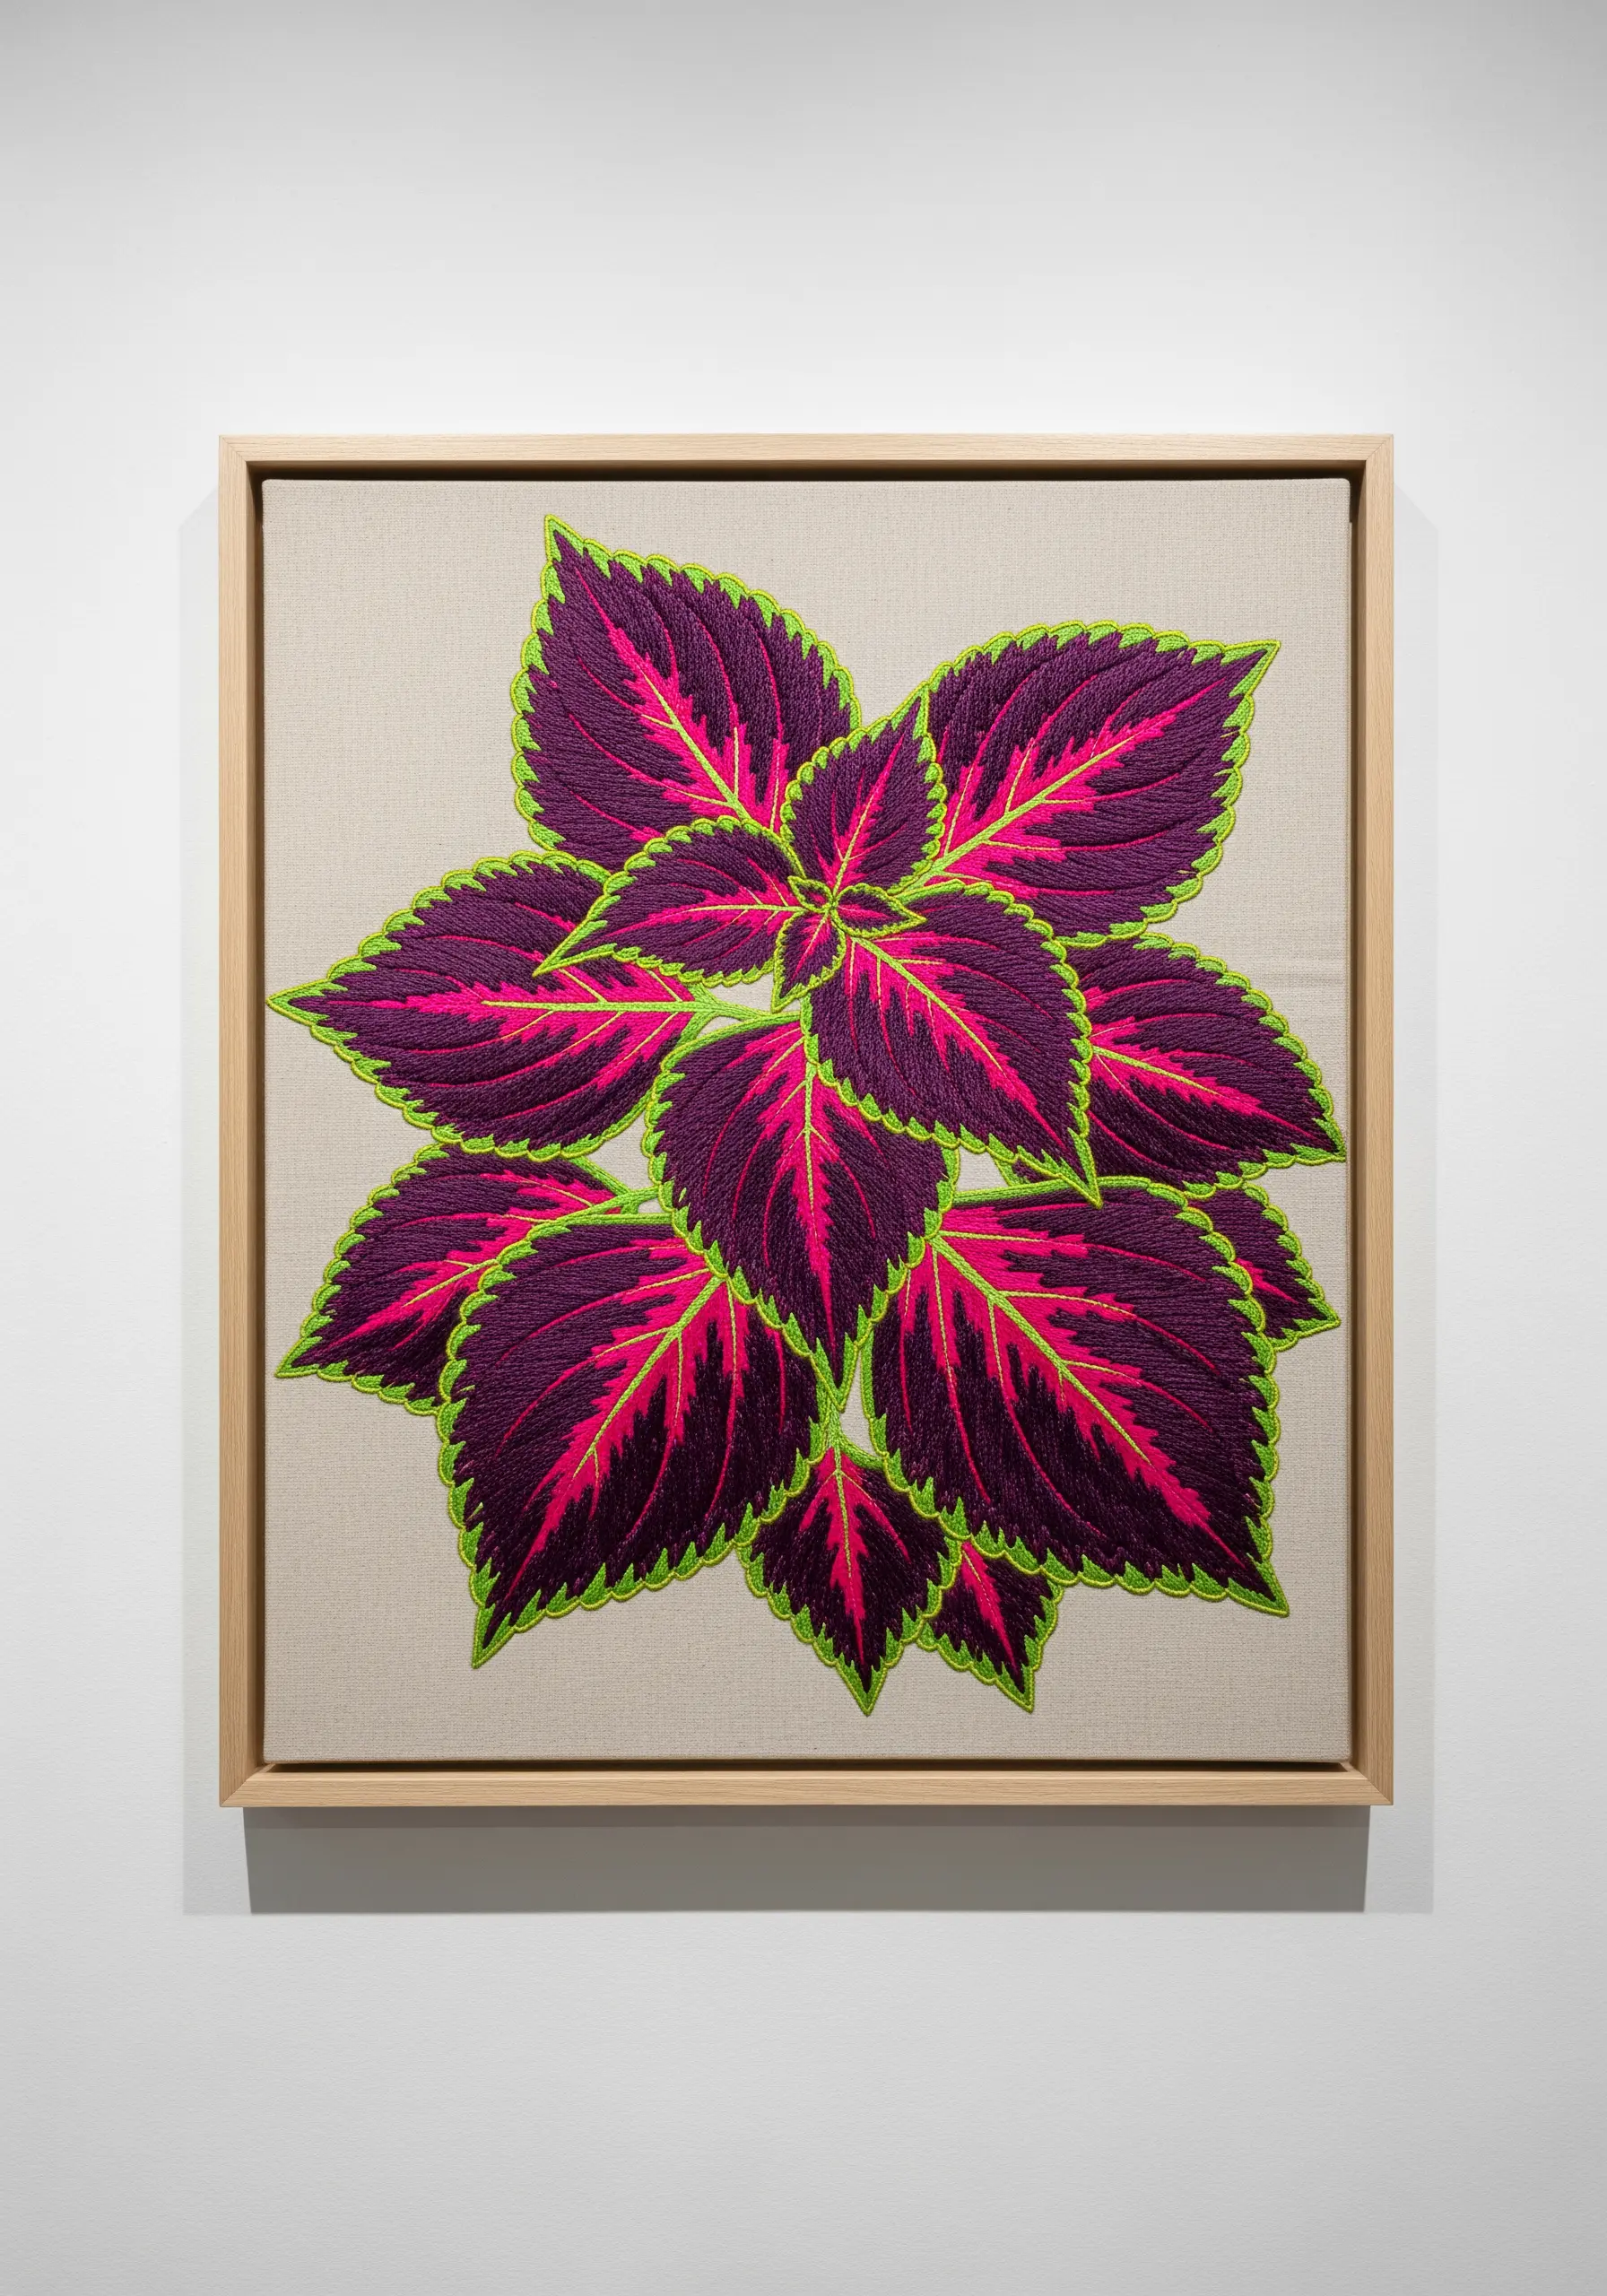
Make your botanicals feel intensely modern by pairing deep, rich tones with a shocking neon accent.
This Coleus plant uses a palette of dark burgundy, magenta, and an electric lime green outline.
Use the lime green as a sharp border, stitched with a precise split stitch. This acts as a container for the richer colors inside, preventing them from feeling muddy.
This high-contrast combination creates a visual buzz that elevates a simple botanical into a piece of contemporary fiber art.
11. The Monochrome Ginkgo Fan
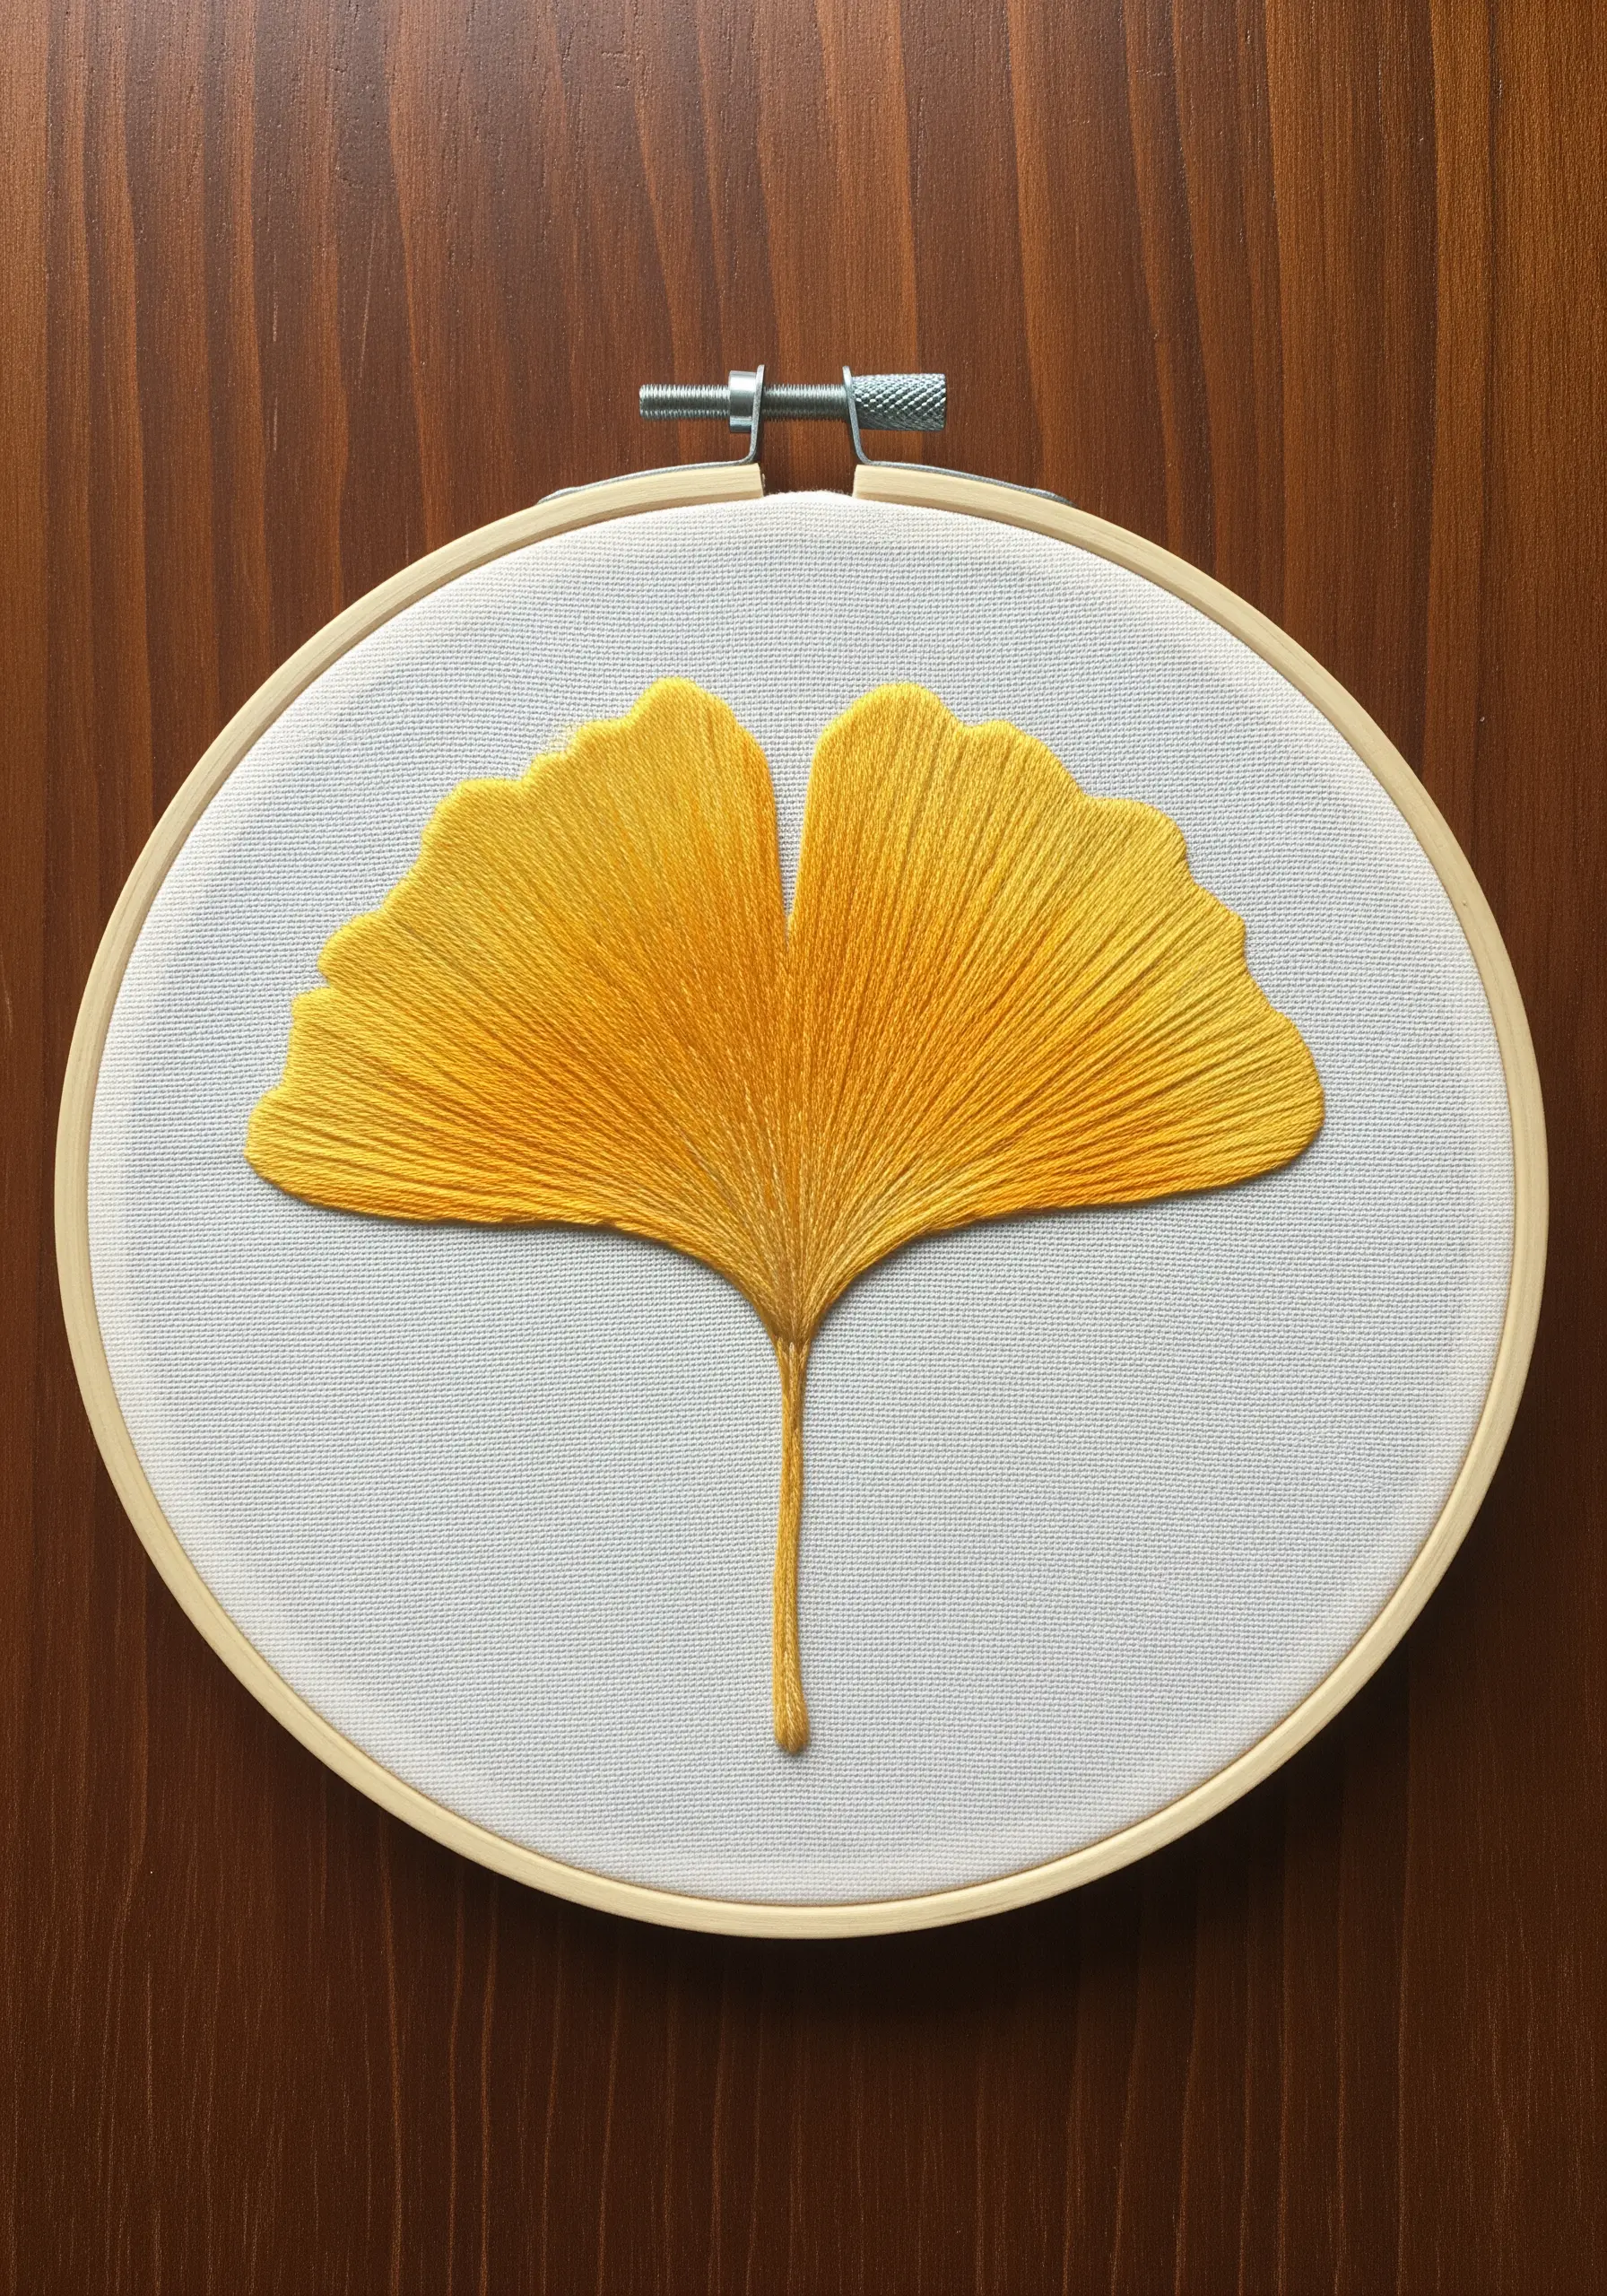
Sometimes, the most powerful statement comes from a single, perfectly chosen color.
For a Ginkgo leaf, select a rich, golden ochre and focus entirely on the precision of your stitches.
Use a long-and-short stitch, ensuring every thread radiates flawlessly from the base of the stem to the ruffled outer edge.
By varying the length of your outermost stitches, you can create the delicate, fan-like texture that makes this leaf so recognizable. This design is a masterclass in form and texture over color.
12. The 3D Polka-Dot Begonia
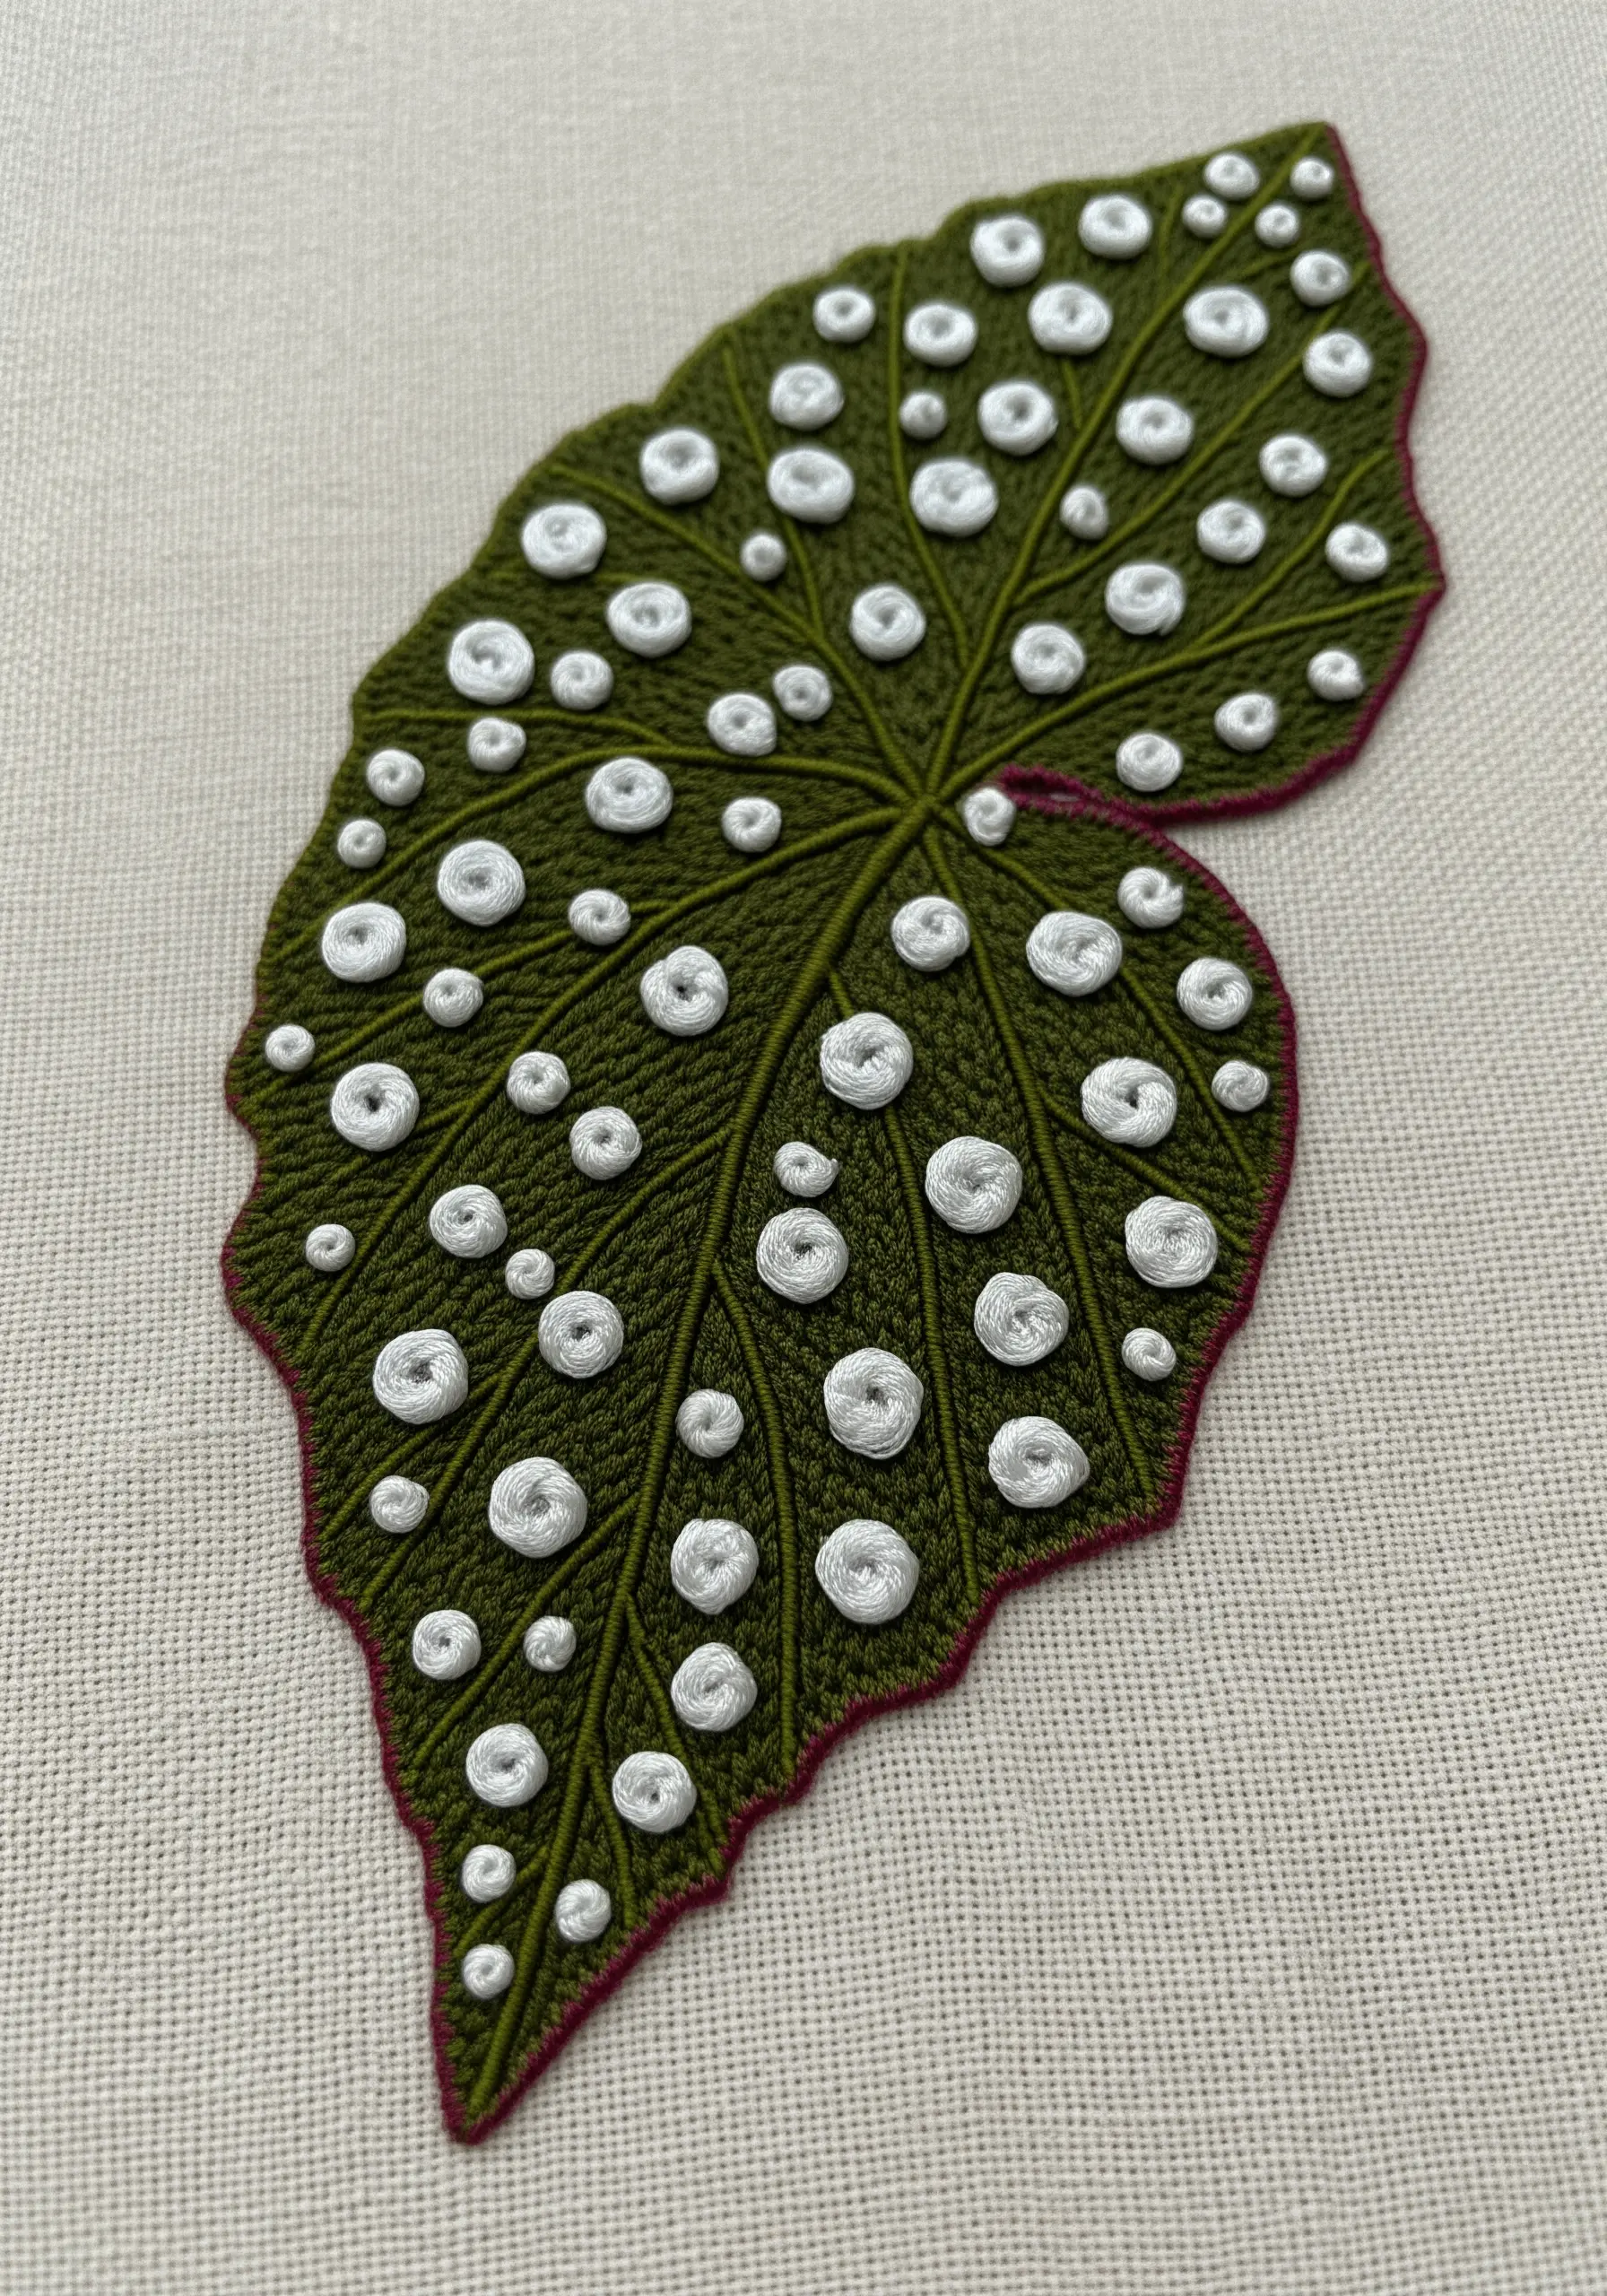
Bring your embroidery into the third dimension by adding textural elements, perfect for a Polka-Dot Begonia.
Stitch the leaf in a solid, deep olive green. Then, create the iconic spots using padded satin stitch—a series of small underlying straight stitches that you then cover with white satin stitch.
This padding lifts the white dots off the fabric surface, giving them a tangible, 3D quality that catches the light and invites touch.
A fine, single-strand dark red outline completes the sophisticated look.
13. The Variegated Vine Composition
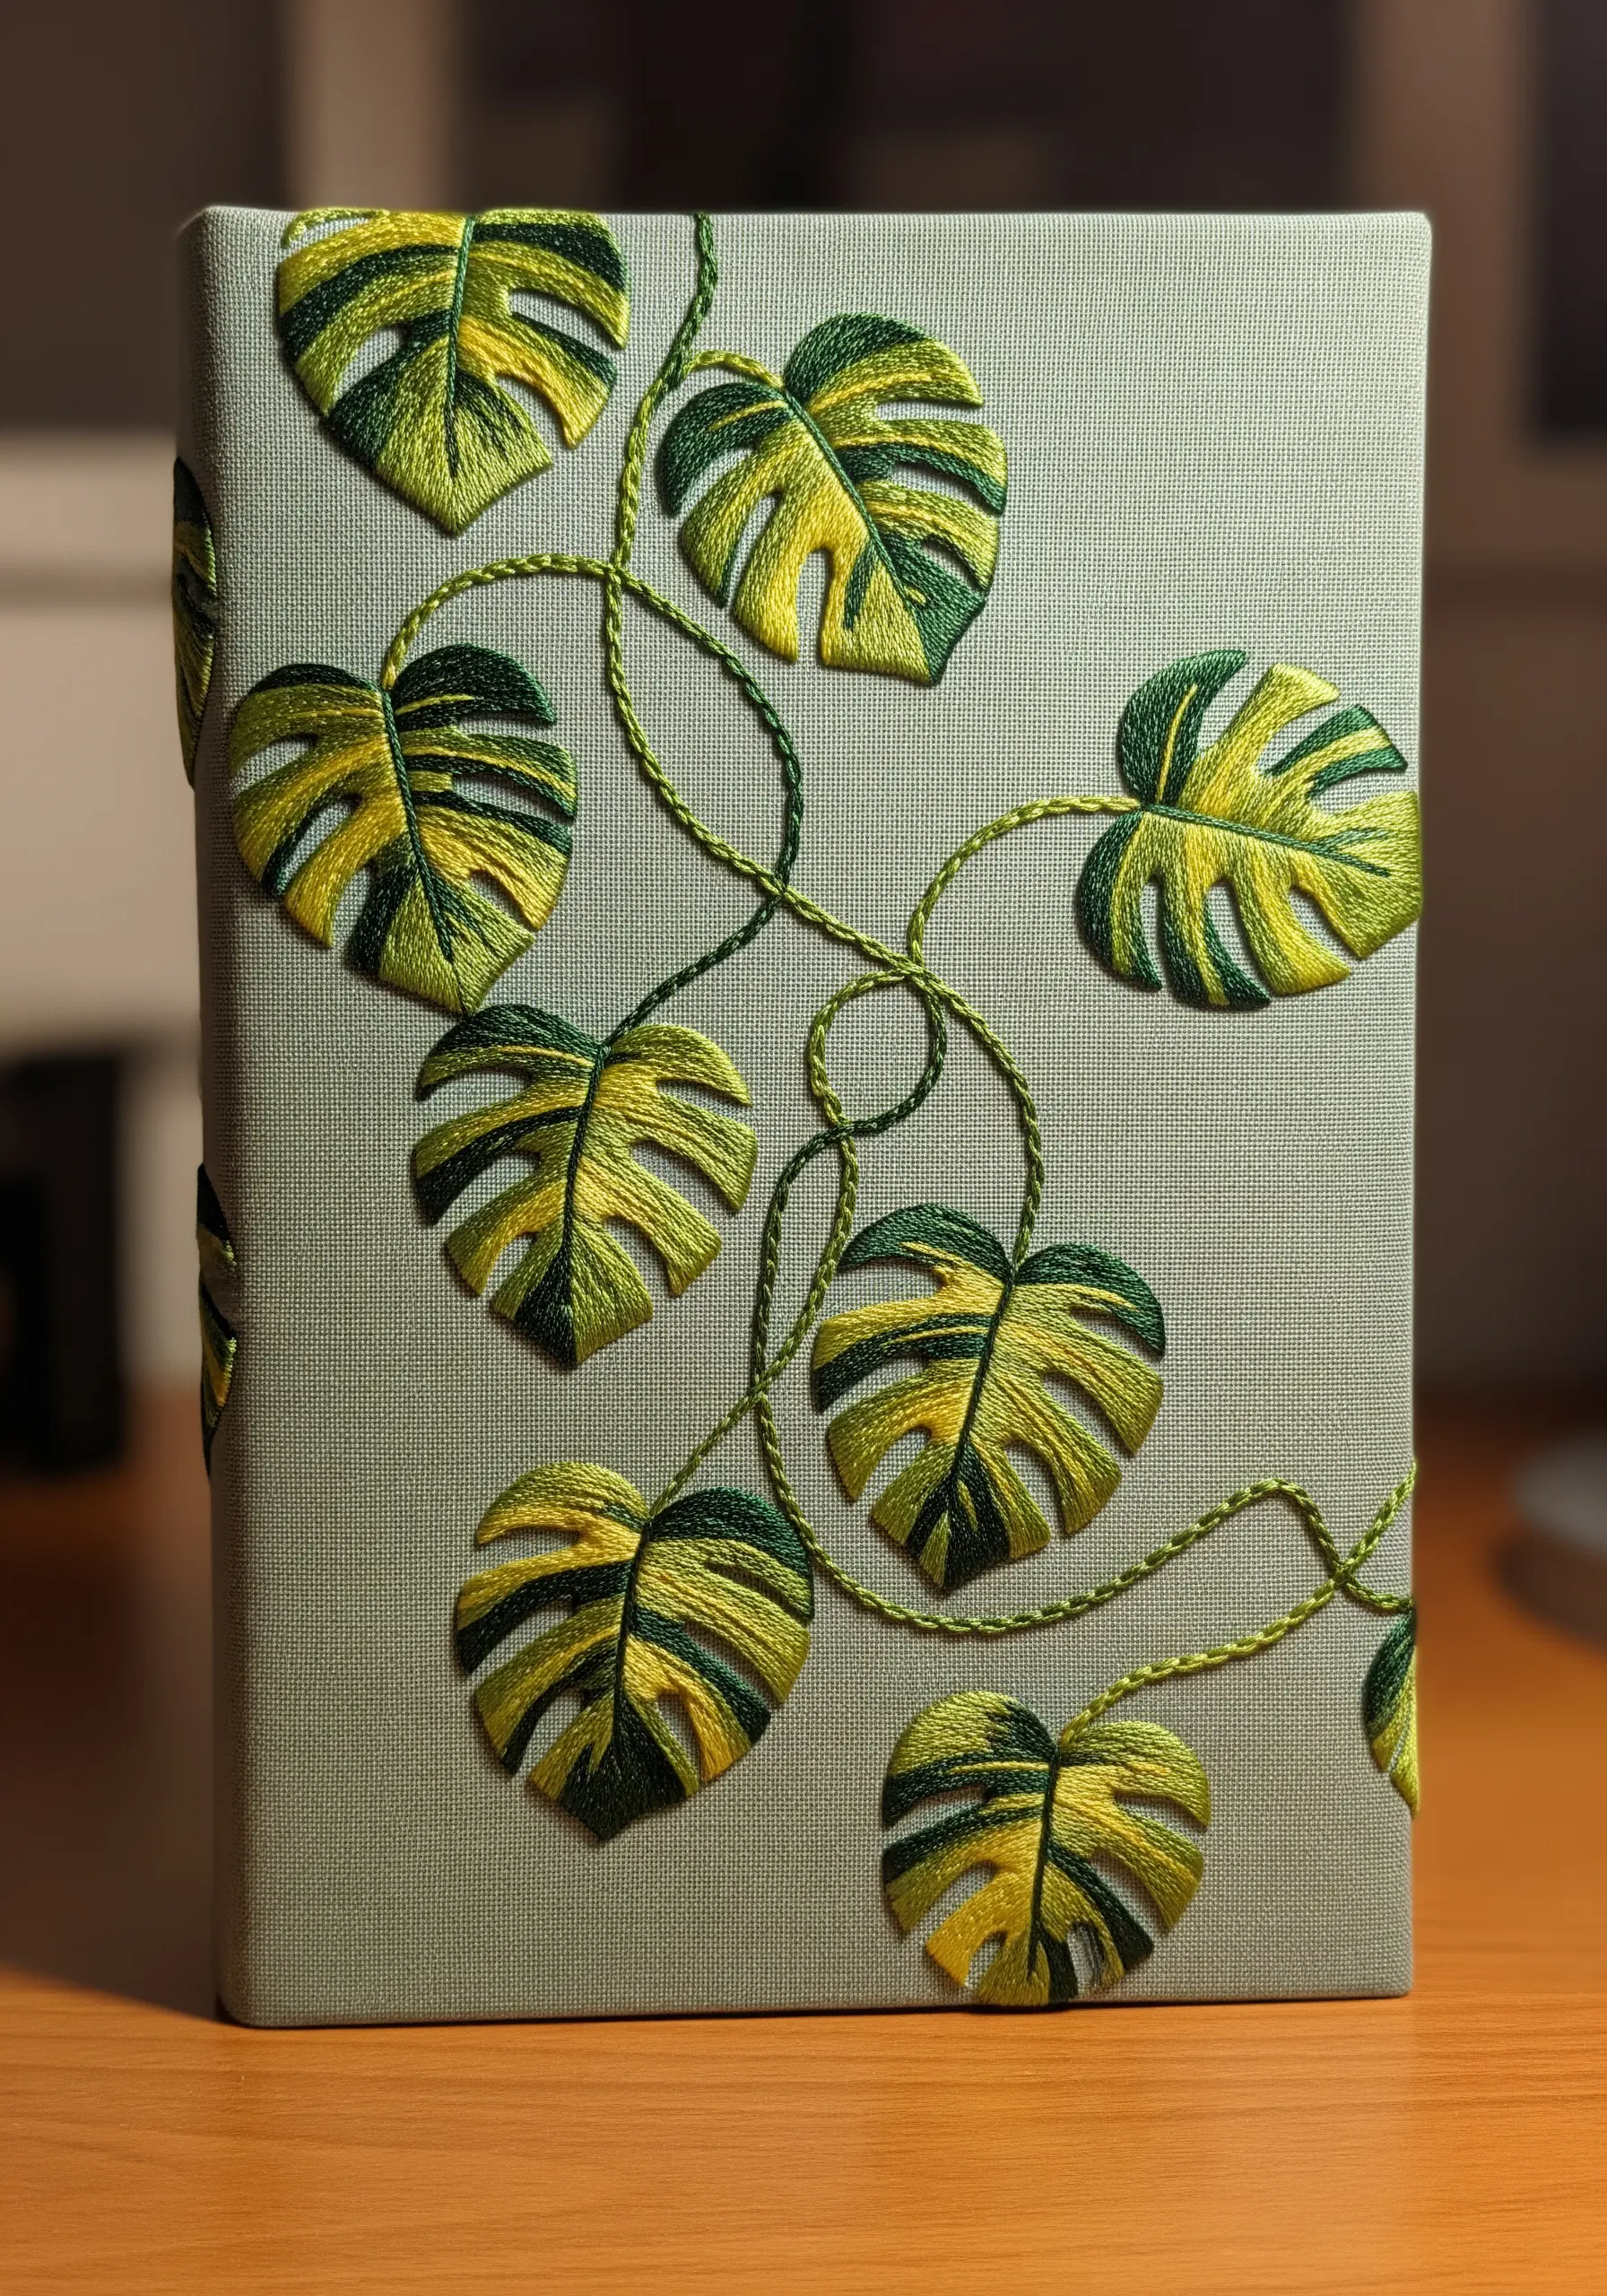
Turn a single leaf motif into a dynamic, flowing composition for projects like journals or book covers.
Using a palette of variegated yellow and green, stitch several small Monstera leaves connected by a wandering vine made from a whipped backstitch or stem stitch.
By rotating each leaf at a slightly different angle, you create a sense of movement and natural, untamed growth.
This approach shows how a simple palette can be used to create complex and engaging patterns across any surface.
14. The Snake Plant on Soft Felt
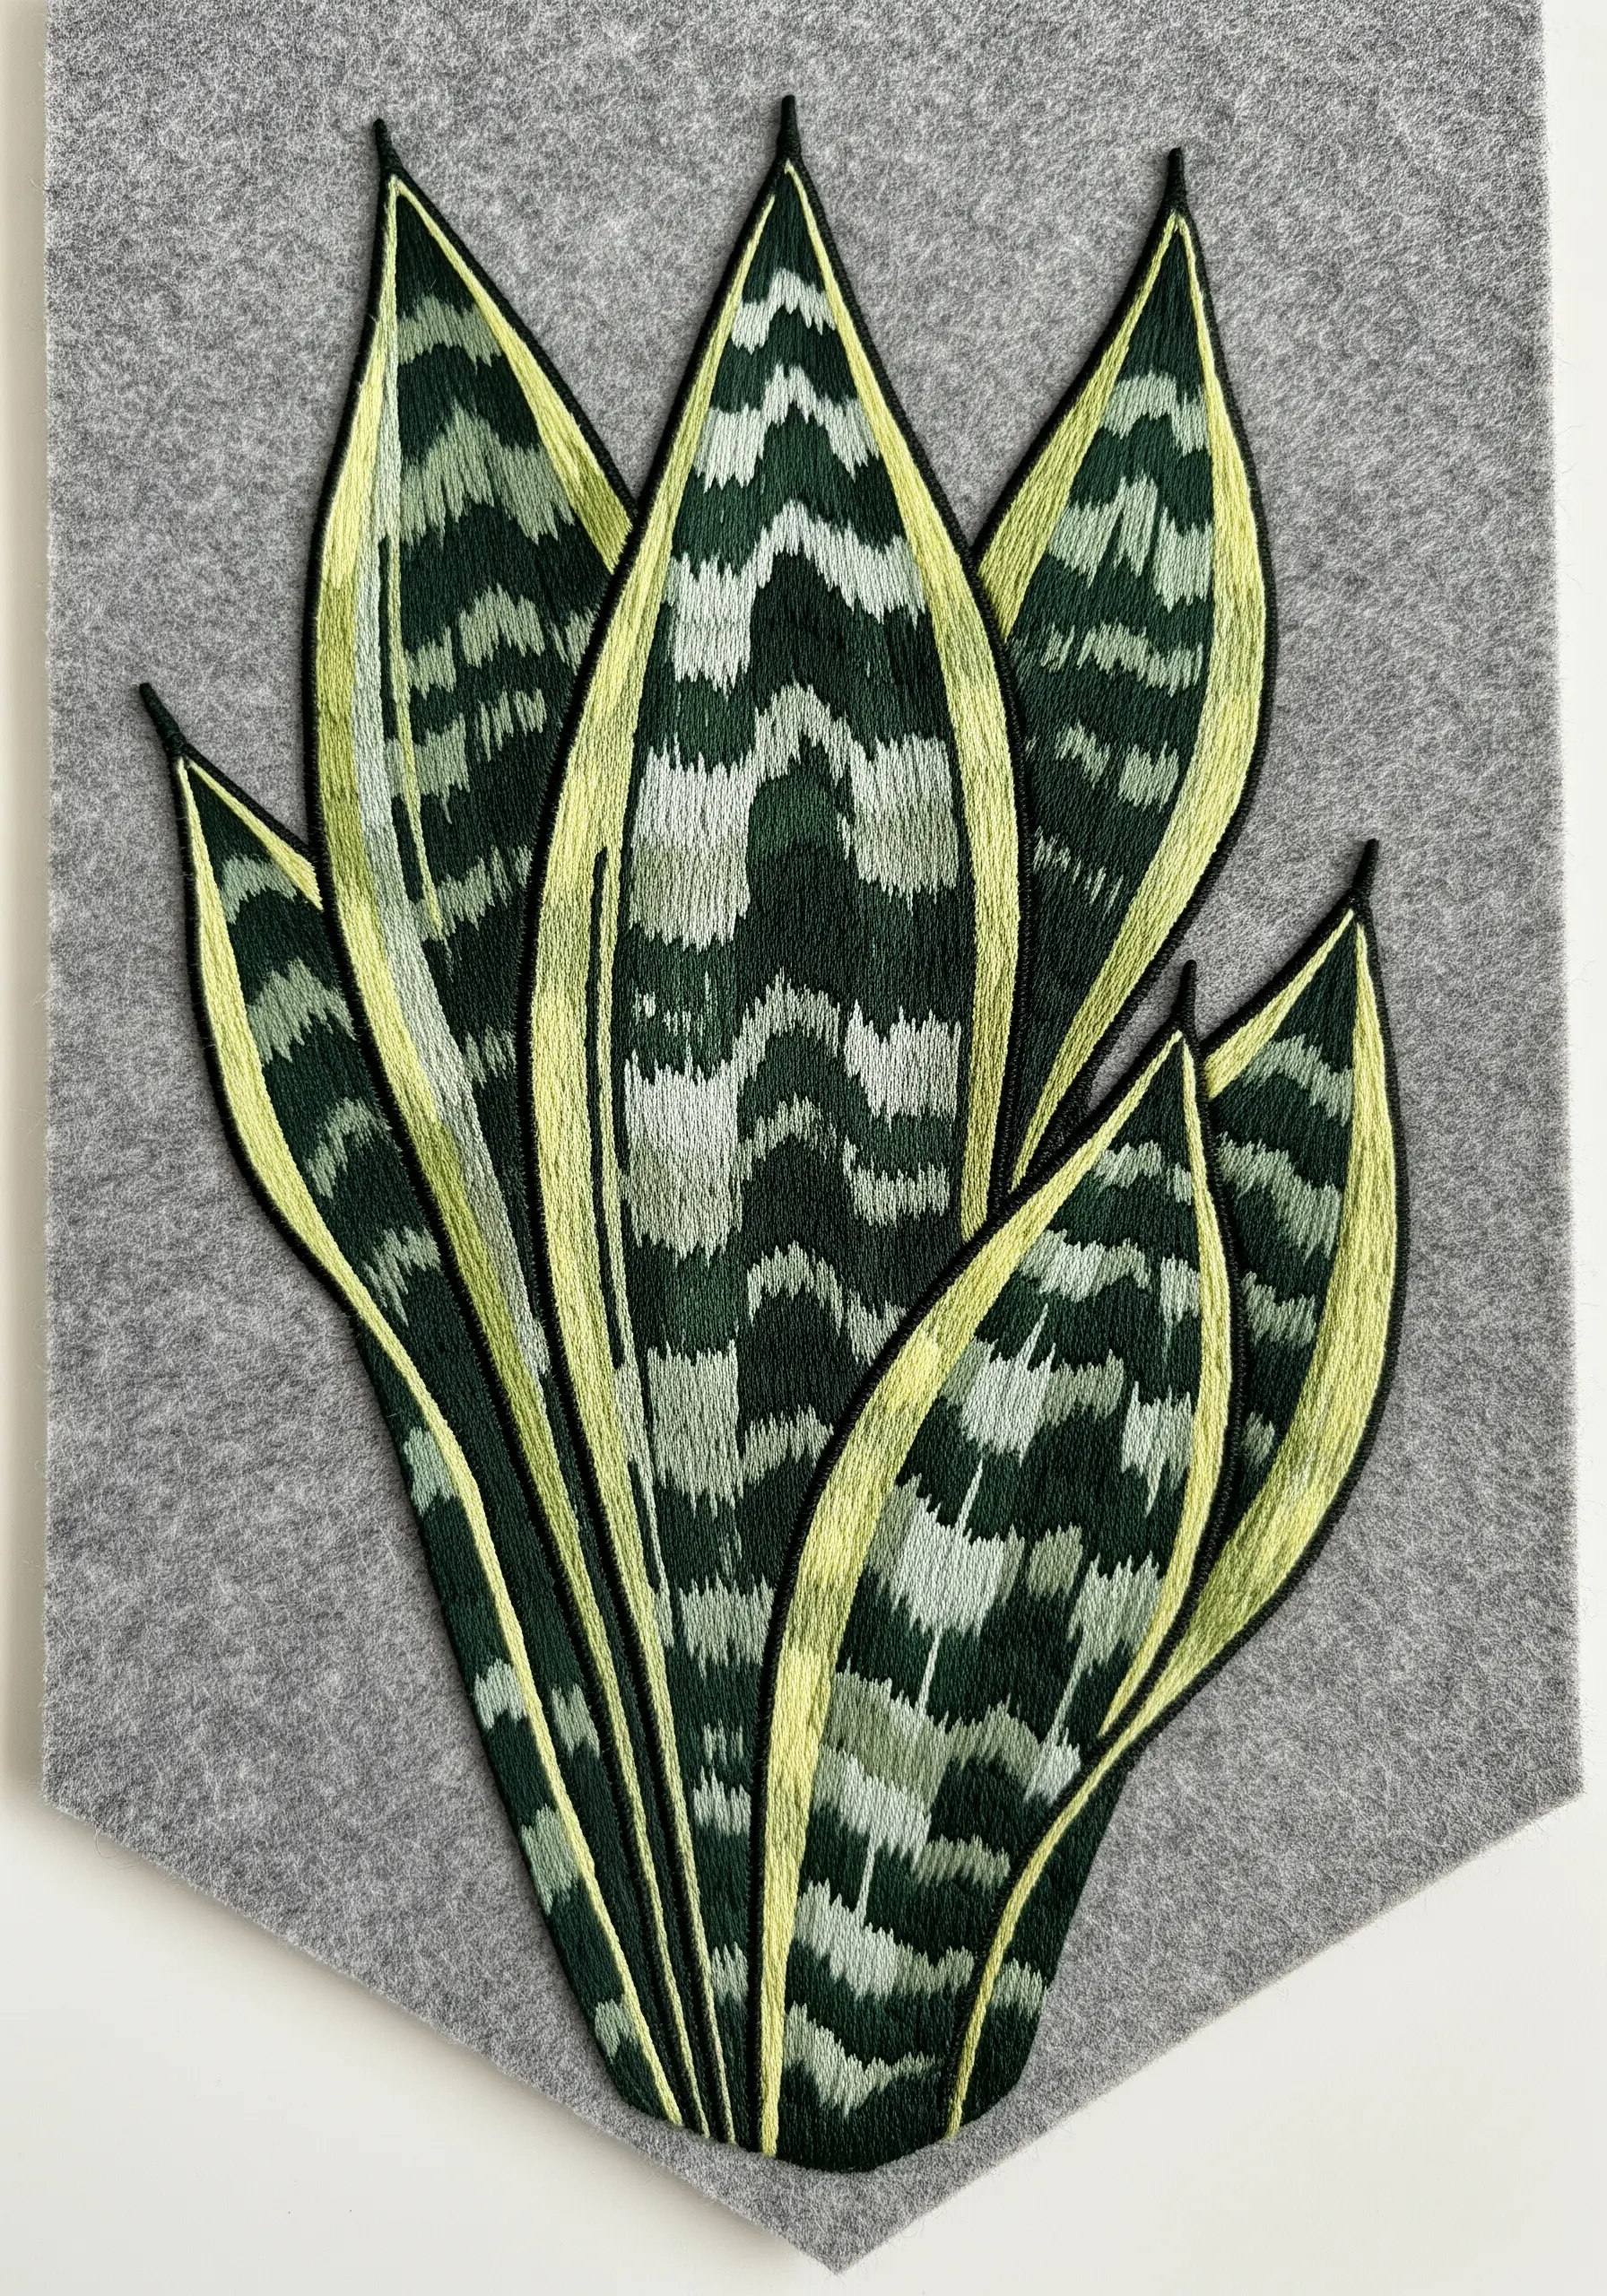
Stitching on felt offers a wonderfully stable and forgiving surface for beginners, and its soft texture complements botanical designs.
For a Snake Plant, use short, vertical satin stitches to create the characteristic mottled pattern, alternating between dark green, grey-green, and off-white.
Instead of aiming for perfect blending, let the colors form rough, zig-zagging bands. Finish with a sharp lime-green border to define the shape.
The felt’s matte finish absorbs light, making the thread’s sheen stand out beautifully.
15. The Prayer Plant’s Shocking Pink Veins
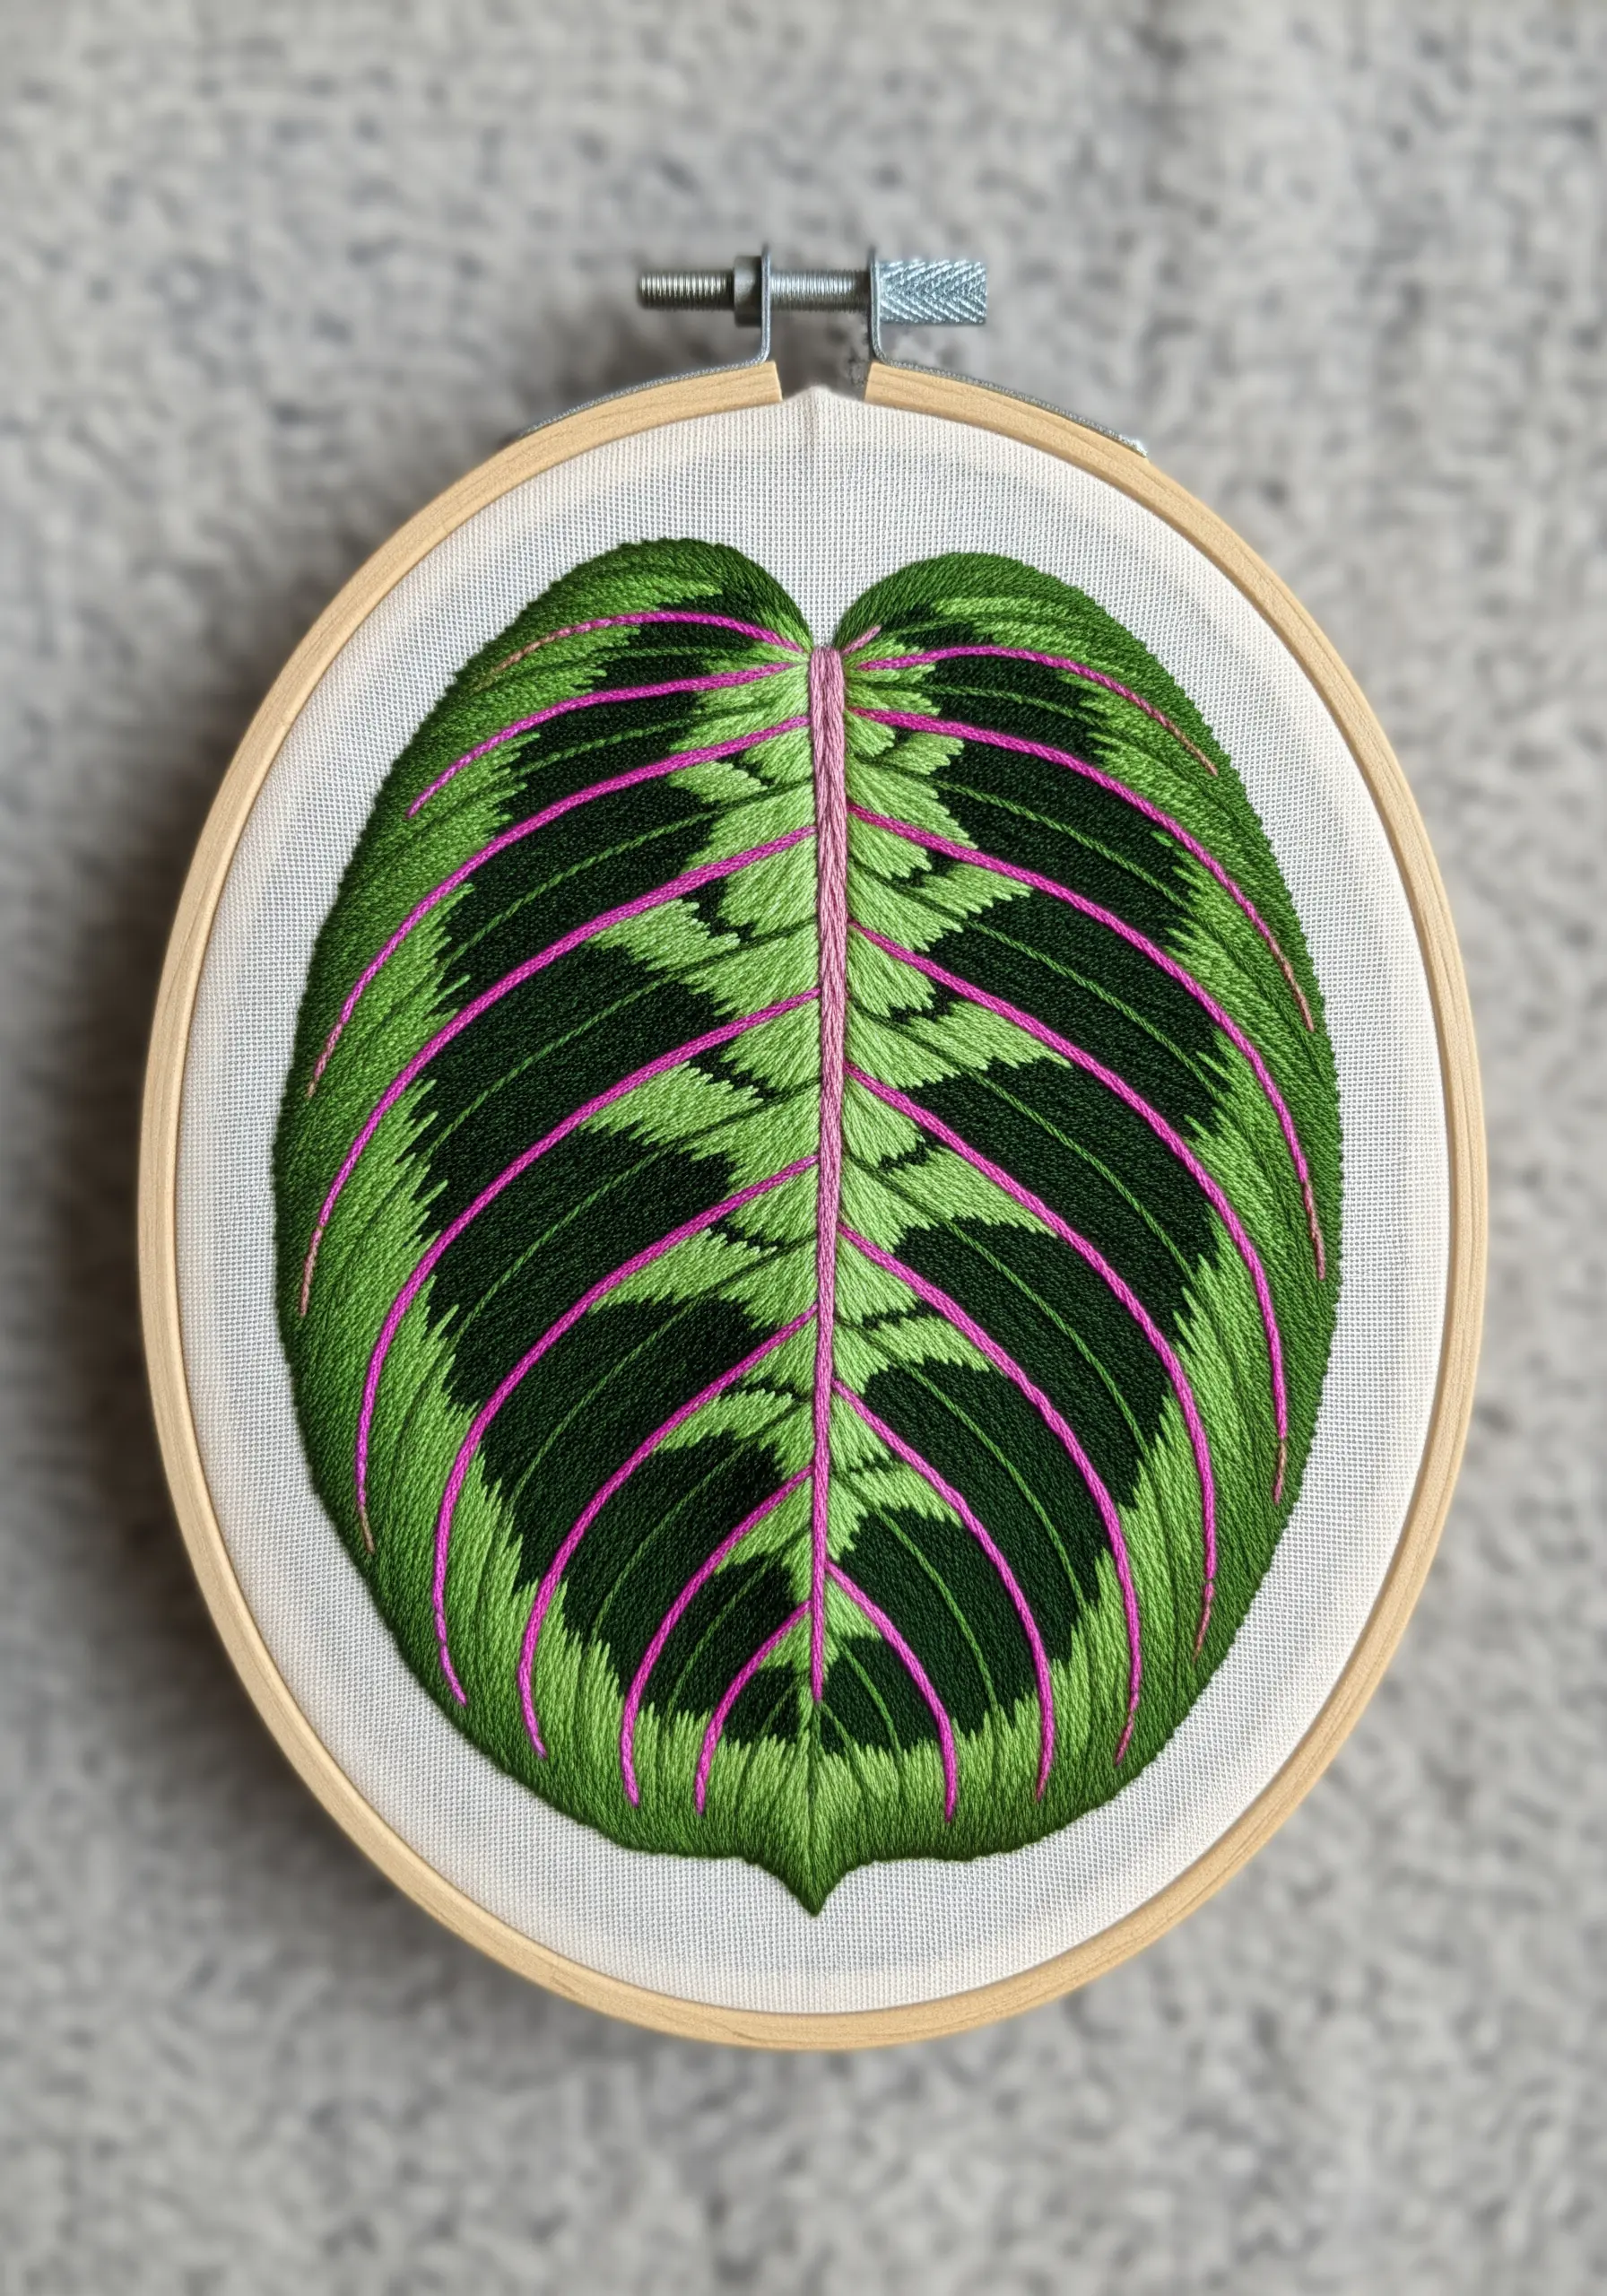
Draw attention to a plant’s most unique feature with a single, bold pop of color.
On the Maranta, or Prayer Plant, the herringbone pattern is striking, but the magenta veins are the true showstopper.
Fill the leaves with soft, blended greens using a fishbone stitch. Then, add the veins *on top* with a vibrant pink stem stitch.
This layering technique ensures the veins sit prominently on the surface, creating a crisp, graphic contrast that makes the entire design sing.
16. The Moody and Textural Japanese Maple
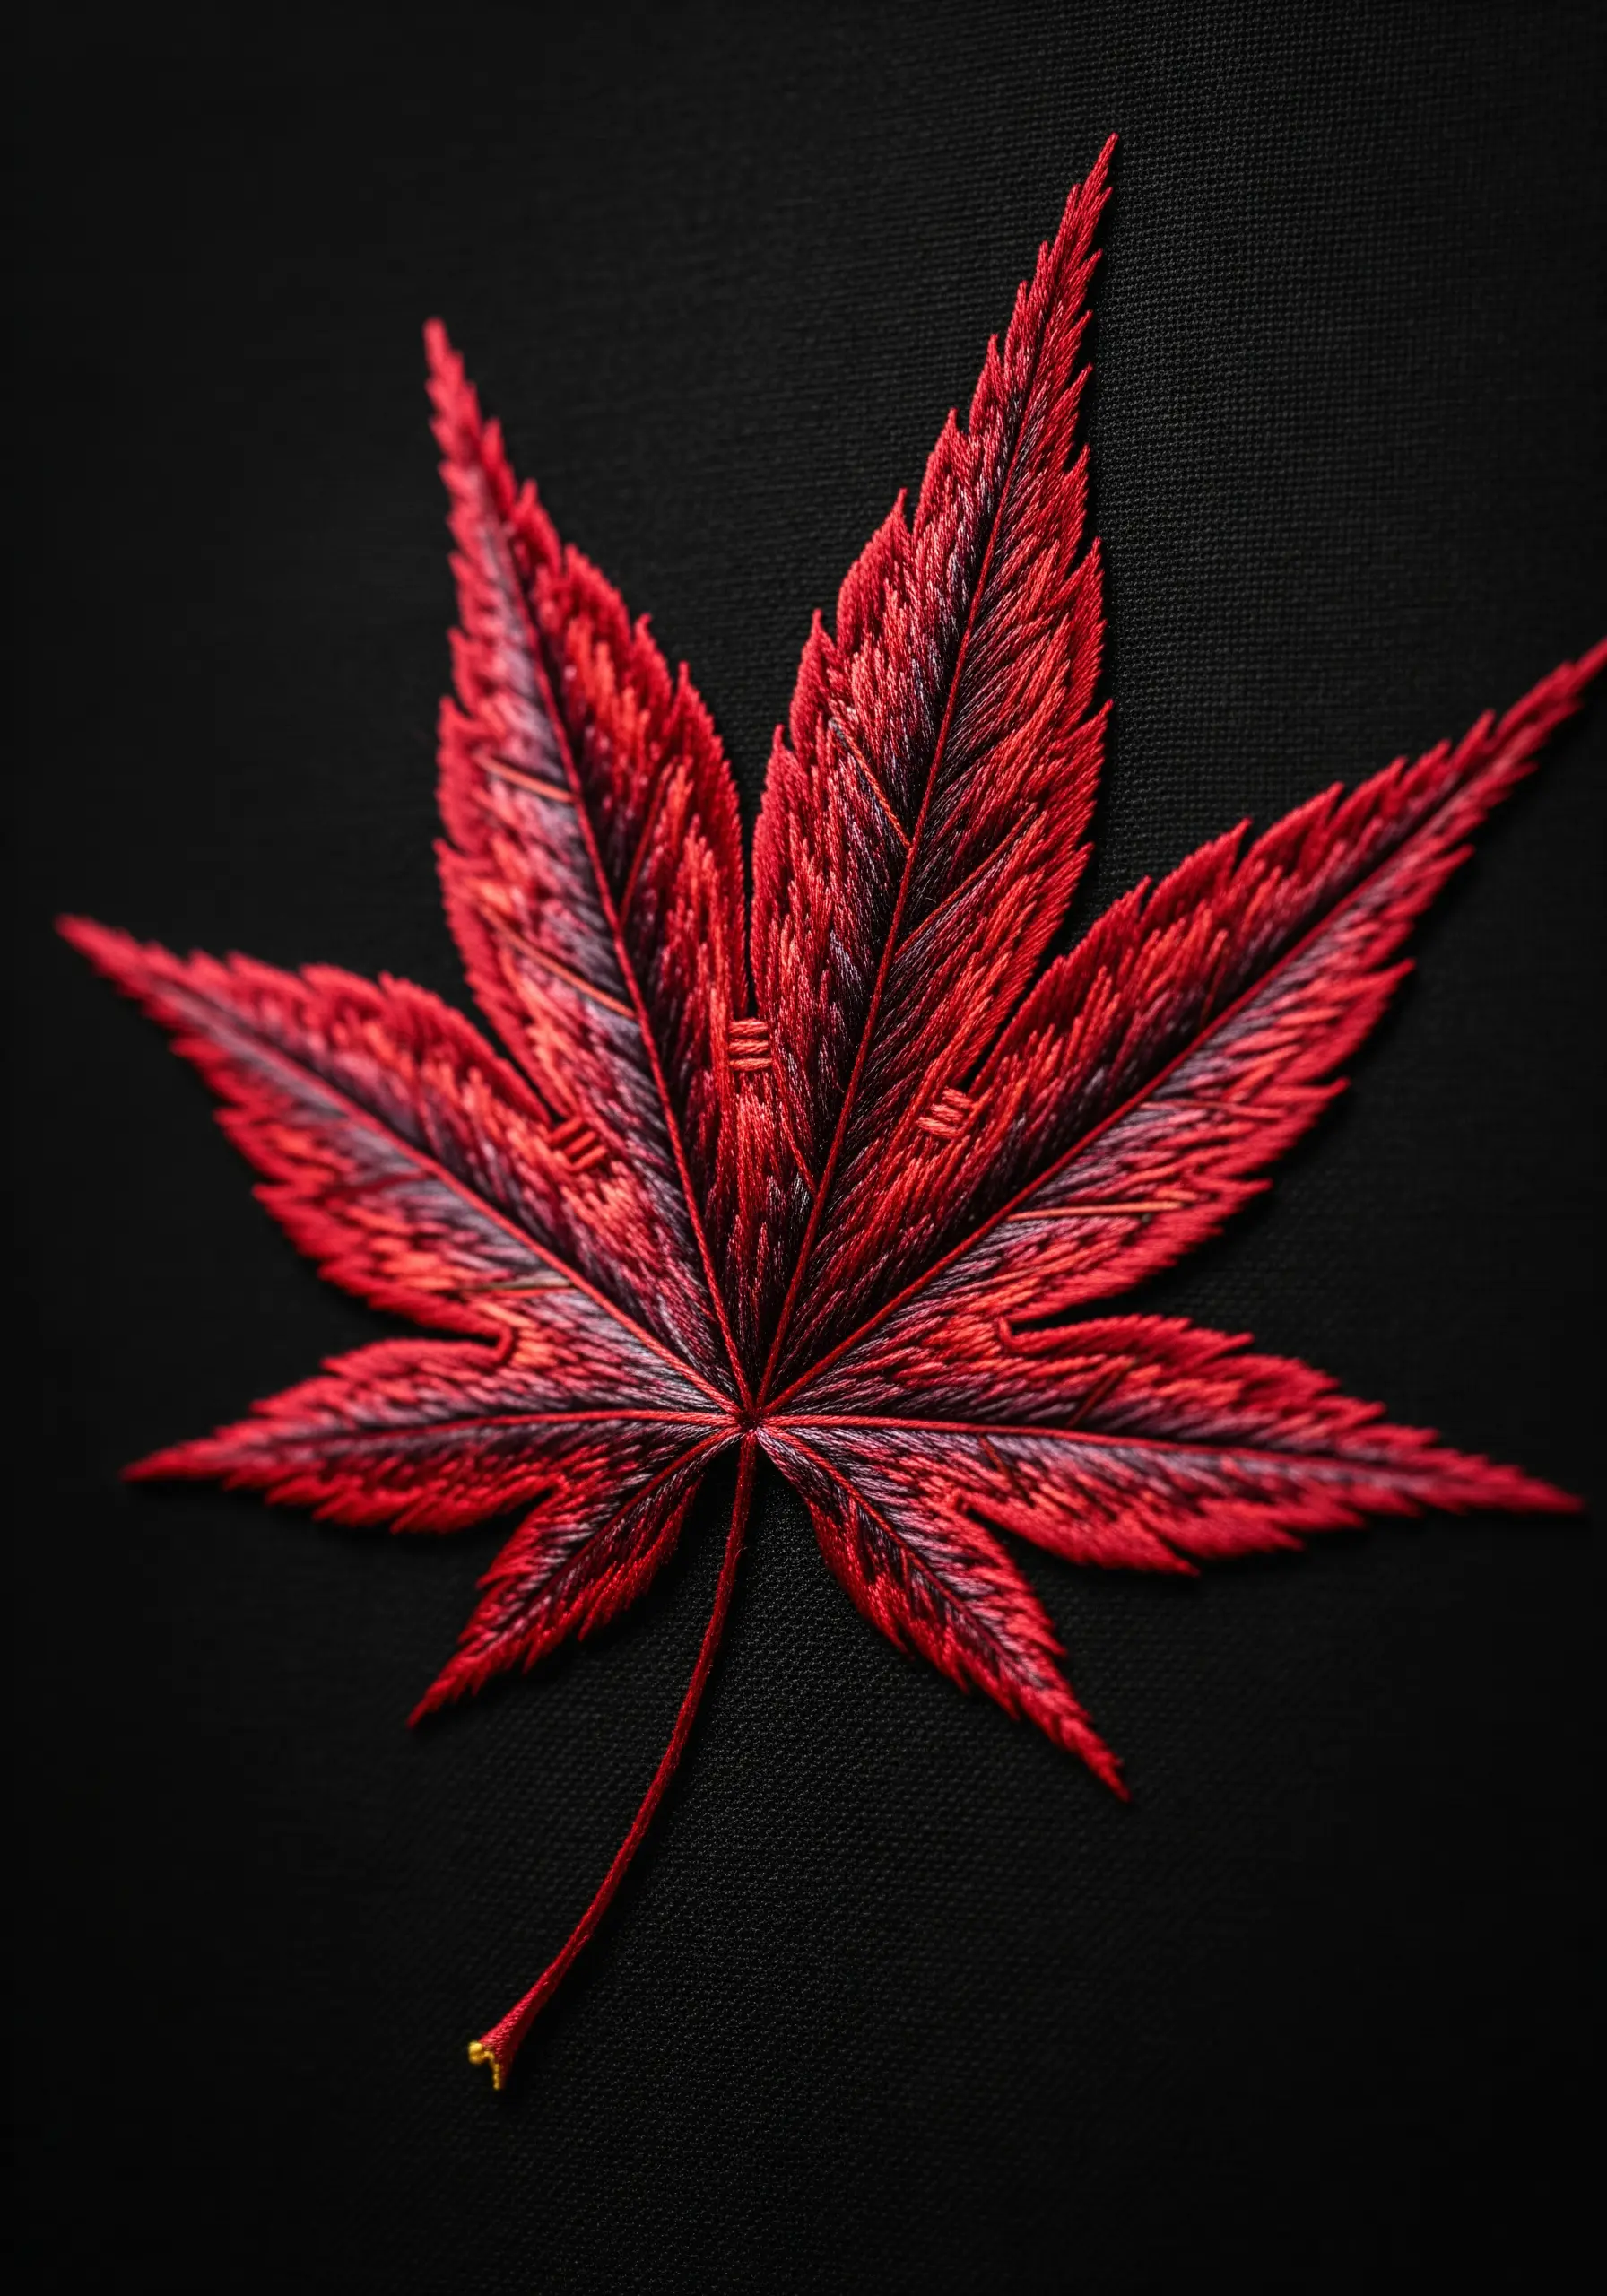
Create a sense of drama and depth by pairing a dark, tonal palette with rich texture.
For this Japanese Maple, use a palette of deep crimson, claret, and hints of black on a dark fabric background.
Instead of smooth satin stitch, fill the leaf with dense, overlapping straight stitches or seed stitches running in multiple directions.
This technique breaks up the surface, creating a complex texture that captures light in interesting ways and gives the leaf a velvety, almost brooding appearance.
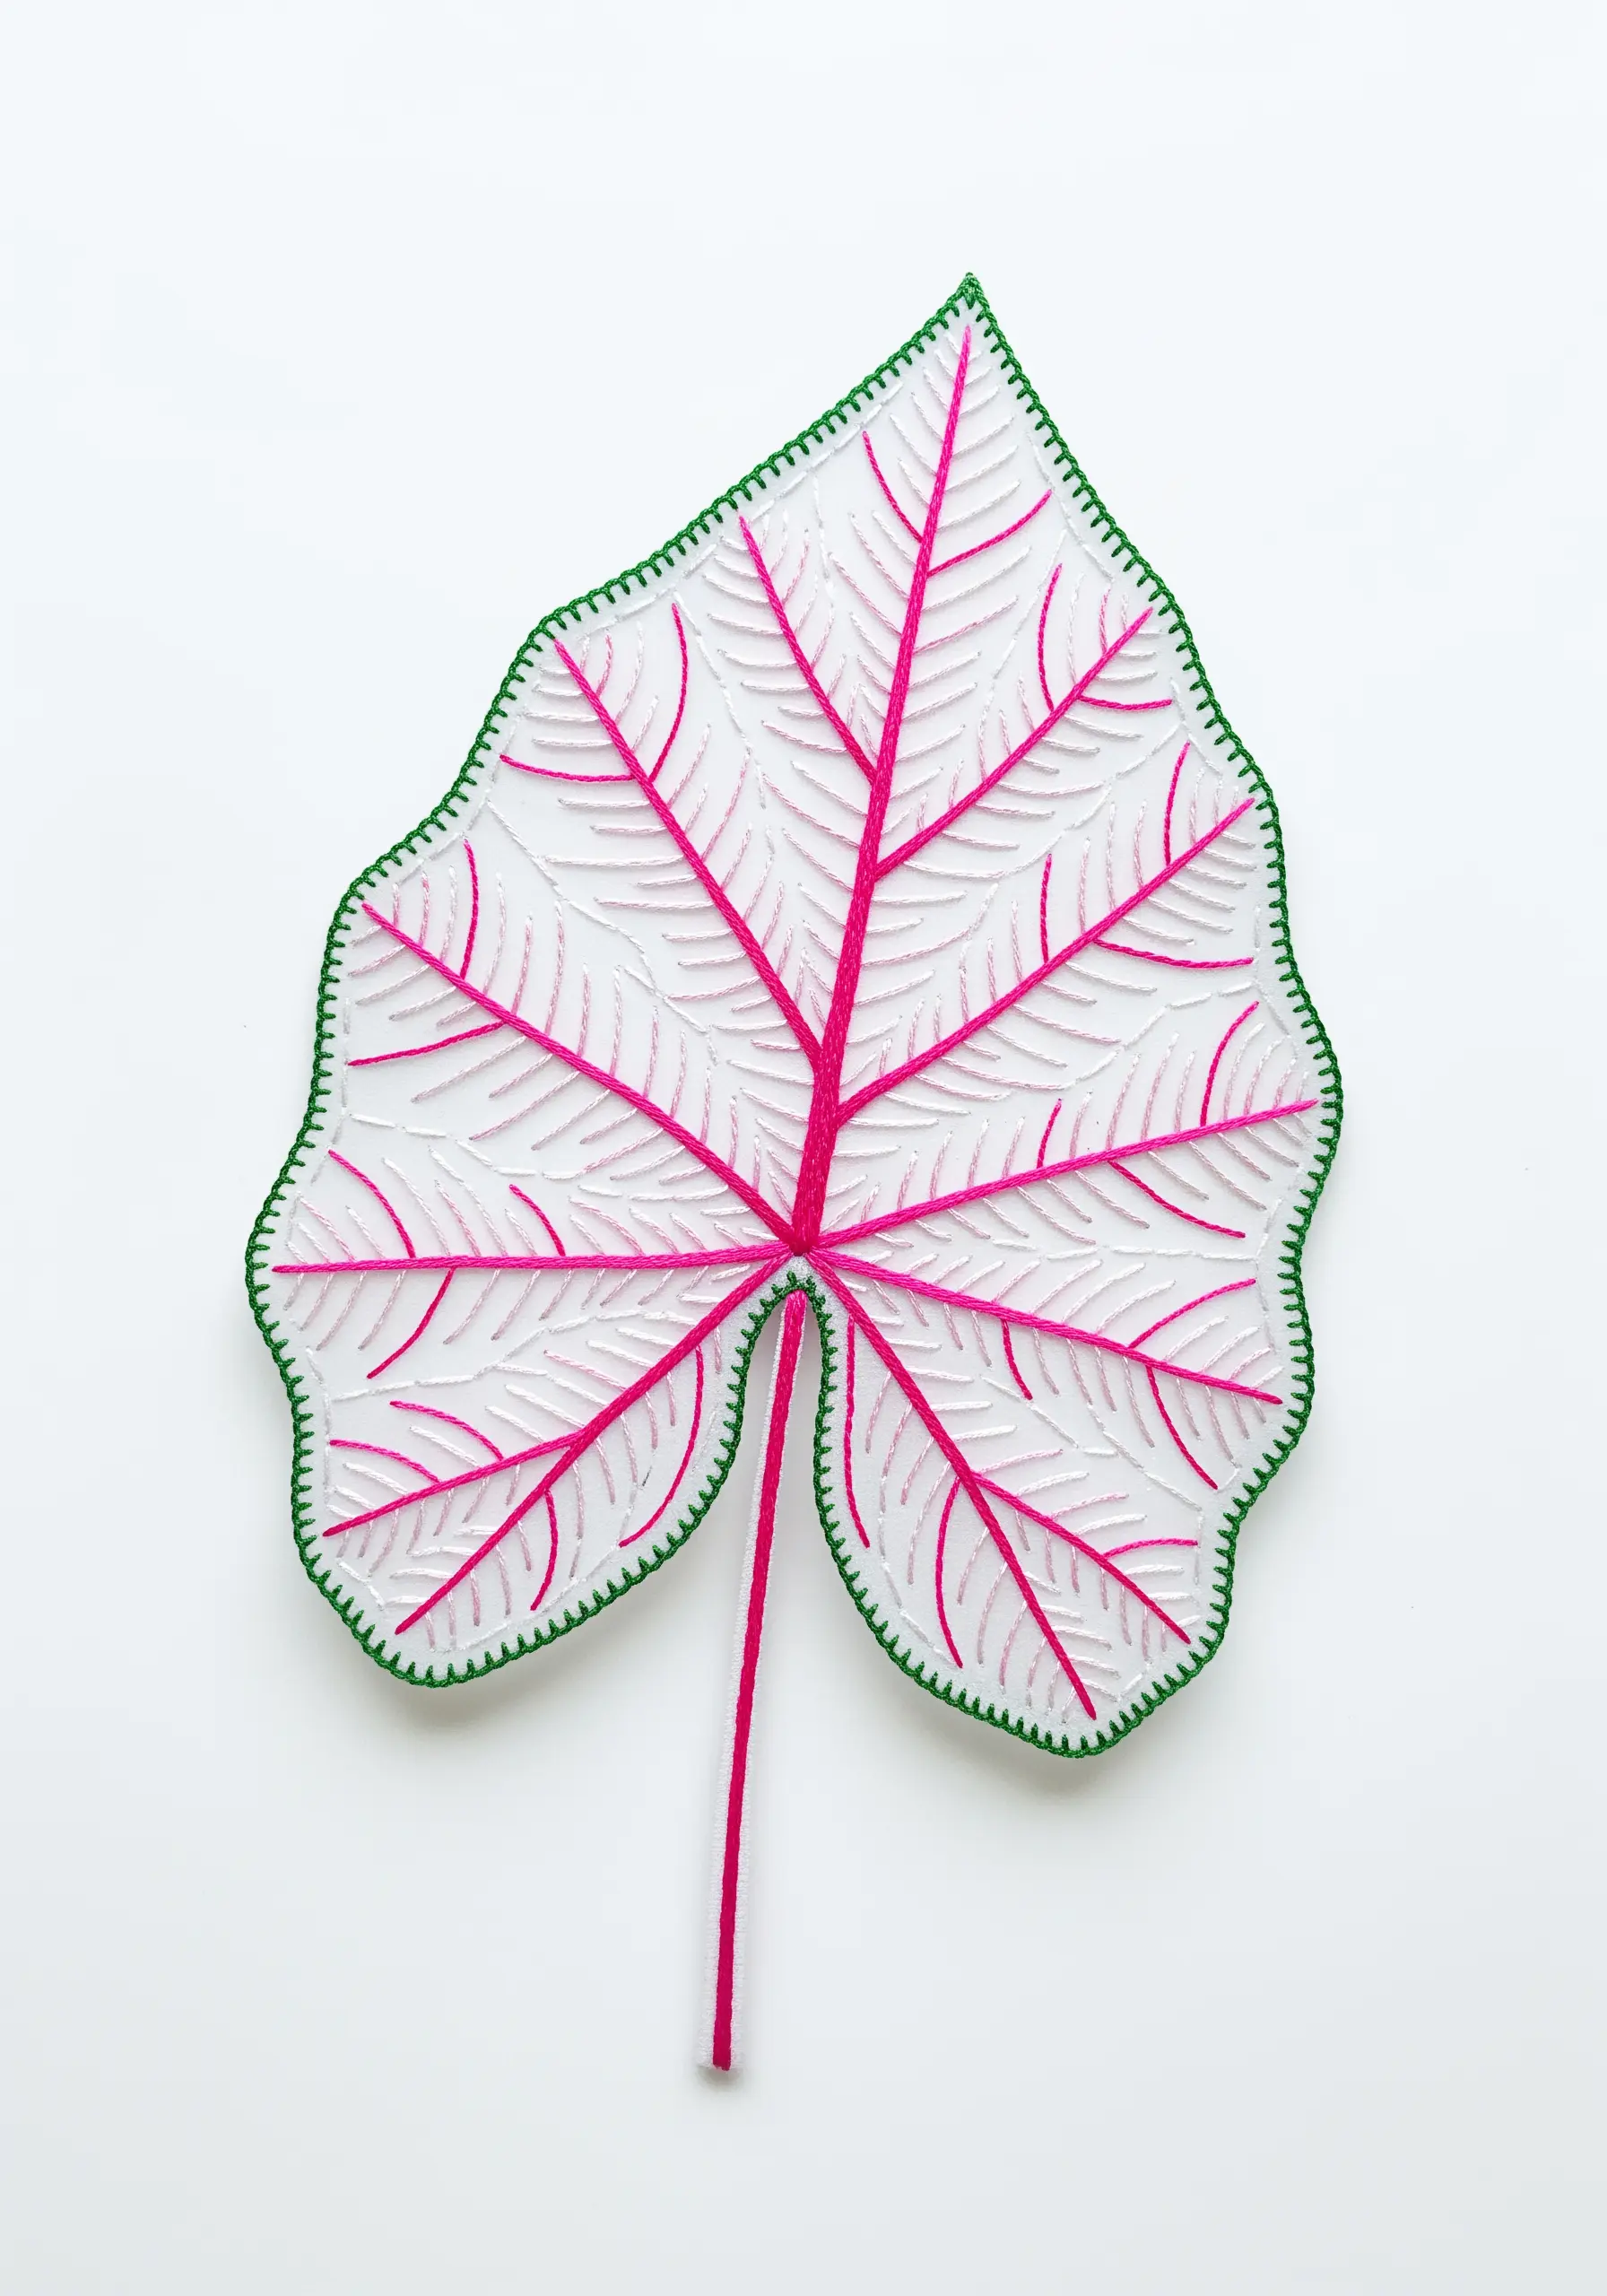
17. The Sculptural Alocasia Outline
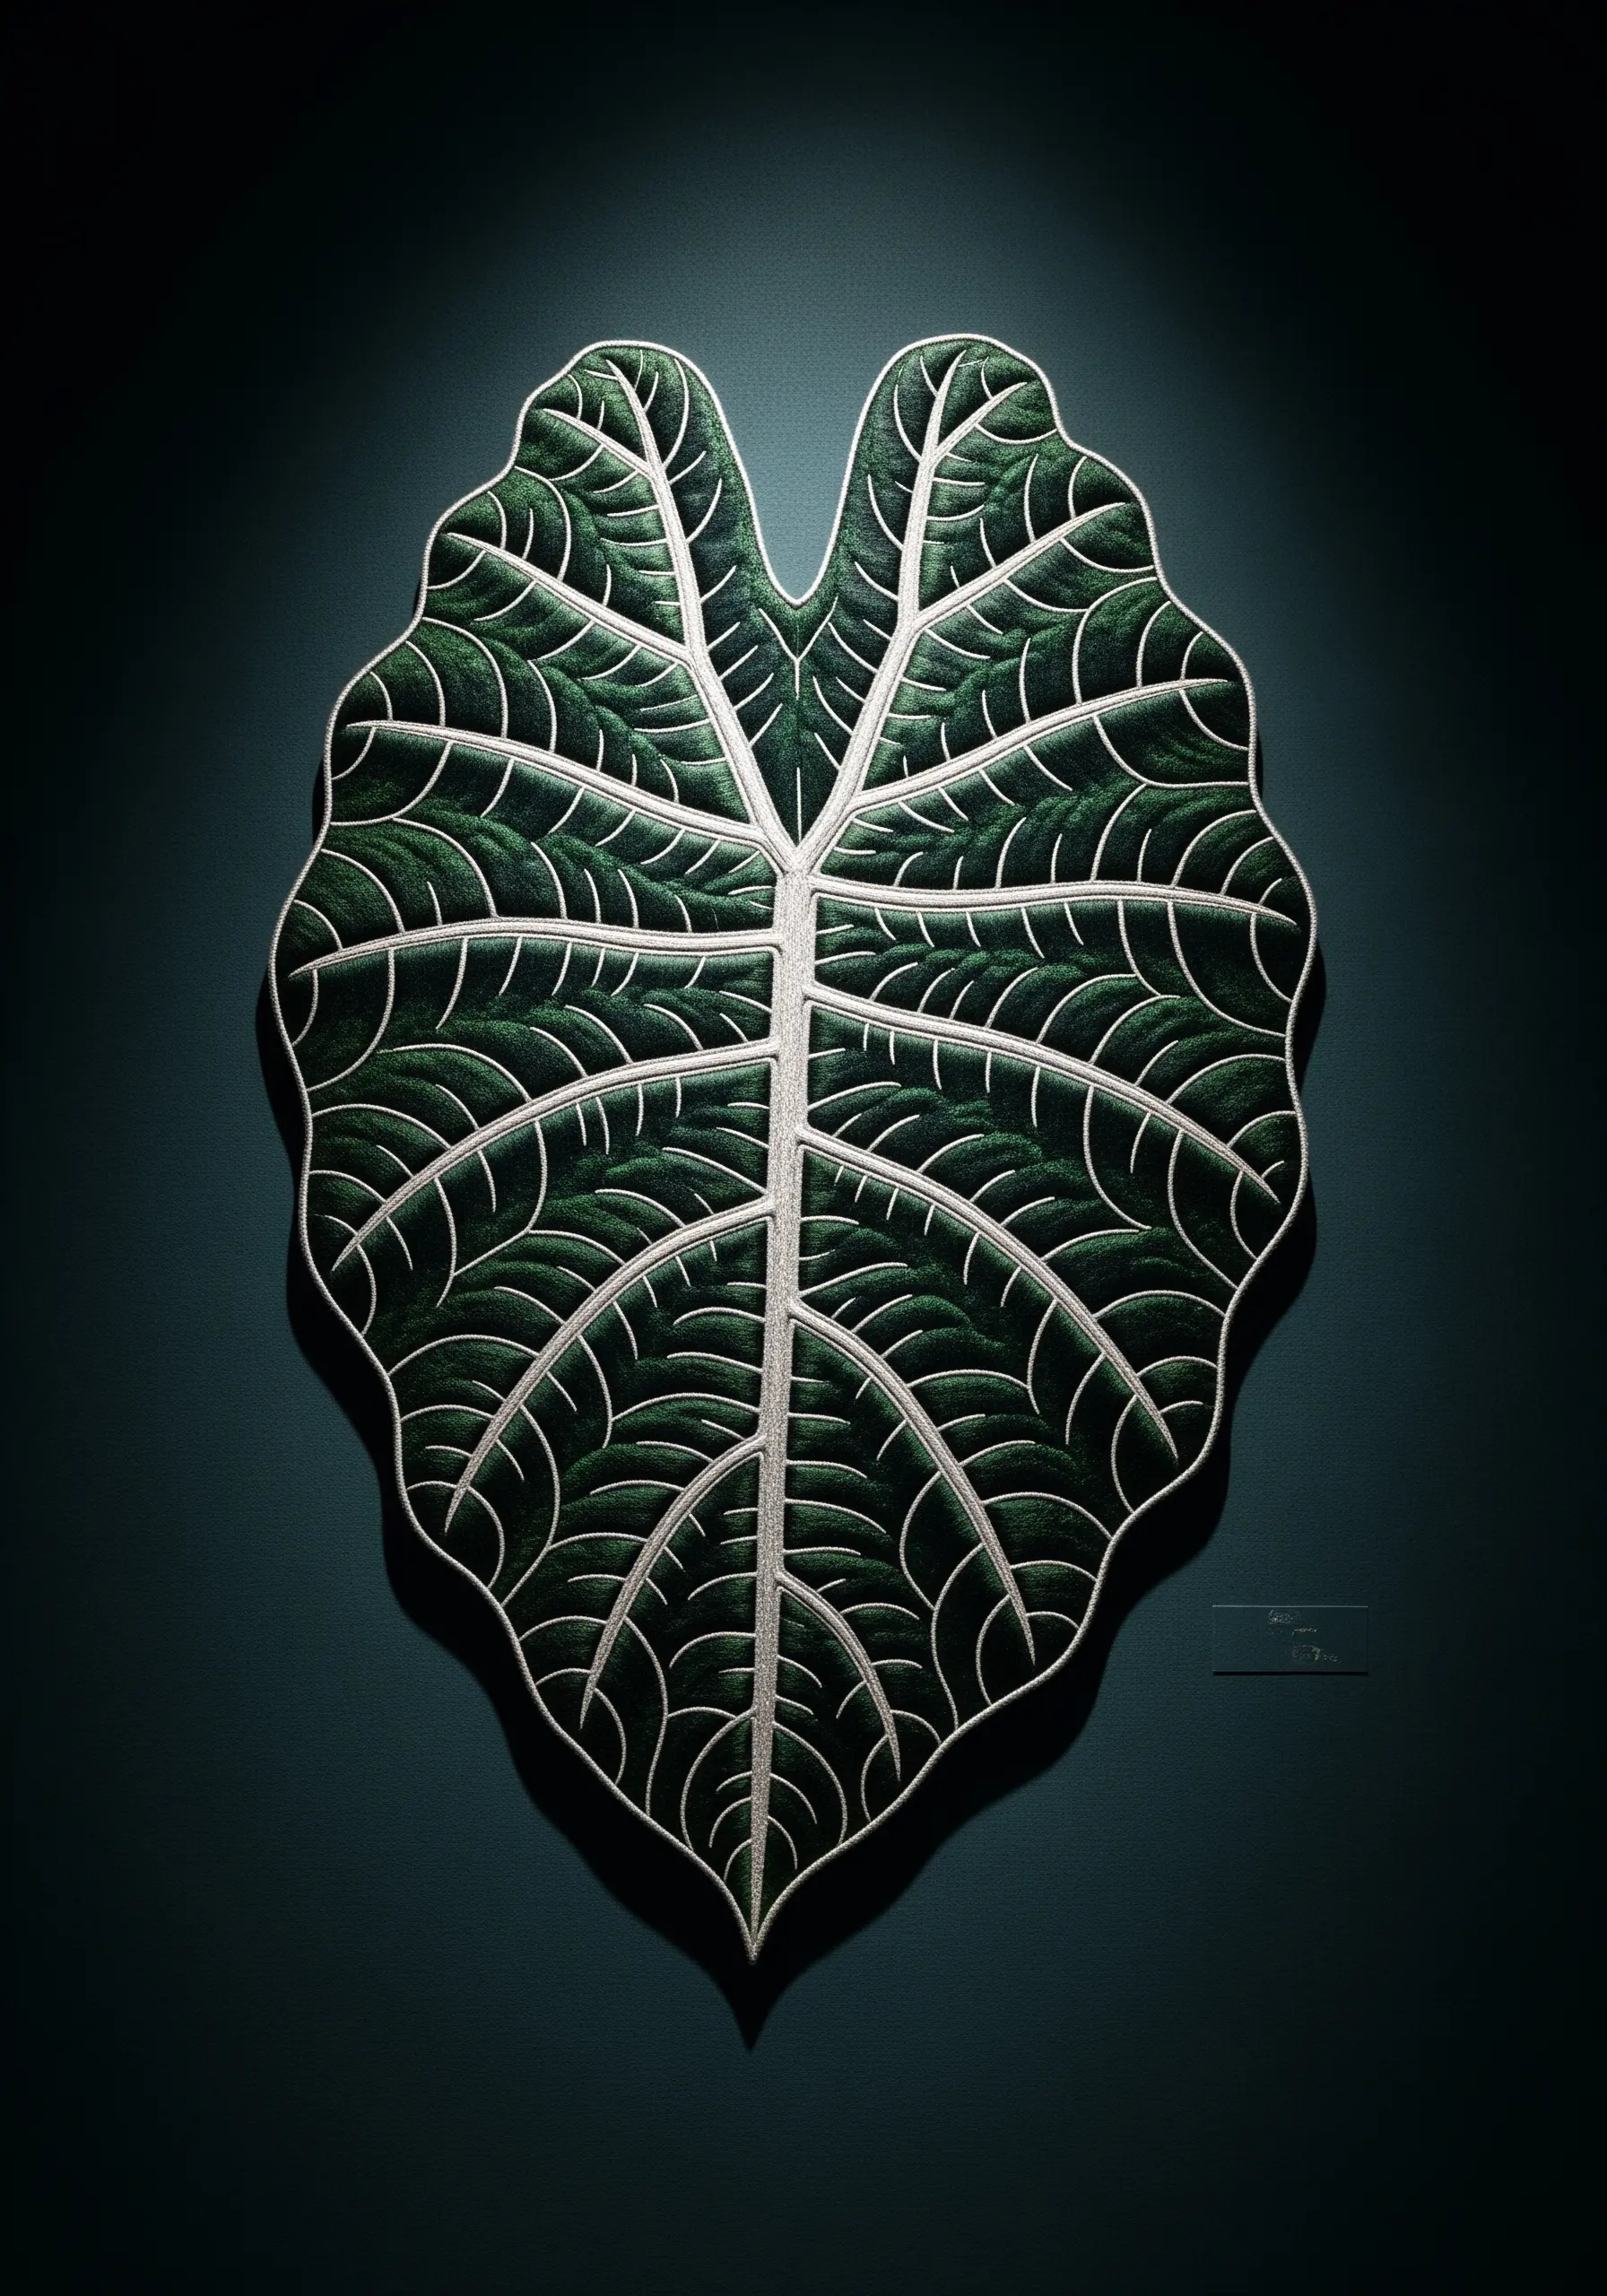
Sometimes, what you *don’t* stitch is as important as what you do. This Alocasia focuses on the striking white veins rather than the leaf itself.
Use a deep, almost-black green for the leaf fill, keeping the satin stitches uniform and dense to create a smooth, dark canvas.
For the veins, use a whipped backstitch in a contrasting silver-grey or off-white thread. This stitch creates a perfectly smooth, raised line that looks incredibly clean and structural.
The result is a design that feels both botanical and architectural.
18. The Translucent White Caladium
Stitching a white leaf presents a unique challenge: how to give it form without color. The answer lies in subtle shading and a single accent hue.
Use an off-white or very light silver thread for the body of the leaf, adding texture with directional satin stitches or even tiny seed stitches.
The bright magenta veins, stitched with a simple backstitch, provide the structure and shape, making the white areas feel intentional and delicate.
A fine green border anchors the design, preventing the white leaf from disappearing into a light background.
19. The Playful 3D String of Pearls
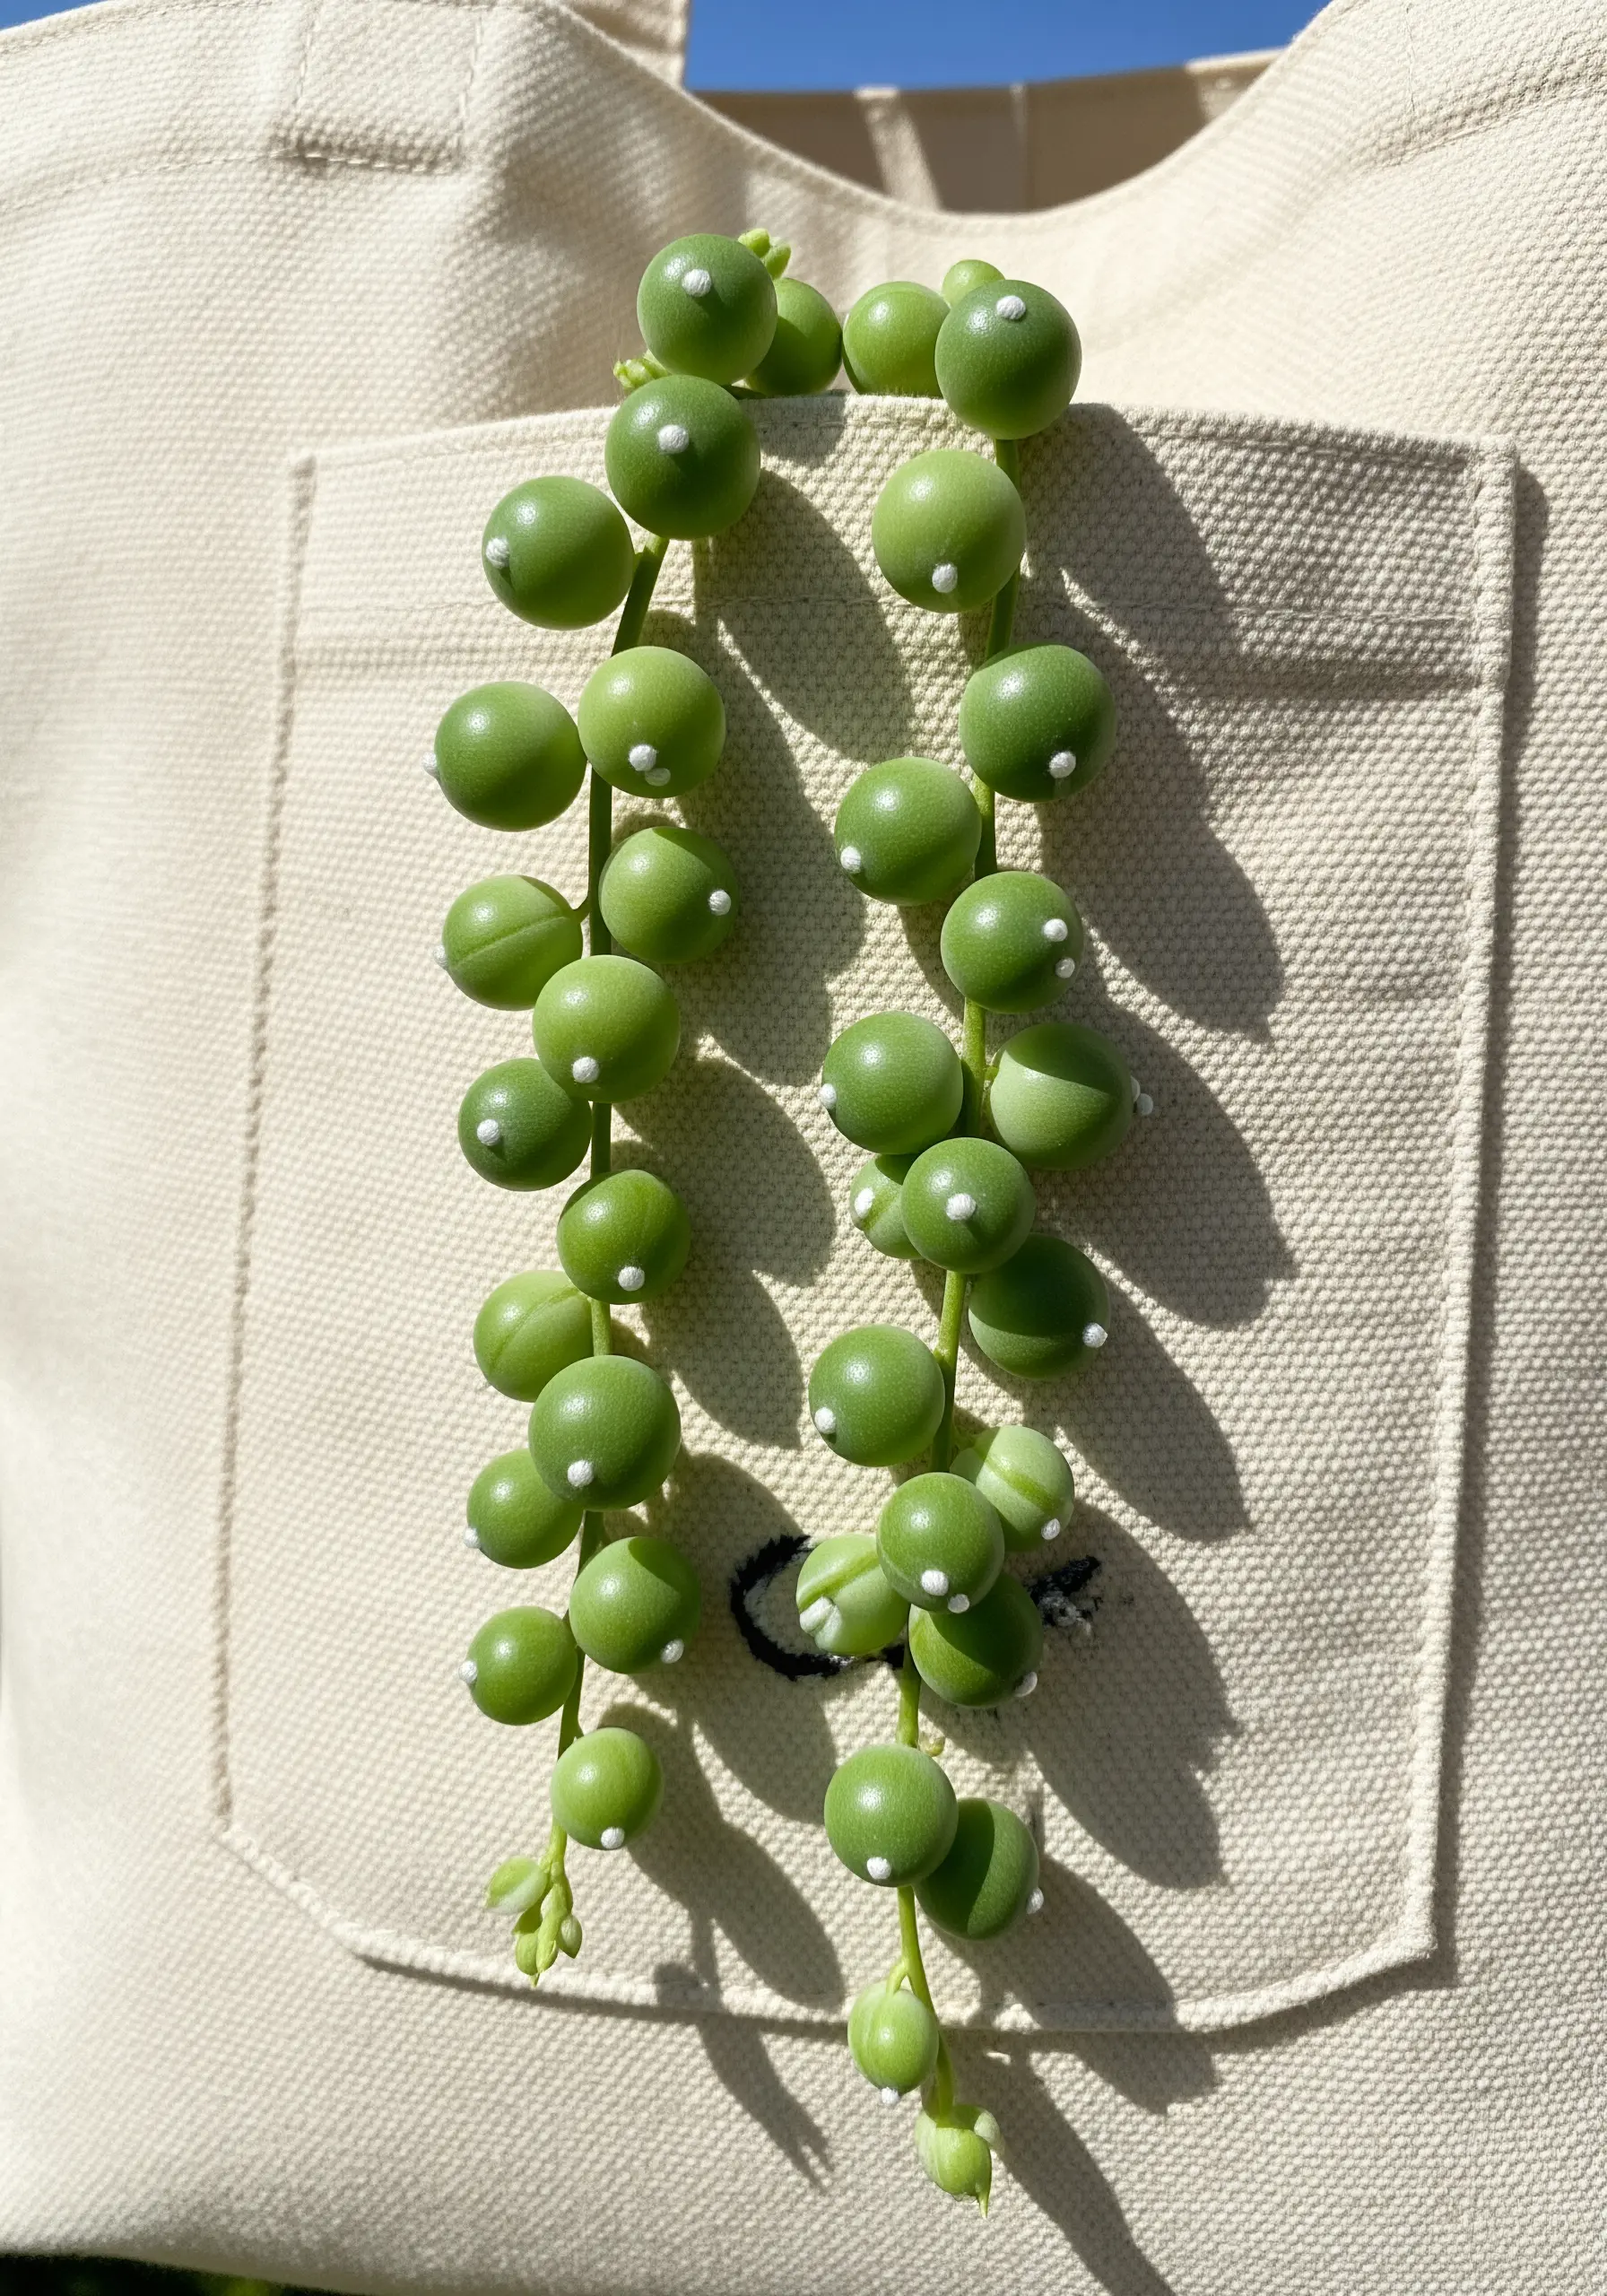
Take your botanical embroidery off the fabric with a fun, three-dimensional technique perfect for a String of Pearls plant.
Create each ‘pearl’ using padded satin stitch or by tightly wrapping thread around a small wooden bead to create a perfect sphere.
A simple palette of bright, pea green is all you need, as the realism comes from the form, not the color complexity.
This is a wonderfully playful technique to add a surprising and tactile element to tote bags, clothing, or fun embroidery accents.
20. The Pink Princess Philodendron for Apparel
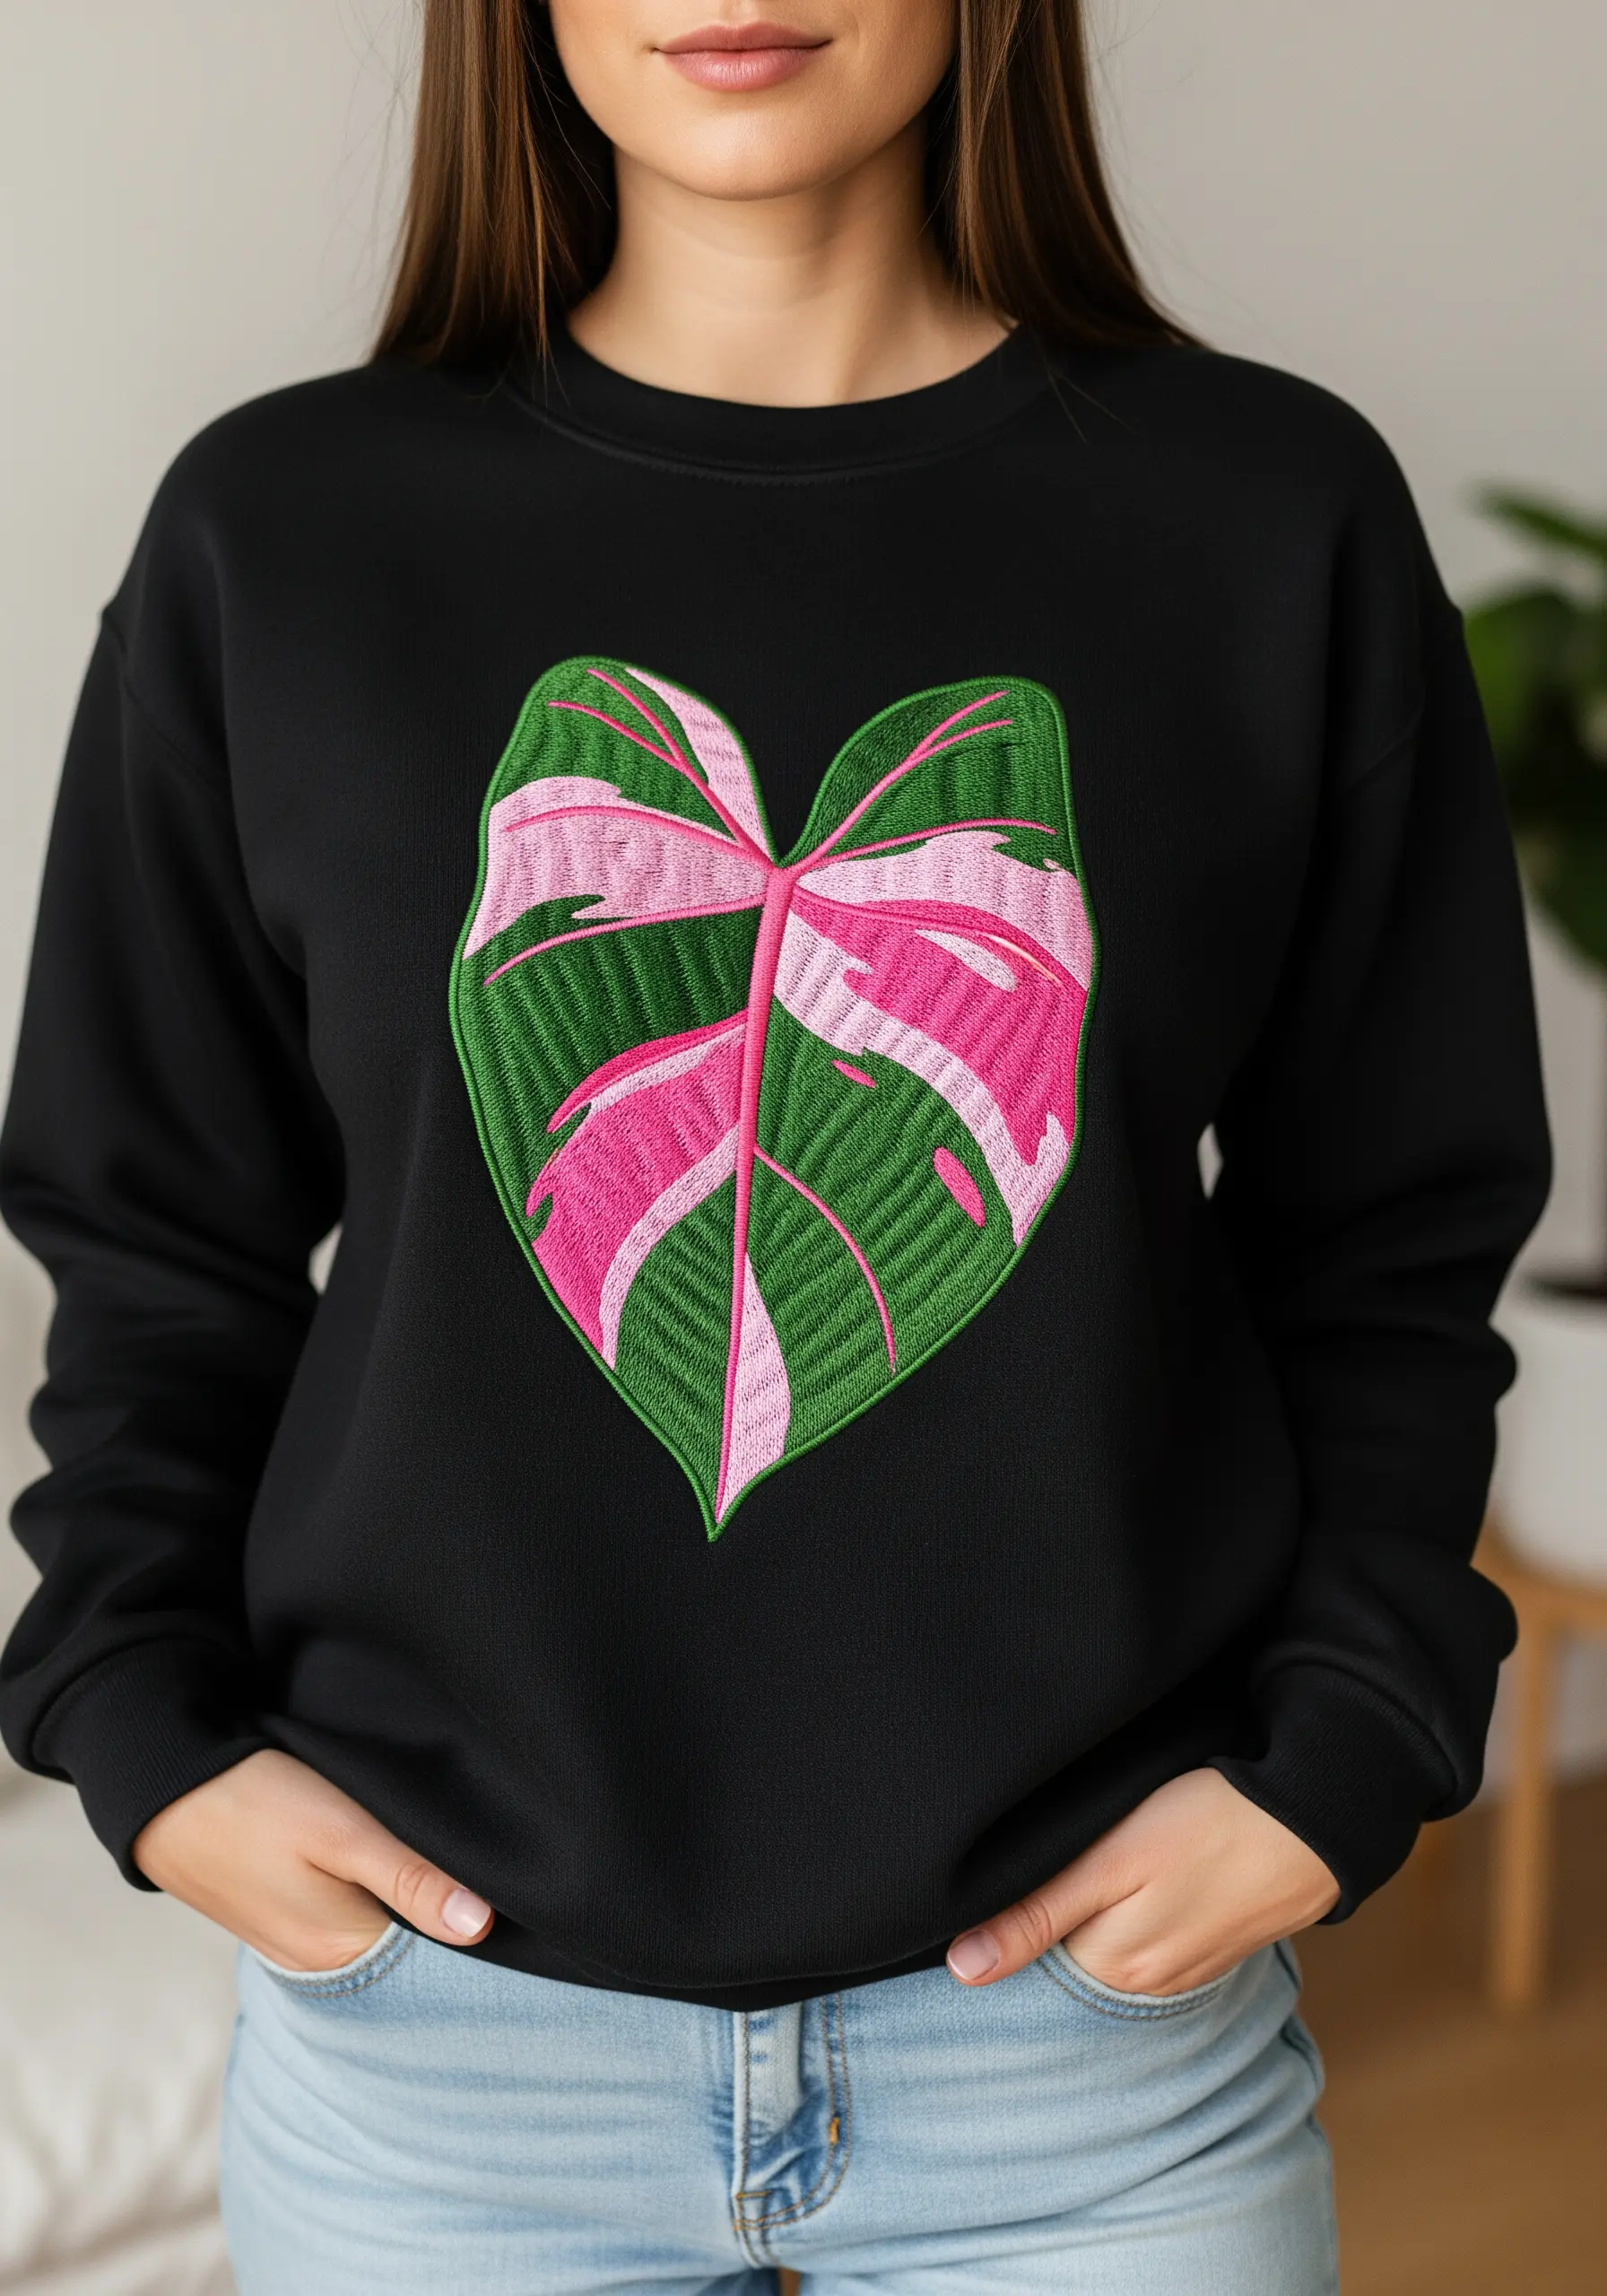
When embroidering on clothing like a sweatshirt, choose a design with bold, graphic color blocks that will hold up to movement and washing.
The Pink Princess Philodendron is perfect, with its confident splashes of hot pink against a classic emerald green.
Use a high-quality, permanent stabilizer on the inside of the garment to prevent the fabric from puckering under the dense satin stitches.
This bold color combination is a guaranteed statement-maker and turns a simple piece of clothing into a wearable work of art.
21. The Frosted and Fuzzy Dusty Miller
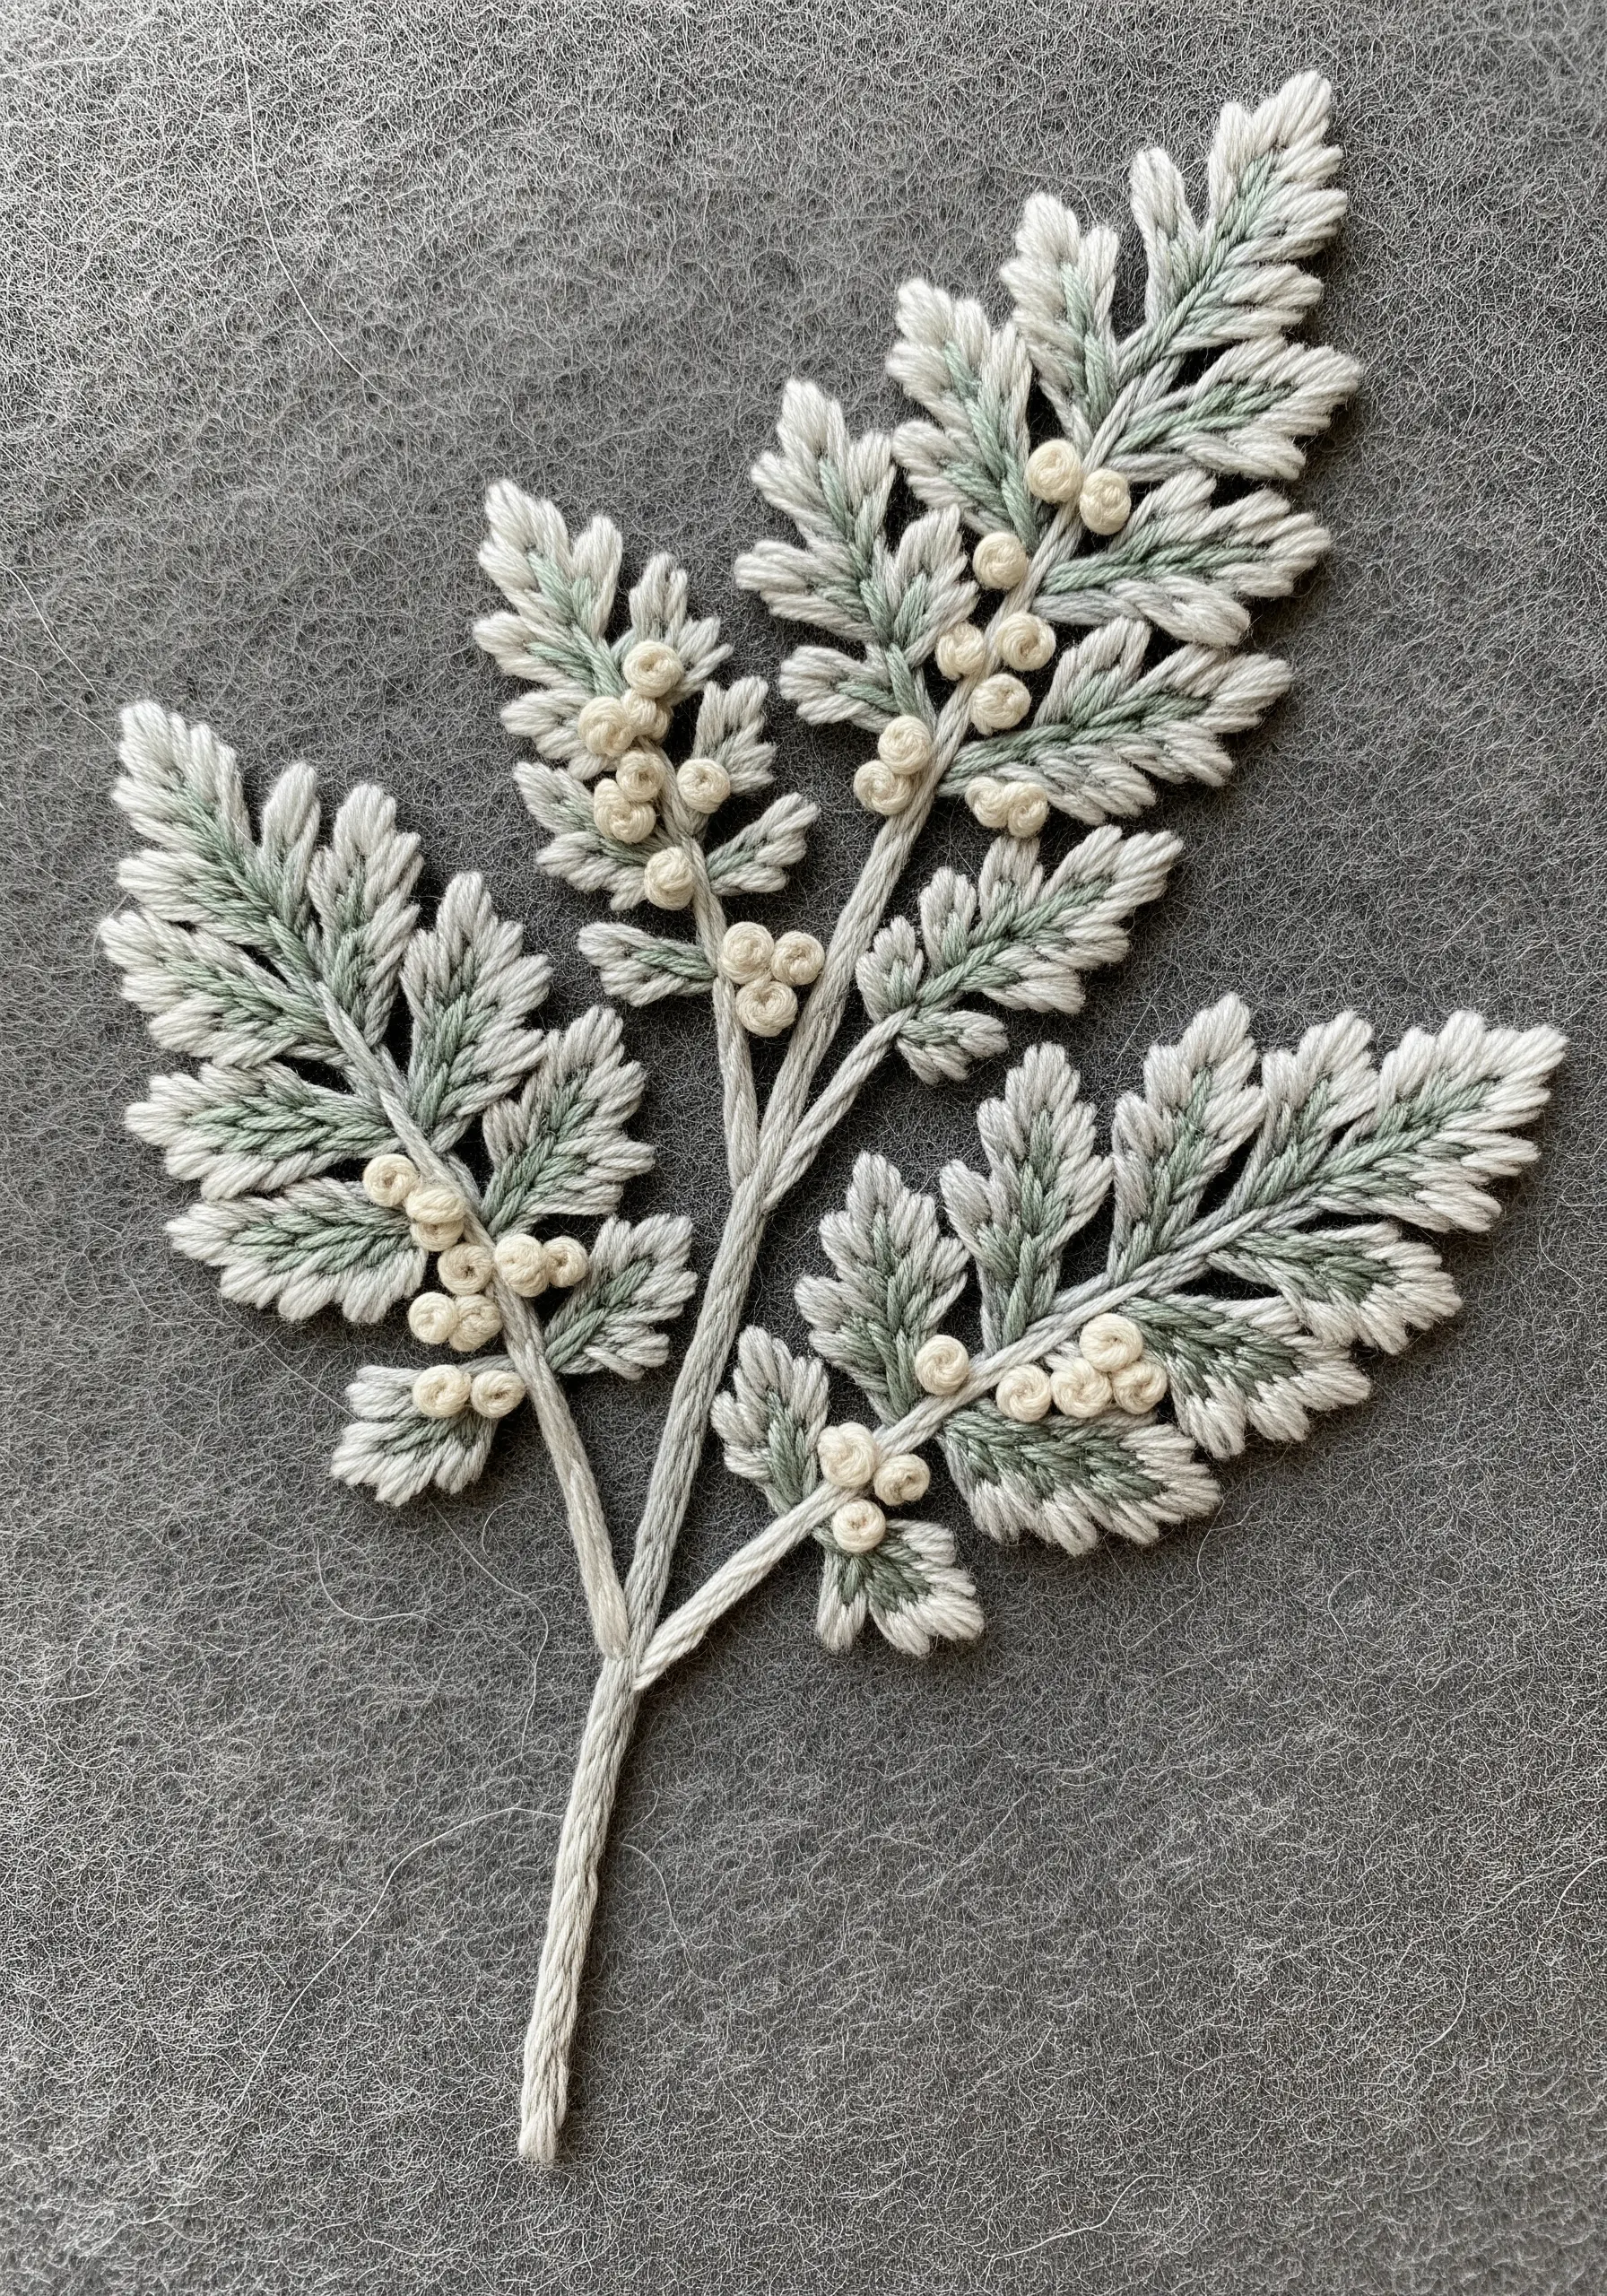
Capture the soft, silvery look of plants like Dusty Miller by combining a muted color palette with textural stitches.
Use a soft sage green and an off-white, stitching the leaves with a fishbone stitch to create a defined central spine and feathery texture.
Add clusters of tiny, off-white French knots to mimic the plant’s small buds or flowers. This adds a delicate, textural contrast to the flatter leaves.
Stitching on a grey felt background enhances the soft, muted aesthetic and makes the white highlights pop.


