

You have the threads, the needles, and a love for creating beautiful things. But how do you move beyond merely following a pattern and begin to create pieces that feel truly elevated, personal, and intentional? How do you give your work that quiet, artistic confidence?
The secret isn’t found in mastering hundreds of complex stitches. Instead, it lies in thoughtful choices: the weight of a thread against a certain fabric, the subtle shift in color that mimics nature, or the interplay of light on a sheer surface. It’s about learning to see your materials not just as tools, but as partners in expressing a vision.
These techniques are designed to shift your perspective. They are invitations to look at a simple journal cover, a plain curtain, or an old denim jacket and see a canvas waiting for your touch. Here, we move beyond the hoop to transform everyday objects into refined, meaningful works of art.
1. Elevate Journal Covers with Dimensional Florals

Transform a simple notebook into an heirloom by stitching directly onto the cover.
Use a single strand of thread for delicate flowers like forget-me-nots to maintain their fine detail, and switch to dense French knots for Queen Anne’s lace to create a lush, raised texture.
For the leaves, a long-and-short stitch allows for subtle color blending, giving them a realistic, soft appearance.
You will need a sharp, strong needle to pierce the cover; pre-punching the holes with an awl can make the process smoother and prevent buckling.
This technique turns a functional item into a deeply personal piece of tactile art you can find in these diy embroidered mixed media journals.
2. Stitch Ethereal Botanicals on Sheer Fabric
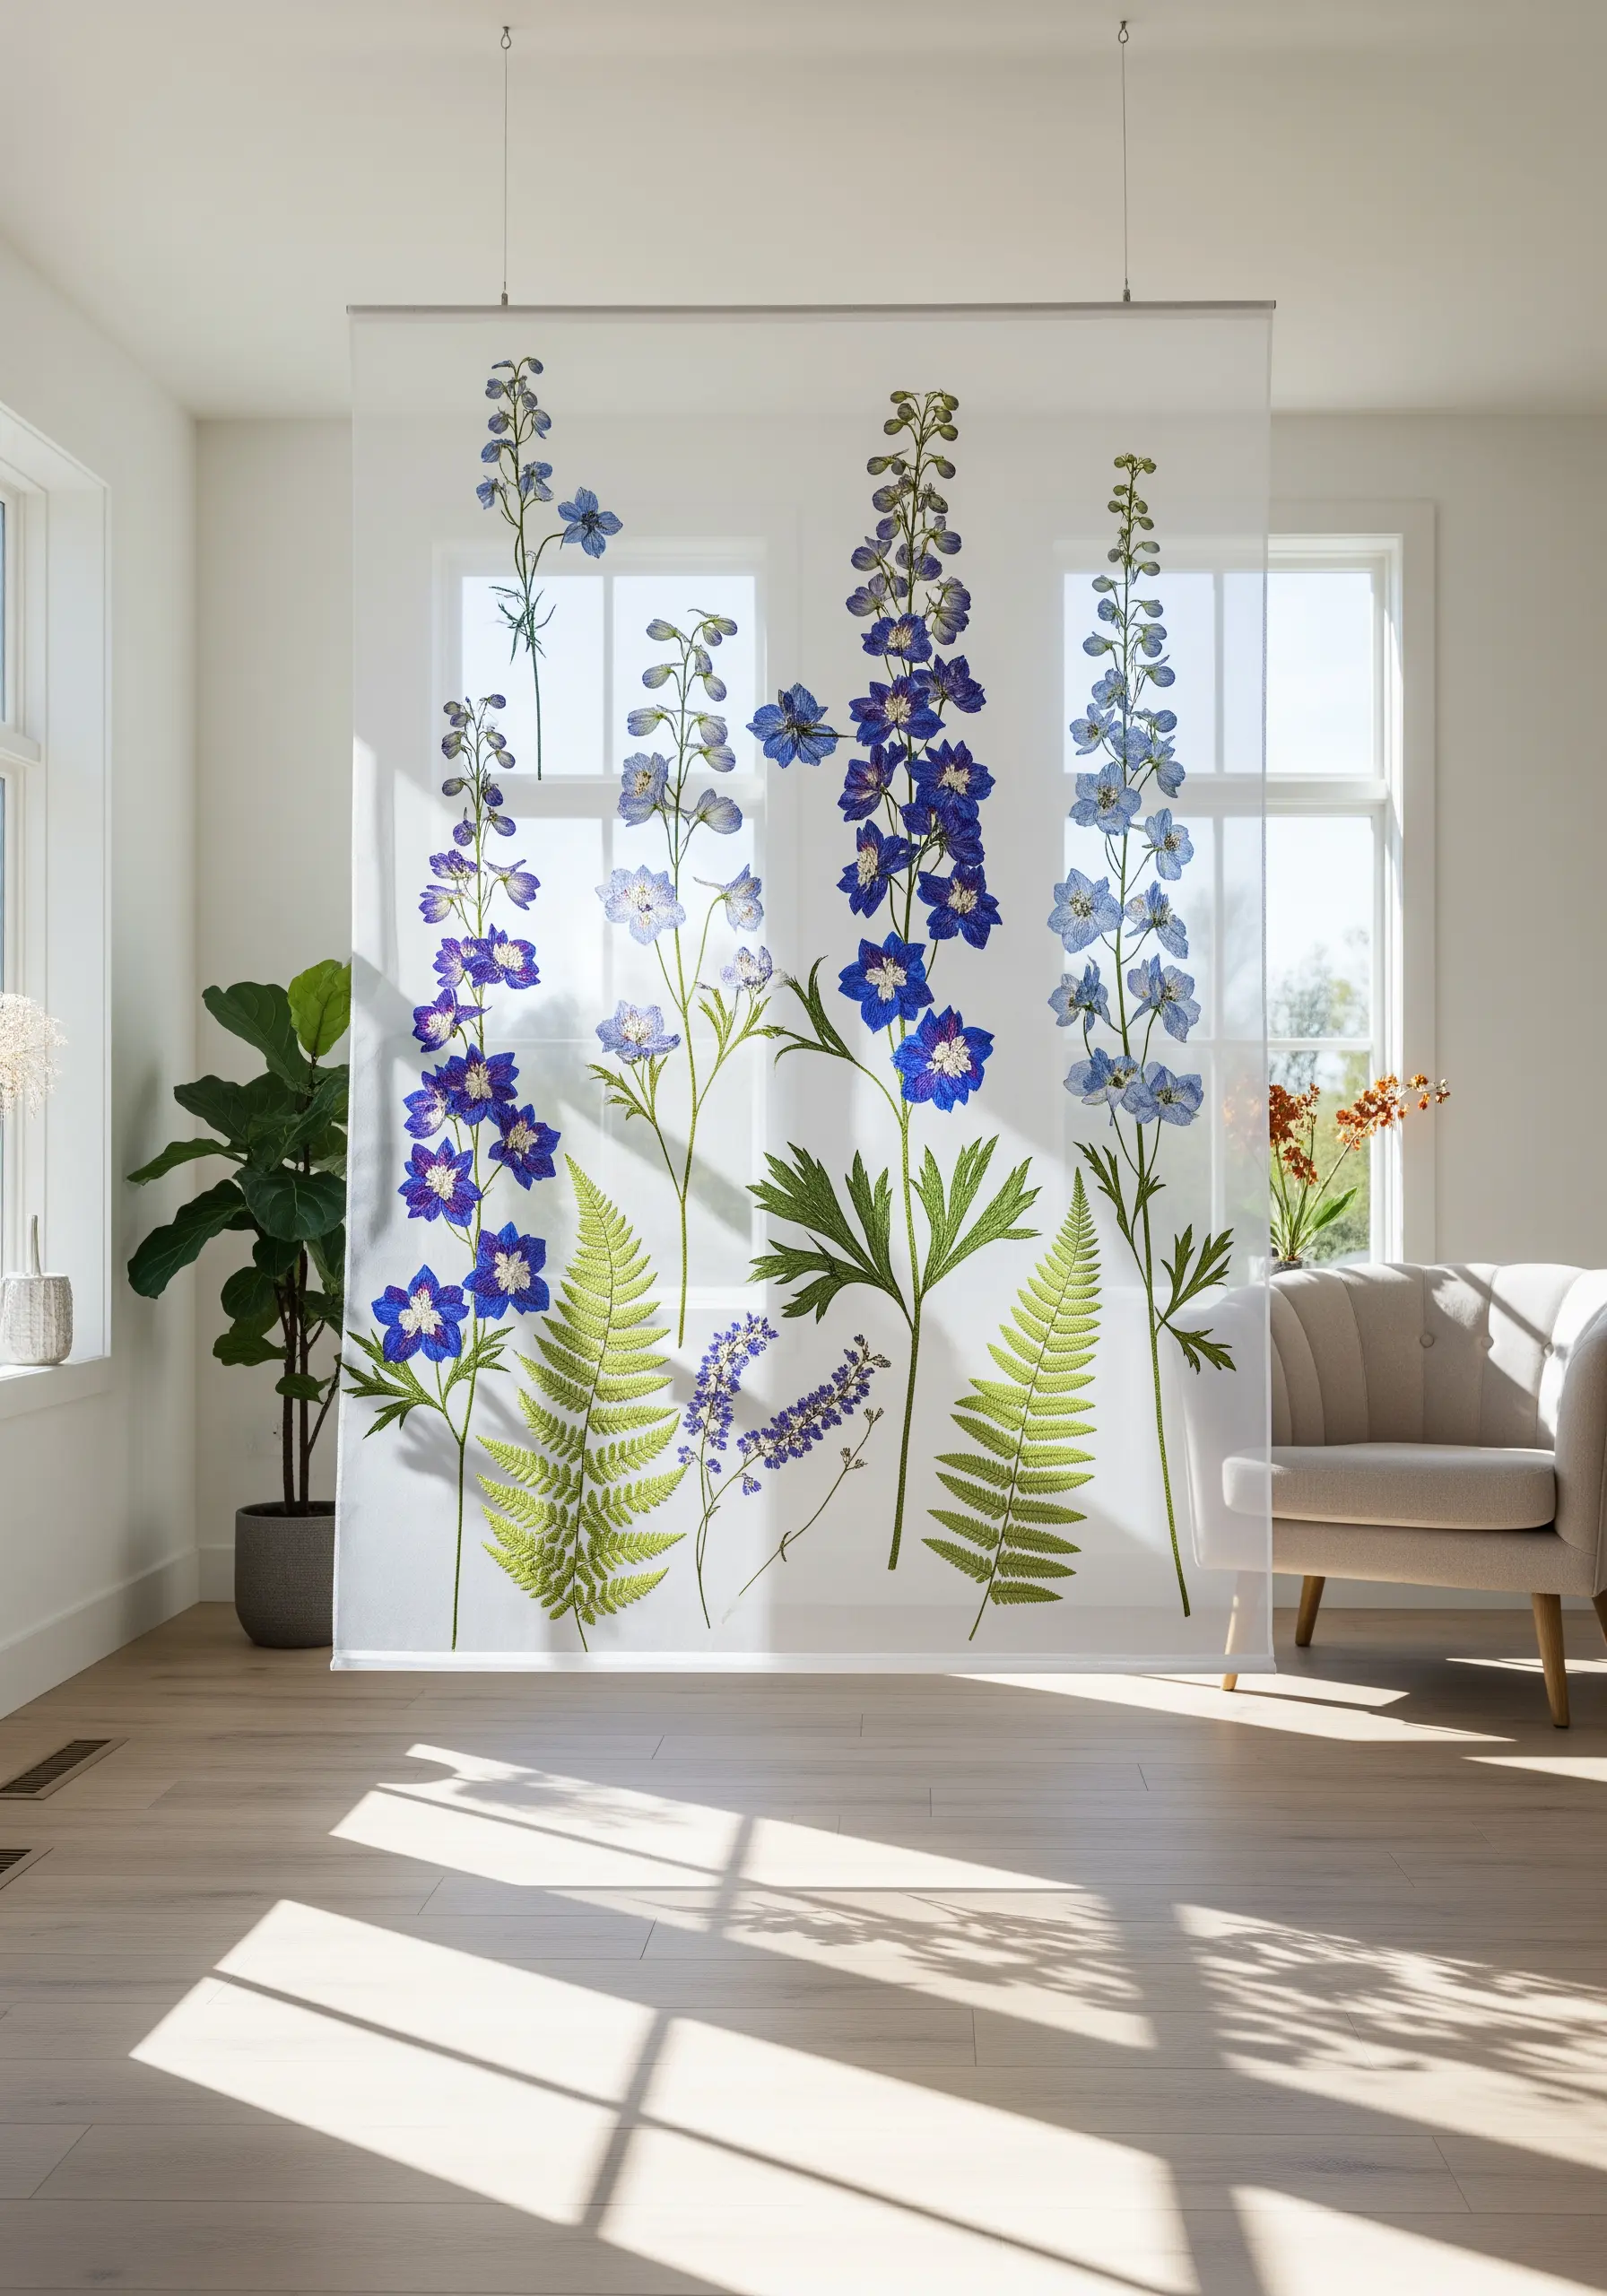
Create a stunning, light-filtering effect by stitching on organza or tulle, perfect for window hangings or room dividers.
To prevent the delicate fabric from puckering, you must use a stabilizer; a wash-away or heat-away version is ideal as it will disappear completely, leaving only your stitches.
Choose lightweight threads that won’t weigh down the fabric, allowing your design to appear as if it’s floating in mid-air.
This method transforms your embroidery into a piece of architectural art, playing with light and shadow in a way that solid fabric cannot.
Explore more fabric collage embroidery projects using sheer fabrics for dreamy effects to master this technique.
3. Master Large-Scale Line Art for Statement Decor
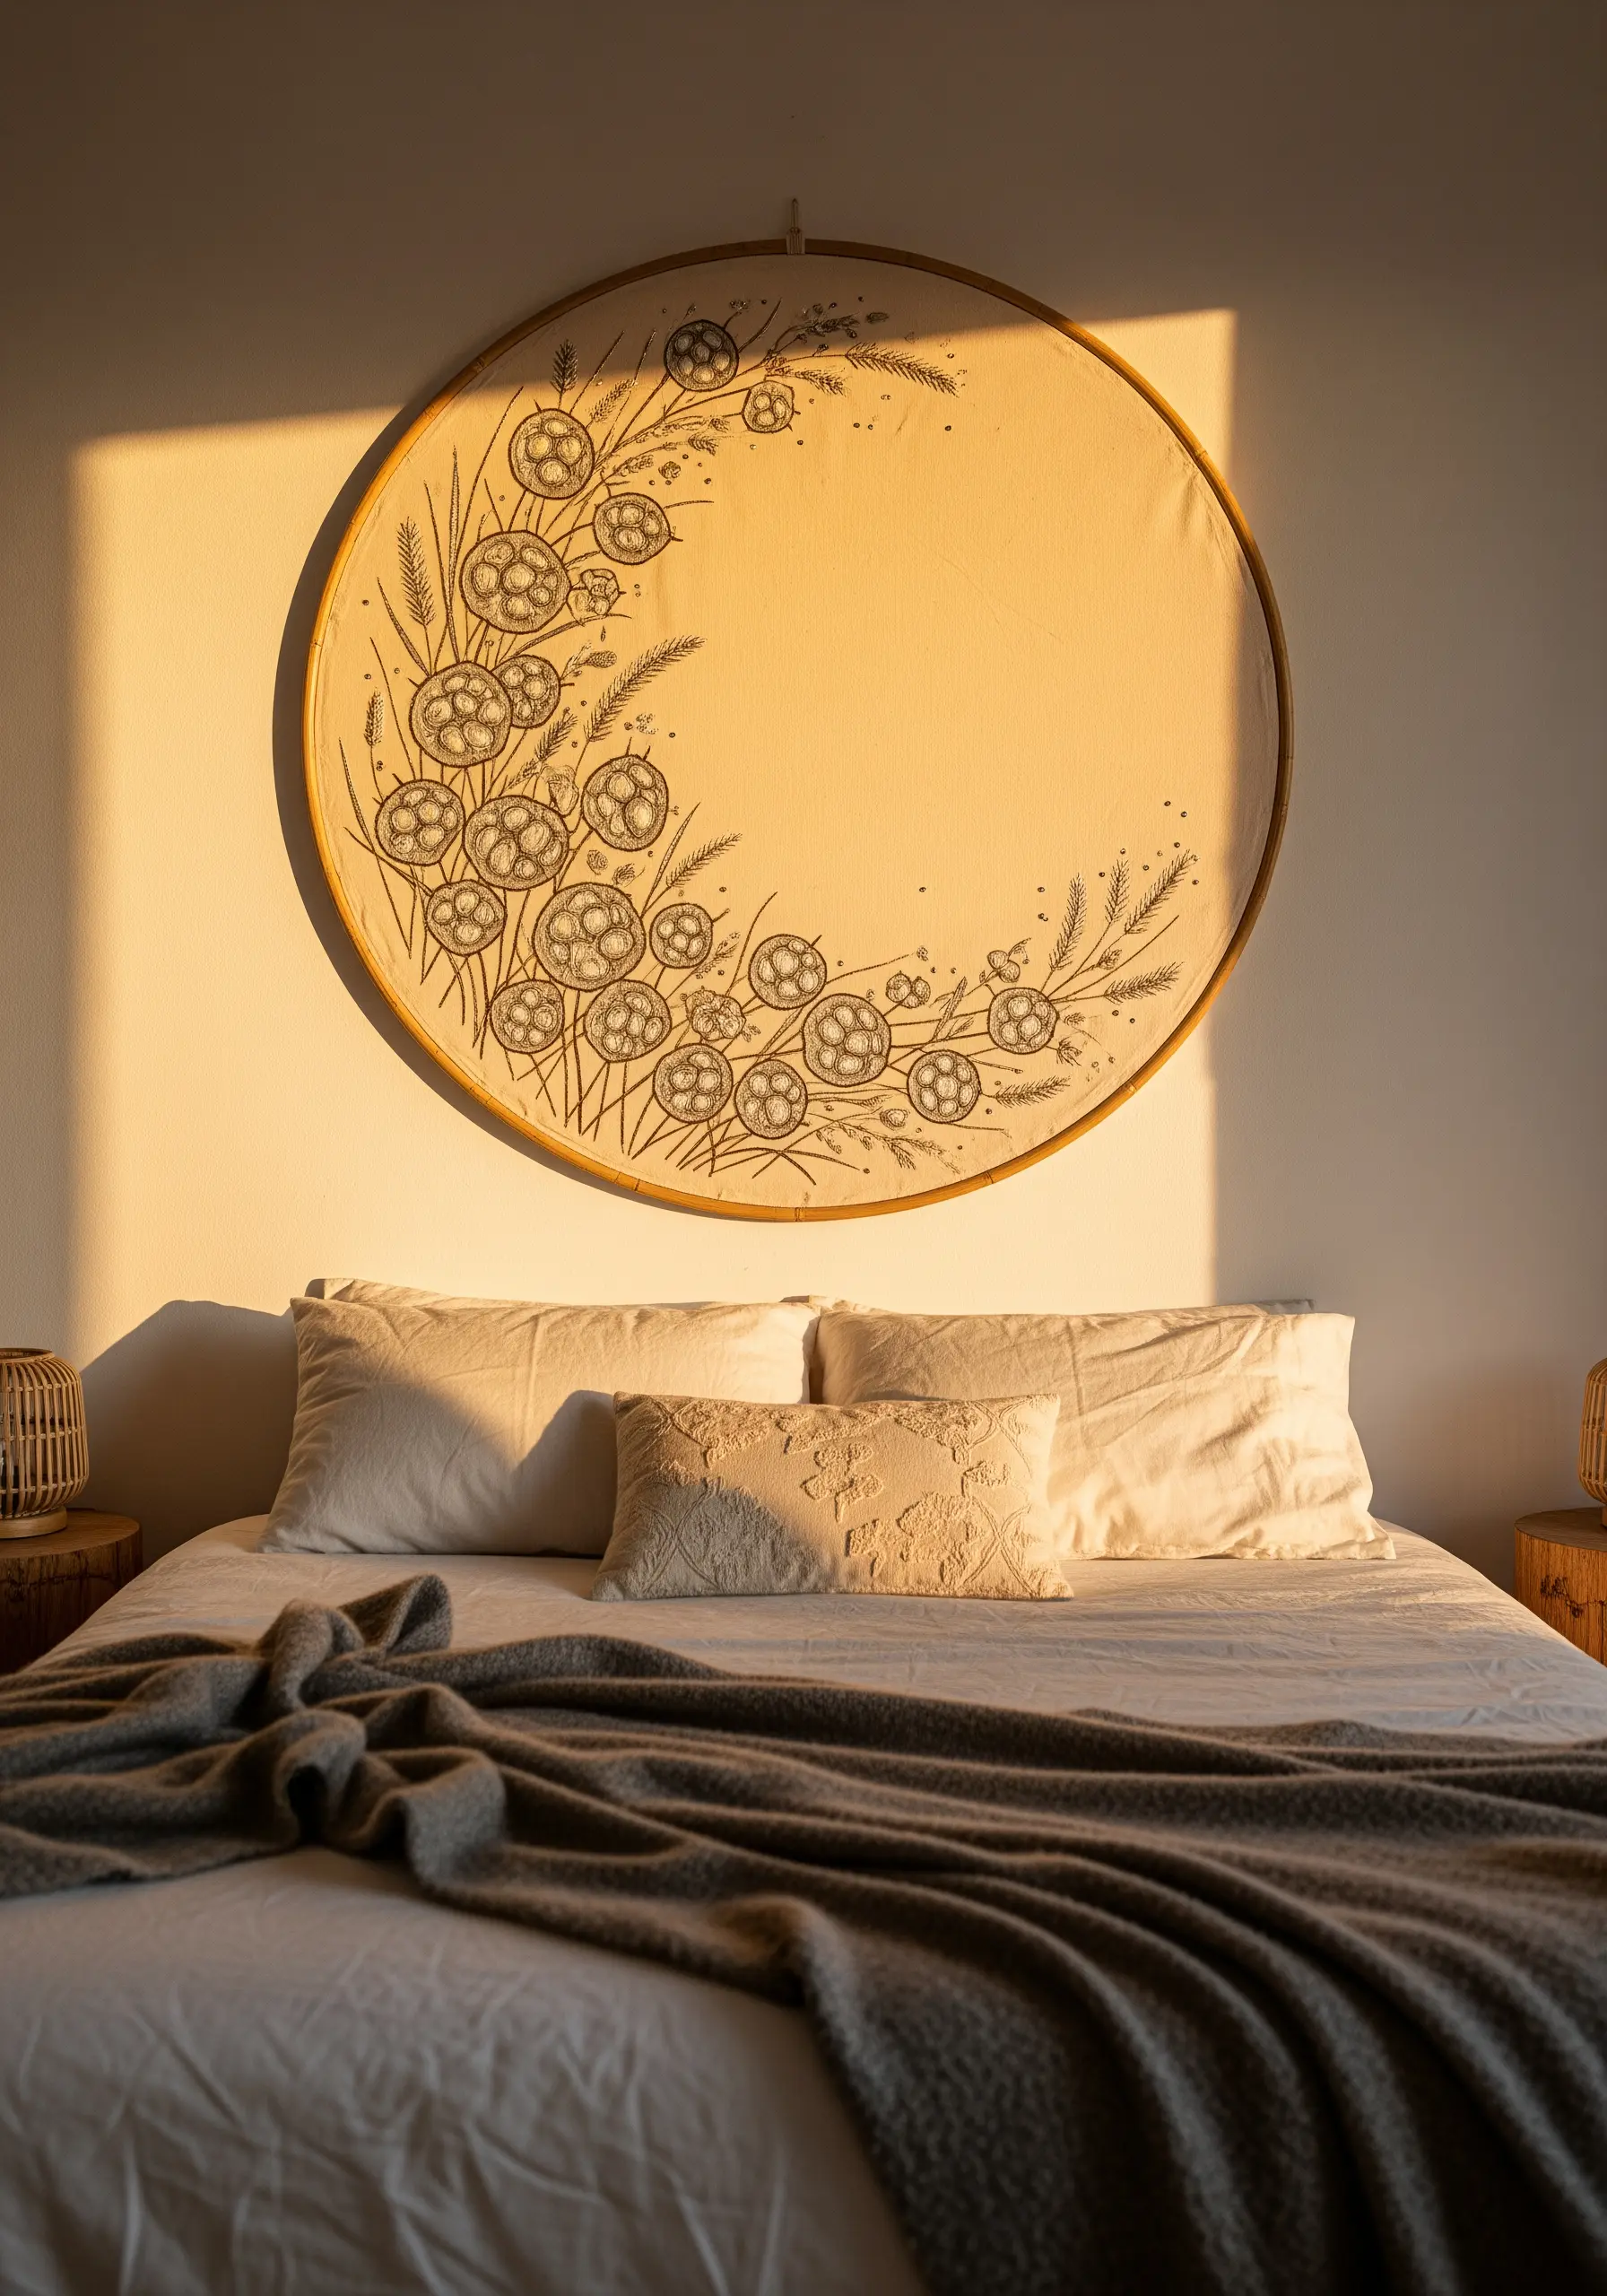
To make a significant impact in a room, scale up your embroidery with an oversized hoop.
For clean, confident lines, use a consistent backstitch or stem stitch with a slightly thicker thread, like a #5 pearl cotton, which adds presence without bulk.
The key to success on this scale is ensuring your fabric is stretched drum-tight in the hoop to prevent any sagging or distortion in the final piece.
This minimalist approach makes negative space a powerful design element, resulting in calm, modern wall art.
4. Achieve Bold Color Saturation on Denim
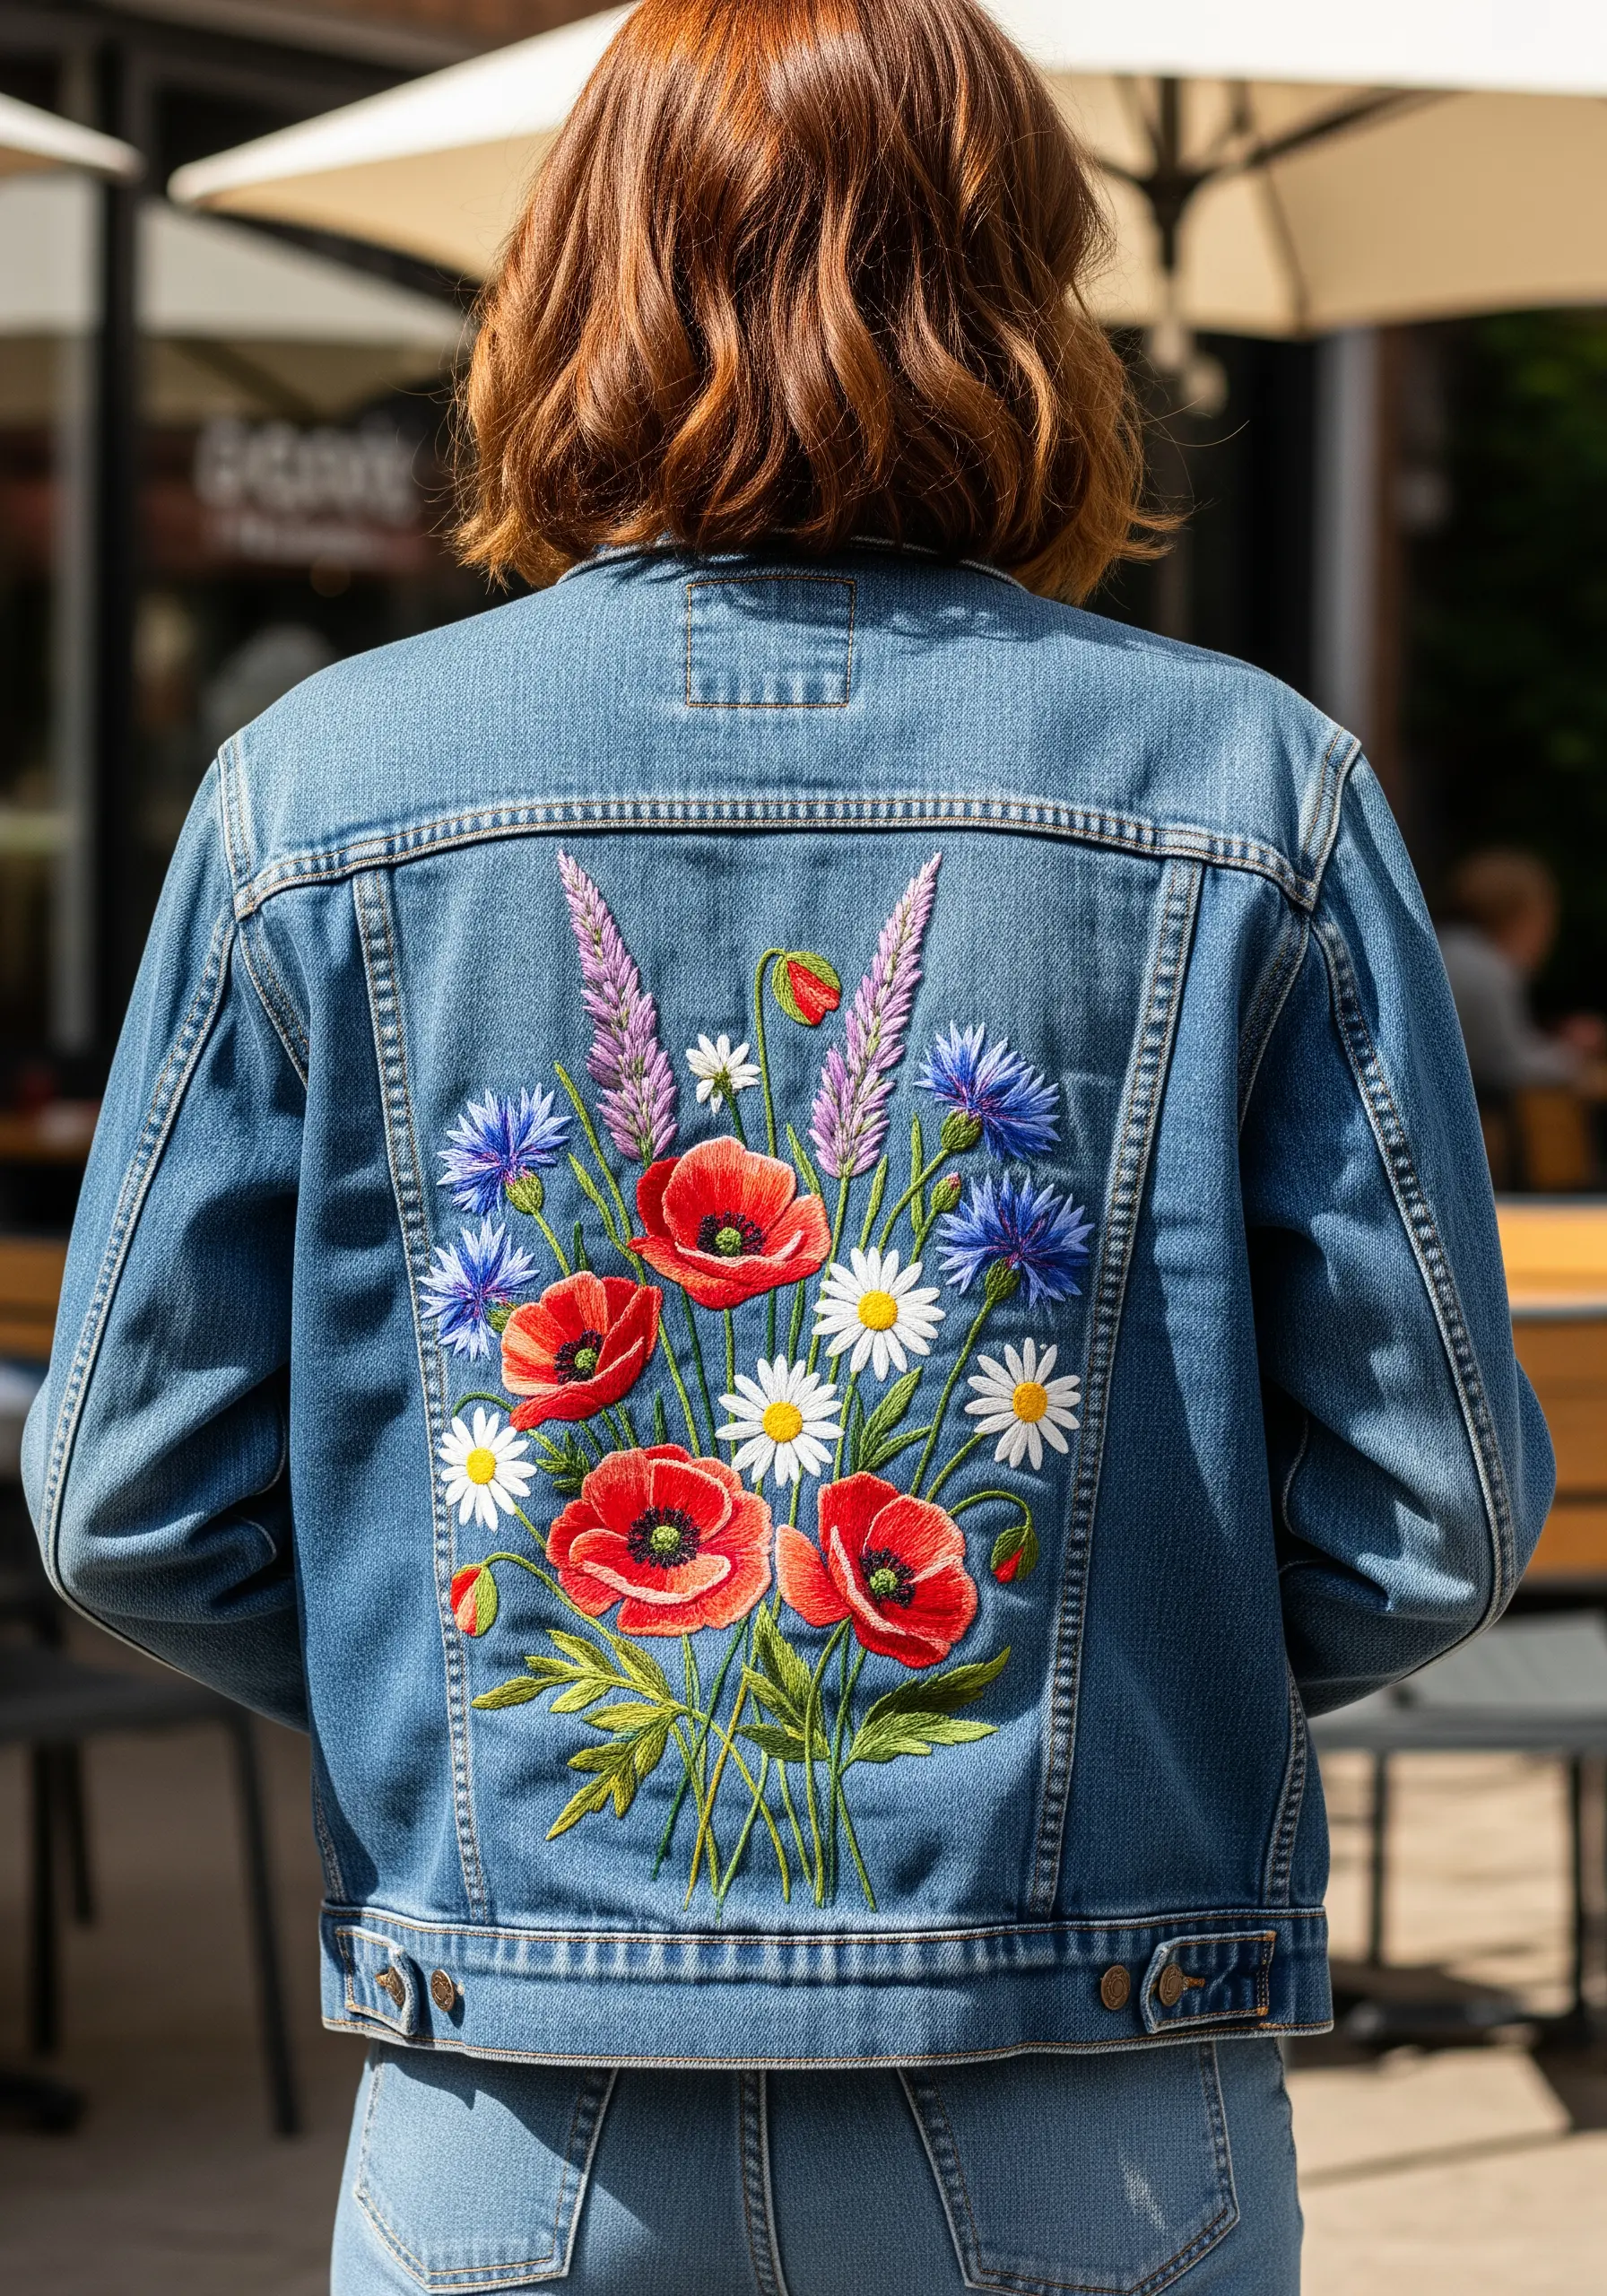
Denim’s sturdy weave makes it an ideal canvas for dense, vibrant embroidery that truly pops.
To ensure your colors remain bright and don’t get lost in the dark fabric, first lay down a base of white satin stitch—this acts as a primer, making your reds, blues, and yellows appear more saturated.
Use a heavy-duty needle (a 90/14 works well) to move through the thick fabric smoothly.
By varying the direction of your satin stitches within a single petal or leaf, you can create subtle dimension and light-play, making your design feel more alive.
Find more inspiration with these wildflower embroidery patterns to turn blank denim jackets into boho fashion statements.
5. Couch Metallic Threads to Frame Pressed Botanicals
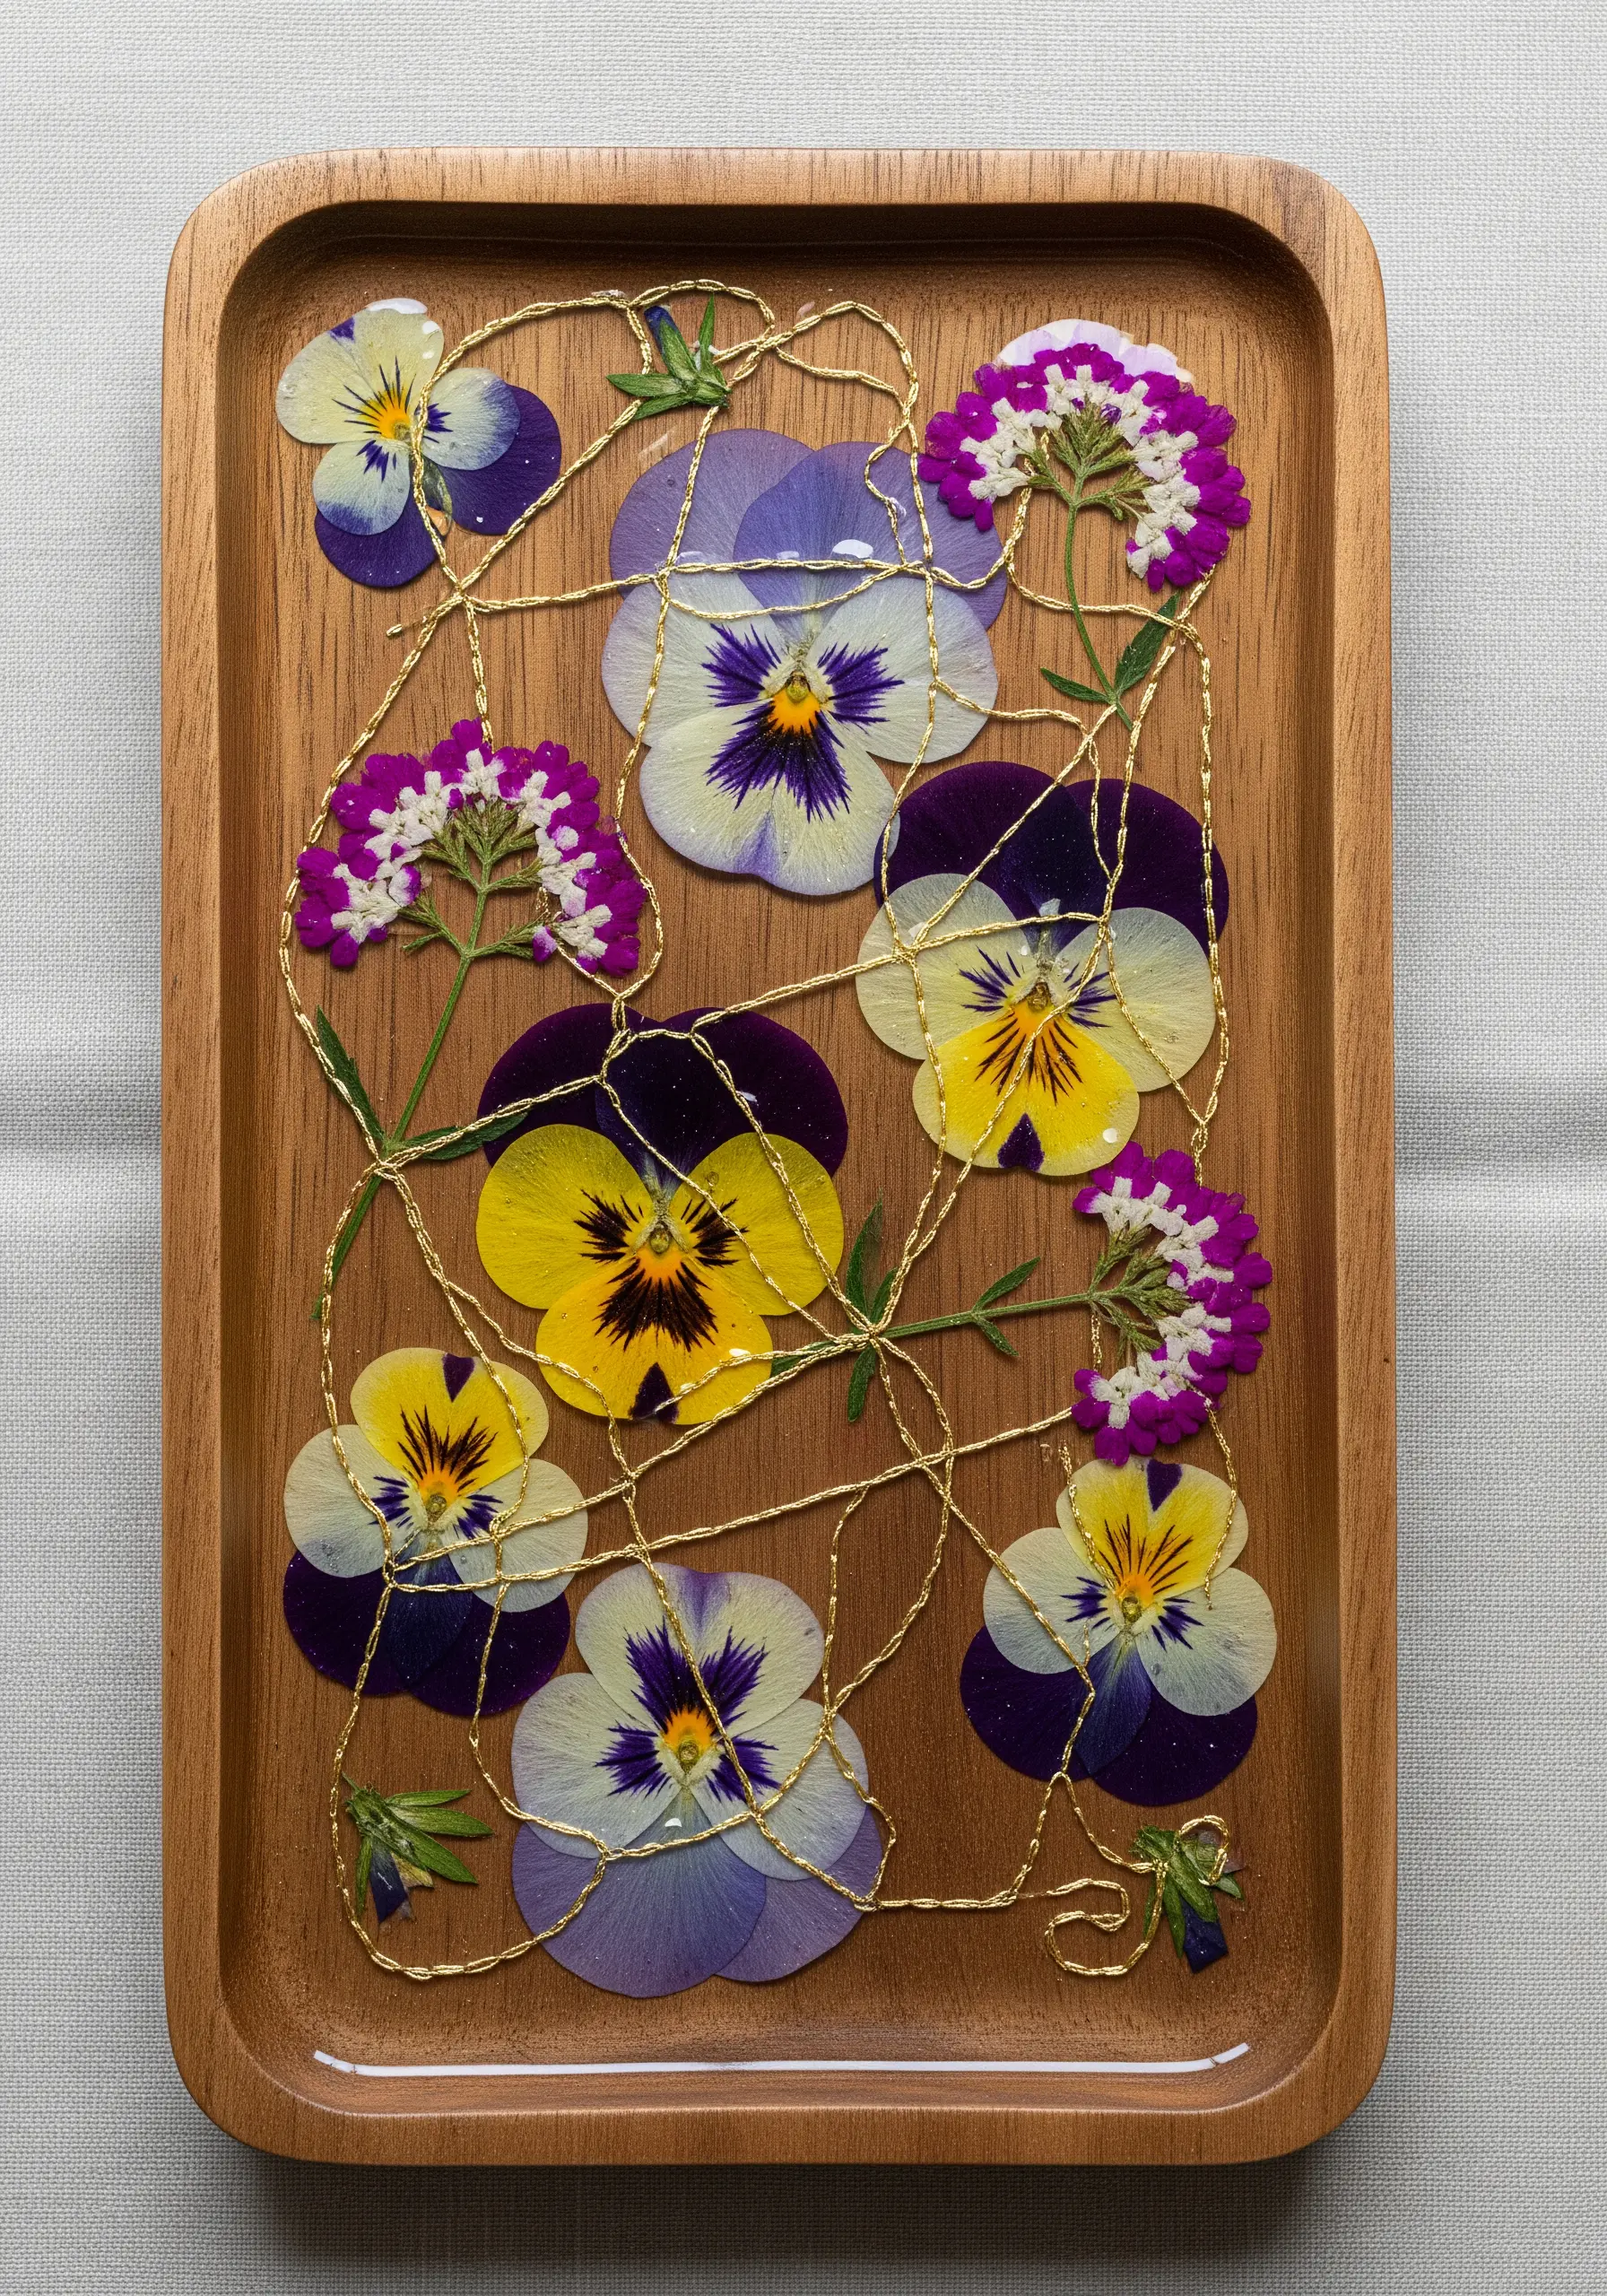
Instead of stitching through fragile pressed flowers, use couching to secure them with elegance.
Lay a decorative metallic cord over the petals in your desired pattern, then use a second, finer thread to tack it down with tiny, nearly invisible stitches placed every few millimeters.
This technique allows you to add linear, graphic details to your botanical arrangement without risking damage to the delicate flowers.
It’s a perfect mixed-media approach for adding texture to wooden trays, handmade paper, or even stretched canvas.
Learn more about how to combine pressed flowers with embroidery for stunning wall art.
6. Translate Botanical Silhouettes onto Functional Art

You can achieve a high-contrast, graphic effect on a lampshade using simple embroidery techniques.
Select a single, dark thread color and stitch onto a light-colored linen shade for a striking, modern look.
Use basic stitches: backstitch for clean stems and a filled fishbone stitch for solid leaves, which naturally creates a central vein.
This technique transforms an everyday object into a piece of functional art that interacts beautifully with light when the lamp is on.
Always ensure you are working on a flame-retardant lampshade for safety.
7. Design a Meadowscape on Table Linens
To create the feeling of a natural, sprawling meadow on a table runner, focus on creating visual depth and variety.
Use simple straight stitches for wispy grasses and lazy daisy stitches for small, delicate blossoms.
Arrange your stitches so that taller, more detailed flowers appear in the foreground, while smaller, simpler stitches recede into the background.
Choosing a linen-blend fabric provides a beautiful drape and ensures your work is durable enough for regular use and washing.
Such table linen embroidery motifs can instantly elevate a dining space.
8. Create Cascading Florals on Drapery
When stitching on sheer curtains, the back of your work becomes visible, so neatness is paramount.
Keep your thread tails trimmed short and secure them discreetly to maintain a clean, professional finish.
To achieve a soft, painterly effect for blossoms like wisteria, use long-and-short stitch to blend multiple shades of a color together seamlessly.
This creates a beautiful watercolor effect that feels light and airy, perfectly complementing the translucent fabric.
9. Add Thread Details to Glazed Surfaces
While you can’t stitch through ceramic, you can achieve a similar aesthetic by combining pressed botanicals with carefully placed thread.
First, arrange and secure your pressed flowers onto the dish using a strong, clear adhesive or a thin layer of resin.
Once set, use the same adhesive to glue fine embroidery thread around the edge or over the flowers to mimic stitch work.
This is a clever way to add textile texture to non-fabric objects like decorative plates, coasters, or jewelry dishes.
10. Build 3D Texture on Velvet with Stumpwork
The rich, plush pile of velvet provides the perfect backdrop for high-dimension embroidery that invites touch.
Use stumpwork techniques to create raised elements, like mushroom caps, by stitching them onto a separate piece of fabric over a wire frame, cutting them out, and applying them to the cushion.
Incorporate textural stitches like French knots or Turkey work to build up mossy ground textures at the base.
This layering of techniques results in a truly dimensional and tactile piece of art.
11. Encase Pressed Leaves and Wire for a Modern Mat

This technique translates the principles of embroidery into a different medium for a durable, functional piece of art.
Arrange pressed autumn leaves between two layers of clear acrylic or within a resin pour.
Before sealing the piece, use a pliable copper wire to create stitch-like patterns and borders around the leaves.
This method captures the beauty of botanicals and the elegance of linear stitching in an unexpected and practical format.
It’s one of the best secrets to making pressed flower art that everyone will admire.
12. Use Thread Gradients to Add Luminous Realism
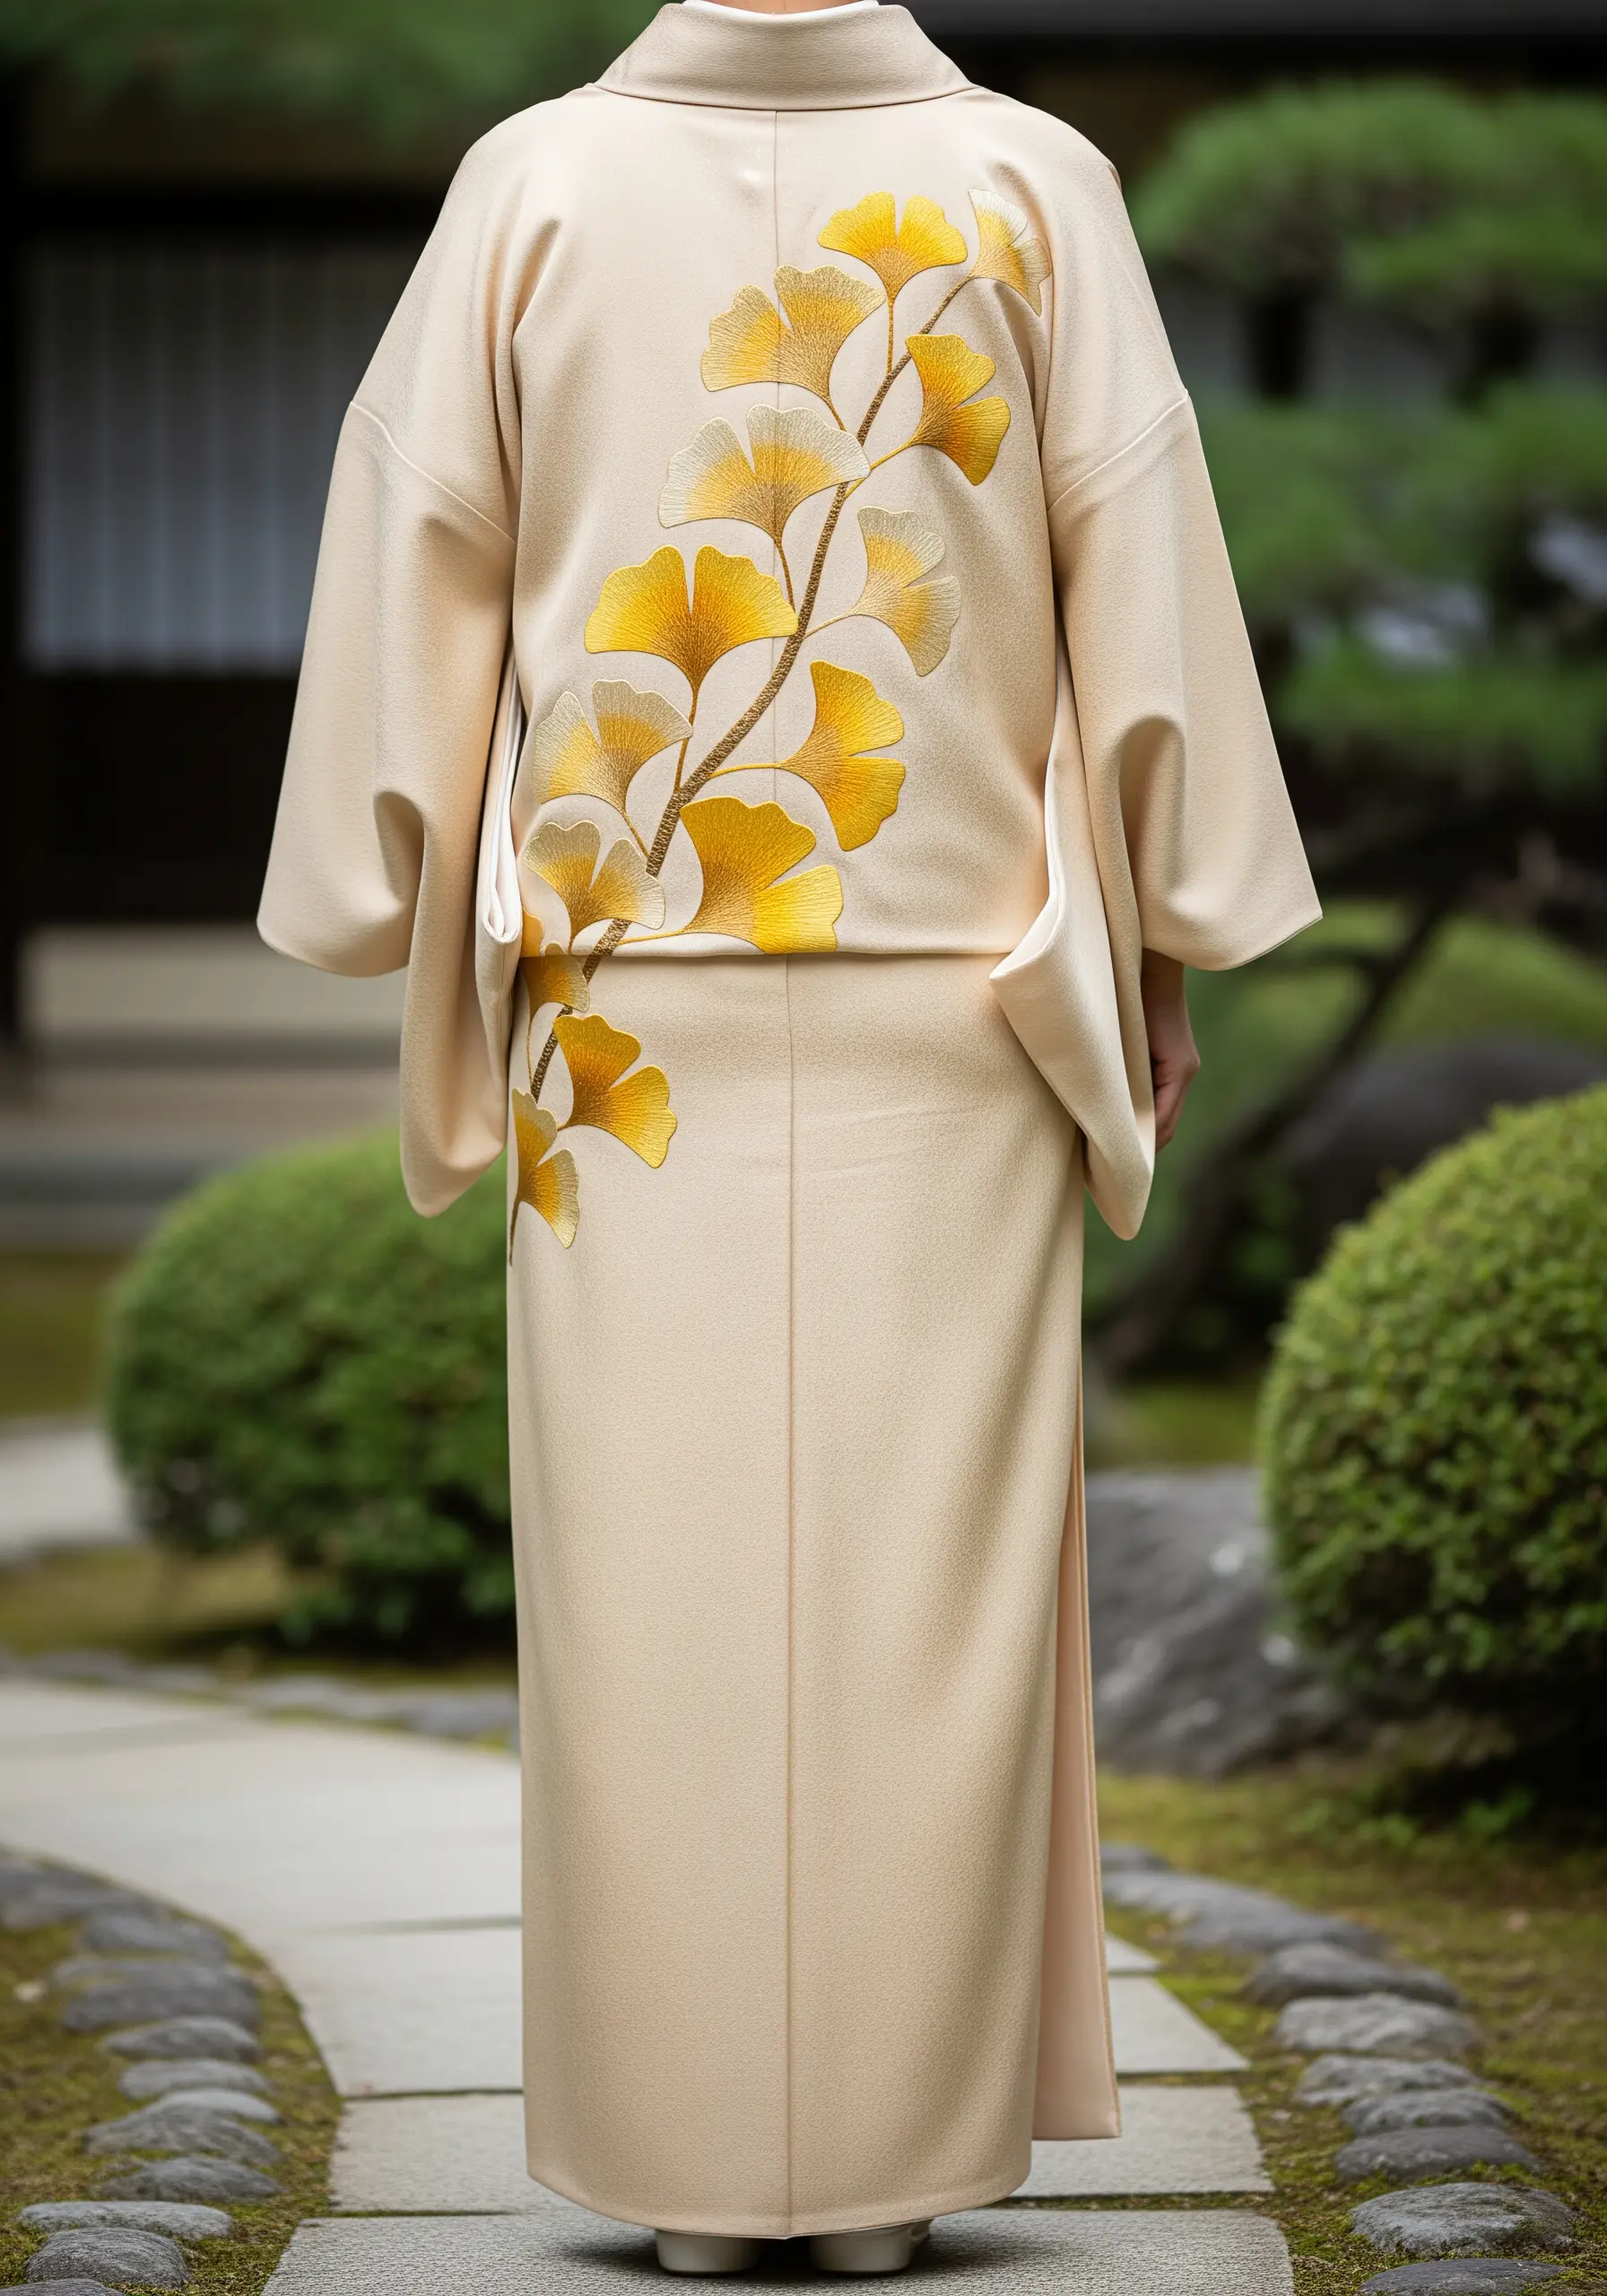
To prevent your botanical motifs from looking flat, use color gradients to mimic the way light naturally falls on a leaf.
Select three closely related shades of a single color—a dark, a medium, and a light tone.
Using a long-and-short stitch, begin with the darkest shade at the base, blend into the medium tone in the middle, and finish with the lightest shade at the tip.
This simple adjustment gives your embroidery a dynamic, realistic quality, especially effective on flowing garments.
13. Stitch Directly onto Textured Paper
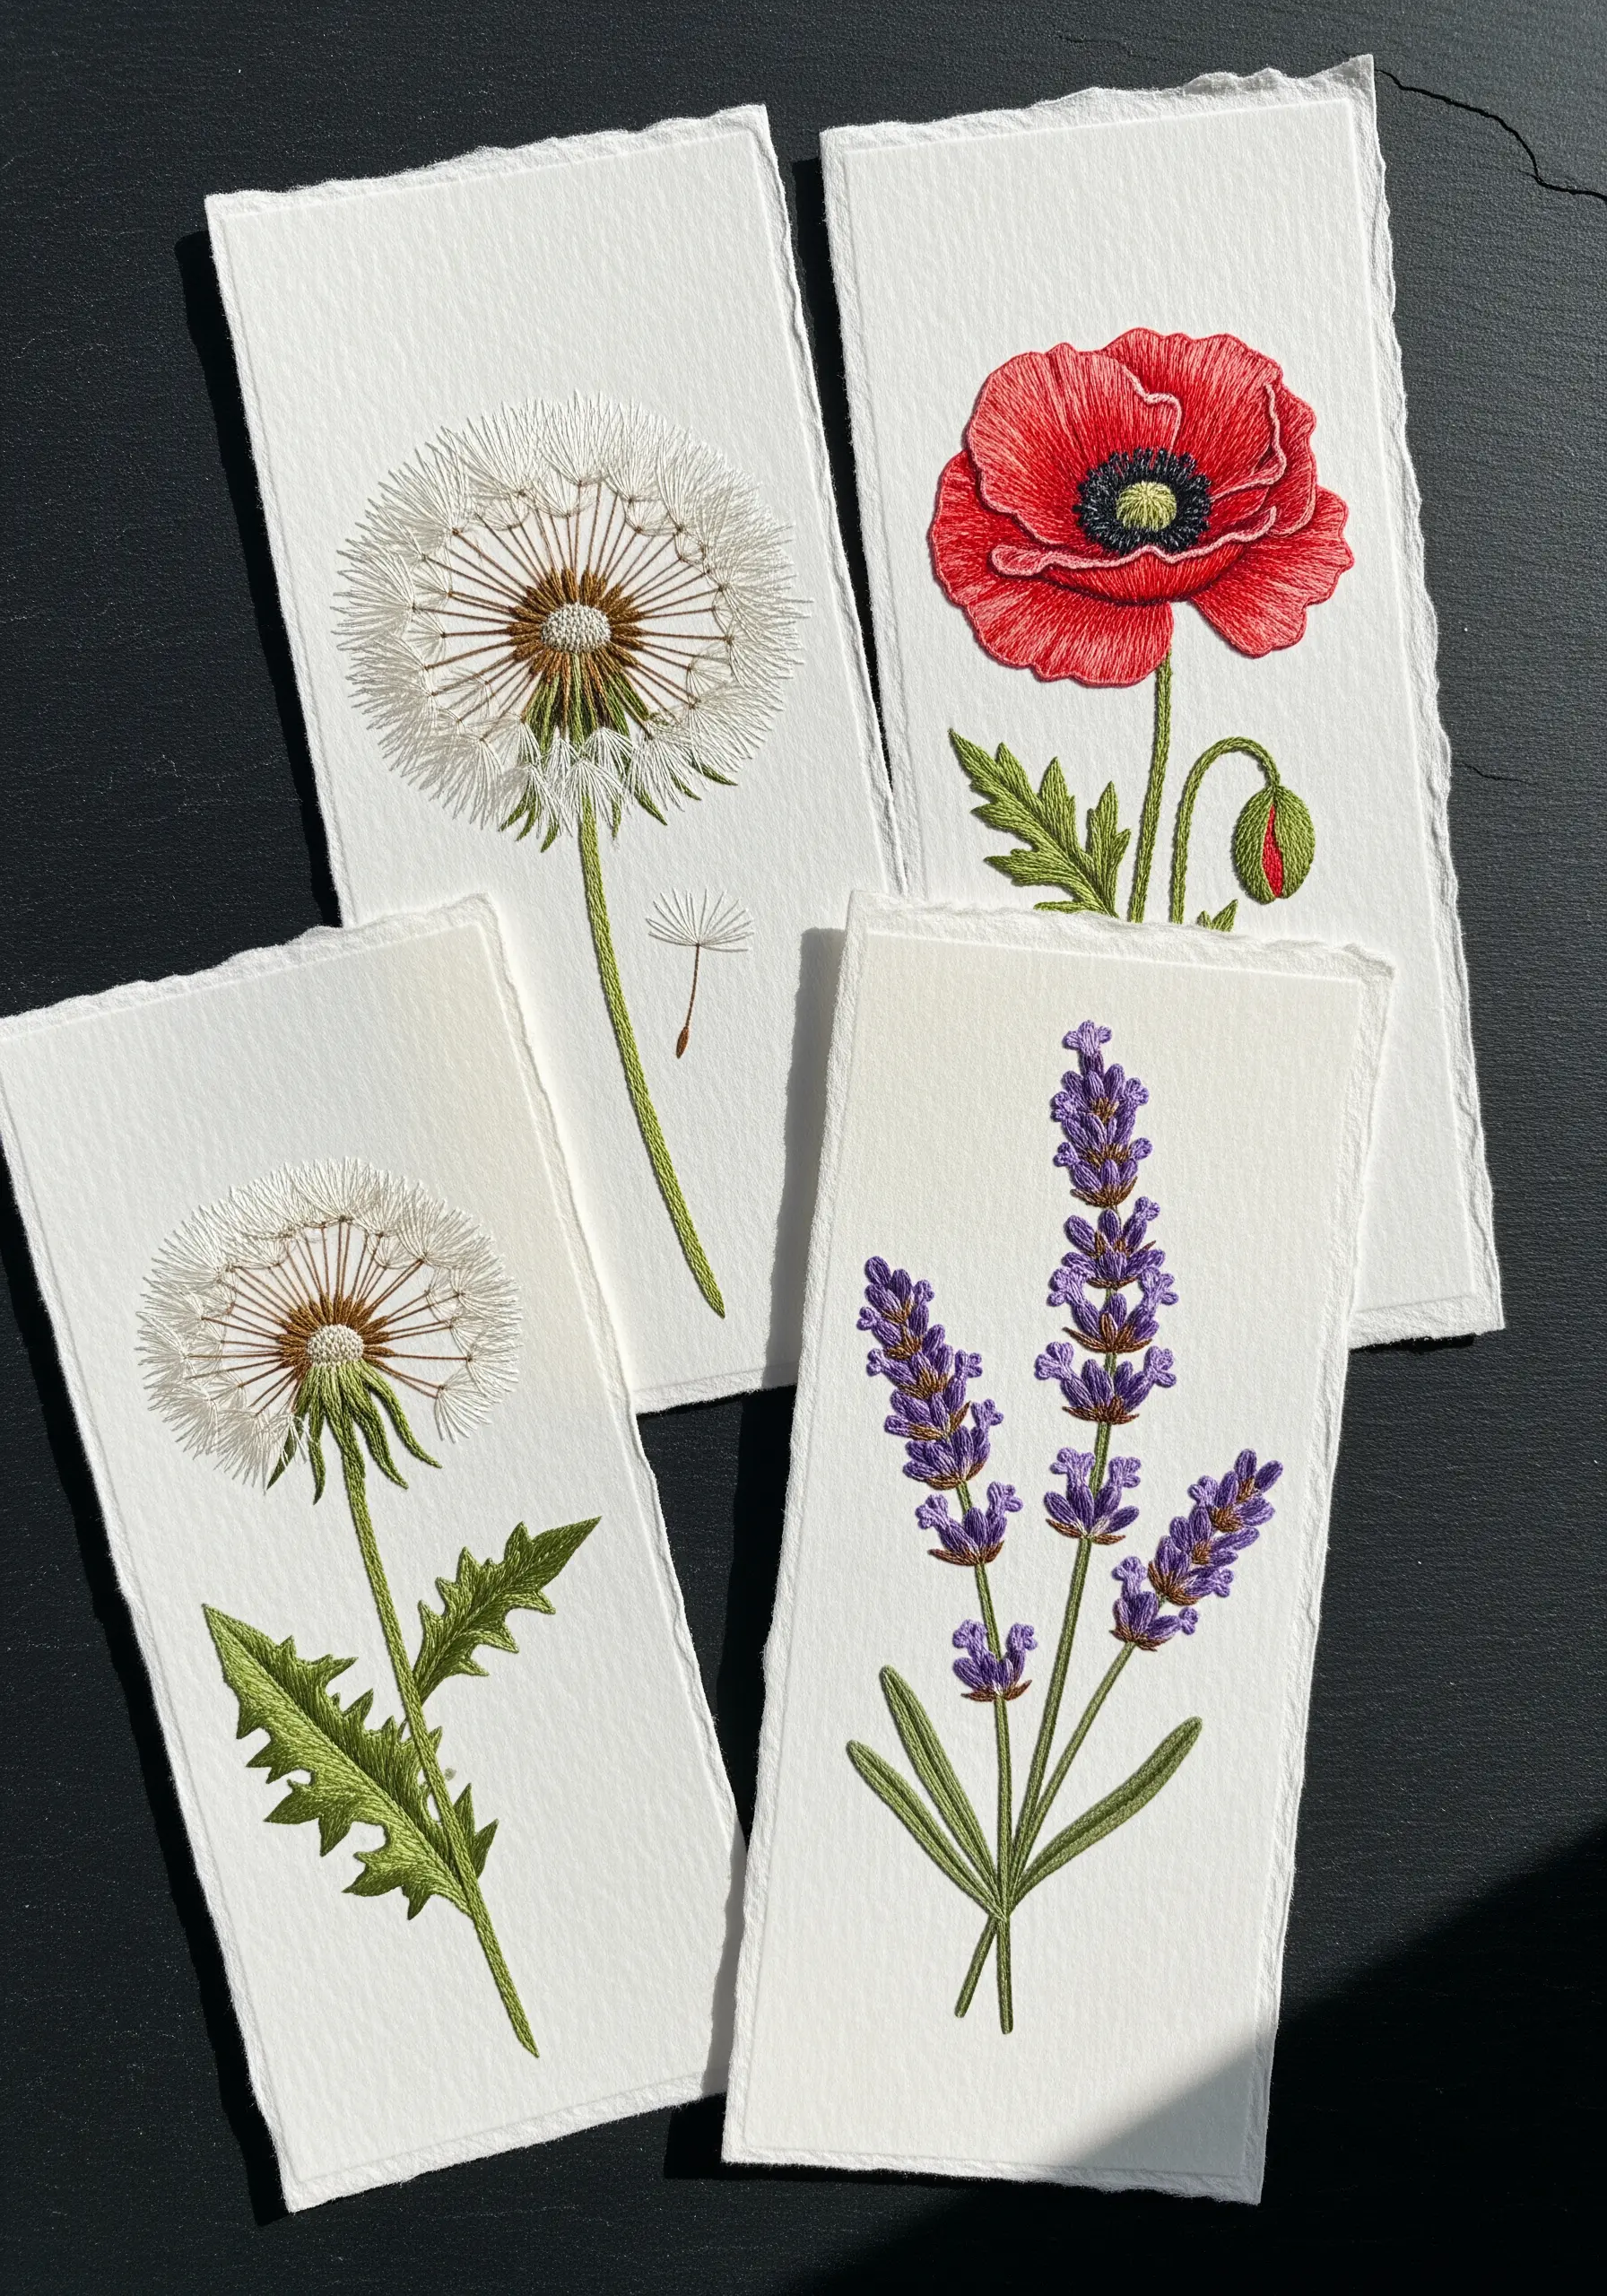
Embroidering on high-quality cotton rag paper creates a sophisticated piece of mixed-media art.
To avoid tearing the paper, use a fine, sharp needle to gently pre-pierce your stitch holes along the design lines before you begin stitching.
Keep your thread tension slightly looser than you would on fabric to prevent the stitches from pulling through the paper.
The tactile contrast between the soft thread and the deckled edge of the paper is elegant and perfect for framing.
These mixed media embroidery techniques that turn simple paper into art are a must-try.
14. Craft Delicate Mobiles with Stitched Skeleton Leaves

This project uses the natural fragility of skeleton leaves as a canvas for the lightest touch of embroidery.
Source or create your own skeleton leaves, which are incredibly delicate but can be stitched upon with care.
Use a very fine needle and a single strand of metallic thread to add a simple line of backstitch along the central vein or around the edge.
You can also attach the leaves to thin, thread-wrapped wire to create swirls and movement, then suspend them from a piece of driftwood for a weightless, natural mobile.
15. Create a Dimensional Wreath with Mixed Materials
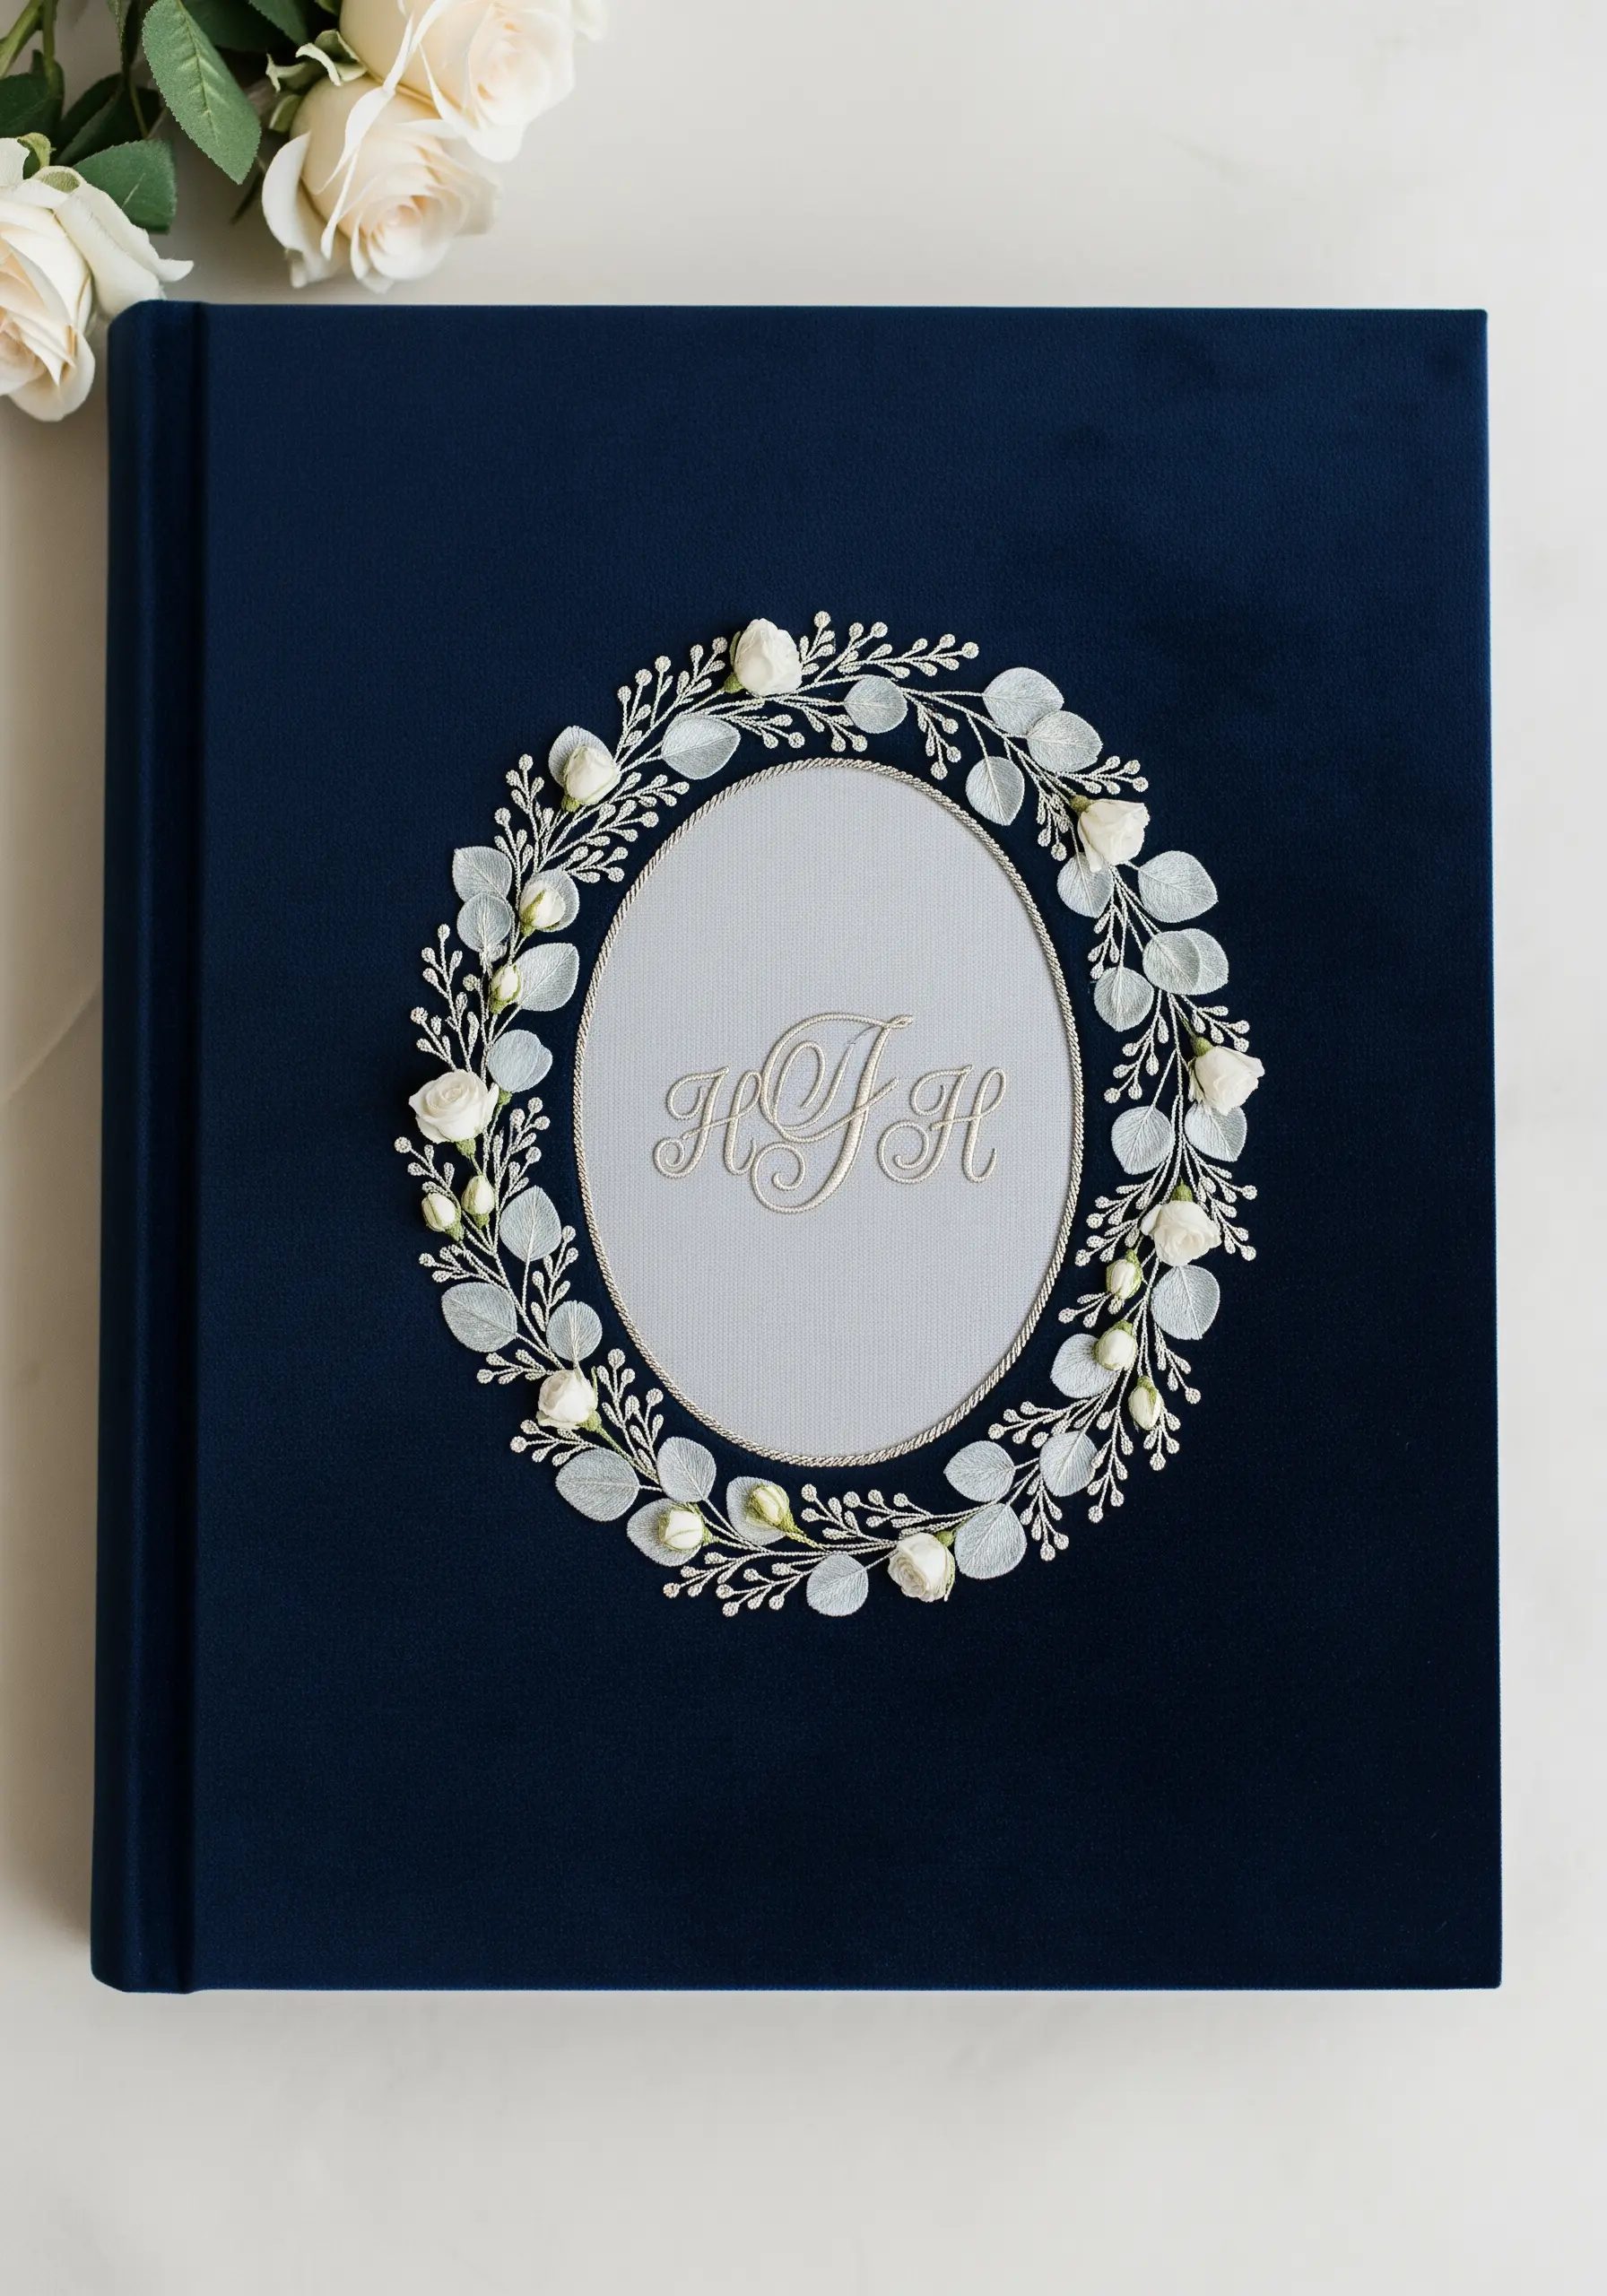
For a truly luxurious and dimensional effect, move beyond thread and incorporate other materials into your design.
Use silk ribbon and folded ribbon stitches to create plush, raised rosebuds, and use tiny seed beads or padded satin stitch for smaller blossoms.
Combine these with traditional single-strand embroidery for finer details like leaves and stems.
This layering of textures—velvet, silk, beads, and thread—gives the piece a rich, heirloom quality that is perfect for a wedding album or memory box.
16. Display 3D Embroidery as Botanical Specimens
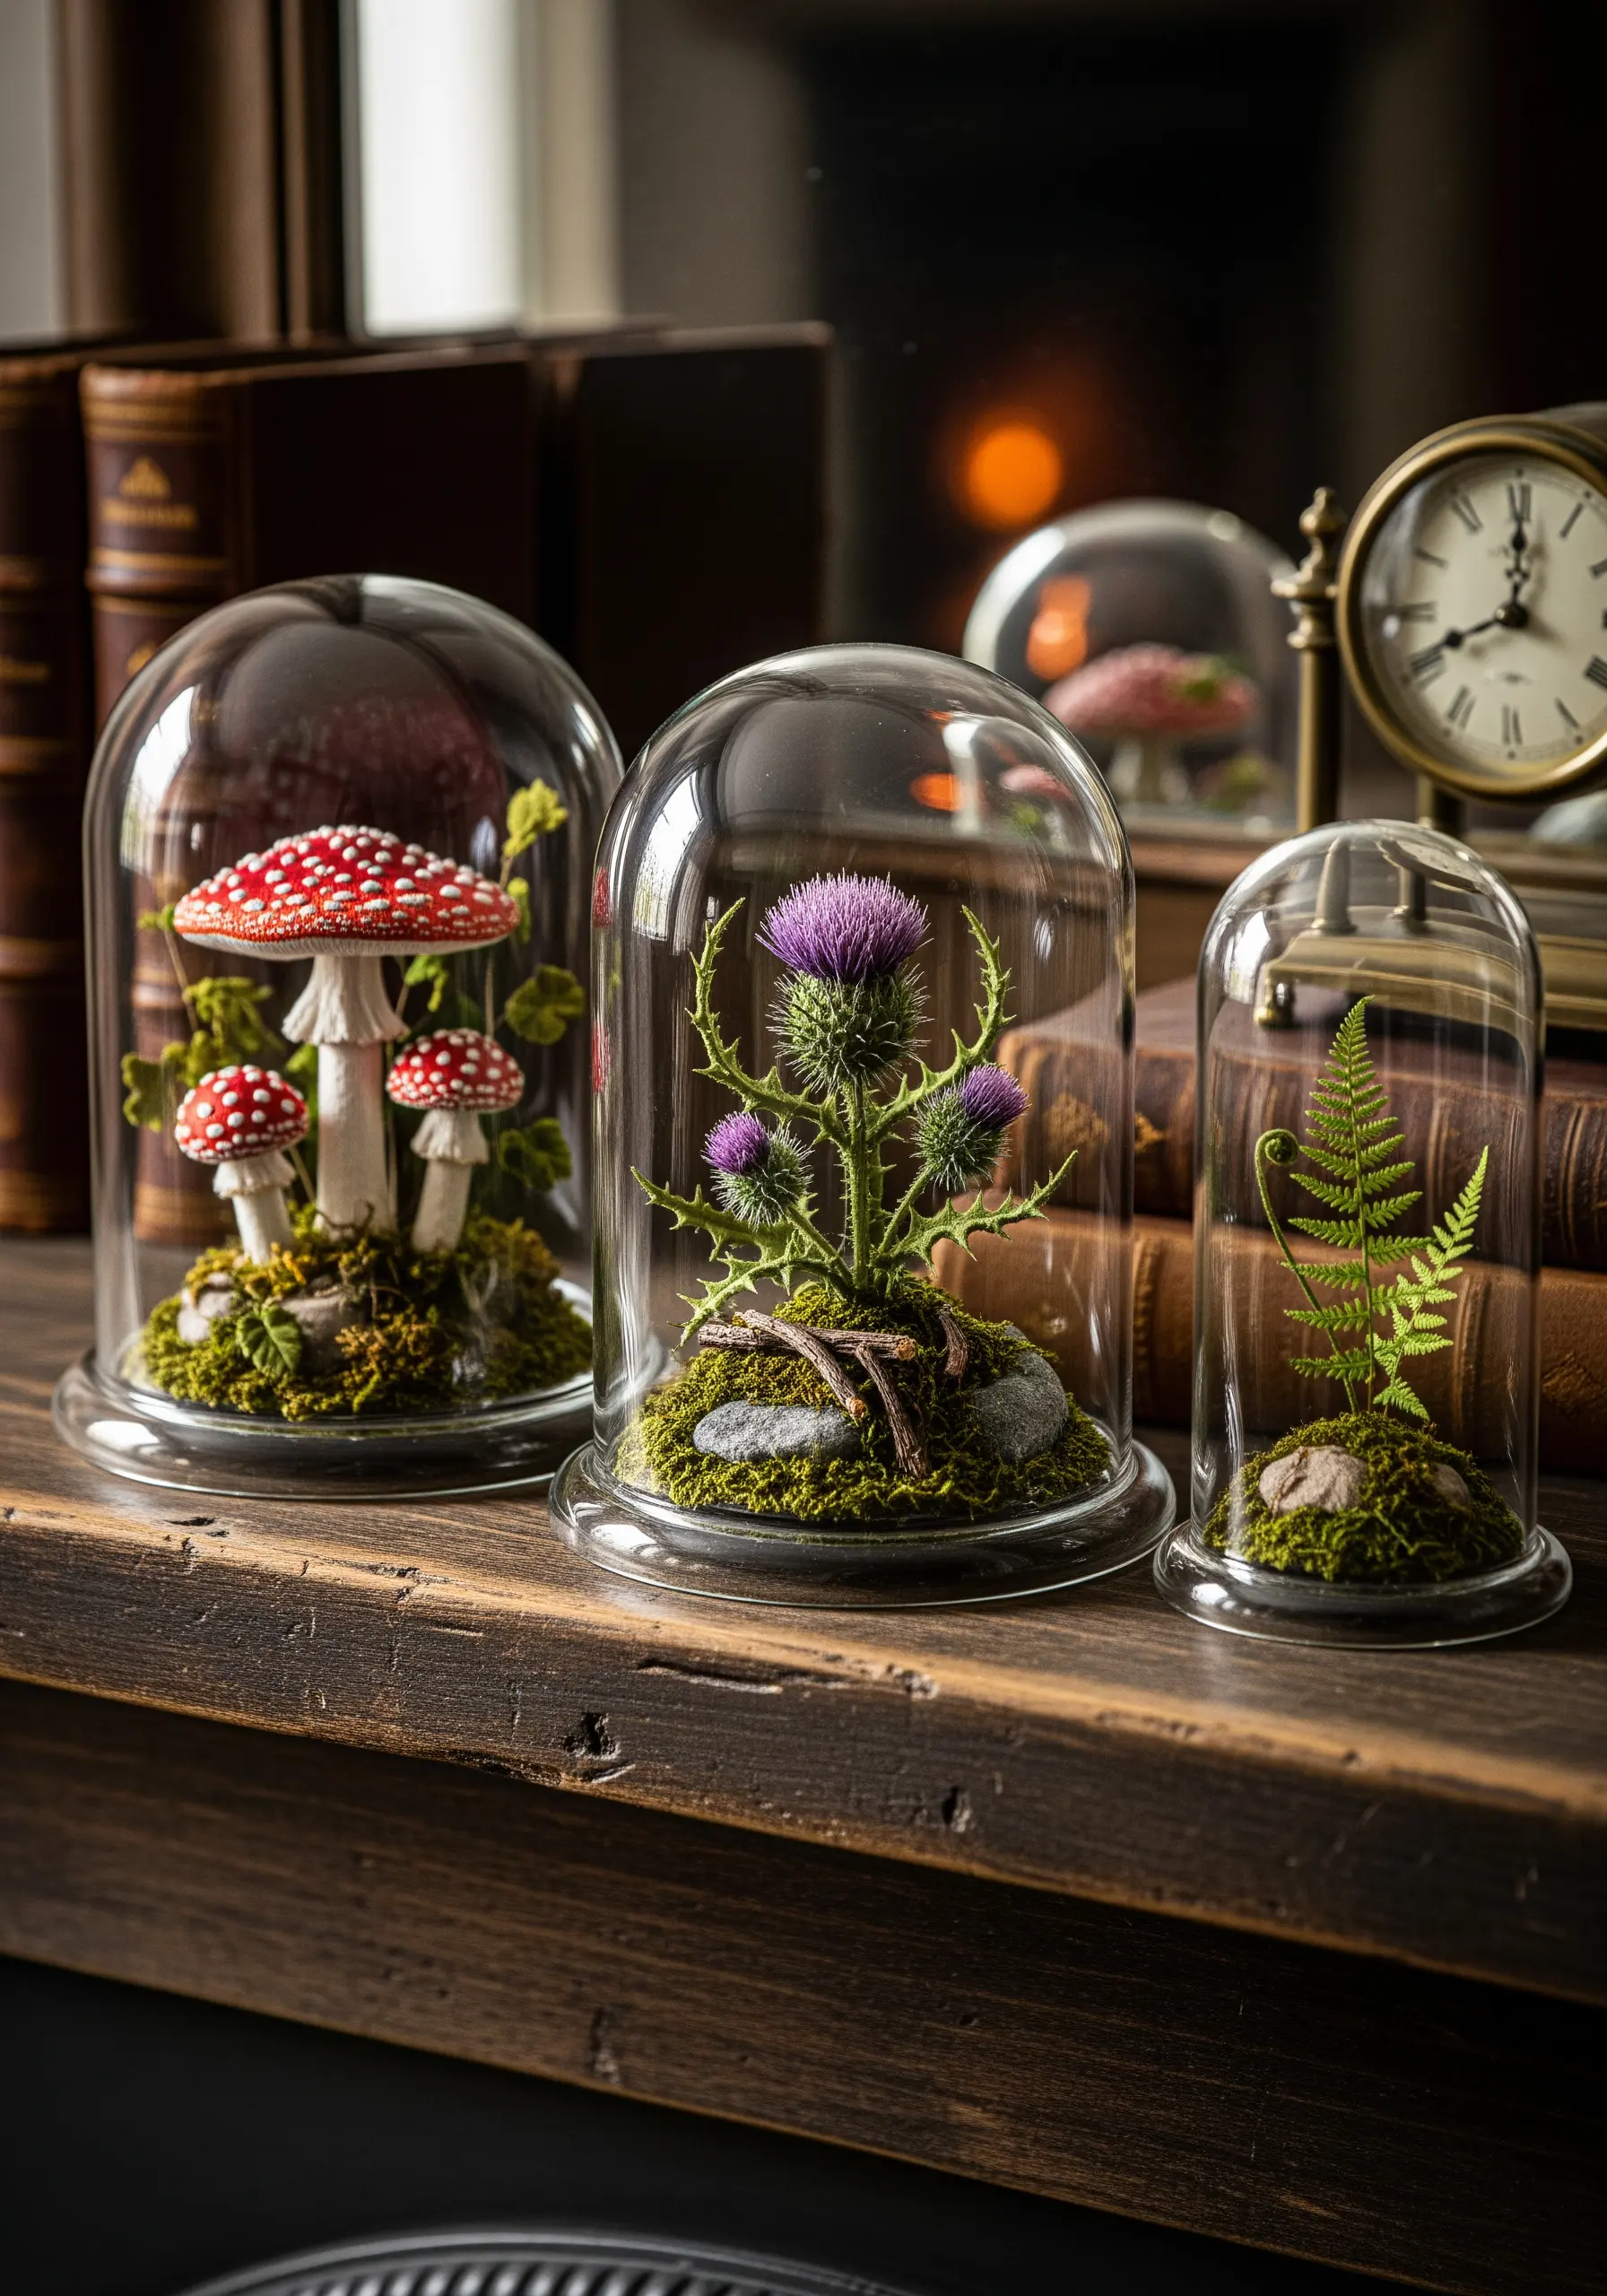
Present your detailed embroidery in a unique and captivating way by turning it into a scientific-style specimen display.
Use stumpwork and high-texture stitches like Turkey work to create a realistic, three-dimensional botanical scene on a small circle of fabric.
Mount your finished piece onto a small wooden base and cover it with a glass cloche or bell jar.
This presentation technique elevates your stitch work from a simple craft to a captivating miniature world, inviting closer inspection.
17. Add Refined Botanical Detail to Kitchen Linens
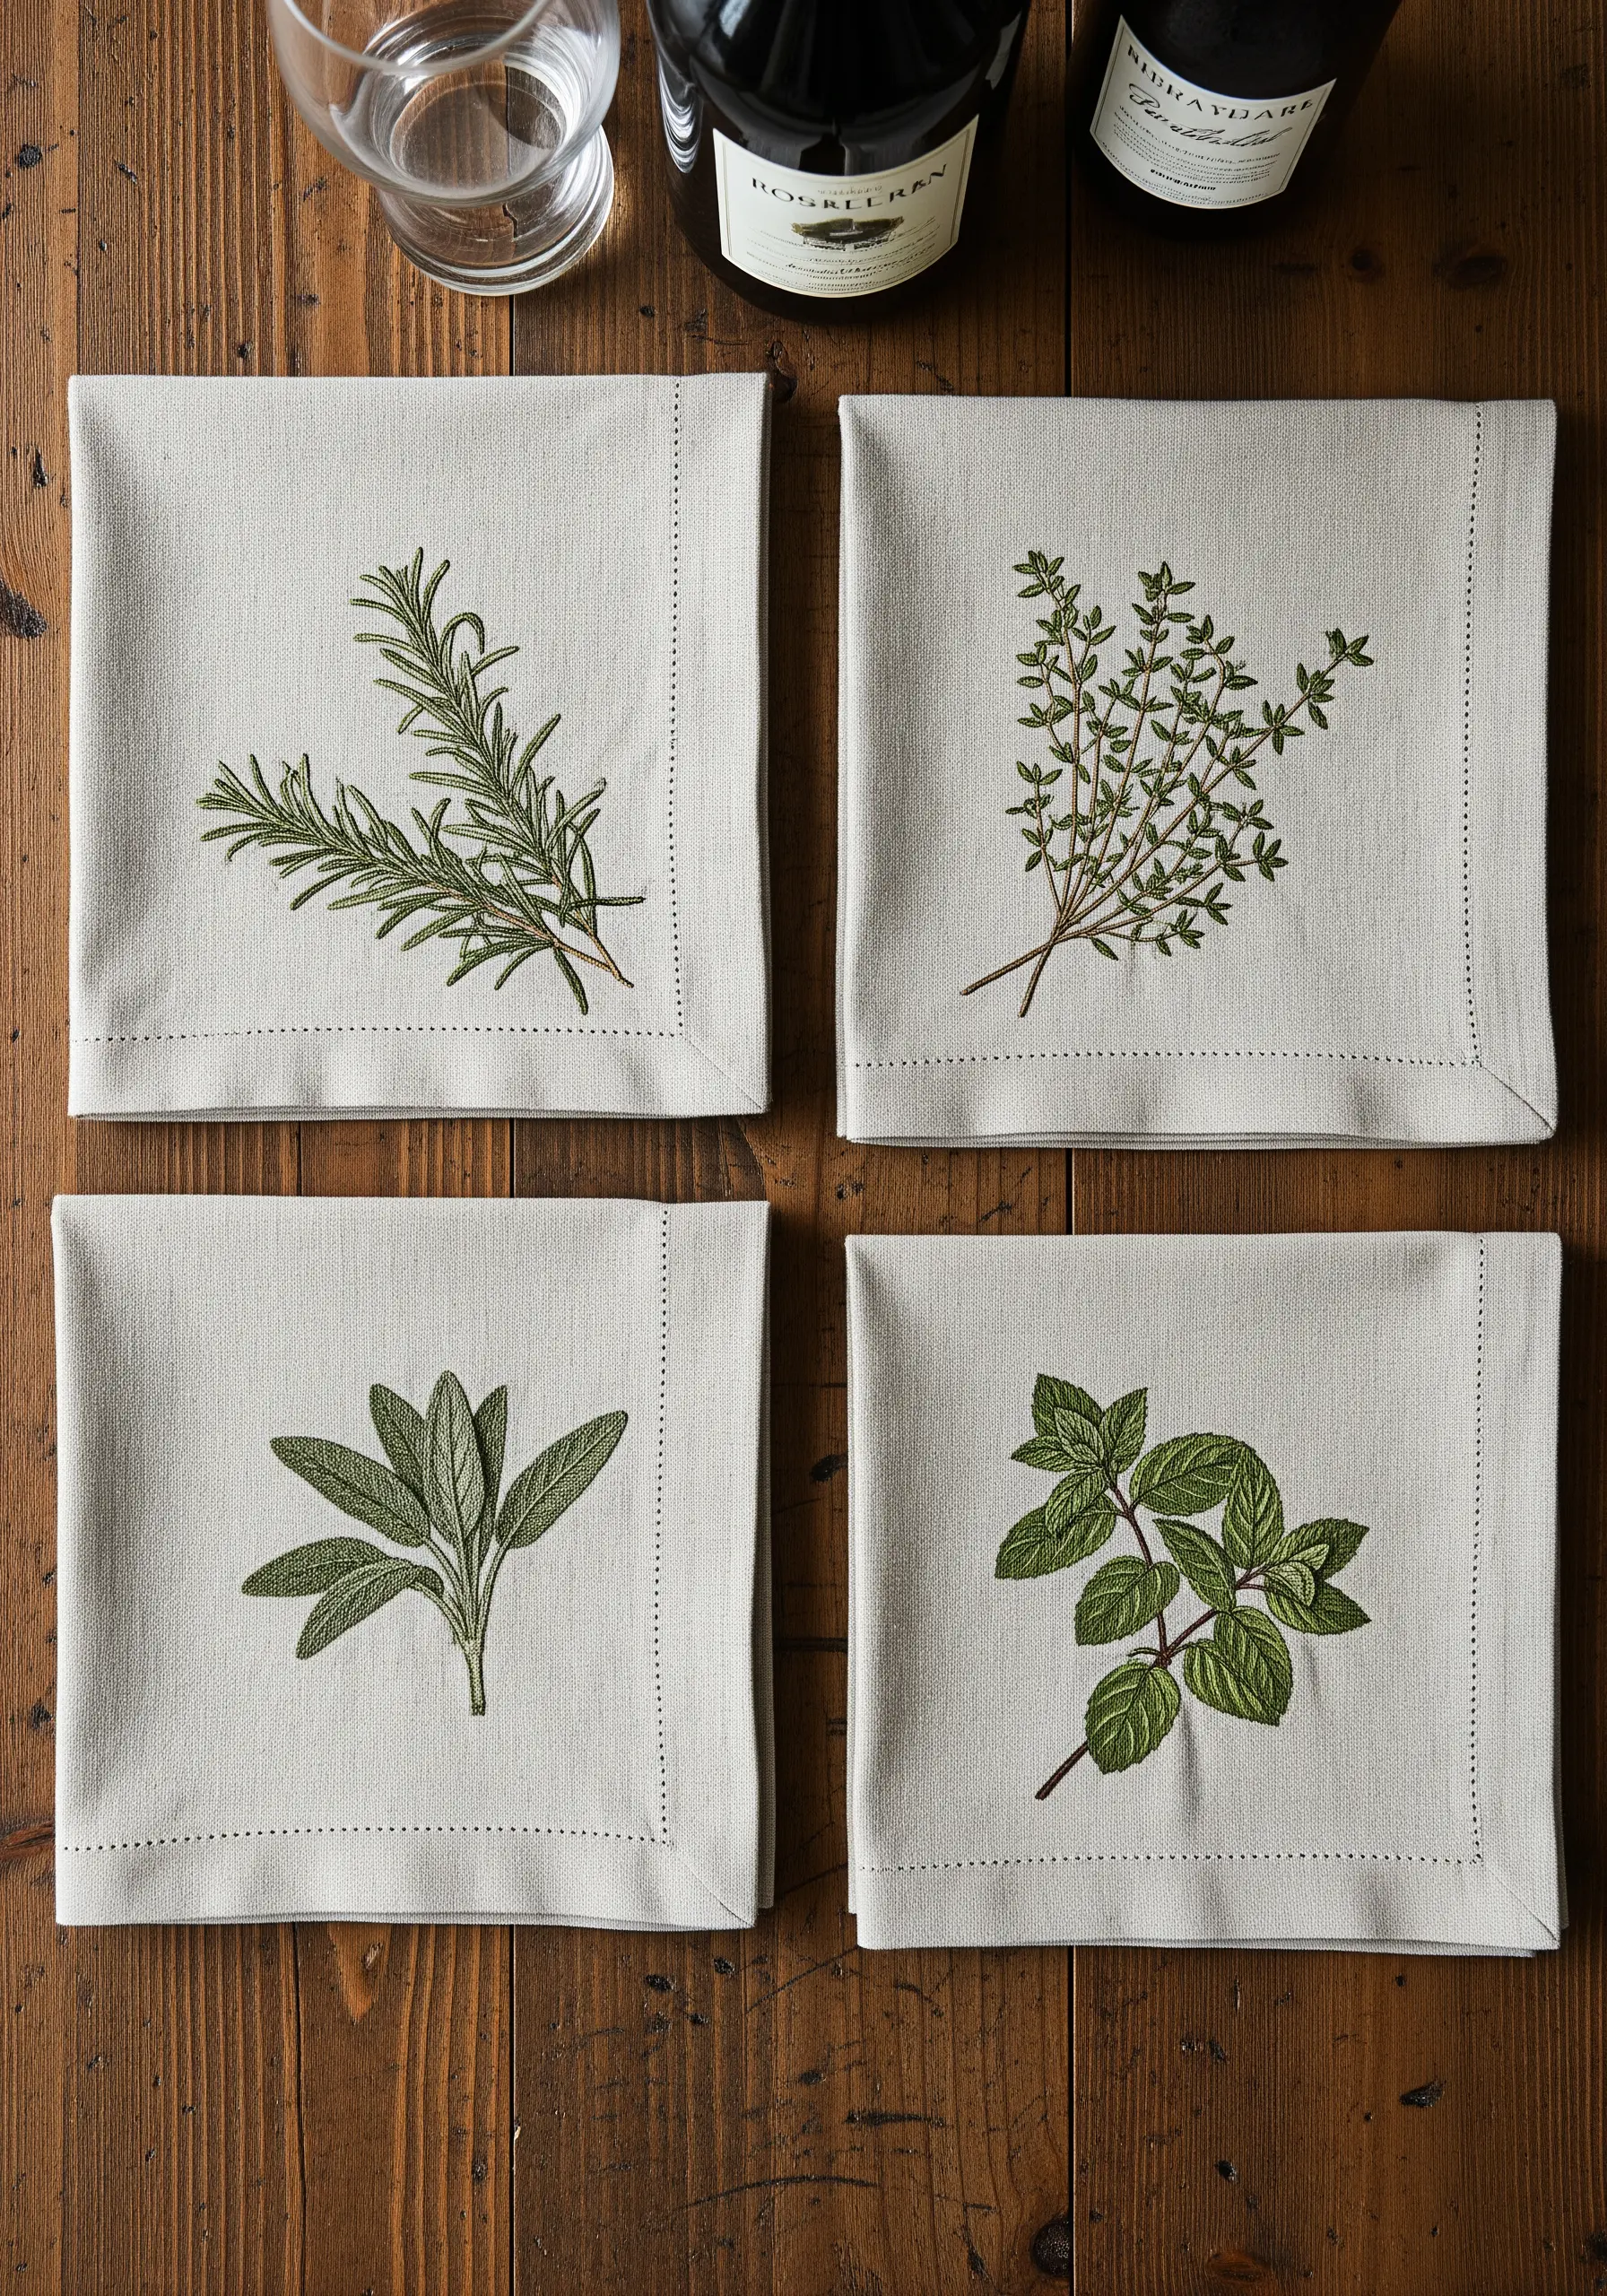
When embroidering functional items like napkins, a refined and simple approach often yields the most elegant results.
Choose a single color palette per herb to maintain a clean, modern aesthetic.
Use a stem stitch for the main branches to give them a defined, slightly rounded edge, and use fishbone stitch for the leaves to create a natural-looking central vein.
This minimalist technique elevates everyday linens without overwhelming them, making them both beautiful and practical.
Find more garden herb embroidery patterns that look stunning on any textile.
18. Embellish Cyanotype Prints with Stitched Highlights

Combine the magic of photographic printing with the texture of embroidery for a stunning mixed-media piece.
Create a cyanotype print on fabric using real ferns and flowers, which will result in a beautiful Prussian blue silhouette.
Once the print is set, use a bright white embroidery thread to add selective details—outline a stem with backstitch or add a cluster of French knots to a flower head.
This contrast between the flat print and the raised thread creates a dynamic and visually interesting surface on tote bags, pillows, or wall art.
19. Weave Wire Details into Pressed Flower Displays
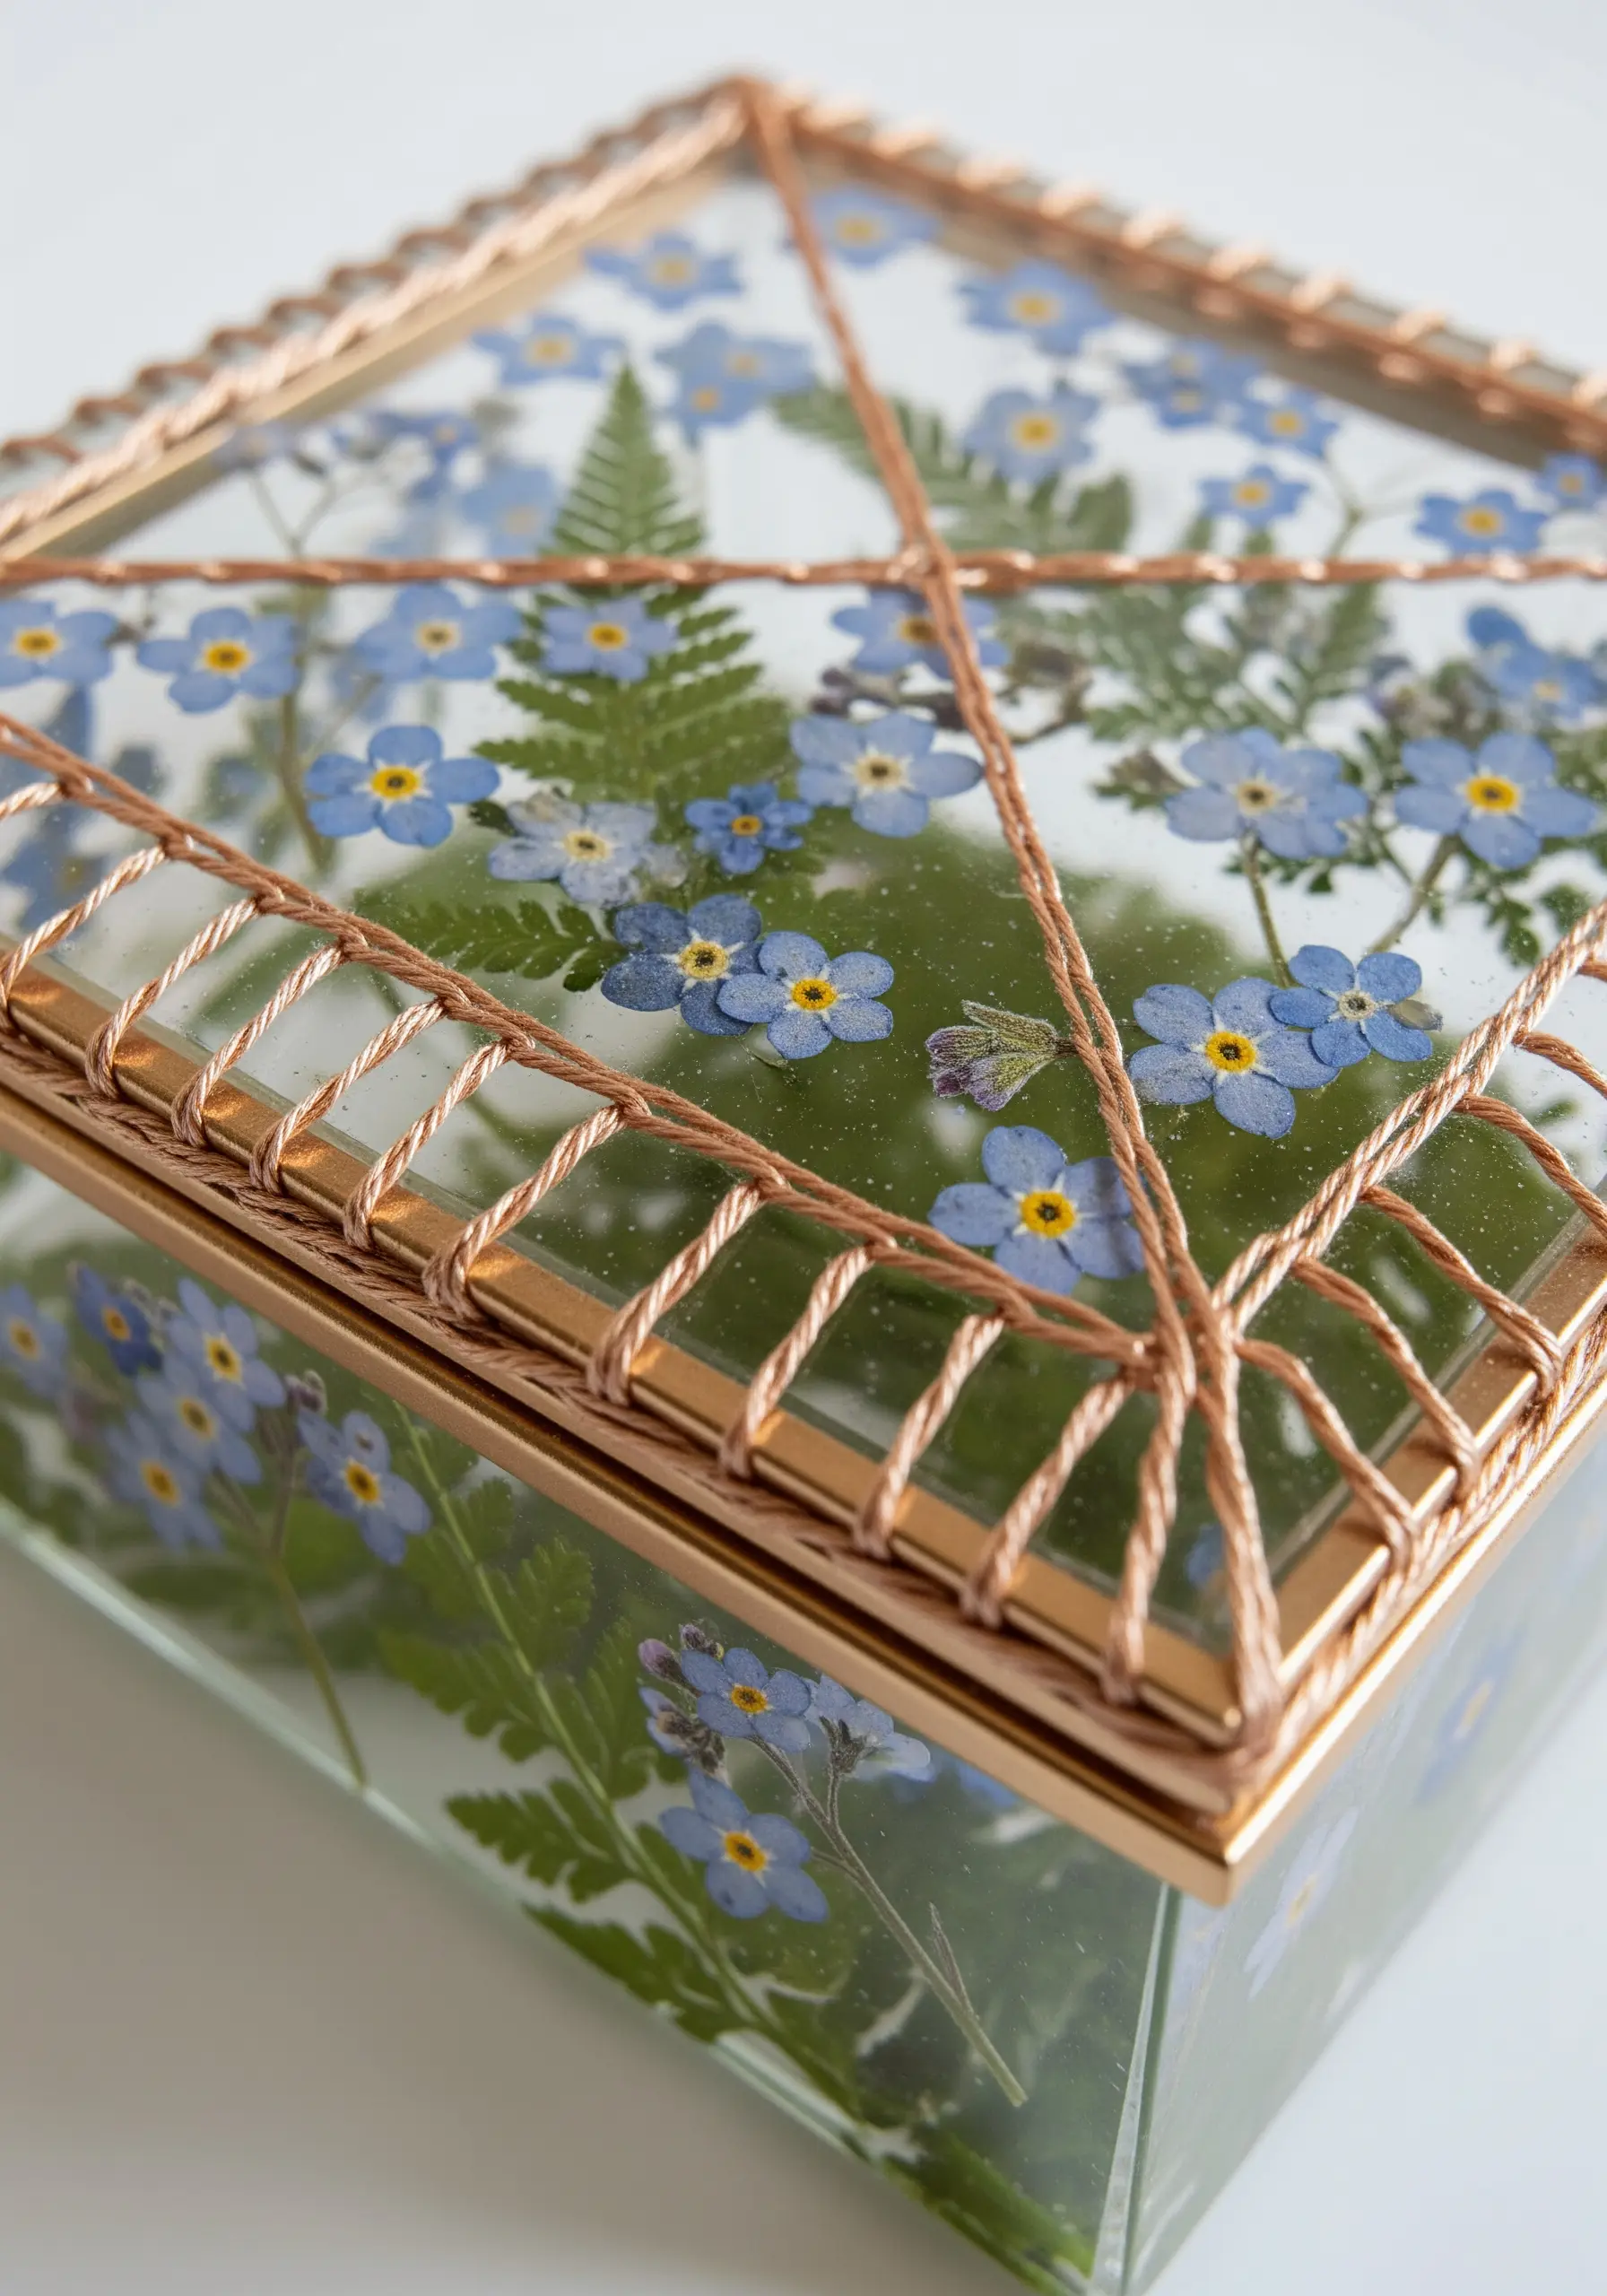
This technique allows you to add the linear quality of embroidery to glass displays without a needle.
Arrange your pressed botanicals inside a glass box or between two panes of glass, securing them in place.
Then, wrap a fine copper wire or metallic thread around the object’s frame, creating geometric patterns that cross over the glass.
This method provides structure and an elegant, shimmering detail that frames and protects the fragile flowers inside.
Check out more pressed flower embroidery hacks for a professional finish.
20. Use Tone-on-Tone Stitching for Subtle Upholstery
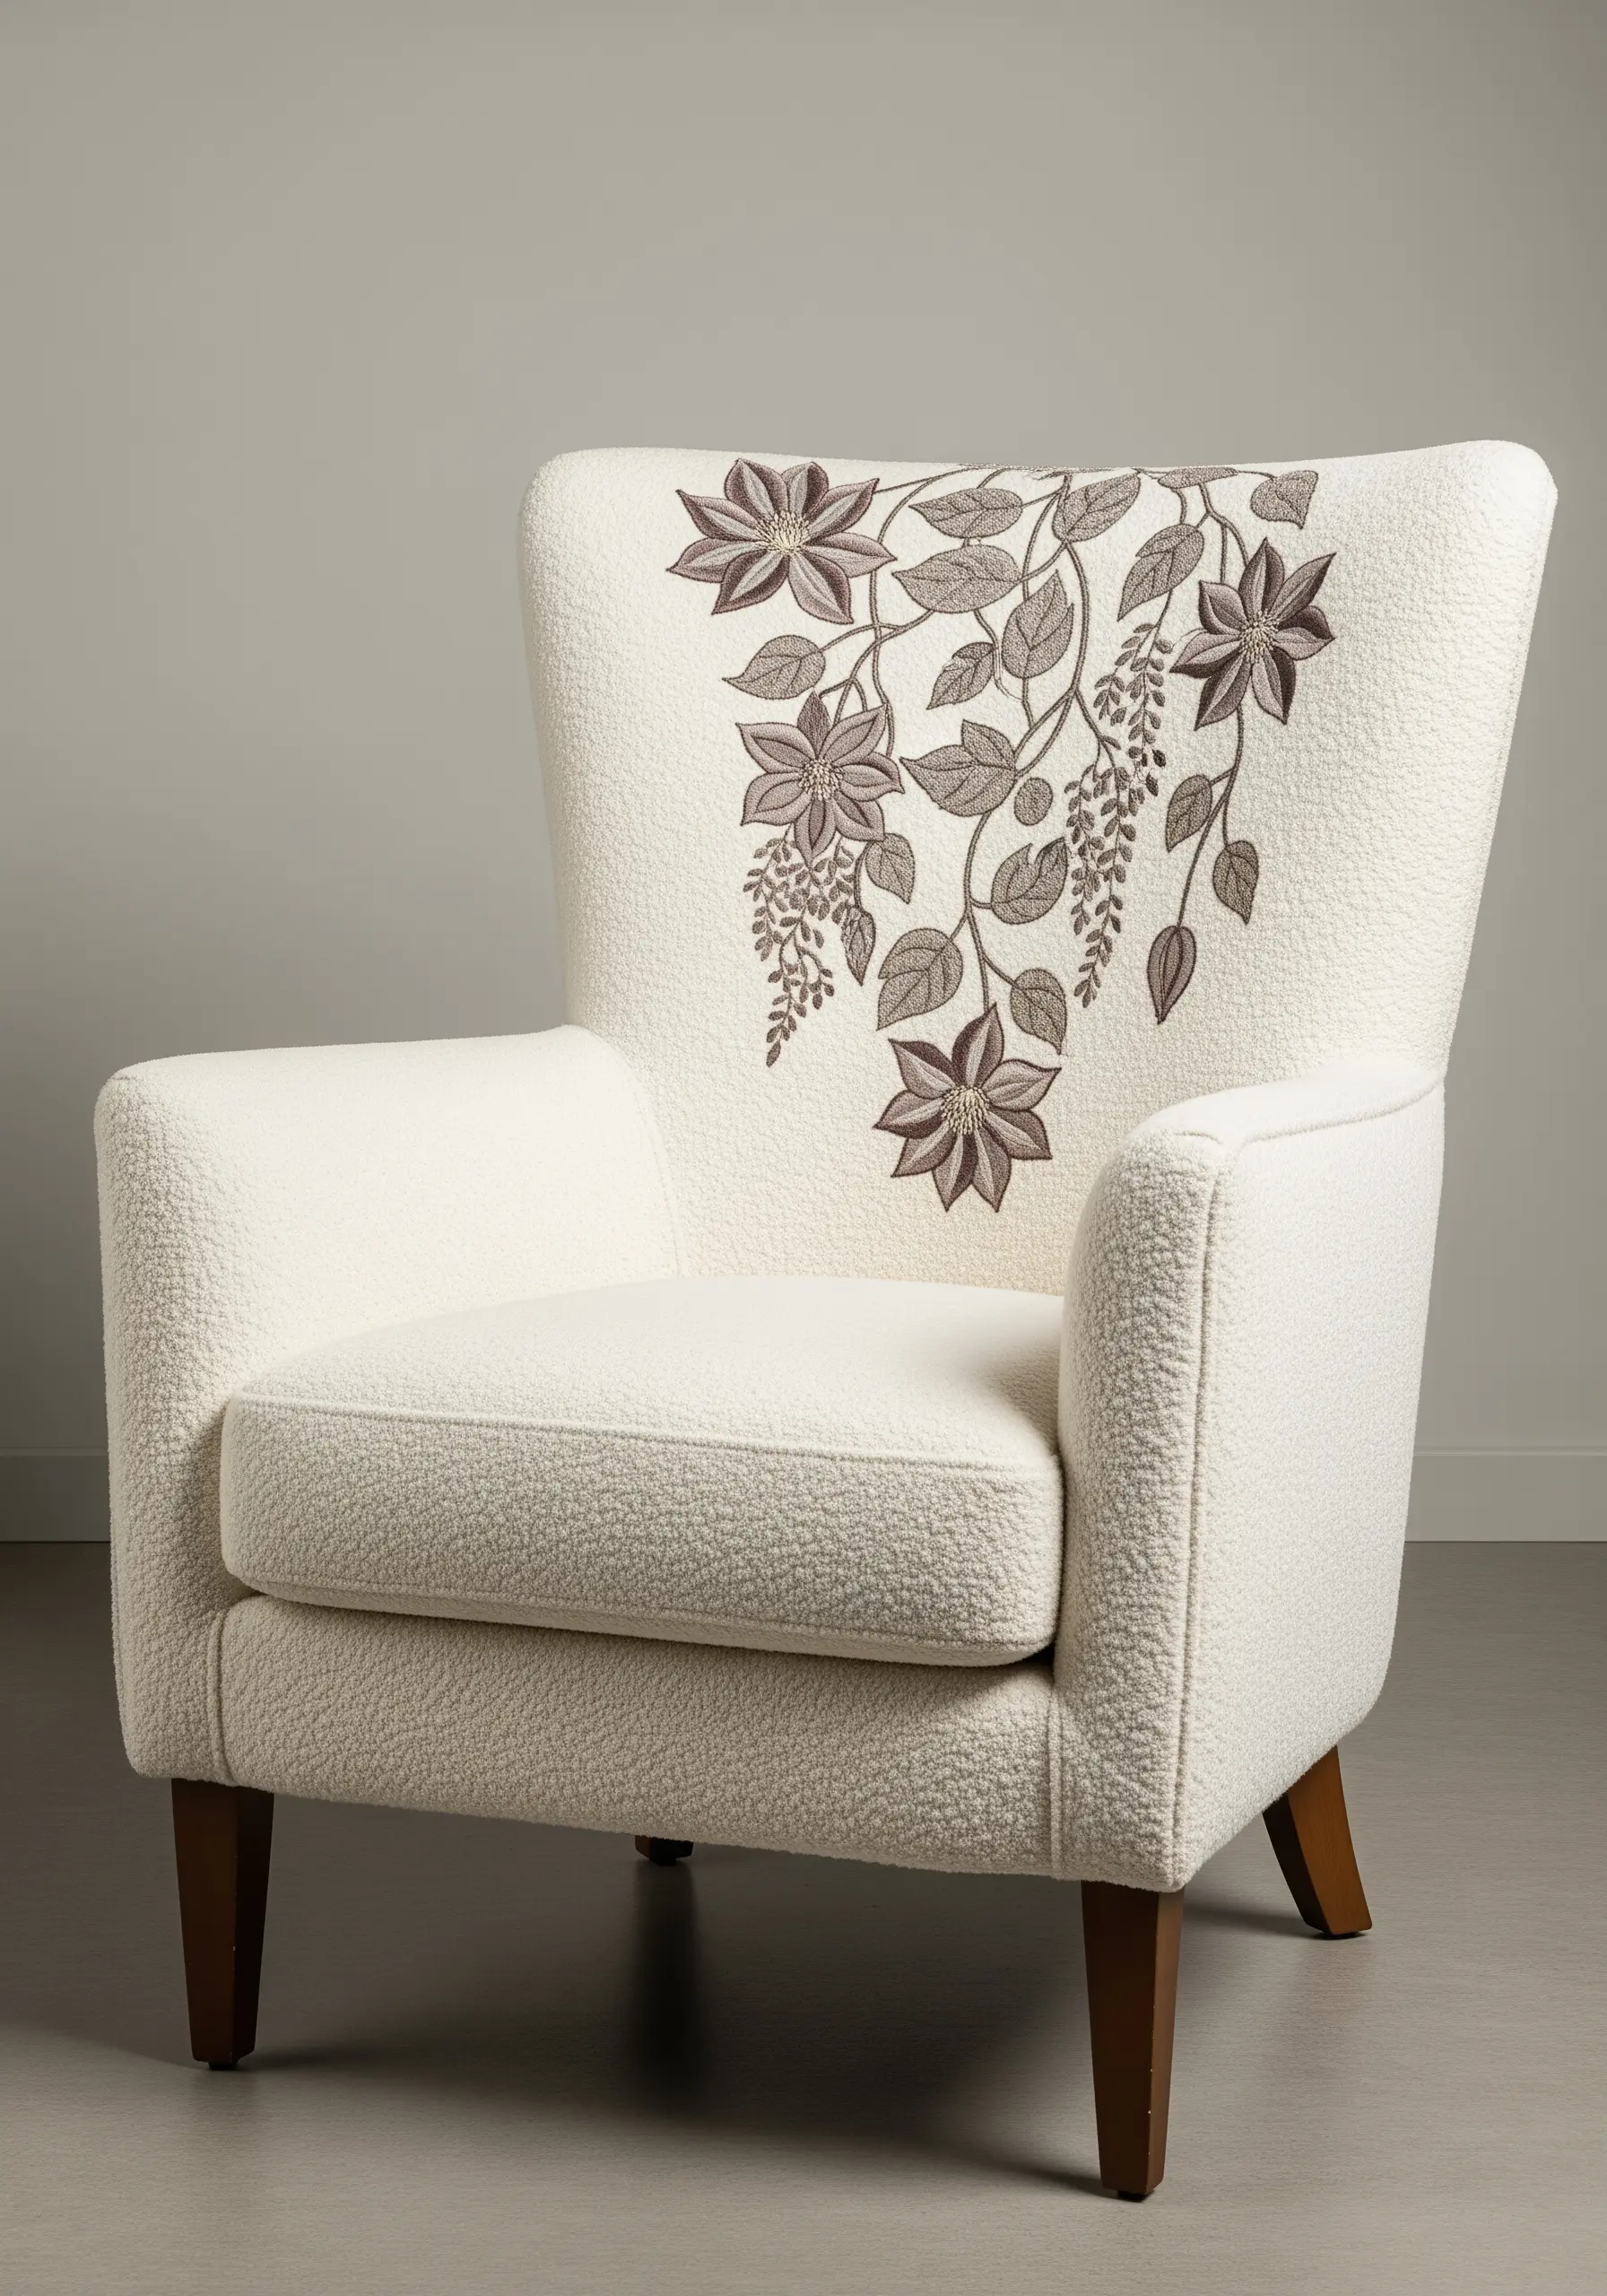
For a sophisticated and high-end look on upholstered furniture, choose embroidery threads that are only a few shades different from the base fabric.
This creates a subtle, textured pattern that is discovered rather than announced, adding depth and interest without overwhelming the piece.
Use durable stitches like backstitch or stem stitch that are less likely to snag with daily use.
Always test on a scrap of your upholstery fabric first, as its weave and thickness will influence your needle choice and stitch tension.
These tone-on-tone embroidery techniques are perfect for this.
21. Combine Embroidery and Lace for Heirloom Sachets

Elevate a simple project like a lavender sachet by layering different textile elements for a rich, romantic feel.
First, complete your botanical embroidery on a piece of linen.
Next, stitch a piece of vintage or modern lace over a section of the fabric before sewing the sachet closed.
For a truly integrated design, weave the embroidered stems through the openings in the lace, making the two elements feel intentionally combined.
This adds a touch of heirloom quality to a small, thoughtful gift.
22. Create Geometric Designs with Thread on Wood

Bring the art of embroidery to unexpected surfaces like wood by using a few simple tools.
Plan your design and use a micro drill or a sharp awl to create small, evenly spaced holes where your stitches will go.
Once the holes are prepared, you can stitch through them just as you would with fabric, using the holes as your guide.
Frame delicate pressed flowers with these stitched geometric patterns, and add tiny beads at the intersections for a polished, decorative finish.
Try these minimal geometry stitch projects for more ideas.


