
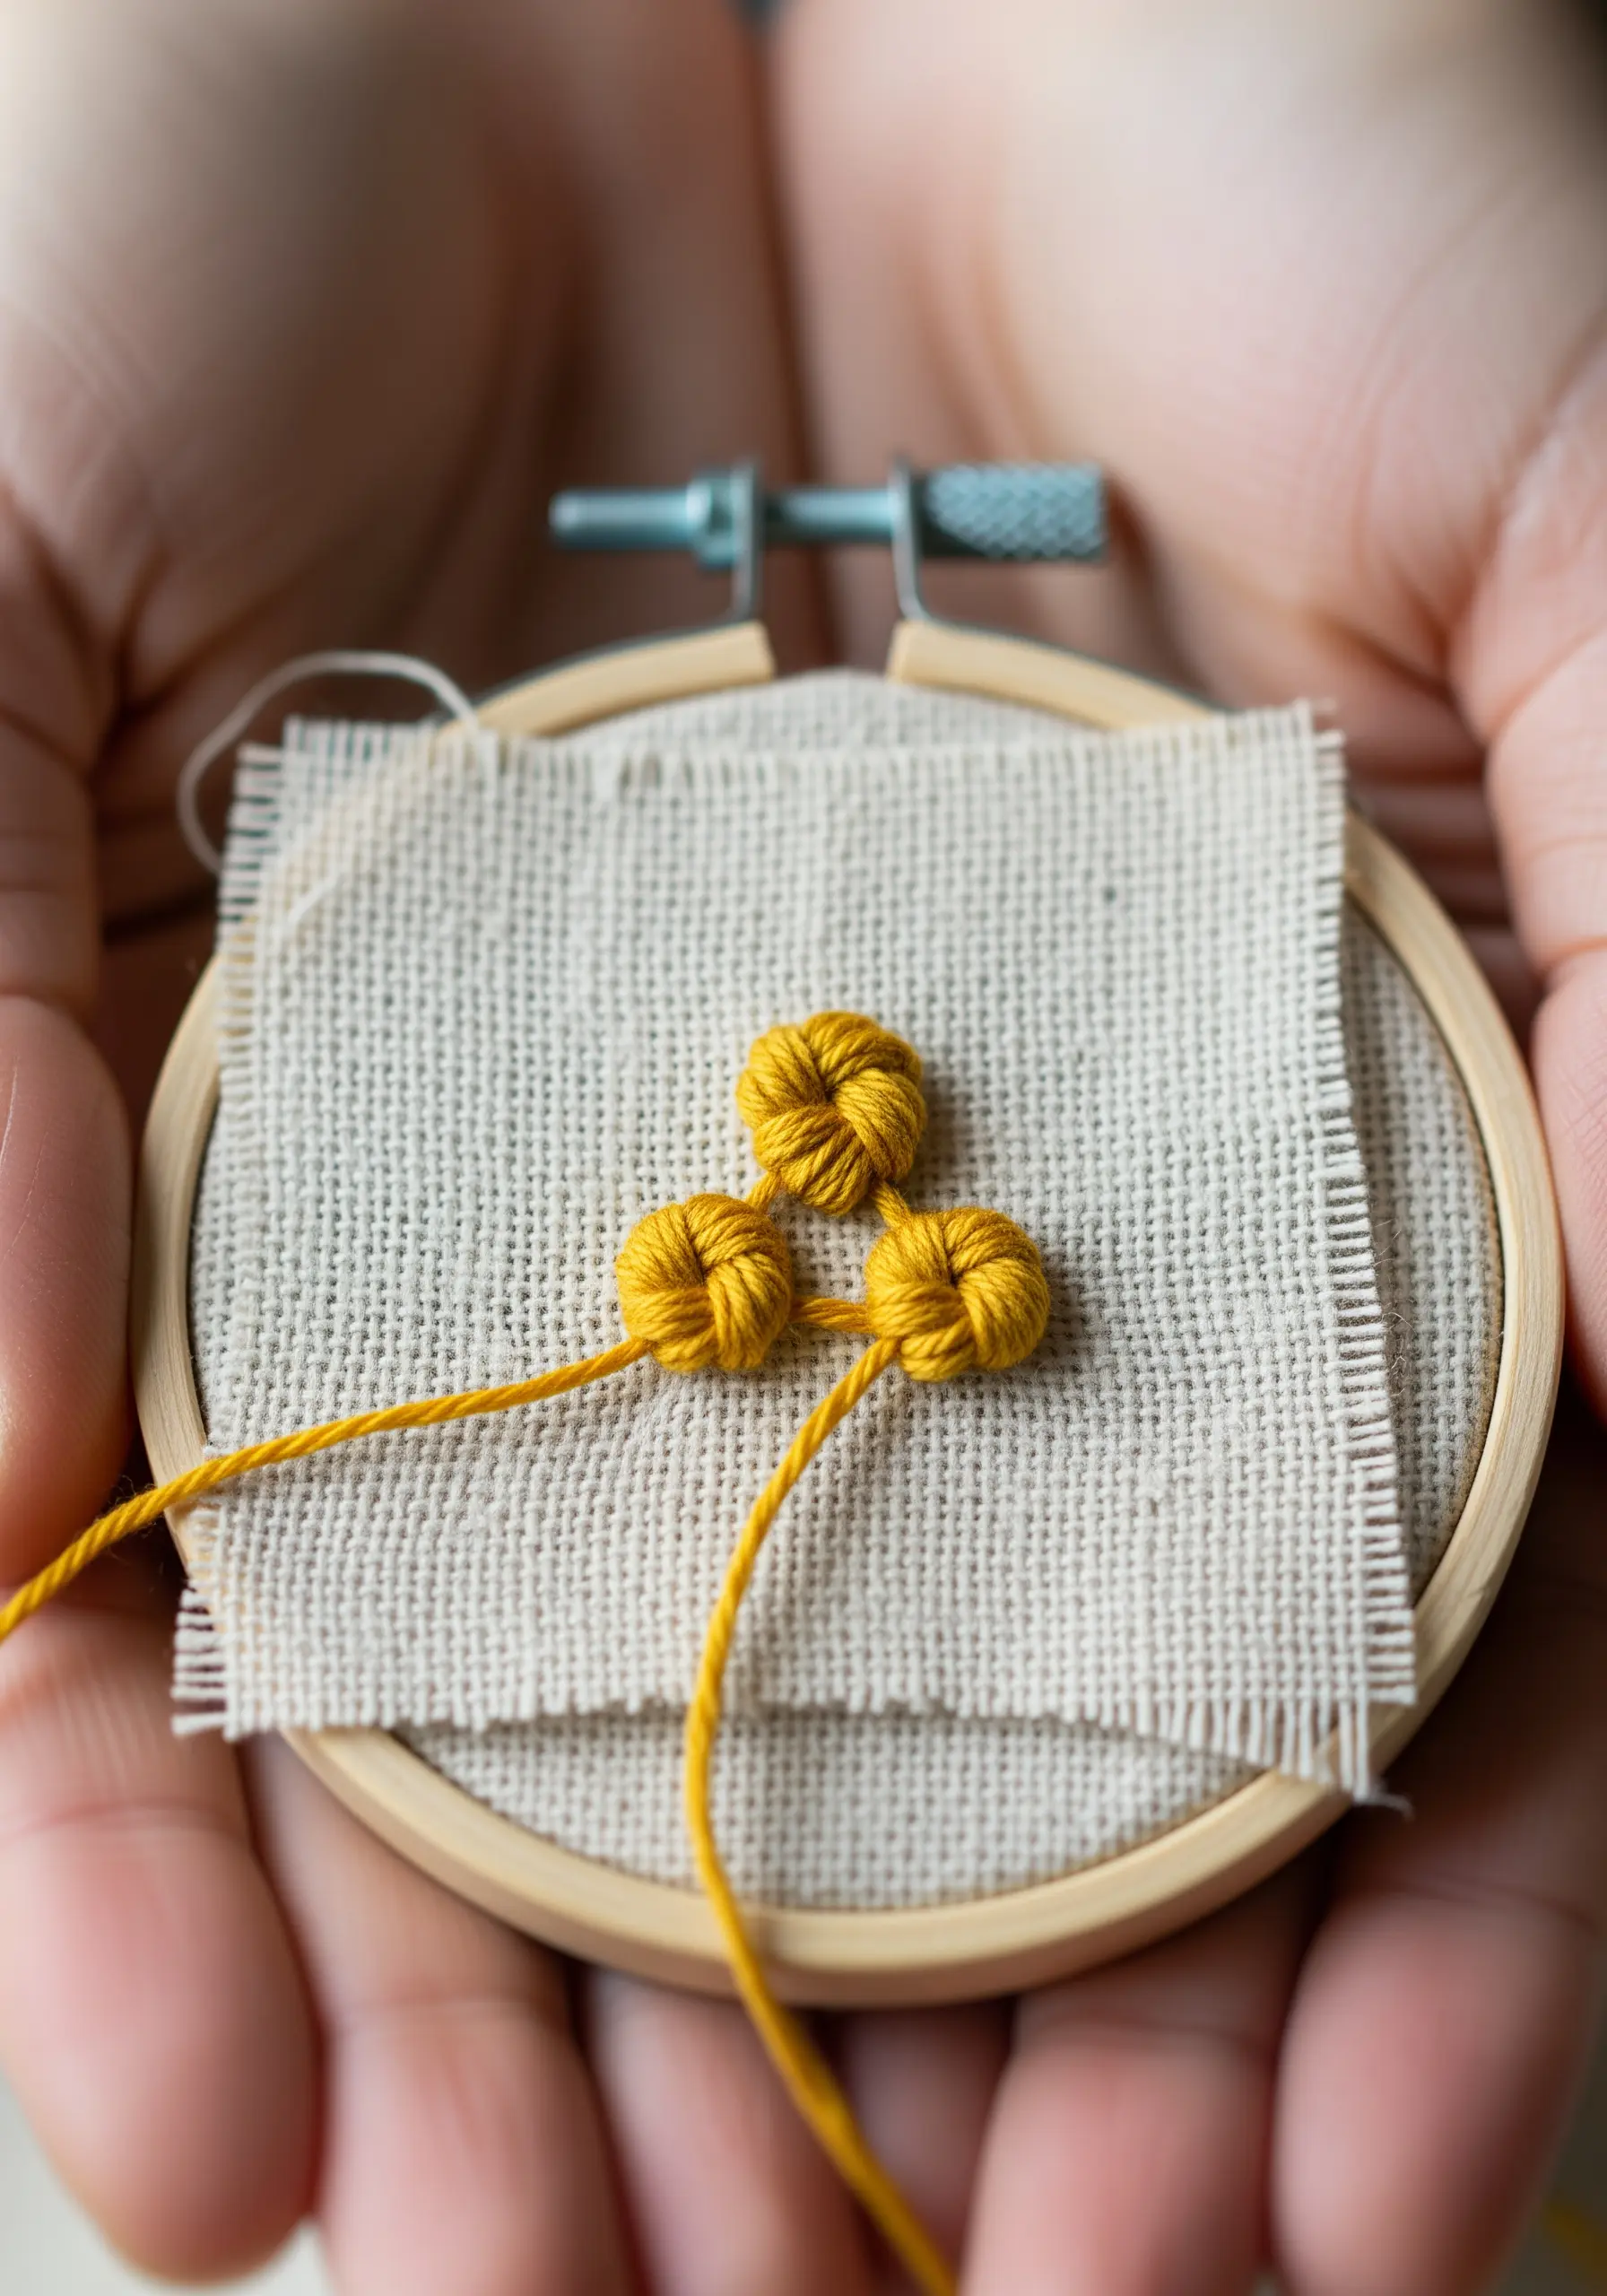
Your collection of scrap fabric and spare threads isn’t a limitation; it’s a curated palette waiting for the right project. Often, the most expressive work comes not from an abundance of supplies, but from the thoughtful use of what you already have.
These small hoop projects are an invitation to focus your creativity. In a small space, every stitch matters. This is where you can perfect a French knot, master the tension of a satin stitch, or see how a single line can tell a whole story.
Consider these hoops not just as finished pieces, but as practice in intention. A way to turn leftover materials into small, deliberate works of art that feel personal, polished, and uniquely yours.
1. Elevate Florals with Textured Knots
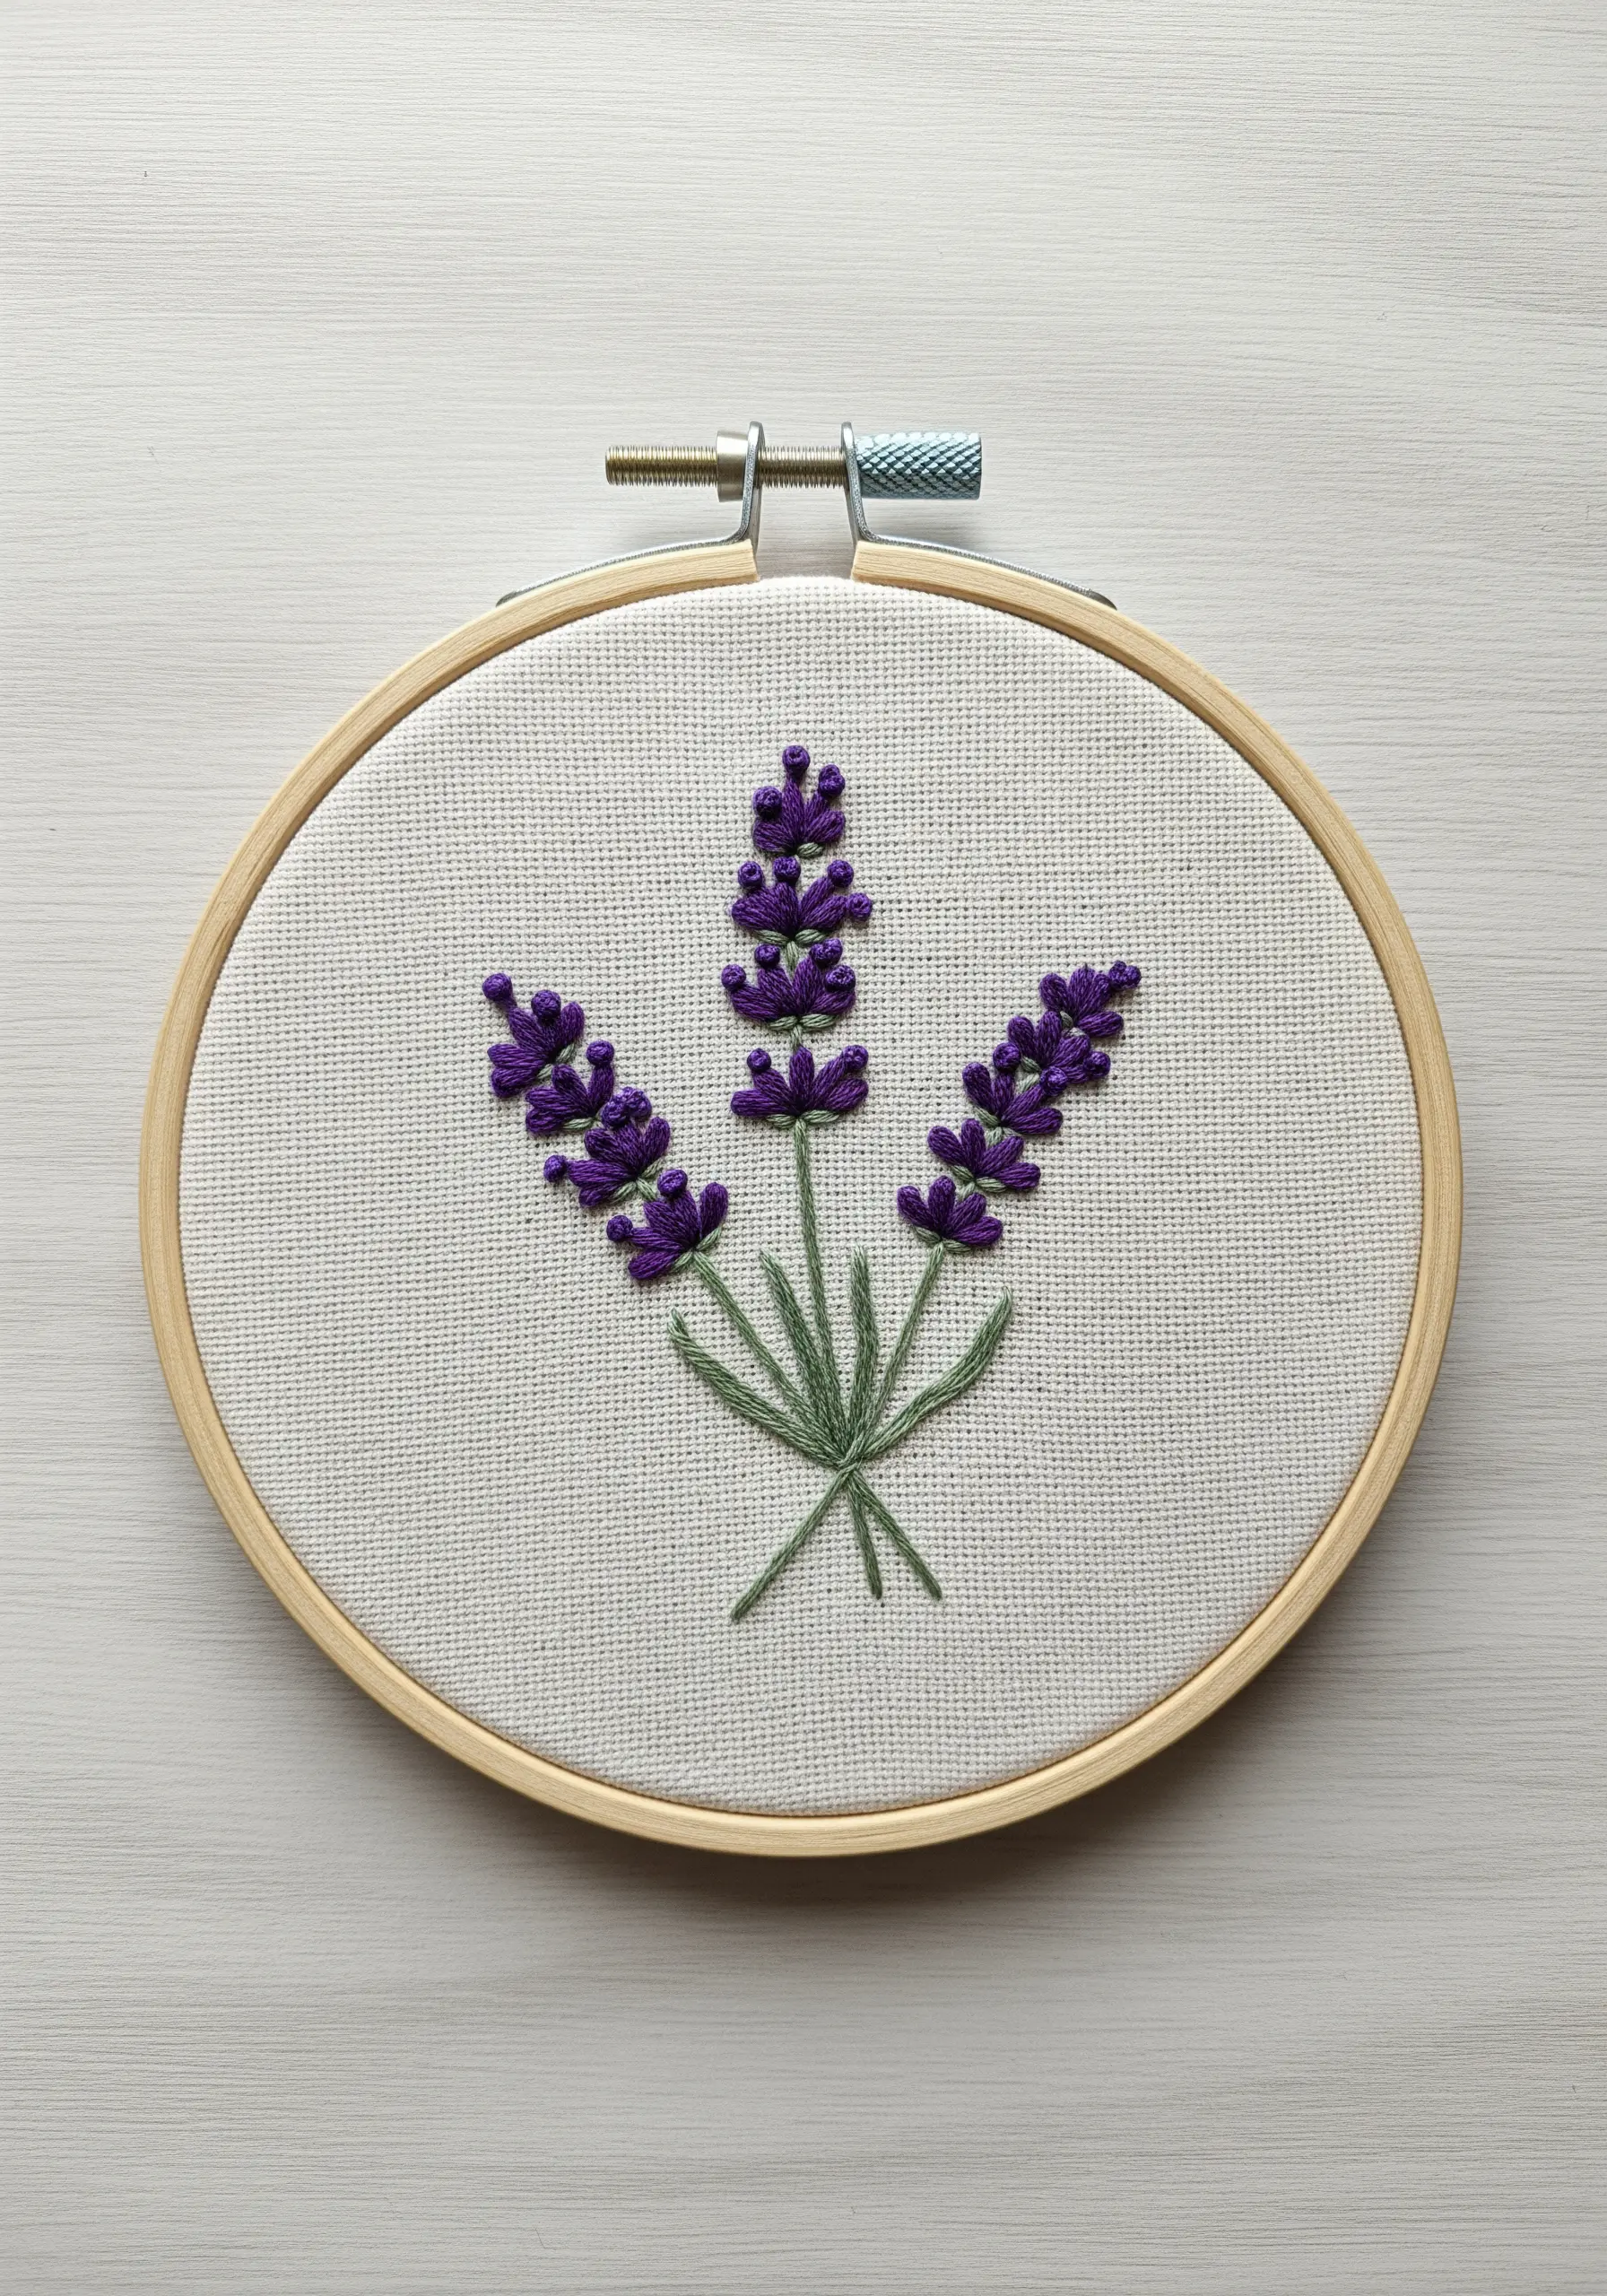
For lavender buds that feel real enough to touch, rely on the French knot.
Instead of making every knot identical, vary the size by wrapping the thread around your needle just once for smaller buds and twice for larger ones.
This simple variation creates a natural, clustered texture that mimics a real lavender sprig.
Use a clean stem stitch for the stalks and leaves, allowing the textured blossoms to be the focal point of your design.
This technique is perfect for adding life to any botanical stitch project.
2. Master the Dimensional Woven Wheel
The woven wheel stitch, also known as a wagon wheel rose, transforms a flat surface into a sculptural motif with minimal effort.
Start with a star-shaped foundation of straight stitches—always use an odd number, like five or seven spokes.
Then, weave your thread over and under these spokes without piercing the fabric.
The magic is in the tension: a gentle pull creates a plump, raised flower, while tighter weaving results in a flatter, more detailed bloom.
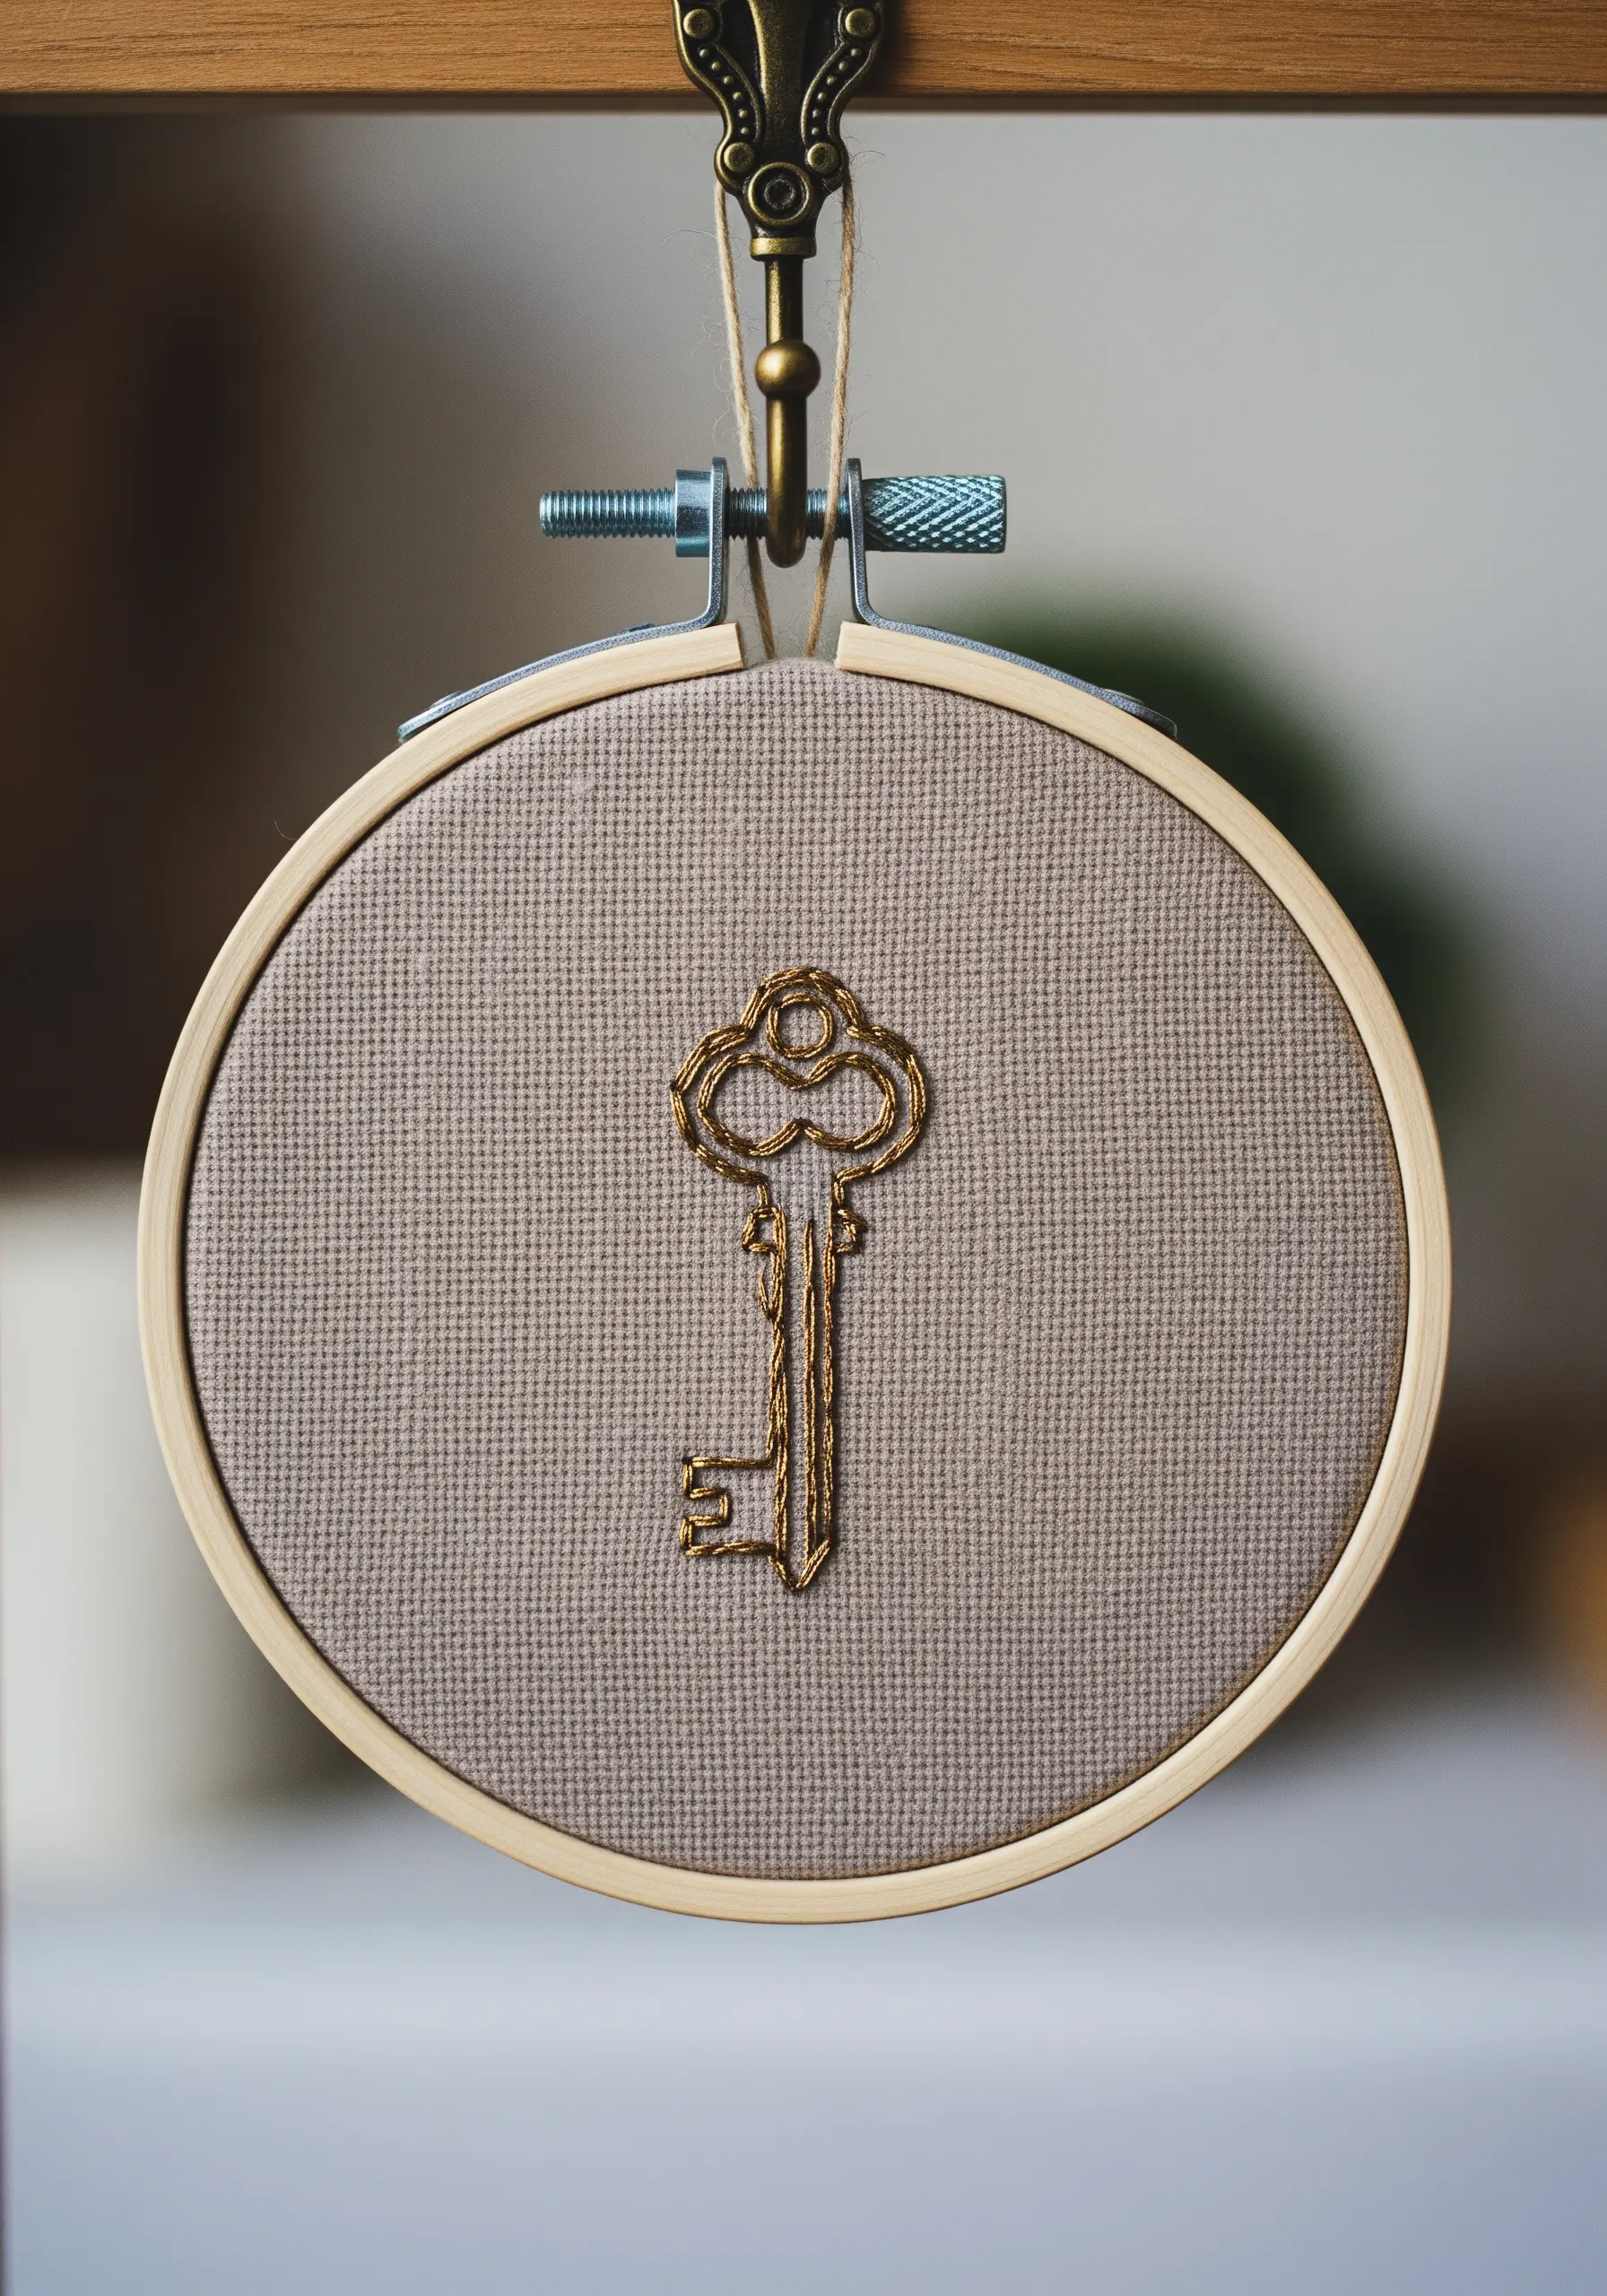
3. Refine Outlines with Whipped Backstitch
A standard backstitch can sometimes appear broken or uneven, especially on curves.
To elevate it, add a whipping stitch: once your backstitch line is complete, take a second thread and slide it under each stitch without piercing the fabric.
This simple action wraps the base stitch, transforming it into a smooth, solid, rope-like line.
It’s an incredibly effective technique for giving minimalist designs a polished, high-quality finish, especially for celestial motifs.
4. Achieve Fluidity in Continuous Line Art

For modern, single-line designs, the stem stitch is your most reliable tool.
It creates a smooth, slightly twisted line that flows beautifully around curves, unlike the backstitch which can look jagged.
The key to a flawless finish is maintaining consistent stitch length.
For sharp corners, secure the turn with a tiny anchoring stitch before changing direction to keep the line crisp and intentional.
This is how you turn a simple drawing into a piece of refined textile art.
5. Sculpt with Directional Satin Stitch
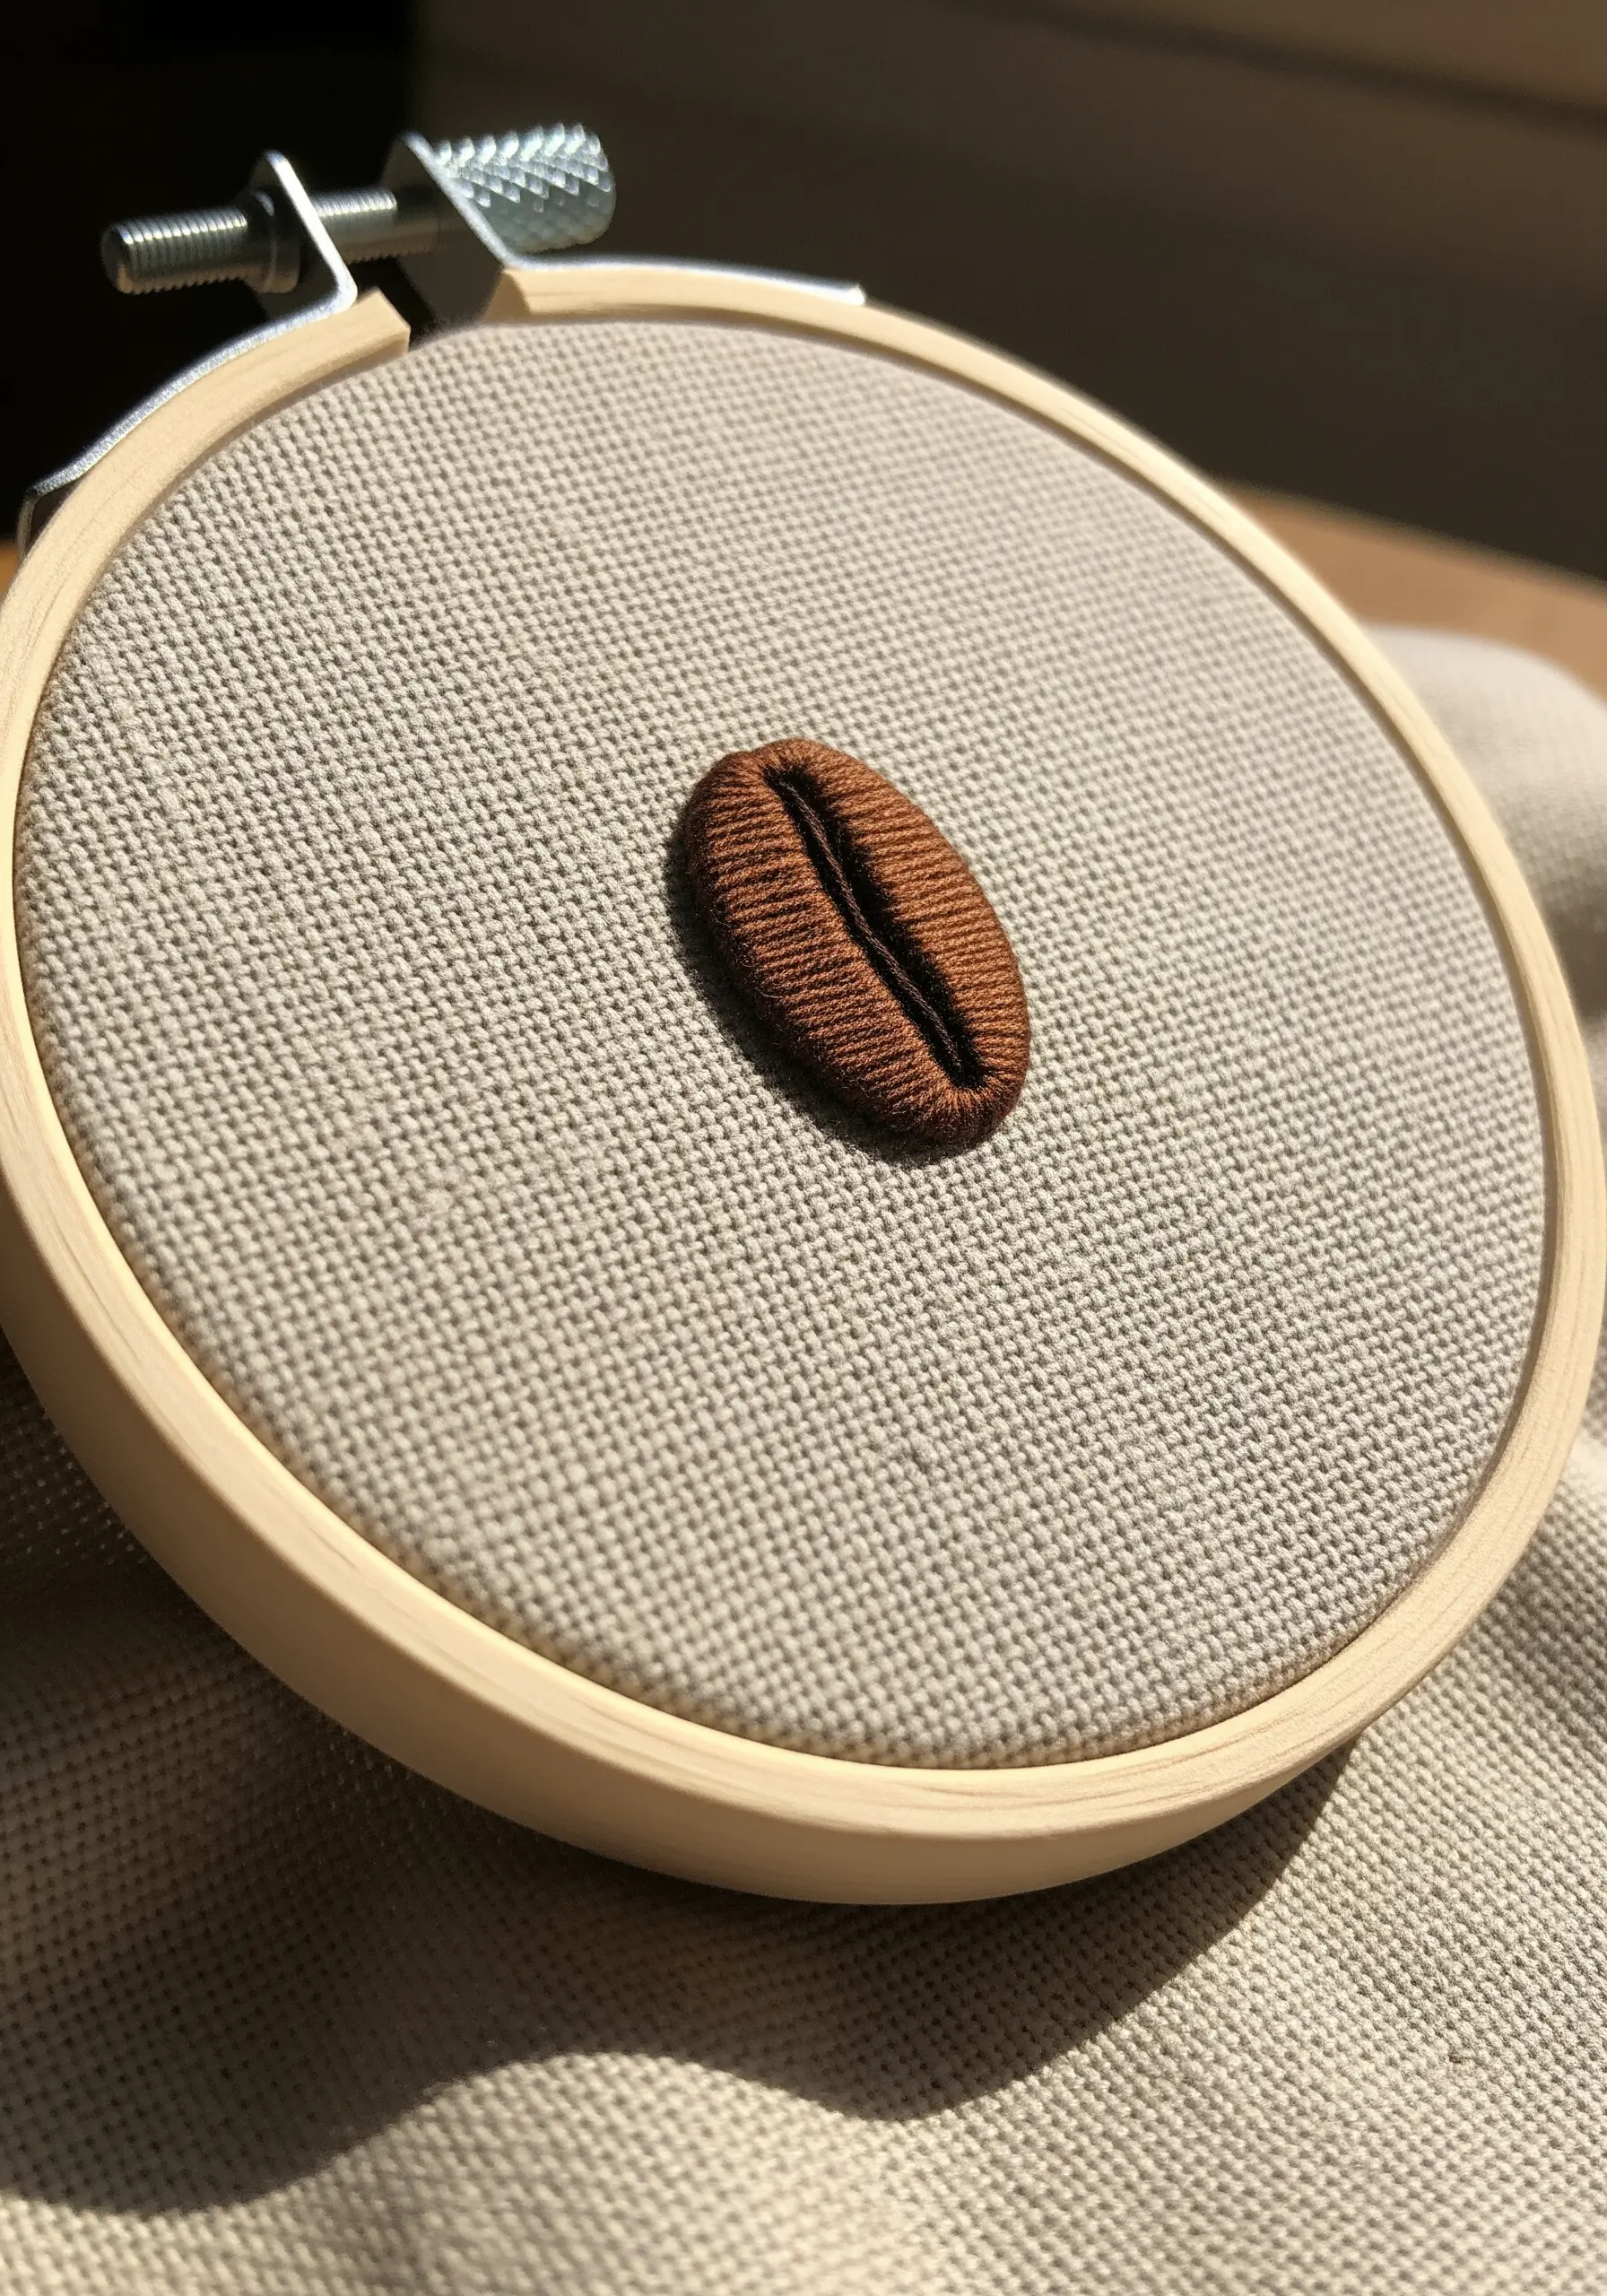
A simple shape like a coffee bean becomes an object of art when you use directional satin stitch.
Instead of filling the shape with uniform vertical or horizontal stitches, angle them to follow the object’s natural curve.
Stitch from the center line outward on both sides, letting the light catch the angled threads differently.
This creates the illusion of a rounded, three-dimensional form without any complex shading, proving how stitch direction alone can build volume.
6. Explore Graphic Texture with Pattern Darning
Turn your scrap fabric into a canvas for pattern darning, a technique that uses simple running stitches to create intricate-looking textures.
You are essentially weaving on the surface of the fabric.
By varying the length of your stitches and the spaces between them, you can build geometric patterns with a beautiful, tactile quality.
Using an even-weave linen or cotton scrap makes it easier to keep your lines symmetrical and your pattern precise.
7. Define Form with Negative Space
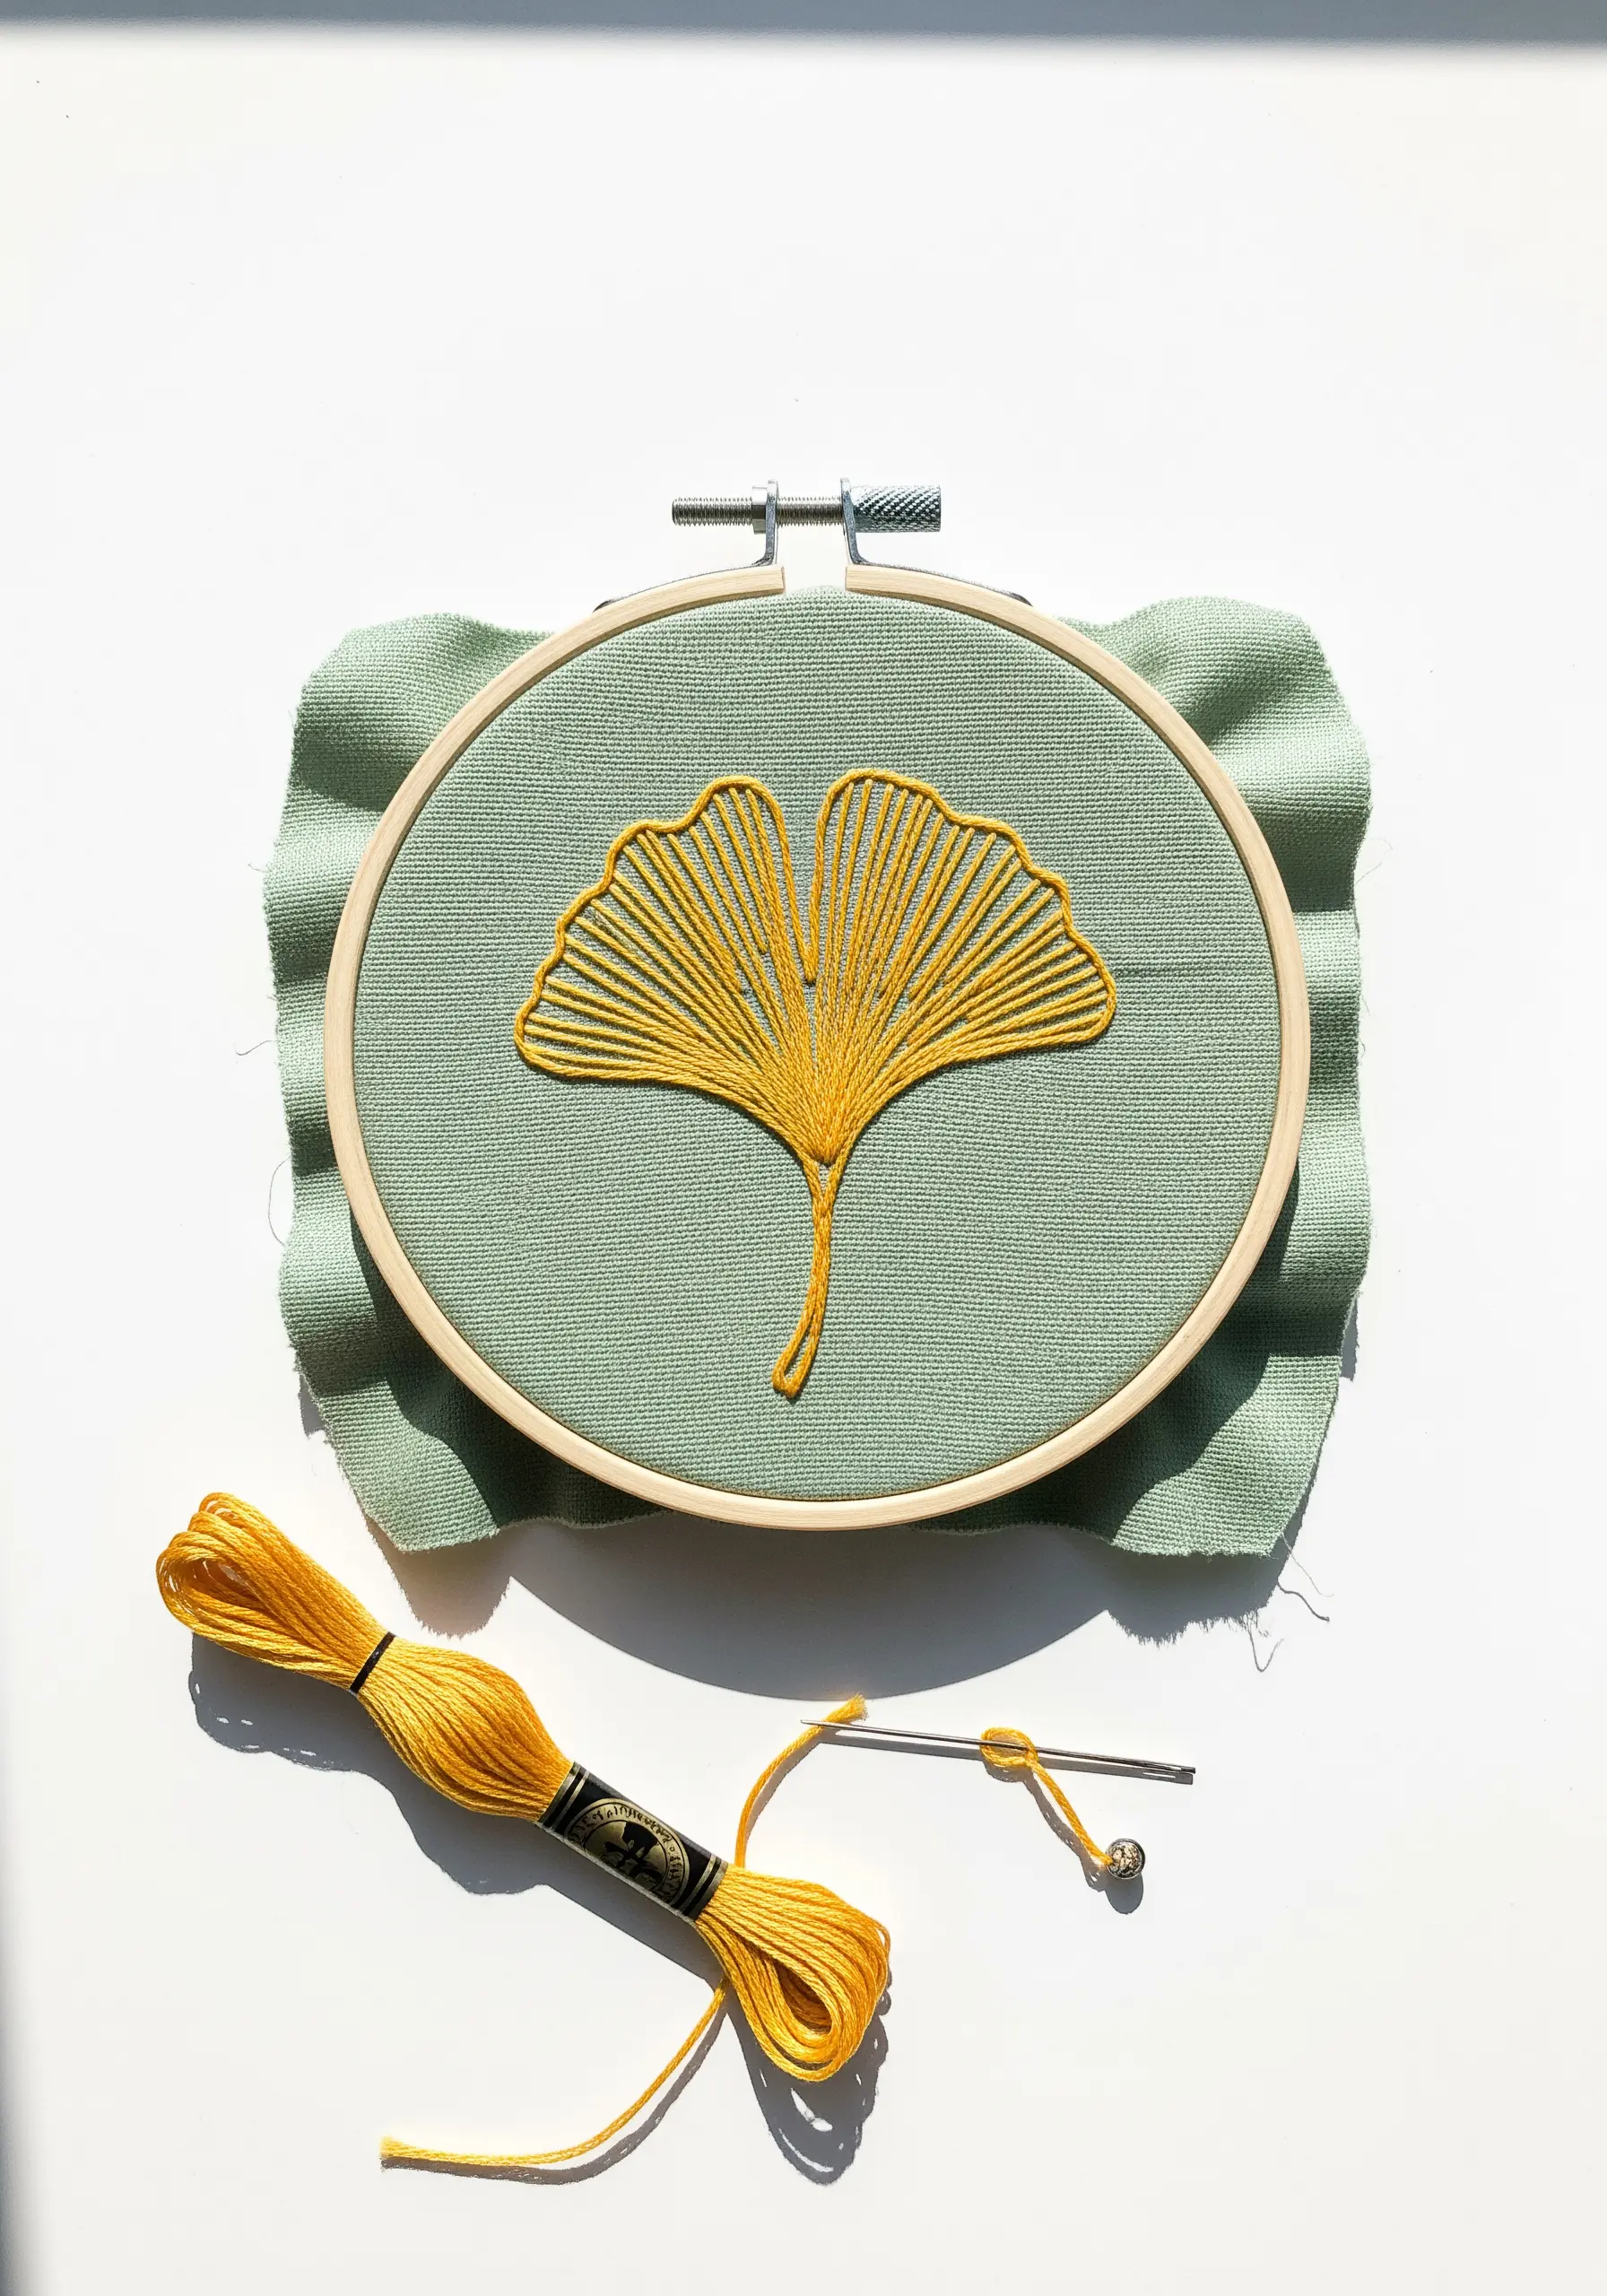
This ginkgo leaf brilliantly illustrates how the space you *don’t* stitch is as important as the space you do.
Instead of filling the shape, long straight stitches radiate from a central point, suggesting the leaf’s delicate structure.
The negative space between the threads defines the form, creating a light, airy design that feels both modern and organic.
This approach allows you to create impactful botanical motifs quickly and with very little thread.
8. Master the Art of the Minimalist Star
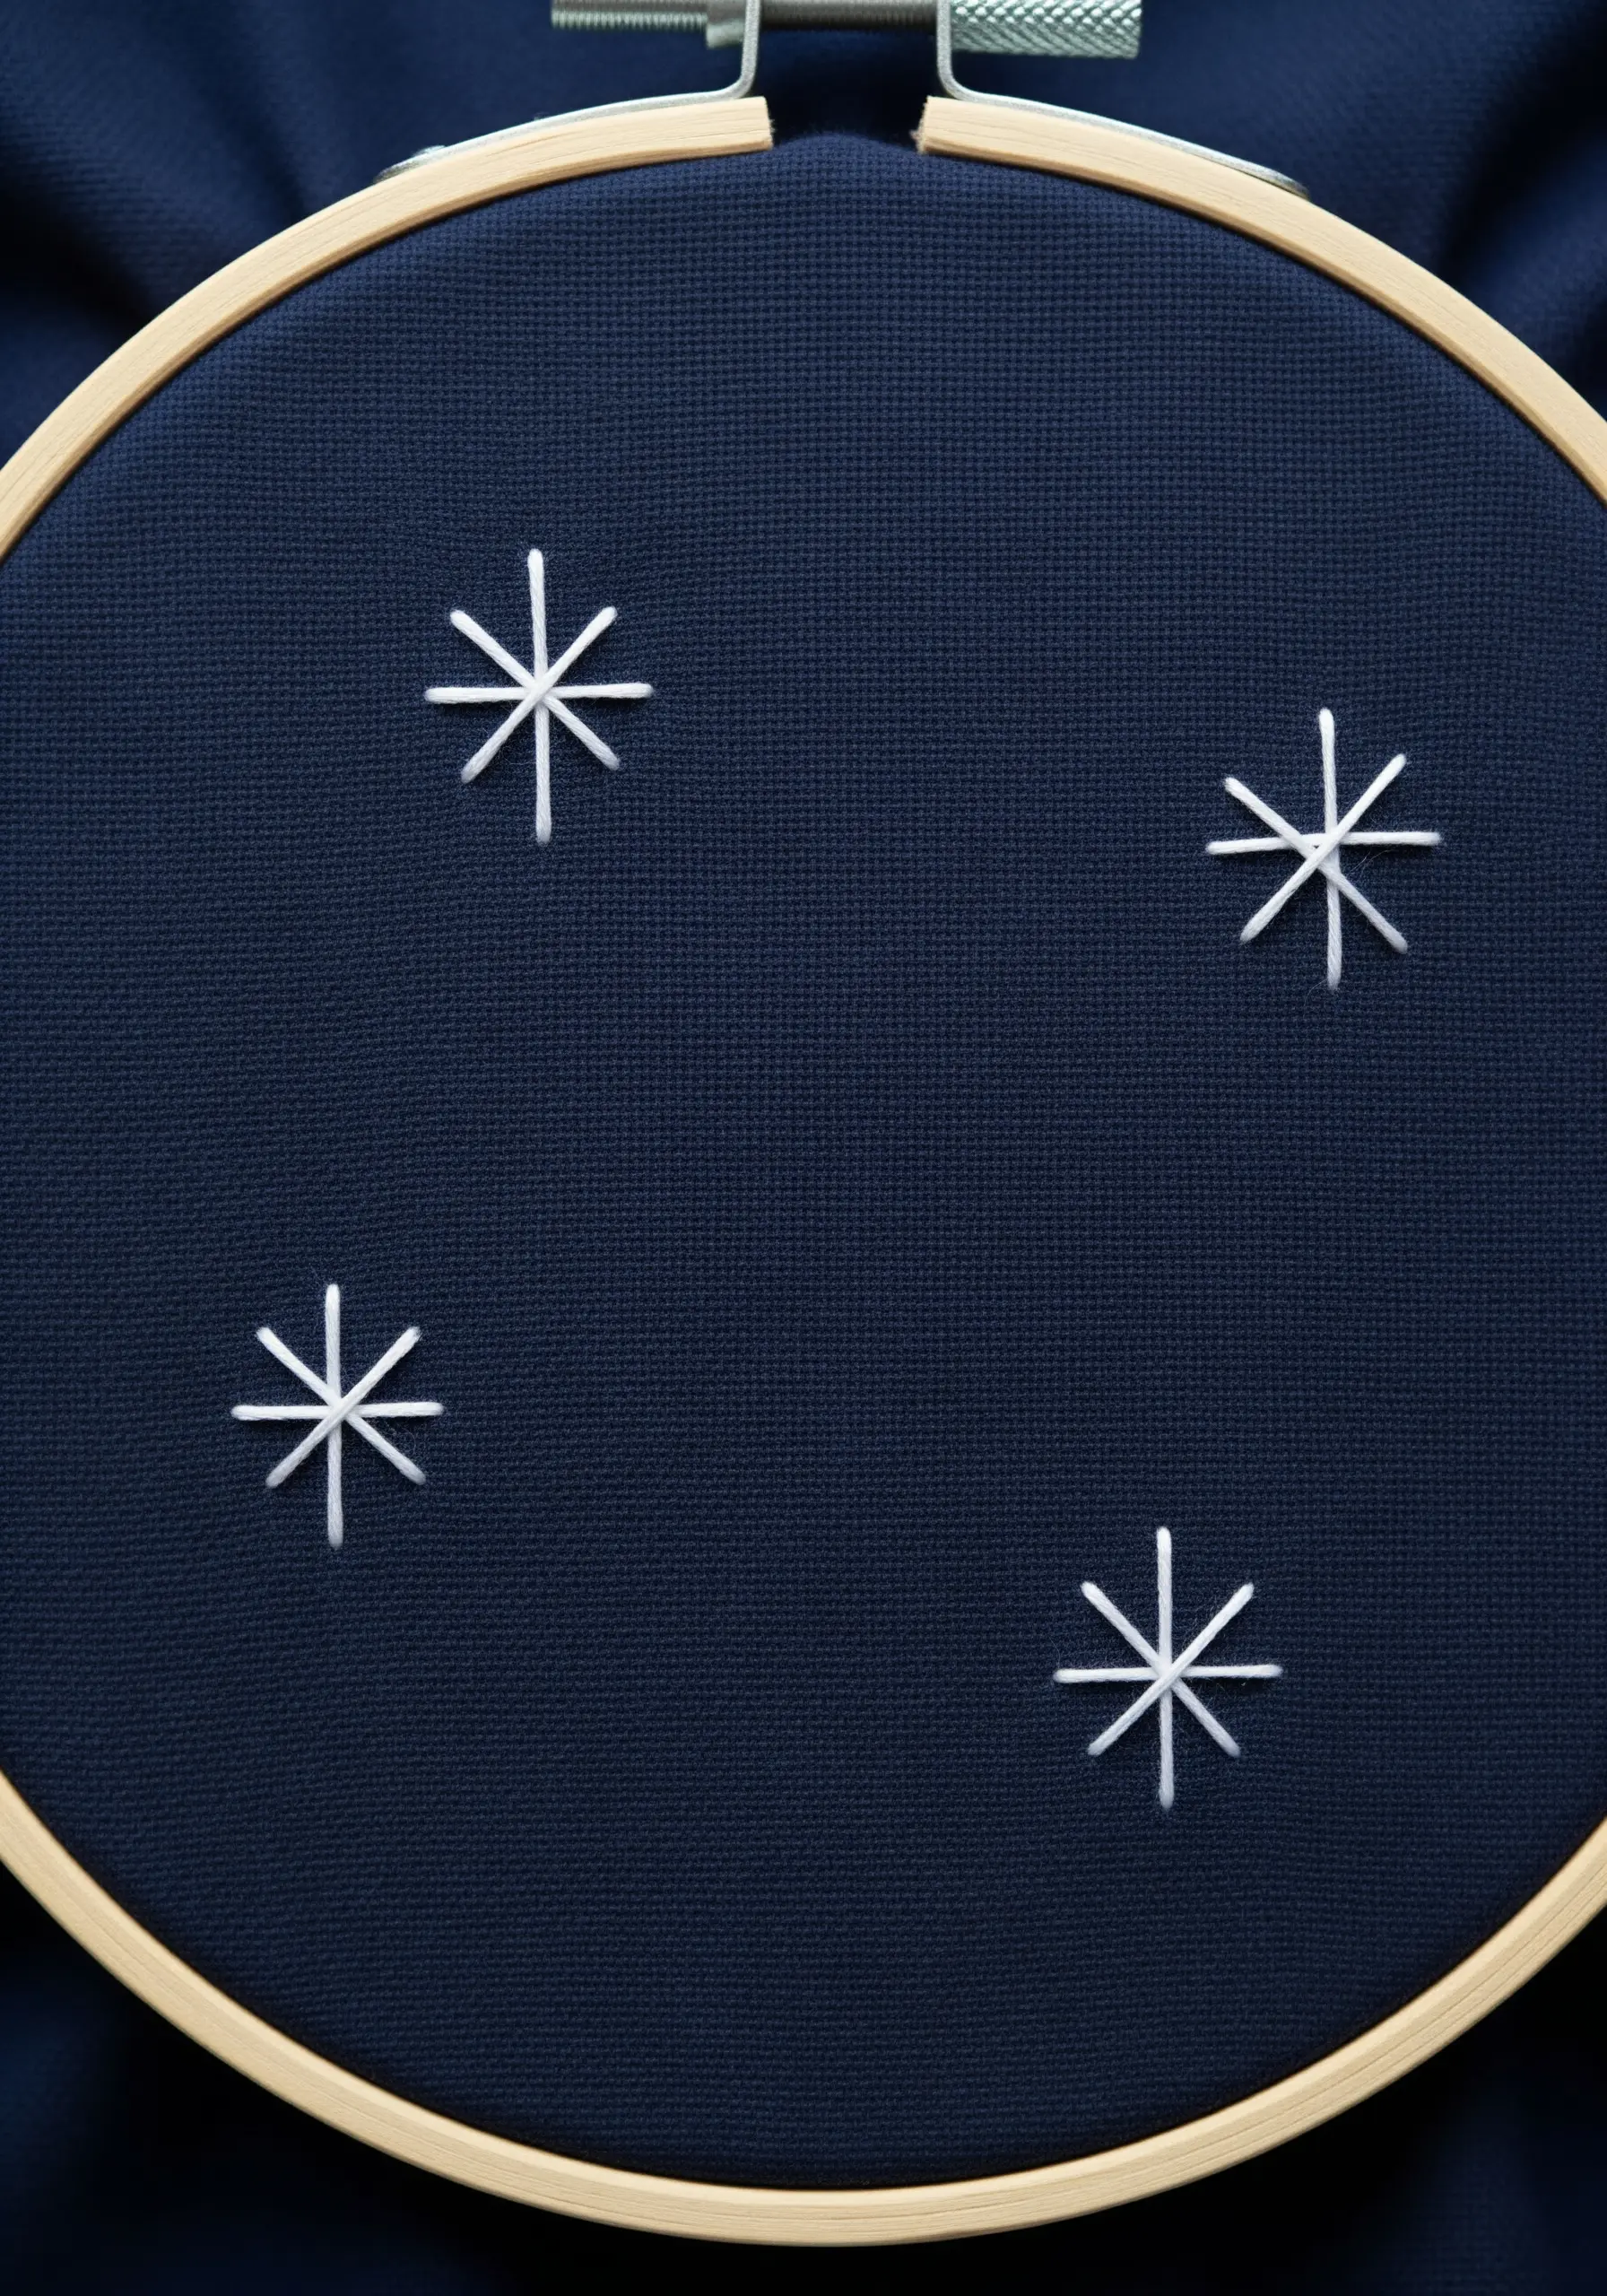
A perfectly executed star stitch is a testament to precision and restraint.
Each star is composed of just three intersecting straight stitches, but the visual harmony comes from achieving perfect symmetry.
For your first few attempts, lightly mark a center point and the endpoints of each line to ensure they are evenly spaced and balanced.
On a dark fabric scrap, a single bright white or metallic thread creates a stunning, high-contrast effect, making it one of the most elegant minimalist projects.
9. Combine Knots and Lines for Rich Texture
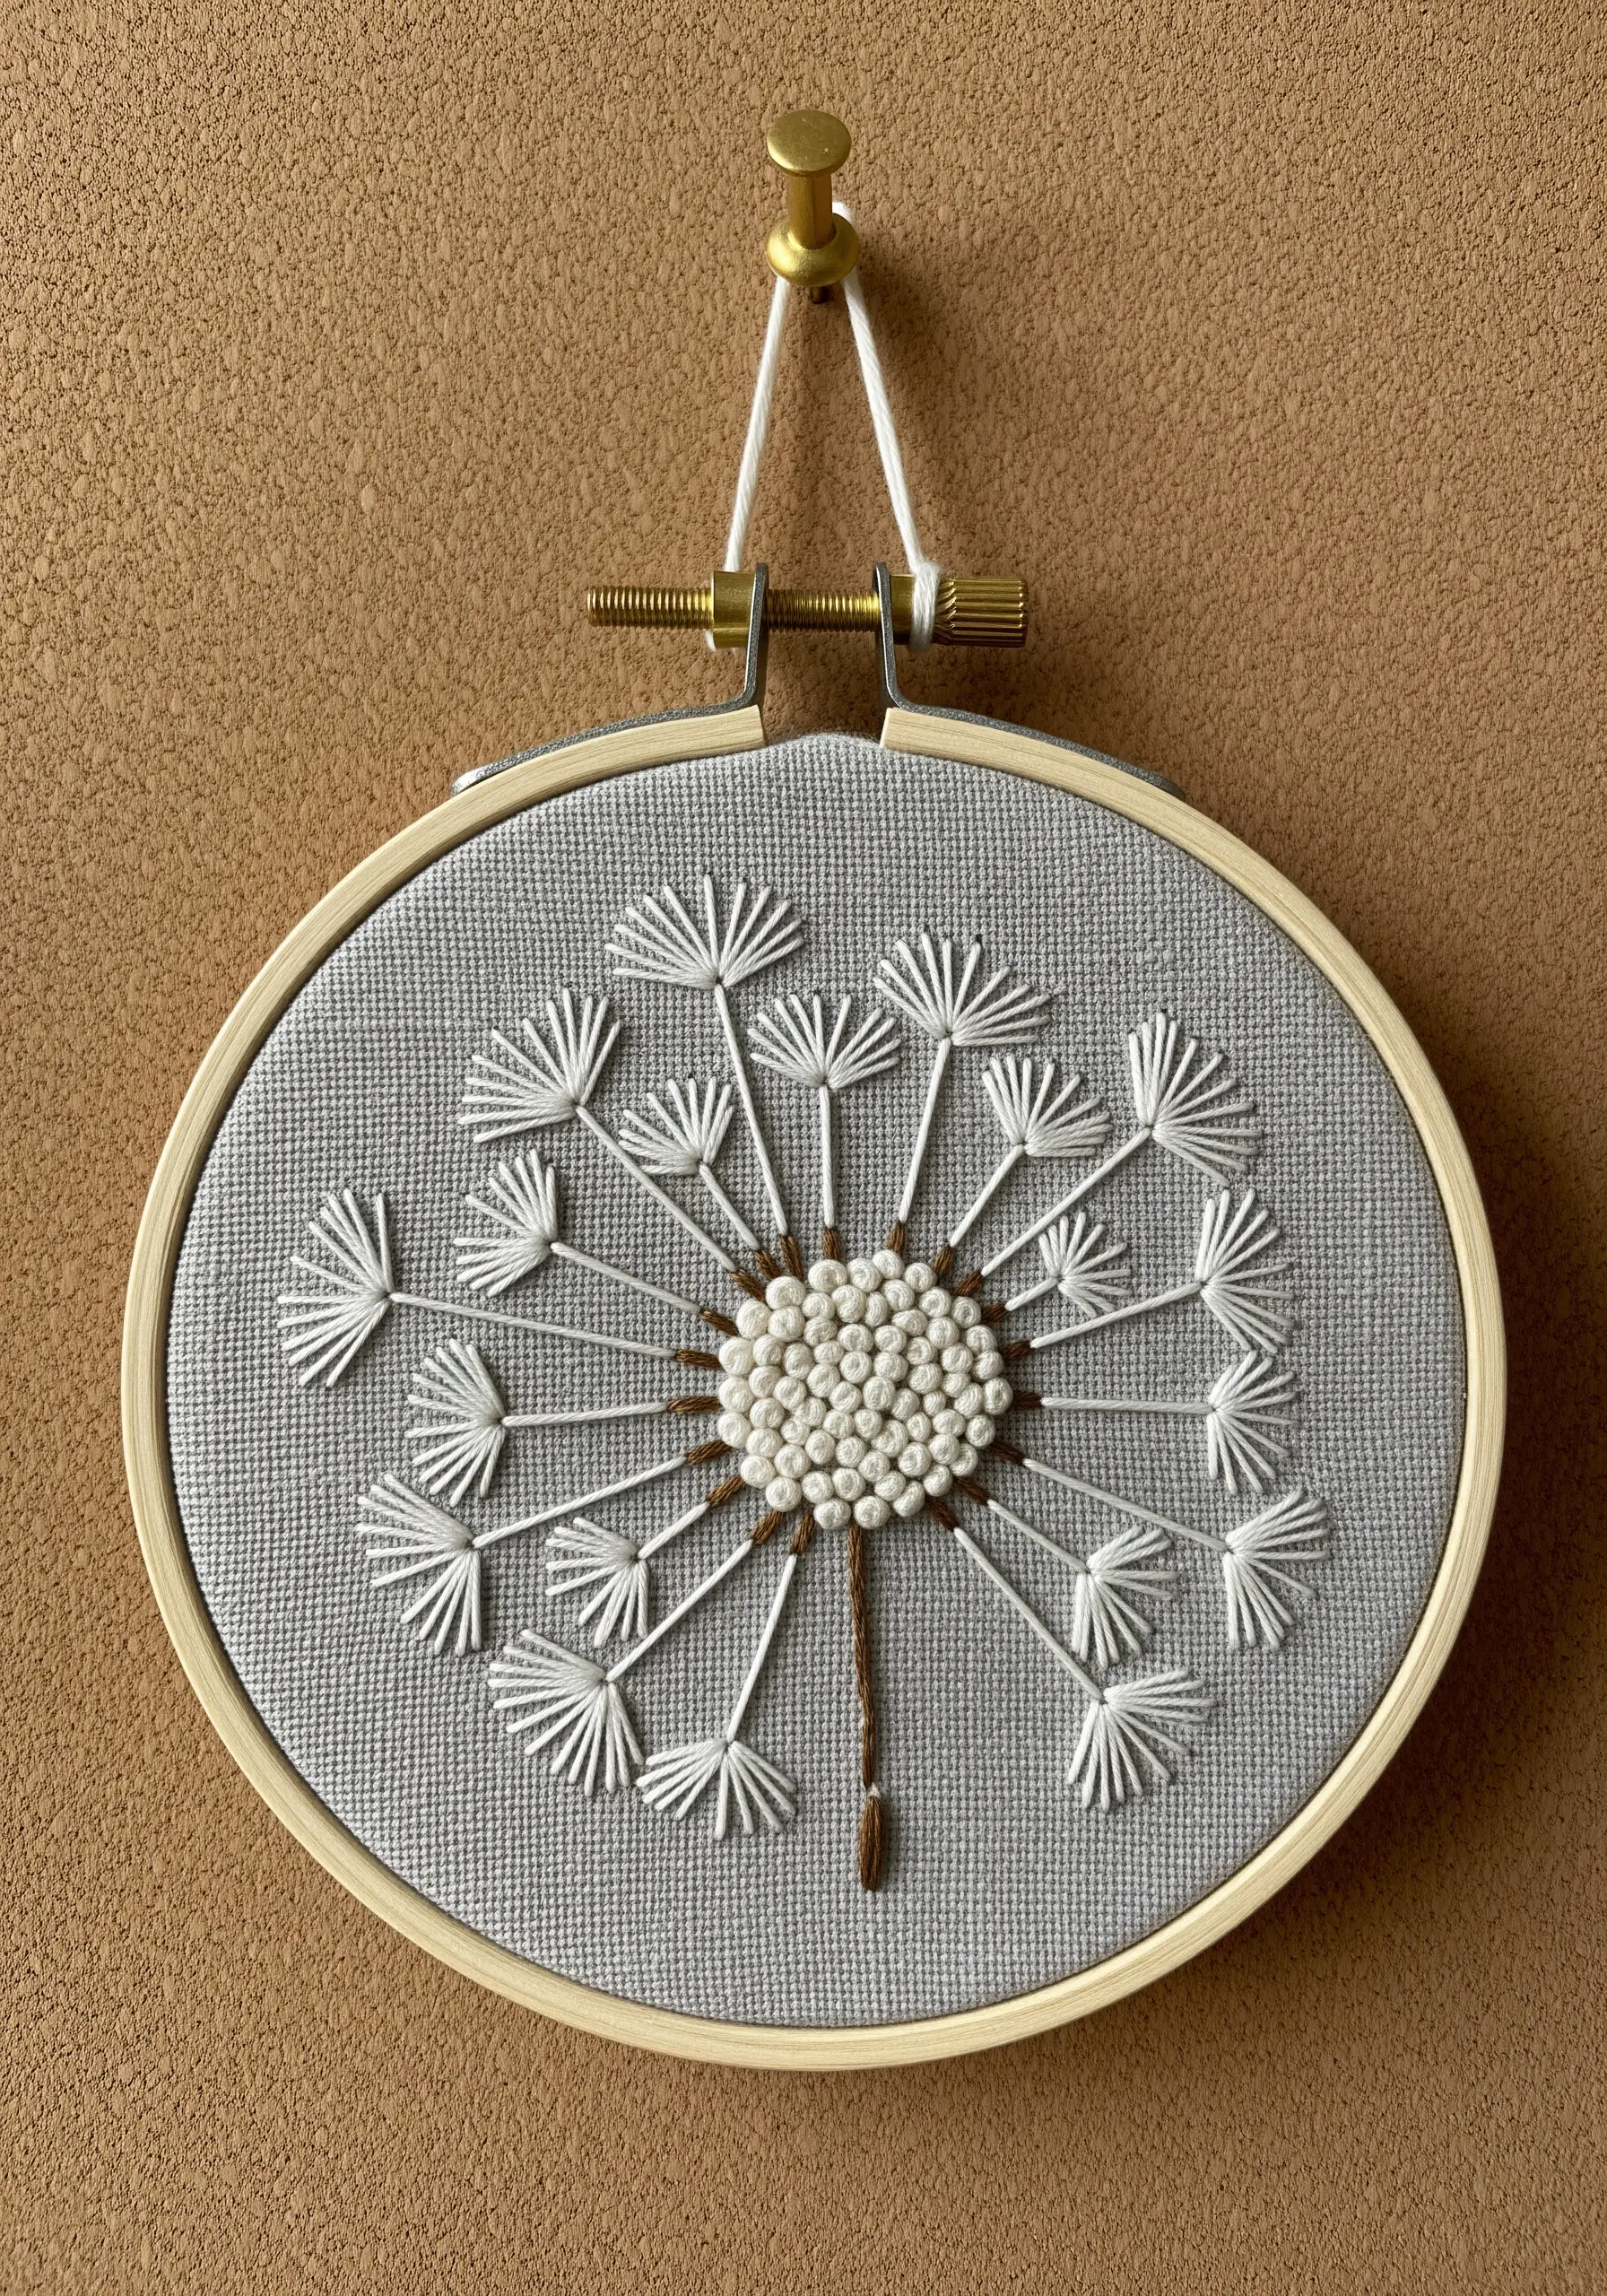
This dandelion is a beautiful study in textural contrast.
The dense core, packed with French knots of varying sizes, creates a bumpy, tangible center.
From this core, the seeds radiate outward, each formed by a detached chain stitch (or lazy daisy) paired with a long, elegant straight stitch.
This interplay between clustered knots and clean lines gives the piece a dynamic, multi-layered quality that invites a closer look.
10. Create Movement with Layered Stitches
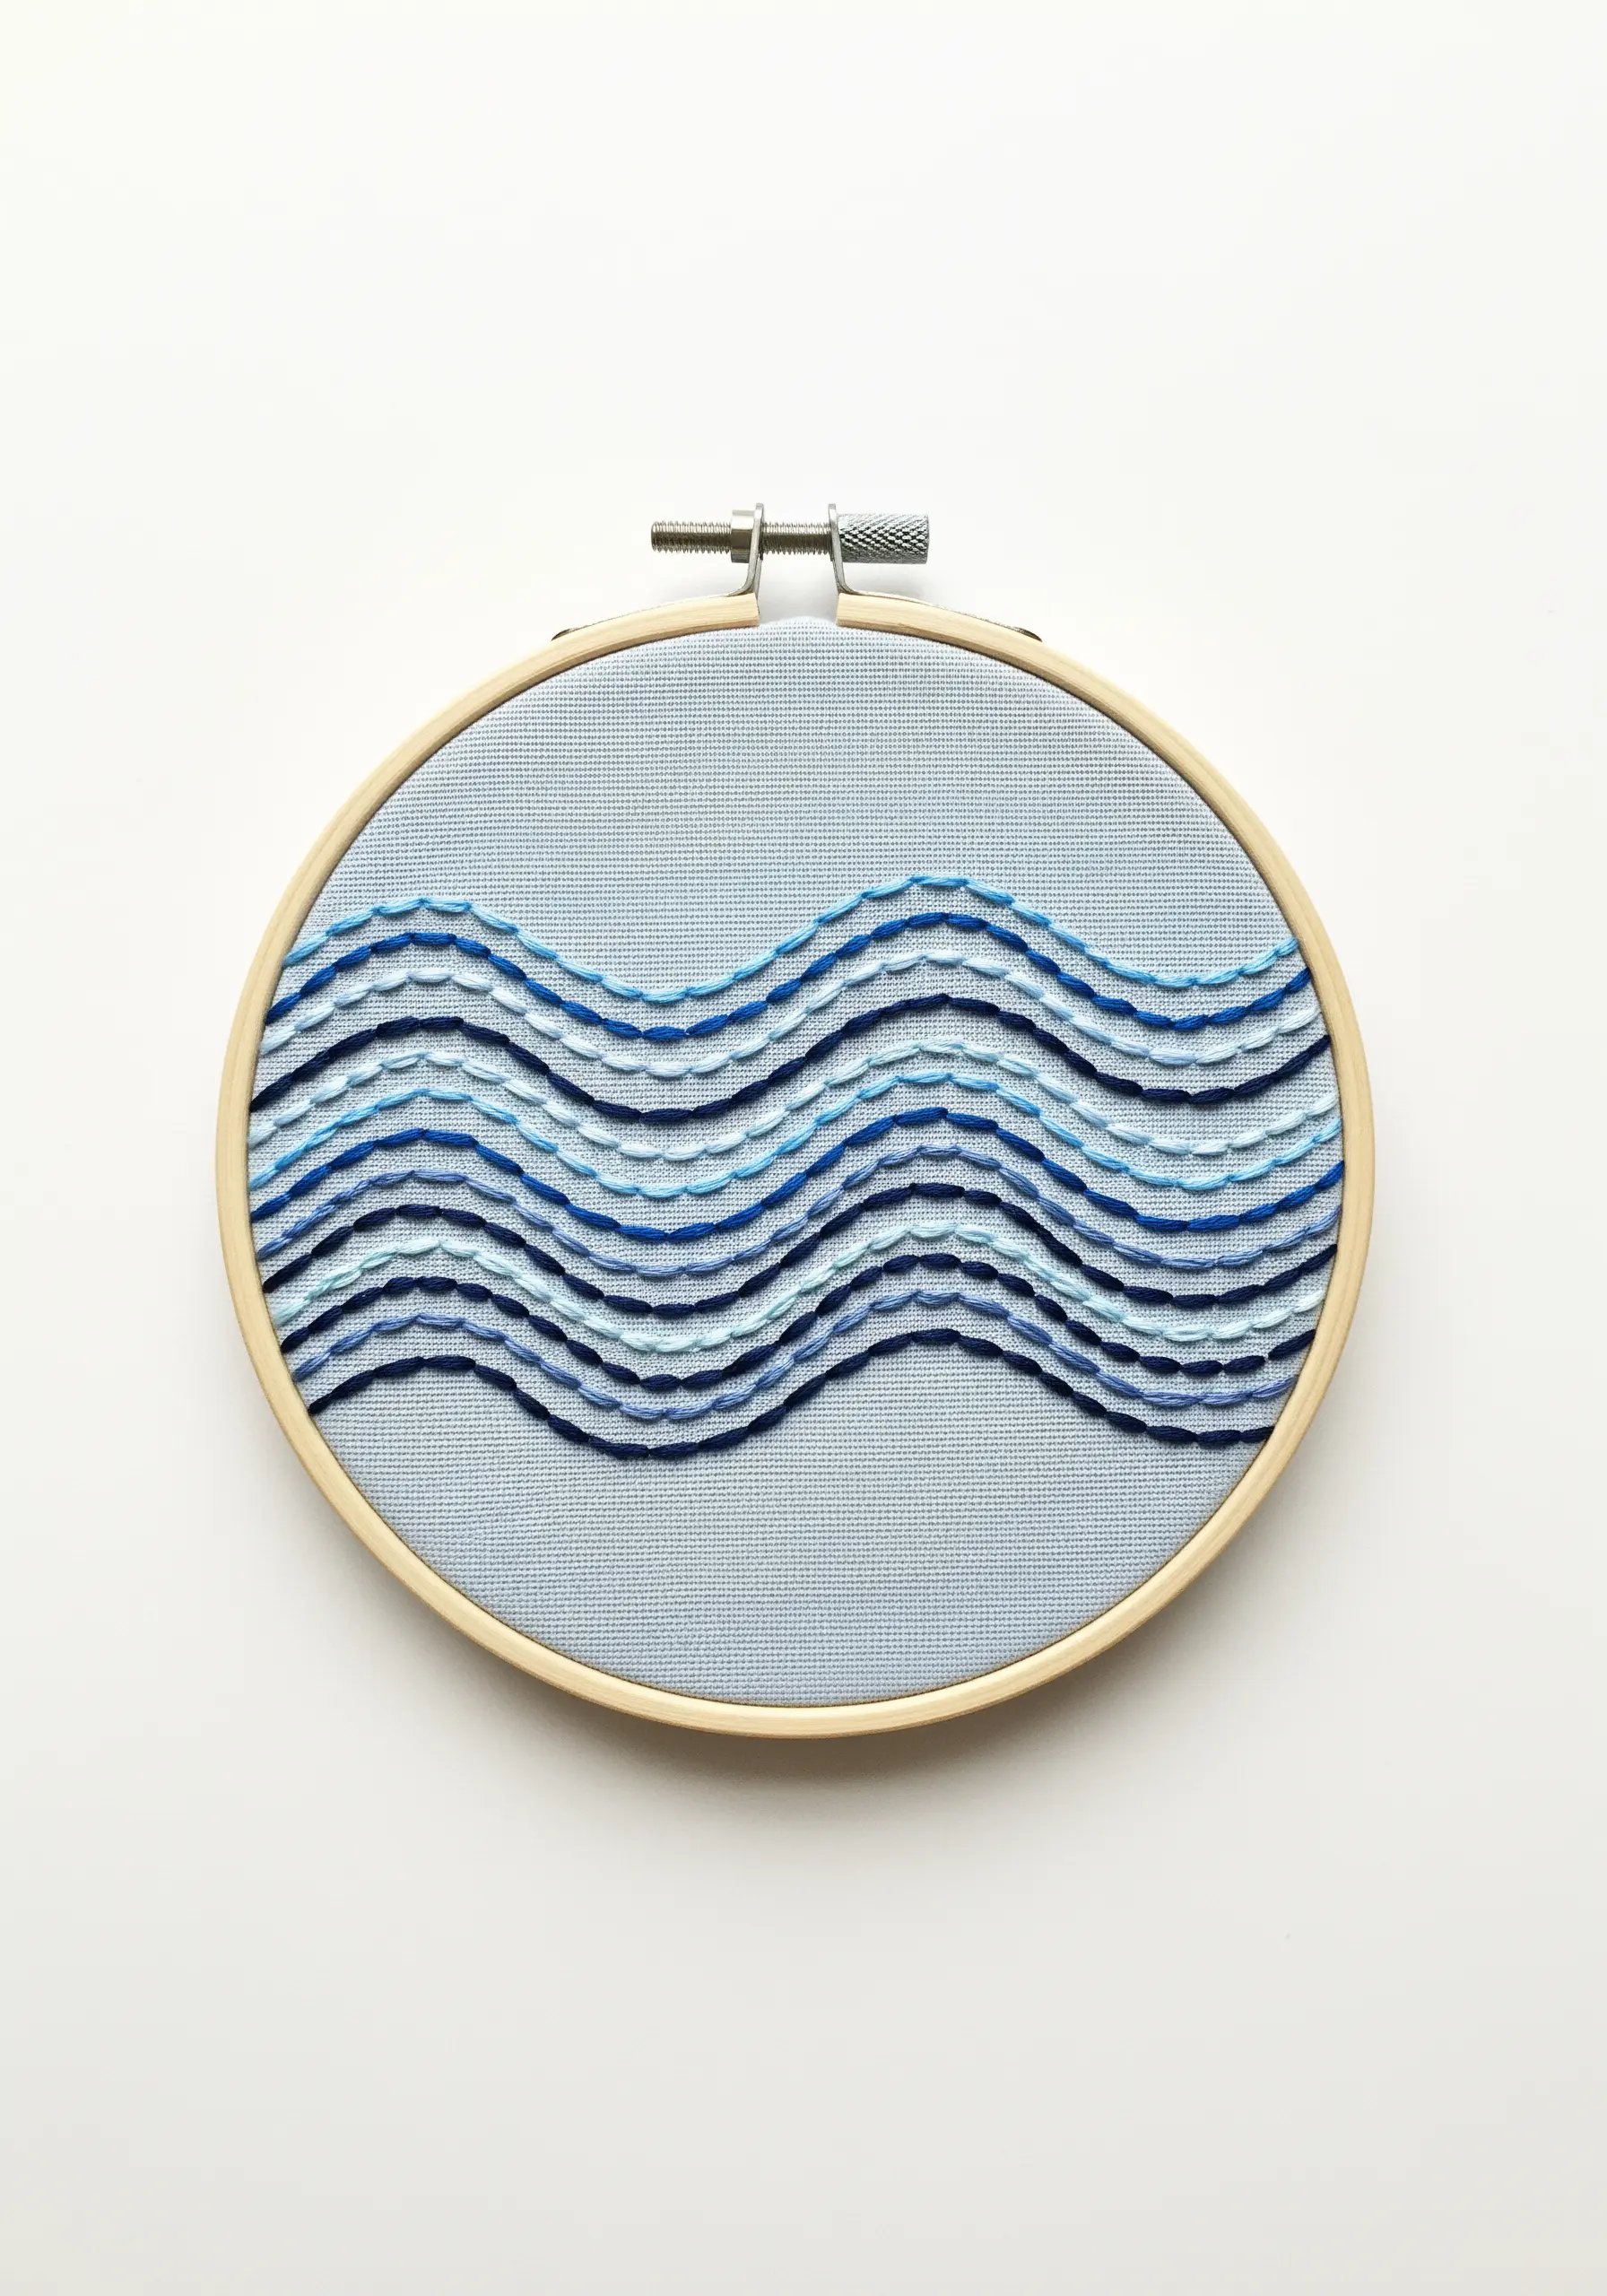
These abstract waves demonstrate how layering can create a powerful sense of motion.
First, establish your base with several wavy lines of backstitch in different shades of blue.
Next, introduce another layer by weaving a contrasting thread through these stitched lines, creating texture and depth.
This technique adds complexity and visual rhythm, turning simple lines into a dynamic seascape—perfect for coastal-inspired decor.
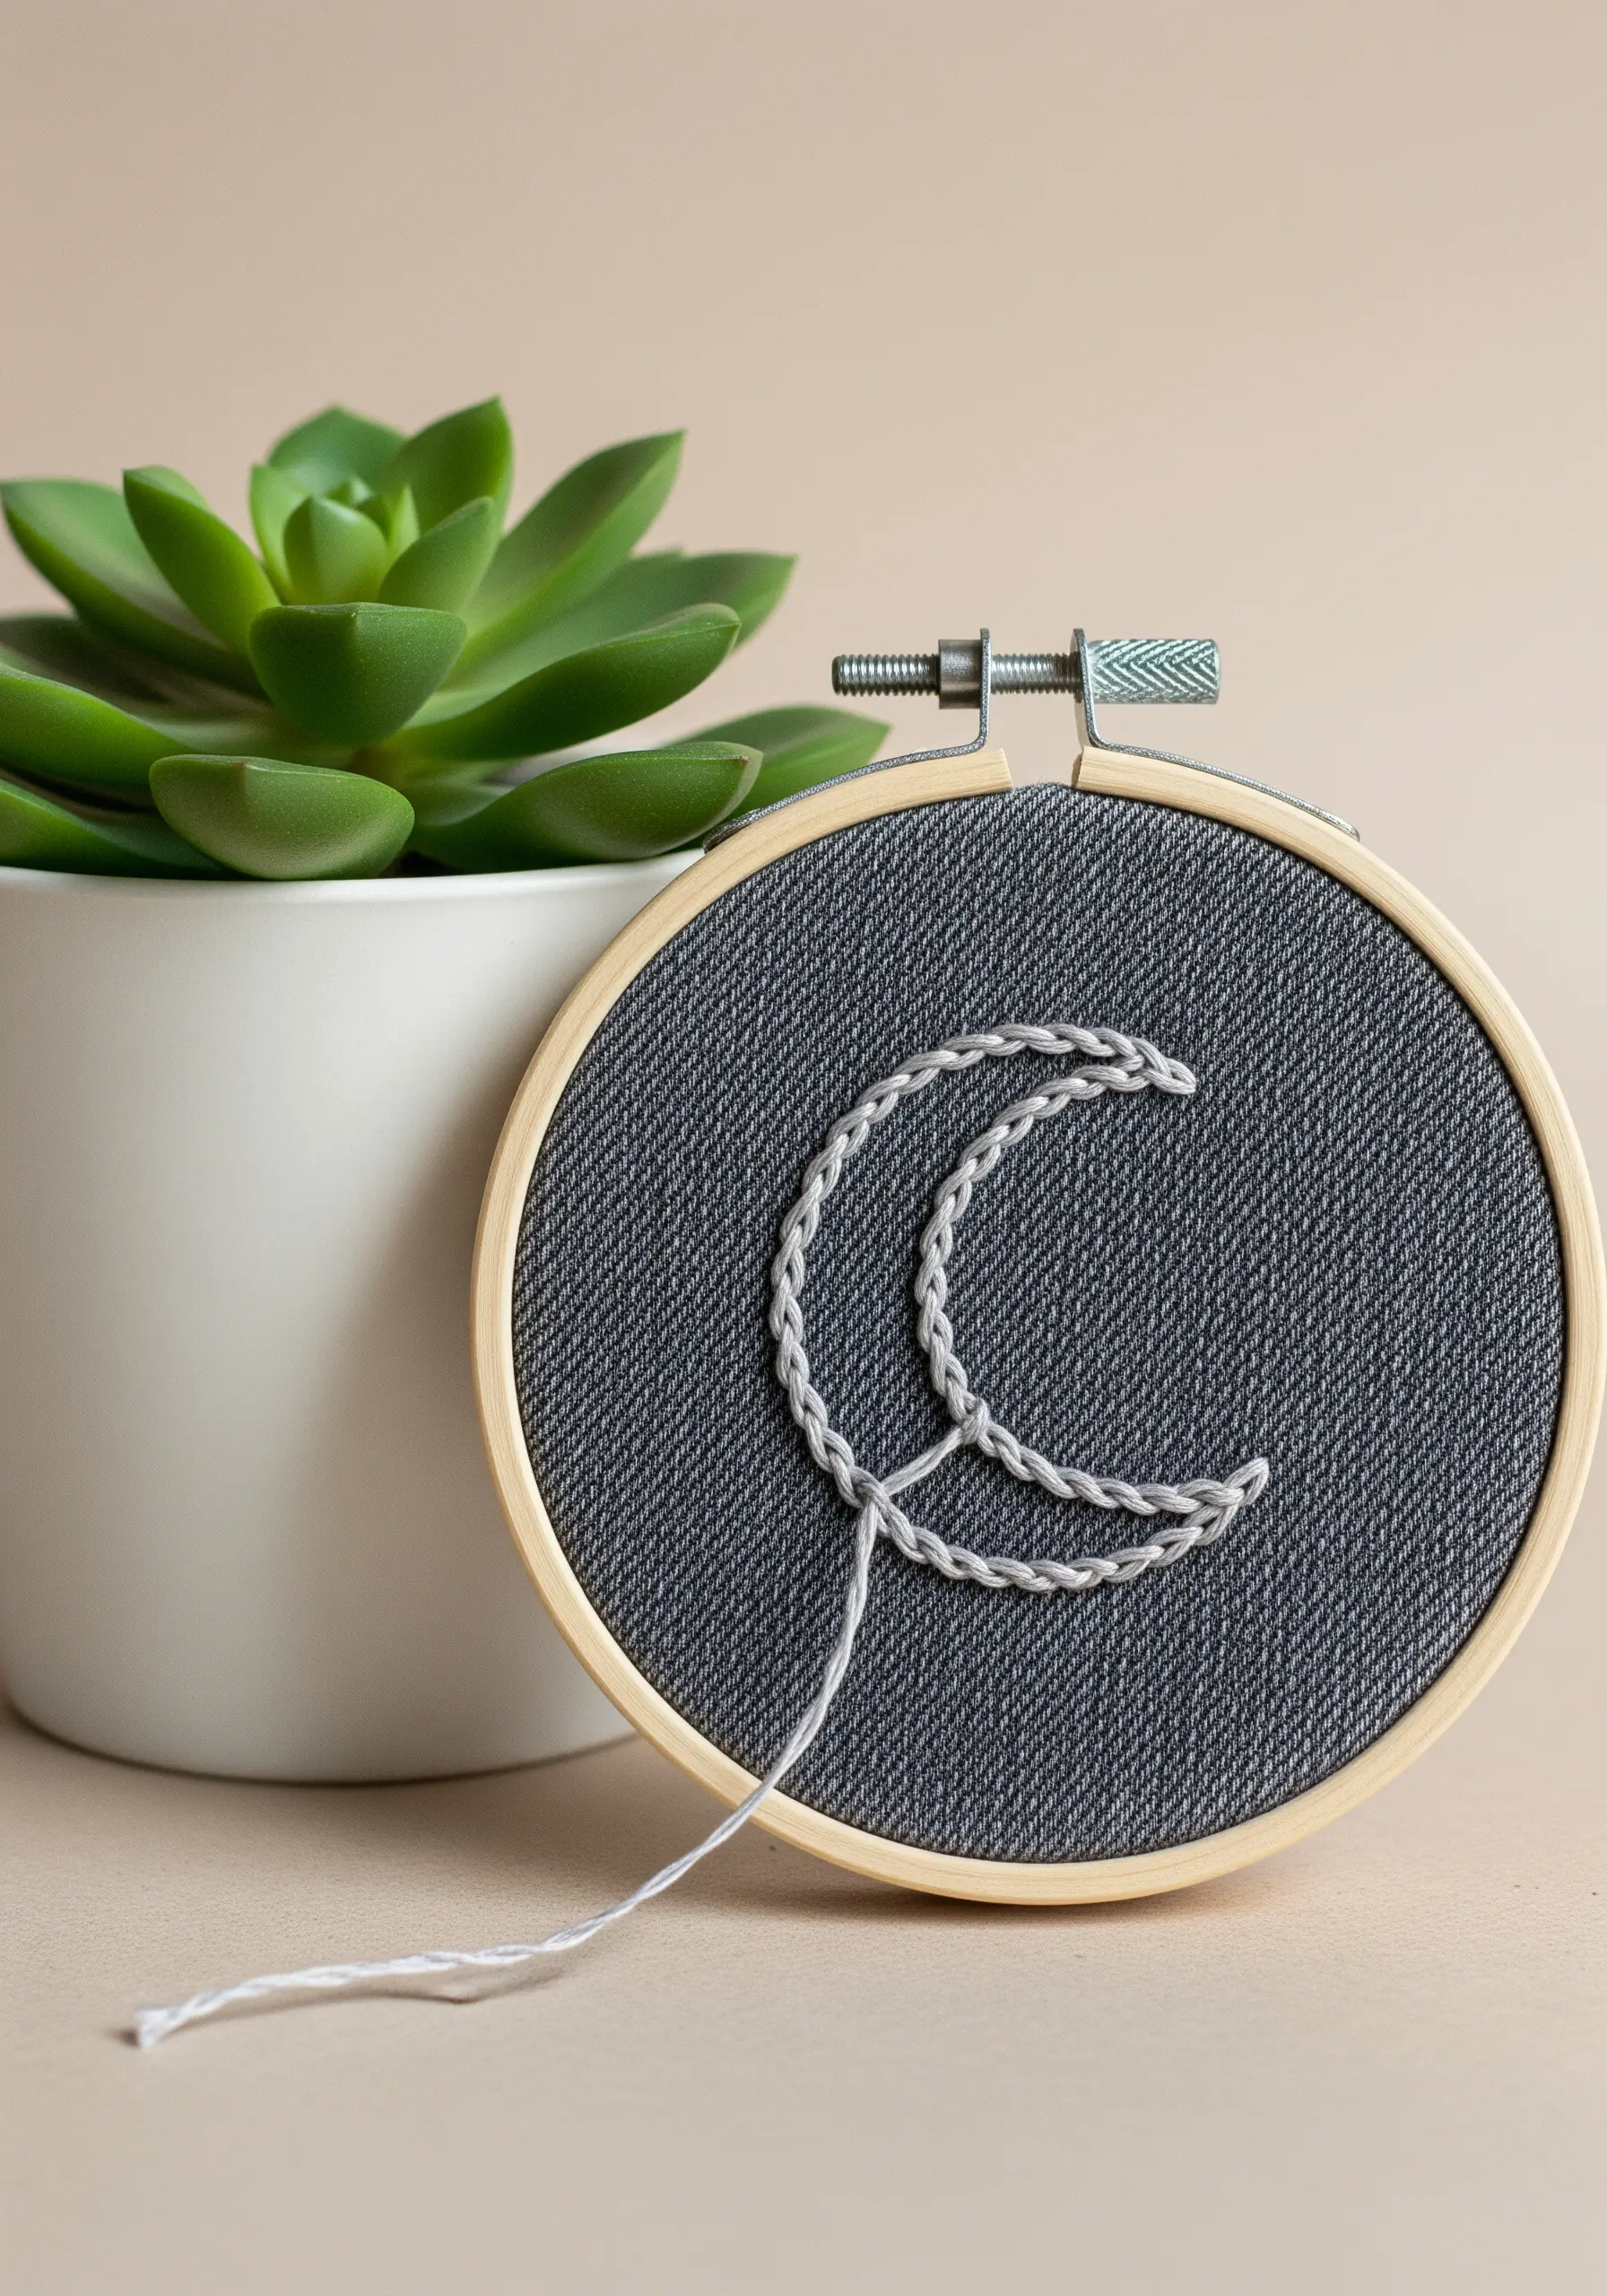
11. Build Character with Linked Chain Stitches
For an outline with more personality than a simple backstitch, try linking detached chain stitches (lazy daisies).
Each stitch forms a small loop, and when connected end-to-end, they create a textured, almost scalloped line.
This technique is perfect for adding a touch of charm and softness to simple line drawings, transforming a basic sketch into something more decorative and tactile.
It’s a simple way to make minimal designs feel special.
12. Use Stitch Direction to Sculpt Form
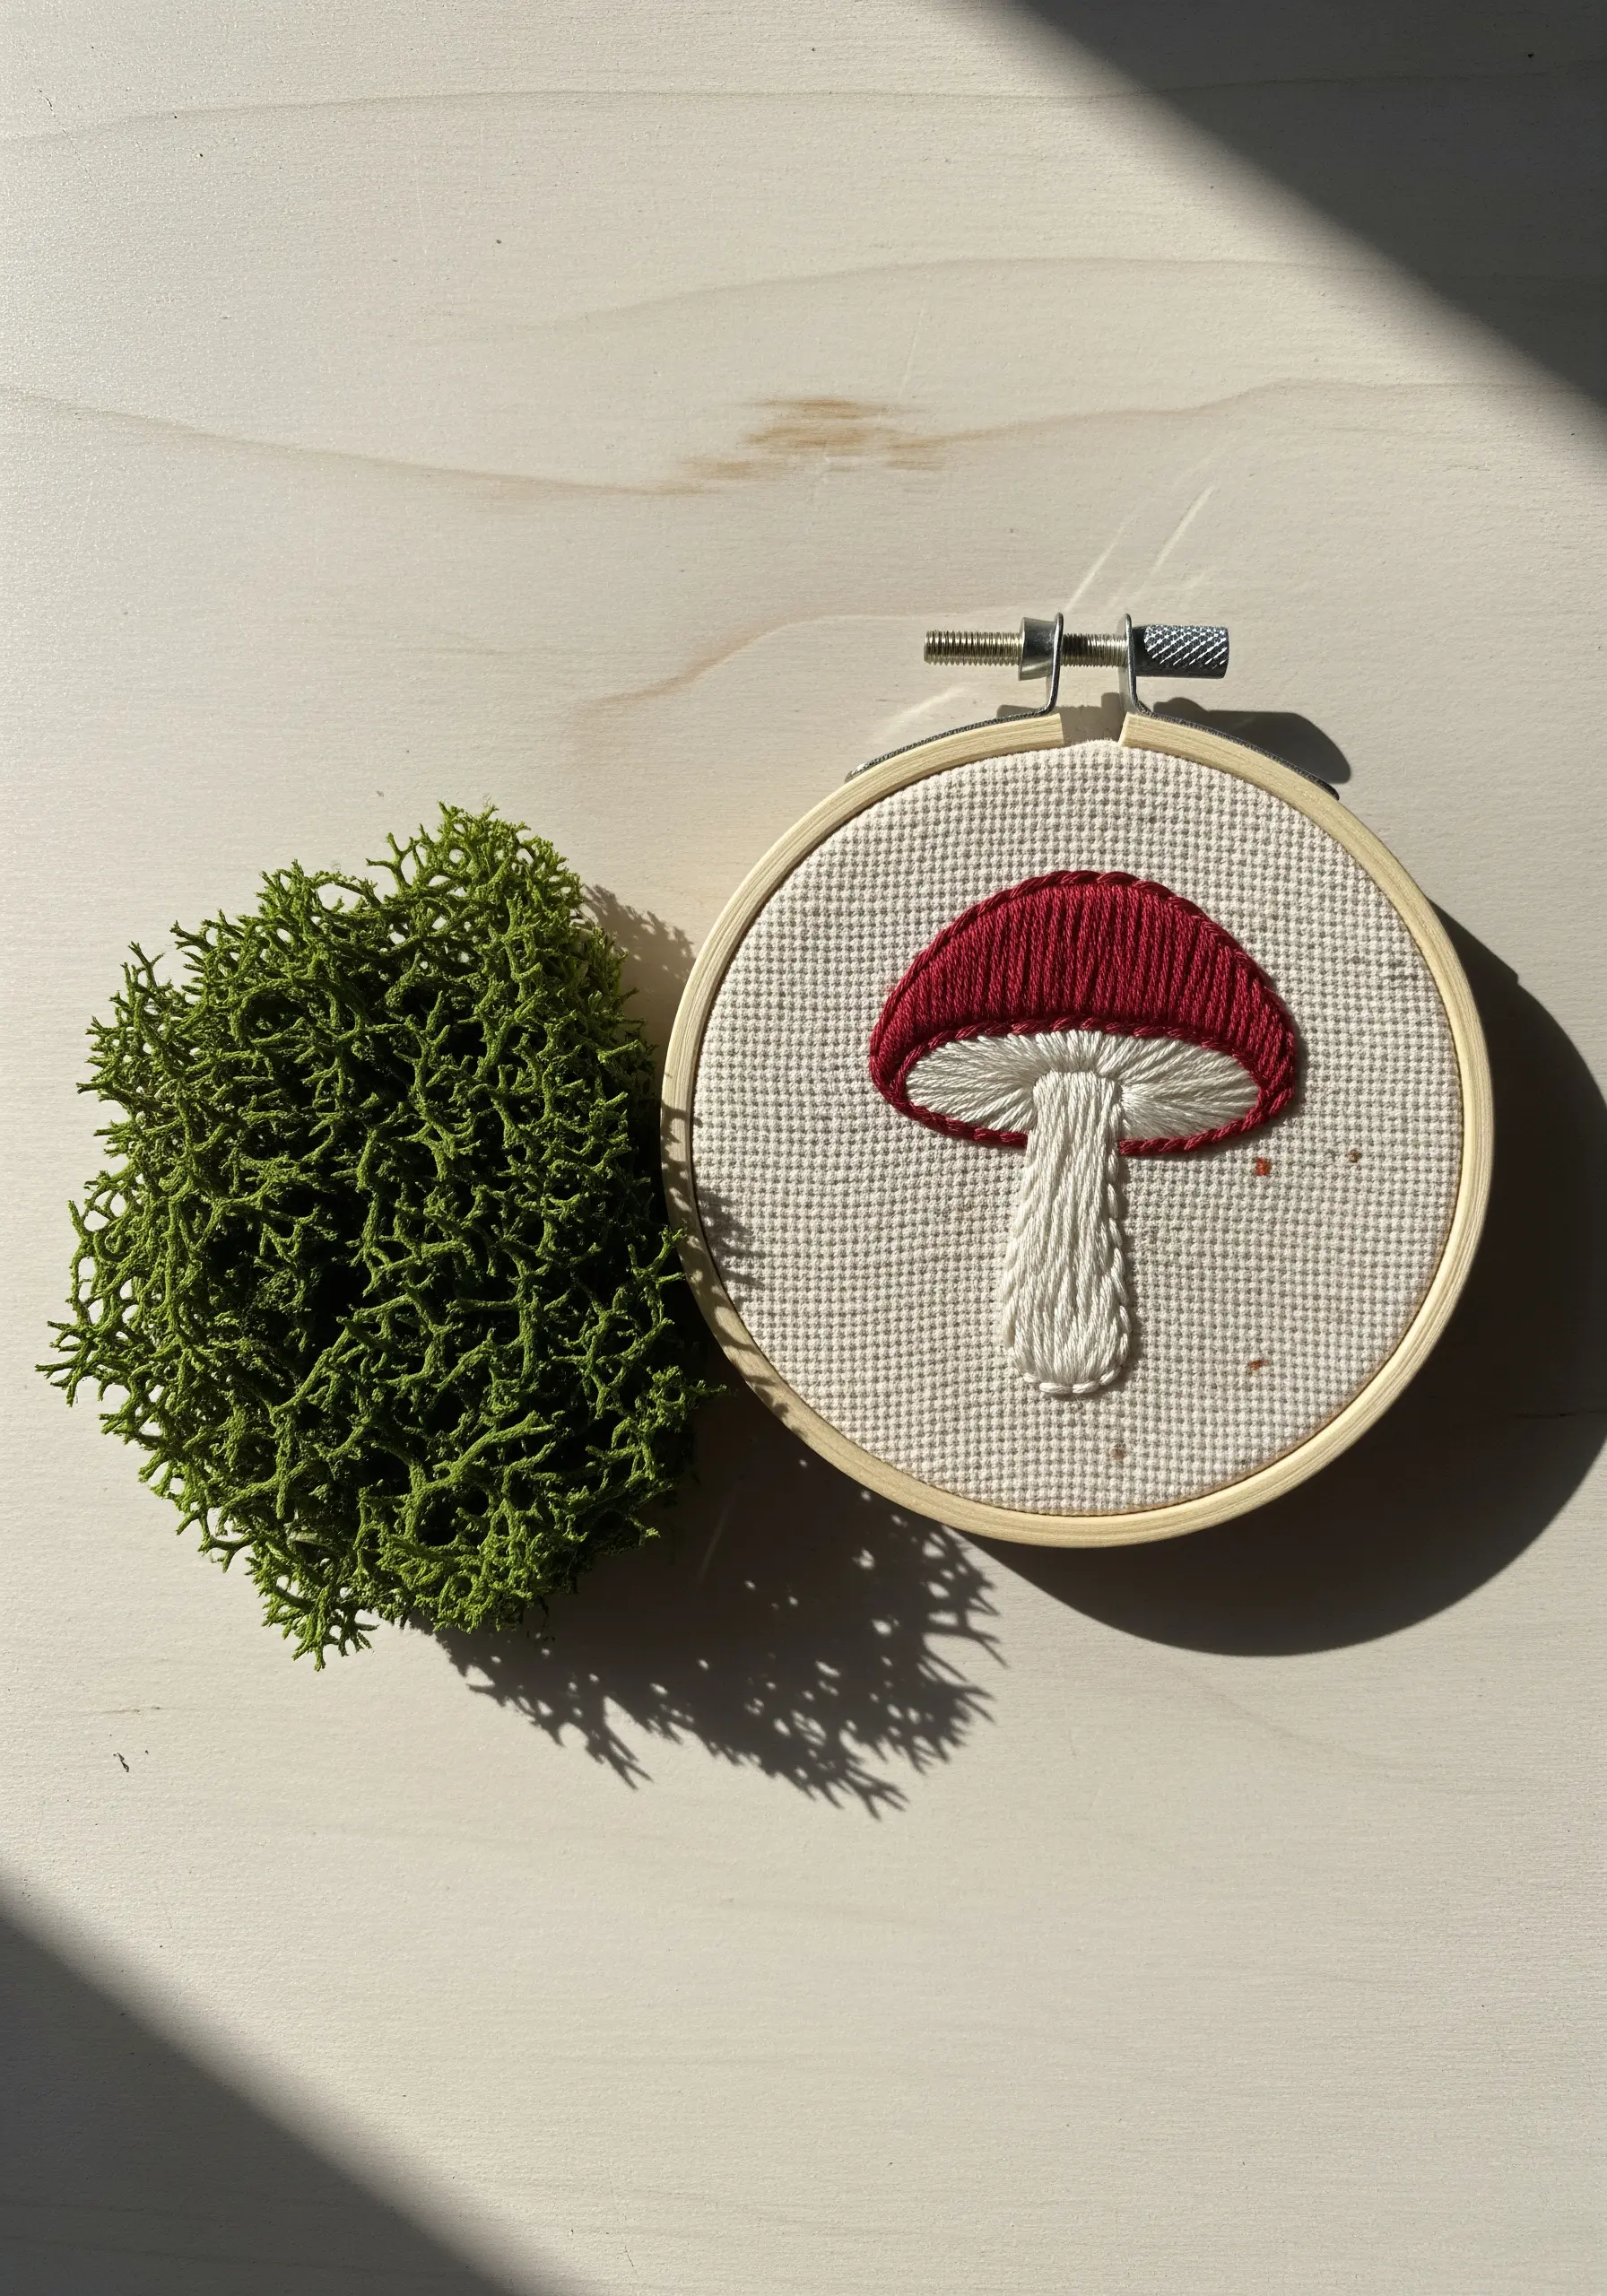
Pay close attention to how the stitches fill this mushroom, as it’s a masterclass in using direction to create form.
The red cap is filled with satin stitches that follow its curve, suggesting roundness.
In contrast, the stem is filled with vertical long-and-short stitches, indicating a different plane and texture.
This intentional shift in stitch direction clearly separates the two parts of the mushroom, adding a subtle but effective touch of realism.
13. Design with Radiating Straight Stitches
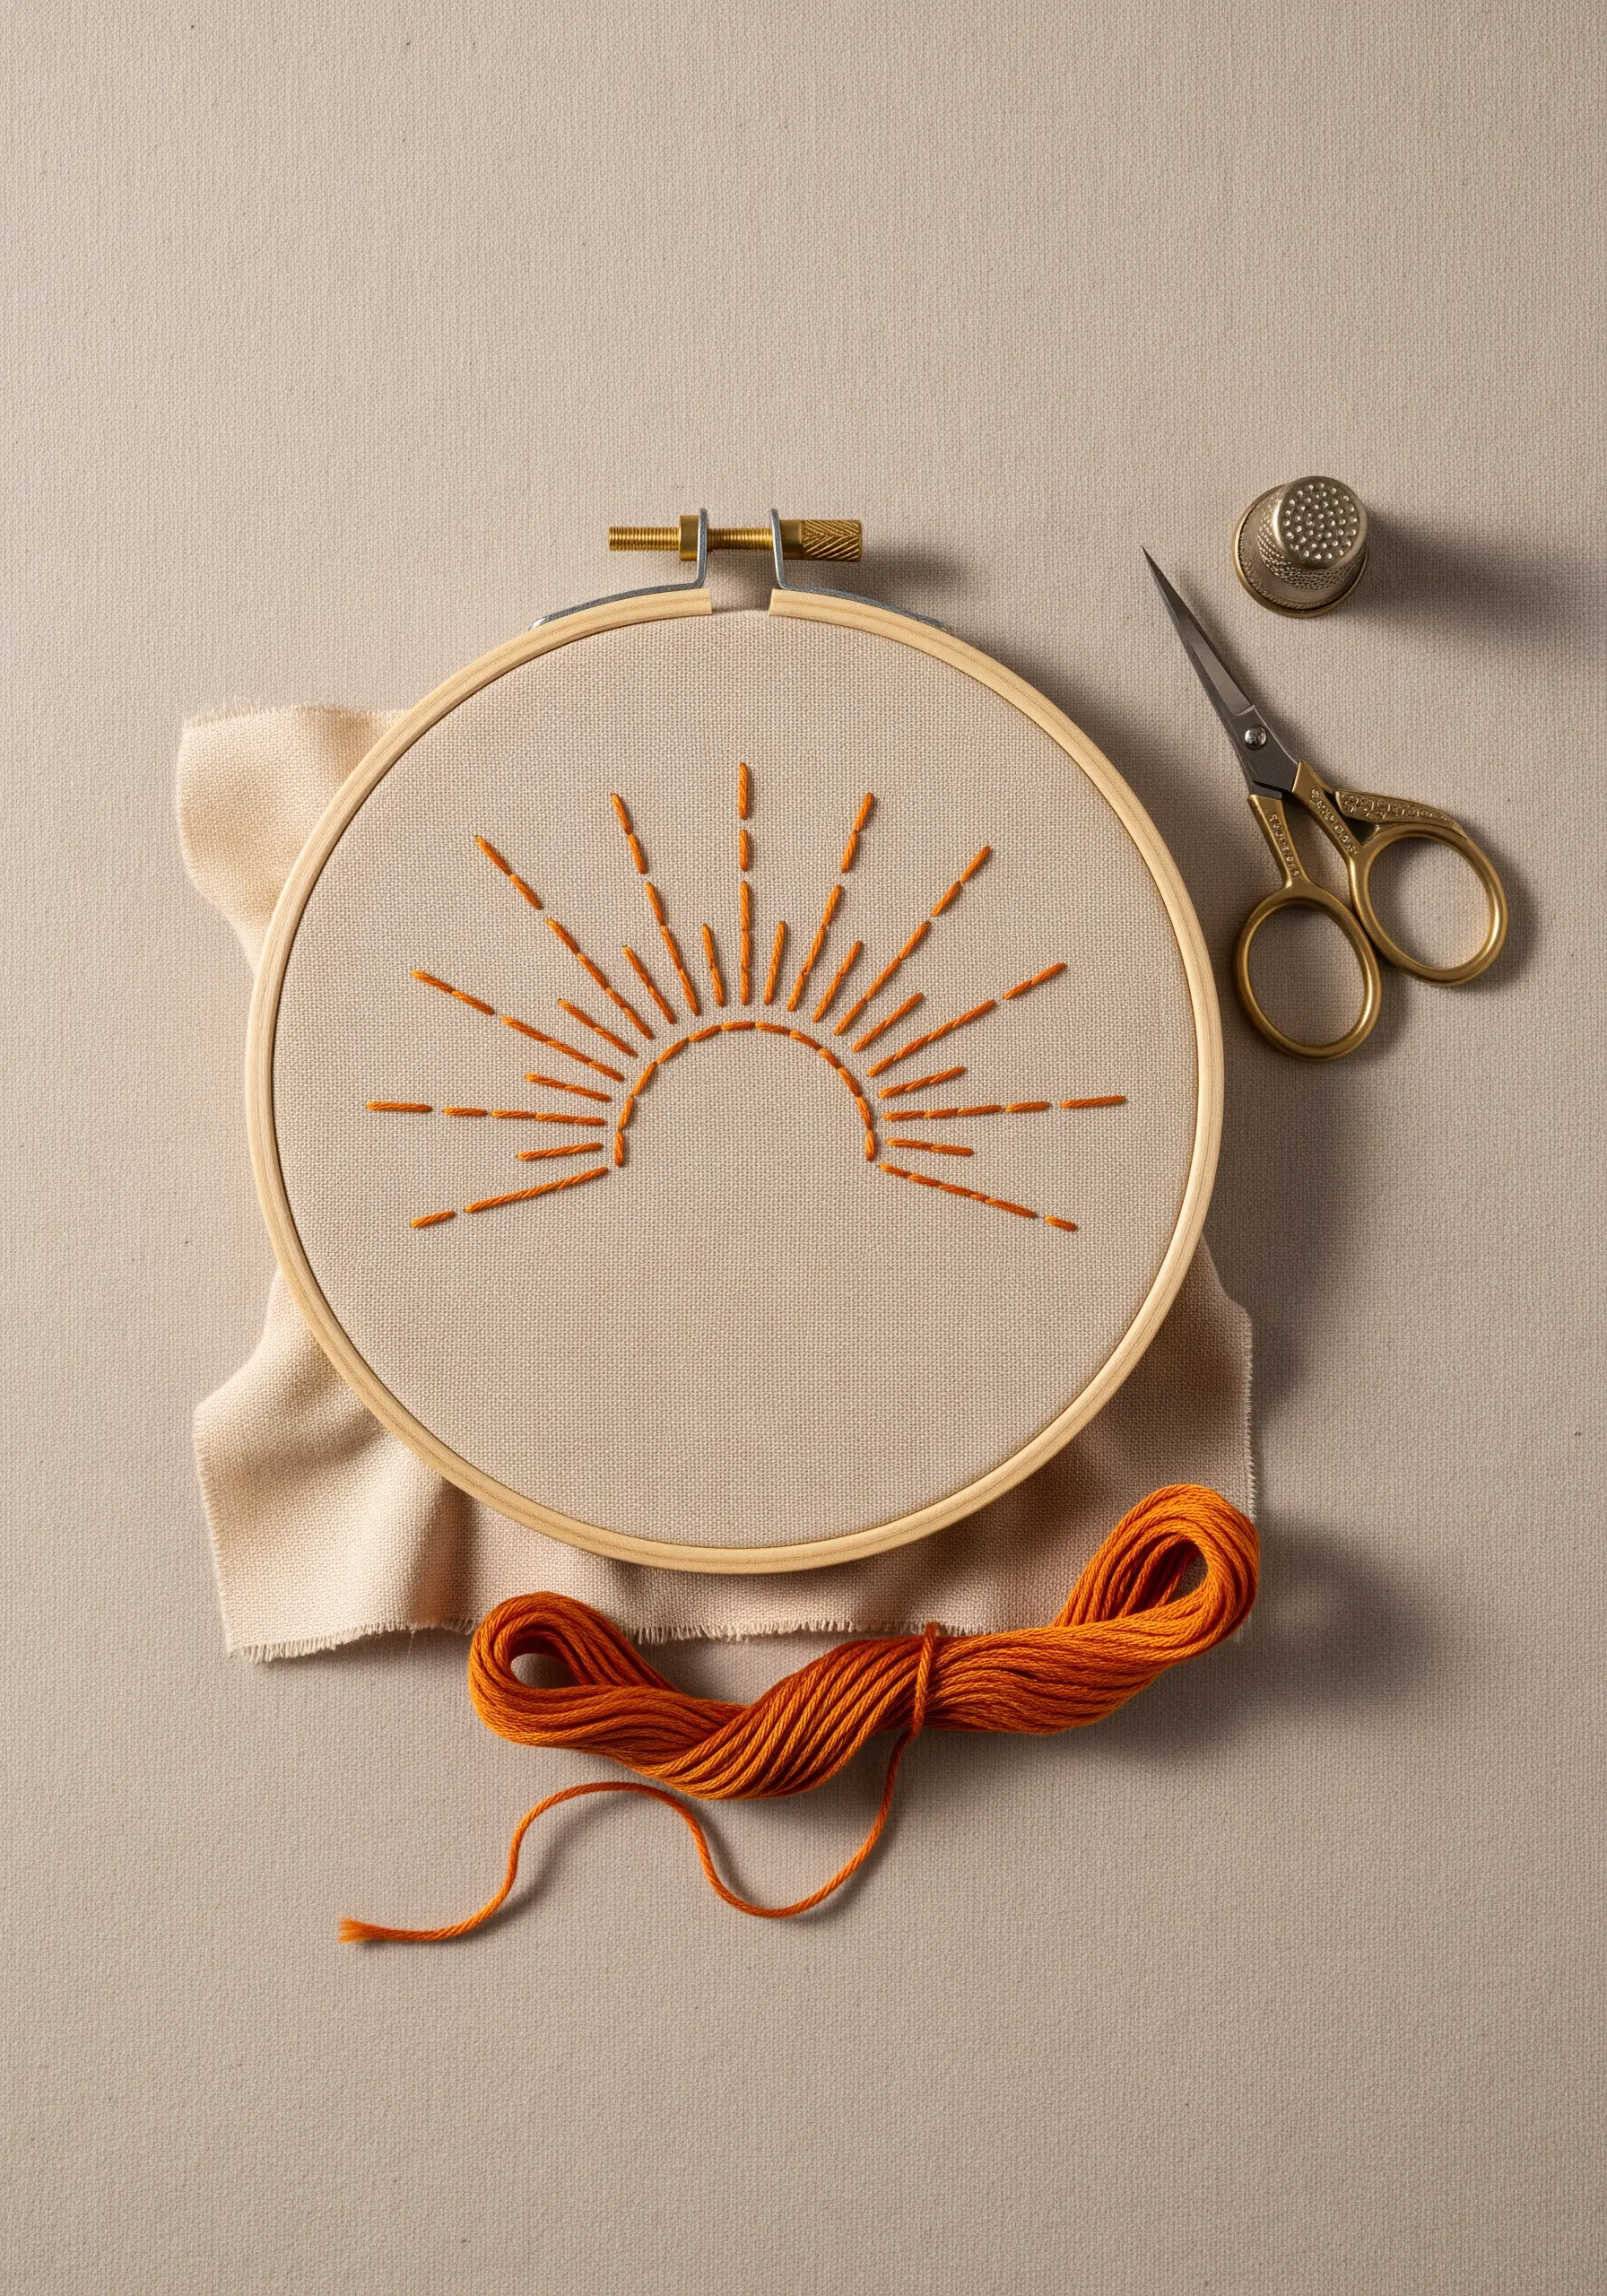
This sunrise proves that the simplest stitch can have the greatest impact.
The entire design is built from straight stitches, but their power comes from strategic placement and varied lengths.
Anchor the design with a solid backstitched arc, then add rays of varying lengths to create a sense of glowing energy.
This is one of the fastest ways to create a bold, graphic piece that feels both modern and hopeful, perfect for quiet decor.
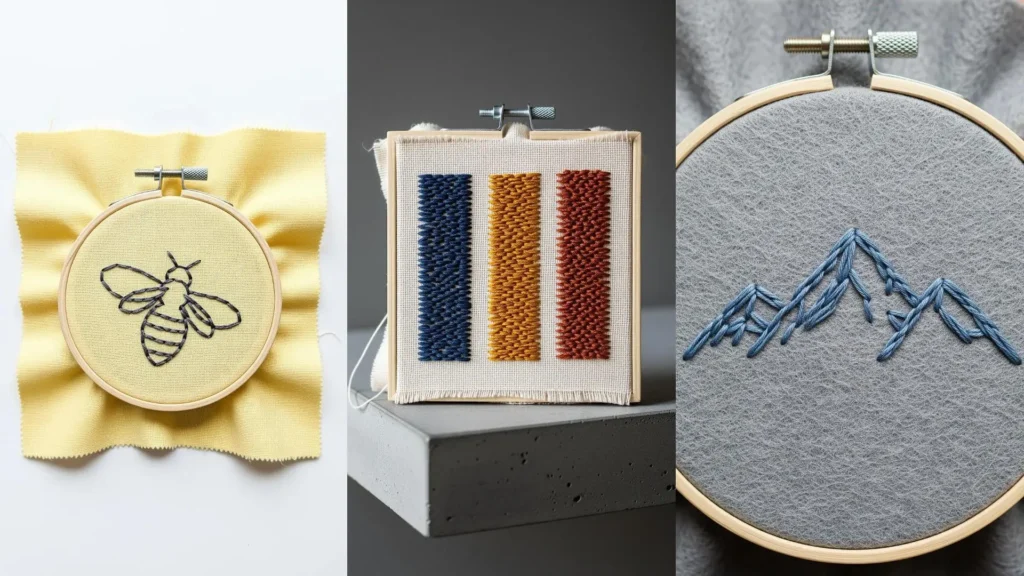
14. Sketch with Thread on Textured Fabric

Choosing a fabric with its own texture, like felt or wool, adds instant depth to your work before you’ve even made a stitch.
Embrace this by adopting a looser, more ‘sketch-like’ stitching style.
This mountain range uses a mix of straight and satin stitches that overlap and vary in angle, mimicking the rough, imperfect texture of rock.
Don’t strive for perfection; let the interaction between thread and fabric create the character.
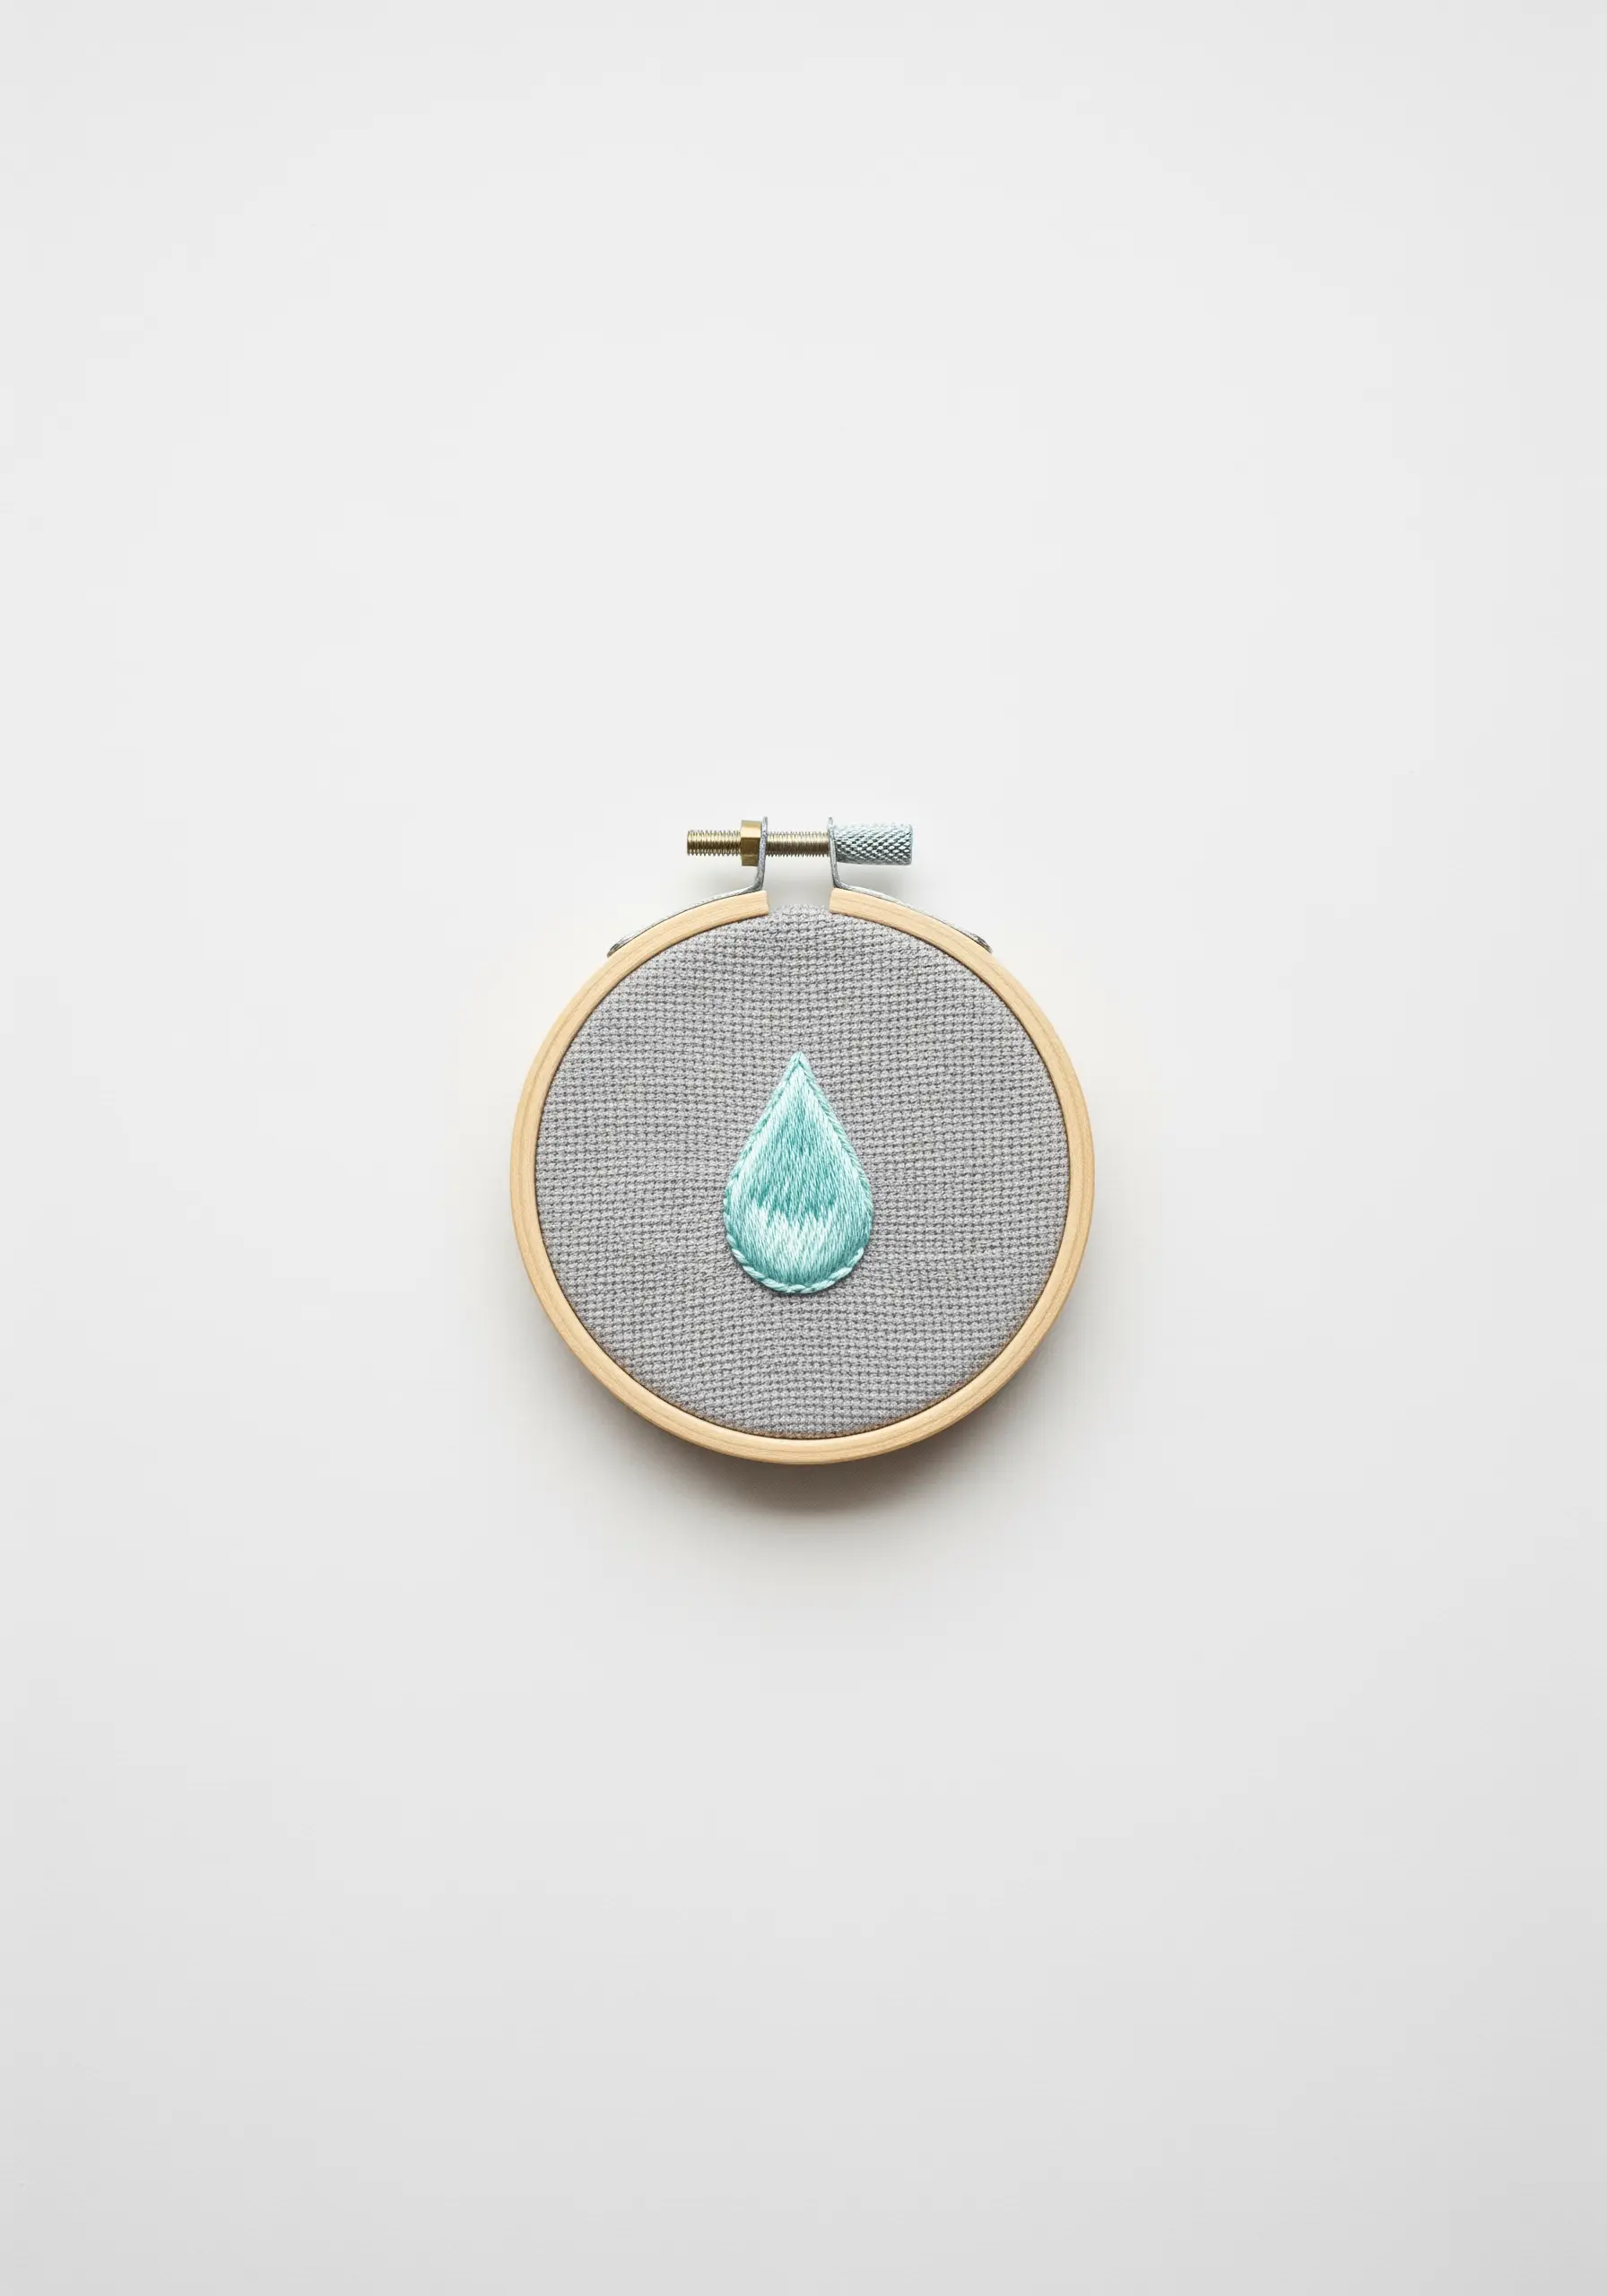
15. Add Dimension with Padded Satin Stitch
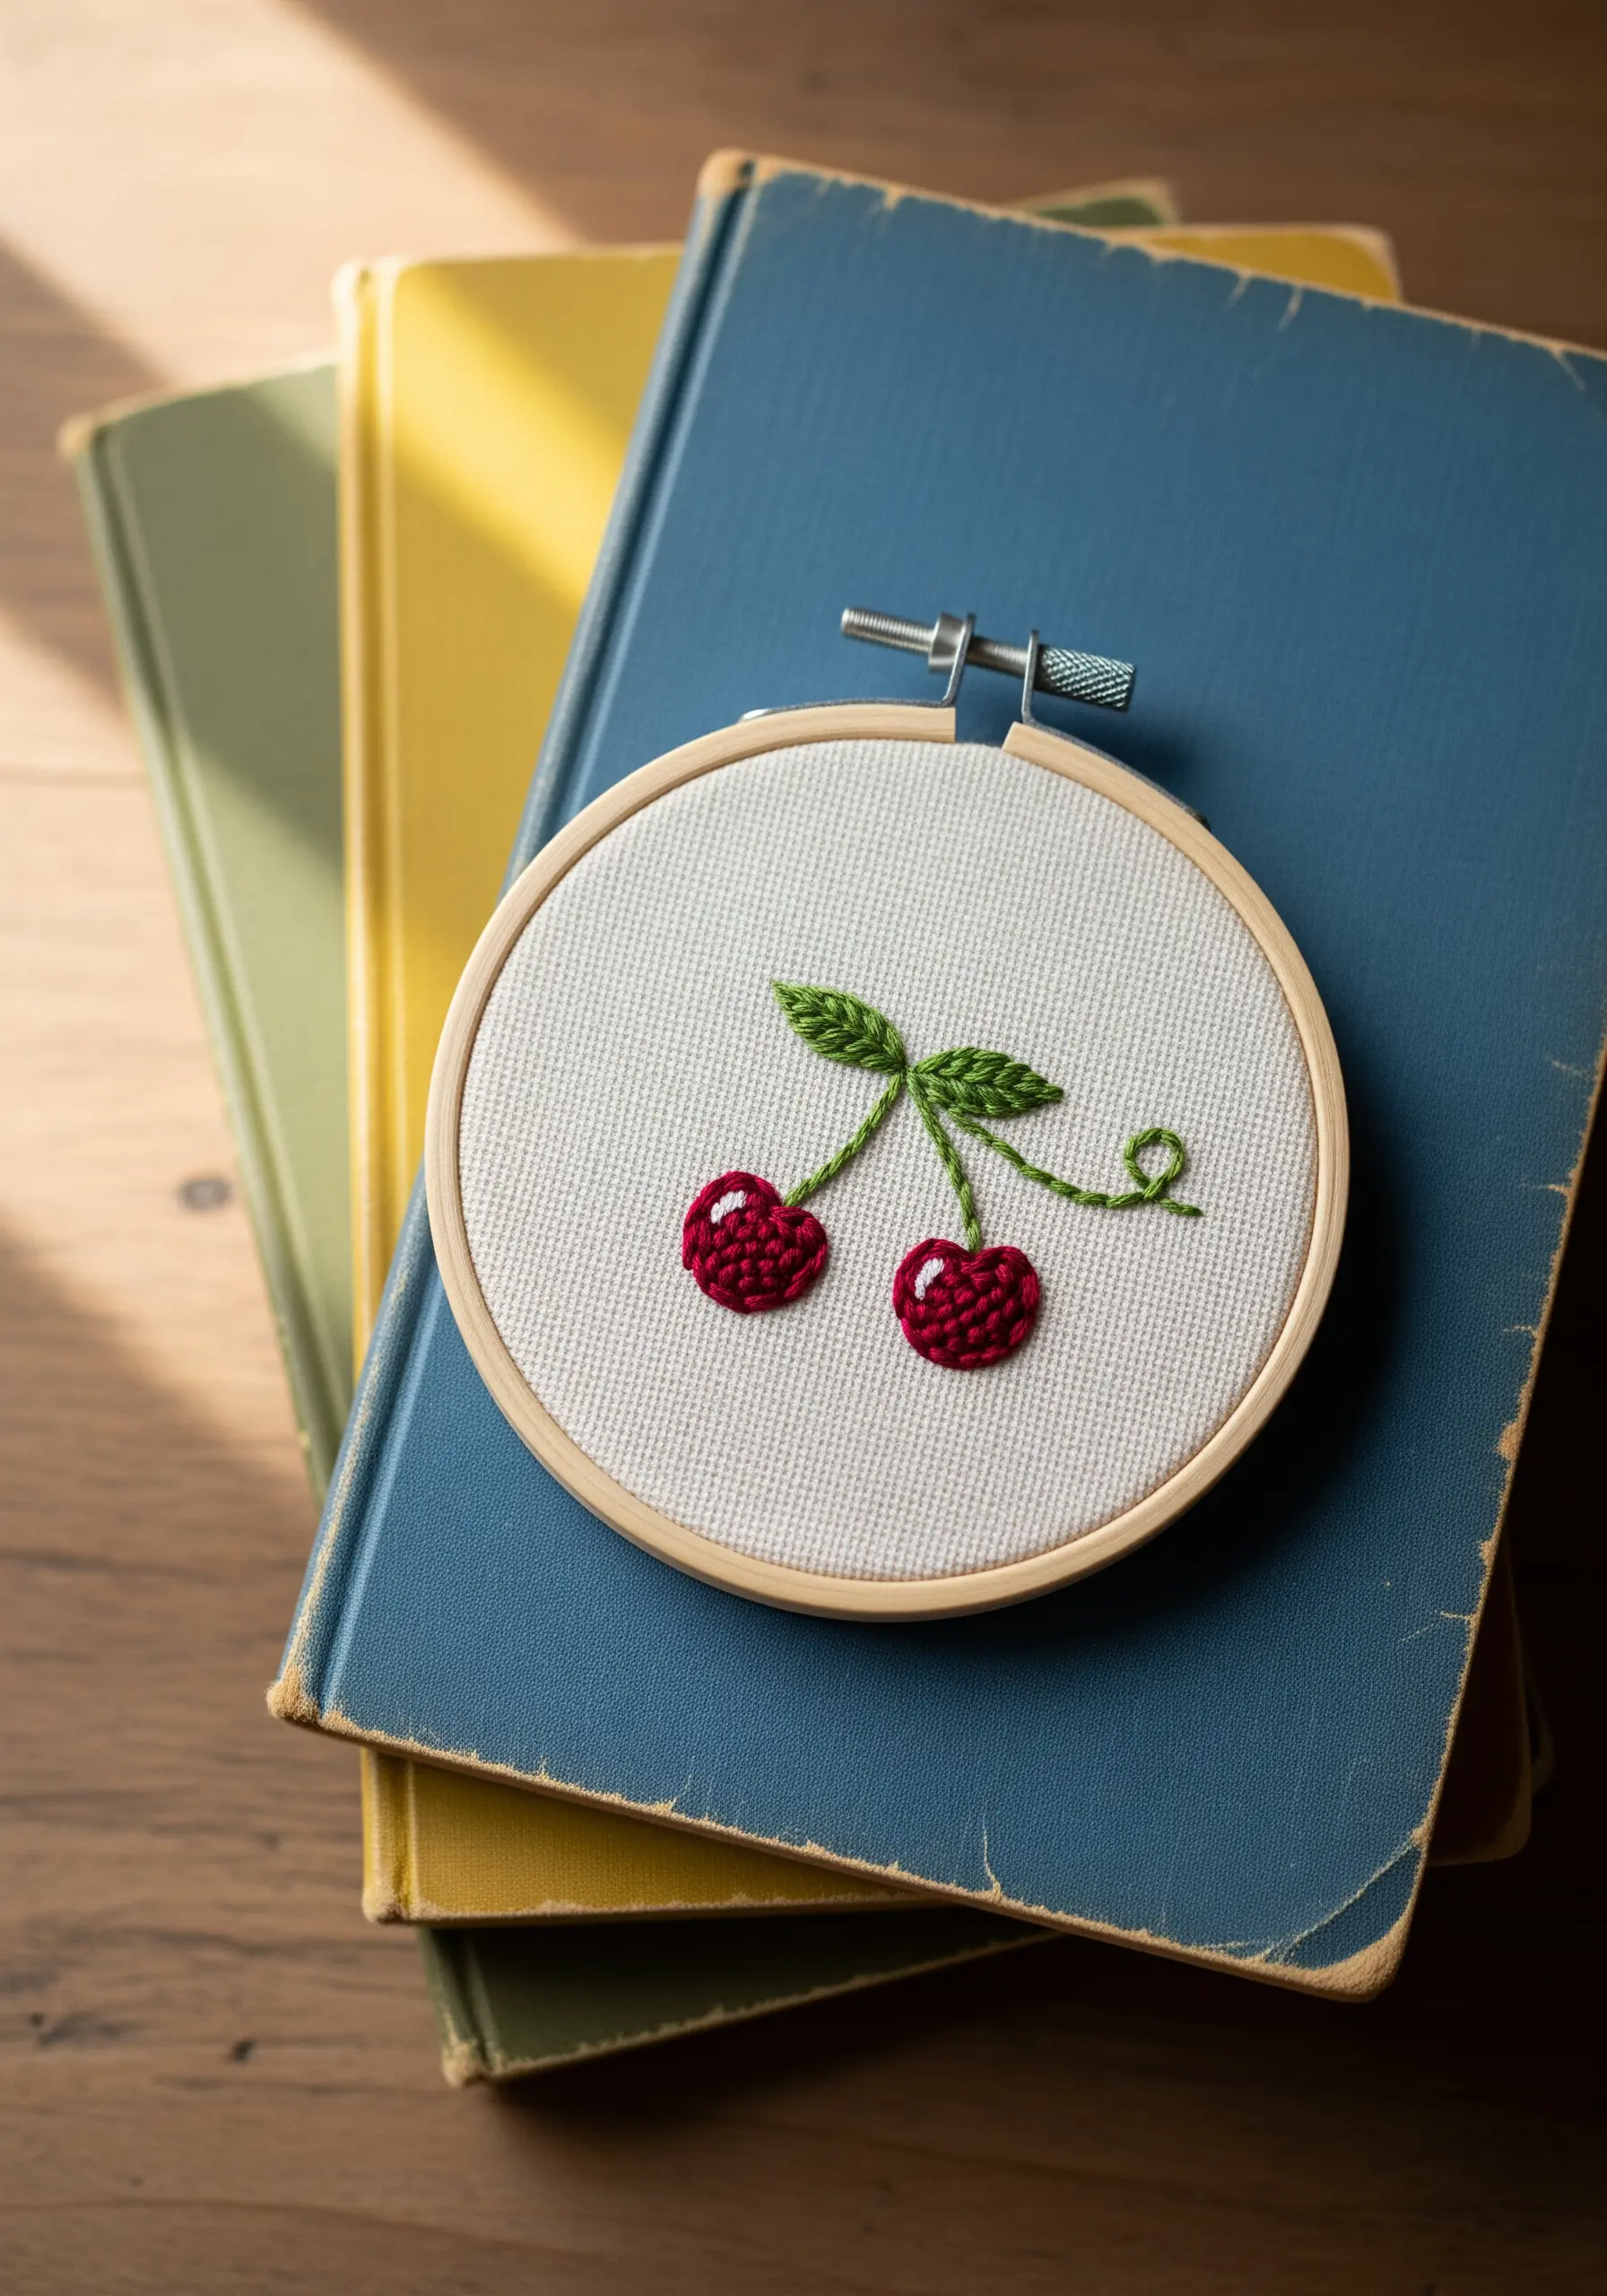
To make small motifs like these cherries literally pop off the fabric, use padded satin stitch.
First, create a foundation by filling the shape with small seed stitches or a base layer of satin stitches worked in the opposite direction of your final layer.
Then, stitch your final, smooth satin stitch over this padding.
This simple preparation raises the surface, creating a beautiful, rounded 3D effect that catches the light and adds a satisfying tactile quality to your work.
16. Harness the Power of a Simple Outline
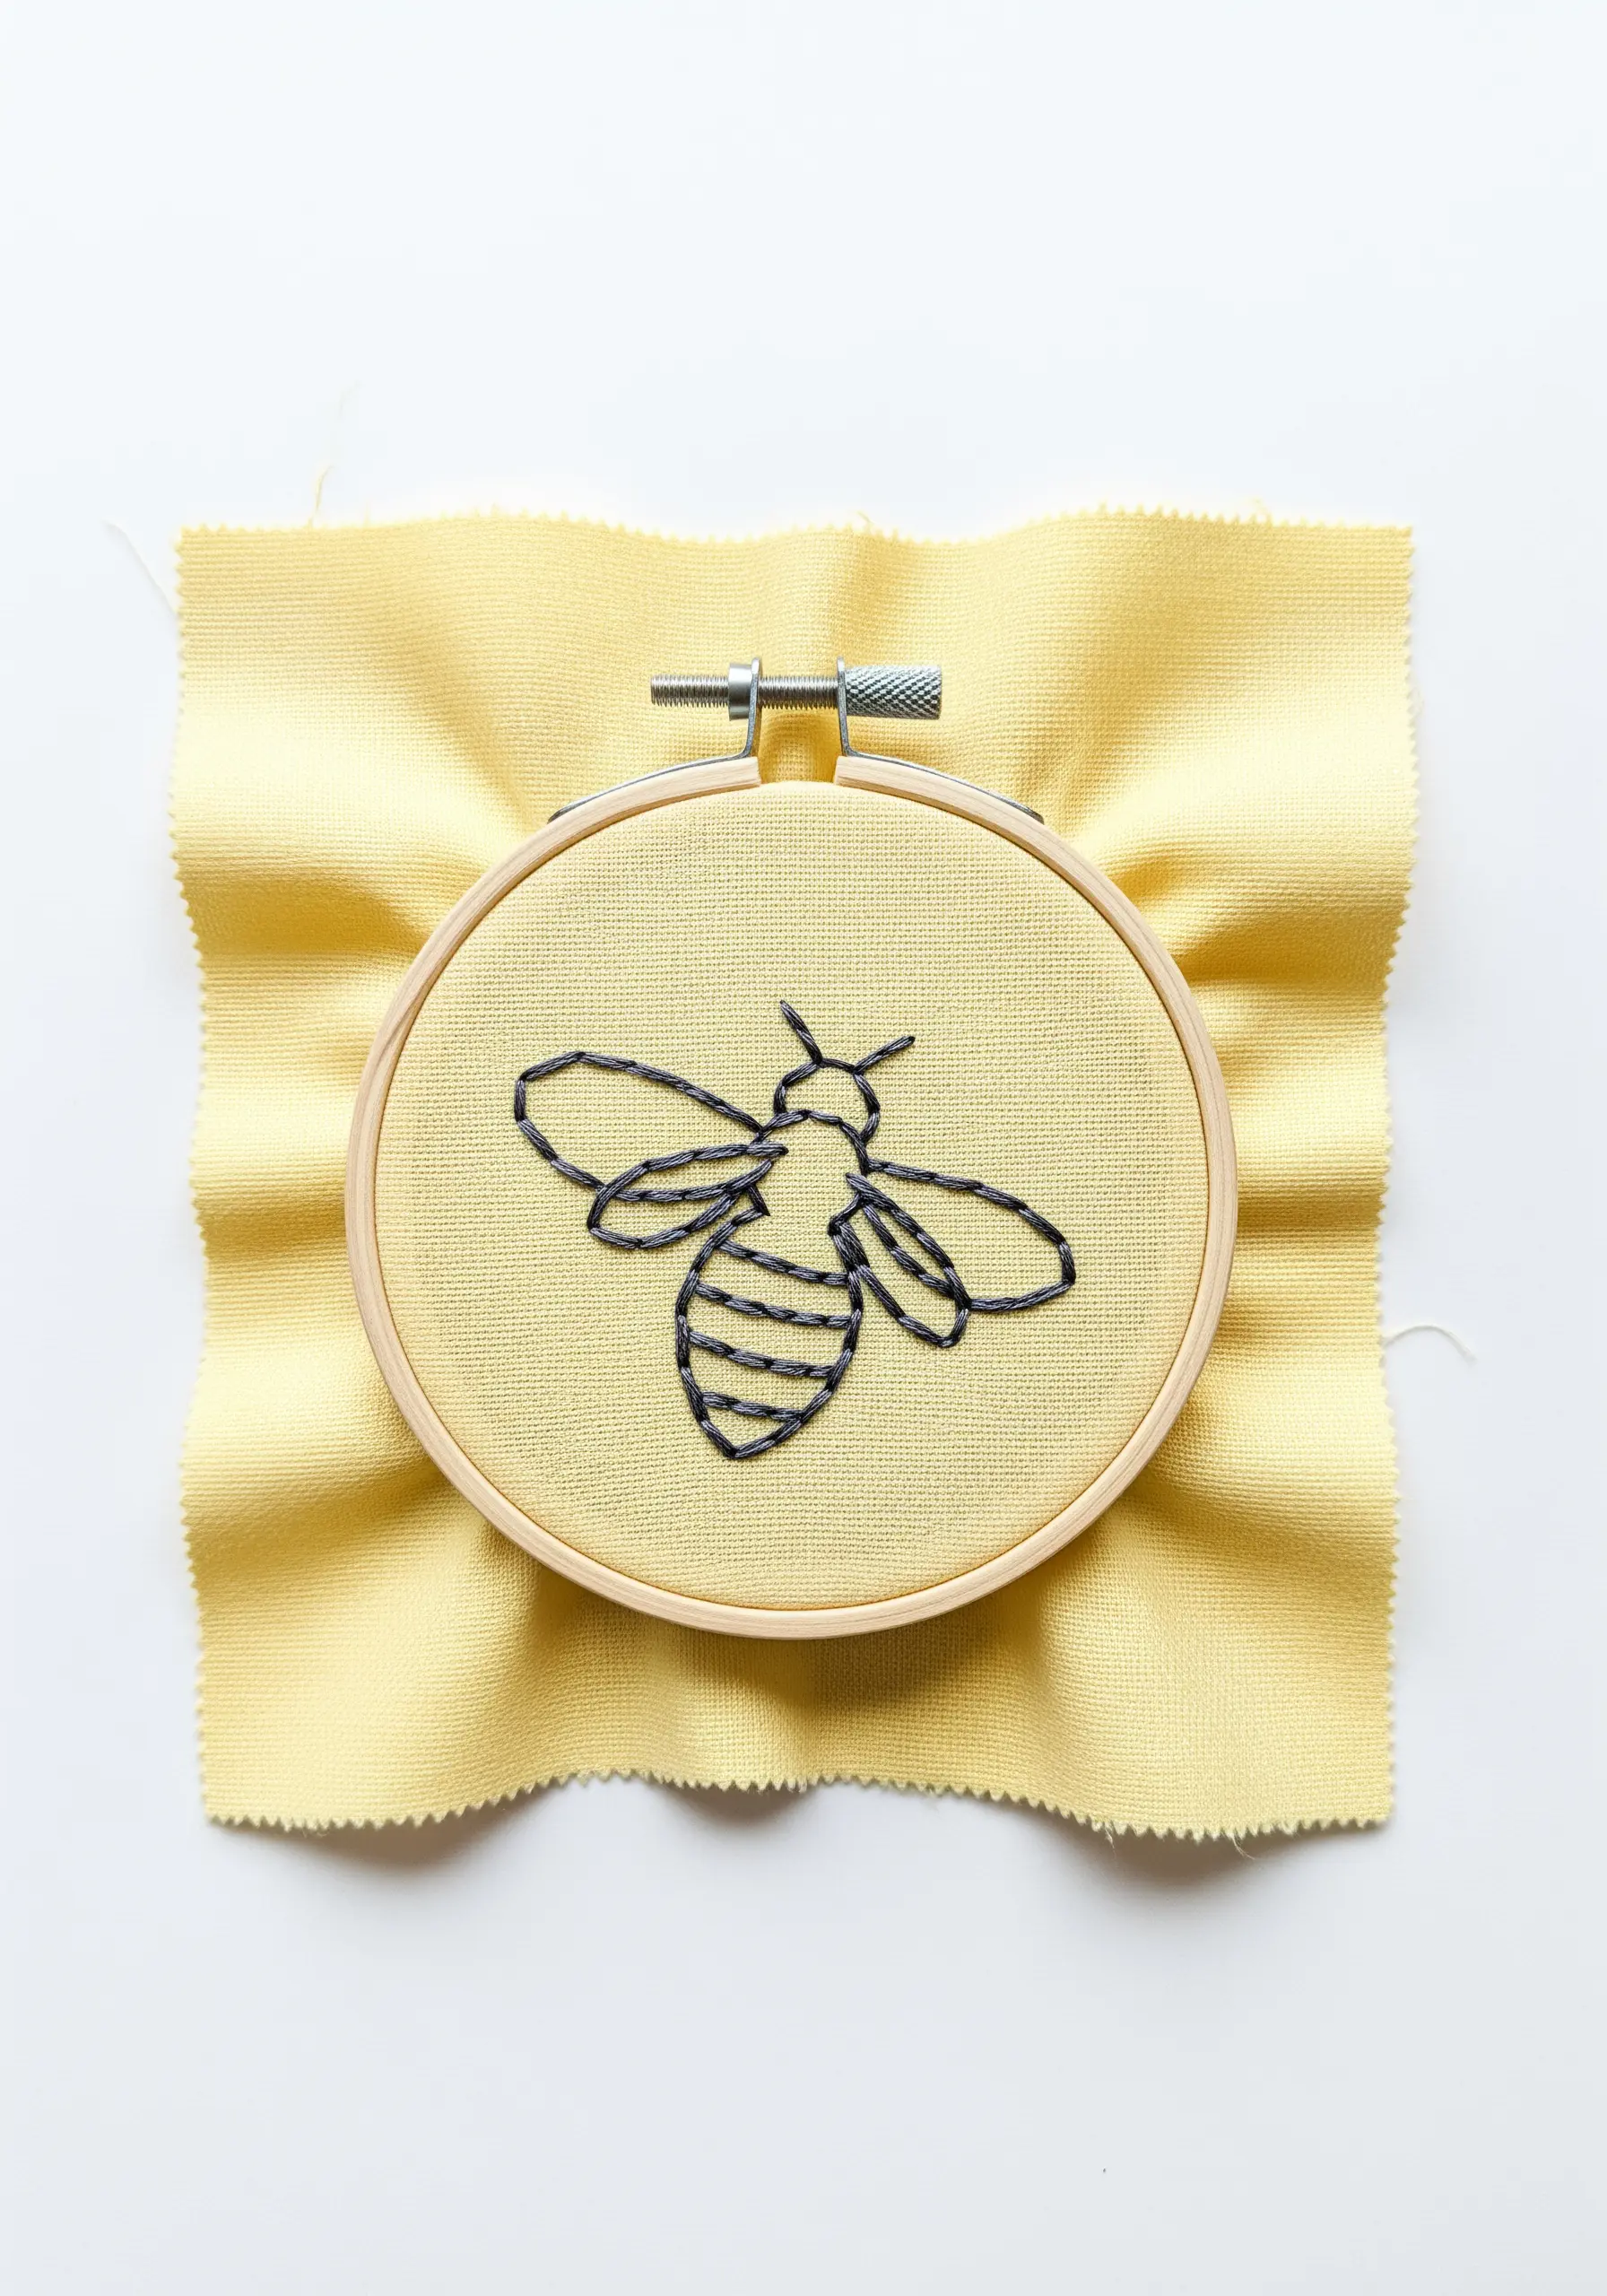
Never underestimate a clean, well-executed backstitch.
This bee proves that you don’t need complex fills or fancy stitches to create a charming and instantly recognizable motif.
The key to making it look polished is consistency in your stitch length.
For the stripes, you can either place short satin stitches or lay several lines of backstitch side-by-side.
This minimalist approach is perfect for adding a quick, personal touch to tote bags or clothing.
17. Try Thread Painting on a Small Scale
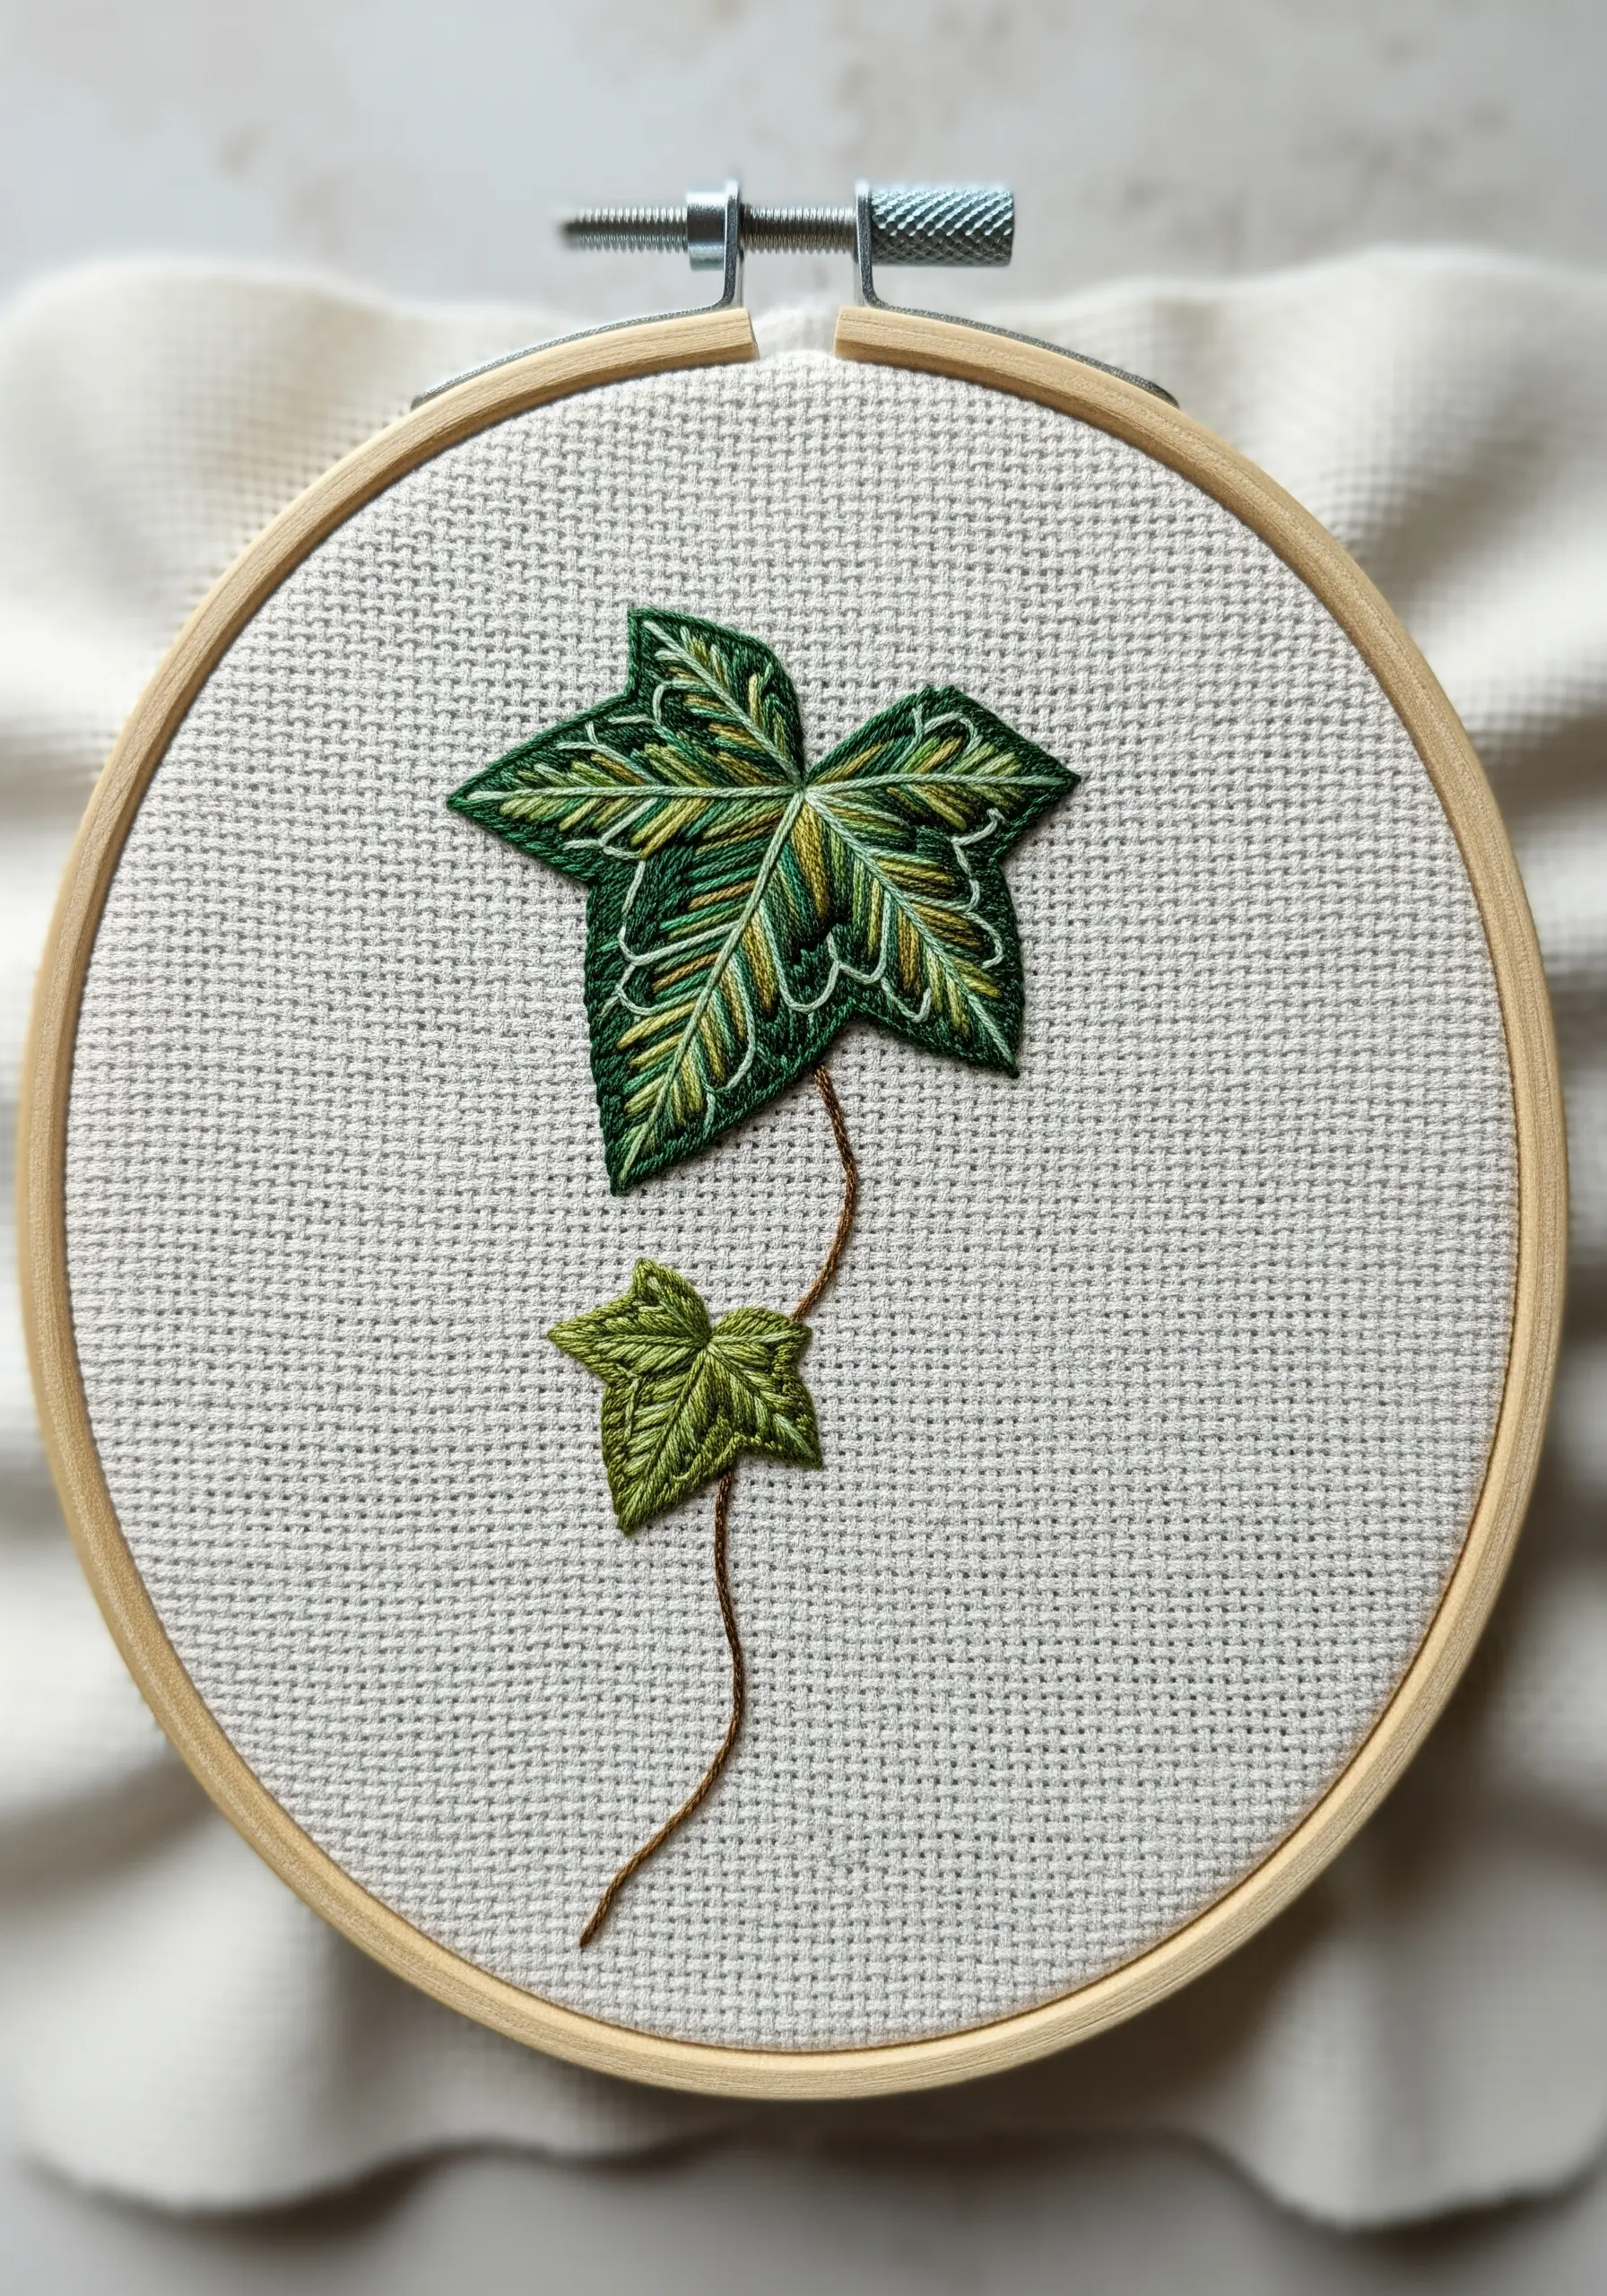
A small scrap of fabric is the perfect canvas for practicing thread painting.
Use a single strand of floss and the long-and-short stitch to blend several shades of green seamlessly within this ivy leaf.
Start with your darkest color, then gradually introduce lighter shades, staggering the length of your stitches to create a soft, paint-like transition.
This technique allows for incredible realism and detail, turning your thread into a palette of colors.
18. Create a Metallic Sheen with Couching
Metallic threads can be difficult to stitch with, but couching solves that problem beautifully.
Simply lay your metallic thread on the surface of the fabric along your design line.
Then, use a second, thinner thread in a matching color to tack it down with tiny, evenly spaced stitches.
This technique allows you to create a clean, raised, and gleaming outline that looks incredibly luxe, ideal for adding a touch of gold to your projects.
19. Map the Stars with Two Simple Stitches
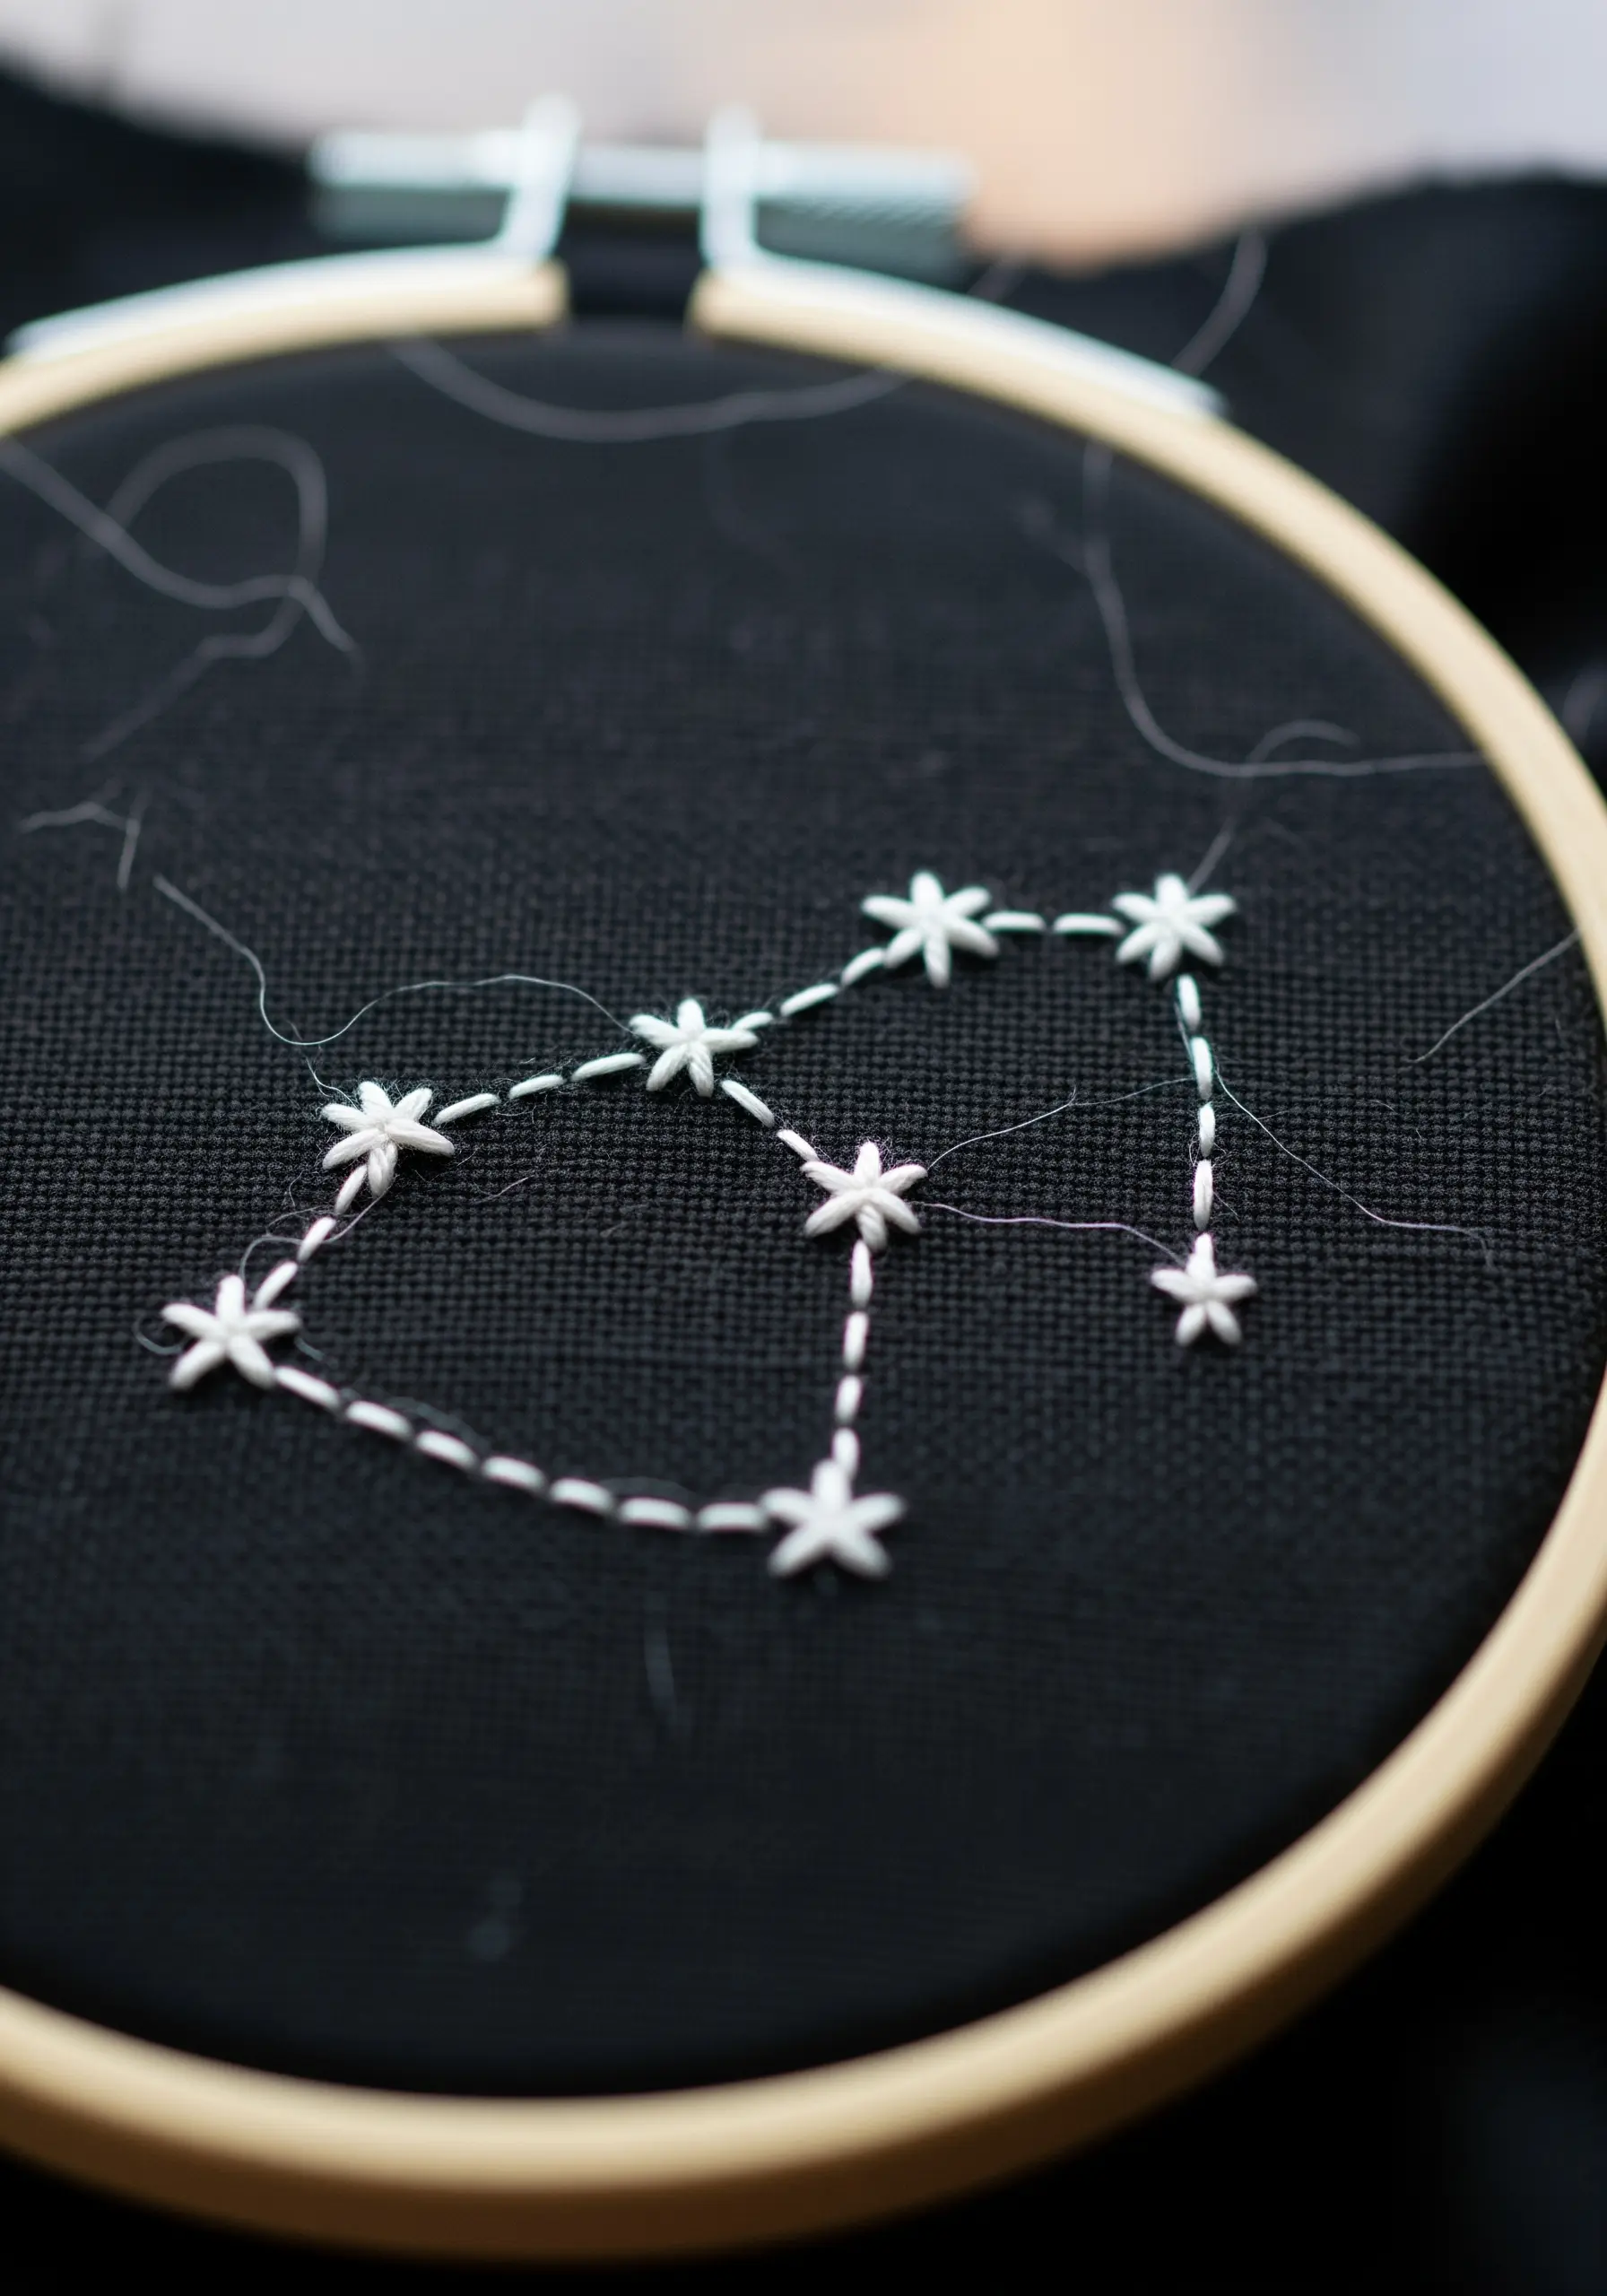
Recreate your favorite constellation using just two fundamental stitches.
Use a delicate running stitch to form the connecting lines, giving them a faint, ethereal quality.
For the stars themselves, a star stitch (three intersecting straight stitches) or a tiny French knot provides a bright focal point.
This minimalist combination is incredibly effective on a dark scrap of fabric, turning it into a tiny piece of the night sky—a great way to personalize accessories.
20. Achieve Soft Gradients with Split Stitch
Creating a smooth color gradient with satin stitch can be challenging.
For a more forgiving and beautifully textured alternative, fill your shape with rows of split stitch.
Work in concentric lines from the outside in, changing thread colors as you go.
Because the split stitch creates a braided texture, the colors blend together softly, resulting in a gentle, painterly effect that mimics the look of watercolor on fabric.
21. Fill Shapes with Woven-Look Seed Stitch
For a rich, tactile fill, skip the satin stitch and opt for densely packed seed stitches.
This technique involves making tiny, single straight stitches in random directions until the entire area is covered.
The result is a wonderfully textured, almost woven appearance that is much more forgiving of imperfections than smooth fills.
It’s a meditative way to add color and texture, making it perfect for abstract color-blocking projects.
22. Tell a Story Through Stitch Contrast
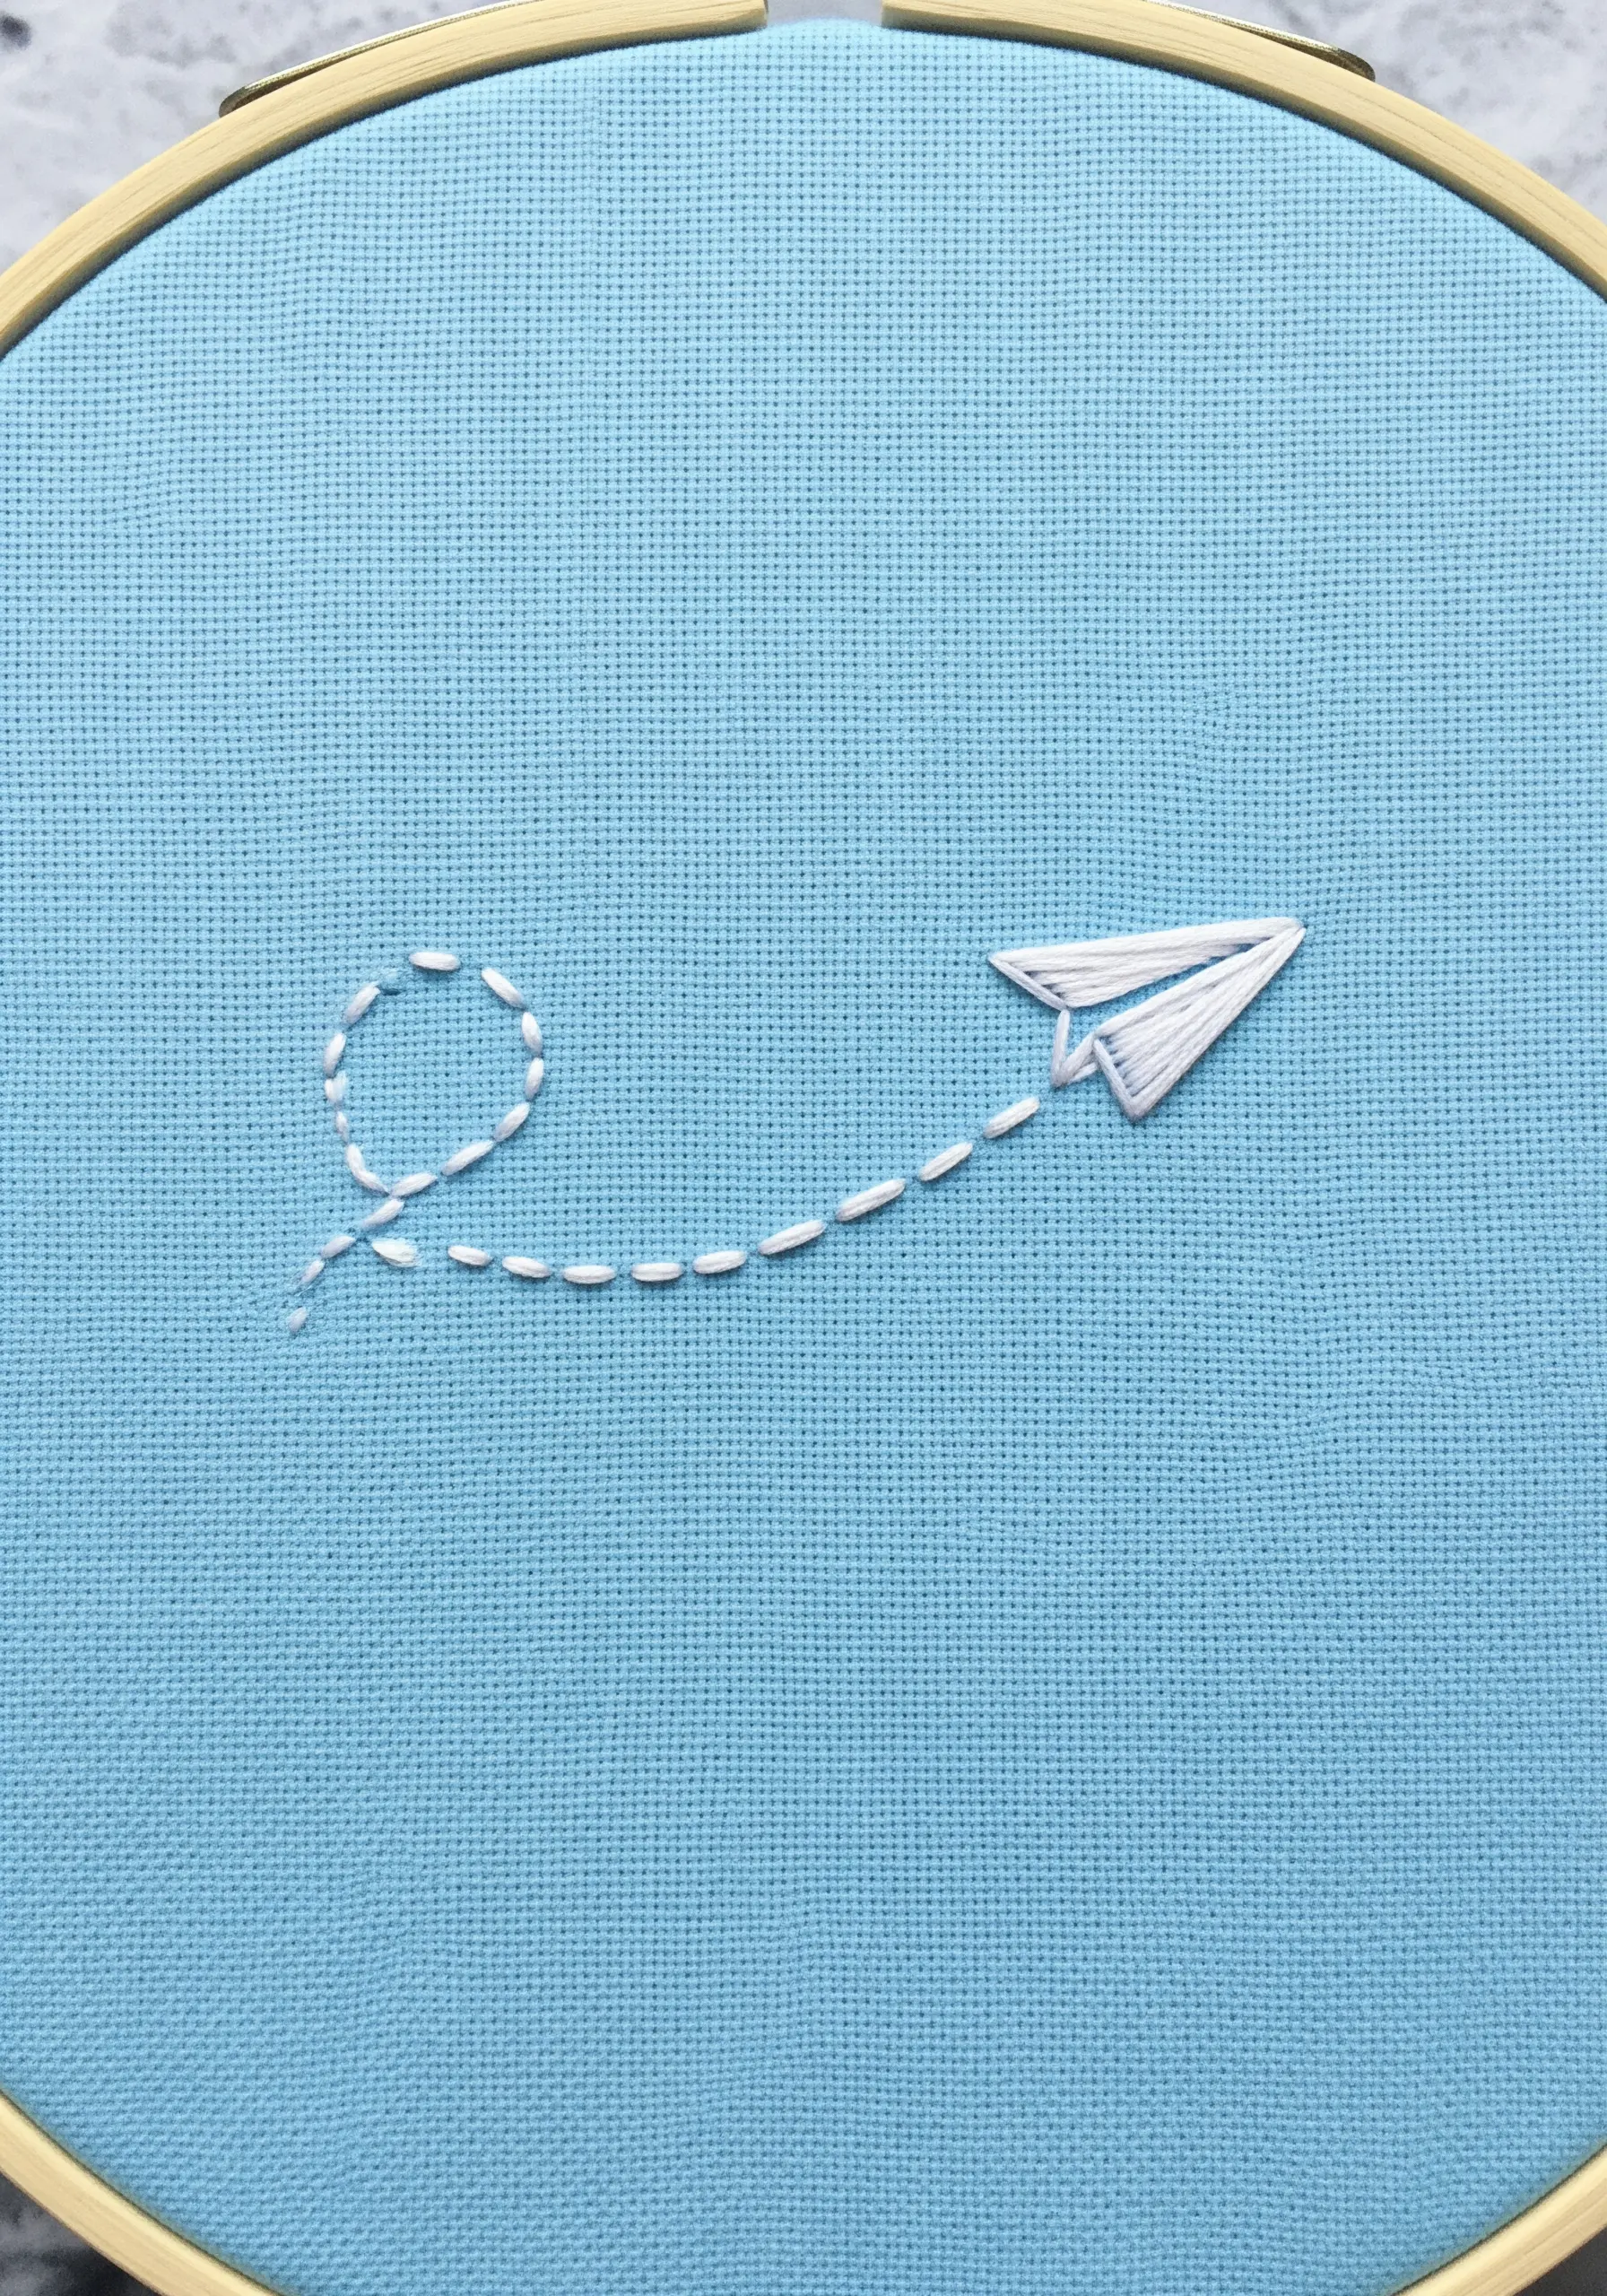
This tiny scene is a perfect lesson in visual storytelling.
The paper airplane is filled with solid satin stitch, giving it weight and form.
In contrast, its flight path is a dashed running stitch, which beautifully conveys a sense of movement, lightness, and memory.
This deliberate contrast between a solid shape and a broken line is a simple yet powerful design choice that adds narrative to your work, creating thoughtful miniature scenes.
23. Capture Realism with Angled Stitches
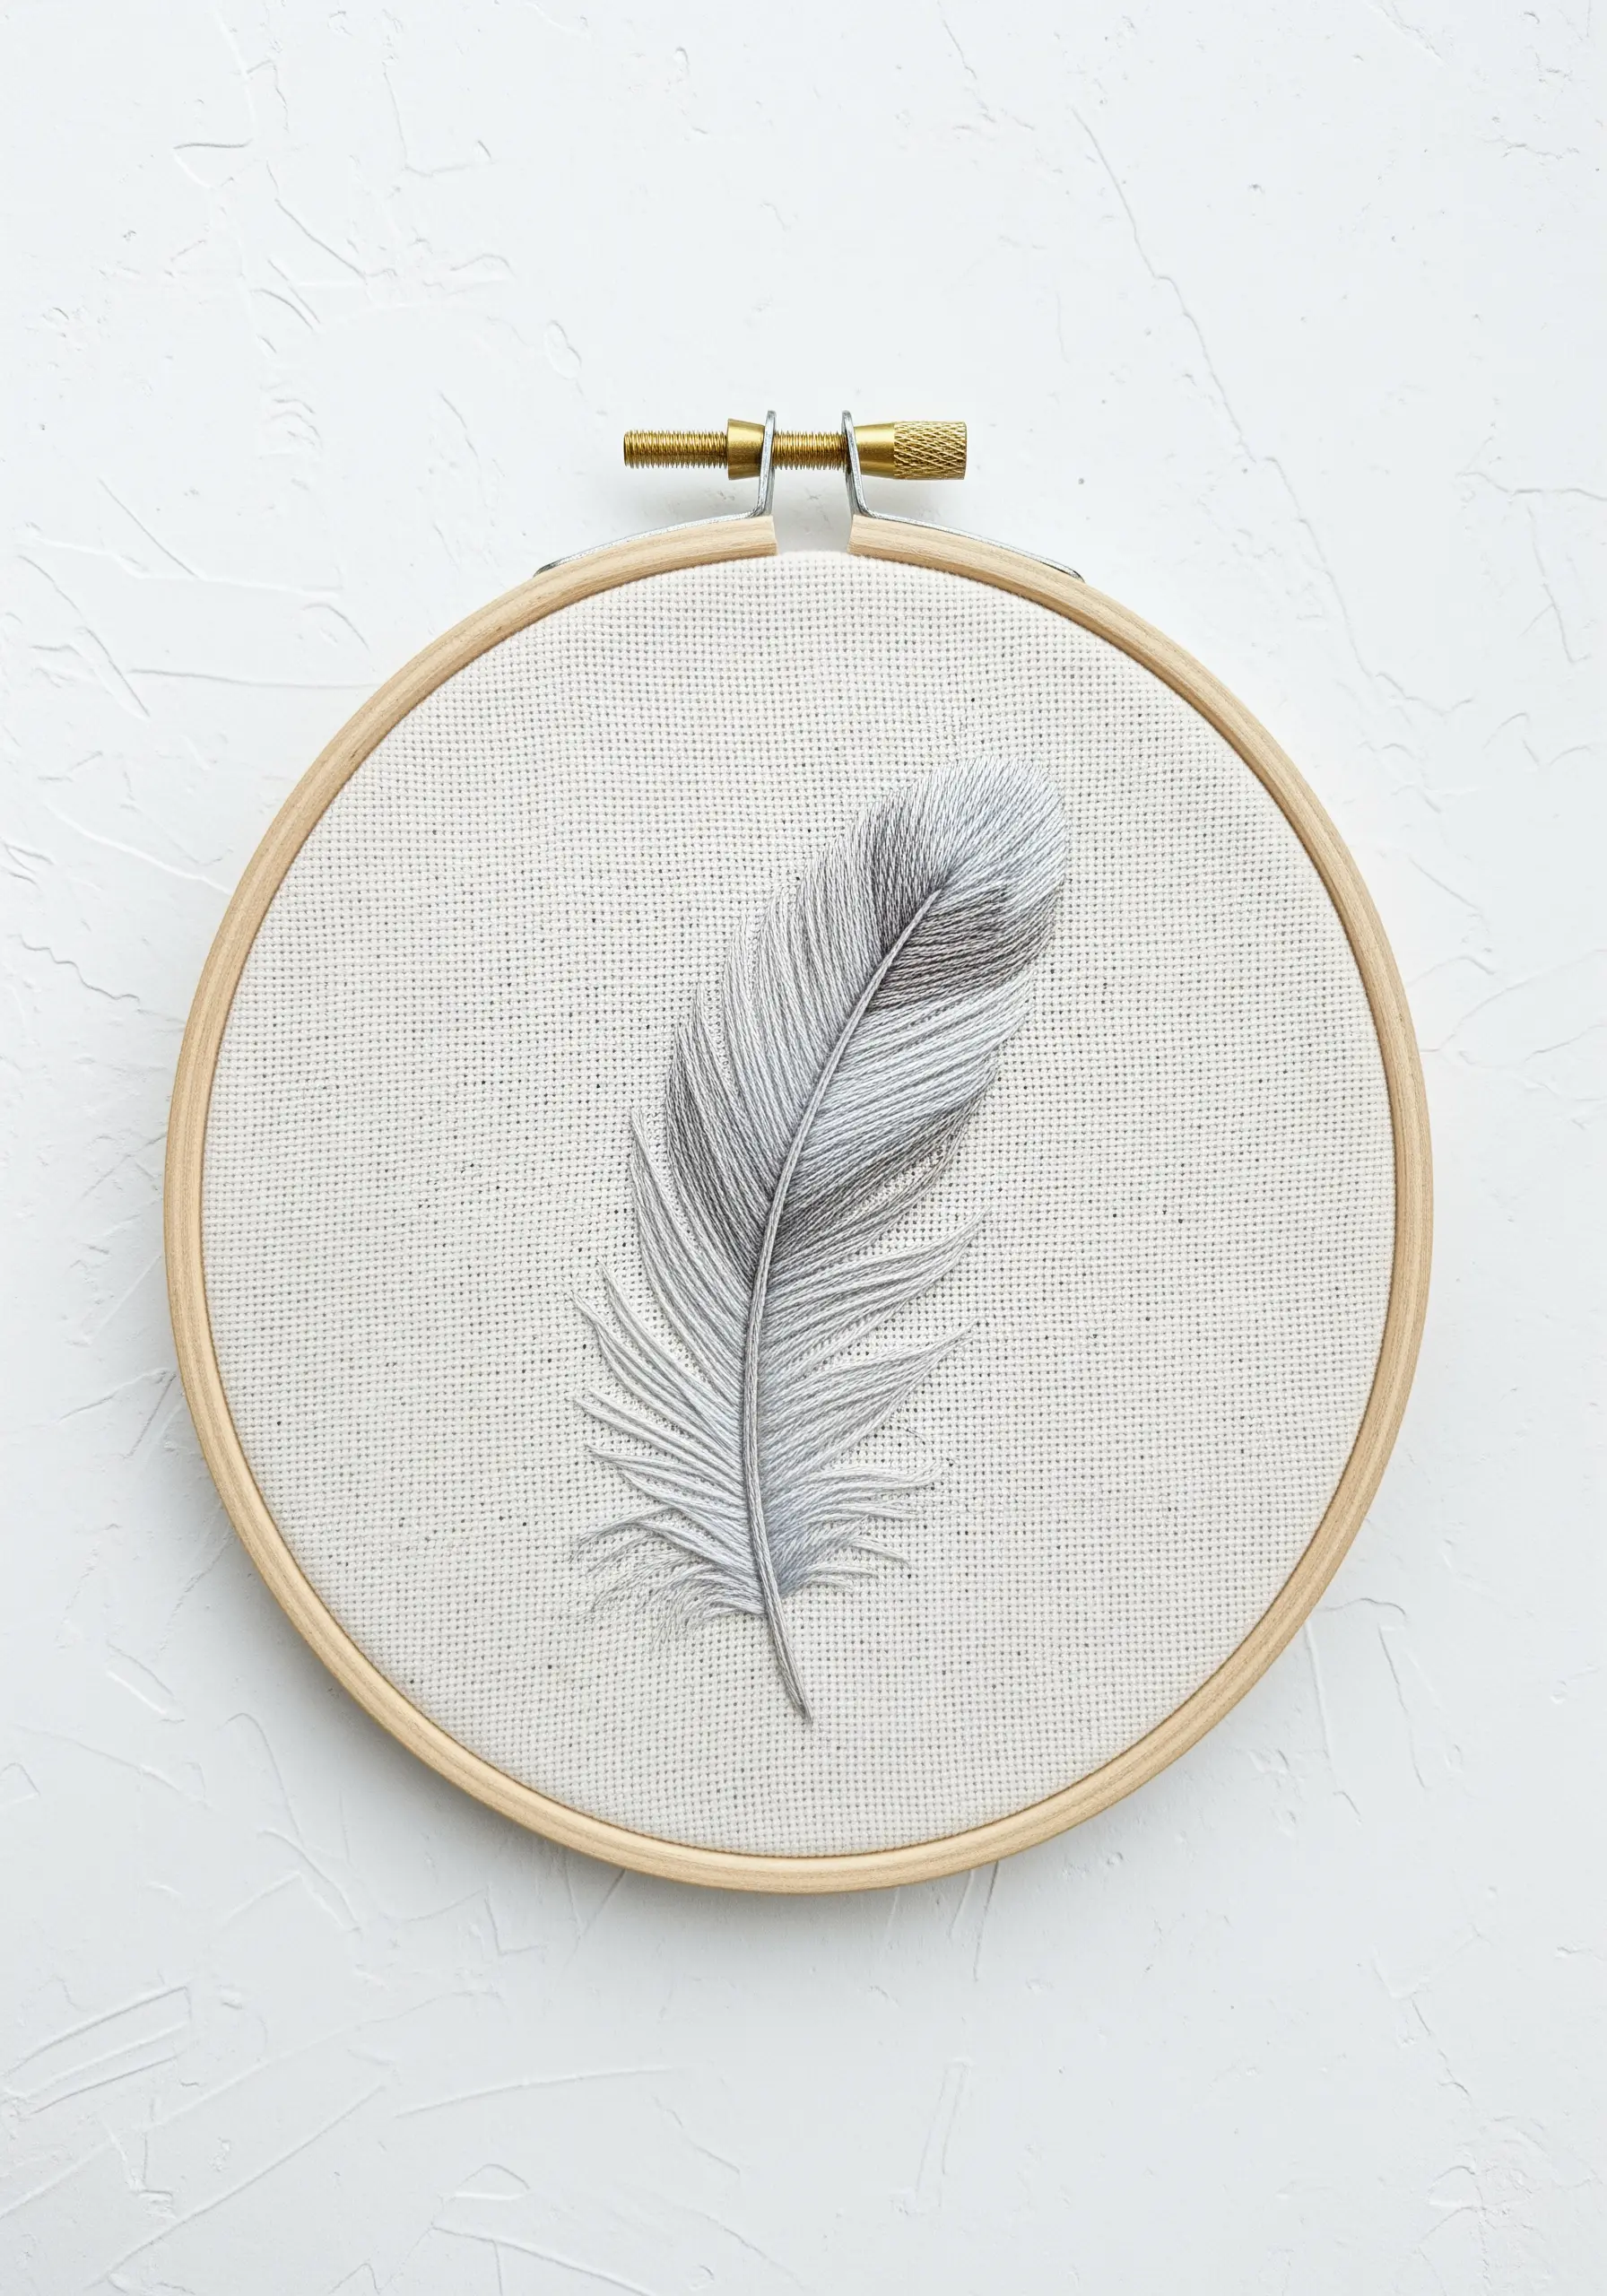
This feather is a stunning example of how stitch direction can mimic nature.
Using a single strand of thread and long-and-short stitch, angle your stitches outwards from the central quill, just as the barbs of a real feather grow.
Blend shades of gray and white to create softness and light, and use a few detached, wispy straight stitches at the base for a delicate, realistic finish.
This is a true illusion of texture.
24. Add Depth with Combined Outlines

Elevate a simple line drawing by using more than one type of outline stitch.
For this lemon slice, a thicker whipped backstitch or stem stitch defines the outer rind, giving it prominence.
The inner segments, however, are stitched with a finer, more delicate backstitch.
This subtle shift in line weight creates a visual hierarchy, adding sophistication and detail without complicating the design, perfect for a quick project to brighten up a tote.
25. Incorporate 3D Objects from Your Scrap Bin
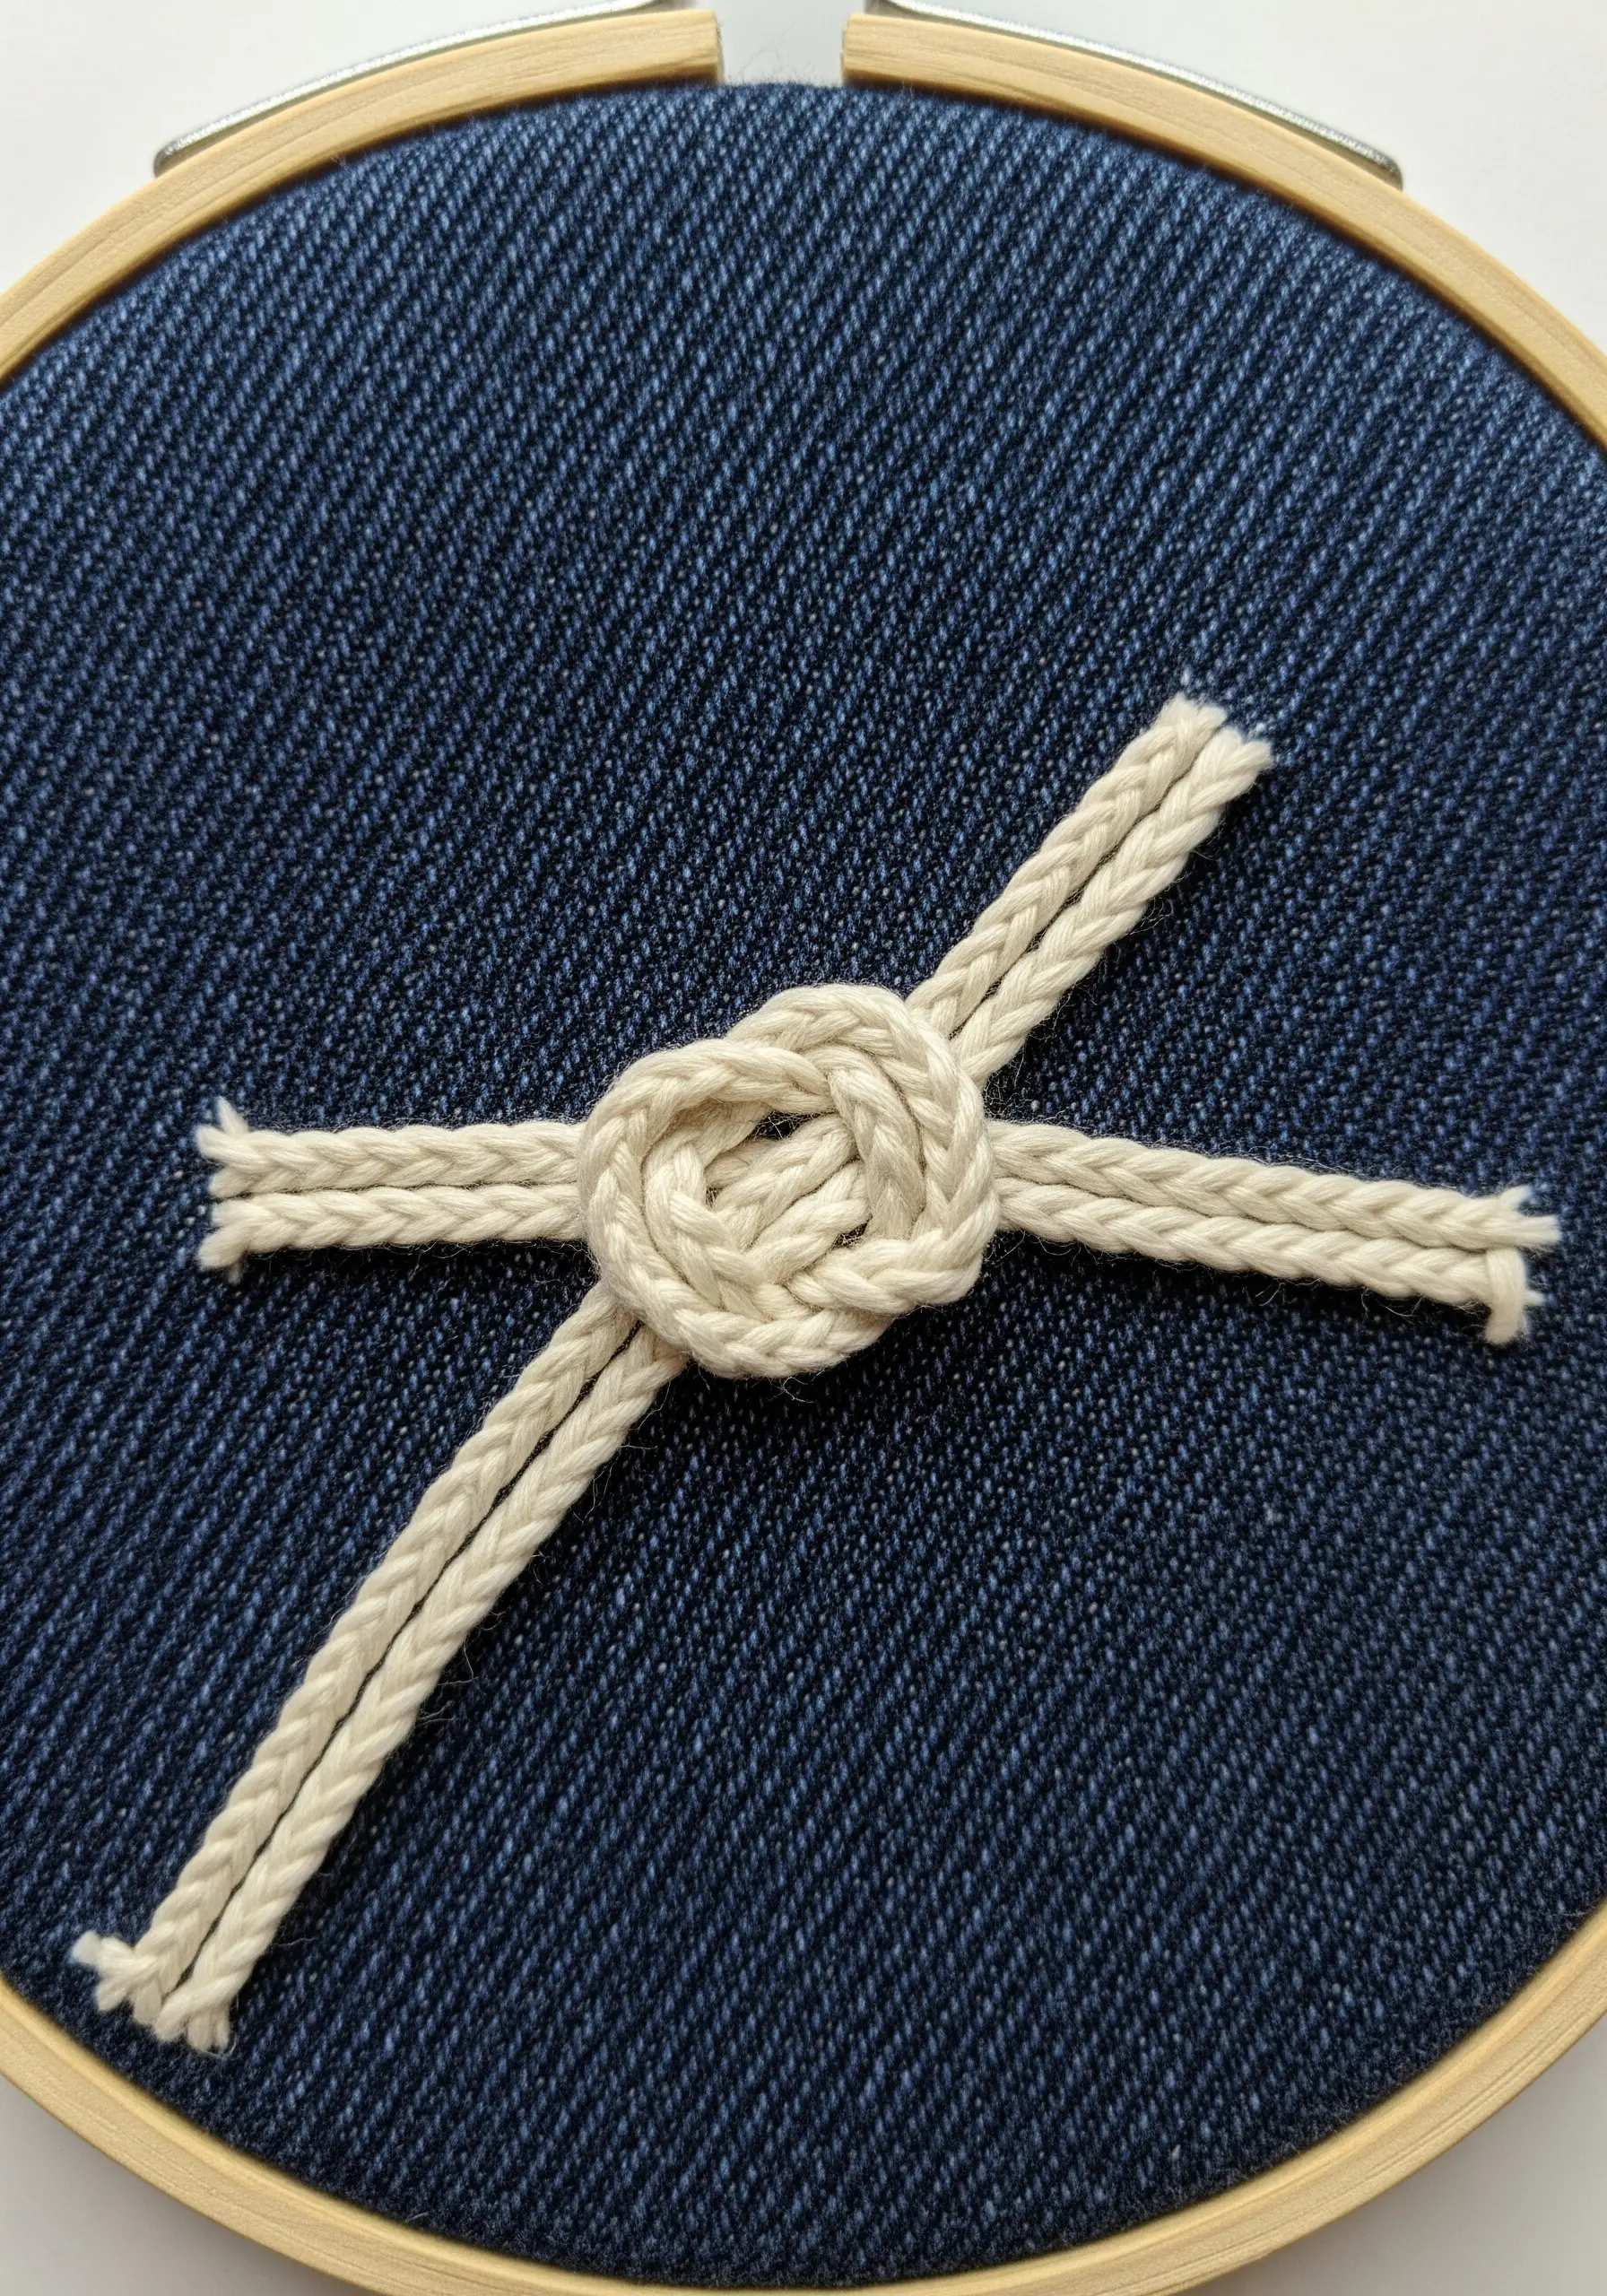
Your embroidery doesn’t have to be limited to thread.
Look through your craft supplies for other materials to incorporate, like the piece of cord used here.
Tie it into a decorative knot and simply tack it onto your fabric with a few small, discreet stitches.
This immediately adds dimension, texture, and surprise to your hoop, turning it into a charming mixed-media piece.
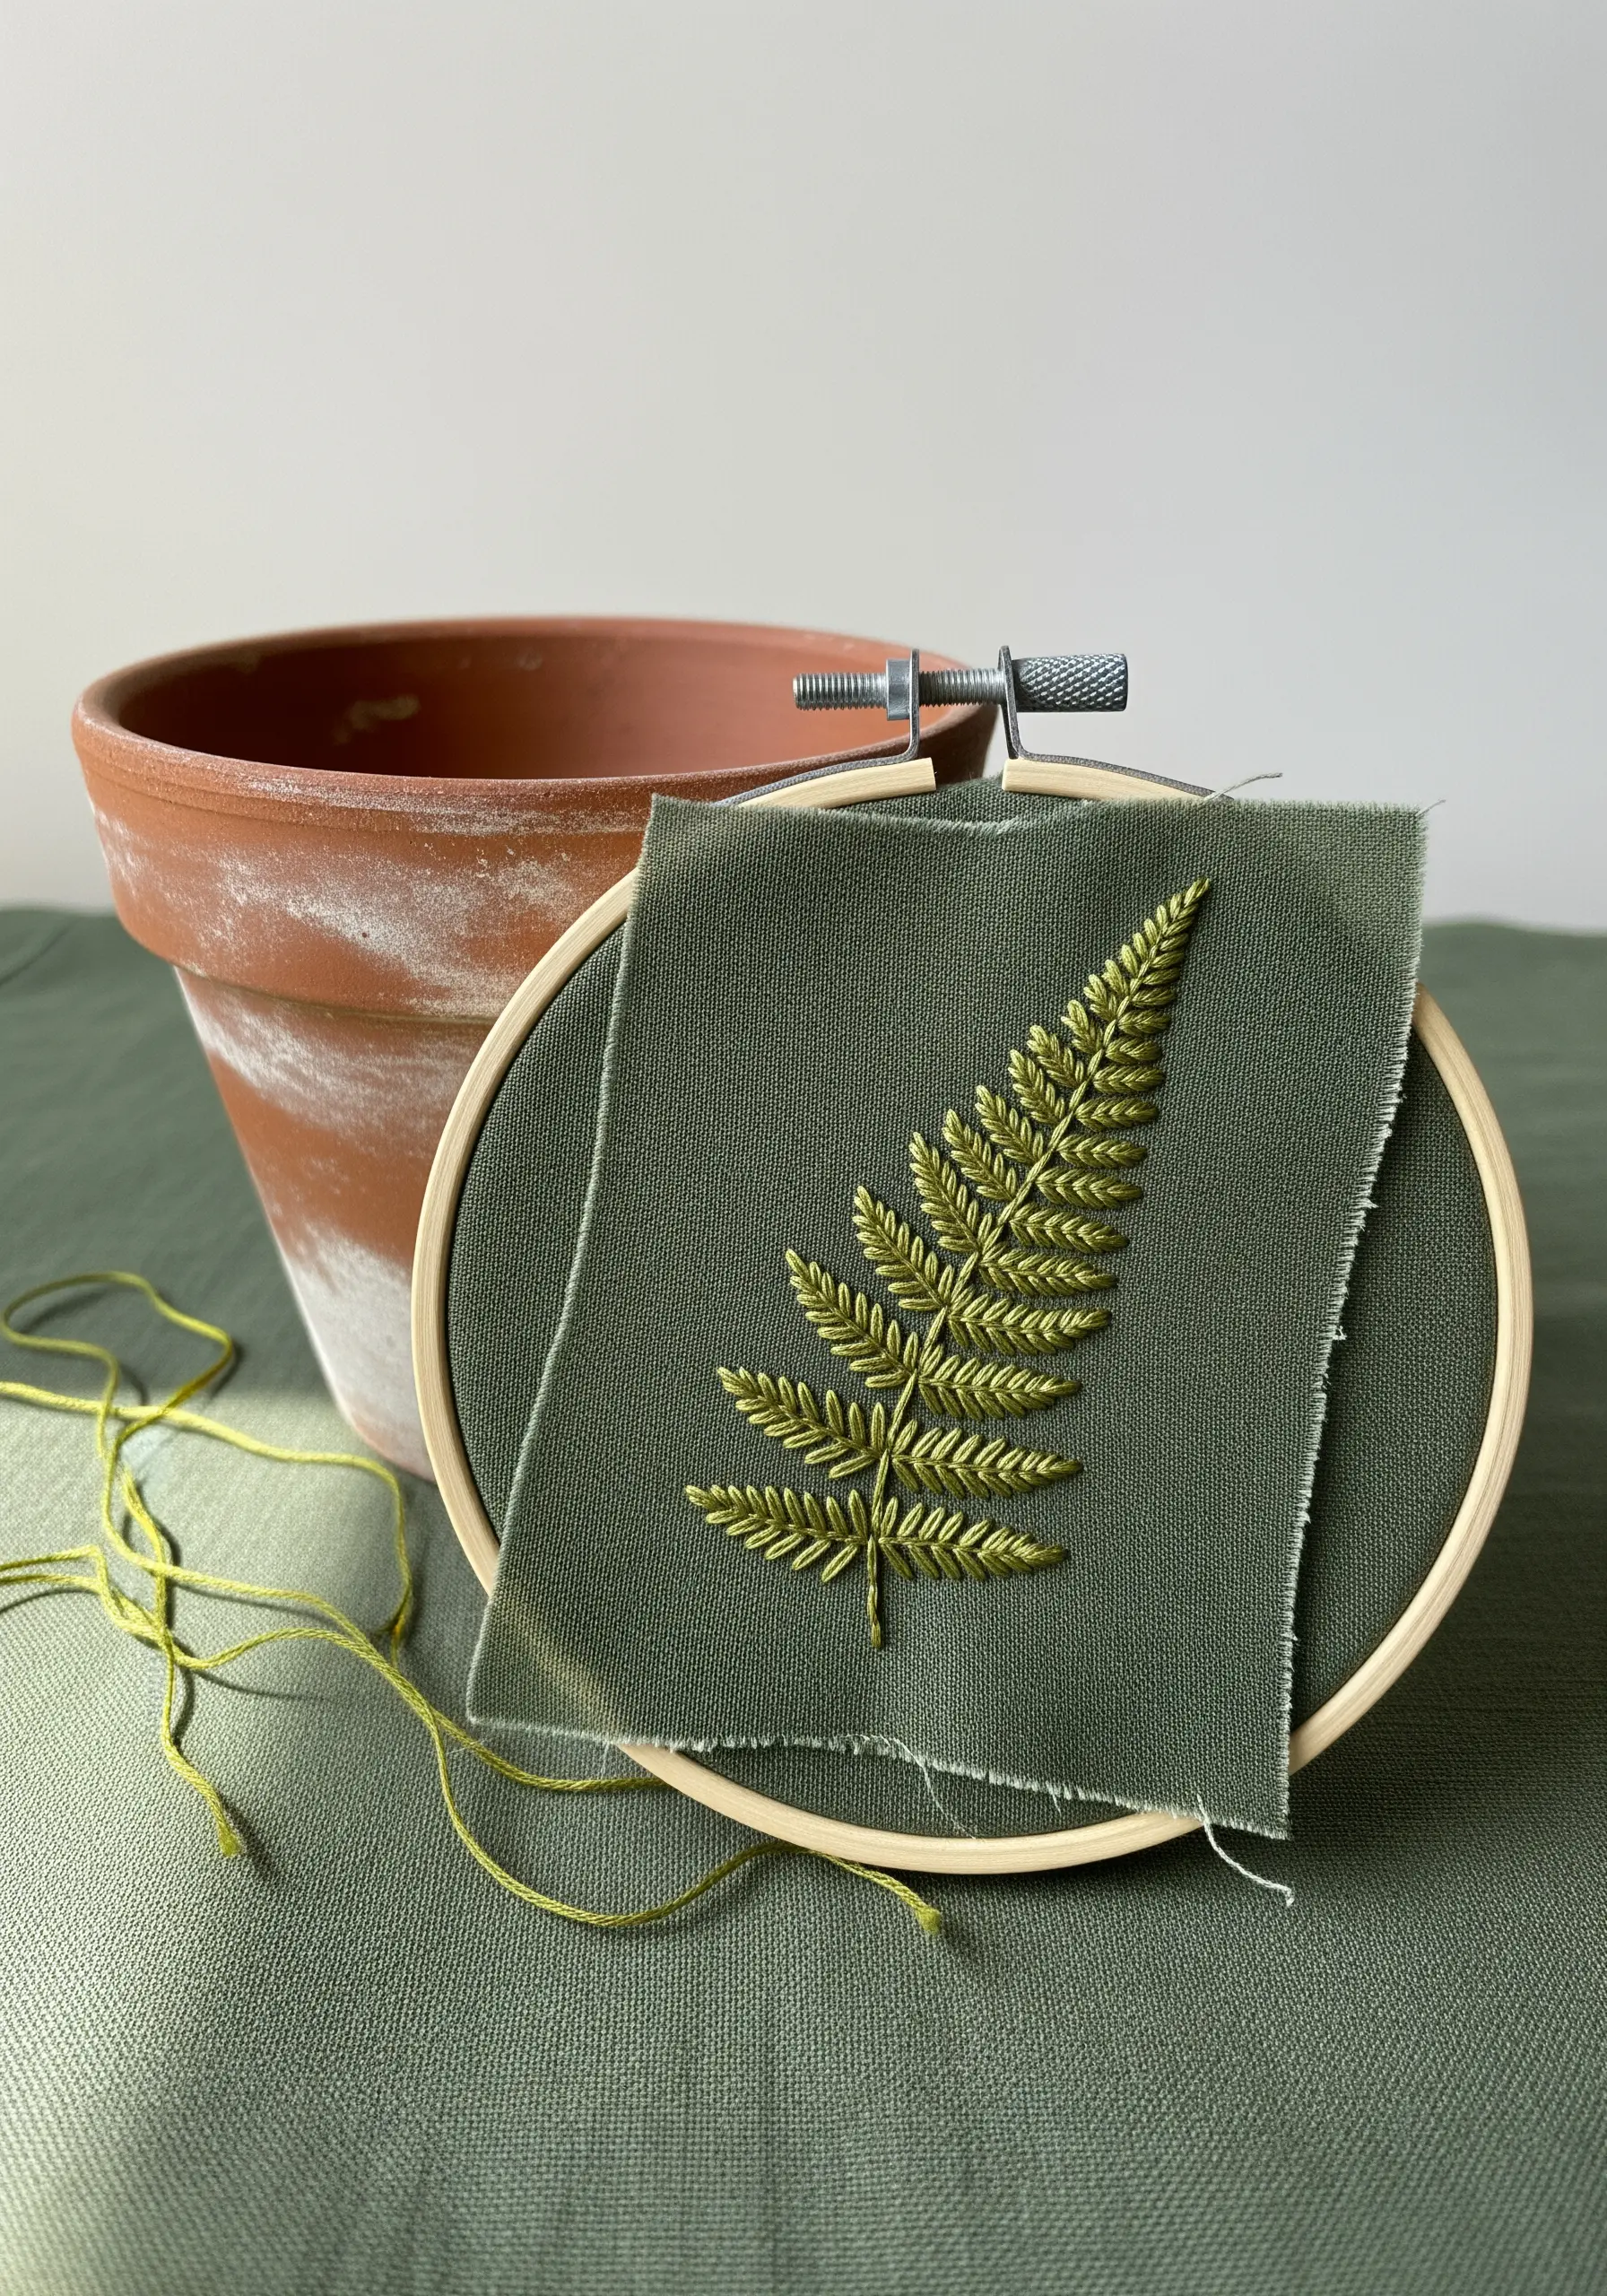
26. Stitch Flawless Leaves with Fishbone Stitch
The fishbone stitch is your secret to creating perfectly formed leaves with a defined central vein.
It’s created by making a series of overlapping, angled stitches that cross over a central guideline.
By keeping your stitches close together and maintaining a consistent angle, you can achieve a beautifully smooth and solid fill that looks incredibly professional.
It’s an essential stitch for any botanical embroidery.
27. Enhance Lettering with Contoured Fill
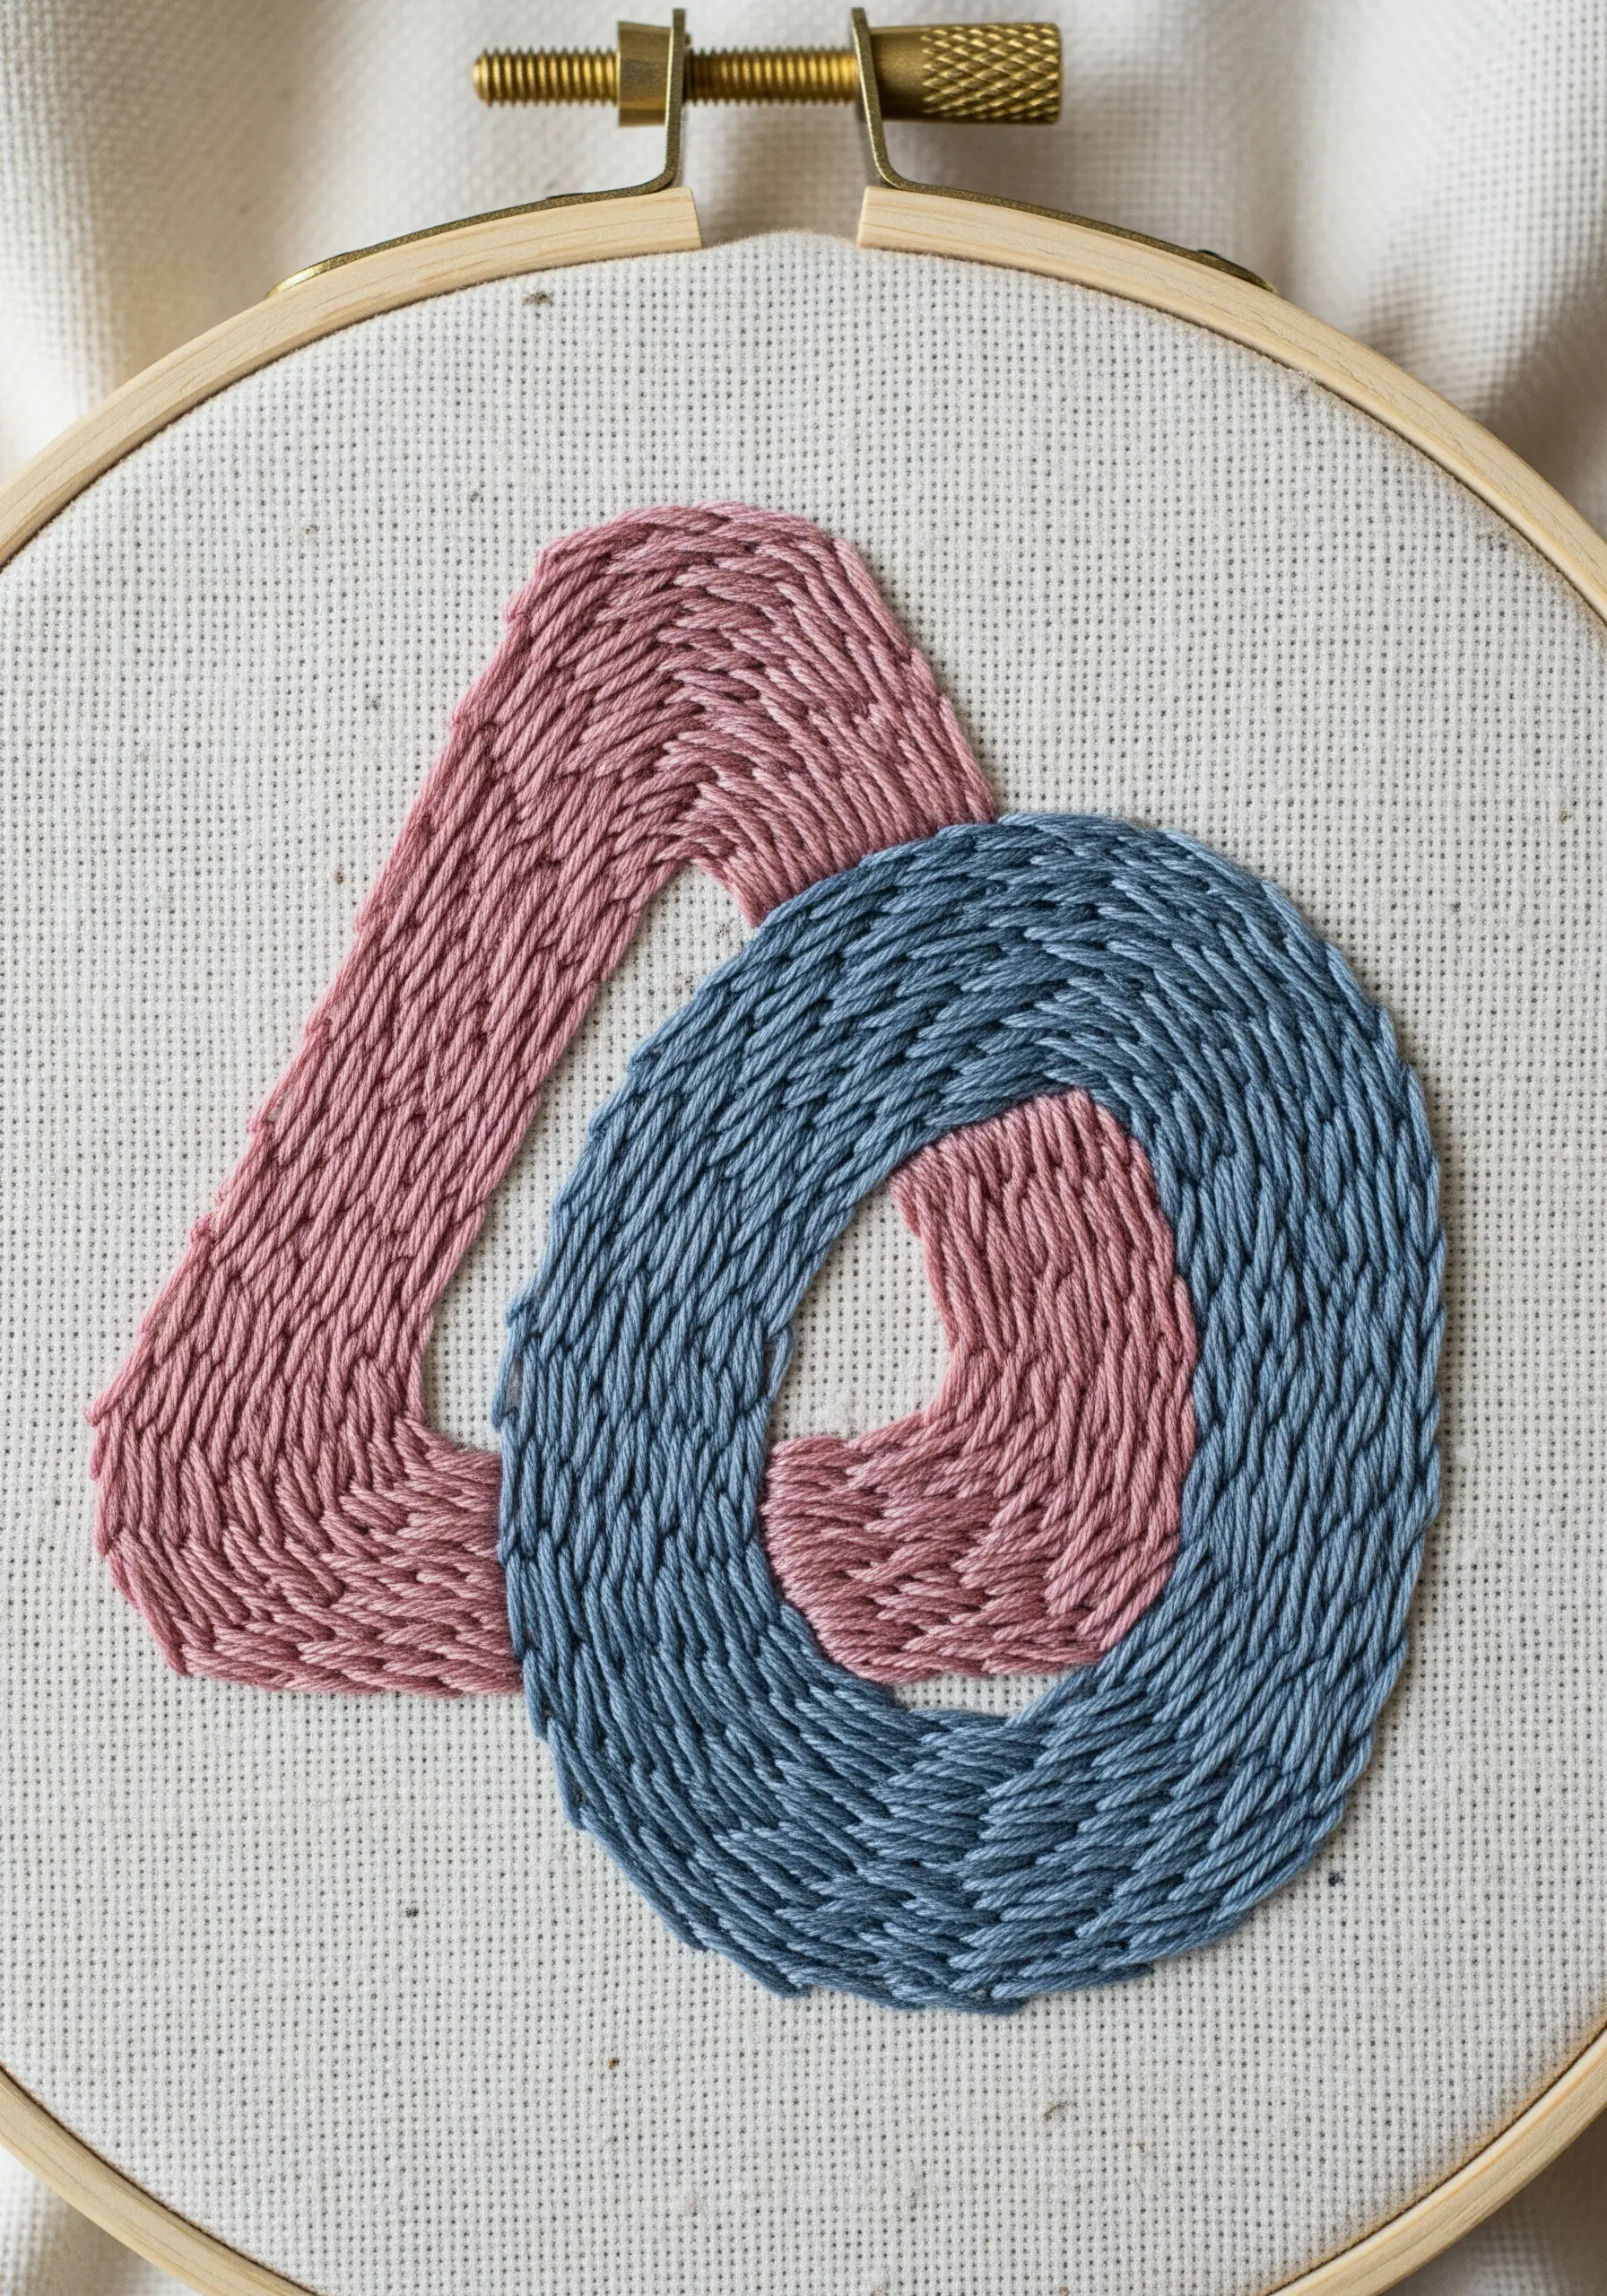
When filling letters or numbers, don’t just stitch straight across.
Instead, let the direction of your stitches follow the natural curve of the shape.
By angling your fill stitches—using a brick stitch or long-and-short stitch—you create a sense of movement and dimension.
This contoured approach enhances the form, making the numbers feel dynamic and integrated rather than flat and static, perfect for personalized art.
28. Create Delicate Ferns with Fly Stitch
Capturing the delicate structure of a fern requires a light, airy stitch.
The fly stitch is the ideal choice, as each stitch naturally forms a V-shape with a small anchoring stitch—perfectly mimicking an individual leaflet.
Work these stitches down both sides of a simple backstitched stem.
For an effortlessly natural look, use a variegated green thread to create subtle color shifts without changing your floss.
29. Practice Precision with Architectural Lines
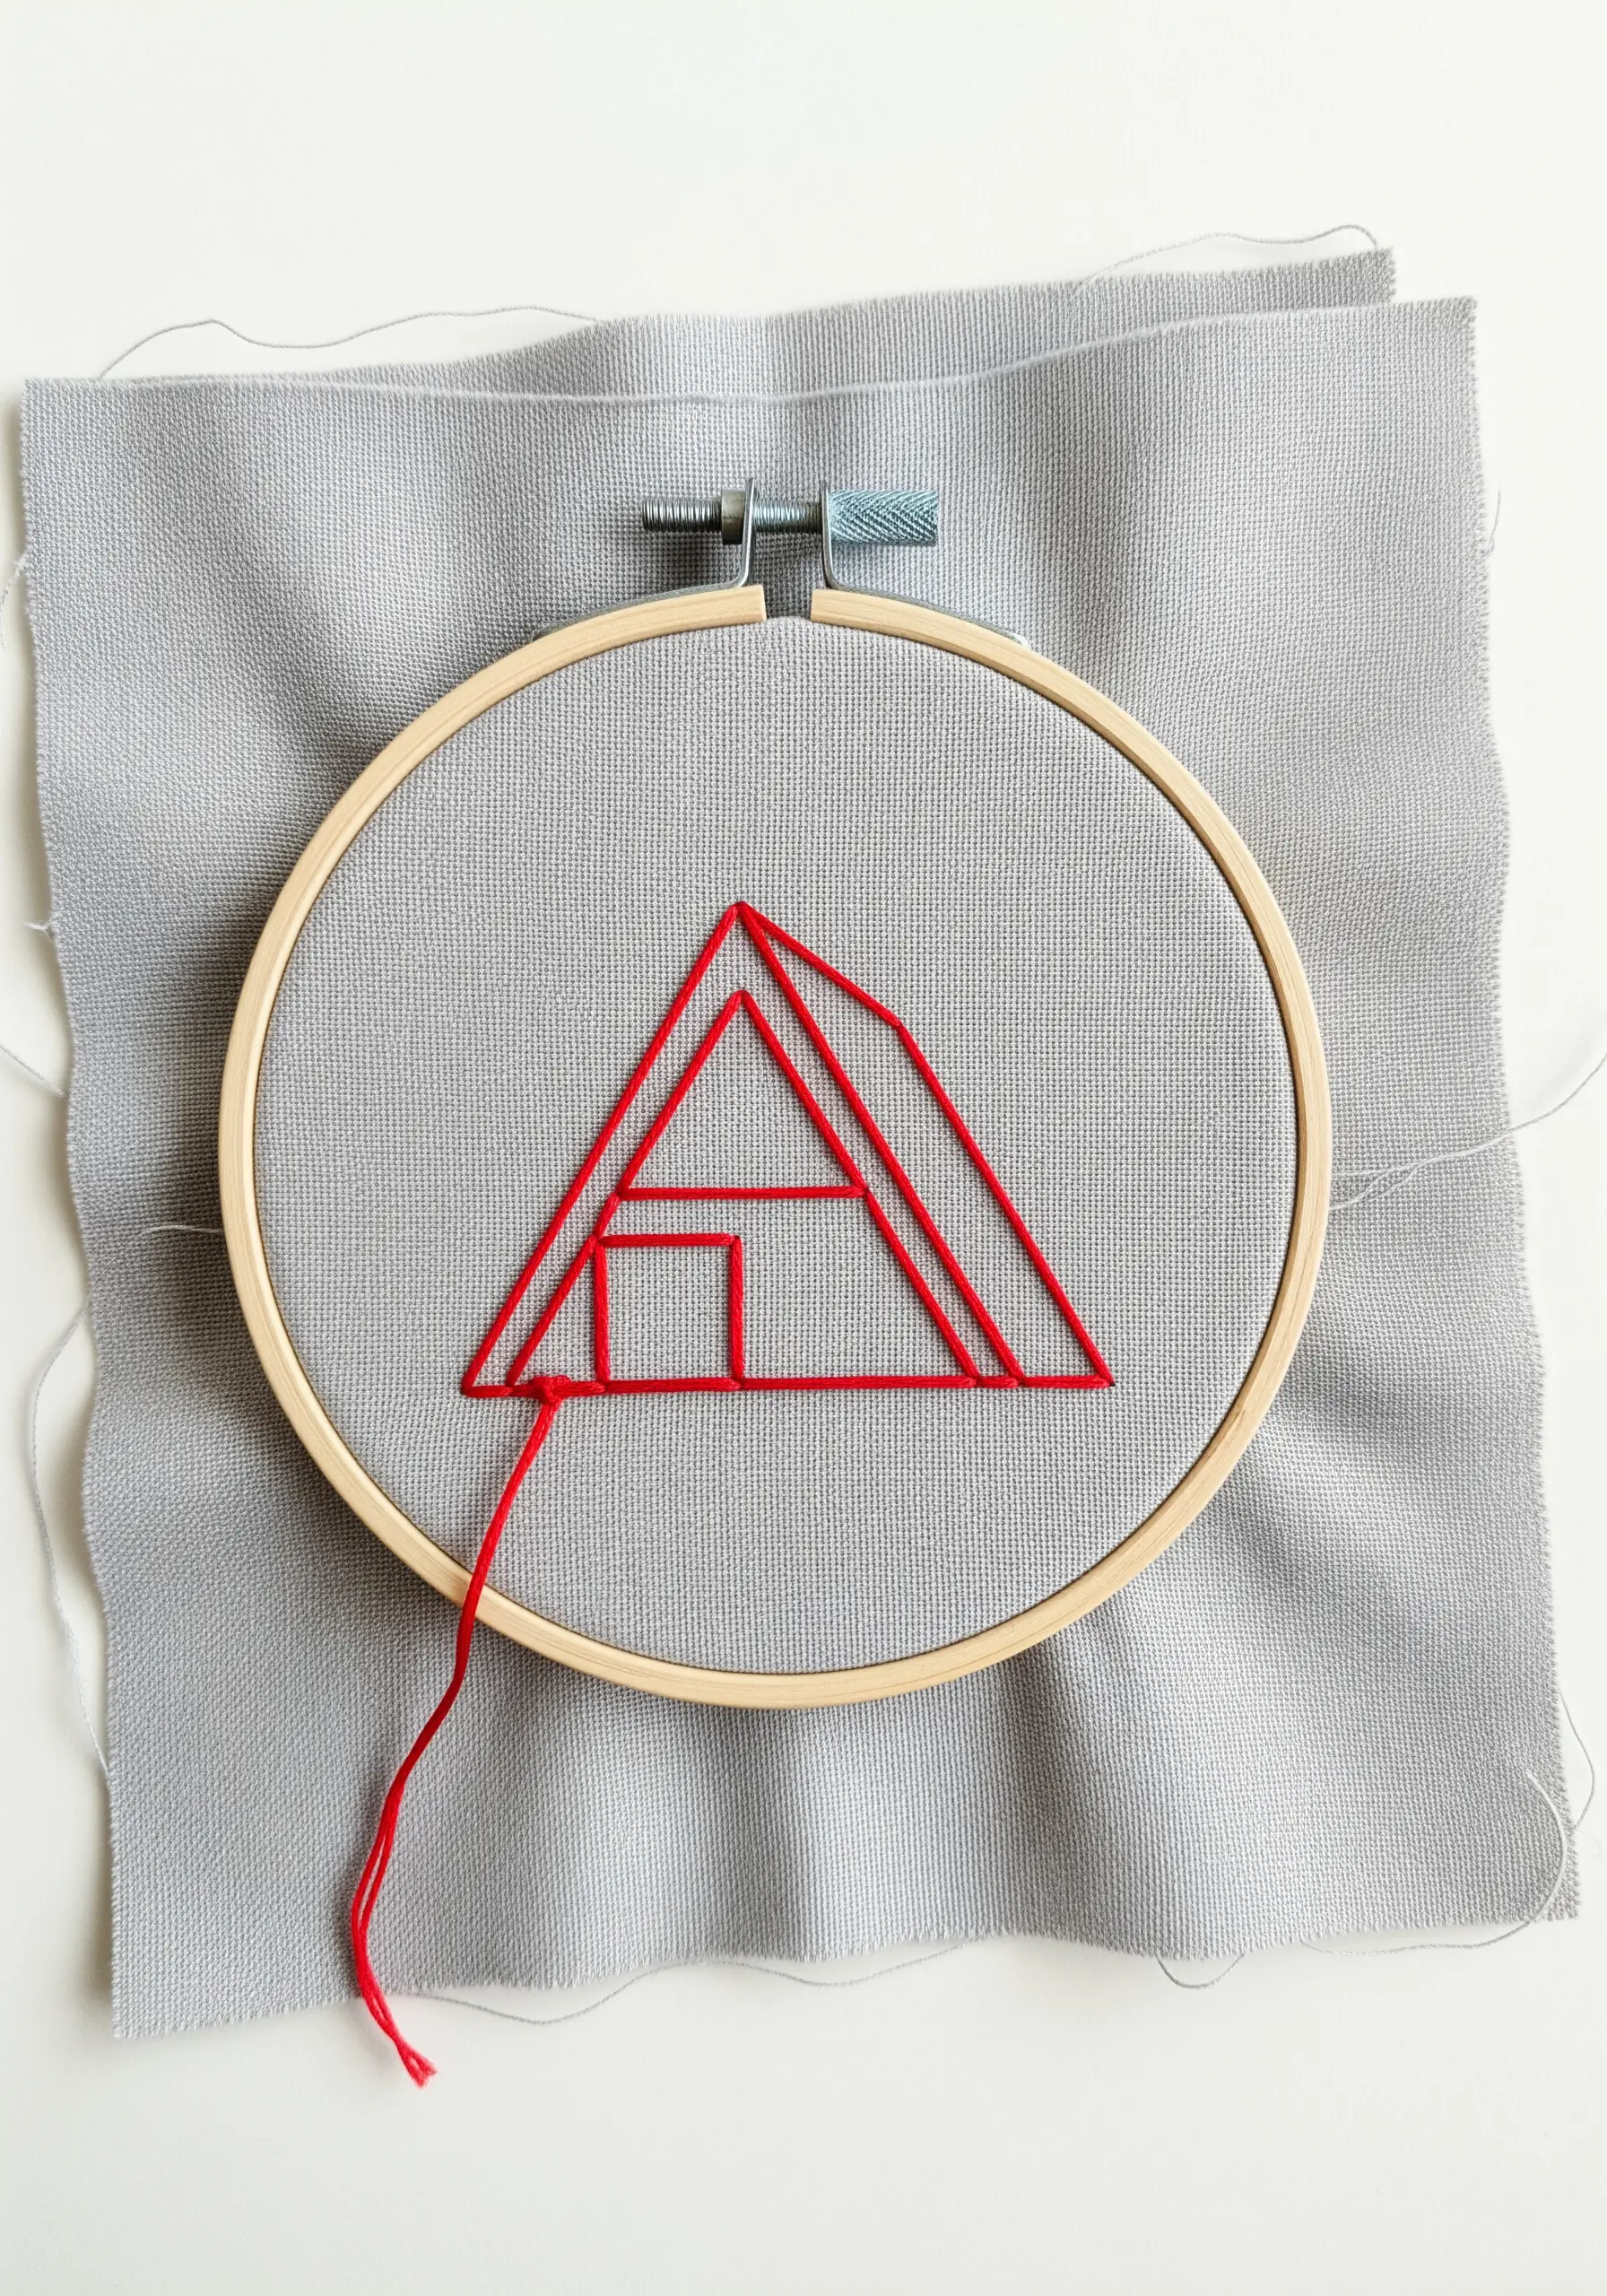
Reduce a familiar object, like a house, to its essential geometric form for a modern, minimalist project.
A simple backstitch is all that’s required, but the success of the piece lies in its precision.
Focus on keeping your lines perfectly straight and your corners sharp.
A pro tip: to get a crisp corner, end one line of stitching completely, then start a new one, rather than trying to pivot mid-stitch.
This elevates simple line art into a piece of clean, graphic decor.
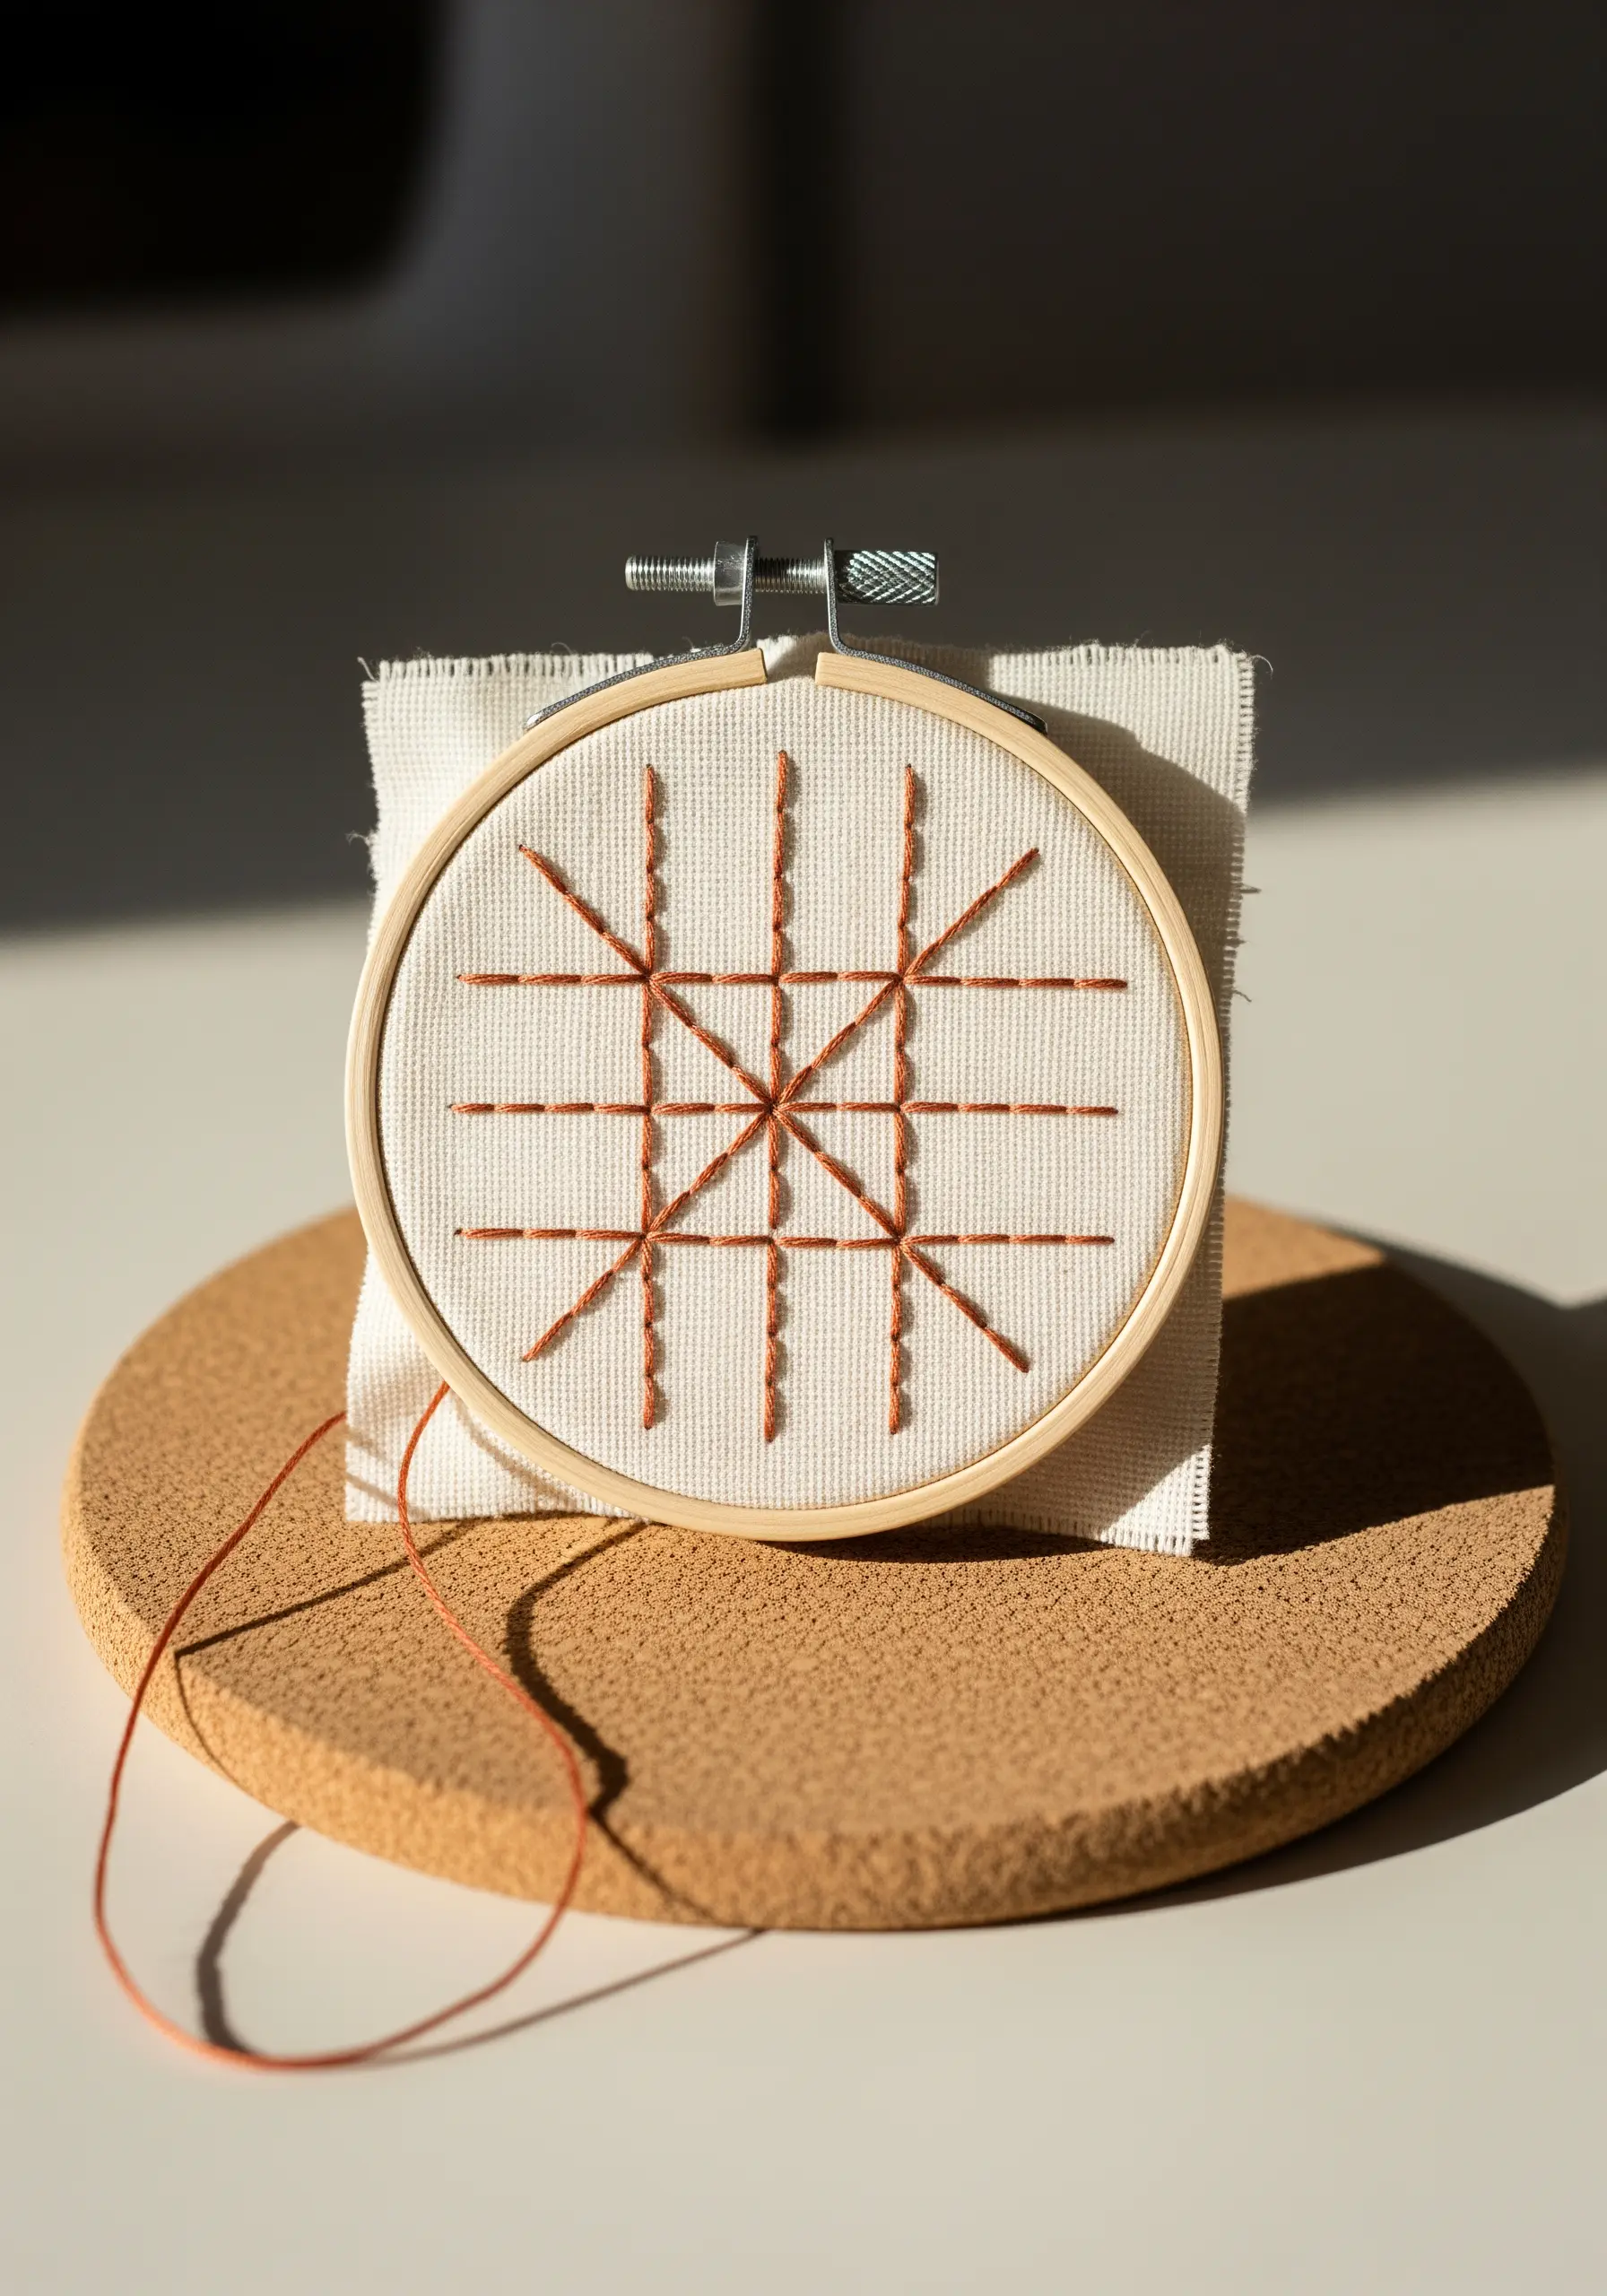
30. Design a Modern Grid with Cross Stitches
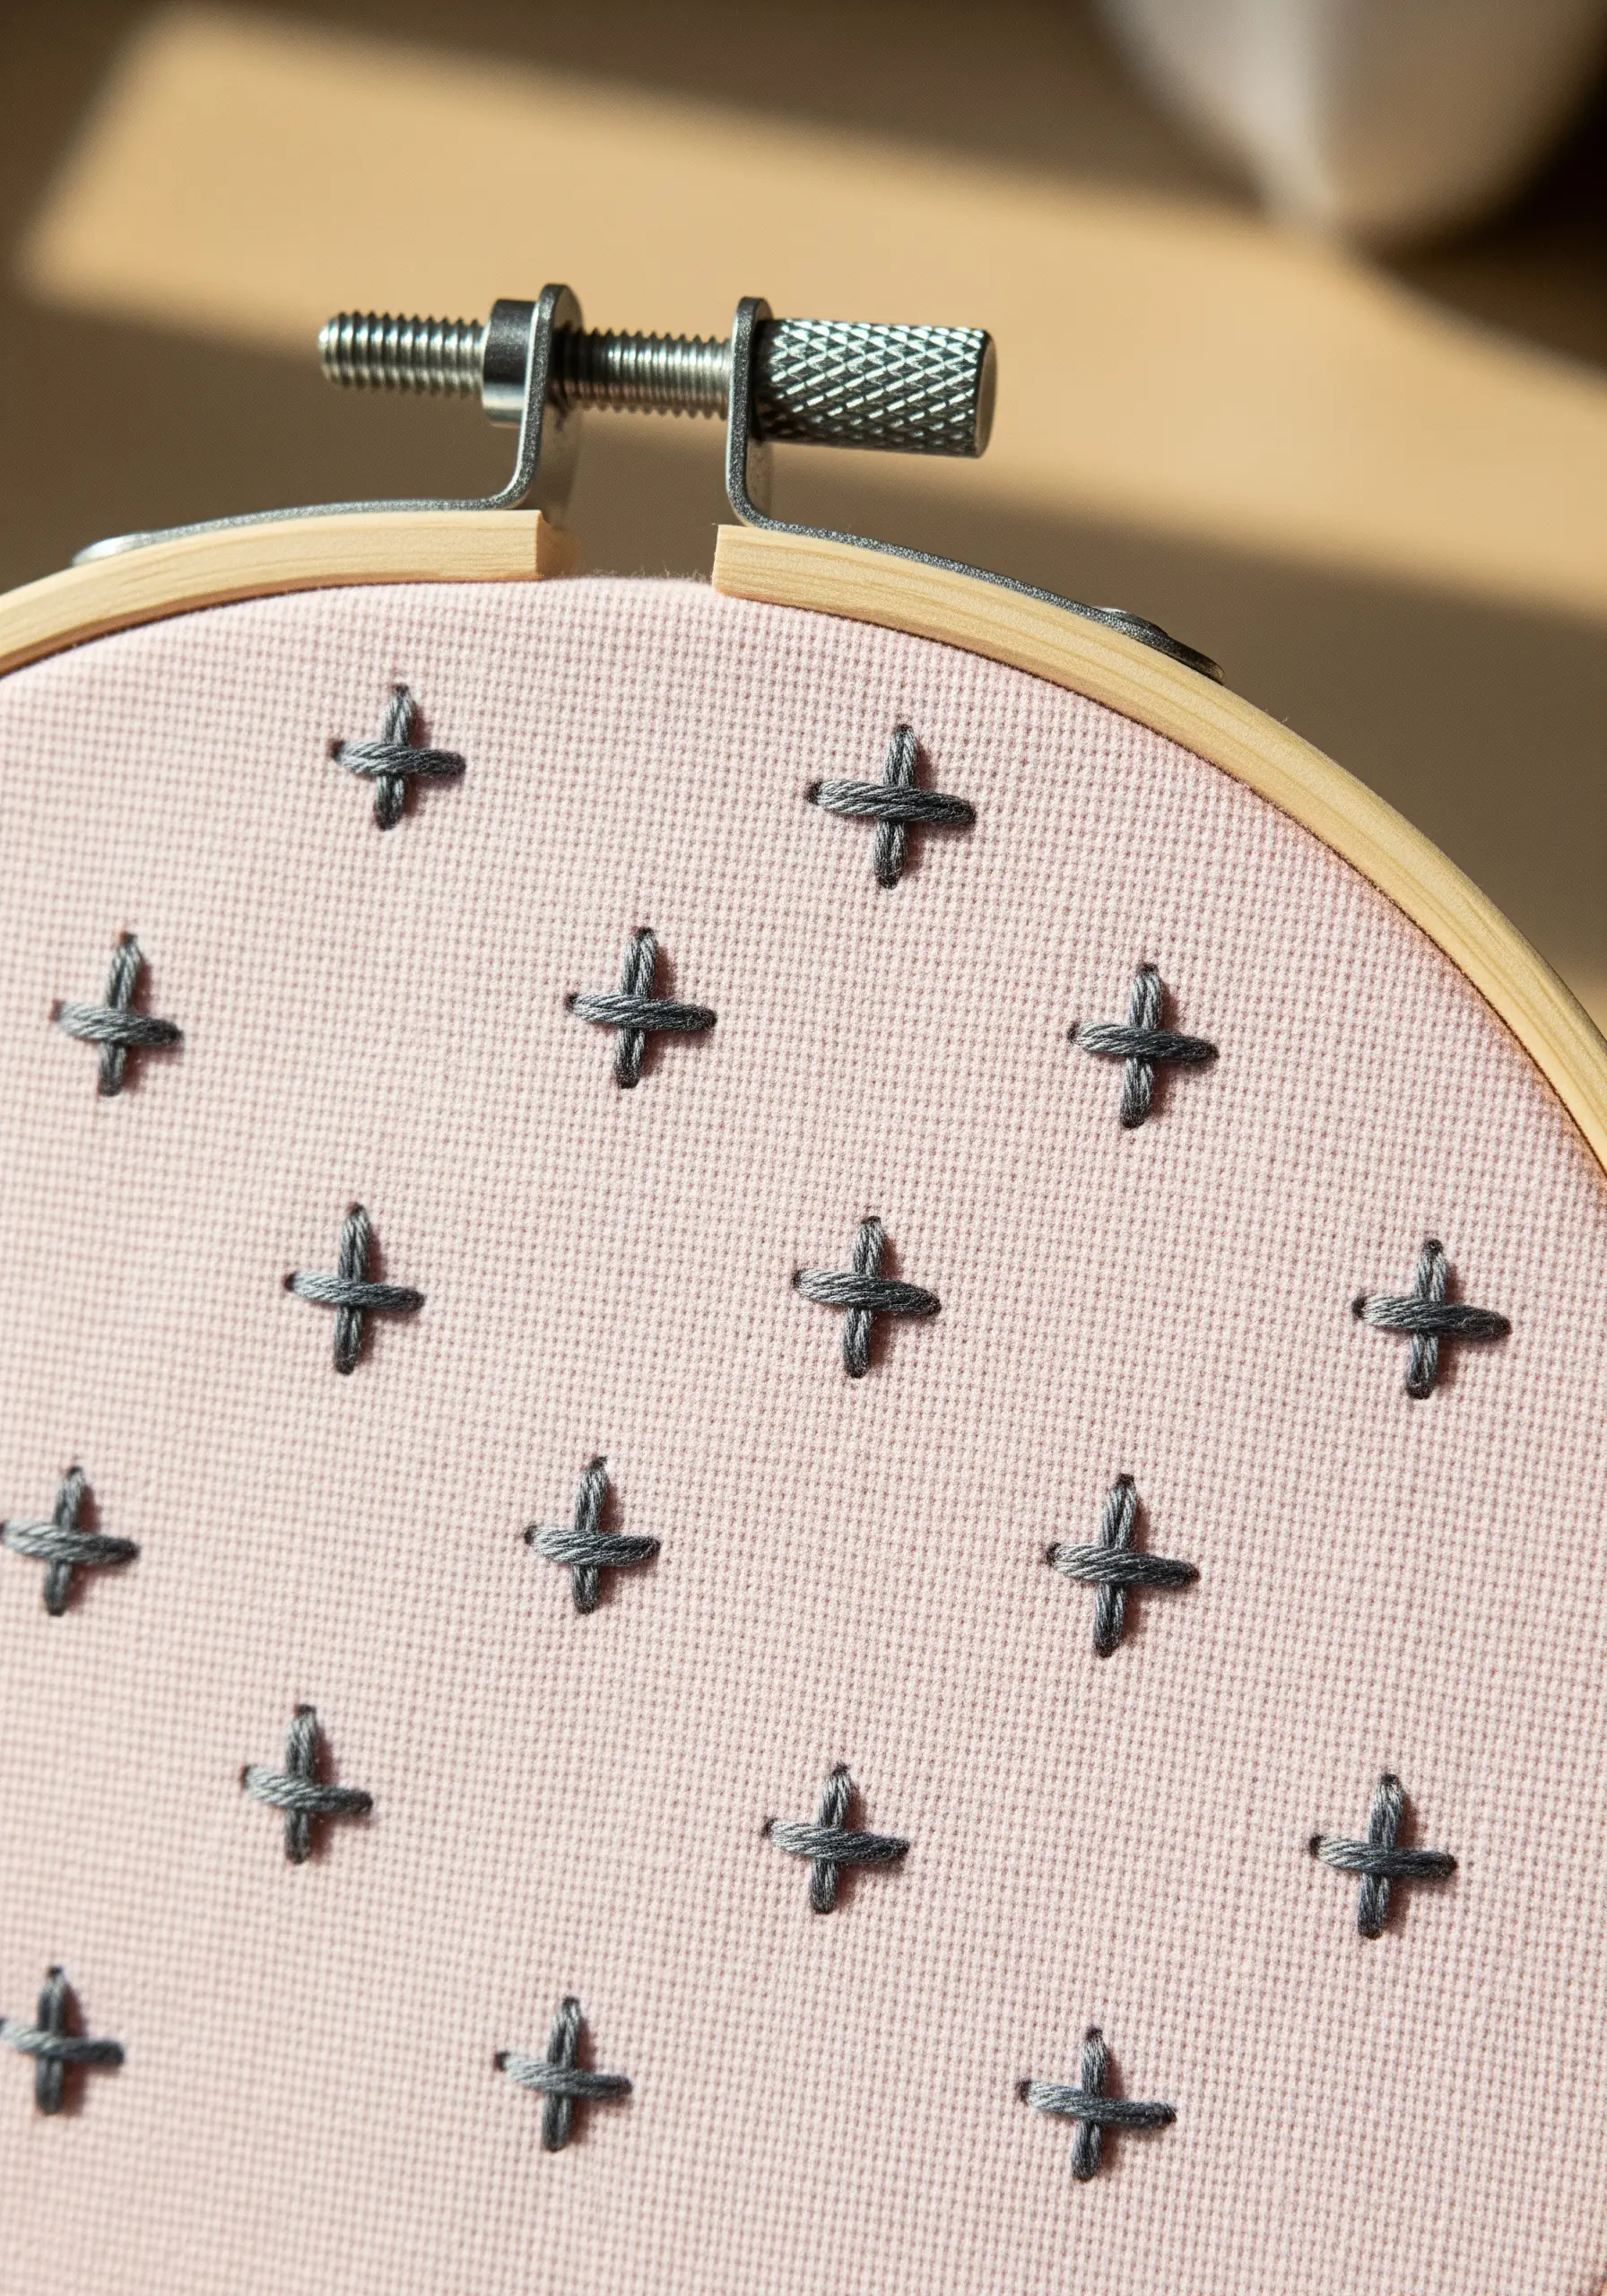
You don’t need an elaborate pattern to enjoy the rhythm of cross stitch.
Create a clean, contemporary design by arranging simple cross stitches in a repeating grid.
The beauty of this project lies in its simplicity and order.
For a truly polished look, ensure all your top stitches face the same direction (e.g., all from bottom left to top right). This tiny detail creates a uniform sheen and a professional finish, proving that even the most simple ideas can make a big impact.
31. Let Variegated Thread Do the Work
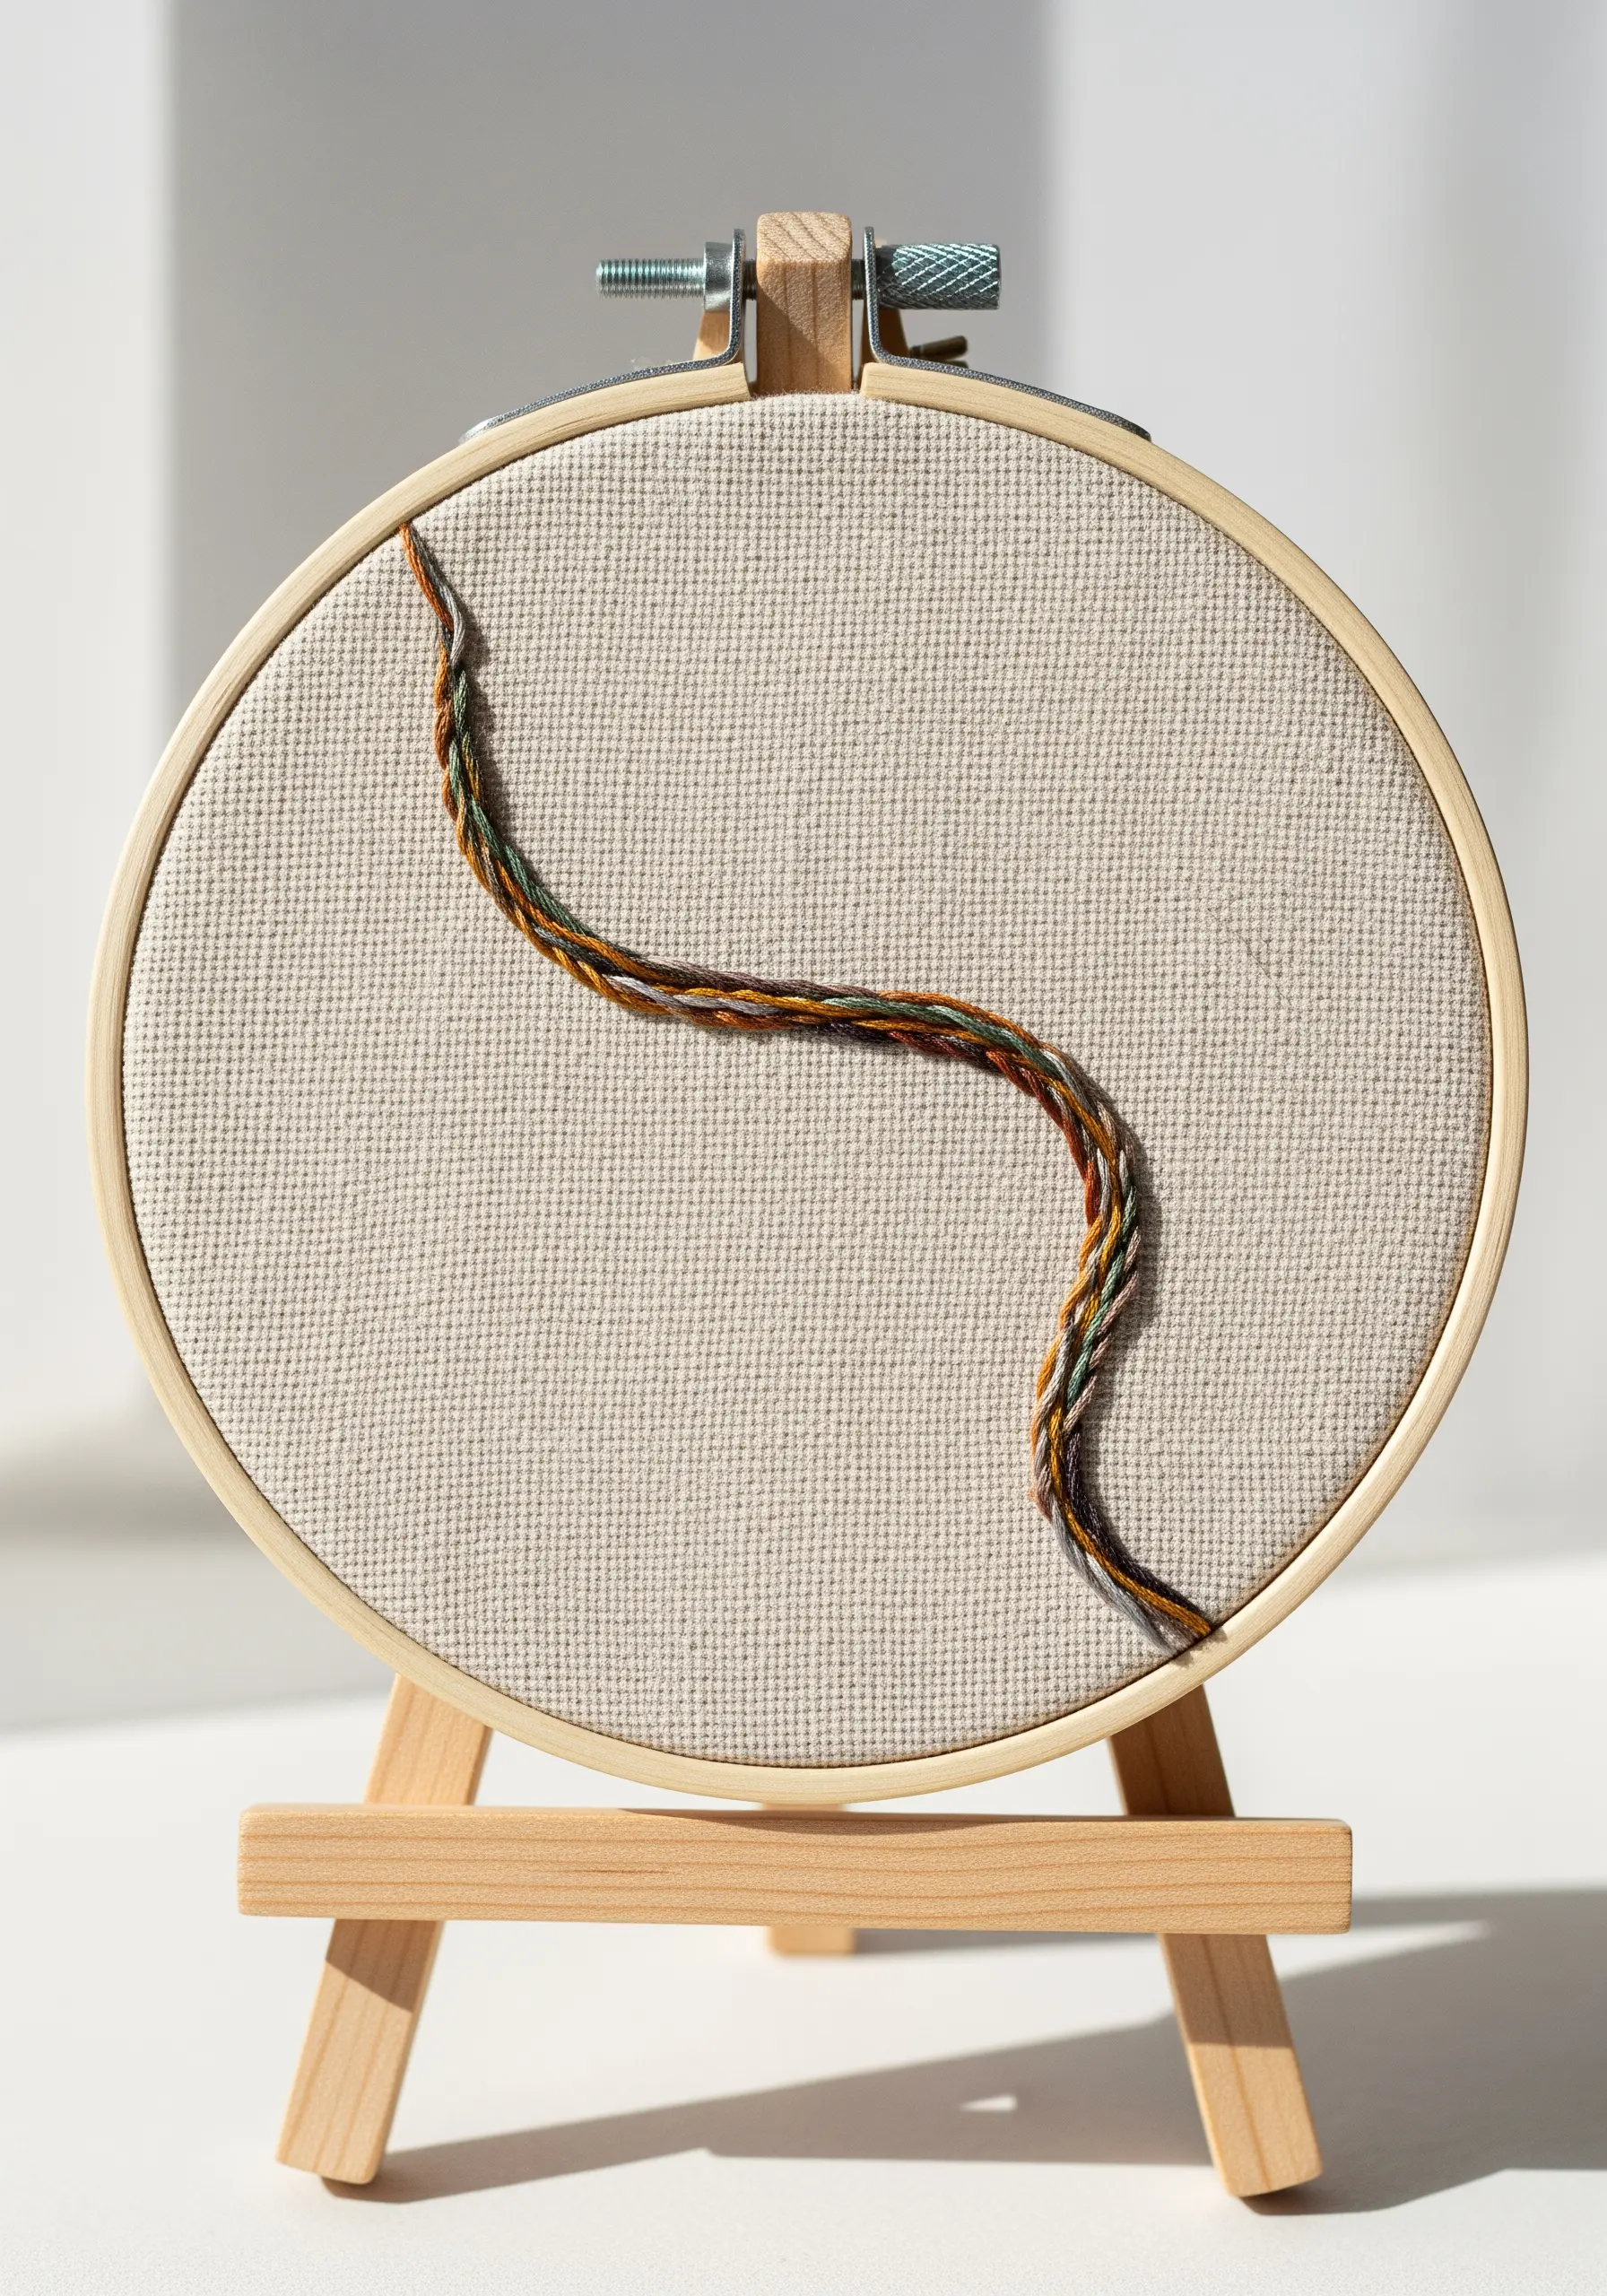
If you feel limited by a small thread collection, a single skein of variegated floss is your best friend.
Even the simplest stitch—like a chain stitch, stem stitch, or couched line—becomes a captivating design as the colors shift and blend along its length.
This is the most efficient way to introduce complex color blending into your work.
You don’t need an intricate pattern; the thread itself provides all the visual interest you need.


