

Sometimes, the space between the embroidery you make and the embroidery you *want* to make feels vast. You have the skills, you love the process, but achieving that polished, artistic finish remains just out of reach.
It’s not about mastering a hundred new stitches or buying expensive threads. It’s about understanding why certain choices work. It’s knowing how a subtle shift in stitch direction can mimic the softness of fur, or how contrasting textures can turn a flat image into a dynamic story.
Here, we’ll move past the patterns and focus on the techniques that create magic. You’ll learn to see thread not just as a material, but as a medium for painting, sculpting, and storytelling. This is your invitation to stitch with intention—to create not just beautiful objects, but miniature masterpieces filled with your unique touch.
1. Master Lifelike Texture with Thread Painting
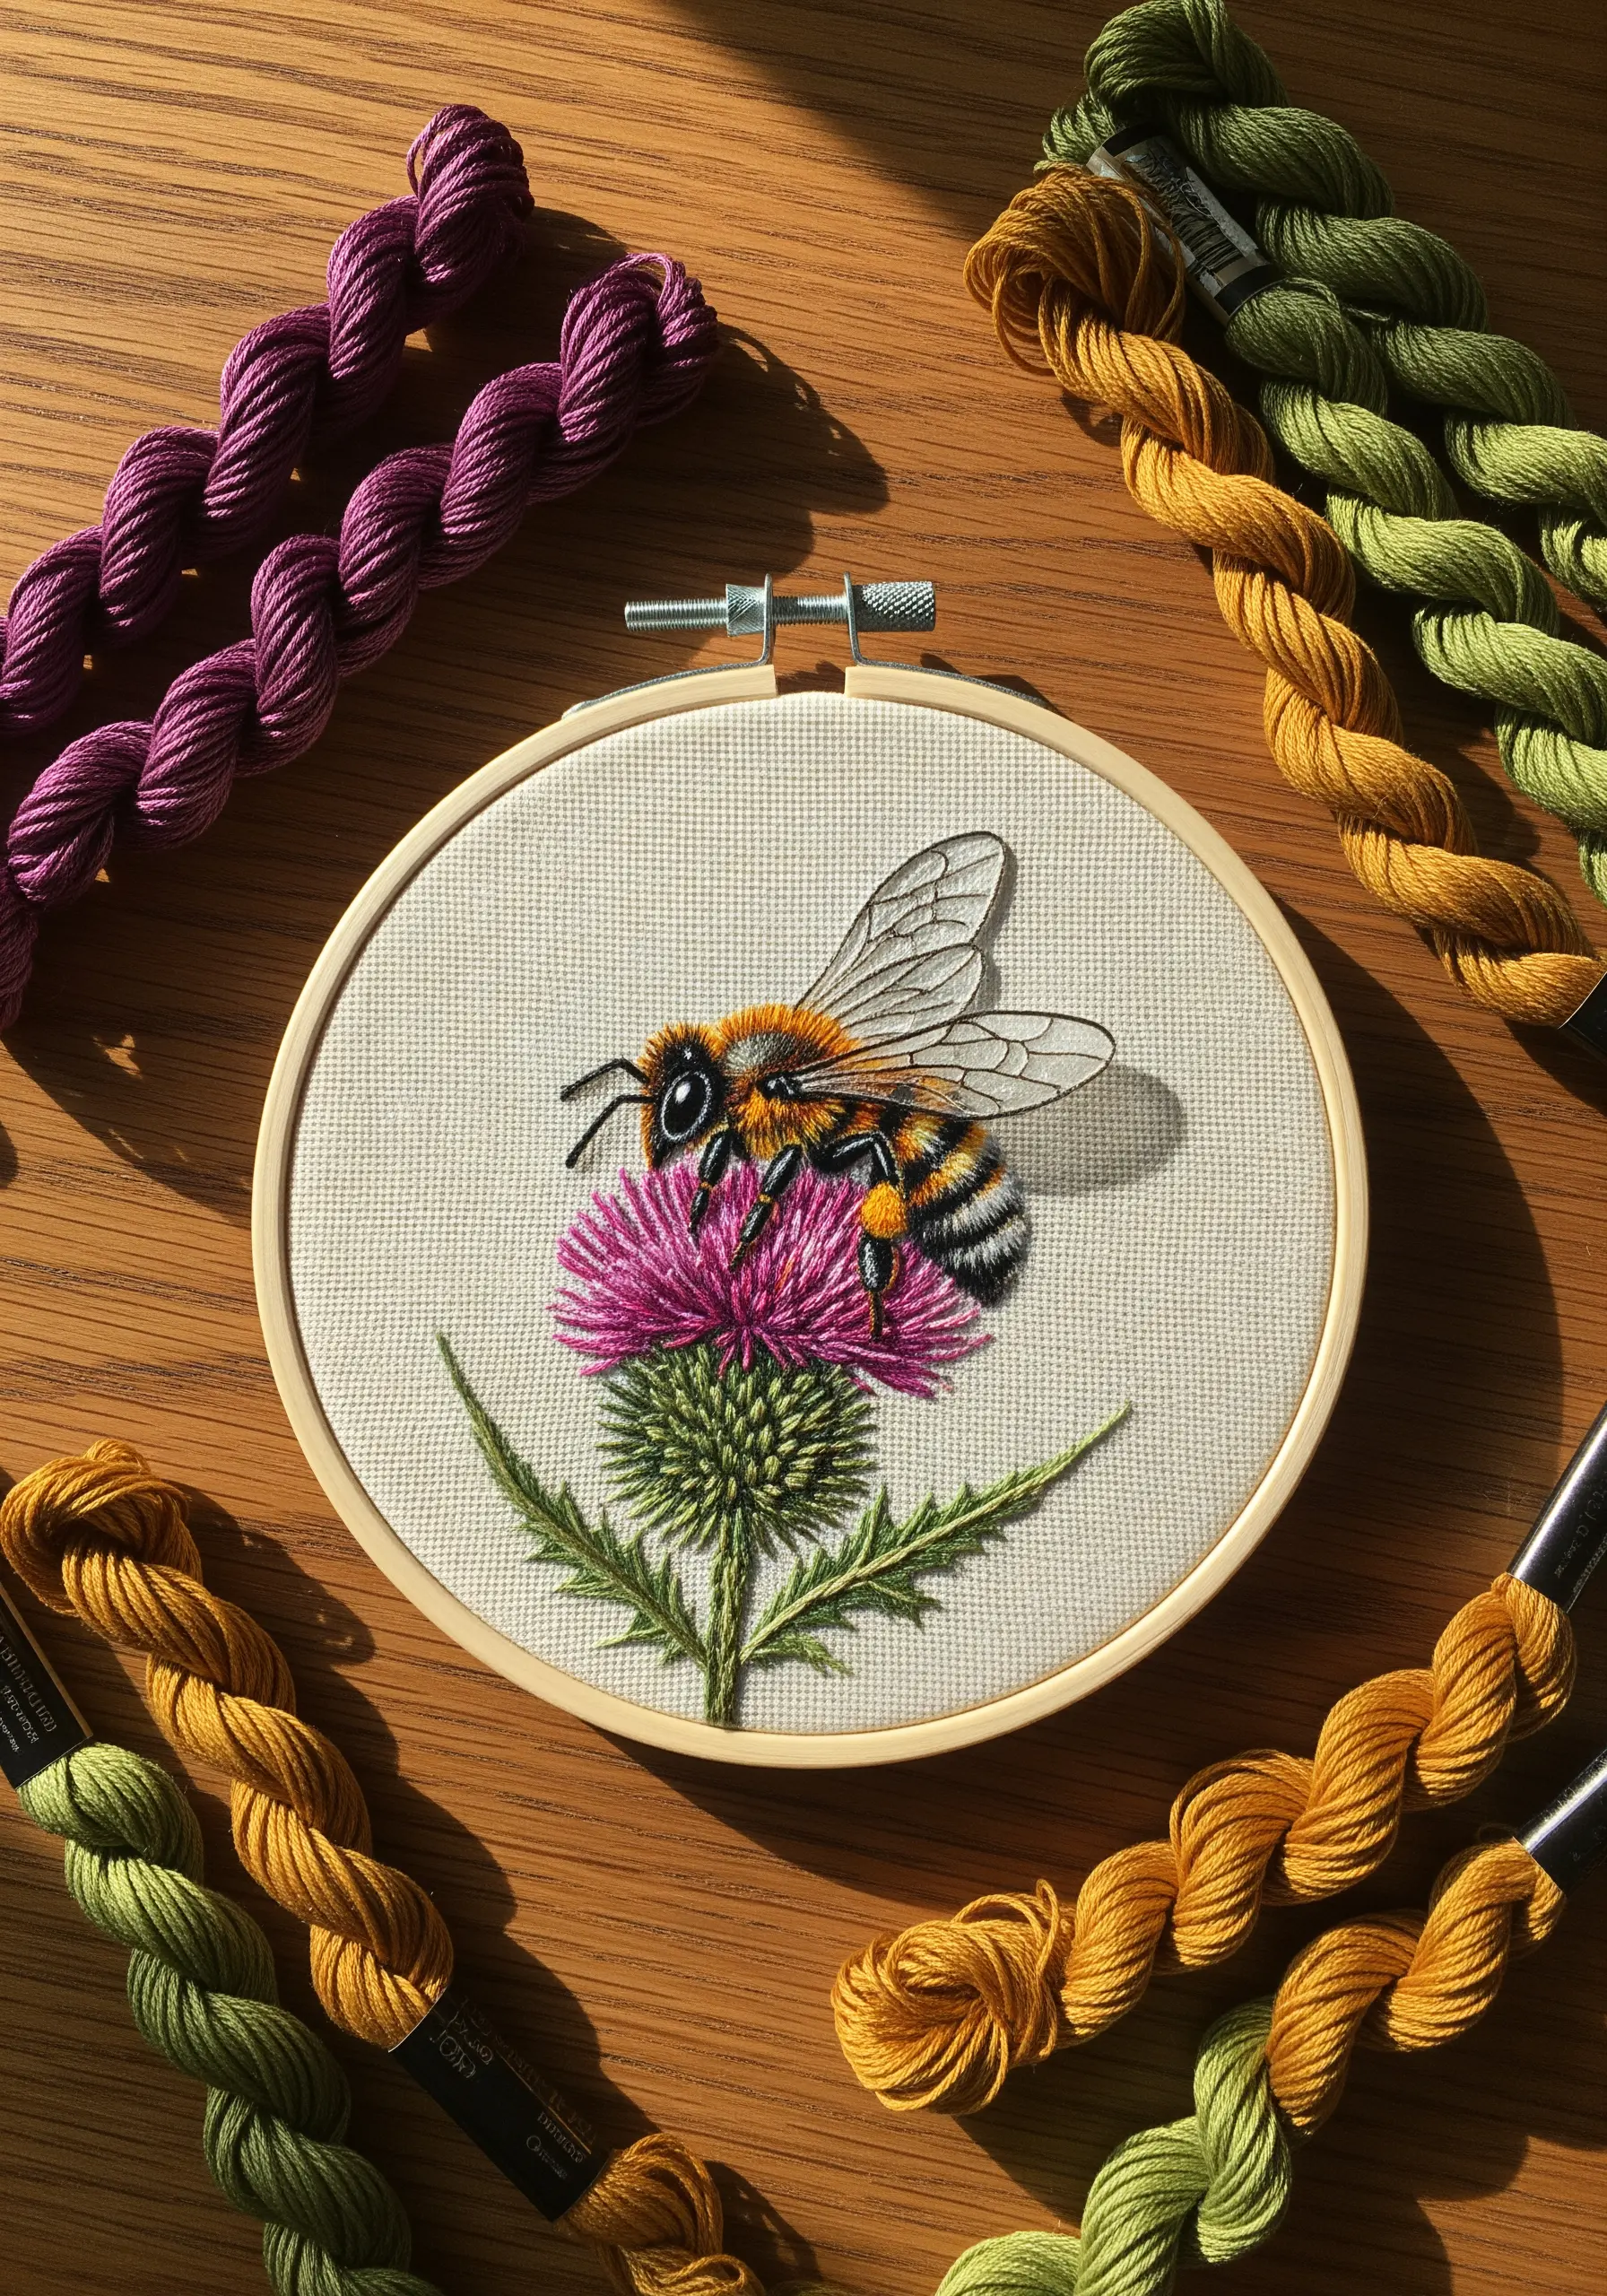
To create the bee’s fuzzy body, use the long-and-short stitch with a single strand of thread, blending shades of gold, amber, and black.
Vary your stitch direction to follow the natural contours of the form; this simple adjustment is what makes the texture look touchable and realistic.
For the translucent wings, use a single strand of light grey or off-white thread in an open fill pattern, like sparse straight stitches, allowing the base fabric to show through.
This contrast between dense, soft texture and delicate sheerness gives your work incredible depth.
2. Create Cosmic Depth with Pointillism Stitching
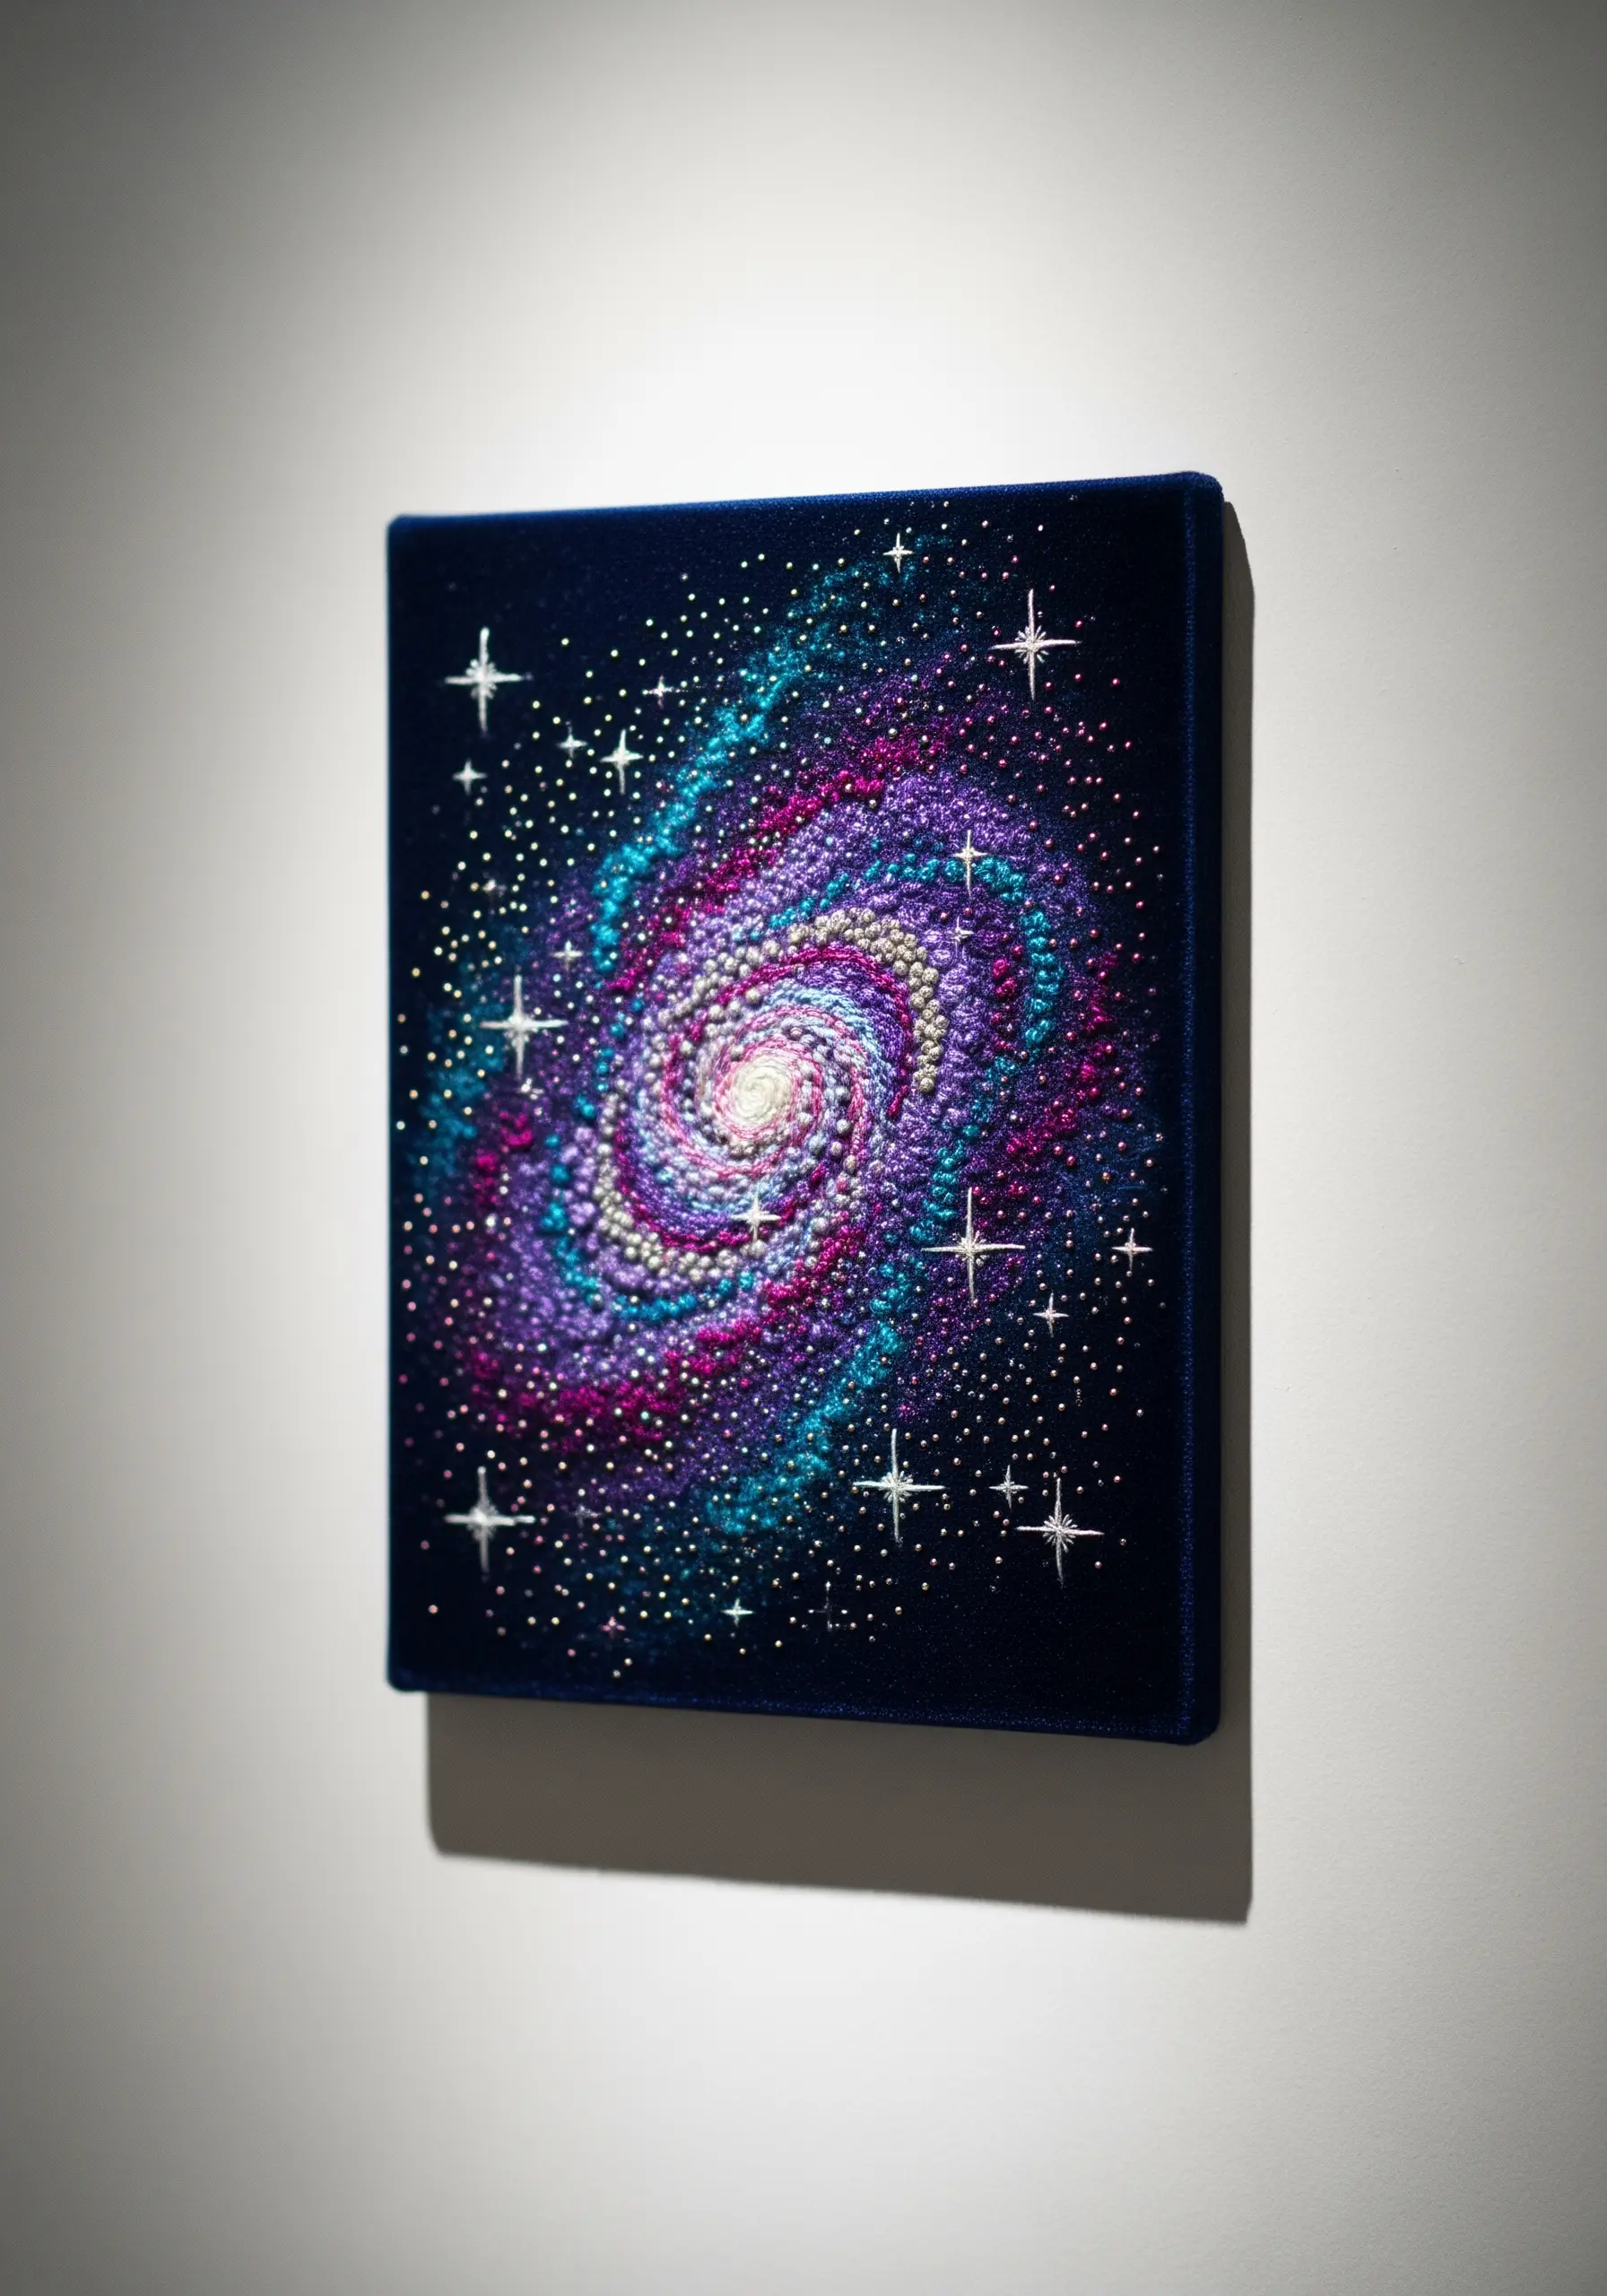
Build a vibrant galaxy using thousands of French knots, a technique that mimics pointillism in painting.
Work on a dark, plush fabric like velvet to absorb light and make your thread colors pop.
Vary the number of thread wraps for your knots (one for tiny stars, two or three for denser clusters) to create a sense of distance and dimension.
Incorporate variegated and metallic threads strategically to suggest nebulas and stellar flares, adding a layer of shimmer that catches the eye.
Finish by stretching the embroidered velvet over a canvas frame for a clean, gallery-worthy display.
3. Add Architectural Dimension with Raised Florals
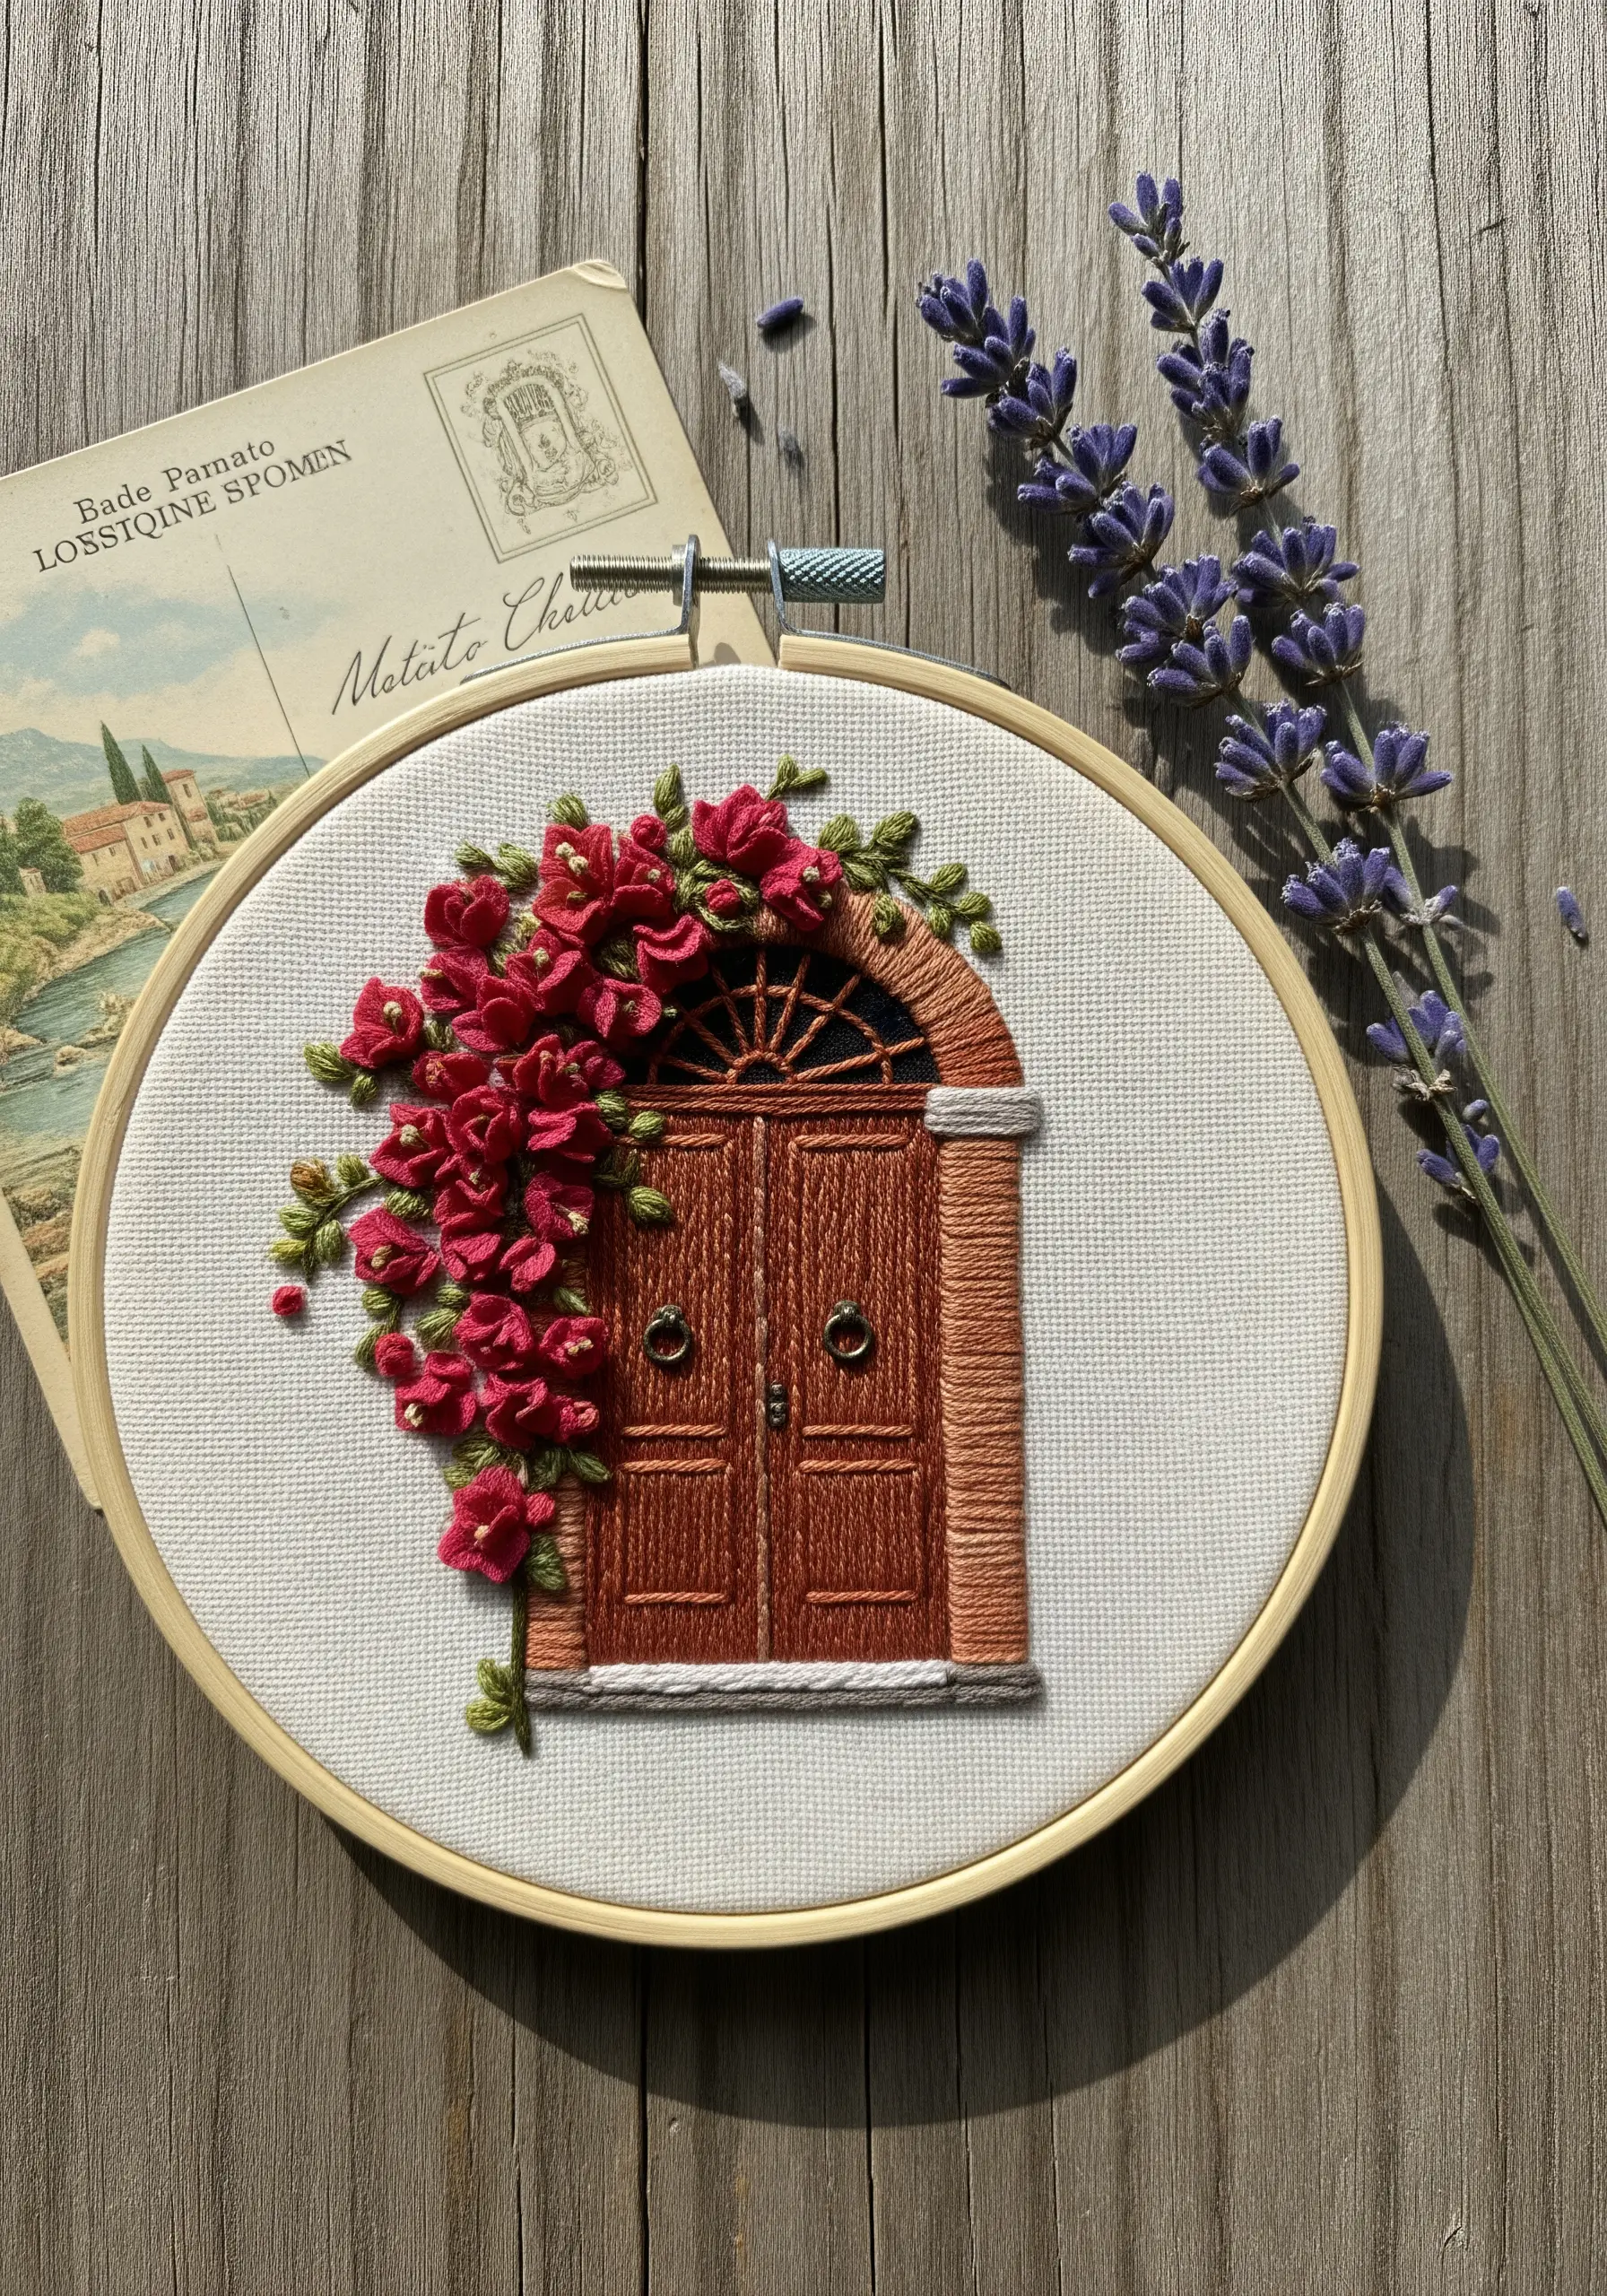
Combine flat architectural elements with three-dimensional florals for a piece that invites a closer look.
Render the door with clean satin stitches, using a darker brown for the inset panels to create the illusion of depth.
For the overflowing bougainvillea, use bullion knots or woven wheel stitches, which lift off the fabric surface and create realistic, clustered petals.
This textural contrast between the flat, solid door and the lush, sculptural flowers is what makes the composition so captivating and dynamic.
4. Stitch Realistic Fur with Directional Blending
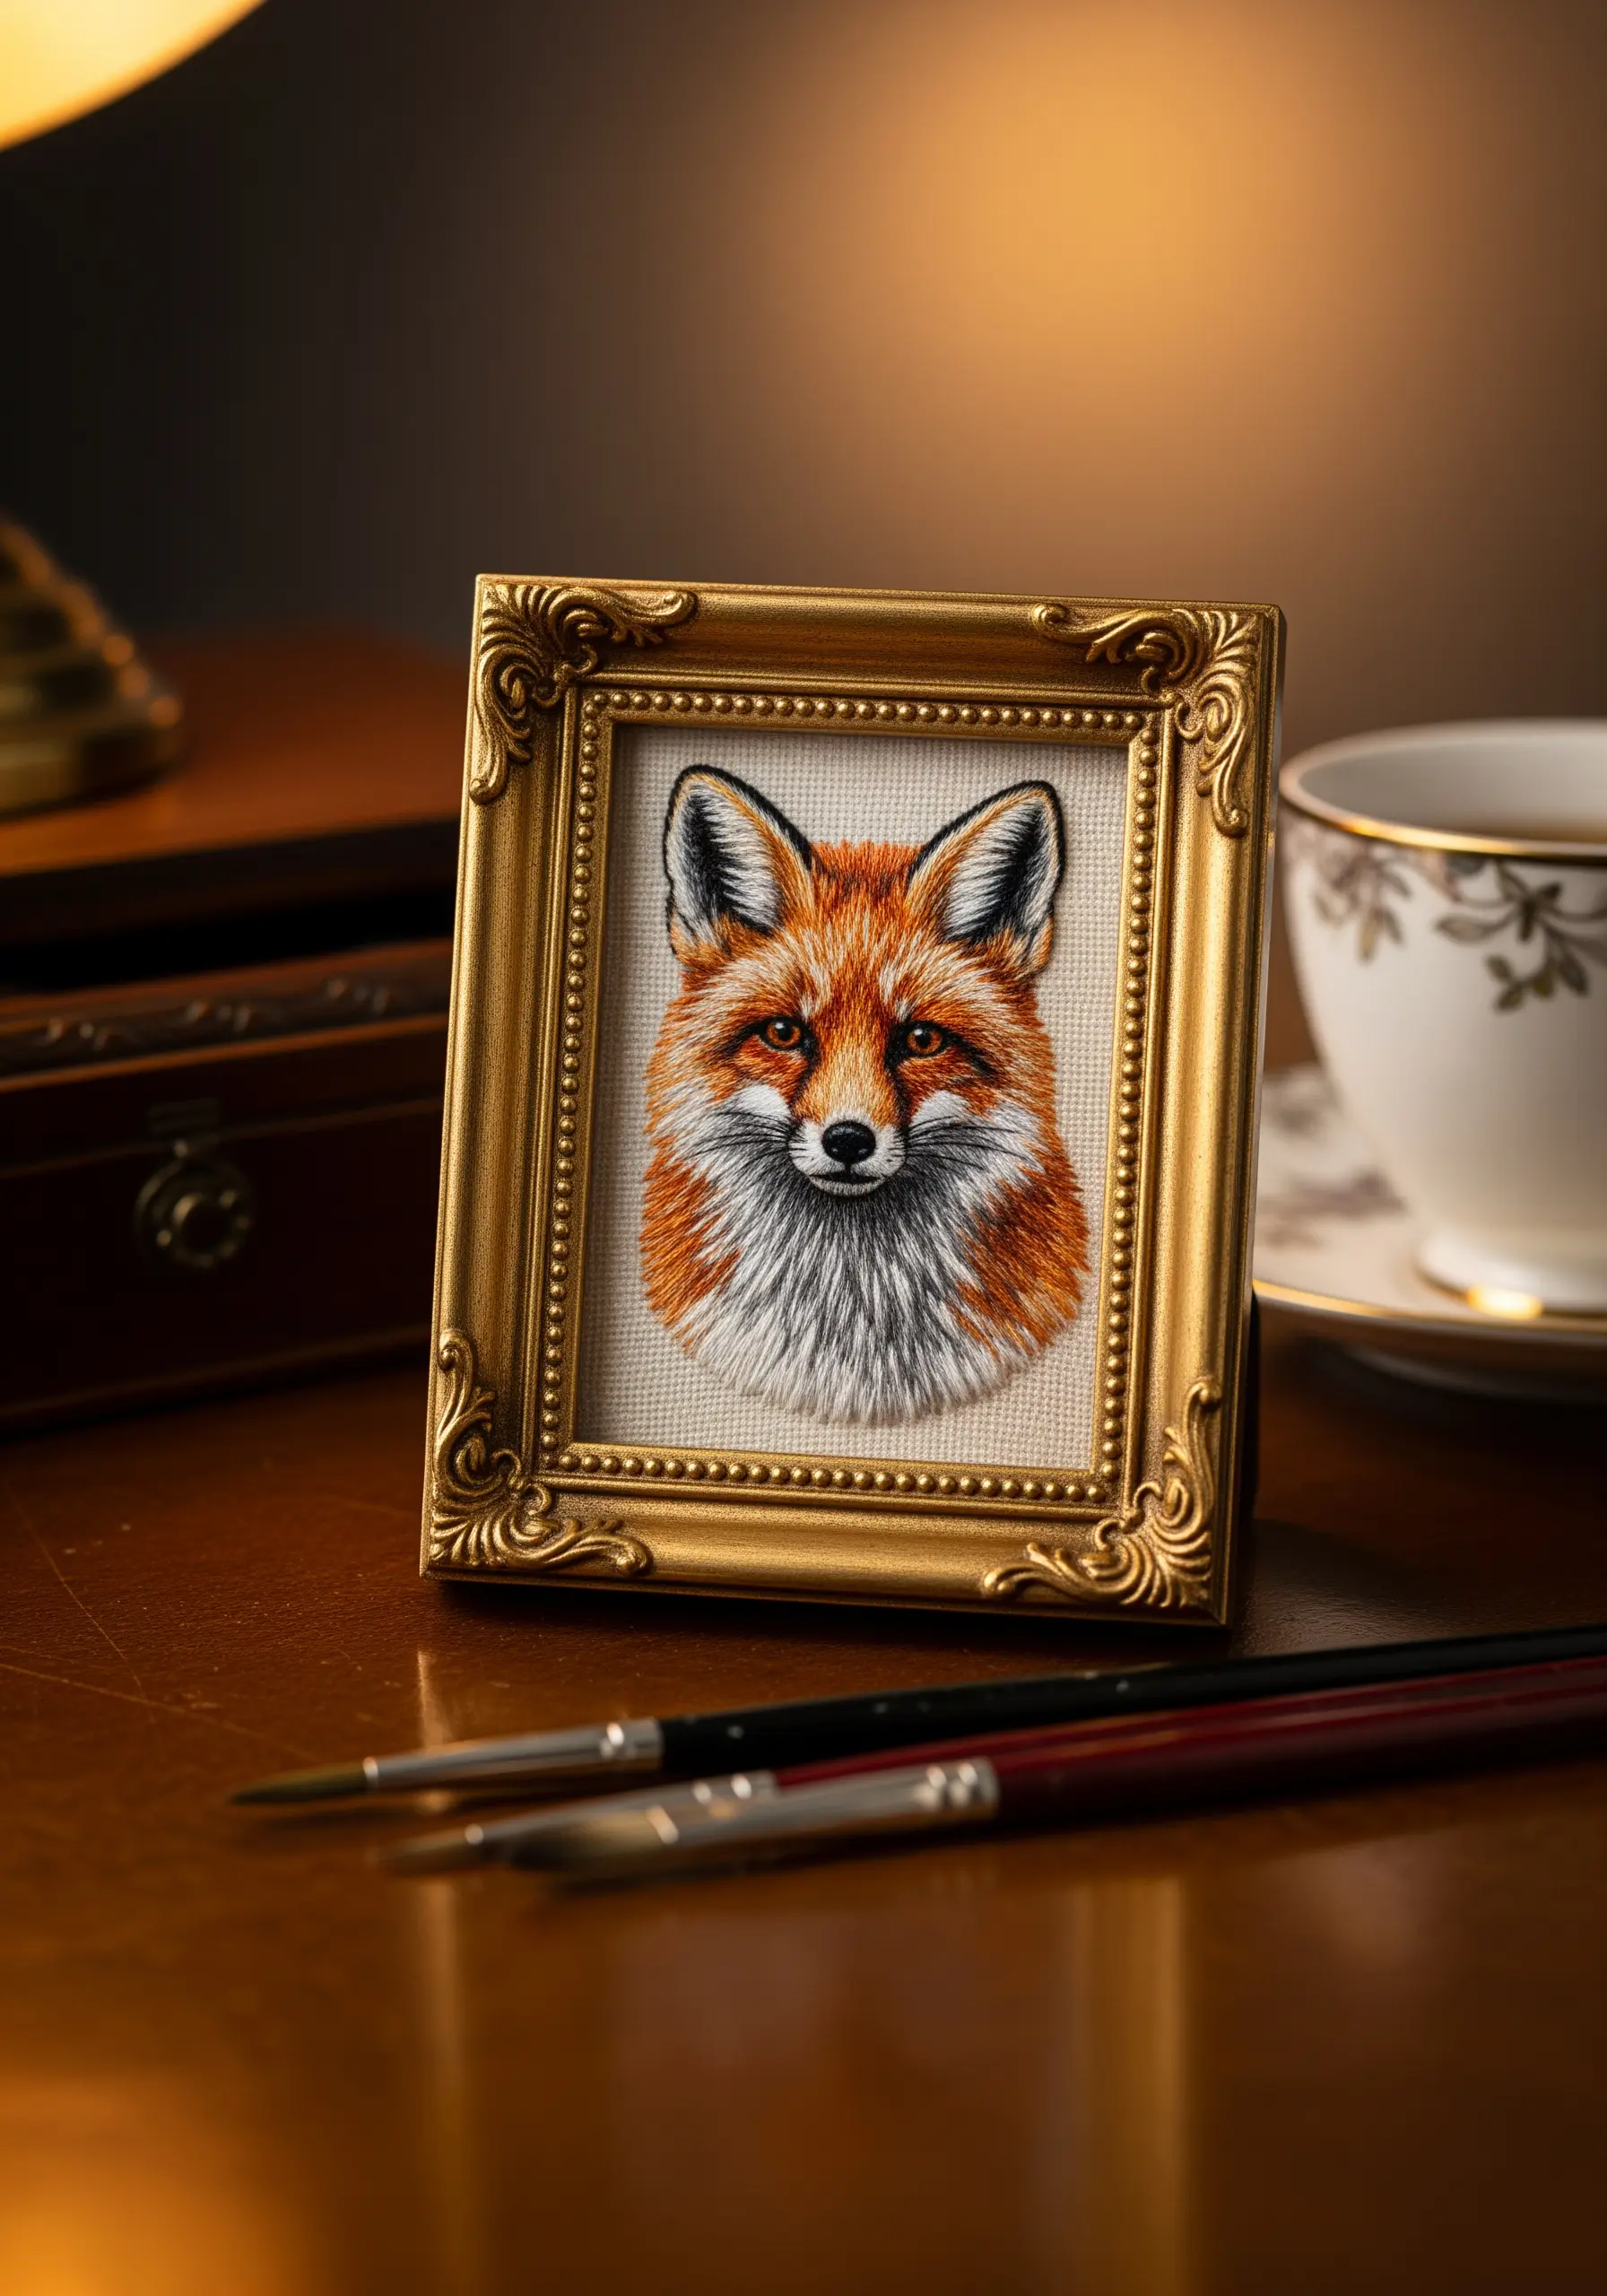
To capture a realistic animal portrait, pay close attention to the direction of your stitches, mimicking the natural growth of fur.
Use a single strand of cotton floss for the finest detail, blending multiple shades of orange, white, and grey with the long-and-short stitch.
Work from the outer edges of a section inward, layering your colors subtly to build soft, believable gradients.
The eyes are the focal point, so use a tiny satin stitch with a single white French knot to create a sharp, lifelike highlight.
5. Build Abstract Landscapes with Textural Fills
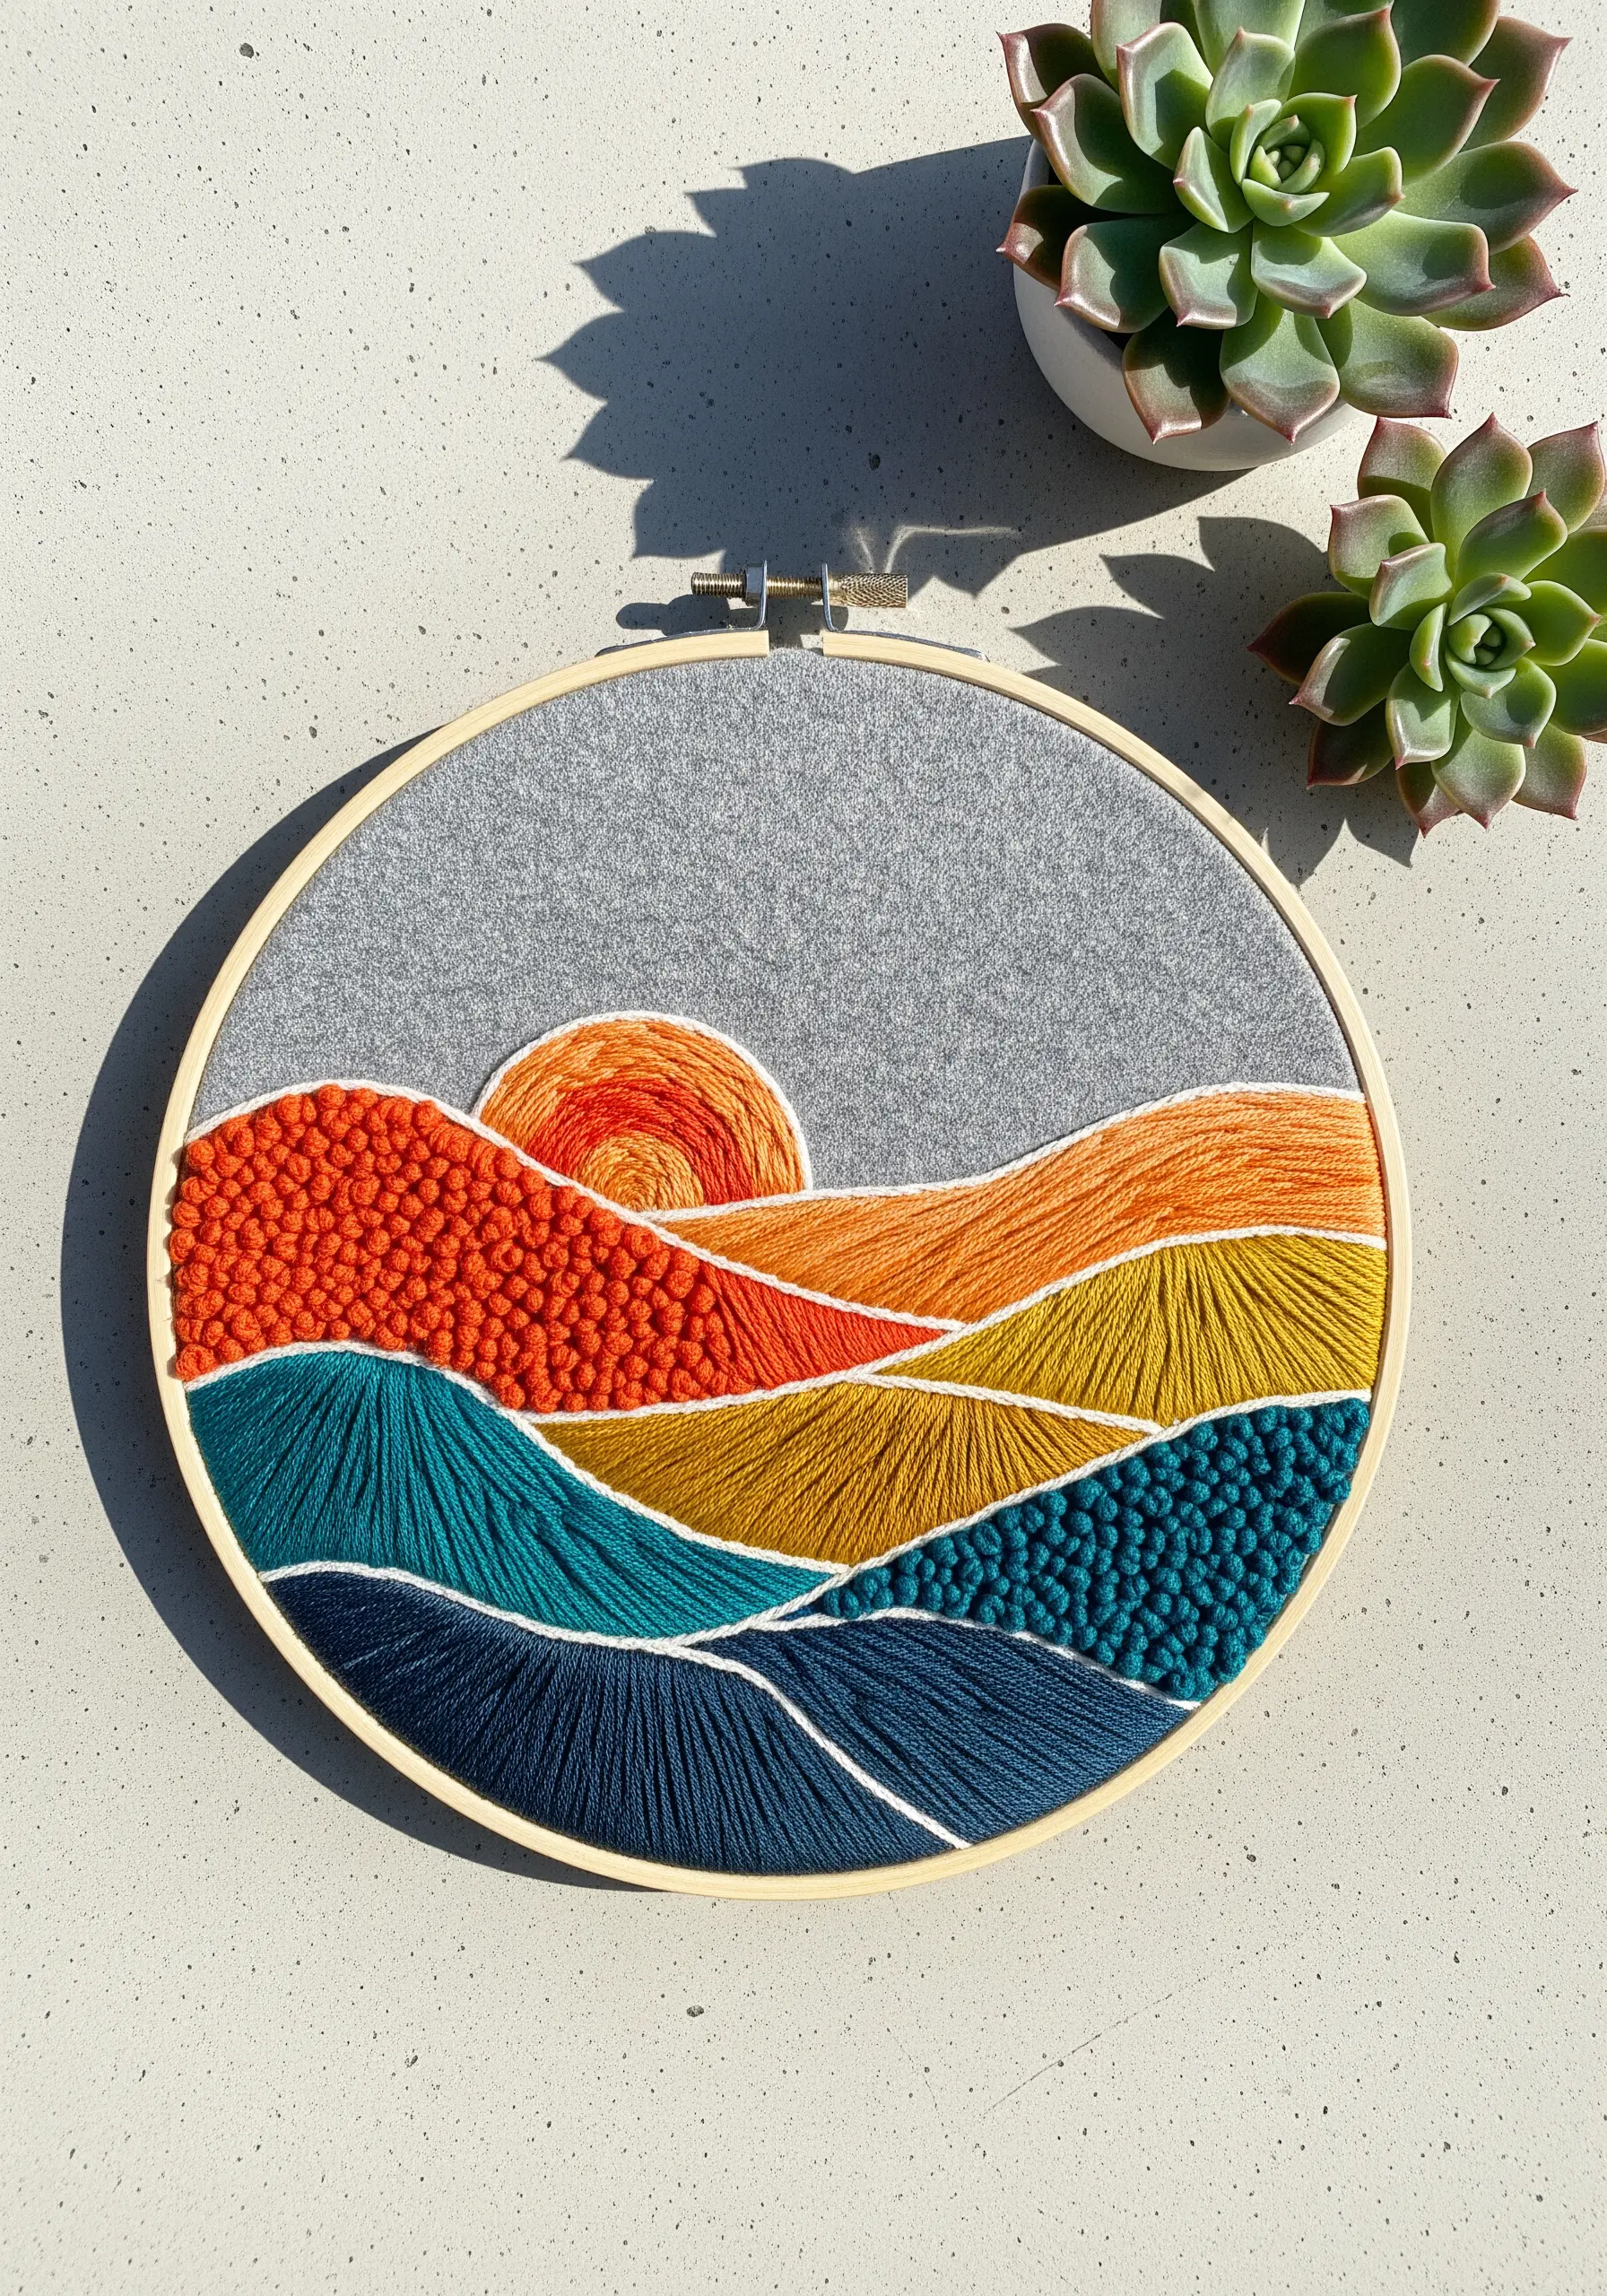
Move beyond simple satin stitch and use a variety of fill stitches to give your landscapes distinct tactile qualities.
Fill rolling hills with dense French knots, tight seed stitches, or layered running stitches to create fields of texture.
This approach transforms simple color-blocked shapes into a rich tapestry that engages both the eyes and the sense of touch.
Using a textured fabric like felt as your base adds another layer of depth and softness to the final piece.
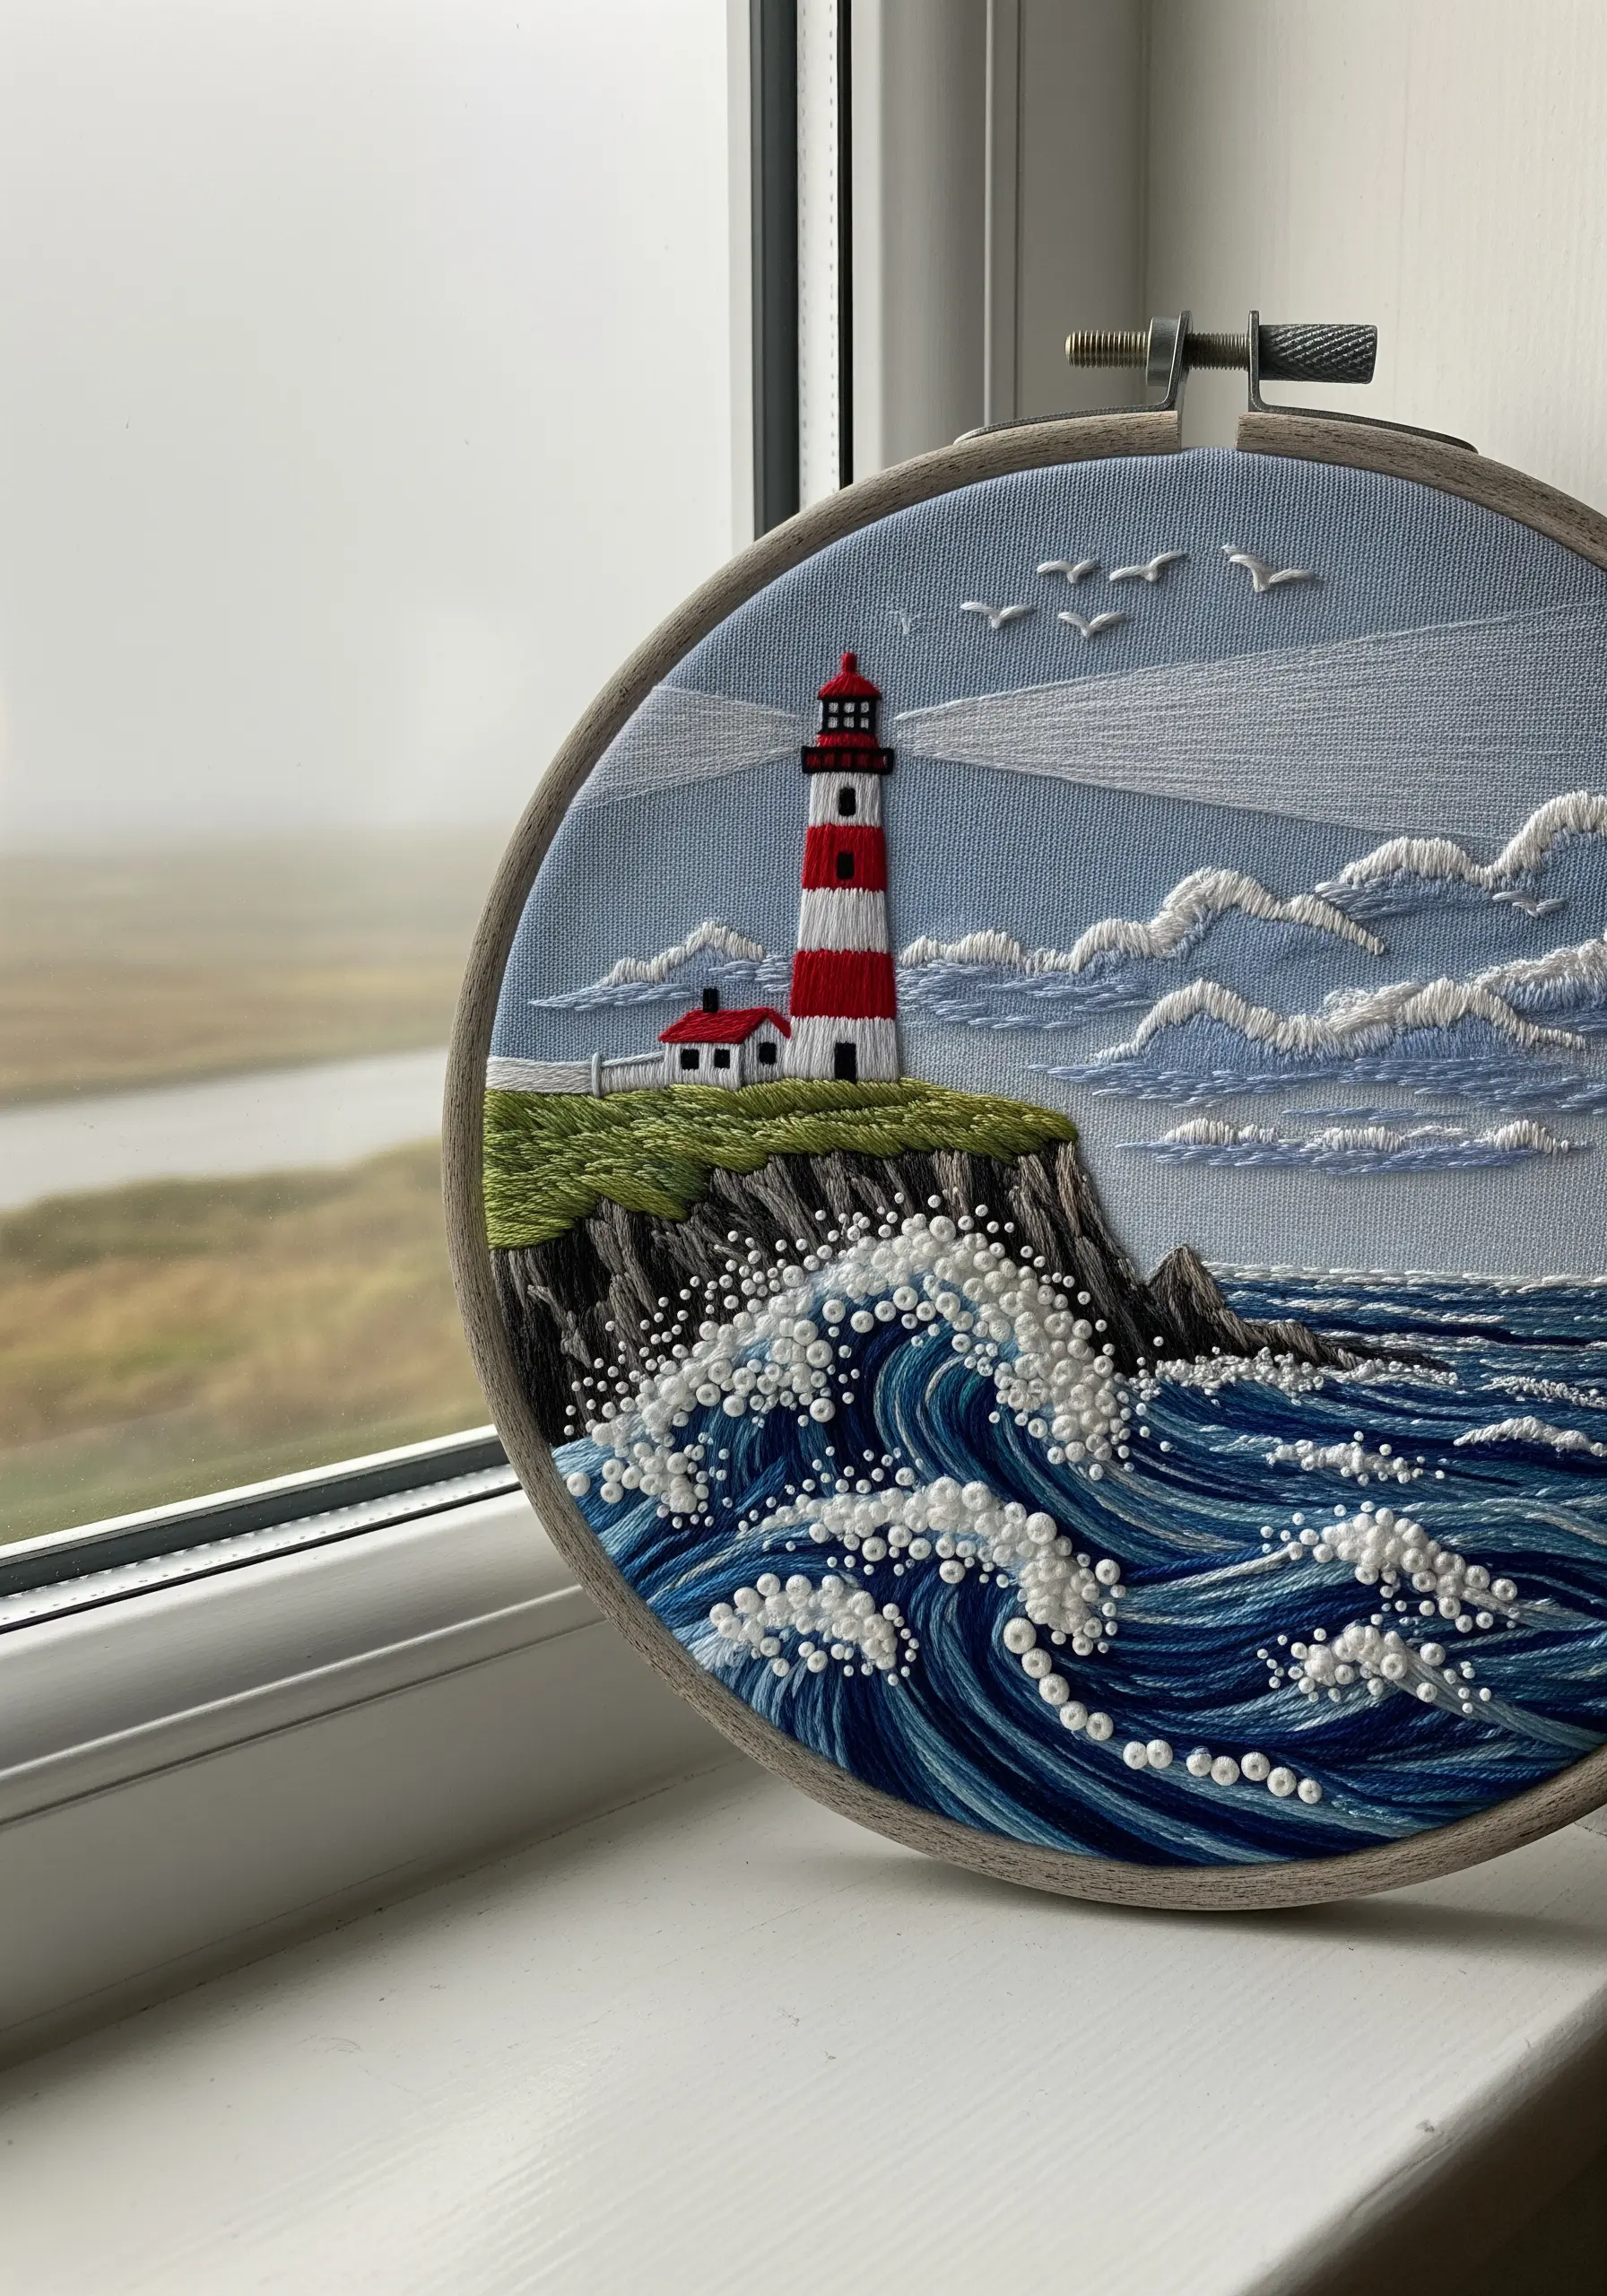
6. Capture Liquid Motion with Thread Contouring
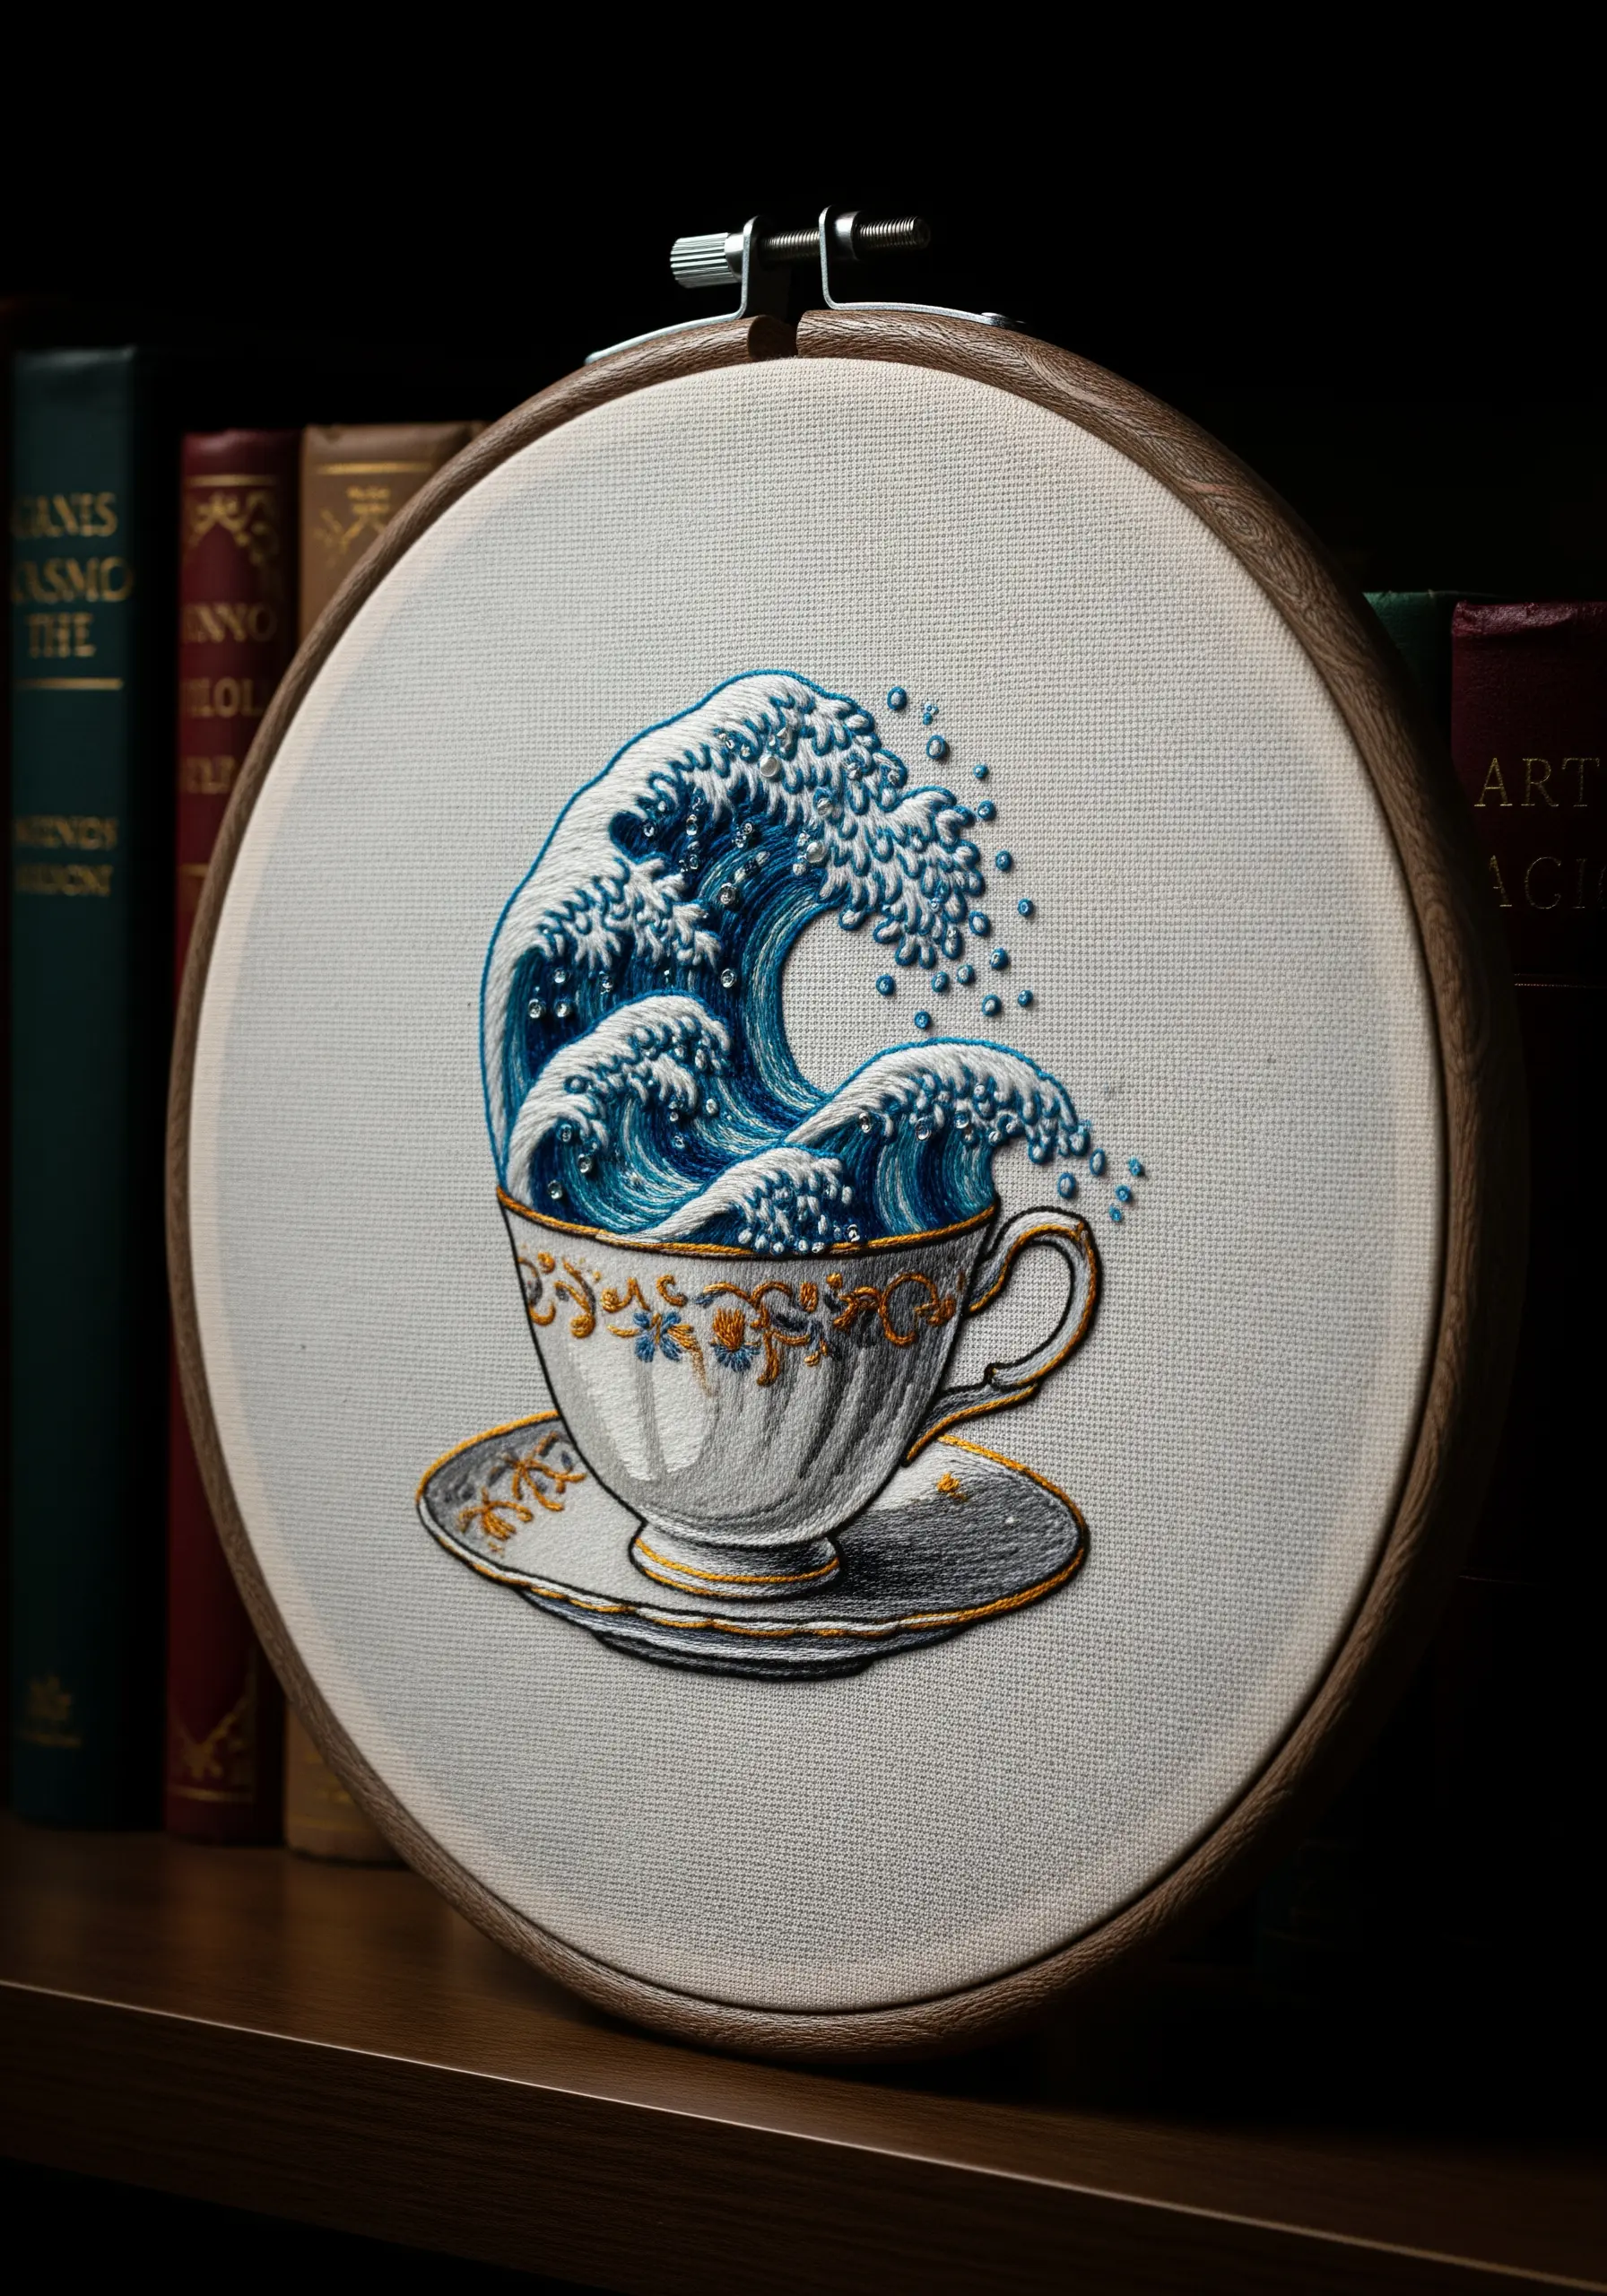
To embroider dynamic water, use directional split stitches or stem stitches that follow the curve and flow of the wave.
Blend several shades of blue and white to create highlights and shadows, giving the water a sense of volume and movement.
Use hundreds of tiny French knots in bright white to depict sea spray, clustering them at the crest of the wave for maximum impact.
Contrast the fluid motion of the water with the refined, delicate lines of the teacup, using a single strand of metallic gold for an elegant finish.
7. Define Structure with Precision Linework

For architectural subjects like this greenhouse, crisp lines are everything. Use a two-strand backstitch or split stitch for all structural frames.
Maintain consistent stitch length to ensure the lines look sharp and uniform, which gives the structure a clean, engineered feel.
Inside the panes, use simple satin stitches and French knots to suggest plants, keeping them slightly less detailed to draw focus to the architecture.
Stitching on a neutral, evenweave fabric provides a subtle grid-like texture that complements the geometric nature of the design.
8. Illuminate Dark Fabric with Metallic Mandalas

Make your designs radiate by stitching with metallic threads on a high-contrast dark fabric like navy or black linen.
To prevent metallic floss from tangling and fraying, work with shorter lengths of thread (no more than 12 inches) and consider using a thread conditioner like beeswax.
Build your mandala from the center out to maintain symmetry, using a combination of backstitch for outlines and seed stitch for delicate fills.
Adding a few glass seed beads can catch the light beautifully and enhance the design’s intricate, jewel-like quality.
9. Create a Narrative with Layered Composition
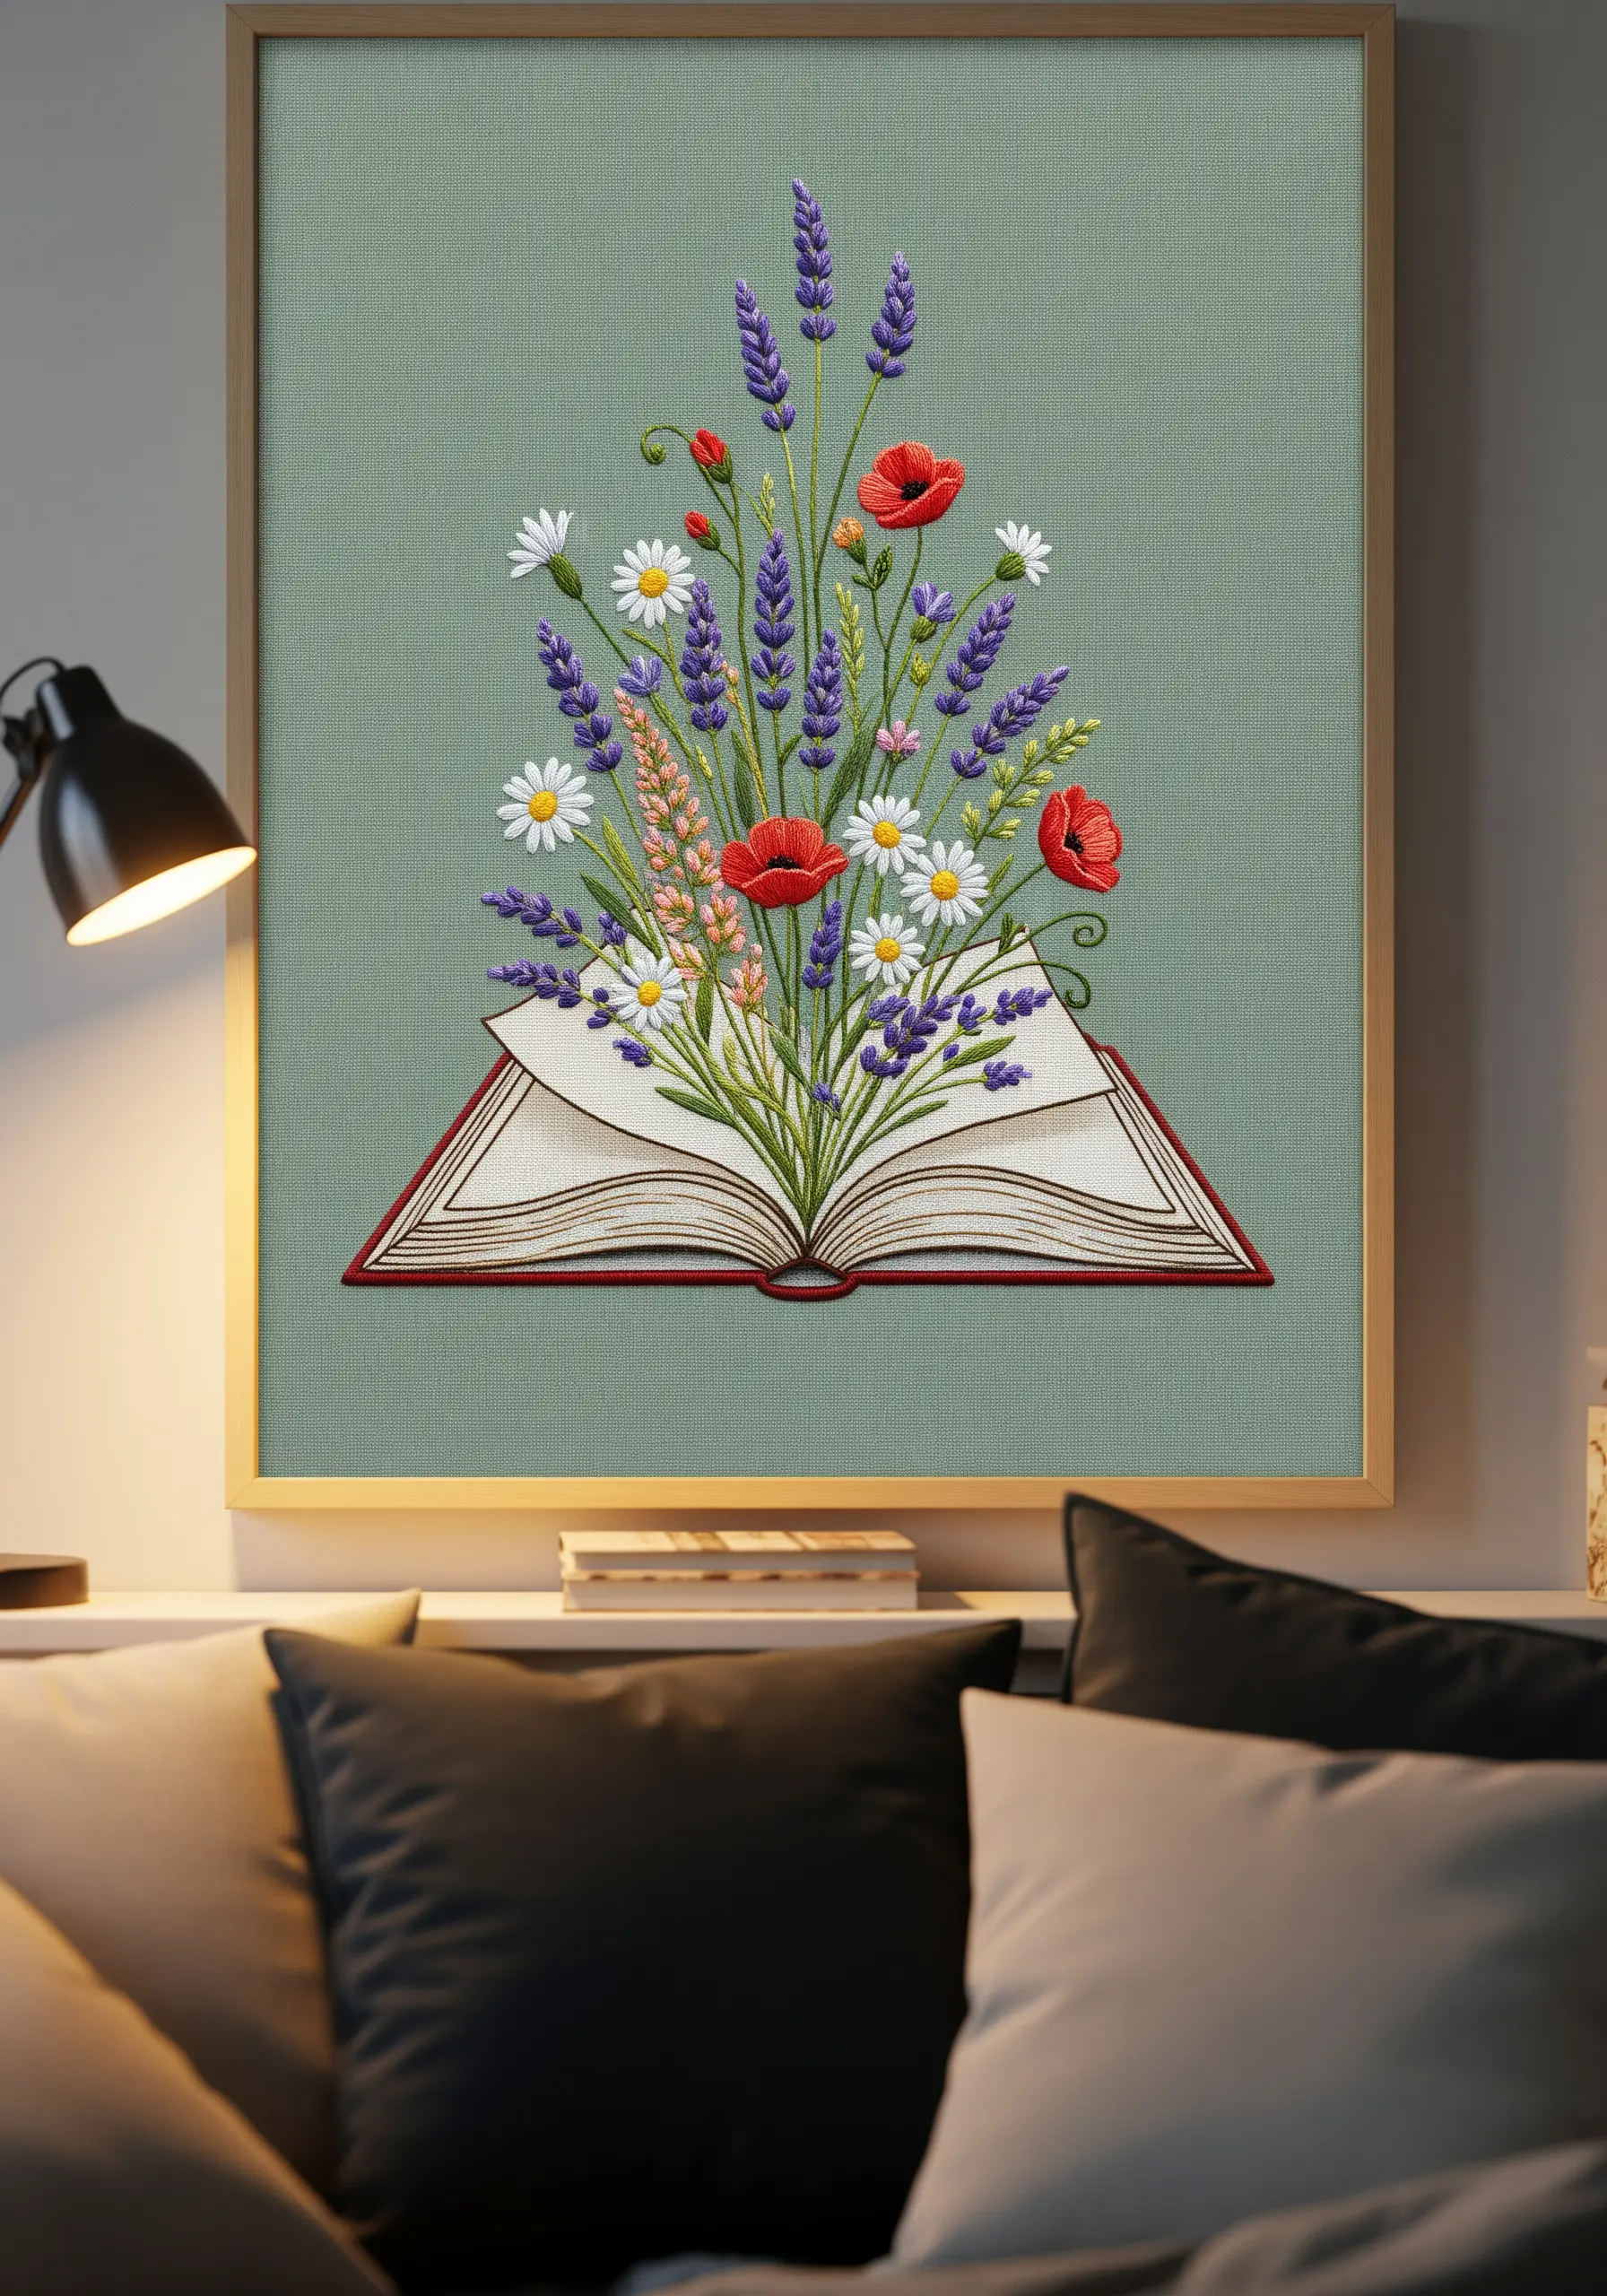
Turn a simple floral bouquet into a story by having it emerge from an object, like an open book.
Stitch the book first, using a single strand of thread and straight stitches to suggest lines of text for a subtle, realistic detail.
For the flowers, use a mix of stitches: lazy daisy for simple petals, woven wheels for roses, and French knots for fillers like baby’s breath.
This combination creates a lush, three-dimensional arrangement that seems to grow directly from the pages, blending the worlds of literature and nature.
10. Imply Movement with Stitches and Space
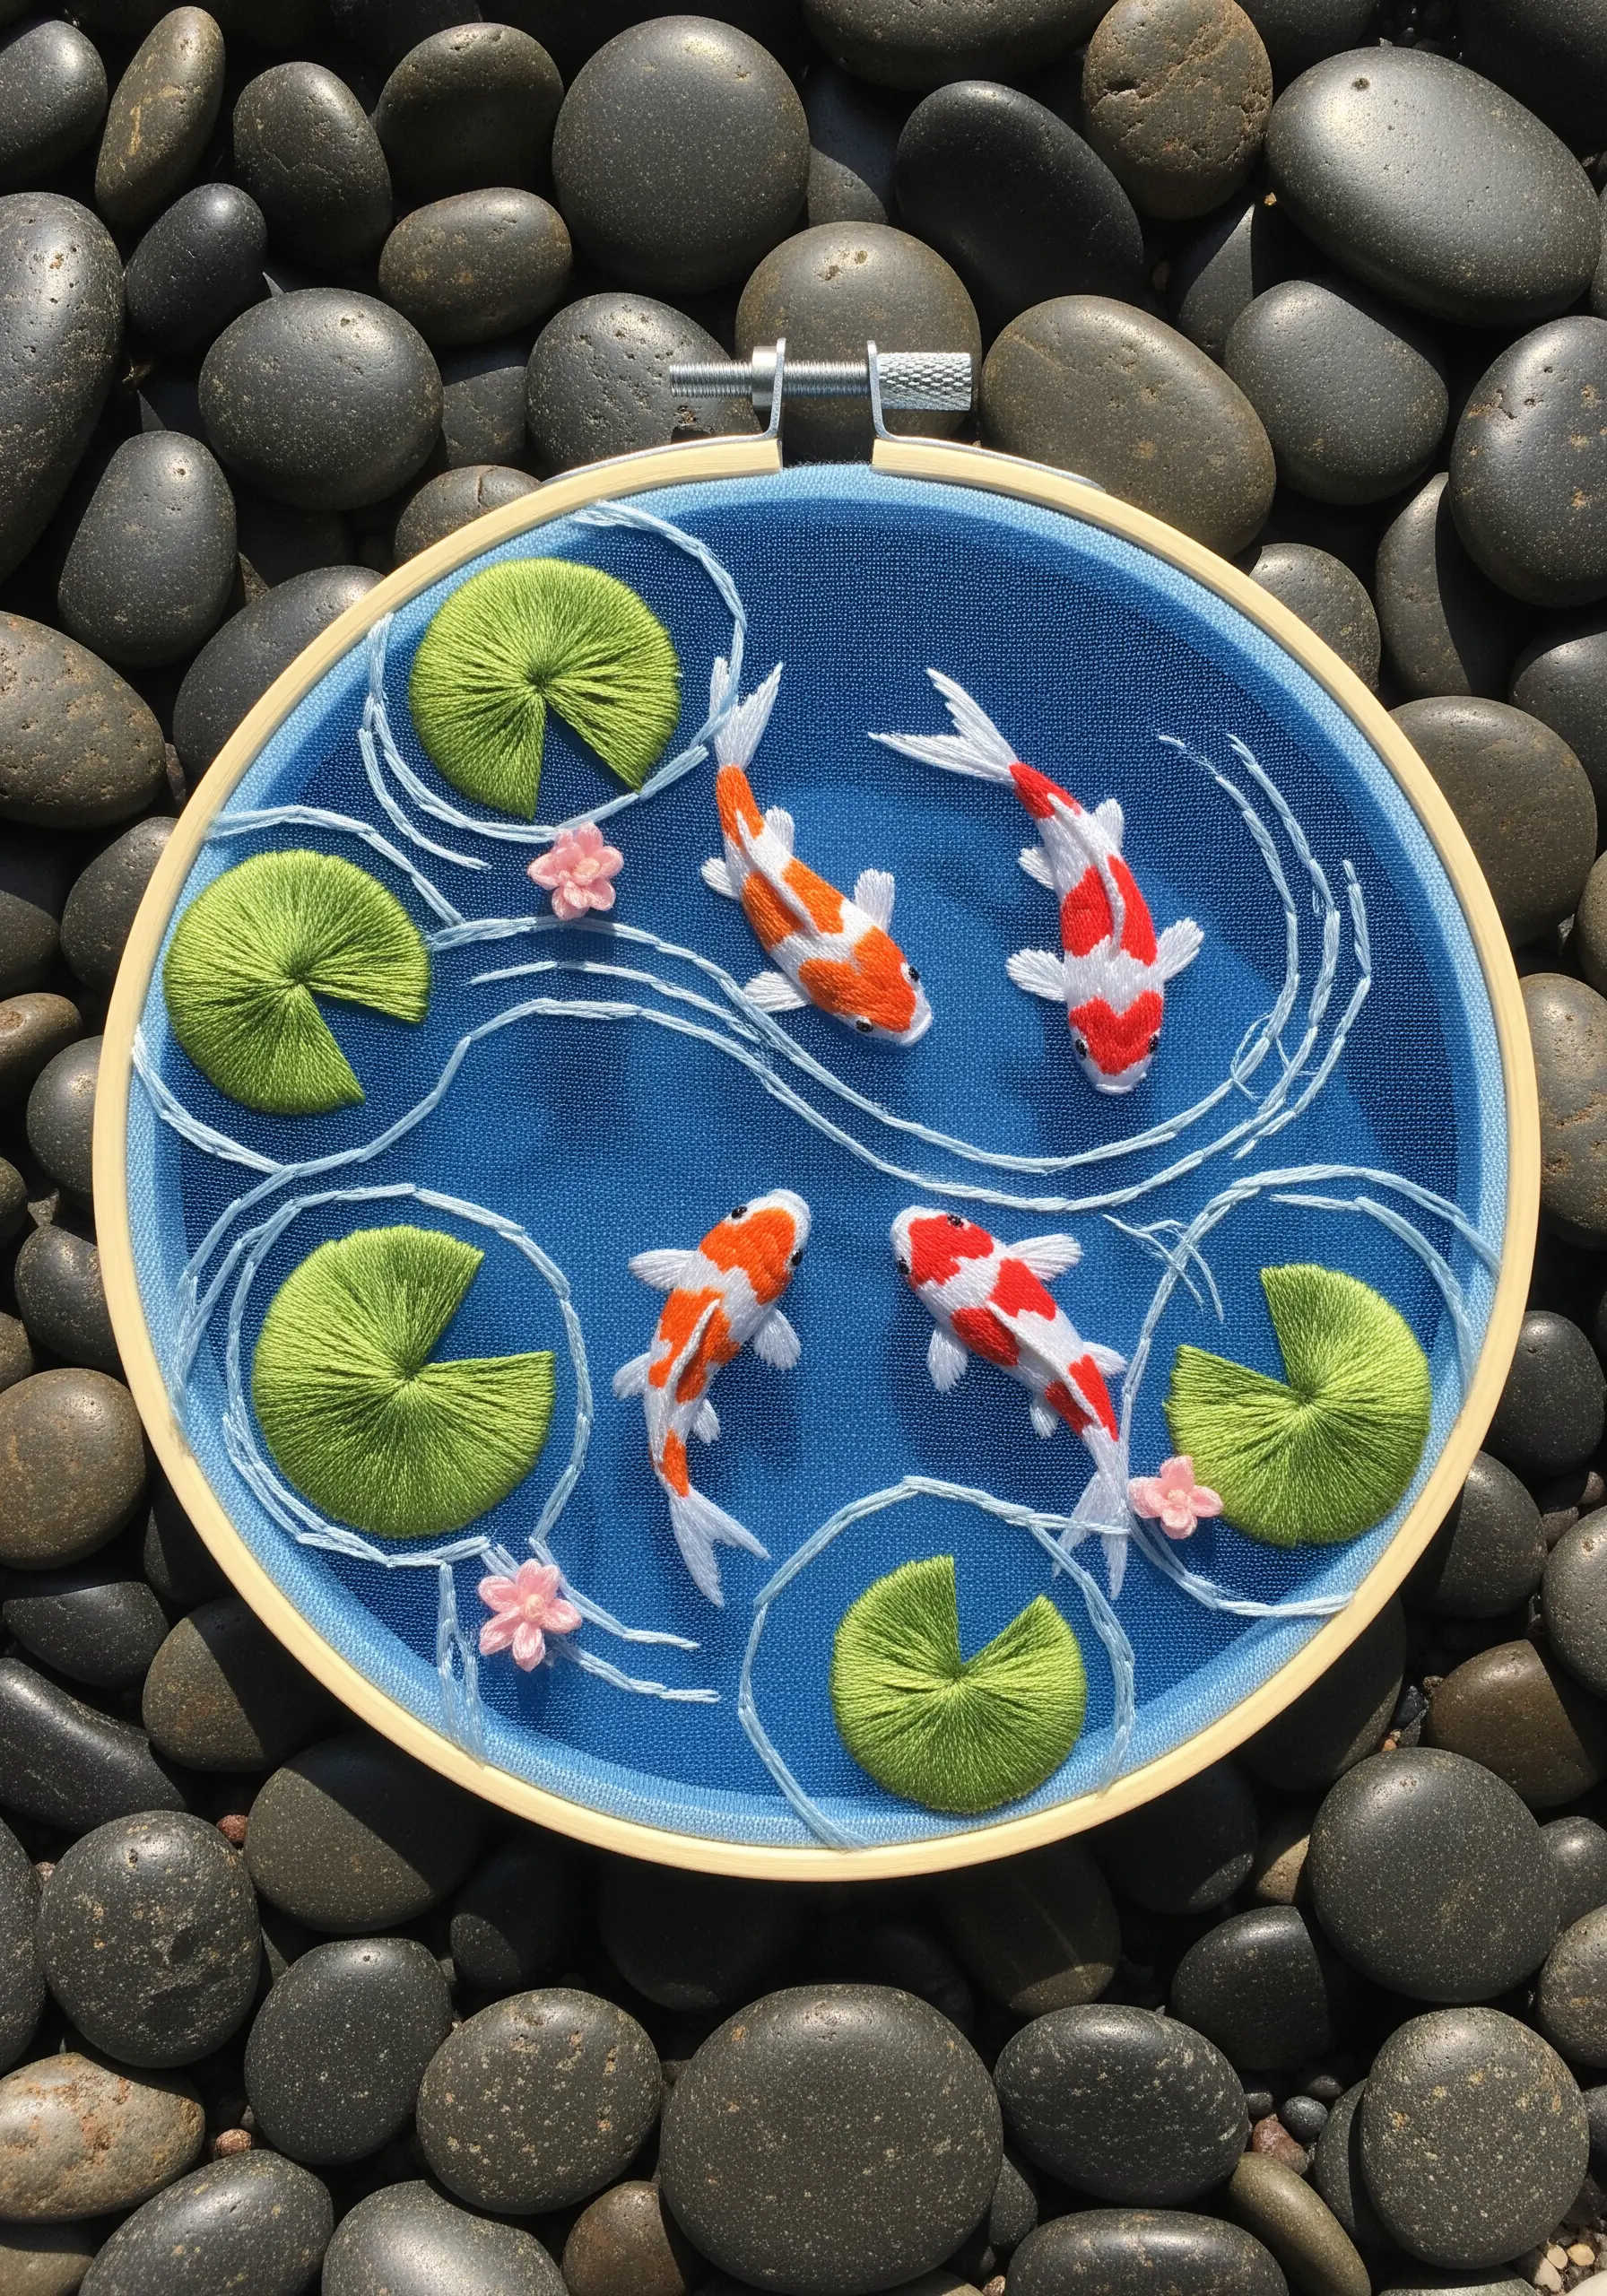
Create the illusion of water without filling the entire background by using gracefully curved stem stitches in a slightly darker blue thread.
For the koi fish, use a padded satin stitch to give their bodies a subtle, rounded dimension that makes them pop against the flat background.
The lily pads, made with a wagon wheel stitch, provide a strong circular anchor in the composition, enhancing the feeling of a calm, contained pond.
This use of negative space allows the key elements to breathe and directs the viewer’s eye to the gentle movement of the fish.
11. Embrace the Power of Minimalist Line Art
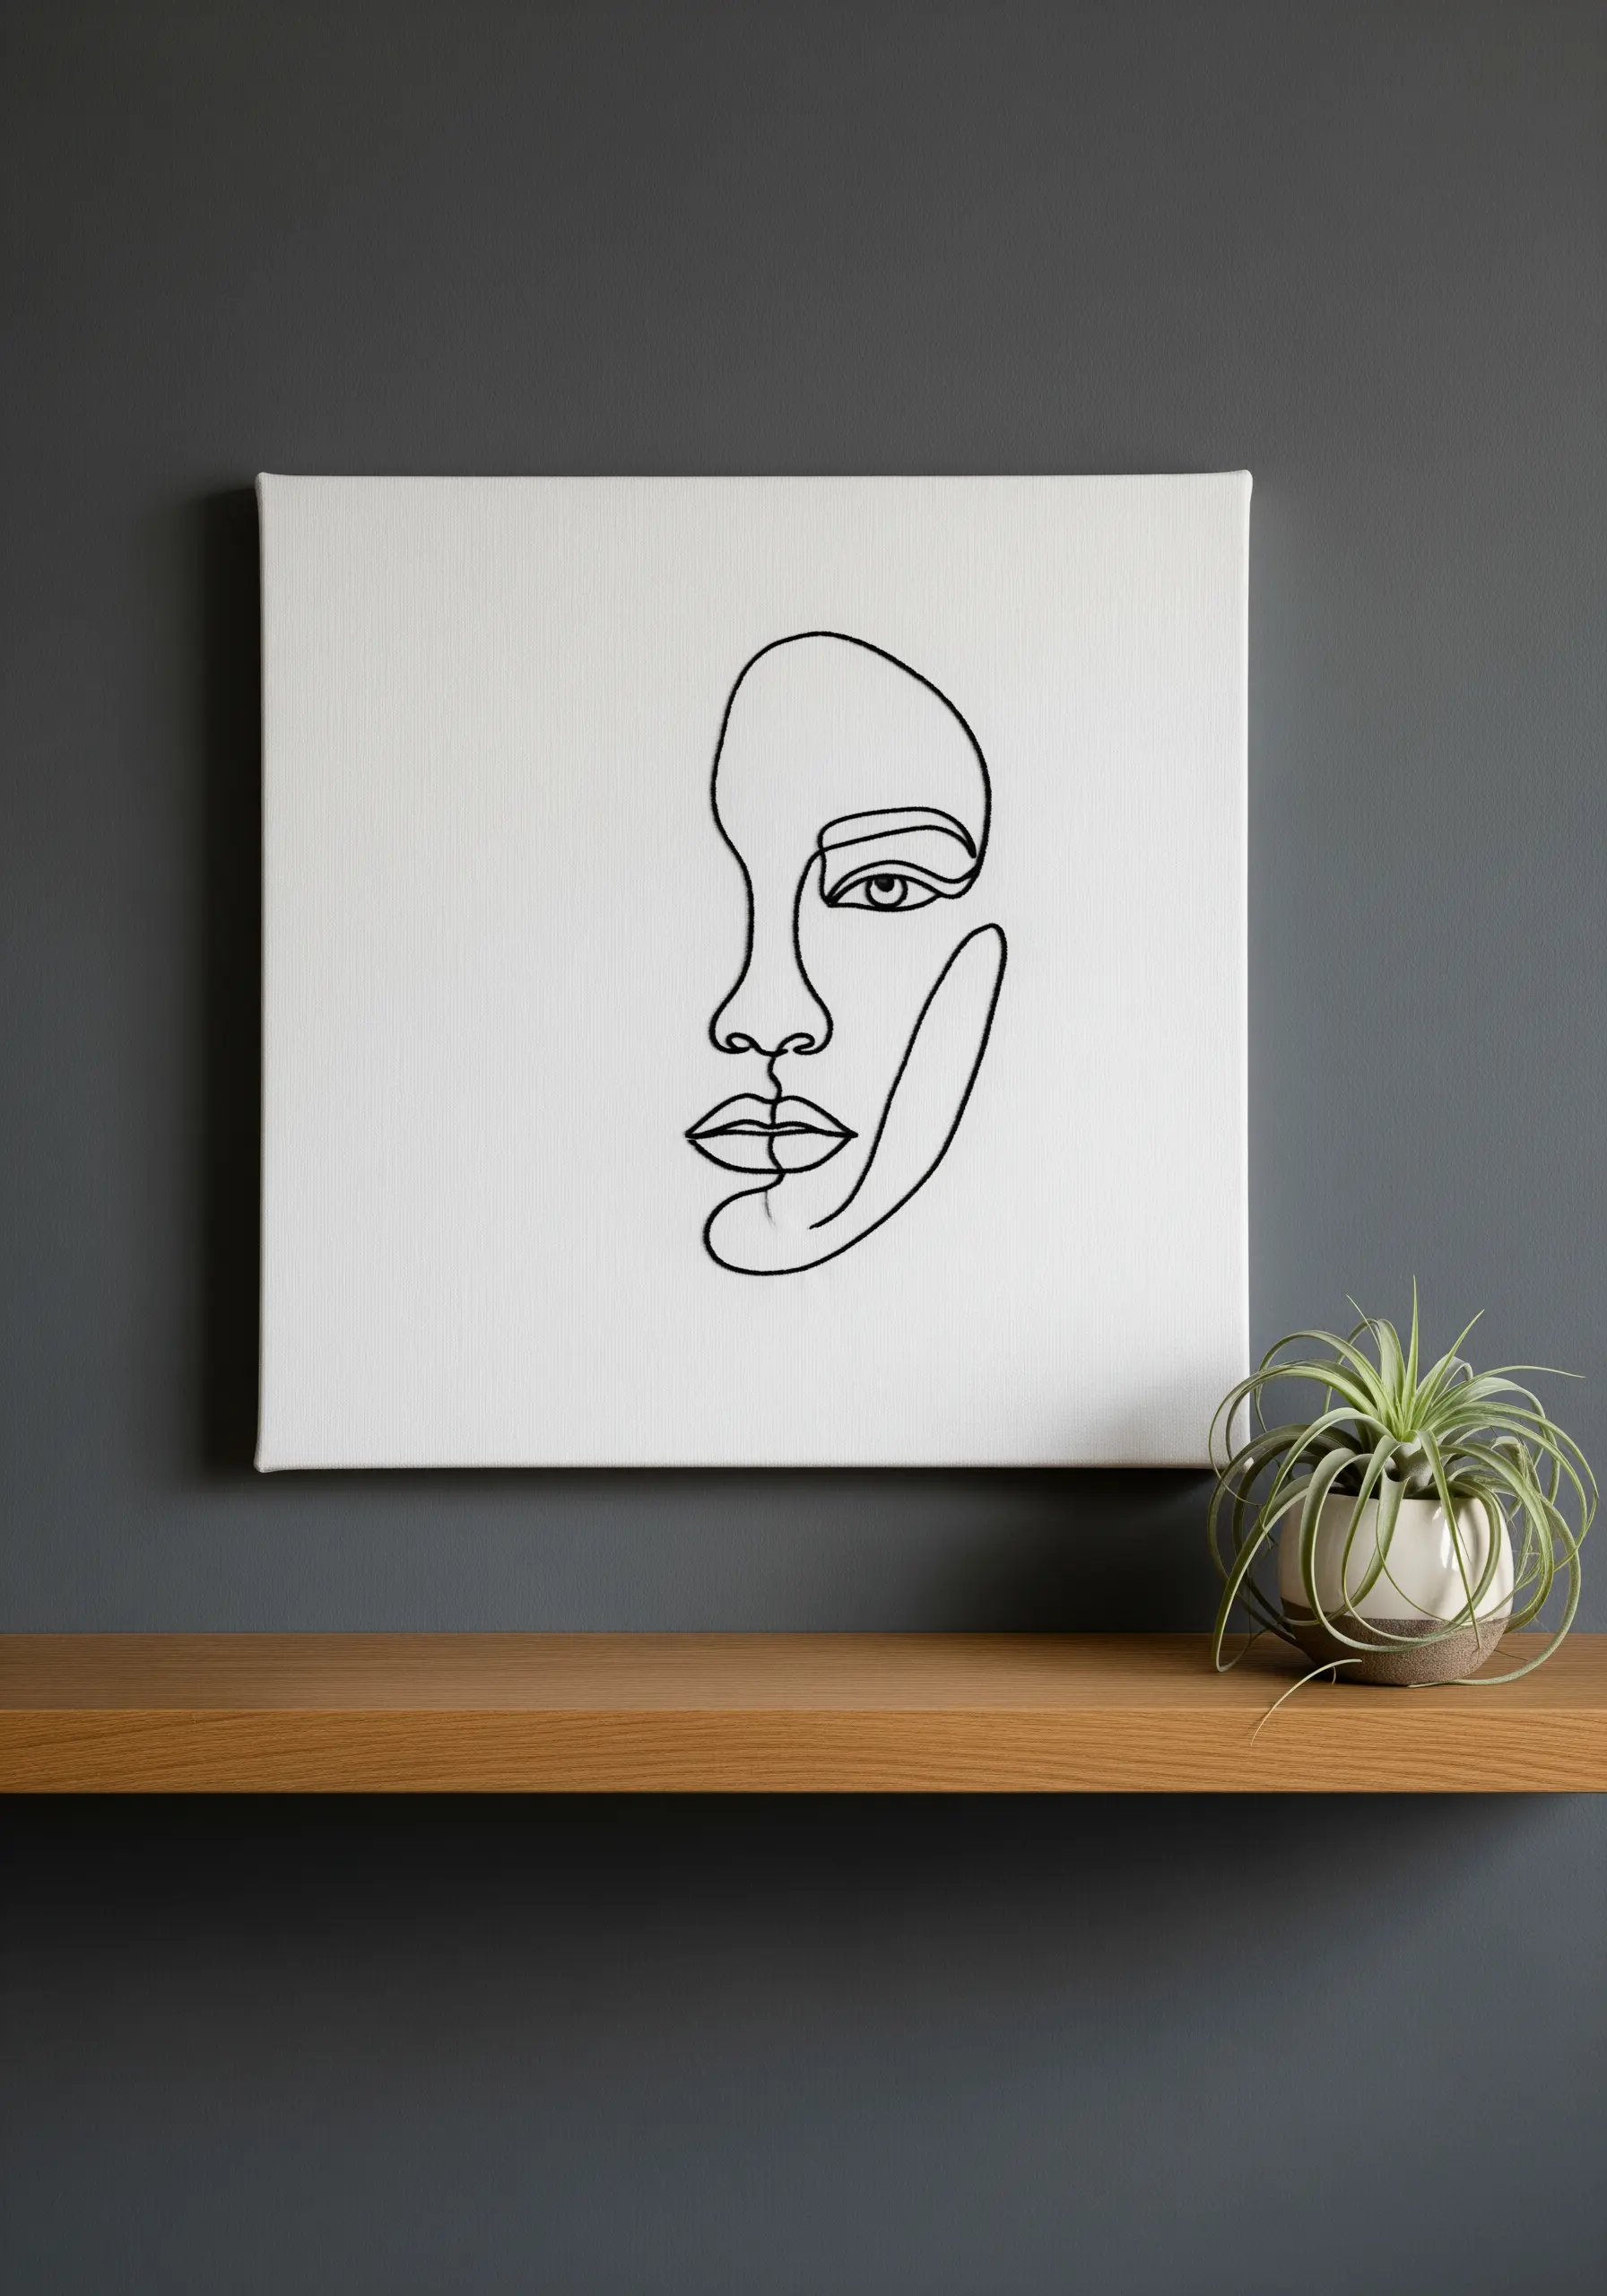
A single, continuous line can convey more emotion and style than a fully rendered piece. This is the essence of blind contour drawing, translated to thread.
To achieve a smooth, ink-like line, use a whipped backstitch or a stem stitch with a consistent tension.
Choose a high-contrast combination, like black thread on white canvas, to give the design graphic impact.
The beauty of this style is its imperfection; slight variations in the line add character and a human touch, making it a powerful form of modern line art.
12. Achieve Richness with Dense, Symmetrical Stitching
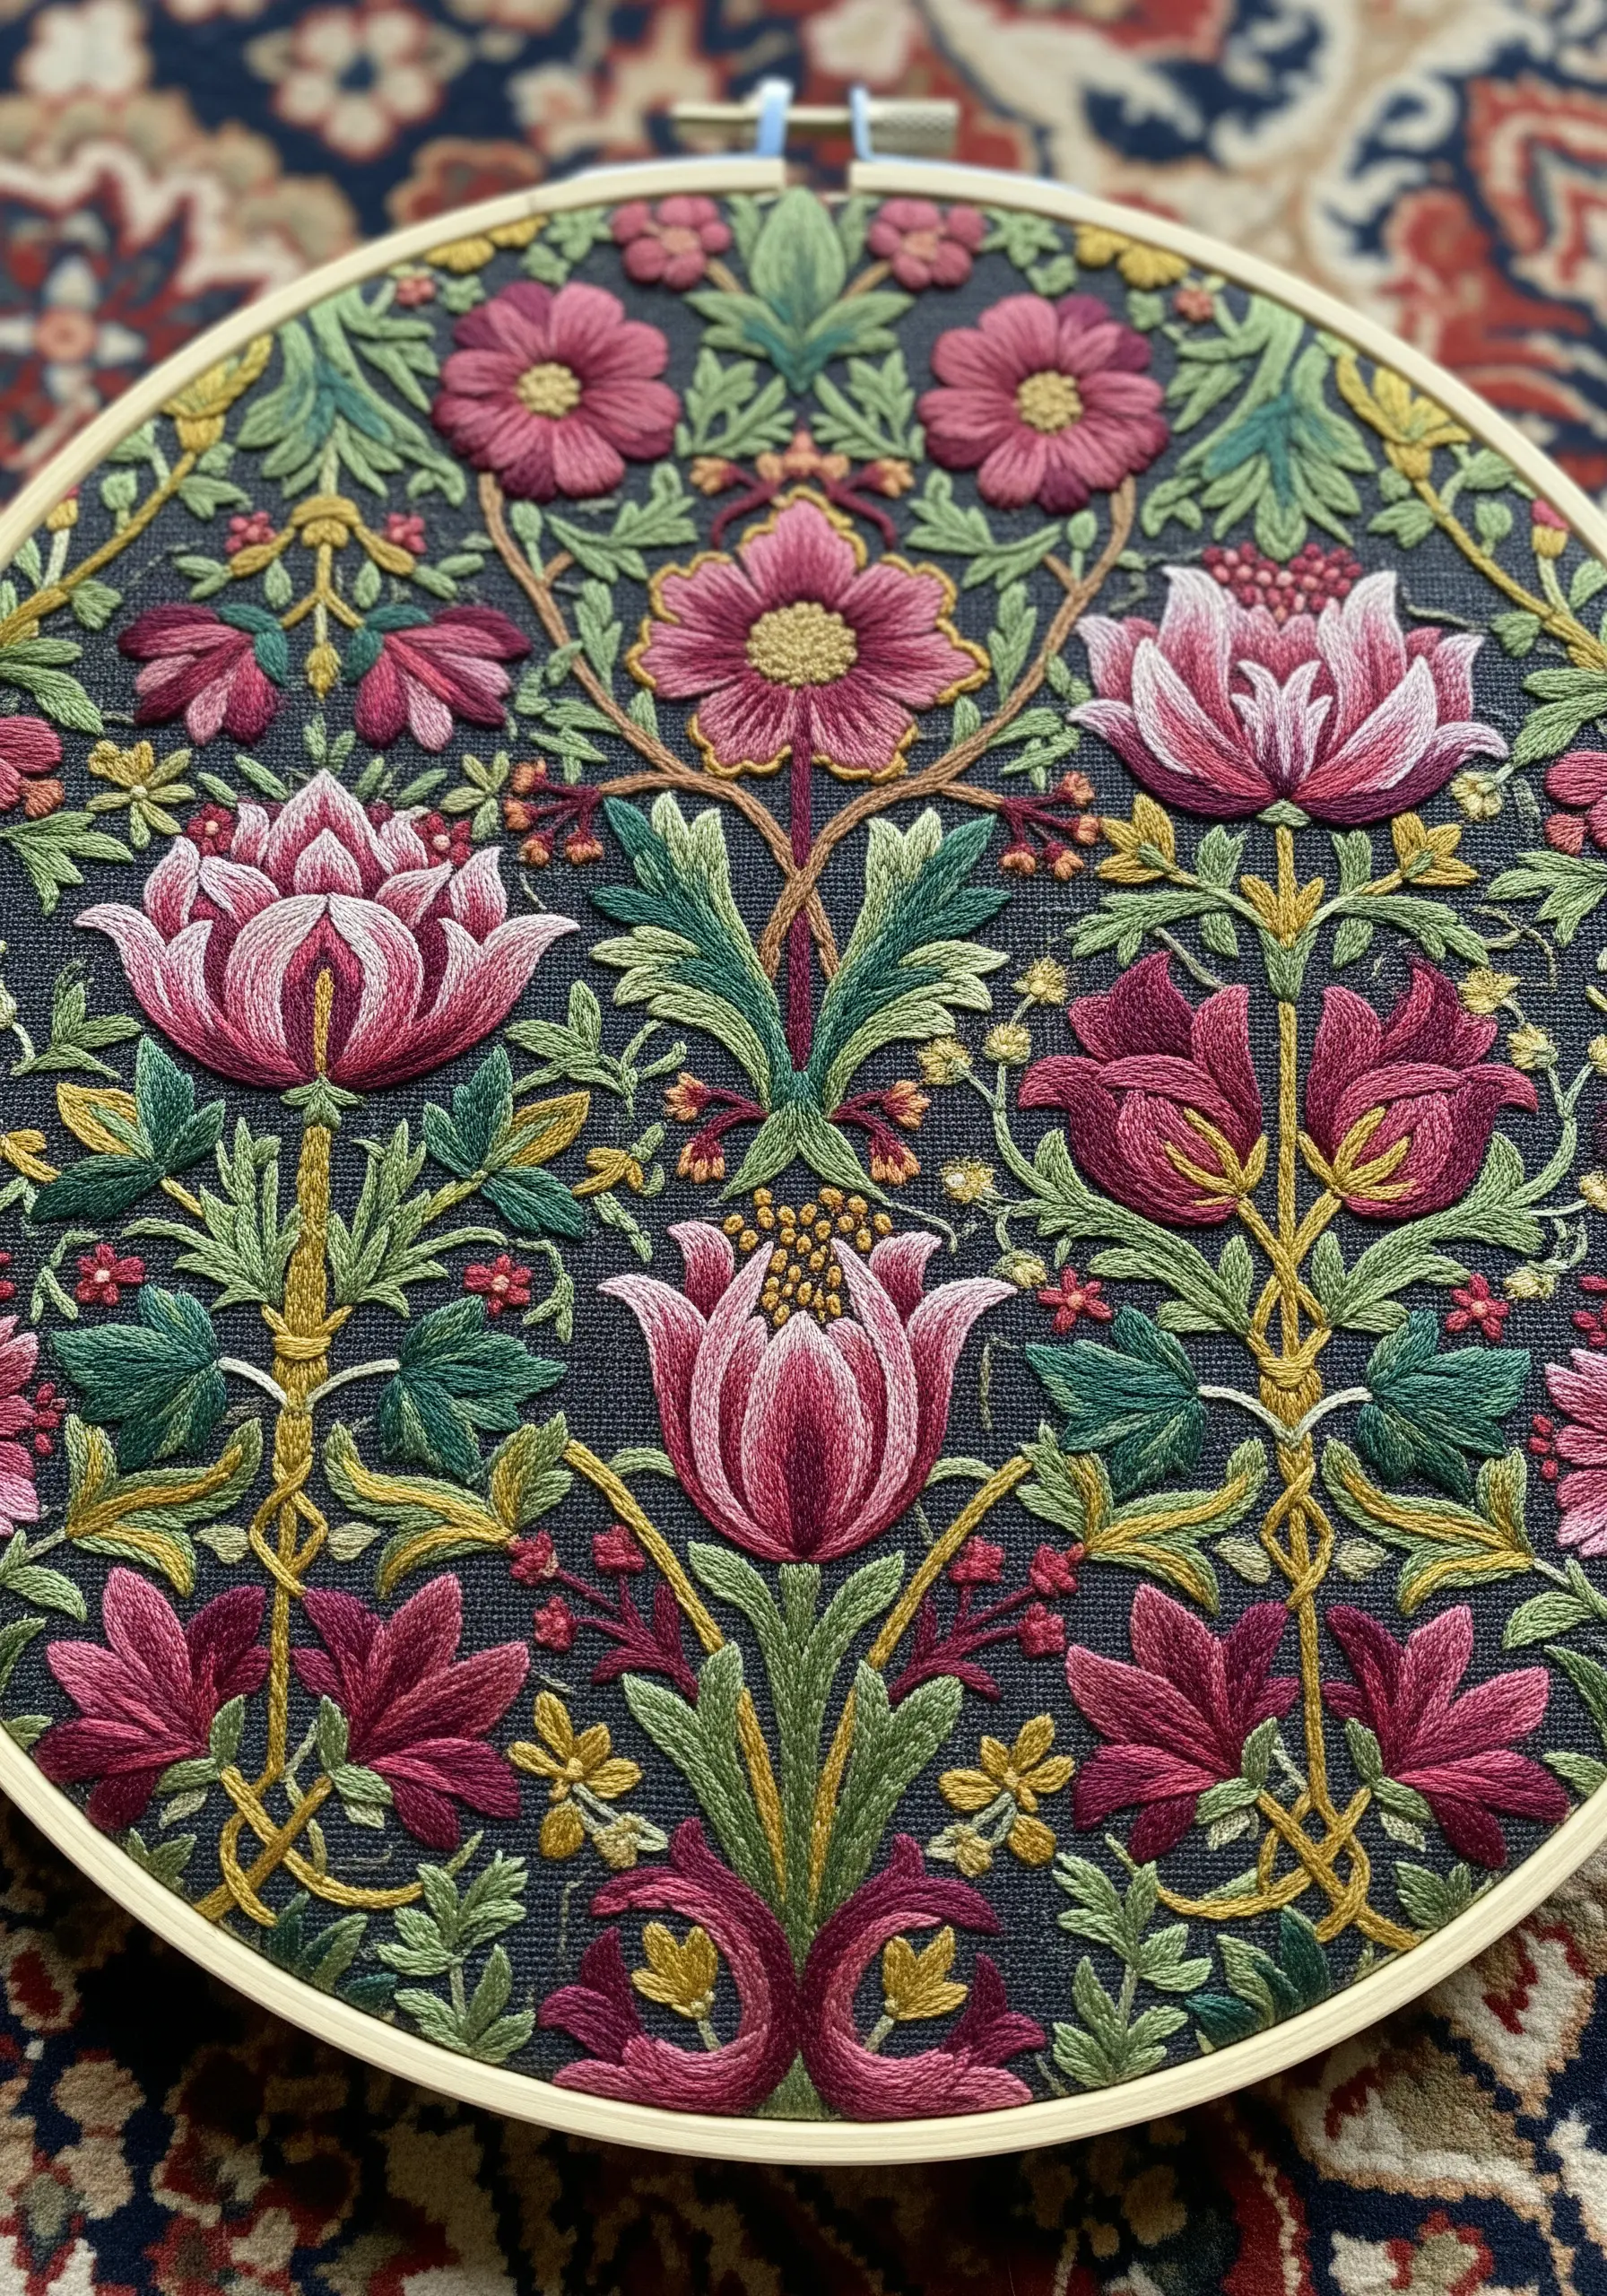
Inspired by Jacobean crewelwork, this style relies on filling the entire surface with a dense variety of stitches for a luxurious, tapestry-like effect.
Work on a dark, heavy linen or cotton-blend fabric that can support the weight of the dense stitching without puckering.
Use a balanced color palette and create symmetry in your design to give the intricate pattern a sense of order and harmony.
Combine stitches like satin stitch for petals, trellis stitch for fills, and stem stitch for vines to build layers of compelling texture.
13. Juxtapose Science and Nature for Poetic Effect
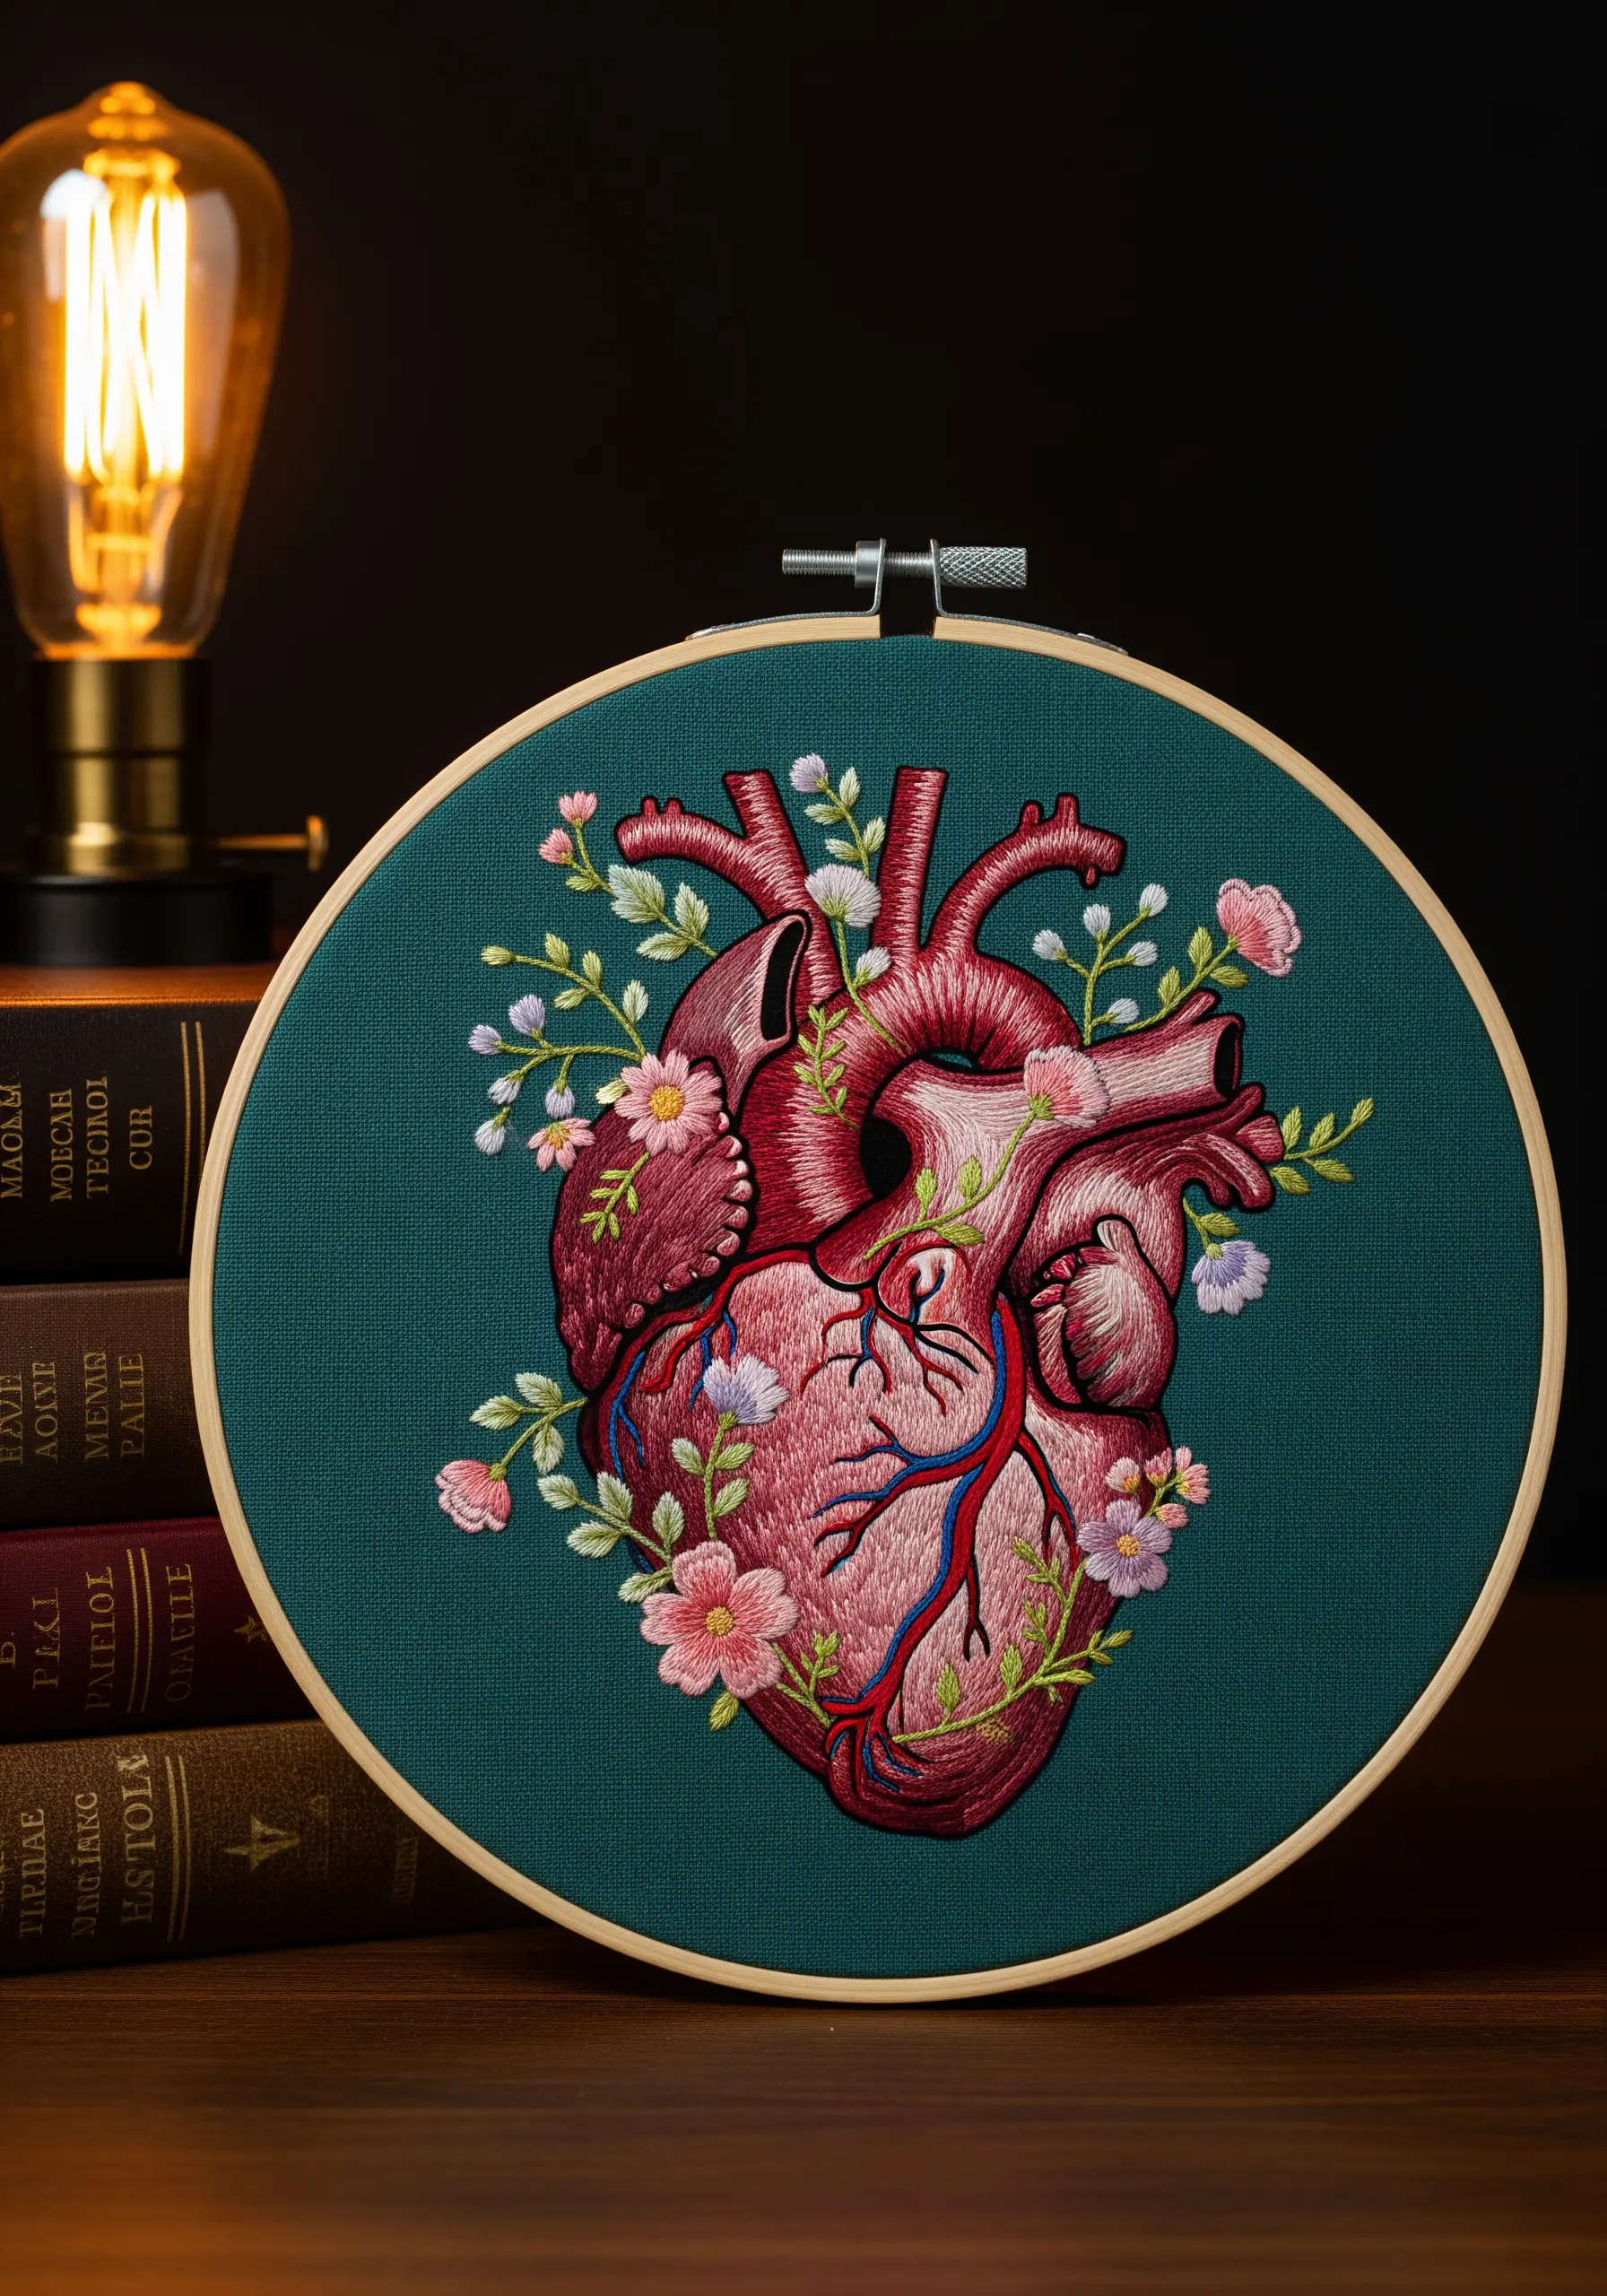
Create a powerful visual metaphor by intertwining a precise, anatomical illustration with soft, organic botanicals.
Use long-and-short stitch to shade the heart, following muscle contours to give it a realistic, sculptural form.
Contrast this with delicate, loosely stitched florals—lazy daisy stitches and French knots—that seem to grow naturally around and through the anatomy.
This surprising combination elevates the design from a simple illustration to a piece of conceptual art that speaks of life, growth, and resilience.
14. Paint a Sky with Thread Gradients
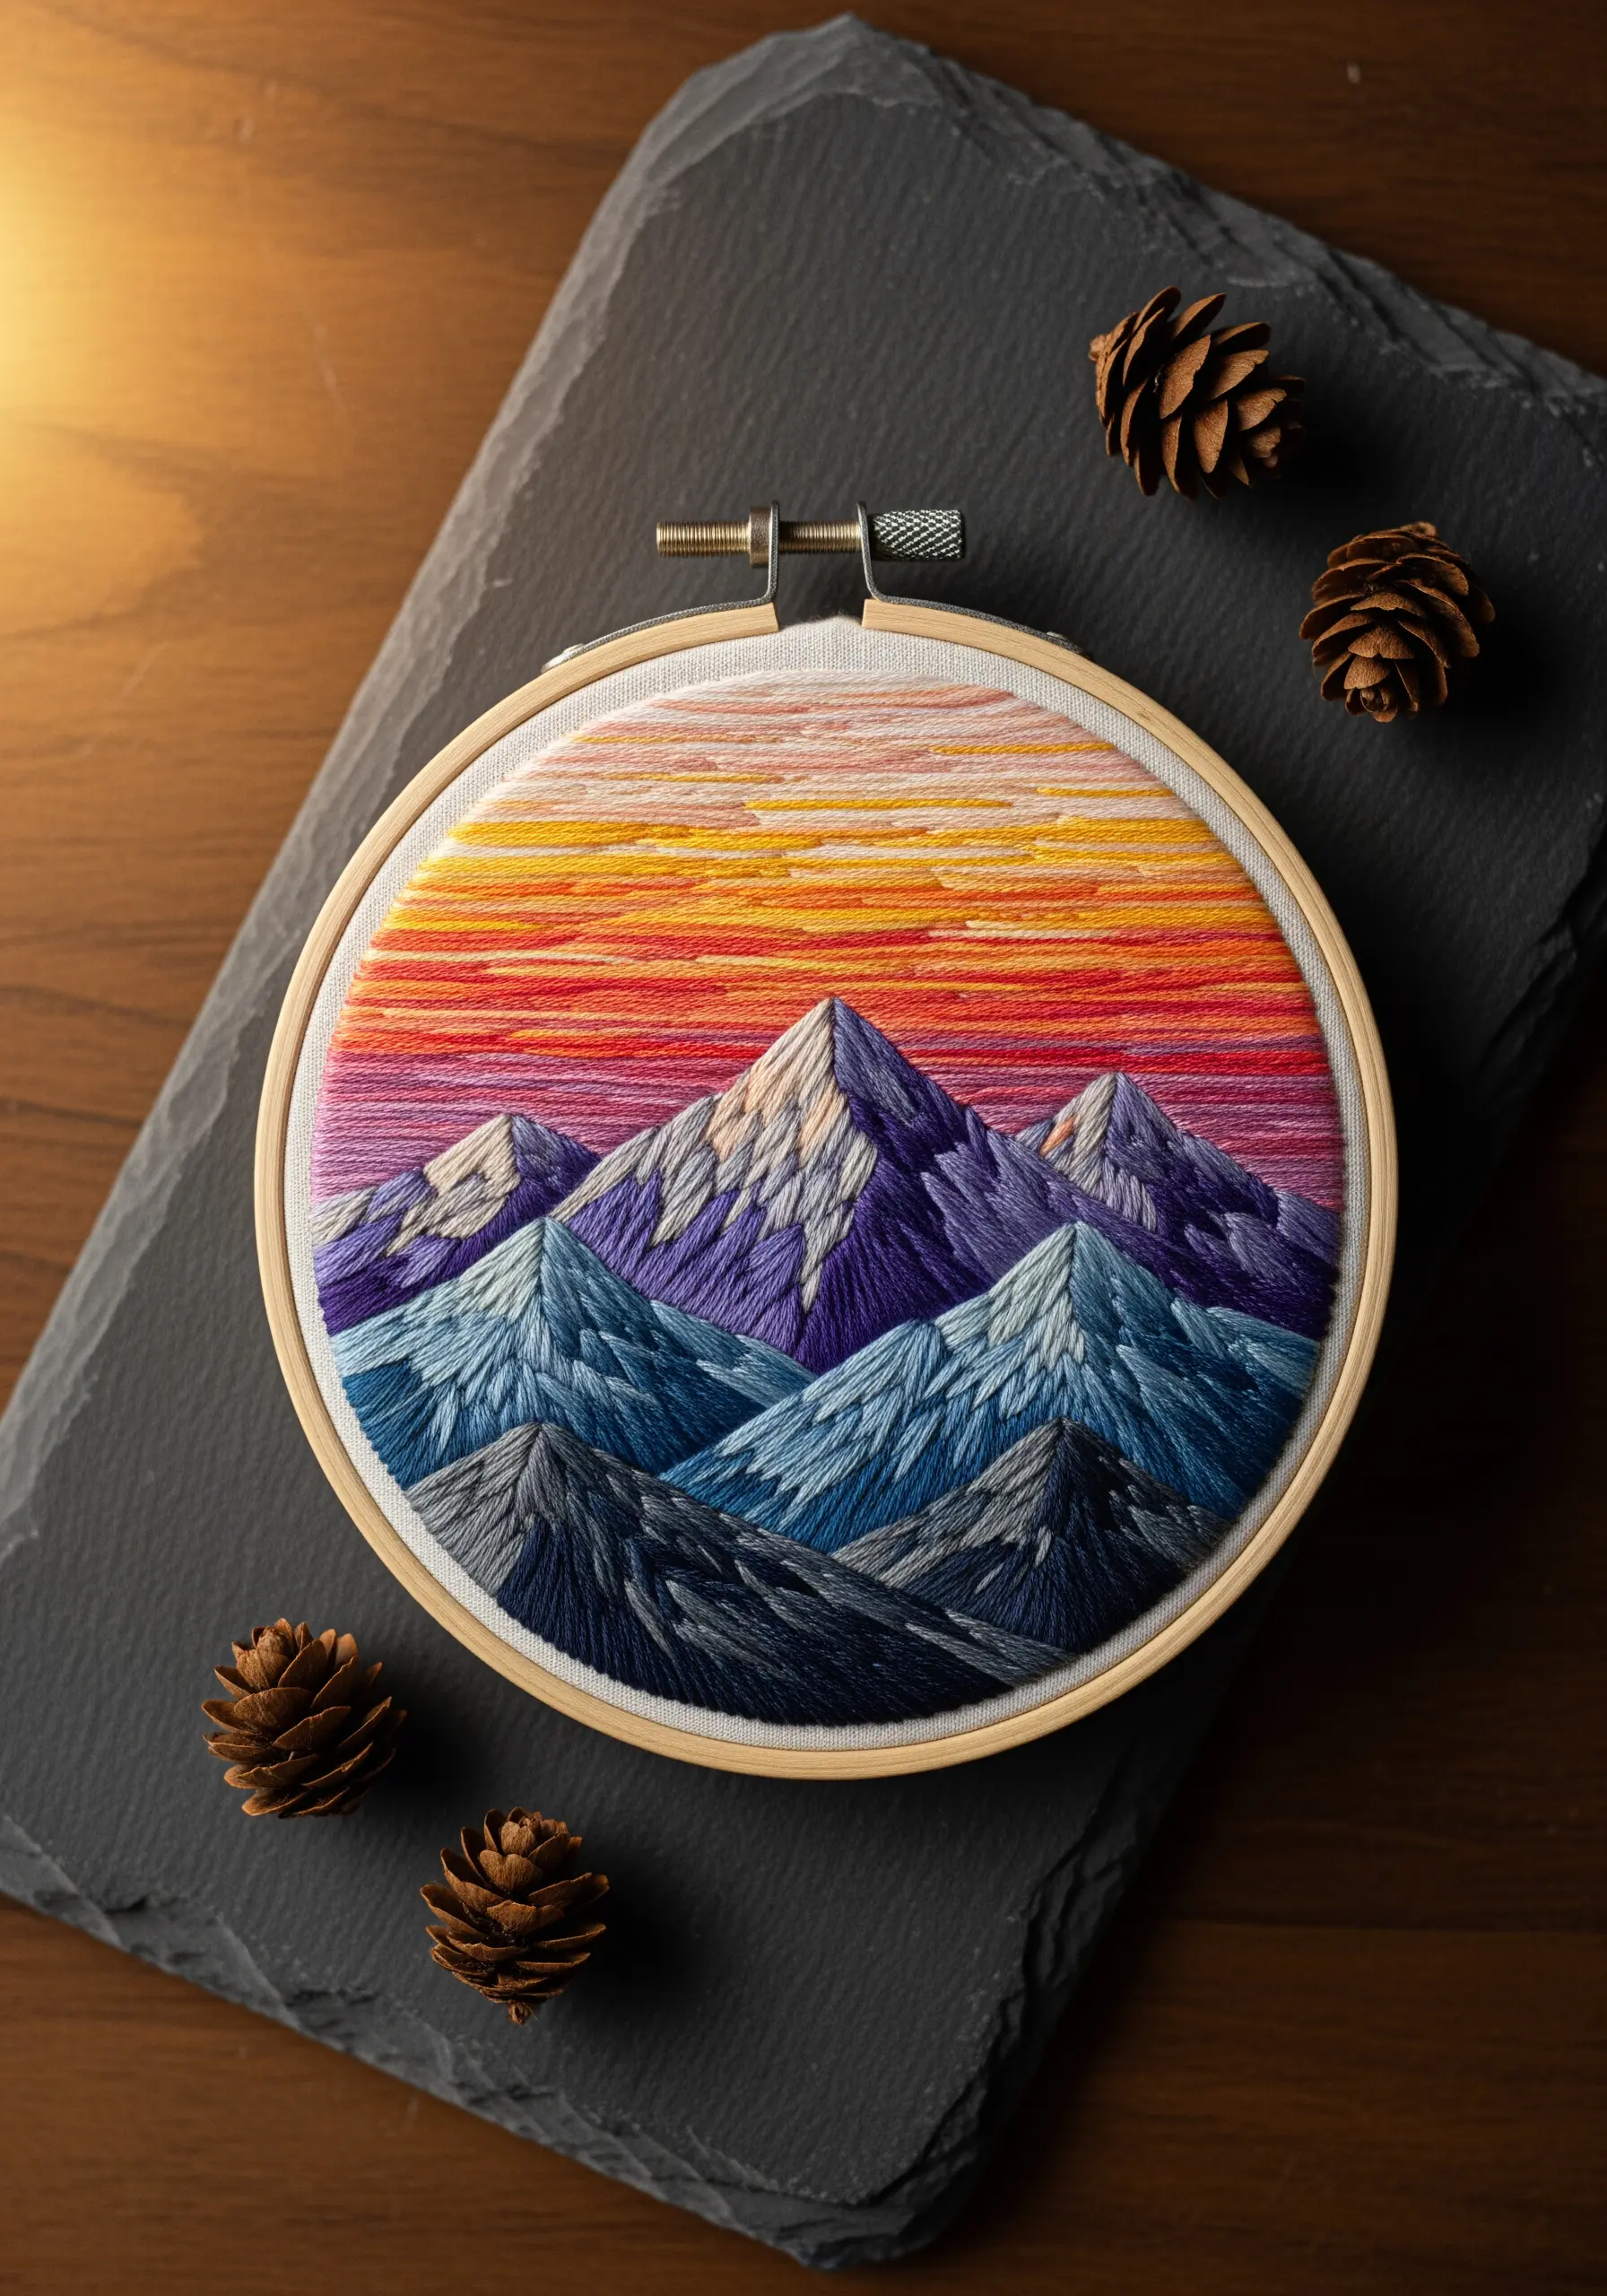
Create a dramatic sunset sky by laying down horizontal bands of color, from deep oranges to pale yellows, using long, straight satin stitches.
For the mountains, switch to directional long-and-short stitches, angling them to match the slopes and shadows of the peaks.
Use darker purples and greys for the mountains in the foreground and lighter, bluer tones for those in the distance to create atmospheric perspective.
This technique, known as thread painting, allows you to blend colors seamlessly and build a landscape with painterly depth and vibrancy.
15. Add Whimsy with Padded Satin Stitch
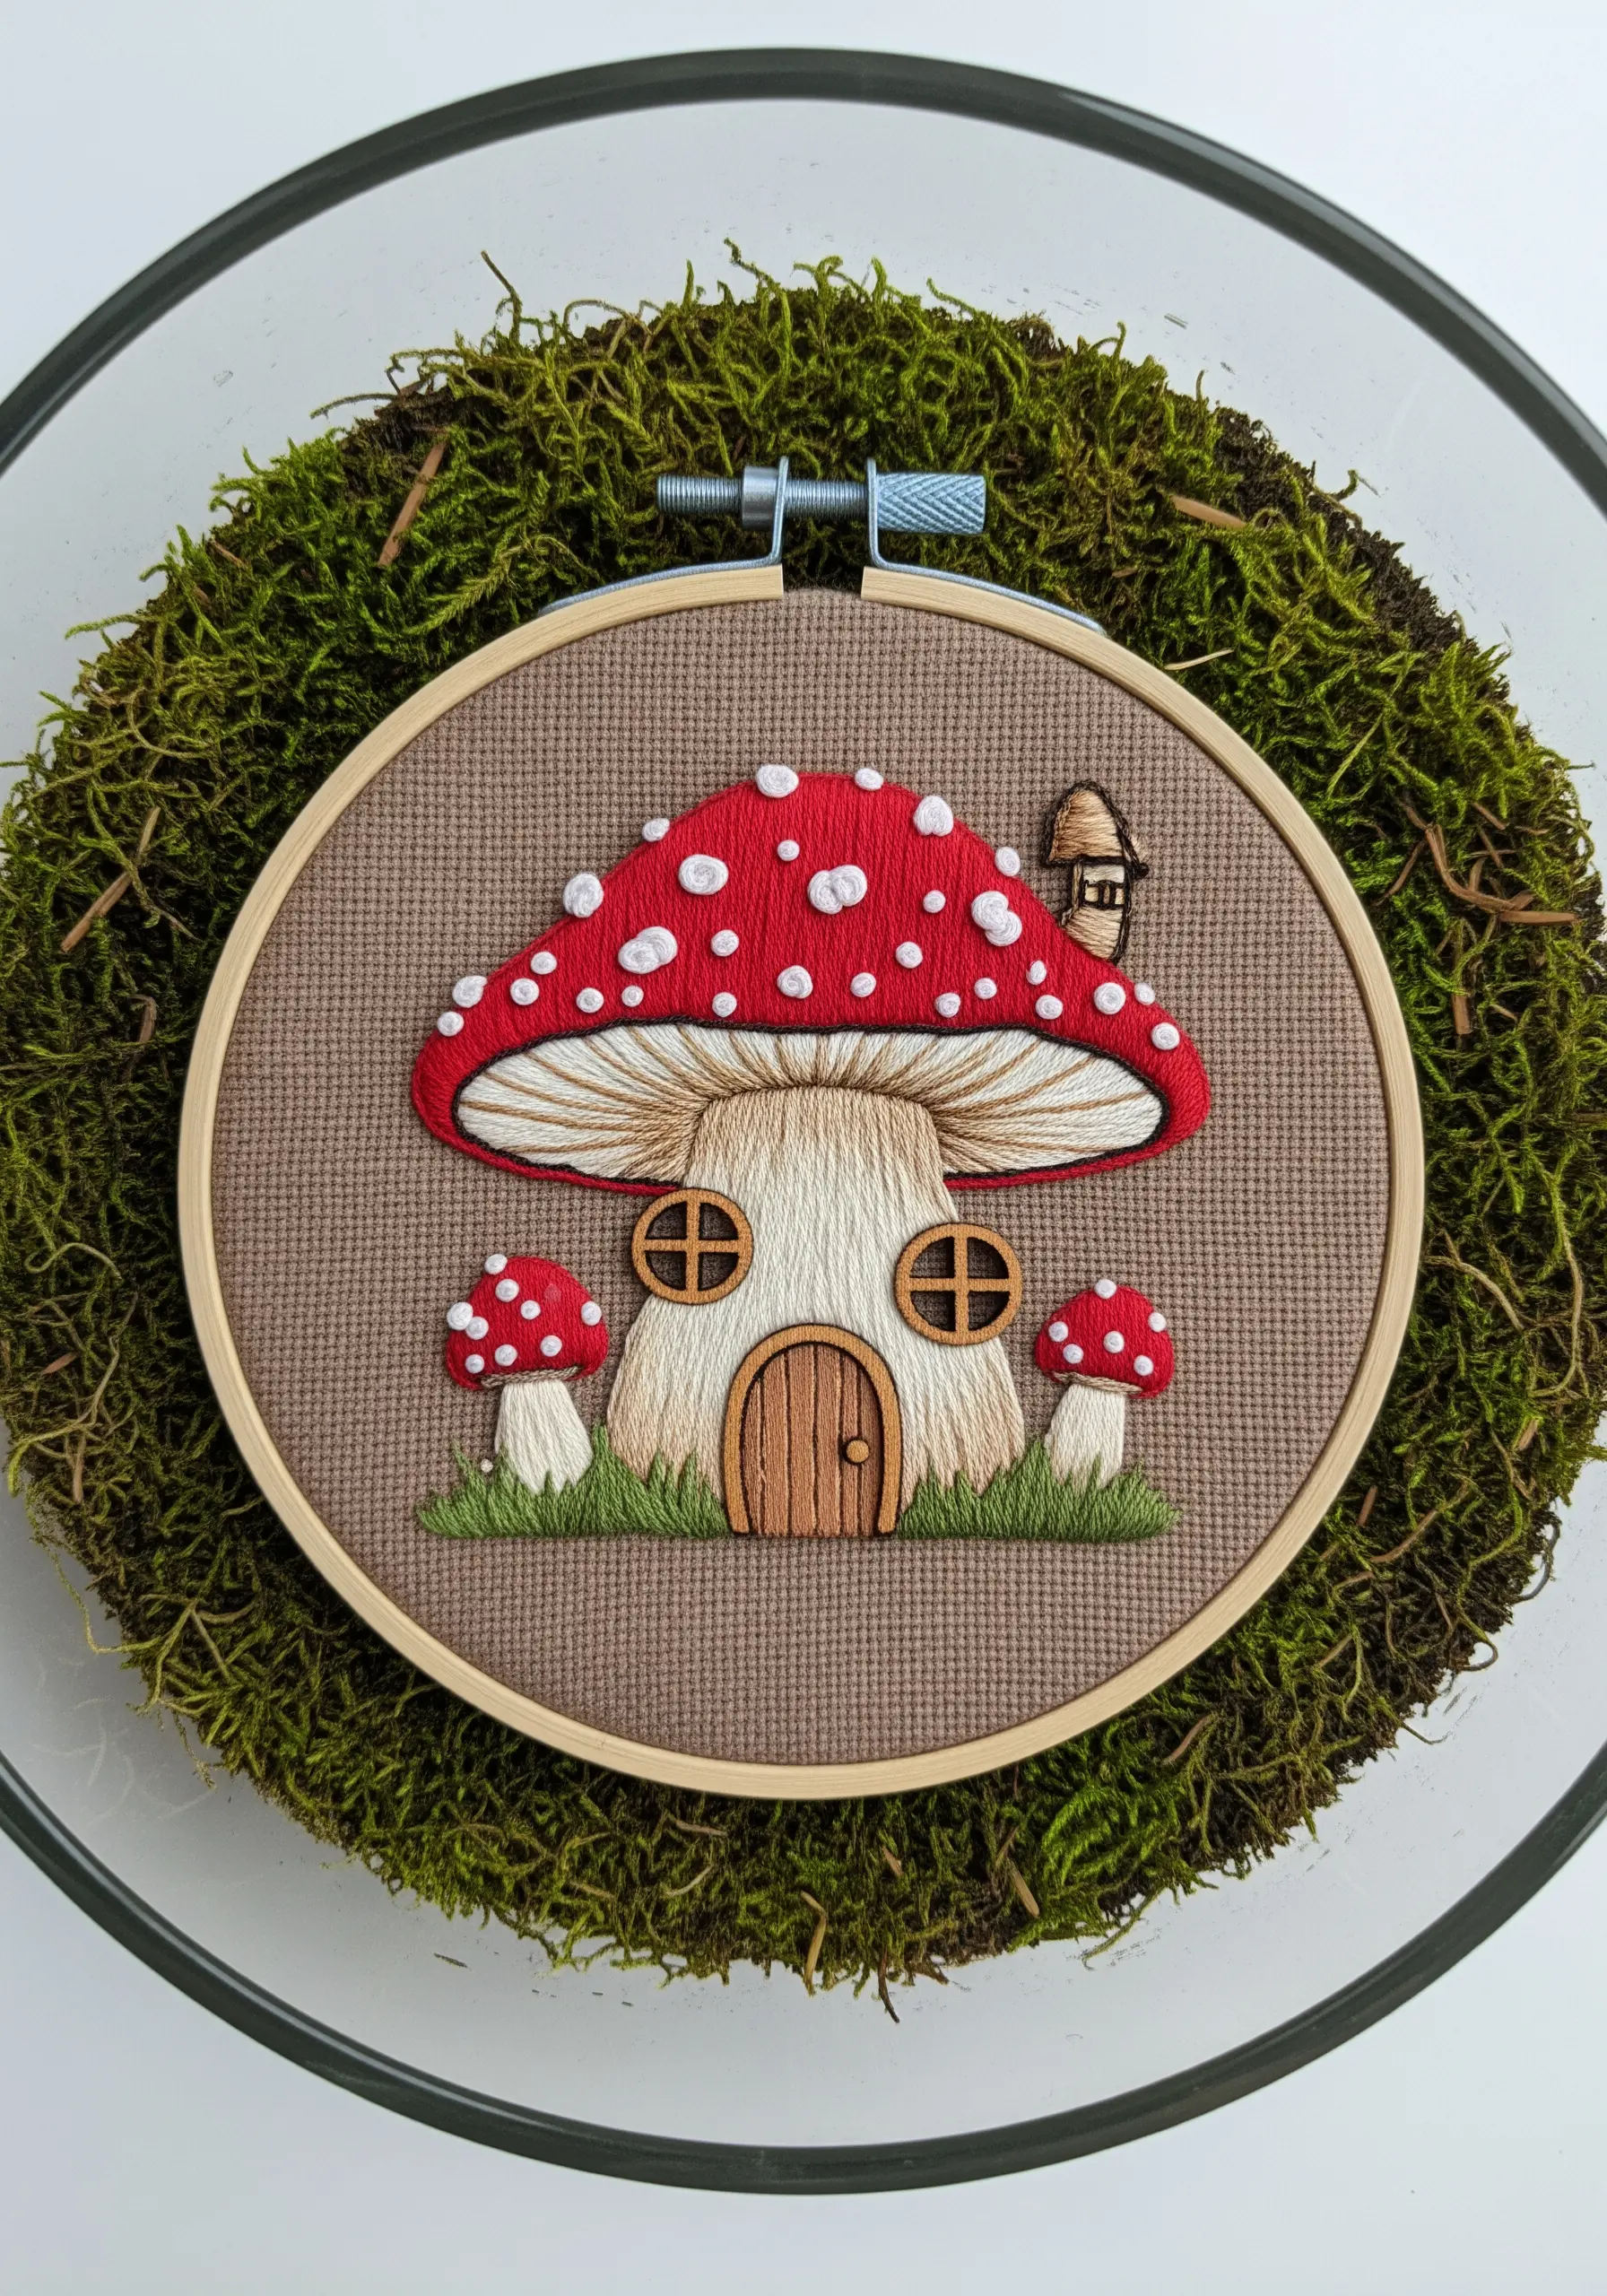
To make elements of your design literally pop off the fabric, use padded satin stitch. This is perfect for creating the rounded cap of a mushroom house.
First, fill the shape with a base layer of small, underlying stitches (like seed stitches or a lattice of straight stitches).
Then, cover this padding with smooth, even satin stitches; the underlayer will raise the surface, giving it a delightful, three-dimensional look.
This simple trick adds a playful, sculptural quality that instantly elevates a whimsical design.
16. Curate a Cohesive Hoop Art Gallery
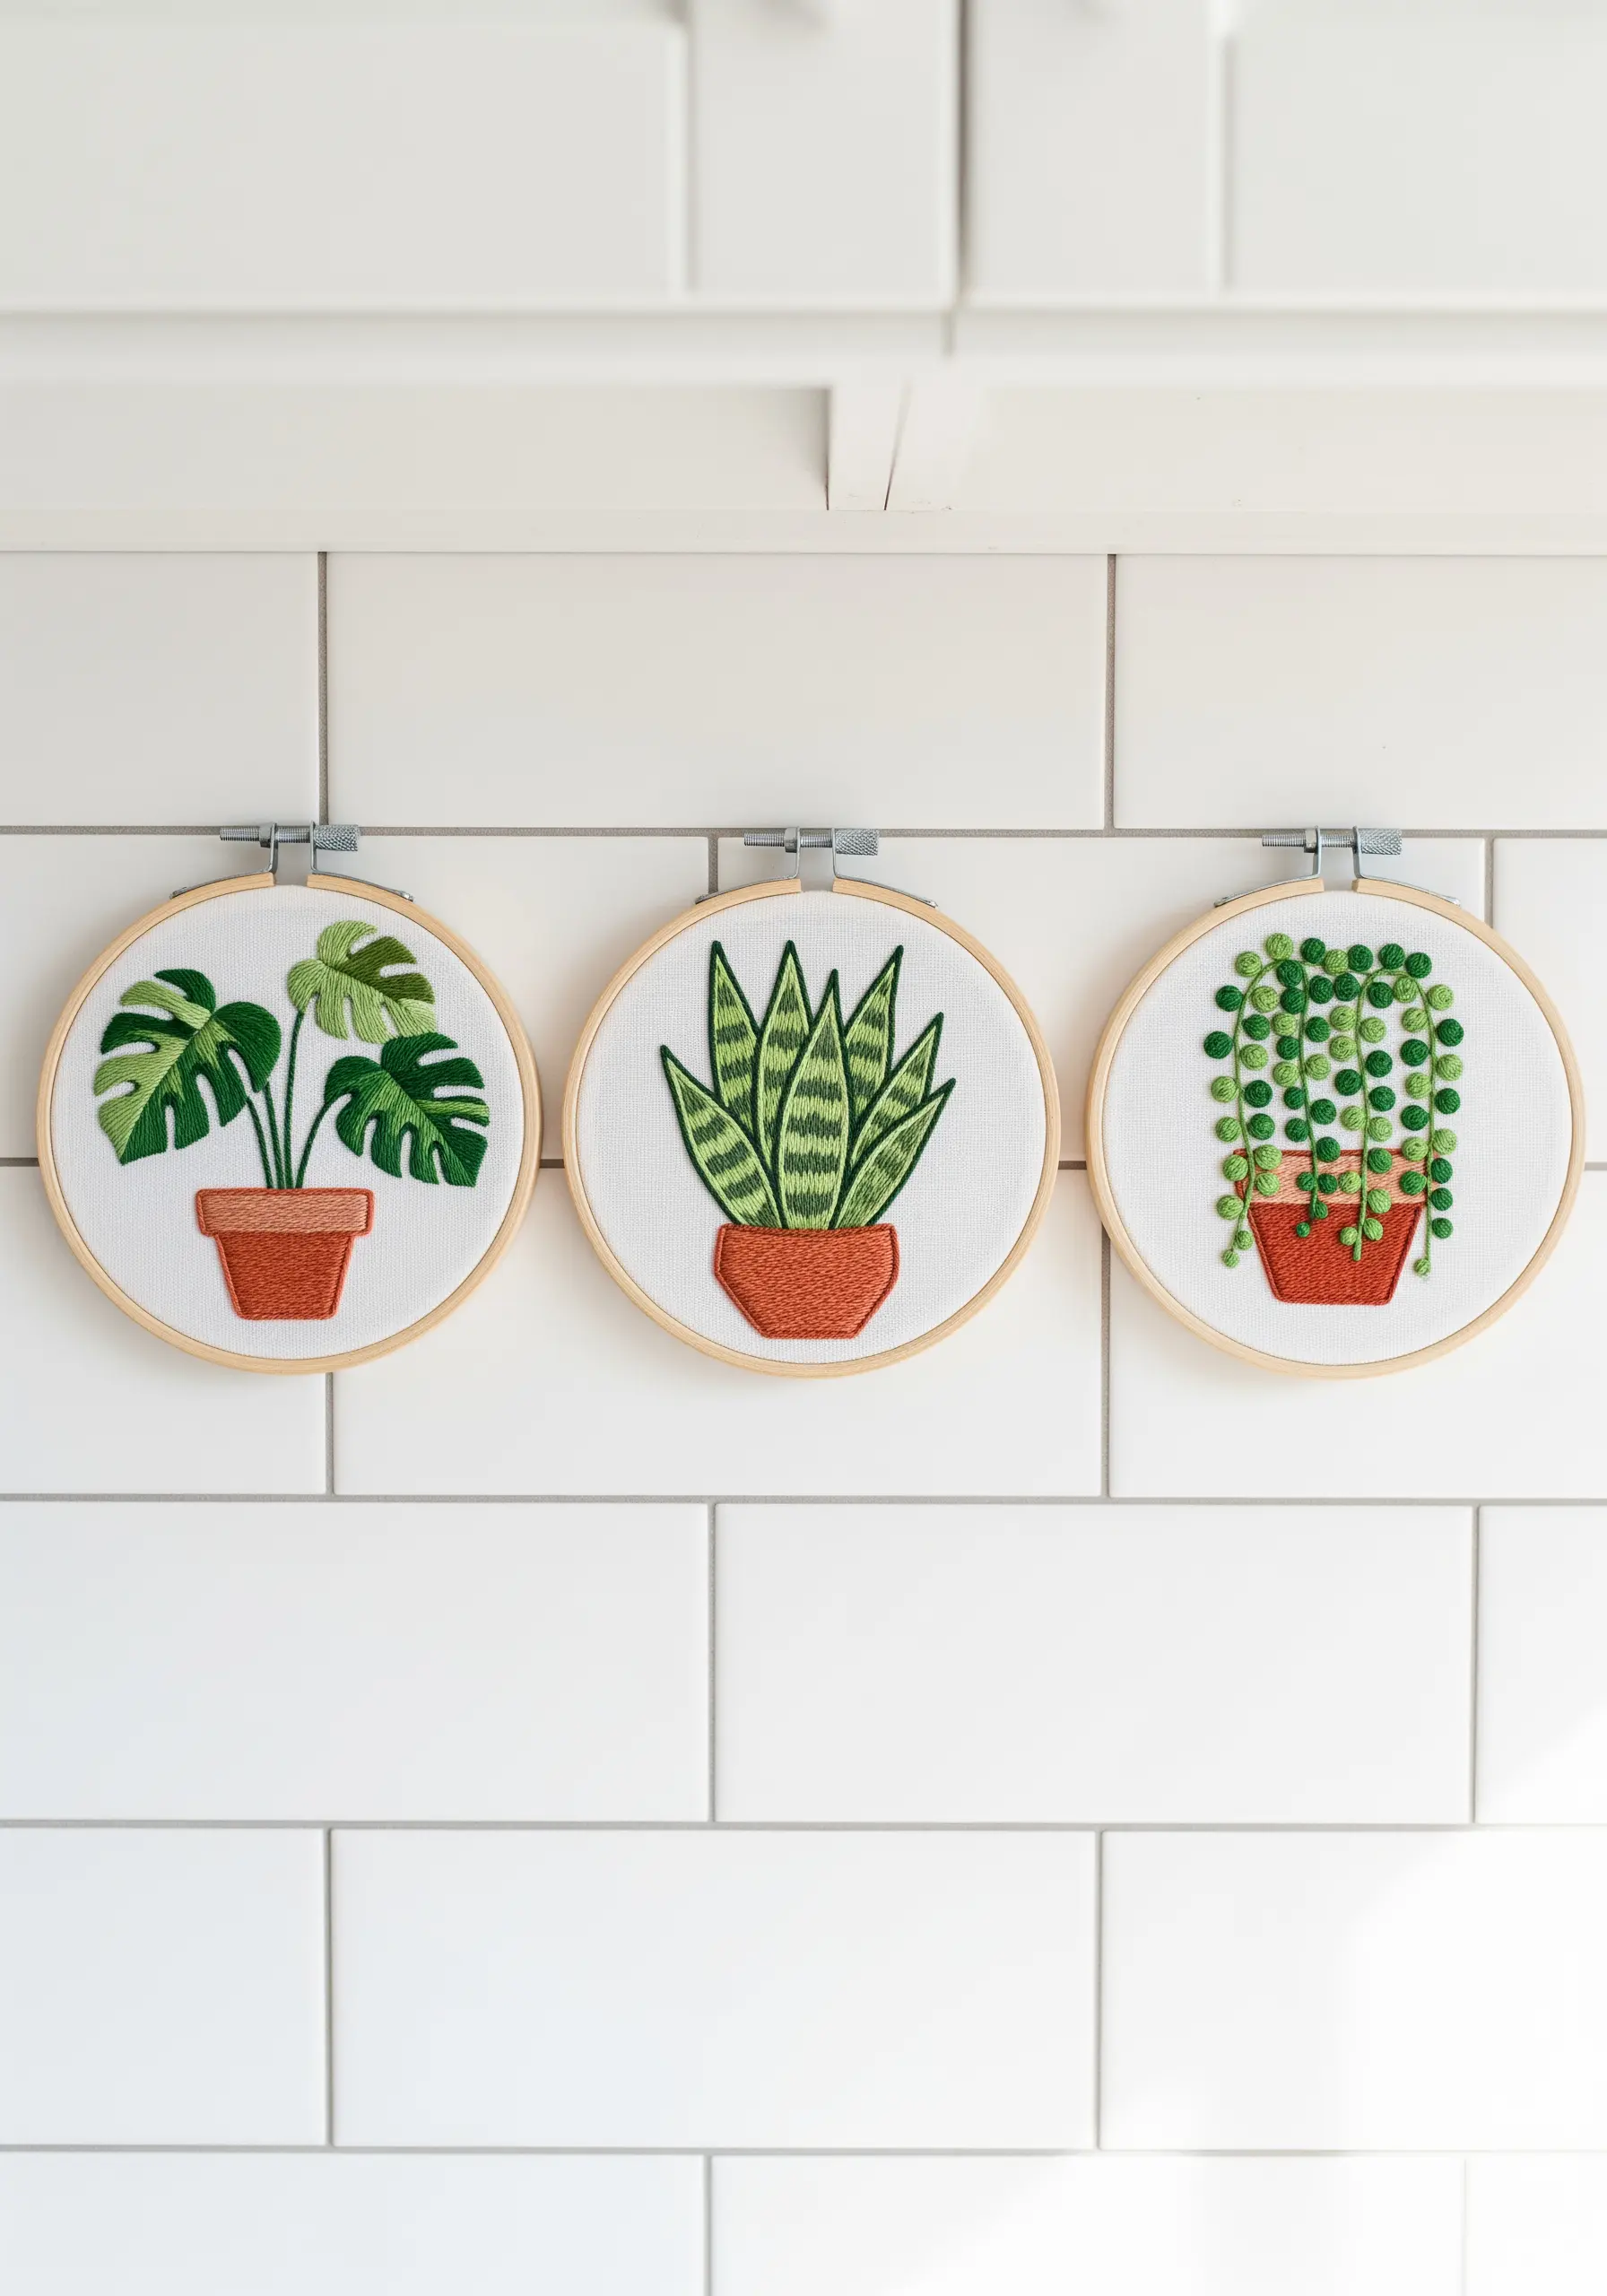
Design a series of simple, related motifs to display as a triptych for greater visual impact.
Keep the style consistent across all pieces by using the same stitch vocabulary—like clean backstitch outlines and smooth satin stitch fills.
Unify the collection with a consistent color palette and by using identical hoops and background fabric for each piece.
This transforms individual small embroidery projects into a curated set that looks intentional and polished on your wall.
17. Create Crisp Edges with a Split-Stitch Outline
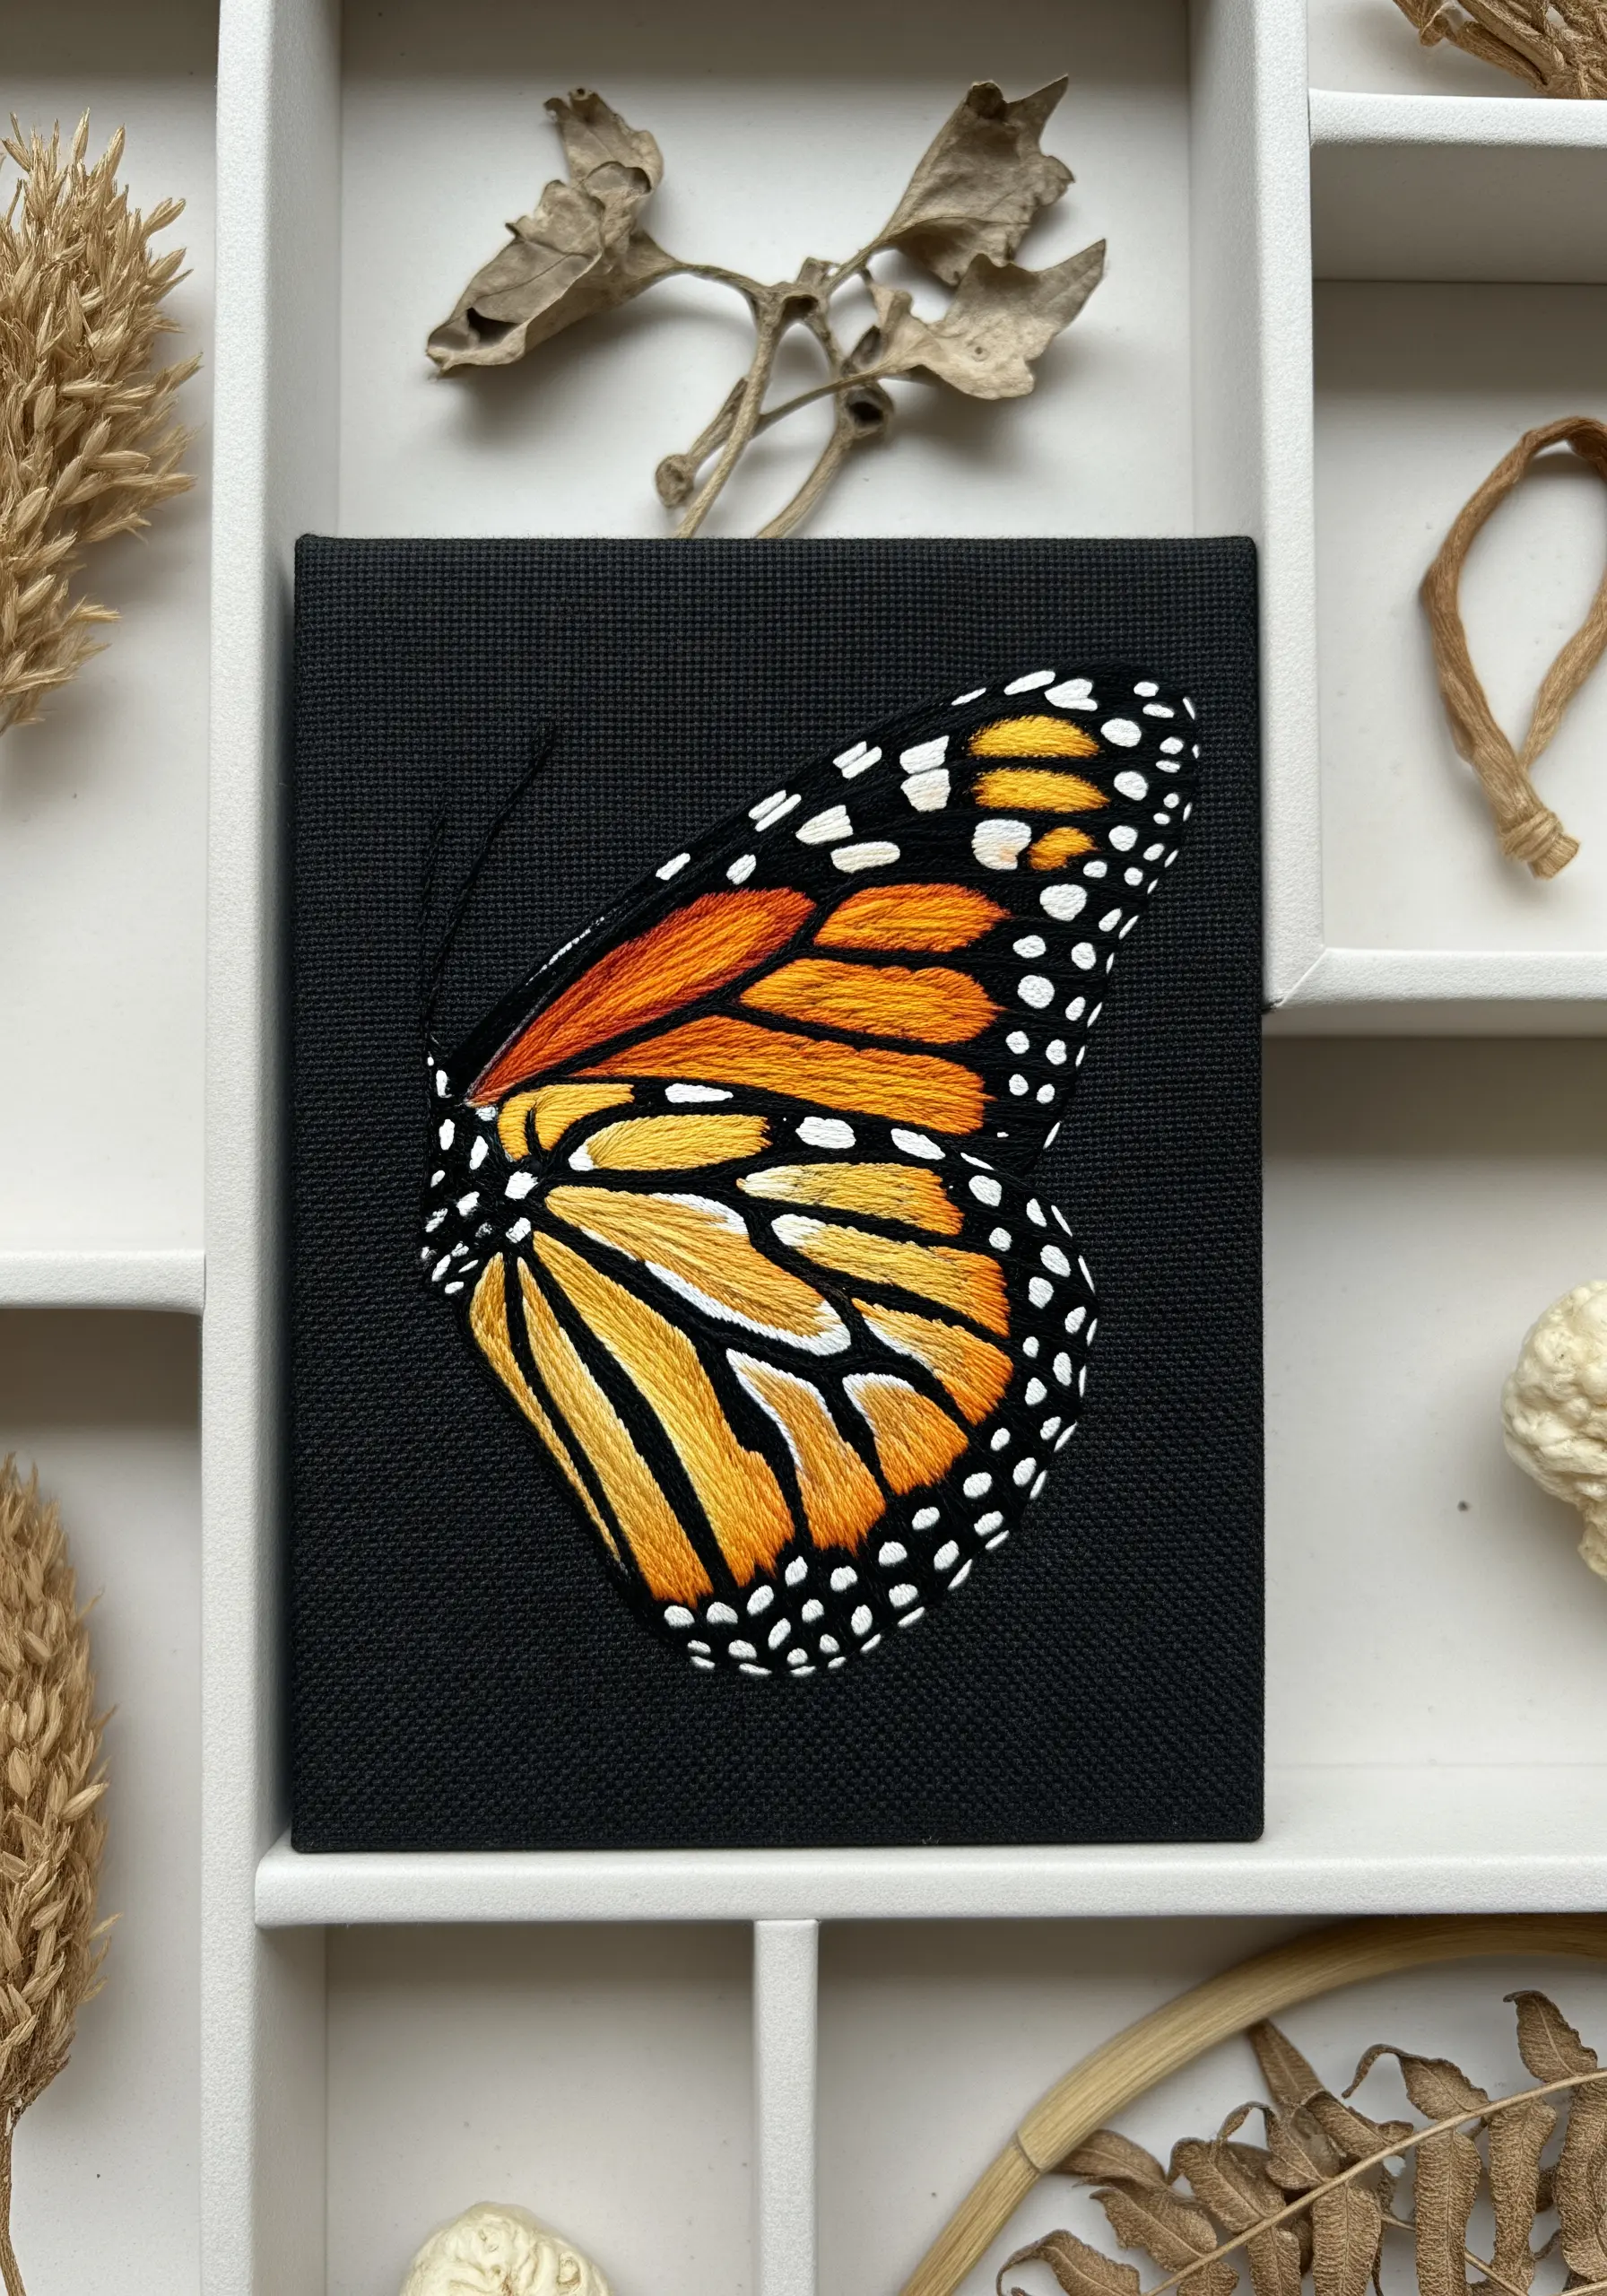
For designs with bold color blocking, like a monarch butterfly’s wings, achieving clean edges is crucial.
Before you begin your satin stitch fill, outline each color section with a precise split stitch using the same color thread.
When you stitch your satin stitch, bring your needle up just inside the outline and down just outside it. The outline acts as a stabilizing ridge, preventing uneven edges and creating a perfectly crisp, defined shape.
This professional technique makes a world of difference in the final quality of your work.
18. Mix Scales and Stitches for Cosmic Detail
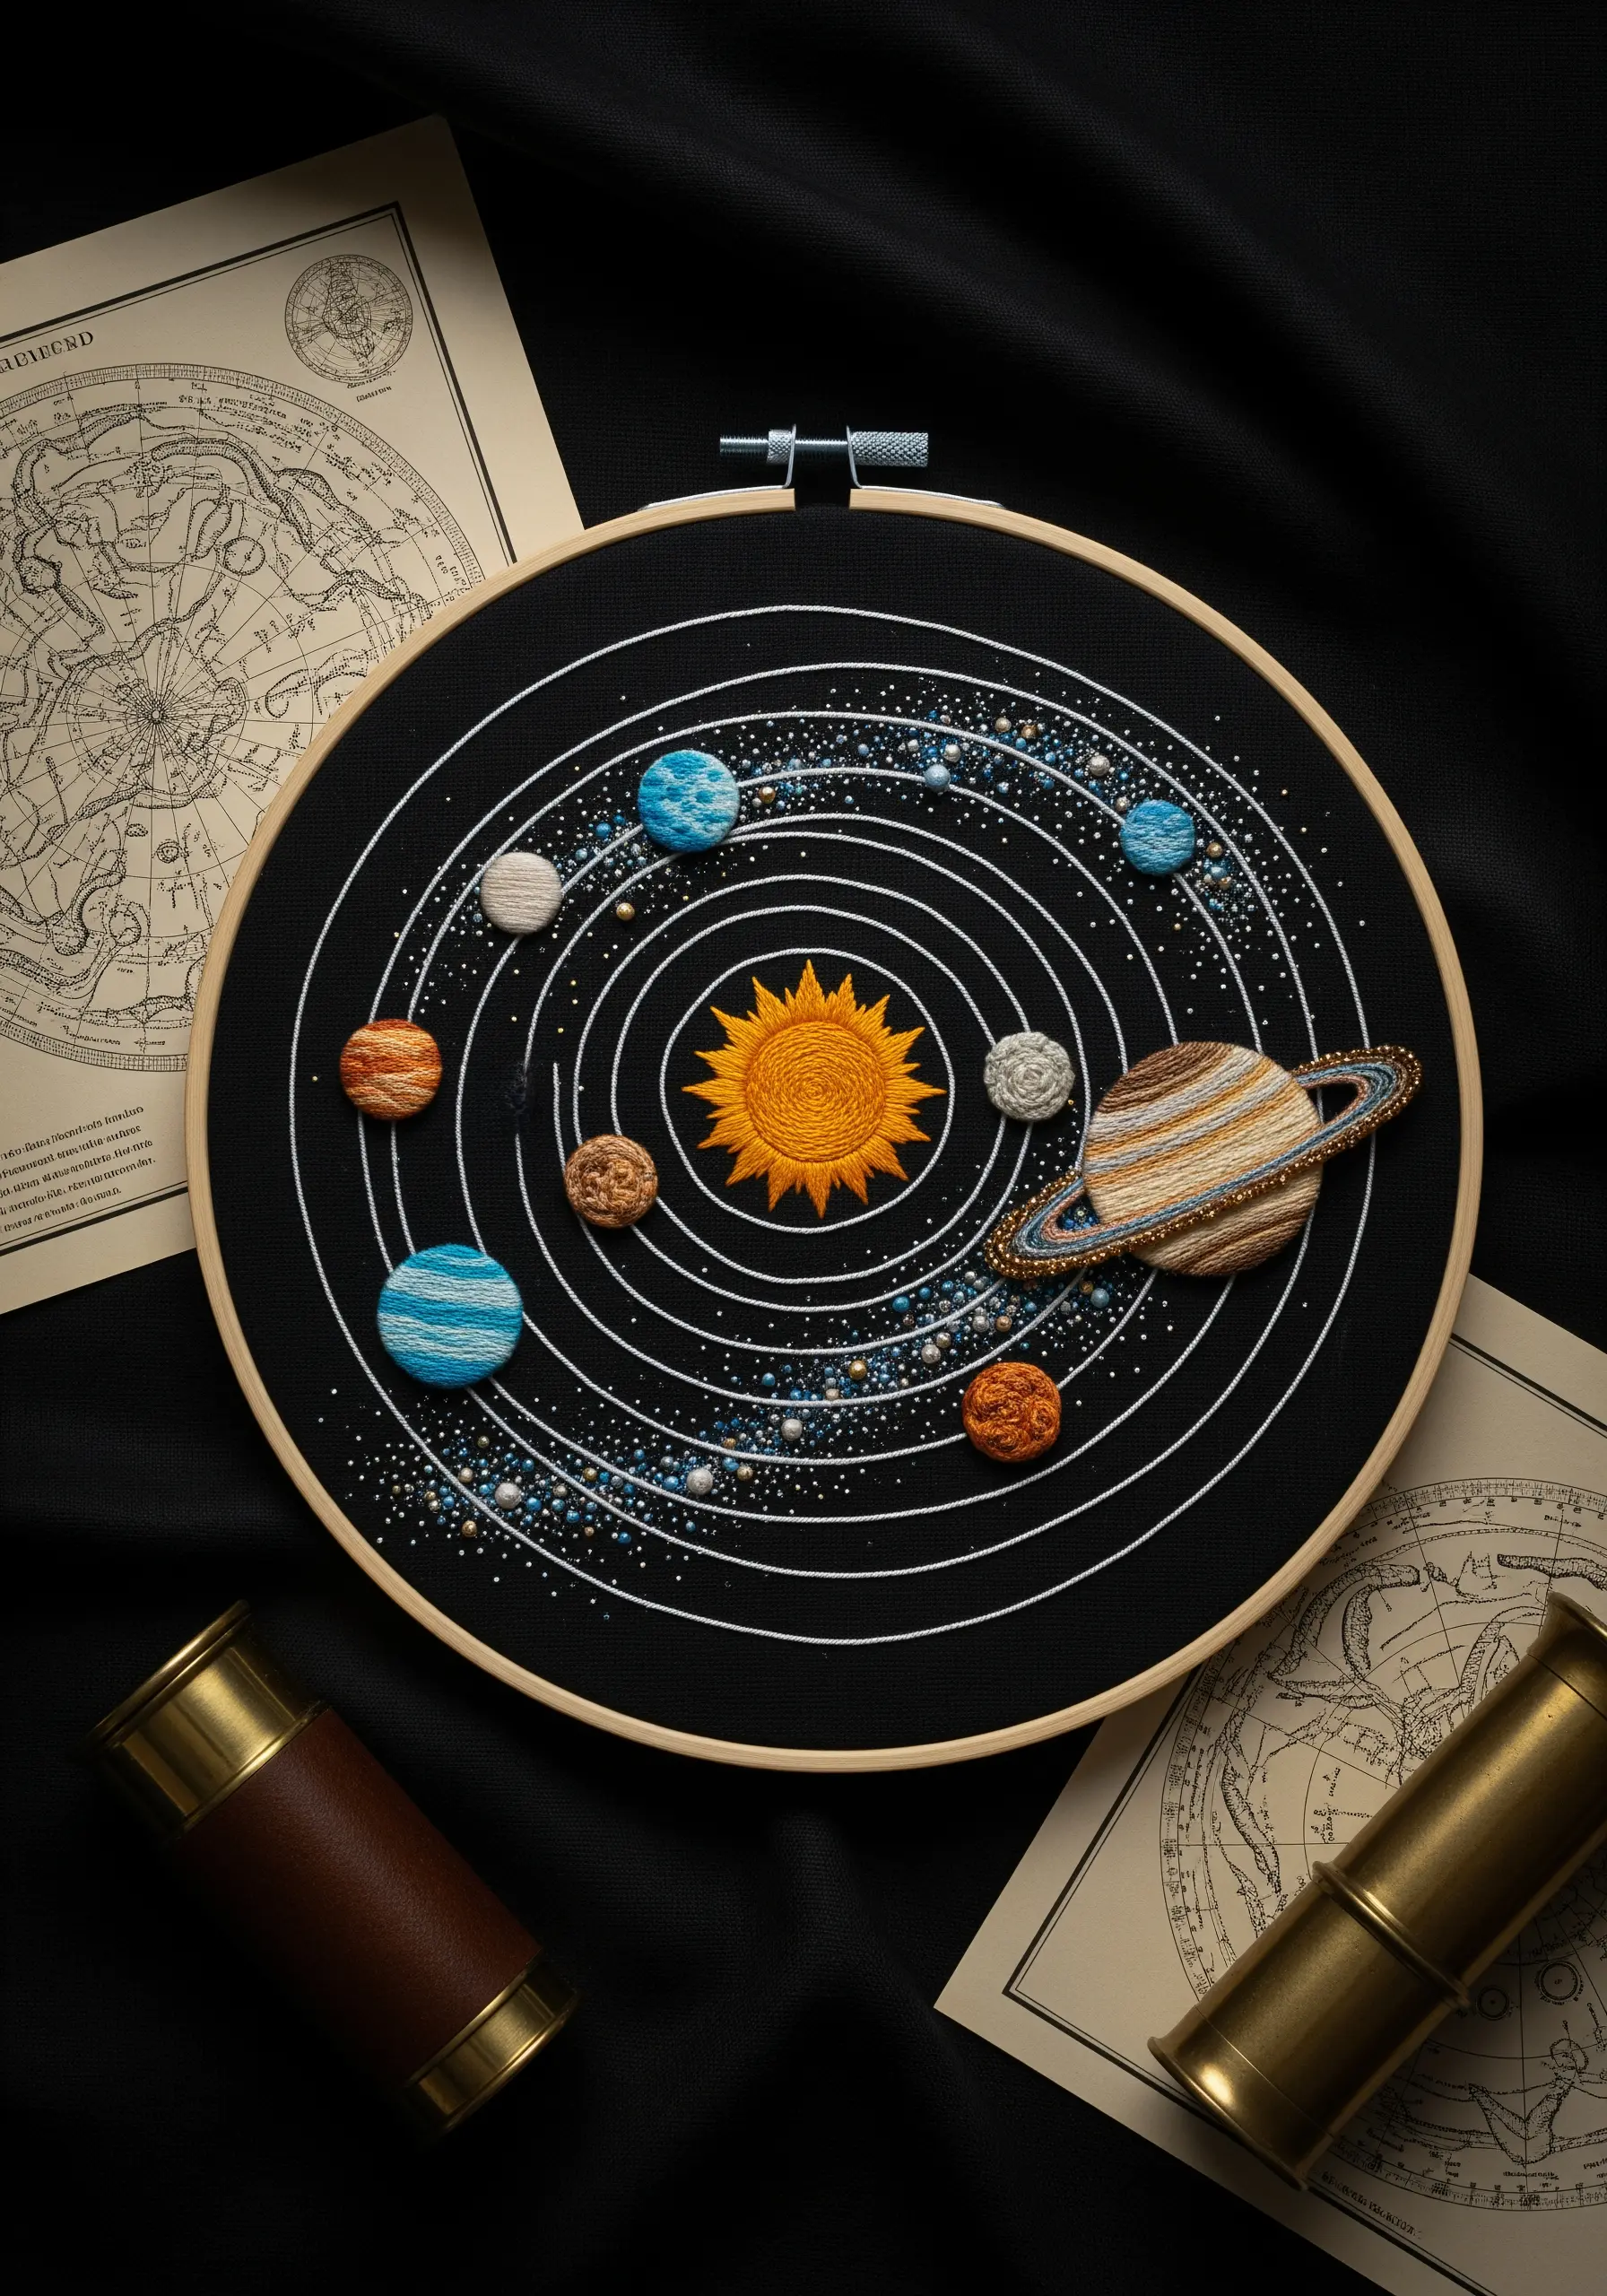
Recreate the solar system by varying your stitches and textures to represent each celestial body uniquely.
Use padded satin stitch to give planets like Jupiter and Saturn a spherical, 3D appearance. Add rings with long, delicate straight stitches using metallic thread.
For the sun, stitch a dense woven wheel, and for distant stars and galaxies, scatter tiny French knots and seed stitches across the black fabric.
This mixed-media approach turns a scientific diagram into a rich, tactile art piece that’s full of detail and wonder.
19. Recreate Food Textures with Playful Stitches
Capture the delicious texture of a birthday cake by choosing your stitches thoughtfully.
Use a chunky thread or yarn with a couching stitch for the piped icing to give it a thick, swirled dimension.
For the cake layers, a slightly uneven seed stitch or satin stitch in beige and brown tones mimics a soft, airy crumb.
Finally, use colorful French knots or add tiny seed beads to serve as sprinkles, giving the piece a fun and celebratory finish.
20. Combine Fiber Techniques for a Layered Landscape
Introduce new textures into your embroidery by incorporating needle felting for soft, diffused elements like clouds or mist.
Lightly felt wisps of white wool roving directly onto your fabric before you begin stitching. The soft, hazy texture creates a beautiful contrast with the sharp definition of thread.
Frame this with thread-painted hills and valleys, using directional stitches to create the flow of the landscape.
This mixed-fiber technique adds a unique softness and depth that thread alone cannot achieve.
21. Capture Still Life with Botanical Realism
To bring embroidered food to life, focus on capturing its unique surface texture and sheen.
For the glossy red chili, use long-and-short stitches with a silky rayon or satin floss, adding a single white stitch as a highlight to suggest reflection.
Contrast this with the matte, papery skin of the garlic, using cotton floss in off-white and pale violet with subtle, directional stitches to indicate its form.
Stitching on a rustic, open-weave fabric like burlap or linen enhances the organic, farmhouse feel of these kitchen herb motifs.
22. Weave Organic Textures with Overlapping Stitches
To create a bird’s nest that looks authentically chaotic and woven, avoid neat, uniform stitches.
Use a variety of brown, tan, and grey threads in different weights, laying down long, overlapping straight stitches in random directions.
Build the nest in layers, starting with a darker base and gradually adding lighter threads and finer stitches (representing twigs and grasses) on top.
This freeform, layered approach results in a wonderfully complex and natural texture that feels truly organic.
23. Explore Elegance with Geometric Blackwork
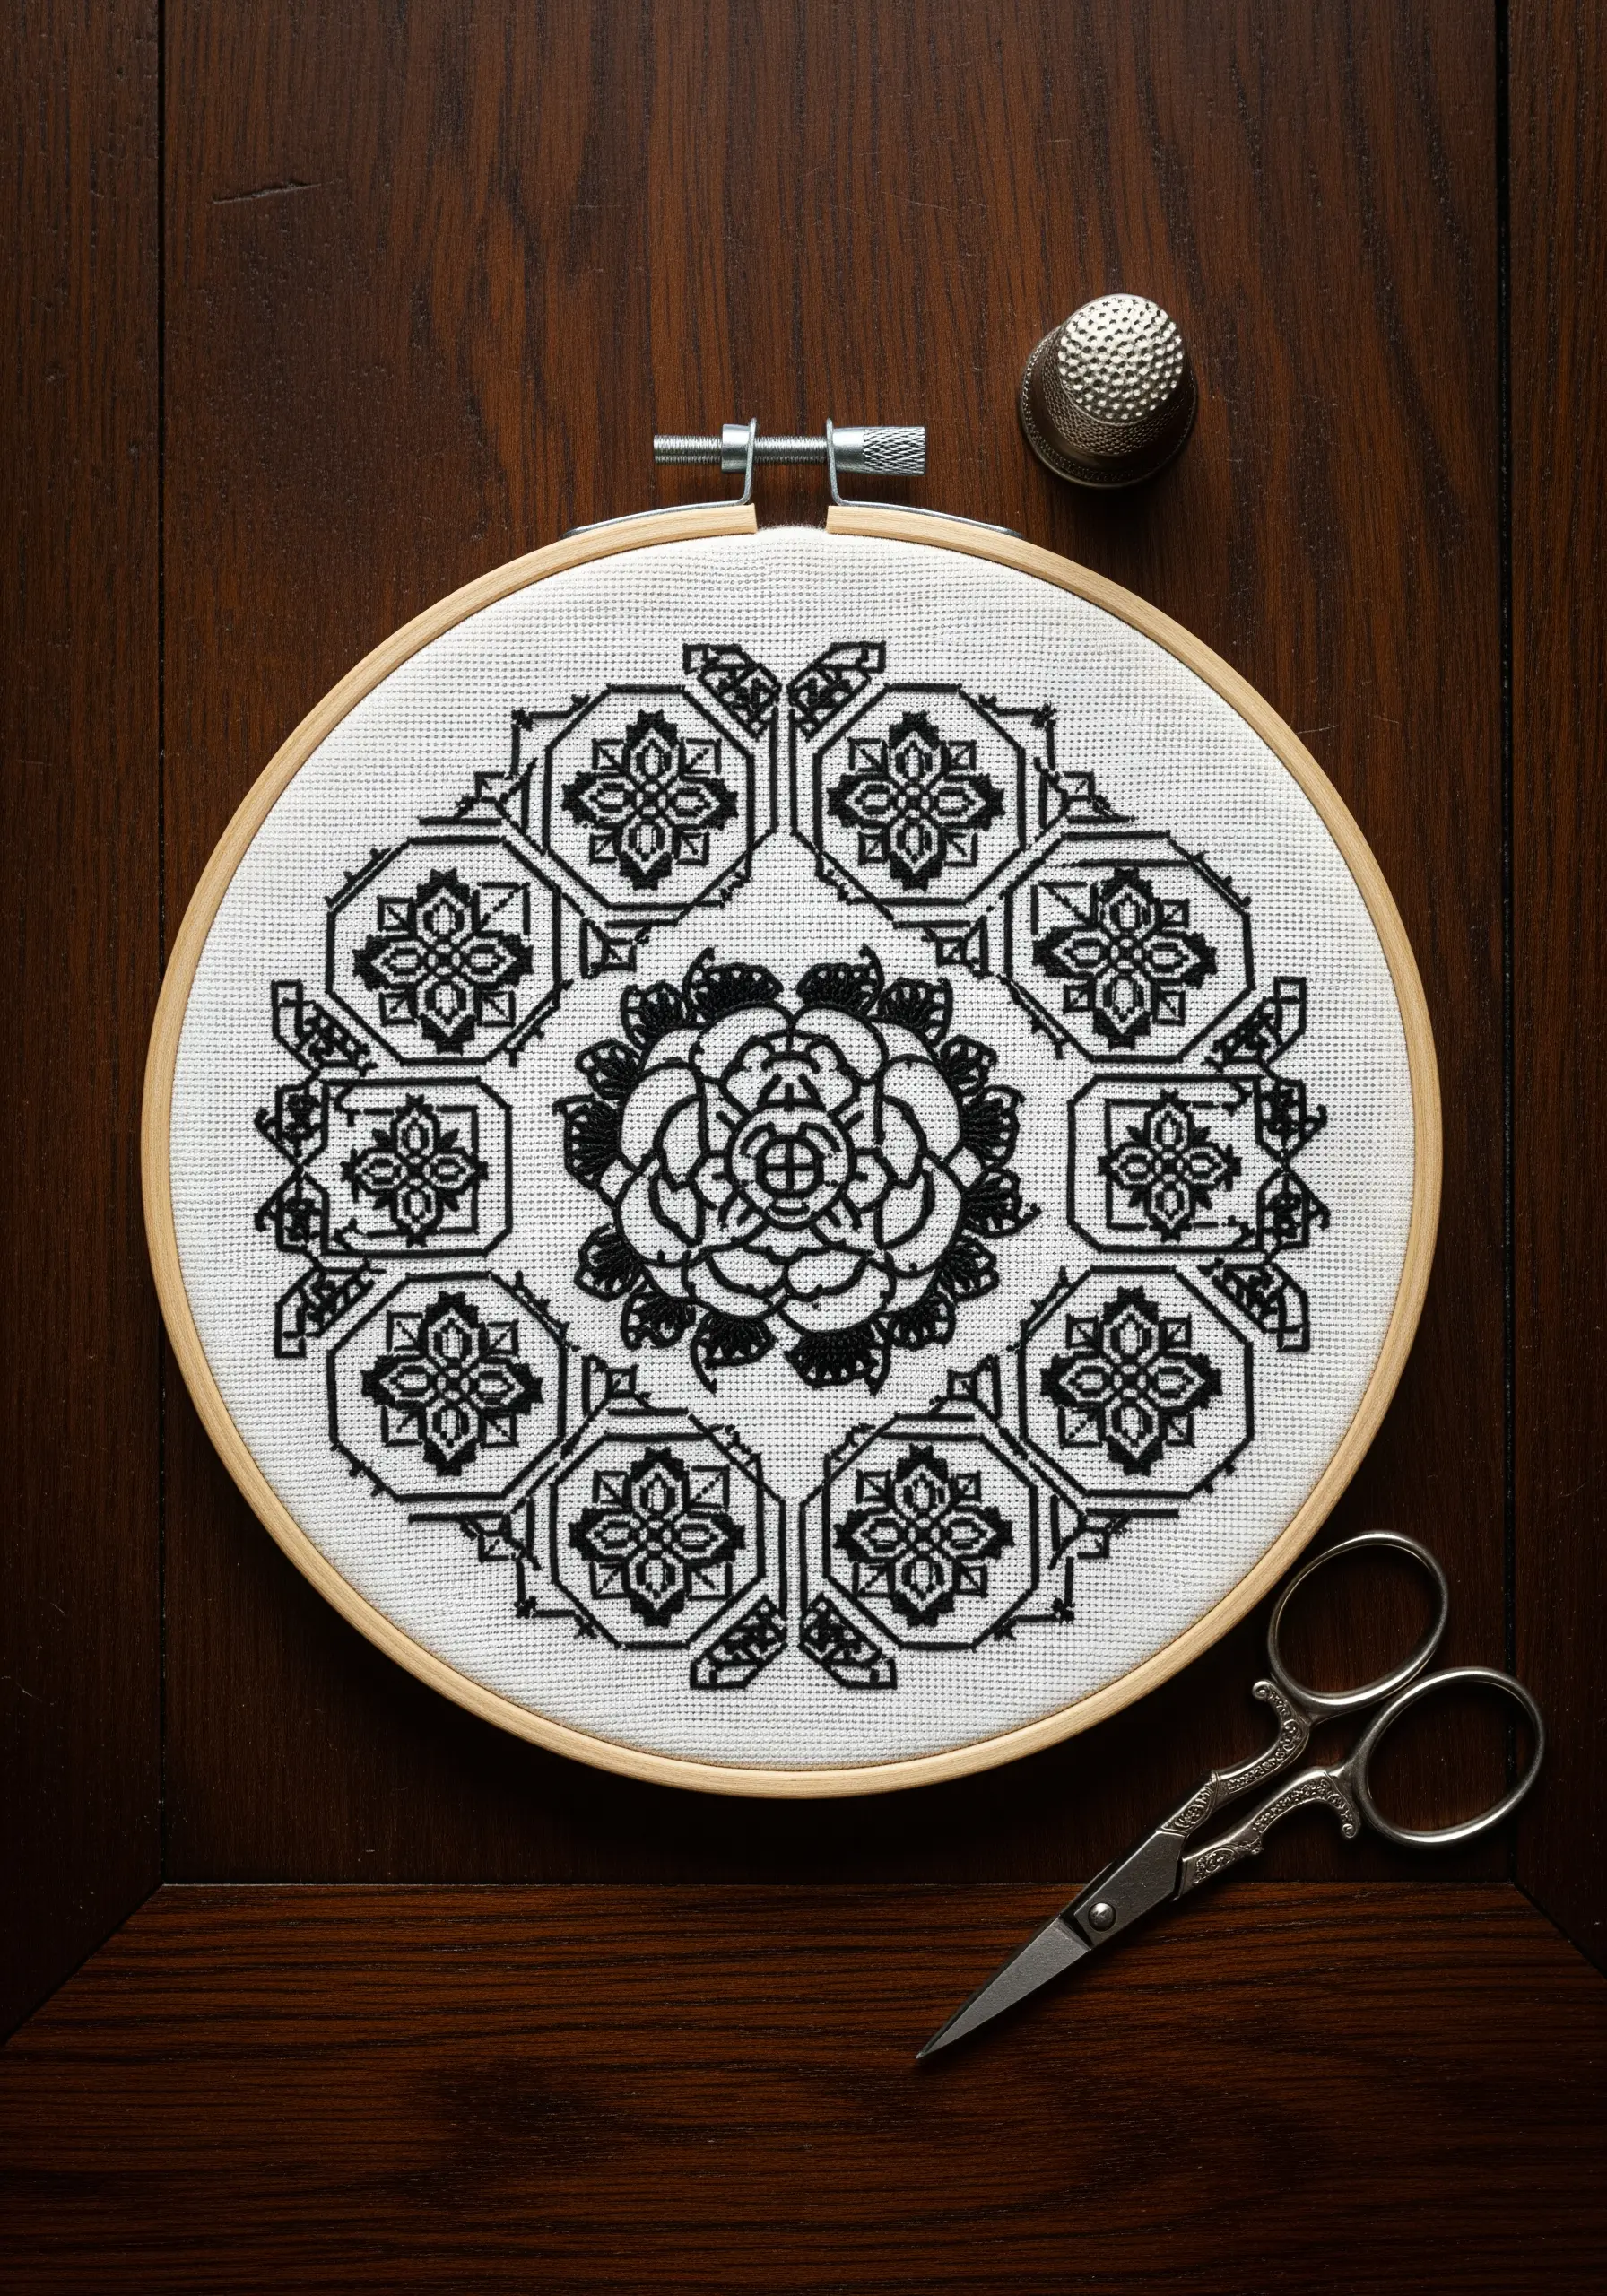
Blackwork embroidery creates intricate patterns using repeating geometric motifs stitched in a single color, traditionally black.
The artistry comes from the precision of the stitches and the complexity of the patterns, not from color variation.
Work on an evenweave fabric like Aida or linen, which allows you to count threads for perfect geometric accuracy.
Combine dense patterns with open, linear ones to create contrast and a sense of light and shadow within the monochrome design.
24. Add Dimension and Shine with Beadwork
Elevate your seascapes by incorporating beads to mimic the glistening spray of ocean foam.
After stitching the waves with directional satin stitches and French knots, strategically sew on small white or iridescent seed beads where the waves crash.
The beads catch the light differently than thread, adding a dynamic, sparkling dimension that perfectly captures the look of wet, churning water.
This simple embellishment is a highly effective way to add a touch of realism and visual excitement to your work.
25. Achieve Bold Graphics with Flawless Satin Stitch
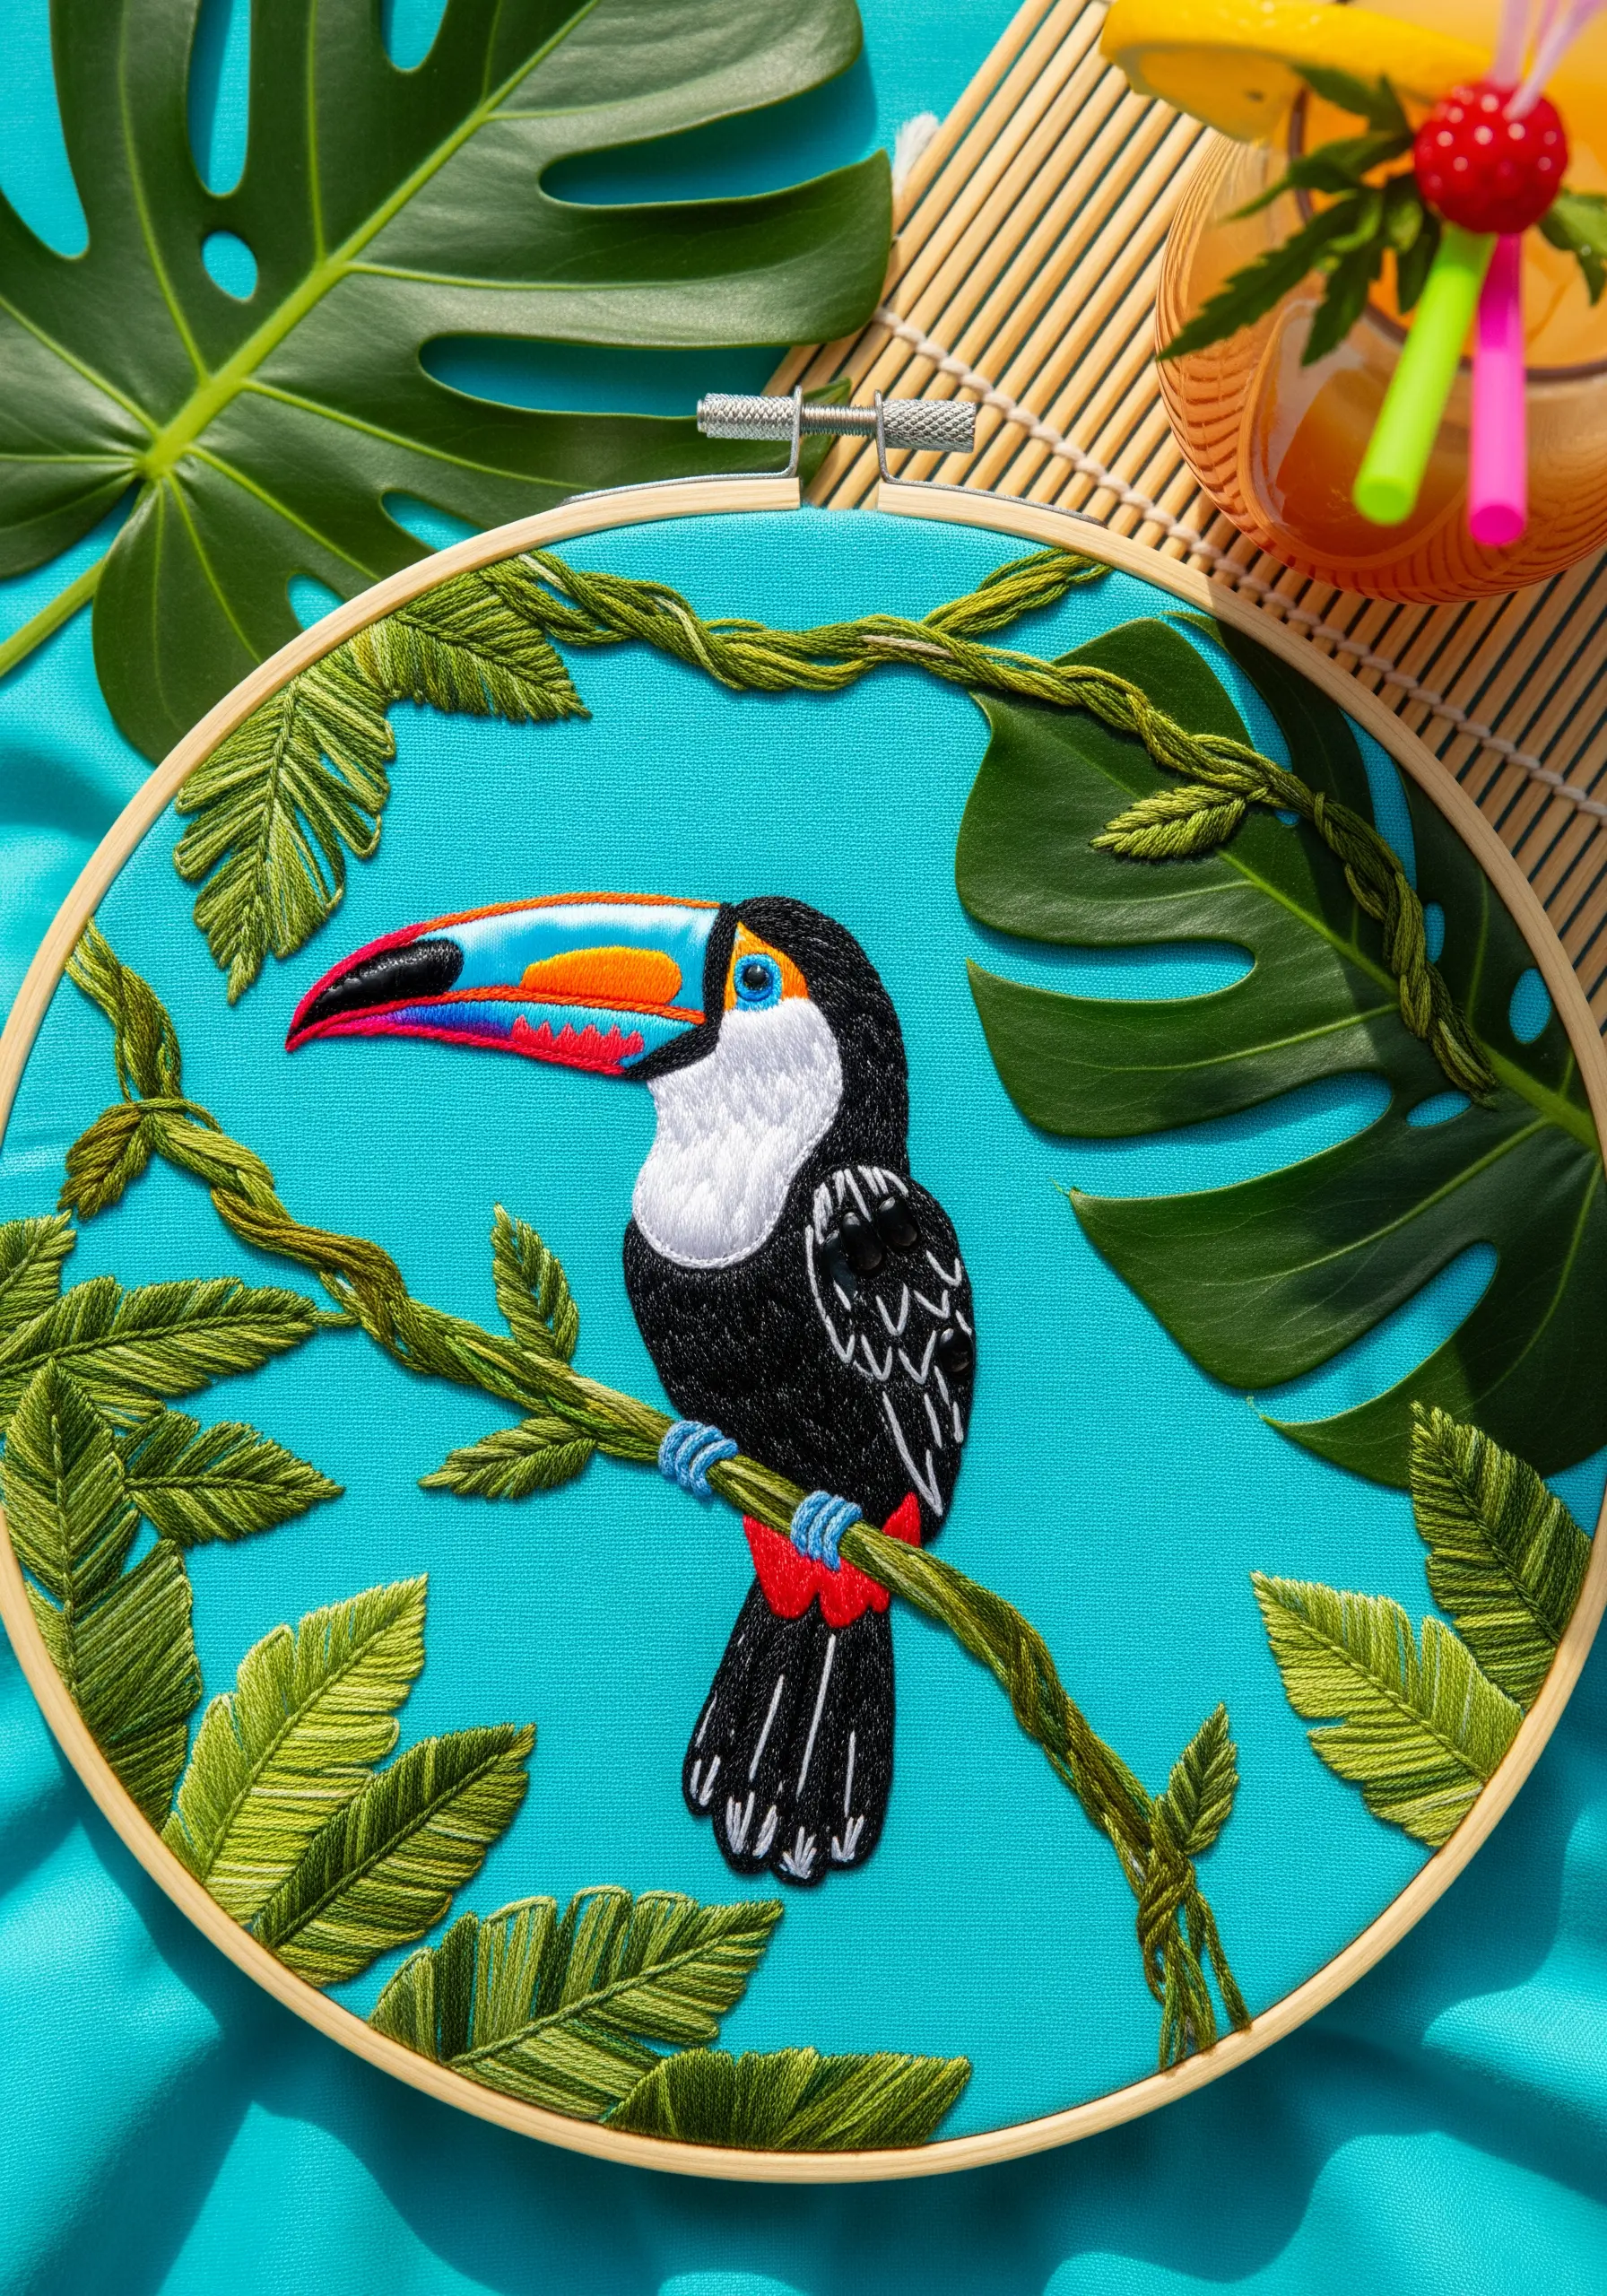
For cartoonish or graphic subjects like a toucan, the goal is impeccably smooth, solid blocks of color.
Lay your satin stitches closely together, ensuring they are all parallel and enter the fabric at a consistent angle. This prevents gaps and creates a uniform, fabric-like sheen.
To create the gradient on the beak, use the long-and-short stitch to seamlessly blend the bright colors.
Working on a brightly colored fabric that complements your subject, like this turquoise blue, makes the entire piece feel vibrant and cohesive.
26. Mimic Woven Textiles with Punch Needle
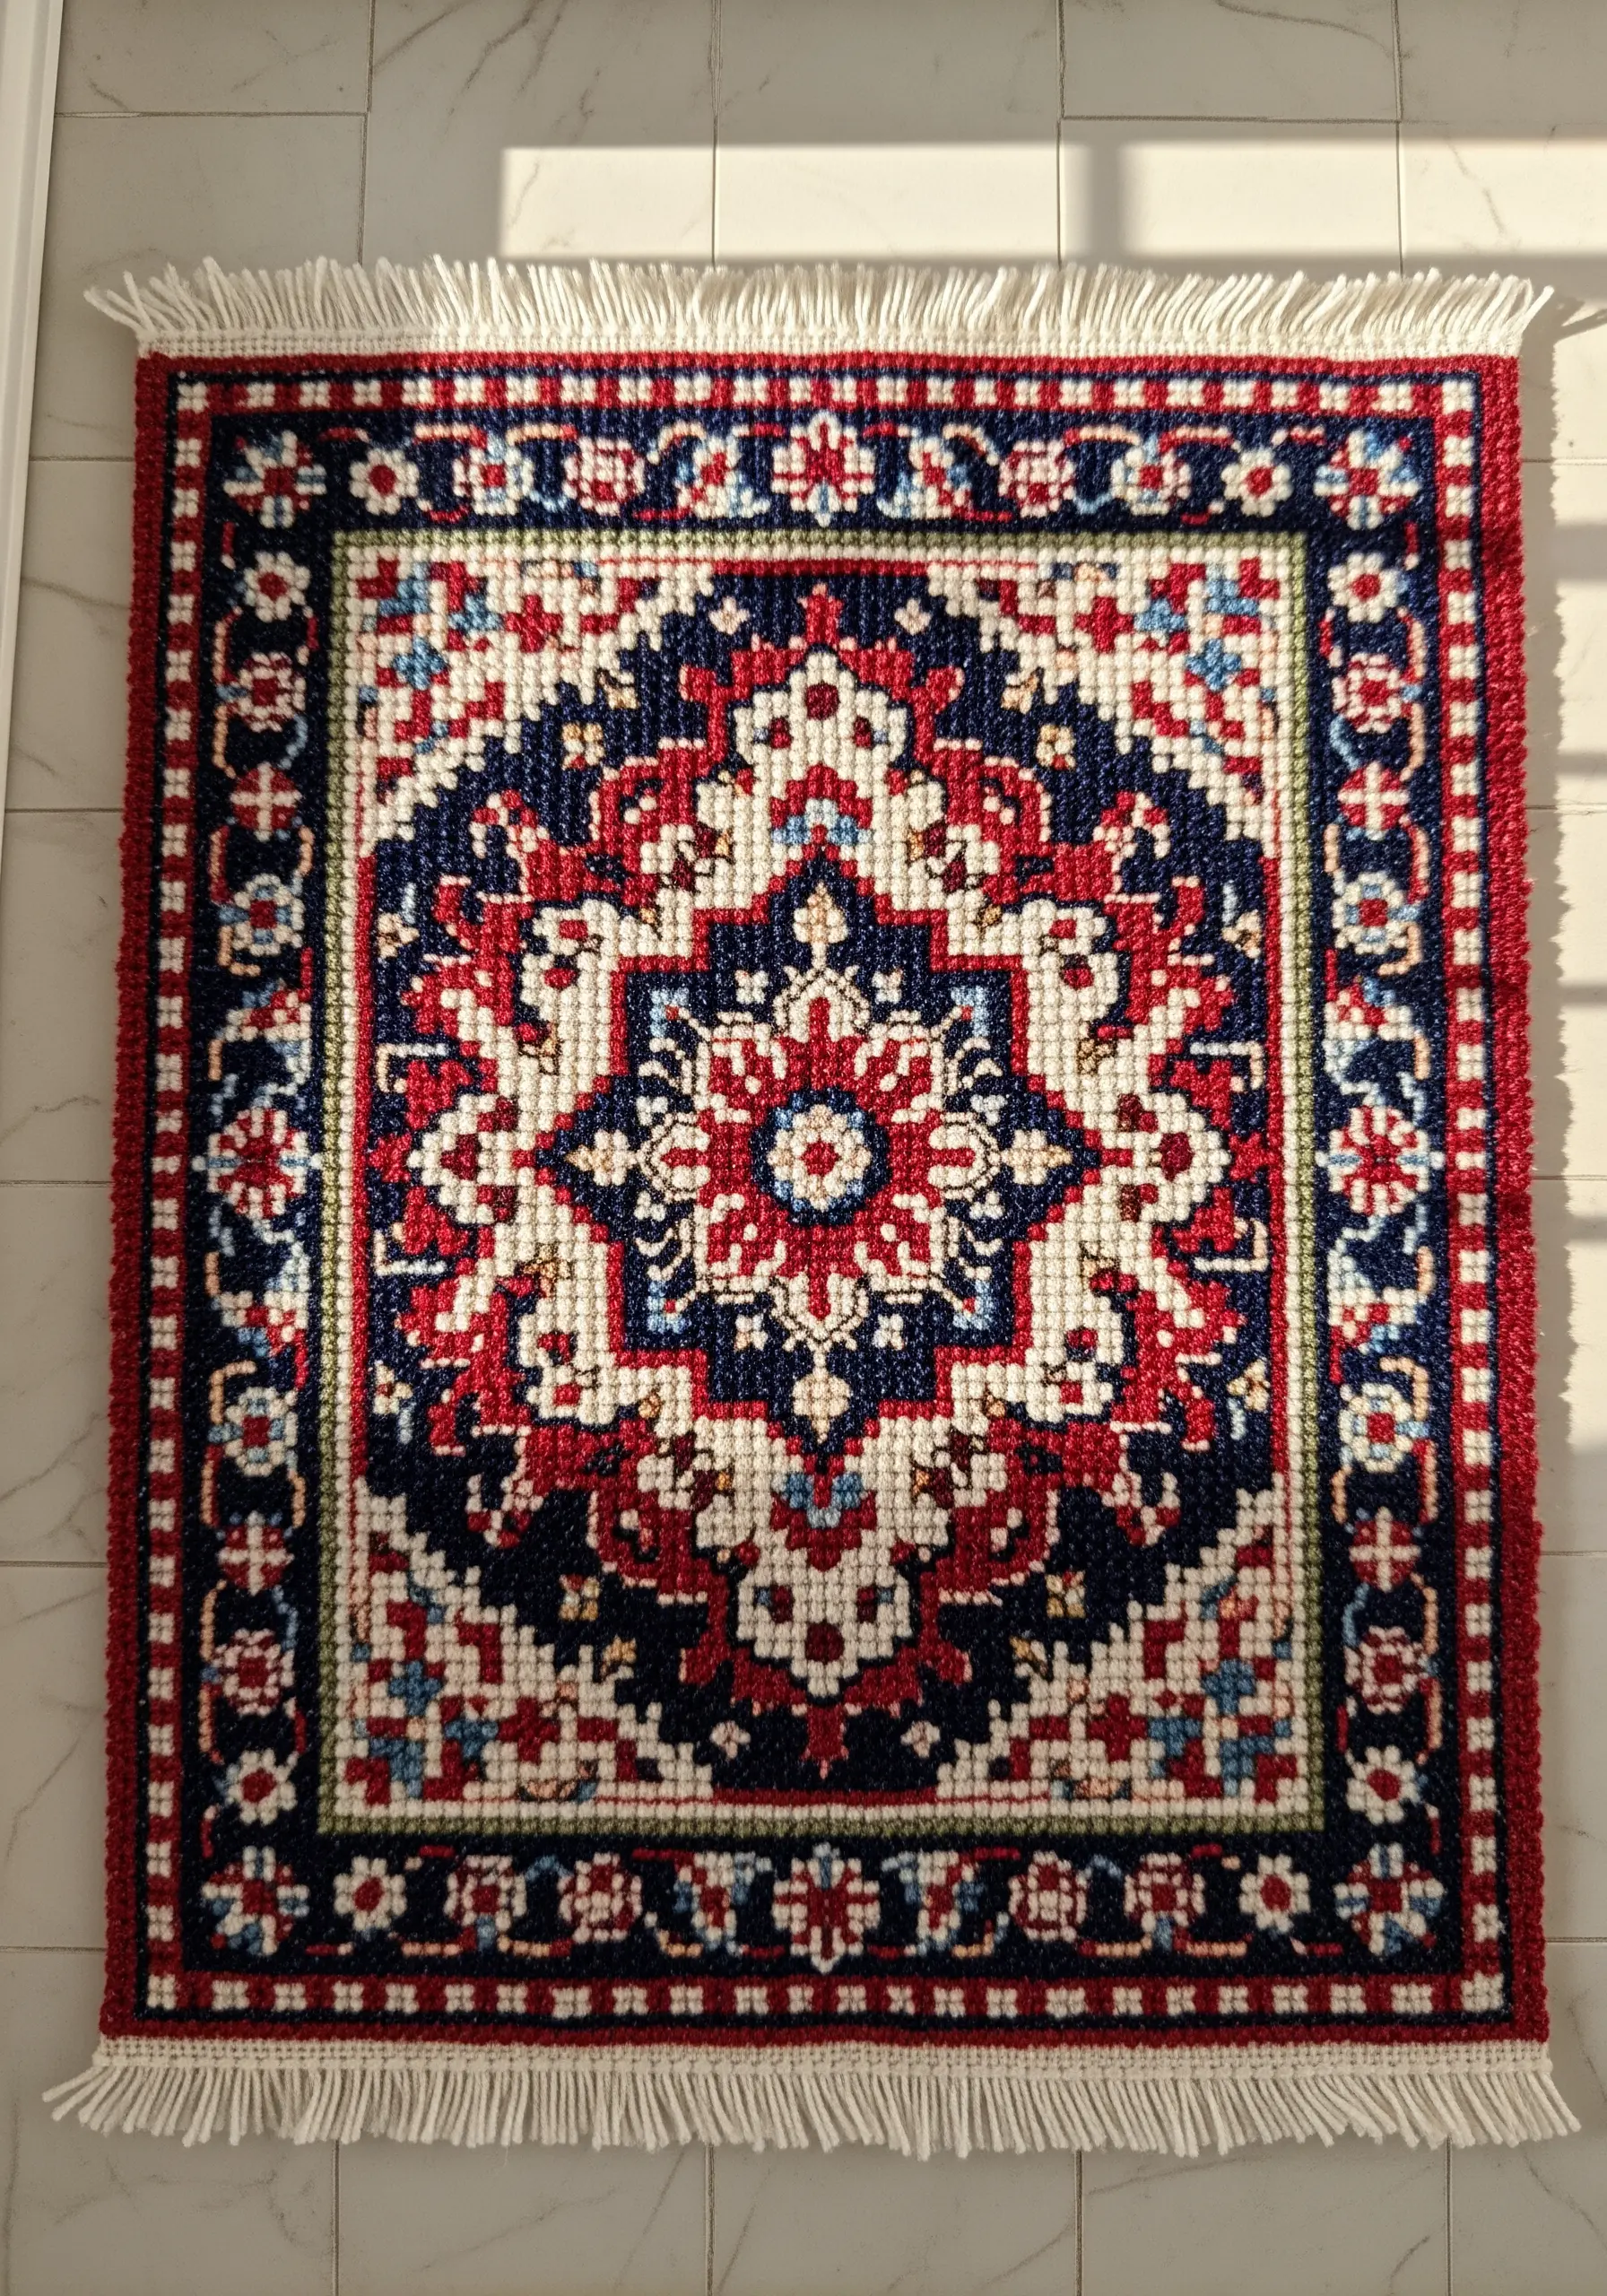
To create the dense, plush texture of a rug, switch from traditional embroidery to punch needle.
This technique involves using a special tool to push loops of yarn through monk’s cloth or another loose-weave fabric.
By varying the height of your needle setting, you can create different loop lengths for added texture. The flat stitches on the reverse side offer another textural option.
This method allows you to create large, highly textural pieces much faster than with traditional needle-and-thread embroidery.
27. Frame Your Art for a Polished Presentation
The final presentation of your embroidery is as important as the stitching itself. Consider framing it for a truly finished look.
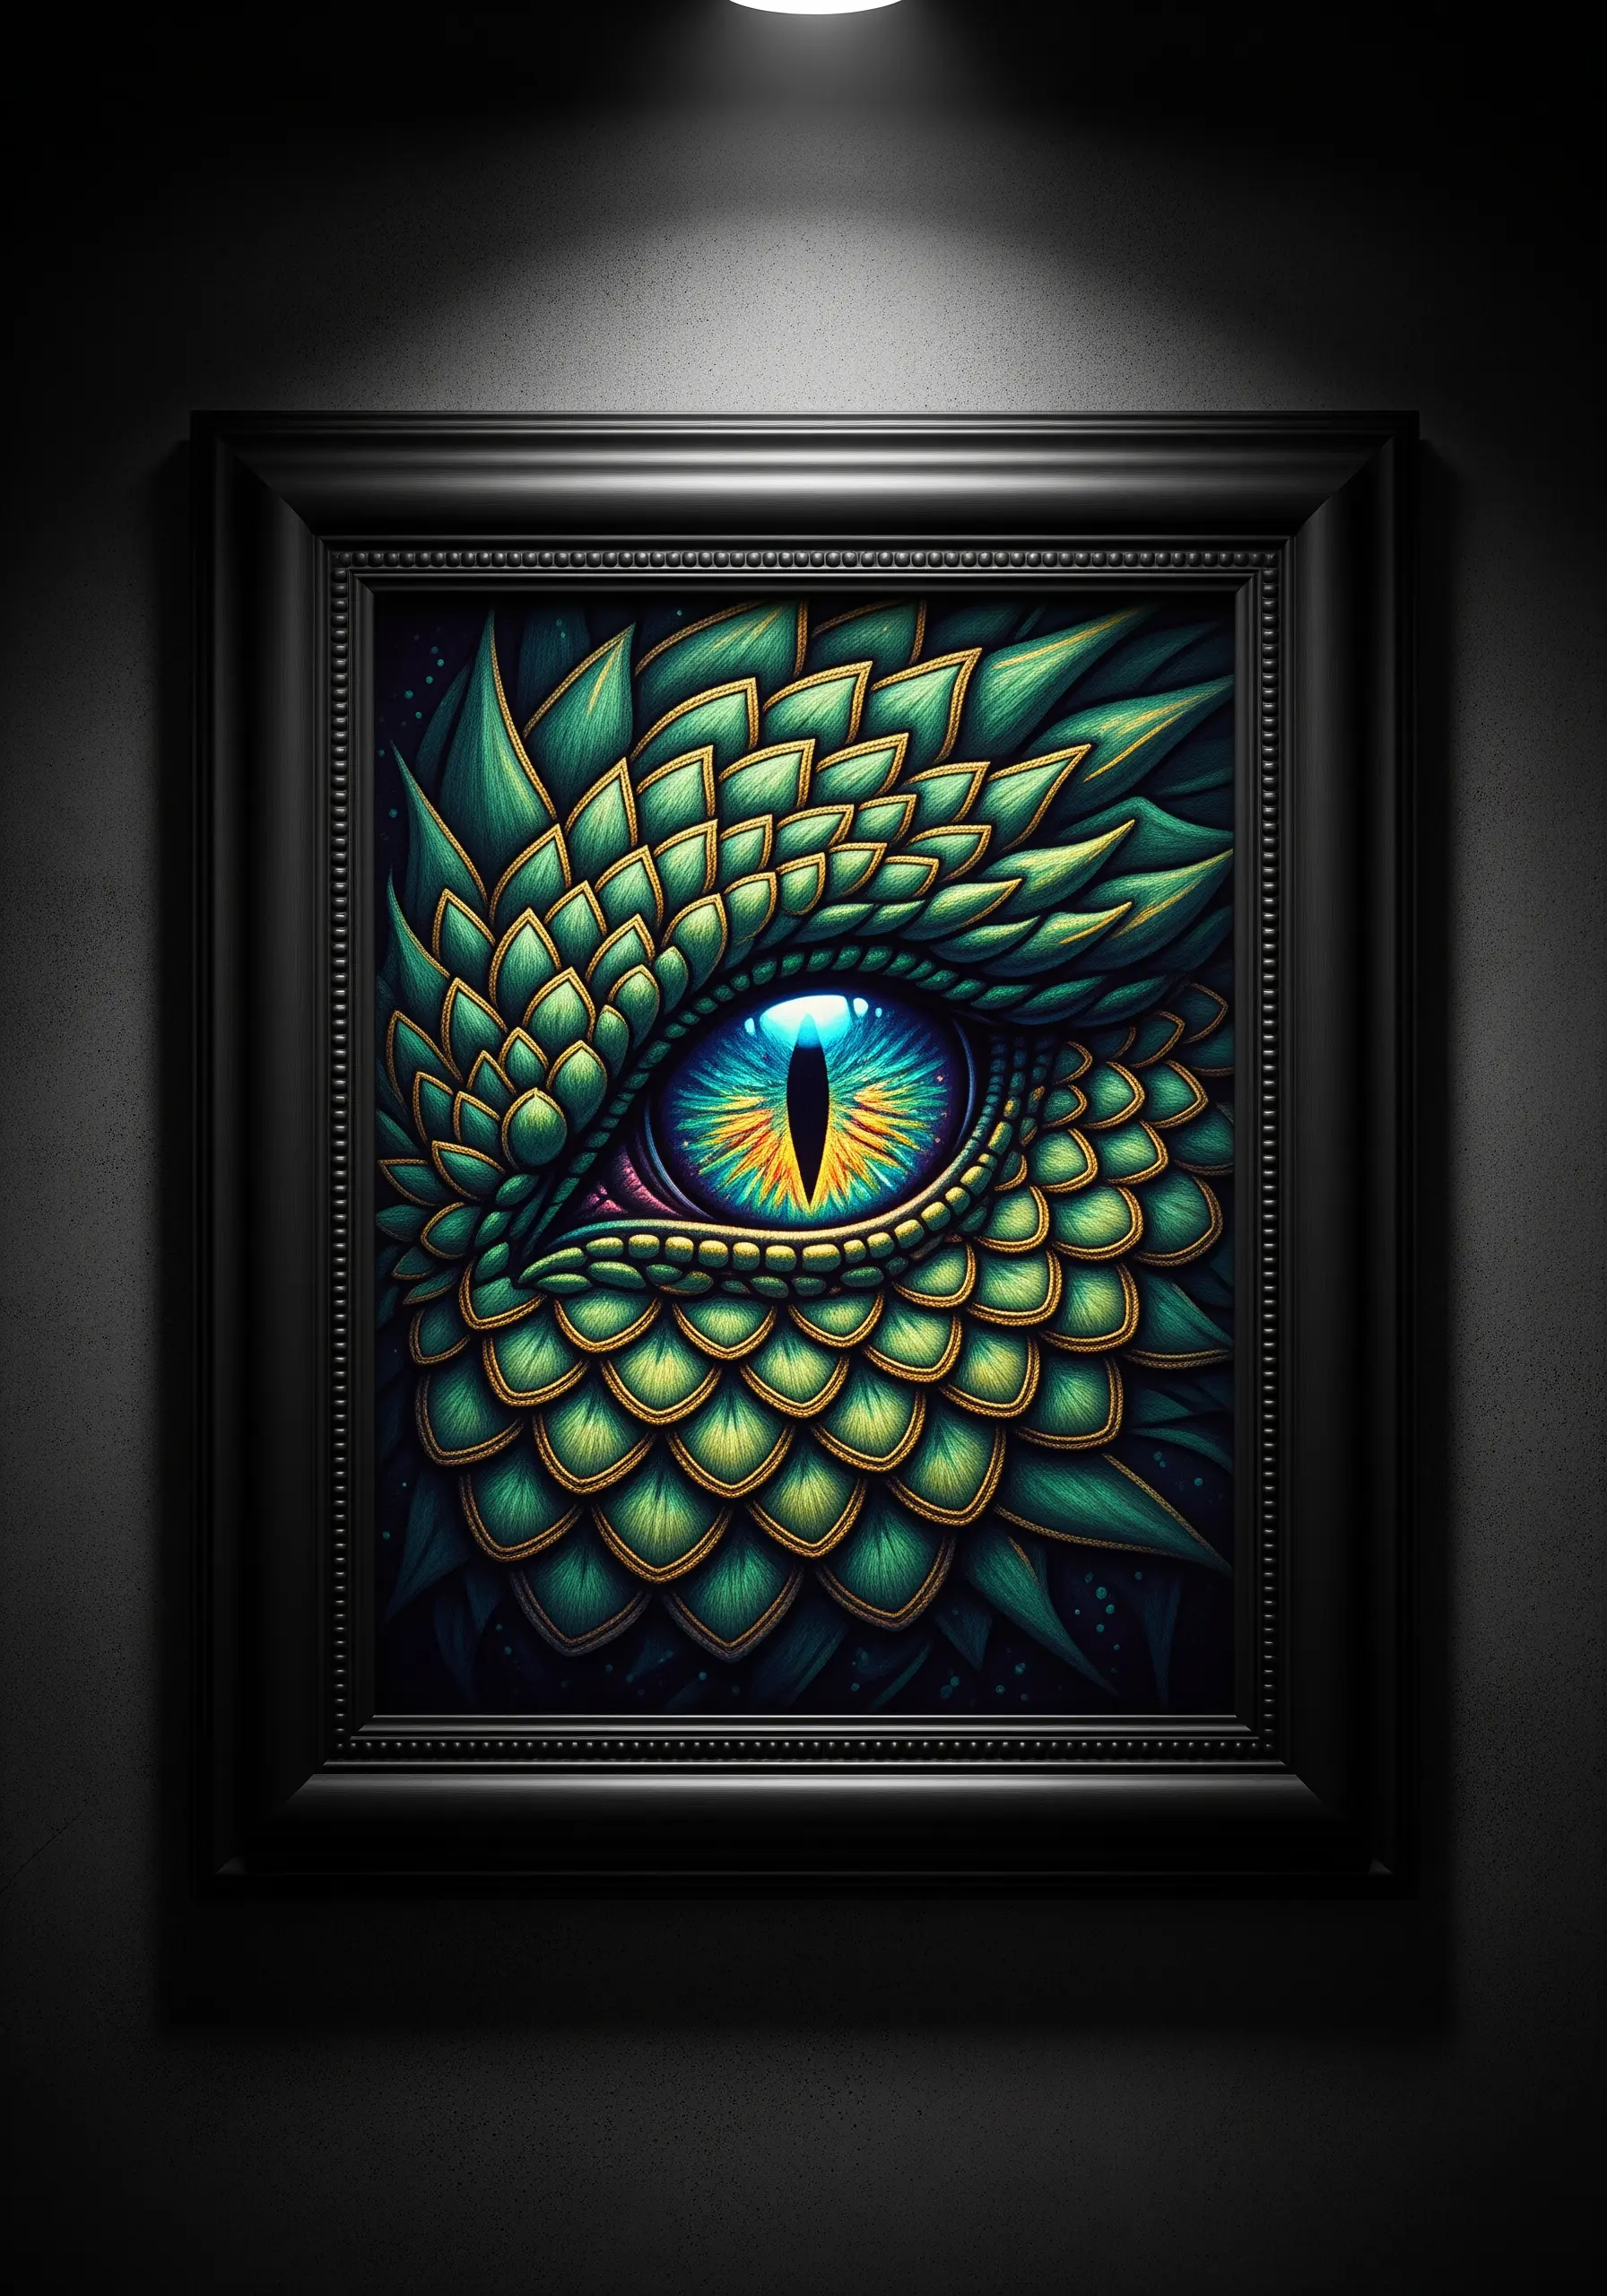
To create the overlapping dragon scales, use a padded satin stitch with a gold metallic thread outline on each scale to define its edge and add a touch of luxury.
Once complete, mount your work on acid-free board and place it in a frame that complements the piece’s style and mood, like a dramatic black frame for this intense subject.
Framing not only protects your work but also transforms it from a craft project into a piece of fine textile wall art.
28. Practice Mindfulness with Sashiko Stitching
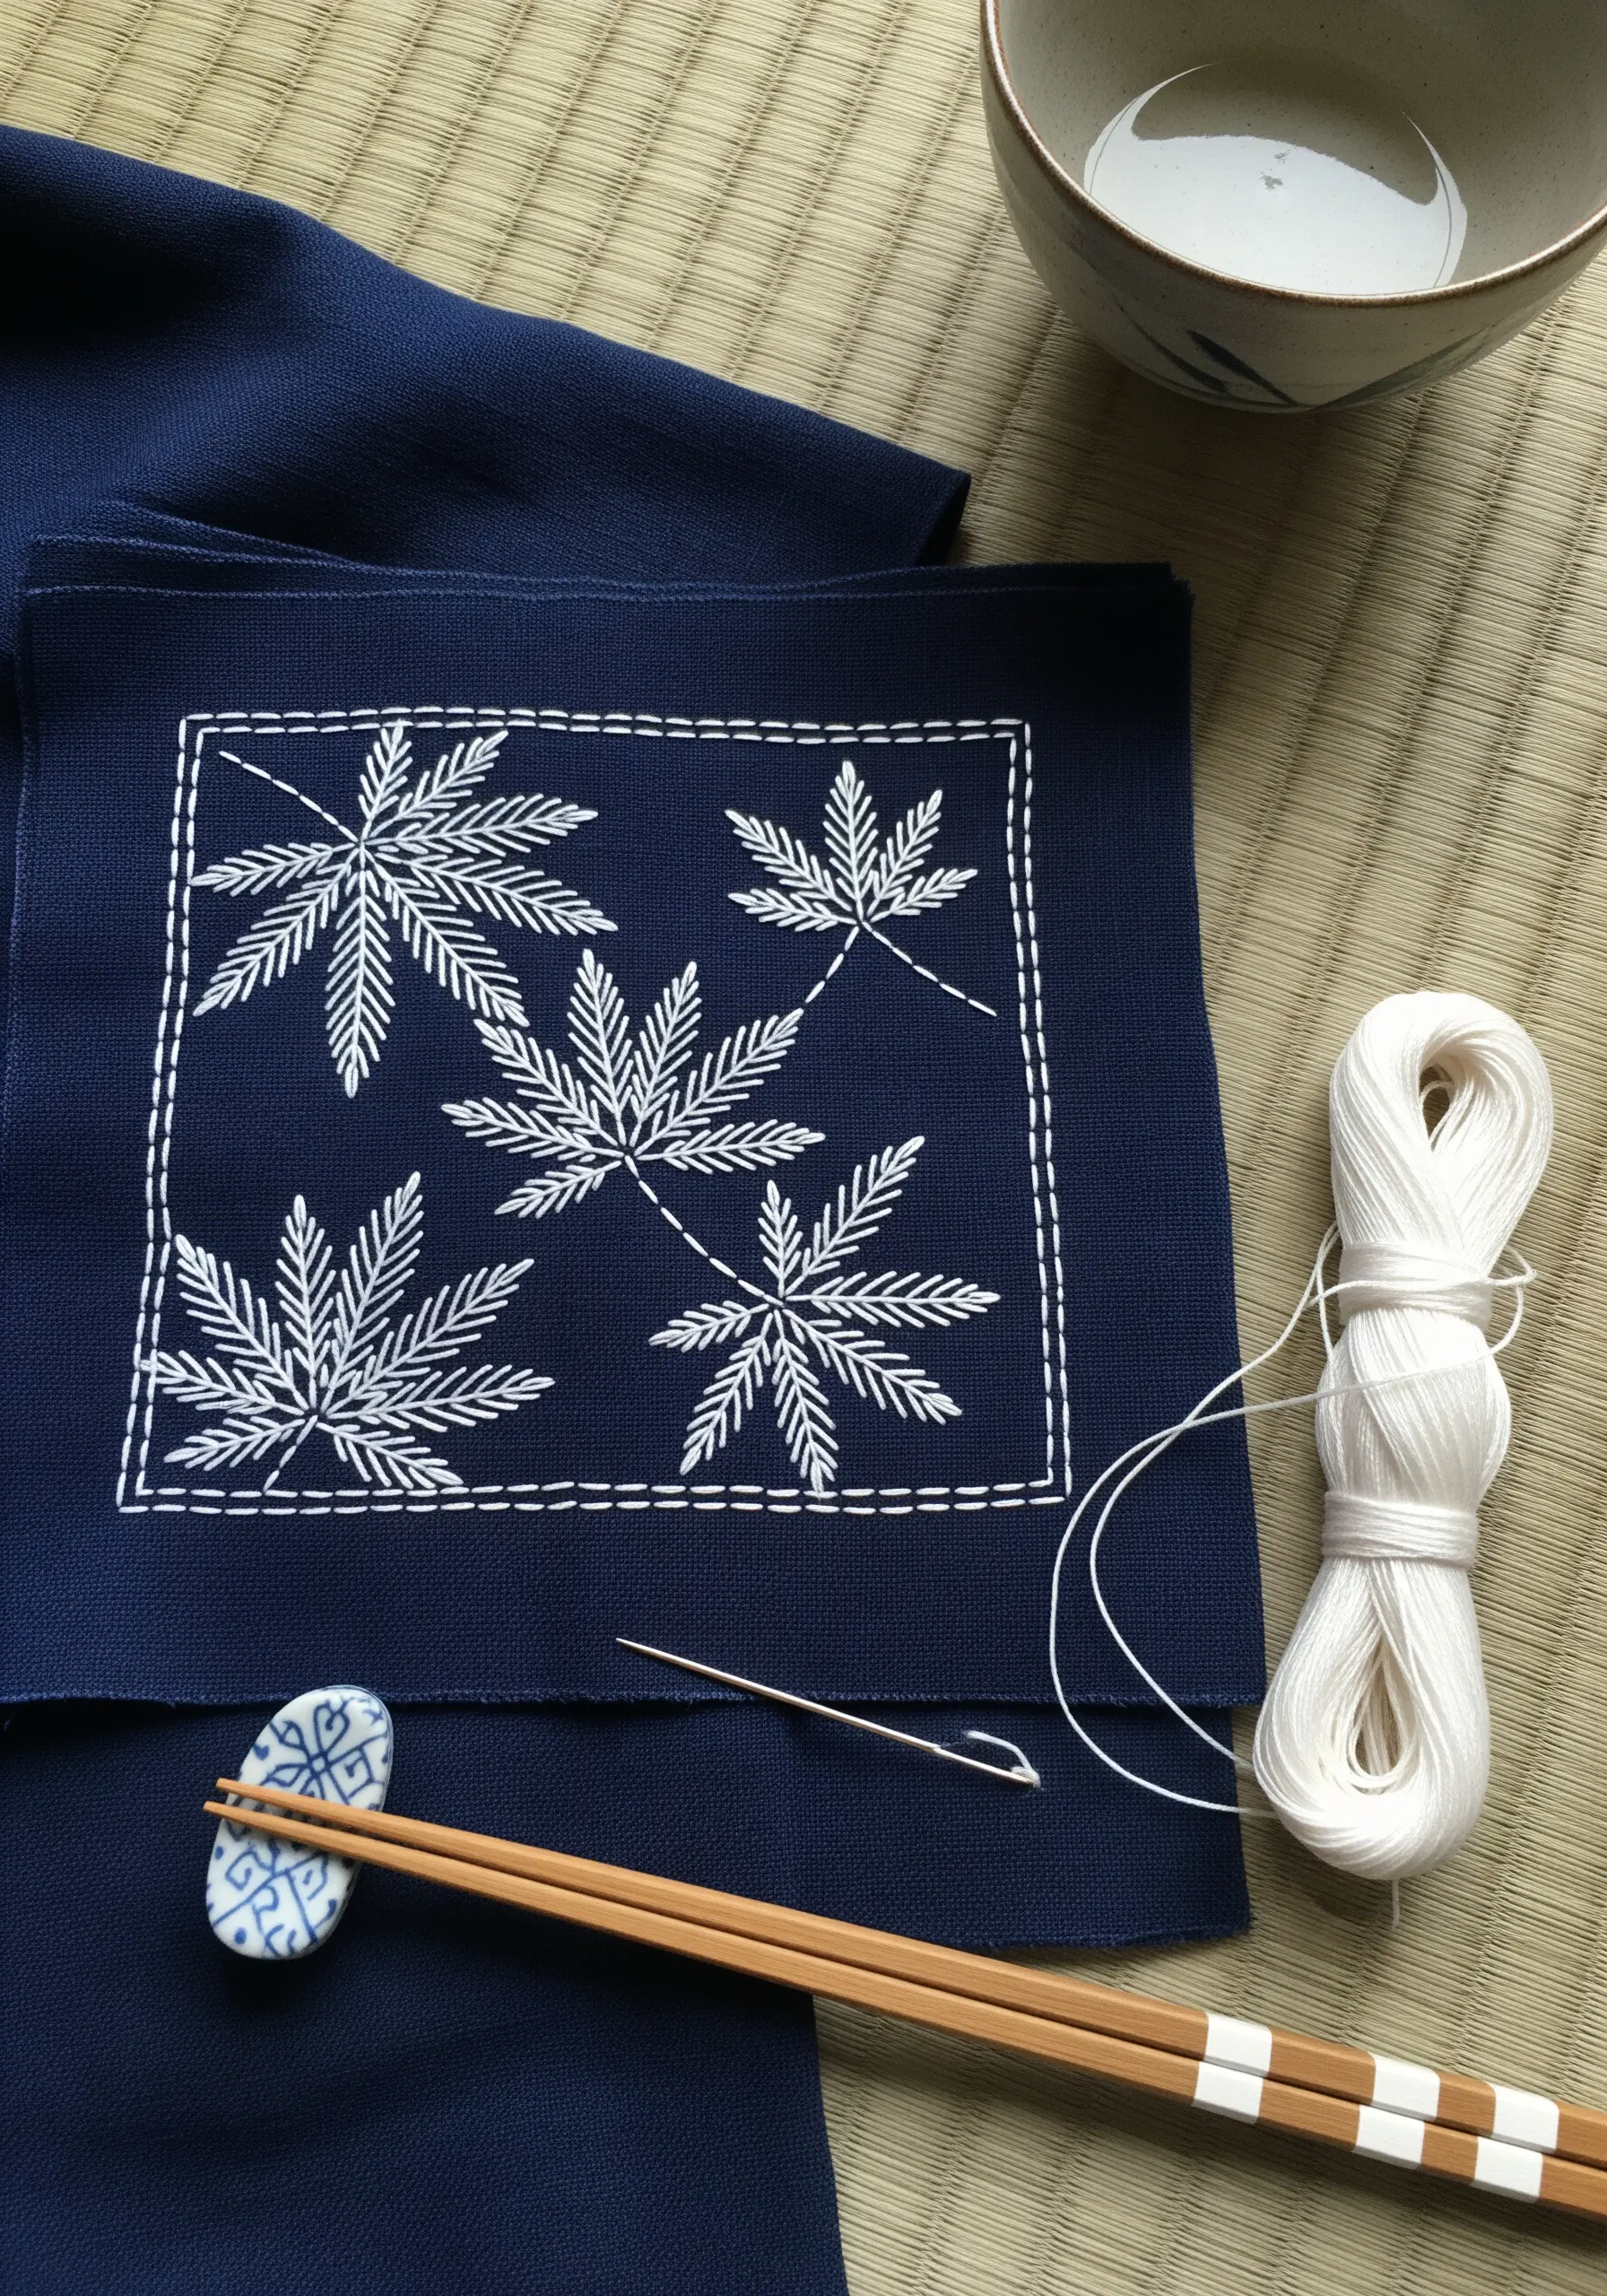
Sashiko is a traditional Japanese embroidery style that uses a simple running stitch to create beautiful, meditative patterns.
The key to authentic sashiko is stitch consistency: aim for each stitch to be the length of a grain of rice, with half that length for the space between.
Use special sashiko thread, which is soft, twisted, and doesn’t separate, along with a long sashiko needle to load several stitches at once for straight, even lines.
The process is as important as the result, offering a calming, rhythmic activity that produces stunningly simple botanical designs.
29. Transform Typography into a Miniature Garden
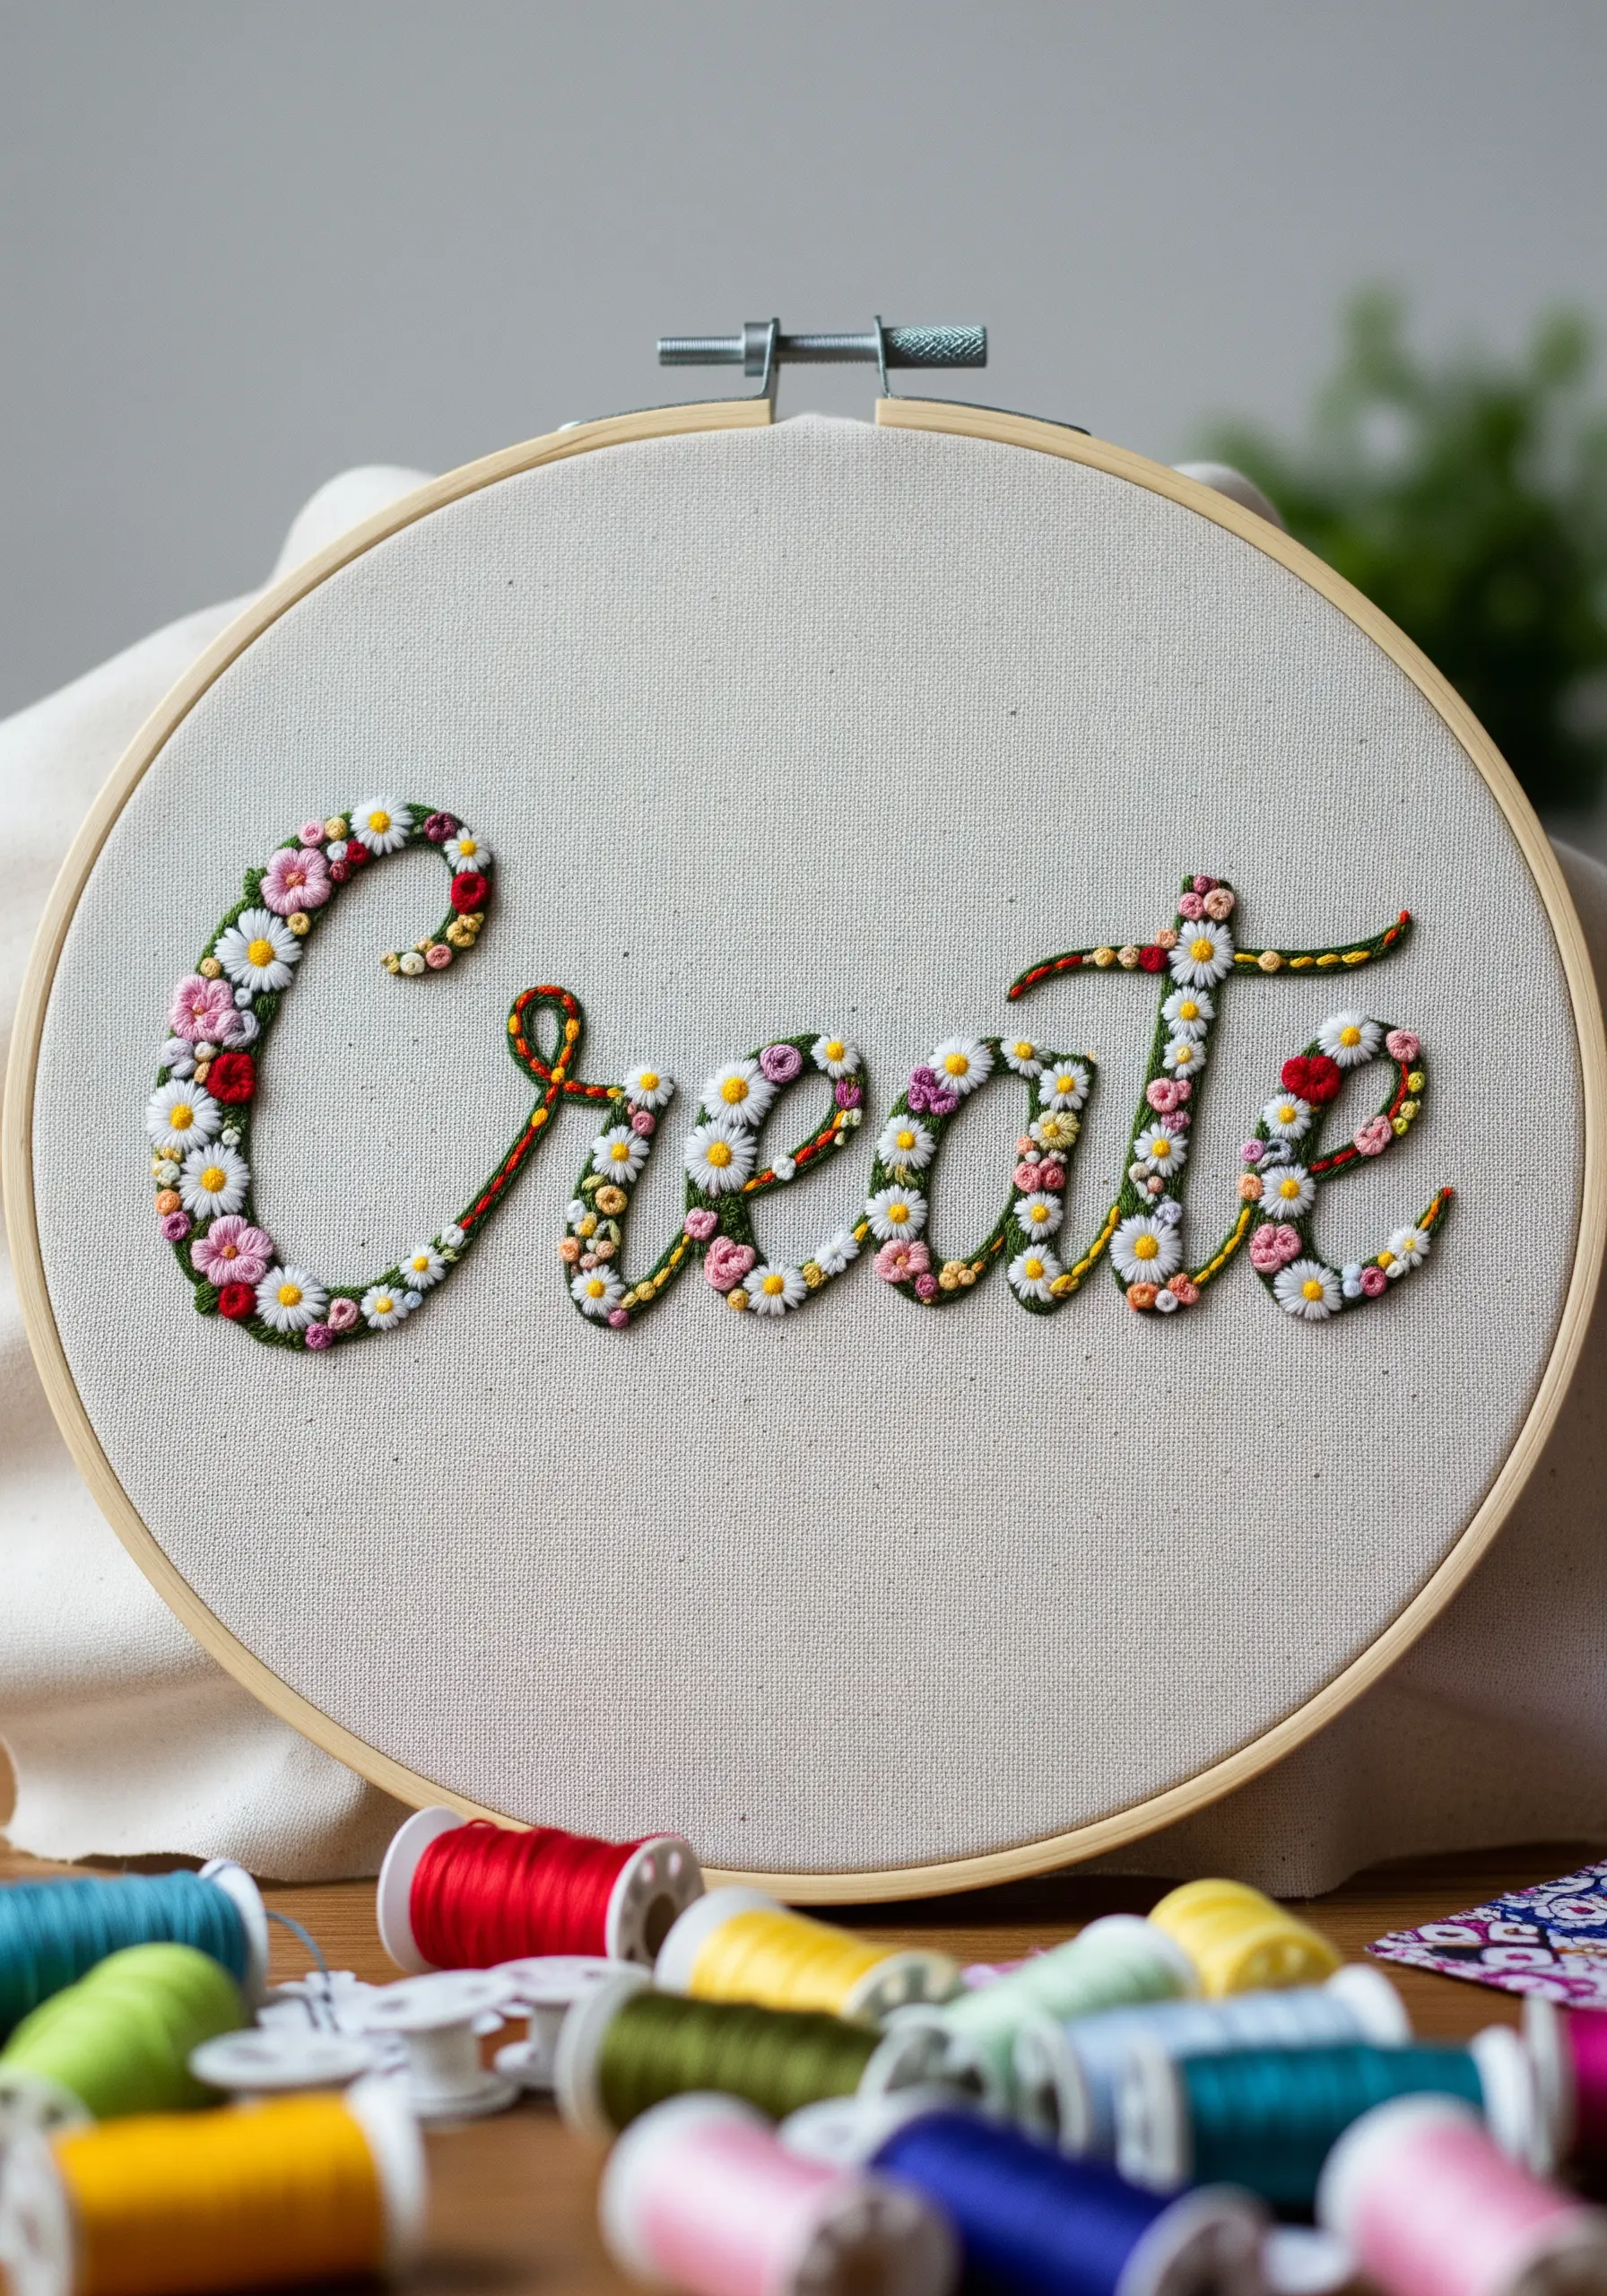
Give embroidered text a creative twist by filling the letters with a meadow of tiny floral stitches.
First, outline your chosen word with a simple backstitch or stem stitch to create a clear container for your florals.
Then, fill the letters with a dense mix of French knots, lazy daisy stitches, and tiny straight stitches in a variety of bright, cheerful colors.
This technique turns a simple word into a piece of art that celebrates creativity and the beauty of nature.
30. Stitch a Landscape with Full Coverage
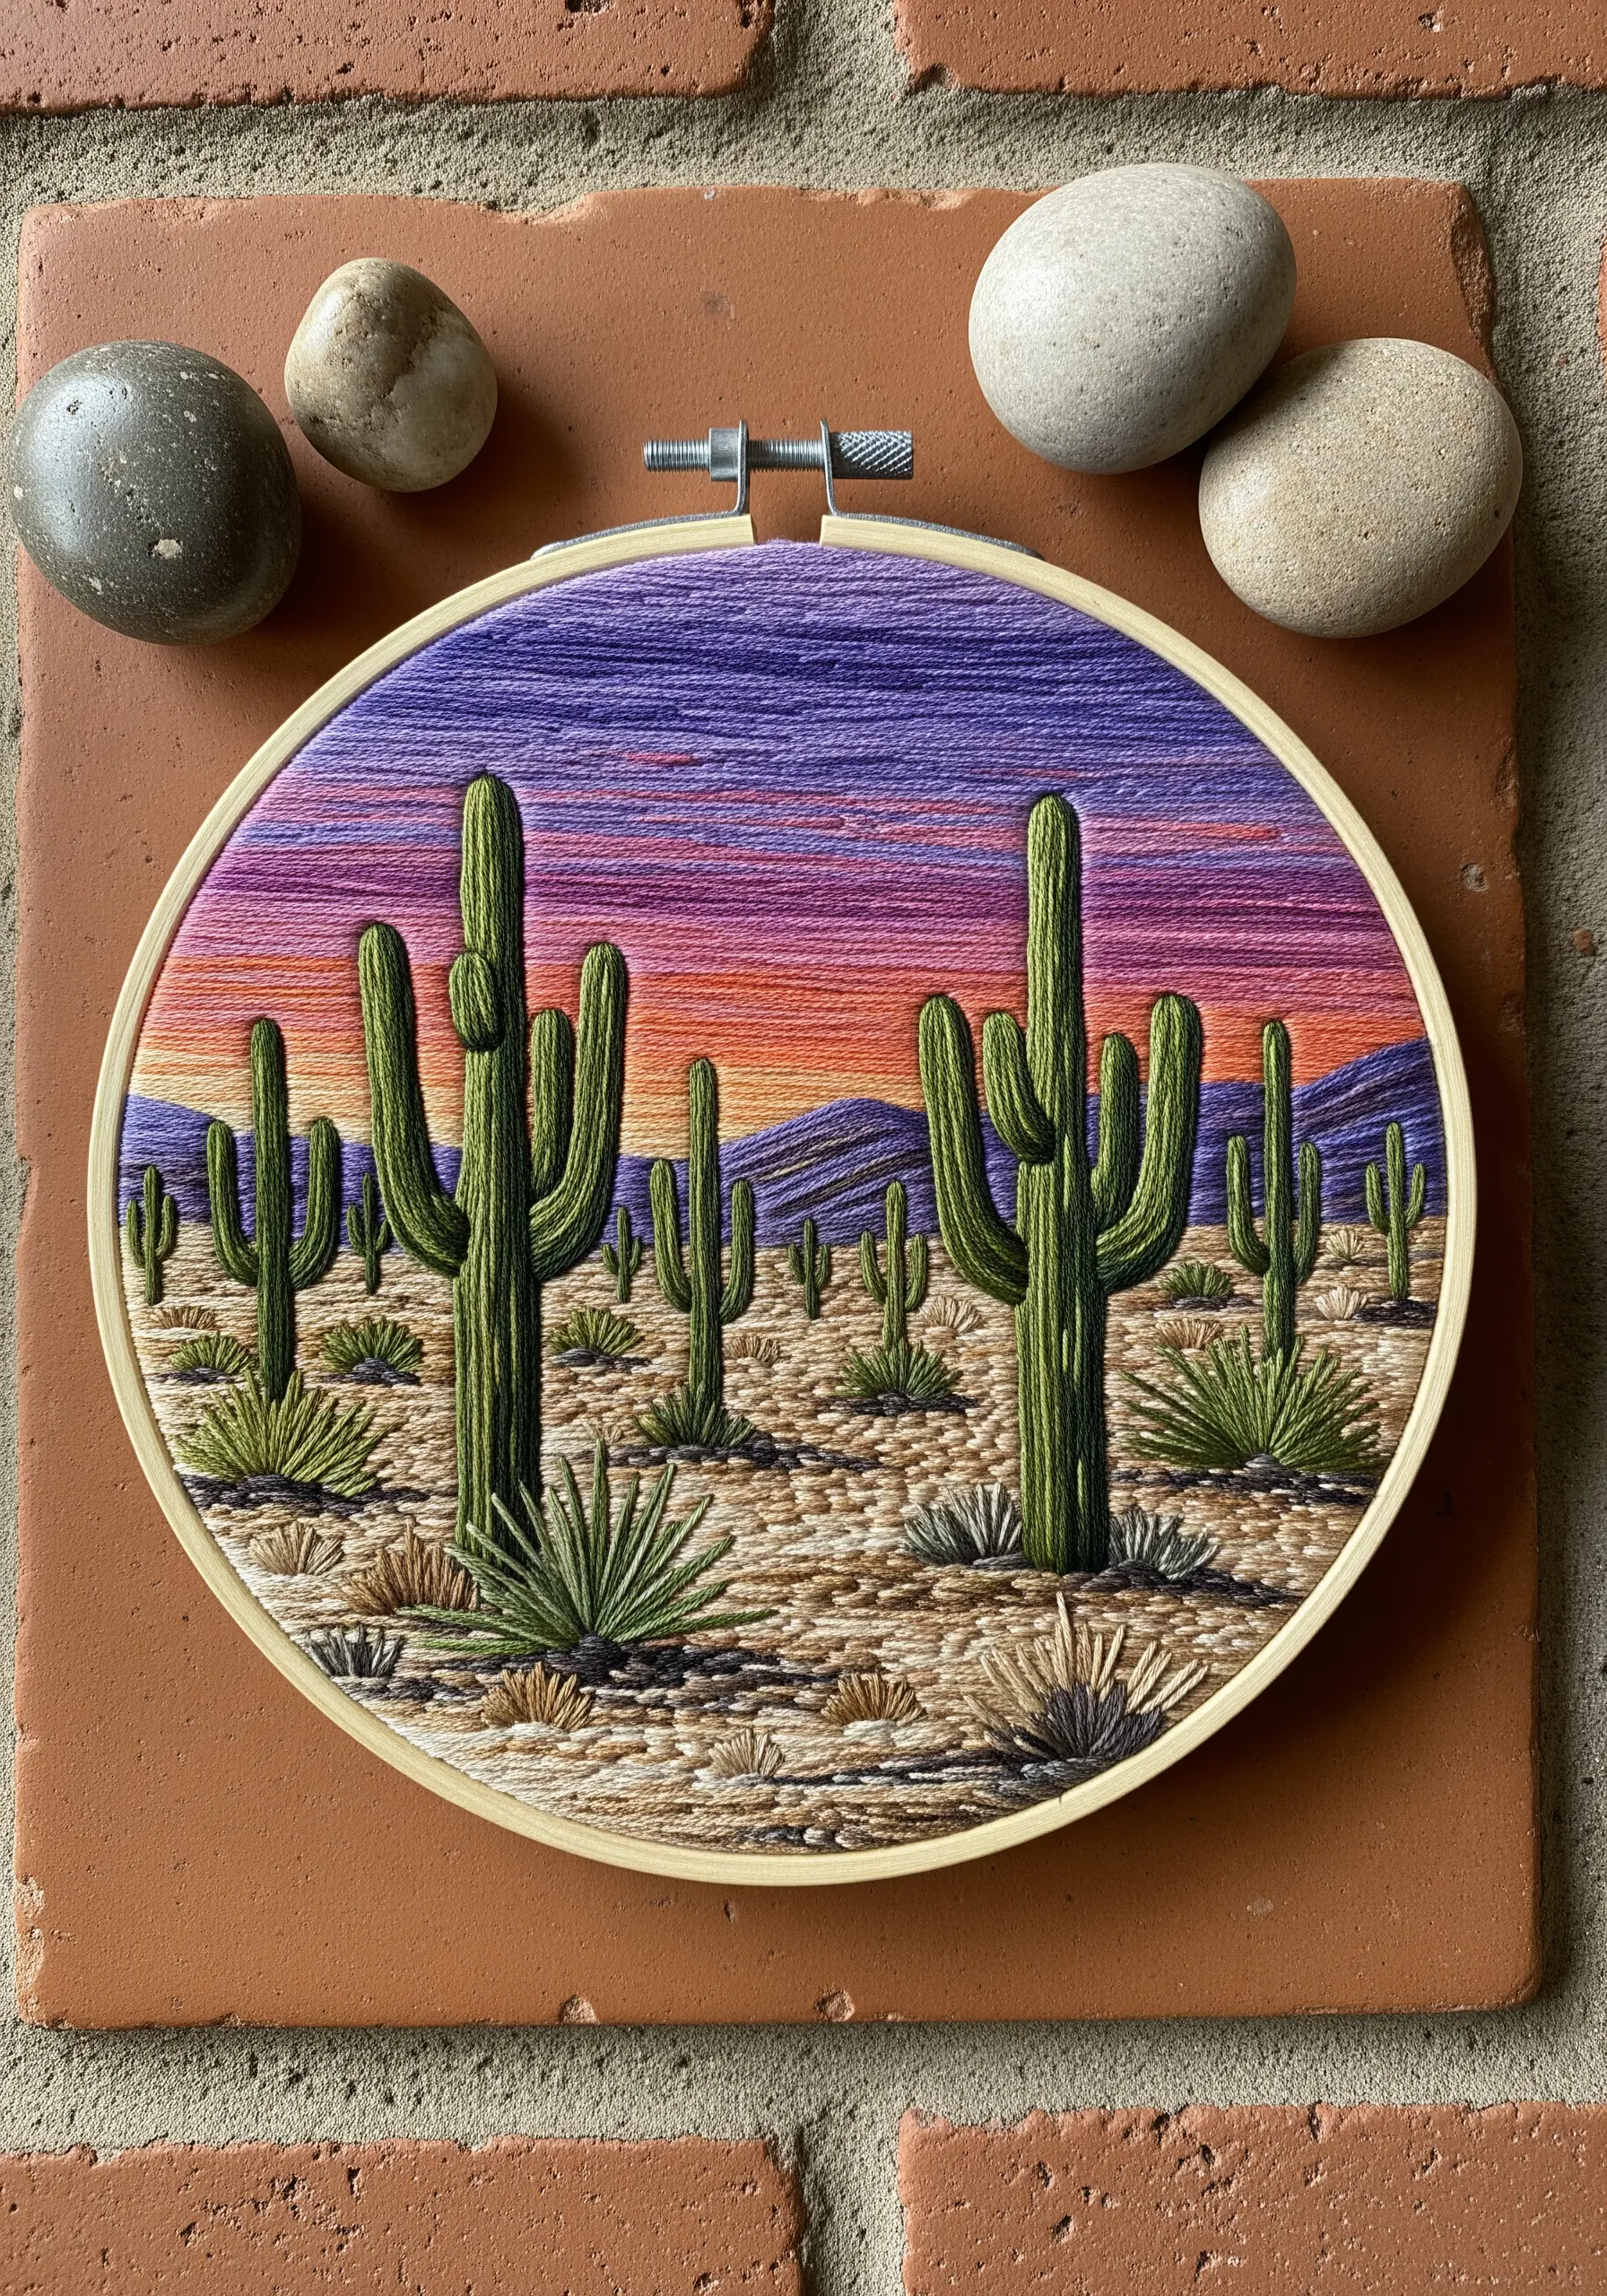
For a rich, tapestry-like feel, commit to covering your entire fabric surface with stitches.
Create a vibrant desert sunset with vertical satin stitches, blending purples, pinks, and oranges to form a soft gradient.
For the desert floor, use a mix of French knots and seed stitches in sandy tones to create a varied, gritty texture.
This full-coverage approach is a commitment, but it results in a powerful piece of thread art that has the visual weight and impact of a painting.


