

You have the thread, the fabric, and the desire to create something beautiful. But perhaps you find your stitches don’t always look as polished as you’d like, or your designs feel disconnected from the garment itself. The secret to elevating your work isn’t about mastering hundreds of complex stitches; it’s about making small, intentional choices.
This is where single-thread embroidery shines. By focusing on one line, one color, and one clear idea, you learn to see the power in restraint. It’s about choosing the *right* stitch for the curve of a letter, understanding how thread weight can change a design’s entire mood, and placing your motif where it doesn’t just decorate, but truly belongs.
Here, you’ll find ideas that are more than just patterns—they are lessons in technique and composition. You’ll learn not just what to stitch, but why a certain method works, empowering you to turn any piece of clothing into a subtle, stylish, and personal work of art.
1. Render Line Art on a T-Shirt Pocket

Transform a simple t-shirt pocket into a focal point with a continuous line-art portrait.
Use a backstitch with two strands of six-strand floss to achieve a line that is delicate yet defined—any thicker, and you risk losing the fluidity of the drawing.
For jersey knits, always apply a stick-on, wash-away stabilizer to the back of the fabric.
This prevents the fabric from stretching as you stitch, ensuring your lines remain crisp and your portrait doesn’t warp after washing.
Choose modern line art faces with open, flowing curves; they are more forgiving and impactful than designs with sharp, complex angles.
2. Place a Delicate Motif on a Denim Collar
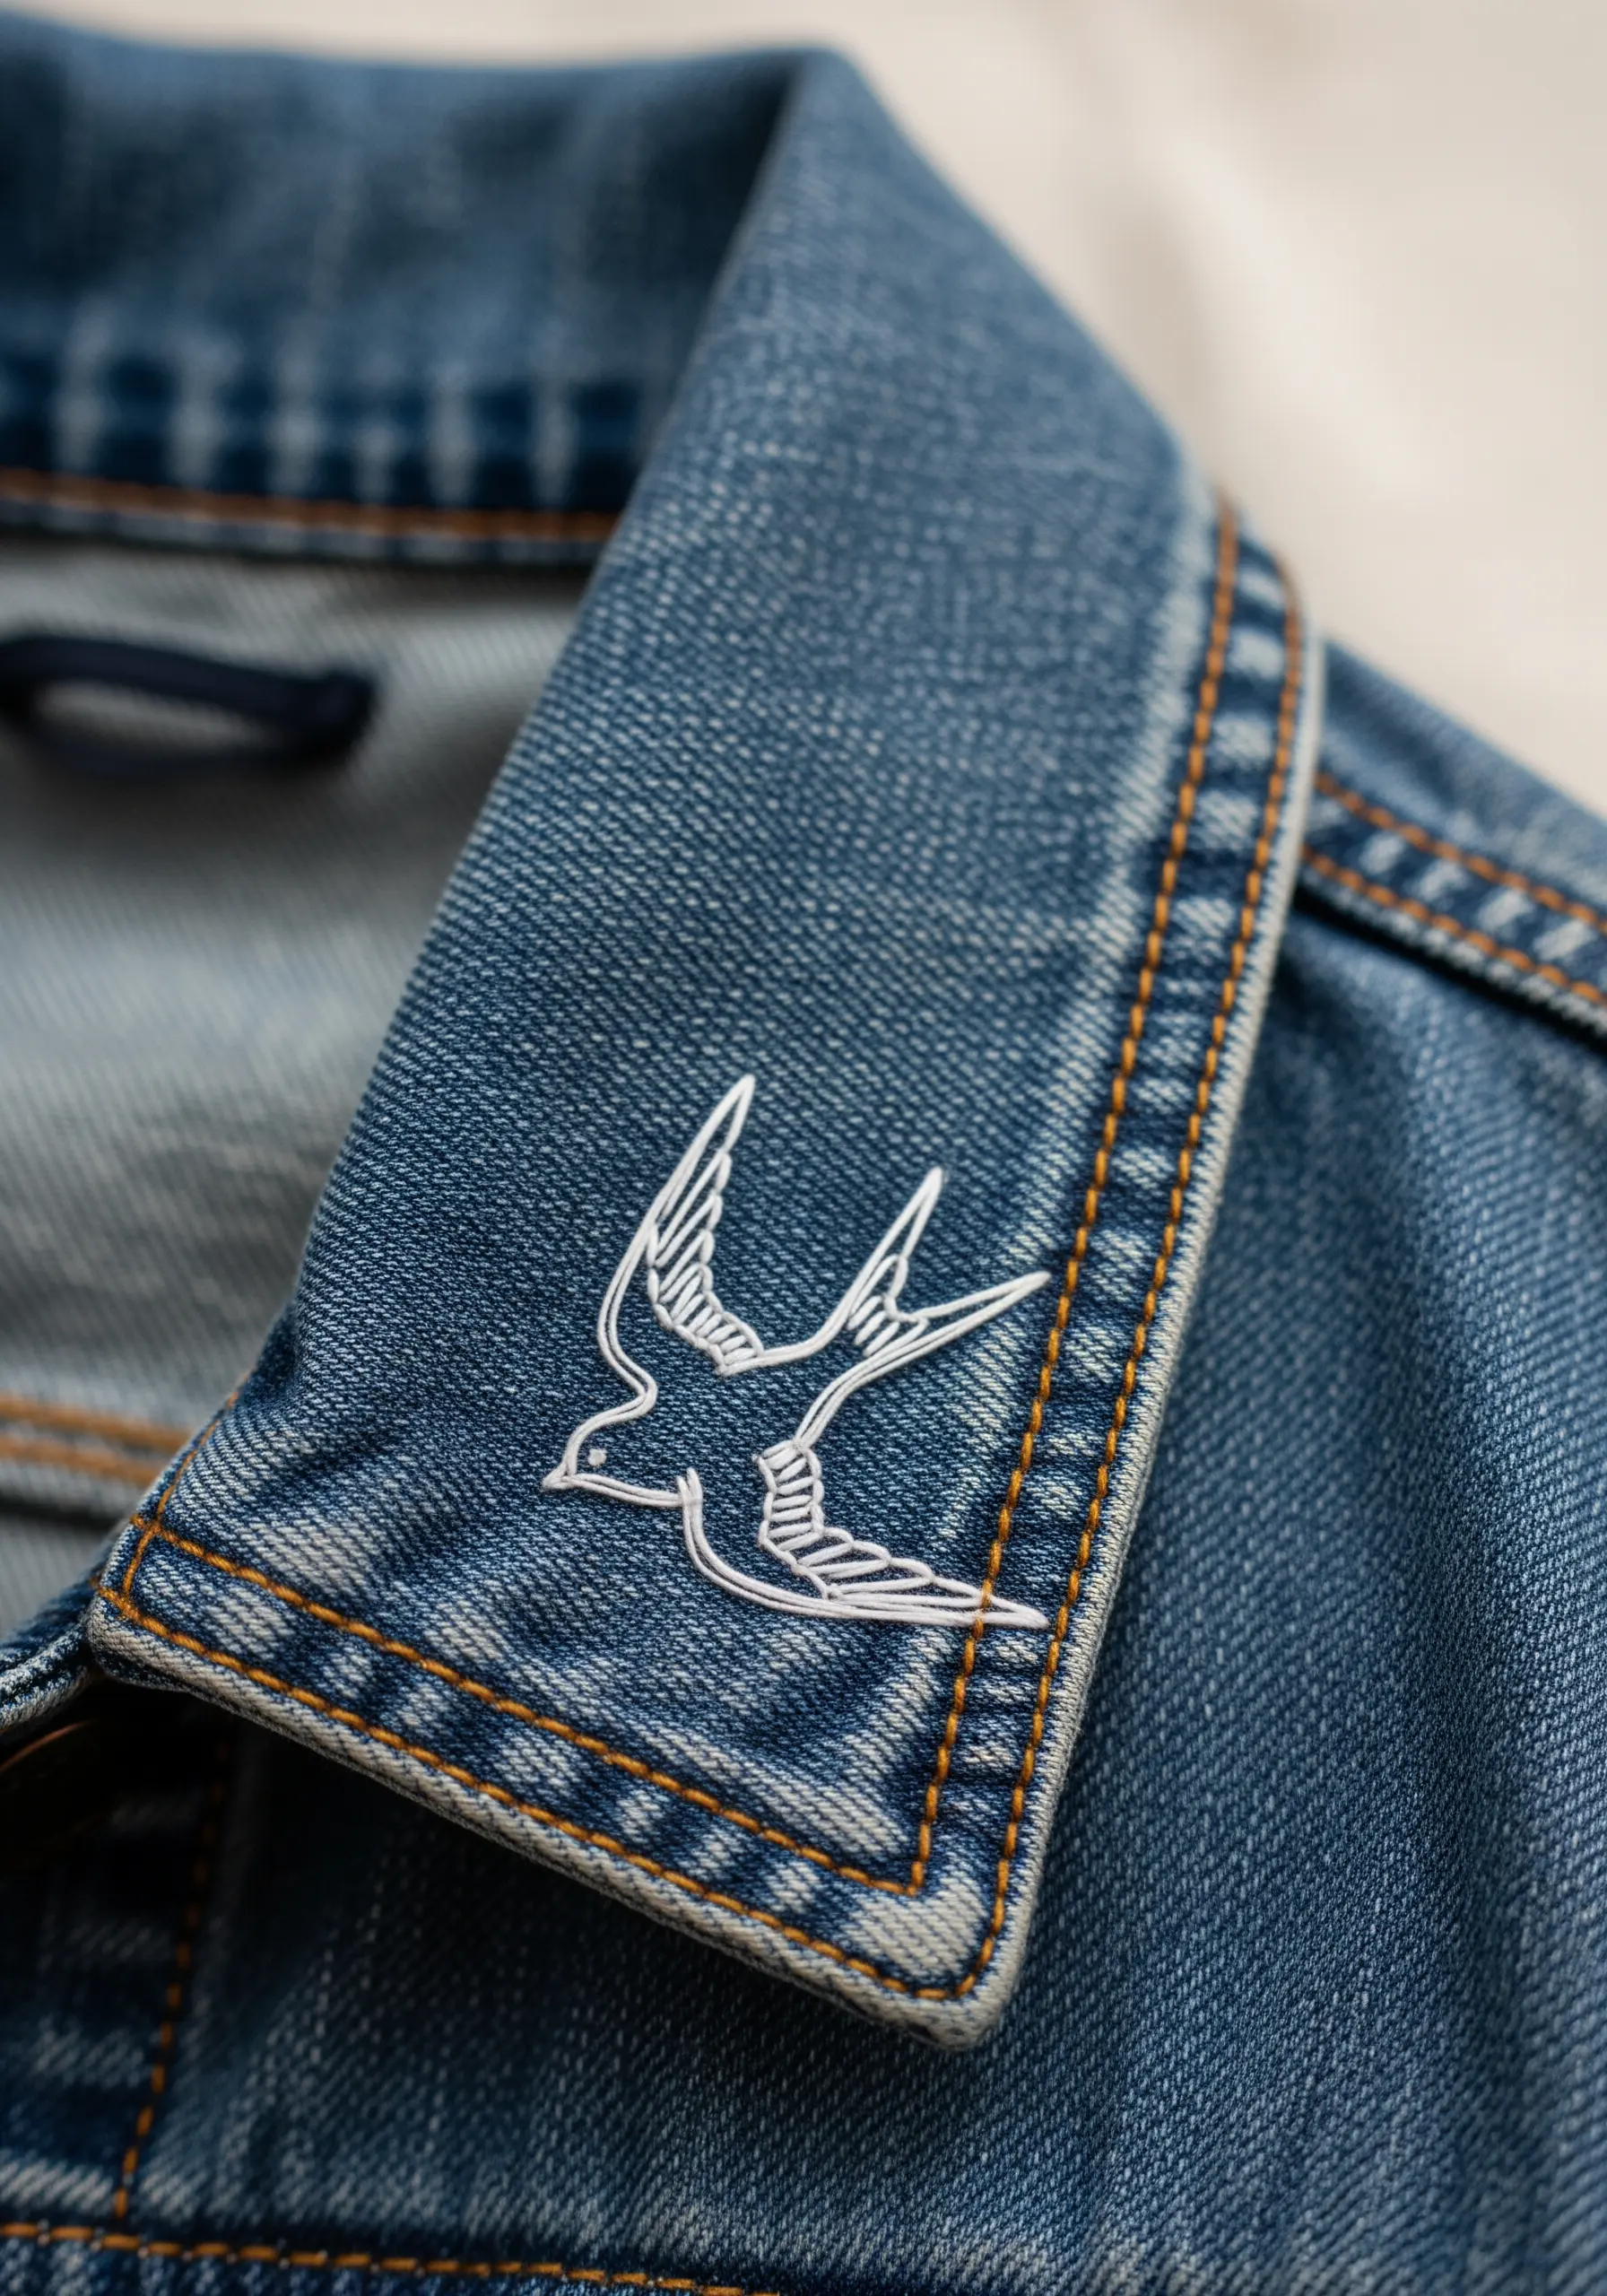
A denim collar offers a structured canvas for a sharp, clean motif like this swallow.
Opt for a split stitch instead of a backstitch on heavy twill fabrics like denim.
The split stitch creates a smoother, more solid line because each new stitch pierces the previous one, eliminating the tiny gaps that a backstitch can leave.
Use a high-contrast thread, like white on blue denim, to make the intricate details pop.
This technique is perfect for turning plain denim jackets into blooming fashion statements with just a single skein of thread.
3. Create a Flowing Accent on a Shirt Cuff
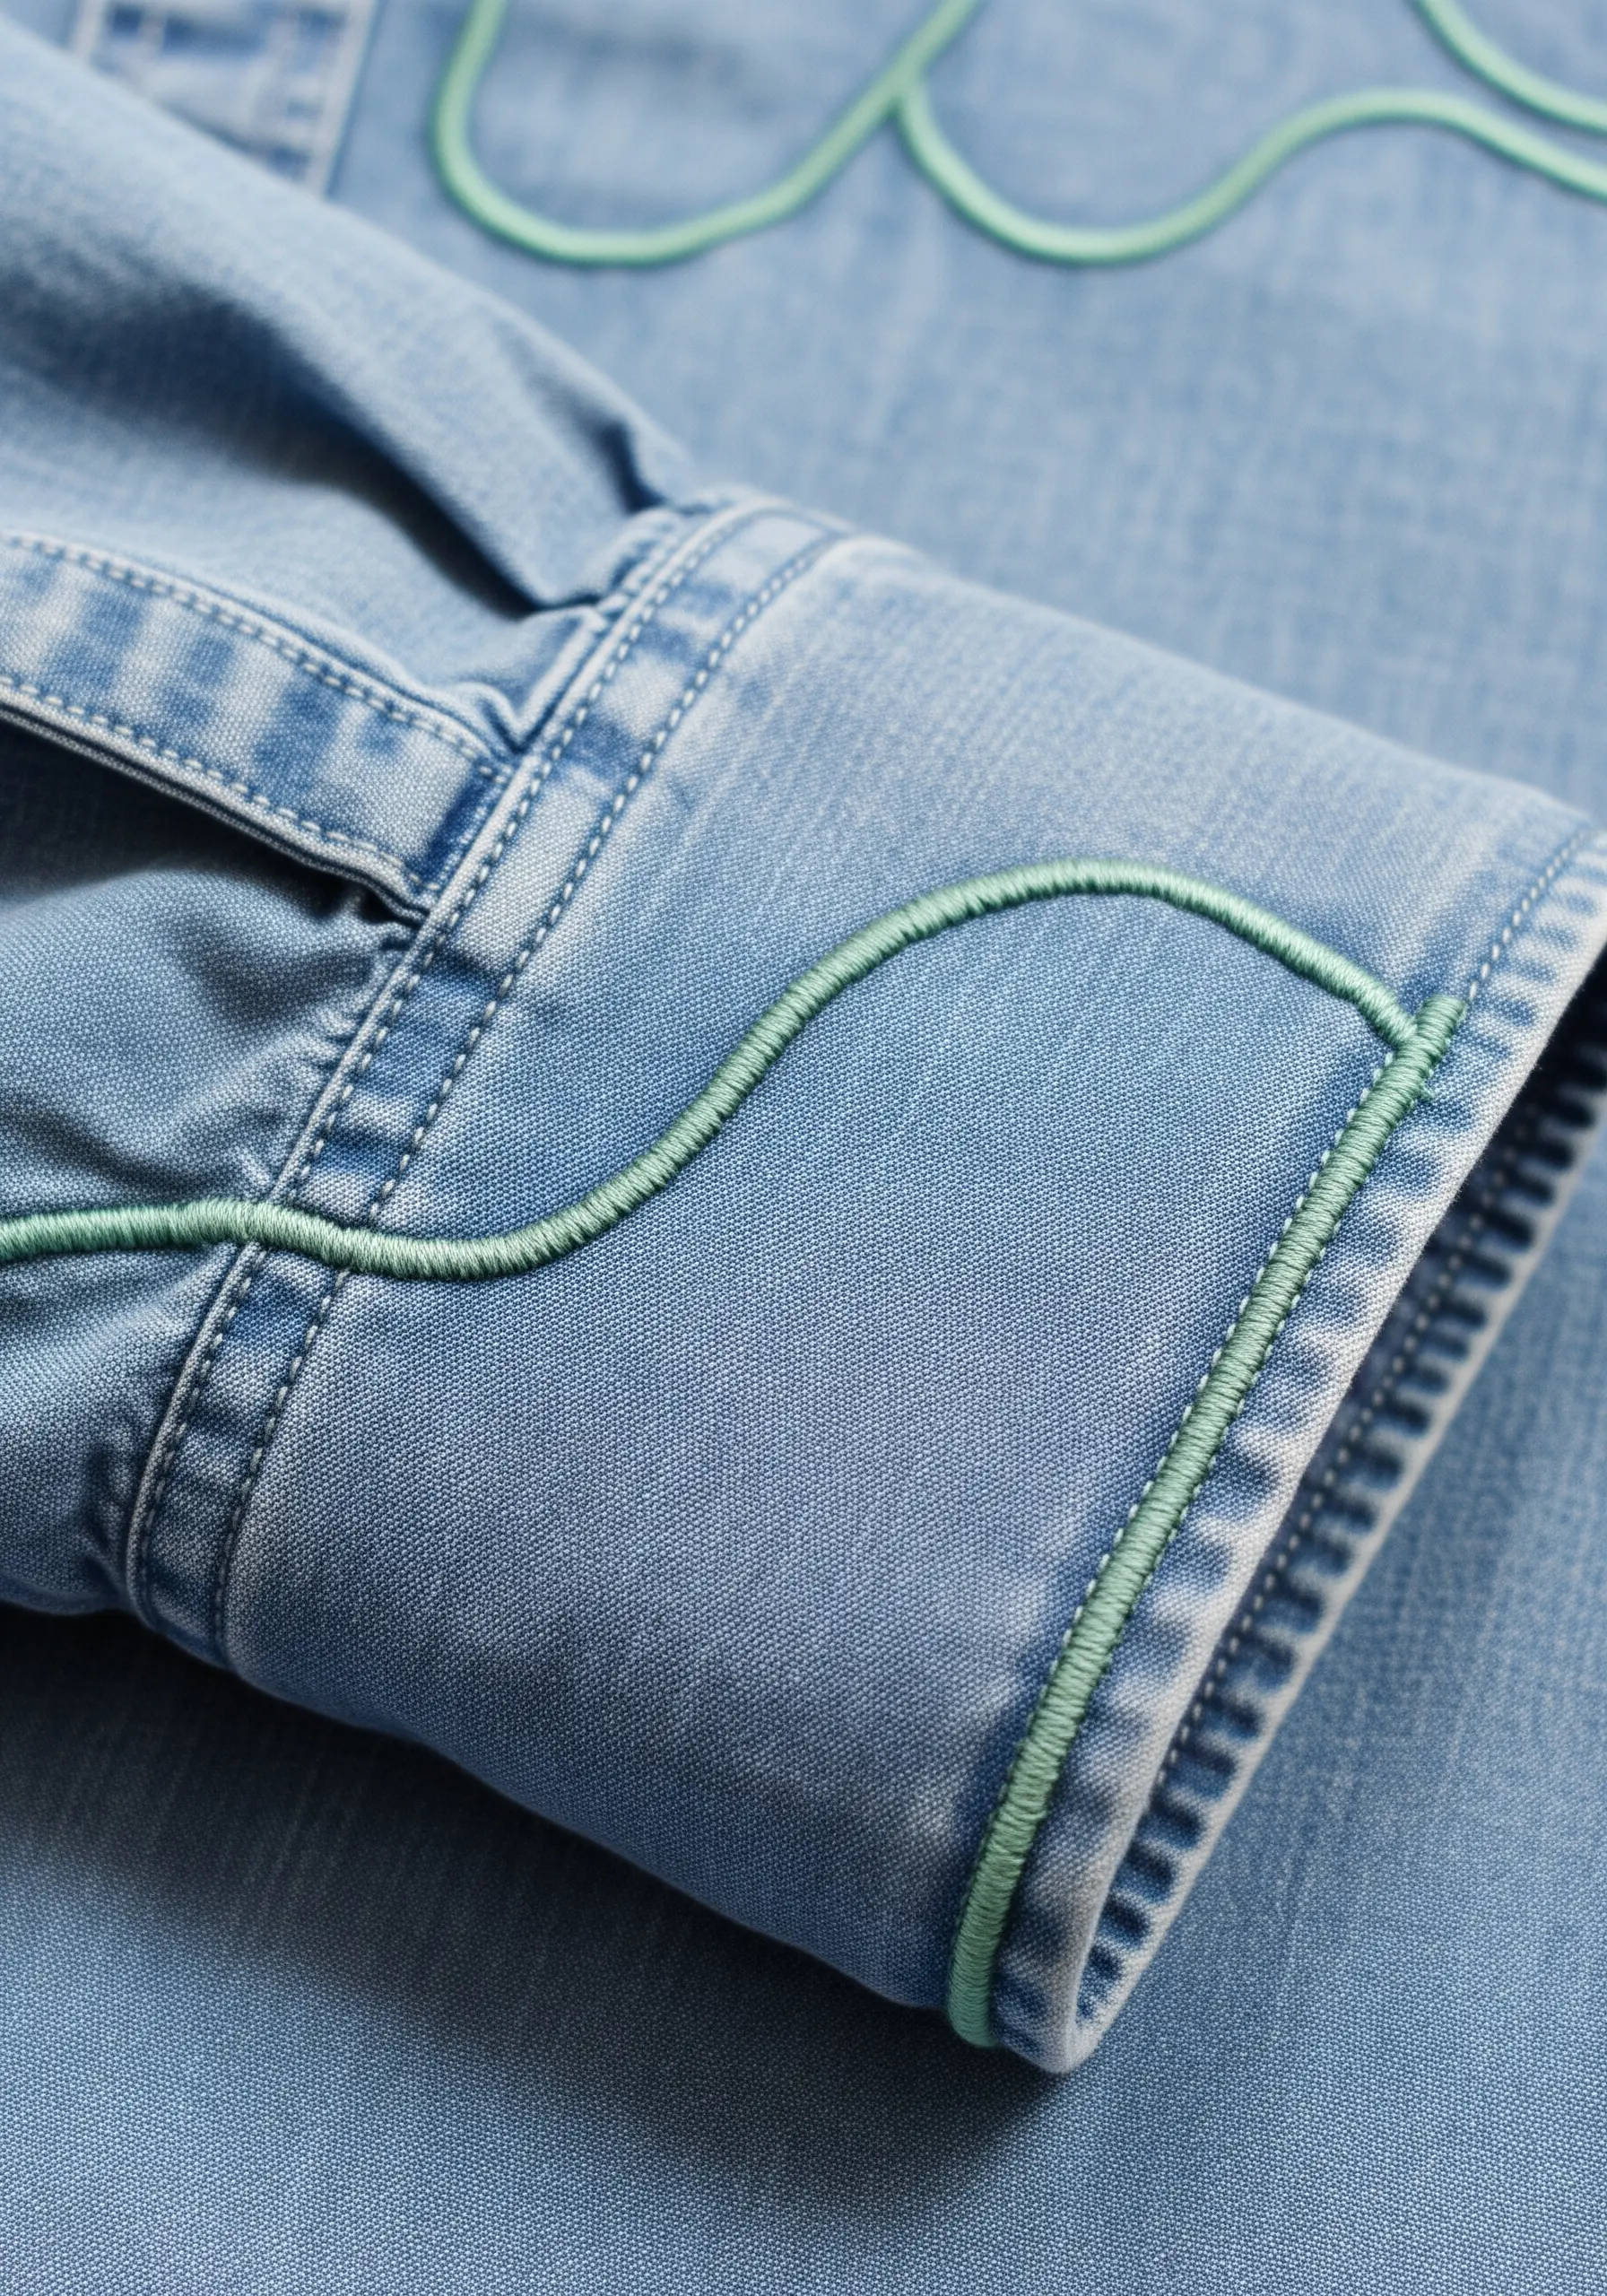
Elevate a simple button-down with an abstract line that travels along the cuff and sleeve.
For a raised, cord-like effect, use a whipped backstitch or a stem stitch.
A whipped backstitch wraps a second thread around a foundational backstitch line, creating a perfectly smooth and uniform curve without any visible stitch marks.
The stem stitch naturally twists, giving your line a subtle, rope-like texture that catches the light beautifully.
These hand-embroidered sleeve ideas work best with a high-contrast, six-strand floss to maximize their graphic impact.
4. Outline a Bold Botanical on a Canvas Tote

A canvas tote bag provides a sturdy, neutral background for a large-scale botanical outline.
Instead of a simple backstitch, use a stem stitch or an outline stitch to give the lines of the Monstera leaf more weight and dimension.
Both stitches create a slightly raised, twisted effect that feels more substantial and intentional than a flat stitch, turning a simple graphic into a textured statement.
These are just a few tote bag embroidery ideas that require only one color to make a powerful visual statement.
5. Add a Gentle Reminder to a Sweatshirt Sleeve
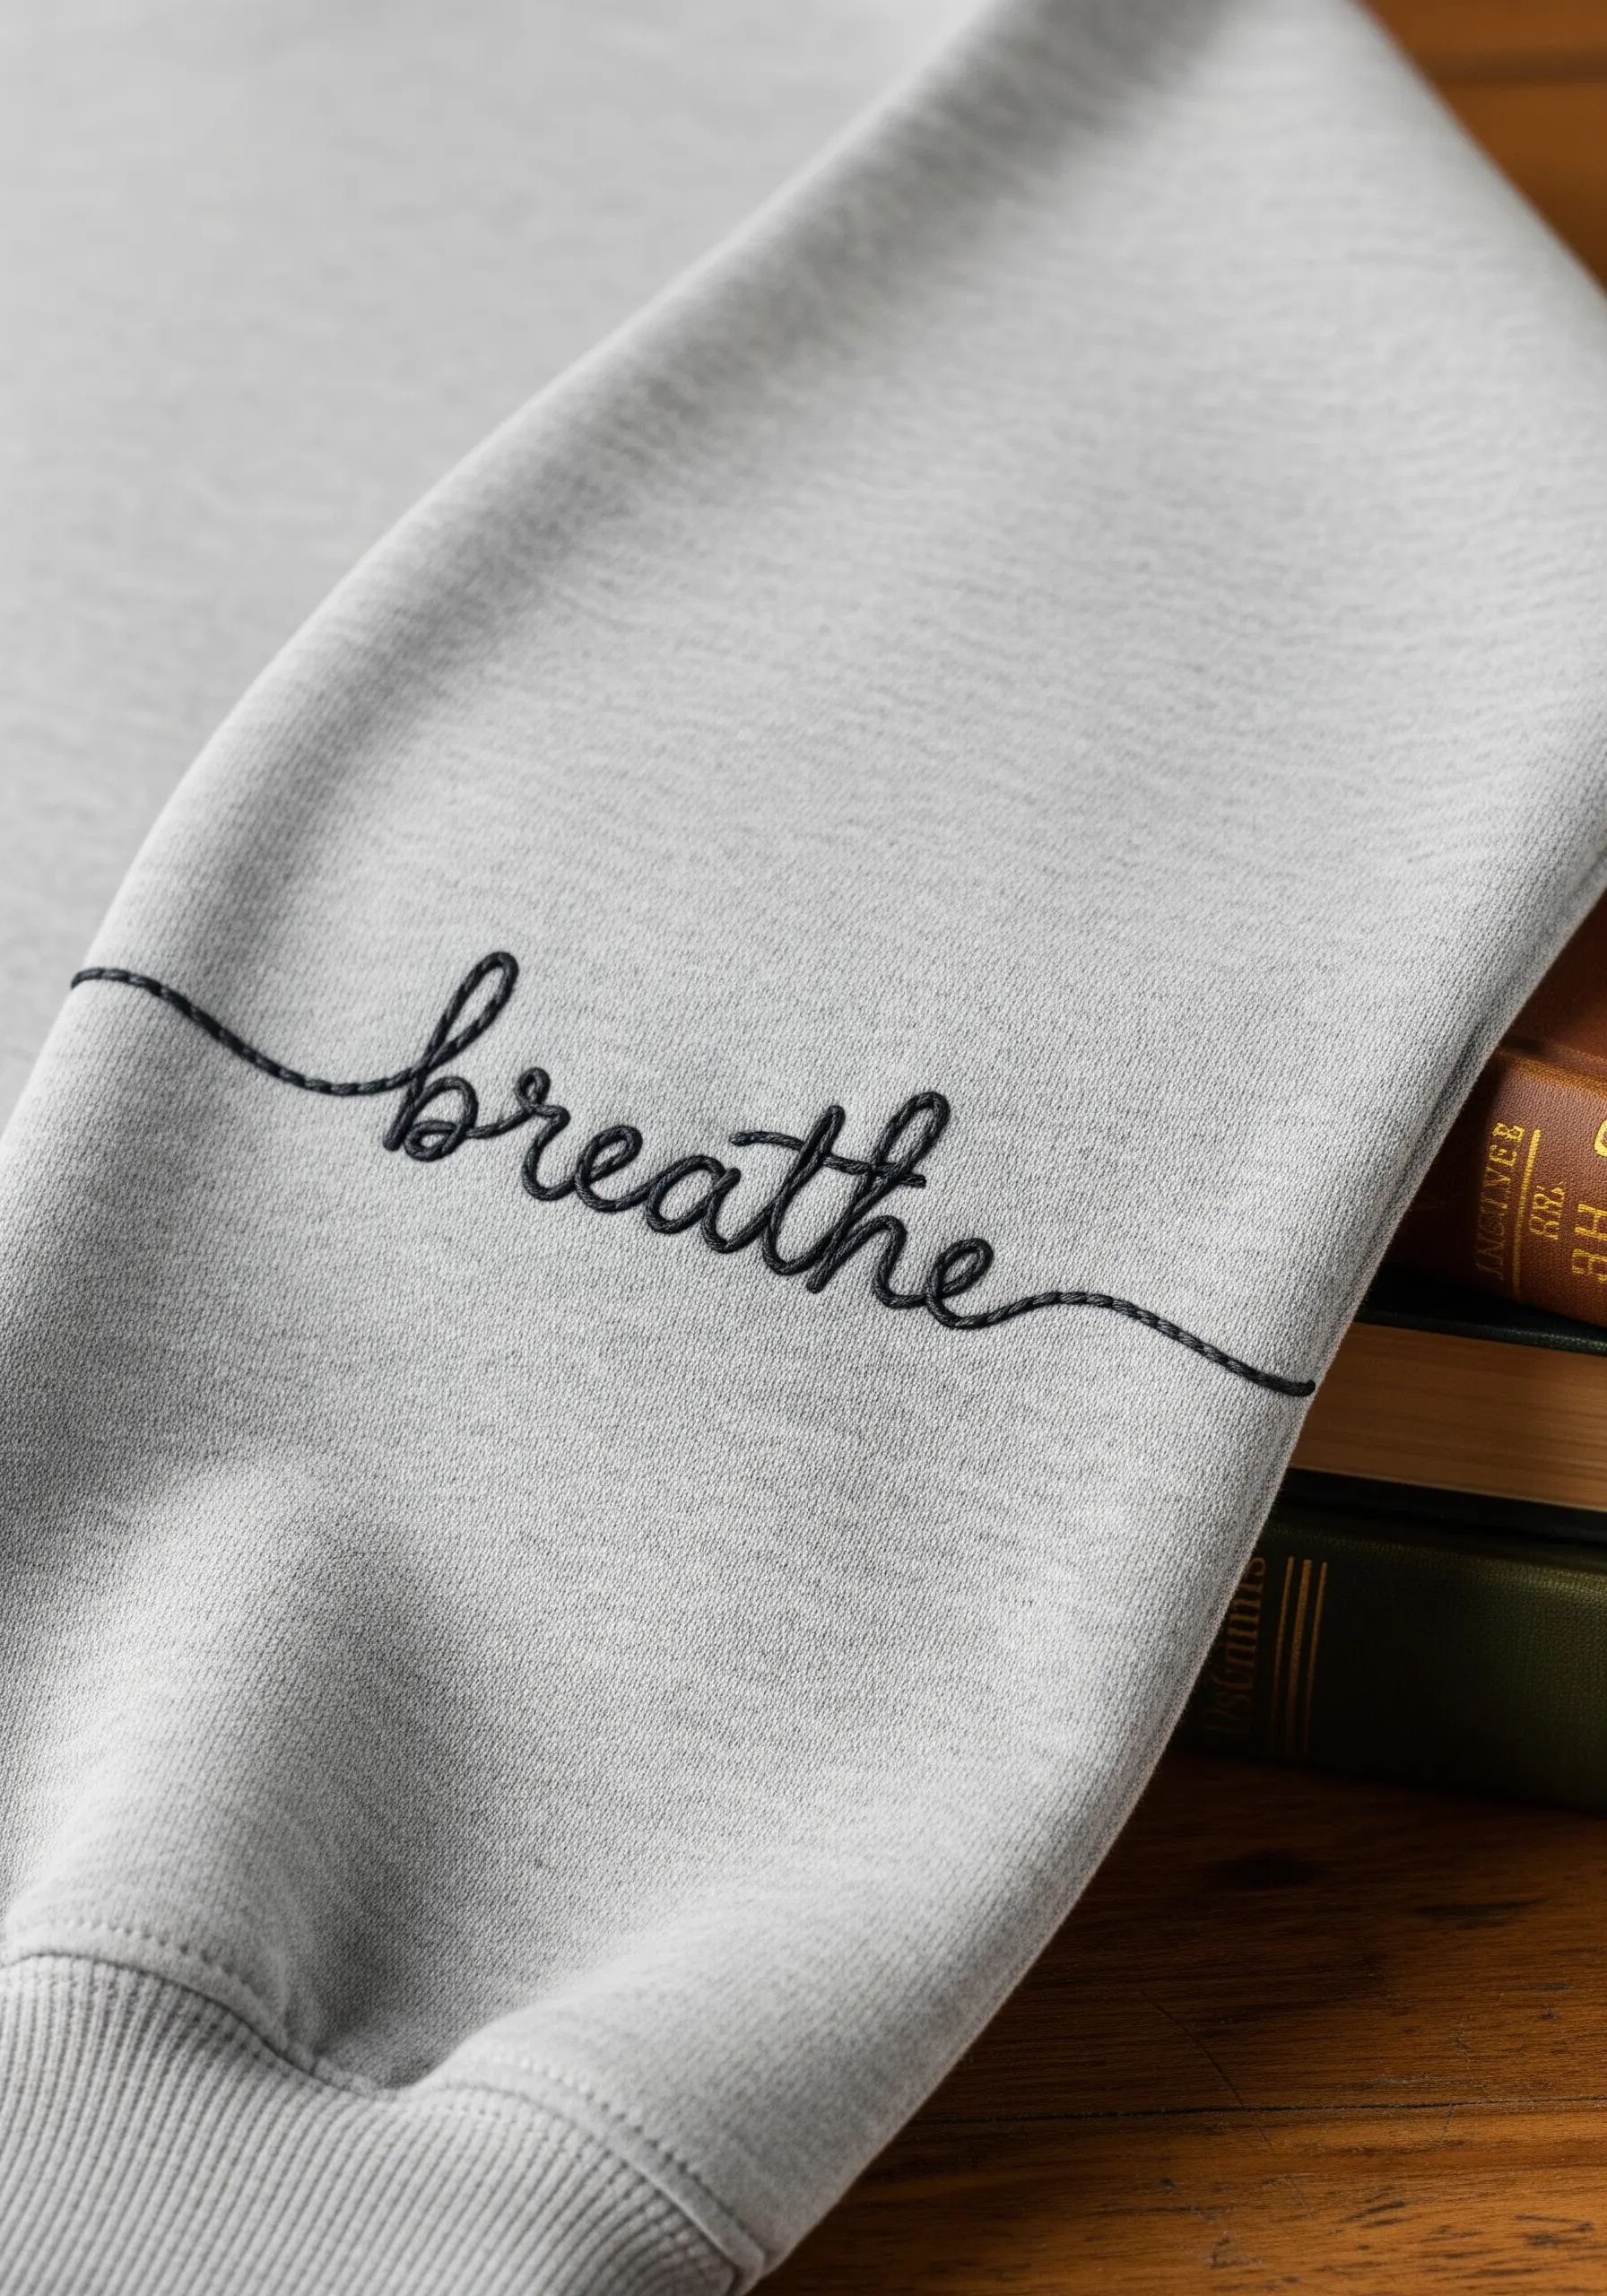
Place a small, personal word on the sleeve of a favorite sweatshirt for a subtle and meaningful touch.
For delicate, cursive lettering, a single-thread chain stitch is superior to a backstitch.
Its interconnected loops mimic the flow of handwriting, creating a more fluid and elegant line without any of the jagged edges that can appear with backstitch on curves.
Keep your stitches small and consistent to maintain the script’s legibility on the soft, fleecy fabric.
Explore other personalized embroidery ideas that turn everyday garments into cherished keepsakes.
6. Frame a Denim Yoke with a Mountain Range

Use the existing seams of a garment, like the yoke on a denim shirt, to frame a minimalist landscape.
A simple backstitch using three or four strands of floss creates a line bold enough to stand out against the texture of the denim.
The design’s power comes from its strategic use of negative space—the unstitched areas define the mountains as much as the stitched lines do.
This is one of the most effective bold back-panel embroidery designs that relies on composition, not complexity.
7. Place a Playful Motif on a Striped Tee
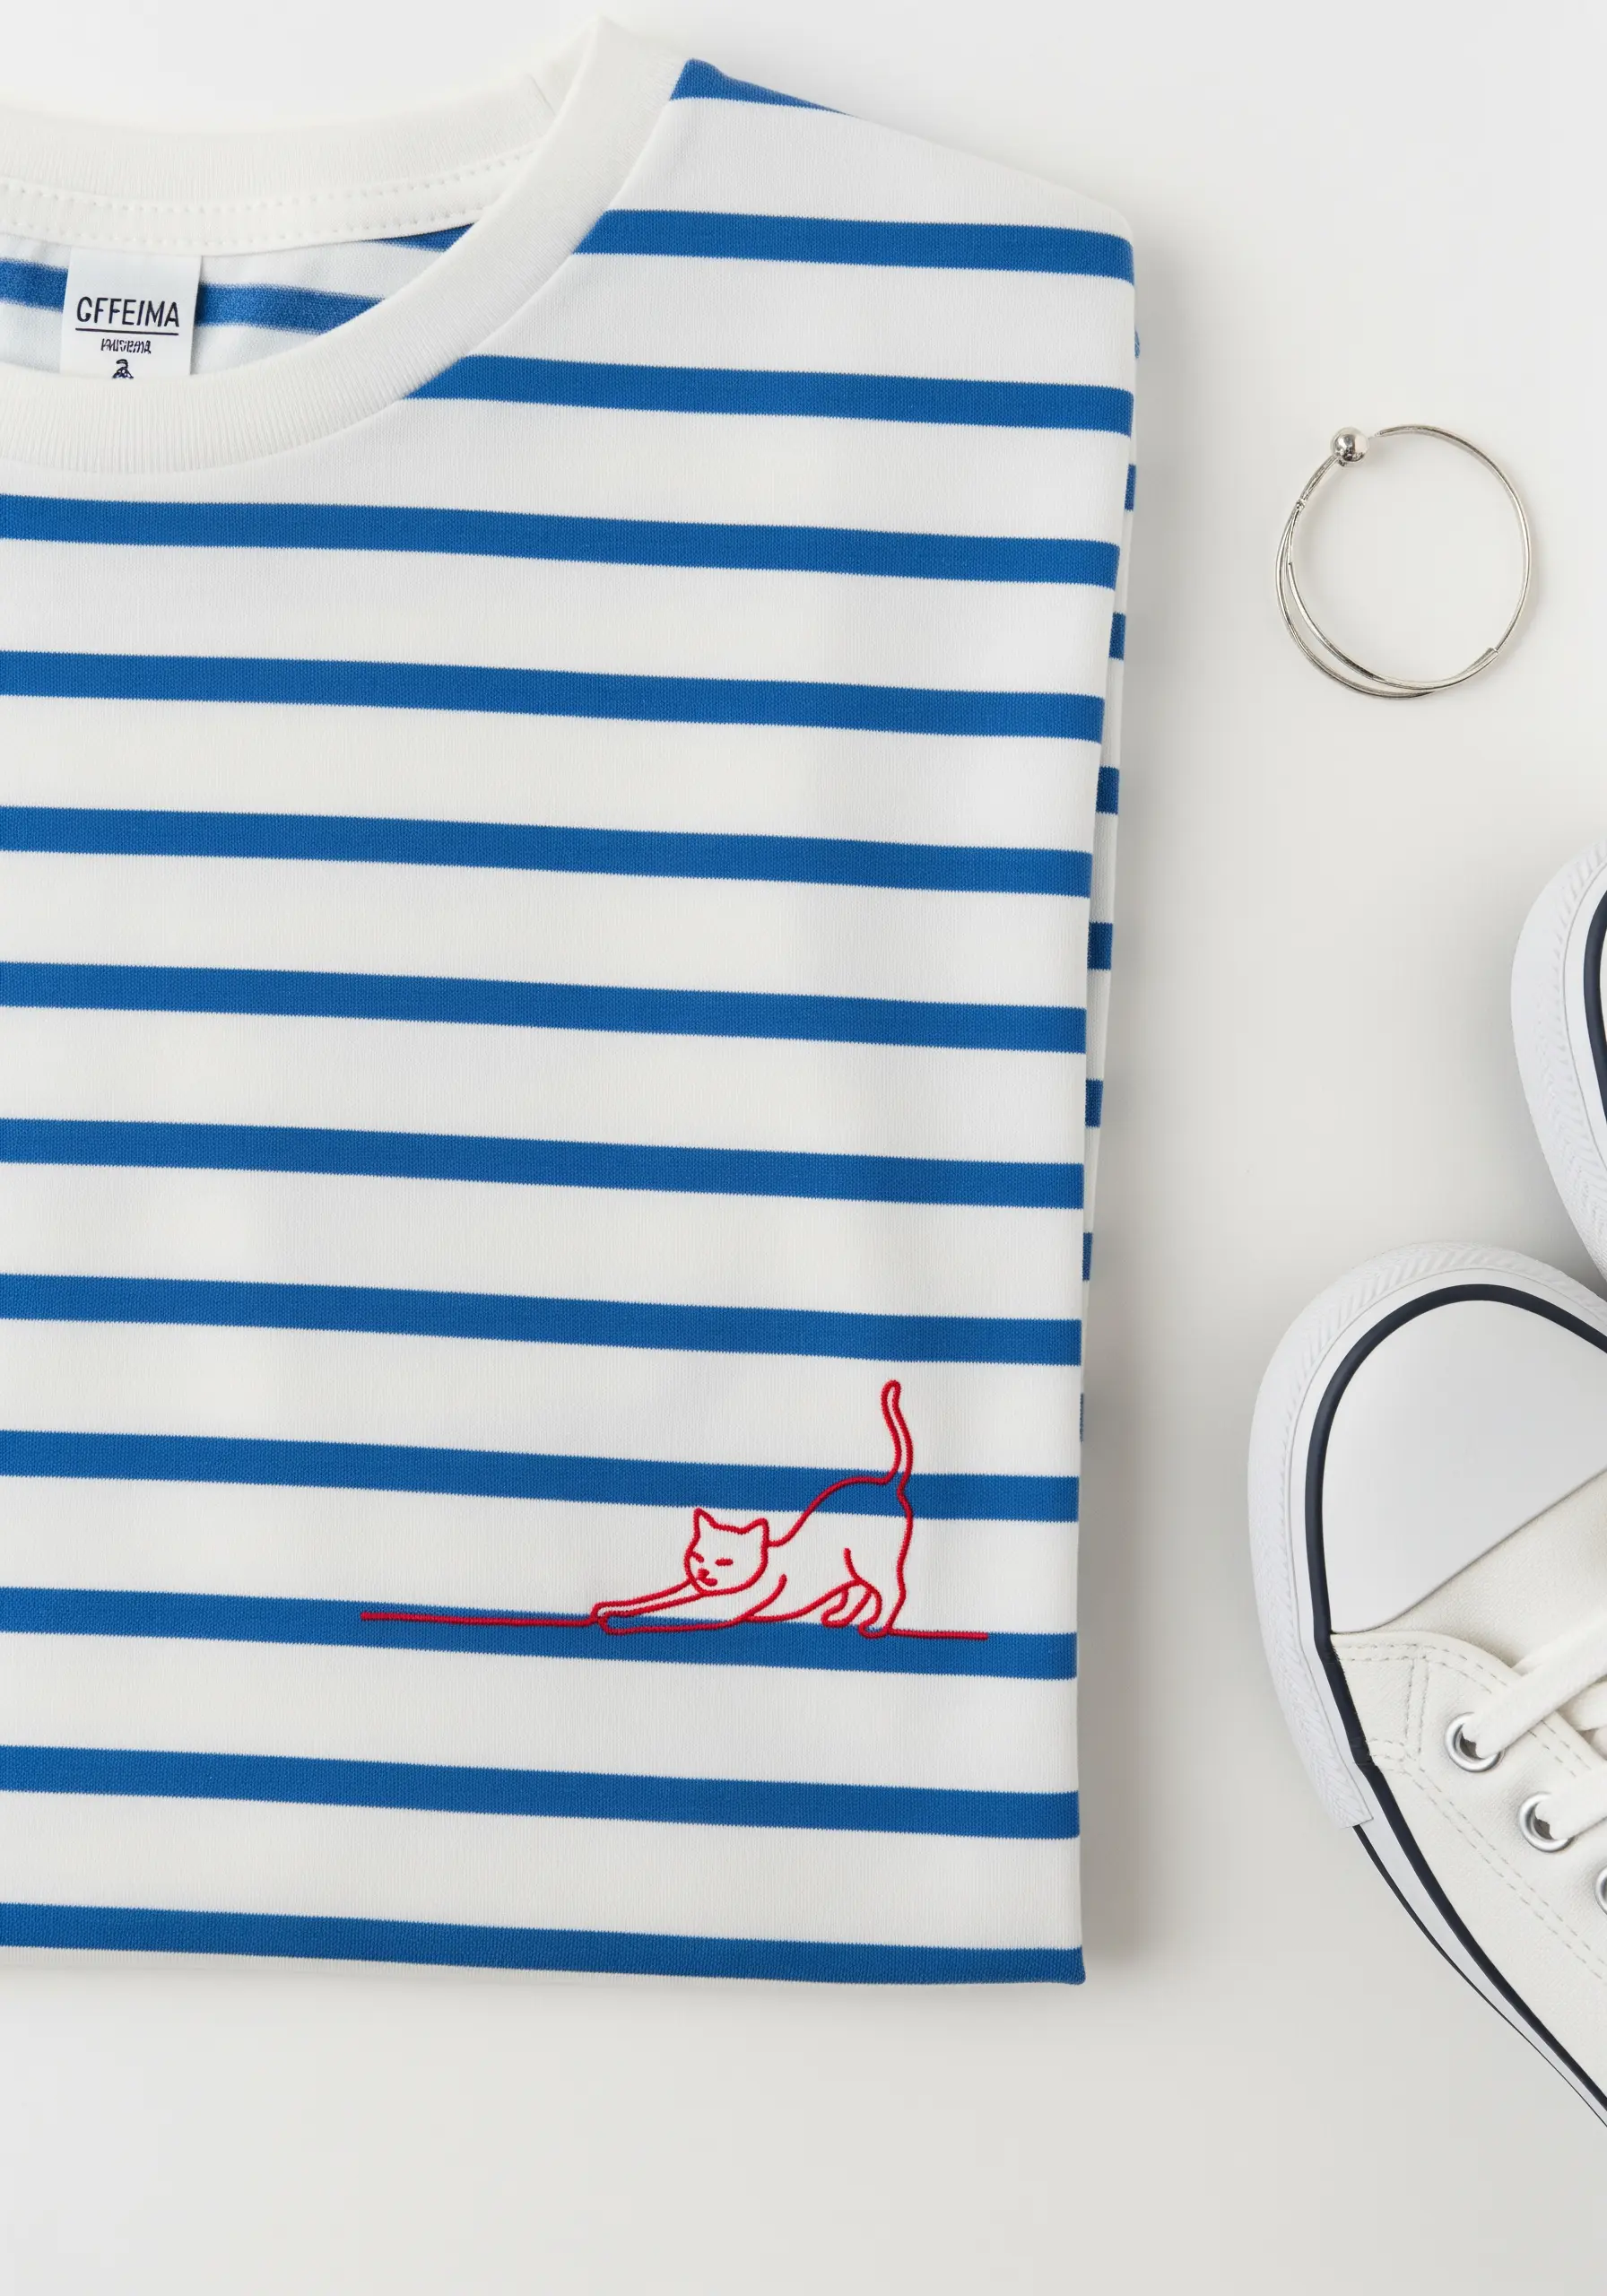
Embroidering on a patterned fabric like stripes requires careful color and placement choices.
Choose a thread color that isn’t present in the pattern—here, the bright red pops against the blue and white, creating an intentional, eye-catching accent.
Align your design with the pattern’s direction.
By grounding the cat along one of the horizontal stripes, the motif feels integrated with the shirt’s design rather than randomly placed.
This is one of those sneaky small embroidery ideas on clothing that make people look twice and smile.
8. Elevate Table Linens with a Simple Icon
A single, well-placed motif can transform an ordinary cloth napkin into a piece of custom table decor.
On a textured linen fabric, use a whipped backstitch to create an outline that sits cleanly on the surface without getting lost in the weave.
First, create a standard backstitch outline, then lace a second thread through the stitches without piercing the fabric.
This technique smooths out the segmented look of a backstitch, resulting in a refined, continuous line perfect to elevate your dining space.
9. Stitch a Constellation on a Denim Pocket
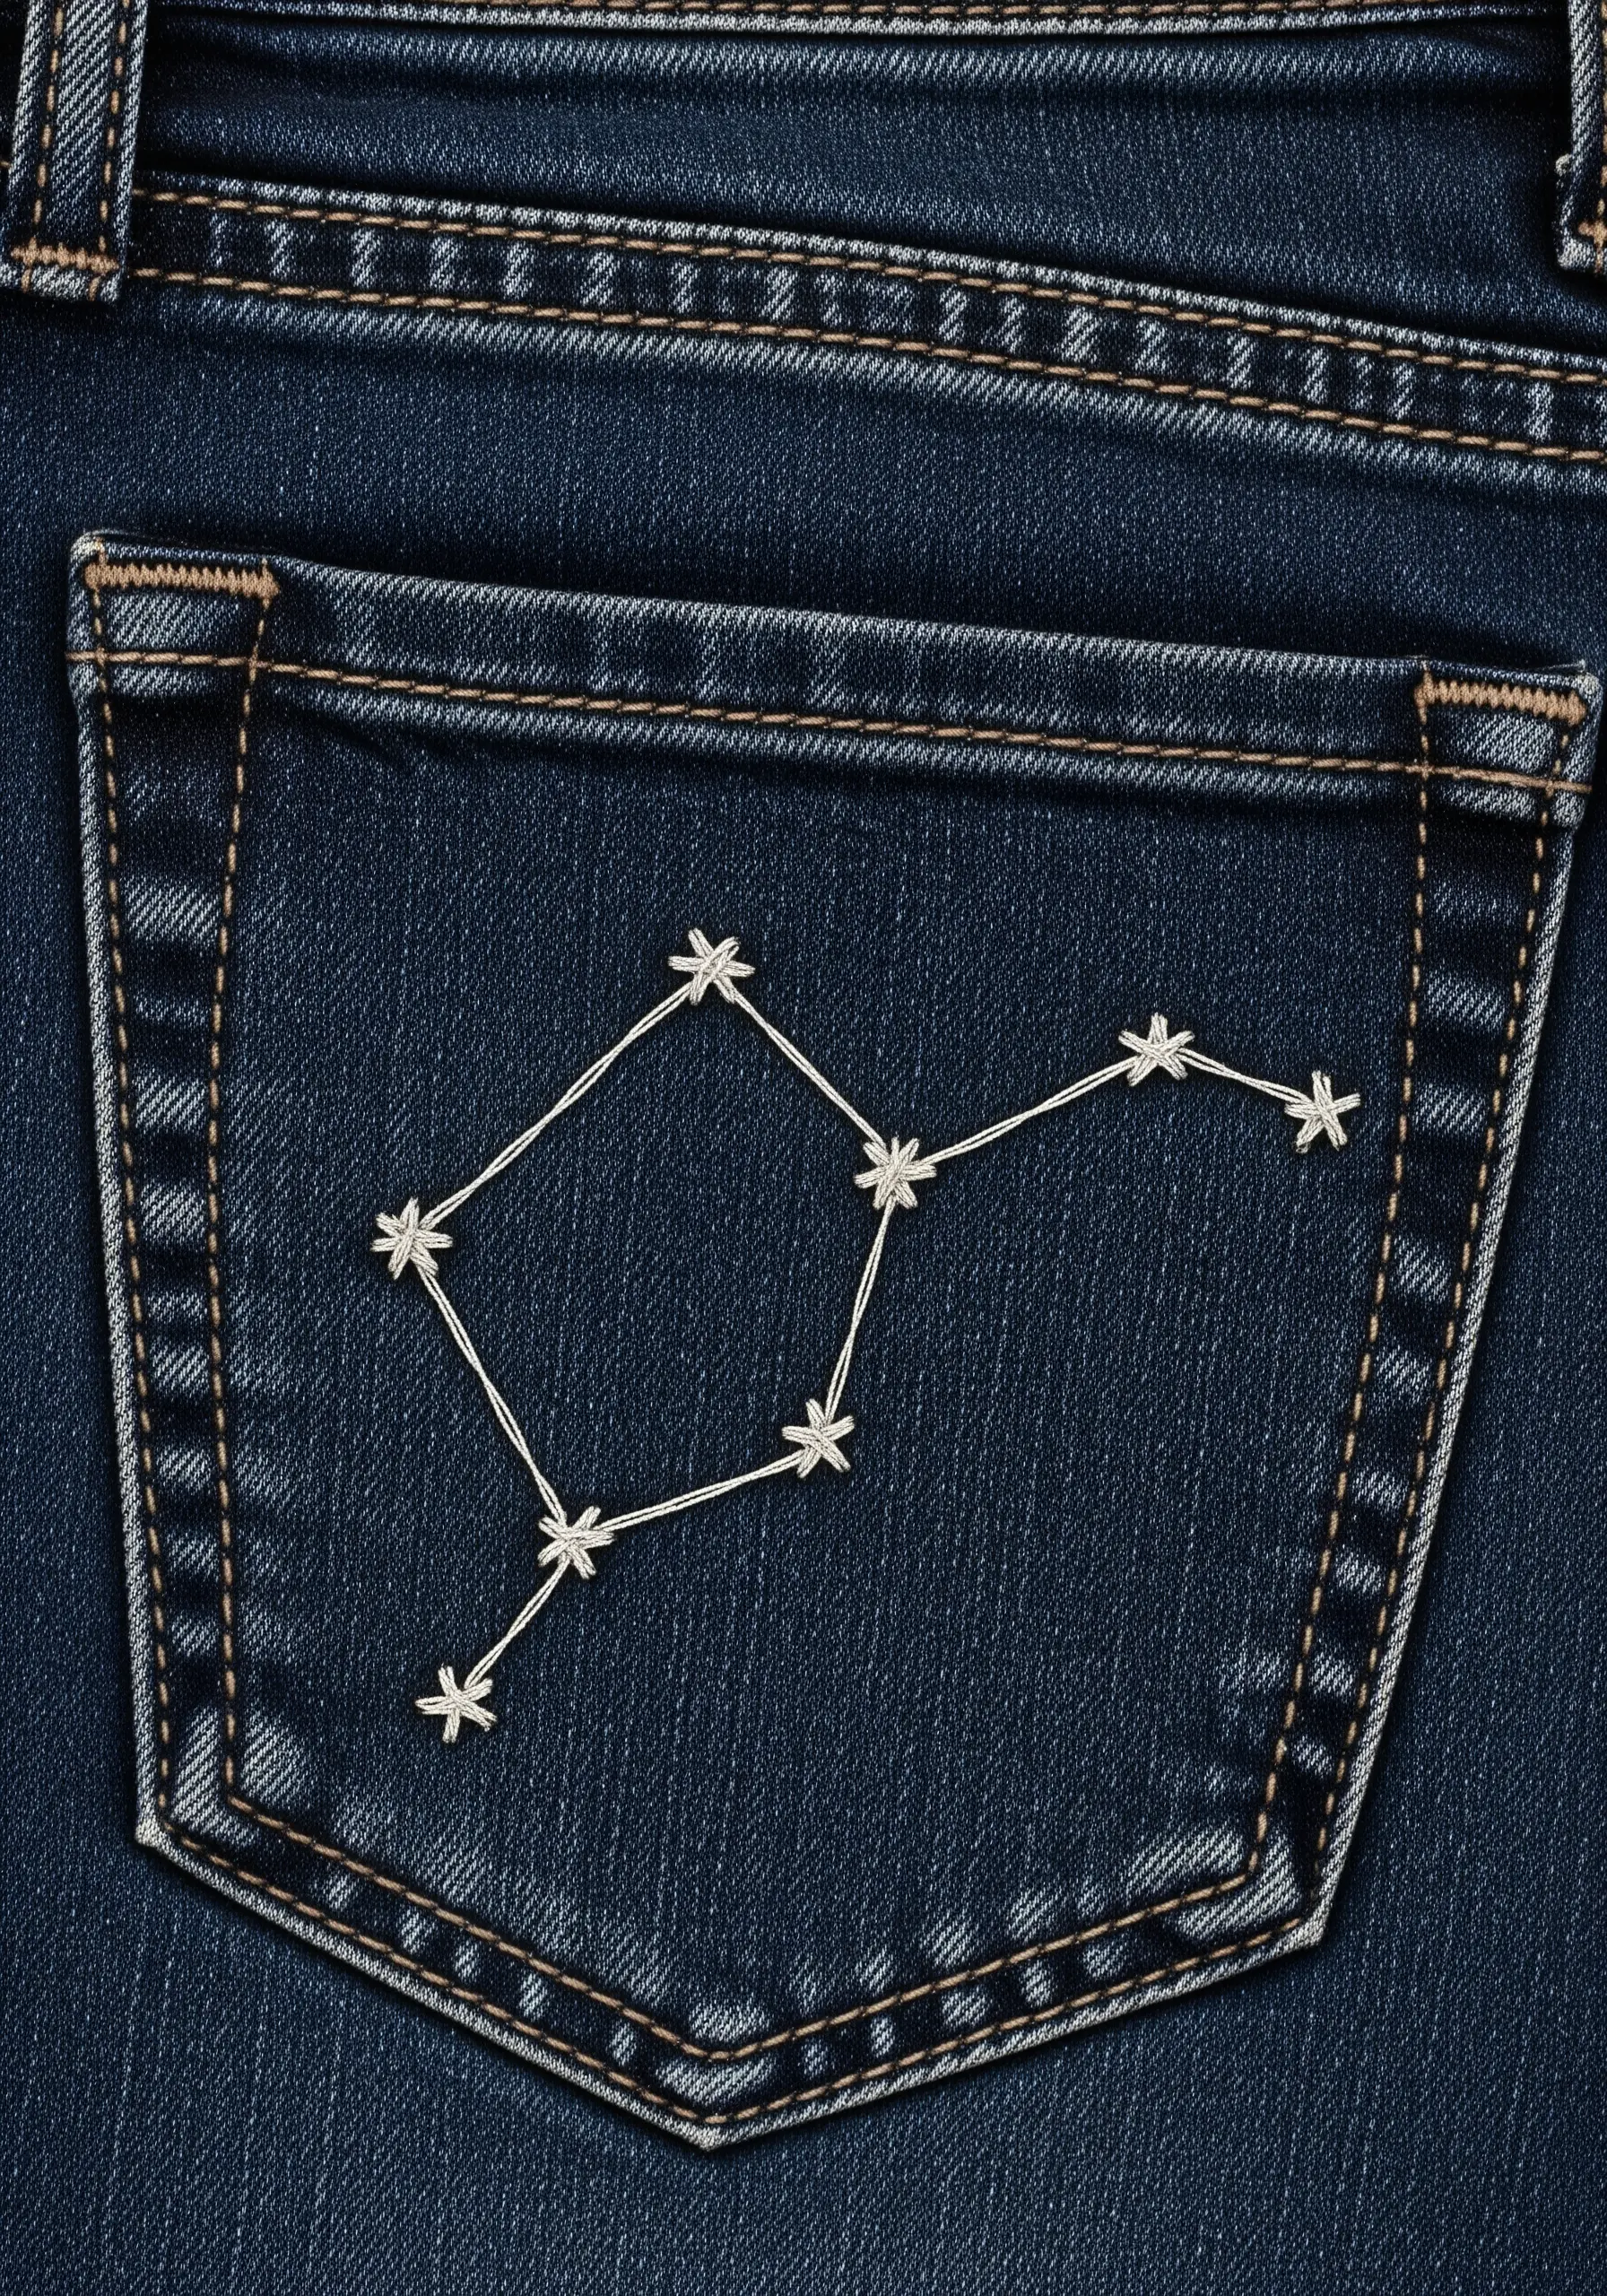
Turn a denim pocket into a tiny canvas for a celestial design.
For the stars, instead of French knots which can snag, use a simple star stitch or an asterisk stitch made of three intersecting straight stitches.
This creates a clean, graphic star shape that lies flat against the durable denim fabric.
Connect the stars with a delicate backstitch using just two strands of floss to keep the connecting lines subtle.
These are the kinds of tiny motifs that instantly add personality to jeans without overwhelming them.
10. Add a Graphic Statement to a Baseball Cap

Embroidering on a structured, curved item like a cap requires a sharp needle and good stabilization.
Use a heavy-duty self-adhesive stabilizer on the inside of the cap front to create a firm, flat surface for stitching.
This prevents the fabric from puckering and ensures your stitches are even and tight.
A bold, high-contrast design in a simple backstitch is most effective, as intricate details can get lost on the heavy twill fabric.
With this method, you can easily transform your accessories into custom pieces.
11. Weave a Botanical Motif Between Buttons

The space between buttons on a dress shirt is the perfect unconventional spot for a vertical botanical design.
To create the delicate veins of a ginkgo leaf, use a fishbone stitch.
This stitch creates a central spine with angled stitches branching out, perfectly mimicking the natural texture and growth pattern of a leaf.
The result is a design with beautiful movement and depth, achieved with just one stitch type and a single thread color.
Consider these kinds of surprising floral collar embroidery patterns to refresh your wardrobe.
12. Drape an Abstract Line Across a Bodice
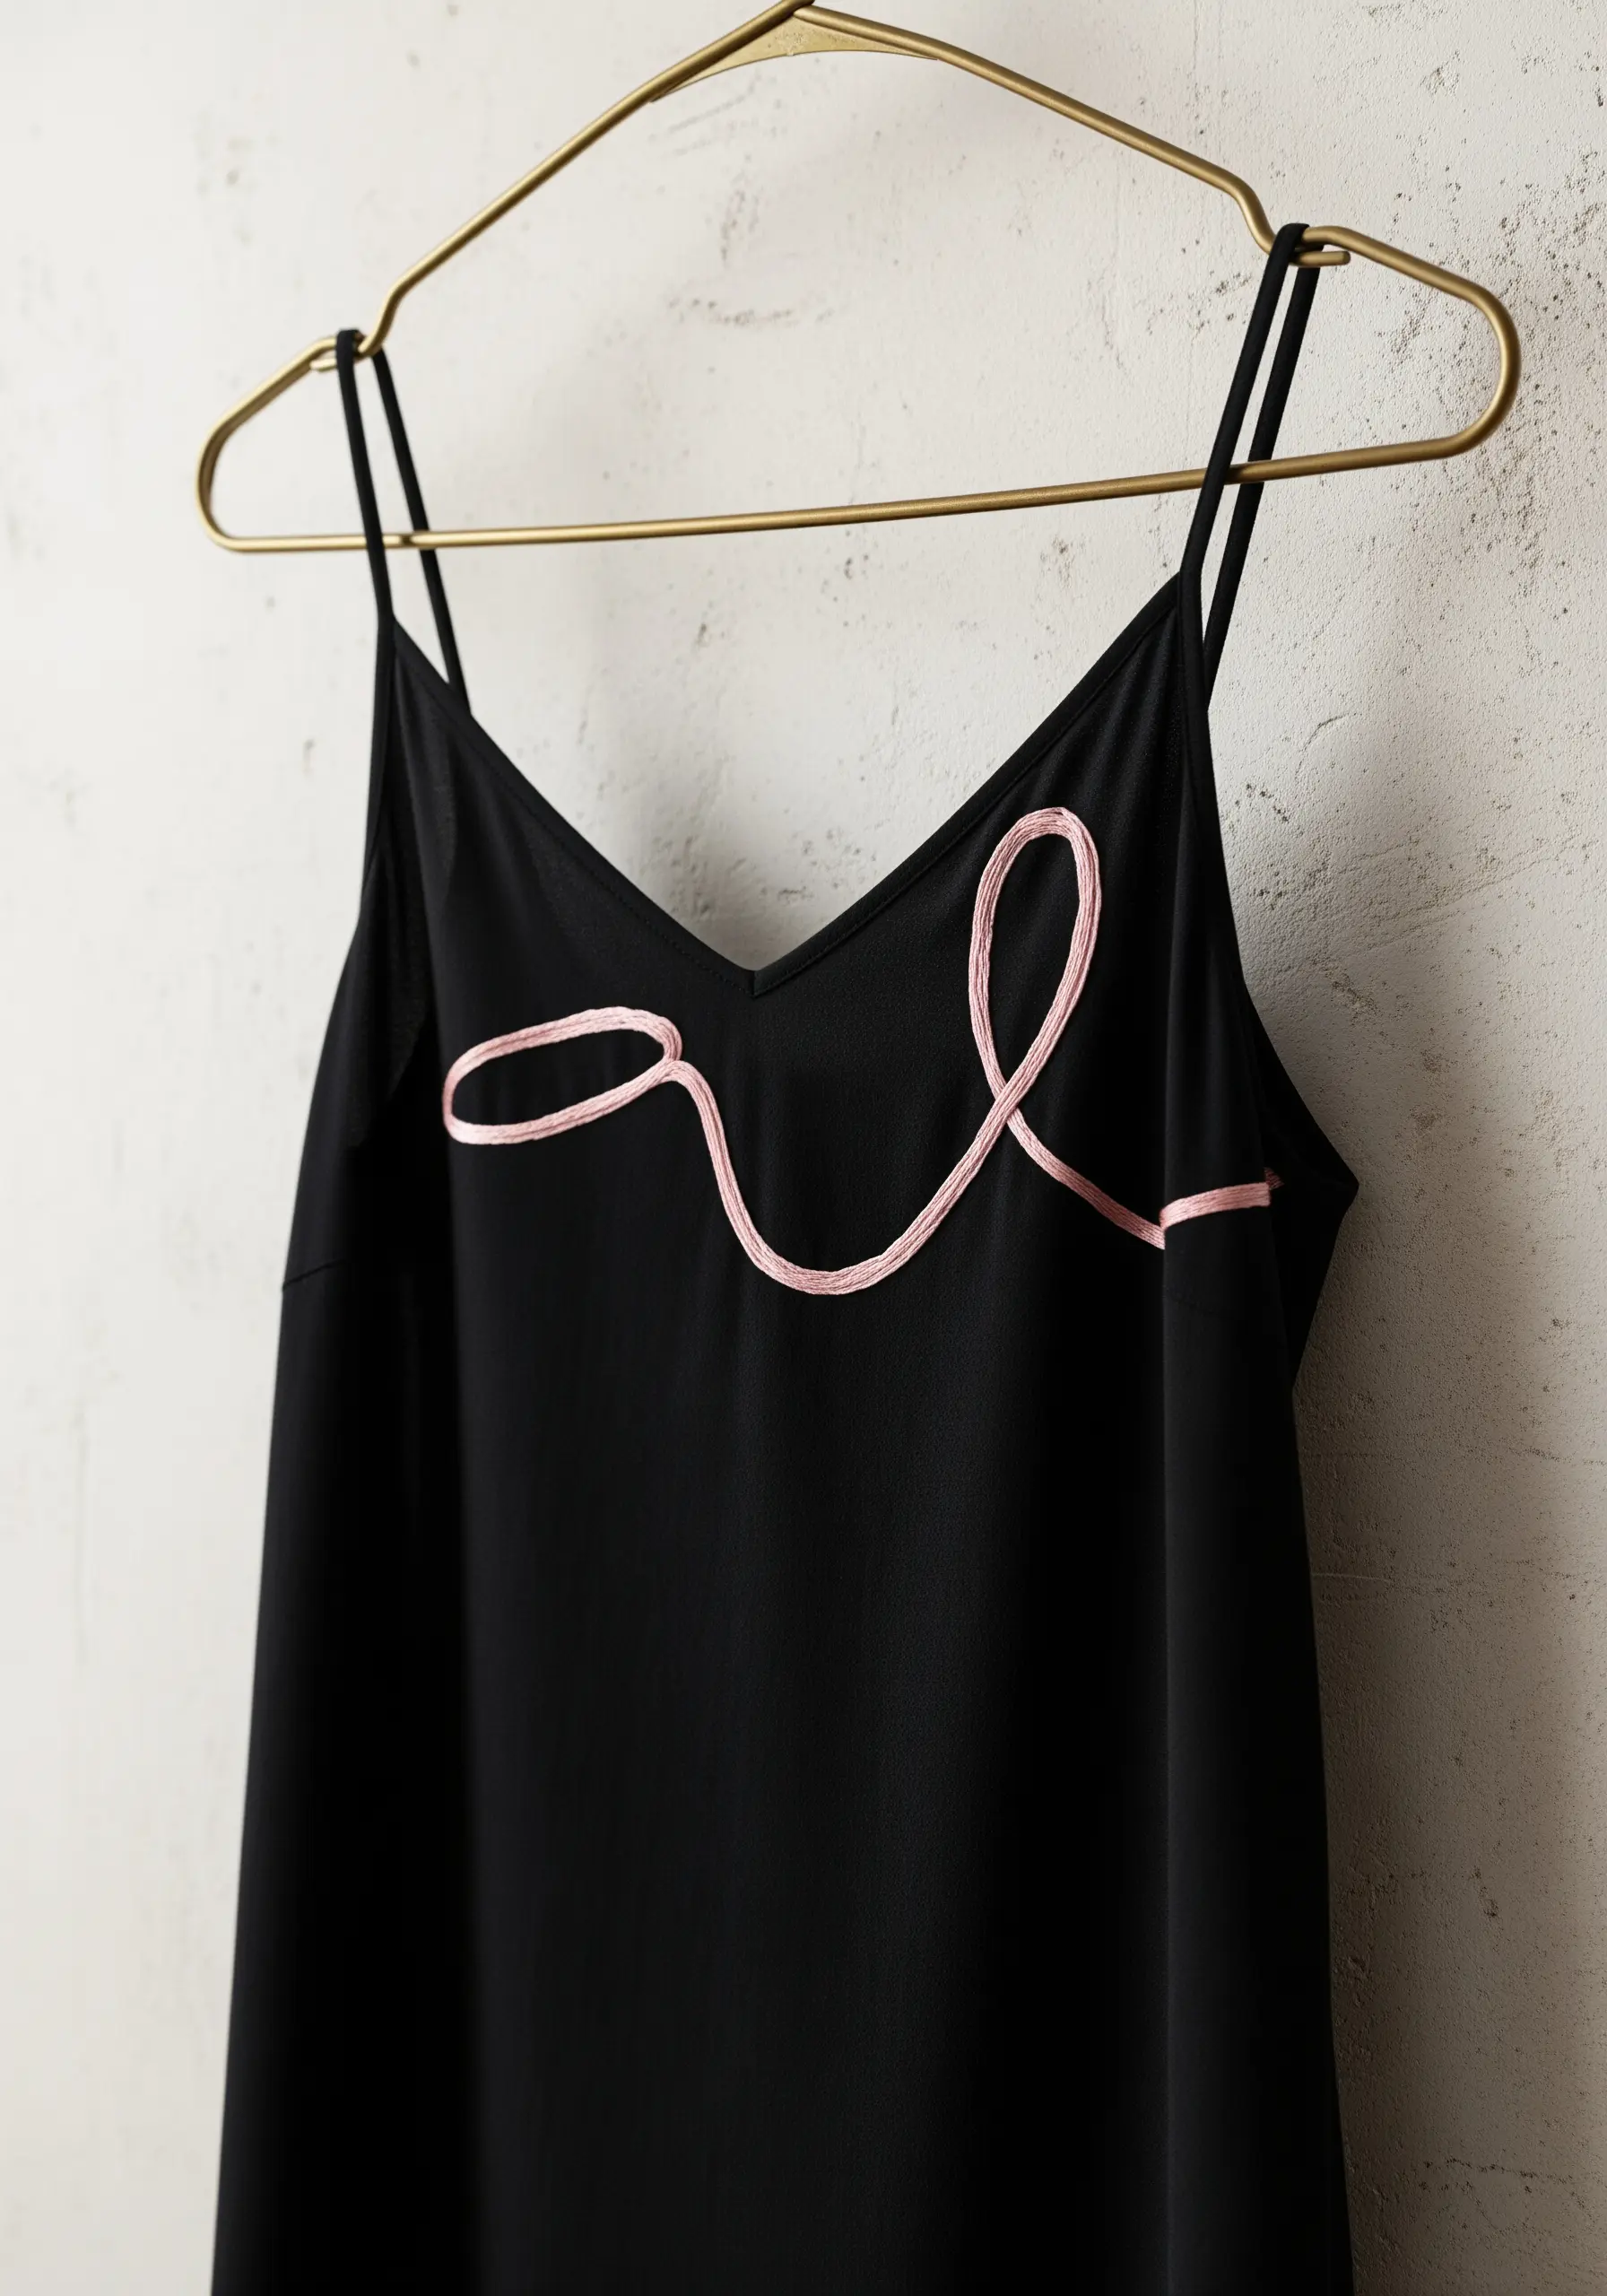
For a bold, sculptural effect on delicate or drapey fabrics like silk or rayon, traditional stitching can sometimes pucker the material.
Instead, try couching.
Lay down a thicker cord, yarn, or even a bundle of embroidery floss along your design line, then use a single, fine strand of matching thread to tack it down with small, invisible stitches.
This technique adds dramatic texture and dimension without pulling or distorting the lightweight fabric, resulting in modern thread designs that feel both graphic and soft.
13. Personalize Canvas Sneakers with an Icon
Embroidering on canvas sneakers adds a unique touch, but you must choose your tools and stitches wisely for durability.
Use a sharp, heavy-duty needle (a denim needle works well) to pierce the tough canvas without straining your hands.
Opt for a durable stitch like a backstitch or split stitch, and use all six strands of your floss for a bold line that can withstand wear.
This is a simple way to turn ordinary clothes into art, or in this case, footwear.
14. Add a Subtle Bloom to Ribbed Socks

Stitching on ribbed, stretchy fabric like socks requires a gentle touch to avoid ruining the garment’s elasticity.
Use a ballpoint needle, which is designed to slip between the knit fibers rather than piercing and breaking them.
Keep your stitch tension slightly loose to allow the fabric to stretch naturally when worn.
Finally, a simple, open design like this line-art flower works best, as dense-fill stitches would restrict the stretch and look distorted.
You can apply this same technique to other small floral embroidery patterns for everyday outfits on knit fabrics.
15. Sketch a Skyline on a Knit Sweater

The ribbed hem of a knit sweater provides a natural, linear canvas for an urban skyline motif.
To prevent your stitches from sinking into the knit texture, use a waste canvas or a water-soluble stabilizer on top of the fabric.
This provides a temporary grid for uniform stitches and ensures your design sits crisply on the surface.
A simple backstitch is all you need for these modern thread landscape projects, allowing the minimalist form to be the hero.
16. Create a Whimsical Flight Path with Metallic Thread
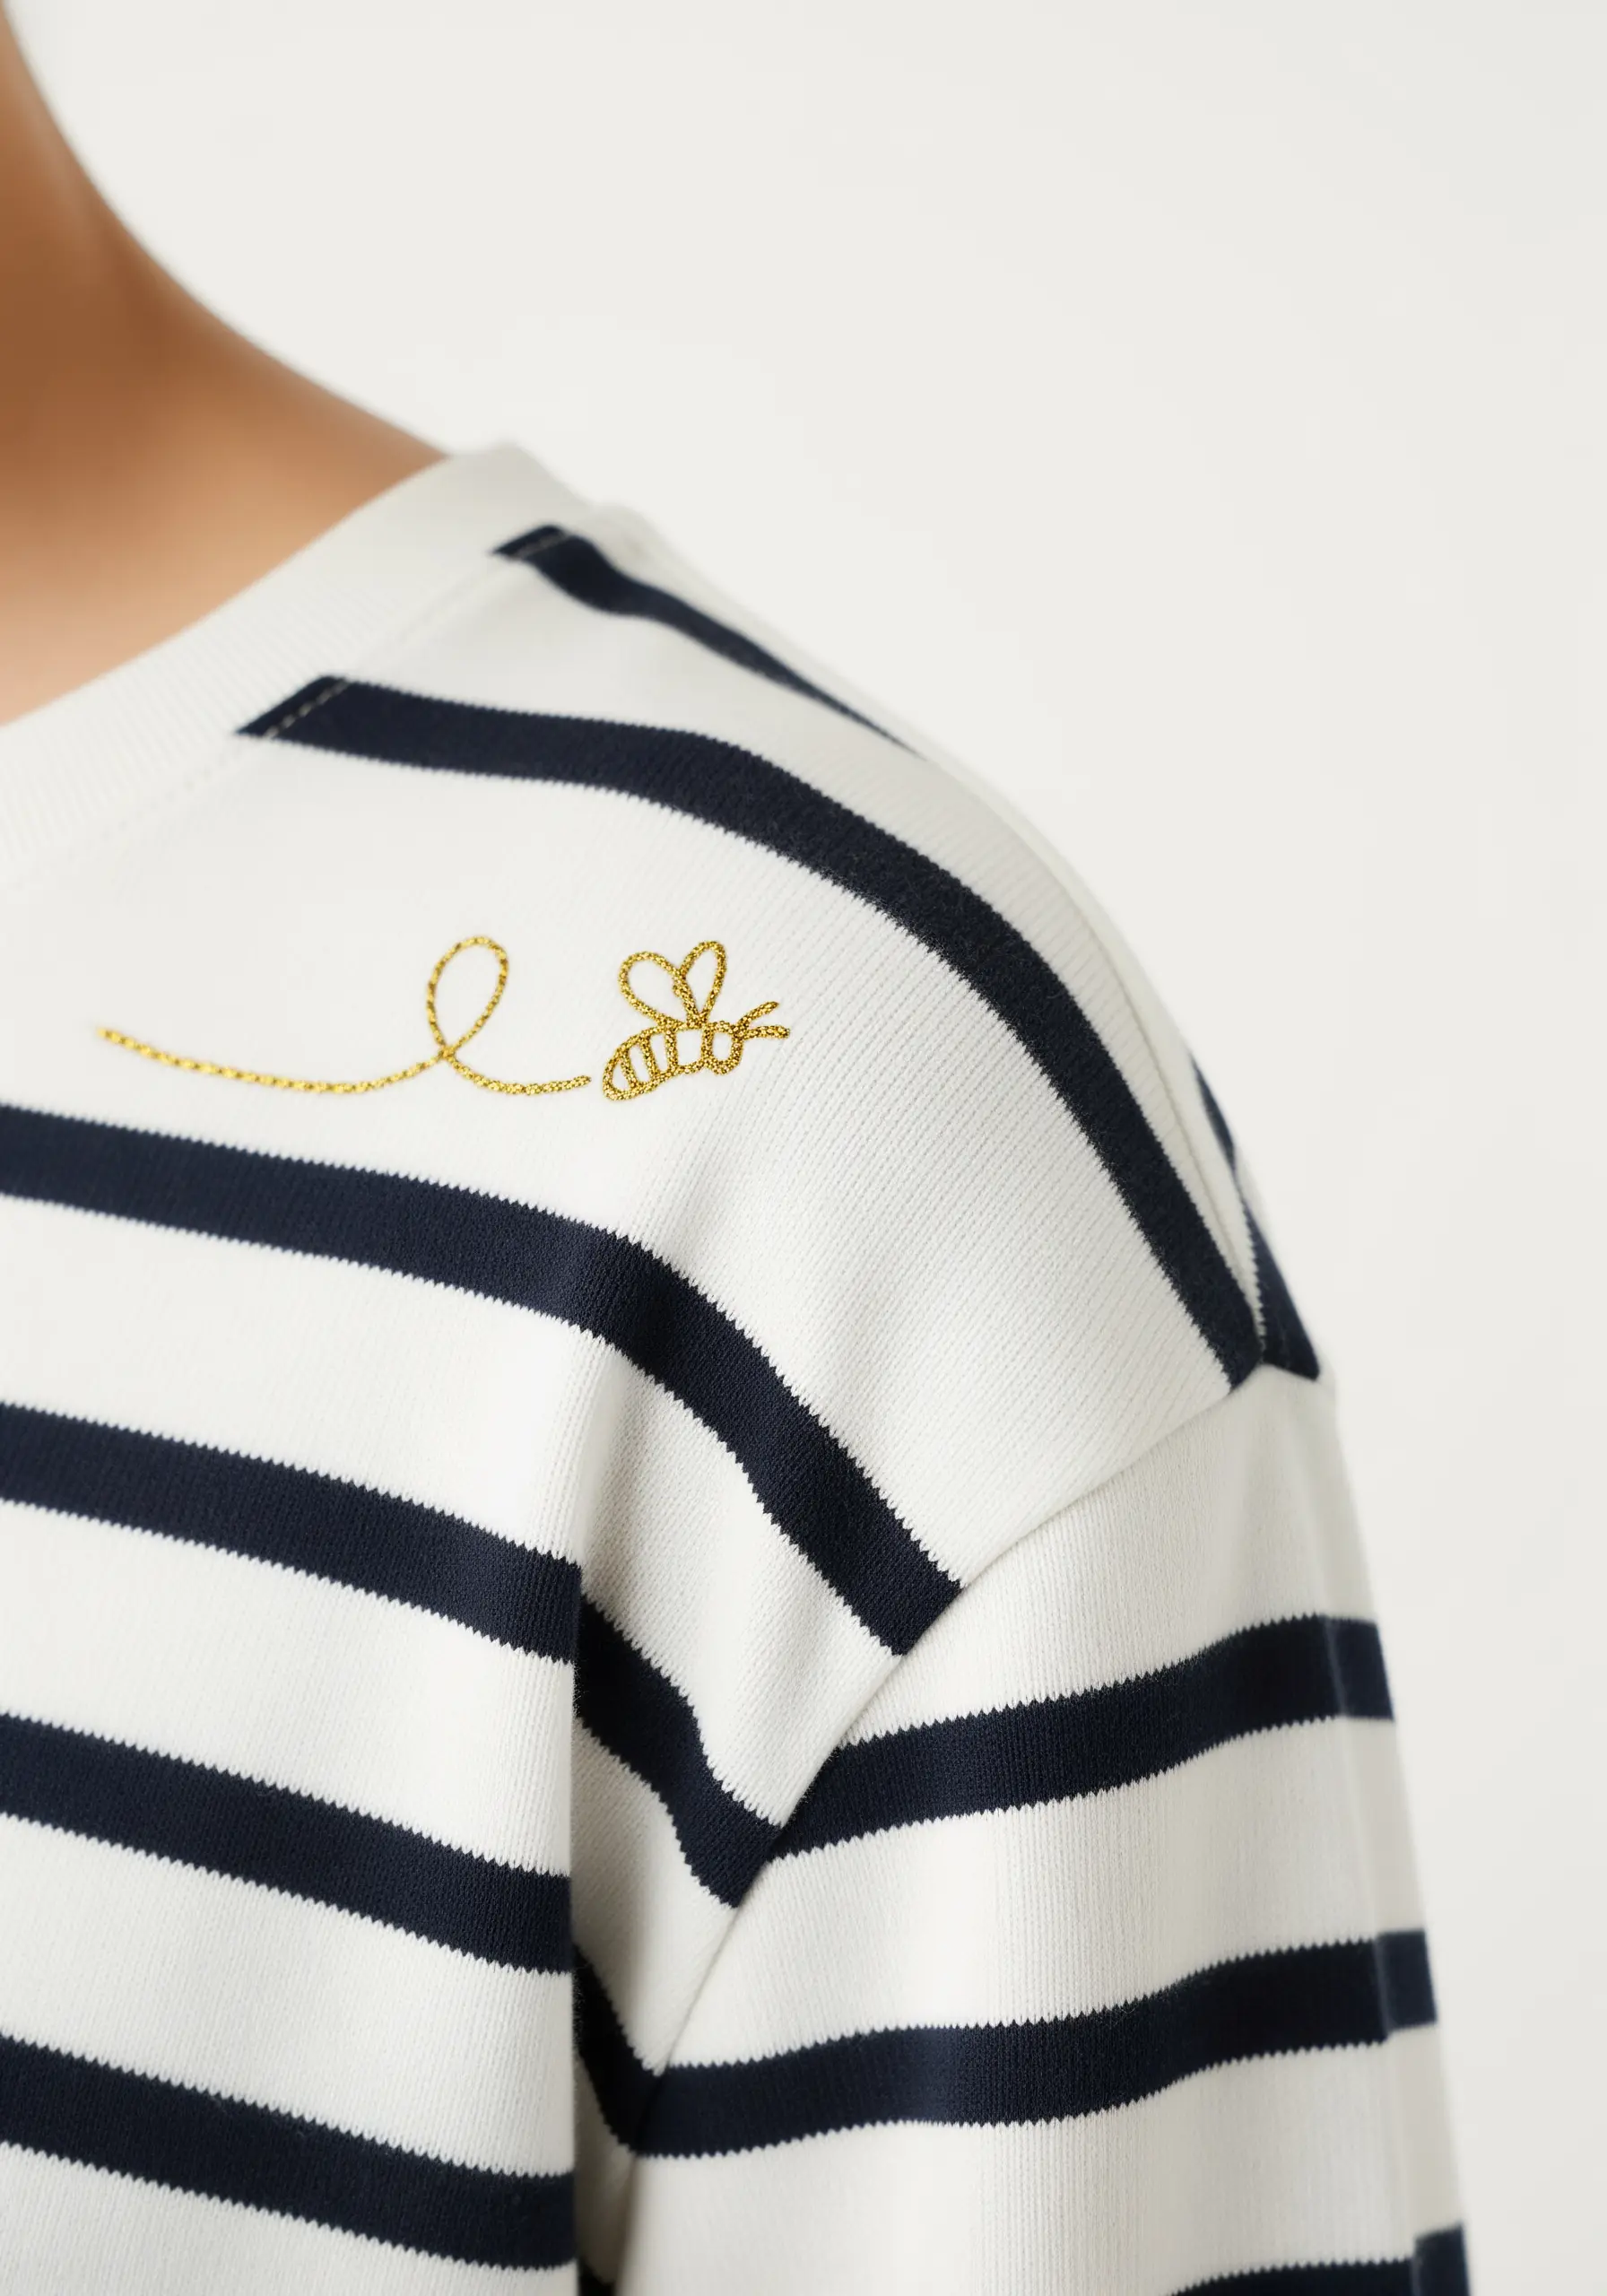
Add a touch of magic to a simple garment with a flight path rendered in metallic thread.
Metallic floss can be tricky to work with as it tends to tangle and fray.
The secret is to use much shorter lengths of thread than you normally would (no more than 12 inches) and work with a thread conditioner like beeswax.
This will help the fibers glide smoothly through the fabric, making it easier to create graceful, shimmering lines and unexpected ways to use metallic thread.
17. Add a Paper Plane Motif to a Backpack
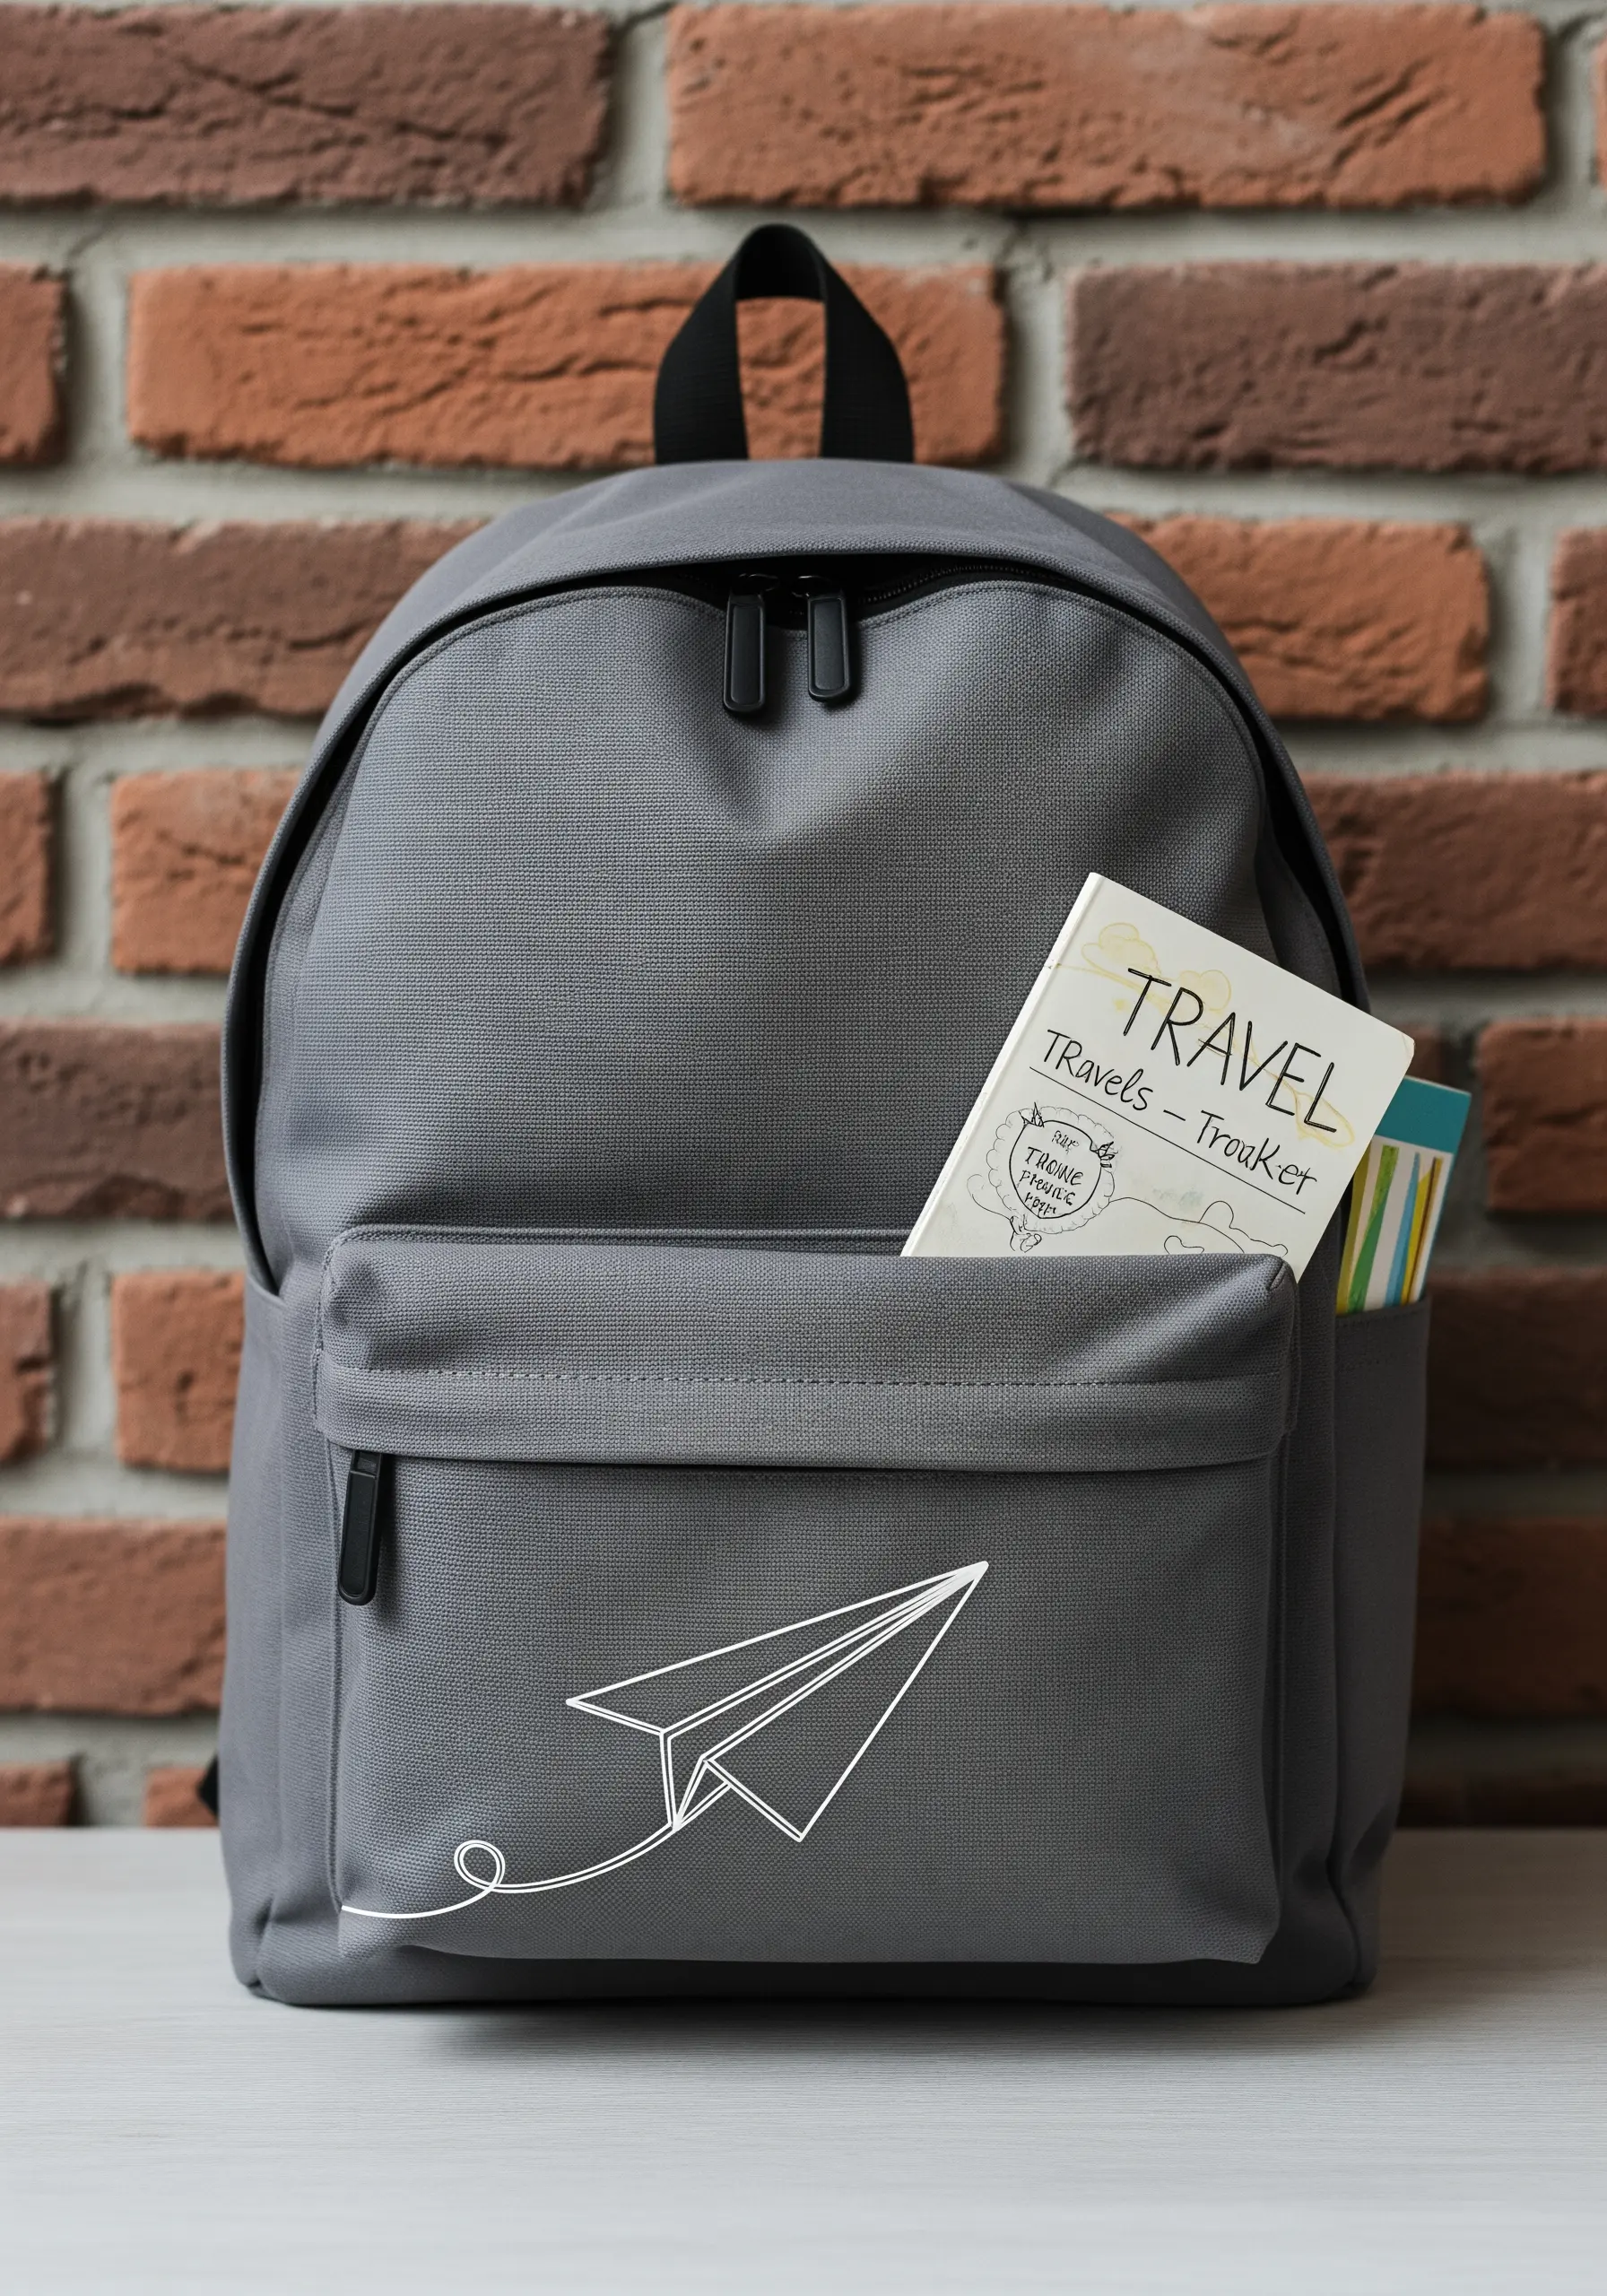
A simple, graphic motif can completely personalize a plain backpack.
For sturdy, tightly woven fabrics like backpack canvas, ensure your design lines are bold and clear.
Use a stem stitch with all six strands of floss to create a raised, cord-like line that won’t get lost on the textured surface.
The slight twist of the stem stitch adds a dynamic quality that complements the motion of the paper plane design.
This approach works beautifully for many tote bag embroidery projects using scrap fabric as well.
18. Embellish a Lapel with a Silver Feather
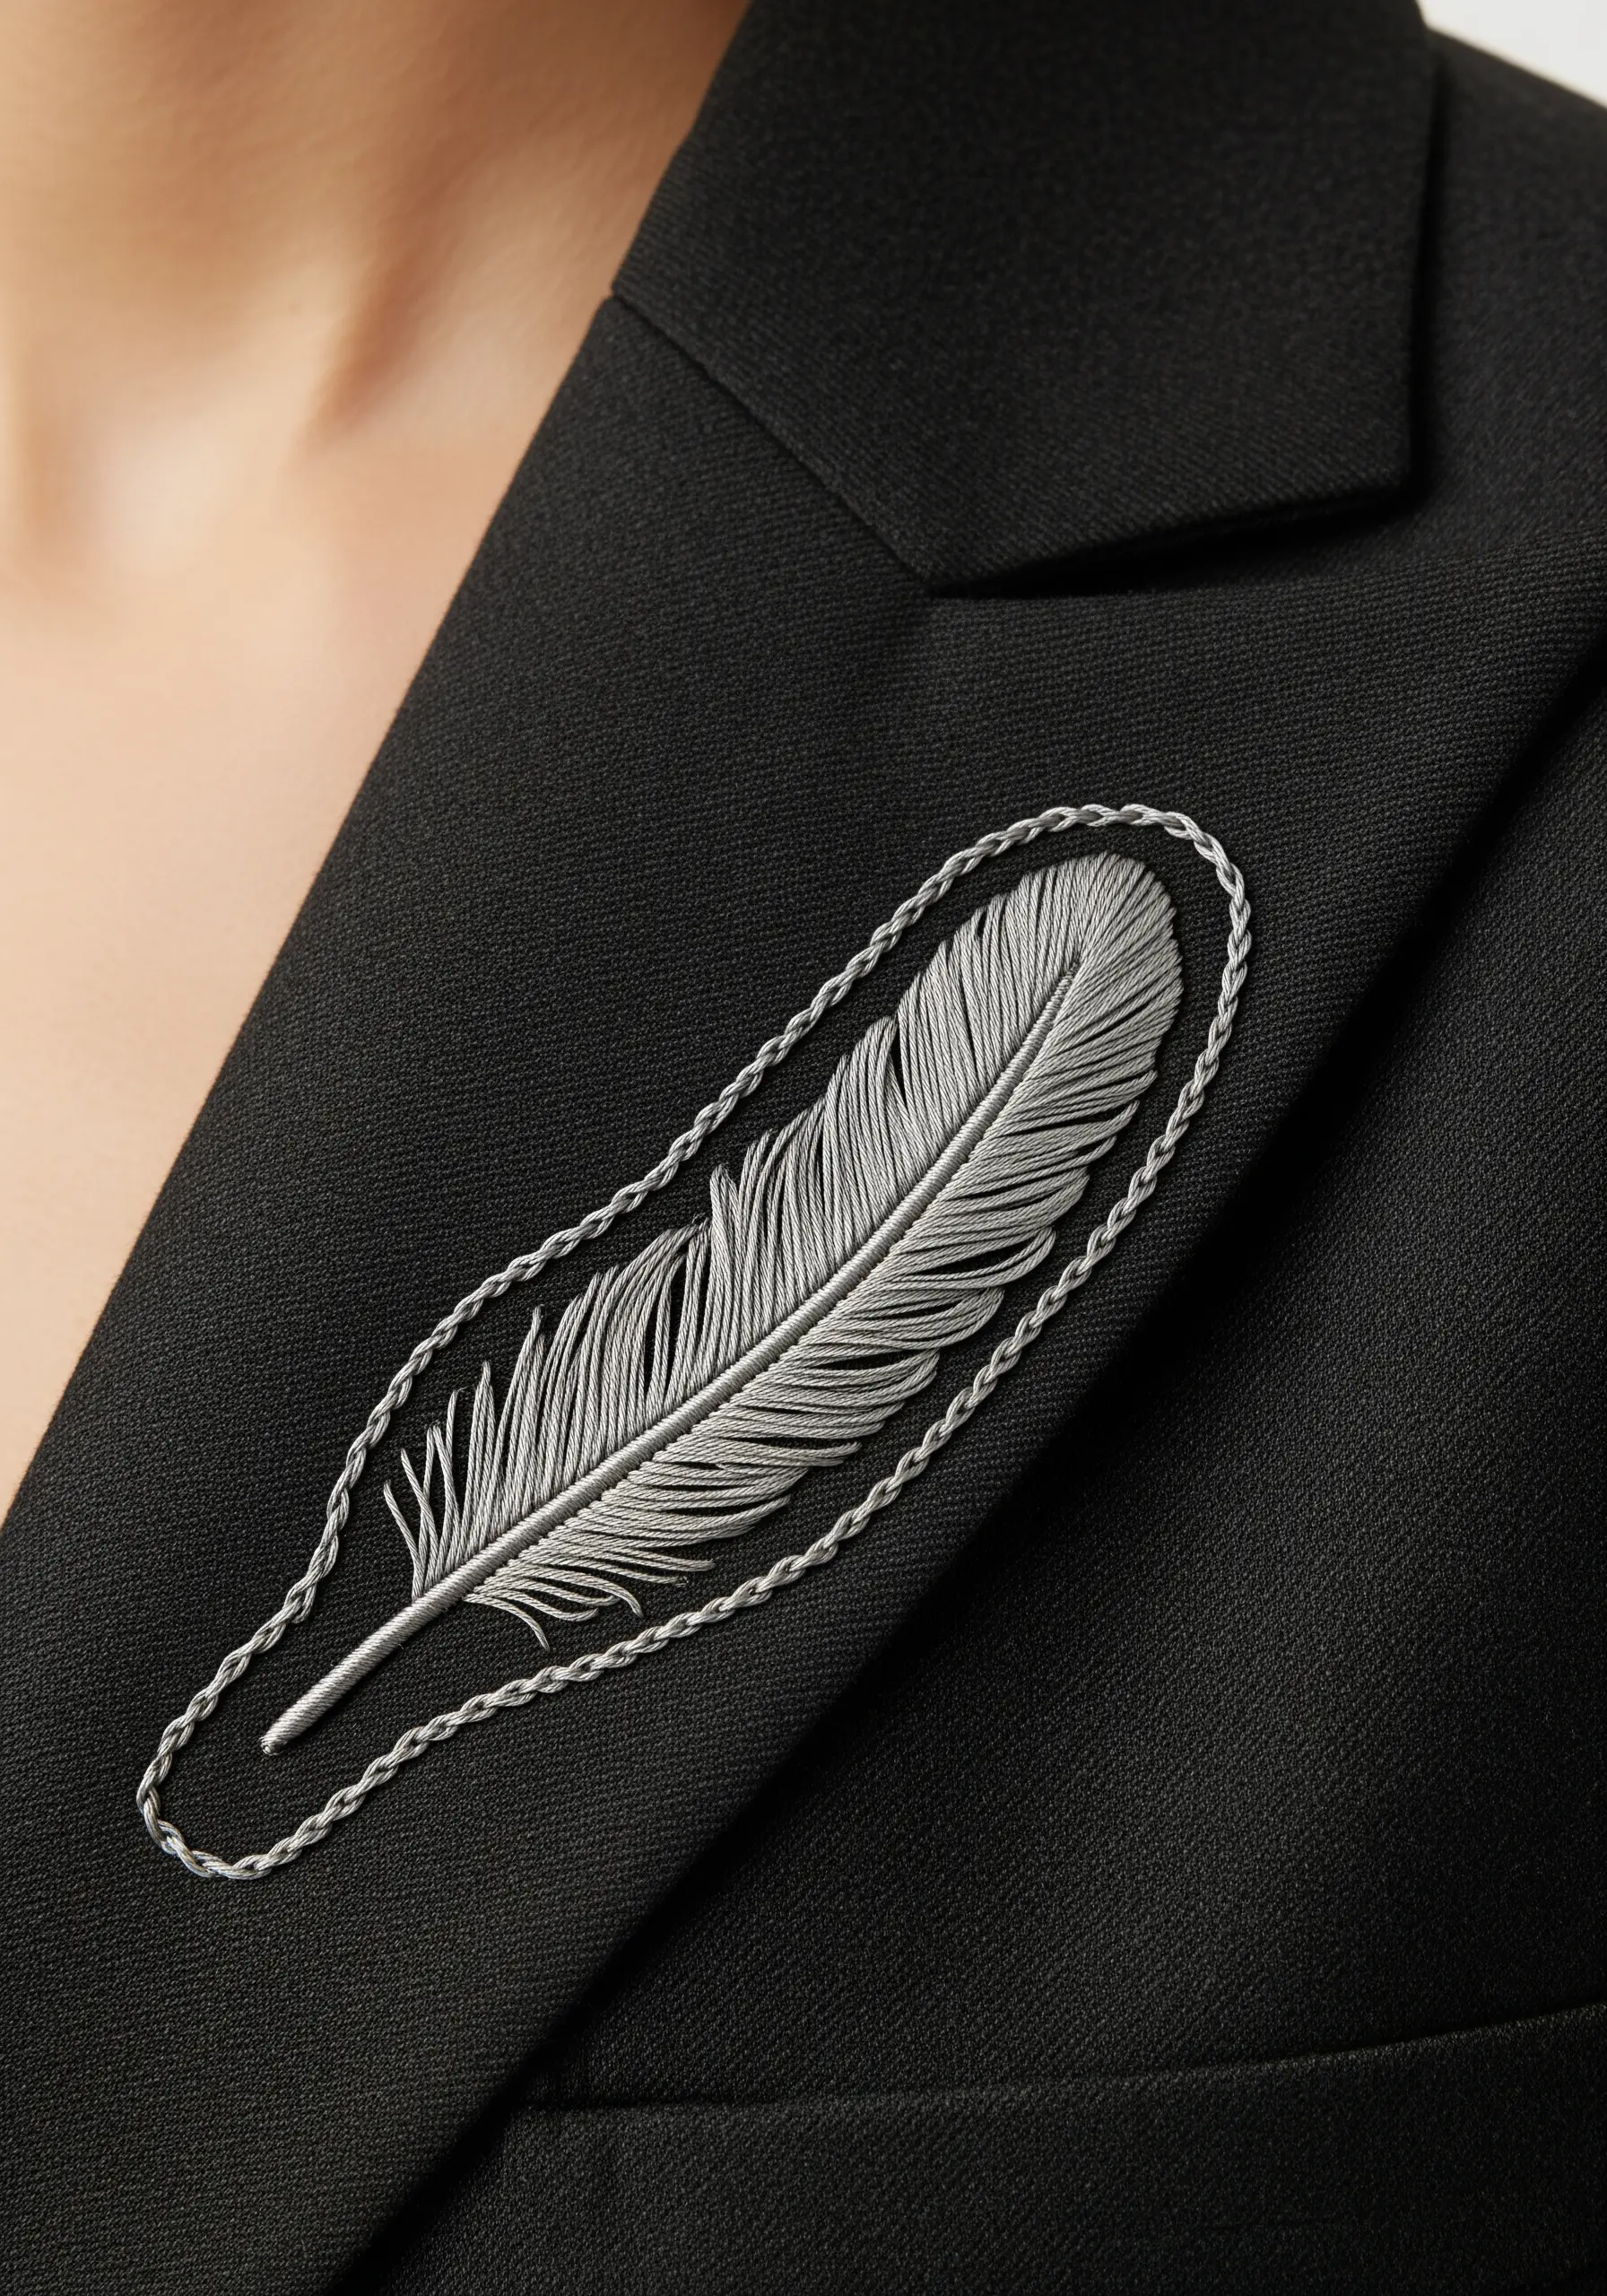
Transform a classic black blazer with a statement feather that has the luster of fine jewelry.
This intricate design combines two techniques: a dense satin stitch for the feather’s body and a couched outline.
To create the outline, lay down a piece of metallic cord or twisted floss and tack it in place with a thinner, matching thread.
This gives the motif a defined, raised edge that elevates it from simple embroidery to a sophisticated embellishment, similar to techniques used in luxury metallic thread wall decor.
19. Illustrate a Story on a Book Lover’s Tote
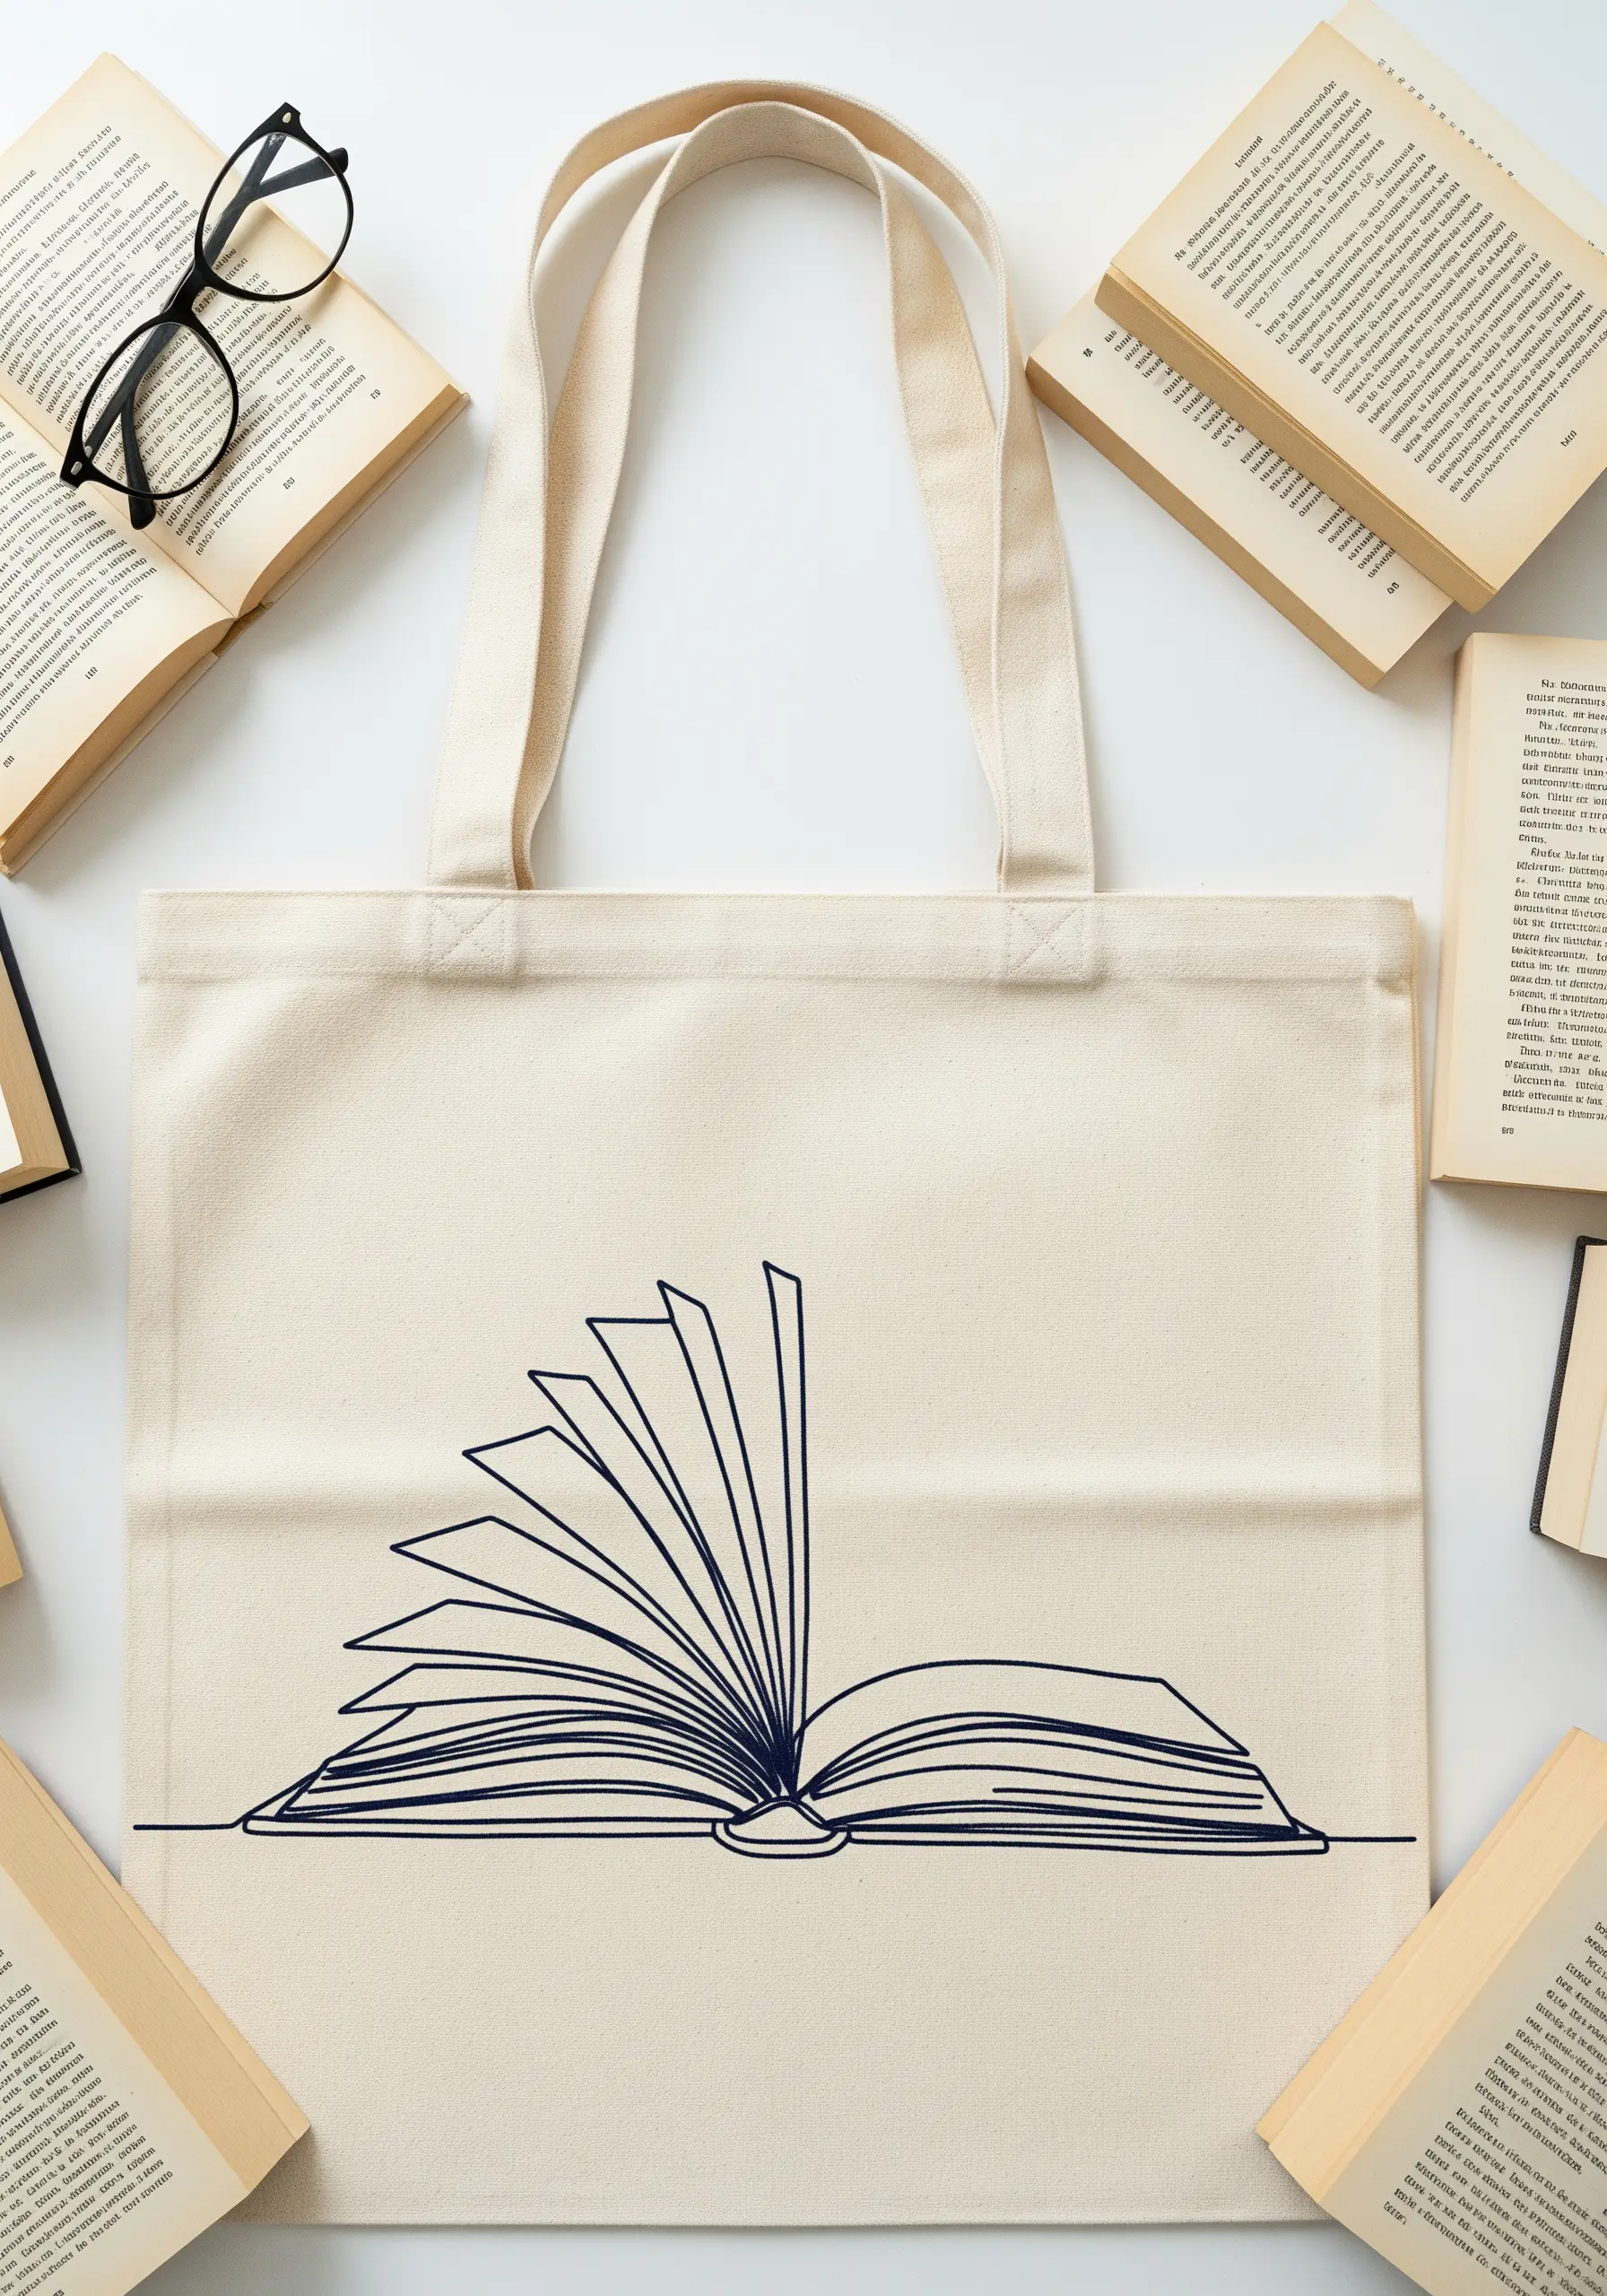
For an illustrative design with many fine lines, vary your line weight to create depth and focus.
Use a single strand of floss for the delicate page edges and a two- or three-strand backstitch for the main outlines of the book’s cover and spine.
This subtle shift in thread thickness guides the viewer’s eye and makes the composition feel more dynamic and professional.
It’s a simple adjustment that can transform plain tote bags into narrative art.
20. Add a Bolt of Color to a Dark Knit
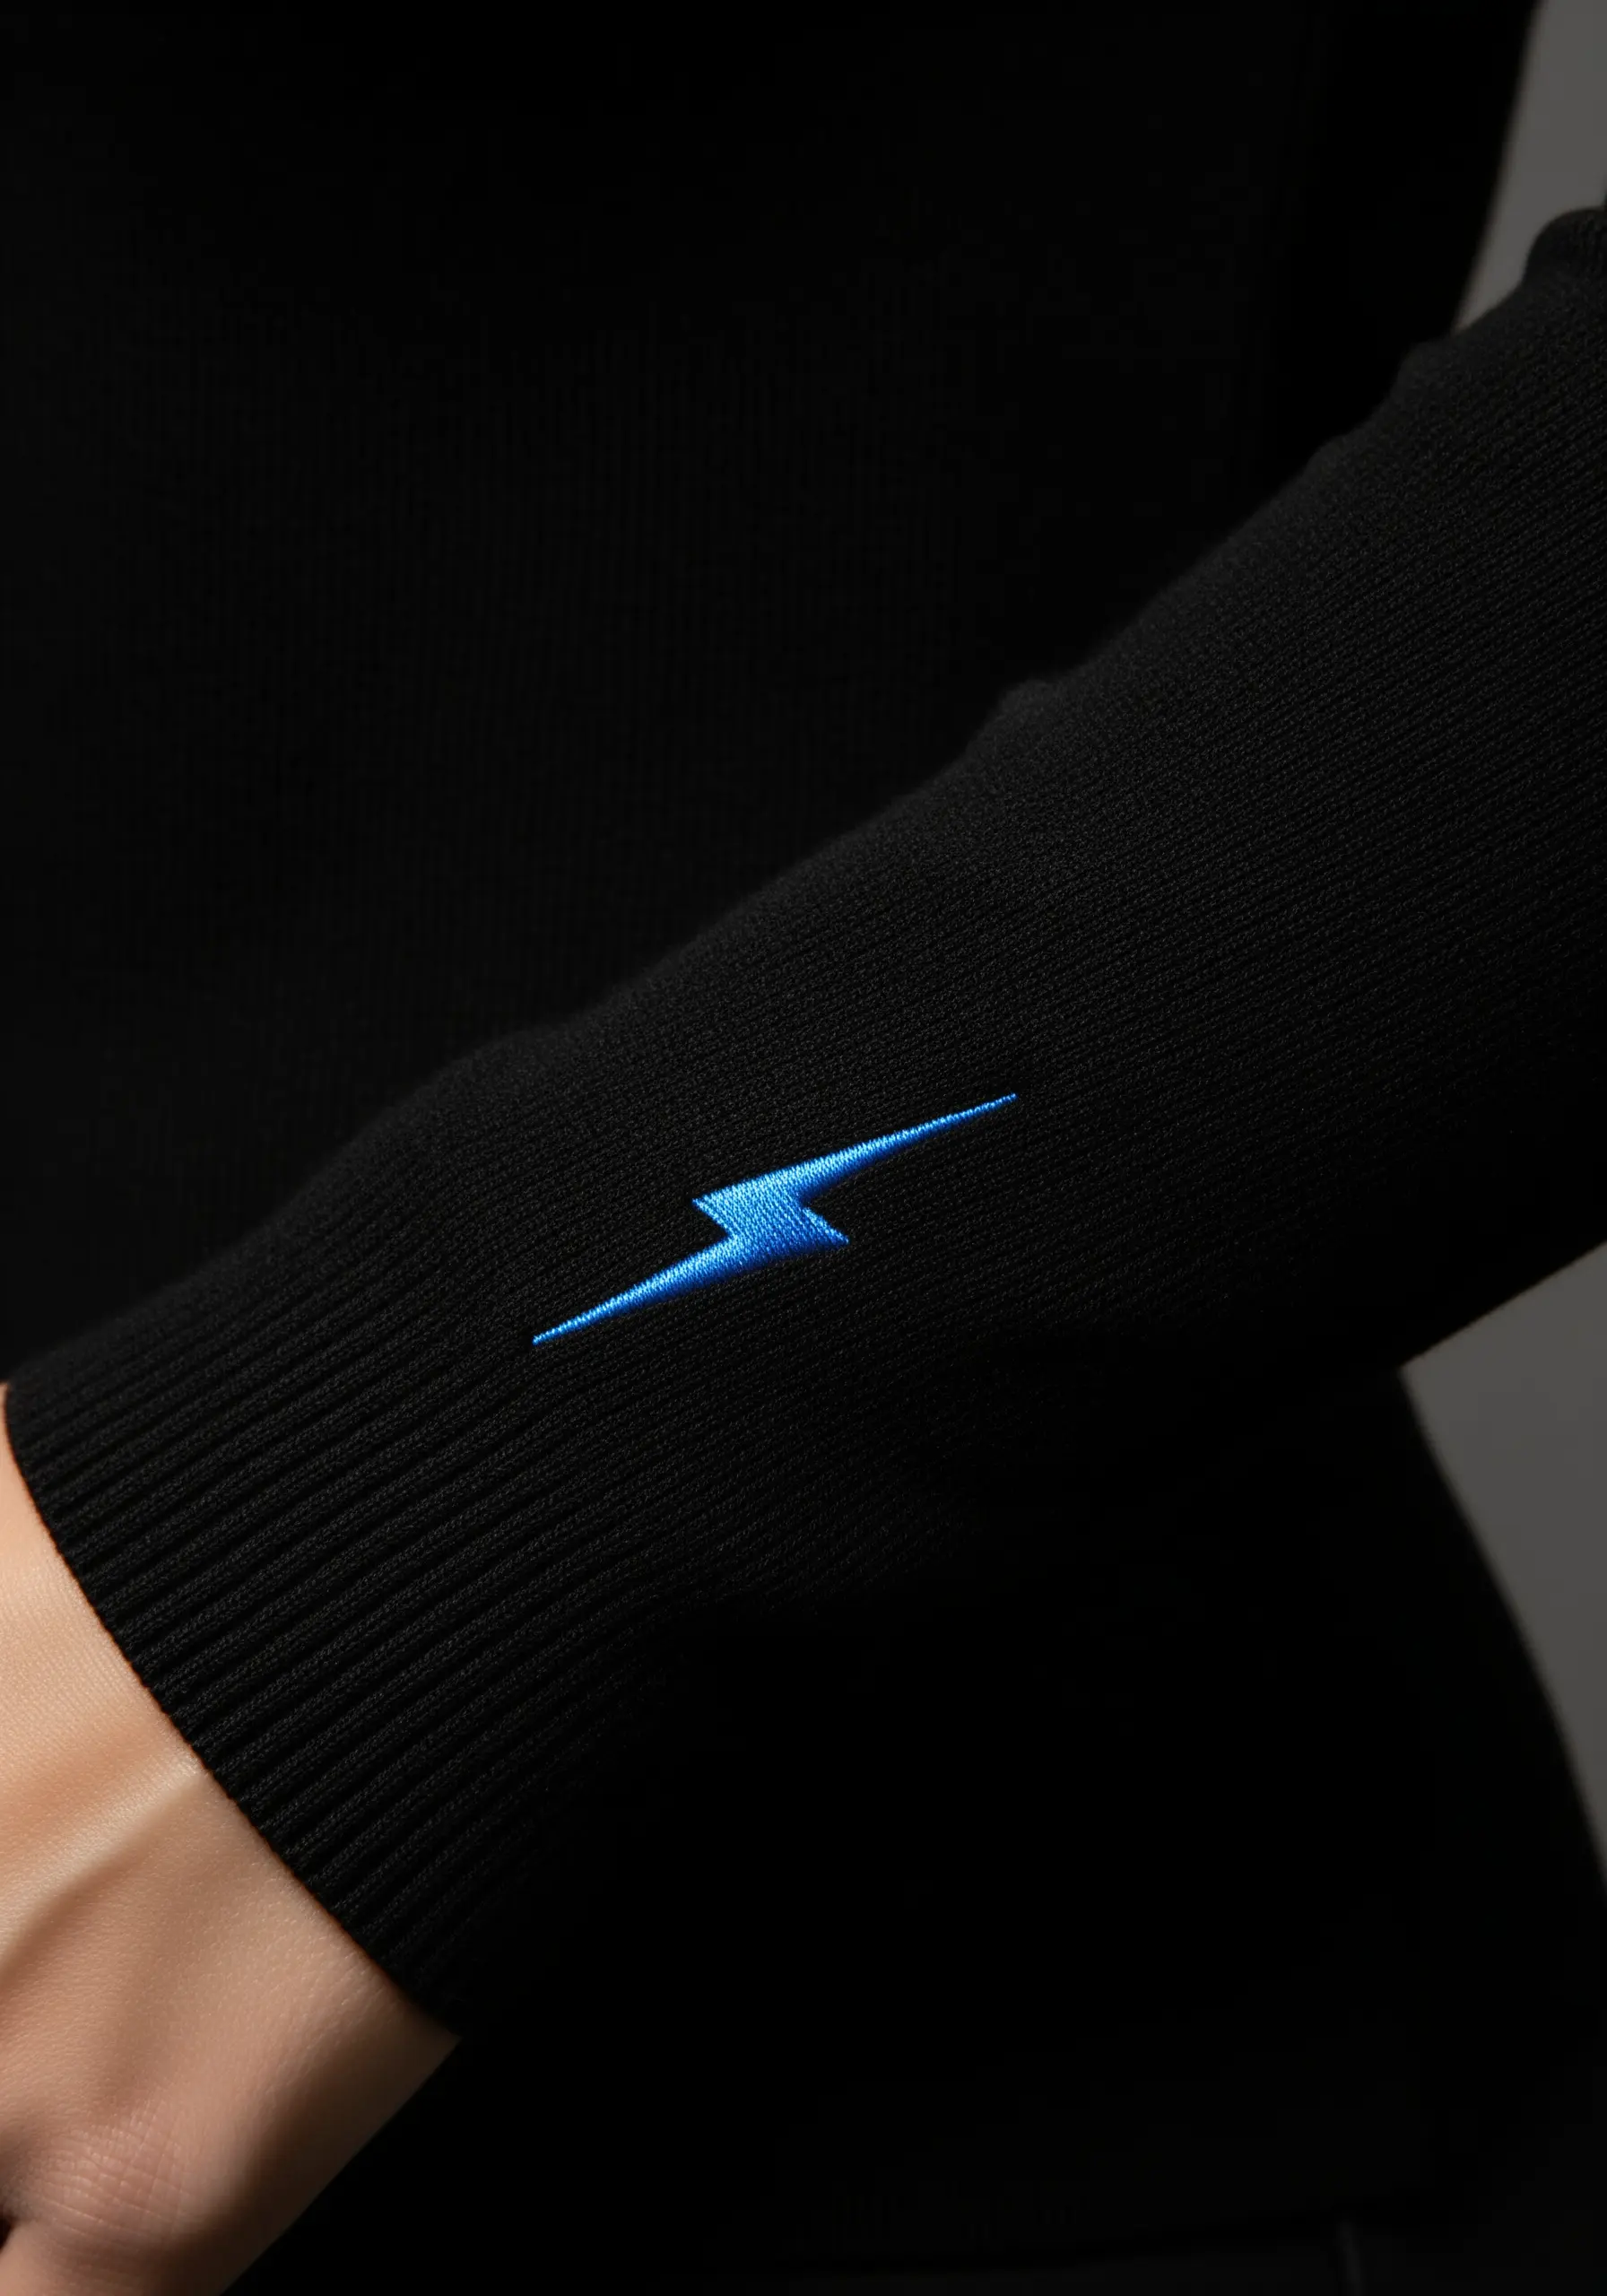
A small, vibrant detail on a dark garment creates an electrifying focal point.
To achieve a solid, graphic shape like this lightning bolt, use a satin stitch.
First, outline the shape with a split stitch. This raised edge acts as a guide and gives your final satin stitches a clean, sharp boundary, preventing them from looking uneven.
Then, fill the shape with parallel satin stitches, ensuring they lie close together for a smooth, opaque finish. These bold color-pop embroidery ideas draw the eye instantly.
21. Capture a Hobby with a Clean Outline
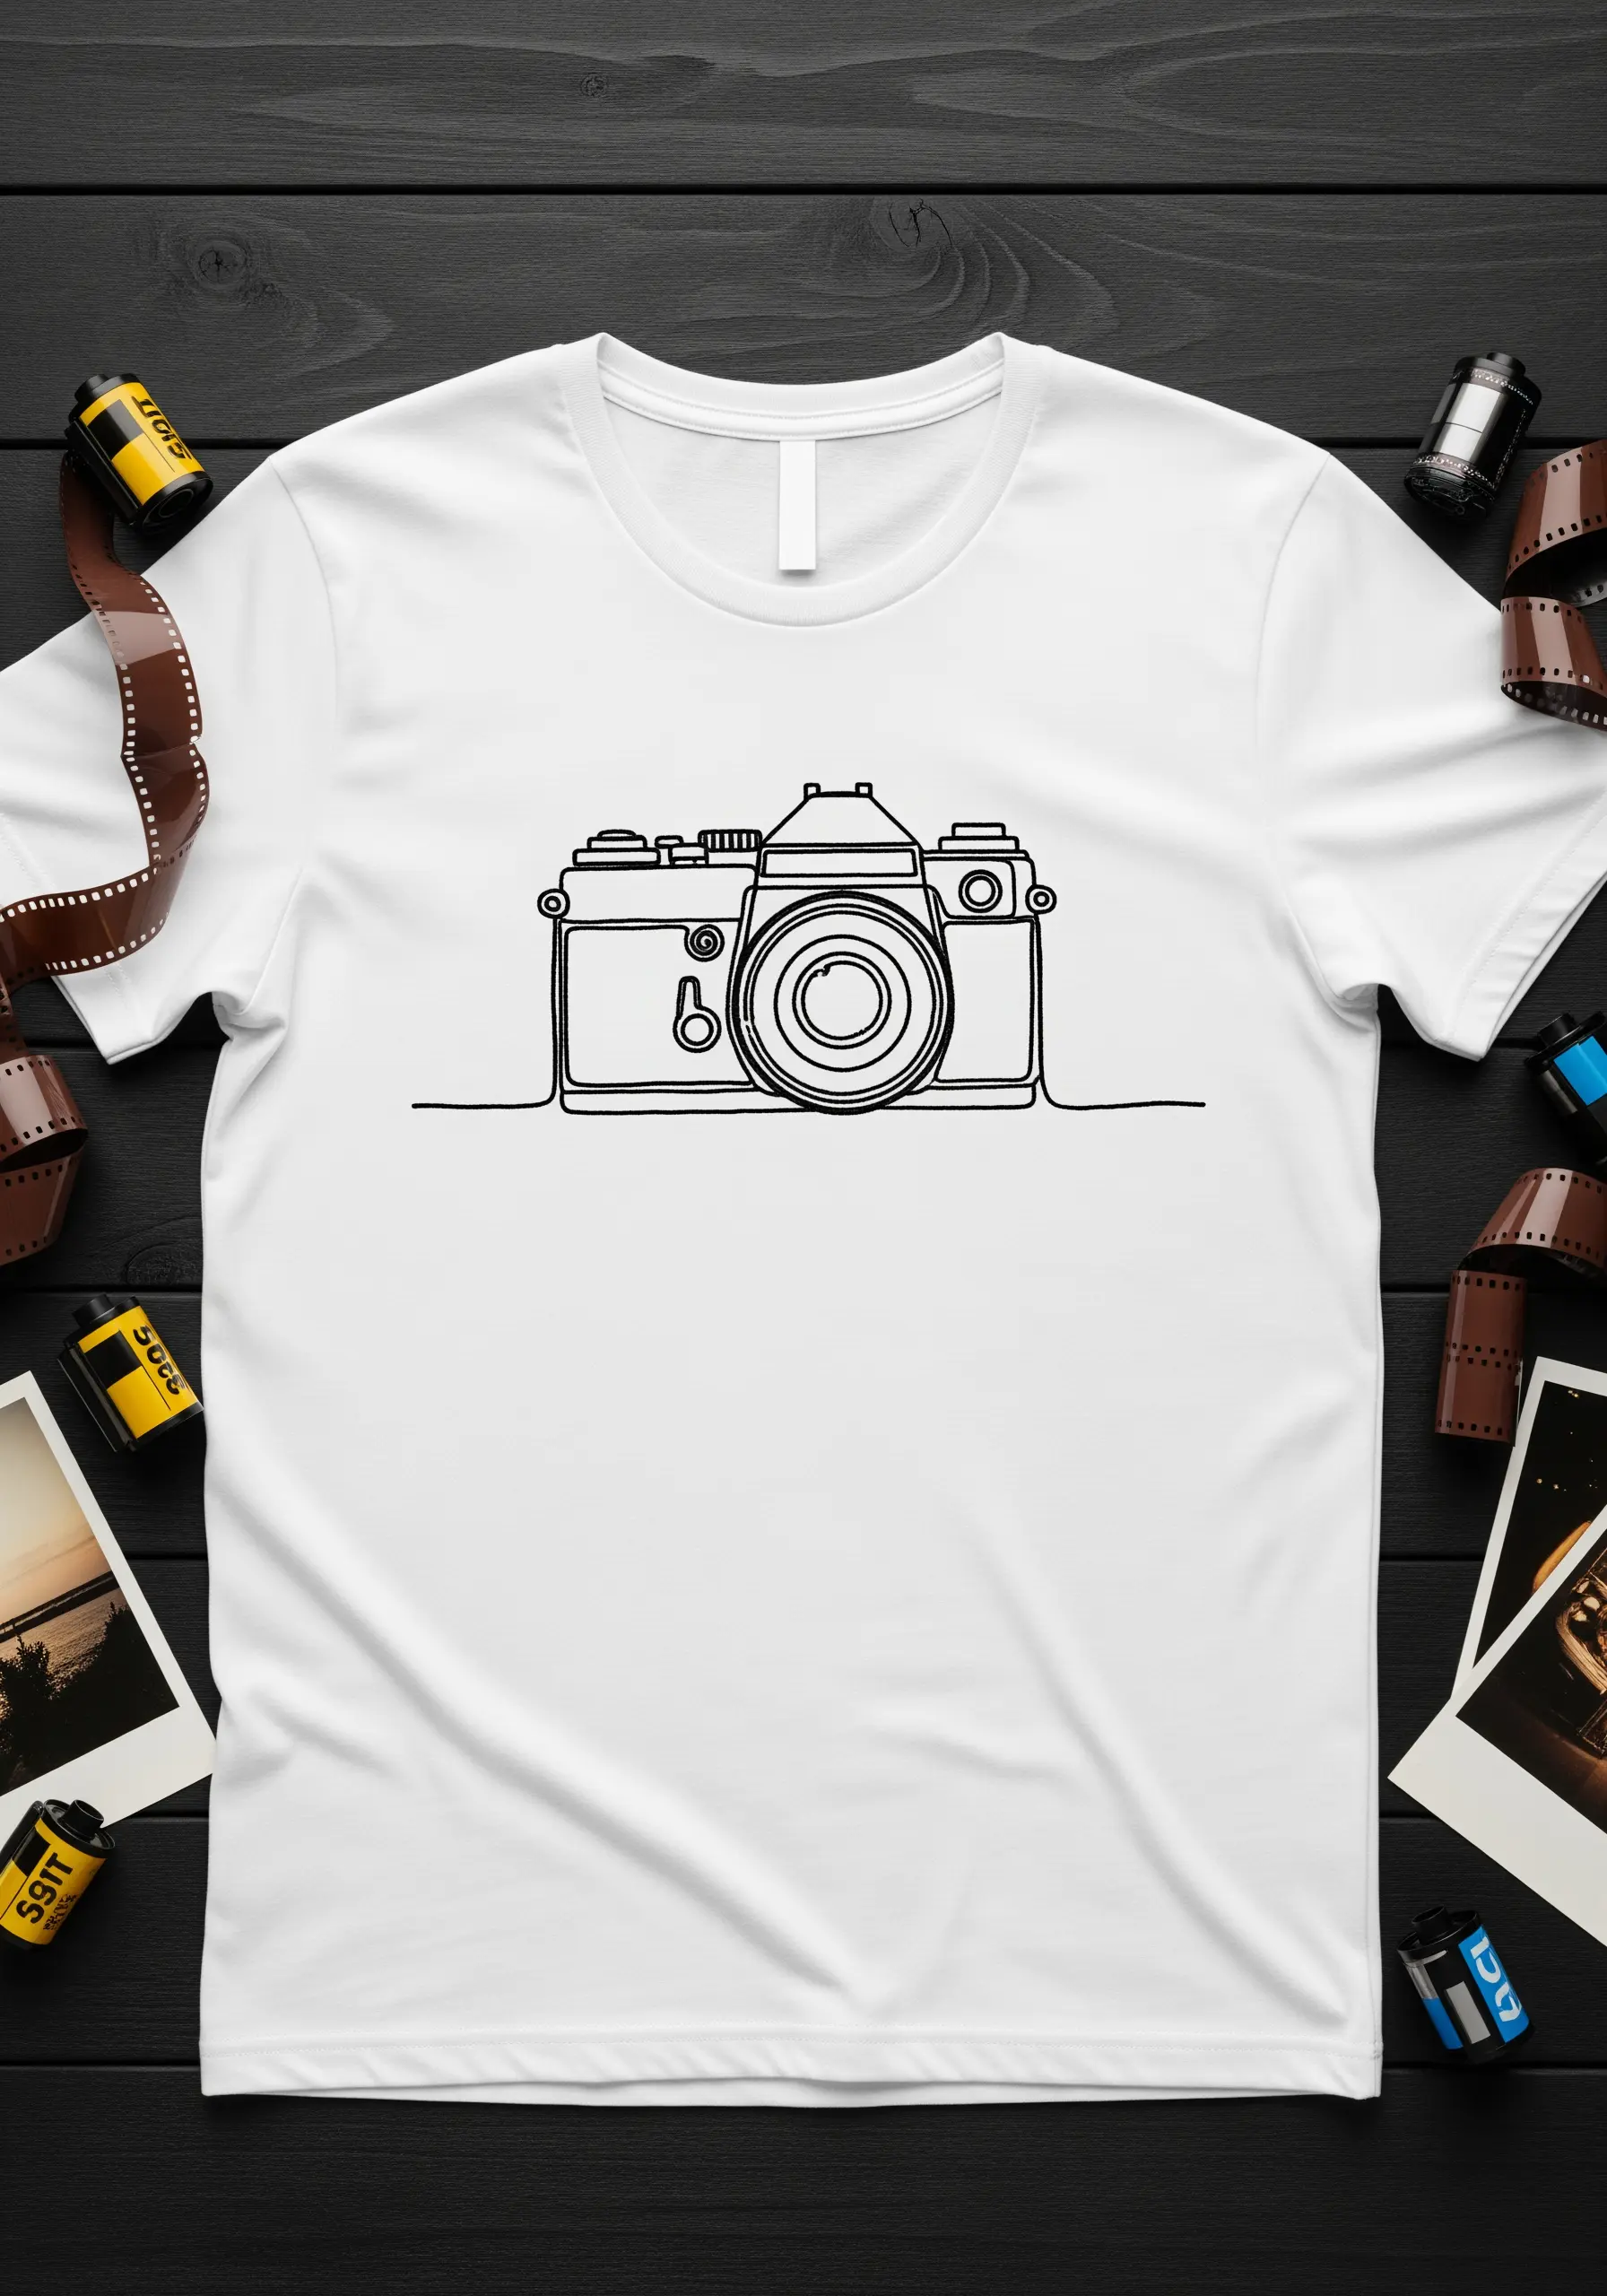
Celebrate a passion by stitching a clean, minimalist icon of a beloved object, like a vintage camera.
The success of this style lies in the precision of the lines.
Use a stem stitch, which creates a slightly more rounded and substantial line than a backstitch, giving the illustration a pleasing, uniform weight.
When stitching on a t-shirt, remember to use a stabilizer on the back to prevent any pulling or puckering of the knit fabric. With this trick, you can make white t-shirts look boutique-level without heavy designs.
22. Define a Denim Pocket with a Modern Rose
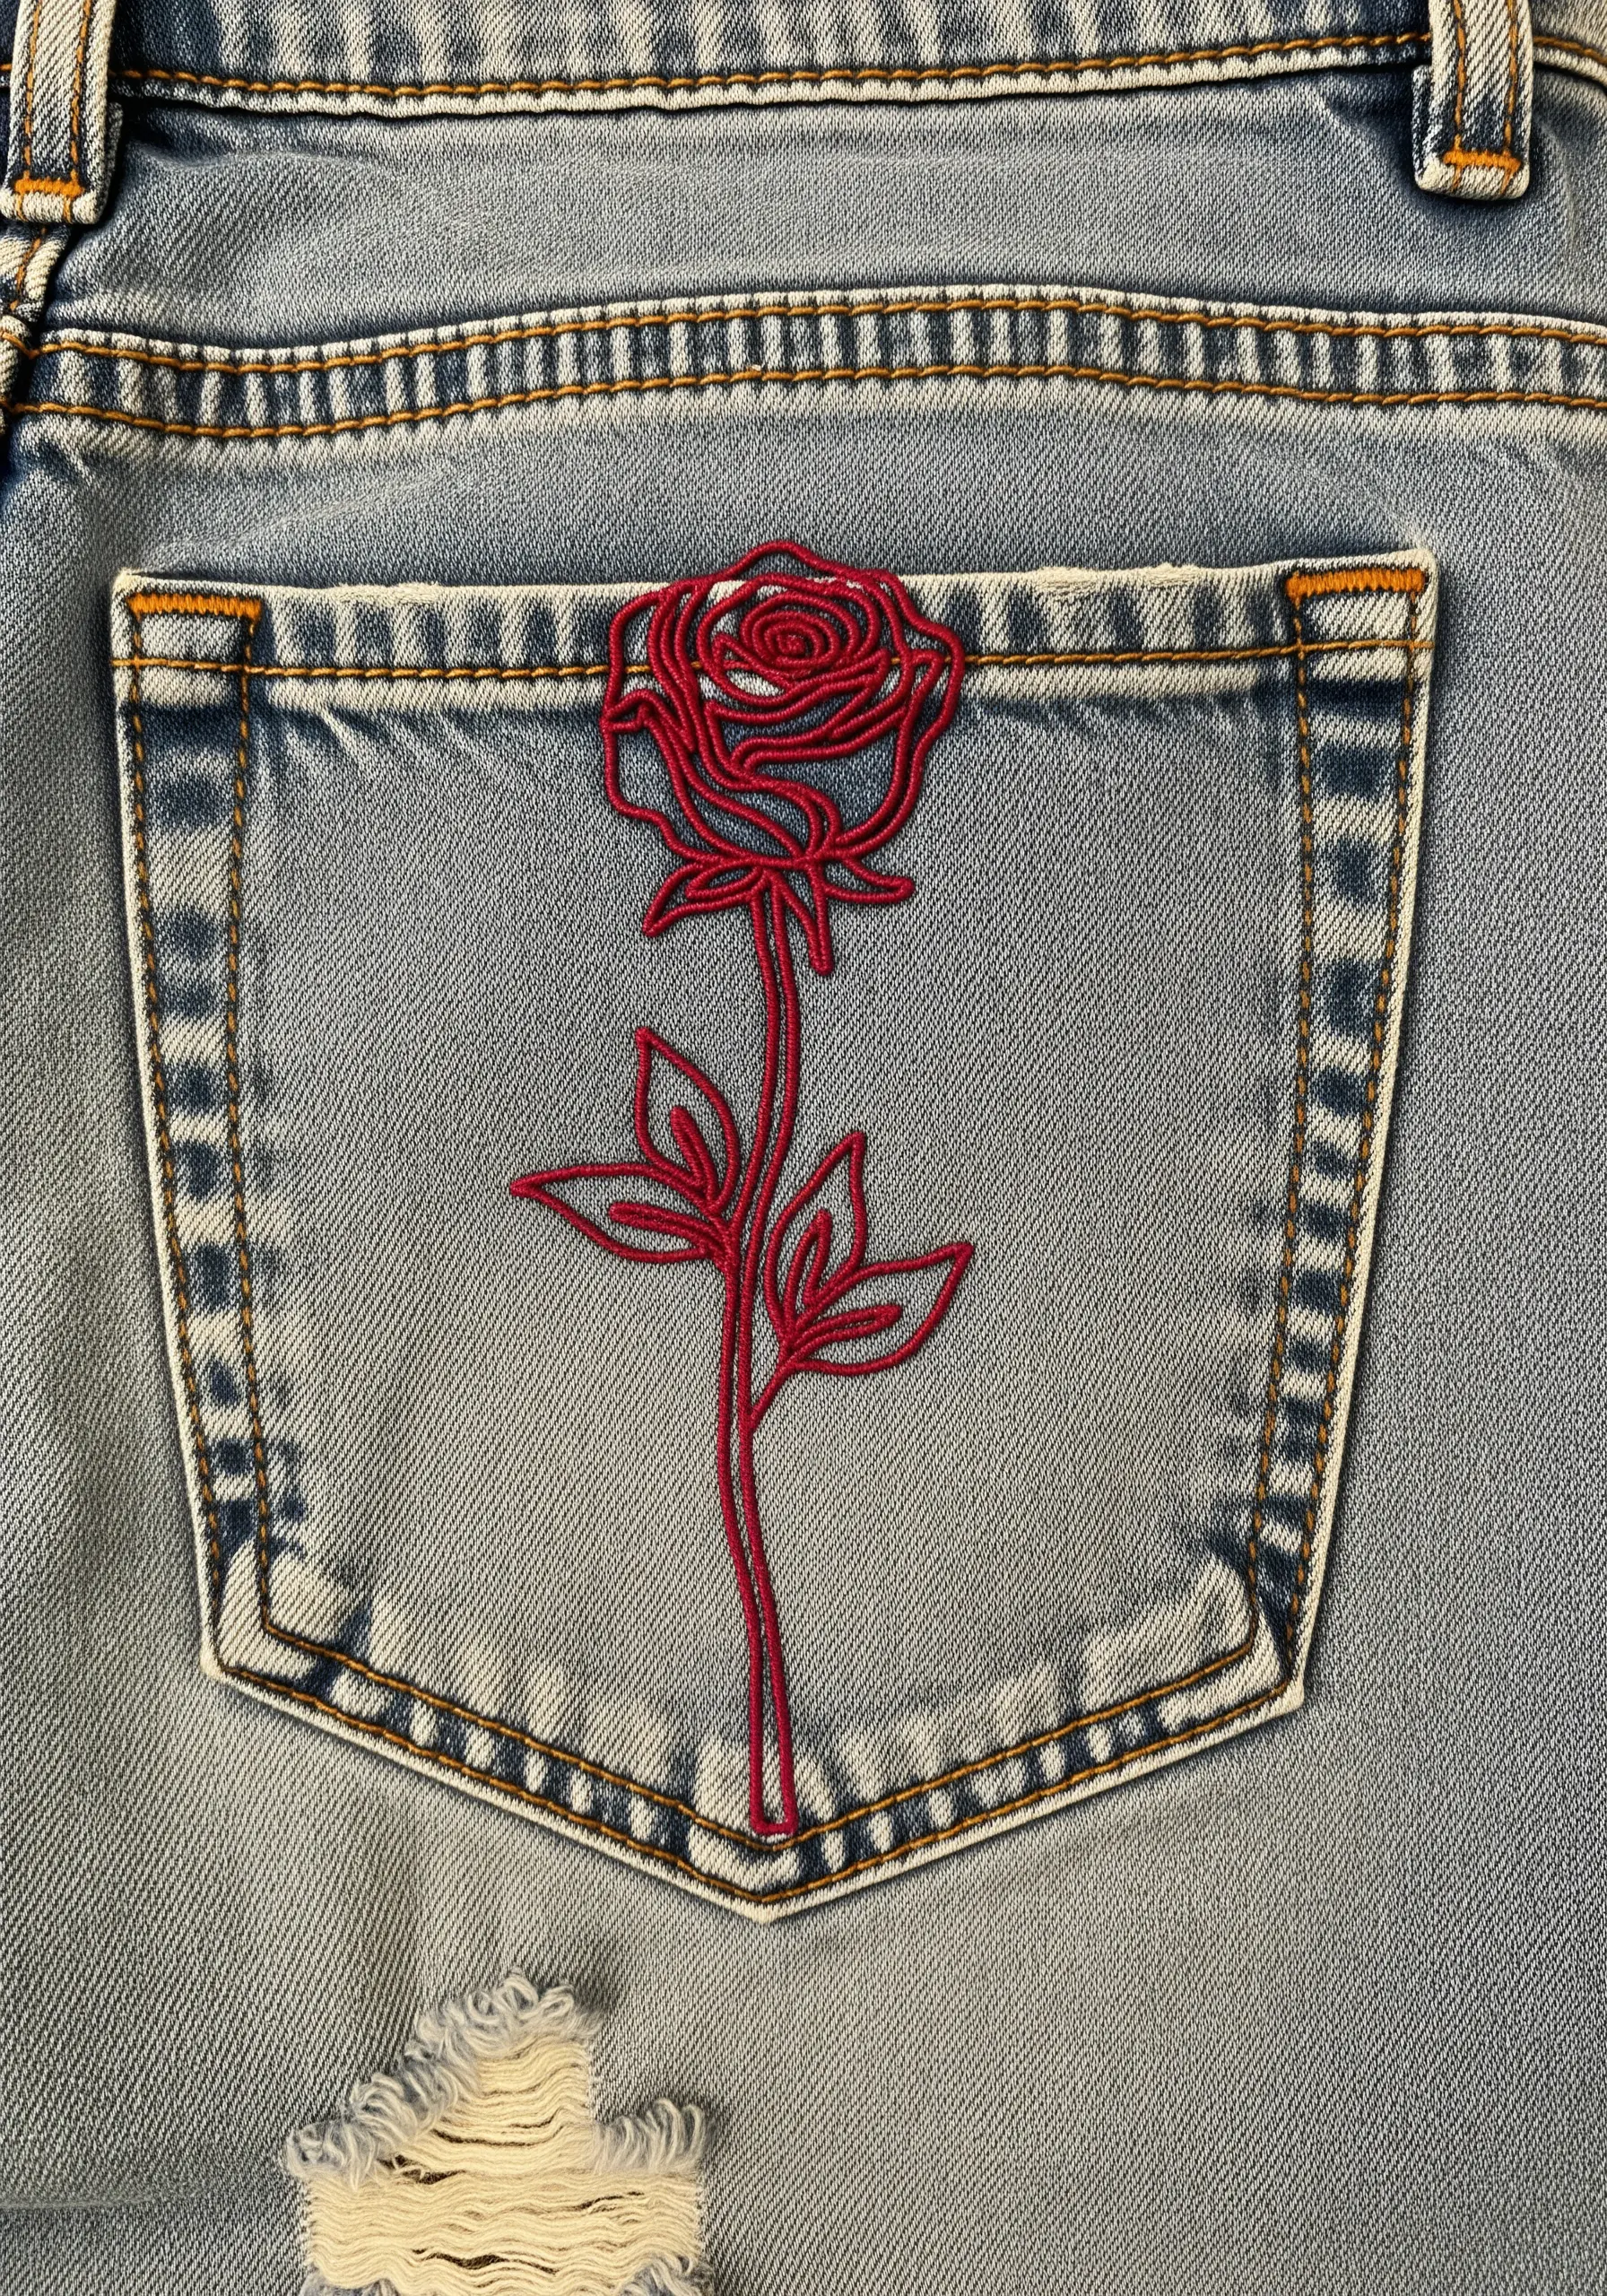
A single, stylized rose adds a touch of modern romance to a pair of jeans.
To create the layered effect of the petals using only one color, use a whipped backstitch.
Stitch the entire outline with a simple backstitch, then use a second thread to whip around the stitches of the central petals.
This adds thickness and a raised texture to certain parts of the design, creating a sense of depth and dimension without adding a second color. Consider these embroidered flower patch ideas to update any denim piece.
23. Add Sculptural Texture with Corded Embroidery

Create a high-impact, three-dimensional design on a pillow cover by using couching, an ancient and versatile technique.
Instead of stitching *through* the fabric with a fine thread, you lay a thick cord or rope on the surface and tack it down with small, discreet stitches of a thinner, matching thread.
This allows you to create bold, graphic shapes with incredible texture and shadow play that traditional embroidery can’t replicate. It’s the perfect way to elevate plain pillows into gallery pieces.
24. Embroider a Cozy Motif on a Knit Beanie
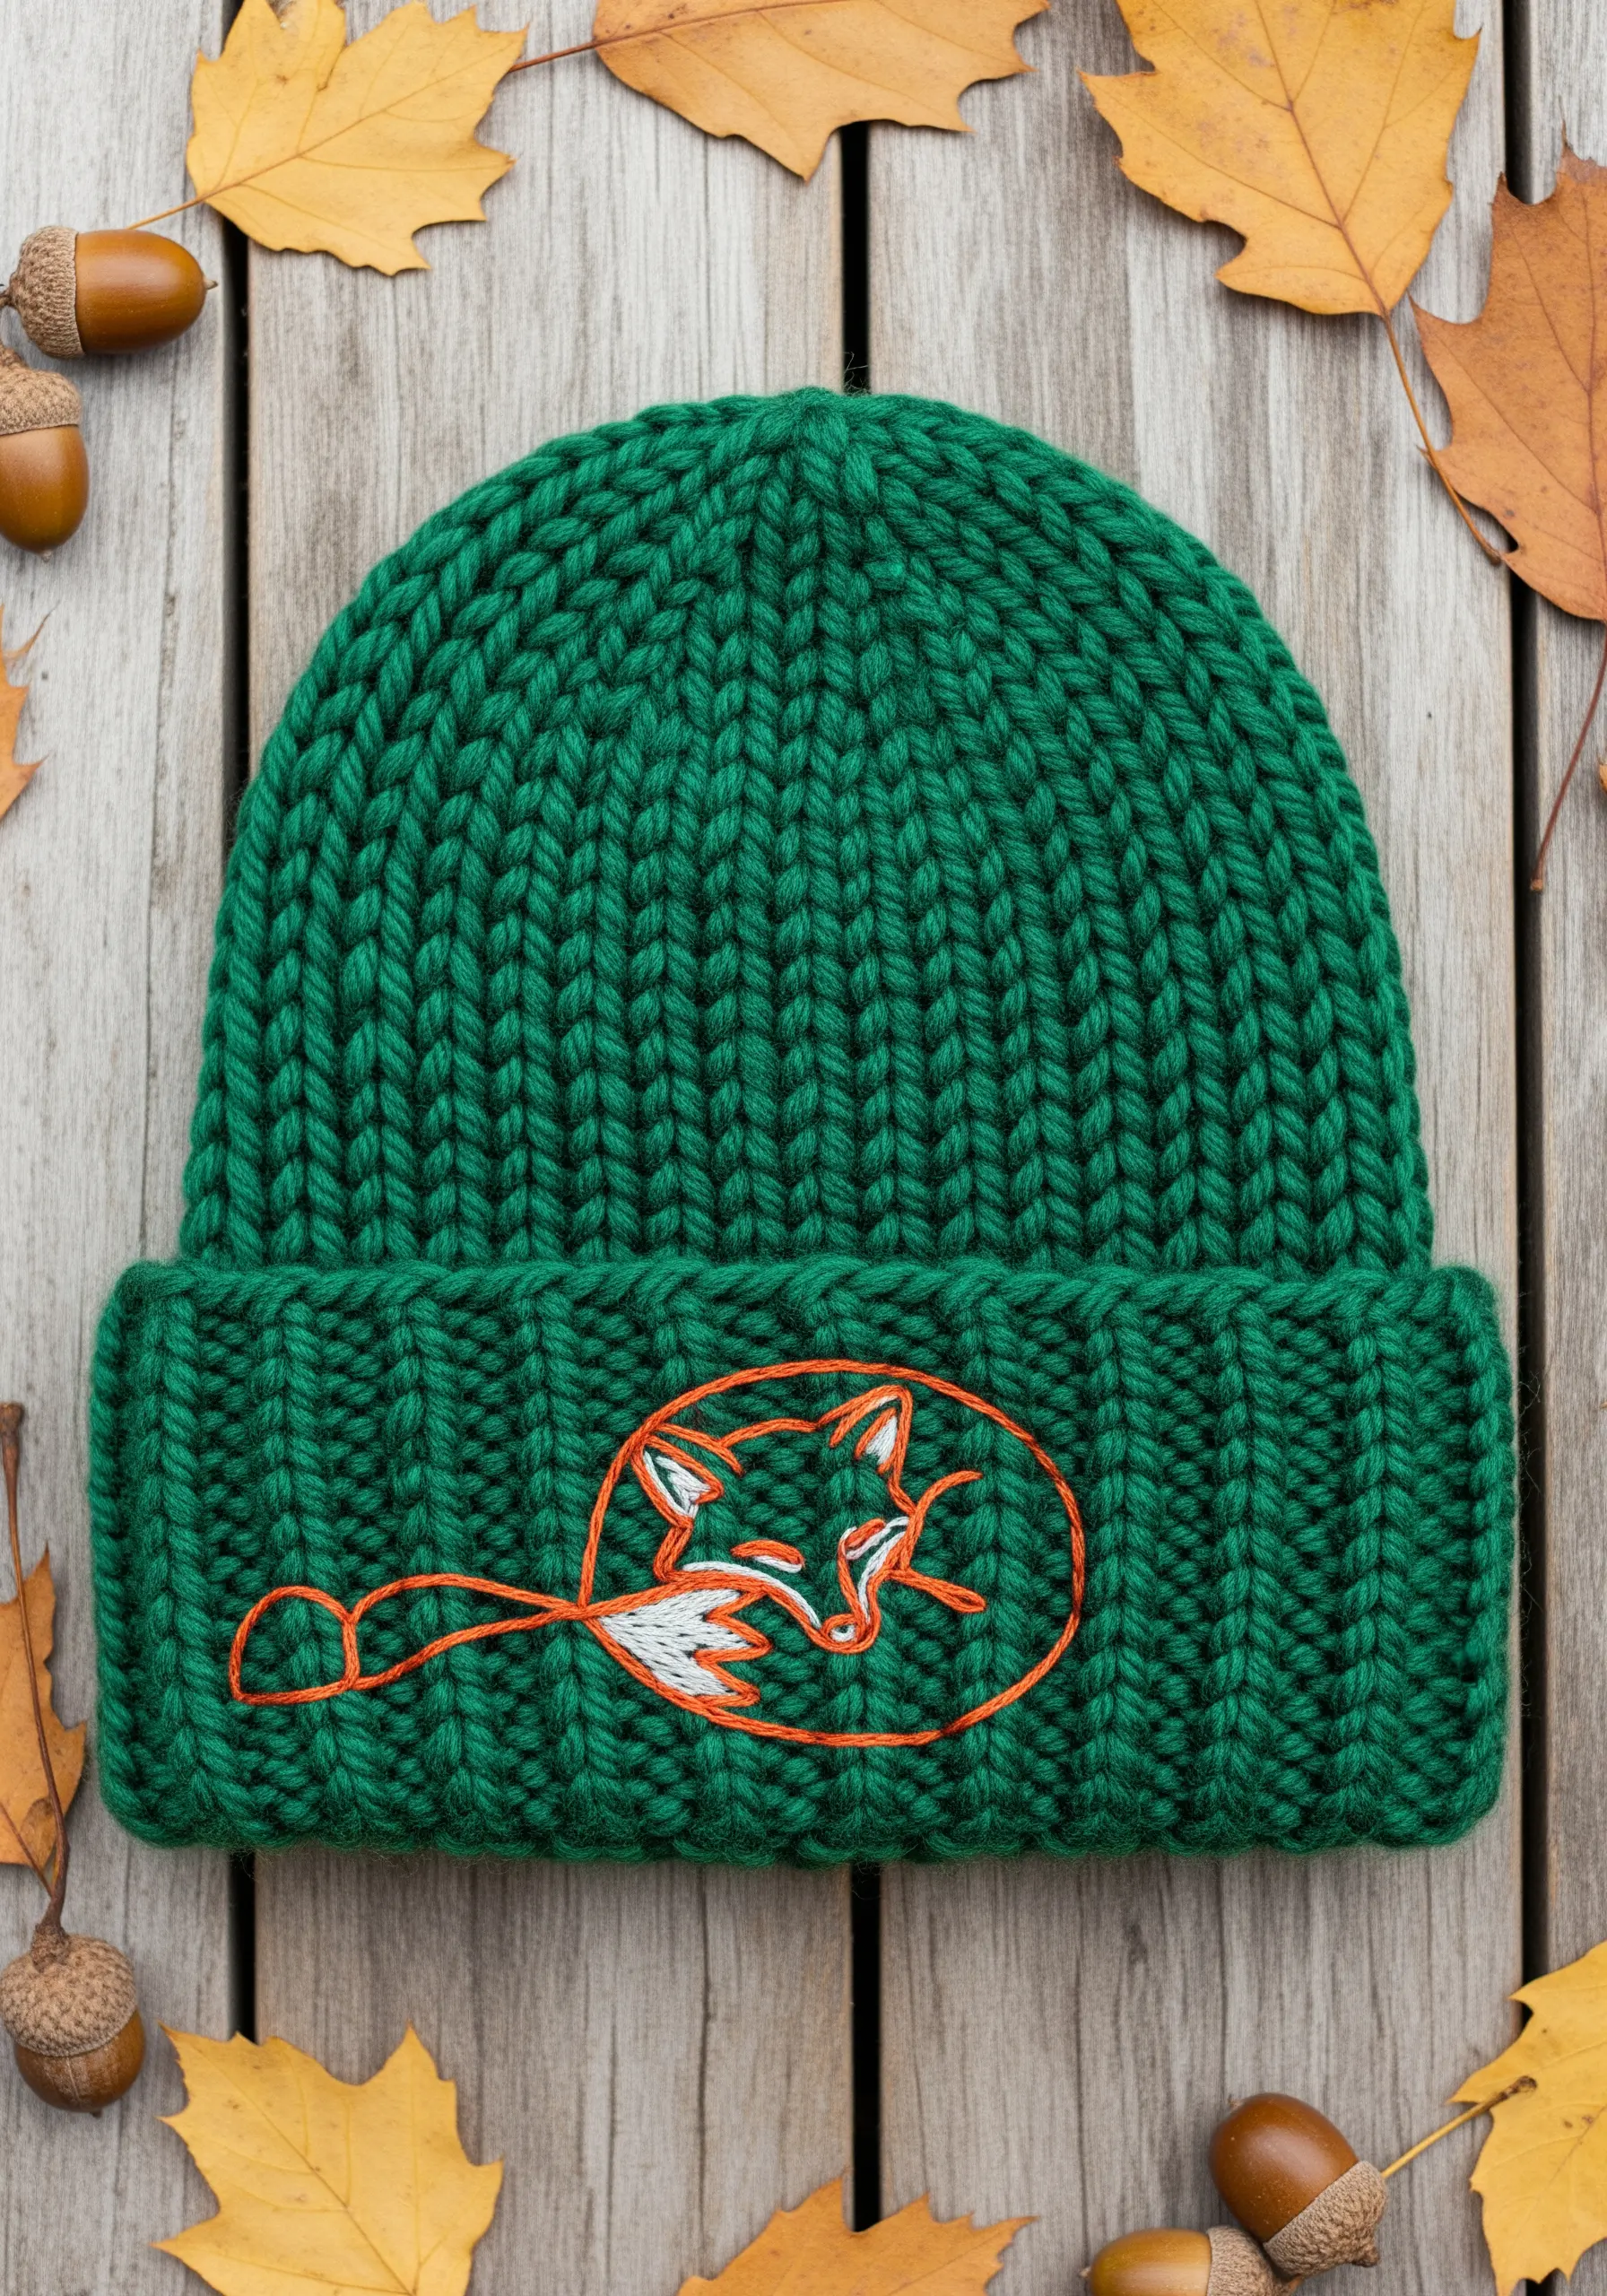
Embroidering on a chunky knit like a beanie requires a different approach than woven fabric.
To prevent your stitches from distorting the knit or getting lost in the texture, use a water-soluble stabilizer on top of your design area.
It provides a smooth surface to stitch on and ensures your lines are clean and even. Once you’re done, it simply dissolves in water.
For the filled-in white tail, use short satin stitches to create a patch of color that complements the clean orange outline. This method is great for all cute animal embroidery hoops and apparel.
25. Grow a Delicate Vine Across a Blouse
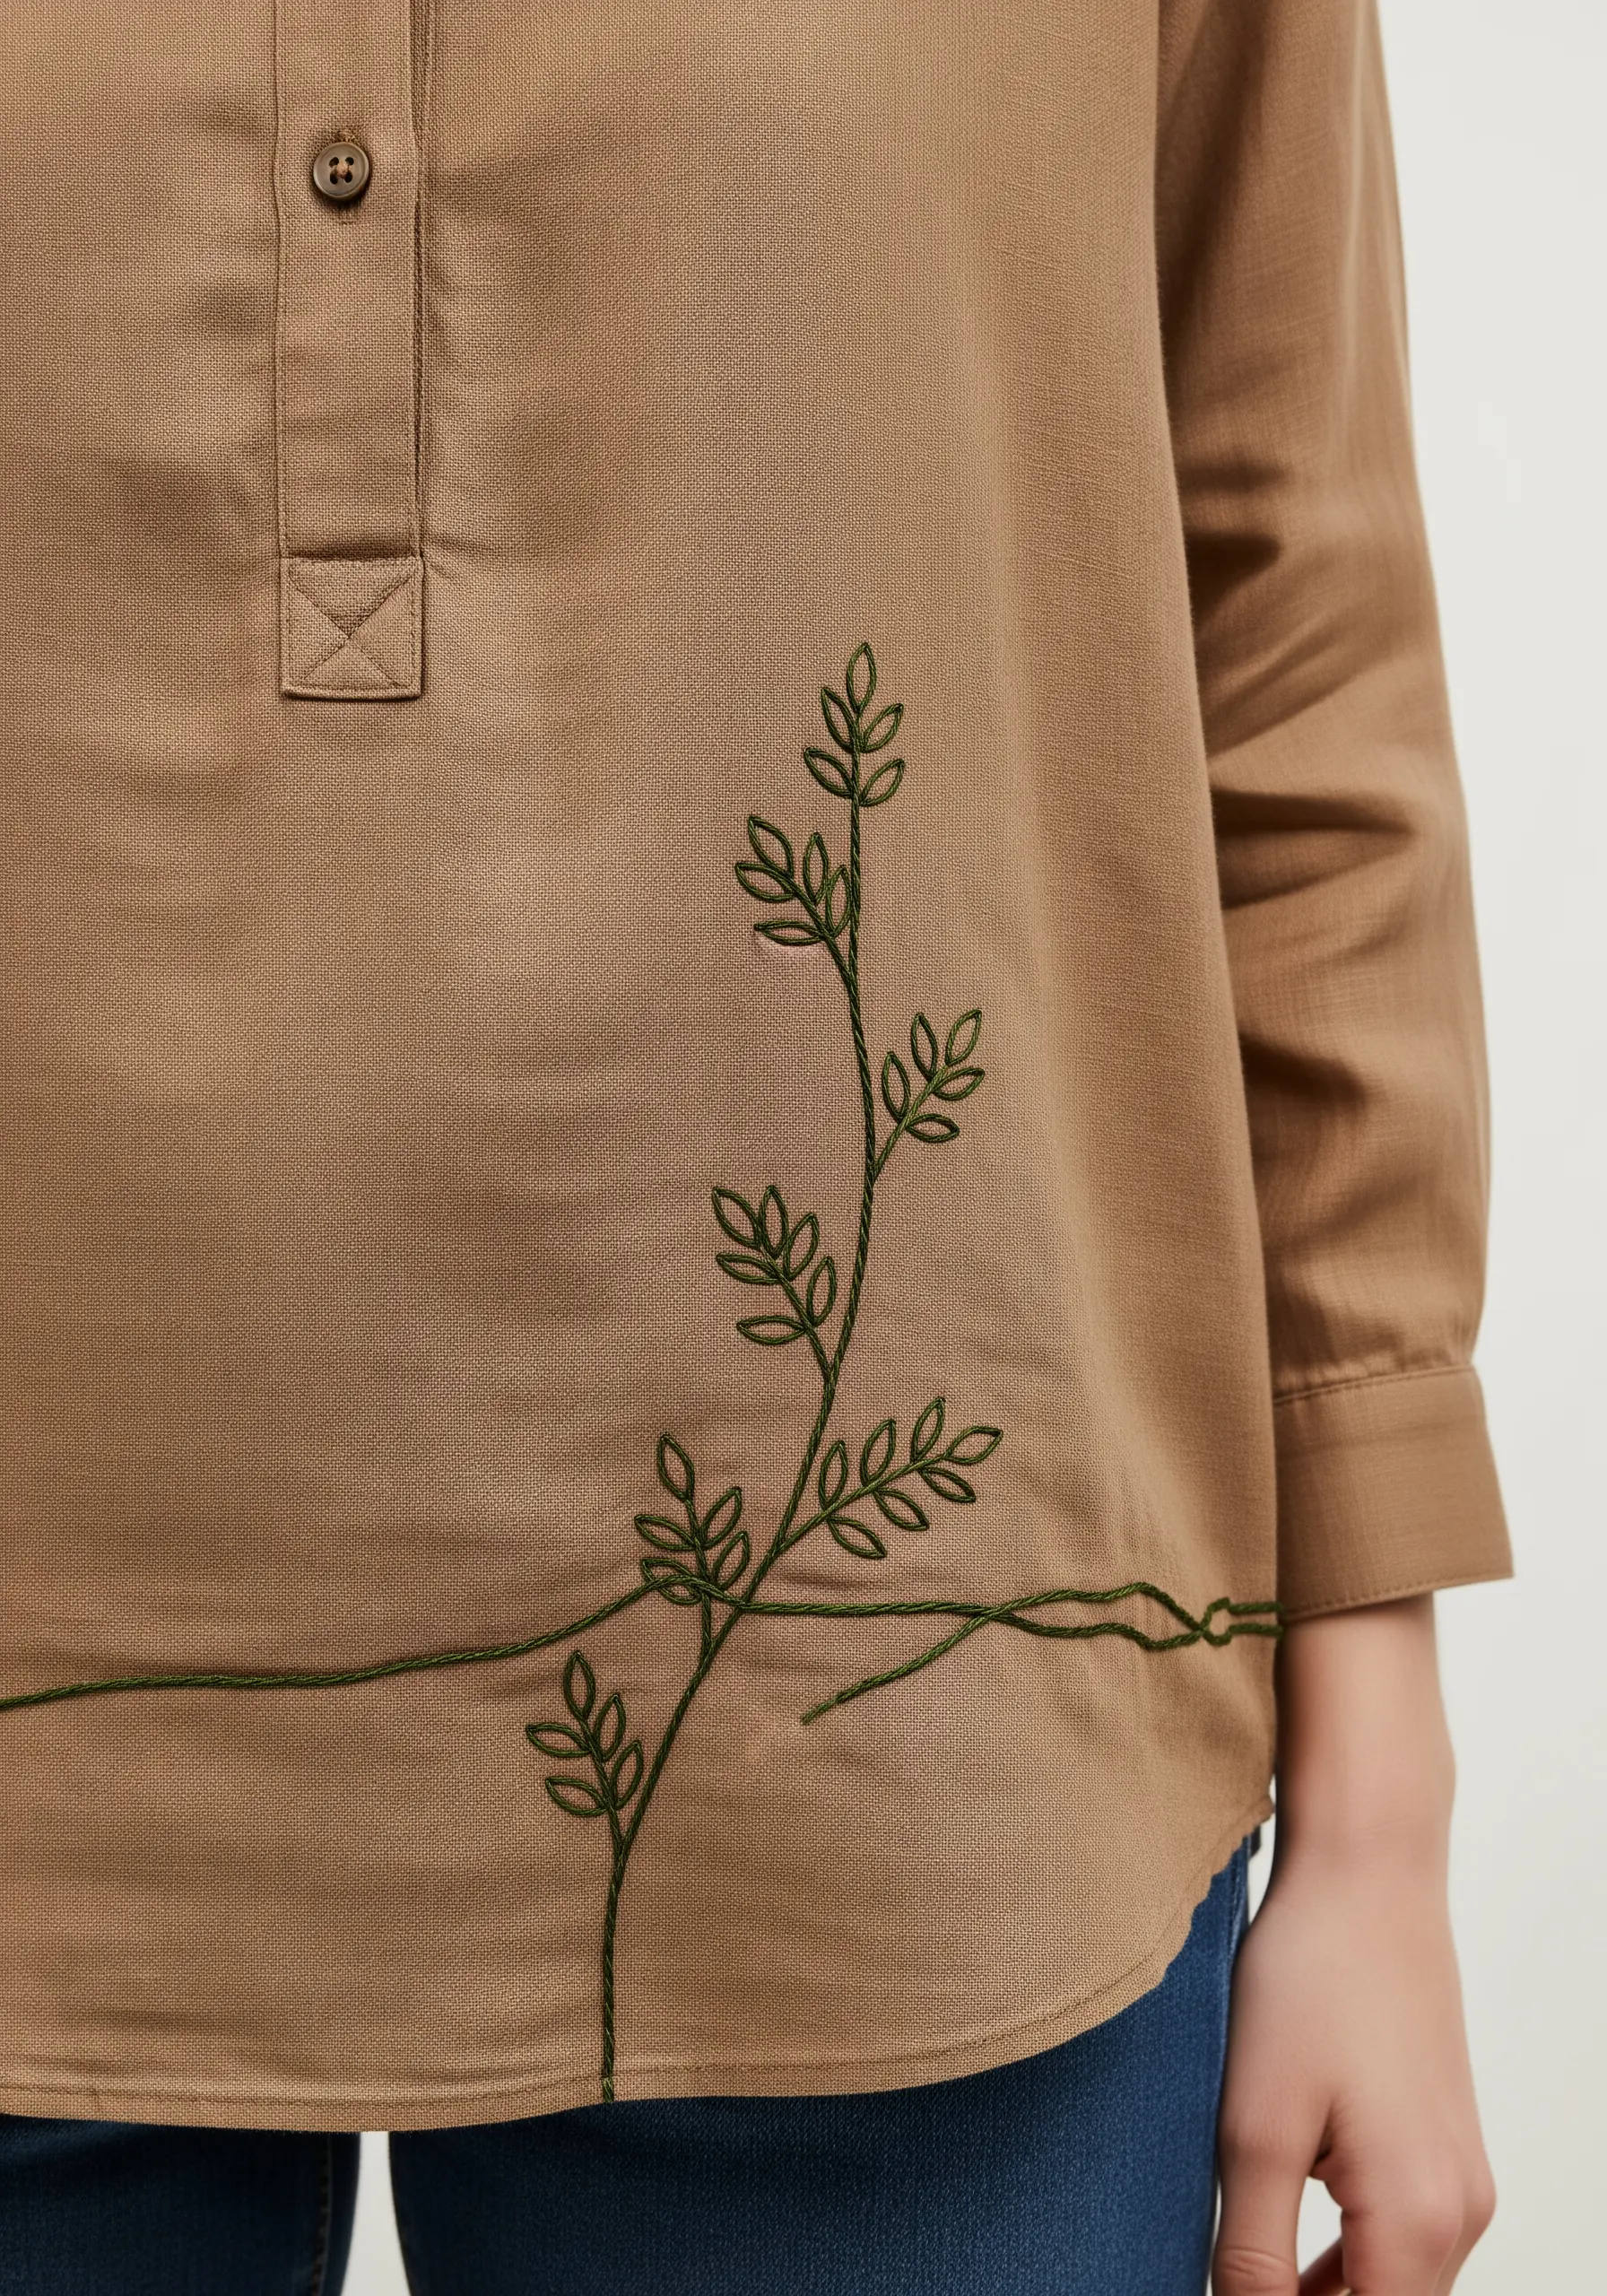
Create an organic, meandering vine that feels like it’s naturally growing across the fabric.
For the leaves, use a detached chain stitch, also known as a lazy daisy stitch. It creates a perfect, small teardrop shape with a single motion, ensuring all your leaves are uniform and delicate.
Connect them with a simple stem stitch, which gives the vine a gentle, flowing curve that mimics natural growth. These details are perfect for nature-inspired leaf borders on any textile.
26. Add a Quirky Detail Above a Shirt Pocket

The small space just above a shirt pocket is prime real estate for a subtle, personality-filled motif.
A pair of glasses, a tiny initial, or a favorite symbol stitched here acts as a thoughtful, custom detail.
Use a simple backstitch with three strands of floss for a line that’s visible but not overwhelming.
The key is placement: positioning the motif to align with the pocket’s edge makes the design feel intentional and integrated, a simple trick to make your t-shirts feel luxe and custom.
27. Place a Secret Message on a Cuff

Stitching a small, personal symbol on a cuff, like this hand-drawn heart, transforms a simple garment into something deeply personal.
To achieve a rustic, sketched look, use a backstitch with irregular stitch lengths. This intentional imperfection gives the design warmth and character.
Using a thread with a natural texture, like a linen or cotton blend, enhances this effect, especially on a linen-blend shirt.
It’s small details like this that turn simple clothes into meaningful keepsakes.


