

There is a quiet magic in holding a wildflower—a fleeting moment of beauty you wish you could keep. With a needle and thread, you can. This is about more than just stitching flowers; it’s about preserving a memory, a walk in the woods, or the feeling of sun on your skin.
Whether you choose to combine real pressed botanicals with thread or recreate their delicate forms entirely in stitch, the goal is the same: to translate the quiet elegance of nature into a lasting form. You don’t need complex techniques, just a thoughtful approach to color, texture, and placement.
Here, you’ll find ways to integrate the wildness of nature into your daily life—on a jacket, a journal, or the linens that grace your table. Let these ideas guide you to create pieces that feel both personal and timeless, a true collaboration between your hands and the natural world.
1. Render a Botanical Illustration in Thread
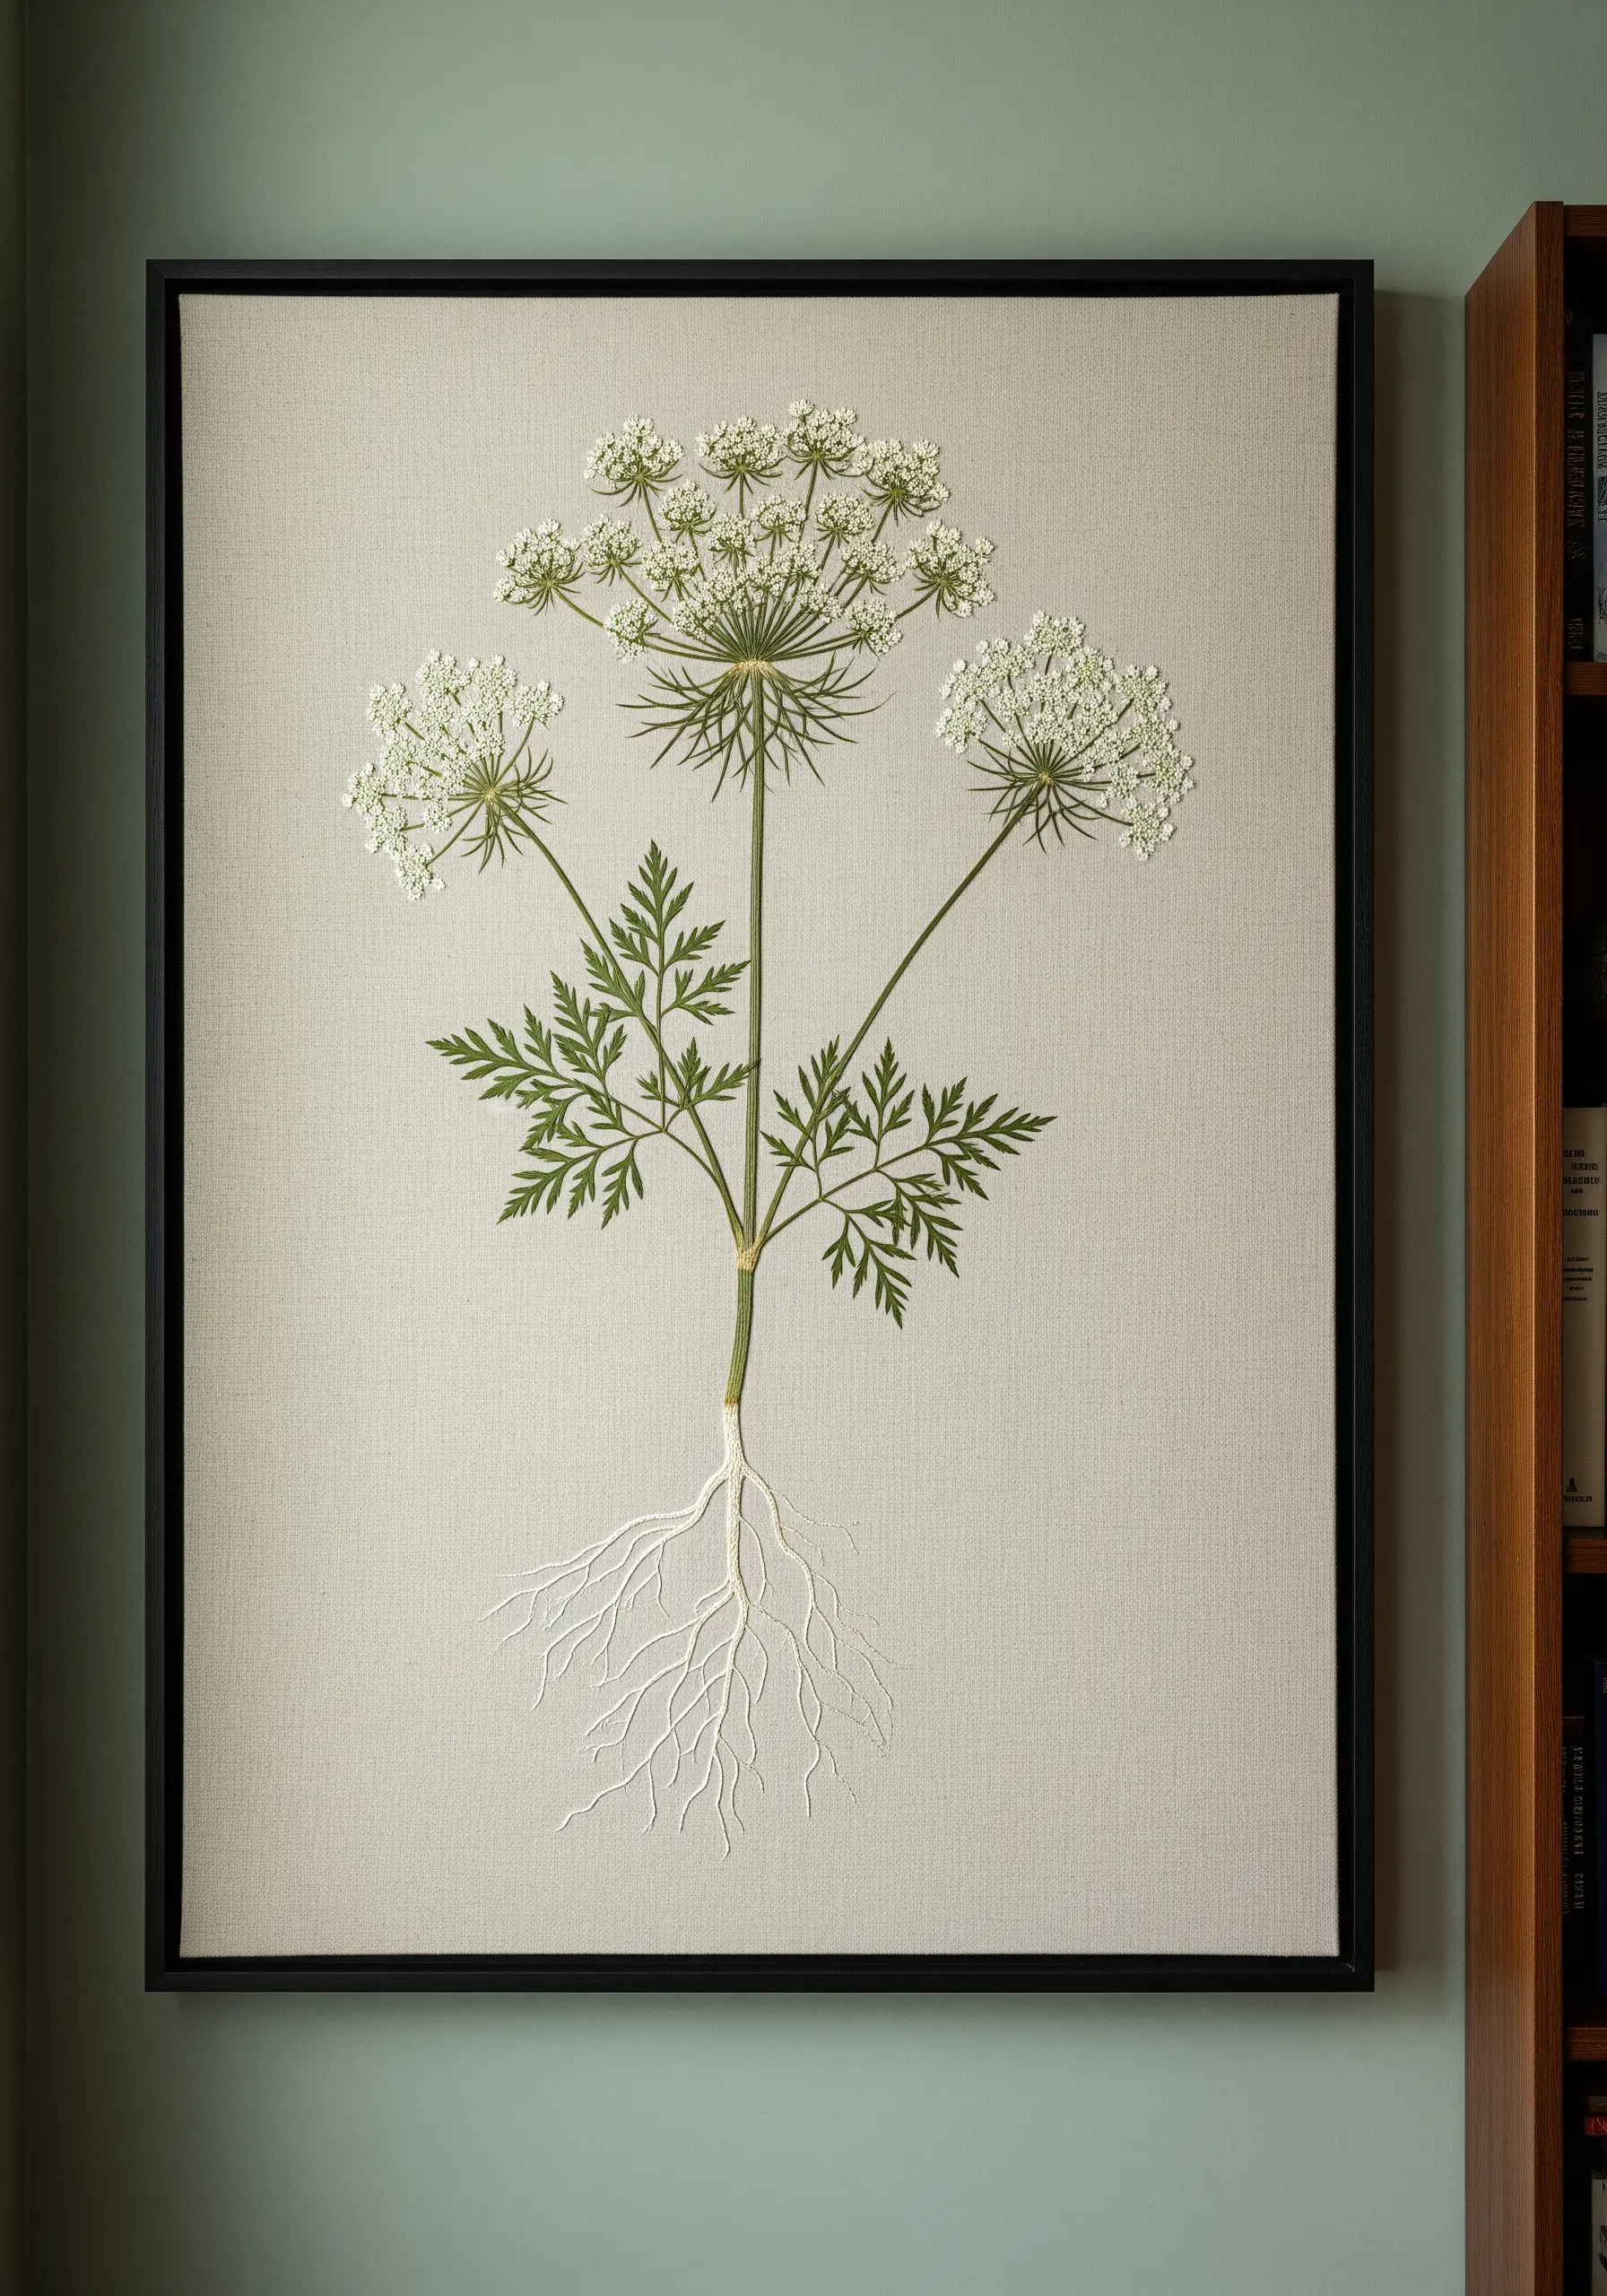
Create a museum-quality botanical study by combining pressed foliage with thread painting.
Press the delicate leaves of a plant like Queen Anne’s Lace until perfectly flat and dry.
Affix them to a neutral linen canvas, then use single-strand floss to embroider the elements you can’t preserve, such as the intricate root system and the delicate flower heads.
Use hundreds of tiny French knots for the blossoms and a fine split stitch for the roots to achieve realistic texture and detail.
This technique transforms a simple embroidery into a sophisticated piece of framed embroidery art.
2. Embellish a Journal with a Tactile Bouquet
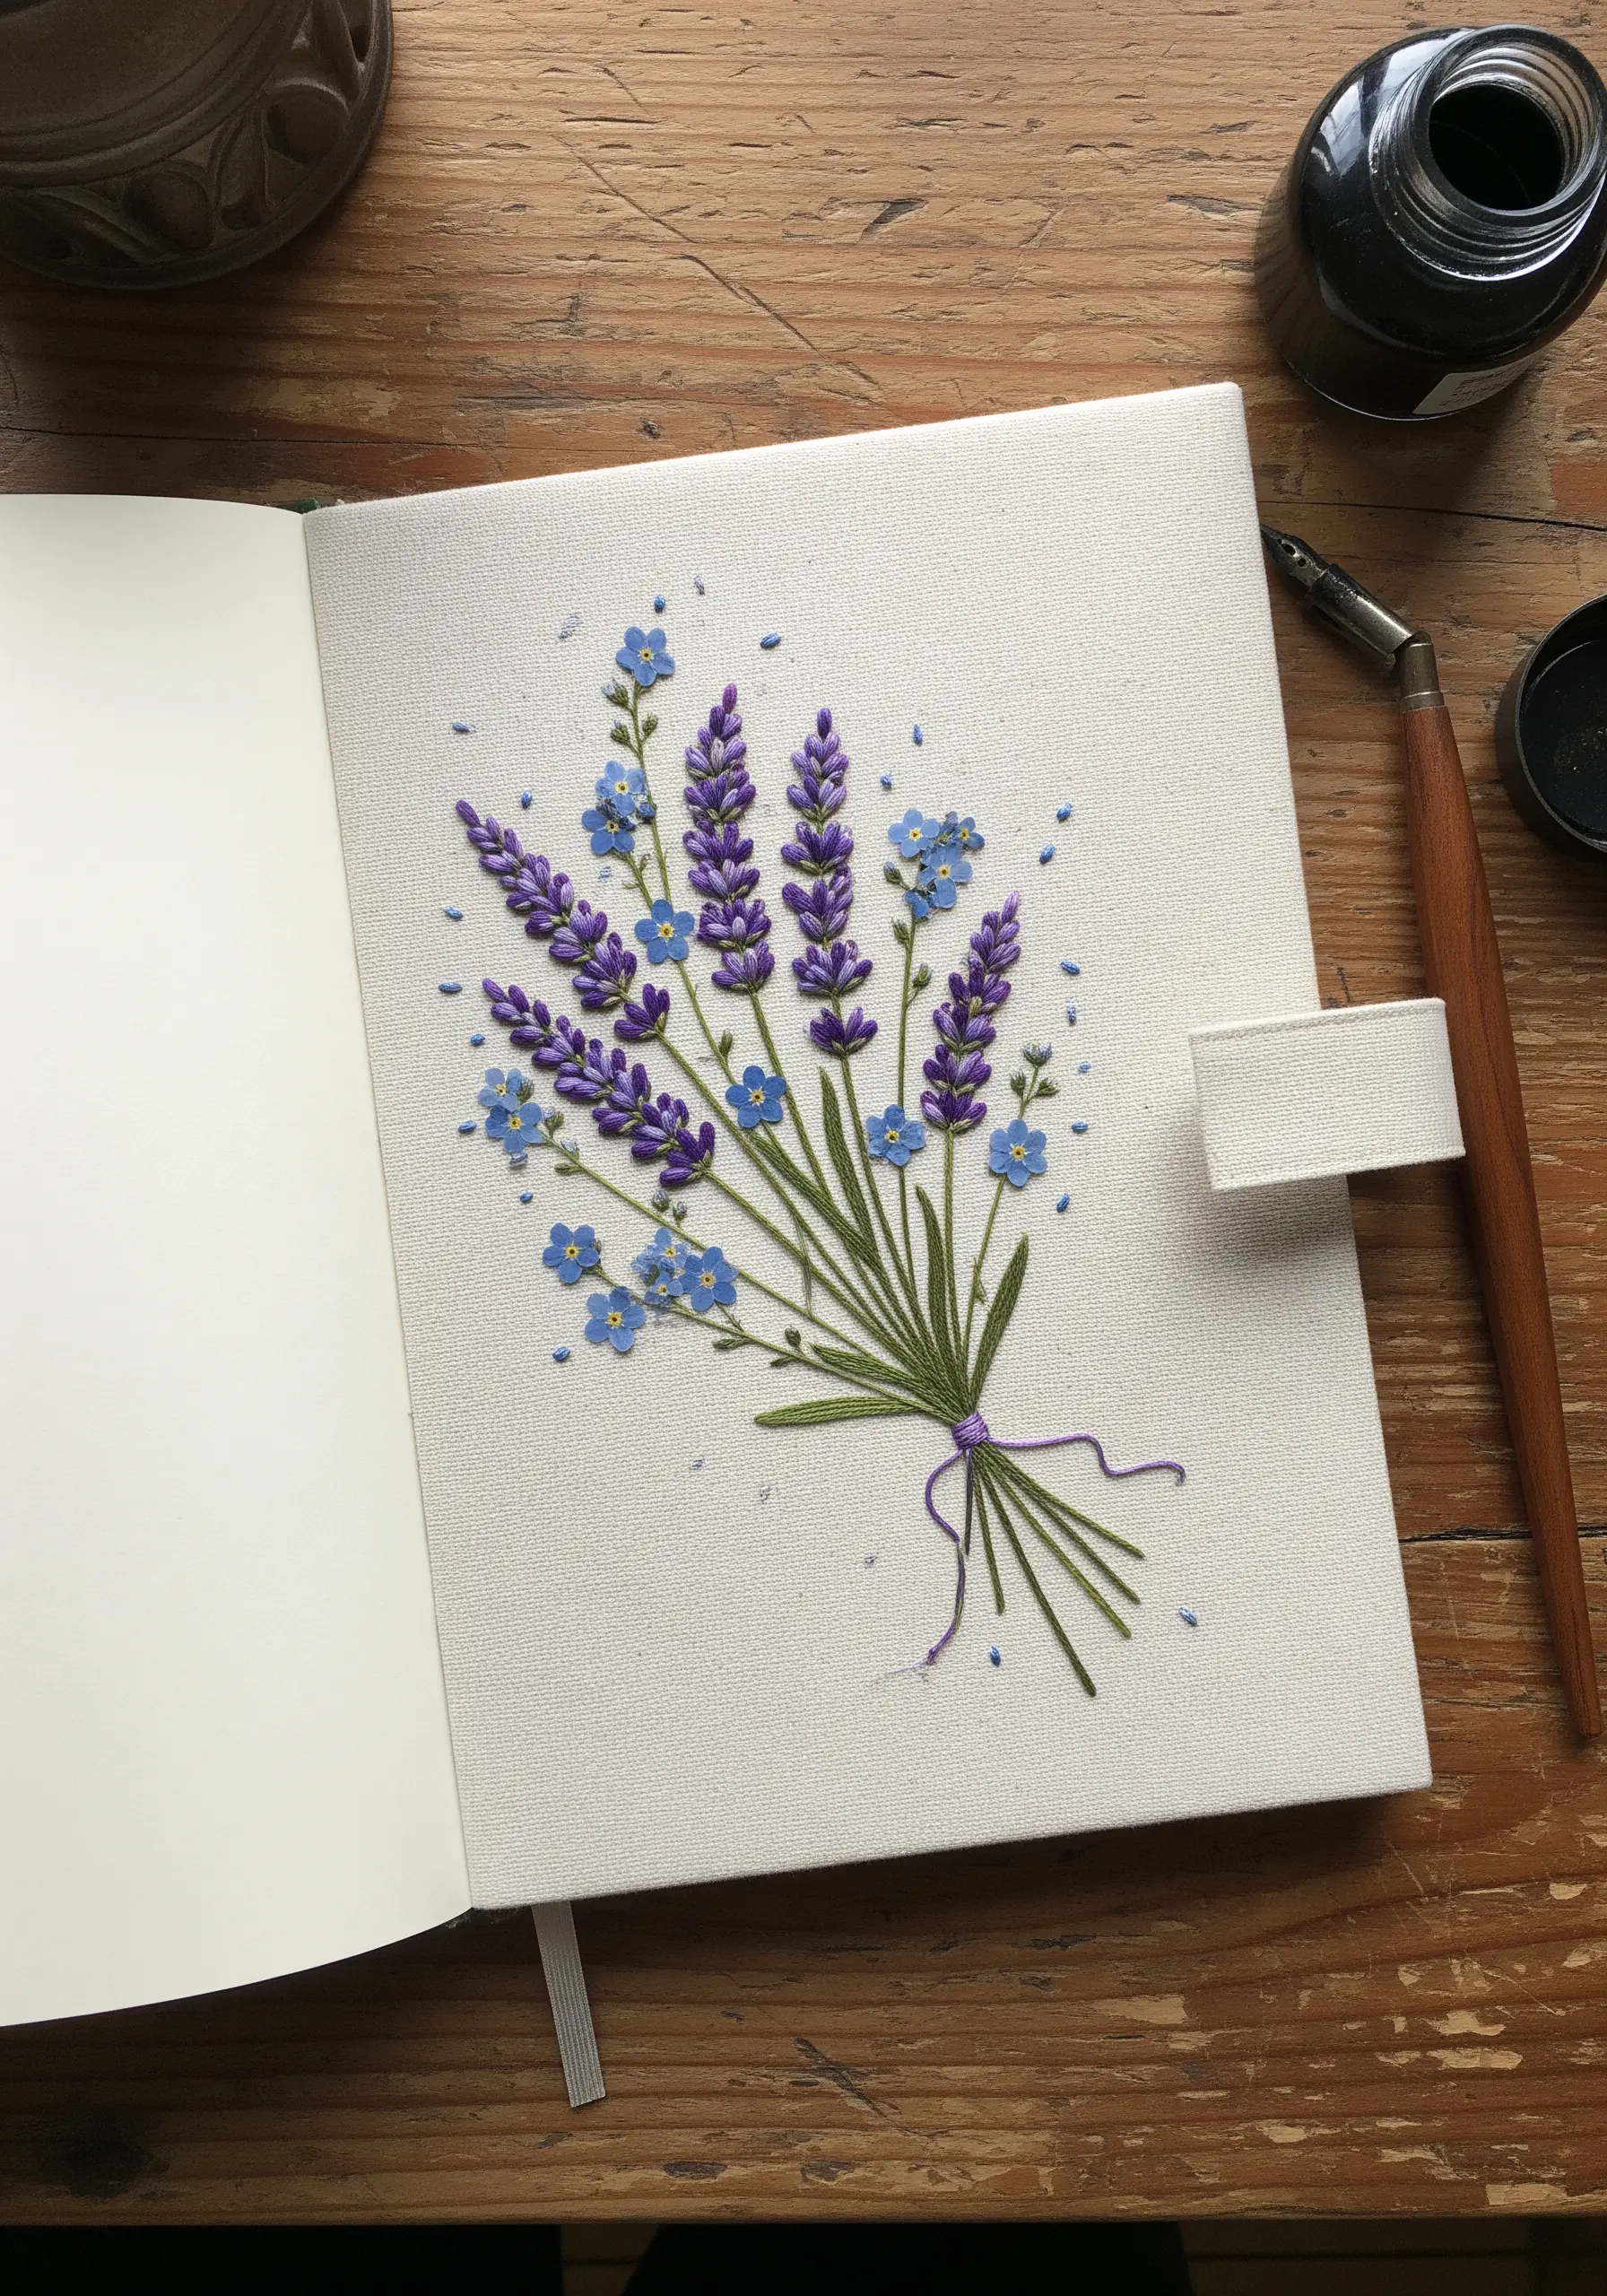
Elevate a simple notebook by embroidering directly onto its fabric cover.
To create the lavender, use padded satin stitch for the main buds—this involves laying down a few foundation stitches to raise the final stitch, giving it dimension.
For the smaller forget-me-nots, use detached chain stitches (lazy daisies) with a French knot in the center, which is faster than satin stitch but just as effective for tiny petals.
Choose a journal with a high-quality canvas or bookcloth cover, as it provides the stability needed for dense stitching.
This method turns a functional item into one of your most handmade embroidery gifts.
3. Frame a Denim Back Panel with a Wildflower Wreath

Transform a denim jacket by using the back panel as a natural frame for a bold floral wreath.
Always use a cut-away stabilizer on the inside of the jacket to prevent the denim’s stretch from warping your stitches.
For the poppy petals, use a long-and-short stitch to blend shades of red, creating a realistic, painted effect.
Contrast the large, vibrant poppies with smaller, delicate filler flowers stitched with simple French knots and lazy daisy stitches to create compositional balance and visual interest.
This is one of the most effective wildflower embroidery patterns for upcycling clothing.
4. Layer Pressed Flowers and Line Art on Tulle

Create an ethereal, floating composition by combining real pressed flowers with delicate line work on sheer fabric.
Start by stretching a layer of organza or tulle tightly in a hoop.
Arrange your pressed wildflowers on the surface, securing each one with a tiny, discreet drop of fabric glue or a nearly invisible couching stitch.
Next, use a single strand of dark thread to add abstract, free-flowing lines with a simple backstitch, overlapping the botanicals to create a sense of depth and connection.
This method is perfect for creating creative mixed-media embroidery projects.
5. Cultivate a Meadow on Your Table Runner
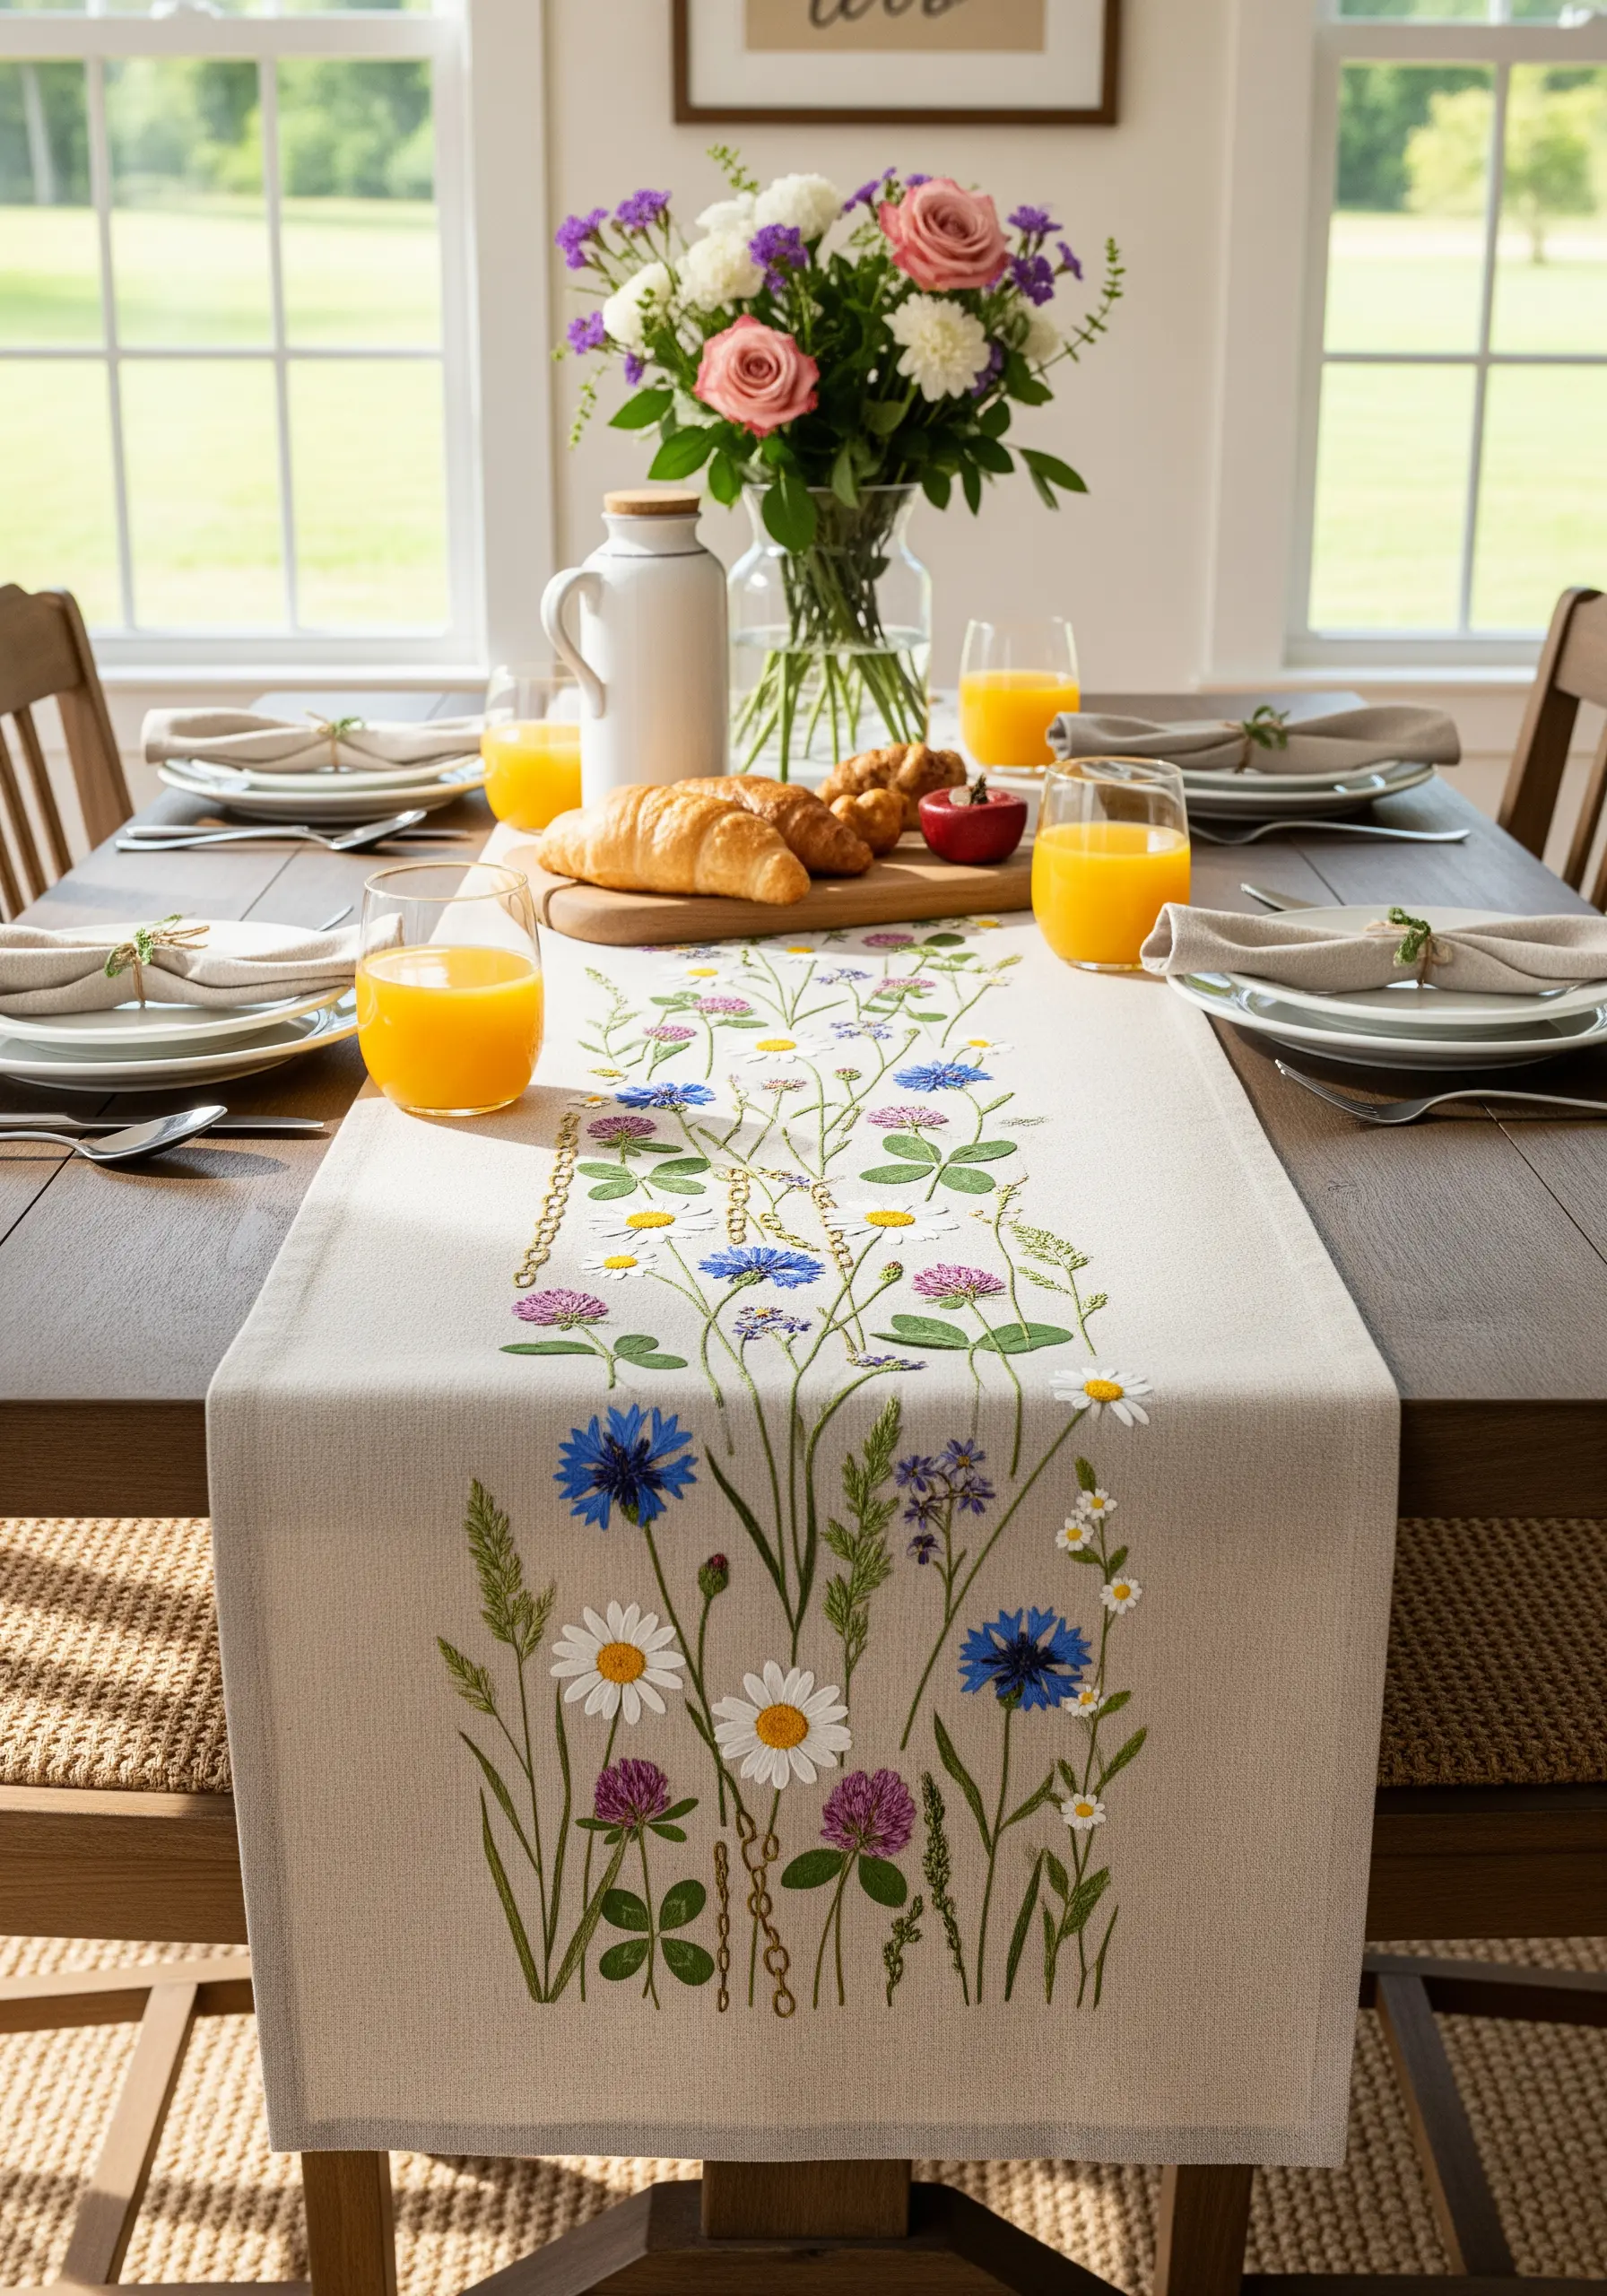
Design a botanical table runner that appears to grow organically from the edge of the table.
To achieve this, concentrate your most densely stitched, vibrant flowers at the bottom, gradually spacing them out and using lighter colors as you move upward.
Vary your stitch techniques to mimic nature: use satin stitch for the bold cornflower petals, woven wheel stitch for the daisies, and tiny French knots for the clover.
This intentional variation gives your embroidery table runner a sense of natural, untamed beauty.
6. Stitch a Thistle with Graphic Precision on Velvet
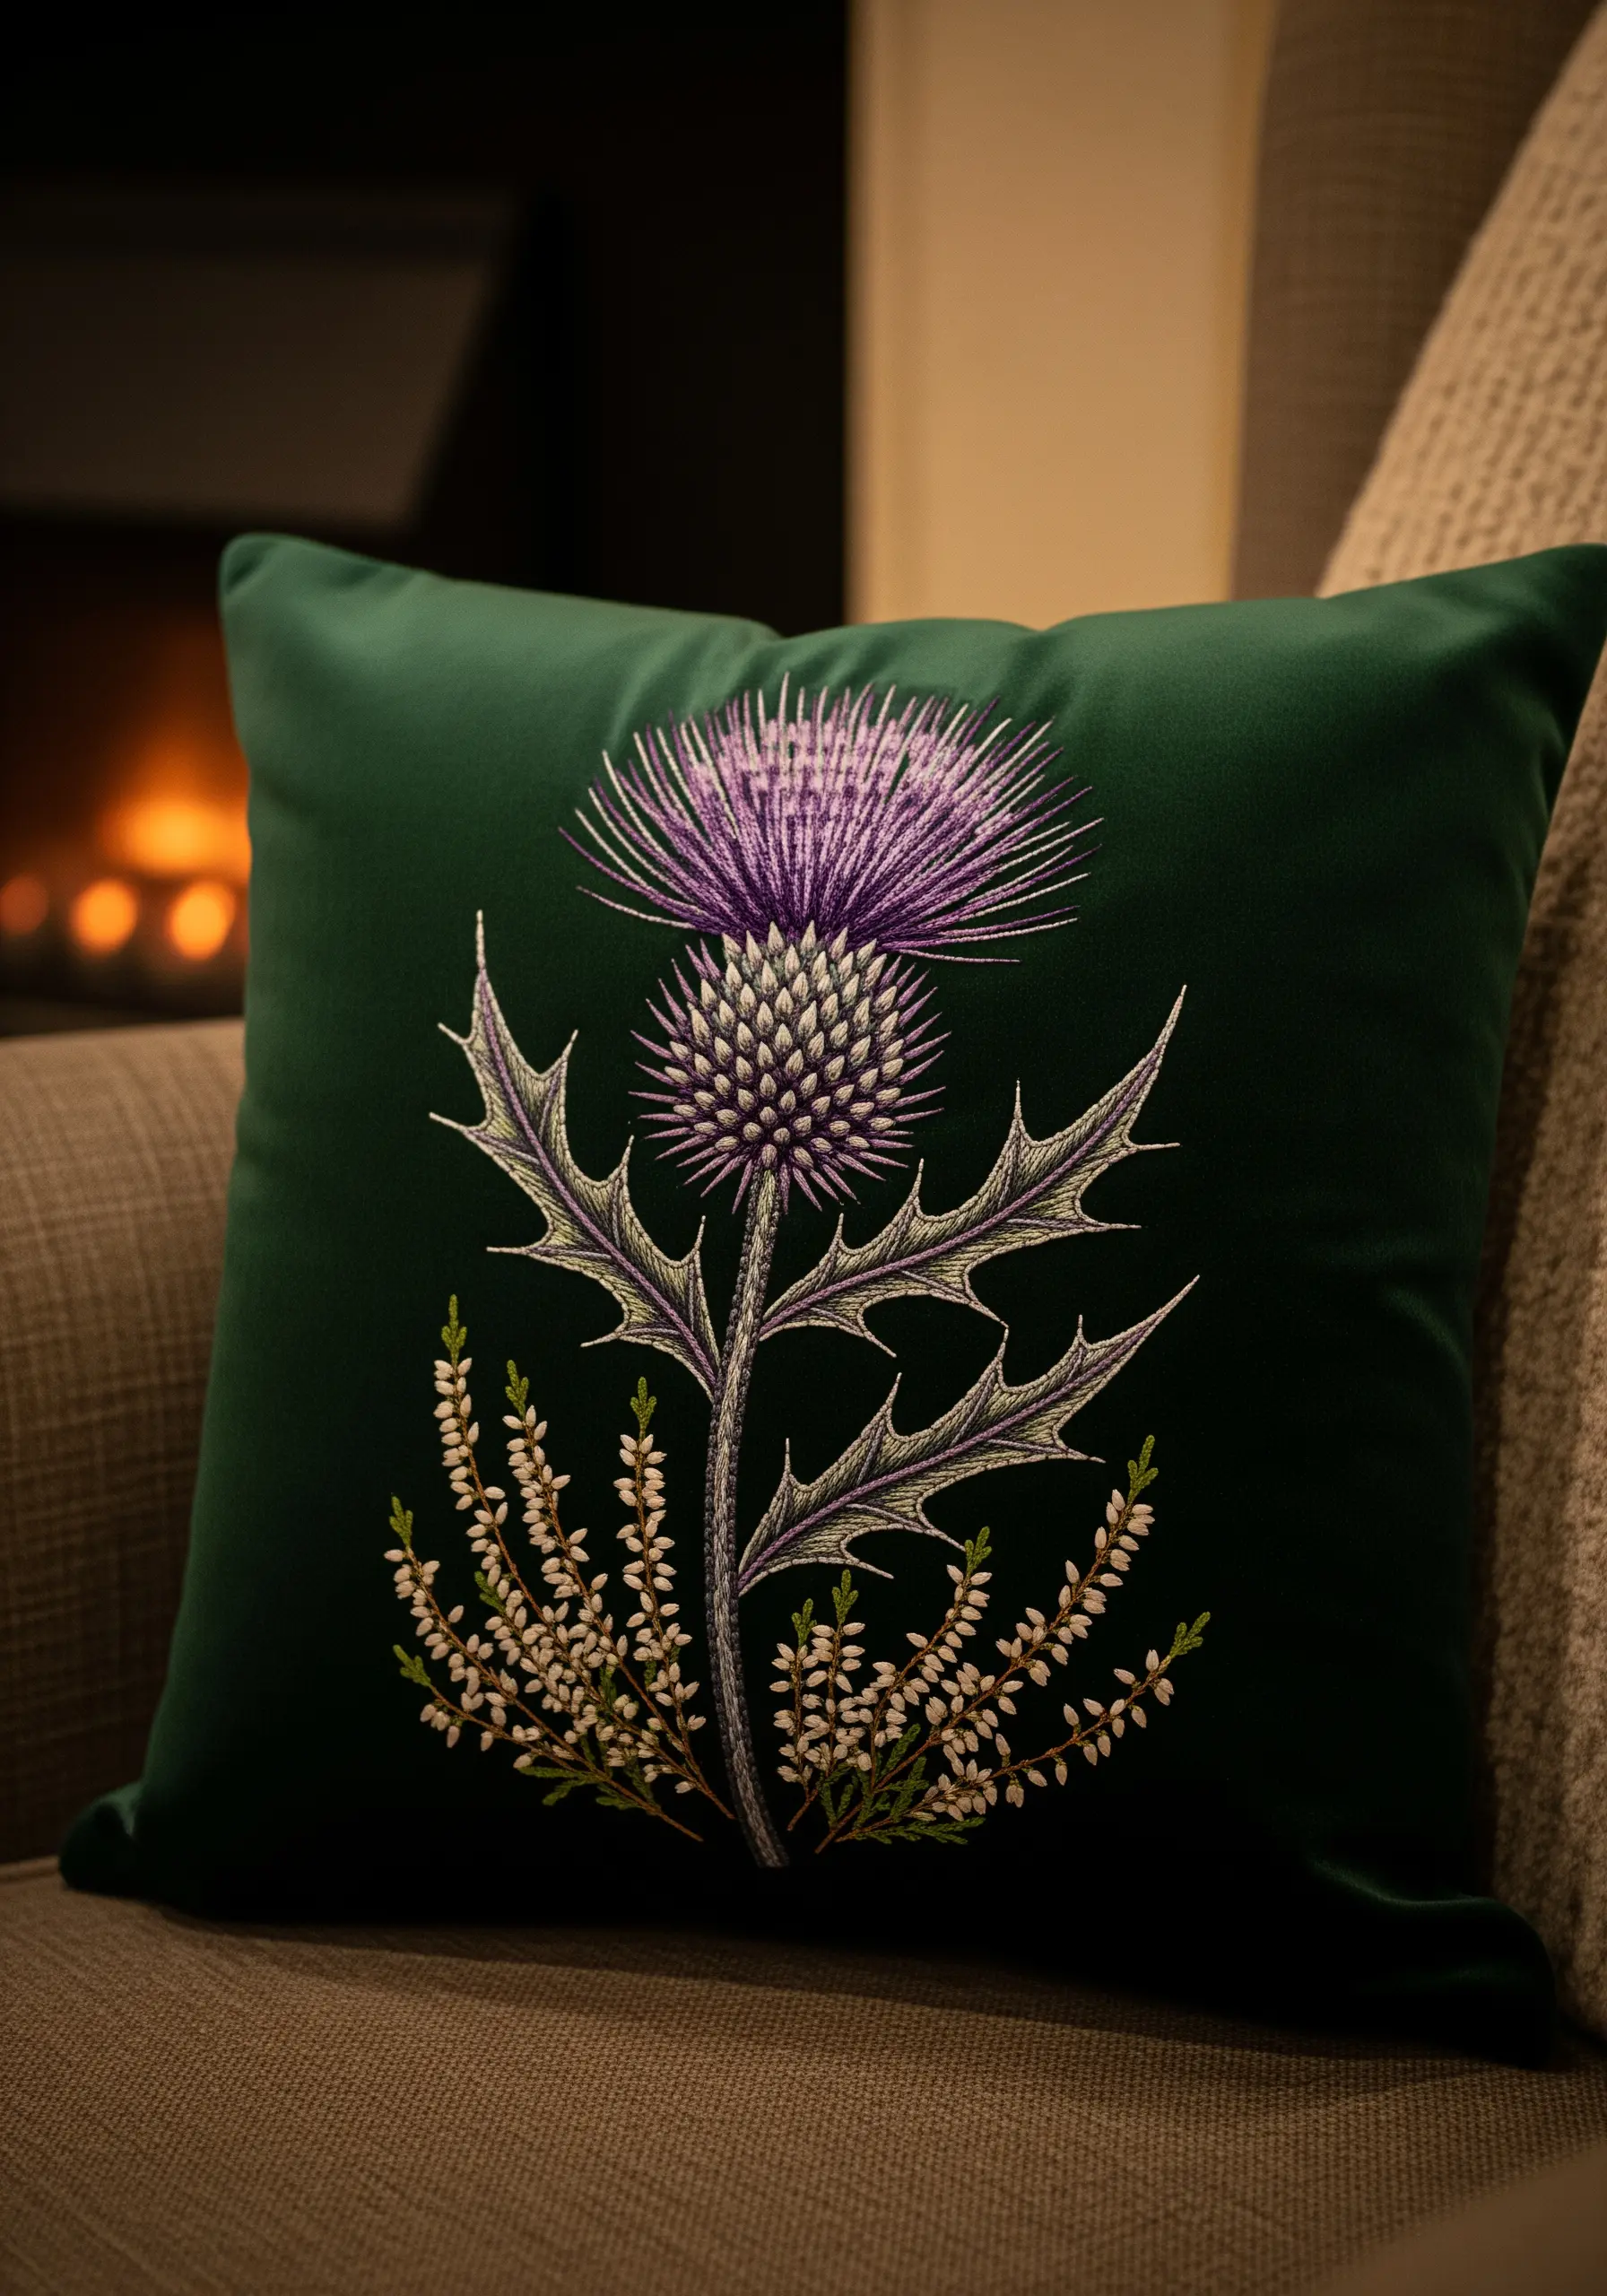
Capture the dramatic texture of a thistle by stitching it on a rich, dark velvet background.
Because of velvet’s pile, you must use a water-soluble topper; this film sits on top of the fabric, preventing your stitches from sinking and disappearing.
Use a long-and-short stitch for the thistle’s head, arranging your stitches in a radiating pattern from the center to mimic its natural form.
For the spiky leaves, use sharp, angular satin stitches and a contrasting backstitch outline to define their iconic, prickly edges.
7. Frame Pressed Botanicals with Stitched Paper
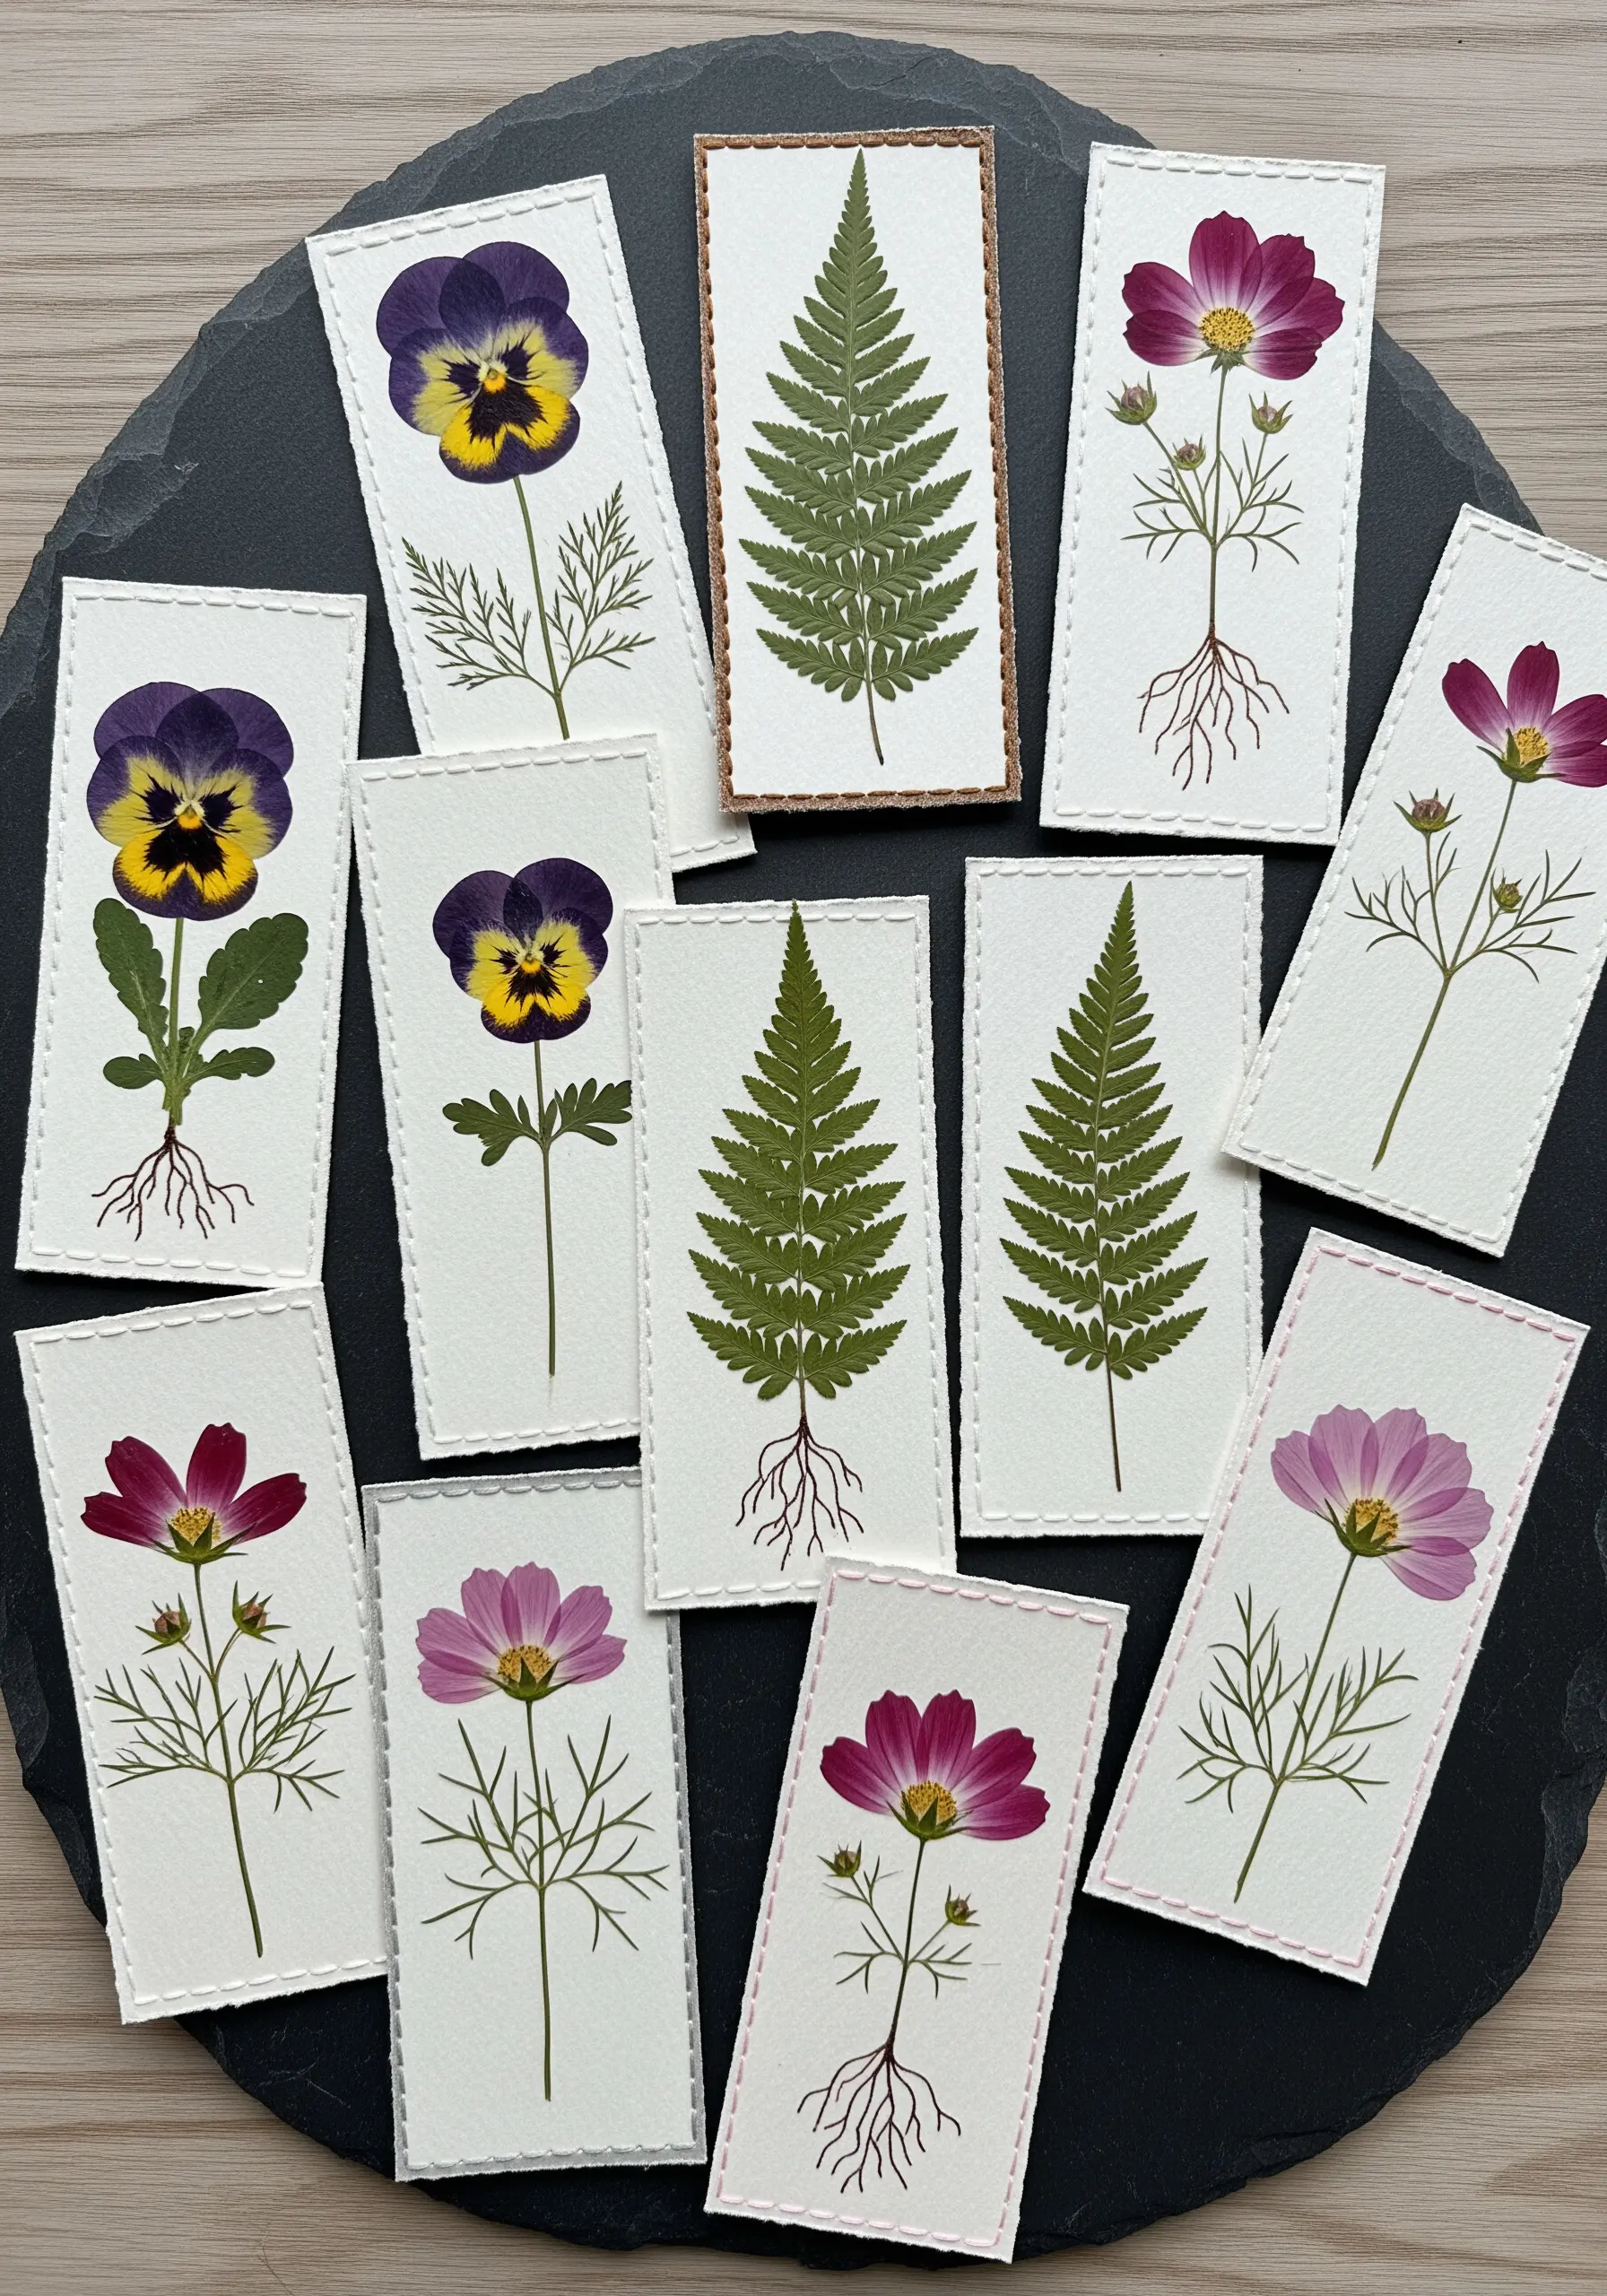
Combine pressed flowers and paper craft by stitching directly onto heavy cardstock.
First, carefully arrange and glue your pressed specimen onto a small piece of watercolor paper.
Instead of punching the fabric with a needle, pre-pierce your stitching holes along the border with a pin to prevent tearing the paper.
Use a simple running stitch with a contrasting thread to create a clean, minimalist frame that highlights the natural beauty of the plant.
These are perfect as easy DIY embroidered mixed-media bookmarks.
8. Create a Botanical Guide on a Tote Bag
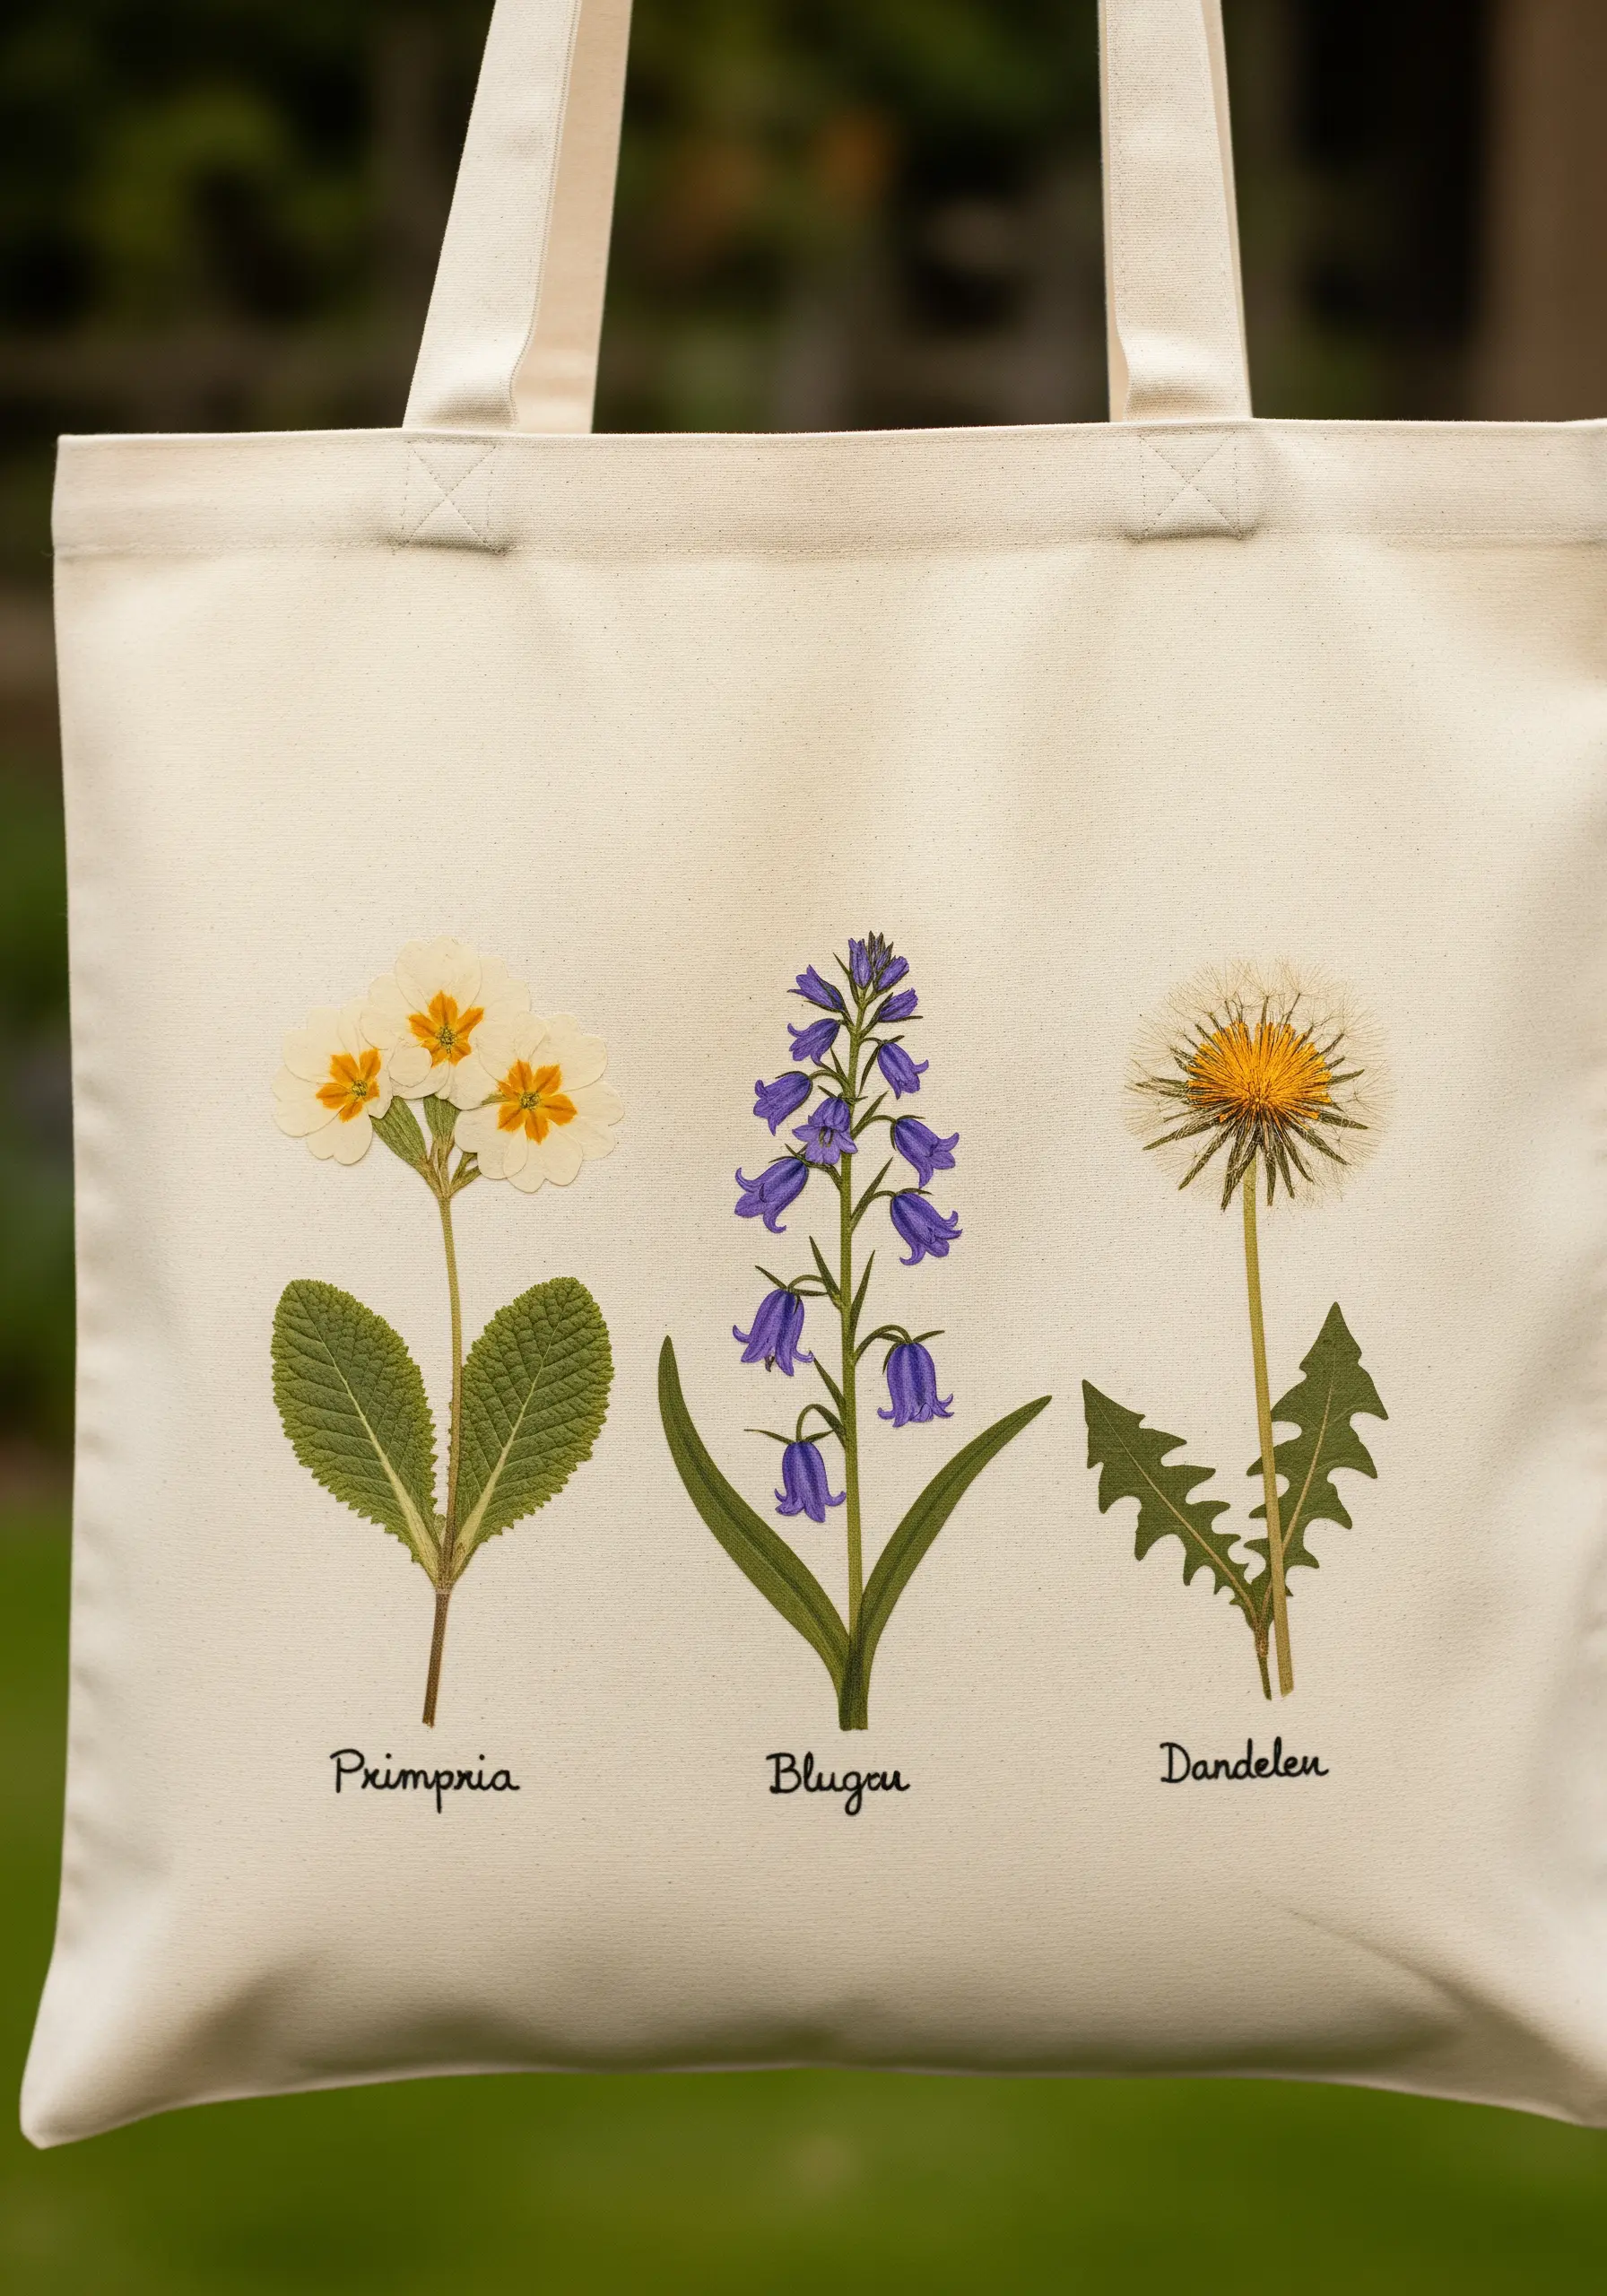
Turn a simple canvas tote into a botanical field guide by stitching scientifically accurate floral specimens.
Use a water-soluble transfer pen to trace your flower designs and their names onto the fabric for precision.
To achieve realism, focus on thread painting techniques, using single strands of floss to blend colors for the petals and leaves.
For the dandelion, use a combination of straight stitches and French knots to capture the texture of both the seed head and the yellow flower, creating a visually engaging tote bag embroidery.
9. Weave a Floral Crown for a Straw Hat

Embellish a simple straw hat with a removable, three-dimensional floral band.
Create your base by cutting a strip of stiff green felt that fits snugly around the hat’s crown.
On this felt base, embroider your leaves using satin stitch and stitch your flowers using layered detached chain stitches for daisies and bullion knots for lavender.
Incorporate small, dried statice flowers by carefully stitching them into the design for added texture and realism.
This approach allows you to create a detailed piece without ever piercing the delicate straw of the hat itself.
10. Curate a Wildflower Specimen Gallery Wall
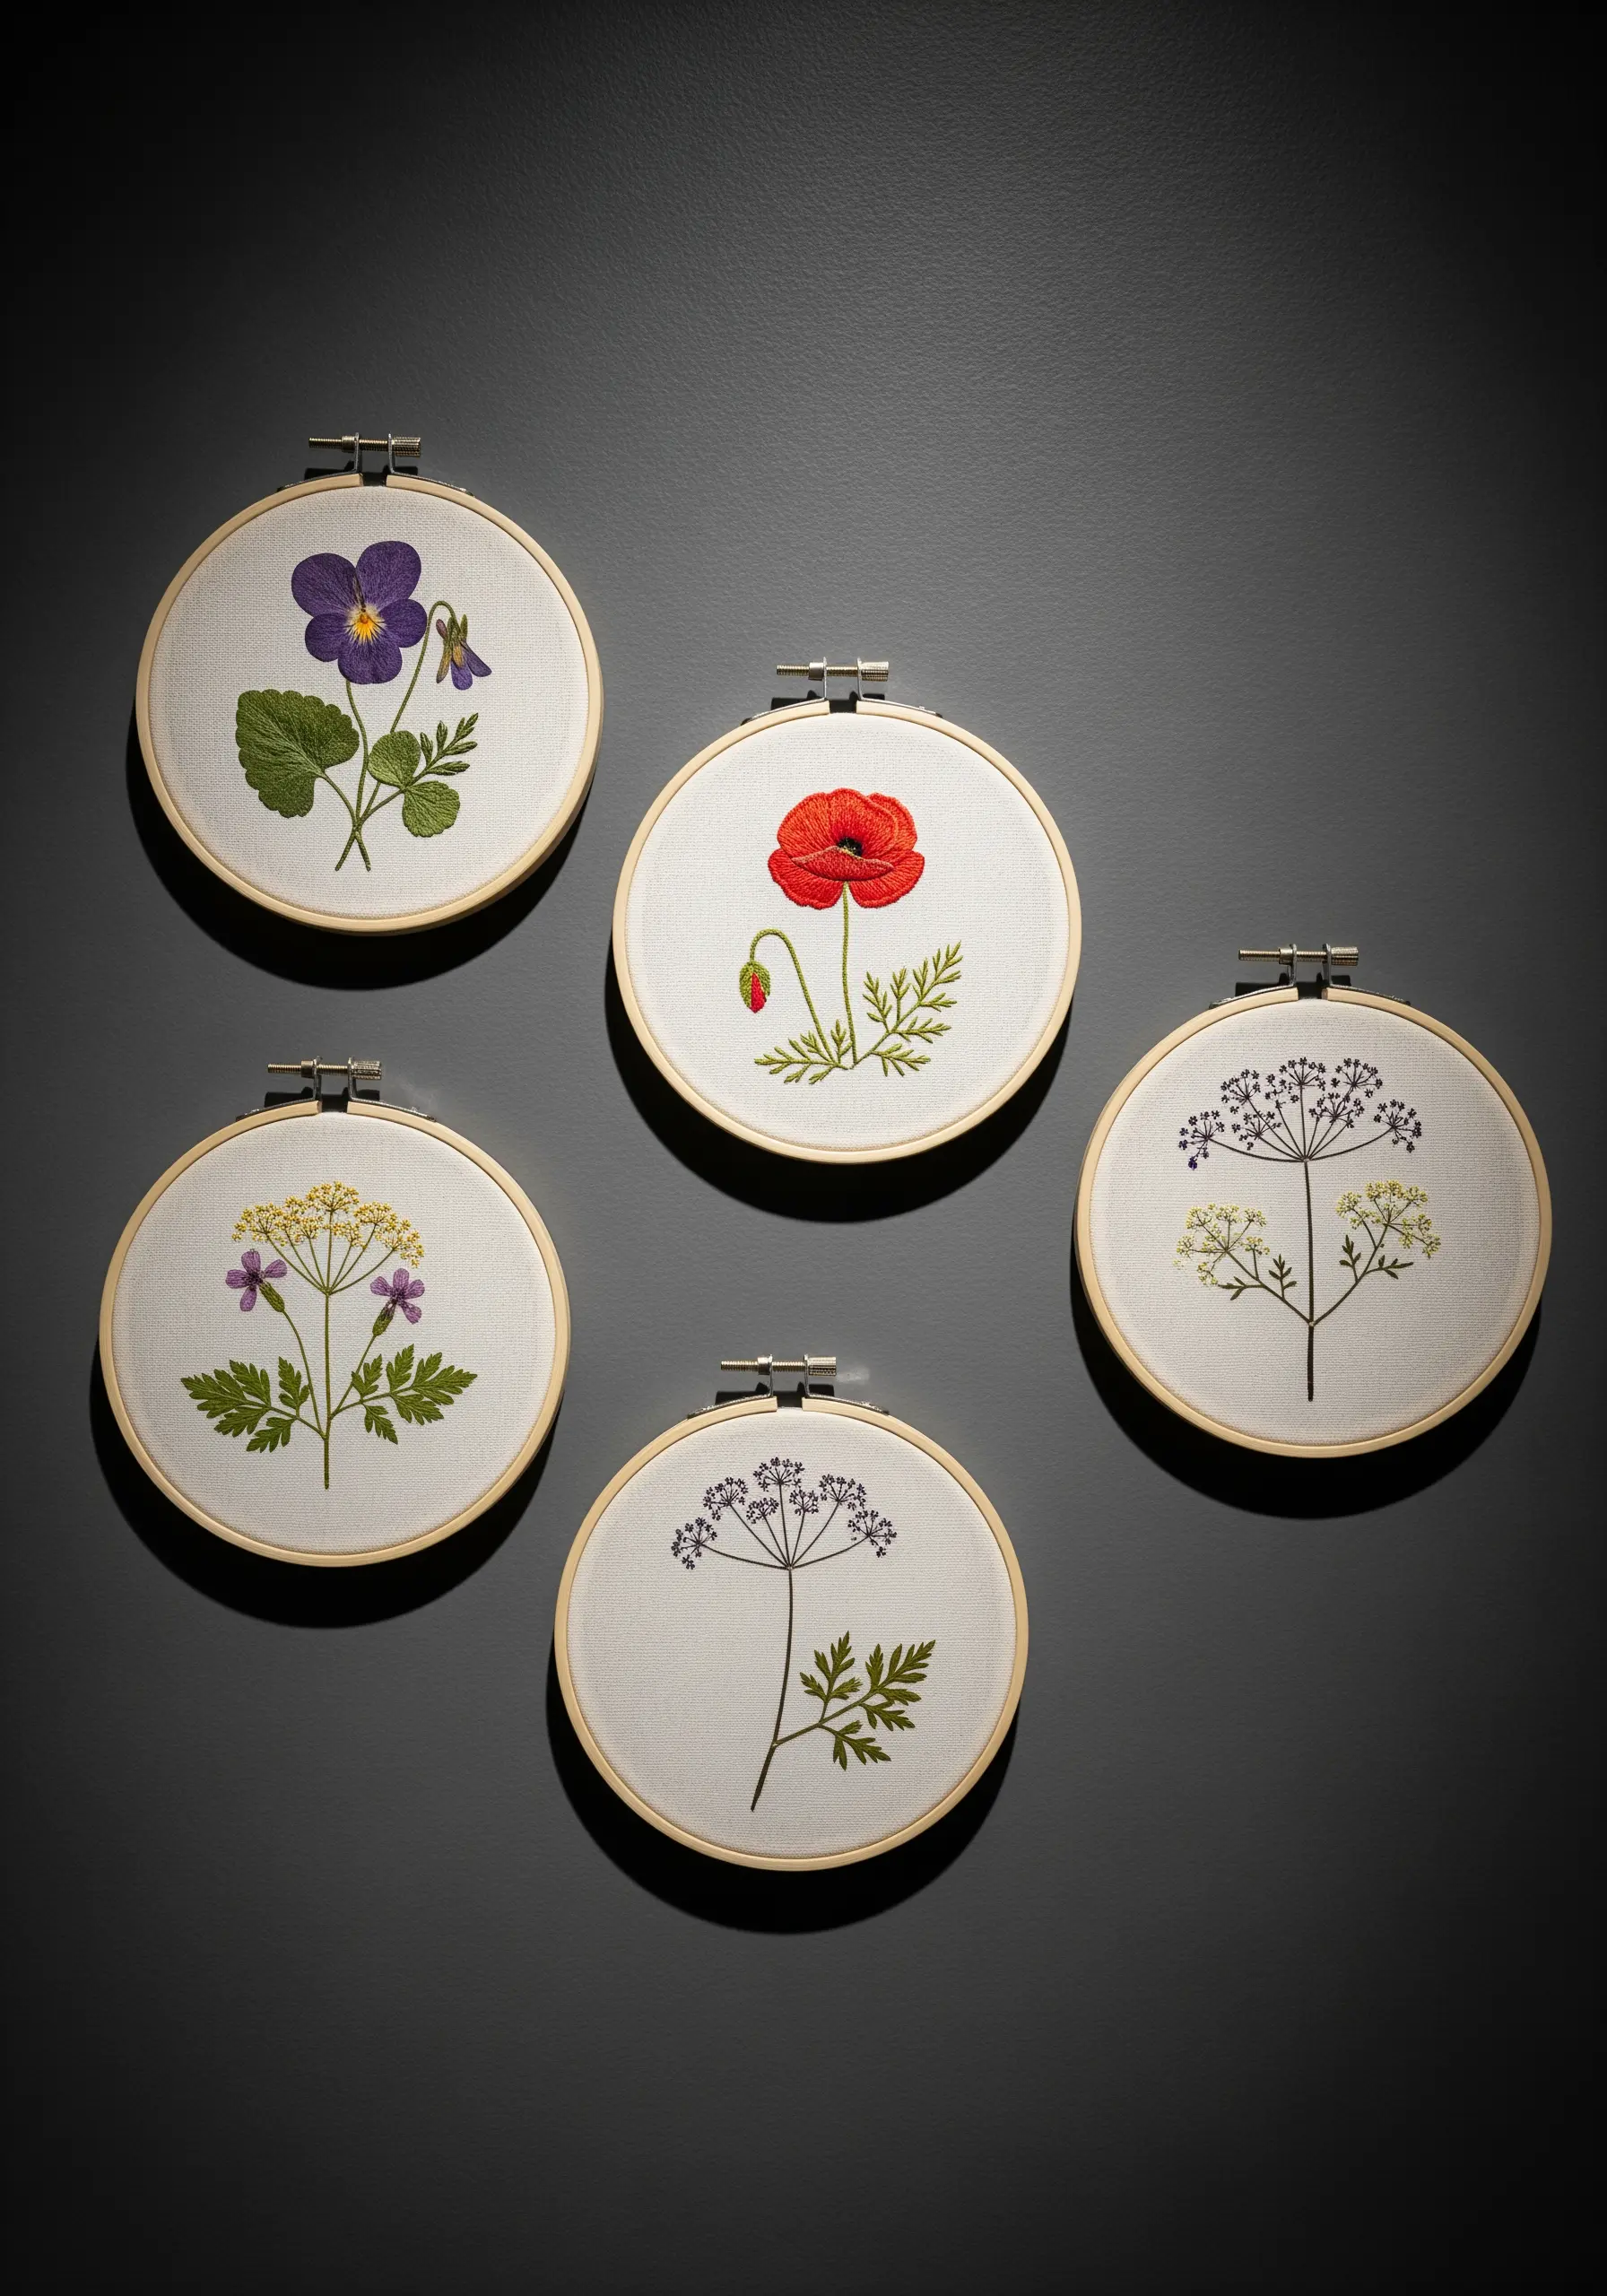
Design a cohesive set of botanical hoops that feel like a curated collection.
To achieve this, maintain consistency in your materials: use the same neutral linen fabric, the same size wooden hoops, and a similar central placement for each flower.
Let the variety come from the wildflowers themselves—a single poppy, a delicate violet, a sprig of Queen Anne’s Lace.
This restrained approach turns simple wildflower hoop art projects into a sophisticated, intentional display.
11. Preserve a Delicate Spray on Heirloom Linen

Give a vintage handkerchief new life by using it as a canvas for a delicate pressed flower arrangement.
Choose fine, flat botanicals like Lily of the Valley, as bulky flowers won’t sit well on the lightweight fabric.
Arrange your pressed spray in a corner, then secure it by creating a border with a single strand of matching thread.
Use a simple, almost invisible running stitch that follows the contour of the arrangement, preserving the flower and honoring the delicate nature of the linen.
12. Design a Botanical Lampshade That Glows
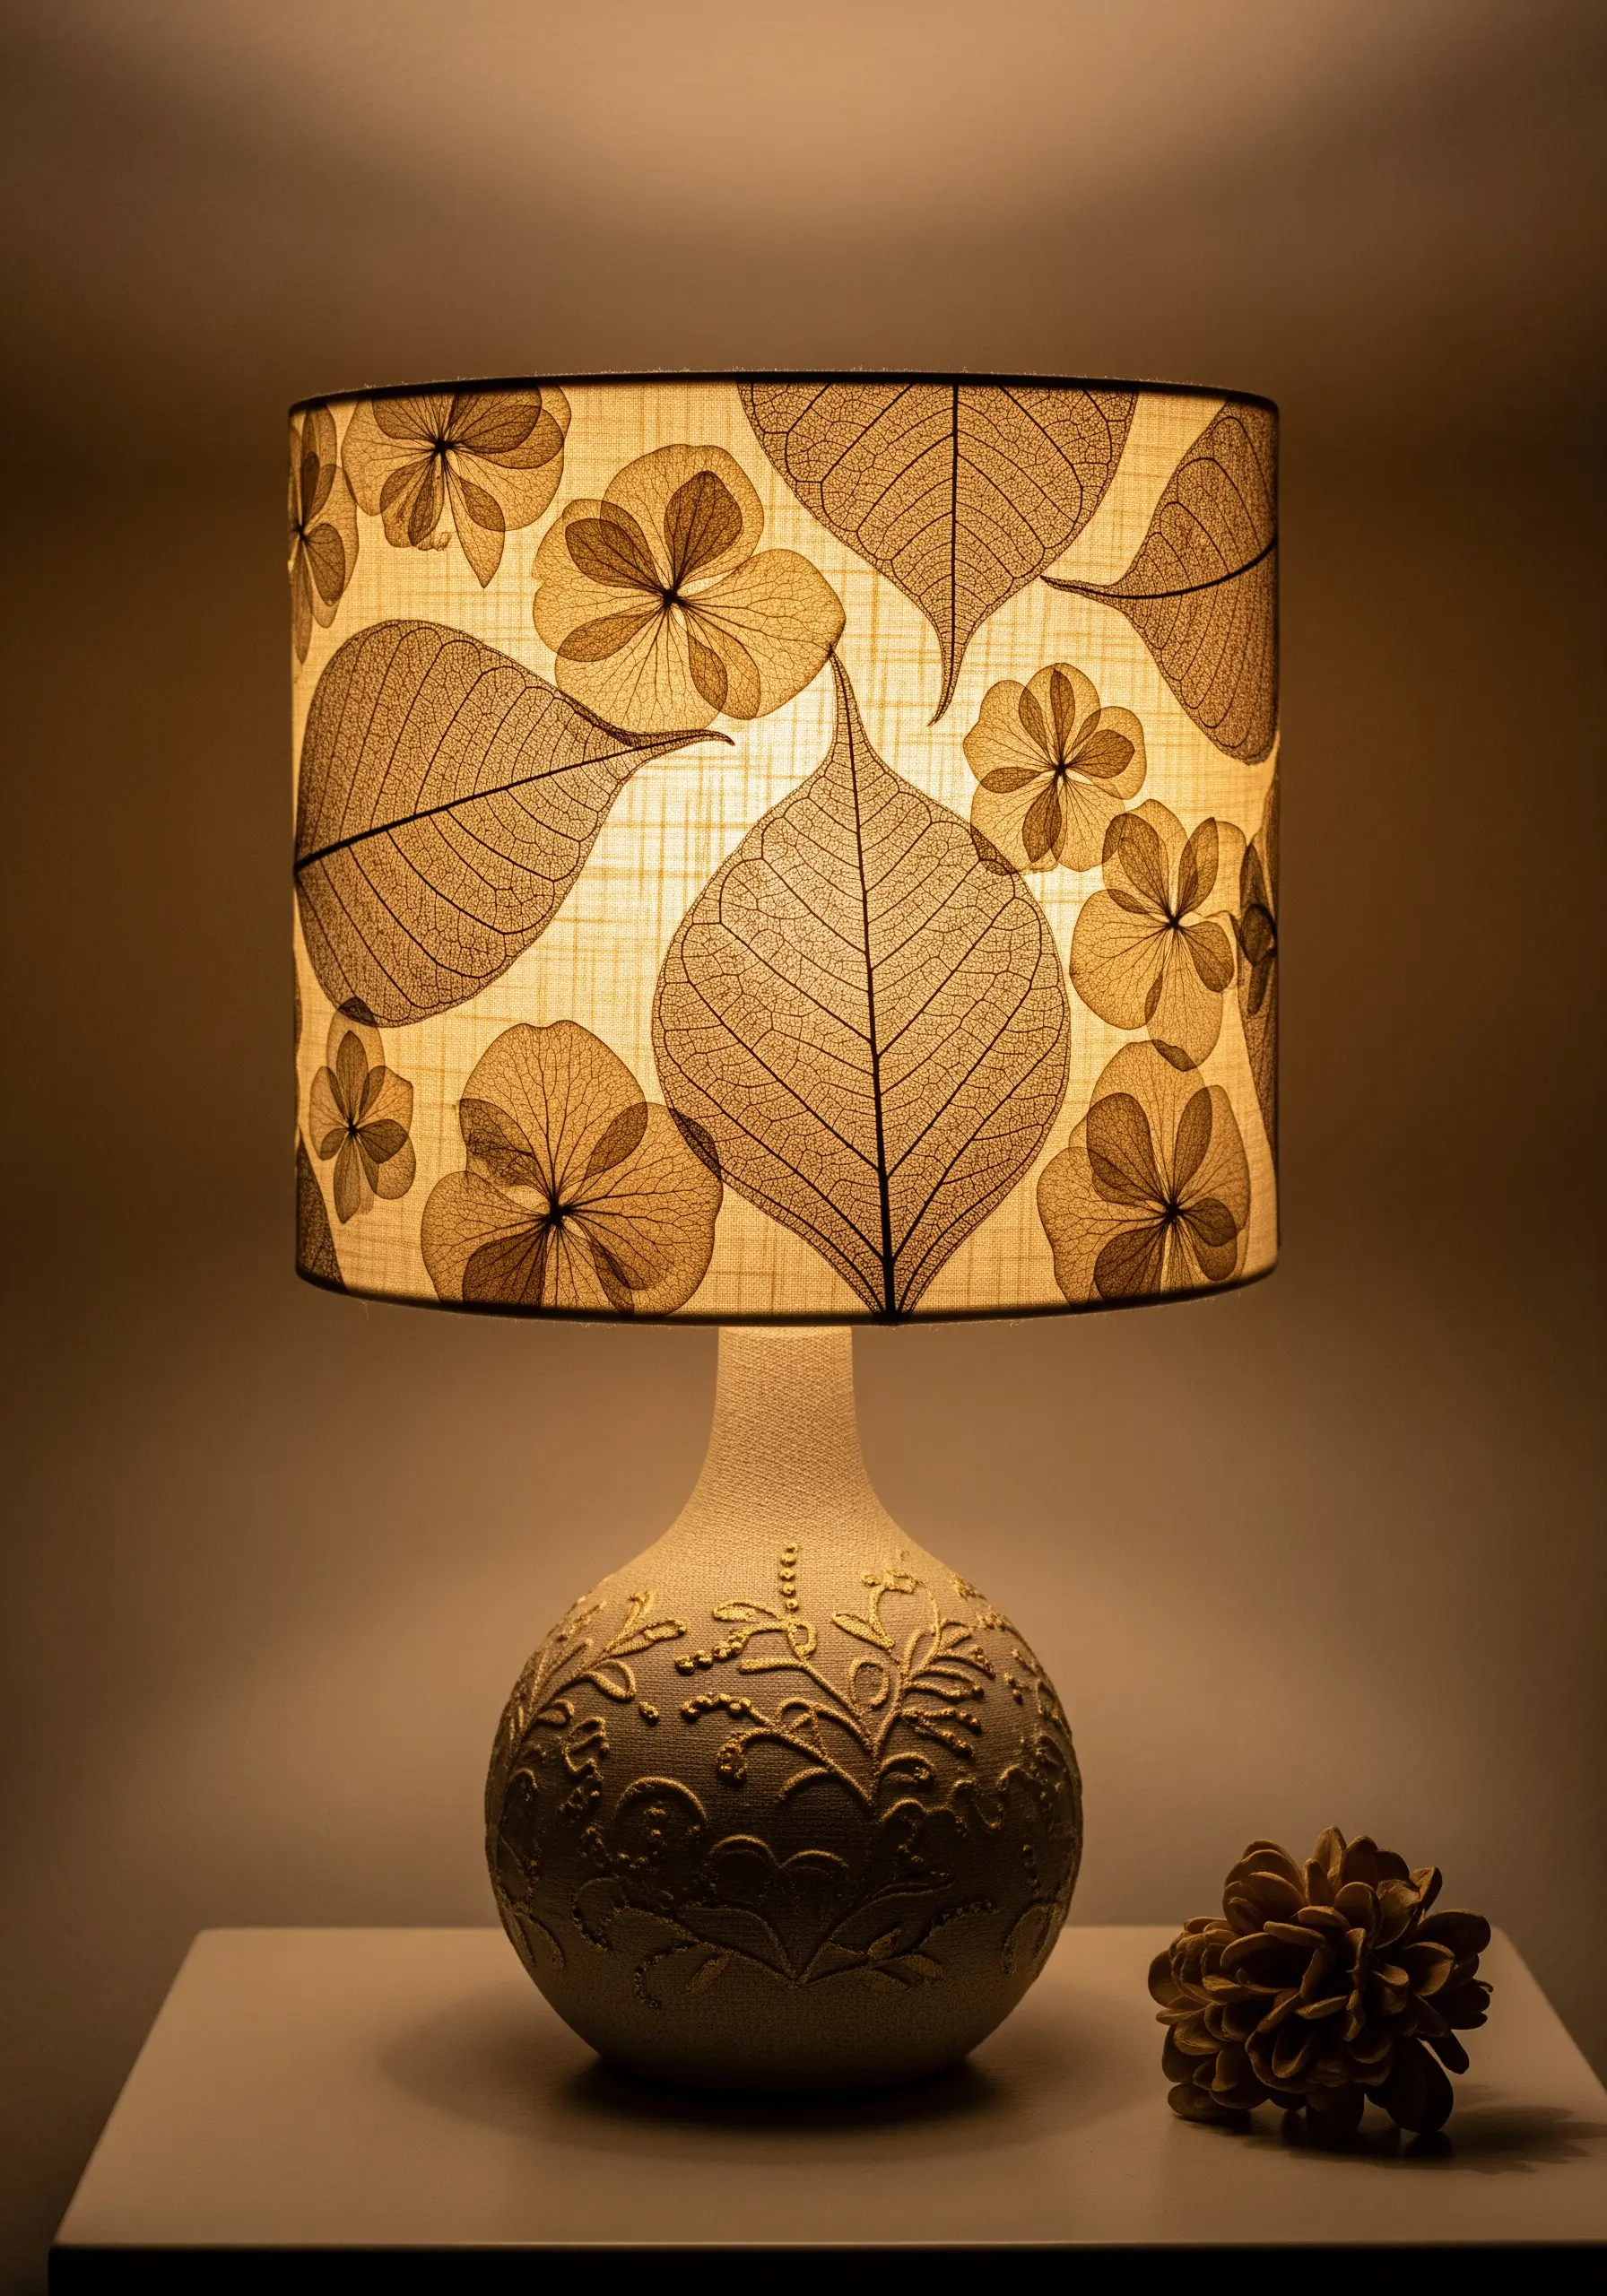
Construct a unique lampshade that illuminates the delicate skeletons of pressed leaves and flowers.
To make this, you’ll need a translucent, fire-retardant lampshade material, available at specialty craft stores.
Carefully arrange your pressed botanicals—skeleton leaves and thin, vibrant pansies work best—on one sheet of the material.
Seal them in place with a thin layer of clear, heat-resistant PVA glue or by sandwiching them with a second sheet of material.
When lit, the light shines through, revealing every intricate vein and petal.
13. Scatter a Floating Meadow on Sheer Curtains
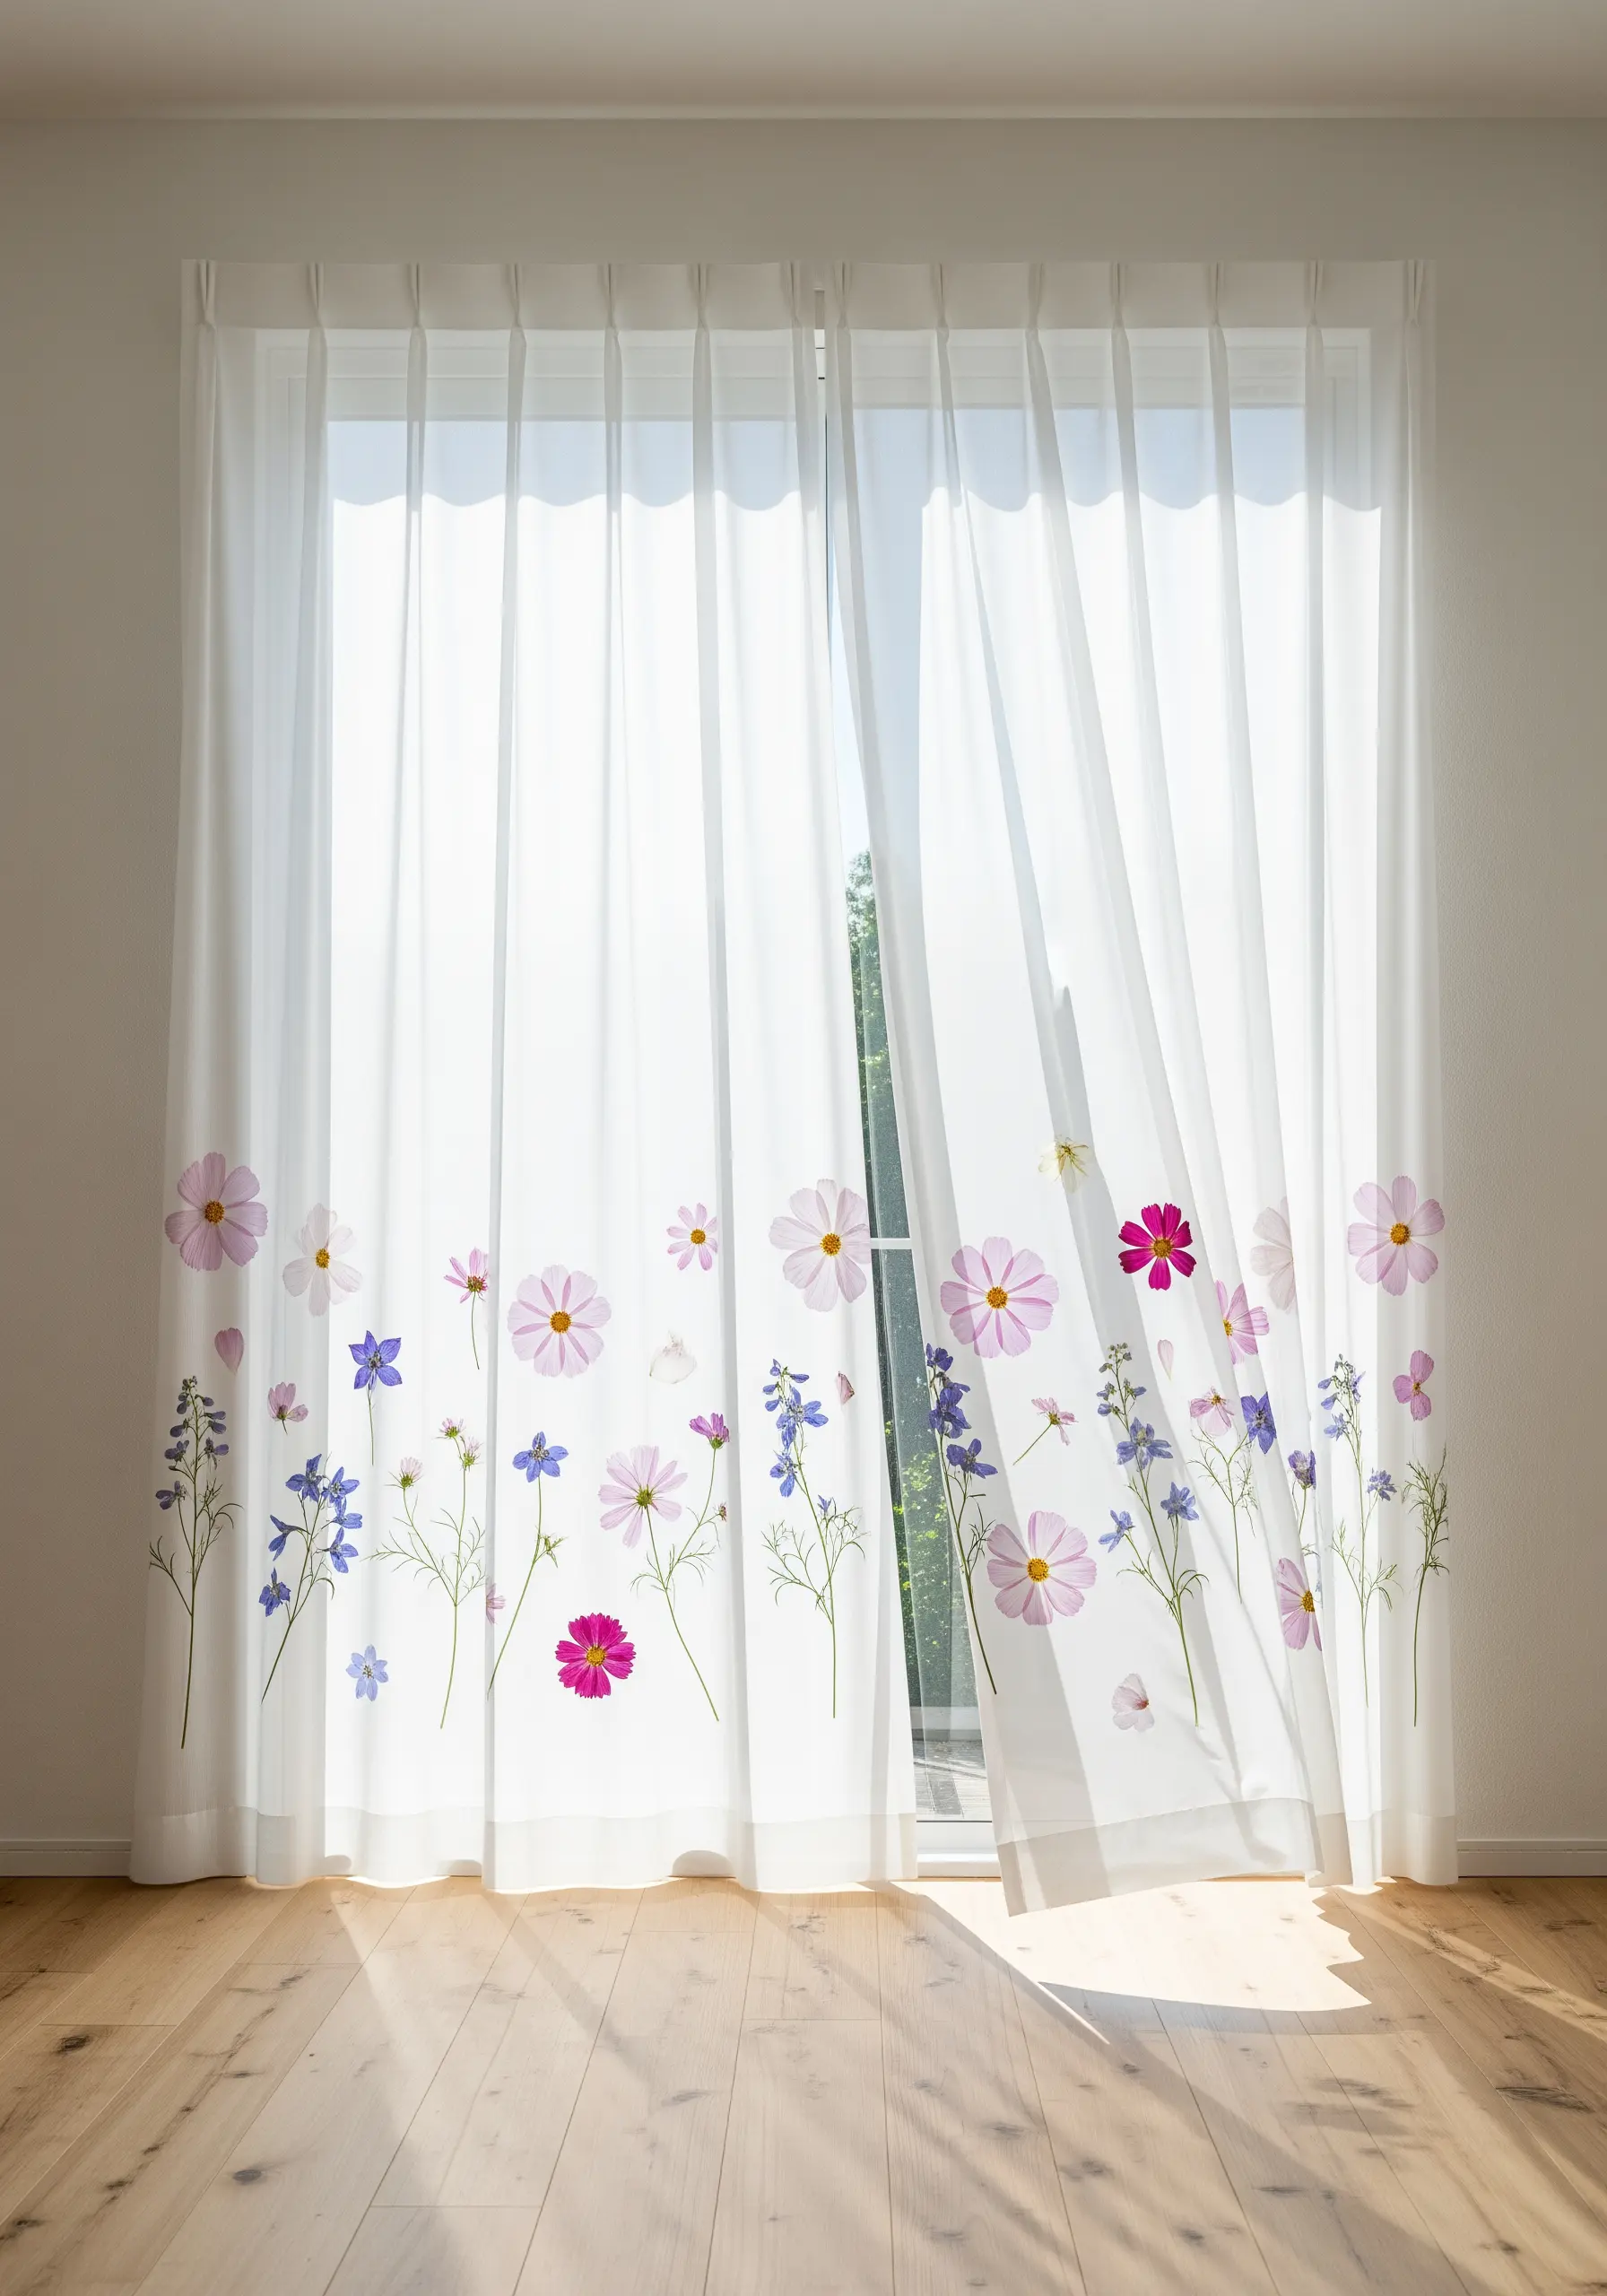
Create the illusion of wildflowers floating in mid-air by embroidering them onto sheer curtain panels.
To prevent puckering on such delicate fabric, always use a lightweight tear-away or water-soluble stabilizer.
Choose simple, open stitches like lazy daisies for petals and stem stitch for the stalks, using only two or three strands of floss to keep the design light and airy.
Scatter the motifs randomly along the bottom third of the curtain, which grounds the design while maintaining a sense of effortless grace.
14. Combine a Real Sunflower with Felt Appliqué
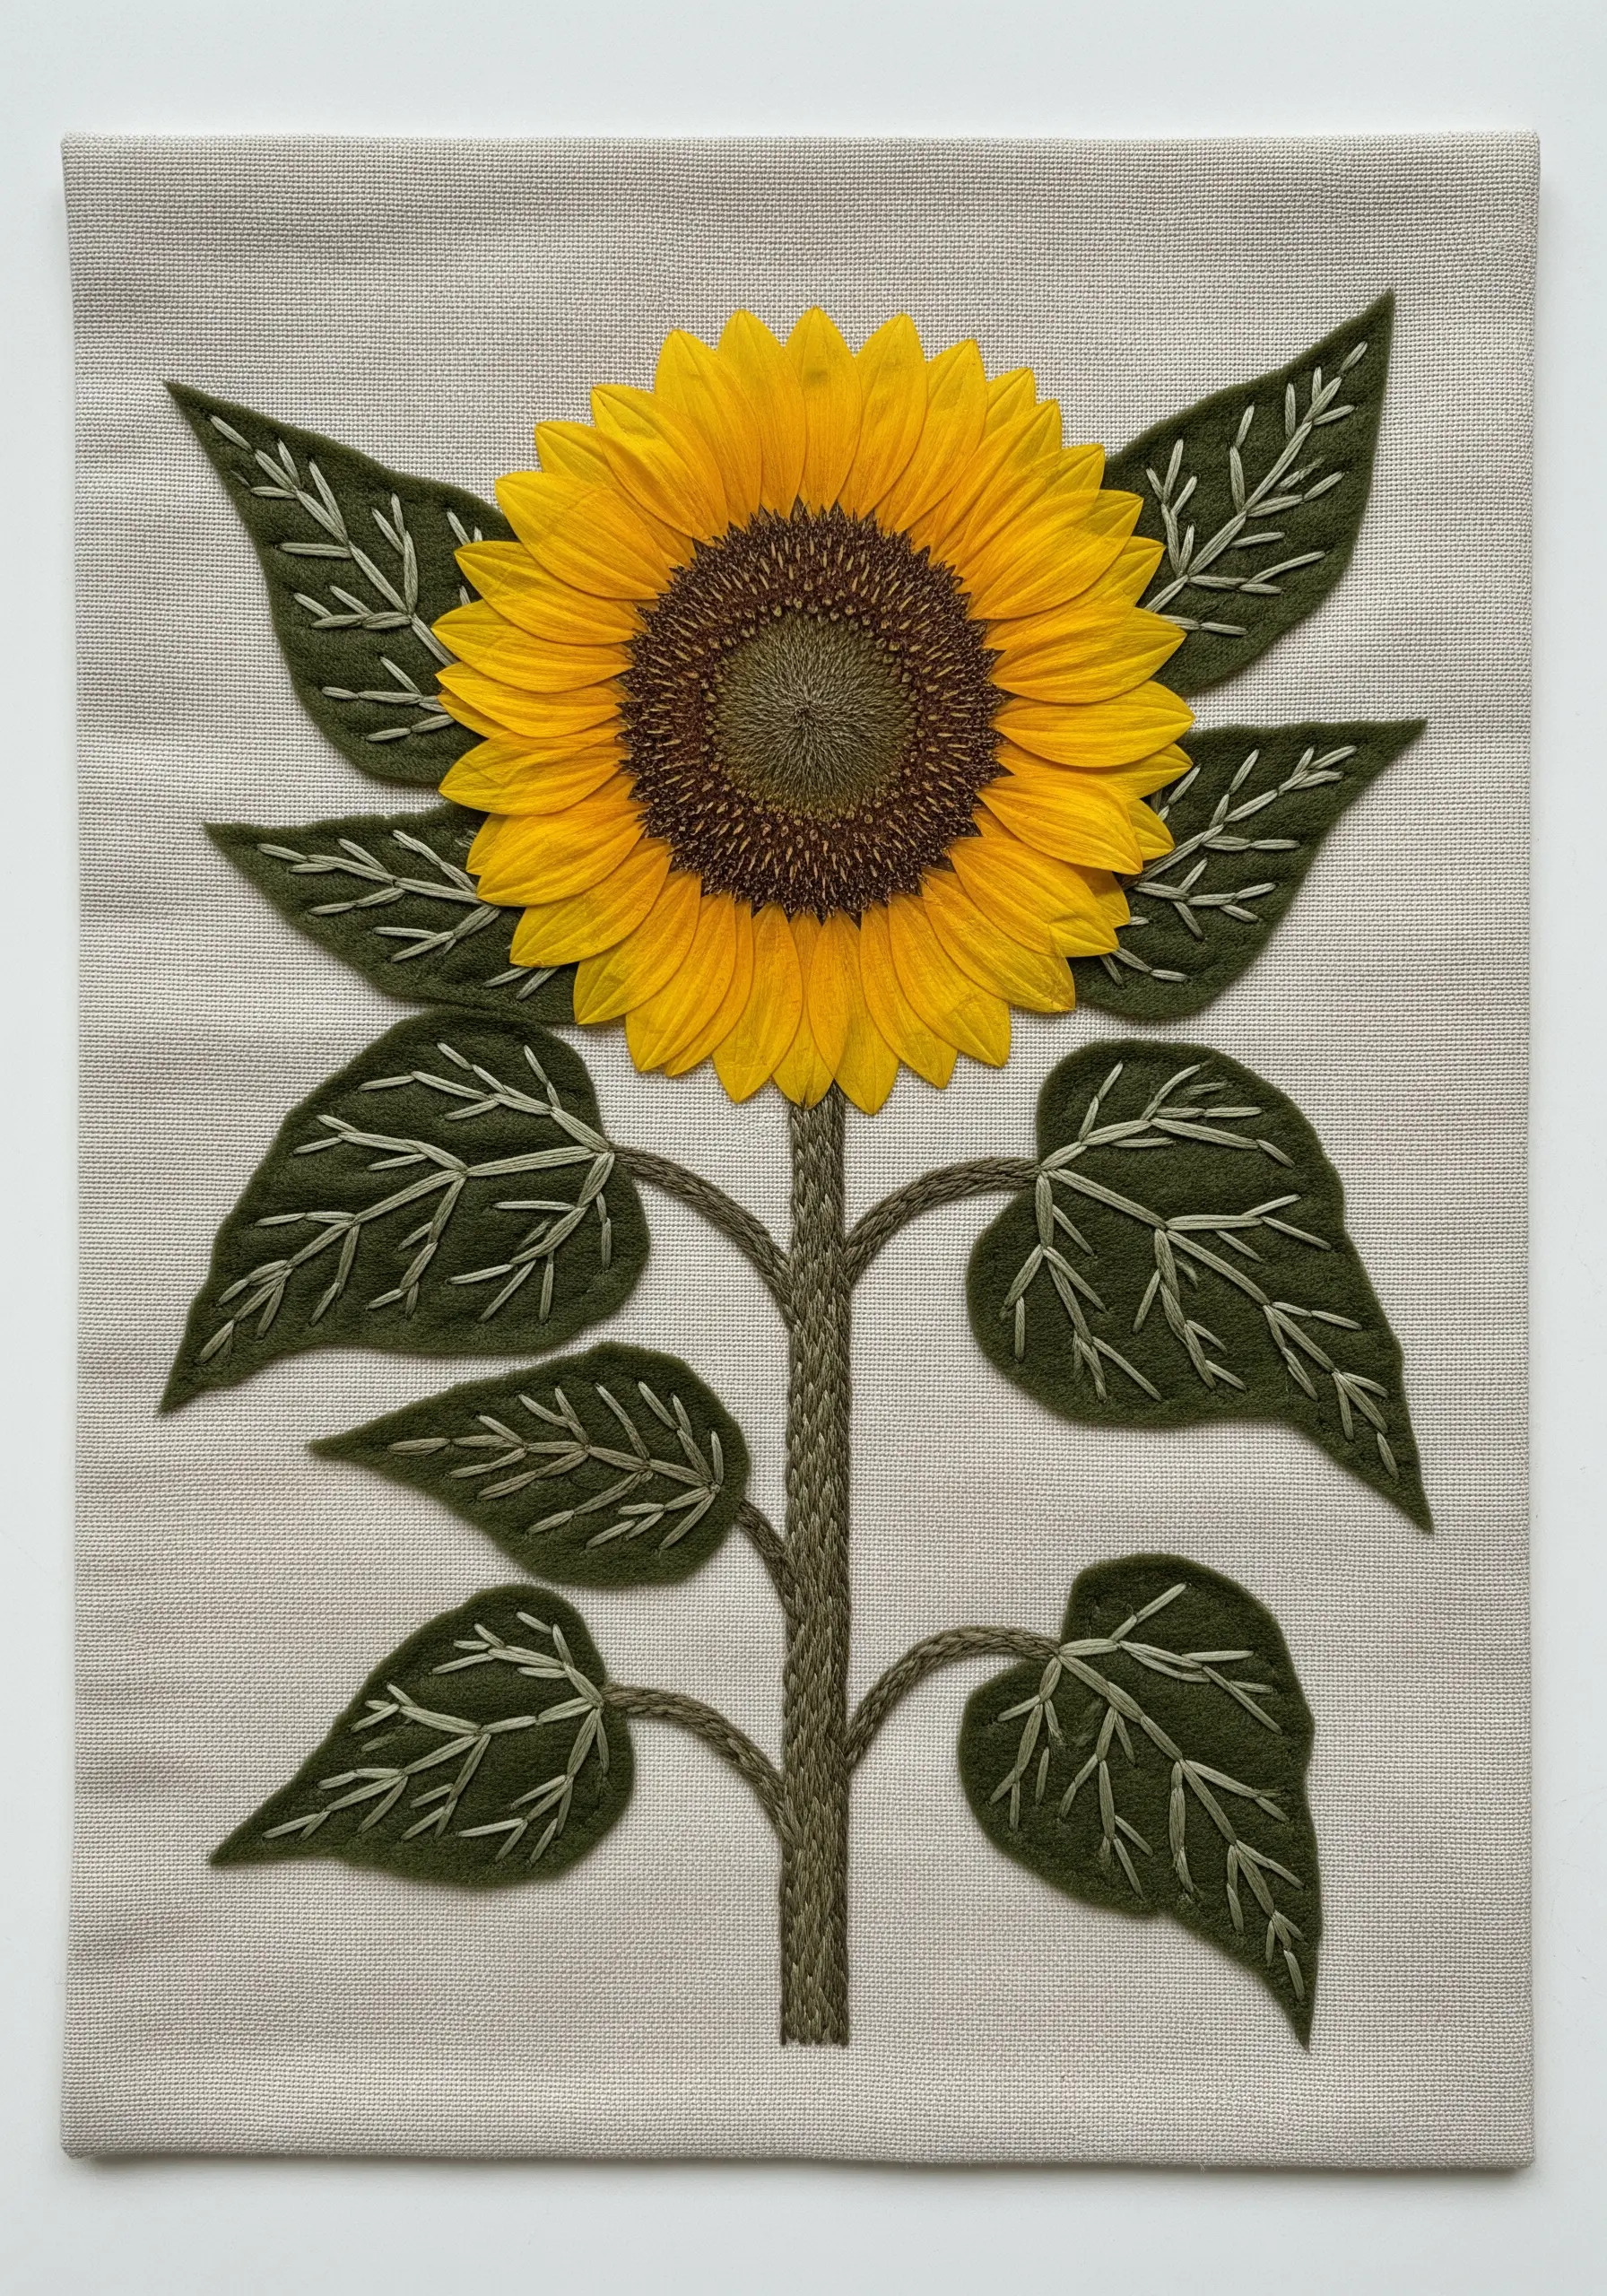
Create a bold, textural piece by combining a real pressed sunflower with embroidered felt leaves.
Start by pressing a large sunflower head until completely dry and flat, then mount it in the center of your canvas.
Cut your leaf shapes from stiff felt and arrange them around the flower.
Use a contrasting thread—like a light gray on dark green—to add the leaf veins with a simple backstitch or split stitch, a technique that brings the felt to life.
Finish with a thick, couched yarn stem for a final touch of rustic texture.
15. Craft a Miniature Terrarium Pendant
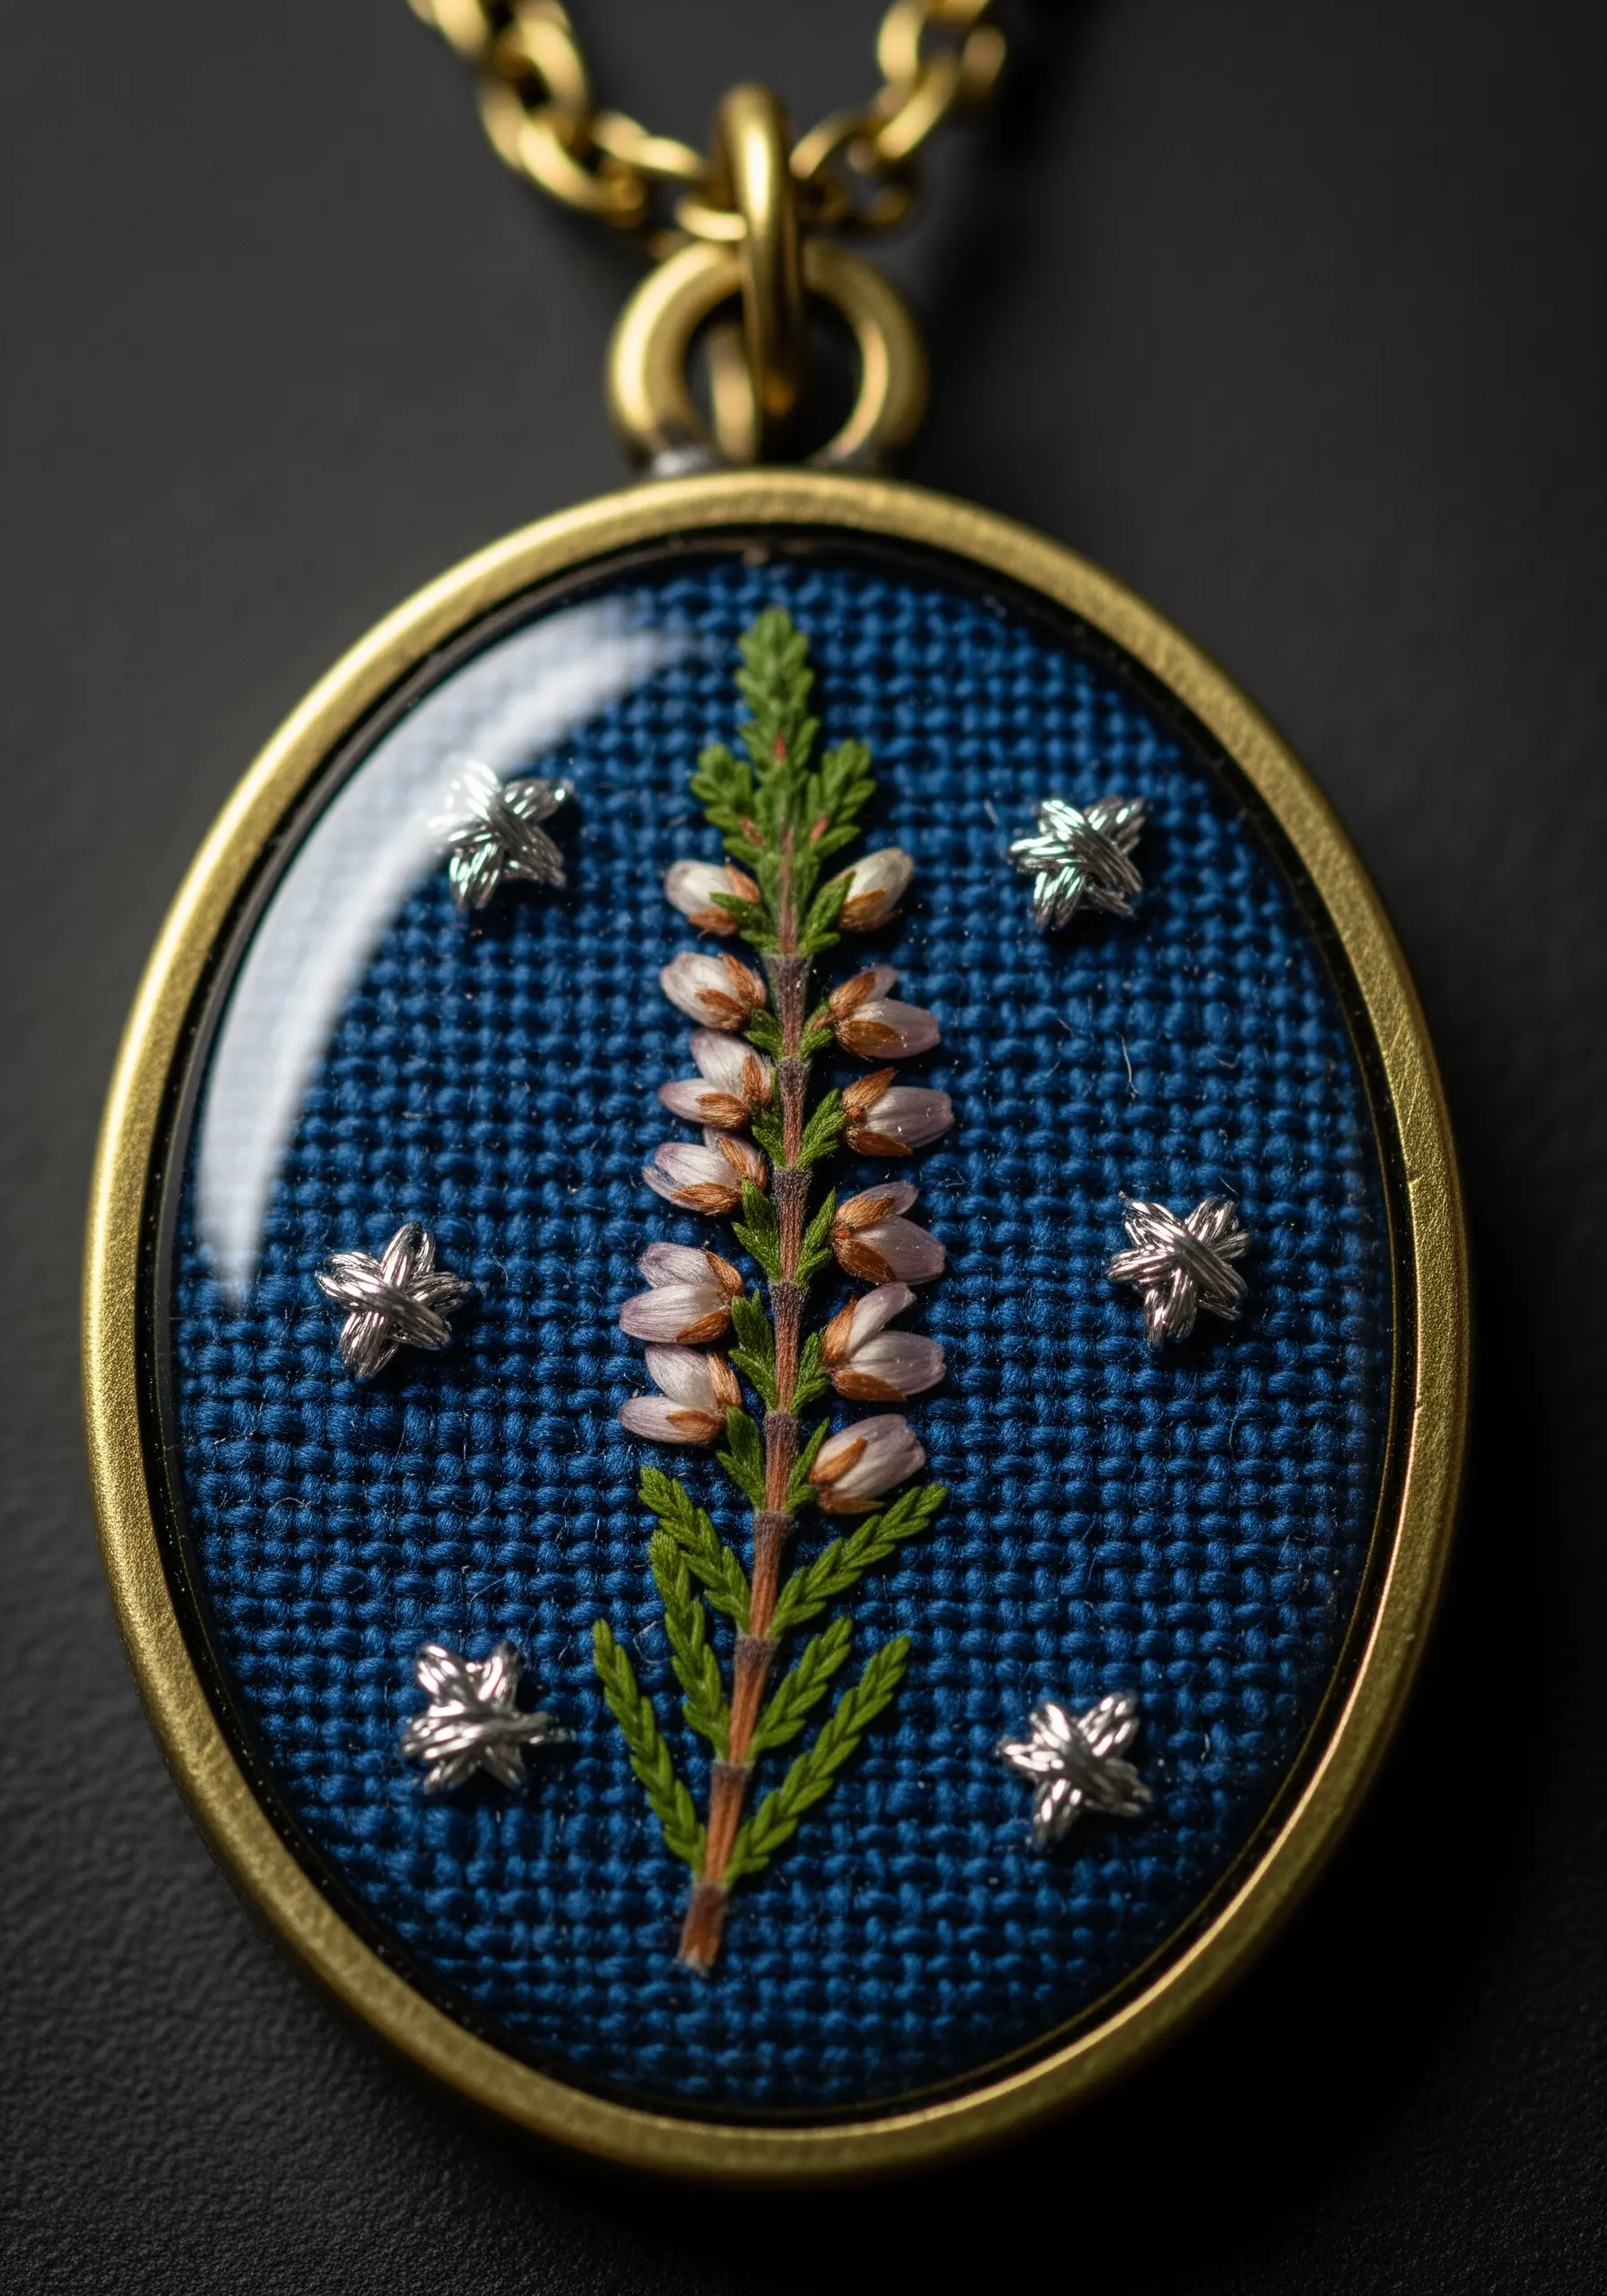
Capture a tiny moment of nature by combining micro-embroidery with a single pressed flower sprig in a pendant bezel.
Choose a tightly woven fabric like Aida cloth or high-count linen to support the fine details.
After securing your pressed botanical, add embroidered elements with a single strand of floss—a delicate split stitch for the stem and tiny metallic beads or star stitches for accents.
Seal the finished piece under a glass cabochon to protect the delicate work and create a professional, magnified finish.
16. Embellish a Rope Tie-Back with Stitched Vines
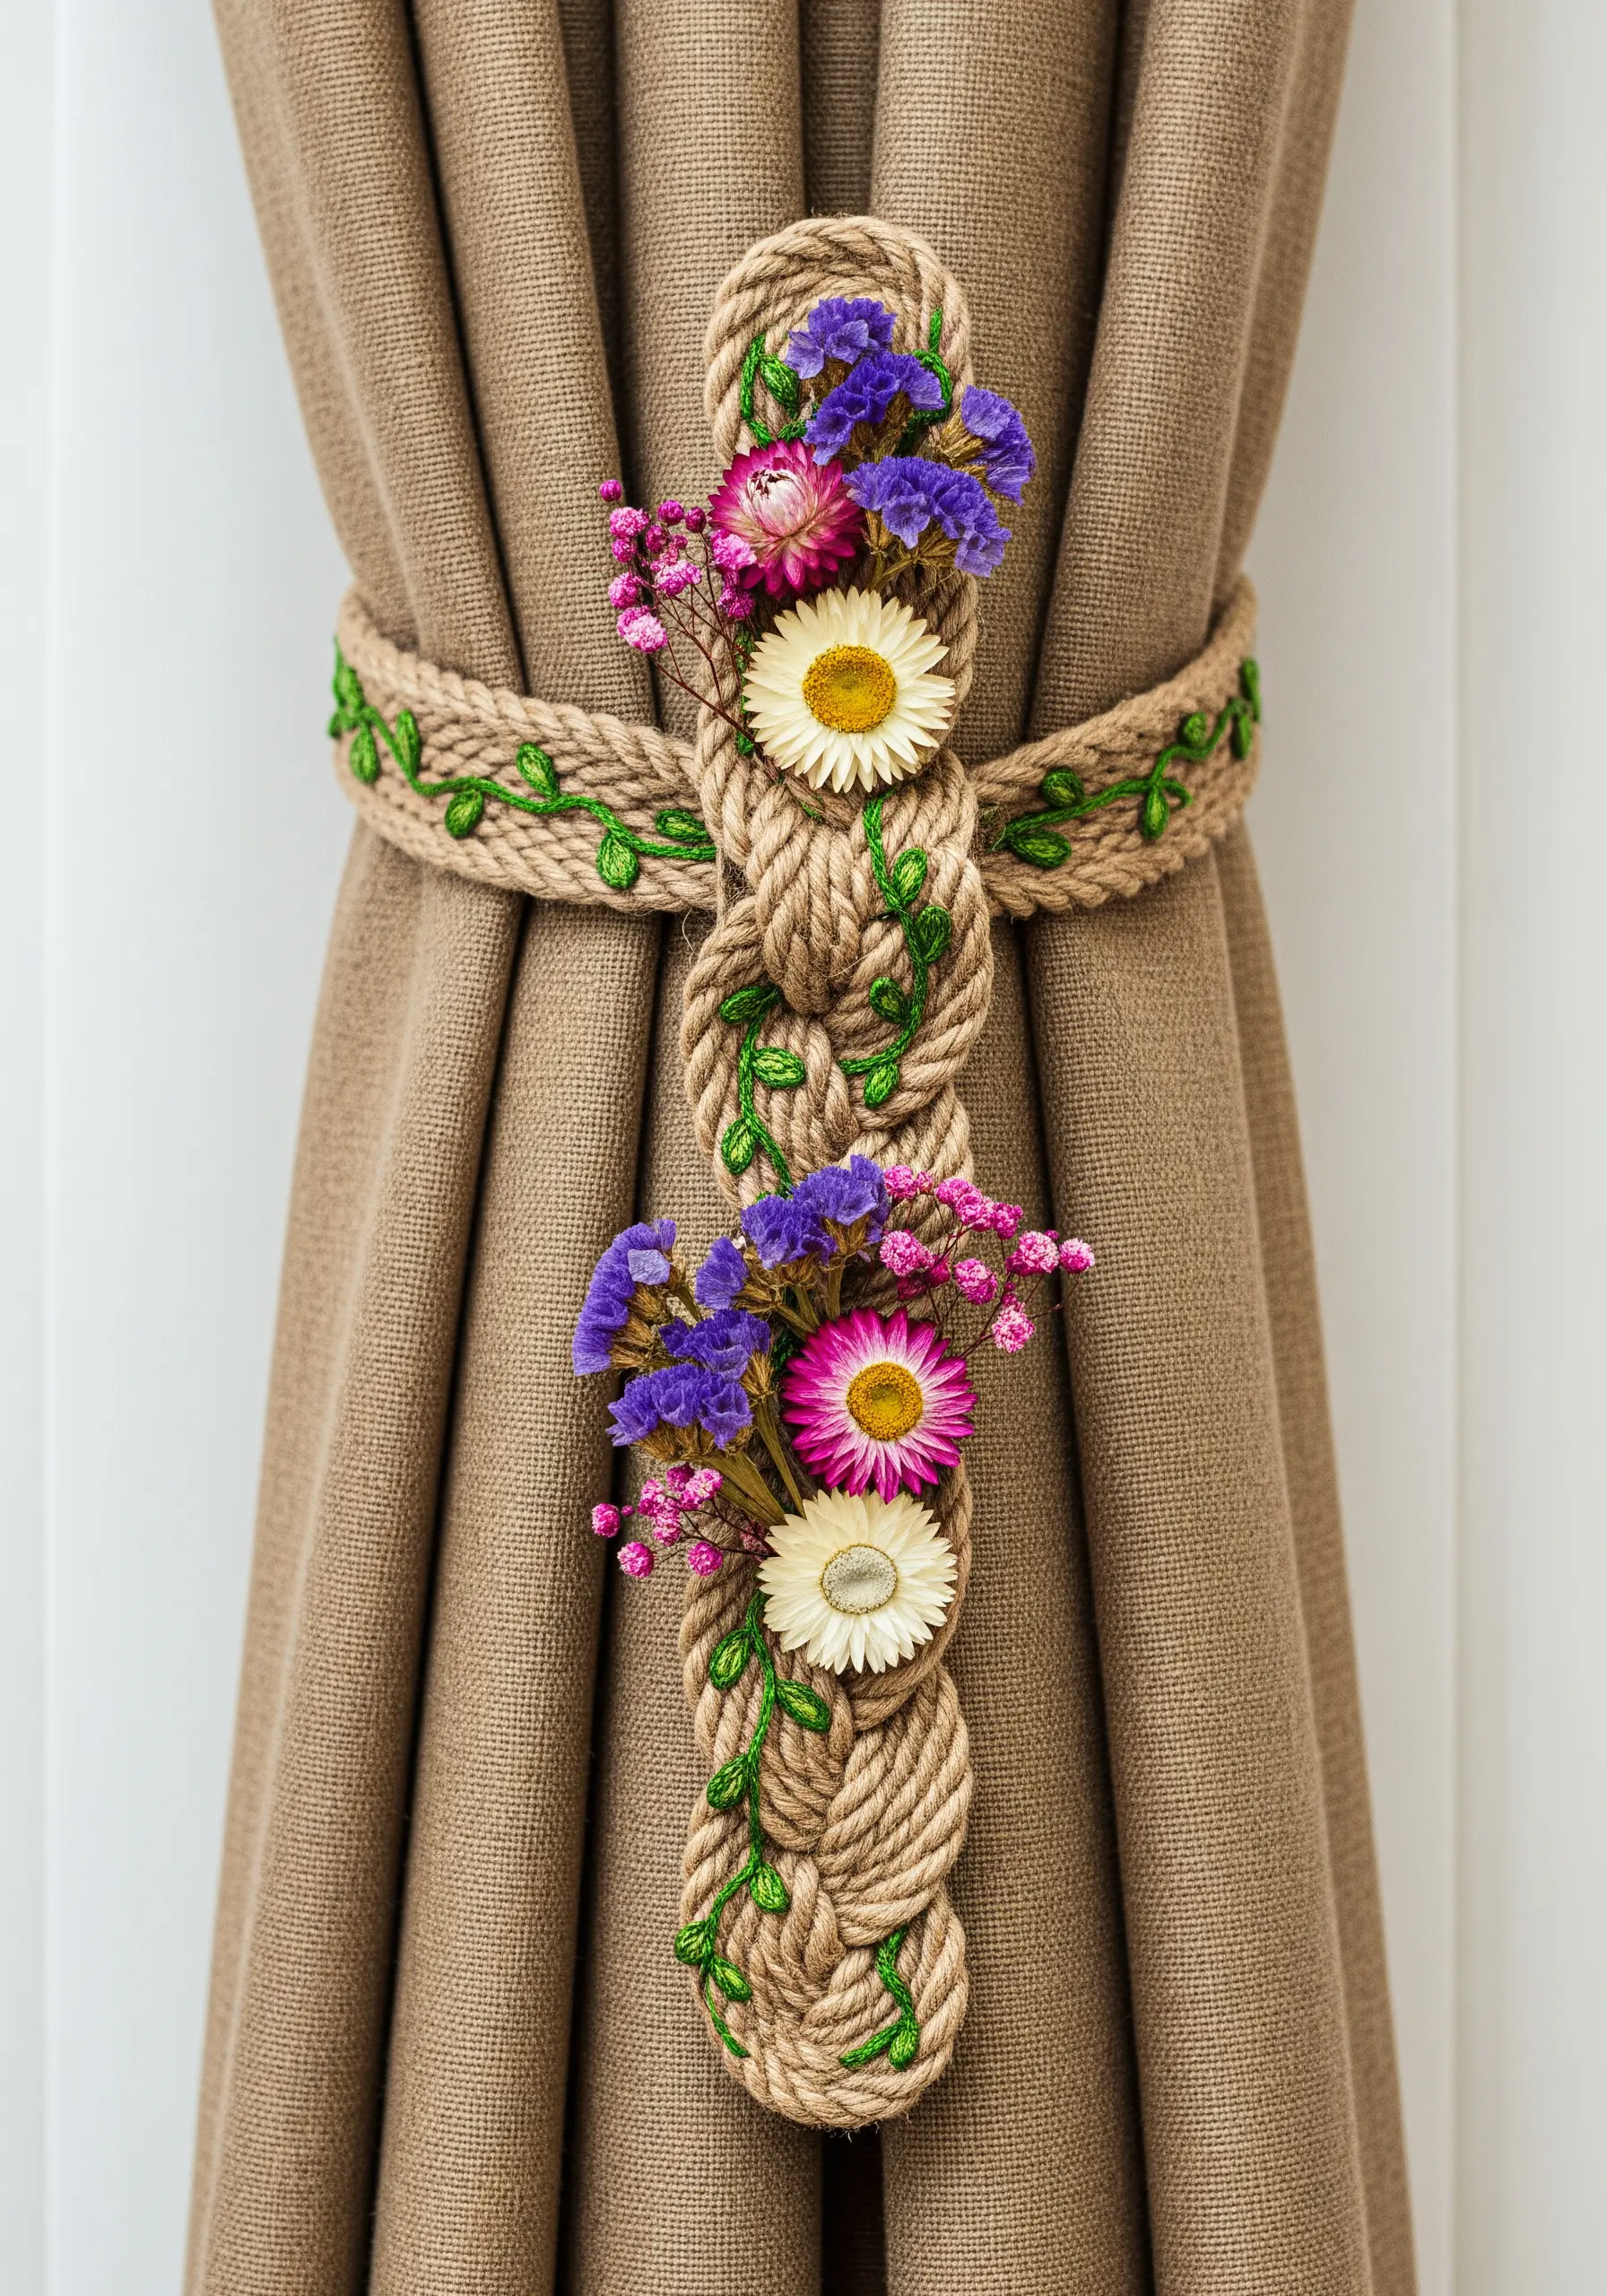
Transform a rustic jute rope into an elegant curtain tie-back with embroidery and dried flowers.
Braid or knot your rope into the desired shape, leaving loops for hanging.
Using a thick, sturdy needle and six-strand floss, wrap the rope with green thread to create a vine-like effect, adding leaves with detached chain stitches directly into the rope’s fibers.
Finally, tuck small bunches of colorful, dried flowers like statice and strawflowers into the knots, securing them with a few hidden stitches or glue.
17. Craft Botanical Coasters from Felt

Create functional art by securing pressed wildflowers onto durable felt coasters.
Choose thick, high-quality wool-blend felt as your base, as it provides a sturdy canvas.
Carefully place your pressed specimen, like a foxglove or wild strawberry, onto the felt.
Secure it using a technique called couching: lay a single, near-invisible strand of thread over the specimen and tack it down with tiny stitches on either side. This holds the delicate plant in place without piercing it.
Finish with a simple machine-stitched border for a clean, modern look.
18. Add Tactile Lavender to a Scented Sachet
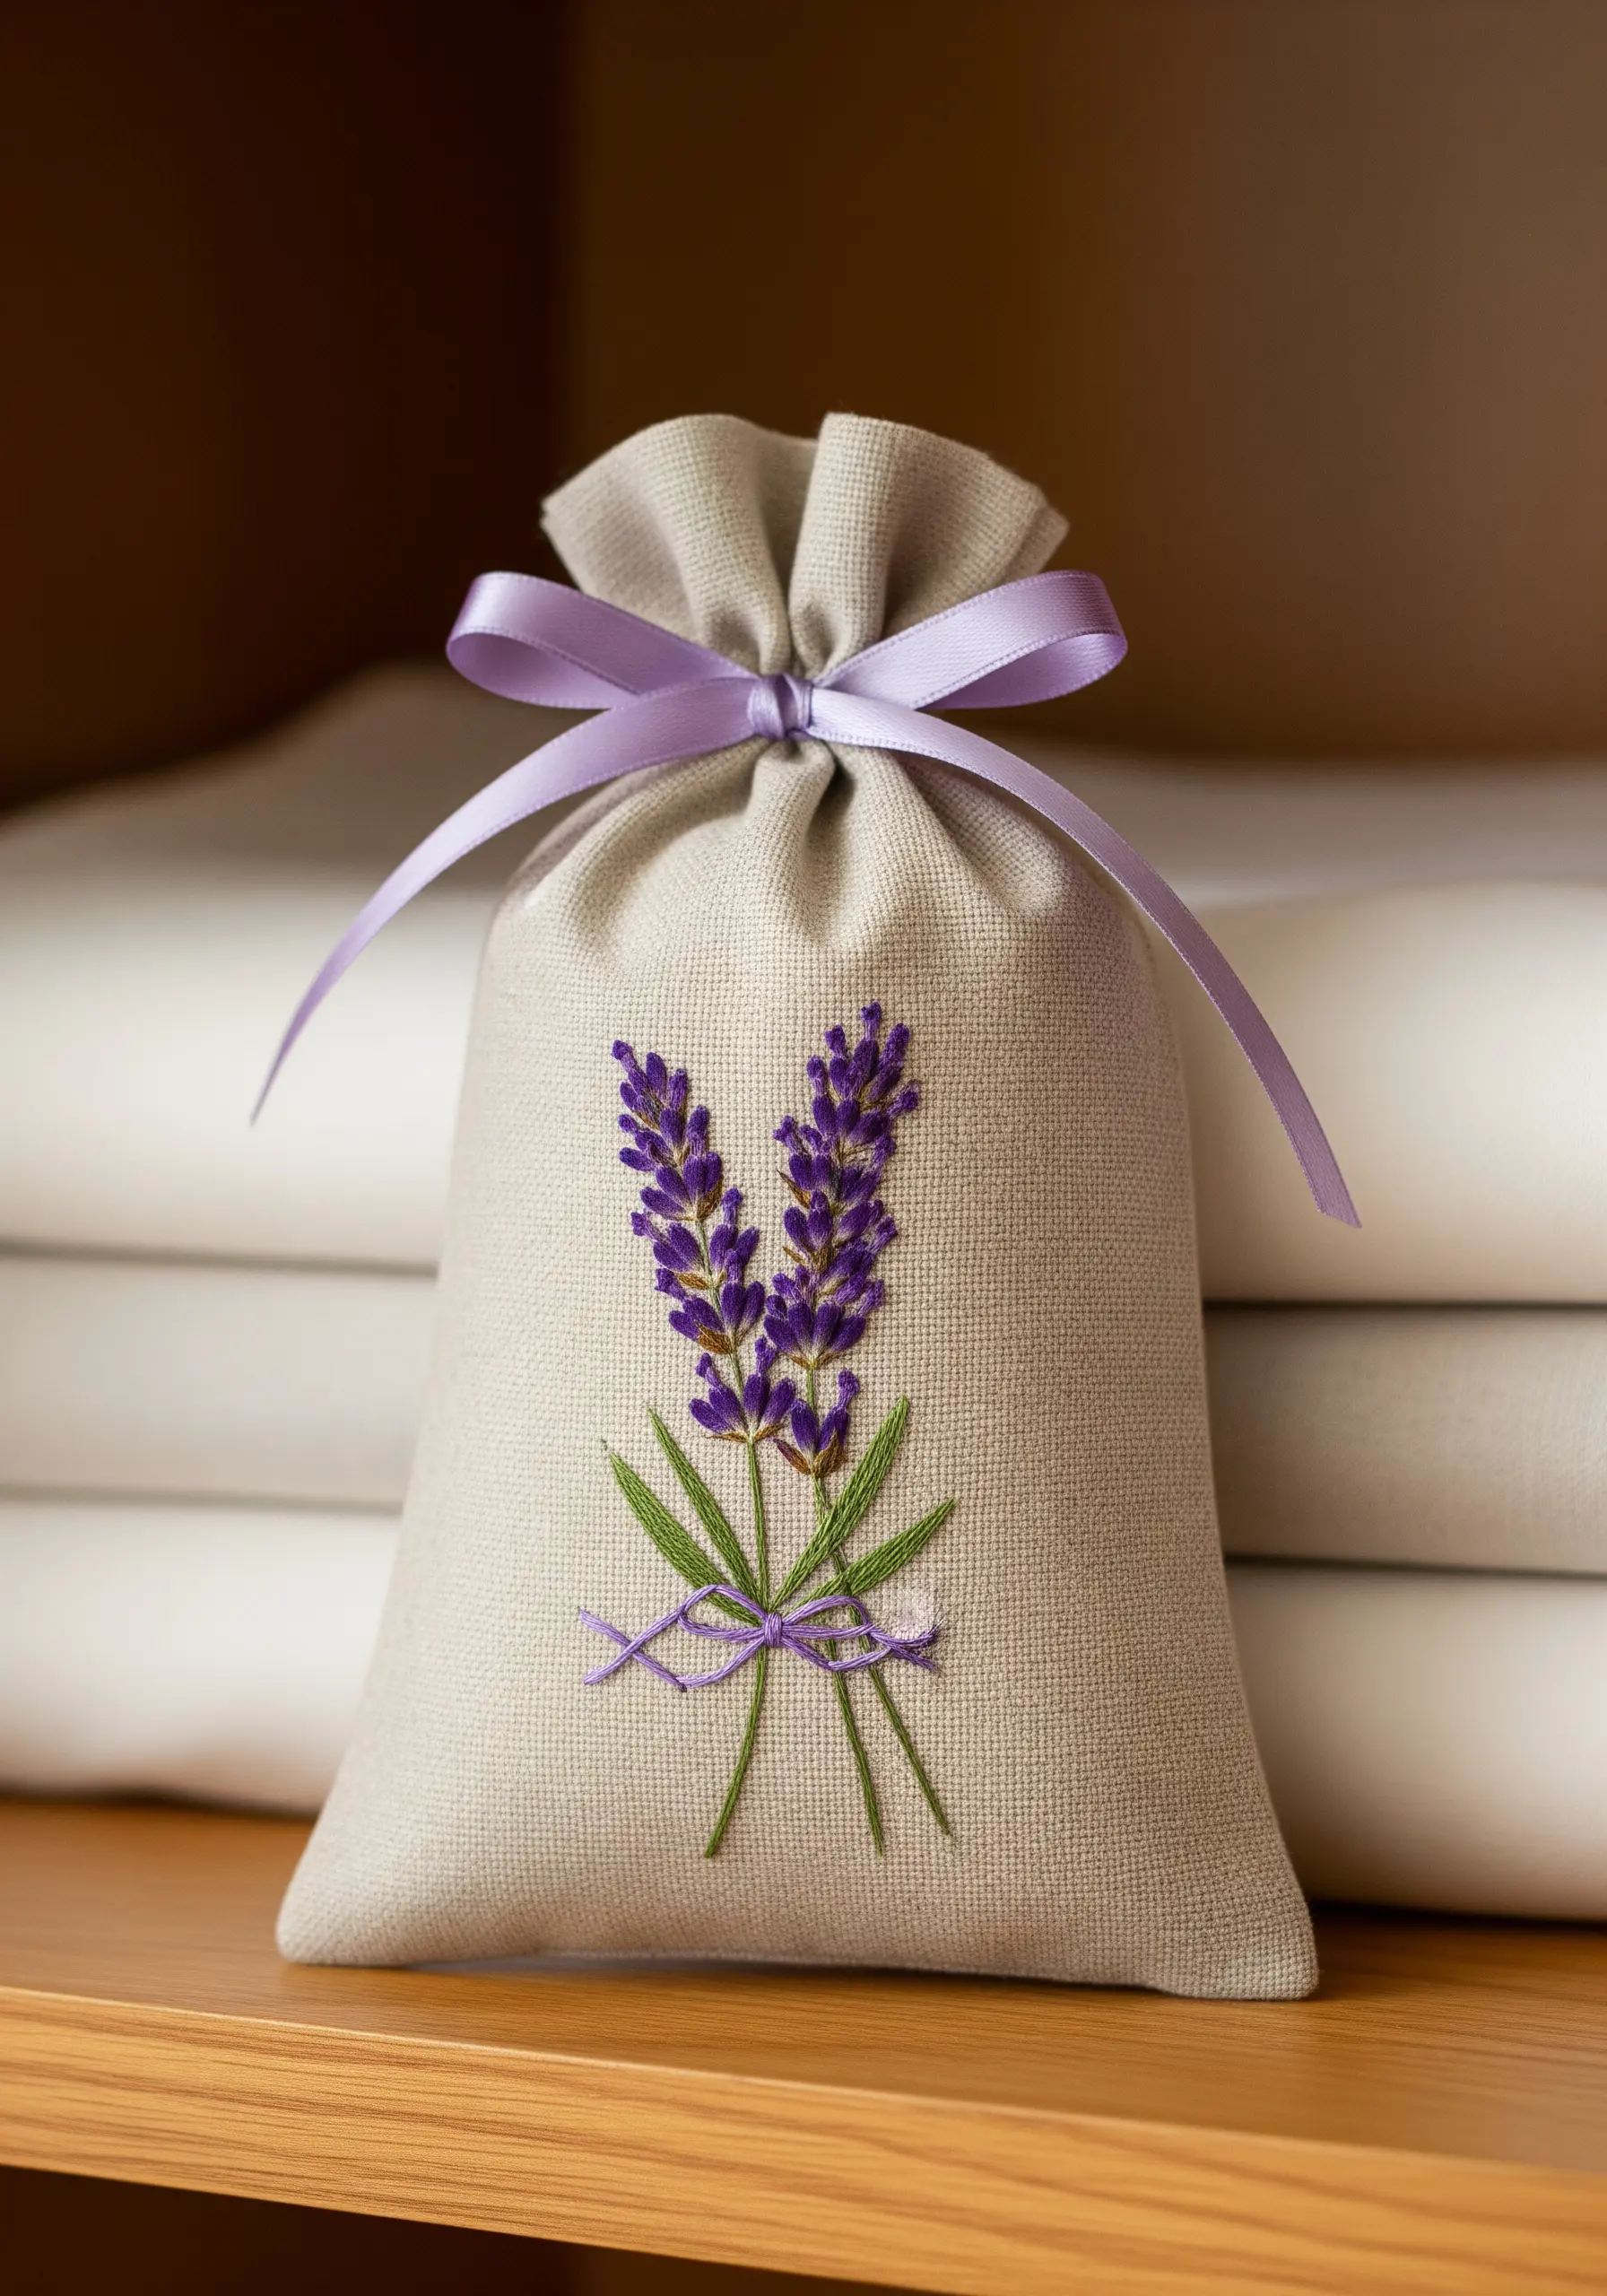
Enhance a simple lavender sachet by adding textural embroidery that hints at the contents within.
Instead of a flat satin stitch, use bullion knots to create the individual lavender buds.
This stitch involves wrapping the thread around the needle multiple times before pulling it through, creating a small, raised coil that mimics the shape of a real lavender flower.
The added texture not only looks beautiful but also adds a pleasing tactile element to the finished sachet.
19. Preserve a Bouquet in a Jar Patch

Create a stunning mixed-media patch that looks like a tiny bouquet preserved in a jar.
Start by embroidering the jar outline and lid details onto a piece of blue fabric using silver metallic thread for highlights.
Arrange a miniature bouquet of pressed baby’s breath in the center, then lay a piece of clear vinyl or organza over the top.
Carefully stitch the see-through layer down, and then finish the entire patch with a thick, clean satin stitch border to encase the edges.
20. Animate a Kitchen Towel with a Floral Cascade
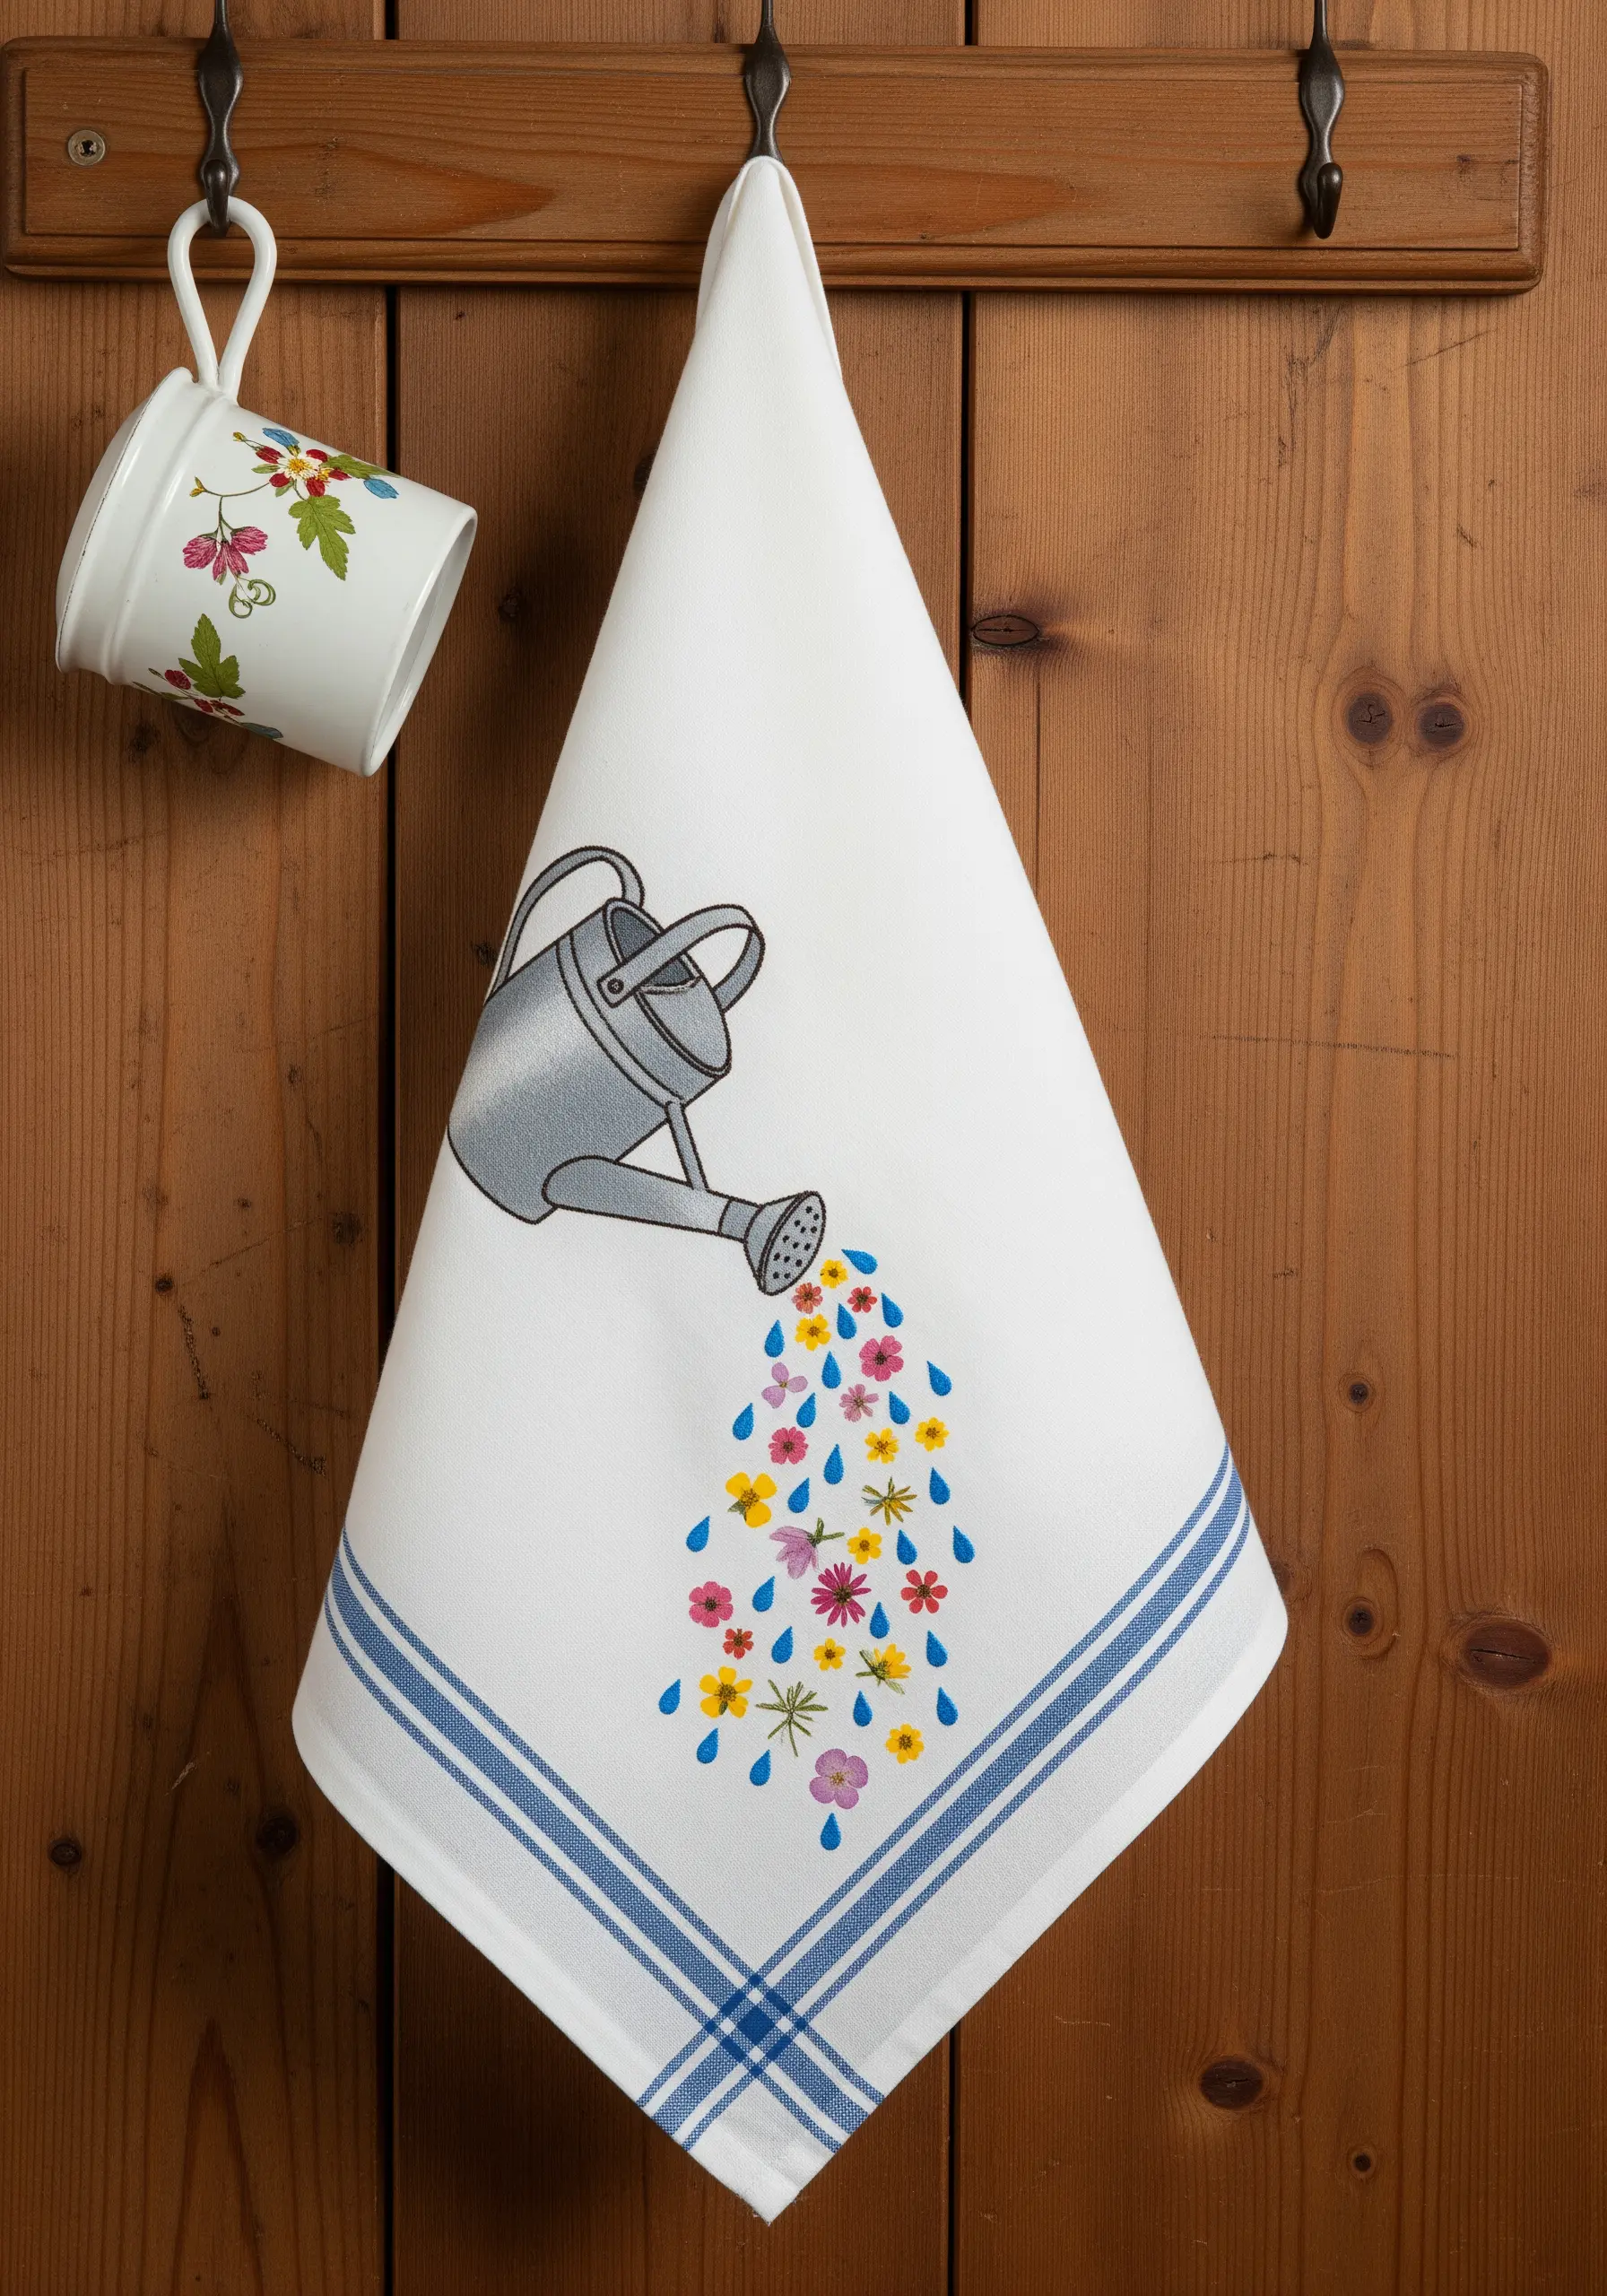
Bring a touch of whimsy to your kitchen with a design that combines a simple object with a burst of nature.
To get crisp results on a cotton dish towel, iron a fusible interfacing onto the back of the stitching area before you begin; this prevents puckering.
Embroider the watering can with a smooth, even satin stitch, using shades of gray to create highlights and shadows for a metallic effect.
For the falling flowers, use quick, simple stitches like single detached chains and French knots in a variety of bright, colorfast threads.
21. Design a Botanical Study Sampler
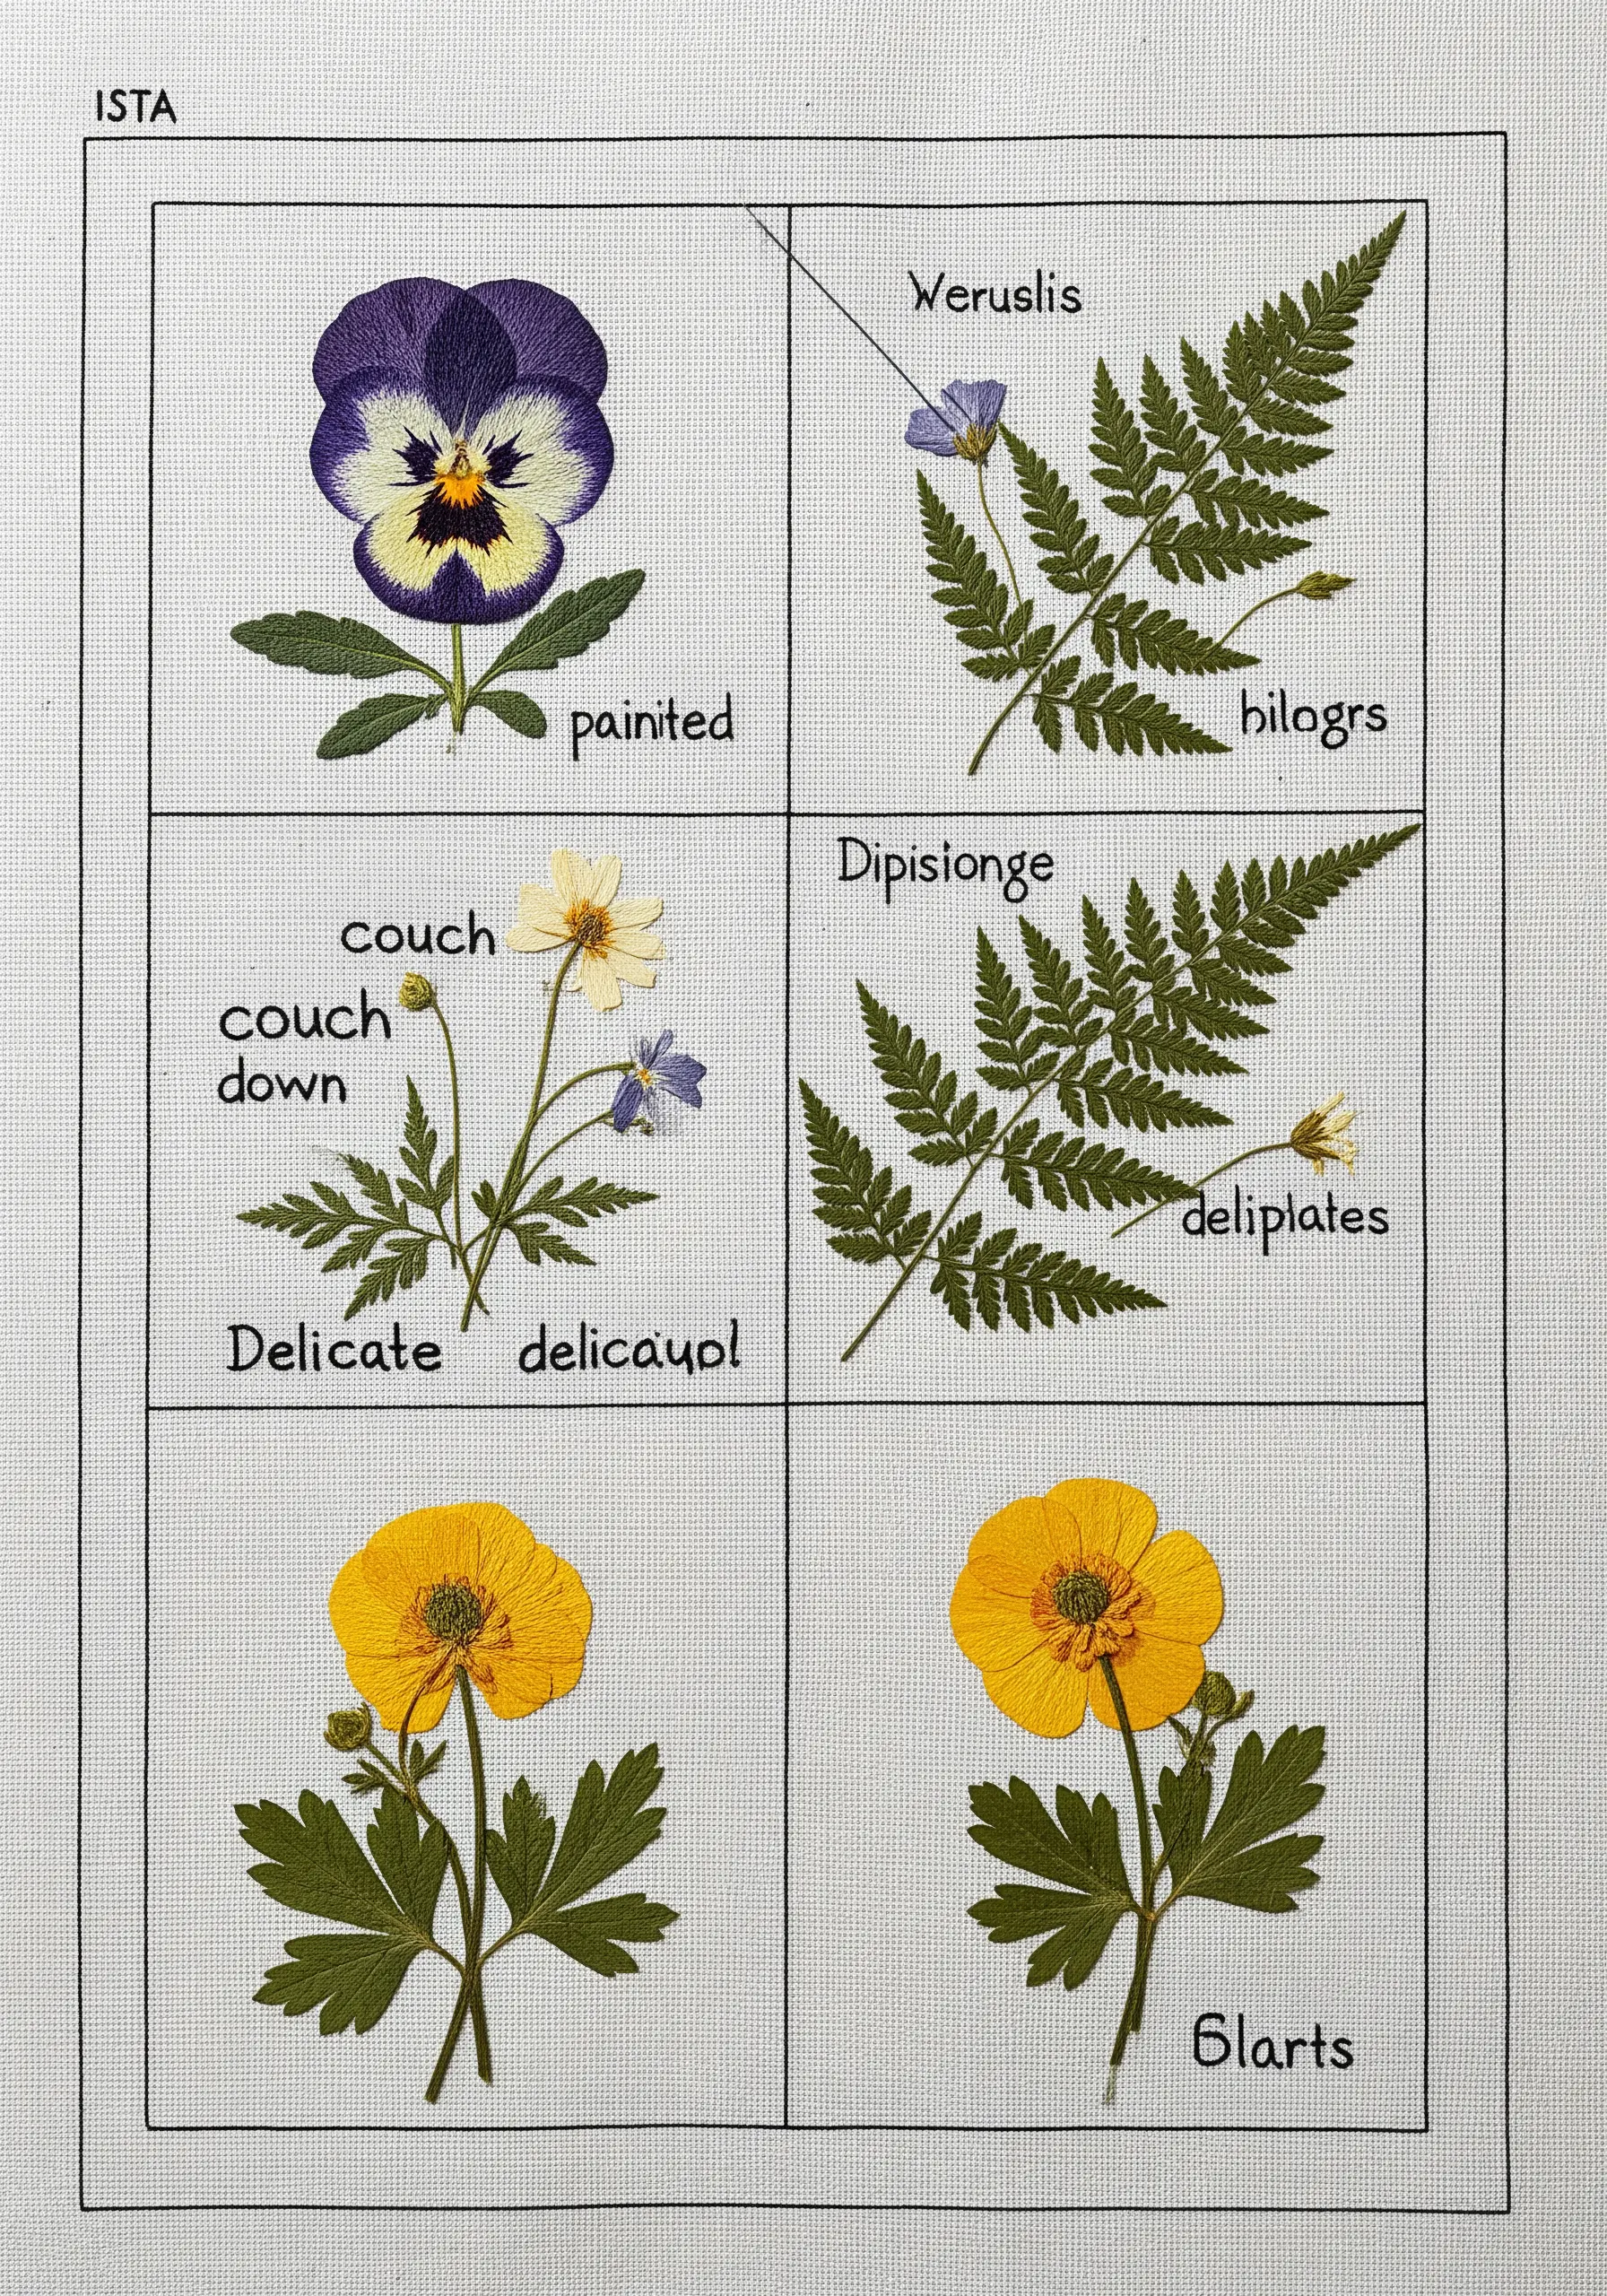
Organize your pressed flowers into a formal botanical sampler that feels both scientific and artistic.
Create a grid on your fabric using a pencil or a single strand of black thread in a running stitch.
Secure a different pressed specimen in each box, then add hand-embroidered labels using a tiny, precise backstitch.
This structured layout transforms a simple collection of flowers into a thoughtful, curated piece of art, perfect for learning and display.
22. Build a Three-Dimensional Wildflower Diorama
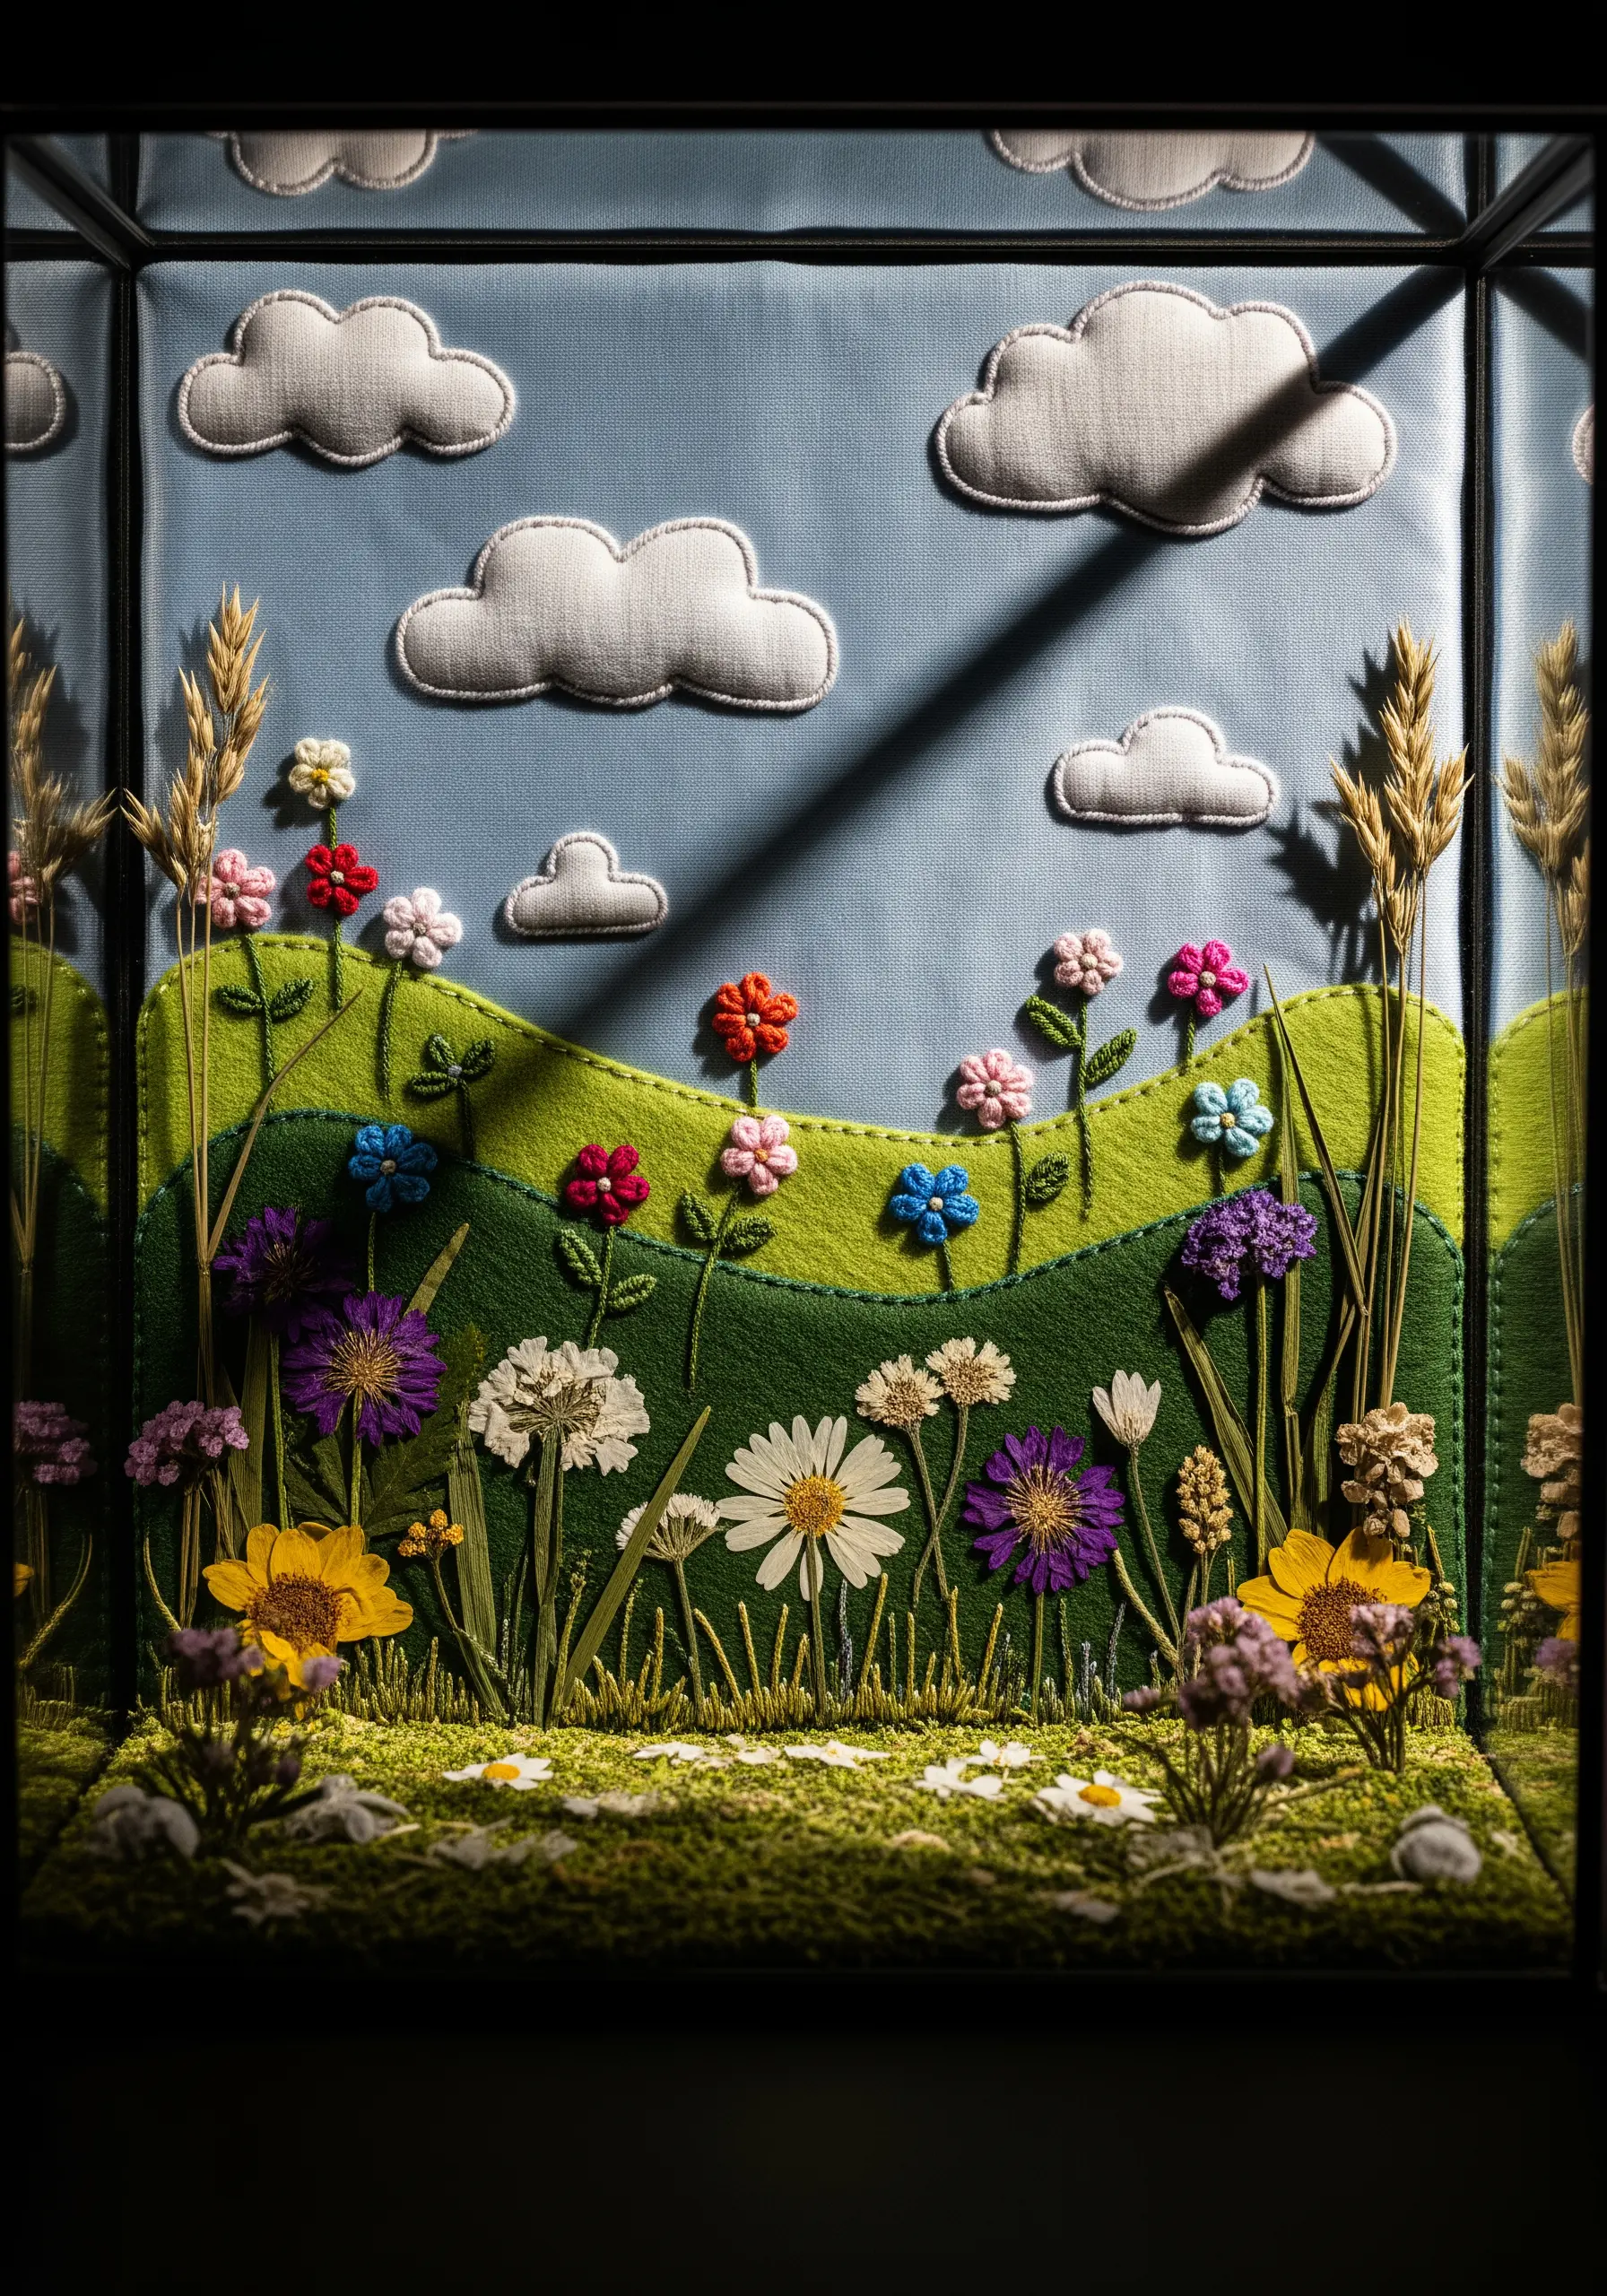
Move beyond the hoop by creating a layered, 3D meadow scene in a shadow box.
Cut rolling hills from different shades of green felt and stitch them onto a light blue background fabric.
Create your flowers using a mix of techniques: woven wheel stitches for roses, French knots for smaller blossoms, and turkey work for a grassy texture in the foreground.
Incorporate real dried flowers and grasses among your stitched ones to add another layer of depth and realism to your mixed-fiber creations.
23. Map Your Wildflower Journey
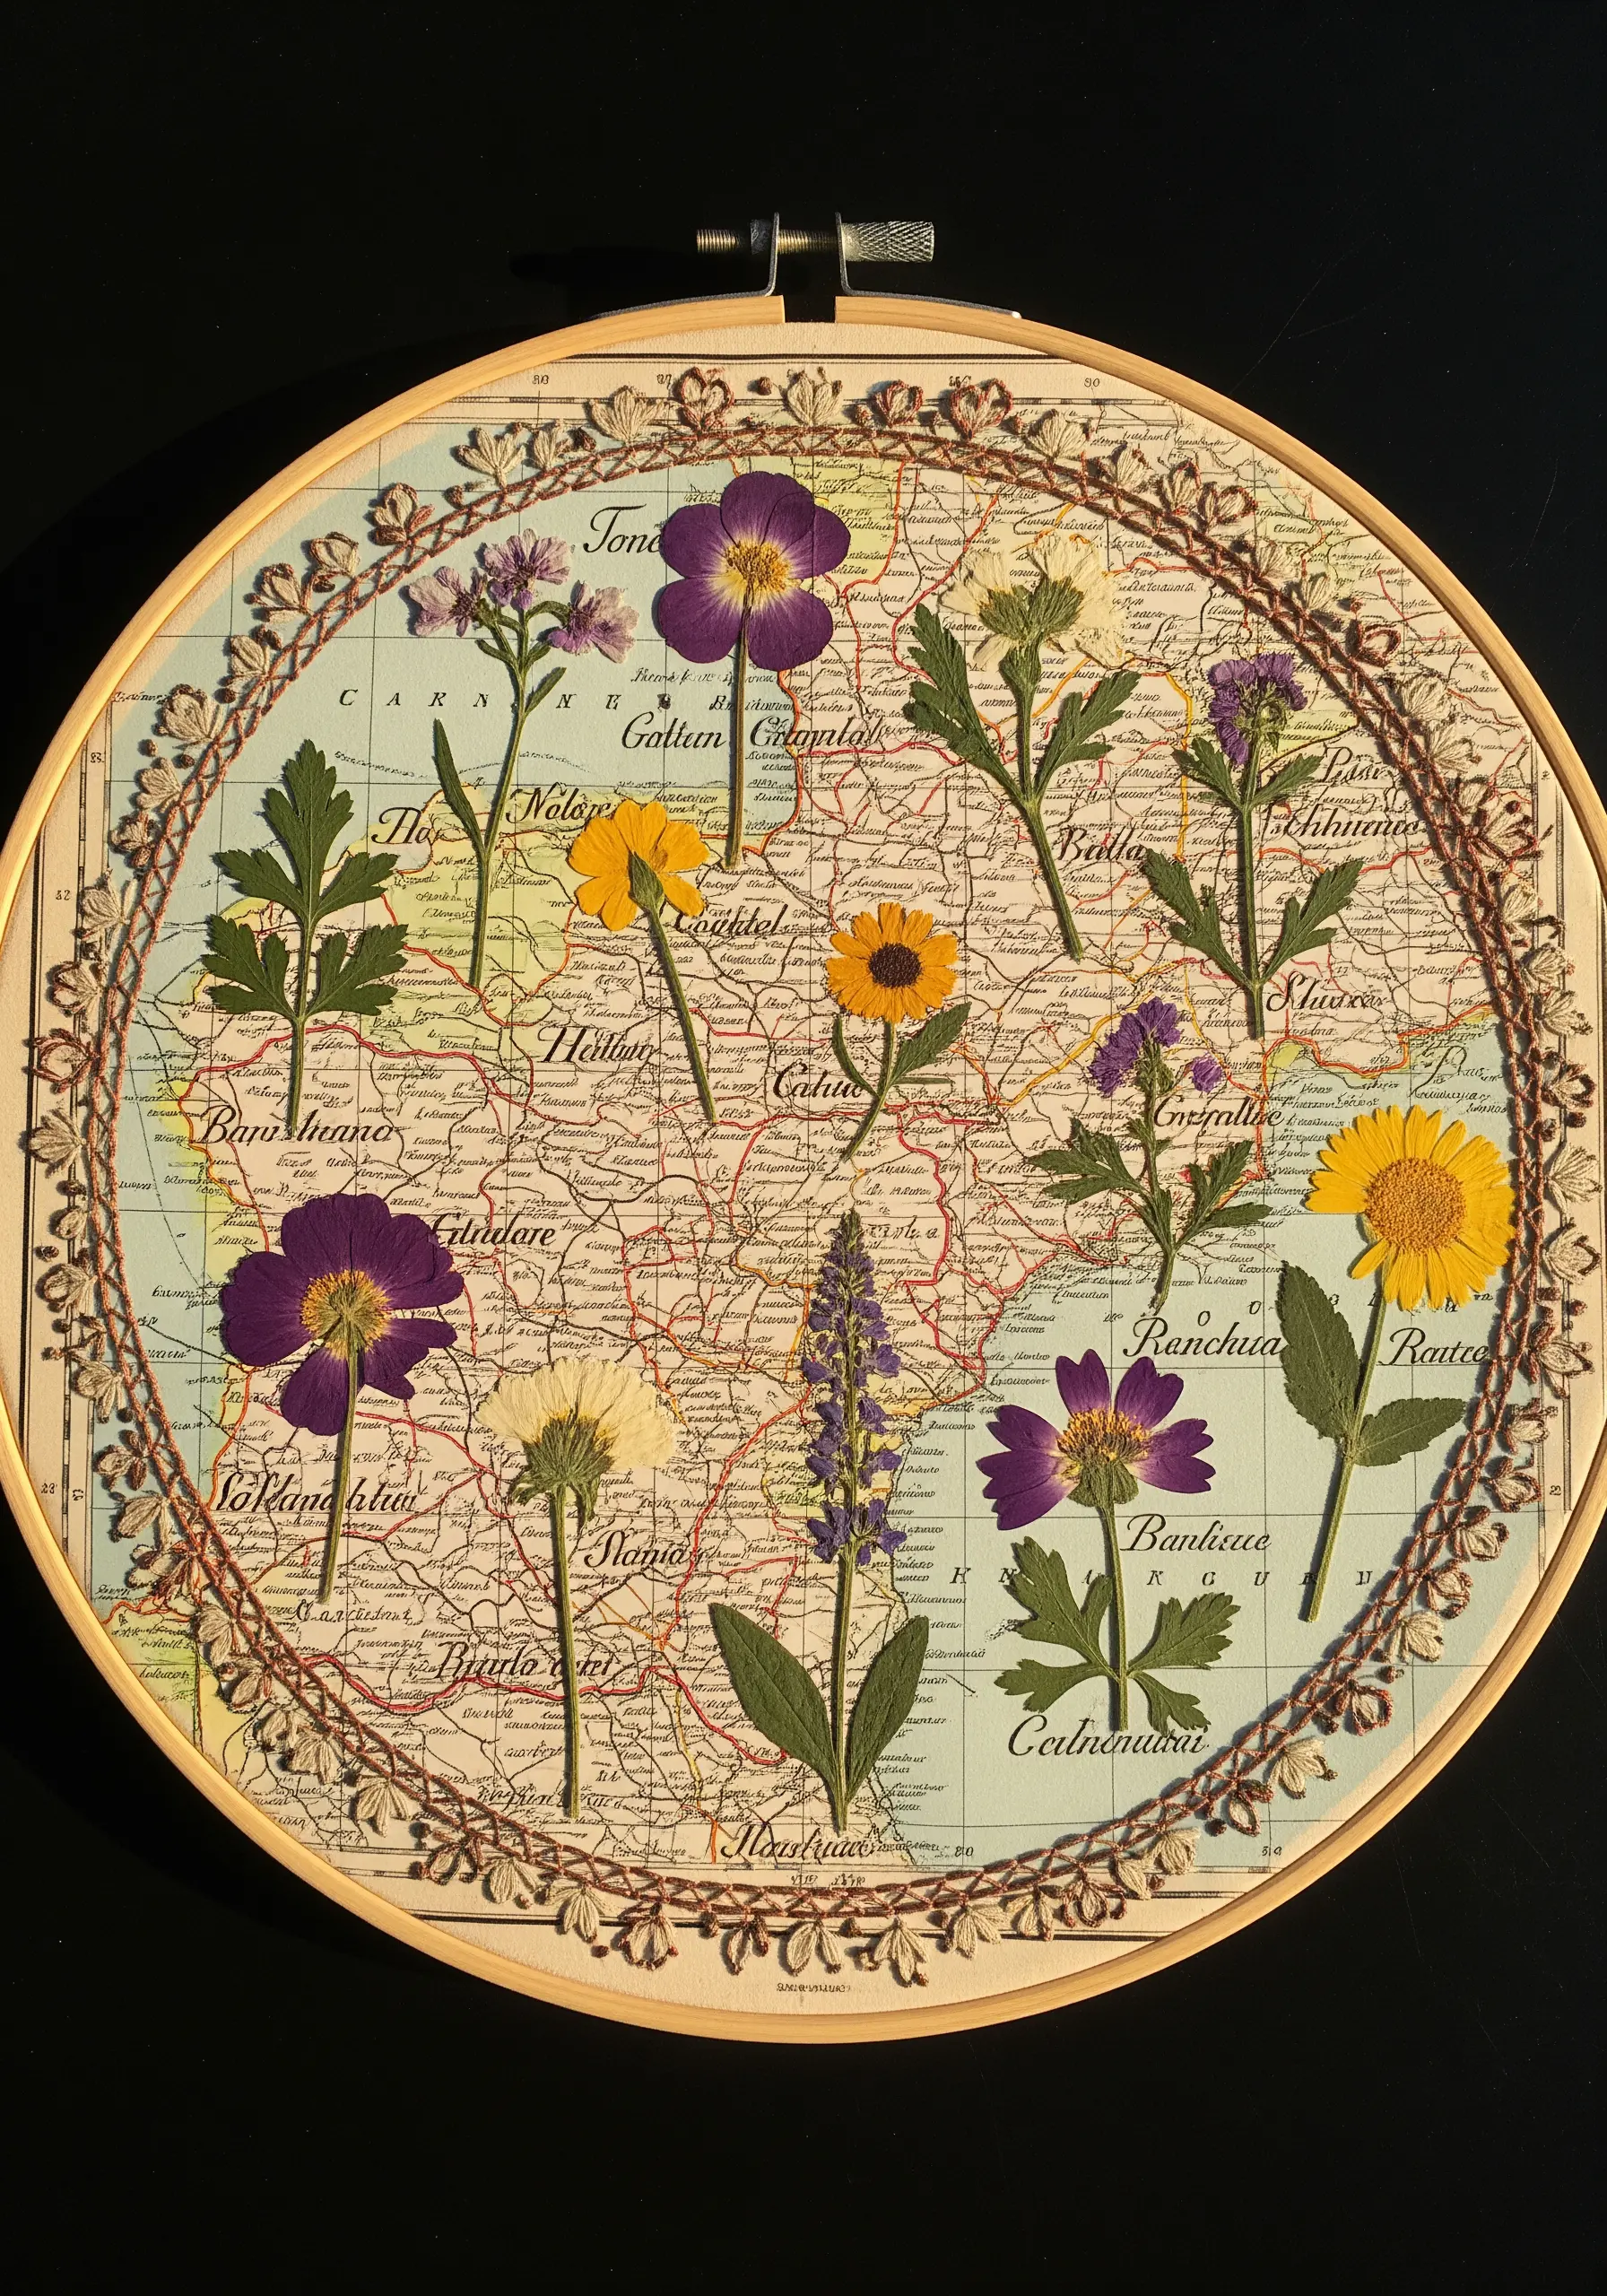
Give your pressed flowers a deeper meaning by mounting them on a background that tells a story, like a vintage map.
Choose a map of a place that is special to you—a favorite hiking trail, a hometown, or a memorable trip.
Arrange the flowers you collected from that area across the map, securing them with tiny, hidden stitches.
The combination of personal geography and natural specimens creates a uniquely meaningful piece of handmade art.
24. Embellish a Veil with Ethereal Blossoms

Add a delicate, handmade touch to a bridal veil with fine embroidery and beading.
Working on fine tulle requires a light hand and the right materials. Use a water-soluble stabilizer to support your stitches, then gently rinse it away once finished.
Create the blossoms with clusters of tiny seed beads or pearls, and use a shimmering white or silver thread for the stems and leaves using a delicate fly stitch or stem stitch.
This technique adds subtle, light-catching detail without overpowering the sheerness of the veil.
25. Weave Metallic Threads Around Autumn Leaves
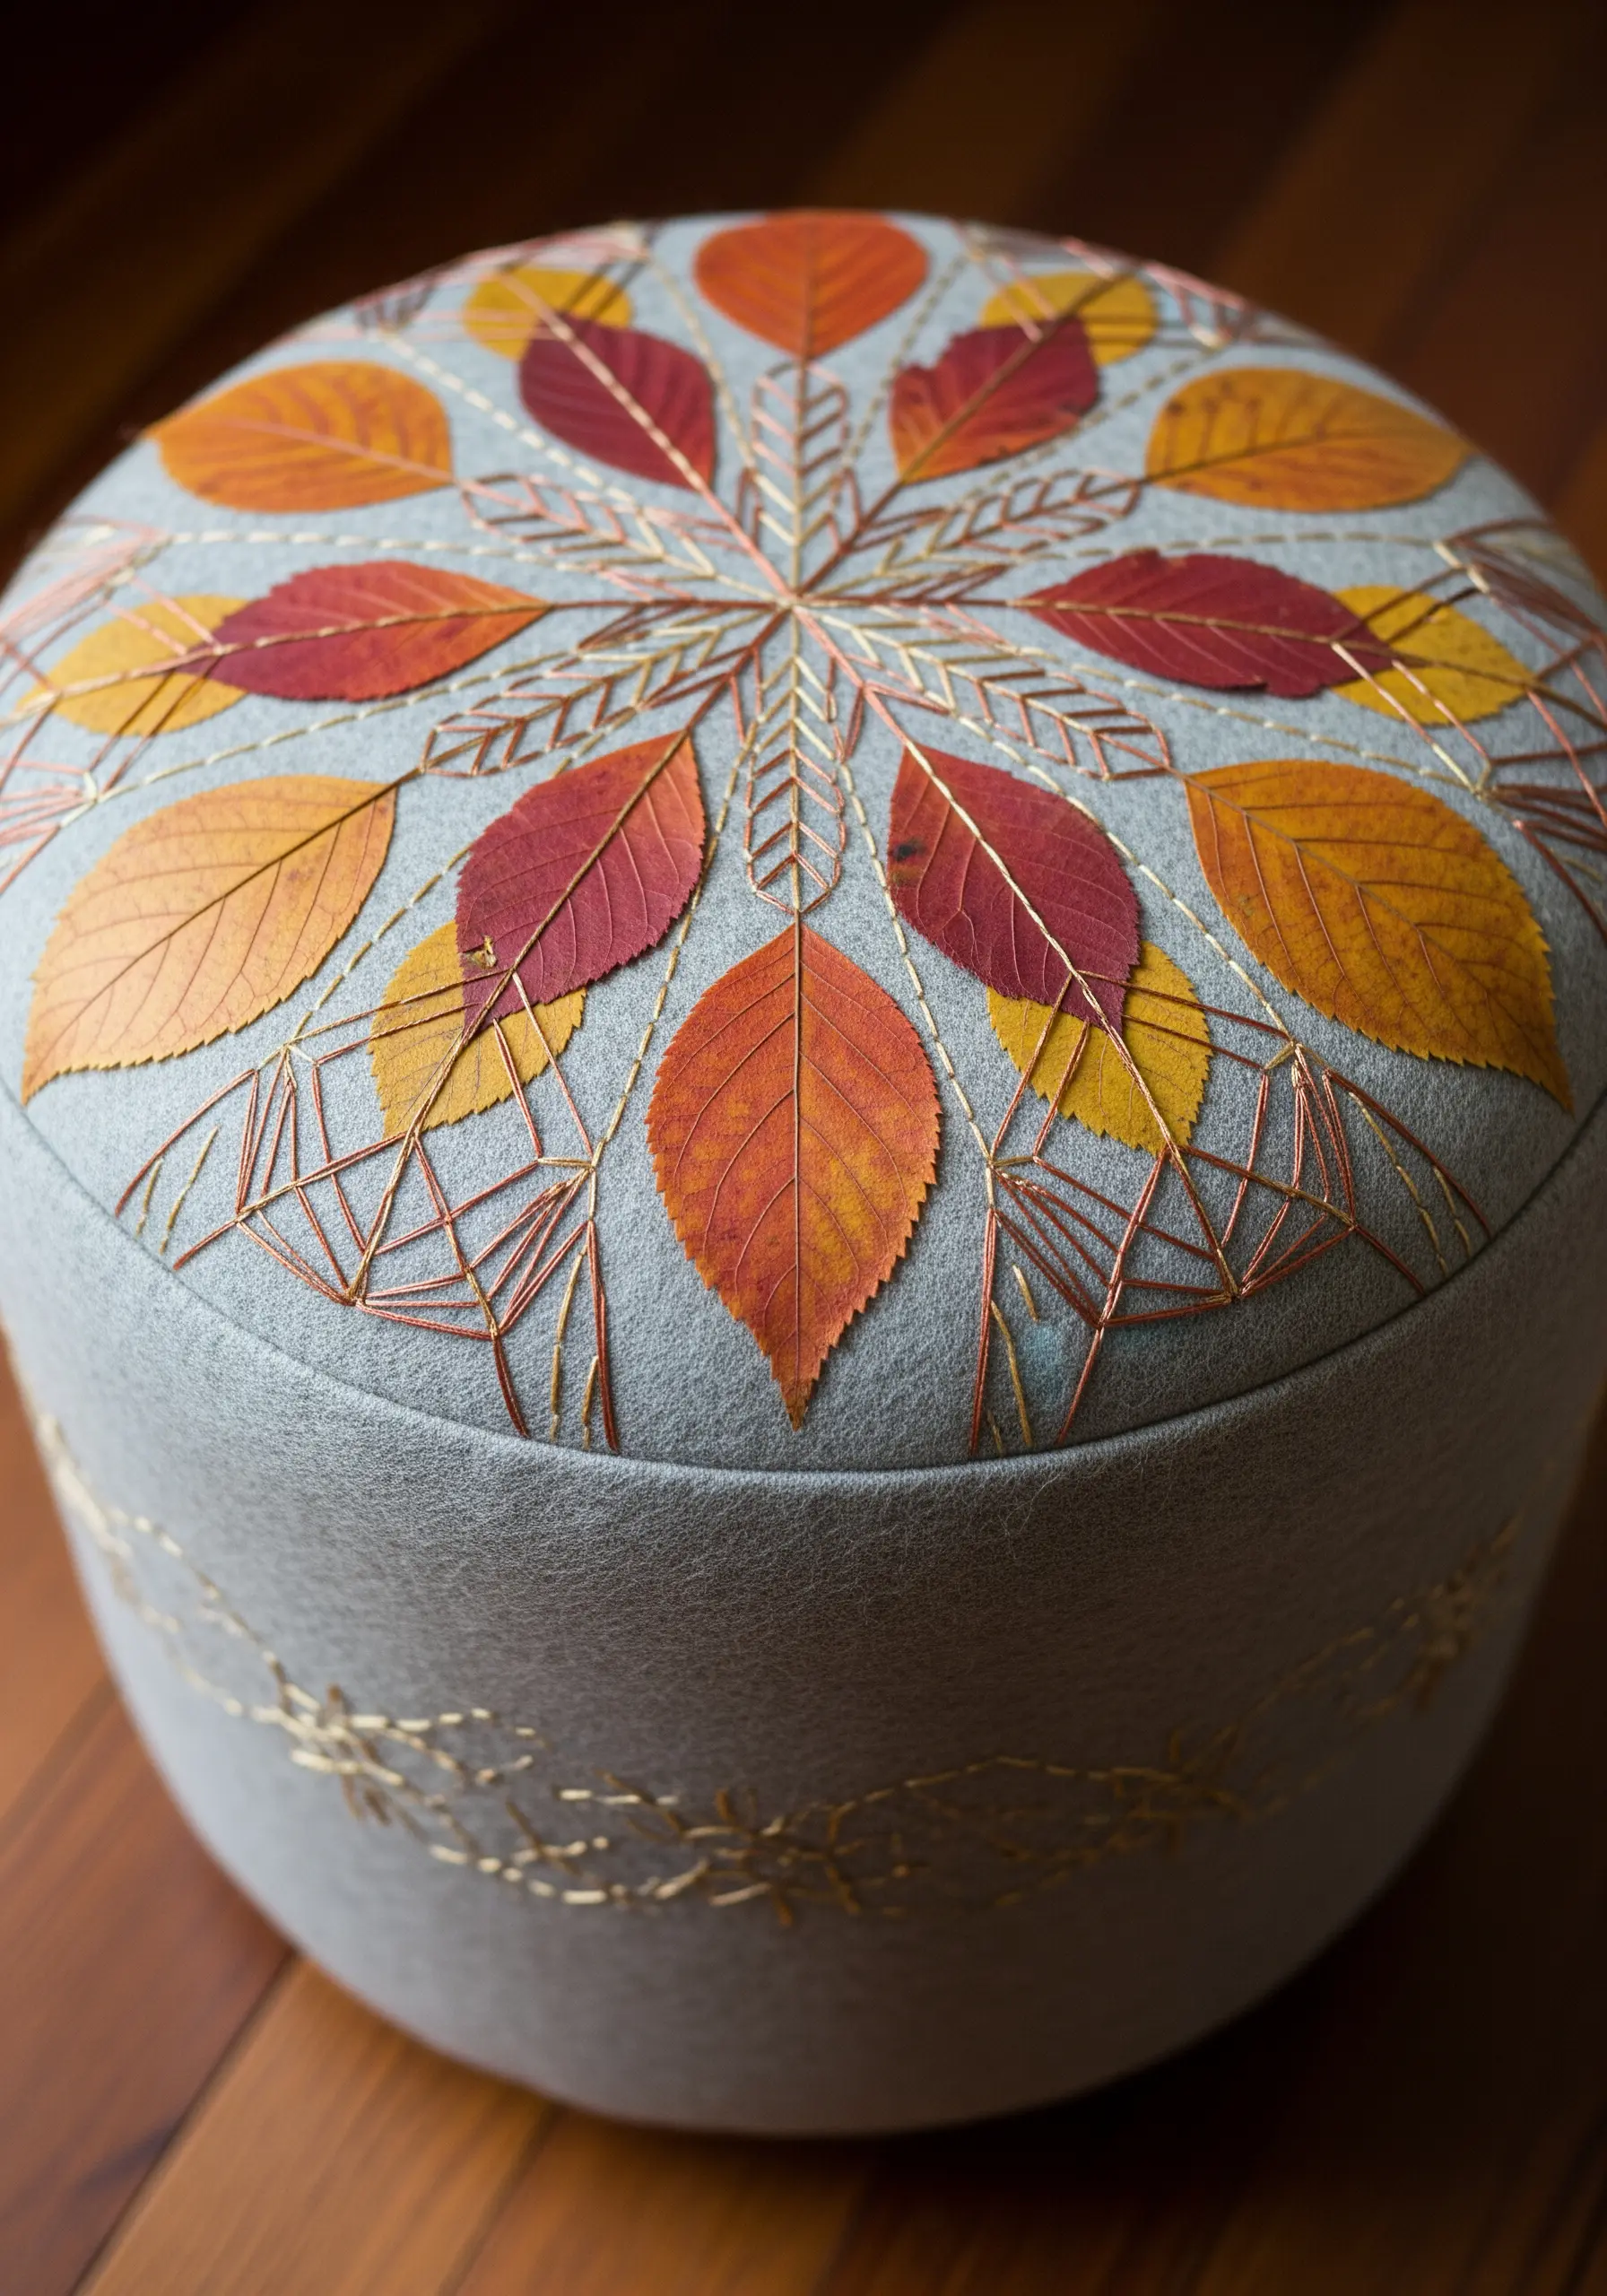
Combine the warmth of autumn leaves with the cool shimmer of metallic thread for a striking piece of home decor.
Press colorful autumn leaves until they are completely flat and dry. Arrange them in a radial pattern on your fabric—a wool felt or tweed works well.
Secure each leaf with a clear, flexible adhesive. Then, using a copper or gold metallic thread, stitch geometric lines that radiate from the center, crossing over and framing the leaves.
The contrast between the natural texture and the sharp, metallic lines creates a captivating modern aesthetic.
26. Protect a Pressed Flower on Your Phone Case
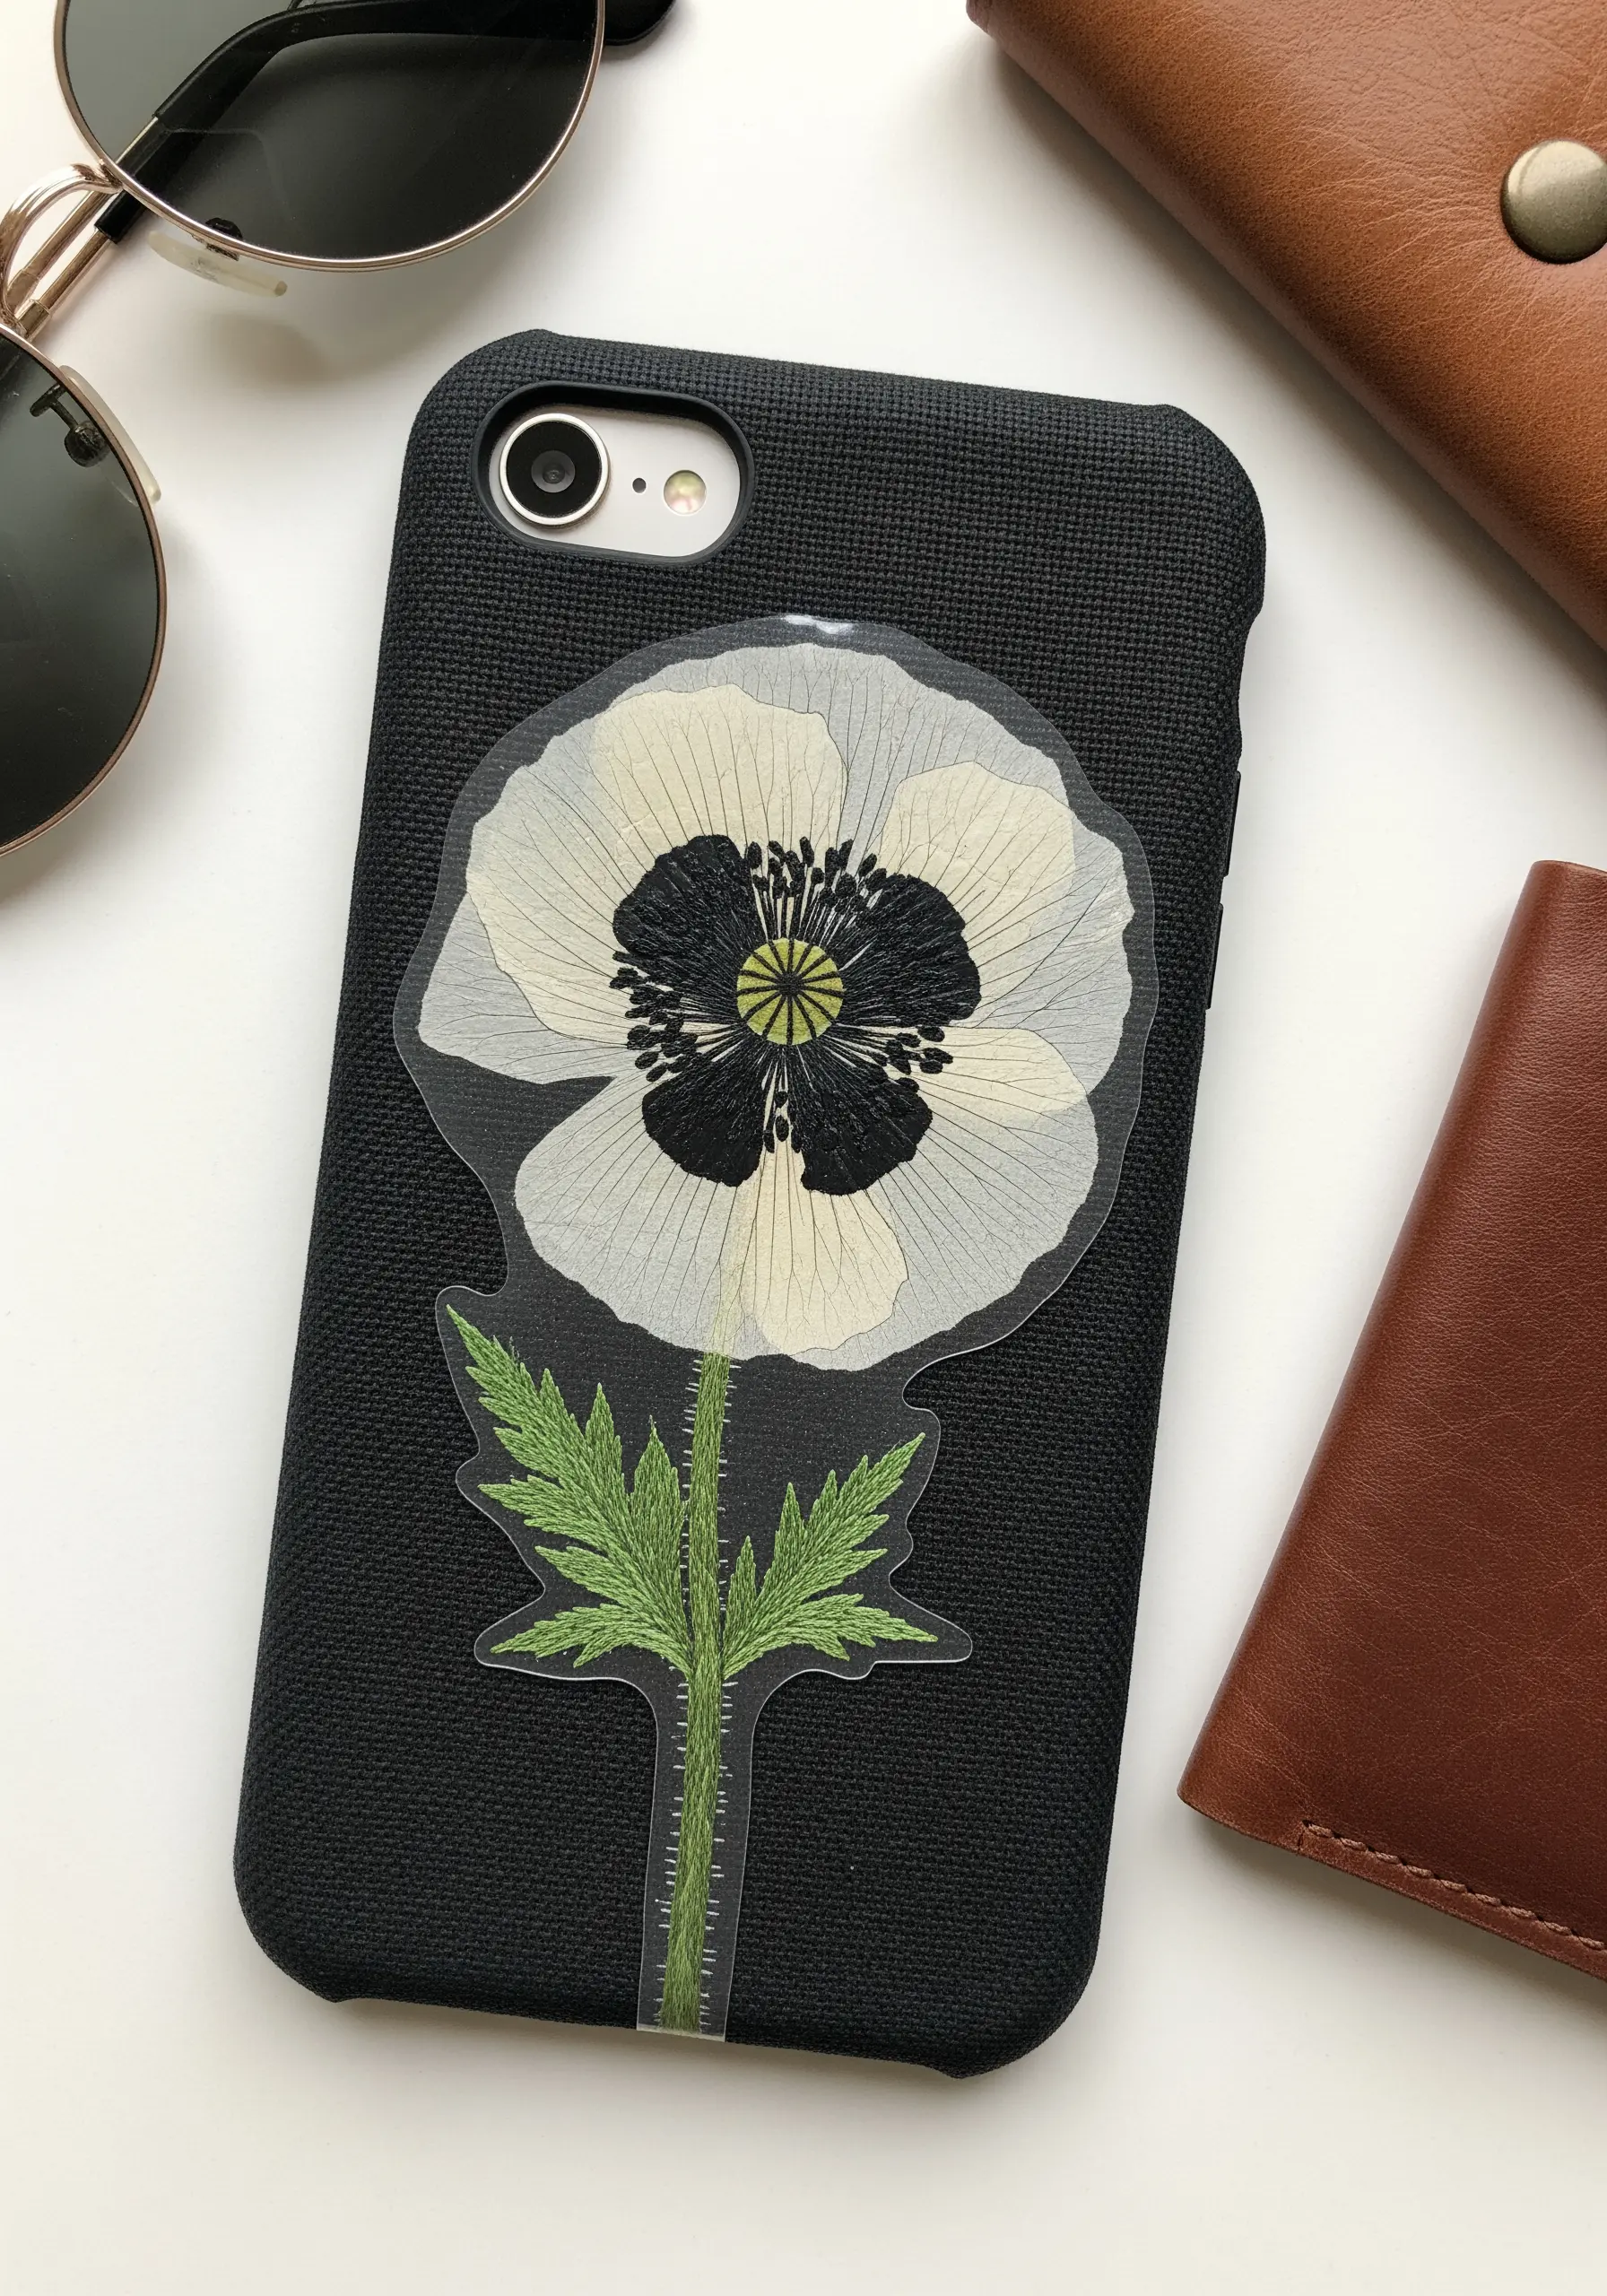
Carry a piece of nature with you by incorporating a pressed flower into your phone case.
While this can be done with resin, you can create a similar, more tactile version with fabric.
Embroider a stem and leaves onto a piece of sturdy black fabric using a simple stem stitch.
Carefully glue a single, beautiful pressed flower—like this white poppy—at the top of the stem.
Place the finished fabric piece inside a clear phone case to keep it protected while showcasing your work.
27. Stitch a Perpetual Botanical Calendar
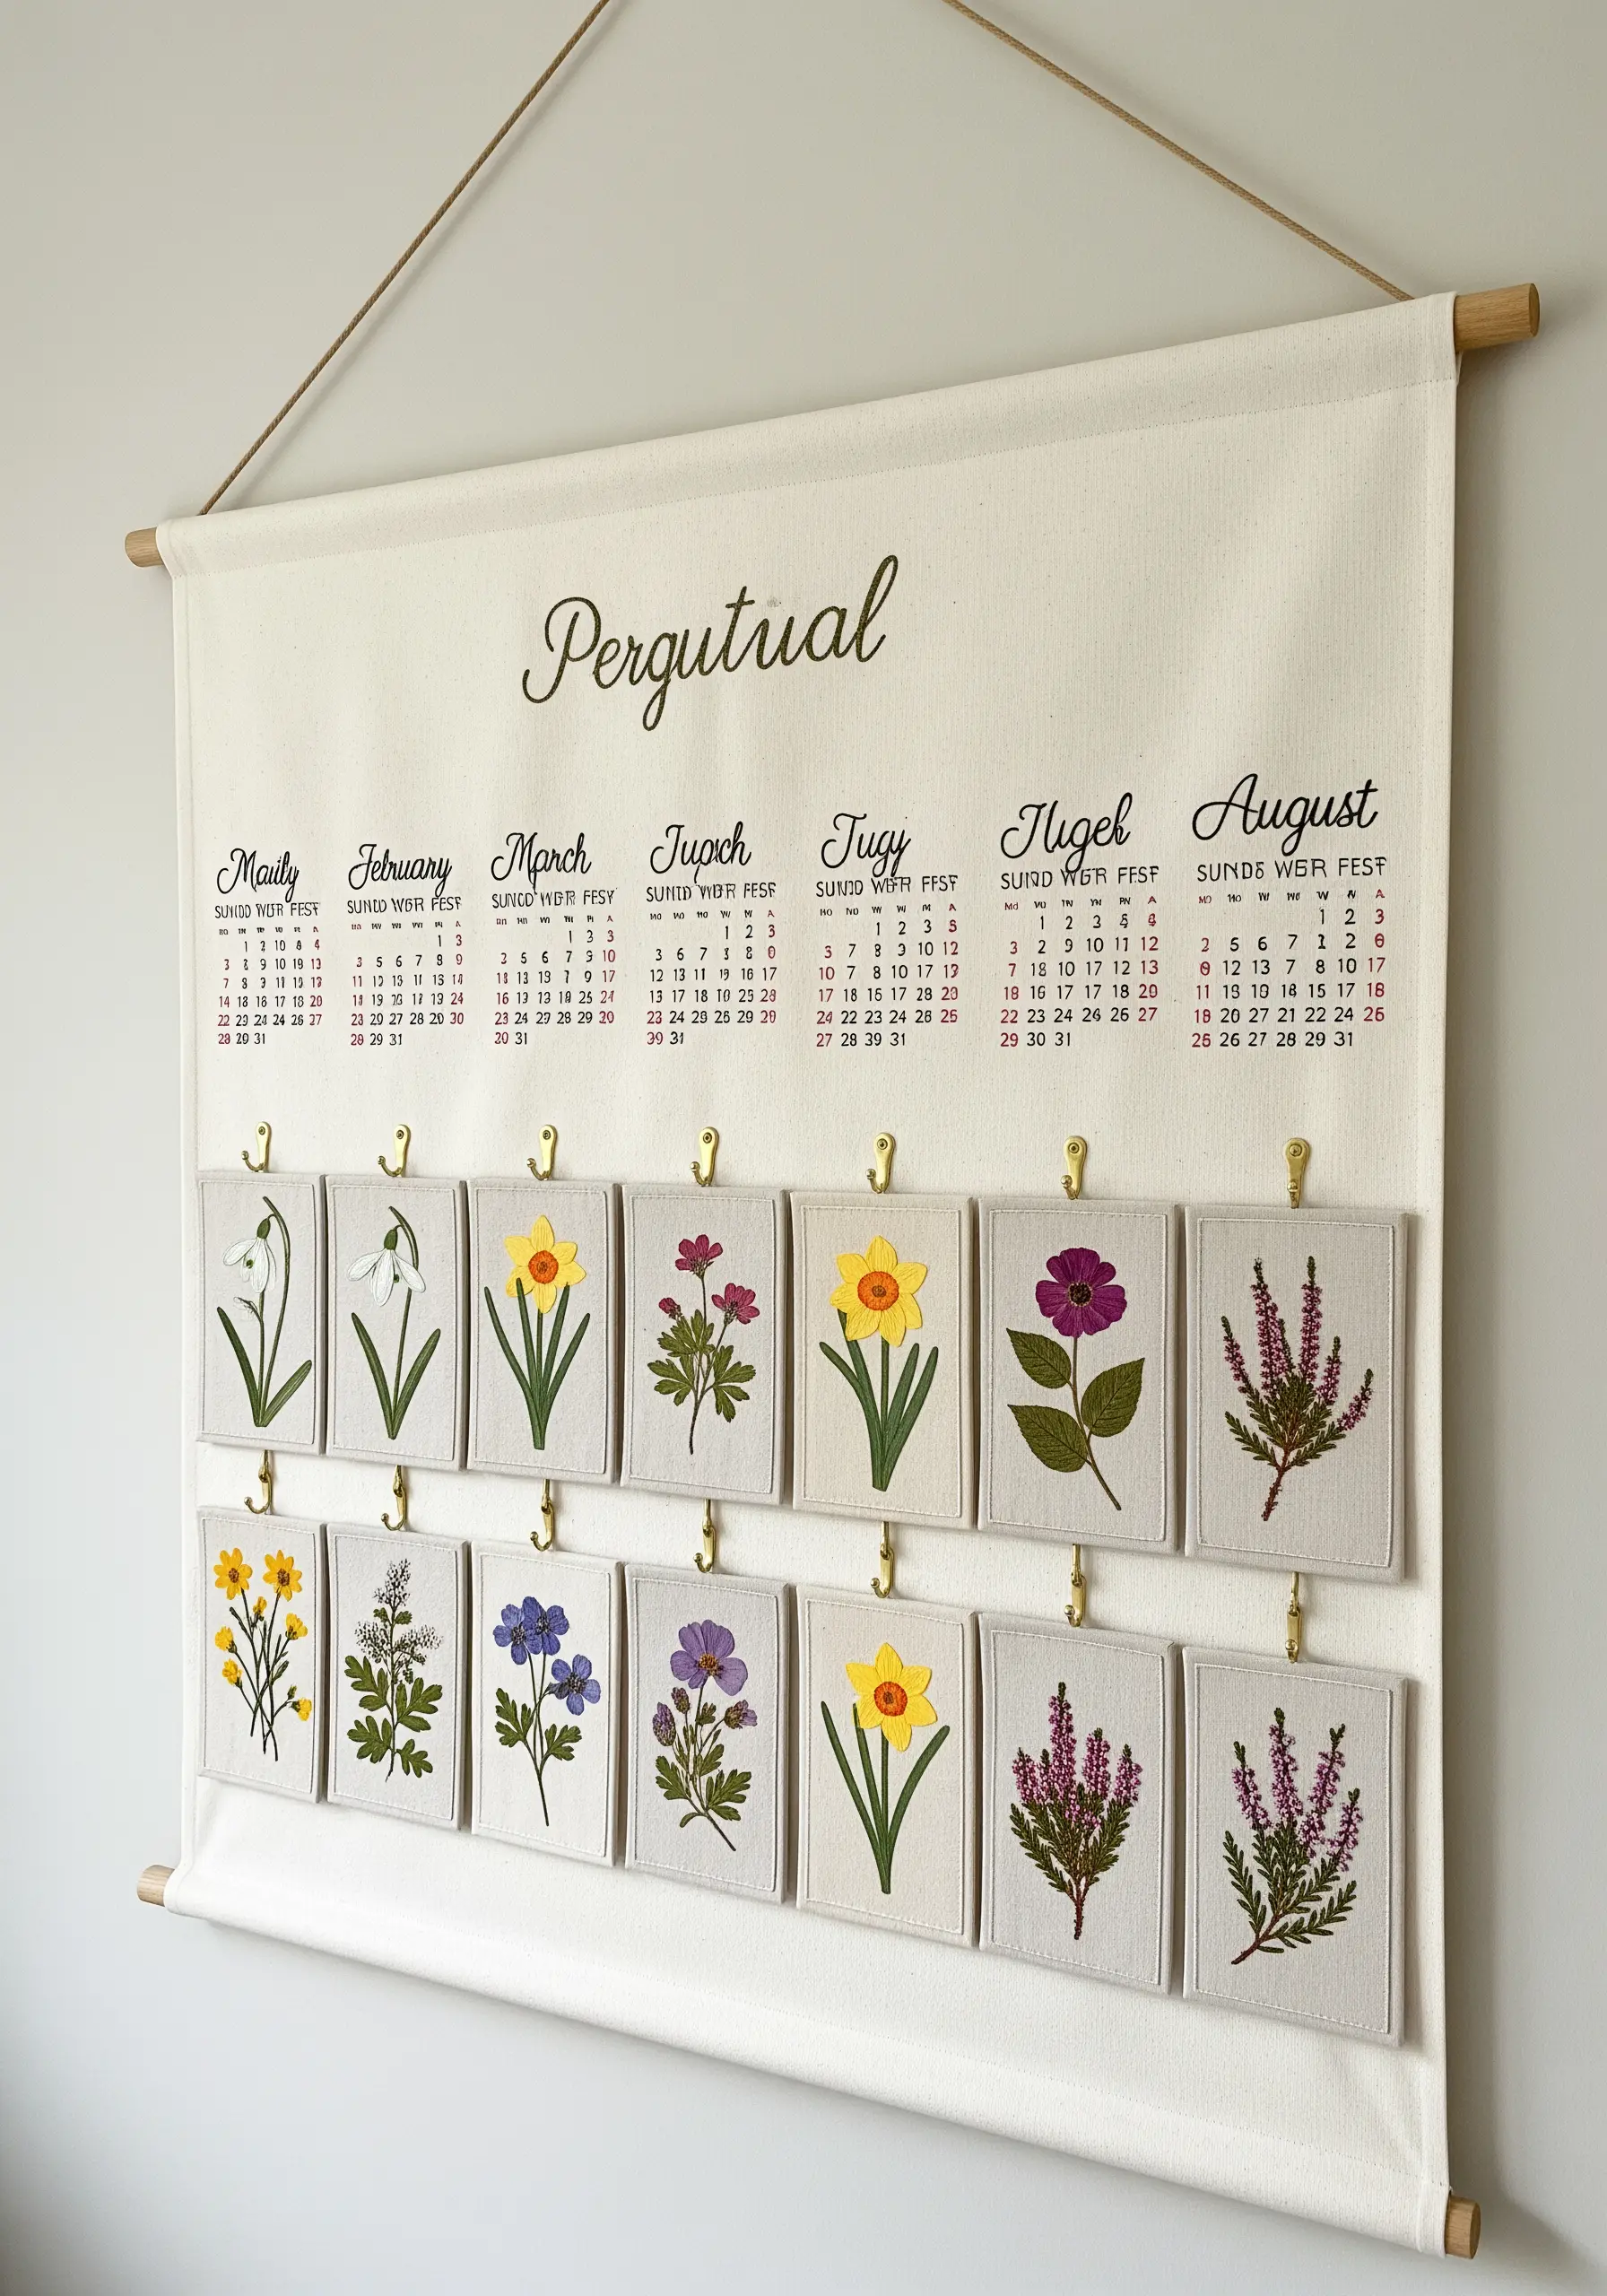
Create a functional piece of wall art that celebrates the changing seasons with a perpetual floral calendar.
Design it in a modular way: embroider a single native flower for each month on its own small canvas panel.
Attach small hooks to a larger hanging banner, allowing you to display and rotate the monthly panels year after year.
This approach breaks a large project into twelve smaller, more manageable pieces, making it a perfect long-term stitching meditation.
28. Add a Hand-Stitched Border to a Floral Hat
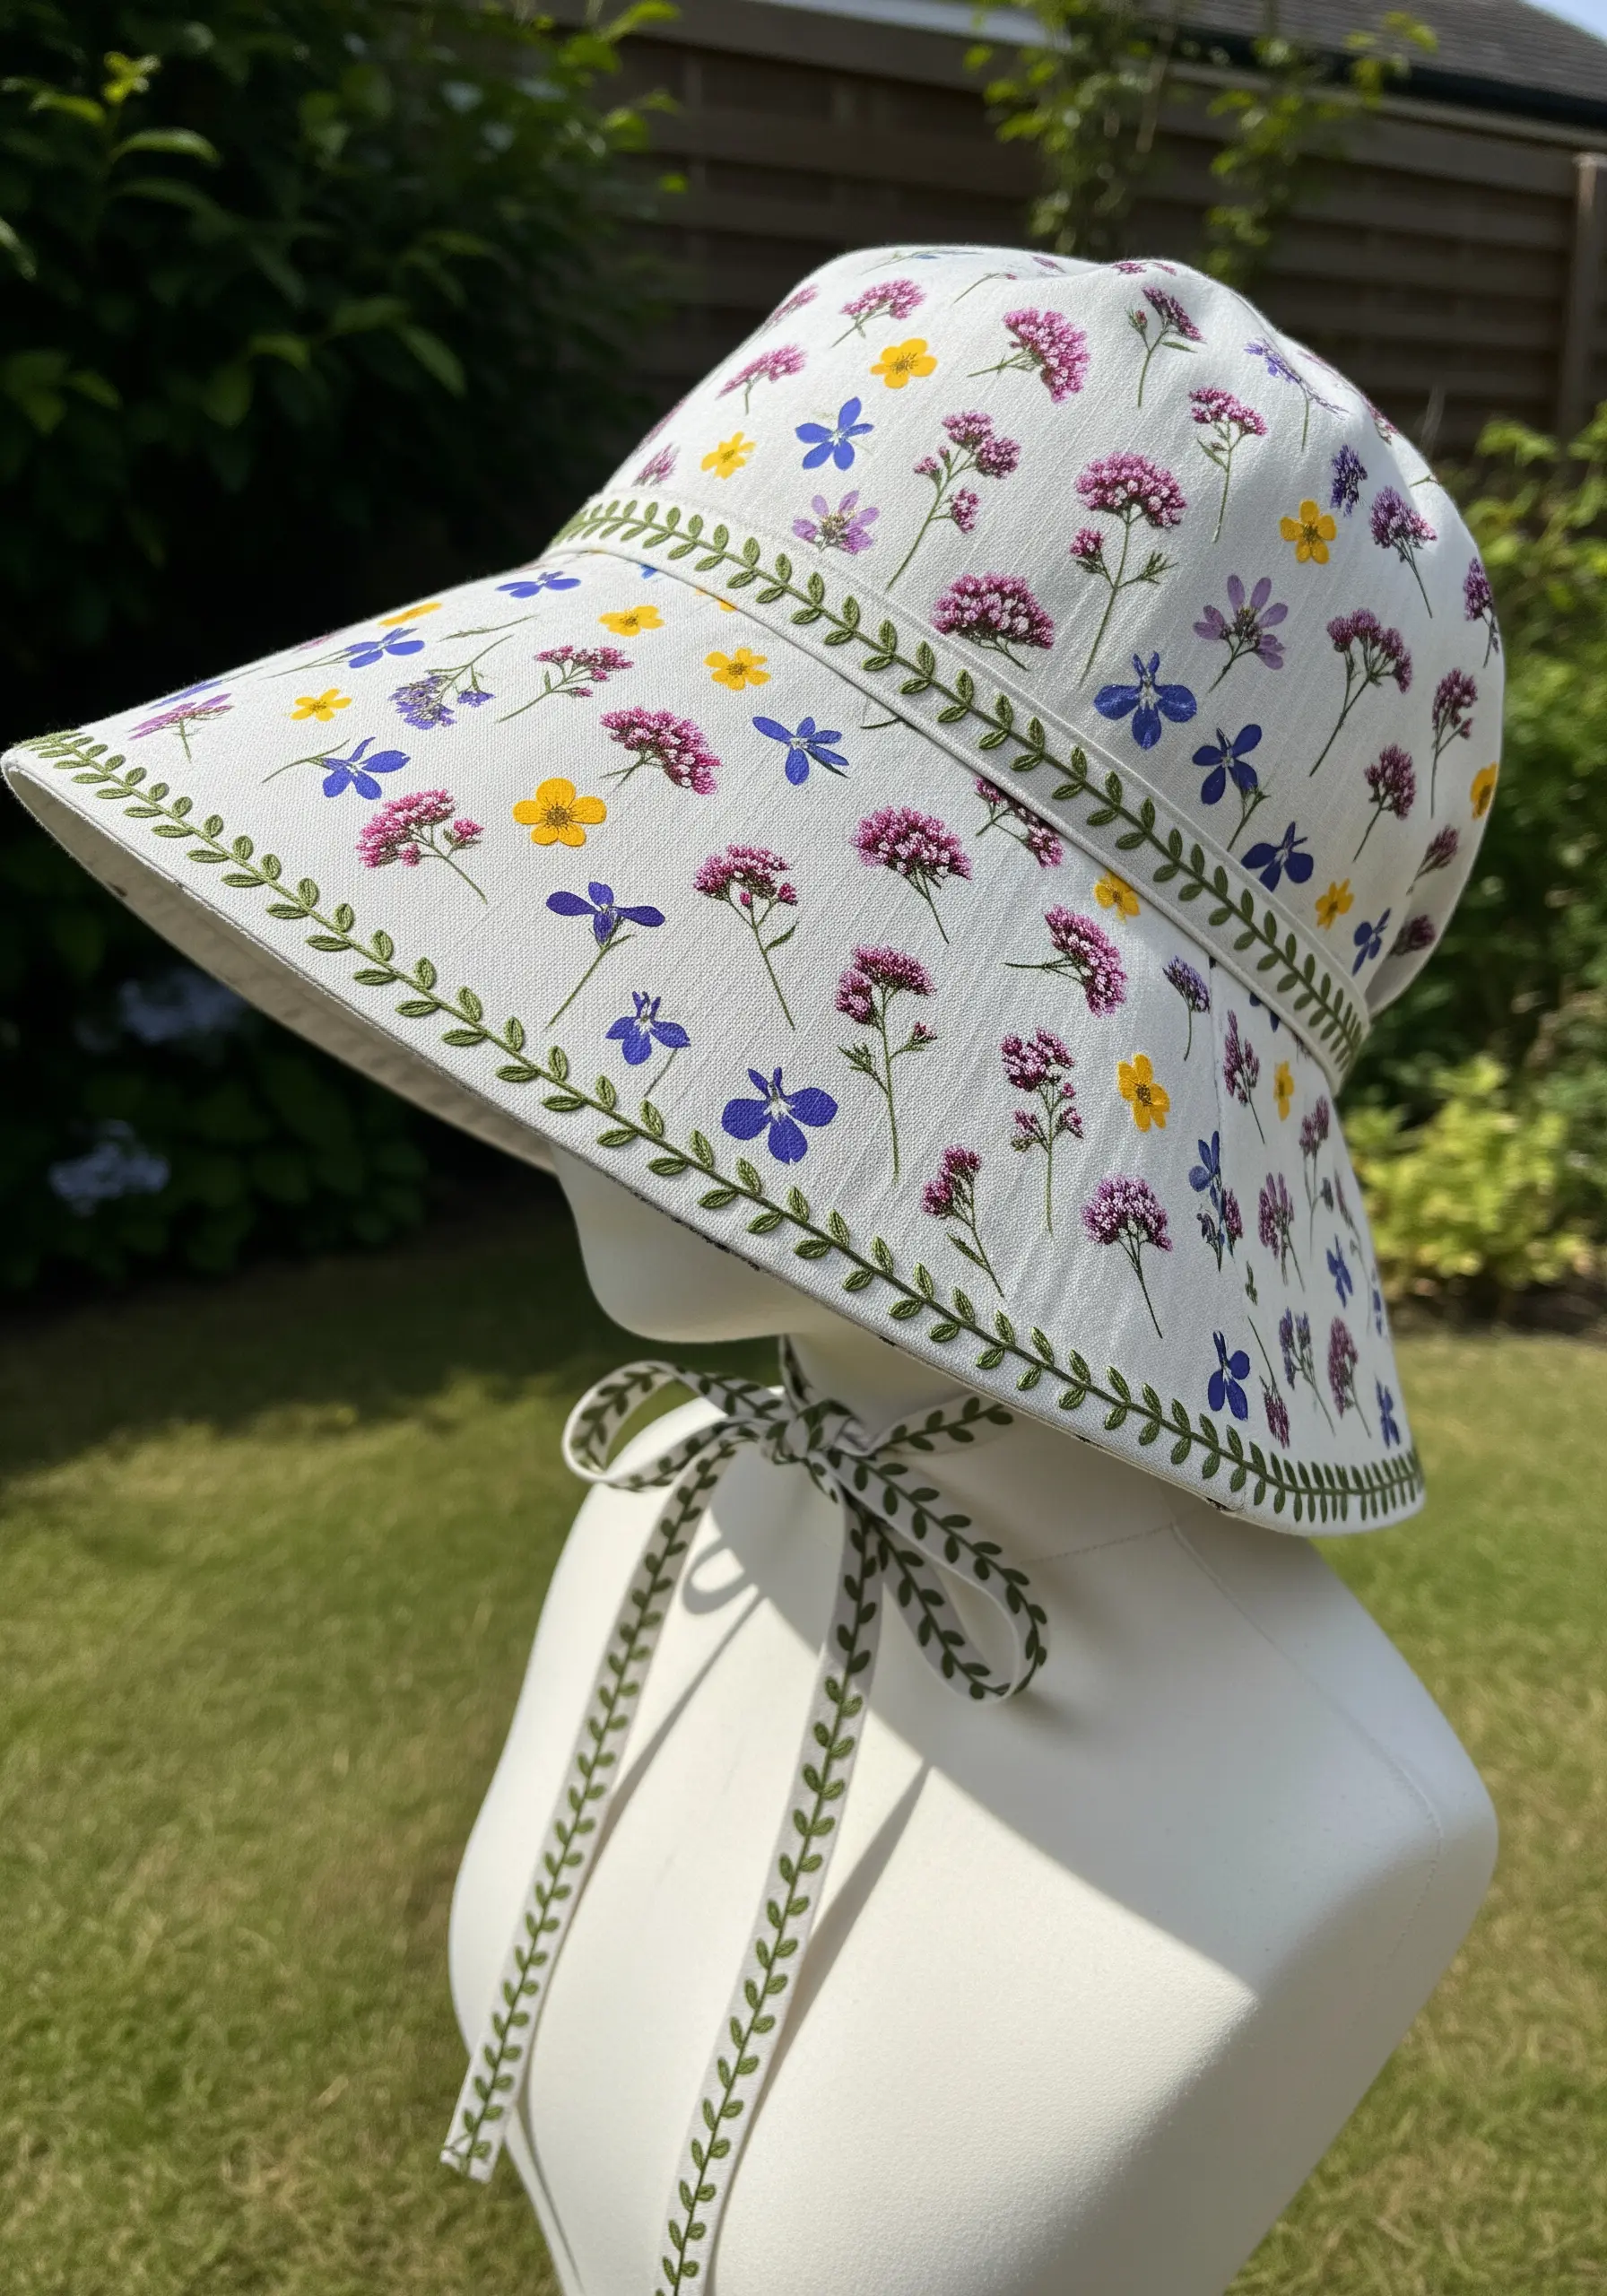
Elevate a store-bought, floral-print sun hat by adding a simple, elegant embroidered border.
Choose a thread color that complements the existing print, like this soft green, to create a cohesive look.
Use a classic stem stitch or chain stitch to embroider a delicate vine pattern along the edge of the hat’s band and ribbon ties.
This simple addition frames the print beautifully and transforms a mass-produced item into a unique, personalized accessory with a thoughtful, handmade touch.


