

Have you ever considered paper as your canvas? It might seem delicate, but stitching on paper opens up a world of texture and precision that fabric simply can’t replicate. It invites you to think not just about the thread, but about the crispness of a pierced hole, the tension of a line, and the interplay between a flat surface and a raised stitch.
Here, your needle doesn’t glide—it punctuates. Each stitch is a deliberate choice. This changes everything. You can create geometric forms with architectural clarity, blend your stitches with watercolor washes, or layer paper like a collage artist to build three-dimensional worlds.
Forget the rules that apply to linen or cotton. Let’s explore how paper can bring a new dimension to your craft, transforming your embroidery into sharp, modern art that feels both intentional and wonderfully tactile.
1. Create Luminous Gradients with String Art Techniques

Transform a simple sheet of perforated paper or cardstock into a vibrant landscape by adapting string art principles.
Instead of randomly placed stitches, use a grid of pre-punched holes to guide your thread, pulling it taut between two points to create perfectly straight lines.
The magic happens when you layer these lines in a gradient, allowing the colors to blend optically and form a smooth, radiant sunset or sky.
This method removes the challenge of uneven tension on fabric and instead emphasizes geometric precision, turning your thread into lines of pure color.
2. Stitch Delicate Botanicals on Textured Paper
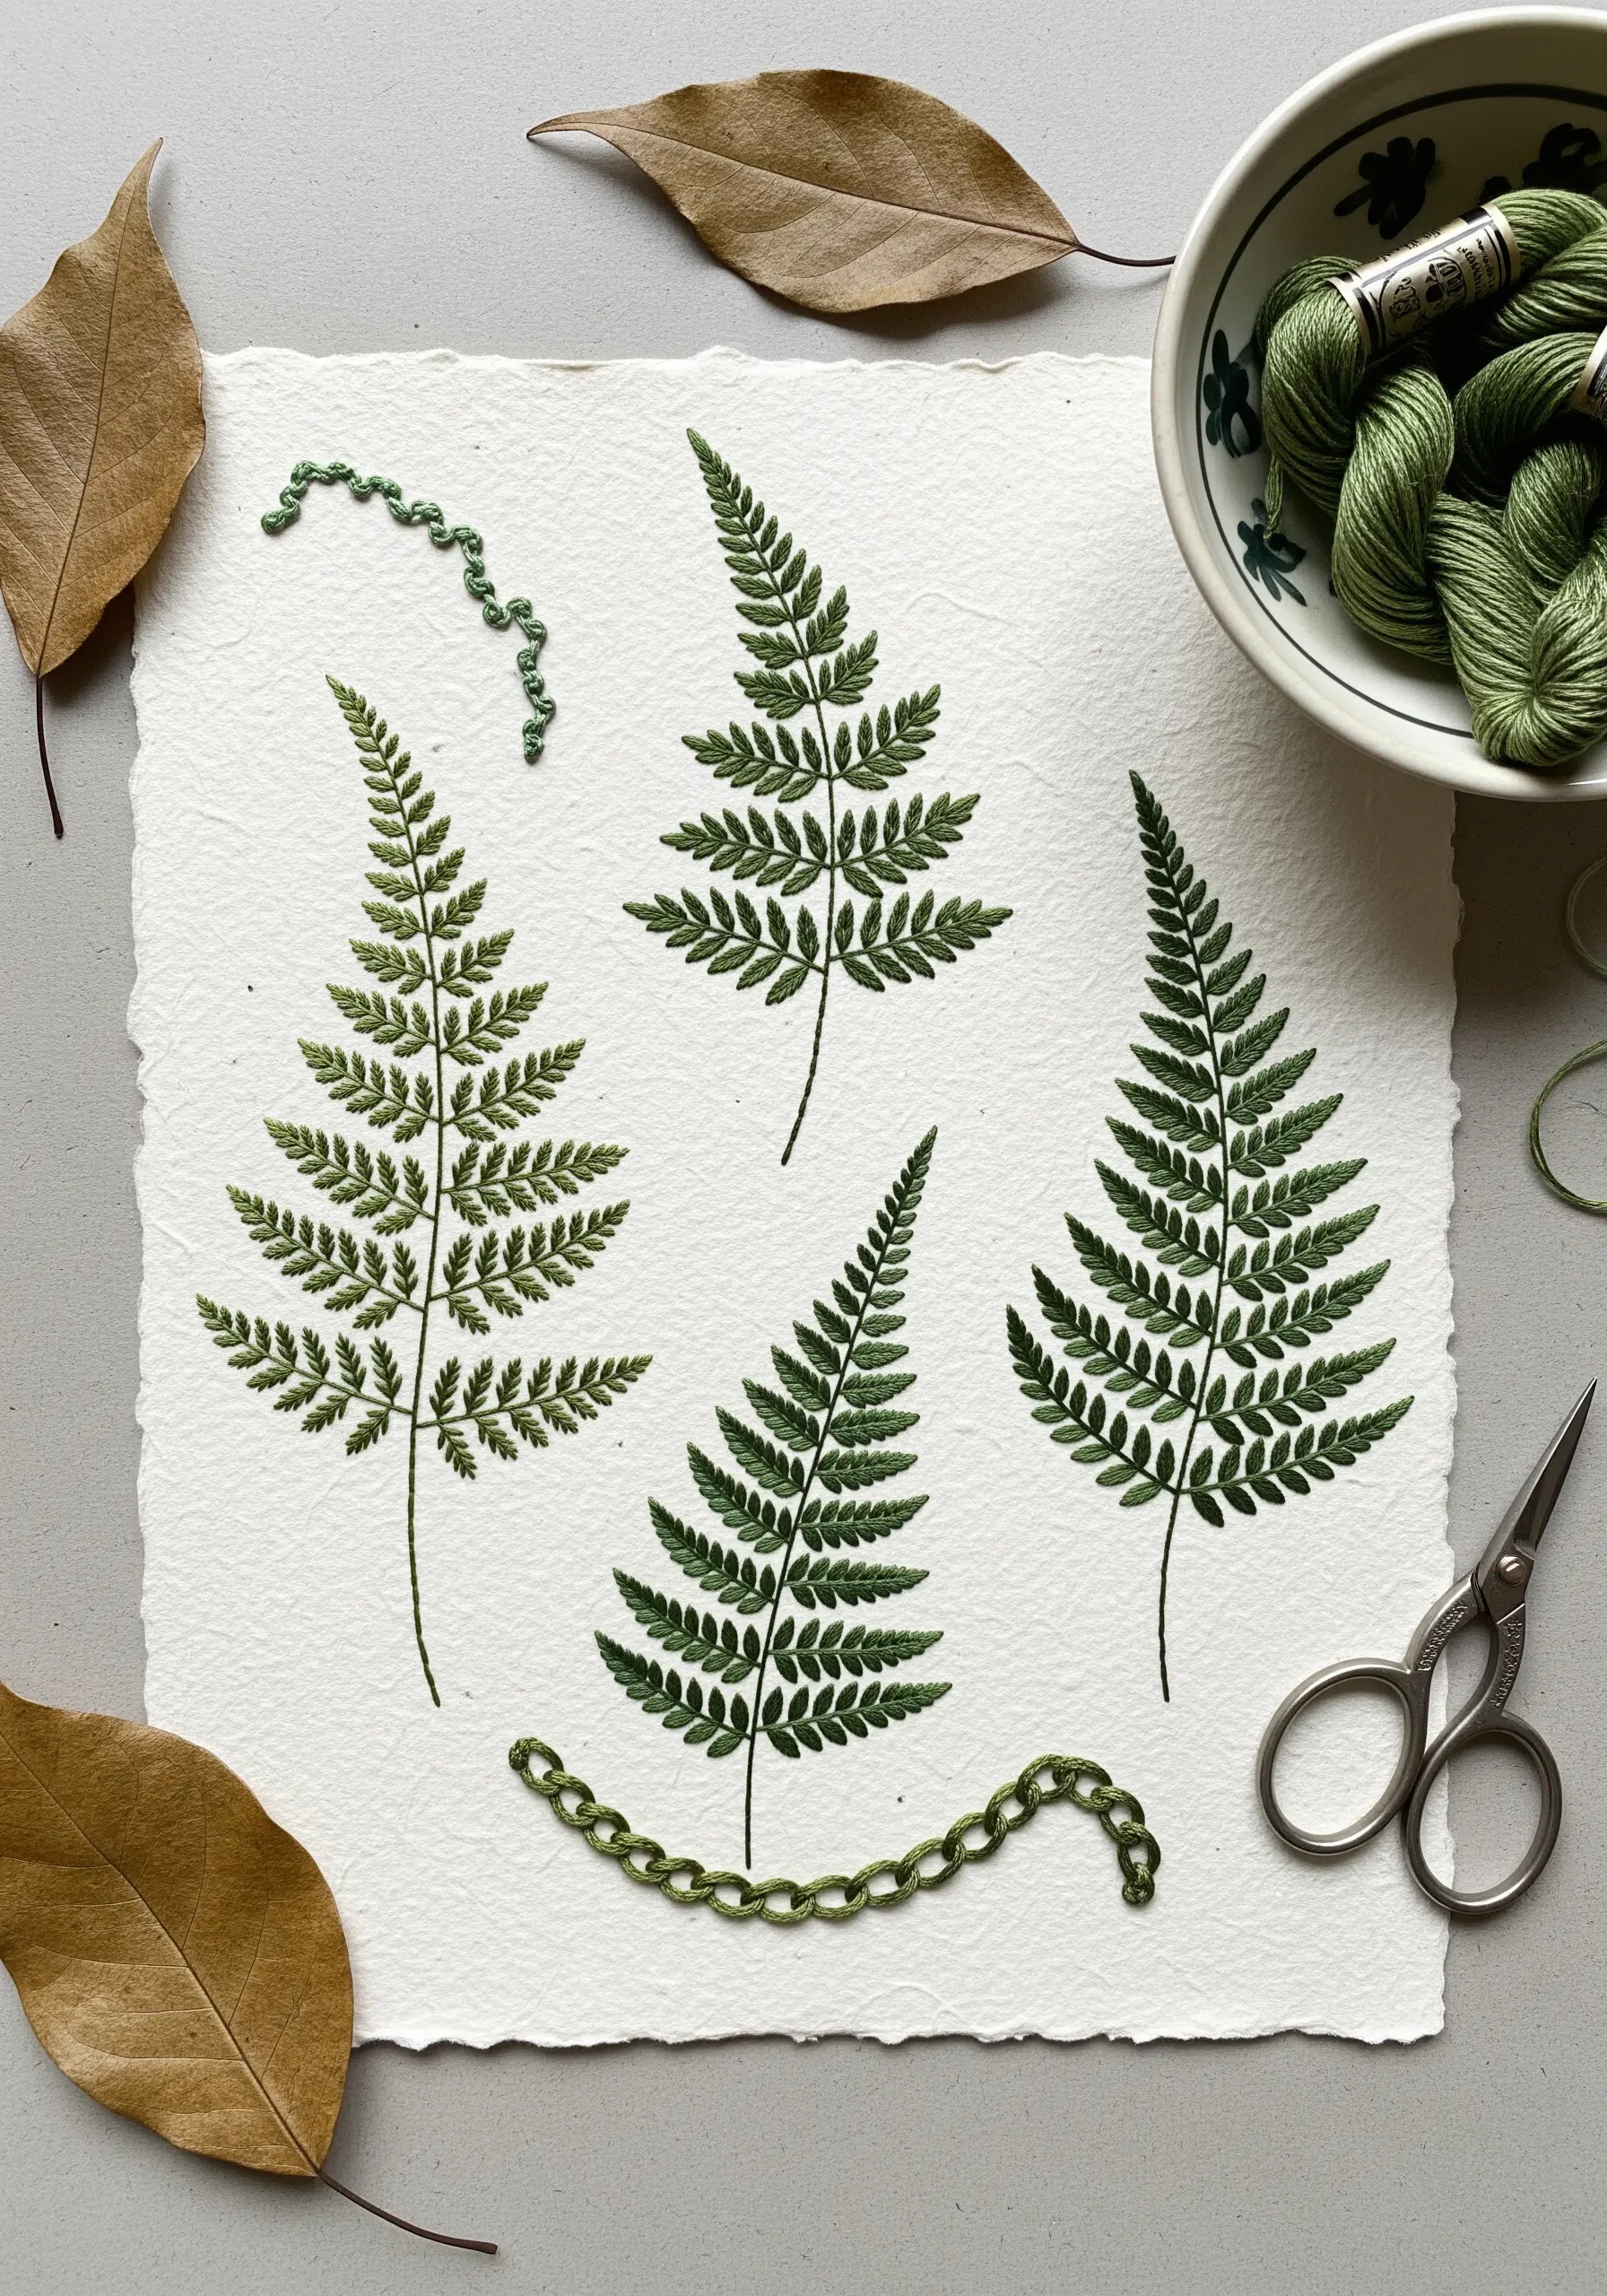
Embroidering on handmade or watercolor paper demands a lighter touch, rewarding you with a stunning contrast between soft thread and rustic surfaces.
Use a single strand of floss and a very fine needle to minimize paper tearing.
Instead of dense fill stitches, focus on outlines and delicate details, like the tiny leaves of a fern, using simple backstitches or single straight stitches.
The deckled edge of the paper becomes a natural frame, making these nature-inspired framed embroidery designs feel both organic and refined.
3. Map Celestial Bodies with Metallic Threads and Beads
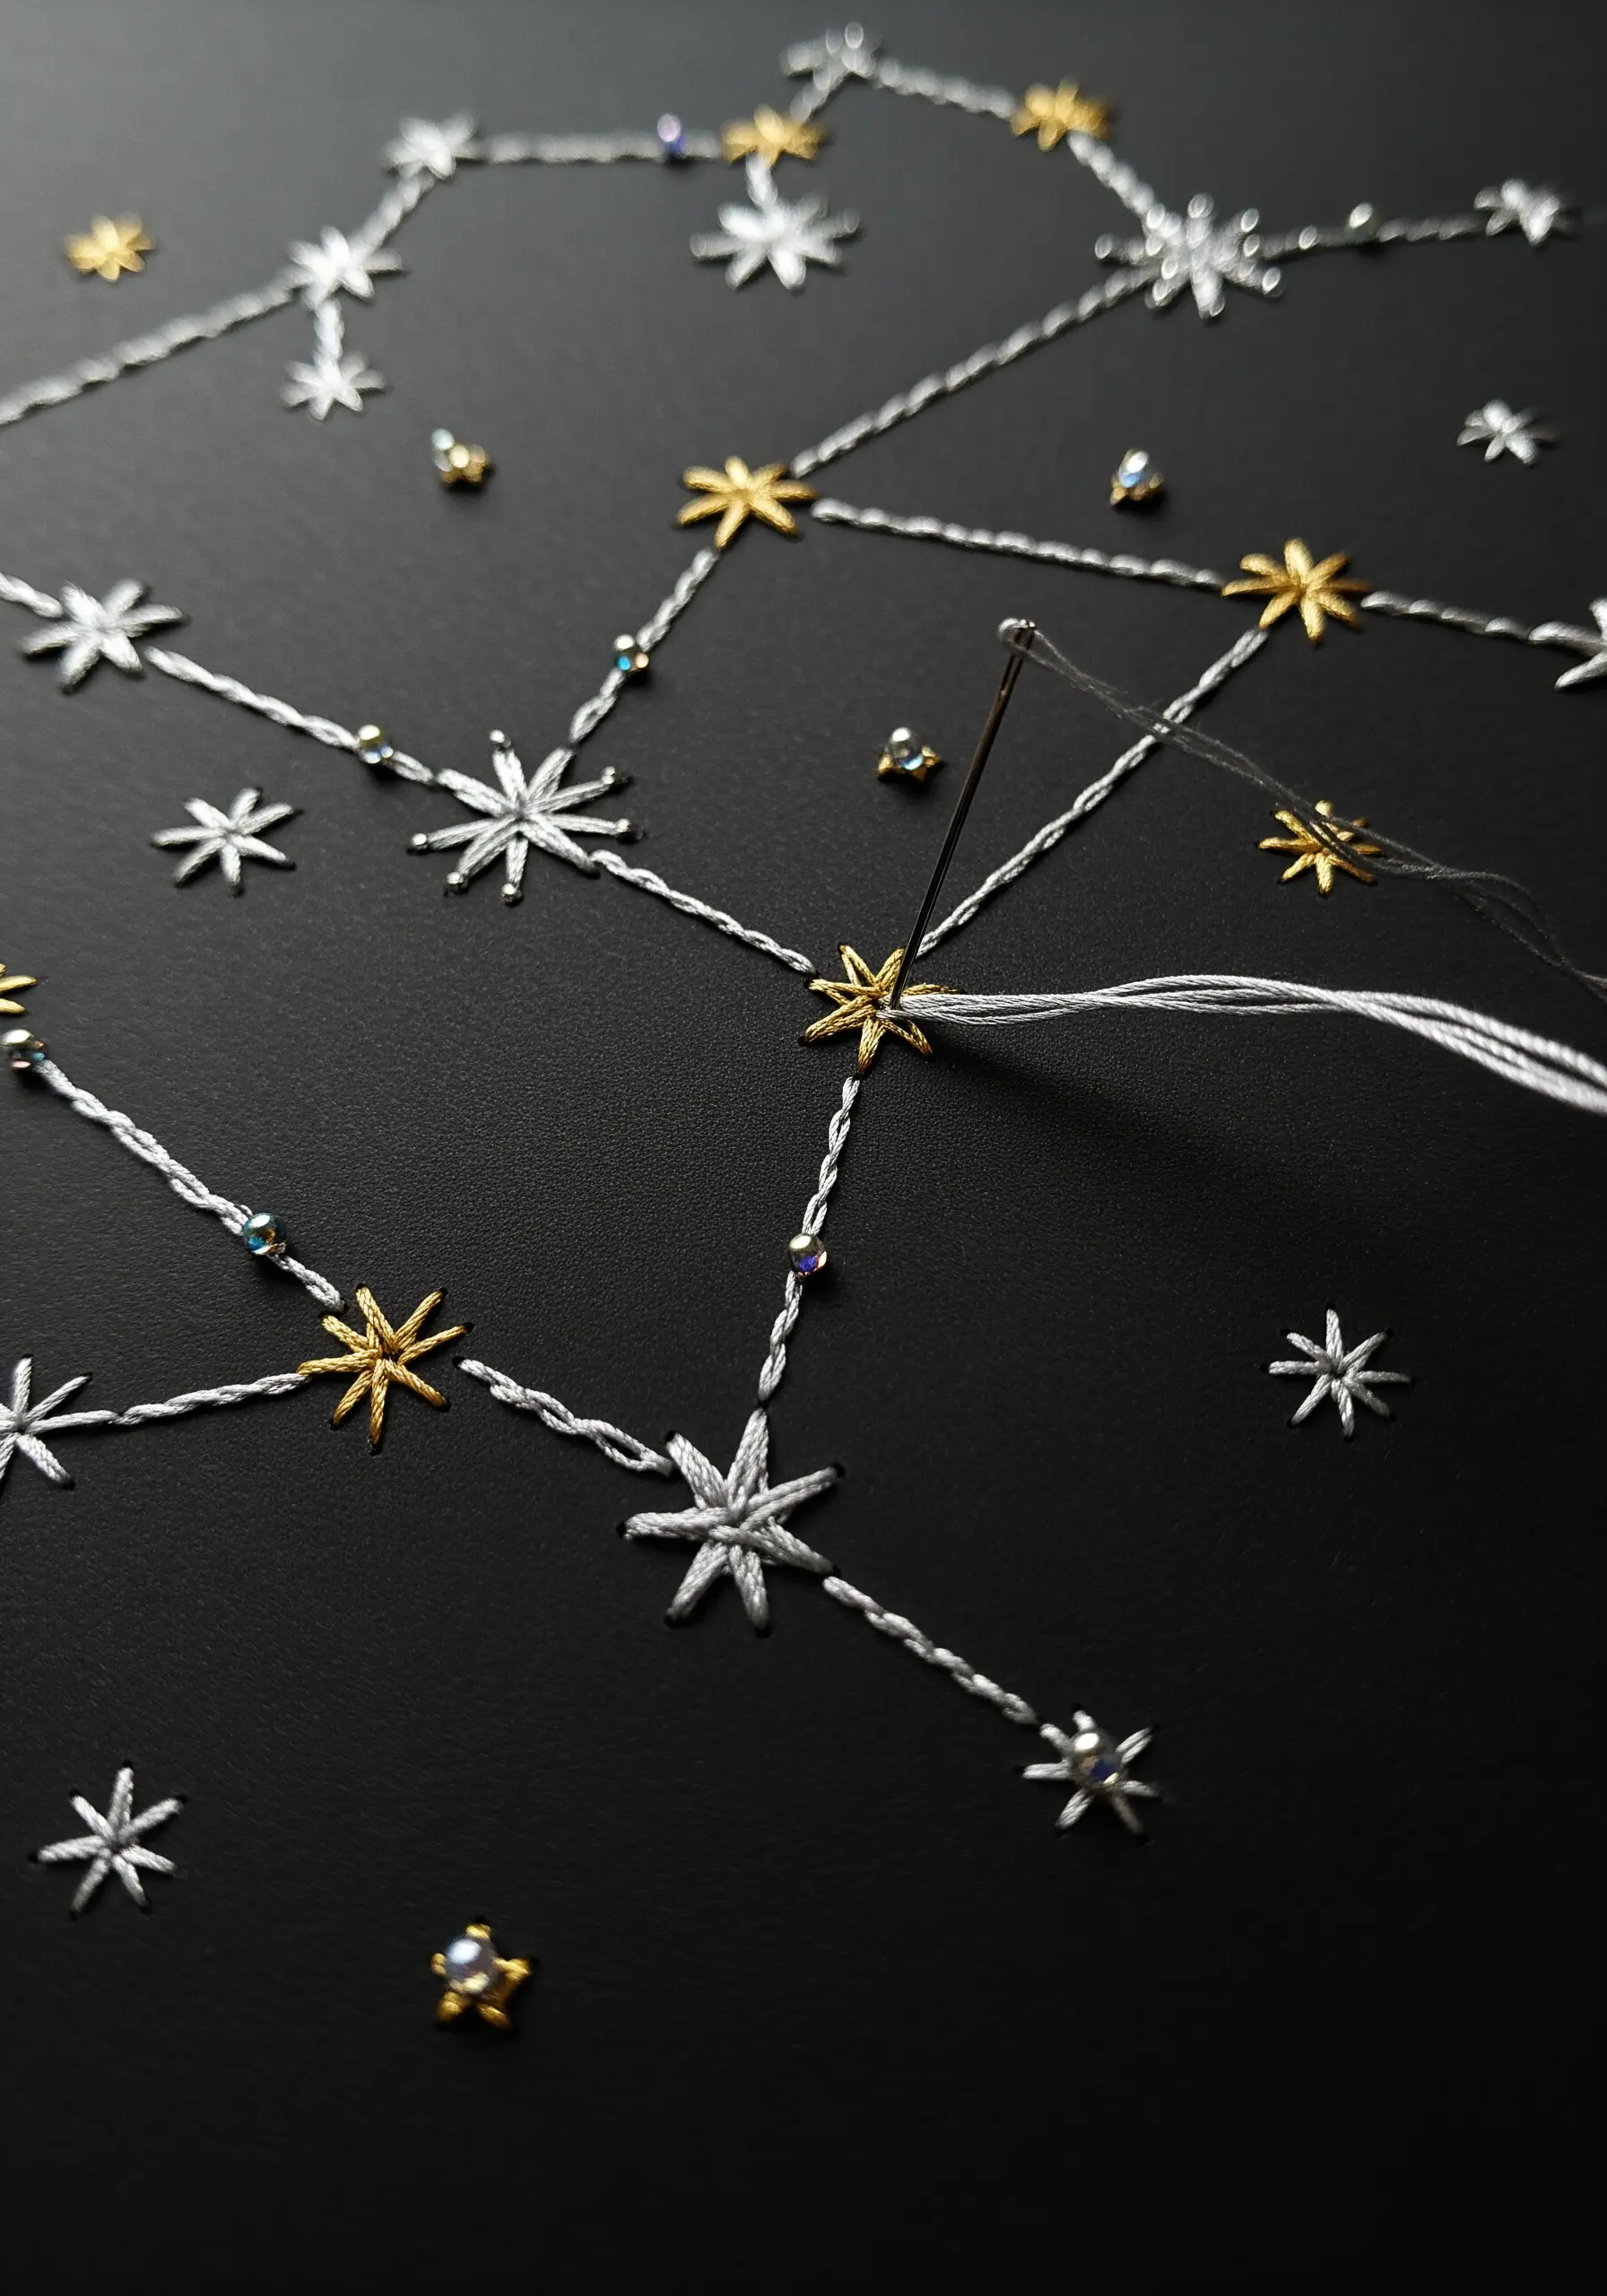
Elevate a simple constellation pattern by stitching on heavy black cardstock, which makes metallic and white threads appear to glow.
Use a silver or gold metallic floss for the starbursts—a simple star stitch of eight overlapping straight stitches works beautifully—and connect them with a fine white backstitch.
Integrate tiny seed beads or sequins at the center of larger stars to add a subtle, light-catching dimension.
This technique turns a flat design into a minimal celestial embroidery piece with tactile and visual depth.
4. Build 3D Topography with Layered Paper and Stitch
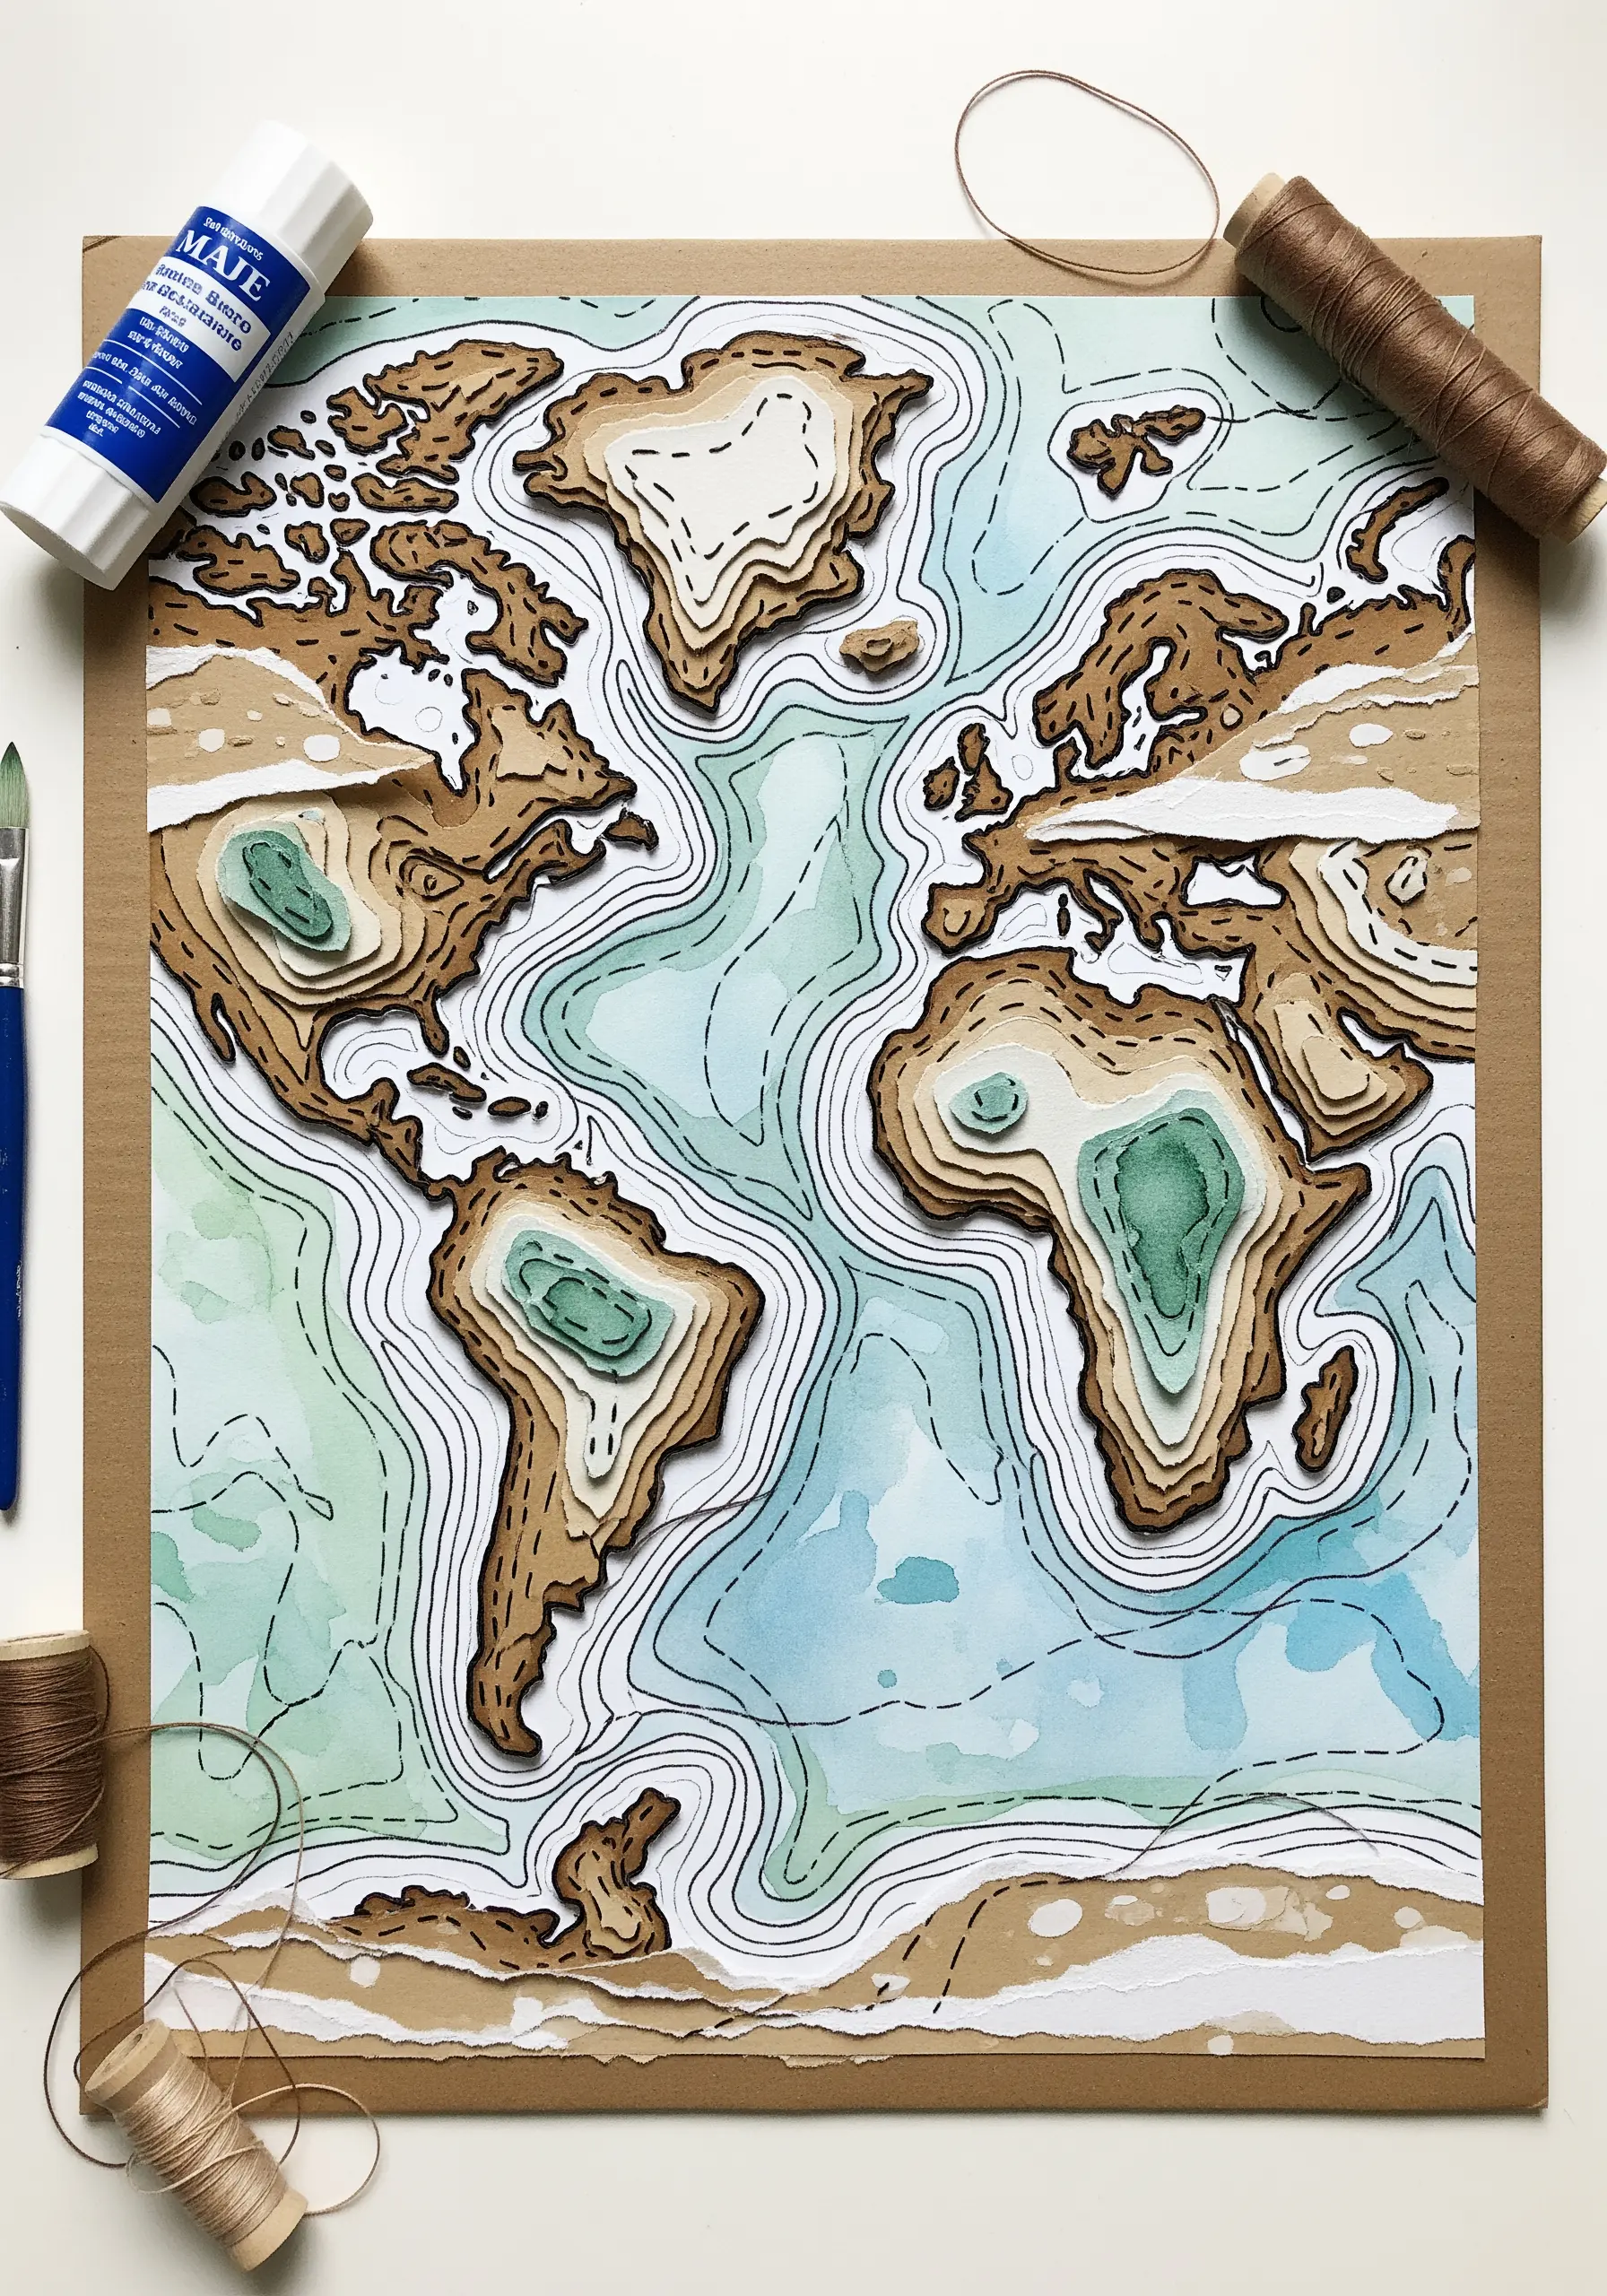
Combine cartography with craft by building a multi-layered topographic map where stitches define the contours.
Start by painting a watercolor base on heavy paper for your oceans and lowest elevations.
Cut progressively smaller landmass shapes from different shades of cardstock, layering them with foam spacers for added height.
Finally, use a simple backstitch in a dark, grounding color to trace the topographic lines, unifying the paper layers and adding a handcrafted finish.
These handmade collage projects turn abstract data into tangible art.
5. Craft Whimsical Scenes with Paper Collage and Yarn
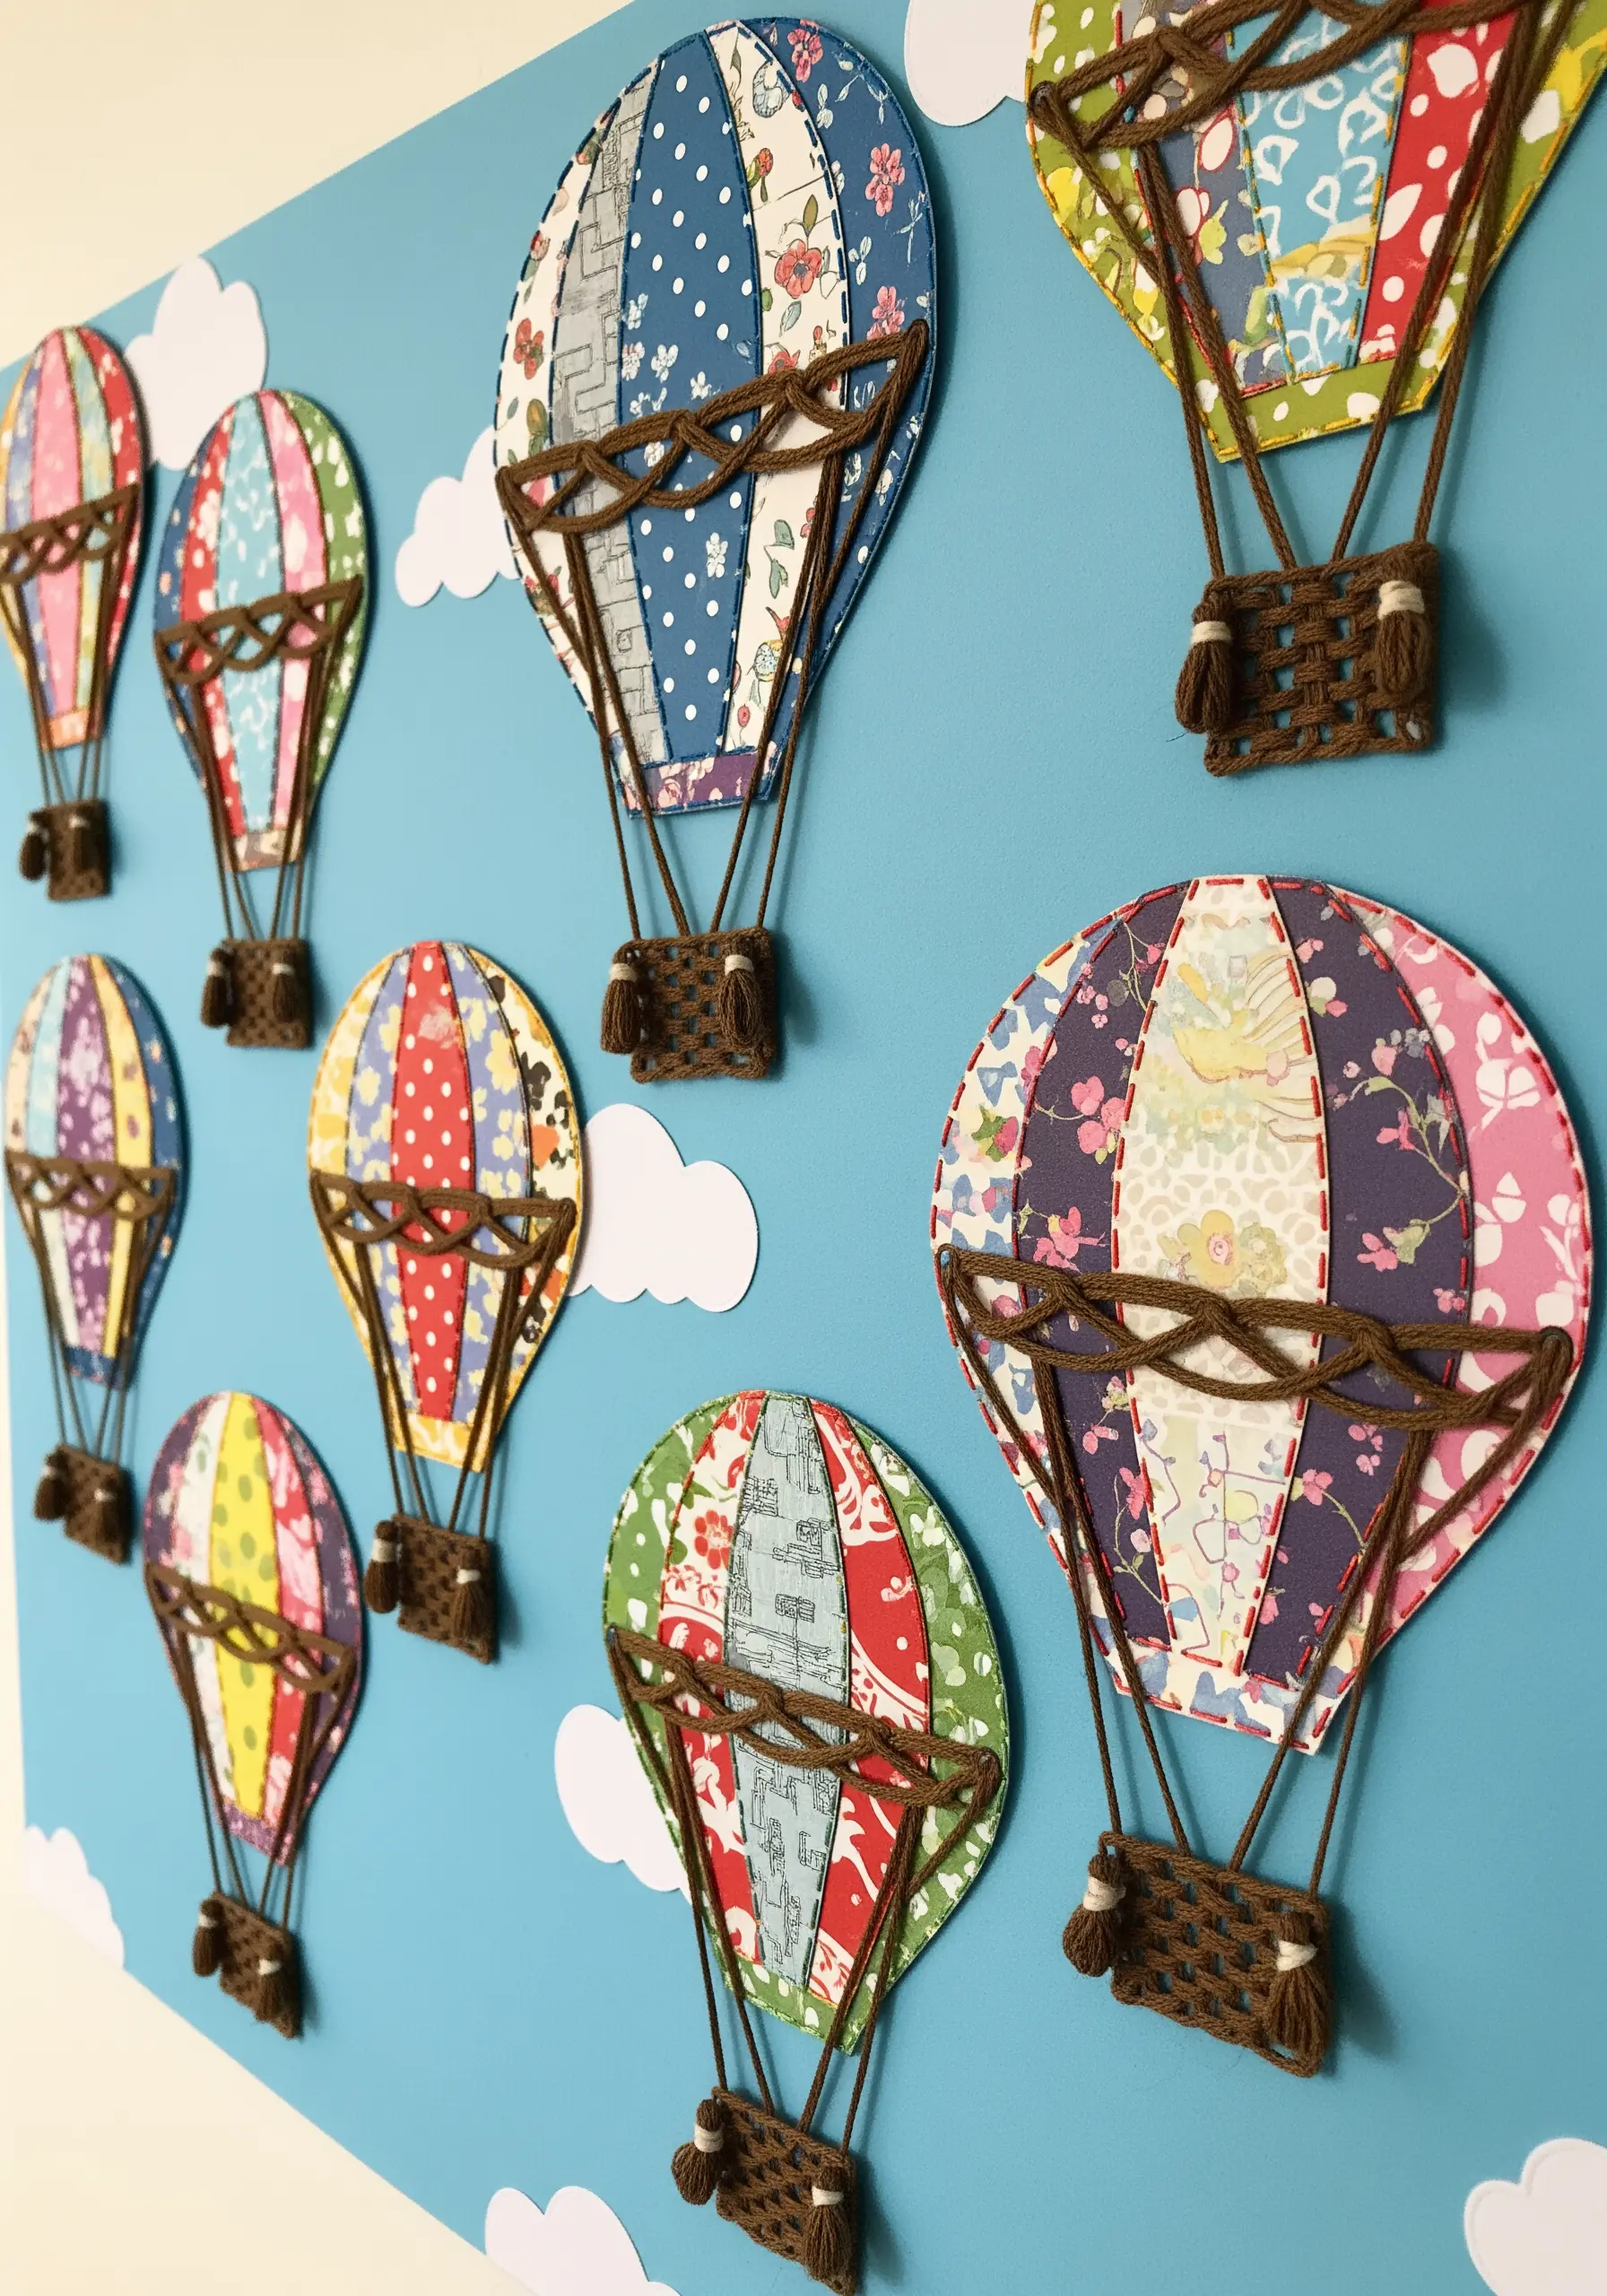
Merge papercraft with fiber art to create cheerful, three-dimensional wall decor.
Cut your main shapes, like these hot air balloons, from patterned scrapbook paper to introduce color and detail without any stitching.
Then, introduce texture with yarn or thick cord for the structural elements, like the baskets and ropes.
Use couching to attach the yarn neatly to the paper surface, or try wrapping and knotting techniques to build small, tactile details that pop against the flat background.
This approach is perfect for nursery stitch art wall ideas, offering both visual interest and a playful feel.
6. Sculpt a Coral Reef with High-Texture Stitches
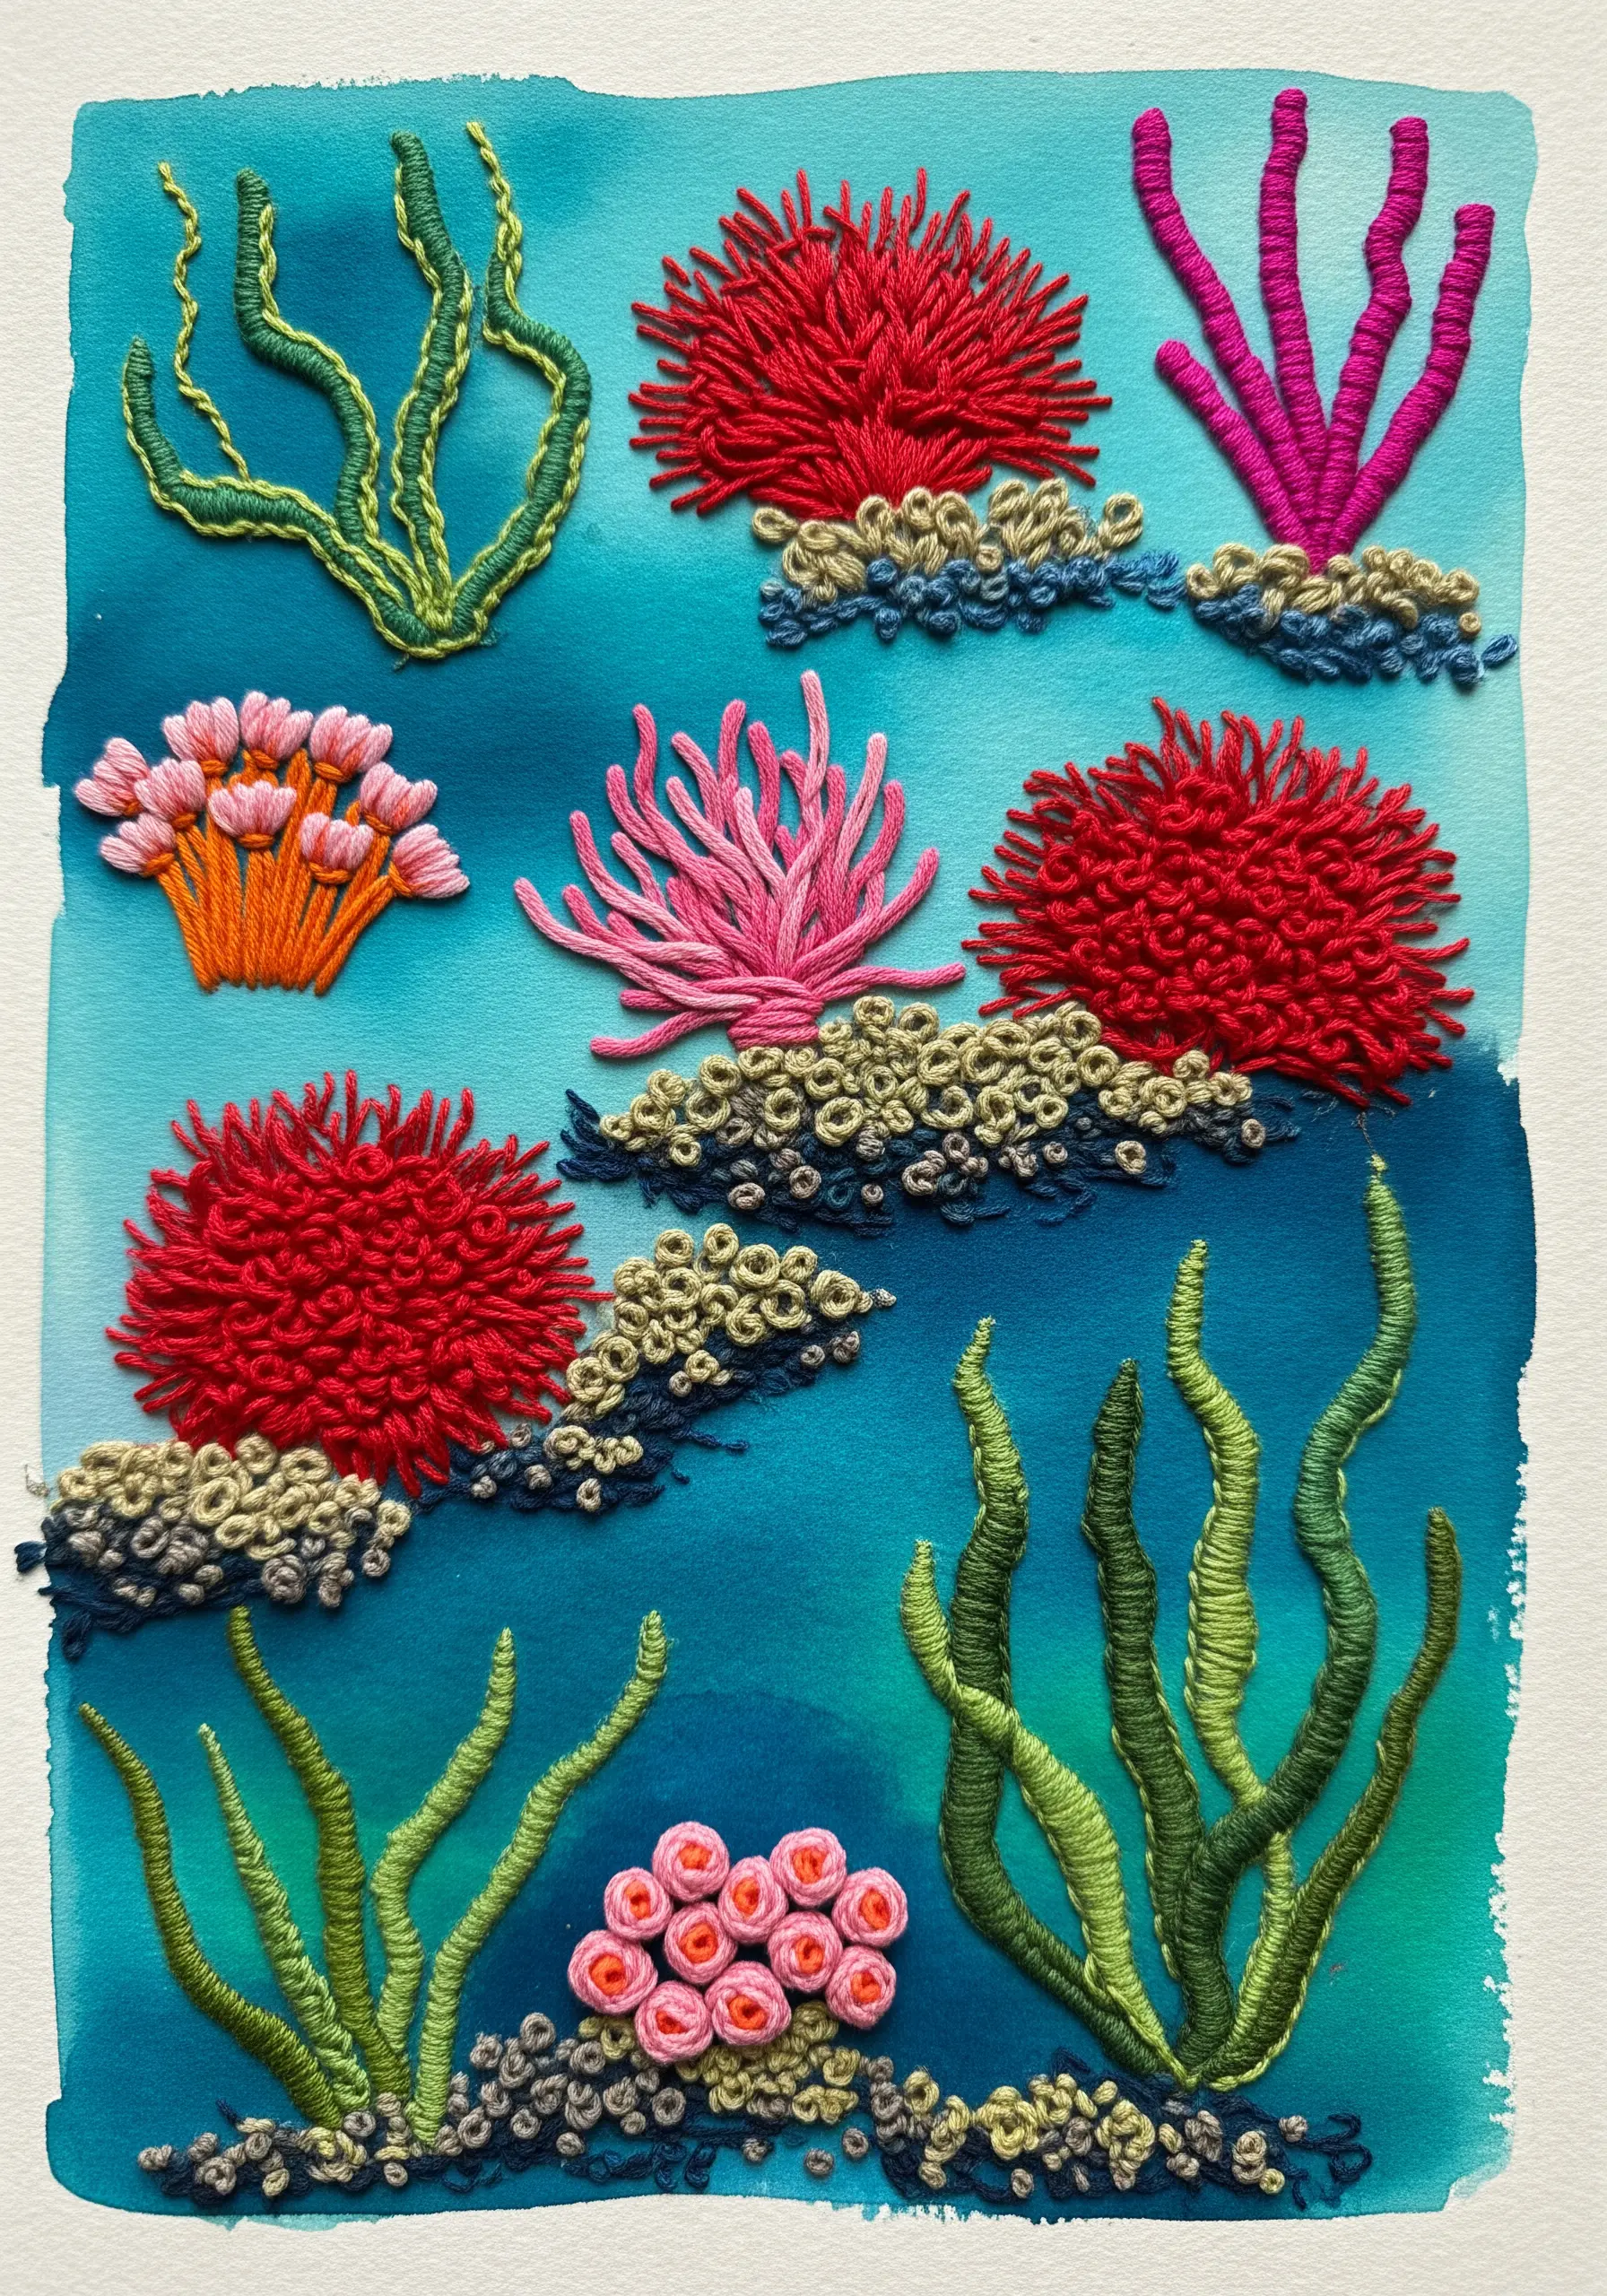
Stitch a vibrant underwater world on watercolor paper to explore how different stitches create organic forms.
Before you stitch, apply a loose watercolor wash to create an atmospheric, watery background.
Use dense clusters of French knots for coral textures, bullion knots for anemones, and couched threads for waving seaweed.
Varying your thread tension and stitch density is key; tighter knots create solid forms, while looser ones feel more fluid, mimicking the diversity of a real reef.
These organic texture embroidery ideas turn your hoop into a miniature ecosystem.
7. Master Art Deco Precision on Metallic Cardstock
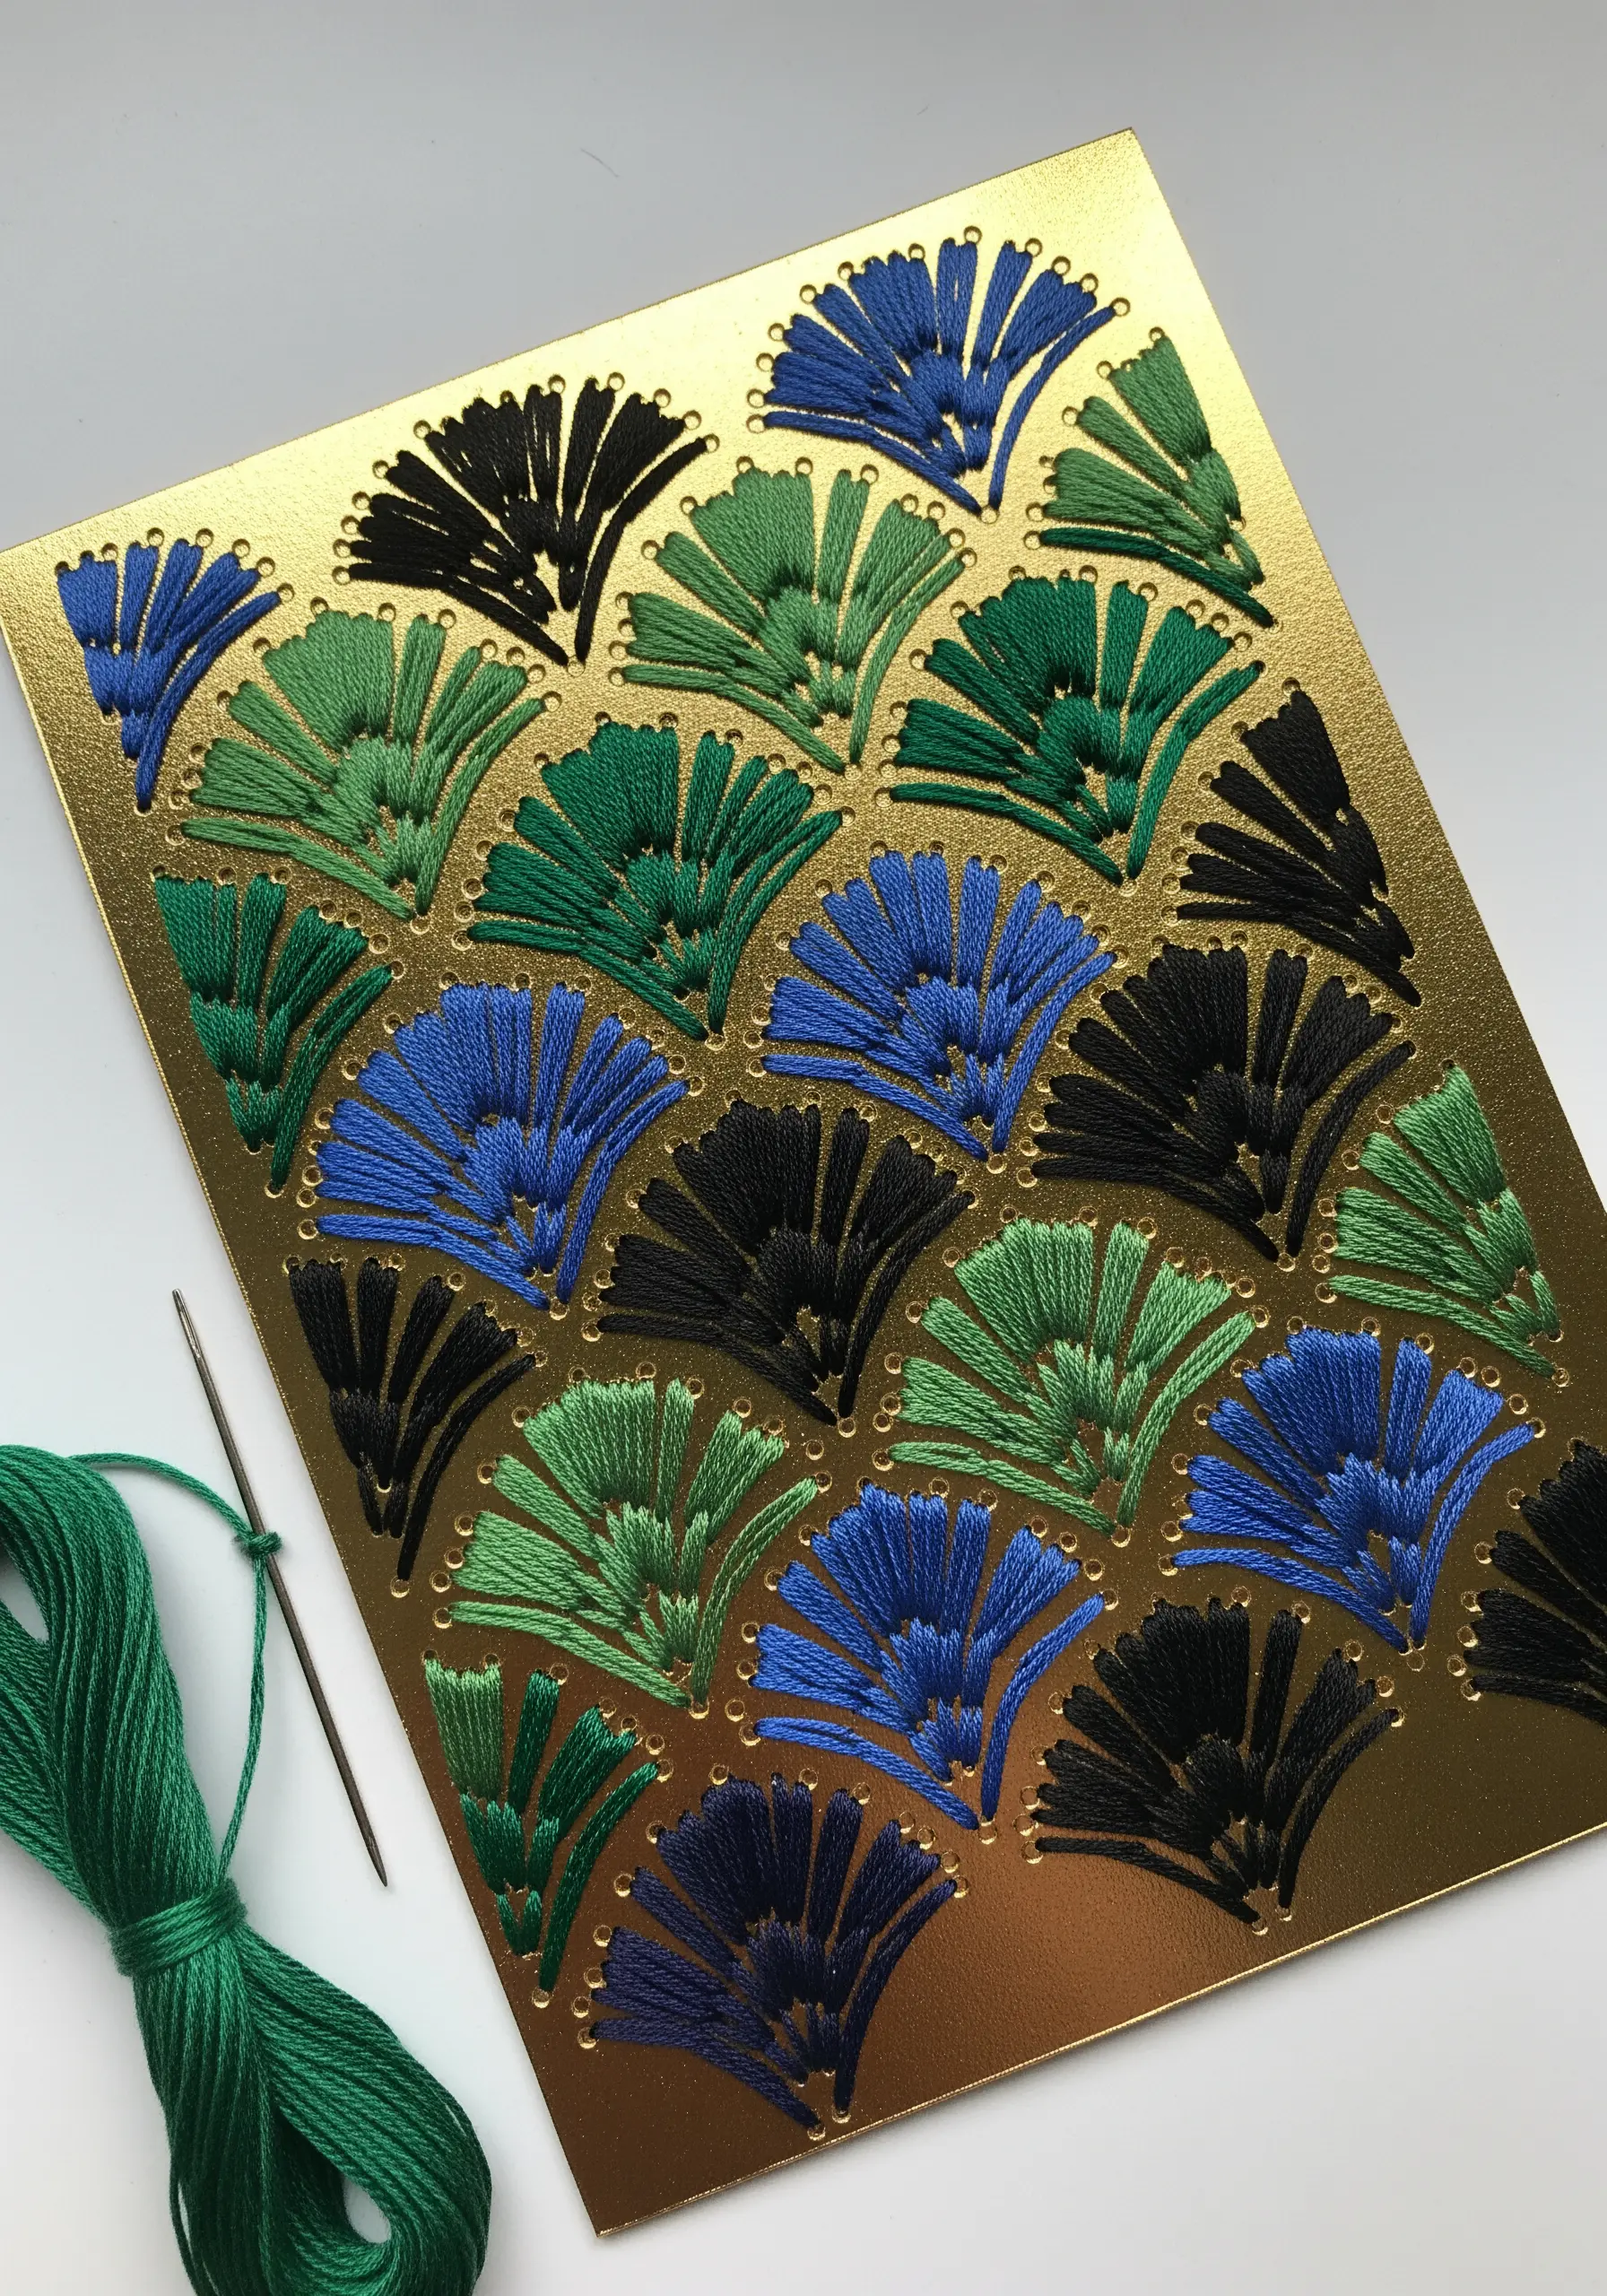
Use the reflective surface of metallic cardstock to make your stitches stand out with dramatic contrast.
The key to this Art Deco-inspired fan pattern is impeccable tension and evenly spaced straight stitches fanning out from a central point.
Pre-pierce your holes with a needle tool to ensure clean entry points that won’t tear the cardstock.
The high shine of the paper amplifies the smooth, matte texture of the cotton floss, creating a look that feels both luxurious and graphic.
8. Design a Symmetrical Mandala with Mixed Stitches
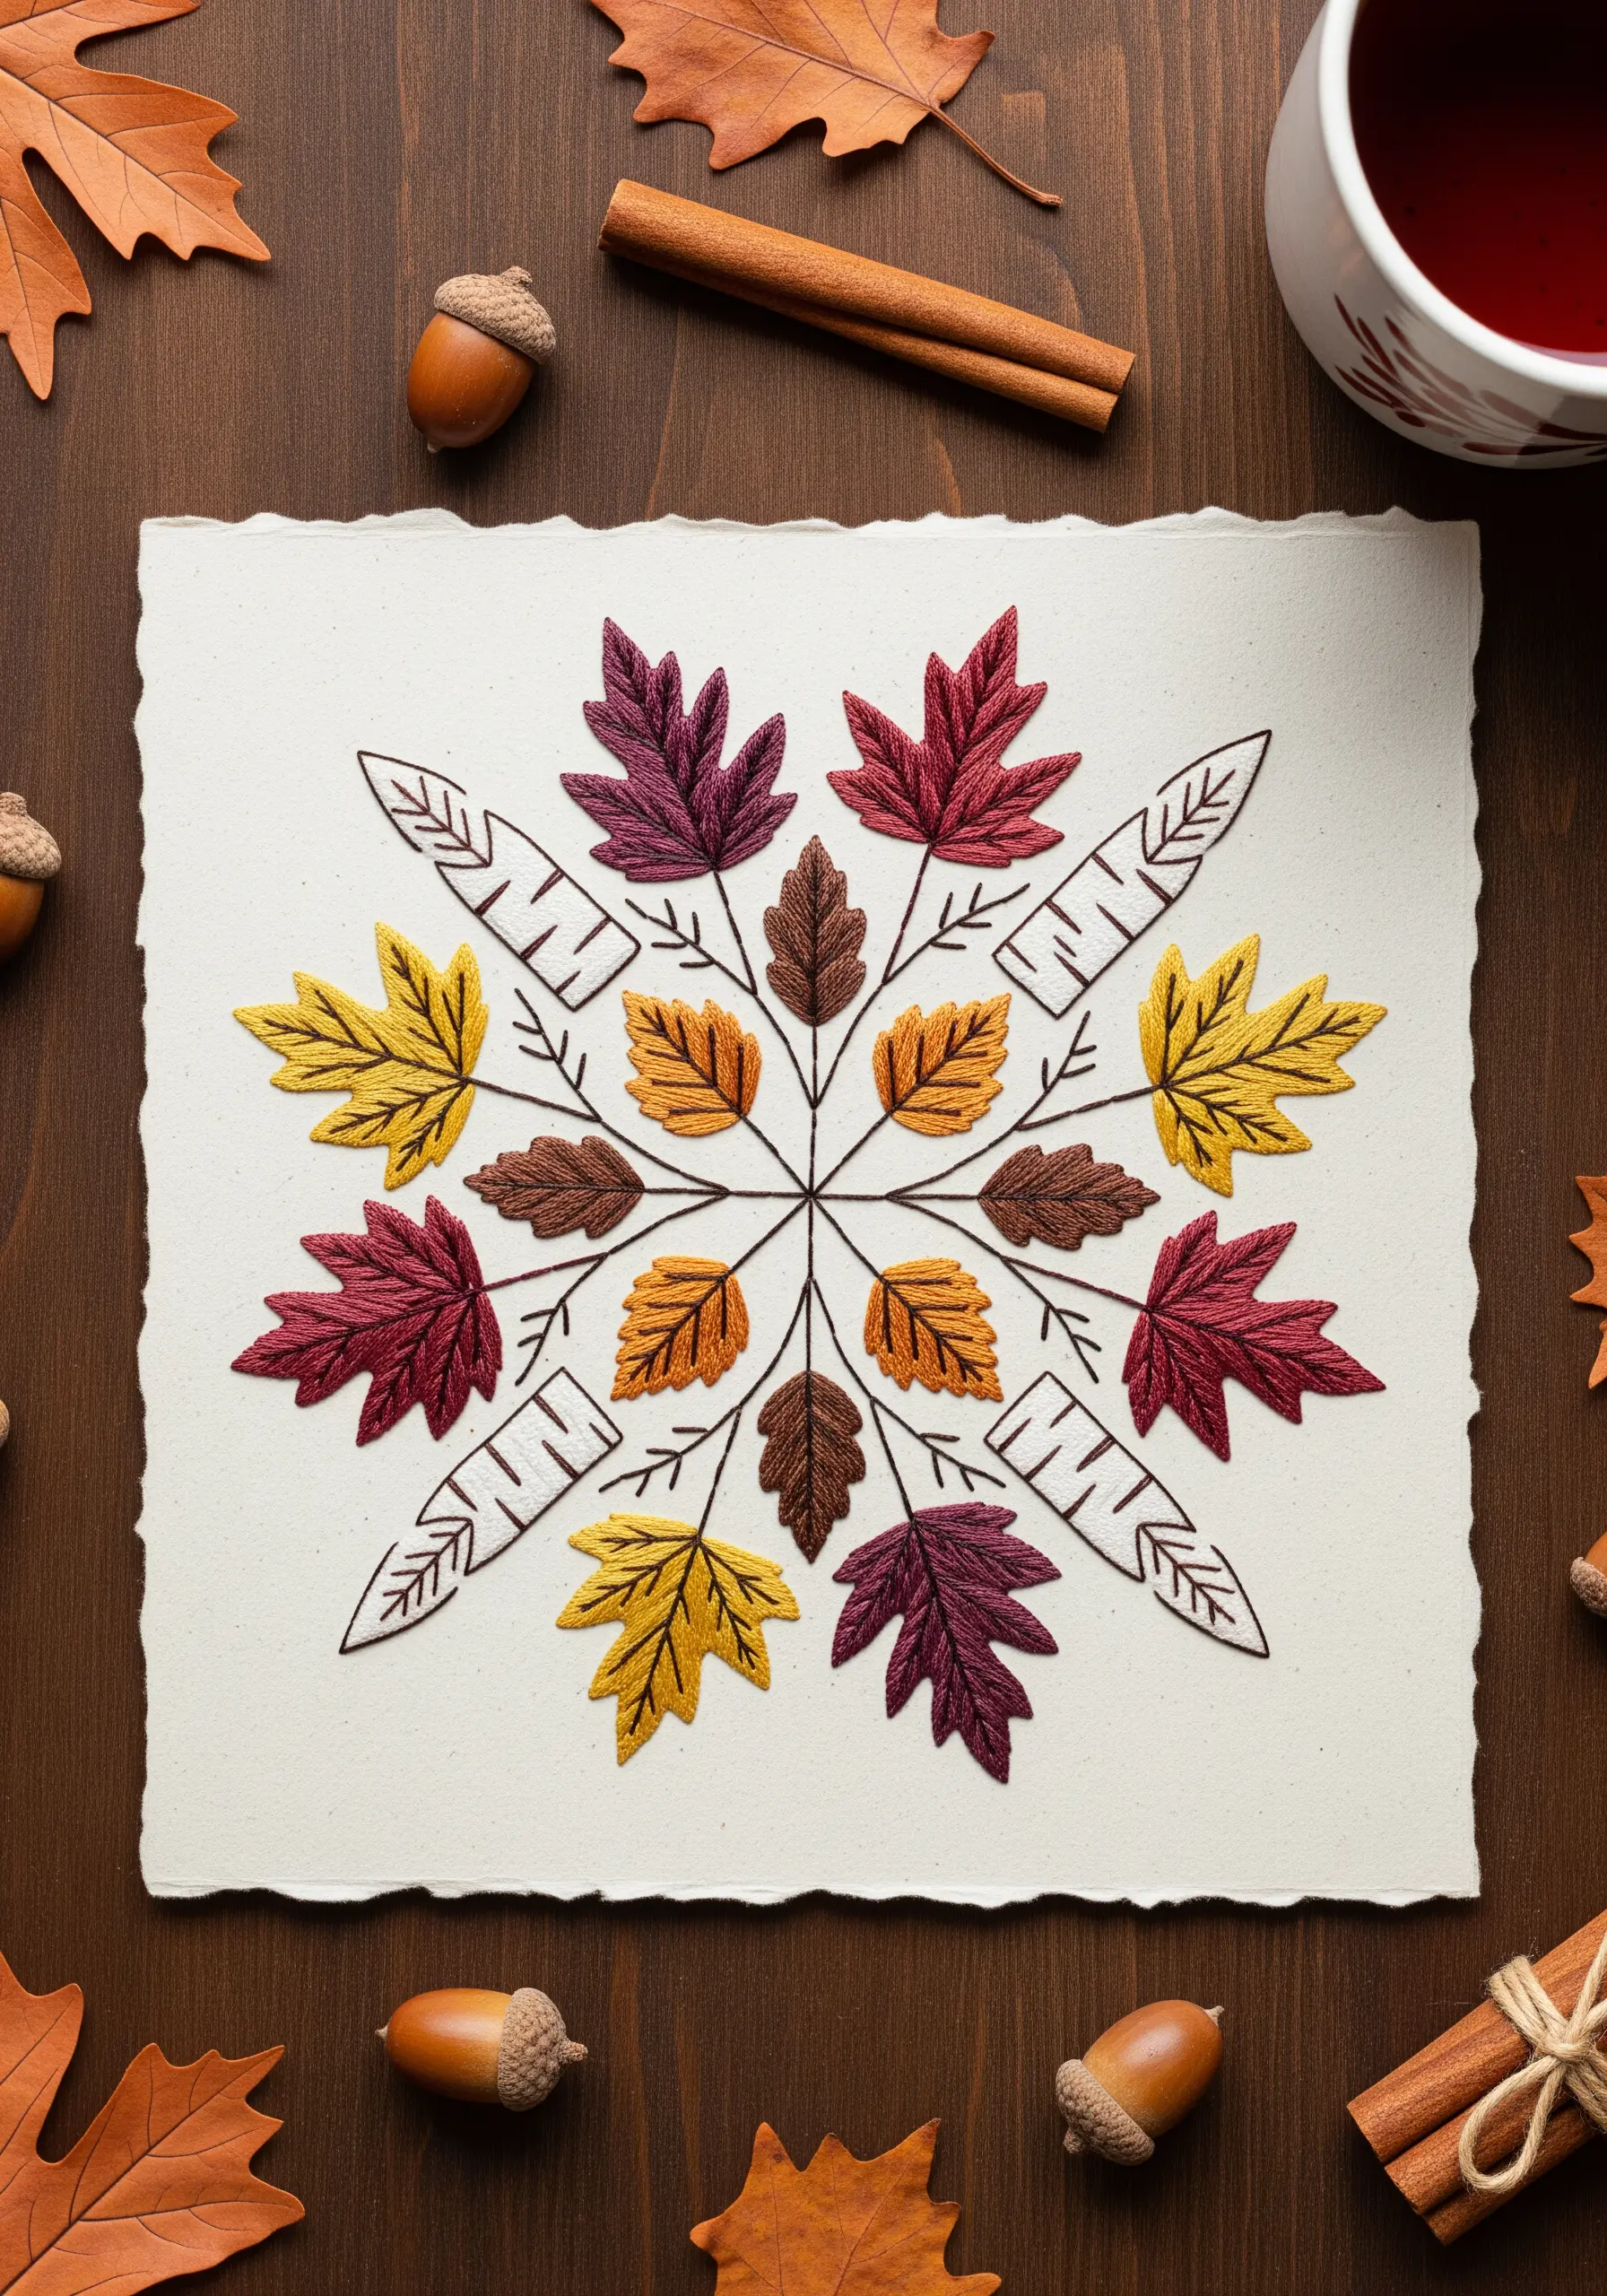
Create a balanced, meditative design by combining filled shapes with delicate outlines on high-quality paper.
For the solid leaves, use a satin stitch, ensuring your stitches lay flat and parallel for a smooth, woven appearance.
Contrast this by rendering other elements, like the carrots, with a simple backstitch outline.
This mix of filled and open space creates a visual rhythm that guides the eye around the mandala, making it feel intricate yet uncluttered, perfect for leaf mandala-inspired embroidery projects.
9. Capture Iridescence with Variegated Thread on Cut Paper
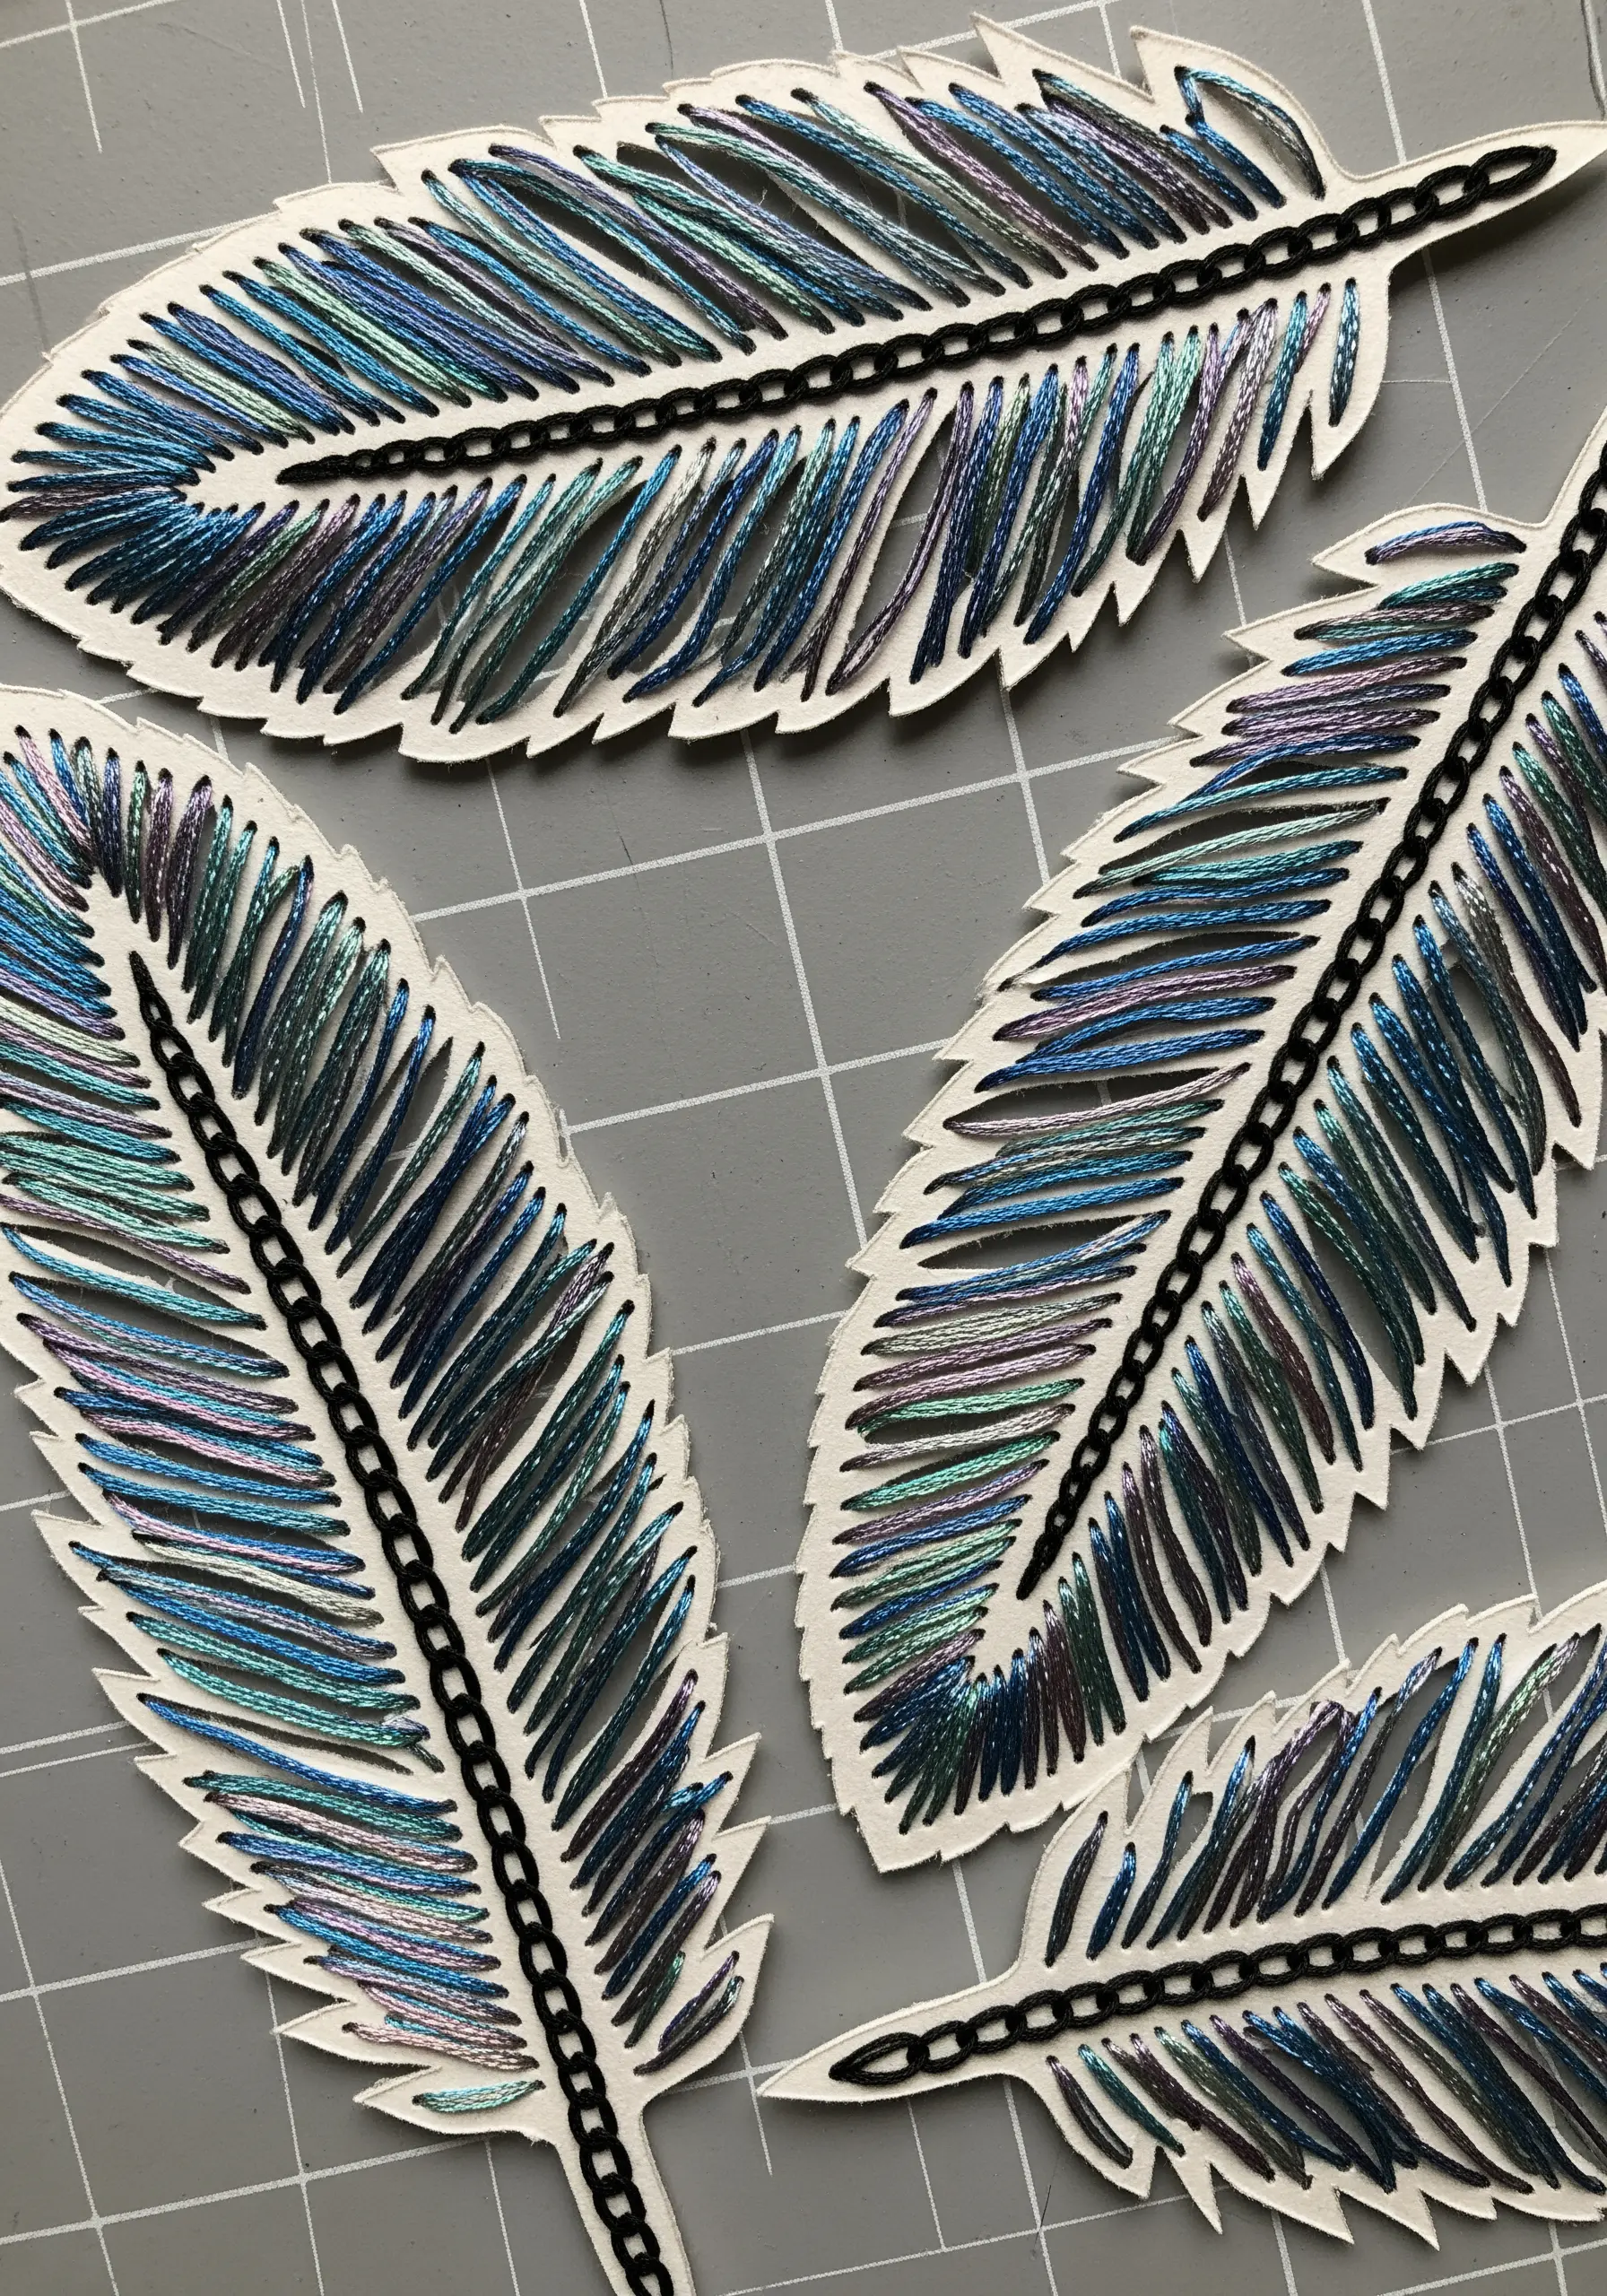
Let the paper do half the work by stitching on pre-cut shapes rather than a solid sheet.
Use die-cut paper feathers as a template, filling the space between the paper ‘barbs’ with long straight stitches.
Choose a variegated or color-changing metallic thread to achieve an iridescent, shimmering effect with minimal effort; the thread itself creates the complex color transitions.
A simple backstitch down the central spine provides a clean, defining edge that grounds the entire design.
10. Translate Line Art with Couched Cord for Fluidity
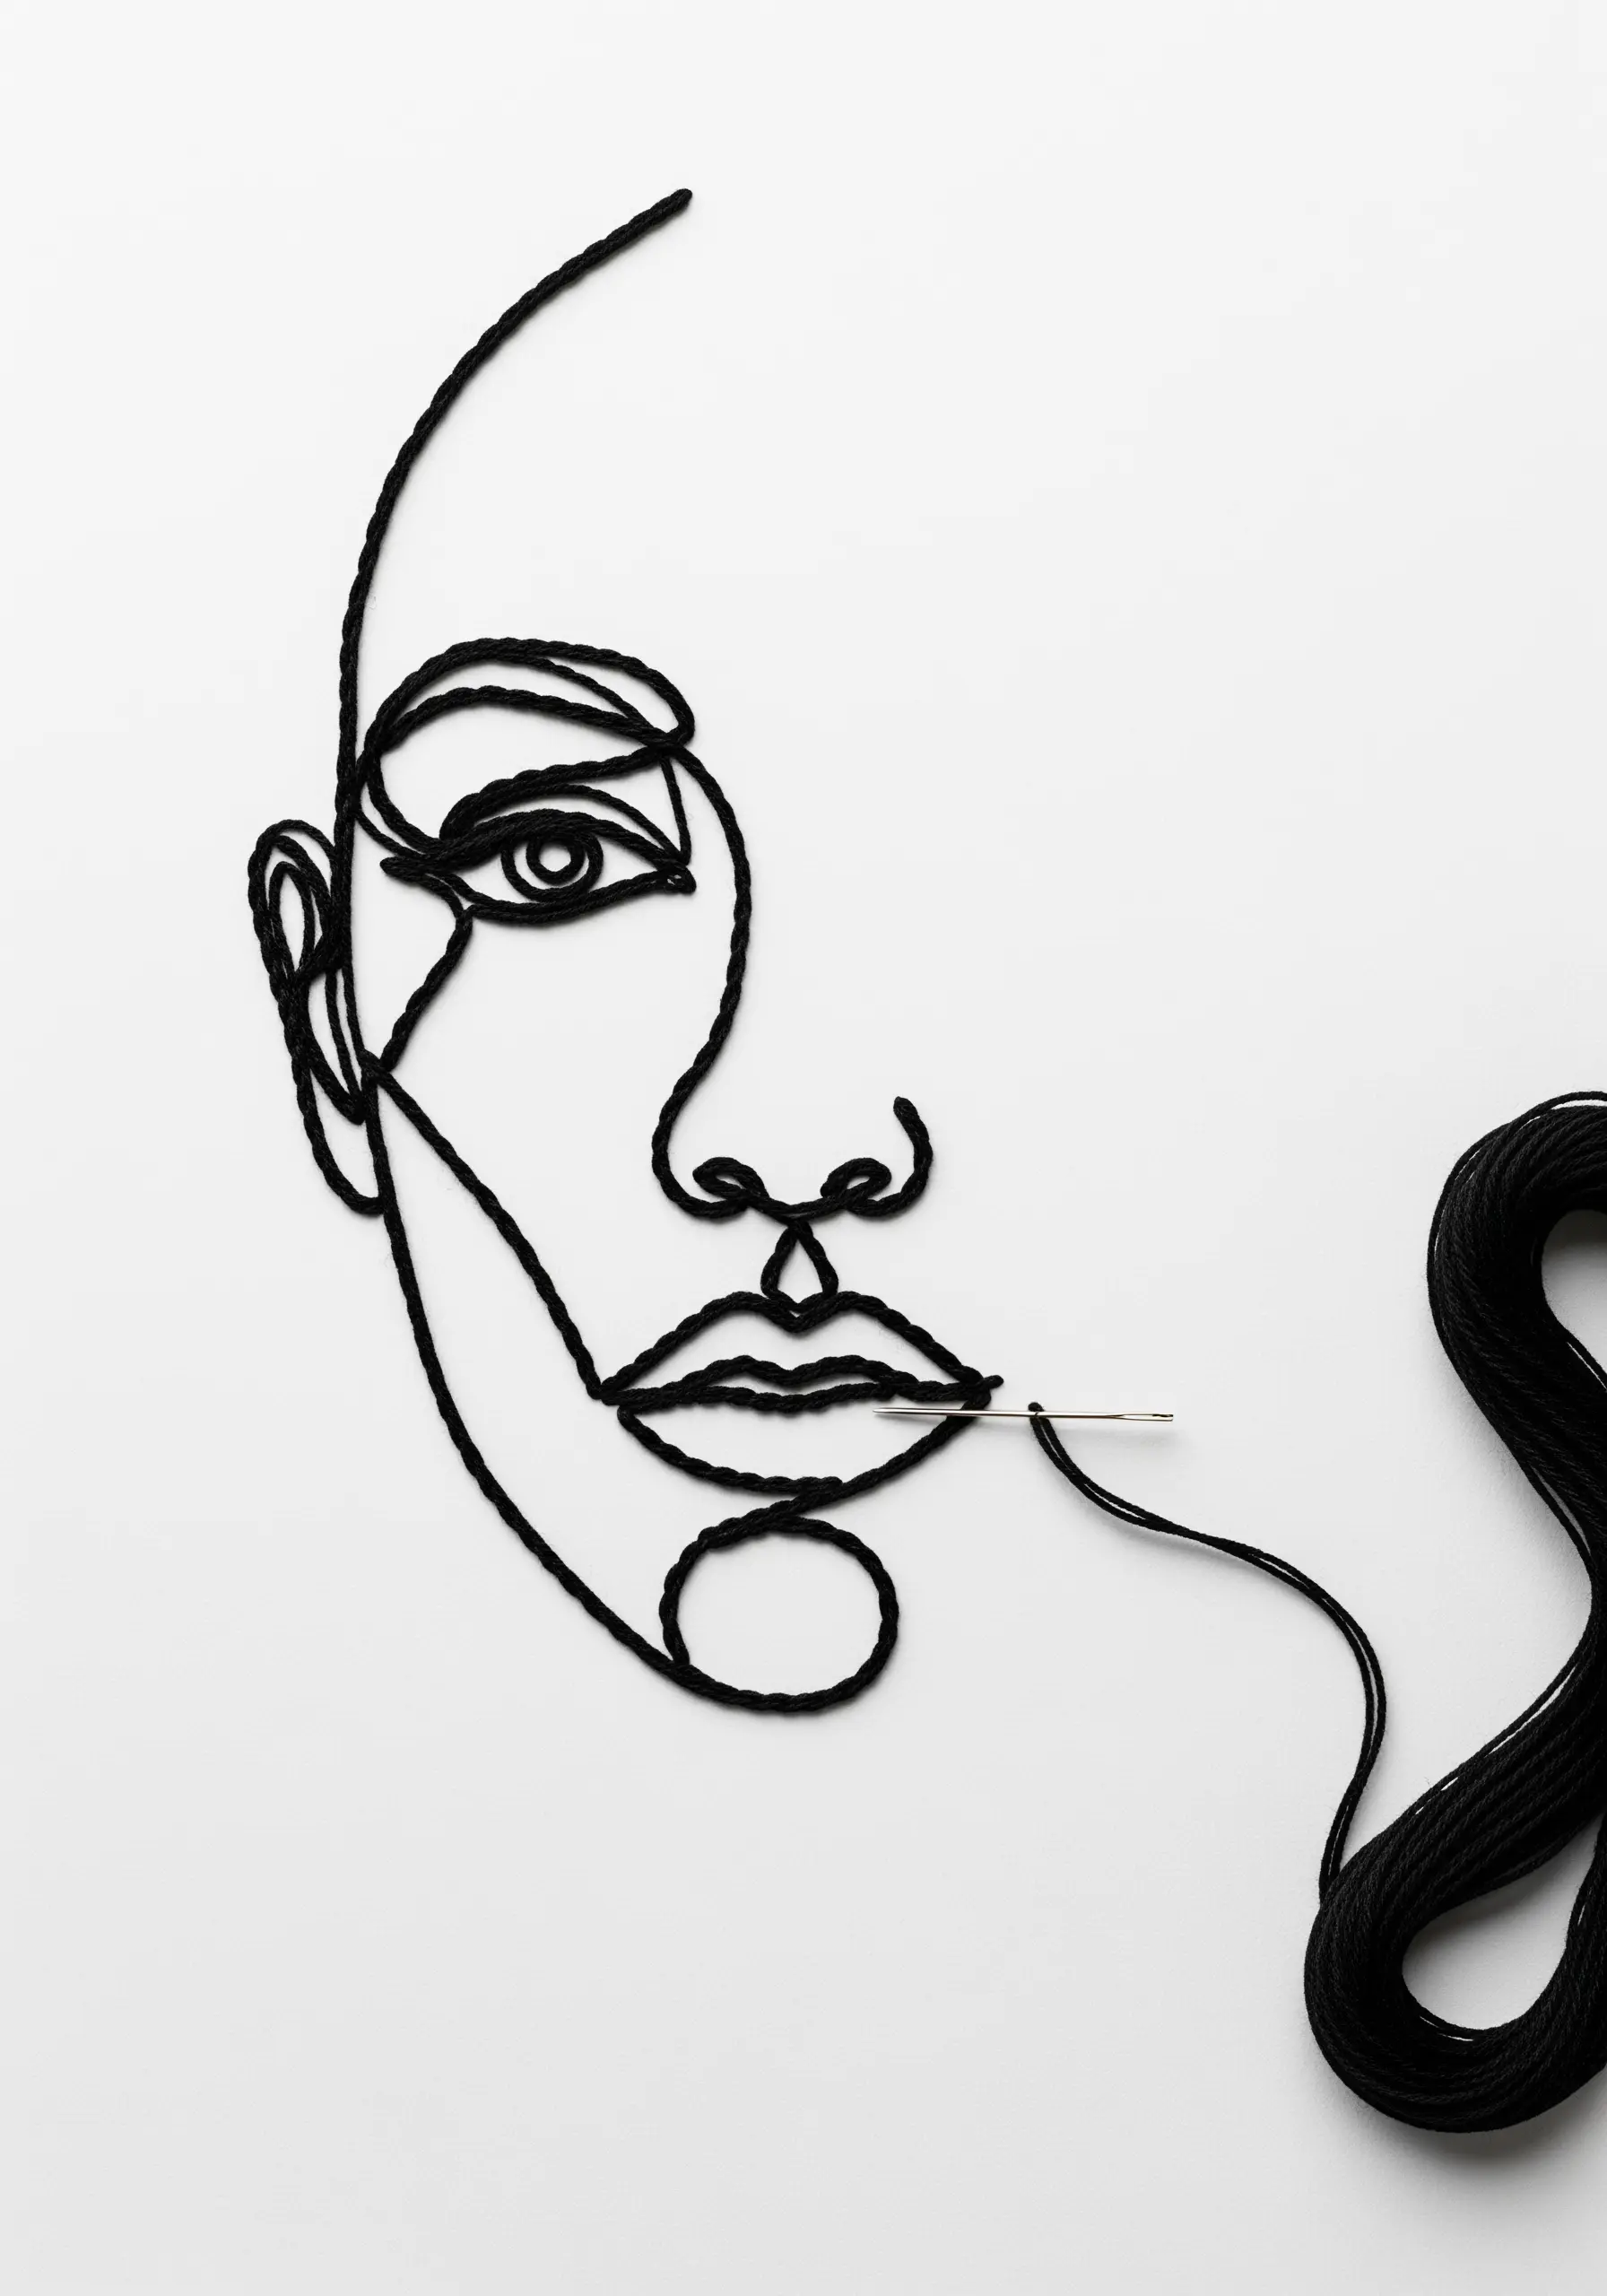
To capture the unbroken flow of a one-line drawing, avoid puncturing the paper with dozens of tiny stitches.
Instead, lay a thick thread or fine cord along your design line and secure it to the paper using a technique called couching.
With a second, finer thread, make small, discreet tacking stitches over the cord at intervals, securing it from the back.
This method preserves the smooth, continuous quality of the line, creating modern line art thread designs that feel both graphic and expressive.
11. Emulate Quilt Blocks with Precision Stitching
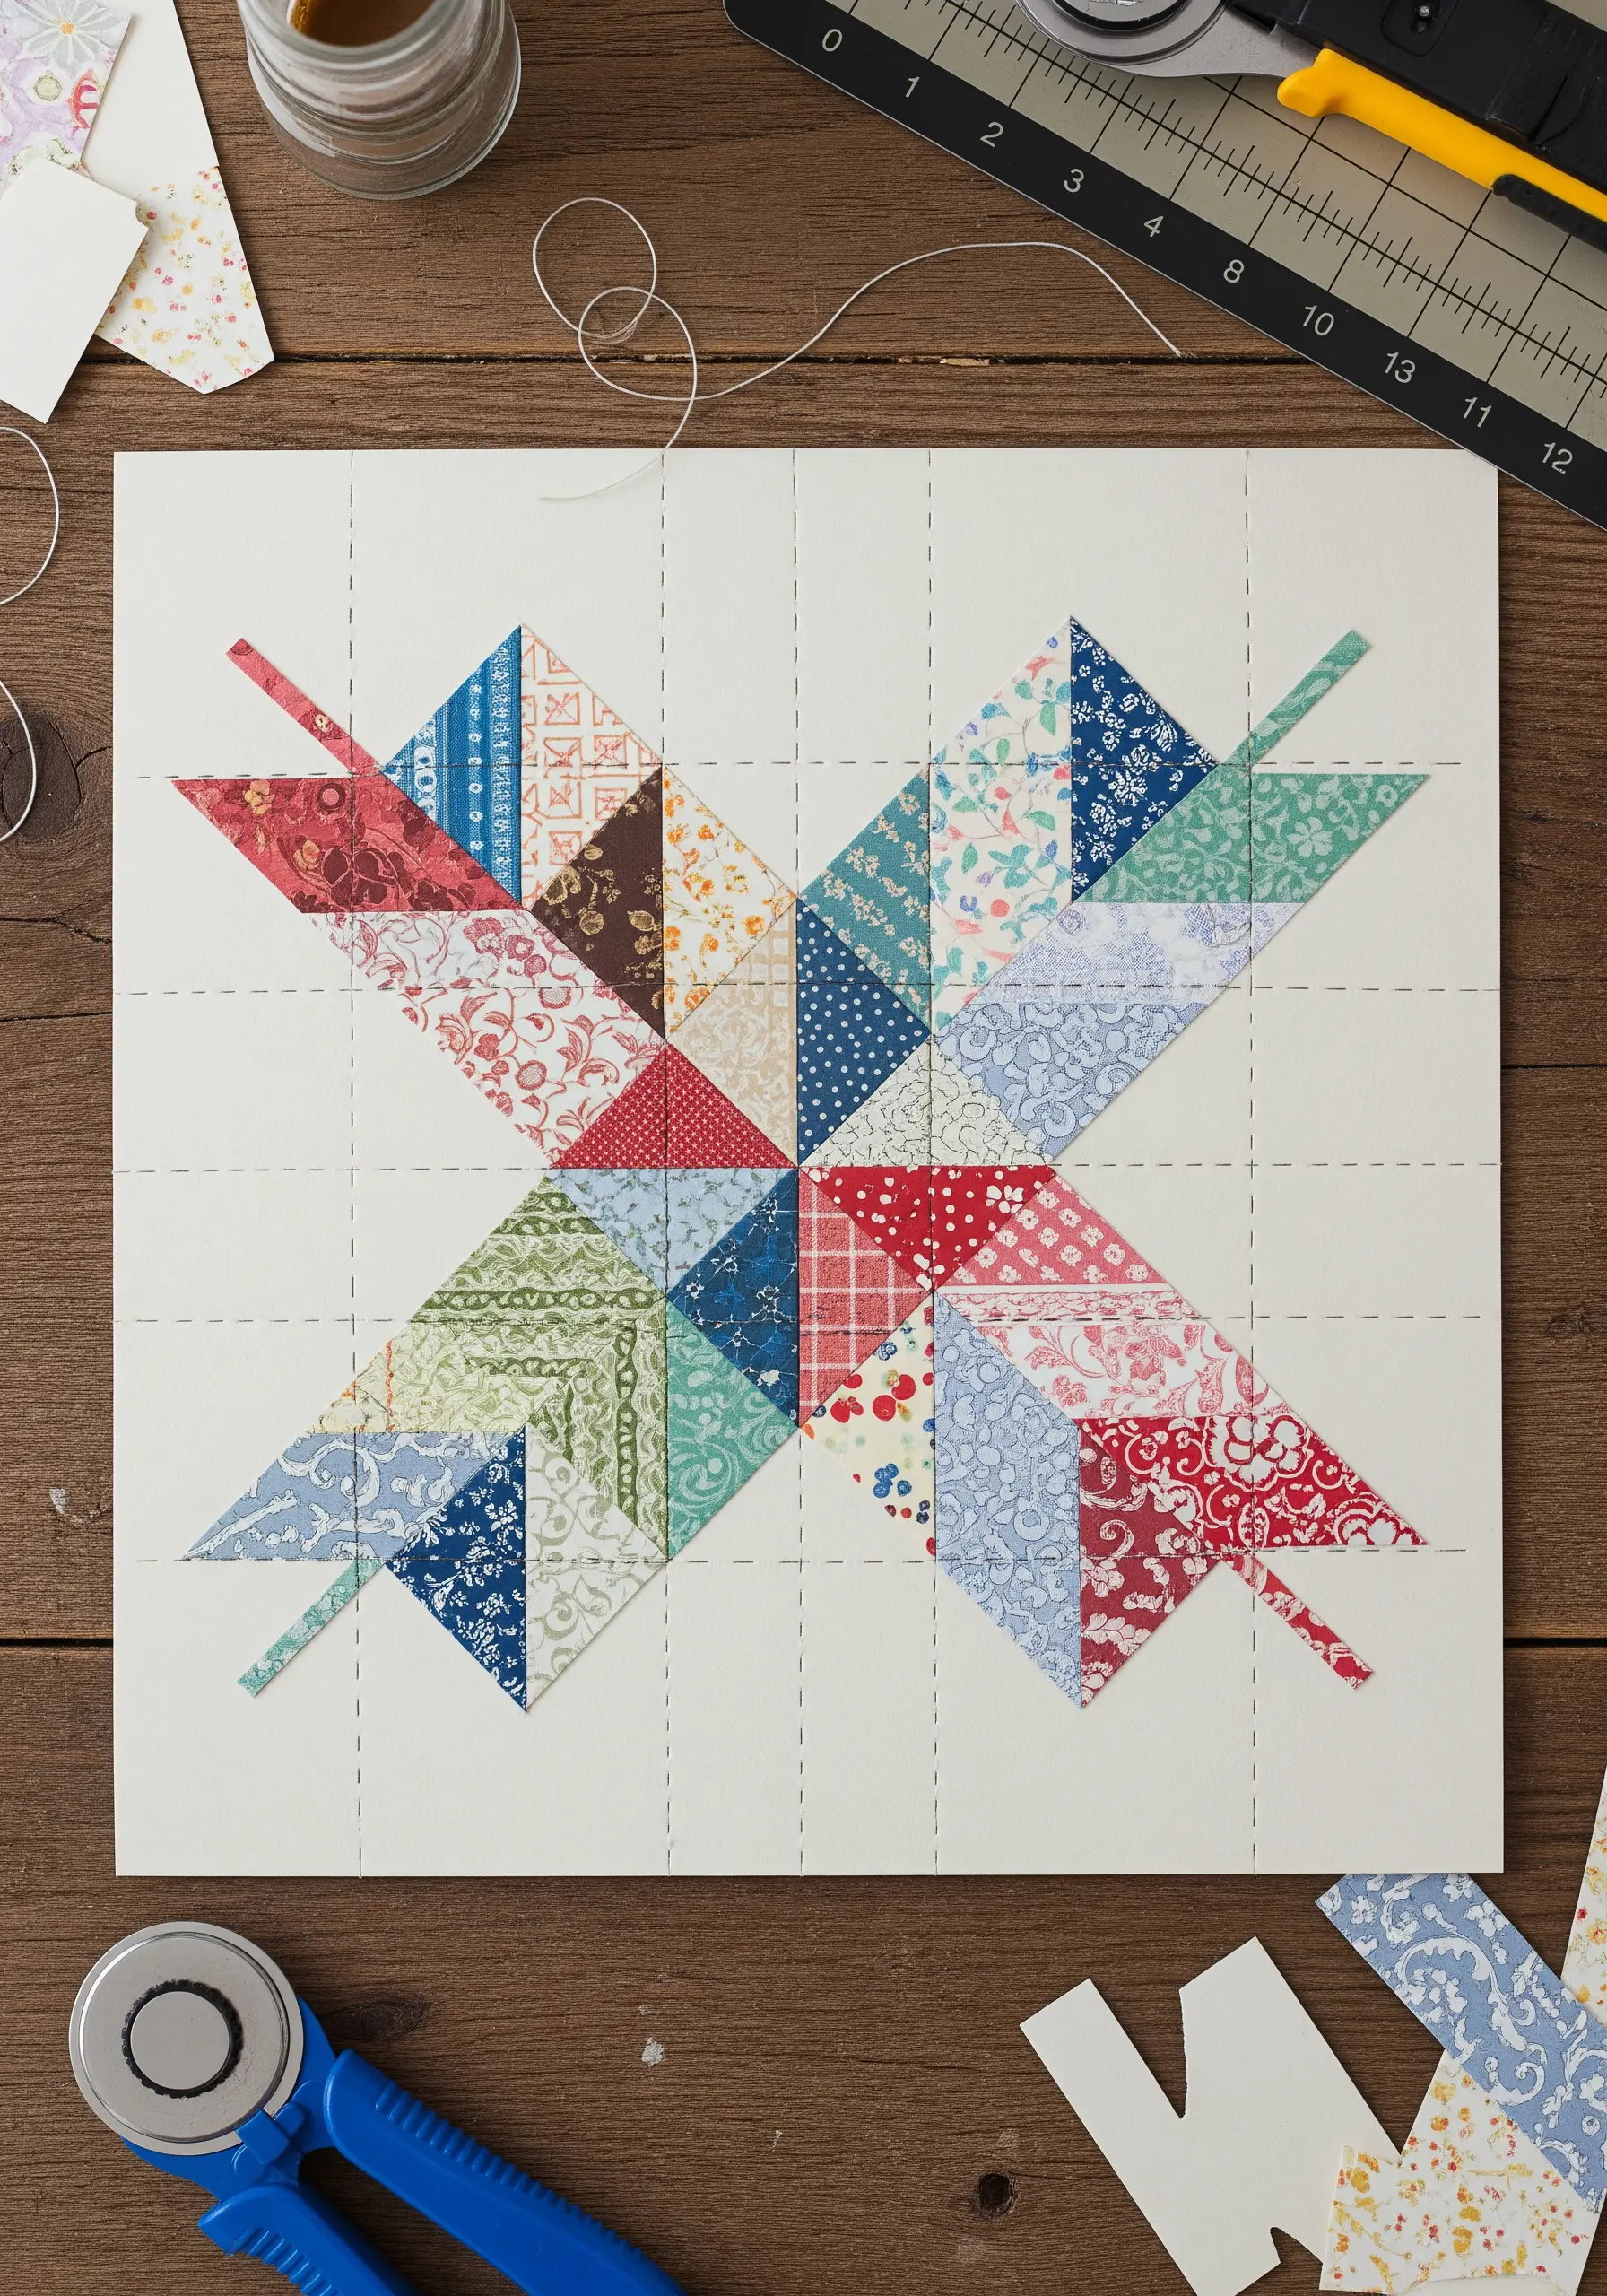
Use the geometry of a traditional quilt block as a pattern for a graphic paper embroidery piece.
Instead of fabric, use patterned paper for the colorful elements, then replace the seams with thread.
Stitch along the grid lines using a simple running stitch or backstitch to create the ‘seams’ and define the shapes.
This DIY collage idea where paper meets thread transforms a classic textile pattern into a modern mixed-media work.
12. Define Painted Paper Collage with Crisp White Outlines
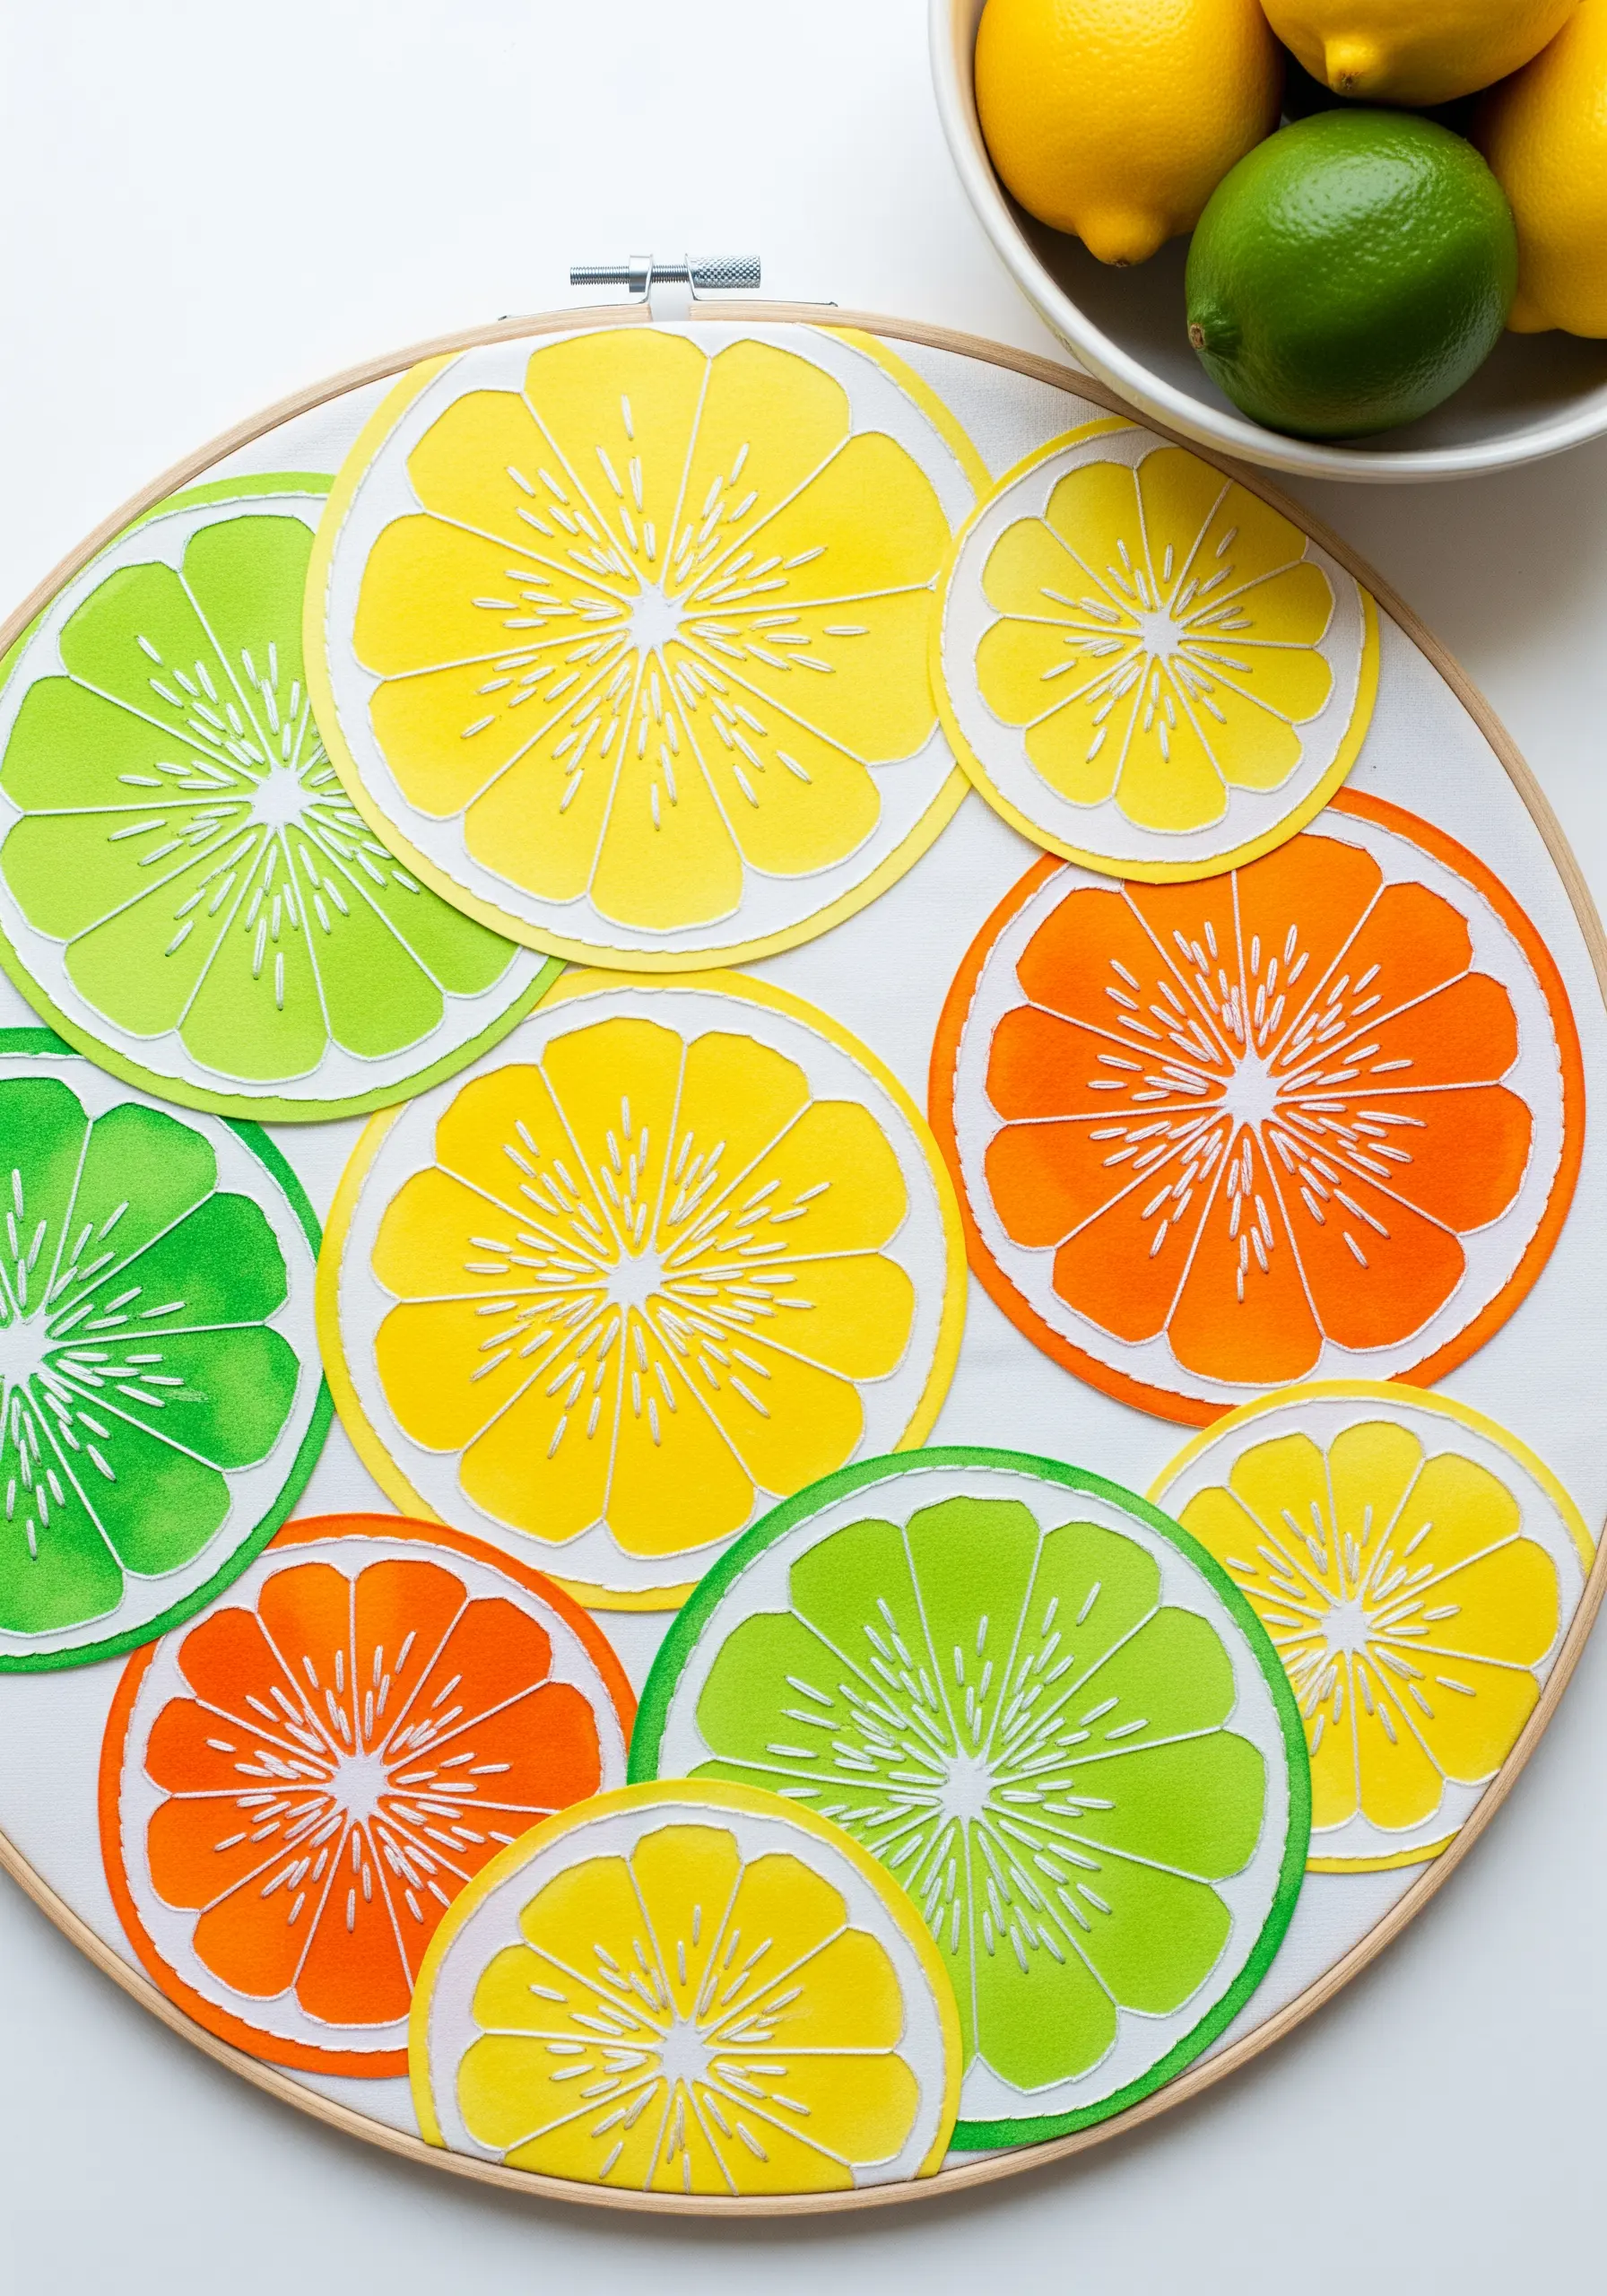
Give your paper collages a clean, illustrative finish by adding stitched details.
First, create your citrus slice shapes by applying a watercolor wash to paper and cutting them into circles.
Arrange and glue them onto a backing fabric or paper, then use a simple white backstitch to add the delicate segment lines.
The white thread on the vibrant, saturated colors creates a crisp, graphic contrast that makes the entire composition pop with energy and freshness.
13. Integrate Weaving and Stitching on a Paper Base
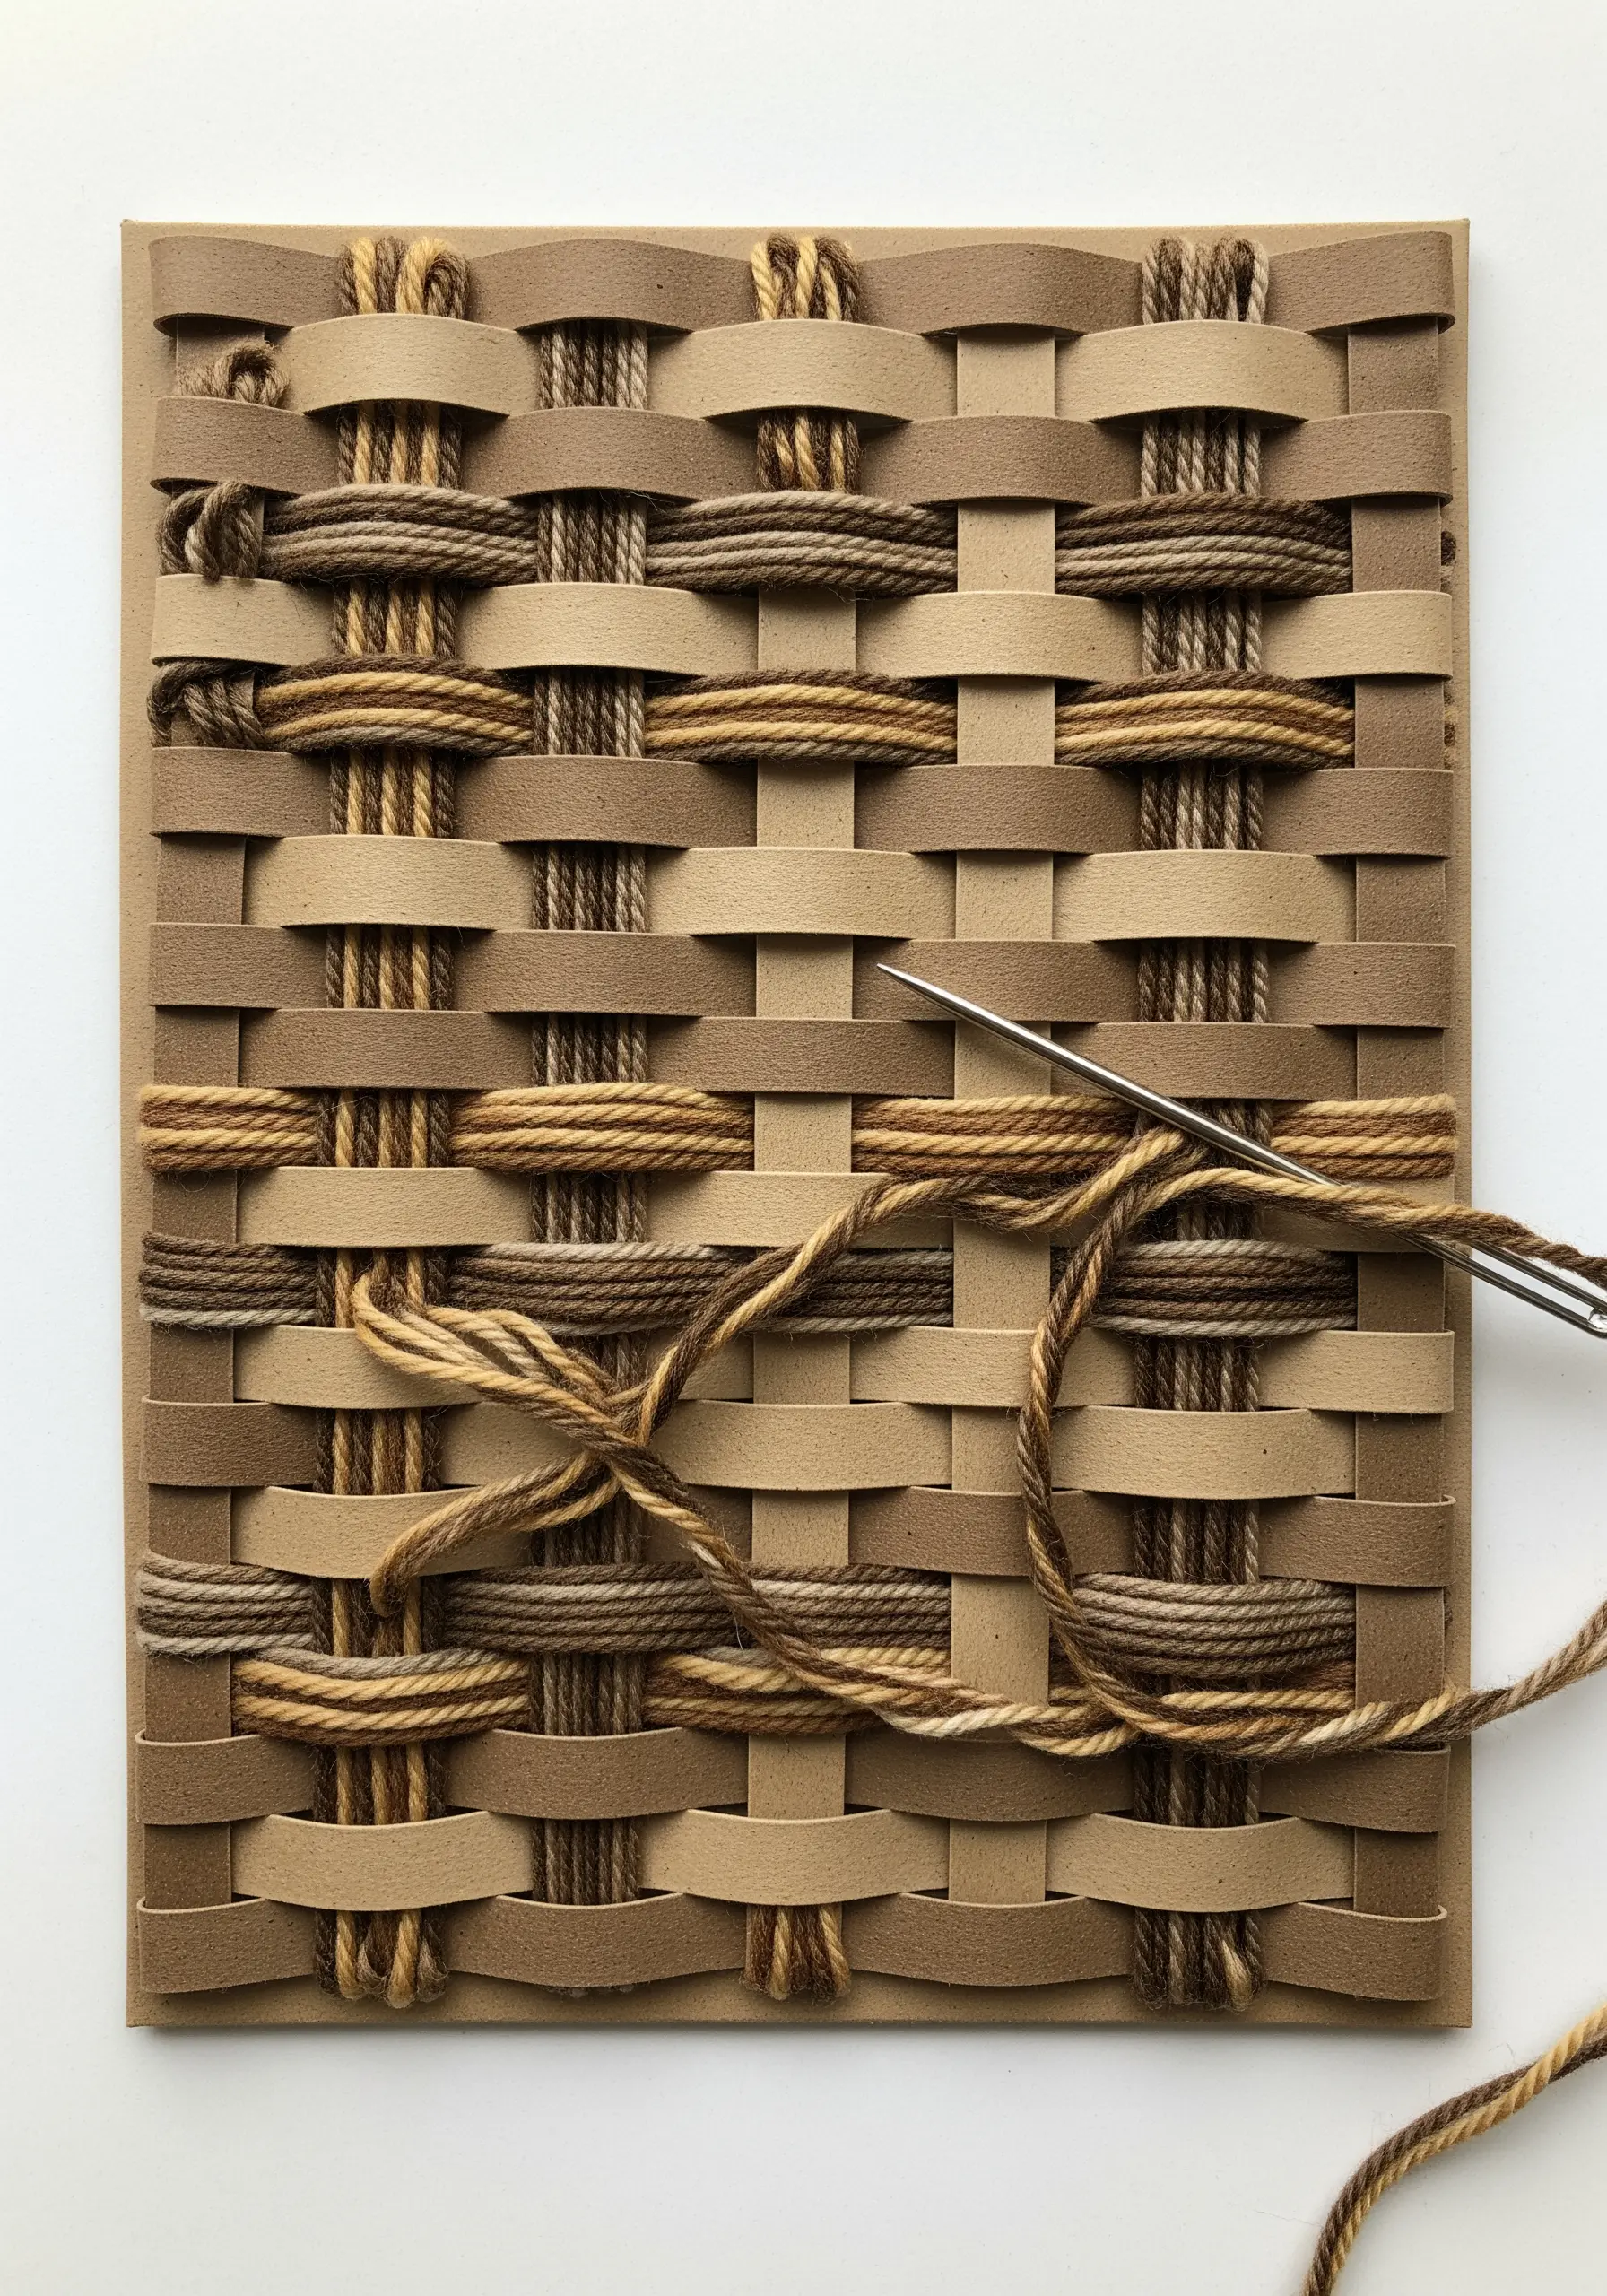
Create a richly textured surface by weaving your thread directly through a woven paper foundation.
Start by weaving strips of cardstock into a simple grid to form your base.
Then, using a blunt tapestry needle and variegated yarn, weave through the paper strips, following the over-under pattern or creating your own path.
This technique builds layers of texture and color, resulting in abstract textile wall art designs where the paper and thread are completely integrated.
14. Recreate Vibrant Folk Art with Dense Satin Stitch
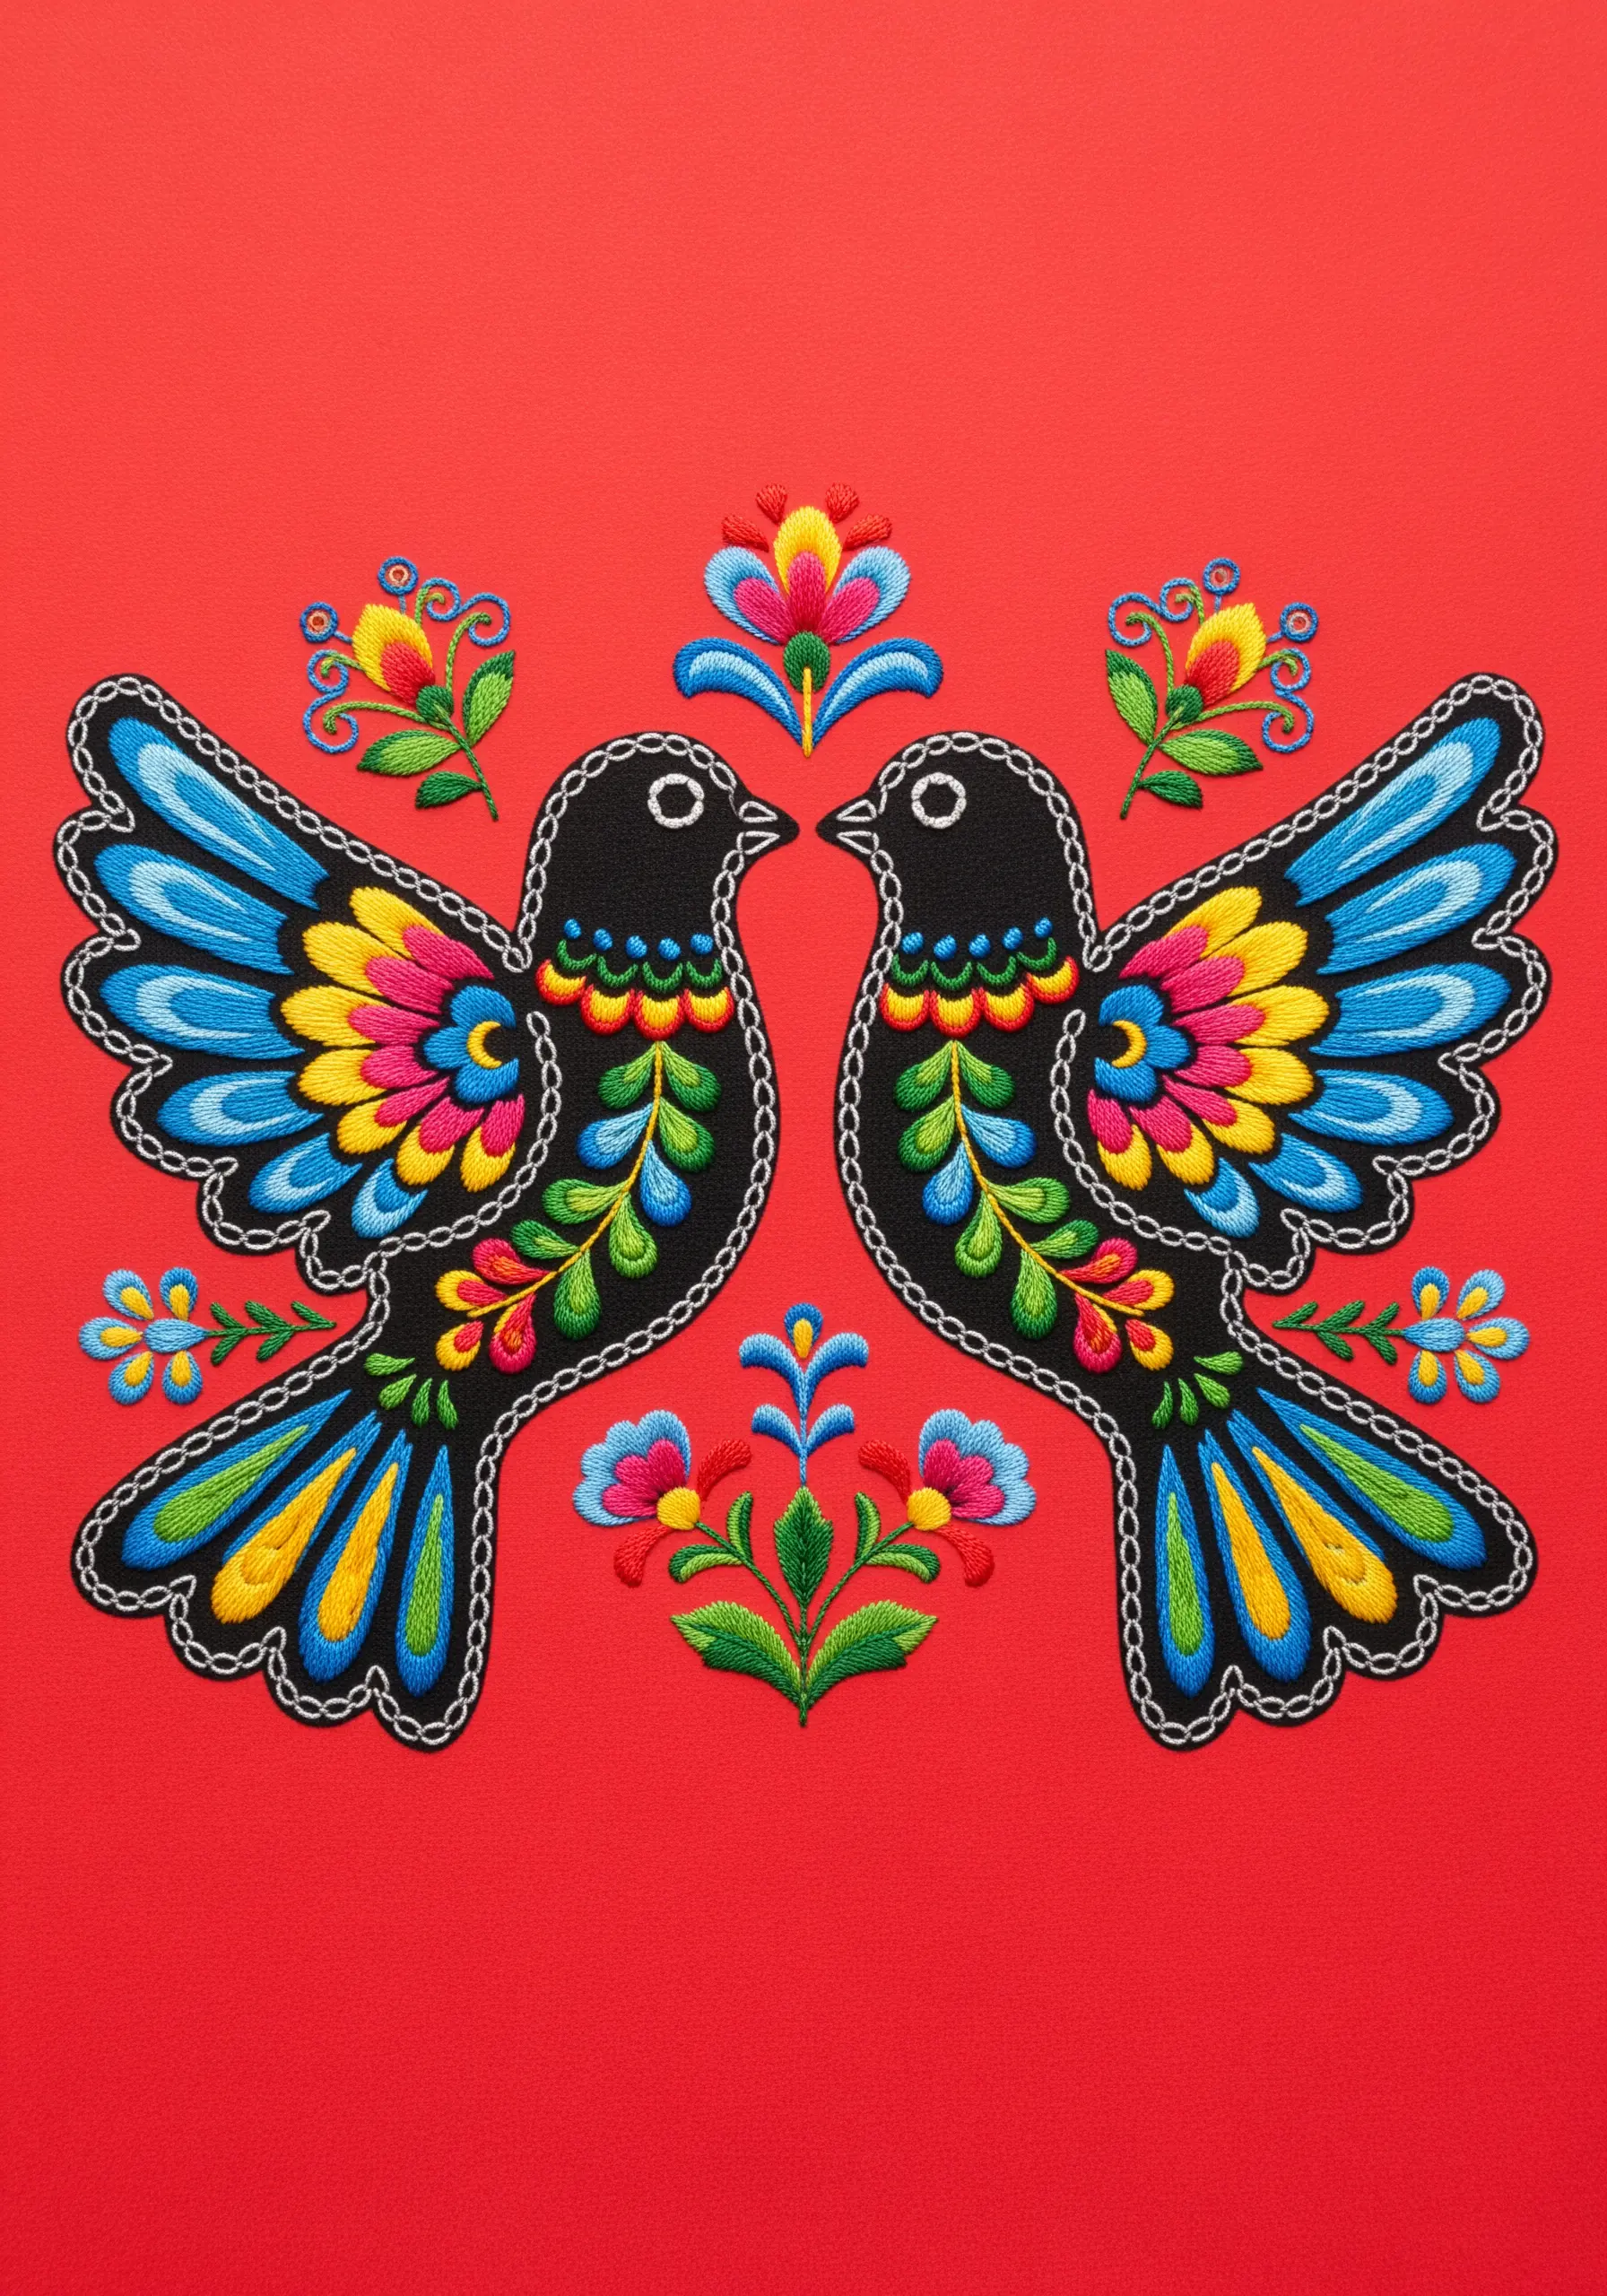
Capture the bold, opaque color of traditional folk art paintings by using dense satin stitch on colored cardstock.
Choose a vibrant background, like this red, to make your thread colors feel even more saturated.
Outline each shape with a dark, contrasting chain stitch or backstitch to create the clean, defining lines characteristic of the style.
Filling each section with meticulously smooth satin stitch gives the design a solid, enamel-like finish that is both tactile and visually striking.
15. Craft Padded Satin Stitches for Graphic 3D Forms

Give your geometric designs a sculptural, three-dimensional quality with padded satin stitch.
To create this effect, first cut your shape—like one of these soundwave bars—from a thin piece of craft foam or felt.
Glue it onto your cardstock base, then cover it completely with vertical satin stitches, pulling the thread just tight enough to hug the padding underneath.
The raised surface catches the light beautifully, turning a flat graphic into a piece of abstract thread sculpting.
16. Enhance Torn-Paper Landscapes with Minimal Stitches
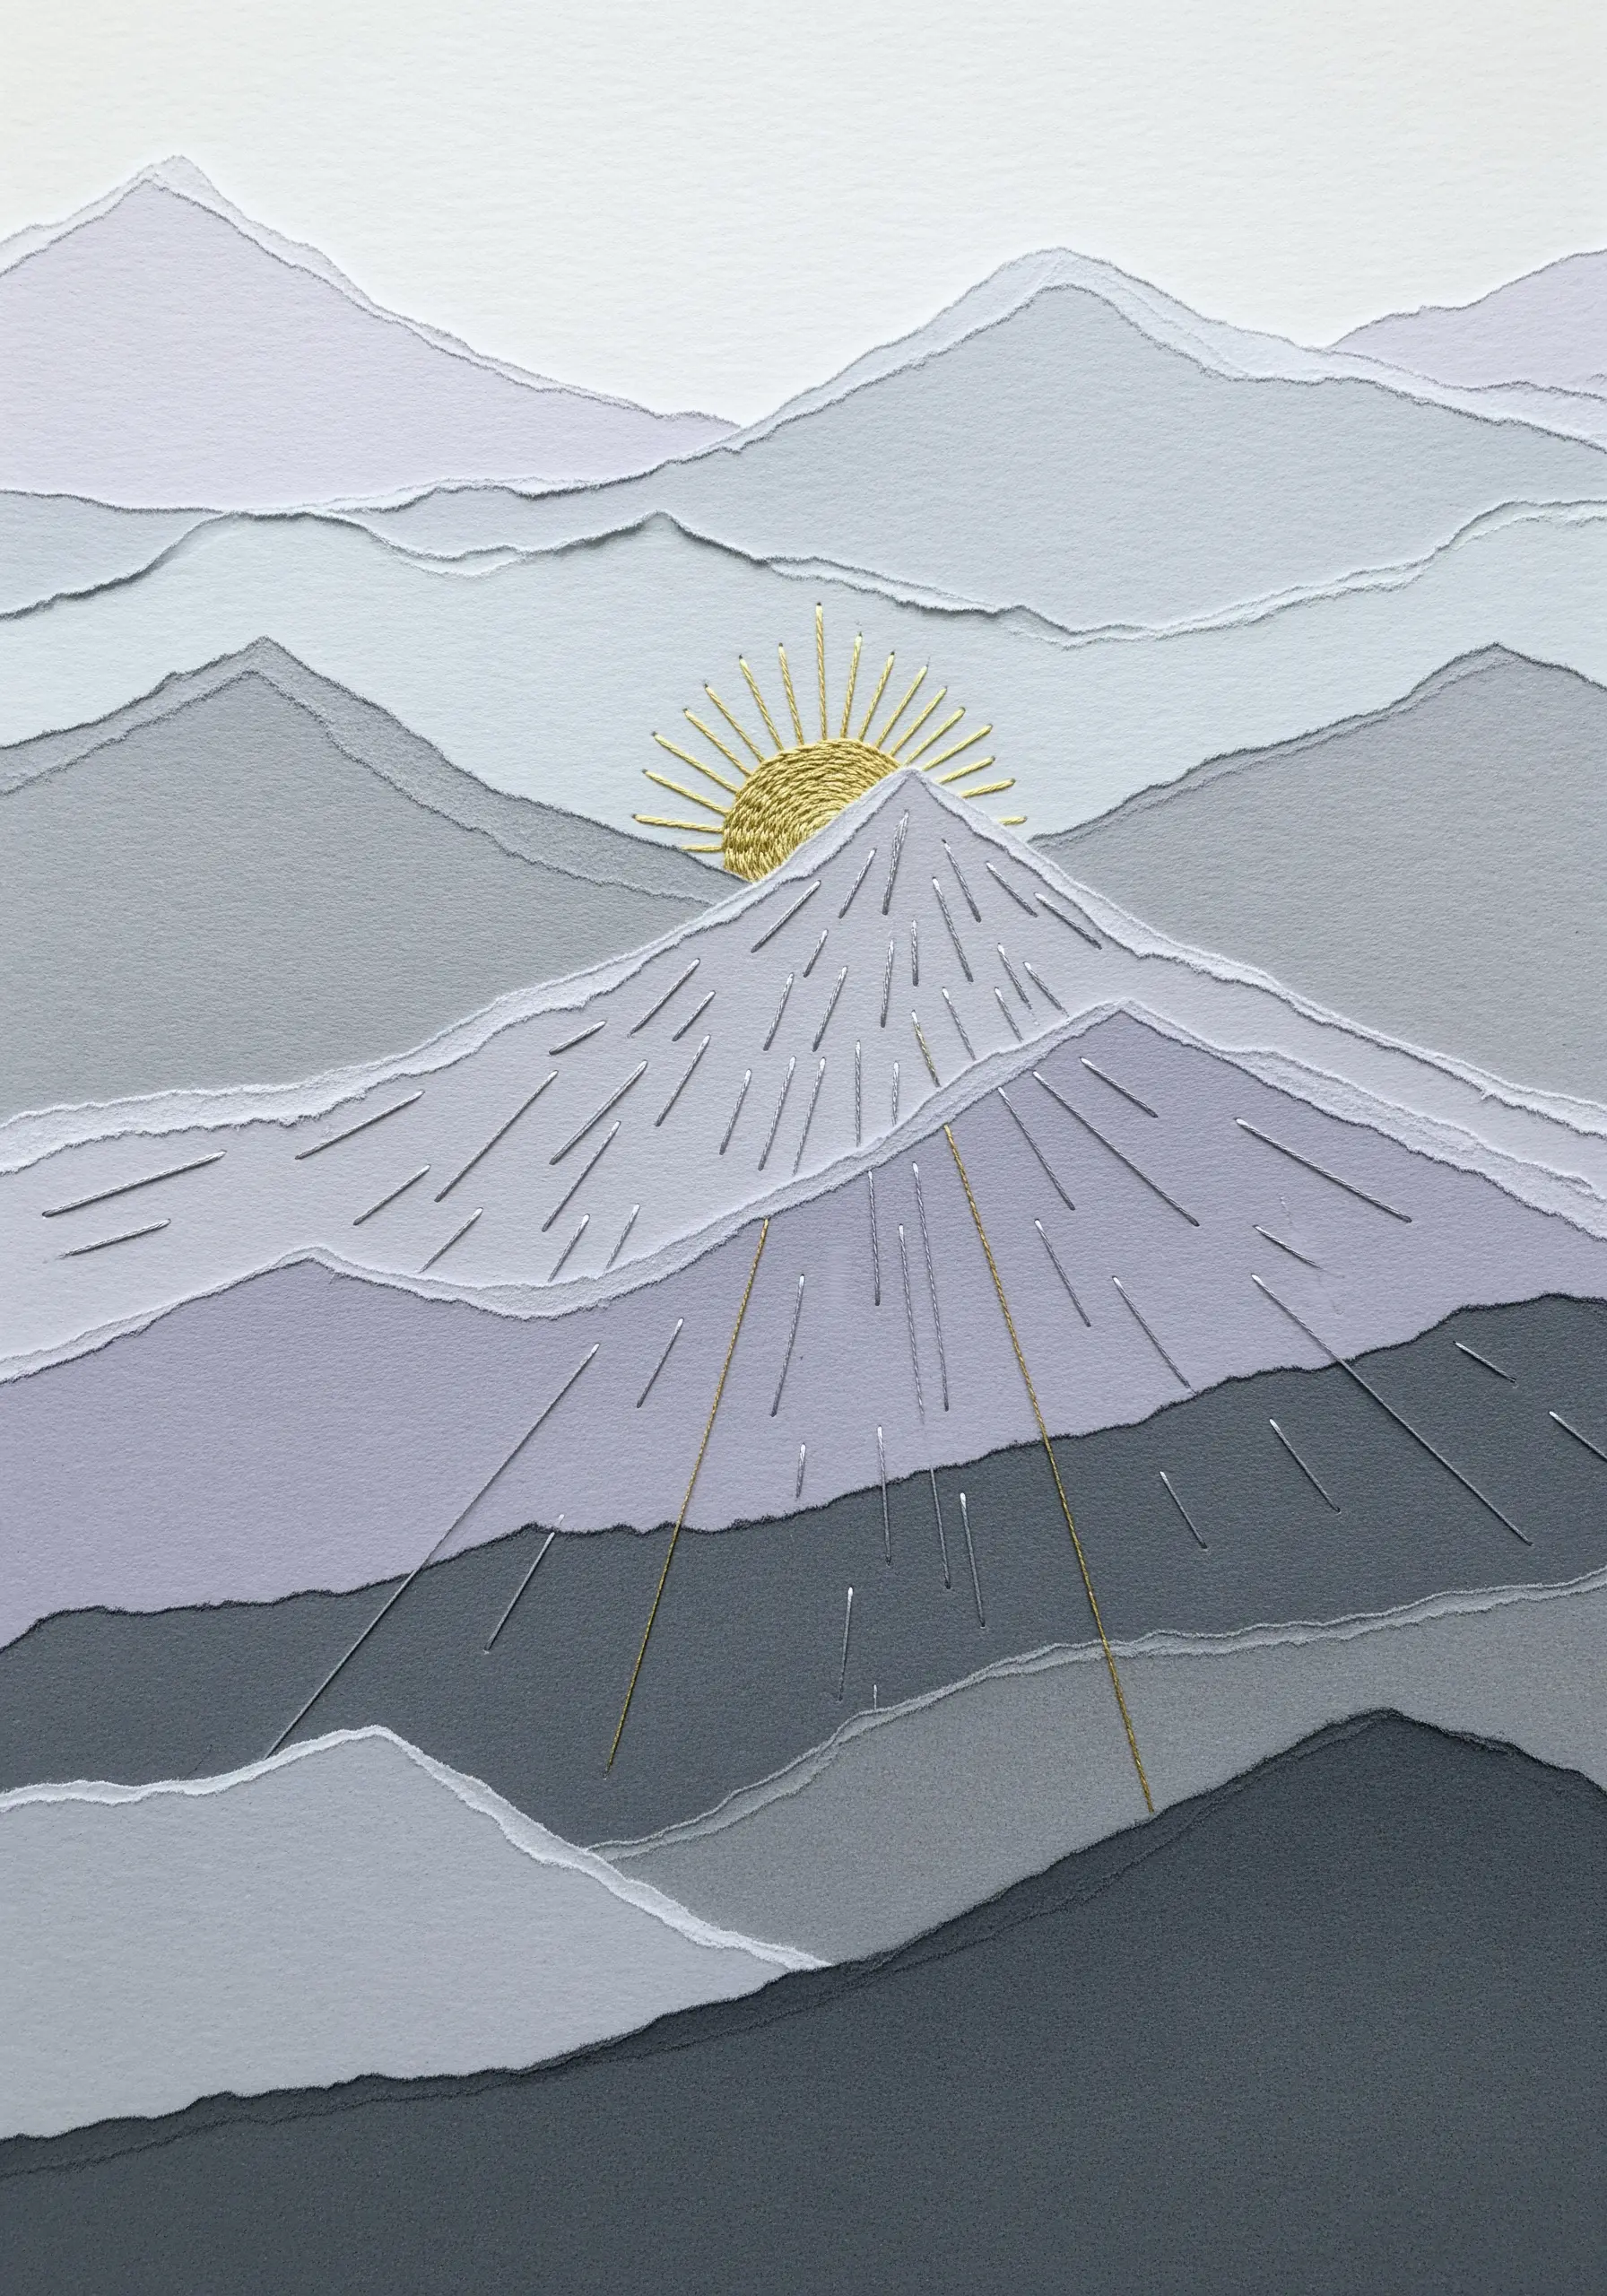
Create atmospheric depth by layering torn paper, then add a single, striking stitched element as a focal point.
Use different shades of gray and lavender paper, tearing the edges to mimic the soft, hazy outlines of distant mountains.
Once your paper collage is set, introduce a sunburst stitched with metallic gold thread.
The precise, radiating lines of the thread provide a brilliant contrast to the soft, organic edges of the torn paper, drawing the eye and adding a touch of magic.
This is one of the most effective minimal gold accent embroidery designs you can try.
17. Stitch Ephemeral Dandelions with Delicate Straight Stitches
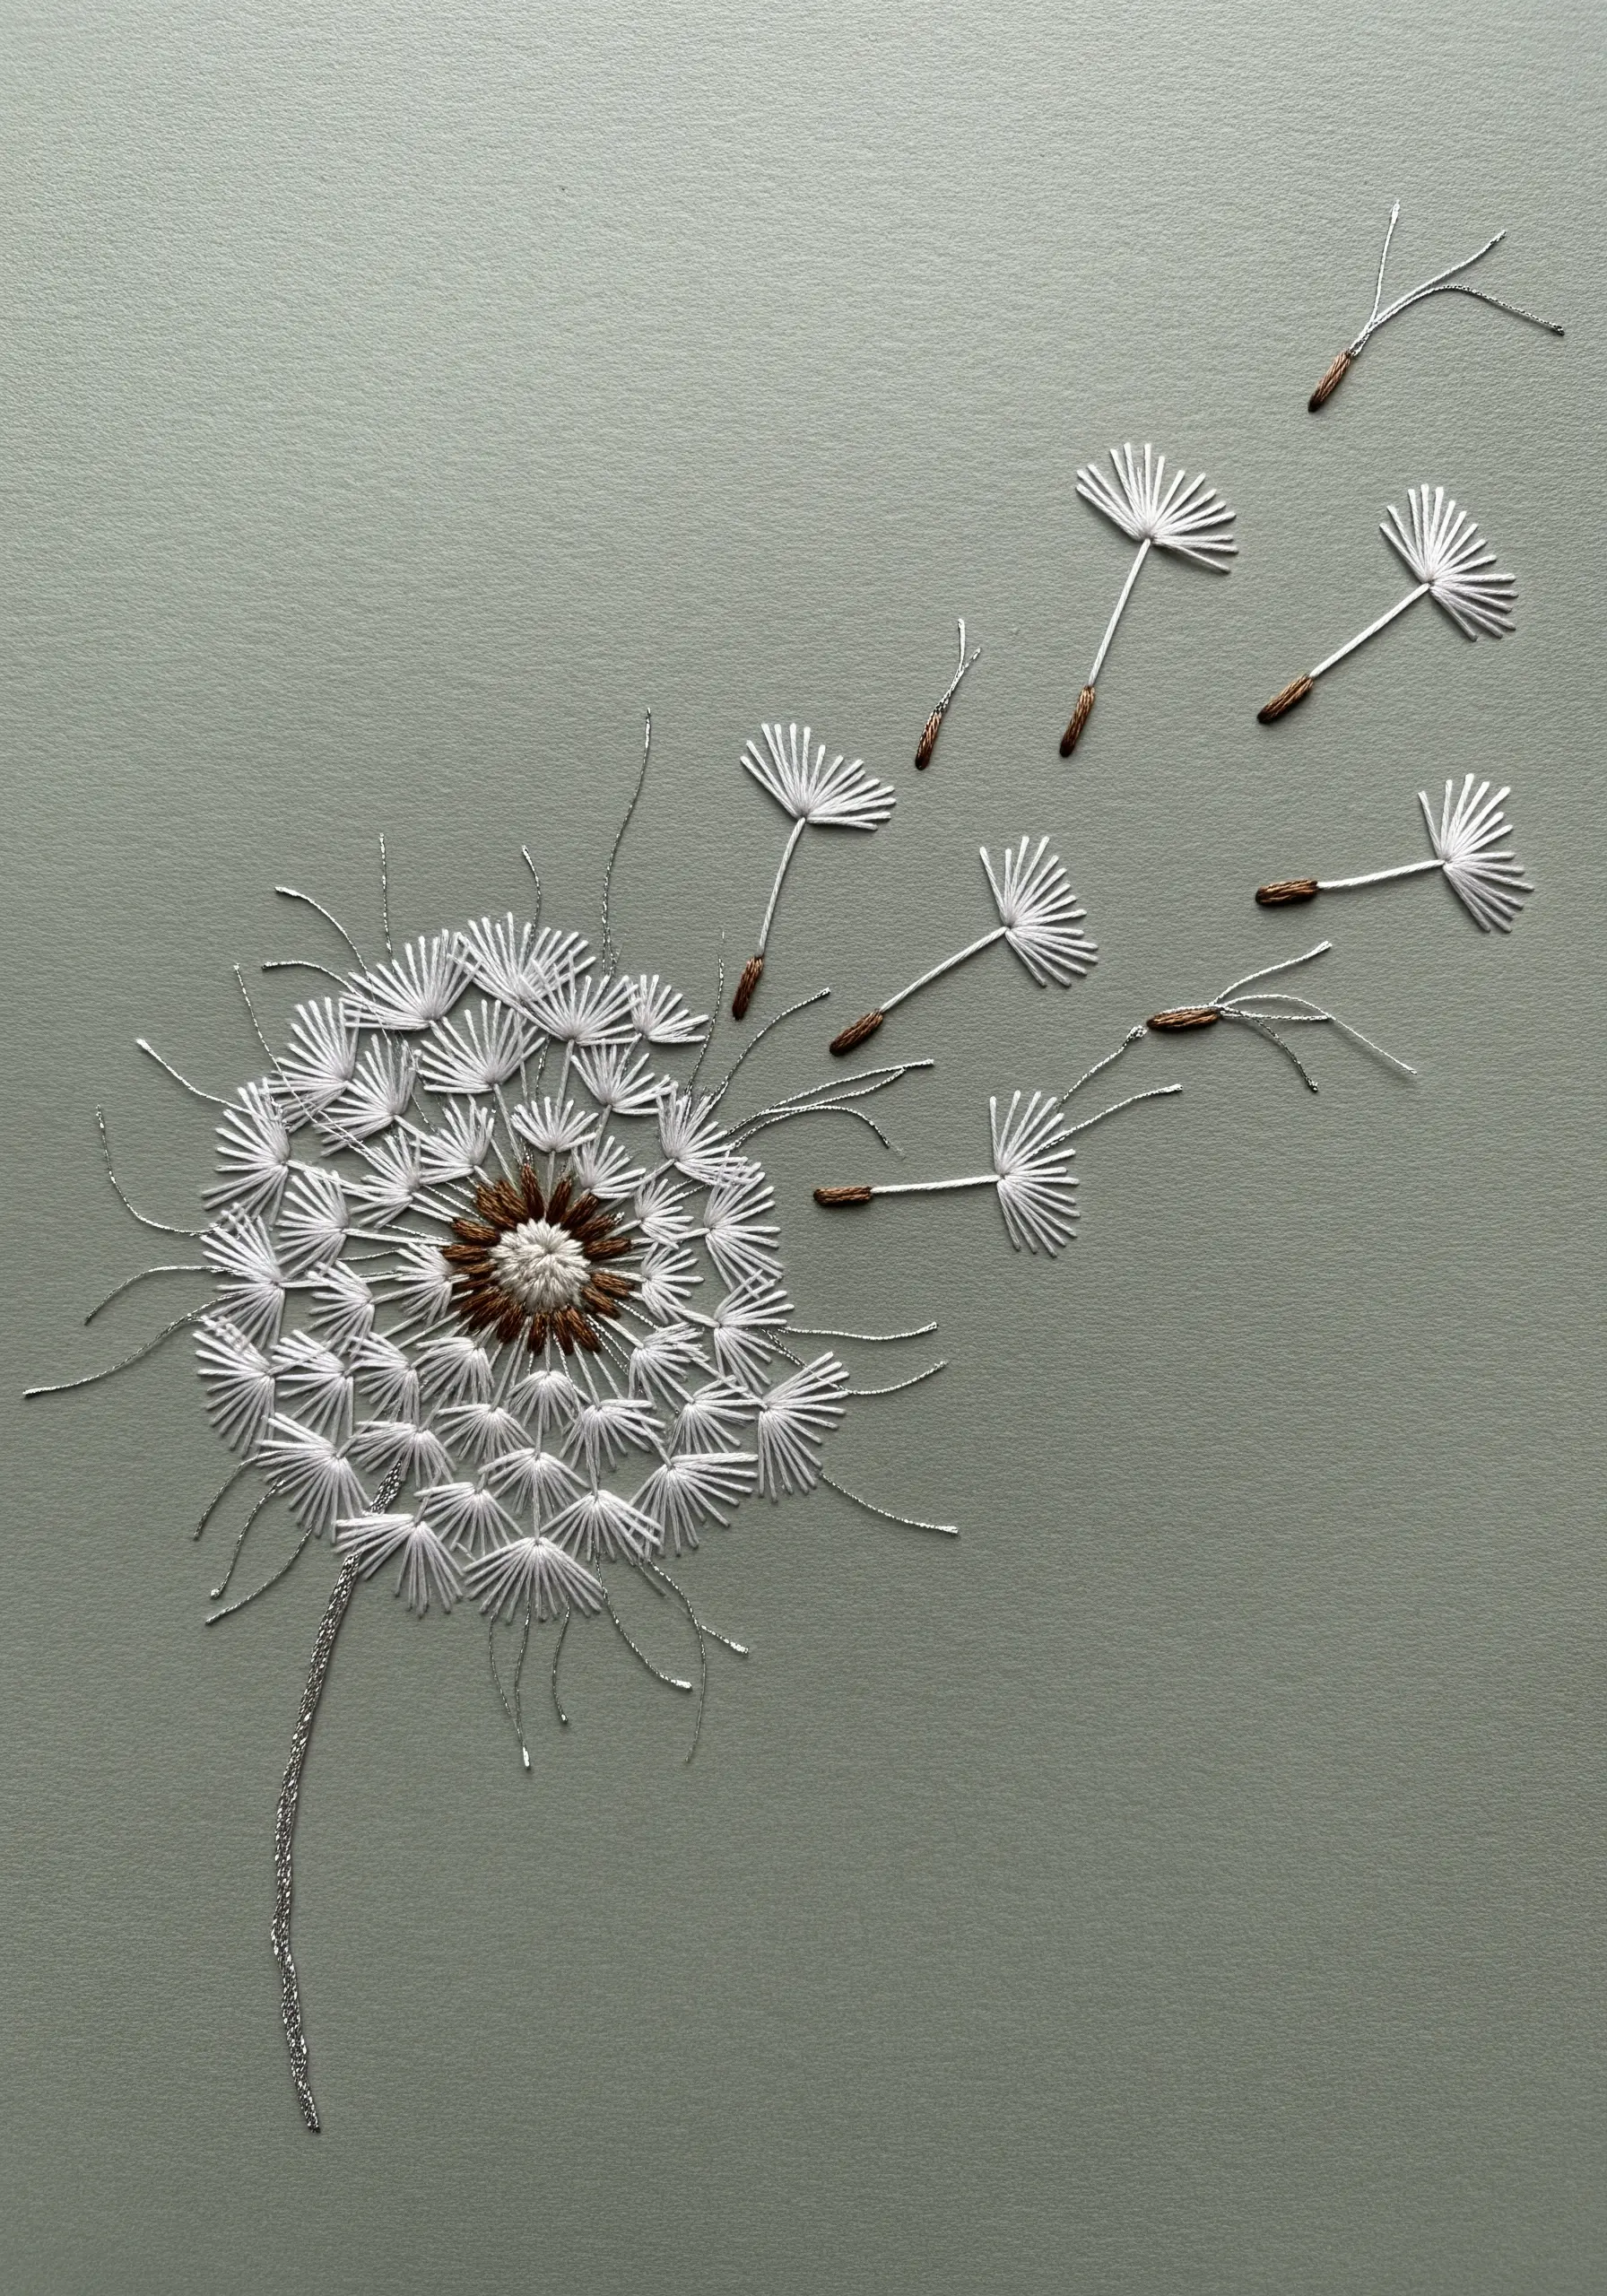
Capture the weightless quality of a dandelion seed head by using open, airy stitching on paper.
Use single, delicate straight stitches for the parachute-like pappus, fanning them out from a central point.
A few French knots in a contrasting color create the textured center of the flower.
For an extra touch of magic, use a fine, shimmering metallic thread for the stem, suggesting fragility and light. This approach transforms simple stitches into a study of movement and grace.


