

You have the threads, the fabric, and the desire to create something that feels truly your own. But perhaps you find yourself hitting a familiar wall—your stitches are neat, but the result feels a little flat, a little too predictable. It’s that gap between the work you’re making and the art you envision that we’re here to close.
The secret isn’t necessarily a new, complicated stitch. It’s a change in perspective. It’s about inviting new materials to the party: the soft fluff of wool roving, the smooth glide of a silk ribbon, the rustic charm of jute twine, or even the unexpected glimmer of a metallic bead. By combining these with your traditional threads, you don’t just add texture—you add story, depth, and a confidence that transforms your work from craft into art.
Let’s explore how you can blend these different fibers to create pieces that are not only beautiful but also deeply tactile and expressive. You already have the skill. Now, it’s time to unlock the materials that will let that skill truly sing.
1. Radiant Fiber Sunbursts

Create explosive texture by contrasting soft, voluminous fibers with sharp, delicate details.
Use wool roving for the central rays, tacking it down with a matching single thread to preserve its fluffy volume.
For the thinner, straighter rays, couch down a twisted cord or metallic yarn; this provides a rigid structure that contrasts beautifully with the soft wool.
Scatter metallic beads throughout the background, stitching them individually to mimic a starfield. The dark fabric base is essential—it makes these colorful mixed fiber ideas truly pop and amplifies their energy.
2. Sculptural Coral Gardens
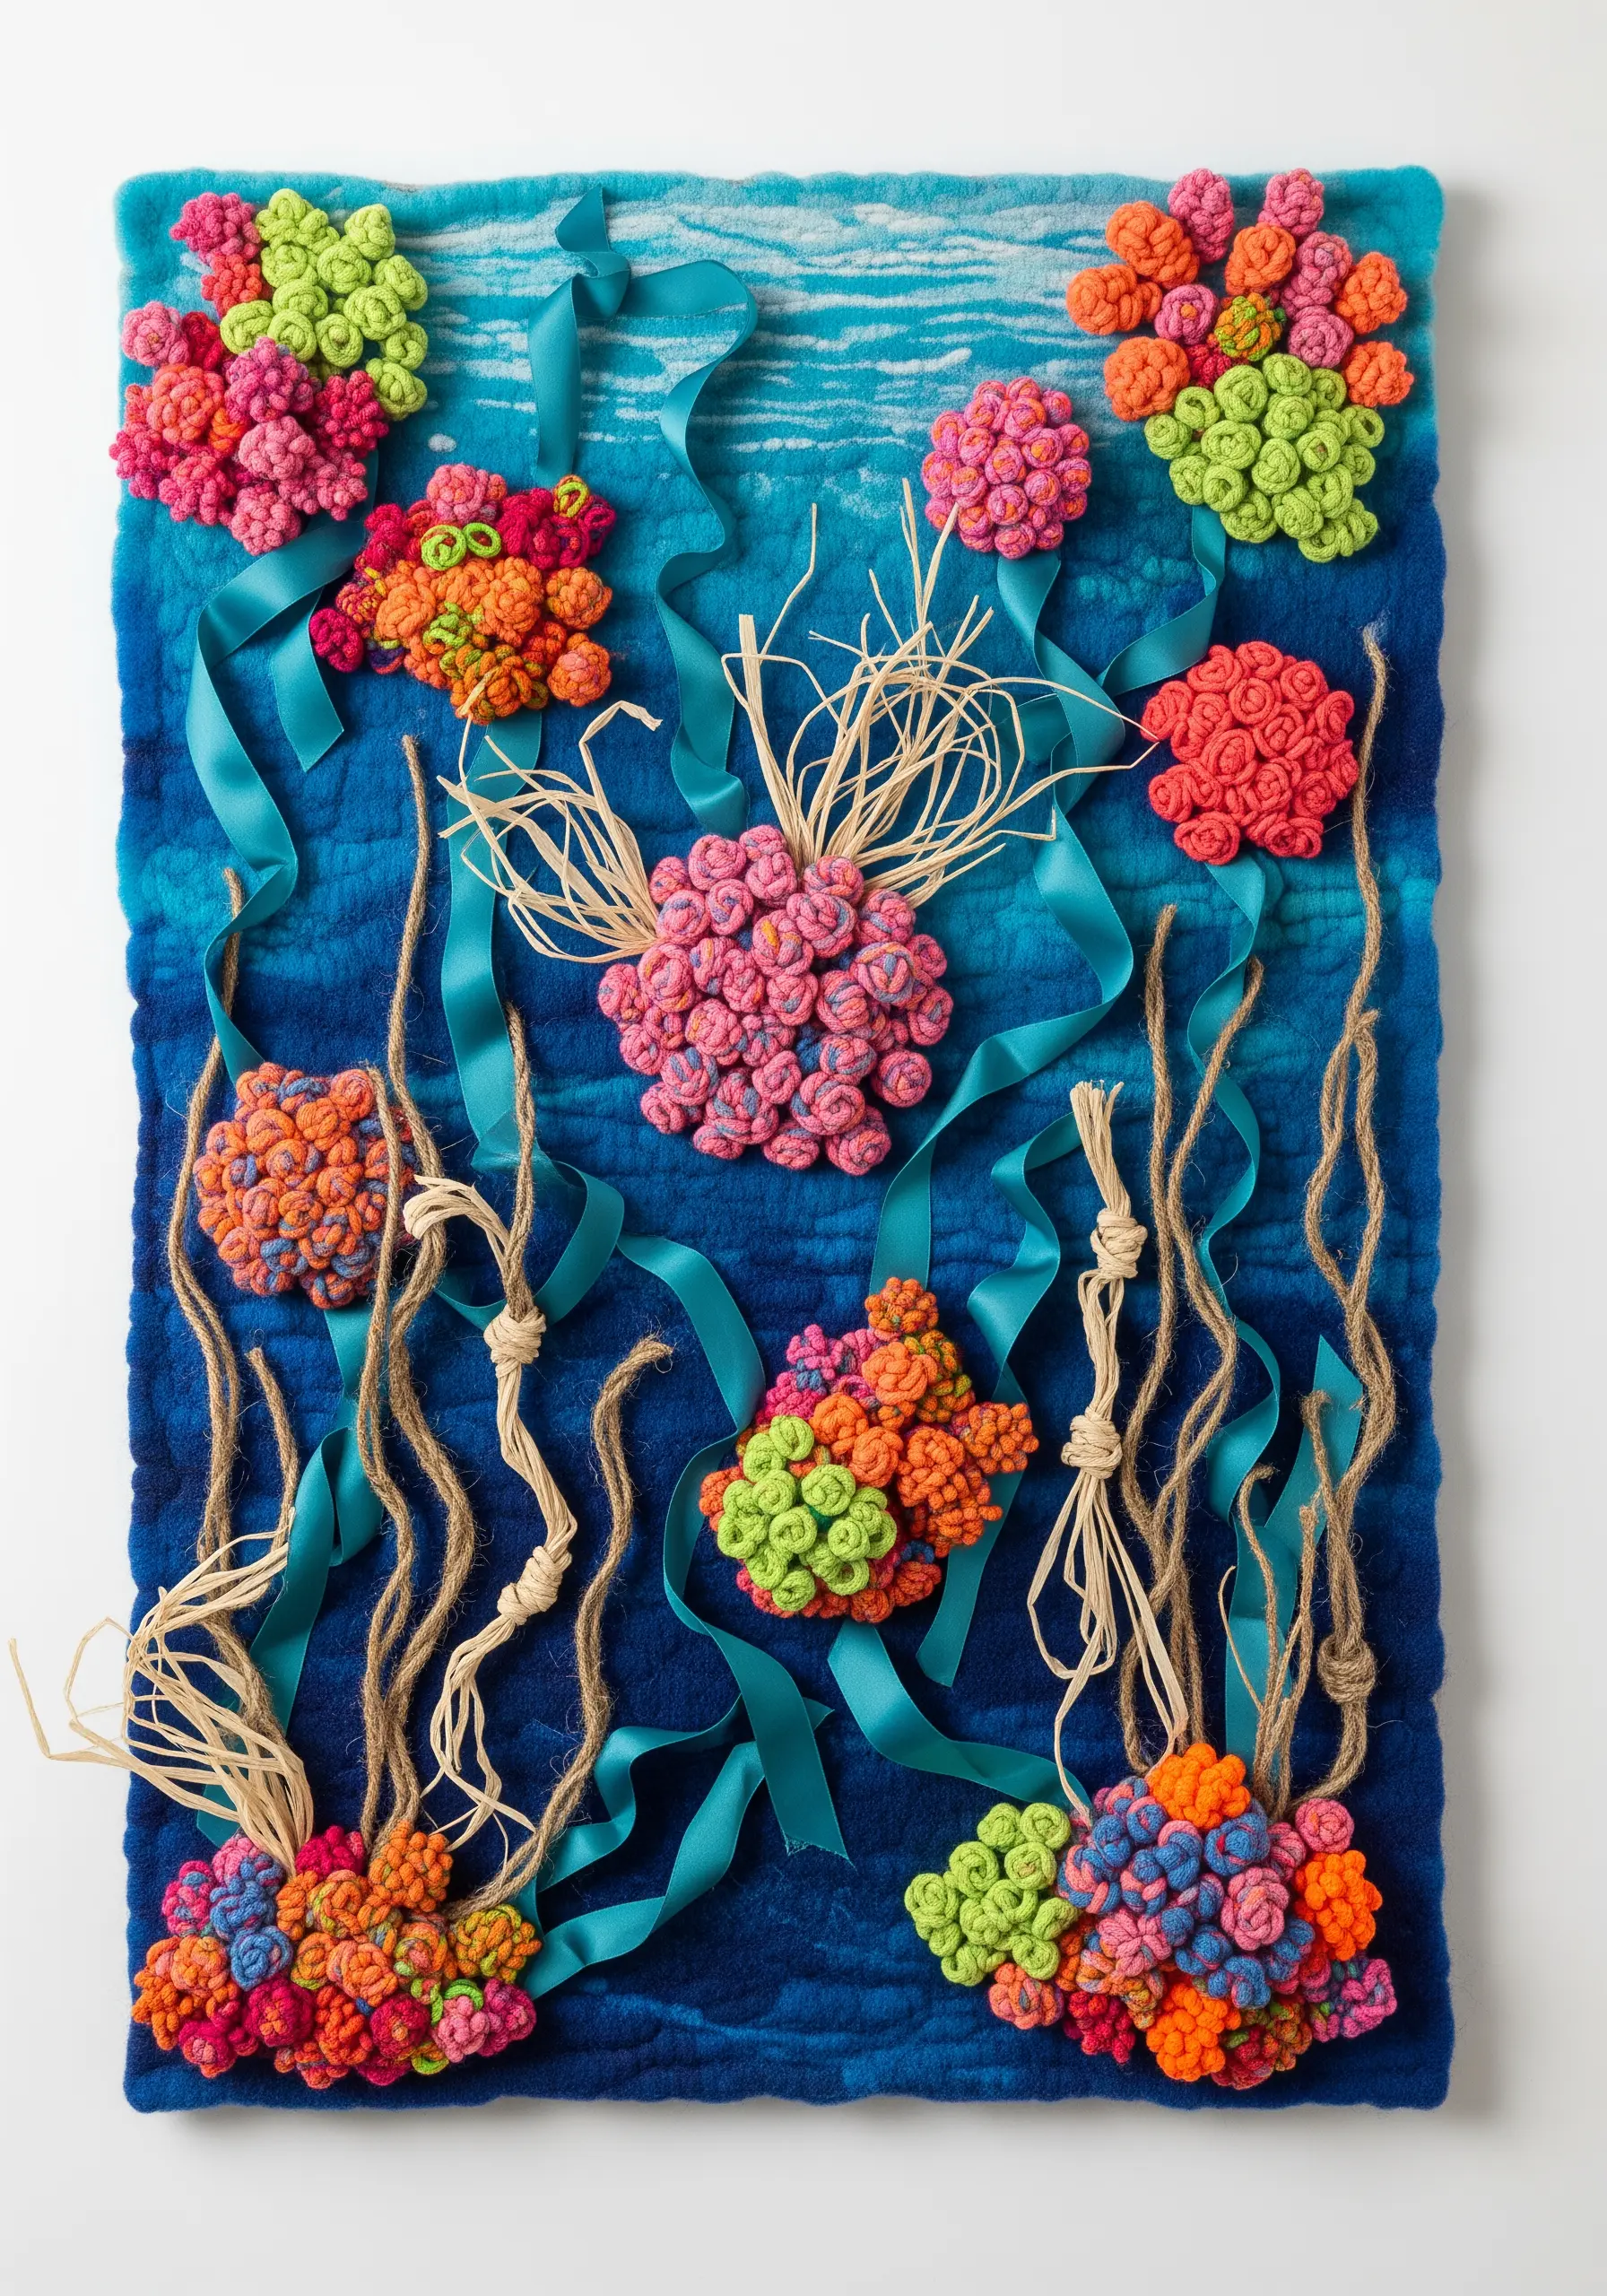
Build a vibrant reef by moving beyond flat stitches and creating dense, three-dimensional forms.
Use chunky yarn and a sea of French knots or bullion knots clustered tightly together to form coral structures. Variegated yarn works exceptionally well here, adding color depth automatically.
Weave silk ribbon through your composition to create a sense of underwater movement and current.
Incorporate natural fibers like raffia or jute, bundling and stitching them down to mimic seaweed. This adds a rustic, organic texture against the softness of the yarn and ribbon.
A thick felted wool background is ideal for supporting the weight of these heavy, coastal-inspired embroidery wall decorations.
3. Woodland Dioramas in a Frame

Transform your embroidery into a miniature natural world by incorporating stumpwork and preserved botanicals.
For the mushrooms, use the stumpwork technique: create a padded base with felt, cover it with a top fabric like velvet or cotton, and stitch the details on top.
Create realistic, winding branches by braiding faux suede or leather cord and couching it onto the fabric.
The final touch of realism comes from adding non-thread elements. Securely attach preserved moss and tiny wooden beads with a few careful stitches to build a convincing forest floor. This combination of techniques creates incredible depth and brings the scene to life.
For more natural forms, explore these tree bark wood texture stitch ideas.
4. Portraiture with Sculptural Hair
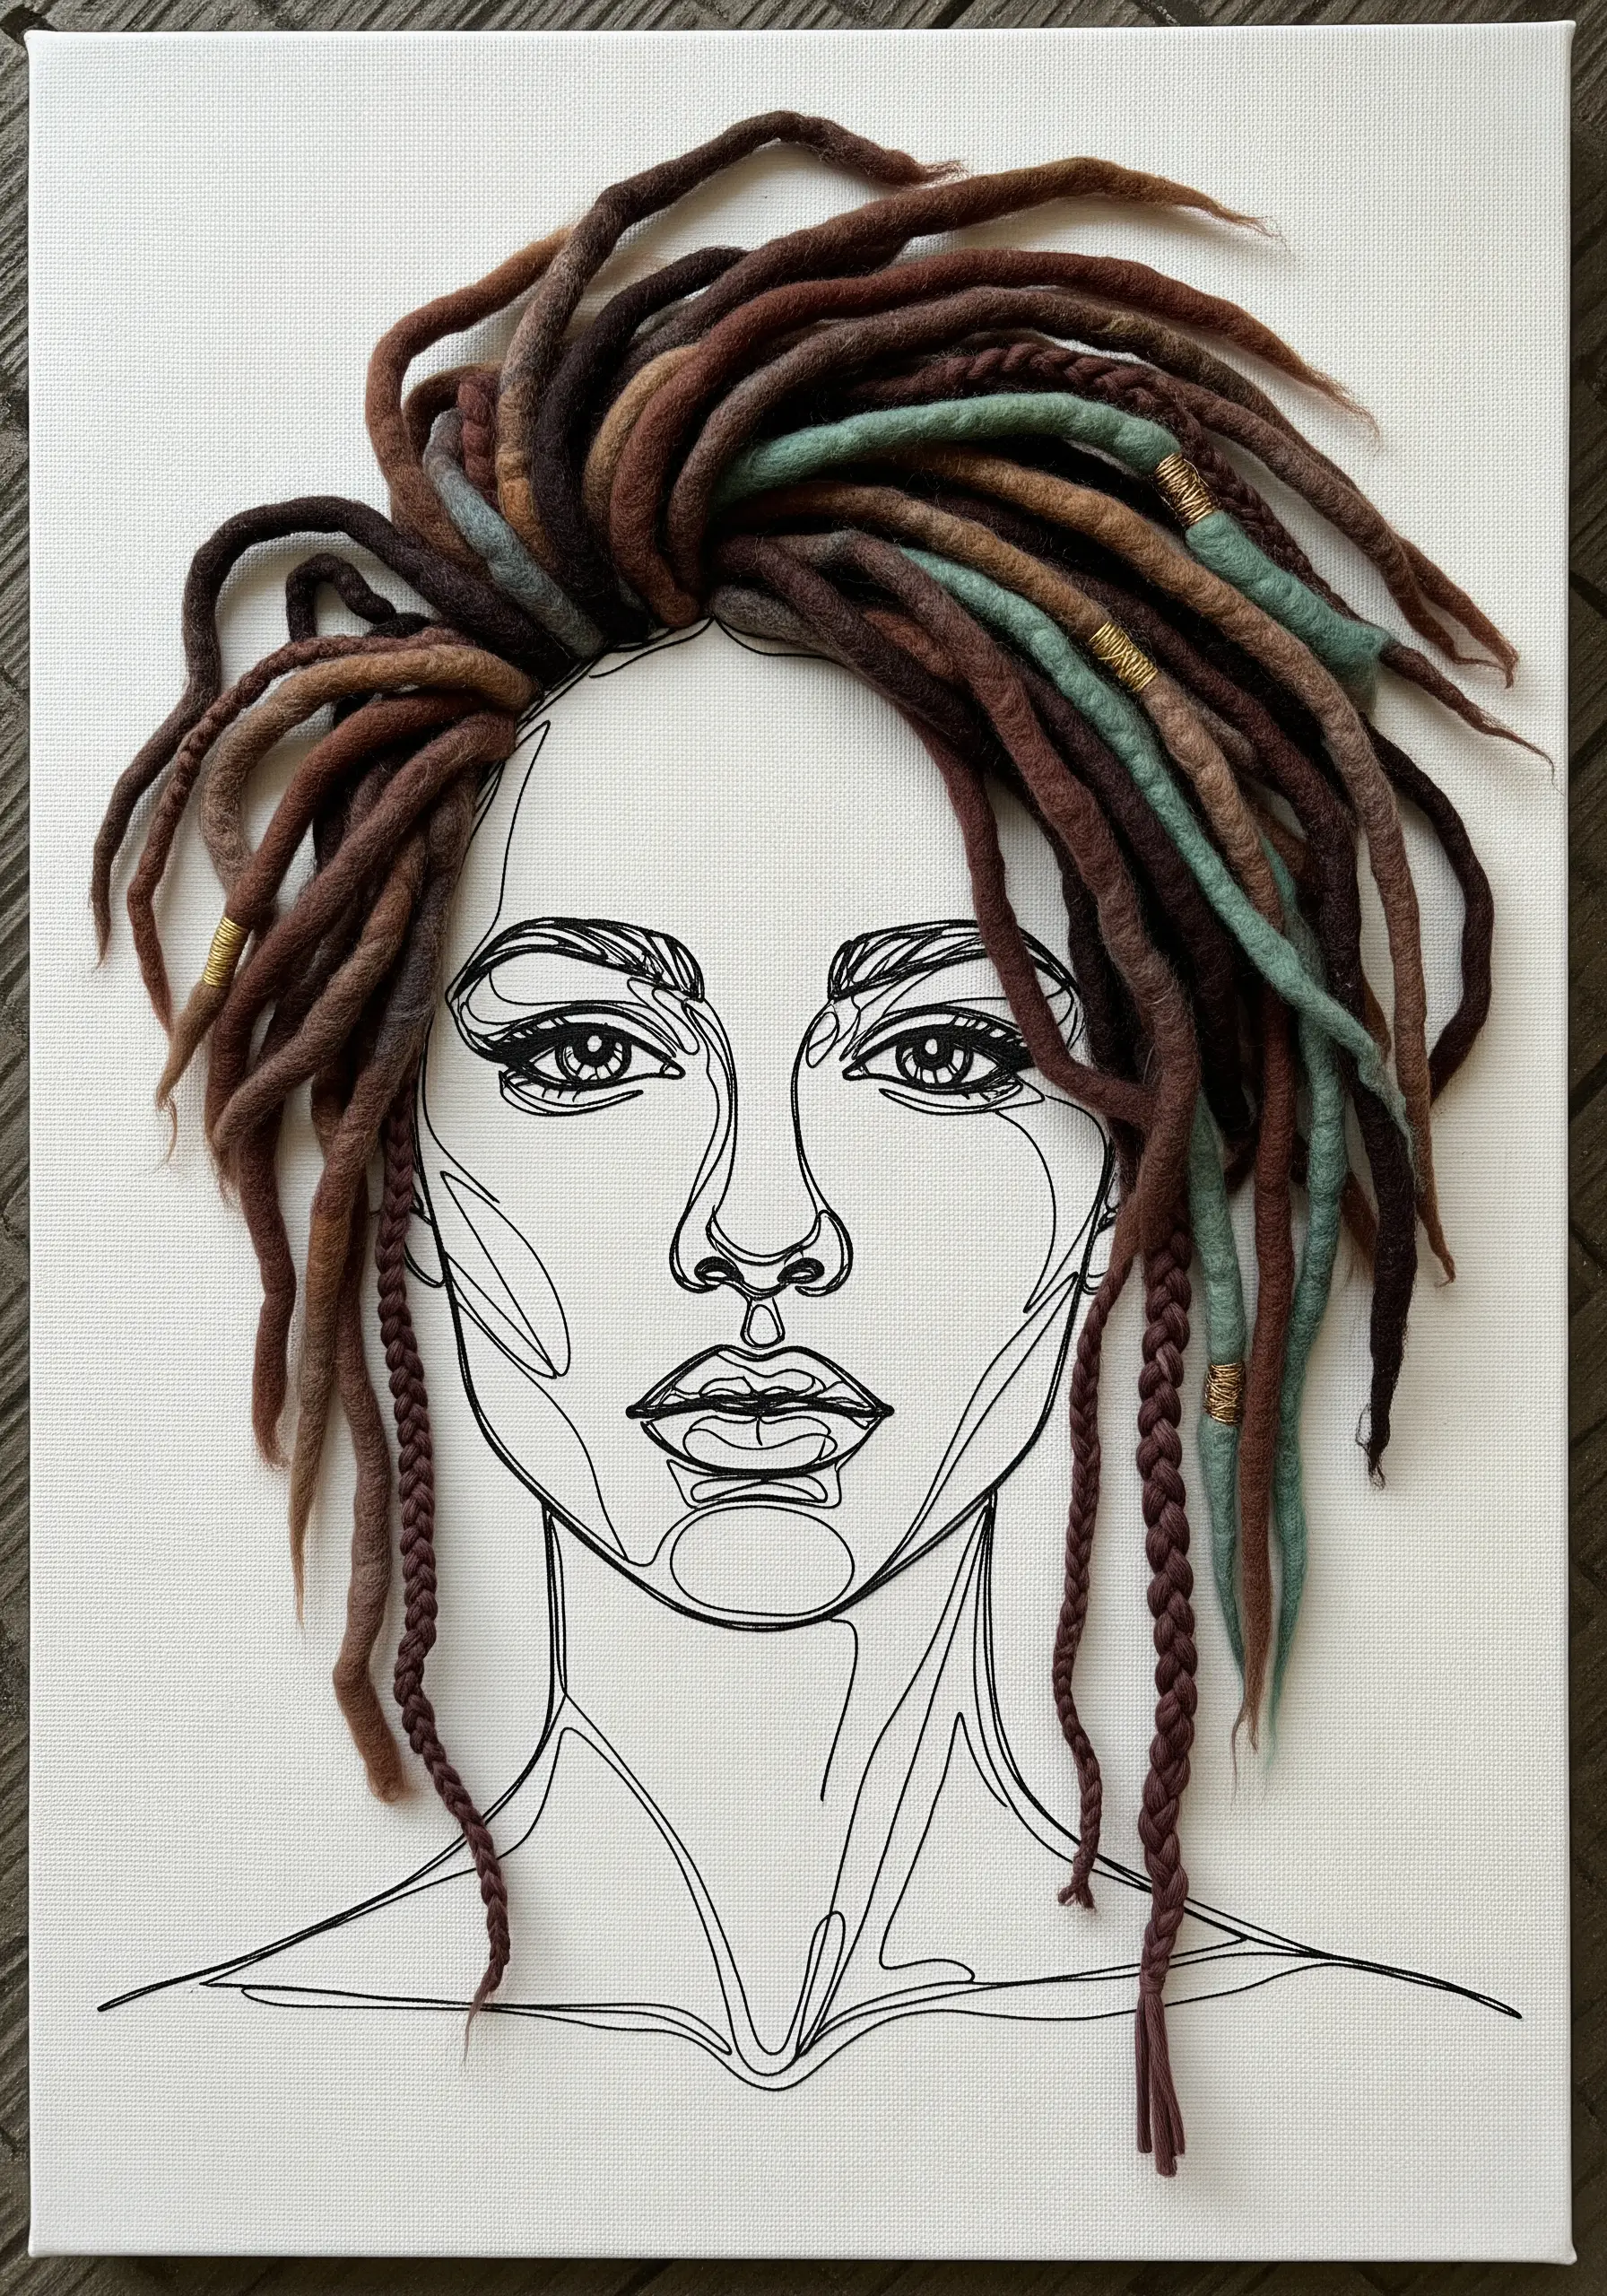
Elevate a simple line drawing by adding a single, powerfully textured element that breaks the two-dimensional plane.
Stitch your portrait on a plain canvas using a clean, minimal backstitch. The simplicity of the line work is crucial, as it allows the textural element to become the undisputed focus.
Create the hair using felted wool roving. You can pre-form dreadlocks or braids by needle-felting them separately, then securely stitch them onto the canvas at the hairline.
This juxtaposition of flat, graphic lines and hyper-textural, sculptural fiber is what gives the piece its modern, confident edge.
This approach works beautifully with all kinds of modern line art faces.
5. Geometric Landscapes with Yarn Blocking
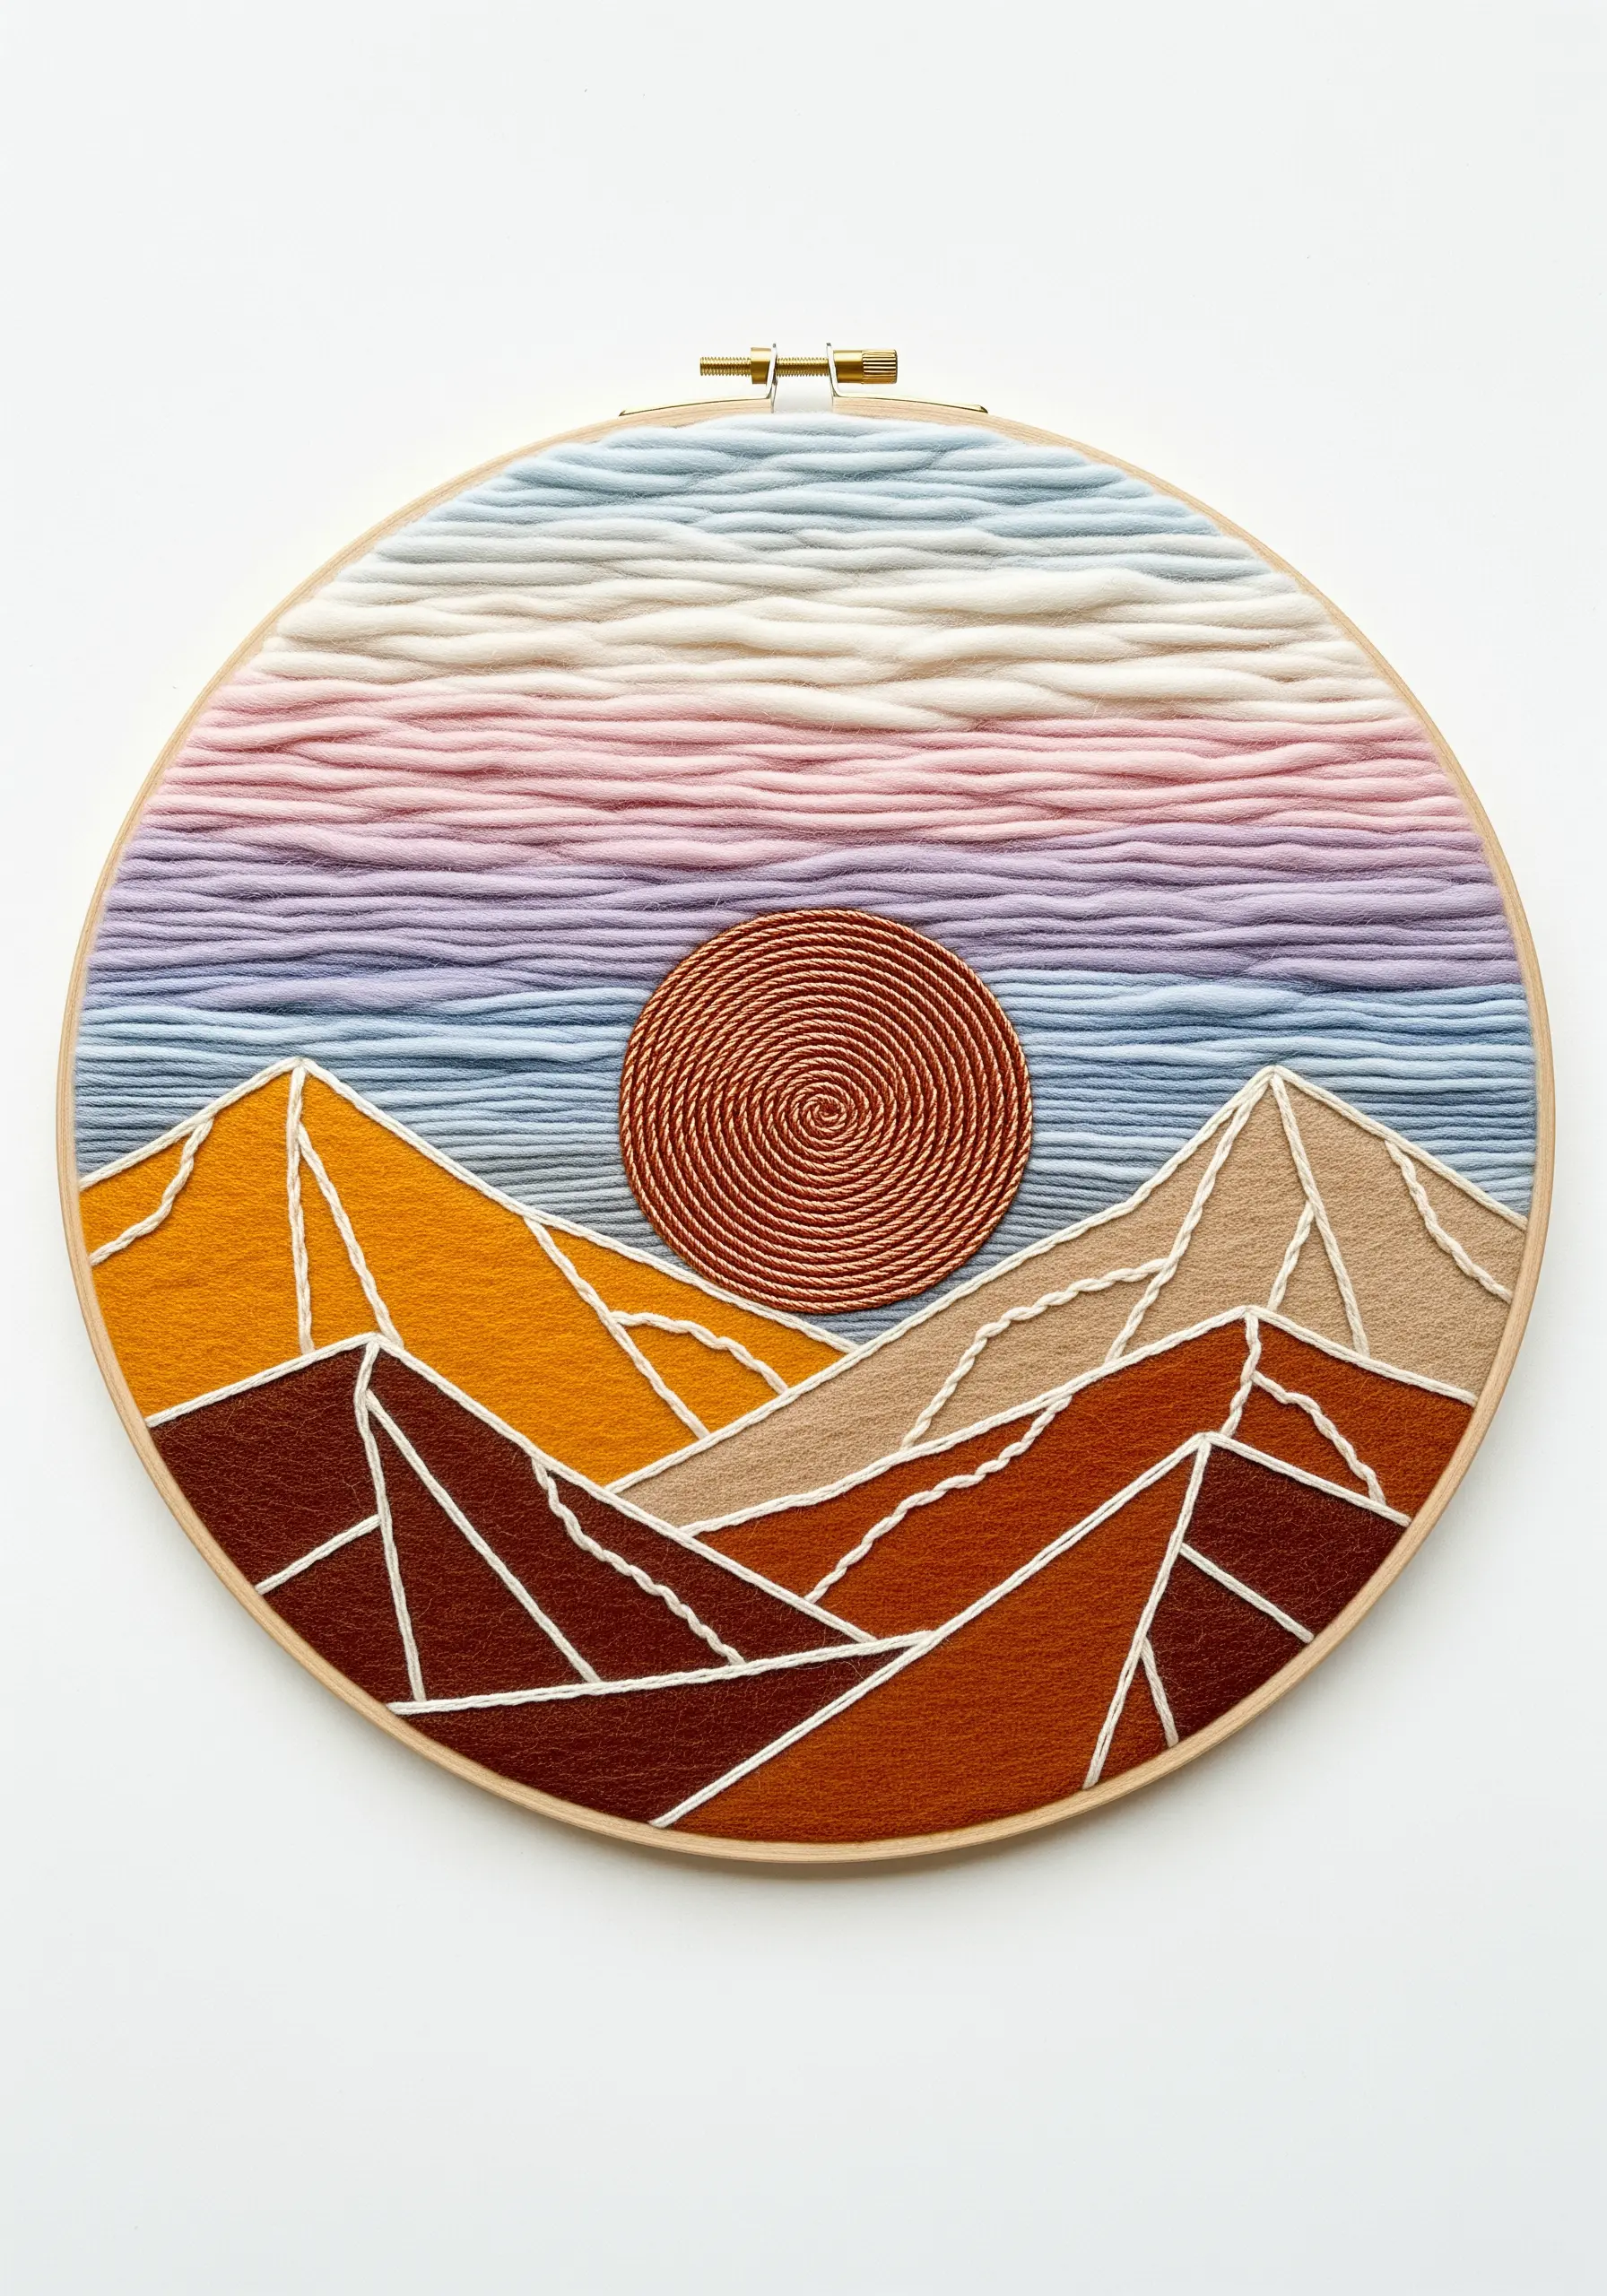
Achieve bold, graphic landscapes by swapping fine floss for chunky yarn and focusing on solid fields of color.
Use a method similar to satin stitch but with thick yarn to fill in the broad shapes of your mountains. The key is to keep the stitches parallel and dense for a smooth, woven appearance.
Create clean, sharp divisions between your color blocks with a crisp backstitch outline in a contrasting color.
For the sun, tightly coil a thick cord and couch it onto the fabric. This introduces a new texture and a perfect circular form that would be difficult to achieve with fill stitches alone.
This technique is perfect for creating abstract geometric hoops.
6. Urban Sketches with Ethereal Layers
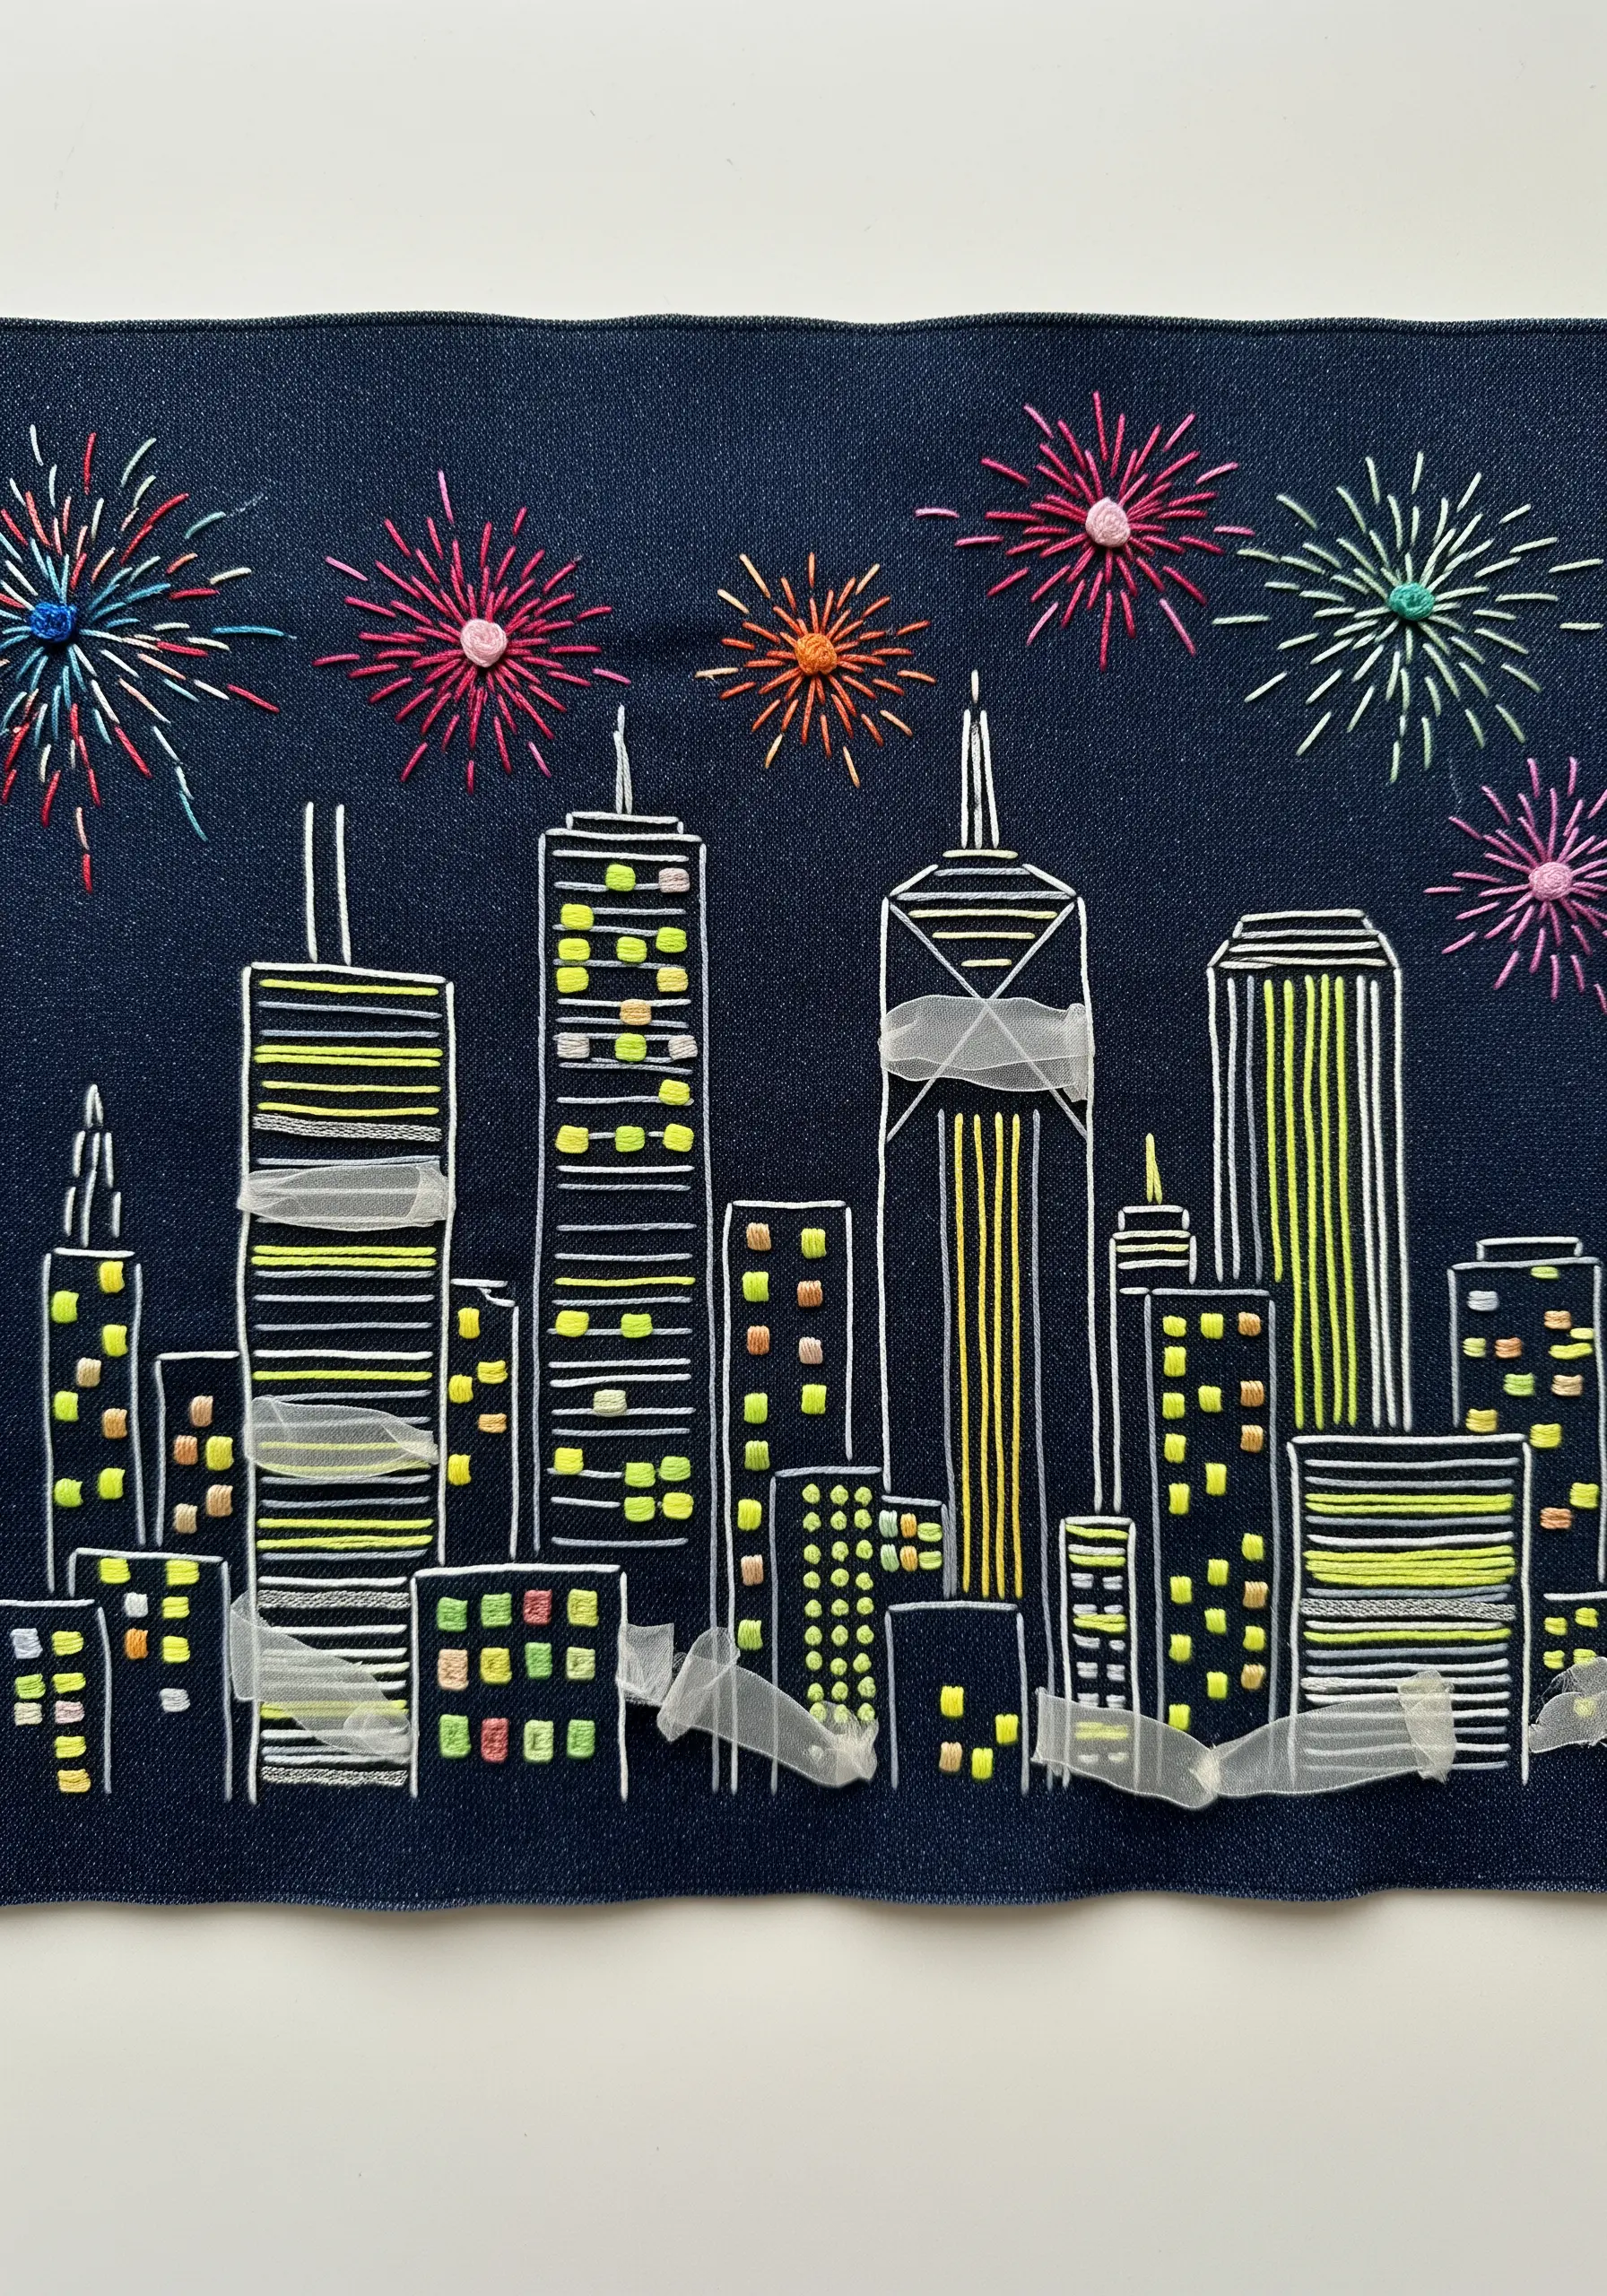
Add atmospheric depth to architectural embroidery by incorporating transparent materials.
First, establish your cityscape using a simple backstitch or stem stitch. A fine, high-contrast thread will ensure the lines of the buildings remain crisp and clear.
Then, introduce a layer of sheer organza ribbon. Instead of stitching it flat, tack it down loosely in a few strategic spots, allowing it to billow slightly. This creates a subtle, three-dimensional effect that perfectly mimics fog or smoke.
This technique adds a soft, ethereal quality that contrasts beautifully with the rigid geometry of your modern thread landscape projects.
7. Sculptural Hoops That Break the Frame
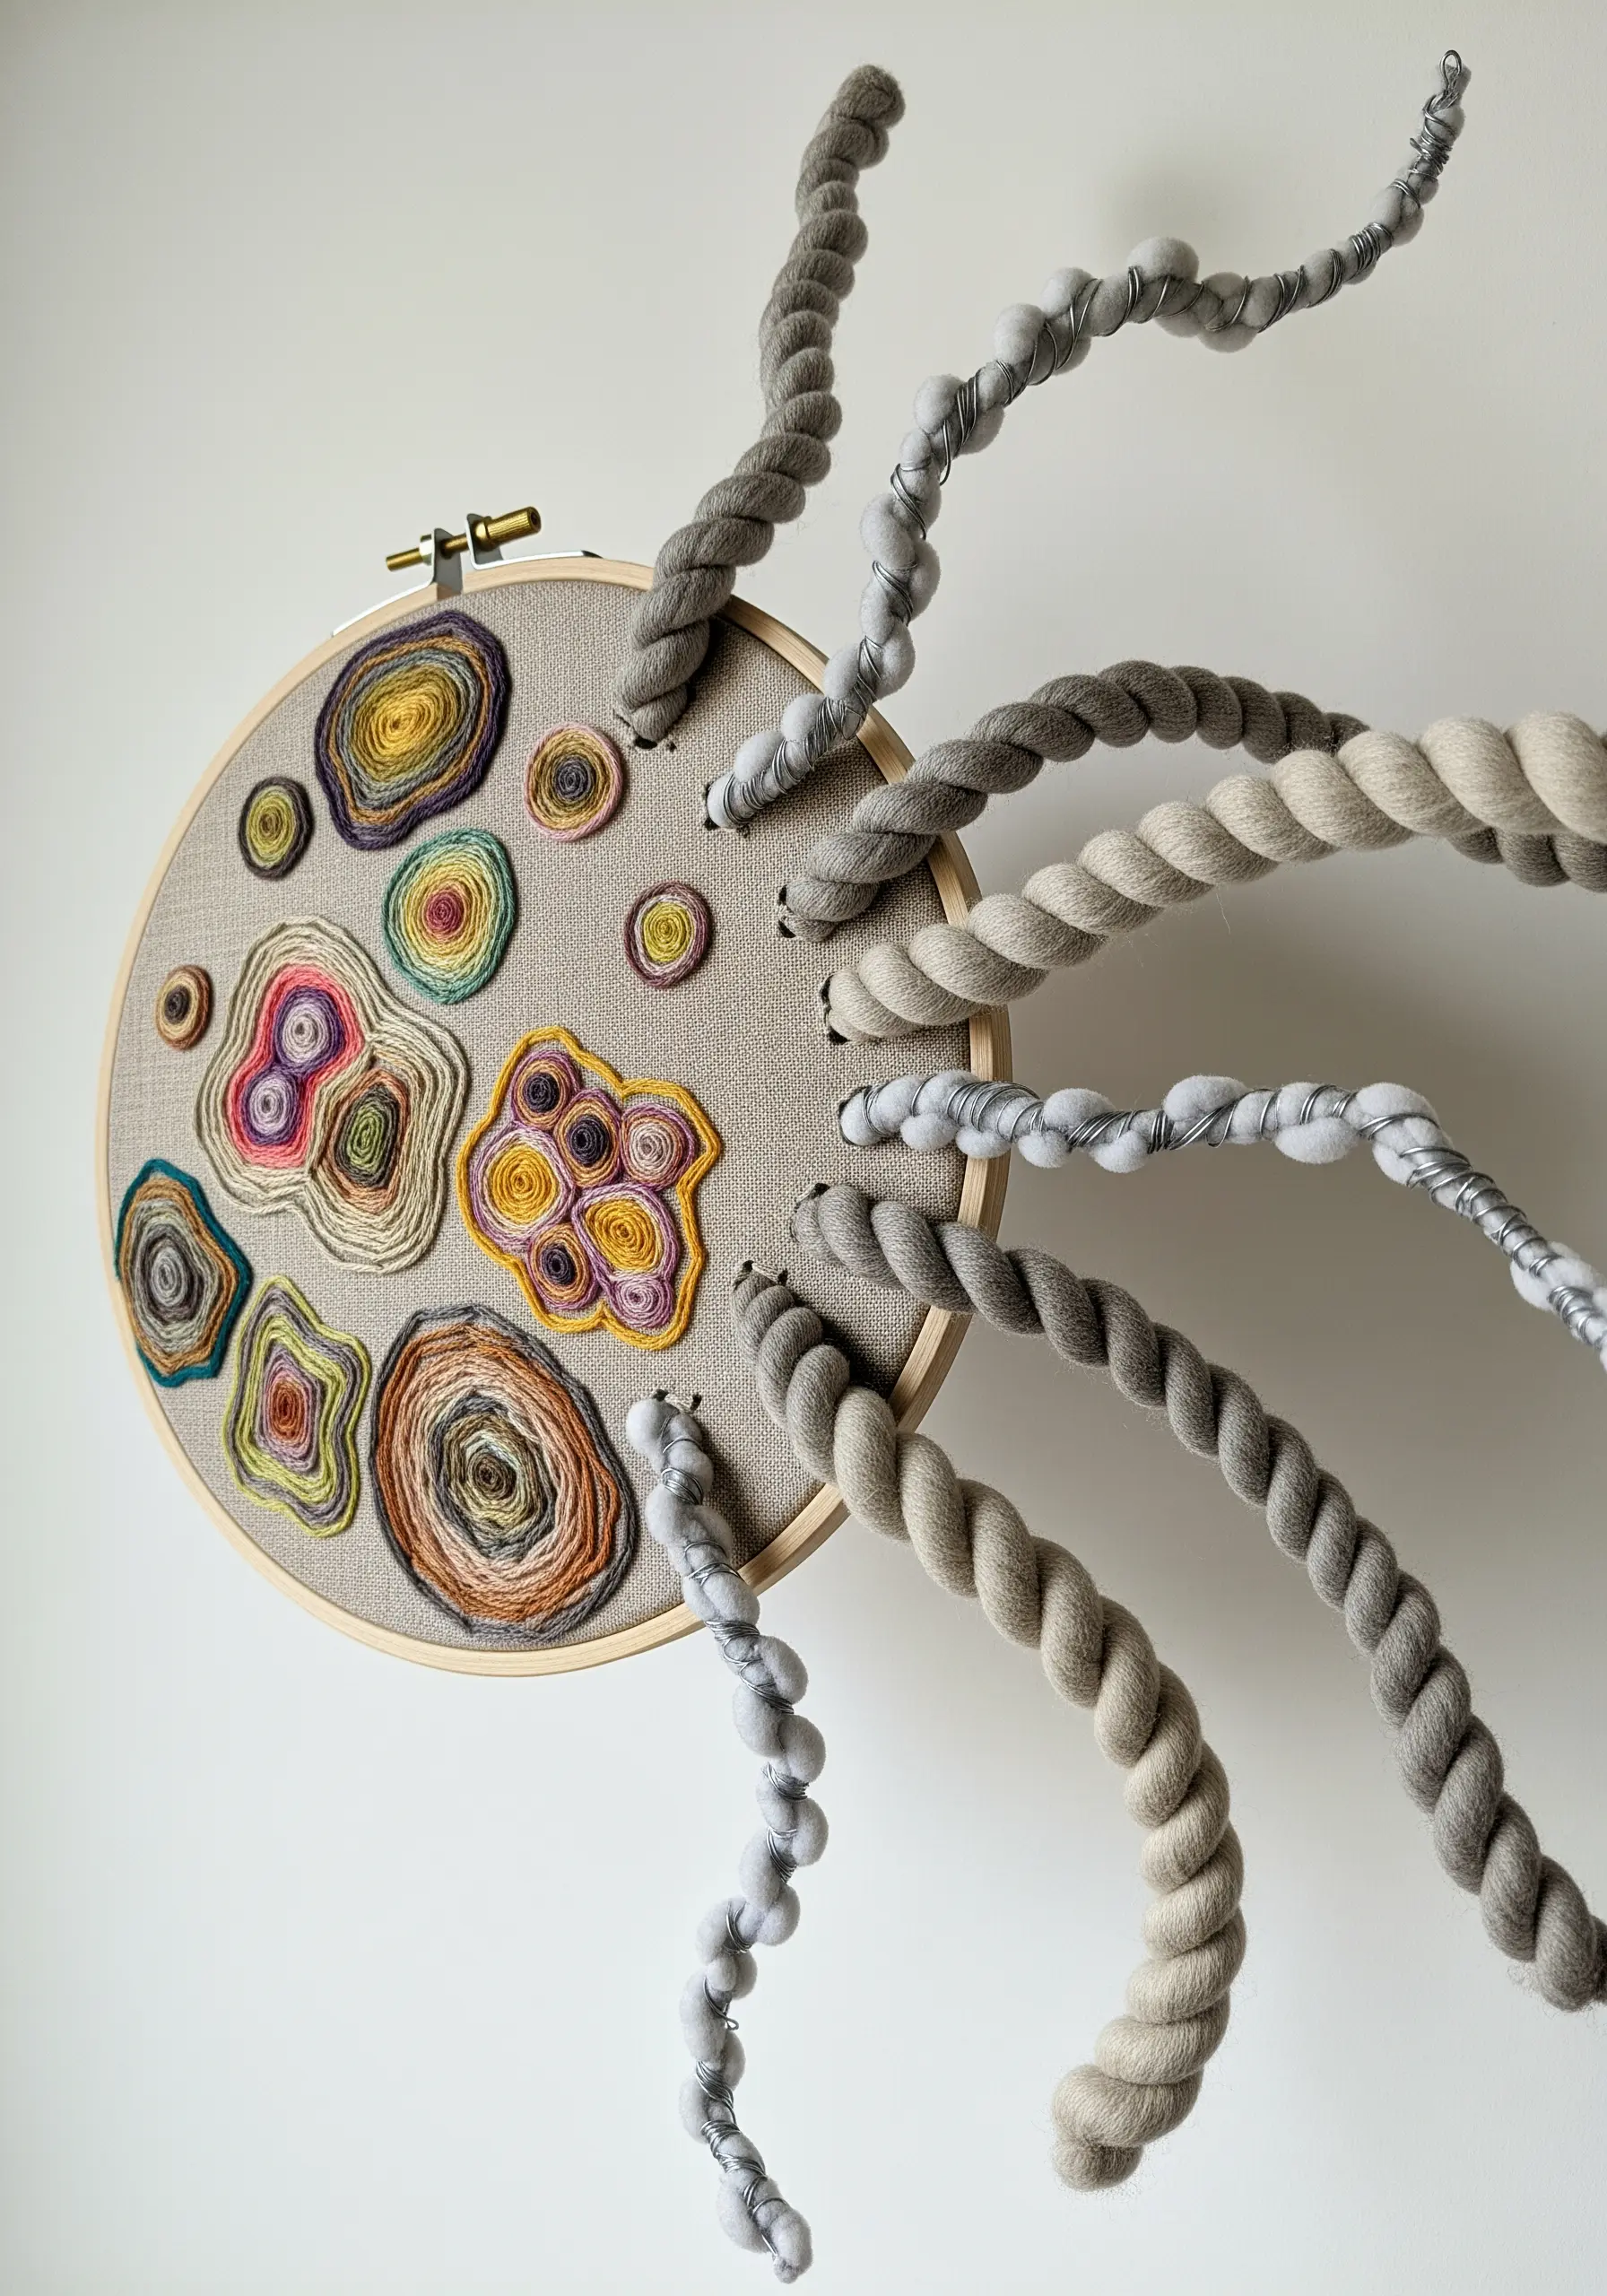
Challenge the boundaries of the hoop by allowing your textural elements to escape the fabric’s surface.
On your canvas, create organic, agate-like shapes with concentric rings of split stitch or chain stitch, using variegated thread to add effortless color gradients.
To add the sculptural tentacles, carefully pierce the fabric and feed thick, soft-twist cotton rope through from the back. You can secure it with knots or stitches on the reverse side.
This technique transforms the hoop from a simple frame into an integral part of a dynamic, interactive sculpture. It’s one of many abstract thread sculpting tricks you can master.
8. The Stained Glass Window Effect

Mimic the bold beauty of stained glass by using thick black cord to create your leading.
Start by laying down your entire design’s outline using a thick black yarn or cord. Couch it down firmly with a matching black thread to create clean, raised lines that will define each colored section.
Fill each segment with vibrant yarn using a dense satin stitch. By laying the stitches diagonally or vertically, you can create the illusion of different panes of glass.
The raised black outlines are essential; they contain the color and are the key to achieving that authentic, graphic stained-glass look.
This is a great technique for any bold and colorful framed embroidery patterns.
9. A Maximalist Embroidered Meadow
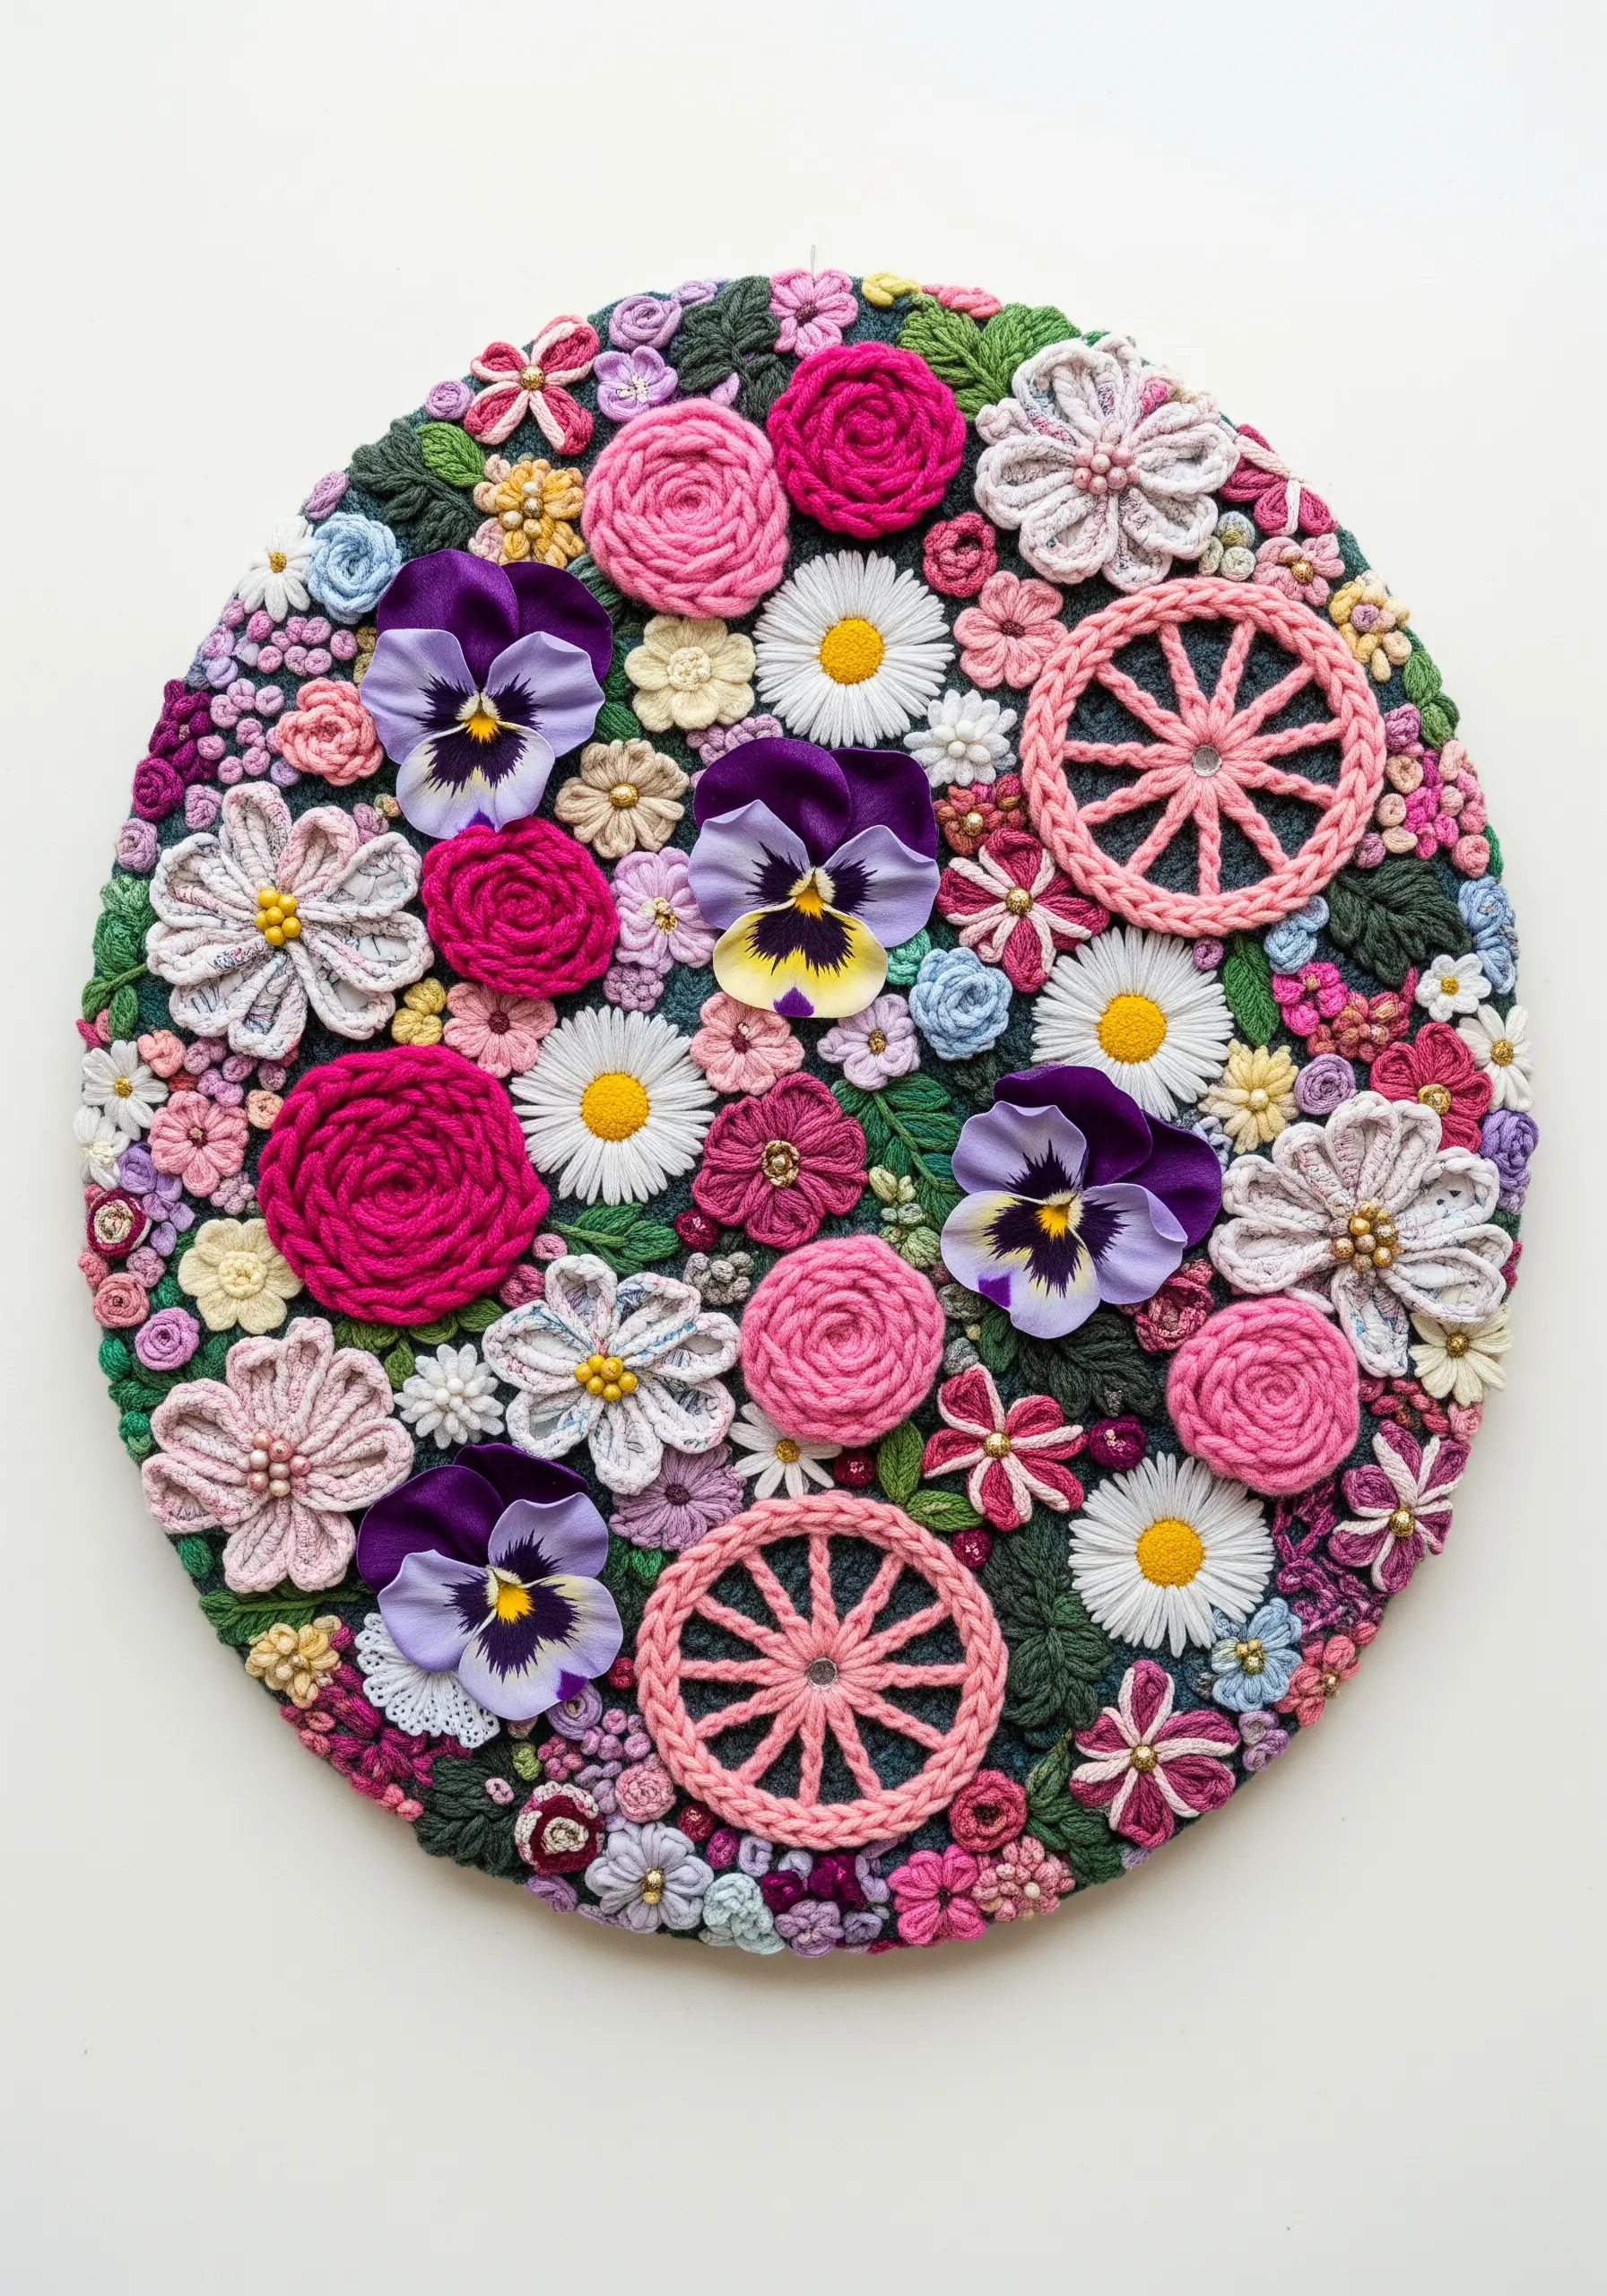
Create a dense, luxurious field of flowers by layering multiple techniques and fibers without leaving any empty space.
Build large blooms like roses using woven wheel stitches with thick yarn or silk ribbon for a lush, 3D effect. For pansies, try fabric appliqué: cut shapes from silk, tack them down, and add embroidered details on top.
Connect your statement flowers with a dense undergrowth of smaller stitches.
Fill every gap with tiny French knots, lazy daisies, and seed stitches in various shades of green and complementary colors. The goal is a rich, tactile surface where every millimeter is packed with texture and color, like in these wild garden floral embroidery ideas.
10. Deconstructed Woven Narratives

Explore fiber art beyond the needle by creating an open-weave tapestry that celebrates raw texture.
Use a simple wooden frame or even heavy-duty canvas as your base. Create a warp using durable jute twine, spacing the strands widely apart for an airy, deconstructed look.
For the weft, move beyond yarn. Weave in thick, nautical-style rope, torn strips of patterned fabric, and unraveled twine.
This technique is about embracing imperfection and showcasing the inherent beauty and texture of each material, much like you’d do with eye-catching yarn wall art projects.
11. The Tactile Texture Sampler
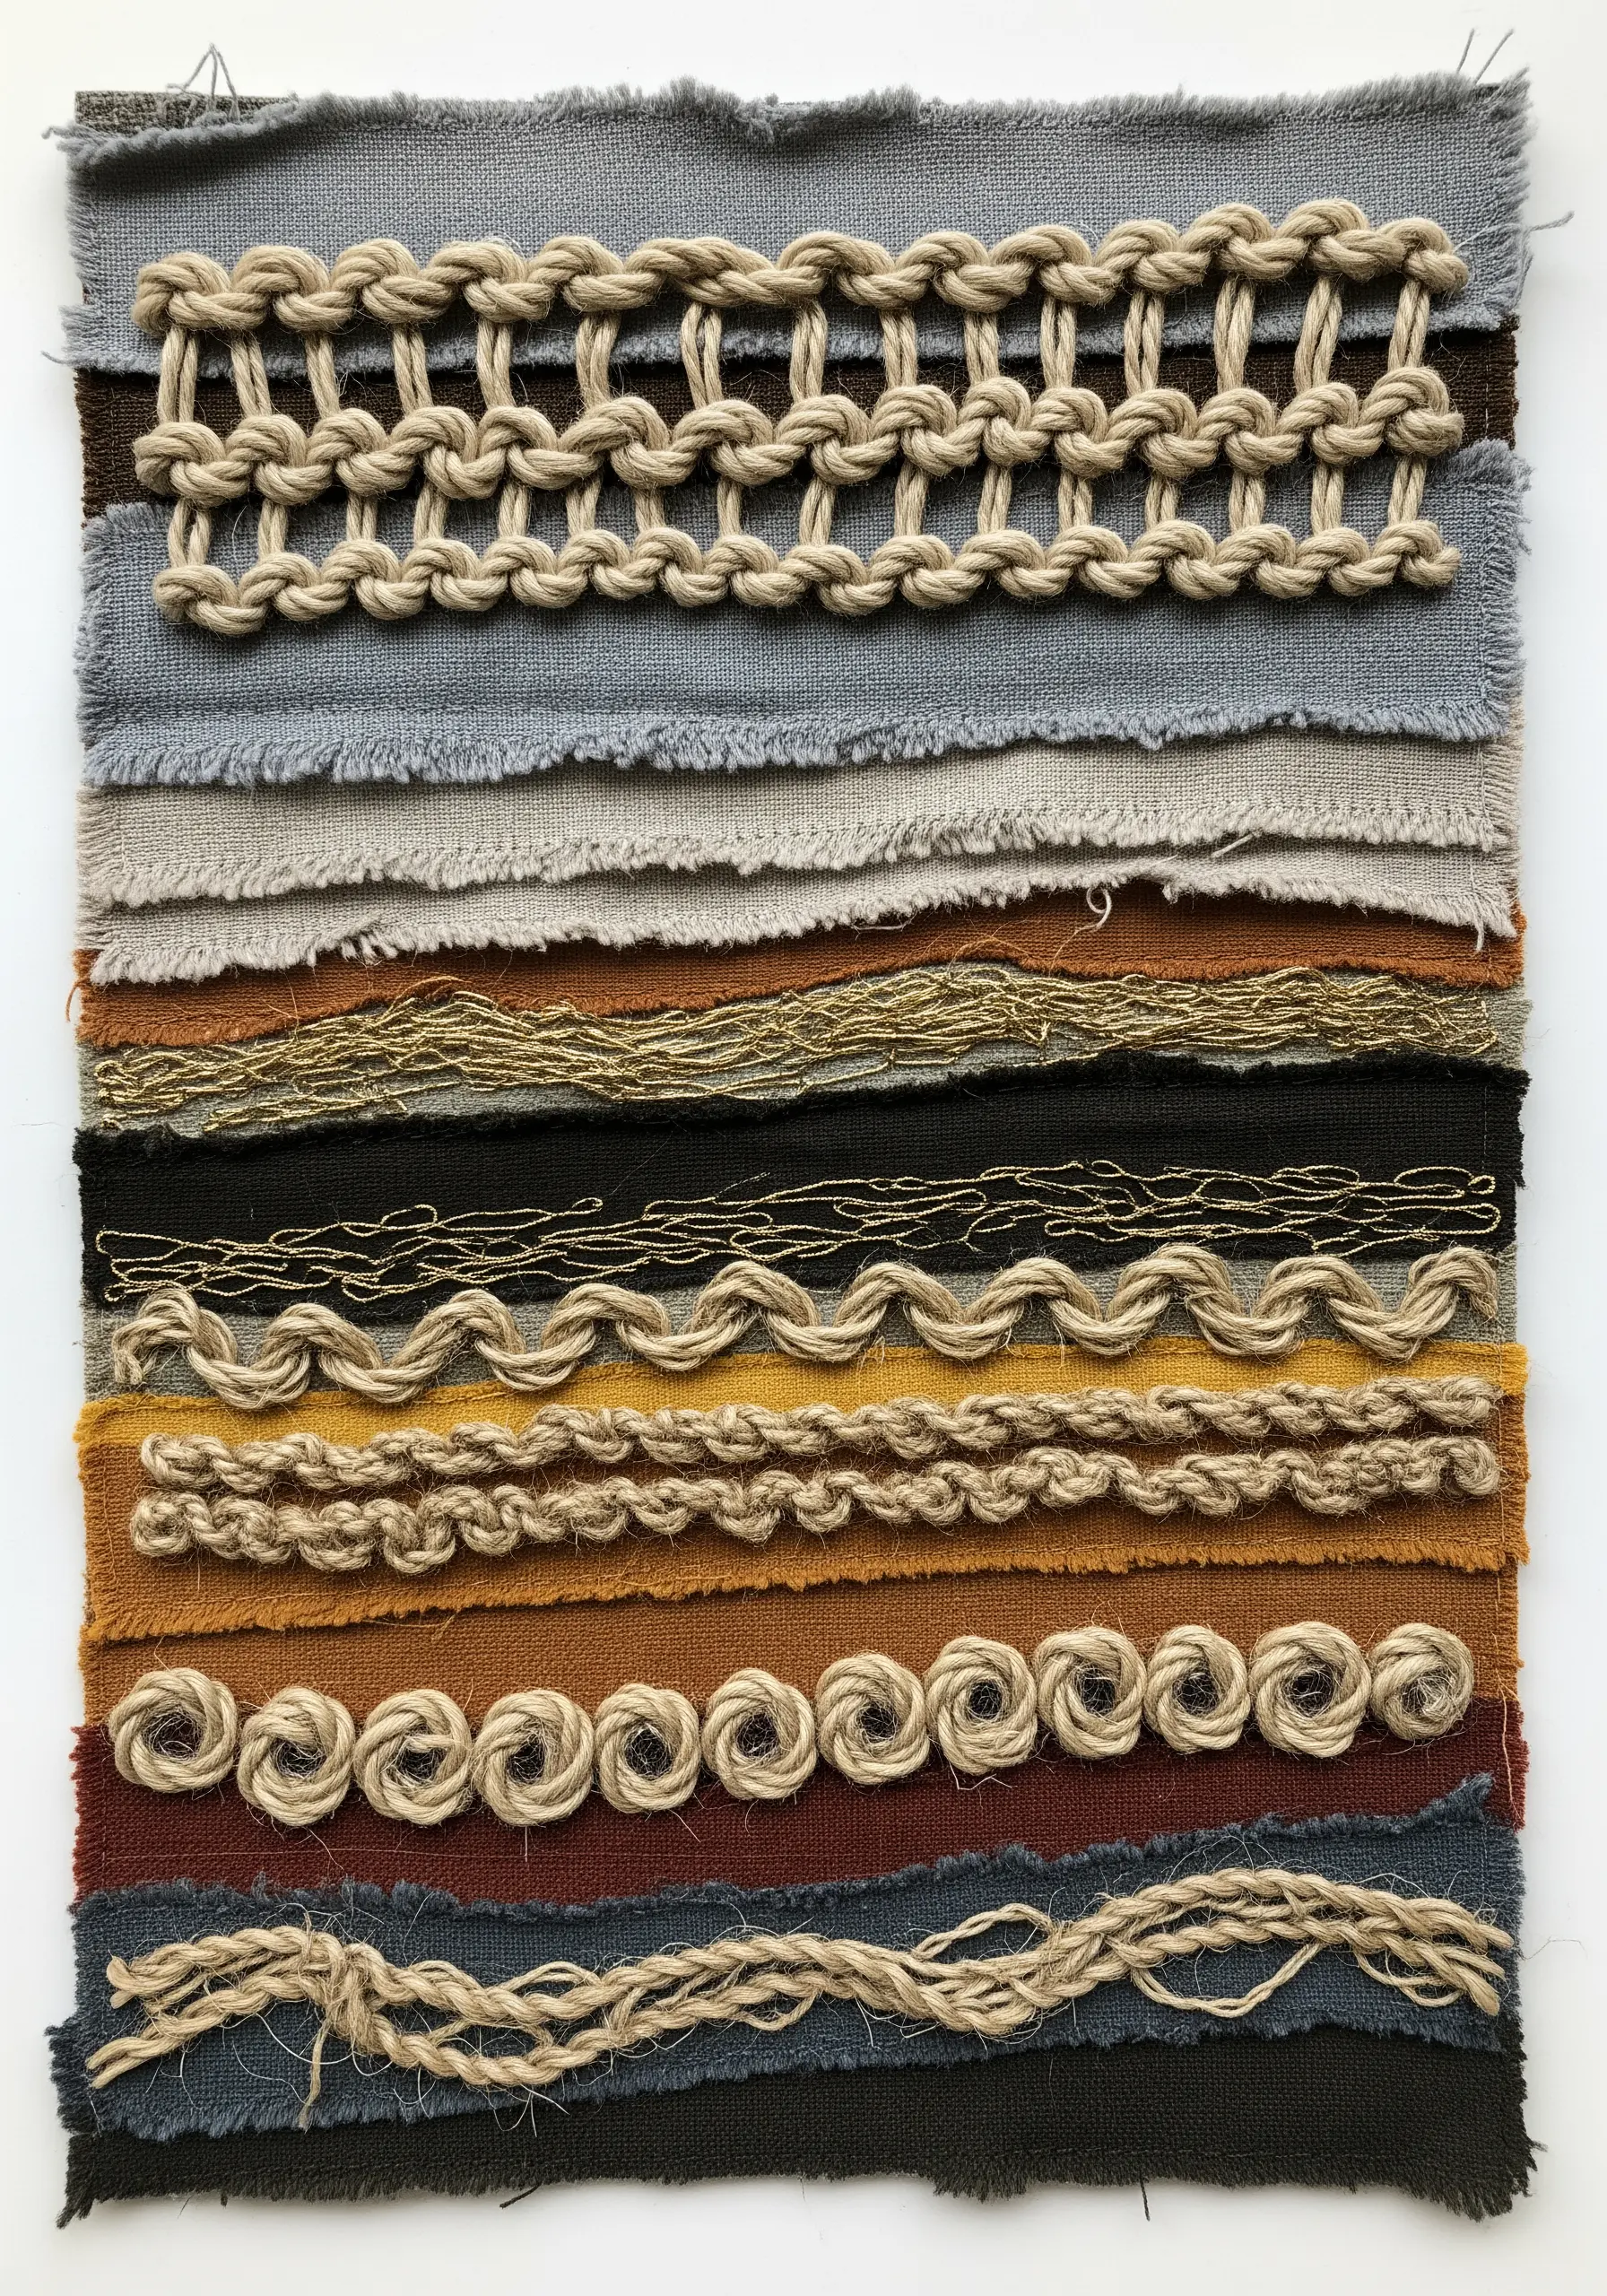
Create a visual and physical library of textures by combining different fibers and couching techniques on a layered fabric base.
Start by creating a patchwork base from scraps of linen, burlap, and canvas, leaving the edges raw for added character.
On each fabric strip, experiment with attaching different materials. Couch down rustic jute twine in swirling patterns, lay metallic threads for a hint of shine, or create braided effects with soft cotton cord.
This project isn’t about creating a picture, but about the meditative process of exploring materials, making it one of the most compelling textured neutral embroidery samplers you can create.
12. Weather Scenes with Wool Roving
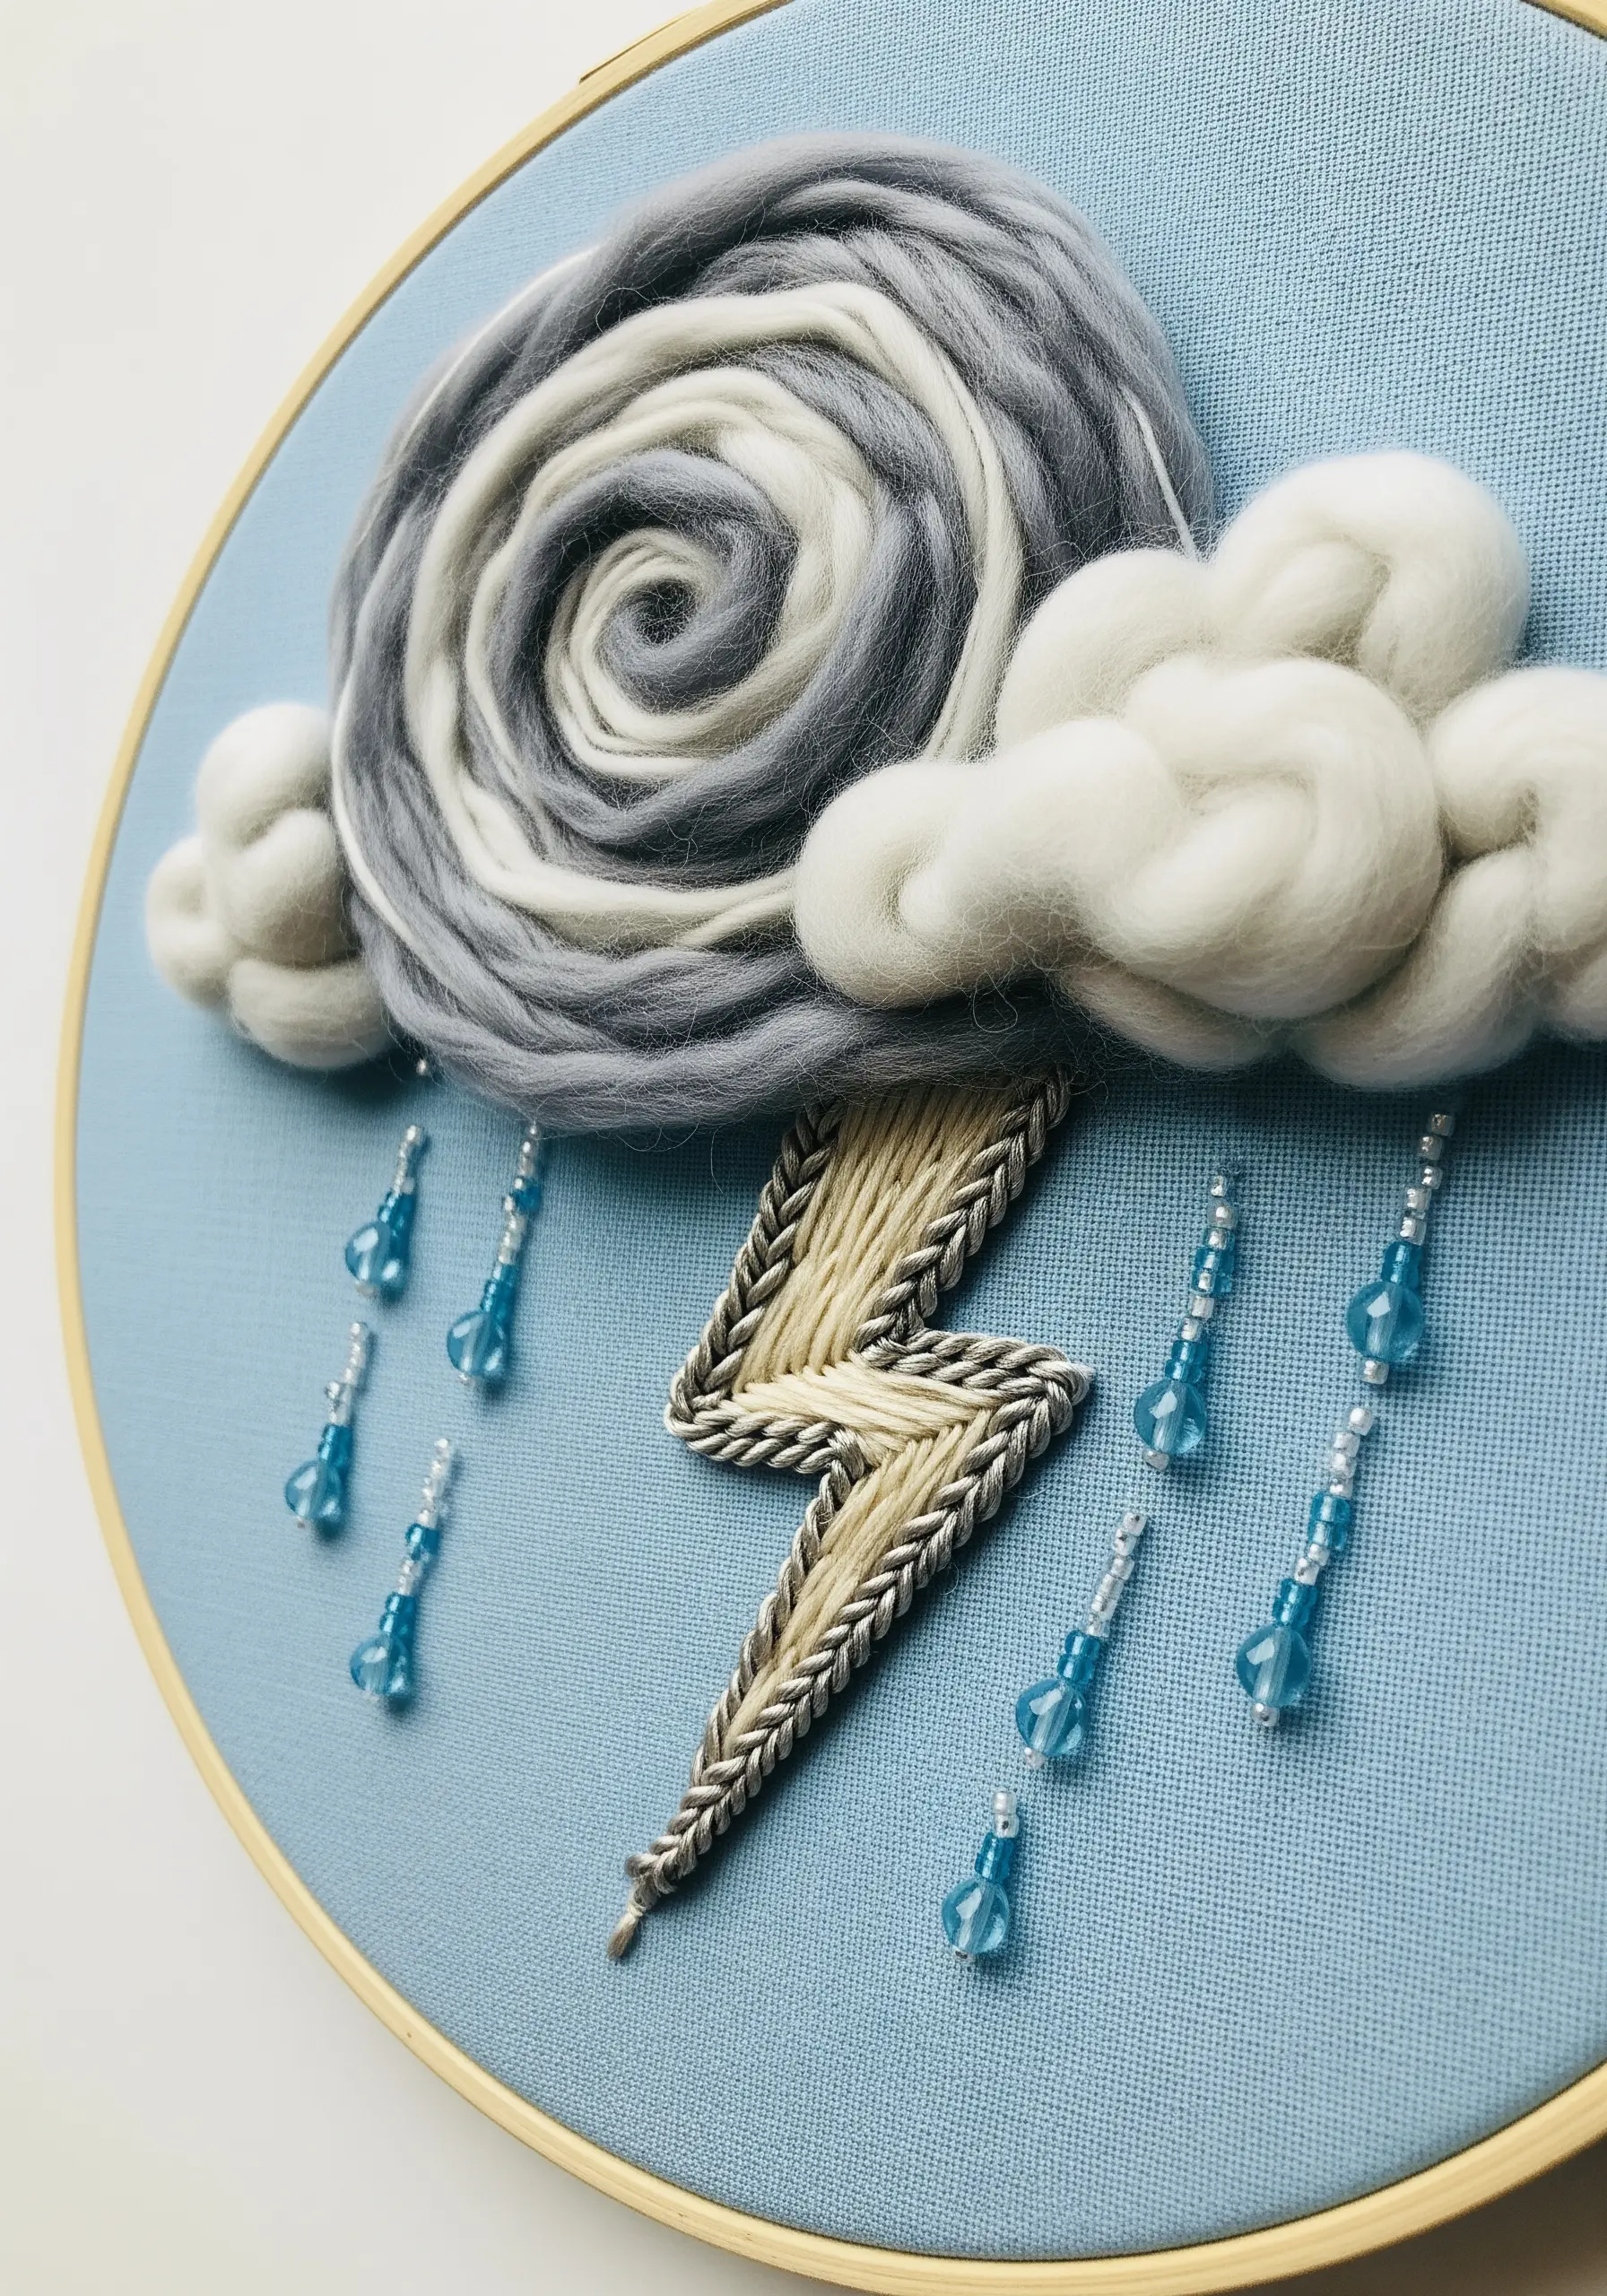
Capture the softness and movement of clouds by using needle-felted wool roving instead of stitches.
Directly on your stretched fabric, place wisps of wool roving and use a felting needle to gently tack the fibers into place. You don’t need to felt it densely; a light touch will preserve the airy, cloud-like texture.
Blend shades of grey, white, and even lavender roving to create a dramatic, swirling storm cloud.
Contrast the cloud’s softness with a sharp, graphic lightning bolt made from satin stitch and add dangling beaded raindrops for a touch of sparkle and weight.
This method is perfect for crafting 3D embroidery wall art pieces.
13. Textured Winter Vignettes

Bring a cozy, illustrative quality to your scenes by combining the plush loops of punch needle with the charm of fabric appliqué.
Use a punch needle and a fluffy white yarn to create the snow on the rooftops and ground. The loop side of punch needlework provides an incredibly satisfying, plush texture that perfectly mimics fresh-fallen snow.
For details like clothing, cut small shapes from felt or plaid flannel and appliqué them onto your base fabric. This adds a clean, graphic layer against the deep texture of the punch needle.
This mix of techniques is ideal for creating cozy DIY embroidery crafts.
14. Abstract Fire with Iridescent Fibers
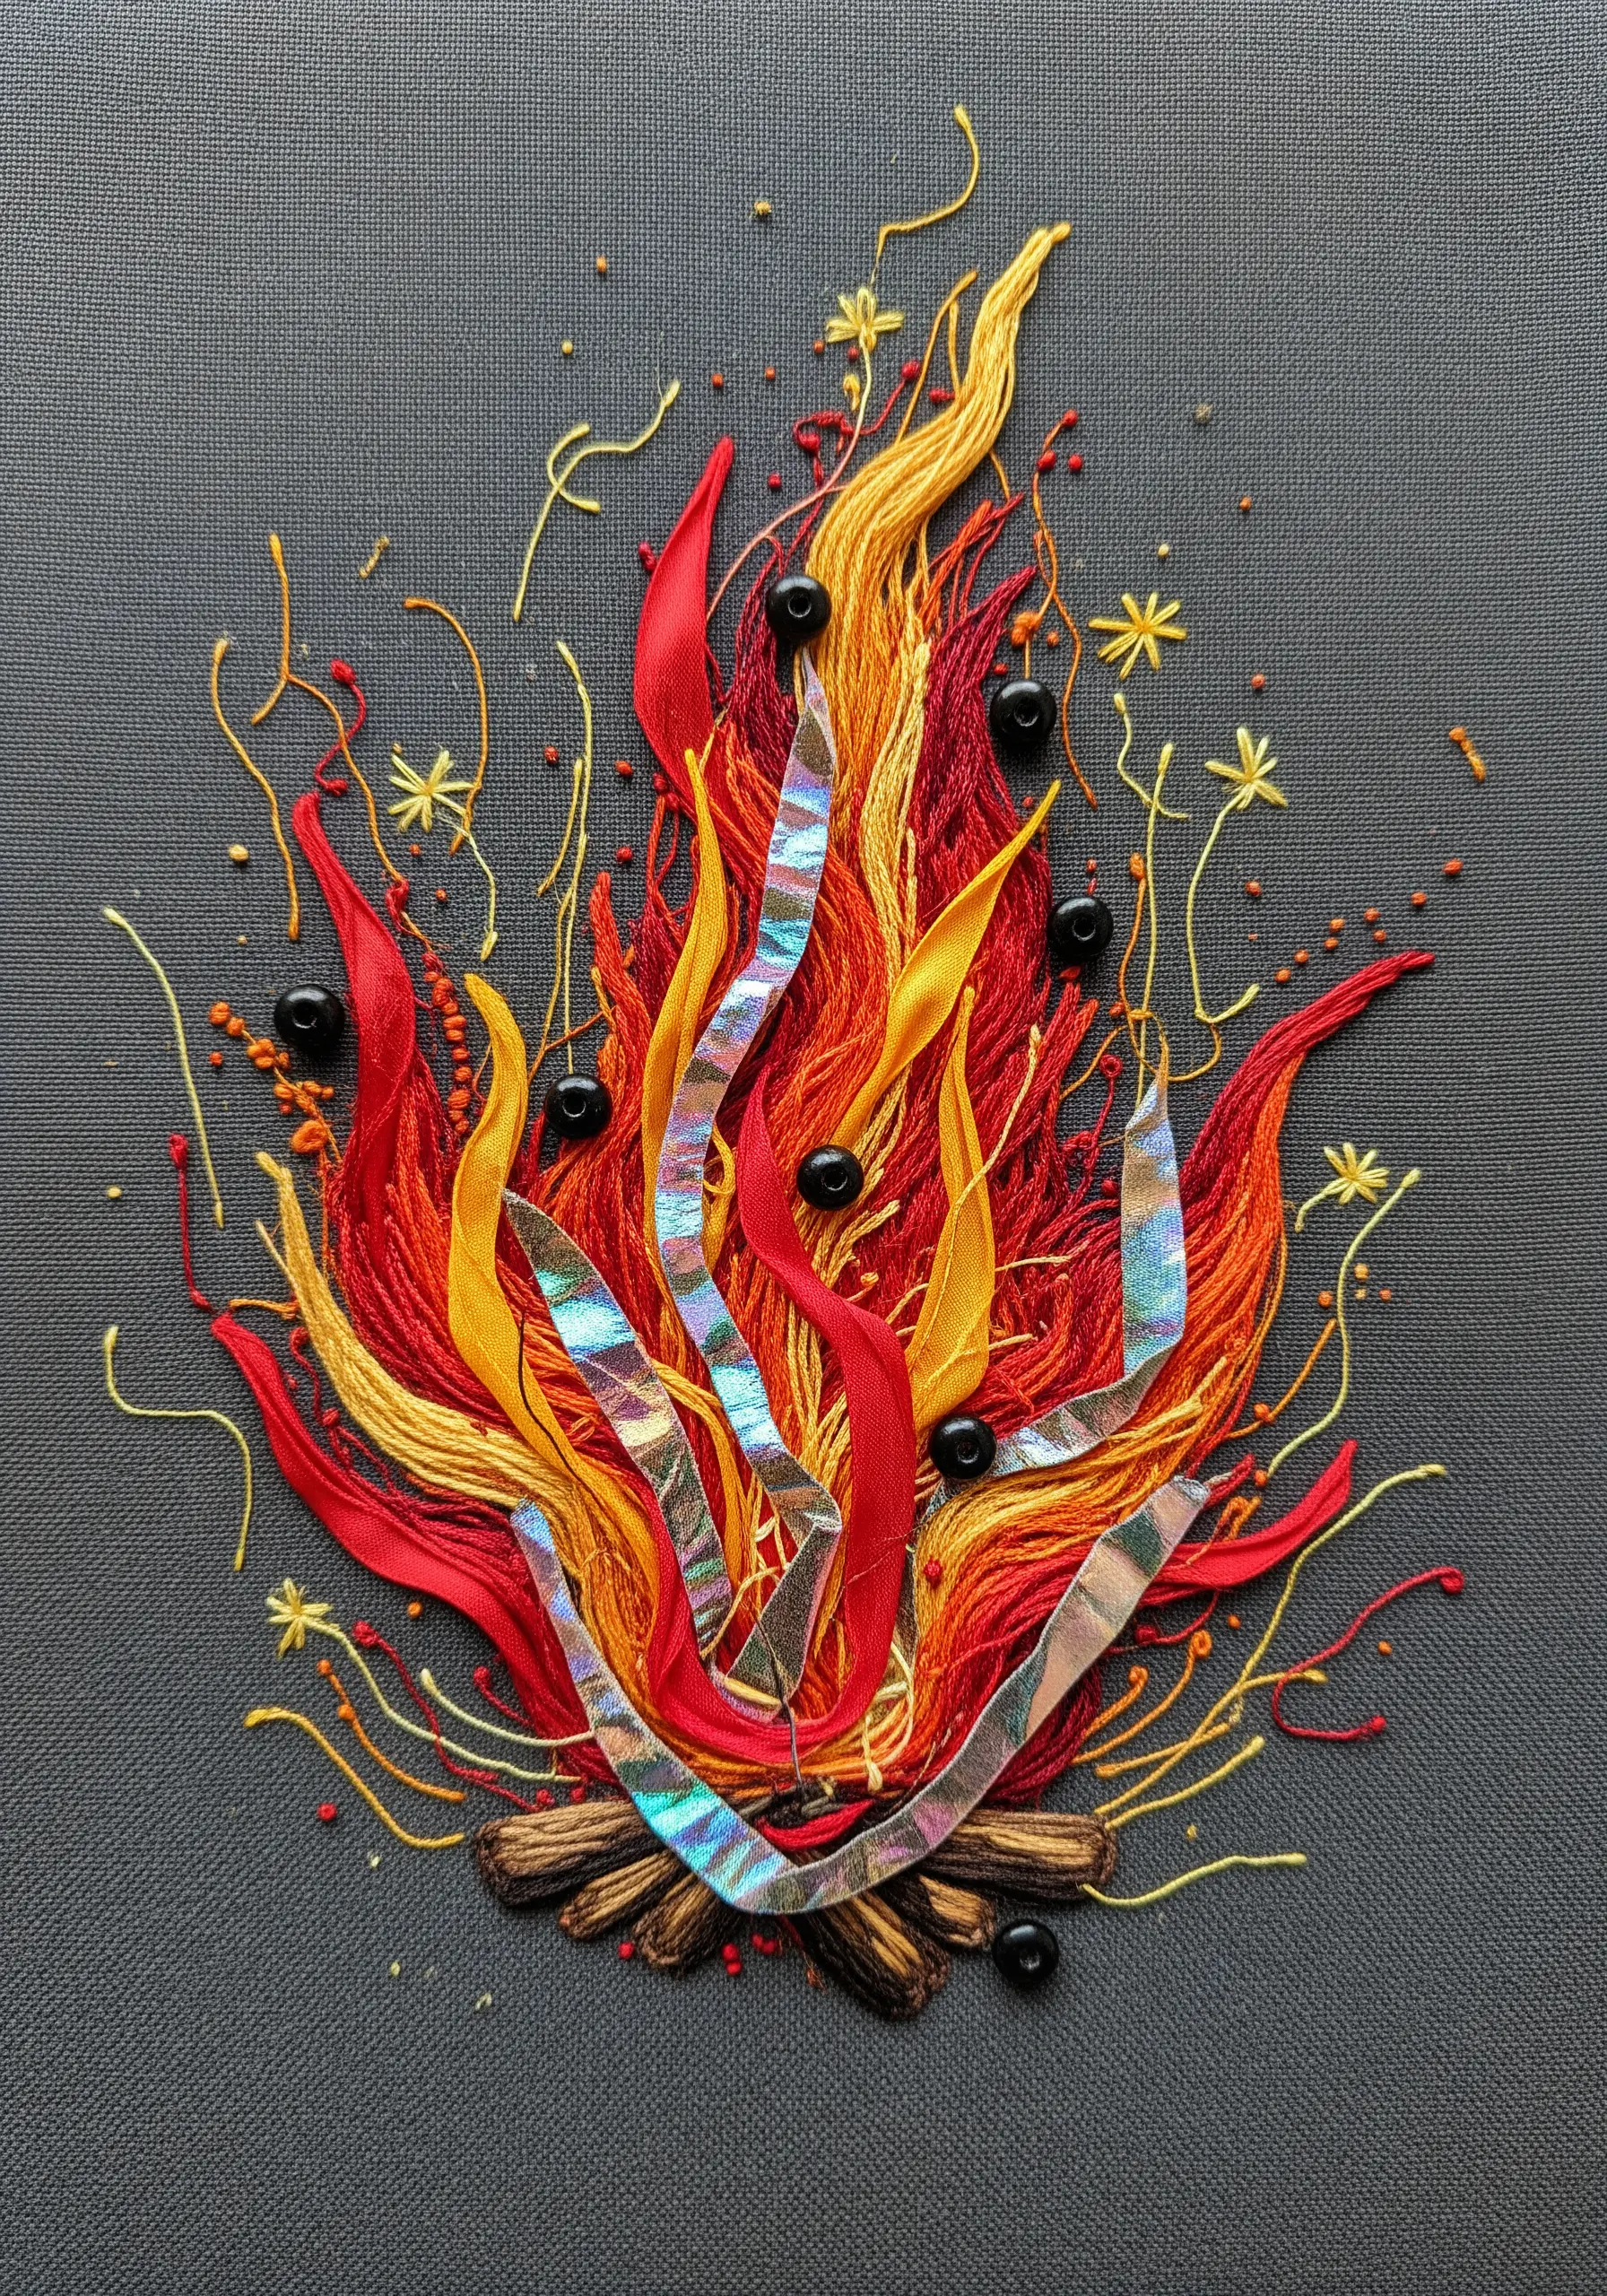
Capture the dynamic, light-catching nature of fire by layering threads, ribbons, and unconventional reflective materials.
Begin with a base of long, wild straight stitches in red, orange, and yellow embroidery floss to establish the shape and movement of the flames.
Next, weave in wider silk ribbon; its sheen will add another dimension of light and flow.
The key element is introducing non-fiber materials. Cut thin strips of iridescent foil or cellophane and couch them into the design. This unexpected element will catch the light and mimic the mesmerizing flicker of a real fire, perfect for creating abstract thread flow patterns.
15. Underwater Collage with Fiber Accents
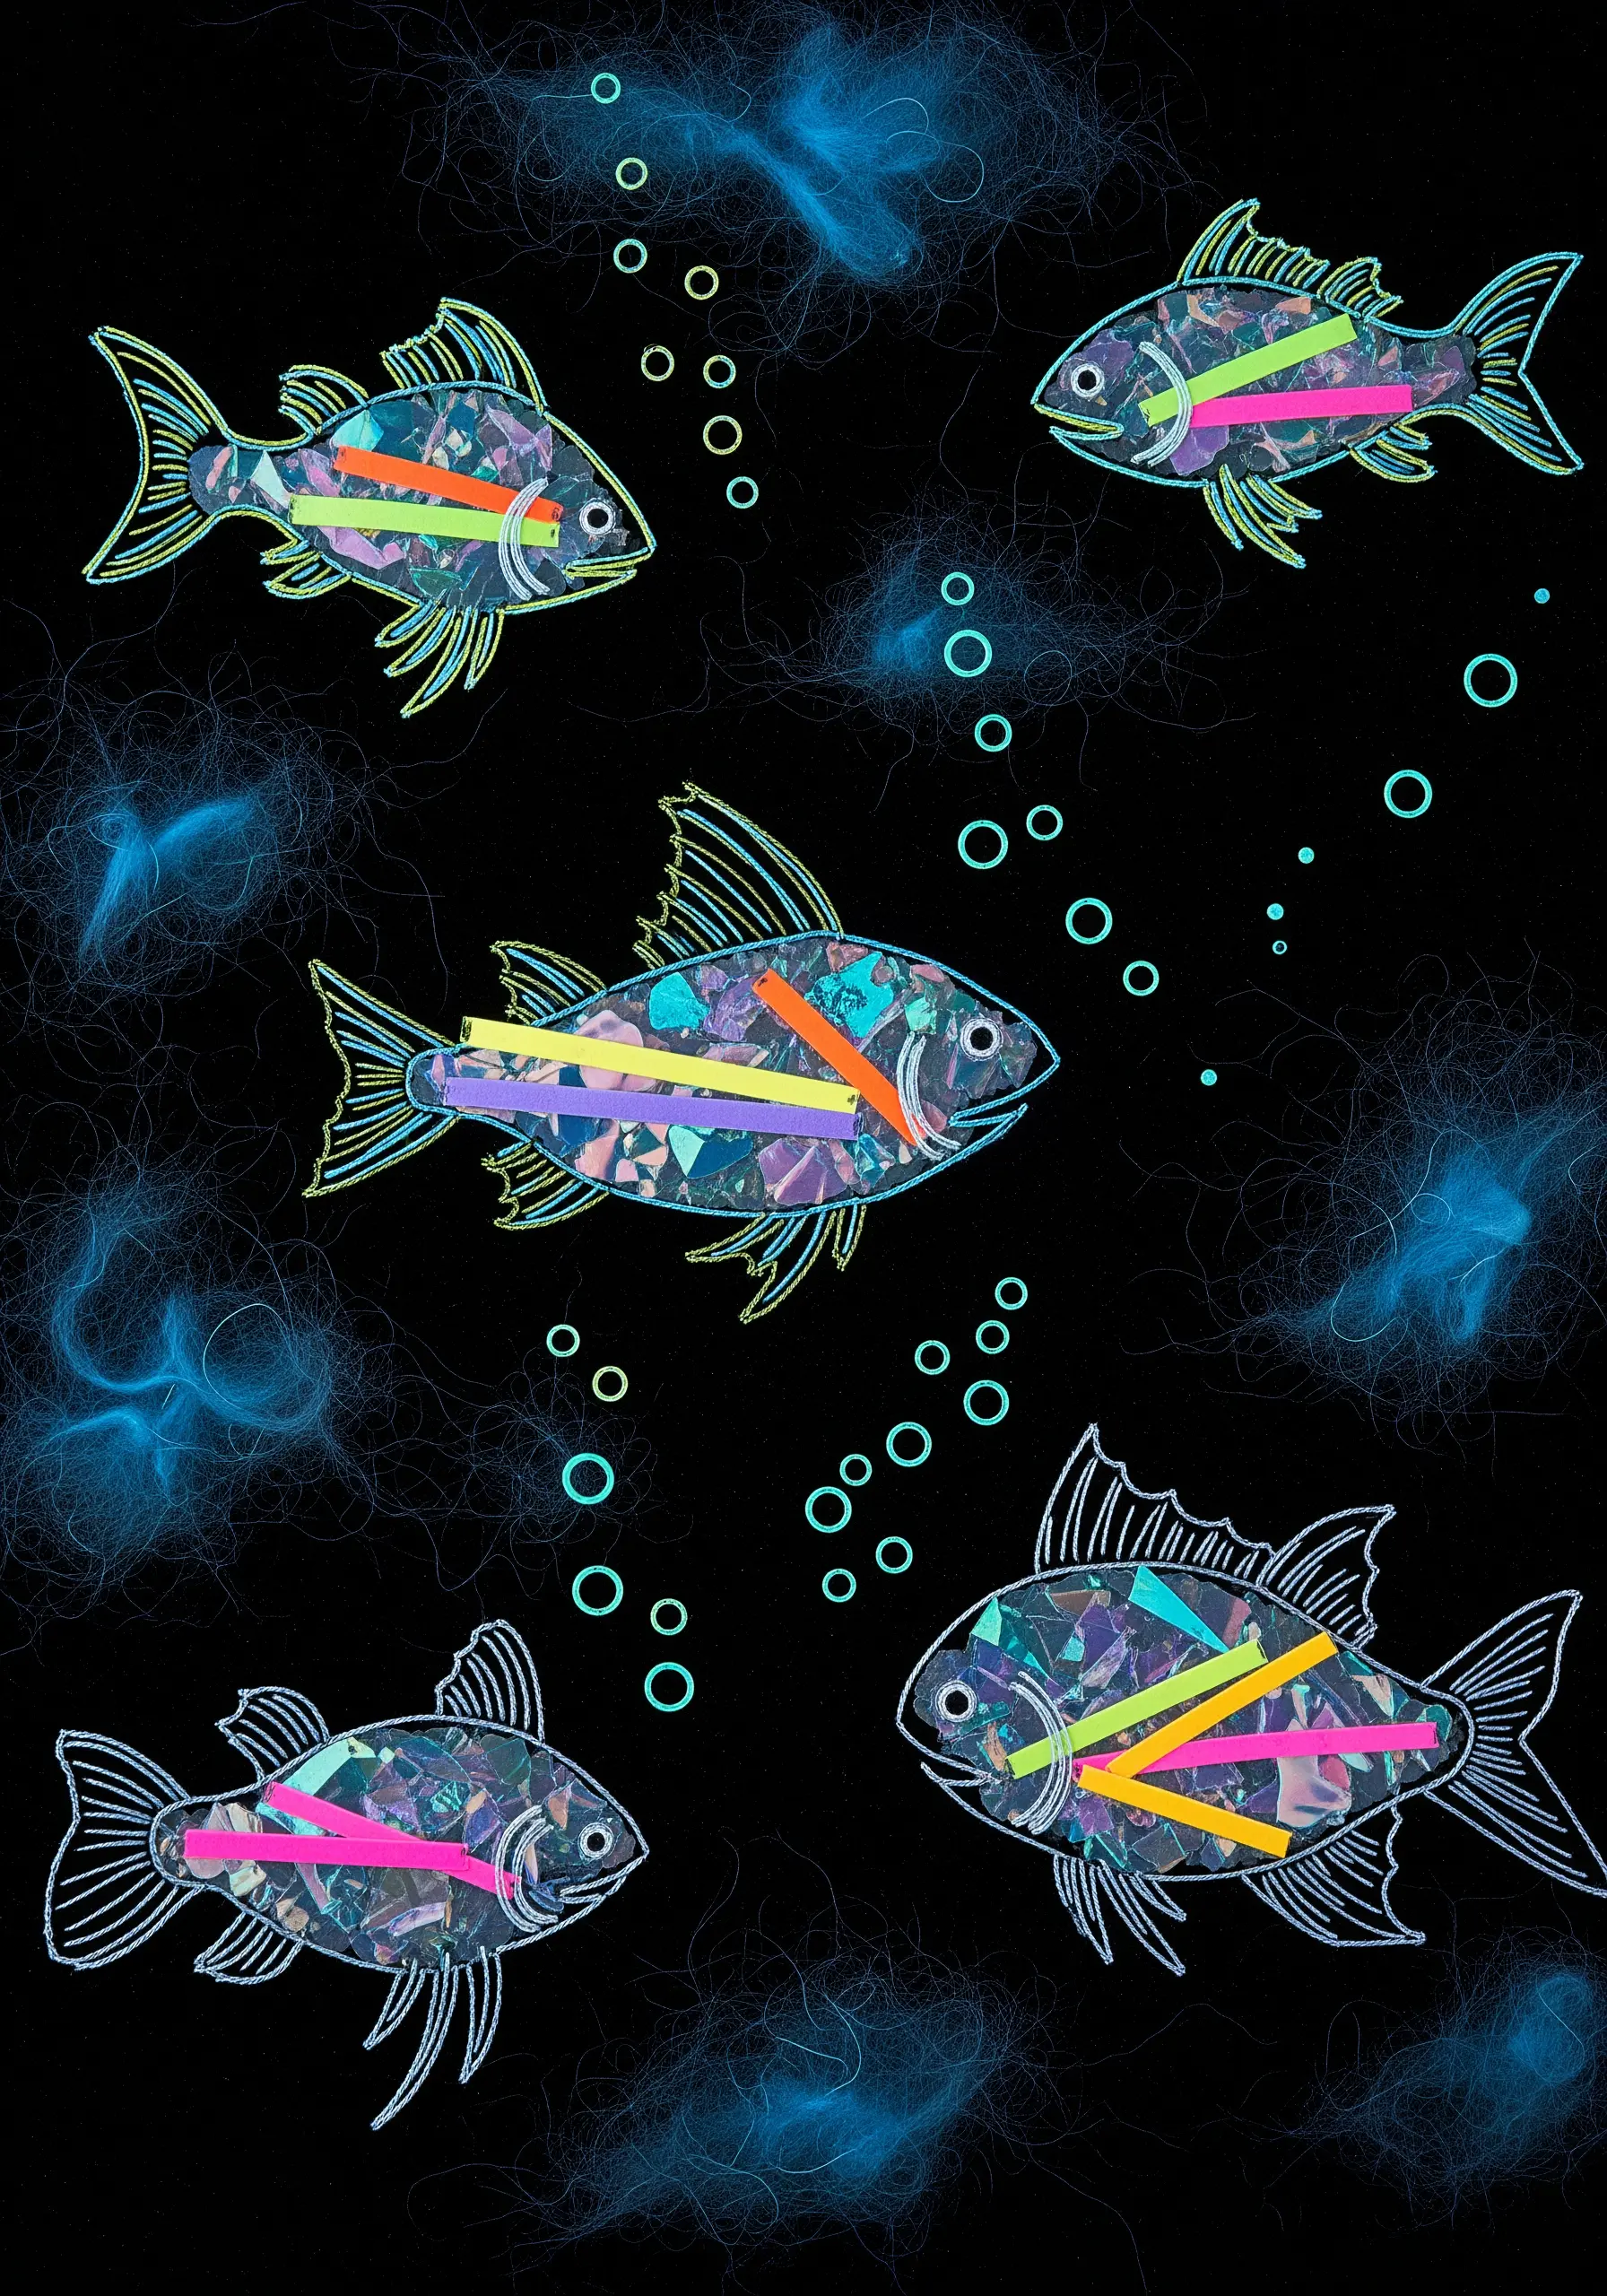
Create a dreamlike underwater scene by combining the clean edges of fabric collage with the soft haze of loose fibers.
First, create your fish by cutting shapes from patterned or collaged paper and securing them to a dark fabric base. Define their forms with a simple backstitch outline in a light, contrasting thread.
To create the atmospheric water effect, use a felting needle to lightly tack down loose tufts of blue Angelina fiber or wool roving. This technique adds color and texture without solid stitches, resulting in a mysterious, deep-sea ambiance.
It’s an imaginative way to create fish mermaid inspired embroidery pieces.
16. Sculptural Fruit Basket
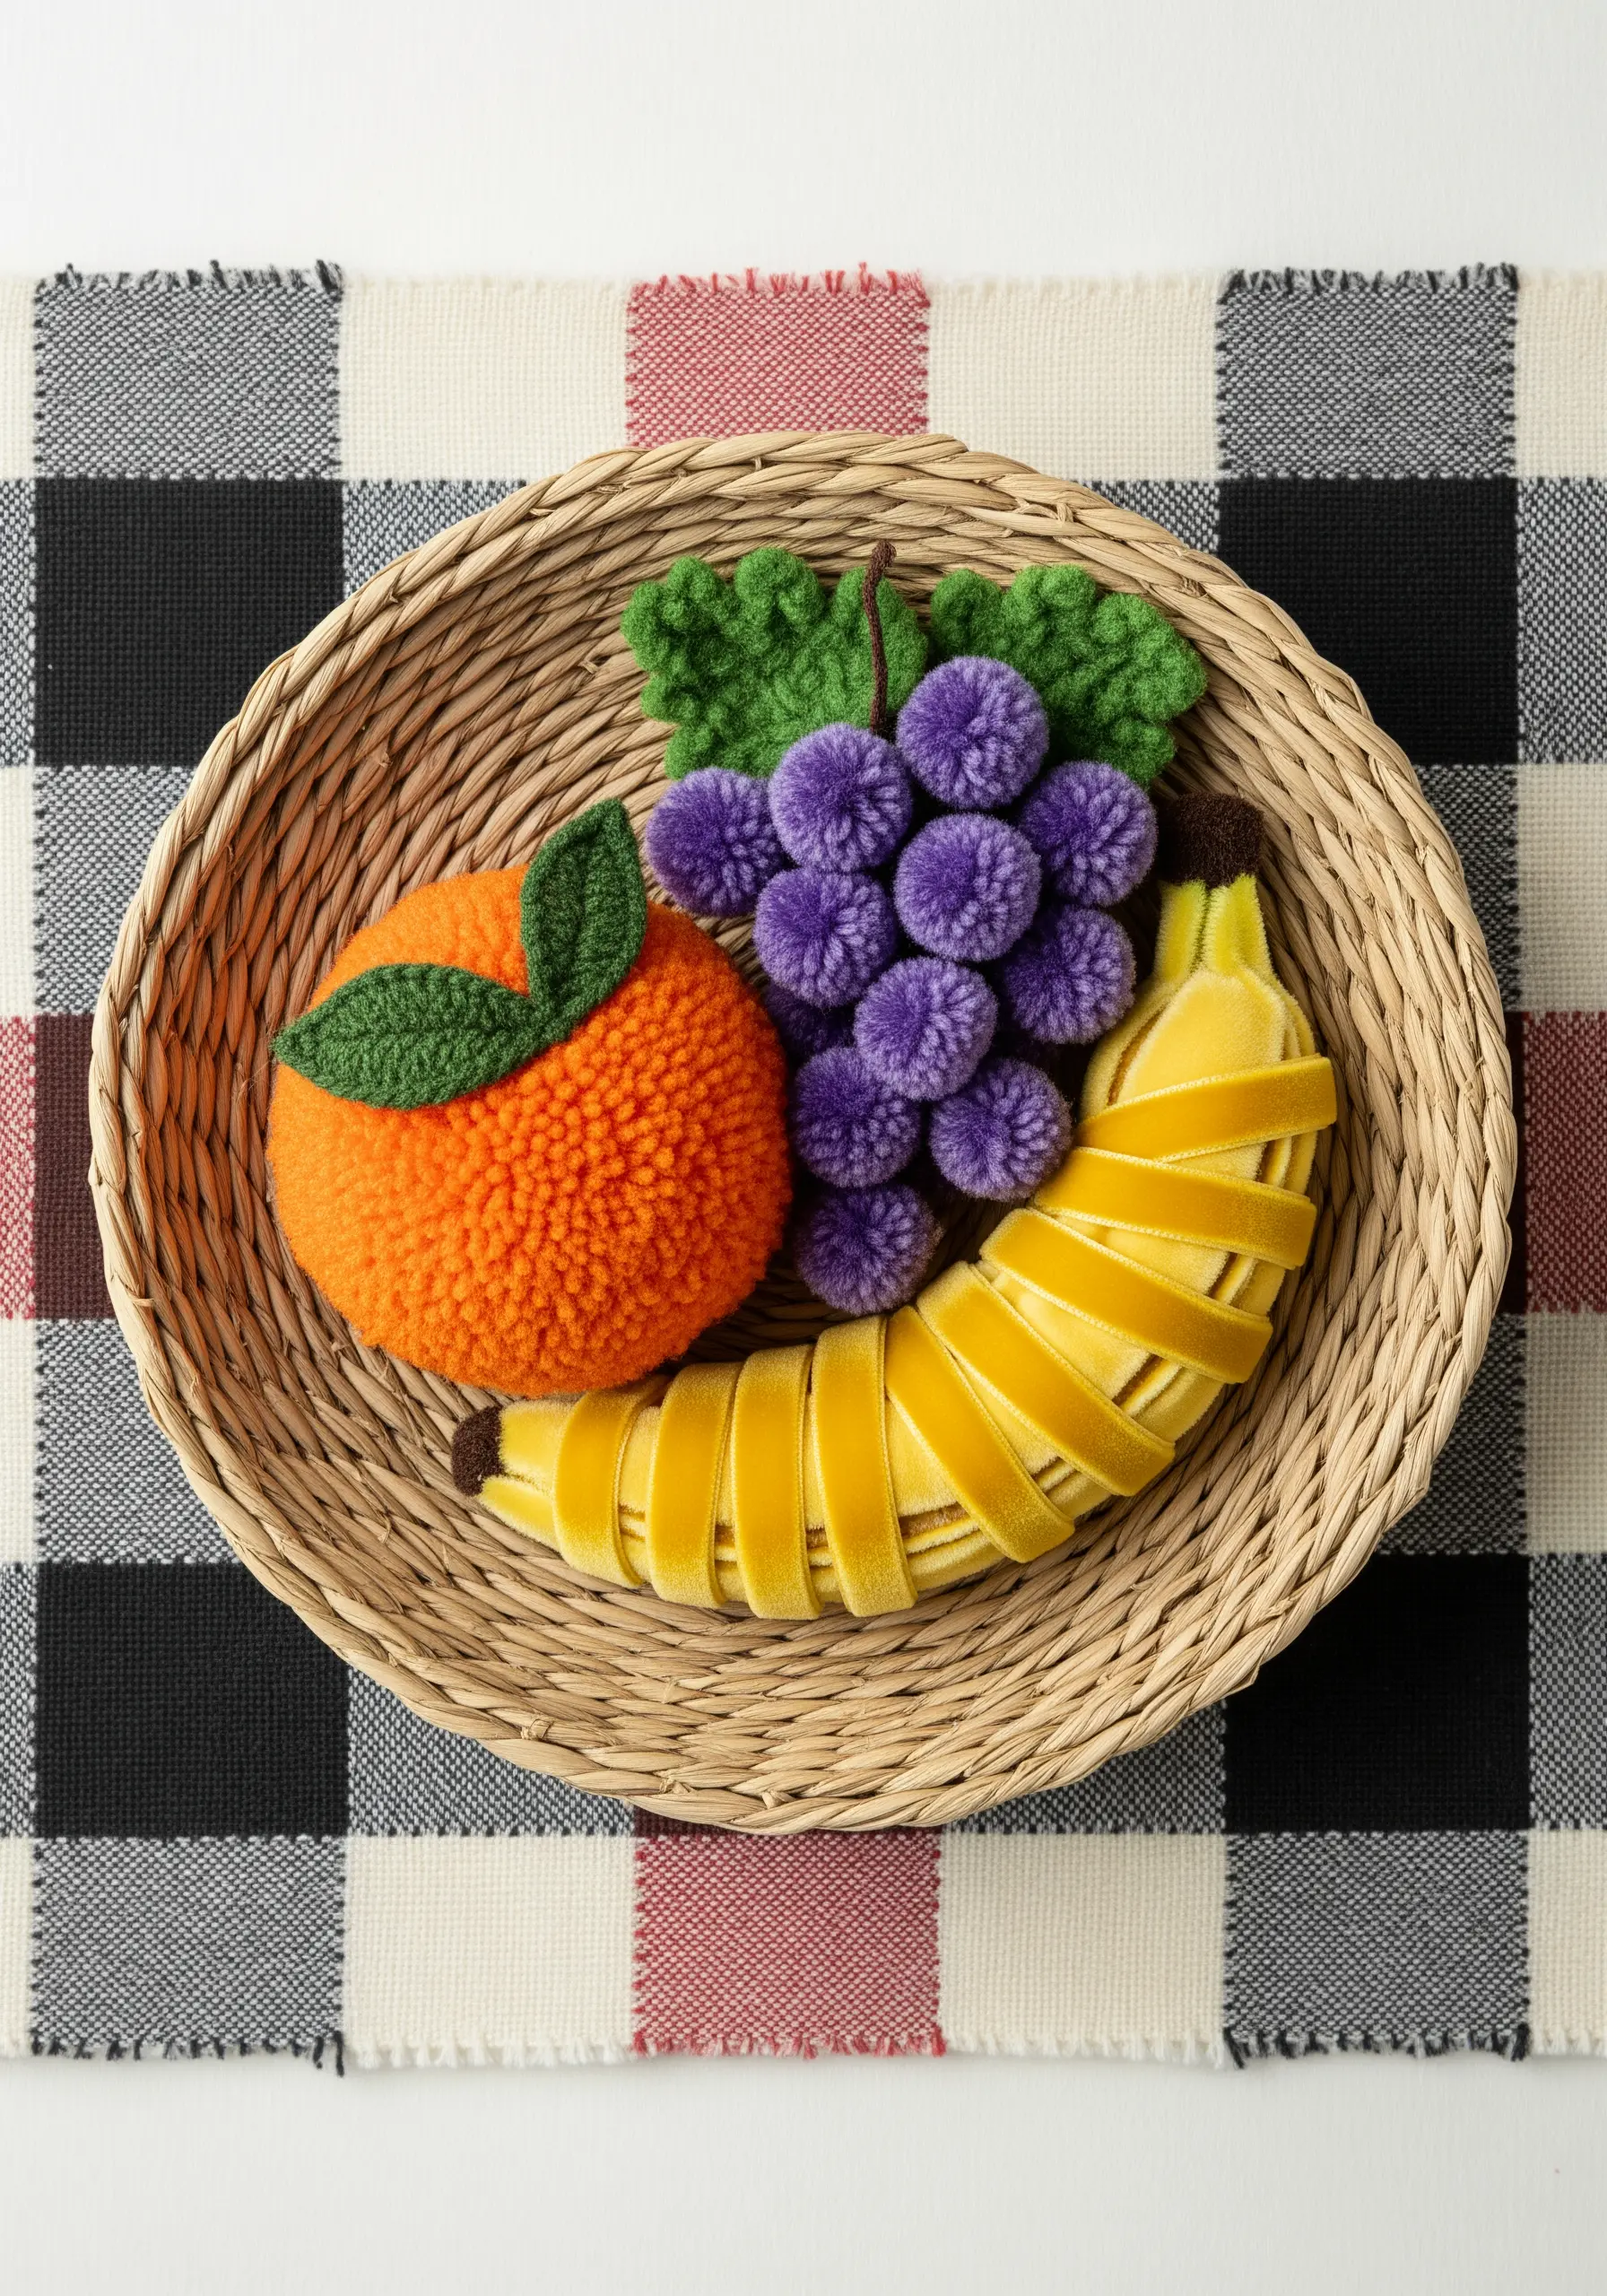
Move beyond the hoop and build three-dimensional objects using fiber techniques that focus on form and volume.
Create plush grapes by making and clustering dozens of small purple yarn pompoms.
For the orange, use a punch needle with thick orange yarn over a spherical base to create a dense, peel-like texture.
To form the banana, create a simple padded shape from scrap fabric and tightly wrap it with strips of luxurious yellow velvet ribbon, securing the ends discreetly. This tactile approach turns simple materials into delightful, sculptural forms.
These are just a few artistic objects you can make from leftover craft supplies.
17. Architectural Embroidery with Color Accents

Create a sophisticated, modern aesthetic by pairing precise, monochrome line work with a single, bold stroke of color.
Use a fine, single-strand thread to stitch your architectural blueprint onto a dark, high-contrast fabric like navy linen. A neat backstitch is perfect for achieving the clean, technical lines required.
Choose one key structural element to become your focal point. Fill this area with a flawless satin stitch in a vibrant, contrasting color.
This disciplined use of color instantly draws the eye, transforming a simple diagram into a piece of graphic art, a great way to elevate even the most minimalist stitches.
18. Embellished Seascapes with Found Objects

Infuse your textile art with a sense of place by incorporating natural, found objects into your design.
Create soft, rolling waves by laying down horizontal bands of wool roving in seafoam and blue tones, tacking them gently into place with a matching thread.
Then, embellish your scene with treasures from the shore. Use a strong thread to securely stitch down pieces of smooth sea glass and small, lustrous pearls.
The combination of the soft, matte wool with the hard, shimmering objects creates a rich, multi-sensory piece that tells a story and elevates your ocean marine embroidery wall themes.
19. Topographical Maps with Layered Felt

Construct a compelling, 3D map by using layered felt to represent elevation and metallic fabrics for dramatic effect.
Start by cutting concentric shapes from different colored felt, with each layer slightly smaller than the one beneath it. Stack and stitch them onto your base fabric to build up your topography.
Use a simple backstitch to add fine contour lines over the felt, enhancing the map-like quality.
For key features like mountain ranges or water, appliqué a piece of silver lamé or metallic fabric. This high-shine element provides a stunning contrast to the matte felt and creates an immediate focal point.
These are the kinds of modern thread illusion techniques that add incredible depth.
20. Curated Collections of Embroidered Objects

Instead of a single composition, create a series of small, individual embroidered patches or brooches to display as a collection.
This approach allows you to experiment with a wide range of materials on a small scale. Try beading for a crystal, felt appliqué and thread painting for a mushroom, and dense French knots for a mossy texture.
Finish each piece individually by gluing it to a stiff felt backing and adding a brooch pin.
Arrange them in a shadow box to create a beautiful, naturalist-style display. These make for small embroidery projects that make perfect handmade gifts.


