

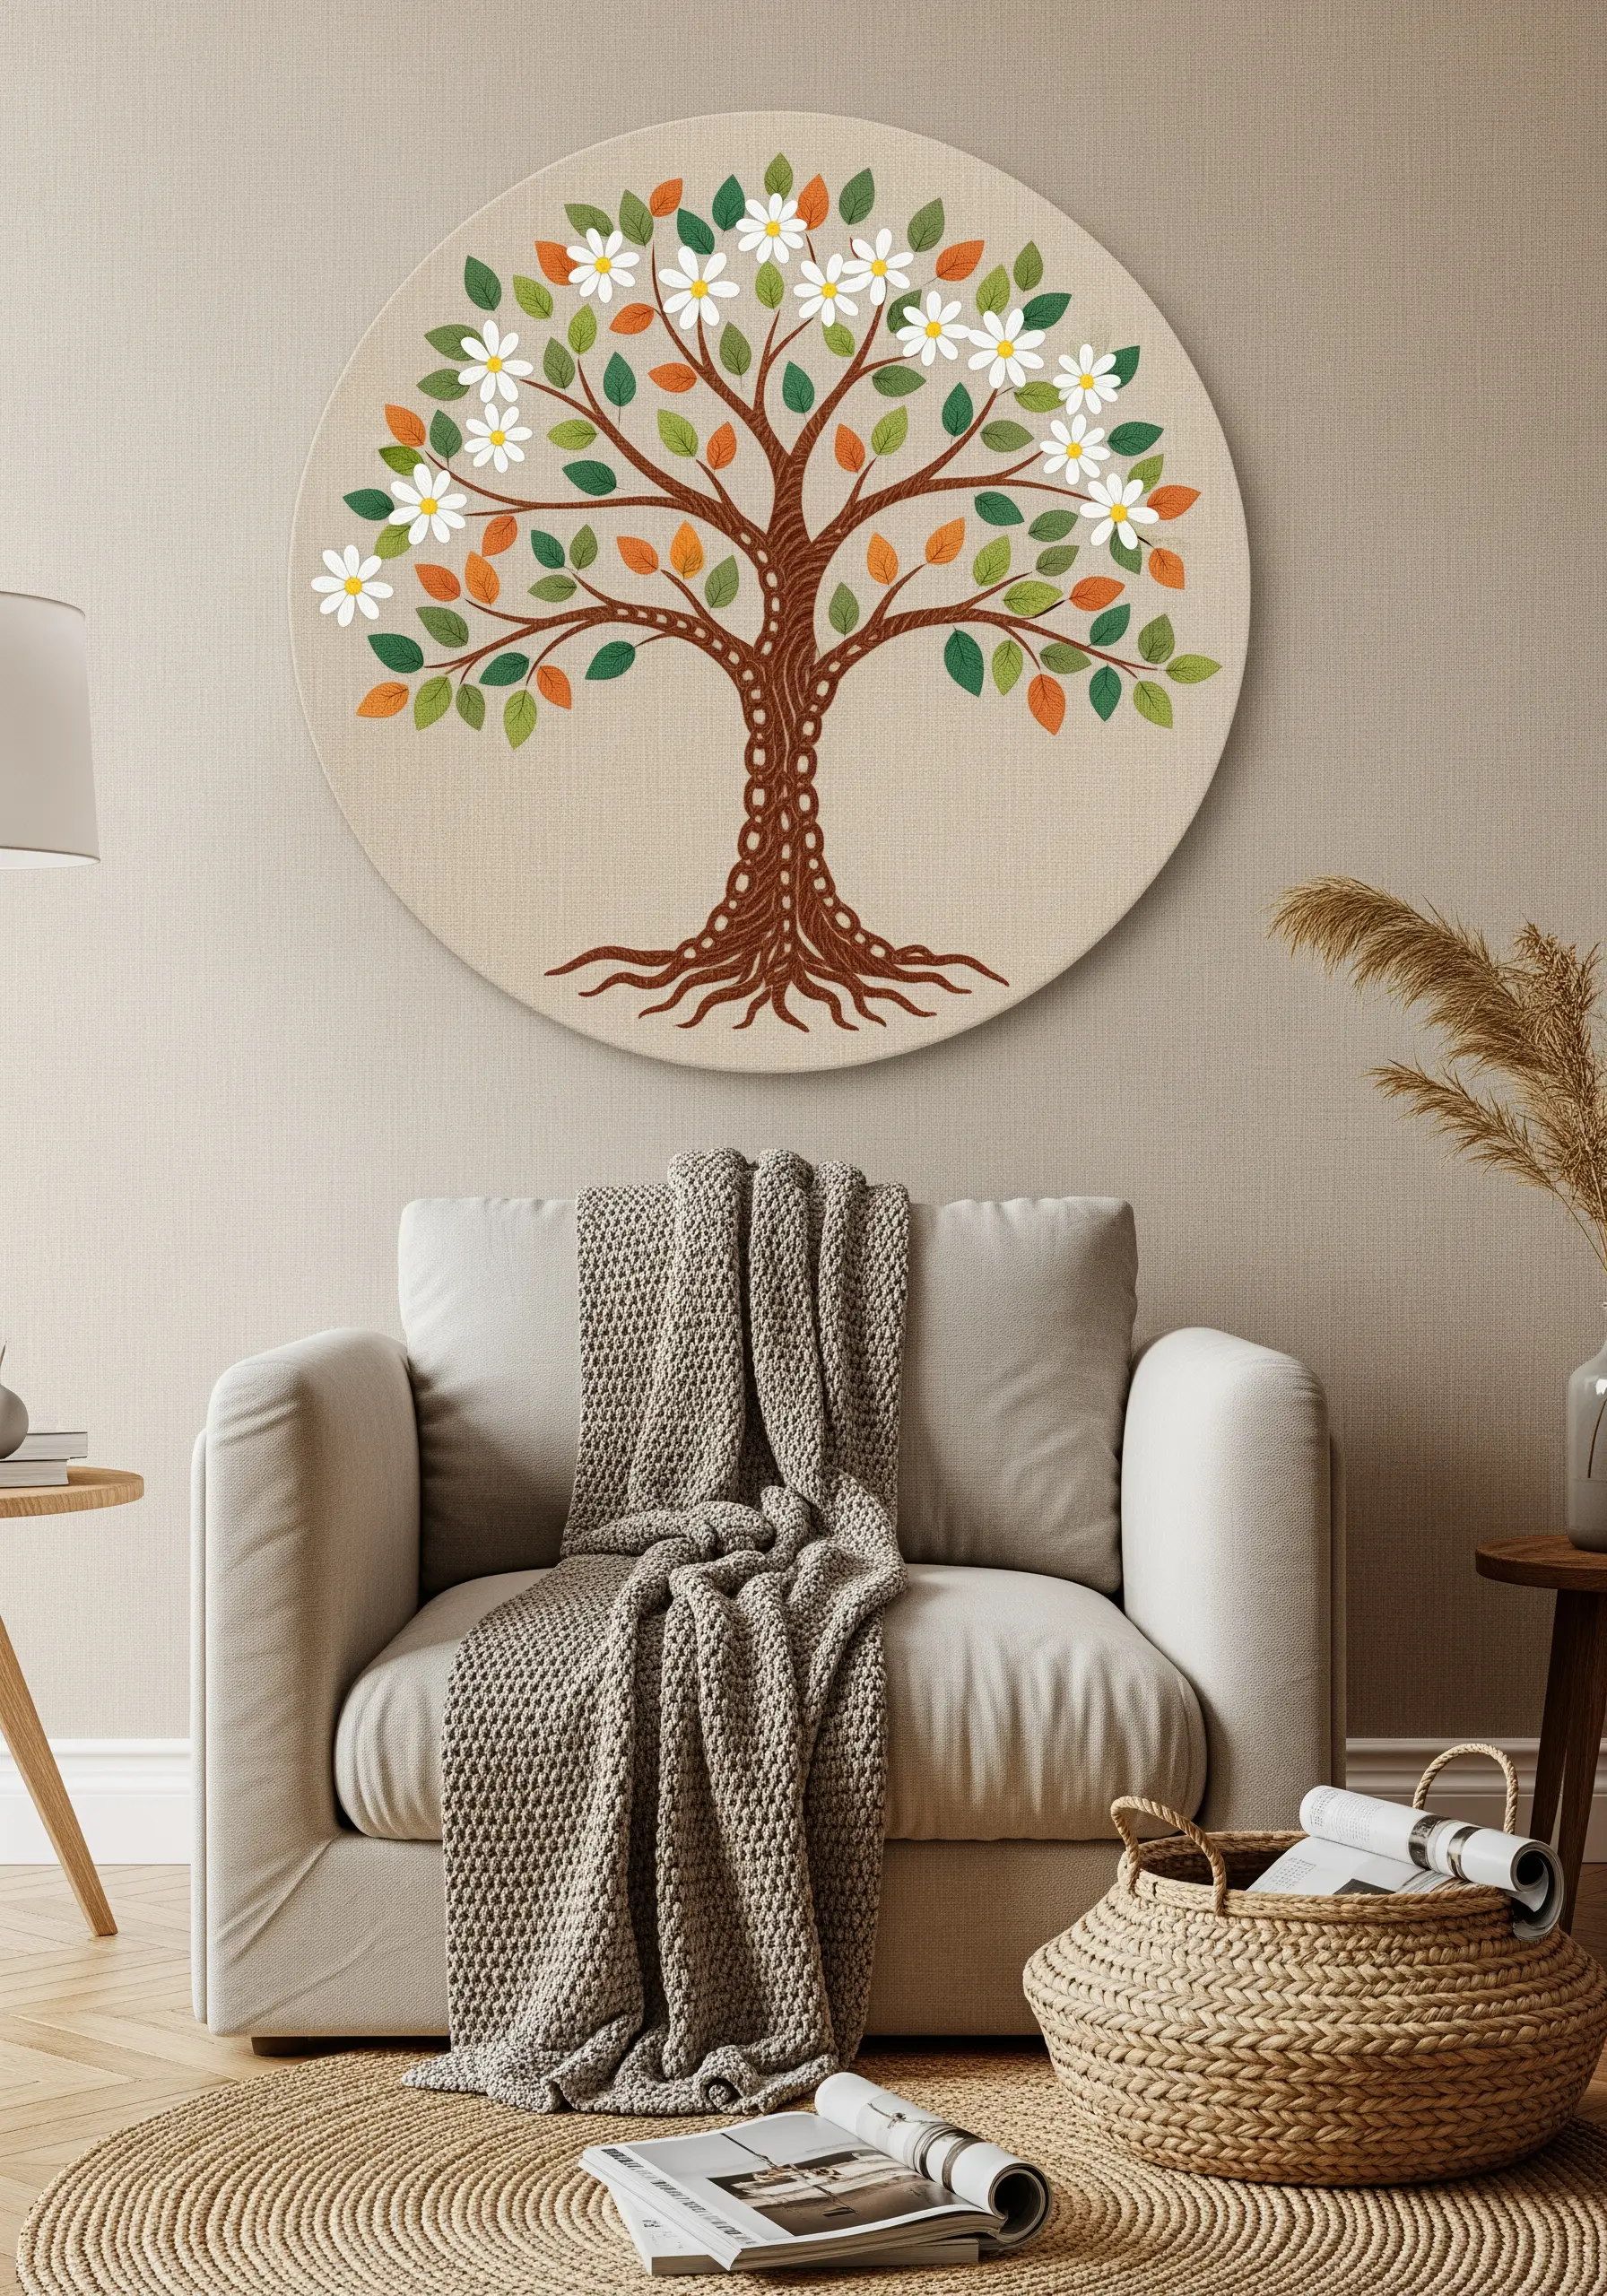
Embroidery on canvas offers something a hoop can’t always give you: a sense of permanence and scale. It allows your stitching to step off the crafting table and become a true piece of interior art. But where do you begin when the possibilities feel endless?
Instead of searching for complex patterns, I want you to focus on the power of a single, well-executed technique. Think about texture, the weight of your thread, and how a simple stitch, when repeated with intention, can create something deeply impactful. This is how you move from following a pattern to designing with thread.
These ideas are your starting point. Use them to explore how a raised stitch can cast a shadow, how a single line can tell a story, and how a thoughtful color palette can transform not just your canvas, but the feeling of your entire room. Your next masterpiece is waiting in a single, confident stitch.
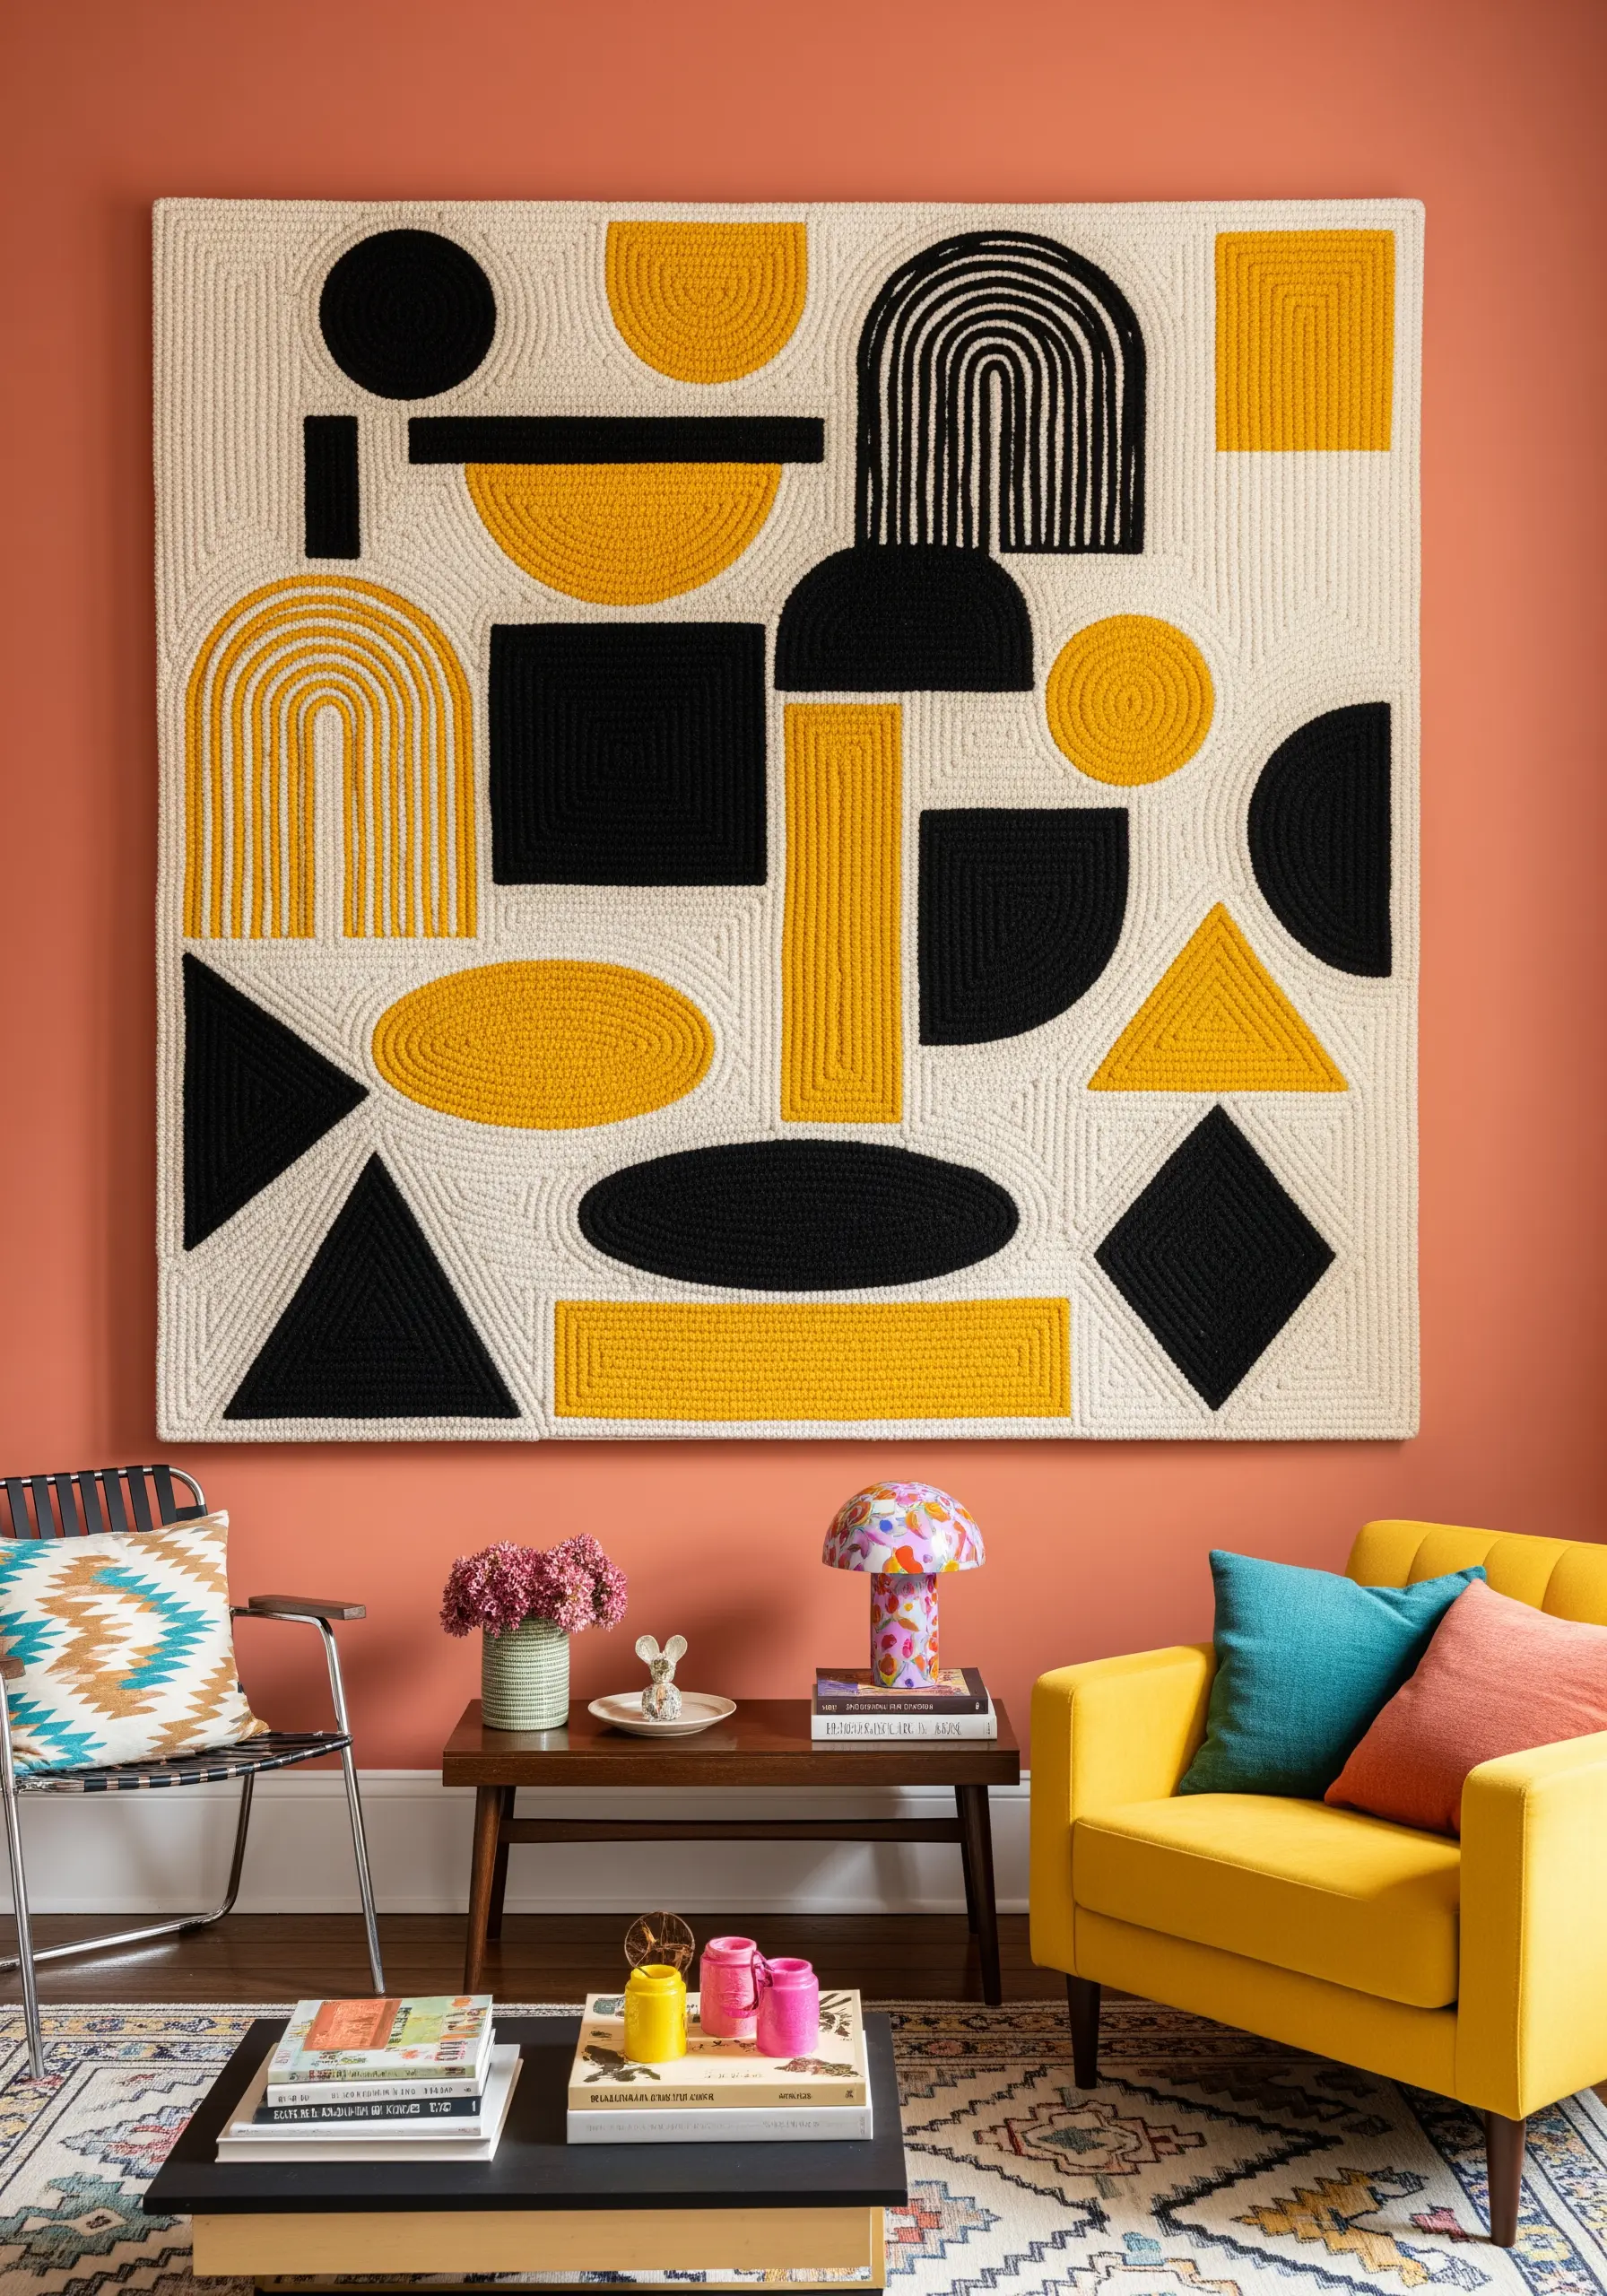
1. Master Large-Scale Texture with Chunky Yarn
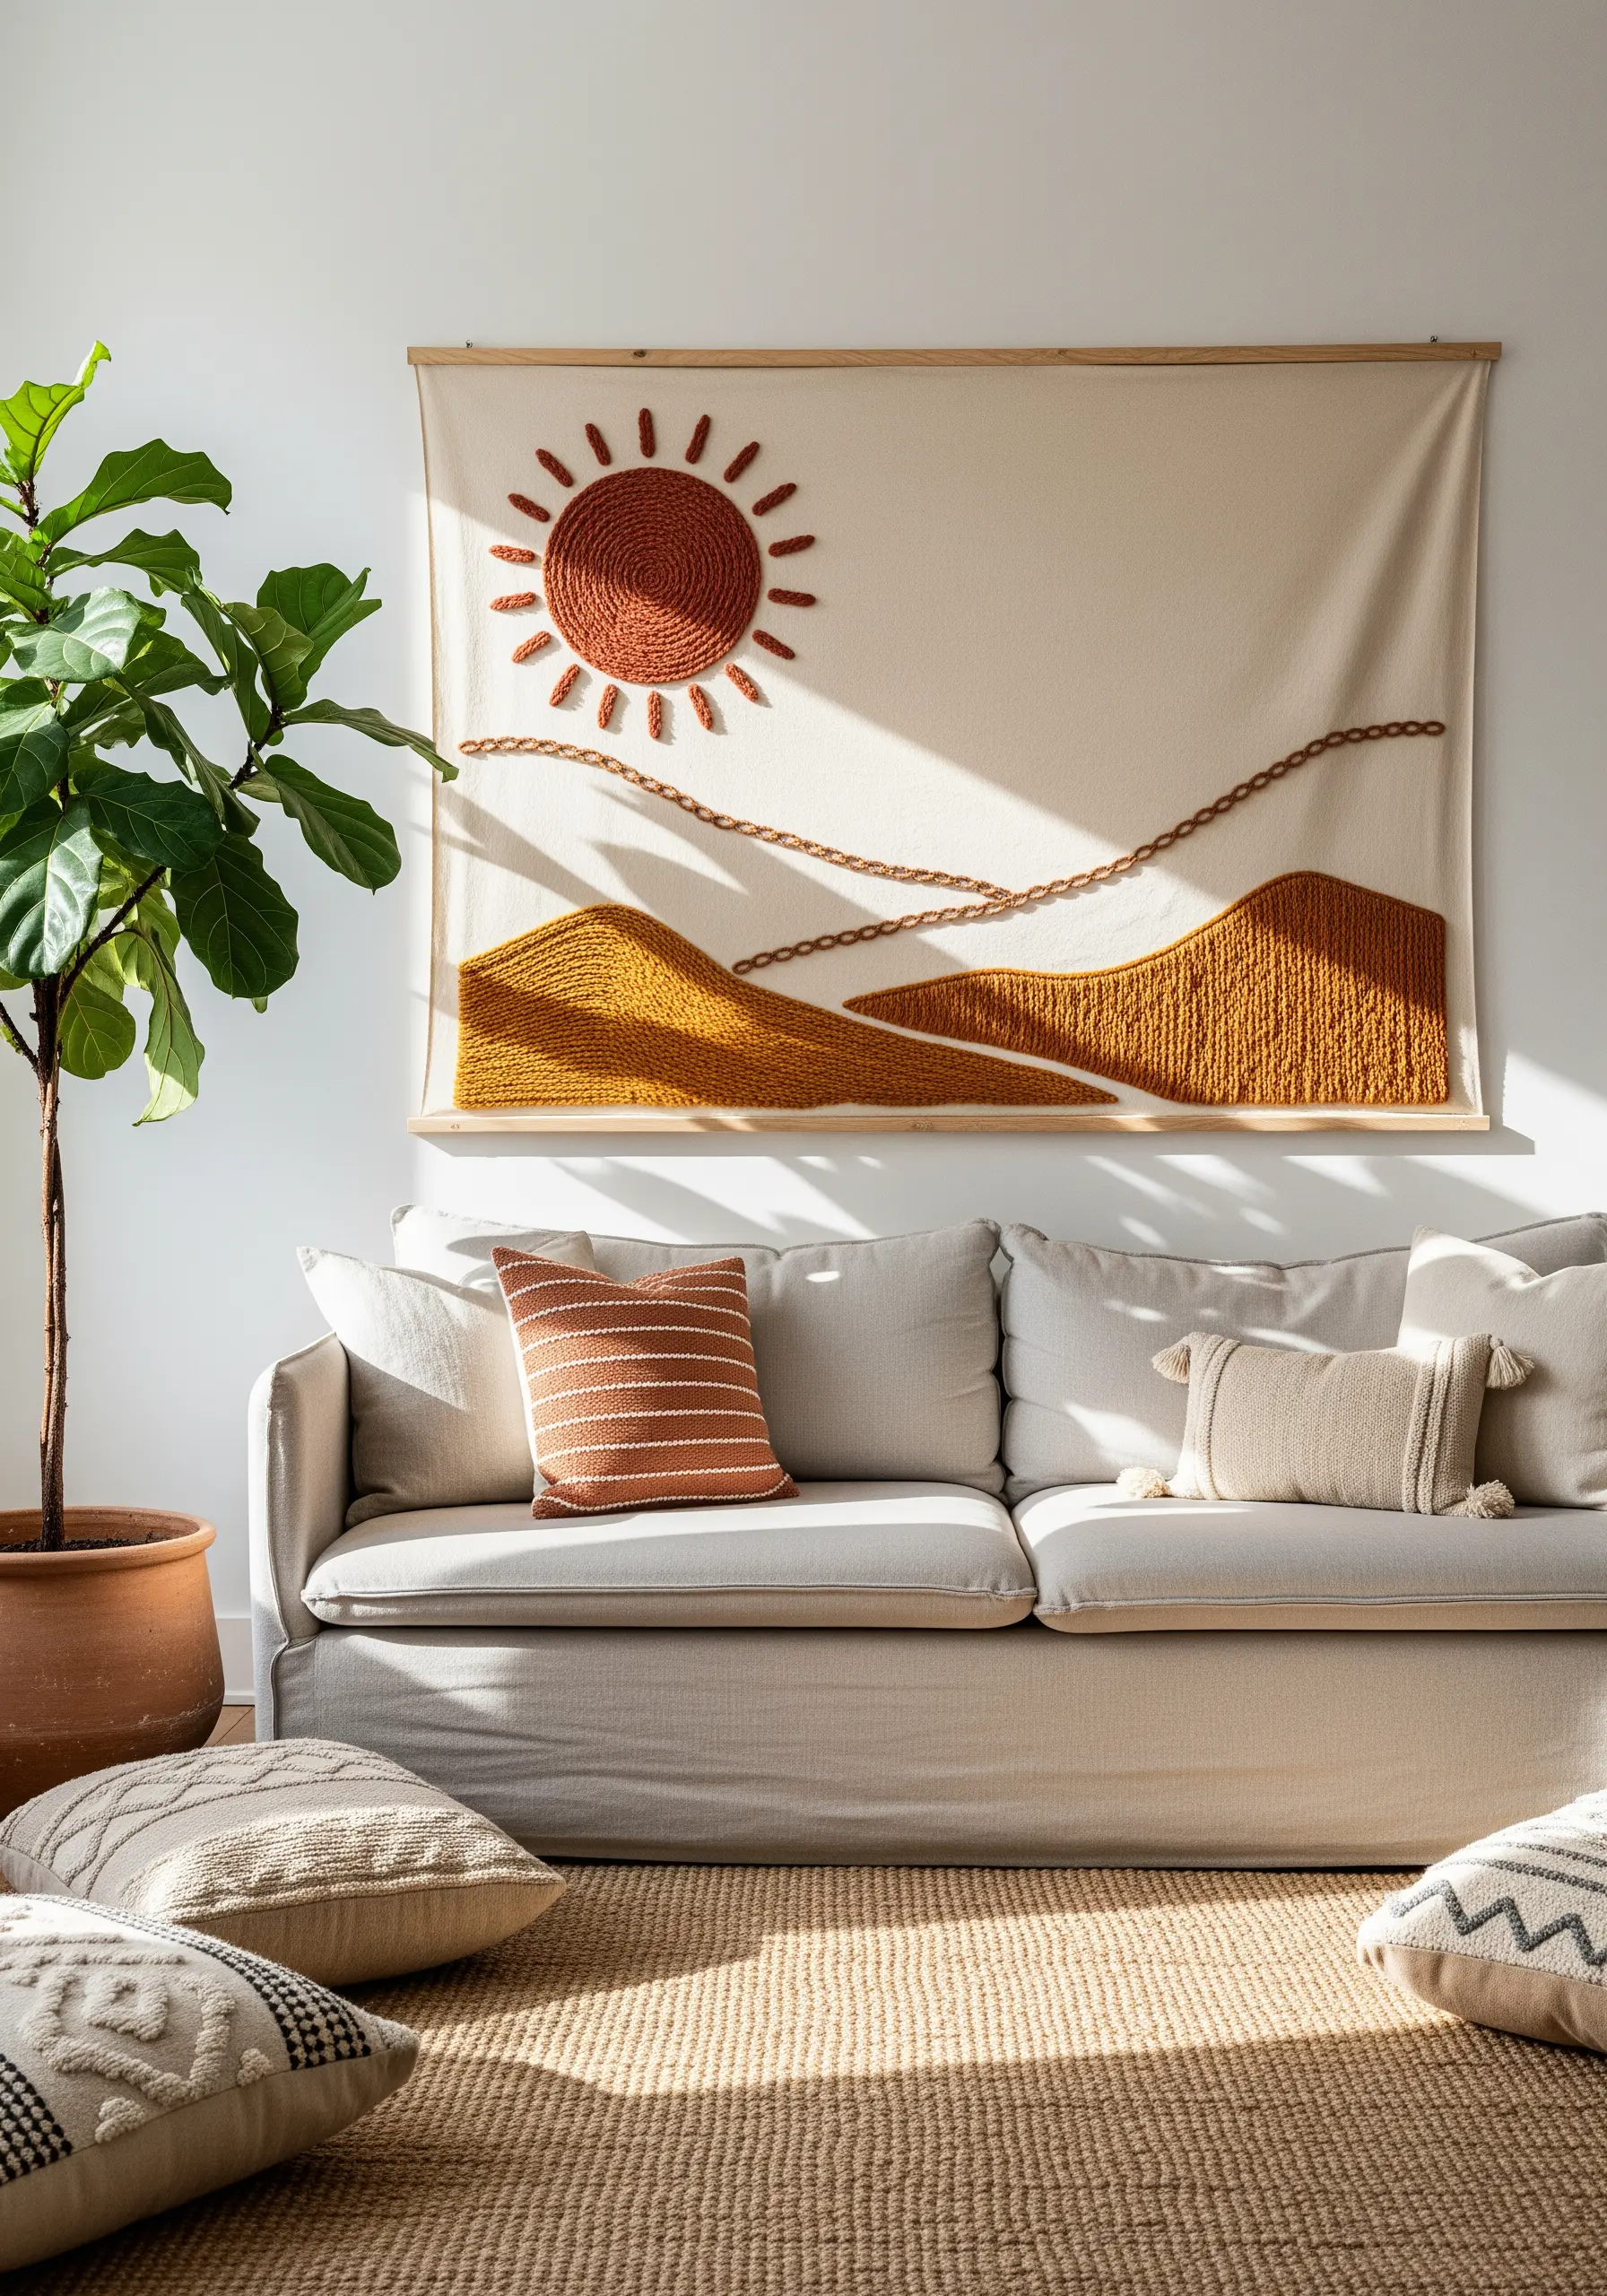
To create impactful, large-scale statement pieces, move beyond standard floss and embrace chunky yarn or wool roving.
Use a couching stitch to tack down thick yarn for the sun’s rays and landscape lines, instantly adding dimension and a sculptural quality.
Fill in the land masses with dense, vertical straight stitches or a chain stitch, which creates a woven, textural effect that catches the light beautifully.
This technique allows you to cover large areas of canvas quickly while achieving a cozy, tactile finish that defines boho style.
2. Use Metallics for a Celestial Triptych
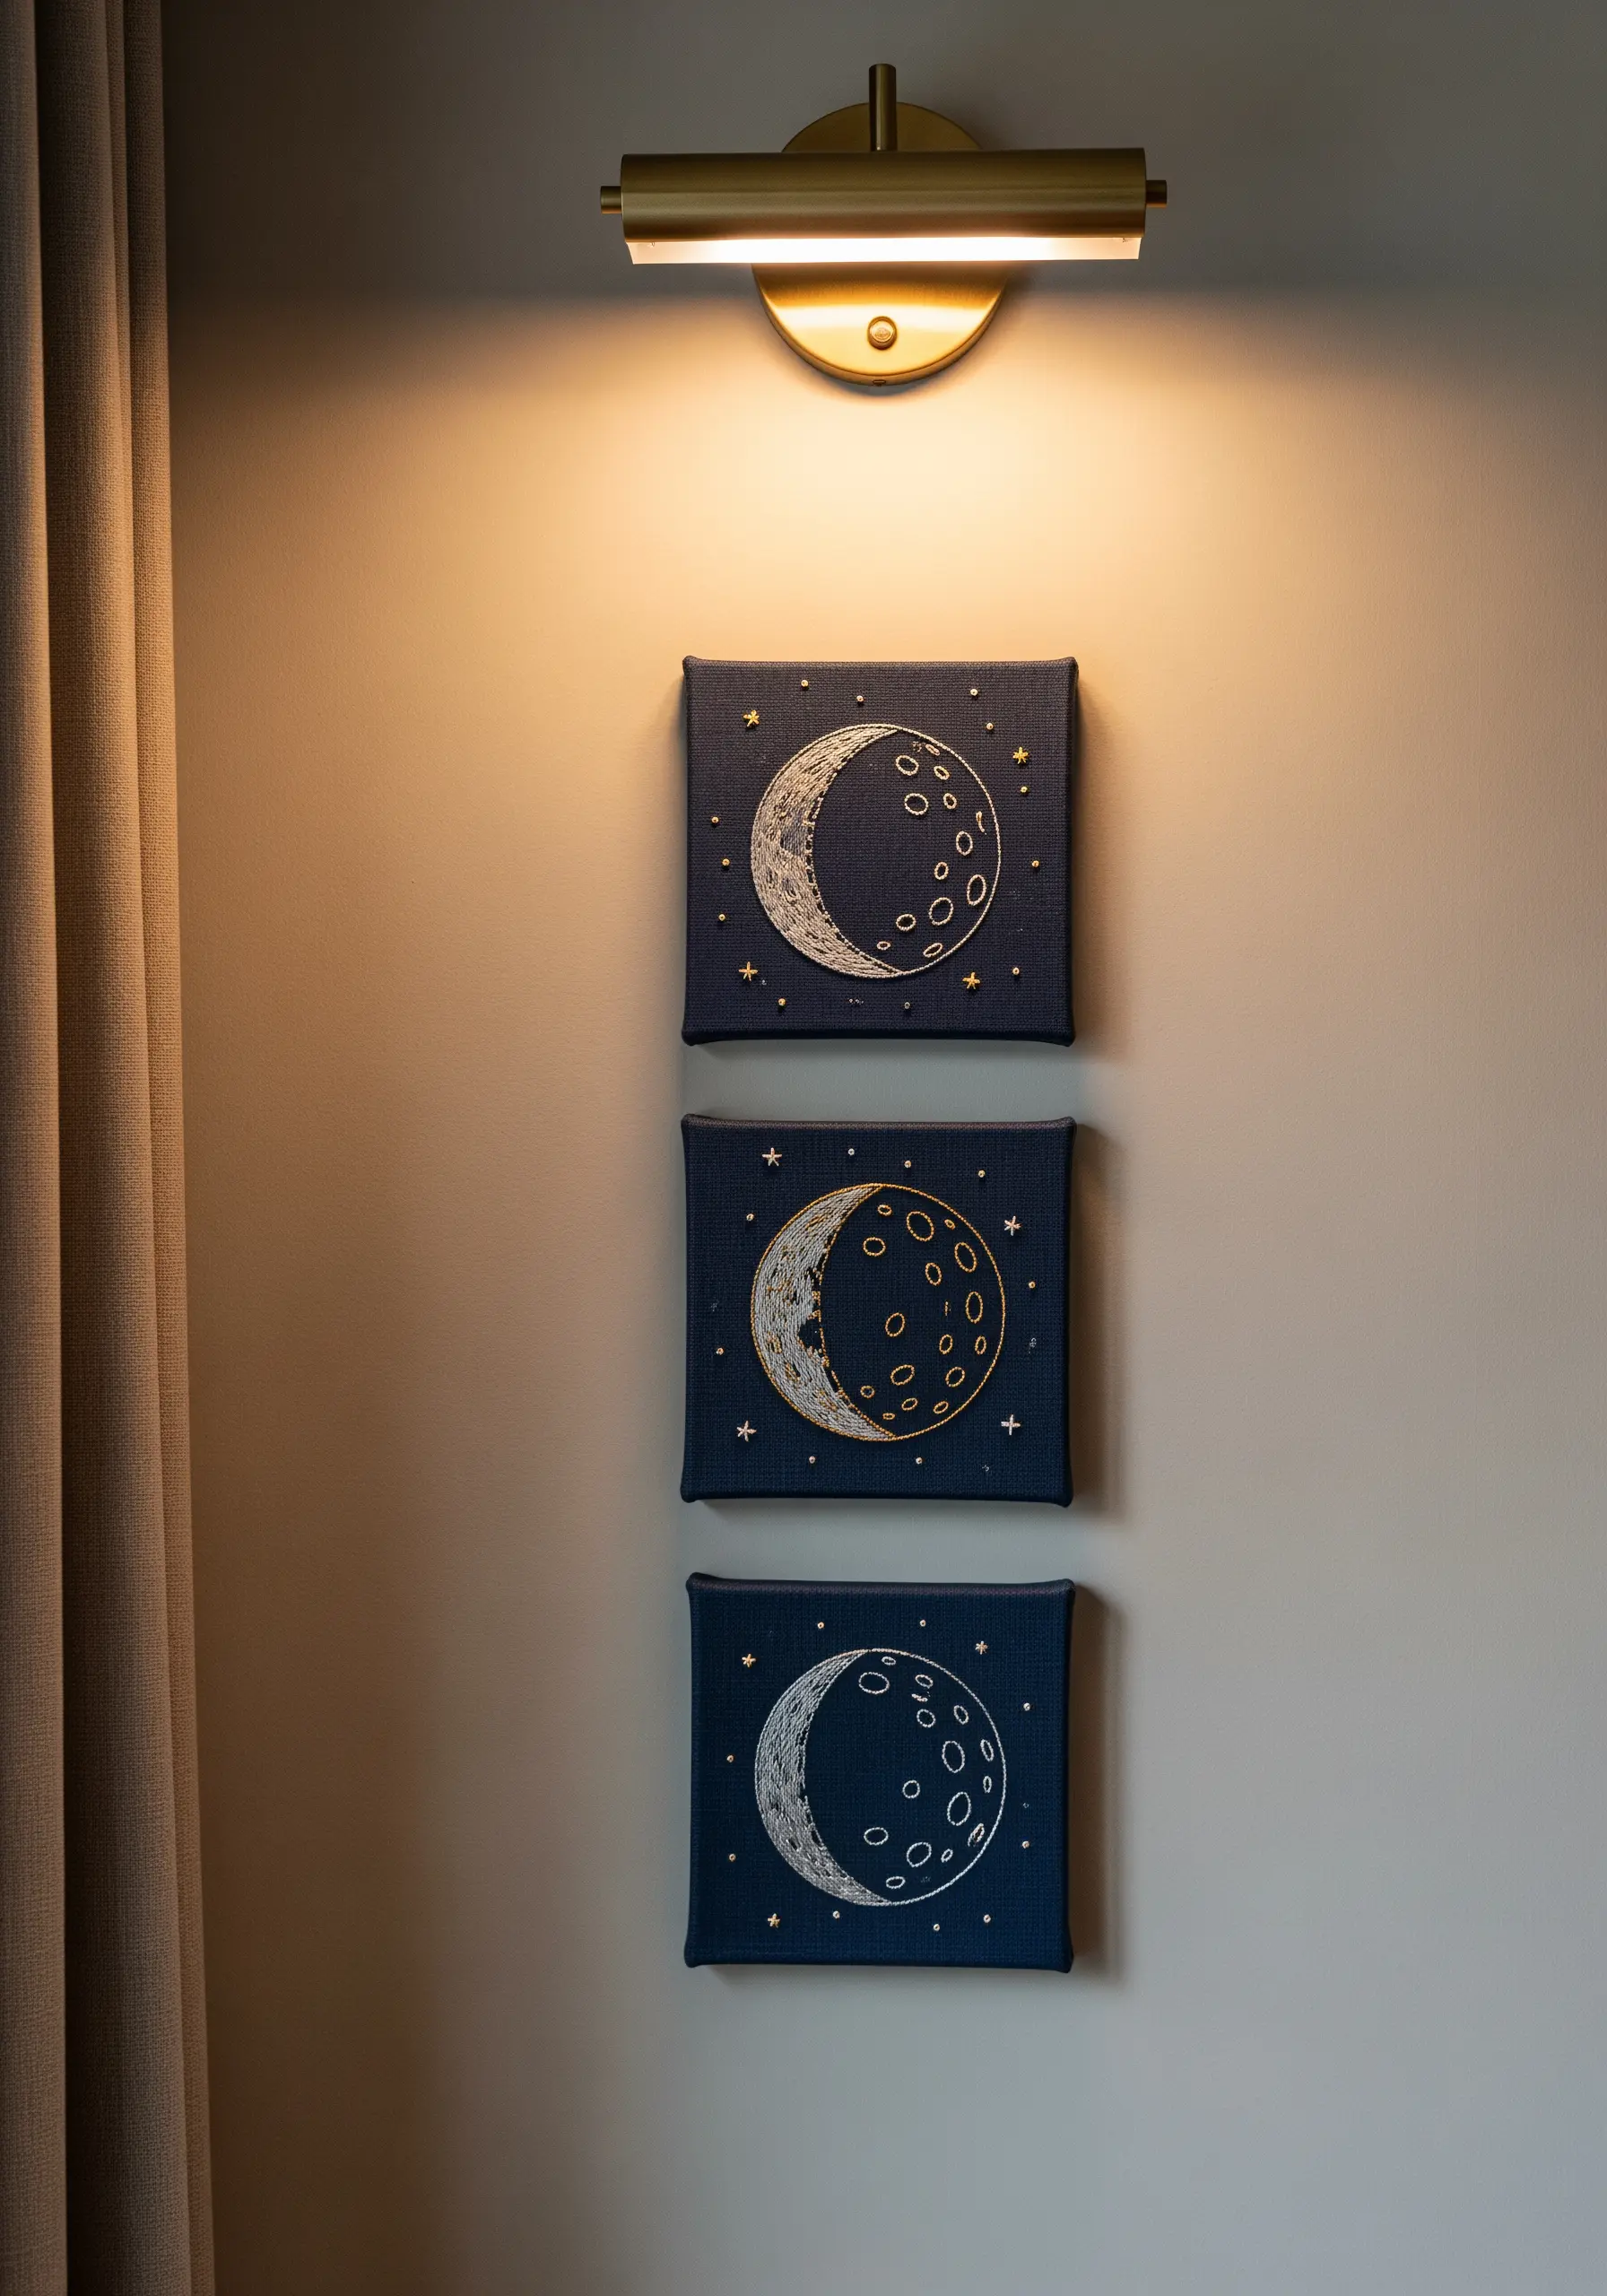
Elevate a simple line drawing by stitching it on dark navy or black canvas with a single strand of metallic silver or gold thread.
A whipped backstitch will give your moon outlines a smooth, solid, and slightly raised line that stands out against the dark fabric.
Use tiny, single-wrap French knots for the surrounding stars, varying their placement and size to create a sense of depth and shimmer.
Grouping three small canvases together as a celestial triptych tells a story of the moon’s phases, turning a simple motif into a sophisticated piece of art.
3. Create 3D Arcs with Raised Chain Stitch
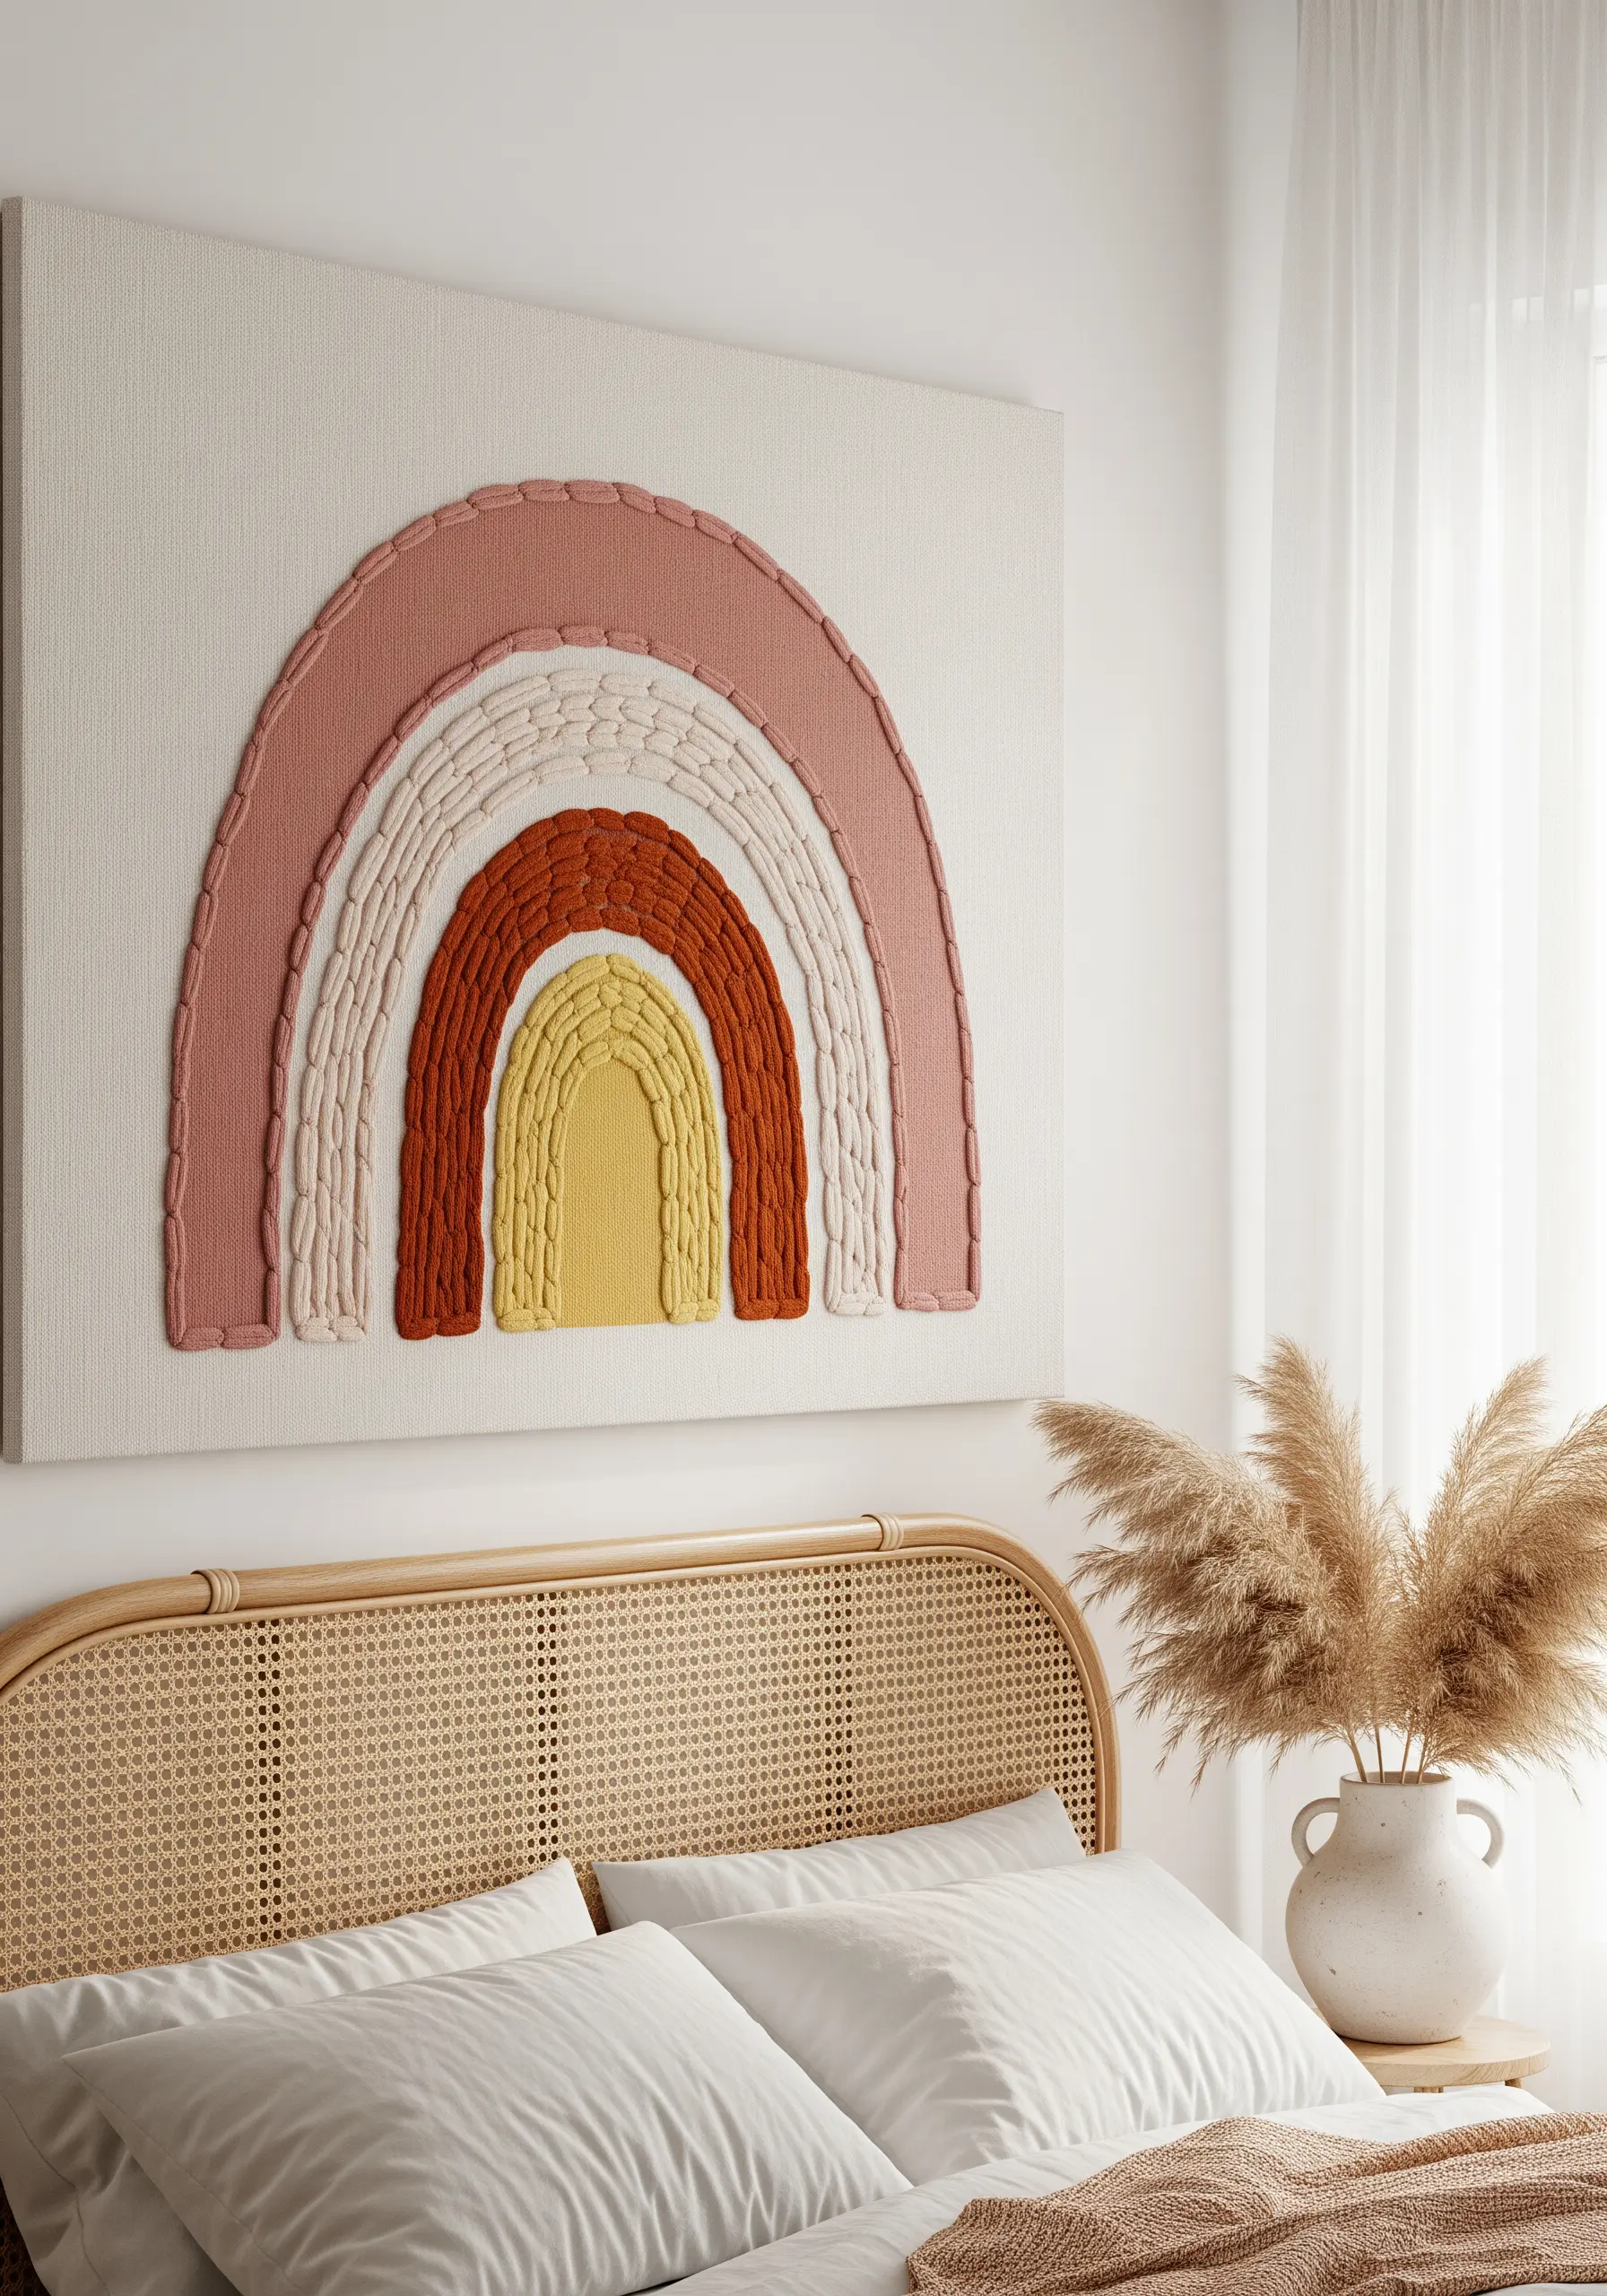
For a rainbow with satisfying, plush texture, use a raised chain stitch band for each arc, working with a thick yarn or multiple strands of cotton floss.
This stitch creates a dense, braided line that lifts off the canvas, making the colors pop and adding a highly touchable dimension.
To ensure your arcs are perfectly nested, draw your guidelines precisely and stitch from the largest arc inward.
This method of statement textured embroidery transforms a simple shape into a piece of soft-sculpture wall art.
4. Stitch Realistic Botanicals with Thread Shading
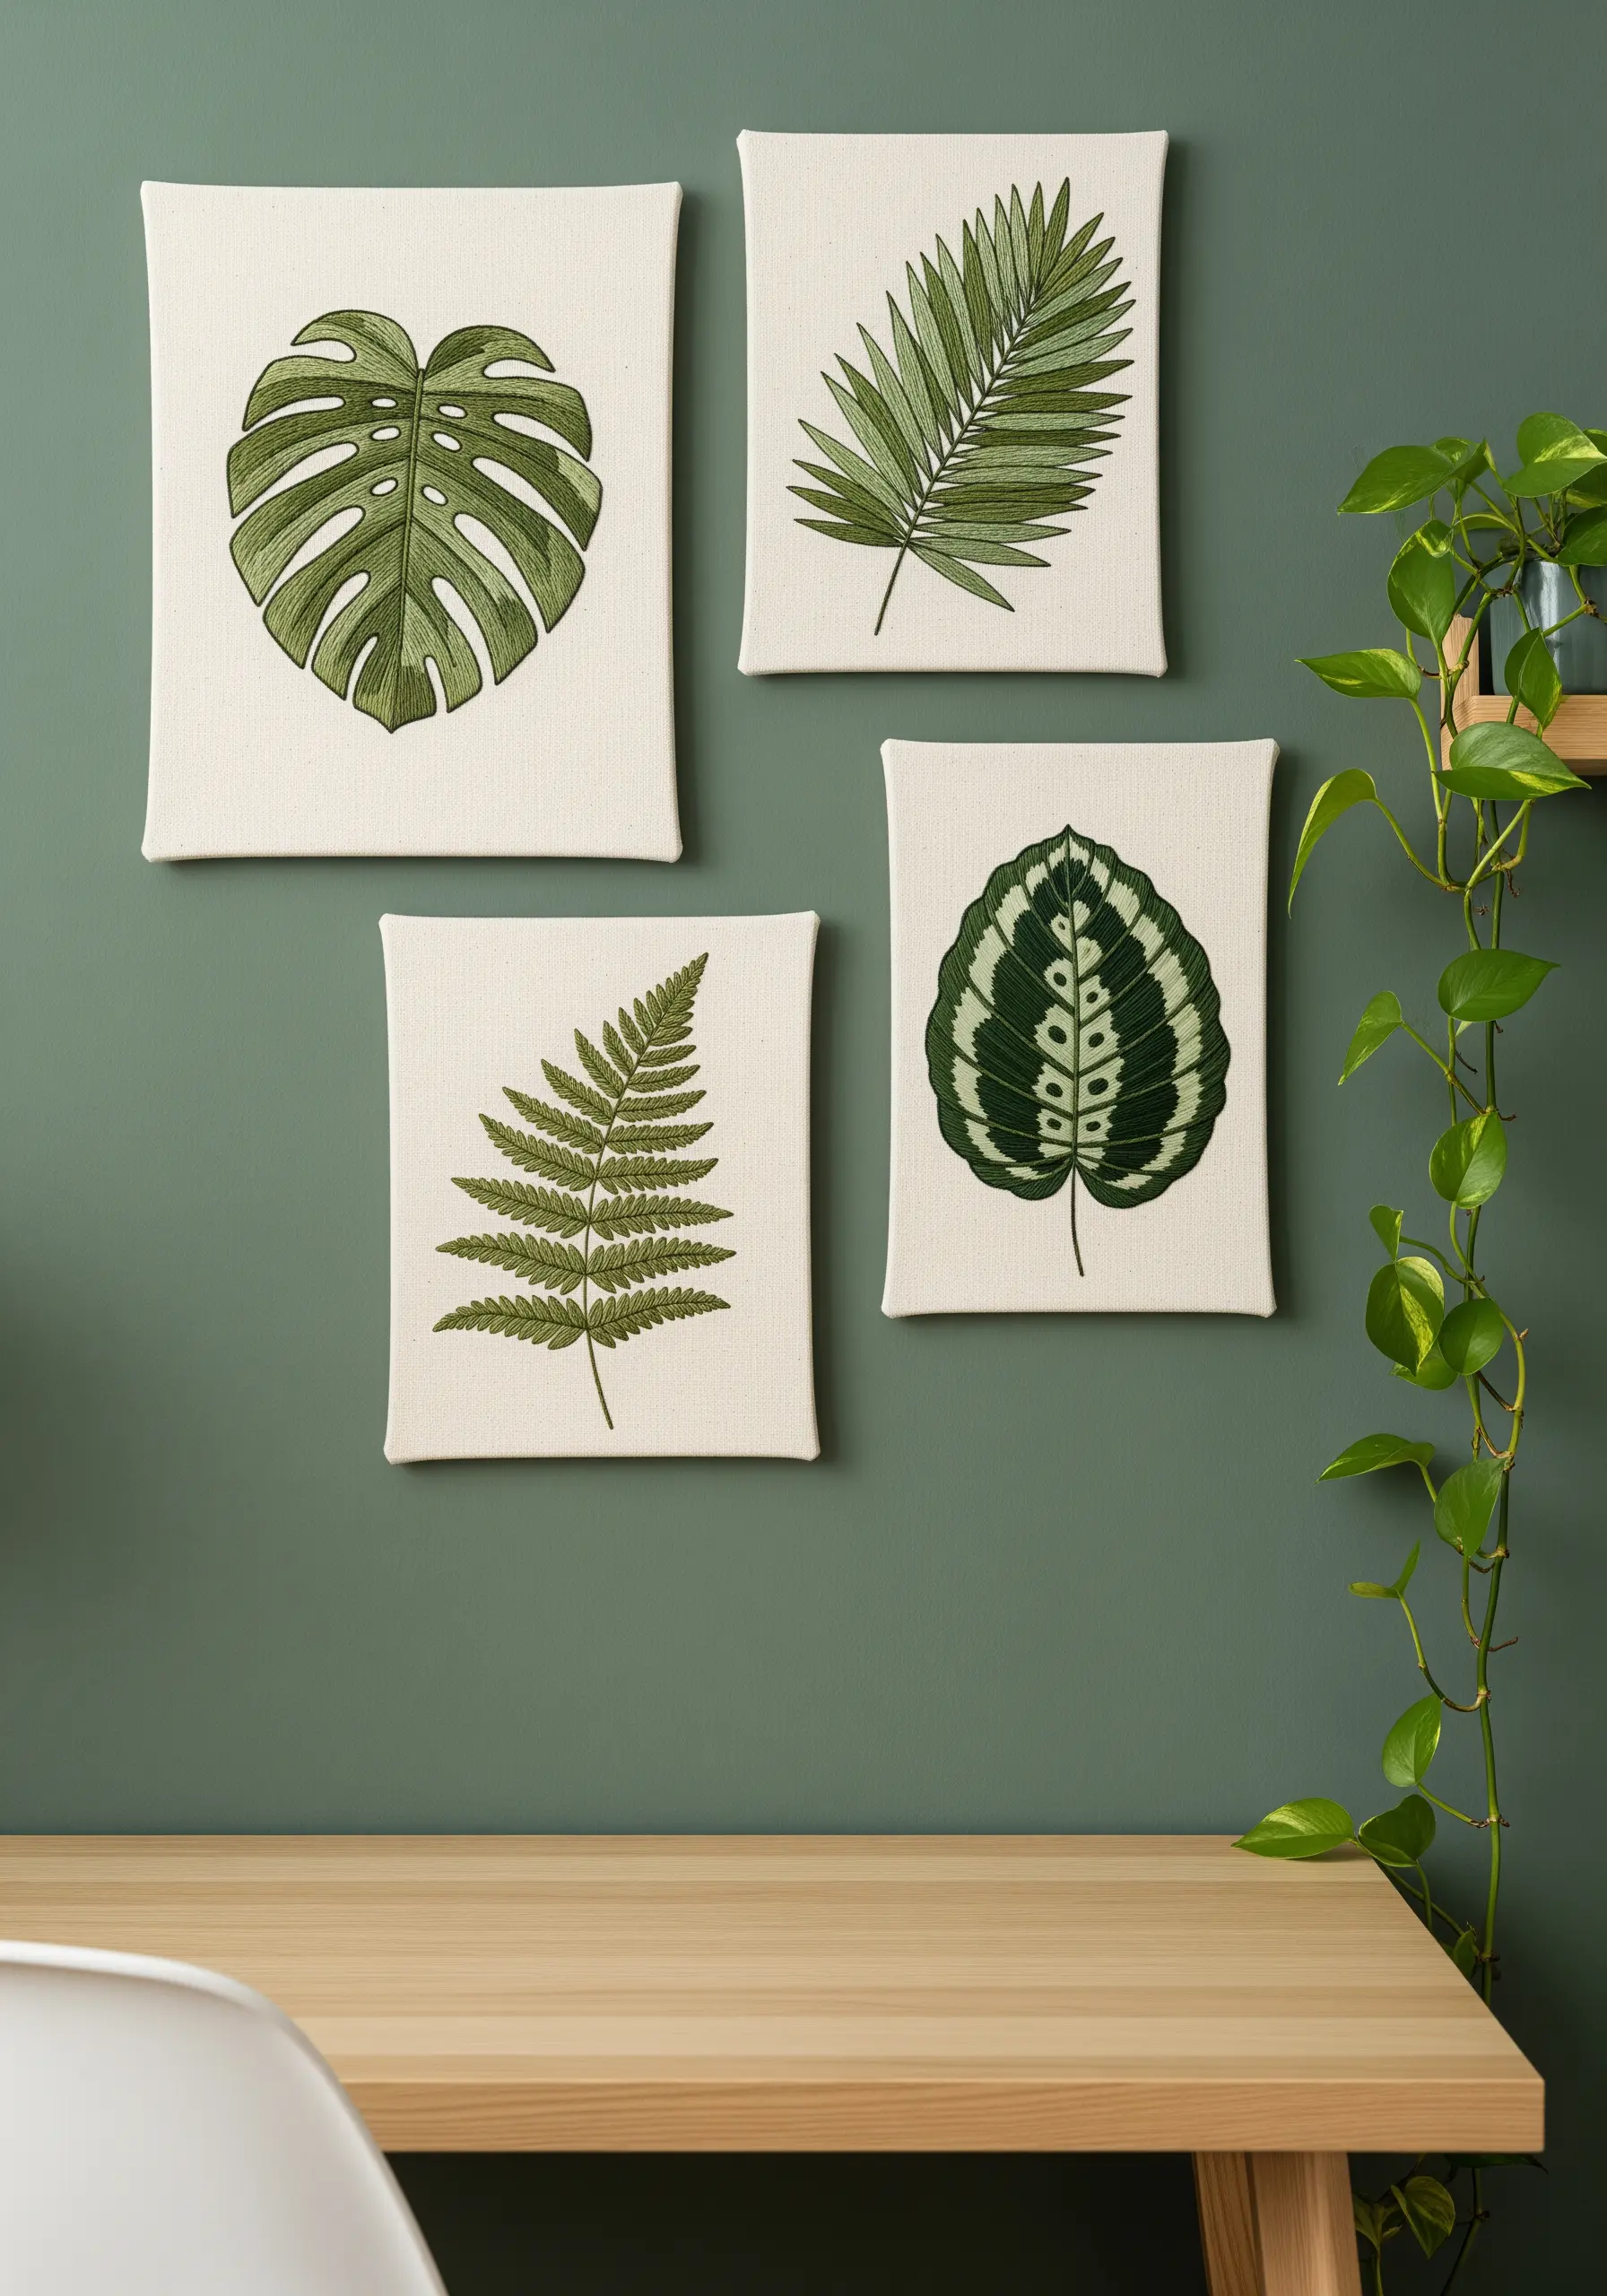
To achieve realistic botanical designs, the direction of your stitches is just as important as the color.
Use the long-and-short stitch to fill the leaves, allowing you to blend different shades of green seamlessly and mimic natural light and shadow.
Follow the natural direction of the leaf’s veins with your stitches to create movement and realism.
Define the central veins with a slightly darker thread using a simple backstitch or stem stitch, which adds sharp detail and structure to the softer fill.
5. Achieve Precision with Whipped Backstitch
For crisp, clean lines in a geometric design, first lay down a simple backstitch, then whip it with the same color thread.
This technique conceals the individual stitches, creating a smooth, solid line that looks almost drawn-on—perfect for intricate patterns.
Modern mandala stitch patterns rely on this precision to feel balanced and serene.
Choose a bold, high-contrast color palette to make the geometric shapes pop against the neutral canvas, emphasizing the clean linework.
6. Incorporate Felt Appliqué for Soft Textures
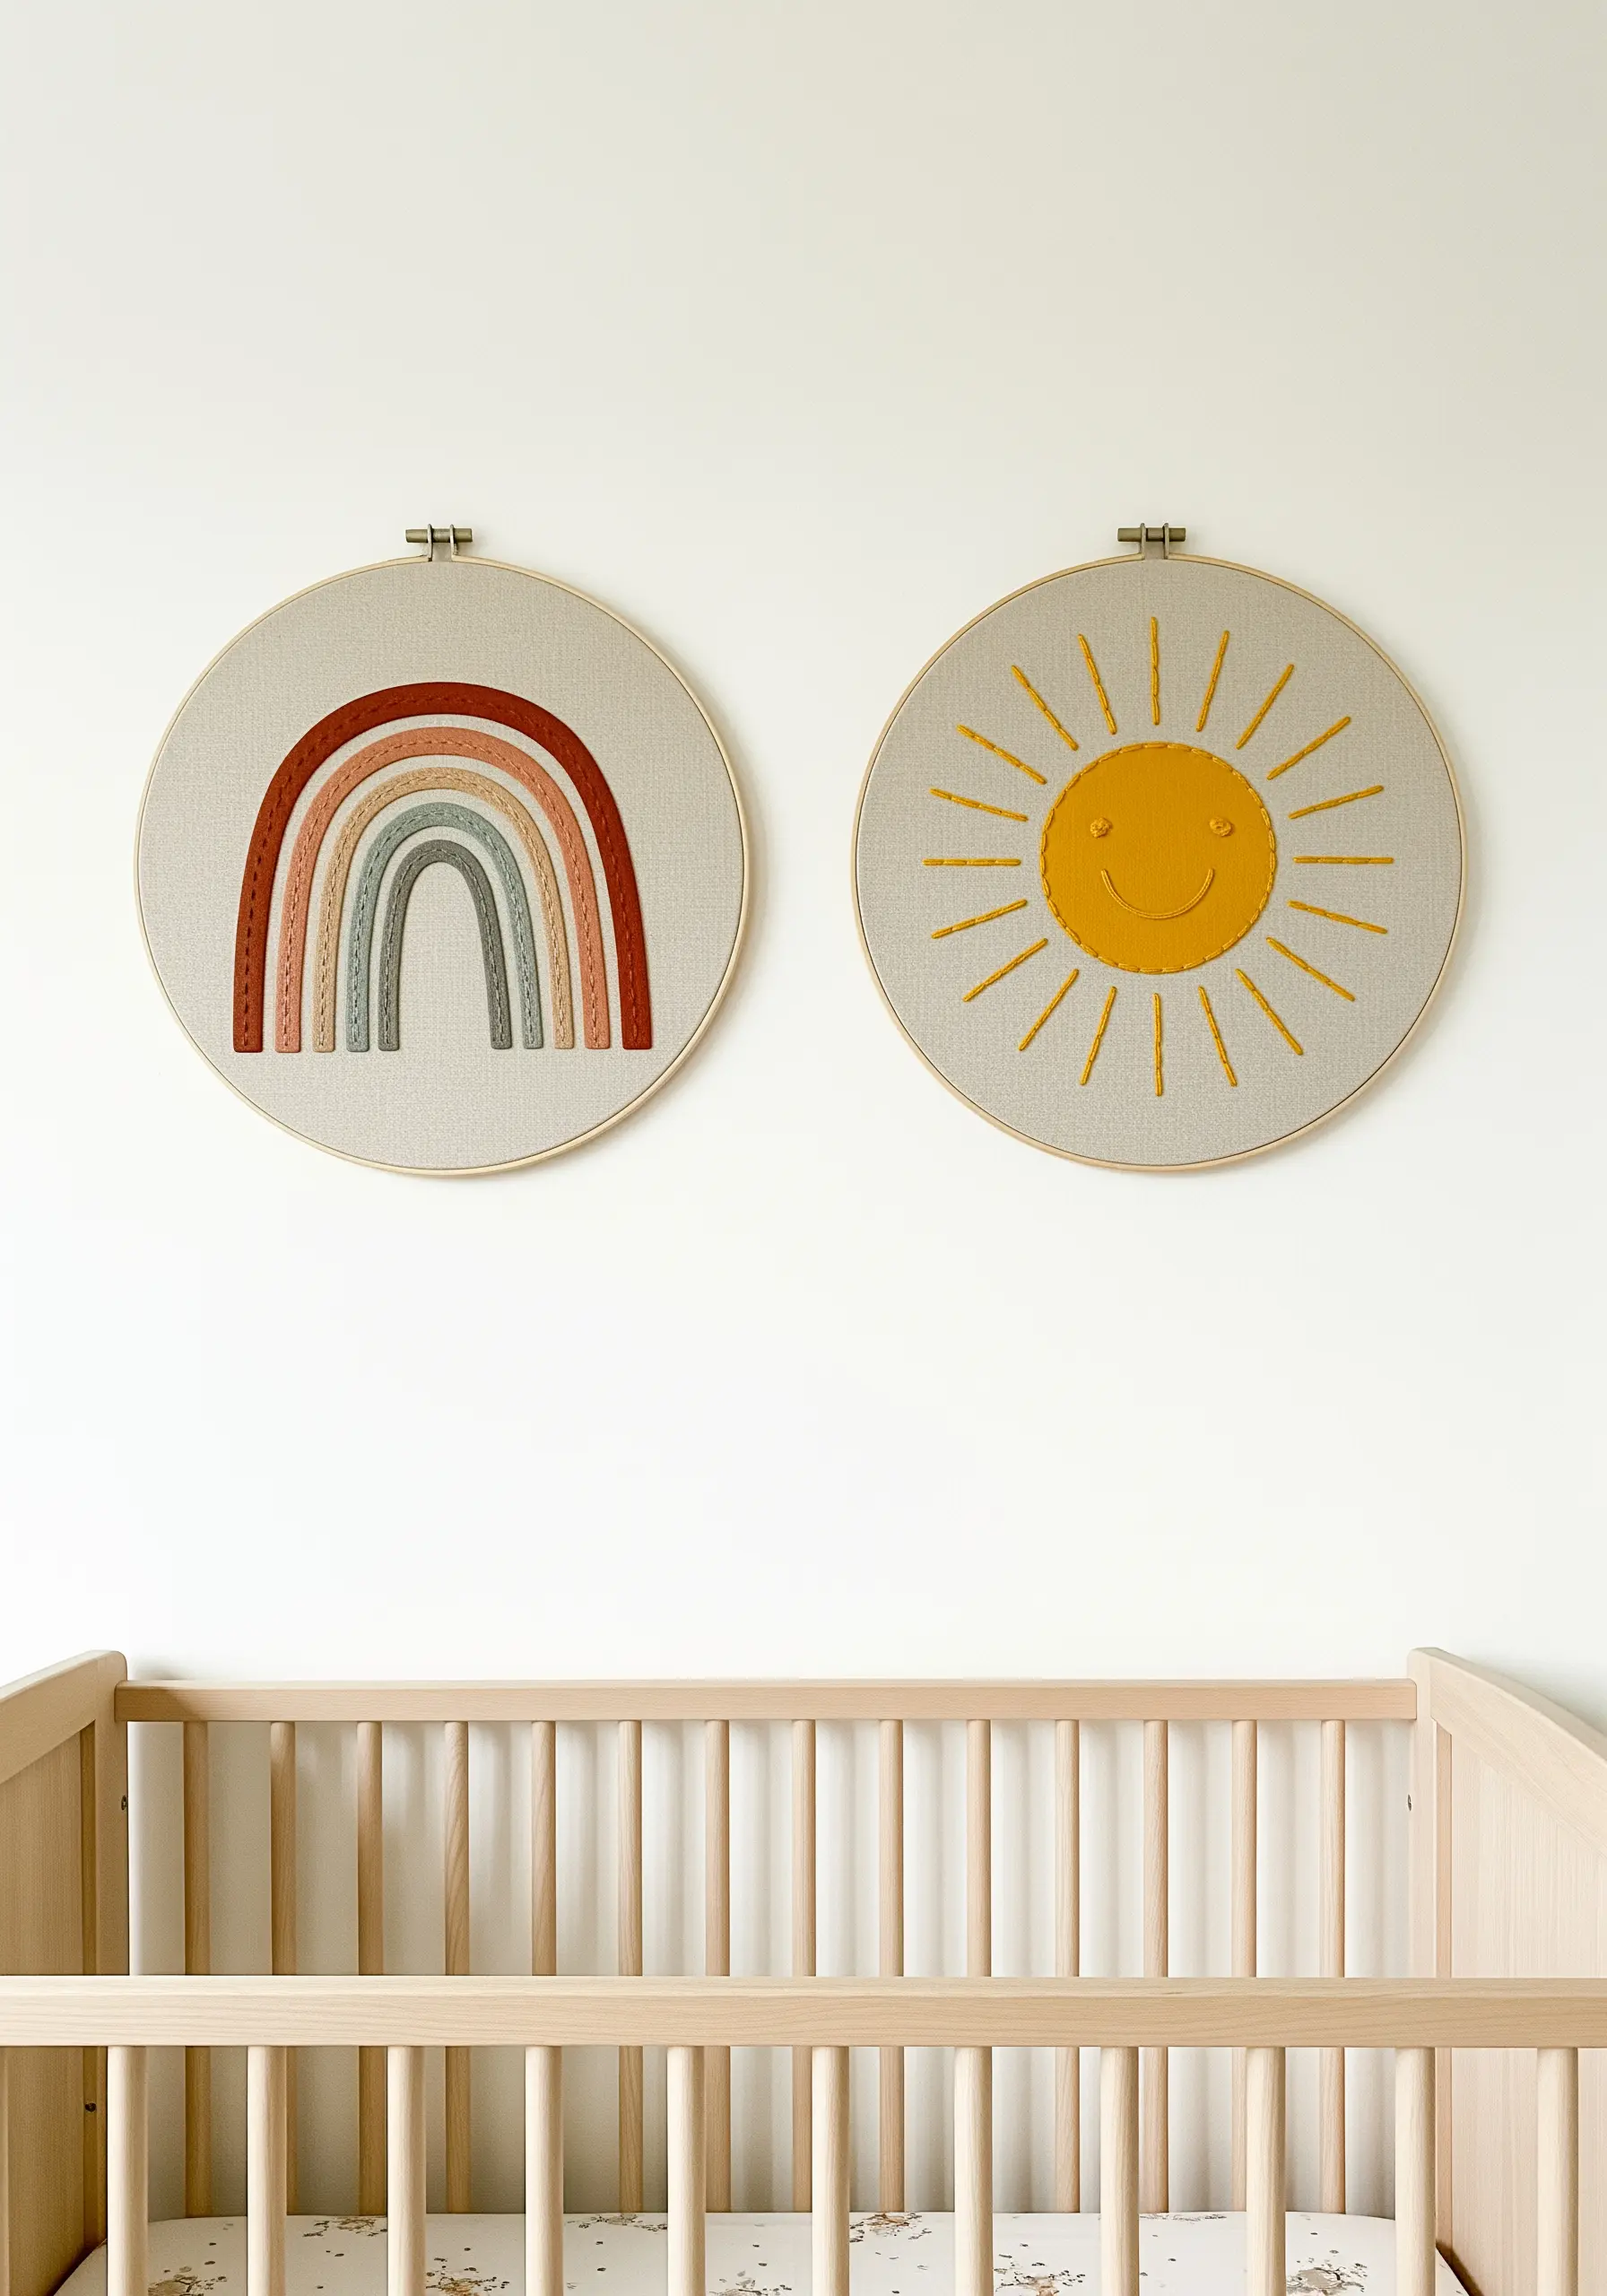
For charming nursery art, combine simple embroidery with felt appliqué for a playful mix of textures.
Cut your main shapes—like the rainbow arcs and sun—from felt and secure them to the fabric with a simple running stitch around the edges.
This adds dimension and softness instantly, and it’s much faster than filling large areas with satin stitch.
These soft, tactile elements are perfect for creating a gentle and inviting atmosphere in a child’s room.
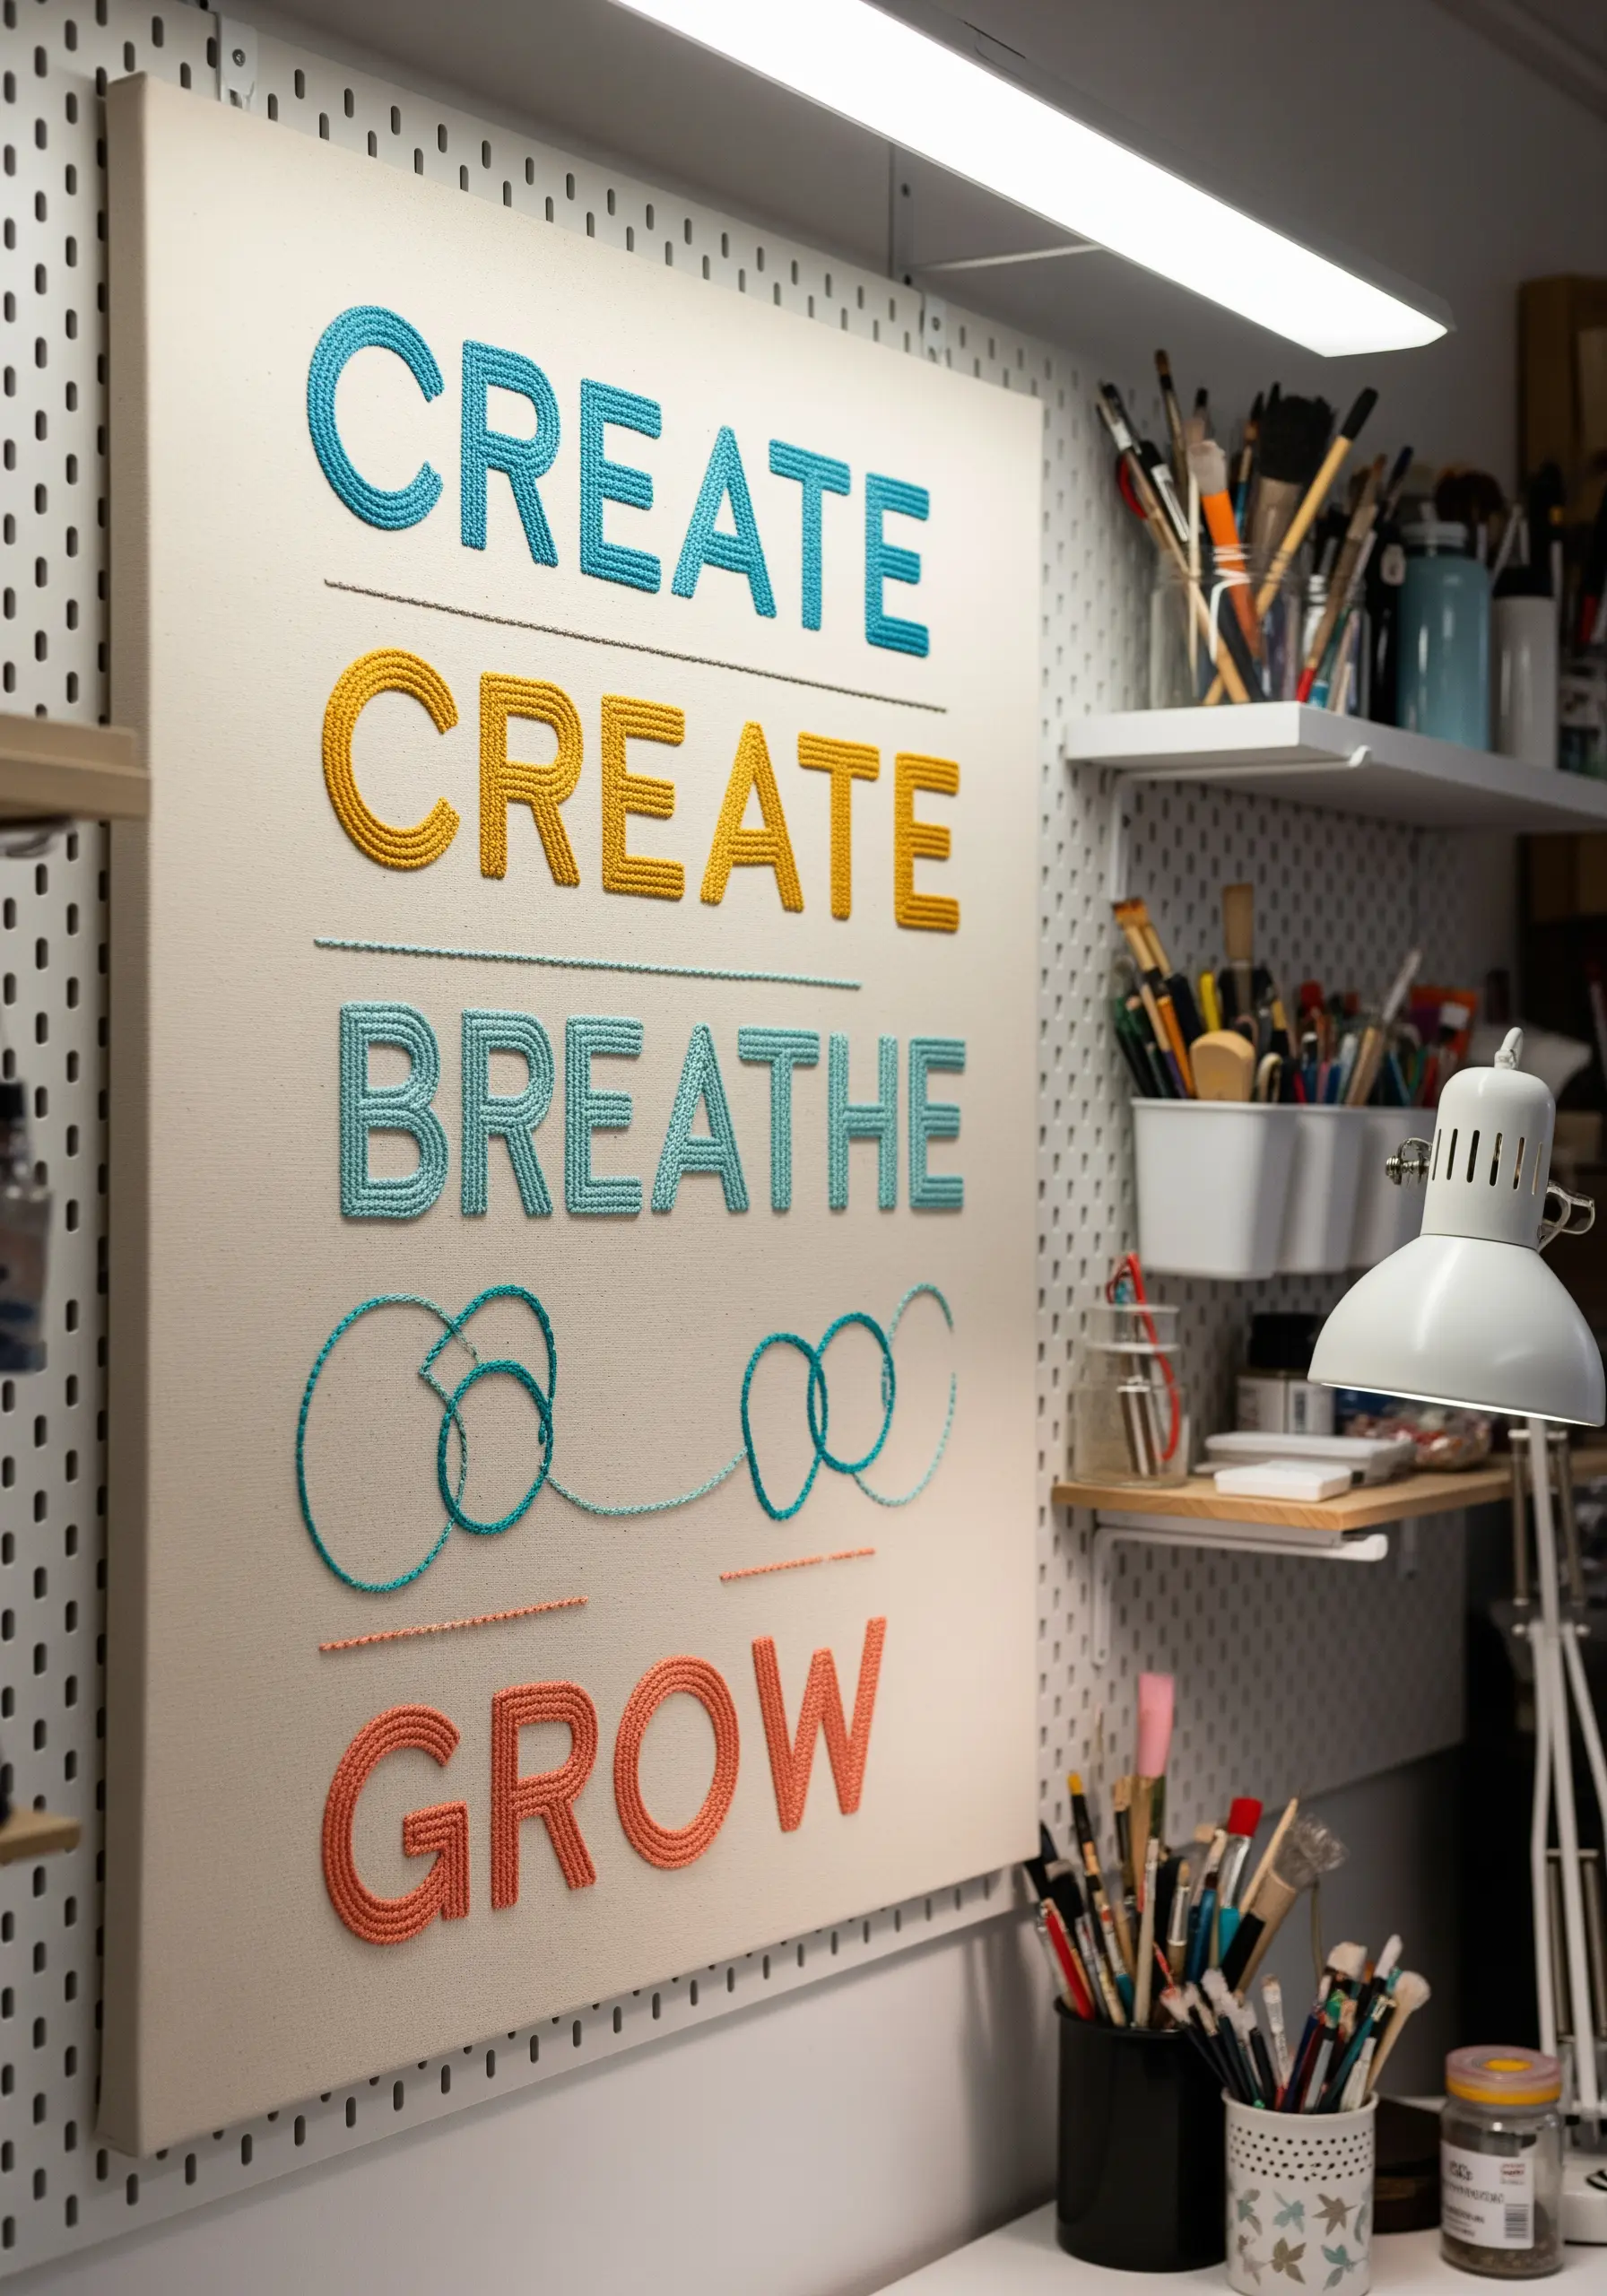
7. Give Typography Dimension with Padding
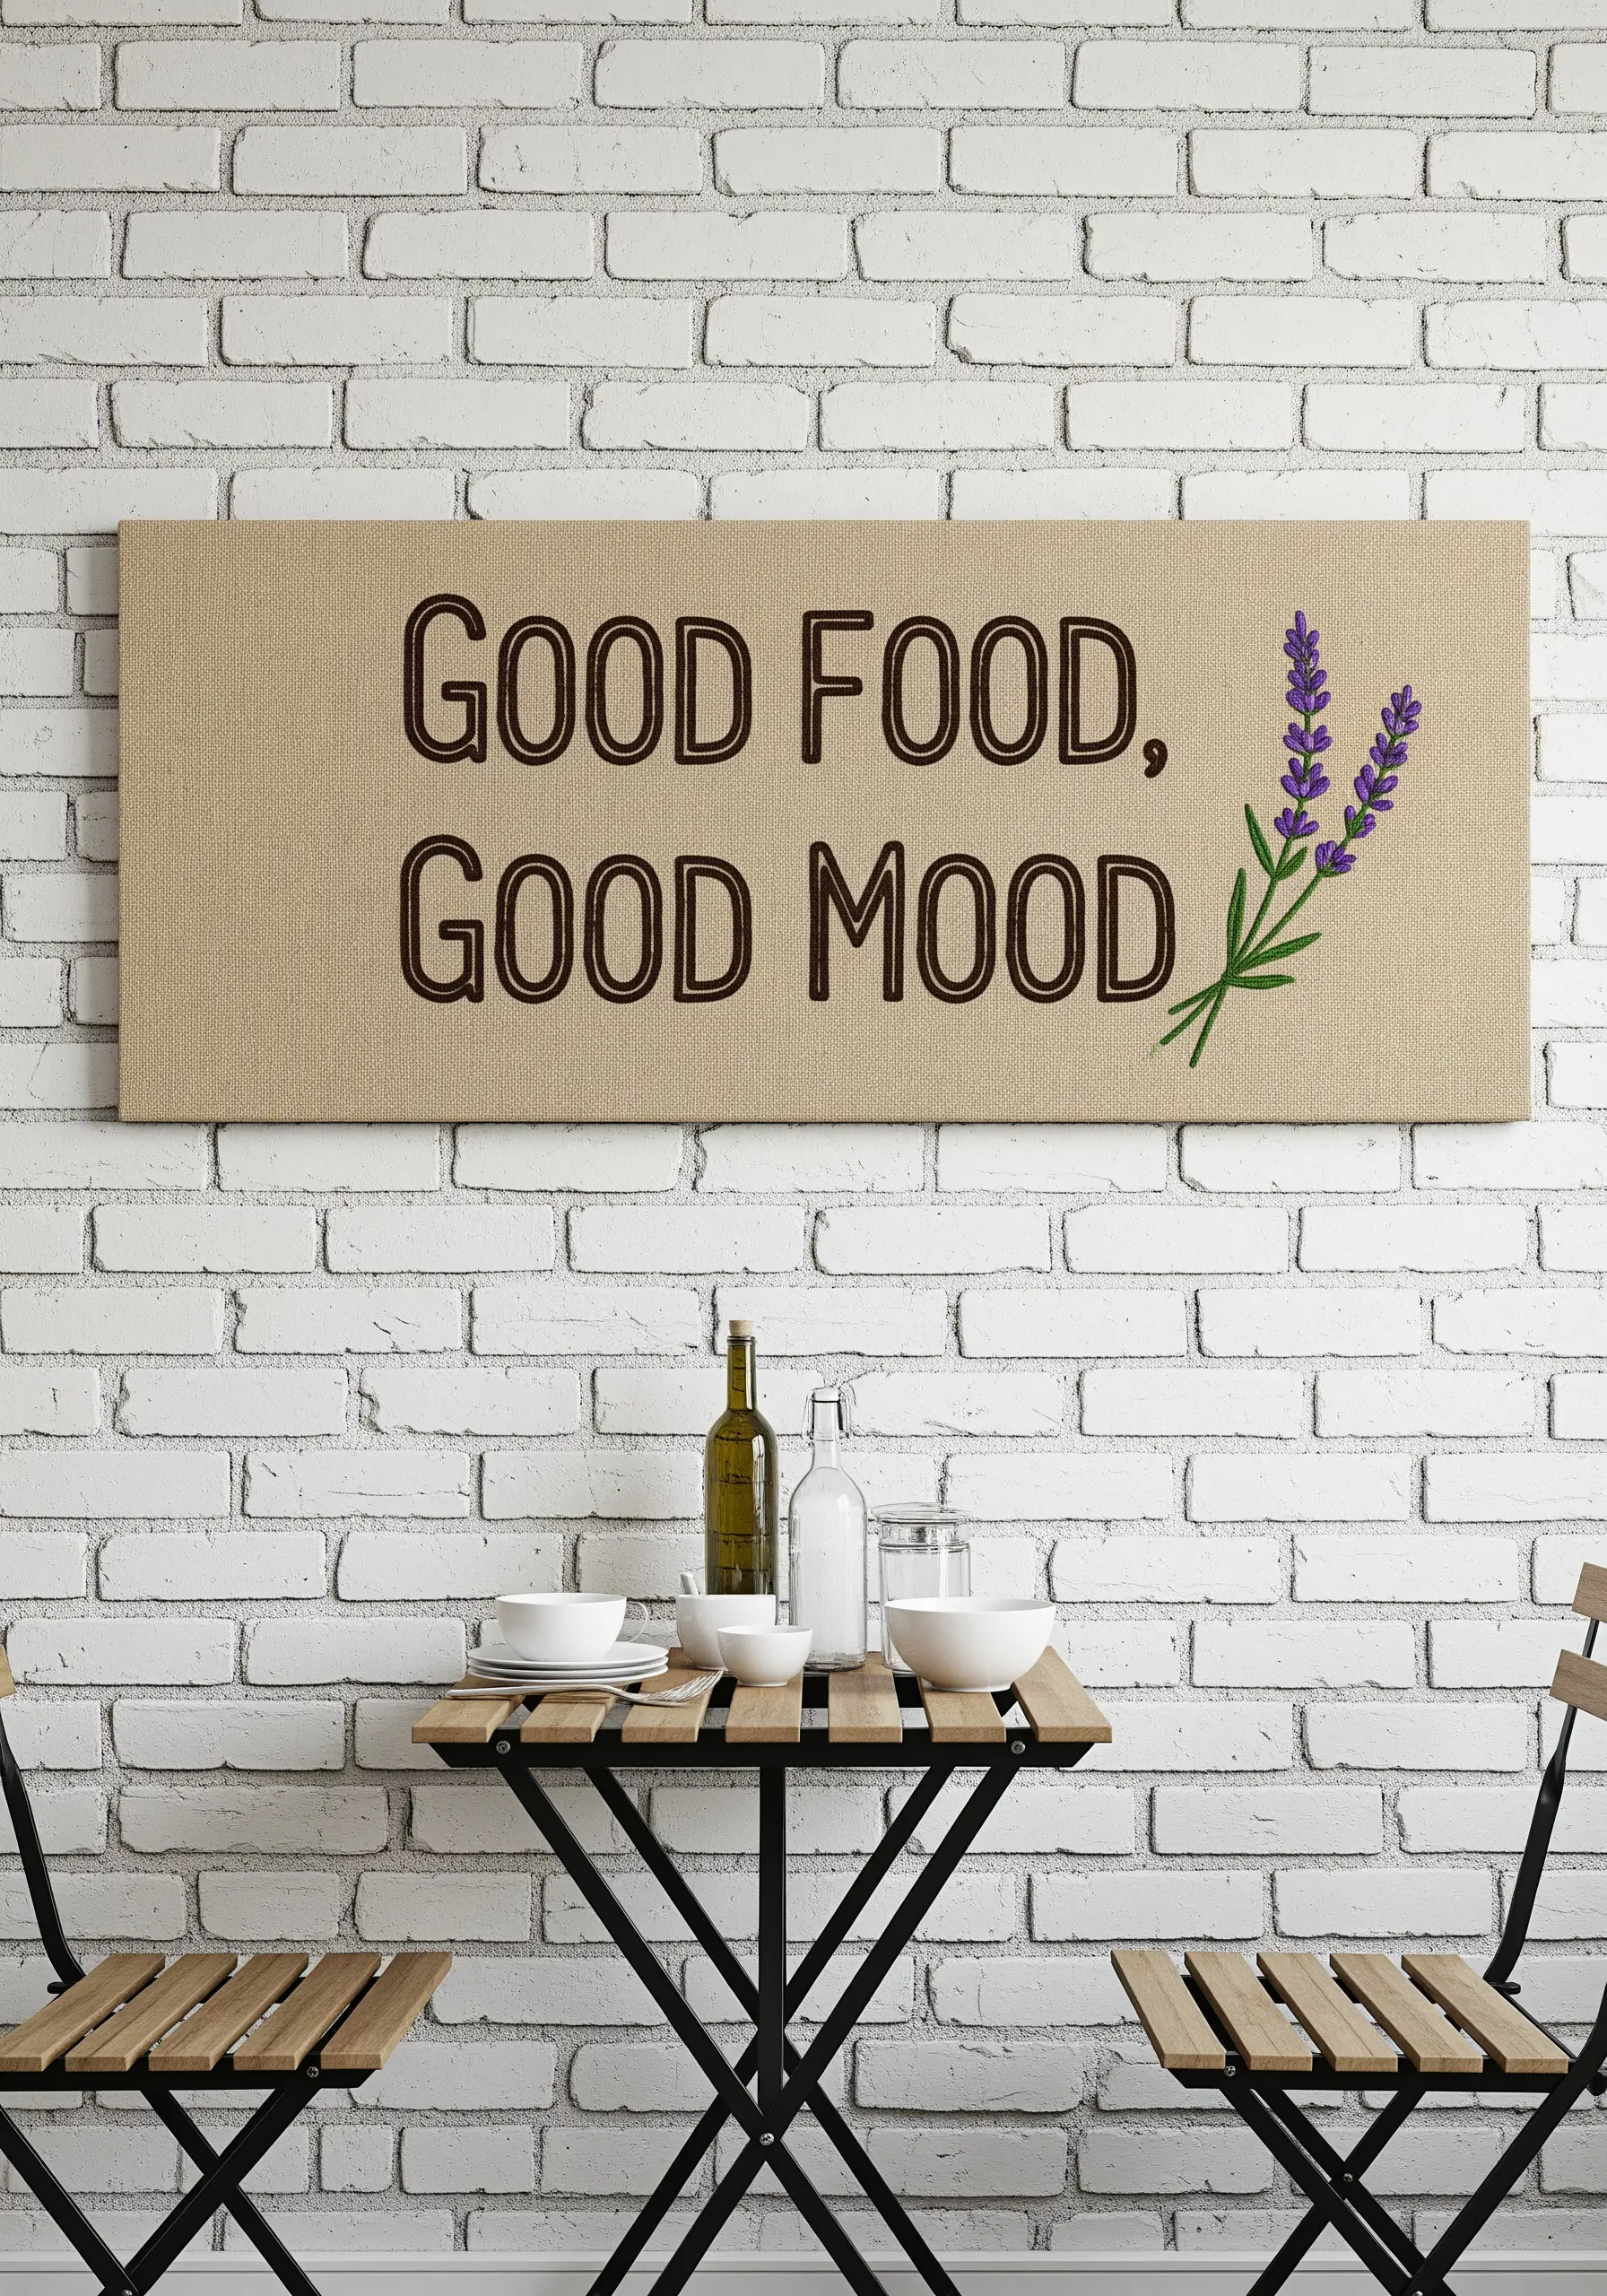
Make your embroidered typography stand out by using a padded satin stitch for the letters.
First, fill the shape of each letter with a foundation of small, straight stitches or a running stitch.
Then, cover this padding with a smooth satin stitch, working perpendicular to the foundation stitches.
This simple step raises the lettering from the canvas, giving it a professional, three-dimensional finish that adds depth and emphasis to your chosen quote.
8. Embrace Negative Space with Graphic Line Work
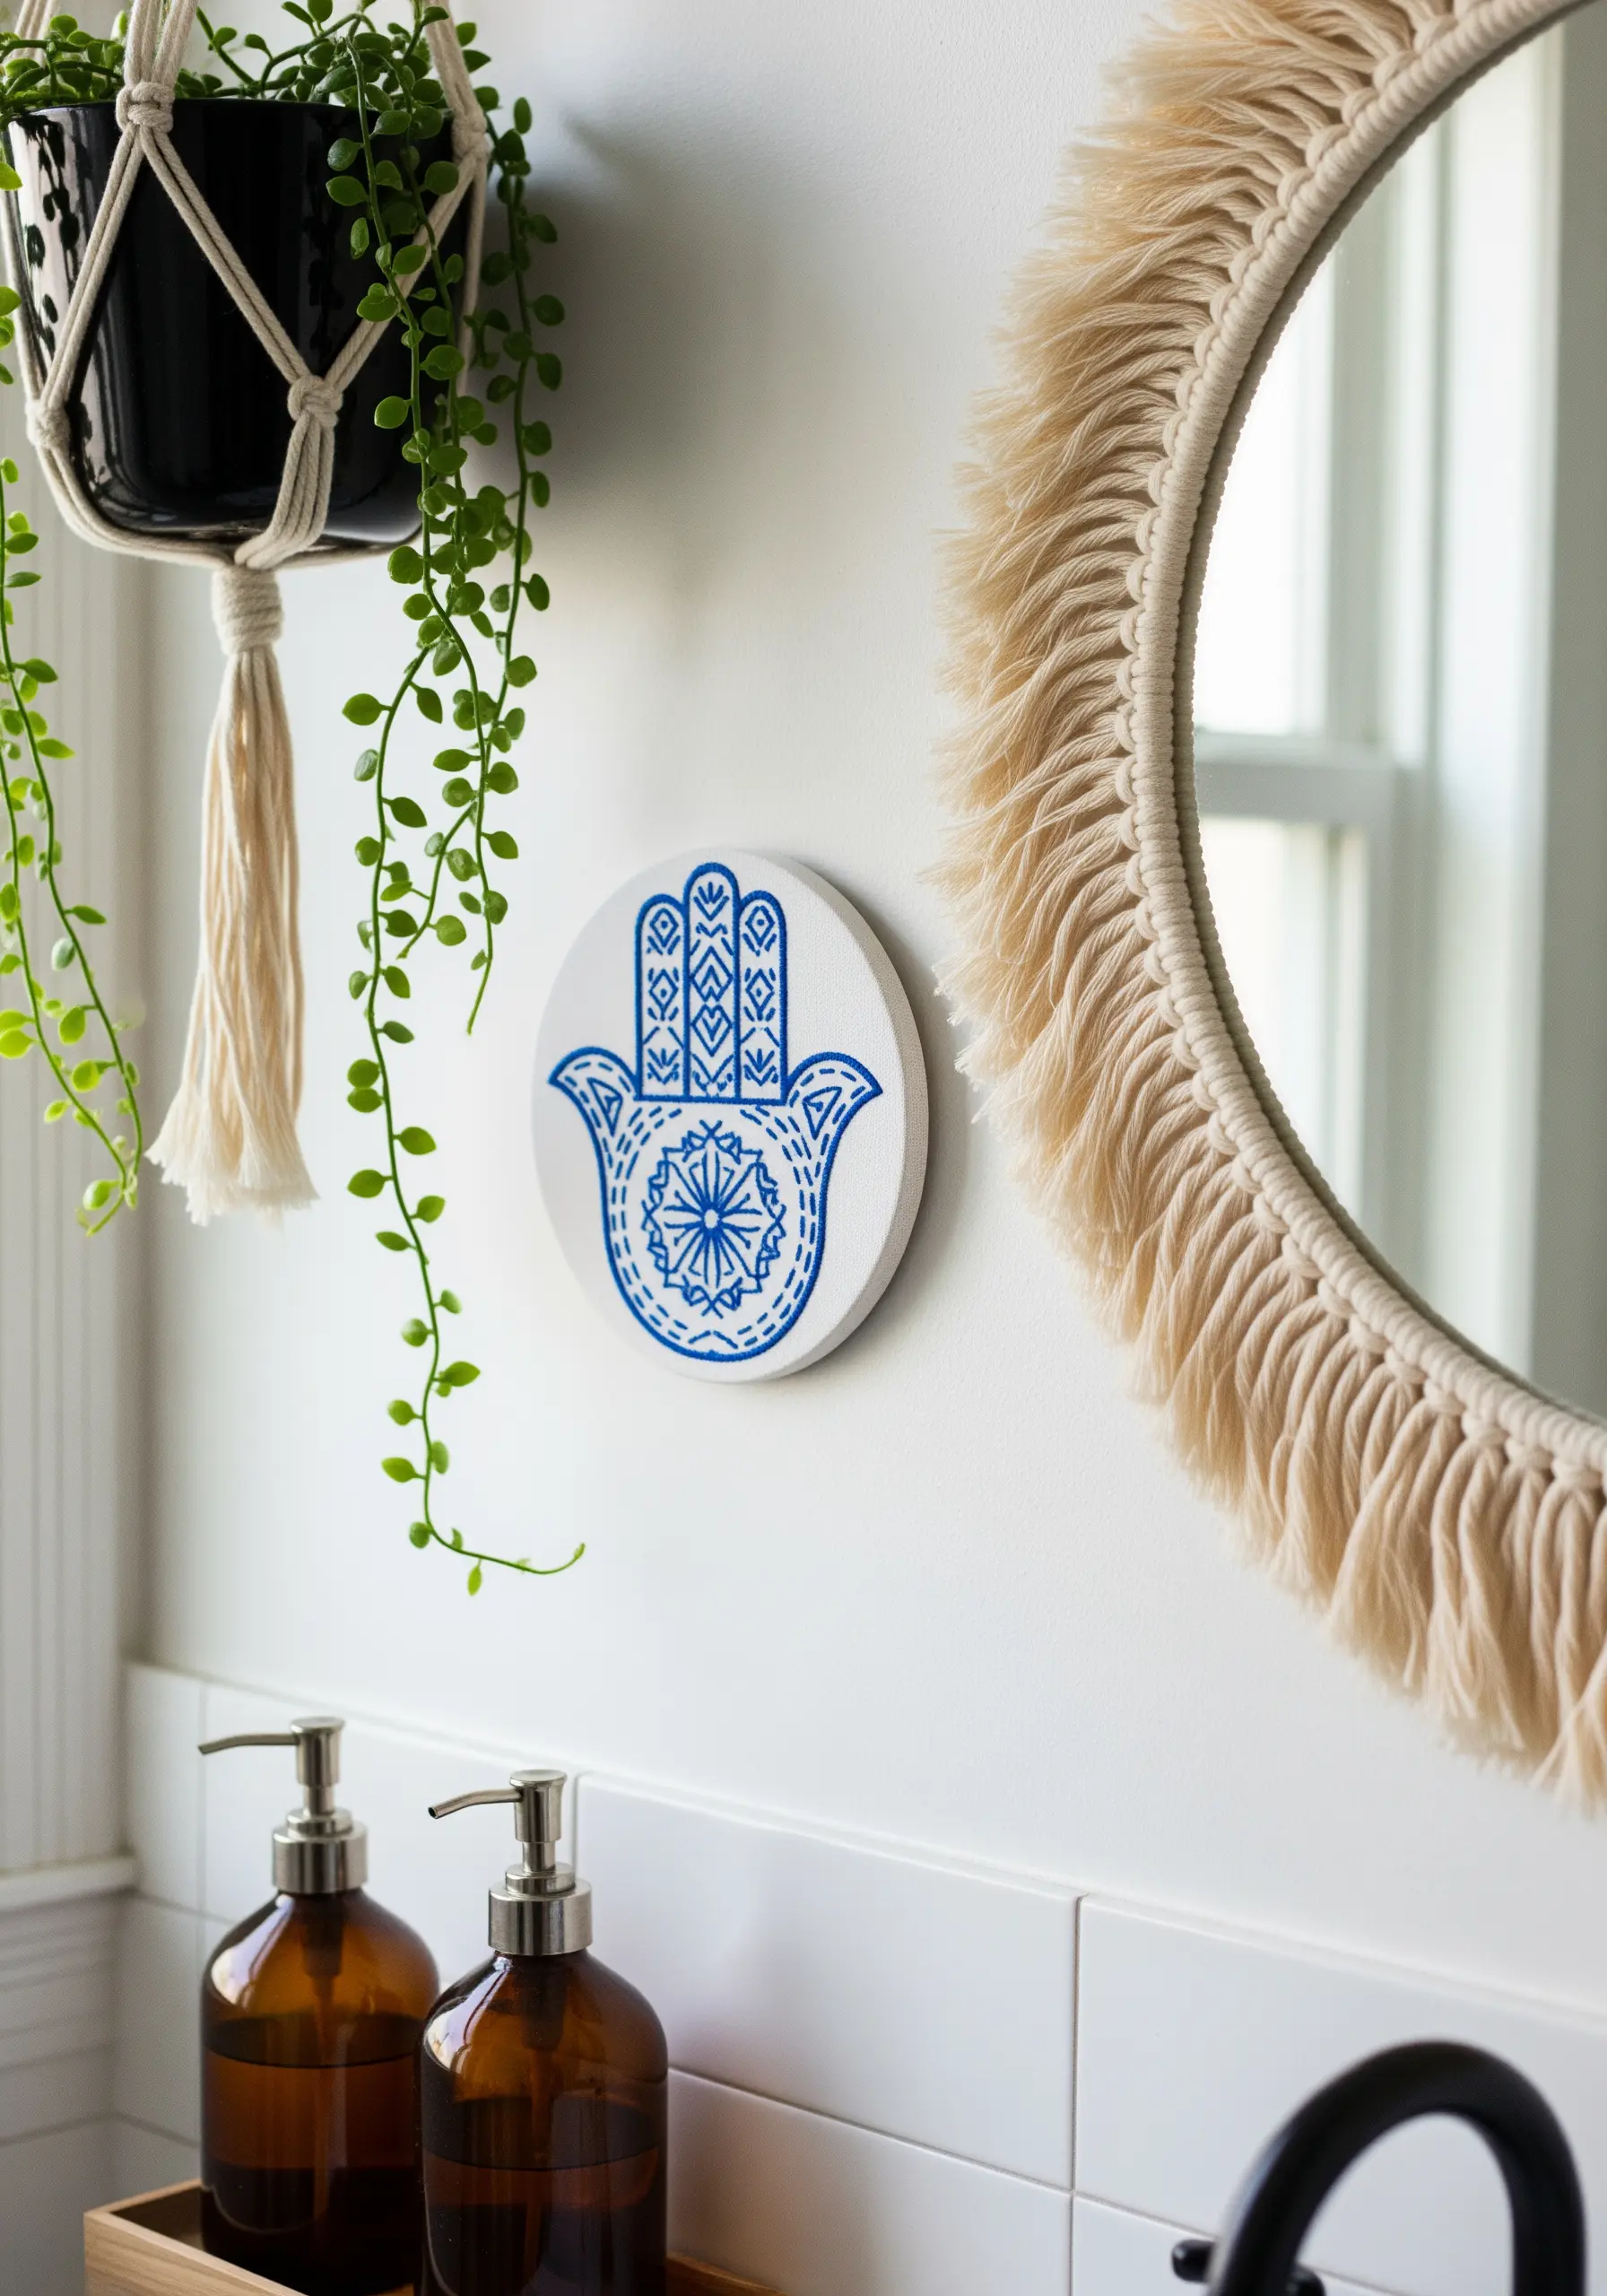
Create a striking, modern look by using a single color of thread to trace a detailed outline, allowing the un-stitched canvas to be part of the design.
A split stitch is perfect here, as it creates a sharp, chain-like line that is ideal for navigating the intricate curves and patterns of a Hamsa hand or similar motif.
Stitching on a small, circular canvas or artist’s panel adds an unexpected, contemporary twist to traditional minimalist embroidery display.
9. Emulate Woven Textures with Chain Stitch Fill
To achieve the dense, woven look of this abstract geometric piece without a punch needle, use a chain stitch fill.
Work in tight, consecutive rows to fill each shape. The interlocking loops of the chain stitch create a beautifully textured, uniform surface that mimics a hand-woven textile.
Use a thick yarn or all six strands of embroidery floss to build texture quickly and give the piece a substantial, tactile presence.
The contrast between the filled shapes and the raw canvas outline adds a clean, graphic quality to your abstract geometric design.
10. Capture Fluidity with a Single Continuous Line
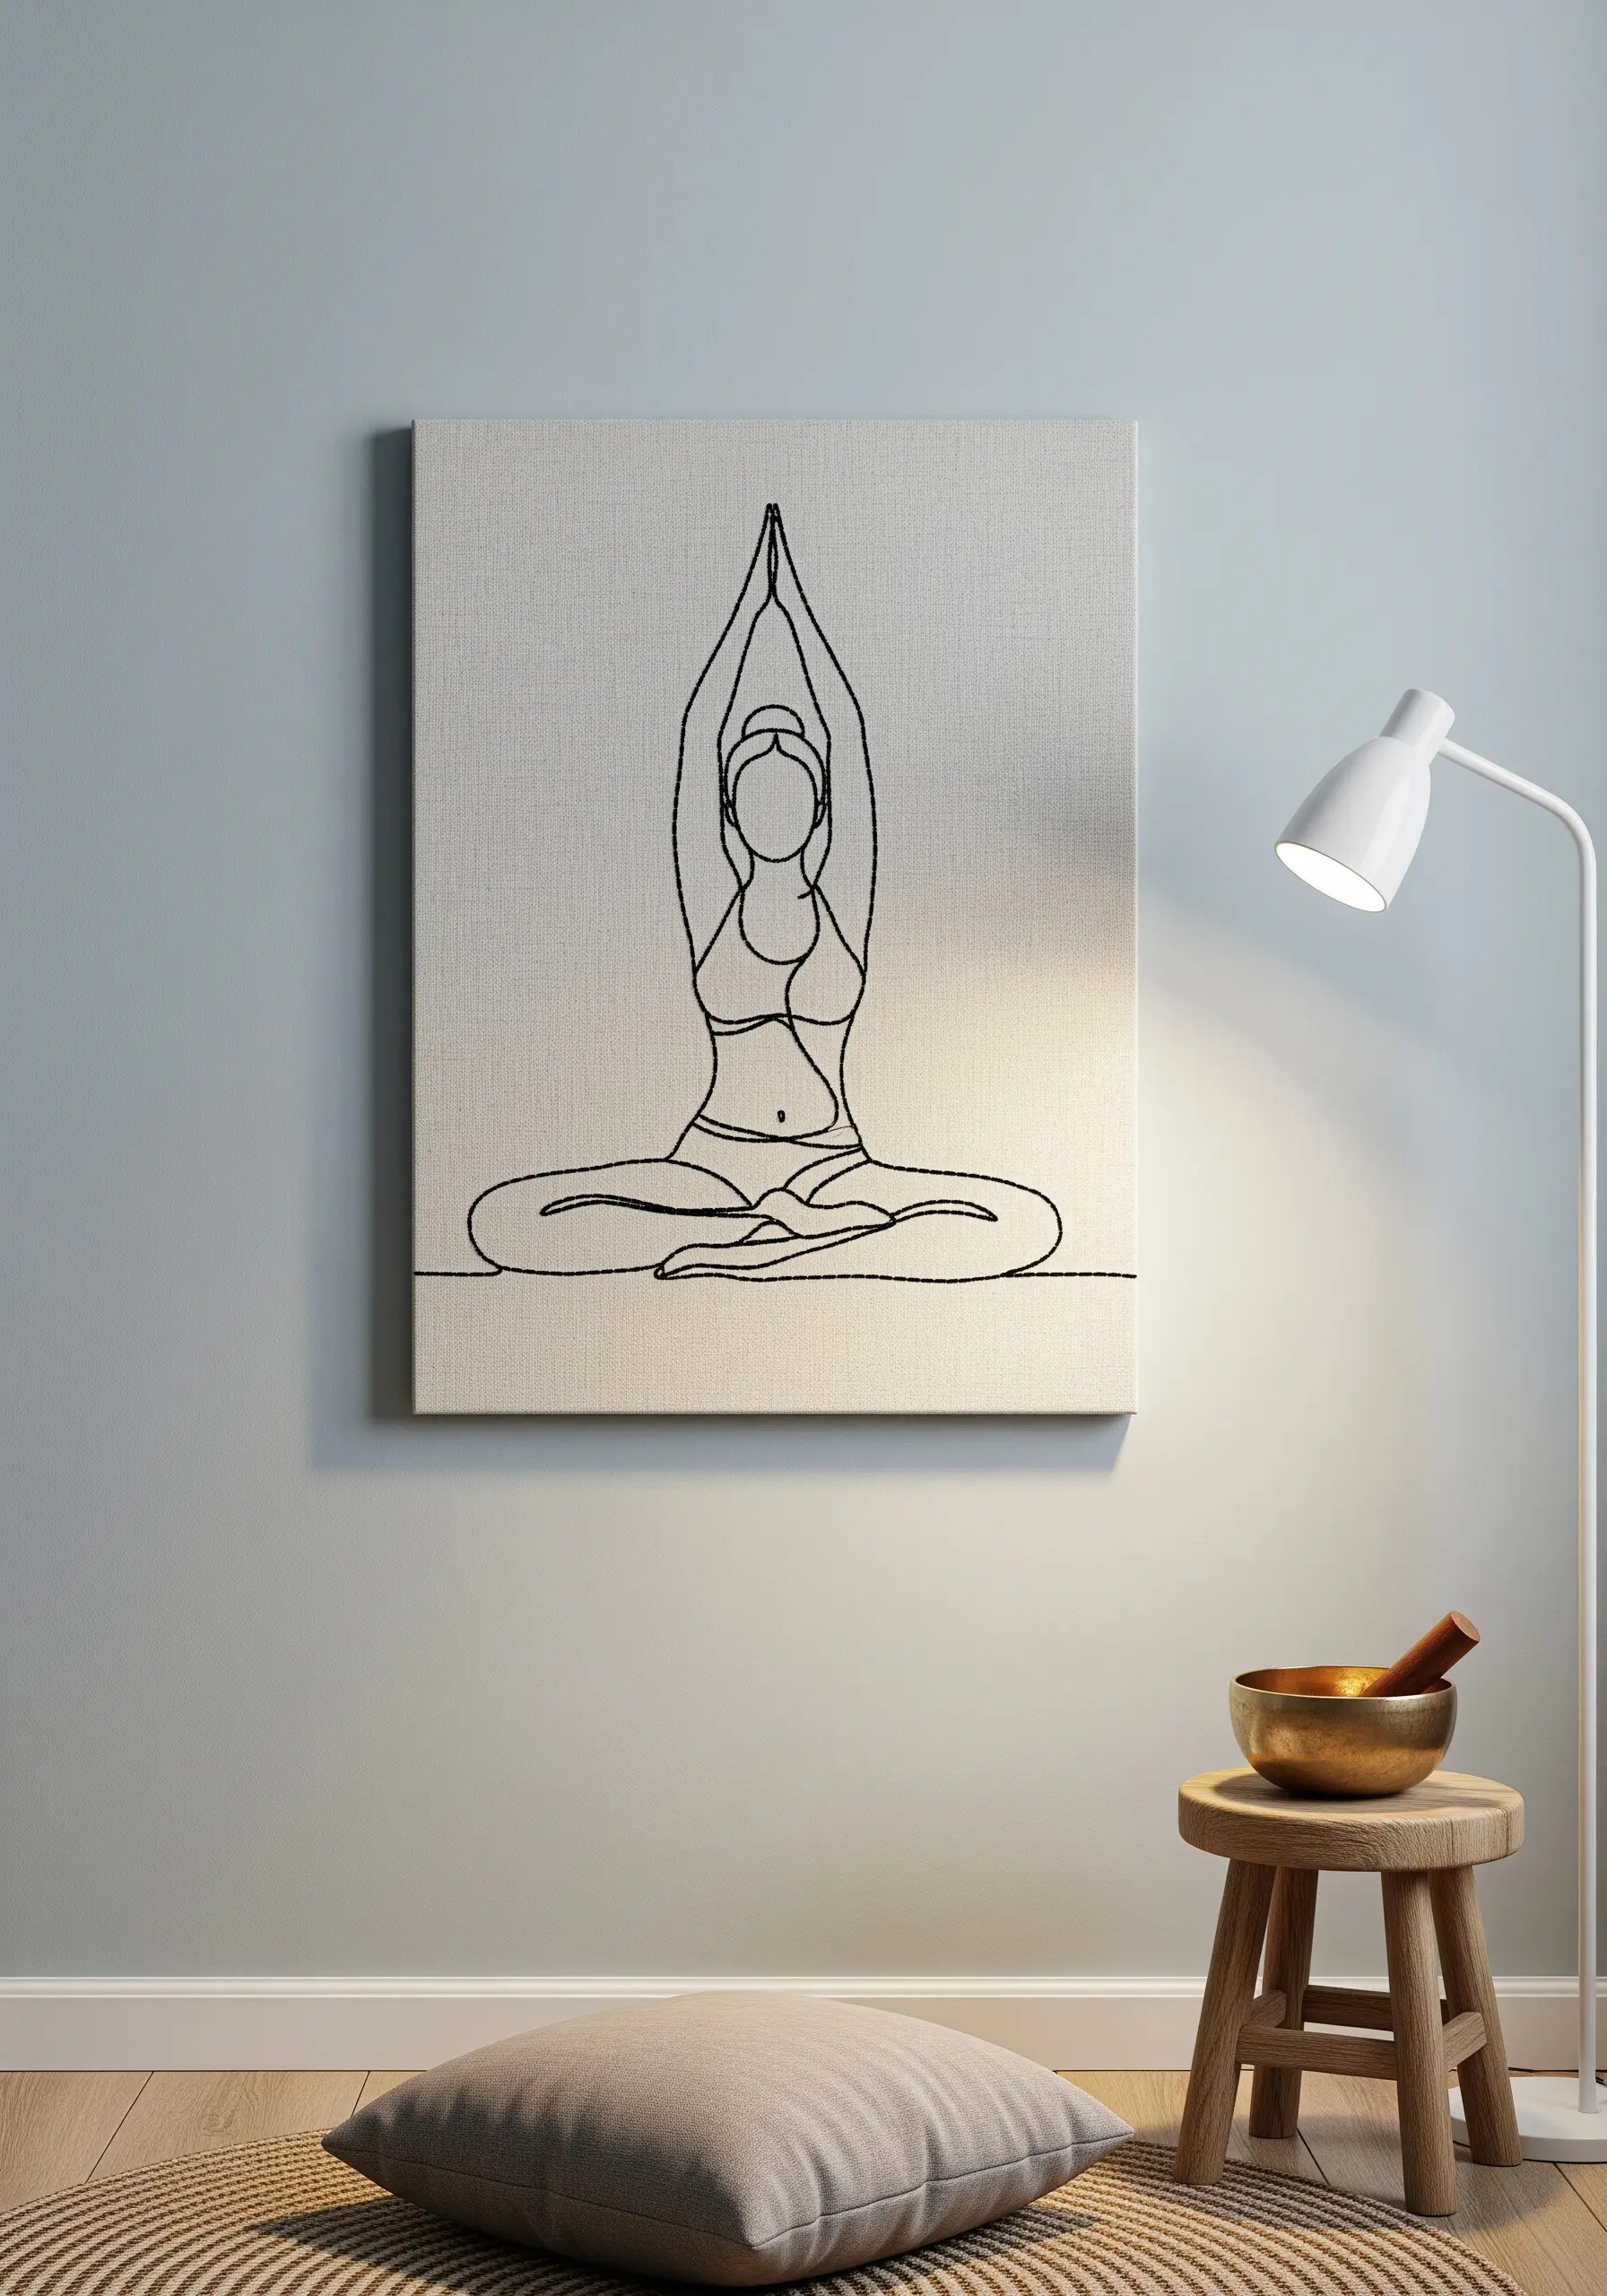
For simple line art, the goal is to create the illusion of a single, unbroken pen stroke. The stem stitch is your best tool for this.
Its twisted, rope-like structure flows beautifully around curves, creating a smooth and continuous line that is perfect for minimalist figures and portraits.
Maintain consistent stitch length and even tension to prevent any puckering or distortion in the fabric, ensuring your line remains fluid and clean.
Using black thread on a light, natural linen canvas enhances the design’s graphic, ink-on-paper quality.
11. Define Shapes with Color-Blocked Satin Stitch
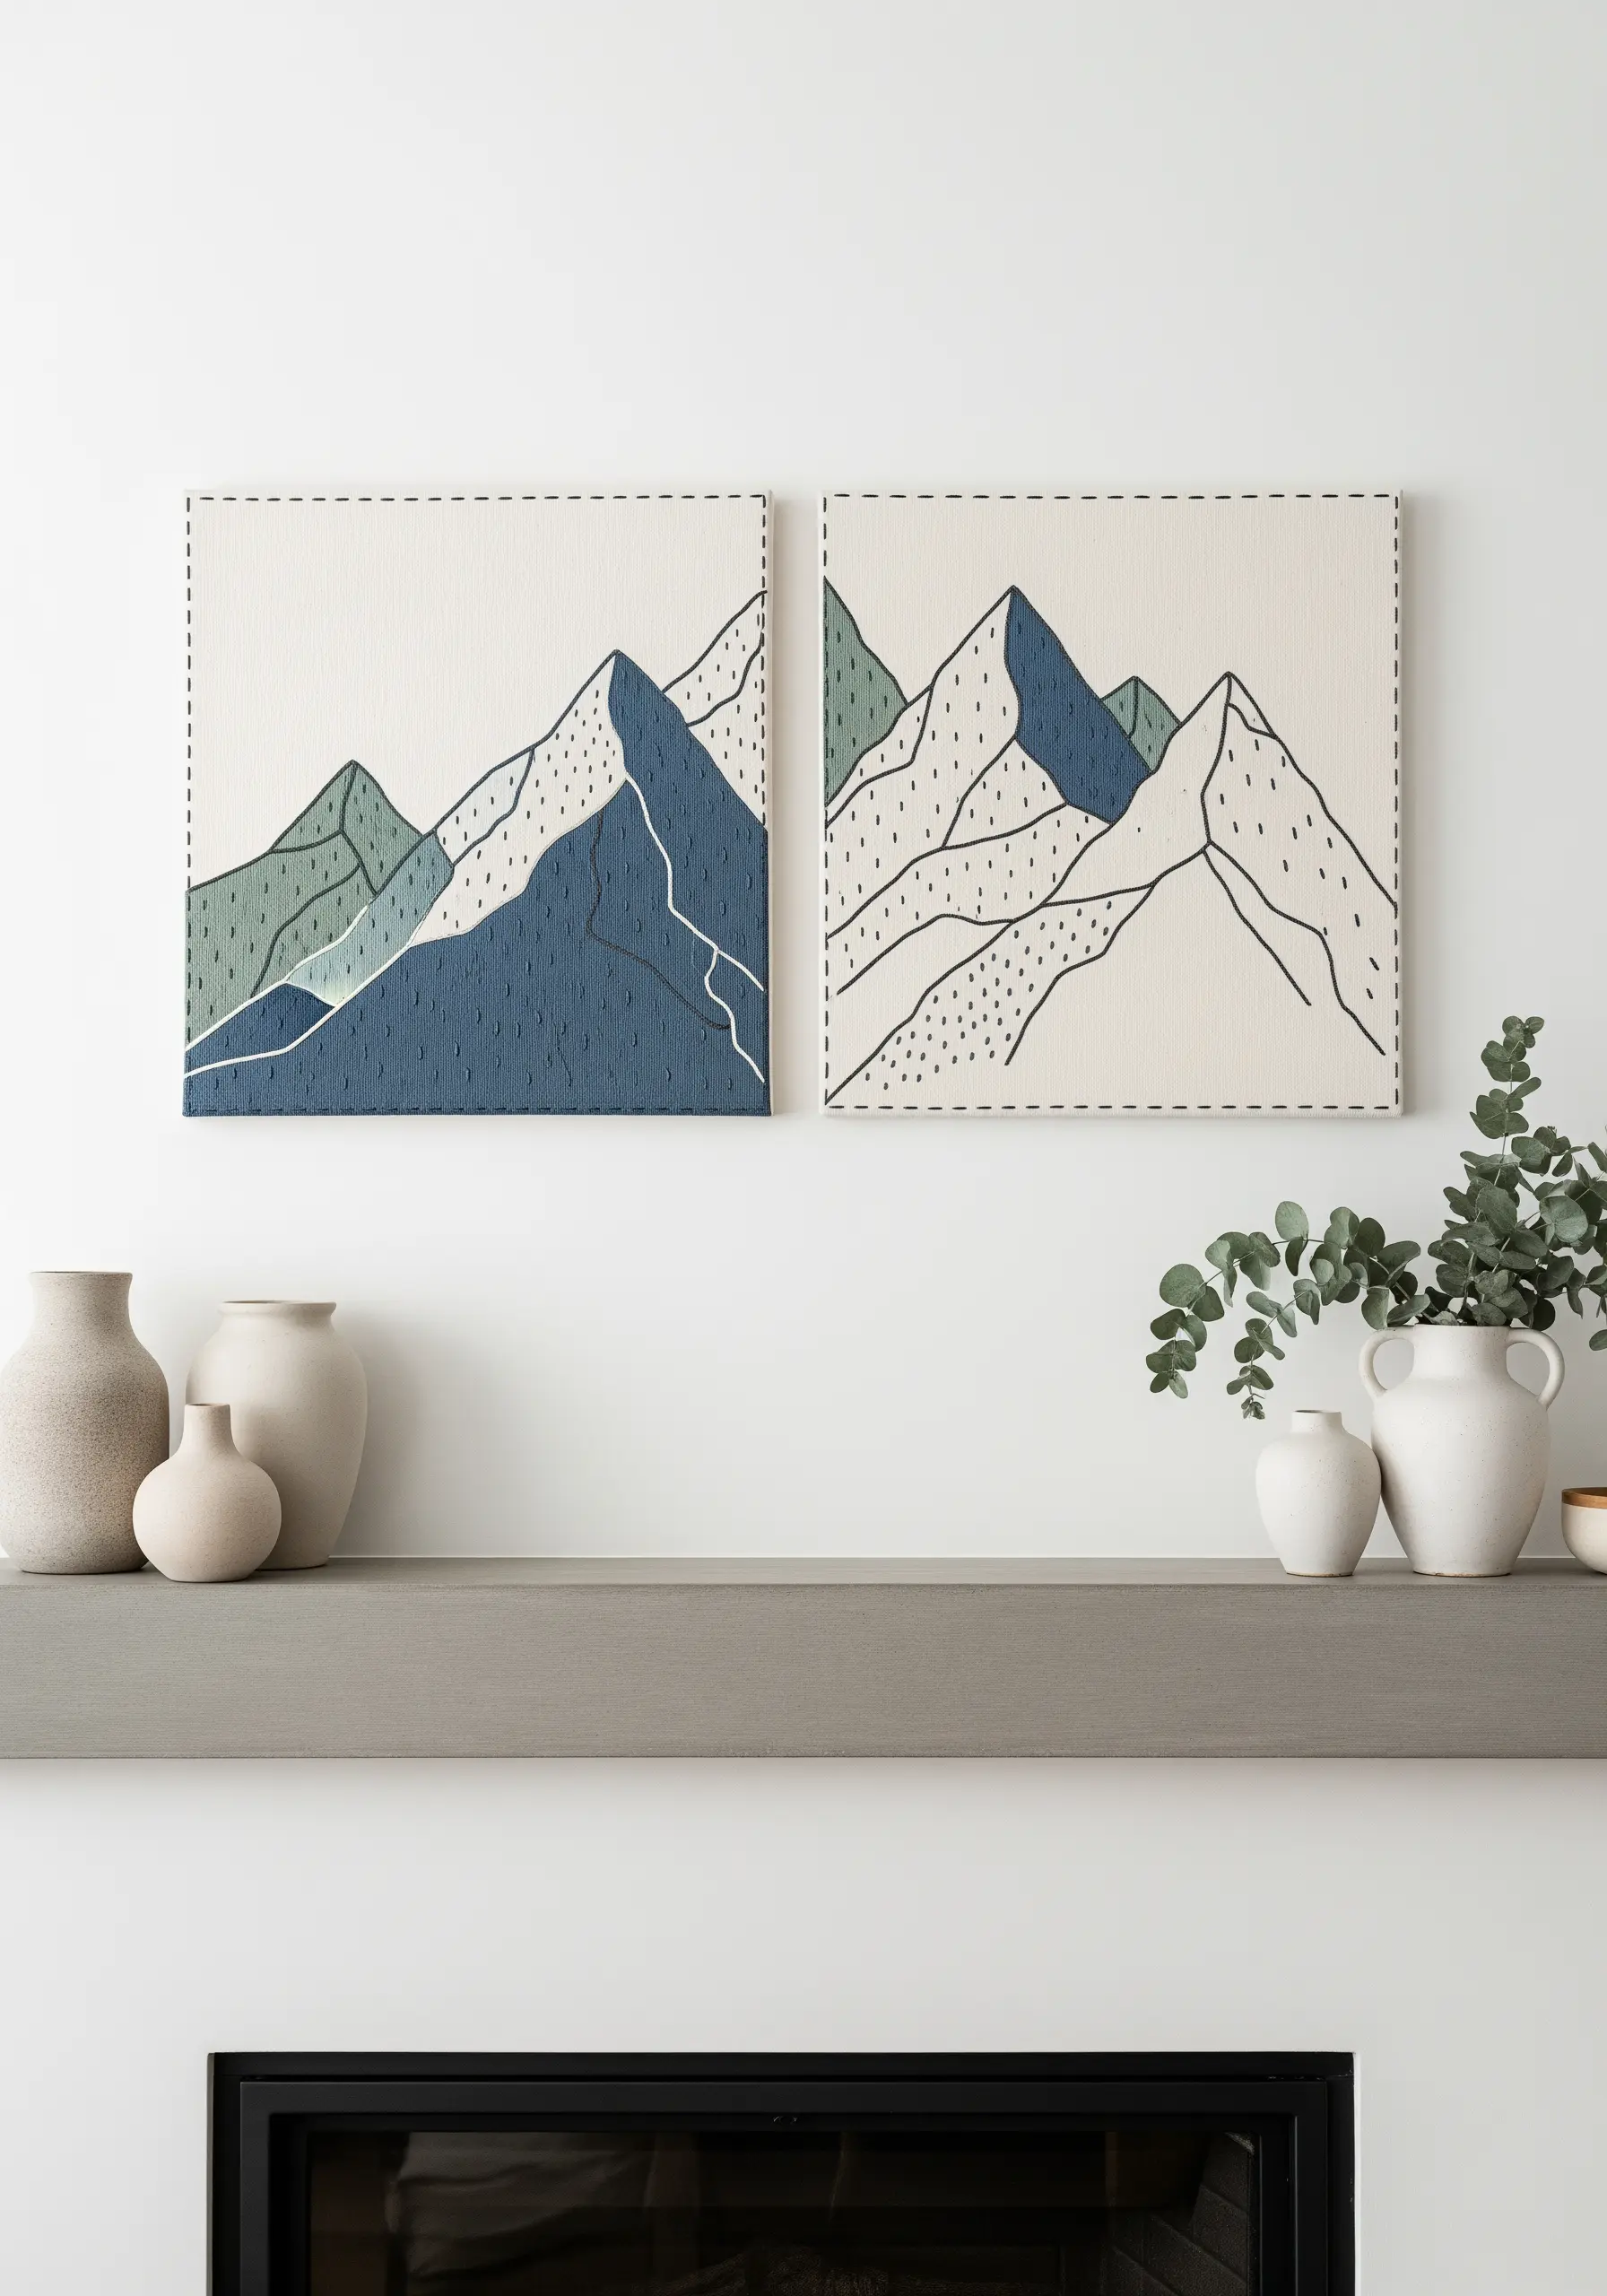
Create a clean, graphic, modern mountain scene by using satin stitch to color-block different sections.
To achieve that smooth, uniform sheen, ensure every stitch within a single block lies perfectly parallel to the others. The direction you choose will affect how light reflects off the thread.
Outline the shapes with a simple backstitch in a contrasting color to define the edges and add a hand-drawn, illustrative quality.
The dashed running stitch border provides a simple, modern frame that contains the artwork without a physical frame.
12. Create Bold, Raised Letters with Couching
For exceptionally bold and textured lettering, couch a thick material like yarn, cord, or even multiple strands of floss onto your canvas.
Lay your thick thread along your design line, then use a single, contrasting strand of regular floss to tack it down with small, evenly spaced straight stitches.
This technique is not only fast but also creates a distinctly raised, 3D effect that makes your inspirational quote pop.
Contrast the thick, couched letters with delicate single-thread stitches for smaller details to create a dynamic visual hierarchy.
13. Add Detail and Texture with Fishbone Stitch
The fishbone stitch is the perfect choice for creating stylized leaves that have both texture and a defined centerline.
The stitch is worked from the tip of the leaf downwards, with alternating stitches overlapping in the middle to create a subtle, raised spine.
For a more dynamic, nature-inspired look, slightly vary the angle of your stitches in each leaf to mimic natural imperfections.
Pair these textured leaves with simple lazy daisy stitches for the flower petals, creating a pleasing contrast in form and texture.
14. Build a Collection with Varied Stitches
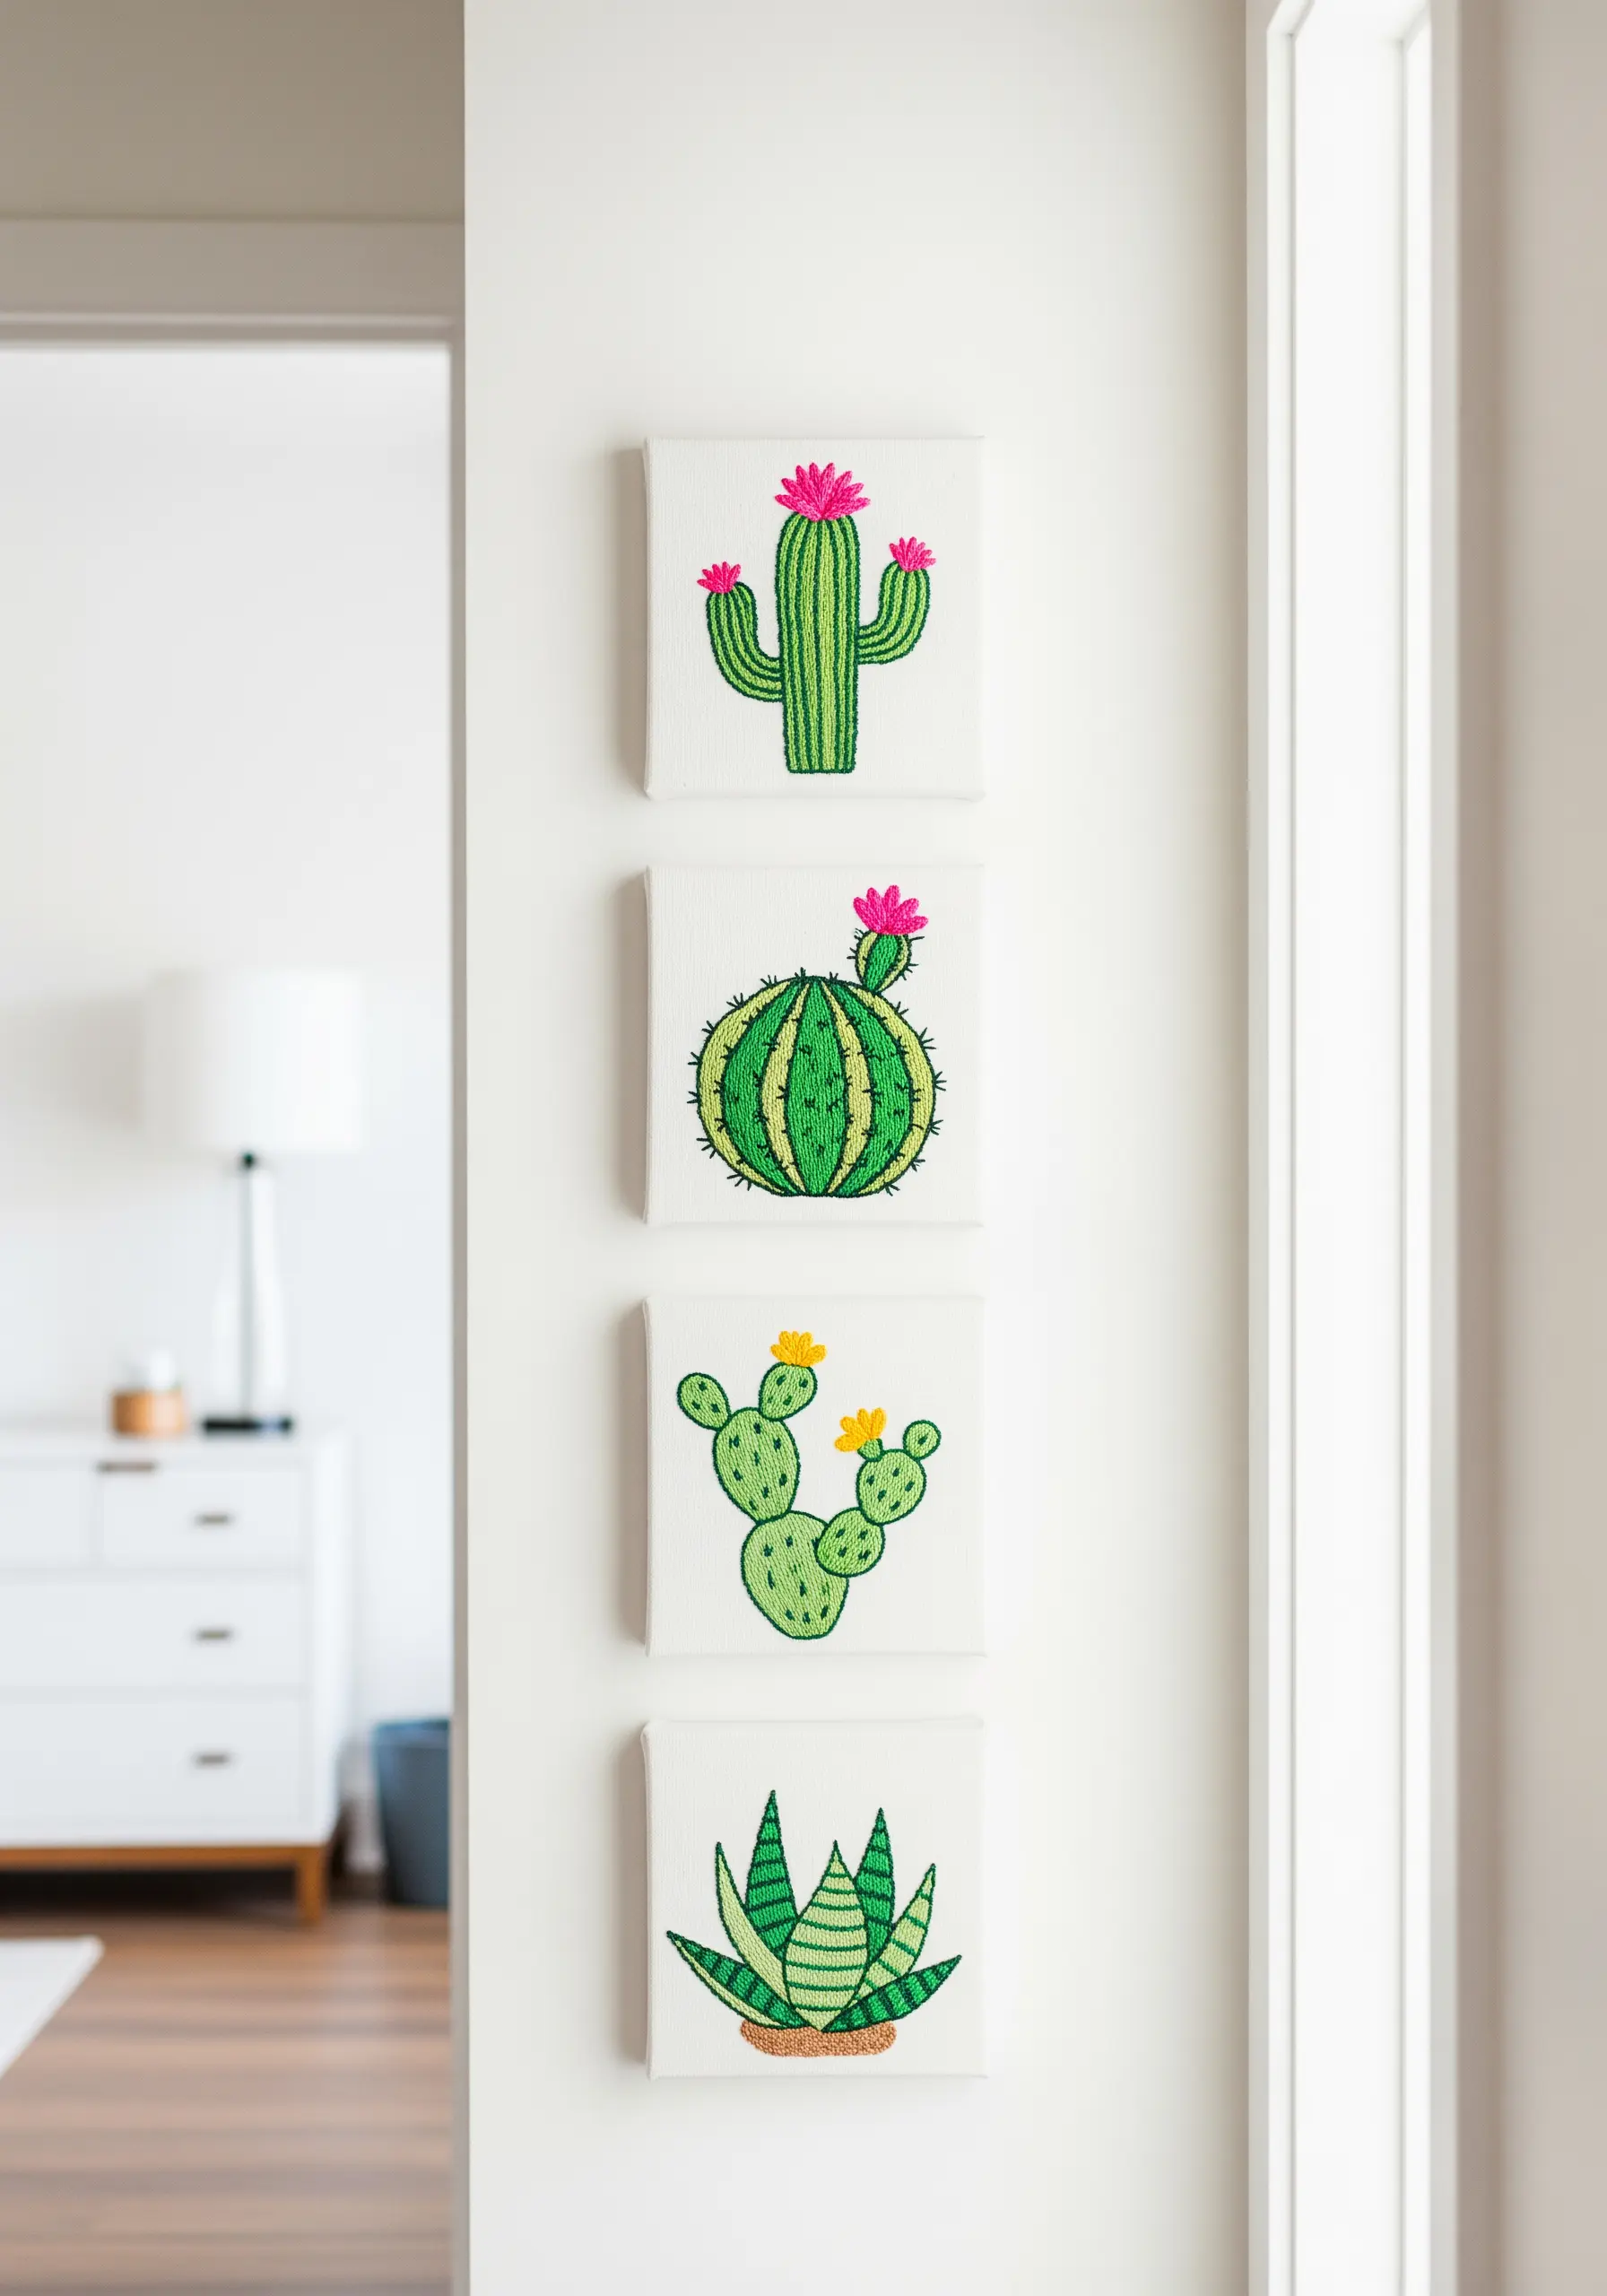
When creating a set of small canvases, assign a different stitch or technique to each one to build visual interest and showcase your skills.
Use long-and-short stitch for smooth gradients on one cactus, a chain stitch fill for a bumpy texture on another, and French knots or seed stitches to represent spines or flowers.
This approach turns a simple collection into a sampler of organic textures, making each piece unique yet cohesive as a group.
Keeping the color palette consistent across all canvases will unify the collection.
15. Master Fine Detail with Single-Strand Thread
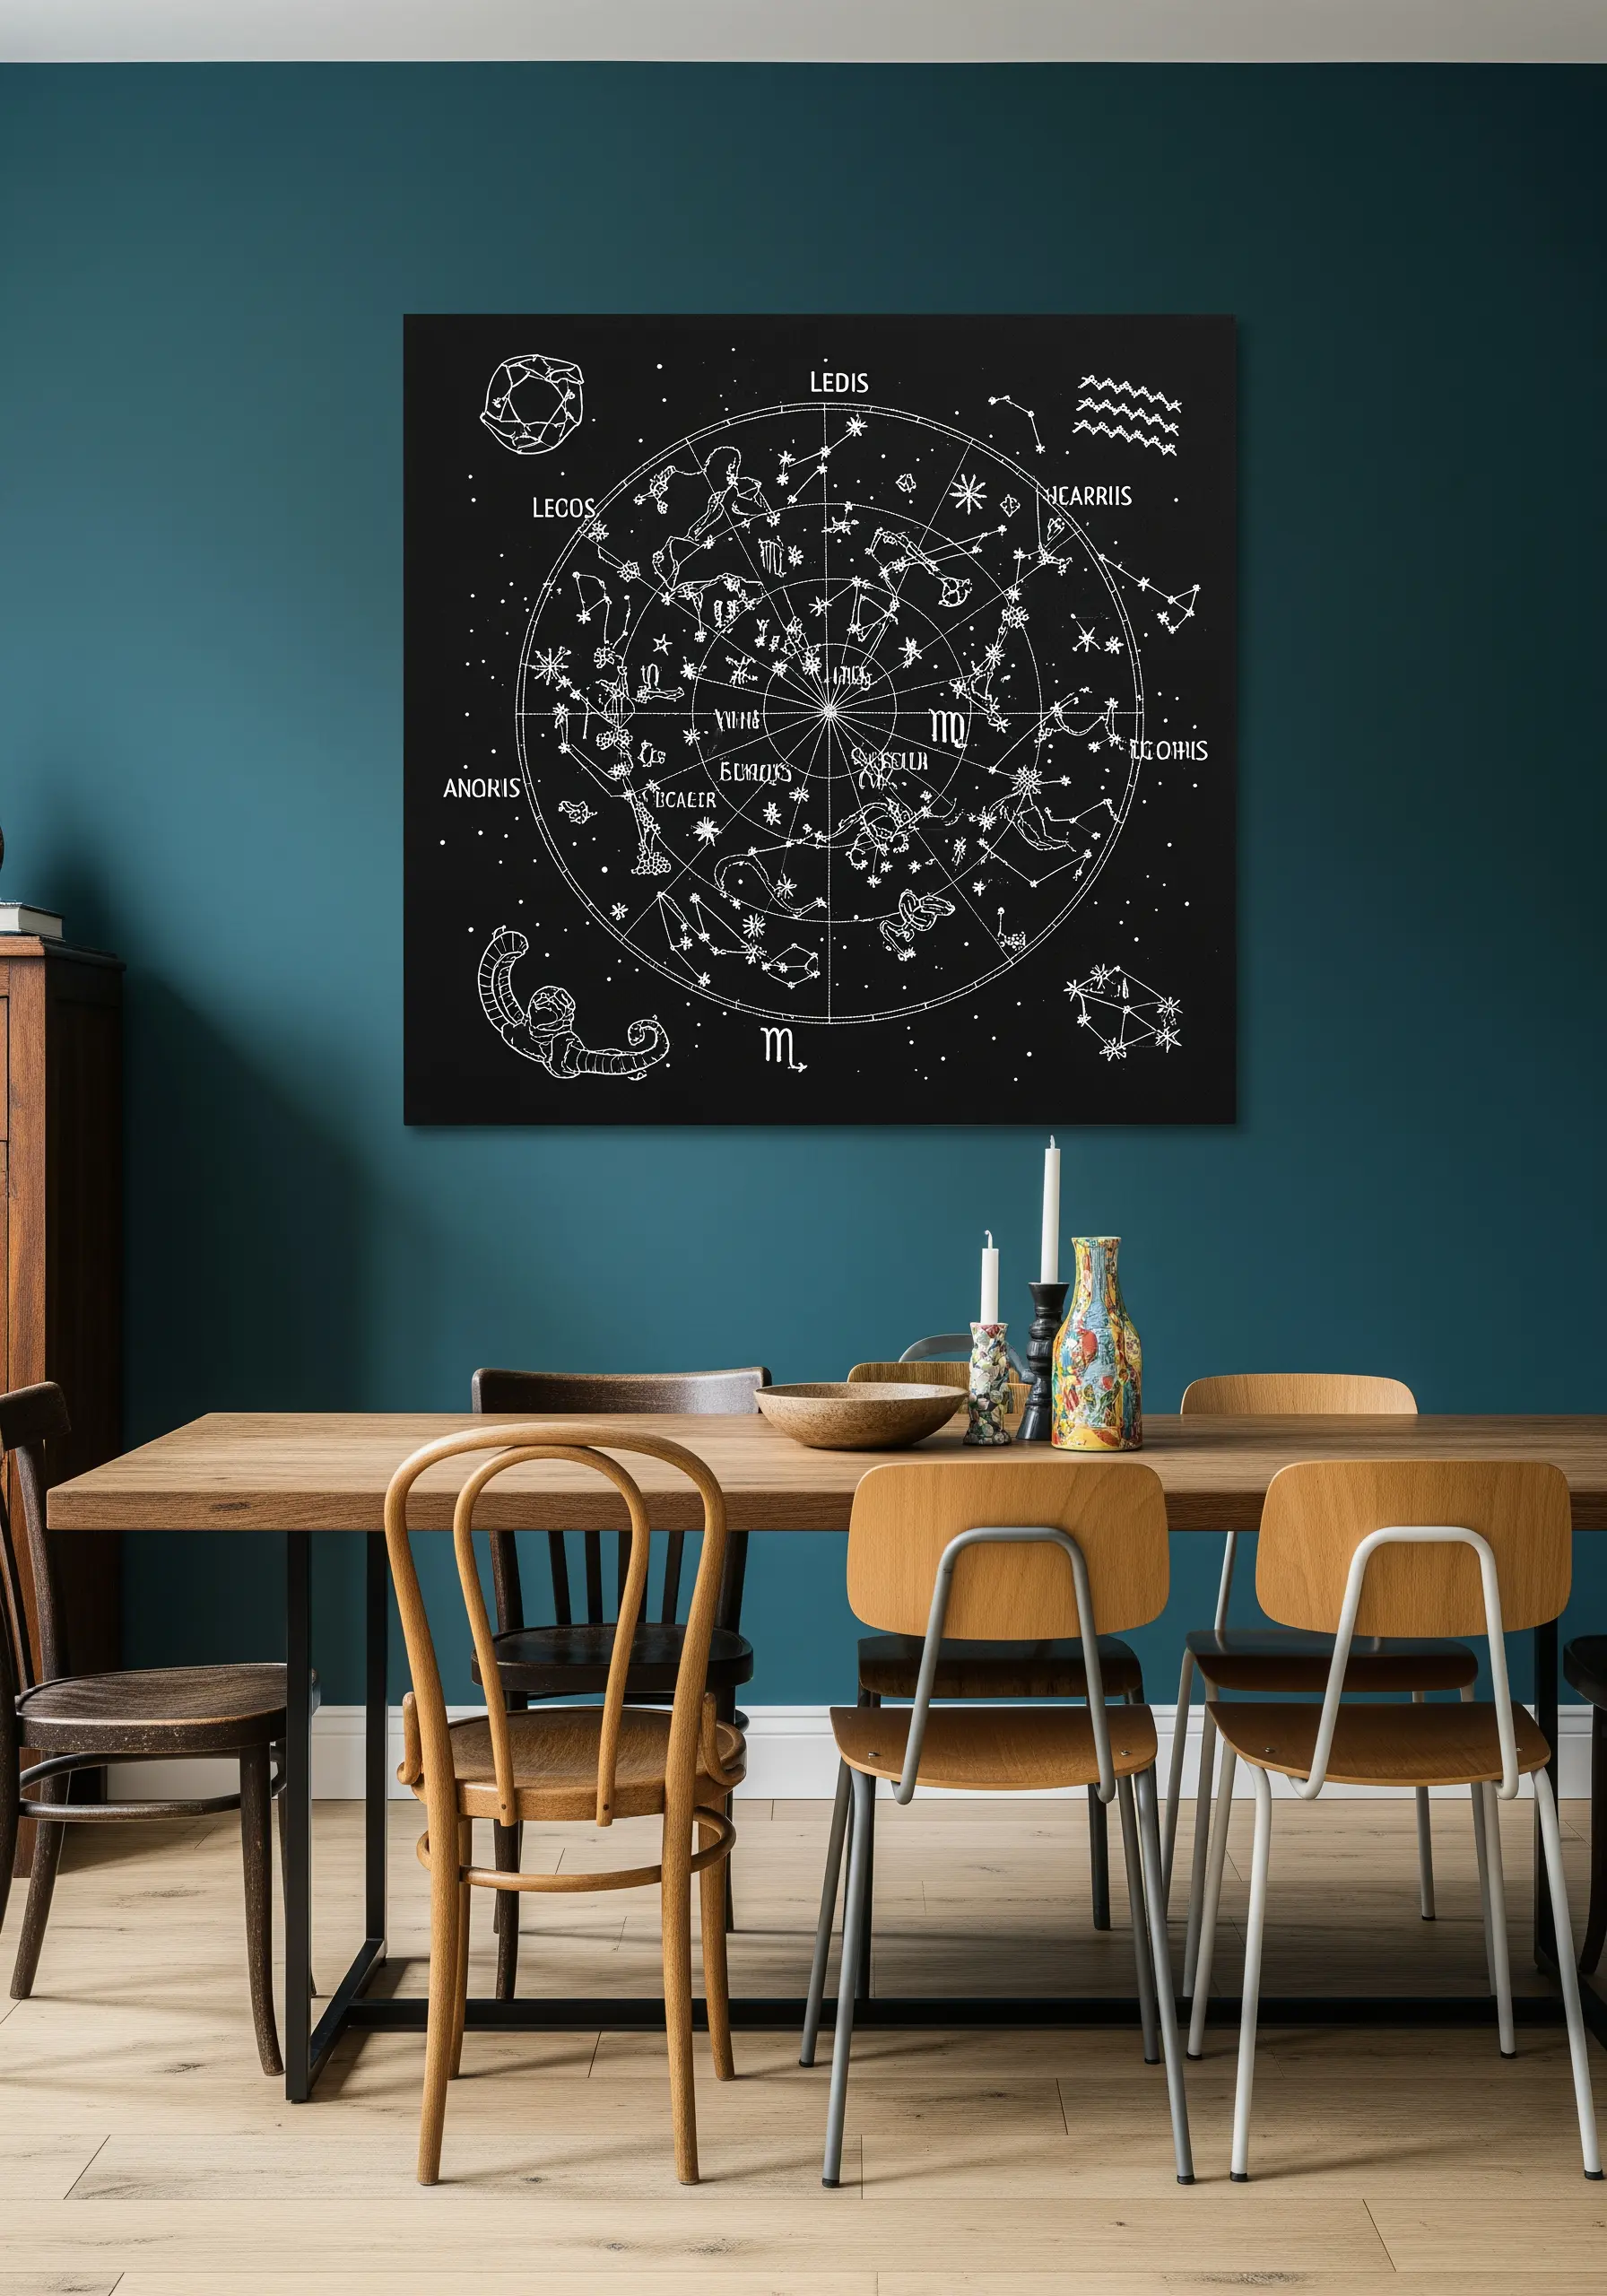
For a highly detailed celestial map, stitch on a dark, high-contrast fabric using only a single strand of white or silver embroidery floss.
Use a tiny split stitch or backstitch to achieve the crispness required for constellations, symbols, and text. A single strand allows for precision that thicker threads can’t offer.
For the stars, use a mix of French knots and single straight stitches to create variation in brightness and size, giving the composition depth and energy.
This project is a meditation on precision, where the negative space of the dark canvas is just as important as the stitches themselves.
16. Perfect the Art of the Continuous Line Portrait
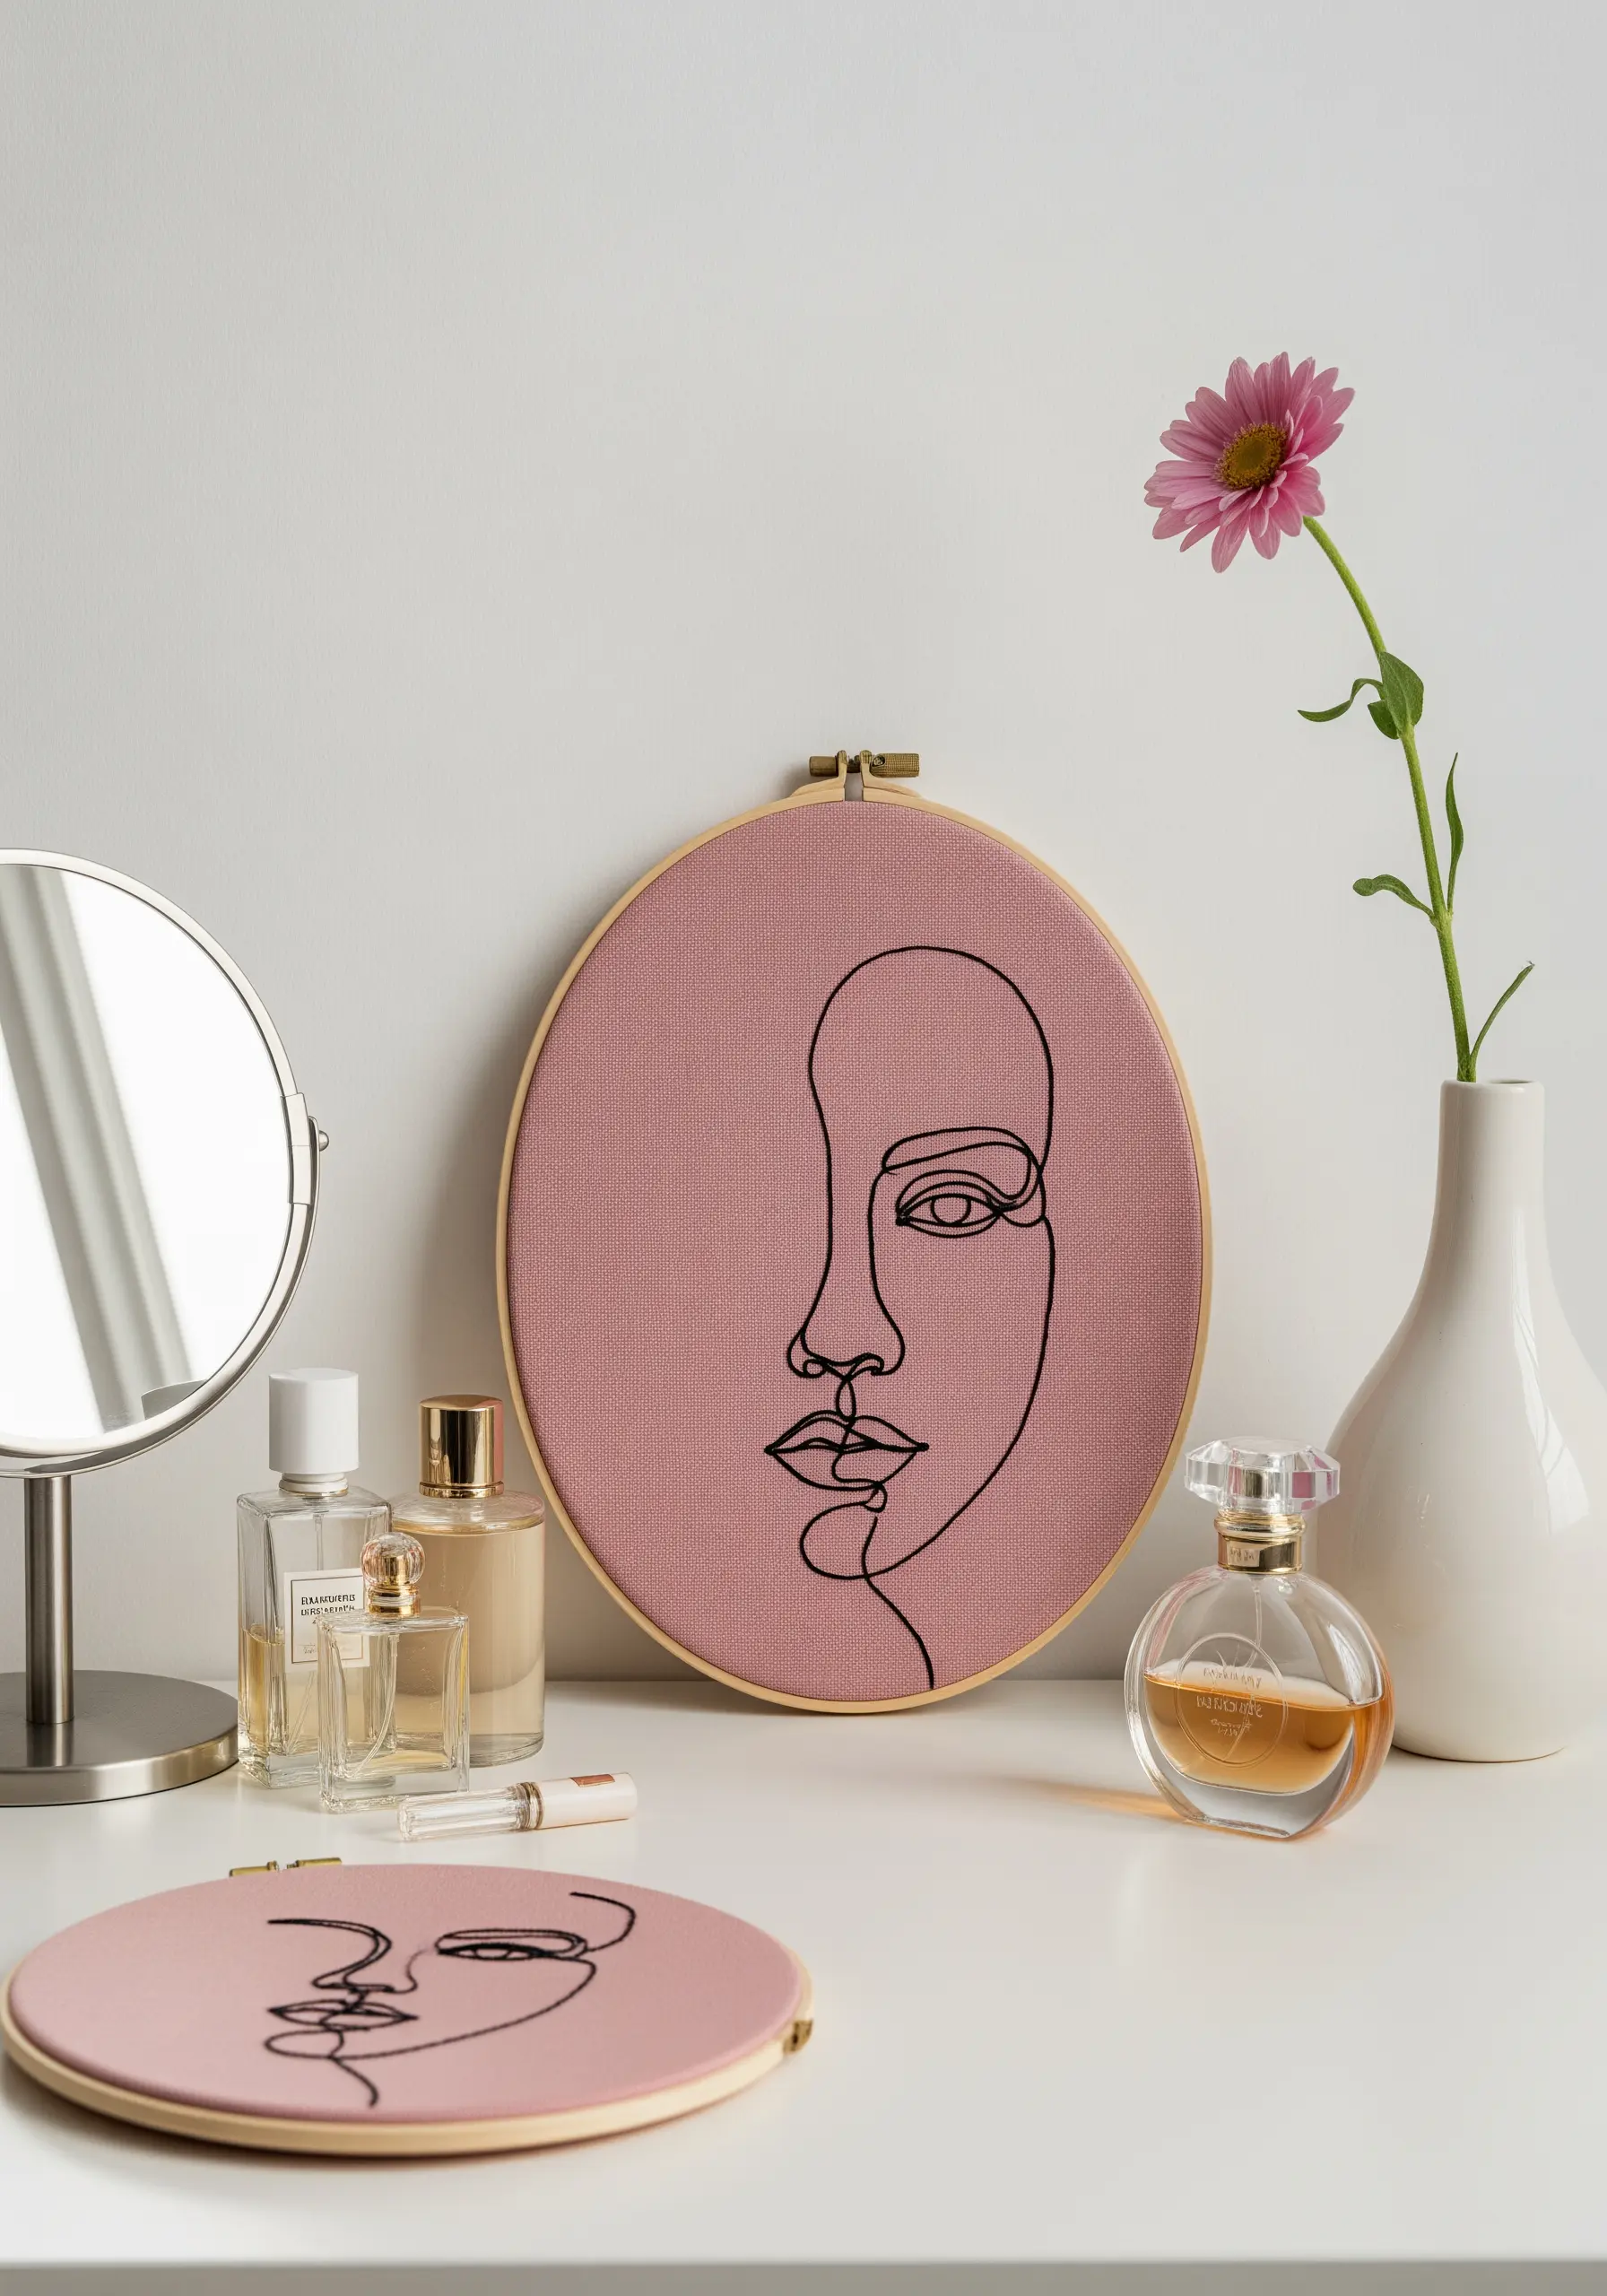
The beauty of modern line art thread designs lies in their effortless appearance, which you can achieve with a whipped backstitch.
First, create a foundation of even backstitches along your design. Then, without piercing the fabric, weave a second thread through these stitches.
This completely smooths the line, removing the segmented look of a standard backstitch and creating a truly fluid, ink-like quality.
Choosing a fabric with a slight texture, like a linen blend, adds a beautiful organic contrast to the sleek, modern lines of the portrait.
17. Create the Illusion of Movement and Distance

To make a flock of birds appear to be moving across the canvas, think like a painter and use perspective to your advantage.
Stitch the birds in the foreground using two or three strands of floss to make them appear closer and more defined. For birds in the distance, use only a single strand.
Varying the size of your stitches—in this case, simple fly stitches or V-stitches—also enhances the illusion of depth.
This subtle technique transforms a static pattern into a dynamic scene, making your minimalist embroidery wall art feel alive.
18. Combine Script and Sans-Serif Typography
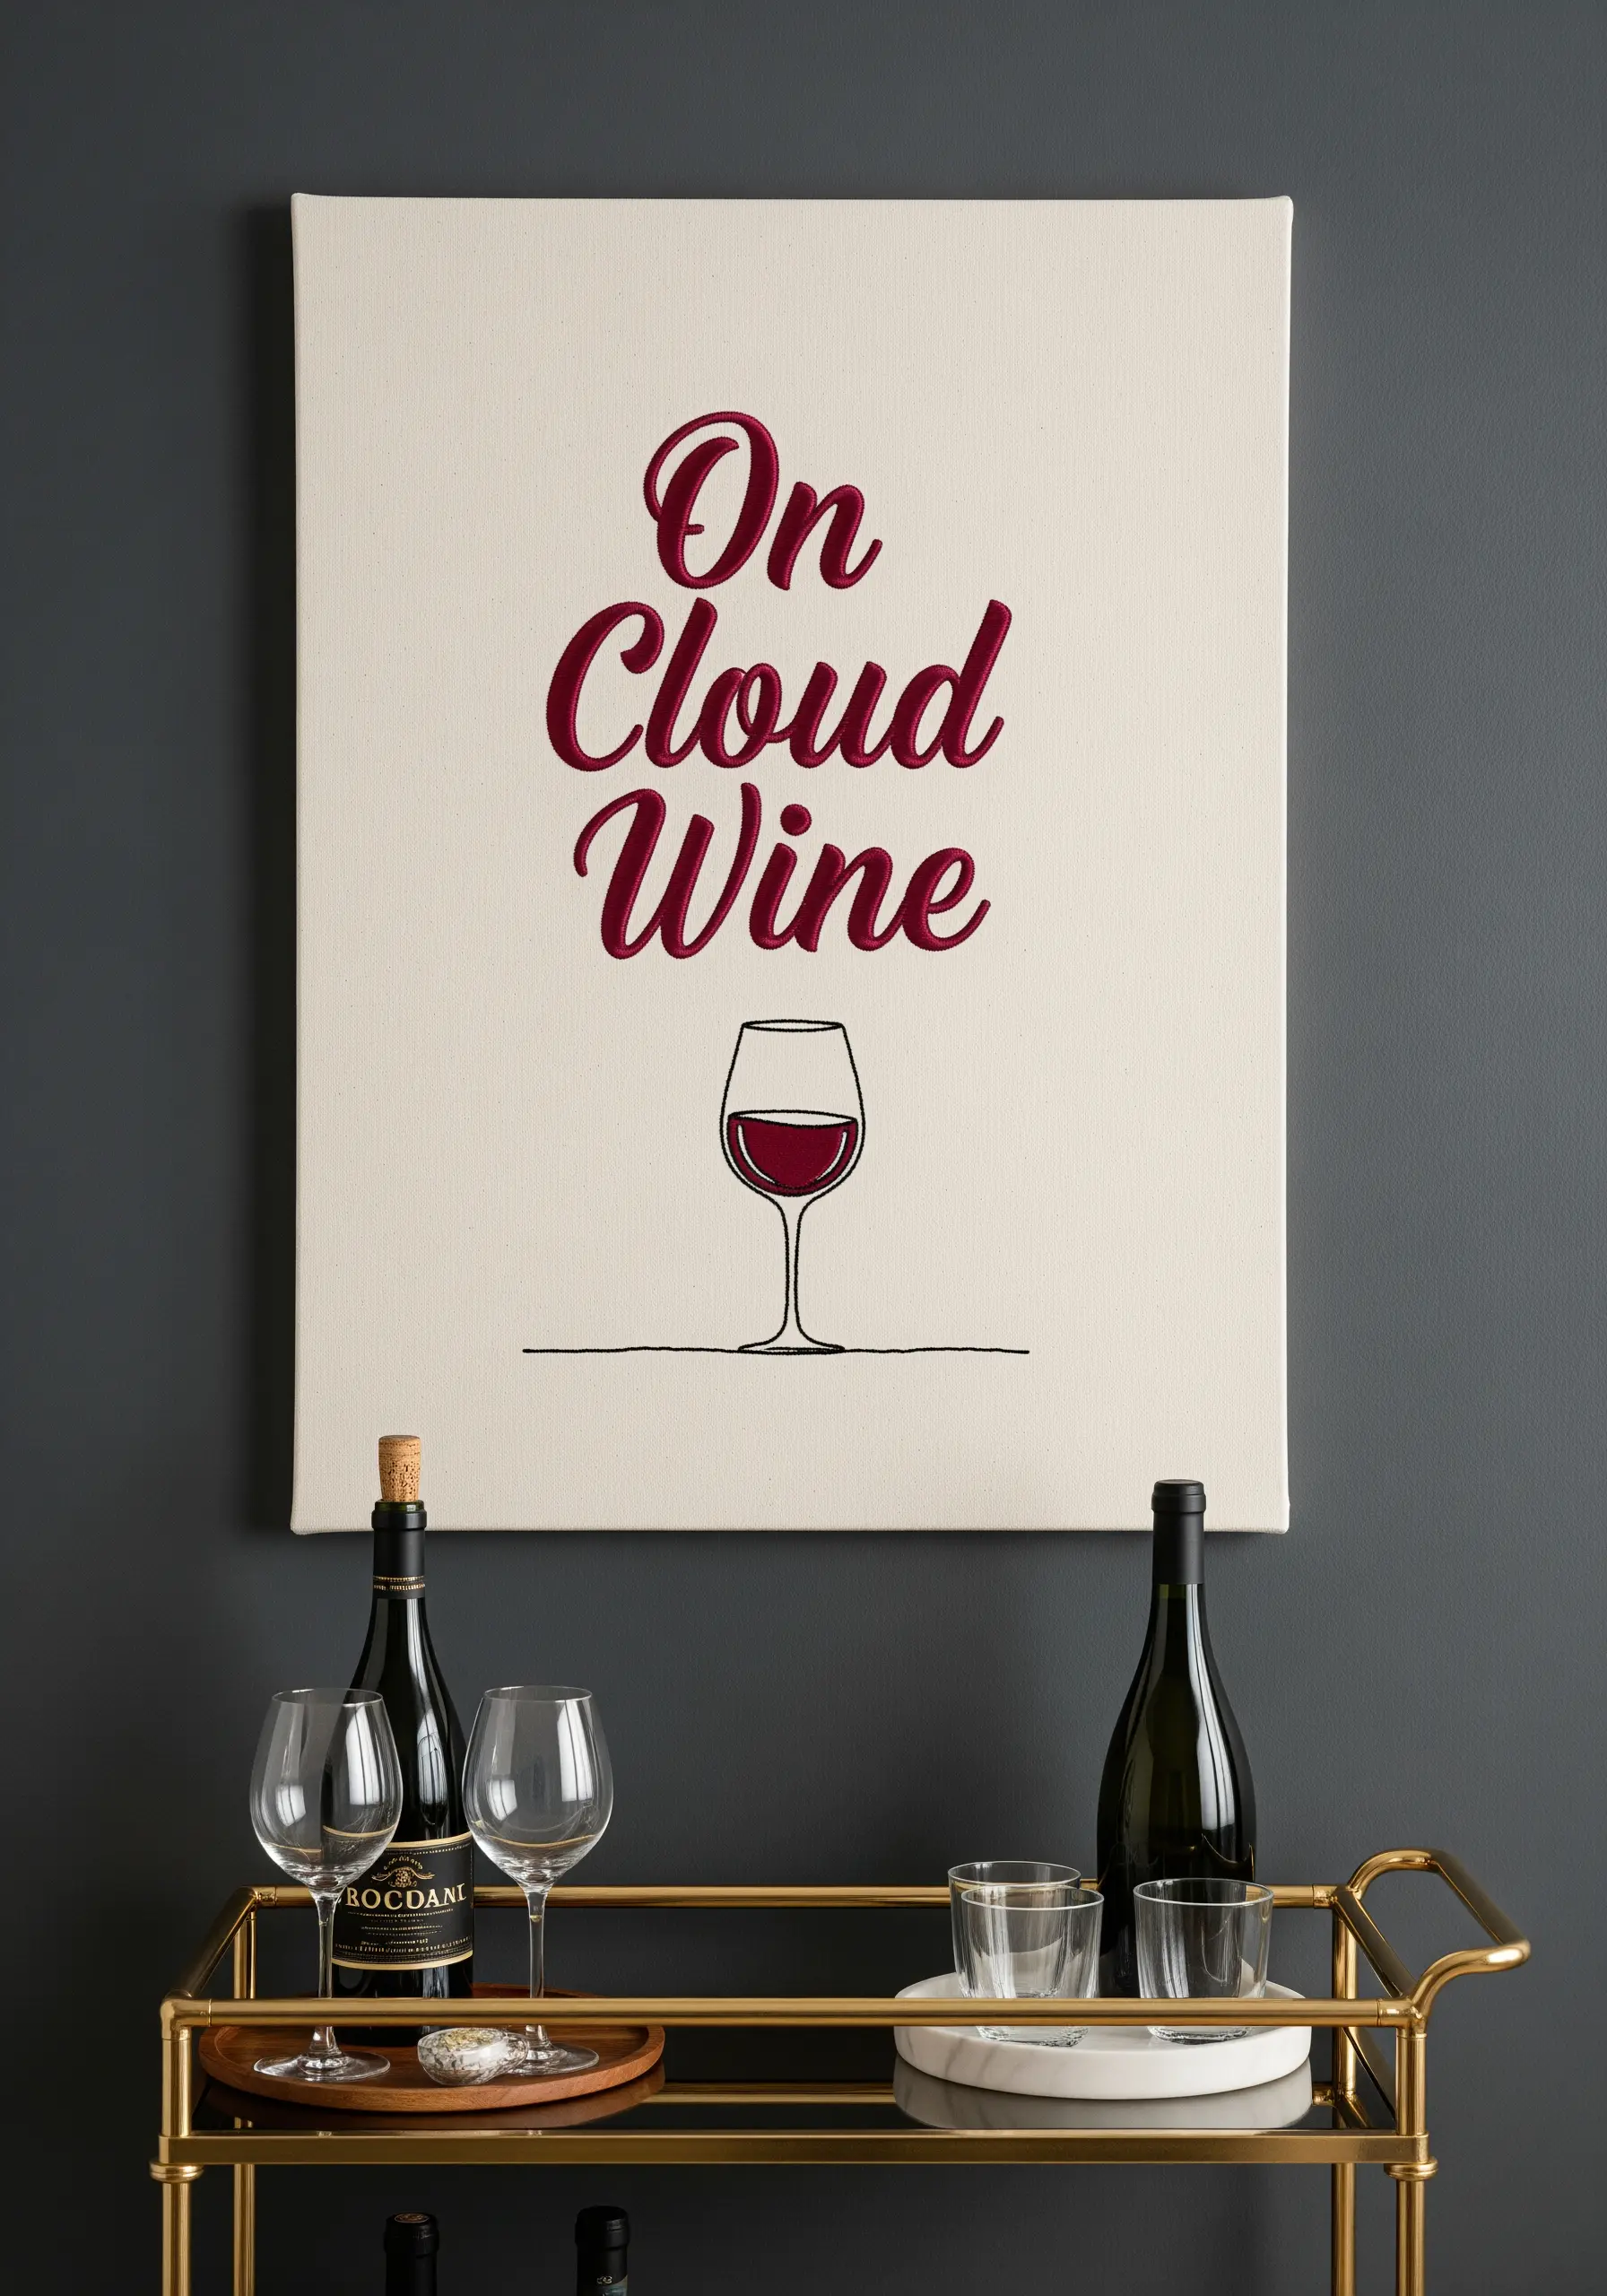
For an elegant line art inspirational quote, pair a flowing script with a simple, clean font. Use a stem stitch for the cursive letters to achieve smooth, graceful curves.
For the simpler font of the wine glass, a basic backstitch will provide the necessary clean, straight lines.
To create the transparent effect of the wine, use a light satin stitch with only one or two strands of floss, leaving some of the canvas visible underneath.
This thoughtful combination of stitch and style creates a balanced and professional-looking piece.
19. Paint a Sunset with Thread Gradients
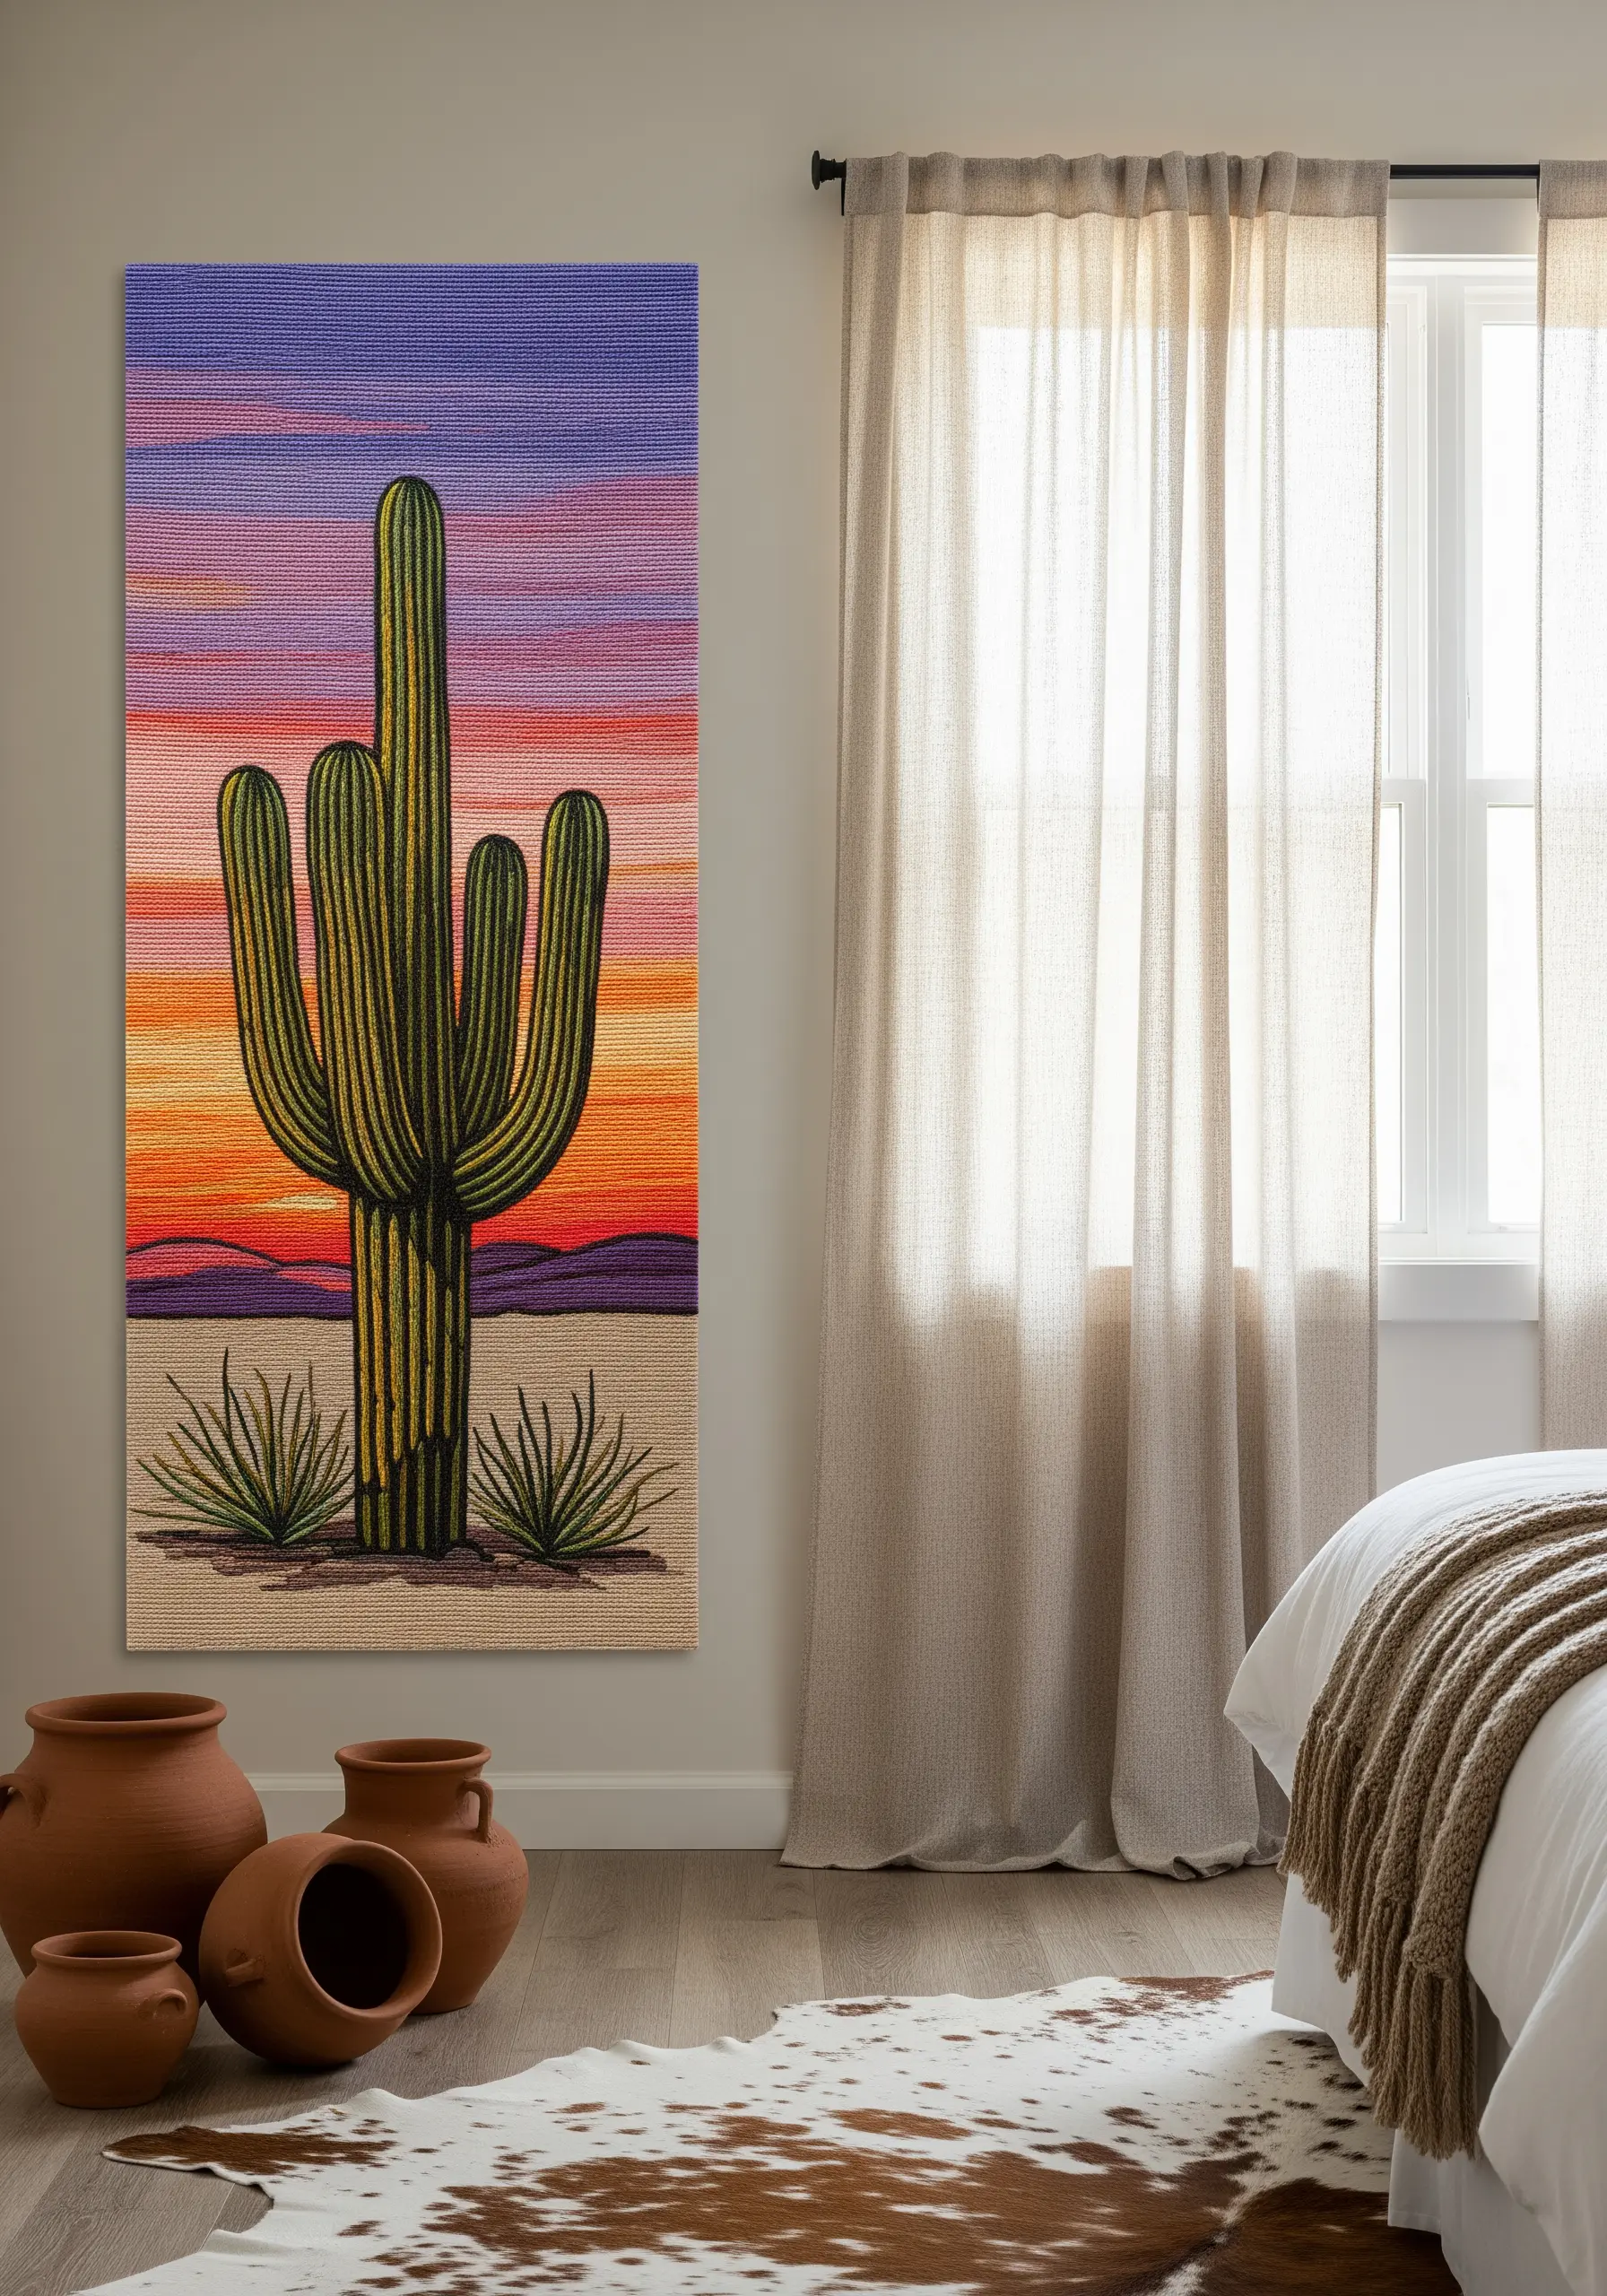
Create a painterly effect in your background by using the long-and-short stitch to blend your colors seamlessly.
Work in horizontal bands of color, allowing the stitches of each new row to interlock with the row above it. This technique removes any harsh lines between colors, creating a soft, natural transition.
This ombre gradient thread effect is perfect for capturing the subtle shifts in a sunset or sunrise.
For the cactus, use vertical satin stitches to create the body, and add definition with a few lines of backstitch in a darker shade to represent the ribs.
20. Bring a Scene to Life with Layered Stitches
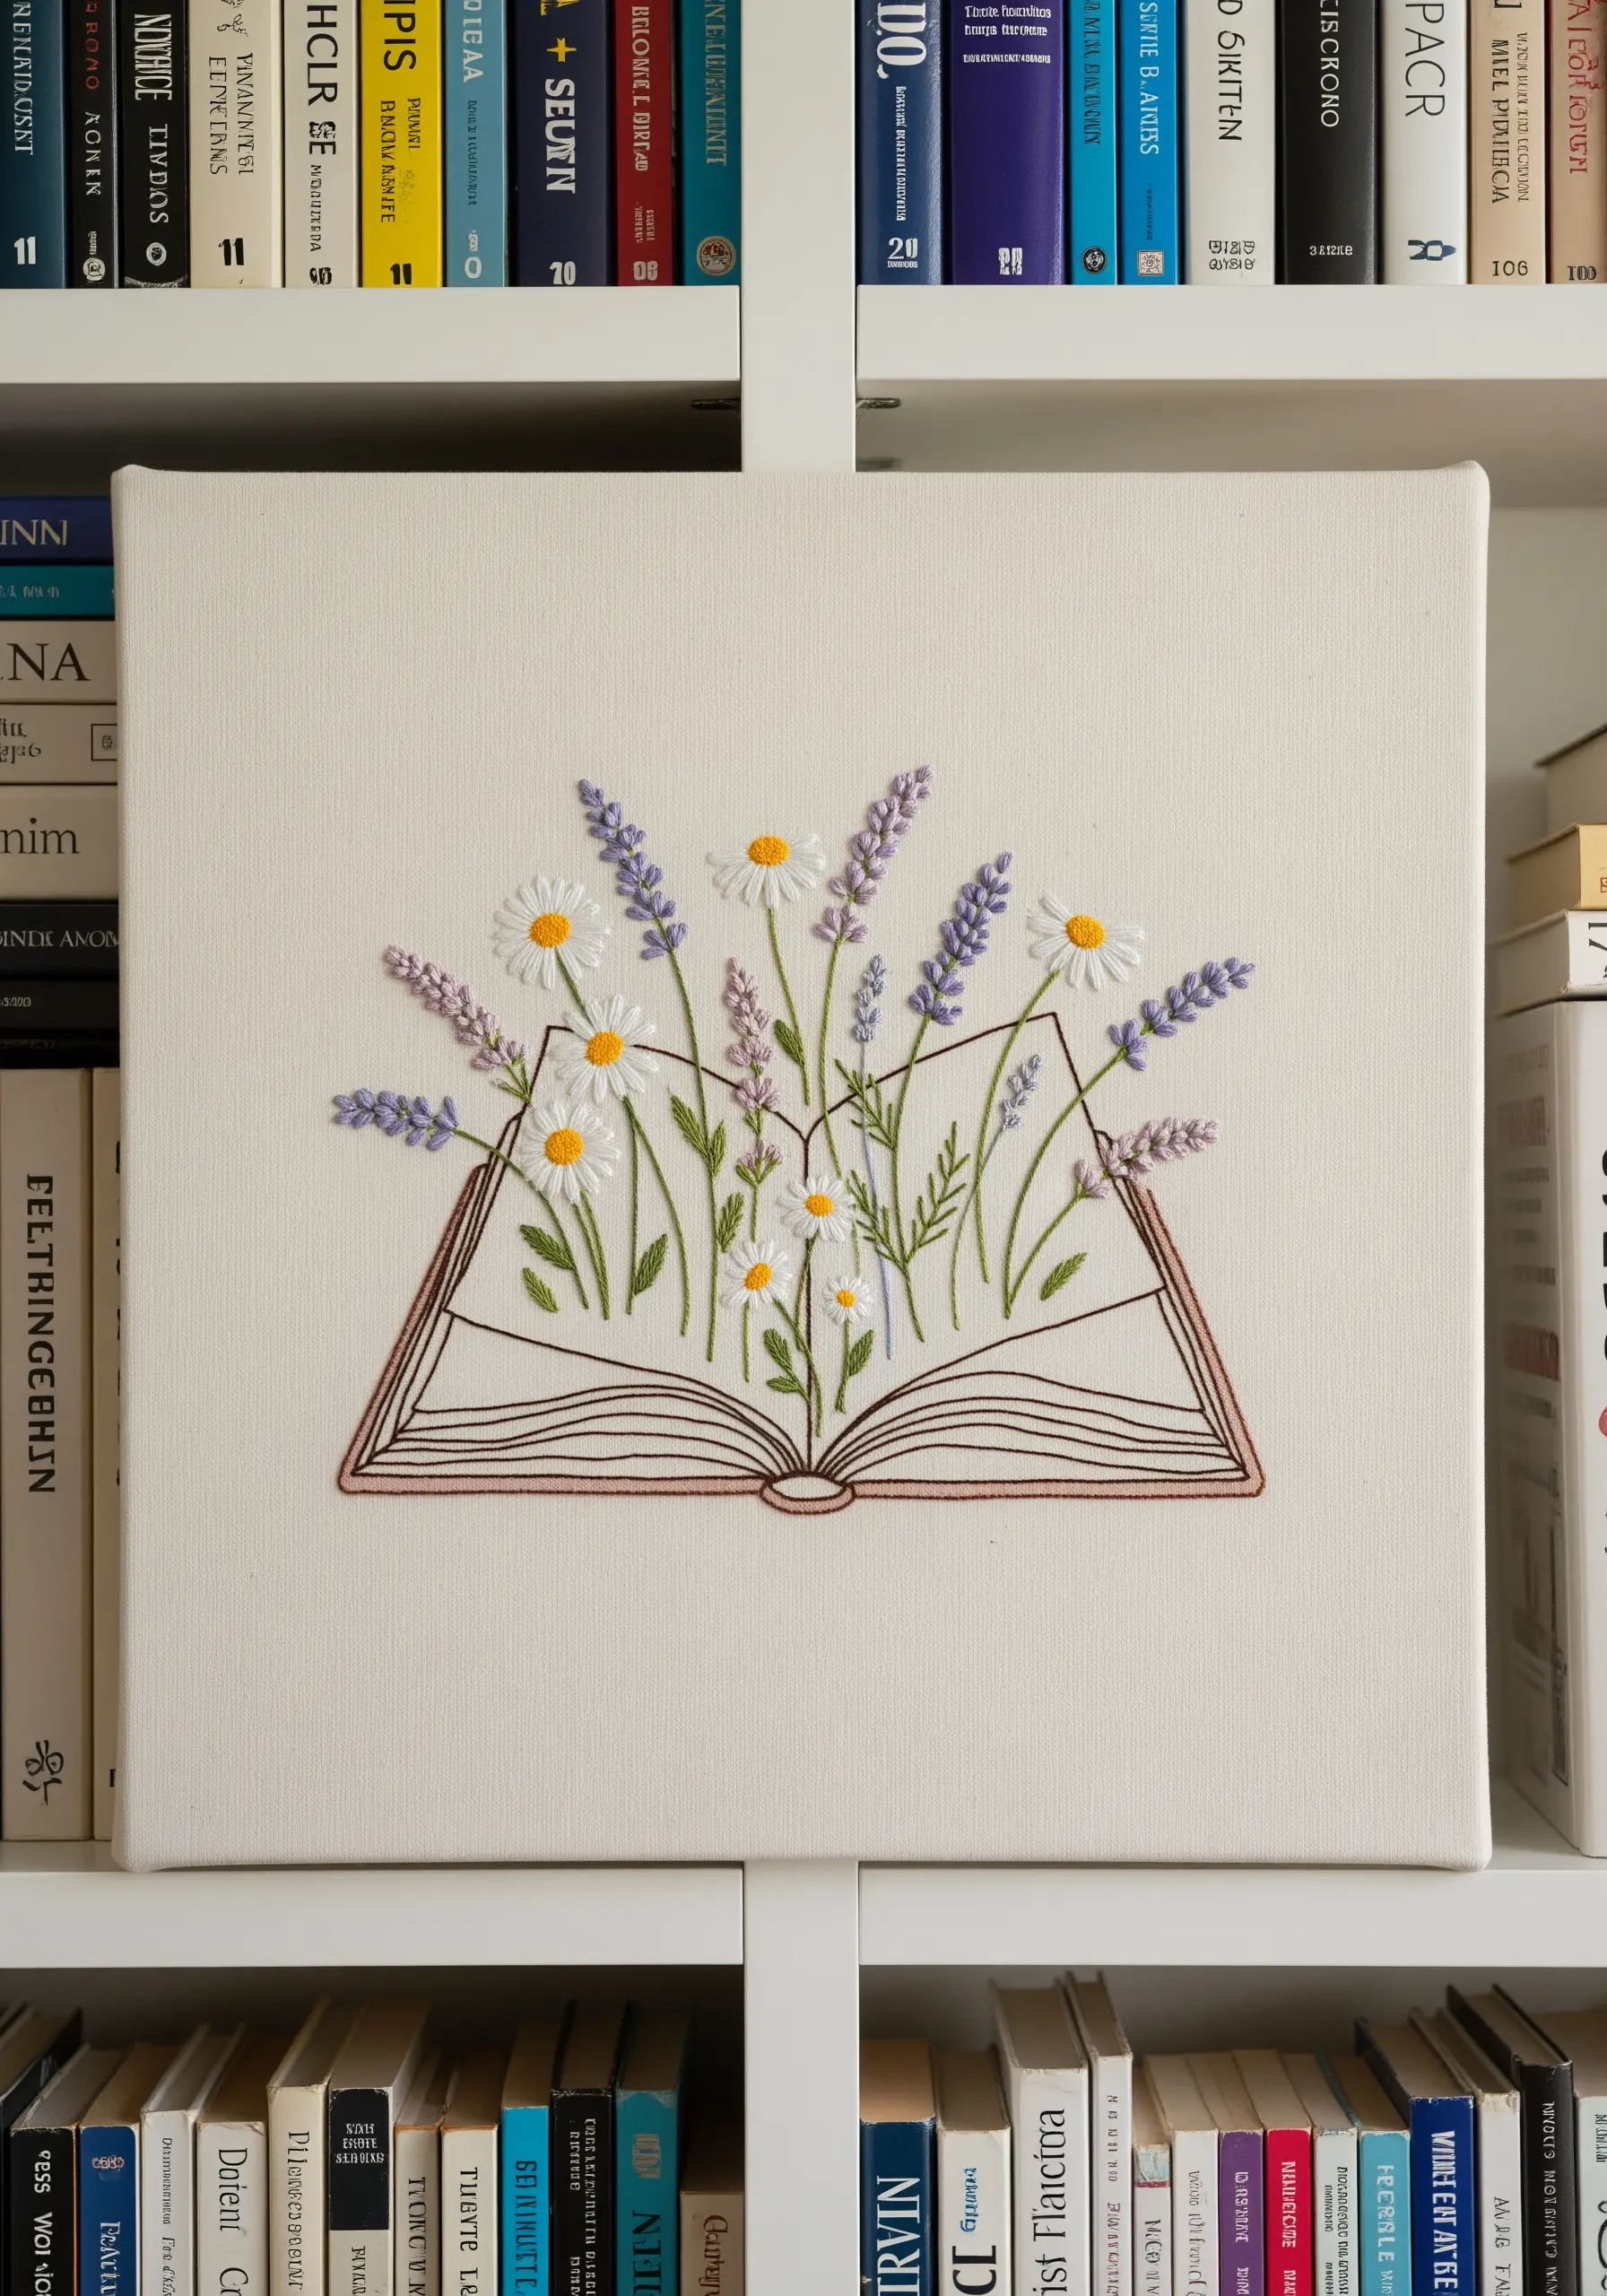
Create a charming, three-dimensional illusion by layering different stitches to make flowers appear to grow out of an open book.
First, outline the book with a neat backstitch. Then, fill the foreground with stems using a stem stitch, and add leaves with the fishbone stitch.
Finally, stitch the wildflowers—like these daisies made with detached chain stitches—on top of the stems, physically layering them to create depth and a whimsical, storybook feel.
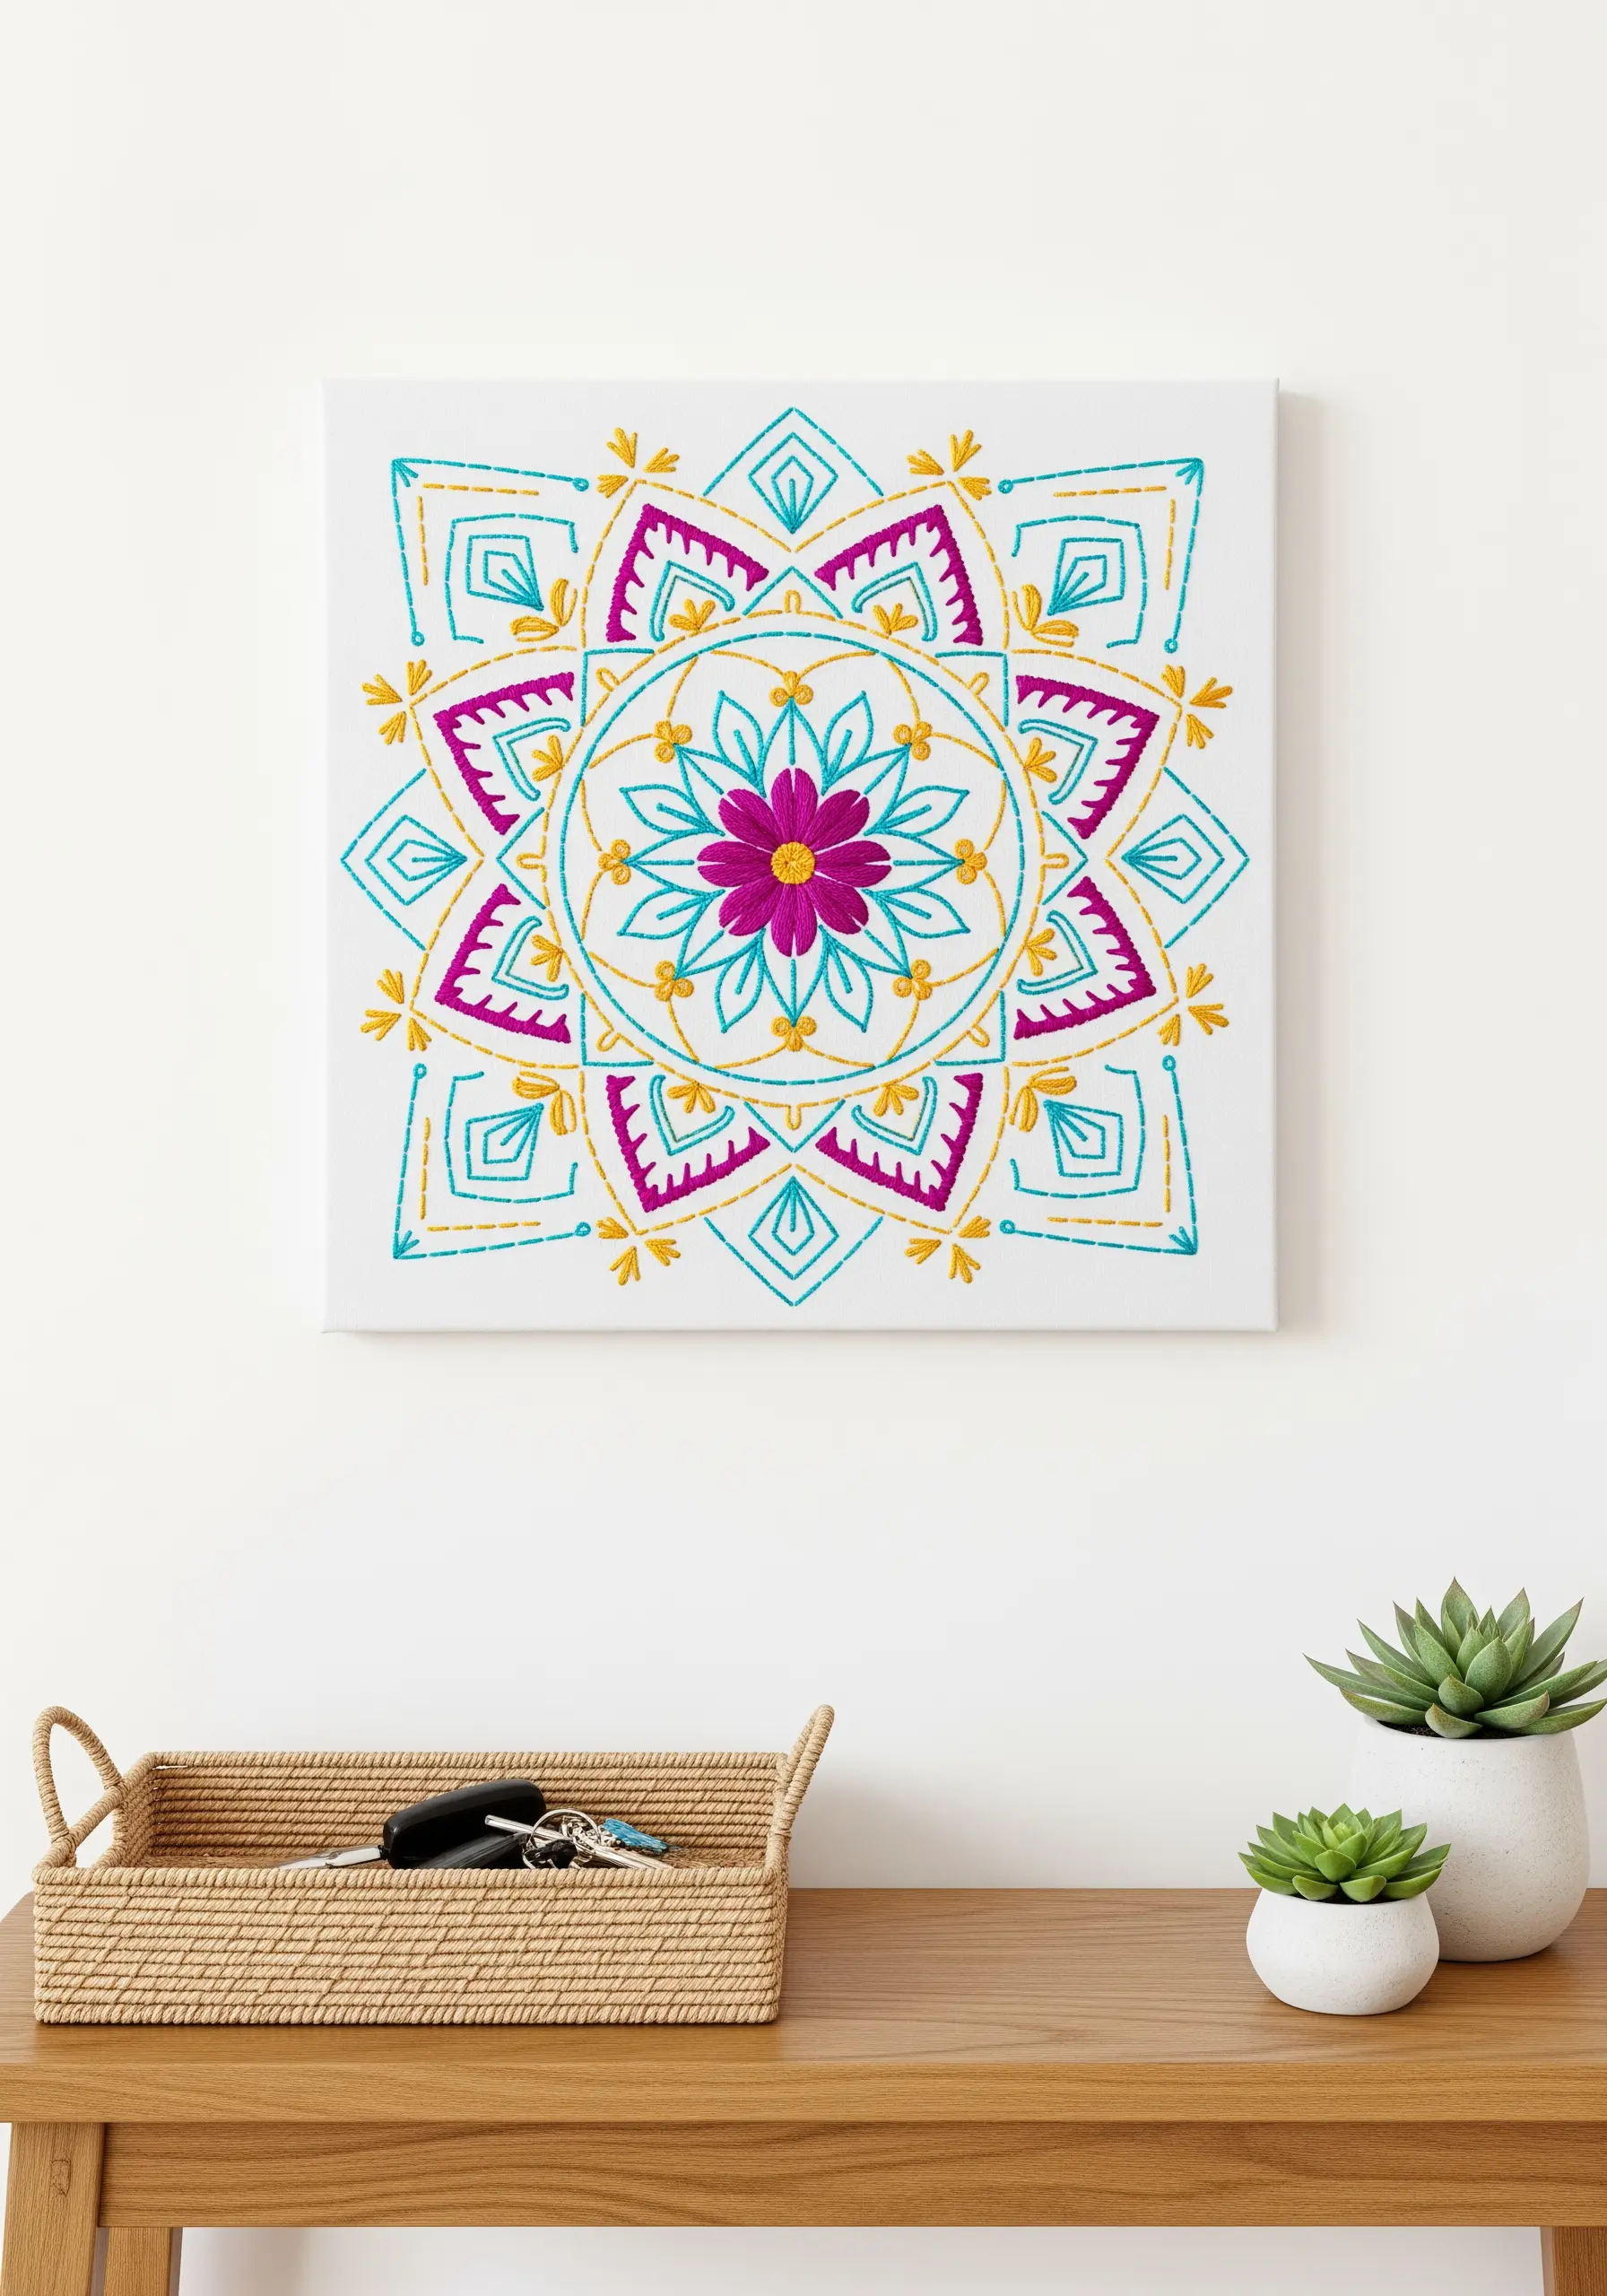
21. Build Concentric Circles of Texture
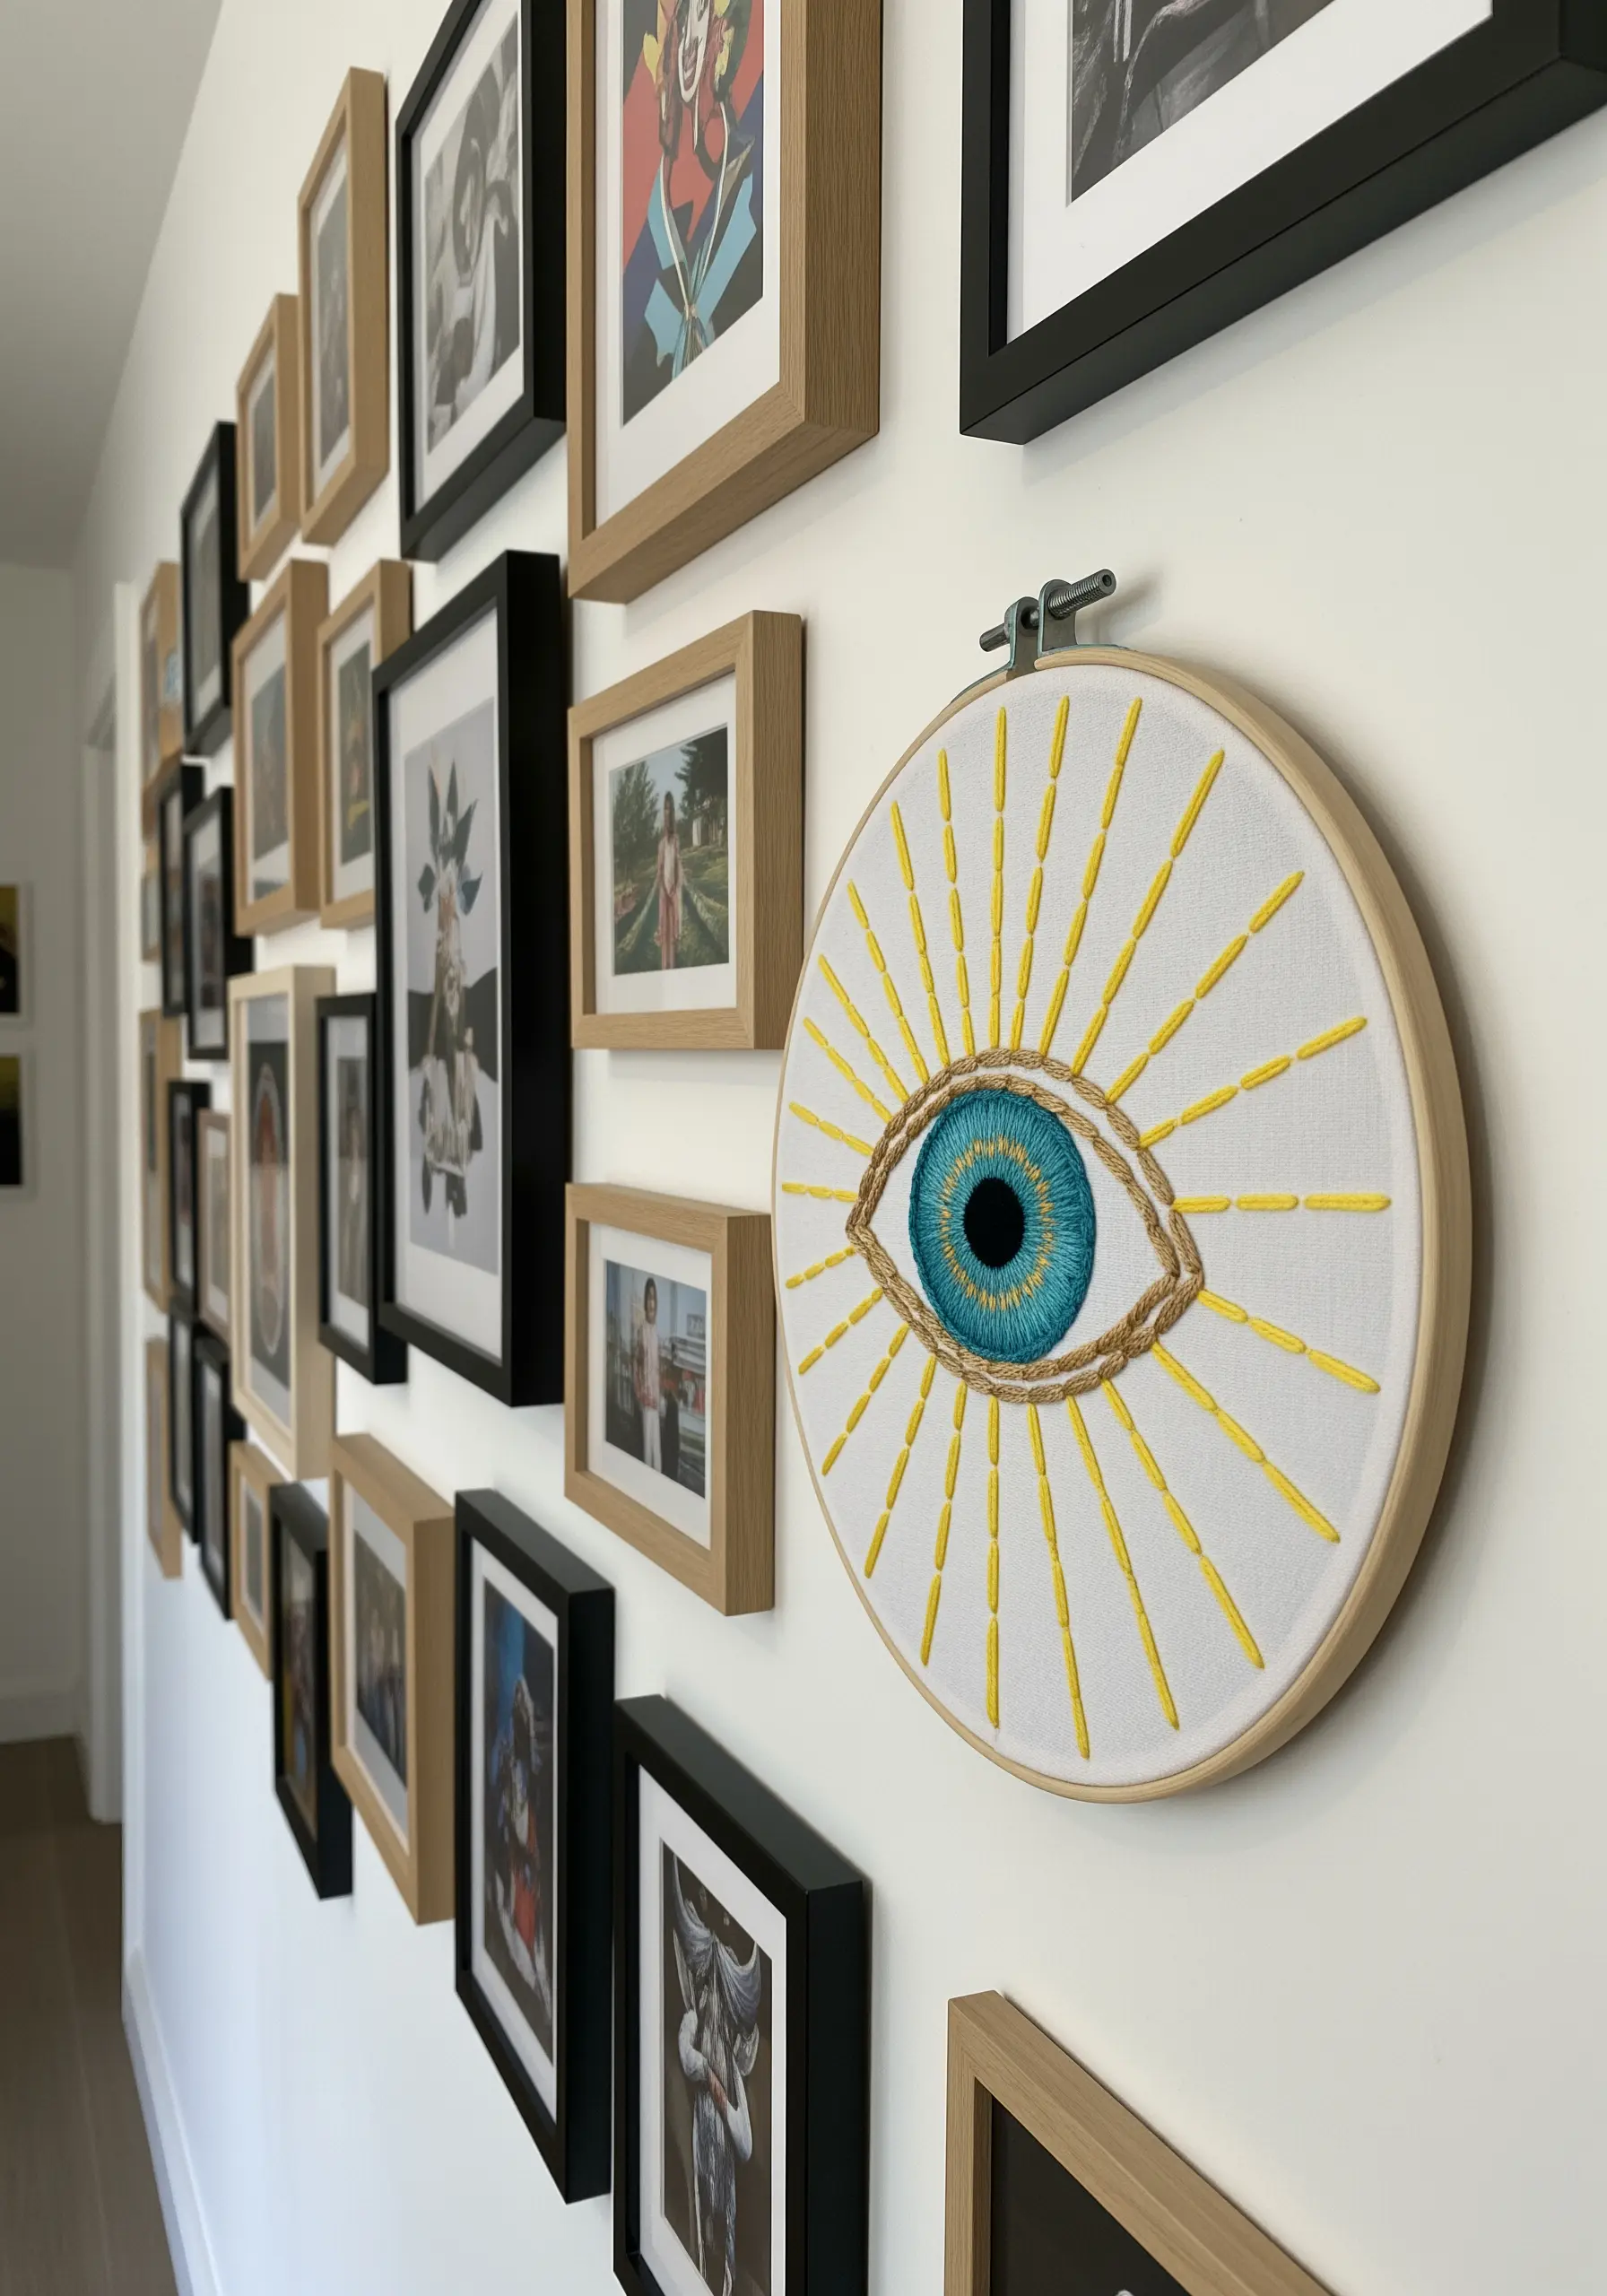
To create the mesmerizing center of an evil eye, use a chain stitch and work in a spiral from the center outwards.
This creates concentric rings of texture that draw the eye inward. Change your thread color for each new ring to create the distinct sections of the iris.
For the outer eye shape, a thick, padded satin stitch provides a bold outline. The sun rays are simple, long straight stitches, which contrast beautifully with the dense texture of the center.
This combination of stitches turns a simple protective symbol into a tactile, high-impact piece of art.
22. Elevate Simplicity with Perfect Form
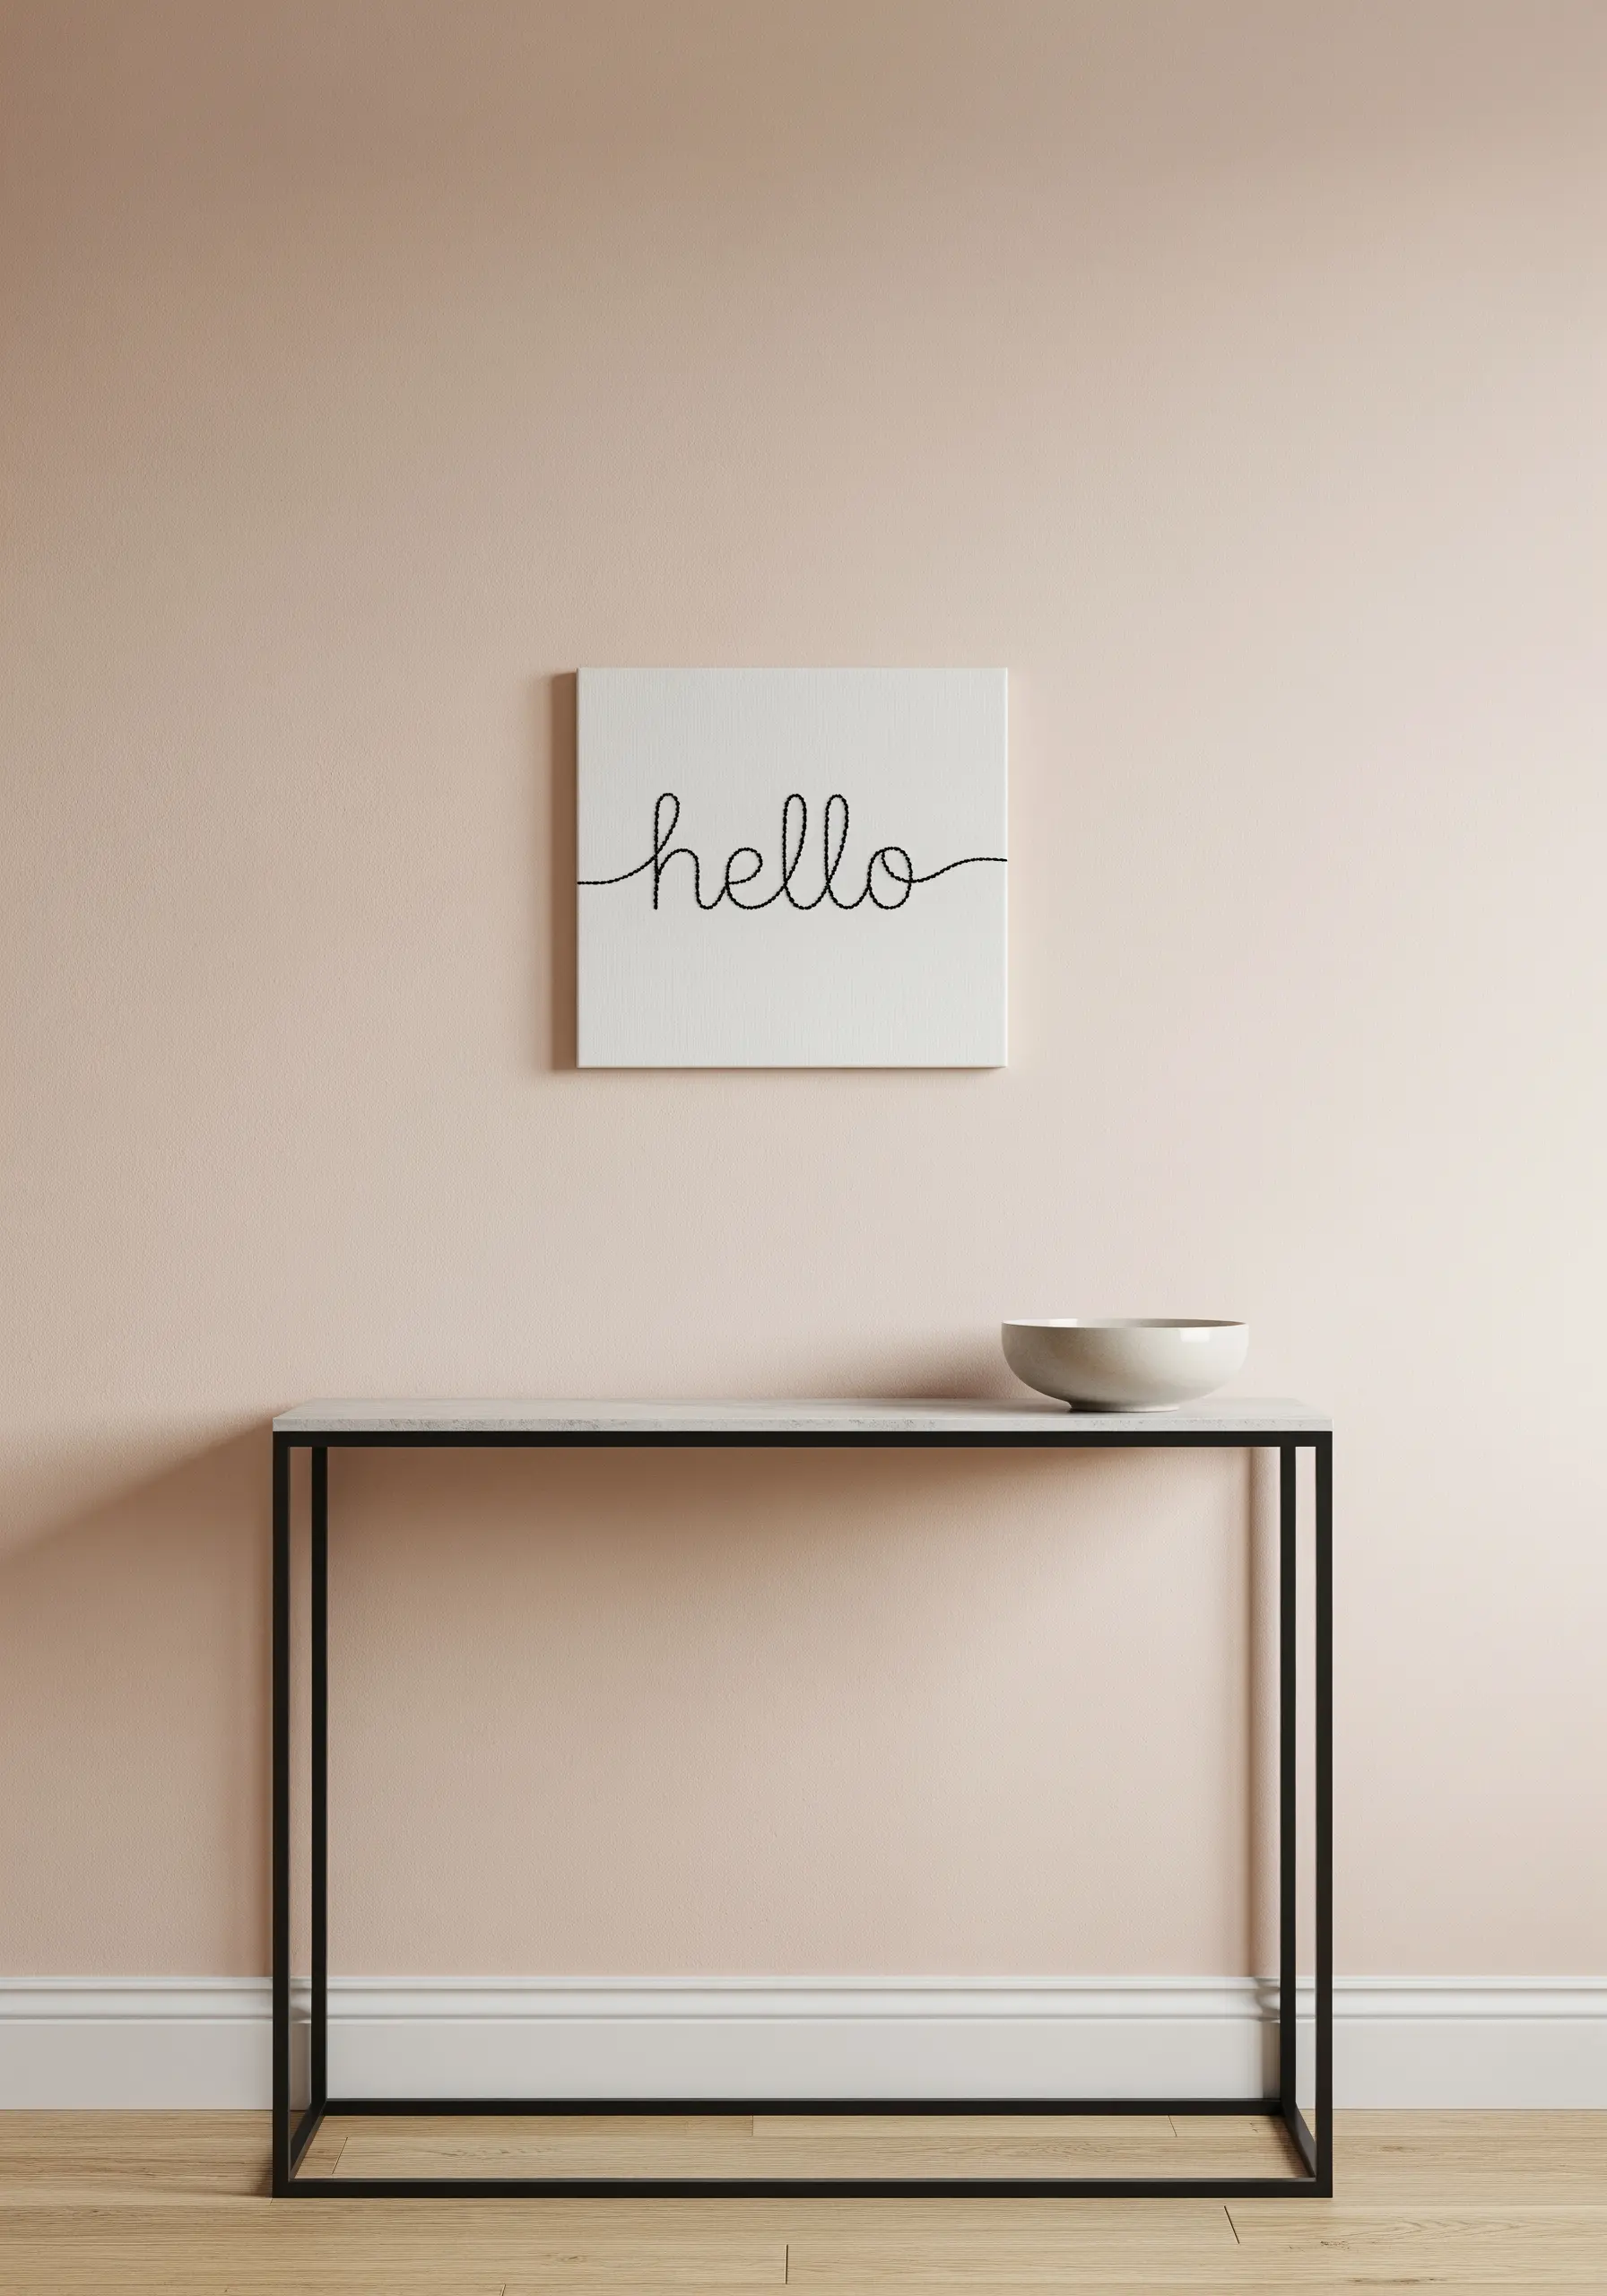
In a minimal line drawing like this, every stitch matters. Use a stem stitch or whipped backstitch to create a single, flowing cursive word.
The key to making this simple design feel luxurious is perfect stitch tension—not too tight to pucker the fabric, not too loose to sag.
Transfer your pattern flawlessly before you begin, as any wobble will be noticeable in the final piece.
The simplicity of the design allows the texture of the thread and the quality of the canvas to become the focal points.
23. Sculpt 3D Botanicals with Padded Satin Stitch
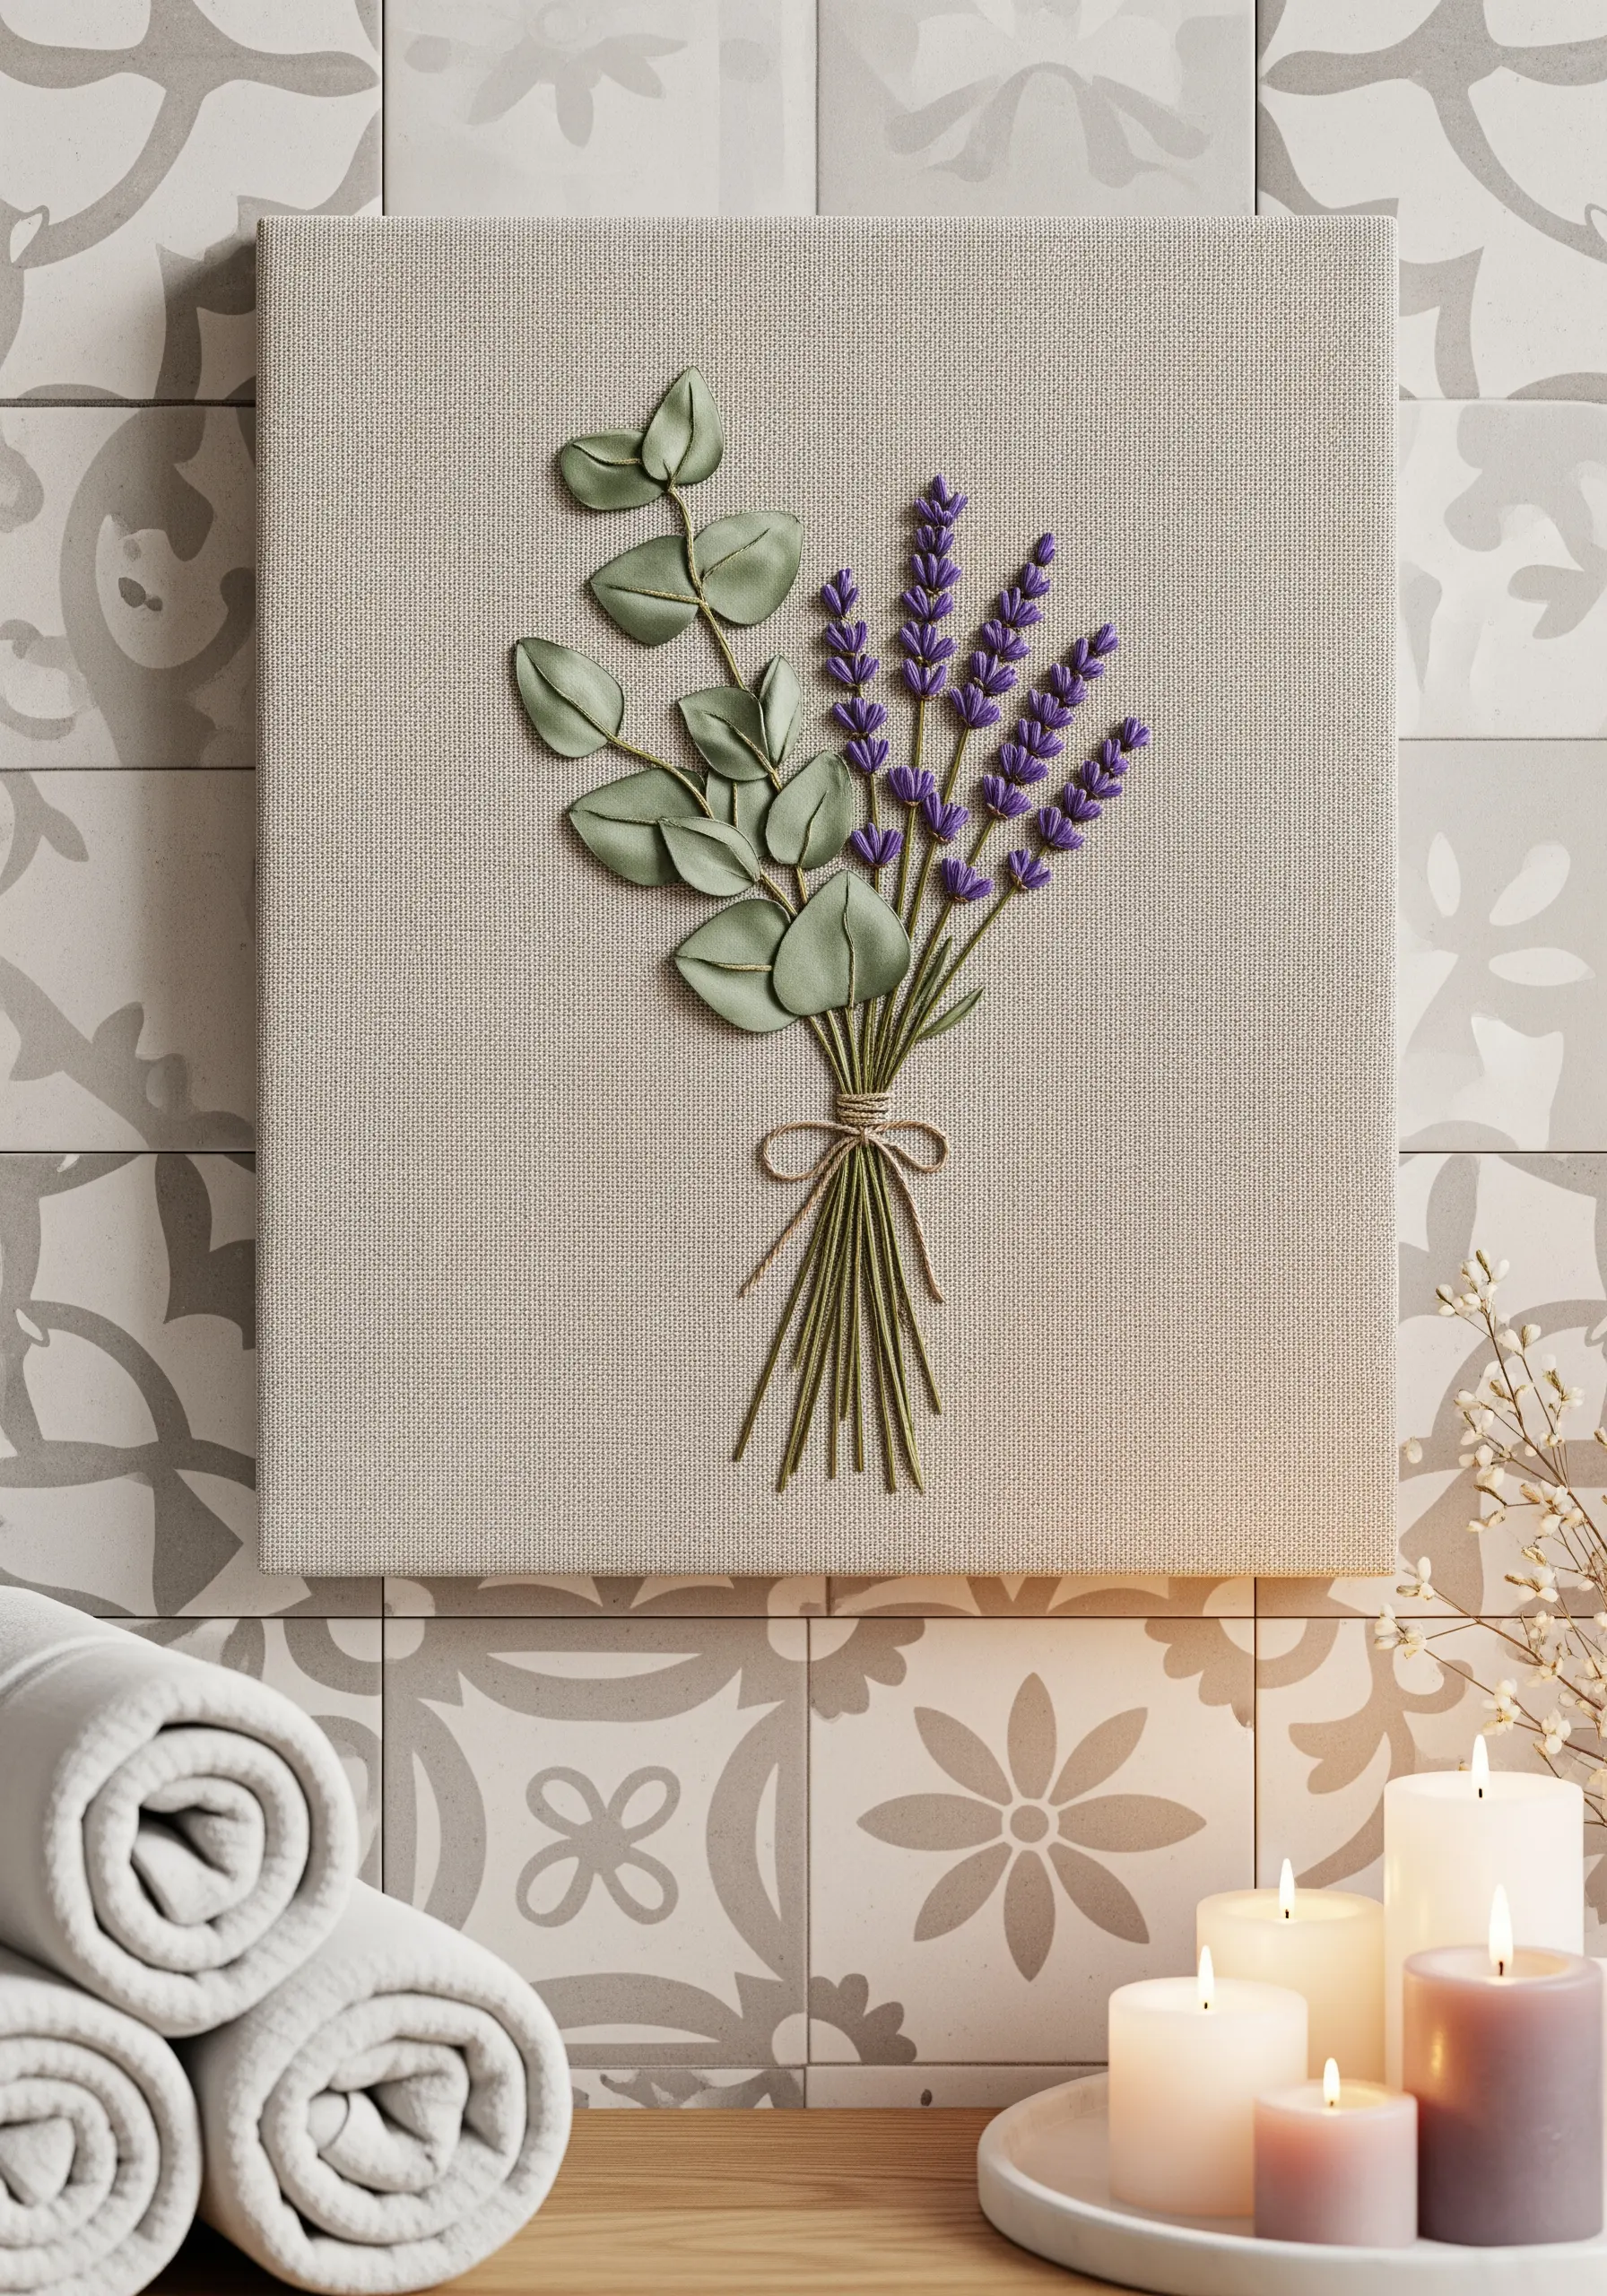
To give your eucalyptus leaves a plump, realistic appearance, use a padded satin stitch.
First, create a small foundation of straight stitches within the leaf shape. Then, cover this padding with satin stitches angled diagonally.
This technique lifts the leaves off the surface, making them look sculptural and lifelike. This is the secret to impressive 3D embroidery.
For the lavender, use a cluster of French knots or short straight stitches at the top of each stem to mimic the delicate flower buds.
24. Design a Modern Sampler with Geometric Fills
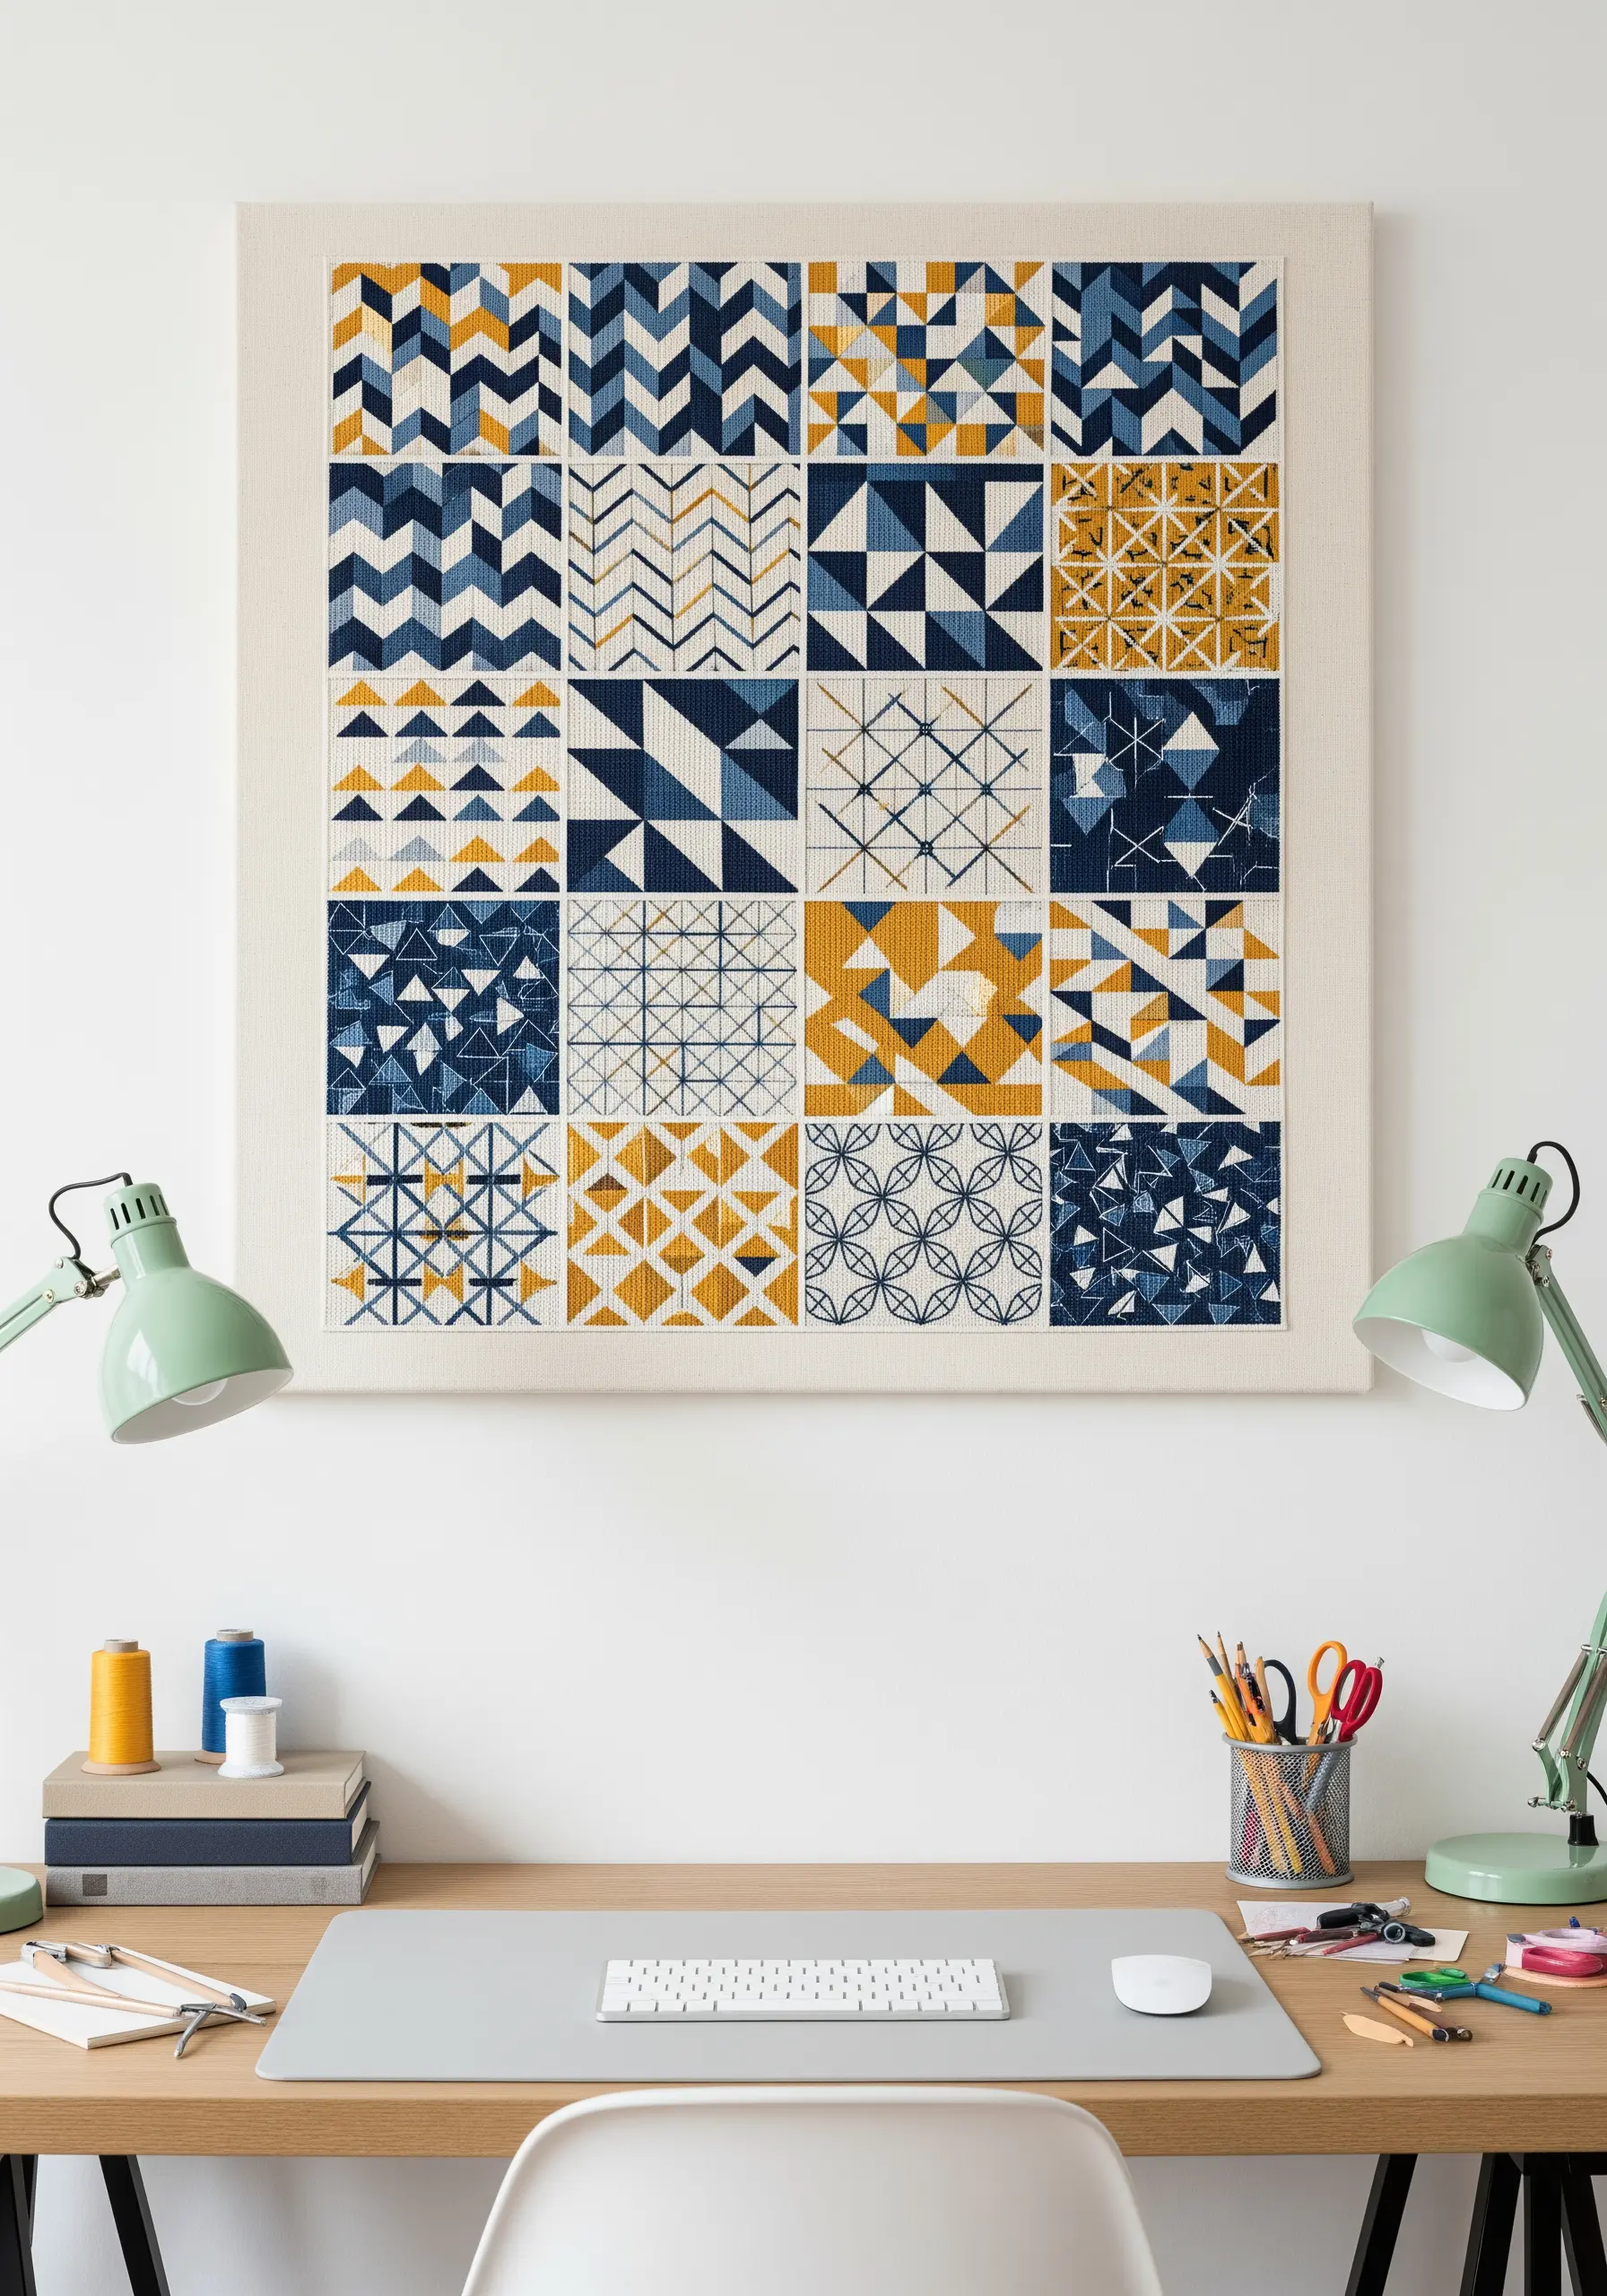
Create a modern sampler by dividing your canvas into a grid and filling each square with a different geometric pattern.
This is a perfect opportunity to practice fundamental stitches. Use satin stitch for solid triangles, backstitch for clean lines, and running stitches for dotted textures.
Stick to a limited color palette of three or four complementary colors to ensure the overall design feels cohesive and intentional, not chaotic.
This project transforms simple stitches into a complex, sophisticated piece of abstract art that is perfect for a modern workspace.


