
Before you begin your next piece, I want you to set aside the pattern for a moment. Instead, think about the feeling you want to bring into your home. Is it the quiet stillness of a misty forest, the vibrant energy of a coral reef, or the expansive peace of a twilight sky?
Your needle and thread are more than just tools; they are instruments for translating those feelings into texture, color, and form. The techniques in this collection are not about complexity, but intention. They are small adjustments in stitch direction, thread weight, or material choice that can transform a simple embroidered line into a living, breathing element.
Let these murals inspire you to think on a larger scale. A wall is simply a larger canvas, an opportunity to create an immersive piece of art that doesn’t just decorate a room, but defines it. You have the skill—now it’s time to stitch your own personal landscape.
1. Create Atmospheric Depth in a Forest Scene
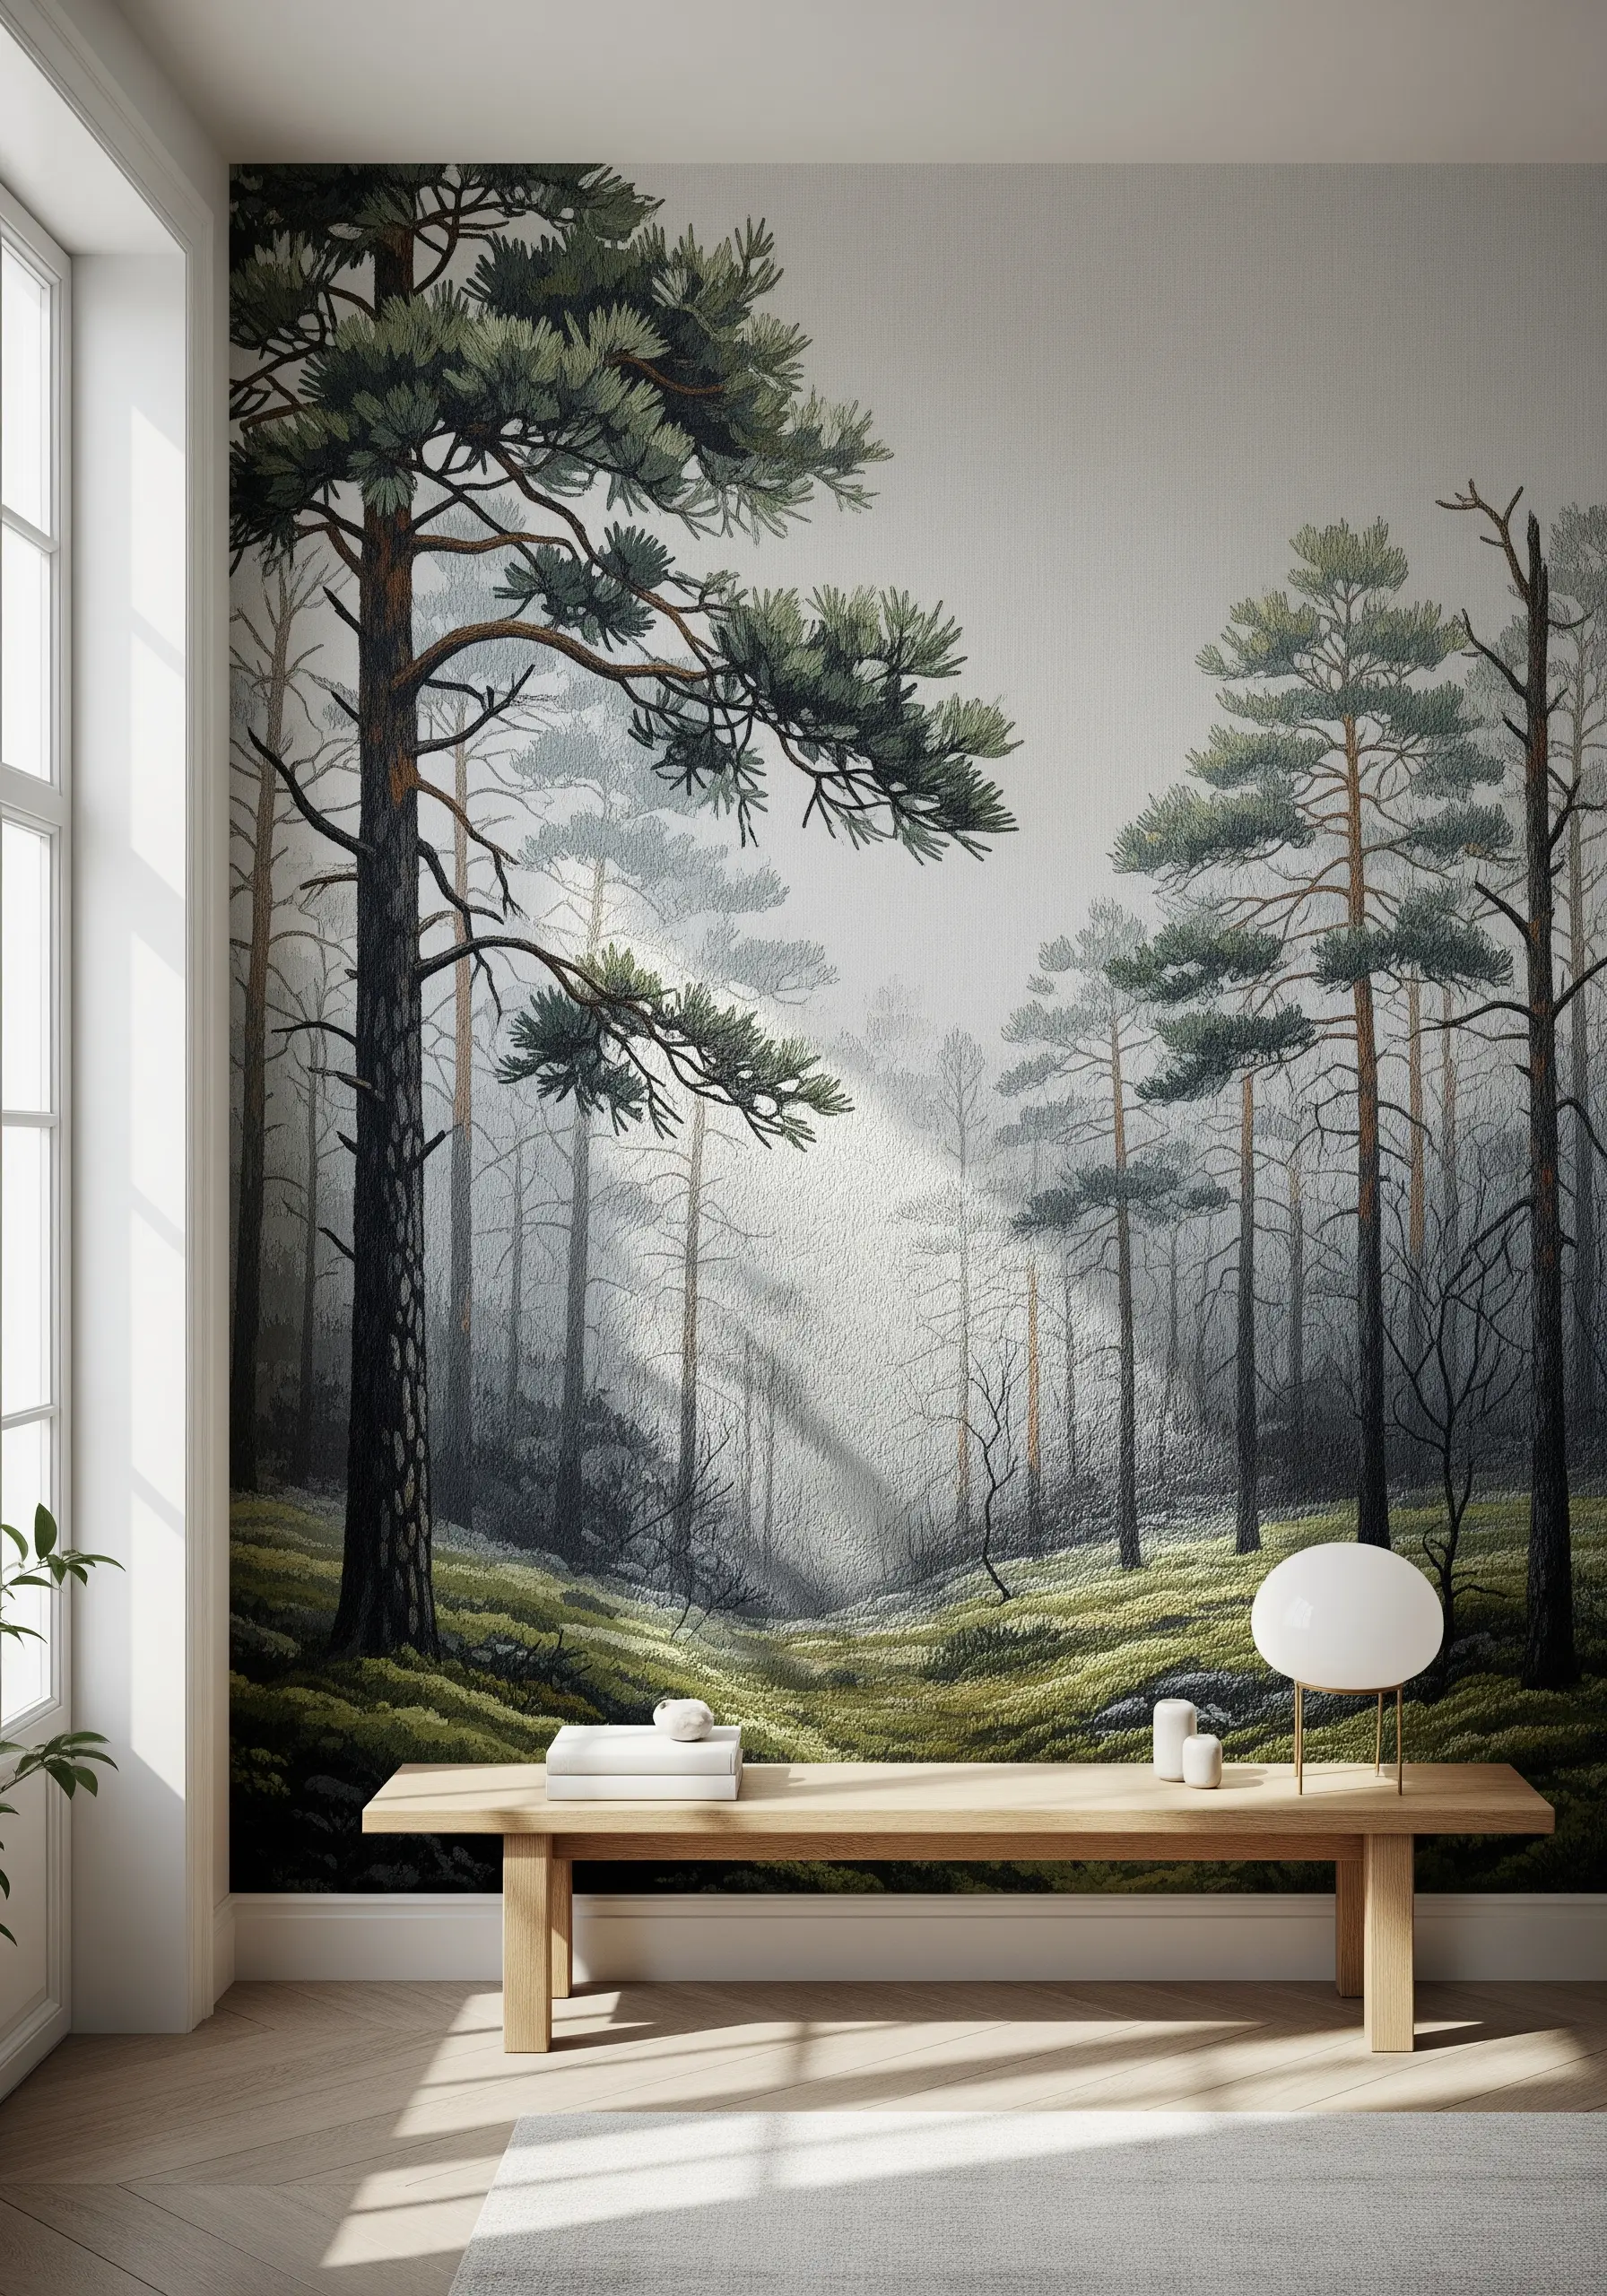
To give your forest mural a sense of deep space, you need to manage thread weight and color temperature with precision.
For the distant trees veiled in mist, use a single strand of grayed-out green or blue floss. Stitch them with simple, sparse straight stitches to suggest they are far away and out of focus.
As you move to the foreground, switch to two or three strands of thread in warmer, more saturated greens and browns. This makes them feel closer and more tangible.
Use directional satin stitch on the main tree trunk to mimic the texture of bark, ensuring your stitches follow the contours of the tree for a truly realistic effect.
This layering technique transforms a flat image into an immersive, three-dimensional woodland magic experience.
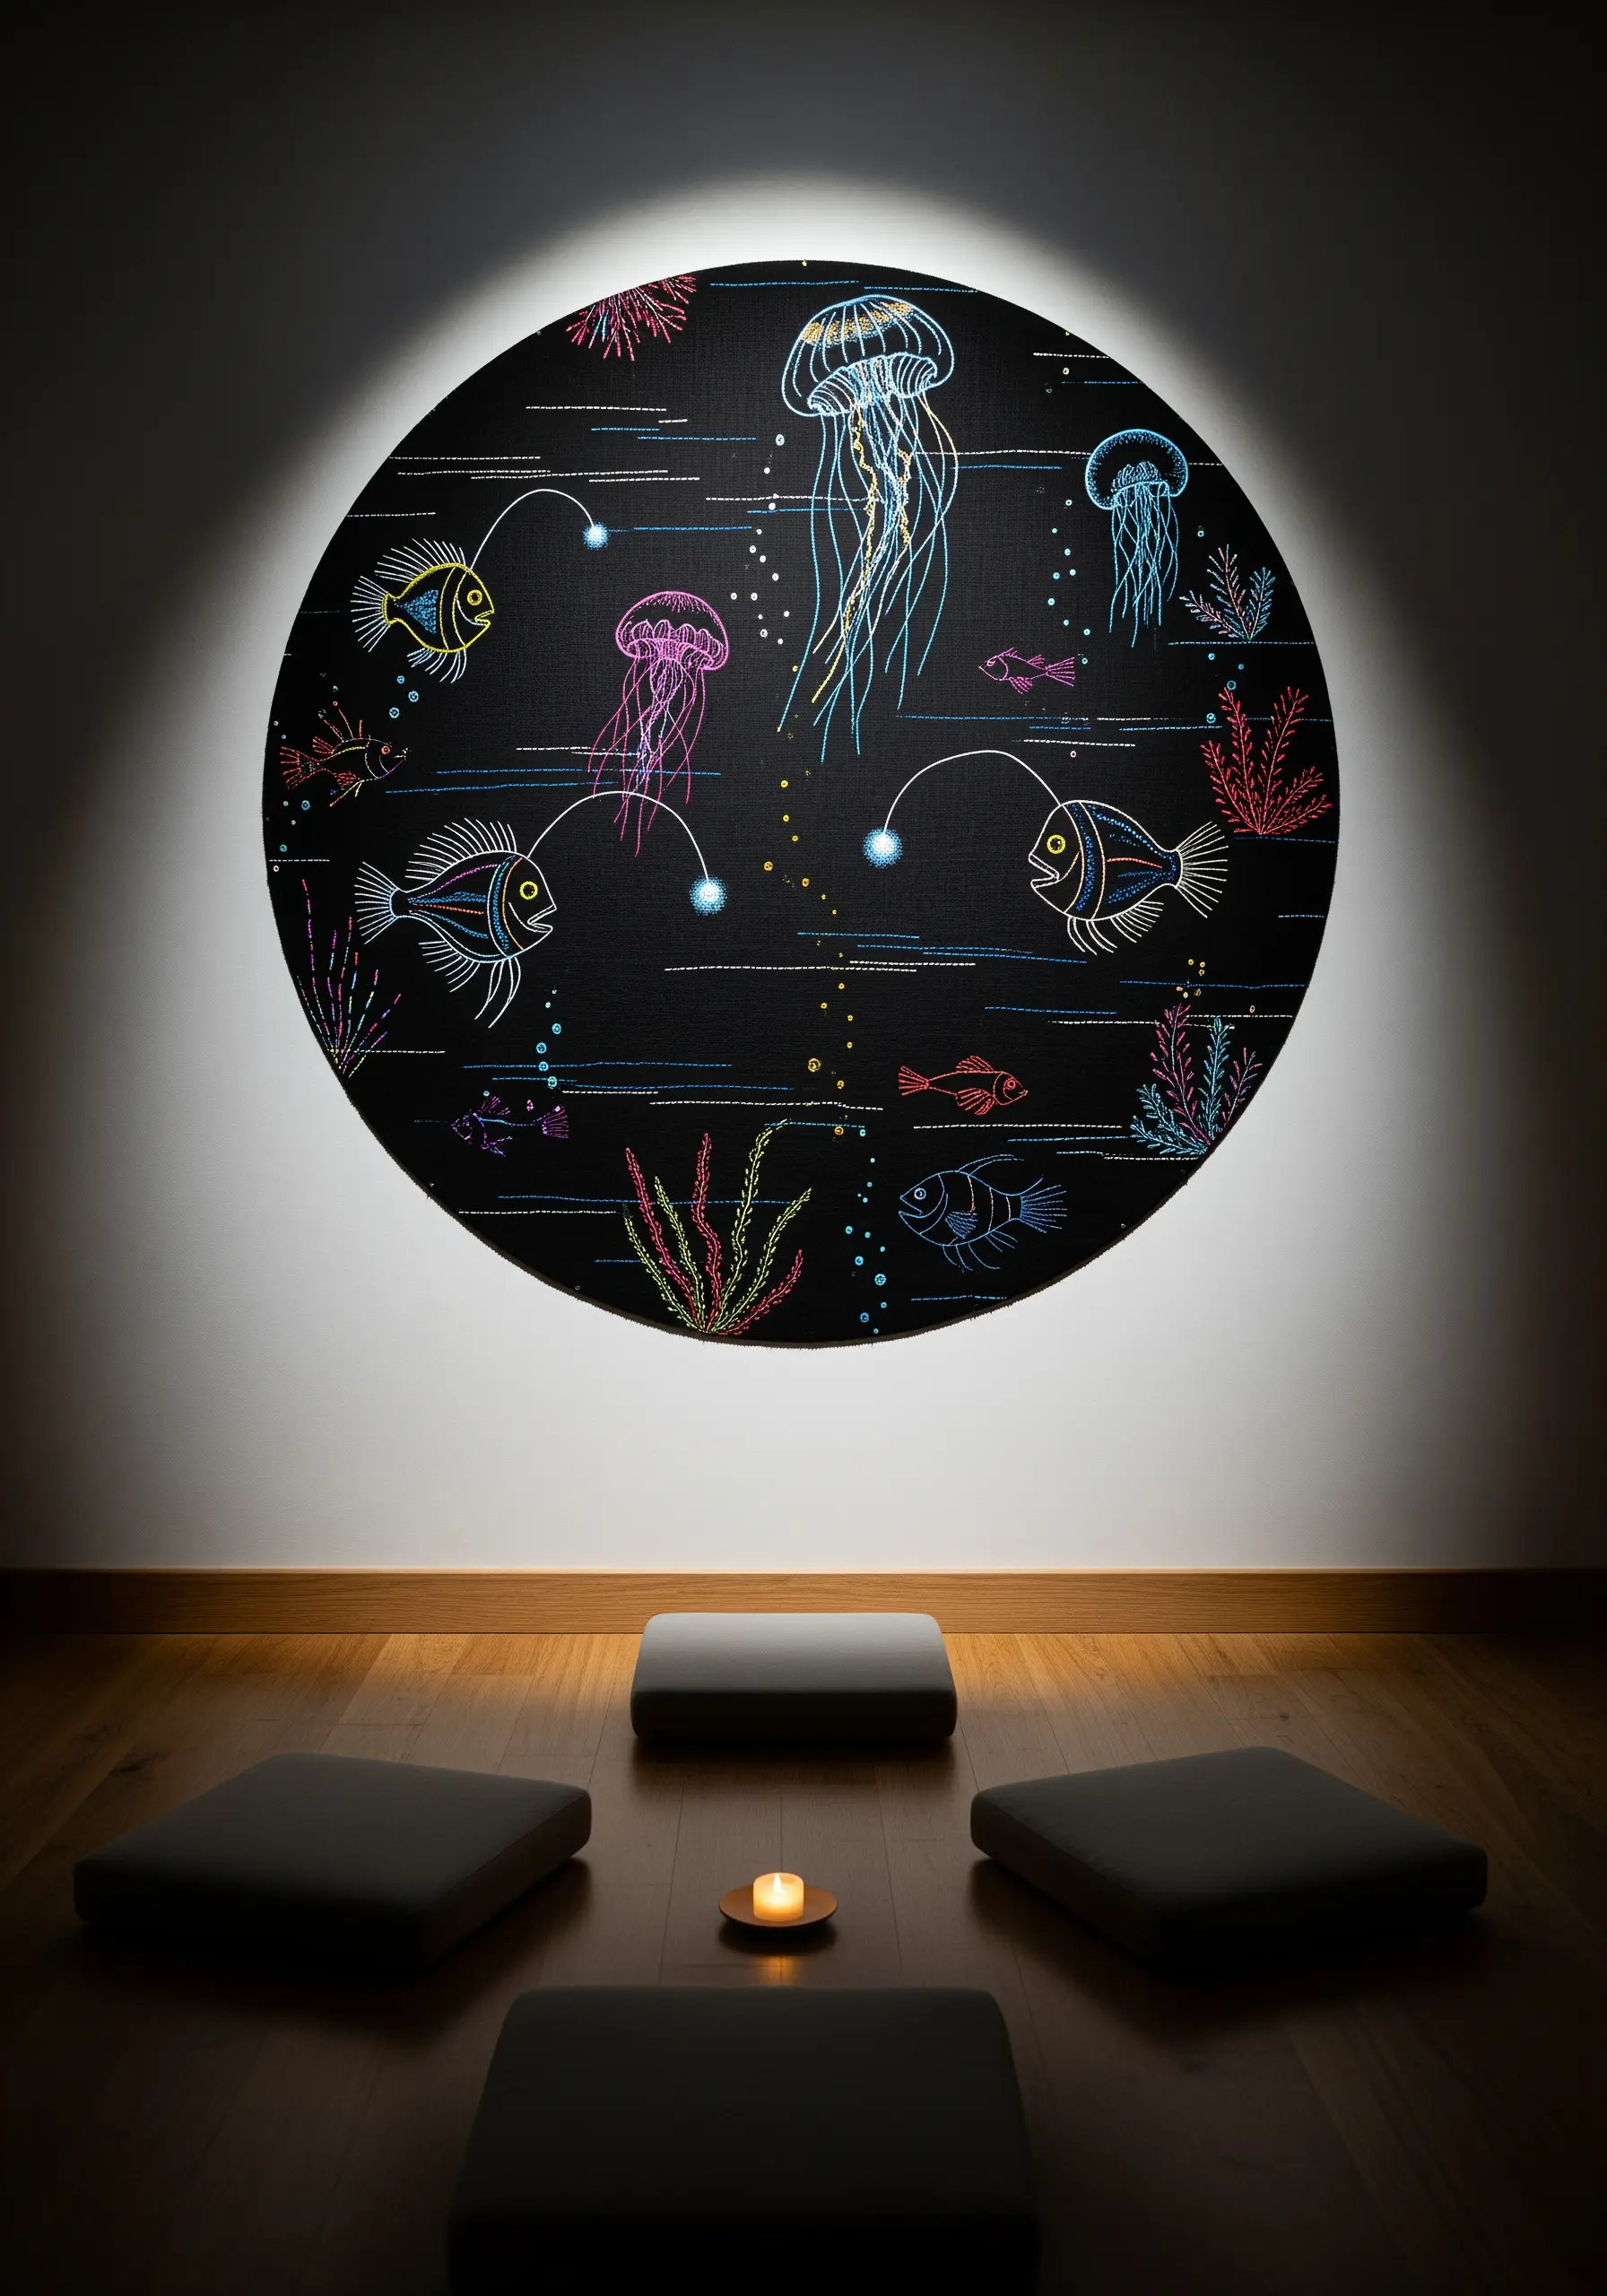
2. Build an Underwater World with Tactile Stitches
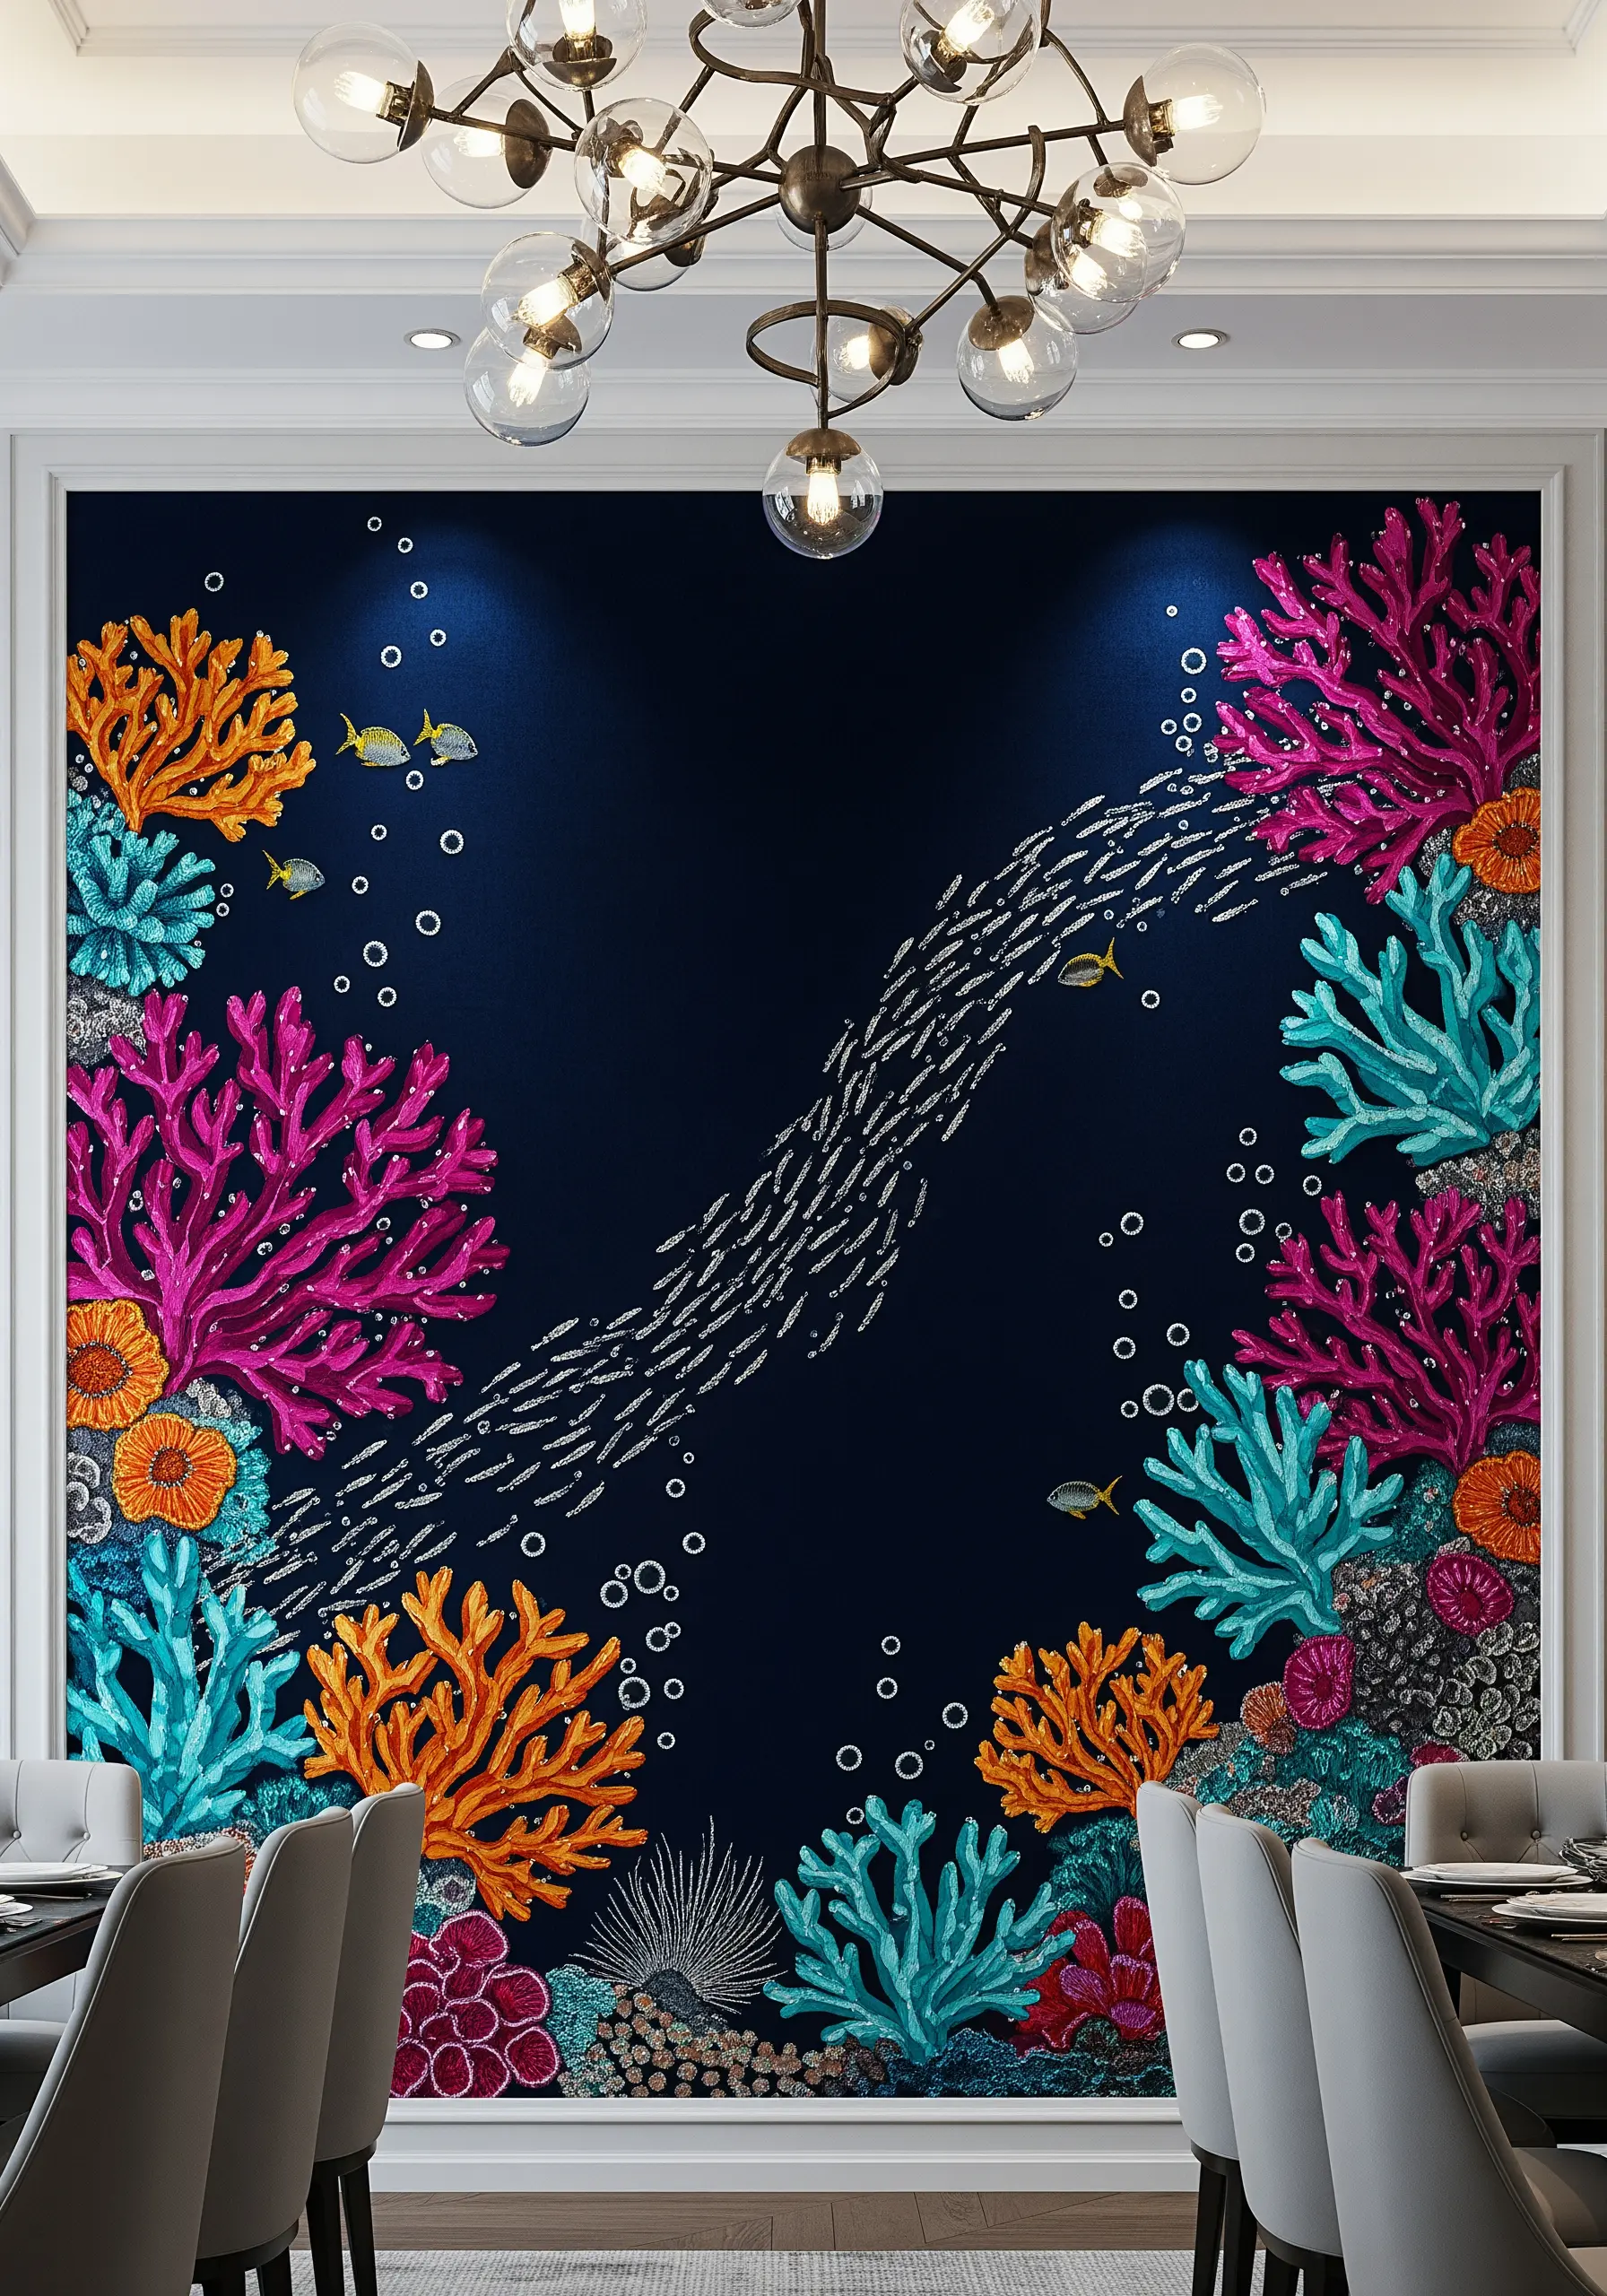
Capture the vibrant life of a coral reef by focusing on texture rather than just color.
Use dense clusters of French knots and bullion knots in varying sizes to build the coral formations. This creates a tangible, 3D surface that invites touch.
To make the colors pop against a dark navy background, choose high-sheen rayon or silk threads for the coral. Their reflective quality mimics the way light filters through water.
For the school of fish, use a single strand of metallic silver or pearlescent white thread. A series of tiny, perfectly spaced seed stitches will create a sense of fluid movement across the canvas.
This combination of texture and sheen is perfect for coastal-inspired homes that need a dramatic focal point.
3. Stitch the Aurora with Vertical Color Blending
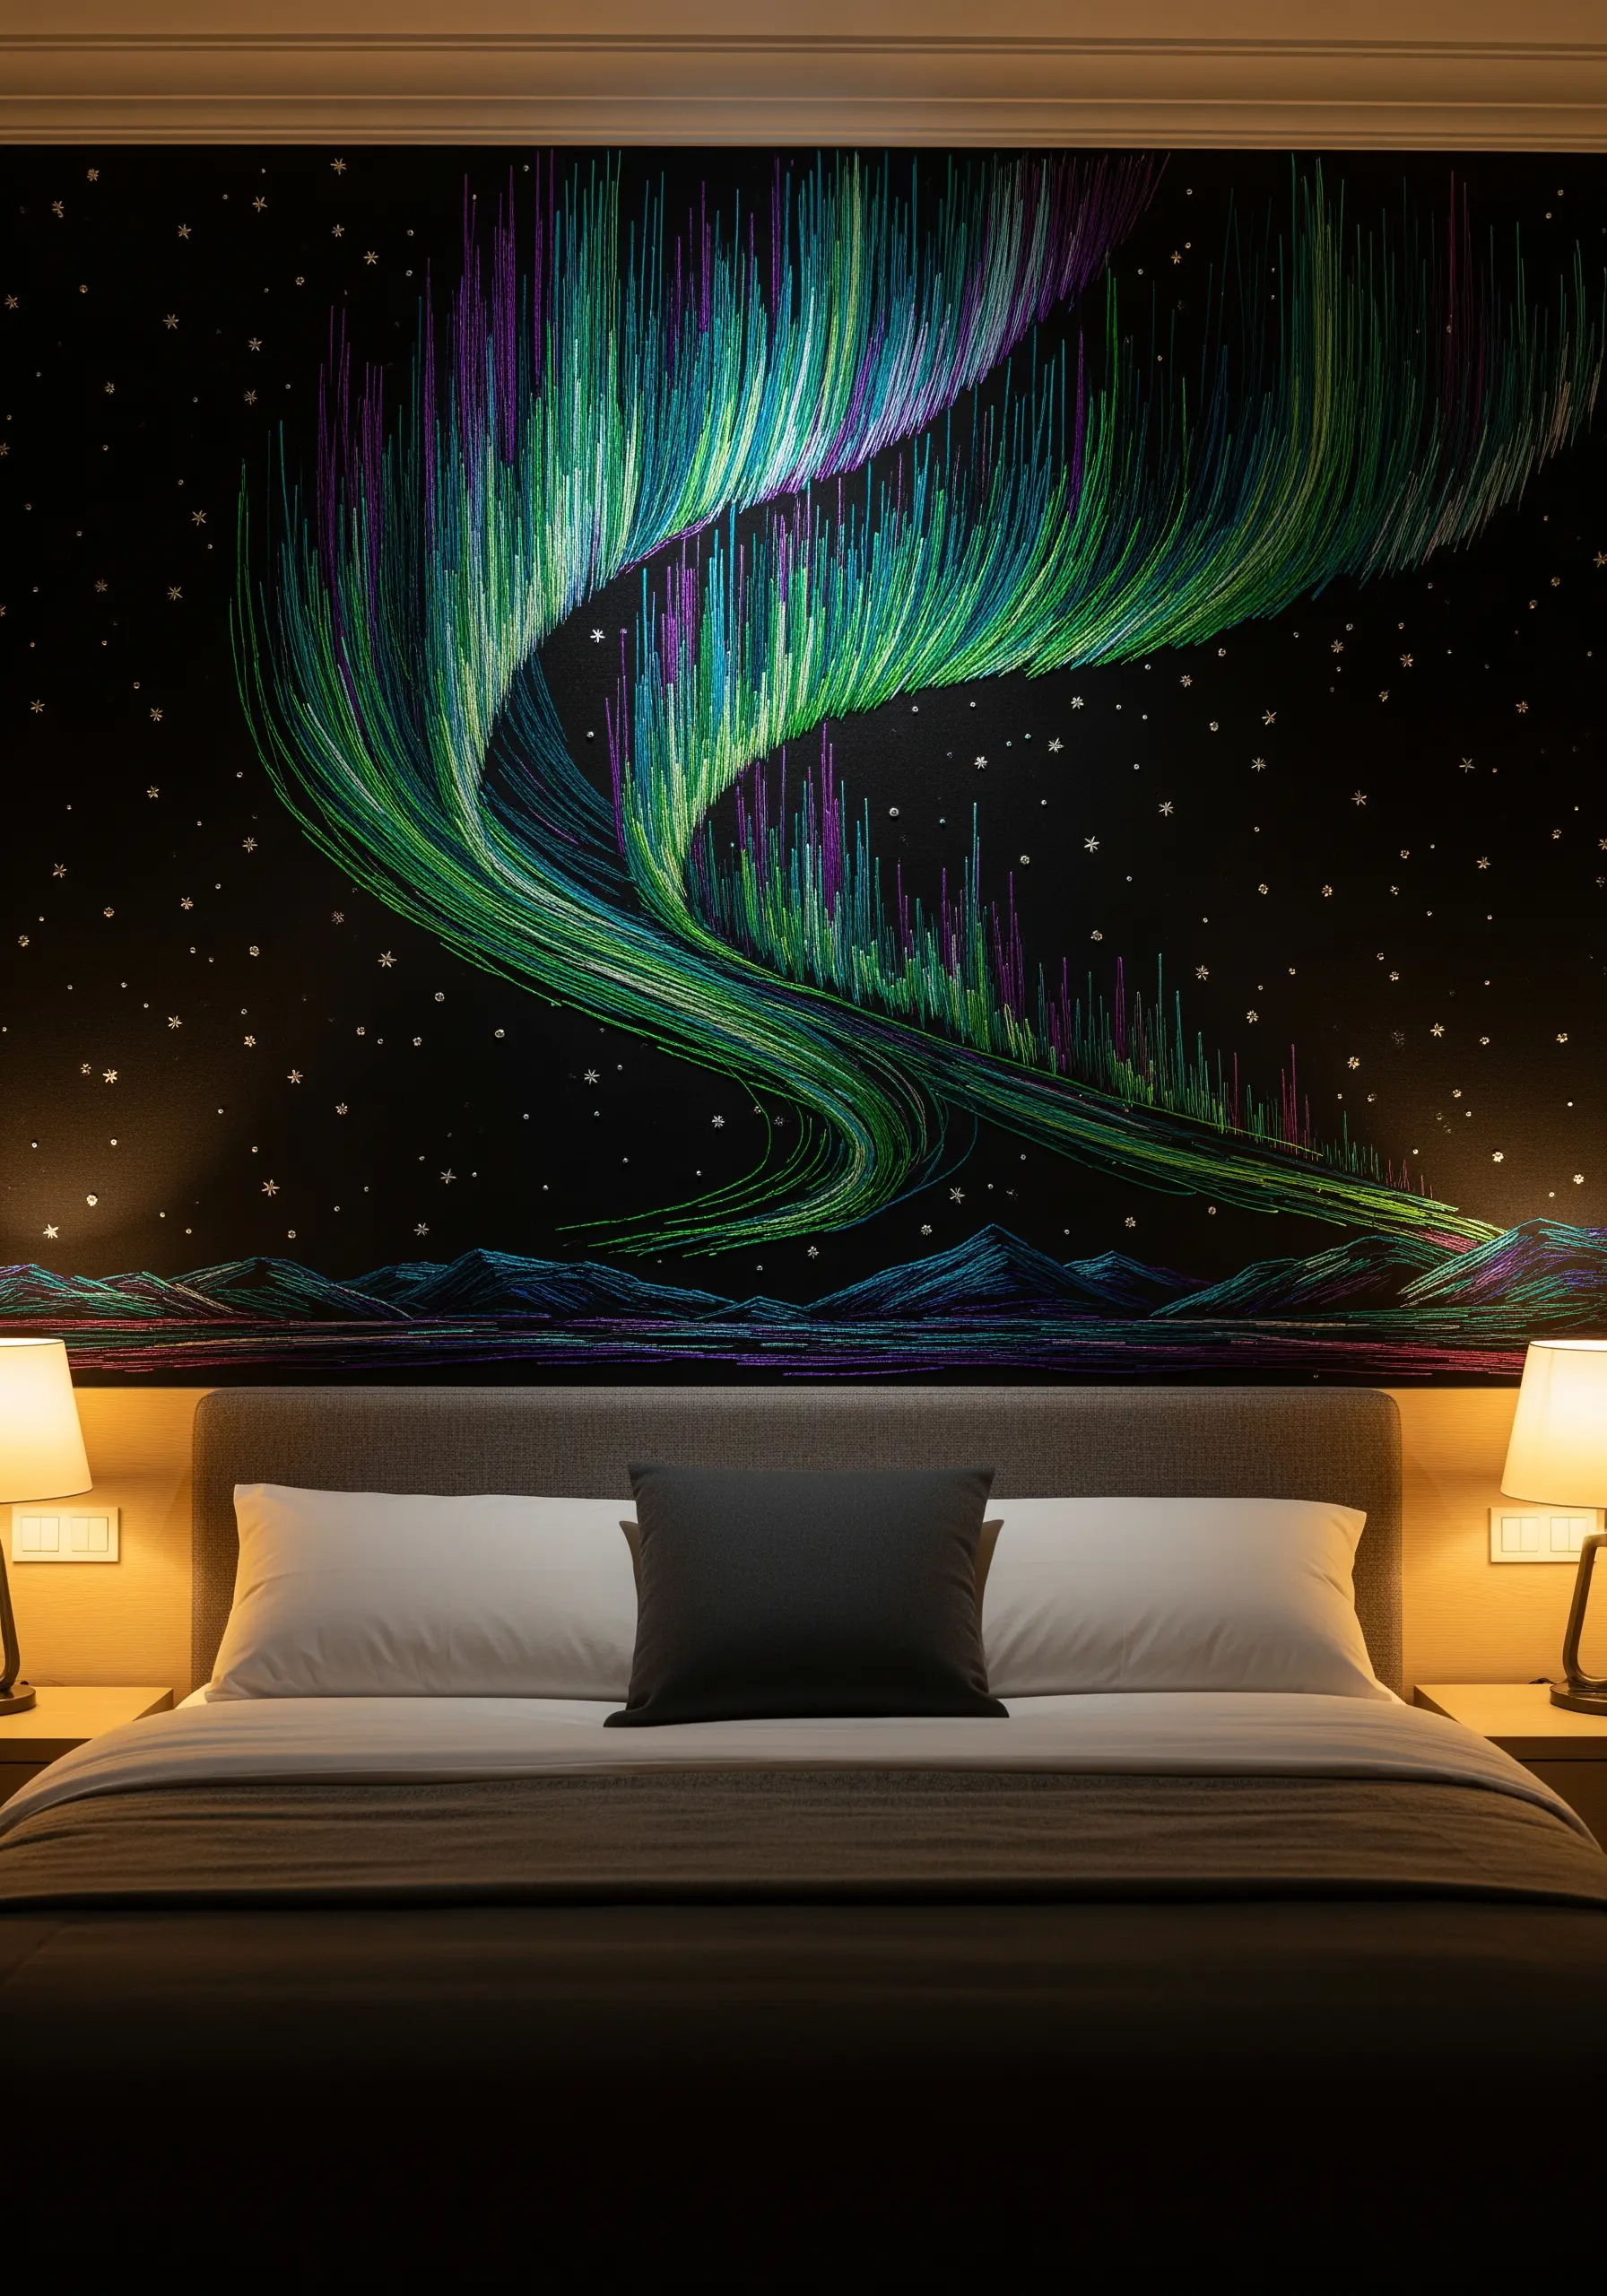
To embroider the northern lights, you must abandon outlines and think like a painter. The effect is achieved through pure color and movement.
Work with long, vertical straight stitches, allowing them to overlap and blend optically. Use single strands of floss to keep the texture fine and fluid.
Select a palette of electric greens, purples, and blues. Incorporate variegated floss to introduce subtle, unpredictable color shifts that mimic the aurora’s shimmer.
The key is to vary the length and density of your stitches, creating a dancing effect. This is one of the best sky and cloud shading tricks to master for dynamic, expressive skies.
4. Capture Autumnal Richness with Layered Textures
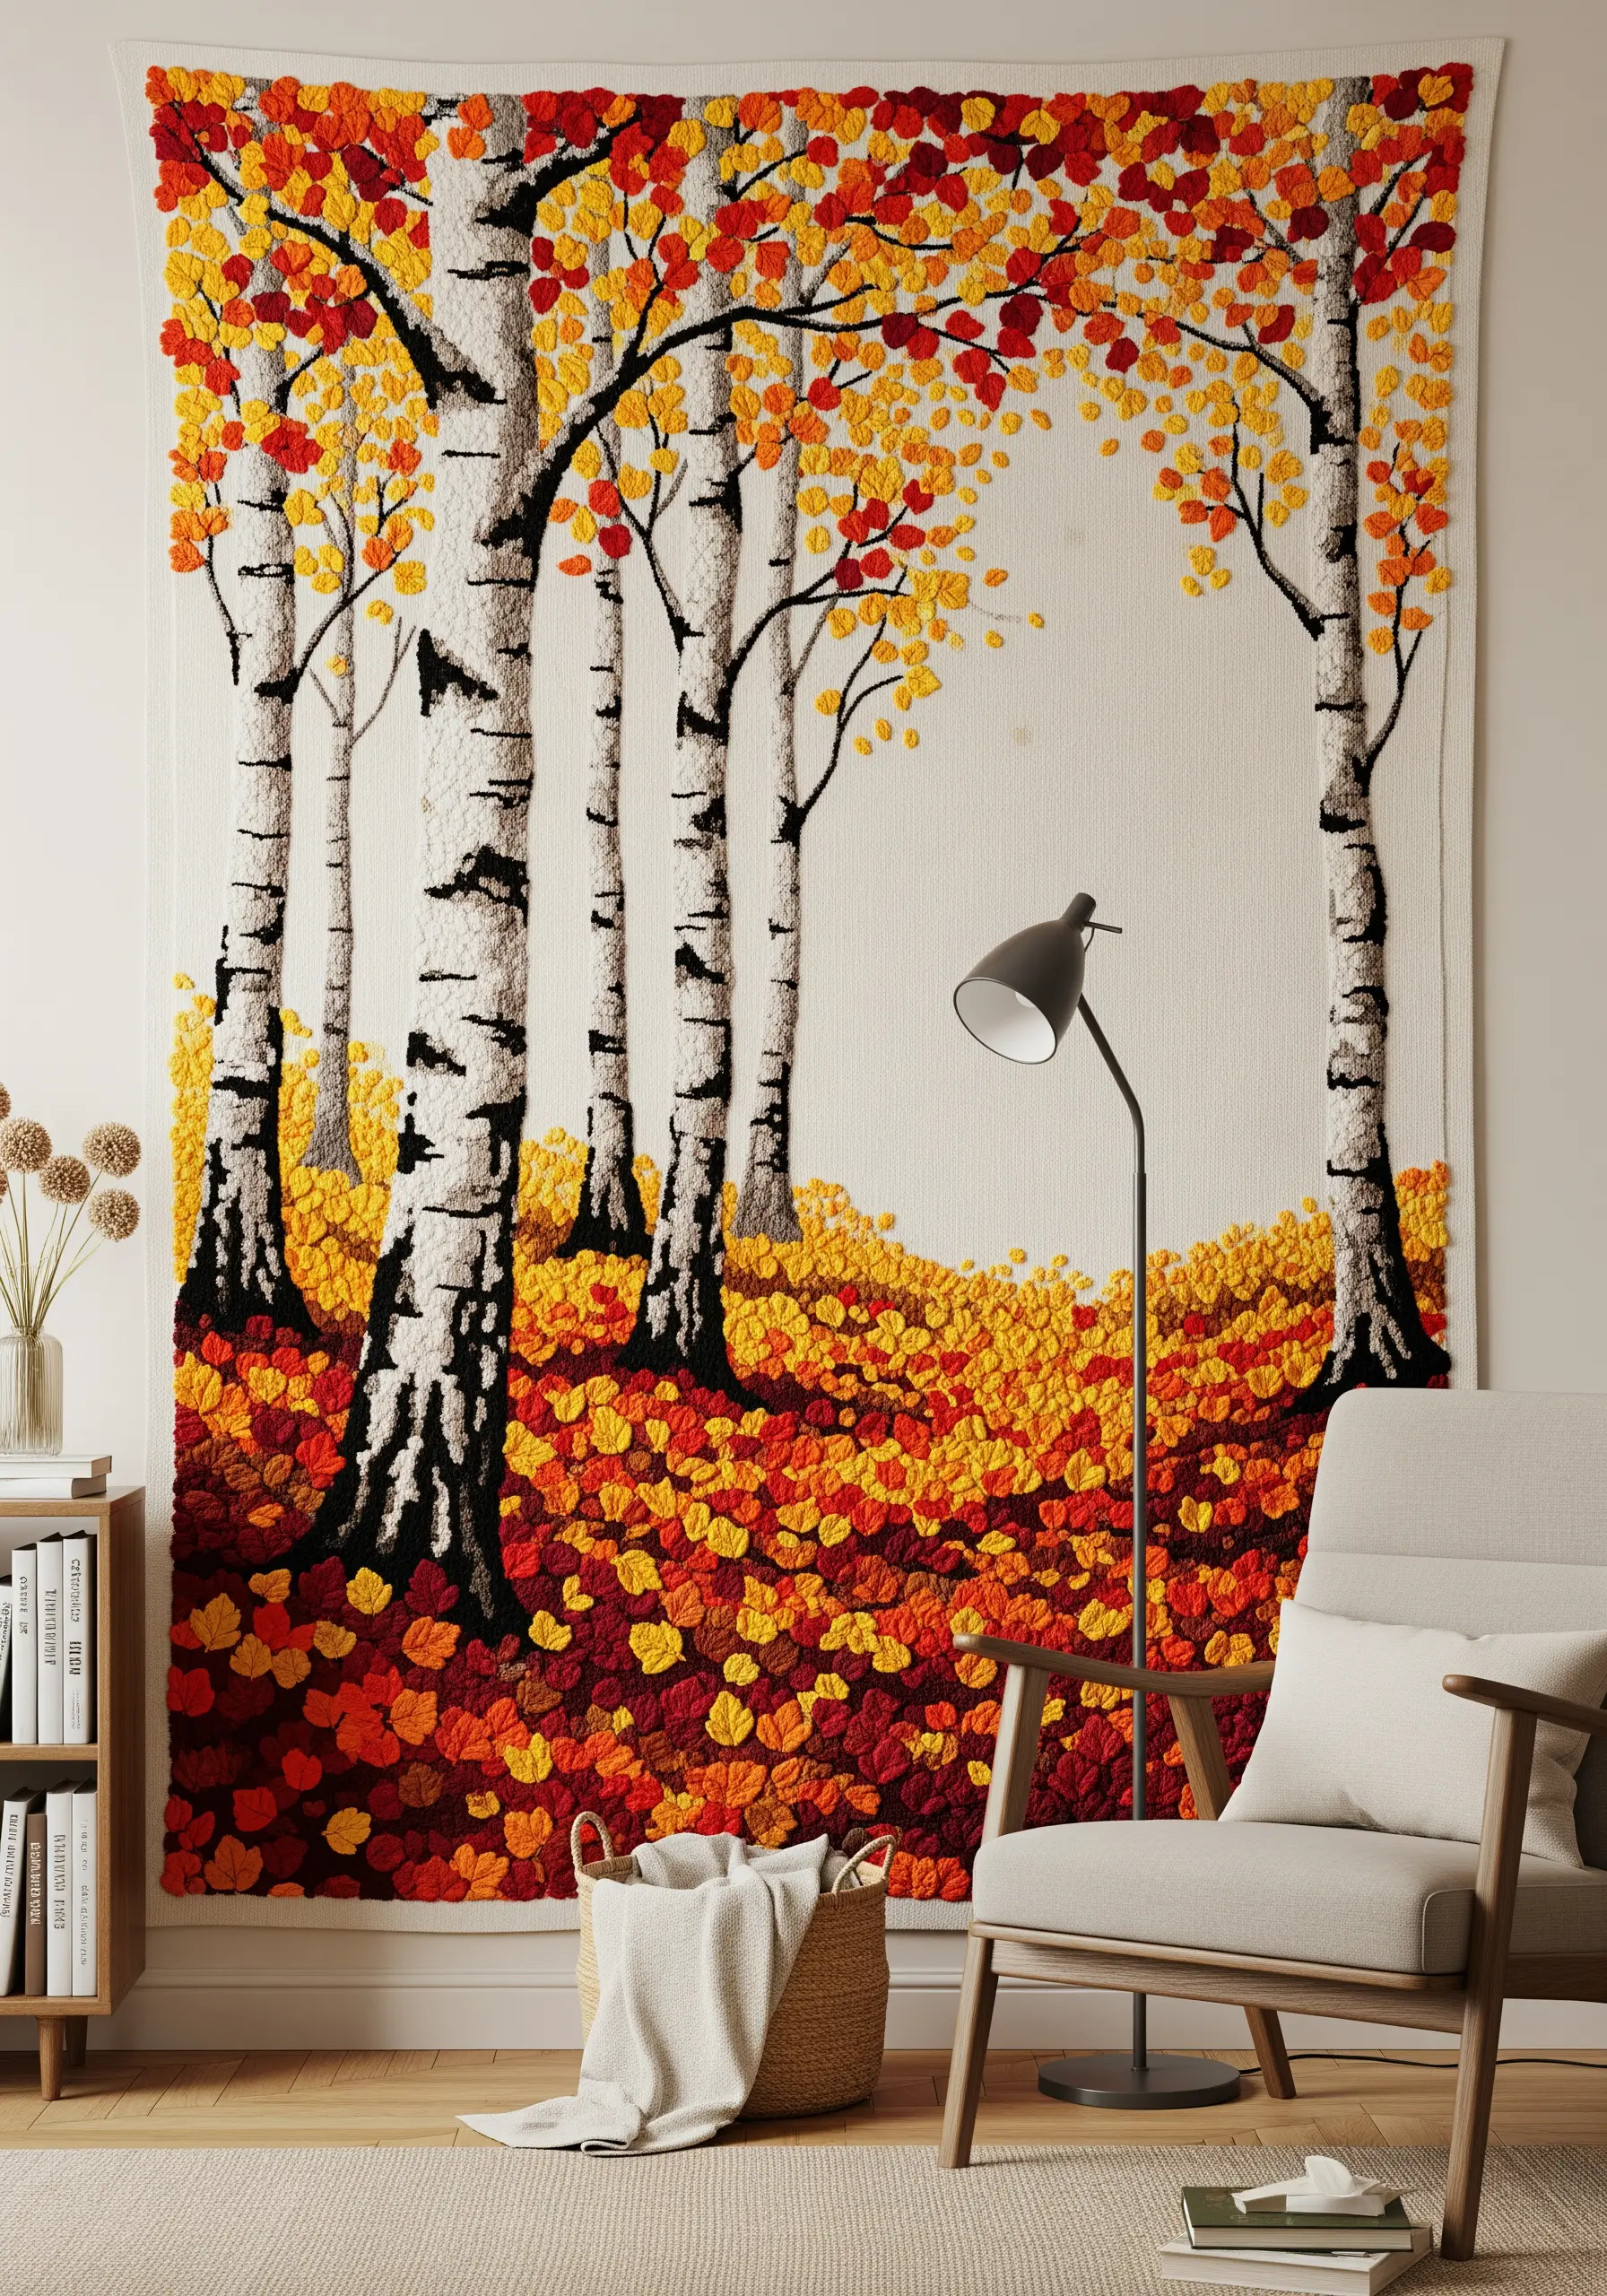
An autumn forest scene comes alive when you combine different embroidery techniques to represent various natural textures.
For the ground, use chunky yarn and a punch needle to create a thick, plush carpet of fallen leaves. This provides a satisfying contrast to the finer details elsewhere.
The birch tree bark can be rendered with a combination of long-and-short stitch in whites and grays, with tiny horizontal straight stitches in black to create the characteristic markings.
For the foliage, use dense clusters of French knots or detached chain stitches (lazy daisies) in a rich palette of reds, oranges, and yellows. This gives the leaves a delicate, three-dimensional quality and enhances your rustic wall art.
5. Weave an Ocean Wave with Directional Stitches
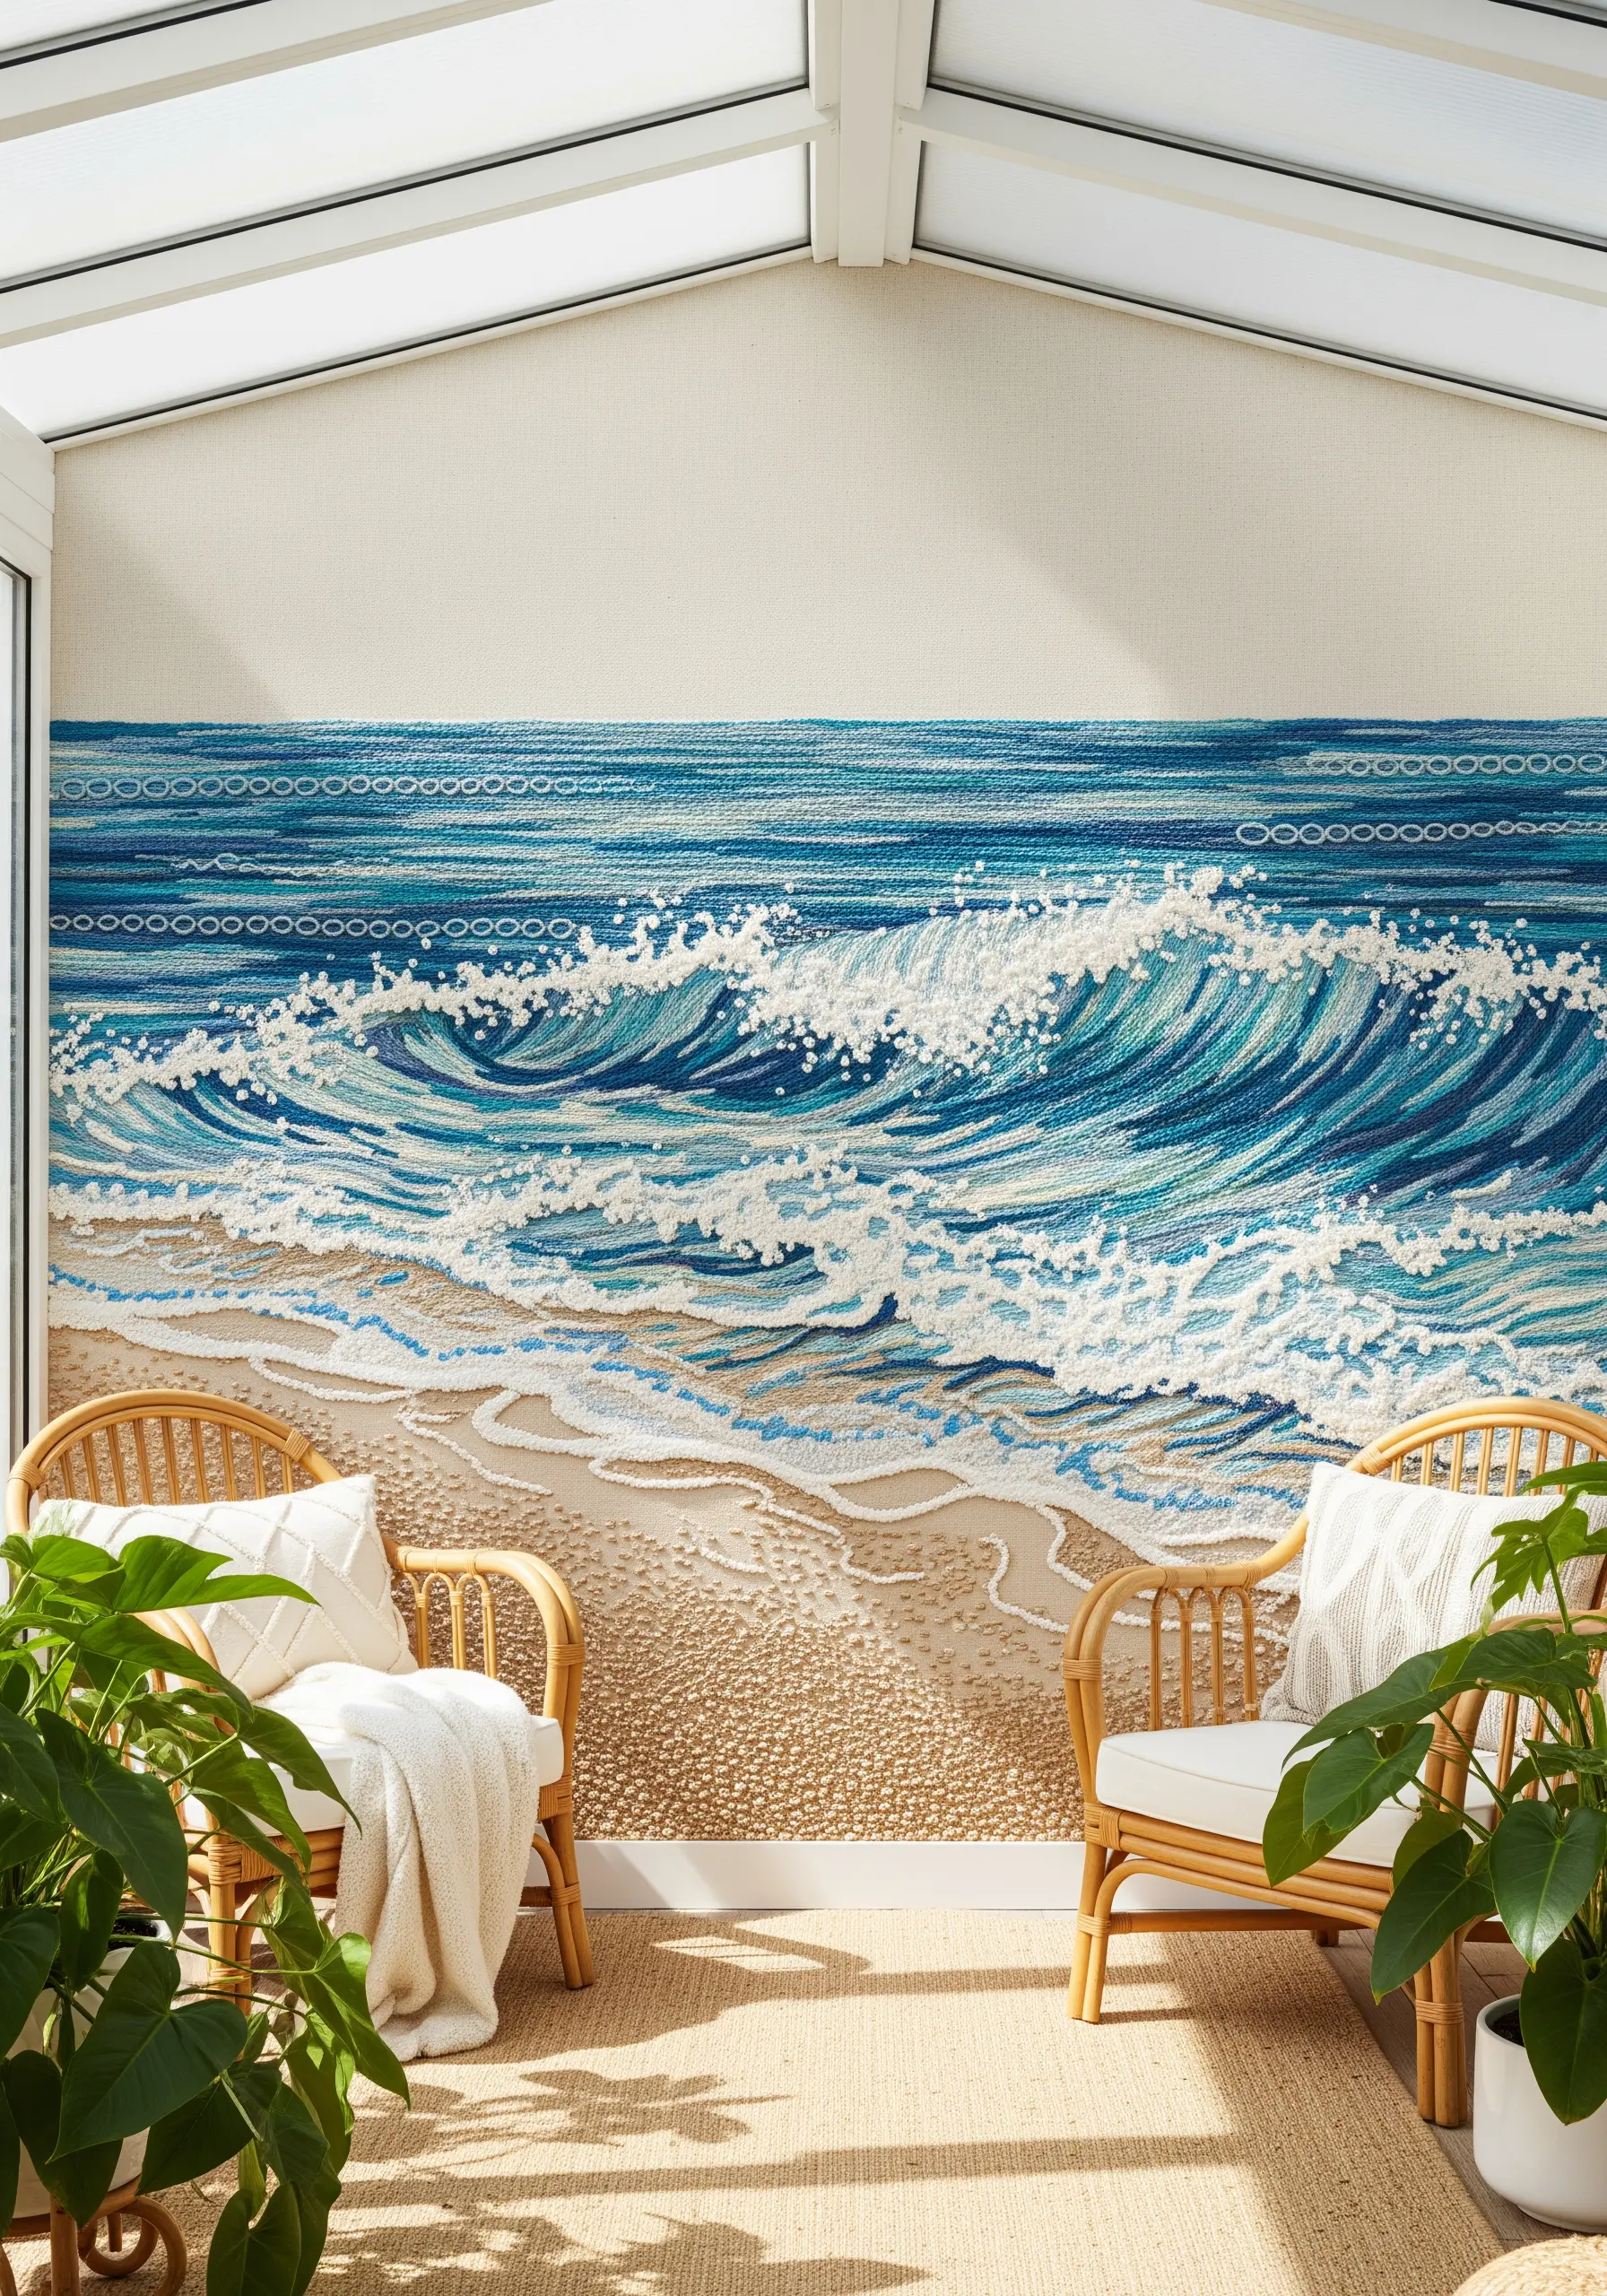
To stitch a convincing ocean wave, your stitches must follow the water’s movement. Direction is everything.
Use a variety of blue and white threads, from deep navy to bright seafoam green. Lay them down in long, curving satin stitches that mimic the arc and curl of the wave.
For the sea spray and foam, switch to French knots and colonial knots. Clustered tightly together in brilliant white, they create a frothy, energetic texture that breaks up the smoothness of the water.
The sandy shore can be filled with a field of seed stitches using beige and tan threads, giving it a granular, tactile feel. This attention to abstract thread motions makes the scene feel dynamic and alive.
6. Blend a Sunset Sky with Thread Painting

A seamless gradient sunset requires a careful application of the long-and-short stitch, also known as thread painting.
Divide your circular canvas into horizontal bands of color: deep blue at the top, transitioning through purple, pink, orange, and finally a brilliant yellow at the bottom.
Within each band, use at least two or three closely related shades. Your stitches should be staggered and interlocked where the colors meet, creating a soft, painterly blend with no harsh lines.
For the bird silhouettes, use a single strand of black thread and simple backstitch. Their clean, sharp lines provide a beautiful graphic contrast to the soft, blended sky, resulting in a stunning ombre gradient embroidery wall hanging.
7. Fill a Hallway with a Lush, Layered Jungle
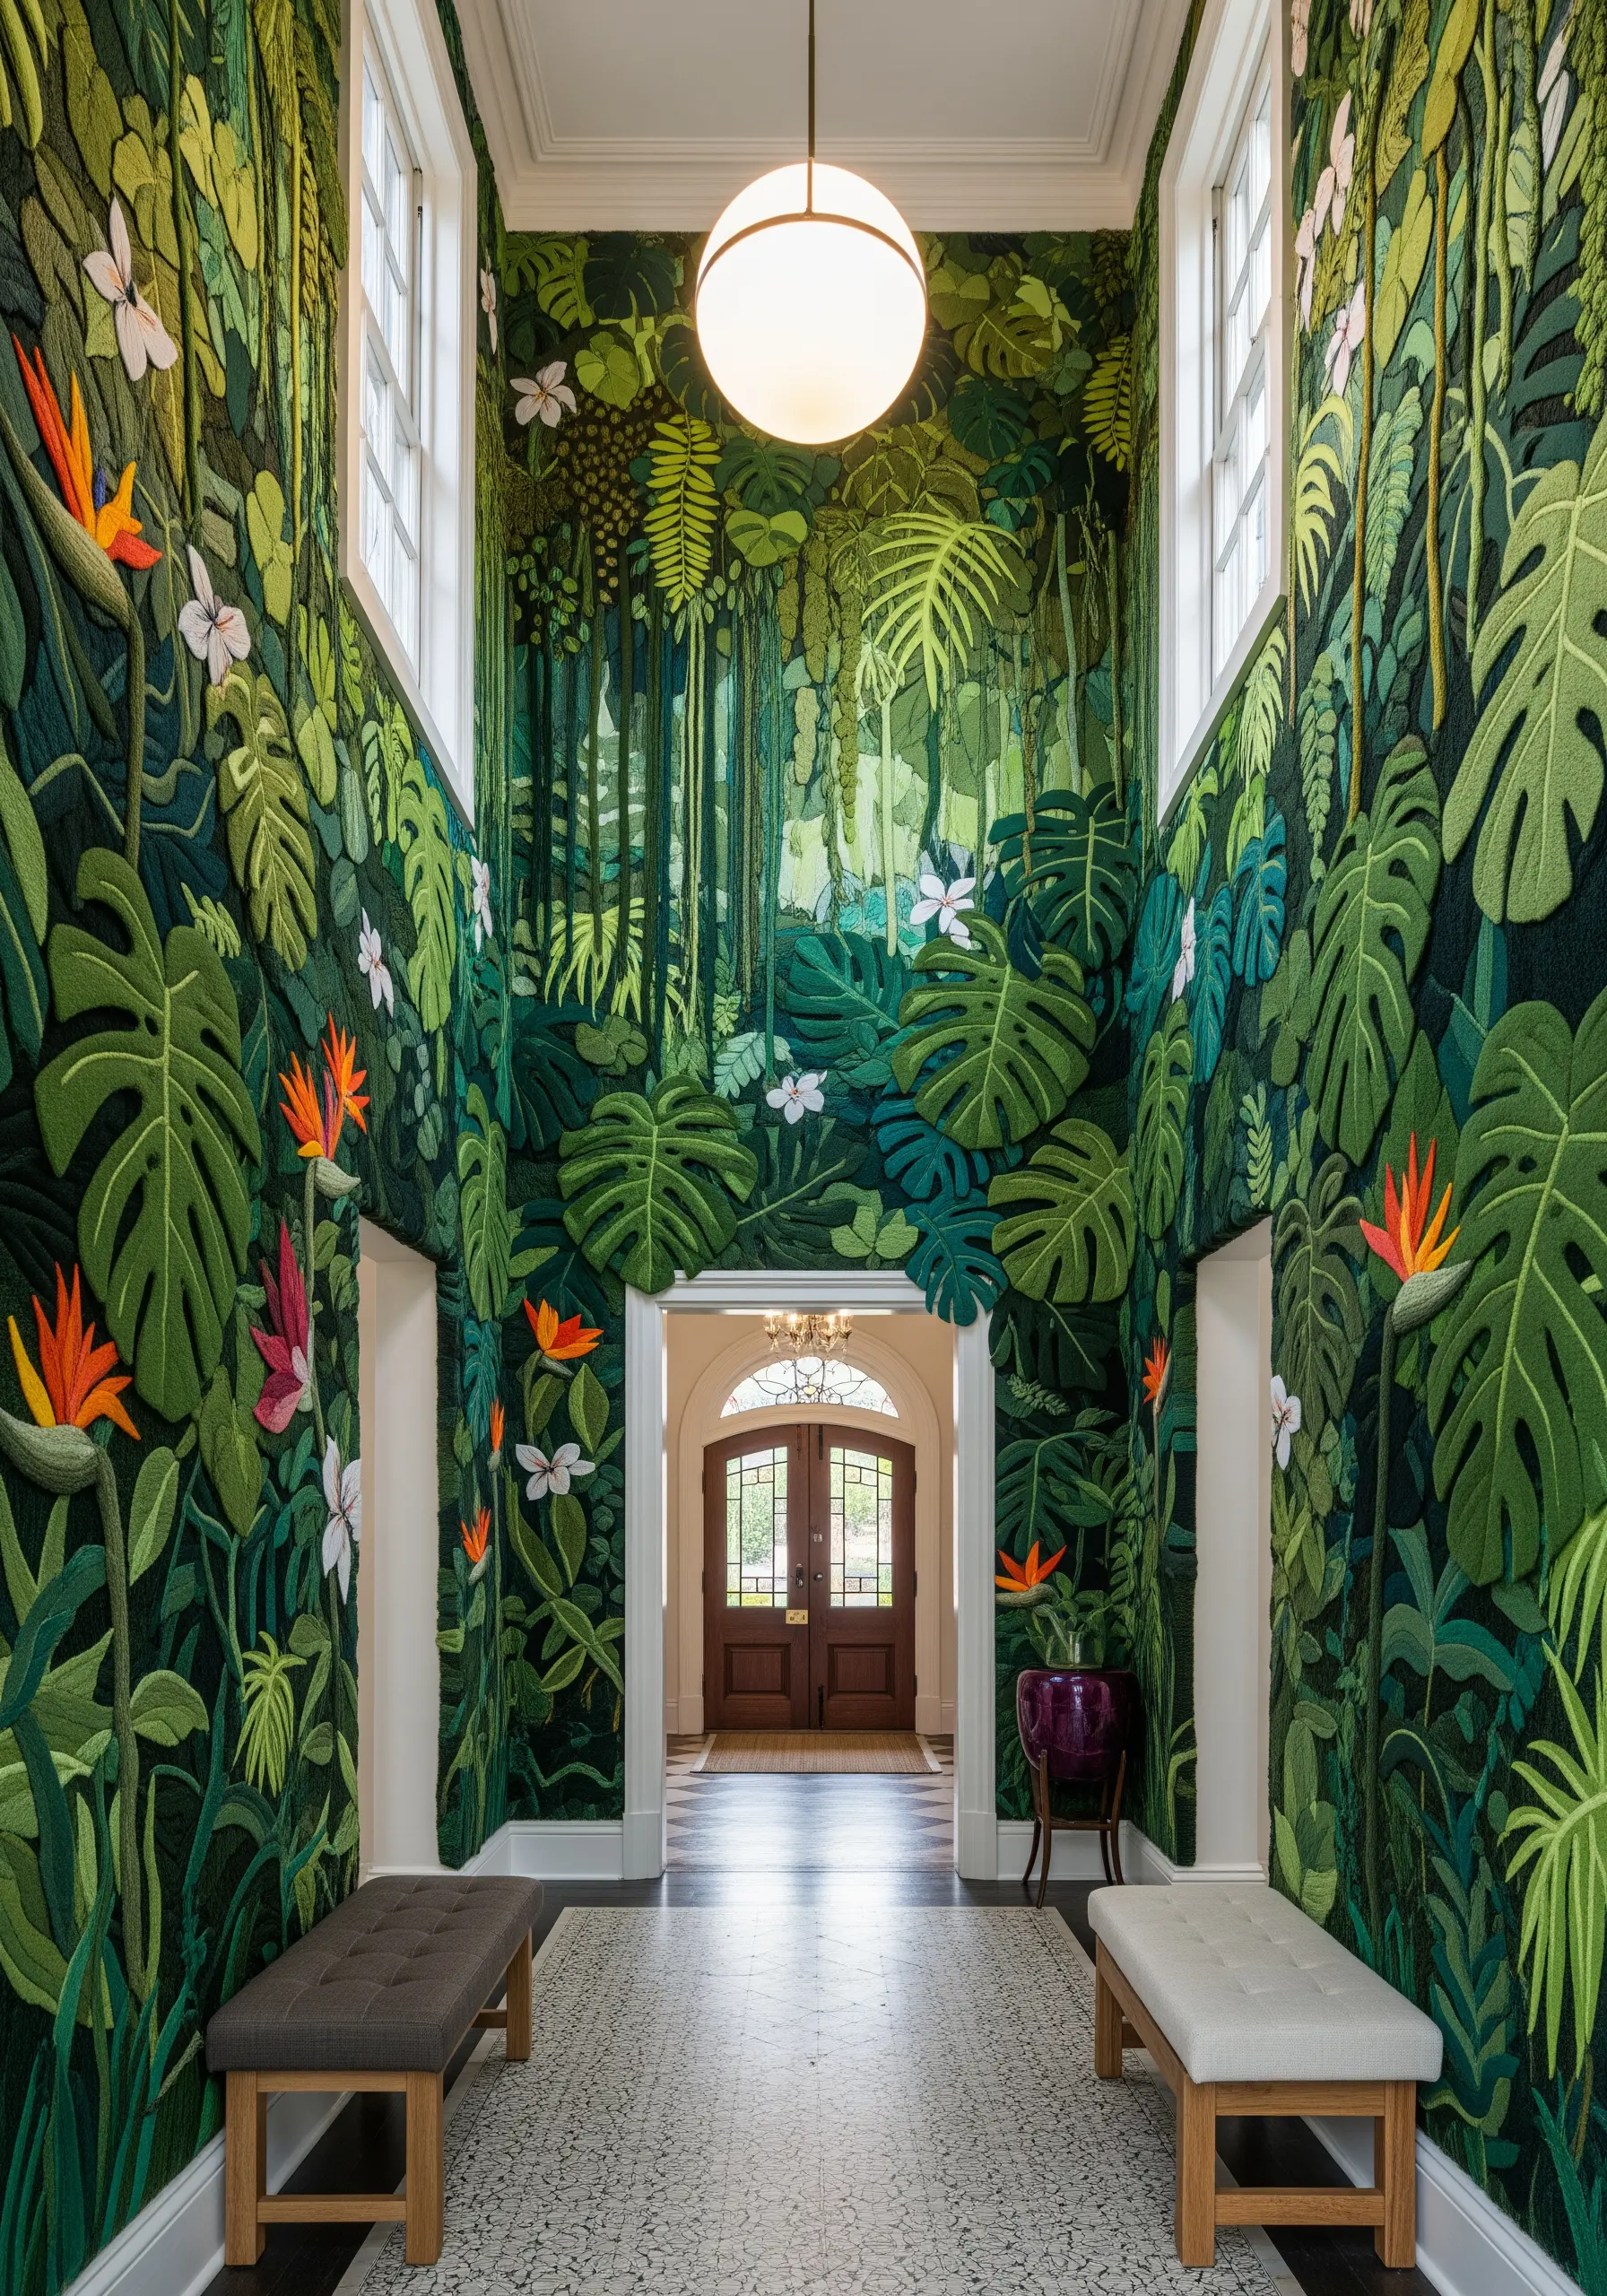
To create an immersive jungle mural, layering is your most important tool. You are essentially creating a collage with thread.
Start with the background layer, using darker greens and less detail. Fill these shapes with a simple, flat satin stitch.
Next, stitch the mid-ground leaves, overlapping the background elements. Introduce lighter greens and more textural stitches, like fishbone or leaf stitch, to define the veins.
Finally, add the foreground leaves and flowers in the brightest, most saturated colors. Use raised satin stitch or padded satin stitch to make them physically pop off the wall, creating a true sense of depth.
Mastering these plant embroidery color palettes will make your foliage look hyper-realistic.
8. Capture Underwater Light with Sheen and Shade
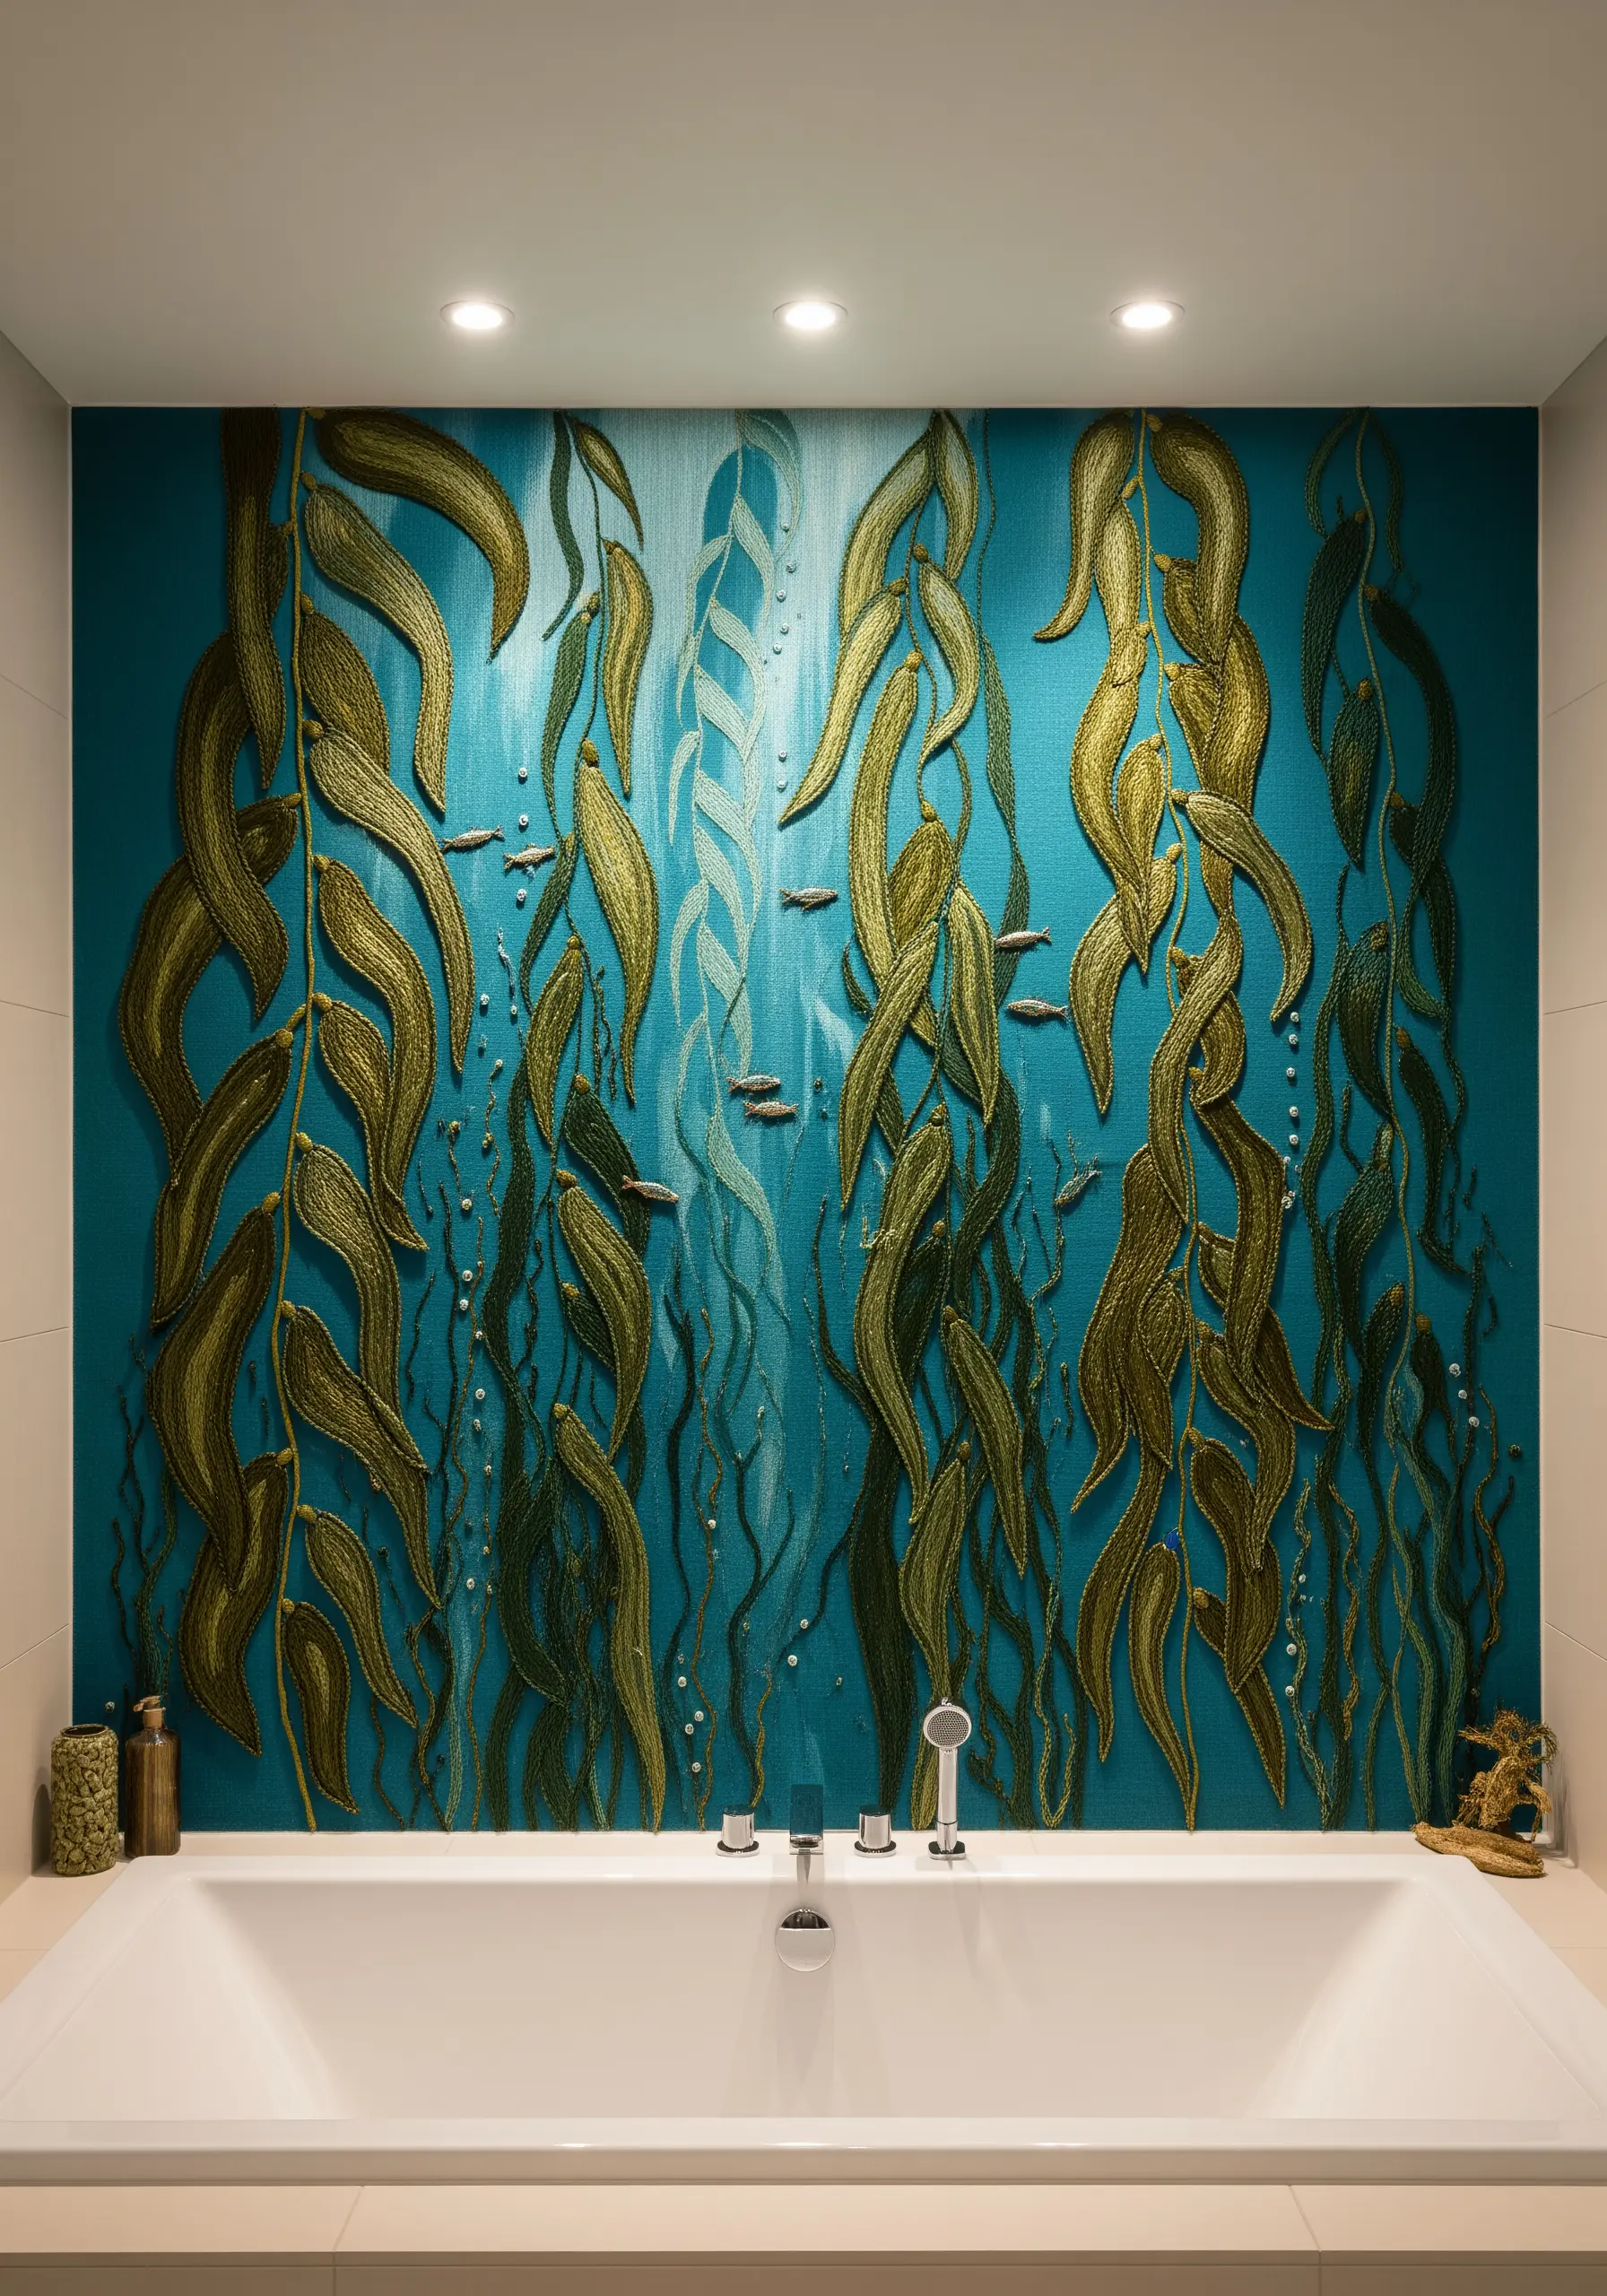
This underwater kelp forest is all about capturing the ethereal play of light beneath the waves.
For the kelp leaves, use a satin stitch with a blend of olive green and metallic gold threads. The gold will catch the light and create a subtle shimmer, mimicking sunlight filtering through water.
In the background, create vertical bands of color using different shades of teal and aqua. A slightly looser, more open fill stitch here will create a softer, more distant feel.
Add tiny air bubbles using single French knots or small seed stitches with a pearlescent white thread. This small detail adds a magical, effervescent quality to the entire piece, perfect for serene wetlands and pond botanical ideas.
9. Design a Dreamy Nursery with Mixed-Fiber Art

Elevate a child’s room by combining traditional embroidery with soft, textural fibers for a tactile and magical experience.
For the constellations and starbursts, use a fine metallic gold thread. Simple straight stitches and backstitch are all you need to create sharp, glittering lines against the navy background.
The clouds are the main textural element. Create them by couching thick, fluffy wool roving onto the fabric. This technique involves laying the wool on the surface and tacking it down with a thinner, matching thread, creating instant volume.
For the moon, use a metallic fabric appliqué, outlined with a simple chain stitch to give it a polished, defined edge. This mix of textures makes for beautiful nursery stitch art.
10. Create Minimalist Elegance with a Triptych
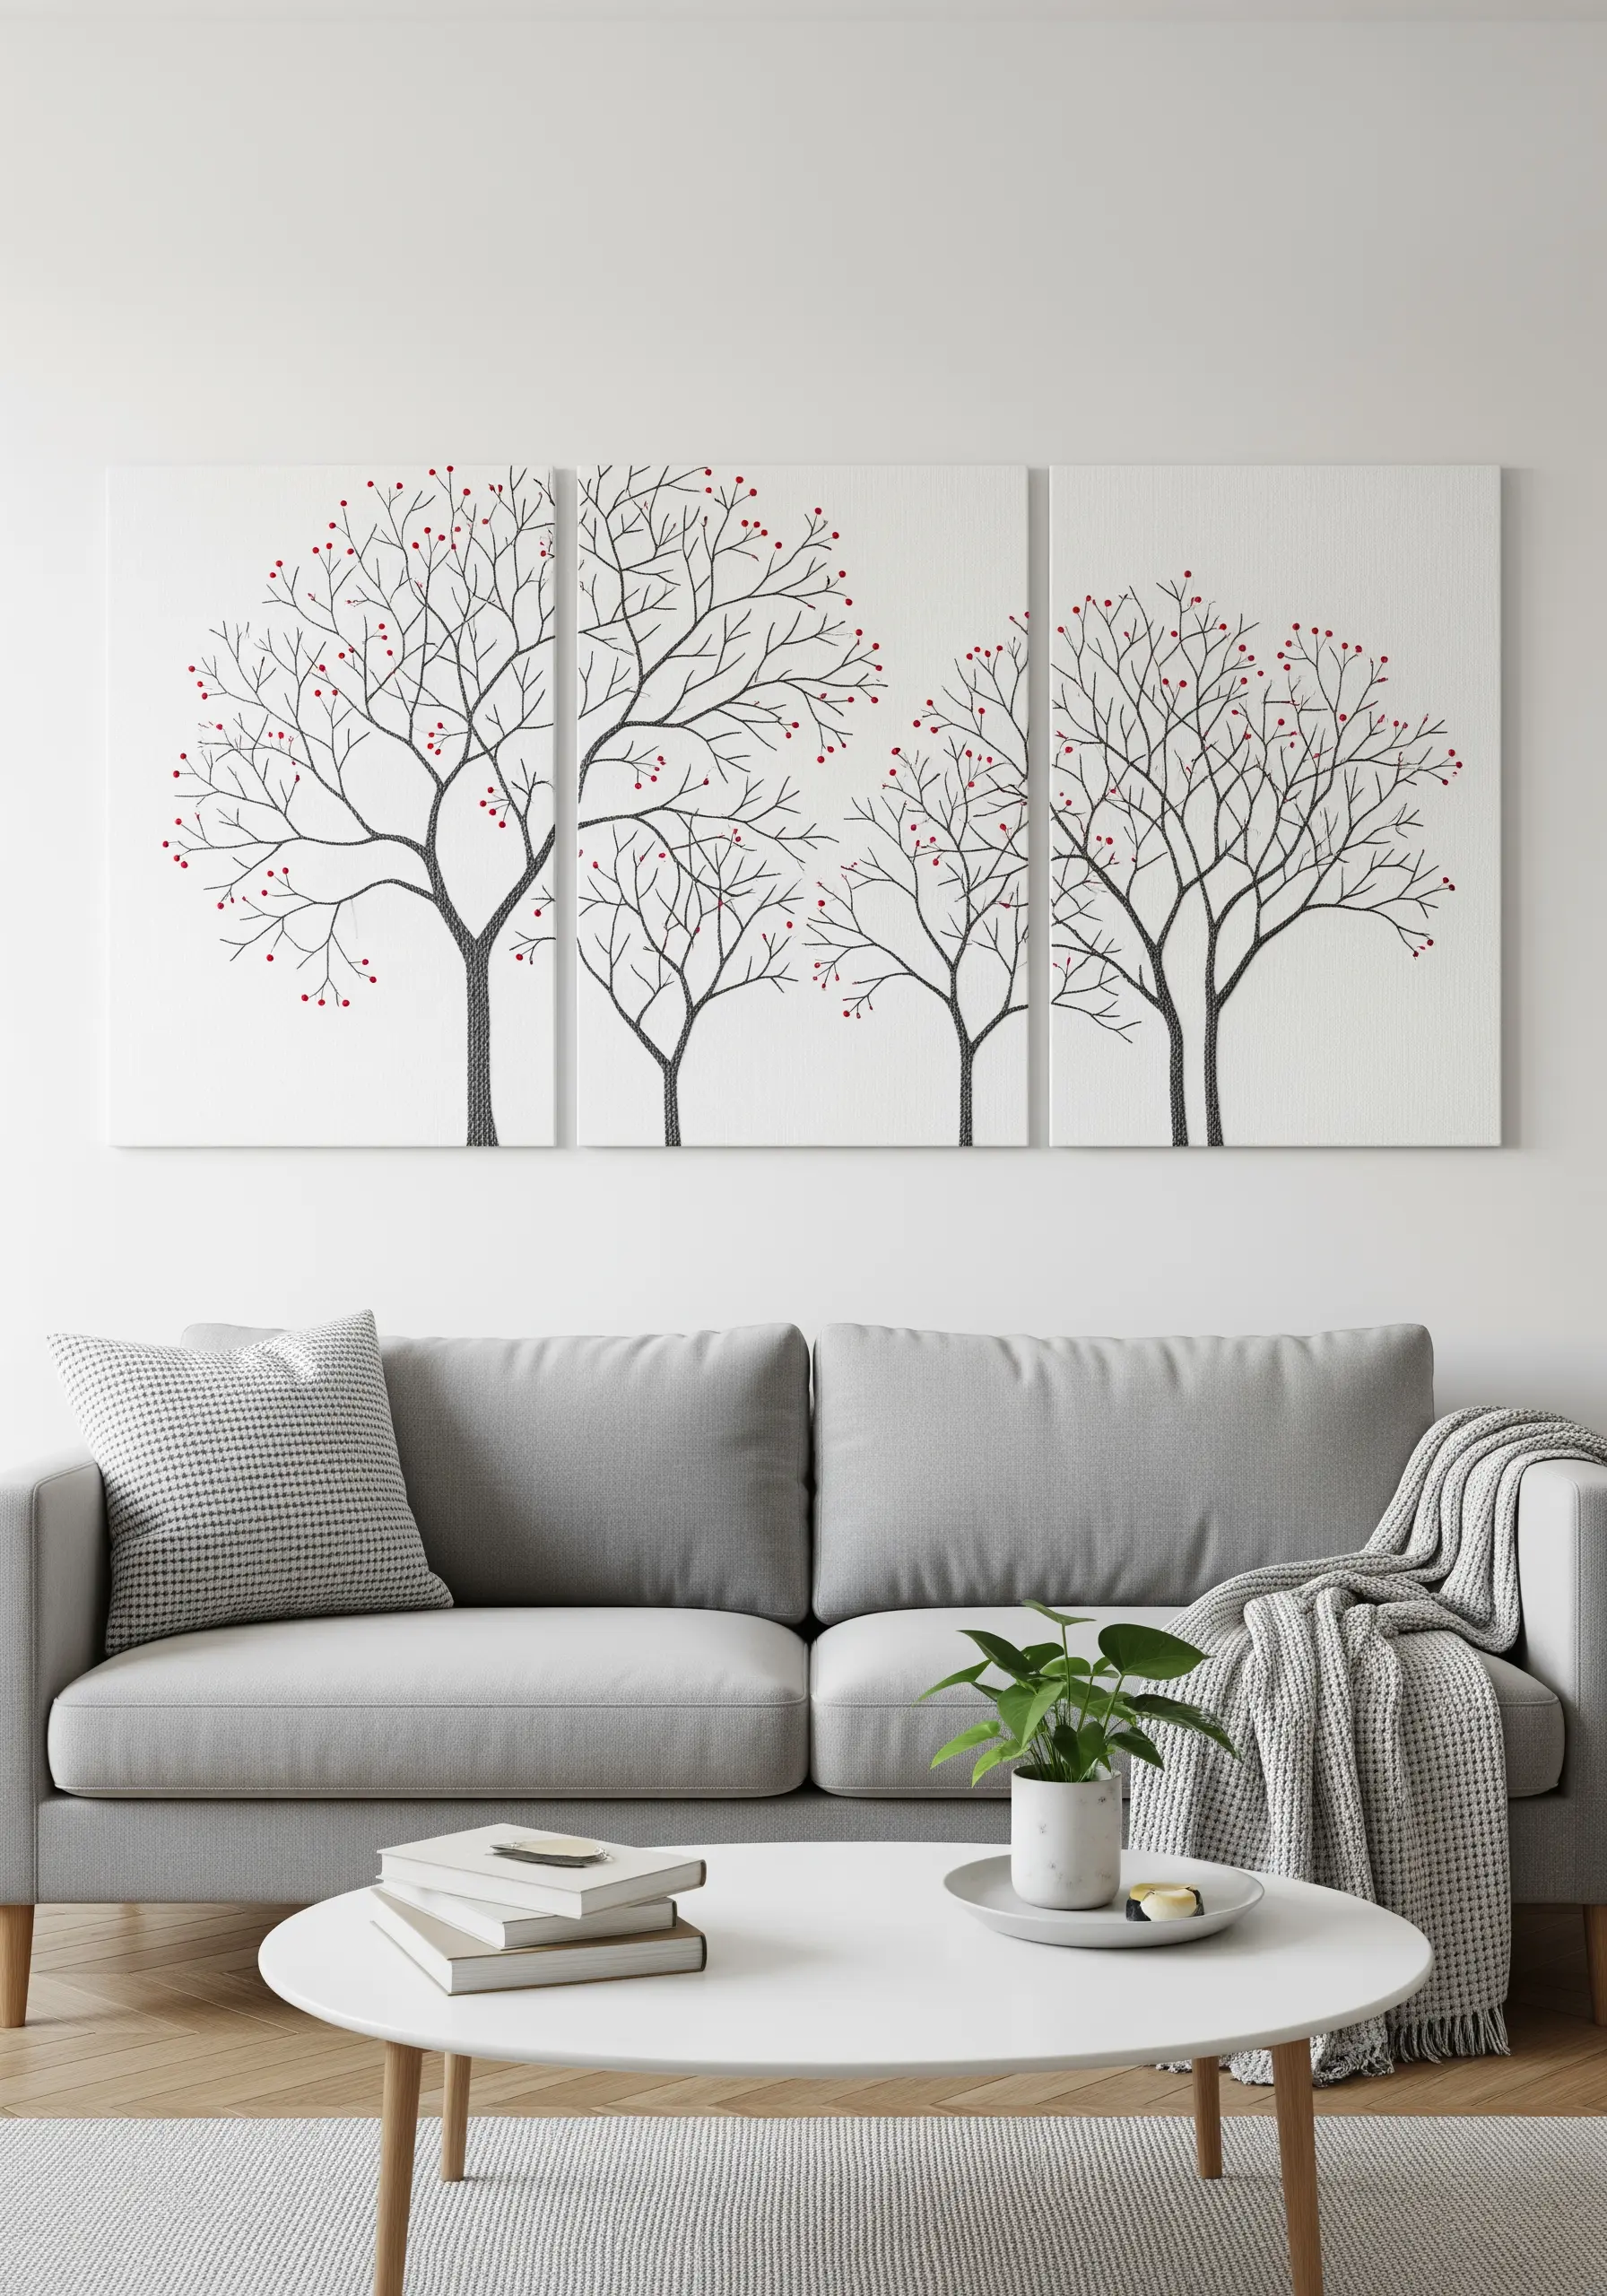
A multi-panel piece, or triptych, allows you to explore a single motif with a sense of rhythm and space.
To achieve this delicate, illustrative style, use a single strand of dark grey or black floss. This ensures your lines are crisp and graphic, like an ink drawing.
Use backstitch or stem stitch for the main branches to create smooth, flowing lines. The finer twigs can be rendered with simple straight stitches.
Introduce a single pop of color with bright red French knots for the berries. Their texture and color provide a focal point without overwhelming the minimalist composition, making it one of the most elegant minimalist leaf and vine ideas.
11. Sculpt a Crashing Wave with 3D Textures
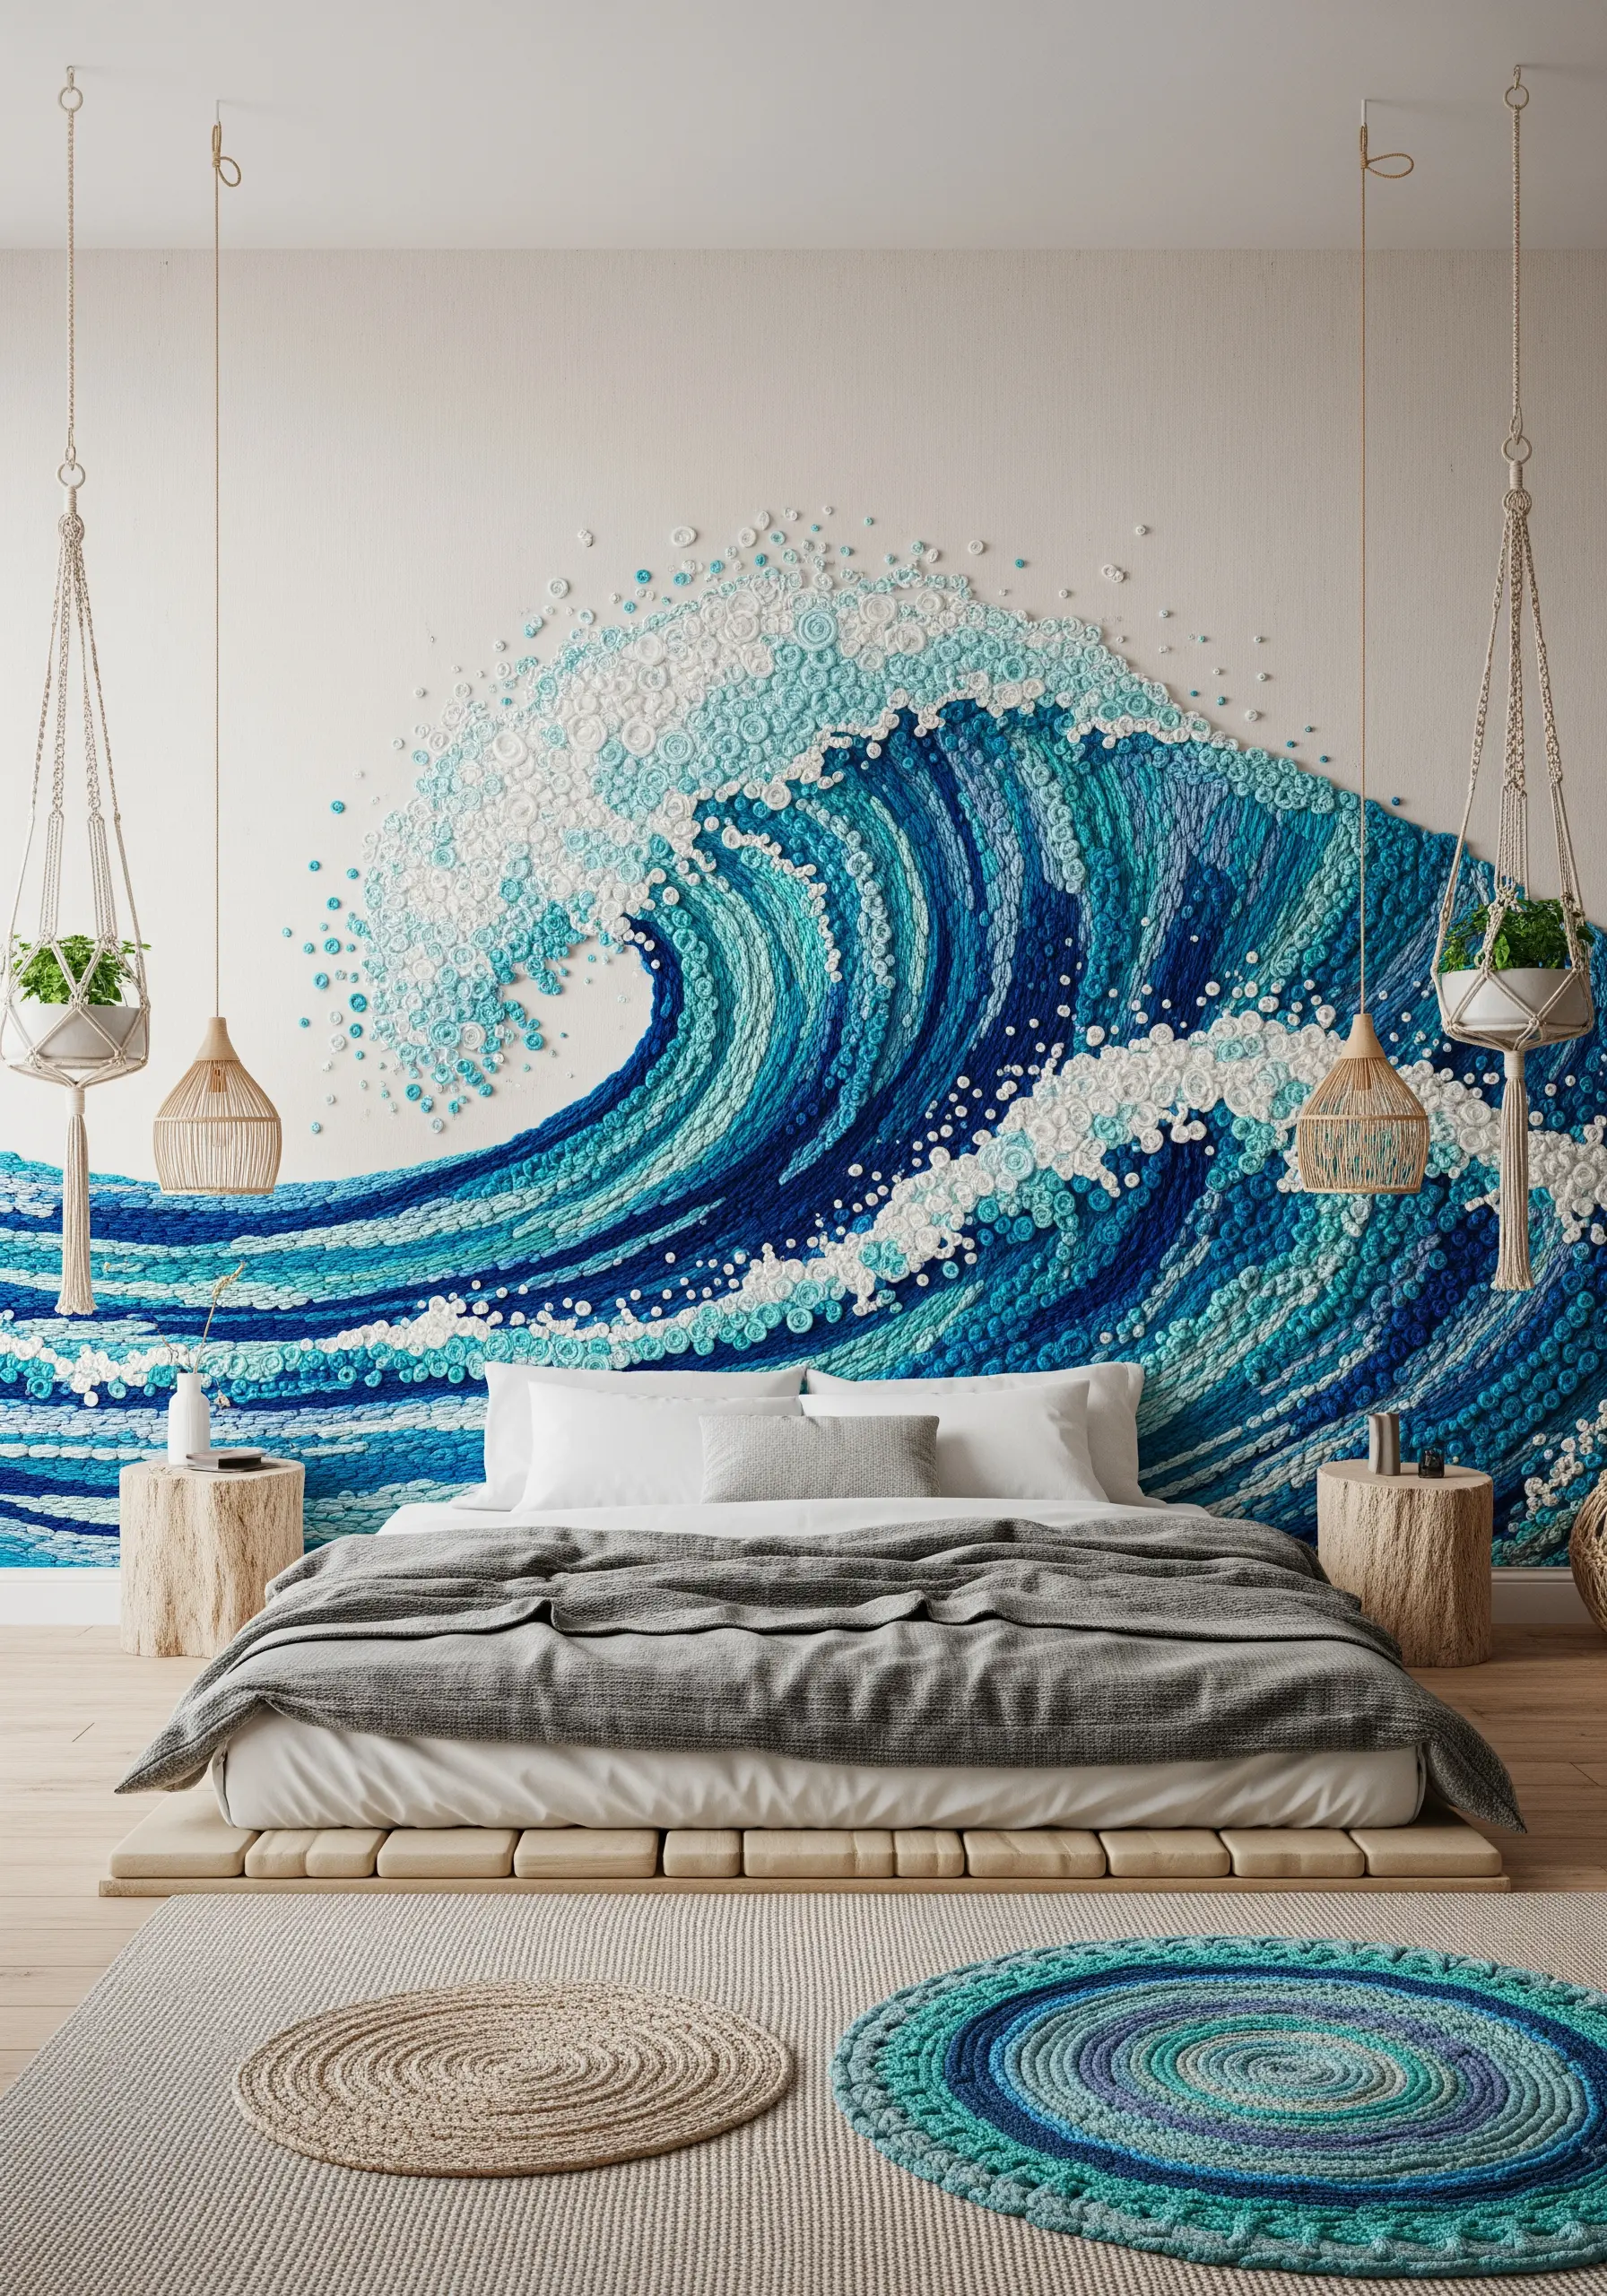
Transform your wall into a dynamic seascape by using stitches that create physical dimension and texture.
The body of the wave is built with thousands of rolled fabric circles, tightly packed together. This technique, known as yo-yo quilting or Suffolk puffs, creates an incredible sculptural surface.
Alternatively, you can achieve a similar effect with densely packed bullion knots or woven wheel stitches, using various shades of blue and turquoise yarn.
For the seafoam, use chunky white yarn and loop stitches (like turkey work) that you can later trim to create a fluffy, frothy texture. These are signature elements of 3D embroidery wall art.
12. Stitch a Vertical Tapestry for Dramatic Height
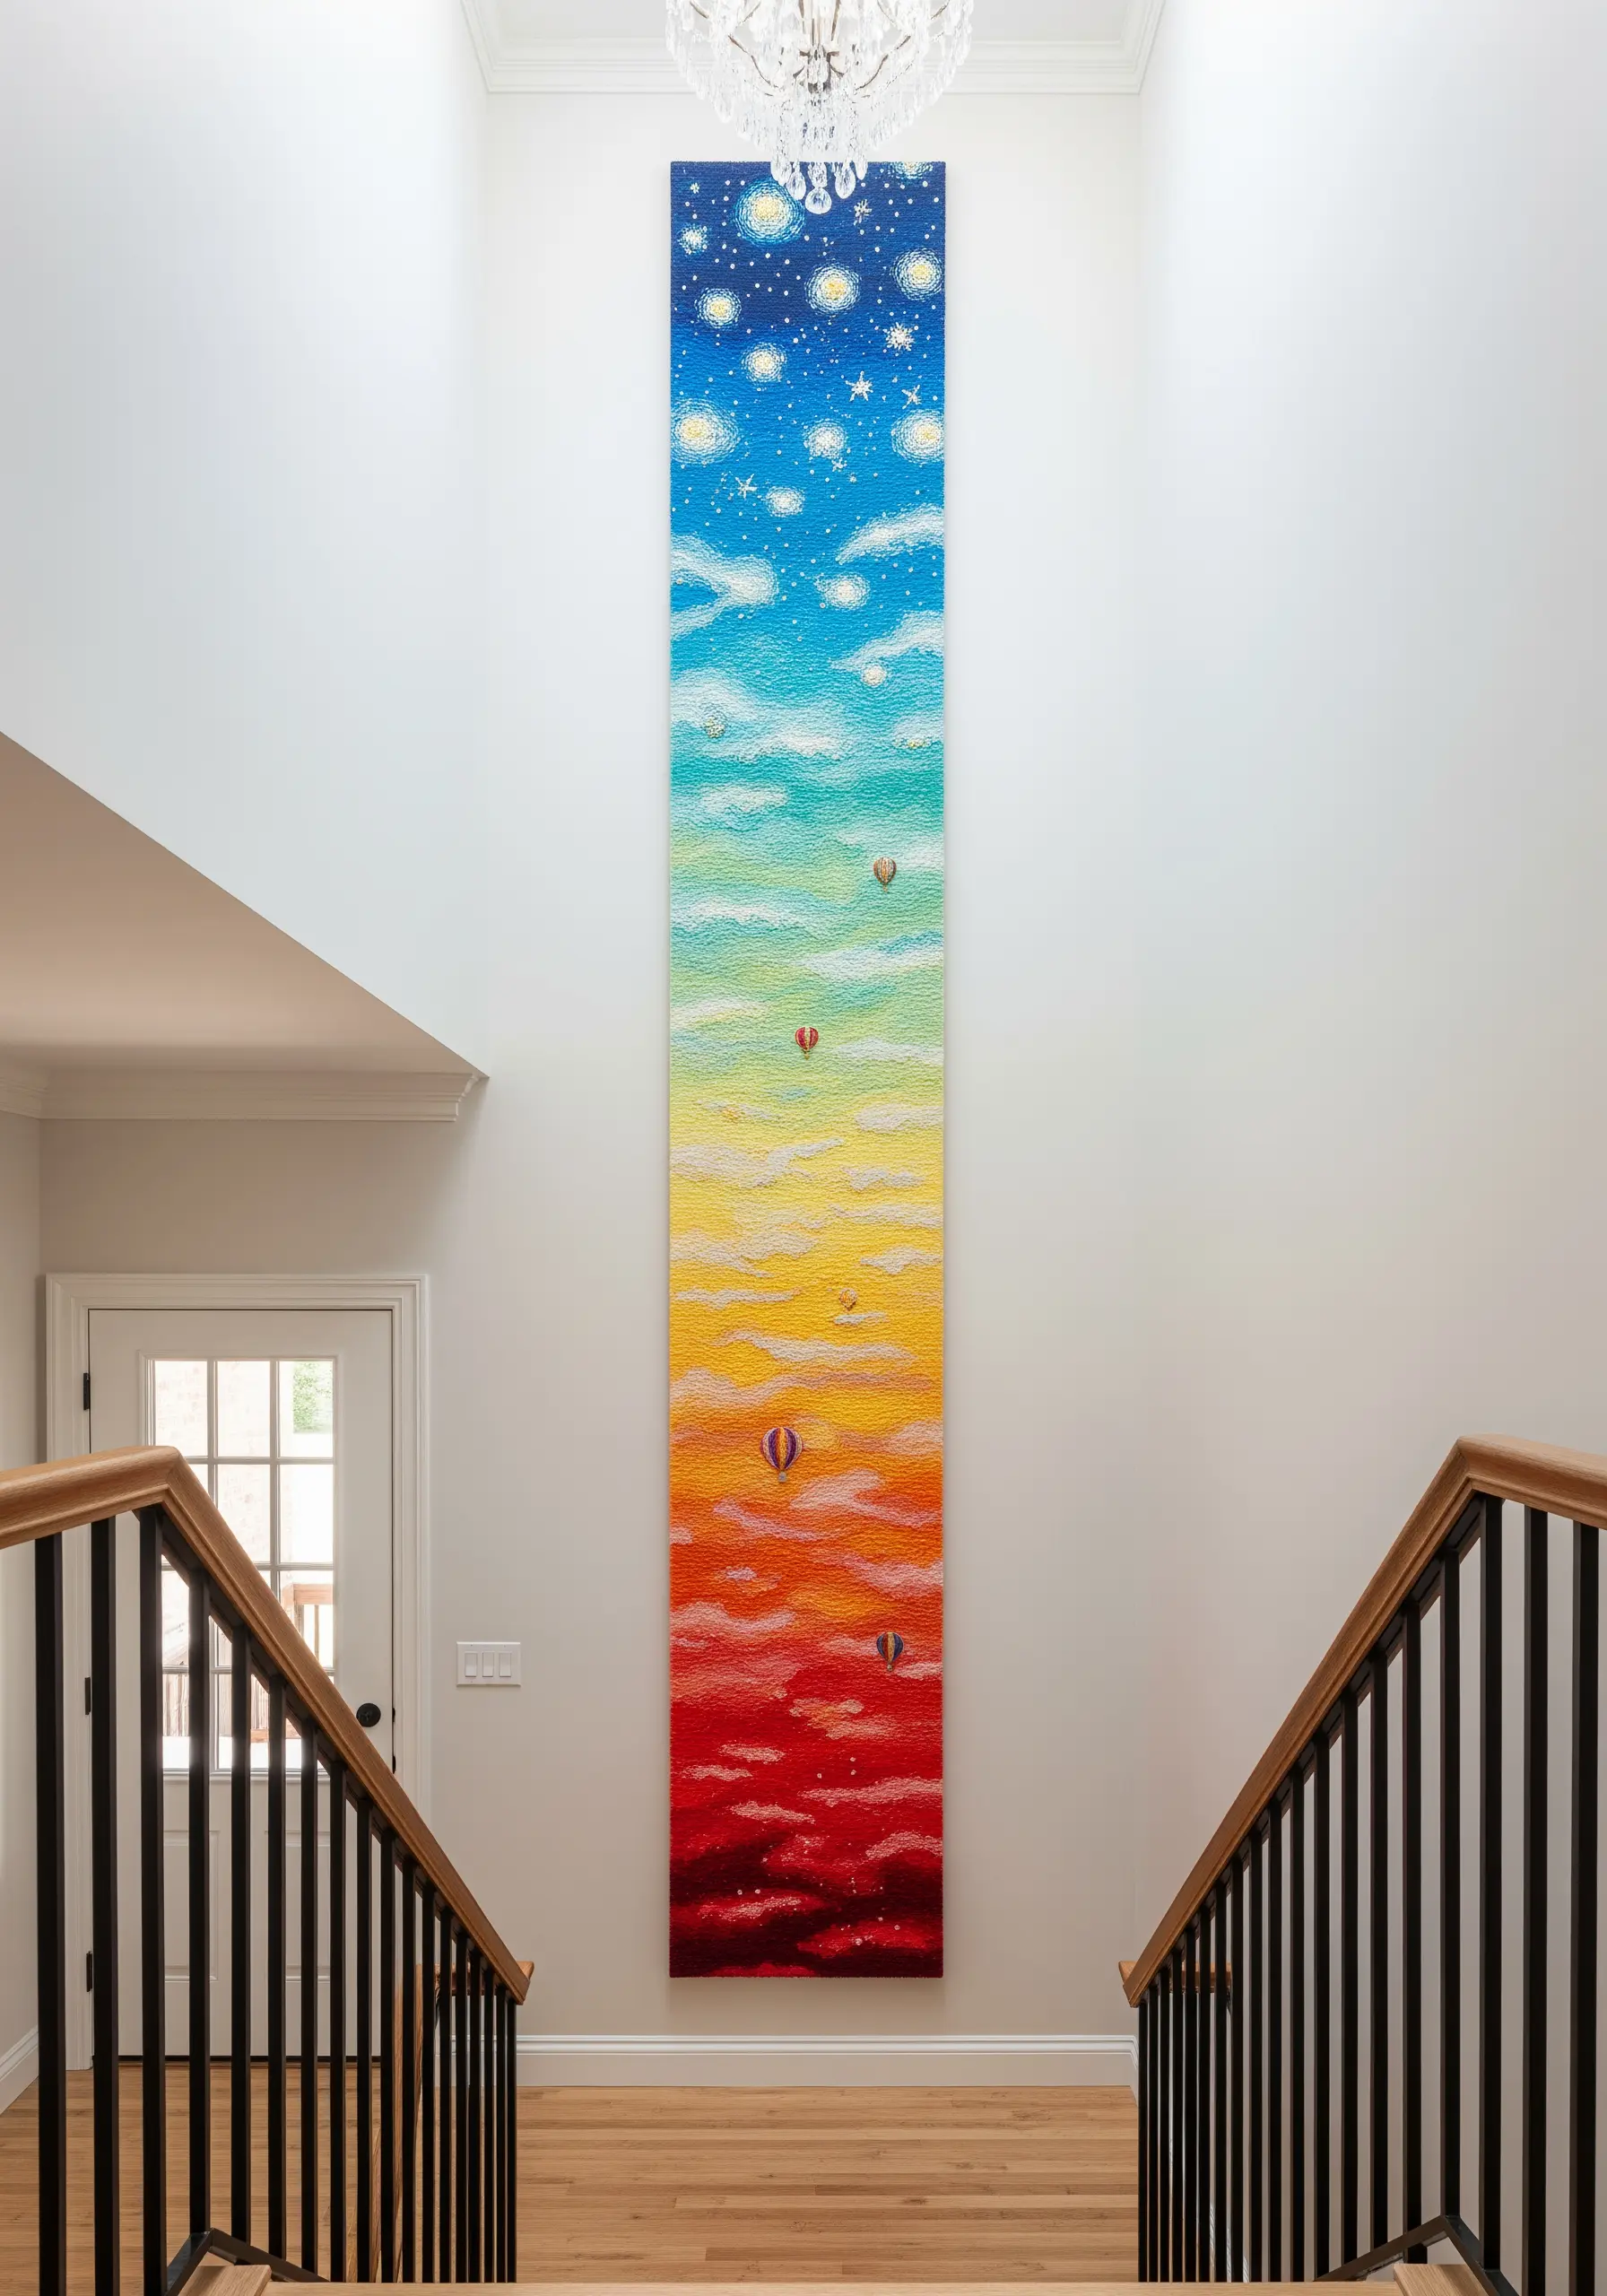
Emphasize the height of a room, like a staircase or foyer, with a long, narrow embroidered panel that draws the eye upward.
This design uses a simple gradient, moving from deep reds and oranges at the bottom to a starry blue sky at the top. The key is a seamless blend using the long-and-short stitch technique.
To keep the stitching process manageable on a large scale, work on smaller sections of fabric that you can later seam together invisibly from the back.
Adding tiny details like hot air balloons and French knot stars provides points of interest and scale within the vast expanse of color, turning a blank wall into a beautiful modern embroidery wall panel.
13. Cultivate a Wildflower Meadow on Your Wall
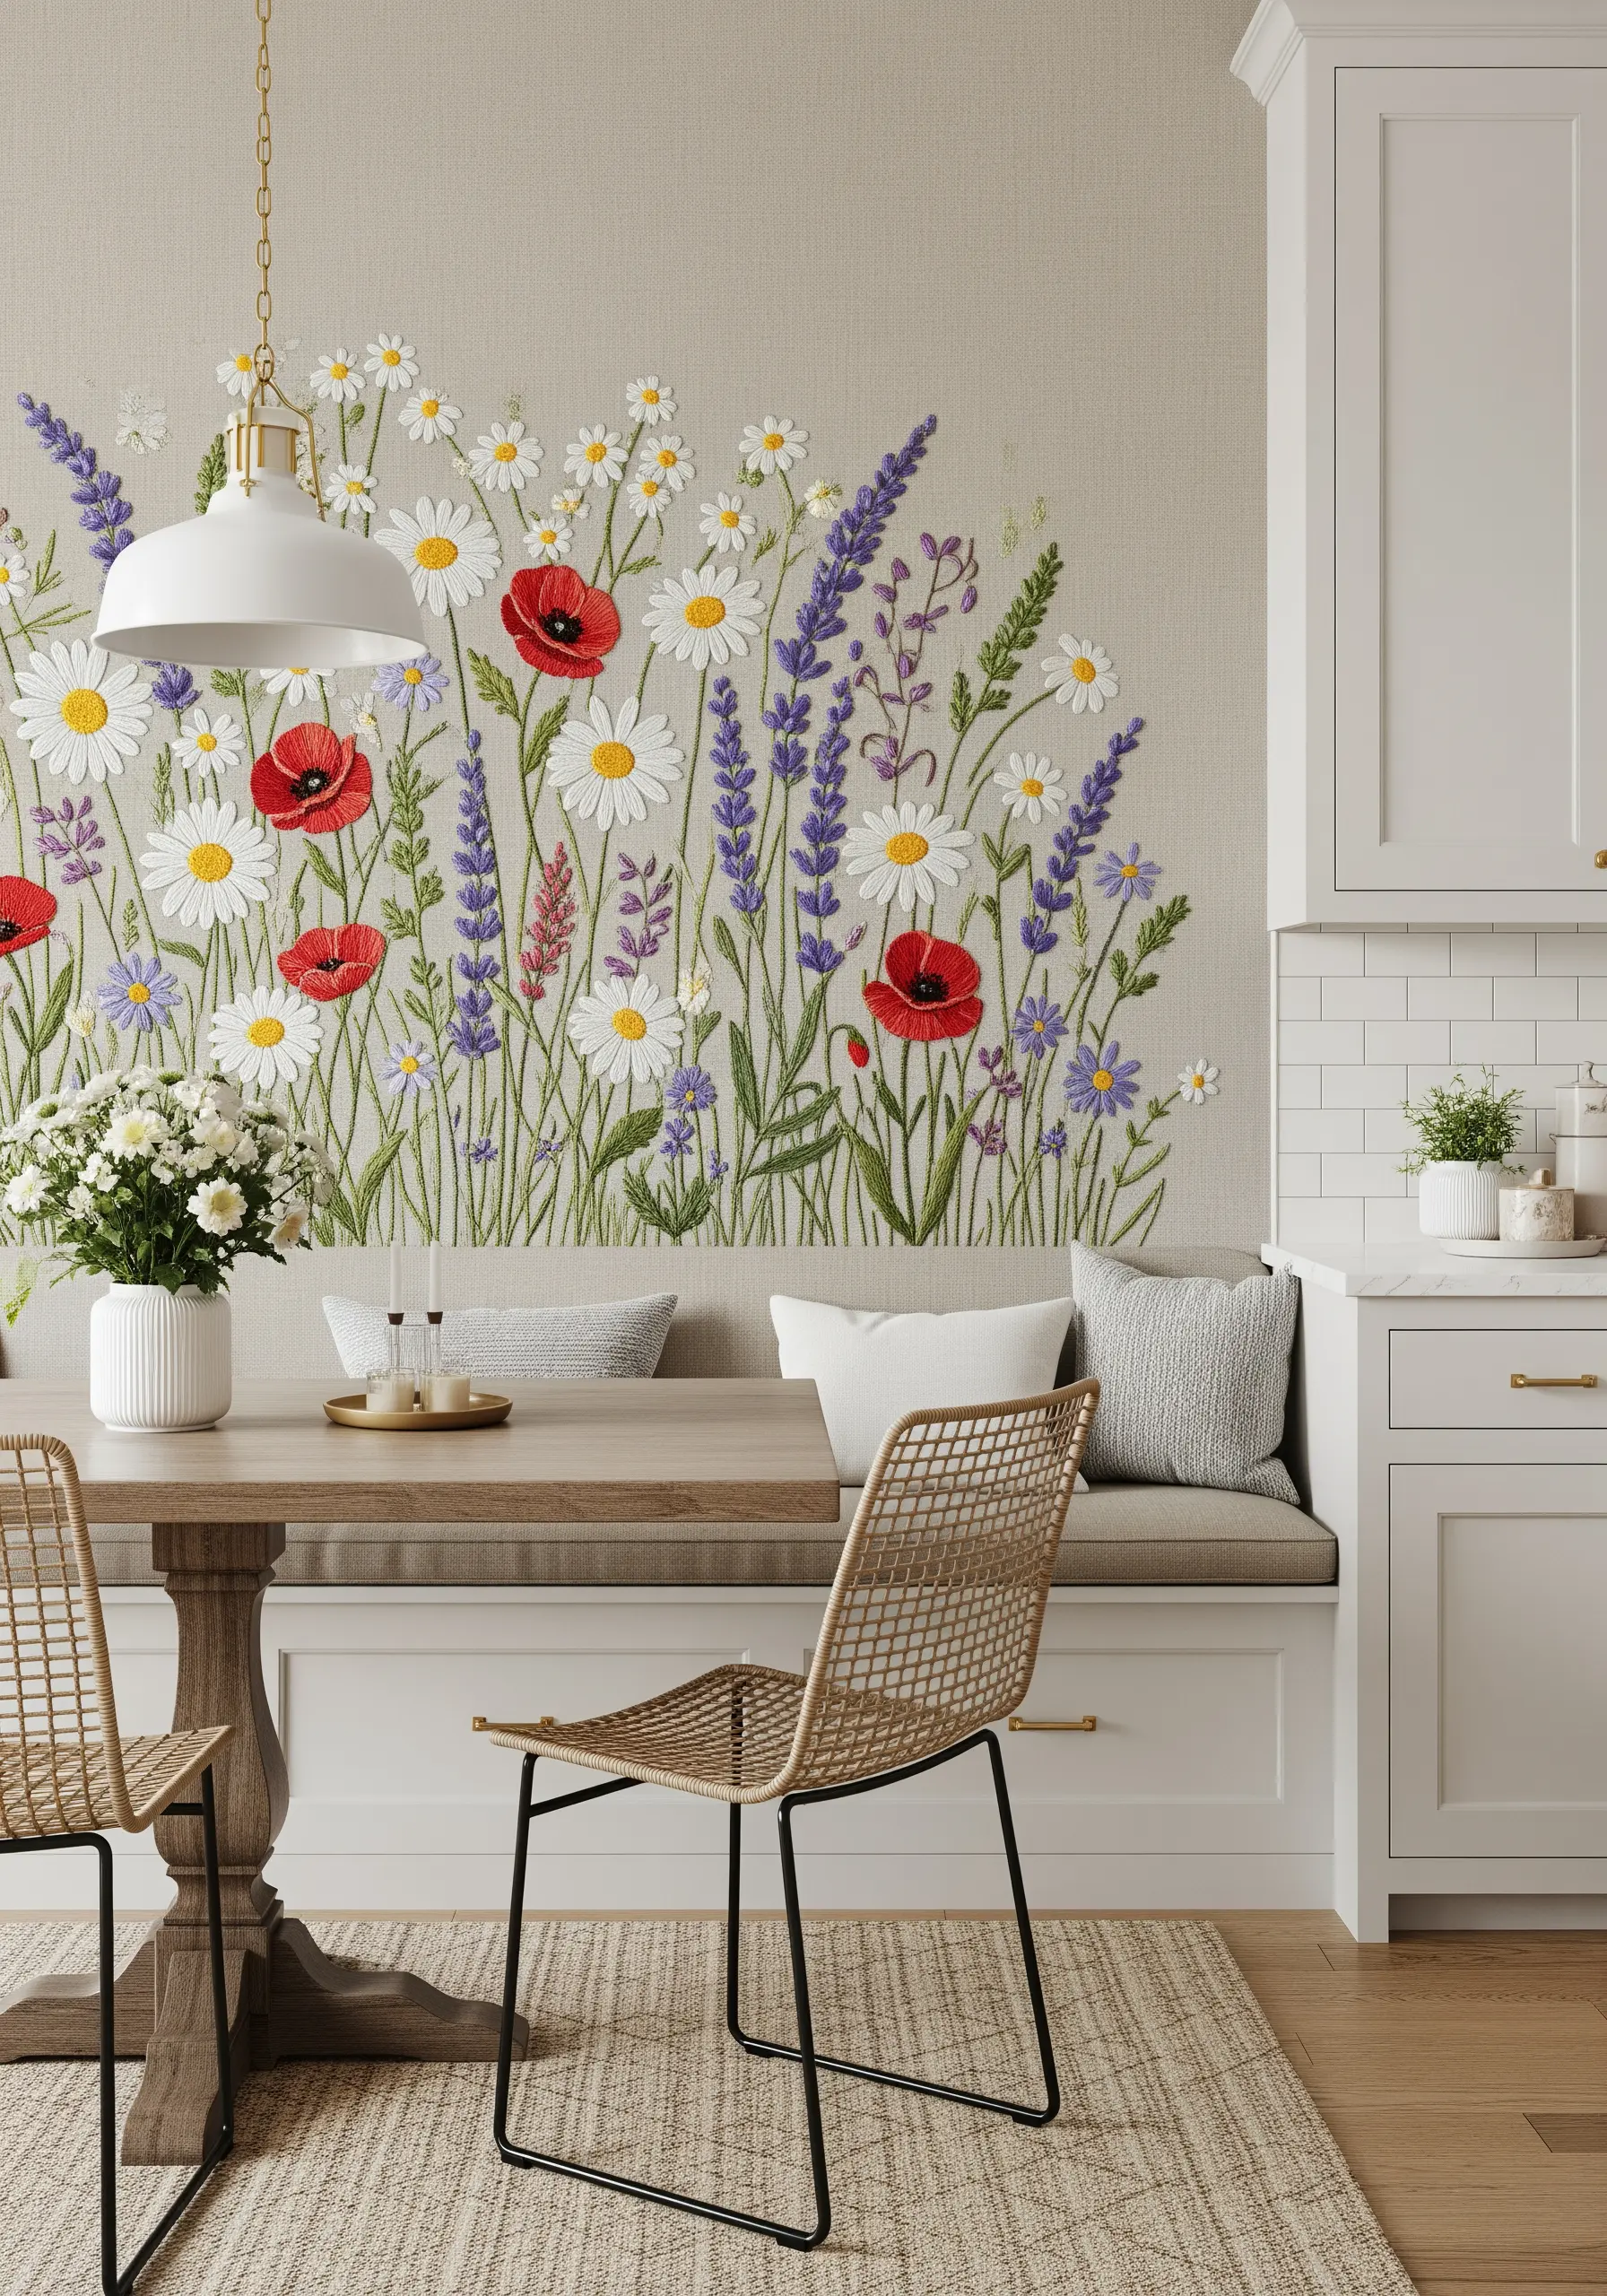
To create a realistic and charming wildflower meadow, you must embrace variety in both stitch and form.
For daisies and poppies, use a padded satin stitch for the petals to give them a slight lift from the fabric surface. A cluster of French knots in the center adds the final touch of realism.
Stitch lavender using rows of small, angled straight stitches or lazy daisy stitches stacked up a central stem. This gives it the characteristic bumpy texture.
Vary the height and density of your flowers to mimic a natural, overgrown field. This approach to wildflower thread painting feels organic and less like a rigid pattern.
14. Illuminate the Deep Sea with Neon Threads
Capture the otherworldly glow of bioluminescent sea creatures by using specialty threads on a stark black background.
Choose neon or glow-in-the-dark embroidery floss for the main elements. These threads react strongly under focused light, creating a stunning visual effect.
Use simple line stitches like backstitch and stem stitch to outline the creatures, allowing the vibrant thread color to be the star.
For the glowing lures on the anglerfish, use a single French knot with a long tail made from a single strand of metallic silver thread. These are fantastic neon color concepts that truly pop.
15. Sculpt Fluffy Clouds with Chunky Yarn
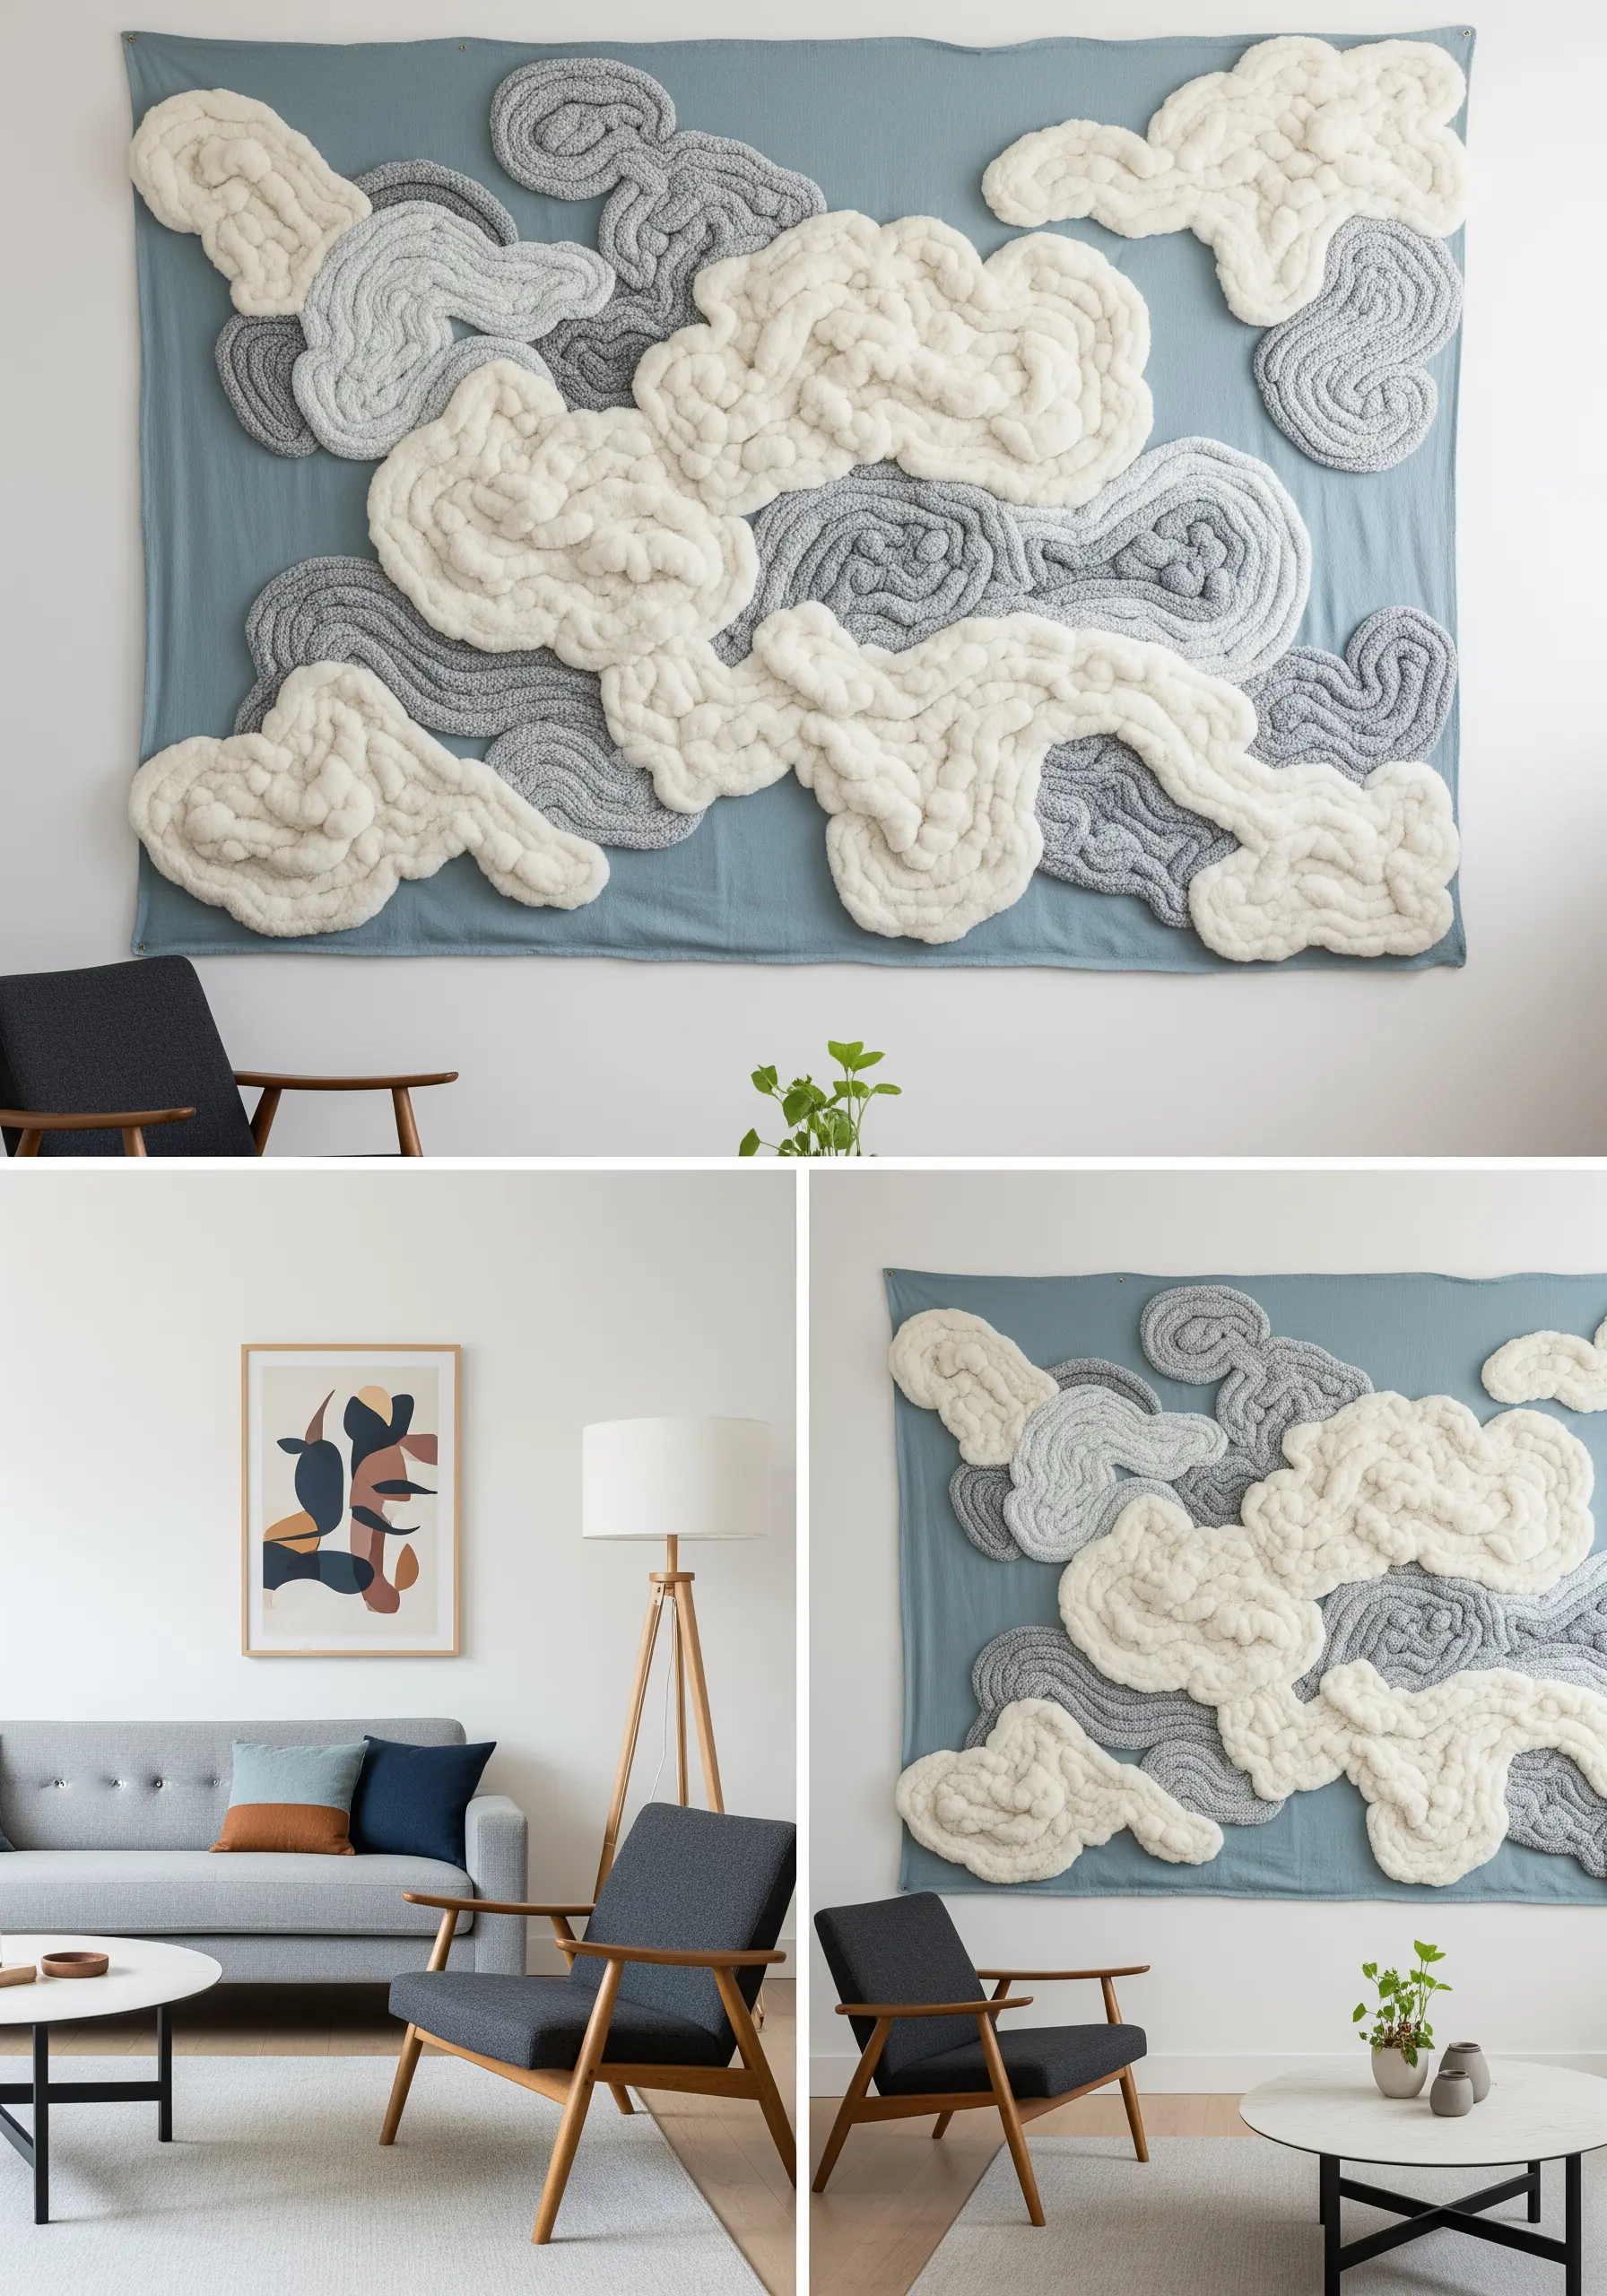
Create dramatic, super-textured clouds by moving beyond standard embroidery floss and embracing thick, chunky yarn or wool roving.
This technique is called couching. You’ll lay down the thick yarn on your fabric in swirling cloud patterns, then use a regular needle and a thinner, matching thread to tack it in place with small, invisible stitches.
Layer different shades of white, cream, and gray yarn to create depth and shadow within the clouds.
This method allows you to cover a large area relatively quickly while creating a bold, sculptural piece. The result is one of the most effective textured yarn wall art techniques for modern homes.
16. Define a Mountain Range with Graphic Outlines
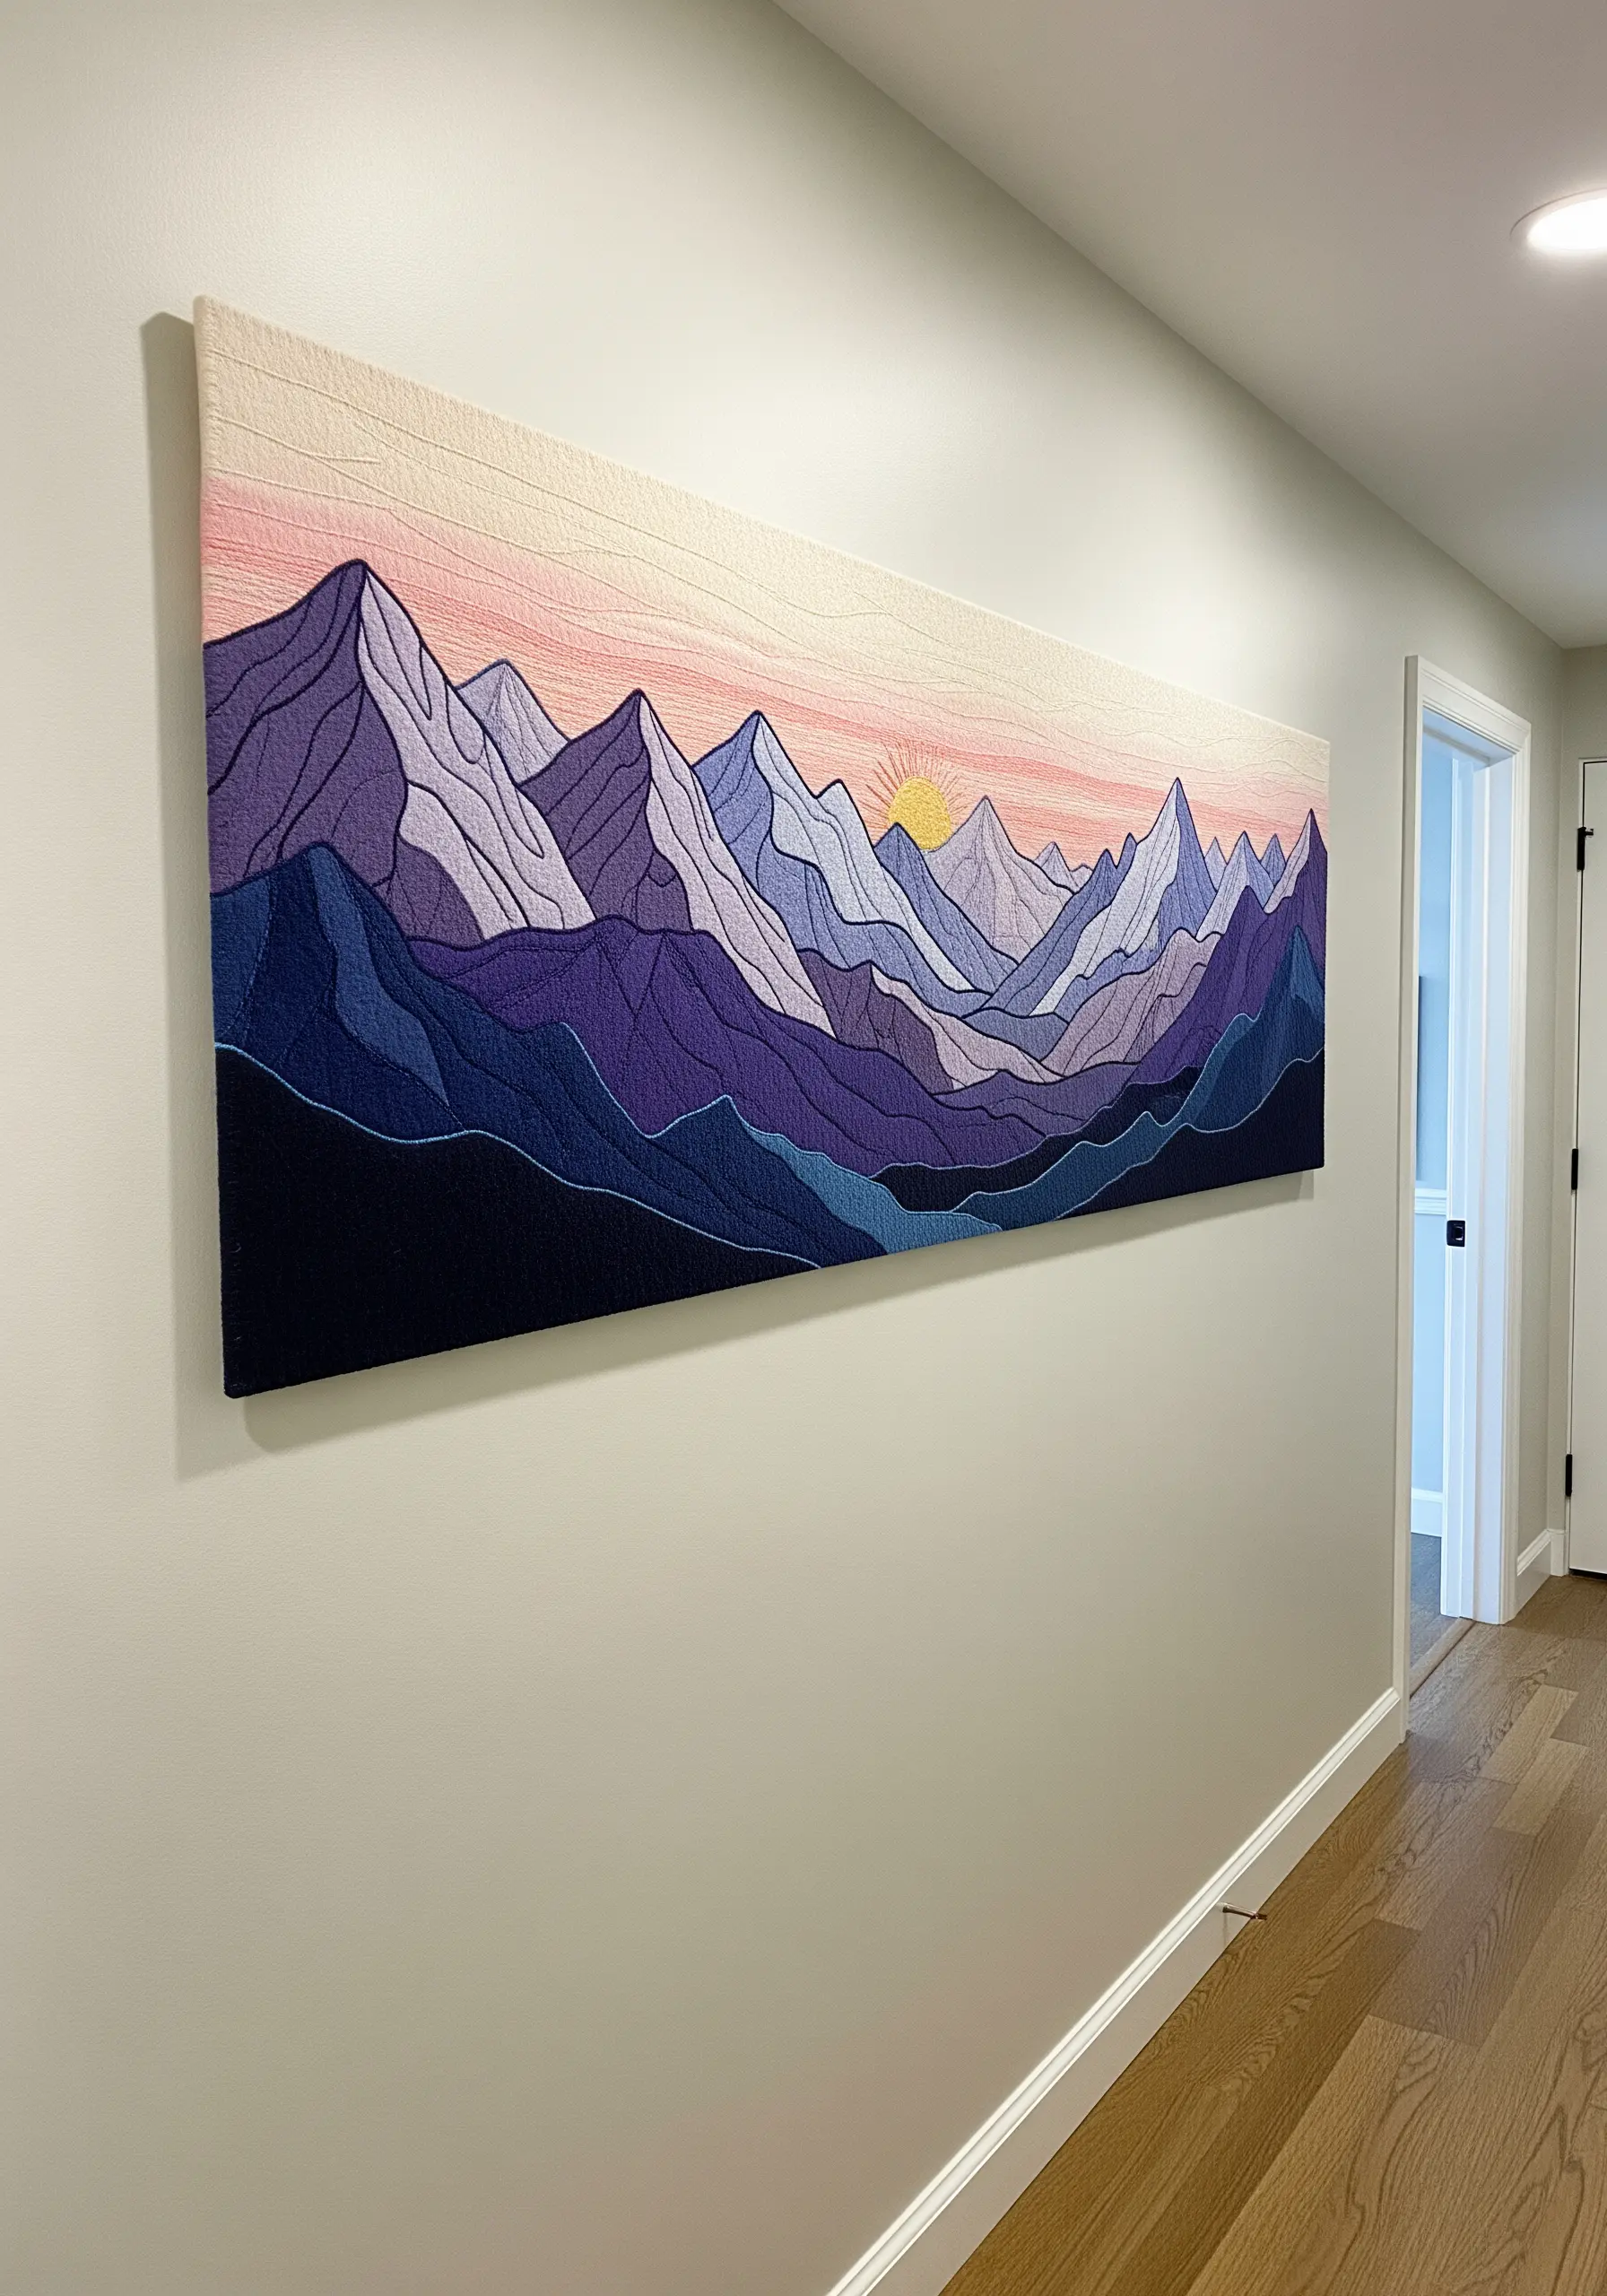
For a modern, stylized mountain landscape, focus on clean lines and bold color blocking rather than realistic blending.
First, outline each section of the mountain range with a dark, contrasting color using a crisp backstitch or split stitch. This creates a graphic, almost stained-glass effect.
Fill in each outlined shape with a smooth, even satin stitch. To ensure your satin stitches are perfectly flat and parallel, you can draw light guide lines with a water-soluble pen before you begin.
A simple gradient in the sky, achieved with long-and-short stitch, provides a soft backdrop that makes the sharp mountain peaks stand out. This approach turns a simple view into a striking piece of landscape embroidery.
17. Design a Cheerful Children’s Ocean Mural
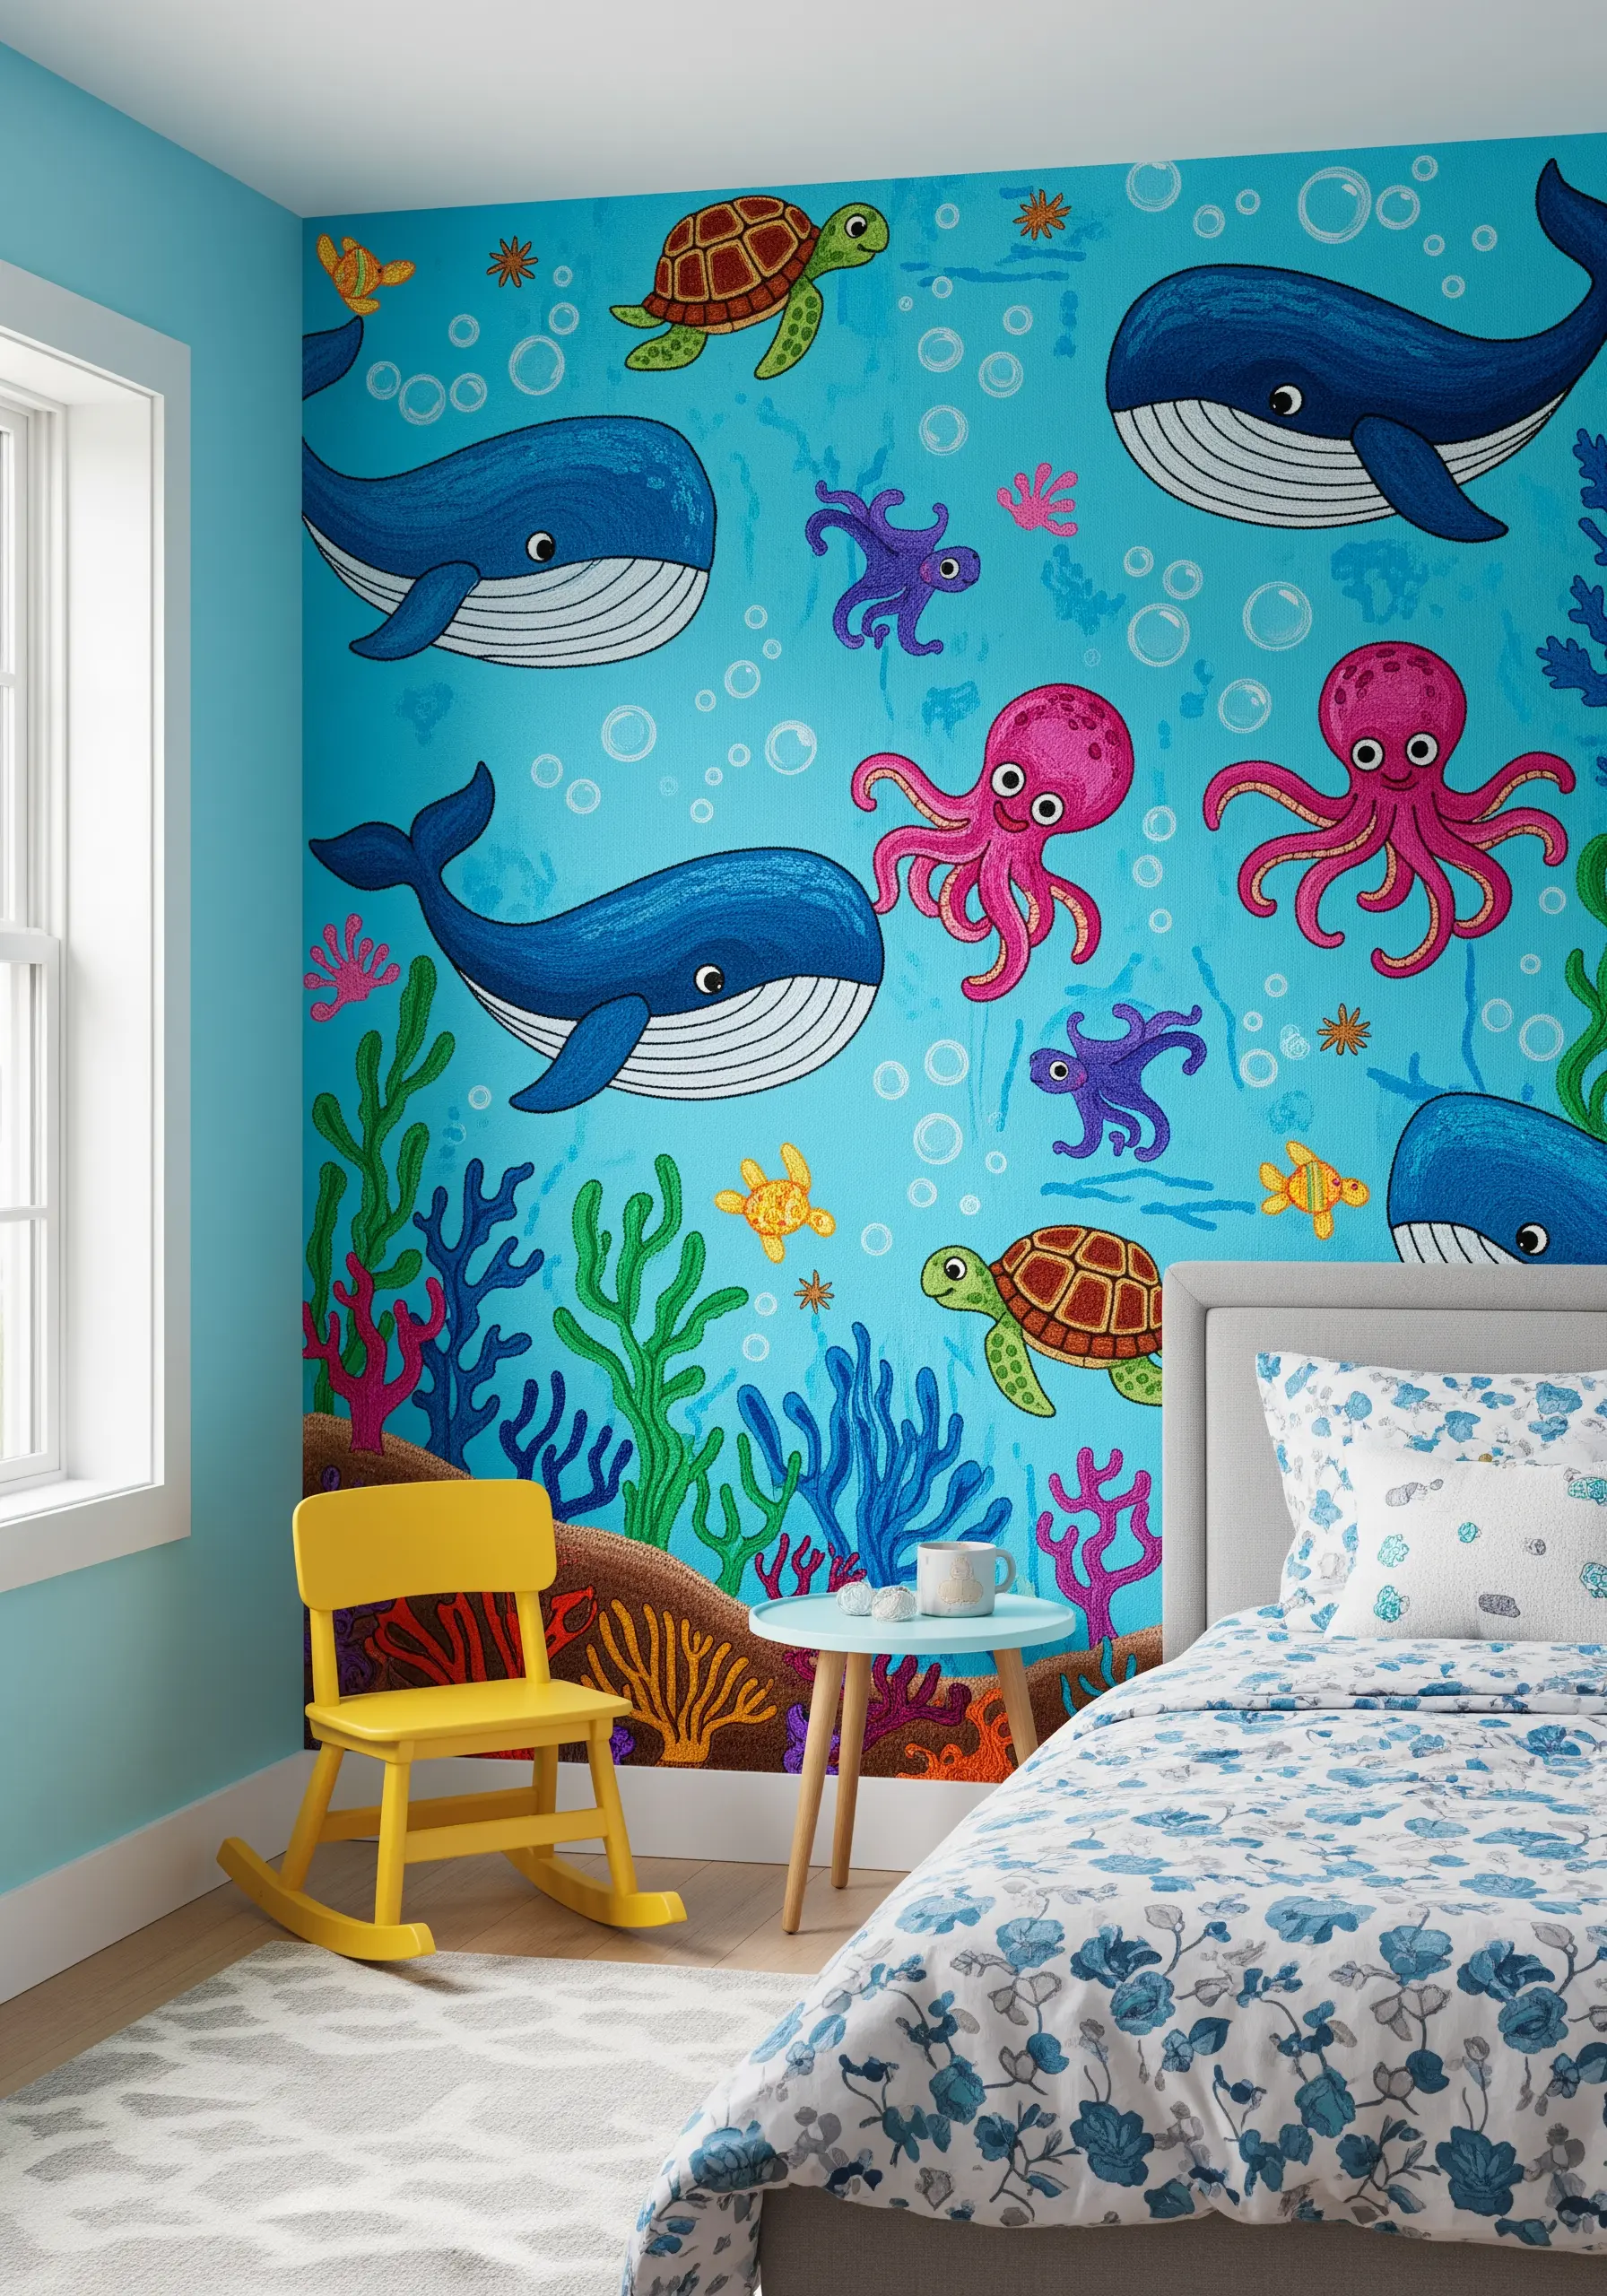
When embroidering for a child’s room, prioritize clear shapes, bright colors, and friendly characters.
Use a simple split stitch or chain stitch for the outlines to keep them bold and easy to see. This helps define each character clearly.
Fill the shapes with a basic satin stitch. Don’t worry about perfect realism; the goal is a joyful, storybook illustration style. Choose a bright, high-contrast color palette to engage a young audience.
For small details like the bubbles, a few well-placed French knots or seed stitches in white are all you need to add a touch of playful energy. You can find many more beginner-friendly animal patterns to expand the scene.
18. Stitch a Pointillist Galaxy
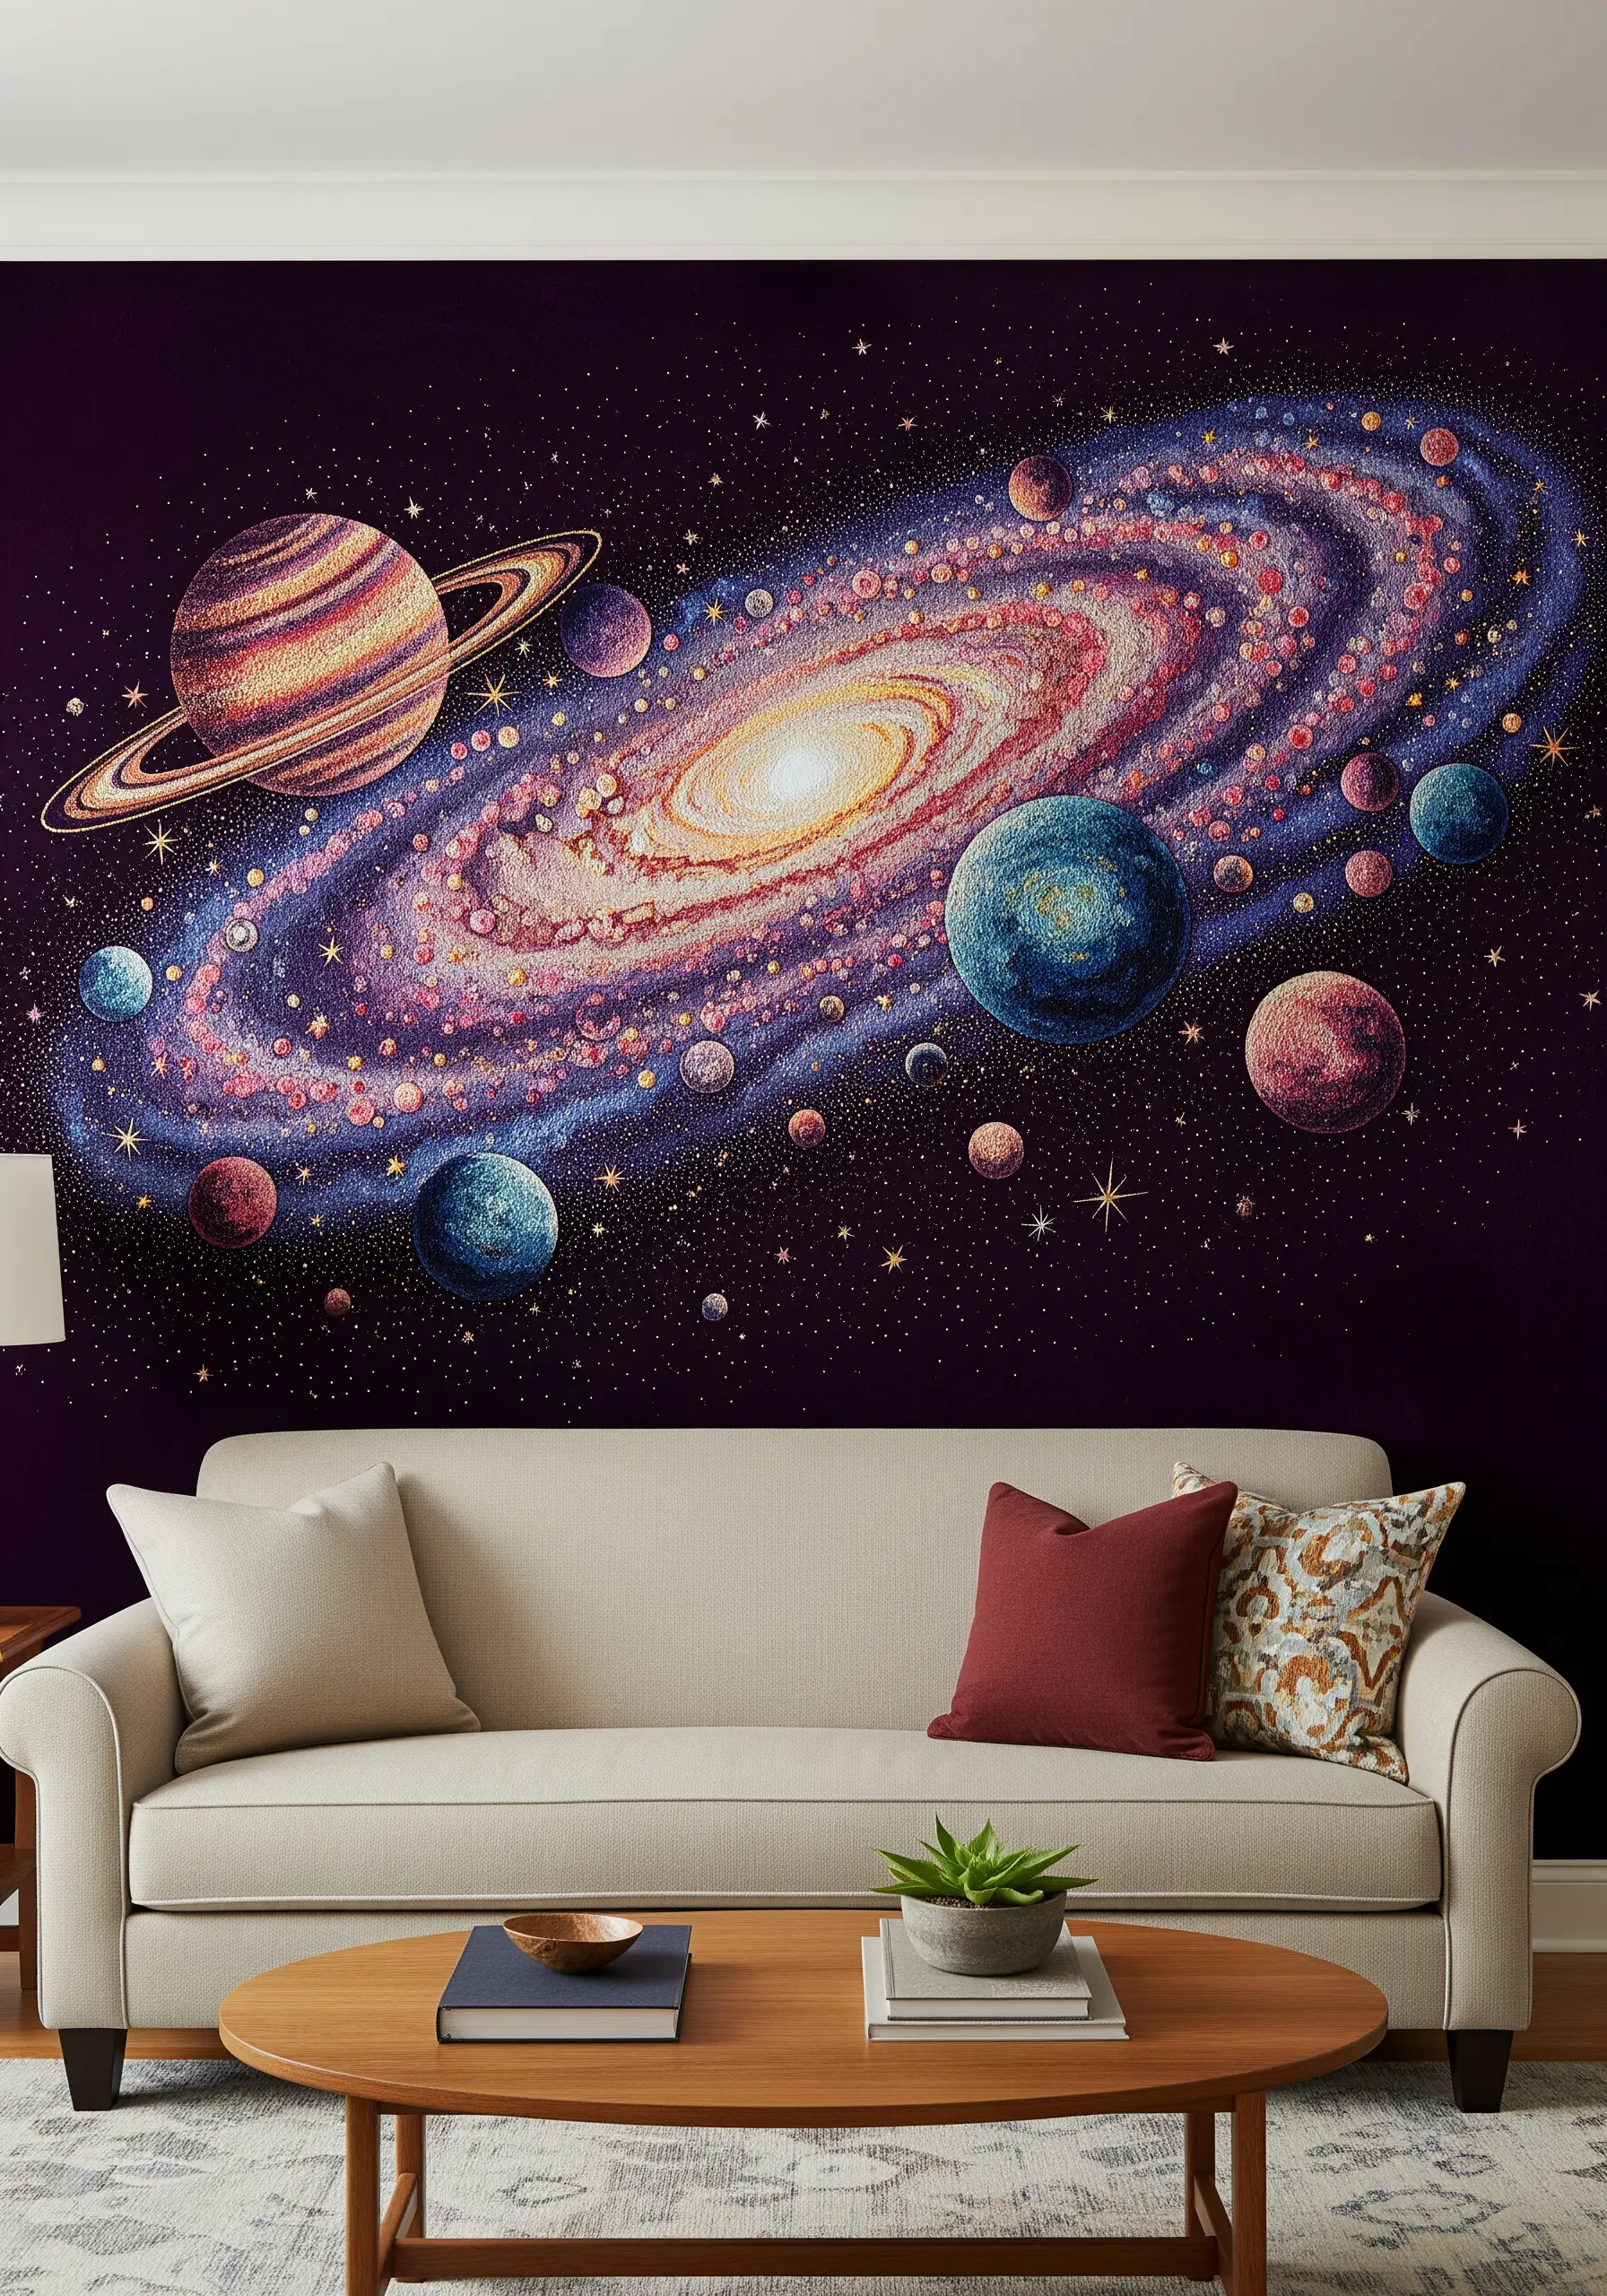
Create the cosmic dust and swirling stars of a galaxy using a pointillist approach with French knots and seed stitches.
Instead of filling large areas with satin stitch, build up the color and texture with thousands of tiny dots. Use a wide palette of pinks, purples, blues, and golds.
Work in swirling patterns, clustering the knots more densely in brighter areas and spacing them out in the darker voids of space.
For the planets, you can use a smooth satin stitch to contrast with the knot-filled background. This mix of textures will make them stand out as solid bodies within the ethereal nebula. It’s a perfect project for astrology lovers’ bedrooms.
19. Achieve Serenity with Minimalist Bamboo
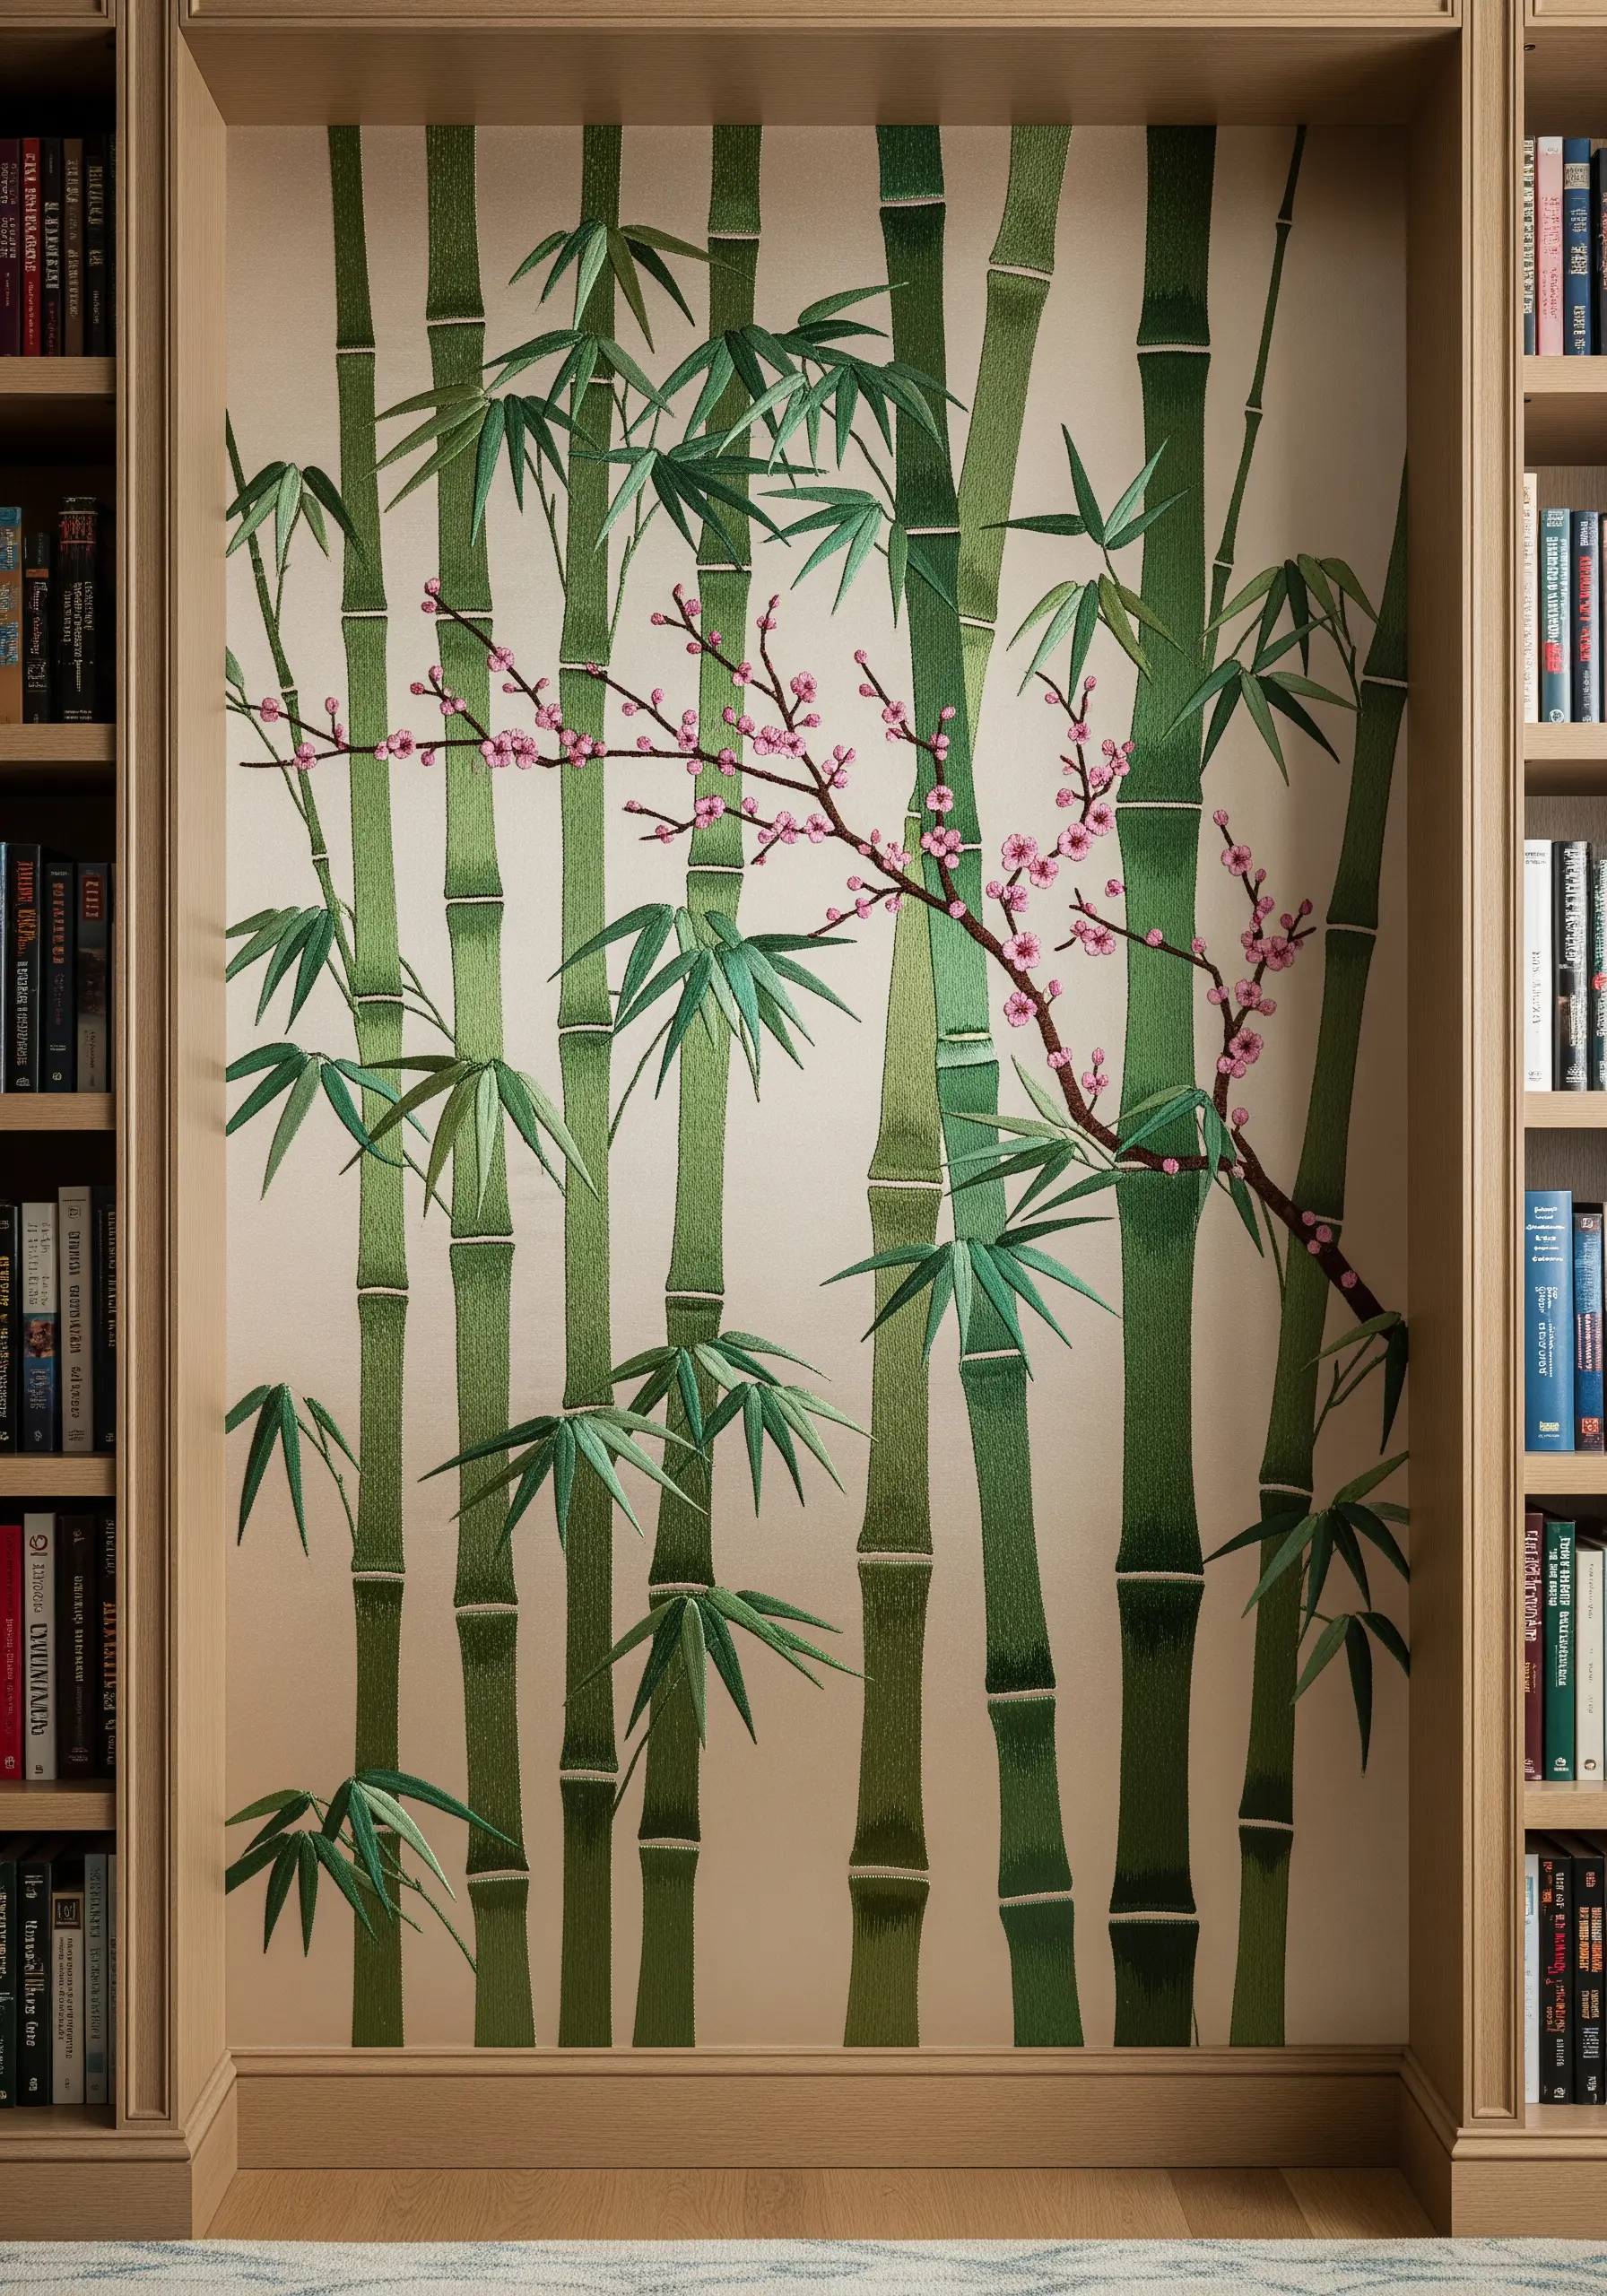
This design is an exercise in restraint and precision, capturing the essence of bamboo with minimal, elegant stitches.
For the bamboo stalks, use a wide, flat satin stitch in several shades of green to create subtle shading and a sense of roundness. The key is to keep your stitches perfectly parallel and even.
The small horizontal lines that segment the bamboo can be added with a single, contrasting straight stitch. This simple detail is crucial for realism.
The leaves are created with the fishbone stitch, which automatically forms a central vein and gives them a delicate, natural shape. This project is a great way to practice plant silhouette embroidery.
20. Recreate a Masterpiece with Thread
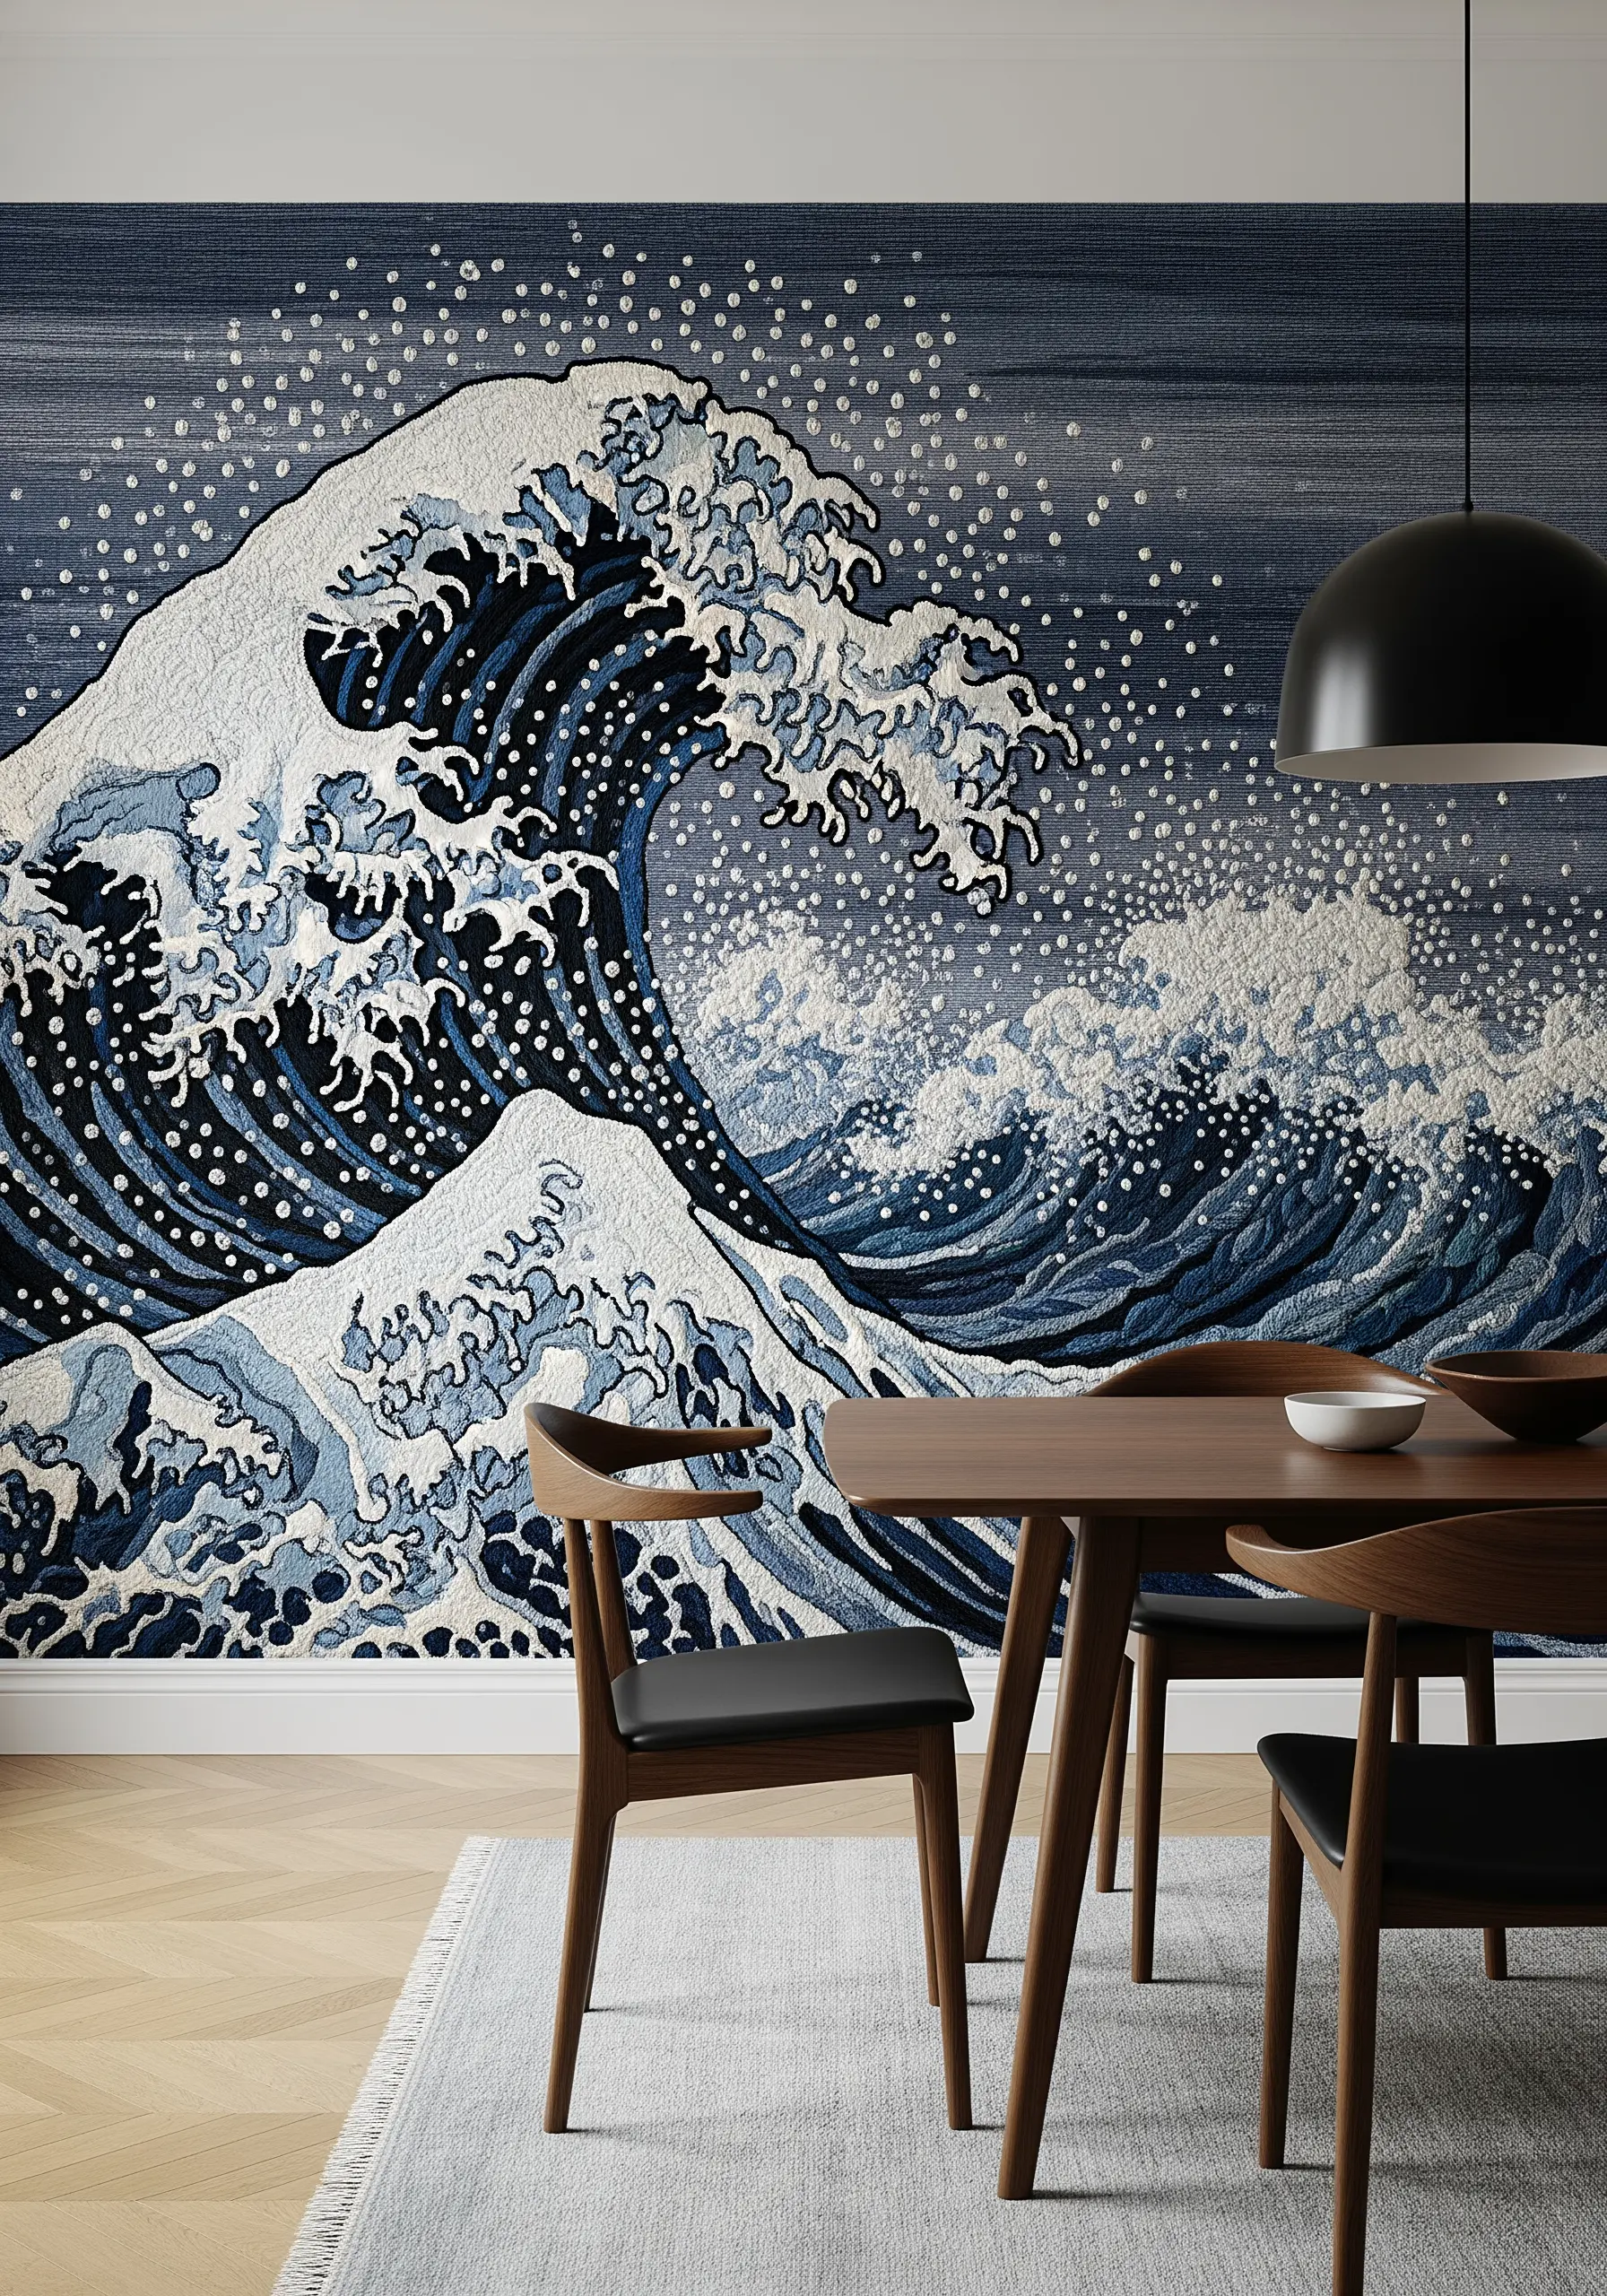
Translating an iconic work of art like Hokusai’s “The Great Wave” into embroidery requires a focus on texture and line quality.
The white sea foam is the most important textural element. Build it up with dense layers of French knots, turkey work, and loop stitches to create a chaotic, frothy energy.
For the deep blues of the wave, use a directional satin stitch or long-and-short stitch, ensuring your stitches follow the powerful curves of the water.
The distant spray can be represented by scattered seed stitches or single French knots in white and light blue. This is one of those contemporary thread art projects that pays homage to the past.
21. Craft a Dreamscape with 3D Cloud Appliqués
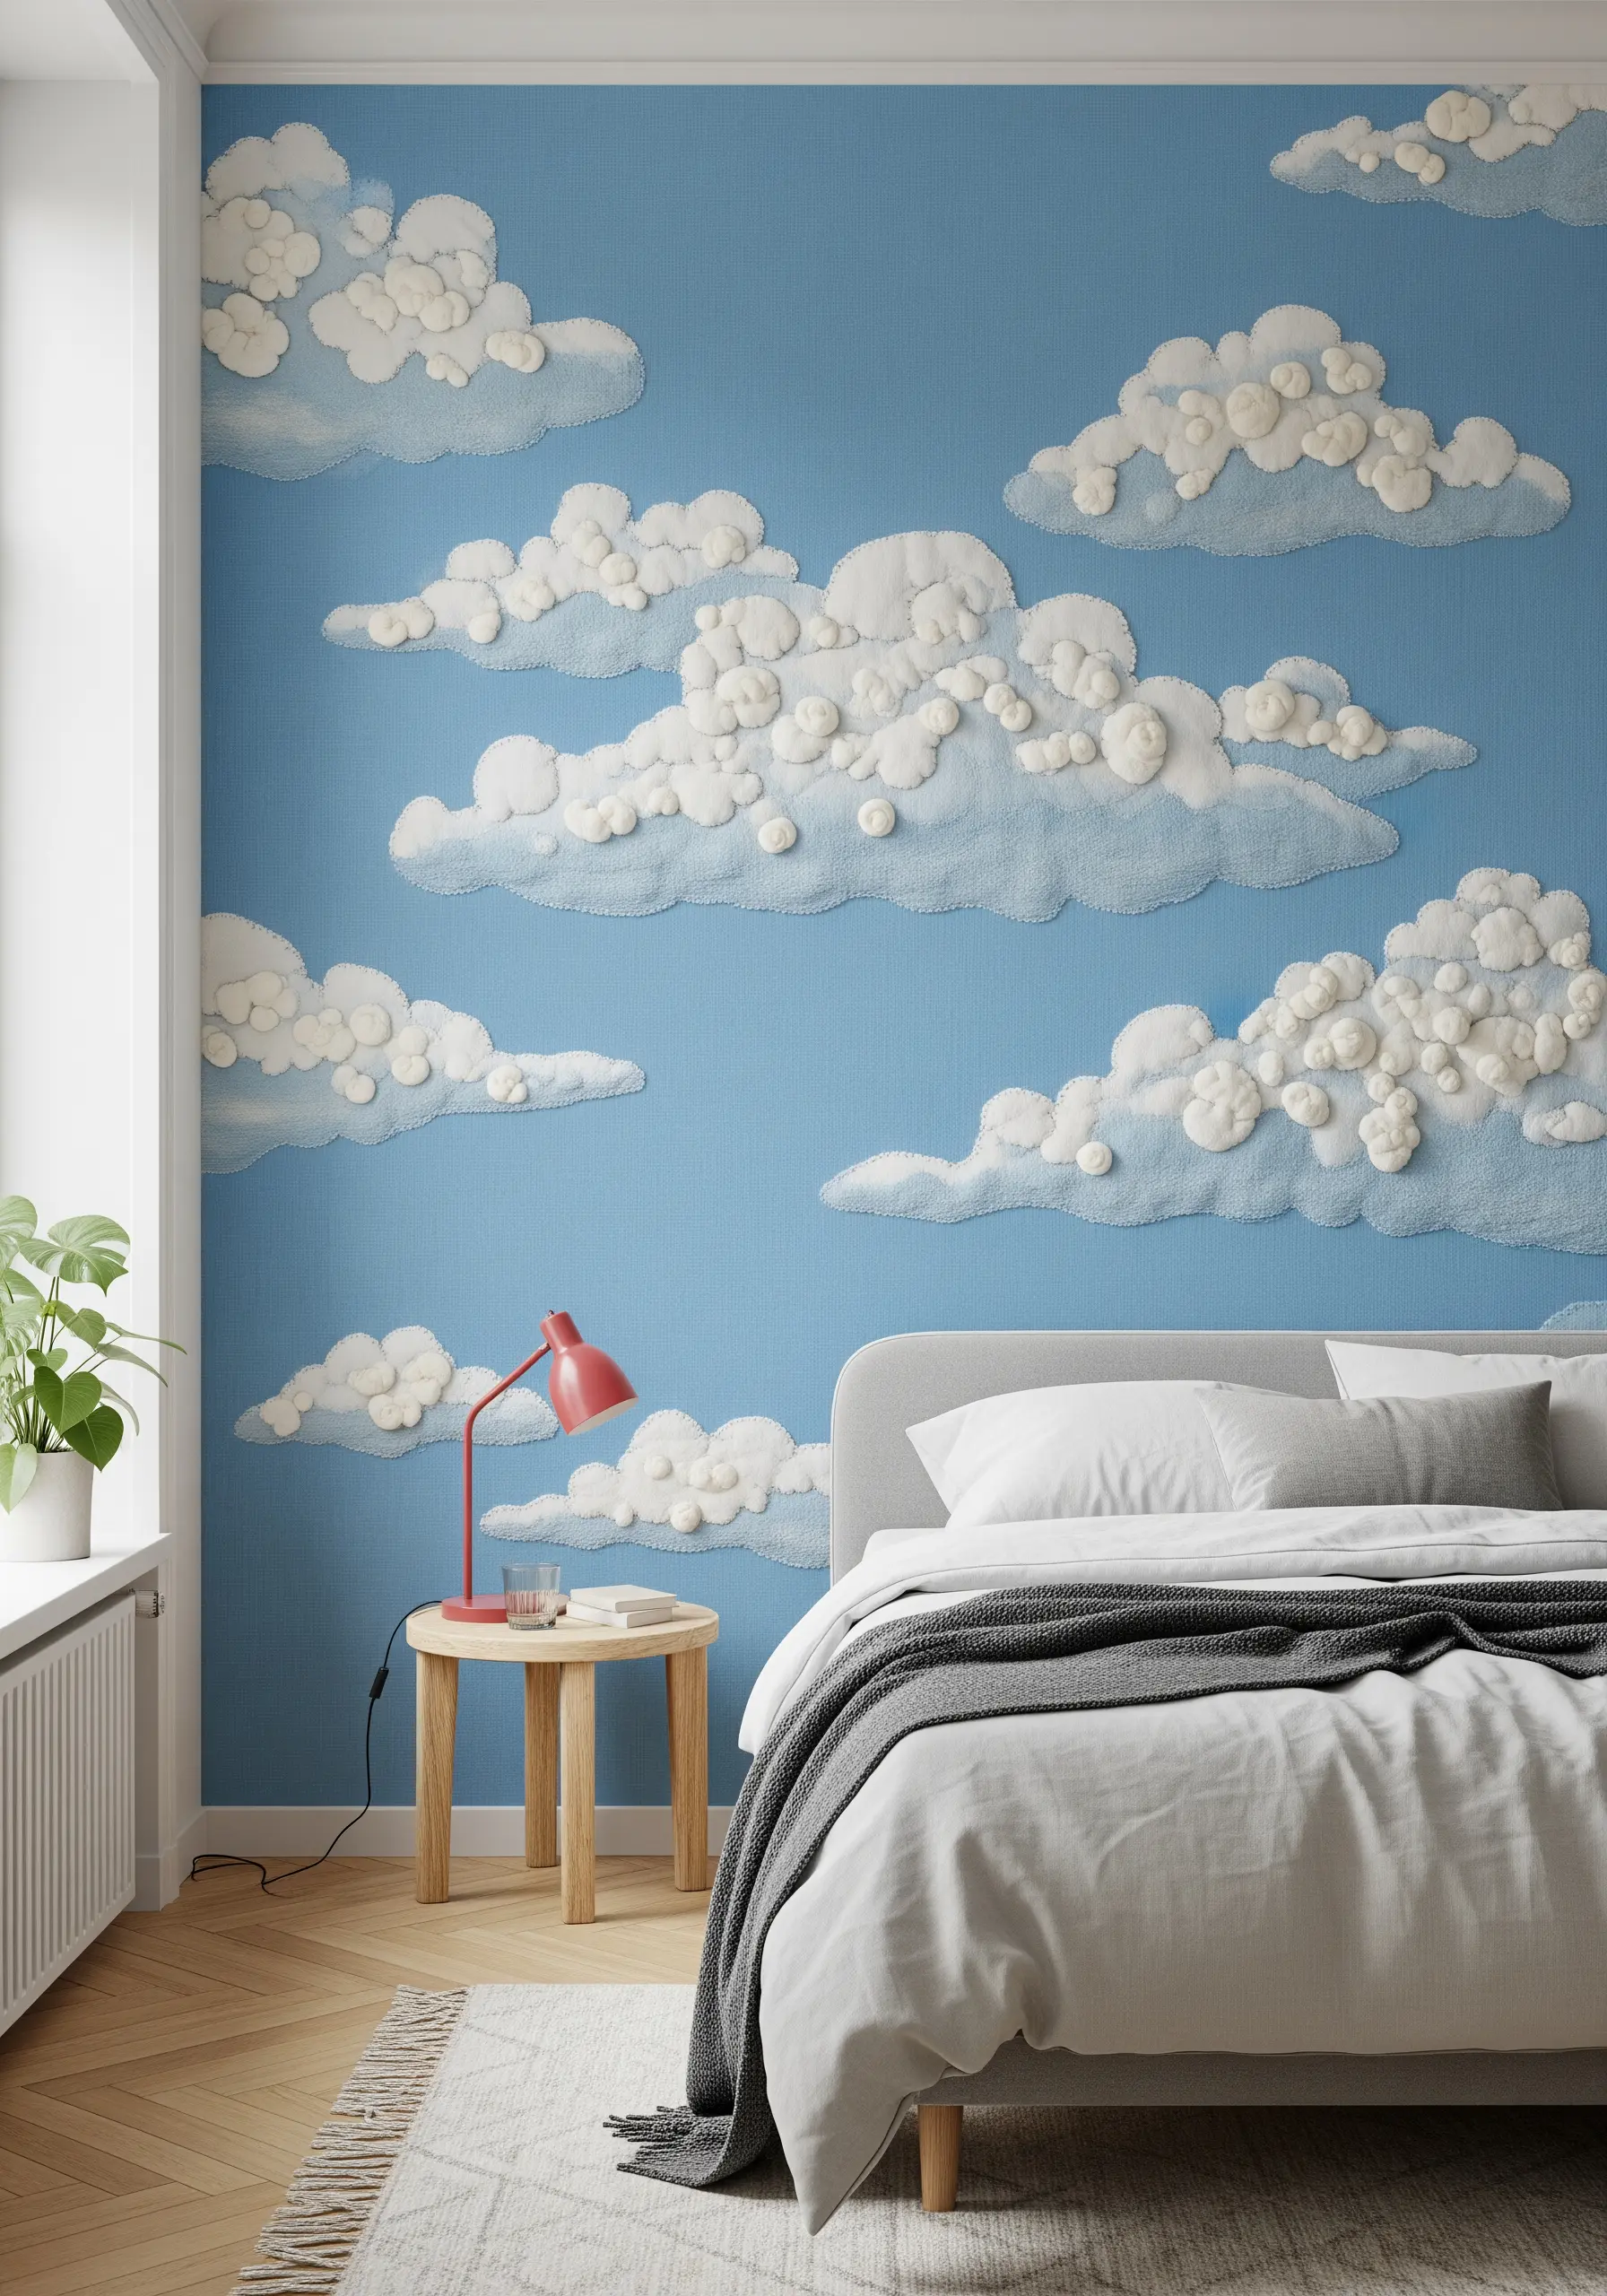
Create a soft, dreamy bedroom wall by treating clouds as individual, plush sculptures attached to the fabric.
Create each cloud separately. Cut cloud shapes from felt or thick fleece, then cover them with a layer of cotton batting for volume.
Wrap these padded shapes with your final fabric (like a soft linen or cotton) and secure it on the back. Then, cover the surface with a mix of French knots and seed stitches for a bumpy, cloud-like texture.
Finally, securely stitch these individual 3D appliqués onto your main wall fabric. This technique offers incredible depth and softness, perfect for DIY embroidery projects that transform a room.
22. Frame a Rustic Scene for a Classic Look
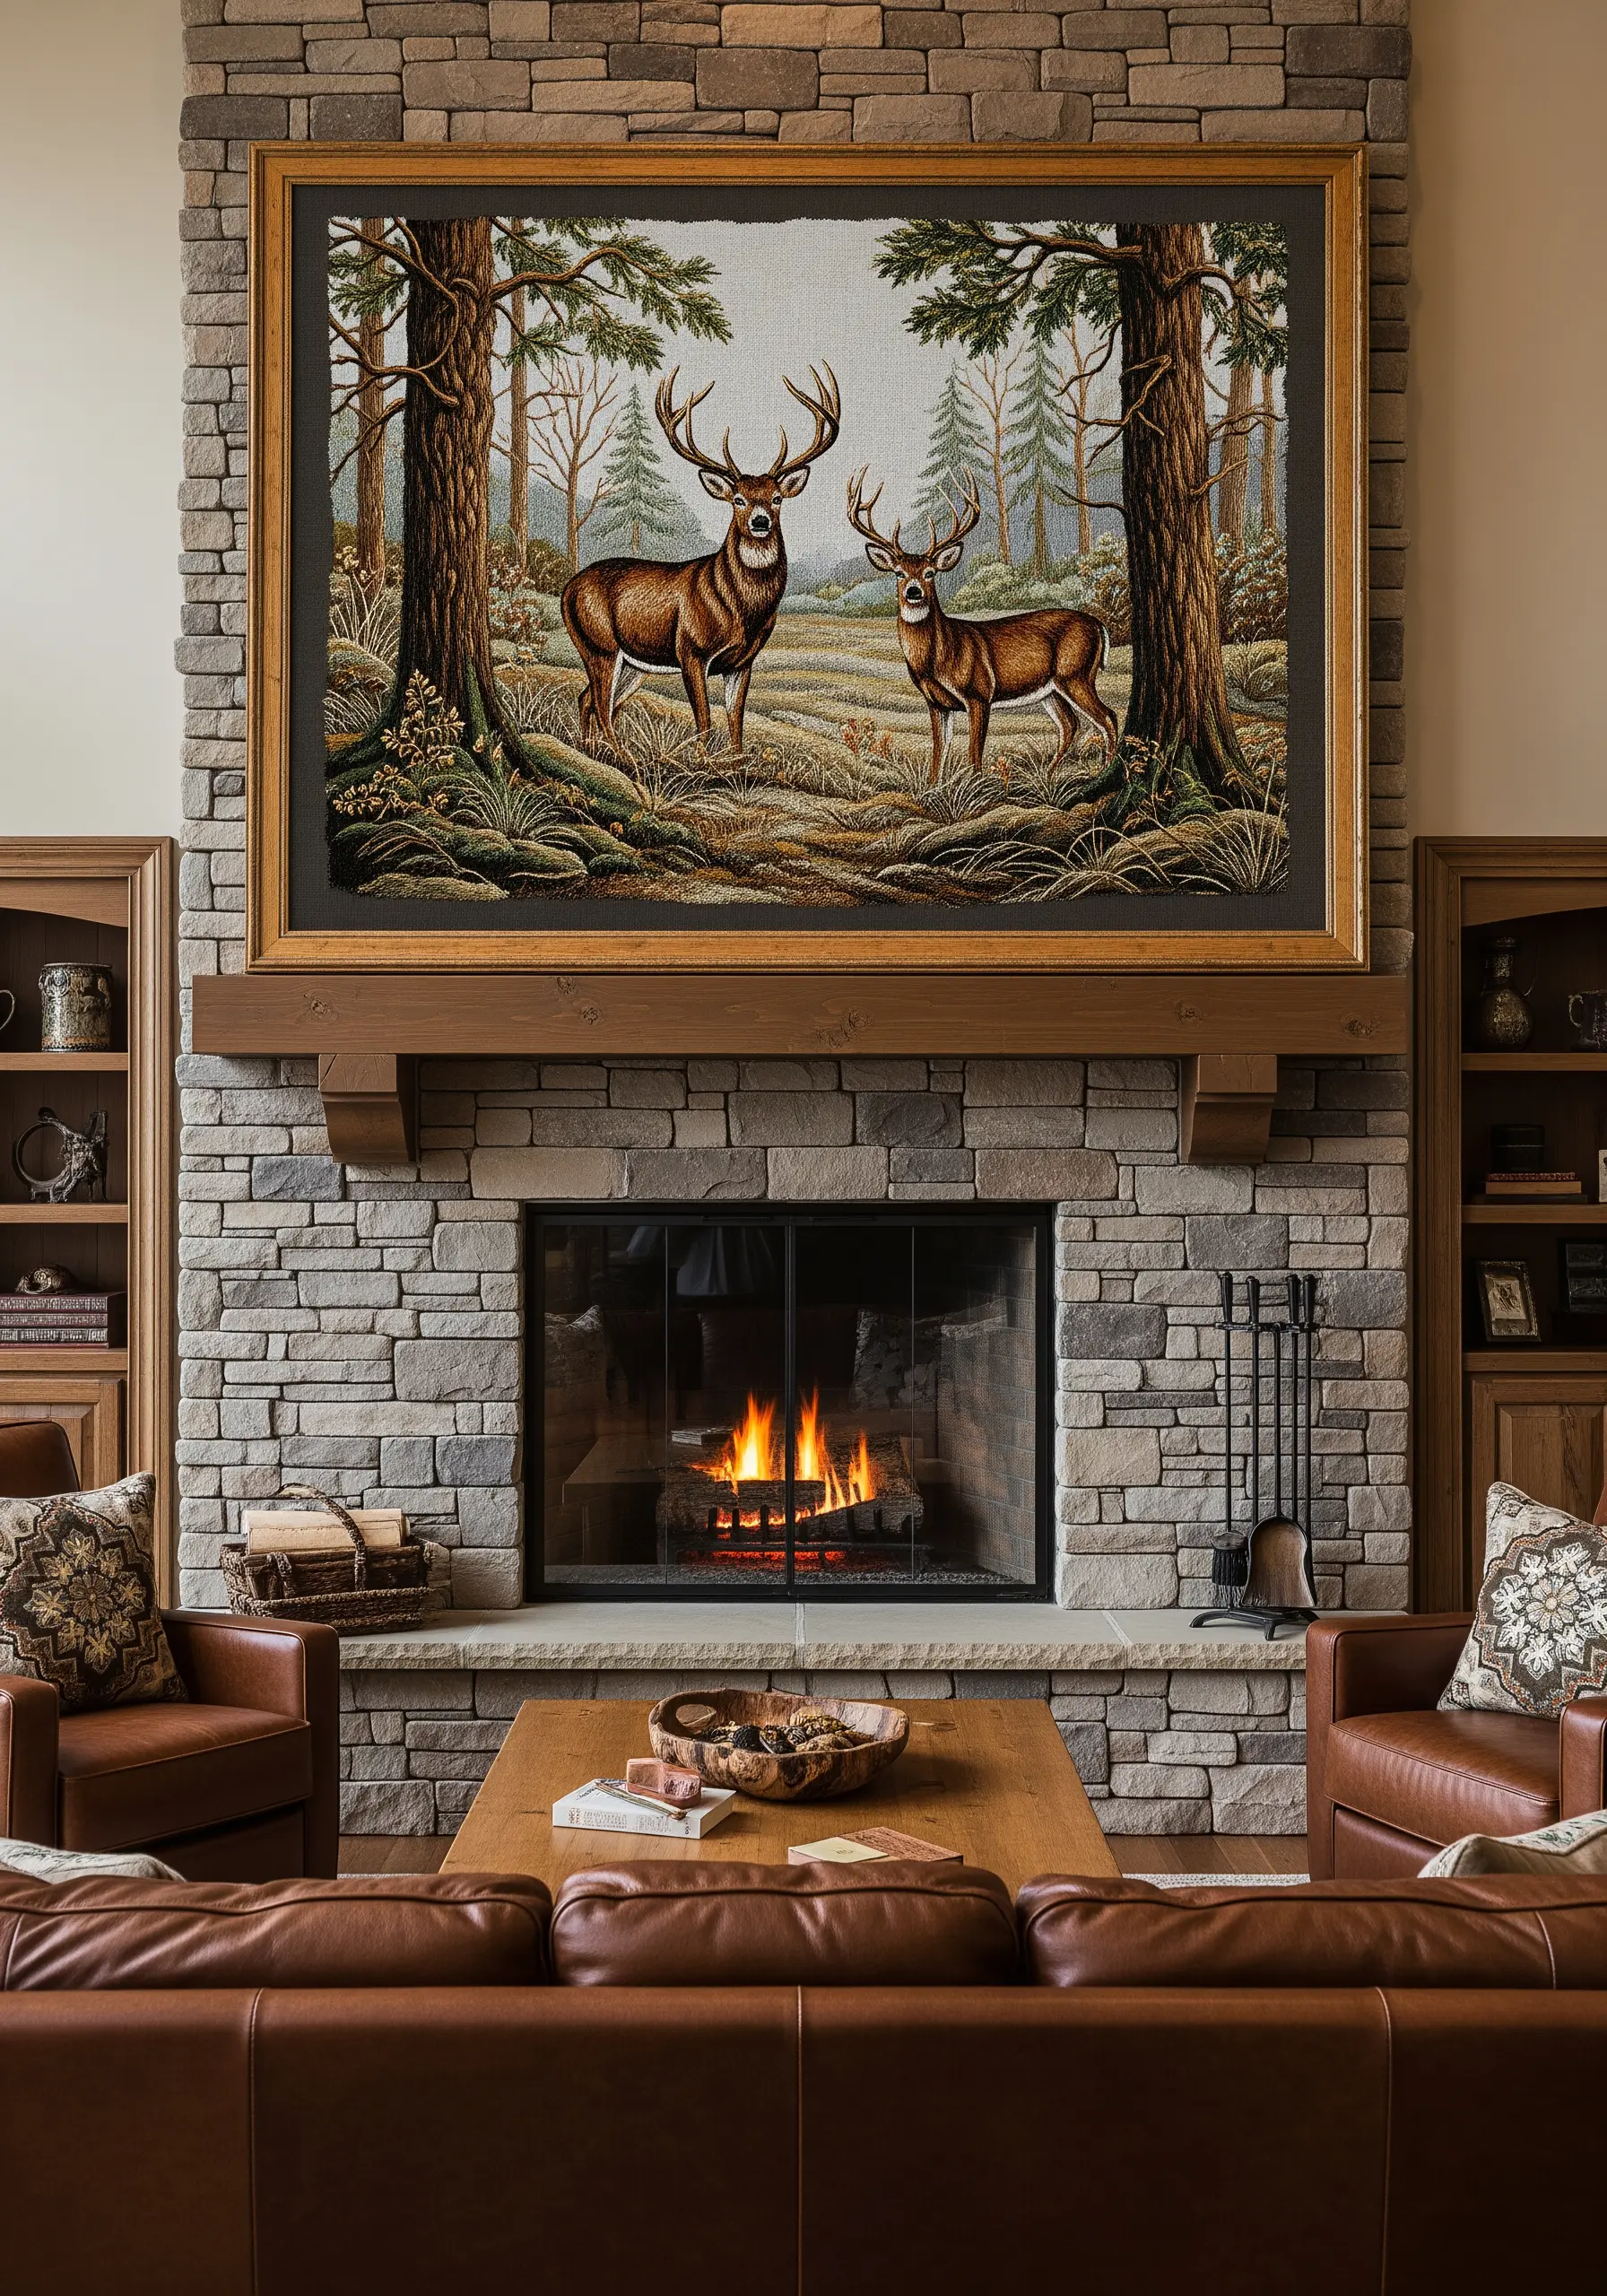
For a traditional, heirloom-quality piece, consider the entire composition, including the frame and its surroundings.
This style of embroidery, often called needlepainting, relies on the long-and-short stitch to create realistic, blended shading on the animals and landscape.
To achieve the fine detail in the deer’s fur, use only a single strand of floss and pay close attention to the direction of your stitches to mimic the way fur grows.
Choosing a heavy, rustic wooden frame complements the woodland theme and elevates the embroidery from a simple craft to a piece of fine art. The result is hand-stitched framed embroidery that looks truly professional.
23. Embrace Negative Space with a Minimalist Motif
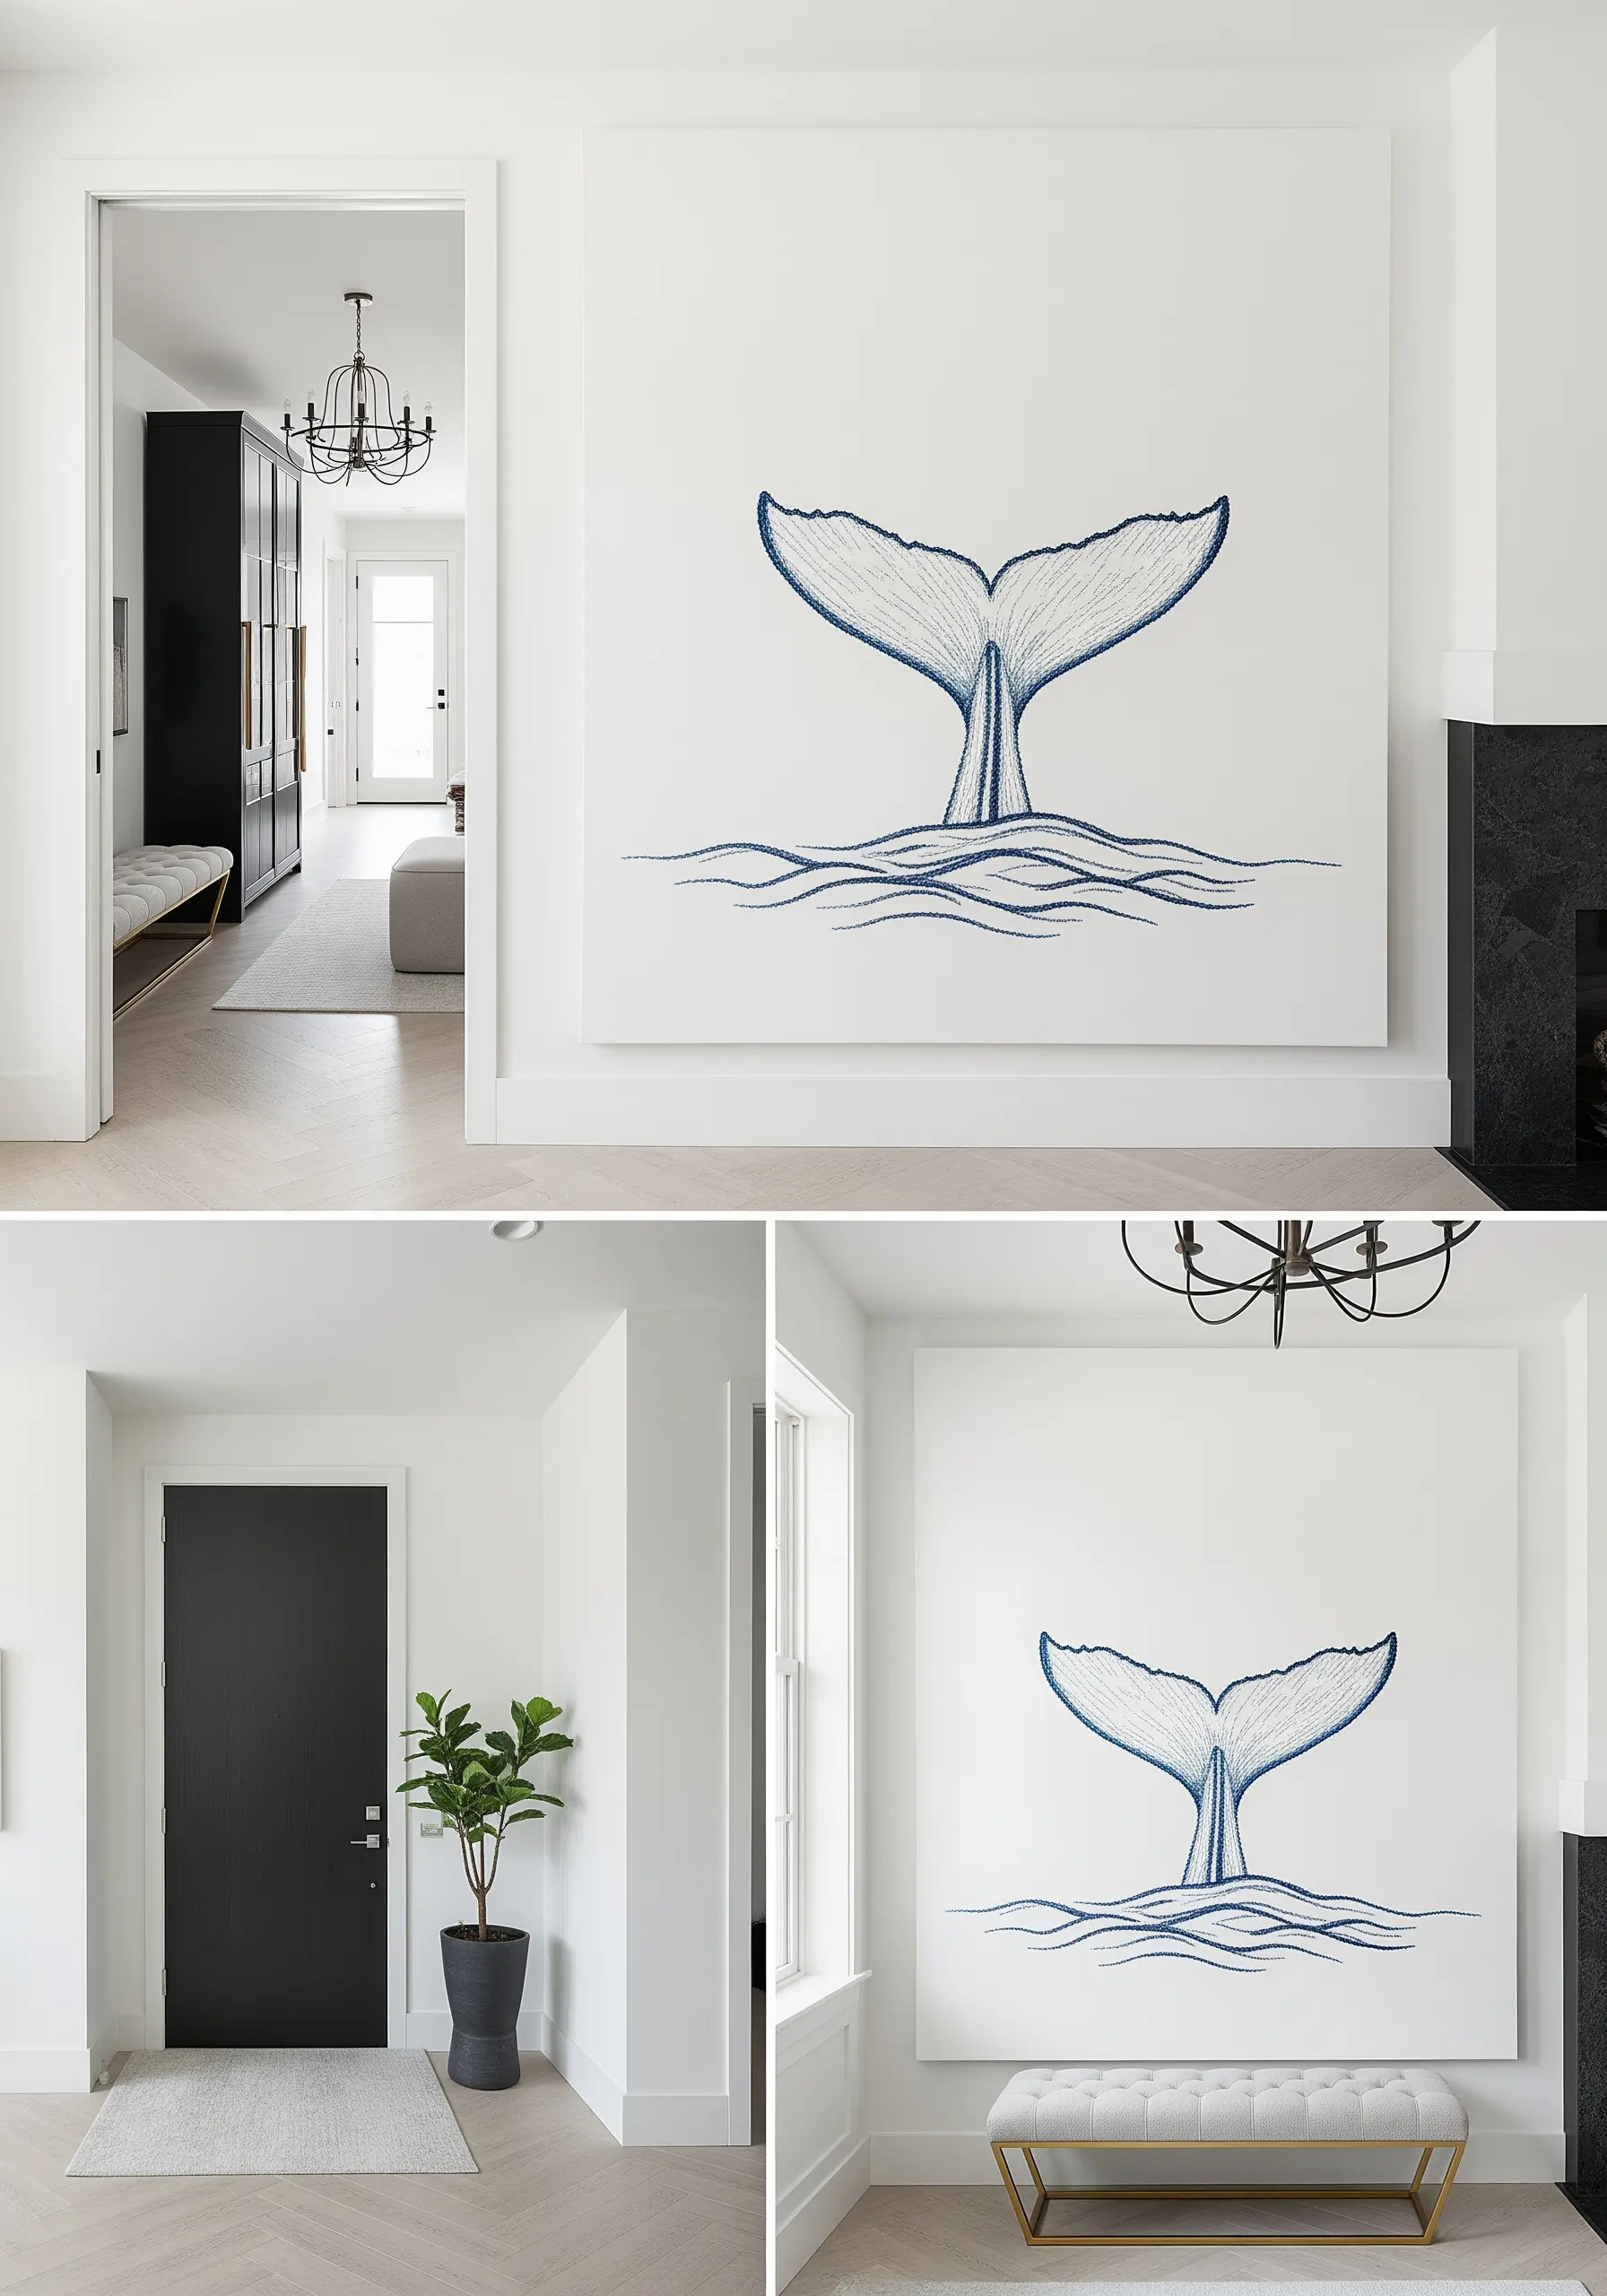
Sometimes, the most powerful statement comes from what you choose *not* to stitch. This minimalist whale tail is a masterclass in using negative space.
The design is composed entirely of seed stitches. For the denser, darker areas, place the stitches very close together. For the lighter, more transparent parts of the water, space them further apart.
This variation in stitch density creates a beautiful sense-of-shading and form without any outlines or color changes.
Mounting the finished piece on a large, gallery-wrapped canvas emphasizes the clean, modern aesthetic. This is how you create minimal thread sketch concepts that feel luxurious.
24. Combine Graphic Lines and Celestial Details
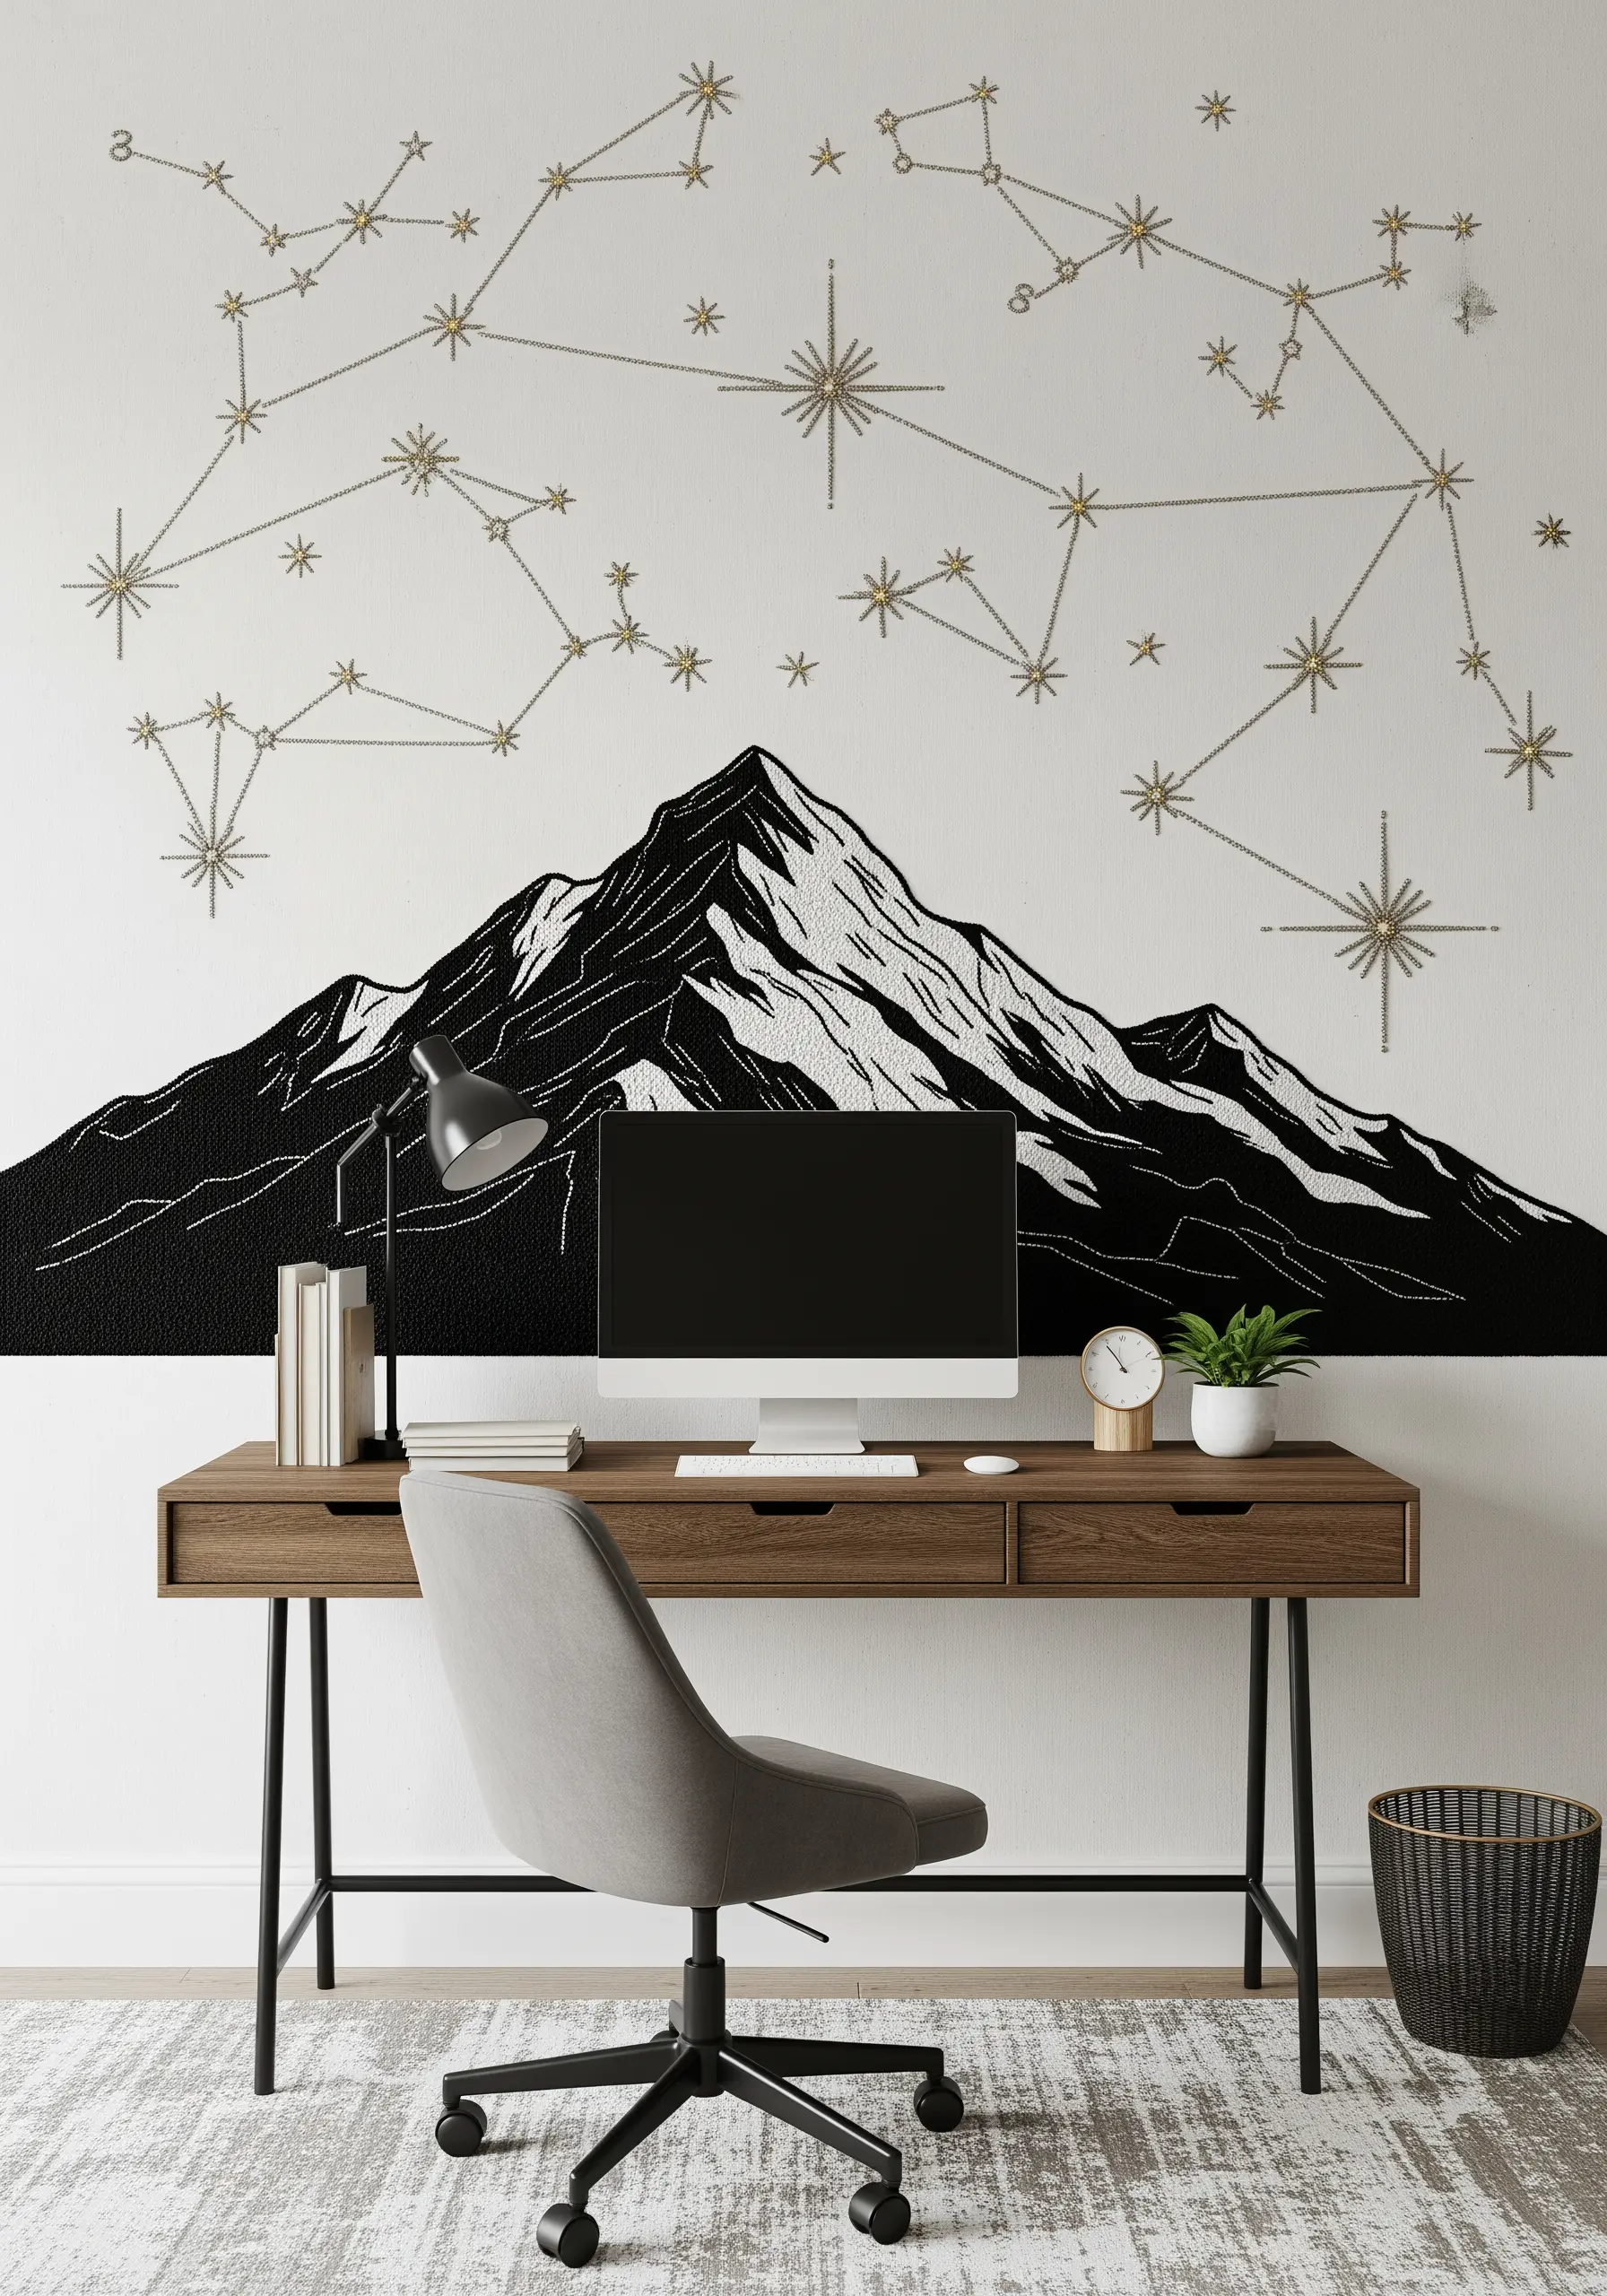
Create a stunning focal point above a desk by merging two distinct styles: a bold, graphic mountain and delicate, shimmering constellations.
For the mountain, use a dense, black satin stitch to create a strong, solid silhouette. Use white thread to add sharp, angular lines for snow, creating high contrast.
The constellations above should be stitched with a fine metallic gold or silver thread. Use simple straight stitches to connect the stars, which can be represented by small star stitches or French knots.
This combination of bold graphic shapes and delicate metallic lines makes for stunning minimal celestial embroidery wall designs.
25. Stitch a Detailed Botanical Undergrowth
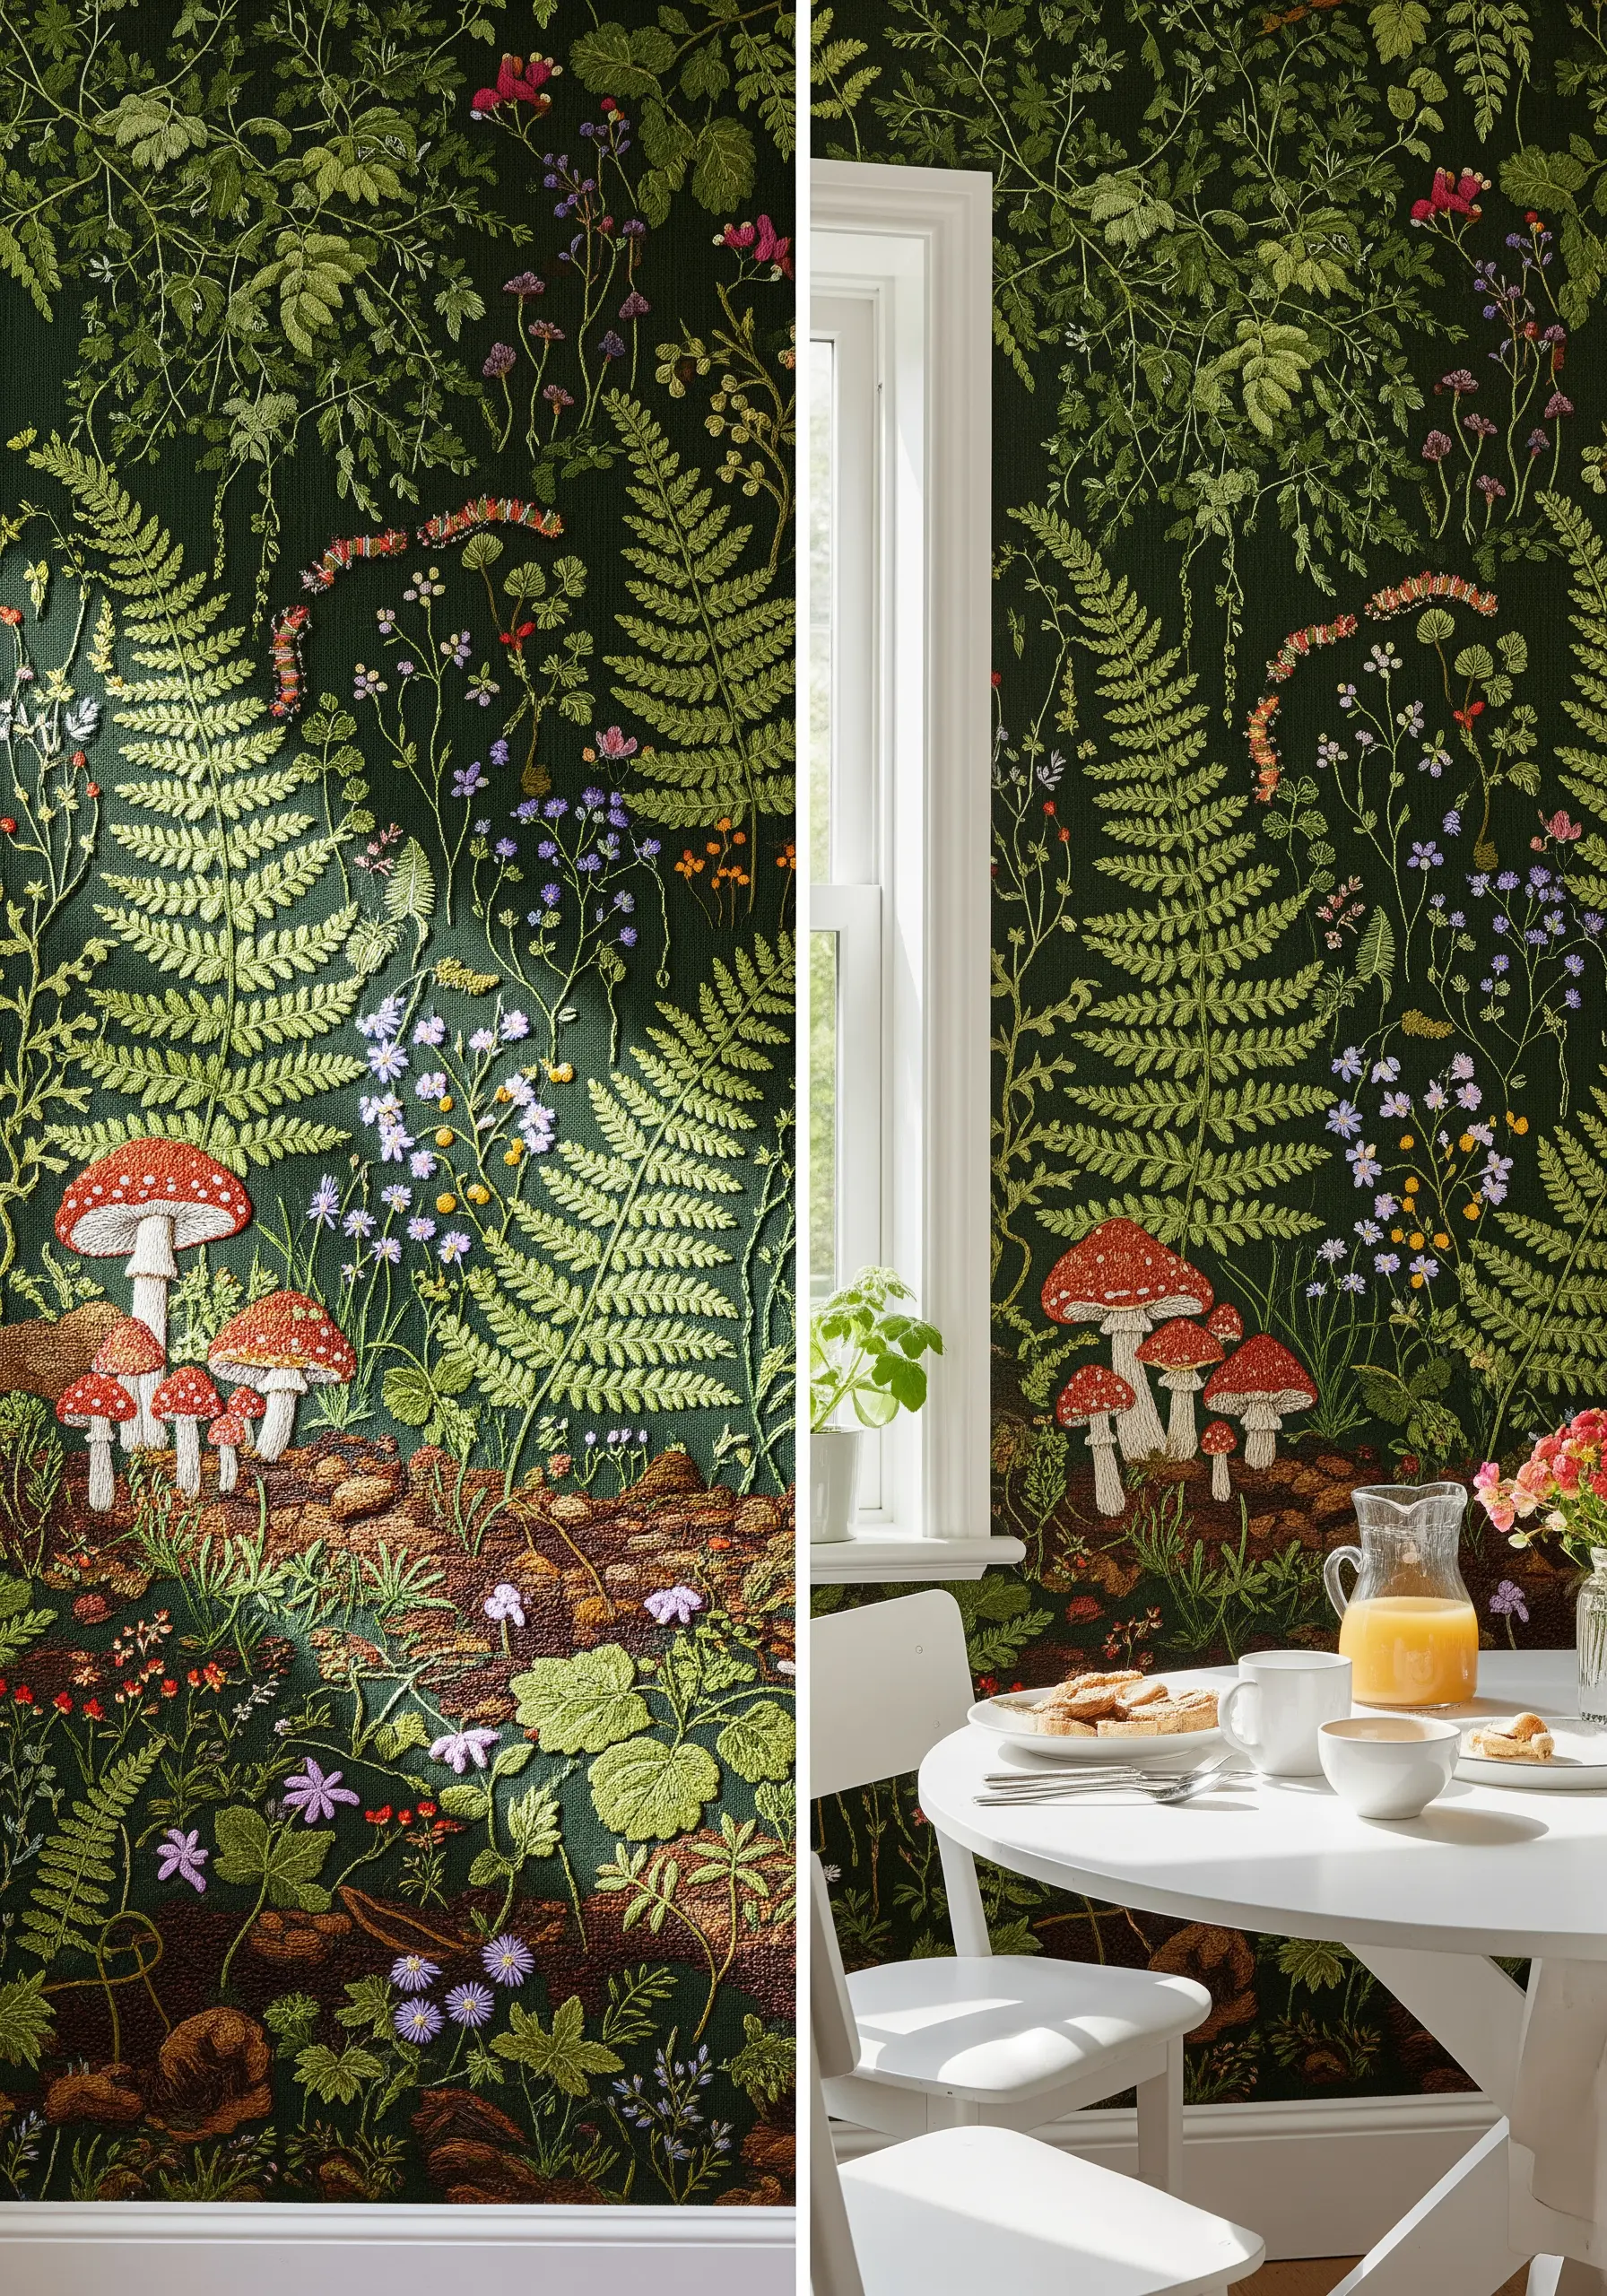
Capture the rich, detailed world of the forest floor by focusing on a variety of stitch techniques for different plants.
For the ferns, use a fishbone stitch or fly stitch for each frond. This creates a beautifully textured, feathery effect that looks incredibly lifelike.
The mushrooms can be brought to life with a padded satin stitch for the caps, giving them a rounded, 3D shape. A few French knots can be used for the spots.
Fill the surrounding space with a mix of tiny lazy daisy stitches for flowers and straight stitches for grass, using a deep, dark background to make the colors and textures pop. It’s a perfect way to try out fern and ivy embroidery ideas.
26. Explore Abstract Flow with Metallic Threads

Create a sense of fluid, luxurious movement by combining organic shapes with the shimmer of metallic thread.
This triptych uses long, flowing backstitches or whipped backstitches to create the continuous, curving lines. Using a metallic gold thread instantly adds a touch of elegance and catches the light beautifully.
The colored sections are filled with satin stitch. To maintain the sense of flow, ensure your satin stitches follow the curve of the shapes rather than being strictly horizontal or vertical.
Mounting the work across three separate canvases creates a sophisticated, modern art piece and is a great way to explore abstract thread-based gradients.
27. Paint a Desert Sunset with Warm Tones
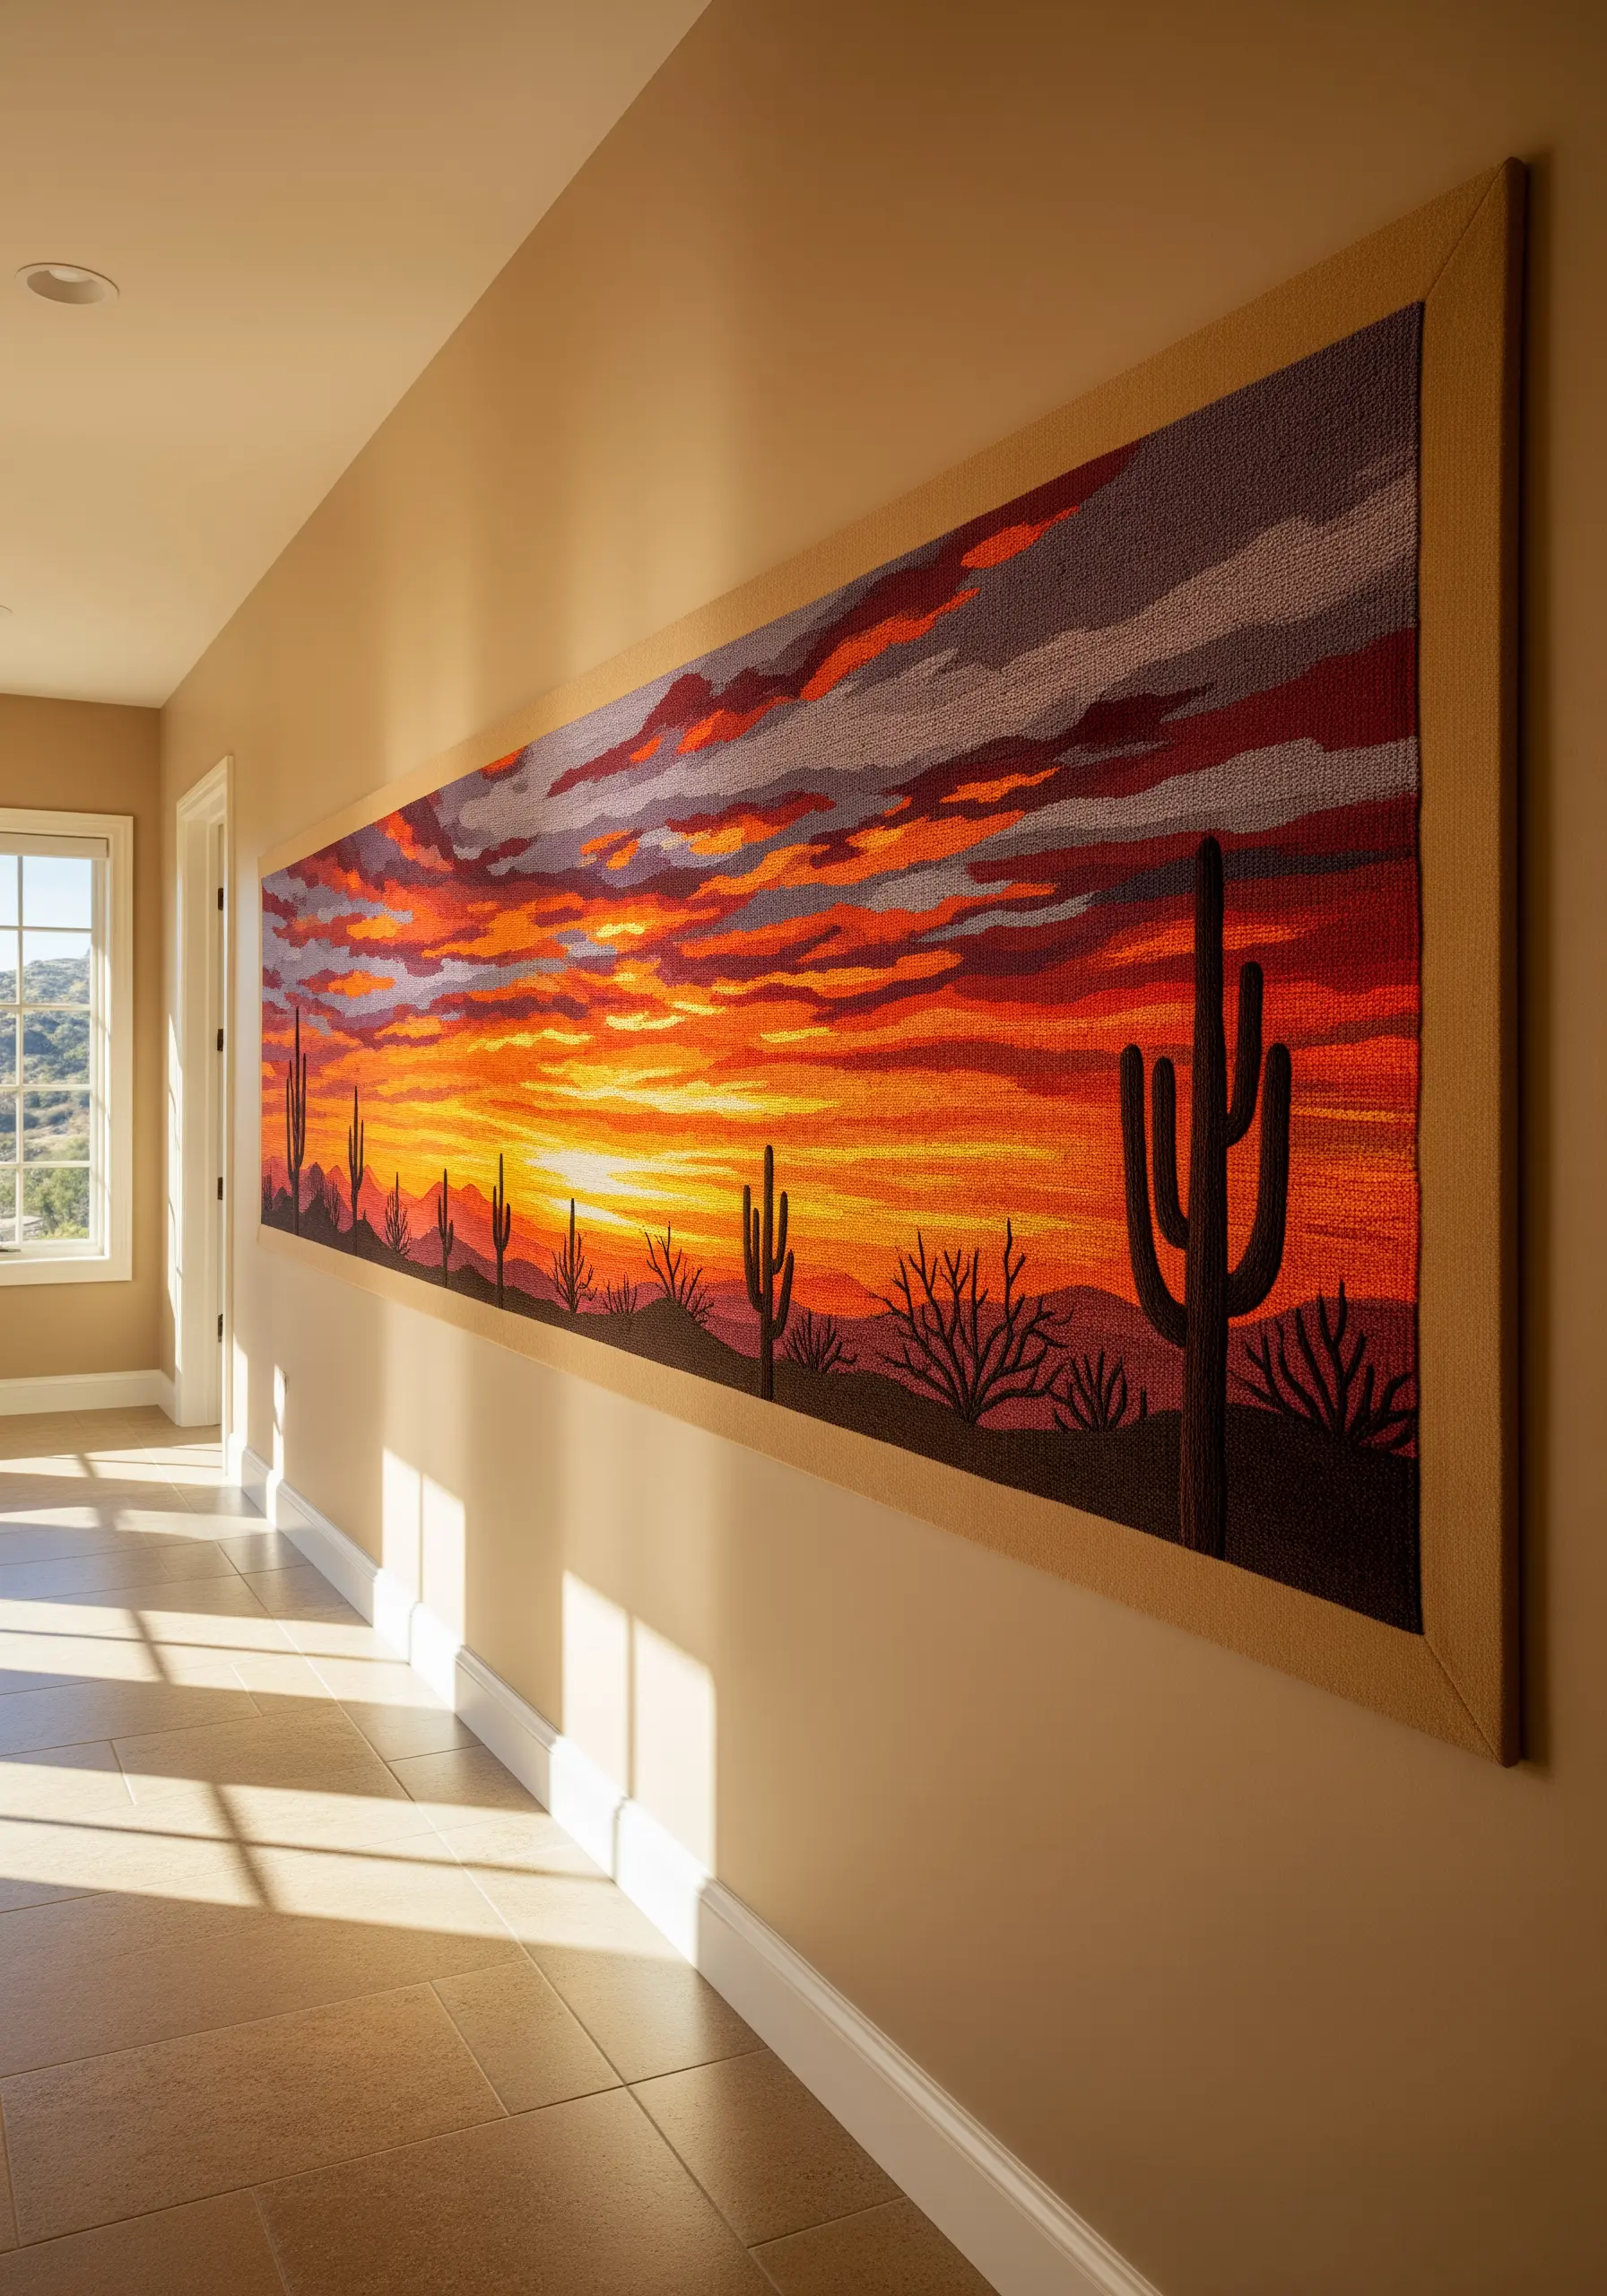
Capture the intense, fiery glow of a desert sunset by using a rich, warm color palette and simple, effective stitch choices.
The sky is the main event. Use the long-and-short stitch to blend a vibrant spectrum of reds, oranges, and purples. Don’t be afraid of high contrast here; it’s what gives the sunset its drama.
For the saguaro cacti and other desert plants, a simple satin stitch silhouette in a dark, near-black color is all you need. Their sharp forms will stand out dramatically against the vibrant sky.
This focus on color blending makes it a perfect project for an earth-tone embroidery wall art collection.
28. Create Delicate Detail with a Weeping Willow
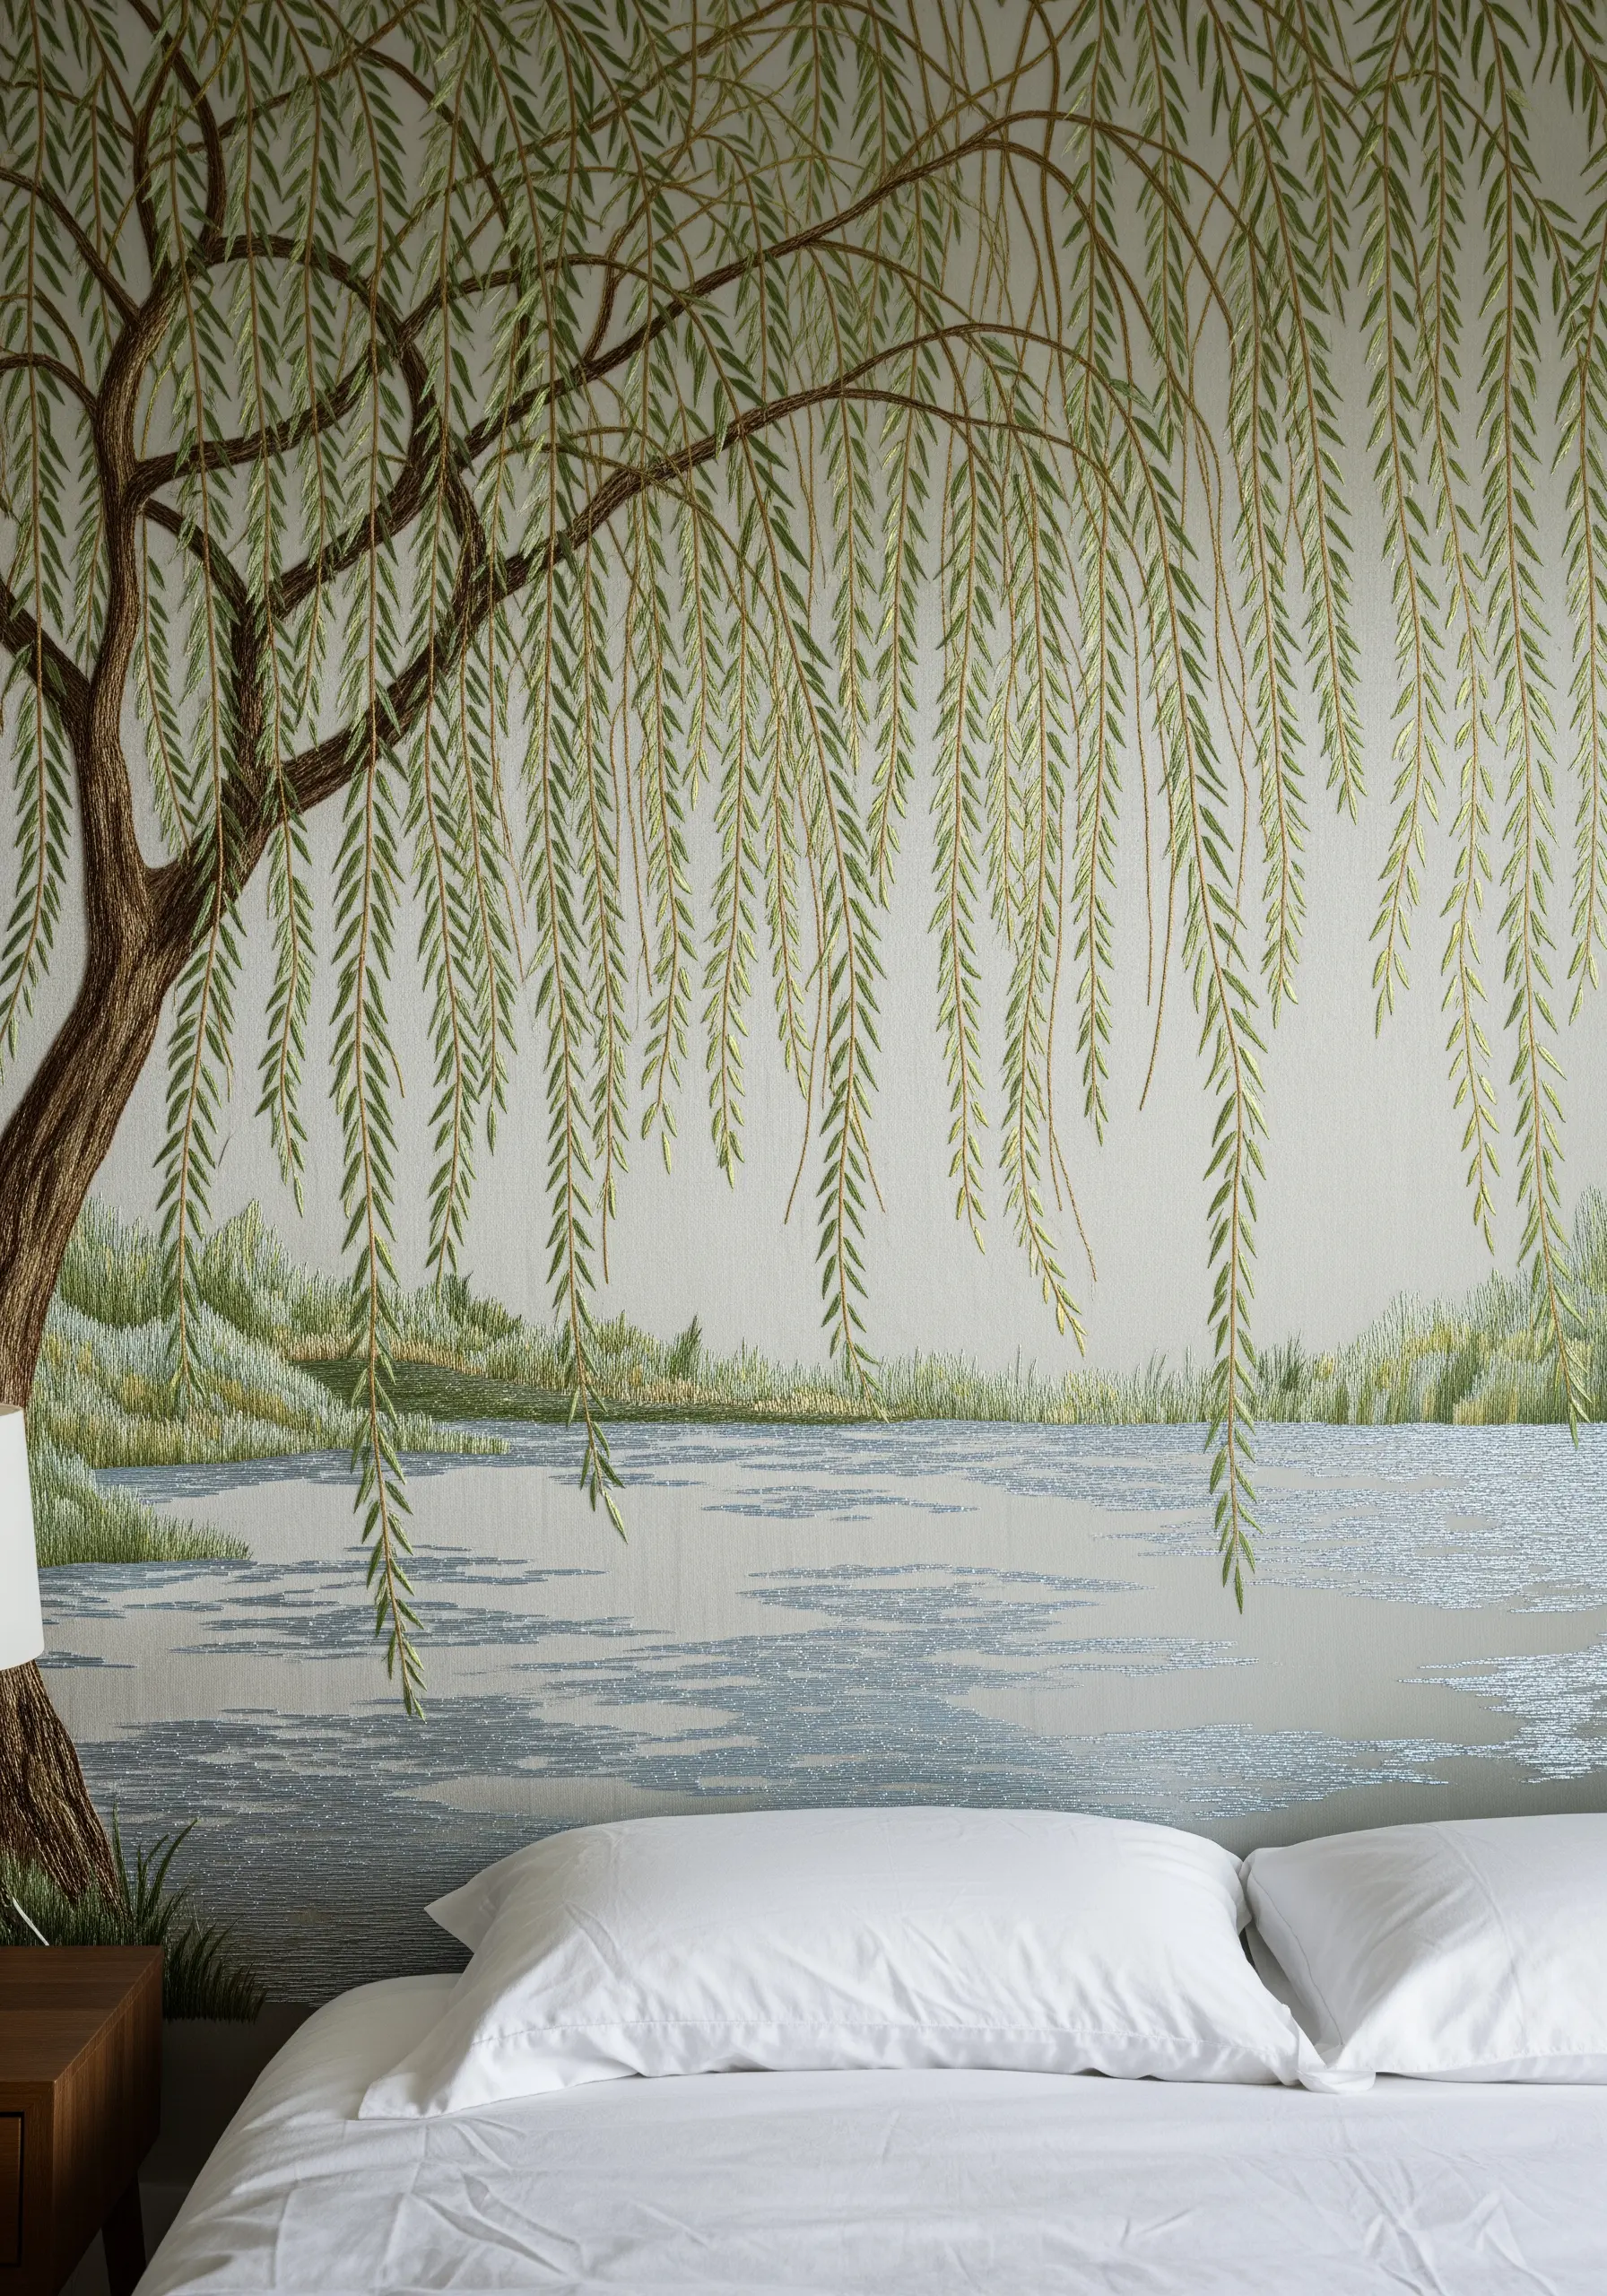
The beauty of a weeping willow is in its delicate, cascading leaves. Your stitch choice should reflect that lightness.
For the tree trunk and main branches, use a textured fill stitch like split stitch or chain stitch, varying the brown tones to create dimension.
The magic is in the hanging leaves. Use a single strand of green floss and stitch thousands of tiny, detached straight stitches, allowing them to hang freely and create a wispy, ethereal effect.
The water below can be filled with horizontal satin stitches in shades of silver and light blue to create a reflective, calm surface. This is a beautiful example of soft, neutral nature-inspired stitch patterns.
29. Curate a Stylized Aquarium Wall

Arrange your stitched sea creatures in a curated, almost scientific-illustration layout for a modern and playful take on an ocean scene.
Give each fish or shark its own distinct personality by using different fill patterns. Try a brick stitch fill on one, a long-and-short stitch on another, and a woven fill on a third.
By stitching each creature as a separate element and arranging them thoughtfully on a plain background, you create a dynamic composition that feels clean and contemporary.
This approach allows you to build a collection over time, adding new creatures whenever you like, perfect for ocean-lover wall hangings.
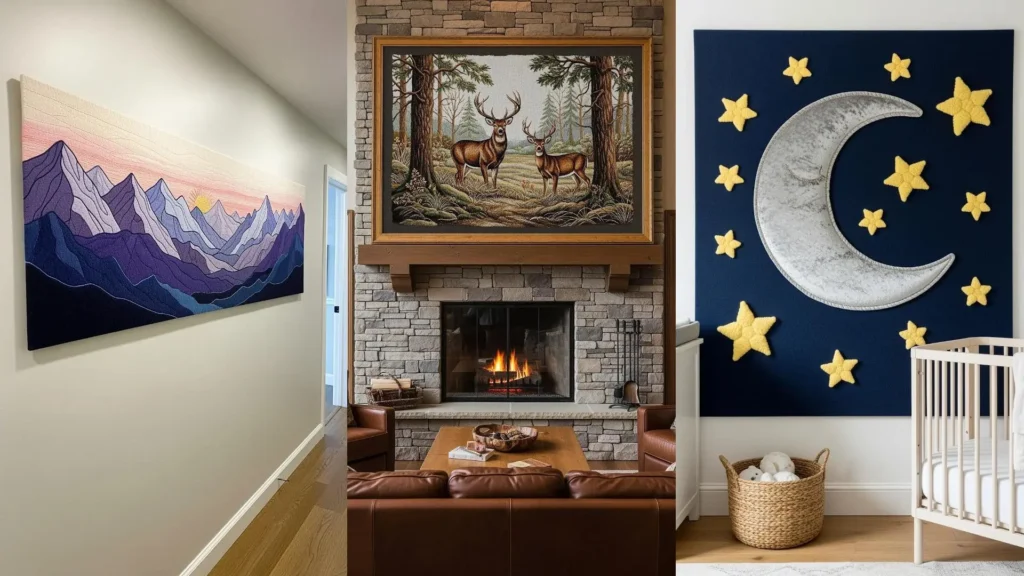
30. Design a Soft and Cuddly Nursery Piece
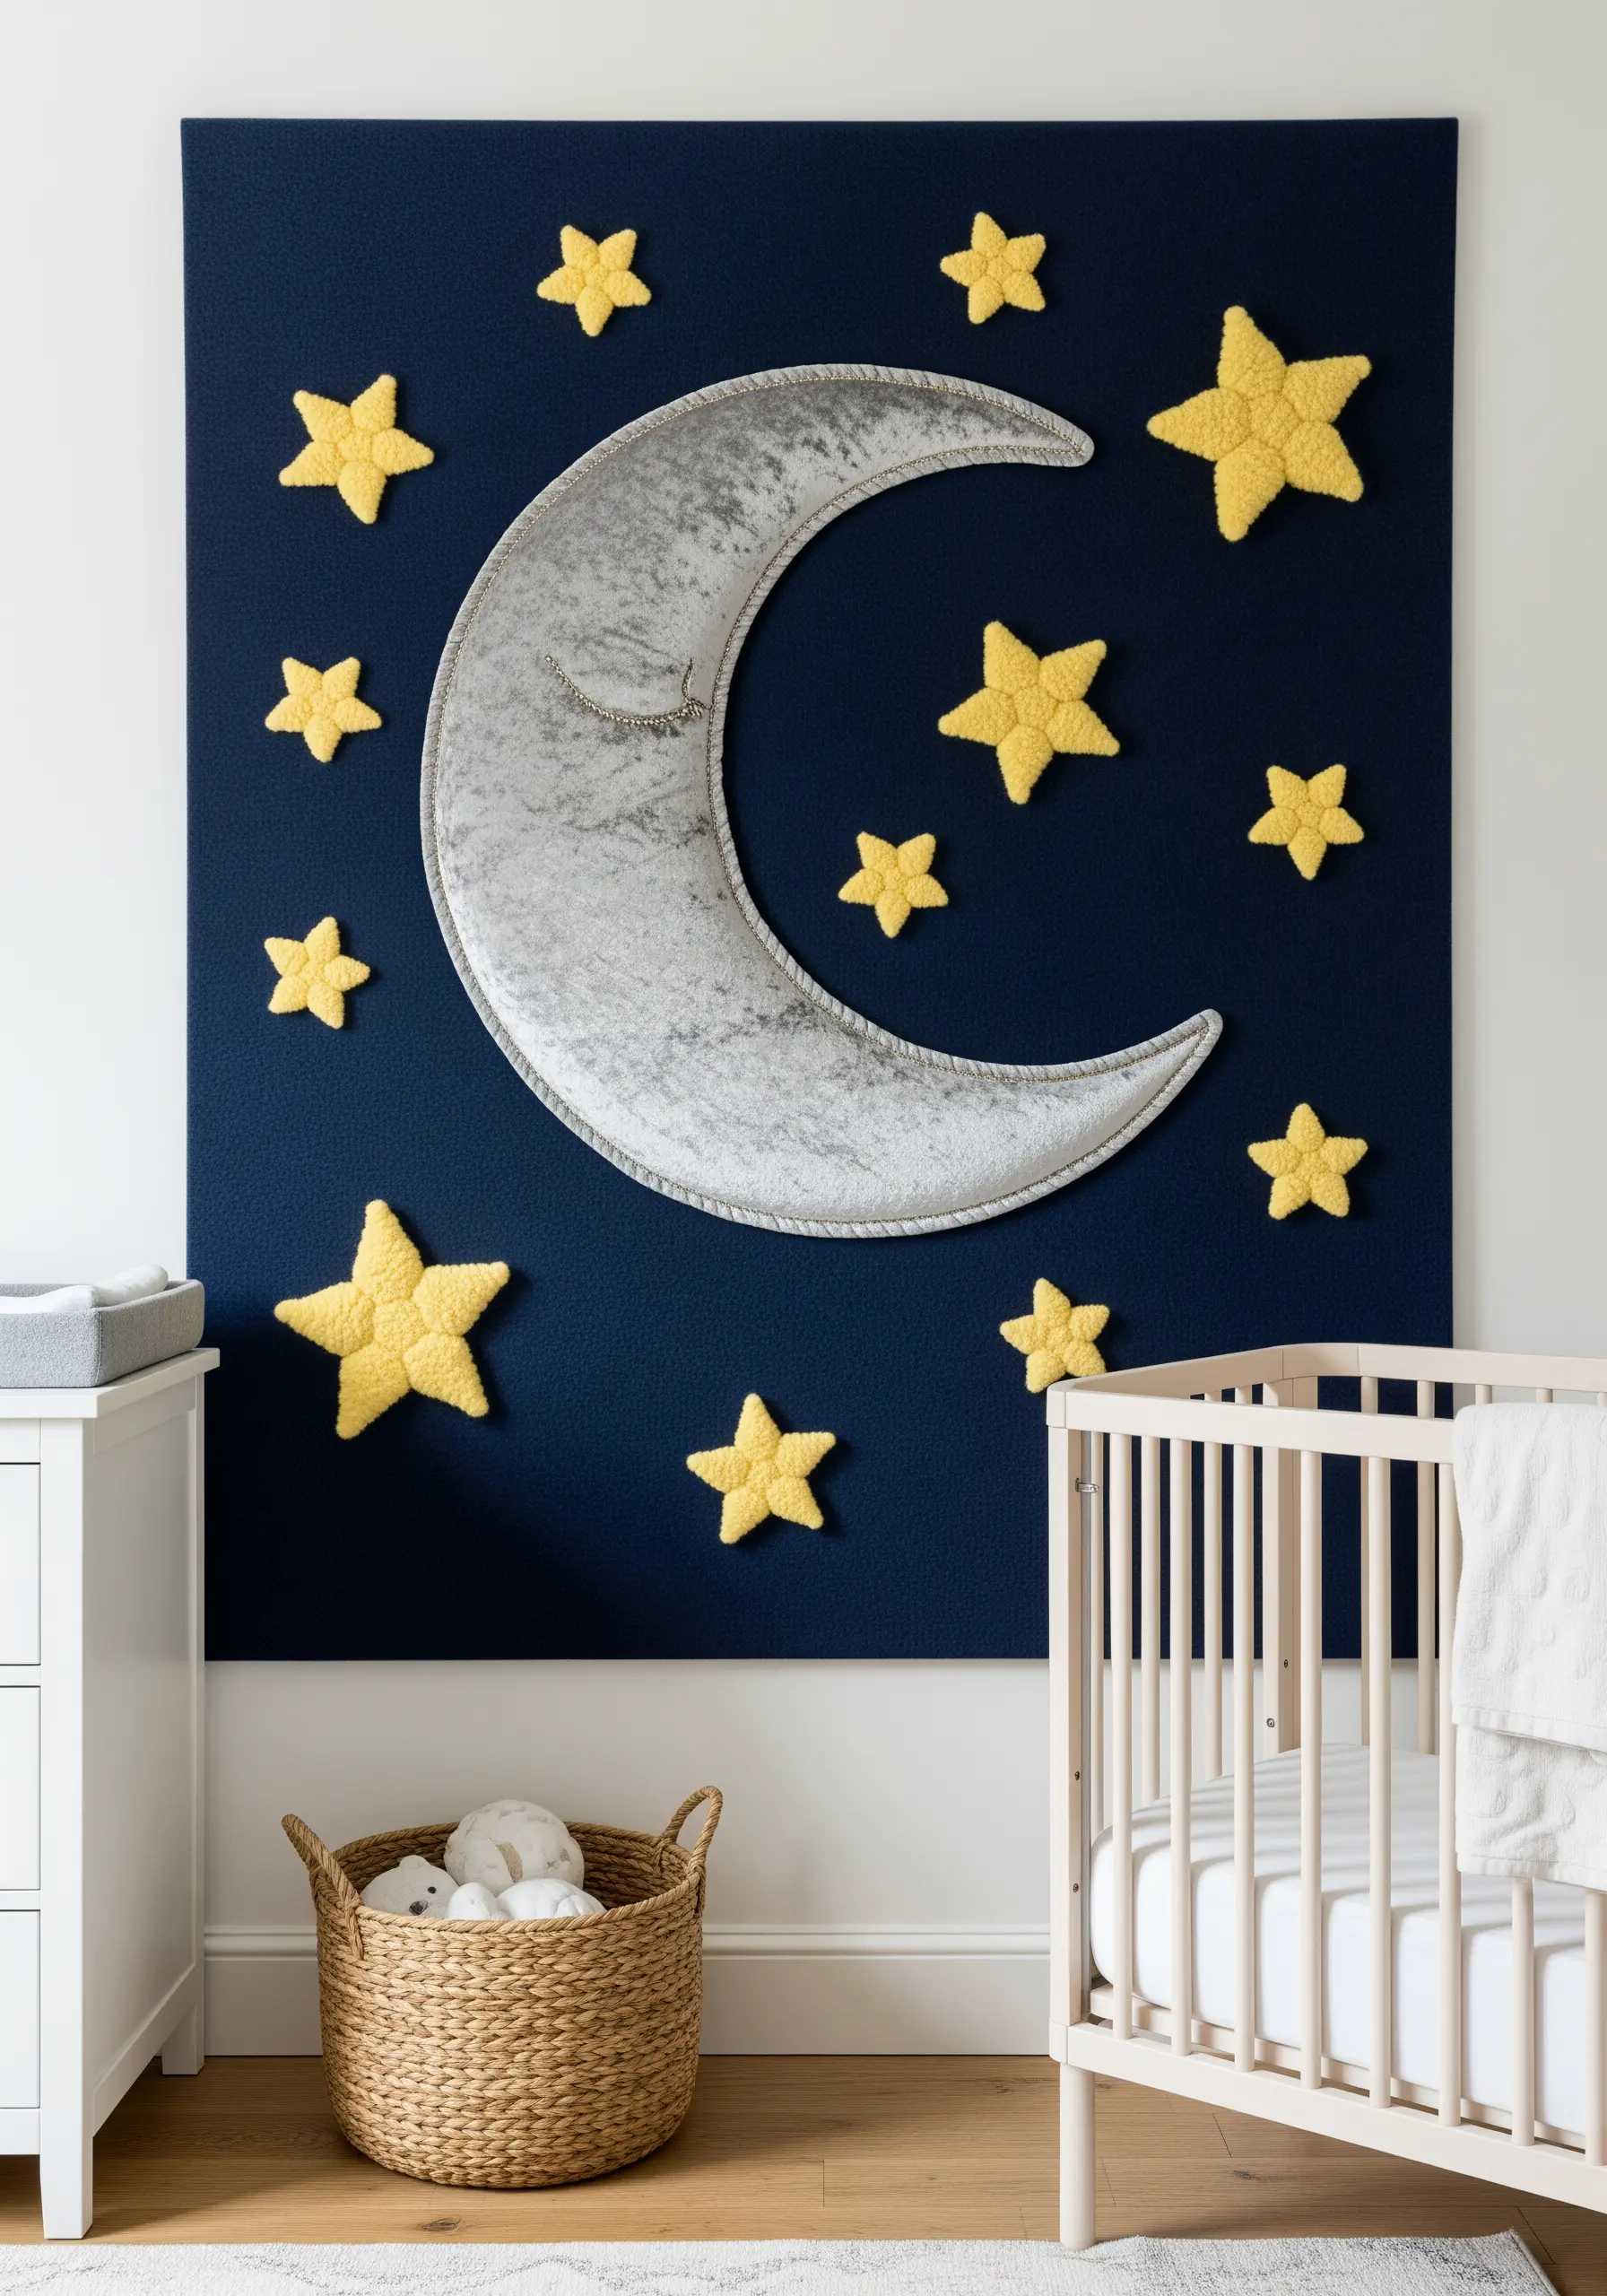
For a nursery, prioritize soft textures and gentle forms. This piece uses appliqué and simple stitches to create a comforting and dreamy atmosphere.
The moon and stars are created from soft, tactile fabrics like velvet, fleece, or minky. Cut out the shapes, then appliqué them to the dark blue background fabric with a neat blanket stitch around the edges.
A simple running stitch or seed stitch can be used to add subtle texture or detail, like the face on the moon.
This technique is safe for a child’s room (no loose threads or beads) and creates a wonderfully sensory piece of art, a perfect cozy embroidery project.


