

Your box of fabric scraps is not a collection of leftovers; it’s a library of memories, colors, and textures waiting for a new story.
When you combine these textile remnants with the thoughtful mark-making of embroidery, you elevate both crafts into a new form of personal art. Fabric collage isn’t about hiding seams or perfect appliqué—it’s about building layers, creating depth, and allowing the character of each piece of cloth to contribute to a larger narrative.
Here, you’ll discover how to blend these two worlds with intention. You’ll learn to see your scraps not as waste, but as a palette. Let these ideas guide you to transform forgotten fabrics into wall art that is not only beautiful but deeply and uniquely yours.
1. Build a 3D Woodland Diorama
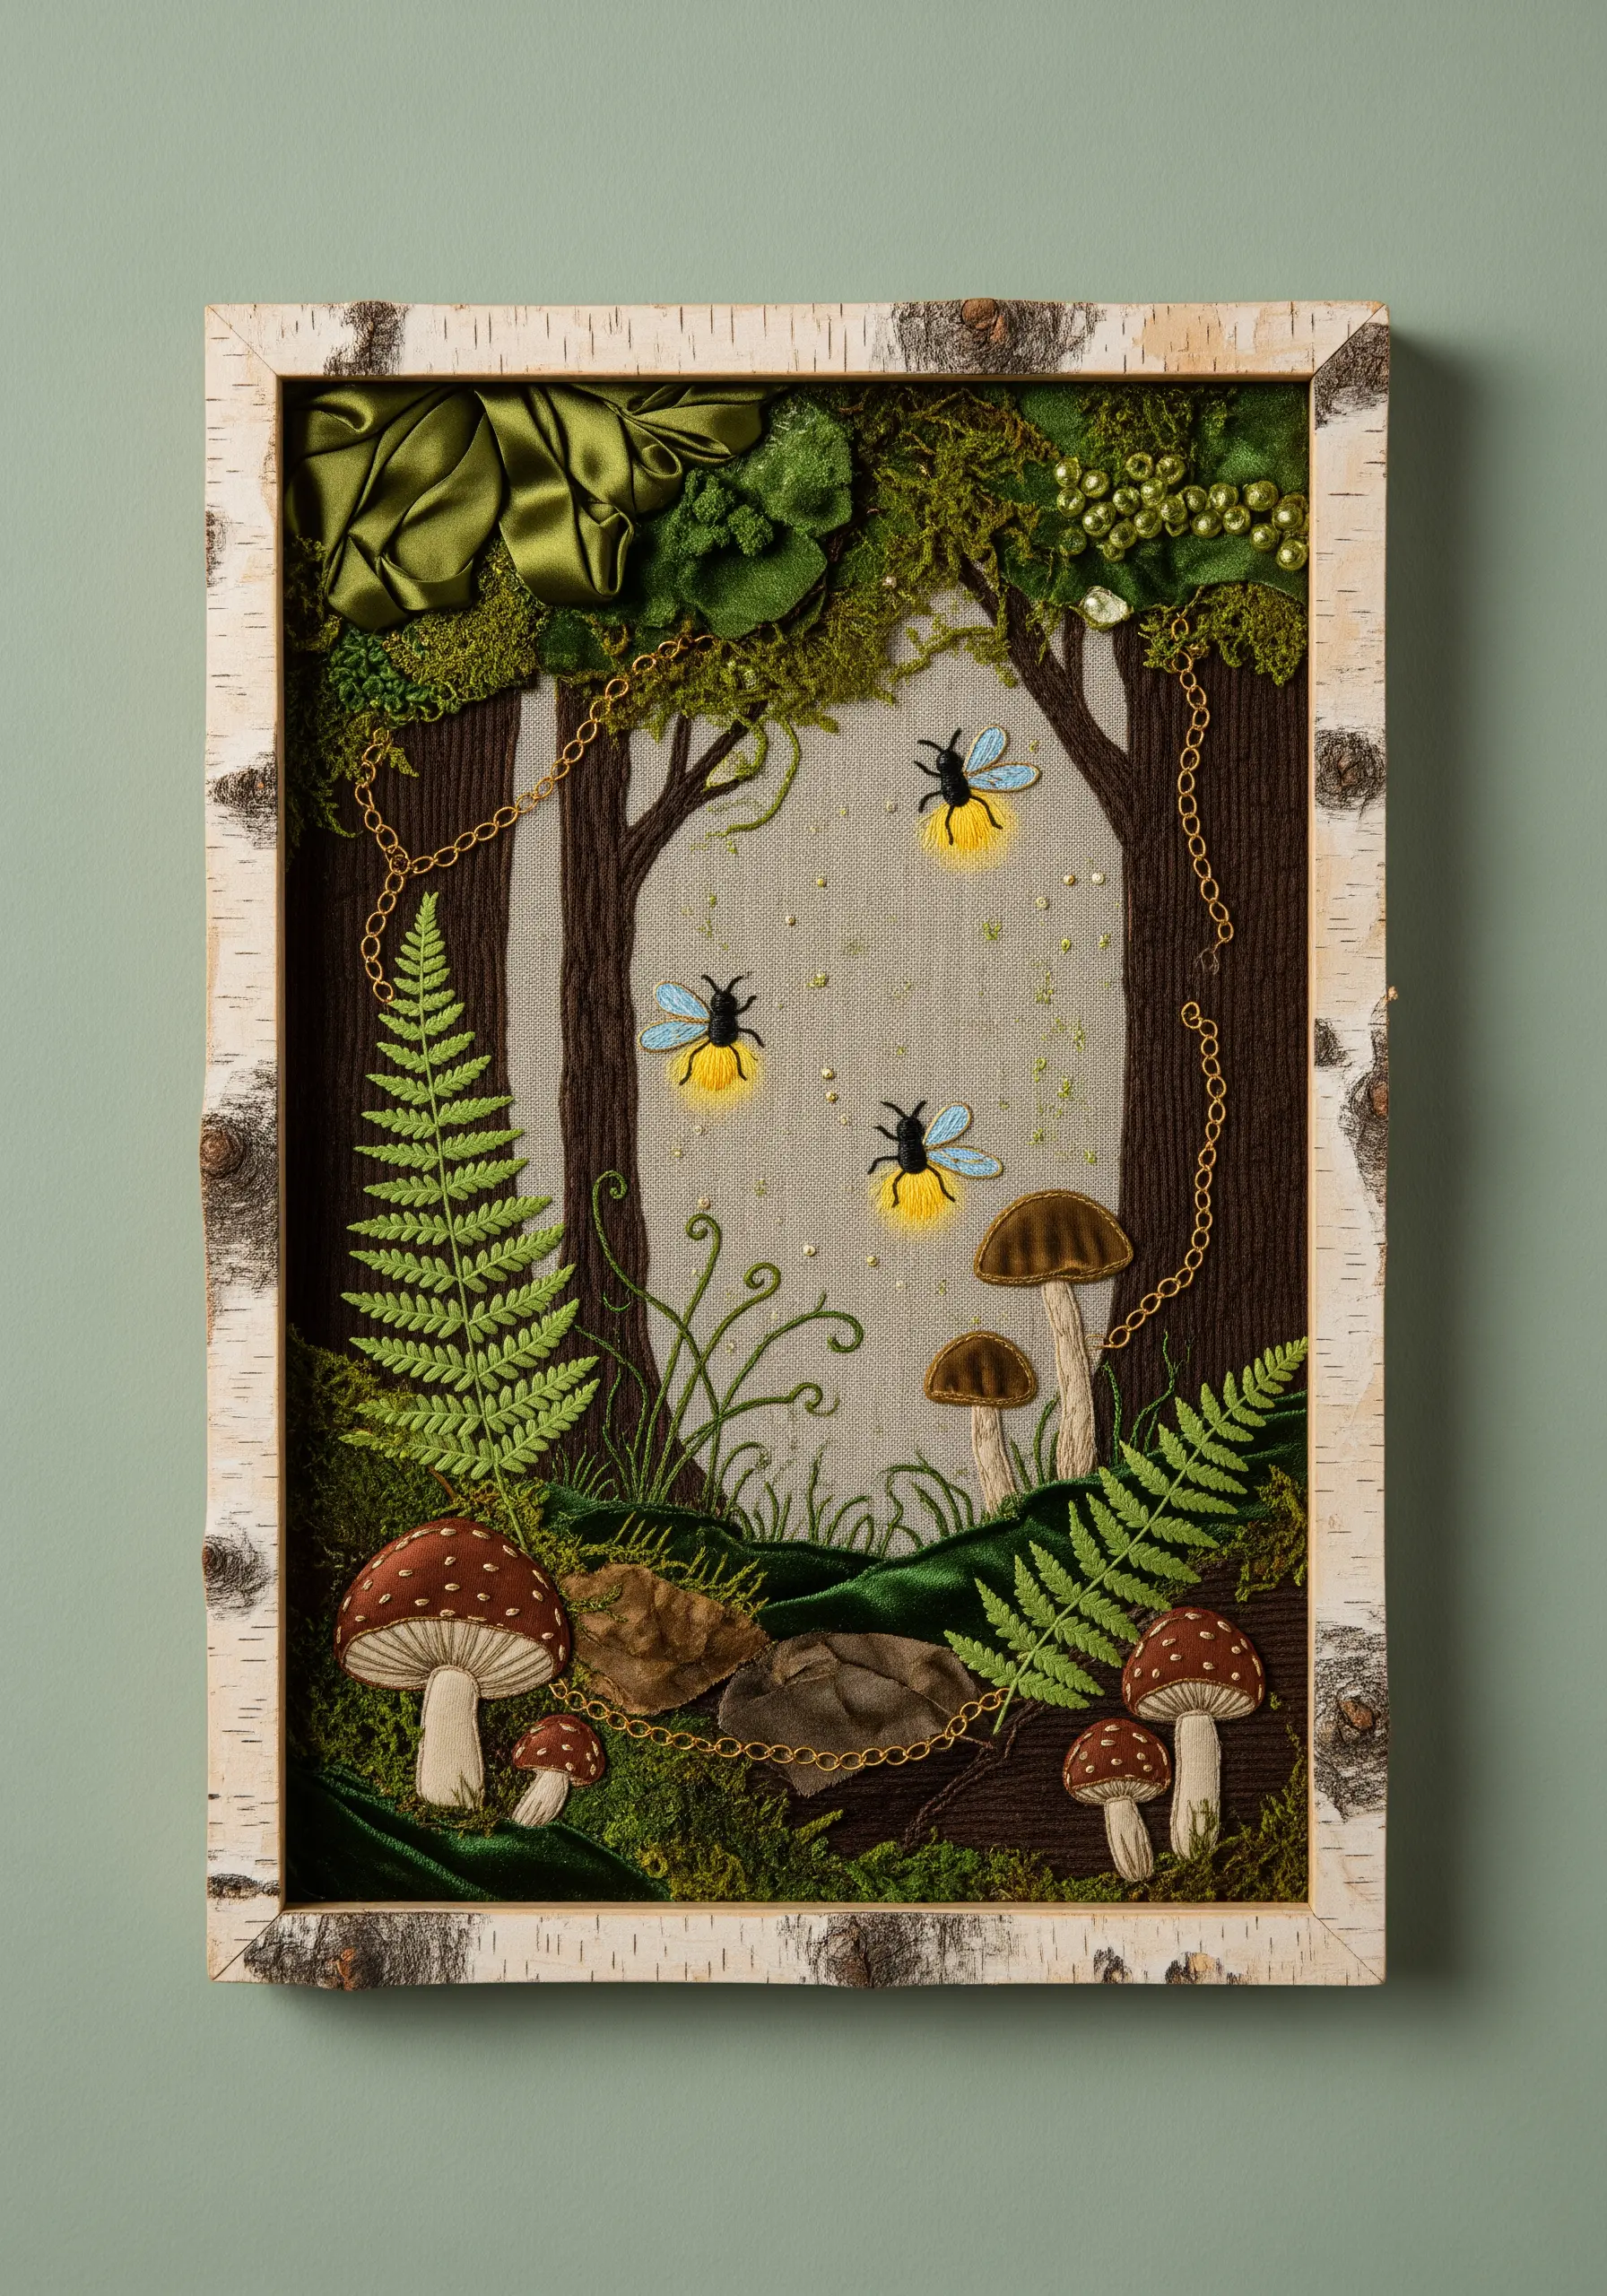
Create immersive depth by layering different materials to tell a story.
Use plush velvet or felt for a mossy forest floor, and apply couching with thick brown yarn to define the tree trunks, giving them a rustic, rounded dimension.
For a dense canopy, fold and stitch wide satin ribbon into lush, leafy clusters.
To make your fireflies glow, stitch a small circle of bright yellow appliqué fabric and then accent it with tiny seed beads or a few radiating straight stitches using metallic thread.
Finishing the piece in a birch-bark frame extends the woodland theme beyond the fabric, making the entire object a cohesive work of art.
2. Stitch a Cosmic Sky with Upcycled Denim
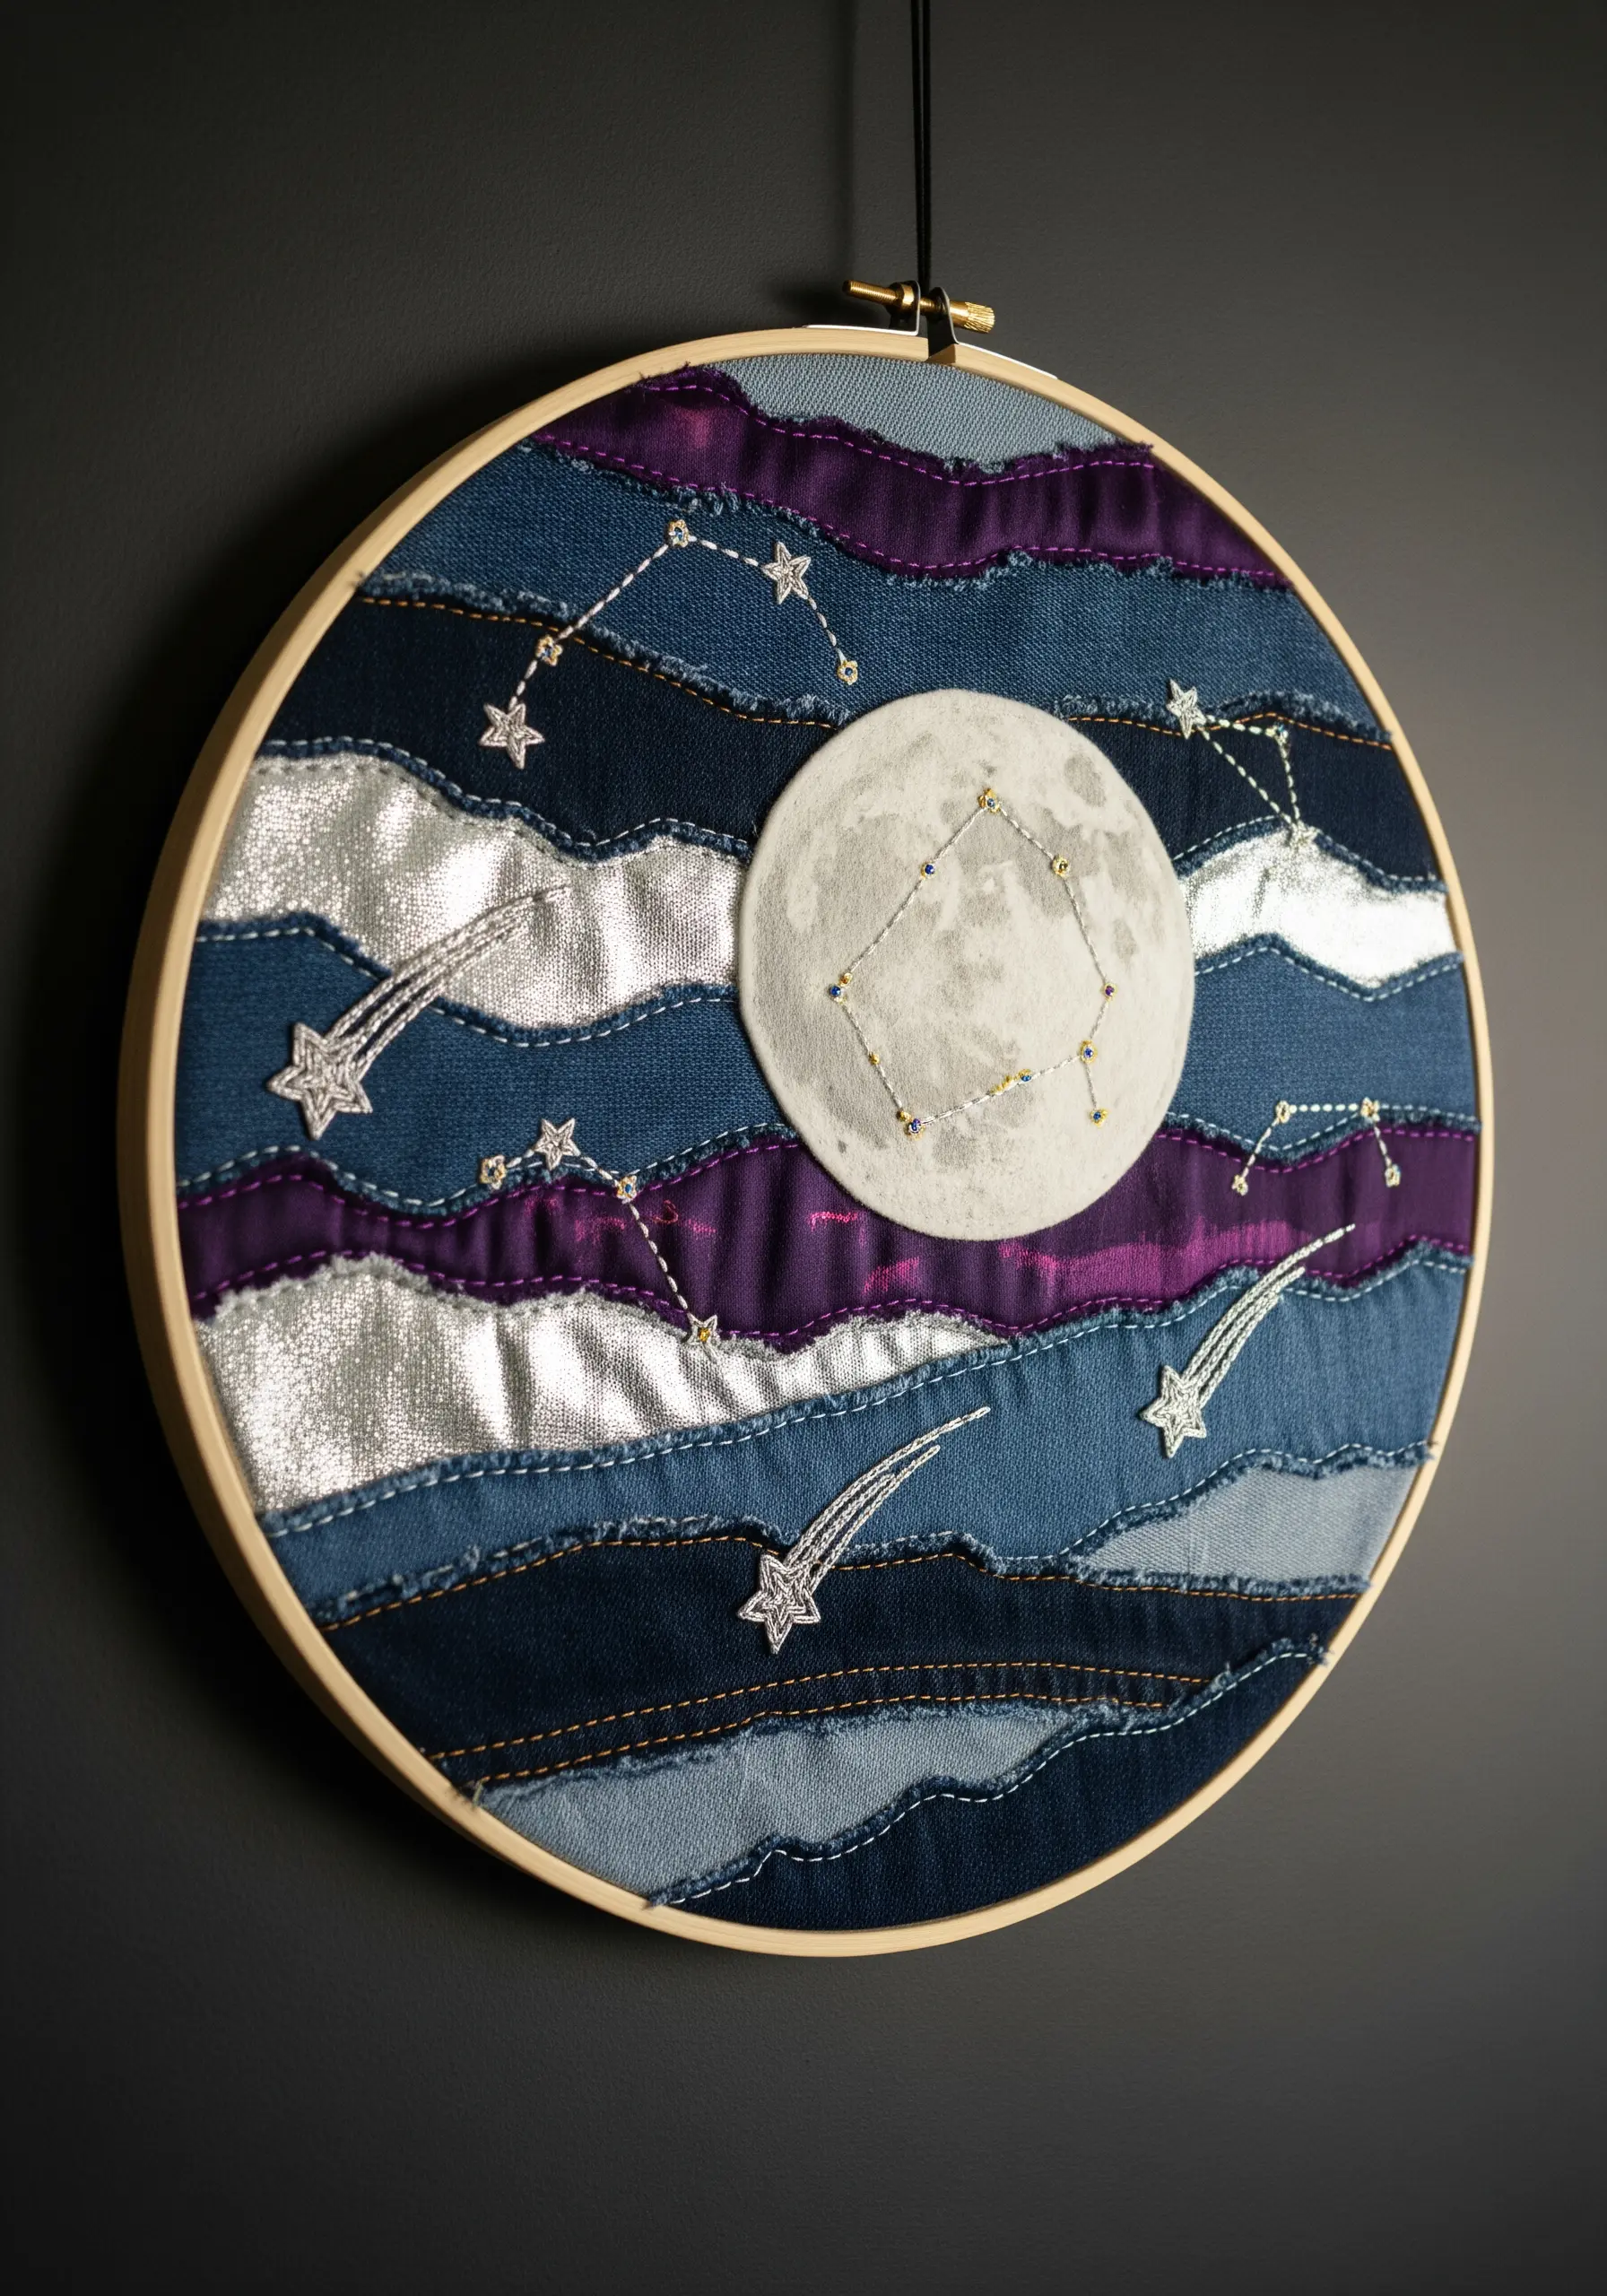
Give old jeans a new life by deconstructing them to harvest a palette of blues, grays, and blacks.
Cut the denim into wavy strips and arrange them horizontally to create atmospheric layers for a night sky.
Introduce a scrap of metallic silver or lamé fabric to create a striking focal point that catches the light, mimicking starlight or a nebula.
For delicate constellations, use a fine metallic sewing thread to connect tiny beads or French knots, creating elegant star charts against the rugged texture of the denim.
The contrast between the humble, recycled fabric and the celestial theme makes the final piece feel both grounded and magical.
3. Sculpt an Underwater World with High-Relief Texture
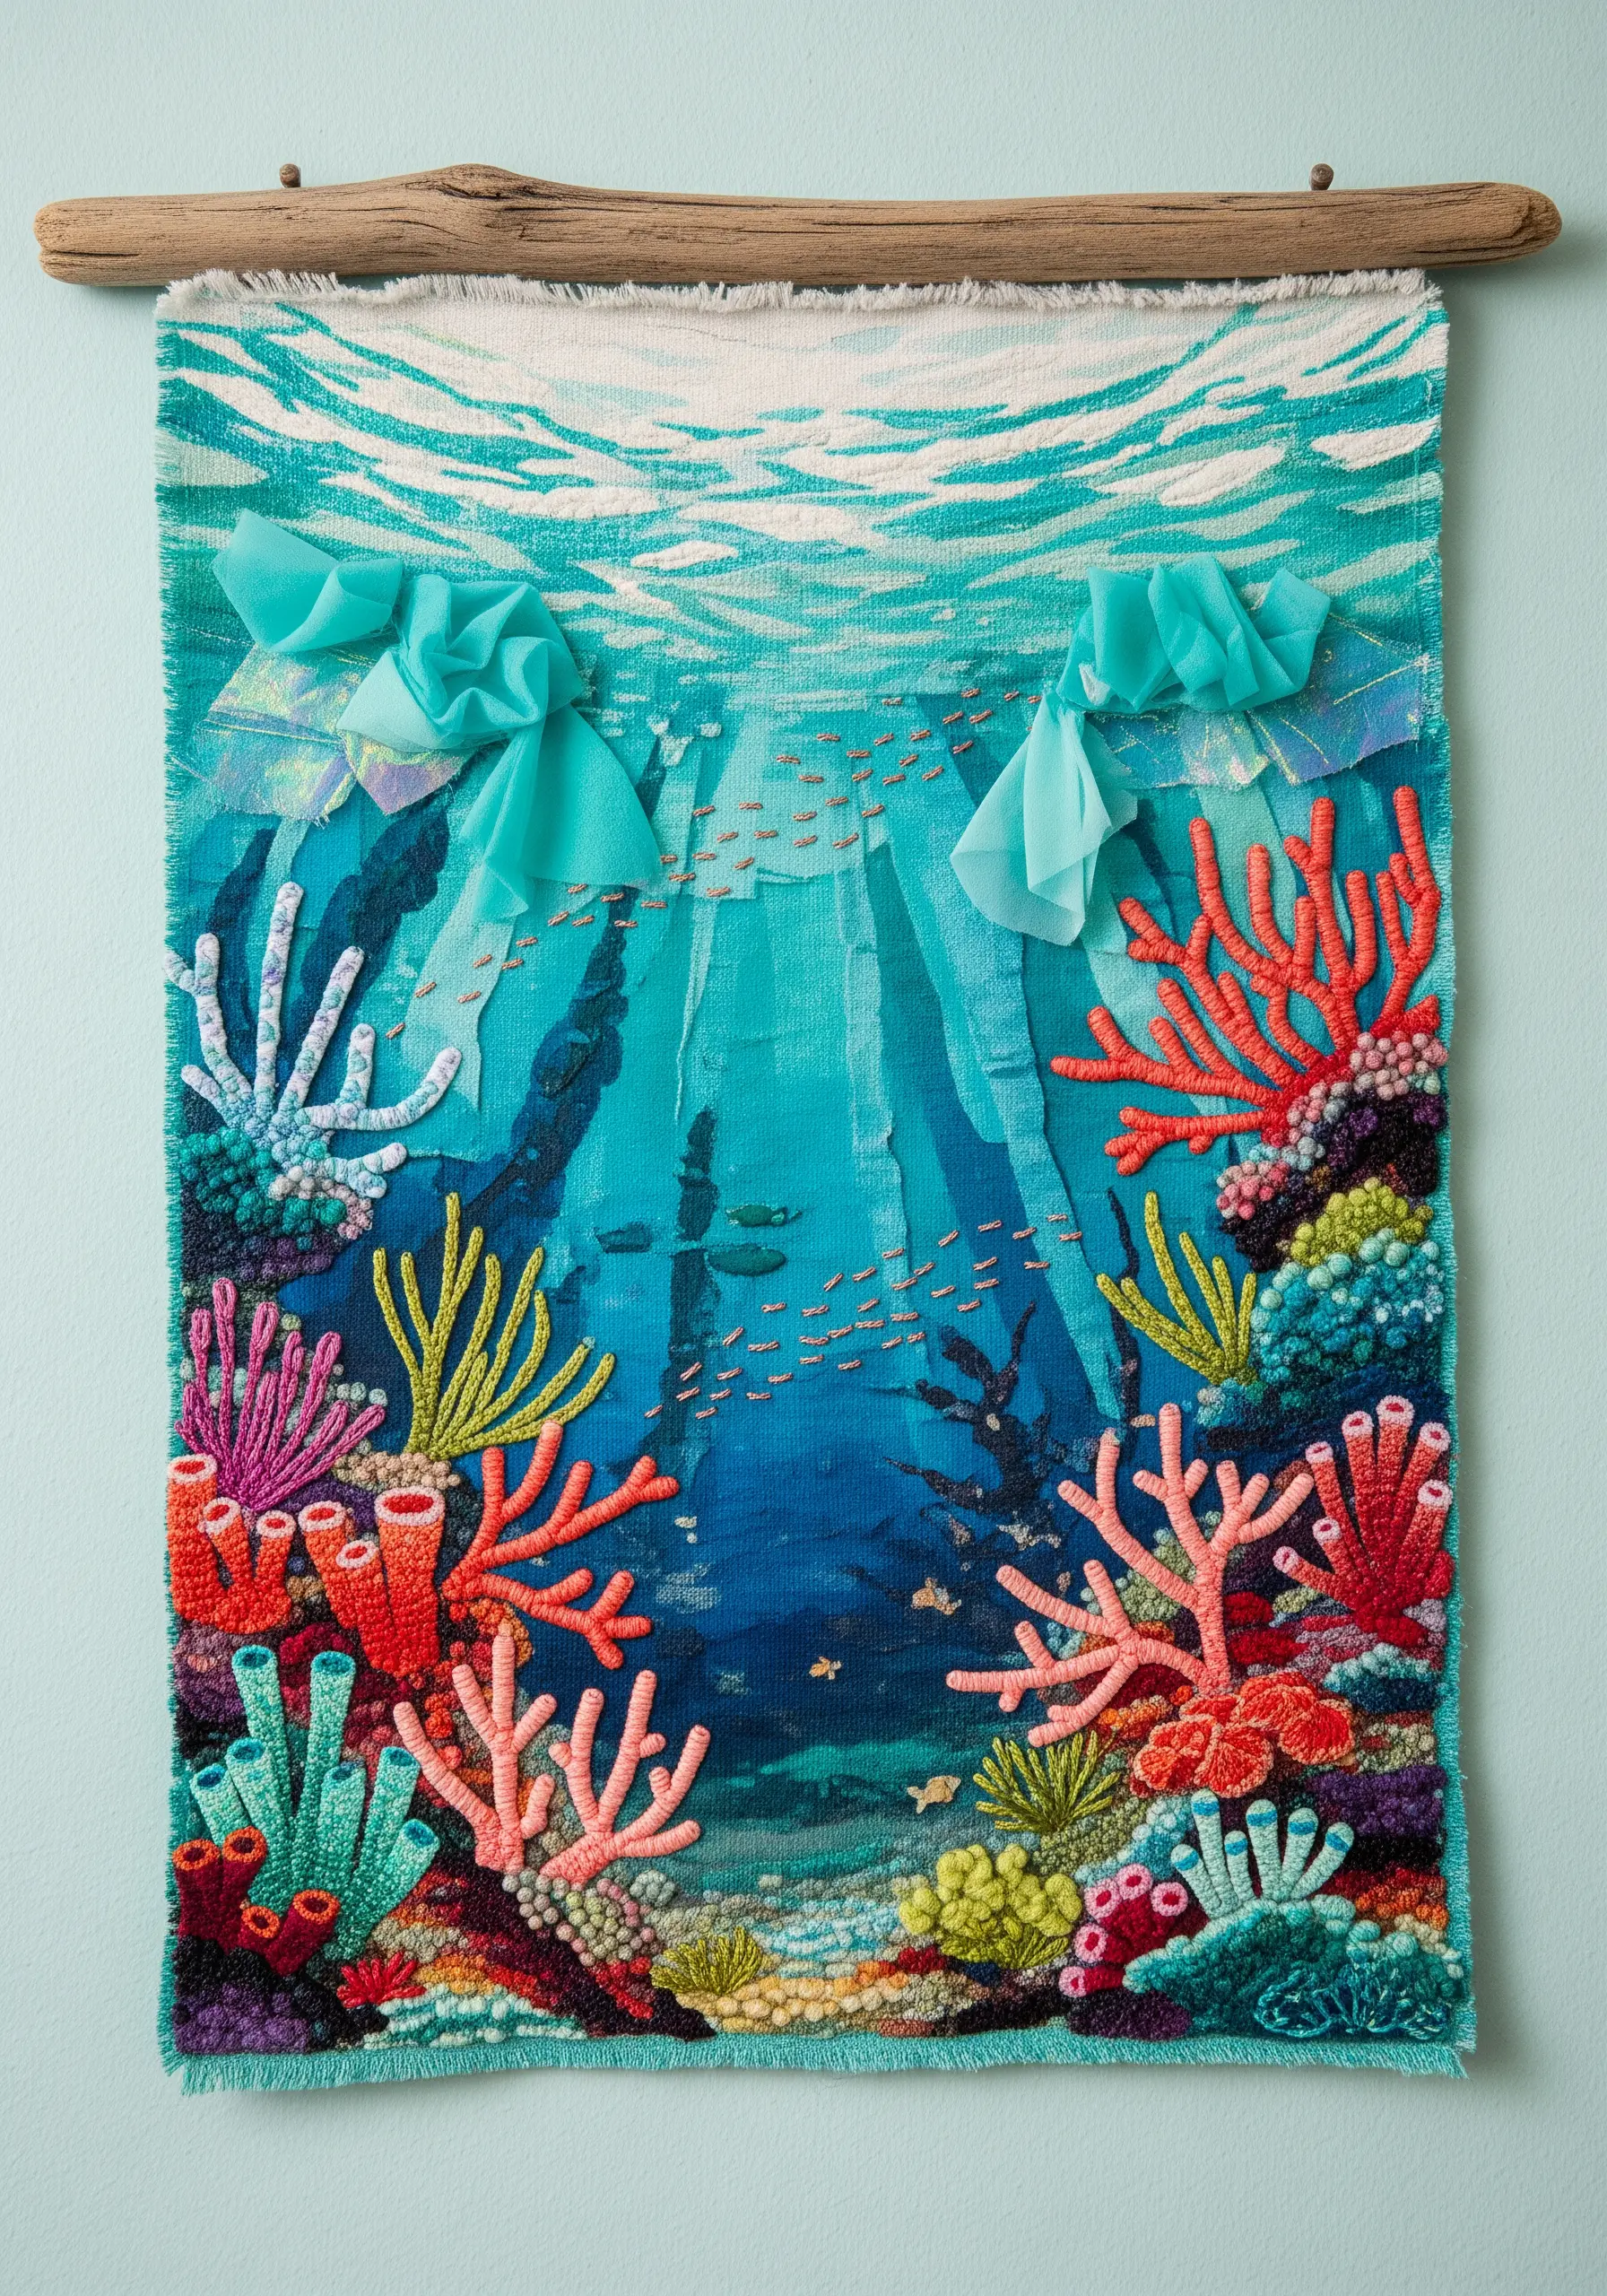
To achieve a vibrant, deep-sea feel without having to stitch the entire background, start with a printed fabric that already depicts water.
Build your coral reef on top of this base using highly dimensional stitches like French knots, turkey work, and woven picots.
Vary the thickness of your thread and the density of your knots to create organic, coral-like textures that rise off the surface.
For an ethereal touch, add ruched or folded pieces of sheer organza to suggest the gentle movement of water or the delicate fins of sea creatures.
This method of combining a flat, printed background with sculptural stitching creates an incredibly dynamic and efficient composition.
4. Design a Modernist Cityscape with Graphic Shapes
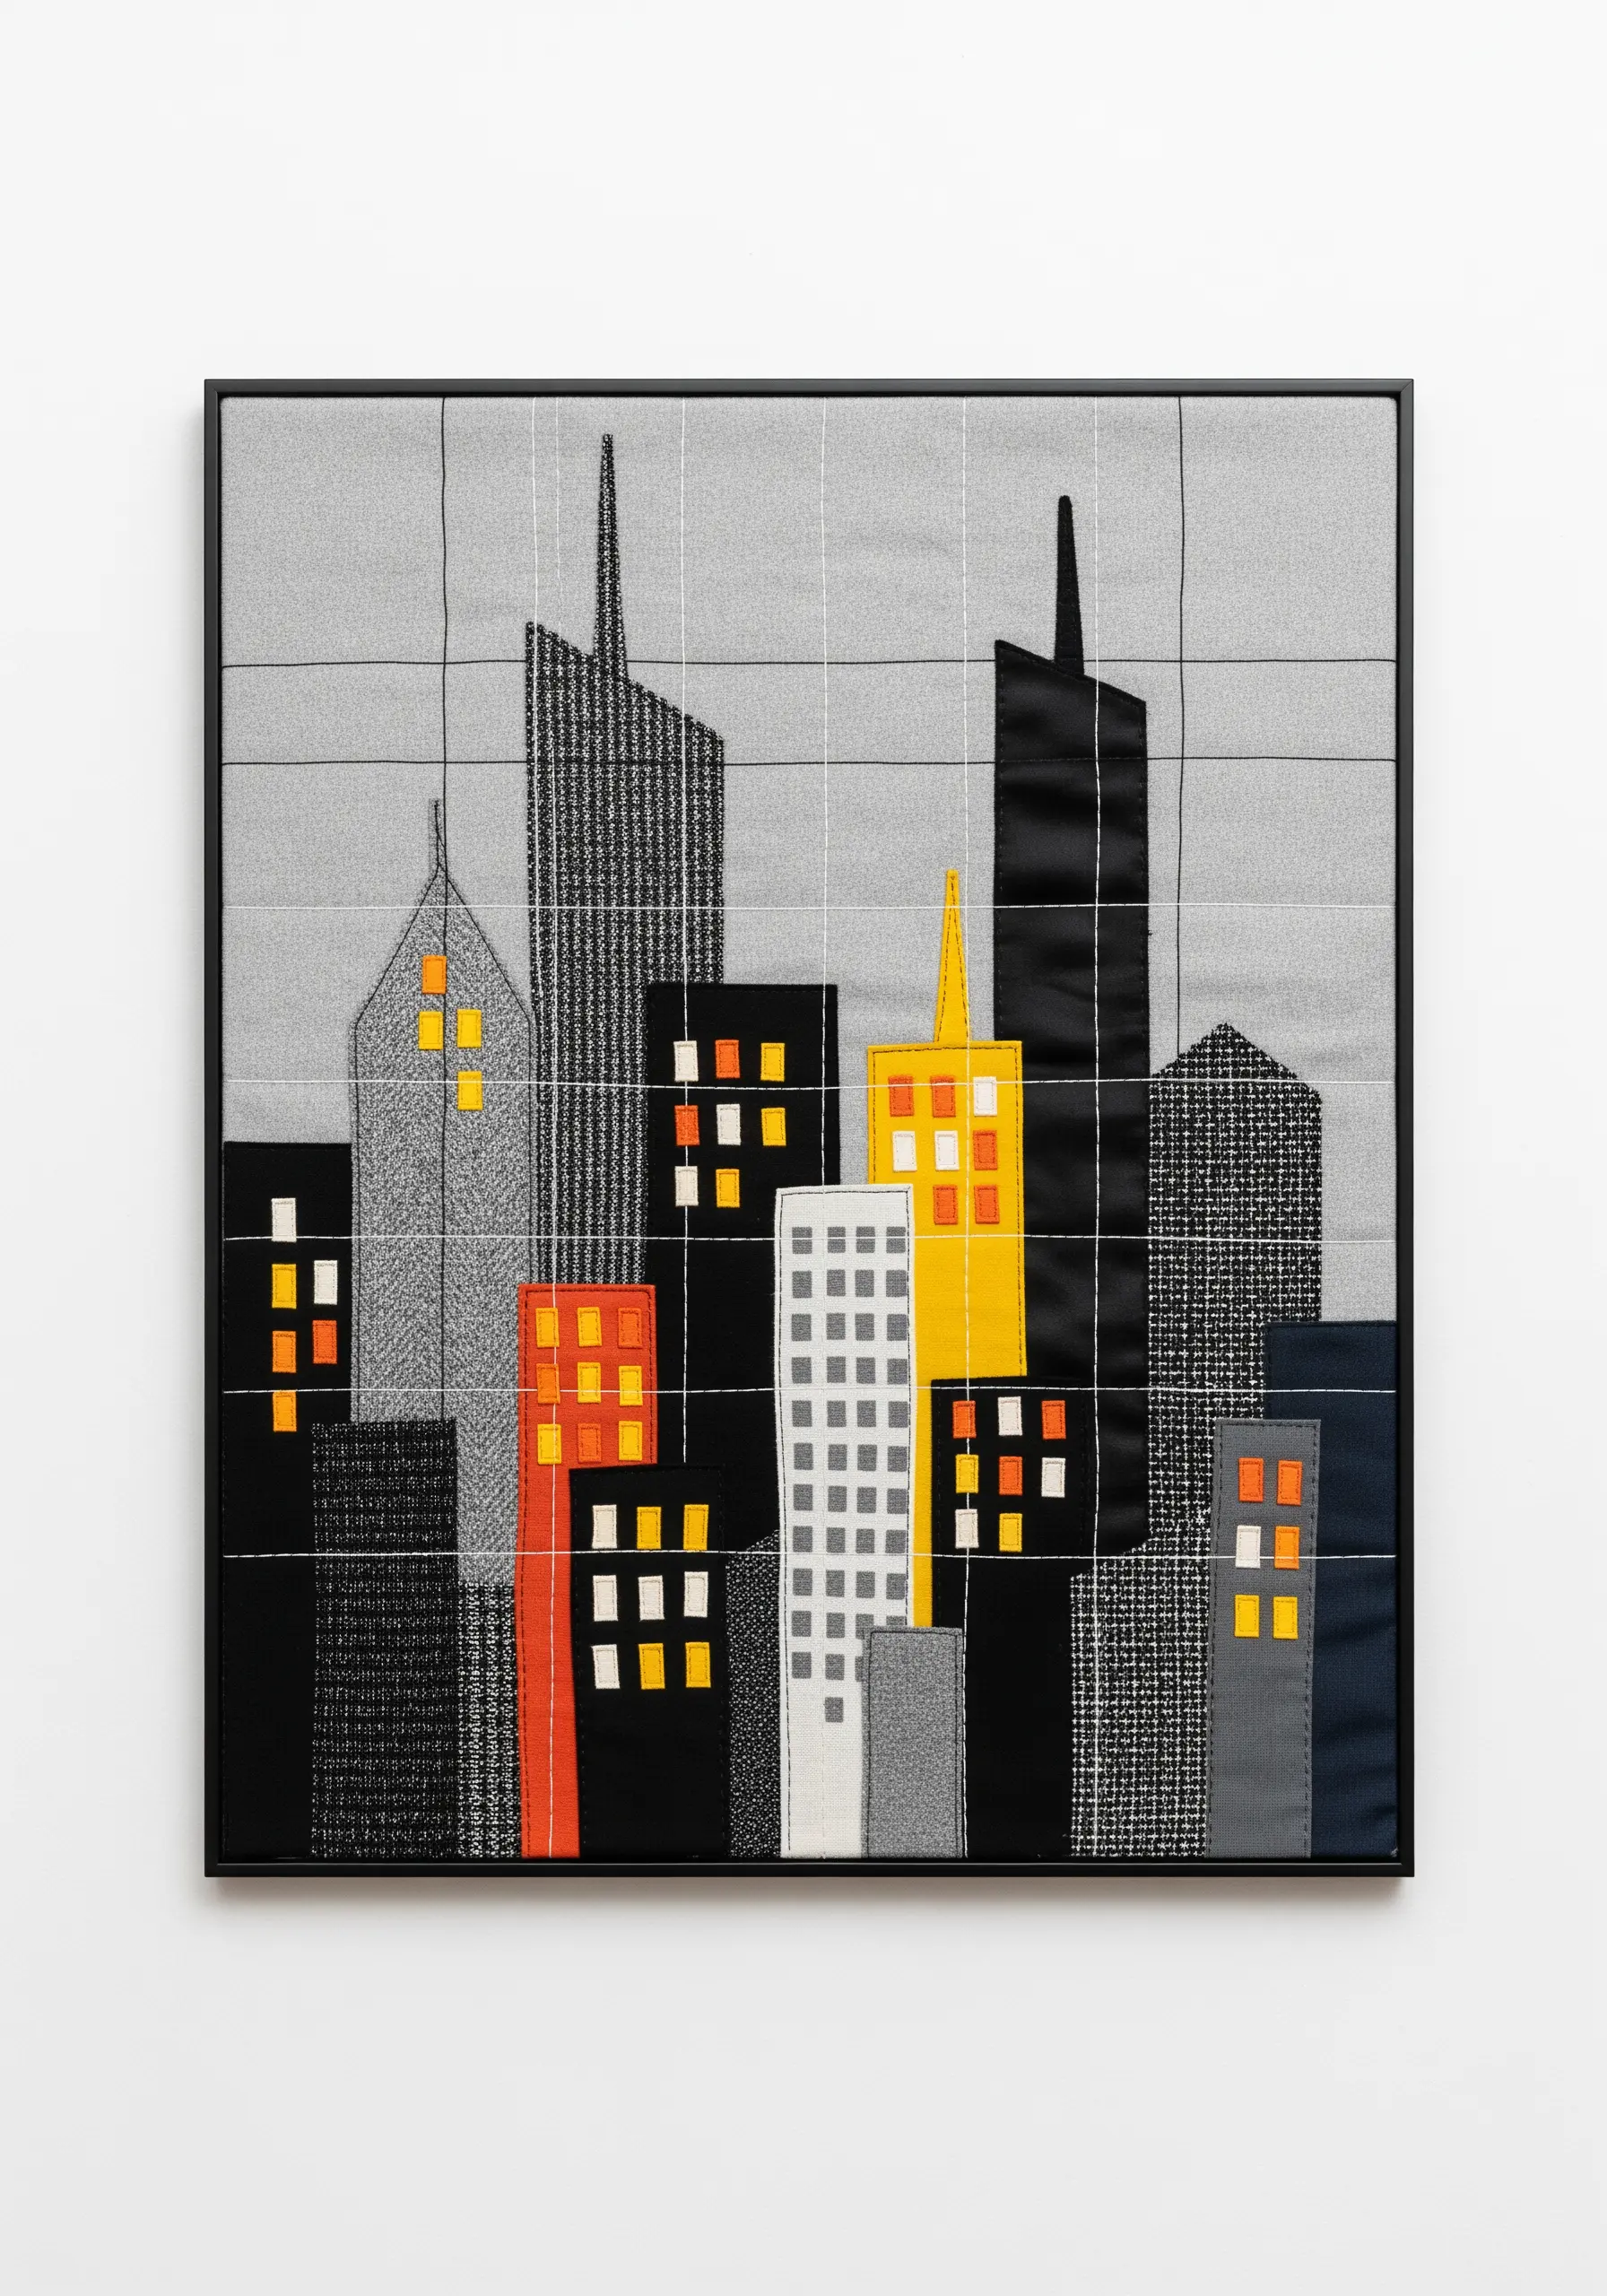
Create a sophisticated urban scene by focusing on clean, geometric shapes cut from a curated selection of fabrics.
Stick to a mostly monochrome palette of blacks, grays, and whites, but choose fabrics with subtle woven patterns—like tweed or herringbone—to add architectural texture.
Introduce one or two bold accent colors, such as yellow or red, for window blocks to draw the eye and create a strong focal point.
Instead of dense stitching, use simple, sparse running stitches in a contrasting thread to suggest a structural grid or distant window lights, keeping the overall aesthetic clean and modern.
5. Craft a Whimsical Patchwork Balloon
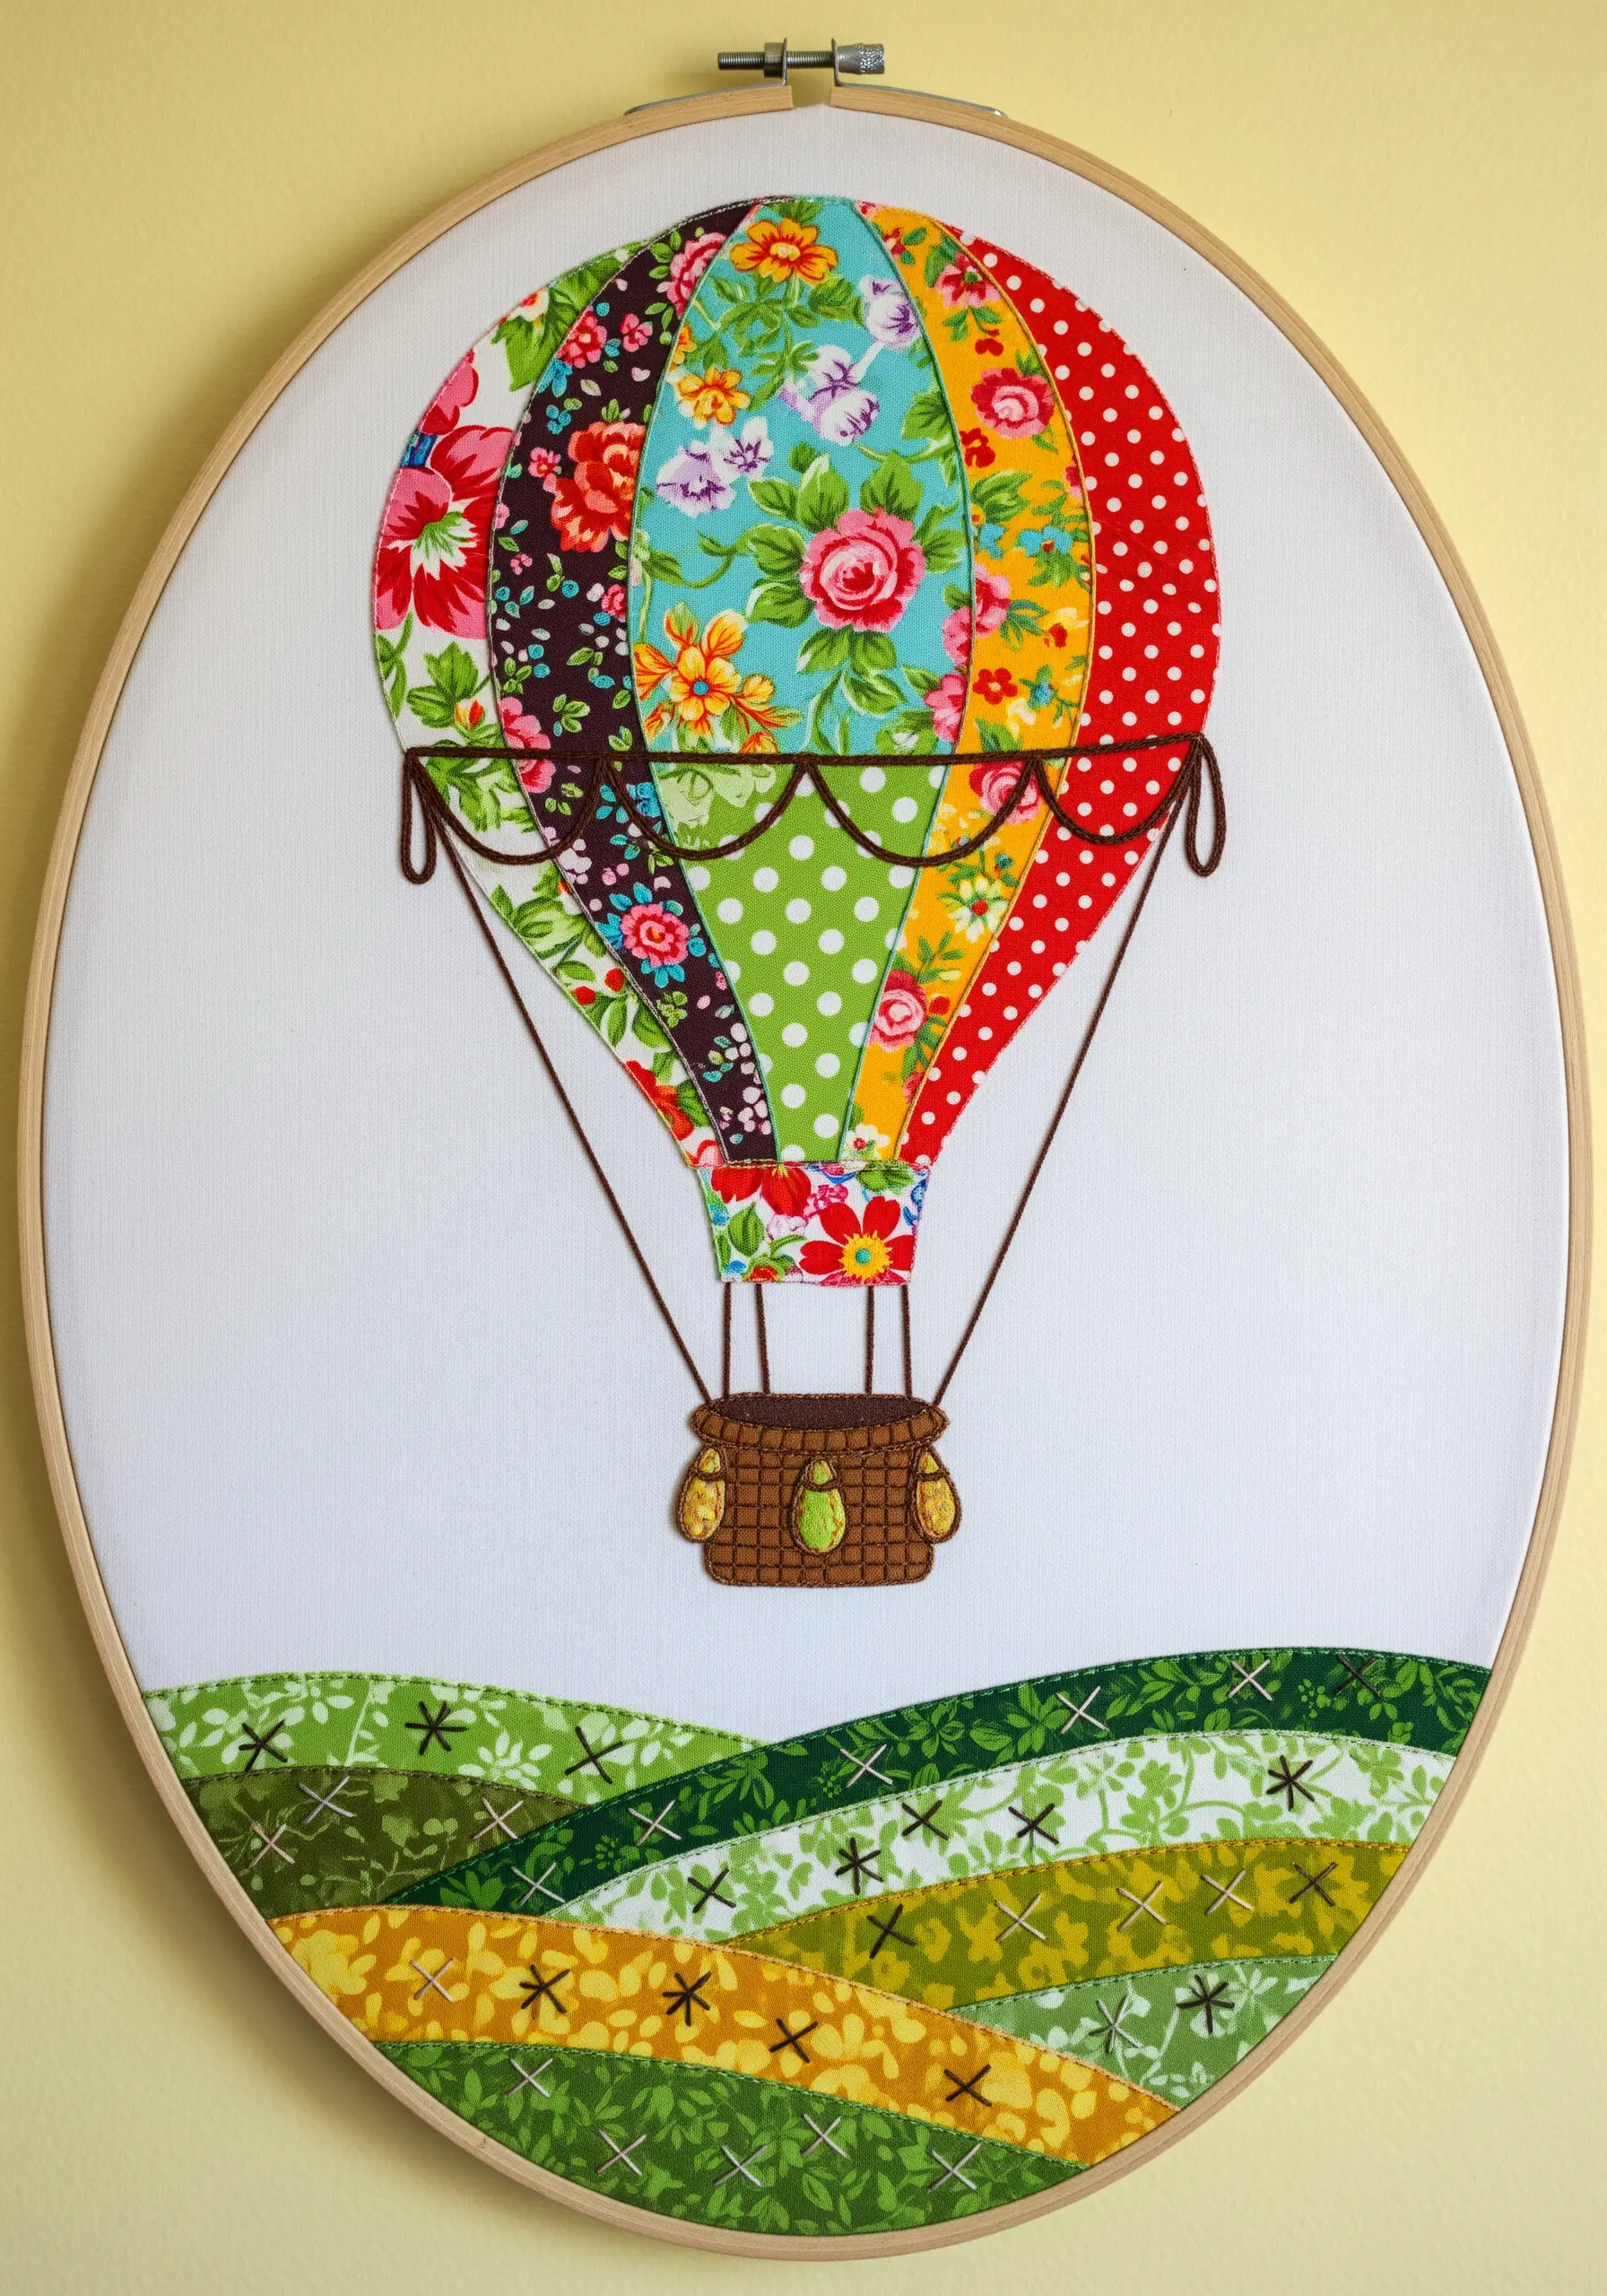
This is the perfect opportunity to showcase your most beloved, vibrant fabric scraps.
Cut panels for the balloon from various patterns—florals, polka dots, geometrics—and arrange them until you find a pleasing rhythm of color and scale.
Appliqué each piece securely onto a neutral background fabric using an iron-on adhesive for clean edges.
Unify the entire patchwork design by outlining each fabric panel with a consistent backstitch or chain stitch in a single dark color.
For the basket, use a heavier thread or even fine cord and a basketweave stitch to give it a distinct, sturdy texture.
6. Layer a Mountainscape with Denim Washes
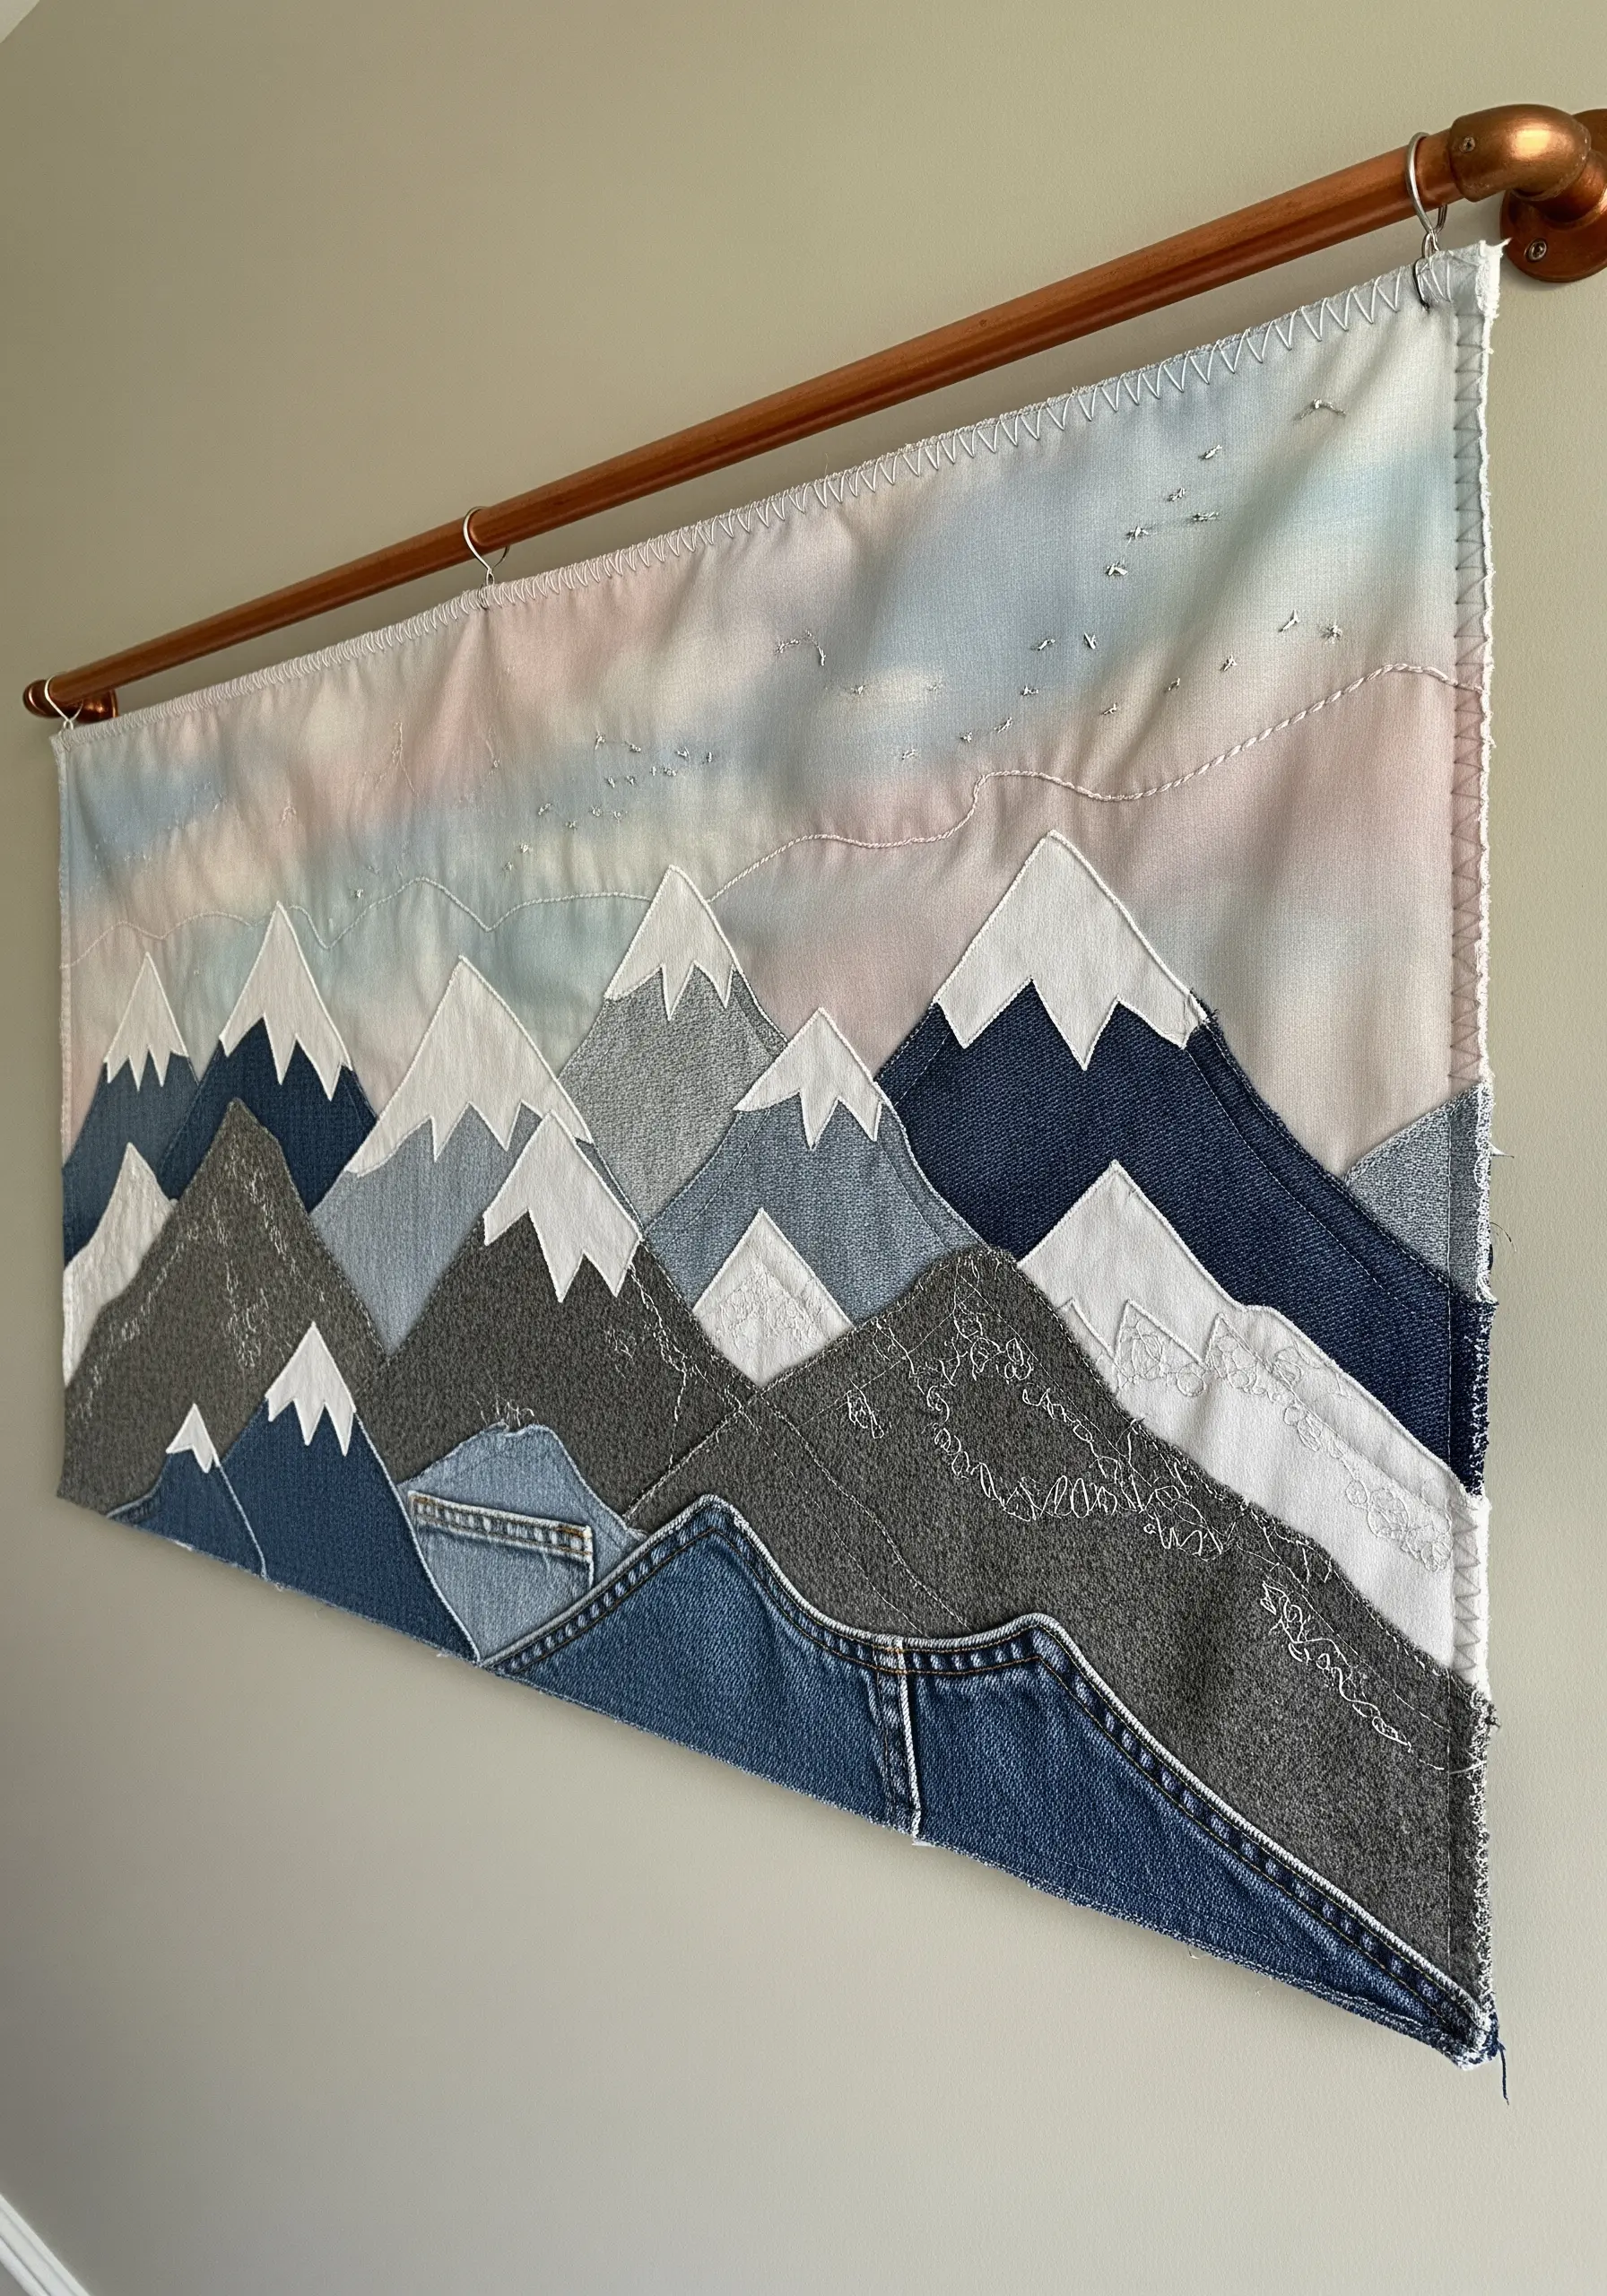
Use the natural color variations in old denim to create effortless atmospheric perspective in a mountain landscape.
Place the darkest denim washes in the foreground and progressively lighter shades for the mountains in the distance; this instantly creates a sense of depth.
Embrace the material’s character by leaving some edges raw and frayed to mimic the rugged texture of rock faces.
A few scattered running stitches or seed stitches in white or light gray thread can suggest snowcaps or distant trails, adding subtle detail without overpowering the bold shapes of the denim.
7. Create a Fabric Mosaic for Bold Color Blocking
Think of your fabric scraps as tiles in a mosaic to achieve clean, saturated color fields that would be time-consuming to fill with thread.
Carefully cut each fabric piece to shape and secure it with a fusible web before stitching.
To define each section and give the piece a polished, graphic look, outline every fabric shape with a bold satin stitch, chain stitch, or couched yarn.
This technique allows you to create incredibly intricate and vibrant color blocking with precision and speed, letting the fabric do most of the work.
8. Build a Romantic Garden Scene with Ribbon
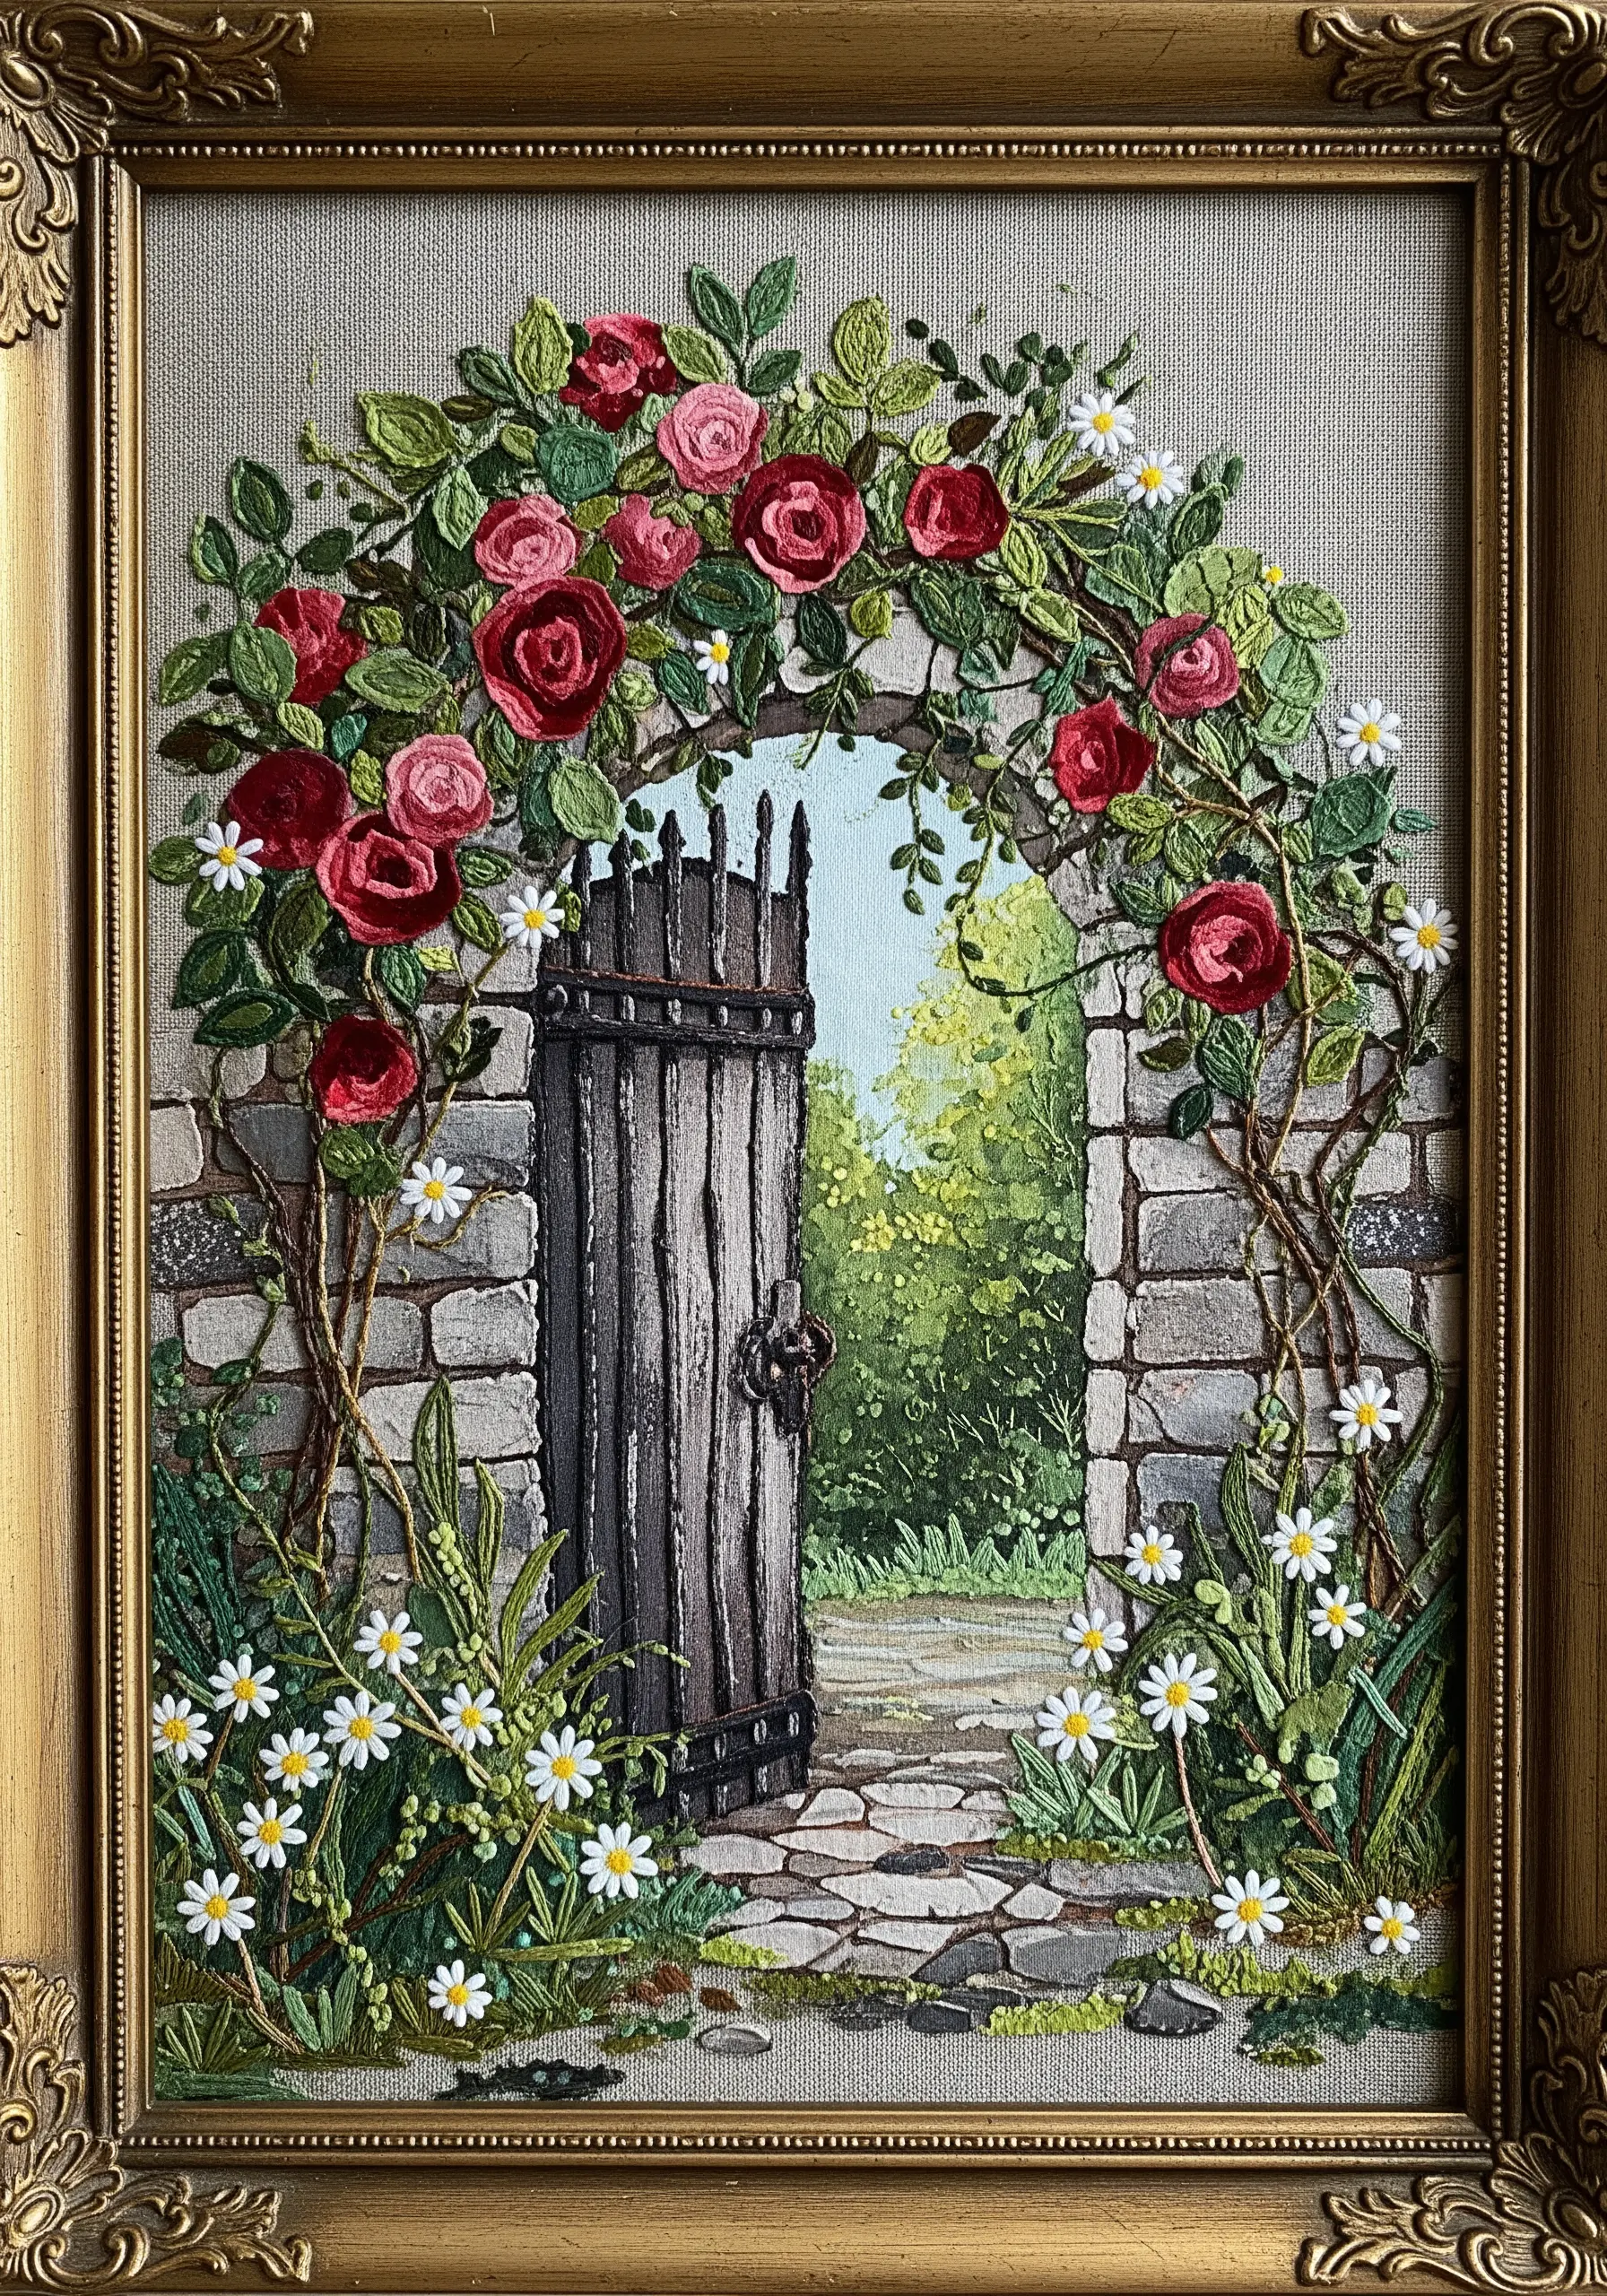
Introduce silk or satin ribbon to create lush, dimensional roses that stand out from the flat surface.
Create them using the woven wheel stitch or by gathering and coiling the ribbon into rosette shapes.
For the stonework of an arch or wall, appliqué small, irregular scraps of gray and beige linen or cotton.
You can then add texture and shadow to the stones with a scattering of French knots and straight stitches in coordinating neutral threads.
The contrast between the soft, lustrous ribbon flowers and the matte, textured fabric stone creates a wonderfully balanced and romantic composition.
9. Construct a Portrait with Textile Scraps
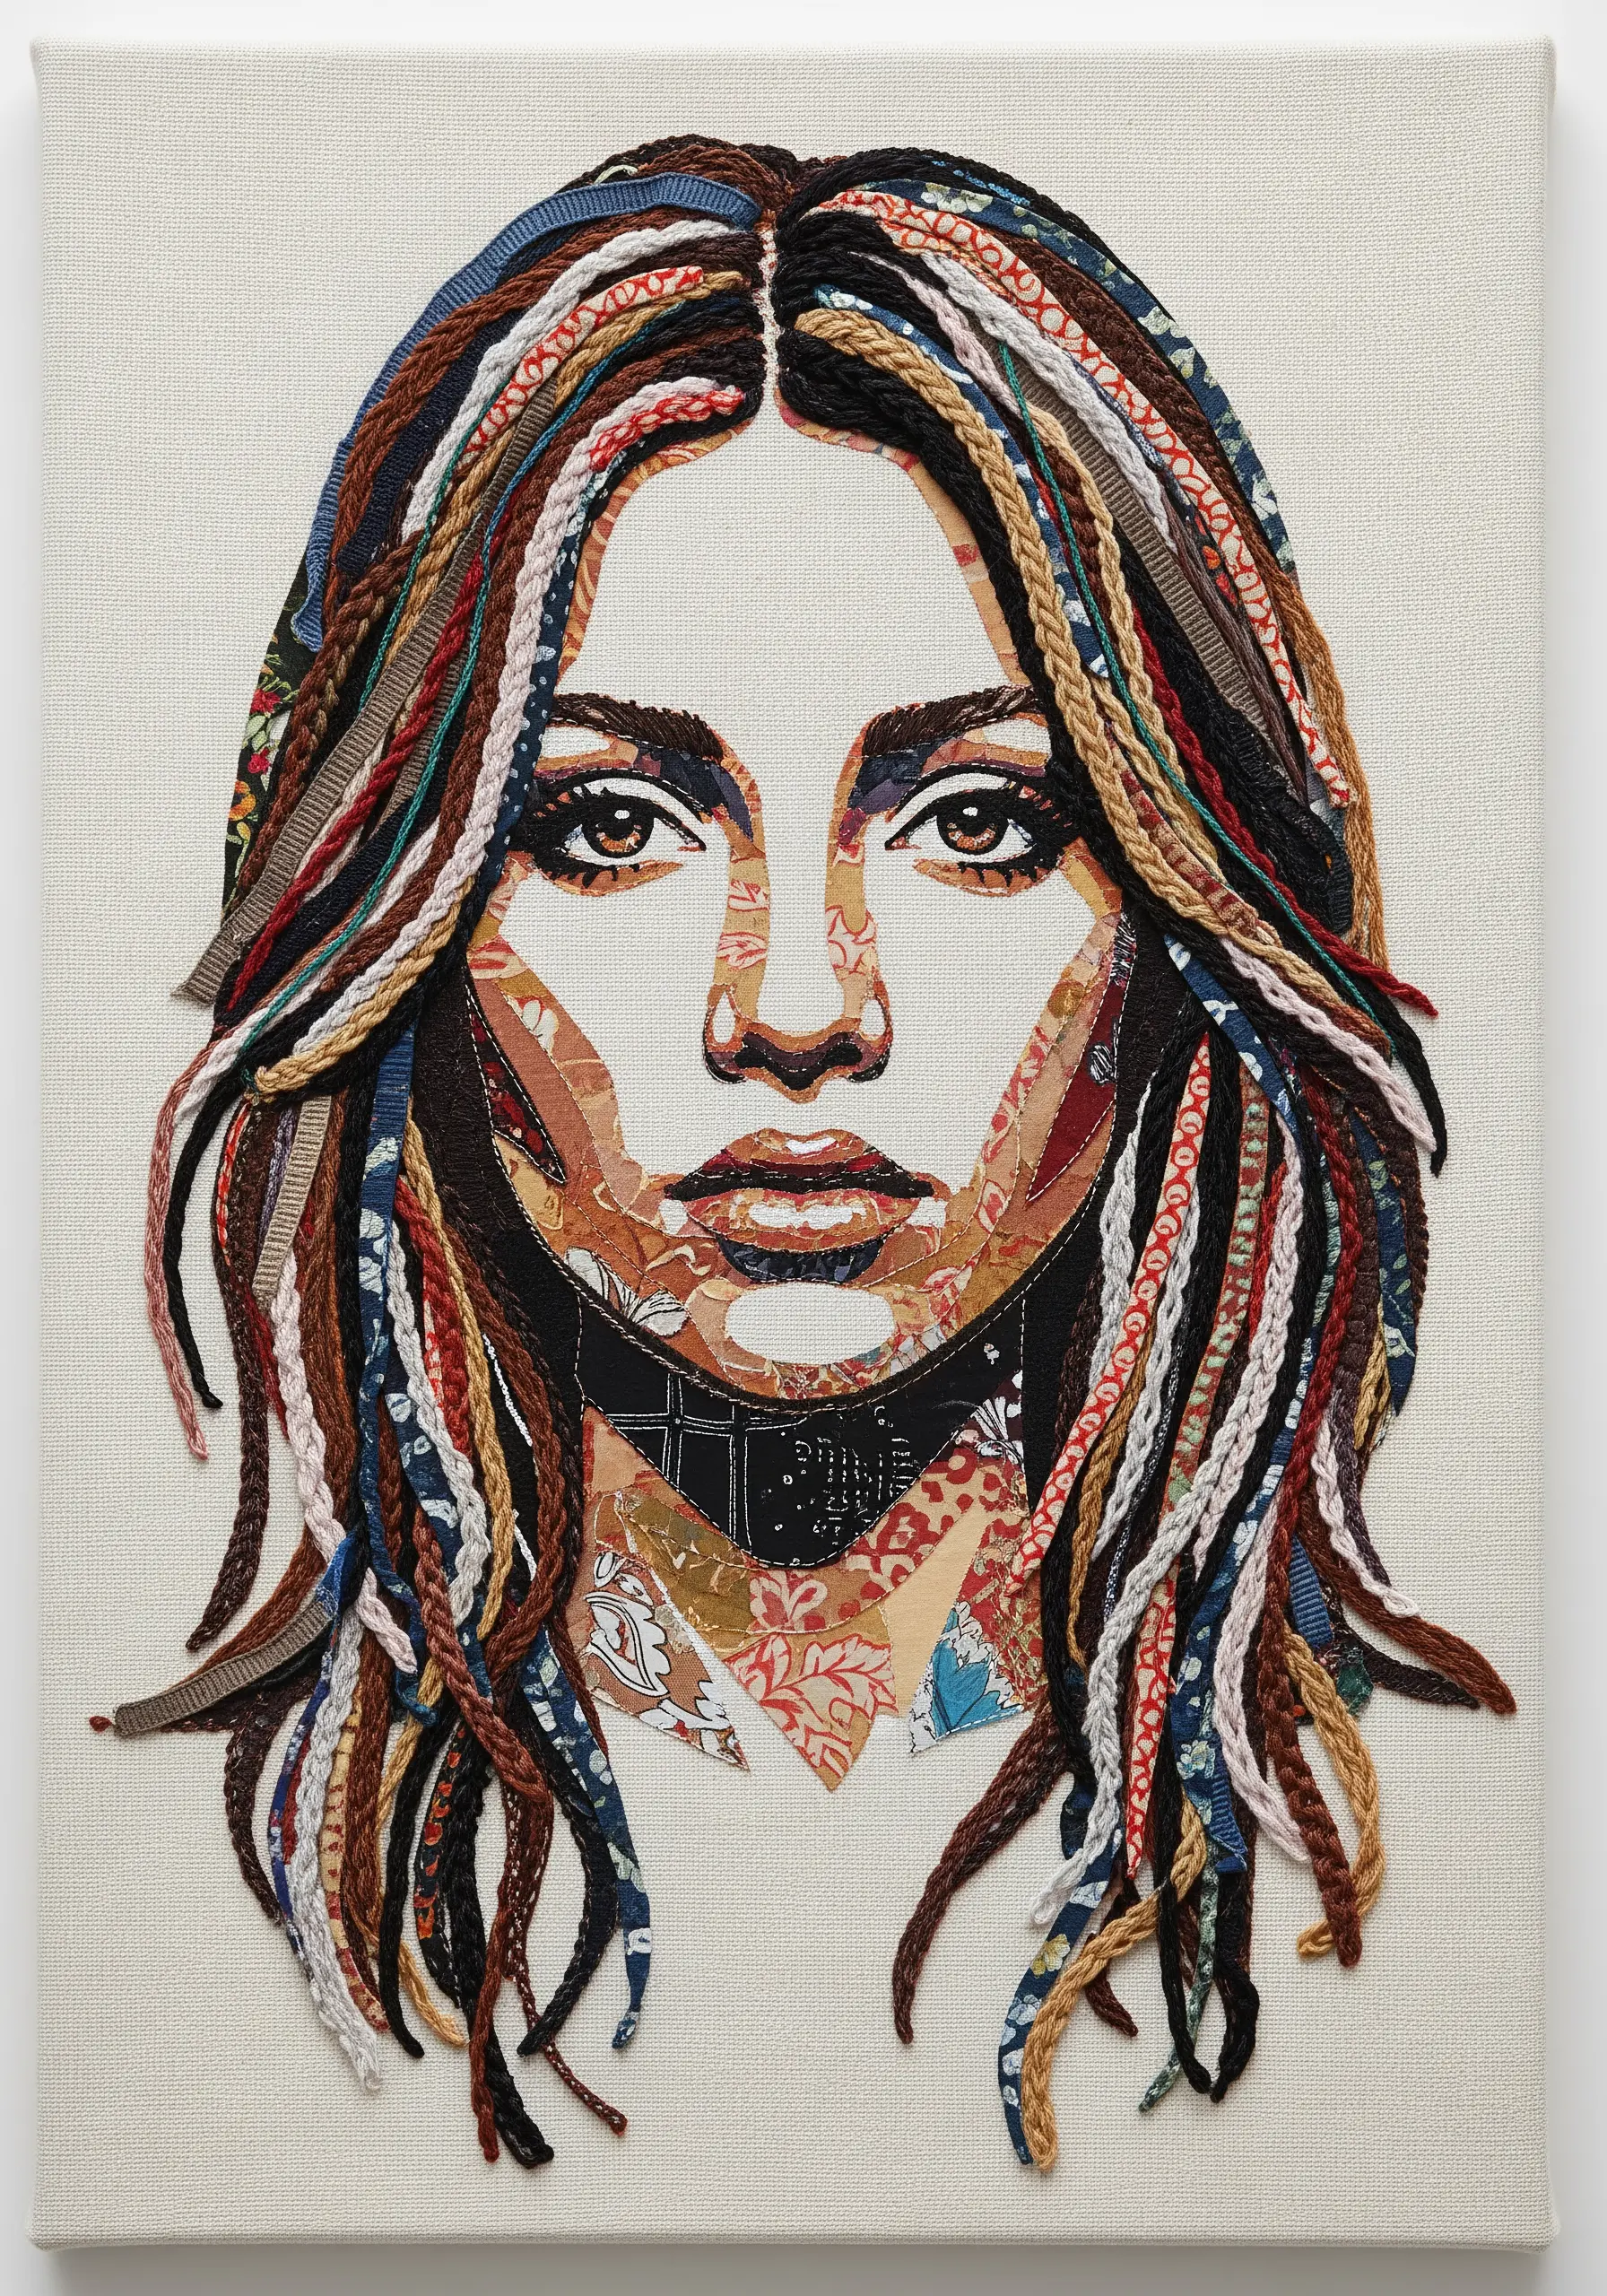
Approach a portrait with textile scraps by thinking like a painter, using fabric patterns and tones to represent light and shadow.
Cut small pieces of patterned fabric to build the planes of the face, letting the prints add unexpected texture and depth.
For the hair, create movement and dimension by braiding thin strips of fabric or thick yarn and stitching them onto the canvas.
The key is to focus on the overall shapes and values created by the fabrics, rather than trying to replicate realistic colors, resulting in a powerfully expressive piece.
10. Mimic Stained Glass with Sheer Fabrics
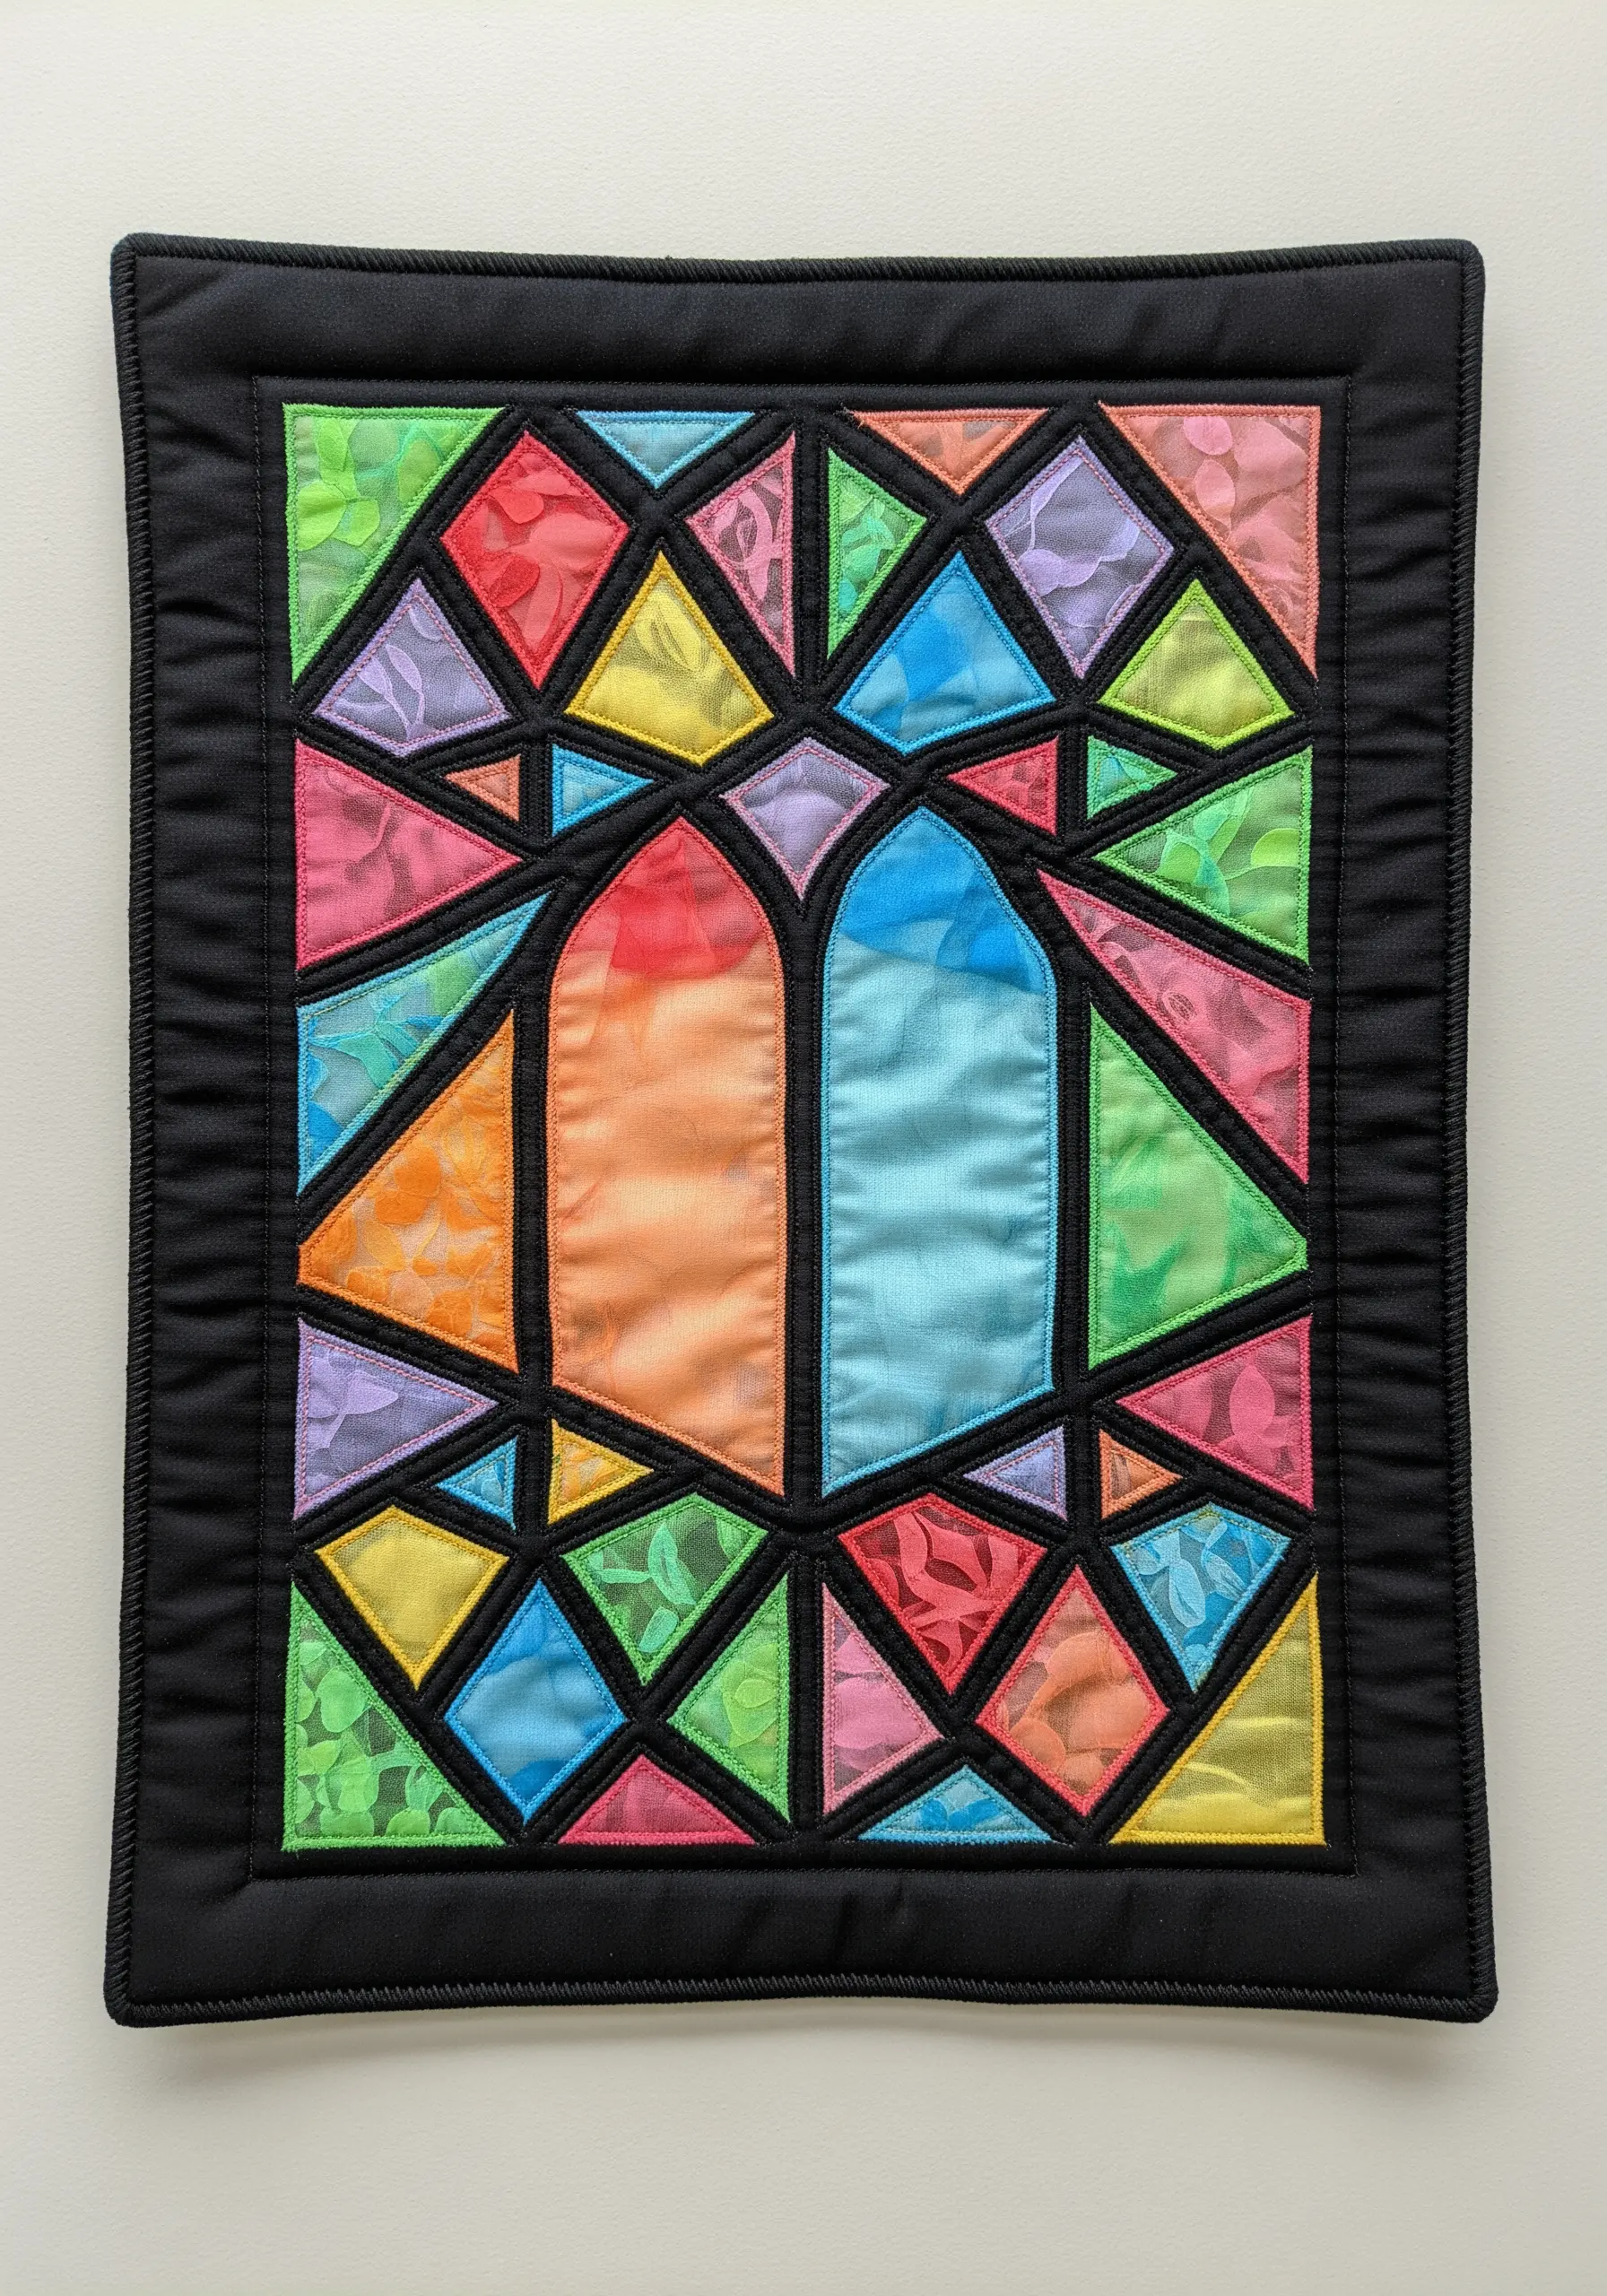
To capture the luminous quality of stained glass, use a black or very dark base fabric to represent the lead lines.
Cut your geometric shapes from sheer fabrics like organza, chiffon, or even colored tulle.
Where the sheer pieces overlap, they will create beautiful new, blended colors, just like real glass.
Finally, outline each fabric piece with a thick, heavy satin stitch or a couched black yarn to create the bold, defining lines that are characteristic of stained-glass windows.
11. Curate a Playful Stack of Patterned Teacups
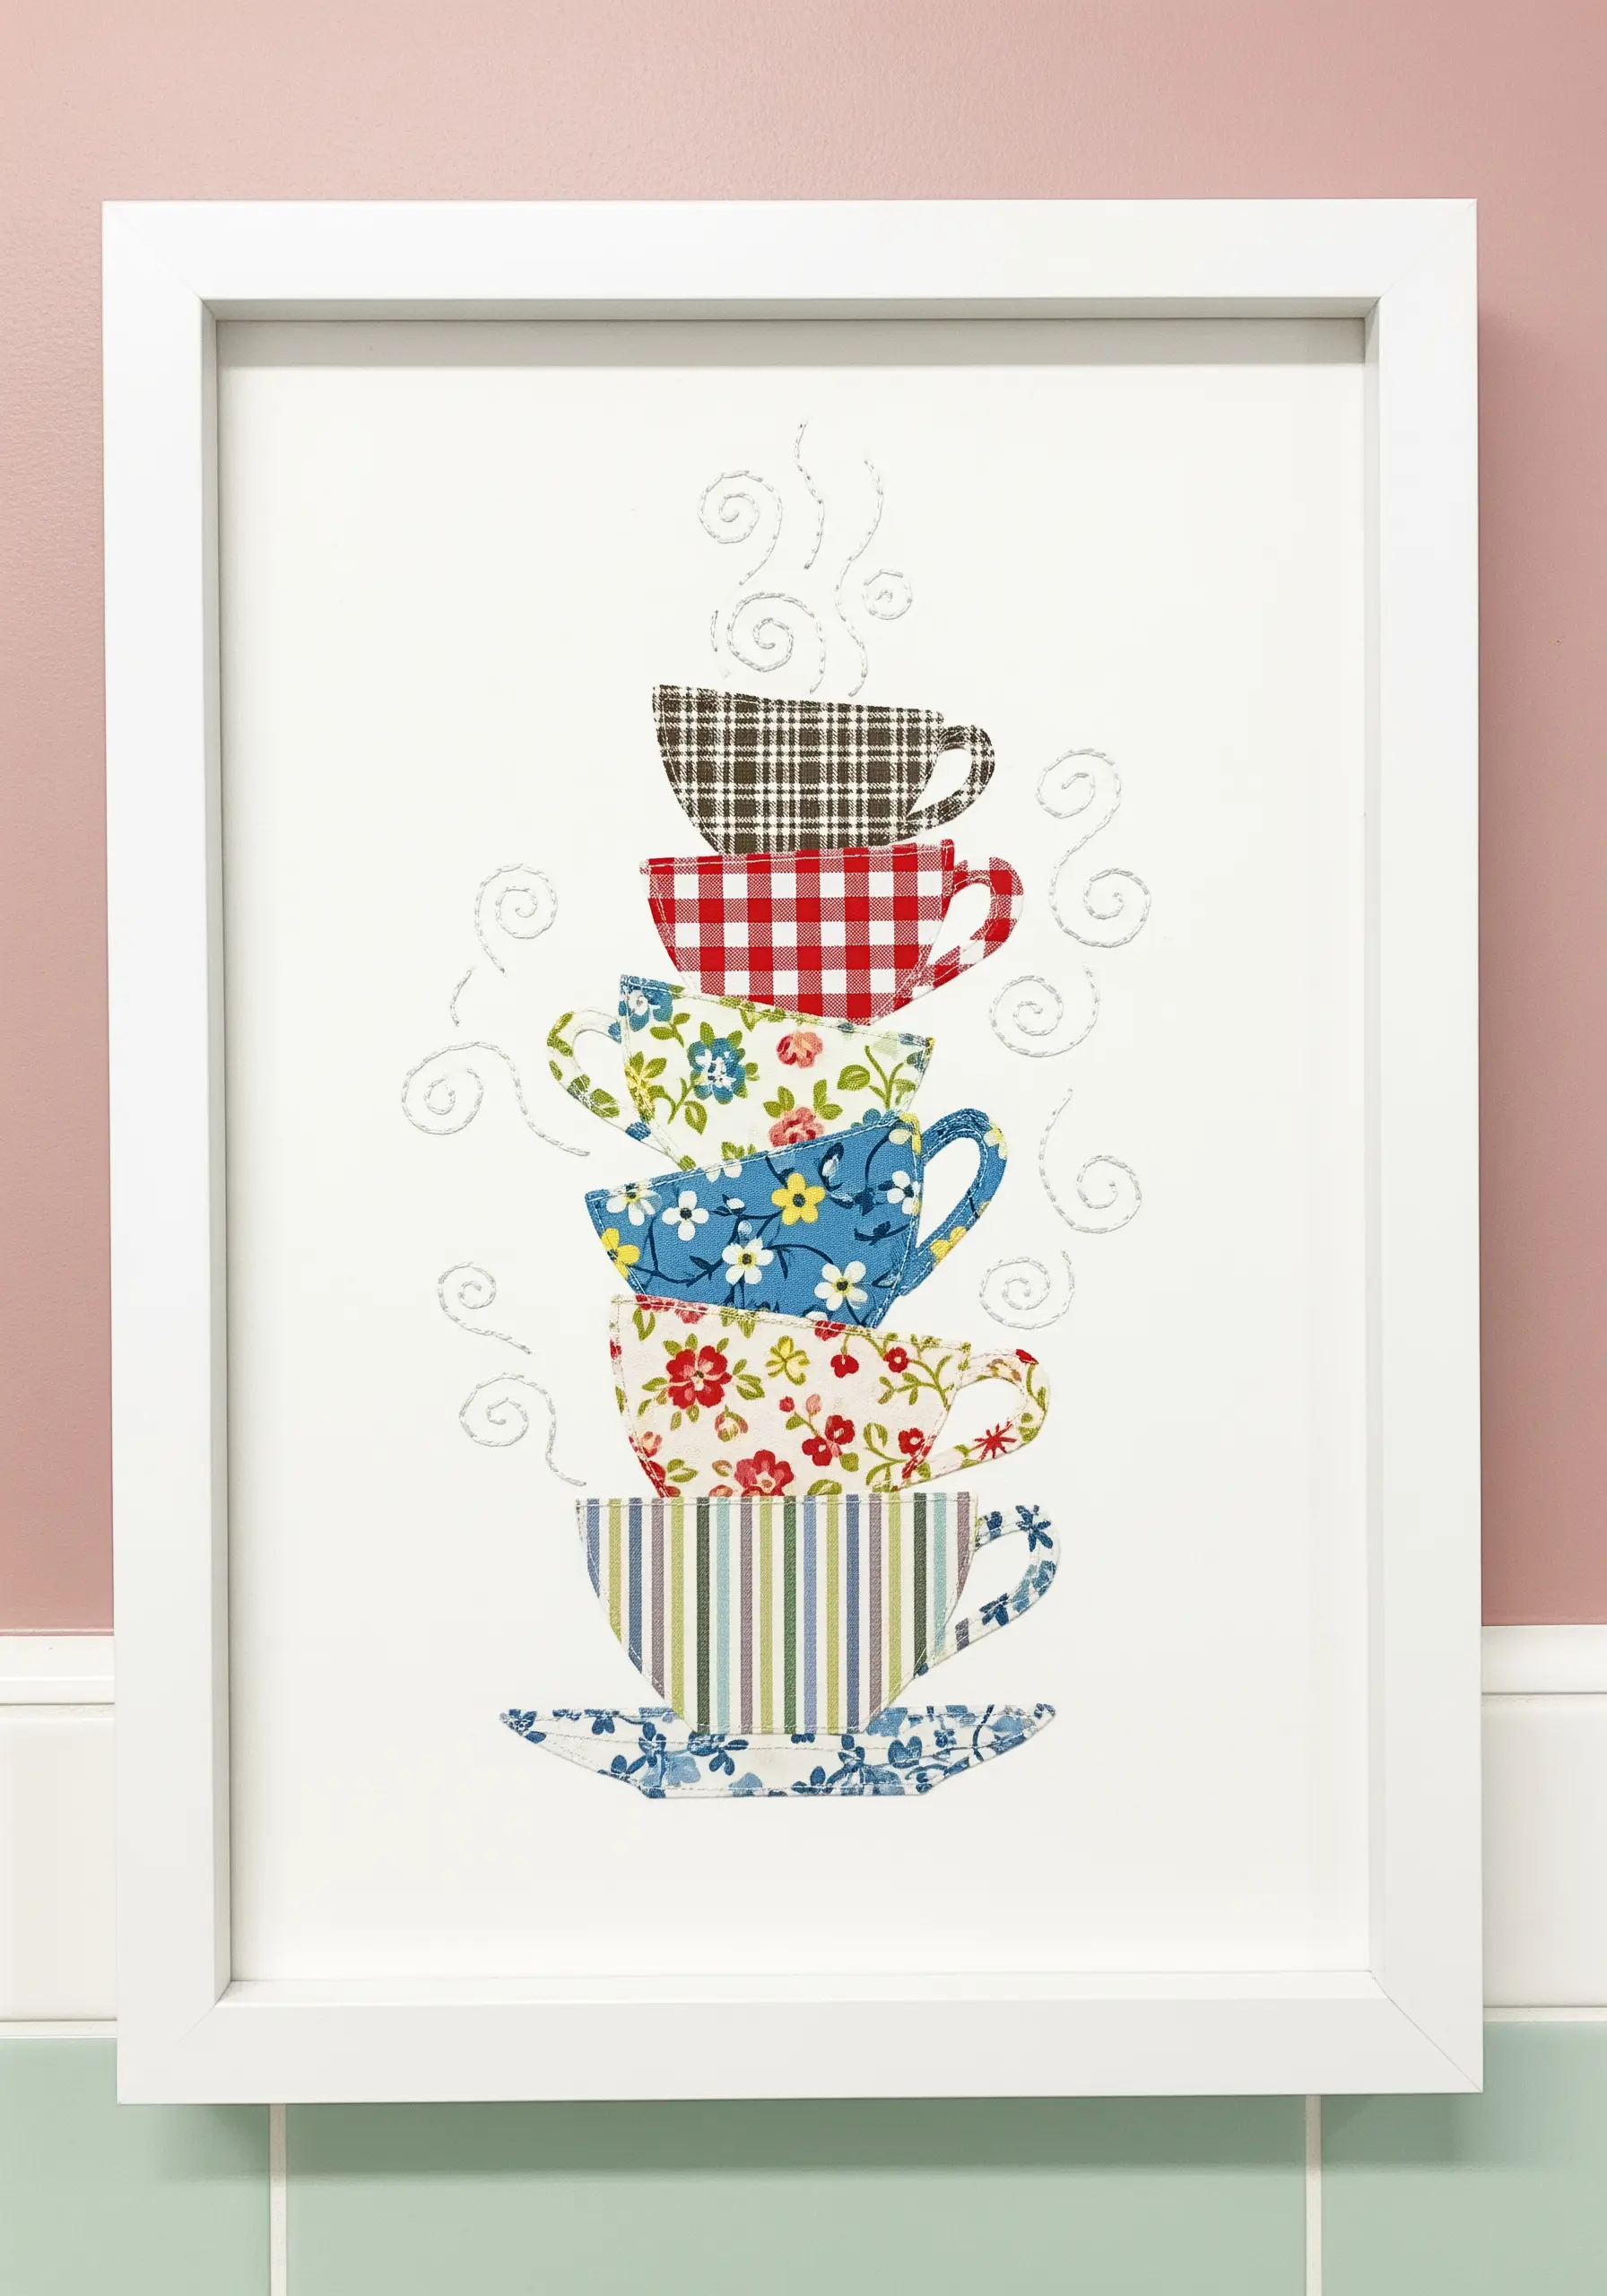
Dive into your scrap bin for small-scale patterns—gingham, tiny florals, stripes, and dots are perfect for this.
Fussy-cut each teacup shape to best feature the pattern, then arrange them in a whimsical, slightly tilted stack for a sense of movement.
Secure the appliqué pieces and then add simple embroidered details like handles with a backstitch.
For the steam, switch to a fine, silvery metallic thread and use a light, looping stitch to create a delicate shimmer that contrasts beautifully with the solid, colorful fabric of the cups.
12. Embellish Felt Leaves with Metallic Details
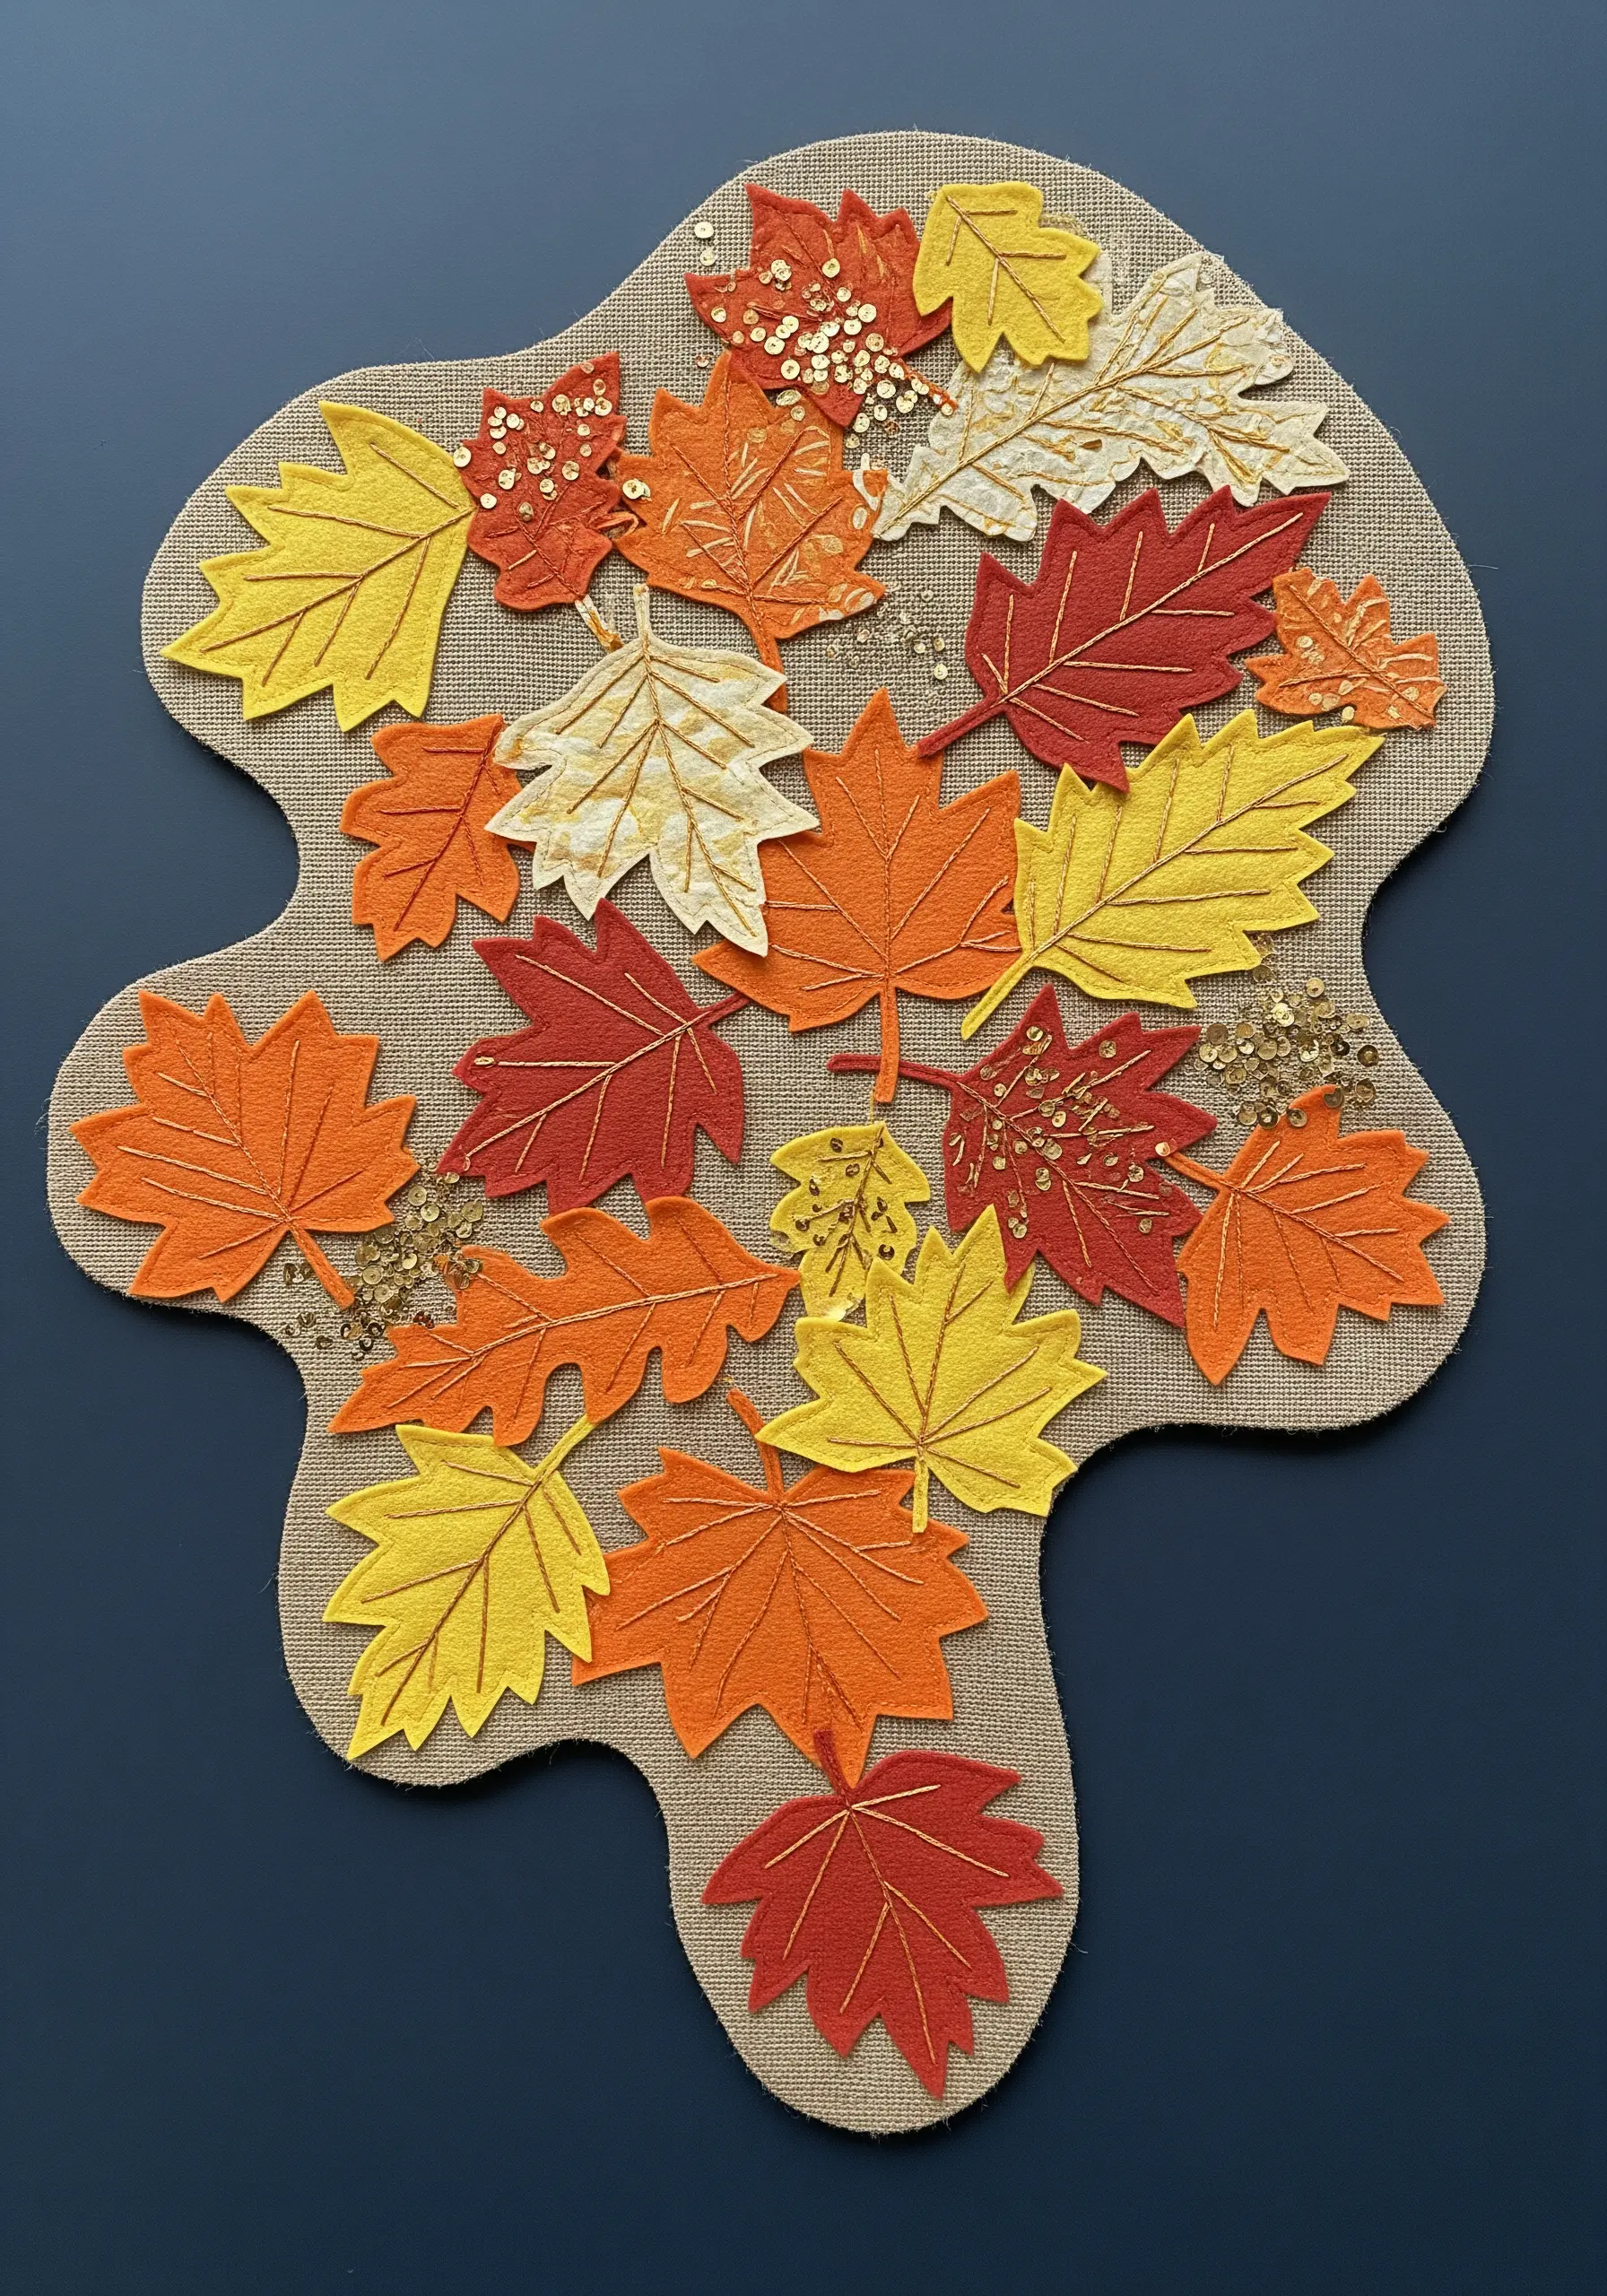
Felt is an ideal material for collage because its edges don’t fray, allowing you to cut intricate shapes with confidence.
Create a composition of autumn-colored felt leaves on a rustic burlap or linen background.
Use a simple backstitch or running stitch in a contrasting thread color to add delicate vein details to each leaf.
To elevate the piece, strategically scatter a few gold sequins or seed beads. This adds a subtle sparkle that mimics the way autumn sunlight catches on fallen leaves, adding a touch of magic.
13. Weave a Narrative with Miniature Details
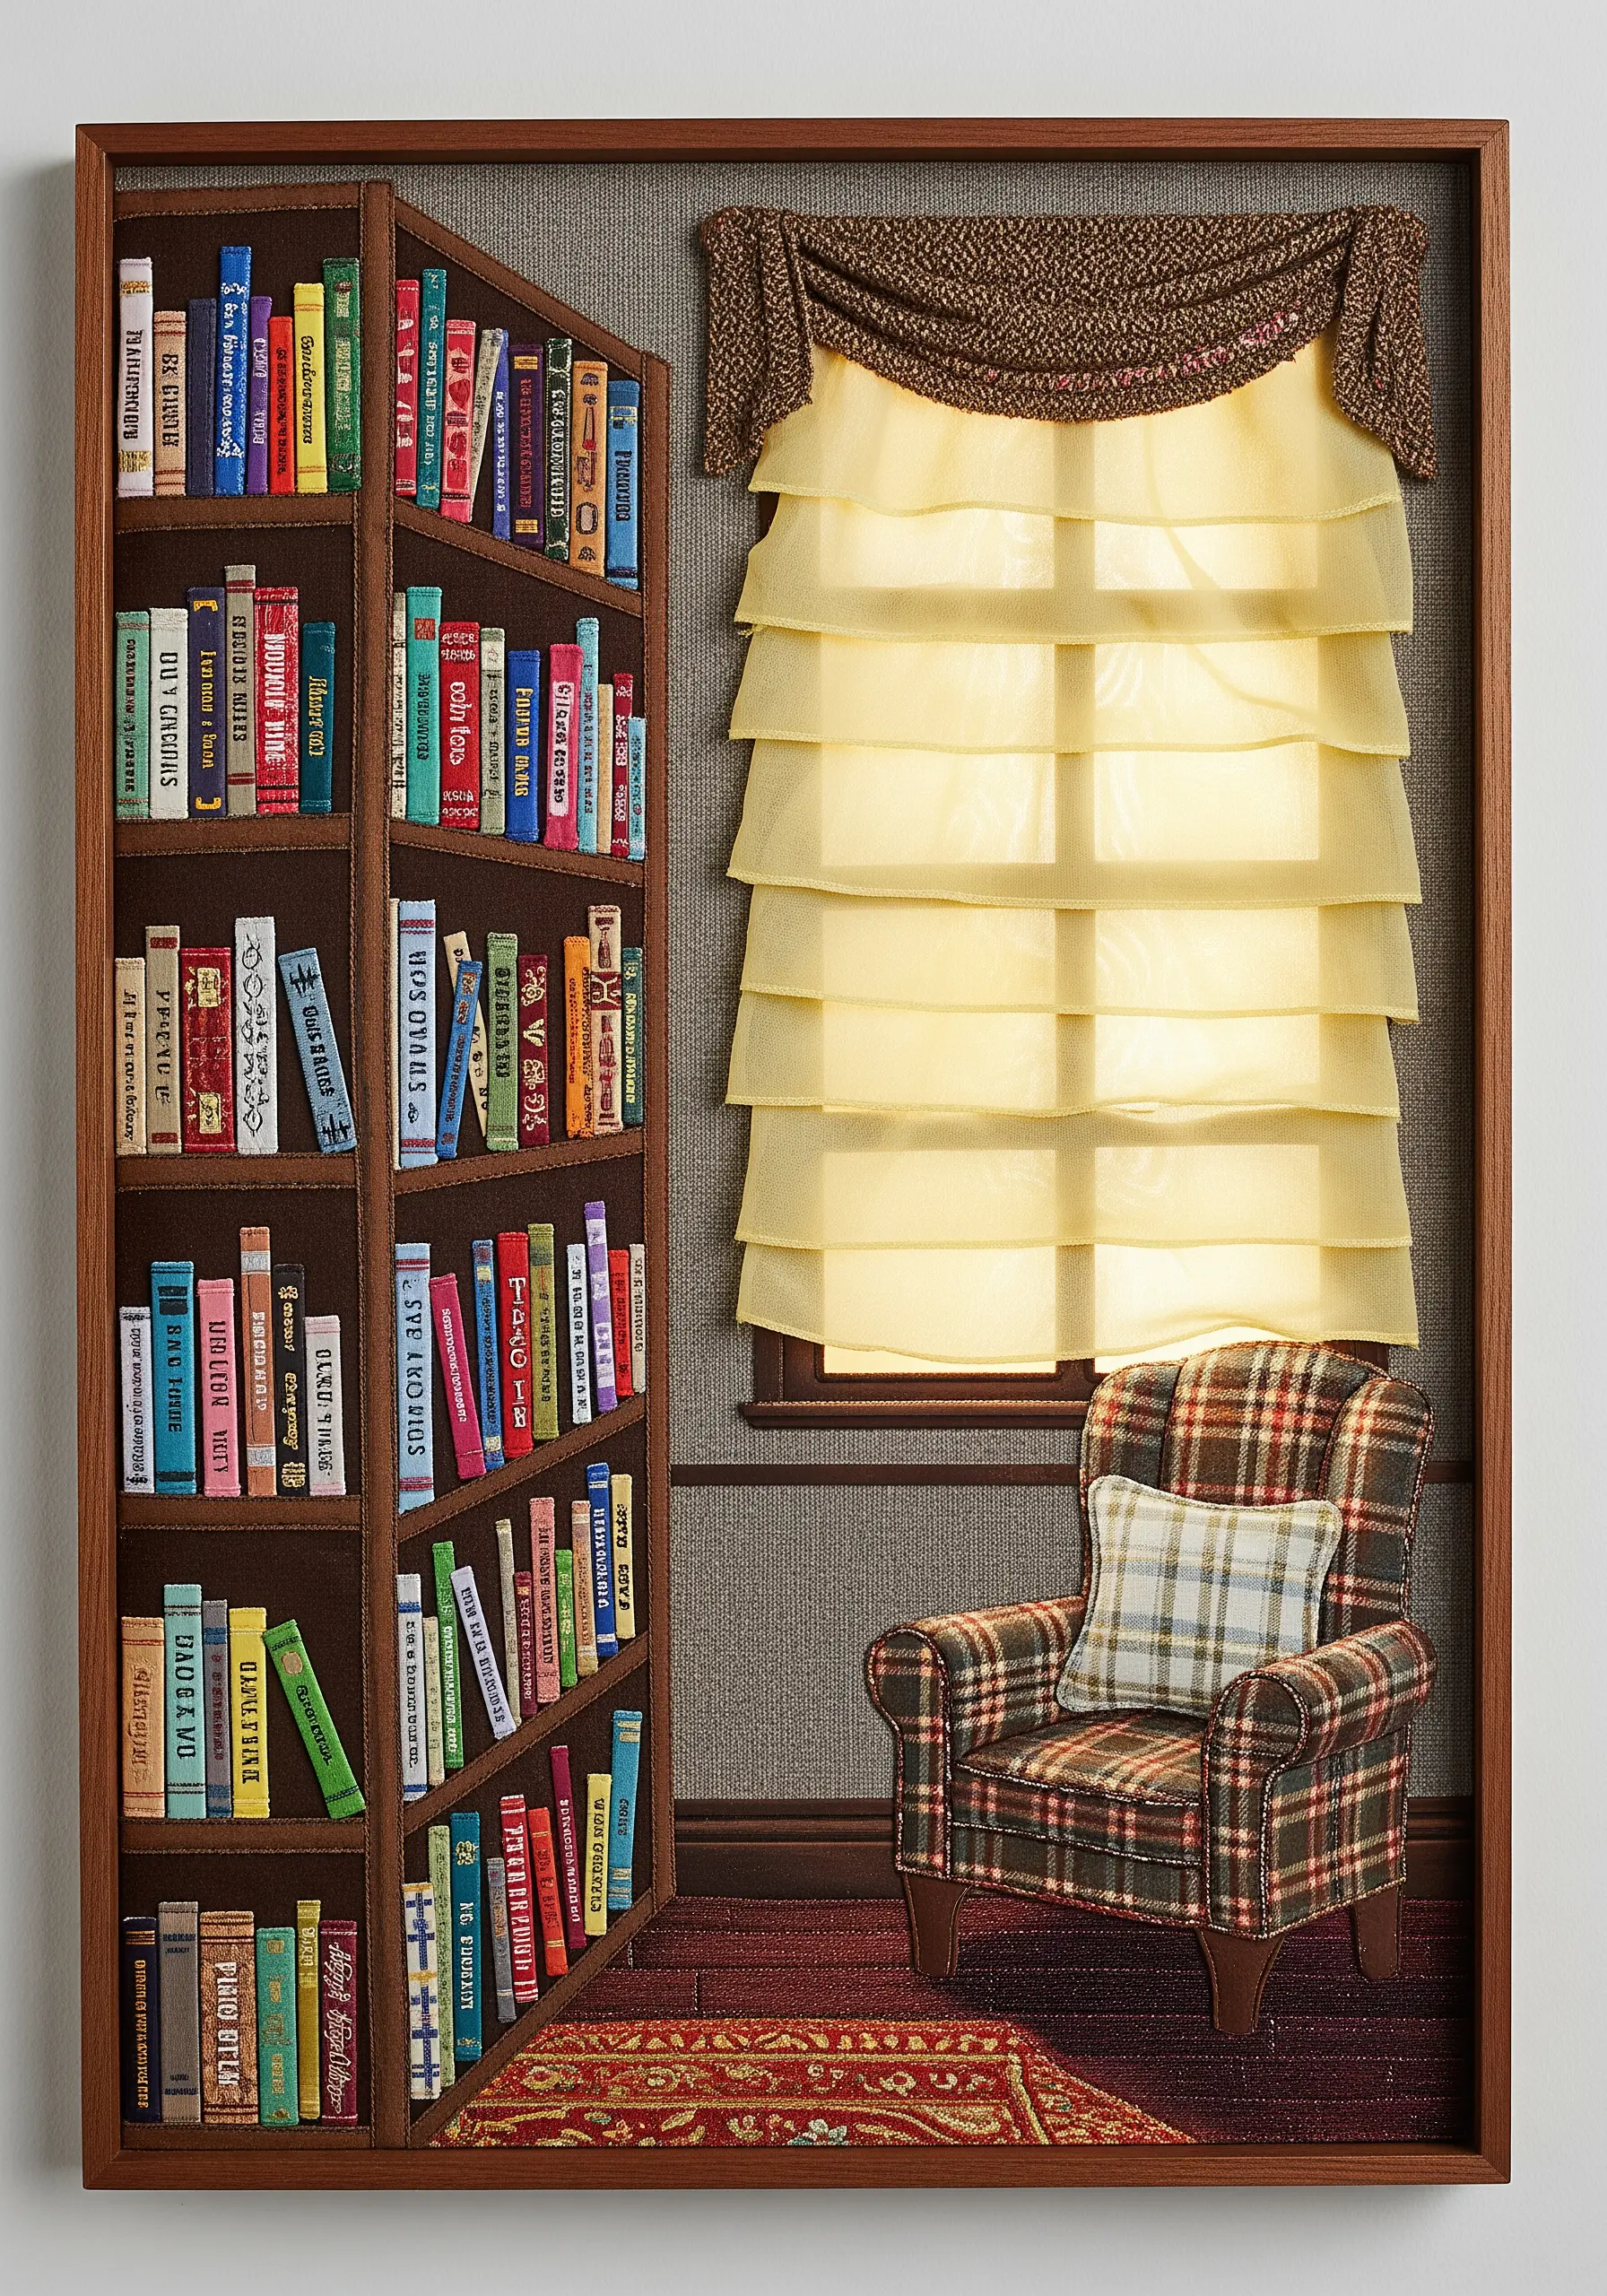
Create an entire world in miniature through careful fabric selection and storytelling through textiles.
Use fabrics with tiny prints to suggest wallpaper, upholstery, or book spines, ensuring the scale of the pattern matches the scale of your scene.
For elements like curtains, use a lightweight, sheer fabric like chiffon and gather it to create realistic folds and light diffusion.
The success of a miniature scene lies in the details, so use single strands of thread for any embroidered elements to keep them fine and in proportion.
14. Design a Celestial Moth with Satin Appliqué
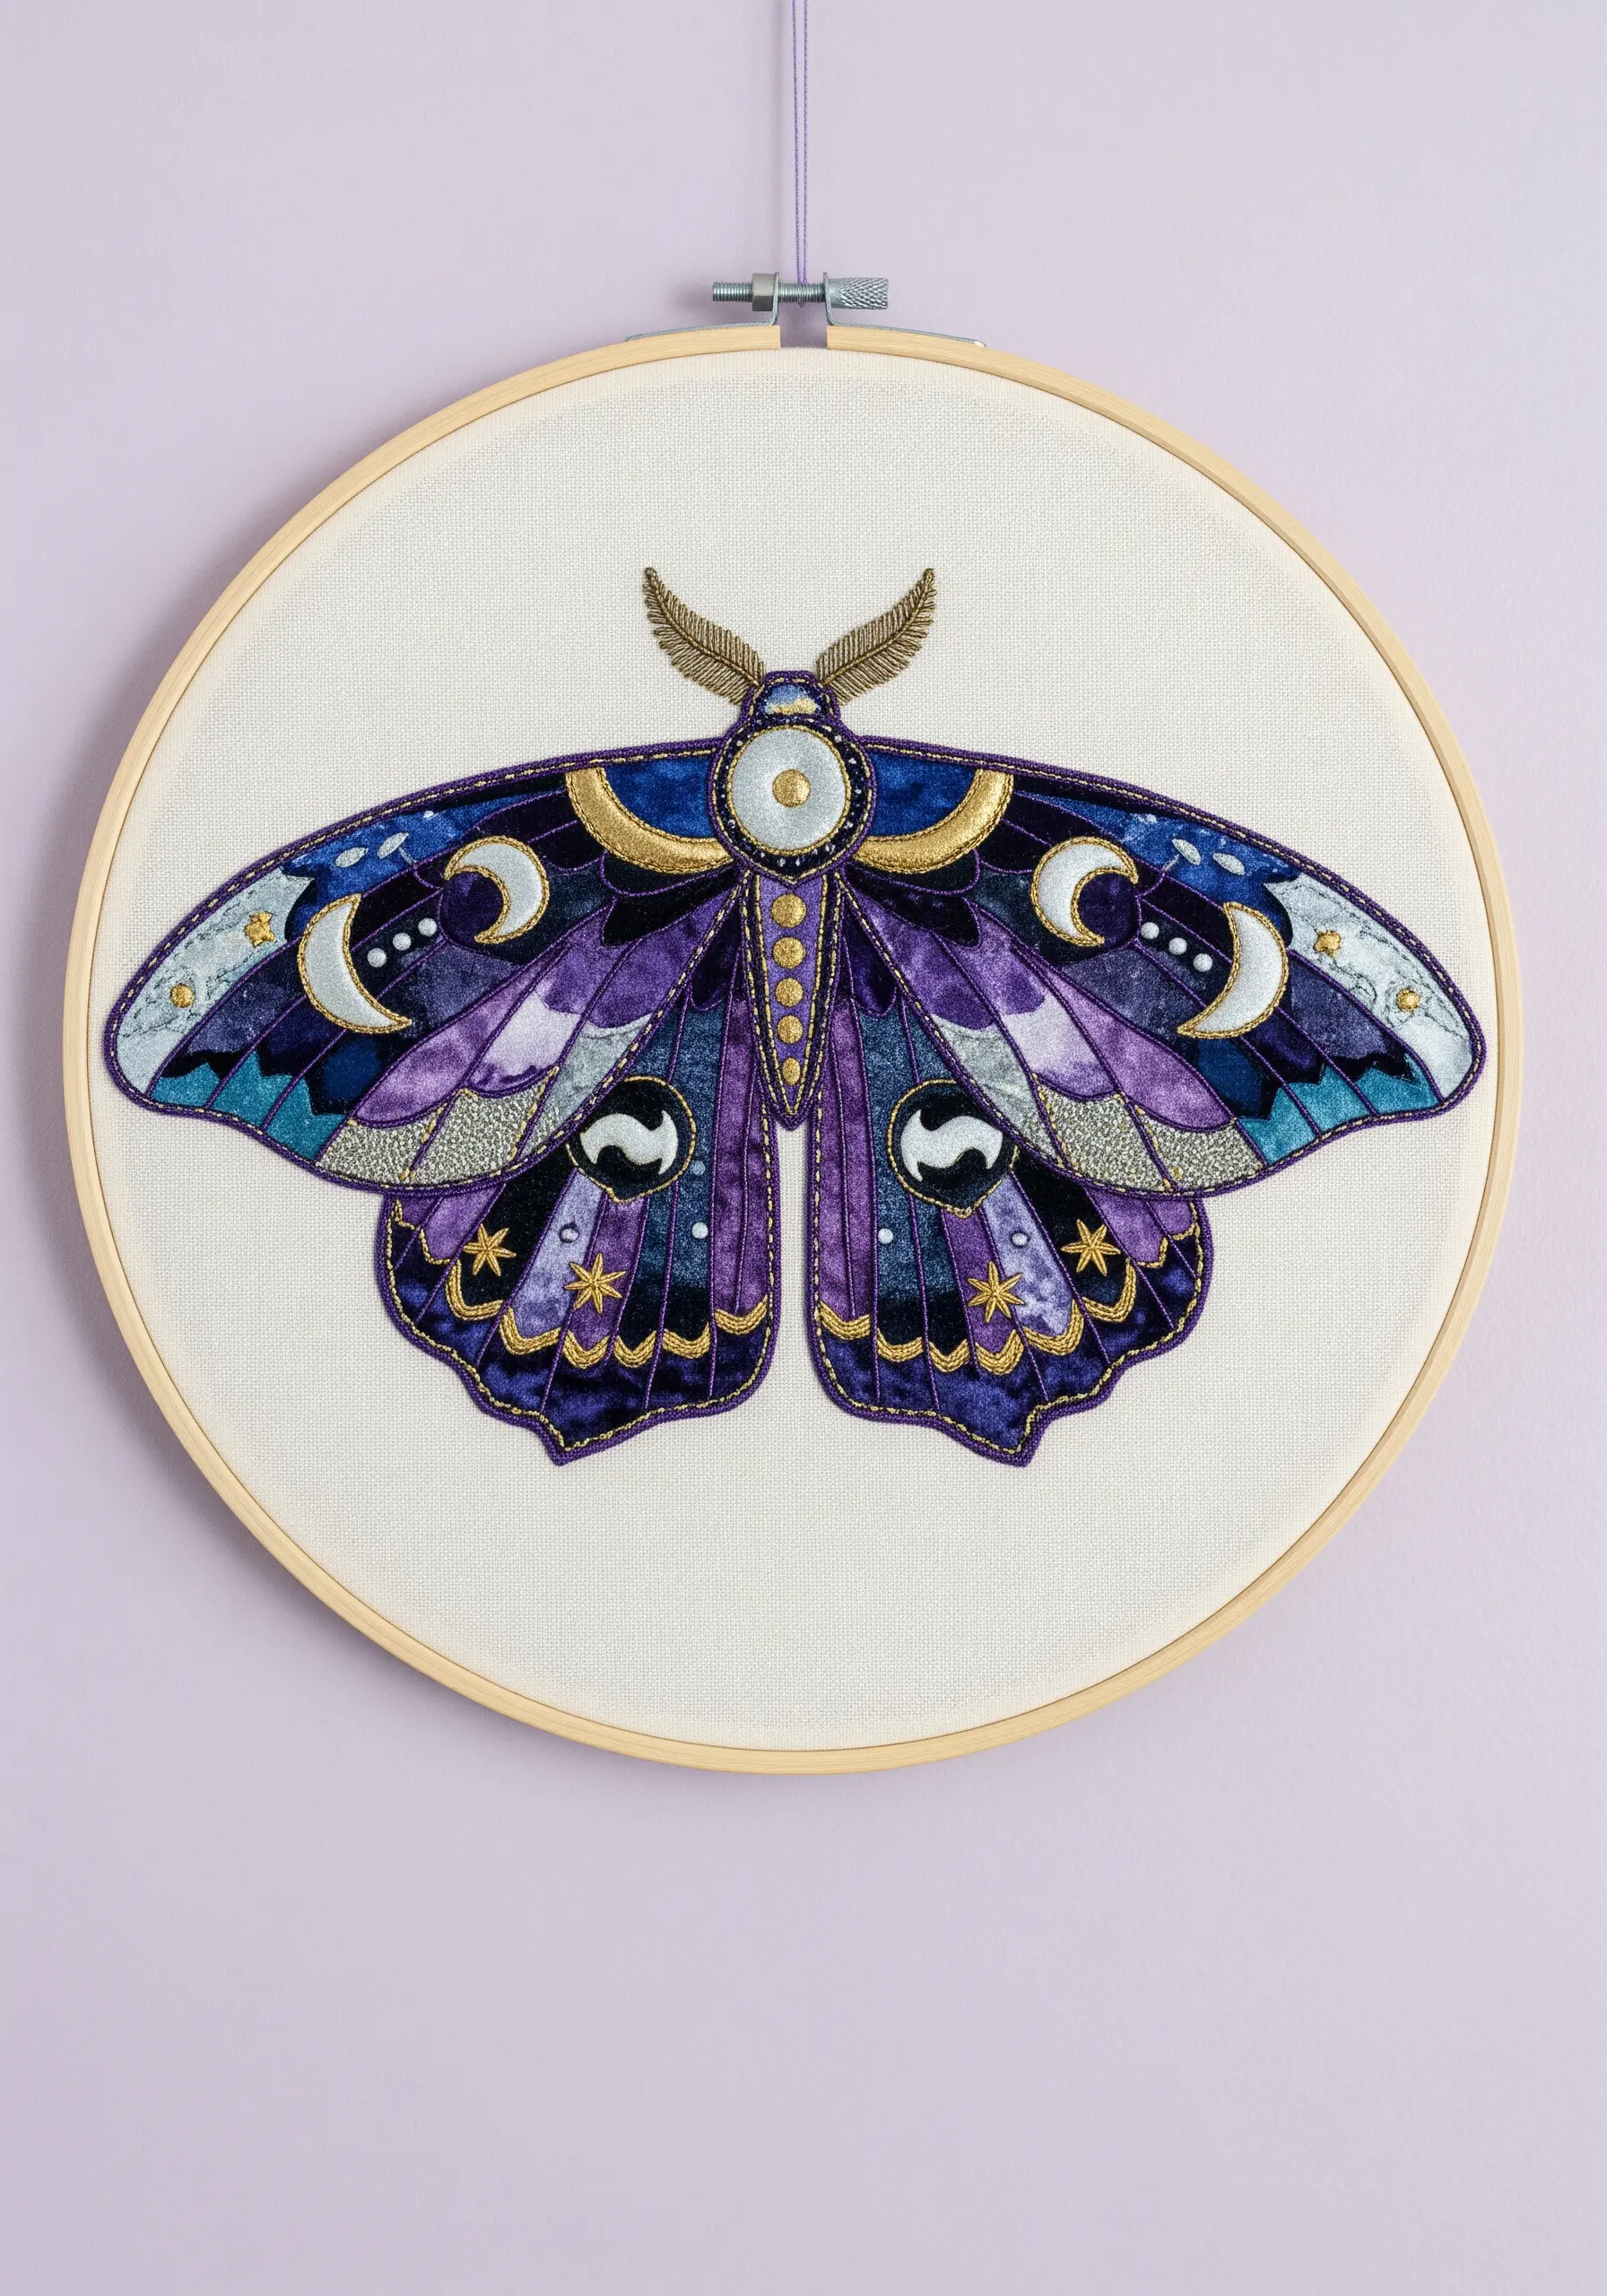
To give your creation a magical luminescence, choose fabrics with a natural sheen, such as satin, sateen, or silk scraps.
Cut out the individual sections of the moth’s wings and appliqué them carefully.
The key to a clean, professional finish is to outline each satin piece with a precise satin stitch border using a metallic gold or silver thread.
This technique not only secures the raw edges but also defines the intricate patterns of the wings, giving the entire piece a precious, jewel-like quality.
15. Illustrate a Bustling Scene with Layered Figures
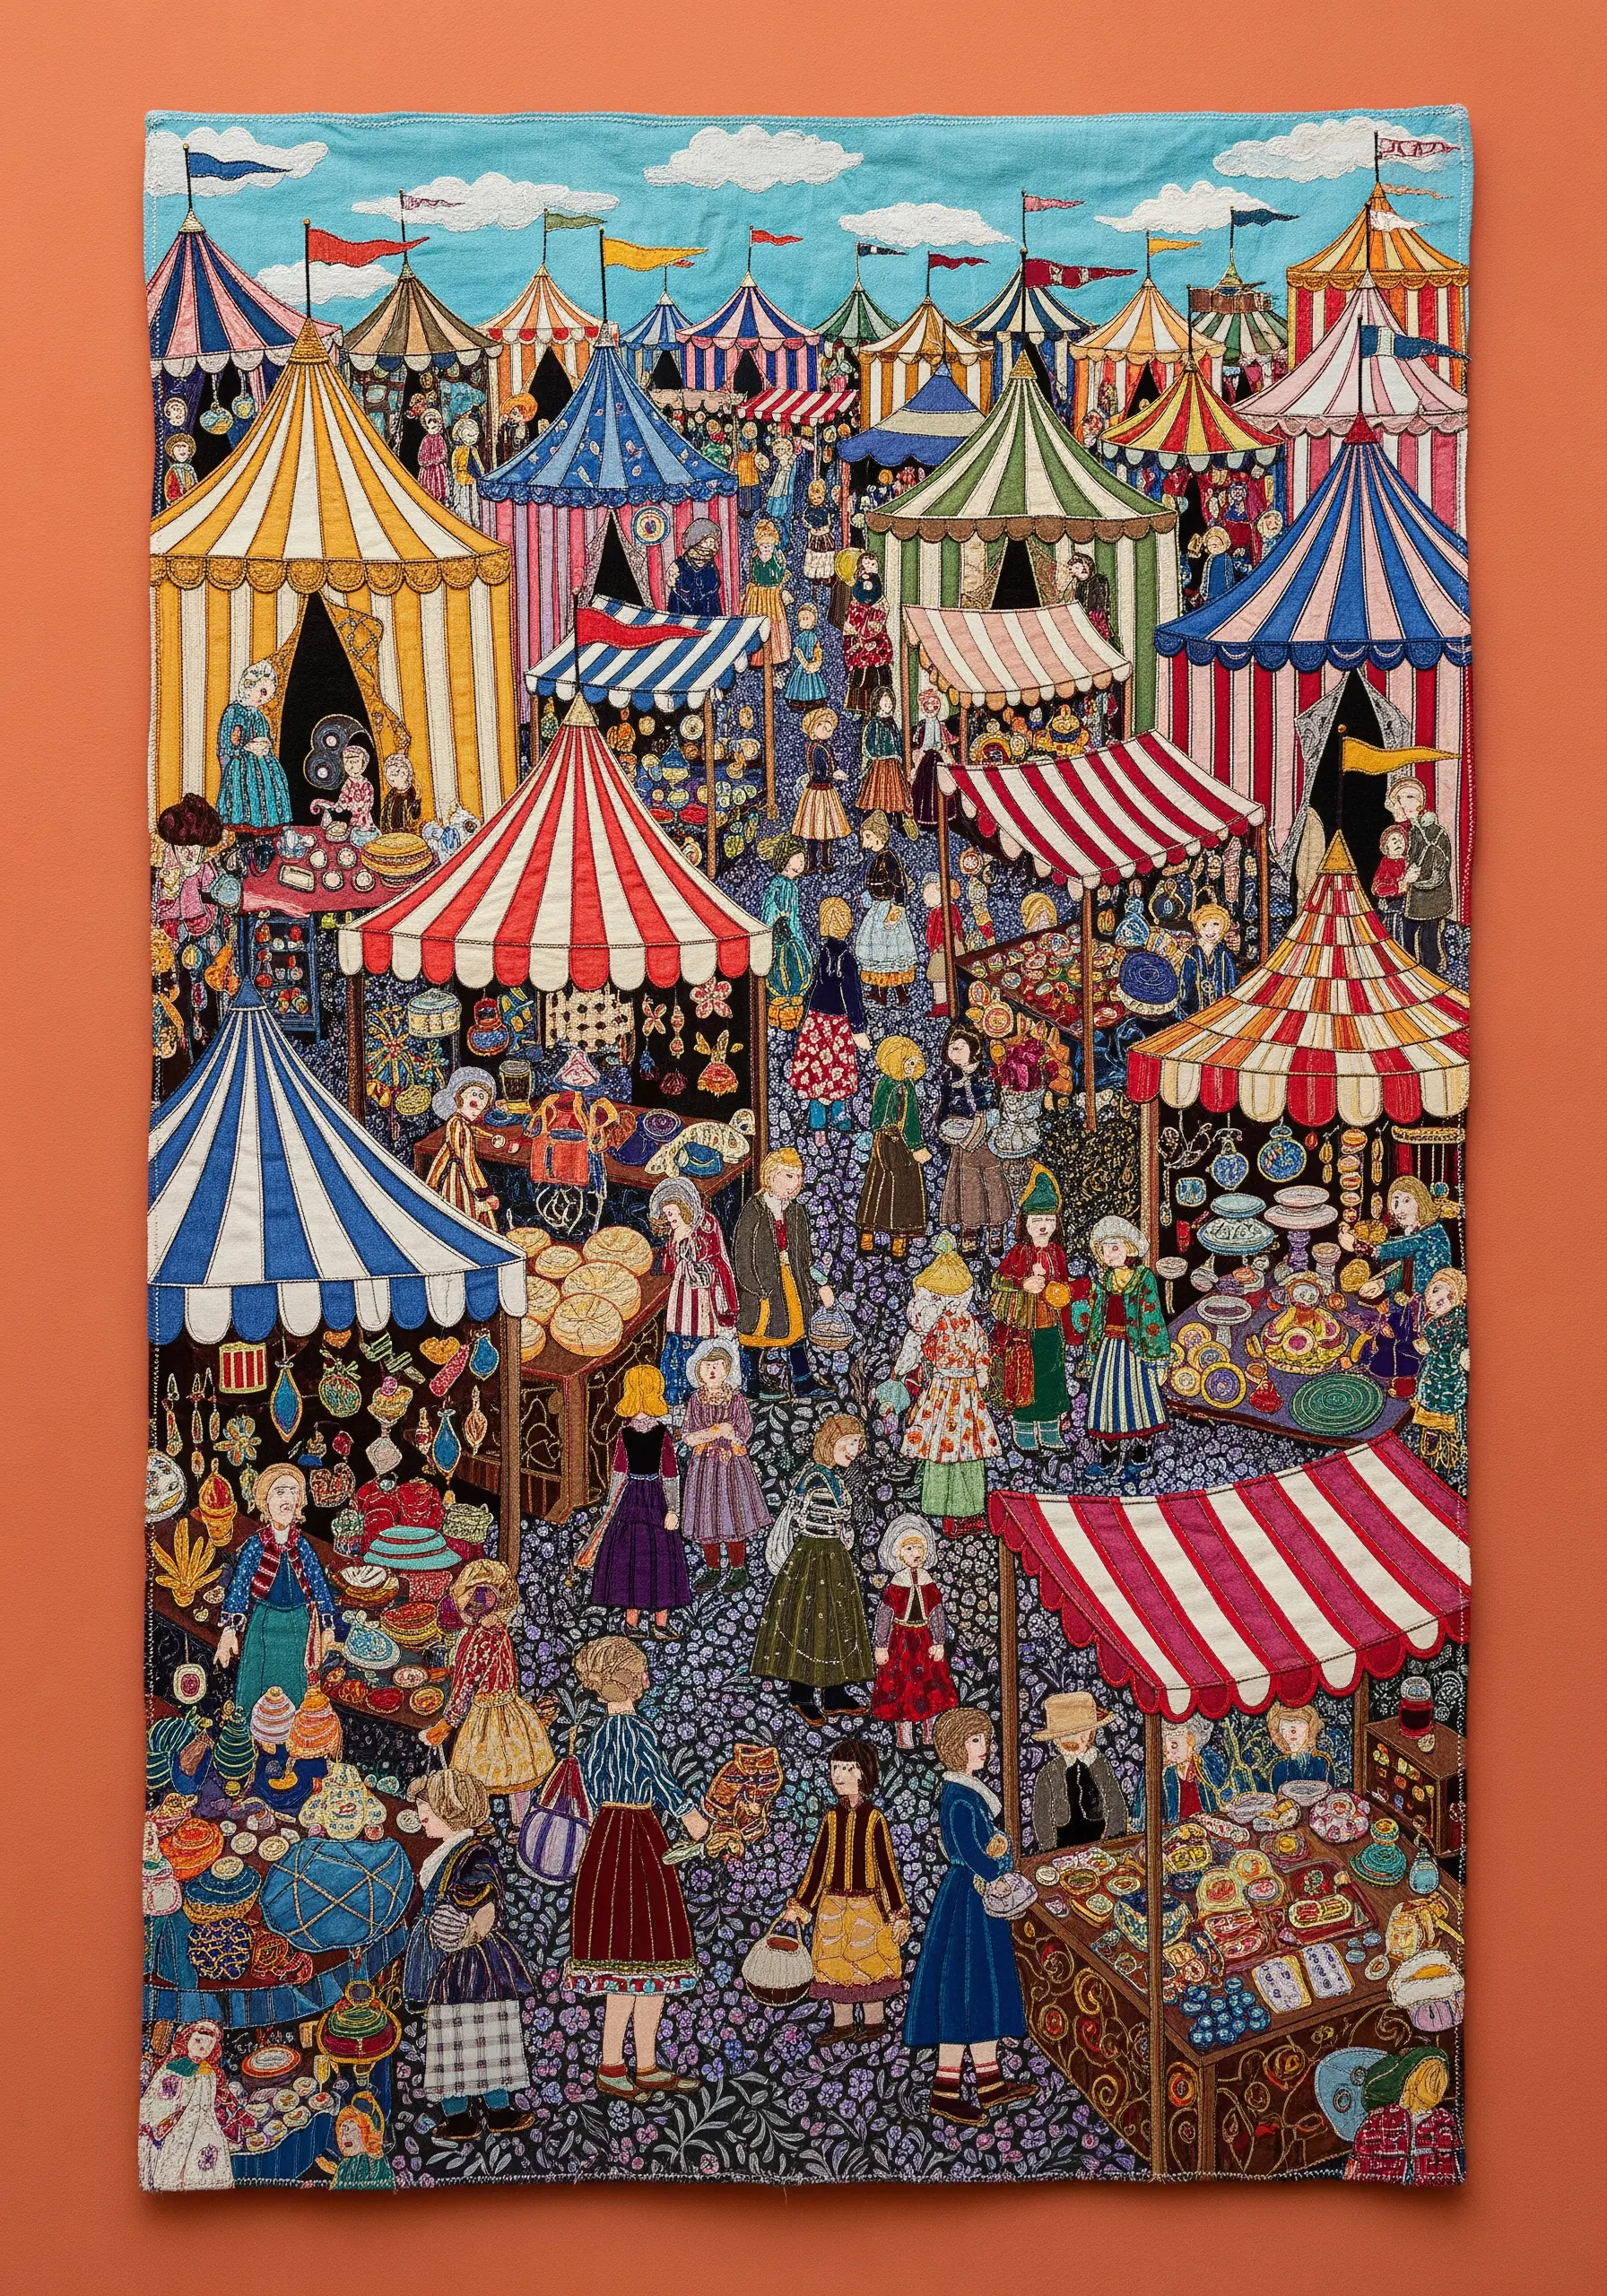
To create the illusion of a crowd without stitching every single detail, focus on layering simplified fabric shapes.
Use a wide variety of patterned scraps for clothing to create visual diversity and energy.
Strategically overlap the figures, placing those in the foreground over the ones behind them to build a convincing sense of depth and perspective.
Reserve fine embroidered details, like faces or hands, for only the one or two figures closest to the viewer. This directs the eye and keeps the rest of the bustling scene impressionistic.
16. Explore a Minimalist Composition with Decorative Edges
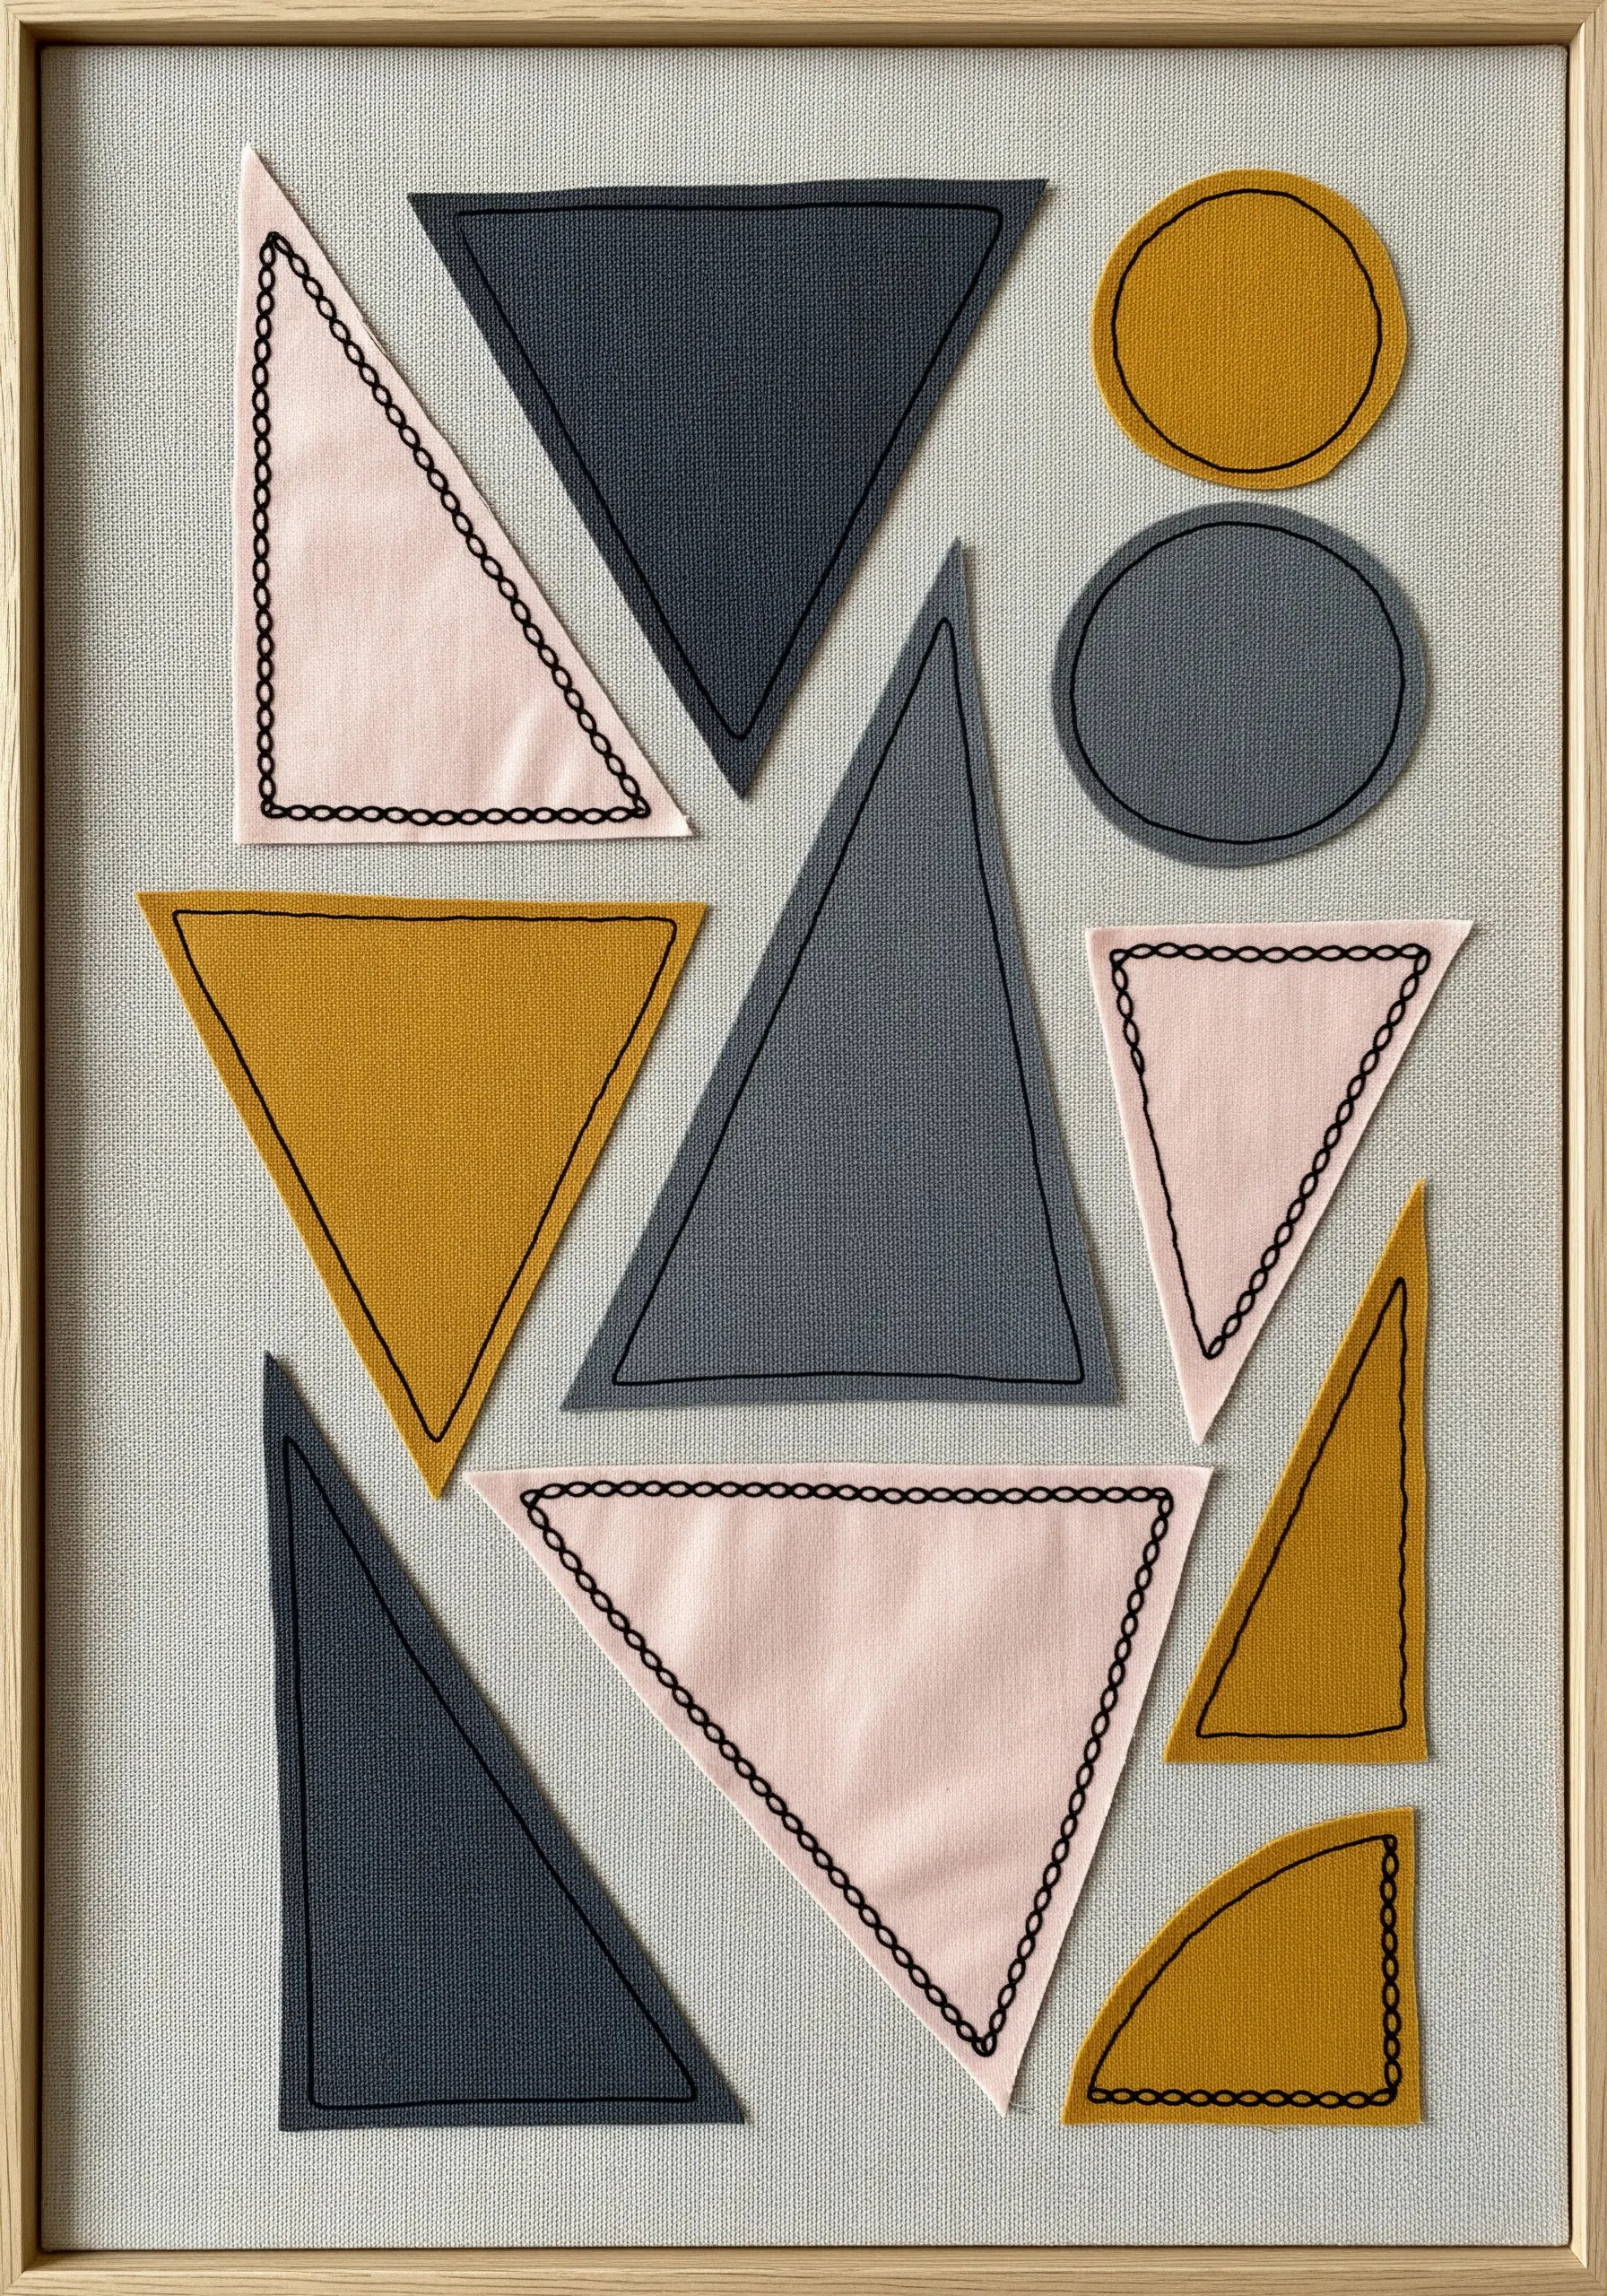
Embrace a clean, modern aesthetic by focusing on the beauty of simple shapes and negative space.
Cut triangles, circles, and other geometric forms from high-quality, solid-colored fabrics like canvas or linen.
Arrange them in a balanced, abstract layout on a neutral background.
Instead of hiding the raw edges with a traditional appliqué stitch, celebrate them by adding a decorative stitch—like a chain stitch or a simple blanket stitch—just inside the edge. This adds a subtle, handcrafted texture to your minimalist composition.
17. Blend Painting and Stitching for a Surreal Landscape
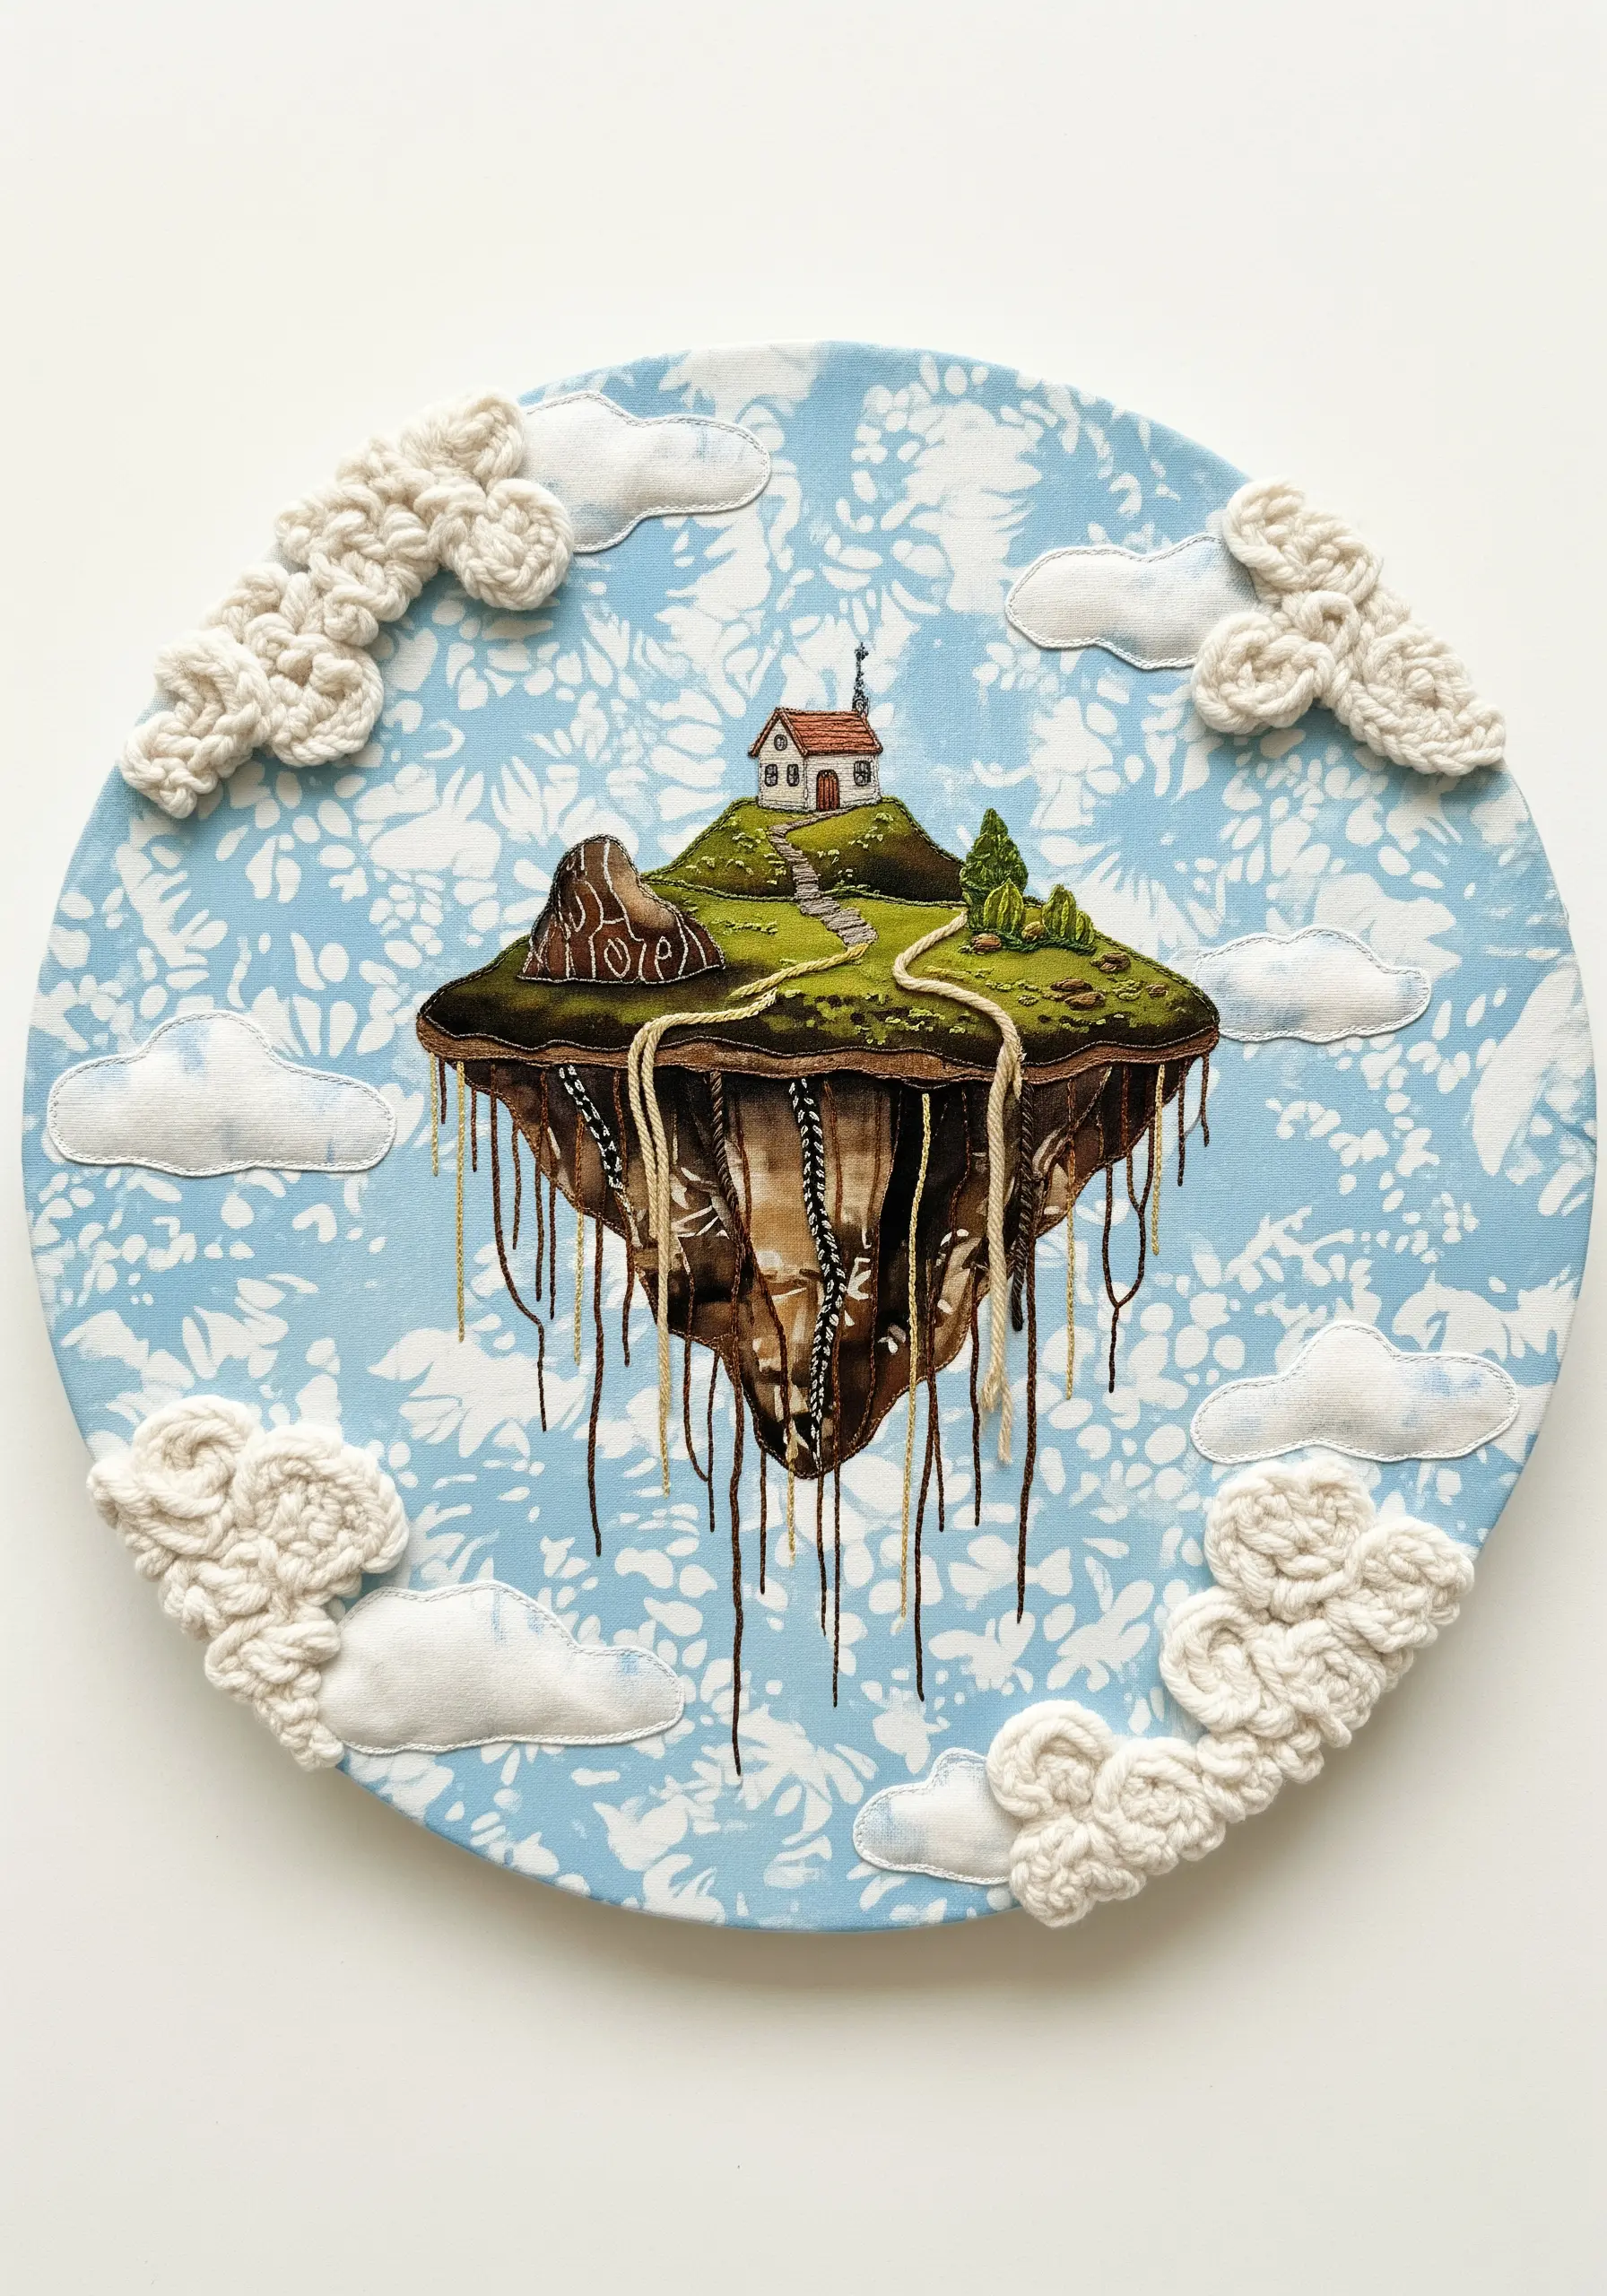
Begin by creating a unique background fabric; you can paint it, use ice dye, or find a piece with an abstract print that suits your vision.
Appliqué your main subject—like a floating island—onto this dynamic base.
Then, introduce a variety of textures to bring the surreal landscape to life. Let threads hang loose to represent roots or waterfalls, and use highly dimensional stitches like bullion knots or woven picots to craft tactile, fluffy clouds that seem to float off the fabric.
18. Cultivate a Garden with Tone-on-Tone Textures
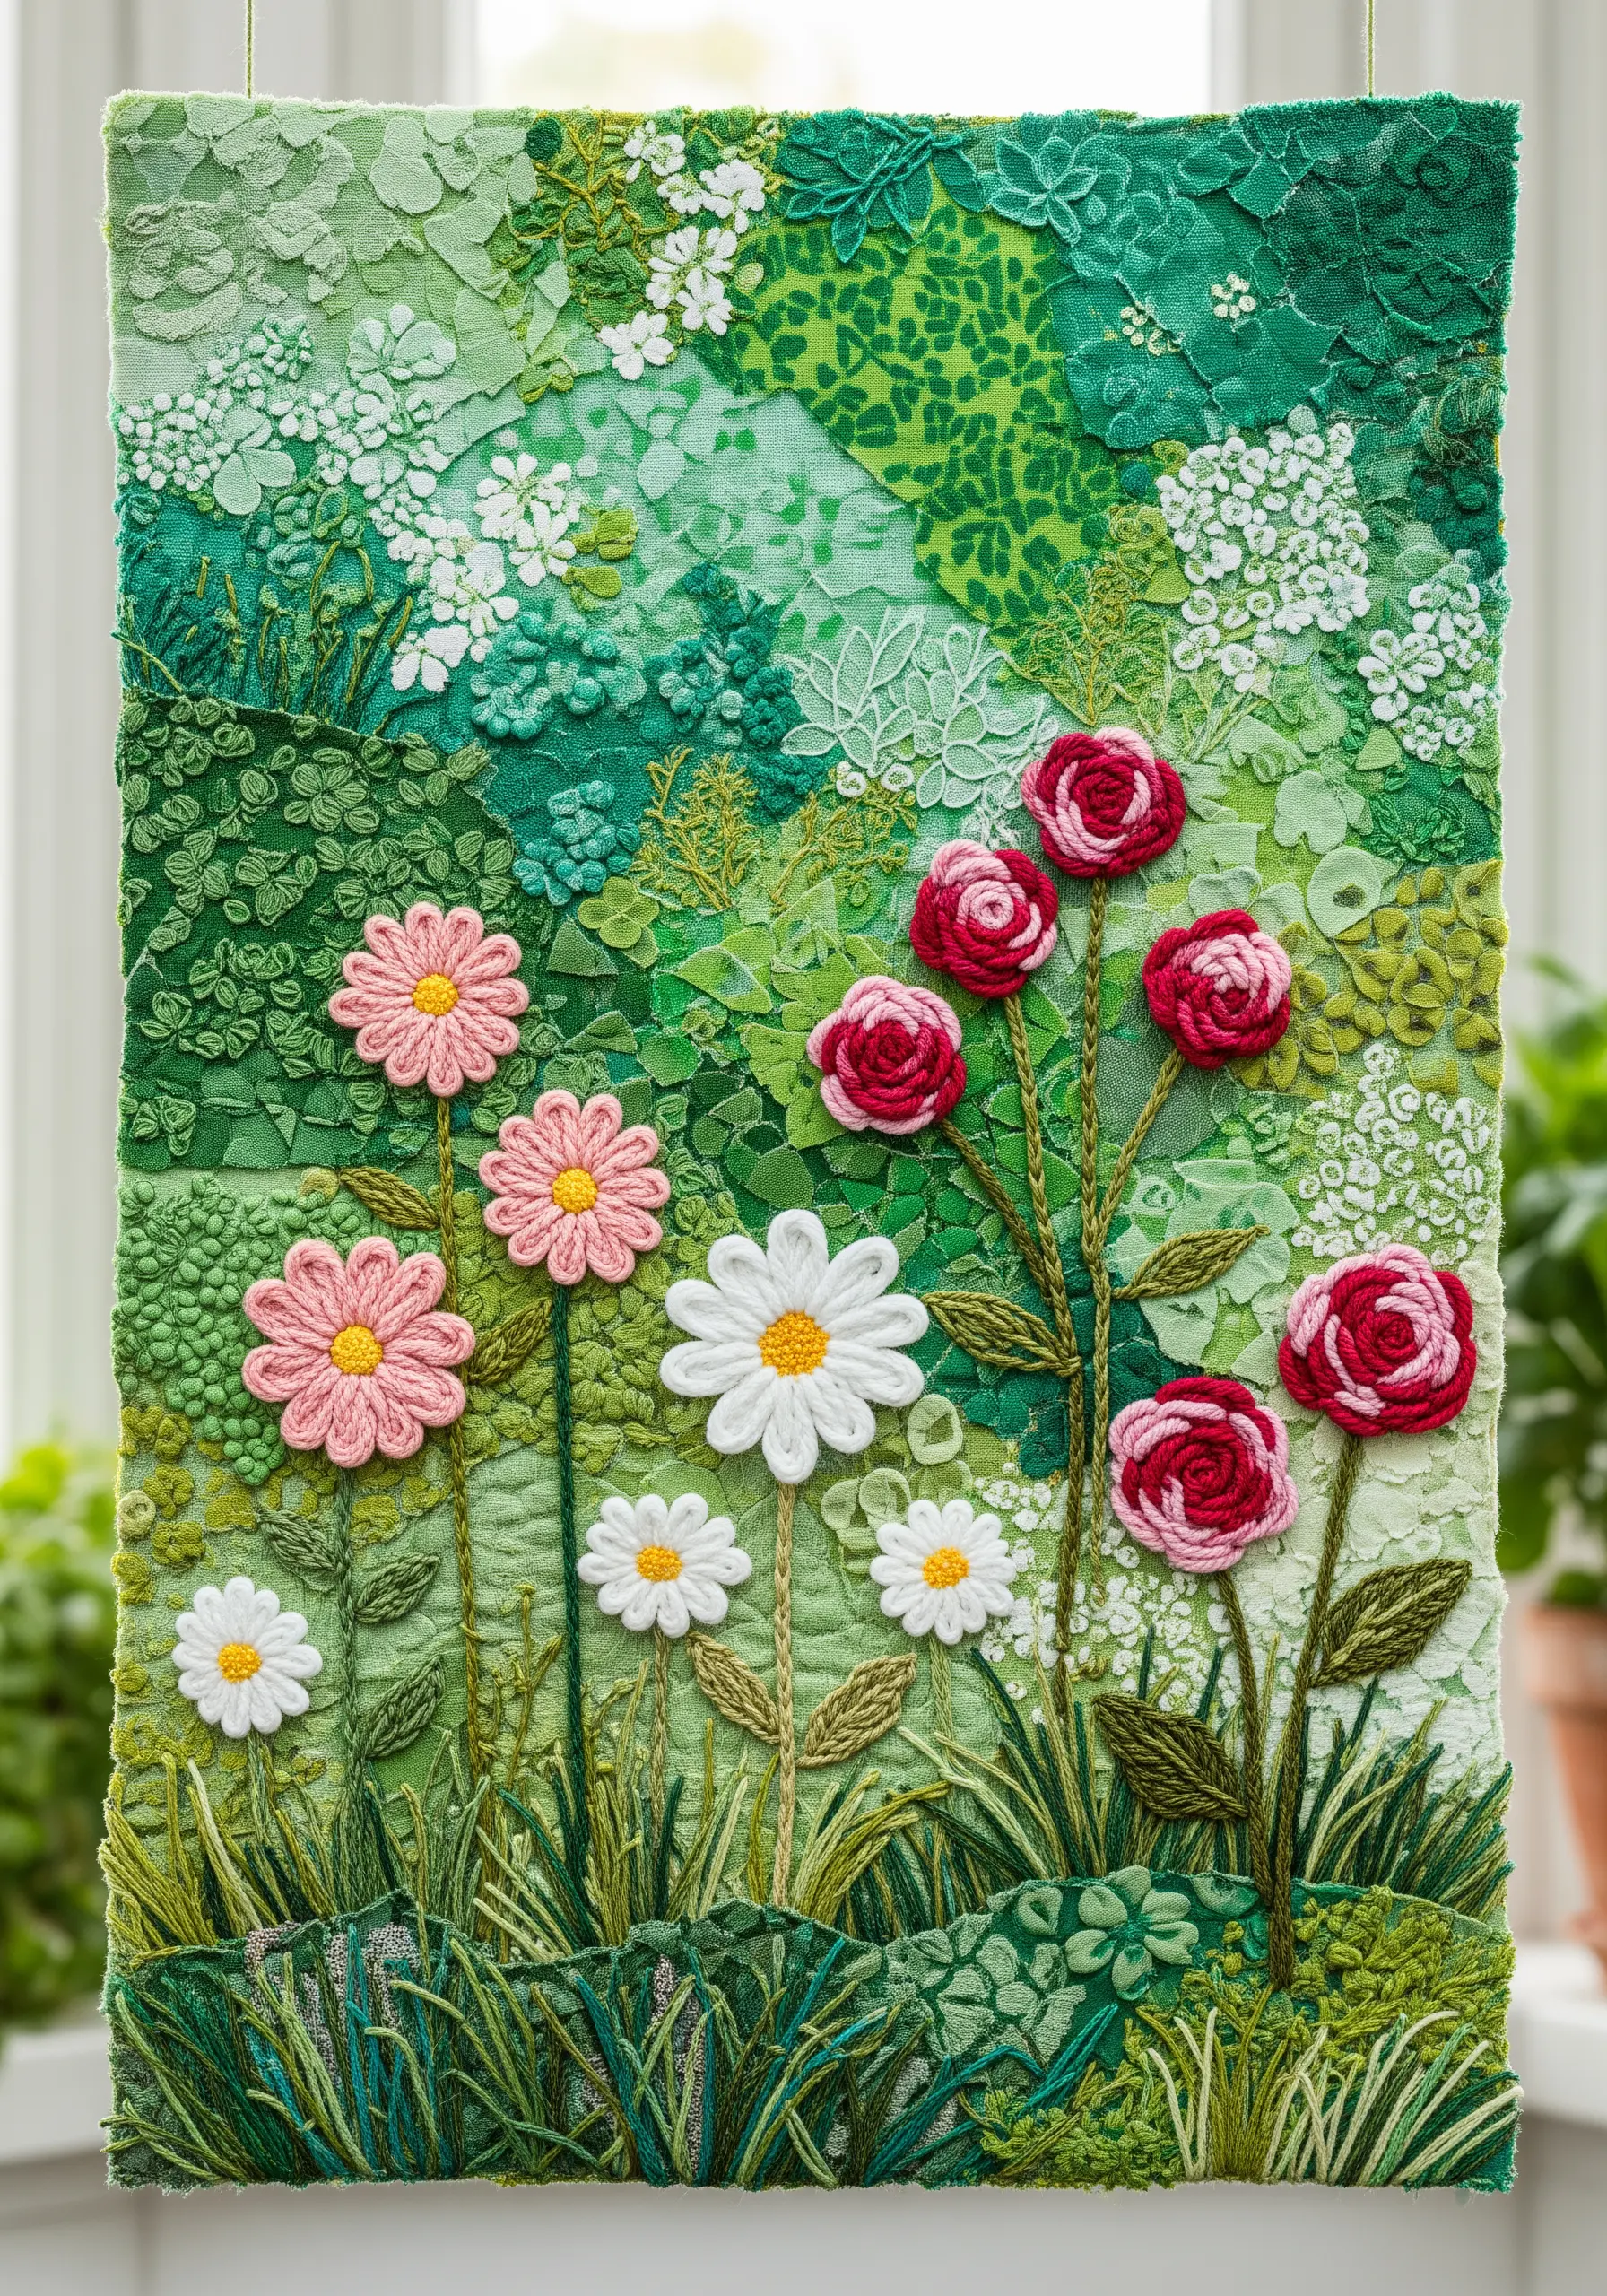
Create a surprisingly rich and complex piece by limiting your palette to a single color family.
Gather every fabric scrap you have in that color—from lace and velvet to corduroy and printed cotton.
Cut and layer these varied textures to build a landscape. The subtle shifts in material, sheen, and pattern will create a deep and engaging monochromatic collage.
Add simple floral shapes with classic stitches like woven wheel roses and lazy daisies; they will pop against the intricate fabric background.
19. Layer Fabric Scales for a Mythical Texture

To create a creature’s skin or dragon scales, cut out dozens of small, identical leaf or petal shapes from various fabrics.
Using fabrics with a bit of shimmer or an iridescent finish will enhance the magical effect.
Begin layering the scales from the bottom up, tucking the top edge of each scale under the one above it and securing it with a few small stitches at the base.
For extra definition and a touch of fantasy, outline each individual scale with a backstitch in a fine metallic thread. This defines the mythical texture and makes the entire surface shimmer.
20. Tell a Story Across a Triptych
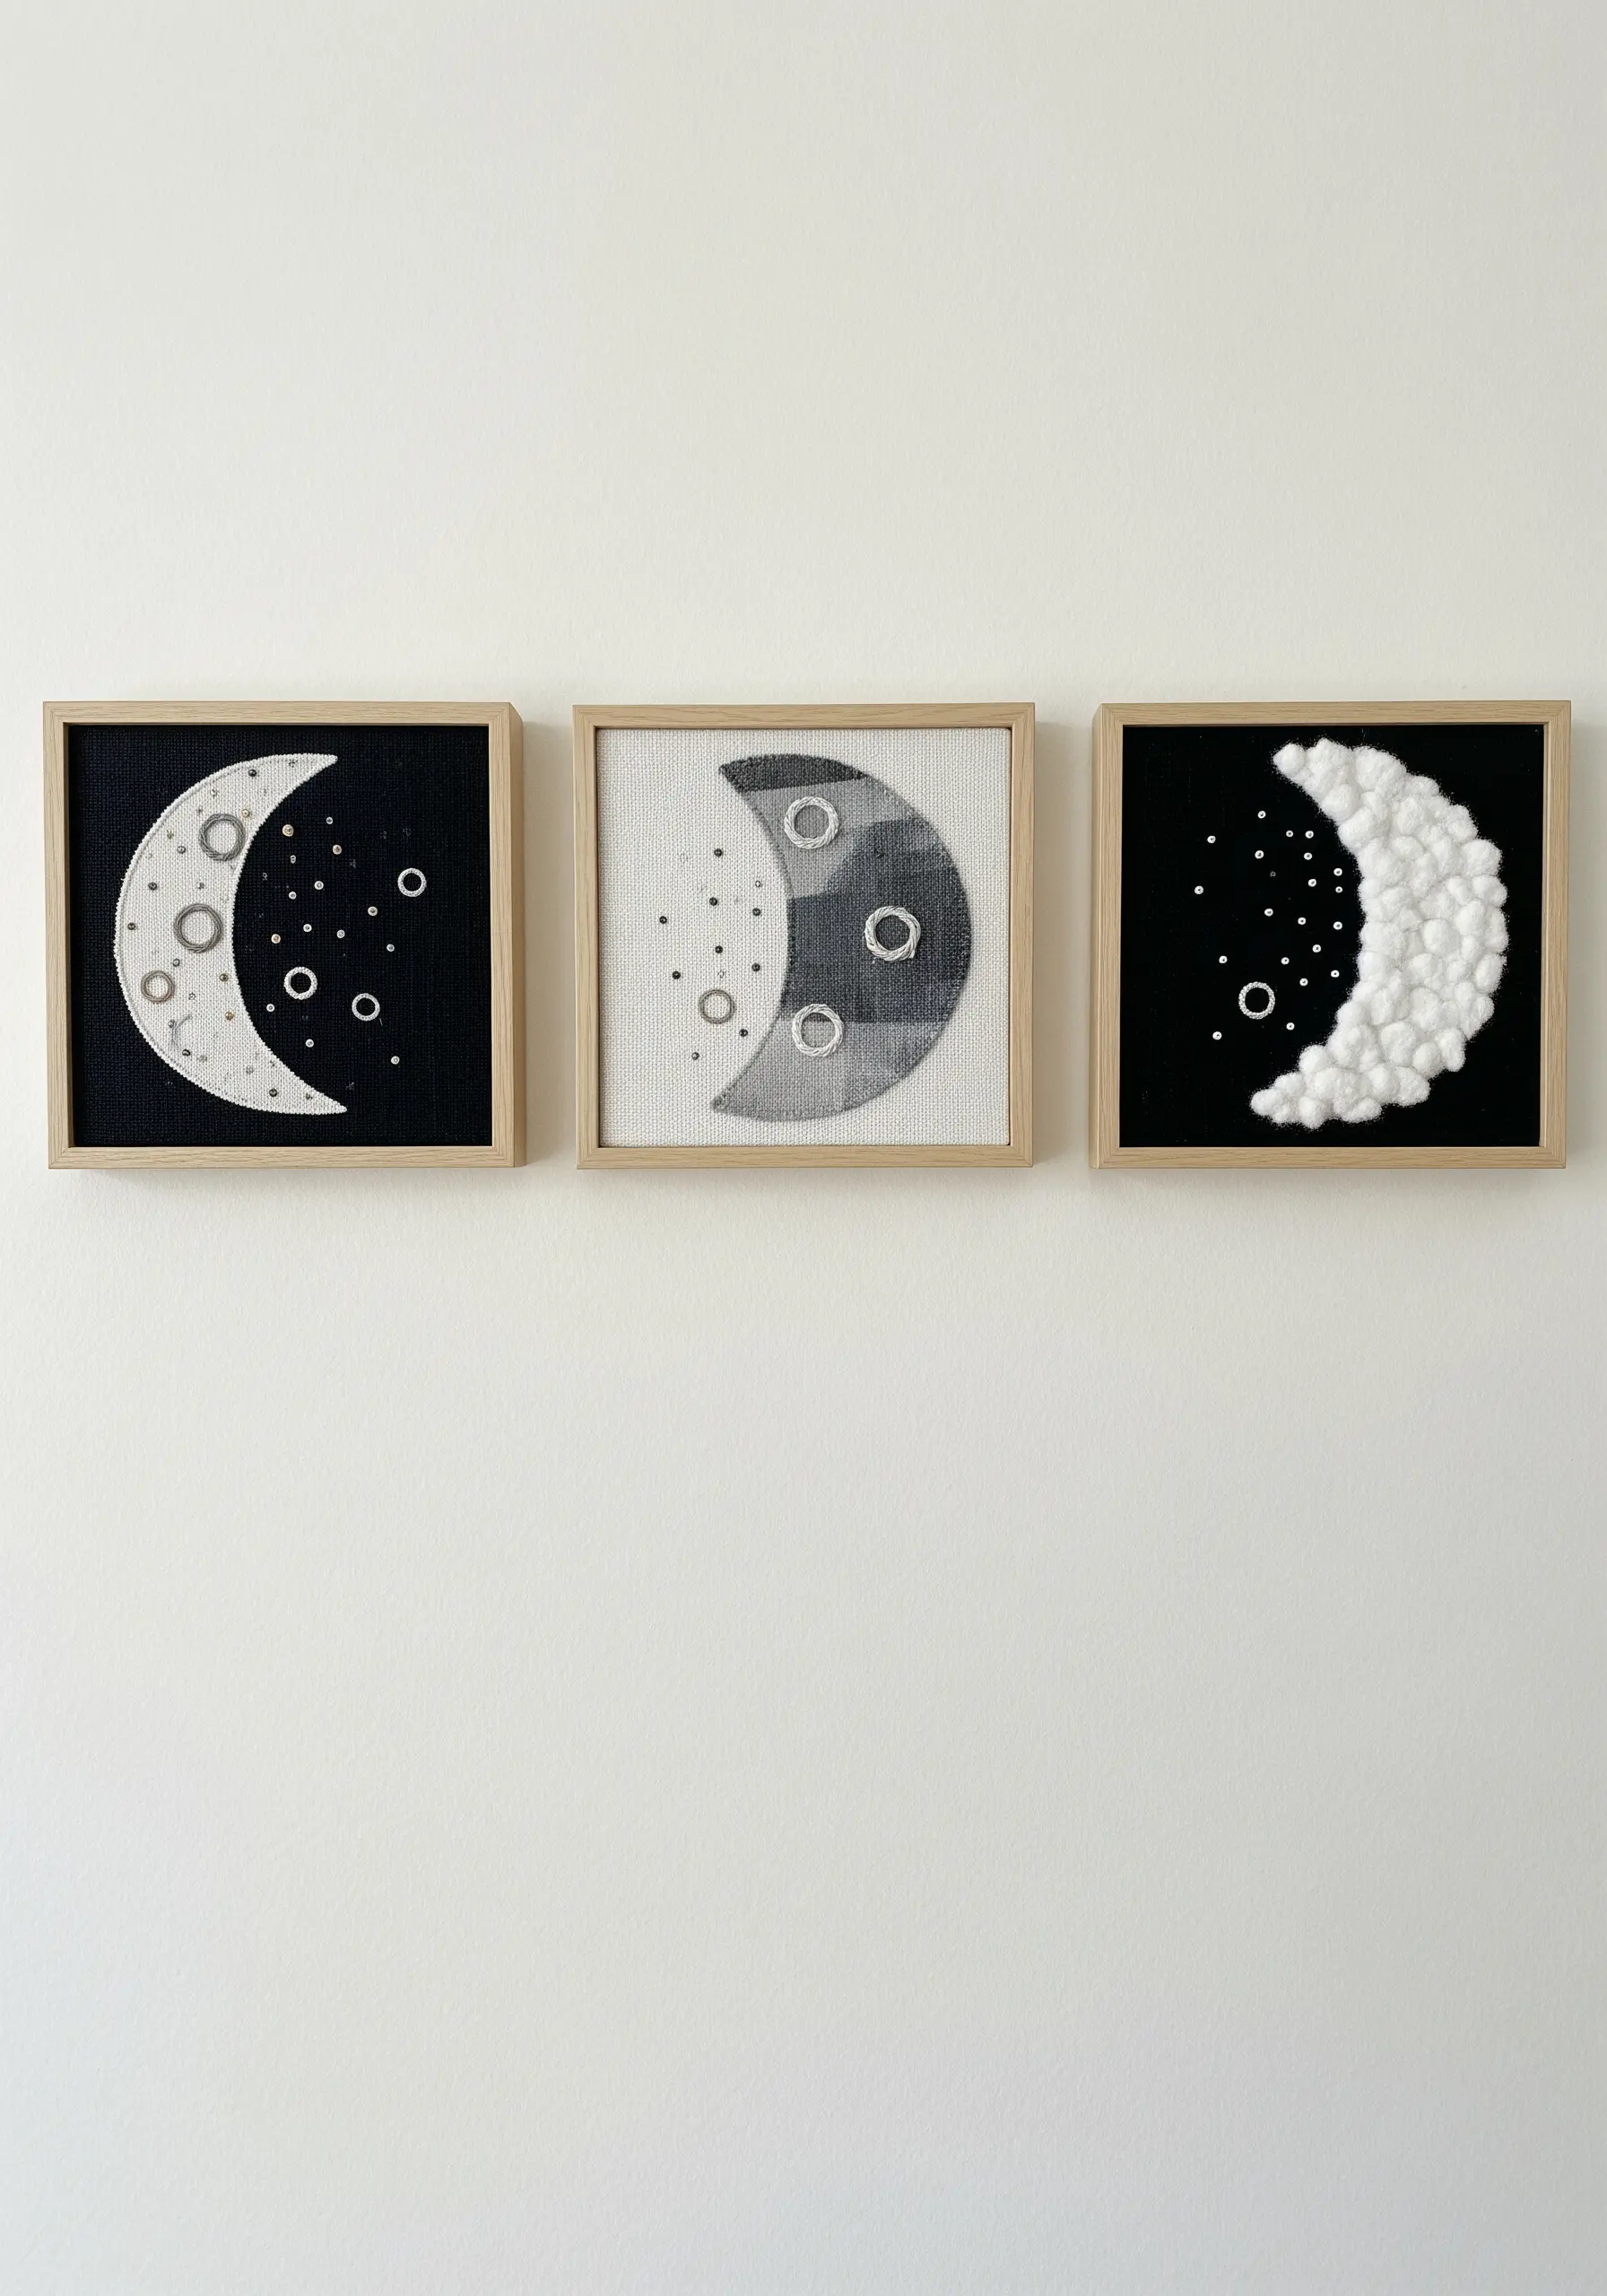
Working in a series of three (a triptych) allows you to explore variations on a single theme, creating a powerful statement piece for your wall.
Maintain cohesion by using a consistent color palette and subject matter across all three frames.
Then, introduce variety by changing your technique in each piece. For example, one moon could be simple fabric appliqué, the next could be filled with textural seed stitch, and the third could use dimensional elements like chenille yarn or pom-poms.
This approach results in a cohesive yet dynamic series that invites closer inspection.
21. Build a Textured Tree with Fabric Bark
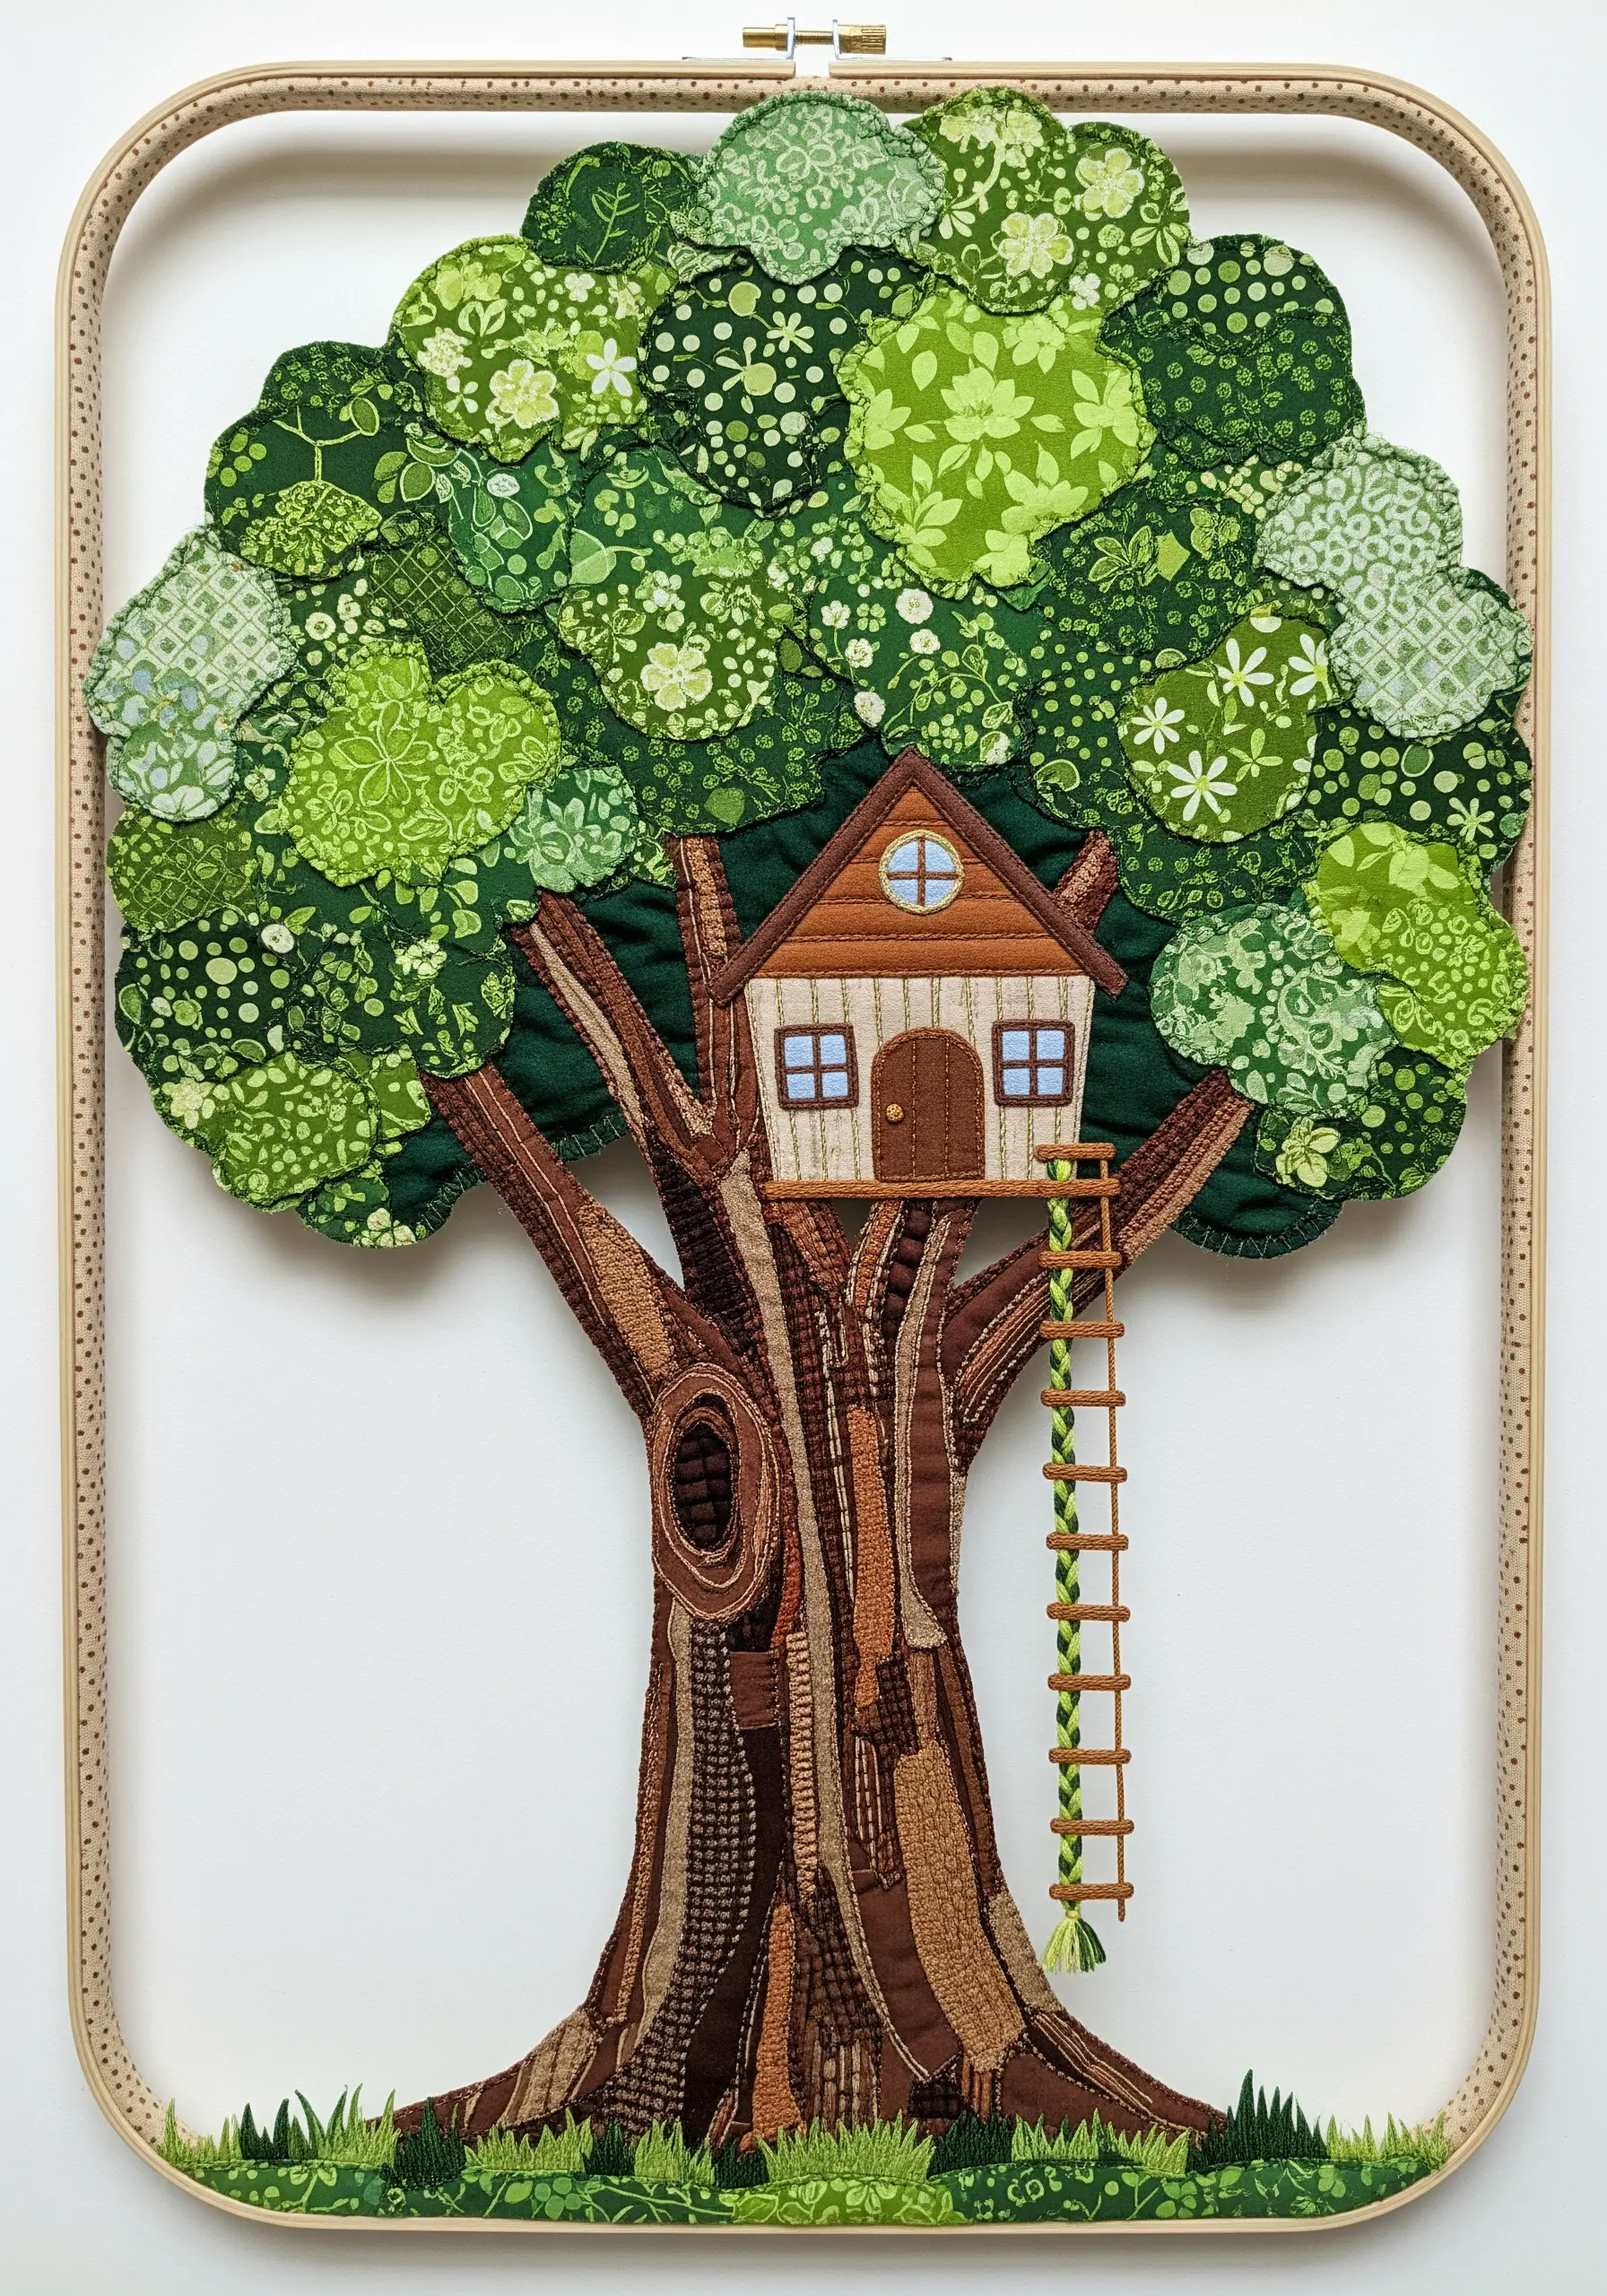
To create a realistic and textured tree trunk, avoid using a single piece of brown fabric.
Instead, cut long, thin, slightly irregular strips from a variety of brown and gray fabrics with different weaves—like corduroy, tweed, linen, and brushed cotton.
Appliqué these strips vertically, overlapping their edges slightly to mimic the rough, layered quality of natural bark.
For the leafy canopy, use a wide range of green patterned fabrics to create the illusion of light filtering through the leaves, giving the treetop more dimension and life.


