

It’s easy to feel like you’ve reached a plateau with your embroidery. You’ve mastered the stitches, you love the feel of thread and fabric, but you’re seeking a new way to express your creativity—something that feels both innovative and deeply personal.
This is where paper comes in. Think of it not as a replacement for fabric, but as a new partner for your thread. Paper offers a structure, crispness, and sculptural potential that fabric cannot. It invites you to pierce, fold, layer, and construct. It challenges you to think about how a simple stitch can become a line, a contour, or a binding element.
Here, you won’t find fleeting trends. Instead, you’ll discover thoughtful, accessible ways to merge these two beloved crafts. You’ll learn how to add dimension to a flat surface, how to tell a story on a vintage postcard, and how to build entire worlds from paper and floss. It’s time to pick up your needle and see paper in a new light.
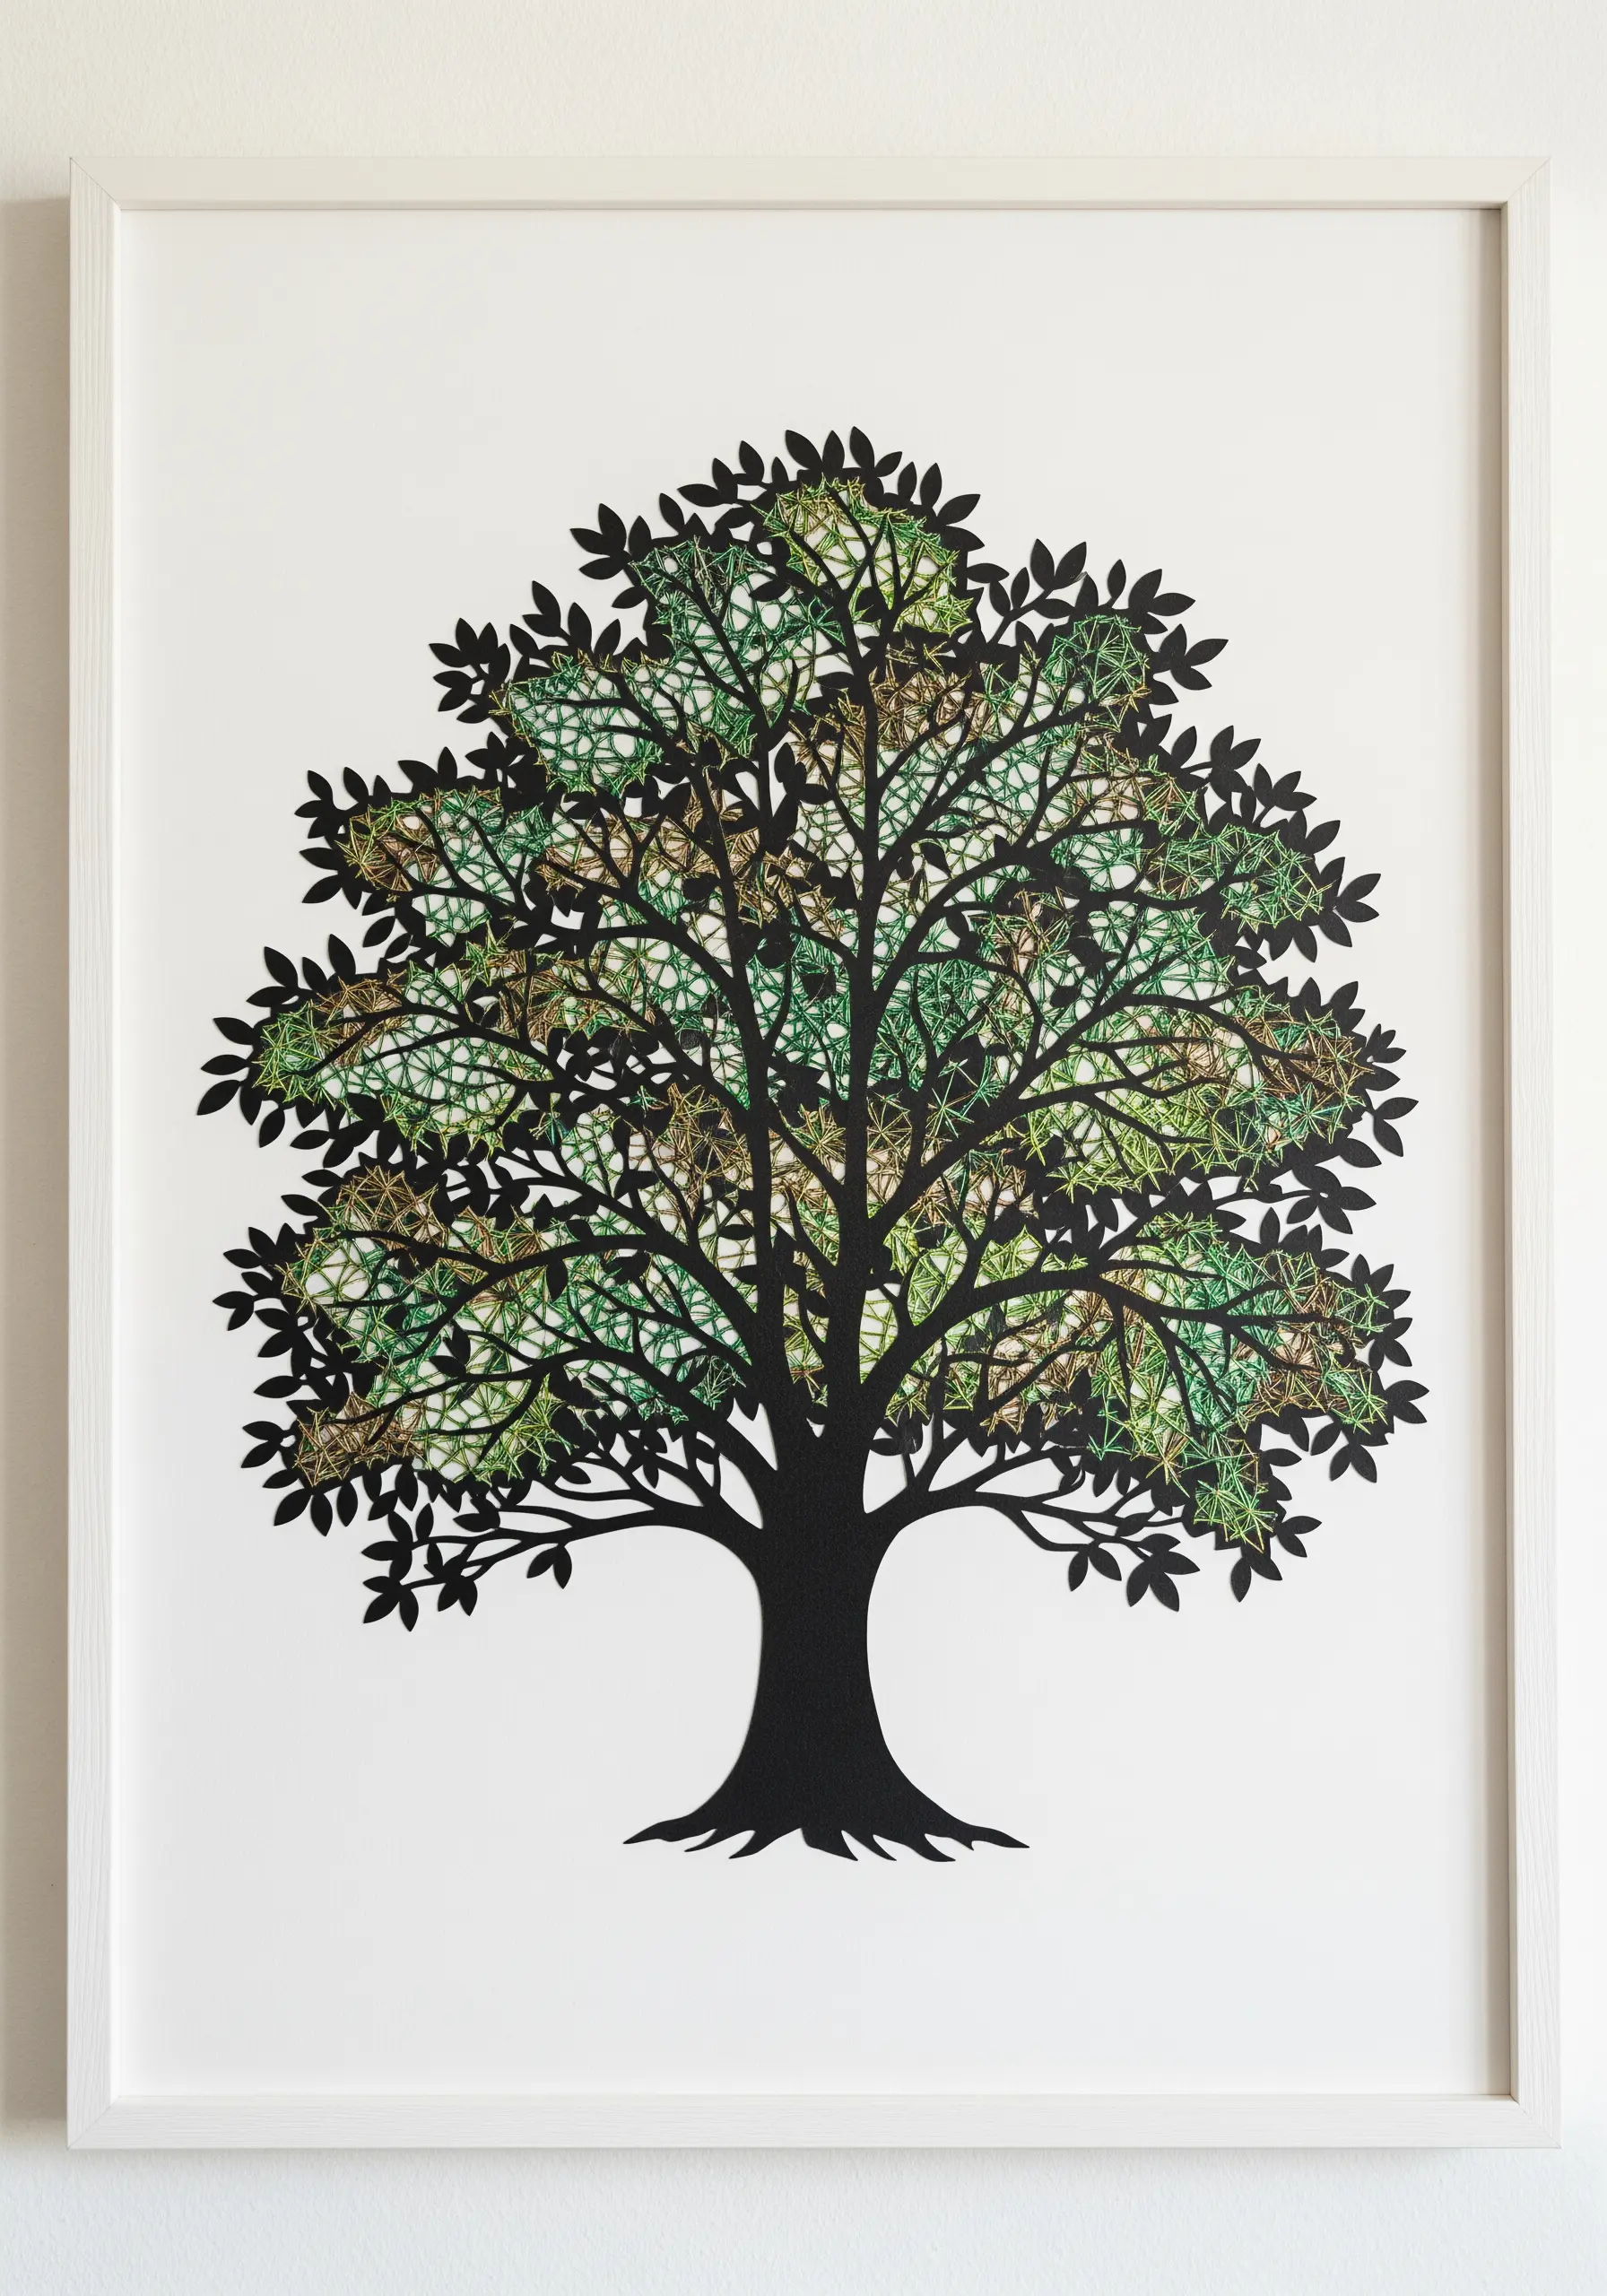
1. Add Dimension with Sculptural Paper Embroidery
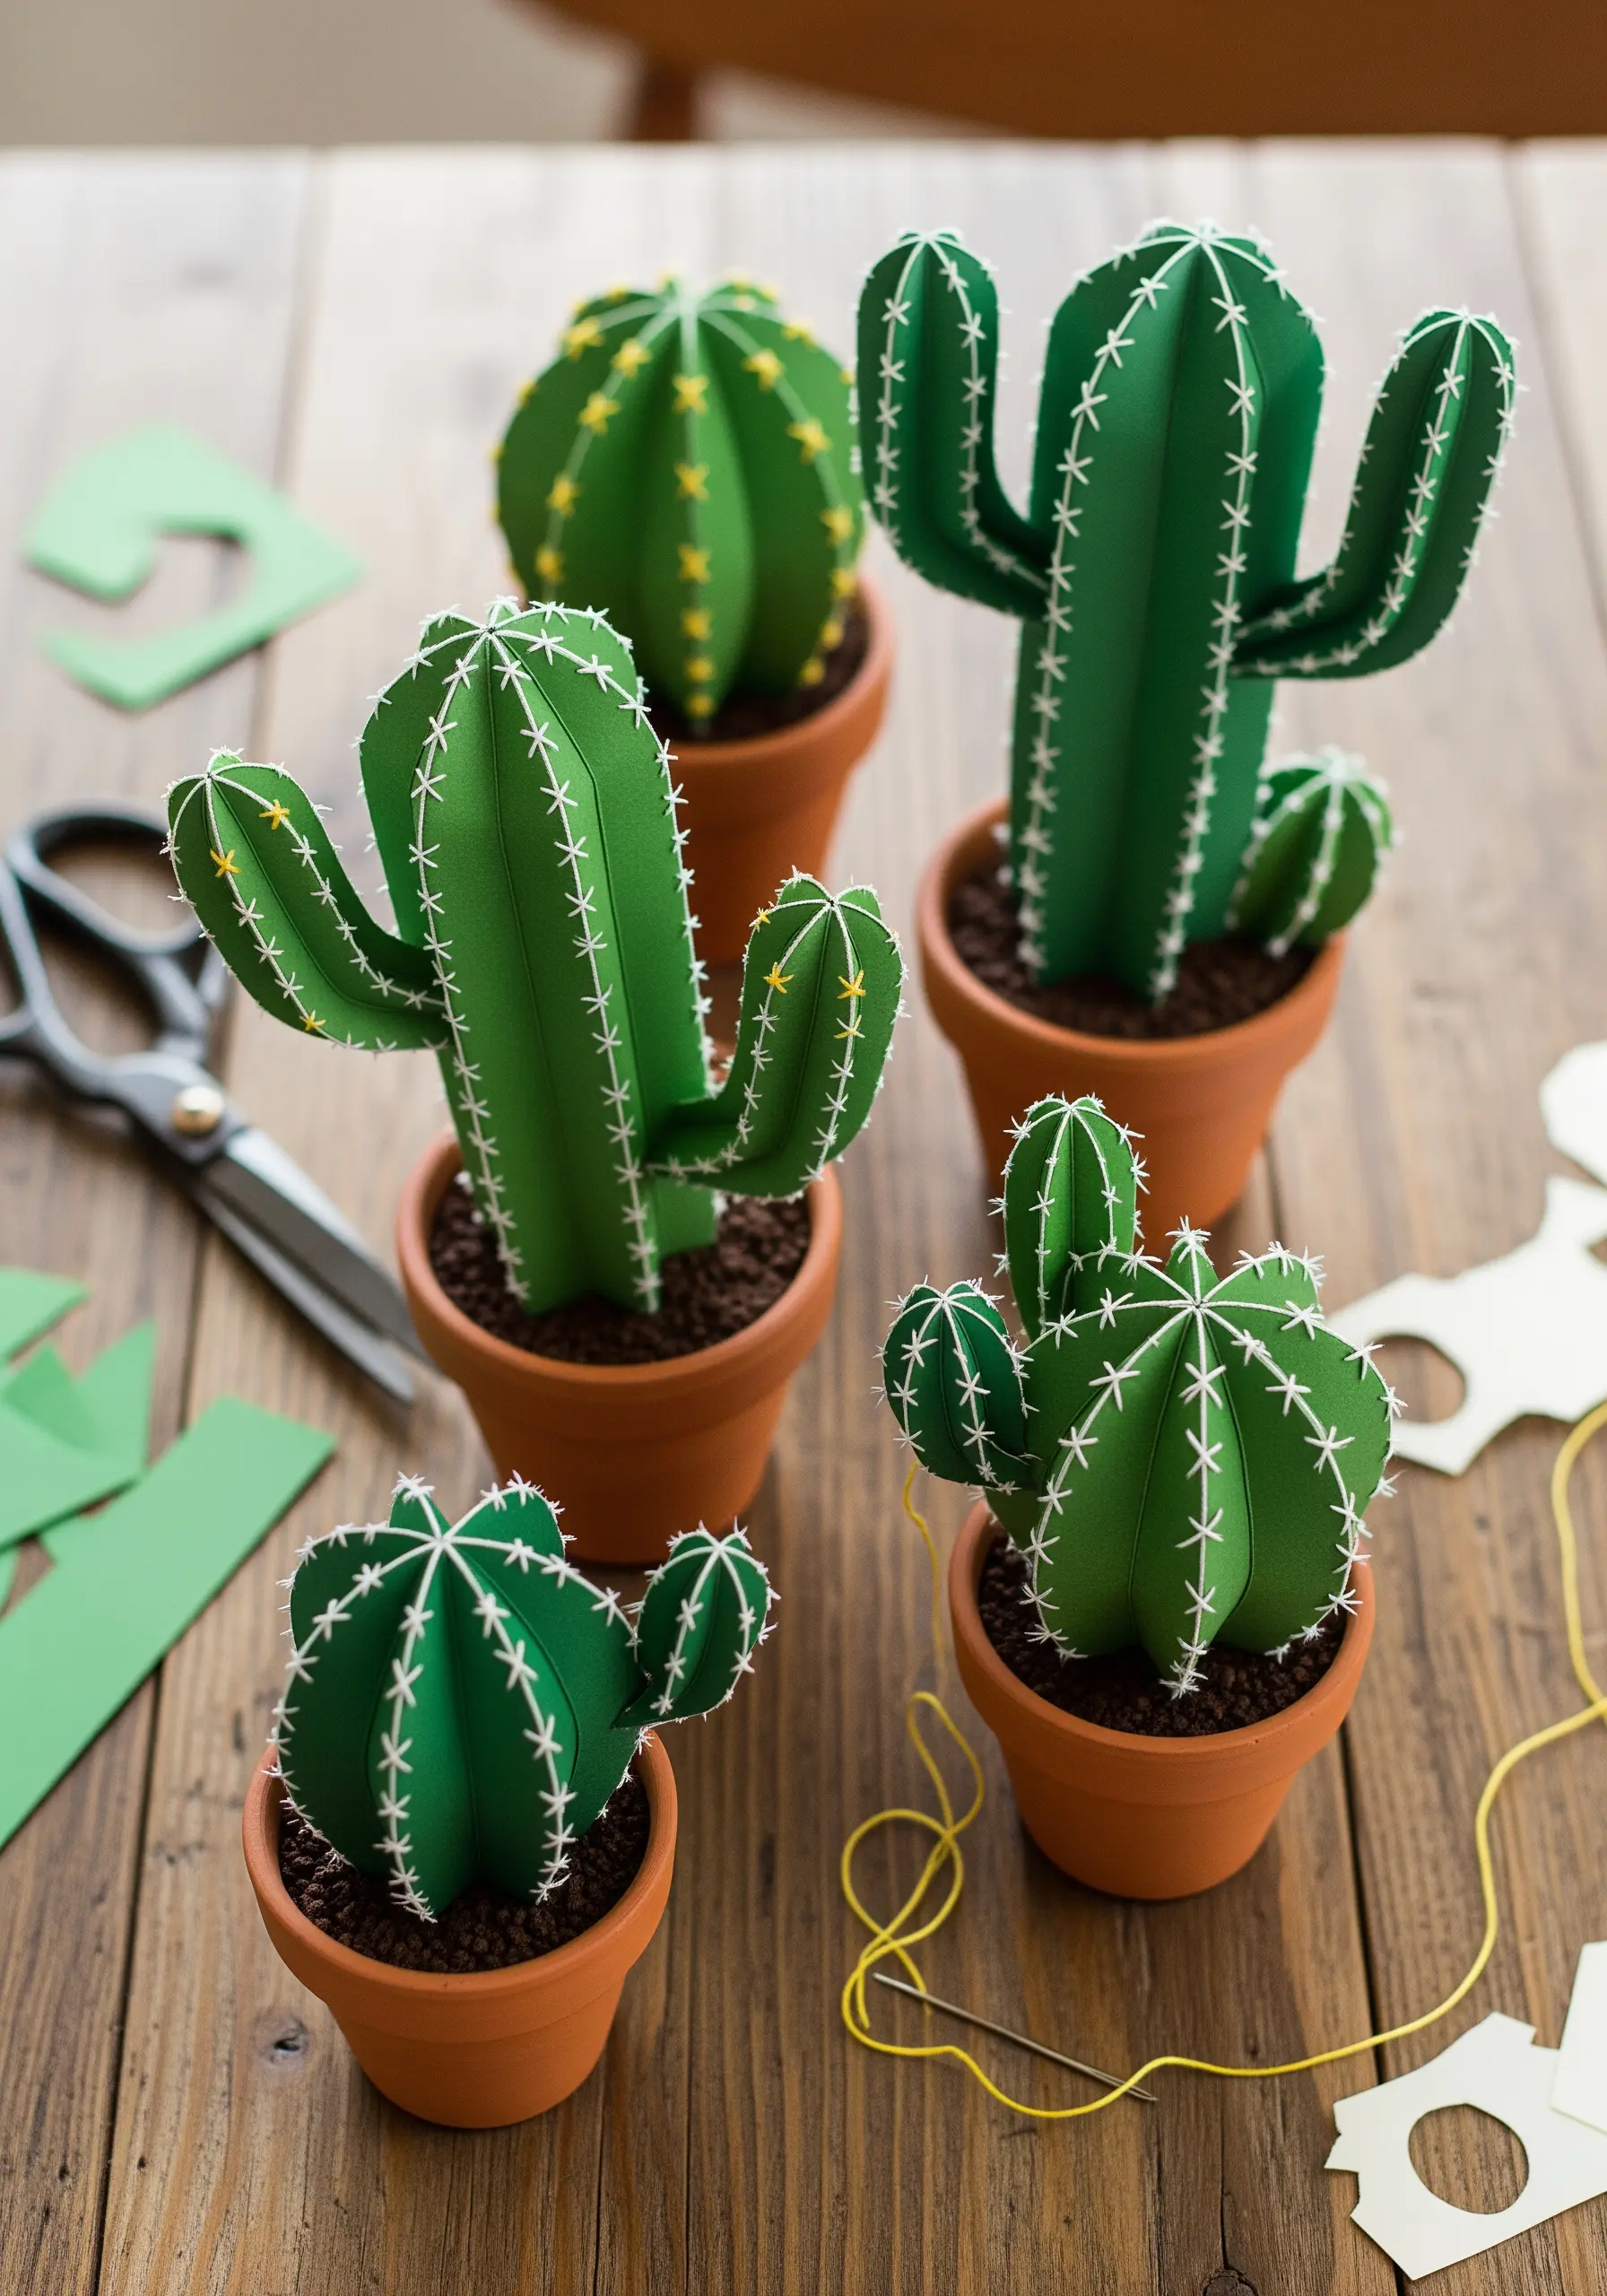
Transform flat cardstock into a three-dimensional object by using thread as both a structural and decorative element.
First, cut your paper shapes and gently score them along the fold lines for crisp edges.
Before assembling, use a sharp awl or a thick needle to pre-punch holes along the seams.
This prevents the paper from tearing as you stitch and ensures your stitches are perfectly uniform.
Use a simple running stitch or whipstitch with a contrasting thread—like bright white against green—to create clean, graphic lines that highlight the form of your paper sculpture.
These paper art designs that pair beautifully with nature-inspired embroidery offer a tactile quality that ink or paint cannot replicate.
2. Pierce Paper for Celestial Light Effects
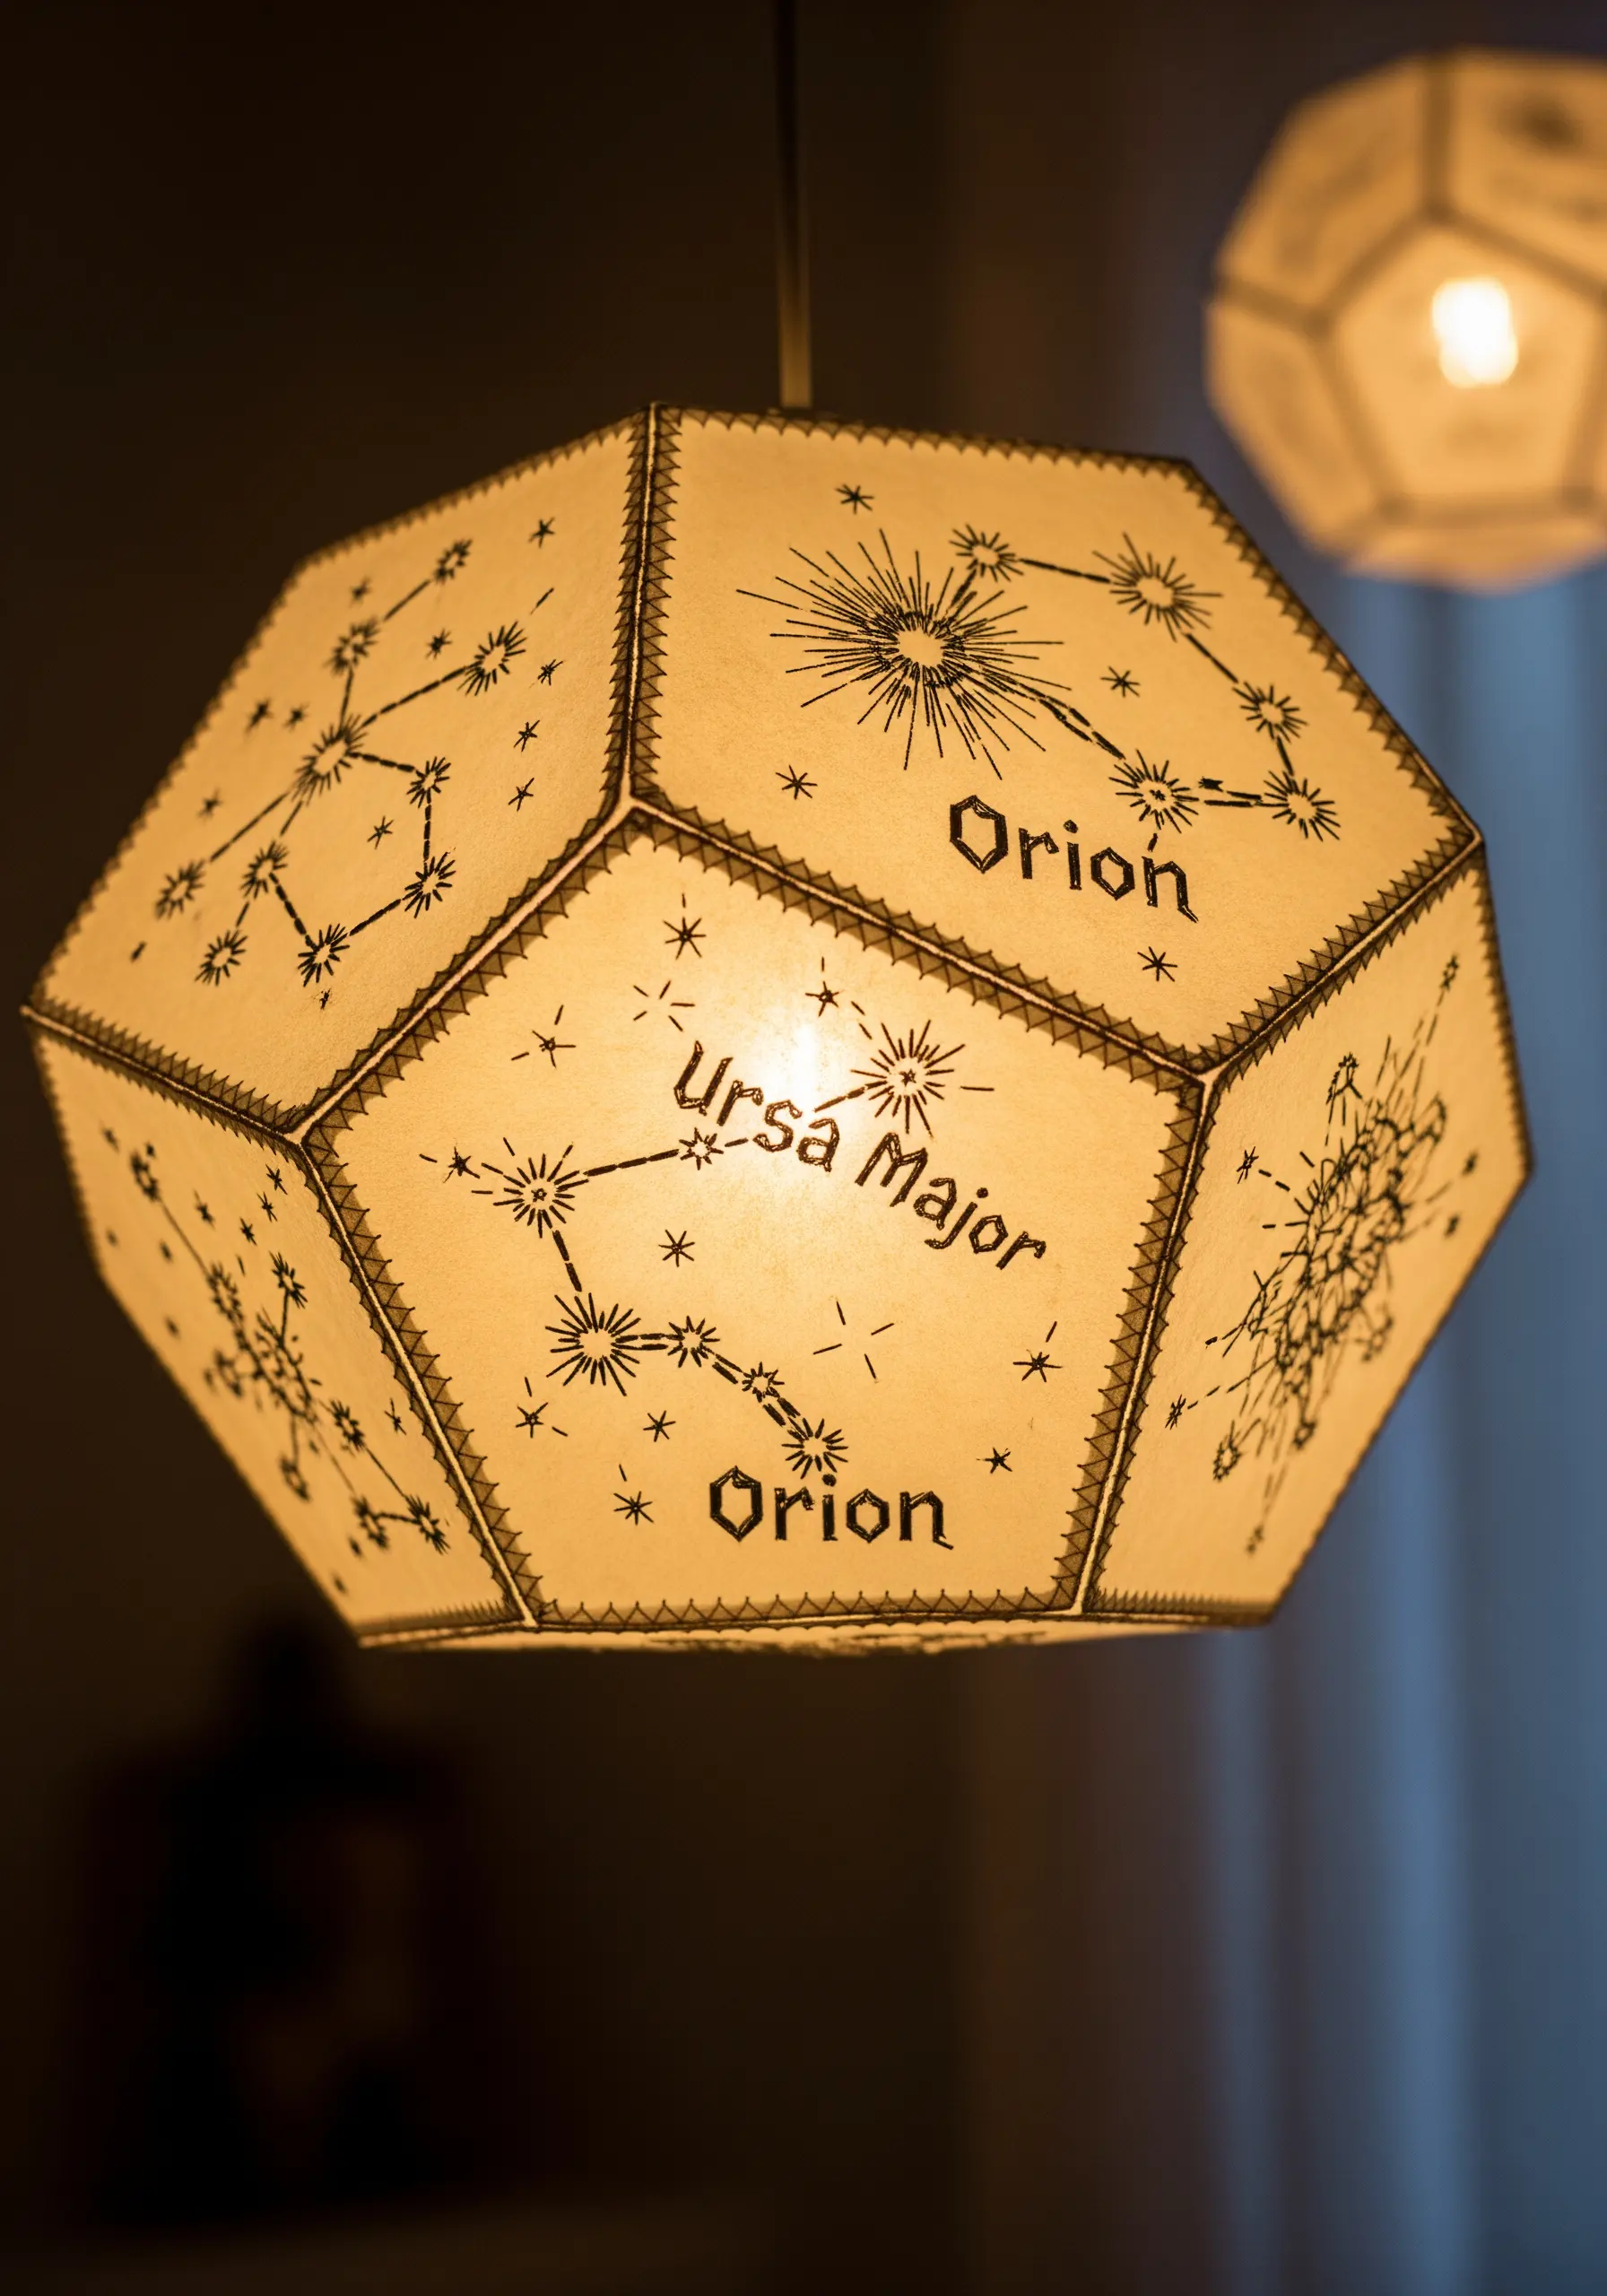
Create a stunning lampshade by perforating thick paper or parchment with constellation patterns.
Draw your design lightly in pencil, then use a pin or needle tool to punch out the stars and connecting lines.
For a more refined look, use a fine backstitch with a dark, single-strand thread to formally outline the constellations, adding definition when the lamp is off.
When illuminated, the pierced holes will glow, creating a magical star map effect.
This technique turns a simple paper structure into enchanting and functional embroidered nursery decor.
3. Layer Stitched Paper for a Botanical Collage
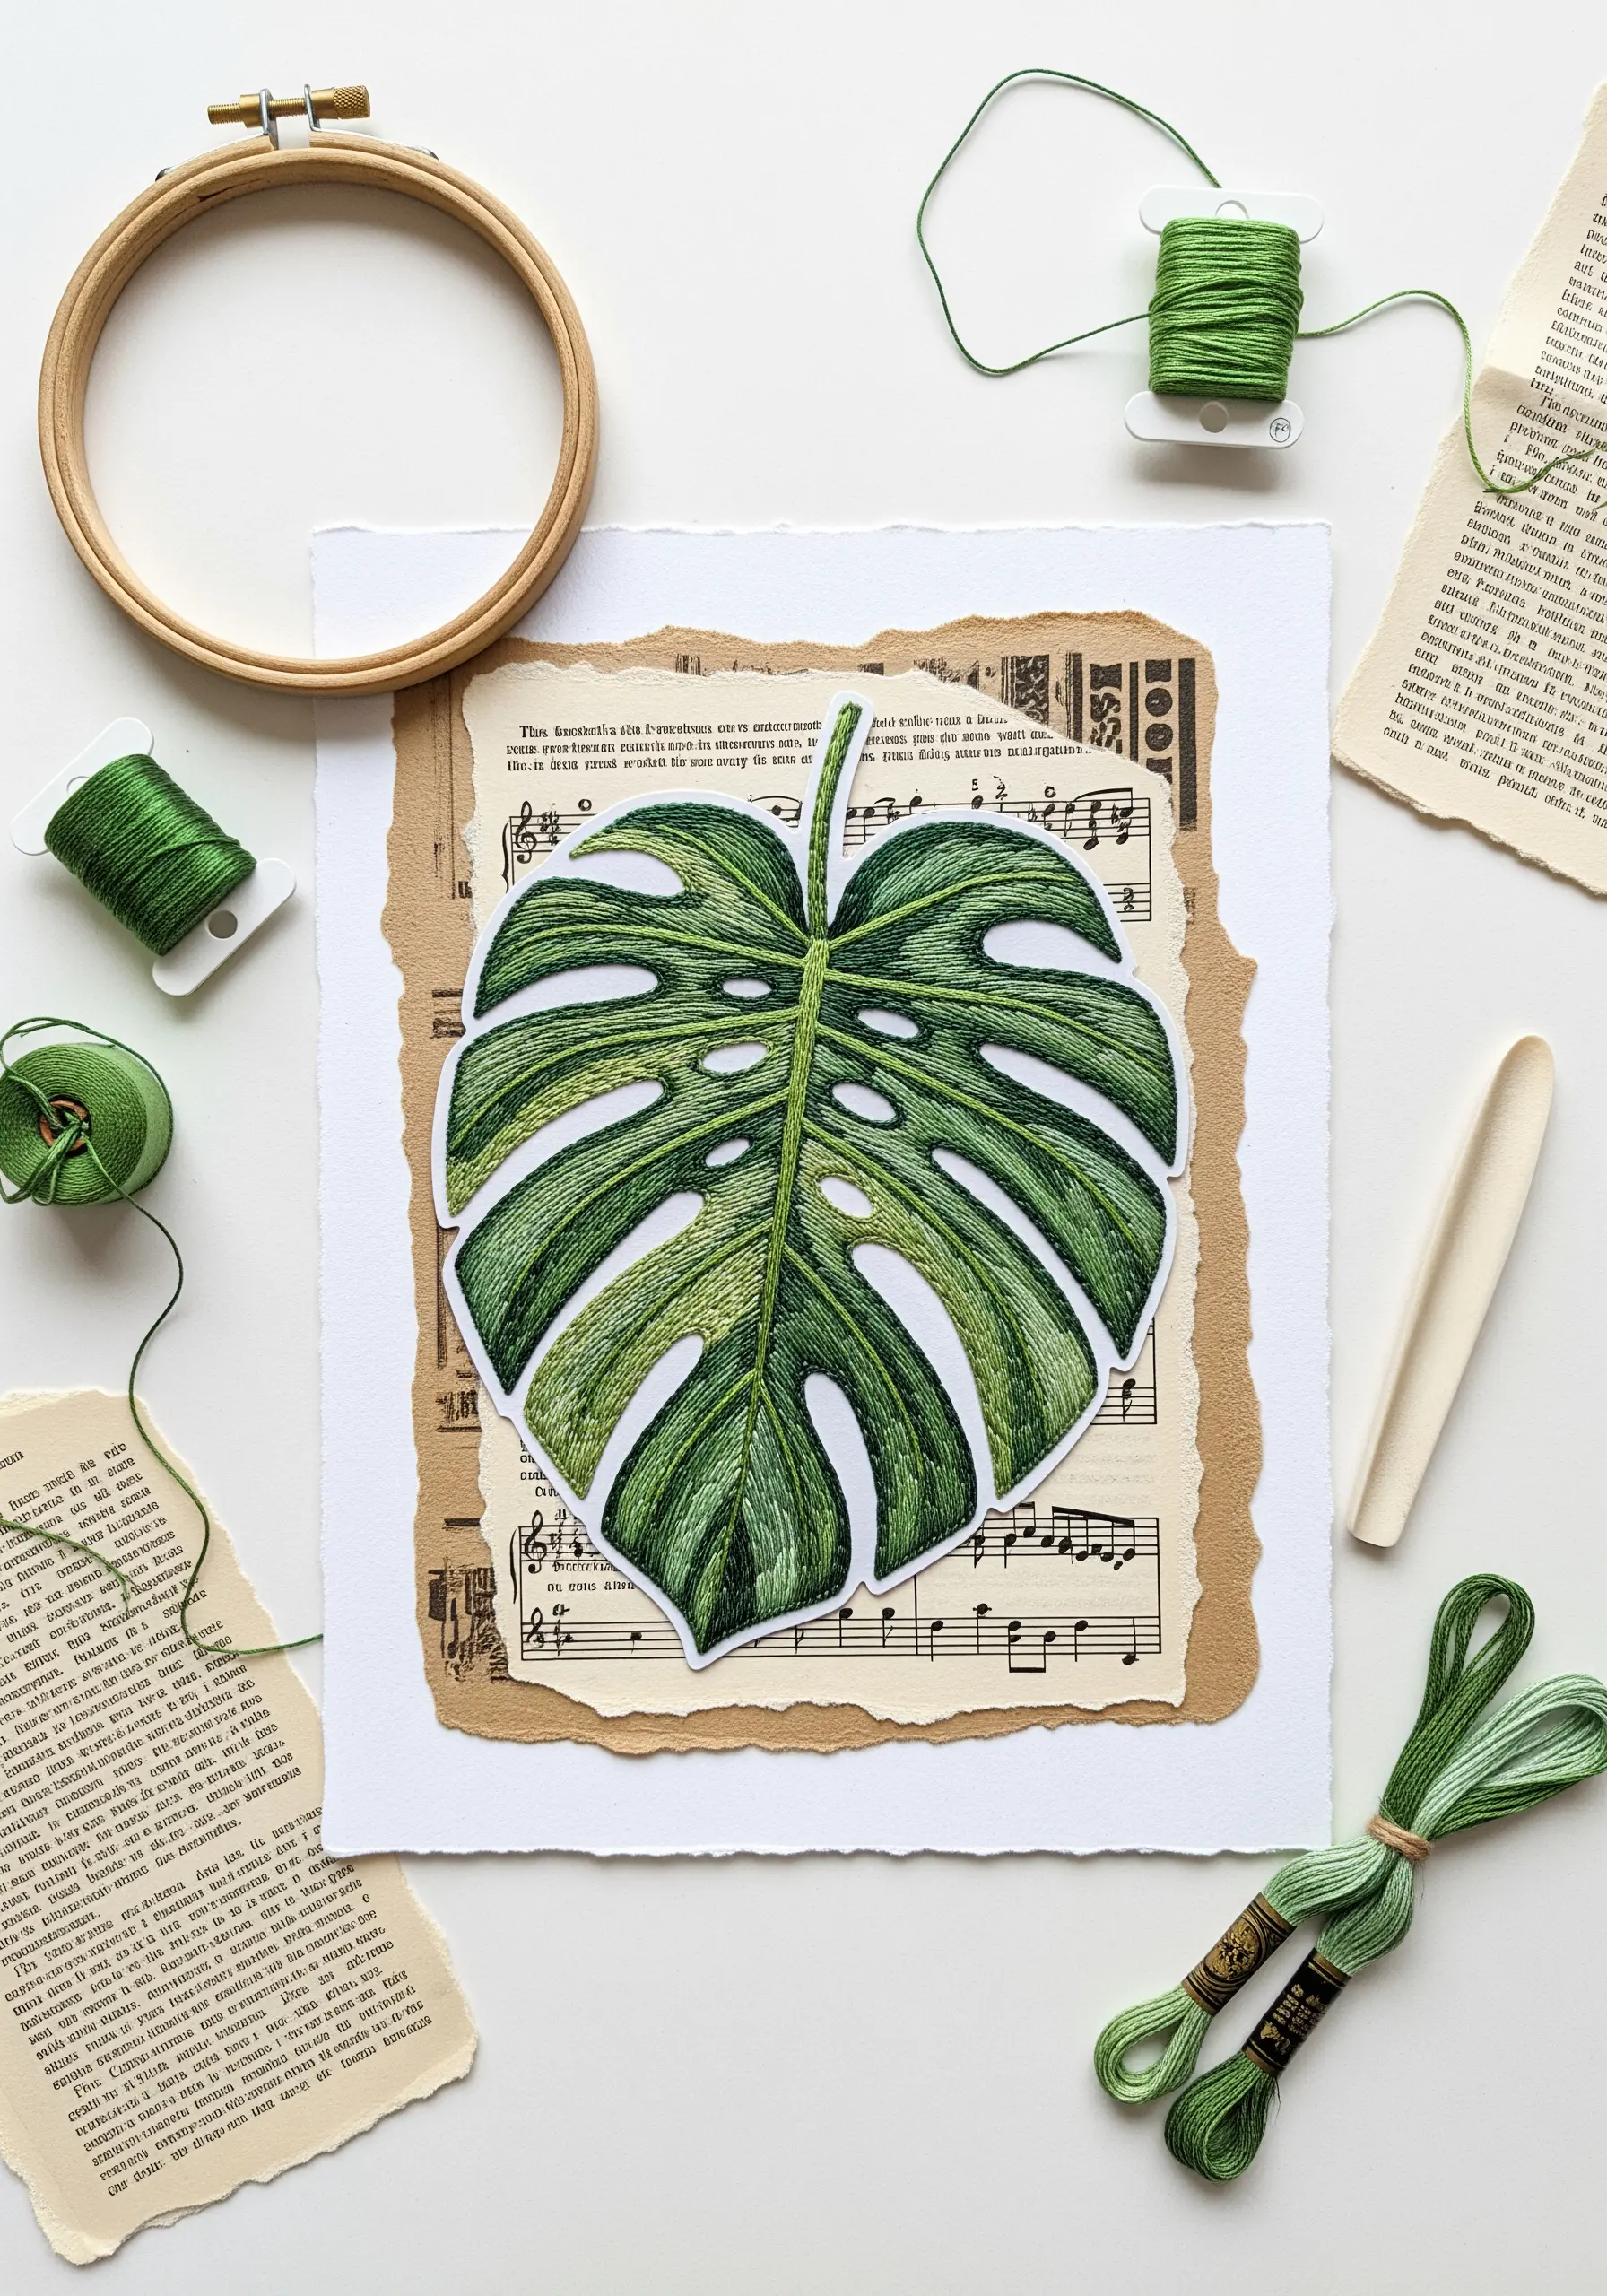
Give your work incredible depth by embroidering your main subject on paper, cutting it out, and mounting it on a textured background.
Use a sturdy watercolor paper for the embroidered element—it holds up well to needle tension.
Stitch your botanical design, like this monstera leaf, using long and short stitches to create a realistic, painterly effect with thread.
Carefully cut out the embroidered shape and use foam spacers to elevate it from a collaged background of sheet music, kraft paper, or vintage book pages.
This method offers creative collage inspirations that blend the precision of embroidery with the freedom of paper art.
4. Outline Illustrations with Thread for Architectural Depth
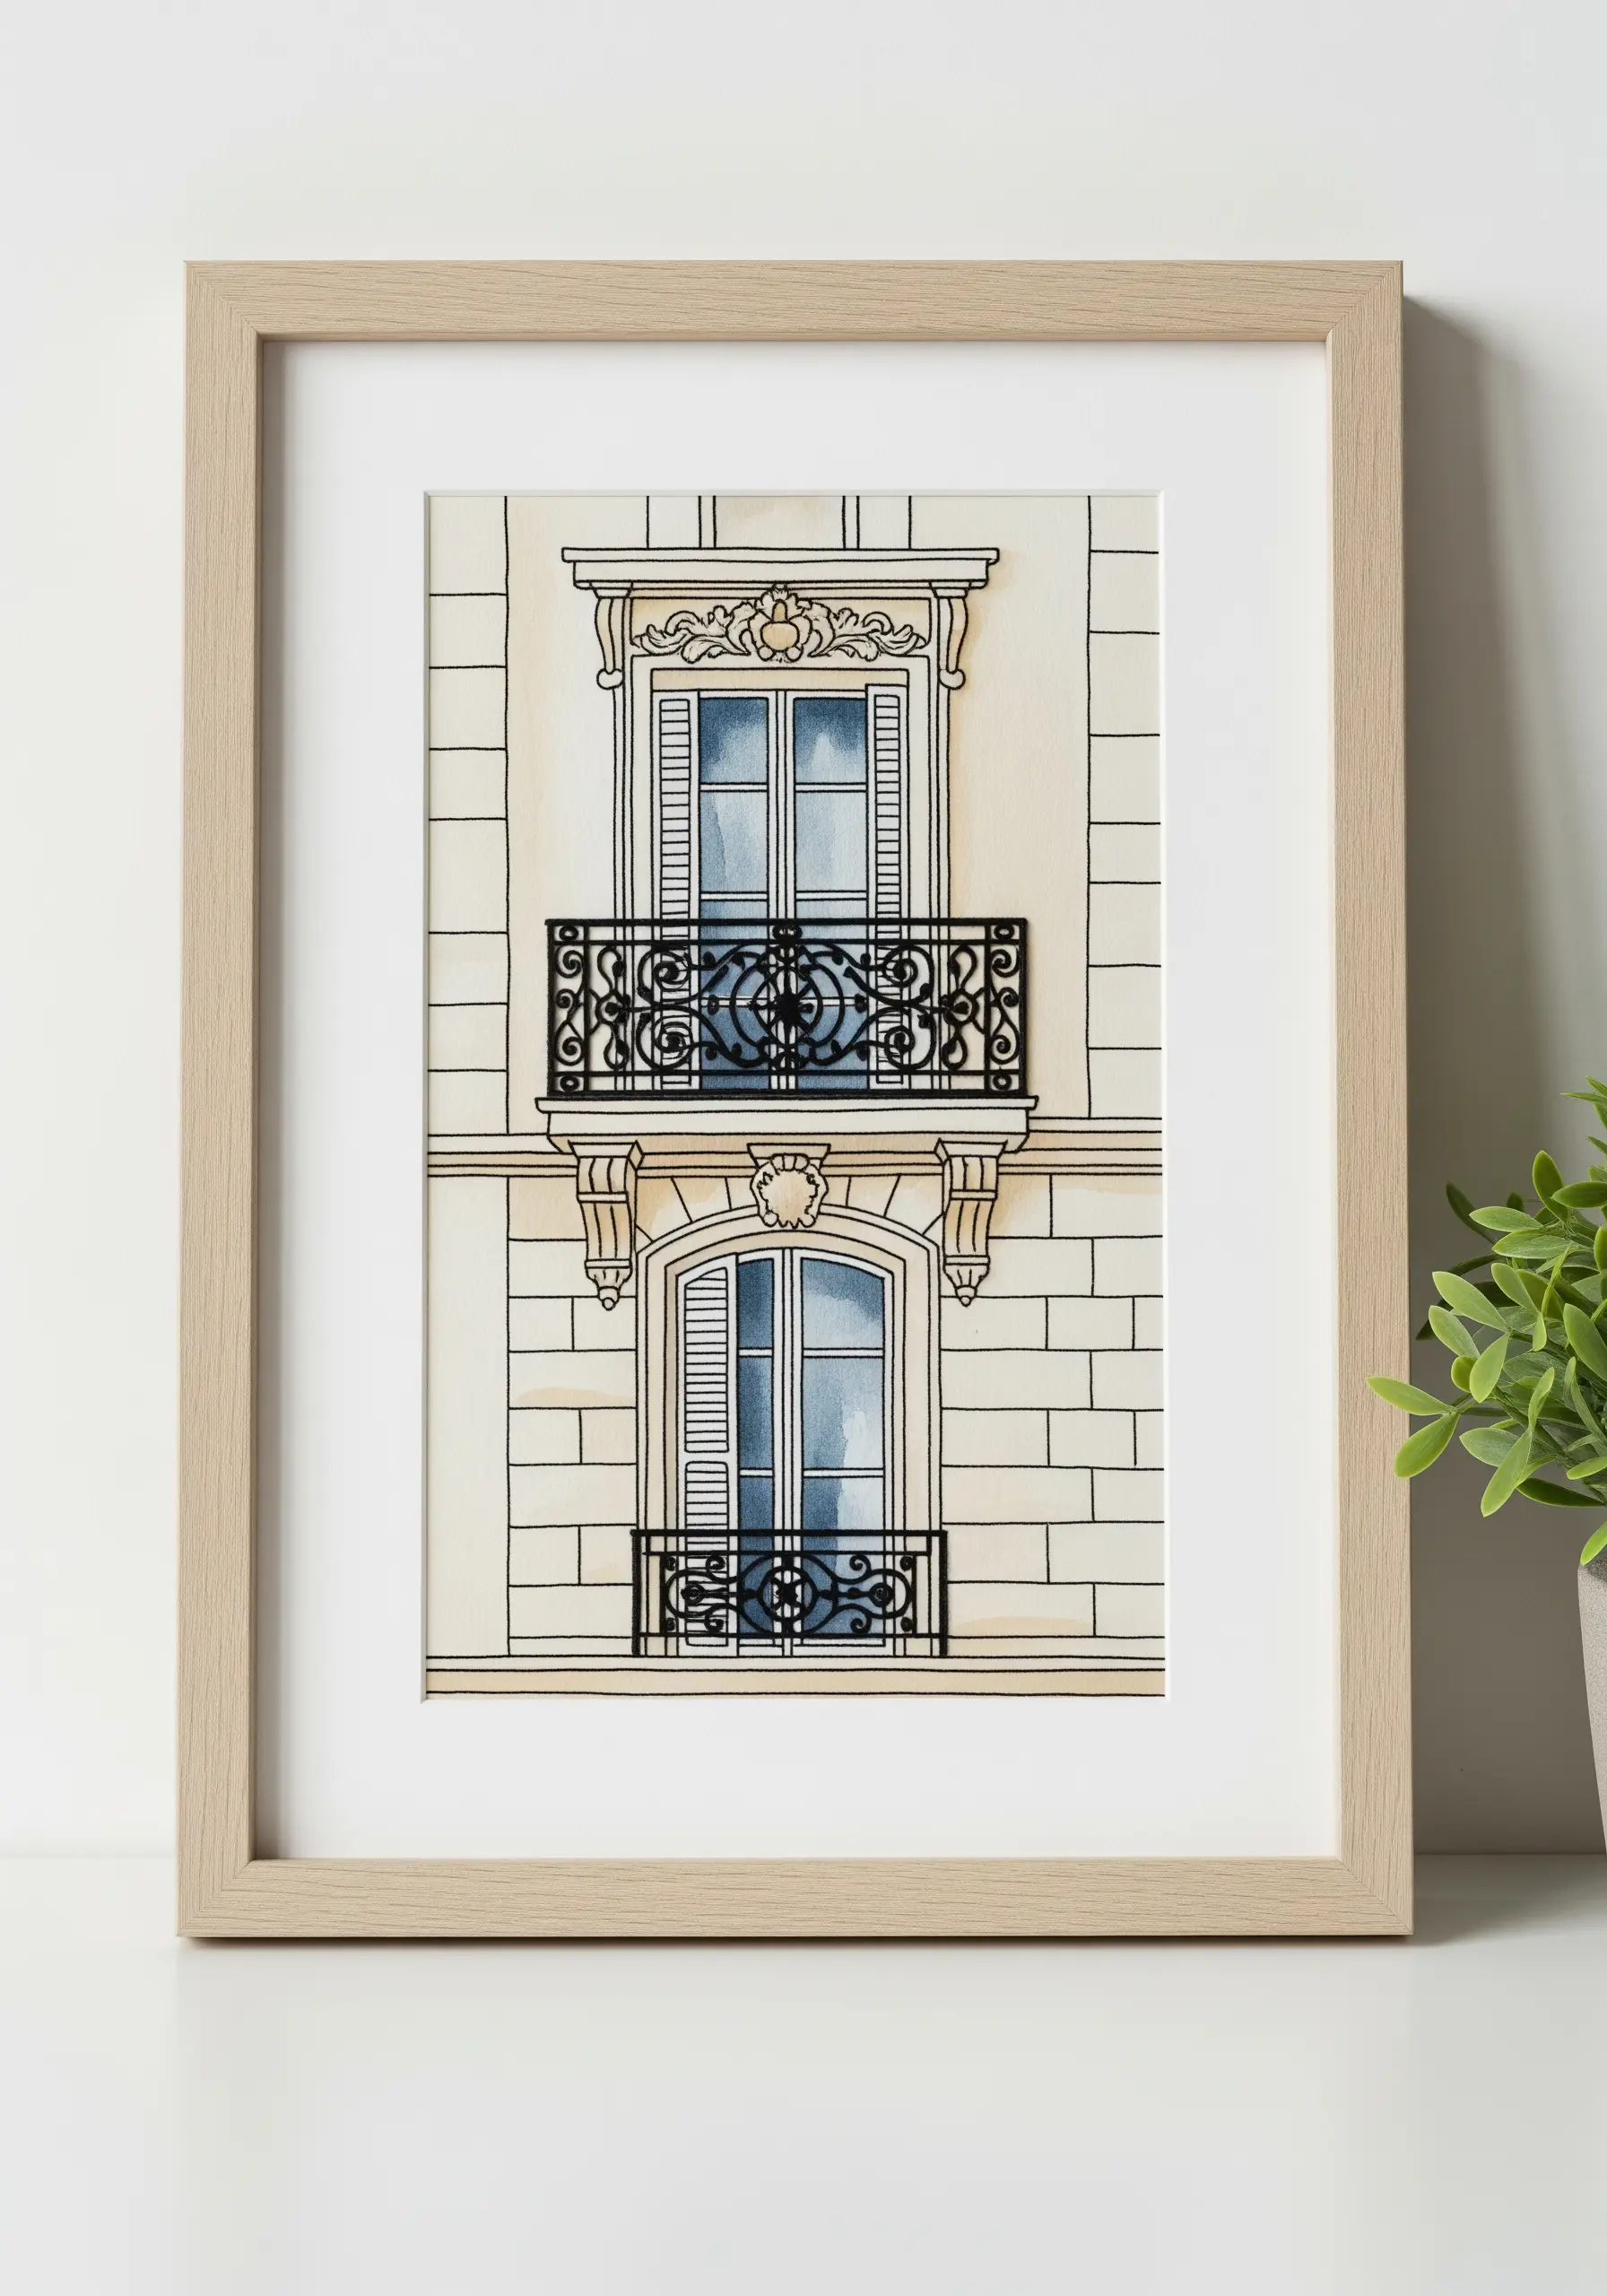
Elevate a simple watercolor or ink illustration by tracing key architectural lines with fine embroidery thread.
Choose specific details to accentuate, such as the intricate ironwork of a balcony or the crisp edges of window shutters.
Use a single strand of black floss and a precise backstitch to maintain the clean, illustrative quality of the original artwork.
This technique adds a subtle, tactile dimension that draws the eye and makes the image feel more substantial and handcrafted.
The result is one of those elegant framed embroidery artworks that will impress guests with its quiet sophistication.
5. Weave Thick Yarn Over Paper Strips
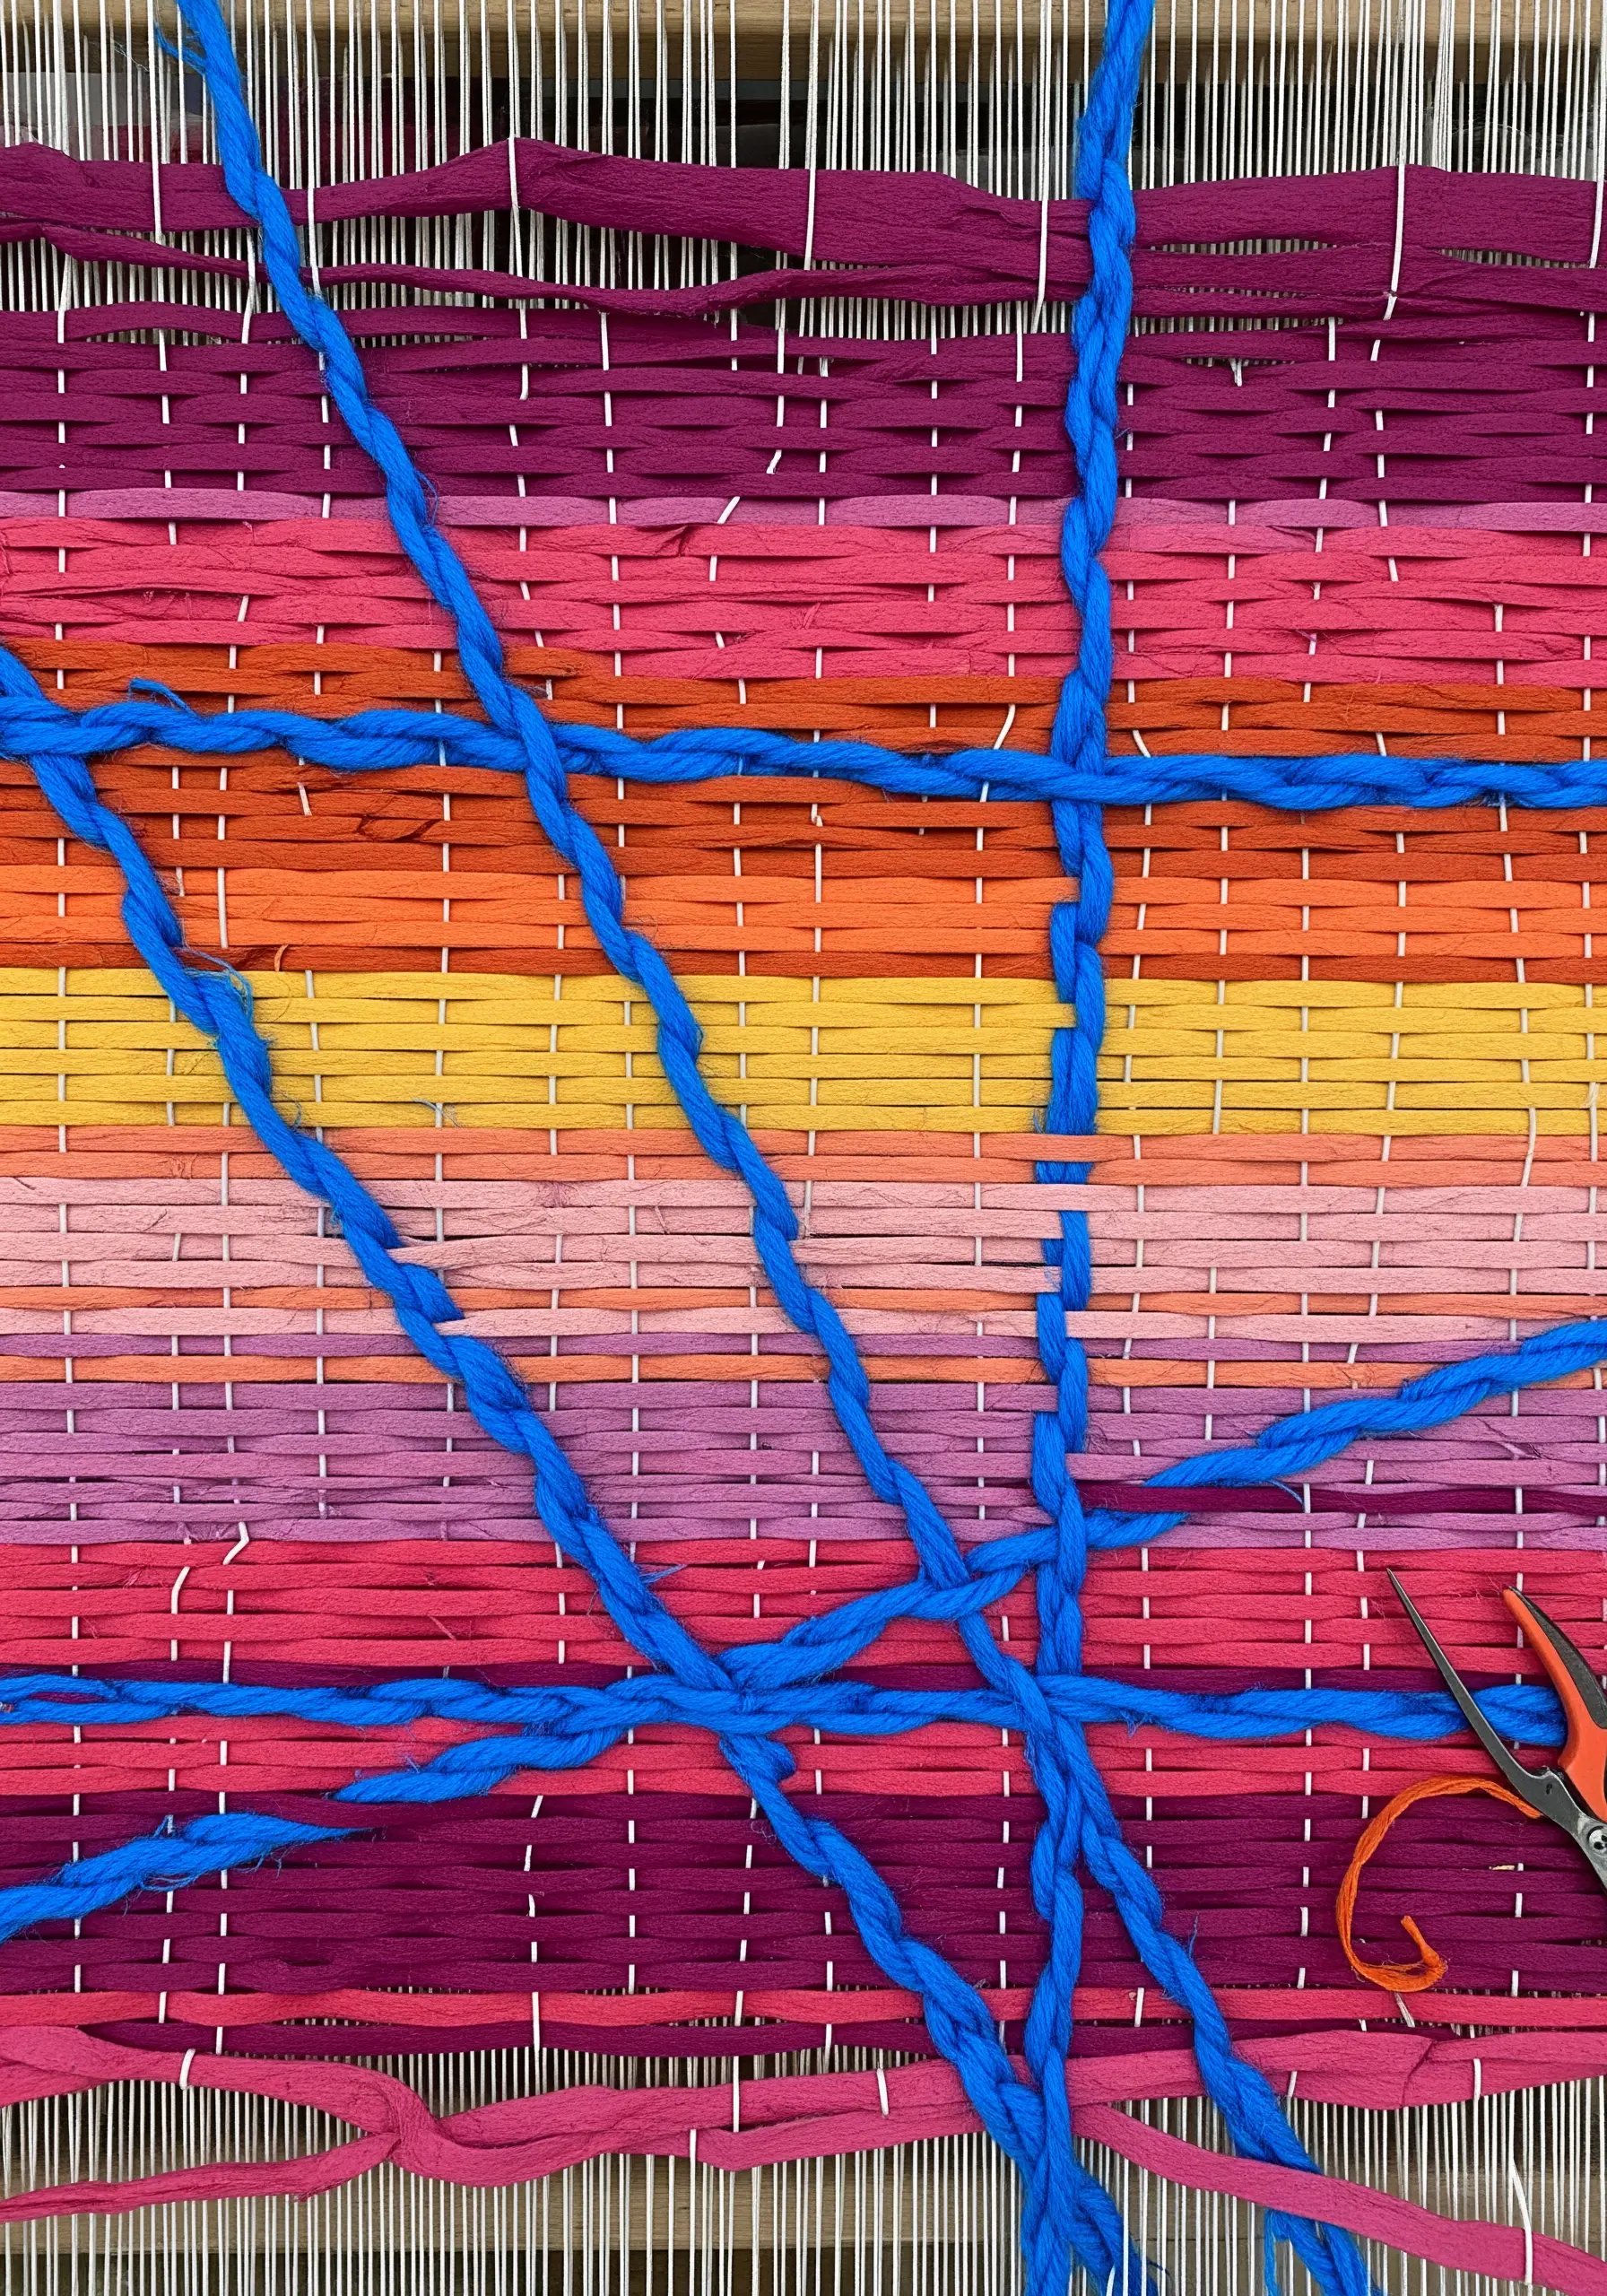
Create a vibrant, abstract tapestry by weaving with unconventional materials.
Instead of traditional warp threads, use strips of painted or colored paper, secured tightly on a simple loom or frame.
For the weft, introduce a contrasting texture and color with a thick, braided yarn.
Rather than a uniform weave, allow the yarn to travel freely across the paper strips, creating bold, intersecting lines.
This approach transforms a flat surface into a dynamic piece of woven art and provides playful yarn wall art crafts that feel spontaneous and modern.
6. Combine Stitched Felt and Sculptural Paper
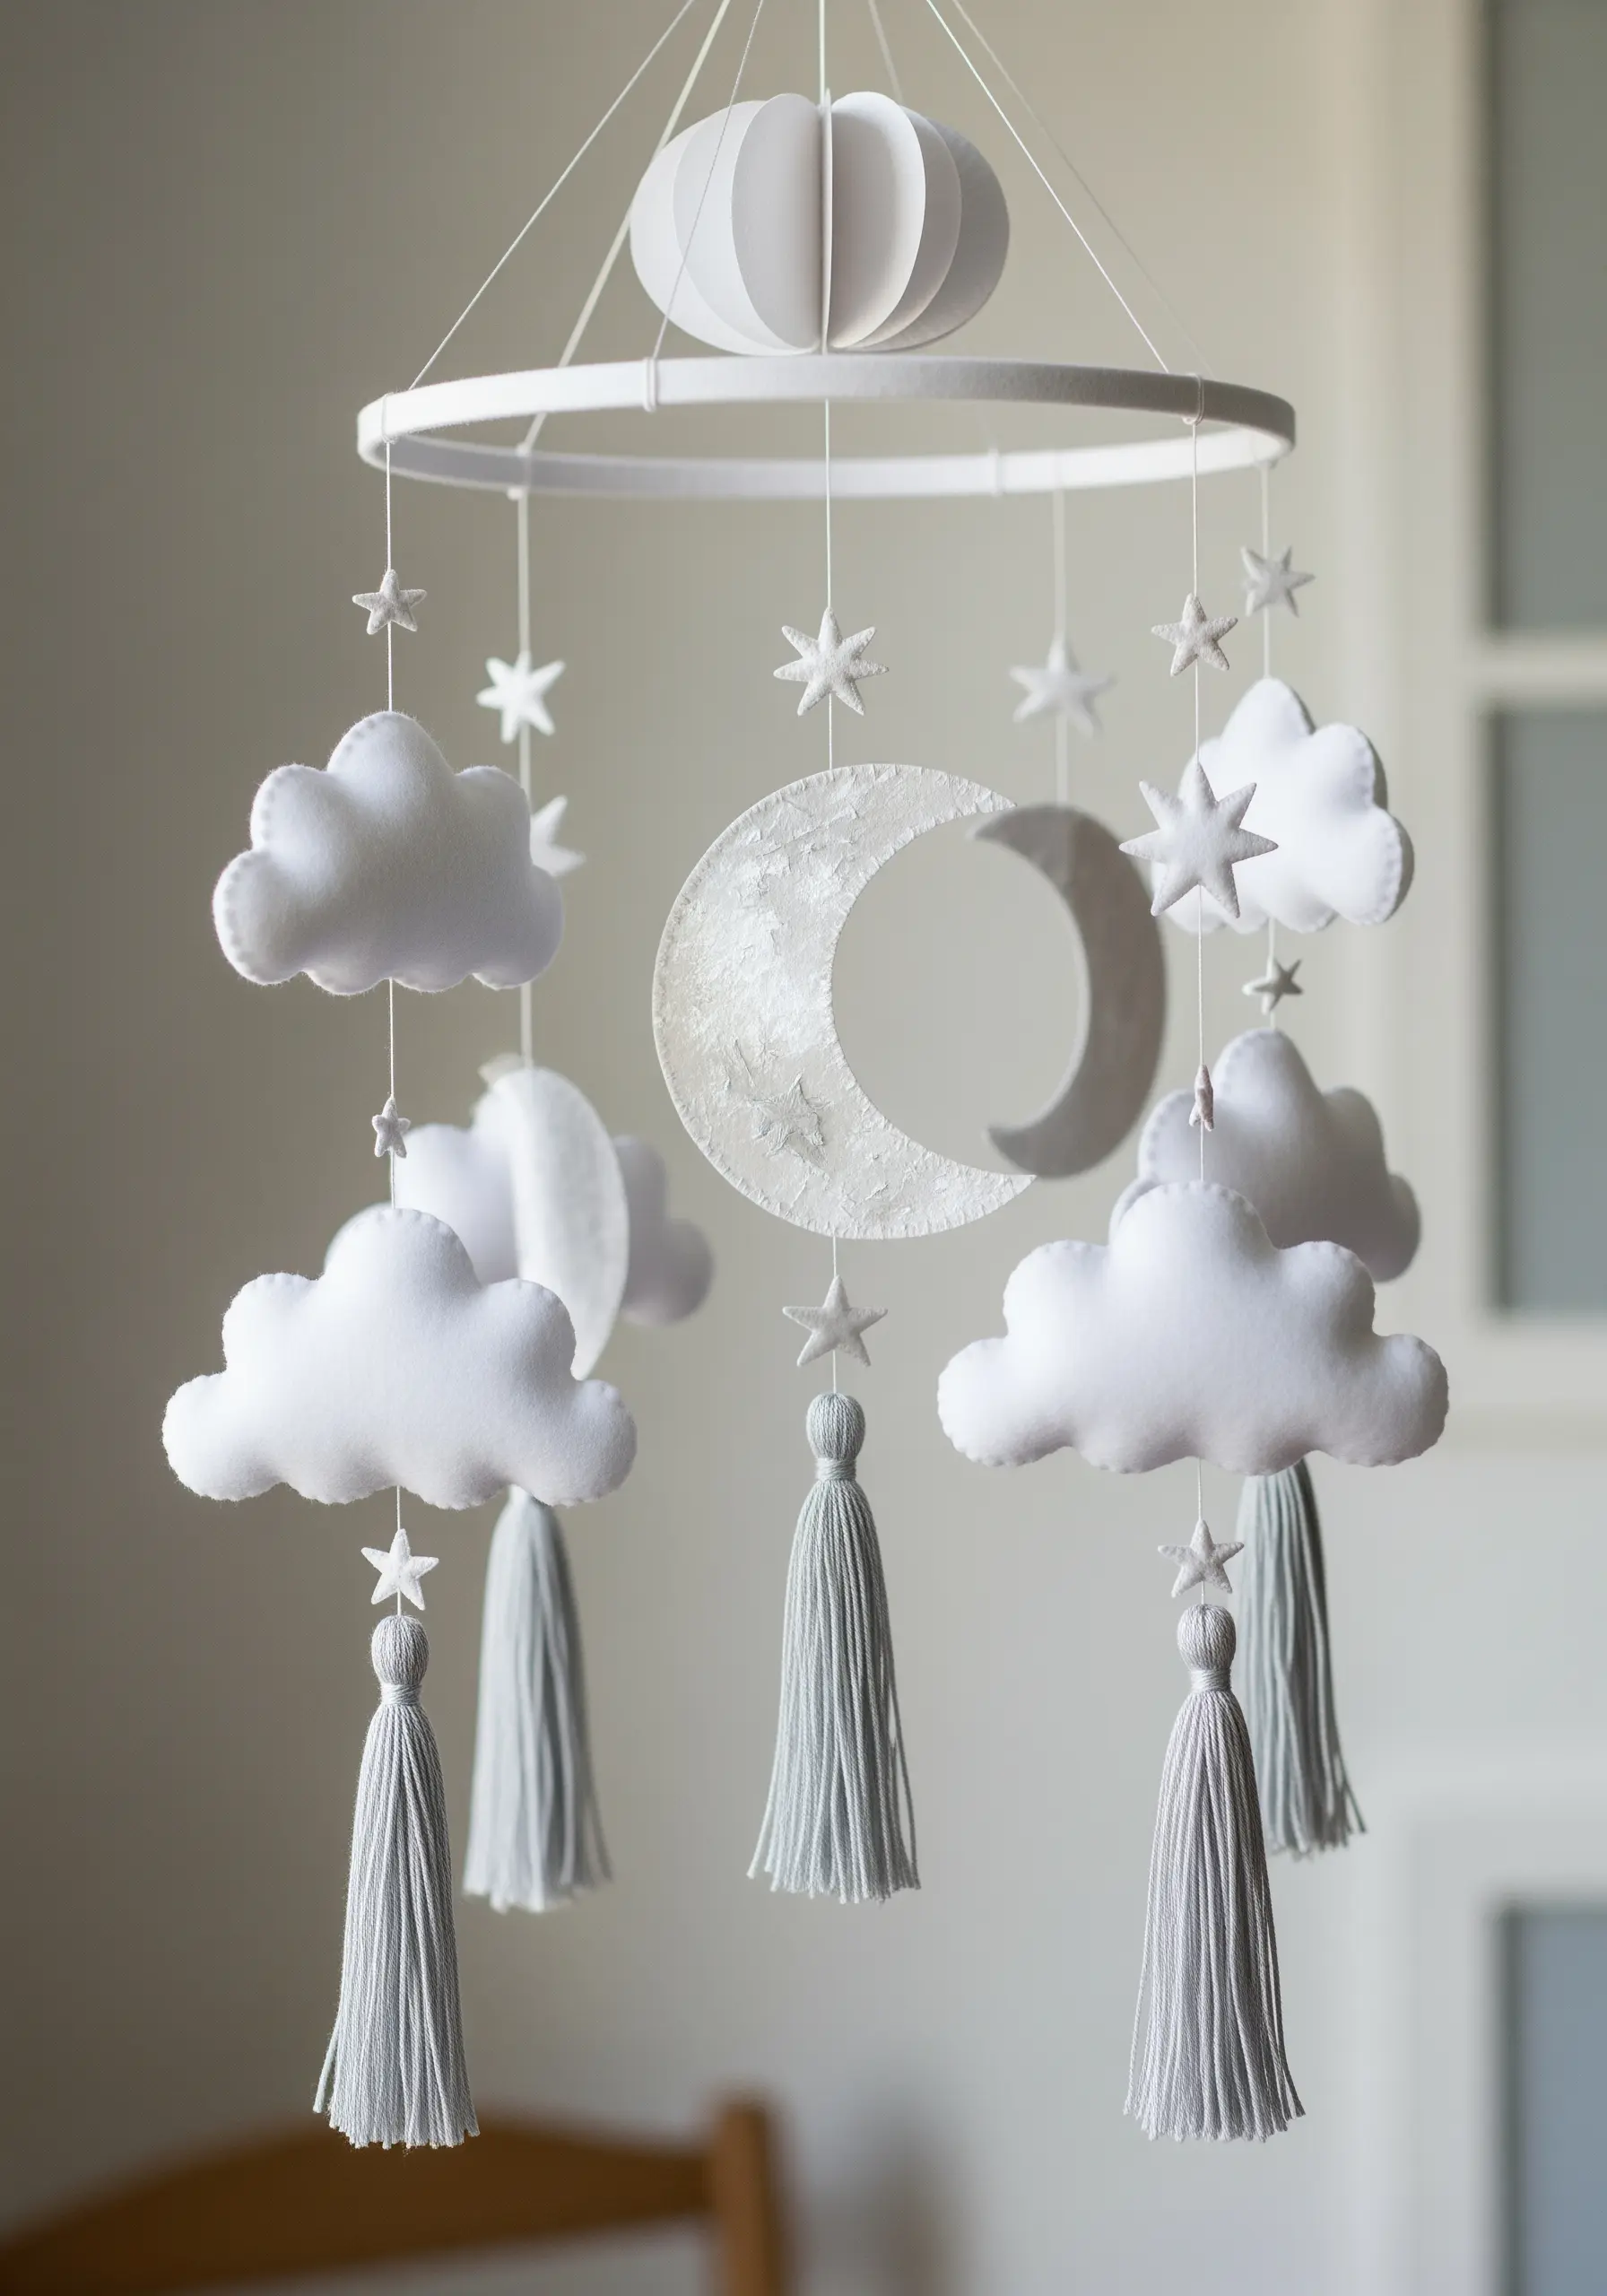
Design a nursery mobile that balances soft and crisp textures for a sophisticated yet gentle aesthetic.
Craft the clouds and stars from soft felt, using a simple running stitch along the edges for a handmade touch.
For the central moon element, switch to layered paper or cardstock to create a sharp, geometric counterpoint to the plush felt shapes.
Add delicate embroidery or beadwork to the paper moon for a touch of sparkle.
This mix of materials elevates the entire piece, turning it into a beautiful keepsake that explores more than just one texture, like these emotional nursery decor and baby keepsakes.
7. Integrate Stitched Details into a Paper Diorama
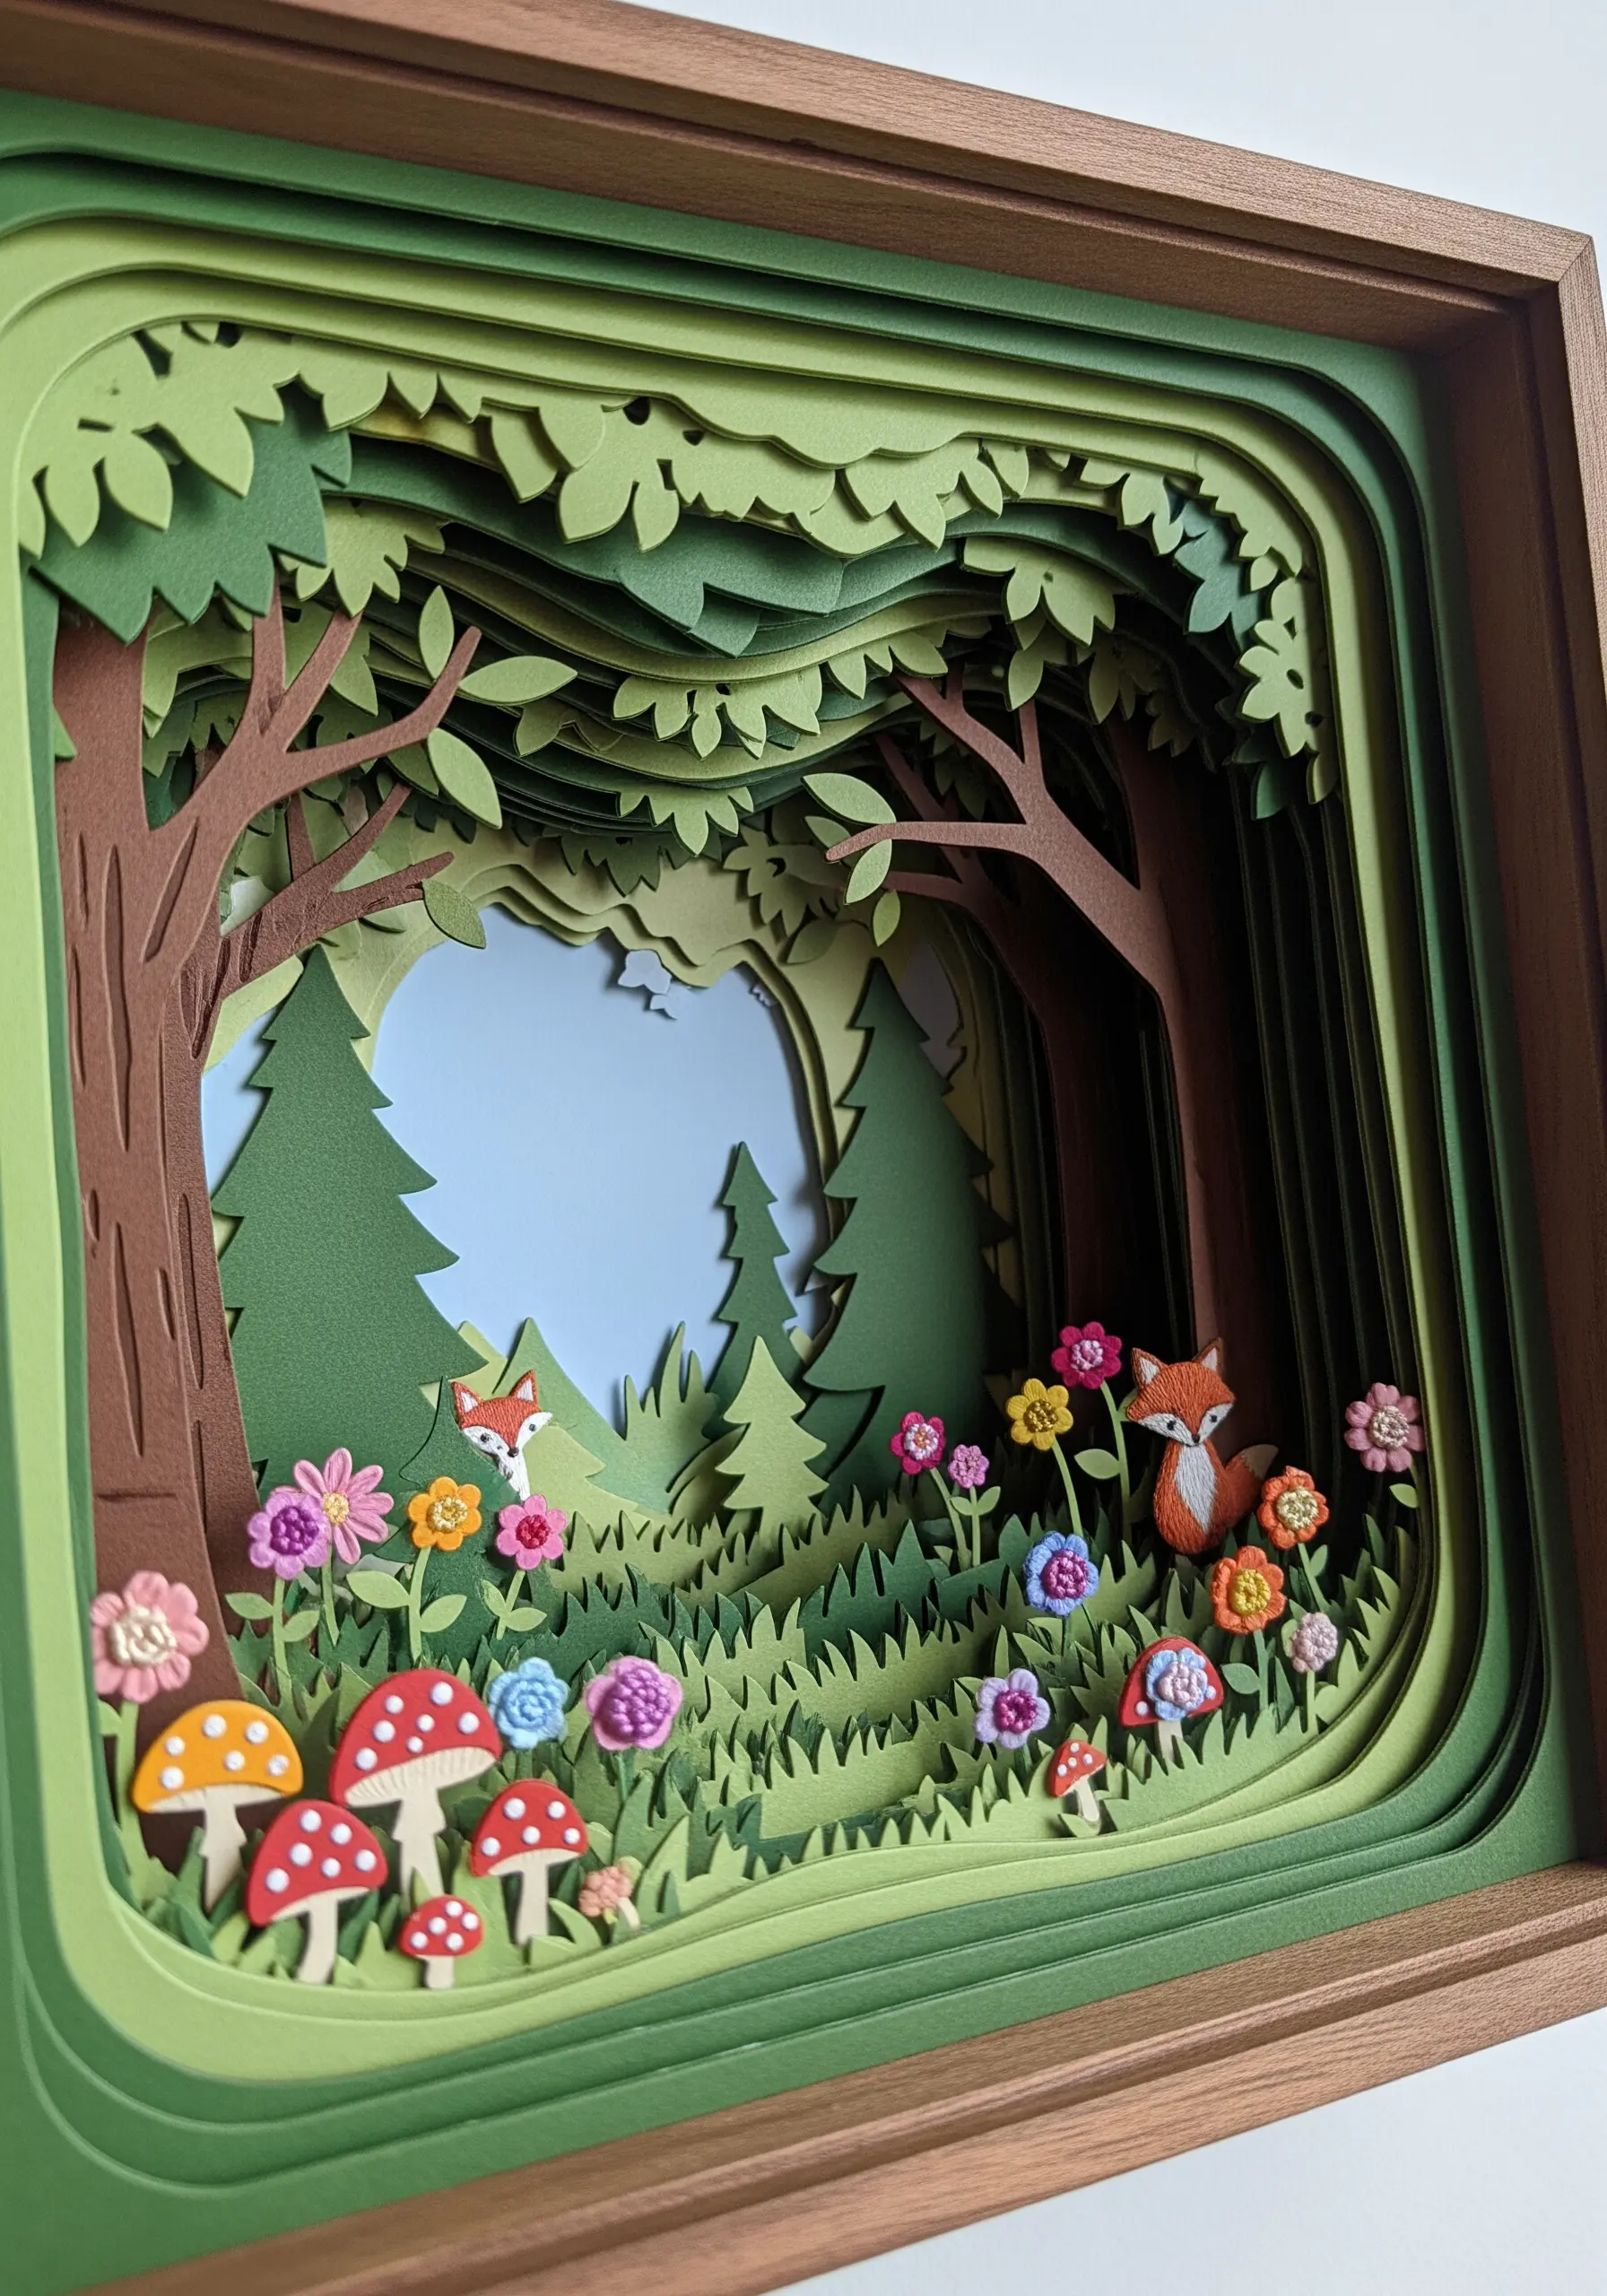
Bring a layered paper shadow box to life by adding tiny, embroidered characters or elements.
Instead of making every detail from paper, select one or two focal points—like the fox and flowers—to render in thread on a small piece of felt or stiffened fabric.
Use simple stitches like satin stitch for the body and French knots for eyes or flower centers.
Cut out the embroidered motifs and place them within the paper layers.
The shift in texture immediately draws the eye, adding warmth and intricate detail to your woodland scene, much like classic fox deer embroidery patterns.
8. Embellish Papier-Mâché with a Simple Border Stitch
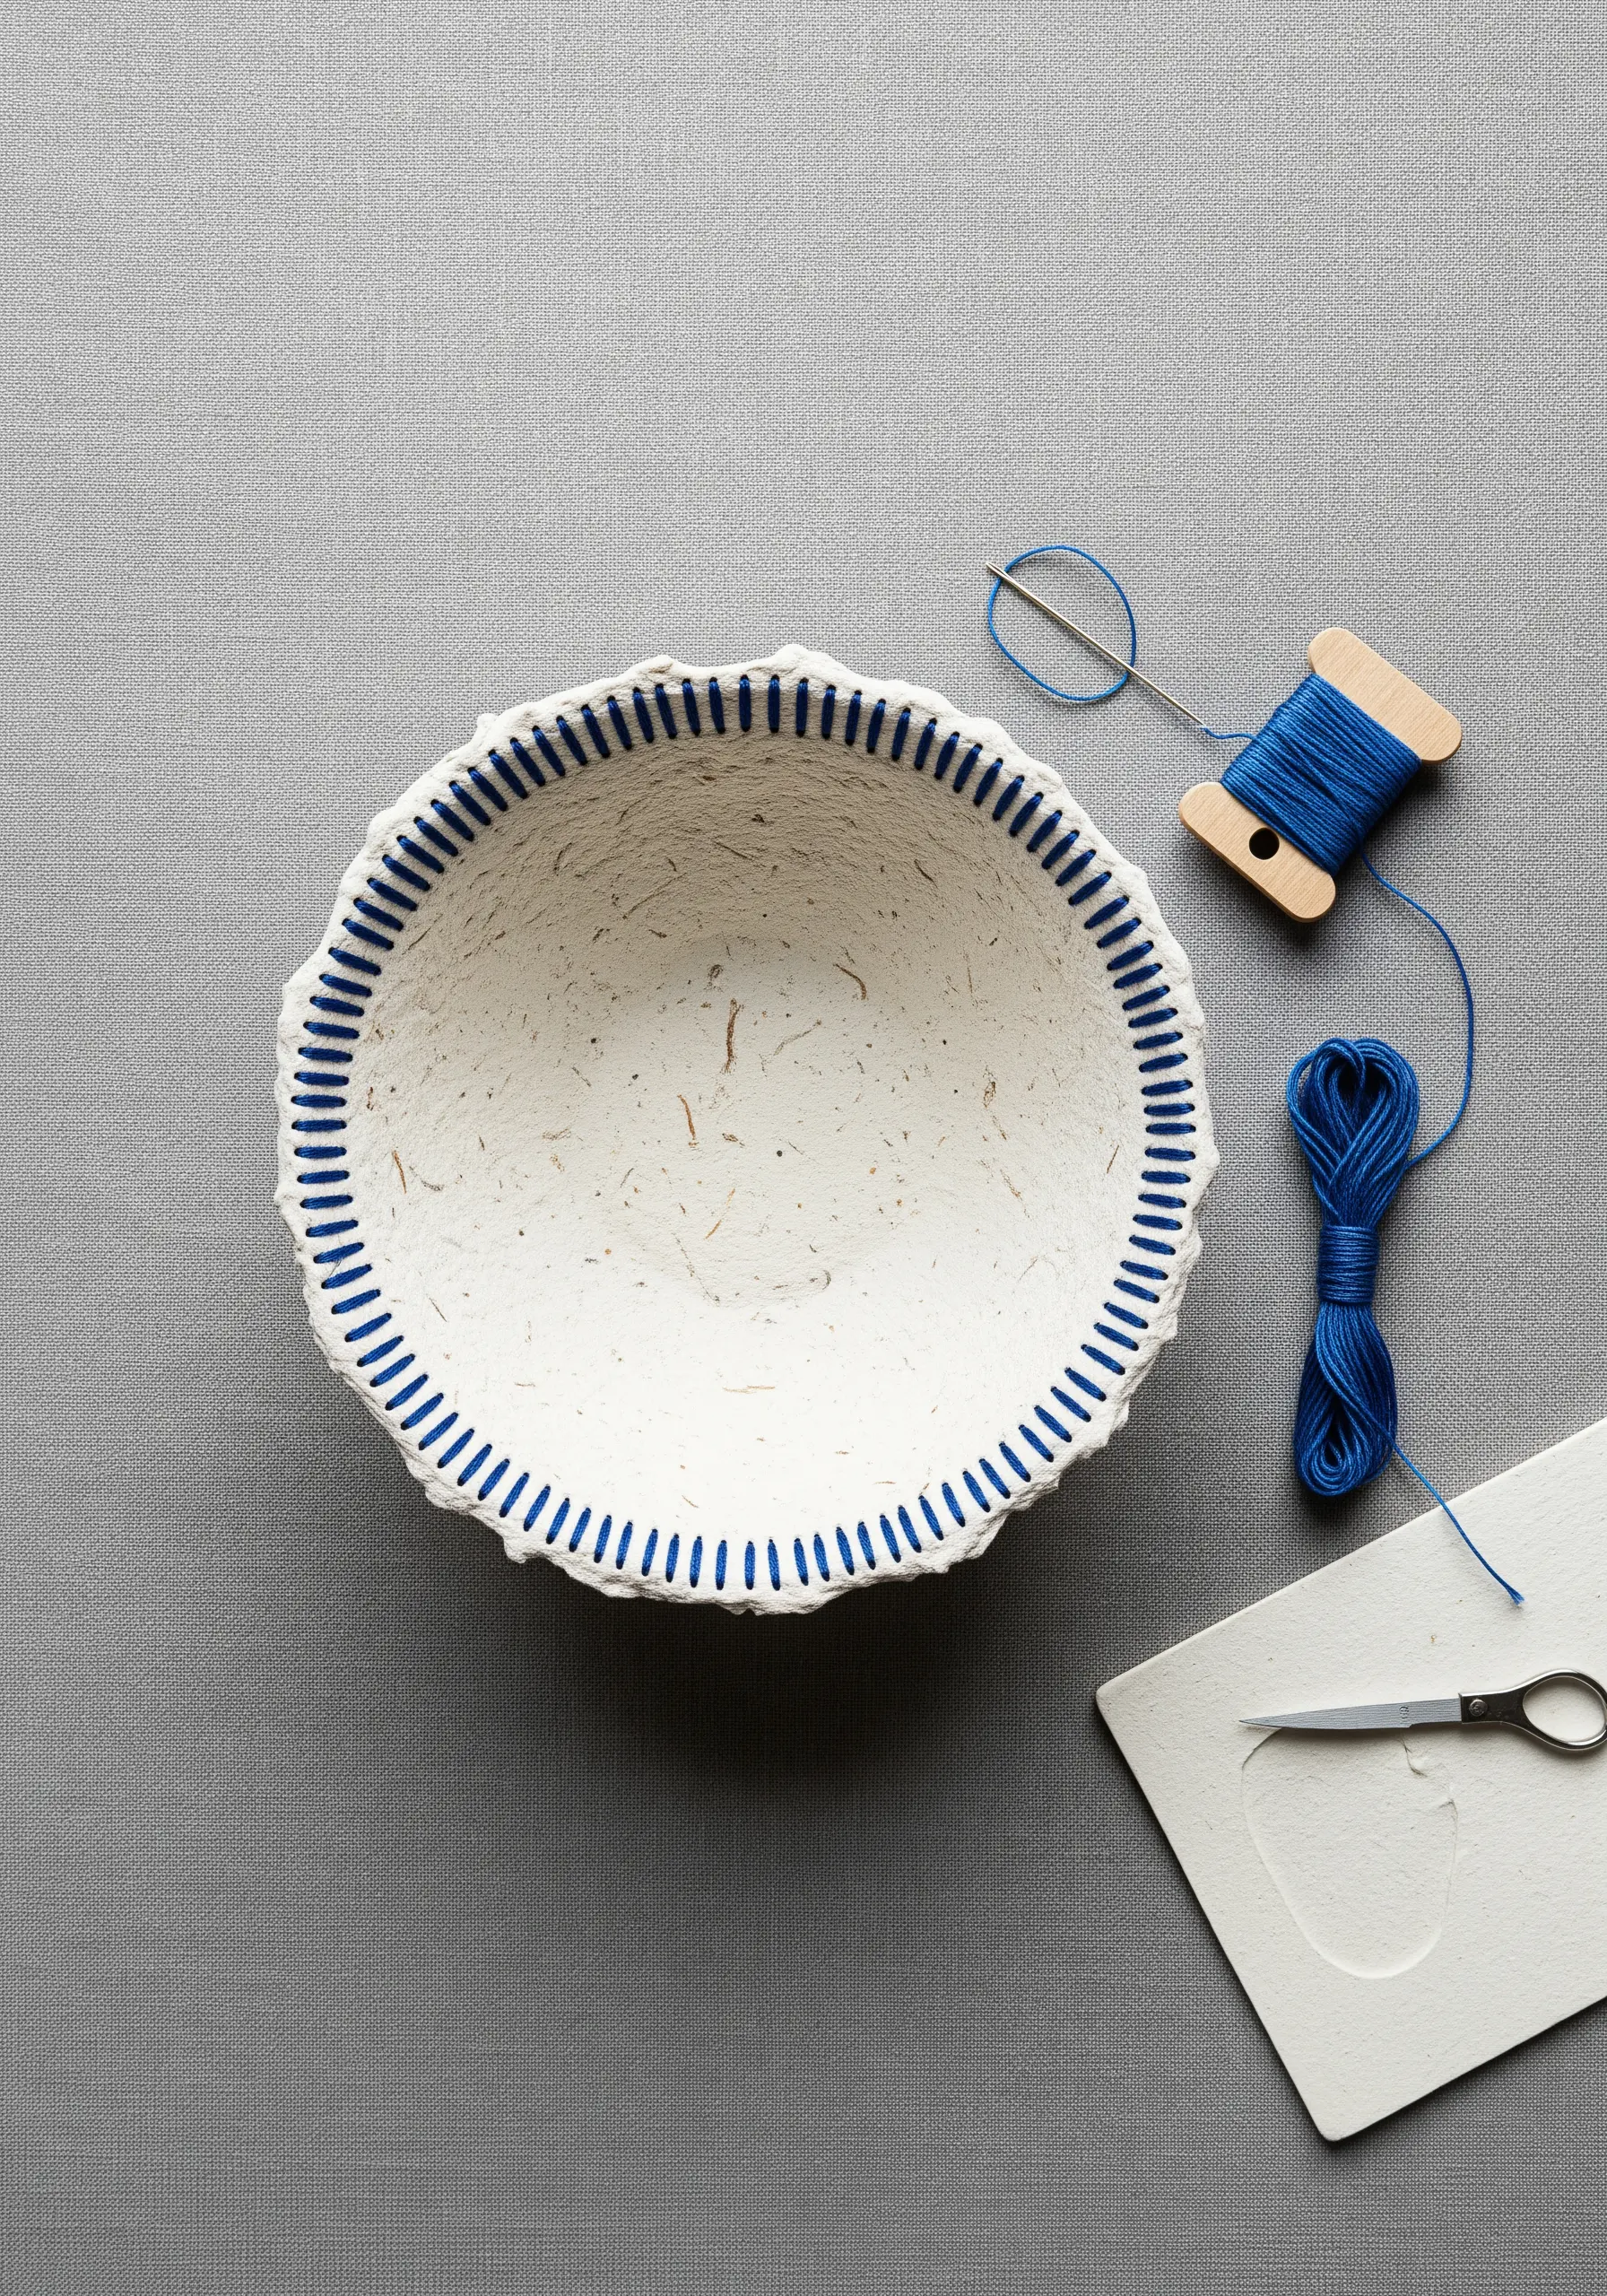
Add a refined, graphic touch to handmade papier-mâché bowls or objects with a clean stitch detail.
Once your papier-mâché is fully dry and smooth, use a fine drill bit or a sturdy needle to carefully punch evenly spaced holes around the rim.
Thread a needle with a contrasting, vibrant floss, such as this cobalt blue against natural white.
Use a simple running stitch or whipstitch to create a clean, modern border that highlights the object’s organic shape.
This technique feels both rustic and contemporary, perfect for modern minimalist table linen and decor pairings.
9. Superimpose Abstract Thread Art onto a Photograph
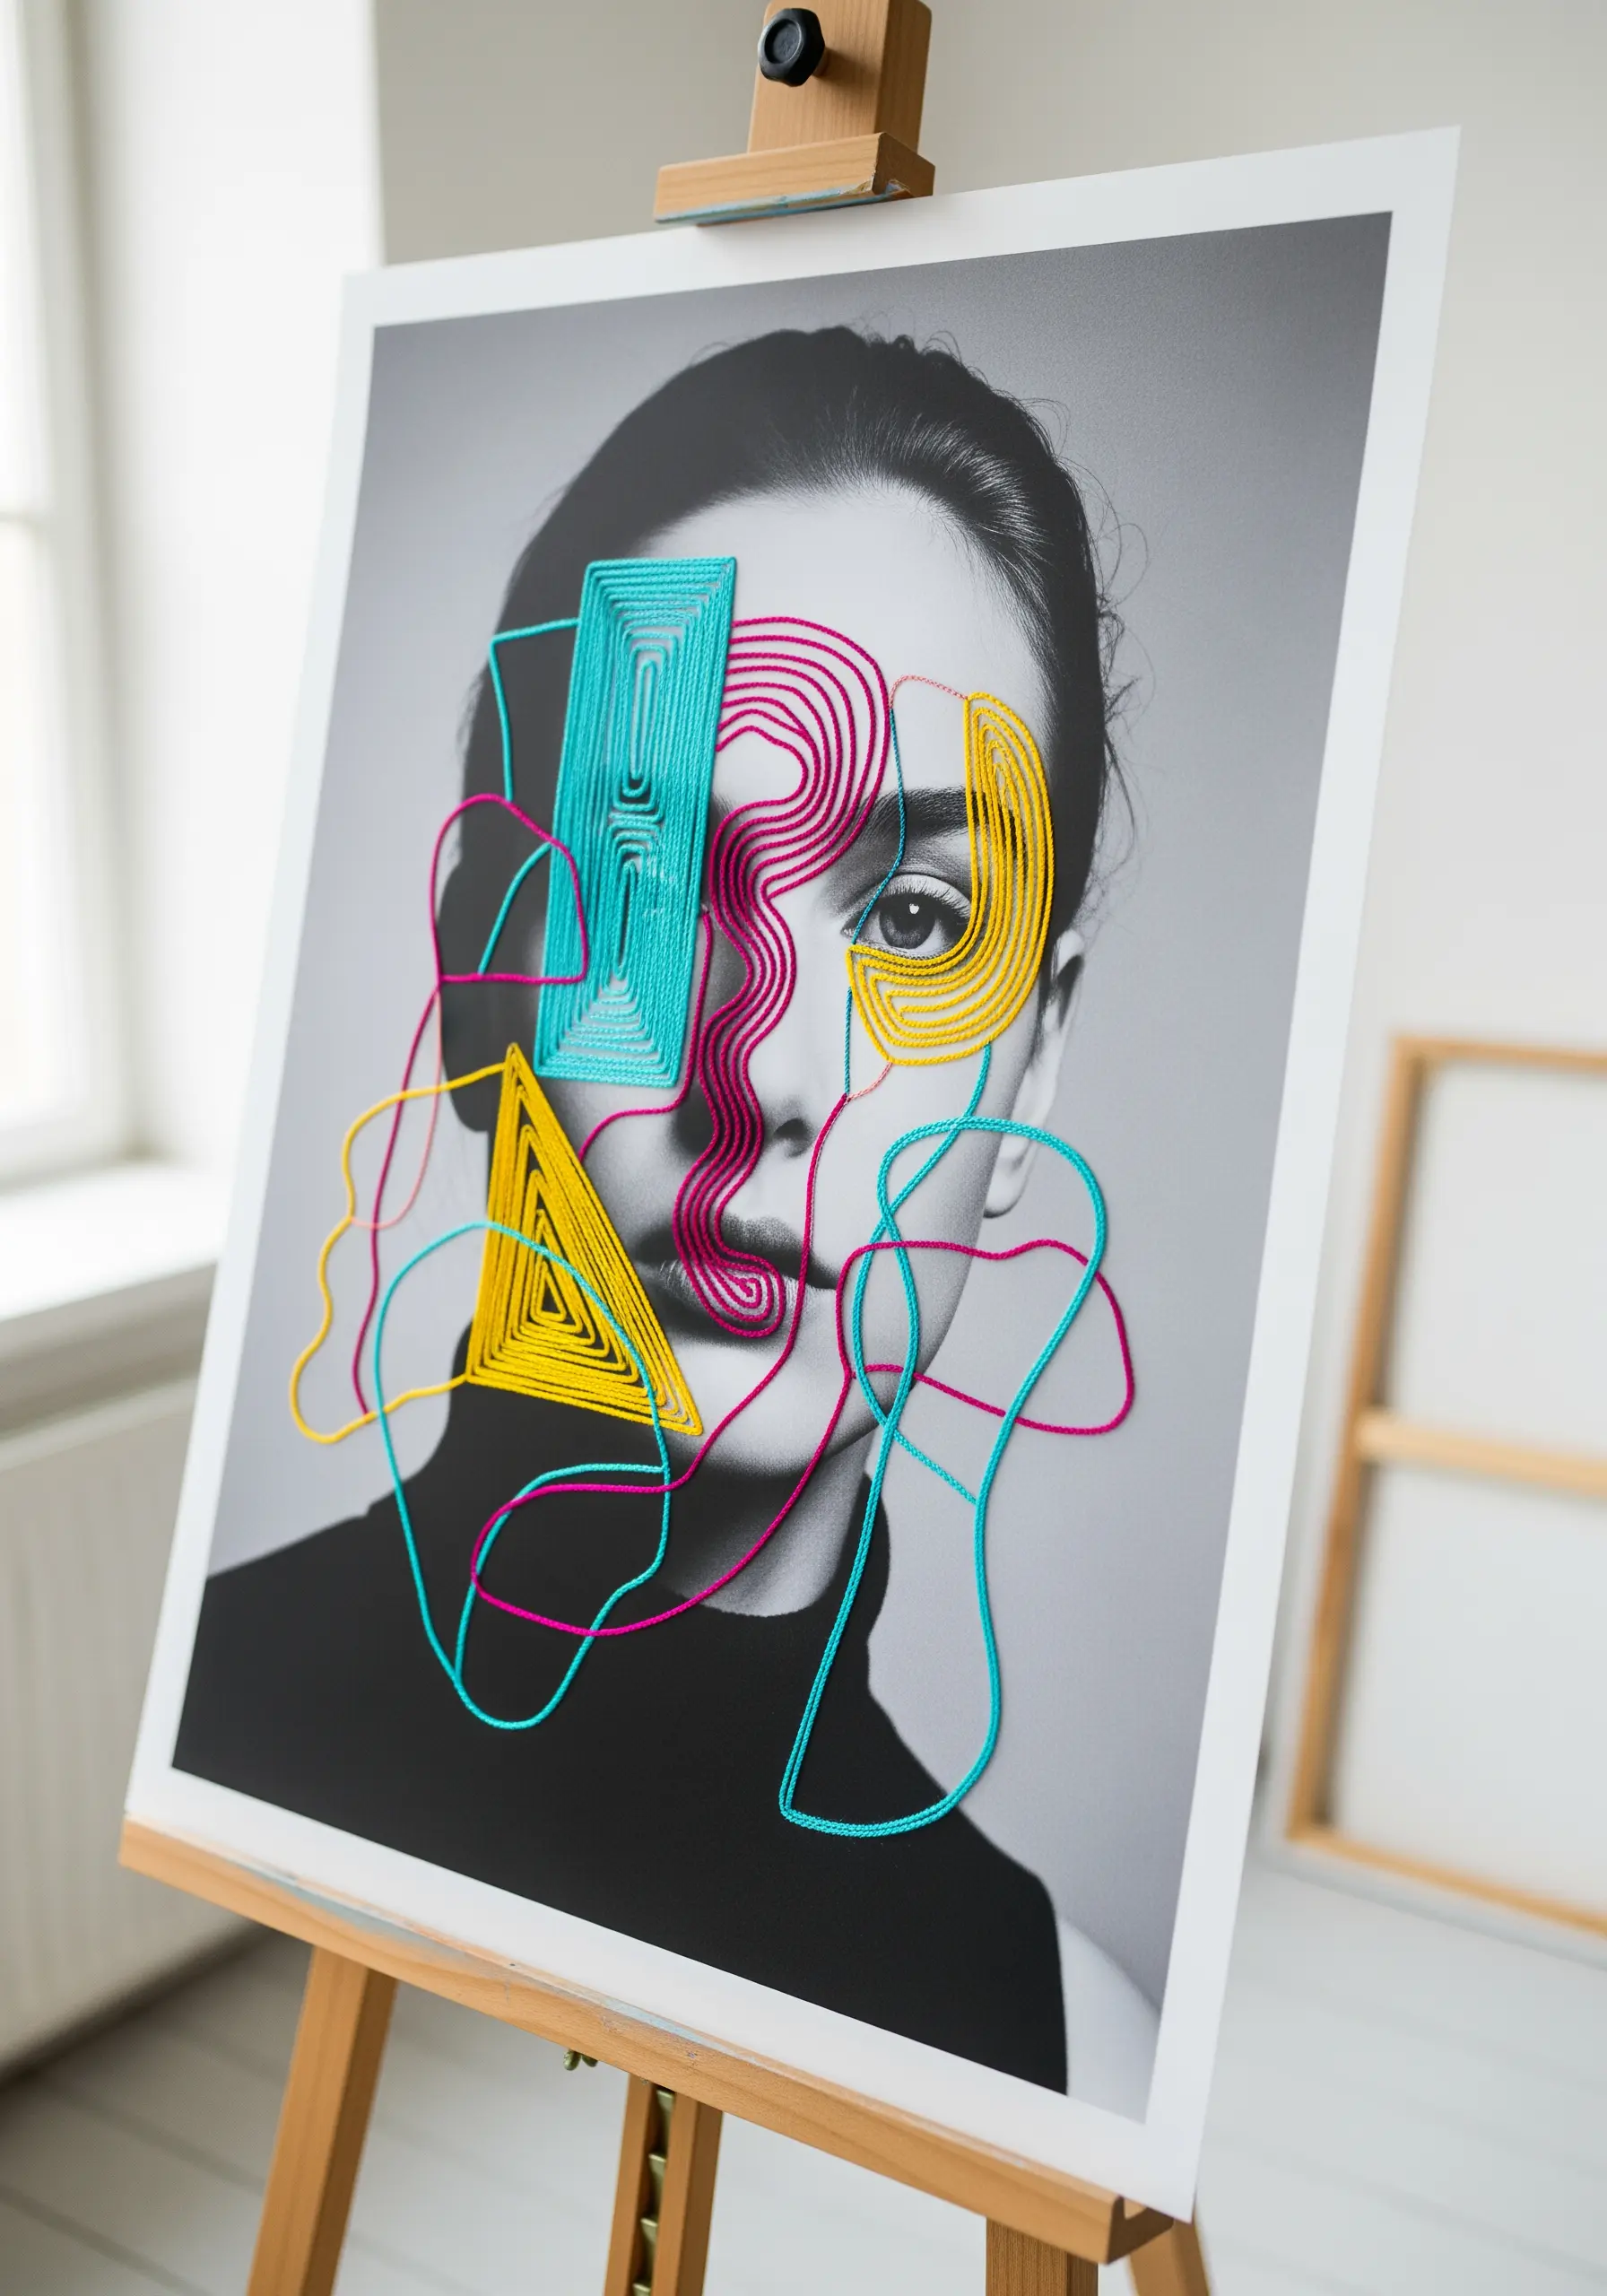
Turn a printed portrait into a piece of contemporary art by stitching abstract shapes directly onto it.
Mount a high-quality photo print onto a foam core board for stability.
Use pins to mark the vertices of your desired geometric or organic shapes, then wrap thread tightly around the pins to create dense, colorful forms.
The interplay between the soft realism of the photograph and the hard, graphic lines of the thread creates a compelling visual tension.
Explore these abstract framed embroidery patterns to add a modern twist to your walls for more inspiration.
10. Add Linear Stitches to Origami
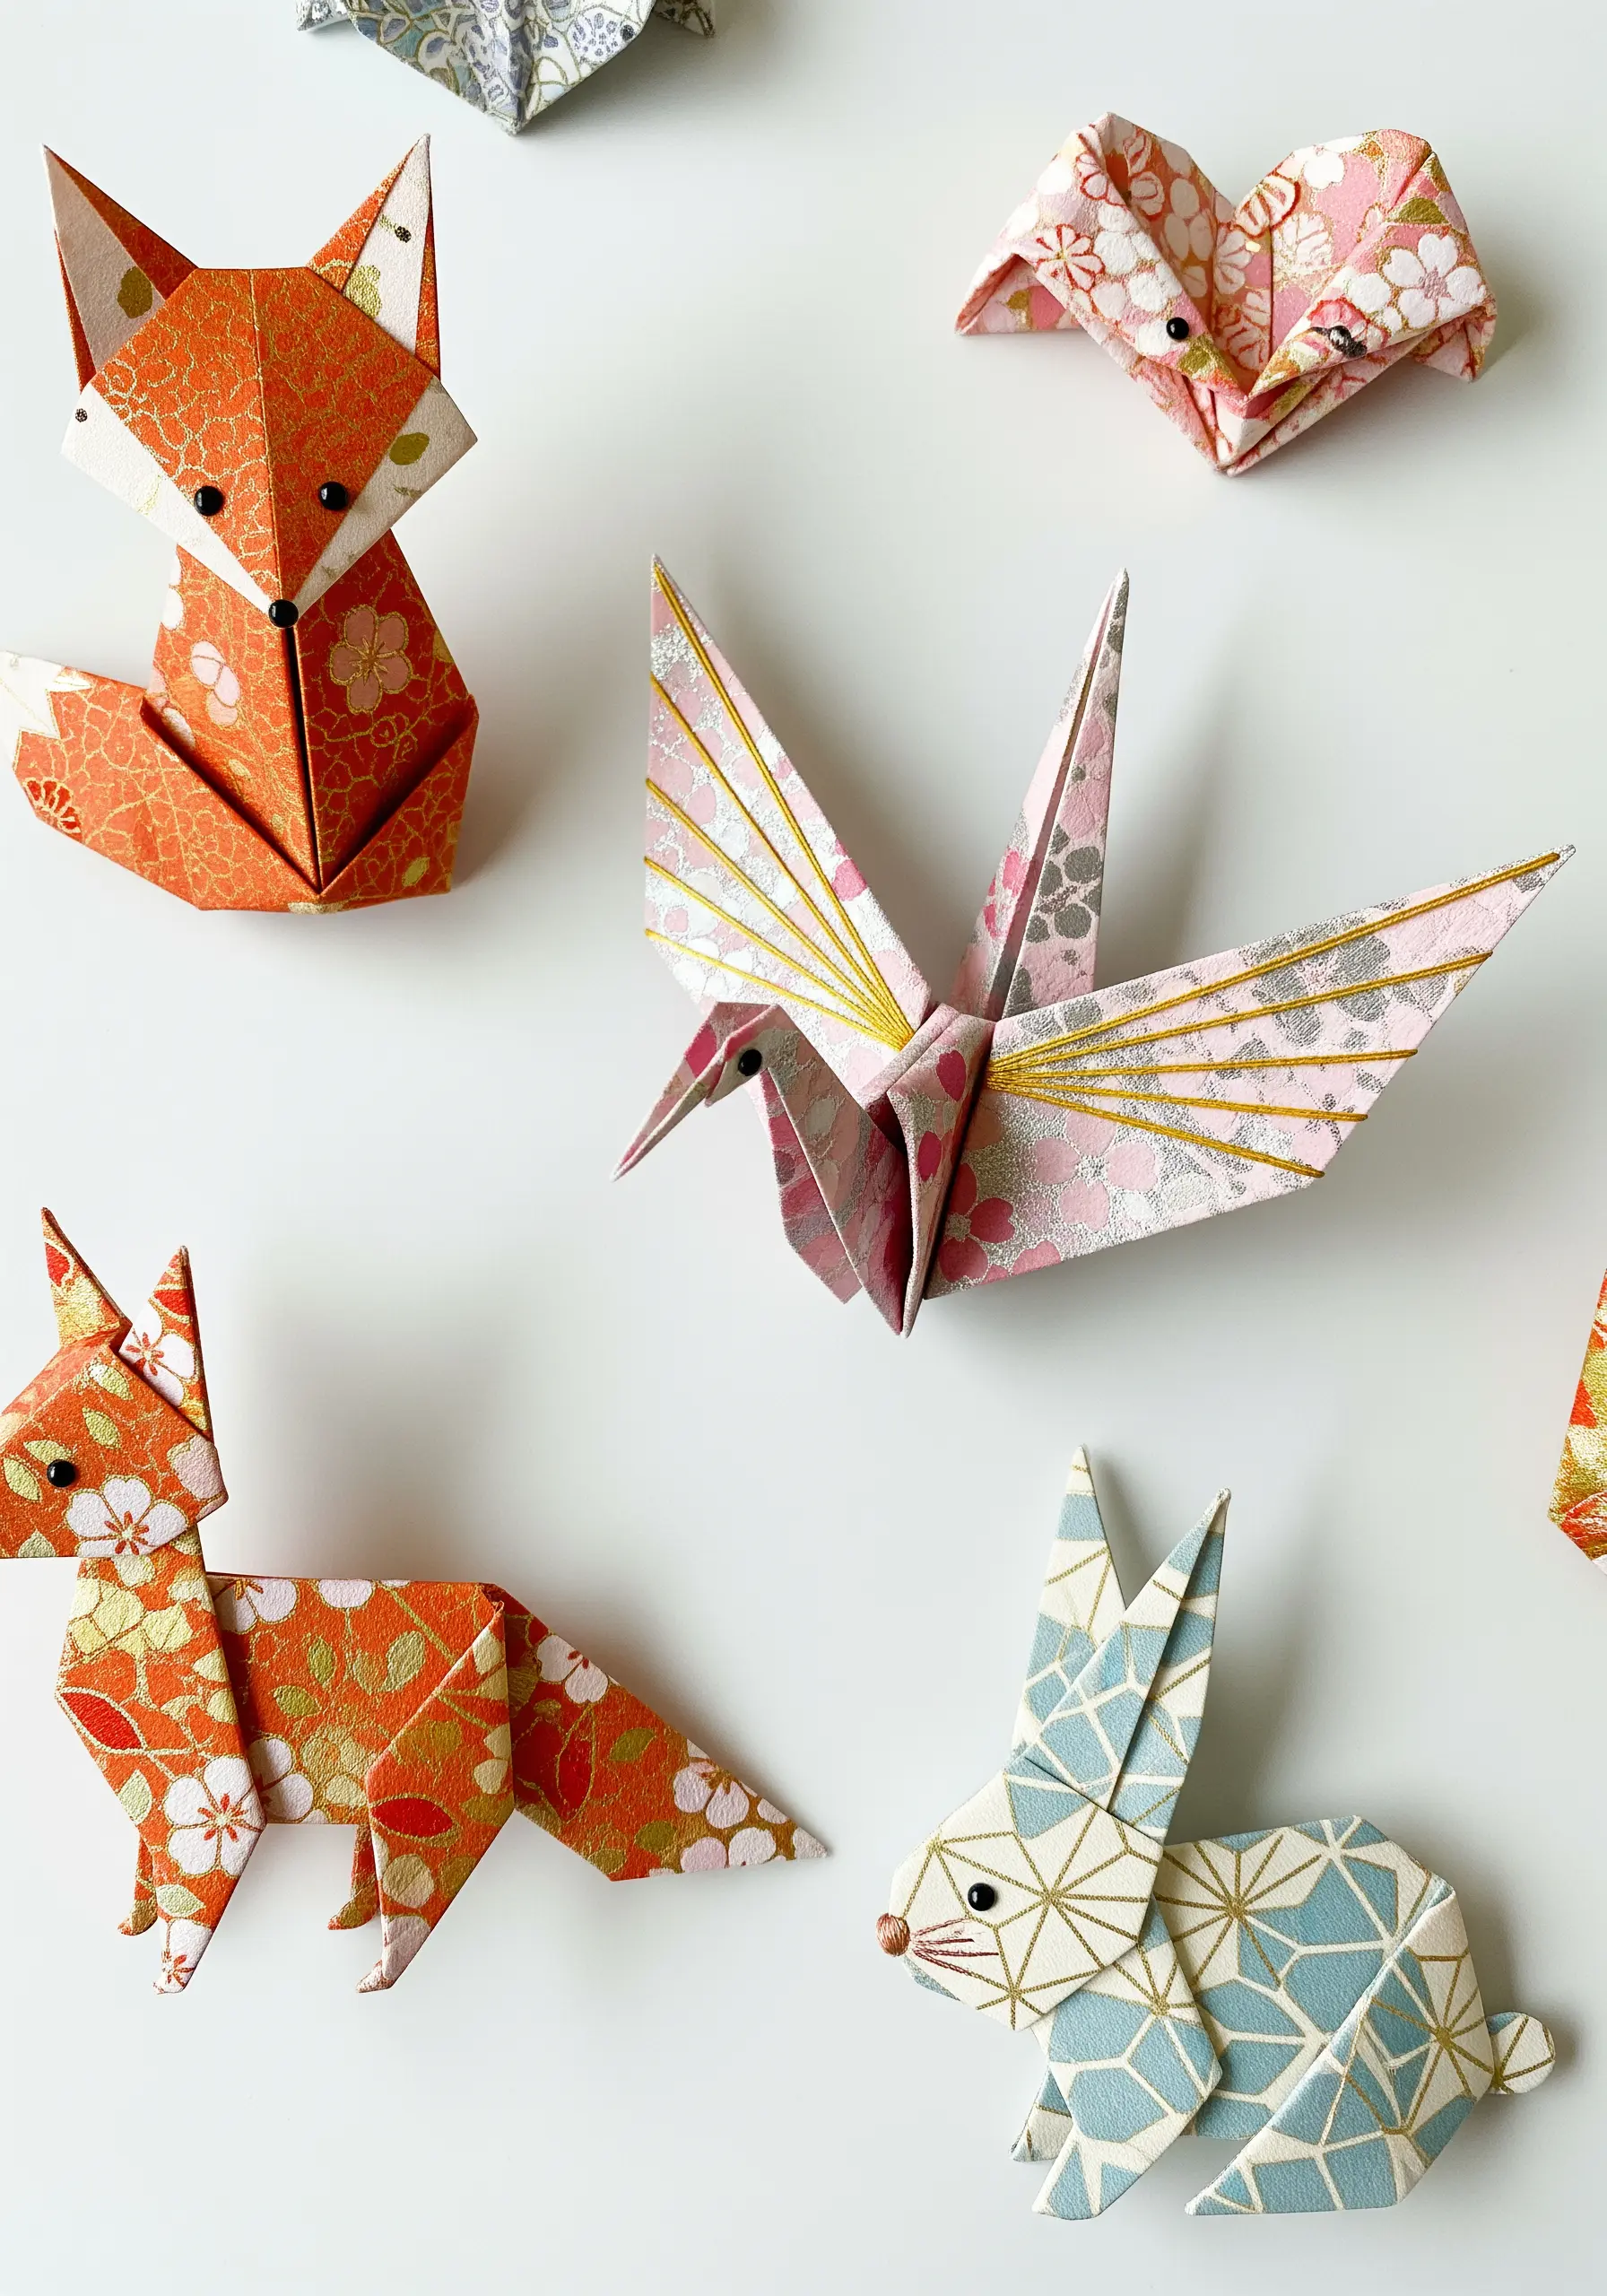
Enhance the delicate folds of origami with fine, strategic stitches.
Before making your final folds, lightly mark where you want to add embroidered details, such as the lines on a crane’s wings or the whiskers on a rabbit.
Use a single strand of metallic or contrasting thread and a simple backstitch to create clean, graphic lines.
The key is subtlety—the stitches should complement the paper’s pattern and folds, not overwhelm them.
This fusion of two classic crafts produces wonderfully tactile and visually intricate results, reminiscent of mini embroidery designs inspired by vintage patterns.
11. Combine Paper Quilling with Bead Embroidery

Elevate the art of paper quilling by integrating the texture and shimmer of beads and metallic thread.
After arranging your primary quilled shapes, fill the negative spaces with couched metallic thread or dense clusters of seed beads.
Couching—tacking down a thick thread with smaller, separate stitches—is perfect for creating smooth, curving lines that complement the swirls of the paper.
The beads add a rich, granular texture that contrasts beautifully with the smooth, linear quality of the paper strips, creating a design that evokes traditional floral mandala embroidery.
12. Create Ghostly Impressions with Vellum Overlays
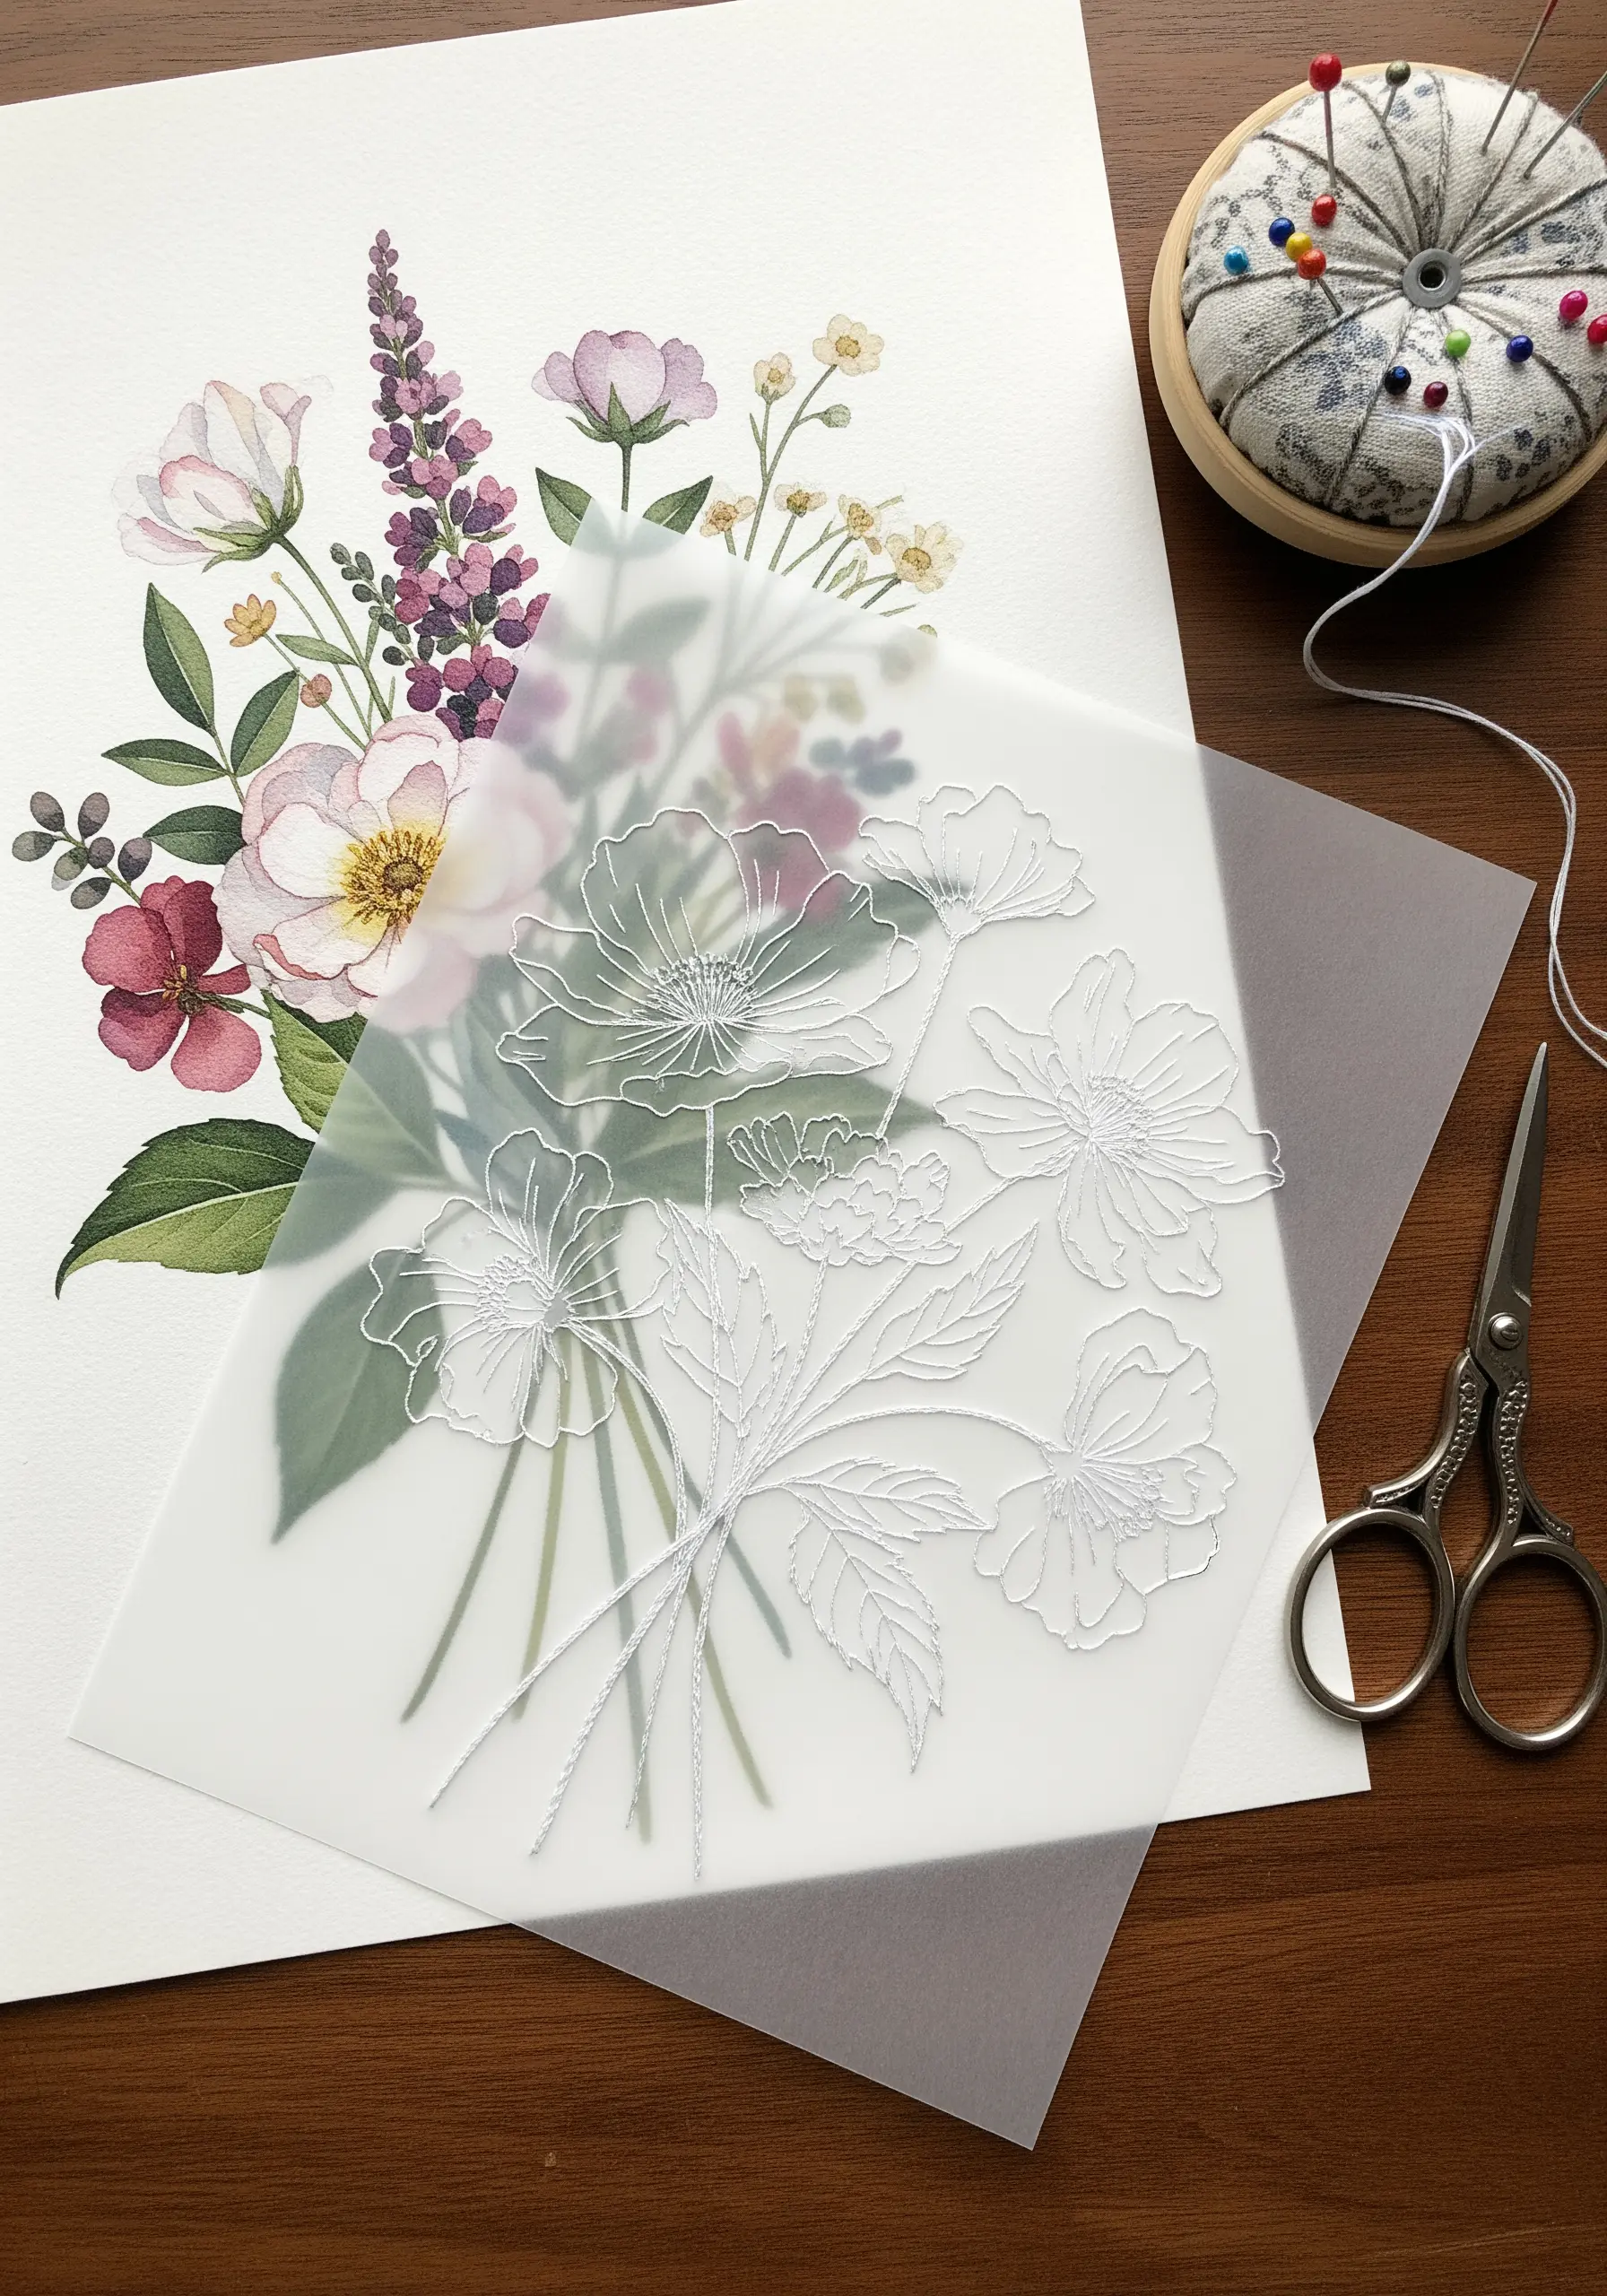
Use vellum paper to create a soft, ethereal layer over a painted or printed image, adding a new dimension with white-on-white embroidery.
Place a sheet of high-quality vellum over your background artwork and stitch a delicate line-art design onto it using a single strand of white floss.
The semi-transparent nature of the vellum softens the colors of the art beneath, while the white thread catches the light, creating a subtle, ghost-like effect.
This technique is perfect for interpreting pressed flower designs in a new, delicate way.
13. Stitch Through Layered Paper to Create Topographical Art
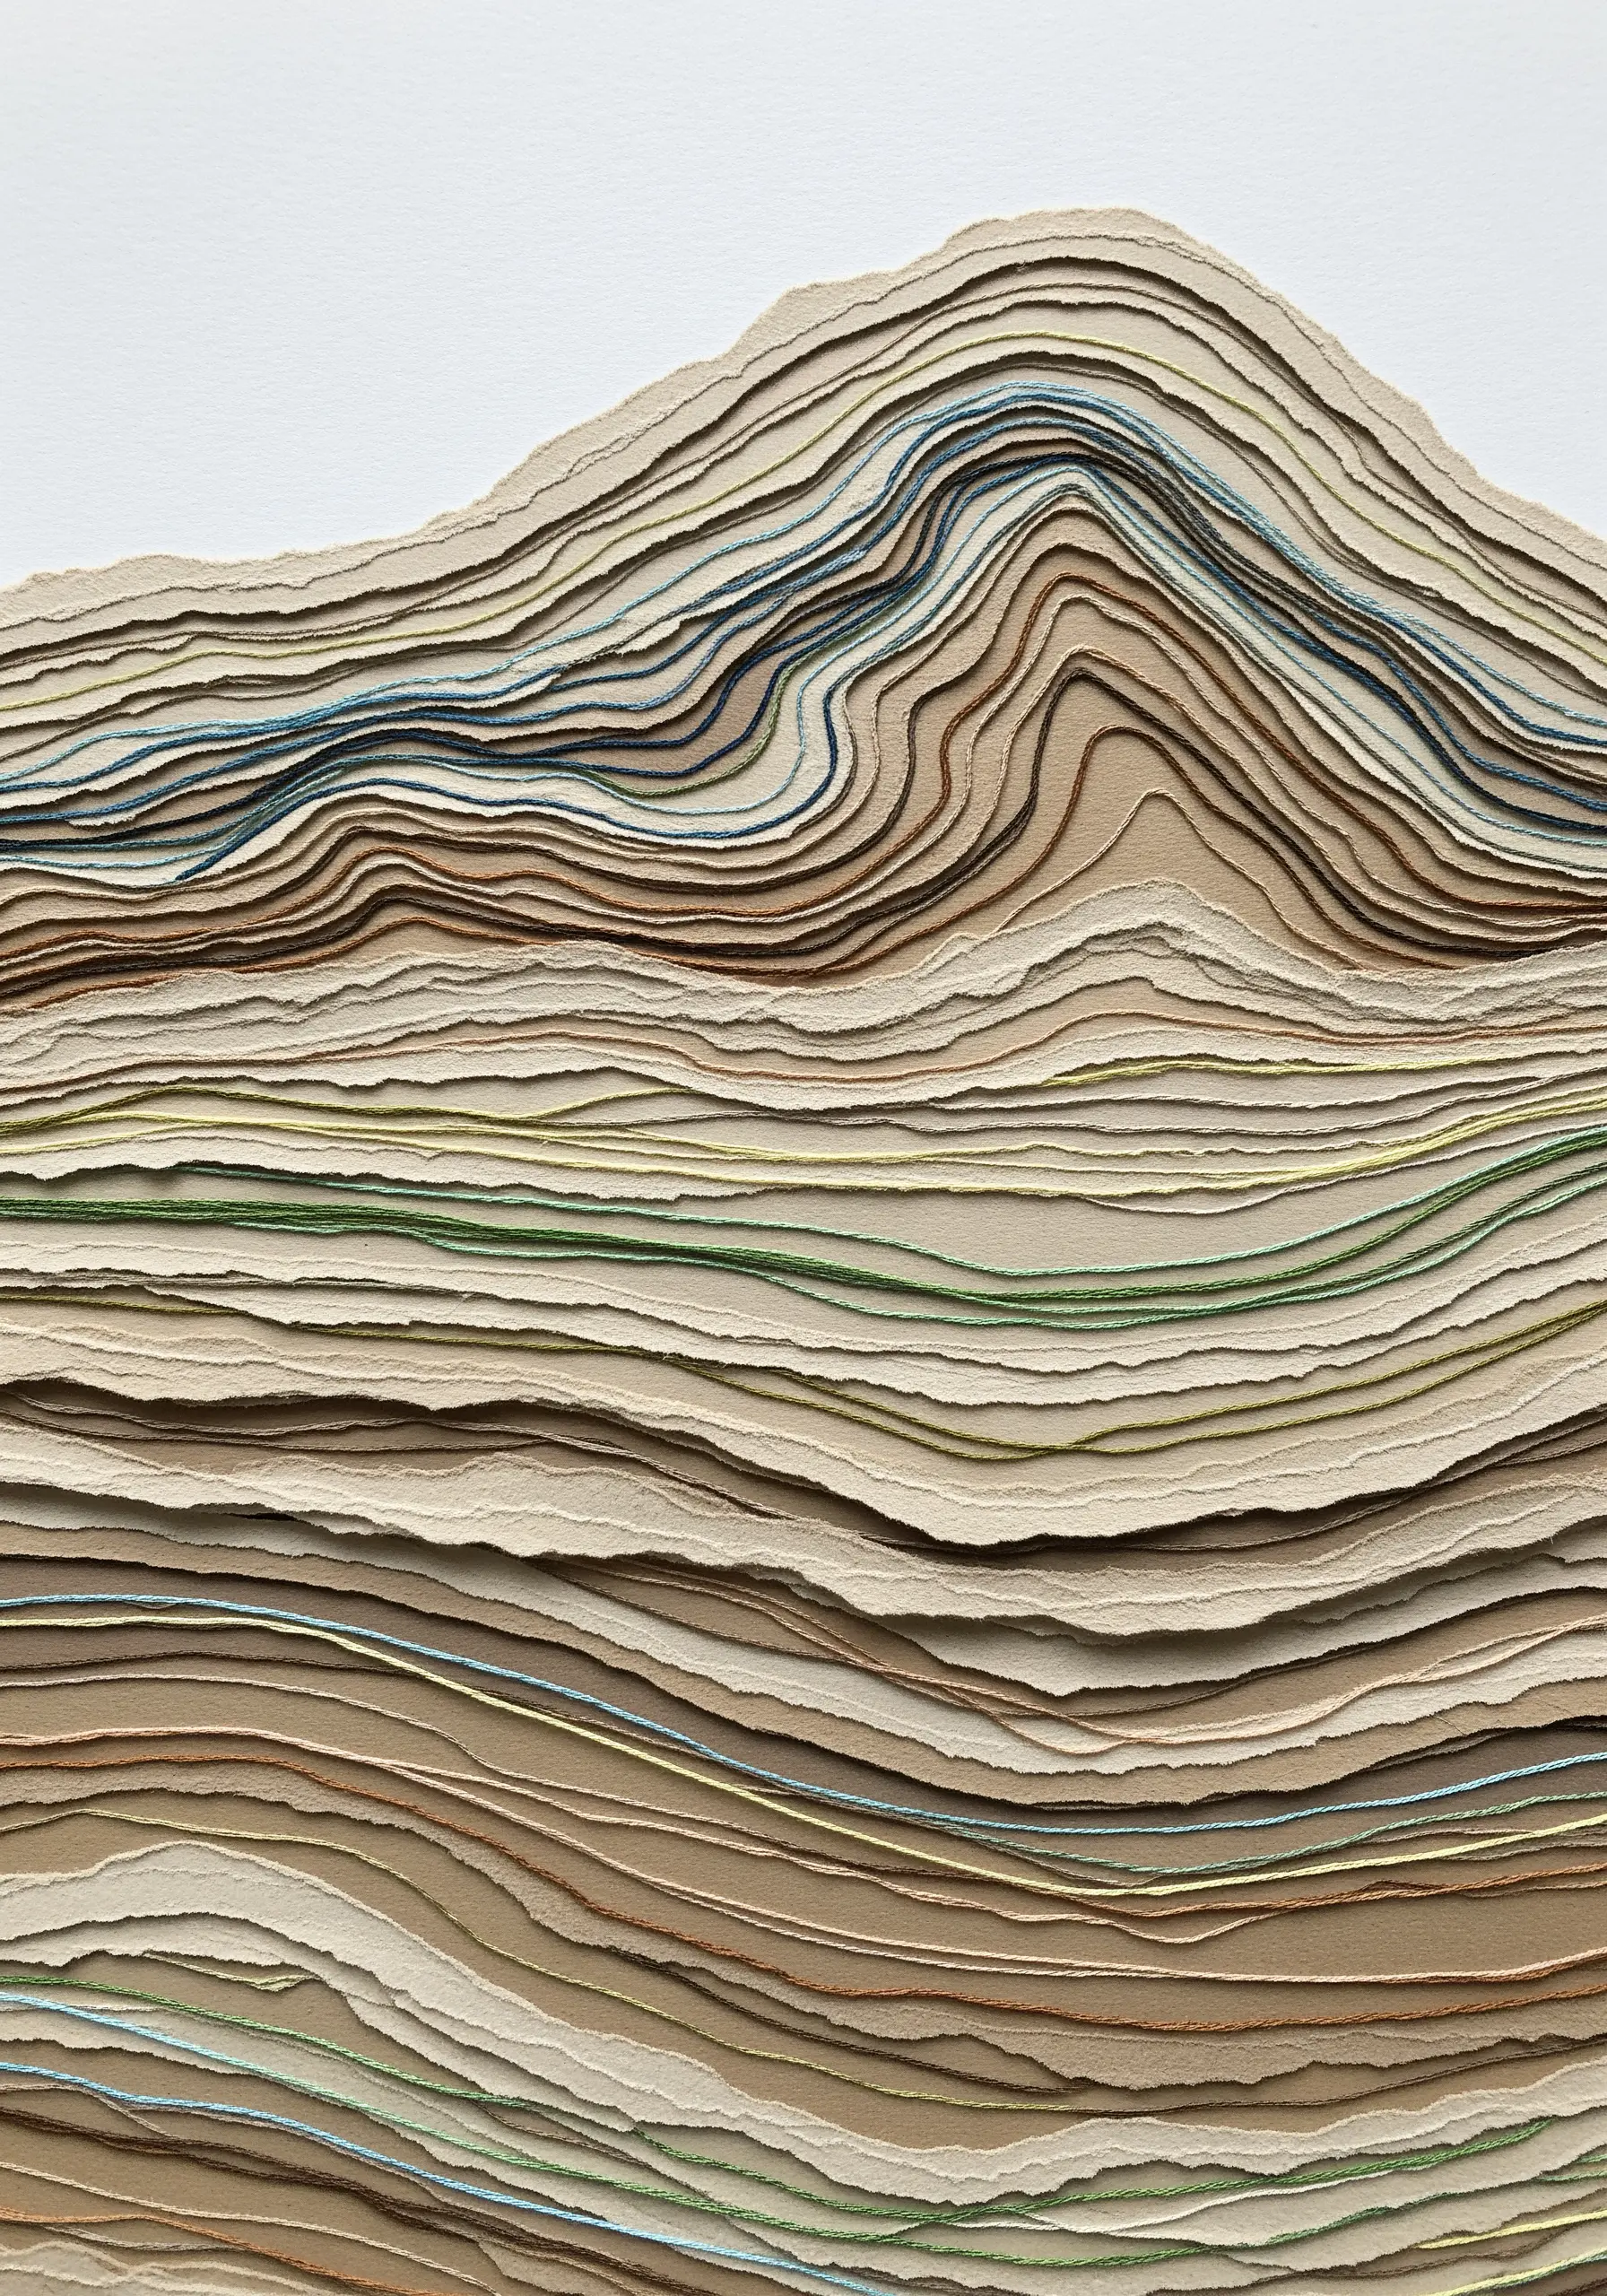
Use thread to add subtle color and texture to a sculpture made from stacked and torn paper.
After layering your paper to create a landscape or abstract form, select a few layers to connect with simple, long stitches.
Use a long needle and a variegated or earth-toned thread that complements the paper’s natural tones.
The stitches can follow the contours of the paper ‘terrain’ or cut across them, adding a linear element that draws the eye through the piece and helps you learn ways to capture nature’s textures.
14. Embroider Directly onto a Textured Paper Journal Cover
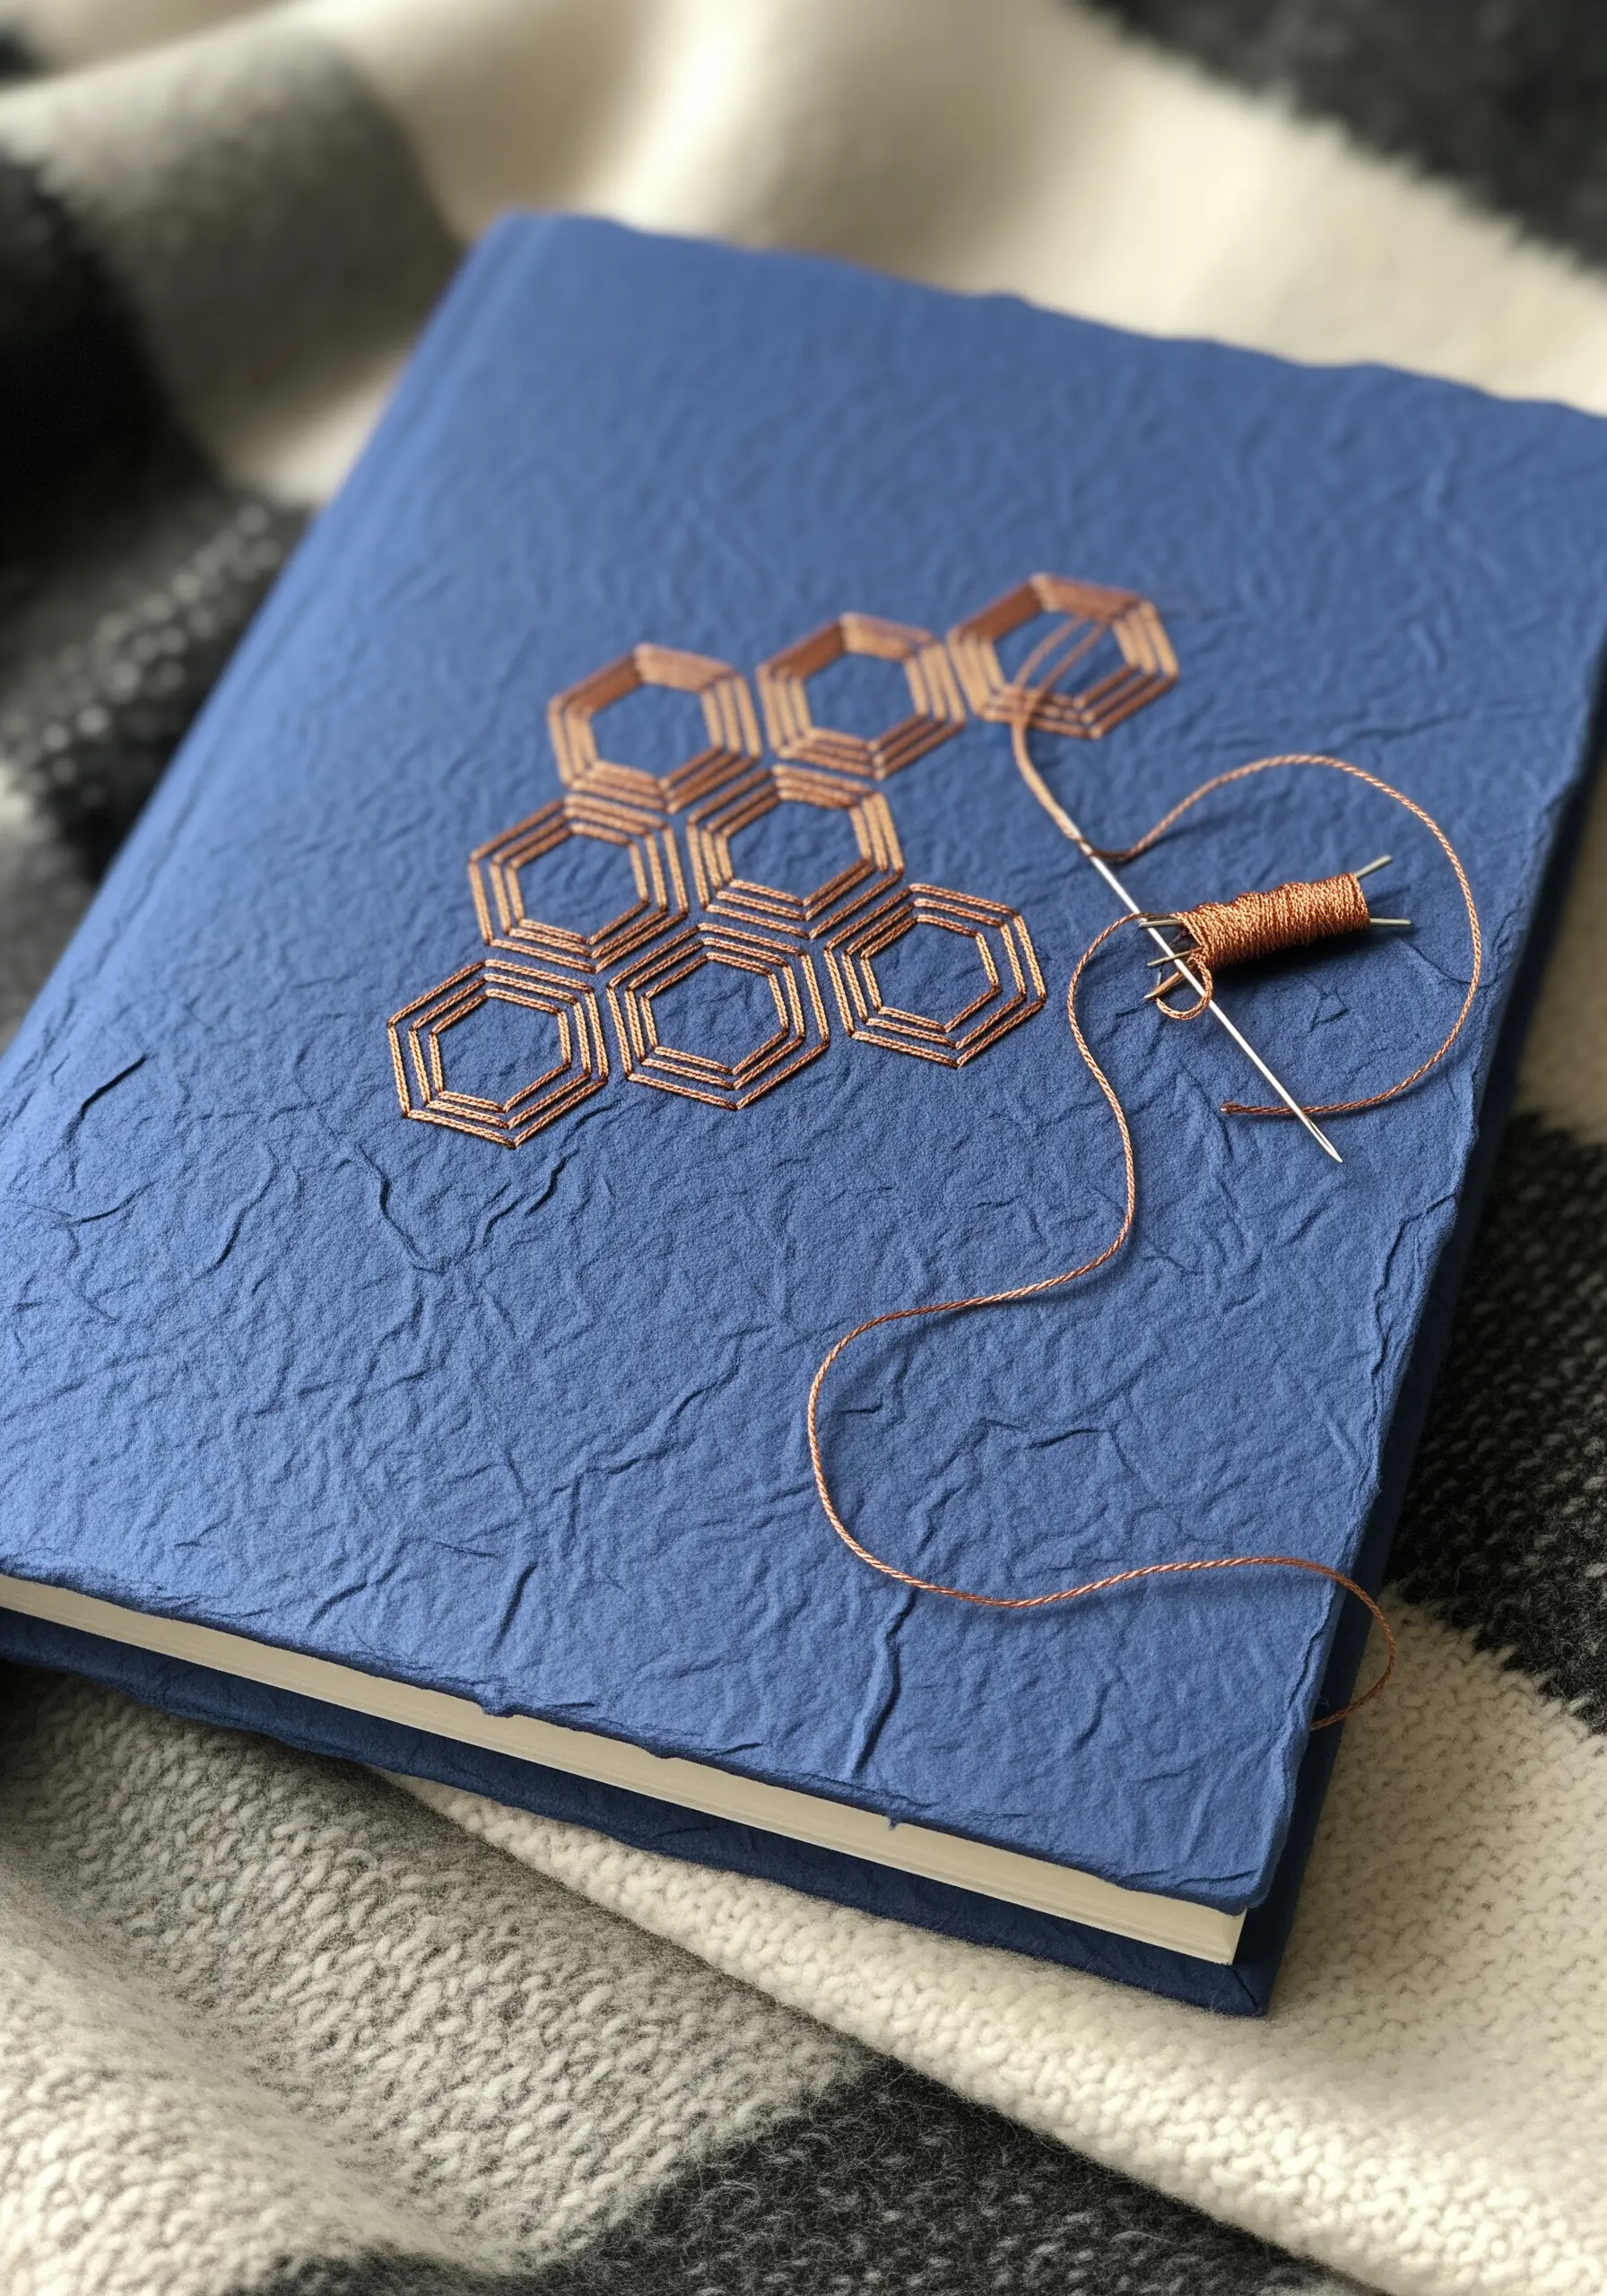
Personalize a journal by stitching a geometric design directly onto its paper cover.
Choose a journal with a fibrous, handmade paper cover, as it’s more forgiving and less likely to tear than smooth, coated paper.
Lightly sketch your design and use an awl to pre-punch the holes at each corner of your pattern.
A satin stitch or simple outline stitch with a metallic or silk thread creates a beautiful contrast against the matte paper texture, making it perfect for custom hand embroidery patterns to personalize journals.
15. Fill Paper Cutouts with Variegated Thread

Create the illusion of painted color within a simple paper cutout by filling the space with variegated thread.
First, carefully cut the shape of a feather or leaf from heavy cardstock.
Using a needle, pierce holes along the inner edge of the cutout shape and then stitch long, straight lines across the open space with a multi-tonal embroidery floss.
The shifting colors of the variegated thread will create a beautiful, organic gradient that mimics the natural variations in a feather, resulting in a unique piece of art that expresses mood and calm.
16. Construct Wearable Art with Stitched Wood or Paper
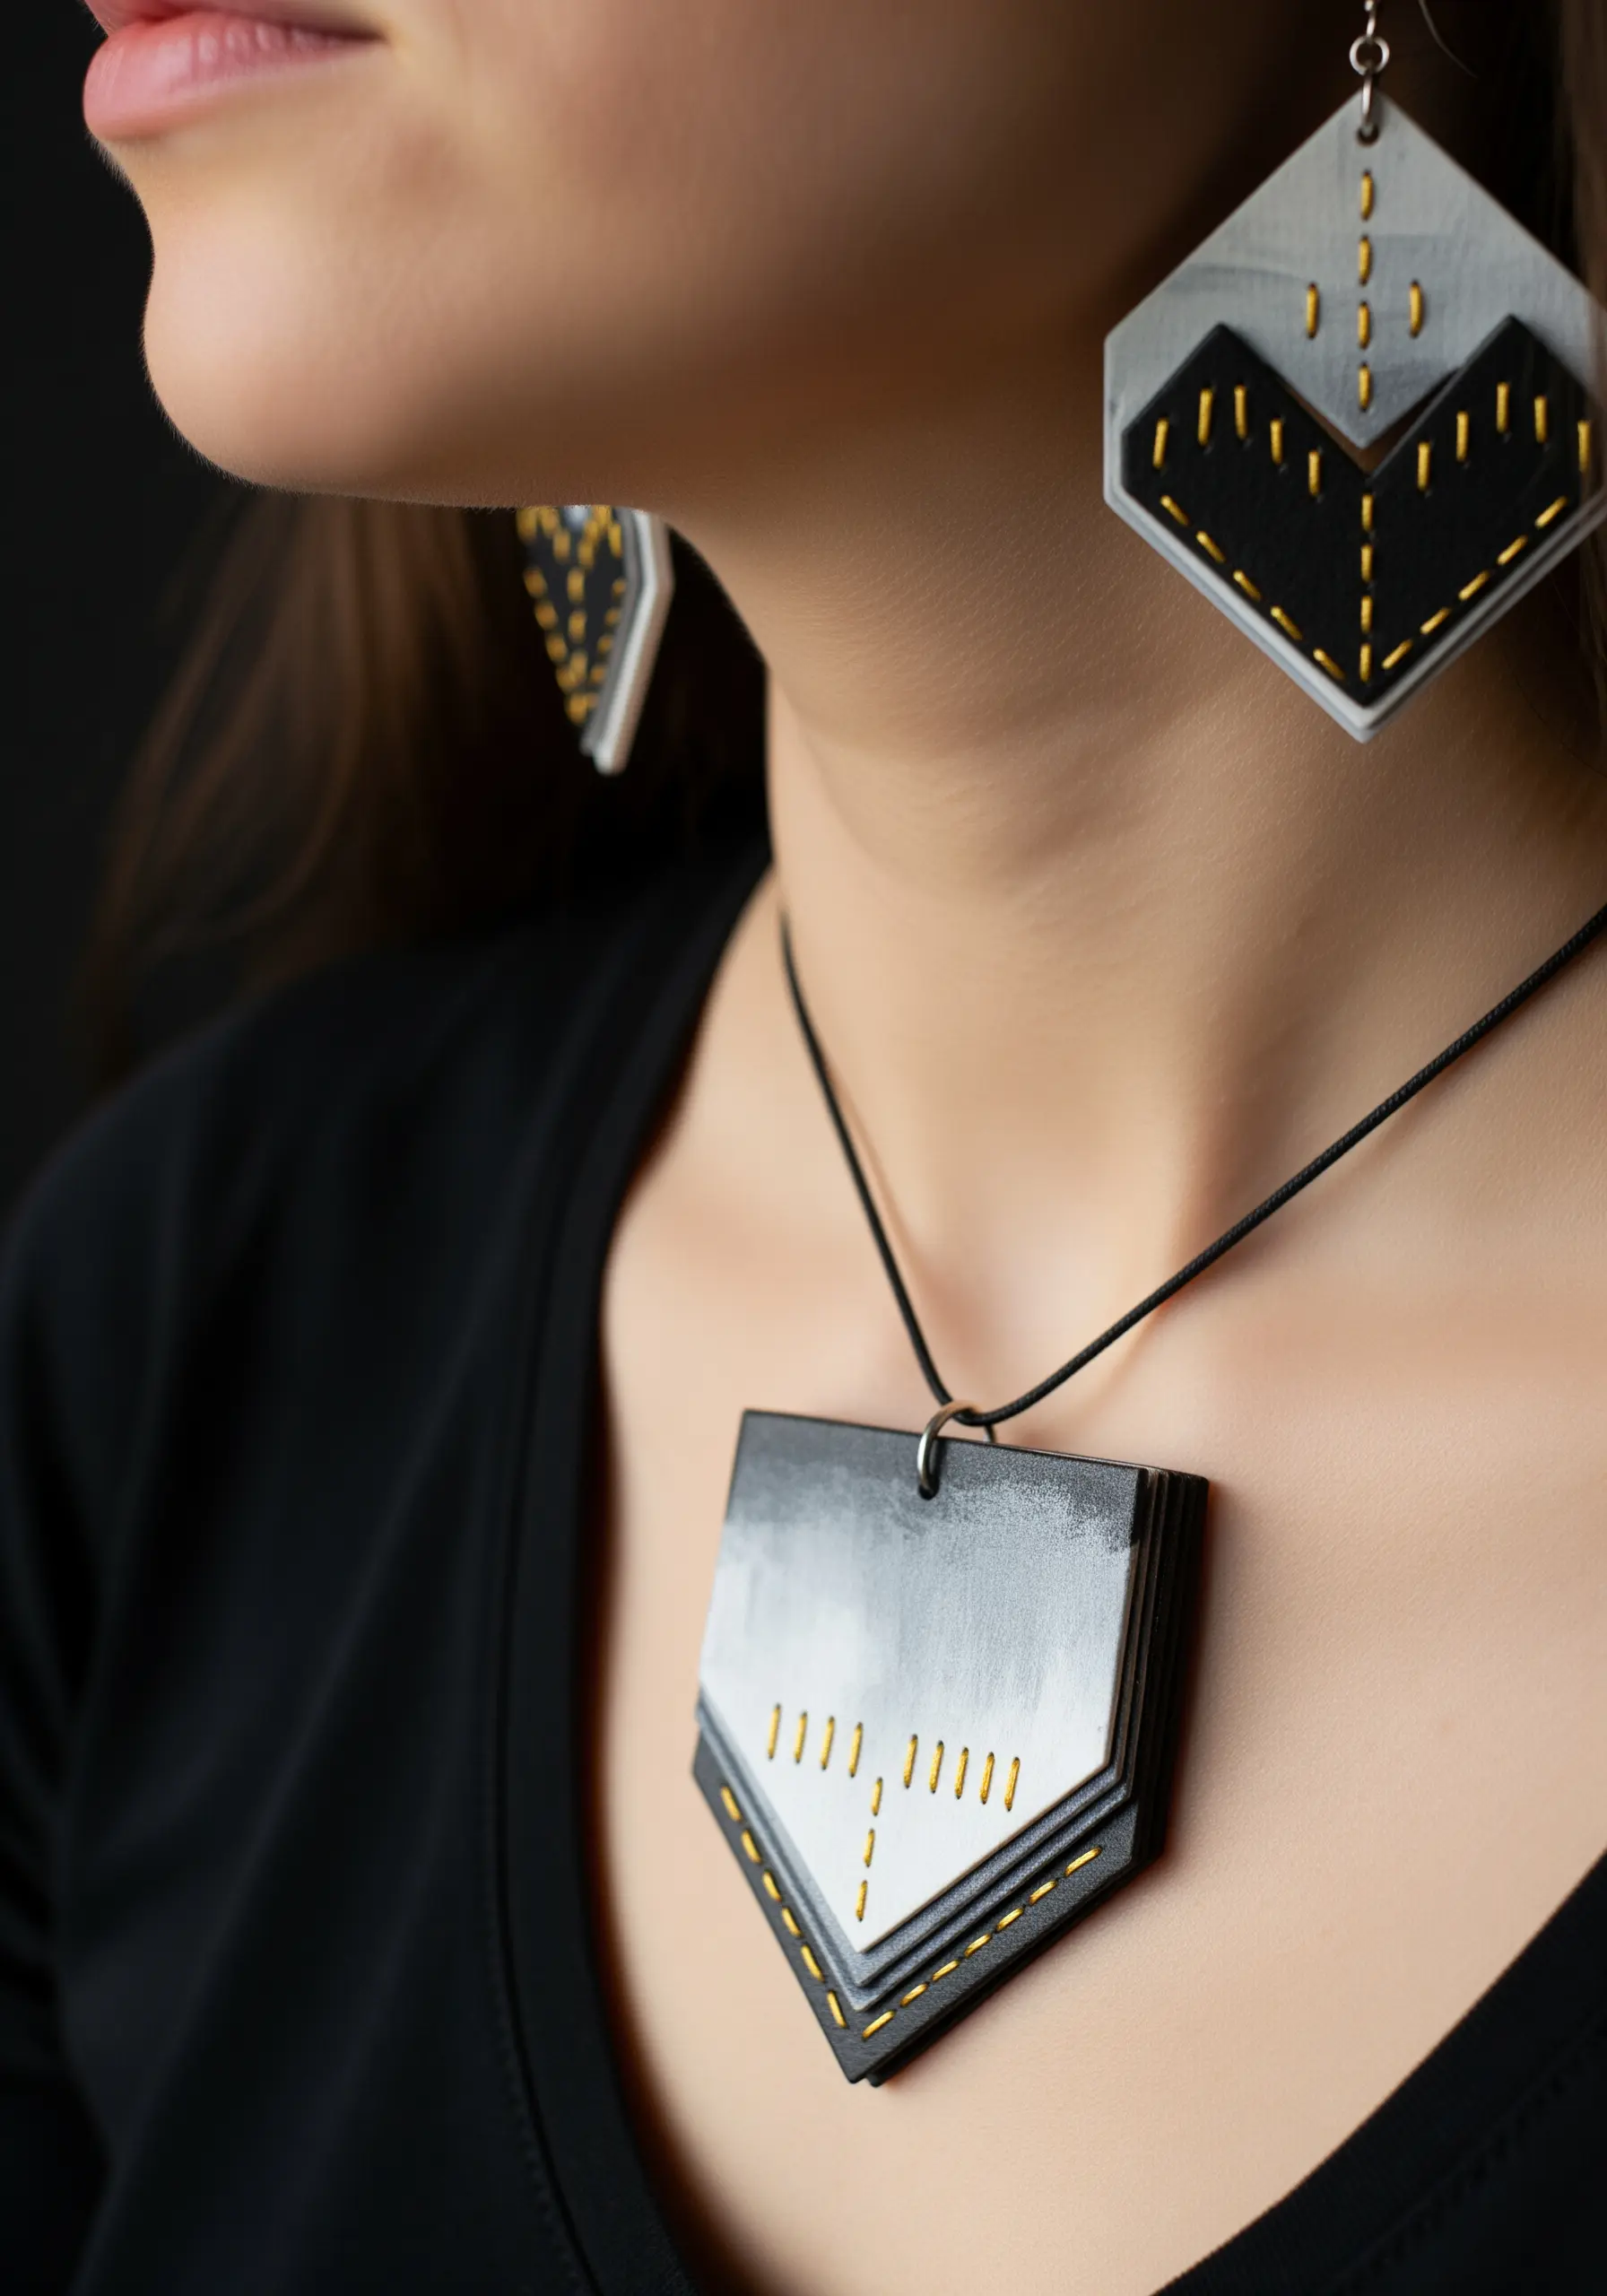
Move beyond fabric and create bold jewelry by stitching on thin, lightweight materials like balsa wood, leather, or layered cardstock.
Paint your shapes first, then use a micro drill bit or pin vise to create precise holes for your stitches.
Use a strong, contrasting thread like golden yellow against black and white to create graphic, linear patterns.
These simple running stitches add a touch of handcrafted warmth to the stark, modern shapes, proving you can make stunning mixed-media contemporary embroidery designs that are also wearable.
17. Blend Embroidery with Pop-Up Papercraft
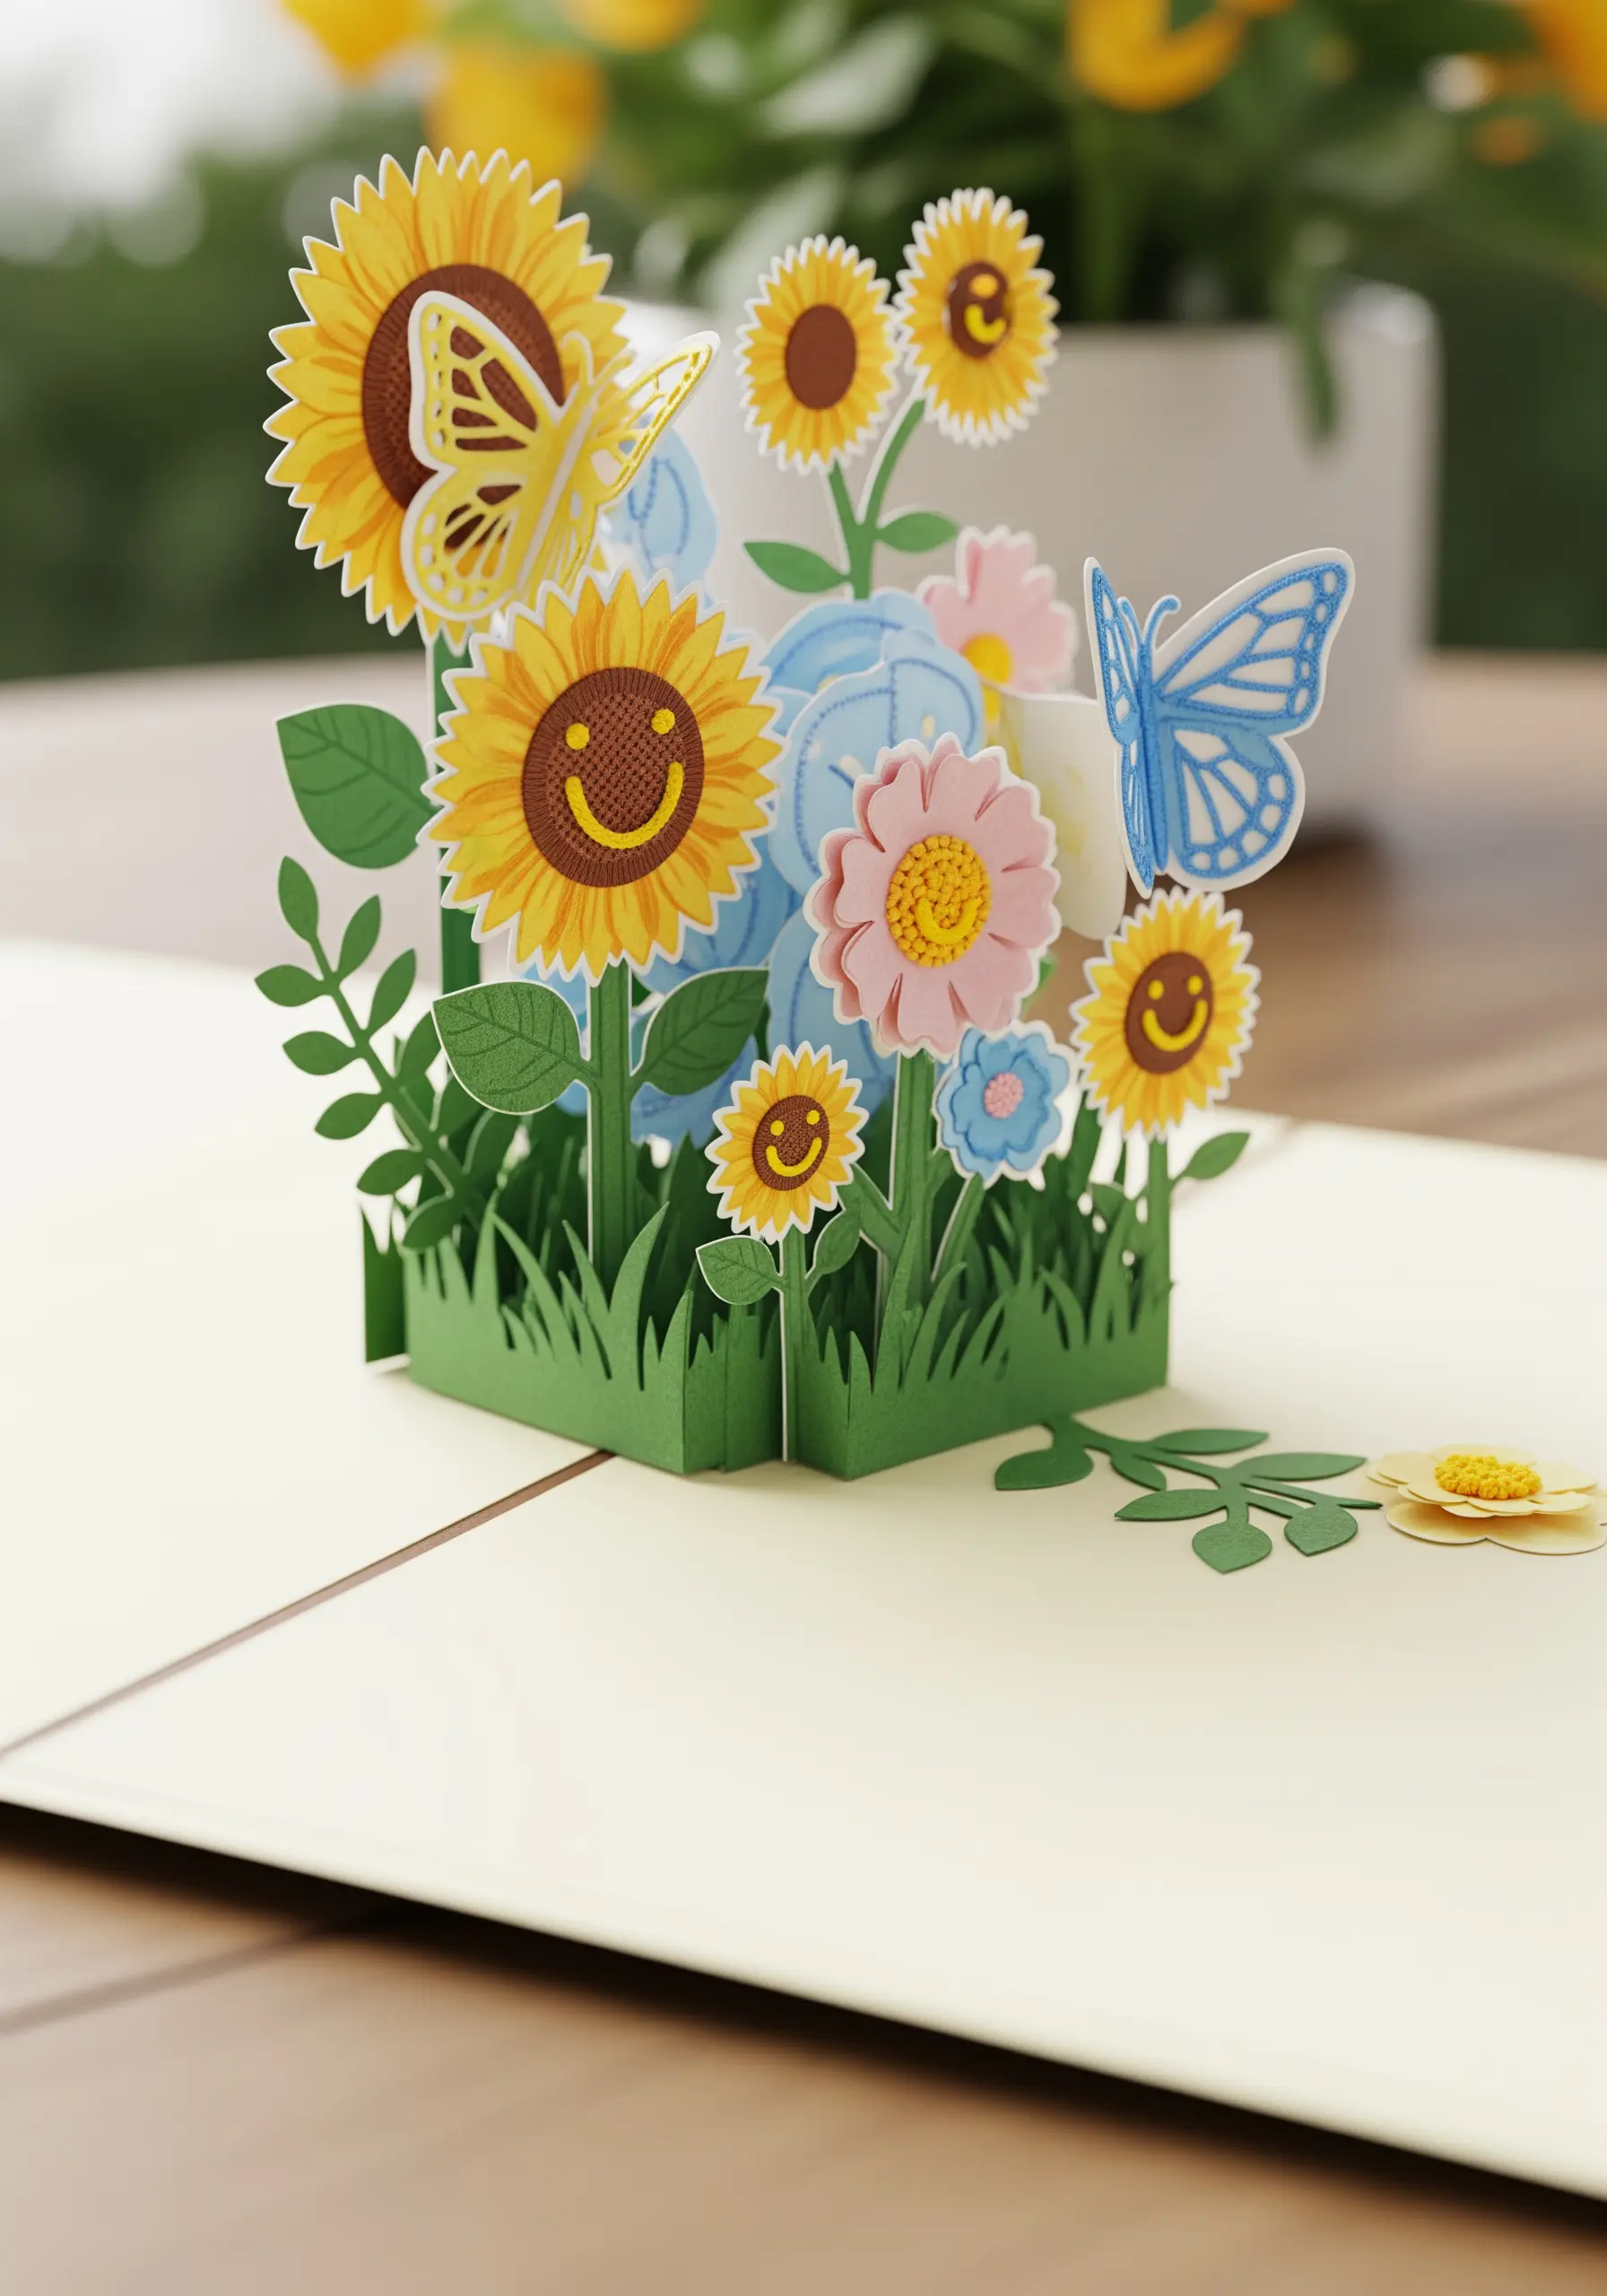
Add a subtle, handcrafted element to a pop-up card by embroidering small details directly onto the paper components before assembly.
Focus on adding texture to simple shapes—a few French knots in the center of a sunflower, or a backstitched outline on a butterfly’s wings.
Use a single strand of floss and a fine needle to keep the work delicate and prevent buckling the paper.
This small touch elevates the card from a simple papercraft to a memorable keepsake, much like these sunflower-inspired embroidery crafts.
18. Stitch a Focal Point into a Paper Collage
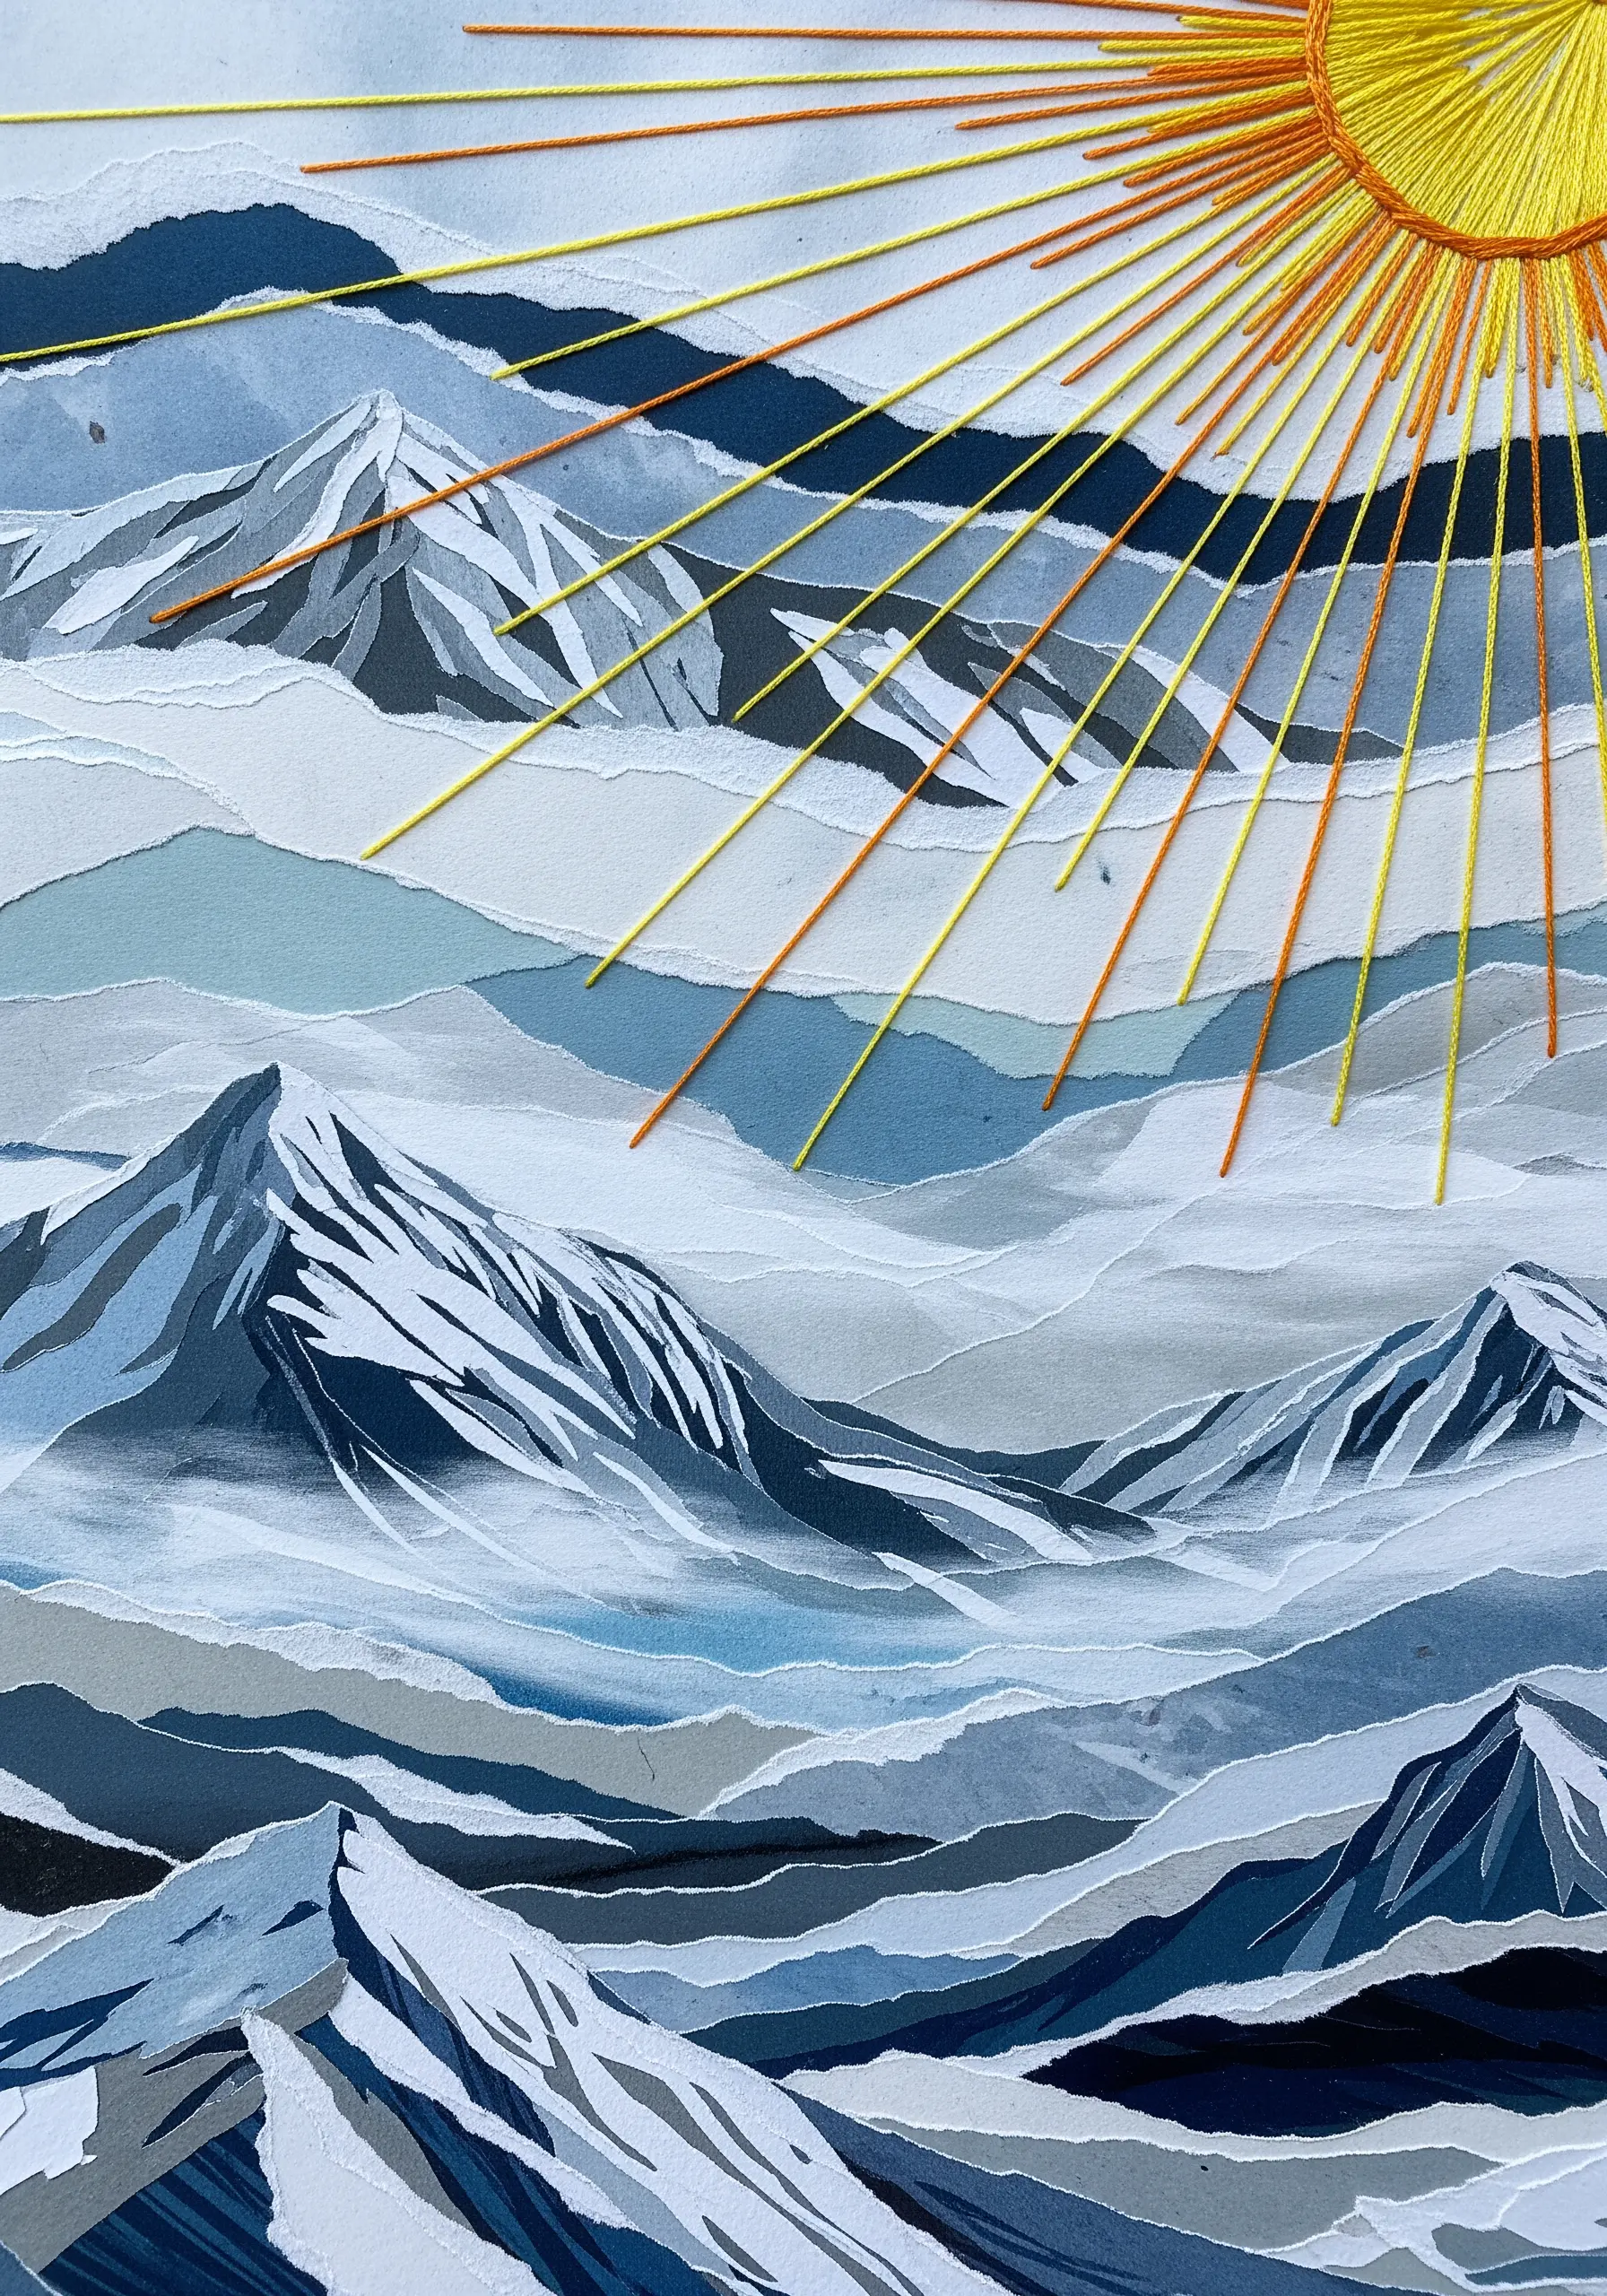
Guide the viewer’s eye by adding a single, vibrant embroidered element to a monochromatic paper collage.
Create a layered landscape using various shades of torn paper to build texture and depth.
Then, introduce a powerful focal point—like a radiant sun—by stitching it directly over the collage.
Use long, straight stitches radiating from a satin-stitched center to create a sense of movement and energy.
The warm, bright thread against the cool, muted paper tones creates a stunning contrast, just as you’d find in creative collage art ideas that use thread and paper.
19. Create Thread-Filled Silhouettes
Use string art techniques within a paper cutout to create intricate, layered color and texture.
Cut a detailed silhouette, like a tree, from a large sheet of sturdy cardstock.
On a separate backing board, mark points along the inside edge of the silhouette shape and insert pins or nails.
Wrap different colors of thread between the pins in random or geometric patterns to fill the negative space.
When you place the paper cutout over the thread art, the silhouette acts as a frame, revealing the vibrant, web-like texture within. This is a great way to make dramatic string art landscape scenes.
20. Embroider Tiny Tags for an Elegant Final Touch
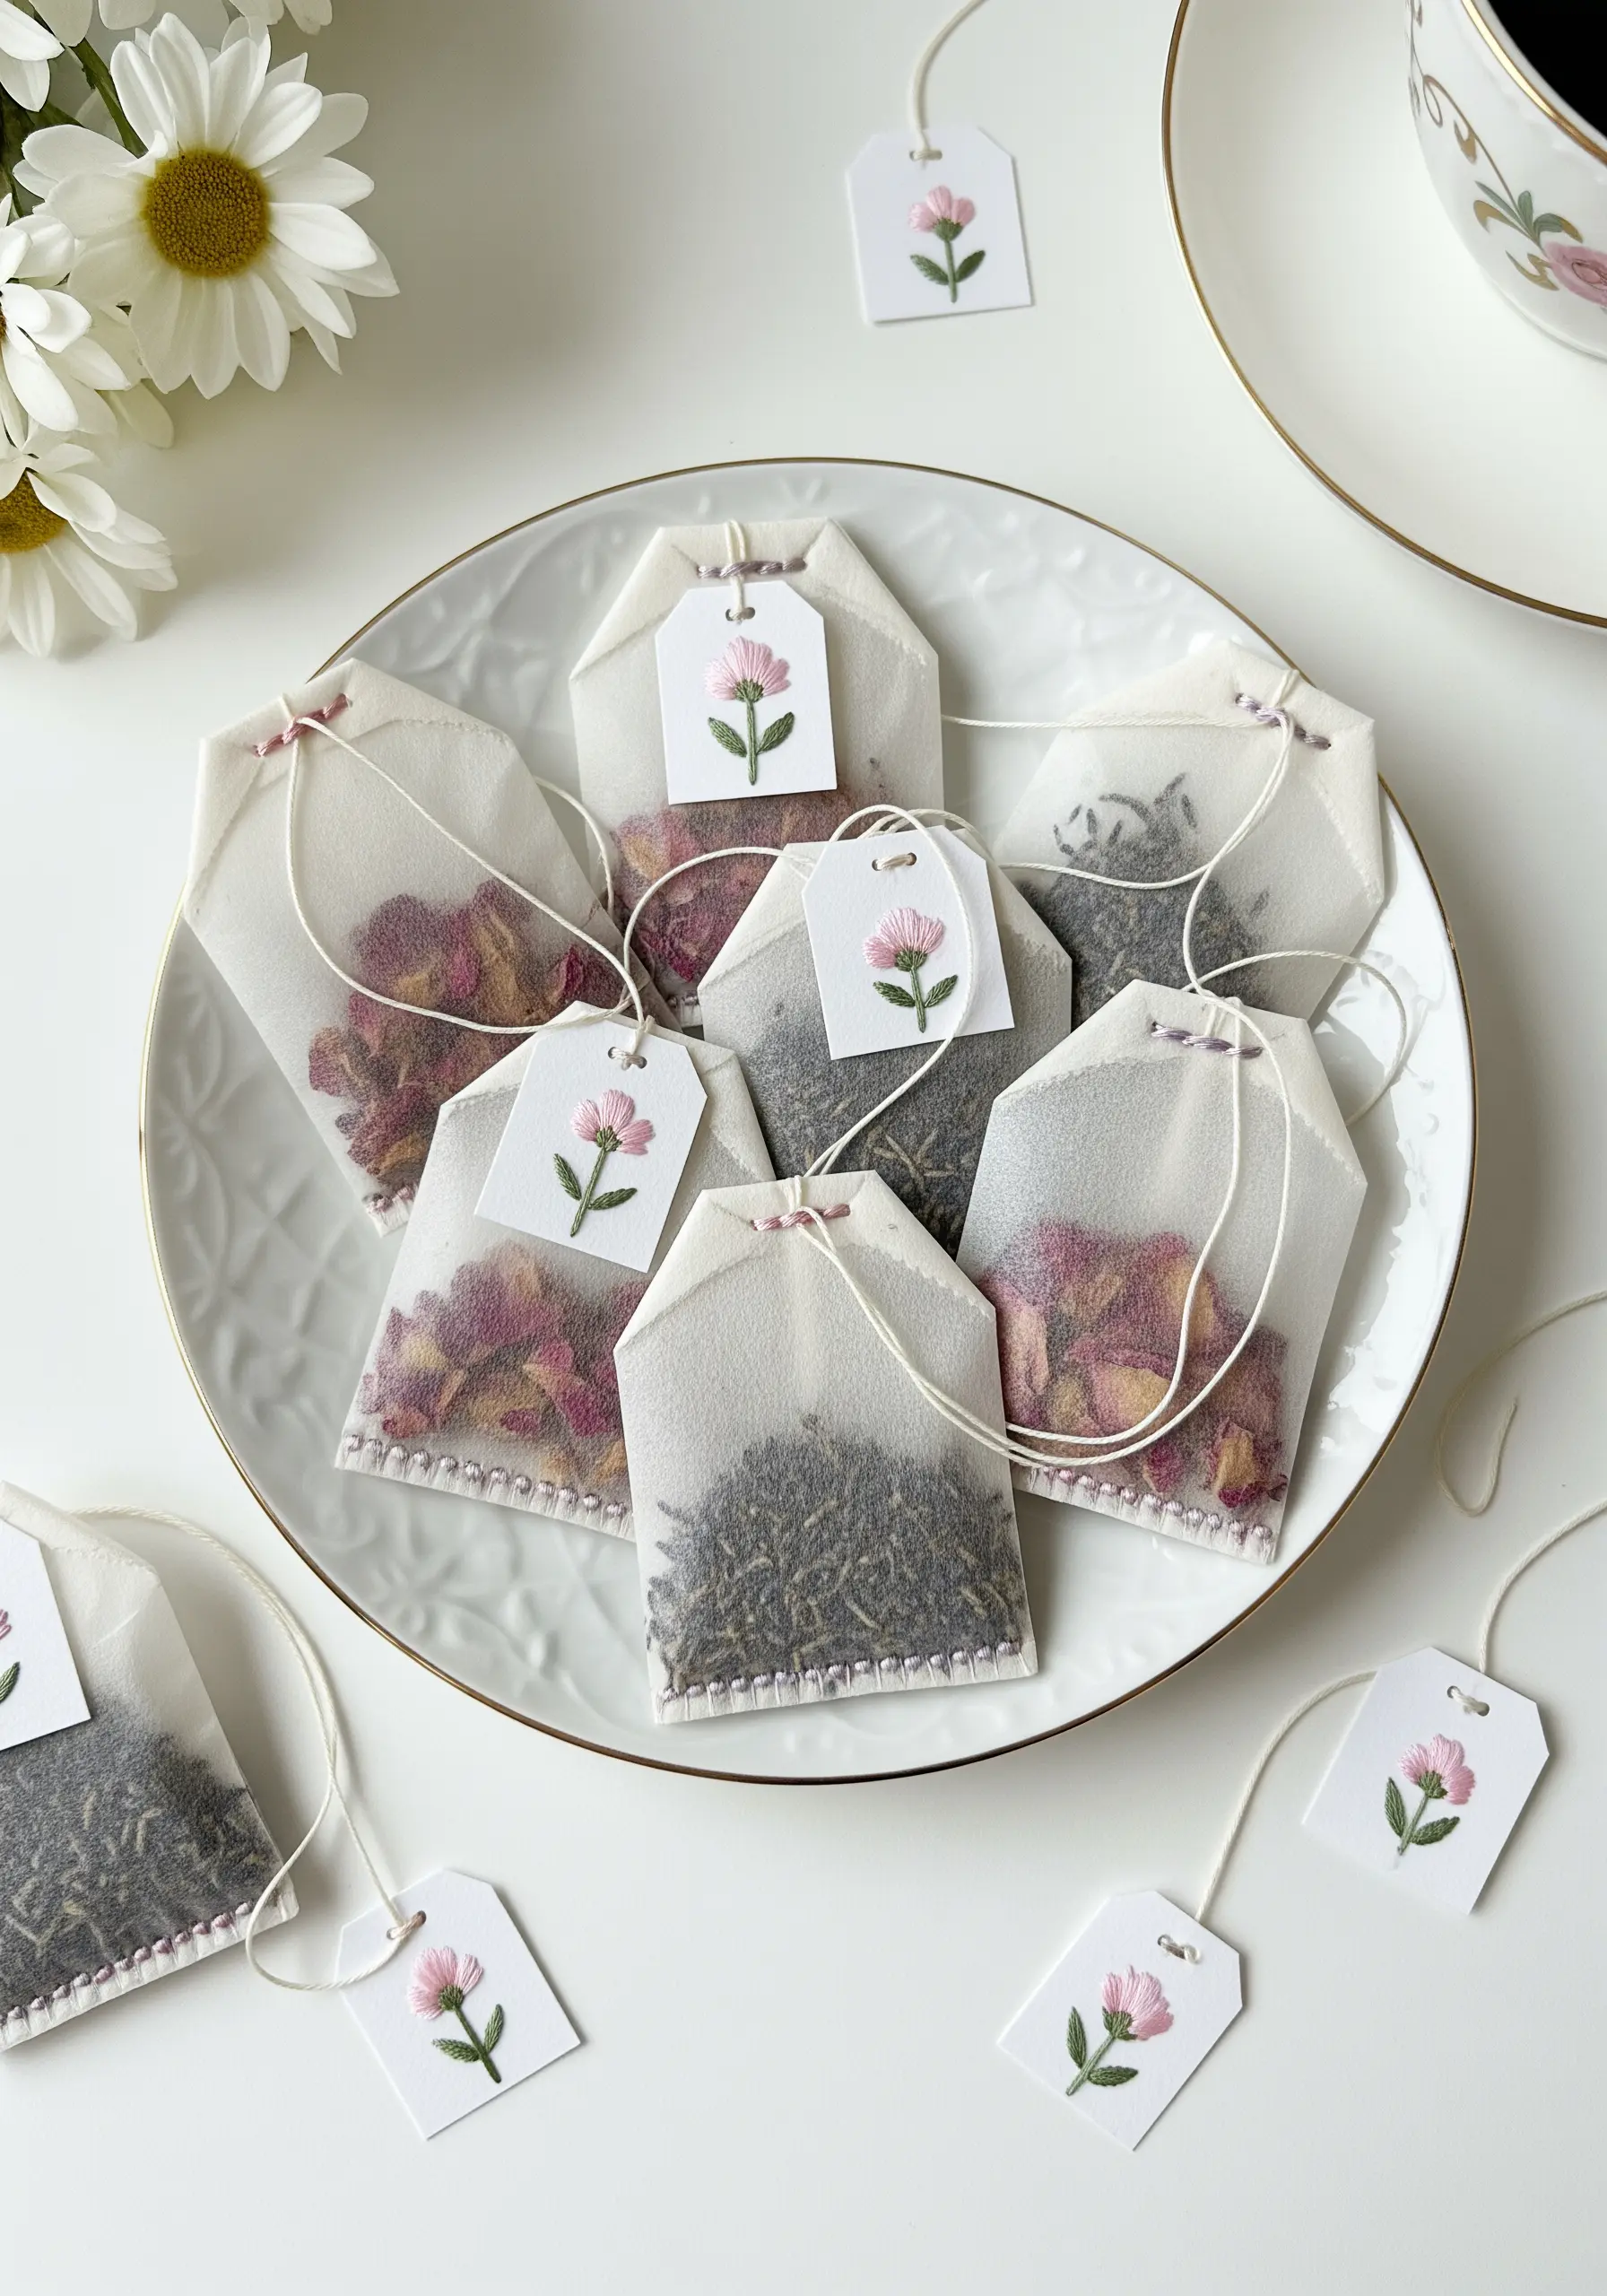
Elevate simple gifts, like handmade tea bags or place settings, by adding a miniature embroidered tag.
Use a small piece of thick cardstock or watercolor paper and stitch a simple, single motif like a flower or initial.
A lazy daisy stitch for the petals and a straight stitch for the stem is all you need for a charming, recognizable design.
The care taken to add this tiny stitched detail communicates thoughtfulness and transforms an everyday object into one of those unique DIY embroidery presents you’ve never seen before.
21. Map the Stars with Metallic Thread
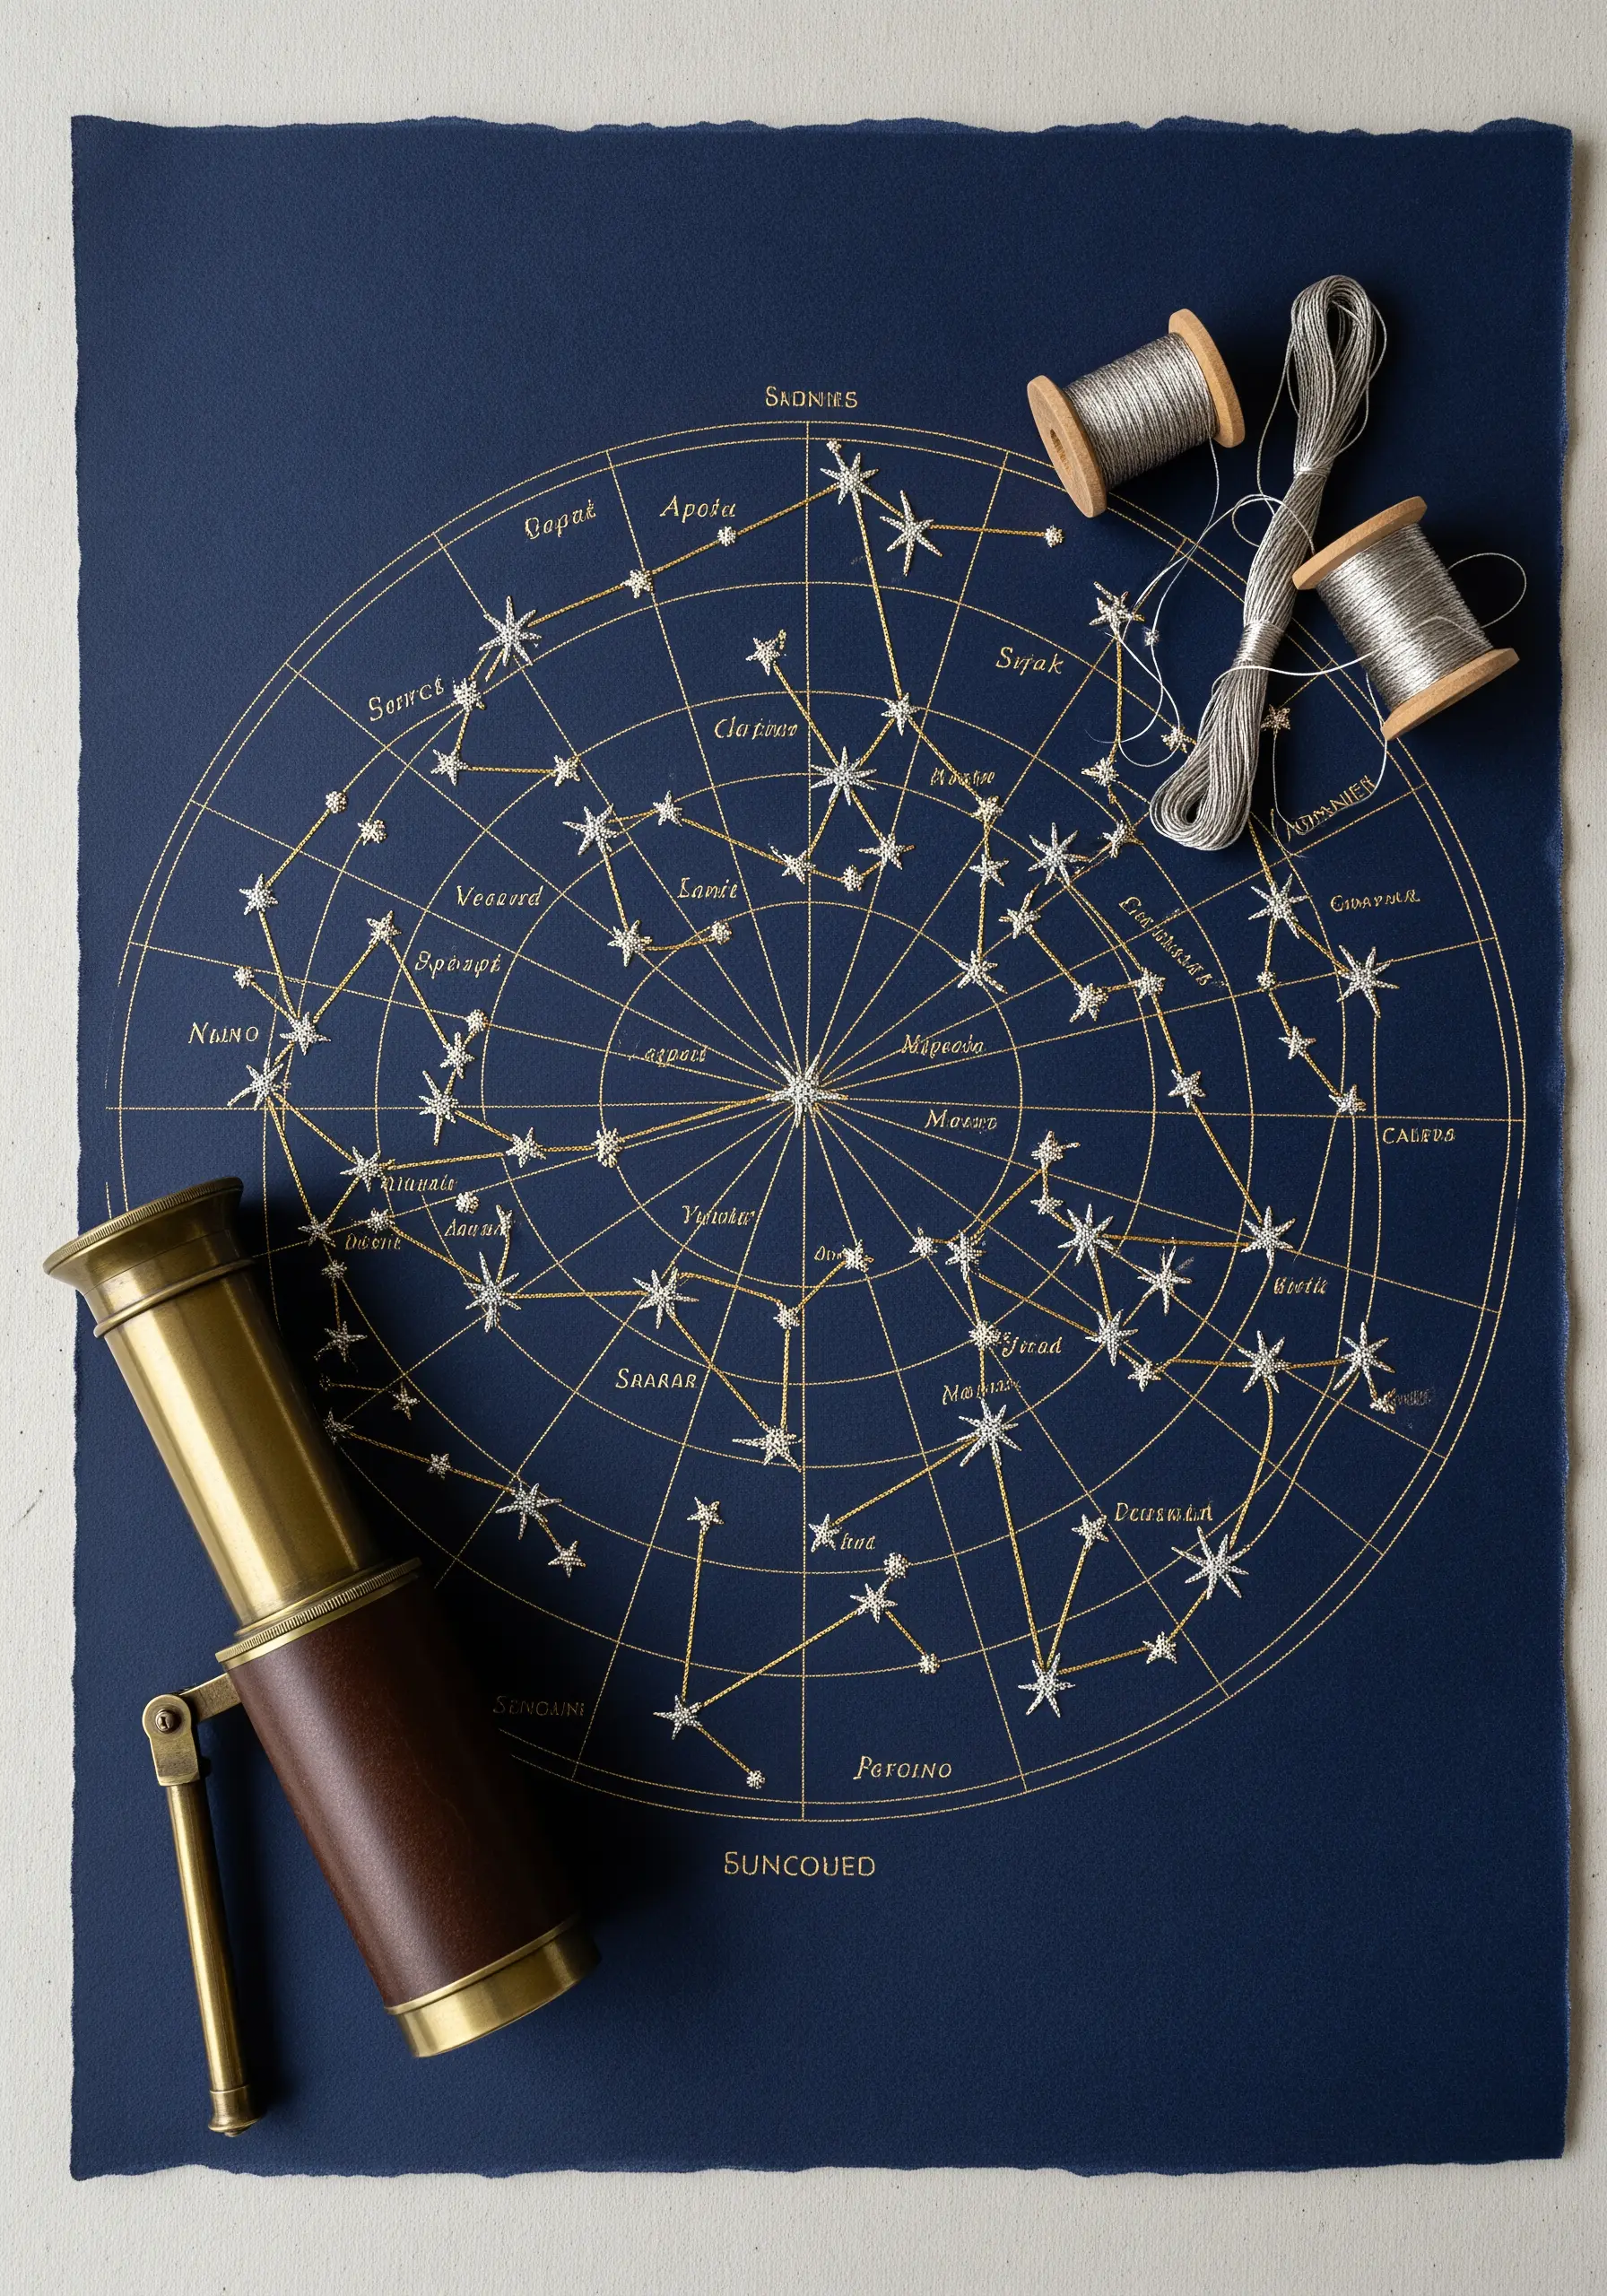
Recreate a vintage star chart by stitching constellations onto dark, high-quality paper.
Use a metallic silver or gold thread to capture the celestial glow.
For the stars, a single French knot or a tiny star stitch works beautifully. Connect them with a clean, precise backstitch to form the constellation lines.
The contrast of the shimmering thread against the deep blue or black paper is incredibly striking and creates an heirloom-quality piece of art that recalls ancient astronomy and soft cosmic vibes.
22. Embellish Sculptural Forms with Couching and Beading
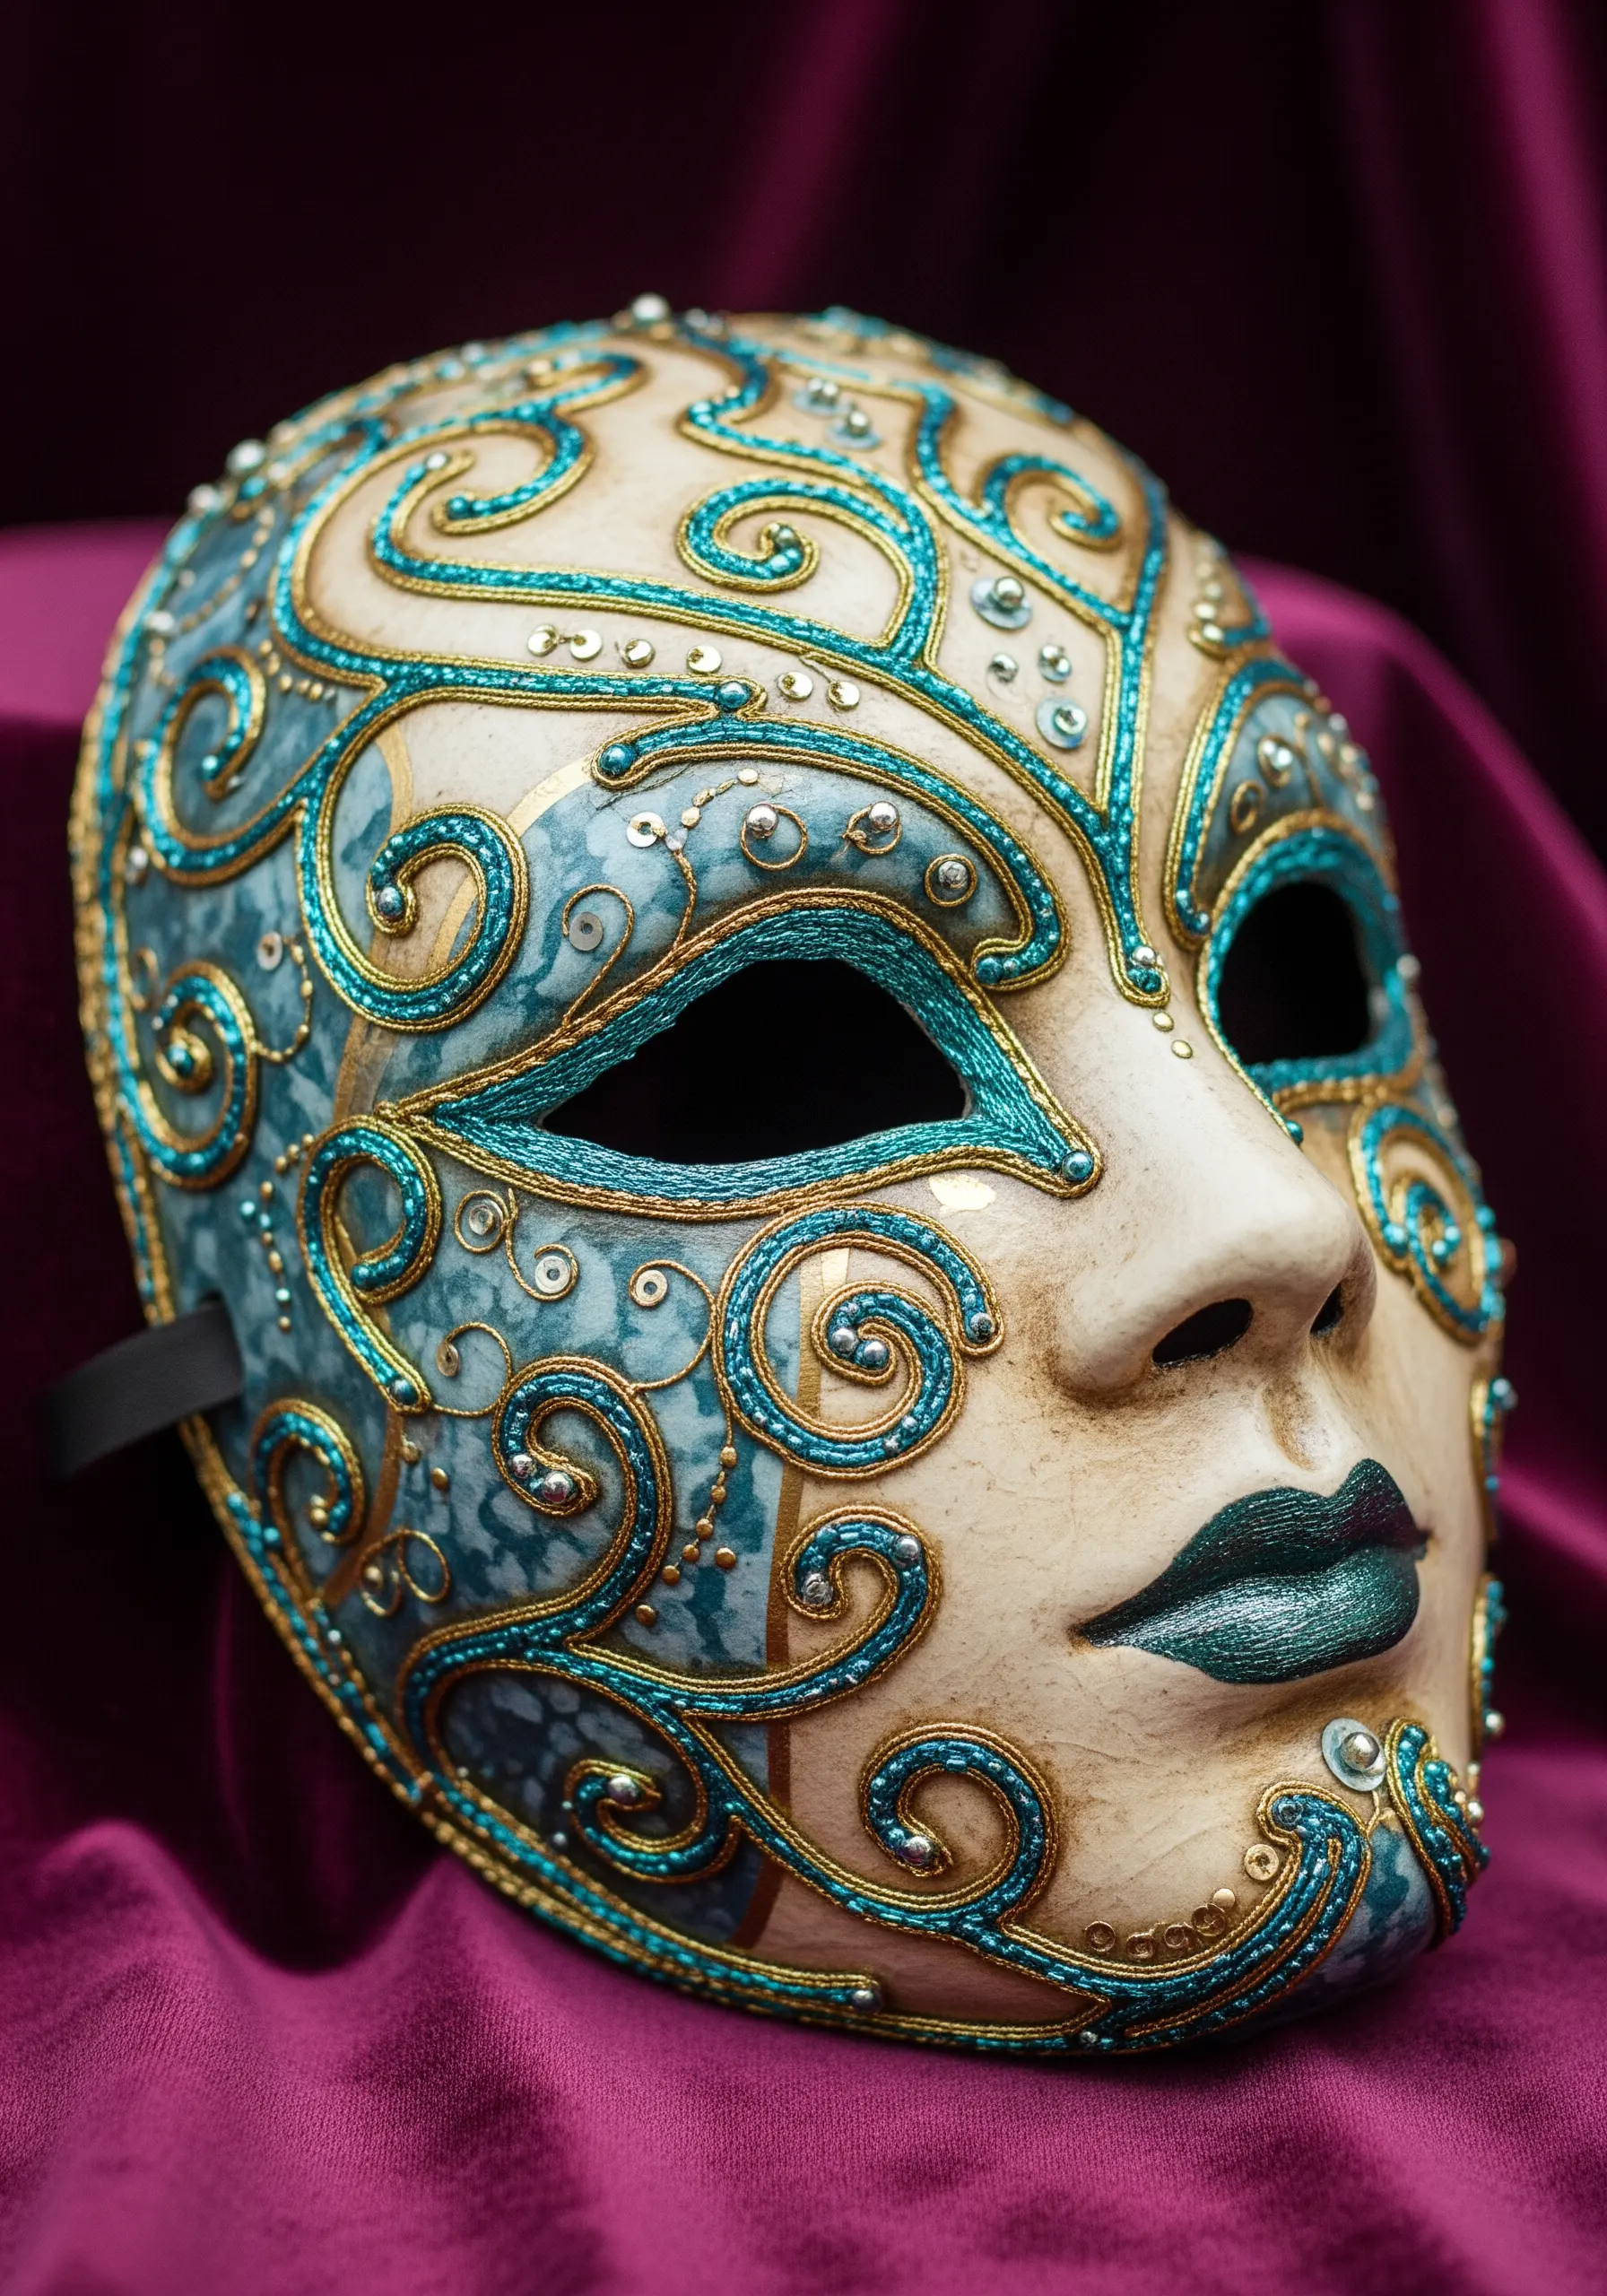
Apply embroidery techniques to three-dimensional objects, like a Venetian mask, to create opulent, wearable art.
Use the couching technique to lay down thick, decorative cords or metallic threads along the mask’s contours. This allows you to create fluid, swirling lines that would be impossible with a standard stitch.
Accentuate the stitched lines with strategically placed beads, sequins, or crystals to catch the light and add a layer of rich texture. This is a perfect example of how to adapt cultural embroidery motifs to new forms.
23. Weave Baskets from Thread-Wrapped Paper

Construct a sturdy, colorful basket by weaving with paper ‘reeds’ you make yourself.
Roll strips of newspaper or magazine pages tightly to create thin, strong rods.
Before weaving, wrap each paper rod tightly with colorful embroidery floss or yarn, securing the ends with a dab of glue.
Use traditional basket-weaving techniques to coil or plait the thread-wrapped rods into your desired shape.
The result is a surprisingly robust and beautifully textured object, a perfect example of DIY mixed-media projects that are both decorative and functional.
24. Combine Layered Paper with Thread for Floral Dimension
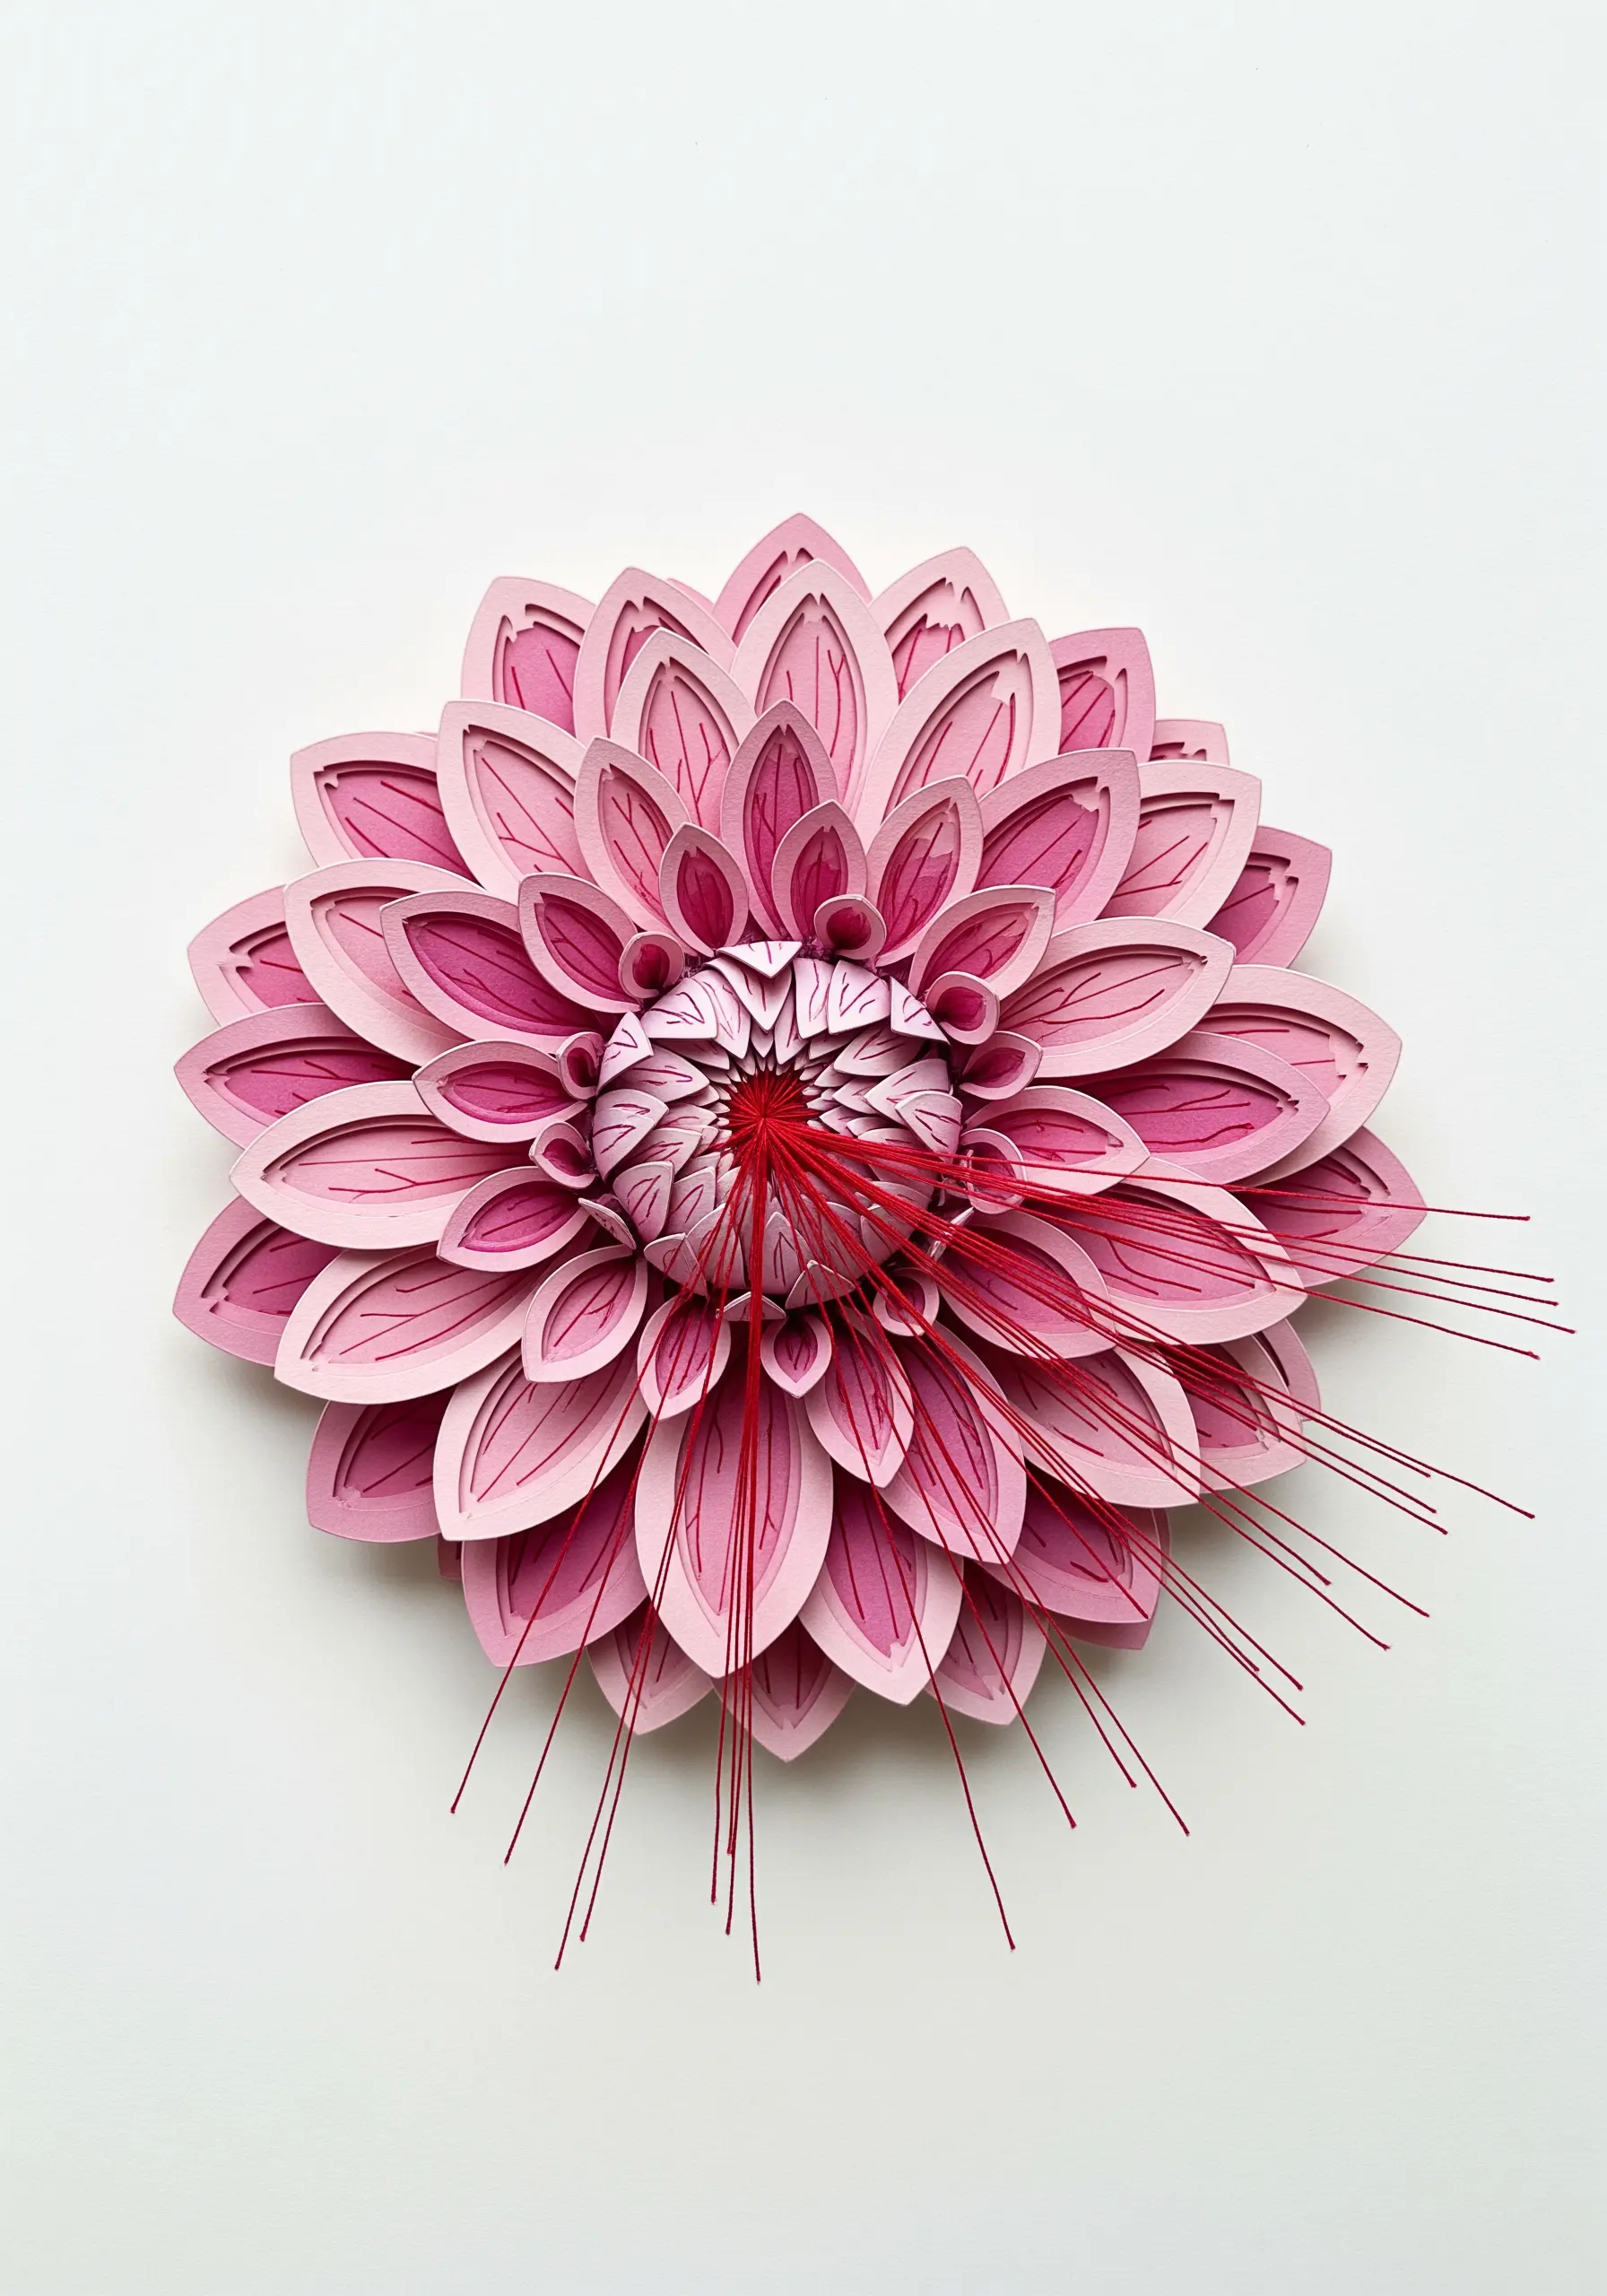
Create a stunning, high-relief flower by adding fine thread details to a layered paper sculpture.
Cut multiple layers of petals from cardstock, gradually decreasing their size.
Before assembling the flower, use a vibrant red thread to stitch fine, radiating lines from the center of the smallest petal layer, mimicking the stamen.
Let the threads extend beyond the paper to create a delicate, wispy texture that contrasts with the solid, sculpted petals. This is one of those paper art projects that turn simple stitches into stunning decor.
25. Stitch on Parchment for a Luminary Effect
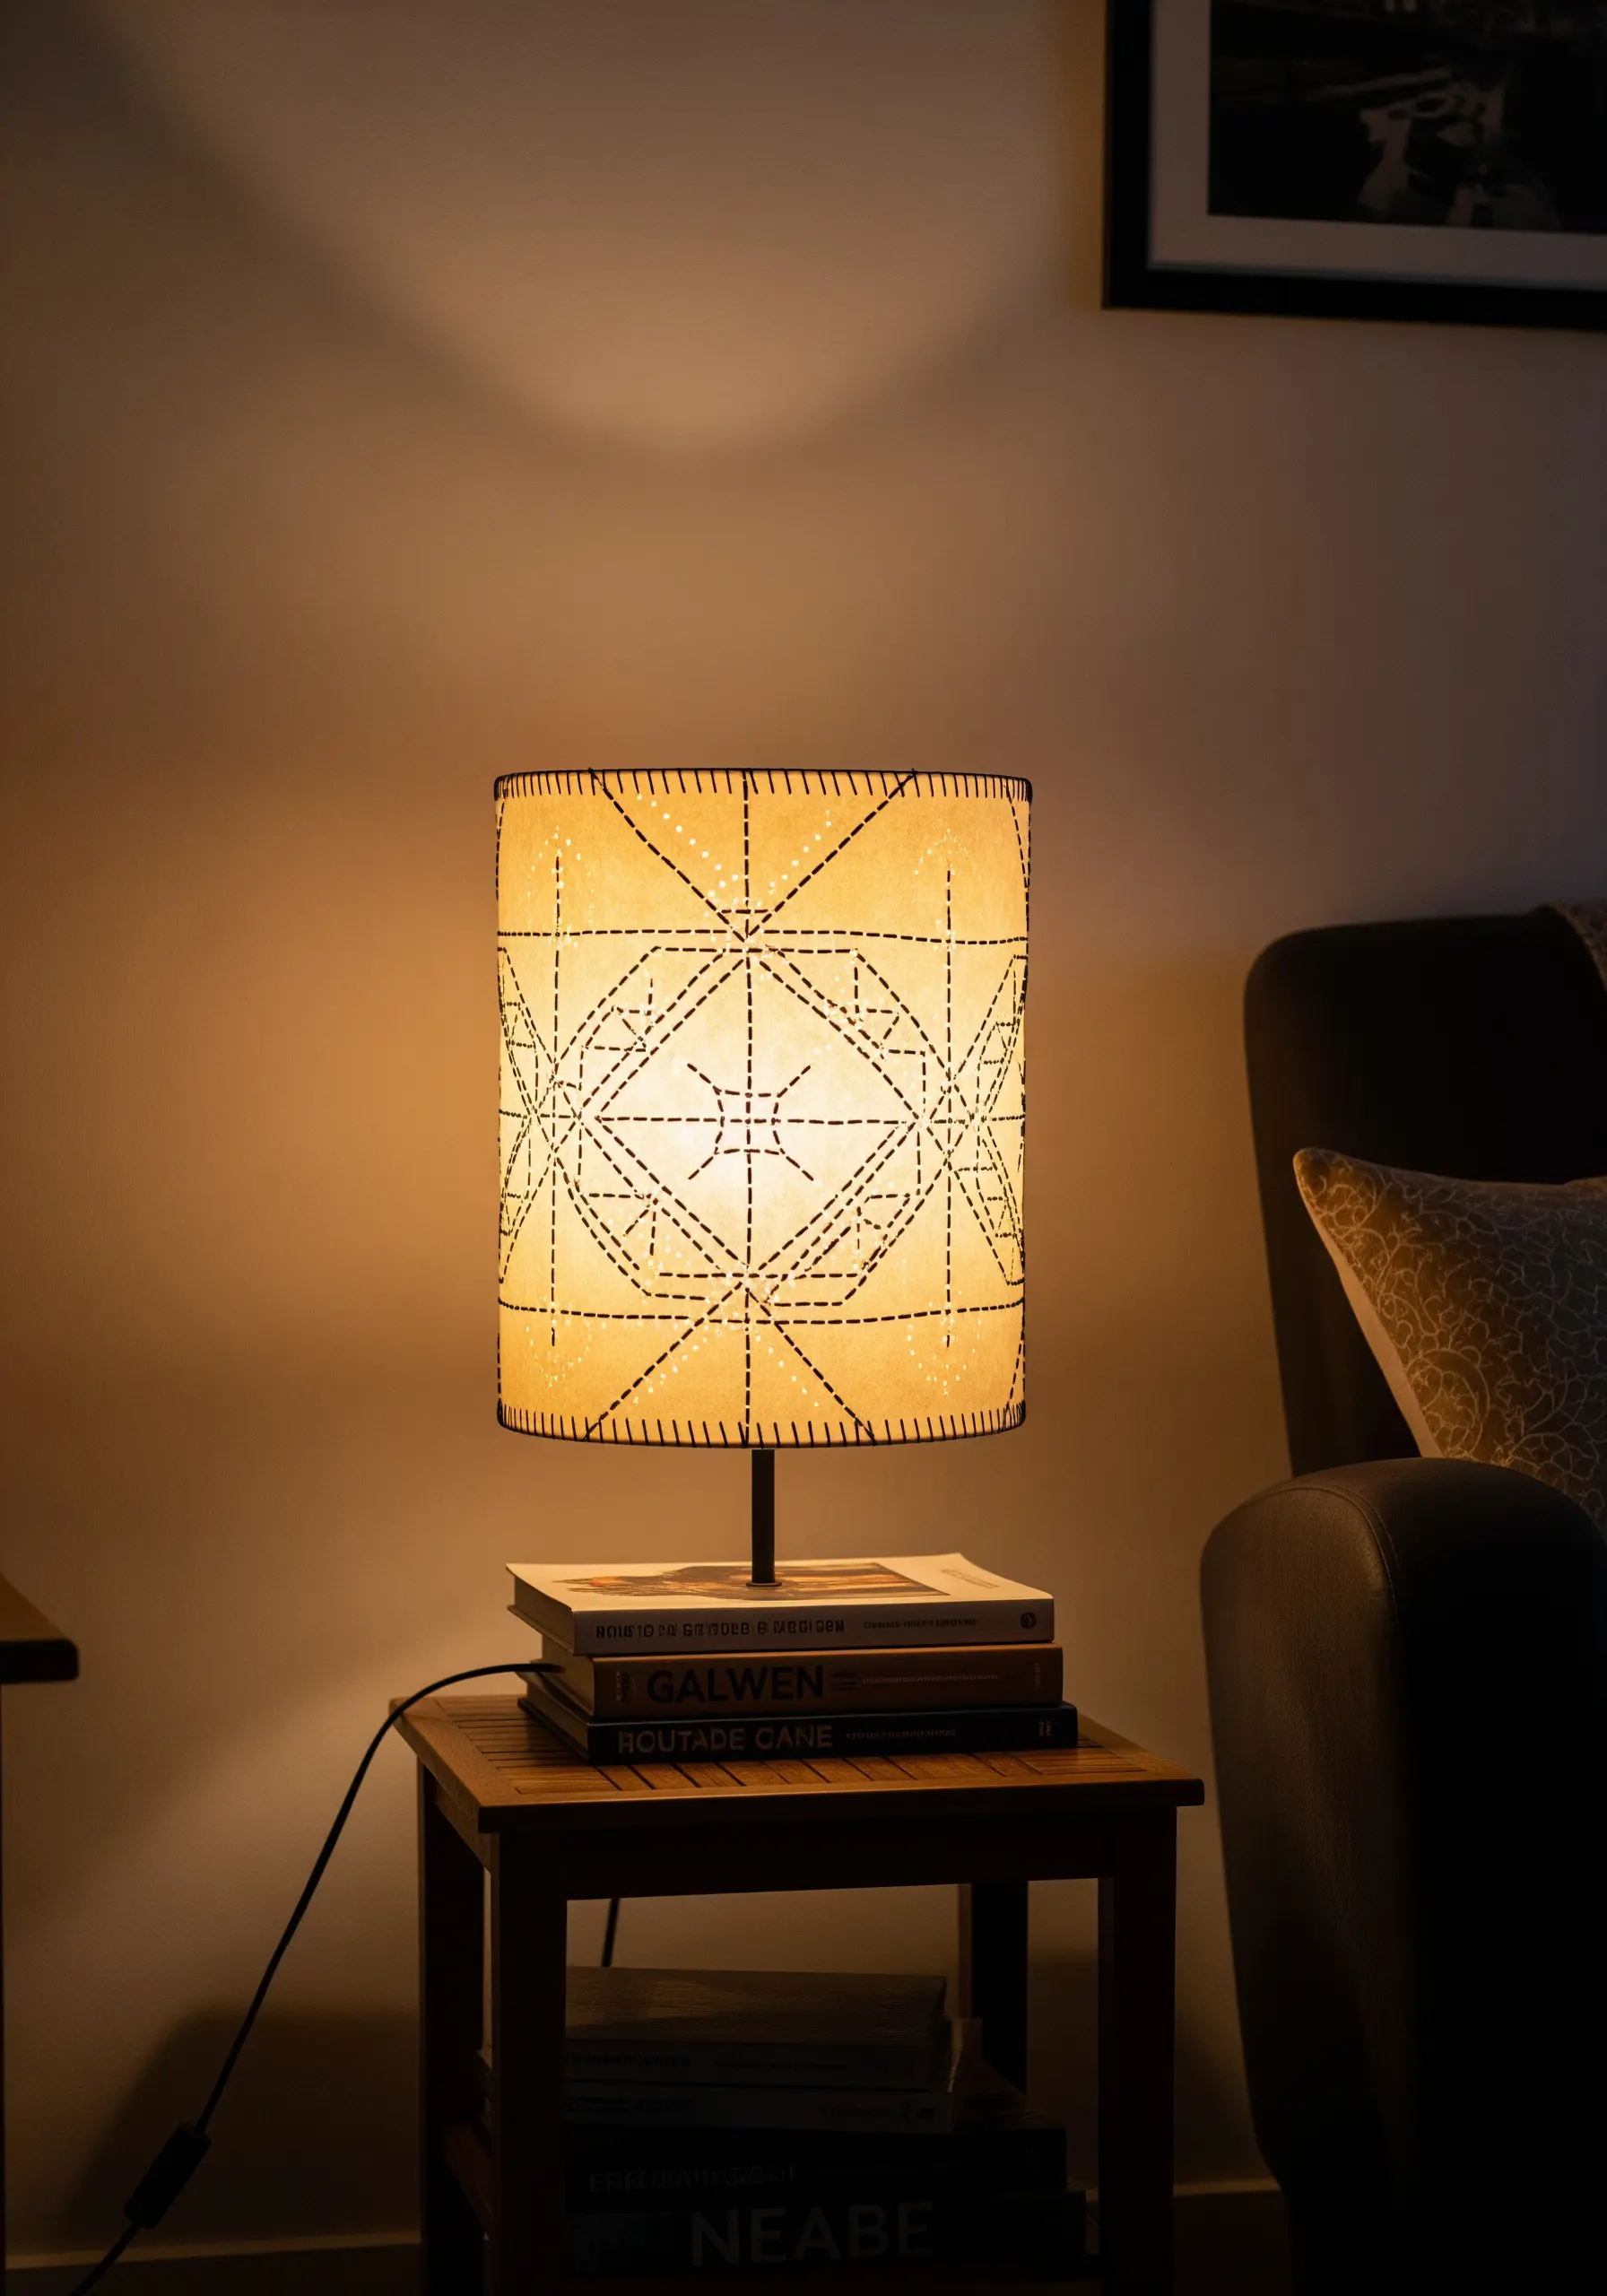
Embroider directly onto a sheet of vellum or parchment paper before shaping it into a lampshade or candle cover.
The semi-translucent quality of the paper allows the silhouette of your stitches to show through when backlit, creating a soft, graphic glow.
Use a simple running stitch or backstitch to create geometric patterns. The key is to keep the design clean and open to allow light to pass through.
This is one of the most unexpected embroidery techniques for creative fabric crafts, using paper as the ‘fabric’ to play with light.
26. Explore Geometric String Art on Cardstock
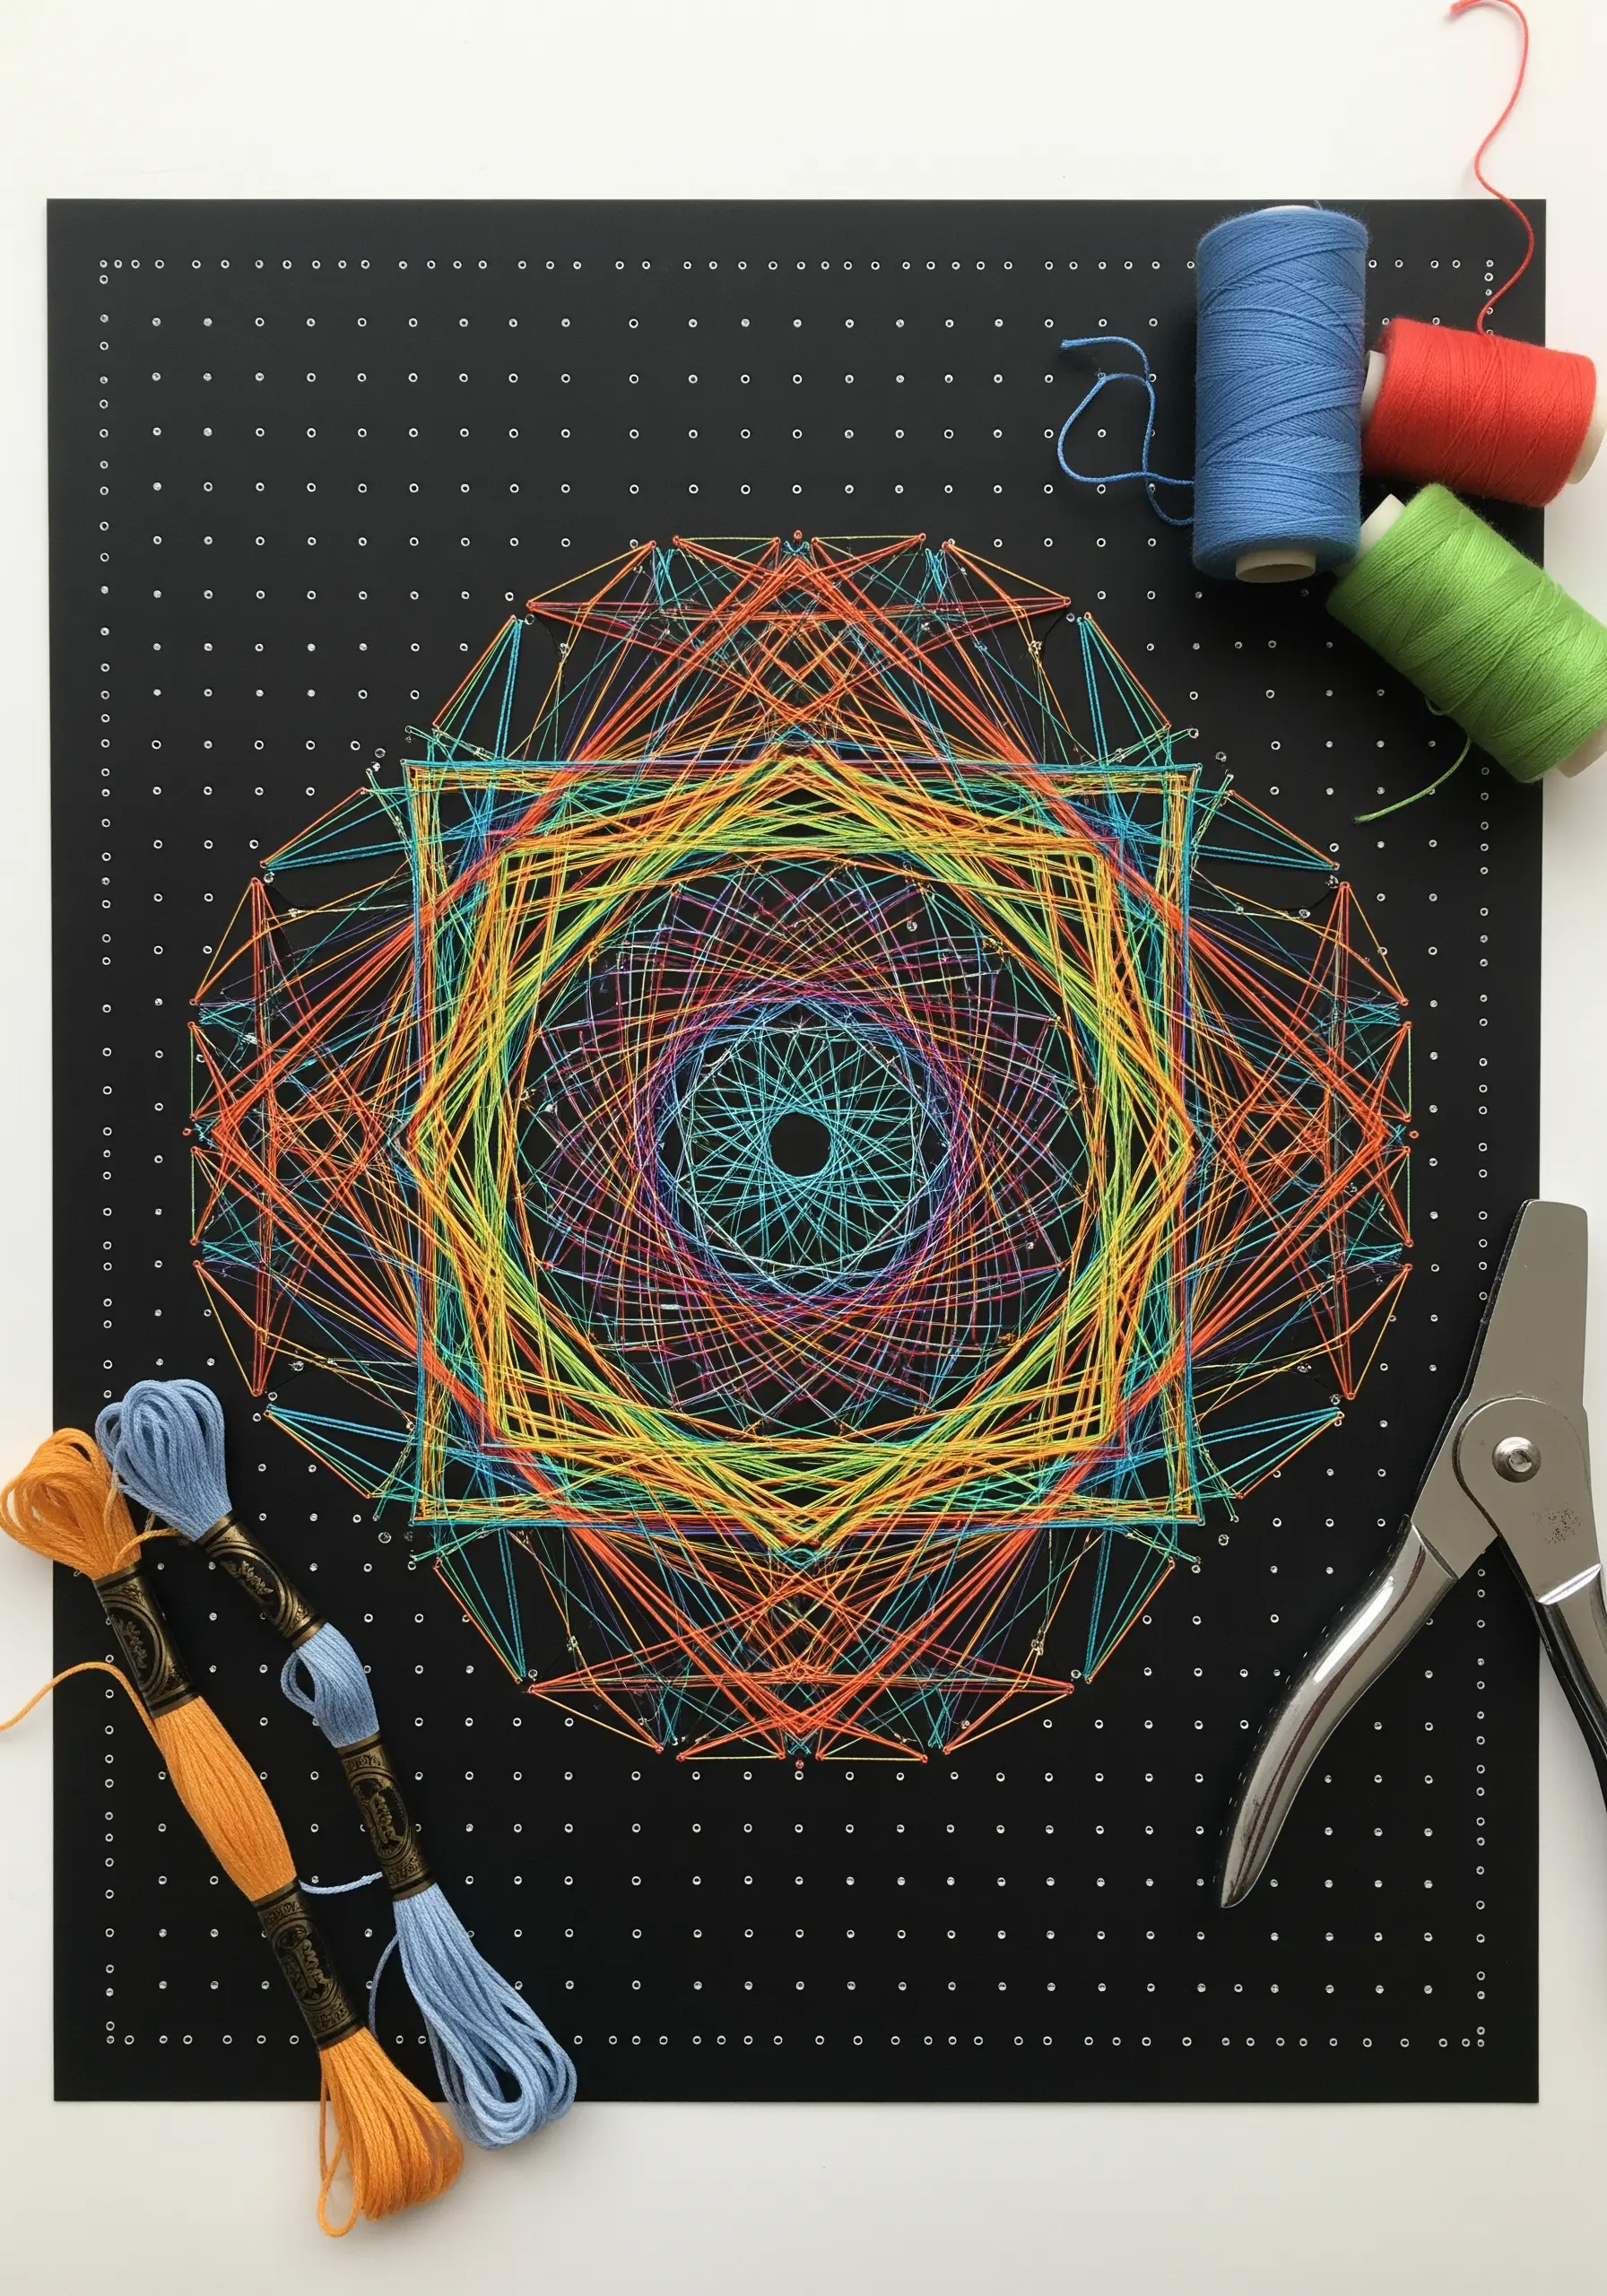
Create complex, kaleidoscopic patterns using only straight lines of thread on a pre-punched grid.
Start with a dark, sturdy piece of cardstock and use a template and awl to punch a grid of holes—circles, squares, and polygons work best.
By stretching colorful threads between different points on the grid, you can generate beautiful parabolic curves and intricate geometric shapes.
Experiment with variegated floss to create automatic color transitions within your design. You can find many retro string art patterns inspired by the 70s that adapt beautifully to this method.
27. Sculpt a Tactile Reef with Quilled Paper
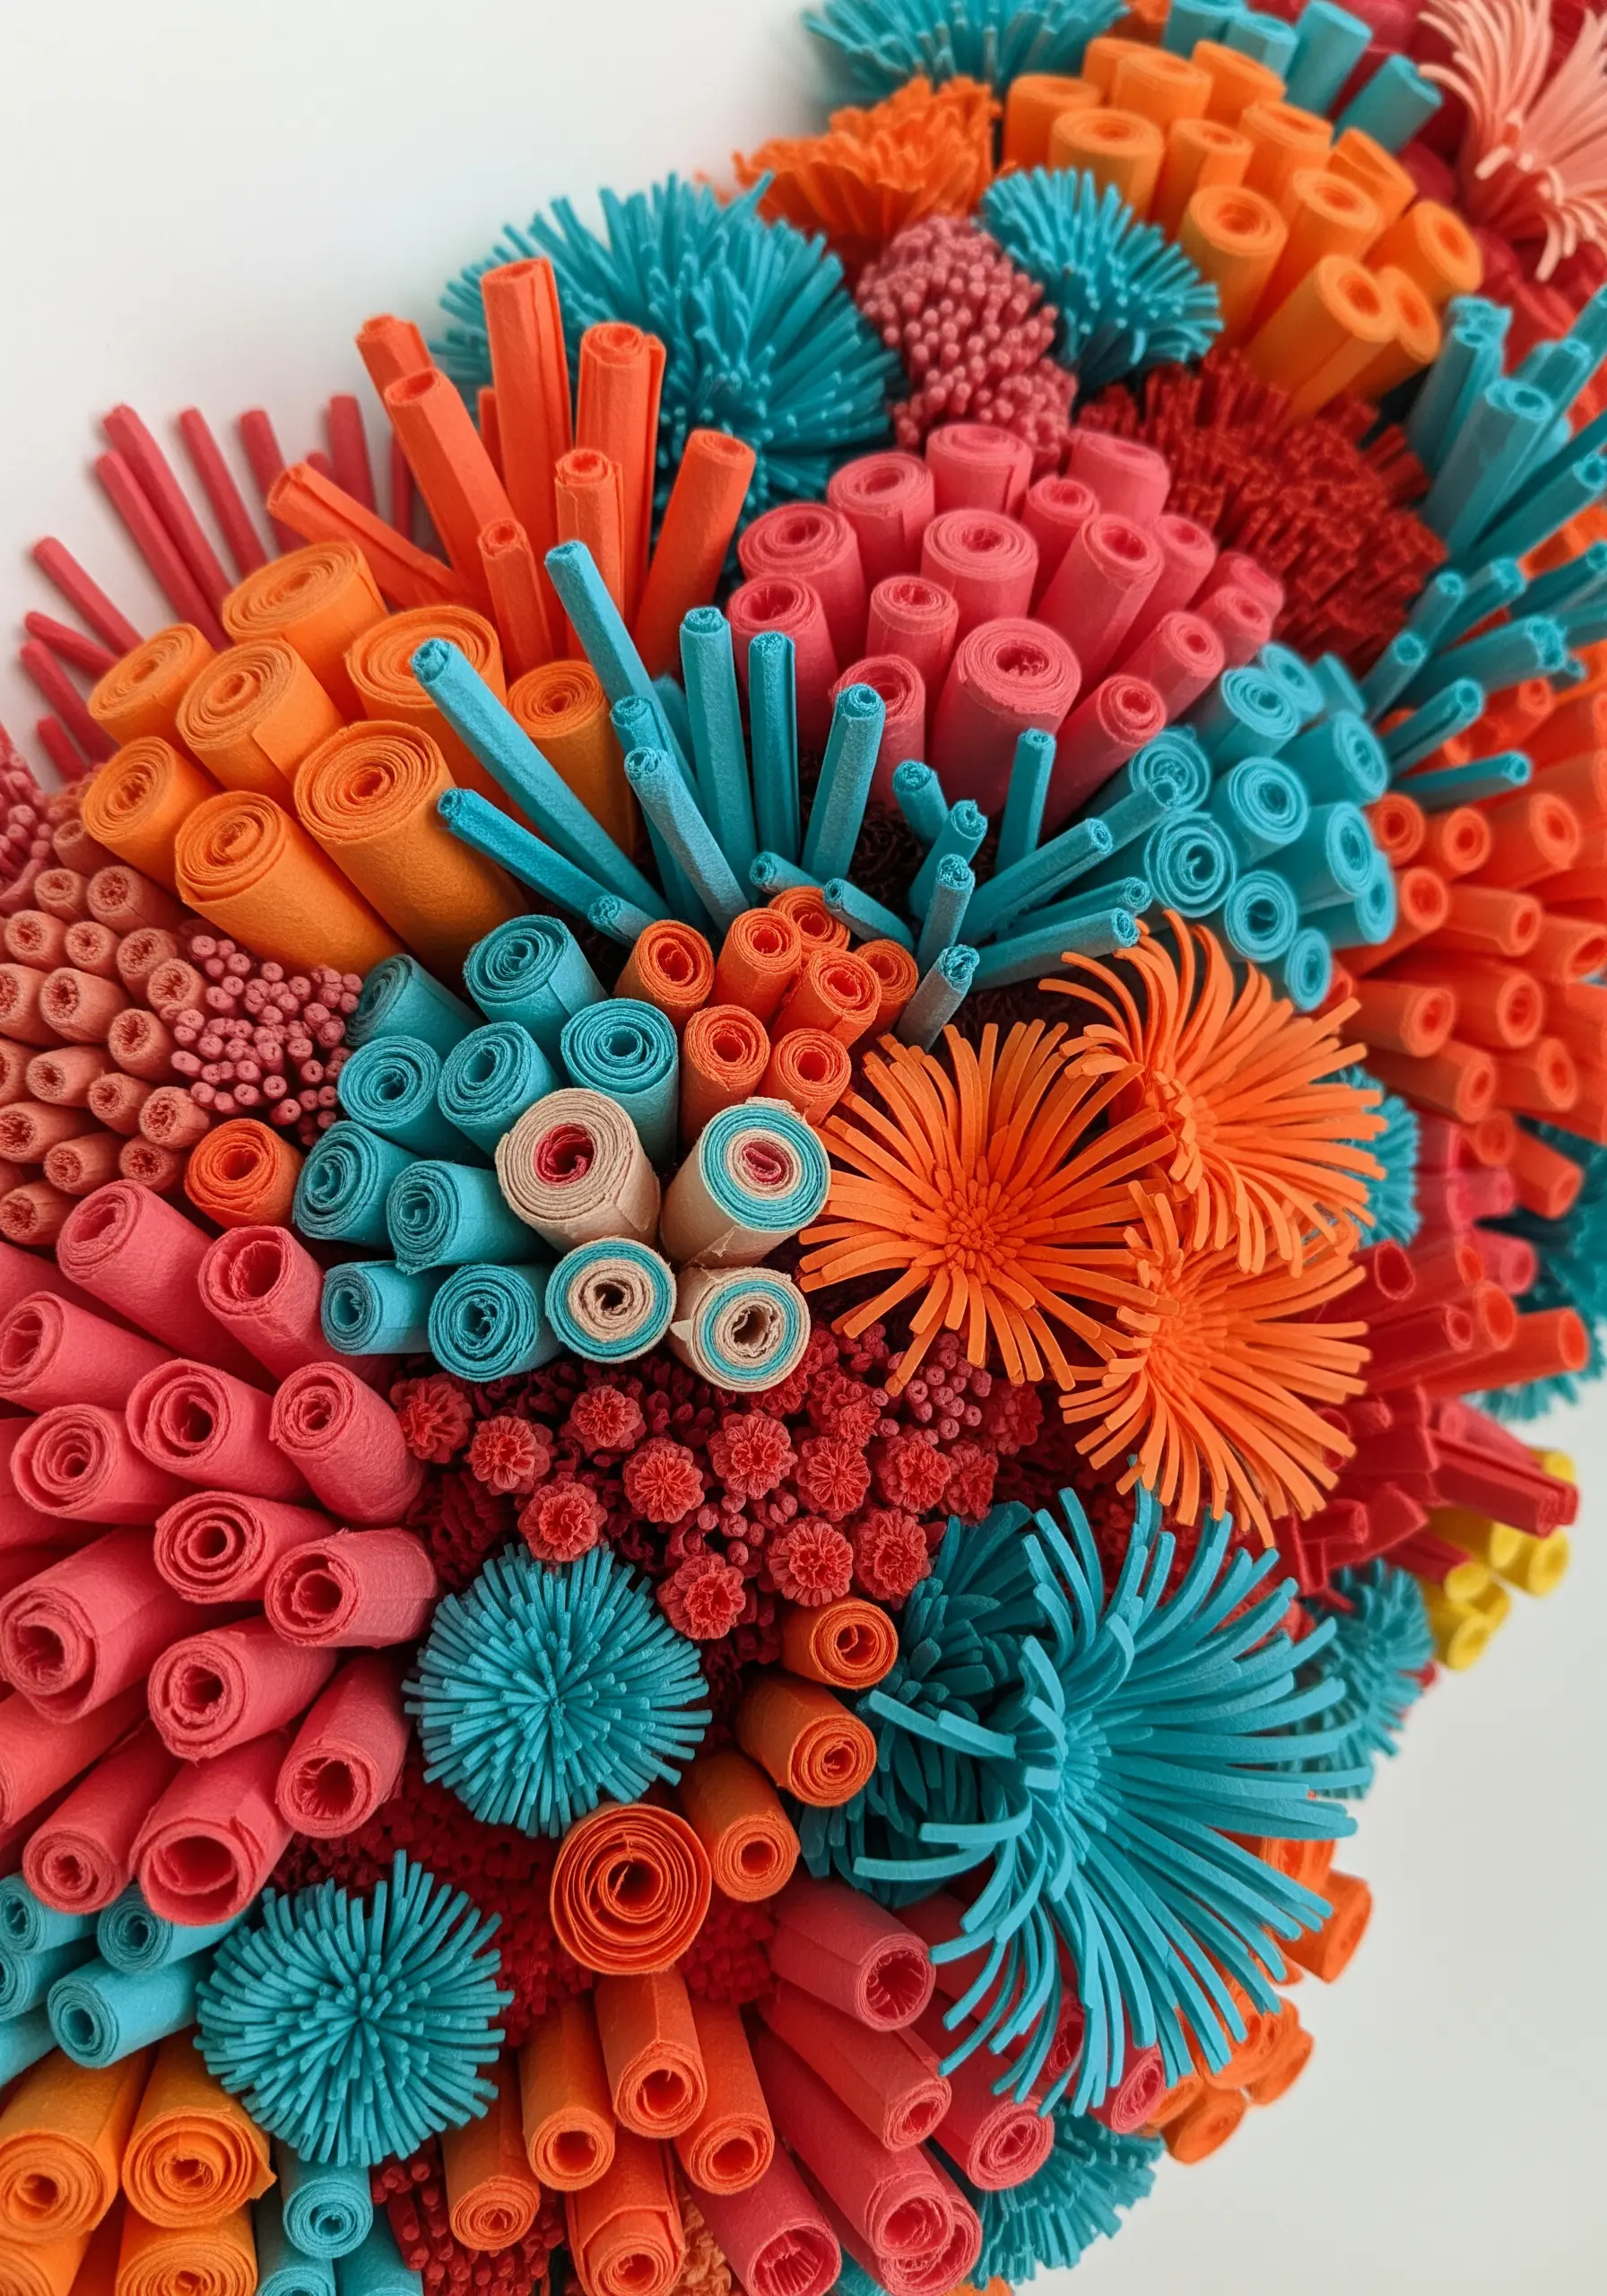
Build a vibrant, three-dimensional coral reef by combining various paper quilling and folding techniques.
Move beyond simple coils and experiment with fringing, husking, and rolling to mimic the diverse textures of a real coral ecosystem.
Create sea anemones by fringing one edge of a paper strip before rolling it, and form tubular coral by wrapping strips around a thin dowel.
Arranging these varied shapes densely creates an incredibly tactile piece of art that invites touch and showcases how paper can mimic nature texture projects that feel amazingly real.
28. Add Whimsical Stitches to Vintage Postcards
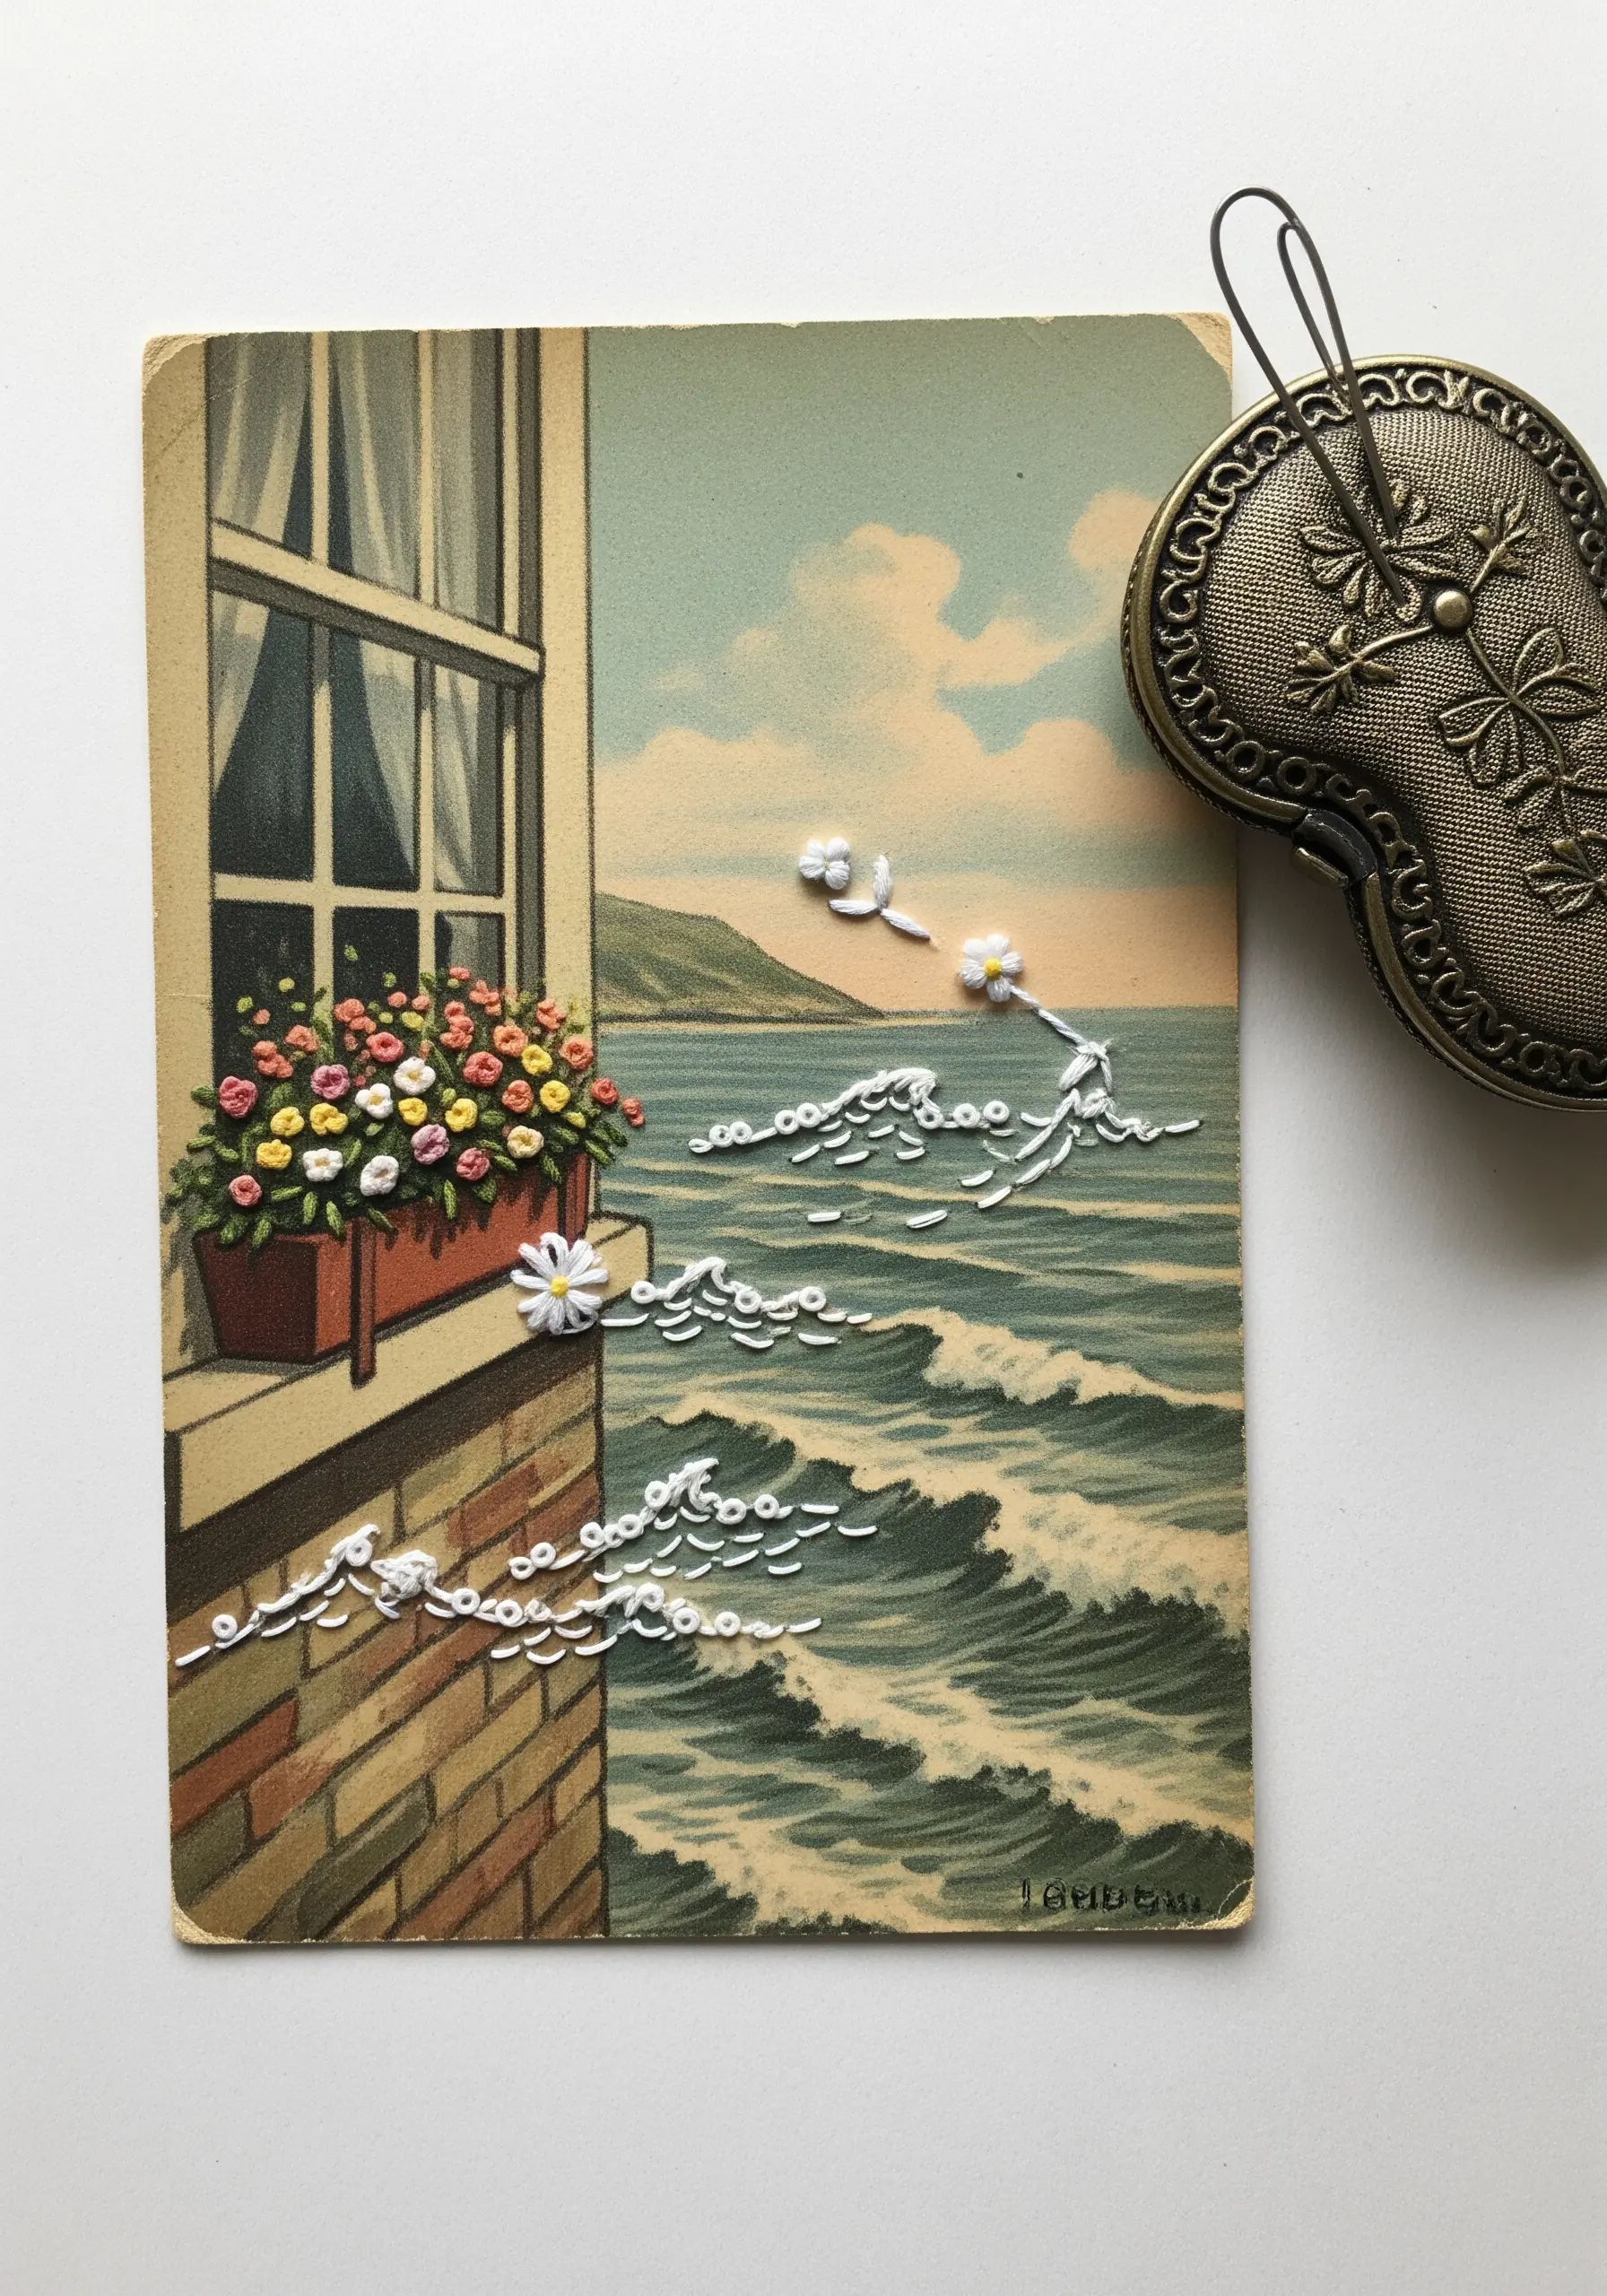
Breathe new life into a vintage postcard or photograph by adding playful, narrative embroidery.
Instead of just outlining, use your stitches to tell a story or add a surreal touch.
Here, simple white stitches transform into whimsical sea foam and floating flowers, creating a dreamlike interaction with the original printed scene.
Use French knots and detached chain stitches (lazy daisies) to create small, organic shapes. This is a wonderful way to make embroidered mixed media ideas that will make your scrapbook pop.
29. Create Abstract Art with Woven Thread Patches
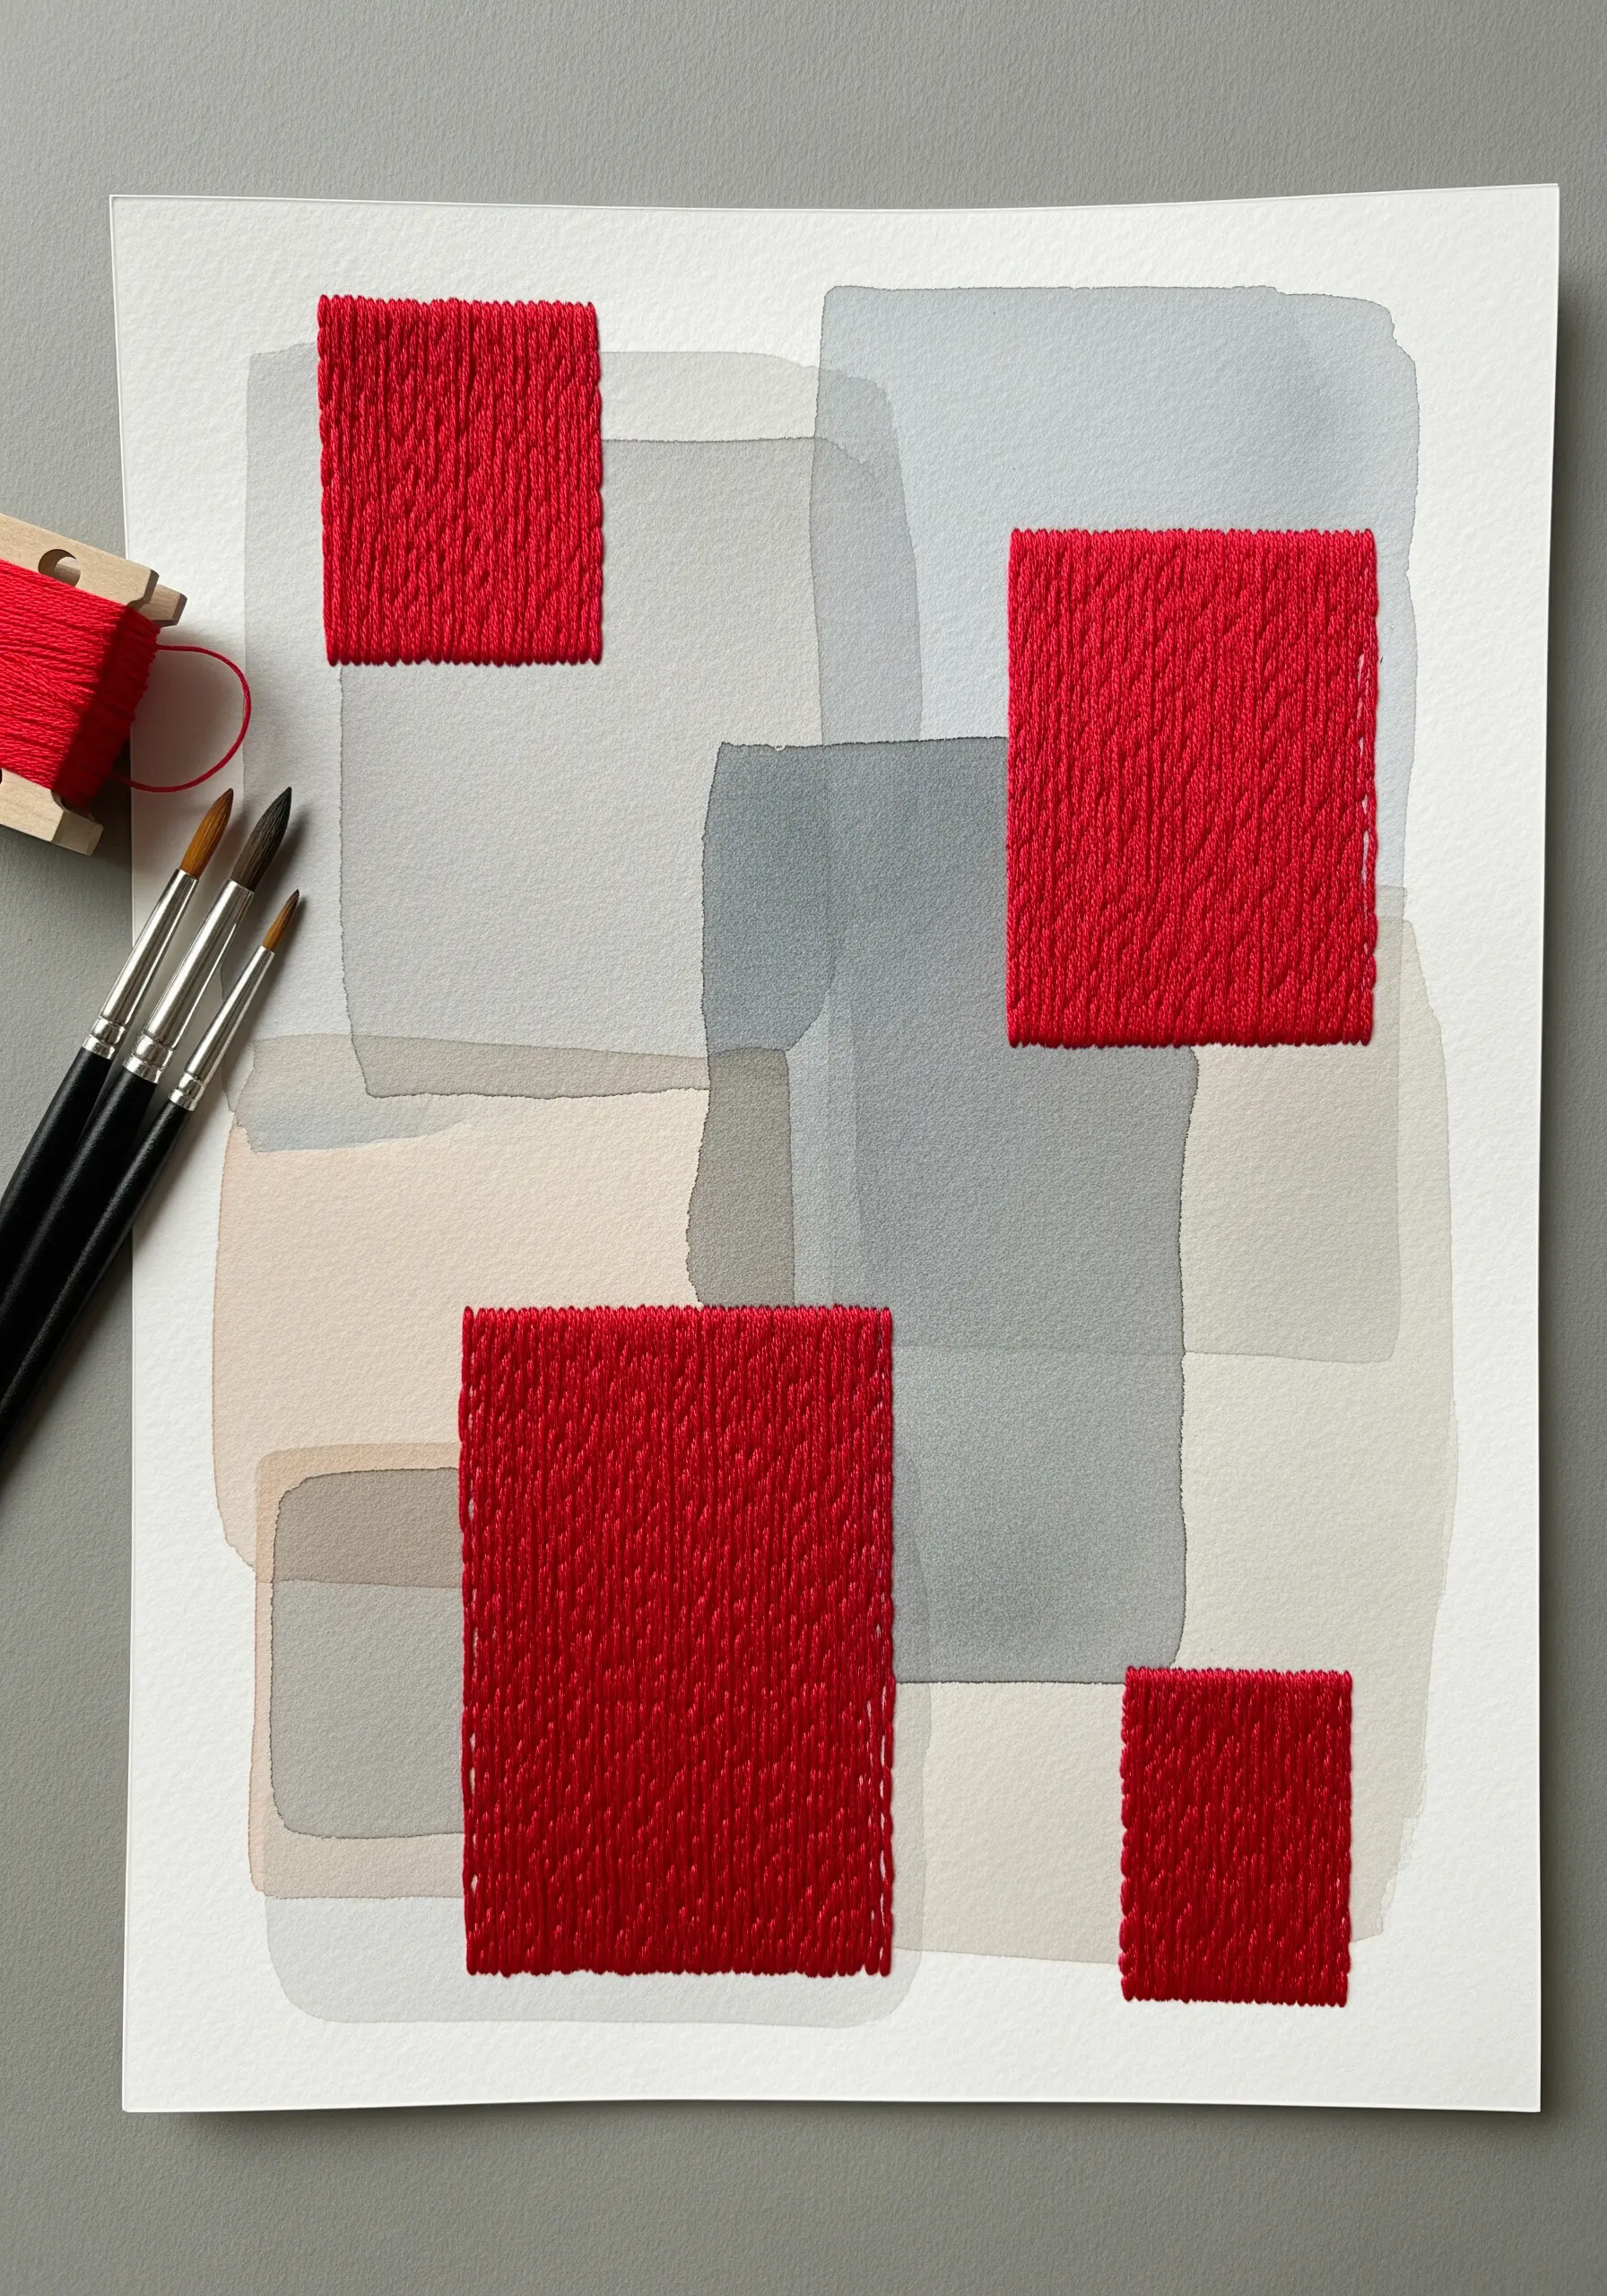
Combine painting and embroidery by creating densely stitched, woven patches as focal points on a watercolor background.
On a separate scrap of fabric or a piece of cardstock, create a small rectangle of woven stitches—like darning or basket weave—using a single, bold color.
Cut out these woven patches and affix them to your painted paper.
The contrast between the soft, translucent watercolor washes and the solid, opaque texture of the thread creates a powerful abstract composition. These are the kind of abstract mixed-media embroidery ideas that feel like modern gallery art.
30. Construct Realistic Insects from Stitched Paper
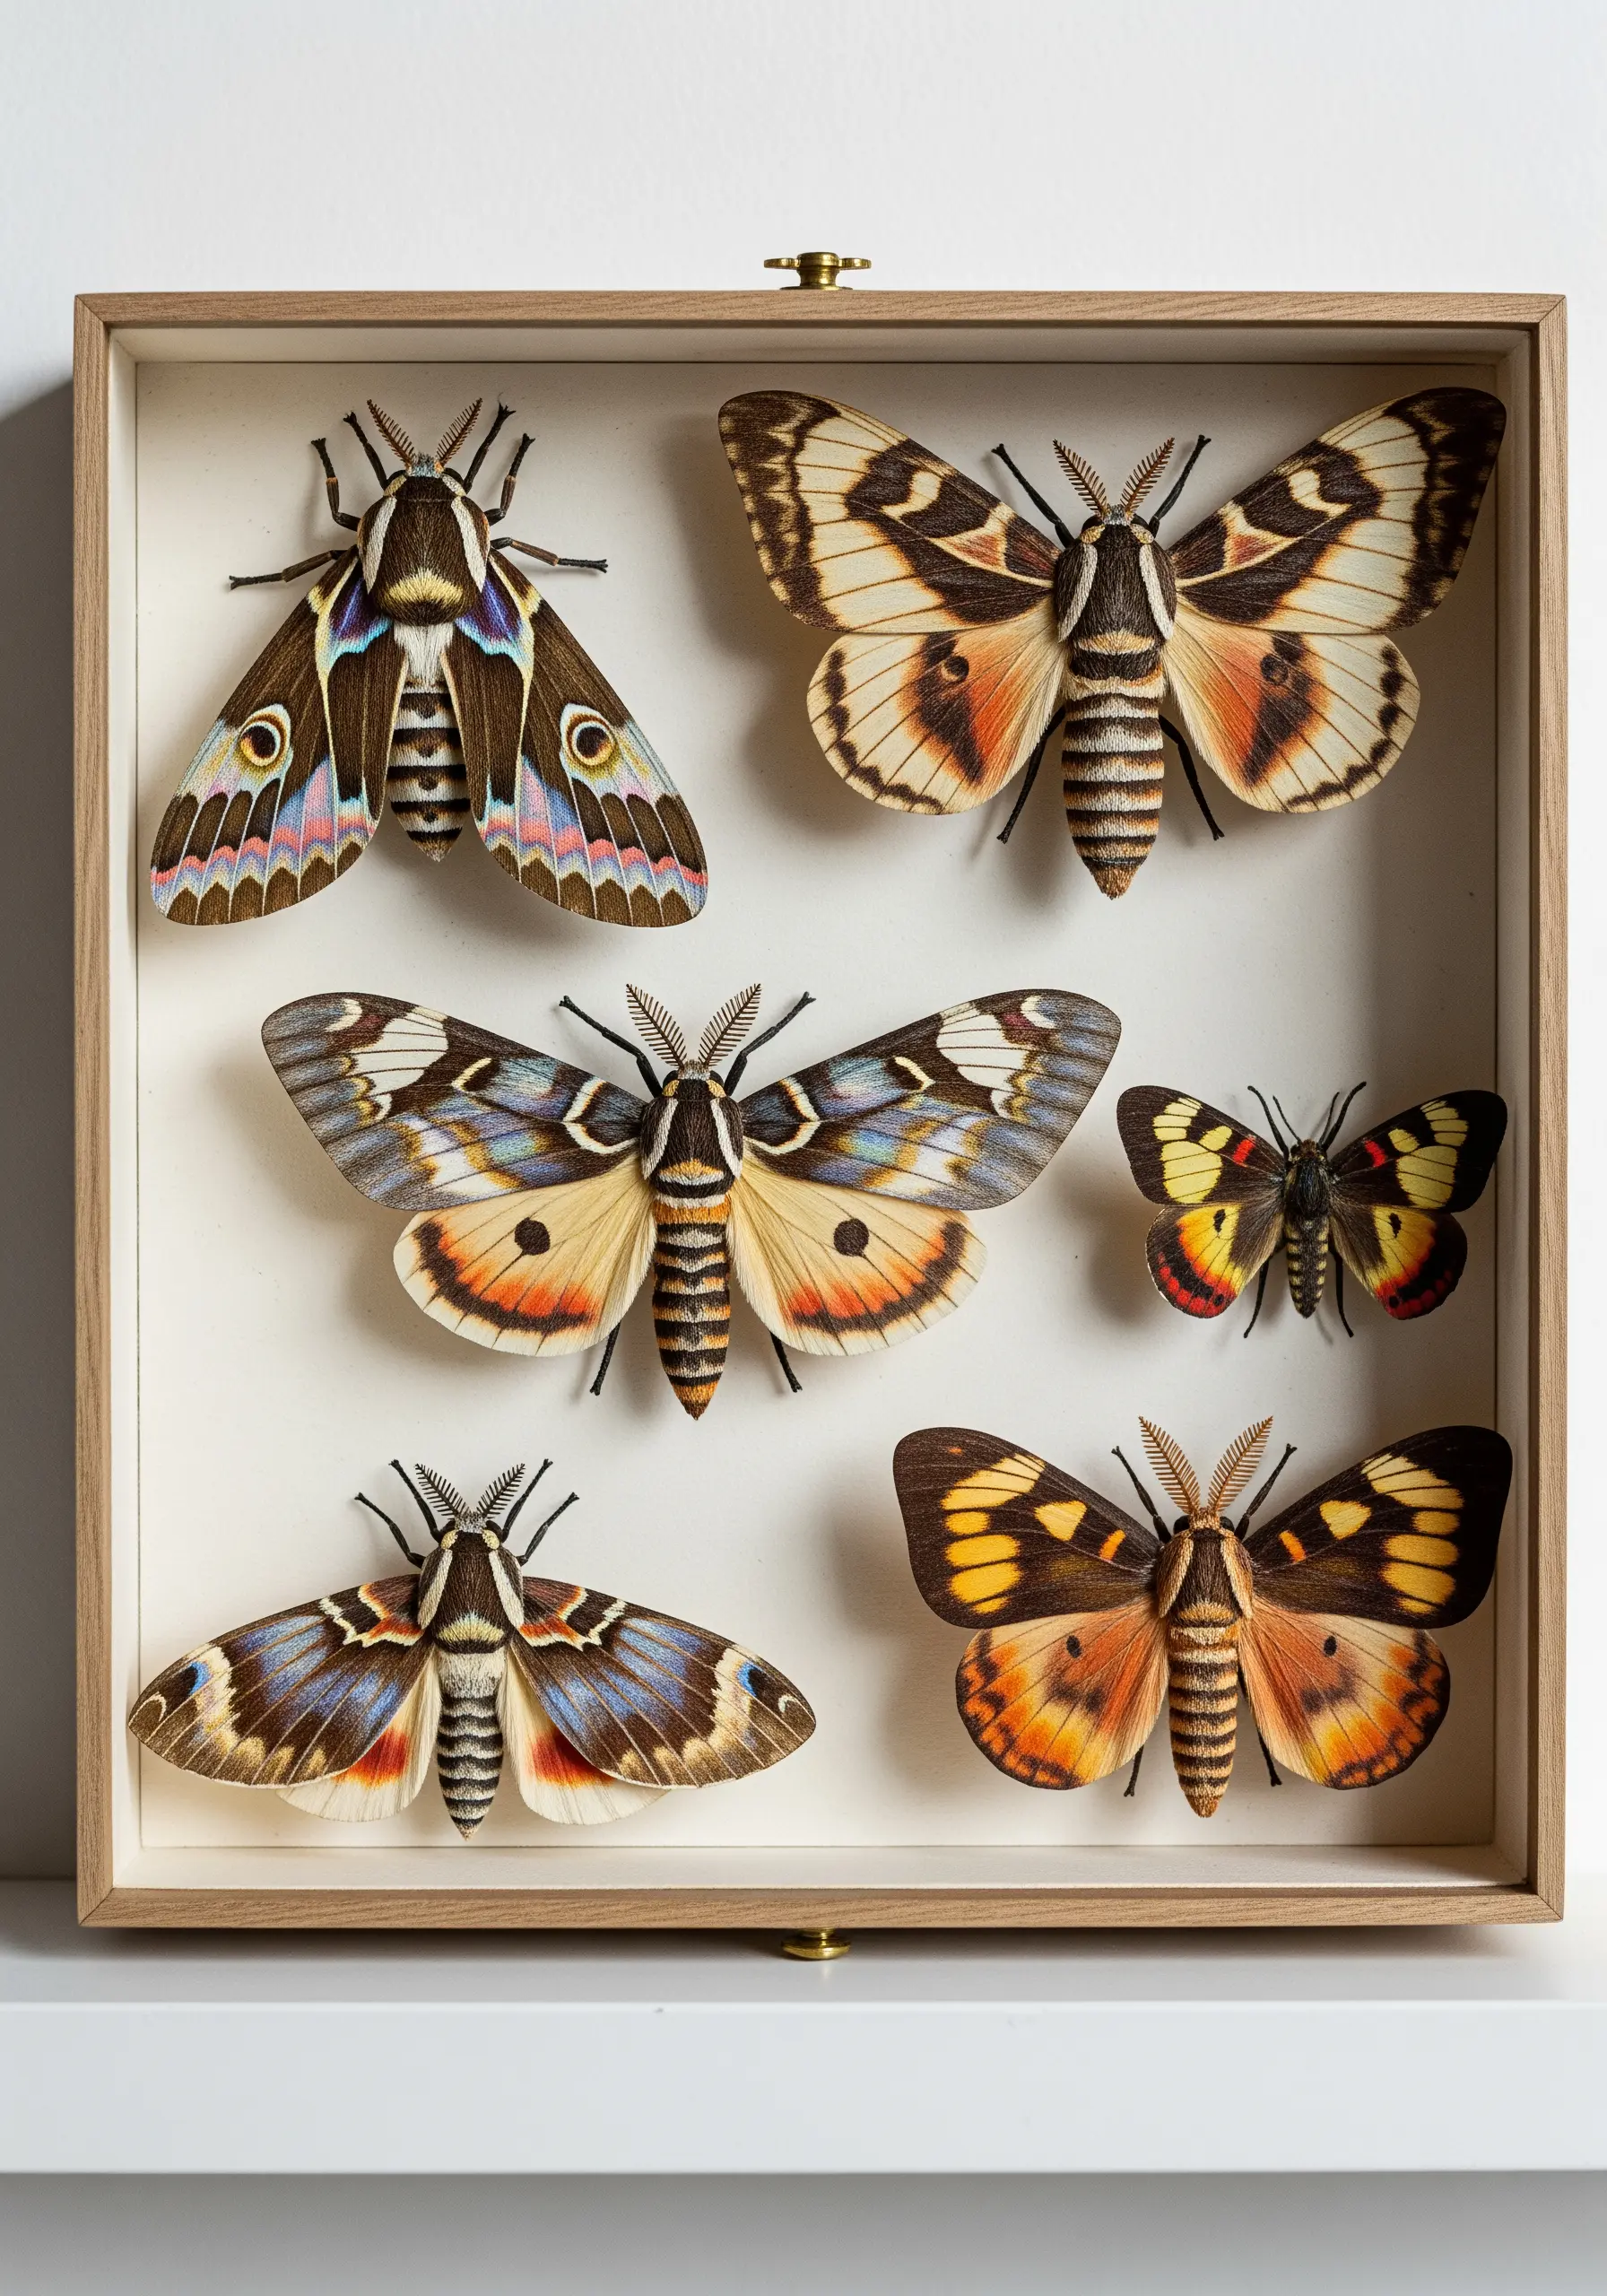
Achieve incredible realism by building insects from layers of printed and embroidered paper.
Print high-resolution images of moth or butterfly wings onto quality matte paper.
Carefully cut them out and use thread to add fine details like antennae, legs, or fuzzy textures on the body.
Stitch the different paper components (wings, body) together rather than gluing them to create subtle articulation and dimension.
This meticulous process results in stunningly lifelike creations, perfect for any fan of realistic animal and insect embroidery patterns.
31. Craft a Stitched Paper Garland for Seasonal Décor
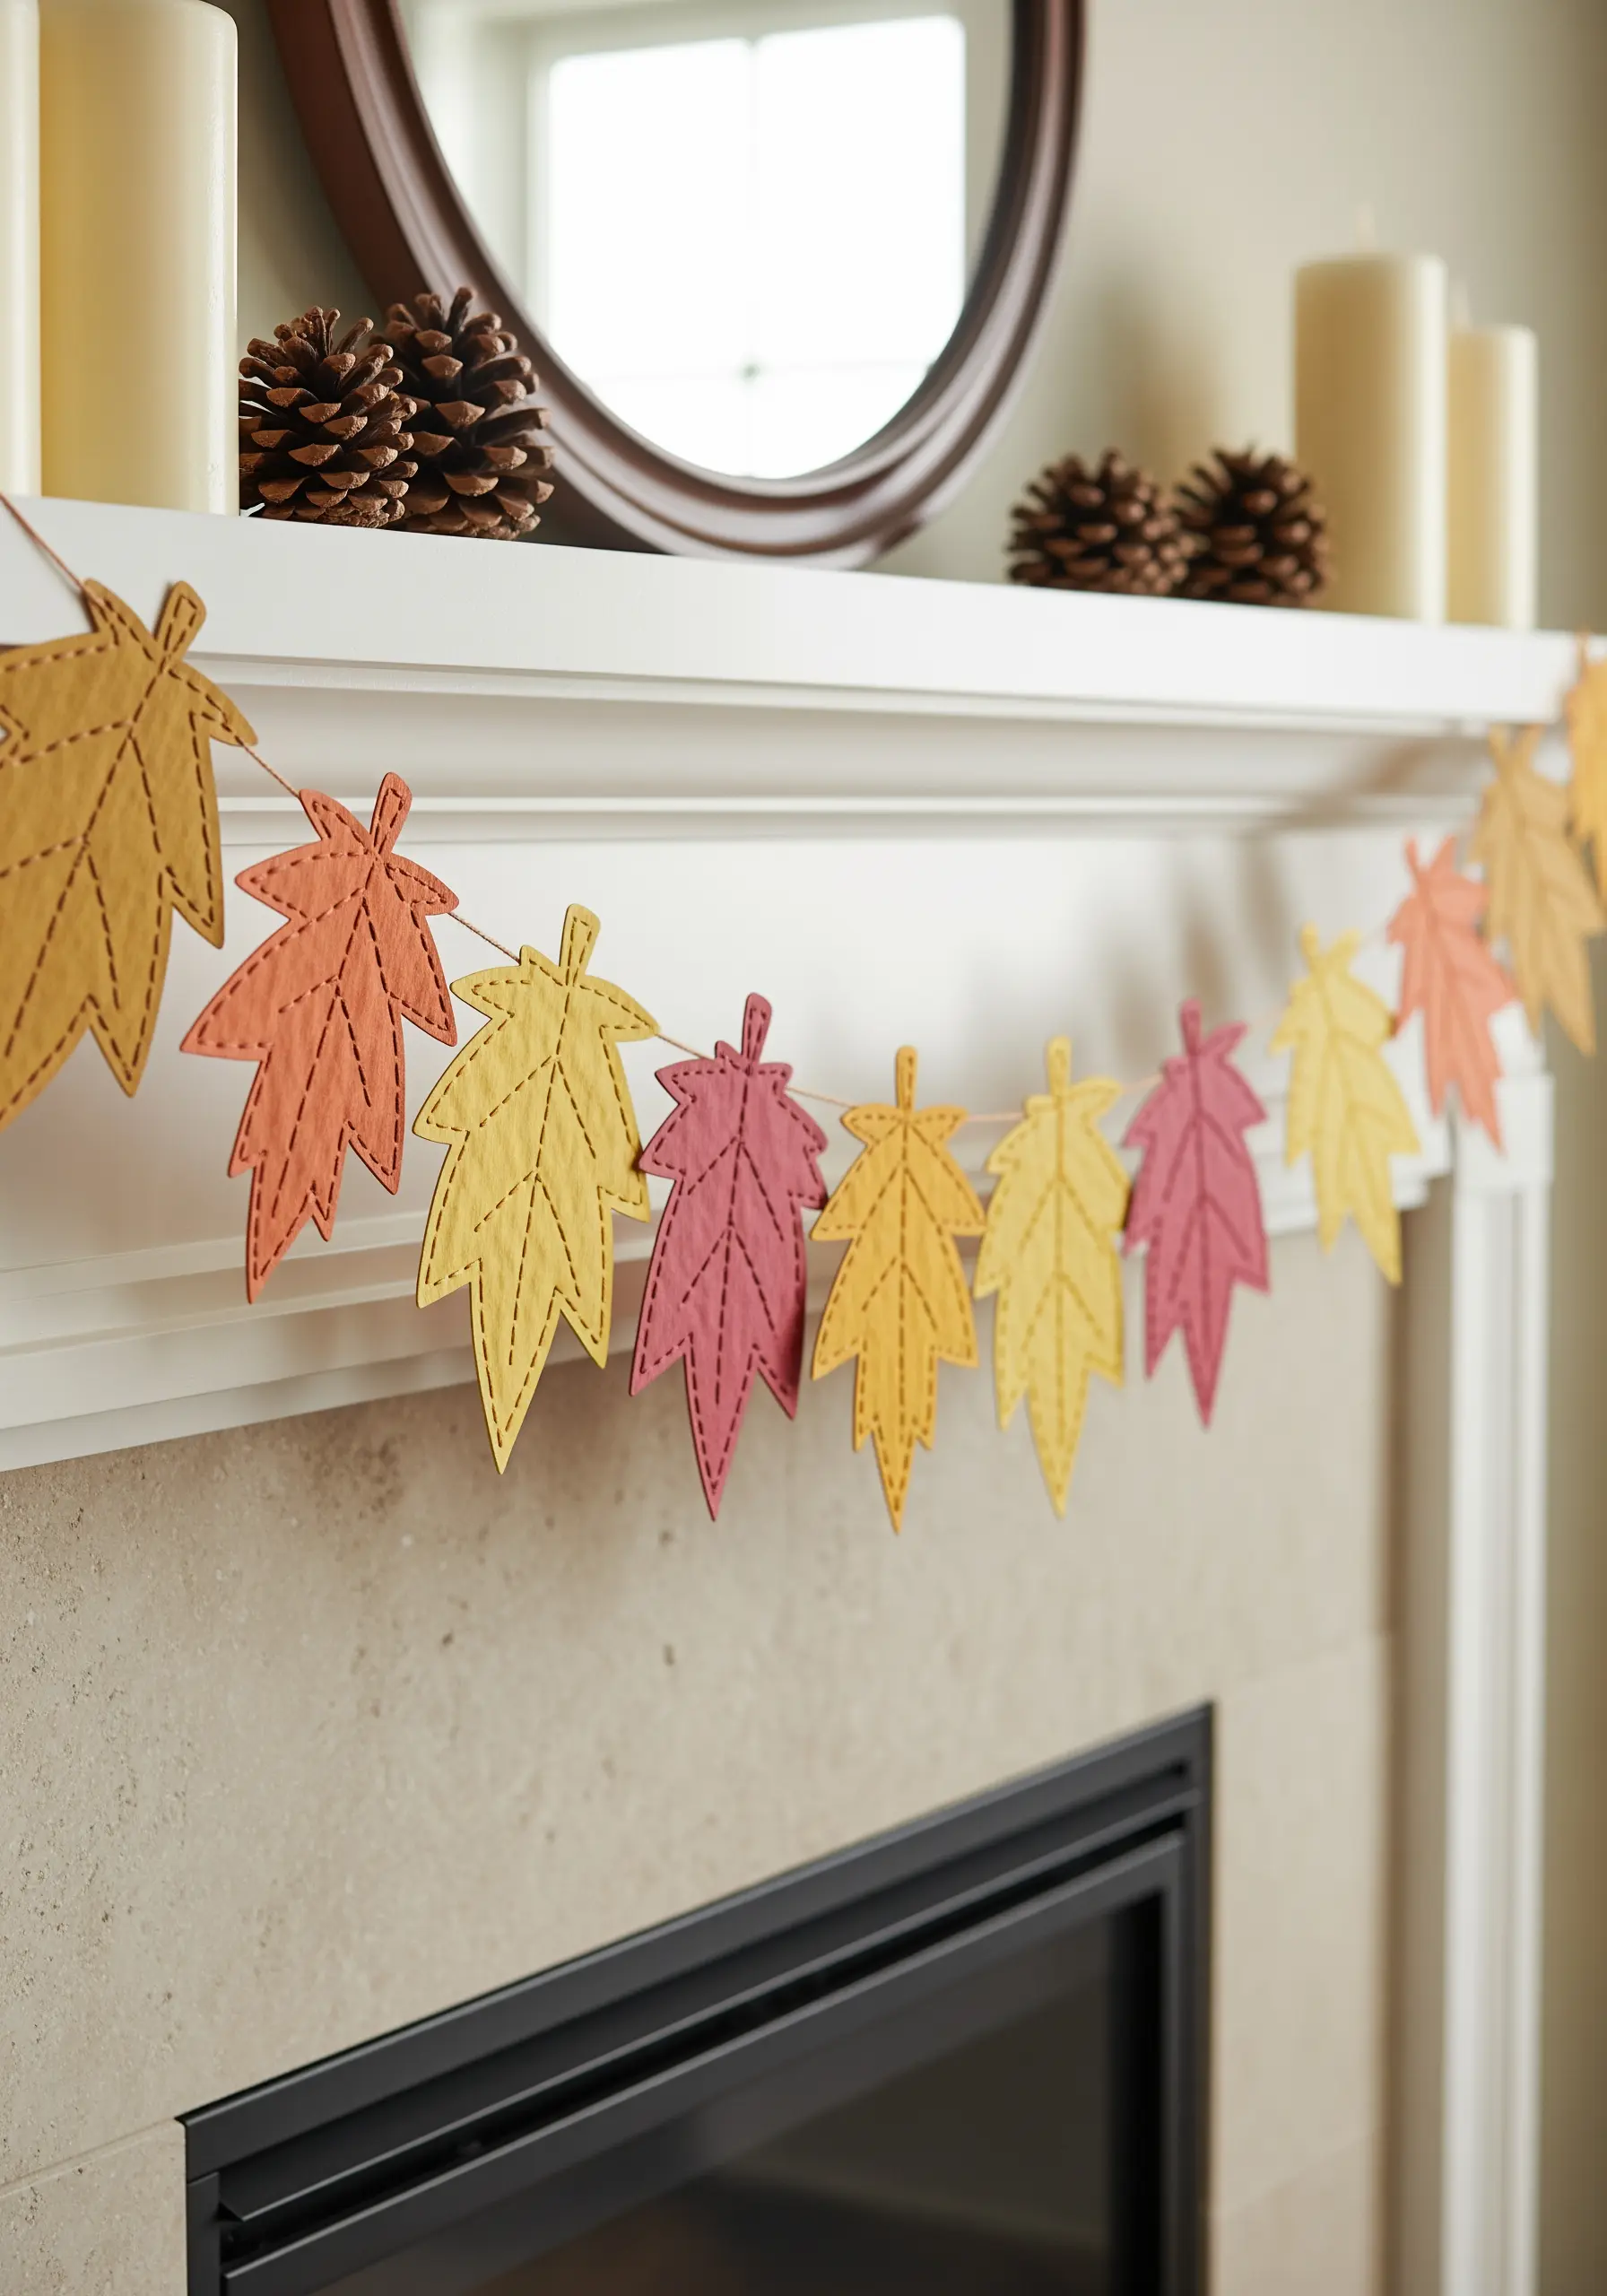
Create a charming and reusable garland by stitching together shapes cut from textured paper.
Use a die-cutter or template to cut leaf shapes from autumnal-colored cardstock.
Instead of connecting them with glue or tape, use a sewing machine or hand stitch a simple running stitch down the center of each leaf and along the connecting twine.
The visible stitching adds a rustic, handmade quality that enhances the simple paper forms, creating minimal festive motifs that look elegant and are easy to make.
32. Bind an Accordion Book with Exposed Stitching
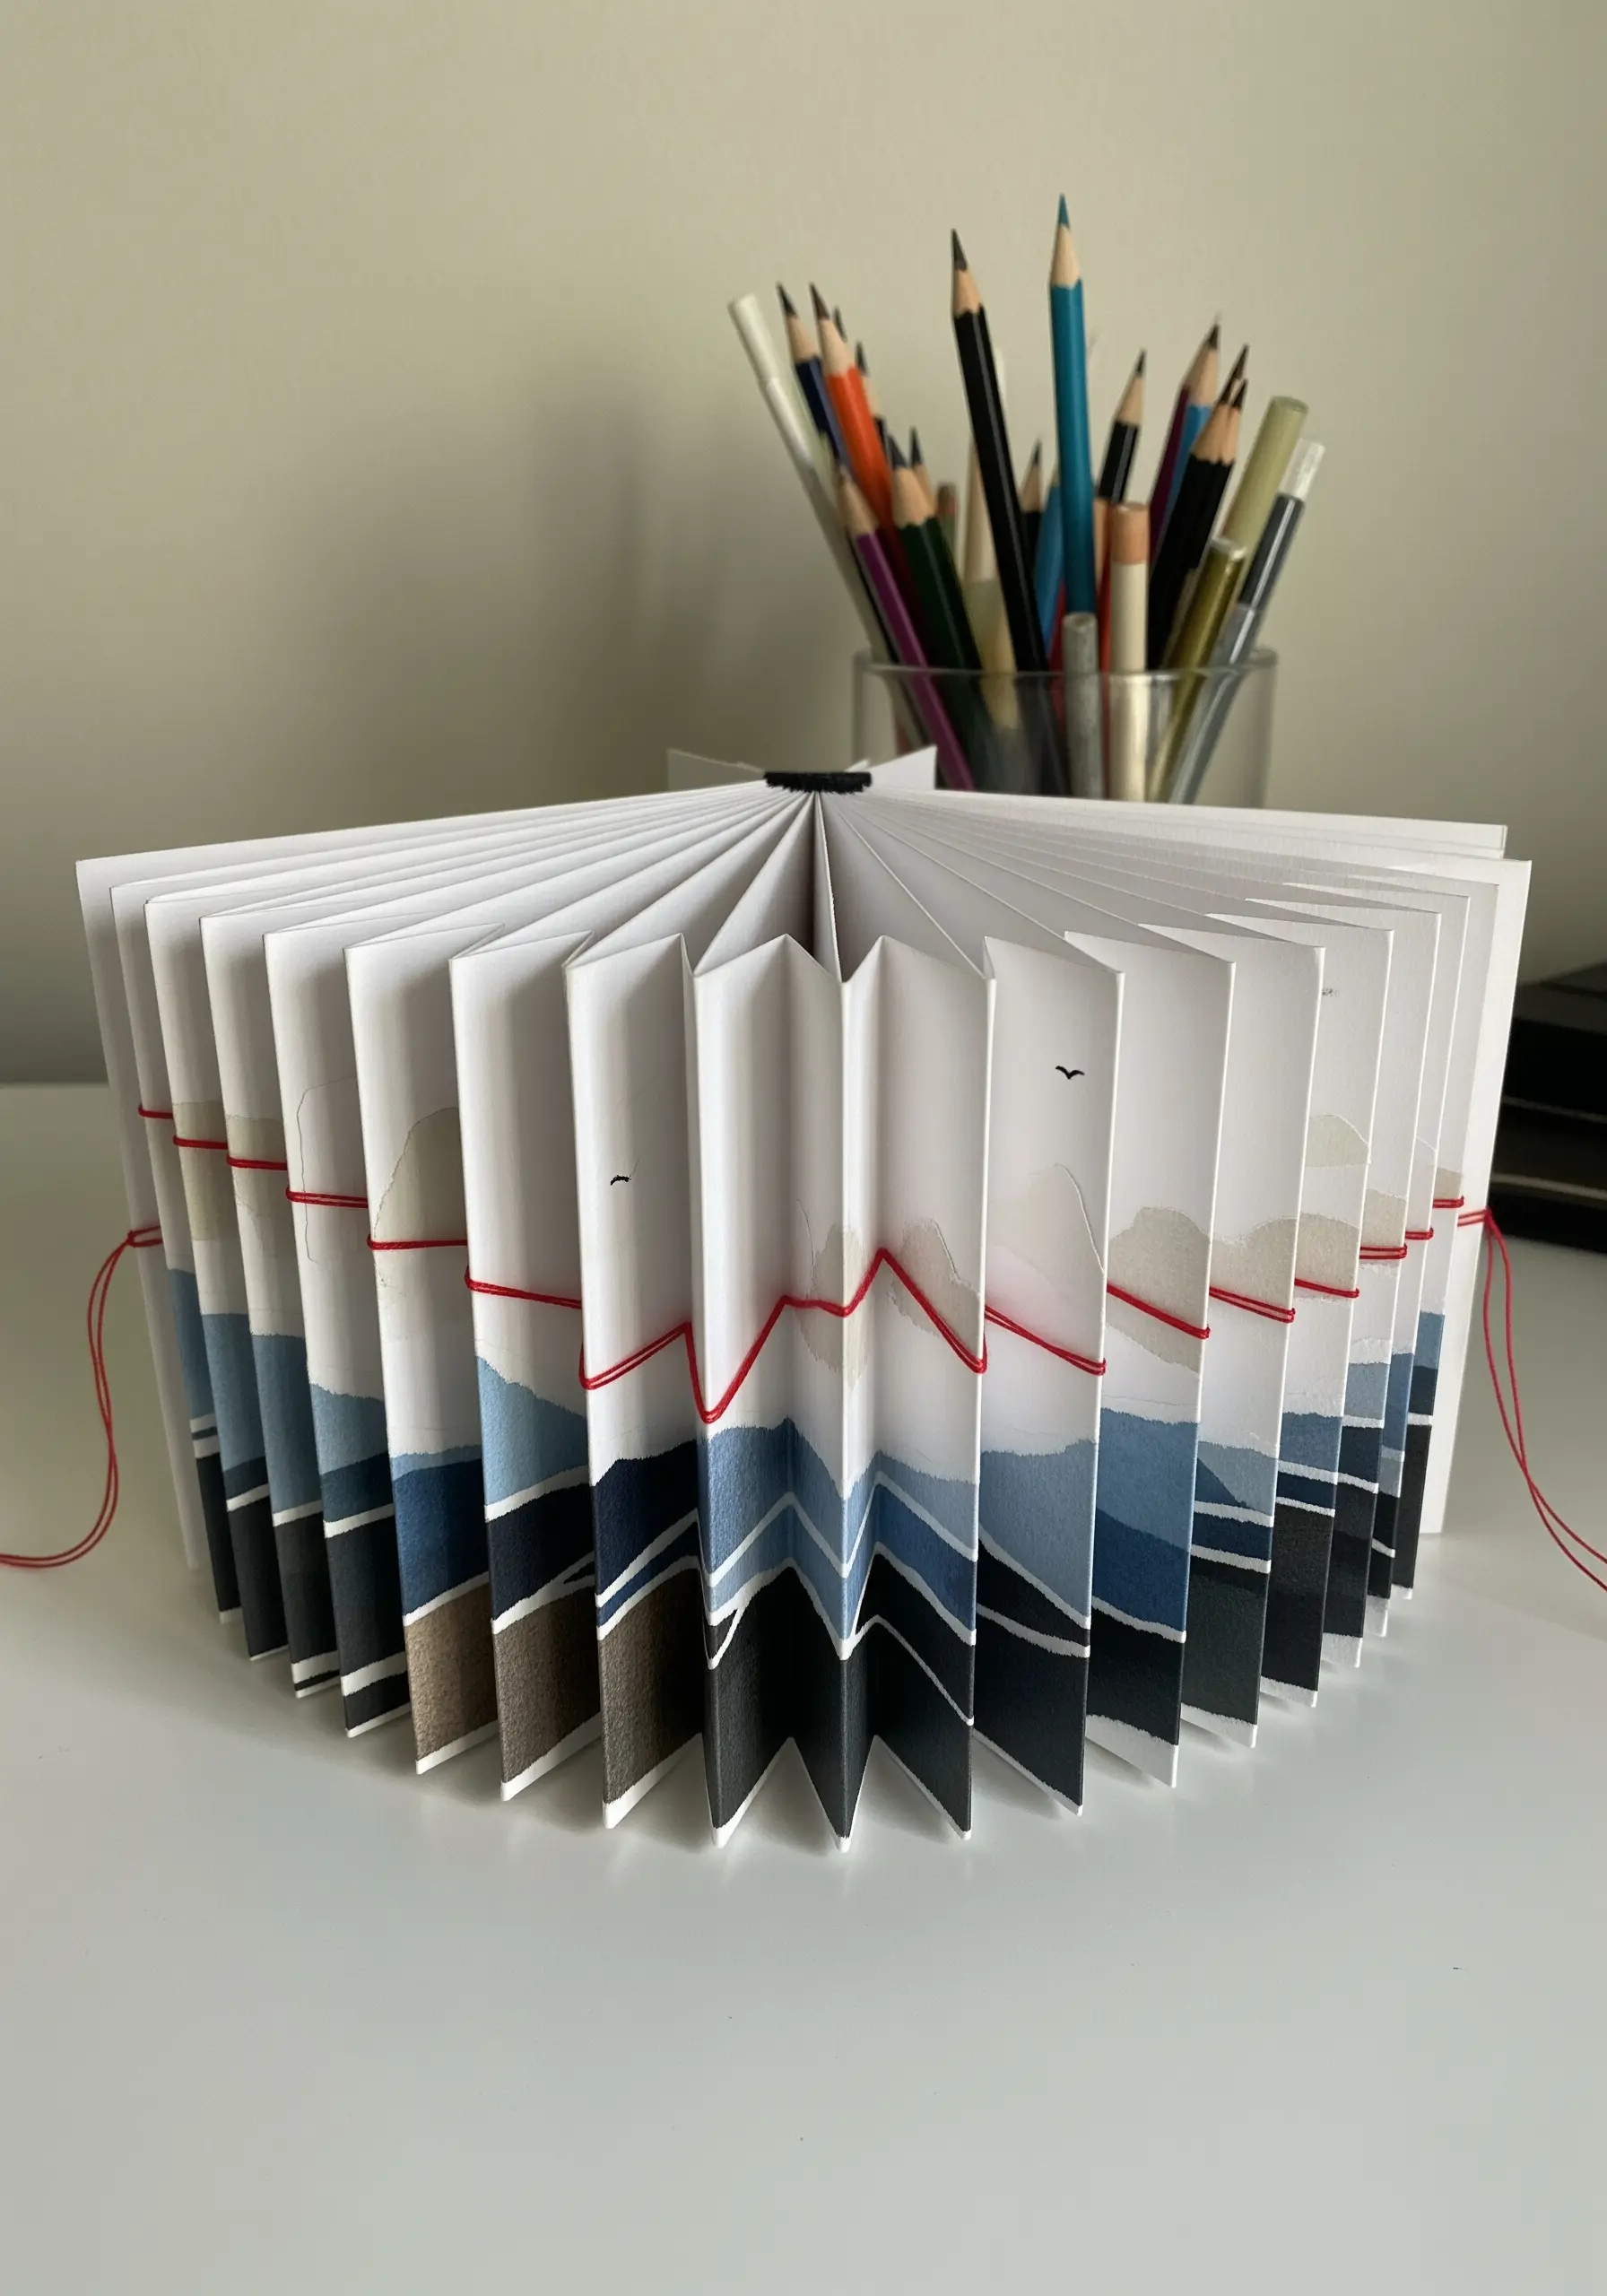
Turn an accordion-folded paper creation into a sculptural object by using thread as a binding and decorative element.
After folding your paper, use a needle to stitch a simple, continuous line that runs through the peaks and valleys of the folds.
This not only holds the book’s shape but also adds a contrasting line of color that traces its structure.
It’s a simple technique that transforms a series of flat images into a cohesive, three-dimensional narrative, perfect for stitching line art travel and adventure symbols.
33. Embroider on Seeded or Handmade Paper
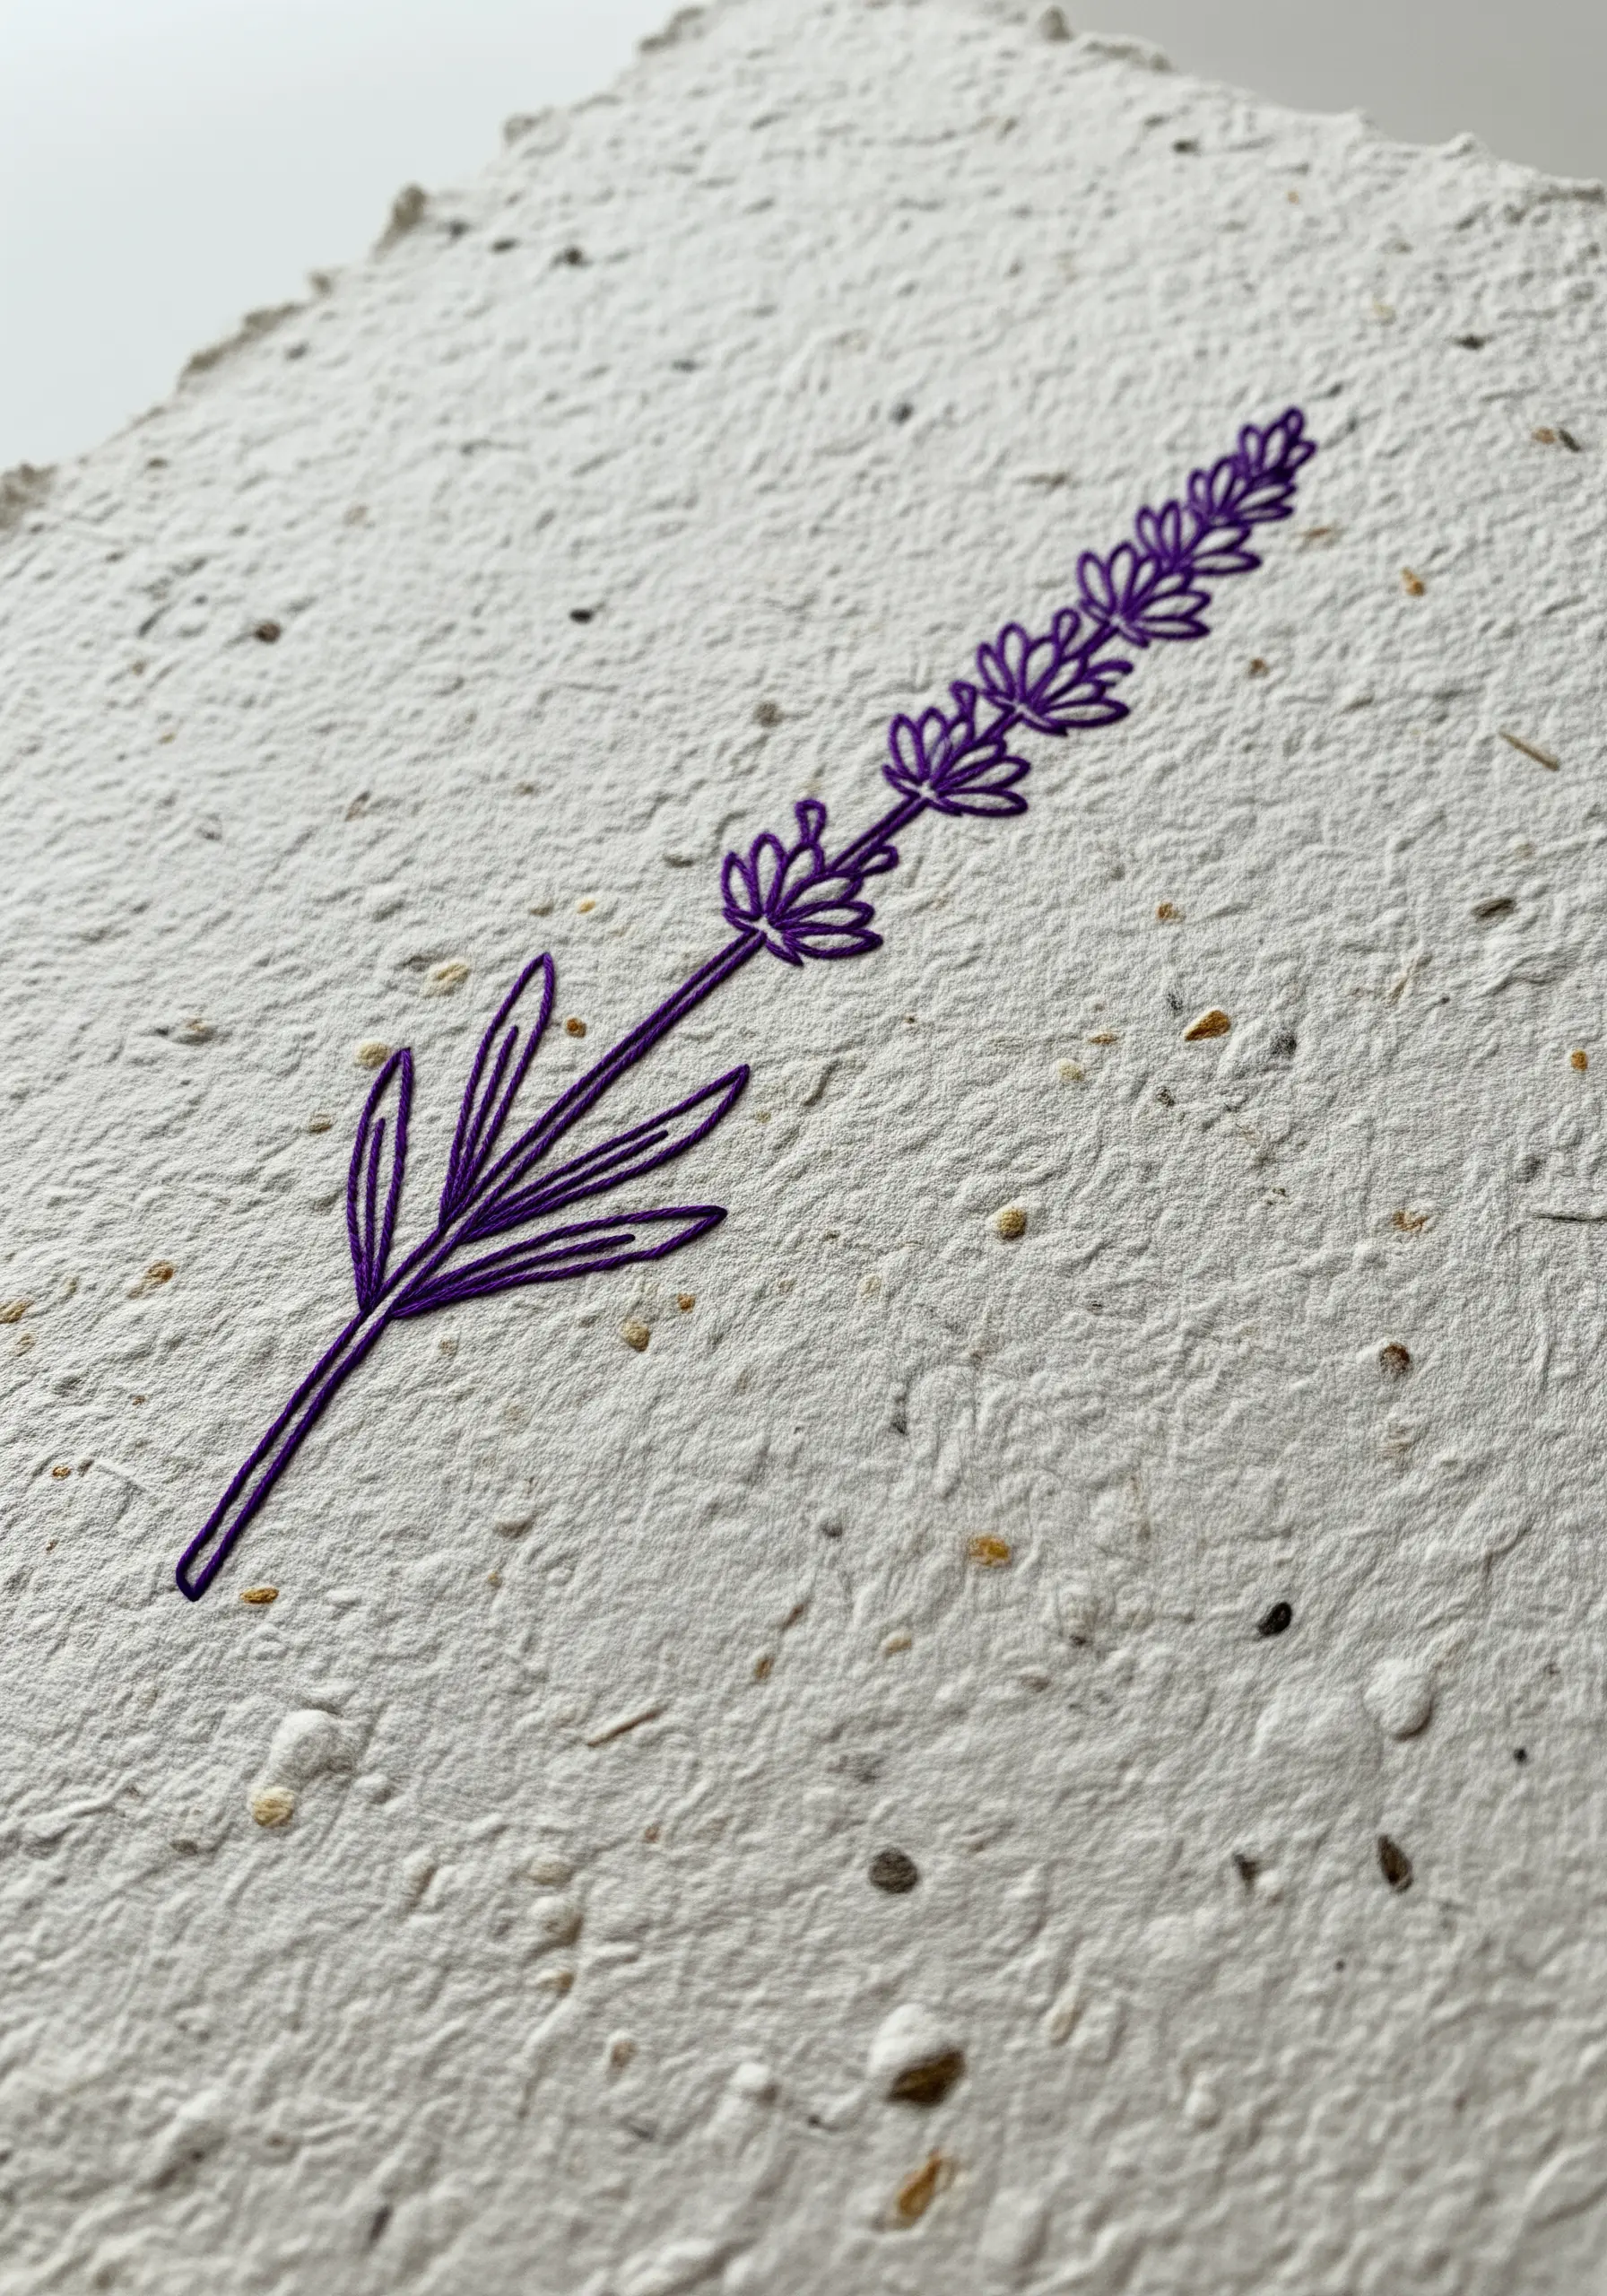
Embrace natural texture by using handmade paper with inclusions like seeds or flower petals as your embroidery base.
The key is to keep the embroidery design minimal and clean—a simple line-art botanical, for instance.
Use a slightly thicker thread (like a pearl cotton) and a backstitch to ensure your design stands out against the paper’s inherent texture.
This pairing of a simple, graphic stitch with organic, rustic paper creates a beautifully balanced piece, perfect for creating calming bedroom art and relaxation gifts.
34. Create High-Relief Art with Papier-Mâché and Thread
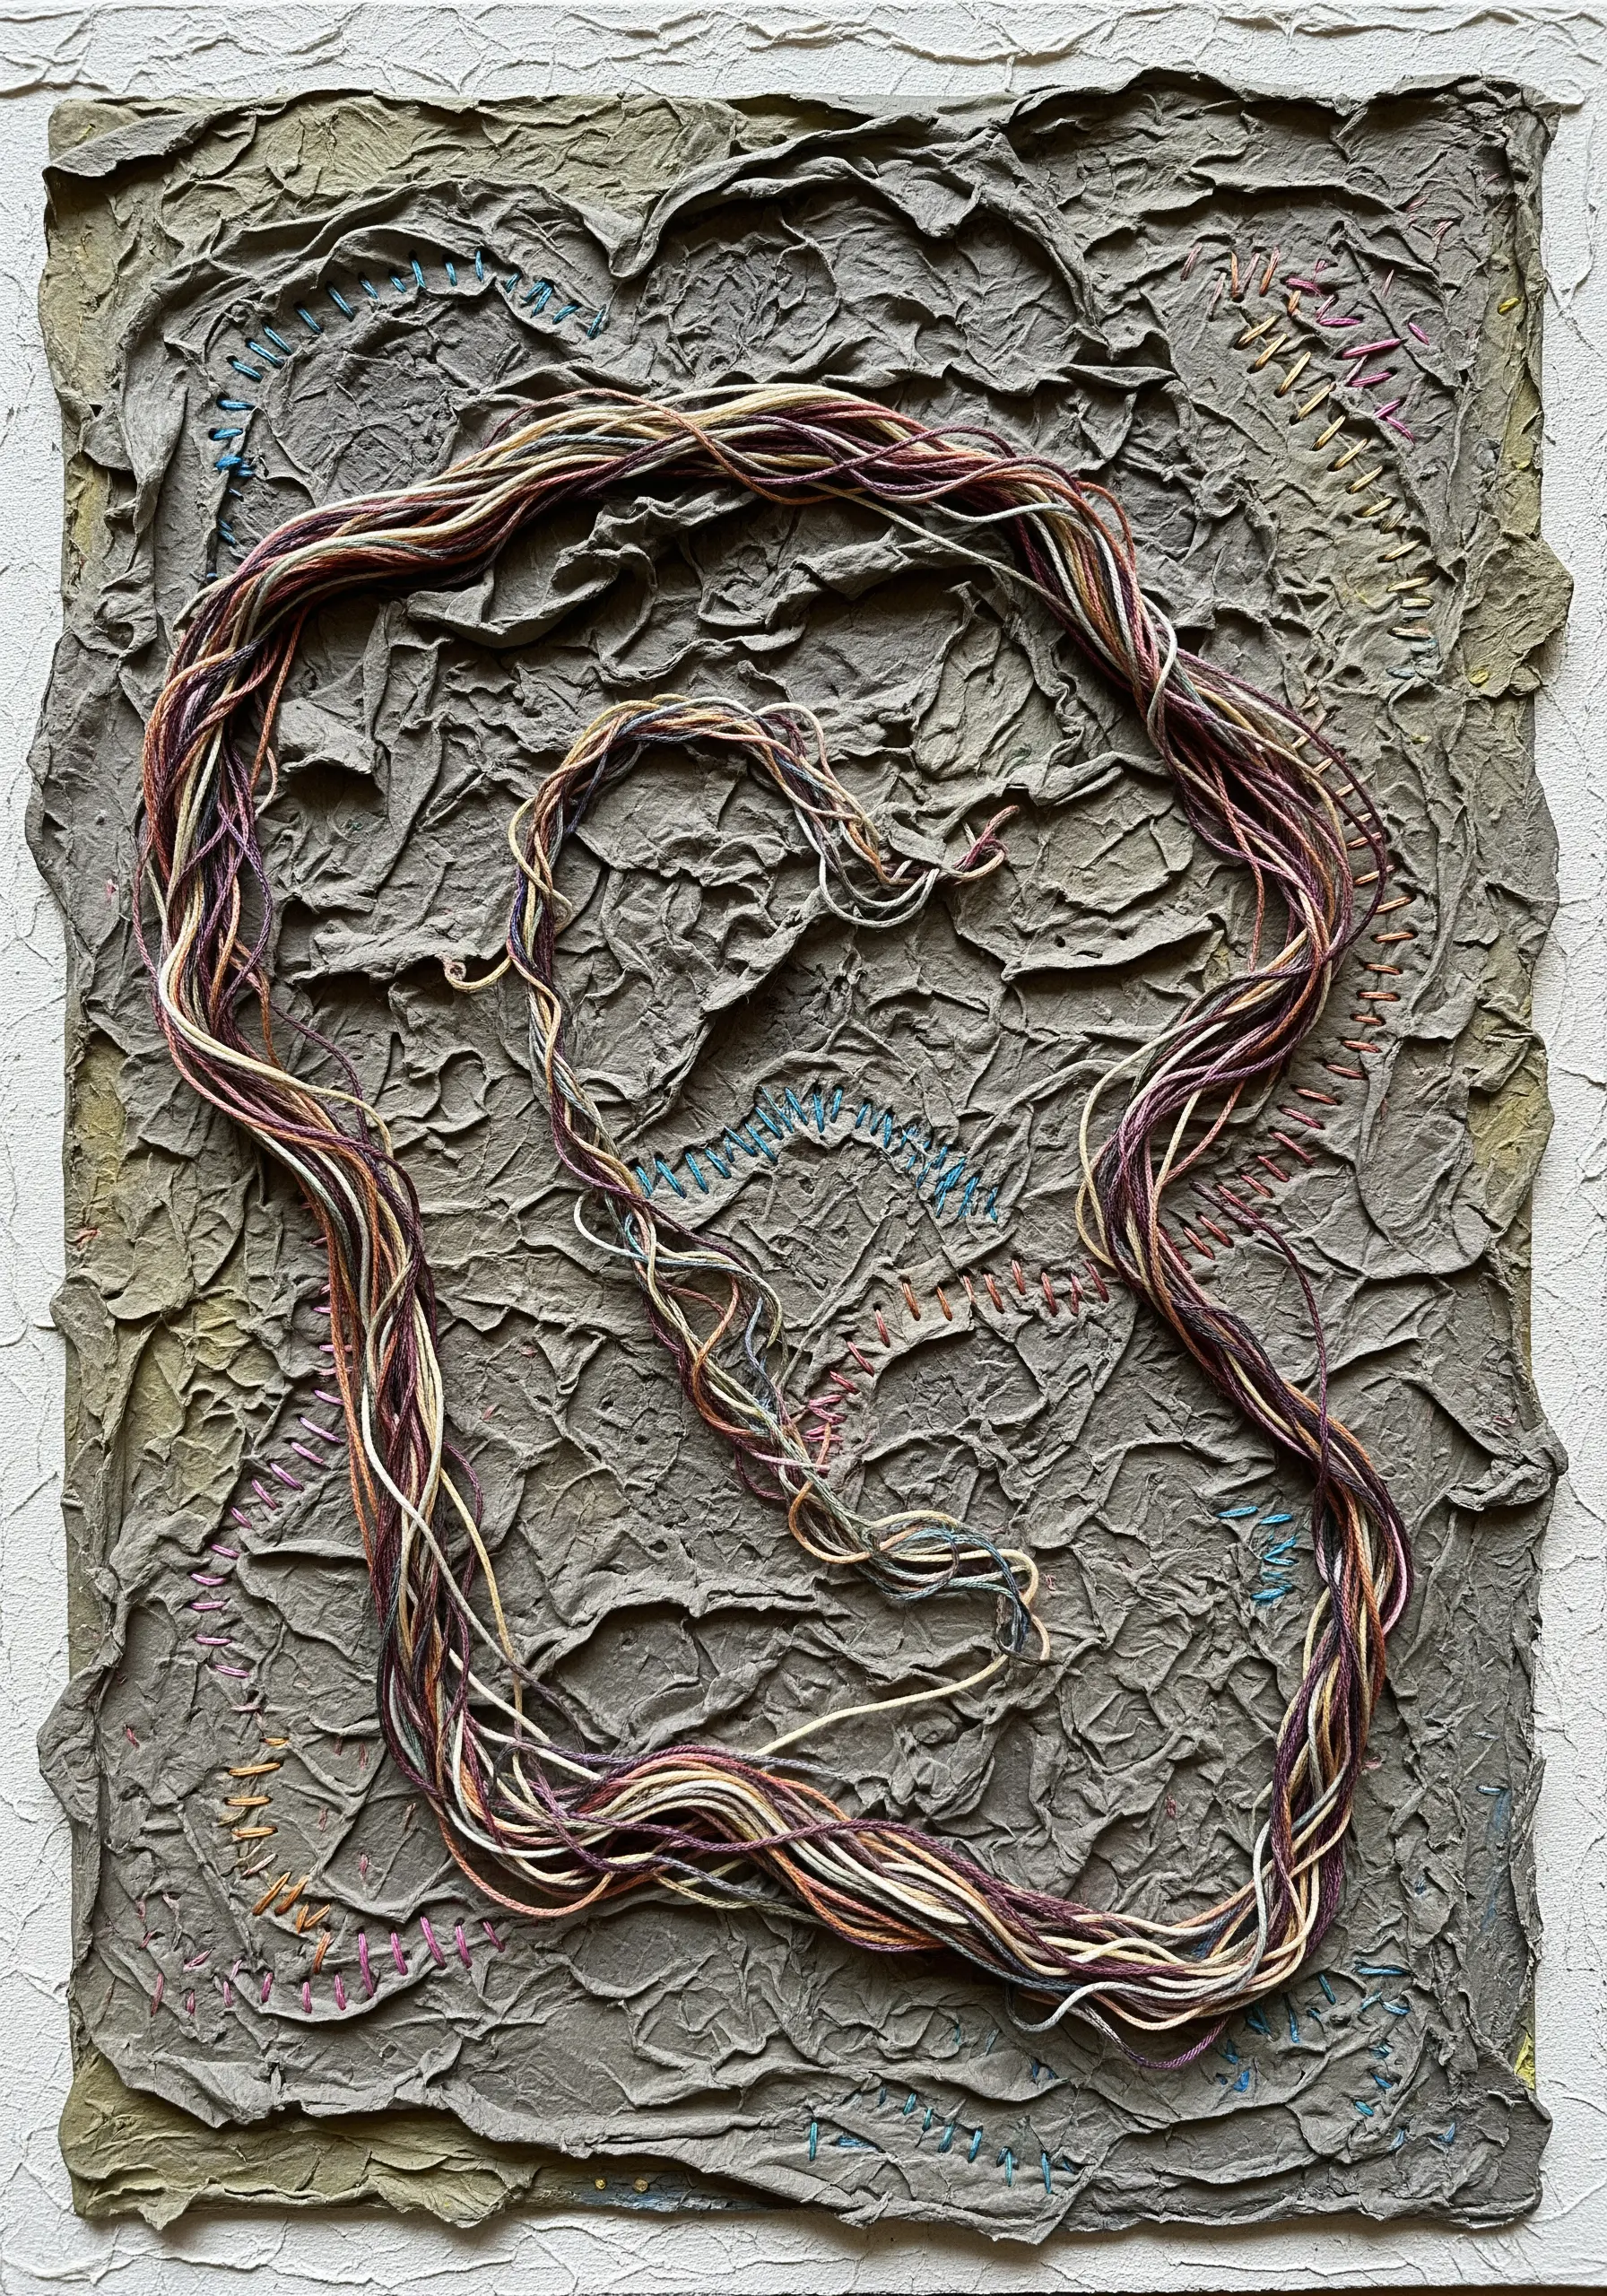
Build a highly textural canvas by applying wet paper pulp or papier-mâché to a board and then stitching into it once dry.
Create an abstract, craggy surface with the paper pulp, letting it dry completely.
Then, use this uneven surface as your embroidery ground. Add subtle stitched lines that follow the contours or contrast with them.
You can also lay down thick bundles of thread or yarn, tacking them into the valleys of the paper texture for a bold, sculptural effect.
This method lets you showcase gorgeous mixed-fiber textures in a completely new way.
35. Accentuate Embossed Designs with Selective Stitching
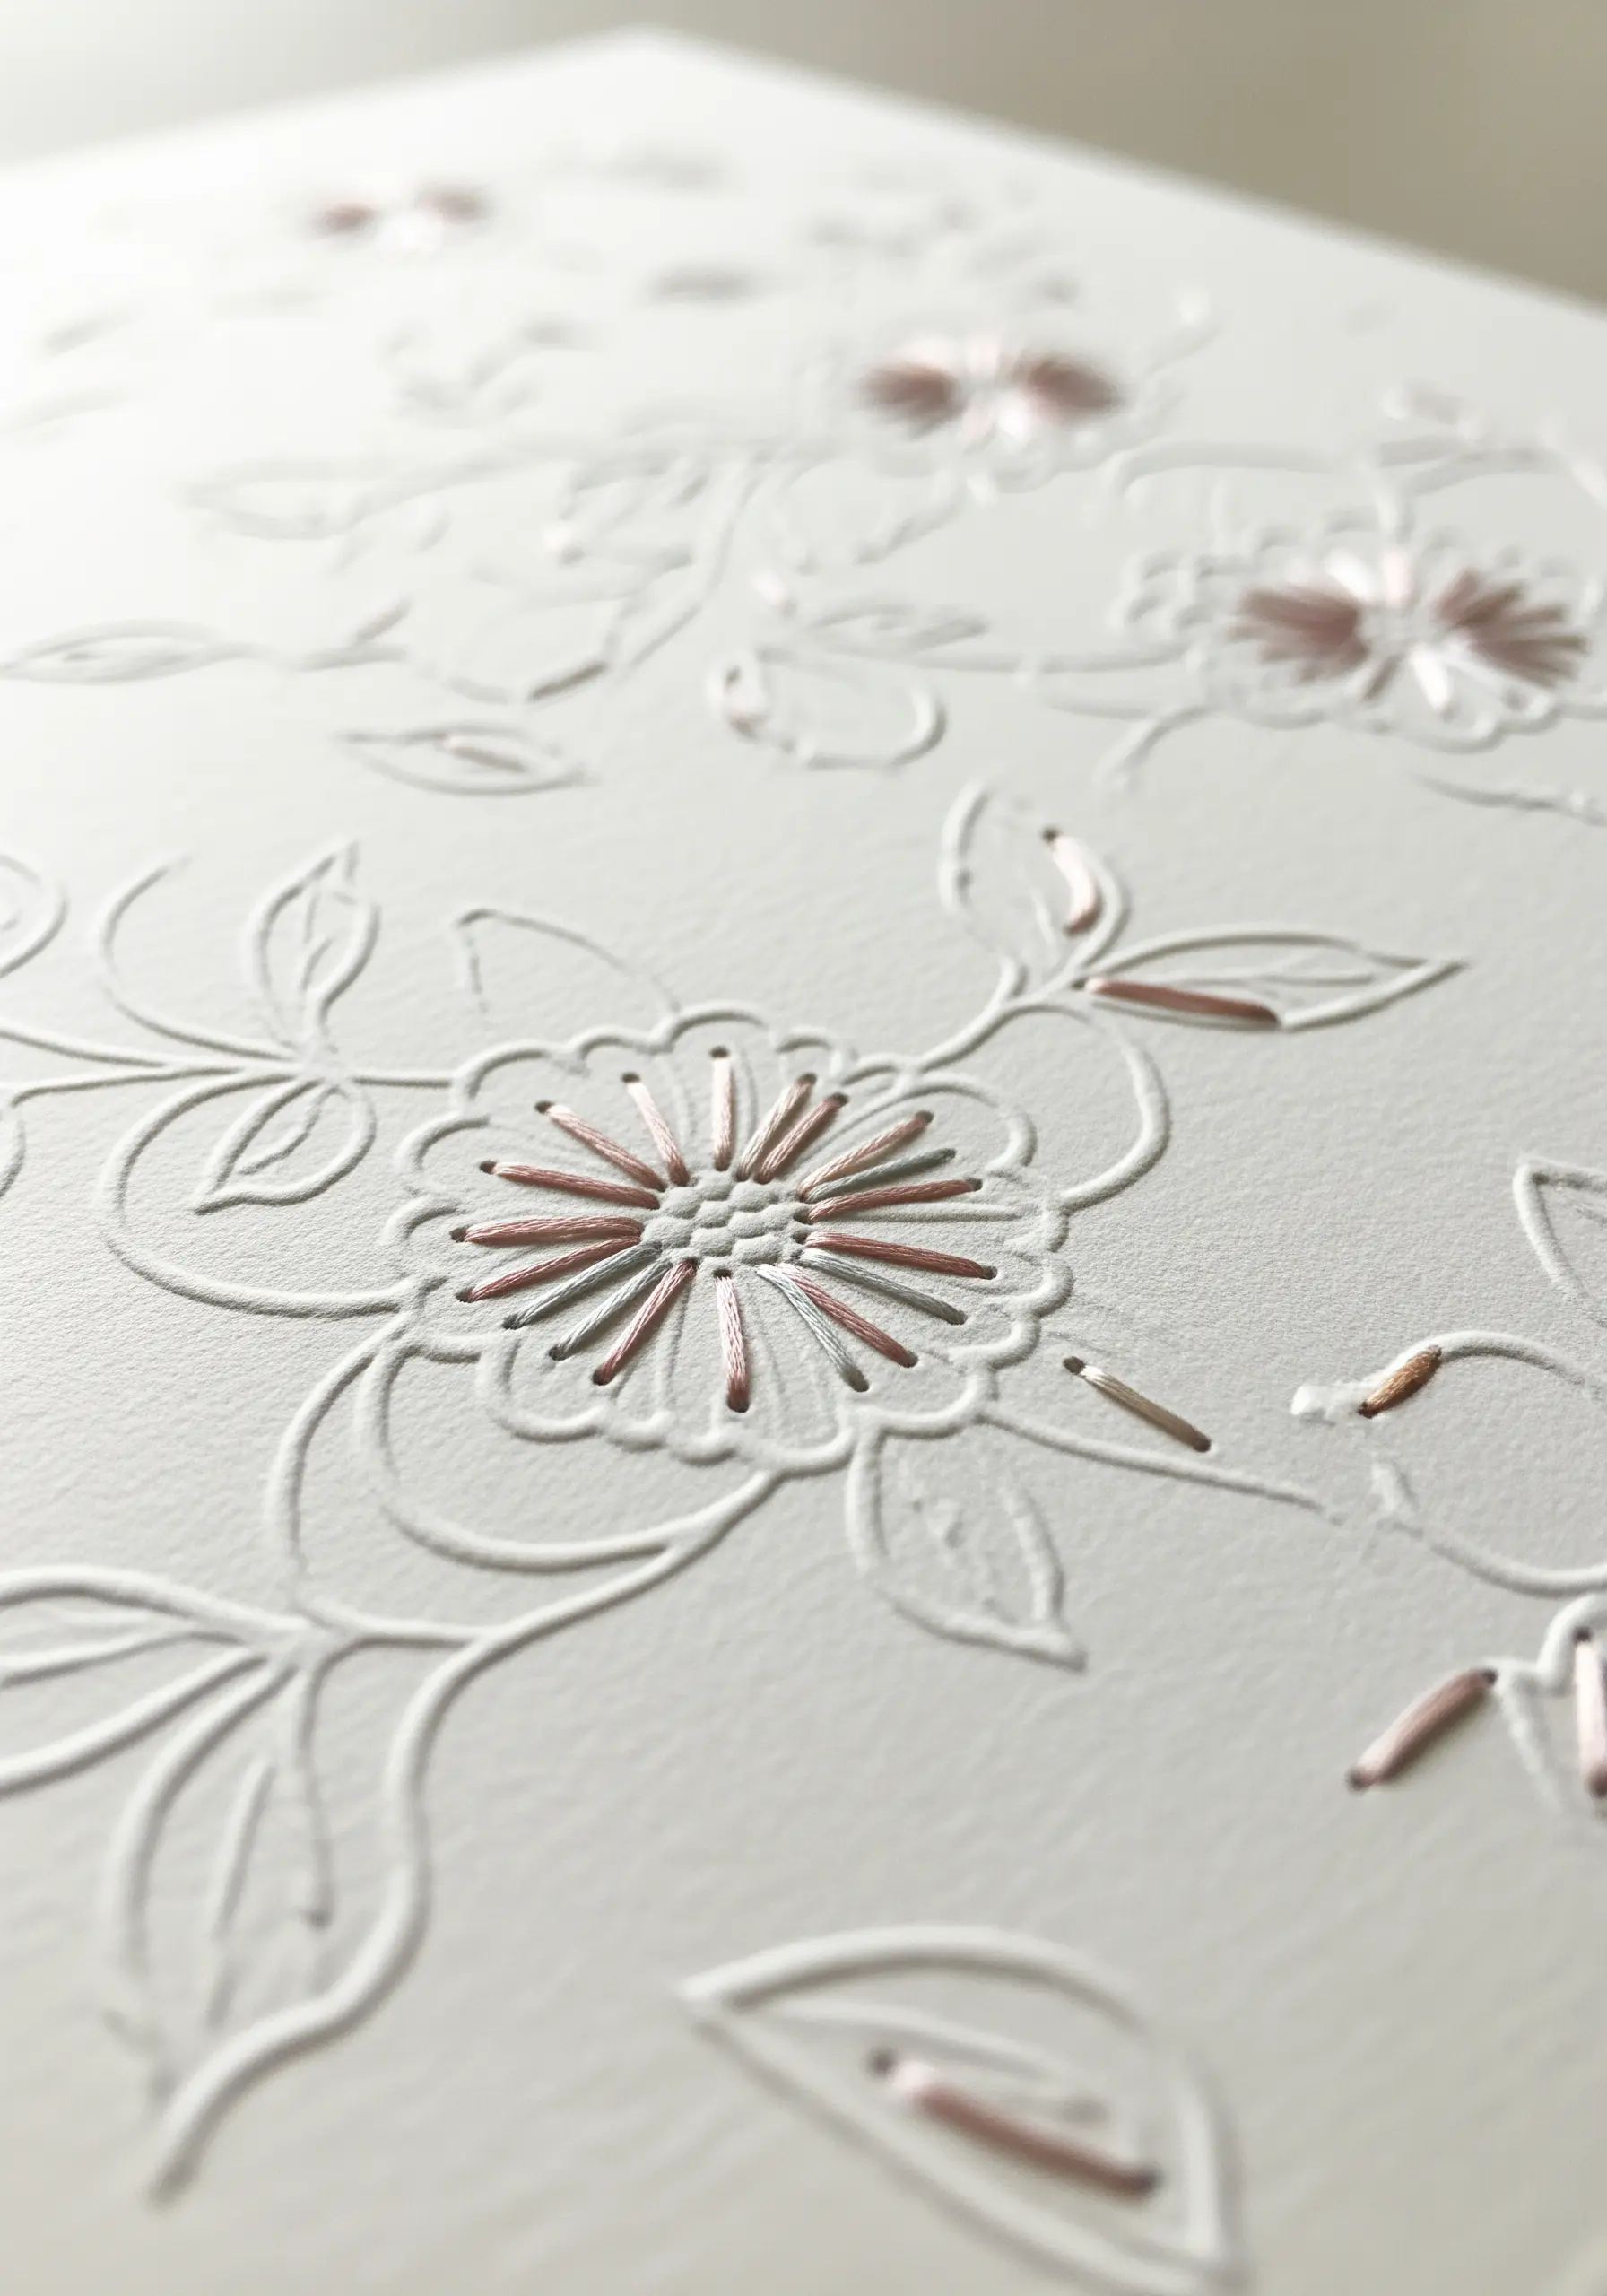
Combine the subtle art of paper embossing with delicate, targeted embroidery for an exquisitely refined look.
First, create a raised design on thick cardstock using an embossing folder or a stencil and stylus.
Instead of embroidering the entire design, choose only a few small elements to highlight with thread—the center of a flower, a single leaf, or a few petals.
Use a satin stitch with a single strand of metallic or silk floss. The result is a piece that beautifully plays with light and shadow, much like monochrome floral embroidery ideas.
36. Stitch City Lights into a Paper-Cut Scene

Evoke a vibrant cityscape at night by using thread to represent illuminated windows in a layered paper-cut design.
Create your city skyline with layers of dark blue and black cardstock to suggest depth and shadow.
Then, use a bright yellow or white thread to add small straight stitches or satin stitches for the windows.
The contrast of the bright, sharp thread against the dark paper perfectly captures the feeling of glowing lights in the darkness, creating a stunning piece of embroidered city skyline wall decor.


